Categorieën
Guide Product Feed Manager For WooCommerce WooCommerce

8 Best Google Shopping Feed Optimization Tips To Drive More Sales [2025]

Since Google is the number one search engine today, its shopping campaigns always bring the best results.

According to The Media Campaign, 46% of all product searches are made via Google.

If you own a WooCommerce store, then promoting your products on the Google Merchant Center will be a game-changer to drive more sales.

And for that, you need to create a product feed for Google Shopping and optimize it properly.

In this article, you will learn a few important Google Shopping Feed optimization tactics that you should embrace if you want successful results.

After reading this article you will learn

  • Why it is important to optimize Google product feed
  • Which product data should be optimized for the best results
  • How you can optimize these data to convert more buyers

And in the long run, you will be able to get more sales from Google Shopping campaigns and grow your business.

So let’s begin.

What is a Google Shopping Feed?

A Google Shopping feed is a file that contains all the details about the products you want to list on Google Shopping. This includes information like product titles, descriptions, prices, images, and other essential attributes.

google shopping feed

Think of it as a structured file that acts as the bridge between your WooCommerce store and Google Merchant Center. Once you upload this feed, Google uses it to display your products in relevant search results or shopping ads.

For example, if you’re selling sneakers, the shopping feed ensures your products show up with accurate information when someone searches for “running shoes” or “comfortable sneakers.”

Why should you optimize your Google Shopping Feed?

To get the best results from Google Shopping, you need more than just uploading a product feed. Optimizing it ensures your products appear in front of the right audience and perform better.

Here’s why it’s important:

  • Increases product visibility: An optimized feed helps Google understand your product better, improving its chances of appearing in search results.
  • Attracts relevant customers: When your product data matches the customer’s search intent, it makes them more likely to click on your listing.
  • Improves ad performance: A detailed and accurate feed leads to higher-quality ads, which typically results in better click-through rates and conversions.
  • Reduces rejection issues: Google has strict guidelines for product feeds. Optimizing ensures you meet their standards, avoiding unnecessary rejections.
  • Simplifies management: A clean, optimized feed is easier to update and maintain over time, saving you effort in the long run.

Optimizing your Google Shopping feed is not an extra step but a crucial part of your product marketing strategy. It ensures your products are presented accurately and attractively to potential buyers.

Challenges Of Promoting Products via Google Shopping

As much as Google Shopping drives sales, there are a few challenges that you need to overcome to get the best outcome.

  1. Your product feed data must meet Google’s feed structure
    Google Shopping has its own defined feed structure which you need to follow if you want to list products there. What most store finds difficult to do is to make sure they have met all the criteria explained in their product data specification. So you should create a product feed that meets all requirements.
  1. Rejection of product feed by Google
    The biggest issue people face is that the data people submit are rejected by Google for one or more reasons. The most common reasons Google rejects are
    • mismatched data between the website’s schema, feed, and frontend view
    • missing required product data
    • dynamic pricing issue
    • wrong currency, and
    • variation product data mismatch.

Try to solve the above problems but if you still struggle then Google Consultants are experts who can come in handy for navigating Google’s requirements and optimizing your data for approval.

  1. Products listed on Google Shopping but not getting results
    This is a blind spot for many online shops that sell via Google Shopping. Many believe that just listing products there should bring results. But the fact here is, that you need to optimize some of your product data to get better results. This may include the product title, images, category, offer prices, and even your website’s design.

    **Submitting basic product data will not trigger potential buyers to purchase, you have to make sure to optimize the data so that the product Ads and listings will convince the prospect to make a buying decision.

Throughout this article, you will learn all the possible ways to optimize your Google shopping feed that will make your Google Shopping campaign successful.

6 Proven Google Shopping Feed Optimization Tips That Can Trigger More Sales

To learn how to optimize Google shopping feed, you can apply these 6 proven Google merchant center optimization techniques :

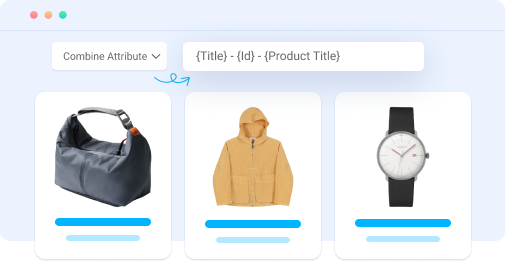
1. Optimized Product Title To Match Search Queries

The product title is a vital element that you can use to drive the right traffic.

It is a crucial element that is not only necessary to optimize your Google Shopping feed but also plays a key role in conversion rate optimization, helping you maximize sales and performance.

When your customer is looking for a product, the title is one of the first things the prospects will judge your product by.

You have to make the title meaningful in a way so that just by reading it, your targeted buyer feels like this is what he/she was looking for.

This will help to trigger more potential buyers to click on the Google Shopping Ads for your products that appear above the search results. In this simple way, you can do your Google shipping optimization.

The best way to optimize a product title is to add some extra elements to the title that will highlight its specialty or features.

product title Optimization

For example, let’s say you are selling a cream in France called ‘Avène Tolérance Extrême Cream.’

Now, if you leave the name as is, only the buyers who are familiar with Avène or have researched the brand will recognize this product. Others may not click on the Shopping Ad with that title.

But, let’s consider naming it ‘Avène Tolérance Extrême – Moisturizer for Sensitive Skin, 50ml.’

This title specifies that

  • this cream is by Avène (i.e. the product brand)
  • it’s a Moisturizer (not a beauty cream)
  • it’s for Sensitive Skin (i.e. skin type), and
  • it is the ’50ml’ pack.

As you can see, this title will tell a buyer, who has zero knowledge about this product, if it is for her, i.e., a higher chance of a conversion.

Just like that, you can optimize the product title for any product by adding elements such as the product brand, color, size, capacity, quantity, special feature, model, who it’s for, or even its use case.

Here are a few more examples for different product types:

  • Books or Novels – Book Name + Genre + Author Name
    Example: The Da Vinci Code – Mystery Thriller by Dan Brown
  • Electronics – Product Brand + Product Name + Model + Special feature
    Example: OnePlus Nord N20 5G – 13 + 3 + 3 MP Camera, 64GB RAM
  • Clothing Products – Brand + Product Name + Color + Size + Material
    Example: Gant The Original T-Shirt – Red, XL, 100% Cotton

This approach is a proven tactic and easy to embrace.

Things to avoid when optimizing product titles:

  • Avoid Promotional terms on the title.
  • Don’t stuff keywords if it doesn’t fit
  • Don’t use all capital letters in a title.
  • Avoid special symbols.

2. Unique Image Optimization Tricks To Connect With Buyers

Once you list on Google Shopping, the product image plays a huge part in convincing buyers to choose your product among others.

Thus this plays a vital role in Google shopping ads optimization.

So you must make sure you use images that clearly show what the product is. This is especially important for products such as clothing and accessories, decoratives, tech products, toys, etc.

The most common advice photographers will give you is to take product images with a white background (or a contrasting background if your product is White).

This is the best approach if you want to clearly keep your buyers focused on your product.

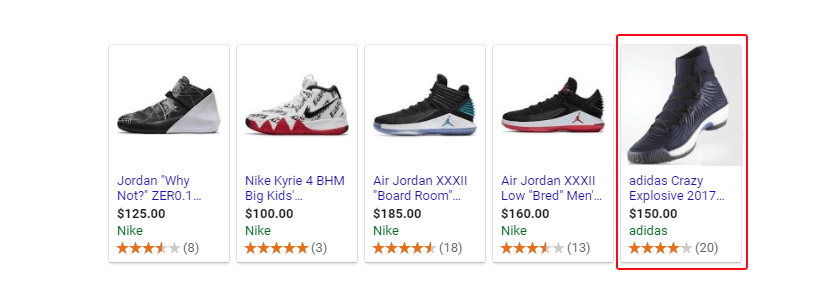
When people search for products on Google, a lot of products are suggested in a single row.

So the idea of a distraction-free view of the product doesn’t really apply there unless the product has a catchy color combination.

Image Optimization

Here are a couple of unique tactics you can follow that may help you stand out in Google merchant center optimization.

  • Use a shaded-white background
    The concept here is to use a gradient background with a mix of white and light grey to give a shaded feel at the back. This creates an unexpected classy impression of the product in the center.
  • Find the most uncommon color for your niche
    If you have competition in the market, you can do a quick search on Google with your product title and look at the suggested product Ads. See which background colors are commonly used. Then you can decide on an uncommon background color that may make your Ad stand out among most other product Ads.
    *It’s best to consult with a professional UX designer for this as they will be more expert in suggesting backgrounds that stand out. A user experience enhancements audit can also help identify the best visual choices for better ad performance and visibility.
  • Use contrast backgrounds
    Large brands such as Zara have embraced the concept of solid contrast background colors and it delivered great results. So it’s a proven approach you can choose to embrace as well.
  • Choose an angle that highlights the best feature(s)
    Often you have to be creative about how you take the picture. You will see that in modern-day eCommerce, most shoe brands take the approach of placing two shoes in two ways – one is laid on the ground and the other is kept upright. This is to try and show all views of the shoes.
  • If Possible, Use Square Images
    Since all Google Shopping Ads are displayed with square images, it’s best if you too could provide images in that size. In most shops, people tend to keep a longer height for the product images. What this will do is that Google will fit the image via the longest dimension, in this case, the height, making the image smaller in the process. A square image will maintain the right dimension ratio and view your product in the best possible size.

    **If you use square images, you can also try using an image border to make your product stand out.

It’s best you make these changes in your WooCommerce store and then use those image links in the product feed data for Google for the best results.

For Product variations, make sure to have specific images for each variation rather than just a single image for all variants.

Things to avoid when optimizing product images:

  • Do not use unclear or blurry images
  • Avoid including product price in the images
  • Avoid using promotional words in the images (e.g. Special offer, 10% discount, etc)
  • Do not cluster the product background with unnecessary elements

3. Follow Google’s Category Hierarchy In Your Store To Optimize Google Shopping Feed

The product category is important to help buyers find a certain type of product they are looking for.

At the same time, Google also maintains a categorization of products to display your shopping ads to the right audience. This is one kind of Google shopping optimization you get for free.

Google doesn’t make it mandatory for you to submit a product category field, but it does look for the category in your store in order to place a product under its right search intent category.

So you must maintain proper categorization in your store.

It’s best to maintain your product category structure as per Google as most other marketplaces also follow the same category hierarchy.
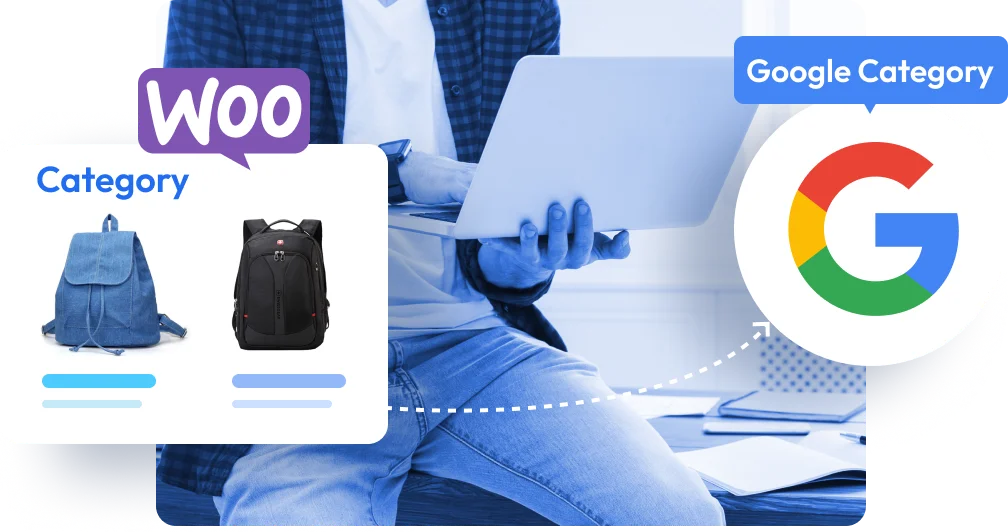
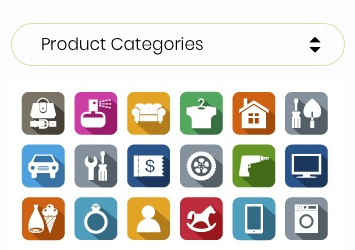
Google Categorie Mapping

You can get help from Google’s taxonomy list to optimize the categories on your website.

However, just maintaining the categories is not the only product feed optimization. You have to ensure you are assigning your product to the most relevant possible product category.

For example, if are selling a Baby Bathtub, then do not just assign it under the category ‘Baby & Toddler’ or the ‘Baby & Toddler > Baby Bathing’. It should rather go under the further child category ‘Baby & Toddler > Baby Bathing > Baby Bathtubs & Bath Seats.’

This will help you keep track of your products more efficiently and help Google display your products to the right audience.

Tips To Optimize Product Category

  • In WooCommerce, when choosing a child category, make sure to mark the parent category as well.
  • Even if you do not follow Google’s taxonomy, make sure to keep the categories meaningful. Google can relate to the meanings of your set categories.
  • Avoid using special characters in category names.

4. Try To Maintain Consistent Product Data Everywhere To Optimize Google Shopping Feed

It is important to make sure your buyers do not get confused with your products.

For example, if you have one title in your WooCommerce store and another title in your Google Shopping listings, it may cause some confusion – the buyer may initially get baffled and start looking for the description, or often, if they are in a hurry, they will simply close the tab and look for other options.

The same can be the same if you have a different meta title and schema which will alter your traditional search result Title and the title Google bot will find in the schema.

So the best practice is to try to keep all your product data same whereever it is listed to optimize google shopping feed better.
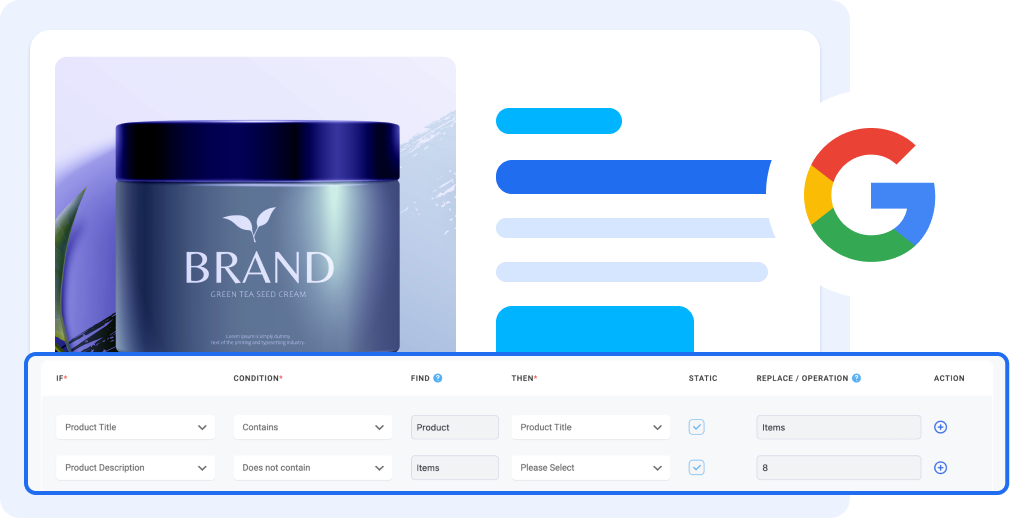
google shopping ads optimization

What to do if you have already added a lot of products without optimized data?

Yes, it can be hectic to change the titles, descriptions, images, or other product data for optimization for all the products that you have already added to your WooCommerce store.

If you have fewer products in-store, then it’s best to take the time and make the changes.

In case you have a lot of products, you can leave them as-is and start optimizing the data for all the new products that you will add in the future.

This will ensure that you will get the best sales results for your new products.

Over time, the old products will eventually be sold out and there will be a time when your store will have all products with optimized data.

Should you not optimize the product feed data for the old products?

One of the questions that may arise is if you keep the old product data unchanged, should you simply submit those data without optimizing them?

The answer is NO.

Even if you can’t take the time to optimize the product data in your store, you should at least optimize some elements of the product when adding them to the Google product feed – the product title and category.

This may not solve the confusion issue due to different content, but it will still trigger more buyers to at least visit your store.

  • Google normally does not reject your feed due to the title as long as the main Title keywords are included in your product title in the feed.
  • The category is important as it helps Google to properly display your products to the right audience.

Apart from this, you should also consider making sure all the required product data by Google is consistent in both your product schema and your product page.

This is important because Google will crawl your website before approving your product feed and may reject products if a mismatch exists for required attributes. And this point is highly important for Google merchant center optimization.

5. Include All Required Product Data In WooCommerce

The required product attributes that Google recommends are more than just for product feed.

If you make sure to include those data for your products properly, then it will also help you rank in terms of SEO. Also, it is highly important for Google shopping optimization.

Without including the required product data, google merchant center optimization is incomplete.

Following are the recommended attributes by Google that you should include for products in your WooCommerce store as well:

  • Product ID
  • Titel van het product
  • Productbeschrijving
  • Product Link/URL
  • Productcategorie
  • Productafbeelding URL
  • Voorraadbeschikbaarheid
  • Normale prijs
  • Productvoorwaarde
  • Fabrikant/Merknaam
  • GTIN (Global Trade Item Number)
  • MPN (Fabrieksonderdeelnummer)
  • Specific product attributes
    • Materiaal
    • Leeftijdsgroep
    • Kleur
    • Geslacht
    • Grootte

Let’s dive deeper into some key attributes and how to optimize them.

i. Product ID Optimization

Your Product ID is a unique identifier that distinguishes each item in your store. It’s crucial for tracking and managing your product listings, especially when you have a large inventory.

  • Use simple, consistent formats (e.g., numeric IDs or SKU codes).
  • Avoid duplicating IDs, as this can cause errors in your Google Merchant Center feed.

ii. Product Description

A well-written product description not only helps with Google SEO but also convinces customers to click.

  • Keep it detailed but concise—highlight the key benefits and features.
  • Use bullet points for technical details and maintain a natural flow for readability.
  • Include keywords naturally without keyword stuffing.

iii. Product Price

Your product price should always reflect the actual cost customers will pay.

  • Ensure your prices are competitive for your industry.
  • Match the price displayed in your feed with the price on your product page—discrepancies can cause rejections in Google Merchant Center.

iv. Product Stock Availability

Accurate stock information is crucial for maintaining customer trust and ensuring your products qualify for ad campaigns.

  • Update your inventory regularly to prevent showing out-of-stock items.
  • Use labels like “In Stock” or “Out of Stock” in your product feed.

v. Managing Product Links

Each product should have a dedicated URL that leads directly to the product page.

  • Avoid redirecting links or using generic URLs.
  • Make your product links user-friendly by including descriptive terms (e.g., /products/blue-running-shoes).
manage product link

vi. Product Category & Subcategory

Assigning the right category to your products ensures they appear in the relevant search results.

  • Use Google’s recommended category structure to map your products accurately.
  • Include subcategories when possible, as they provide better targeting for niche audiences.

vii. Using Correct GTIN & MPN

Google requires specific identifiers like GTIN (Global Trade Item Number) and MPN (Manufacturer Part Number) for products to improve search accuracy.

  • Add GTIN and MPN for each product, especially if they’re brand-specific or globally sold items.

viii. Add as Many Additional Product Images

Customers are more likely to convert when they can view a product from multiple angles.

  • Upload high-quality images that showcase your product’s features.
  • Include close-ups, variations (like colors or styles), and lifestyle shots for better engagement.
  • Optimize image file sizes to maintain page loading speeds.

Some of these are important for proper product Ads distribution, for example, the GTIN can help identify your product’s legitimacy and help Google to choose a more appropriate category.

Some of these data can also be used to trigger conversion on the product page. For example, the specific product attributes are things buyers look at when considering buying something for personal use, such as a Jacket. Plus, these attributes can also be used to create variations of the same product.

Now, some of the data here cannot be included in the default WooCommerce.

For example, there is no default product field for GTIN, MPN, or Brand. In this case, you may use different plugins to get the custom fields.

Note that, just using a custom field is not enough. The data saved there should be part of the product structured data or Schema Markup. Plus, in the case of variable products, these attributes have to be specific for each variant.

Following are a couple of tools you can consider looking at:

6. Dynamic Display of Products

Dynamic product views let you tailor how your products appear based on what shoppers are searching for. This means the product images, titles, and descriptions can adjust dynamically to match search terms, making your listings more relevant and appealing.

Here’s why this matters:

  • It helps improve your click-through rate since shoppers see exactly what they’re searching for.
  • It increases conversion rates by displaying product details that match buyer intent.

To get the best results, use relevant and descriptive keywords in your dynamic views. These keywords help Google understand your product better and show it in the right search results.

7. Include Shipping Information

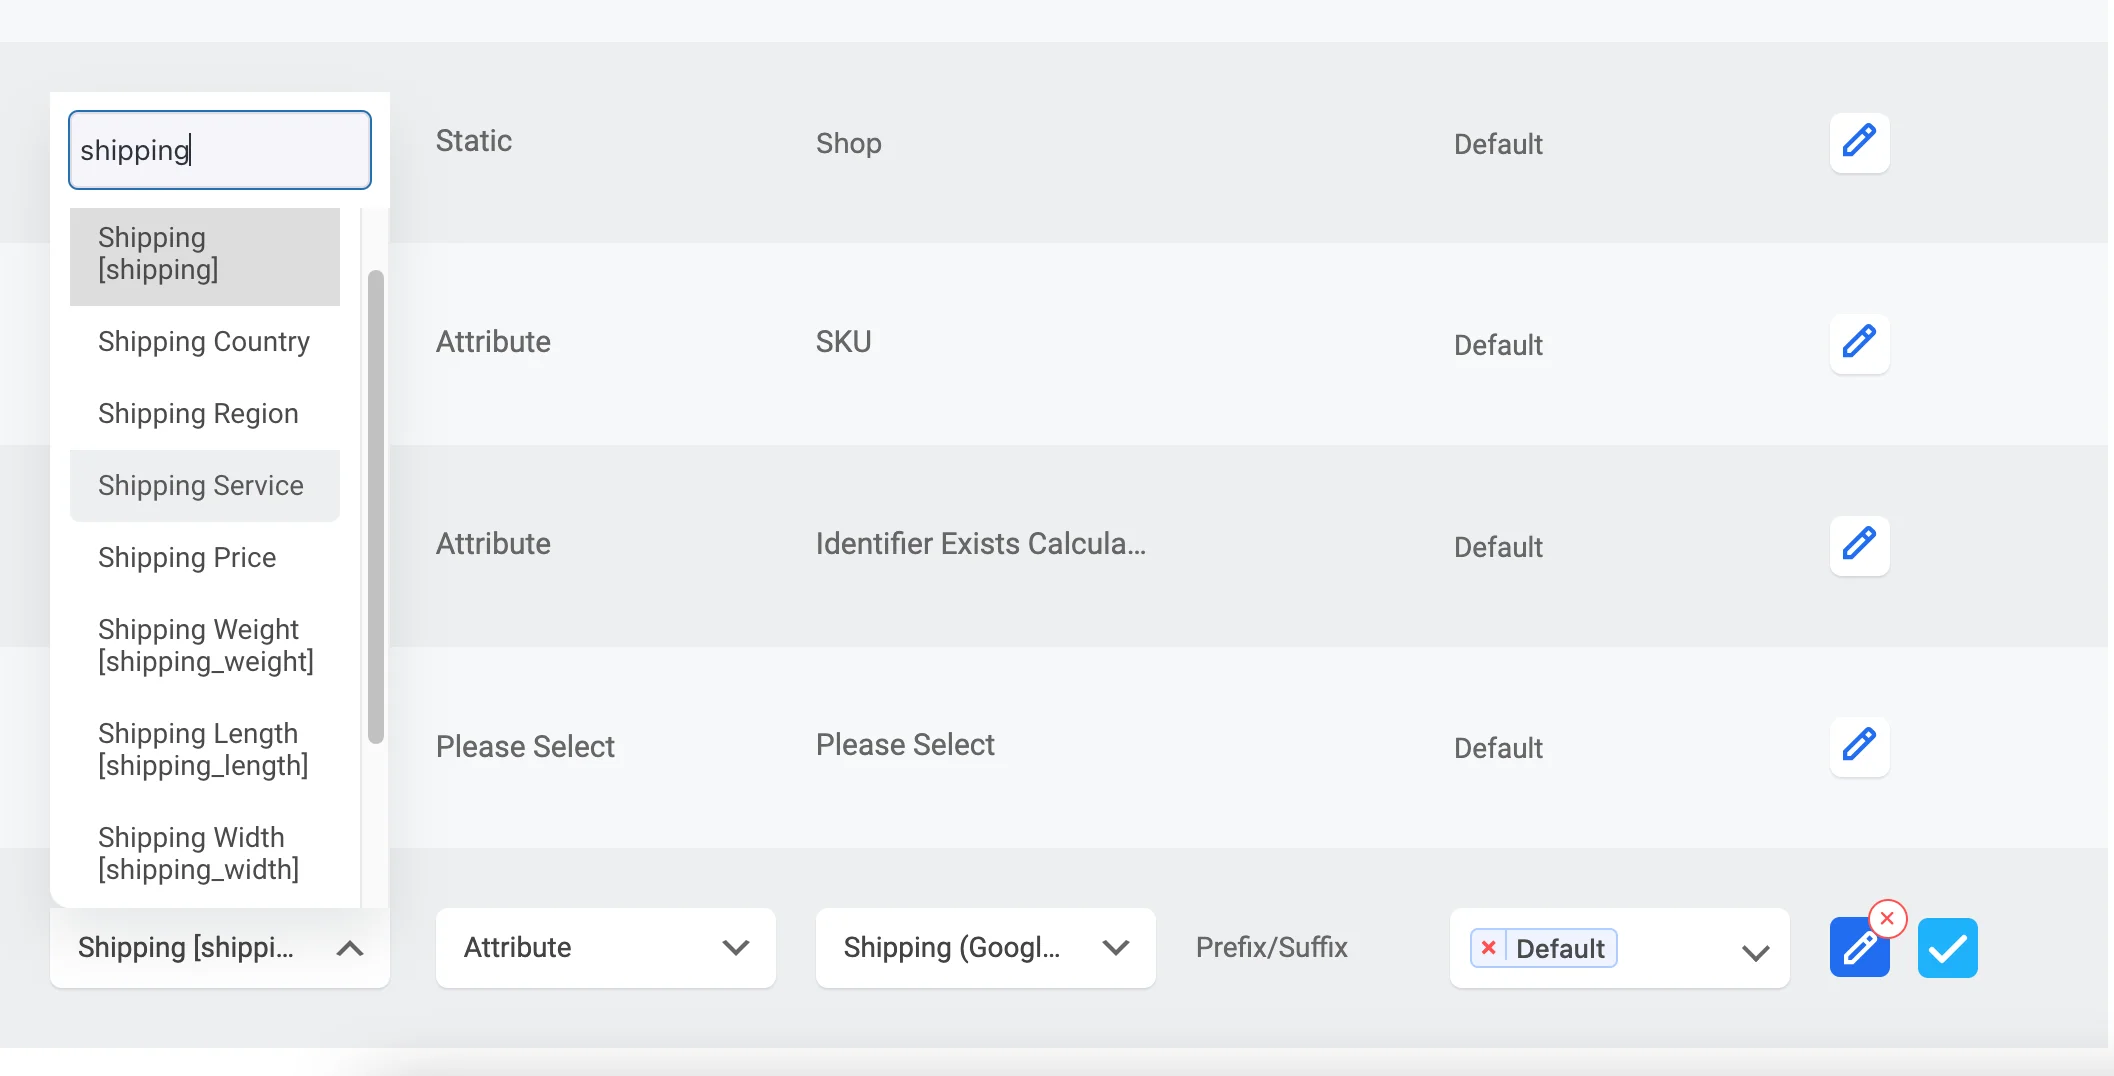
The shipping details in your product feed play a big role in customer decisions and Google Shopping rankings. Shoppers want clarity on courier service costs and delivery times, so optimizing this information is essential.

Shipping info

Here’s how to make the most of your shipping details:

  • Offer free shipping: This can make your product more attractive and encourage more buyers to click and purchase.
  • Provide expedited shipping options: Fast delivery sets your product apart from competitors, especially for time-sensitive buyers.
  • Track your shipping performance: Monitor delivery times and product condition on arrival. Keeping shipping reliable and consistent helps build trust and customer satisfaction.

8. Use A Feed Generation Plugin For Accuracy

Now, despite putting enough effort into making your product data optimized for conversion, it is also important to generate the product feed in the right format and with the right product data.

As per Google’s product data specification, you have to maintain a set XML format with all the required attributes as tags.

In this regard, you can either partner up with a feed management SAAS tool such as Feed Army, or, you can rather consider going with a much more affordable WordPress plugin, Product Feed Manager for WooCommerce.

Product Feed Manager For WooCommerce (PFM)

Product Feed Manager is a simple and easy-to-use plugin that helps to generate product feed for several marketplaces (including Google Shopping) in the right format in just a few clicks.

The specialty of this plugin is its pre-built feed template, which you can set up in just a few minutes, even without any prior knowledge of Google product feed.

If you want to avoid getting your feed rejected due to a human error, you should consider using this plugin to list your products on Google Shopping easily.

PFM has all the tools required to optimize Google shopping feed :

  • The plugin comes with the combined field feature which can help with optimizing product titles for the Google shopping feed optimization.
  • Its category mapping feature will help to optimize the category in the feed data without changing your store’s original categories.
  • This plugin also comes with custom fields for GTIN, MPN, and Product Brand to help you set up your products in an optimized way before generating the feed.
  • Plus, its one-click JSON-LD structured data ensures data mismatch in the schema.

Following is a glimpse of how you can generate a Google product feed using PFM:

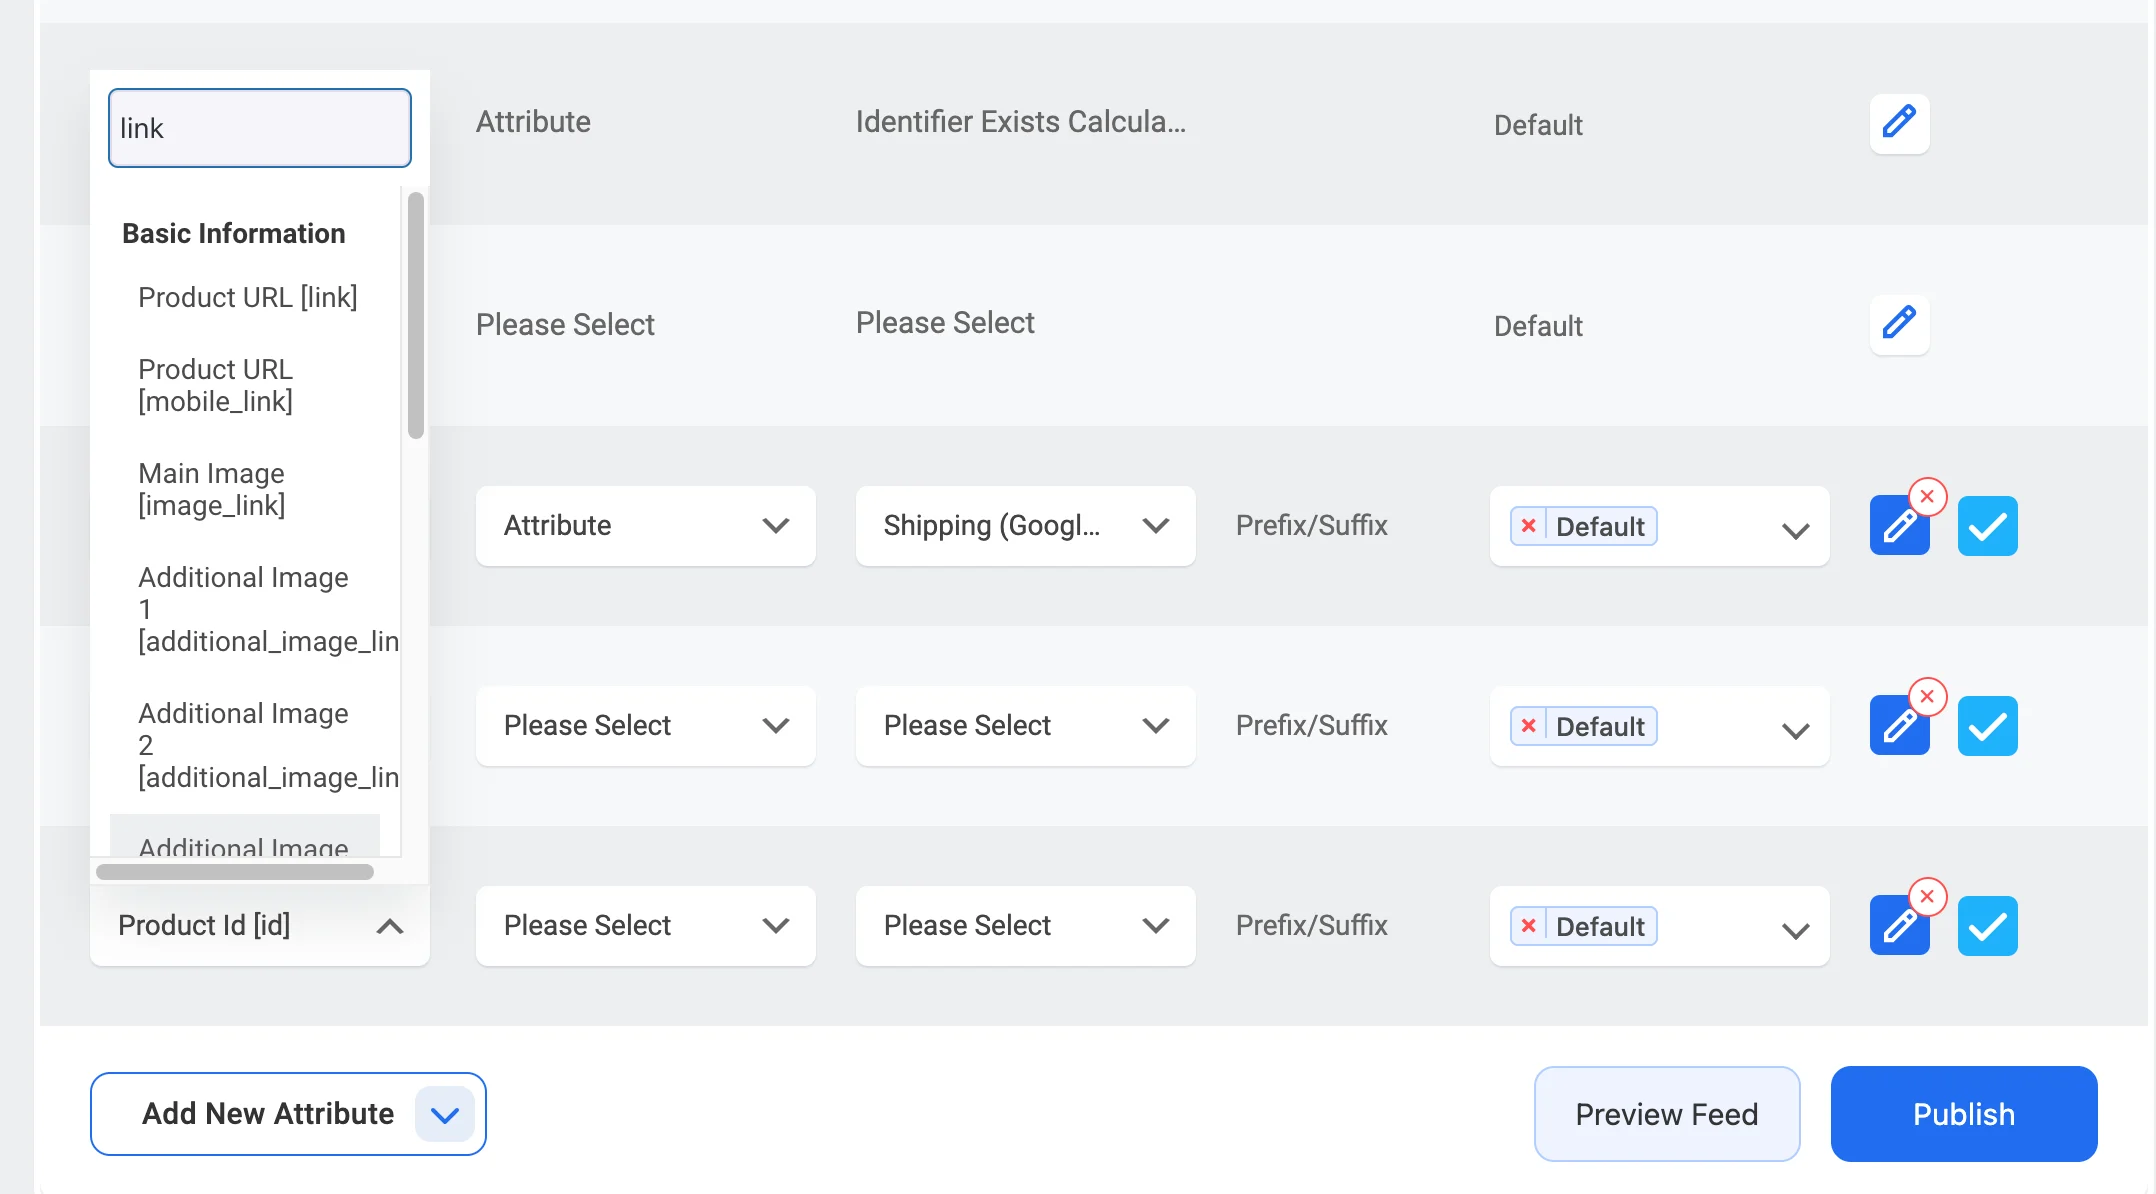
On your PFM dashboard –

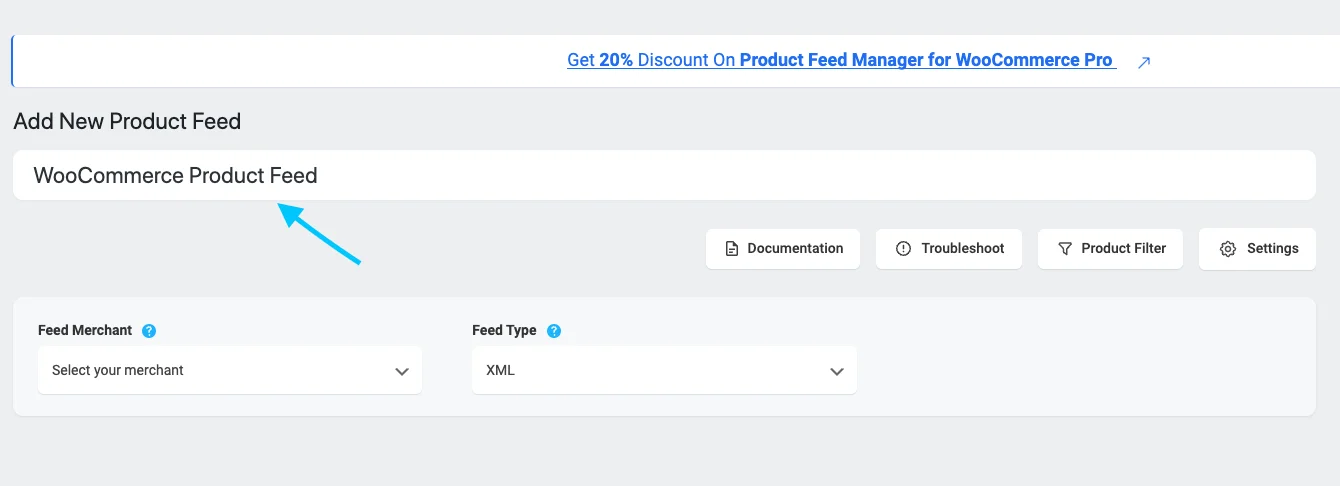
  1. Click on Add New Feed.
  2. Enter A feed title.
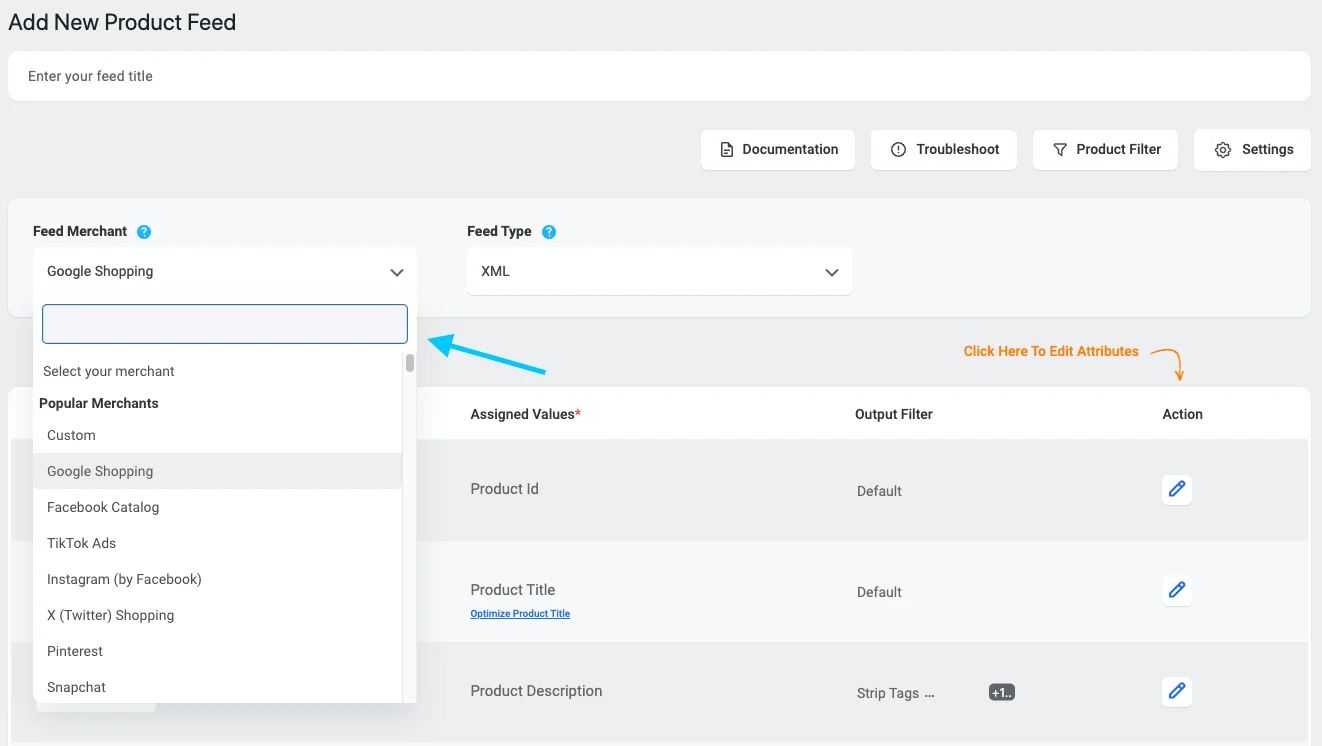
  3. Select Google from the merchant list.

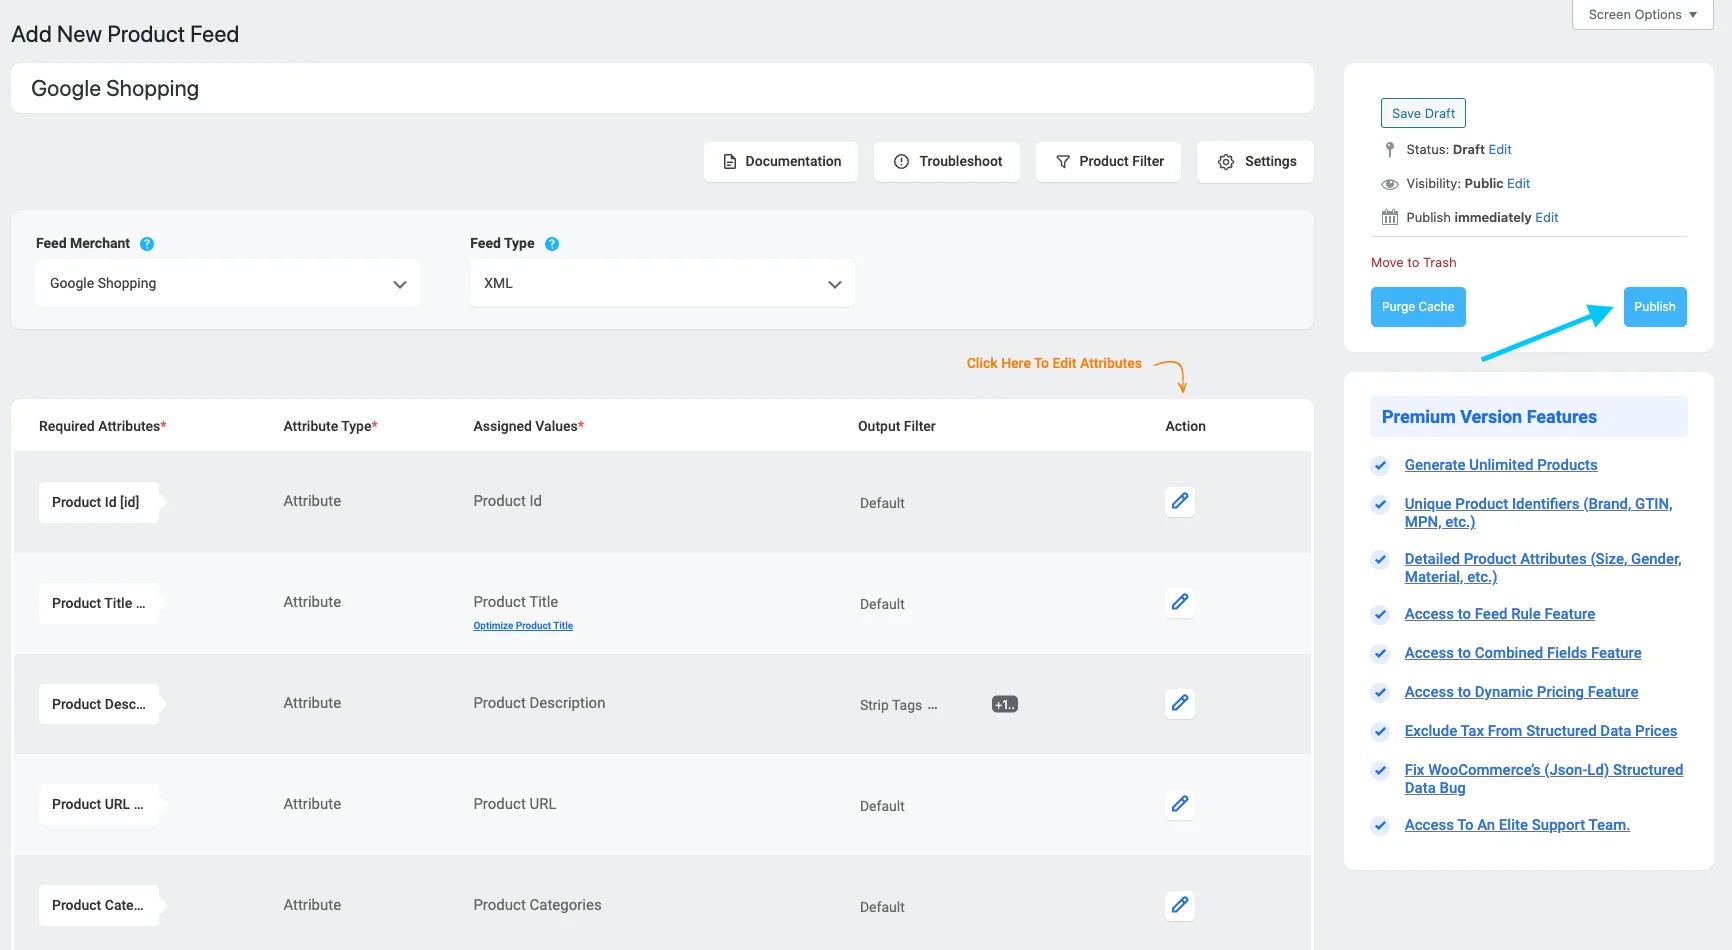
Once you map all the attributes with the correct product data, click on the publish button.

And, your feed will be ready to upload in the Google Merchant Centre. This way you can pull up Google merchant center optimization very easily.
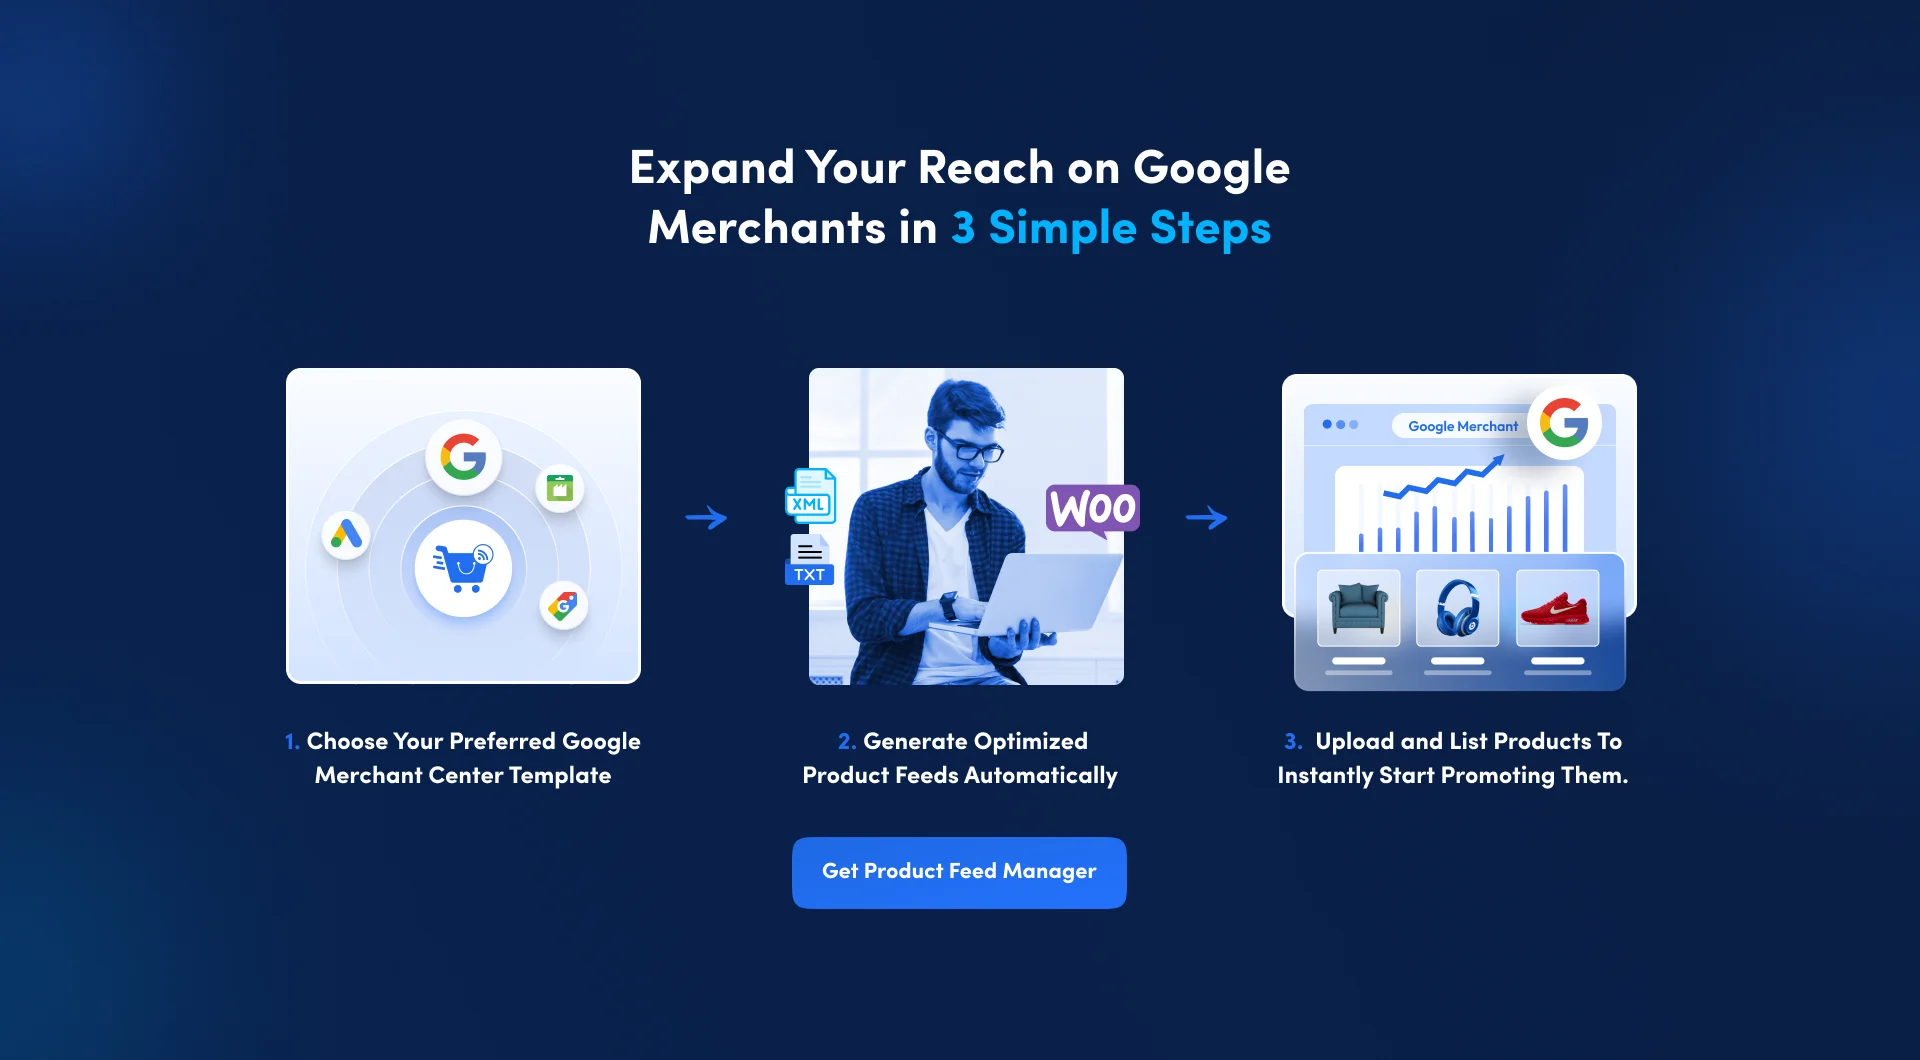
Create product feeds in 3 simple steps

Common Errors While Optimizing Google Shopping Feed

Even with the best intentions, it’s easy to make mistakes when optimizing your Google Shopping feed. These errors can hurt your product visibility and lead to missed opportunities. Here are some of the most common ones you should watch out for:

  • Leaving out critical product attributes: Forgetting to include fields like GTIN or product category can cause Google to disapprove your product listings. For instance, if you’re selling branded shoes and don’t add the correct GTIN, your listing might never reach the right audience.
  • Using vague or generic titles: Titles like “Stylish Shirt” don’t help shoppers or Google understand what you’re selling. Be specific: “Men’s Cotton Polo Shirt – Navy Blue, Size L” works much better.
  • Uploading low-quality product images: A blurry or poorly cropped image can deter shoppers. Always use high-resolution images that clearly display your product.
  • Incorrect pricing or availability: If your feed shows a different price or indicates “in stock” when your product is actually sold out, shoppers will lose trust, and Google might flag your listing.
  • Missing keywords in descriptions: A plain description without relevant search terms can prevent your product from showing up in searches. Use keywords naturally in a way that highlights your product’s benefits.
  • Skipping regular feed updates: Product details, like prices and stock levels, change frequently. Not keeping your feed updated can lead to outdated information being displayed, which frustrates shoppers.

Read our guide if you want to know more about the google feed errors.

Noot van de auteur

Since WooCommerce is your source of earning money, you need to invest some time to optimize your Google shopping feed and then go for promotions.

And when it comes to product promoting your products, listing products on Google Shopping is a must.

The tactics mentioned above are just 6 among many other ways you can do google merchant center optimization or even Google Shopping ads optimization.

If you haven’t already, start optimizing your product data and make your marketing efforts fruitful.

FAQs

1. How often should you update your Google Shopping feed?

You should update your feed whenever product details like price, stock, or availability change. Regular updates keep your listings accurate and improve performance.

2. What happens if your product images are low quality?

Low-quality images can reduce clicks and conversions. Google might even disapprove your listings if images don’t meet their guidelines.

3. Why is GTIN important for your products?

GTIN helps Google identify and categorize your products accurately. Without it, your listings might not show up in relevant searches.

4. Can incorrect shipping details impact your feed?

Yes, inaccurate shipping info can confuse shoppers and lead to lower sales or negative reviews. Always double-check your shipping parameters.

5. Do product titles affect search visibility?

Absolutely. Clear, specific titles with relevant details improve your product’s chances of appearing in the right searches.



Categorieën
Guide Product Feed Manager For WooCommerce WooCommerce

How To Generate WooCommerce Google Product Feed – With 6 Simple Steps

Als je een WooCommerce winkel hebt, moet je wat extra moeite doen om je producten te promoten.

Een manier waarop de meeste WooCommerce winkels succes vinden is door het promoten van hun producten via Google Shopping.

As a WooCommerce store owner, you can get numerous opportunities to showcase your products with Google Shopping ads.

But, there is a big issue that most store owners face.

To upload product feed files properly in the format that Google suggests.

This article will guide you through the steps of building a Woocommerce Google shopping product feed with WooCommerce with 6 simple steps(VERY EASY)

Now, I am here using a plugin Product Feed Manager For WooCommerce, and going to show you how you can generate a Woocommerce Google shopping product feed with JUST A FEW CLICKS.

Hulpmiddel om WooCommerce Google Product Feed te genereren 

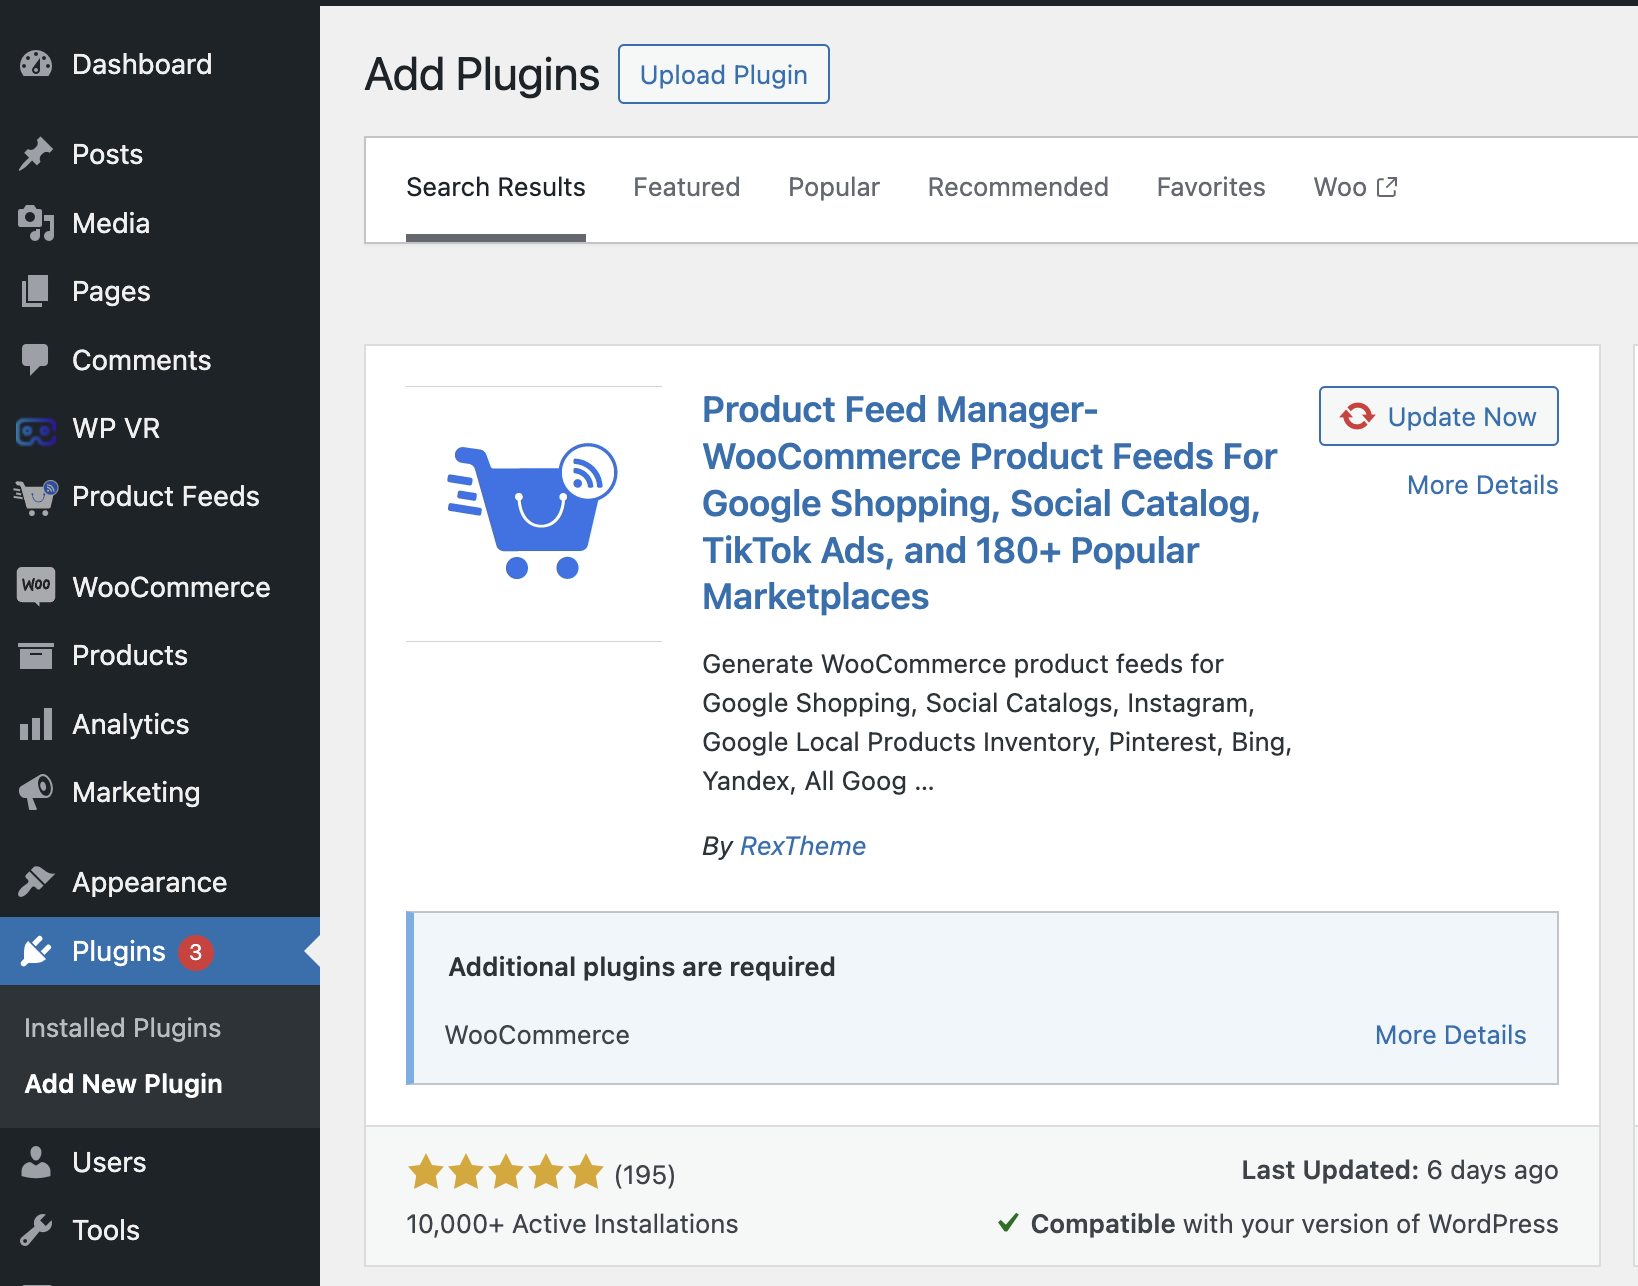
First, you need to make sure that the Product Feed Manager For WooCommerce is installed and activated.

PFM plugin

Nu kunt u overgaan tot het efficiënt genereren van WooCommerce Google productfeed.

6 Easy Steps To Generate WooCommerce Google Product Feed

Om een nauwkeurige WooCommerce Google Product Feed te kunnen genereren, moet je de onderstaande 10 eenvoudige stappen volgen:

Laten we nu de stappen in detail volgen:

Stap 1 - Nieuwe voeding toevoegen

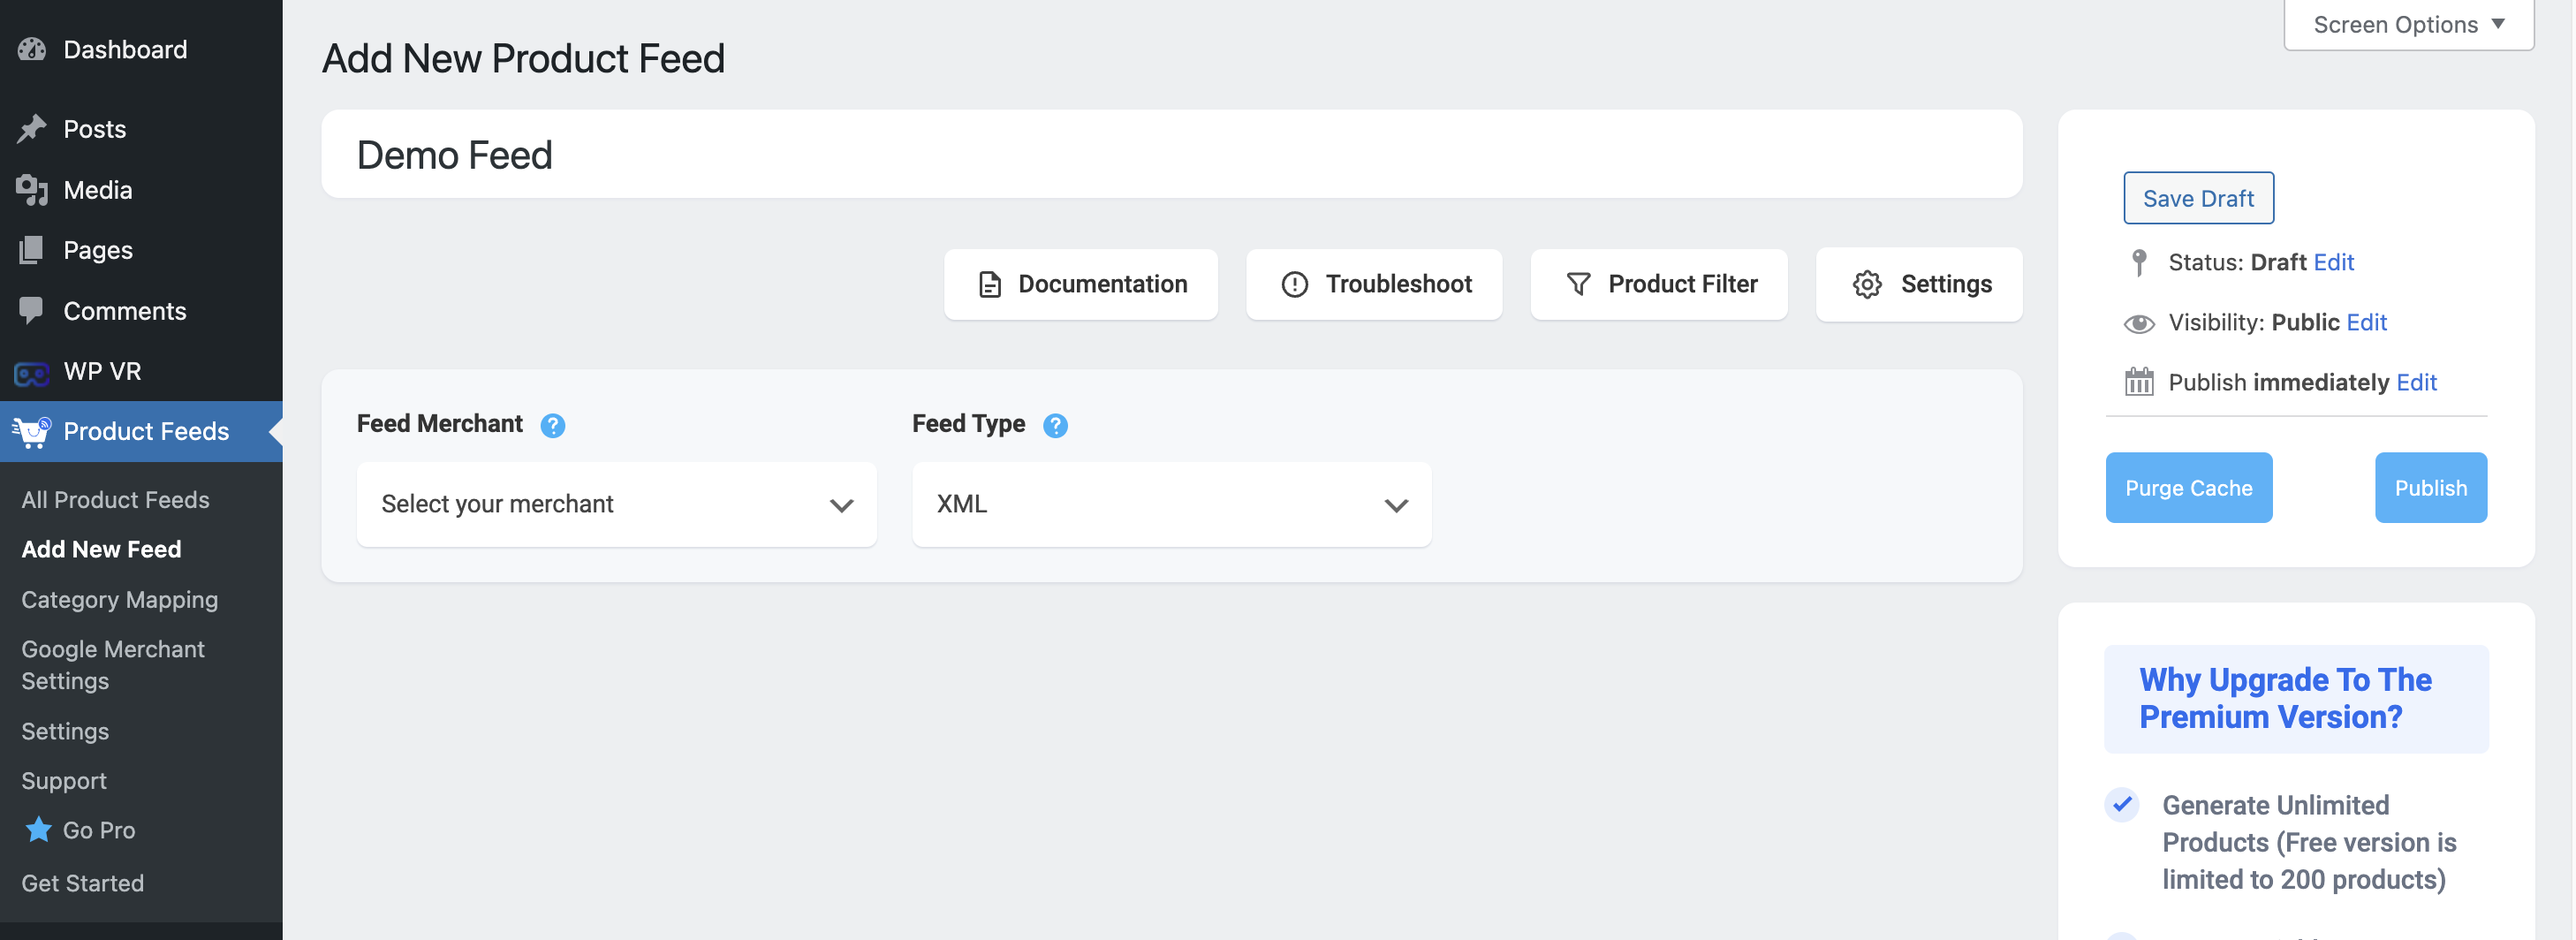
Ga naar Dashboard > productfeed > Nieuwe feed toevoegen

PFM feed title

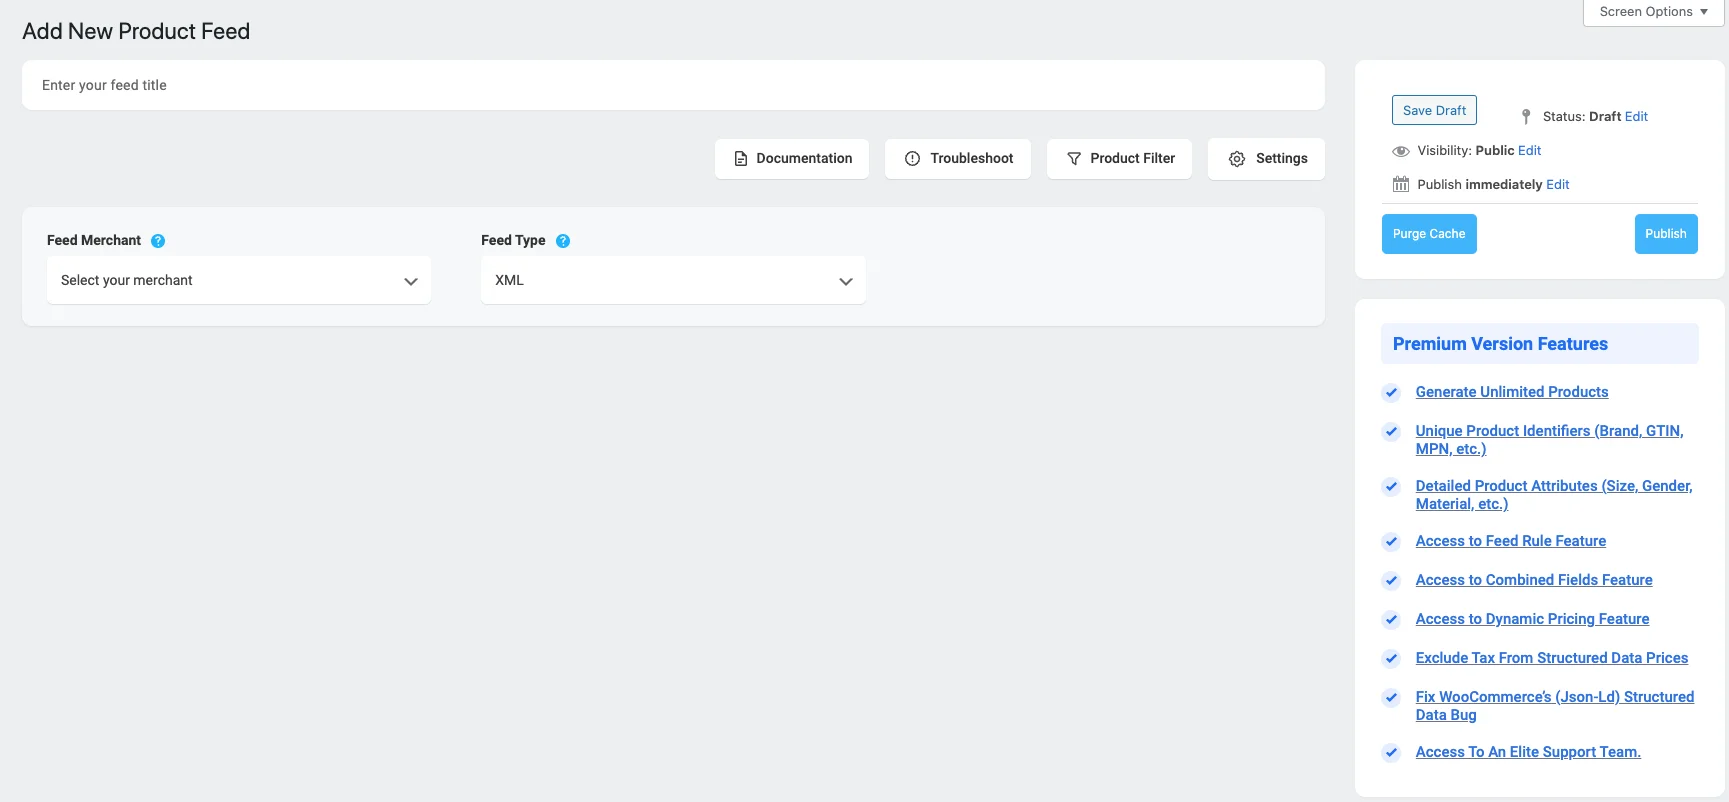
Het brengt u naar de volgende pagina:

Adding title in PFM

Geef nu een titel aan dit productvoer.

Stap 2 - Selecteer uw handelaar

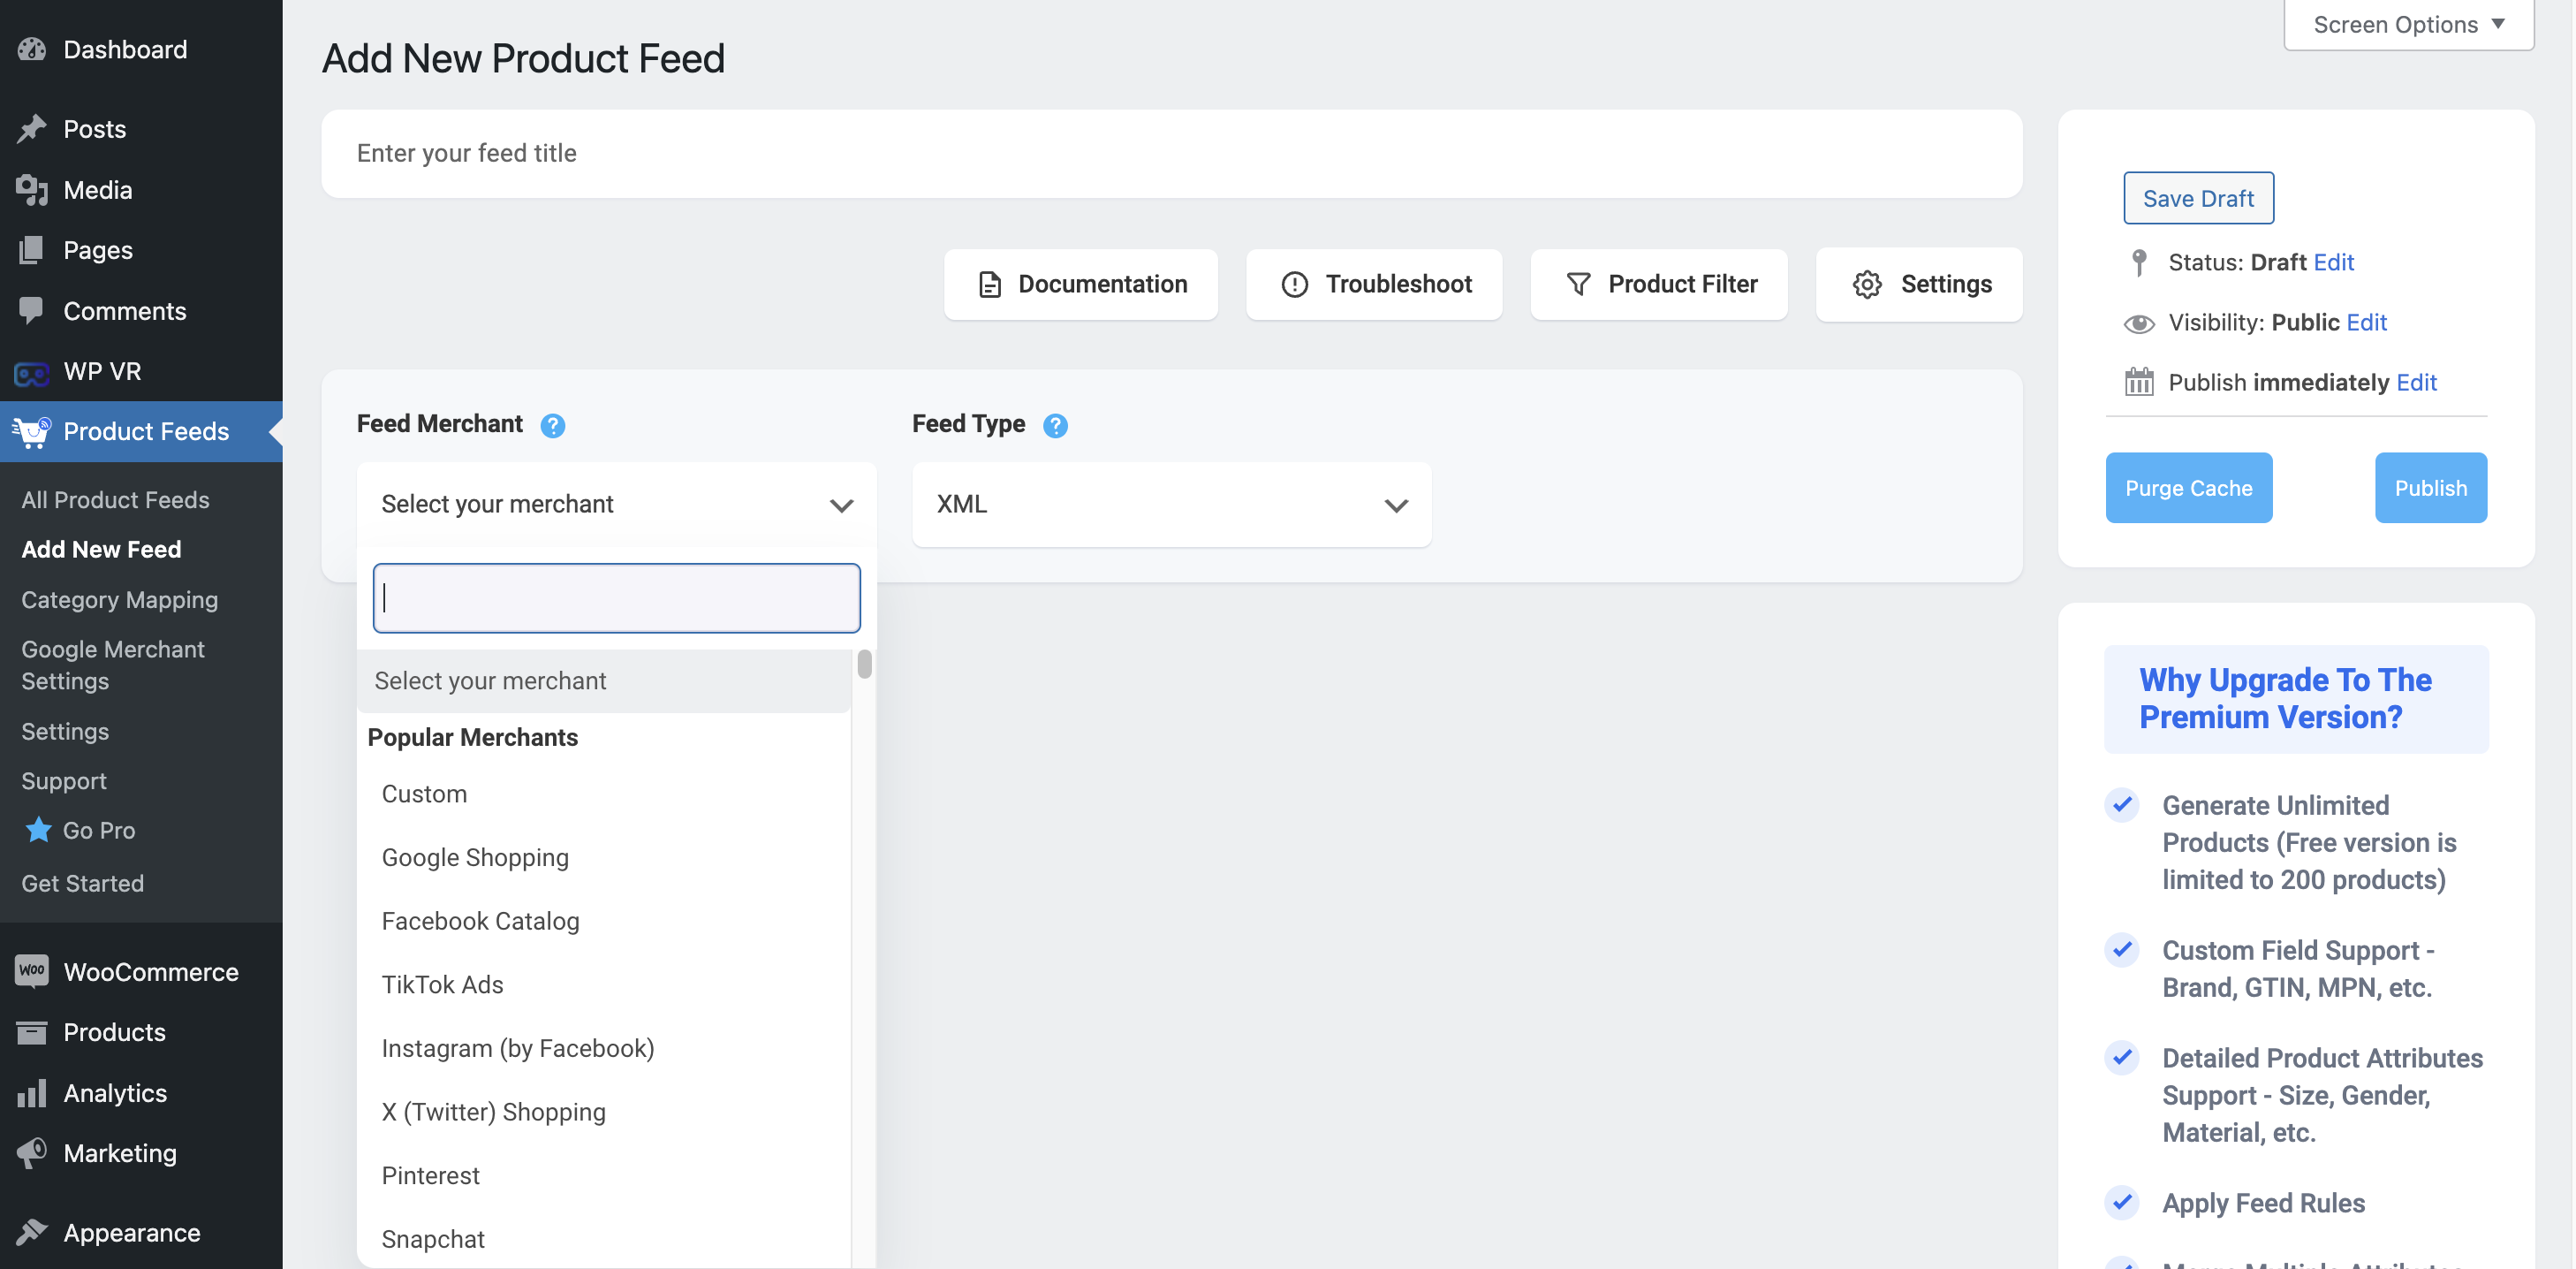
Selecteer in de drop-down de handelaar waar u uw producten wilt aanbieden. Hier selecteert u Google Shopping.

select you merchant options-PFM

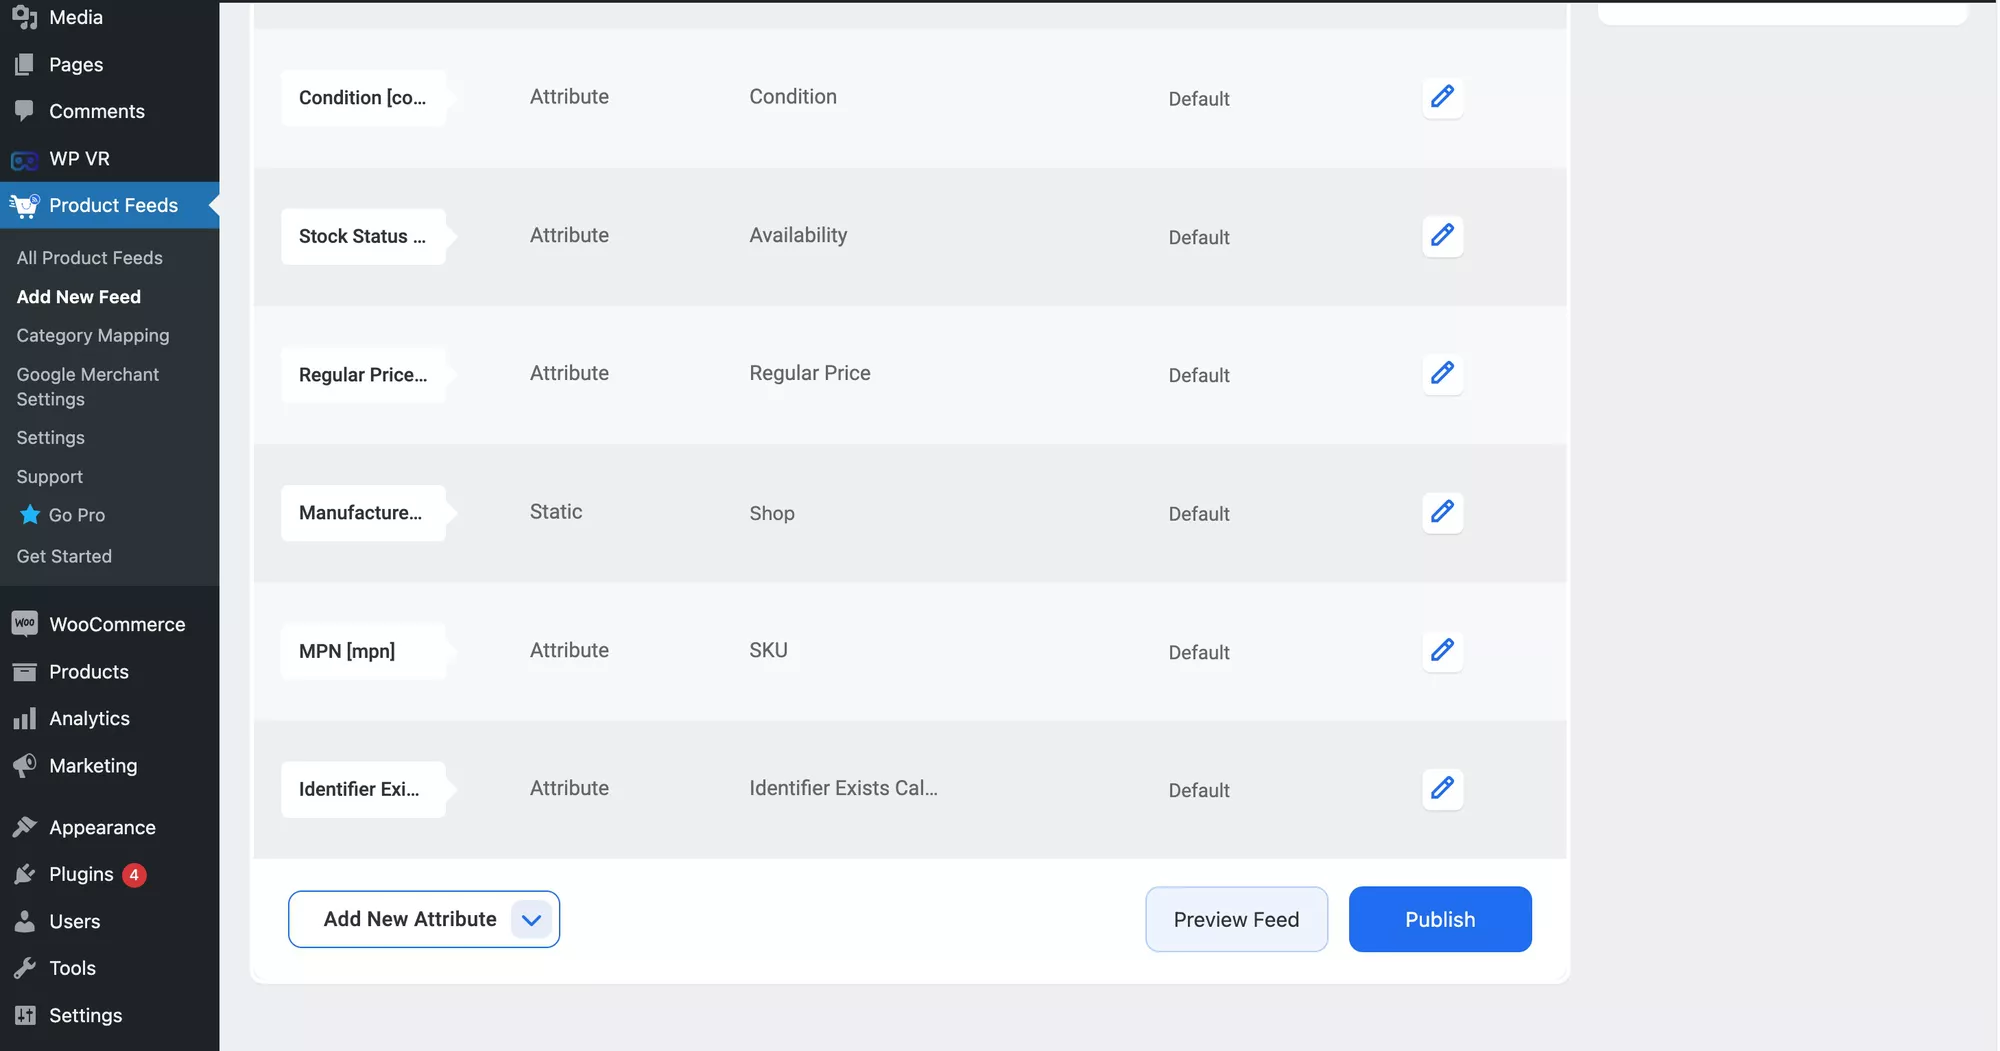
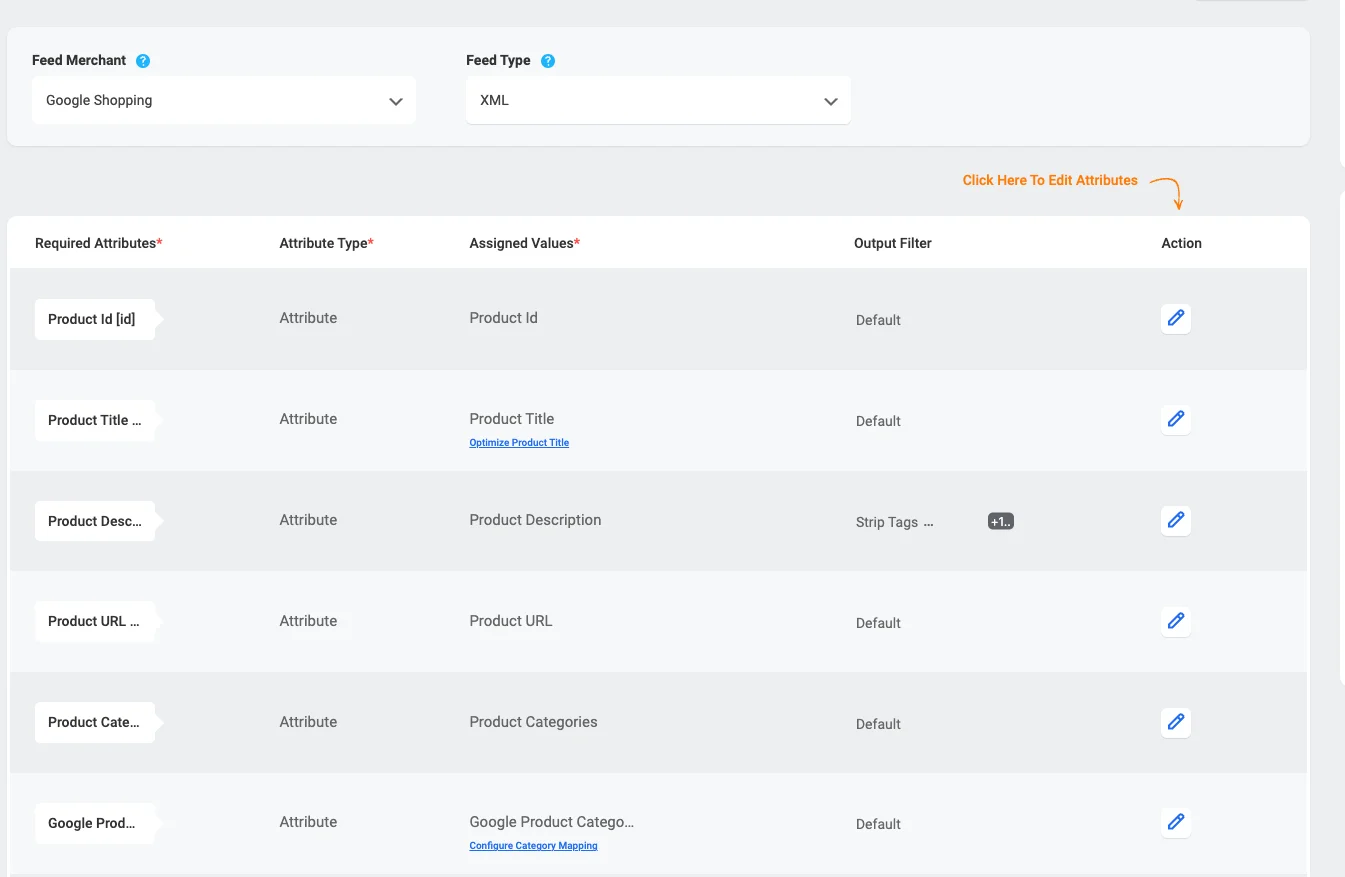
Once you select Google Shopping, you’ll see all the required Google Shopping feed attributes listed on the page.

google shopping attributes in PFM

Stap 3 - De niet in kaart gebrachte attributen configureren

Op de pagina voor het aanmaken van feed zul je zien dat voor bijna alle attributen de juiste waarden zijn ingesteld.

As you can see here for the Manufacturer (brand)the values are set as static.

google shopping product attribute PFM

but for Google Product Categories, the values are not set.

U moet de juiste waarden voor deze attributen in kaart brengen.

Stap 4 - Filter en instellingen configureren

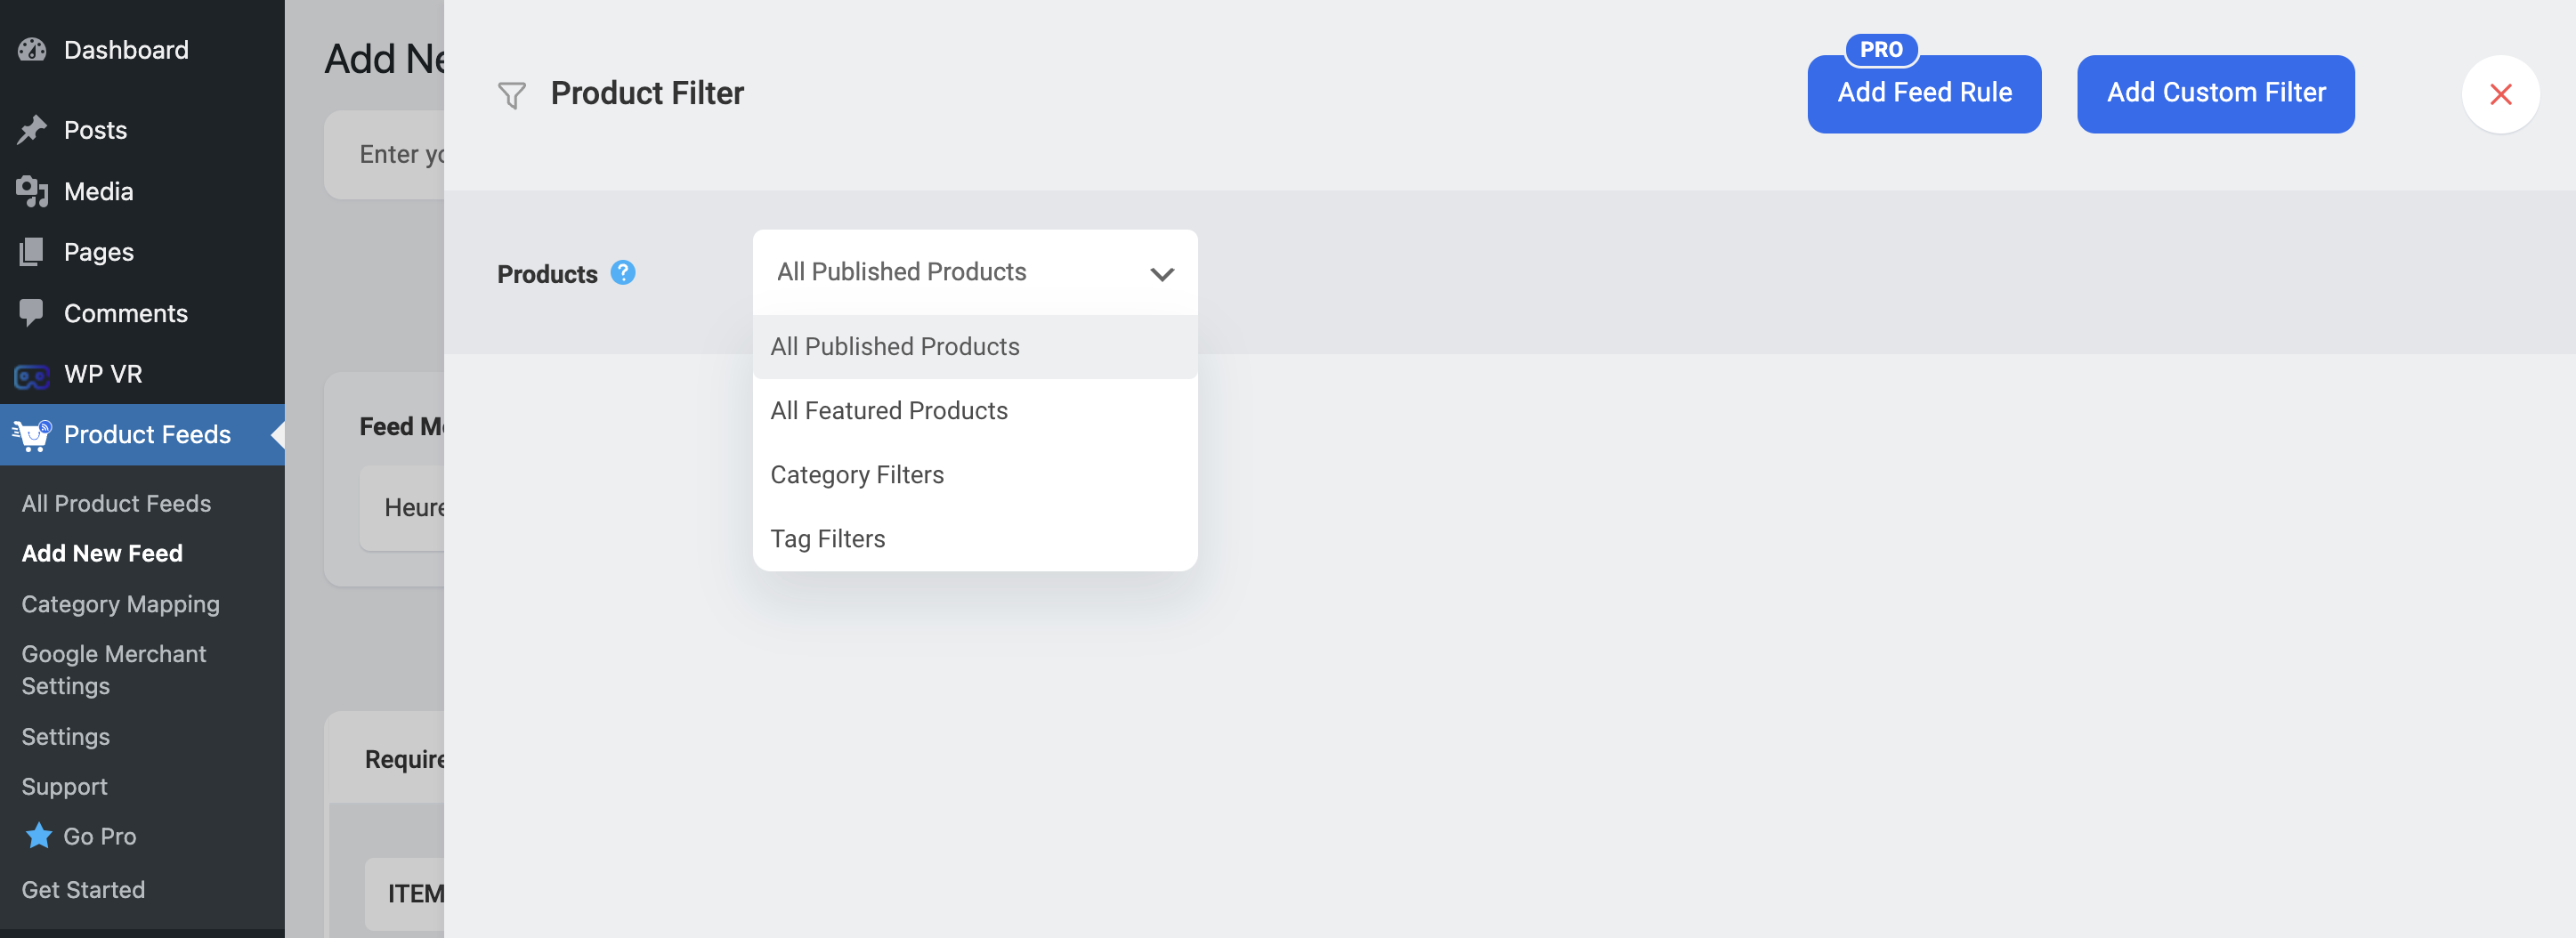
U kunt verschillende filters gebruiken om te selecteren welke producten u in uw feed wilt opnemen.

Product filter options for PFM

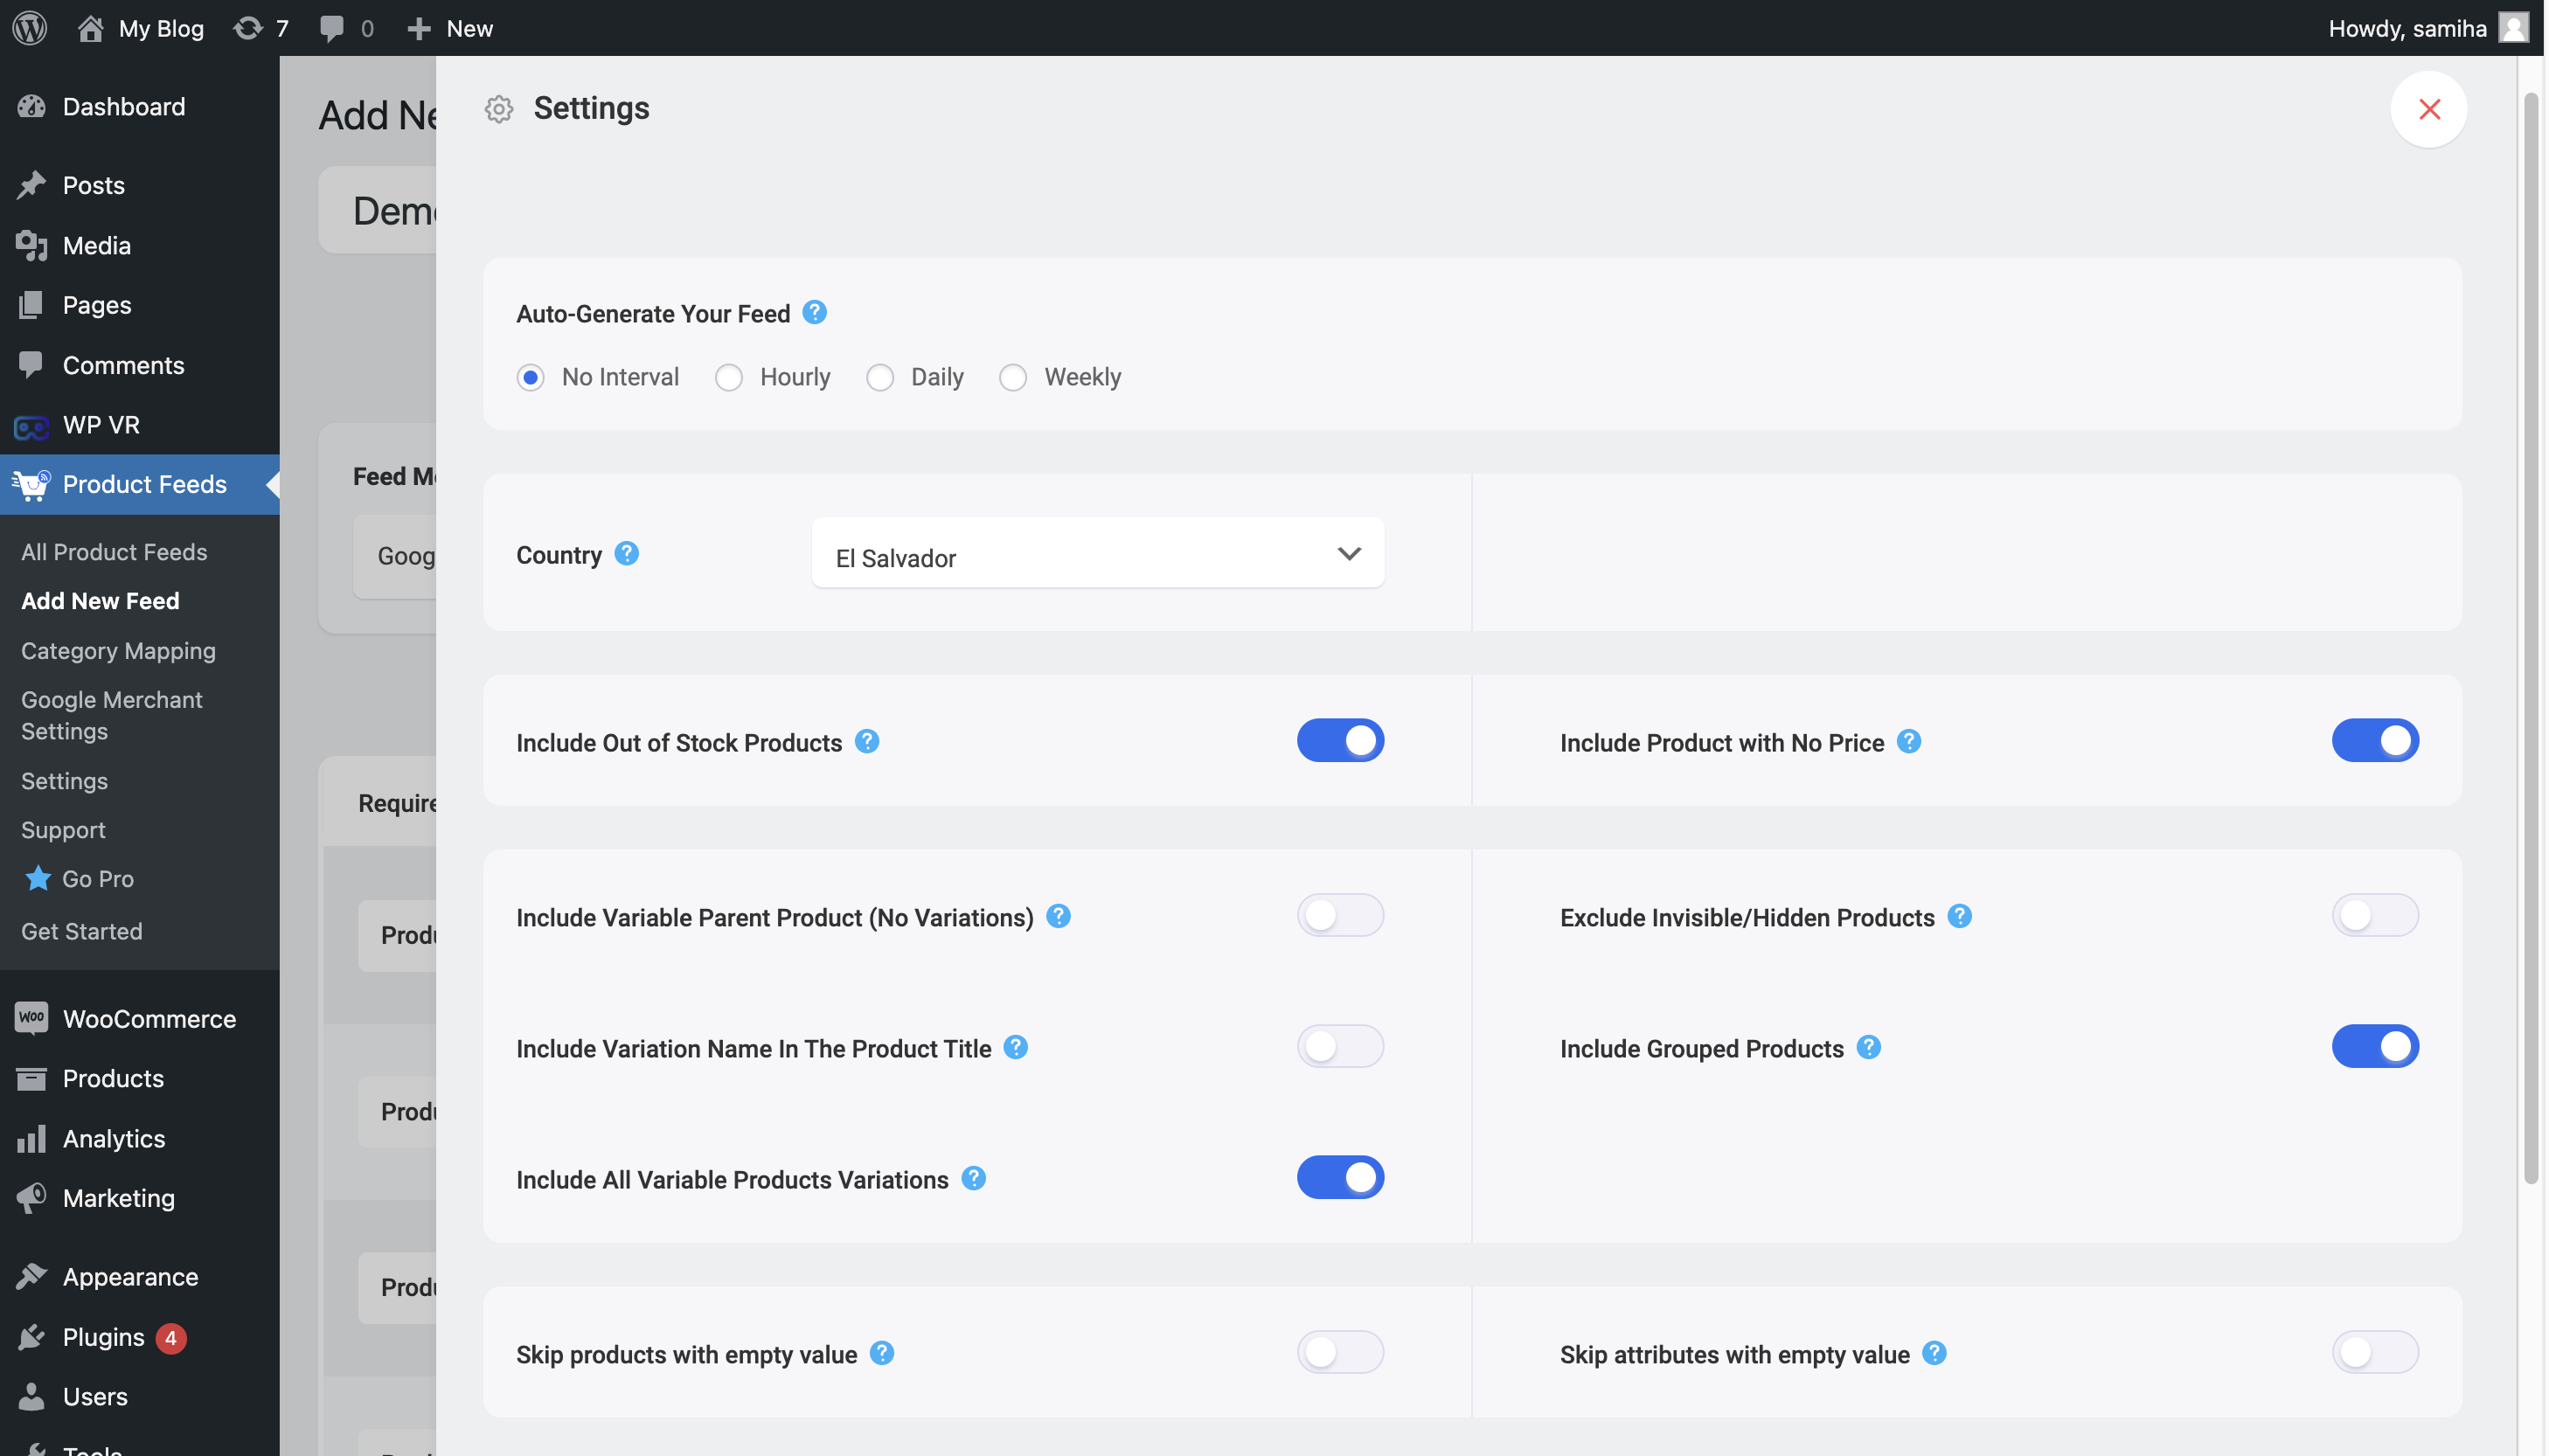
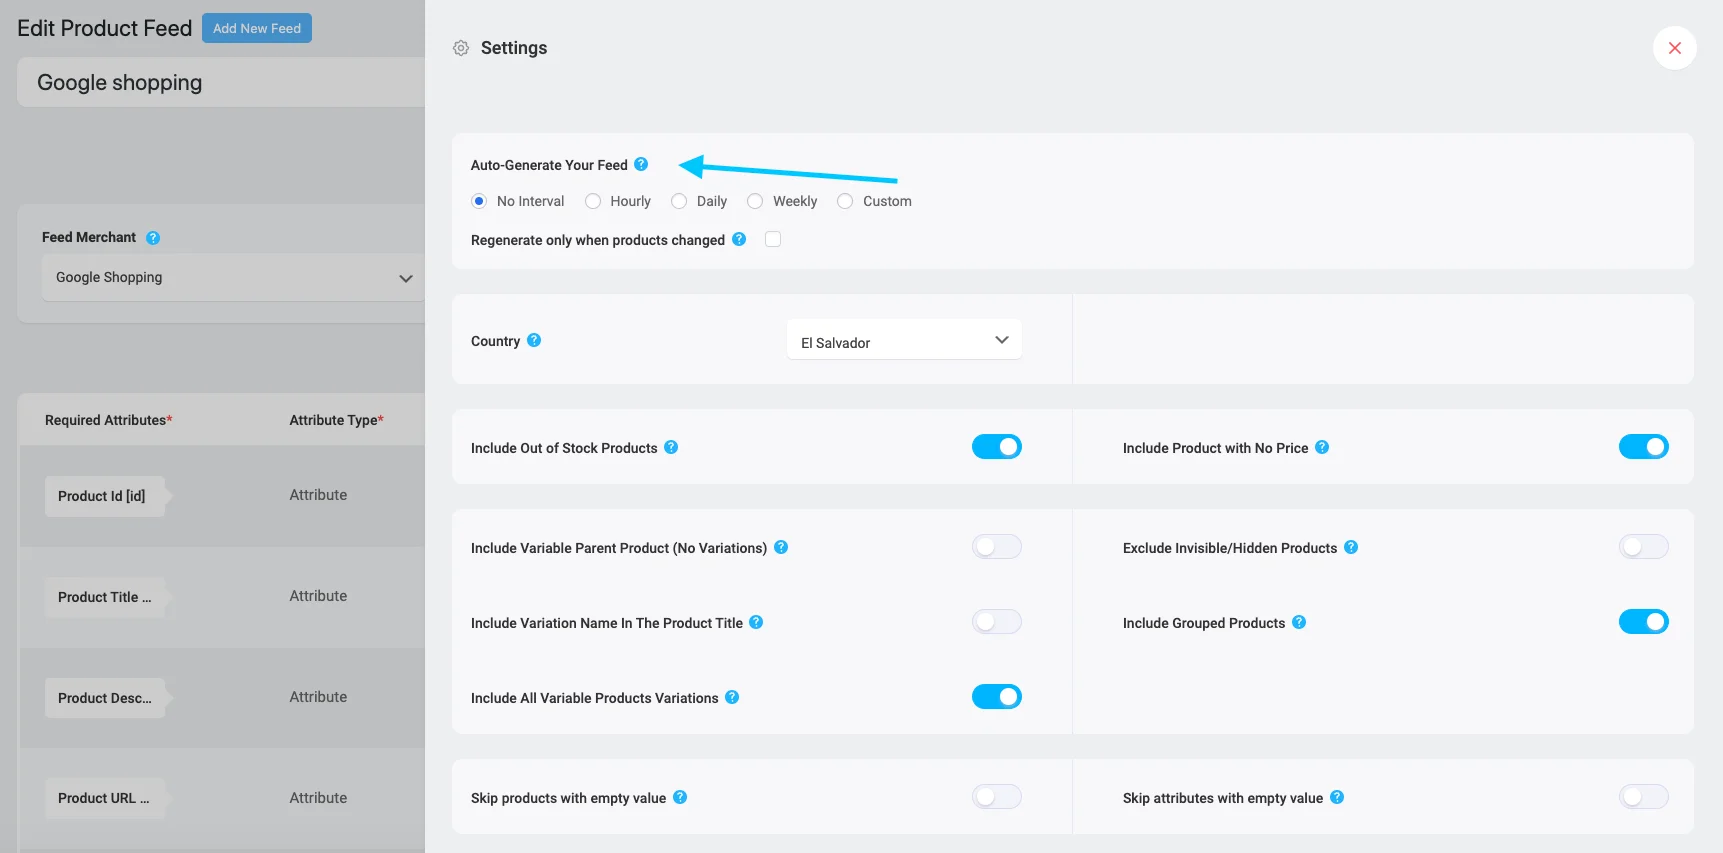
U kunt ook verschillende instellingsopties configureren op basis van uw voorkeuren.

Setting options of PFM

Stap 5 - De productfeed genereren 

Als alle configuratie op zijn plaats is, scrollt u naar de rechterbovenkant en publiceert u de feed.

Publish button in PFM

Dan verschijnt de laadbalk voor het genereren van voer.

Zodra het laden klaar is, is je voer klaar.

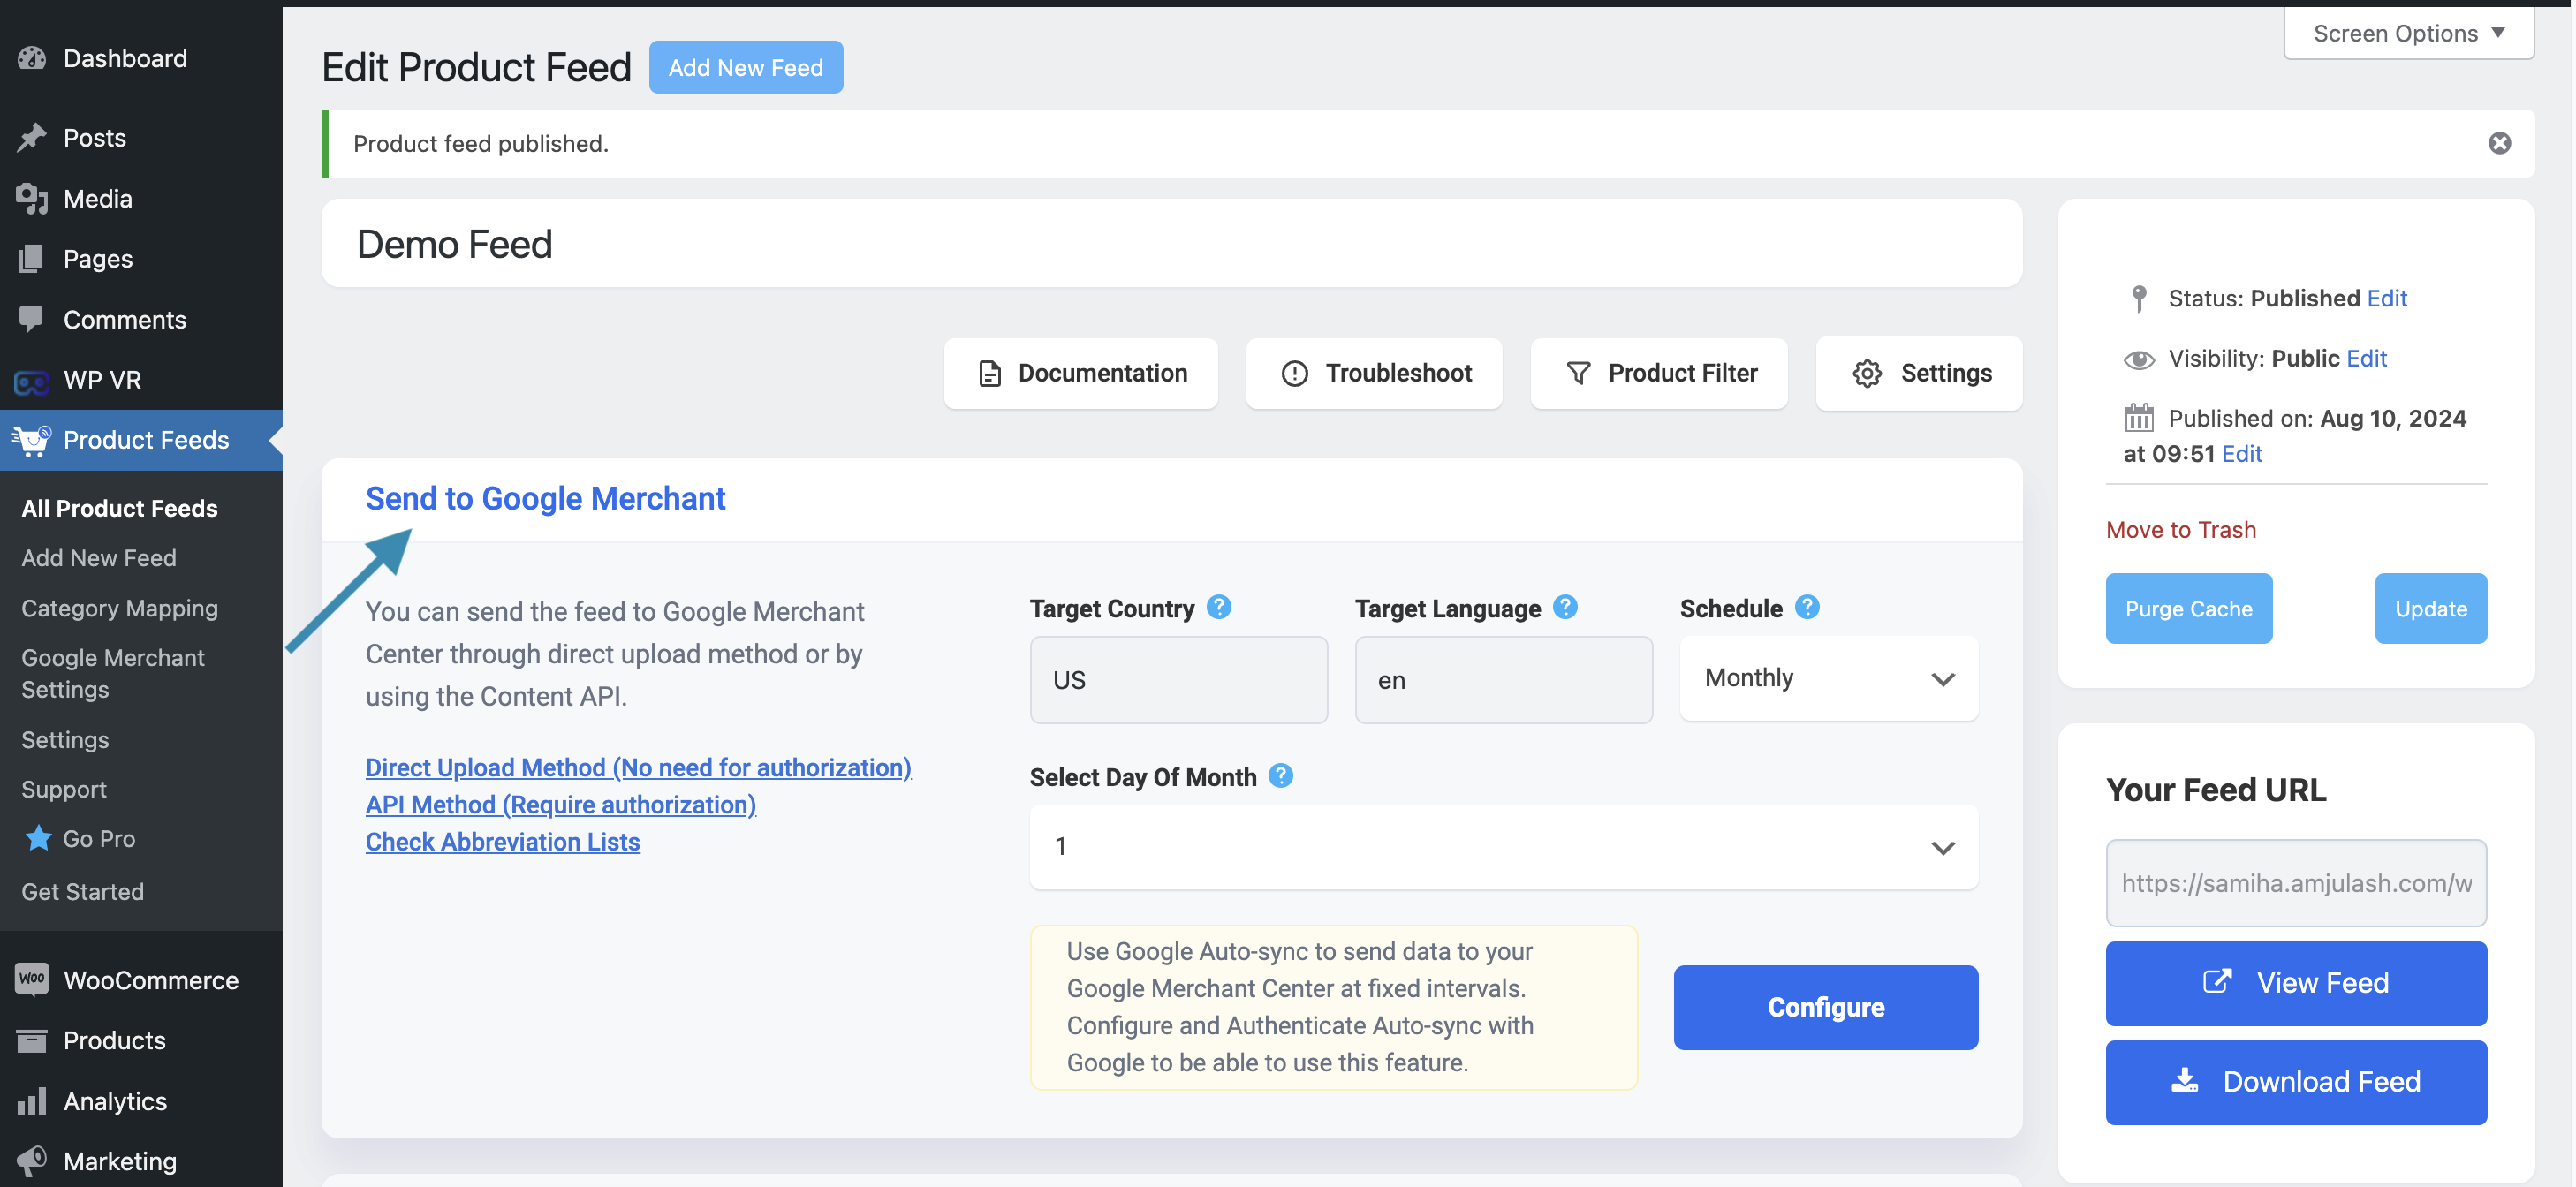
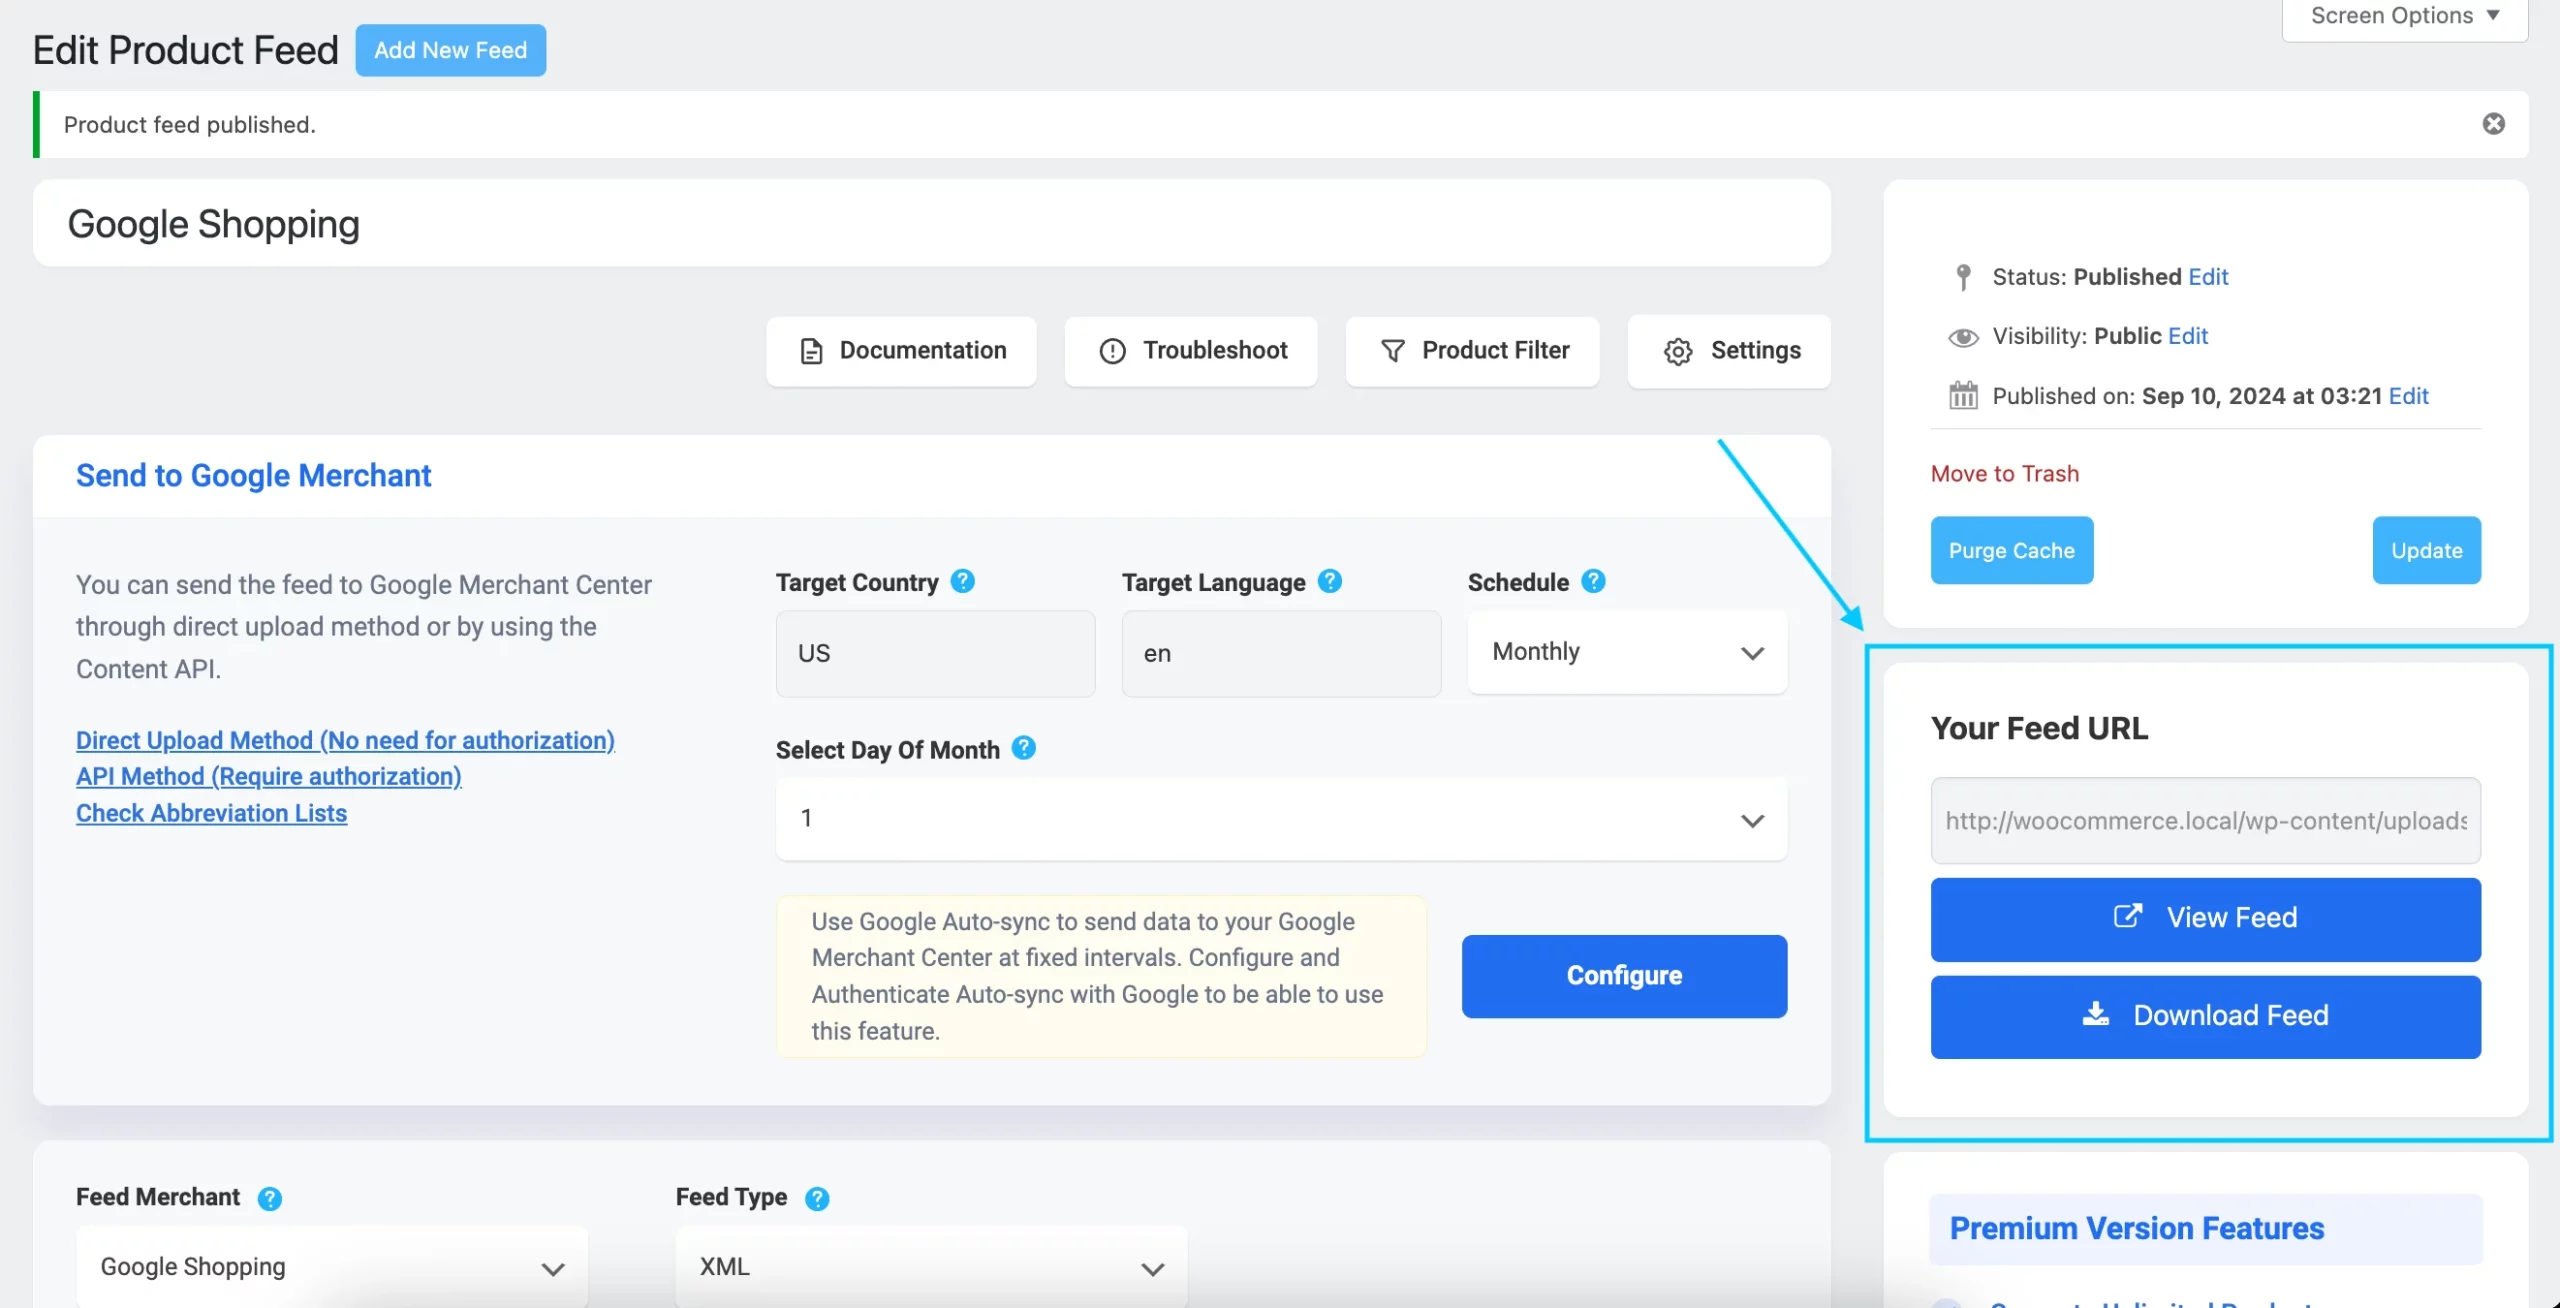
Now, you will be able to view the feed, copy the feed link, and download the feed.

Stap 6 - WooCommerce Google Product Feed uploaden voor promotie 

U kunt nu de gegenereerde productfeed downloaden en uploaden naar uw Google Merchant Center.

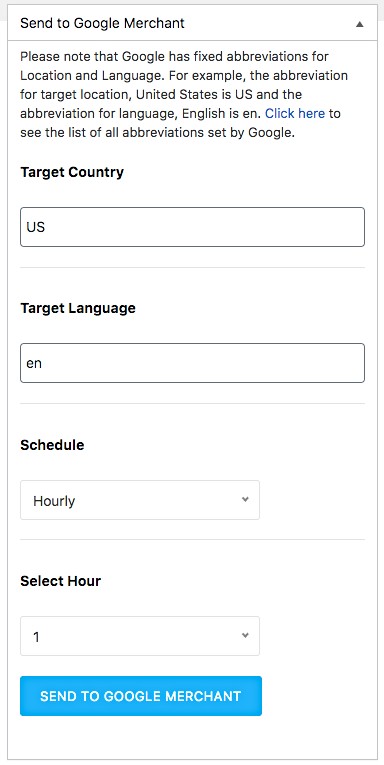
Als je je WooCommerce-winkel automatisch hebt gesynchroniseerd met Google Shopping met behulp van onze plugin, dan kun je het direct versturen vanuit de optie 'Verzenden naar Google'.

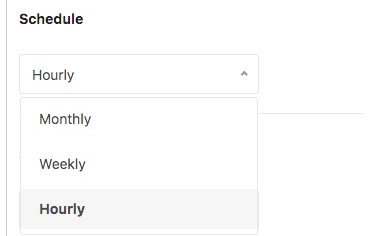
sent to google merchant

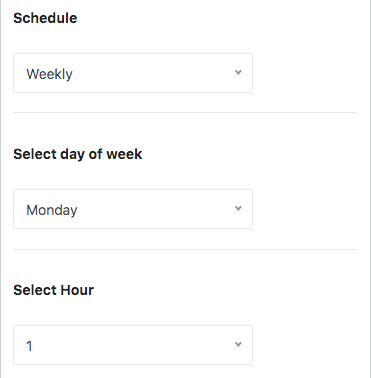
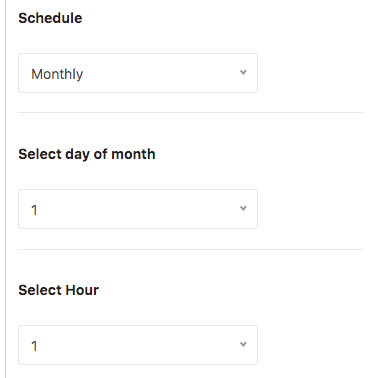
Under this option, you can set your schedule according to your own will, either WeeklyMonthly, or Hourly basis. Once you select the schedule, click on the Green button Send To Google.

En dat is het, de feed zal worden verzonden naar Google en regelmatig worden bijgewerkt volgens uw vaste schema.

Als je niet weet hoe je je WooCommerce-winkel automatisch kunt synchroniseren met Google met behulp van Product Feed Manager For WooCommerce, lees dan dit artikel.

Generate WooCommerce Google Product Feed with Product Feed Manager

The simplest yet most efficient product feed management plugin for creating a Google Shopping feed for WooCommerce is Product Feed Manager for WooCommerce.

PFM google feature page

Everything that the Google Merchant Feed (also known as the Google Shopping Feed) requires will be provided to you.

This plugin is a very easy-to-use Google shopping feed generator.

If you still having confusion, go through this video tutorial :

Conclusie

Hopefully, after this complete guide, you will have no issues in generating WooCommerce Google Product Feed.

Dus ga je gang en begin je producten te promoten via Google Shopping en zie je een stijging van de omzettingsgraad.

Categorieën
Guide Product Feed Manager For WooCommerce WooCommerce

Complete Guide To WooCommerce Product Feed – Google Shopping & Facebook [2024]

Online winkelen is de afgelopen tien jaar in opkomst. Meer dan 85% van de mensen wereldwijd geeft de voorkeur aan online winkelen boven het bezoeken van fysieke winkels (volgens alphr.com).

Many WooCommerce stores are doing exceptionally well and have achieved three times more sales than they used to about a few years ago.

Wist u dat u uw winkelverkoop in een mum van tijd ook gemakkelijk kunt verdrievoudigen?

Maar wat is het geheim?

Nou, de sleutel is ...
Als u uw Product Feedop de juiste manier genereert en promoot via Google Shopping Ads en Facebook Dynamic Ads, kunt u uw verkoop meteen zien stijgen.

Laat het me uitleggen.

Google en Facebook hebben het grootste publiek. Promotie op hun handelsplatformen kan uw verkoop in een mum van tijd een boost geven, als u maar een beetje wil.

Today, you will get a complete step-by-step guide on how to generate your WooCommerce Product Feed in the most optimized way and skyrocket your store performance.

Aan het einde van deze gids zult u in staat zijn om 

  • Set up proper WooCommerce product feed in the most optimized way for Google Shopping and Facebook Dynamic Ads
  • Genereer nauwkeurige en prestatiegerichte productaanvoer in enkele minuten
  • Upload de feed op het door u gewenste platform en zie uw verkoop stijgen.

Inhoudstafel


1. WooCommerce Product Feed Voor Google Shopping Ads
1.1 Hoe WooCommerce Google Product Feed in te stellen op de meest geoptimaliseerde manier
1.2 Google-productvoedingsmonsters

2. WooCommerce Product Feed Voor Facebook Dynamic Ads
2.1 Hoe kan ik WooCommerce Facebook Productvoer op de meest geoptimaliseerde manier instellen?
2.2 Facebook Productvoedingsmonsters

3. Hoe productinvoer te genereren Gemakkelijk gebruik van het juiste gereedschap

Laten we er nu in duiken.

What is a WooCommerce Product Feed?

To sell your products on Google Shopping, Facebook Marketplace, or Instagram Shop, you need to create the PROPER WooCommerce product data feeds.

So, What it is?

Basically, when you create a product feed for your online store, it includes all the important information about your products.

Then, when you upload this feed to a marketplace, like Google Shopping, the platform uses that data to list your products for sale.

Those data are basically called product attributes or product feed attributes that match with the marketplace.

This is how a WooCommerce Product Feed Works!

Let’s make you understand this with Facebook!

So, when you send your store’s products to Facebook, it takes important info from your list to show your stuff on your Facebook catalog feed.

When someone looks for something, Facebook uses your product details to show ads that match.

If they like what they see, they can click on the ad and go straight to your Facebook store to check it out.

Product feed manager to Facebook marketplace
Source: Freepik

This can bring more people to your site and increase your sales on WooCommerce on a large scale!

How Does Product Feed Attribute Work

Product feed attributes tell you all the important stuff like what the product looks like, how much it costs, and even what size it is.

These attributes help your customers find what they are looking for when shopping online.

For example, if you’re looking for a shirt, attributes like color and size make it easy to find the right one.

Search engines and online shopping platforms use these attributes to match up what your customers are looking for with the right products.

The more accurate and detailed the attributes are, the better chance a product has of showing up in search results.

This means more people will see it and maybe even buy it.

1. WooCommerce Product Feed voor Google Shopping Ads

WooCommerce Product Feed voor Google Shopping

The most popular and effective merchant shop for promoting your WooCommerce products is Google.

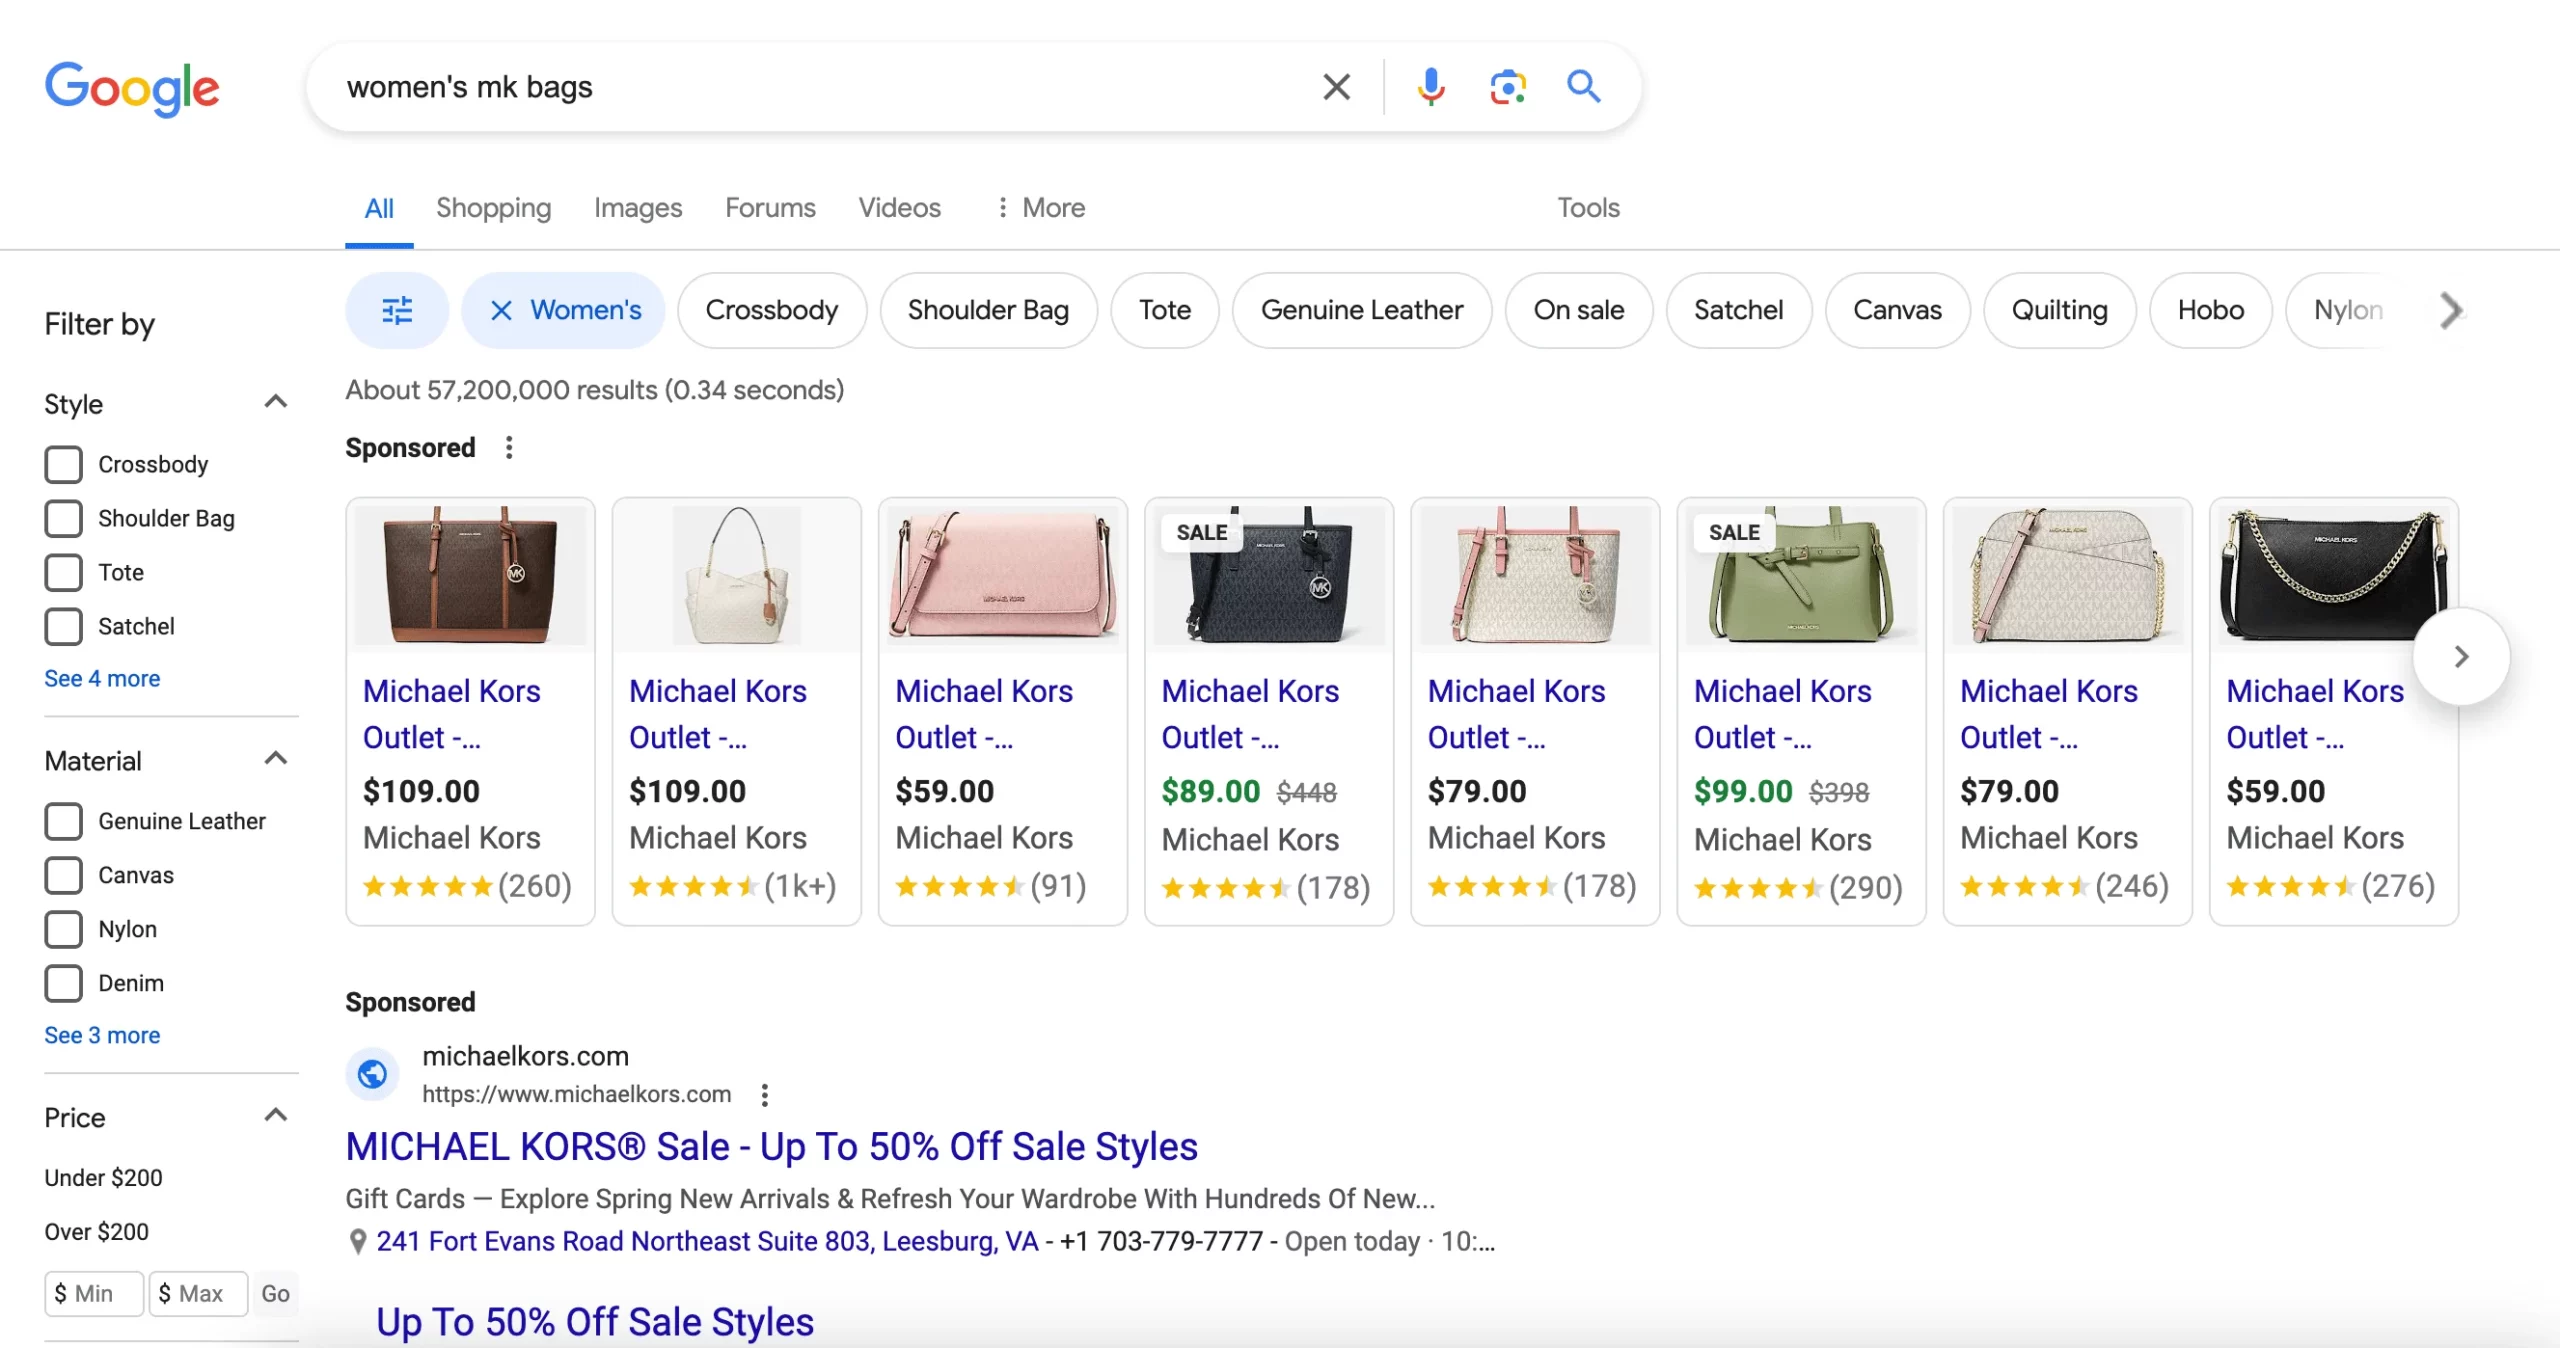
U moet gehoord hebben over Google Shopping Ads. Wanneer u naar een bepaald product zoekt, krijgt u zoiets als dit:

Google Shopping Ads - WooCommerce Google Product Feed
Google Shopping Ads

Deze zijn zeer boeiend en de meeste kopers vinden hun gewenste producten via deze Ads.

Uw producten uit uw WooCommerce productfeed kunnen ook in deze resultaten verschijnen als u het goed doet.

And this guide will help you execute it successfully with ease.

First, set up an account on Google Merchant Center.

Zodra u een account heeft, moet u uw WooCommerce Product Feed uploaden om te promoten via Google. Google heeft echter een paar feed-specificaties die je moet volgen. Laten we het dus nader bekijken.

Hoe kan ik WooCommerce Google Product Feed op de meest geoptimaliseerde manier instellen?

Wanneer u uw producten uploadt, zal Google op zoek gaan naar enkele specifieke gegevens.

Laat ons kijken welke gegevens u moet opnemen in uw feed en ik zal u voorbeelden geven voor elke data, zodat u de meest geoptimaliseerde manier weet om de WooCommerce Google product feed te genereren.

Een goede Google-productfeed (in XML-formaat) van een enkel product ziet er meestal als volgt uit:

<rss xmlns:g="http://base.google.com/ns/1.0" version="2.0" >
    <channel>
    <title> The name of the feed file </title>
    <link> Your website link </link>
    <description> Description of the content </description>
    <item>
        Product data attributes
    </item>
    </channel>
</rss>

**Here the item tag ( <item> </item> ) encapsulates the data of a product. For multiple products, you simply add more item tags and the product data within, and the rest remains the same.

De productgegevens bevatten nu veel informatie die u moet toewijzen aan hun respectievelijke attribuuttags binnen de artikeltag.

Google Shopping Ads vereisen de volgende gegevens voor elk van uw producten:

  • Product ID
  • Titel van het product
  • Productbeschrijving
  • Product Link/URL
  • Productcategorie
  • Google Product Categorie
  • Productafbeelding URL
  • Voorraadbeschikbaarheid
  • Normale prijs
  • Productvoorwaarde
  • Fabrikant/Merknaam
  • GTIN (Global Trade Item Number)
  • MPN (Fabrieksonderdeelnummer)
  • Identificatiecode
  • Inhoud voor volwassenen
  • Multipack
  • Bundel
  • Materiaal
  • Leeftijdsgroep
  • Kleur
  • Geslacht
  • Grootte
  • Patroon
  • Item Groeps-ID

Sommige van deze attributen zijn afhankelijk van het producttype en de varianten ervan. Hieronder vindt u een meer gedetailleerde uitleg met voorbeelden van hoe elk van deze gegevens op uw winkel zou moeten staan voor de maximale output.

Elk attribuut is opgenomen in het volgende formaat op de feed:


<g: Attribute name > Attribute Data </g: Attribute name >

U krijgt later in dit artikel een voorbeeld van een product feed file link nadat ik de gedetailleerde instructies over de attributen en enkele tips heb doorgenomen.

== Click here to skip the details and tips, and go to view the sample product feed. ==

Laten we de details bekijken om te begrijpen hoe u deze gegevens moet opnemen, het formaat op het feed-bestand, en welke op basis van de producten in uw WooCommerce Store moeten worden opgenomen/uitgesloten.

Product Feed Manager For WooCommerce

Product ID

Attribuutid
Voorbeeldwaarde671
Voerstructuur<g:id>671</g:id>

It is a unique identifier for your product in your store.
On WooCommerce, you should see the ID when you browse the product list.

Product ID

U kunt echter ook het product SKU gebruiken als product ID.

Titel van het product

Attribuuttitel
VoorbeeldwaardeRood Logo Rex T-shirt
Voerstructuur<g:title>
    <![CDATA[ Red Logo Rex T-shirt ]]>
</g:title>

Het is de naam van het te tonen product.
Op WooCommerce moet u de titel van het product zien wanneer u de productlijst doorbladert.

Producttitel op WooCommerce - PFM

When you set the product title, do specify any special feature, such as its color and the brand name, along with the product. This will create more attraction for buyers.

However, you are not allowed to use any other promotional touch to the tile (for example, adding “free shipping” or “discounted price” or using all caps).

In the case of variable products, include the brand name in the title. Rather than including just ‘any’ feature to the main title, mention the feature that makes it a variant of the product.

For example, if a product is a Logo Rex T-shirt and has variations of Red and Blue, then on your Google Product Feed, one variation should be named “Logo Rex T-shirt – Red” and the other one “Logo Rex T-shirt – Blue”.

So, the feed data view will look like this individually:

<g:title>
    <![CDATA[ Logo Rex T-shirt - Red ]]>
</g:title>
<g:title>
    <![CDATA[ Logo Rex T-shirt - Blue ]]>
</g:title>

Productbeschrijving

Attribuutbeschrijving
VoorbeeldwaardeDit is een rood T-shirt. Het is alleen gemaakt voor testdoeleinden.
Voerstructuur<g:description>
    <![CDATA[ This is a Red T-shirt. It was created for testing purposes only. ]]>
</g:description>

Voeg een goede beschrijving toe van het product dat u verkoopt. Zorg ervoor dat u alle belangrijke functies die het kan hebben, dat zal het aantrekken van kopers te markeren.

Wanneer u een product bewerkt, kunt u de tegel, de link en de beschrijving ervan instellen zoals in de onderstaande afbeelding:

Product Bewerkingspagina

Even though you should mention the exclusive features and benefits of the description, you are not allowed to use any extensive promotional touch in the description (for example, adding “free shipping” or “discounted price” or using all caps to highlight a certain point).

Ook moet u geen links naar een andere webpagina opnemen of de producten vergelijken met die van concurrenten.

Product Link/URL

Attribuutlink
Voorbeeldwaardehttps://www.yourwebsite.com/red-logo-rex-t-shirt/
Voerstructuur<g:link>
    <![CDATA[ https://www.yourwebsite.com/red-logo-rex-t-shirt/ ]]>
</g:link>

Dit is de link naar uw productpagina.
Bij het bewerken van een product zie je de Permalink net onder het Titelvak. Dat is de URL naar uw product.

Product Permalink

When people find your product on Google, clicking on that Ad will take the potential buyer to the link you provide here.

Het is het beste om de producttitel op de link te vermelden, maar velen geven de voorkeur aan het product Id in plaats daarvan, en sommigen gebruiken beide.

Ook moet u ervoor zorgen dat uw website-domein wordt geverifieerd en begint met "http" of "https".

Productcategorie

Attribuutproducttype
VoorbeeldwaardeKleding
Voerstructuur<g:product_type>
    <![CDATA[ Clothing ]]>
</g:product_type>

This is the product type or category that you set on your store.
When editing a product on WooCommerce, on the right side, you will have the option to set a Category.

Complete Guide To WooCommerce Product Feed - Google Shopping &amp; Facebook [2024] 1

This attribute is optional, but we recommend you use it to create a better visualization for viewers.

Google Product Categorie

Attribuutgoogle_product_categorie
VoorbeeldwaardeKleding & Accessoires > Kleding
Voerstructuur<g:google_product_category>
    <![CDATA[ Apparel & Accessories > Clothing ]]>
</g:google_product_category>

Google has a category list of its own, which you need to use to categorize your products on Google Shopping. You must set this attribute according to their required taxonomy in order to get your Google Product Feed approved.

Klik hier om de Google-categorielijst en de taxonomie te bekijken

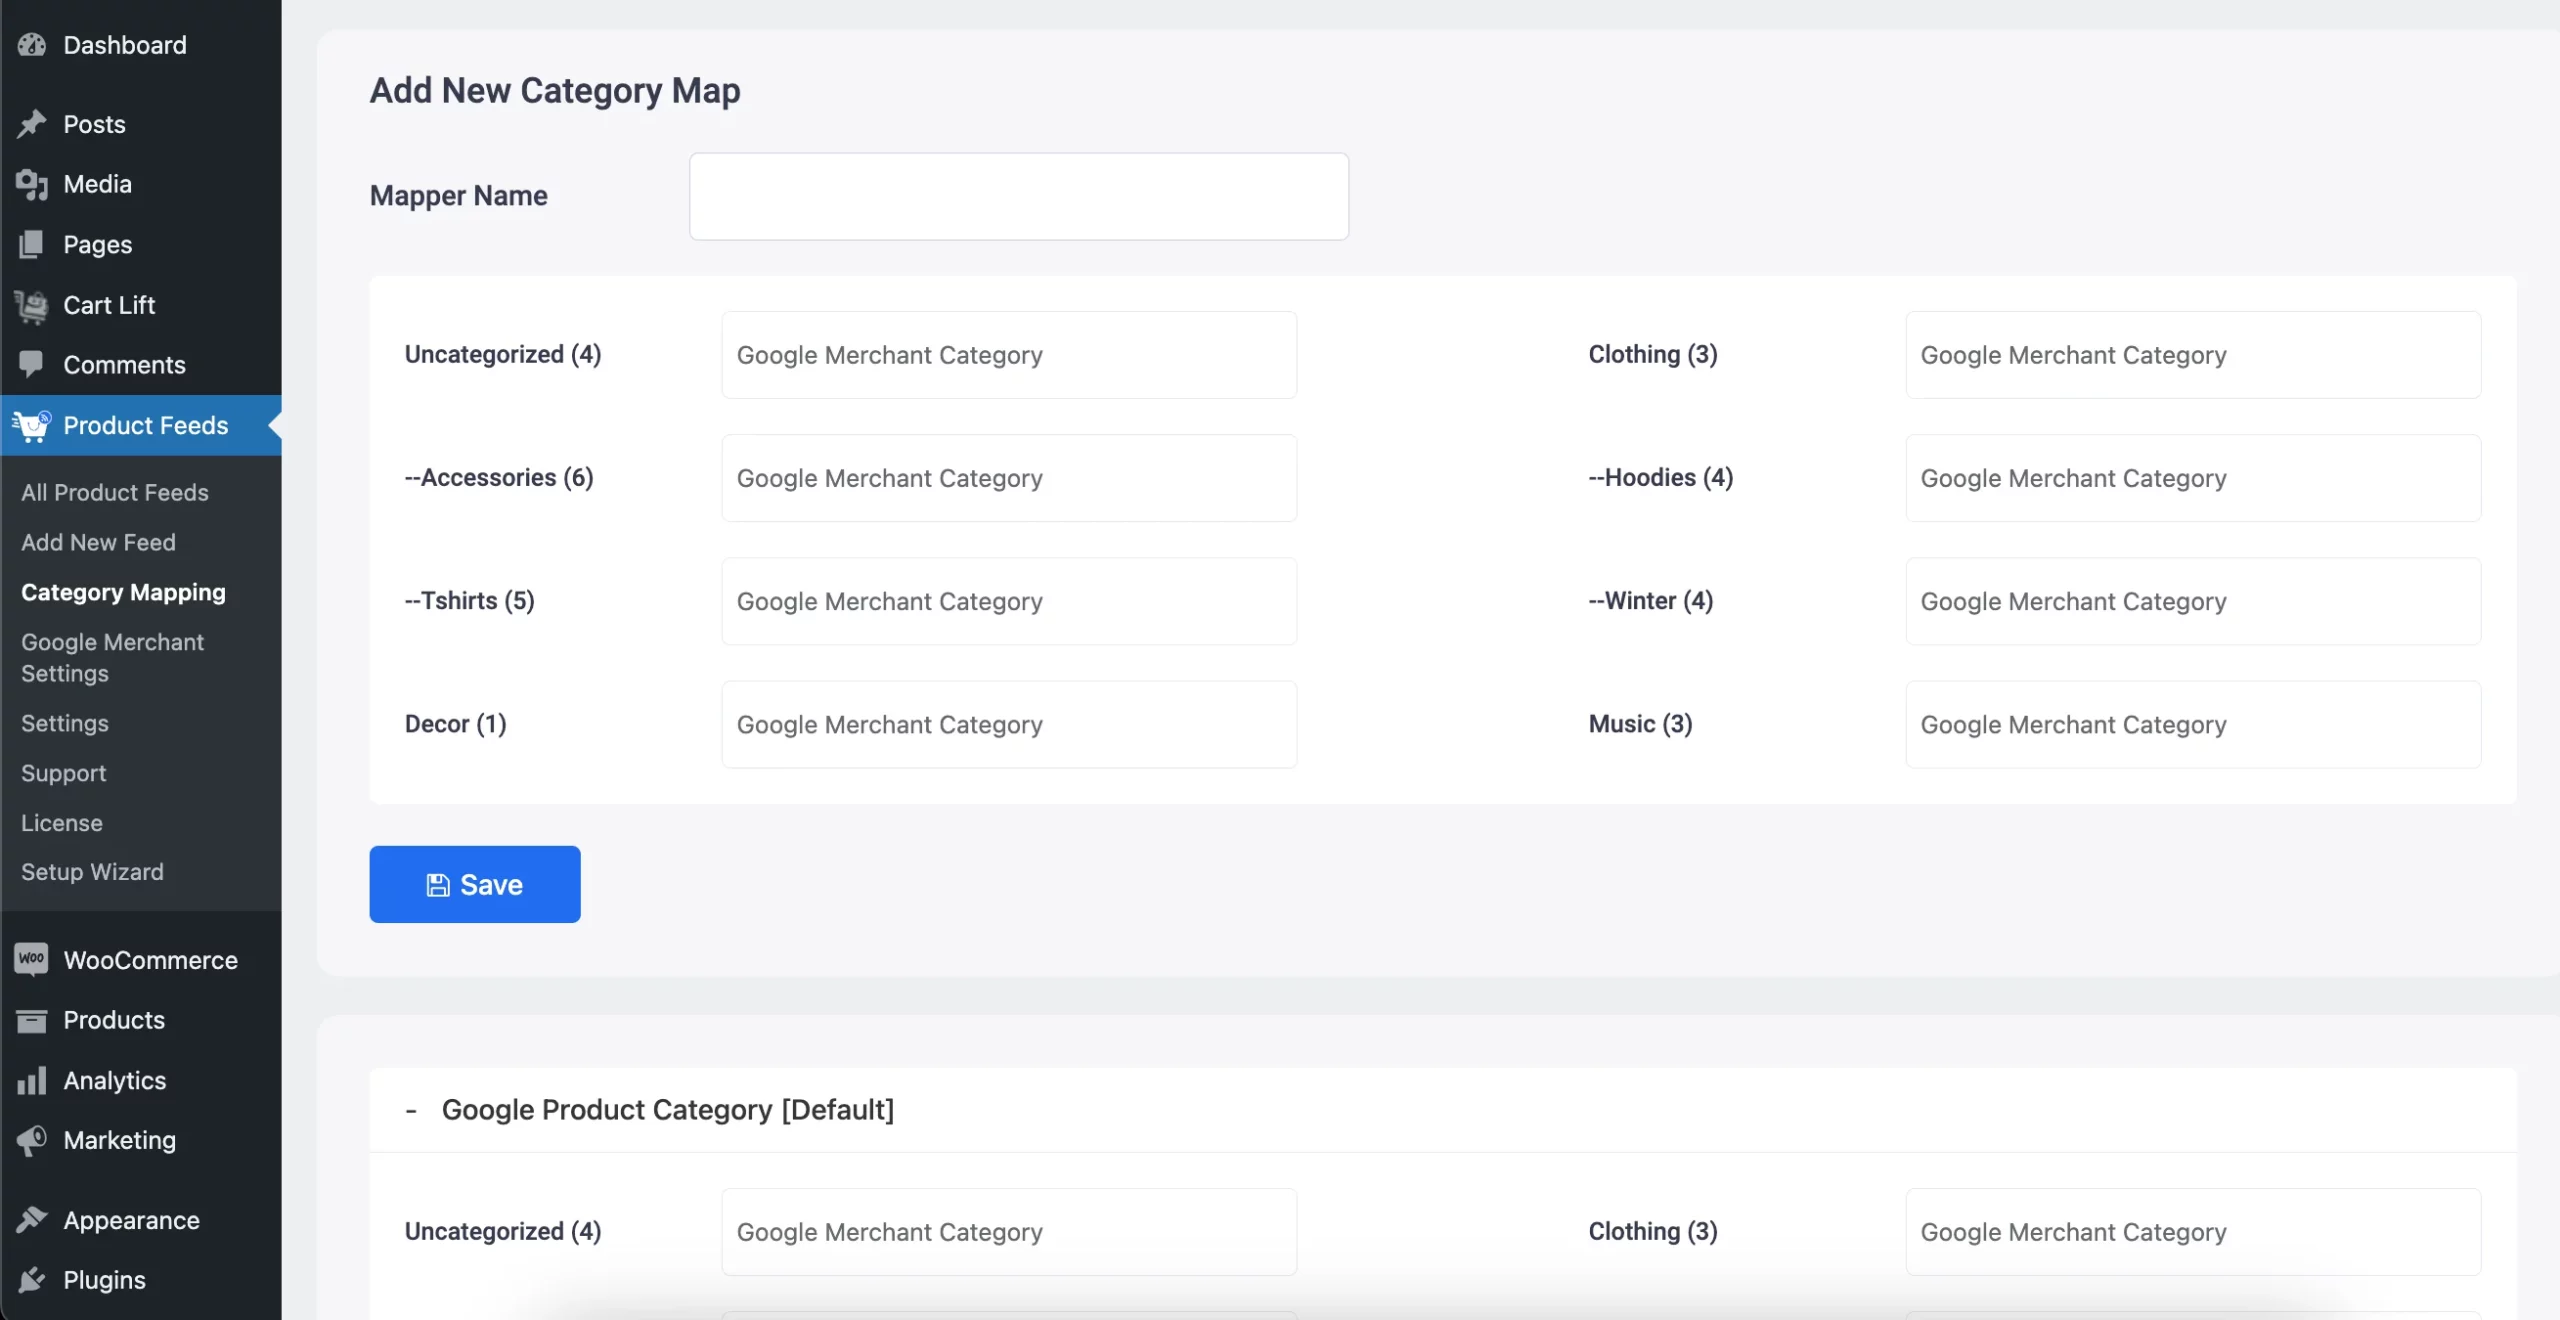
Daarom kun je je WooCommerce-winkelcategorieën dienovereenkomstig instellen of je eigen categorieën laten koppelen aan die van Google met behulp van een plugin bij het genereren van productfeeds.

Ik gebruik de Product Feed Manager For WooCommerce om Category Mapping toe te passen.

Categorie Mapping met behulp van WooCommerce Product Feed Manager
Categorie Karteringsvoorbeeld

As you can see, on the left is a list of all the categories available in my store. On the right, get the option to map them with Google Categories.

Productafbeelding URL

Attribuutimage_link
Voorbeeldwaardehttps://www.yourwebsite.com/redtee394.png
Voerstructuur<g:image_link>
    <![CDATA[
        https://www.yourwebsite.com/redtee394.png
    ]]>
</g:image_link>

Dit zal de link zijn naar het hoofdbeeld van uw product.
Wanneer u een product bewerkt, scrollt u aan de rechterkant naar beneden en vindt u de optie om een productafbeelding toe te voegen.

Complete Guide To WooCommerce Product Feed - Google Shopping &amp; Facebook [2024] 2

Welke afbeelding u hier ook gebruikt, u moet de URL naar die afbeelding opgeven voor het "image_link"-attribuut.

U moet een overtuigend beeld van het product geven zonder enige promotionele tekst of watermerk. Vermijd ook het gebruik van een plaatshouderafbeelding.

Vergeet niet dat dit beeld de belangrijkste factor is om meer klanten te krijgen. De meeste mensen zullen uw product alleen opmerken als ze het leuk vinden wat ze zien. Zorg dus voor een duidelijk beeld met een hoge kwaliteit.

Voorraadstatus/beschikbaarheid

Attribuutbeschikbaarheid
Voorbeeldwaardein_voorraad
Voerstructuur<g:availability>in_stock</g:availability>

Dit betekent dat het product nog steeds op voorraad is, of dat het helemaal uitverkocht is.
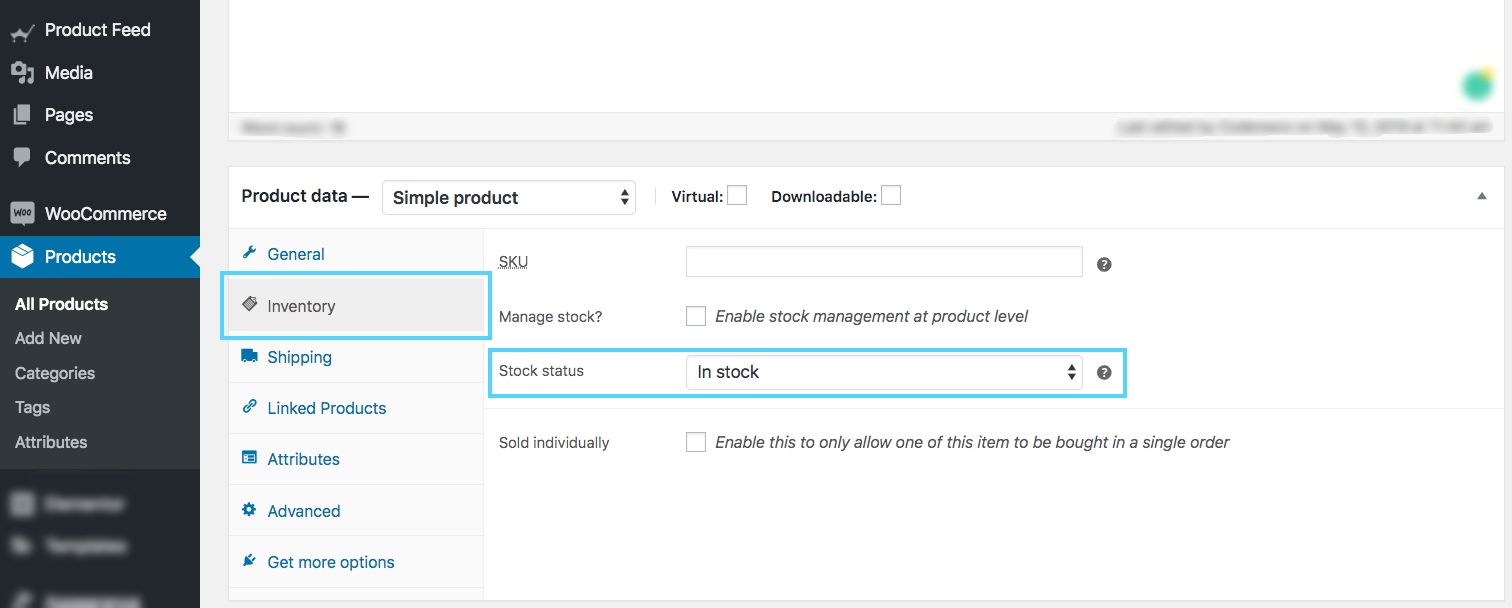
Blader op de pagina met productbewerking naar beneden naar het gedeelte met productgegevens. Kies Inventaris en u zou de optie moeten krijgen om de Voorraadstatus in te stellen.

Op voorraad

This value will be added under the attribute “availability” when generating a Google product feed. Google accepts the values “in_stock”, “out_of_stock”, or “preorder.”

WooCommerce geeft u standaard de opties "op voorraad" en "niet op voorraad". Voor de "preorder" optie moet u extra codering of een andere plugin gebruiken.

Tip:
U zou kunnen denken, waarom u producten zou moeten toevoegen die "niet op voorraad" zijn. Nou, soms kun je de "out of stock" optie gebruiken als een psychologische tactiek.

Hier is een voorbeeld:
Laten we zeggen dat je een T-shirt hebt met 2 variaties, Rood en Zwart en laten we zeggen dat de zwarte uitverkocht zijn.

Nu, wanneer prospects de producten zullen bekijken, zullen ze zien dat er twee soortgelijke producten zijn, en een variatie is uitverkocht.

Dit zou kunnen betekenen dat dit t-shirt vrij populair is. Vandaar dat het bepaalde prospects zal verleiden om na te denken over het kopen van de Red One.

Normale prijs

Attribuutprijs
Voorbeeldwaarde26.53 USD
Voerstructuur<g:price>26.53 USD</g:price>

Dit is de prijs van het product (meestal vóór belastingen).
Blader op de pagina met productbewerking naar beneden naar het gedeelte met productgegevens. Op het tabblad Algemeen krijgt u de mogelijkheid om de Reguliere Prijs in te stellen.

Prijs

This value will be added under the attribute “price” when generating a WooCommerce Google product feed.

Make sure you are inputting the accurate price, with the ISO currency code as the suffix.

Houd er rekening mee dat de prijs niet "0" kan zijn. (De prijs "0" is alleen aanvaardbaar voor mobiele apparaten die op contractuele basis worden verkocht).

Ook, als uw producten voor de VS of Canada zijn, voeg dan geen belasting toe aan de prijs. Voor elk ander land, zorg ervoor dat u BTW of GST toevoegt of welke regionale belasting dan ook die van toepassing is.

Productvoorwaarde

Attribuutvoorwaarde
VoorbeeldwaardeNieuw
Voerstructuur<g:condition>
    <![CDATA[ New ]]>
</g:condition>

Gebruik dit kenmerk om aan te geven of uw product gloednieuw of gereviseerd is. U kunt de waarden "nieuw", "vernieuwd" of "gebruikt" gebruiken om de toestand te definiëren.

WooCommerce heeft geen veld om de conditie van het product te definiëren, vandaar dat je het zelf moet toevoegen aan de productfeed.

Product Feed Manager For WooCommerce zal echter de optie voor je hebben om het productconditieveld voor alle producten toe te voegen.

Fabrikant/Merknaam

Attribuutmerk
VoorbeeldwaardeRexTest
Voerstructuur<g:brand>
    <![CDATA[ RexTest ]]>
</g:brand>

It is mandatory to provide the manufacturer/brand name in order to add a product to Google Shopping. Ideally, you should also mention the brand name on the product tile.

Maar WooCommerce bevat geen "merk"-veld voor uw producten. U kunt dus voor elk product een aangepast veld aanmaken of een plugin gebruiken om het merkveld toe te voegen aan elk product in uw WooCommerce winkel.

However, movies, books, or musical records don’t require you to include a brand name. In that case, you can keep the brand section empty.

GTIN (Global Trade Item Number)

Attribuutgtin
Voorbeeldwaarde123465465464
Voerstructuur<g:gtin>
    <![CDATA[ 123465465464 ]]>
</g:gtin>

Om producten te promoten via Google Shopping Ads, moeten fabrikanten uit de VS of Canada die GTIN-gecertificeerd zijn, het GTIN-nummer opgeven voor elk product op uw Google Product Feed.

Voor andere fabrikanten

  • in Noord-Amerika, UPC
  • in Europa de EAN
  • in Japan, JAN

Voor een boek moet je echter ISBN leveren, en voor multipacks moet je de ITF-14 leveren.

MPN (Fabrieksonderdeelnummer)

AttribuutMPN
VoorbeeldwaardeRex0011Test
Voerstructuur<g: MPN>
    <![CDATA[ Rex0011Test ]]>
</g: MPN>

Indien een product geen GTIN (of UPC, EAN, JAN) heeft, dan dient u in plaats daarvan de MPN op te geven.

U kunt ook het SKU van het product gebruiken als de waarde van zijn MPN wanneer u niet beschikt over zowel GTIN als MPN (op voorwaarde dat u het SKU niet hebt gebruikt als de product-id).

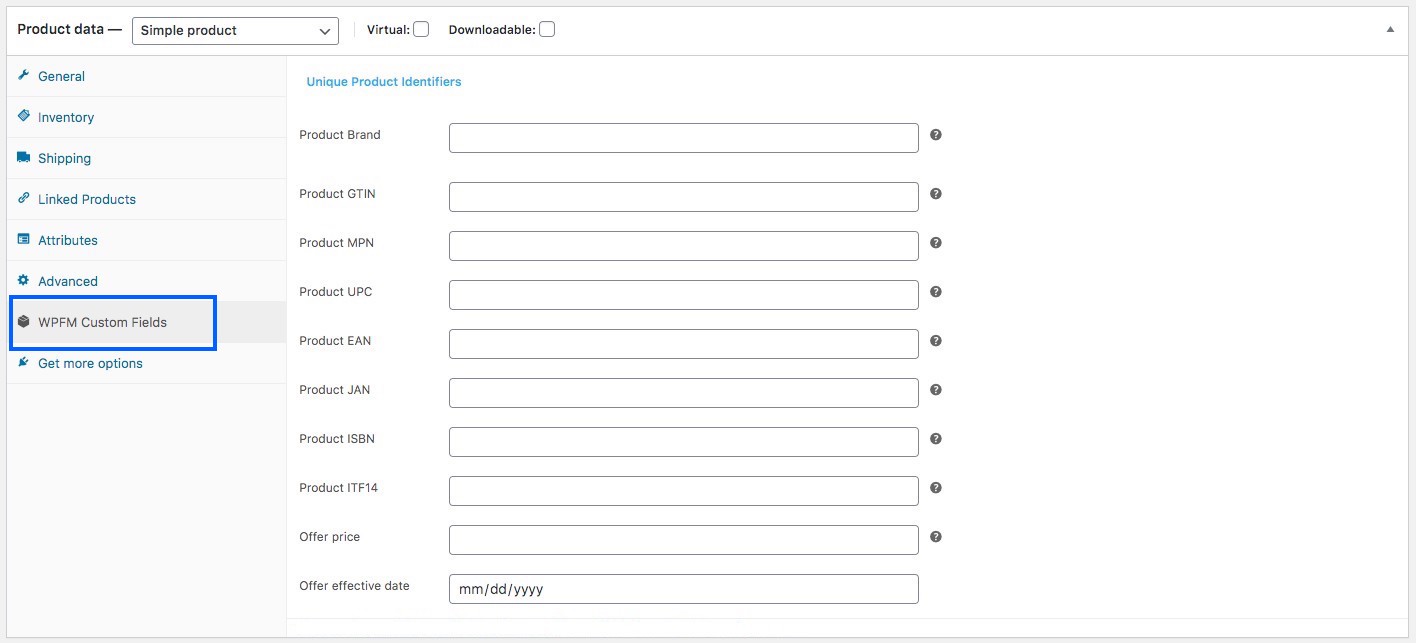
Now, WooCommerce doesn’t provide fields for Brand, GTIN, or MPN by default. Hence, you need to input custom fields for every product manually.

However, I use the Product Feed Manager For the WooCommerce plugin which includes those fields on every product, as shown below:

Aangepaste velden

Ik hoef alleen maar de juiste gegevens in te voeren en deze te gebruiken als waarden van de vereiste attributen bij het genereren van mijn WooCommerce Product feed.

Identifier Bestaat

Attribuutidentificator_bestaat
Voorbeeldwaardegeen
Voerstructuur<g:identifier_exists>no</g:identifier_exists>

U hebt al eerder geleerd dat het verplicht is een GTIN of MPN op te geven. Sommige producten hebben echter geen GTIN of MPN.

Sommige producten worden bijvoorbeeld gewoon lokaal geproduceerd en bevatten geen GTIN of MPN.

In dit geval moet u het attribuut "identifier_exists" gebruiken en de waarde "no" toekennen. 

Inhoud voor volwassenen

Attribuutvolwassen
Voorbeeldwaardeja
Voerstructuur<g:adult>yes</g:adult>

Je hebt misschien wat erotische of volwassen producten. Het is prima om ze te promoten op Google Shopping, zolang je ze maar als volwassen content bestempelt. Bij het indienen van een product dat in de volwassen industrie zit, moet u het "volwassen" attribuut gebruiken en de waarde "ja" toekennen.

Als je een bedrijf runt dat volledig in de volwassen industrie zit, bijvoorbeeld een gelicenseerde erotische winkel, dan heb je geen attributen nodig. U kunt beter naar uw Google Merchant Center-instellingen gaan en de optie selecteren die zegt dat uw bedrijf volwassen producten levert.

Multipack

Attribuutmultipack
Voorbeeldwaarde8
Voerstructuur<g:multipack>8</g:multipack>

Een multipack is wanneer u een groep van meerdere identieke producten als één geheel verkoopt; bijvoorbeeld 8 pennen bij elkaar.

This attribute is required for promotion in certain locations such as Australia, Brazil, Czechia, France, Germany, Italy, Japan, Netherlands, Spain, Switzerland, the UK, and the US.

You must include this attribute and assign its value to the number of products you assembled into a multipack.

Als het multipack door de eigenlijke fabrikant wordt geassembleerd, en niet door u, dan hoeft u dit attribuut niet op te nemen.

Tip:
Probeer multipacks op te nemen in uw winkel met een kleine korting.

Bijvoorbeeld, als 1 pen 10 dollar kost, en je stelt een multipack in voor 8 pennen, probeer dan in plaats van 80 dollar te rekenen, een korting te geven en misschien 70 of 75 dollar in rekening te brengen. Deze kleine korting zorgt voor meer aantrekkingskracht.

Bundel

Attribuutis_bundel
Voorbeeldja
Voergegevens<g:is_bundle>yes</g:is_bundle>

Een bundel is wanneer u meerdere producten neemt en deze als één pakket verkoopt. Meestal zijn alle producten in een bundel enigszins verwant en kunnen ze individueel worden verkocht zonder de bundel.

Hier fungeert één product als hoofdproduct en worden de rest in een bundel aangeboden.

U kunt bijvoorbeeld een productbundel maken met een camera, een geheugenkaart en een draagtas. Hier is de camera het hoofdproduct, terwijl de geheugenkaart en de draagtas verwante bijproducten zijn in een bundel.

Voor het promoten van bundels in Australië, Brazilië, Tsjechië, Frankrijk, Duitsland, Italië, Japan, Nederland, Spanje, Zwitserland, het Verenigd Koninkrijk en de VS moet u dit attribuut gebruiken en de waarde ervan als "ja" of "waar" toekennen.

Materiaal

Attribuutmateriaal
VoorbeeldLeder
Voergegevens<g:material>Leather</g:material>

Als u een product wilt uploaden waarvan het materiaal een opvallende eigenschap is, dan kunt u dit attribuut gebruiken. U moet geldige materiaalnamen gebruiken.

Indien het product met meerdere materialen is gemaakt, vermeld dan alle materialen en scheid ze met "/" ertussen. Bijvoorbeeld katoen/leer/polyester.

**For promoting Apparel & Accessories in Brazil, France, Germany, Japan, the UK, and the US, you need to provide more attributes, including age group, color, gender, and size. For variable products, you must include an extra attribute called item_group_id. So let’s learn more about them.

Leeftijdsgroep

Attribuutleeftijdsgroep
Voorbeeldwaardekinderen
Voerstructuur<g:age_group>kids</g:age_group>

(Dit veld is alleen verplicht als uw product onder de categorie Kleding & Accessoires of de subcategorie valt)

U moet aangeven voor welke leeftijdsgroep dit product bestemd is.

Google accepteert de volgende waarden:

  • pasgeborene
  • baby
  • peuter
  • kinderen
  • volwassen

In the case of variable products, assign a separate age group for each variant.

Kleur

Attribuutkleur
VoorbeeldwaardeTango rood
Voerstructuur<g:color>Tango Red</g:color>

(Dit veld is alleen verplicht als uw product onder de categorie Kleding & Accessoires of de subcategorie valt).

U moet de kleur van het product beschrijven (maar geen kleurcodes of losse letters).

Als er meerdere kleuren zijn, vermeld dan alle kleuren en scheid ze met een "/". Bijvoorbeeld, Rood/Blauw/Groen.

For variable products, assign a separate color for each variant and add it to the product title.

Tip:
Het is niet nodig om een generieke kleur te geven. U kunt liever pakkende kleurnamen gebruiken zoals "Tango Rood" in plaats van alleen "Rood", wat aantrekkelijker is voor kopers.

Geslacht

Attribuutgeslacht
Voorbeeldwaardemannetje
Voerstructuur<g:gender>male</g:gender>

(Dit veld is alleen verplicht als uw product onder de categorie Kleding & Accessoires of de subcategorie valt).

Bij de verkoop van kleding moet u aangeven voor welk geslacht het product bestemd is.

Google accepteert de volgende geslachten:

  • mannetje
  • vrouwelijk
  • uniseks

Grootte

Attribuutformaat
VoorbeeldwaardeXL
Voerstructuur<g:size>XL</g:size>

(Dit veld is alleen verplicht als uw product onder de categorie Kleding & Accessoires of de subcategorie valt).

U moet een geschikte maat voor het product toewijzen.

For example, “XL” to define extra-large, or “15/32 slim” to define a 15-inch neck size, 32 inches sleeves, and a slim fit.

Voor een vrij formaat product moet u de waarde "one size", "OS", "one size fits all", "OSFA", "one size fits most", of "OSFM" toekennen.

In het geval van variabele producten, wijs een aparte maat toe voor elke variant en u kunt deze ook toevoegen aan de titel van het product.

Tip:
Bewaar een meettabel op uw site om de hier genoemde maten te definiëren.

Als u bijvoorbeeld de maat als XL toekent, leg dan op de tafel de hoogte, breedte, borstomvang, etc. uit in inches of cms, om uw klanten een manier te geven om te controleren of die maat de juiste pasvorm heeft.

Verschillende landen hebben verschillende maten voor dezelfde groottecodes, vandaar dat dit nuttig zal zijn.

Patroon

Attribuutpatroon
Voorbeeldwaardegestreept
Voerstructuur<g:pattern>Striped</g:pattern>

This field is only applicable to variable products. If you have different pattern designs for the same product, then you need to mention separate patterns for each variant using this attribute.

Item Groeps-ID

Attribuutitem_groep_id
VoorbeeldwaardeAB12345
Voerstructuur<g:item_group_id>AB12345</g:item_group_id>

Voor variabele producten, als de variaties zich voordoen als gevolg van een van de volgende:

Voor variabele producten, als de variaties zich voordoen als gevolg van een van de volgende:

  • kleur
  • formaat
  • patroon
  • materiaal
  • leeftijdsgroep
  • geslacht

dan moet je het "item_group_id" attribuut gebruiken.

Alle varianten van hetzelfde variabele product zullen dezelfde Item Group ID hebben. Dit geeft aan dat het om varianten van een enkel product gaat. U moet dus voor elk variabel product een unieke groeps-ID kiezen.

Google Productvoedingsmonsters

Nu u weet welke details u nodig heeft om uw WooCommerce Product Feed voor Google te genereren, laten we nu kijken naar enkele voorbeelden om de structuur te begrijpen.

Google accepteert verschillende bestandsformaten van de te uploaden productfeed. Het aanbevolen formaat is echter XML.

Here’s a sample of a simple product feed:

Voorbeeld Google Productvoer van een eenvoudig product

Here’s a sample of a variable product feed:

Steekproef Google Productvoer van een variabel product

These feeds can easily be generated using the plugin, Product Feed Manager For WooCommerce.

Once you have the product feed file, you can now manually upload it to your Google Shopping Center.

However, the plugin also allows you to auto-sync with Google Shopping directly.

This means the feed can automatically be generated and sent to Google, according to your scheduled time.

I’ll give you a proper tutorial on the plugin at the end of this article.
Or you can,

2. WooCommerce Productfeed voor Facebook Dynamic Ads

WooCommerce Productfeed voor Facebook Dynamic Ads

Facebook is de grootste sociale media en momenteel een belangrijk platform om producten voor uw bedrijf te uploaden en te promoten.

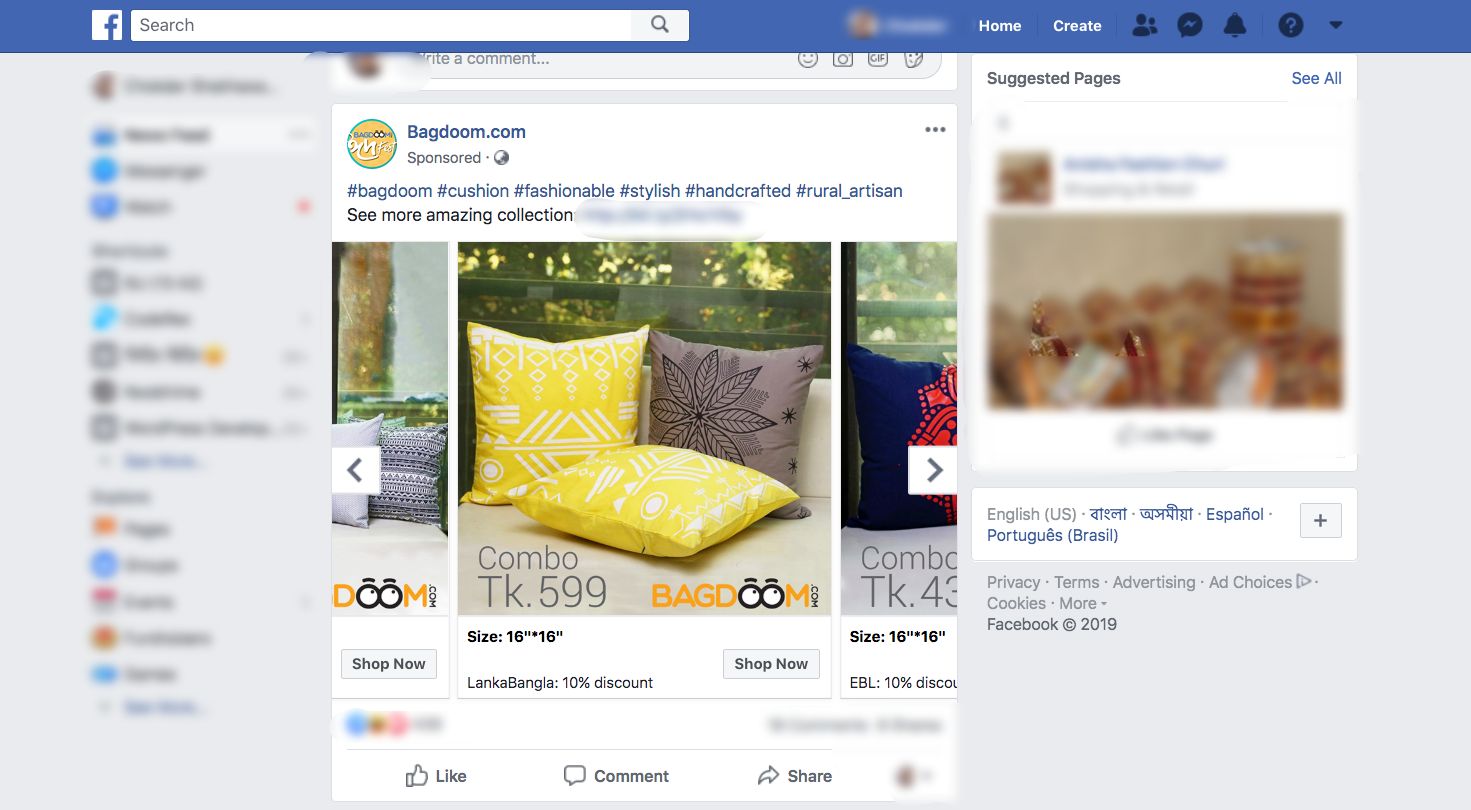
Tijdens het scrollen op Facebook vind je vaak gesponsorde berichten zoals hieronder weergegeven:

Facebook Dynamic AdsBagdoom.com

U kunt zien dat er de "Shop Now" knop is, en er zijn pijlen om te vegen binnen een galerij van producten voor hetzelfde bedrijf.

Dit is een slimme manier om uw producten te promoten.

Als Woocommerce winkeleigenaar is het ideaal om uw producten via Facebook te verkopen omdat u een groter publiek krijgt.

Als u bepaalde richtlijnen volgt, kunt u ook profiteren van het gebruik van Facebook Dynamic Ads en de ROI van uw winkel verhogen.

Hoe kan ik WooCommerce Facebook-productvoer op de meest geoptimaliseerde manier instellen?

Facebook heeft enkele richtlijnen voor de productfeedspecificaties die je moet volgen om je producten goedgekeurd te krijgen voor Facebook Dynamic Ads.

Let’s take a look at the necessary data that you must submit for your product to be promoted on Facebook. 

I will give you examples for each data so that you know the most optimized way to generate the feed.

Een productfeed (in CSV-formaat) van een enkel product voor Facebook ziet er meestal zo uit:

Complete Guide To WooCommerce Product Feed - Google Shopping &amp; Facebook [2024] 3

**Here, the 1st row will be the list of attributes per column.

And then from the 2nd row onwards, each row is a product, with values assigned for attributes (or product data).

Nu, Facebook Dynamic Ads vereisen de volgende attribuutwaarden voor elk van uw producten:

● Productidentificatie ●
Producttitel ●
Voorraadbeschikbaarheid ●
Productvoorwaarde ●
Productbeschrijving ●
Productafbeelding-URL ●
Product-URL ●
Normale prijs ●
Fabrikant/Brand

● Google-productcategorie ●
GTIN (Global Trade Item Number) ●
MPN (Fabrikant onderdeelnummer) ●
Grootte ●
Kleur ●
Geslacht ●
Patroon ●
Speciale beperkte aanbieding ●
Speciale beperkte aanbiedingstermijn

Some of these attributes depend on the product type and its variants. Below is a more detailed explanation with examples of how each of these attributes should be assigned on your Facebook product feed for maximum output.

You will get samples of Facebook product feeds later on in this article after I go over detailed instructions on the attributes and some tips.

Laten we de details bekijken om te begrijpen welke waarden u aan elk attribuut moet toekennen, en welke u moet opnemen/uitschakelen op basis van de producten in uw WooCommerce Store.

Upload products to Facebook Catalog with Flawless Product Feed in Just a Few Minutes

Product ID

Attribuutid
Voorbeeldwaarde671

Het is een unieke identificatie voor uw product op uw winkel.
Op WooCommerce zou u de ID moeten zien als u door de productlijst bladert.

Product ID

Het is aan te raden om de bestaande SKU van het product als ID te gebruiken, omdat dat altijd uniek is.

Als meerdere producten dezelfde ID hebben, wordt alleen de eerste op de lijst in aanmerking genomen. De rest wordt genegeerd. Zorg er dus voor dat elk product een uniek ID heeft.

Titel van het product

Attribuuttitel
VoorbeeldwaardeRood Logo Rex T-shirt

Het is de naam van het te tonen product.
Op WooCommerce zou u de producttitel moeten zien wanneer u de productlijst doorbladert.

Producttitel over WooCommerce

Wanneer u de producttitel instelt, specificeert u eventuele speciale kenmerken zoals de kleur en de merknaam, samen met het product. Dit zal de aandacht van de kopers trekken.

However, you are not allowed to use any other promotional touch to the tile (for example adding “free shipping” or “discounted price” or using all caps).

In case of variable products include the brand name to the title. Rather than including just any feature in the main title, mention the feature that makes it a variant of the product.

For example, if a product is a Logo Rex T-shirt and has variations of Red and Blue, then one variation should be named “Logo Rex T-shirt – Red” and the other one “Logo Rex T-shirt – Blue”.

Dus in het CSV-bestand zullen ze verschillende waarden hebben voor de titel:

idtitel
872Logo Rex T-shirt - Rood
873Logo Rex T-shirt - Blauw

Voorraadbeschikbaarheid

Attribuutbeschikbaarheid
Voorbeeldwaardeop voorraad

Dit betekent dat het product nog steeds op voorraad is, of dat het helemaal uitverkocht is.
Blader op de pagina met productbewerking naar beneden naar het gedeelte met productgegevens. Kies Inventaris en u zou de optie moeten krijgen om de Voorraadstatus in te stellen.

Op voorraad

This value will be added under the attribute “availability” when generating WooCommerce Facebook product feed for Facebook Dynamic Ads.

Facebook accepts the following values:

  • in stock – when the product is ready for immediate shipping
  • out of stock – when the product is not available in stock
  • voorbestelling - kan vooraf bestellen voor toekomstige herbevoorrading
  • available for order – if the product is available, but will require a couple of weeks for shipping
  • stopgezet - als het product wordt stopgezet

WooCommerce will give you the options “in stock” and “out of stock” by default.

For the rest of the values, you will need to use extra coding or another plugin.

Tip:
Wist u dat het toevoegen van producten die "niet op voorraad" zijn een grote psychologische tactiek kan zijn?

Hier is een voorbeeld:
Laten we zeggen dat je een T-shirt hebt met 2 variaties, Rood en Zwart en laten we zeggen dat de zwarte uitverkocht zijn.

Nu, wanneer prospects de producten zullen bekijken, zullen ze zien dat er twee soortgelijke producten zijn, en een variatie is uitverkocht.

Dit zou kunnen betekenen dat dit t-shirt vrij populair is. Vandaar dat het bepaalde prospects zal verleiden om na te denken over het kopen van de Red One.

Productvoorwaarde

Attribuutvoorwaarde
Voorbeeldwaardenieuwe

Gebruik dit kenmerk om aan te geven of uw product gloednieuw of gereviseerd is. U kunt de waarden "nieuw", "vernieuwd" of "gebruikt" gebruiken om de toestand te definiëren.

WooCommerce heeft geen veld om de conditie van het product te definiëren, vandaar dat je het zelf moet toevoegen aan de productfeed.

However, the Product Feed Manager For WooCommerce will have the option for you to add the product condition field for all products.

Productbeschrijving

Attribuutbeschrijving
VoorbeeldwaardeDit is een rood T-shirt. Het is alleen gemaakt voor testdoeleinden.

Voeg een goede beschrijving toe van het product dat u verkoopt. Zorg ervoor dat u alle belangrijke functies die het kan hebben, dat zal het aantrekken van kopers te markeren.

When you edit a product, you get to set its title, link, and description as shown in the picture below:

Product Bewerkingspagina

You should mention the exclusive features and benefits of the description.

However, you are not allowed to use any extensive promotional touch in the description (for example adding “free shipping” or “discounted price” or using all caps to highlight a certain point).

Ook moet u geen links naar een andere webpagina opnemen of de producten vergelijken met die van concurrenten.

Productafbeelding URL

Attribuutimage_link
Voorbeeldwaardehttps://www.yourwebsite.com/redtee394.png/

Dit zal de link zijn naar het hoofdbeeld van uw product.
Wanneer u een product bewerkt, scrollt u aan de rechterkant naar beneden en vindt u de optie om een productafbeelding toe te voegen.

Productbeeld op WooCommerce

Welke afbeelding u hier ook gebruikt, u moet de URL naar die afbeelding opgeven voor het "image_link"-attribuut.

Vergeet niet dat dit beeld de belangrijkste factor is om meer klanten te krijgen. De meeste mensen zullen uw product alleen opmerken als ze het leuk vinden wat ze zien. Zorg dus voor een duidelijk beeld met een hoge kwaliteit.

It’s best if the image is a clear picture of the product without any promotional text watermark, or any placeholder image (although I am using one just for test purposes).

U moet echter wel de juiste beeldresolutie behouden.

If you use a square image for carousel ads, then the dimensions should be 600×600 px.

For Dynamic Ads with a single image, you need a minimum resolution of 1200×630 px with a minimum aspect ratio of 4 : 5 and a maximum aspect ratio of 1: 91: 1.

Alles wat buiten de genoemde maximale beeldverhoudingen valt zal worden uitgesneden.

Product URL

Attribuutlink
Voorbeeldwaardehttps://www.yourwebsite.com/red-logo-rex-t-shirt/

Dit is de link naar uw productpagina.
Bij het bewerken van een product zie je de Permalink net onder het Titelvak. Dat is de URL naar uw product.

Product Permalink

Het is het beste om de producttitel op de link te vermelden, maar velen geven de voorkeur aan het product Id in plaats daarvan, en sommigen gebruiken beide.

Ook moet u ervoor zorgen dat uw website-domein wordt geverifieerd en begint met http of https.

Normale prijs

Attribuutprijs
Voorbeeldwaarde26.53 USD

Dit is de prijs van het te tonen product.
Blader op de pagina met productbewerking naar beneden naar het gedeelte met productgegevens. Op het tabblad Algemeen krijgt u de mogelijkheid om de Reguliere Prijs in te stellen.

Prijs

This value will be added under the attribute “price” when generating a product feed for Facebook.

Houd er rekening mee dat de prijs niet "0" kan zijn en dat elk product met "0" of geen prijswaarde zal resulteren in een afwijzing van Facebook Dynamic Ads.

Make sure you are inputting the accurate price with the ISO currency code as the suffix.

Fabrikant/Merk

Attribuutmerk
VoorbeeldwaardeRexTest

Indien een product geen GTIN heeft, dan is het verplicht om de fabrikant/merknaam op te geven om dat product op Facebook toe te voegen.

If the product falls under the Daily Deals Inventory, then you must also include MPN alongside brand. 

Maar WooCommerce bevat geen "merk"-veld voor uw producten. U kunt dus voor elk product een aangepast veld aanmaken of een plugin gebruiken om het merkveld toe te voegen aan elk product in uw WooCommerce winkel.

Google Product Categorie

Attribuutgoogle_product_categorie
VoorbeeldwaardeKleding & Accessoires > Kleding

Facebook gebruikt dezelfde taxonomie en categoriespecificaties als Google. Vandaar, om uw producten te categoriseren, moet u dit kenmerk instellen volgens de taxonomie van Google, om uw WooCommerce Facebook Product Feed te kunnen goedkeuren.

Klik hier om de Google-categorielijst en de taxonomie te bekijken

You can either set your WooCommerce store categories accordingly or have your own categories mapped to Google’s using a plugin when generating a feed.

Ik gebruik de Product Feed Manager For WooCommerce om Category Mapping toe te passen:

category maqpping

GTIN (Global Trade Item Number)

Attribuutgtin
Voorbeeldwaarde3234567890126

Voor een fabrikant in de VS of Canada, die GTIN-gecertificeerd is, is het noodzakelijk om het GTIN-nummer voor elk product op uw Facebook Product Feed te vermelden.

Alternatively, you can also use UPC, EAN, JAN, or ISBN in place of GTIN if you are from a different location.

MPN (Fabrieksonderdeelnummer)

Attribuutmpn
VoorbeeldwaardeRex0011Test

Indien een product geen GTIN (of UPC, EAN, JAN, ISBN) heeft, dan dient u in plaats daarvan het MPN op te geven. Het is een uniek fabrikant-ID voor een product dat geen GTIN heeft.

Voor producten die onder de Daily Deals Inventory vallen, is het, indien u een merknaam opgeeft, ook verplicht om MPN op te nemen.

Now, WooCommerce doesn’t provide fields for Brand, GTIN, or MPN by default. Hence, you need to input custom fields for every product manually.

However, I use the Product Feed Manager For the WooCommerce plugin includes those fields on every product, as shown below:

Aangepaste velden

Ik hoef alleen maar de juiste gegevens in te voeren en deze te gebruiken als waarden van de vereiste attributen bij het genereren van Facebook Product feed.

Grootte

Attribuutformaat
VoorbeeldwaardeGrote

Dit veld is alleen vereist voor variabele producten met maatvarianten.

You may use words such as Small, Medium, or Large, or you may use numbers such as 20, 25, etc, whichever is appropriate to define the size of a product.

Tips:
U dient een meettabel op uw site bij te houden om de door u genoemde maten voor uw producten te bepalen.

Als u bijvoorbeeld de maat als Large hebt toegewezen, leg dan op de tafel de hoogte, breedte, borstomvang, etc. uit in inches of cms, om uw klanten een manier te geven om te controleren of die maat de juiste pasvorm heeft.

Verschillende landen hebben verschillende maten voor dezelfde groottecodes, vandaar dat dit nuttig zal zijn.

Kleur

Attribuutkleur
VoorbeeldwaardeTango rood

Dit veld is alleen verplicht voor variabele producten met kleurvarianten.

U moet de kleur van het product beschrijven (maar geen kleurcodes of losse letters).

Als er meerdere kleuren zijn, vermeld dan alle kleuren en scheid ze met een "/". Bijvoorbeeld, Rood/Blauw/Groen.

In the case of variable products, assign a separate color for each variant and add it to the product title.

Tip:
U kunt een creatieve manier gebruiken om de kleur te beschrijven, in plaats van alleen generieke kleuren te gebruiken. Zo kunt u bijvoorbeeld liever pakkende kleurnamen gebruiken zoals "Tango Rood" in plaats van alleen "Rood", wat aantrekkelijker is voor kopers.

Geslacht

Attribuutgeslacht
Voorbeeldwaardeuniseks

U moet vermelden voor welk geslacht het product bestemd is.

Facebook accepteert de volgende geslachten:

  • mannetje
  • vrouwelijk
  • uniseks

Patroon

Attribuutpatroon
VoorbeeldwaardeFlannel

Dit veld is alleen vereist voor variabele producten met patroonvarianten. Gebruik de juiste patroonnamen zoals "Striped", "Flannel", enz.

Speciale Beperkte Aanbieding

Attribuutaanbiedingsprijs
Voorbeeldwaarde9.99 USD

Dit is een unieke optie die u alleen op Facebook Dynamic Ads krijgt.

You can set a product to be on a special discounted price for certain hours every day (during the offer period), or in other words, the product will be under the Daily Deals Inventory.

Tip:
Soms kan een enkele dag korting op bepaalde populaire producten in uw winkel uw verkoop stimuleren.

Als u bijvoorbeeld een horloge op uw winkel heeft, dat mensen meer kopen dan andere producten, kunt u een verrassingsaanbieding van één dag geven. Dit kan uw verkoop op die dag verdubbelen en meer aandacht krijgen van de toekomstperspectieven.

Voeg gewoon het "offer_price" attribuut toe aan uw WooCommerce Facebook productfeed en stel een gereduceerde prijs in als waarde om de aangeboden speciale prijs te definiëren (inclusief een juiste ISO-valutacode als achtervoegsel). De aanbiedingsprijs moet minimaal 15% lager zijn dan de reguliere prijs, anders zal Facebook deze afwijzen.

Speciale Beperkte Aanbiedingsduur

Attribuutoffer_prijs_effectief_datum
Voorbeeldwaarde2018-06-01T12:00-0300/2018-12-01T00:00-0300

If you want to give a special offer for a product under the Daily Deals Inventory on Facebook, then along with “offer_price”, you must also add this attribute to specify the start and end date, with time, for the special offer.

Mention the start date and hours of the offer, then use a slash, and then mention the end date and hours of the offer.

Tip:
Voorafgaand aan grote festivals, internationale gelegenheden of vakanties kan het geven van speciale aanbiedingen op bepaalde relatieve producten uw verkoop een boost geven.

Zo kunt u bijvoorbeeld een week voor kerstmis een speciale kortingsactie op kerstmutsen uitvoeren. Dit zal uw verkoop zeker stimuleren.

Facebook Product Feed voorbeelden

Nu u weet welke details u nodig heeft om uw WooCommerce Product Feed voor Facebook Dynamics te genereren, laten we nu enkele voorbeelden bekijken om de structuur te begrijpen.

Facebook accepts several file formats of product feeds to be uploaded. However, the recommended format is CSV.

Here’s a sample of a simple product feed:

Voorbeeld van een Facebook-productvoer van een eenvoudig product

Here’s a sample of a variable product feed:

Voorbeeld van Facebook-productvoer van een variabel product

These feeds can easily be generated using the plugin, Product Feed Manager For WooCommerce. Once you have the product feed file, you can now manually upload it to your Facebook Business Account.

Nu heeft u alles geleerd over WooCommerce Google Product Feed en WooCommerce Facebook Product Feed.

Dus, laat me je een goede gids geven over de tool die ik gebruik om WooCommerce productfeed gemakkelijk te genereren, in een paar seconden.

Hoe kan ik WooCommerce Product Feed genereren met behulp van het juiste gereedschap?

Product Feed Manager For WooCommerce is een plugin waarmee je gemakkelijk productfeed kunt genereren zonder coderingsvaardigheden of geavanceerde technologische expertise.

Waarom deze plugin gebruiken?

Er zijn verschillende redenen waarom Product Feed Manager For WooCommerce een ideale keuze is om je te helpen feed te genereren:

  • Het handmatig uploaden van producten duurt uren. Deze plugin zal binnen enkele seconden voeding genereren.
  • De plugin heeft een schone en eenvoudige interface met de juiste documentatie. Dus, gemakkelijk te gebruiken en te leren.
  • Genereer feilloze feeds, ongeacht het aantal producten dat je hebt.
  • Met de filteropties kunt u alleen voer genereren voor de producten die u nodig hebt.
  • It provides a Google Category Mapping option that saves us from changing the categories on our WooCommerce store.
  • Het stelt u in staat om automatisch te synchroniseren met Google Shopping Center, d.w.z. uw WooCommerce productfeed wordt automatisch naar Google gestuurd, zonder dat u deze handmatig hoeft te uploaden.
  • Het wordt geleverd met een vooraf opgestelde lijst van alle vereiste attributen van Google en Facebook, dus u hoeft niet handmatig attributen toe te voegen.
  • Add certain custom fields such as GTIN, MPN, Brand, and UPC to your products, which are not available by default on WooCommerce.
  • Een zeer actief en nuttig ondersteuningsteam helpt u bij eventuele verwarring.

Laten we nu eens doornemen hoe je gemakkelijk productfeed kunt genereren met behulp van Product Feed Manager For WooCommerce.

How to get a Product Feed Manager For WooCommerce?

Product Feed Manager For WooCommerce heeft een gratis versie die je kunt gebruiken om de basisfuncties uit te testen en de interface te begrijpen.

Maar het is aan te raden om de pro-versie te krijgen, omdat deze met meer verfijnde functies wordt geleverd.

Installeer en activeer de plugin op uw WordPress-dashboard en u zou zoiets moeten zien:

Product Feed Manager Settings

Nu bent u klaar om productaanvoer te genereren.

Hoe WooCommerce Product Feed genereren met Product Feed Manager?

Product Feed Manager For WooCommerce is zo gemakkelijk te gebruiken.

1. Klik gewoon op "Nieuwe feed toevoegen" en je krijgt de pagina Nieuwe product feed toevoegen te zien:

add new feed

2. Bovenaan krijgt u de optie om een titel aan de feed toe te voegen.

Geef eerst een titel aan het feedbestand. Daarna kun je instellen welke producten je in je feed wilt opnemen.

add feed name

3. Net onder de titel ziet u een optie om de handelaar van uw voorkeur te selecteren. Klik gewoon op de Feed Merchant dropdown knop en selecteer de handelaar van uw voorkeur uit de dropdown of u kunt zoeken in de dropdown box.

Select your preferred merchant and all the required attributes will be loaded below.

add merchant

Product Filter

With the Product Feed Manager for the WooCommerce plugin, you will have the option to choose which products to include in your feed.

Om de opties te zien, klikt u gewoon op de knop Productfilter.

add product filter

Zodra u op de knop Productfilter klikt, schuift de Productfilterlade aan de rechterkant van het venster naar binnen.

product filter dashboard

Hier zie je dat de optie "Alle gepubliceerde producten" standaard is geselecteerd - deze optie omvat elk product in je WooCommerce winkel.

Als u wilt, kunt u andere filteropties gebruiken. Klik op de dropdown, en u ziet enkele filteropties in de dropdownlijst:

all products filter option in PFM

U kunt kiezen uit

  • Alle aanbevolen producten - alleen de aanbevolen producten publiceren
  • Categorie Filter - kies producten met behulp van categorieën
  • Product Filter – use this custom filter to set a conditional filter
  • Tag Filter – choose a product using tags

Bekijk deze video om te zien hoe geweldig de filteropties zijn. U kunt eenvoudig de producten kiezen die u wilt opnemen of uitsluiten van uw productvoer.

Plan Auto-update

Om een ophaaltijd in te stellen, klikt u eerst op de knop Productinstellingen.

Setting

Zodra u op de knop Productinstellingen klikt, schuift de lade Productinstellingen in vanaf de rechterkant van het venster

Hier, bovenaan de Instellingen, vindt u een optie Automatisch uw feed genereren.

U kunt de geplande update dagelijks, elk uur of wekelijks laten plaatsvinden.

Daarna krijgt u de opties om variatieproducten op te nemen of uit te sluiten, en om ouderproducten op te nemen in het geval van gegroepeerde producten.

WPML-ondersteuning

Als u WPML gebruikt om verschillende taalversies van uw producten in te stellen, vindt u hier een WPML sectie.

You can have a look at this doc for a better understanding of how you can generate a feed with WPML:

Voerconfiguratie

Om een feed te genereren, moet u eerst de handelaar van uw voorkeur selecteren.

Voor Google Product Feed selecteert u Merchant Type "Google Shopping".
Voor Facebook Product Feed selecteert u Merchant Type "Facebook".

add merchants

Zodra u een keuze maakt, ziet u de pagina verversen en verschijnen de vereiste attributen automatisch.

all product attributes

De Attributen staan hier links, en de waarden van de attributen staan in de kolom Toegewezen waarden.

Kies het Type als attribuut en selecteer vervolgens de waarde die dit attribuut in uw WooCommerce winkel zal hebben.

Als u denkt dat een Attribuut ontbreekt, kunt u het toevoegen door op de knop "NIEUWE ATTRIBUTE TOEVOEGEN" te drukken.

Op deze pagina vindt u enkele taalgerelateerde opties als u WPML gebruikt.

You can have a look at this doc for a better understanding of how you can generate a feed with WPML translation.

Genereer WooCommerce Product Feed

Zodra de feed is geconfigureerd, kunt u nu aan de rechterkant op "Publiceren" klikken en ziet u een laadbalk.

publish button

Once this is complete, the “Publish” button will change to an “Update” button and you will get the feed link or feed download button right below the “Update button.”

Get URL or Download Product Data Feed

Then you can set your product data feed to be updated automatically using the “Auto-Generate Your Feed” feature. So you won’t need to manually update your feed everytime you add new products or update any product individually.

auto feed generate

Now you can download this feed and upload it to your desired merchant shop and watch your store sales get a boom.

Categorie Kartering

Nu, zoals ik al eerder zei, deze plugin biedt categorie mapping opties. Bekijk deze video om te zien hoe je de categorie mapping functie gemakkelijk kunt gebruiken:

Auto-synchronisatie met Google Shopping Center

Een van de beste functies die Product Feed Manager For WooCommerce biedt, is dat je je WooCommerce-productfeed rechtstreeks kunt synchroniseren met Google Shopping Center.

You can schedule the auto-sync to take place either hourly, weekly, or monthly. This means that every change you make to your products of the product feed. They will automatically be updated on your Google Shopping Center. You do not have to download and upload the feed every time.

Klik hier om te leren hoe je WooCommerce-producten automatisch kunt synchroniseren met Google Shopping Center met behulp van Product Feed Manager For WooCommerce.

Noot van de auteur

Het is altijd belangrijk om te leren en de beste manieren te implementeren die er zijn, om uw ROI te verhogen.

Product Feed Manager For WooCommerce is a powerful tool that you can use to achieve the goal of tripling your store performance, along with other marketing campaigns.

Dus, ga je gang en begin je reis naar het succes!

Voel je vrij om opmerkingen achter te laten als je enige verwarring of suggesties hebt.


Frequently Asked Question

What is a Product Feed?

A product feed is basically a file (could be CSV, XML, RSS, etc.) containing comprehensive data about products, including titles, images, descriptions, prices, categories, availability, quantities, and other relevant attributes or data.


By providing your customers with accurate and engaging product information in various marketplaces, a well-structured product feed will help with informed purchasing decisions and targeted advertising campaigns.

What are the Benefits of Using Product Feeds For WooCommerce?

Here are some of the significant benefits of using product feeds for your business,

  • Get more visibility for your products by listing them on popular marketplaces and comparison shopping engines. This opens up your business to a much larger customer base who may have never discovered your store otherwise.
  • Product feed management tools help ensure the product information you provide stays consistent and accurate across all platforms. No more worrying about errors that could leave customers feeling misled or dissatisfied.
  • Updating product details like pricing and availability with product feeds. Make any changes once, and they’ll automatically sync across every channel where your feed is distributed.
What criteria should I consider before selecting a Product Feed Management tool that suits my business?

Before you invest in a Product Feed Management tool you should check whether the tool has these or not,

  • WooCommerce compatibility
  • Easy-to-use interface
  • Customizable feed attributes
  • Automated Feed Updates
  • Performance analytics and reporting

Product Feed Manager For WooCommerce has all these – Check it out

How do Product Data Feeds work?

Once you create product feeds for your preferred marketplace, you can upload and promote them on those marketplaces to increase your sales without any effort. If you change anything in your WooCommerce store, and they’ll automatically sync across every channel where your feed is distributed.

Categorieën
Guide Product Feed Manager For WooCommerce

Google kondigt gratis Google Shopping Promoties aan [2022]

The Corona outbreak is a big threat to humanity. We all know how dangerous the virus is. However, it also comes with another big threat – an economic crisis.

Due to the lockdown, most offices are incapable of running operations, and consumers have no option but to stay at home. And every business saw a drastic fall in its revenue.

However, a few local online shops are able to continue running their business, despite earning a lot less than usual.

Since people are not able to go out, they may order products online and get them delivered to their homes, thus creating a little opportunity for the eCommerce business to somehow survive.

However, things might just get better for your shop.

Selling On Google Shopping Is Free Of Cost During Corona Crisis

Earlier on 21st April 2020, Google made a huge announcement.

Within 1 week, Google will start allowing merchants to sell their products through Google Shopping completely free of cost!

According to Google, “as consumers increasingly shop online, they’re searching not just for essentials but also things like toys, apparel, and home goods.”

So Google wants to extend out a helping hand to both the consumers and the merchants. Free online listing means more merchant shops will be able to sell products through Google Shopping, and consumers will get more products to buy from.

This is great news for all online shops, especially the sites that deliver locally and the stores that sell digital products.

If you are running a WooCommerce store and deliver locally, then this is your biggest opportunity to get the maximum exposure and increase sales during this global crisis.

How To Make The Most Out Of This Opportunity

This could be your best chance to sustain during the economic crisis threat. And there is still one week time before Google starts this initiative.

So, let us look at how you can make the most out of this golden opportunity that Google is offering.

With one week at hand, we suggest you do the following:

  1. Prepare your shop by optimizing product details for SEO
  2. Identify your best selling products and plan a discount campaign
  3. Identify products that might be necessities and plan a discount campaign
  4. Make arrangement for selling a few digital products if possible
  5. Get your products listed on Google Shopping ASAP

Let us look at how you can pull this off.

1. Prepare your shop by optimizing product details for SEO

Product Details For SEO

SEO is always important if you want your products to be found on Google. Even if you list your products on Google shopping, SEO optimization will determine how relevant your product is based on your customer’s search term.

**Make sure to use an SEO plugin, such as Yoast or RankMath, on your WooCommerce store.

For example, if you are selling a T-shirt with Avengers’ design on it, then obviously you want your ideal customers to be the ones who are looking for Avengers themed t-shirts.

In that case, you can set the t-shirt title, Special Marvel Avengers Tshirt – Red, and set the keyword to Marvel Avengers Tshirt. Within the description, use this keyword a couple of times in the product description, and include it in the product link as well. These will indicate that the product is relevant to the keyword.

Your SEO tool will give you a score to understand if it was well optimized.

If you have a few products in your shop, then apply SEO optimization on every product. If you have too many products, then conduct SEO optimization at least for your best selling products.

2. Plan A Discount Campaign For Your Best-Selling Products

Browse through your website’s analytics or reports, and find out which products performed the best in the last two months.

Collect their titles, links, and the price.

Now, the 1st thing to do is to optimize them for SEO.

Next, plan out a discount campaign for your best selling products, such as a 20% discount for the 1st twenty sales from Google Shopping, or a 10% discount throughout the lockdown.

Plan A Discount Campaign

You might assume that since these are bestsellers, they will sell automatically through Google’s immense reach.

However, keep in mind, just like you, there are tons of other online shops that also plan to take advantage of this opportunity. Hence, along with more exposure, you will face more competition as well.

Consumers will look to purchase products either based on higher rating, or lower price. Nowadays, a lower price will get a high priority since everyone is trying to save money in response to the crisis.

Hence, it is only logical to run discounts and increase your sales.

3. Plan A Discount Campaign For Products That Might Be Necessities

Certain products are a necessity nowadays besides food and beverages, for example, bathing products, cleaning products, tissues, tampons, etc.

Also, certain electronics such as water purifiers, ovens, hair trimmers, etc might also be considered necessities at this time.

You may identify such products, optimize them for SEO, and decide on a discount campaign for them as well.

**Since we are focusing on local sales, it would be even better if you could deliver free of cost. But that’s totally your decision to make.

4. Make Arrangement For Selling A Few Digital Products If Possible

You might have a fixed category of products that you sell.

However, if you are an online retail shop that sells various types of products, then you might consider adding a few digital products (if you don’t have any already) such as movies, music collections, games, or books.

Most people are sitting idle at home, and looking for ways to make their days more entertaining. Hence, these digital products are pretty demanded in the current situation.

Even though there is no guarantee that if you arrange such products they will have maximum sales, it is still a high possibility.

5. Get Your Products Listed On Google Shopping ASAP

With this free of cost opportunity at hand, you should list your products on Google Shopping ASAP. You need to be prepared to upload your products right from the start.

Get Products Listed On Google Shopping ASAP

To do so, you first need to understand that Google Shopping has a fixed set of instructions that you must follow for your products to get approved.

It will look for specific data in the right format that is accepted by Google Shopping. Plus, Google has its own set of categories that you must indicate through your feed.

Here’s a guide to set up your WooCommerce Product data in an optimized way for Google Shopping:

In the guide, you will get actionable instructions on what data to submit and how to optimize them for approval on Google Shopping.

For example, if you have a t-shirt with 3 color variations, red, blue, and green, then you have to submit each variation separately and include the color name in the Product title. So if the product is called “New Cotton T-shirt”, for its the red variant, then the title should be “New Cotton T-shirt – Red”.

Similar to this, there are several other tips that you will find in that guide to optimize your feed data.

Now, to create the product feed, it’s really not convenient to do so manually. Rather use a product feed generation tool to generate a feed for all of your products in a few minutes.

If you own a WooCommerce store, then you can use Product Feed Manager For WooCommerce. It is a plugin that already has a set template for Google Shopping.

All you need to do is create a new feed, choose Google Shopping as the merchant, and assign a few attributes with the right values.

Let us look at a few reasons for you to use Product Feed Manager For WooCommerce.

Product Feed Manager For WooCommerce

WPFM banner for Google Shopping promotions

The plugin as a few features that are dedicated to helping you generate an accurate product feed for Google Shopping.

1. Pre-Built Google Shopping Feed Template

Google specifically requires you to submit 12 mandatory data for your products:

  • Product ID
  • Titel van het product
  • Productbeschrijving
  • Product Link/URL
  • Productcategorie
  • Google Product Categorie
  • Productafbeelding URL
  • Voorraadbeschikbaarheid
  • Normale prijs
  • Productvoorwaarde
  • Fabrikant/Merknaam
  • GTIN or MPN

And there are a few more conditional attributes that you need to submit depending on your niche.

The plugin by default has these attributes set. When you choose Google Shopping, the plugin will display the template which includes all the mandatory fields and values assign (except for 3 which I will explain in a bit).

So, you don’t need hours to set it up, and nor do you need exclusive knowledge to set up the feed. 80% of your work is already done.

2. Auto-sync WooCommerce Products To Google Shopping

One of the notable features this plugin has is the option to auto-sync your generated product feed to Google Shopping.

Once you generate the product feed, you can send the feed to your Google Merchant Center in just a click. Once you send the feed to Google, any changes you make later to the products and the feed, they will automatically be updated on Google Shopping.

You won’t have to manually upload new feed files to Google every time you make changes.

Here’s a written guide on how it works:

Here’s a video to show you how it works:

3. Category Mapping For Accepted Google Categories

On the mandatory attributes mentioned above, there is one called Google Product Category. You need to assign each of your products to a category that Google accepts.

Don’t worry, you do not need to change any data or category names on your shop for this.

The plugin has a Category Mapping feature where you can map your shop categories to that of Googles. Durig feed generation simply assigns the mapping values as the values for Google Product Category.

It’s really easy to use. Here’s a written guide on it:

Here’s a video to show you how it works:

4. Special Custom Attribute Fields

On the mandatory attribute list mentioned above, you can see that there certain attributes, Manufacturer/Brand, GTIN, and MPN.

However, WooCommerce by default has no field(s) for these attributes.

Product Feed Manager For WooCommerce comes with the feature of including these fields to your products where you can assign the values.

You also get extra custom fields for conditional attributes such as Gender, Color, Size, or Pattern which you need to submit if you sell products in the Apparels category.

Here’s a guide about it:

5. Avoid Price Mismatch Error When Uploading Feed

Many people face a common error, “Price mismatch” when uploading the feed and many of their products get rejected.

The reason behind this is, for a variable product, if you have different pricing for different variations, WooCoomerce displays both the highest price and the lowest price when Google crawls that product page for a particular variation. This causes a mismatch in the price you submitted.

Product Feed Manager For WooCommerce holds the option to fix JSON LD structured data so that only the accurate price is displayed when Google crawls a variant of a variable product.

It’s just a single click in the plugin’s settings to activate it. Here’s how:

Hence, you will be able to avoid facing the “Price mismatch” error on Google Shopping.

6. Exclusive Filter For Efficient Feed Generation

The plugin allows you to generate a product feed for all the products, or you may use it’s filter options to generate a feed for specific products only.

For example, if you have products that are no longer in stock and you do not want to submit them on Google, then you can use the custom filter to exclude all products that are out of stock.

It also has a category filter and tag filter where you can simply choose certain categories or tags to generate a product feed for the products under those categories or tags only.

Here’s a video to show you how it works:

This really saves time and you can upload only the products that you want to sell through Google Shopping.

7. Easily Add Variant Values To The Product Title

Now, as I have mentioned above, Google advises to include the variant value to the Product title (though not mandatory).

However, it is not necessary to change the title in your store to achieve this. The plugin allows you to choose to add the variant names to Product titles in the product feed that you generate.

As you can see, this plugin is a great help in generating an accurate product feed quickly, and optimize the feed for getting the best results through Google Shopping.

Conclusie

Google is taking a very honorable initiative to help both the consumers and sellers. There is no way you should lose this opportunity.

So, go ahead and prepare your store right away if you want the best results out of free promotion through Google Shopping and increase your sales to sustain during this world crisis.

Categorieën
Guide Product Feed Manager For WooCommerce

Accepted Google Country Codes List For All Google Ads [2024]

Google is currently the largest marketplace to promote WooCommerce products through various Ad campaigns such as Shopping Ads, Adwords, Dynamic Remarketing, and many more.

Here’s a list of Google Country Codes List that you may use throughout Google Ads when referring to countries you are promoting to or shipping to.

Google Country Codes List

Usually, the Google country codes are of two letters (not case sensitive).

A | B | C | D | E | F | G | H | I | J | K | L | M | N | O | P | Q | R | S | T | U | V | W | Y | Z

A

CountryCountry Codes
🇦🇫 Afghanistanaf
🇦🇱 Albaniaal
🇩🇿 Algeriadz
🇦🇸 American Samoaas
🇦🇩 Andorraad
🇦🇴 Angolaao
🇦🇮 Anguillaai
🇦🇶 Antarcticaaq
🇦🇬 Antigua & Barbudaag
🇦🇷 Argentinaar
🇦🇲 Armeniaam
🇦🇼 Arubaaw
🇦🇺 Australiaau
🇦🇹 Austriaat
🇦🇿 Azerbaijanaz

B

CountryCountry Codes
🇧🇸 Bahamasbs
🇧🇭 Bahrainbh
🇧🇩 Bangladeshbd
🇧🇧 Barbadosbb
🇧🇾 Belarusby
🇧🇪 Belgiumbe
🇧🇿 Belizebz
🇧🇯 Beninbj
🇧🇲 Bermudabm
🇧🇹 Bhutanbt
🇧🇴 Boliviabo
🇧🇦 Bosnia & Herzegovinaba
🇧🇼 Botswanabw
🇧🇻 Bouvet Islandbv
🇧🇷 Brazilbr
🇮🇴 British Indian Ocean Territoryio
🇧🇳 Brunei Darussalambn
🇧🇬 Bulgariabg
🇧🇫 Burkina Fasobf
🇧🇮 Burundibi

C

CountryCountry Codes
🇰🇭 Cambodiakh
🇨🇲 Camerooncm
🇨🇦 Canadaca
🇨🇻 Cape Verdecv
🇰🇾 Cayman Islandsky
🇨🇫 Central African Republiccf
🇹🇩 Chadtd
🇨🇱 Chilecl
🇨🇳 Chinacn
🇨🇽 Christmas Islandcx
🇨🇨 Cocos (Keeling) Islandscc
🇨🇴 Colombiaco
🇰🇲 Comoroskm
🇨🇬 Congocg
🇨🇩 Congo, The Democratic Republic of thecd
🇨🇰 Cook Islandsck
🇨🇷 Costa Ricacr
🇨🇮 Cote D’ivoireci
🇭🇷 Croatiahr
🇨🇺 Cubacu
🇨🇾 Cypruscy
🇨🇿 Czech Republiccz

D

CountryCountry Codes
🇩🇰 Denmarkdk
🇩🇯 Djiboutidj
🇩🇲 Dominicadm
🇩🇴 Dominican Republicdo

E

CountryCountry Codes
🇪🇨 Ecuadorec
🇪🇬 Egypteg
🇸🇻 El Salvadorsv
🇬🇶 Equatorial Guineagq
🇪🇷 Eritreaer
🇪🇪 Estoniaee
🇪🇹 Ethiopiaet

F

CountryCountry Codes
🇦🇨 Falkland Islands (Malvinas)fk
🇫🇴 Faroe Islandsfo
🇫🇯 Fijifj
🇫🇮 Finlandfi
🇫🇷 Francefr
🇬🇫 French Guianagf
🇵🇫 French Polynesiapf
🇹🇫 French Southern Territoriestf
Product Feed Manager For WooCommerce

G

CountryCountry Codes
🇬🇦 Gabonga
🇬🇲 Gambiagm
🇬🇪 Georgiage
🇩🇪 Germanyde
🇬🇭 Ghanagh
🇬🇮 Gibraltargi
🇬🇷 Greecegr
🇬🇱 Greenlandgl
🇬🇩 Grenadagd
🇬🇵 Guadeloupegp
🇬🇺 Guamgu
🇬🇹 Guatemalagt
🇬🇳 Guineagn
🇬🇼 Guinea-Bissaugw
🇬🇾 Guyanagy

H

CountryCountry Codes
🇭🇹Haitiht
🇭🇲 Heard Island and Mcdonald Islandshm
🇻🇦 Holy See (Vatican City State)va
🇭🇳 Hondurashn
🇭🇰 Hong Konghk
🇭🇺 Hungaryhu

I

CountryCountry Codes
🇮🇸 Icelandis
🇮🇳 Indiain
🇮🇩 Indonesiaid
🇮🇷 Iran, Islamic Republic ofir
🇮🇶 Iraqiq
🇮🇪 Irelandie
🇮🇱 Israelil
🇮🇹 Italyit

J

CountryCountry Codes
🇯🇲 Jamaicajm
🇯🇵 Japanjp
🇯🇴 Jordanjo

K

CountryCountry Codes
🇰🇿 Kazakhstankz
🇰🇪 Kenyake
🇰🇮 Kiribatiki
🇰🇵 Korea, Democratic People’s Republic ofkp
🇰🇷 Korea, Republic ofkr
🇰🇼 Kuwaitkw
🇰🇬 Kyrgyzstankg

L

CountryCountry Codes
🇱🇦 Lao People’s Democratic Republicla
🇱🇻 Latvialv
🇱🇧 Lebanonlb
🇱🇸 Lesothols
🇱🇷 Liberialr
🇱🇾 Libyan Arab Jamahiriyaly
🇱🇮 Liechtensteinli
🇱🇹 Lithuanialt
🇱🇺 Luxembourglu

M

CountryCountry Codes
🇲🇴 Macaomo
🇲🇰 Macedonia, The Former Yugosalv Republic ofmk
🇲🇬 Madagascarmg
🇲🇼 Malawimw
🇲🇾 Malaysiamy
🇲🇻 Maldivesmv
🇲🇱 Maliml
🇲🇹 Maltamt
🇲🇭 Marshall Islandsmh
🇲🇶 Martiniquemq
🇲🇷 Mauritaniamr
🇲🇺 Mauritiusmu
🇾🇹 Mayotteyt
🇲🇽 Mexicomx
🇫🇲 Micronesia, Federated States offm
🇲🇩 Moldova, Republic ofmd
🇲🇨 Monacomc
🇲🇳 Mongoliamn
🇲🇸 Montserratms
🇲🇦 Moroccoma
🇲🇿 Mozambiquemz
🇲🇲 Myanmarmm
Product Feed Manager For WooCommerce

N

CountryCountry Codes
🇳🇦 Namibiana
🇳🇷 Naurunr
🇳🇵 Nepalnp
🇳🇱 Netherlandsnl
| | Netherlands Antillesan
🇳🇨 New Caledonianc
🇳🇿 New Zealandnz
🇳🇮 Nicaraguani
🇳🇪 Nigerne
🇳🇬 Nigeriang
🇳🇺 Niuenu
🇳🇫 Norfolk Islandnf
🇲🇵 Northern Mariana Islandsmp
🇧🇻 Norwaygeen

O

CountryCountry Codes
🇴🇲 Omanom

P

CountryCountry Codes
🇵🇰 Pakistanpk
🇵🇼 Palaupw
🇵🇸 Palestinian Territory, Occupiedps
🇵🇦 Panamapa
🇵🇬 Papua New Guineapg
🇵🇾 Paraguaypy
🇵🇪 Perupe
🇵🇭 Philippinesph
🇵🇳 Pitcairnpn
🇵🇱 Polandpl
🇵🇹 Portugalpt
🇵🇷 Puerto Ricopr

Q

CountryCountry Codes
🇶🇦 Qatarqa

R

CountryCountry Codes
🇷🇪 Réunionre
🇷🇴 Romaniaro
🇷🇺 Russian Federationru
🇷🇼 Rwandarw

S

CountryCountry Codes
🇸🇭 Saint Helenash
🇰🇳 Saint Kitts & Neviskn
🇱🇨 Saint Lucialc
🇵🇲 Saint Pierre & Miquelonpm
🇻🇨 Saint Vincent and the Grenadinesvc
🇼🇸 Samoaws
🇸🇲 San Marinosm
🇸🇹 Sao Tome & Principest
🇸🇦 Saudi Arabiasa
🇸🇳 Senegalsn
🇷🇸 Serbia & 🇲🇪 Montenegrocs
🇸🇨 Seychellessc
🇸🇱 Sierra Leonesl
🇸🇬 Singaporesg
🇸🇰 Slovakiask
🇸🇮 Sloveniasi
🇸🇧 Solomon Islandssb
🇸🇴 Somaliaso
🇿🇦 South Africaza
🇬🇸 South Georgia and the South Sandwich Islandsgs
🇪🇸 Spaines
🇱🇰 Sri Lankalk
🇸🇩 Sudansd
🇸🇷 Surinamesr
🇸🇯 Svalbard & Jan Mayensj
🇸🇿 Swazilandsz
🇸🇪 Swedense
🇨🇭 Switzerlandch
🇸🇾 Syrian Arab Republicsy

T

CountryCountry Codes
🇹🇼 Taiwan, Province of Chinatw
🇹🇯 Tajikistantj
🇹🇿 Tanzania, United Republic oftz
🇹🇭 Thailandth
🇹🇱 Timor-Lestetl
🇹🇬 Togotg
🇹🇰 Tokelautk
🇹🇴 Tongato
🇹🇹 Trinidad & Tobagott
🇹🇳 Tunisiatn
🇹🇷 Turkeytr
🇹🇲 Turkmenistantm
🇹🇨 Turks & Caicos Islandstc
🇹🇻 Tuvalutv

U

CountryCountry Codes
🇺🇬 Ugandaug
🇺🇦 Ukraineua
🇦🇪 United Arab Emiratesae
🇬🇧 United Kingdomuk
🇺🇸 United Statesus
🇺🇲 United States Minor Outlying Islandsum
🇺🇾 Uruguayuy
🇺🇿 Uzbekistanuz

V

CountryCountry Codes
🇻🇺 Vanuatuvu
🇻🇪 Venezuelave
🇻🇳 Vietnamvn
🇦🇨 Virgin Islands, Britishvg
🇻🇮 Virgin Islands, U.S.vi

W

CountryCountry Codes
🇼🇫 Wallis and Futunawf
🇪🇭 Western Saharaeh

Y

CountryCountry Codes
🇾🇪 Yemenye

Z

CountryCountry Codes
🇿🇲 Zambiazm
🇿🇼 Zimbabwezw

Prohibited Countries

Due to the sanctions imposed by the OFAC, Google Ads isn’t available to advertisers in certain countries mentioned below:

  • Crimea
  • Cuba
  • Iran
  • North Korea
  • Sudan
  • Syria
No Google Ads - Google Country Codes

Conclusie

Use the country codes where necessary for Google.

If you wish to promote through Google Shopping Ads, then here is a complete guide to generate WooCommerce product feed For Google Shopping.

Categorieën
WooCommerce Guide Product Feed Manager For WooCommerce

How To Auto-Sync WooCommerce Products To Google Merchant Shop in 2024

Het is natuurlijk voor de meeste WooCommerce Winkeliers om te proberen hun verkoop te verhogen door het promoten van verschillende winkels. Bijna alle WooCommerce winkeliers promoten hun WooCommerce Producten naar Google Merchant Shop omdat het de grootste marktplaats is om meer potentiële klanten te krijgen.

Product Feed Manager For WooCommerce makes it extra easy for you to promote your valuable products in different merchant shops. As a reliable WordPress agency, we care about your success. With the regular iteration of our plugin, we are spreading the way for your continuous improvements and benefits.

Today, we are happy to inform you about the new update of our plugin Product Feed Manager For WooCommerce. We recently added a new feature that will give you an extra hand in promoting your products on Google Merchant Shop.

With this latest version, you can simply work in harmony with the best merchant shop out there and potentially increase your revenue with product feed management strategies.

Laten we ons ingraven!

Hier is de complete video tutorial. Of u kunt de schriftelijke handleiding hieronder lezen, zodat u uw WooCommerce producten gemakkelijk kunt synchroniseren met Google.

Auto-sync WooCommerce producten naar Google

You can auto-sync your WooCommerce Products to Google Merchant Shop using our plugin.

This means that with the latest Product Feed Manager For WooCommerce, you can now directly send your WooCommerce products to Google Merchant Shop; you no longer need to download and upload feed on your Google Merchant Center manually.

This feature carries out the task by allowing your Google Merchant Center to fetch the data of your updated Google product feed according to the schedule you decide.

You need to simply set up your Product Feed Manager For WooCommerce to integrate with your Google Merchant Shop.

Once you have set the required credentials to auto-sync the plugin with your Google merchant account, you can then choose your desired schedule, when you want your updated product feed to be collected by your Google Merchant Shop. It’s as simple as that.

Dit zal je zoveel tijd besparen. U kunt zich richten op het verbeteren van uw WooCommerce Shop terwijl uw bijgewerkte productfeed automatisch naar uw Google Merchant Shop wordt gestuurd.

WooCommerce producten naar Google Merchant Shop

Hier is hoe het werkt

Synchronizing your WooCommerce Products to Google Merchant Shop is an easy procedure. Just follow these steps and you are good to know how to generate A WooCommerce Google feed with auto sync featurs.

U heeft 3 specifieke informatie nodig om de synchronisatie in te stellen:

  • Klant ID
  • Klantengeheim
  • Google Merchant ID

U kunt uw Client ID en Client Secret ophalen bij uw Google Developers Console en u kunt uw Google Merchant ID ophalen bij uw Google Merchant Shop.

Als u niet weet hoe u ze kunt vinden, lees dan verder, we hebben instructies gegeven over hoe u ze kunt ophalen.

Laten we nu beginnen met de stappen.

Stappen naar Auto-Sync WooCommerce Producten naar Google Merchant Shop

U moet een paar specifieke stappen volgen om het op te zetten.

Dus laten we elke stap een voor een doornemen.

Stap 1 - Verzamel klant-ID en klantgeheim

i. Creëer een project

Ga eerst naar Google Developers Console en log in met uw Google-account. U ziet dan zo'n dashboard:

Google Console API Dashboard.png

Als u al een project hebt gemaakt voor uw producten, kunt u hetzelfde gebruiken, of u kunt een nieuw project maken als u dat nog niet hebt.

To do this, you need to click on New Project. Here you will be given a list of projects that you have created so far.

Selecteer een nieuw project

Click on New Project to set up a new project.

Create New Project

Now provide the required information.

New Project Required Information

Here, you can change the Project Name/ Project ID if you want.

Once the project is ready, you will get a notification on the top right corner. You can select your new project from the New Project option or from the Notification dropdown.

New Project Added Notification

ii. Activeer de Content API voor winkelen

Content API for Shopping is an interface that allows you to interact with the merchant center platform directly. This helps you to increase the efficiency of your shop with proper data management in a more organized way.

To activate it for your current project, Go to the Dashboard. Select ENABLE APIS AND SERVICES.

Enable Content API Option

It will take you to the API Library Dashboard.

API Library Dashboard

Search for Content API for Google Shopping and select the Content API for Shopping option

Search Content API for Shopping

Click on the Enable button to enable the Content API for the Shopping option

Enable Content API for Shopping

However, you don’t need to enable this Content API for Shopping if you see that it is enabled in the first place.

iii. Geloofsbrieven aanmaken

Dit is het belangrijkste onderdeel waar u uw referenties moet instellen om de API goed te laten werken. Laten we beginnen.

a. Toestemmingsscherm van OAuth

Click on the OAuth Consent Screen option on the left, and It will take you to the OAuth Consent Screen.

Select External as the User Type and click on the Create button.

OAuth Consent Screen - User Type

Now fill up the forms and click on the SAVE AND CONTINUE button.

OAuth Consent Screen - App Registration
The terms you will face here are

OAuth Toestemmingsscherm

- Toepassing Naam

De naam van de App die u vraagt om toestemming. U moet dit aangeven, anders kunt u niet bij uw stap komen.

- Toepassingslogo

De identieke afbeelding van uw app om specifiek te zijn, een logo van uw app. Klanten zullen uw app herkennen aan de hand van dit beeld.

- Ondersteunende e-mail

Deze e-mail-ID zal uw klanten helpen om u te bereiken als ze gebruikersondersteuning nodig hebben. De google-id die u gebruikt heeft om in te loggen op uw google-console wordt hier standaard geplaatst.

- Geautoriseerd Domein

U moet hier de applicatie-URL invoeren. Anders zal Google uw domein niet als geautoriseerd markeren. Zoals u kunt zien in de afbeelding hieronder, heb ik mijn domein, cloudwaysapps.com, opgegeven.

Uw domein zal er waarschijnlijk al standaard zijn, maar als u ziet dat er geen domein is, moet u hier het geautoriseerde domein van uw winkel opgeven.

- Voorpagina/Privacy-beleid/ TOS-link

Dit zijn de respectievelijke homepage en het privacybeleid/voorwaarden en servicelinks van uw toepassing en deze zullen op uw toestemmingsformulier worden getoond. Maar het moet worden gehost op uw geautoriseerde domein - anders hoeft u het vakje niet in te vullen.

Provide the Application Name and Authorized Domain(s) to start the process. You can add the rest of the options later.


Click on SAVE AND CONTINUE.

Scopes

OAuth Consent Screen - Scopes
- Toepassingsgebieden voor Google-API's

You are provided with a list of scopes here. You can also add your own. The level of scopes you choose here (such as email/profile/OpenID/custom), your application can access only that part of your user’s data.

Click on SAVE AND CONTINUE.

Test Users

OAuth Consent Screen - Test Users
Assign Test Users

While the publishing status is set to “Testing”, only test users are able to access the app. Allowed user cap prior to app verification is 100, and is counted over the entire lifetime of the app. 

You can provide access to the test users from here.

Click on SAVE AND CONTINUE.

It will show you a summary and your registration is now complete.

OAuth Consent App Registration Summary
b. OAuth Klant ID

Ga terug naar Credentials. Klik op de blauwe knop Creëer referenties en kies OAuth Client ID in het uitklapmenu.

OAuth Client ID - Create Credentials

At first, select Web Application as the Application Type.

OAuth Cliet ID Type

You will see the following info:

Create New OAuth Client ID
The terms you will face here are
- Naam

U moet hier een naam opgeven om te benaderen. Het is de naam van uw OAuth (Open Authorization) Client ID. Zoals u kunt zien, heb ik de naam ingesteld als Test Guide Web App1.

- Geautoriseerde JavaScript-oorsprong

Het is de oorsprong URI van de klantapplicatie. Het is niet altijd verplicht om te gebruiken. Als u echter een niet-standaard poort gebruikt, moet u deze hier opnemen.

- Geautoriseerde Redirect URI's

Na de authenticatie met Google is dit het pad dat u nodig heeft om uw gebruikers om te leiden naar uw applicatie. Het kan geen openbaar IP-adres zijn en het moet de bijpassende Redirect URL van uw plugin-dashboard zijn.

You will get the Redirect URL from your Product Feed Manager For WooCommerce dashboard. Go to Product Feed> Google Merchant Settings and you can see the redirect URL marked in the picture below.

Verzamel Redirect URL

Kopieer het adres en plak het onder Authorized redirect URI's en klik op Create.

OAuth Content ID - Set Redirect URL

You will see that under Credentials, you have an OAuth 2.0 Client ID created, and you will get the OAuth Client ID credentials.

New OAuth Client ID Credentials

Copy the Client ID and Secret and you can also download the credentials in JSON format for later use by clicking on the DOWNLOAD JSON button.

Close the box and you will see that a new OAuth 2.0 Client ID is added.

OAuth 2.0 Client ID List

You can click on the ID to view and edit information.

Stap 2 - Verkrijg uw Google Merchant ID

To get started with Google Merchants, follow this link. You will be taken to your merchant dashboard. From here you can monitor your feeds, product list, and some more options.

So when you send your WooCommerce Products to Google, they will be listed here.

Het vinden van uw merchant ID vanaf hier is eenvoudig. Het is gegeven net naast onze Profiel afbeelding zoals in de afbeelding hieronder:

Google Merchant ID

Kopieer de Merchant ID en sla het op.

Step 3 – Sync Product Feed Manager For WooCommerce With Google Merchant Shop

Finally, when you have your Client ID, Client Secret, and Merchant ID, Go to Your Dashboard> Product Feed> Google Merchant Settings.

Zet alle informatie op de juiste manier in zoals hieronder aangegeven:

Enter Google Merchant Credentials to PFM

Als je alles op zijn plaats hebt, klik je op Verzenden. Klik na het indienen op Authenticeren.

It will redirect you to the permission page of Google. Allow your Google account to approve access to your authorized domain. Then you will get a message that ‘You are authorized’.

Geautoriseerd voor Auto-synchronisatie

En je bent helemaal klaar! Nu is het tijd om de auto-synchronisatie functie te gebruiken om uw WooCommerce Producten naar Google Merchant Shop te sturen.

Stap 4 - Plannen van de Auto-Sync

Now that the setup is complete, you can go to your product feed, and on the right side of the page, you will see that there is the new feature, Send to Google Merchant.

Plan Productinvoer Auto-synchronisatie naar Google

Onder deze rubriek vindt u de opties:

  • Doelland
  • Doeltaal
  • Plan
  • Selecteer Uur
Stuur naar Google Merchant Box

Kies eerst het doelland en de taal.

FYI:
You have to input a short form, and it has to match Google’s format. At first, you can see a small paragraph with a ‘Click here’ link. Go there and check the short forms of your desired target country and language to be accurate.

Vervolgens kunt u uw agenda naar eigen inzicht instellen.

Choose between WeeklyMonthly, or Hourly basis.

Plannen van de soorten

Als je kiest voor Hourly:

Uurrooster

Then select the number of hours after which the schedule will be triggered.

Als je kiest voor Weekly:

Wekelijks schema

Then choose a day of the week and the hour of that day when this schedule will be triggered.

Als je kiest voor Maandelijks:

Maandelijks schema

Kies vervolgens de datum van een maand en het uur van die dag waarop dit schema in werking treedt.

U kunt naar uw Google Merchant Center > Feed gaan en de verzonden feed controleren.

Since the schedule is set, this feed will be updated automatically according to the schedule, regularly.

Nu zijn uw feeds goed gesynchroniseerd met Google Merchant Center en hoeft u niet elke keer dat u uw productfeeds bijwerkt toegang te hebben tot uw accounts. U hoeft dus geen WooCommerce-producten meer handmatig te uploaden naar Google.

U hoeft alleen maar wijzigingen aan te brengen in uw feed, en uw Google Merchant Shop krijgt de update automatisch.

Conclusie

Product Feed Manager For WooCommerce has been under constant improvement to help you promote your products easily.

If you find any Google feed errors, our support team is always there to give you instant support when you need it.

Update your Product Feed Manager For WooCommerce on a regular basis and benefit from all the new features we add on a regular basis.

We hopen dat dit artikel nuttig voor u was en we wensen u een heerlijke reis met uw WooCommerce Store door uw WooCommerce Producten automatisch te synchroniseren met Google.

Categorieën
WooCommerce Guide Product Feed Manager For WooCommerce

6+ Powerful Google Product Feed Optimization Tips For E-commerce Success

Google is the #1 search engine in the world and seemingly the best place for marketing. Google offers Google Merchant Center to allow eCommerce stores to promote their products through Google.

If an eCommerce store can create proper Google product feeds, its sales can skyrocket in no time.

But, you will need to know how to optimize Google Shopping feed so that your Google product feed is approved by Google in the first place. 

Your WooCommerce store may include many variations and attributes for your products, but Google Merchant Center has its own set of requirements that you must meet in order to upload your products and get approved with your Google product feed.

That’s why I came up with 6+ high-impact Google product feed optimization tips and going to explain them in this blog.

So, let’s get started!

**P.S. These are just basic tips. If you want a detailed guide then read:

1. Select Product Category According To Google

Google Product Feed Category

Your website may have custom categories, different from Google. But Google has its own taxonomy list, and you must submit a feed accordingly.

You must make sure that Google product feed has all the products categorized according to the Google taxonomy list.

Your website may have custom categories, different from Google. But Google has its own taxonomy list, and you must submit a feed accordingly. You must make sure that Google product feed has all the products categorized according to the Google taxonomy list.

When you optimize product feeds, you must map your categories with Google category list, or else Google won’t accept it.

For Example:
If you have a product under the category ‘Apparels > Bodywear’ on your site, it is not in the Google taxonomy list. So you need to map it with the most relevant one. In this case, in Google, the product should be under ‘Apparel & Accessories > Clothing.’

Also when mapping, be as specific as possible and categorize the product under the most relevant sub-heading. 

For example, if your product is a Tuxedo, then the best category under Google will be ’Apparel & Accessories > Clothing > Suits > Tuxedos.’ 

This will narrow down search results for targeted customers, hence more chance of a conversion.

2. Deciding A Good Title

Your product title is what Google relies on when deciding how to optimize Google Shopping feed for a customer’s search phrase.

Plus the title acts as a hook, to grab customers’ attention and create more interest.

Google allows you to write a title of up to 150 characters. It is wise to optimize product feeds by giving a title that says what your product is from your eCommerce store, and some of its best features that people search for.

For Example:
If you are selling a Tuxedo for a particular brand — let’s assume ‘Rexth Clothing’ is a brand. You can choose the title “Rexth Ultralight Black Modern Fit Tuxedo With Golden Buttons.” This title highlights the brand, the color, the type, the product itself and one of its exclusive features.

Now, basic Google previews will only show 35 characters only. So try to make the first 35 characters relevant to what people might search for when looking for this particular product.

Inside the Google Merchant Portal, it will only display 75 characters and the rest will show when the customer clicks on your product. Which means you should include your best keywords within the first 75 characters.

It’s ideal for shop owners to write titles within 75 characters and include target keywords there for optimized results.

Google Product Preview

**P.S.: Don’t add promotional phrases to your title such as “Limited offer,” “Special Discount,” etc. Google algorithms take these negatively.

3. Beginning Of Description

After searching for a product on Google, a person will be able to see a preview of the details of your product. These details include the title, description, review rating, price, etc.

For description, even though you can write up to 5000 characters, the first couple of lines are crucial. How to optimize Google shopping feed involves making the description as compelling and informative as possible within the first 175 characters.

The description on Google Shopping Preview will only display the first 175 characters of the actual description. 

Thus you should try to include the best benefits and features of your products in the first couple of lines. This will act as a trigger to create ‘desire’ in customers.

Try to make it precise and not a marketing promotion of your site.

Beschrijving

4. Detailed Description

As we mentioned earlier, the beginning of the product description is crucial and should be catchy while including targeted keywords. But this doesn’t change the fact that you have to write a proper description nonetheless. 

Make the description as detailed as possible and include all the features and benefits of your product. This is crucial for google feed optimization as it helps in better ranking and visibility.

Also, keep in mind the SEO attributes when writing the description. Make sure to include keywords and avoid including any irrelevant data.

Do not give any misinformation. Reminding you that just one bad review can lower your rankings on Google search.

5. Advantage Of A Unique Image For Google Product Feed Optimization

Even though you may have multiple images for your product, Google will specifically ask for an image link to a picture of your product, which will be used as the preview photo in the search results.

Google Shopping Preview

It is best to create a high-quality Image for this purpose. Now, most shop owners directly take images from the manufacturers’ sites; thus almost all of their previews are about the same.

The smart thing to do here is to try and give a picture that is different and will stand out.

You can take a photo on your own or search for a uniquely clicked photo of the same product and use them (as long it is not a copyright infringement) as the image for your product.

Having a unique photo on display, among others who all look similar to each other, will create more curiosity among customers.

Unique Picure

A different picture stands out and grabs customers’ attention.

But do make sure not to add extra promotional text on the images. Also, it is advised to give an image with a white background.

6. Include The Mandatory Data In Your Google Product Feed

Include The Mandatory Data for Google Product Feed Optimization

Apart from the product category, title, description and image, there are a few more data which you must include in your product feed.

(i) Condition

This basically lets you choose from the options ‘new’, ‘refurbished’ or ‘used.’

(ii) Availability

You can choose from the options, ‘in stock’, ‘out of stock’ or ‘pre-order’. This information has to be included on your feed and later updated according to current availability on a regular basis.

**P.S.: Failure to deliver, while saying the product is available, has a negative impact. One bad review from a customer can affect Google’s priority on your products. Hence, be honest about the availability.

(iii) Price

You need to specify the product price and currency.

Make sure to include VAT within the price (except in the USA, Canada or India). Most customers expect to pay exactly what is mentioned. (The only extra fee people may agree to pay is the shipping charge).

**Note: Don’t tweak your Google product feed and make it different from your actual site, at least in the case of the data that are to be displayed on the preview. Once you provide the data, Google will cross-check with your website. Any mismatch and Google will penalize your ranking.

(iv) GTIN (Global Trade Item Number)

This is a unique product identifier for any product (often in the form of barcodes).

You may know GTIN as UPC (if in North America), EAN/UCC (if in most places outside North America), JAN (if in Japan), ISBN (if you deal with books), etc. There are more countries which call it by different names, but all serve the same purpose.

Often products may have multiple GTINs. In that case, you may choose either one. If you are offering a package with numerous products, then providing the GTIN of any one of the products will be fine.

GTIN is not a marketing term or a feature of the product. But Google algorithm gives more priority to products that have GTIN. So it’s best to include it in your Google Product Feed.

(v) MPN (Manufacturer Part Number)

MPN is a unique identifier of each product, deduced by the manufacturer. You will be required to include this in case you don’t have a GTIN for any product.

**In case you have a product with no GTIN or MPN, you need to mark the ‘identifier_exists’ attribute of that particular product as false. Not marking it false will automatically be considered as true, and Google will look for a GTIN in your product feed. In this case, your product feed will be rejected.

(vi) Product Link

You will need to provide a direct link to the product, not the root domain.

(vii) Brand Name

Google will ask for the name of the manufacturer, not your company or any distributors. So don’t include your name in this field unless it is your own manufactured product.

(viii) Product ID

The product ID is the code you assign to your products on your website. This will allow you to keep track of your products from Google to your site.

Google Merchant Shop is a must for any WooCommerce shop owners, who want more potential customers.

Make sure you have created a proper Google Product Feed. In case you are not confident in creating on your own, you can use plugins or feed management tools.

You May Try Out A WordPress Plugin

The process of setting up and keeping up a Google Shopping feed takes time and work.

You can rely on the plugin Product Feed Manager For WooCommerce (developed by us, RexTheme) which is simple to use and will help you generate Google Product Feed with no hassle. It has a built-in feed format set up for Google and many other merchants’ shops.

Product Feed Manager

This plugin will let you map categories very easily, and all you will need to do is select the products you want to generate a feed for. 

It will create a feed that you can auto-sync with your Google Merchant Shop, and with little or no changes, your products will be up on Google Shipping. 

You may try using its free version and see if it suits you.