Categorieën
Product Feed Manager For WooCommerce WooCommerce

What Is An XML Feed? Choose the Best Tool For Your WooCommerce Store [2025]

Ever tried manually listing your products on multiple marketplaces? It’s like trying to individually email 10,000 people about your new product—painful, slow, and absolutely not scalable.

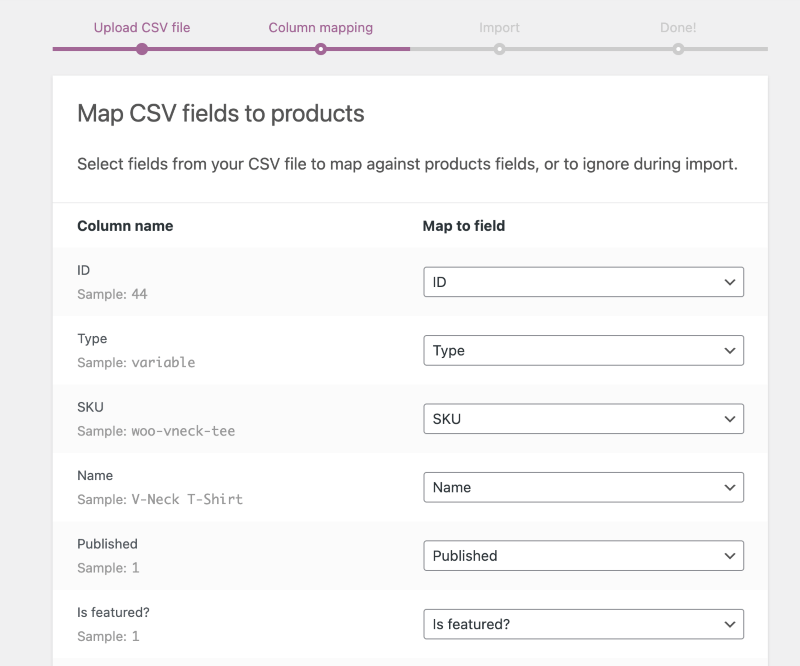
Now, when submitting your products to online marketplaces, the main challenge you may face is maintaining the product feed format. Most marketplaces expect you to submit your product data in the form of an XML feed, which is quite complicated to create manually.

That’s where XML feeds come in. Think of them as a megaphone for your product data—automating the process, keeping things structured, and making sure your listings don’t look like a chaotic mess.

But let’s be real: creating an XML feed manually is about as fun as filling out tax forms. Luckily, you don’t have to.

In this guide, I’ll show you:

✅ What an XML feed actually is (minus the tech jargon)

✅ Why your WooCommerce store needs one

✅ The best tool to create an XML feed without losing your sanity

By the end, you’ll have a fully optimized product feed without breaking a sweat.

Let’s dive in.

What Is an XML Feed?

An XML feed is a structured data file that automatically updates and shares your product information with marketplaces, comparison shopping engines, and ad platforms.

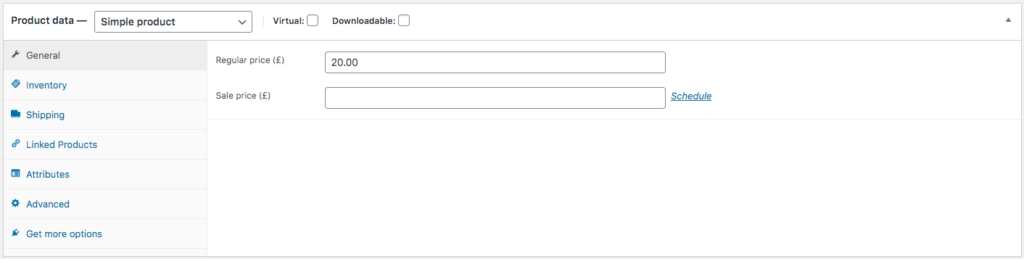
Instead of manually updating product listings, the XML feed keeps everything in sync—pricing, stock levels, descriptions, and more—without any extra effort from you.

For a WooCommerce store, this means your products are always up-to-date across platforms like Google Shopping, Facebook, and Amazon. You make changes in one place, and the feed takes care of the rest.

Benefits of Using an XML Feed for Your WooCommerce Store

Manually managing product listings takes time and increases the chances of errors. An XML feed eliminates the hassle of automating the entire process.

Benefits of Using an XML Feed

Here’s how it helps:

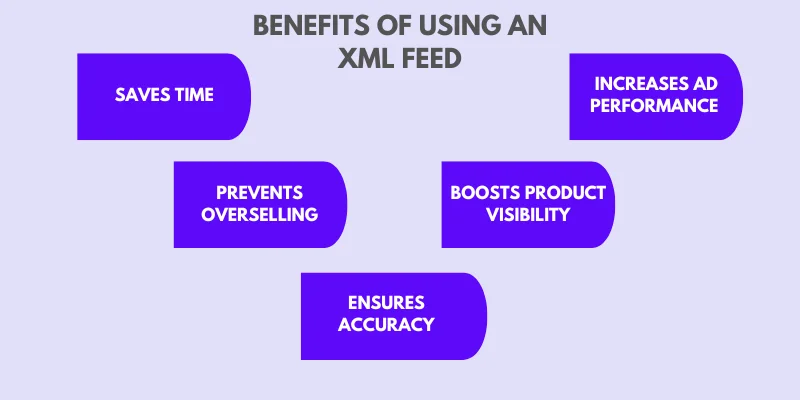
  • Saves time – No need to update product details on multiple platforms one by one. The XML feed syncs everything automatically.
  • Prevents overselling – Your stock levels are updated in real-time, so you won’t sell something that’s already out of stock.
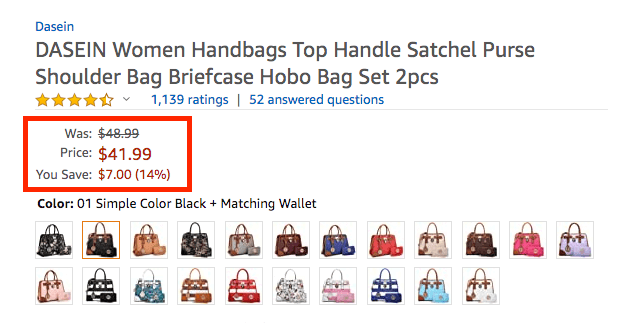
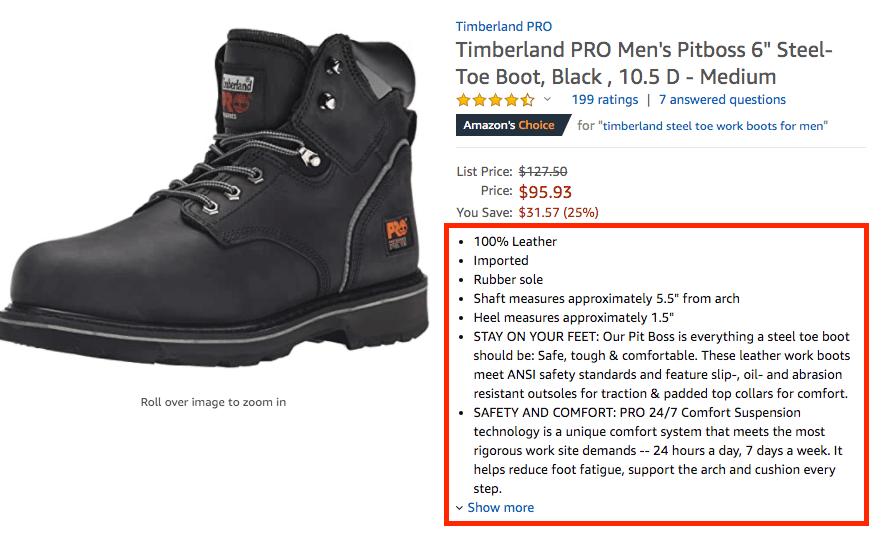
  • Ensures accuracy – No more outdated prices or missing product details. The feed keeps everything consistent.
  • Boosts product visibility – Your listings appear on multiple platforms without extra manual work, reaching more potential buyers.
  • Increases ad performance – Platforms like Google Shopping prioritize accurate and updated listings, helping you get better results from paid campaigns.

With an XML feed, you spend less time managing product data and more time growing your business.

Checklist To Choose The Right WooCommerce XML Feed Tool

When you look for an XML feed generator, you will find several tools out there. But not all of them are ideal for feed generation without any hassle. You have to consider a few important factors to understand if it is the right tool for you. Let’s put light on that-

1. Prioritize User-friendliness

As a WooCommerce store owner, you already have a lot on your plate and don’t have time to learn a complex tool.

A good tool should have a clear and structured layout that’s easy to navigate. You shouldn’t have to spend a lot of time searching for the functionality you need.

You need to look for an XML product feed plugin that’s easy to set up and use, even if you don’t have technical expertise. The plugin should have a user-friendly interface and clear instructions to help you generate and manage your product feeds.

Again, Before committing to a tool, it’s always a good idea to request a free demo or trial to see if it’s a good fit for your business.

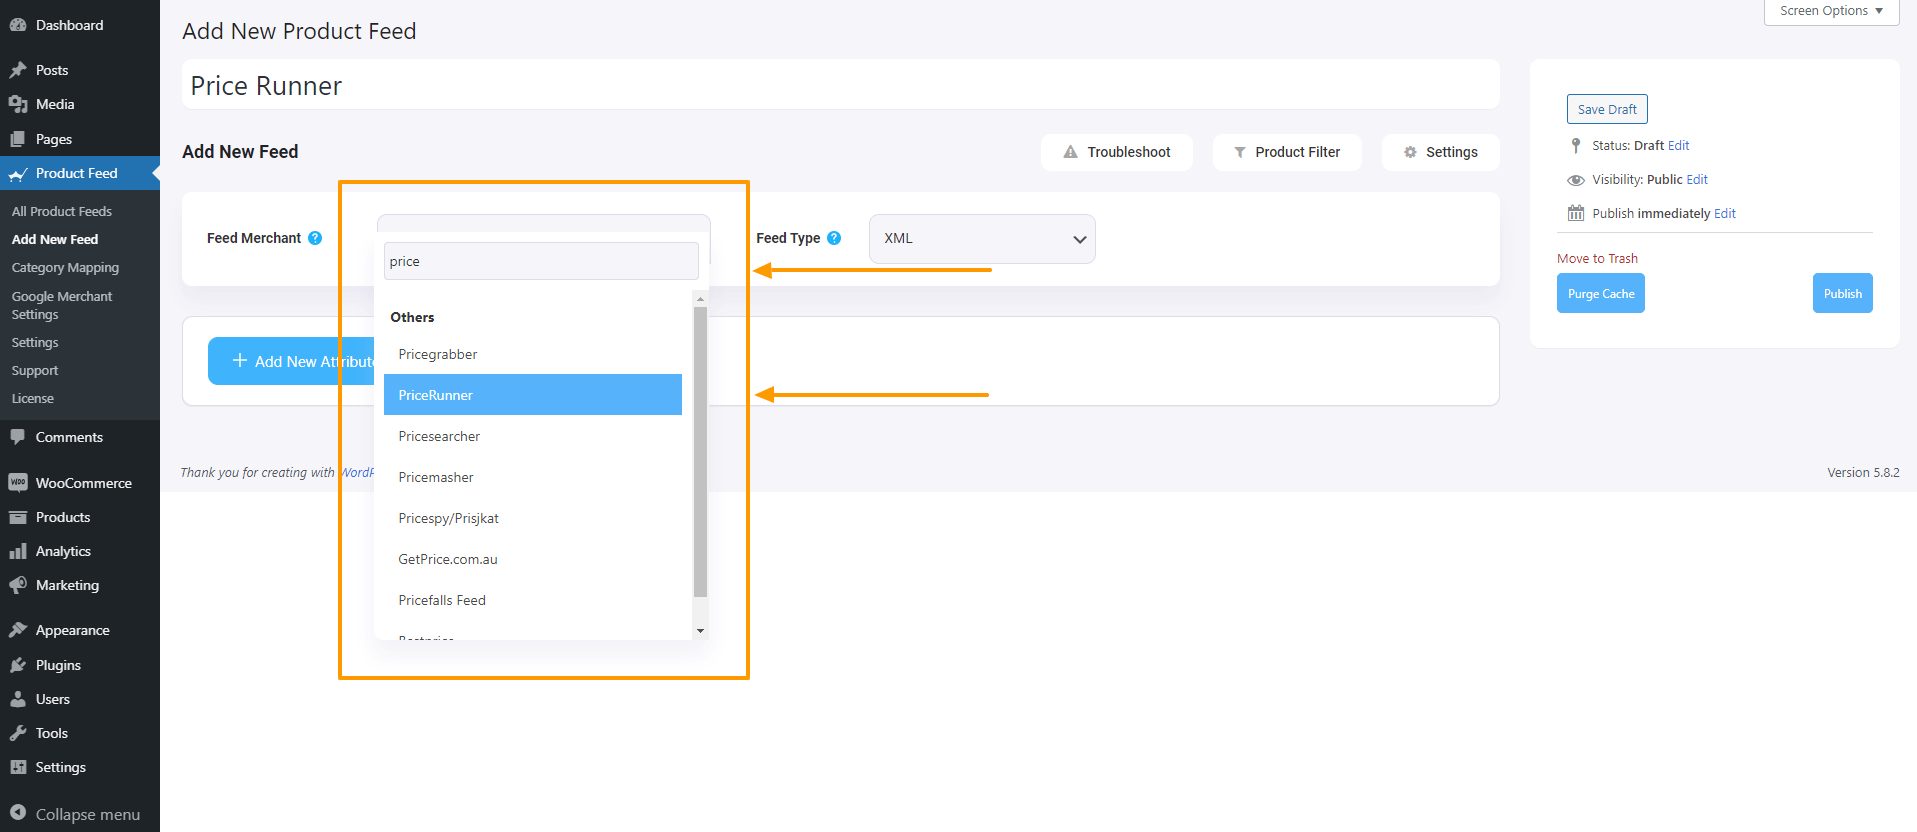
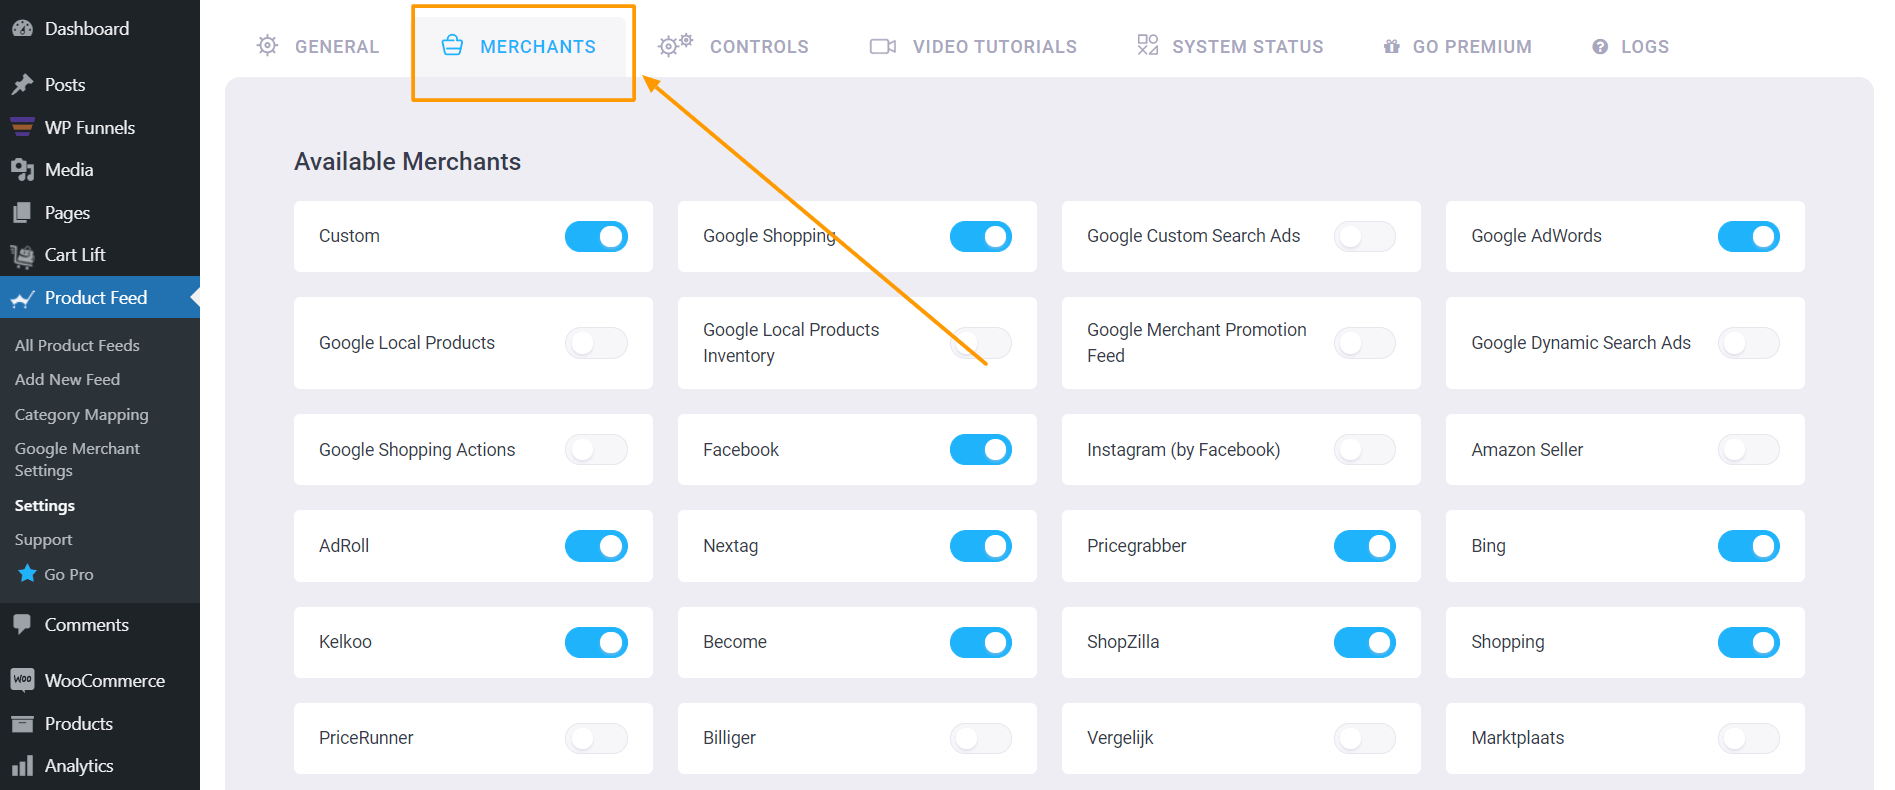
2. Look For A Plugin That Is Compatible with Your Desired Marketplace

It will be a big time-saver if you can find a plugin that is compatible with your desired marketplace in some way.

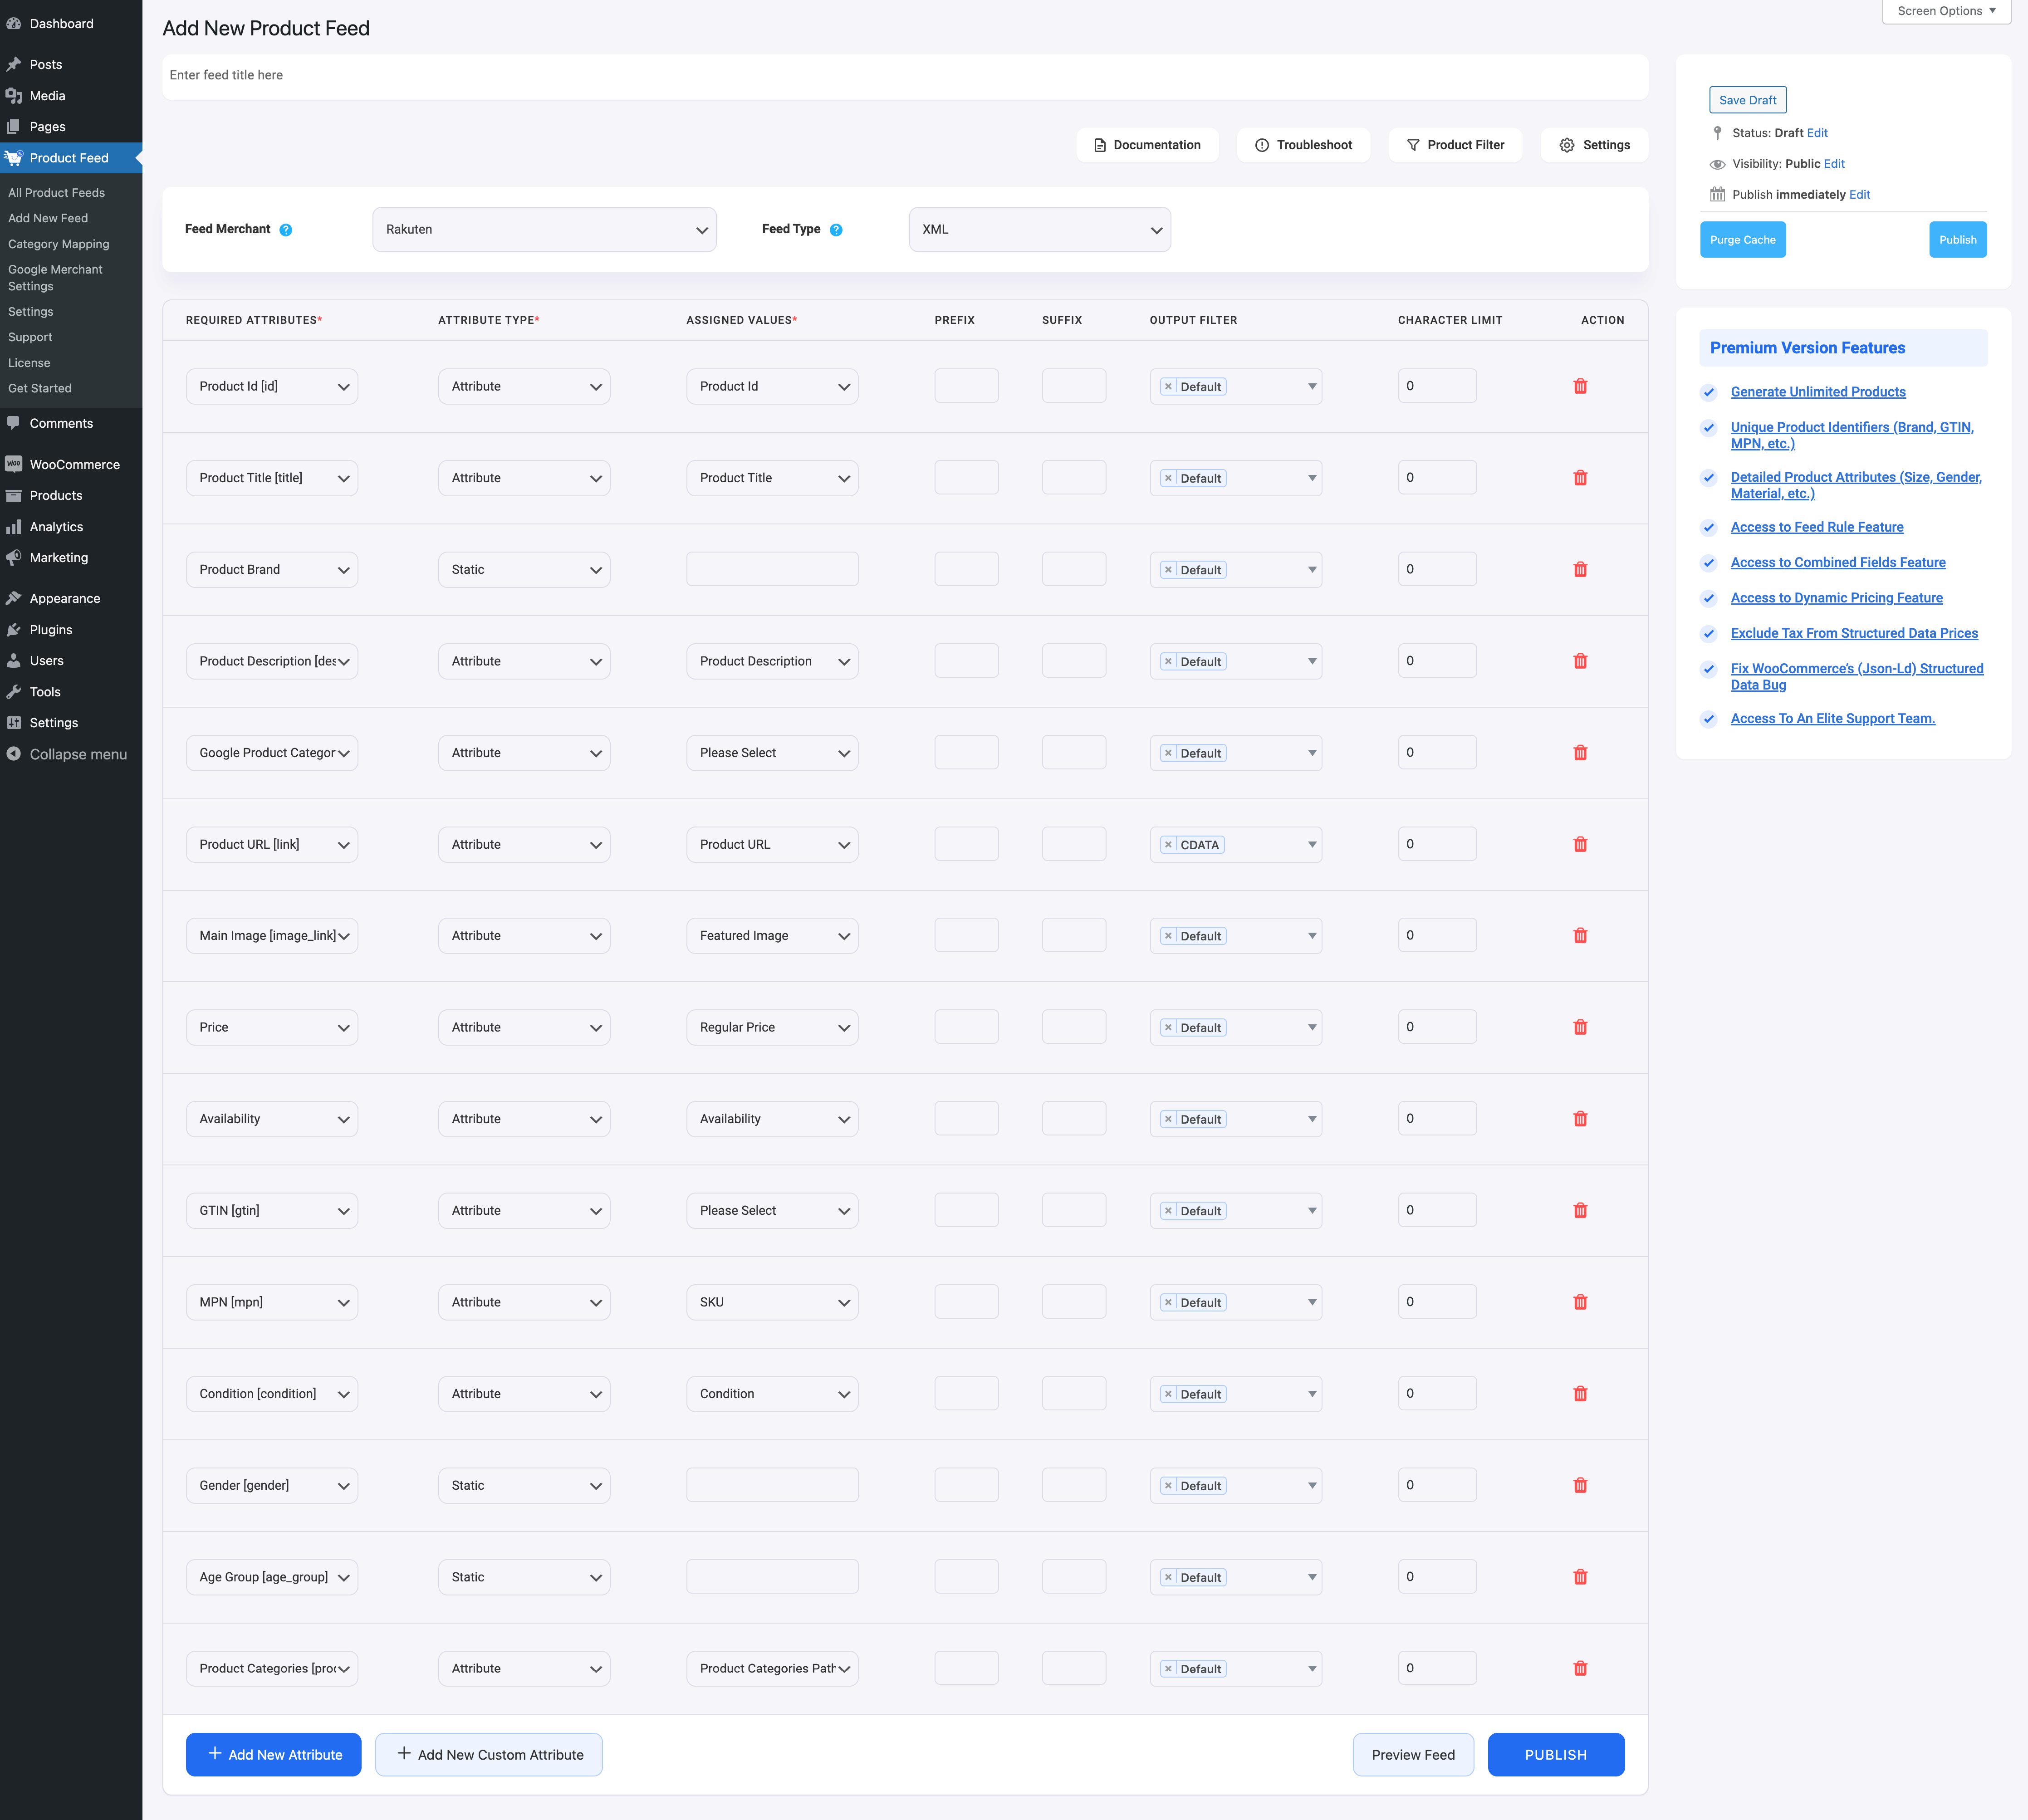
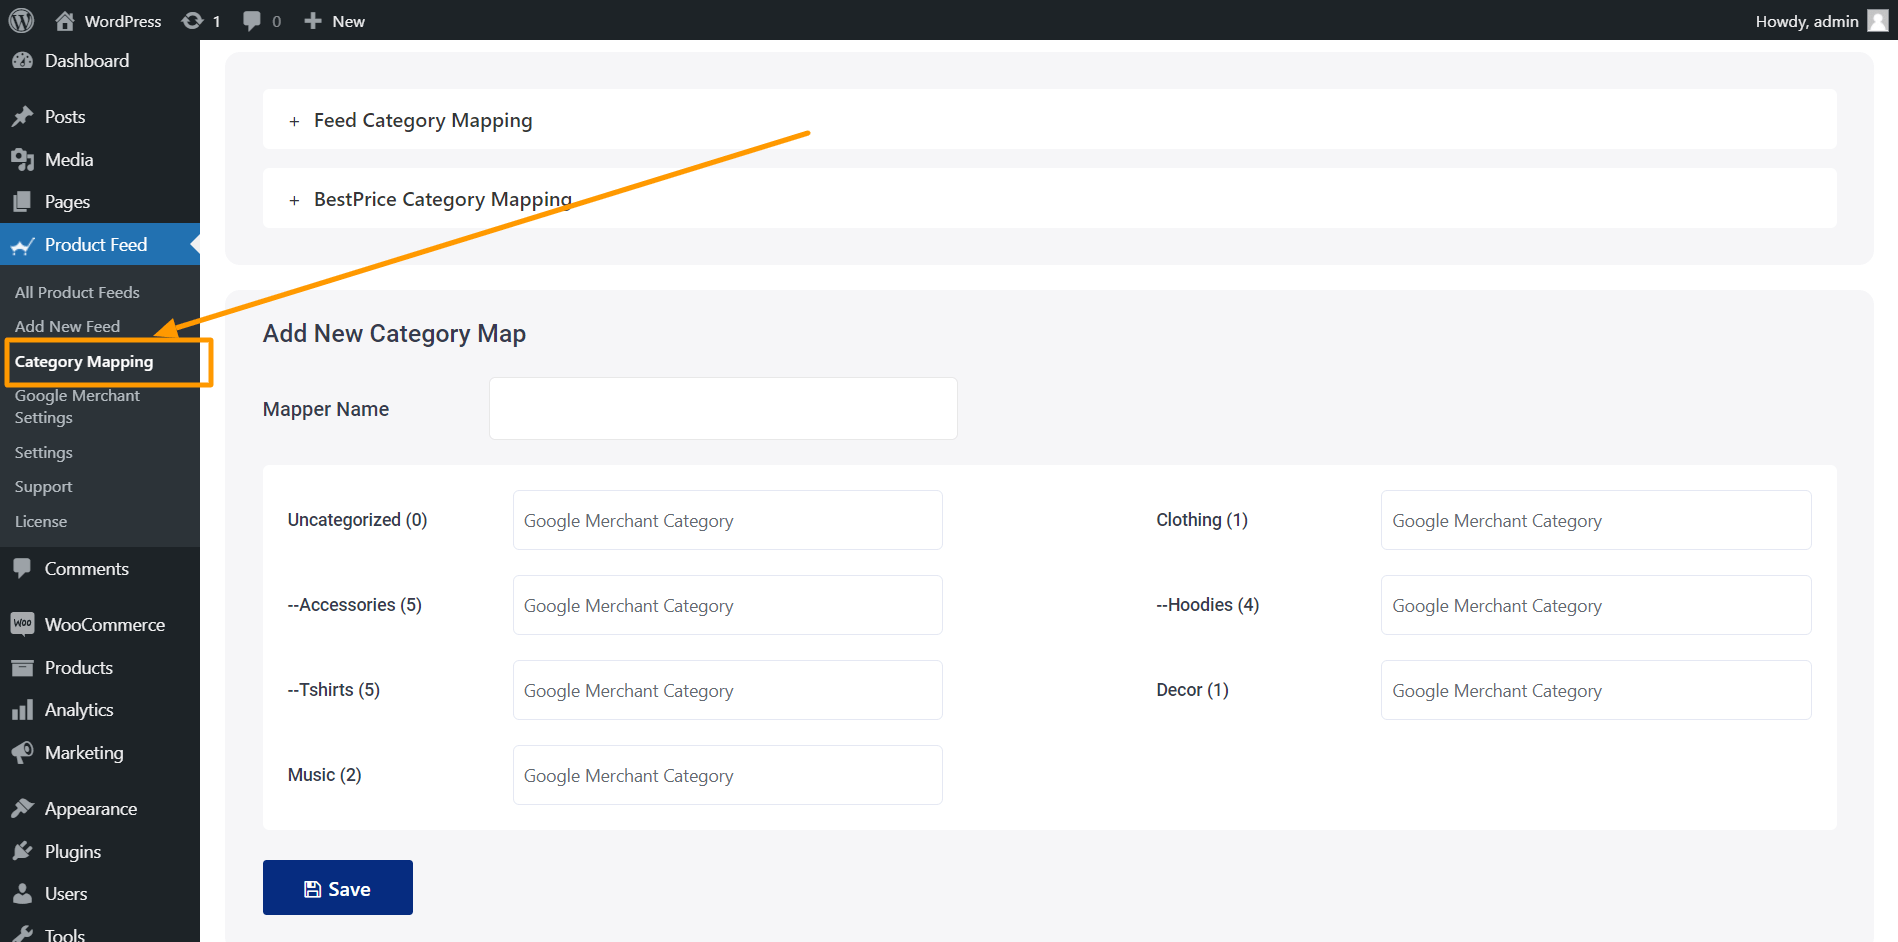
For example, let’s say you want to upload your products on Ceneo. Look for an XML feed plugin that has a prebuilt feed format setup, and all you have to do is ensure the product data is mapped to the right tags.

This will not only save you from spending hours manually configuring tags but also help you ensure you have an accurate feed prepared before uploading on your marketplace.

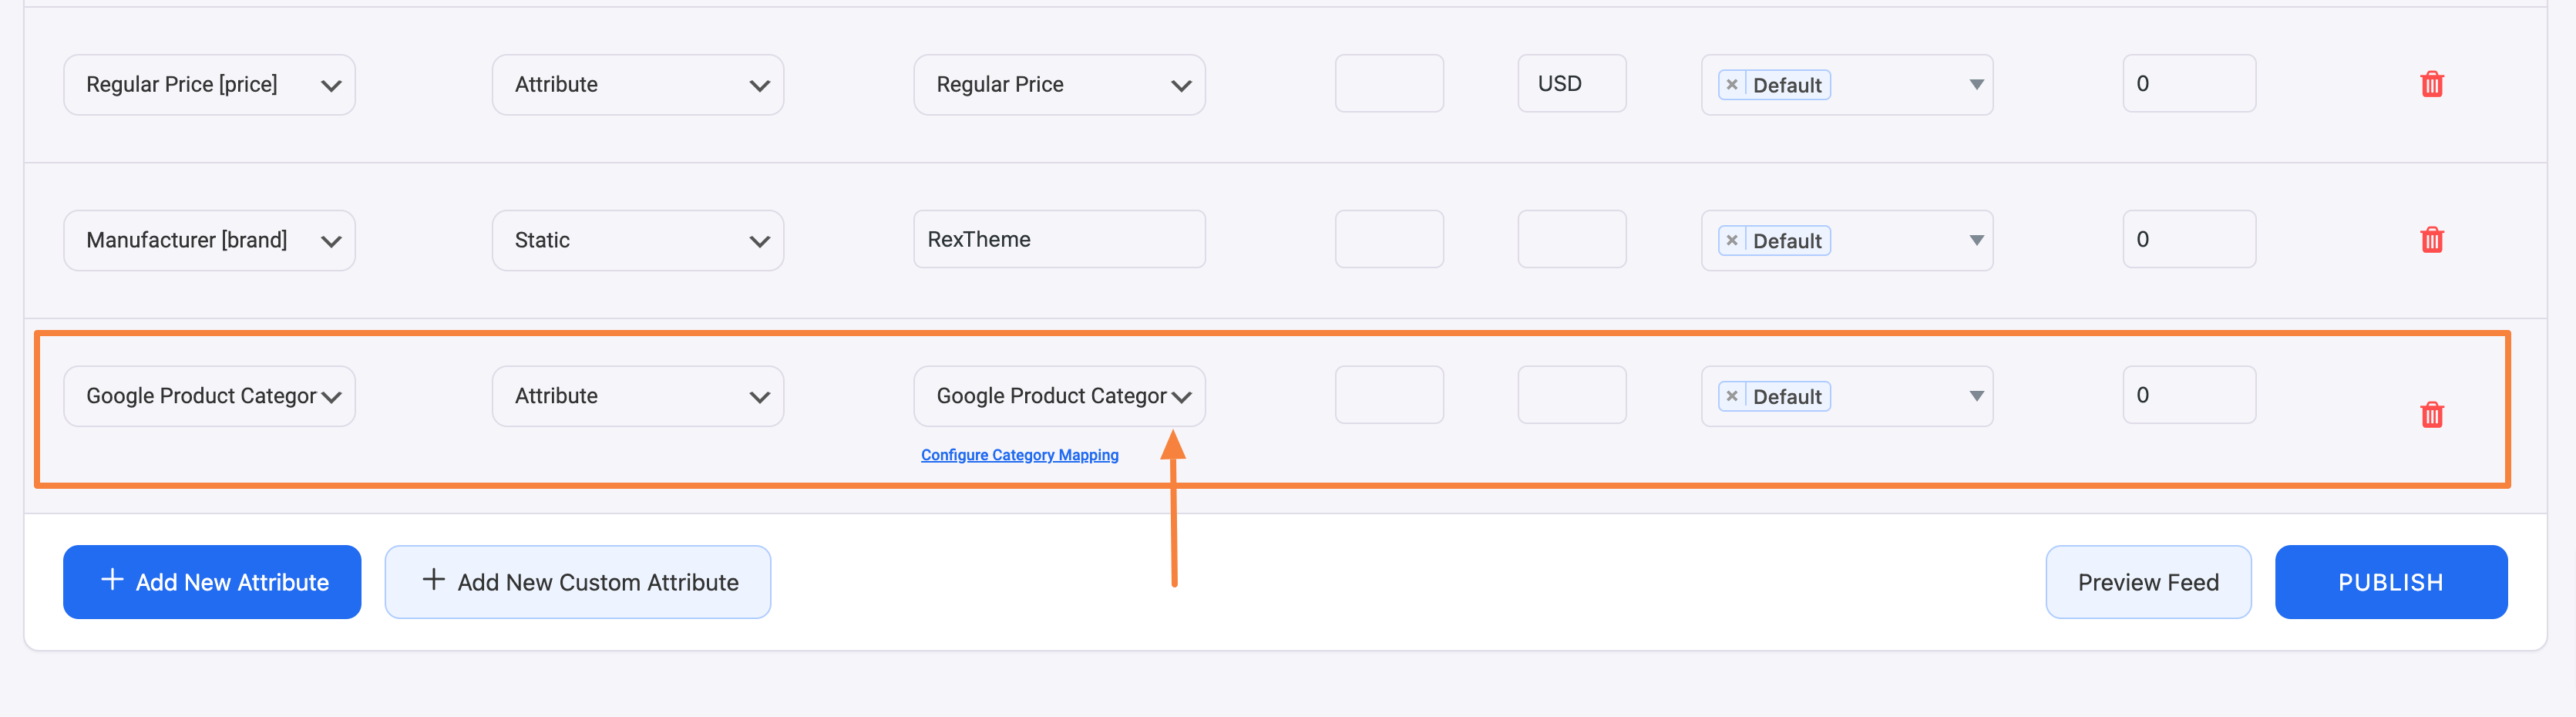
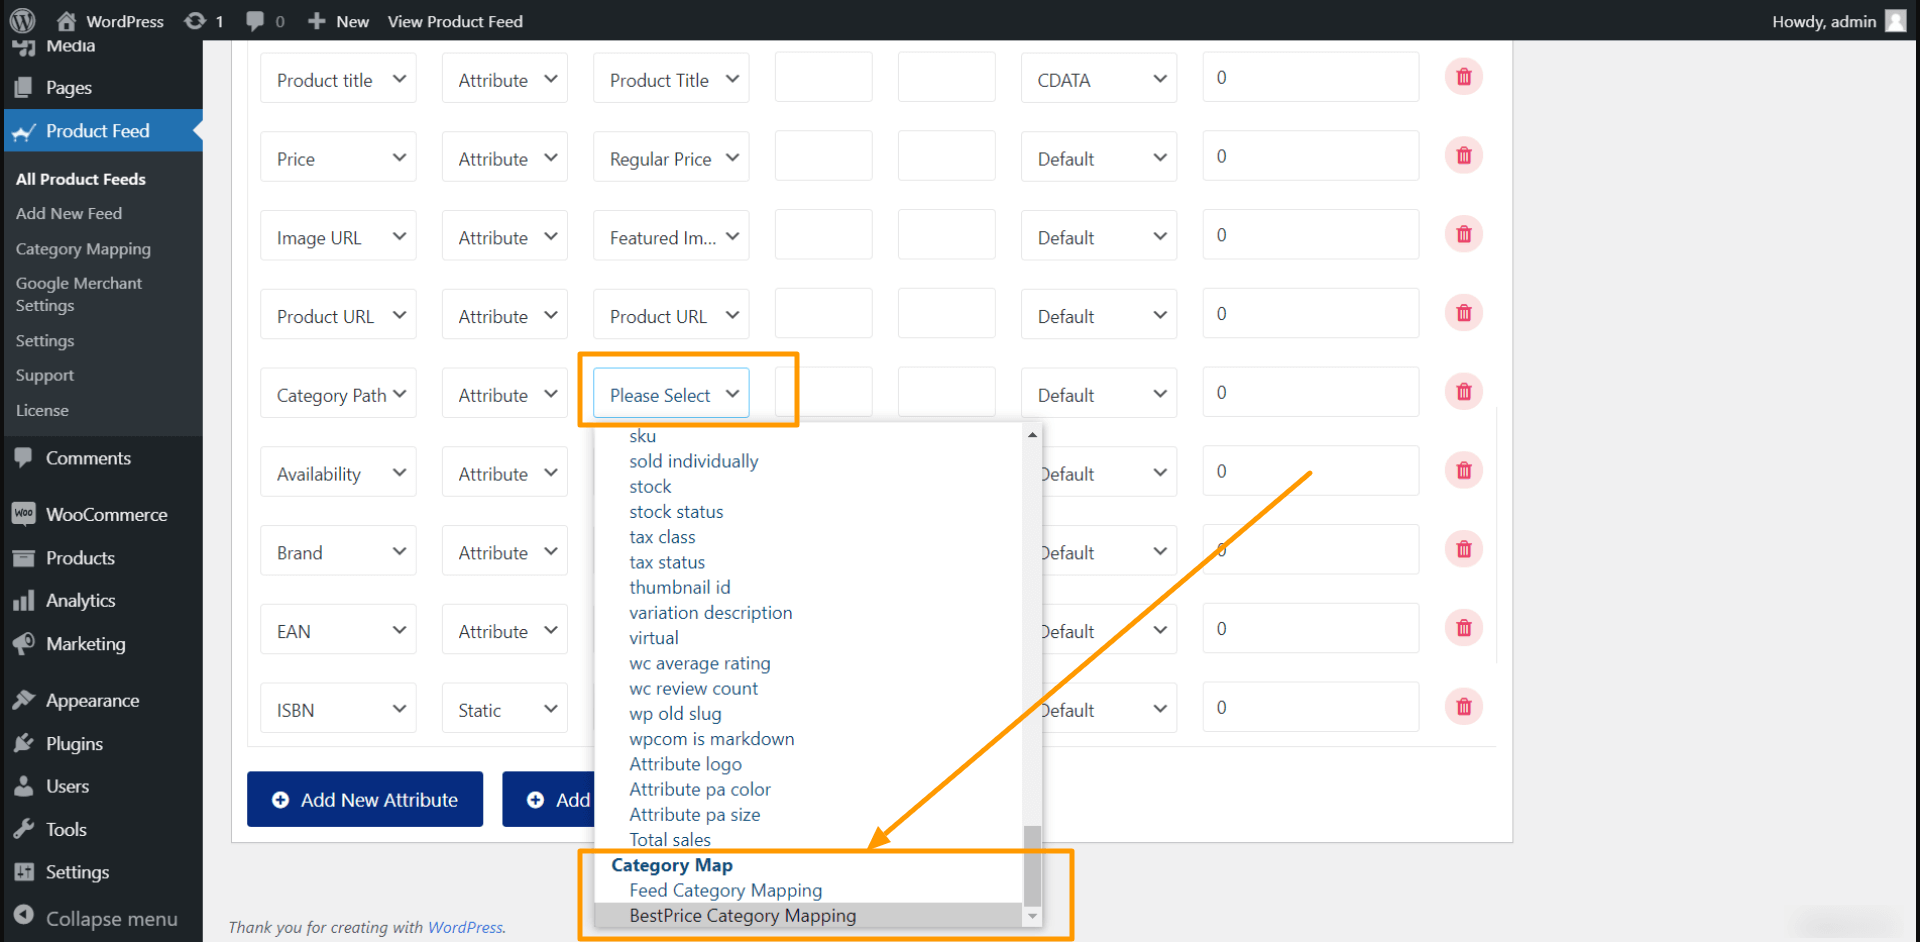
3. Option To Customize The Feed Is A Plus

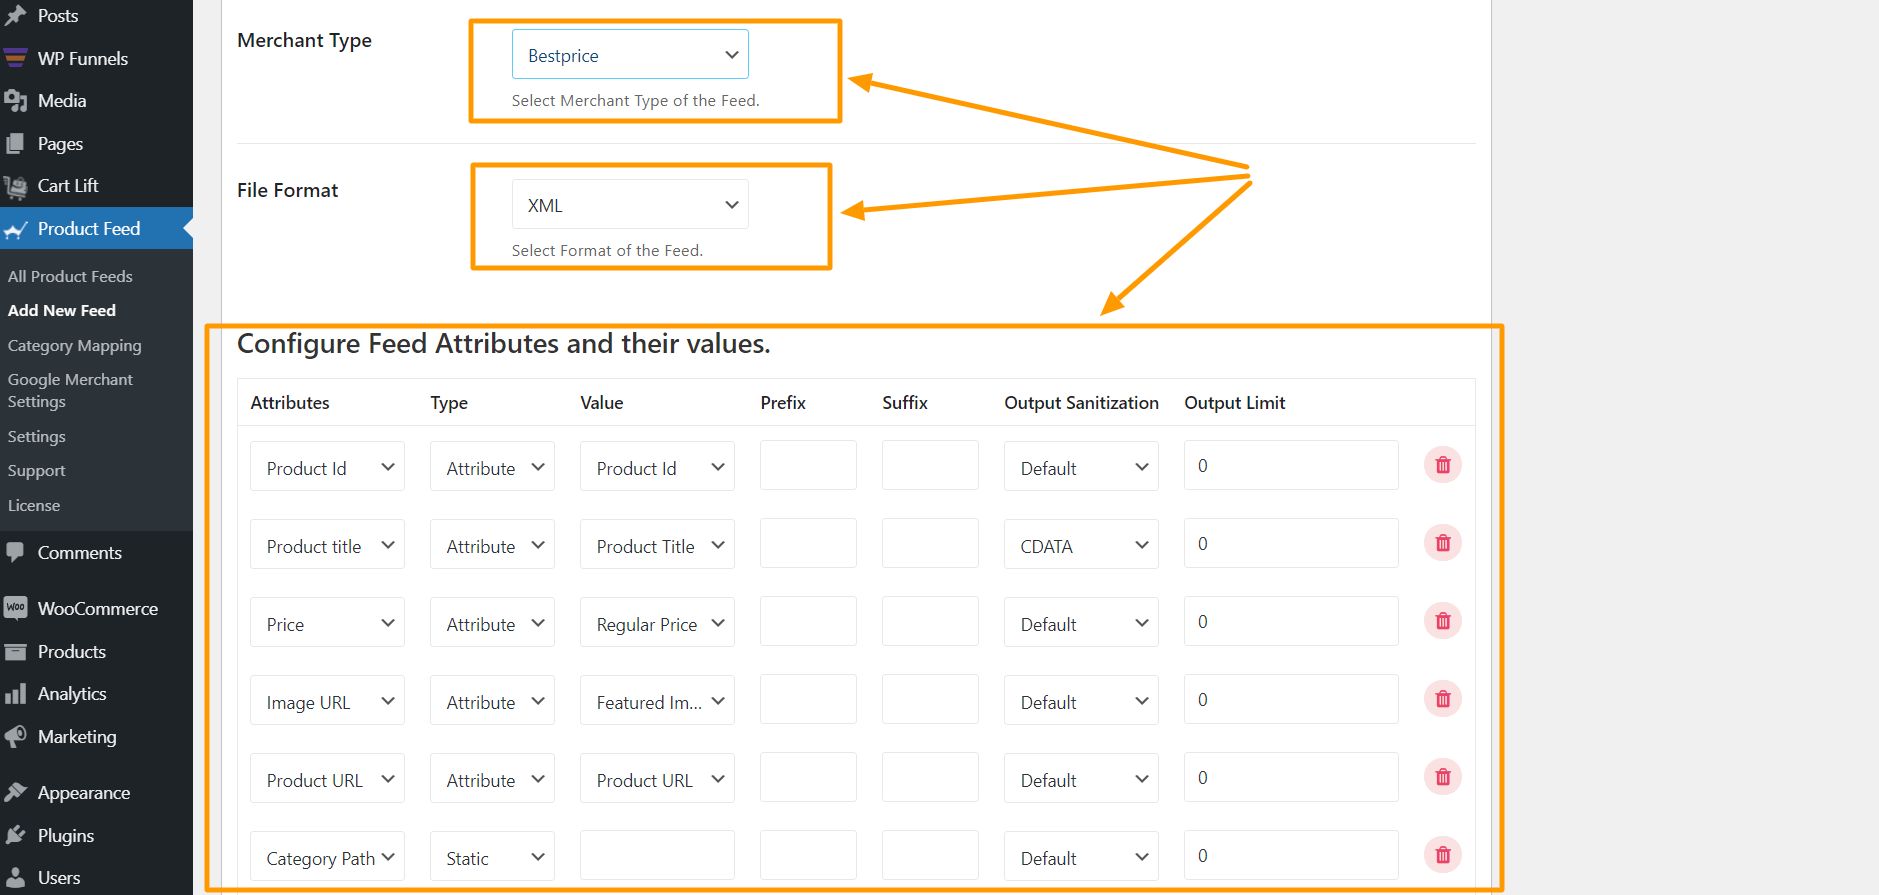
Apart from finding a tool with XML feed templates for certain online marketplaces, having the ability to customize the feed will give you more control.

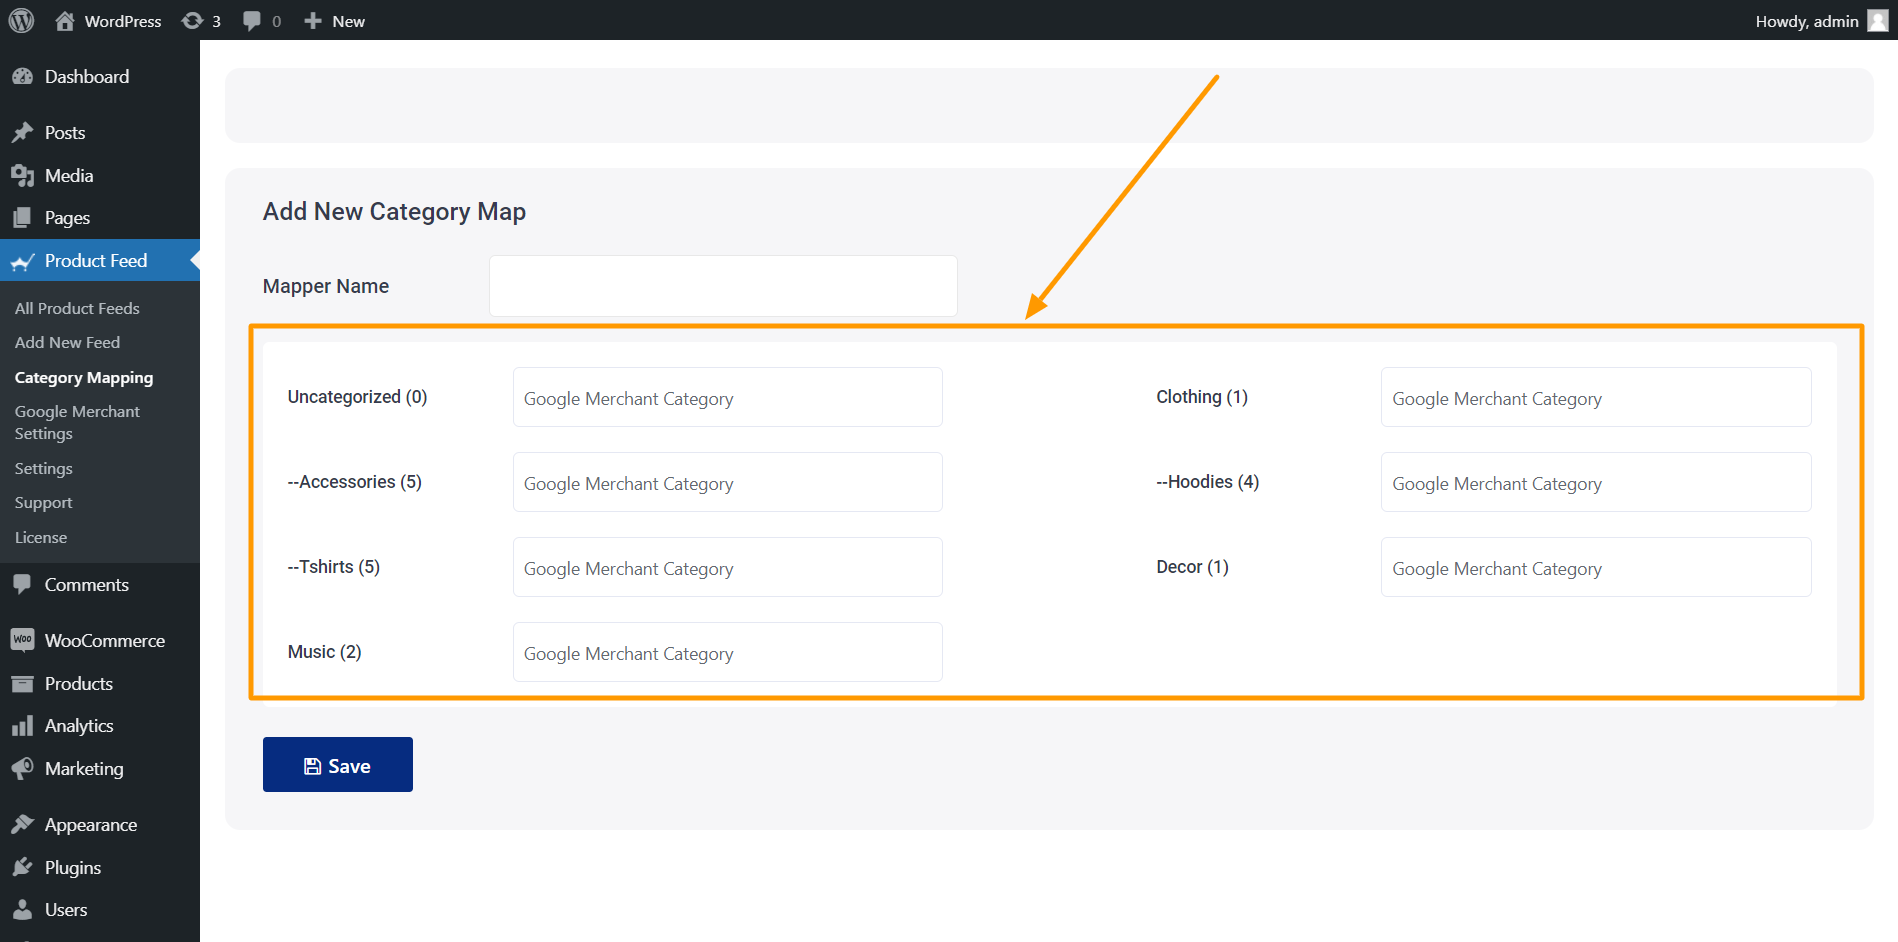
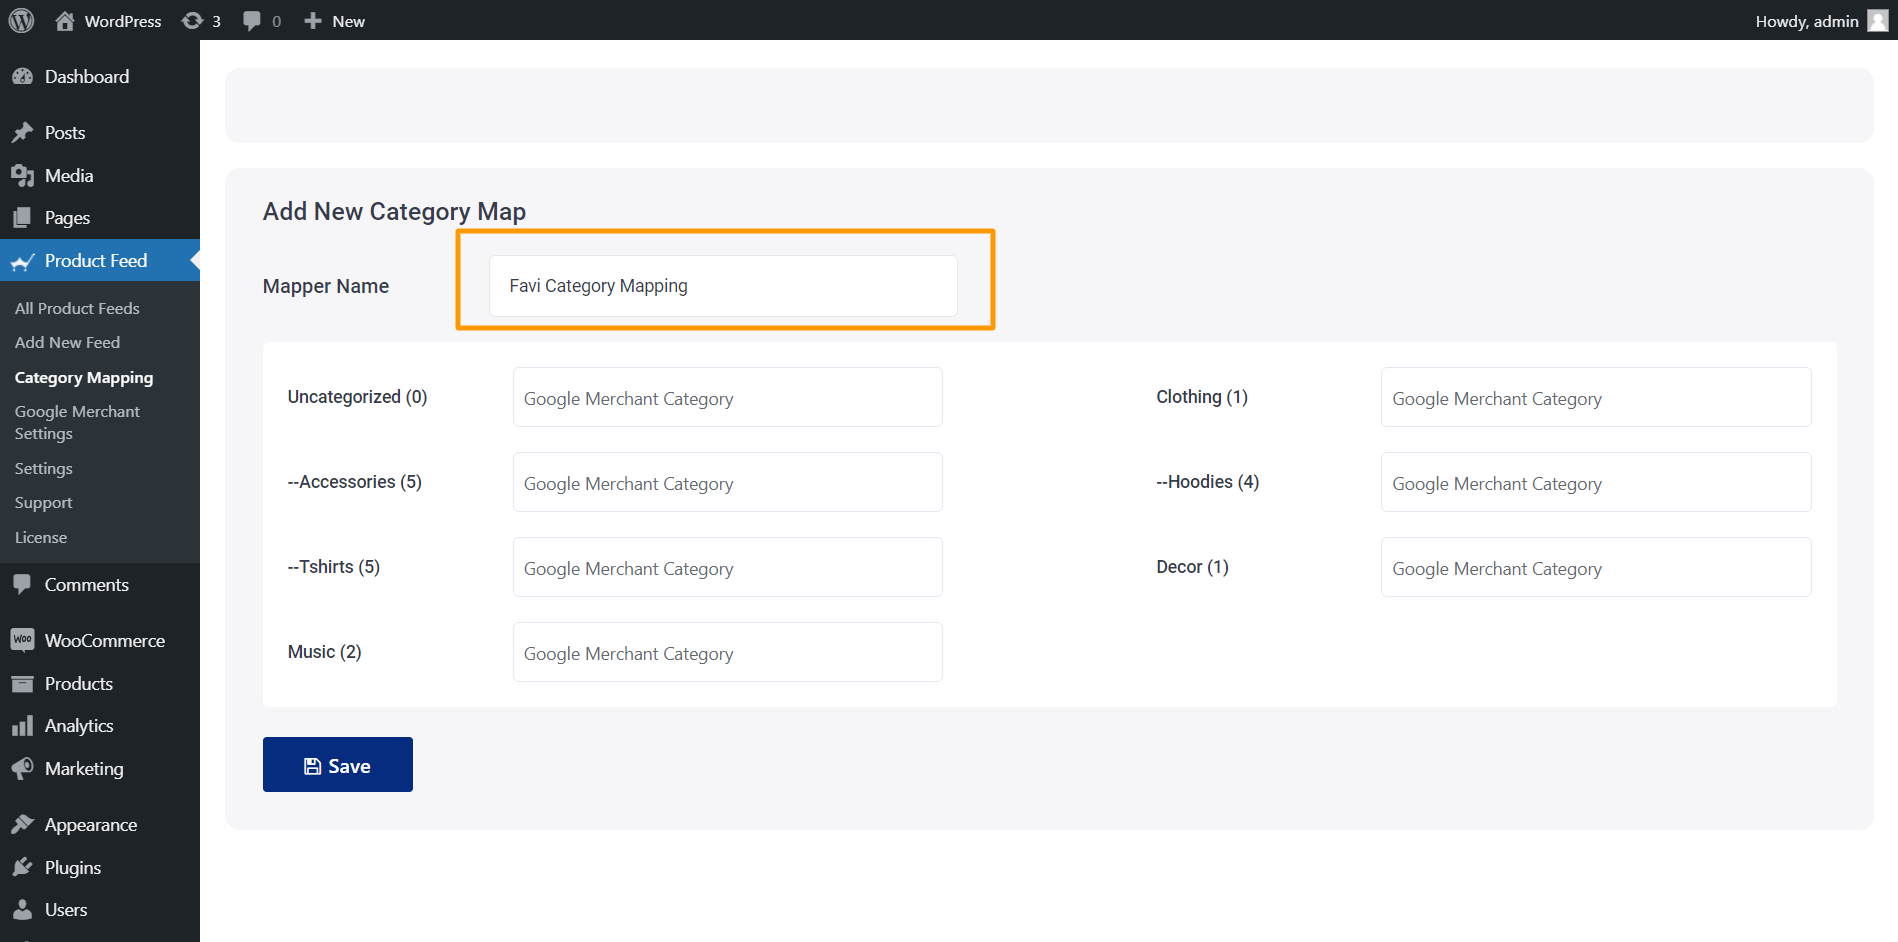
For instance, if you have a local marketplace that requires specific tags to be included in the XML feed, then you may create a custom XML feed template to ensure you don’t need to use a separate tool for it.

Plus, the ability to customize the product data based on a few conditions can be a great added benefit. For instance, let’s say you want to sell your products on Google Shopping, which requires specific image sizes and categories. If your feed plugin does not allow you to modify the attributes, you may be unable to list your products on Google Shopping, resulting in lost sales opportunities. So, the customization option can be quite handy.

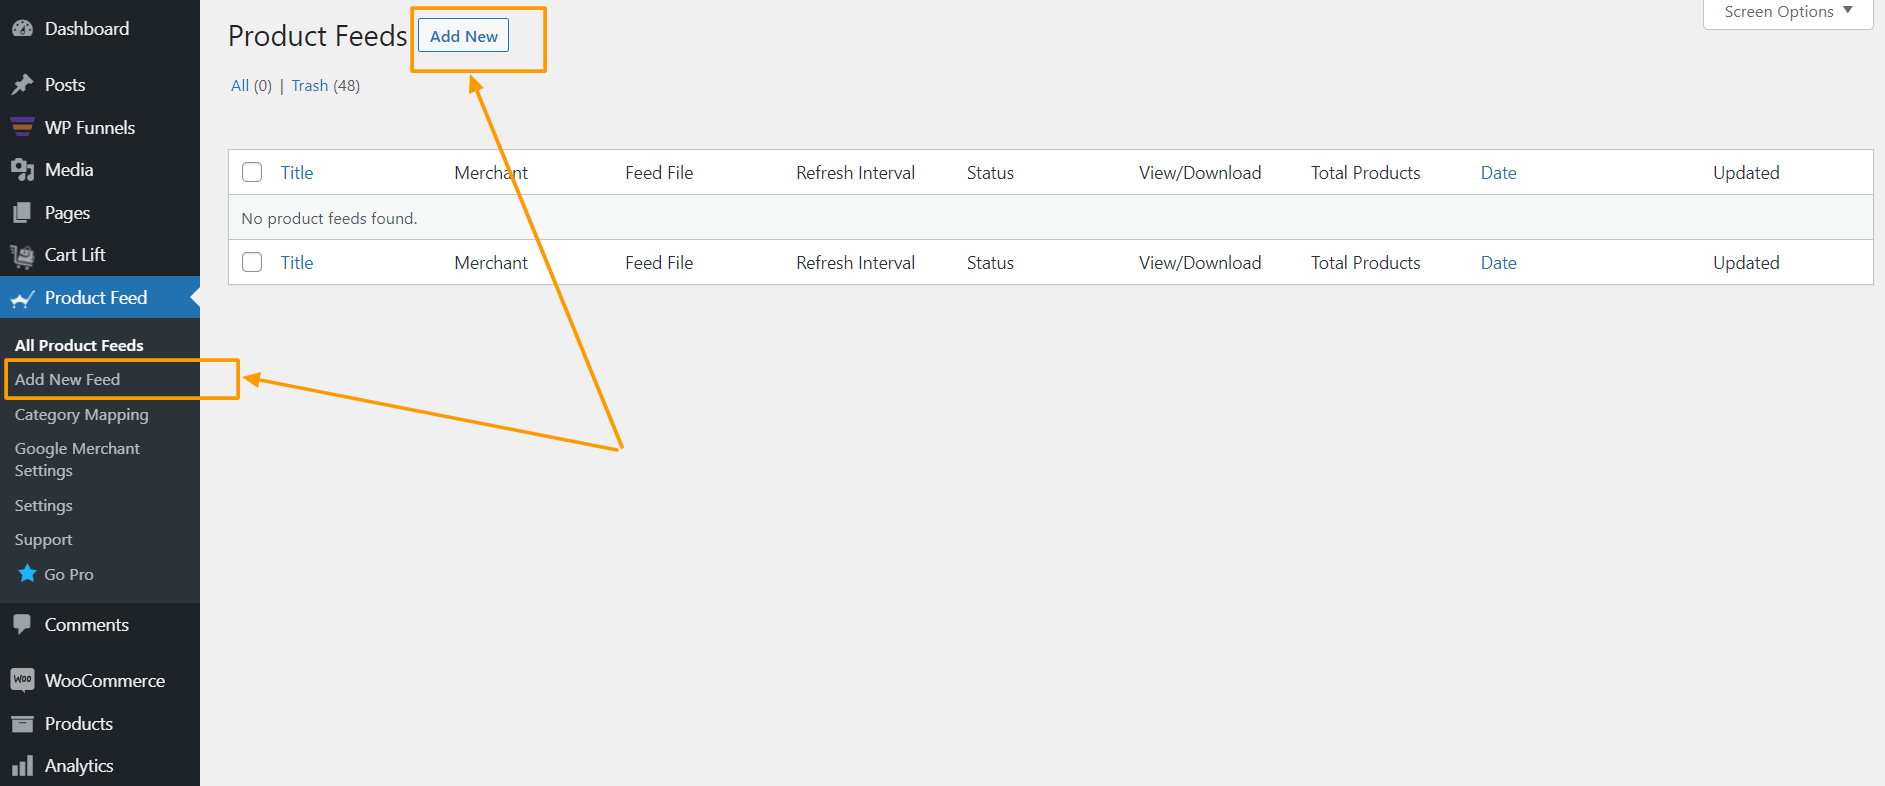
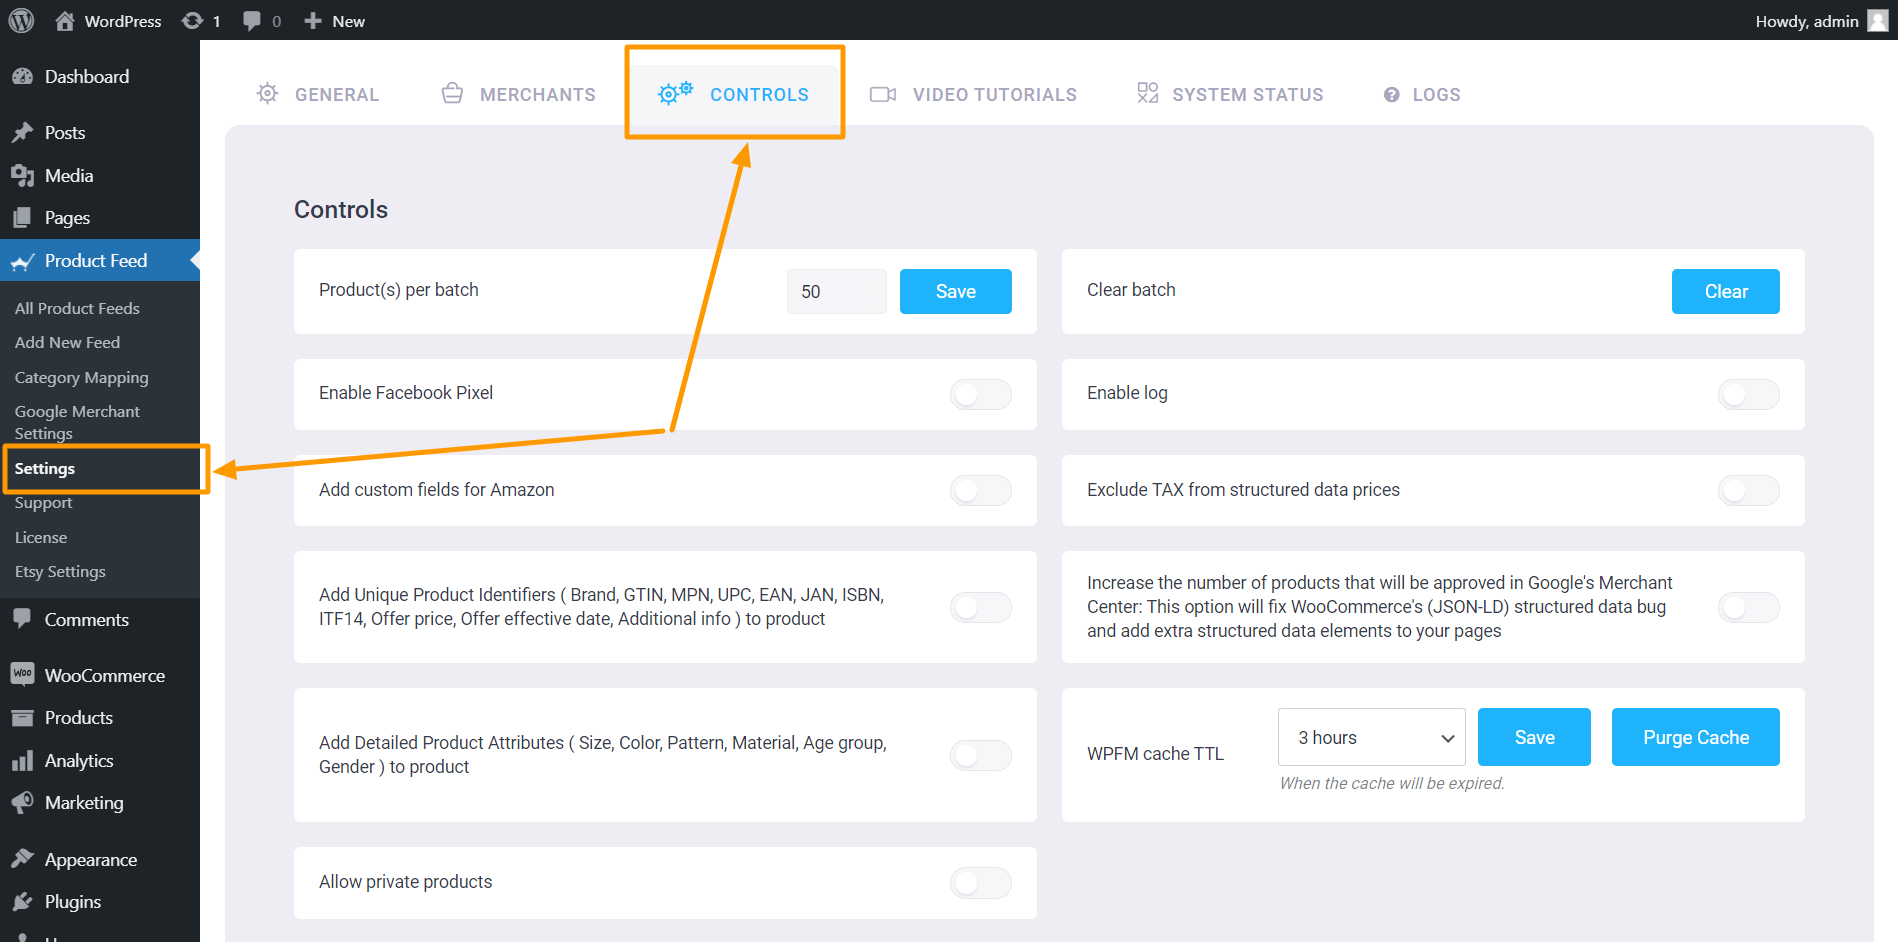
4. Easy Feed Management

Creating a product feed should not be complicated. You need to ensure you can start generating a product feed for a specific marketplace without spending hours of your time.

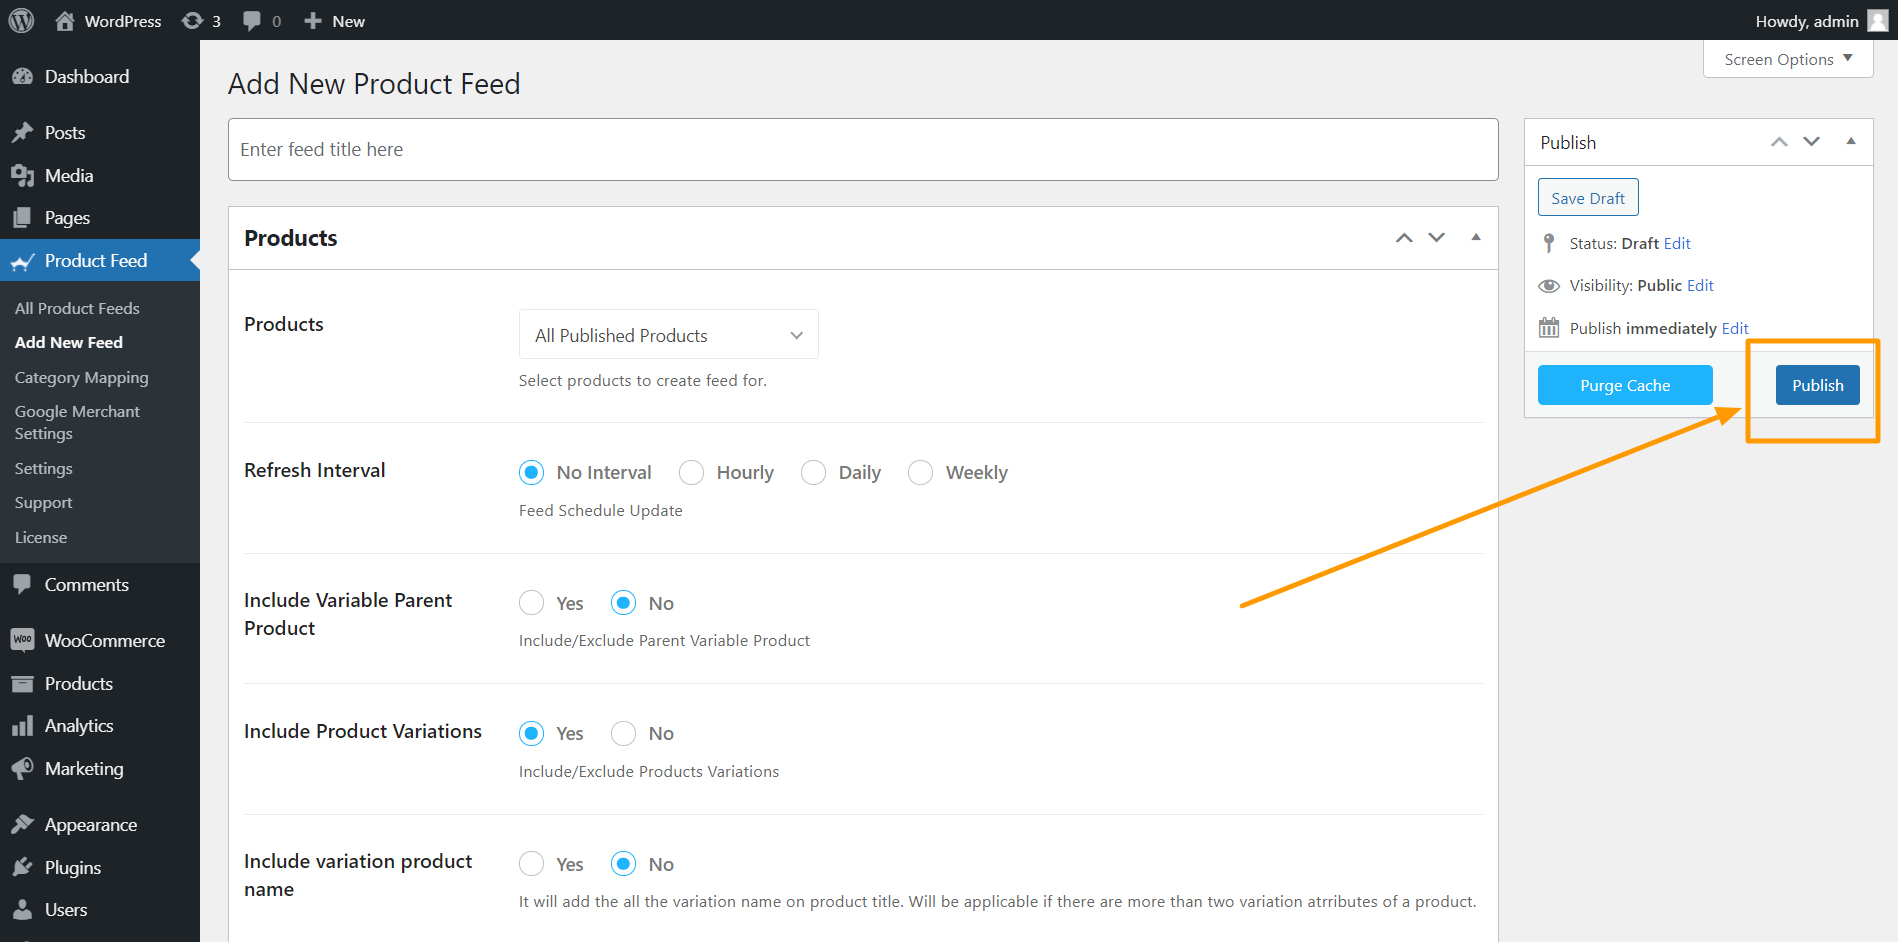
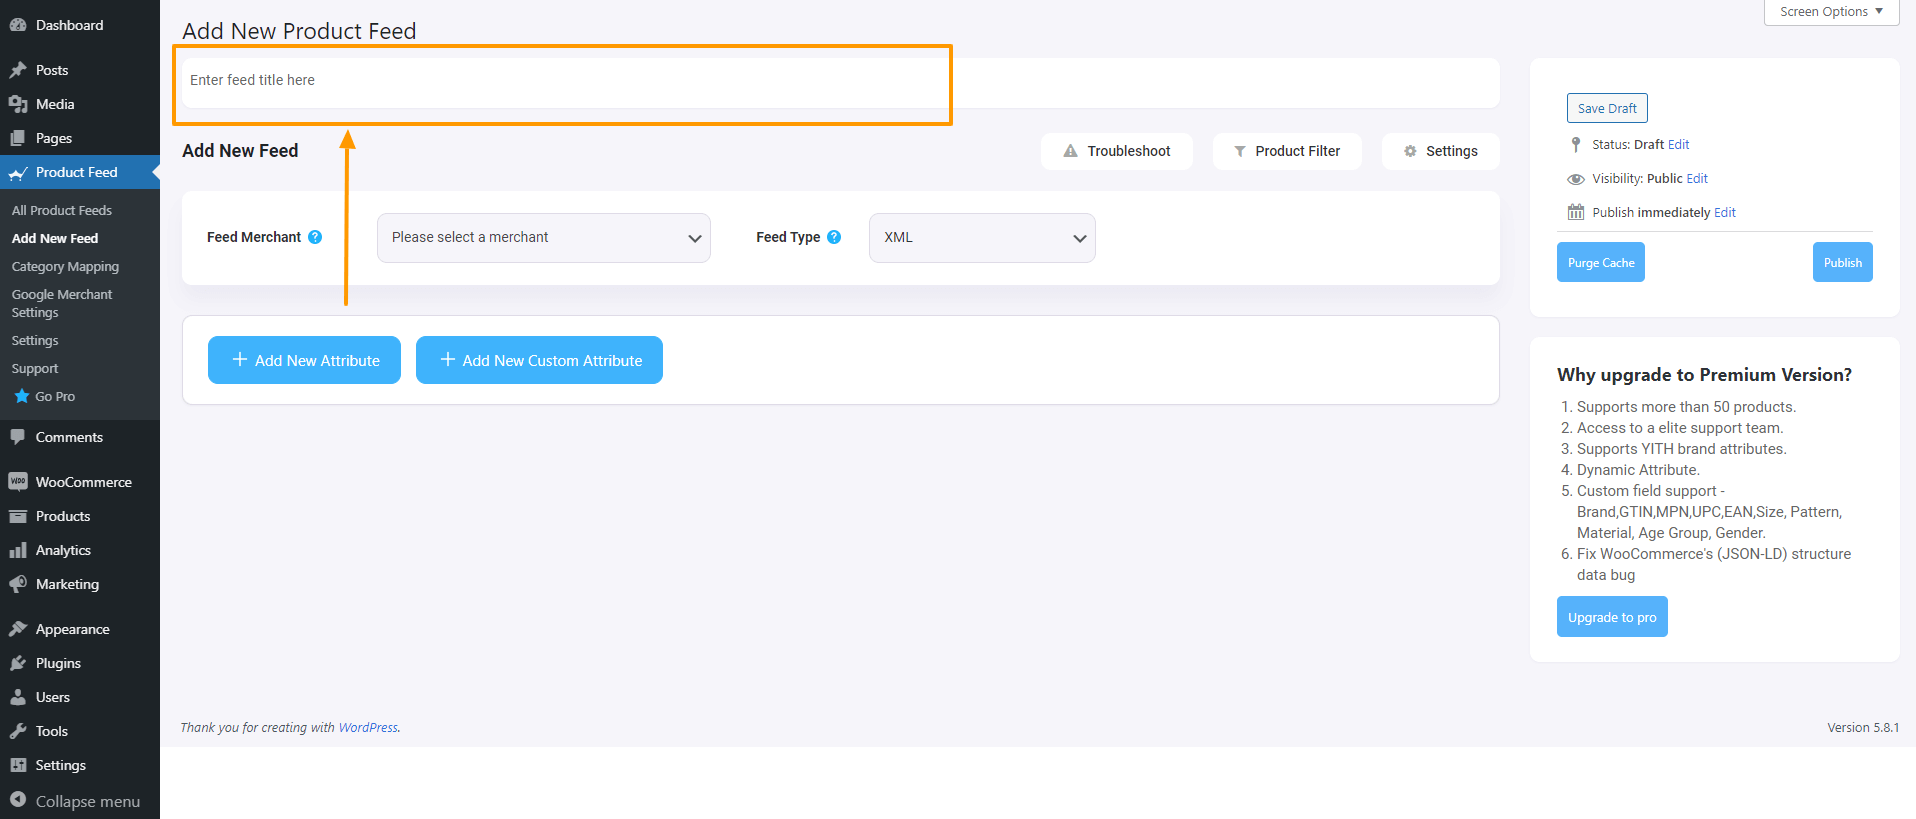
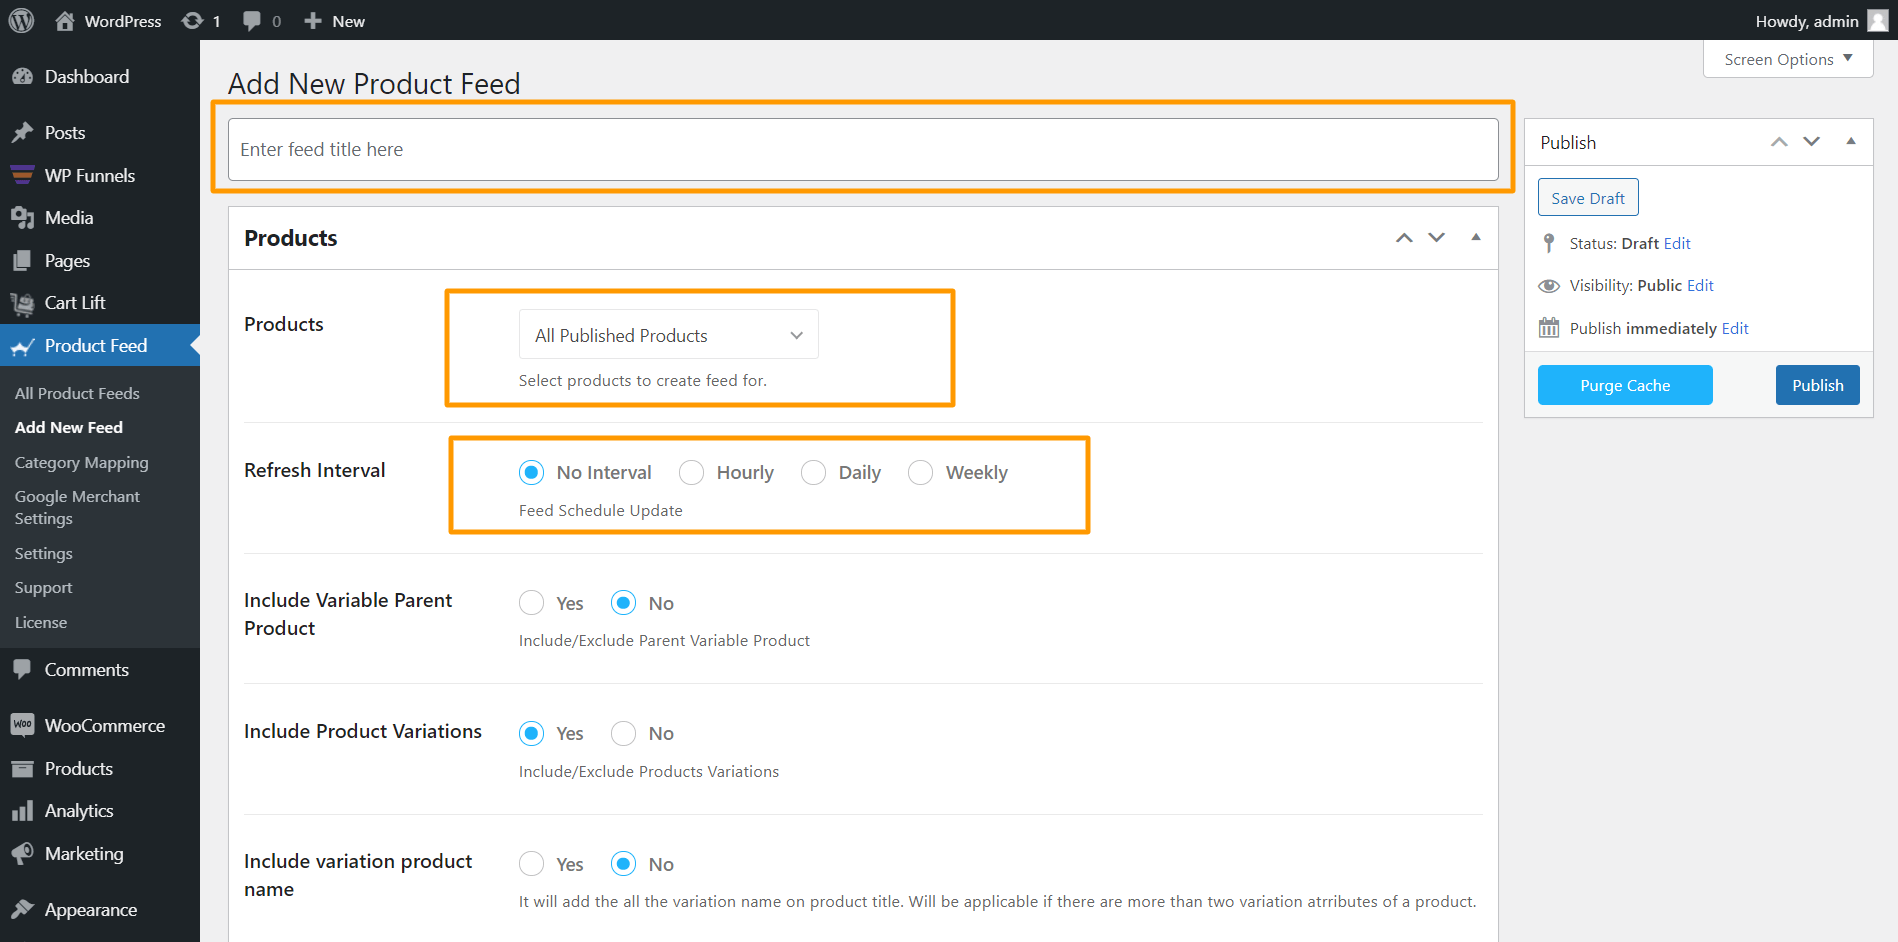
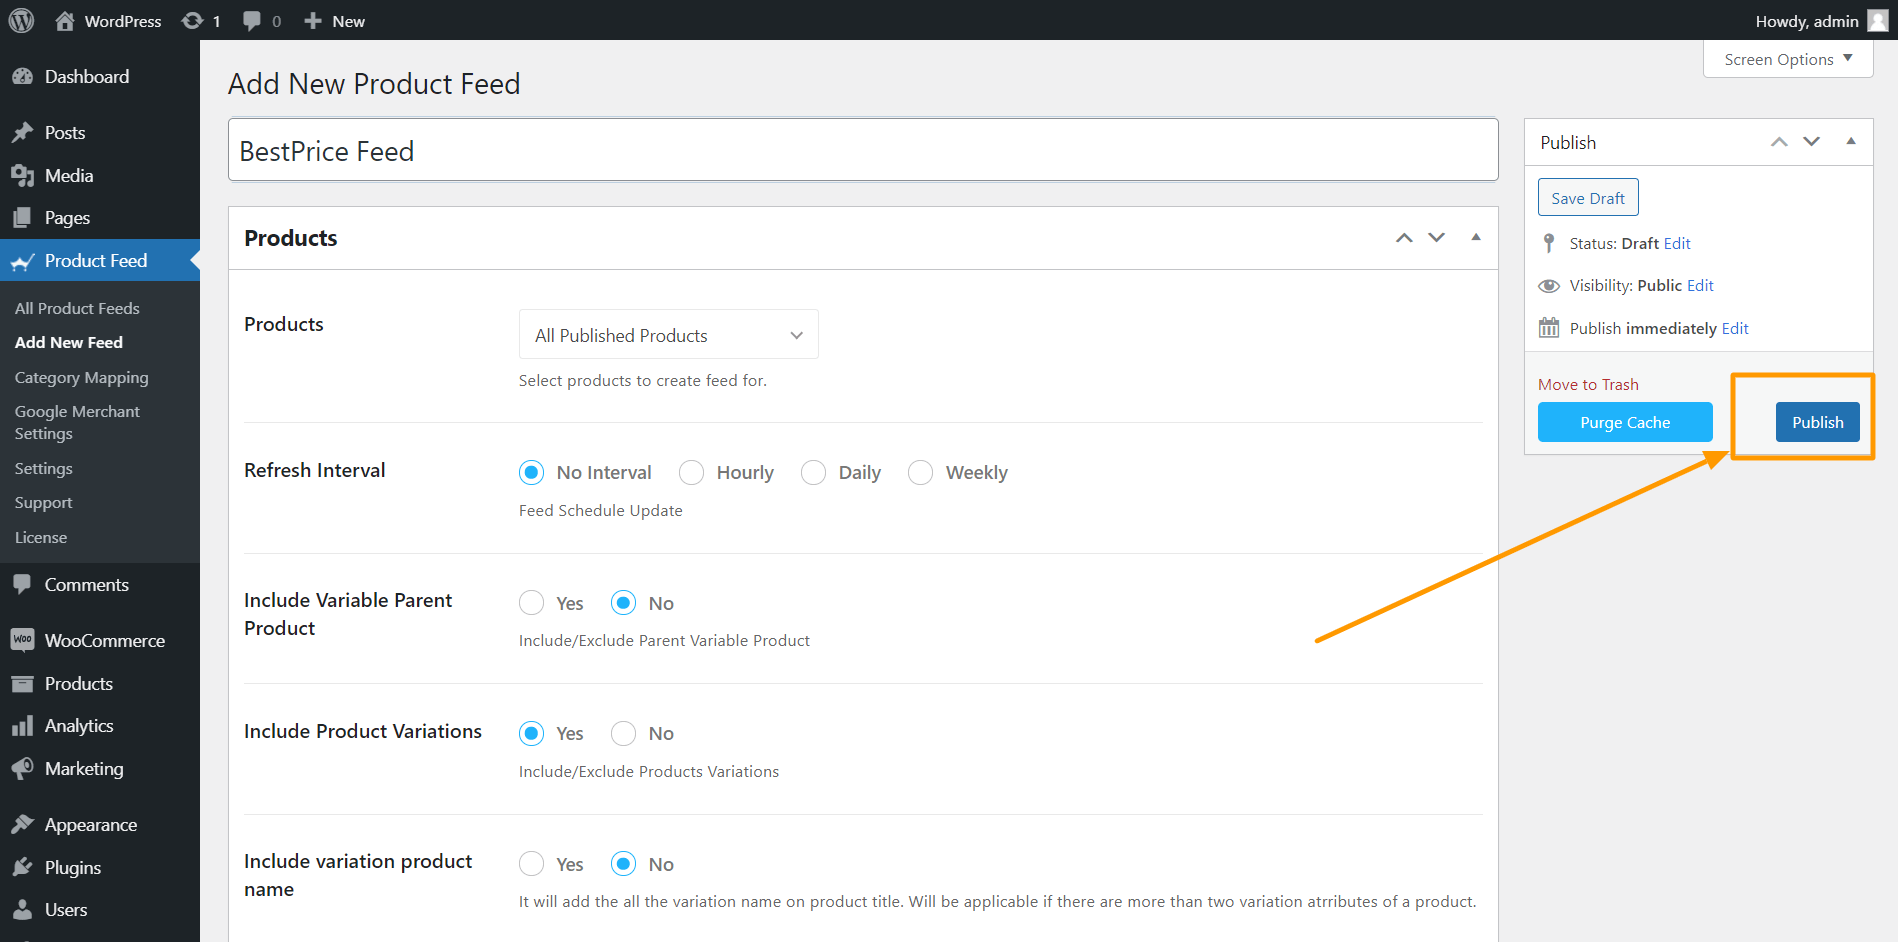
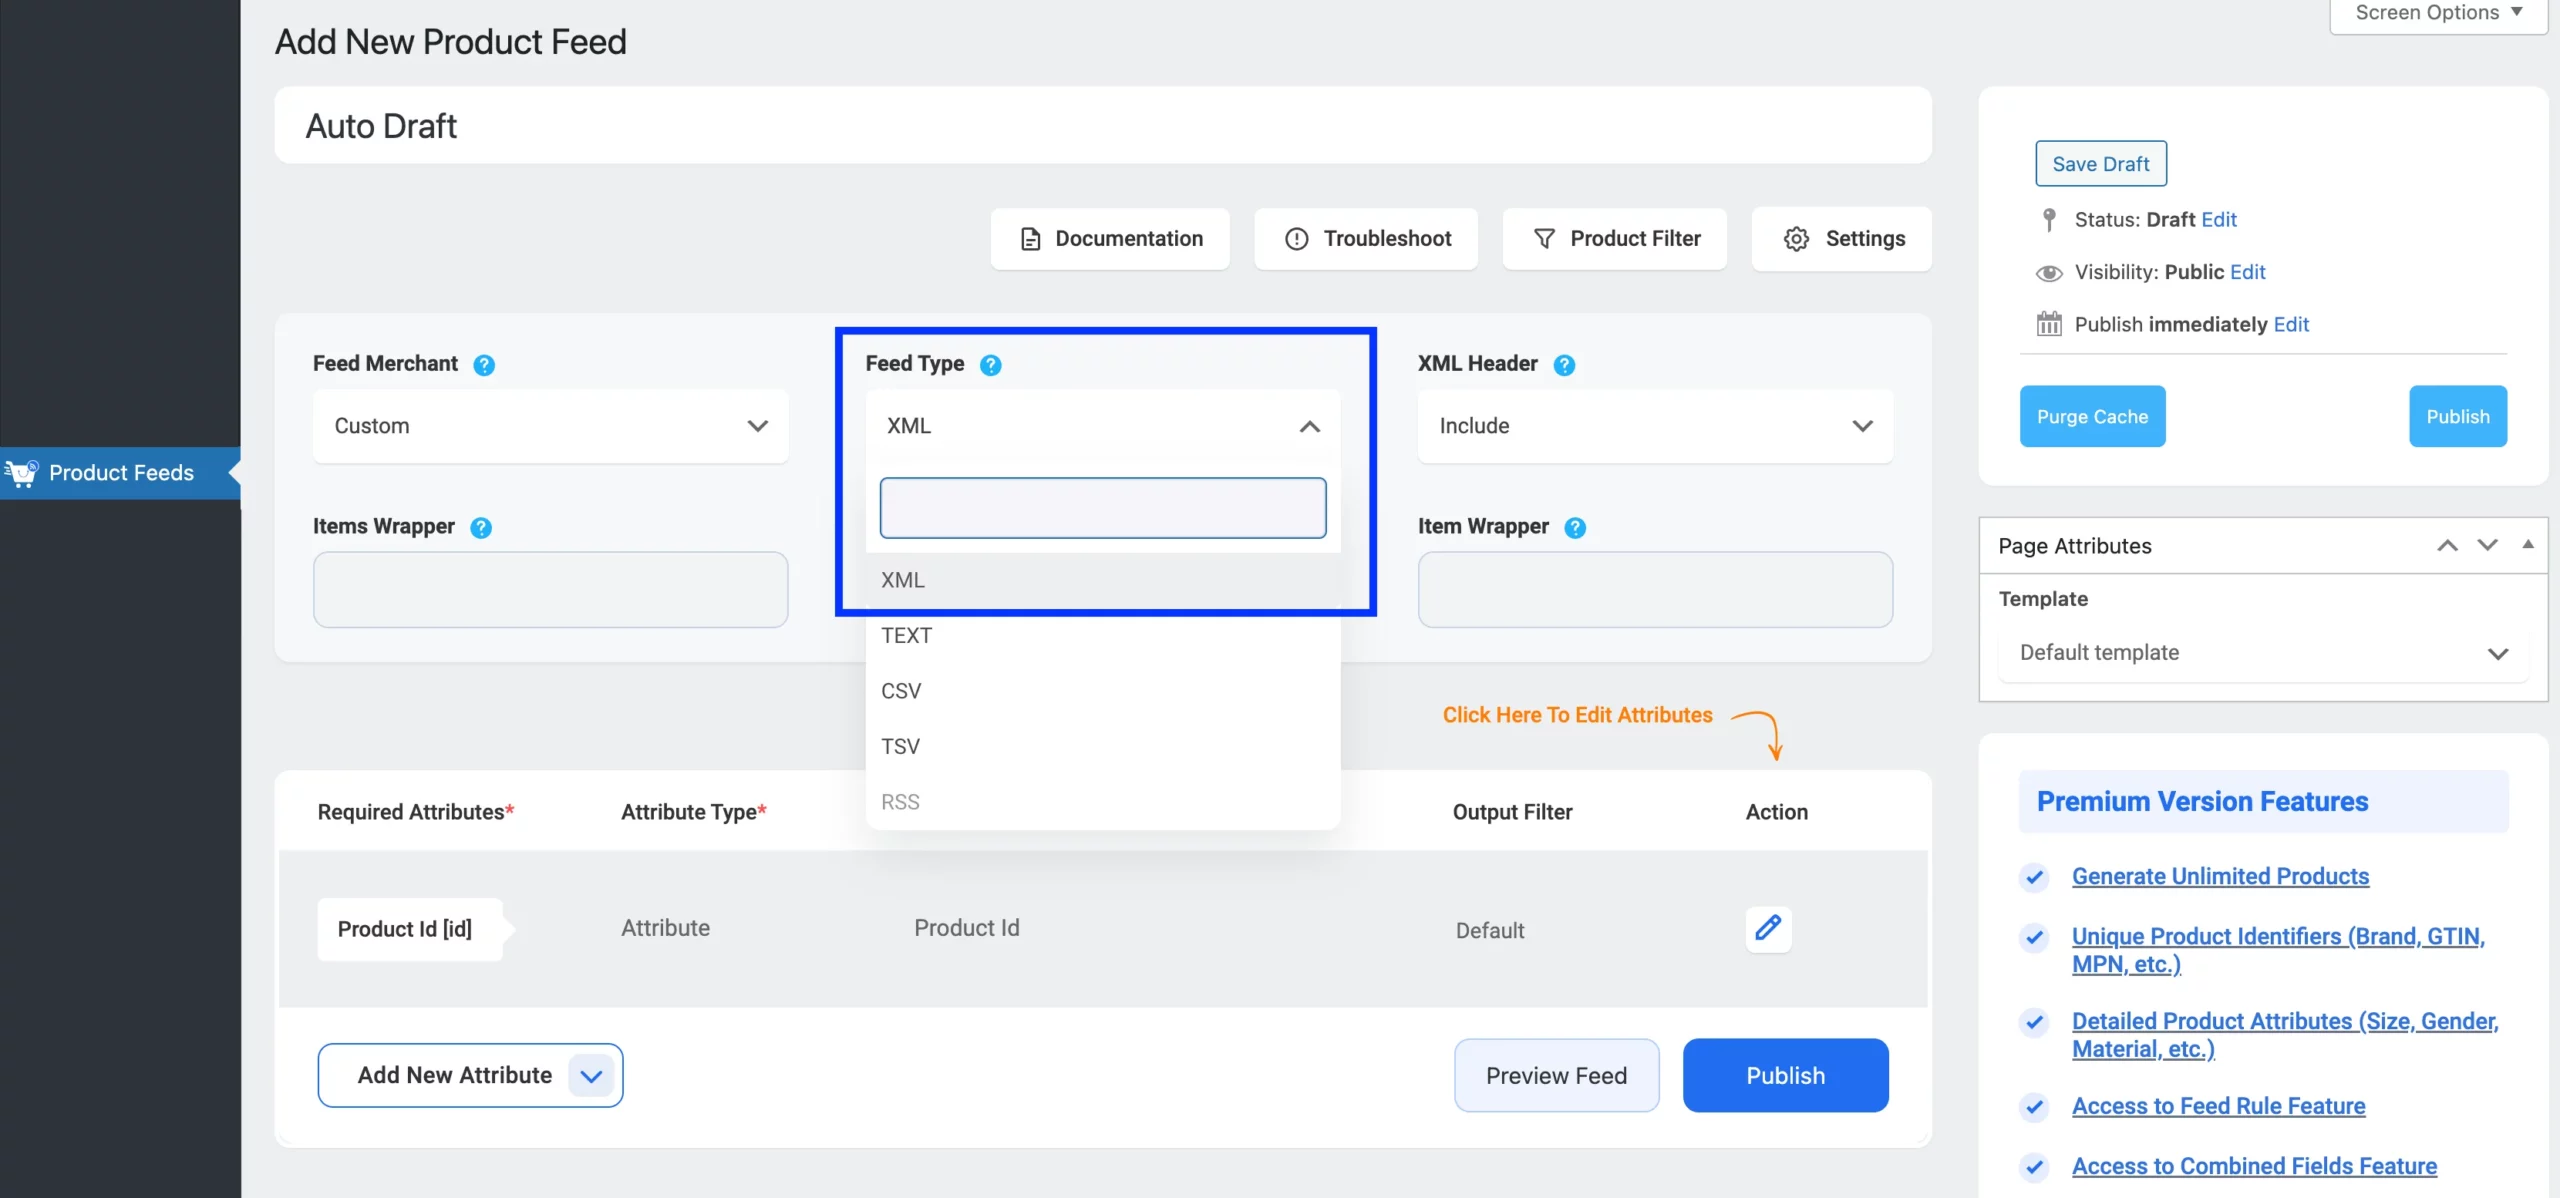
Seemingly, there are a few plugins in WordPress that help with this. But today I will introduce you to a plugin that will allow you to generate an XML feed for your desired marketplace in as low as 4 clocks, along with all the right data and tags.

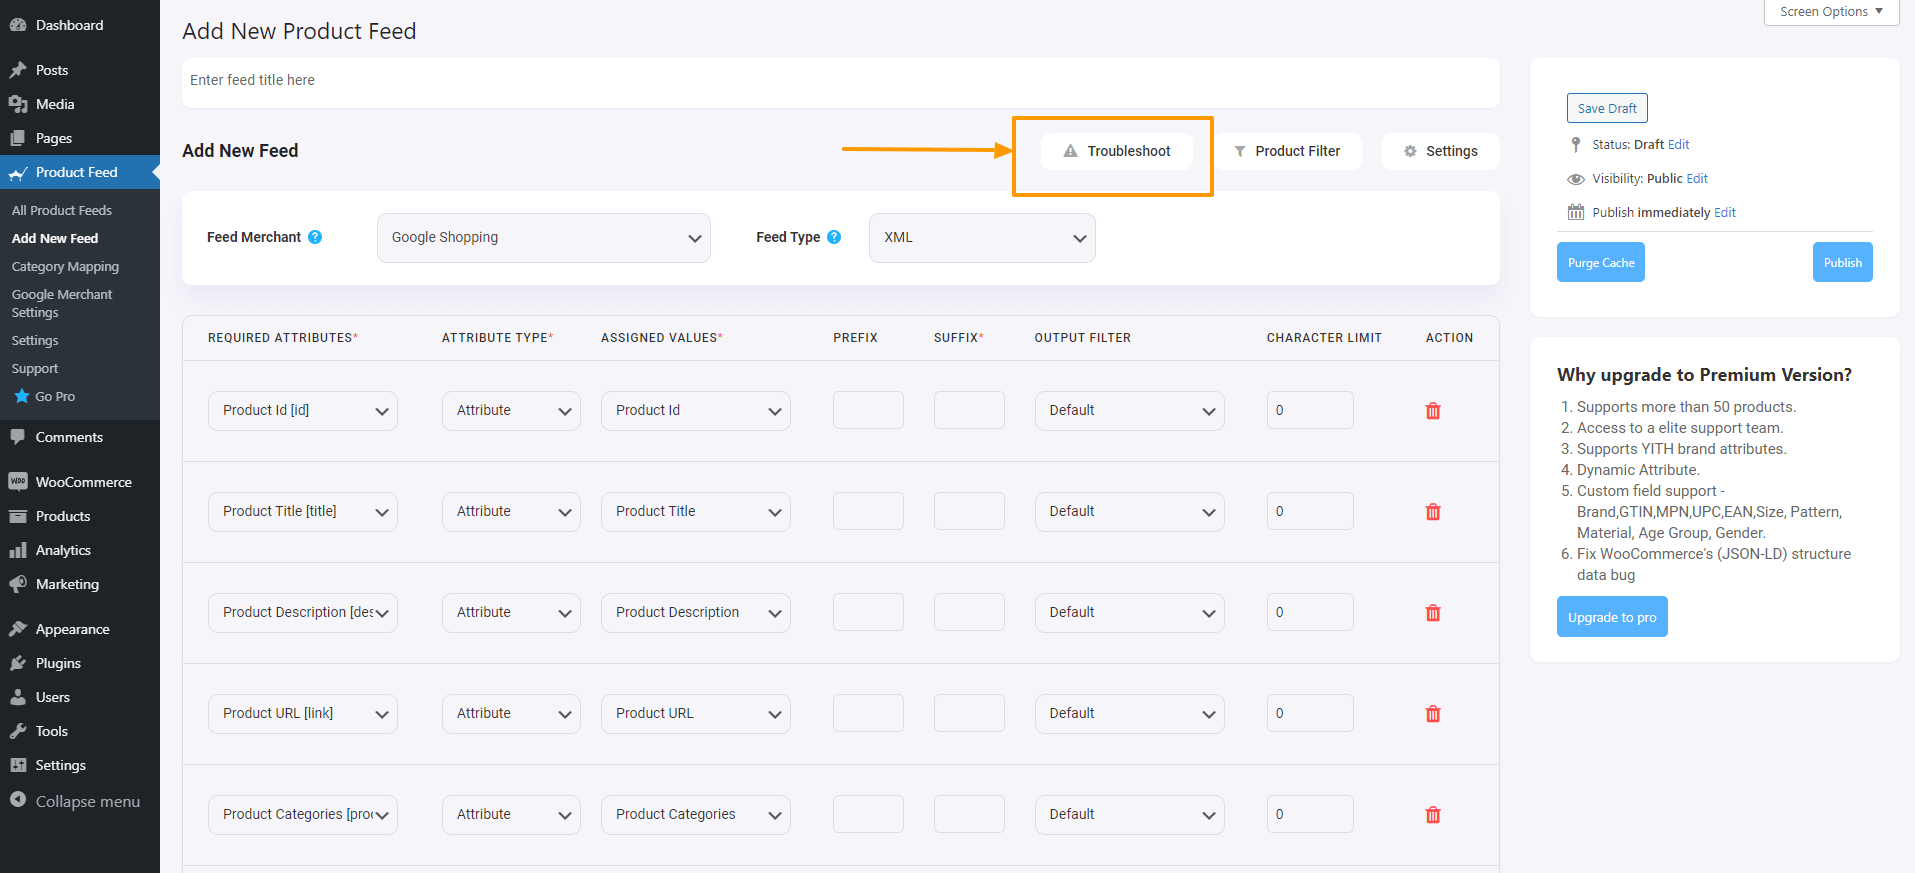
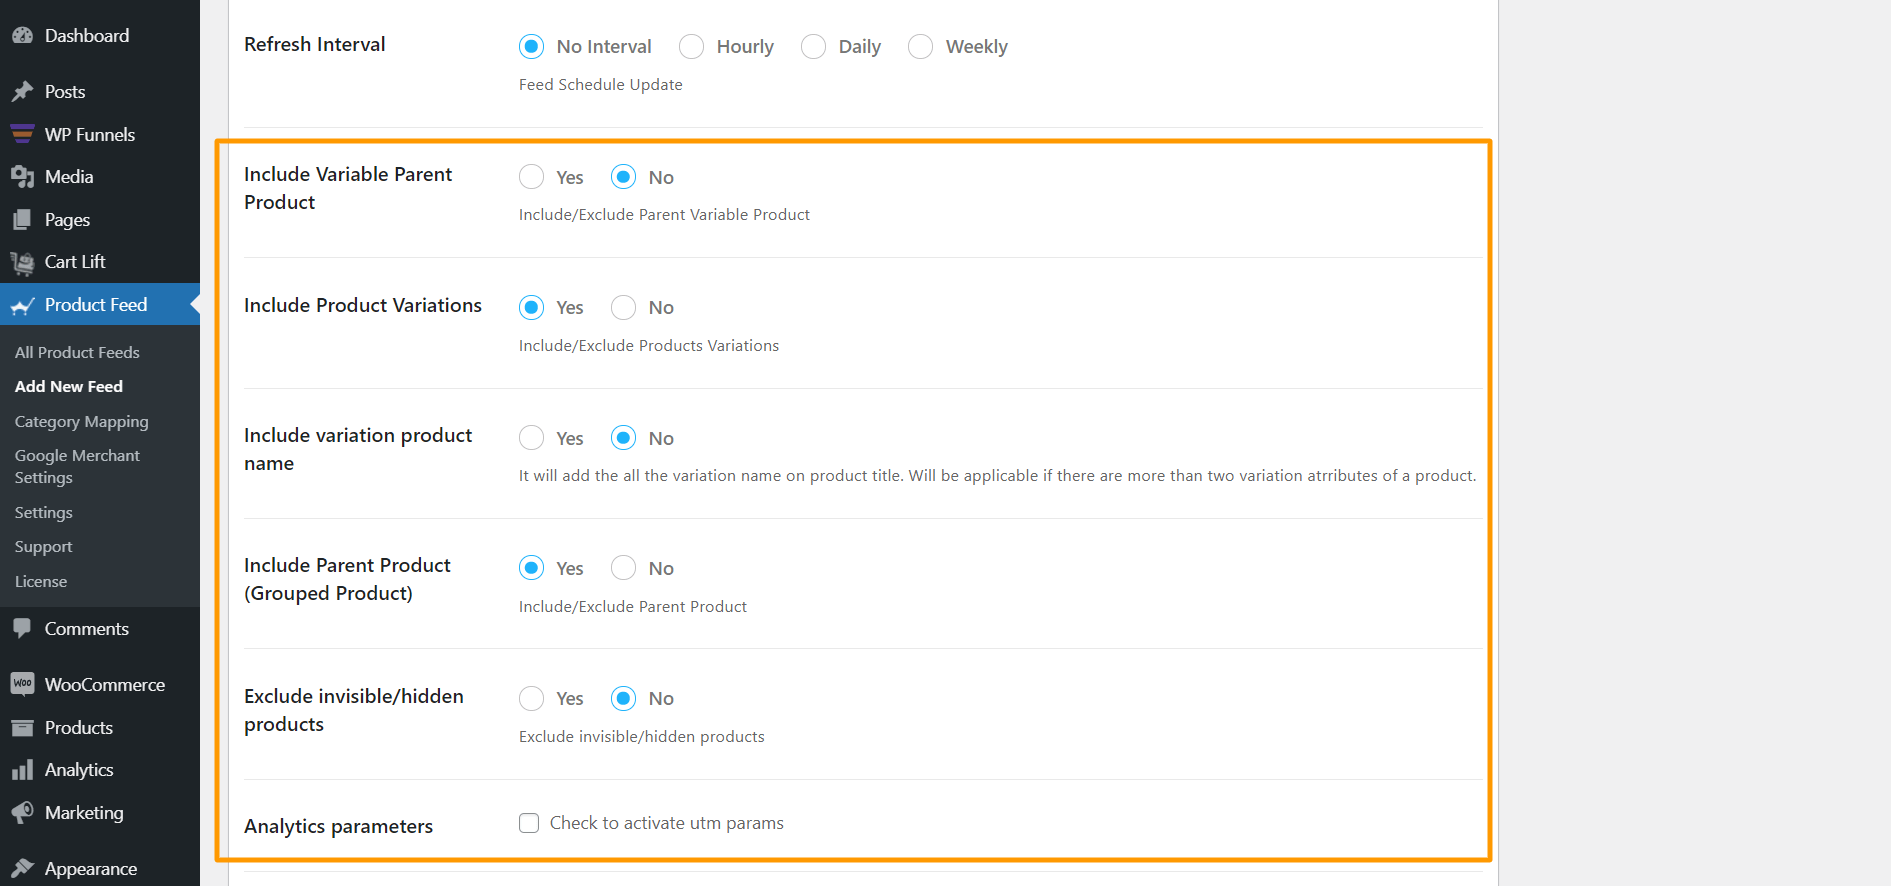
But that’s not all. After generating the feed, you should have control over the feed – editing, scheduling, and configuring the feed.

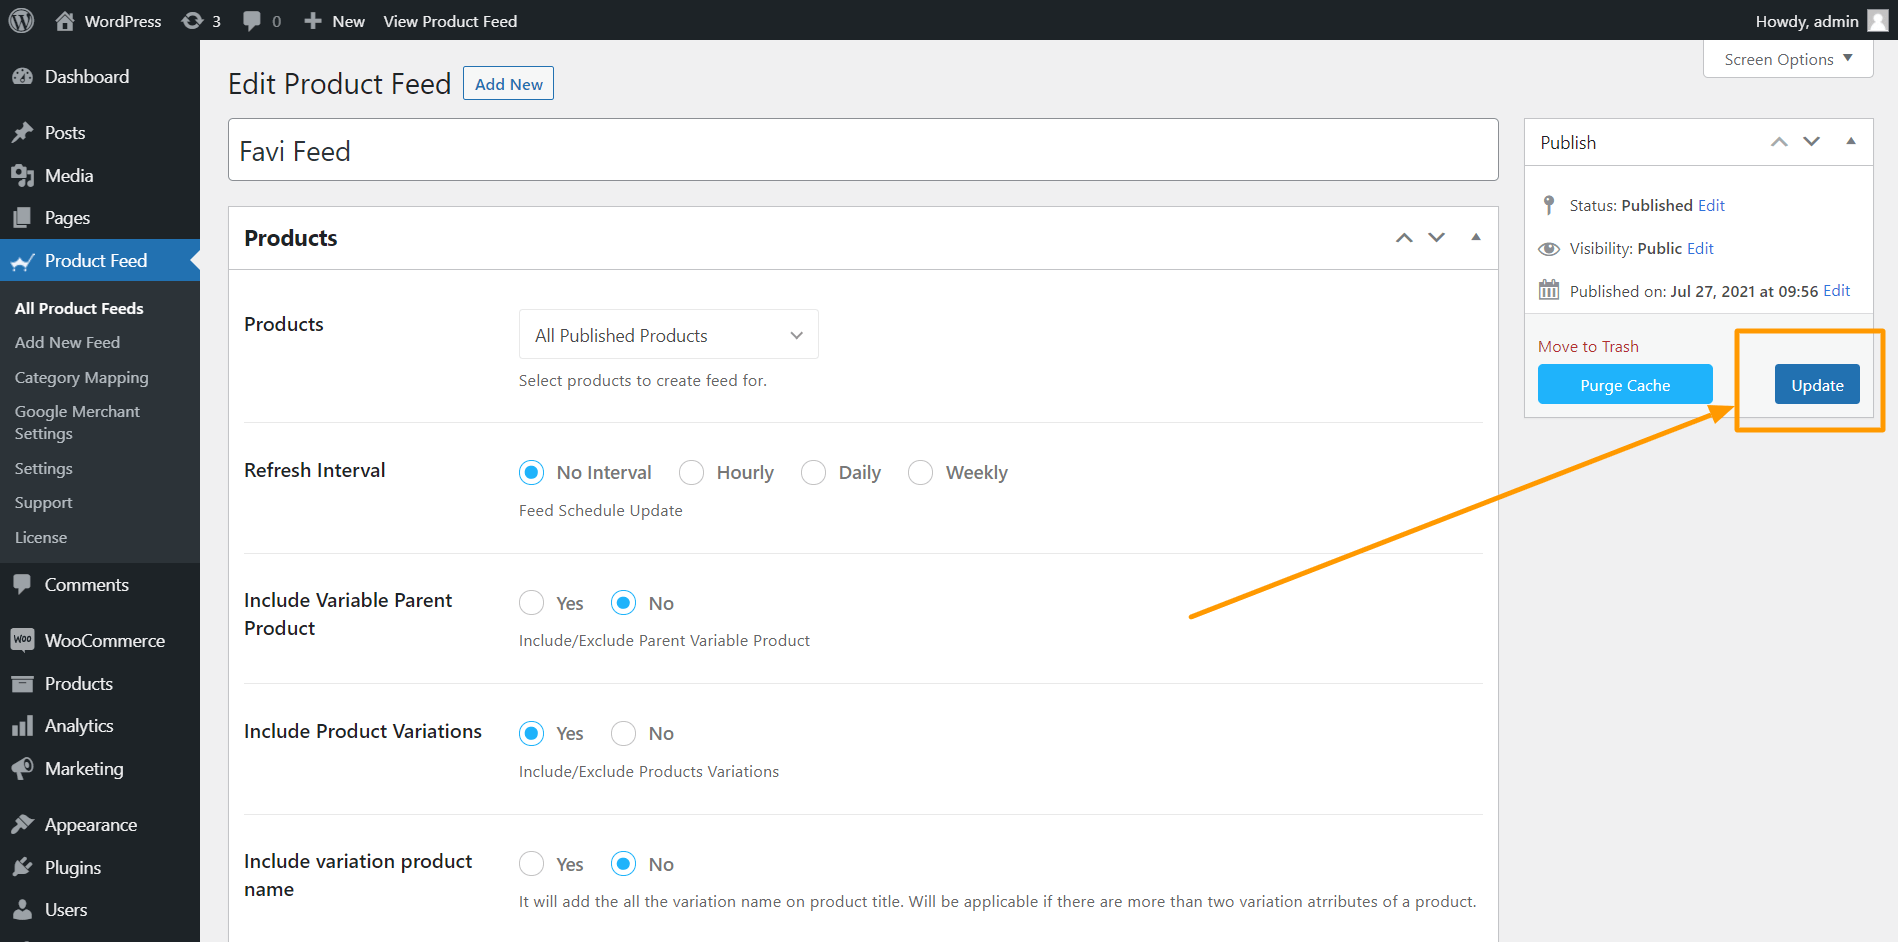
For example, let’s say you decided to add a few extra attributes to your feed that you did not add earlier. You should be able to update your XML feed for this easily.

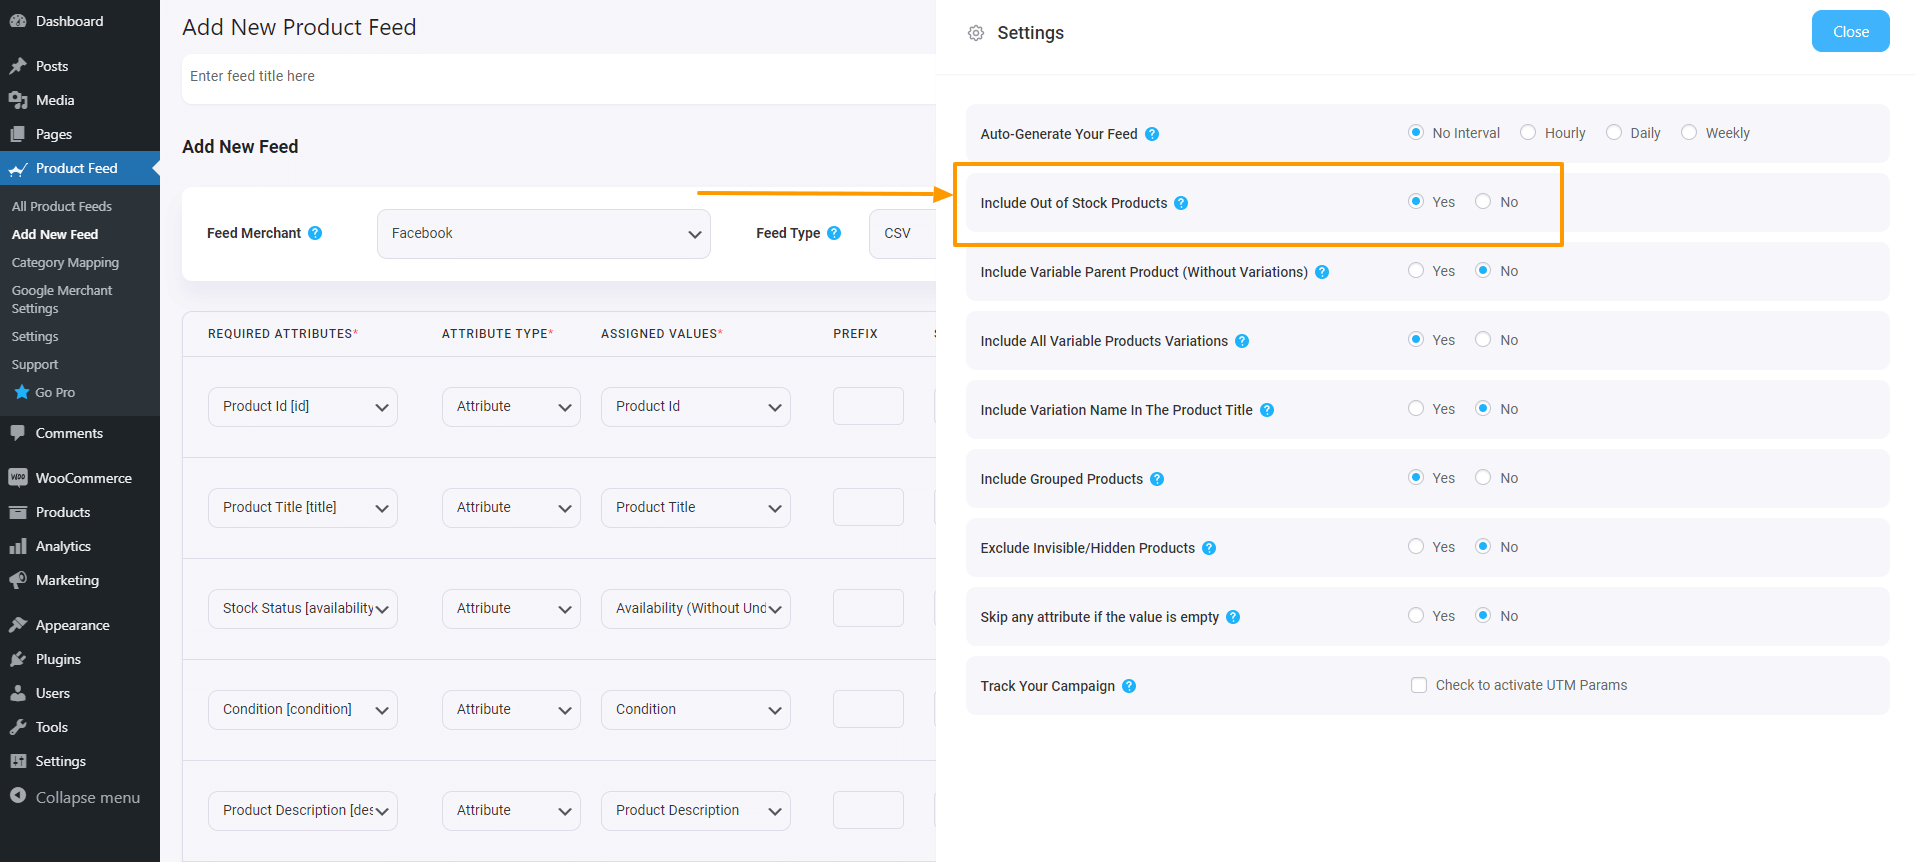
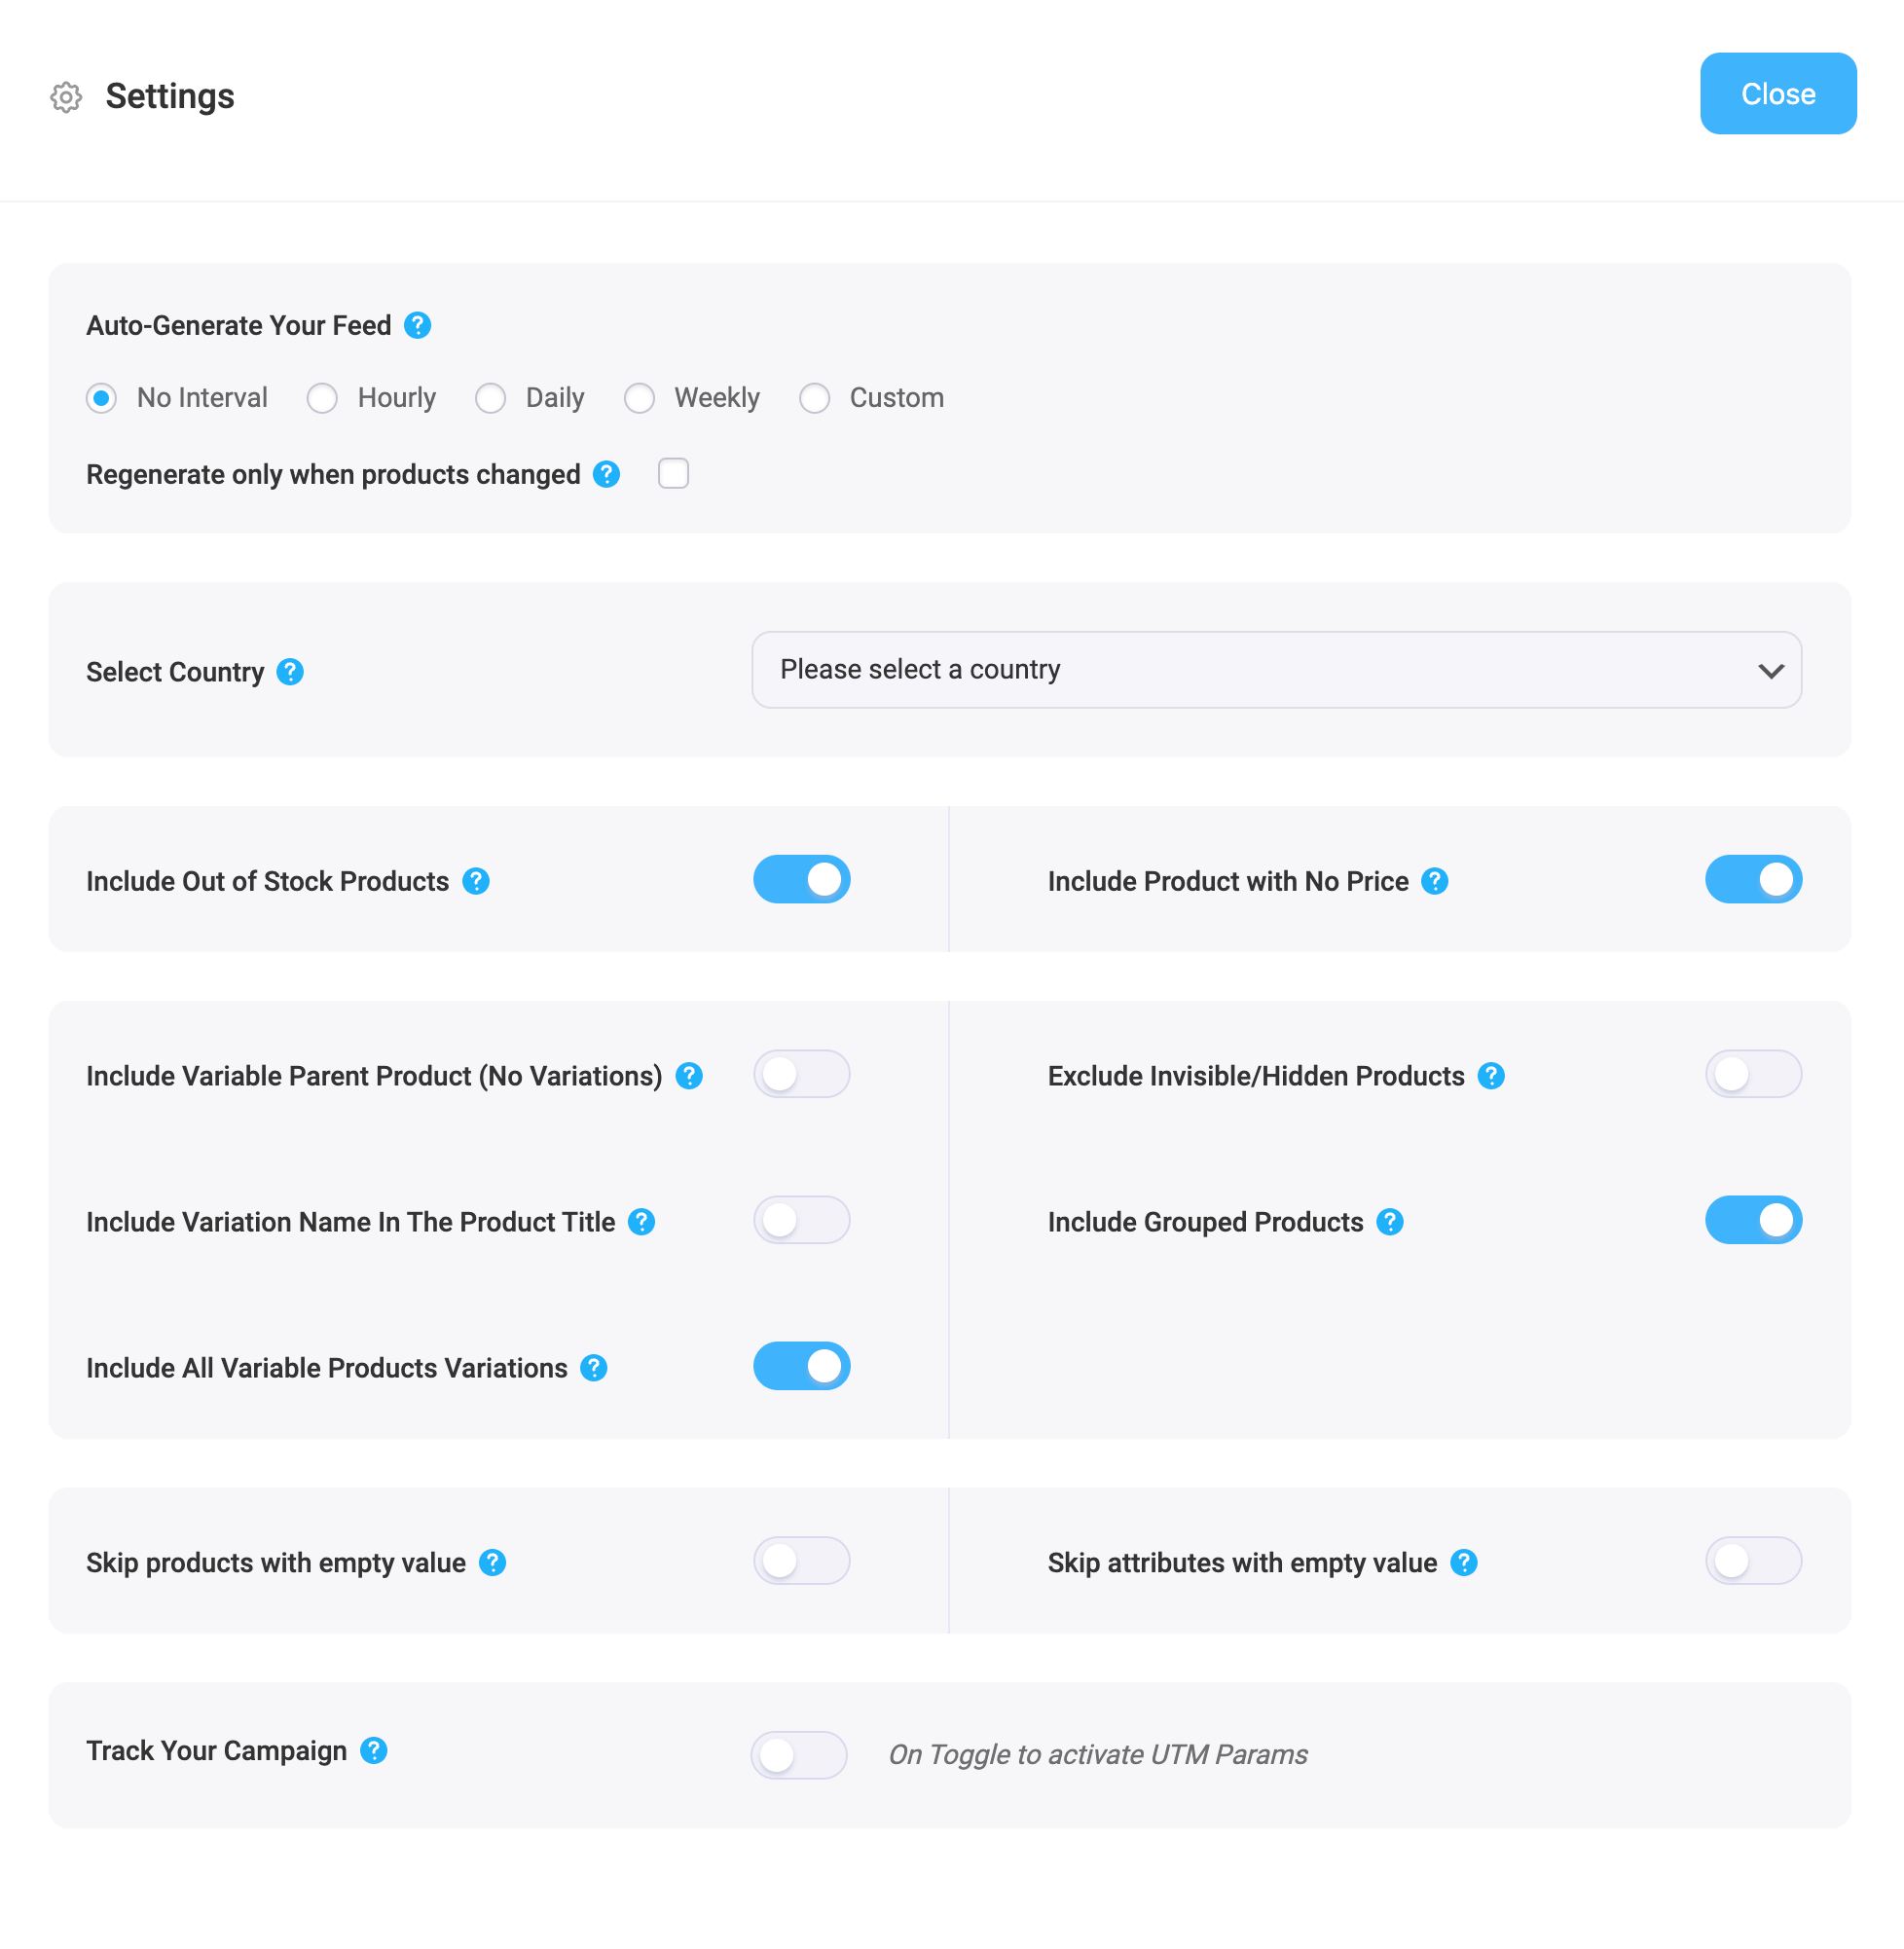
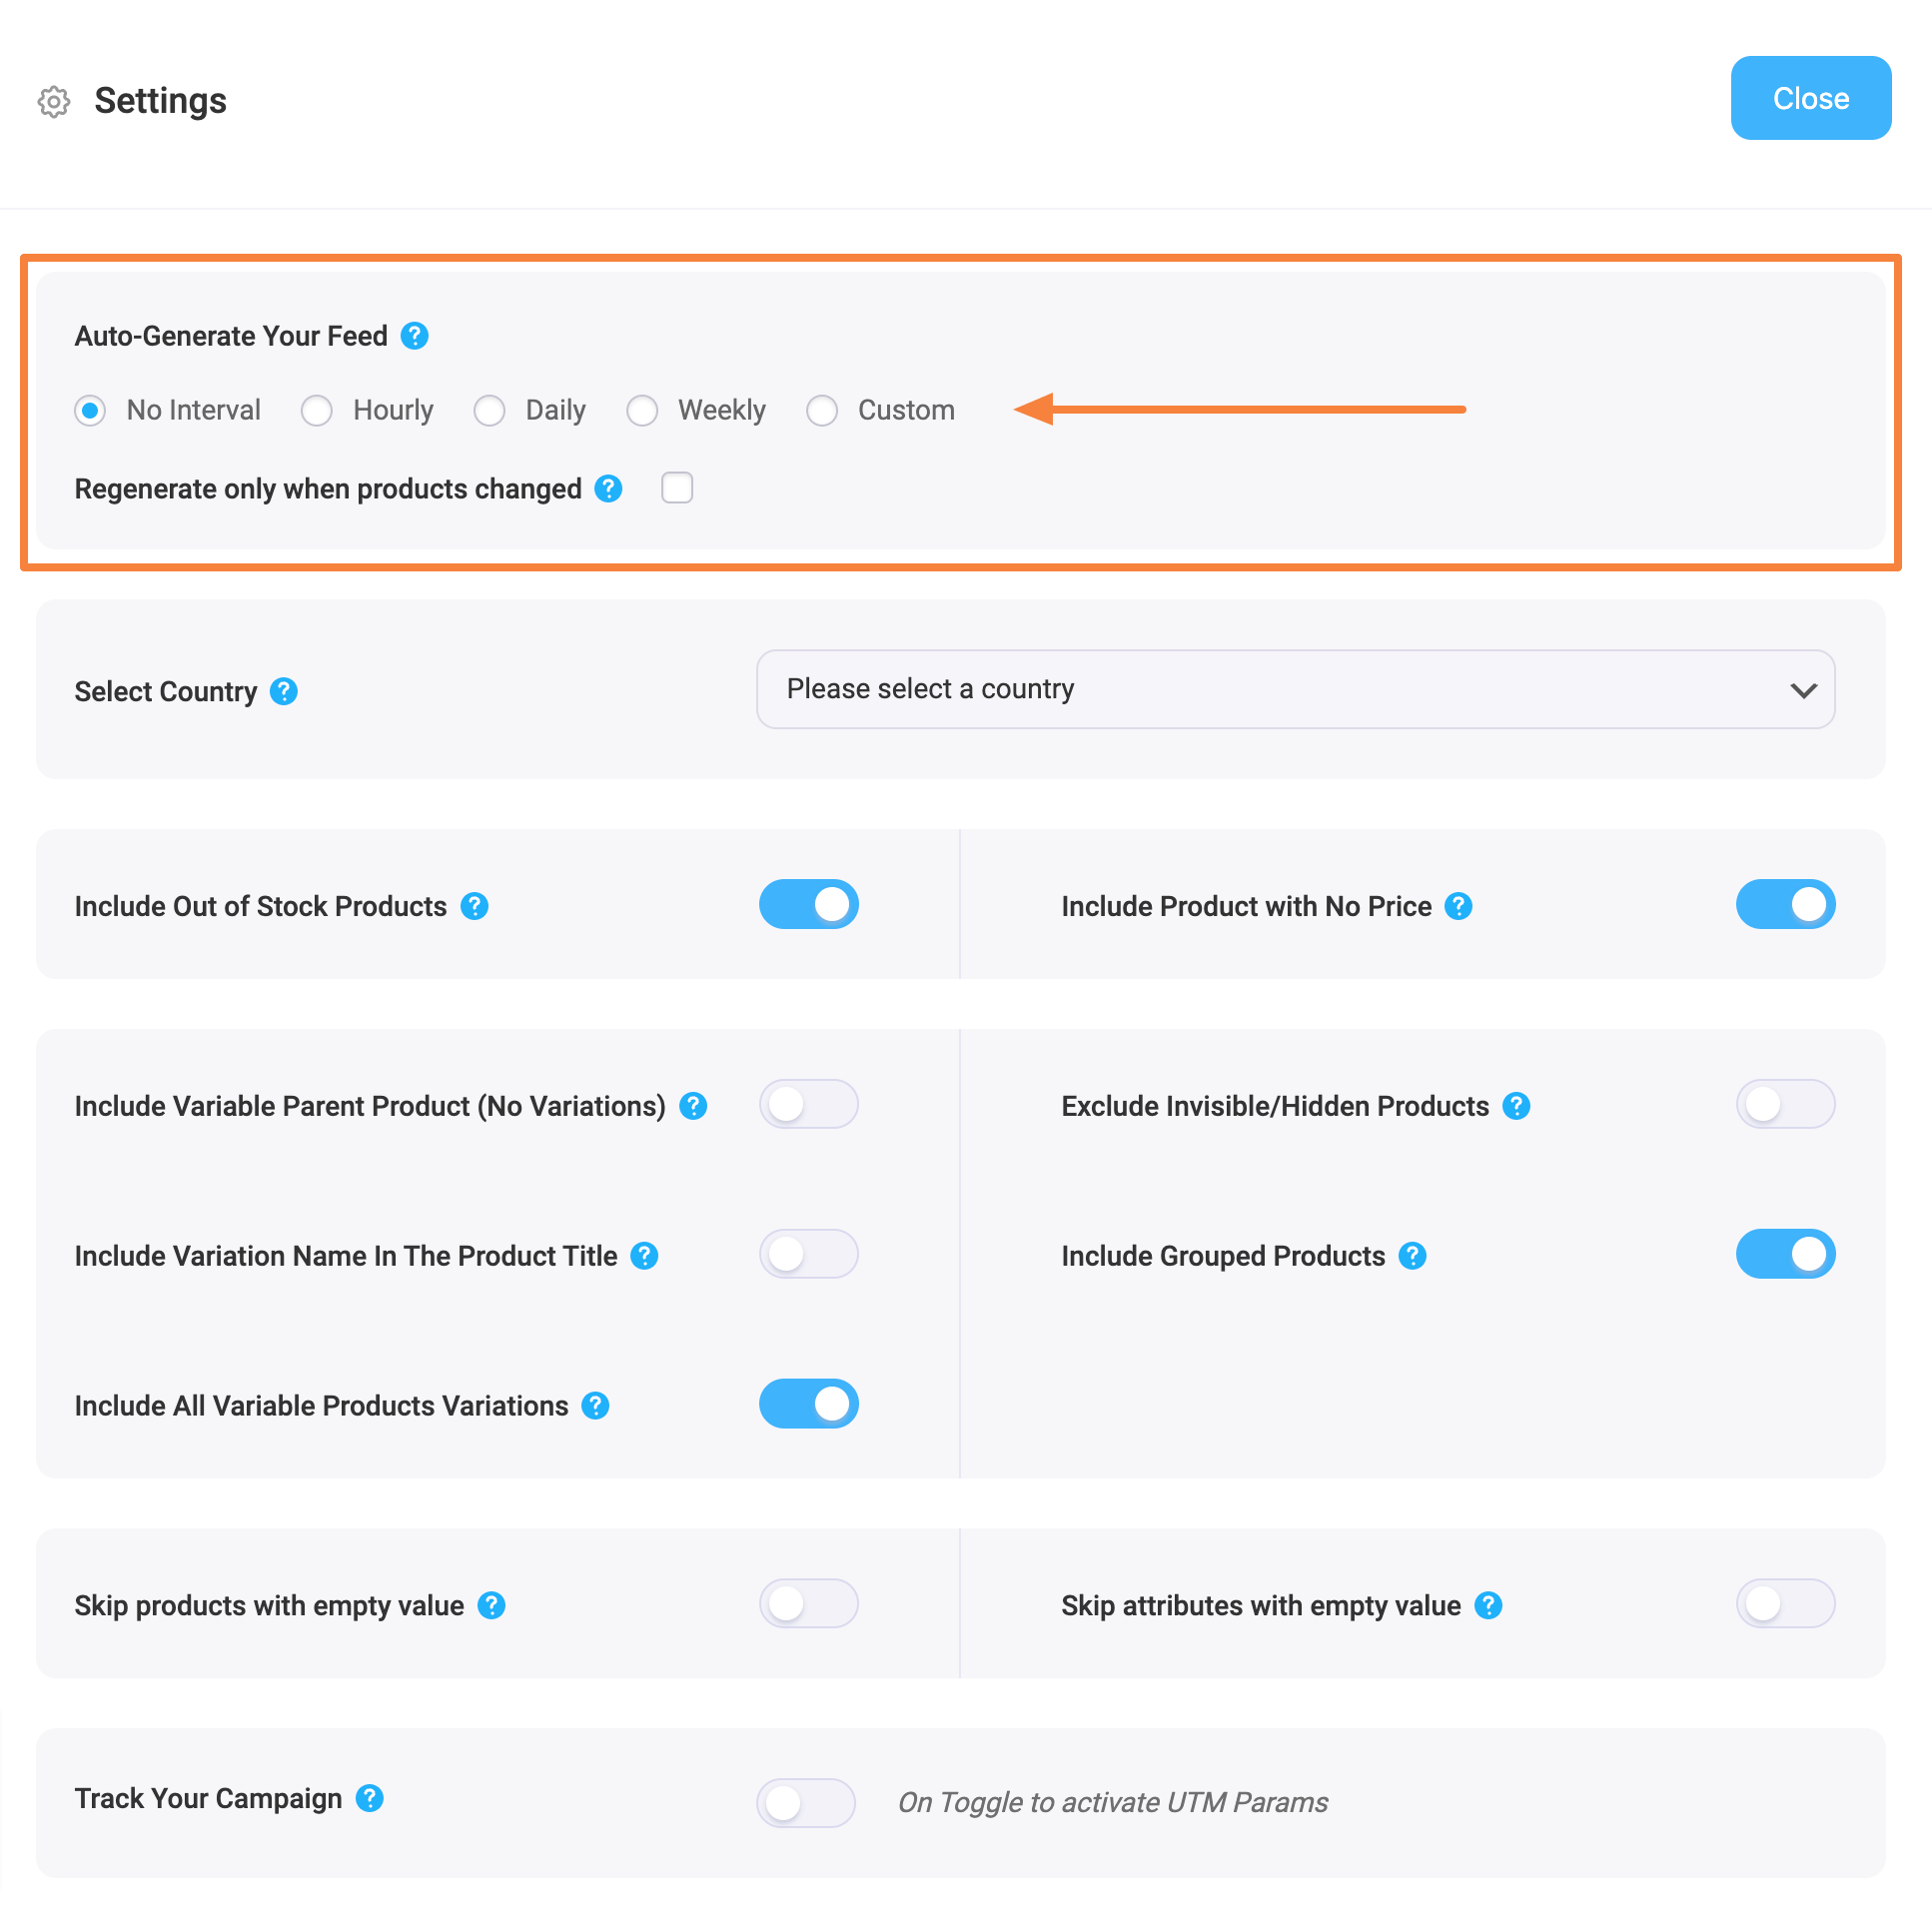
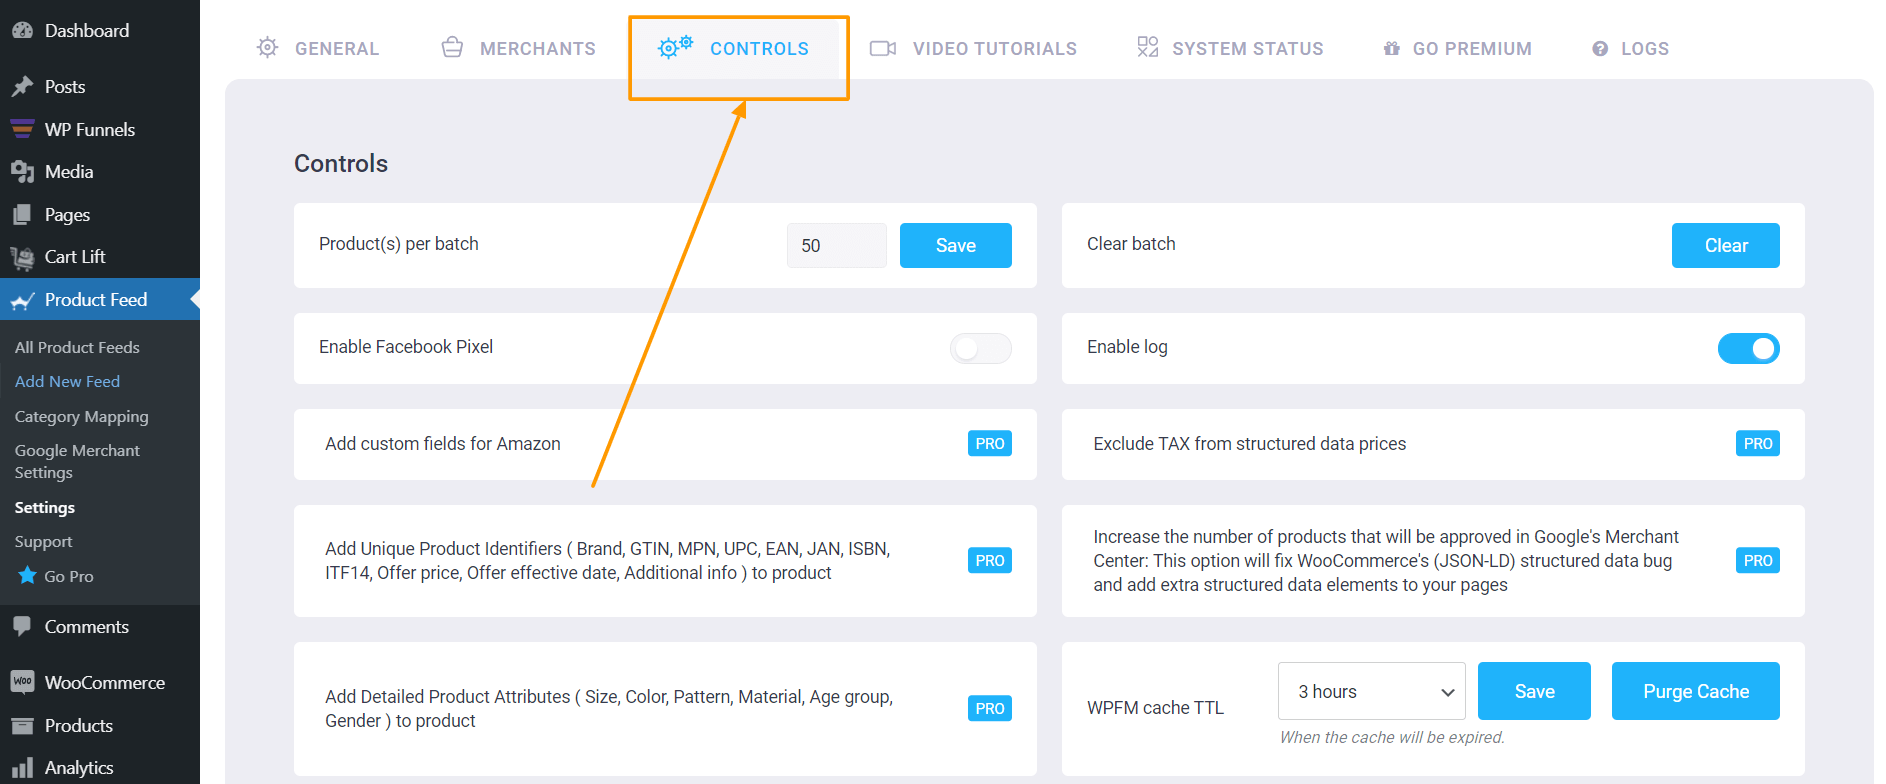
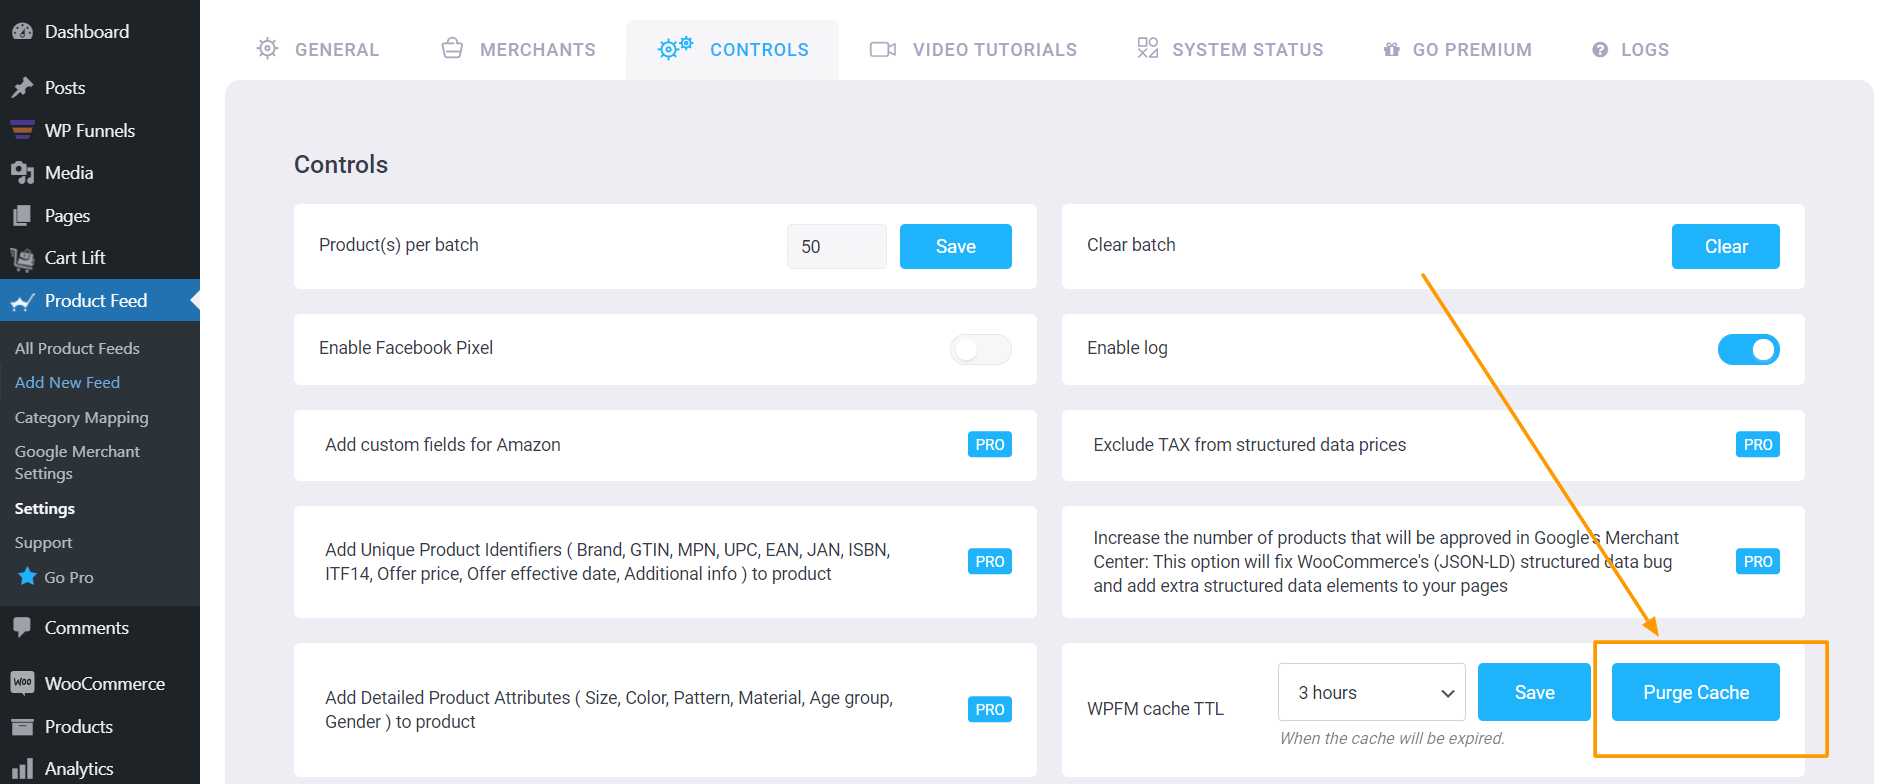
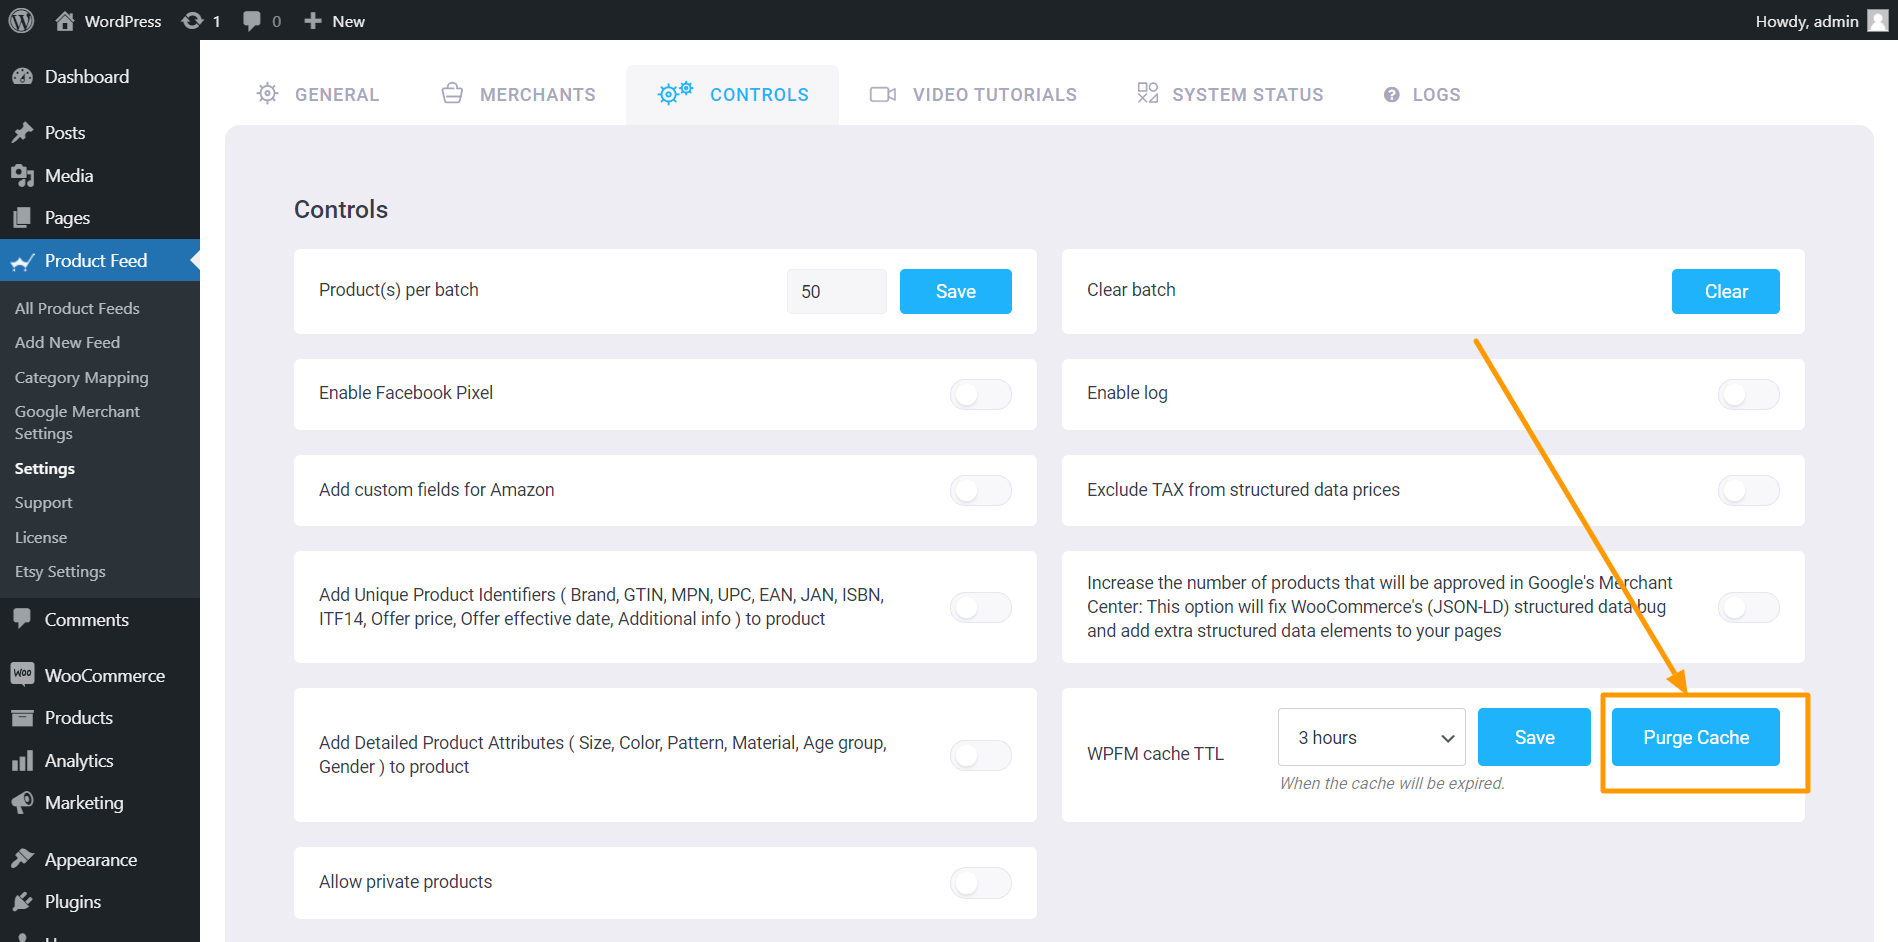
5. Automatic Feed Updates

It’s crucial to keep your product feeds updated with the latest information to avoid any discrepancies in pricing, inventory, or product details.

However, manually updating product feeds can be a time-consuming and tedious task, especially if you have a large number of products in your store.

That’s why it’s important to look for an XML feed plugin that can automate the process of updating your product feeds based on any changes you make in your WooCommerce store.

For example, if you have a product that’s out of stock or discontinued, you don’t want it to appear in your product feed and risk disappointing potential customers.

So an automated feed update process would be very helpful here.

6. Compatibility With Required WooCommerce Plugins

Since you use WooCommerce, it is possible that you may be using other WooCommerce extensions for various purposes.

For example, let’s say you use the plugin “Table Rate Shipping Plugin” to handle shipping options on your store. In this case, your plugin should have compatibility so that you can get the right shipping details for your product XML feed.

Likewise, you may be using various other plugins for dynamic pricing, product brands, and other such product customization tools. You need to check if your XML feed tool is compatible with these tools.

7. Multi-Language Support

If you sell products internationally, then you have to consider the language of your product data. Hence, you may use WPML, PolyLang, or Loco Translate to translate your website’s content into multiple languages.

Likewise, when uploading product feeds to various marketplaces, you probably want to upload separate feeds for separate countries, along with translated product data, to get a higher conversion rate.

multilingual support

Hence, your XML feed generator should be compatible with a multilingual plugin.

8. Consider The Team Behind The Tool

Since an XML feed plugin will play a vital role in your business, it is important to make sure there is a strong team behind the plugin.

You don’t want to use a tool that may shut down after a few months. Then you have to invest time in finding another tool all over again.

Meanwhile, you also don’t want a team that provides poor support. In fact, when choosing any plugin, one of your first priorities should be to investigate if the founding company has a strong support team.

Since you are choosing a tool for long-term business purposes, having a good support team is always a big advantage when facing issues.

9. Choose A Tool With More Value For Money

Since you are running a business, you probably have a planned budget. Hence, though little, one important thing you may consider thinking about is the price of a plugin.

You do not want to use a tool that is too expensive but has nothing extra to offer. You should rather look for a plugin that can give you more valuable use cases.

For example, you could ask for a tool that not only has XML feed templates for marketplaces but you could also generate CSV feed templates with it.

But more importantly, you have to see if the plugin is affordable and has all the right features.

Best WooCommerce XML Feed Plugin

Now that you’ve seen the essential aspects of a WooCommerce XML feed plugin let’s take a look at a plugin that comes with all the key features you would want in a proper XML feed tool.

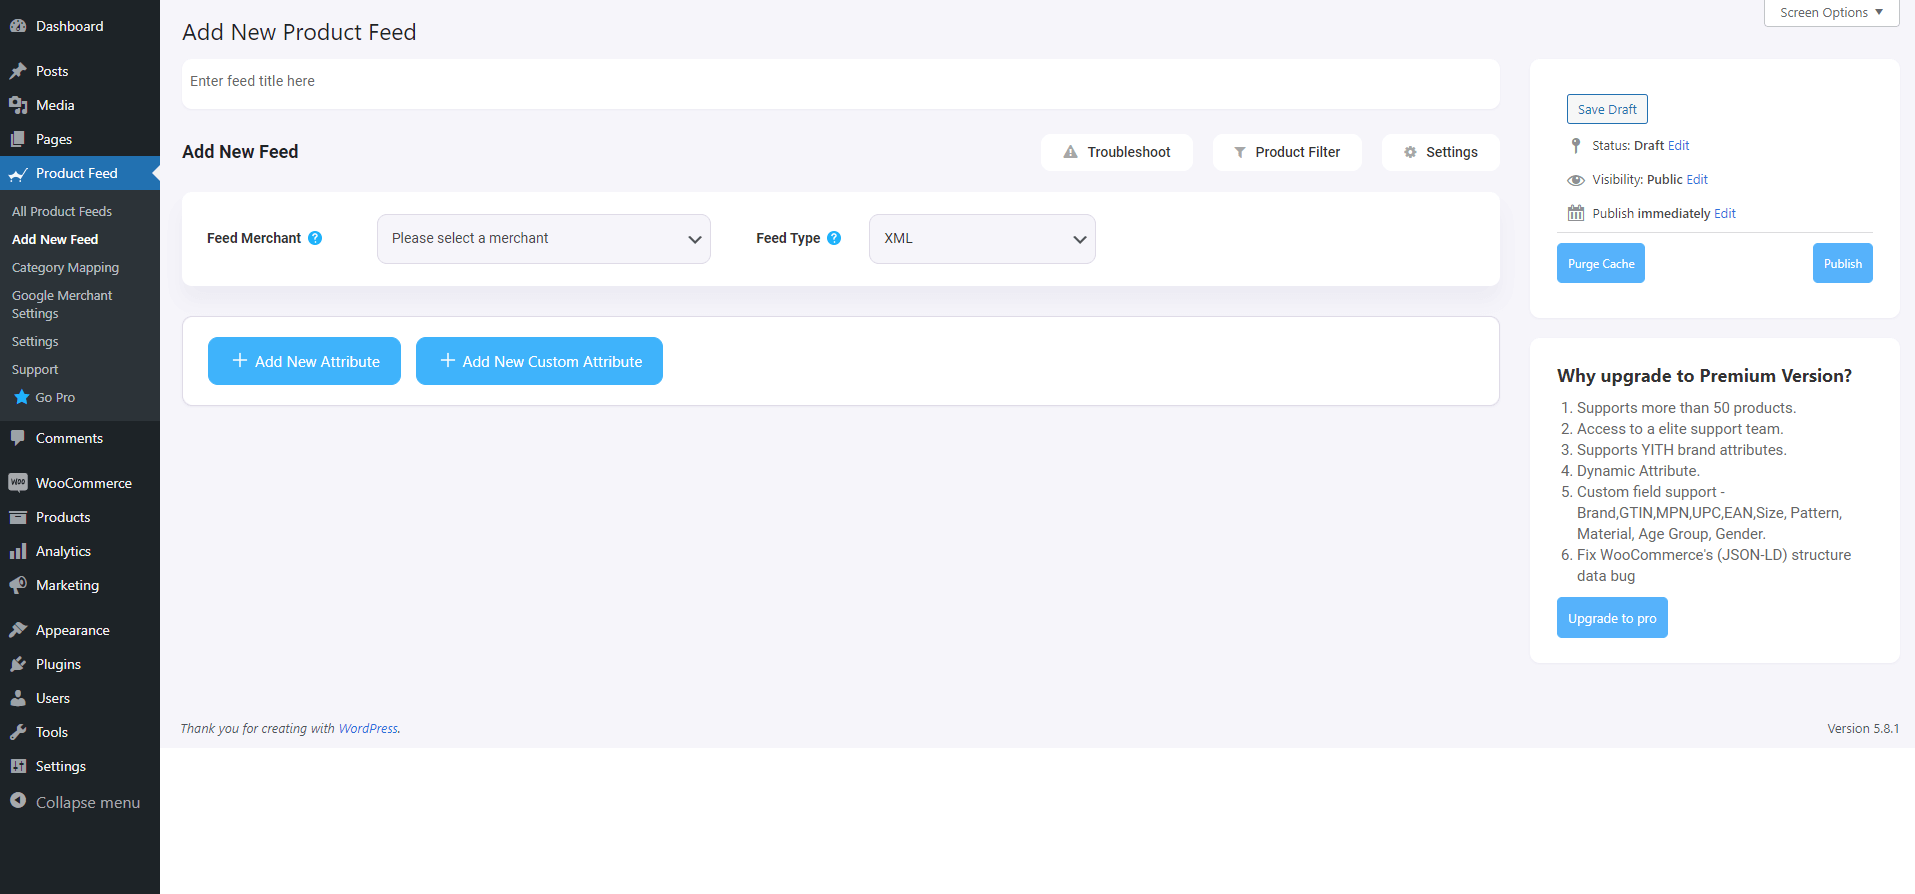
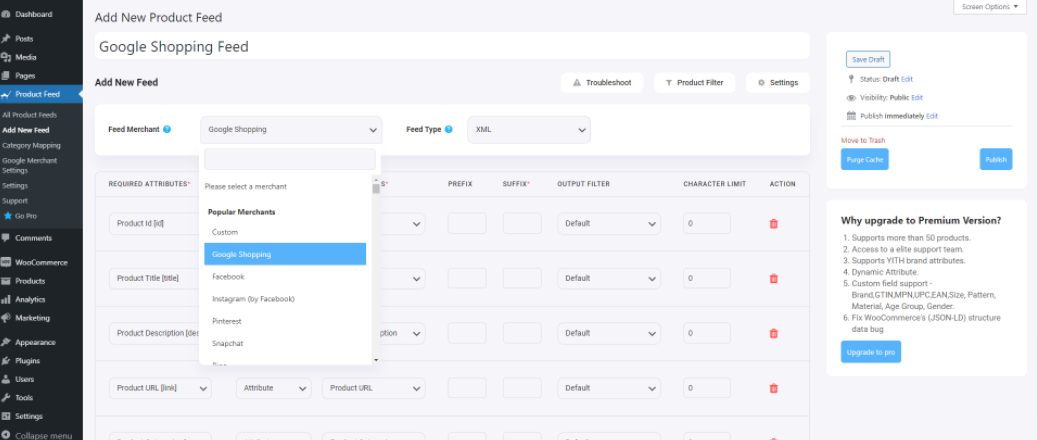
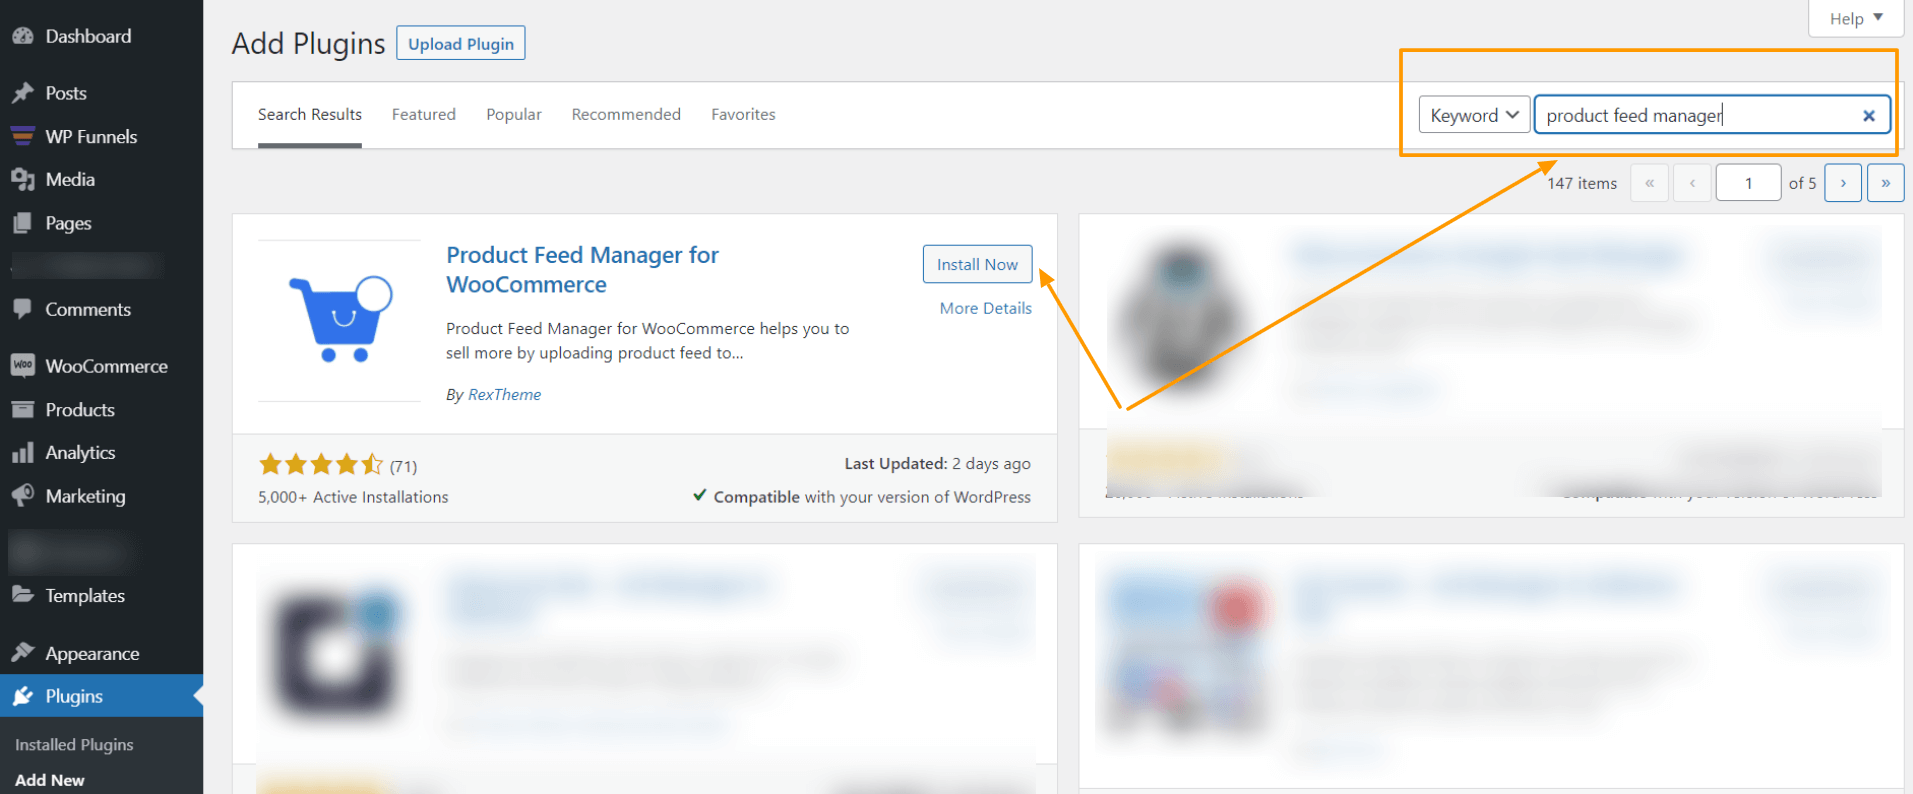
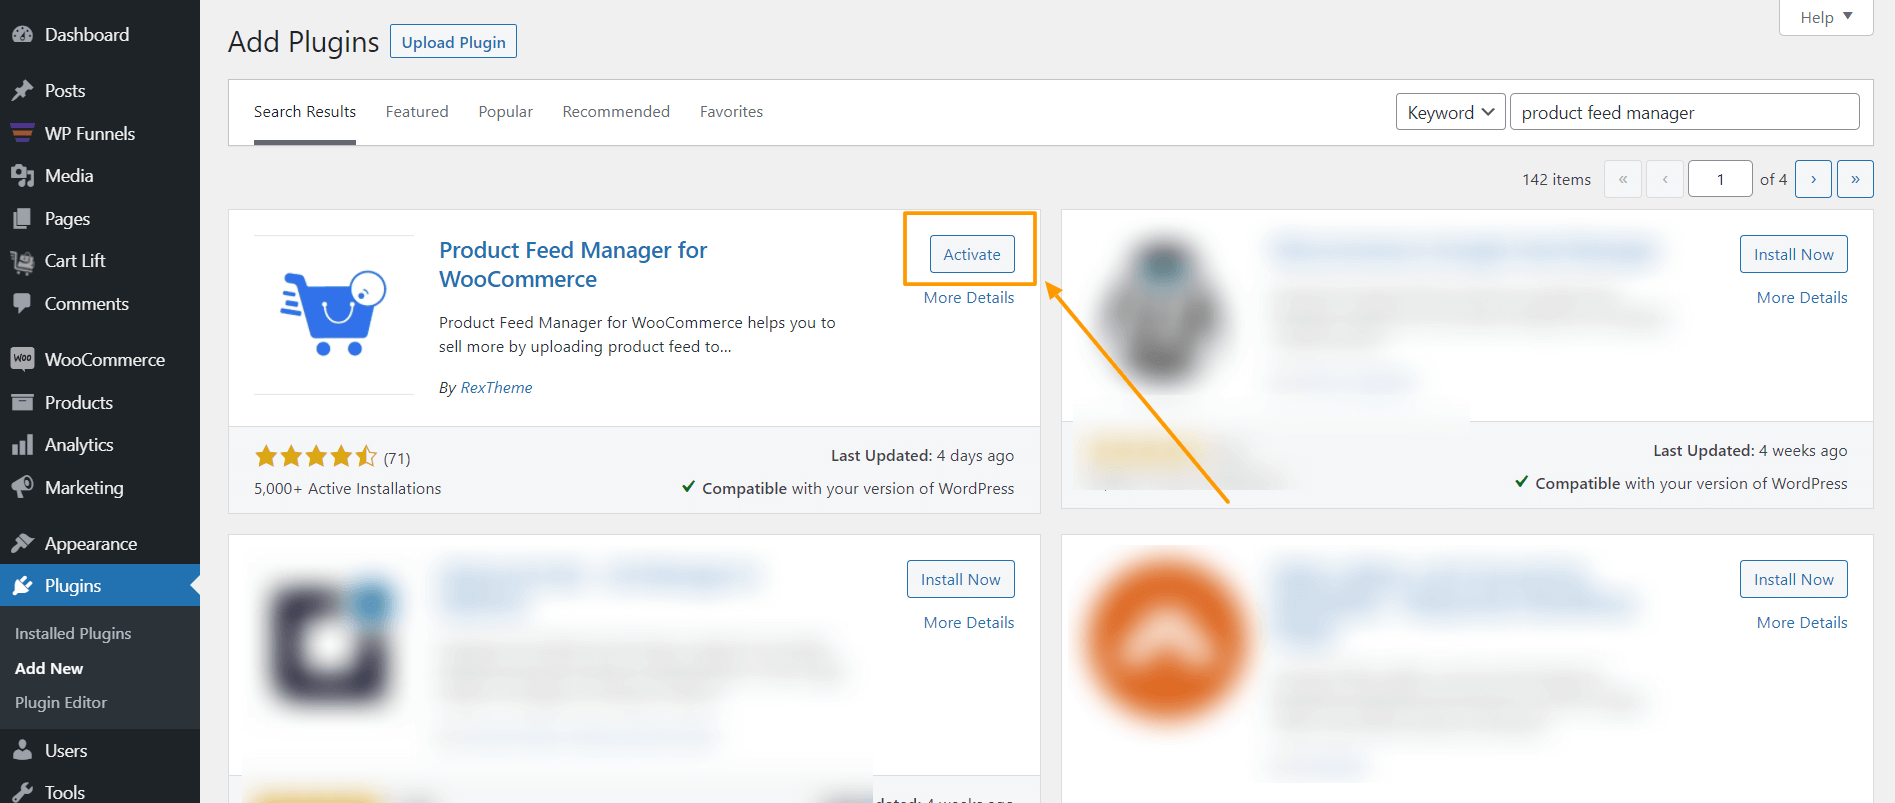
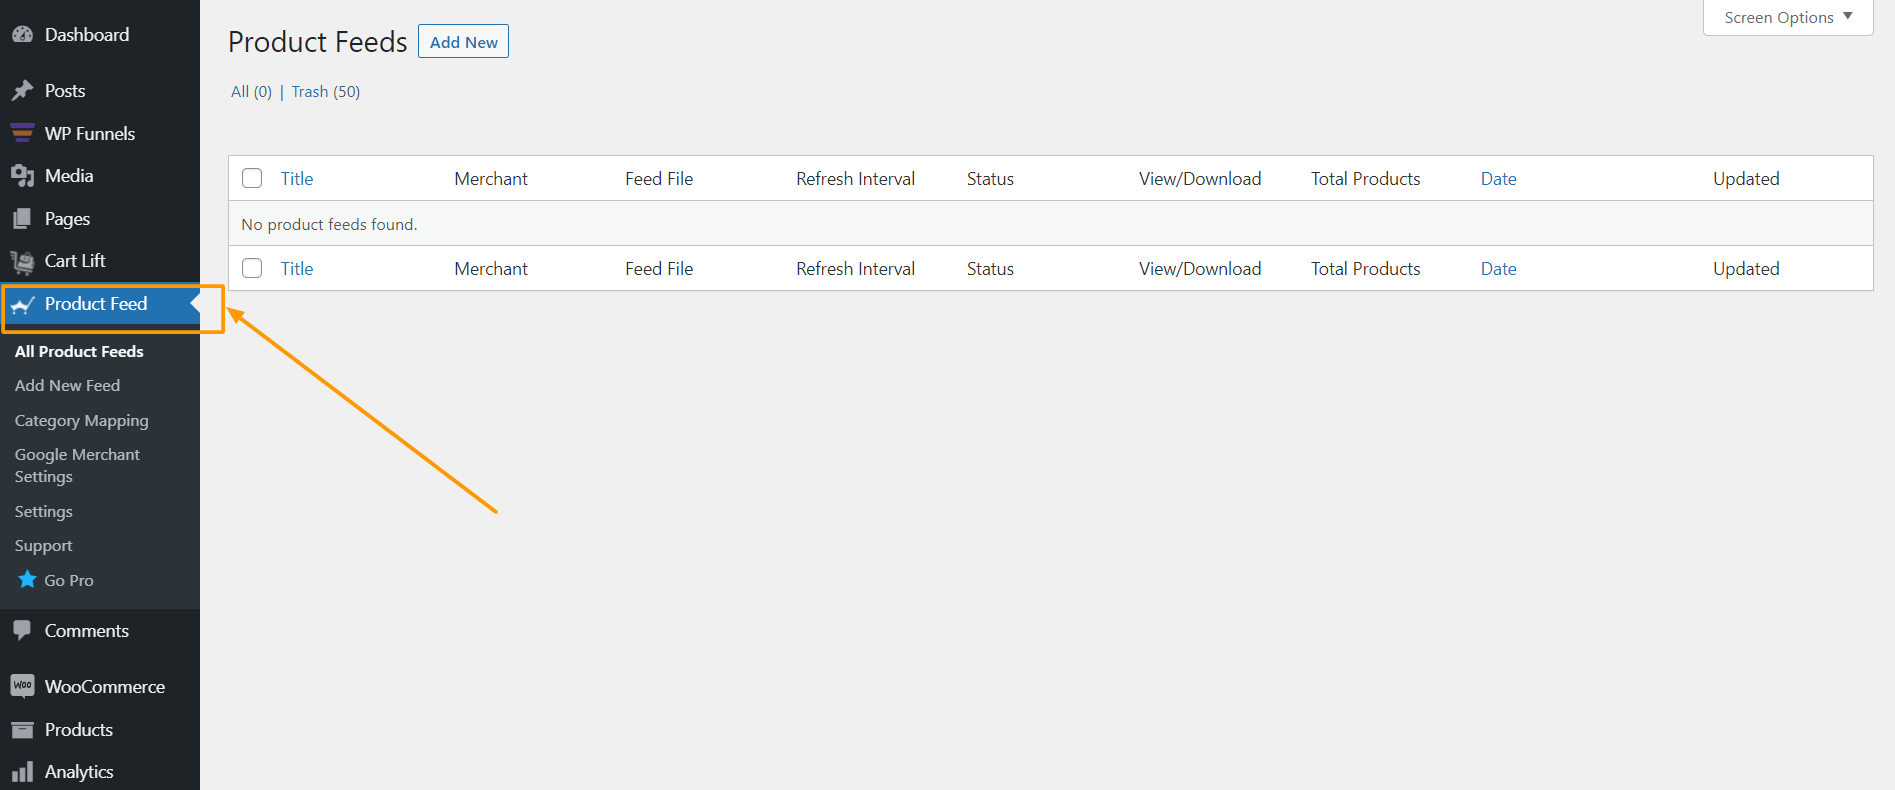
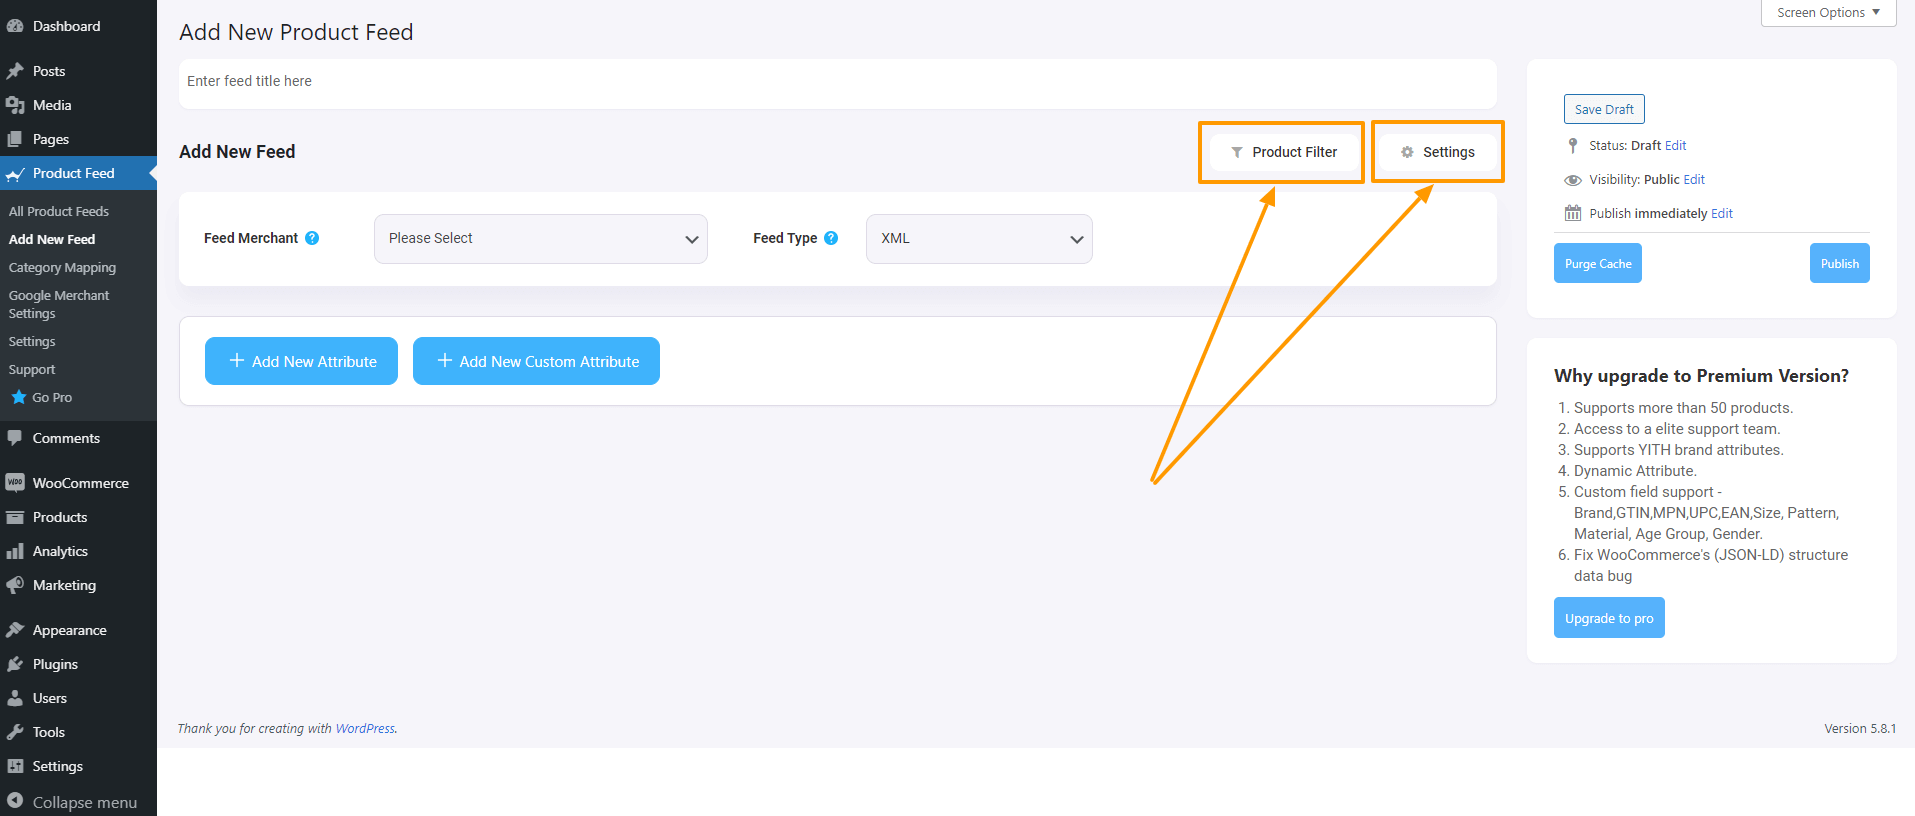
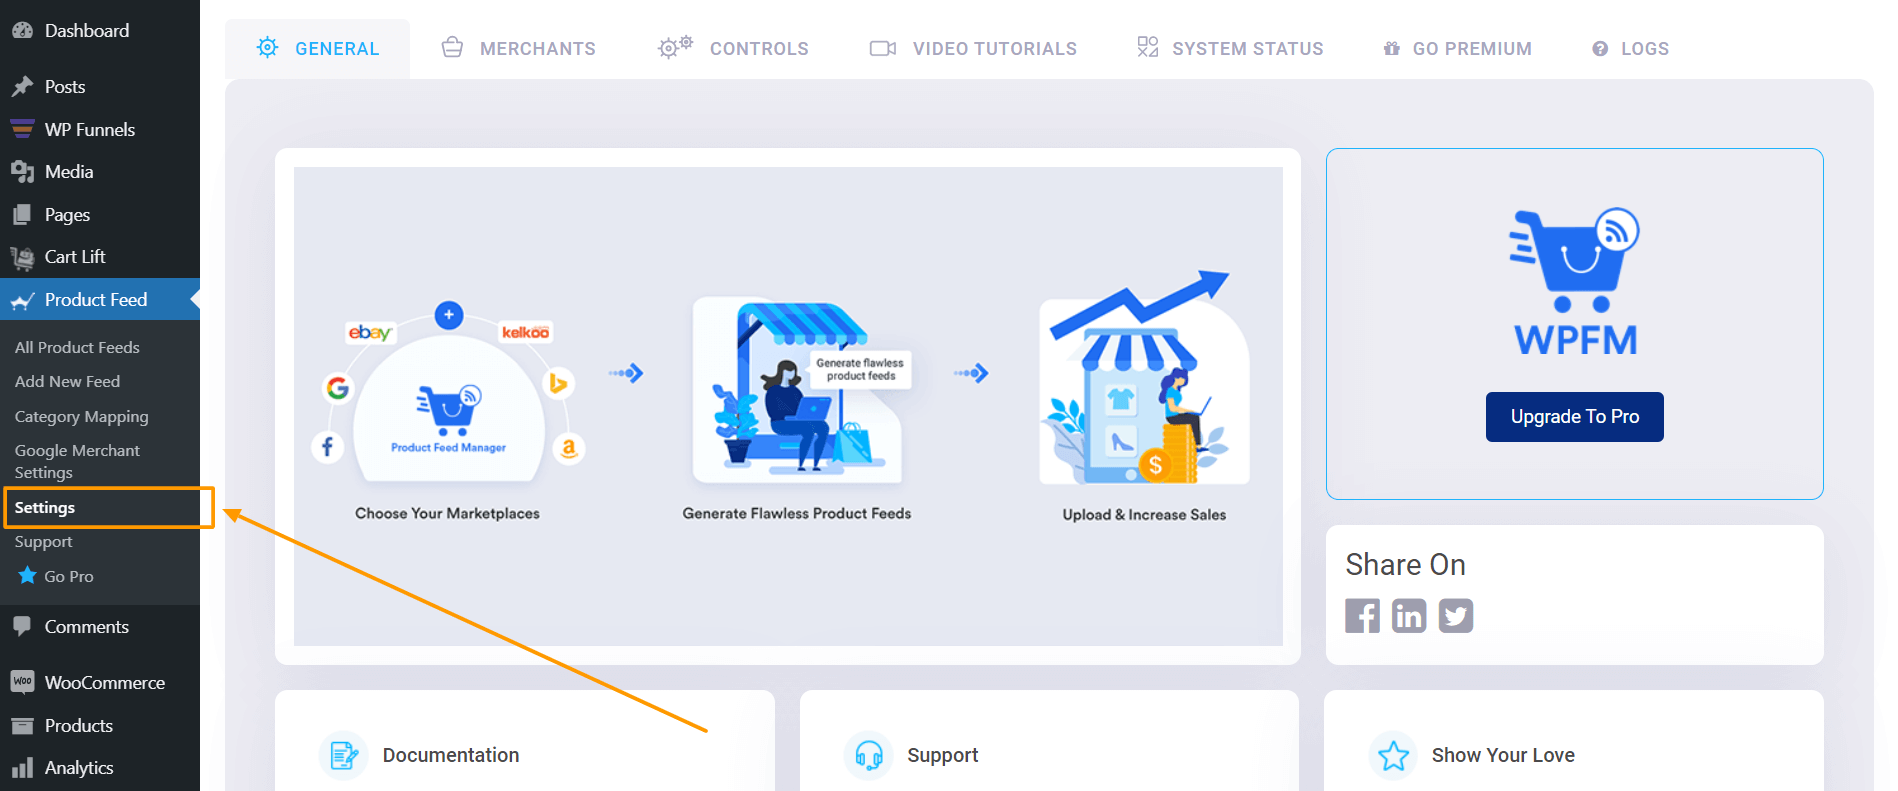
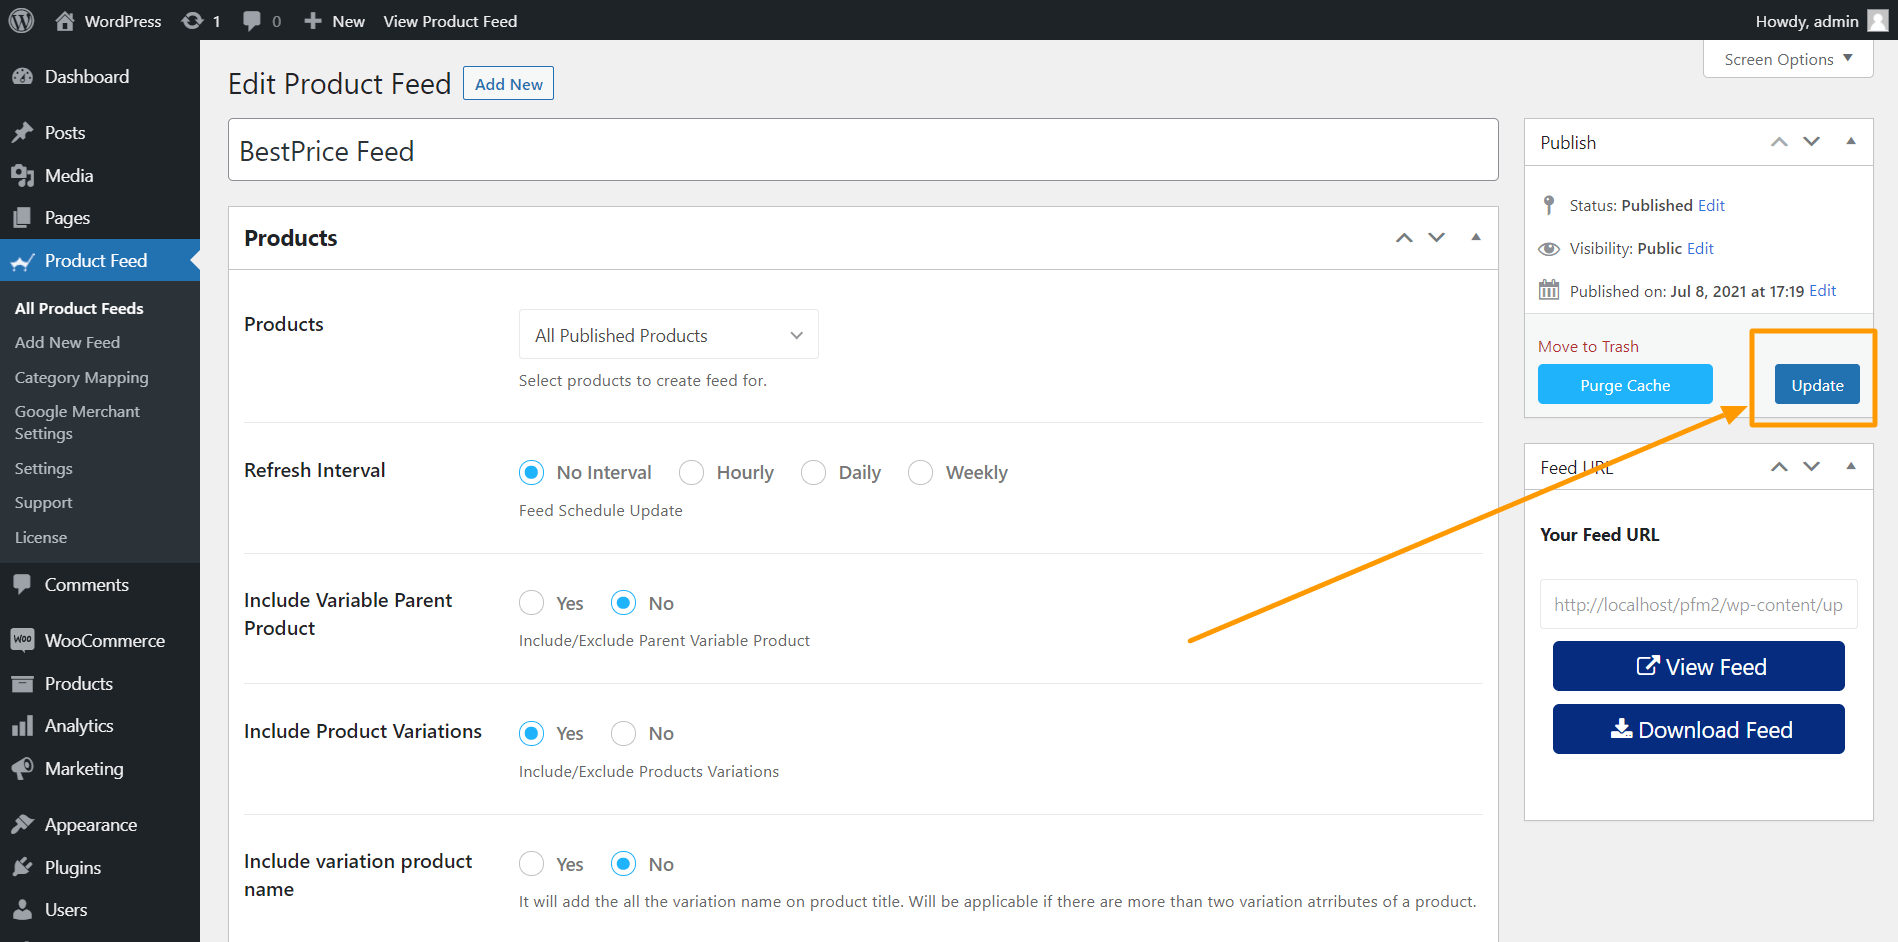
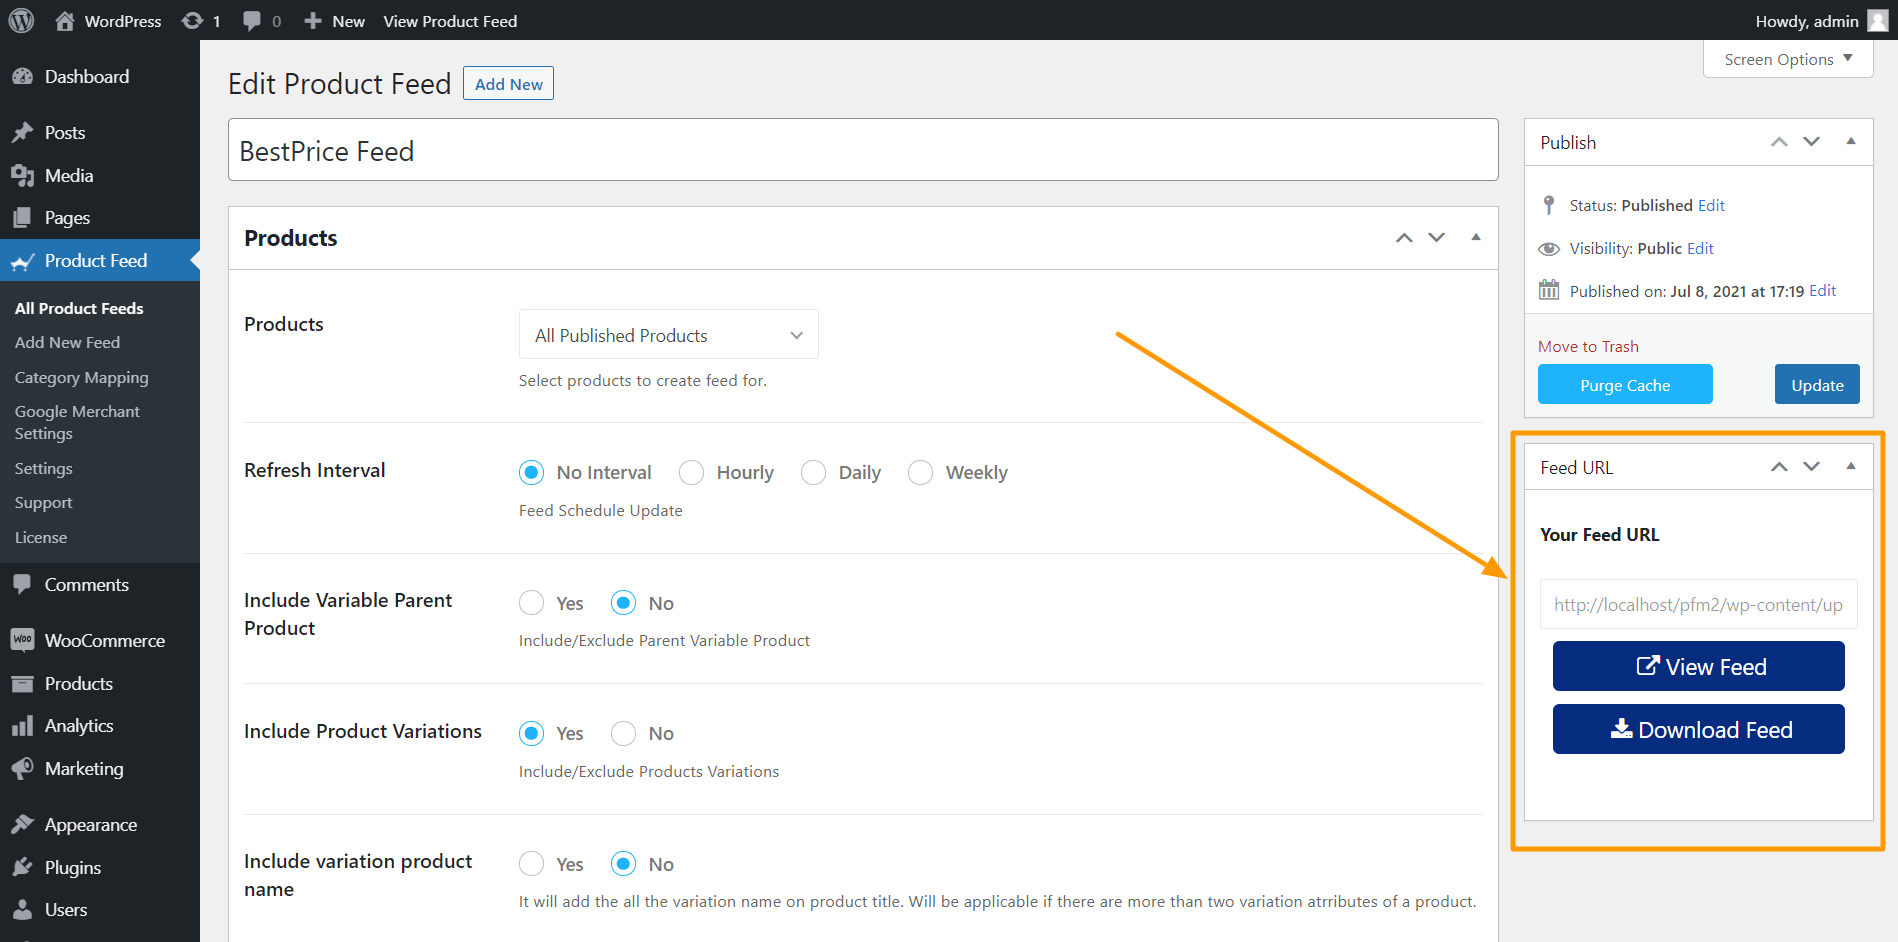
Introducing Product Feed Manager for WooCommerce.

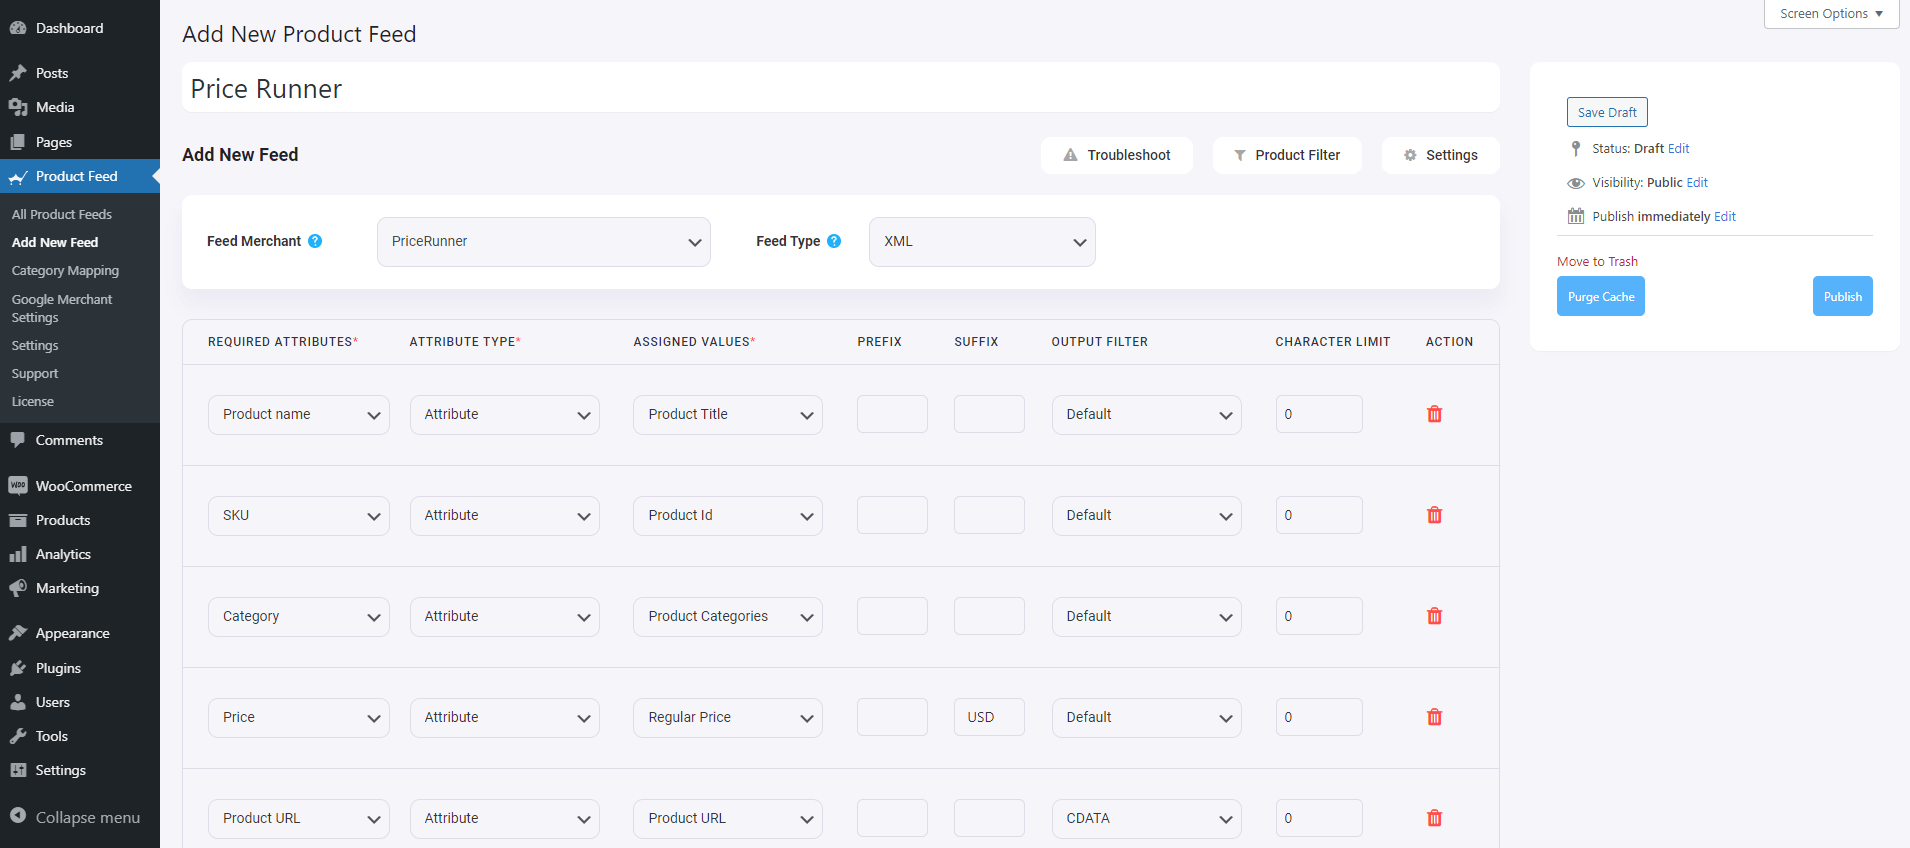
It is the easiest WooCommerce plugin for generating product feeds and has built-in feed templates to generate product feeds for over 170+ large online marketplaces.

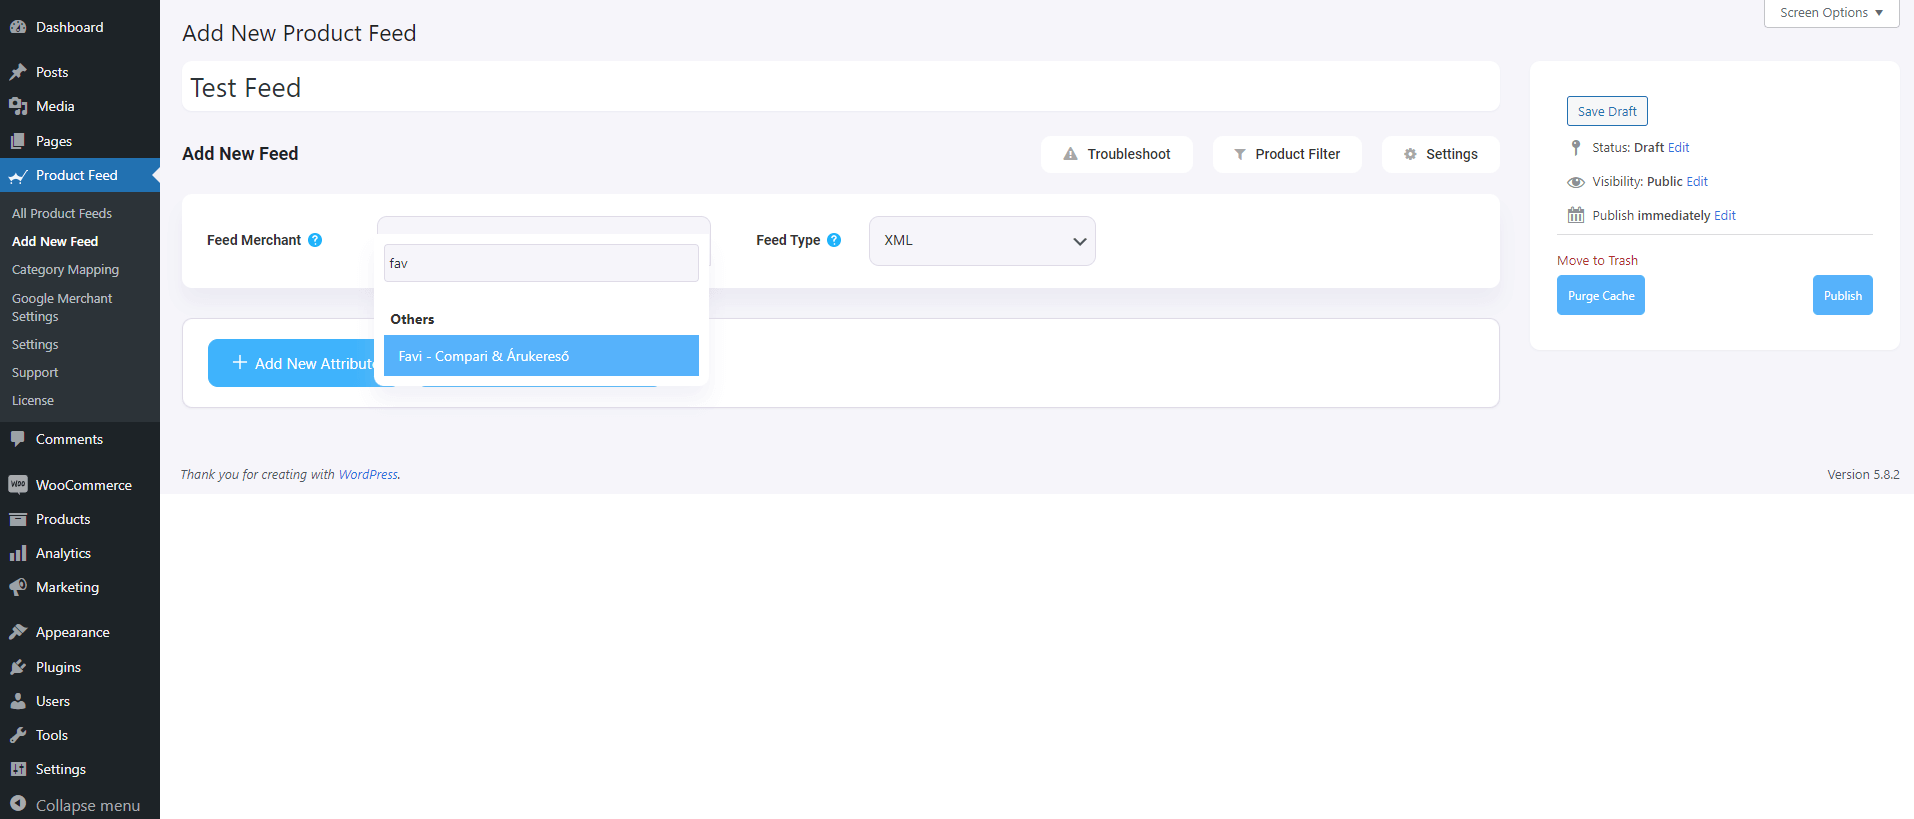
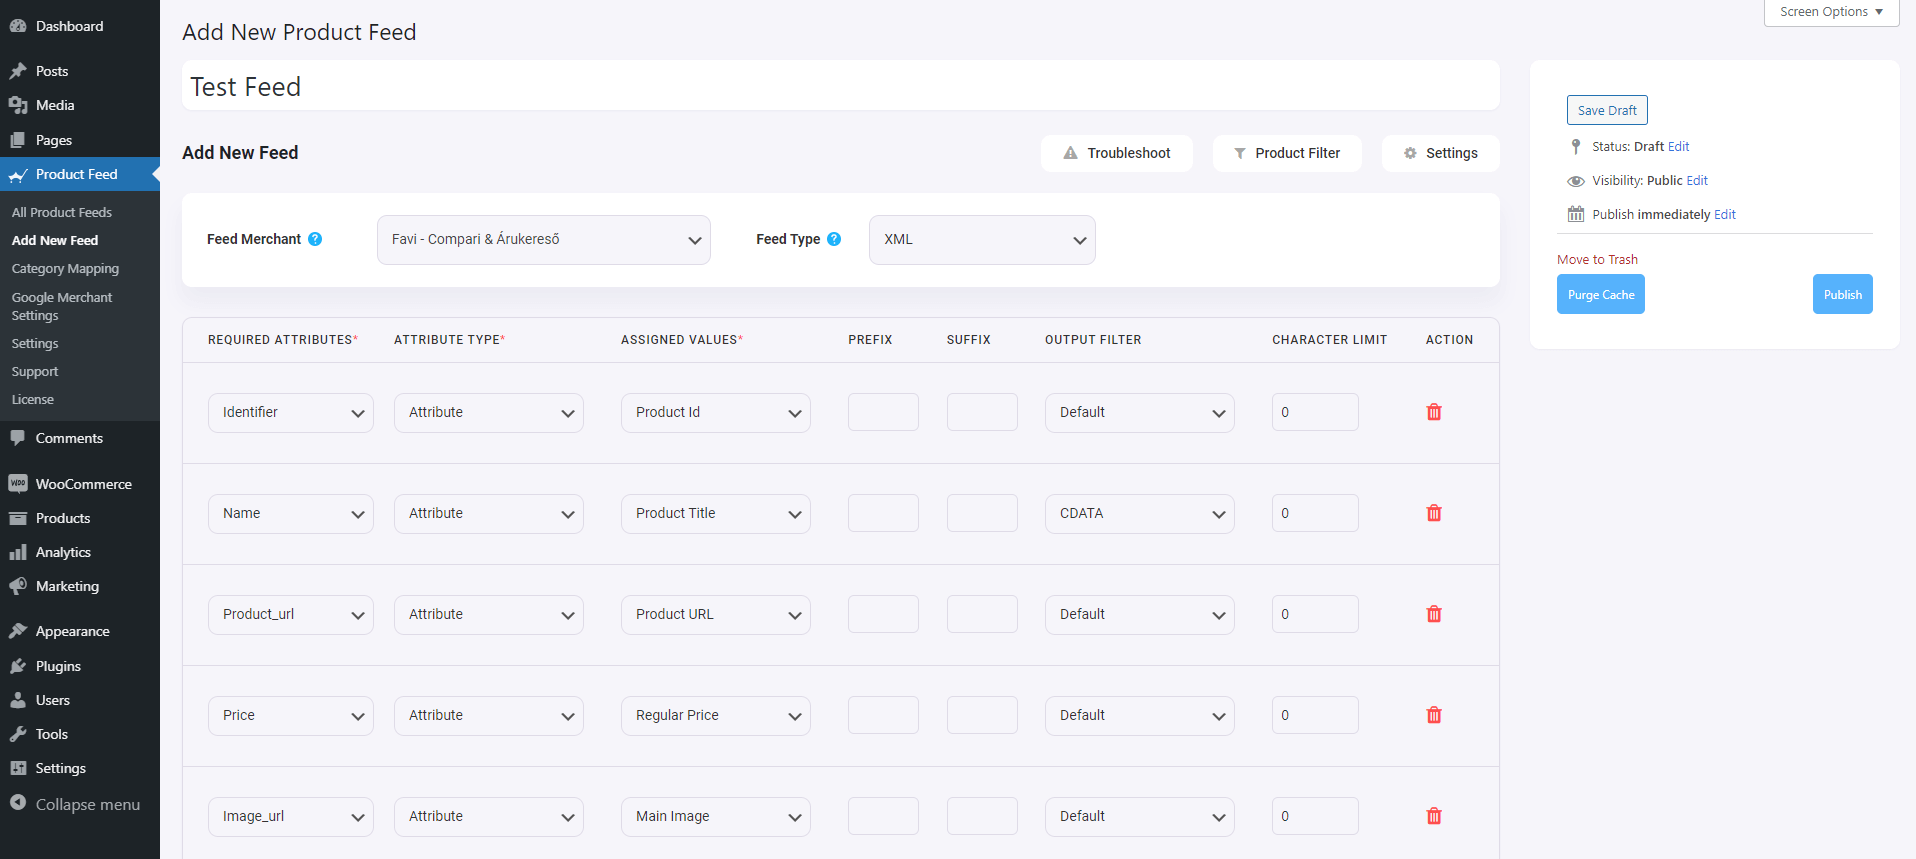
With the plugin, you can create an accurate product feed in a few clicks.

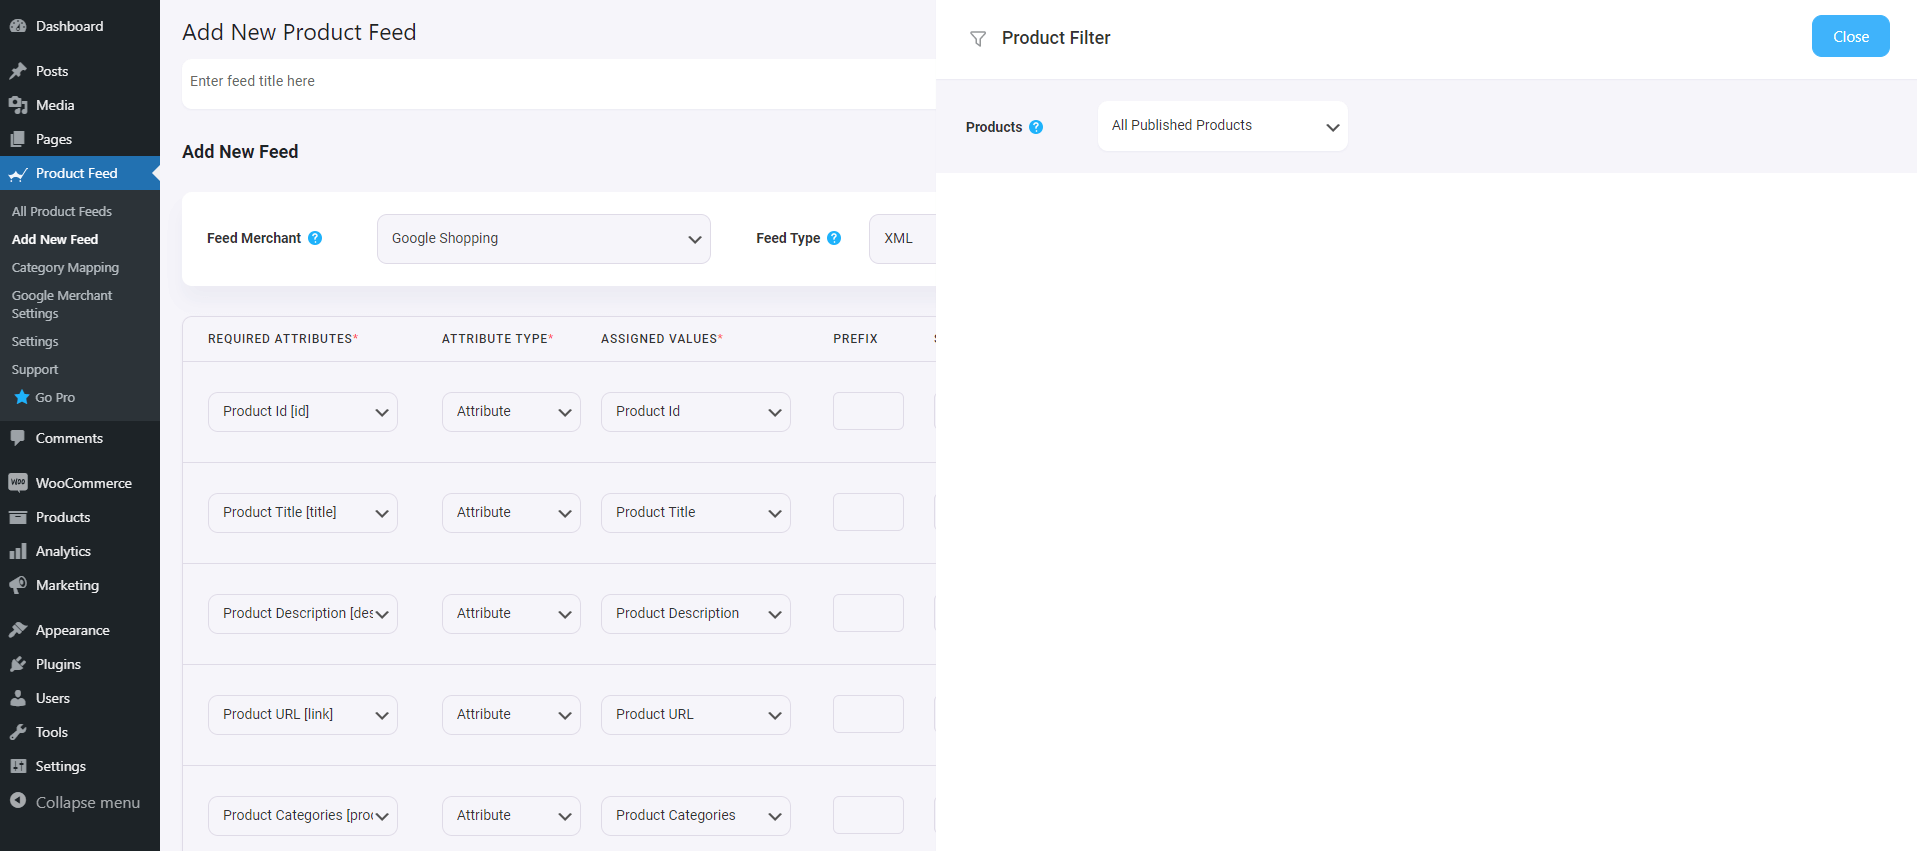
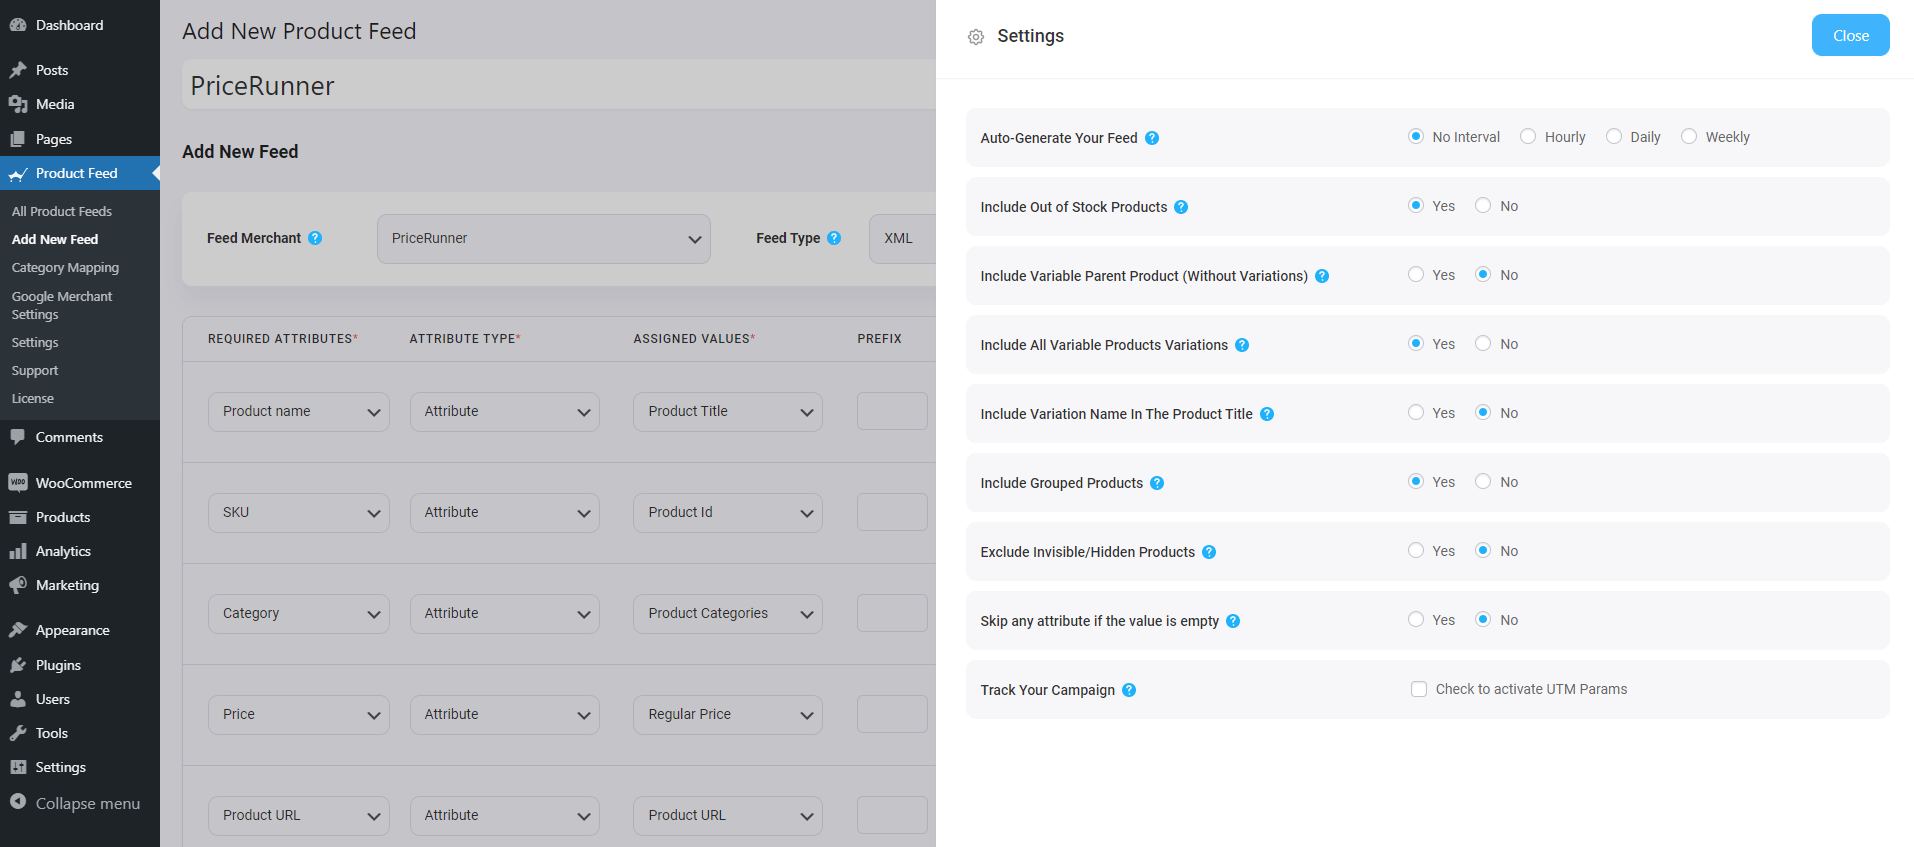
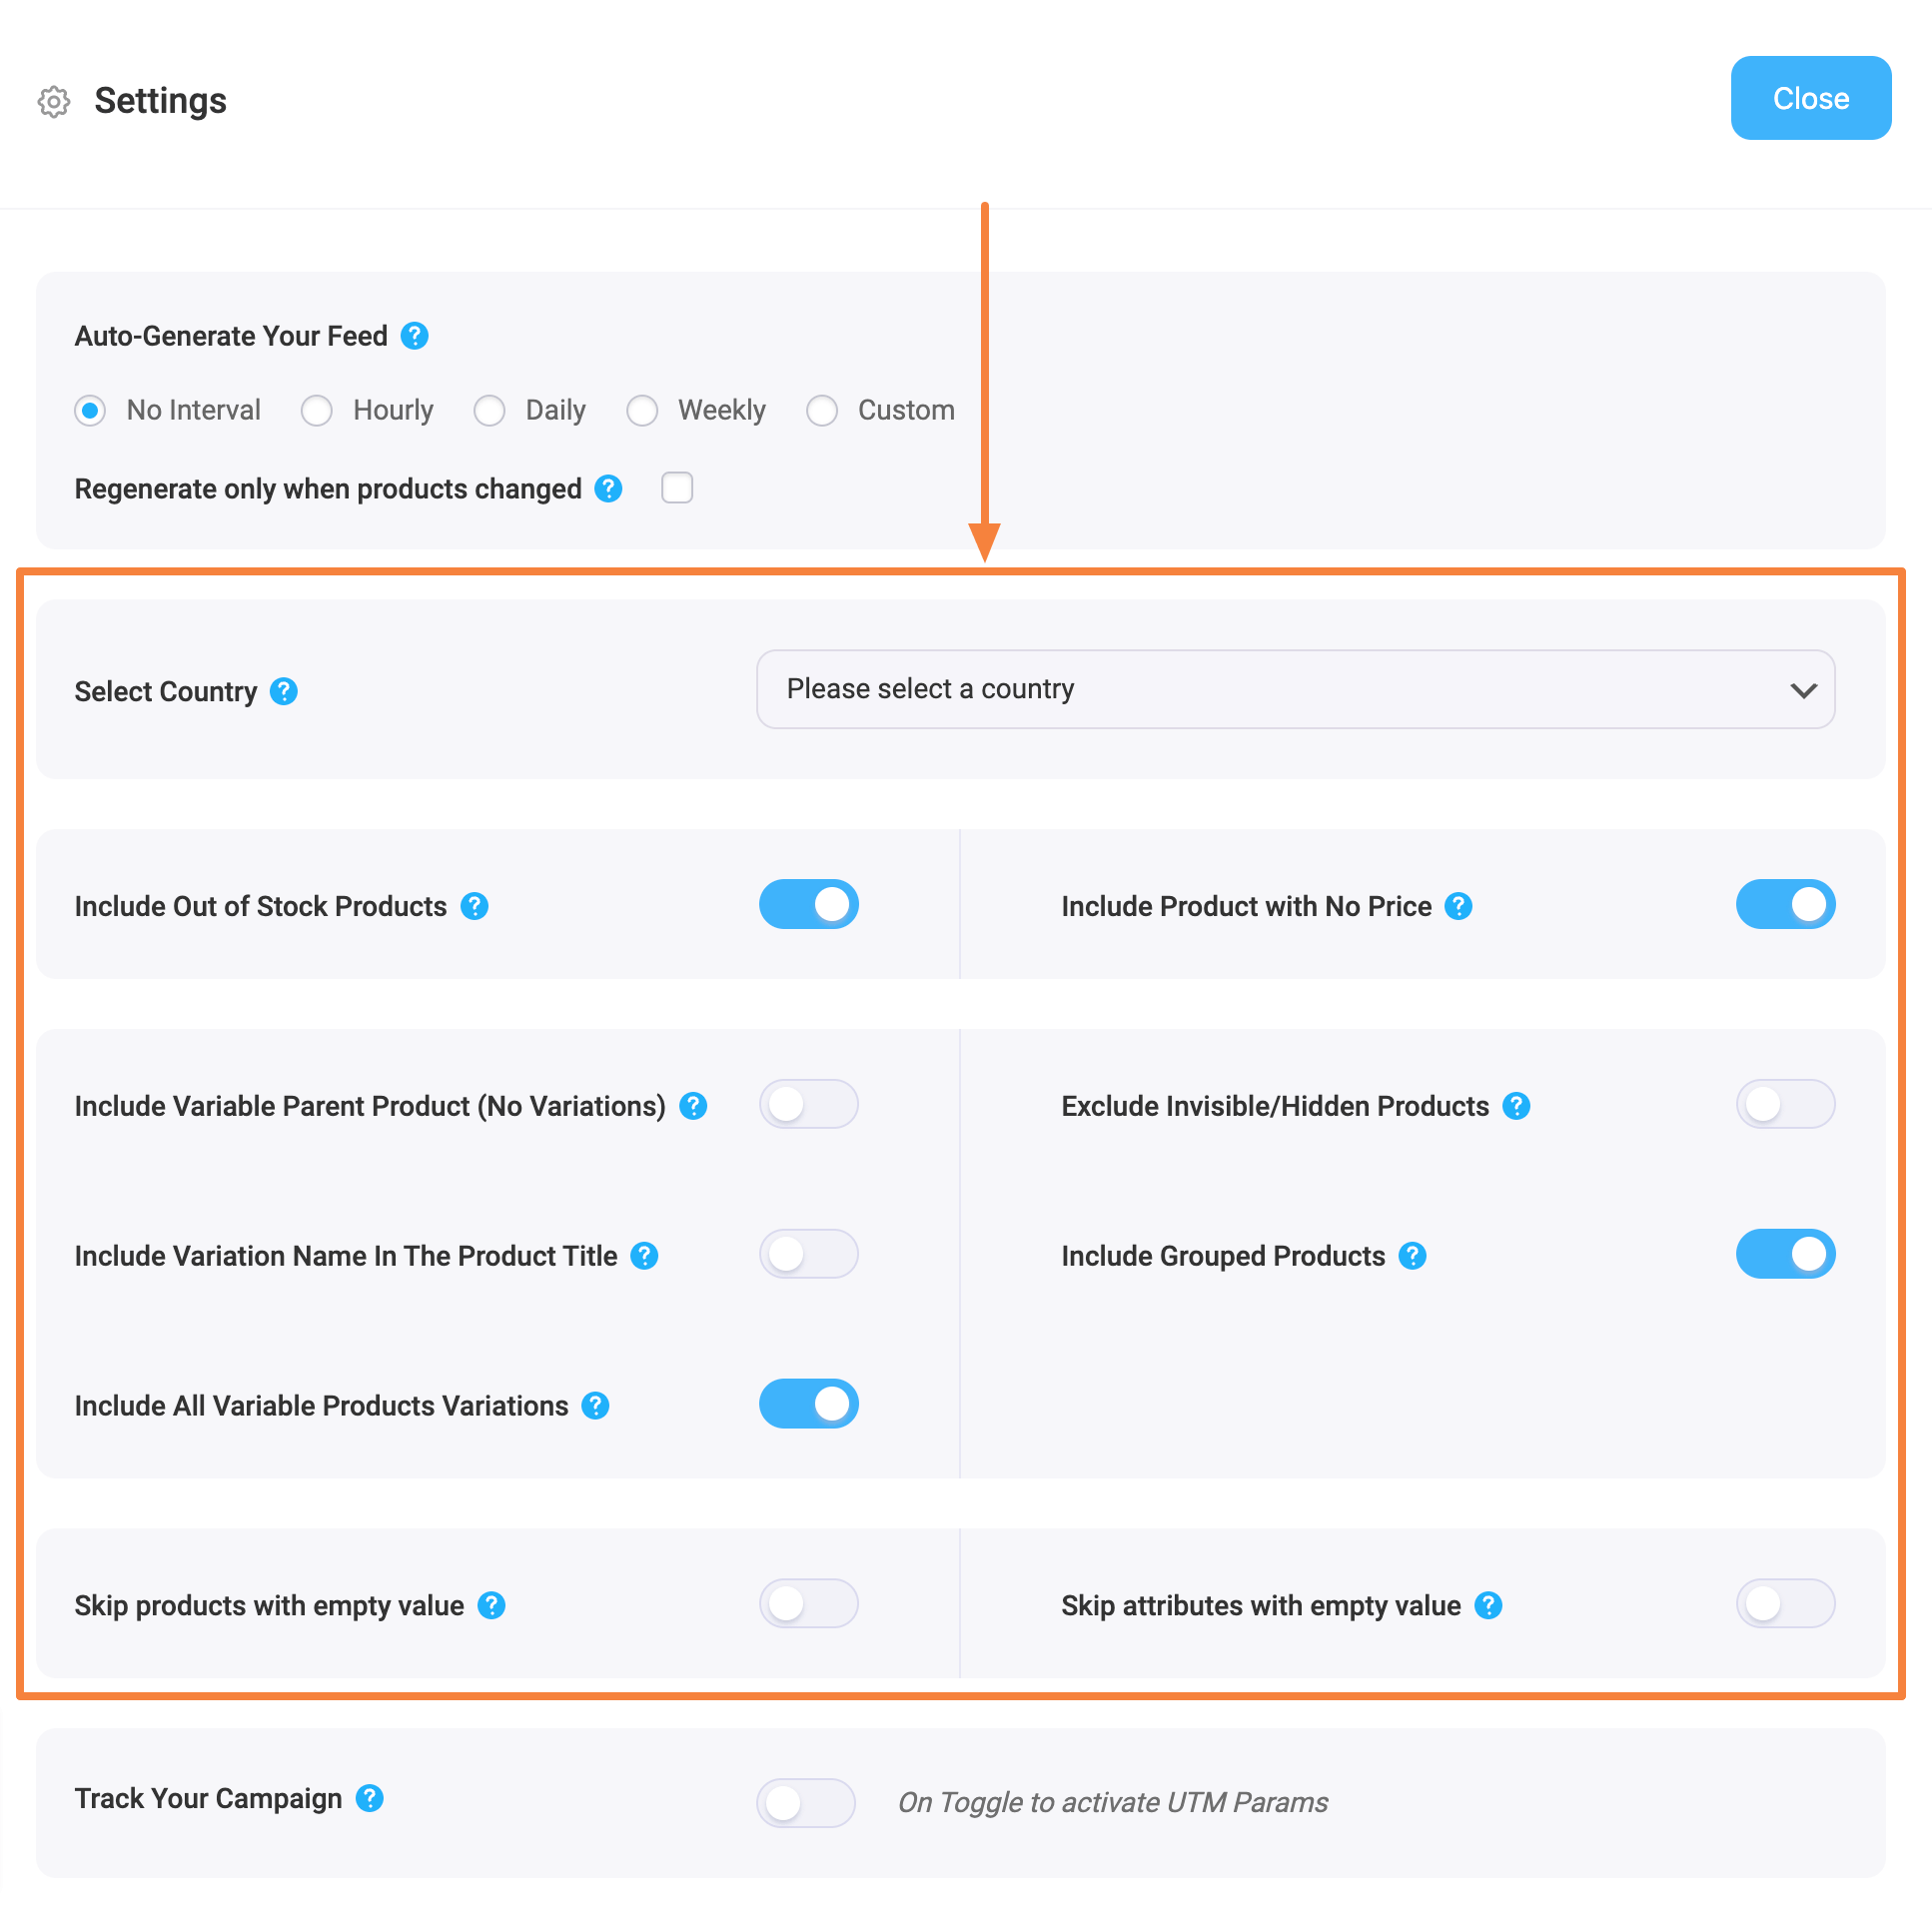
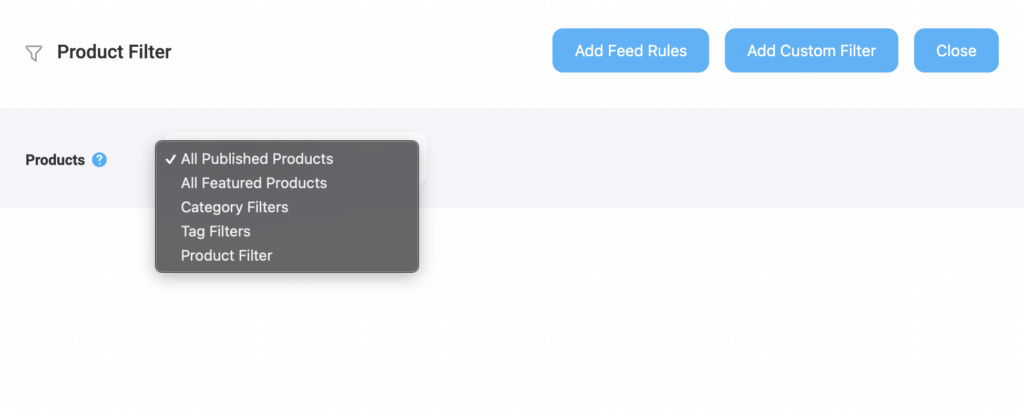
In addition, to feed creation, the Product Feed Manager for WooCommerce plugin offers various features to optimize your feed for the best results. It provides features like feed scheduling and advanced filtering to ensure that your feeds are up-to-date, error-free, and optimized for maximum performance.

PFM- XML feed

So, if you are looking for an affordable and reliable WooCommerce XML feed generator, check it out here.

Summing Up

Having a good XML feed generator can make a big difference for your business. You can simply provide instructions and let the tool do its task.

And using Product Feed Manage for WooCommerce can help you get started with promoting your products on other online marketplaces in just a few clicks.

FAQs

What is an XML feed in WooCommerce?

An XML feed is a structured file that automatically updates your WooCommerce product data across platforms like Google Shopping and Facebook.

Why is an XML feed important for eCommerce?

It ensures real-time product updates, prevents stock mismatches, and helps improve visibility on multiple sales channels.

How often should I update my WooCommerce XML feed?

Ideally, update it in real-time or at least once a day to ensure accurate pricing, stock levels, and product details.

What are XML feed best practices for WooCommerce?

Use high-quality product titles, optimized descriptions, correct attributes, and frequent updates to improve feed performance.

Can I create an XML feed without coding?

Yes, plugins like CTX Feed and Product Feed PRO allow you to generate and manage XML feeds without any coding.

Categorieën
Product Feed Manager For WooCommerce WooCommerce

How To Add Products In WooCommerce – Complete Guide [2024]

If you want to run a successful eCommerce business, WooCommerce is the best option you can consider.

WooCommerce comes with some amazing plugins and extensions that make it easy for you to manage products, orders, payments, and everything needed to run an eCommerce business.

Once you do the basic configuration, the next crucial step is to add your products to WooCommerce.

Today, you’ll get a complete guide on how to add products to WooCommerce to start selling effectively.

How To Add Products In WooCommerce – Step-by-step

WooCommerce has different configurations for different product types. So, you need to know each configuration type for adding them to your store.

Understanding The Default WooCommerce Product Types

WooCommerce has 4 default product types. They are simple, variable, grouped & external/affiliate product.

Before showing you how to add them, let’s quickly go through each of them.

Simple Products

Simple products are basically stand-alone products that you can directly sell in your WooCommerce store. These types of products are unique and have only one version.

For example, a pen can be a simple product if it doesn’t have any variation. Users can view it on the site and when clicking it, it will forward them to the cart page directly.

How To Add A Simple Product In WooCommerce

For adding a simple product, follow the navigation –

WooCommerce> Products> Add new

It will take you to the product adding page.

Step -1: Add product title and description

At first, you need to add your product name. The more engaging title you put, the more it is likely to be clicked by a potential searcher.

For the description, add a detailed overview of what your product is. It should highlight the key features of your product. Users should get the idea right.

WooCommerce product title and description

Step 2: Configure Product Data

Below you will see separate sections for updating your product information.

  • Algemeen

In this option, you set the price of your product. There can be two prices Regular & Sale. While setting the sale price, you can schedule the dates of the discount.

Simple products general tab
  • Inventory

This is the option where you manage your product inventory settings.

  • SKU: SKU is the stock-keeping unit. You can track and manage your inventory levels with the SKU.
  • Manage stock? Here you can decide on the stock levels.

If you choose to manage stock, you’ll get the following options.

woocommerce stock update option

Here you can –

  • provide the stock quantity.
  • choose if you are going to allow backorder or not.
  • set the low stock threshold. This means at which point do you want to receive notification that you’re running low on this product.
  • limit purchase to one item per order. This depends on you. You might have some rich customers who will want to purchase on a larger level. So, it’s better to leave the box unchecked.

Let’s move on to the next option which is Shipping.

  • Shipping

Here, you’ll add the weight and dimensions of the product. If you have some shipping classes and want to assign a specific shipping class to the product, you’ll select it from the drop-down.

WooCommerce Product Shipping option edit

In the next sections, you’ll see Linked Products and Attributes, I’m gonna explain them in the next section.

  • Advanced

In the advanced option, you can

  • enable reviews.
  • add a purchase note; for example, you want to give your users a special thank you note.
woocommerce product advanced option

And, the last tab is – get more options. This is required if you want additional options. As you’re just adding products, you should focus on the previous sections. We’re skipping this option for now.

Step -3: Add Category, Image, Tags

On the right, you’ll find some more options.

Additional product info options
  • Add category – you can assign your product to a particular category or sub-categories.
  • Product tags – here you can add certain tags to your products.
  • Add product image – You must include an image of your product. It should be appealing enough so that customers will click on it.
  • Product Gallery images – Sometimes, only one picture is not convincing enough to attract customers. You can add those additional images from product gallery. And, try to provide every angle images to create a better impact on your potential buyers.

Step -4: Add Product Short Description

You can also add a short description of your products if you want.

product short description

Variable Products

Variable products are products with different variations that you can’t sell directly. Visitors need to see the variations before clicking on the purchase button.

Let’s say, you want to buy a T-Shirt. You can’t randomly select a T-shirt to purchase. You can have your size, color, design, material, etc preferences. So, there can be variations based on the attributes I just mentioned.

You need to add those variations to your WooCommerce store. A user will select a specific variation to purchase.

How To Add Variable Products In WooCommerce

To add a variable product, firstly you’ll add the title and description like before.

Then in the product data, select the variable product. Once you select it, you’ll see a new section will be added called Variations.

add woocommerce variable product

Now, a variable product will have different variations based on the attributes.

You’ll have to create the attribute first and then add those variations.

For example, your product has different colors.

Firstly, you’ll add the color attribute.

configure variable products
  • Give a name
  • Add the value.
  • Enable the visibility option on the product page.
  • Enable the variations.

Once you do that, click on the save attributes.

Now, go to the variations and add them.

variations of woocommerce product

When a user clicks on the variable product, he will be able to view the variations. And send to the cart his preferable variation for purchasing.

Click to find out a detailed guide.

Understanding Virtual & Downloadable Products

When you add a simple product, you’ll see two options – Virtual & Downloadable.

A virtual product on WooCommerce is a product that does not require any shipping like a downloadable file or service you’re providing.

If a virtual product is also a downloadable product like a file a customer can access those files from My Account > Downloads when logged into your WordPress installation.

So, if you’re product is virtual and downloadable you’ll enable the options.

Virtual & Downloadable Products

Now, for the downloadable products, you’ll need to add additional information like downloadable files, limit and expiry.

Grouped Products

From the name you can guess that grouped products are composed of multiple products. Normally, several products together create a grouped product.

Let’s say, you sell sweatshirts in your WooCommerce store. And you want to show all types of sweatshirts in a product.

So, when a user will click on the product sweatshirt, he will see the products under it.

He then can view a particular product and add it to the cart.

How To Add Grouped Products In WooCommerce

To add grouped products, first select Grouped products in the product data.

grouped product

Then go to the Linked Products section. Here, in the grouped products option you have to add the products in a particular group.

configuring woocommerce grouped products

That’s it! These products will be displayed now as a group in your store.

How To Add External/Affiliate Product

These products are external products that you do not sell on your site.

Basically, you promote them on your site but they are sold on an external site.

affiliate product

So, in the external/affiliate section, you have to provide the URL. It will direct users to the page where they can purchase. You need to add a button text as well.

How To Import Products In WooCommerce Via CSV

So far I’ve shown the process of manually adding products to your WooCommerce store.

But, if you want you can bulk upload WooCommerce products.

You just need to create a CSV file where you will add the product details and then import the file on WooCommerce.

For importing,

  1. Go to the Products Page and click on Import.
WooCommerce Product Import Option

2. Choose the CSV file where you listed the product information.

choose CSV file

3. Check if the column mapping is okay.

WooCommerce product column mapping

4. Now, Run the importer.

Run the importer

5. That’s it! Once the loading is done, your products will be imported successfully.

upload woocommerce products with CSV

More WooCommerce Product Types

Now, there are more WooCommerce product types than the default WooCommerce product types. They are:

1. Bundled Product

From the name you can guess, A bundled product is a combination of other products. In a bundled product, you can add simple, variable or subscription products and assign a new price for the bundle.

2. Subscription Product

When a customer subscribes to a product and receives recurring invoices, that is a subscription product. It applies to any kind of product that uses the typical subscription model to collect payments from customers.

3. Composite Product

Composite products are a type of customized product that your clients create from various other products.

4. External/Affilaite Product

External or Affiliate products are products that you do not sell on your website. People will click on the link and it will redirect to the external site where it is sold.

5. Donation Product

In WooCommerce, you can accept donations up to a customer-specified sum.
Donation For WooCommerce is a powerful WooCommerce extension that allows you to take donations without charging your customers any transaction costs.

6. Bookable Product

A bookable product allows users to book a reservation, rental, or appointment without making a phone contact.

You need a subscription or additional plugin to add these products to your WooCommerce store.

Noot van de auteur

So, you have seen how easy it is to add WooCommerce products.

What are you waiting for?

Start adding products to your WooCommerce store and start driving sales.

If you want to read an article on WooCommerce SEO optimization, click here.

Let us know in the comment if you want any specific WooCommmerce guide.

Proost.

Categorieën
Guide Product Feed Manager For WooCommerce

Integrate Pinterest For WooCommerce & Maximize Your Reach [2024]

Running a WooCommerce store can be extremely beneficial to your online business. However, to scale up, you need to put in extra effort to promote your products.

One of the best ways to increase WooCommerce sales is to list your products on large online marketplaces that have the potential to reach more potential buyers.

One of the platforms that can drive tons of sales without much effort is Pinterest.

With 518 million active users, Pinterest is currently the number one visual search engine that most WooCommerce rely on.

However, to promote on Pinterest, you first need to upload your products to the Pinterest merchant center in the right format. Moreover, you need to work on improving your title and description to maximize conversion.

In this article, you’ll get a complete guide on how you can prepare a WooCommerce Pinterest feed in the most optimized way, without wasting hours on formatting.

After reading the article, you will be able to

  • Create a proper Pinterest product feed with your WooCommerce products real quick.
  • Optimize the product data for higher conversion on Pinterest
  • Promote on Pinterest and start getting more sales.

Let’s dive in.

How Promoting WooCommerce Products On Pinterest Works?

Your Pinterest for WooCommerce strategy is entirely dependent on Pinterest product pins. By uploading your feed, you publish your products as product pins on Pinterest.

Product Pins contain information that customers want to know about, such as product name, description, price, availability, etc., and direct them to your website on click.

These pins show up organically when people search for relevant keywords on Pinterest or are displayed on other Ad platforms for Pinterest.

Pinterest For WooCommerce

Once a prospect finds your pin,

  1. Users can click on your pins and see website links, titles, buttons, etc. They get ideas about your product through these pins.
  2. When they click on the image, they get more detailed information about your product.
  3. If they are convinced enough, they can directly go to your WooCommerce product feed from the link you provided.

This ensures that the prospects you get have more potential as they already have a visualized idea of your product.

For a store with 5-10 products, it’s quite easy to add your products as pins manually, but, if you have a WooCommerce store with more than 100 products, it can get quite hectic and time-consuming.

Rather, it’s more feasible to prepare a Pinterest catalog feed with all your products and upload them in bulk. And that is easily possible if you have all your products hosted on a WooCommerce website.

**Before you start uploading your products, make sure you have set up your Pinterest business account properly.

Let’s look at how you can generate a Pinterest shopping feed to upload your WooCommerce store to Pinterest.

How To Set Up Pinterest Product Feed In The Right Way

Pinterest For WooCommerce

In order to upload your products, Pinterest merchant comes with specific guidelines. Your product feed must have certain attributes.

Pinterest Feed Required Attributes

Following are seven product attributes that you must include for all of your products

Here’s a sample CSV template of a Pinterest product feed.

1. Product ID (id)

This is the unique identifier of a product. You may use your product ID or SKU as the value for this attribute.

2. Product Name (title)

This is the name of your product. When submitting the title in your Pinterest feed, you need to focus on highlighting the core features of a product.

In fact, doing the same in your WooCommerce store itself will get more results and SEO rankings than simply naming the product as what it is.

For example, if you are selling a t-shirt from Versace, rather than naming it “Round-neck t-shirt,” name it “Black round-neck t-shirt by Versace.”

This is highlighting not only the product itself but also the color and the brand of the t-shirt.

Besides the image, this is a great way to grab the attention of the right buyers.

3. Product Description (description)

This will be a quick description of what features the product has and it’s the benefit of buying your product.

It’s best to write an SEO-optimized description so that it may rank for more potential search terms.

4. Product URL (link)

This will simply be the link to your product page where a buyer will be able to place an order for your product.

**You may add UTM parameters to your product links to get a useful performance report on your Google Analytics dashboard.

5. Product Image (image_link)

You should submit links to a few good images of your products. Make sure they are of high quality.

6. Product Price (price)

This will be the price of your product.

Try to observe other stores and offer a competitive price. People often decide to purchase a product based on the price.

7. Stock Availability (availability)

It refers to the stock status of your product. Usually, you may submit the value “in stock.”

Often you may have certain products that are no longer in stock, but you want your buyers to know you had them in the past. These are the products that you may upload to your Pinterest feed with an availability value of “out of stock” or “back order.”

Example of a Pinterest product feed:

pinterest product feed - Pinterest For WooCommerce
Type caption (optional)

Apart from these attributes, there are some other optional Pinterest feed attributes.

These attributes help Pinterest better match your products with shoppers. The more attributes you add, the more Pinterest understands your product and who it is intended for.

So, make sure you add the optional attributes to your feed to enhance relevancy.

How To Generate An Accurate Product Feed For Pinterest From Your WooCommerce Store

To create a successful Pinterest product feed for WooCommerce, you can use a reliable plugin that can help you generate the feed in just a few clicks.

Product Feed Manager for WooCommerce is a WooCommerce-specialized plugin that helps you to create perfect product feeds with only 3 clicks.

The plugin comes with more than 170+ pre-defined marketplace feed templates so you can promote products not only on Pinterest, but also on other popular marketplaces such as Google Shopping, eBay MIP, Idealo, or even on local marketplaces with custom feed data.

Let us look at how quickly you can generate a Pinterest shopping feed using this plugin.

First, install and activate the plugin, Product Feed Manager for WooCommerce.

Now, follow the steps below.

  1. On your product feed dashboard, you’ll find a button that says ‘Add New Feed.’
add a new product feed - Pinterest For WooCommerce
Type caption (optional)

When you click the button, it will take you to the feed creation page.

  1. On this page,
  • Give a title to your feed.
  • Select your preferred merchant.
  • Select your feed type.
generating product feed of pinterest for woocommerce
Type caption (optional)

Once you do that, you’ll see the list of required attributes will appear automatically.

  1. Now, if you want you can add any new or custom attribute. You can also configure the feed with different filters and settings options.
  2. Once you’re done with configuring the feed, you can click on the ‘Publish’ button.
publishing feed - Pinterest For WooCommerce
Type caption (optional)

And that’s it. Your feed will be generated.

You can download and upload the file to your merchant account for listing your products on Pinterest for your WooCommerce store.

To easily do the process, I’m recommending you to go through this guideline ‘Before you get started with Catalogs’

Tips To Optimize Your Pinterest Product Feed For A Better Result

Now, let me share some valuable tips to optimize your Pinterest product feed for even better results.

1. Auto Update Your Feed In Certain Intervals

Pinterest investigates your feed every 24-48 hours and notifies you of any changes.

If it finds any mistakes while reviewing your feed, then your feed will be rejected.

Hence you should ensure that your product information is accurate and up to date.

The good news is Product Feed Manager for WooCommerce has an Auto Feed Generate feature that allows you to schedule your feed update in certain intervals.

This means that Pinterest will get the most up-to-date feed and save you from rejection.

2. Optimize Your Product Title For More Engagement

Product titles should be engaging enough to convince the pinners to be interested.

Hence, you should make the titles as descriptive as possible.

Include distinguishing features such as brand names, size, size type, color, gender, and age group in your title. This information is particularly useful if these attributes are not visible in the image.

Now, going to your WooCommerce products and manually updating the titles isn’t something you want. This would mean you would have to spend hours editing product titles, assuming you have 100+ products in your store.

This is why Product Feed Manager for WooCommerce allows you to combine multiple attributes to produce a detailed and engaging title.

3. Ensure Proper Categorization To Appear In Relevant Searches

A proper product categorization makes it easier to find your product and provides a good structure for your Pinterest shopping campaigns.

You can add the Google product category attribute to map your WooCommerce products according to the categories of Google product taxonomy.

You can easily achieve this using the Category Mapping Feature of the plugin Product Feed Manager for WooCommerce.

4. High-Quality Images and Rich Pins:

Using top-notch images and Rich Pins is key to supercharging your Pinterest shopping feed. Think about it like this: when you’re scrolling through Pinterest, what catches your eye? It’s those stunning visuals, right?

That’s what you want for your products too, high-quality images make your pins stand out and grab attention. And with Rich Pins, you’re giving users all the info they need right there on the pin – no extra clicks required.

It’s like having a mini storefront right on Pinterest. Plus, when people see your pins, they’re more likely to click through and check out your website. So, don’t skip on the visuals – they’re your secret weapon for Pinterest success.

5. Consistent Pinning Schedule:

Maintain a consistent pinning schedule to keep your audience engaged and your products visible. By regularly sharing new pins and content, you stay active in users’ feeds and increase the probability of your products being discovered.

Moreover, you can aim for a balance between promoting your products and sharing relevant content from others in your niche to keep your feed fresh and appealing.

Consistency is key to building a loyal following and maximizing your reach on Pinterest for WooCommerce. Additionally, using a scheduling tool can help you plan and maintain your pinning routine effortlessly.

Conclusion

As you’ve seen, it’s incredibly easy to generate a Pinterest product feed with your WooCommerce products. This process can significantly boost your visibility and engagement on Pinterest.

However, there are different WooCommerce plugins for Pinterest feeds available, but that can be overwhelming, as many of them are complex and not user-friendly. To simplify this process and enhance your productivity, try the Product Feed Manager.

This tool simplifies the creation of your Pinterest product feed and saves you time and money. By utilizing it, you can focus on other aspects of your business while effectively generating more revenue through Pinterest.

This easy integration ensures that your products reach a broader audience with minimal effort on your part. So try it now.

** FAQs **

How often should I update my Pinterest product feed?

  • It’s best to update your Pinterest product feed at least once every 24-48 hours to ensure that your product information is always accurate and up-to-date. This prevents feed rejections and keeps your listings current.

Can I schedule automatic updates for my Pinterest product feed?

  • Yes, using Product Feed Manager for WooCommerce, you can set up automatic updates for your feed at specific intervals. This ensures your products are always up-to-date without manual intervention.

How can I make my product titles more engaging on Pinterest?

  • To make your titles more engaging, include key details such as brand names, size, color, and other unique features. Use the Product Feed Manager to combine multiple attributes into a detailed and appealing title effortlessly.

What should I include in my product descriptions for Pinterest?

  • Your product descriptions should highlight the key features and benefits of your products. You should also ensure that they are SEO-optimized to rank better in search results and attract more potential buyers.

How do I ensure my products are properly categorized on Pinterest?

  • Proper categorization helps your products appear in relevant searches. You can use the Category Mapping feature in Product Feed Manager to map your WooCommerce products to appropriate Google product categories. It helps to improve visibility and search accuracy.
Categorieën
Product Feed Manager For WooCommerce Update

De veelbelovende nieuwe interface van Product Feed Manager voor WooCommerce

Generating a WooCommerce product feed is sometimes complicated, but with Product Feed Manager for WooCommerce, we always tried to provide you with the best possible options and make the feed generation process as simple as possible.

And recently, we’ve made some major changes to our plugin, that will really make your feed generation process so much easier. 

Over the past few months, we considered our users’ suggestions, feedback, problematic areas and came up with a solution that will help you overcome major obstacles when generating product feed in WooCommerce.

The plugin is going through a huge makeover that will ensure

  • Less complications.
  • Faster feed generation.
  • Super easy user interface.
  • Less time wasted to learn the plugin.

Let us look at the major changes you will experience.

Easy Feed Generation Without Complications

The first major change you will experience is the feed generation area. You will notice the following:

  1. The new user interface is so neat and clean – you know exactly what you need to do.
  2. You will no longer see unnecessary additional settings options unless you need them.
  3. Now you don’t have to take additional steps to enable your merchant for feed generation.
PFM New User Interface

There were numerous feedbacks from users who indicated that they were confused at the first glance when they tried to generate a product feed.

This urged us to try and find out what could be causing this confusion. And after thorough observation and testing, we figured this could be due to the additional options you see initially when you try creating a feed. This seemed more logical as those settings were mostly pre-set and you didn’t really have to configure them unless there was an exception.

On top of that, in the last version, you first had to go to a separate tab and enable your required merchant before you could find it in the list during feed generation. As you can tell, this was just an unnecessary additional step which we should have avoided a long time ago.

To solve these issues, we made the following changes.

  • The first step you take when you create a feed will be choosing your merchant. The second step will be verifying the feed attribute values. And the third step could be generating the feed.
    **This used to be over 5 steps process due to the additional settings you had to configure first, which we moved.
PFM Feed Generating Steps
  • You no longer have to enable your required merchant prior to feed generation. Once you decide to create a feed, search for your required merchant on a smart search bar (where you can scroll or type-and-search) and select it. The merchant will be immediately enabled and the feed template will load below.
Search Merchant Template
  • We moved the additional settings for a feed into a separate section which you can view by clicking on a button. So this won’t act, in anyway, to create confusion. You can use the settings only when you need them.
PFM Settings Option
  • The filter options are also moved to another section which you can access by clicking on a button. Not everyone uses filters so it’s best to keep it separate unless required. By default the filter will be “All available products.”
PFM Product Filter Options

The main benefit of this change is that you don’t need to waste time trying to understand the additional settings or going through additional steps.

You can generate a product feed in as low as 3 steps (which may increase depending on the merchant but without the additional steps we had before).

More Useful Changes

1. You can now choose whether to include or exclude the ‘out of stock’ products in your feed using our new “Include Out of Stock Products” option. 

You will find this option in the Settings drawer.

Exclude Out of Stock Products

2. PFM custom fields are now useable for Grouped and Affiliate products in your WooCommerce store..

PFM Custom Fields for Grouped Products

3. A Troubleshoot option is added. You can click on the Troubleshoot option to get the list of possible issues that are commonly faced along with their solutions.

**The Troubleshoot page will be regularly updated.

PFM Troubleshoot Button

Sounds interesting?

Start exploring our new user interface and enjoy this new and unique feed generation experience with no limits.

Categorieën
Guide Product Feed Manager For WooCommerce WooCommerce

How To List WooCommerce Products In Pricerunner DK – Product Feed Guide [2024]

There are many ways you can increase WooCommerce sales. One of the best ways today is to promote your WooCommerce products on large price comparison sites that have a high amount of active users.

If you run a WooCommerce store in Europe and ship your products to Denmark, Sweden, UK, or other nearby EU countries, then you must promote your products on Pricerunner DK.

Pricerunner is currently one of the largest price comparison sites in Europe with over 2 million visits every month. And it is trusted by sellers to increase their online sales by a significant amount.

Right now, it’s easier than ever to list your products on the Pricerunner’s price list. All you need to do is signup as a merchant and upload your products with the right product data.

In this guide, you will learn how you can start promoting on Pricerunner and get step-by-step instructions on generating your WooCommerce product feed to upload products on Pricerunner real quick.

Dus laten we beginnen.

1. How To Start Promoting On Pricerunner DK

The first thing to do is to sign up for listing your store products on Pricerunner DK.

FYI, you may list your products on Pricerunner for free and pay on a CPC basis.

However, it’s quite different from other marketplaces. You may increase your CPC amount, i.e. set a higher spending budget to increase your visibility for certain products or products in certain categories, similar to how social media dynamic Ads work.

This means you may choose to spend a bit extra to promote your best sellers so that you can get a higher number of sales without much effort.

Though this makes the marketplace a bit competitive, at the end of the day, this won’t matter too much if you sell quality products.

Once you have registered your store to list products on Pricerunner, the second step is to upload your product data in the right format.

So let us look at the required product attributes that you must submit to list your products on Pricerunner.

2. Mandatory Attributes & Product Feed Specification For PriceRunner DK

Following are the product attributes that you may include in the product feed when trying to list your WooCommerce products on the PriceRunner price list.

Some of them are mandatory to be accepted in the marketplace. Others are optional attributes that you may choose to submit for a better chance of appearing on users’ search results.

**The ones marked in Pink color are required attributes and the ones marked Grey are optional attributes.

Product ID/ SKU (ProductId)

Example Format:

<ProductId>12340-004_1300_34_34</ProductId>

You can use the WooCommerce Product ID or the SKU for this attribute.

Product Name (ProductName)

Example Format:

<ProductName>

<![CDATA[ PriceRunner Tapered Jeans (Navy – W34 / L34) ]]>

</ProductName>

Use the product Title in your WooCommerce store. For variable products, it’s recommended to include the variation term to the tile for each variant.

Product Price (Price)

Example Format:

<Price>549.00 GBP</Price>

Use the current price of the product on your site, i.e., if you have a sale running, then submit the sale price, else submit the regular price.

Shipping Cost (ShippingCost )

Example Format:

<ShippingCost>49.00 GBP</ShippingCost>

The product’s shipping cost. Shipping cost needs to combine all shipping/order costs for the consumer, like for example environmental surcharge, freight surcharge, handling surcharge, packaging fee etc.

Stock Status (StockStatus)

Example Format:

<StockStatus>in stock</StockStatus>

If you manage stock in your WooCommerce store, then you may use the number of products available in stock to submit this attribute.

Delivery Time (LeadTime)

Example Format:

<LeadTime>1-3 days</LeadTime>

This is the promised delivery time from the time of the order in the number of days. It’s important that the delivery time in the feed corresponds to the info on your site.

Brand/ Manufacturer (Brand)

Example Format:

<Brand>PR Jeans</Brand>

If the product is manufactured by a renounced Brand, then you have to include the brand name in the product name as well as under this attribute.

Manufacturer SKU/MPN (Msku)

Example Format:

<Msku>PRjeans1231</Msku>

Manufacturer’s unique article number. Used by us to automatically match many product types.

EAN/GTIN (Ean)

Example Format:

<Ean>4051015130000</Ean>

EAN code. Unique barcode number. Used by us to automatically match many product types and make the products searchable in the barcode scanner in our app.

Product URL (Url)

Example Format:

<Url>https://www.example.com/Product.html</Url>

Submit the product link. For variable products, the URL should be unique for each variant.

Image URL (ImageURL)

Example Format:

<ImageUrl>https://www.example.com/images/Product.jpg</ImageUrl>

URL to the product image. The CMYK format is not supported.

Product Category (Category)

Example Format:

<Category>

<![CDATA[ Clothing > Mens > Pants > Jeans ]]>

</Category>

Use > to separate multiple levels in a category. Also, include a space before and after the > symbol.

Product Description (Description)

Example Format:

<Description>

<![CDATA[ Cotton blend Flex twill – Sleek tapered cut – YKK zip-fly – Jeans-style pockets – Authentic tailored details ]]>

</Description>

Detailed information about the product. PriceRunner’s search engine and filters work using the information in this field. Try to include the keywords you want to be found for.

Adult Content (AdultContent) – optional

Example Format:

<AdultContent>No</AdultContent>

Indicate a product includes sexually suggestive content (yes/no)

Age Group (AgeGroup) – optional

Example Format:

<AgeGroup>Adult</AgeGroup>

The demographic for which your product is intended

Bundled (Bundled) – optional

Example Format:

<Bundled>No</Bundled>

Indicates a product is a merchant-defined custom group of different products featuring one main product (yes/no)

Color (Color) – optional

Example Format:

<Color>Blue</Color>

This is the color of the product

Energy Efficiency Class (EnergyEfficiencyClass) – optional

Example Format:

<EnergyEfficiencyClass>A</EnergyEfficiencyClass>

This is your product’s energy label.

Gender (Gender) – optional

Example Format:

<Gender>Male</Gender>

The gender for which your product is intended

Condition (Condition) – optional

Example Format:

<Condition>New</Condition>

The condition of your product at time of sale e.g. “new”, “used”, “refurbished”, “demo”. PriceRunner only lists and compares new products atm, but we are looking into the possibility to expand this in the future. Until then its important these types of products are tagged correct in your product feed.

GroupId (GroupId) – optional

Example Format:

<GroupId>123</GroupId>

ID for a group of products that come in different versions (variants)

Material (Material) – optional

Example Format:

<Material>Demin</Material>

Your product’s fabric or material

Multipack (Multipack) – optional

Example Format:

<Multipack>No</Multipack>

The number of identical products sold within a merchant-defined multipack (yes/no)

Pattern (Pattern) – optional

Example Format:

<Pattern>Plain</Pattern>

Your product’s pattern or graphic print

Size (Size) – optional

Example Format:

<Size>32W 34L</Size>

Your product’s size

Size System (SizeSystem) – optional

Example Format:

<SizeSystem>UK</SizeSystem>

The country of the size system used by your product

Example Feed Data With Required Attribute

<?xml version="1.0" encoding="UTF-8"?>
<products>
	<product>
		<ProductId>1001</ProductId>
		<ProductName>Hoodie with Logo
		</Product_name>
		<price>45.00 GBP</price>
		<ShippingCost>15.00 GBP</ShippingCost>
		<StockStatus>in stock</StockStatus>
		<LeadTime>1-3 days</LeadTime>
		<Brand>Lacoste</Brand>
		<MSku>woo-hoodie-with-logo</MSku>
		<Ean>012345678900</Ean>
		<Product_URL>https://yourwebsite.com/product/hoodie-with-logo/</Product_URL>
		<Image_URL>https://yourwebsite.com/wp-content/uploads/2022/08/hoodie-with-logo-2.jpg</Image_URL>
		<Description>Grab this incredible hoodie to change your style in to comfort.</Description>
	</product>
</products>

How To Generate PriceRunner Product Feed In WooCommerce

In WooCommerce, you will find an easy-to-use plugin, Product Feed Manager for WooCommerce (PFM), with which you can generate an XML feed in just a few clicks.

This is because the plugin has a pre-built template for PriceRunner with the right XML format and product attributes.

Then, follow the step-by-step instructions below to successfully generate a product feed for Pricerunner DK.

Step 1 – Import PriceRunner Template For Feed Generation

1. On your dashboard, click on Product Feed and then click on Add New Feed option.

Product Feed Manager - Nieuwe feed toevoegen

It will take you to the feed creation page.

Nieuwe voeding toevoegen

Here, on the top you will get an option to give a name to your feed, you can skip it too.

2. Click on the Feed Merchant Dropdown and you will get the list of all the supported merchants.

You can scroll down this merchant dropdown list or you can type PriceRunner in the search box, and you will get the PriceRunner option in the list.

PriceRunner Merchant Option

Select PriceRunner, and all the required attributes of PriceRunner will be loaded below.

PriceRunner Required Attributes

Step 2 – Feed Configuration

Now, you can see three buttons under the Feed Title text box, Troubleshoot, Product Filter, and Settings.

1. If you are having any issues generating feed, click on this Troubleshoot button, it will take you to the Troubleshoot page, it could be helpful for you.

2. If you want to use any filter or condition, you can click on the Product Filter option, and a drawer will slide in from the right side of the window, and there you will get the following filters:

PriceRunner Product Settings Options
  • All Featured Items
  • Custom Filter
  • Category Filter
  • Tag Filter
  • Product Filter (Pro)

You can select any filter option and use them as per your need and click on the Close button when done.

3. Now, to schedule your feed or to choose which type of products will be included in your feed, click on the Settings button, and you will get a list of options to exclude or include products.

PriceRunner Settings Options

Change the options as per your need and click on the Close button when done.

Step 3 – Use The PriceRunner XML Feed Template

1. If you look at the Feed Merchant dropdown button, there you will get another dropdown Feed Type, you can click here to set the type of this feed. You can set different types of feeds depending on what types of feeds this merchant supports or what types of feeds this Product Feed Manager has the support for.

For PriceRunner, keep the Feed Type as XML.

2. Now, in the attributes section, you will see that all the attributes are under the Required Attributes column, and their values are set according to the attributes under the Assigned Values column.

You can change any values to any attributes, simply click on the value dropdown, and select your preferred value.

All the required attributes will appear below. Now, most of the attributes will already be configured but notice that some of these attributes are unassigned.

Step 4 – Assign The Right Values To Unassigned Attributes

1. You will need to assign values for the following:

  • Verzendkosten
  • LeadTime
  • Merk
  • Ean

**For these 4 attributes, WooCommerce doesn’t have default fields in the product data section to assign these values to the products. So the best option here is to add custom fields and save these values there. You may then use those values in the feed.

Watch these videos – Video1 & Video2 – to see how you can get custom fields with PFM.

Step 5 – Publish The Feed And Use The Feed To List Them In the Marketplace

1. Once the attributes are all set, scroll up and click on Publish and the feed will be generated.

2. You will be able to view or download the feed.

That’s it. You have created your required product feed. The next thing to do is upload your products to PriceRunner.

Conclusie

As you saw above, this is how easily you can generate PriceRunner product feed using Product Feed Manager for WooCommerce.

If you want, you can check out the plugin here:
– https://wordpress.org/plugins/best-woocommerce-feed/
– Product Feed Manager for WooCommerce Pro

Initially, test out the free version of the plugin, and once you are sure the plugin does what is required, you can go ahead think about upgrading to Pro.

It’s high time you take advantage of the PriceRunner DK marketplace and start getting more sales on your Danish WooCommerce store.

Categorieën
Guide Product Feed Manager For WooCommerce WooCommerce

Guide To Sell On Ceneo.pl Using Accurate Ceneo XML Feed – WooCommerce (2024)

The eCommerce industry is growing every day. One of the prime reasons for this growth is the increased popularity of large local online marketplaces. If you run a WooCommerce store in Poland, then you must promote your products on Ceneo, the most popular Polish online marketplace.

With an average of 7.5 Million (avg) monthly traffic, Ceneo helped the worldwide e-Commerce industry grow at least 26%, with approximately 22 billion euros in revenue in 2020.

In fact, most small to medium local online shops in Poland have benefitted by promoting their products on Ceneo.pl, and it’s high time you take advantage of their huge audience.

To promote your products on Ceneo, all you need is to create a Ceneo XML feed in the right format and upload your products to their marketplace.

Now, the main issue most people face is that Ceneo has a unique required format for the XML feed structure, and it’s not possible to prepare manually.

However, if you run a WooCommerce store, then you can easily generate a Ceneo product feed in just a few clicks using a reliable tool.

Today, you will learn how to generate an accurate Ceneo XML feed and promote your products to a huge audience. After reading this guide, you will learn

  • The mandatory attributes to include in the product data
  • The dedicated Ceneo XML feed structure to follow
  • How to generate WooCommerce product feed for Ceneo.pl in just a few clicks

Then, you can go ahead and start getting more sales from this huge local online marketplace.

Laten we beginnen.

The Right Ceneo XML Feed Format With WooCommerce Product Data

When creating a new feed for Ceneo, you will need to include a few specific data in the right format.

Normally, the feed structure is as follows:

<?xml version="1.0" encoding="utf-8"?>
<offers xmlns:xsi="http://www.w3.org/2001/XMLSchema-instance" version="1">
  <o id="1" url="https://www.yourwebsite.pl/your-product-1" price="99.99" avail="1" weight="4" stock="2" basket="1">
    <cat>
      <![CDATA[Komputery/Monitory]]>
    </cat>
    <name>
      <![CDATA[LG 27" 27UK650-W (27UK650W)]]>
    </name>
    <imgs>
      <main url="https://www.yourwebsite.pl/your-product-1/img1.jpg"/>
      <i url="https://www.yourwebsite.pl/your-product-1/img2.jpg"/>
      <i url="https://www.yourwebsite.pl/your-product-1/img3.jpg"/>
      <i url="https://www.yourwebsite.pl/your-product-1/img4.jpg"/>
    </imgs>
    <desc>
      <![CDATA[<strong>Nastała era UHD 4K HDR</strong><br><br>Oglądaj nieskazitelny obraz o
      niespotykanym bogactwie kolorów na monitorze LG UHD 4K HDR.Twórcy pracujący z treścią
      HDR ucieszą się z możliwości odtwarzania jasności i kontrastu dopodglądu i edycji.<br>
      <br><strong>HDR Effect do treści SDR</strong><br><br>Monitor LG UHD 4K HDR może
      przekonwertować standardową treść na format HDR wprost na ekranie. Specjalny algorytm
      poprawia mapowanie tonalne i luminancję treści SDR, zapewniając jakość zbliżoną do HDR.
      <br><br><strong>Prawdziwe kolory i szeroki kąt patrzenia</strong><br><br>Monitor LG IPS
      odznacza się wyjątkową dokładnością odwzorowania kolorów – pokrywa 99% gamy sRGB. 
      Ponadto ma szeroki kąt patrzenia, dzięki czemu łatwiej jest cieszyć się doskonałą 
      jakością kolorów.<br><br><strong>Czystszy i płynniejszy obraz</strong><br><br> 
      Technologia AMD FreeSync™ zapewnia płynną i niczym niezakłóconą rozrywkę w wysokiej 
      rozdzielczości nawet w dynamicznych grach. Całkowicie eliminuje rozrywanie i zacinanie
      obrazu.<br><br><strong>Indywidualne ustawienia dla każdej gry </strong><br><br><strong> 
      Wrogowie nie mają gdzie się ukryć</strong><br><br>Funkcja Black Stabilizer zapewnia
      wyraźny obraz nawet w mrocznych grach. Synchronizuje i rozjaśnia najciemniejsze zakątki, 
      dzięki czemu znajdziesz wrogów czających się w ciemności i zaatakujesz przed nimi.<br> 
      ]]>
    </desc>
    <attrs>
      <a name="Producent">
        <![CDATA[LG]]>
      </a>
      <a name="EAN">
        <![CDATA[8806098110254]]>
      </a>
      <a name="Kod producenta">
        <![CDATA[27UK650W]]>
      </a>
    </attrs>
  </o>

</offers>

Now let us look at the product attributes that you need to include in the feed.

Mandatory Product Data To Include In the Ceneo Product Feed

Following are the product data that you may submit with your products when uploading the XML feed to Ceneo.

*The ones marked green are mandatory attributes. The ones marked blue are optional.

Product ID (id)

You can use the WooCommerce Product ID or the SKU for this attribute.

Price (price)

Use the current price of the product on your site, i.e., if you have a sale running, then submit the sale price, else submit the regular price.

Product URL (url)

Submit the product link. For variable products, the URL should be unique for each variant.

Availability (avail)

You have to mention how soon you can ship out the product or if some other cases apply.

Accecpted values are 1, 3, 7, 14, 90, 99 and 110.

  • 1 – available, the store will send the product within 24 hours
  • 3 – the store will send the product within 3 days
  • 7 – the store will send the product within a week
  • 14 – the store will send the product within 14 days
  • 90 – goods on request
  • 99 – no information about availability – status “check in store”
  • 110 – pre-sale
Category (cat)

You need to submit the exact category your product falls under as per Ceneo’s category list.

Product Name (name)

Use the product Title in your WooCommerce store. For variable products, it’s recommended to include the variation term to the tile for each variant.

Main And Additional Images (imgs)

You must submit at least one image. Use the product’s main image and if you want, you may include extra five additional images as well.

Product Description (desc)

Use a benefit-rich description. You may choose to use the product description or the short description, whichever suits you better.

You may use the following HTML tags for their respective purposes and organize the description into an attractive format:

  • <p> – paragraph
  • <h1> – title
  • <h2> – subtitle
  • <br/> – new line
  • <ol> – a numbered list
  • <ul> – an unnumbered list
  • <i> – list item
  • <i> – italics
  • <b> or <strong> – bold
  • <em> – Highlighted text
Extra Product Attributes (attrs) – recommended + optional

Based on the category, you may be required to submit a few extra attributes for certain products.

Here is a list of attributes that you may submit for the products under their respective categories:

After submitting your feed on Ceneo initially, if you are asked to add more attributes for products in certain categories, then first, list down those categories. Next, visit this attribute list and look for each of these categories to find their available extra attributes that you can submit.

Here, you will see, for each attribute, there is a tag, <iskeyattribute>. Some of them have values False and some of them have values True. Collect the attributes that have the <iskeyattribute> value as True, i.e., <iskeyattribute>True</iskeyattribute>.

These are the attributes that you need to include in the feed for the products in their respective categories.

In WooCommerce, for most of them, you have to save these attributes’ data in Product data via custom fields. Then you can use the values of the custom fields in the feed.

Weight (weight) – optional

You may submit the product weight if you want to.

Simply use the value in kilograms – no need to add the unit of measurement.

Stock (stock) – optional

If you manage stock in your WooCommerce store, then you may use the number of products available in stock to submit this attribute.

Basket (basket) – optional

If you are part of the special Ceneo “Kup Teraz” program, then you may submit a positive value for this attribute.

Accepted values are:

  • 1 – to confirm inclusion of a product to the Kup Terz program.
  • 0 – to indicate that a product is not part of the Kup Terz program.

Now that you have a good idea of the required product data you need to submit on Ceneo, let us look at how you can generate an XML feed of your WooCommerce products in just a few clicks.

7 Steps To Generate Ceneo Product Feed In Your WooCommerce Store

In WooCommerce, you will find a reliable plugin called Product Feed Manager For WooCommerce with which you can generate an XML feed for all of your products in just a few clicks.

In the steps below, I will show you how you can generate a product feed for Ceneo.pl using this plugin in minutes.

Step 1 – Import Ceneo Template For Feed Generation

1. On your dashboard, click on Product Feed and then click on Add New Feed option.

Nieuwe voeding toevoegen

It will take you to the feed creation page

Nieuwe voeding toevoegen

Here, on the top you will get an option to give a name to your feed, you can skip it too.

2. Click on the Feed Merchant Dropdown and you will get the list of all the supported merchants.

You can scroll down this merchant dropdown list or you can type Ceneo in the search box, and you will get the Ceneo option in the list.

Ceneo Merchant Option

Select Ceneo, and all the required attributes of Ceneo will be loaded below.

Step 2 – Create A New Product Feed

Now, you can see three buttons under the Feed Title text box, Troubleshoot, Product Filter, and Settings.

1. If you are having any issues generating feed, click on this Troubleshoot button, it will take you to the Troubleshoot page, which could be helpful for you.

2. If you want to use any filter or condition, you can click on the Product Filter option, and a drawer will slide in from the right side of the window, and there you will get the following filters:

  • All Featured Items
  • Custom Filter
  • Category Filter
  • Tag Filter
  • Product Filter (Pro)

You can select any filter option and use them as per your need and click on the Close button when done.

3. Now, to schedule your feed or to choose which type of products will be included in your feed, click on the Settings button, and you will get a list of options to exclude or include products.

Change the options as per your need and click on the Close button when done.

Step 3 – Use The Ceneo Feed Template

1. If you look at the Feed Merchant dropdown button, there you will get another dropdown “Feed Type”, you can click here to set the type of this feed. You can set different types of feeds depending on what types of feeds this merchant supports or what types of feeds this Product Feed Manager has the support for.

For Ceneo, select XML as the Feed Type.

2. Now, in the attributes section, you will see that all the attributes are under the Required Attributes column, and their values are set according to the attributes under the Assigned Values column.

You can change any values to any attributes, simply click on the value dropdown, and select your preferred value.

All the required attributes will appear below. Now, most of the attributes will already be configured but notice that some of these attributes are unassigned.

Step 4 – Assign The Right Values To Unassigned Attributes

  1. You will see that all the required attributes for Ceneo will appear below and it is already configured, except a few.
  1. Update the value for Avail attribute if required.

You can see, the value of avail is by default set to 1. This means you will send out the product for delivery within 24 hours. But if that’s not the case, i.e., let’s say you rather ship out the product within 3 days, then change the value to 3.

Avail attribute

**However, if you require different times to ship out different products, in that case, you need to save the values in a custom field in each of your WooCommerce product data and then use the value of that field here.

Step 5 – Publish The Feed Initially And Set Up Category Mapping

The category attribute is also not configured, but to assign that, you first need to set up a category mapping.

  1. Scroll up and click on Publish, and the feed will be generated.
  1. Go to Product feed > Category Mapping.

    Here, you will find all of your WooCommerce categories listed, with empty fields beside them.
  1. Give a Mapper Name.
  1. Set up the category mapping.

Since Ceneo has its own category list, what you have to do is you need to find out which category in your WooCommerce store matches the category in Ceneo’s marketplace category list.

Simply visit this list and search for categories that match your store’s category. Once you find a suitable one, copy that category path, and paste it in the respective empty field beside it in your Category mapping page in the plugin.

Do the same for all the categories listed here.

  1. Scroll down and Save it.

Now that you have saved a category mapper, it’s time to use it in the feed.

Step 6 – Assign Your Category Mapping List To The Category Attribute

  1. Go to Product feed > All Product Feeds and edit the feed you created earlier.
  1. Here, first, click on the Purge cache button on the right side.
  1. Next, scroll down to the feed configuration section. Click on the value field for Product Category and scroll down to the very bottom to choose the mapper you just created.
  1. Scroll up and click on update.
  1. Your feed will be generated, and you will be able to view or download the feed.

Step 7 – Start Promoting Your Products On Ceneo.pl

Now that you have the feed generated, the next thing to do is to log in to your Ceneo merchant account and submit the feed URL to list your products on Ceneo.

That’s it. That’s how easily you can generate a product feed and start promoting your products in Ceneo.

Conclusie

If you are a local online shop owner in Poland, then it’s high time you start promoting your WooCommerce products on Ceneo and take advantage of its huge audience.

Use Product Feed Manager for WooCommerce to generate the product feed in minutes and start boosting your sales.

Check out the plugin here:
– https://wordpress.org/plugins/best-woocommerce-feed/
– Product Feed Manager for WooCommerce Pro

In eerste instantie, test de gratis versie van de plugin, en zodra je zeker weet dat de plugin doet wat het beweert, kun je doorgaan en upgraden naar Pro.

Go ahead and start getting more sales through Ceneo.pl.

Categorieën
Guide Product Feed Manager For WooCommerce WooCommerce

Generate WooCommerce Product Feed For Favi Compari & Árukereső To Sell Furniture (2024)

Recently, online sales of furniture and home decor are on the rise in Europe.

In the Czech Republic, online Furniture and appliance sales lead to revenue growth of over 20% on average for eCommerce sites compared to 2020.

If you run a WooCommerce store to sell furniture and home decor in the Czech Republic or Slovakia, then you too can easily boost your sales.

You simply need to promote your products through a local price comparison site that can deliver a high traffic volume.

Favi is one such site that has proven to deliver great results for furniture businesses in the Czech Republic or Slovakia. It is one of the largest price comparison sites in Europe, with over 3 million monthly traffic.

And today, you will learn how you can upload your products on Favi and start getting more sales.

In this guide you will learn:

  • Requirements to join the Favi marketplace
  • The correct format to generate XML product feed
  • Examples of product data and attributes to include in the feed
  • How to generate Favi XML feed in just a few clicks.

And once you learn all these, you will be able to start promoting on Favi and boost your revenue.

Dus laten we beginnen.

Joining The Favi Marketplace

Favi currently operates in around 9 European countries that include:

Although it’s pretty popular in all these countries, Favi is more popular in the Czech Republic and Slovakia.

Requirements To Join The Favi Marketplace

To register on Favi, you first need to make sure you meet the following requirements:

  1. Your website is SSL certified.
  2. You must have a valid telephone number and email address, which should be mentioned on your website’s Contact page.
  3. A valid Terms Of Use page should be available.
  4. All rules, validities, and processes related to returns, refunds, or complaints, should be clearly specified on your site.
  5. No fake reviews should be added. (This may be checked for an independent server of the reviewer for verification.)
  6. You must submit an XML feed in the right format, which should be hosted on your site and fully accessible.
  7. It is recommended to have a responsive website.
  8. Having multiple payment methods is a plus.
  9. Make sure the products you submit are in stock.

Once you meet all these requirements, you can then proceed to registration.

After registration, you will be contacted by a Favi account manager and you can then proceed with the campaigns.

FYI:
Favi’s fees follow a CPC policy that varies from category to category.
You may check out the pricing here.

Now, let us learn how you can generate a product feed so that you can upload your WooCommerce products on Favi.

Guide To Generate XML Feed for Favi Compari & Árukereső

Favi accepts feed submission in many formats – feed formats of Google shopping, Zbozi, Ceneo, Comapri, and Árukereső.

In this guide, we will explain the feed generation process for Favi Compari & Árukereső.

First, let us look at the attributes and their example values you need to submit for each product. Then you will learn how you can generate an accurate product feed in the right format using a reliable tool.

Feed Specification For Favi XML Feed With Example Values

When creating a new feed for Favi, you will need to include a few specific data in the right format.

Normally, the feed structure is as follows:

<products>
        <product>
                ---PRODUCT BASIC/REQUIRED ATTRIBUTES AND DATA HERE---
        </product>
</products>

Now, let us look at a list of the required product attributes that you should include on your product feed with example values.

Required Product Attributes For The XML Feed

The following are the mandatory attributes you need to submit for each product.

Product AttributeFormat With Example
1. Identification Number (i.e., Product ID)

This is the unique ID for a product.

Ideally, you should use the Product ID from your WooCommerce store as the value for this attribute.
<Identifier>1031</Identifier>
2. Product Name

Use a proper product name. Do not use a generic name which may lead to confusion of what this product actually is.

For product variants, you may add the variation term to the title.
<Name>Wooden double bed MERIDA, 160×200 cm</Name>
3. Product URL

This should be the URL to the product page on your site. The product page should include the product details you submit here, such as the price and description, and a button to purchase should be there.

Make sure the URL is valid and has no spaces. Also, all special characters should be submitted in HTML form, and there should not be any diacritics in the link.
<Product_url>https://www.yourdomain.cz/products/bed-merida-160×200</Product_url>
4. Price Including VAT

Submit the original product price, including VAT.

Do not use commas or dots to separate thousands. They are only to be used as decimals for fractional charges.
<Price>499.99</Price>
5. Product Main Image URL

You must submit a real image of the product. It should not have any graphics, watermarks, or promotional texts.

The specifications mentioned in the description or via attributes, such as color, should match the product in the image. For example, you can not use an image of a Brown bedsheet when you mentioned it is Red.

Also, there should not be any other objects visible in the image other than the product itself.
The URL should not have any spaces or diacritics, and special characters must be in the HTML format.

The image must be at least 400×400 px.
<Image_url>https://www.yourdomain.cz/bed-merida-img1.png</Image_url>
6. Product Category

Use a specific category under which your product should be listed on Favi.

This should be specific to the category list from Favi themselves.

**Later, we will show you how you can map these categories in the feed without changing the category names within your WooCommerce store.
<Category>Bedroom > Beds</Category>
7. Description

Include a product description that is keyword optimized but specific to the product itself. If it’s a variant of a variable product, the description should only be about that particular variant.

Do not include any external URLs, contact info, or email address in the description.

You may use a handful of HTML tags for formating the description which includes:
– <p> </p>
– <b> </b>
– <strong> </strong>
– <i> </i>
– <em> </em>
– <ul> </ul>
– <ol> </ol>
– <li> </li>
– <br>
No other tags are allowed.
<Description><![CDATA[<p>This beech MERIDA double bed comes from a series of tall beds and features a central partition.<br>
**Supplied without grate and mattress.</p>]]></Description>
8. Delivery Time

This is the time you take to deliver the product since order.

The accepted values for this attribute are 0, 1, 2, and 3.

Use 0 to indicate same-day delivery.
<Delivery_Time>3</Delivery_Time>
9. Product Parent ID

In case you are submitting multiple variants of the same product, then you may use this attribute to indicate that they are variants of the same product.

Ideally, you should use the Parent Product ID. of your variable products as the value for this attribute.
<GroupId>1030</GroupId>

Other Recommended Product Attributes To Include

These are some extra attributes that you may include if you want to but are not mandatory.

AttribuutVoorbeeld
⬥ Manufacturer

You may submit the name of the manufacturer of the product you are selling.
<Manufacturer>Furniture One</Manufacturer>
⬥ Delivery Cost

If you want to indicate free shipping for any particular product, then you may use this attribute to mention that.

Accepted values may include FREE, gratuit, gratis, fara cost, ingyenes, ingyen, or ingyenesen.
<Delivery_Cost>FREE</Delivery_Cost>
⬥ Additional Images

In case you want to submit more images for your product, you can submit up to 8 additional images.

Use the tags Image_url_2, Image_url_3, and so on until Image_url_9.

<Image_url_2>https://www.yourdomain.cz/bed-merida-img2.png</Image_url_2>
<Image_url_3>https://www.yourdomain.cz/bed-merida-img3.png</Image_url_3>
⬥ Extra Product Attributes

You may submit some additional traits or attributes for your products. to increase the possibility of reaching more appropriate prospects.

The most commonly used attributes (depending on the product) are:
– material
– shape
– pattern
– texture
– color
– decor
– style
– dimensions

You may add additional custom attributes if you want to. For example, you may include an attribute “Type” to mention that the bed is a double bed.

We recommend you do not submit more than 5 attributes.
<Attributes>
<Attribute>
<Attribute_name>Material</Attribute_name>
<Attribute_value>solid wood, beech</Attribute_value>
</Attribute>
<Attribute>
<Attribute_name>Type</Attribute_name>
<Attribute_value>double bed</Attribute_value>
</Attribute>
</Attributes>
⬥ EAN

If you have the product EAN available, then it’s best to submit it for better listing performance.
<EAN_code>142654634124</EAN_code>

Example Feed Structure Of Favi Compari & Árukereső XML Feed

<?xml version="1.0" encoding="UTF-8" ?>
<Products>
	<Product>
		<Identifier>1031</Identifier>
		<Name>Wooden double bed MERIDA, 160x200 cm</Name>
		<Product_url>https://www.yourdomain.cz/products/bed-merida-160x200</Product_url>
		<Price>1499.99</Price>
		<Image_url>https://www.yourdomain.cz/bed-merida-img1.png</Image_url>
		<Category><![CDATA[Bedroom > Beds]]</Category>
		<Description>
			<![CDATA[
				<p>This beech MERIDA double bed comes from a series of tall beds.
			 	<br>It features a central partition with a foot.<br>
				**Supplied without grate and mattress.</p>
			]]>
		</Description>
		<Delivery_Time>3</Delivery_Time>
		<Manufacturer>Furniture XYZ</Manufacturer>
		<Attributes>
		   <Attribute>
		       <Attribute_name>Material</Attribute_name>
		       <Attribute_value>solid wood, beech</Attribute_value>
		   </Attribute>
		   <Attribute>
		       <Attribute_name>Type</Attribute_name>
		       <Attribute_value>double bed</Attribute_value>
		   </Attribute>
		</Attributes>
		<EAN_code>142654634124</EAN_code>
		<GroupId>1030</GroupId>
	</Product>
</Products>

Now that you have a good idea about all the required attributes, let us look at a simple tool that can help you generate a proper XML feed for Favi in minutes.

7 Steps To Generate Favi Product Feed In Your WooCommerce Store

Manually creating an XML feed for all of your products is no longer required. You will find several tools out there that you can use to easily generate a product feed for Favi Compari & Árukereső.

In the following simple steps, I will show you how you can generate a product feed for Favi using Product Feed Manager for WooCommerce. It is one of the most efficient plugins to use and you will get a pre-built template to generate Favi XML feed in just a few clicks. 

Follow these 7 quick steps below to use the plugin easily and generate Favi product feed real quick.

Step 1 – Install & Activate Product Feed Manager For WooCommerce

1. First, go to Dashboard > Plugins and click on Add New.

WordPress Dashboard - Nieuwe plugin toevoegen

2. On the search box, type “Product Feed Manager” and you will find the plugin with a blue cart icon.

WordPress Dashboard - Zoeken naar de plugin

3. Click on the Install Now. Then click on the Activate button to activate the plugin.

Product Feed Manager activeren

Once activated, you will find the Product feed menu on your dashboard menus.

Step 2 – Import Favi Template For Feed Generation

1. On your dashboard, click on Product Feed and then click on Add New Feed option.

Nieuwe voeding toevoegen

It will take you to the feed creation page.

Nieuwe voeding toevoegen

Here, on the top you will get an option to give a name to your feed, you can skip it too.

2. Click on the Feed Merchant Dropdown and you will get the list of all the supported merchants.

You can scroll down this merchant dropdown list or you can type Favi in the search box, and you will get the Favi option in the list.

Favi Merchnat Option

Select Favi, and all the required attributes of Favi will be loaded below.

Favi Required Attributes

Step 3 – Create A New Product Feed

Now, you can see three buttons under the Feed Title text box, Troubleshoot, Product Filter, and Settings.

1. If you are having any issues generating feed, click on this Troubleshoot button, it will take you to the Troubleshoot page, which could be helpful for you.

2. If you want to use any filter or condition, you can click on the Product Filter option, and a drawer will slide in from the right side of the window, and there you will get the following filters:

  • All Featured Items
  • Custom Filter
  • Category Filter
  • Tag Filter
  • Product Filter (Pro)

You can select any filter option and use them as per your need and click on the Close button when done.

3. Now, to schedule your feed or to choose which type of products will be included in your feed, click on the Settings button, and you will get a list of options to exclude or include products.

Change the options as per your need and click on the Close button when done.

Step 4 – Use The Favi Compari & Árukereső XML Feed Template

1. If you look at the Feed Merchant dropdown button, there you will get another dropdown “Feed Type”, you can click here to set the type of this feed. You can set different types of feeds depending on what types of feeds this merchant supports or what types of feeds this Product Feed Manager has the support for.

For Favi, XML will be selected by default.

2. Now, in the attributes section, you will see that all the attributes are under the Required Attributes column, and their values are set according to the attributes under the Assigned Values column.

You can change any values to any attributes, simply click on the value dropdown, and select your preferred value.

All the required attributes will appear below. Now, most of the attributes will already be configured but notice that some of these attributes are unassigned.

Step 5 – Assign The Right Values To Unassigned Attributes

You simply need to configure the following:

  • Category
    – You will need to set up Category Mapping for this. So for now leave it as is. You will work on this on the next step.
  • Delivery_Time
    – You may use a static value of 0, 1, 2, or 3 to indicate the delivery time.
    – Or ifyou have different delivery time for different products, then you need to save that value in a custom feed in WooCommerce anduse that value here.
  • Manufacturer
    – If you are the manufacturer or if all the products are manufactured by the same company, then use a Static value here.
    – If different products have different manufacturers, then you can either save them on custom fields within products and use that value, add them as WooCommerce attributes for products and use them as values here, or use the plugin Perfect Brands for WooCommerce to assign the manufacturers to the products and then use that value here.
Configure Static Manufacturer and Delivery Time

Step 6 – Publish & Setup Category Mapping

1. Scroll up and click on Publish.

Product Feed Manager Publish Feed

The feed will be generated, but the category is not configured yet.

2. Now, go to Dashboard > Product Feed > Category Mapping.

Product Feed Manager Category Mappingg

Here, you can see all the categories in your store are listed.

Product Feed Manager Category Mapping - Category List

3. Give a name to this Category Map

Product Feed Manager Category Mapper Name

4. Map these categories according to Favi’s category list.
**To find the accepted category list for your store, click here.
– For every category in your store, search for appropriate category in Favi’s category list.
– Copy that and paste it in the field beside your store’s category. Do this for all the categories there.

5. Then click on the Save button below.

Step 7 – Finalize Feed Generation

1. Go To Product Feed > All Product Feeds and edit the feed you created just now for Favi.

2. Once on the edit mode, on the right side, click on Purge Cache.

3. Now, scroll down to the feed configurations section and click on the Value field for Category.

Choose Category Mapping Favi

4. Scroll to the very bottom and you will find the Category Map that you just created. Select it.

5. Now scroll up and click on Update

Product Feed Manager Update Feed

And that’s it. Your feed generation is complete.

Once the feed is generated, you may now review your progress on meeting the requirements, and go ahead and register on Favi.

Conclusie

Favi has made a significant impact in increasing revenue for many local furniture brands and it’s time you take advantage of this reliable price comparison platform yourself.

As you just saw how easy it is to generate an XML feed, you can use Product Feed Manager for WooCommerce and start promoting your WooCommerce products on Favi real quick.

Check out the plugin here:
– https://wordpress.org/plugins/best-woocommerce-feed/
– Product Feed Manager for WooCommerce Pro

In eerste instantie, test de gratis versie van de plugin, en zodra je zeker weet dat de plugin doet wat het beweert, kun je doorgaan en upgraden naar Pro.

Grab this opportunity and boost your revenue locally.

Categorieën
Guide Product Feed Manager For WooCommerce WooCommerce

Simple Guide To Generate Rakuten Product Feed – WooCommerce [2024]

Een e-commerce bedrijf runnen kan moeilijk zijn. Een van de beste manieren om uw omzet snel te verhogen is echter door uw producten te promoten op grote marktplaatsen.

Rakuten is zo'n marktplaats waarop u kunt vertrouwen. Met meer dan een miljard actieve gebruikers in 30 landen is Rakuten een van de topverkopers die u kan helpen uw verkoop te stimuleren zonder veel moeite.

En als je WooCommerce gebruikt, dan is het super eenvoudig om je producten op Rakuten marketplace te plaatsen.

U hoeft alleen maar een Rakuten productfeed aan te maken met de juiste attributen en uw producten te uploaden naar de marktplaats. En al snel zult u meer potentiële kopers op uw site krijgen.

In deze gids krijgt u stapsgewijze instructies voor het nauwkeurig aanmaken van een productfeed voor de Rakuten marktplaats.

Na het lezen van deze gids zul je leren,

  • De vereiste attributen om in de productfeed op te nemen
  • Voorbeelden van in te dienen productgegevens voor elk kenmerk.
  • Hoe genereer je Rakuten product feed in een paar klikken.

Dus laten we beginnen.

Gids voor het genereren van Rakuten Product Feed

Laten we eerst leren over alle vereiste gegevens voor elk product die je in de productfeed moet opnemen. Daarna bekijken we hoe u deze productfeed in het juiste formaat kunt genereren.

Specificatie productgegevens voor Rakuten Product Feed

Een productfeed voor Rakuten wordt meestal gegenereerd in CSV-formaat. Maar u kunt ook TXT- of TSV-formaten gebruiken om uw productgegevens in te dienen.

Vereiste productkenmerken om in te dienen bij Rakuten

Hieronder volgen de verplichte kenmerken voor elk product:

Attribuut kopInstructiesVoorbeeld
idDit fungeert als een unieke identificatie voor een product. Je kunt je WooCommerce product ID of product SKU gebruiken als waarde voor dit attribuut.102
titel Vermeld de naam van het product (niet meer dan 70 tekens).Pullover Hoodie met Logo
merkWijs een merknaam toe aan het product dat u op de Rakuten marketplace wilt aanbieden.

Als u de fabrikant bent, kunt u uw eigen bedrijfsnaam als merknaam toewijzen.
Lacoste
beschrijving Voeg een korte beschrijving van uw product toe met details over het gebruik en de voordelen ervan.Deze pullover hoodie is gemaakt van 100% biologisch katoen voor extreem comfort. Met de nieuwste generatie stijl en mesh voering, zal deze hoodie je een speciaal gevoel geven, terwijl het comfort behouden blijft.
google_product_categorieU moet ook een categorie opgeven uit de taxonomielijst van Google, waarvoor dit product relevant is.Kleding & Accessoires
linkDit zou de link naar uw product moeten zijnhttp://yourwebsite.com/product/pullover-hoodie-with-logo
Afbeelding_link U moet voor elk product minstens één afbeelding indienen.

*De afbeelding moet minstens 600×600 groot zijn.
http://yourwebsite.com/wp-content/uploads/2022/04/pullover-hoodie-with-logo-1.jpg
prijs Geef de werkelijke prijs van het product op. Als er een korting geldt, geef dan de normale prijs op voor dit kenmerk, en gebruik het sale_price kenmerk om de gereduceerde prijs op te geven.

Neem de valuta op als achtervoegsel.
45.00 EUR
beschikbaarheid Vermeld de beschikbaarheid van de voorraad, d.w.z. of het product nog in voorraad is voor aankoop.

*Aangevaarde waarden:
- op voorraad
- niet op voorraad
- voorbestelling
- nabestelling 
op voorraad
gtinGTIN is een unieke productidentificatie die u in het voer moet opnemen.

Dit staat ook voor alle andere vormen van identificatie, zoals UPC, EAN, JAN, en alle vormen van GTIN.
401234512343
mpnDien ook het MPN in, dat een specifiek product uniek identificeert tussen alle producten van dezelfde fabrikant.HSC0424PP
voorwaardeVermeld de toestand van het product dat u verkoopt.

*Geaccepteerde waarden:
- Nieuw
- Gereviseerd
- Gebruikt
Nieuw
geslachtHet is verplicht te vermelden voor welk geslacht uw product geschikt is.

*Aanvaardbare waarden zijn:
- Man
- Vrouw
- Unisex.
Unisex
leeftijdsgroepU moet ook de leeftijdsgroep opgeven van de prospects waarvoor uw producten geschikt zijn.

*Aanvaardbare waarden:
- Volwassen
- Kinderen
Volwassen
producttypeDit kenmerk staat voor de productcategorie die je hebt toegewezen aan je producten in je WooCommerce winkel.

*Het is sterk aanbevolen om dit kenmerk in te dienen voor betere zoekresultaten, maar het is niet verplicht.
Heren Hoodies
item_groep_idAls u variabele producten hebt, dan moet u een gemeenschappelijke item_group_id opnemen voor elke variant van hetzelfde product. Dat is in feite de ID of de SKU van het bovenliggende product.1001

Voorwaardelijk vereiste attributen om op te nemen in de feed

Enkele attributen zijn niet altijd vereist, maar moeten vaak onder bepaalde voorwaarden worden ingediend. Laten we deze kenmerken in detail bekijken.

Attribuut kopInstructiesVoorbeeld
verkoopprijsDit kenmerk is alleen nodig als je een korting in je winkel hebt lopen. Neem in dat geval de afgeprijsde prijs op als verkoopprijs in de feed.35.00 EUR
kleurHet kleurkenmerk is verplicht voor producten die onder de categorie Kleding vallen, maar u kunt het ook gebruiken voor producten in andere categorieën.

Ook als u variabele producten hebt die variëren door de kleur, moet u het kleurkenmerk indienen.
Rood
formaat U moet het kenmerk Grootte indienen voor producten die onder de categorie Kleding vallen. U kunt het ook voor producten in andere categorieën gebruiken.

Ook als u variabele producten hebt die variëren door de maat, moet u het maatkenmerk indienen.
XXL
materiaalU moet dit kenmerk indienen voor variabele producten die variëren door het patroon (of het grafisch ontwerp).Leder
patroon Voor variabele producten die variëren door het patroon (of het grafisch ontwerp), moet u dit kenmerk indienen.Gestript
verzendgewichtAls u in uw koopcentrum een regel hebt ingesteld voor verzendkosten op basis van het verzendgewicht, dan moet u dit kenmerk indienen.

*U kunt de eenheid als achtervoegsel indienen, dat hetzelfde moet zijn als u in uw koopcentrum hebt ingesteld.
1.2 kg
volwassenAls u een product voor volwassenen verkoopt, d.w.z. artikelen of afbeeldingen met naaktheid of suggestieve inhoud, moet u dit kenmerk voor die producten indienen.

*Accepted values:
- yes
- no
ja

Andere optionele kenmerken die u kunt opgeven

Naast de bovenstaande kenmerken zijn er nog een paar kenmerken die u kunt opgeven indien dat nodig of van toepassing is.

Attribuut kopInstructiesVoorbeeld
verkoopprijs ingangsdatumAls uw product in de uitverkoop is en de verkoopprijs heeft een beperkte tijd, kunt u dit attribuut gebruiken om de datum en tijd te vermelden waarop de uitverkoop afloopt.

**Dit attribuut is niet verplicht, maar u kunt het gebruiken als het nodig is.
2022-10-29T23:07:31​+0100

extra_afbeelding_link
Als u extra afbeeldingen voor uw producten wilt indienen, kunt u de links naar uw producten indienen onder het kenmerk additional_image_link, waarbij u de afbeeldingslinks scheidt door komma's.http://yourwebsite.com/wp-content/uploads/2022/04/image1.jpg,http://yourwebsite.com/wp-content/uploads/2022/04/image2.jpg,http://yourwebsite.com/wp-content/uploads/2022/04/image3.jpg
belastingGewoonlijk moet u de belastingtarieven instellen in uw Merchant Center-account. Maar als u voor bepaalde producten een uniek belastingtarief wilt indienen, dan kunt u daarvoor dit attribuut gebruiken.15
verzendingU moet de verzendkosten voor uw producten instellen in uw Merchant Center-account. Maar als u voor bepaalde producten een unieke verzendkosten wilt opgeven, dan kunt u daarvoor dit attribuut gebruiken.3.99 EUR
multipackAls u meerdere hoeveelheden van hetzelfde product tegen één prijs wilt verkopen, dan kunt u die hoeveelheid opgeven als de waarde voor het multipack attribuut.

U kunt er bijvoorbeeld voor kiezen om 6 t-shirts als multipack te verkopen.
In dit geval moet de prijs de totale kosten van het pakket zijn, d.w.z. in het geval van de 6 t-shirts moet de prijs de totale kosten voor alle zes t-shirts vertegenwoordigen.
6

Voorbeeld Voerstructuur van Rakuten

Hier is een voorbeeld van een Rakuten CSV feed. U kunt het downloaden en bekijken met een CSV-viewer.

Nu je volledig begrijpt hoe de Rakuten feed werkt en welke vereiste attributen je in je productgegevens moet opnemen, laten we eens kijken hoe je gemakkelijk een productfeed voor Rakuten kunt genereren.

7 eenvoudige stappen om Rakuten Product Feed te genereren in je WooCommerce winkel

Ten eerste hoeft u niet handmatig een CSV feed te maken voor al uw producten. Op dit moment zijn er verschillende tools waarmee u gemakkelijk een productfeed voor Rakuten kunt genereren.

In de volgende stappen laat ik je zien hoe je een productfeed voor Rakuten kunt genereren met Product Feed Manager voor WooCommerce. Het is een van de gemakkelijkste plugins om te gebruiken en heeft een vooraf gemaakt sjabloon met alle noodzakelijke attributen om je te helpen Rakuten CSV feed te genereren in slechts een paar klikken. 

Volg deze 7 eenvoudige stappen om te leren hoe je een Rakuten feed template gebruikt, en maak je CSV feed snel klaar.

Stap 1 - Product Feed Manager installeren en activeren

1. Ga naar Dashboard > Plugins en klik dan op de knop Nieuw toevoegen.

WordPress Dashboard - Nieuwe plugin toevoegen

2. Typ "Product Feed Manager" in het zoekvak, en je vindt de plugin in het zoekresultaat.

WordPress Dashboard - Zoeken naar de plugin

3. Klik op de knop Nu installeren.

4. Klik vervolgens op de knop Activeren om de plugin te activeren.

Product Feed Manager activeren

Zodra je de plugin hebt geactiveerd, vind je het menu, Product feed, onder je dashboard menu's.

Stap 2 - Rakuten-sjabloon en kaartattributen importeren

1. Klik op uw dashboard op Product Feed.

Product Feed Manager Dashboard

2. Klik vervolgens op de knop Nieuwe feed toevoegen.

Product Feed Manager - Nieuwe feed toevoegen

U komt op een lege pagina voor het genereren van feed.

Product Feed Manager Nieuwe feed toevoegen

3. Bovenaan krijg je de optie om een titel aan de feed toe te voegen. Geef je feed een naam.

Product Feed Manager Feed Titel

4. Net onder de titel ziet u een optie om uw voorkeursverkoper te selecteren. Klik gewoon op de Feed Merchant dropdown knop en selecteer de handelaar van uw voorkeur uit de dropdown of u kunt zoeken in de dropdown box.

Selecteer de handelaar van uw voorkeur, en alle vereiste attributen worden hieronder geladen.

Selecteer Rakuten in de keuzelijst.

Vereiste attributen voor Rakuten Feed

**Let op: voor Rakuten kunt u alleen CSV, TXT of TSV feed aanmaken. U kunt uw voorkeursfeedformaat kiezen in de Feed Type file format selection dropdown naast de Feed Merchant dropdown optie.

Hier zullen we een CSV feed voor Rakuten maken, dus laten we CSV selecteren in de Feed Type dropdown optie.

3. U ziet dat de meeste attributen al zijn geconfigureerd - hun waarden zijn correct toegewezen; u kunt de toegewezen waarden naar behoefte wijzigen of ze laten zoals ze zijn.

De rest van de attribuutwaarden moet u echter handmatig toewijzen.

Voor Rakuten moet u waarden toekennen aan de volgende attributen:

  • Merk -
    Dit moet de merknaam zijn van het product dat u verkoopt. Als u de fabrikant bent, kunt u het type instellen als Statisch en hier uw bedrijfsnaam invoeren.
    Als u verschillende merknamen hebt voor verschillende producten, moet u de waarde opslaan in een aangepast veld of productkenmerk en vervolgens die waarde hier gebruiken.
    **U kunt ook Perfect Brands for WooCommerce gebruiken om merken toe te wijzen, die u in de feed kunt gebruiken.
  • Google Productcategorie -

Category Mapping is in feite het samenvoegen van je WooCommerce productcategorieën met de Google productcategorieën.

Je kunt categoriemapping op twee manieren configureren. De eerste is dat je een vooraf gemaakte category mapper kunt gebruiken, die standaard is gemaakt voor Google Shopping - je kunt deze ook gebruiken voor Facebook of andere marktplaatsen. En de tweede is het maken van een nieuwe Category Mapper.

Om de standaard categoriemapper te gebruiken die voor Google is gemaakt, selecteert u gewoon de Googe Product Category mapper in de Category Mapping dropdown-waarde:

Optie voor categorietoewijzing

Dit is een lege Category Mapper. Klik op de knop Category Mapping configureren die u vindt onder de waarde Category Mapping, en er wordt een nieuw tabblad geopend met de standaard category mapper - Google Product Category. Breng hier uw categorieën in kaart en klik op de knop Bijwerken en sluiten om terug te gaan naar het attribuutgedeelte.

Je kunt echter ook een nieuwe Category Mapper aanmaken. Je moet op de knop Category Mapping klikken vanuit het WordPress dashboard en daar krijg je de optie om een nieuwe Category Mapper aan te maken en de mapper te configureren.

U kunt deze docu volgen om te leren hoe u een nieuwe Category Mapper voor uw feed kunt maken.

  • GTIN -
    Dit is gewoonlijk uniek voor elk product. U moet deze waarde dus opslaan in een aangepast veld binnen elk product en die waarde hier gebruiken.
  • MPN -
    Het MPN moet uniek zijn voor elk product. U moet deze waarde dus opslaan in een aangepast veld binnen elk product en die waarde hier gebruiken.
  • Leeftijdsgroep -
    De bevolkingsgroep waarvoor uw product bestemd is. De enige twee geaccepteerde waarden van dit kenmerk zijn Volwassenen en Kinderen.
  • Geslacht -
    Het geslacht waarvoor uw product bestemd is. Drie vooraf gedefinieerde waarden worden geaccepteerd: Man, Vrouw en Unisex.

Stap 4 - Basisconfiguratie-instellingen voor de feed

1. Scroll naar boven en hier ziet u dat er twee opties zijn, Productfilter en Productinstellingen.

  • Producten Instellingen
  • Product Filter
Product Feed Manager Invoeropties

2. Laten we eerst de functies configureren in de Productinstellingen. Klik op de knop Productinstellingen, en aan de rechterkant van het scherm wordt een lade geopend.

Product Feed Manager Gedeelte voerinstellingen

3. De eerste optie die je ziet is Automatisch je feed genereren.

Product Feed Manager Schedule Feed Optie

Deze optie wordt gebruikt om een automatische update van de feed te plannen na bepaalde intervallen. Kies een optie om een auto-update in te stellen of laat het staan op "Geen interval" als je geen auto-update van de feed wilt instellen.

4. Gebruik vervolgens indien nodig de volgende opties.

Product Feed Manager Feed-instellingen voor producten
  • Selecteer land/regio
  1. Selecteer een regio uit dit vervolgkeuzemenu als je de verzendgegevens in je feed wilt opnemen. Zodra je de regio hebt geselecteerd, moet je het kenmerk Verzenden aan je feed toevoegen om de waarden voor Verzenden te krijgen.
  2. U kunt dit document volgen om te leren hoe u de verzendinformatie in uw feed kunt opnemen.
  • Inclusief uitverkochte producten
    -Als je de uitverkochte producten wilt opnemen, kun je de optie inschakelen.
    -Voor deze feed gebruiken we deze optie niet en houden we de waarde op "Nee".
  • Inclusief variabel ouderproduct (zonder variaties)
    -Als je de ouderfeed voor variabele producten wilt opnemen, kun je de optie inschakelen.
    -Bij weinig verkopers, zoals Google Shopping of Facebook, hoef je geen ouderproducten in te dienen, maar bij veel andere verkopers, zoals eBay MIP, moet je wel productproducten in de feed opnemen.
    -Voor deze feed gebruiken we deze optie niet en houden we de waarde op "Nee".
  • Include All Variable Products Variations -
    -Als je alleen eenvoudige producten wilt opnemen in de feed en geen variabele producten, houd de waarde dan op "No".
    -Als je zowel eenvoudige producten als variabele producten wilt indienen bij Google Shopping, houd de waarde dan op "Yes".
    -Laten we deze functie gebruiken en markeren als "Yes", voor deze feed.
  • Variantnaam opnemen in de producttitel
    -Weinig handelaren, zoals Google Shopping, raden je aan de variatieterm toe te voegen aan de productnaam als je variabele producten uploadt, maar het is volledig optioneel.
    -Dus als je de variatieterm wilt opnemen in de variabele productnamen, dan kun je de waarde ervan instellen als "Ja".
    -Laten we deze functie gebruiken en markeren als "Ja", voor deze feed.
  • Inclusief gegroepeerde producten
    -Als u gegroepeerde producten hebt, dan kunt u het beste het bovenliggende product van het gegroepeerde product dat u hebt gemaakt indienen.
    -Dus moet u deze optie aanvinken met "Ja".
  • Onzichtbare/verborgen producten uitsluiten
    -Je hebt misschien bepaalde producten in je winkel die in WooCommerce zijn gemarkeerd als verborgen of onzichtbaar.
    -Als je alleen feed wilt genereren voor eenvoudige producten, kun je deze optie markeren als "Ja" om onzichtbare producten uit te sluiten van de feed.
    -Maar productvarianten zijn standaard gemarkeerd als onzichtbaar in WooCommerce. Dus als je variabele producten opneemt in de feed, dan moet je dit markeren als "Nee".
    -Omdat we in deze feed productvarianten opnemen, zullen we deze functie niet gebruiken en deze op "Nee" houden.
  • Elk attribuut overslaan als de waarde leeg is
    -Inschakelen van deze functie sluit alle attributen van een product uit als de waarde van het attribuut ontbreekt.
    -Voor deze feed zullen we deze optie niet gebruiken en de waarde ervan op "Nee" houden.

5. U vindt dan een optie om Track Your Campaign (Analytics parameters) toe te voegen.

Gebruik deze optie als u analyseparameters wilt toevoegen aan productlinks in uw productfeed, zodat u de prestaties van de producten op Google Shopping kunt volgen.

6. Sluit nu de lade en klik op de optie Productfilter. Een nieuwe lade wordt geopend aan de rechterkant van het venster.

Bovenaan krijgt u de optie om het Aangepaste filter of de functie Feed Rules (PRO) te gebruiken.

En u krijgt de feed filteropties uit het Filter dropdown menu.

Product Toevoermanger - Toevoer Filter Sectie

Kies de producten die je in de feed wilt opnemen met behulp van een filter. Standaard is "Alle gepubliceerde producten" geselecteerd

U kunt alle andere filteropties, Aangepast filter, Categoriefilter en Tagfilter, gebruiken om de producten die u nodig hebt op te nemen (of uit te sluiten die u niet wilt opnemen).

Voor een basisvoeding kun je het houden zoals het is.

Stap 6 - De WooCommerce Product Feed voor Rakuten publiceren

Nu je feedconfiguratie klaar is, is het tijd om de feed te publiceren.

Scroll terug naar boven, en u vindt rechts een knop Publiceren.

Klik op de knop Publiceren, uw feed wordt gegenereerd.

Zodra het genereren van uw feed voltooid is, kunt u de feed bekijken of downloaden.

Dat is het. Uw CSV feed voor Rakuten is gegenereerd. U kunt dit bestand nu downloaden en uploaden naar uw merchant account en uw producten aanbieden op de Rakuten Advertising marktplaats.

Conclusie

Rakuten is een enorme merknaam en de reputatie van hun marktplaats is immens. Het promoten van je WooCommerce producten op dit multinationale platform kan je helpen je inkomsten aanzienlijk te verhogen.

Zoals je hebt gezien, is dit hoe eenvoudig het is om een productfeed voor Rakuten te genereren met Product Feed Manager voor WooCommerce.

Je kunt de plugin hier krijgen:
- https://wordpress.org/plugins/best-woocommerce-feed/
- Product Feed Manager voor WooCommerce Pro

In eerste instantie, test de gratis versie van de plugin, en zodra je zeker weet dat de plugin doet wat het beweert, kun je doorgaan en upgraden naar Pro.

Dus als je de kans hebt, ga je gang en begin te promoten op Rakuten.

Categorieën
Guide Product Feed Manager For WooCommerce WooCommerce

How To Generate Product XML Feed For BestPrice Greece – WooCommerce (2024)

Wist u dat u uw omzet gemakkelijk kunt verhogen door reclame te maken op lokale prijsvergelijkingssites?

Als u een retailer bent in Griekenland of eigenaar van een Griekse online e-commerce site, dan kunt u gemakkelijk uw verkoop stimuleren via BestPrice.gr.

BestPrice is een van de top drie prijsvergelijkingssites in Griekenland. Met een gemiddelde van 5,6 miljoen maandelijks verkeer, kan het promoten van uw producten hier een game-changer zijn voor uw bedrijf om u te helpen uw inkomsten te laten groeien.

Om je producten op BestPrice.gr te plaatsen, hoef je alleen maar lid te worden van hun marktplaats als Merchant, een product XML feed te genereren in het juiste formaat, en deze te uploaden naar je merchant account om te beginnen met verkopen. Dat is het.

Als je een WooCommerce winkel runt om producten te verkopen binnen Griekenland, dan kun je met de juiste tool eenvoudig in een paar klikken een productfeed genereren voor BestPrice.

In deze gids leer je over,

  • Hoe toetreden tot BestPrice.gr marktplaats
  • Het juiste XML formaat om producten op BestPrice.gr te plaatsen
  • De verplichte kenmerken om dit productfeed te genereren
  • Hoe maak je WooCommerce feed voor BestPrice in een paar klikken.

En zodra je de feed klaar hebt, kun je je producten uploaden naar BestPrice en direct beginnen met verkopen.

Dus laten we beginnen.

Gids voor het genereren van BestPrice Product Feed

Het eerste wat je moet doen is lid worden van het BestPrice.gr merchant programma.

U kunt de BestPrice voor handelaren pagina bezoeken, en daar zult u alle details te weten komen die nodig zijn om toe te treden tot de marktplaats. Meld u aan en configureer uw Merchant Affiliates Platform instellingen zoals Verzending, Belasting, Beleid, en andere dergelijke gegevens.

Deelnemen aan deze marktplaats vereist een kleine vergoeding, maar dat is heel weinig vergeleken met de duizenden dollars aan business die het zal opleveren.

Zodra u een handelaar bent, is het volgende wat u moet doen uw producten in het juiste formaat naar de marktplaats uploaden.

Specificatie voor BestPrice productgegevens

Bij het genereren van een data feed om je producten te uploaden op BestPrice.gr, moet je het volgende XML formaat aanhouden:

<?xml version="1.0" encoding="ISO-8859-7"?>
<store>
<date>--date-- --time--</date>	
        <products>		
                <product>			
                        ---PRODUCT ATTRIBUTES AND DATA HERE---		
                </product>	
        </products>
</store>

Hier moet je de datum en tijd waarop je de feed hebt gegenereerd en de juiste productattributen voor elk product opnemen.

Maar als je een WooCommerce-winkel hebt, hoef je je geen zorgen te maken over het zelf maken van dit formaat. Je kunt gewoon de plugin Product Feed Manager for WooCommerce gebruiken om in een paar klikken een XML-feed te genereren.
**We zullen later in dit artikel meer over deze plugin bespreken.

Laten we eens kijken naar de gegevens over de productattributen die u voor elk product moet opnemen.

Vereiste productattributen voor BestPrice Feed - met voorbeelden

De volgende zijn de verplichte attributen die u moet indienen voor elk product op BestPrice -.

AttribuutInstructiesVoorbeeld
productId 

Format:
<productId>…</productId>
Dit moet een unieke ID zijn voor het product. U kunt de product-ID van uw winkel of de SKU van het product als waarde voor dit kenmerk gebruiken.  <productId>15</productId>
title 

Format:
<title>…</title>
De producttitel moet de productnaam bevatten en aanvullende informatie zoals de naam van de fabrikant/merk, de unieke kenmerken, de modelnaam, enz.<title>Lacoste Hoodie With Logo – Grey</title>
productURL 

Format:
<productURL>…</productURL>
Dit is de directe URL van het product.

Voor variabele producten moet dit uniek zijn voor elke variant.
<productURL>https://www.yourdomain.gr/products/lacoste-hoodie-grey</productURL>
imageURL 

Format:
<imageURL>…</imageURL>
U moet ten minste één afbeelding voor uw product opgeven.

**Voor meerdere afbeeldingen moet u de tag 'imagesURL' gebruiken, die in de volgende rij wordt uitgelegd.
<imageURL>
https://www.yourdomain.gr/productimage1.png
</imageURL>
imagesURL

Format:
<imagesURL>
<img1>…</img1>
<img2>…</img2>
</imagesURL>
Als je meerdere afbeeldingen voor je producten wilt indienen, moet je dit attribuut gebruiken in plaats van 'imageURL'.

<imagesURL>
<img1>https://www.yourdomain.gr/productimage1.png</img1>
<img2>https://www.yourdomain.gr/productimage2.png</img2>
</imagesURL>
price

Format:
<price>…</price>
Voer de huidige verkoopprijs van het product in, d.w.z. als het product is afgeprijsd, moet je de afgeprijsde prijs invoeren; anders moet je gewoon de oorspronkelijke prijs invoeren.

In WooCommerce, als je een verkoopprijs hebt toegewezen aan een product, moet je de verkoopprijs invoeren als de prijs van het product in de feed.
<price>59.99</price>
category_path 

Format:
<category_path>…</category_path>
Voeg de naam van de productcategorie toe, indien mogelijk, met het volledige categoriepad met een '->' scheidingsteken.

*Als alternatief kunt u de categorie-id opgeven als u dat wilt.
<category_path>Τεχνολογία->Κινητή Τηλεφωνία->Κινητά τηλέφωνα</category_path>
availability

Format:
<availability>…</availability>
Dit kenmerk wordt voornamelijk gebruikt om de levertijd te bepalen.

De aanvaarde waarden voor beschikbaarheid zijn:
- Σε απόθεμα
- Παράδοση σε 1-3 ημέρες
- Παράδοση σε 4-7 ημέρες
- Παράδοση σε 4-10 ημέρες
- Παράδοση σε 8-14 ημέρες
- Κατόπιν παραγγελίας
- Προπαραγγελία
- Εξαντλήθηκε

** Σε απόθεμα (op voorraad betekent dat het product kan worden afgehaald.
<availability>Παράδοση σε 1–3 ημέρες</availability>
brand 

Format:
<brand>…</brand>
Geef de merknaam van uw producten op. Als u de fabrikant bent, kunt u uw bedrijfsnaam als merknaam gebruiken.<brand>Market προσφορέσ</brand>
EAN / Barcode /MPN / SKU 

Format: 
<MPN>…</MPN>
U moet het onderdeelnummer van de fabrikant van uw producten vermelden.

**Als u geen MPN hebt, kunt u het EAN, de streepjescode of het artikelnummer als waarde voor dit kenmerk opgeven.
<MPN>MN8X2ZD/A</MPN> 

Zodra je deze vereiste attributen hebt toegevoegd, is je feed vrijwel klaar om te worden geüpload naar de BestPrice marktplaats.

Er zijn echter meer attributen die je nodig hebt of wilt opnemen om dit voer verder te optimaliseren.

Voorwaardelijk Vereiste Attributen

U moet een aantal kenmerken opgeven, afhankelijk van specifieke factoren. Is uw product bijvoorbeeld een boek, dan moet u een ISBN opgeven.

Laten we deze voorwaardelijke attributen eens bekijken.

AttribuutInstructiesVoorbeeld
ISBN 

Format:
<ISBN>…</ISBN>
Als uw product een boek is, moet u het ISBN indienen in plaats van het MPN of EAN.<ISBN>960-6604-92-6</ISBN>
size 

Format:
<size>…</size>
Als uw product een kleding- of schoenenproduct is, moet u het maatkenmerk opgeven.

U kunt gewoon alle beschikbare maten opgeven via dit kenmerk, waarbij u komma's gebruikt om ze te scheiden.

**Dit kan ook worden gebruikt voor producten in elke andere categorie, indien relevant.
<size>S,M,L,XL</size>
color 

Format:
<color>…</color>
Voor variabele producten die in kleur variëren, moet elke variant als een afzonderlijk product worden gegenereerd. En u moet er het kenmerk kleur aan toevoegen om de kleur te specificeren.<color>Red</color>
weight 

Format:
<weight>…</weight>
U moet het gewichtskenmerk indienen als u bij het definiëren van de verzendkosten via het Merchant Affiliatie Platform kiest voor de berekening van de verzendkosten op basis van het gewicht.

U kunt de waarde indienen als een numerieke waarde (geheel getal of decimaal) of een alfanumerieke waarde (gewicht + eenheid).
**Als u de alfanumerieke waarde gebruikt, moet de eenheid van het gewicht overeenkomen met de eenheid die u in het Merchant Affiliatieplatform hebt gedefinieerd.
<weight>5.2</weight>

Optionele attributen om de feed verder te optimaliseren

U kunt er ook voor kiezen enkele optionele kenmerken op te nemen om de indiening van uw productgegevens te optimaliseren.

AttribuutInstructiesVoorbeeld
stock 

Format: 
<stock>Y</stock>
Gebruik dit kenmerk om aan te geven of het product al dan niet op voorraad is.

Geef de waarde op als "Y" als het product op voorraad is en "N" als het product niet op voorraad is.

**Dit is een optioneel veld. Als u dit kenmerk niet opgeeft, of als de waarde voor dit kenmerk voor een product leeg is, dan wordt de voorraadstatus beschouwd als "Κατόπιν Παραγγελίας" (d.w.z. "op bestelling").
<stock>Y</stock> 
categoryID

Format:
<categoryID>…</categoryID>
U kunt de categorie-id samen met het categoriepad indienen om de nauwkeurigheid te verbeteren.

**Als u een categorie-id indient die niet correct is volgens het categoriepad dat u indient, wordt dit kenmerk genegeerd.
<categoryID>223</categoryID>
warranty_provider 

Format:
<warranty_provider>…</warranty_provider>
U kunt dit kenmerk indienen als er een garantie beschikbaar is voor een product.

De volgende waarden worden geaccepteerd:
- GR: als het product wordt gegarandeerd door de officiële Griekse dealer en/of geautoriseerde servicepunten binnen Griekenland.
- EU: als het product een Europese garantie heeft van de fabrikant (dealer of erkende servicepunten binnen de Europese Unie), die NIET de Griekse delegatie omvat.
- STORE: als de garantie wordt verleend door de winkel zelf of de winkelpartner. 
<warranty_provider>STORE</warranty_provider>
warranty_duration 

Format:
<warranty_duration>…</warranty_duration>
Dit is de geldigheidsduur van de garantieperiode in maanden.
**Indien u het kenmerk "warranty_provider" toevoegt, moet u dit verplicht indienen.
<warranty_duration>24</warranty_duration>
bundle 

Format:
<bundle>…</bundle>
Voor een gebundeld product kunt u dit attribuut gebruiken om de productID's van de gebundelde producten aan te geven.<bundle>B1C2, A2B6</bundle>
features 

Format
<features>
<power>…</power>
<voltage>…</voltage>
</features>
Als u een elektronisch product hebt dat een meetbaar vermogen en een meetbare spanning heeft, dan kunt u dit attribuut gebruiken om de waarden aan te geven.<features>
<power>1000W</power>
<voltage>230V/50Hz</voltage>
</features>
shipping 

Format:
<shipping>…</shipping>
Als u voor een bepaald product unieke verzendkosten wilt opgeven, d.w.z. andere verzendkosten dan de kosten die u in het Merchant Affiliate Platform hebt gedefinieerd, kunt u dit attribuut gebruiken.

**Als u gratis verzending wilt aangeven, geef dan een waarde 0 op voor dit attribuut.
<shipping>2.99</shipping>

Voorbeeld feed voor BestPrice in het juiste formaat

Hier is een voorbeeld van een BestPrice feed structuur met voorbeeld data.

<?xml version="1.0" encoding="ISO-8859-7"?>
<store>
<date>2022-05-28 07:05</date>
        <products>
                <product>
                        <productId>13</productId>
                        <title>Lacoste Hoodie with Logo - Black</title>
                        <price>45.00</price>
                        <productURL>
                                https://www.yourdomain.gr/products/lacoste-hoodie-grey
                        </productURL>
                        <imagesURL>
                                <img1>https://www.yourdomain.gr/productimage1.png</img1>
                                <img2>https://www.yourdomain.gr/productimage1.png</img1>
                        </imagesURL>
          		<category_path>
                                Τεχνολογία->Κινητή Τηλεφωνία->Κινητά τηλέφωνα
          		</category_path>
         		<availability>Παράδοση σε 1–3 ημέρες</availability>
                        <brand>Market προσφορέσ</brand>
                        <MPN>MN8X2ZD/A</MPN>
                        <size>S,M,L,XL</size>
                        <color>Black</color>
                </product>
        </products>
</store>

Nu je een goed idee hebt van de benodigde productgegevens die je moet indienen op BestPrice.gr, laten we eens kijken hoe je een XML feed kunt genereren van je WooCommerce producten in slechts een paar klikken.

7 stappen om BestPrice Product Feed te genereren in je WooCommerce winkel

In WooCommerce vind je een efficiënte tool om in een paar klikken een XML feed te genereren voor al je producten.

In deze gids laat ik je zien hoe je een productfeed voor BestPrice kunt genereren met behulp van Product Feed Manager voor WooCommerce. Het is een van de makkelijkste plugins om te gebruiken en heeft een voorgebouwde template voor BestPrice.gr. 

Bekijk deze 7 snelle stappen om de plugin gemakkelijk te gebruiken en de BestPrice XML feed snel te genereren.

Stap 1 - Product Feed Manager installeren en activeren

1. Ga naar Dashboard > Plugins en klik op de knop Nieuw toevoegen.

WordPress Dashboard - Nieuwe plugin toevoegen

2. Typ "Product Feed Manager" in het zoekvak, en je vindt de Product Feed Manager plugin in het zoekresultaat.

WordPress Dashboard - Zoeken naar de plugin

3. Klik op de knop Nu installeren.

4. Klik vervolgens op de knop Activeren om de plugin te activeren.

Product Feed Manager activeren

Zodra je de plugin activeert, vind je het Product feed menu op je dashboard menu's.

Stap 2 - BestPrice inschakelen als Merchant Type voor de Plugin

Als u een nieuwe productfeed voor uw favoriete Merchant aanmaakt, moet u die Merchant eerst inschakelen.

1. Ga naar Dashboard > Productfeed > Instellingen.

Product Feed Manager Instellingen Home

2. Klik op het tabblad Handelaren, en de lijst toont alle ondersteunde handelaren.

Product Feed Manager Handelslijst

3. Zoek naar BestPrice en schakel het in.

4. Klik nu op het tabblad Controls.

Product Feed Manager Instellingen

5. Klik hier op de knop Cache wissen.

Product Feed Manager Cache wissen

Nu bent u klaar om uw productfeed te genereren.

Stap 3 - Een nieuwe feed aanmaken

1. Klik op uw dashboard op Product Feed.

Product Feed Manager Dashboard

2. Klik vervolgens op Nieuwe feed toevoegen.

Product Feed Manager - Nieuwe feed toevoegen

U komt op een lege pagina voor het genereren van feed.

Product Feed Manager - New Feed

Stap 4 - Basisinstellingen voor de feed configureren

Het genereren van BestPrice Feed

1. Geef een naam aan je feed.

2. In de dropdown Producten kun je kiezen of je deze feed wilt genereren voor al je producten, of je kunt een filteroptie kiezen.

3. Als je wilt dat deze feed op vaste tijdstippen automatisch wordt bijgewerkt, kun je deze plannen op Uurlijk, Dagelijks of Maandelijks in het onderdeel Verversingsinterval.

4. Houd de "Include Variable Parent Product" op Nee en de "Include Product Variations" op Ja.

5. Markeer "Include variation product name" als Ja.

6. U kunt de rest van de opties laten zoals ze zijn of ze desgewenst gebruiken.

BestPrice Griekenland Feed Instellingen

Stap 5 - Gebruik de BestPrice Griekenland Feed Sjabloon

1. Scroll naar beneden naar de Feed Configuratie sectie, en selecteer BestPrice als Merchant Type en houd het Bestandsformaat op XML.

BestPrice Feed Configuratie

Eens je het Merchant Type gekozen hebt, zal je merken dat alle vereiste attributen voor BestPrice hieronder verschijnen.

2. U zult zien dat de meeste attributen zijn geconfigureerd. U hoeft alleen het volgende te configureren:

ελληνικά BestPrice Categorie Pad, Beschikbaarheid, Merk &amp; MPN velden
  • Category Path -
    U moet category mapping gebruiken om de categoriepaden te definiëren, dus laat dit attribuut voorlopig leeg. We zullen dit attribuut in een van de volgende stappen configureren.
  • Beschikbaarheid -
    Als u een vaste levertijd hebt voor alle producten, stel dan het type in als statisch en voer een van de eerder genoemde geaccepteerde waarden in. Als u verschillende levertijden hebt voor verschillende producten, dan moet u de waarde opslaan in een aangepast veld en die waarde hier gebruiken.
  • Merk -
    Dit moet de merknaam zijn van het product dat u verkoopt. Als u de fabrikant bent, kunt u het type instellen als Statisch en hier uw bedrijfsnaam invoeren.
    Als u verschillende merknamen hebt voor verschillende producten, moet u de waarde opslaan in een aangepast veld of productattribuut en vervolgens die waarde hier gebruiken.
    **U kunt ook Perfect Brands for WooCommerce gebruiken, wat het gemakkelijker maakt om merknamen toe te wijzen en te gebruiken.
  • MPN -
    Deze waarde moet uniek zijn voor elk product. U moet deze waarde dus opslaan in een aangepast veld binnen elk product en die waarde hier gebruiken.

Stap 6 - De feed aanvankelijk publiceren

1. Zodra je klaar bent met je feed configuratie, scroll je naar boven en klik je op Publiceren, waarna de feed wordt gegenereerd.

BestPrice Feed publiceren

Vergeet niet dat je het categoriepad leeg hebt gelaten.

Stap 7 - Stel de waarde van het categoriepad in en werk de feed bij

1. Ga naar Product feed > Category Mapping en stel een nieuwe category map in met de juiste Category paths.

Product Feed Manager Instellingen voor categorietoewijzing

2. Zodra u een Mapper hebt opgeslagen, gaat u naar Product feed > Instellingen en klikt u op het tabblad Controls.

Product Feed Manager Instellingen &gt; Bedieningselementen

3. Klik hier onder op Cache wissen.

Product Feed Manager Instellingen &gt; Cache wissen

4. Ga naar Dashboard > Productfeed > Alle productfeed en bewerk de feed die je eerder hebt gemaakt.

5. Scroll naar beneden naar de sectie feedconfiguratie. Klik op het waardeveld voor Category Path en scroll helemaal naar beneden om de mapper te kiezen die je hebt gemaakt.

BestPrice Merchant Template Kies Categorie Mapping

6. Scroll naar boven en klik op update.

BestPrice Update Feed

7. Uw feed wordt gegenereerd en u kunt de feed bekijken of downloaden.

Product Feed Manager Feed bekijken/downloaden

Het volgende wat je moet doen is inloggen op je BestPrice merchant account en de feed URL indienen om je producten op BestPrice te vermelden.

Dat is het. Dat is hoe gemakkelijk u een product feed kunt genereren en uw producten kunt vermelden als BestPrice.gr markt προσφορέσ.

Conclusie

BestPrice is al een one-stop-oplossing geworden voor veel winkeliers in Griekenland omdat het bewezen heeft goede resultaten op te leveren in termen van verkoop.

Aangezien je een Griekse WooCommerce winkel hebt, is het het beste als ook jij kunt profiteren van het enorme lokale publiek dat BestPrice te bieden heeft.

En nu dat je weet hoe makkelijk het is om een product feed te genereren ga je gang en gebruik Product Feed Manager voor WooCommerce om je producten aan te maken en te uploaden op BestPrice.gr.

Categorieën
Guide Product Feed Manager For WooCommerce

Google kondigt gratis Google Shopping Promoties aan [2022]

The Corona outbreak is a big threat to humanity. We all know how dangerous the virus is. However, it also comes with another big threat – an economic crisis.

Due to the lockdown, most offices are incapable of running operations, and consumers have no option but to stay at home. And every business saw a drastic fall in its revenue.

However, a few local online shops are able to continue running their business, despite earning a lot less than usual.

Since people are not able to go out, they may order products online and get them delivered to their homes, thus creating a little opportunity for the eCommerce business to somehow survive.

However, things might just get better for your shop.

Selling On Google Shopping Is Free Of Cost During Corona Crisis

Earlier on 21st April 2020, Google made a huge announcement.

Within 1 week, Google will start allowing merchants to sell their products through Google Shopping completely free of cost!

According to Google, “as consumers increasingly shop online, they’re searching not just for essentials but also things like toys, apparel, and home goods.”

So Google wants to extend out a helping hand to both the consumers and the merchants. Free online listing means more merchant shops will be able to sell products through Google Shopping, and consumers will get more products to buy from.

This is great news for all online shops, especially the sites that deliver locally and the stores that sell digital products.

If you are running a WooCommerce store and deliver locally, then this is your biggest opportunity to get the maximum exposure and increase sales during this global crisis.

How To Make The Most Out Of This Opportunity

This could be your best chance to sustain during the economic crisis threat. And there is still one week time before Google starts this initiative.

So, let us look at how you can make the most out of this golden opportunity that Google is offering.

With one week at hand, we suggest you do the following:

  1. Prepare your shop by optimizing product details for SEO
  2. Identify your best selling products and plan a discount campaign
  3. Identify products that might be necessities and plan a discount campaign
  4. Make arrangement for selling a few digital products if possible
  5. Get your products listed on Google Shopping ASAP

Let us look at how you can pull this off.

1. Prepare your shop by optimizing product details for SEO

Product Details For SEO

SEO is always important if you want your products to be found on Google. Even if you list your products on Google shopping, SEO optimization will determine how relevant your product is based on your customer’s search term.

**Make sure to use an SEO plugin, such as Yoast or RankMath, on your WooCommerce store.

For example, if you are selling a T-shirt with Avengers’ design on it, then obviously you want your ideal customers to be the ones who are looking for Avengers themed t-shirts.

In that case, you can set the t-shirt title, Special Marvel Avengers Tshirt – Red, and set the keyword to Marvel Avengers Tshirt. Within the description, use this keyword a couple of times in the product description, and include it in the product link as well. These will indicate that the product is relevant to the keyword.

Your SEO tool will give you a score to understand if it was well optimized.

If you have a few products in your shop, then apply SEO optimization on every product. If you have too many products, then conduct SEO optimization at least for your best selling products.

2. Plan A Discount Campaign For Your Best-Selling Products

Browse through your website’s analytics or reports, and find out which products performed the best in the last two months.

Collect their titles, links, and the price.

Now, the 1st thing to do is to optimize them for SEO.

Next, plan out a discount campaign for your best selling products, such as a 20% discount for the 1st twenty sales from Google Shopping, or a 10% discount throughout the lockdown.

Plan A Discount Campaign

You might assume that since these are bestsellers, they will sell automatically through Google’s immense reach.

However, keep in mind, just like you, there are tons of other online shops that also plan to take advantage of this opportunity. Hence, along with more exposure, you will face more competition as well.

Consumers will look to purchase products either based on higher rating, or lower price. Nowadays, a lower price will get a high priority since everyone is trying to save money in response to the crisis.

Hence, it is only logical to run discounts and increase your sales.

3. Plan A Discount Campaign For Products That Might Be Necessities

Certain products are a necessity nowadays besides food and beverages, for example, bathing products, cleaning products, tissues, tampons, etc.

Also, certain electronics such as water purifiers, ovens, hair trimmers, etc might also be considered necessities at this time.

You may identify such products, optimize them for SEO, and decide on a discount campaign for them as well.

**Since we are focusing on local sales, it would be even better if you could deliver free of cost. But that’s totally your decision to make.

4. Make Arrangement For Selling A Few Digital Products If Possible

You might have a fixed category of products that you sell.

However, if you are an online retail shop that sells various types of products, then you might consider adding a few digital products (if you don’t have any already) such as movies, music collections, games, or books.

Most people are sitting idle at home, and looking for ways to make their days more entertaining. Hence, these digital products are pretty demanded in the current situation.

Even though there is no guarantee that if you arrange such products they will have maximum sales, it is still a high possibility.

5. Get Your Products Listed On Google Shopping ASAP

With this free of cost opportunity at hand, you should list your products on Google Shopping ASAP. You need to be prepared to upload your products right from the start.

Get Products Listed On Google Shopping ASAP

To do so, you first need to understand that Google Shopping has a fixed set of instructions that you must follow for your products to get approved.

It will look for specific data in the right format that is accepted by Google Shopping. Plus, Google has its own set of categories that you must indicate through your feed.

Here’s a guide to set up your WooCommerce Product data in an optimized way for Google Shopping:

In the guide, you will get actionable instructions on what data to submit and how to optimize them for approval on Google Shopping.

For example, if you have a t-shirt with 3 color variations, red, blue, and green, then you have to submit each variation separately and include the color name in the Product title. So if the product is called “New Cotton T-shirt”, for its the red variant, then the title should be “New Cotton T-shirt – Red”.

Similar to this, there are several other tips that you will find in that guide to optimize your feed data.

Now, to create the product feed, it’s really not convenient to do so manually. Rather use a product feed generation tool to generate a feed for all of your products in a few minutes.

If you own a WooCommerce store, then you can use Product Feed Manager For WooCommerce. It is a plugin that already has a set template for Google Shopping.

All you need to do is create a new feed, choose Google Shopping as the merchant, and assign a few attributes with the right values.

Let us look at a few reasons for you to use Product Feed Manager For WooCommerce.

Product Feed Manager For WooCommerce

WPFM banner for Google Shopping promotions

The plugin as a few features that are dedicated to helping you generate an accurate product feed for Google Shopping.

1. Pre-Built Google Shopping Feed Template

Google specifically requires you to submit 12 mandatory data for your products:

  • Product ID
  • Titel van het product
  • Productbeschrijving
  • Product Link/URL
  • Productcategorie
  • Google Product Categorie
  • Productafbeelding URL
  • Voorraadbeschikbaarheid
  • Normale prijs
  • Productvoorwaarde
  • Fabrikant/Merknaam
  • GTIN or MPN

And there are a few more conditional attributes that you need to submit depending on your niche.

The plugin by default has these attributes set. When you choose Google Shopping, the plugin will display the template which includes all the mandatory fields and values assign (except for 3 which I will explain in a bit).

So, you don’t need hours to set it up, and nor do you need exclusive knowledge to set up the feed. 80% of your work is already done.

2. Auto-sync WooCommerce Products To Google Shopping

One of the notable features this plugin has is the option to auto-sync your generated product feed to Google Shopping.

Once you generate the product feed, you can send the feed to your Google Merchant Center in just a click. Once you send the feed to Google, any changes you make later to the products and the feed, they will automatically be updated on Google Shopping.

You won’t have to manually upload new feed files to Google every time you make changes.

Here’s a written guide on how it works:

Here’s a video to show you how it works:

3. Category Mapping For Accepted Google Categories

On the mandatory attributes mentioned above, there is one called Google Product Category. You need to assign each of your products to a category that Google accepts.

Don’t worry, you do not need to change any data or category names on your shop for this.

The plugin has a Category Mapping feature where you can map your shop categories to that of Googles. Durig feed generation simply assigns the mapping values as the values for Google Product Category.

It’s really easy to use. Here’s a written guide on it:

Here’s a video to show you how it works:

4. Special Custom Attribute Fields

On the mandatory attribute list mentioned above, you can see that there certain attributes, Manufacturer/Brand, GTIN, and MPN.

However, WooCommerce by default has no field(s) for these attributes.

Product Feed Manager For WooCommerce comes with the feature of including these fields to your products where you can assign the values.

You also get extra custom fields for conditional attributes such as Gender, Color, Size, or Pattern which you need to submit if you sell products in the Apparels category.

Here’s a guide about it:

5. Avoid Price Mismatch Error When Uploading Feed

Many people face a common error, “Price mismatch” when uploading the feed and many of their products get rejected.

The reason behind this is, for a variable product, if you have different pricing for different variations, WooCoomerce displays both the highest price and the lowest price when Google crawls that product page for a particular variation. This causes a mismatch in the price you submitted.

Product Feed Manager For WooCommerce holds the option to fix JSON LD structured data so that only the accurate price is displayed when Google crawls a variant of a variable product.

It’s just a single click in the plugin’s settings to activate it. Here’s how:

Hence, you will be able to avoid facing the “Price mismatch” error on Google Shopping.

6. Exclusive Filter For Efficient Feed Generation

The plugin allows you to generate a product feed for all the products, or you may use it’s filter options to generate a feed for specific products only.

For example, if you have products that are no longer in stock and you do not want to submit them on Google, then you can use the custom filter to exclude all products that are out of stock.

It also has a category filter and tag filter where you can simply choose certain categories or tags to generate a product feed for the products under those categories or tags only.

Here’s a video to show you how it works:

This really saves time and you can upload only the products that you want to sell through Google Shopping.

7. Easily Add Variant Values To The Product Title

Now, as I have mentioned above, Google advises to include the variant value to the Product title (though not mandatory).

However, it is not necessary to change the title in your store to achieve this. The plugin allows you to choose to add the variant names to Product titles in the product feed that you generate.

As you can see, this plugin is a great help in generating an accurate product feed quickly, and optimize the feed for getting the best results through Google Shopping.

Conclusie

Google is taking a very honorable initiative to help both the consumers and sellers. There is no way you should lose this opportunity.

So, go ahead and prepare your store right away if you want the best results out of free promotion through Google Shopping and increase your sales to sustain during this world crisis.

Categorieën
Guide Product Feed Manager For WooCommerce WooCommerce

A Complete Guide On Amazon Seller Central Product Feed [2021]

As a WooCommerce store owner, you always want to scale up the sales of your store in the most optimized way.

Een van de meest effectieve manieren om het aantal verkopen in uw winkel te verhogen is het promoten van uw winkelproducten op de grootste marktplaatsen, vooral als u een relatief nieuwe online winkel heeft.

Met 2,31 miljard maandelijkse bezoekers, wat neerkomt op 77 miljoen dagelijkse shoppers, is Amazon de grootste marktplaats ter wereld waar u uw producten kunt promoten.

Het promoten op een gigantische marktplaats als Amazon Seller Central zal uw bedrijf ten goede komen omdat:

  • Op Amazon zullen uw producten veel meer kopers bereiken dan uw eigen winkel, met veel minder moeite.
  • Amazon heeft gedetailleerde informatie over hun klanten, dus uw producten zullen worden getoond aan de klanten die een echte neiging hebben om te kopen.
  • De klanten vertrouwen op Amazon en de producten die er in staan, terwijl u misschien problemen heeft met het vertrouwen in uw winkel van de eerste keer dat u een aankoop doet.

Door het genereren van een productfeed kunt u producten op Amazon in bulk uploaden, wat u enorm veel tijd zal besparen.

U kunt eenvoudig producten aanleveren op Amazon, waardoor u automatisch gestructureerde producten maakt en beter presteert in de zoekresultaten.

But first, you need to know how to create an accurate product feed of your products to submit on Amazon Seller Central.

Er zijn bepaalde manieren voor u om de productfeed te optimaliseren voor een maximale verkoop via Amazon Seller Central.

Na het lezen van deze gids, zult u in staat zijn om:

  • Creëer een nauwkeurige en perfecte productfeed voor Amazon Marketplace.
  • Successfully promote and market your WooCommerce products on Amazon and increase your sales.

Dus, laten we beginnen.

Hoe opent u een centrale Amazone-verkopersaccount om uw producten te promoten?

Voordat u begint met het promoten van uw producten van de WooCommerce winkel naar de Amazon Marketplace, moet u een account openen op Amazon verkoper centraal.

But first, let’s look at the necessary things you need before opening the account.

Vereisten voor het openen van een centrale Amazoneverkopersaccount

1. 1. Internationaal geaccepteerde Creditcard

U moet in het bezit zijn van een creditcard die internationaal geaccepteerd kan worden en die verbonden is met uw geldige e-mailadres.

2. 2. Fiscale identificatie-informatie

Amazon zal vragen naar het fiscale identificatienummer ( EIN als u in de staten bent) van u of uw bedrijf.

3. 3. Zakelijke informatie

Uw wettelijke bedrijfsnaam, adres, e-mail en andere contactgegevens zijn vereist.

4. 4. Bankrekeninggegevens

U heeft ook een bankrekening en andere gerelateerde basisinformatie nodig.

Zodra u deze heeft verzameld en georganiseerd, volgt u de onderstaande stappen om een Amazon Seller Central account aan te maken.

Stap 1 - Aanmelden

Go to the following link to start the signup process:

Hier laten we u zien hoe u een rekening kunt openen voor een individuele verkoper.

Zodra u naar de bovenstaande link gaat, ziet u een gele, Start Selling knop.

Maak een account aan op Amazon Seller Central

Klik op de Start Selling knop, en u wordt naar de registratiepagina van Amazon Seller Central gebracht.

Account Credentials Amazoneverkoper Centraal

Provide your like name and email address, set up a password and click on the Next button.

Stap 2 - Stel uw bedrijfsinformatie in

Bij de volgende stap moet u uw bedrijfsgegevens opgeven, zoals de bedrijfslocatie, het bedrijfstype, enz.

Bedrijfstype en locatie op Amazonegebied

Stap 3 - Persoonlijke informatie

Hier moet u meer informatie geven zoals het land van uw nationaliteit, het land waar u geboren bent, uw geboortedatum en het volledige adres van uw bedrijf.

Persoonlijke informatie voor Amazone-verkoper Centraal

You will also need to provide your contact number, which you will get a call or SMS to verify that it’s your valid number.

Stap 4 - Stel uw factureringsmethode in

In this step, you have to set up the billing method for your Amazon Seller Central account. You’ll see the cost details of your plan.

Er zijn 2 plannen waaruit u kunt kiezen:

  • Professioneel plan - $39,99 maandelijks abonnement.
  • Individueel plan - $0,99 per verkocht product.

Het individuele plan is perfect voor u als u van plan bent om minder dan 40 producten per maand te verkopen. (Het hangt echt af van de categorie.)

Het professionele verkoopplan is een betere keuze voor u als u van plan bent om meer dan 40 producten per maand te verkopen.

Factureringsmethode voor Amazone's
Hier is een factureringsmethode opgezette pagina voor het professionele plan.

Stap 5 - Vul een fiscaal interview in

In this step, you have to provide your tax information through a tax interview.

Belastinginformatie Amazoneverkoper Centraal

In dit interview gaat Amazon na of u een individuele verkoper of een professioneel bedrijf bent.

U mag uw sociale zekerheidsnummer gebruiken in plaats van het identificatienummer van de werkgever als fiscaal identificatienummer.

Stap 6 - Geef uw productinformatie

Dit is de laatste stap. Hier moet u wat basisinformatie over uw producten geven zoals:

  • Als u universele productcodes (UPC's) heeft voor uw producten.
  • Als u een fabrikant bent of een eigen merk heeft.
  • Hoeveel verschillende soorten producten wilt u op Amazon vermelden.
Productinformatie Amazone

Lijst van specifieke Amazonemarkten

Right now, Amazon operates in 16 different countries with local domains and languages.

Amazone's kunnen echter bijna overal ter wereld producten verschepen.

Hoe maak je een geoptimaliseerde WooCommerce Product Feed voor Amazone's

Similar to most other marketplaces, Amazon also requires you to submit data in specific formats. In fact, there are a few details that are mandatory to provide to be approved for selling.

Specificatie van productgegevens

Een typisch amazonevoer ziet er als volgt uit:

<?xml version="1.0" encoding="UTF-8" ?>
   <products>
        <product>
		Product Data Attributes
        </product>
  </products>
</rss>

Op de feed moet u de volgende data-attributen opgeven.

Noodzakelijke gegevenseigenschappen

  • Titel van het product
  • Product URL
  • Productcategorie
  • Prijs
  • SKU
  • Afbeelding URL
  • Merk

  • UPC/EAN
  • Productbeschrijving
  • MPN
  • Verzendkosten
  • Kogelpunten
  • Hoogte
  • Lengte
  • Gewicht
  • Breedte
  • Item Verpakkingshoeveelheid
  • Modelnummer
  • Trefwoorden
  • Andere afbeelding URL

Titel van het product

Attribuuttitel
VoorbeeldBeanie met logo
Voergegevens<title><![CDATA[Beanie with Logo]]></title>

Dit is de naam van uw product die zal worden weergegeven.

Nu, er zijn enkele criteria voor de producttitel op Amazon. Zoals:

  • De producttitel mag niet groter zijn dan 200 tekens, inclusief spaties.
  • Een producttitel mag geen promotionele of marketingzinnen bevatten zoals "gratis verzending" of "100% kwaliteitsgarantie".

A product title must not contain special characters like ~ ! * $ ? _ ~ { } # < > | * ; ^ ¬ ¦

Producttitel op Amazoneverkoper Centraal

This is what a perfect product title on Amazon looks like.

Product URL

Attribuutlink
Voorbeeldhttps://yourwebsite.com/product/beanie-with-logo
Voergegevens<link>
<![CDATA[https://yourwebsite.com/product/beanie-with-logo]]>
</link>

Dit is de URL van een bepaalde productpagina.

Uw product-URL's moeten beginnen met HTTPS of HTTP.

Productcategorie

Attribuutproducttype
VoorbeeldKleding, Accessoires
Voergegevens<g:product_type>
<![CDATA[ Clothing, Accessories ]]>
</g:product_type>

U moet altijd aangeven onder welke categorie uw producten vallen.

Als u subcategorieën in uw winkel heeft, probeer ze dan te specificeren, want dat geeft u betere resultaten.

Prijs

Attribuutprijs
Voorbeeld20.00 GBP
Voergegevens<price>20.00 GBP</price>

Het Prijskenmerk moet worden ingediend met de valuta als Achtervoegsel. Zoals GBP of USD.

Productprijs op Amazoneverkoper Centraal

Zo komt de prijs van het product op de productpagina's van Amazon te staan (hier kunt u ook de kortingsdetails zien).

Stel de productprijs in op WooCommerce

U kunt de productprijzen vanaf hier instellen op uw WooCommerce winkel.

SKU

Attribuutsku
VoorbeeldWoo-beanie-logo
Voergegevens<sku>Woo-beanie-logo</sku>

KU of Stock Keeping Unit is een term voor voorraadbeheer die u kunt gebruiken om de beschikbare voorraden te identificeren aan de hand van lijsten, bestelformulieren en facturen.

Hier zijn de voorwaarden voor SKU in het Amazonegebied:

  • Elk product in uw productvoer moet een unieke SKU-waarde hebben.
  • Elke SKU-waarde die op Amazon wordt geüpload, creëert een nieuw record.
  • Omdat elke SKU-waarde uniek is, mag je die niet veranderen. Deze waarden blijven op uw feed staan totdat u ze verwijdert.
  • If you upload a product with an already existing SKU value, the new product data will replace the old product data against that SKU.

Afbeelding URL

Attribuutafbeelding
Voorbeeldhttps://yourwebsite.com/beanie-with-logo-1.jpg
Voergegevens<image>
https://yourwebsite.com/beanie-with-logo-1.jpg
</image>

Geef hier de URL van uw productafbeelding. De URL moet beginnen met 'HTTP' of 'HTTPS' omdat andere formaten niet worden ondersteund.

Hier zijn de richtlijnen voor productafbeeldingen op Amazon:

Ondersteunde beeldformaten voor Amazon: PNG, JPG, JPEG en TIFF.

Niet-ondersteunde beeldformaten voor Amazon: AI, PSD, PDF of EPS.

Eisen:

  • U moet één grote productafbeelding aanleveren met een minimum van 500 pixels en een maximum van 2100 pixels op de langste afmeting.
  • Het beeld moet helder en scherp zijn.
  • Het beeld moet het gebied van 85% van het frame vullen.
  • De achtergrondkleur moet zuiver wit zijn.
  • De beeldkleur moet in de RGB-modus staan.
  • Een achtergrondafbeelding of ander object in de afbeelding is niet toegestaan.
  • Het beeld moet een professioneel beeld zijn of een cover art.
  • Het gehele product moet in beeld zijn, bijsnijden is niet toegestaan.
  • Er zijn geen watermerken, logo's, teksten of randen in de afbeelding toegestaan.
Productbeeld op Amazoneverkoper Centraal

Hier is hoe u productfoto's kunt laten zien.

Merk

Attribuutmerk
VoorbeeldRexThema
Voergegevens<brand><![CDATA[AmazonRex]]></brand>

Geef hier het merk van het product. U kunt ook uw eigen merk of winkelnaam instellen.

EPC/EAN

Attribuutean
Voorbeeld4856349589328
Voergegevens<ean>4856349589328</ean>

Dit veld is voor de productidentificatienummers.

Als u uw producten in Europa promoot, moet u de EAN- of Europese artikelnummers voor uw producten opgeven.

Of u kunt de EPC of de Electronic Product Code aanleveren die overal ter wereld van toepassing is.

Hier zijn alle geaccepteerde vormen van productidentificatie:

  • UPC-E (dat is 6 cijfers)
  • EAN-8/UCC-8/GTIN-8 (dat is 8 cijfers)
  • UPC-A/GTIN-12 (dat is 12 cijfers)
  • EAN-13/UCC-13/GTIN-13 ( Dat is 13 cijfers)
  • EAN-14/UCC-14/GTIN-14 (welke14 cijfers)

Volgens de regels van de promotie op Amazon, moet u een van deze geldige identificatienummers opgeven.

Productbeschrijving

Attribuutbeschrijving
VoorbeeldDit is een reisrugzak.
Voergegevens<description>
<![CDATA[This is a travel backpack.]]>
</description>

U moet de producten hier op uw eigen manier beschrijven.

Hier zijn de overtredingen te vermijden tijdens het schrijven van productbeschrijvingen:

  • Met beledigende, pornografische of obscene woorden.
  • Including Phone numbers, Emails, or any contact information.
  • Met woorden als 'De beste' en 'De meeste'.
  • Met als hoofdletter de hele beschrijving.
  • Het aanvragen van een positieve klantenbeoordeling.
  • Met behulp van een beoordeling of getuigenissen.
  • Links naar elke website.
  • Tijdsgebonden informatie zoals data.
Productbeschrijving op Amazoneverkoper Centraal

Dit is een voorbeeld van een productbeschrijving op Amazon.

You can also use a product description generator for this.

MPN

Attribuutmpn
Voorbeeld4856349589328
Voergegevens<mpn>4856349589328</mpn>

U dient hier de onderdeelnummers van de fabrikant van uw producten op te geven.

Als u de EAN/EPC al aan uw producten heeft toegewezen, hoeft u geen MPN's voor uw producten aan te leveren.

Verzendkosten

Attribuutverzendkosten
Voorbeeld9.99 USD
Voergegevens<shipping_cost>9.99 USD</shipping_cost>

U moet de verzendkosten van uw producten hier instellen en Amazon stelt voor dat u dit zo veel mogelijk vereenvoudigt.

U kunt de verzendkosten op 3 manieren instellen:

  • Item/Weight-Based Shipping
  • Product-gebonden verzending
  • Verzending op gewichtsbasis.

Volg deze Amazone-instructies over verzendkosten om uw verzendkosten in te stellen.

Kogelpunten

Attribuutbullet_point1
VoorbeeldDit product is waterdicht!
Voergegevens<bullet_point1>This product is waterproof!</bullet_point1>

Kogelpunten zijn onderdeel van uw productbeschrijving. Dit attribuut maakt het mogelijk om het belangrijkste kenmerk van uw producten in kogelpunten te markeren.

Amazon allows the vendors to add up to 10 bullet points. Sellers can add up to 5 bullet points.

You are allowed to only describe your product features on these bullet points.

De kogelpuntovertredingen zijn dezelfde als de productbeschrijvingsovertredingen.

Kogelpunten op Amazoneverkoper Centraal

Hier ziet u een voorbeeld van de opsommingstekens op de productpagina's van Amazon.

Hoogte

Attribuuthoogte
Voorbeeld2 M
Voergegevens<height><[Product height]></height>

Hier moet u de hoogte van elk van uw producten vermelden.

Lengte

Attribuutlengte
Voorbeeld2M
Voergegevens<length><[Product length]></length>

Hier moet u de lengte van elk van uw producten vermelden.

Breedte

Attribuutbreedte
Voorbeeld2M
Voergegevens<width><[Product width]></width>

Hier moet u de breedte van elk van uw producten vermelden.

Gewicht

Attribuutgewicht
Voorbeeld2 KG
Voergegevens<weight><[Product weight]></weight>

Hier moet u het gewicht van elk van uw producten vermelden. Dit kenmerk kan cruciaal zijn, afhankelijk van uw verzendingsregels.

Item Verpakkingshoeveelheid

Attribuutitem_verpakking_hoeveelheid
Voorbeeld2
Voergegevens<item_package_quantity><[package quantity]></item_package_quantity>

Als u producten in pakketten of bundels verkoopt, moet u hier de Item Package Quantity vermelden.

Stel dat u een Koffiebundel heeft inclusief koffiebonen en suikerklontjes, dan moet u hier 2 producten vermelden.

Modelnummer

Attribuutmodelnummer
Voorbeeld2384
Voergegevens<model_number>2384</model_number>

Als u uw eigen merkproducten of gefabriceerde producten verkoopt, kan het zijn dat u het modelnummer aan uw producten moet toekennen.

Anders hoef je dit attribuut niet te gebruiken.

Trefwoorden

AttribuutTrefwoorden1
VoorbeeldLavendelhout Bruin Groot
Voergegevens<Keywords1>Lavender Wood Brown Large</Keywords1>

You can set Keywords to your products for better results on Amazon searches.

Volg deze Amazone-instructie om de voorwaarden en beperkingen van het gebruik van trefwoorden te kennen en ze perfect in te stellen voor uw producten.

Andere afbeelding URL

Attribuutander_beeld_url1
Voorbeeldhttps://yourwebsite.com/beanie-with-logo-2.jpg
Voergegevens<other_image_url1>
https://yourwebsite.com/beanie-with-logo-2.jpg
</other_image_url1>

Als u meer afbeeldingen aan uw producten wilt toevoegen, gebruik dan dit attribuut en geef de URL's van uw extra productafbeeldingen.

Met Amazon kunt u tot 9 productafbeeldingen per pagina weergeven. Maar meestal worden er 7 productafbeeldingen weergegeven op elke productpagina.

Upload uw productinvoer naar Amazonië

Als u eenmaal uw productvoer hebt gemaakt:

  1. Go to the Inventory page on your Amazon Seller Central account.
  2. Klik op het Upload Your Inventory File om de producten te uploaden via een product feed file. U kunt ook het bestandstype selecteren in de sectie Bestandstype.

Here is what a product feed for Amazon looks like in the TEXT format.

Here is what a product feed for Amazon looks like in the XML format.

Volg deze Amazon Seller Central documentatie om uw producten te uploaden via een productfeed.

Laatste gedachten

Promotie op de grote markten zal u altijd meer omzet opleveren met de minste inspanning.

Amazon is de beste plek voor u als u de verkoop van uw WooCommerce winkel wilt verhogen. Daarom is het hoog tijd dat u uw producten gaat promoten via Amazon Seller Central.

Here are the guides to creating accurate and optimized product feeds for more popular marketplaces:

Also, if you have any specific marketplace, for which you want a guide on the product feed, let me know in the comments. I will try to create one for you.

Categorieën
Guide Product Feed Manager For WooCommerce

Accepted Google Country Codes List For All Google Ads [2024]

Google is currently the largest marketplace to promote WooCommerce products through various Ad campaigns such as Shopping Ads, Adwords, Dynamic Remarketing, and many more.

Here’s a list of Google Country Codes List that you may use throughout Google Ads when referring to countries you are promoting to or shipping to.

Google Country Codes List

Usually, the Google country codes are of two letters (not case sensitive).

A | B | C | D | E | F | G | H | I | J | K | L | M | N | O | P | Q | R | S | T | U | V | W | Y | Z

A

CountryCountry Codes
🇦🇫 Afghanistanaf
🇦🇱 Albaniaal
🇩🇿 Algeriadz
🇦🇸 American Samoaas
🇦🇩 Andorraad
🇦🇴 Angolaao
🇦🇮 Anguillaai
🇦🇶 Antarcticaaq
🇦🇬 Antigua & Barbudaag
🇦🇷 Argentinaar
🇦🇲 Armeniaam
🇦🇼 Arubaaw
🇦🇺 Australiaau
🇦🇹 Austriaat
🇦🇿 Azerbaijanaz

B

CountryCountry Codes
🇧🇸 Bahamasbs
🇧🇭 Bahrainbh
🇧🇩 Bangladeshbd
🇧🇧 Barbadosbb
🇧🇾 Belarusby
🇧🇪 Belgiumbe
🇧🇿 Belizebz
🇧🇯 Beninbj
🇧🇲 Bermudabm
🇧🇹 Bhutanbt
🇧🇴 Boliviabo
🇧🇦 Bosnia & Herzegovinaba
🇧🇼 Botswanabw
🇧🇻 Bouvet Islandbv
🇧🇷 Brazilbr
🇮🇴 British Indian Ocean Territoryio
🇧🇳 Brunei Darussalambn
🇧🇬 Bulgariabg
🇧🇫 Burkina Fasobf
🇧🇮 Burundibi

C

CountryCountry Codes
🇰🇭 Cambodiakh
🇨🇲 Camerooncm
🇨🇦 Canadaca
🇨🇻 Cape Verdecv
🇰🇾 Cayman Islandsky
🇨🇫 Central African Republiccf
🇹🇩 Chadtd
🇨🇱 Chilecl
🇨🇳 Chinacn
🇨🇽 Christmas Islandcx
🇨🇨 Cocos (Keeling) Islandscc
🇨🇴 Colombiaco
🇰🇲 Comoroskm
🇨🇬 Congocg
🇨🇩 Congo, The Democratic Republic of thecd
🇨🇰 Cook Islandsck
🇨🇷 Costa Ricacr
🇨🇮 Cote D’ivoireci
🇭🇷 Croatiahr
🇨🇺 Cubacu
🇨🇾 Cypruscy
🇨🇿 Czech Republiccz

D

CountryCountry Codes
🇩🇰 Denmarkdk
🇩🇯 Djiboutidj
🇩🇲 Dominicadm
🇩🇴 Dominican Republicdo

E

CountryCountry Codes
🇪🇨 Ecuadorec
🇪🇬 Egypteg
🇸🇻 El Salvadorsv
🇬🇶 Equatorial Guineagq
🇪🇷 Eritreaer
🇪🇪 Estoniaee
🇪🇹 Ethiopiaet

F

CountryCountry Codes
🇦🇨 Falkland Islands (Malvinas)fk
🇫🇴 Faroe Islandsfo
🇫🇯 Fijifj
🇫🇮 Finlandfi
🇫🇷 Francefr
🇬🇫 French Guianagf
🇵🇫 French Polynesiapf
🇹🇫 French Southern Territoriestf
Product Feed Manager For WooCommerce

G

CountryCountry Codes
🇬🇦 Gabonga
🇬🇲 Gambiagm
🇬🇪 Georgiage
🇩🇪 Germanyde
🇬🇭 Ghanagh
🇬🇮 Gibraltargi
🇬🇷 Greecegr
🇬🇱 Greenlandgl
🇬🇩 Grenadagd
🇬🇵 Guadeloupegp
🇬🇺 Guamgu
🇬🇹 Guatemalagt
🇬🇳 Guineagn
🇬🇼 Guinea-Bissaugw
🇬🇾 Guyanagy

H

CountryCountry Codes
🇭🇹Haitiht
🇭🇲 Heard Island and Mcdonald Islandshm
🇻🇦 Holy See (Vatican City State)va
🇭🇳 Hondurashn
🇭🇰 Hong Konghk
🇭🇺 Hungaryhu

I

CountryCountry Codes
🇮🇸 Icelandis
🇮🇳 Indiain
🇮🇩 Indonesiaid
🇮🇷 Iran, Islamic Republic ofir
🇮🇶 Iraqiq
🇮🇪 Irelandie
🇮🇱 Israelil
🇮🇹 Italyit

J

CountryCountry Codes
🇯🇲 Jamaicajm
🇯🇵 Japanjp
🇯🇴 Jordanjo

K

CountryCountry Codes
🇰🇿 Kazakhstankz
🇰🇪 Kenyake
🇰🇮 Kiribatiki
🇰🇵 Korea, Democratic People’s Republic ofkp
🇰🇷 Korea, Republic ofkr
🇰🇼 Kuwaitkw
🇰🇬 Kyrgyzstankg

L

CountryCountry Codes
🇱🇦 Lao People’s Democratic Republicla
🇱🇻 Latvialv
🇱🇧 Lebanonlb
🇱🇸 Lesothols
🇱🇷 Liberialr
🇱🇾 Libyan Arab Jamahiriyaly
🇱🇮 Liechtensteinli
🇱🇹 Lithuanialt
🇱🇺 Luxembourglu

M

CountryCountry Codes
🇲🇴 Macaomo
🇲🇰 Macedonia, The Former Yugosalv Republic ofmk
🇲🇬 Madagascarmg
🇲🇼 Malawimw
🇲🇾 Malaysiamy
🇲🇻 Maldivesmv
🇲🇱 Maliml
🇲🇹 Maltamt
🇲🇭 Marshall Islandsmh
🇲🇶 Martiniquemq
🇲🇷 Mauritaniamr
🇲🇺 Mauritiusmu
🇾🇹 Mayotteyt
🇲🇽 Mexicomx
🇫🇲 Micronesia, Federated States offm
🇲🇩 Moldova, Republic ofmd
🇲🇨 Monacomc
🇲🇳 Mongoliamn
🇲🇸 Montserratms
🇲🇦 Moroccoma
🇲🇿 Mozambiquemz
🇲🇲 Myanmarmm
Product Feed Manager For WooCommerce

N

CountryCountry Codes
🇳🇦 Namibiana
🇳🇷 Naurunr
🇳🇵 Nepalnp
🇳🇱 Netherlandsnl
| | Netherlands Antillesan
🇳🇨 New Caledonianc
🇳🇿 New Zealandnz
🇳🇮 Nicaraguani
🇳🇪 Nigerne
🇳🇬 Nigeriang
🇳🇺 Niuenu
🇳🇫 Norfolk Islandnf
🇲🇵 Northern Mariana Islandsmp
🇧🇻 Norwaygeen

O

CountryCountry Codes
🇴🇲 Omanom

P

CountryCountry Codes
🇵🇰 Pakistanpk
🇵🇼 Palaupw
🇵🇸 Palestinian Territory, Occupiedps
🇵🇦 Panamapa
🇵🇬 Papua New Guineapg
🇵🇾 Paraguaypy
🇵🇪 Perupe
🇵🇭 Philippinesph
🇵🇳 Pitcairnpn
🇵🇱 Polandpl
🇵🇹 Portugalpt
🇵🇷 Puerto Ricopr

Q

CountryCountry Codes
🇶🇦 Qatarqa

R

CountryCountry Codes
🇷🇪 Réunionre
🇷🇴 Romaniaro
🇷🇺 Russian Federationru
🇷🇼 Rwandarw

S

CountryCountry Codes
🇸🇭 Saint Helenash
🇰🇳 Saint Kitts & Neviskn
🇱🇨 Saint Lucialc
🇵🇲 Saint Pierre & Miquelonpm
🇻🇨 Saint Vincent and the Grenadinesvc
🇼🇸 Samoaws
🇸🇲 San Marinosm
🇸🇹 Sao Tome & Principest
🇸🇦 Saudi Arabiasa
🇸🇳 Senegalsn
🇷🇸 Serbia & 🇲🇪 Montenegrocs
🇸🇨 Seychellessc
🇸🇱 Sierra Leonesl
🇸🇬 Singaporesg
🇸🇰 Slovakiask
🇸🇮 Sloveniasi
🇸🇧 Solomon Islandssb
🇸🇴 Somaliaso
🇿🇦 South Africaza
🇬🇸 South Georgia and the South Sandwich Islandsgs
🇪🇸 Spaines
🇱🇰 Sri Lankalk
🇸🇩 Sudansd
🇸🇷 Surinamesr
🇸🇯 Svalbard & Jan Mayensj
🇸🇿 Swazilandsz
🇸🇪 Swedense
🇨🇭 Switzerlandch
🇸🇾 Syrian Arab Republicsy

T

CountryCountry Codes
🇹🇼 Taiwan, Province of Chinatw
🇹🇯 Tajikistantj
🇹🇿 Tanzania, United Republic oftz
🇹🇭 Thailandth
🇹🇱 Timor-Lestetl
🇹🇬 Togotg
🇹🇰 Tokelautk
🇹🇴 Tongato
🇹🇹 Trinidad & Tobagott
🇹🇳 Tunisiatn
🇹🇷 Turkeytr
🇹🇲 Turkmenistantm
🇹🇨 Turks & Caicos Islandstc
🇹🇻 Tuvalutv

U

CountryCountry Codes
🇺🇬 Ugandaug
🇺🇦 Ukraineua
🇦🇪 United Arab Emiratesae
🇬🇧 United Kingdomuk
🇺🇸 United Statesus
🇺🇲 United States Minor Outlying Islandsum
🇺🇾 Uruguayuy
🇺🇿 Uzbekistanuz

V

CountryCountry Codes
🇻🇺 Vanuatuvu
🇻🇪 Venezuelave
🇻🇳 Vietnamvn
🇦🇨 Virgin Islands, Britishvg
🇻🇮 Virgin Islands, U.S.vi

W

CountryCountry Codes
🇼🇫 Wallis and Futunawf
🇪🇭 Western Saharaeh

Y

CountryCountry Codes
🇾🇪 Yemenye

Z

CountryCountry Codes
🇿🇲 Zambiazm
🇿🇼 Zimbabwezw

Prohibited Countries

Due to the sanctions imposed by the OFAC, Google Ads isn’t available to advertisers in certain countries mentioned below:

  • Crimea
  • Cuba
  • Iran
  • North Korea
  • Sudan
  • Syria
No Google Ads - Google Country Codes

Conclusie

Use the country codes where necessary for Google.

If you wish to promote through Google Shopping Ads, then here is a complete guide to generate WooCommerce product feed For Google Shopping.