Categorieën
Guide Product Feed Manager For WooCommerce WooCommerce

Generate WooCommerce Product Feed For Favi Compari & Árukereső To Sell Furniture (2024)

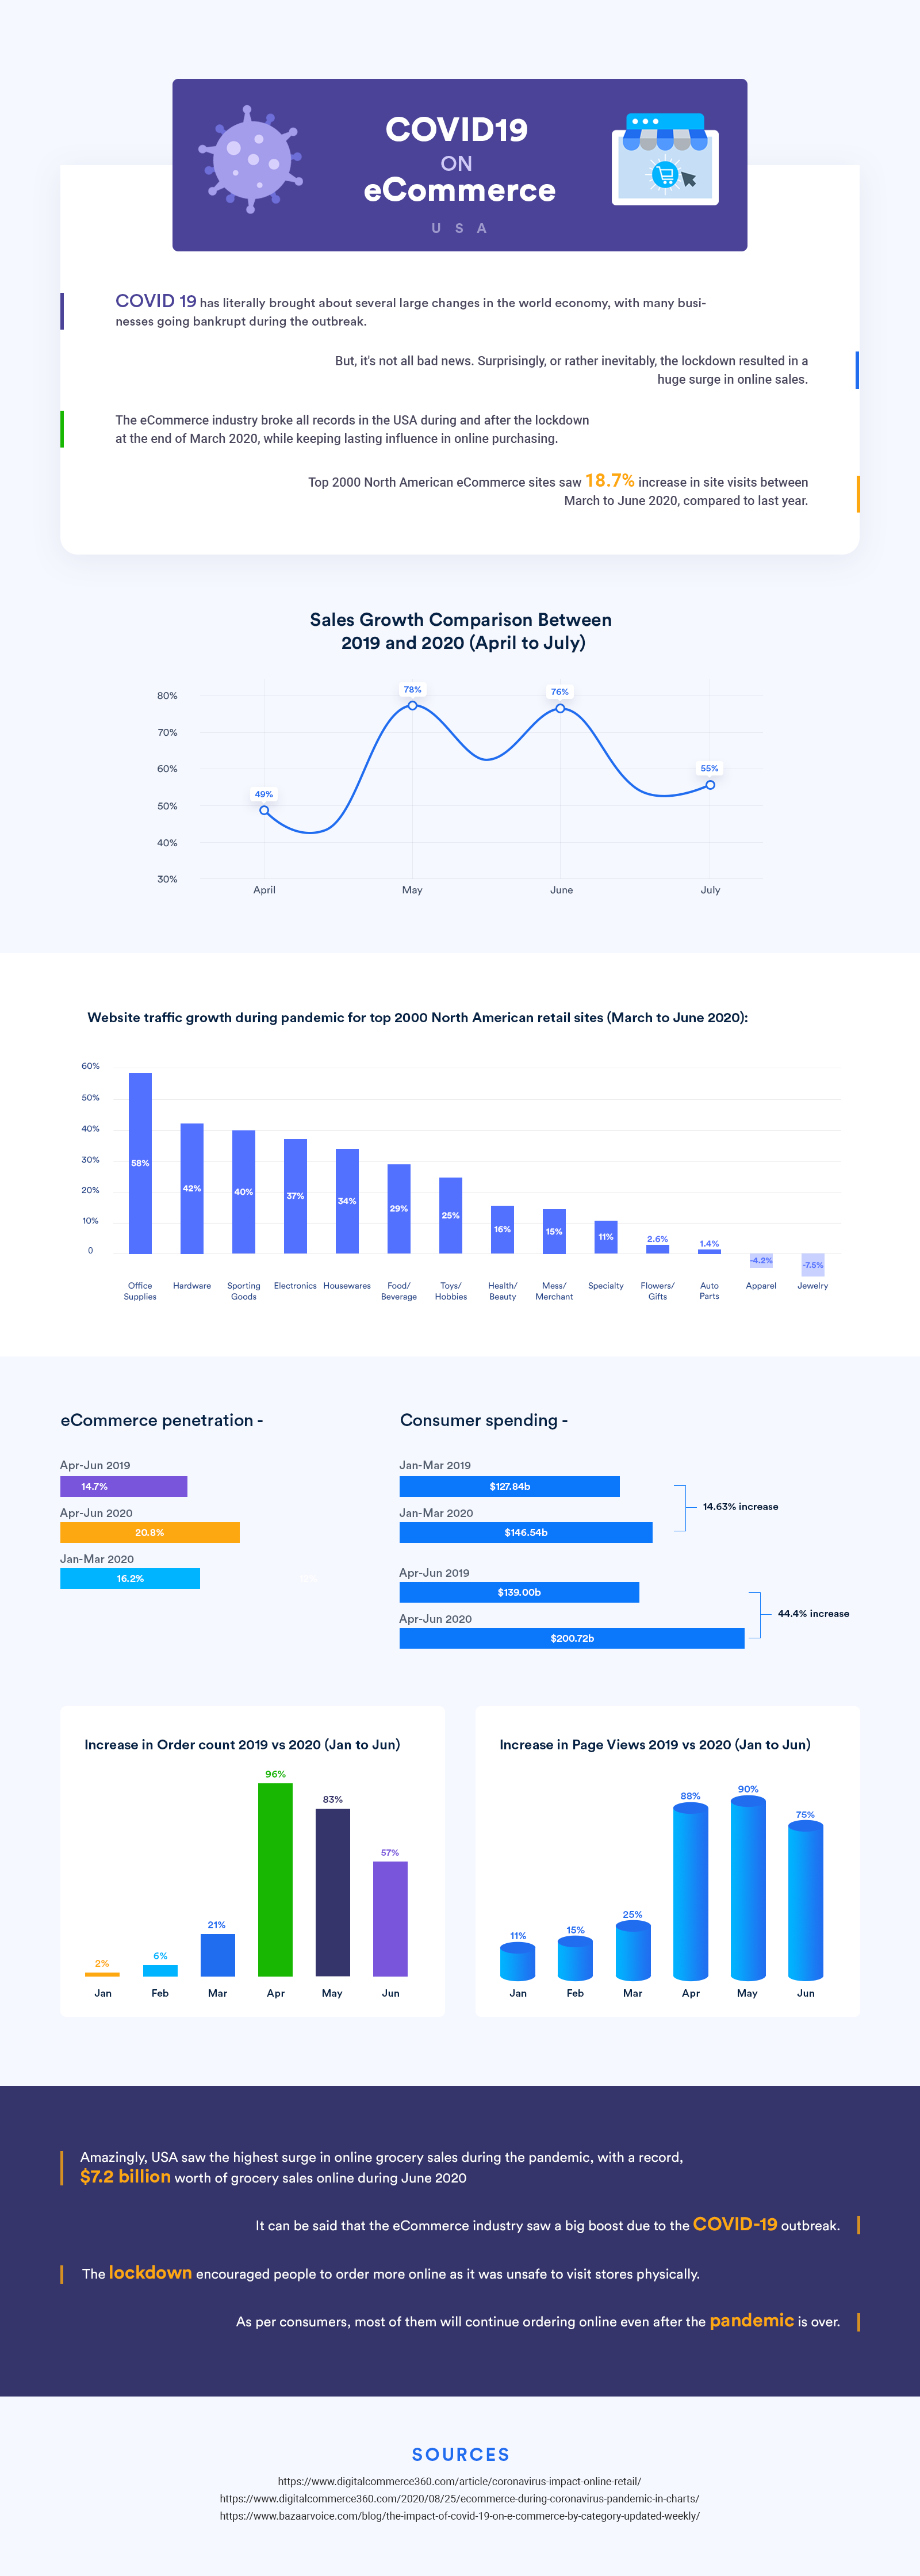
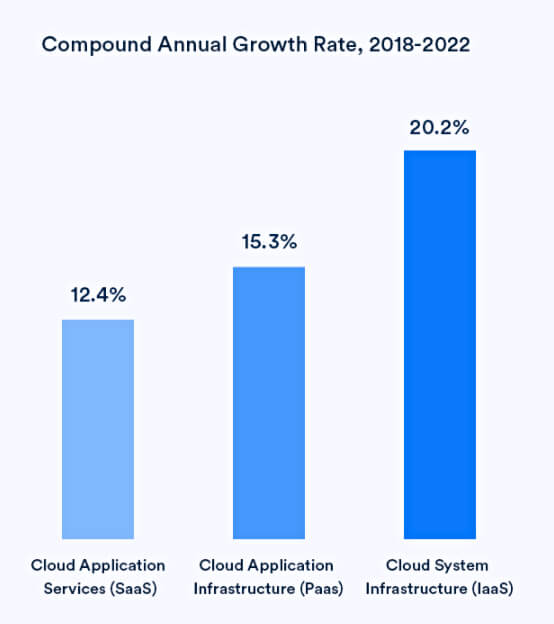
Recently, online sales of furniture and home decor are on the rise in Europe.

In the Czech Republic, online Furniture and appliance sales lead to revenue growth of over 20% on average for eCommerce sites compared to 2020.

If you run a WooCommerce store to sell furniture and home decor in the Czech Republic or Slovakia, then you too can easily boost your sales.

You simply need to promote your products through a local price comparison site that can deliver a high traffic volume.

Favi is one such site that has proven to deliver great results for furniture businesses in the Czech Republic or Slovakia. It is one of the largest price comparison sites in Europe, with over 3 million monthly traffic.

And today, you will learn how you can upload your products on Favi and start getting more sales.

In this guide you will learn:

  • Requirements to join the Favi marketplace
  • The correct format to generate XML product feed
  • Examples of product data and attributes to include in the feed
  • How to generate Favi XML feed in just a few clicks.

And once you learn all these, you will be able to start promoting on Favi and boost your revenue.

Dus laten we beginnen.

Joining The Favi Marketplace

Favi currently operates in around 9 European countries that include:

Although it’s pretty popular in all these countries, Favi is more popular in the Czech Republic and Slovakia.

Requirements To Join The Favi Marketplace

To register on Favi, you first need to make sure you meet the following requirements:

  1. Your website is SSL certified.
  2. You must have a valid telephone number and email address, which should be mentioned on your website’s Contact page.
  3. A valid Terms Of Use page should be available.
  4. All rules, validities, and processes related to returns, refunds, or complaints, should be clearly specified on your site.
  5. No fake reviews should be added. (This may be checked for an independent server of the reviewer for verification.)
  6. You must submit an XML feed in the right format, which should be hosted on your site and fully accessible.
  7. It is recommended to have a responsive website.
  8. Having multiple payment methods is a plus.
  9. Make sure the products you submit are in stock.

Once you meet all these requirements, you can then proceed to registration.

After registration, you will be contacted by a Favi account manager and you can then proceed with the campaigns.

FYI:
Favi’s fees follow a CPC policy that varies from category to category.
You may check out the pricing here.

Now, let us learn how you can generate a product feed so that you can upload your WooCommerce products on Favi.

Guide To Generate XML Feed for Favi Compari & Árukereső

Favi accepts feed submission in many formats – feed formats of Google shopping, Zbozi, Ceneo, Comapri, and Árukereső.

In this guide, we will explain the feed generation process for Favi Compari & Árukereső.

First, let us look at the attributes and their example values you need to submit for each product. Then you will learn how you can generate an accurate product feed in the right format using a reliable tool.

Feed Specification For Favi XML Feed With Example Values

When creating a new feed for Favi, you will need to include a few specific data in the right format.

Normally, the feed structure is as follows:

<products>
        <product>
                ---PRODUCT BASIC/REQUIRED ATTRIBUTES AND DATA HERE---
        </product>
</products>

Now, let us look at a list of the required product attributes that you should include on your product feed with example values.

Required Product Attributes For The XML Feed

The following are the mandatory attributes you need to submit for each product.

Product AttributeFormat With Example
1. Identification Number (i.e., Product ID)

This is the unique ID for a product.

Ideally, you should use the Product ID from your WooCommerce store as the value for this attribute.
<Identifier>1031</Identifier>
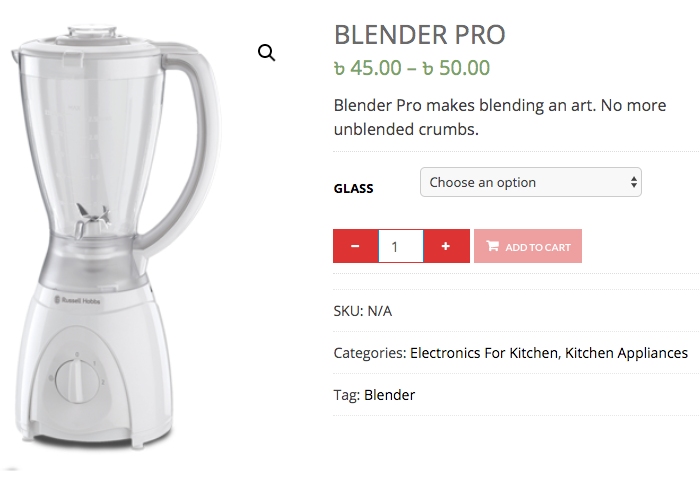
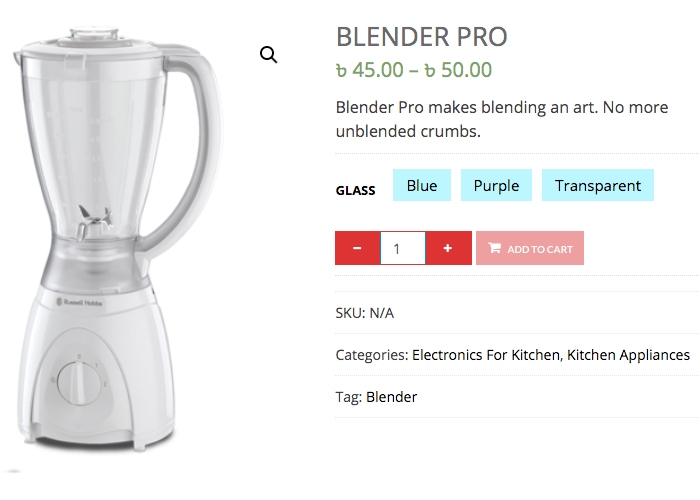
2. Product Name

Use a proper product name. Do not use a generic name which may lead to confusion of what this product actually is.

For product variants, you may add the variation term to the title.
<Name>Wooden double bed MERIDA, 160×200 cm</Name>
3. Product URL

This should be the URL to the product page on your site. The product page should include the product details you submit here, such as the price and description, and a button to purchase should be there.

Make sure the URL is valid and has no spaces. Also, all special characters should be submitted in HTML form, and there should not be any diacritics in the link.
<Product_url>https://www.yourdomain.cz/products/bed-merida-160×200</Product_url>
4. Price Including VAT

Submit the original product price, including VAT.

Do not use commas or dots to separate thousands. They are only to be used as decimals for fractional charges.
<Price>499.99</Price>
5. Product Main Image URL

You must submit a real image of the product. It should not have any graphics, watermarks, or promotional texts.

The specifications mentioned in the description or via attributes, such as color, should match the product in the image. For example, you can not use an image of a Brown bedsheet when you mentioned it is Red.

Also, there should not be any other objects visible in the image other than the product itself.
The URL should not have any spaces or diacritics, and special characters must be in the HTML format.

The image must be at least 400×400 px.
<Image_url>https://www.yourdomain.cz/bed-merida-img1.png</Image_url>
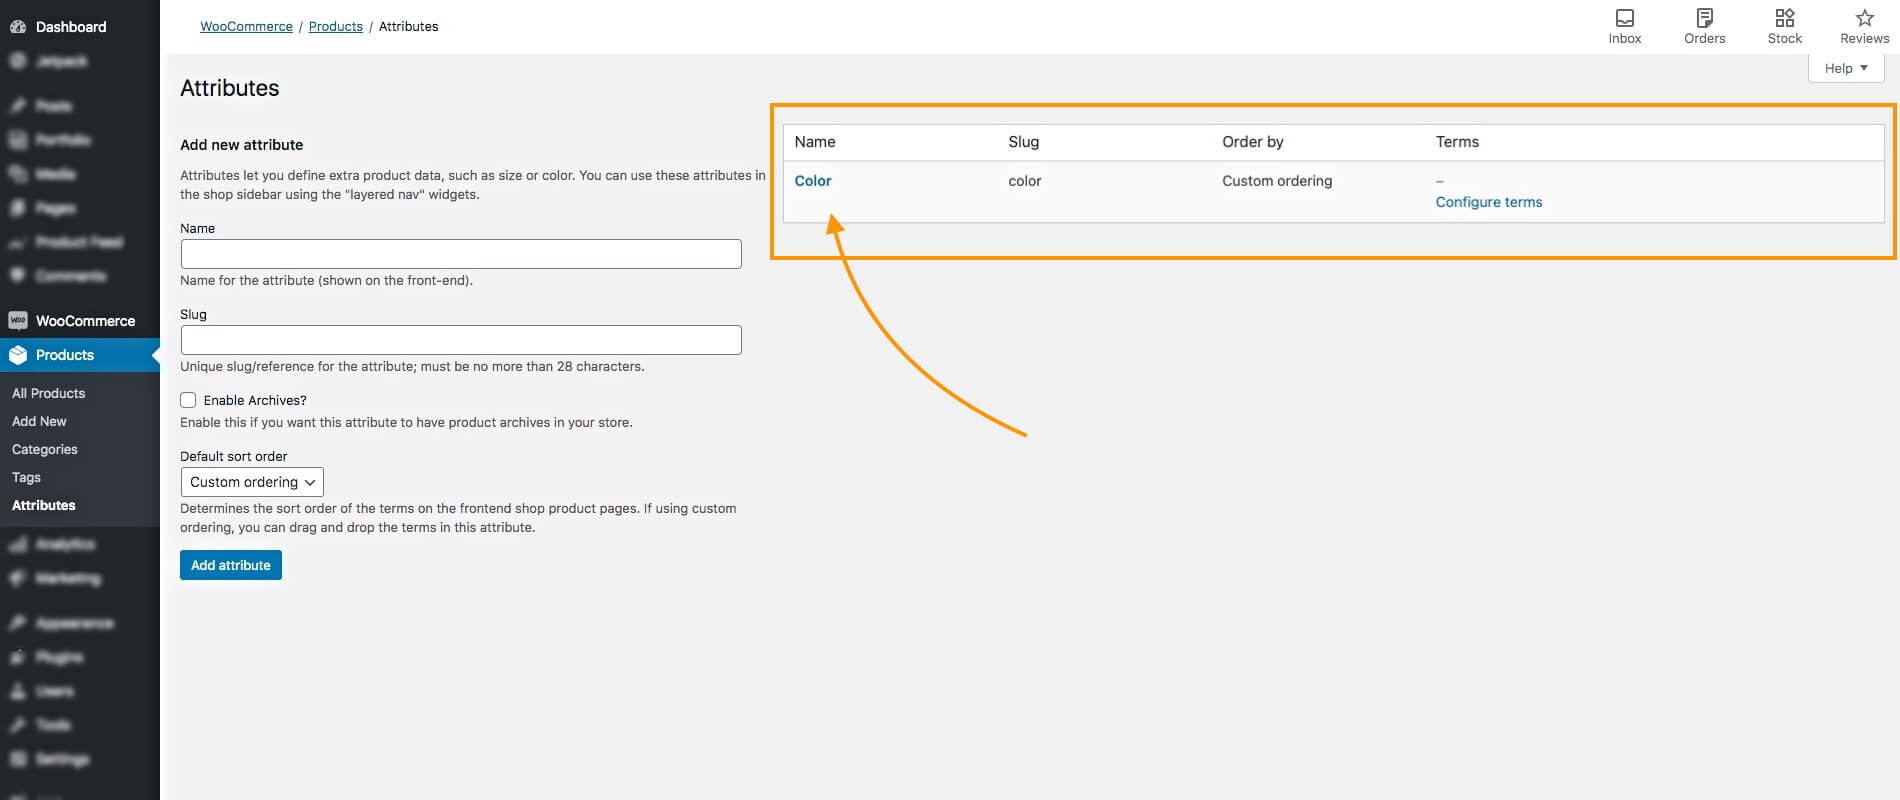
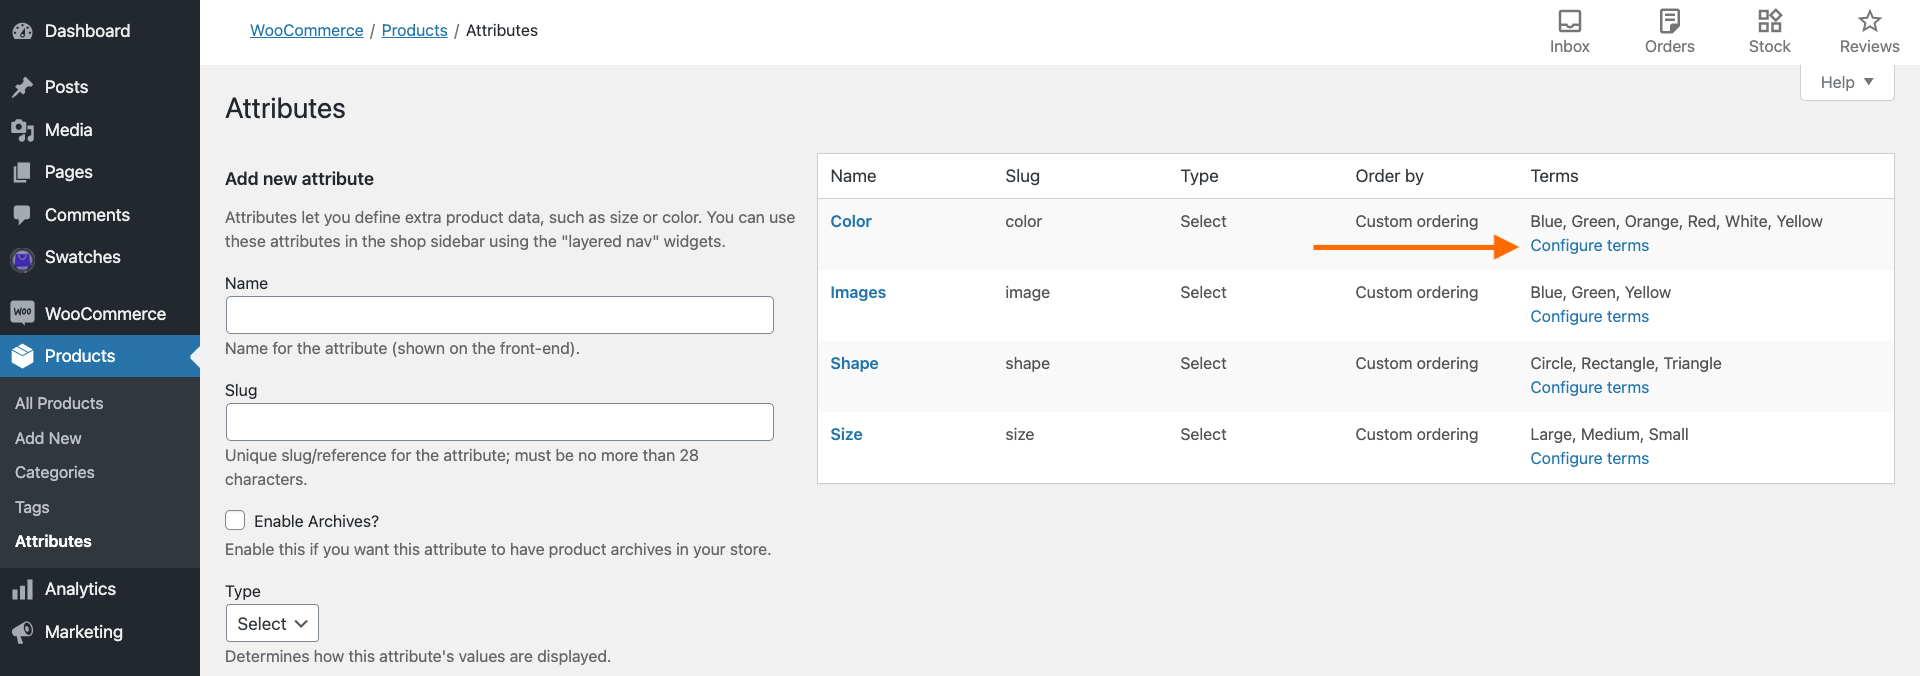
6. Product Category

Use a specific category under which your product should be listed on Favi.

This should be specific to the category list from Favi themselves.

**Later, we will show you how you can map these categories in the feed without changing the category names within your WooCommerce store.
<Category>Bedroom > Beds</Category>
7. Description

Include a product description that is keyword optimized but specific to the product itself. If it’s a variant of a variable product, the description should only be about that particular variant.

Do not include any external URLs, contact info, or email address in the description.

You may use a handful of HTML tags for formating the description which includes:
– <p> </p>
– <b> </b>
– <strong> </strong>
– <i> </i>
– <em> </em>
– <ul> </ul>
– <ol> </ol>
– <li> </li>
– <br>
No other tags are allowed.
<Description><![CDATA[<p>This beech MERIDA double bed comes from a series of tall beds and features a central partition.<br>
**Supplied without grate and mattress.</p>]]></Description>
8. Delivery Time

This is the time you take to deliver the product since order.

The accepted values for this attribute are 0, 1, 2, and 3.

Use 0 to indicate same-day delivery.
<Delivery_Time>3</Delivery_Time>
9. Product Parent ID

In case you are submitting multiple variants of the same product, then you may use this attribute to indicate that they are variants of the same product.

Ideally, you should use the Parent Product ID. of your variable products as the value for this attribute.
<GroupId>1030</GroupId>

Other Recommended Product Attributes To Include

These are some extra attributes that you may include if you want to but are not mandatory.

AttribuutVoorbeeld
⬥ Manufacturer

You may submit the name of the manufacturer of the product you are selling.
<Manufacturer>Furniture One</Manufacturer>
⬥ Delivery Cost

If you want to indicate free shipping for any particular product, then you may use this attribute to mention that.

Accepted values may include FREE, gratuit, gratis, fara cost, ingyenes, ingyen, or ingyenesen.
<Delivery_Cost>FREE</Delivery_Cost>
⬥ Additional Images

In case you want to submit more images for your product, you can submit up to 8 additional images.

Use the tags Image_url_2, Image_url_3, and so on until Image_url_9.

<Image_url_2>https://www.yourdomain.cz/bed-merida-img2.png</Image_url_2>
<Image_url_3>https://www.yourdomain.cz/bed-merida-img3.png</Image_url_3>
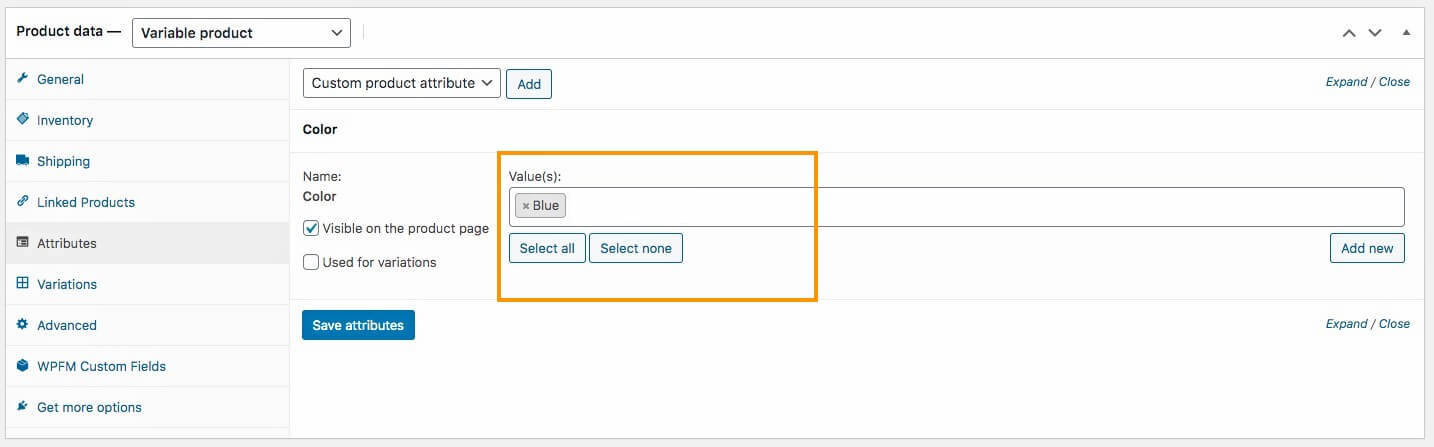
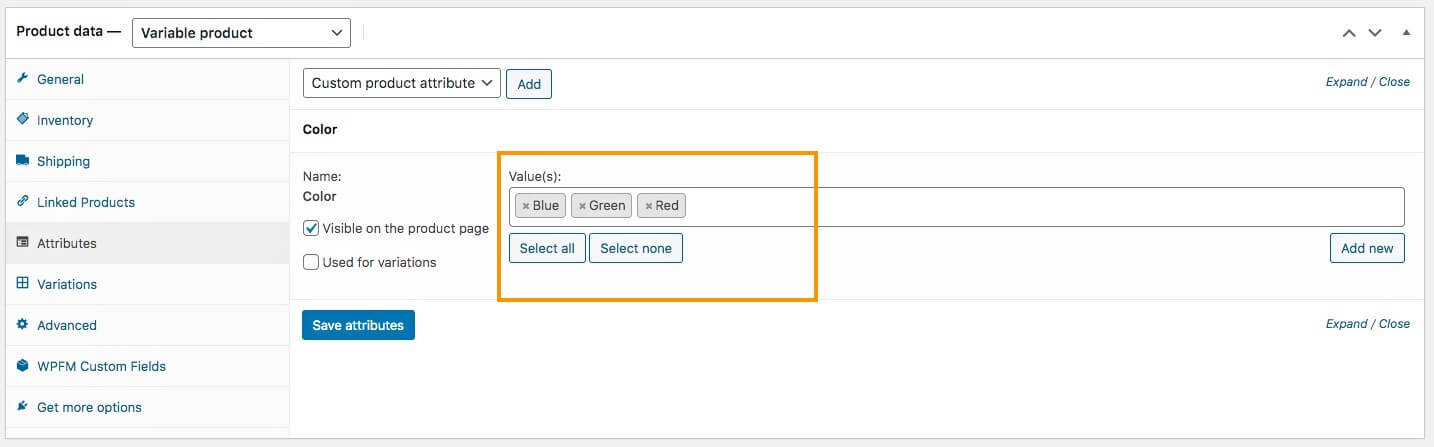
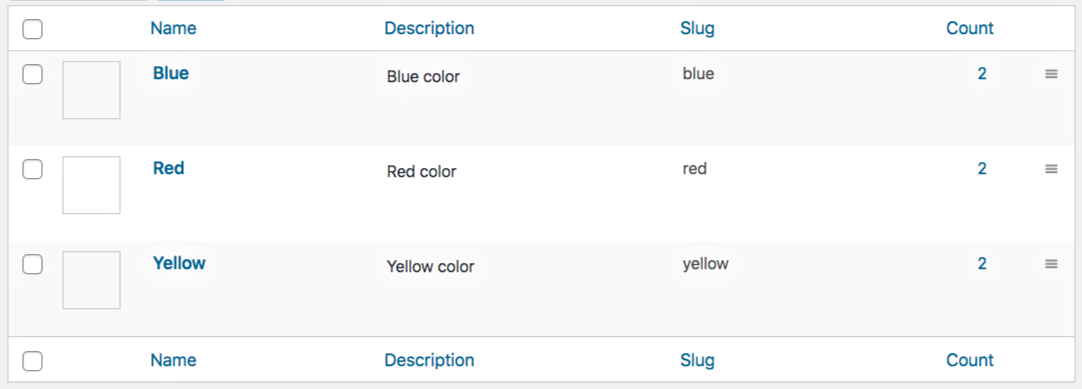
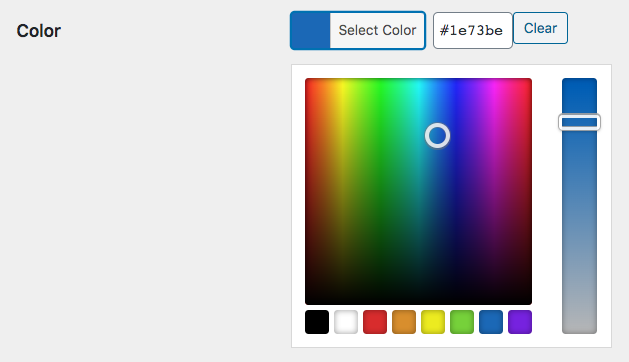
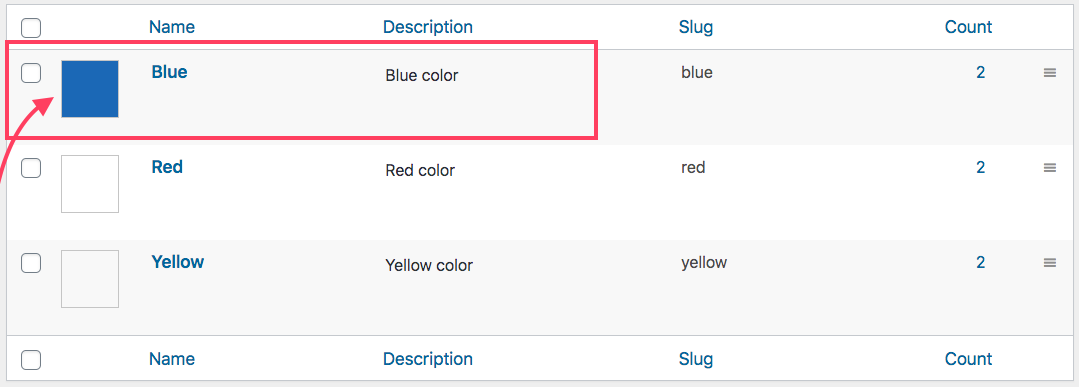
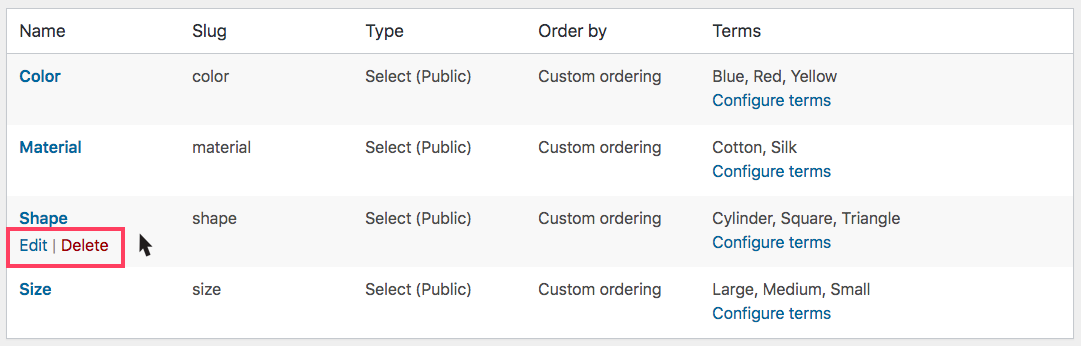
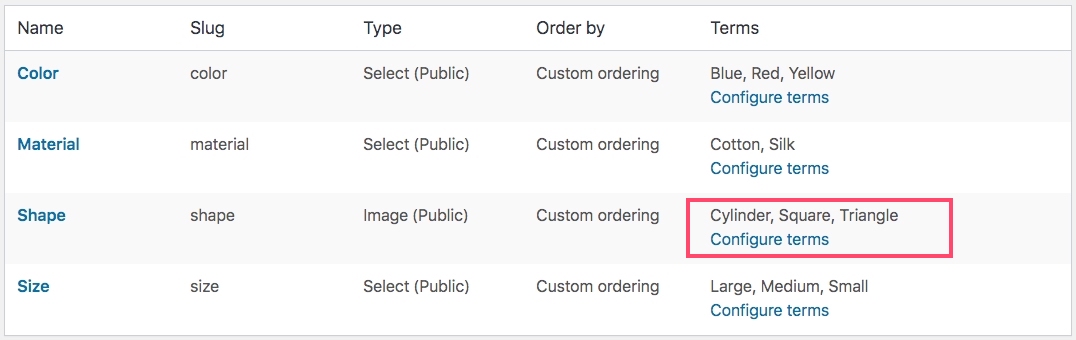
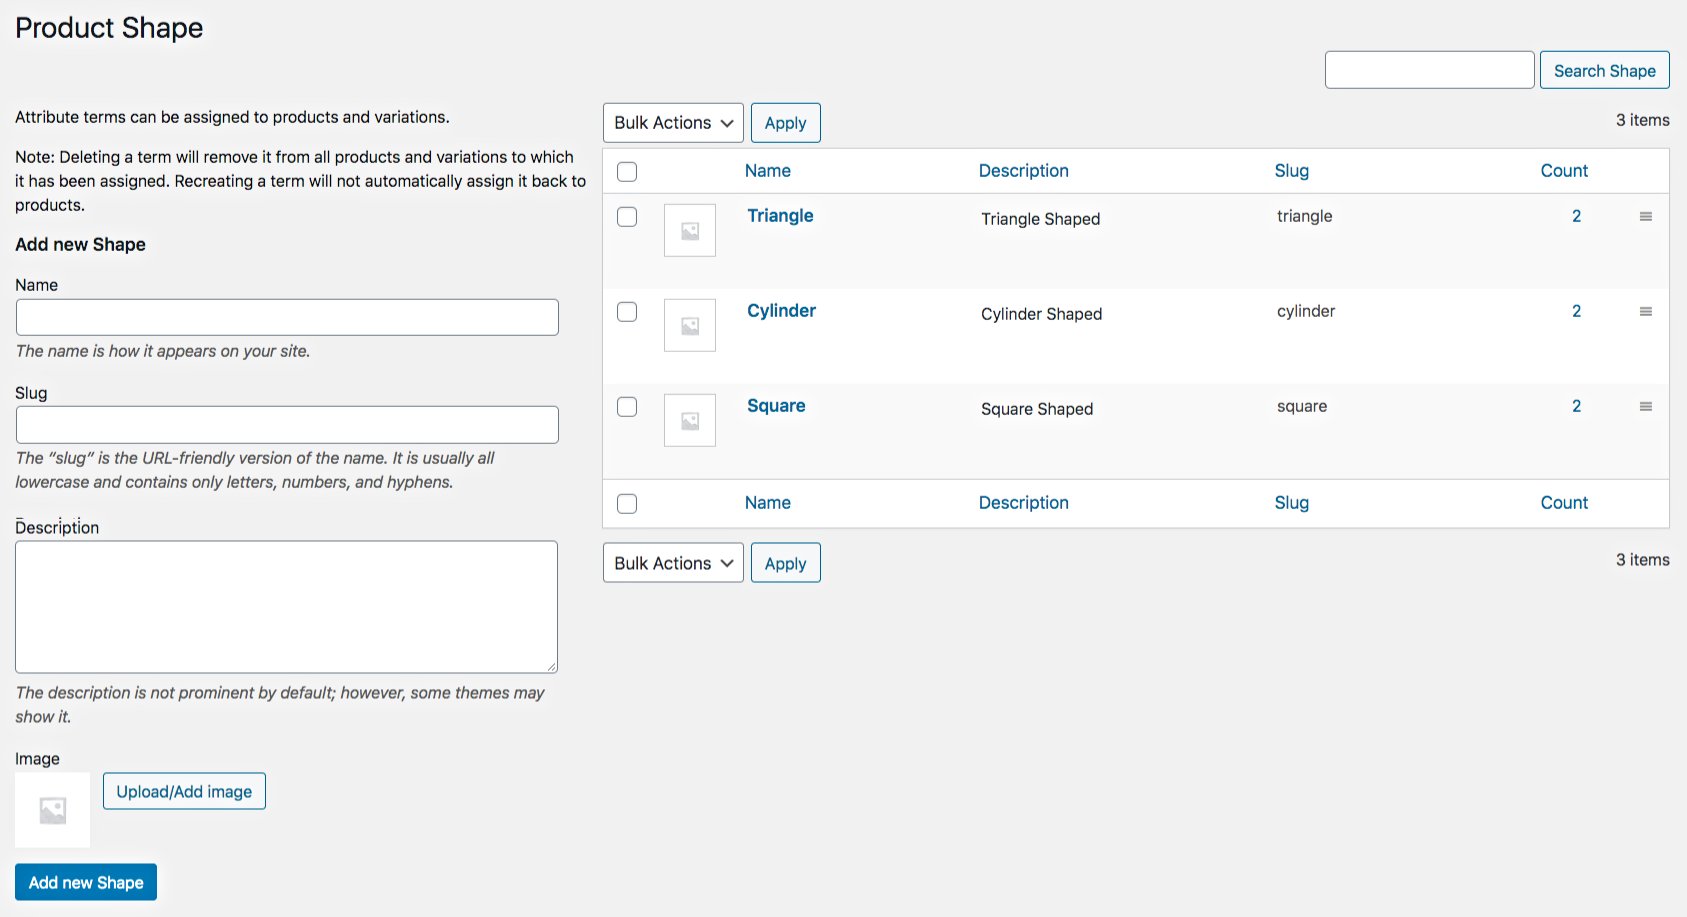
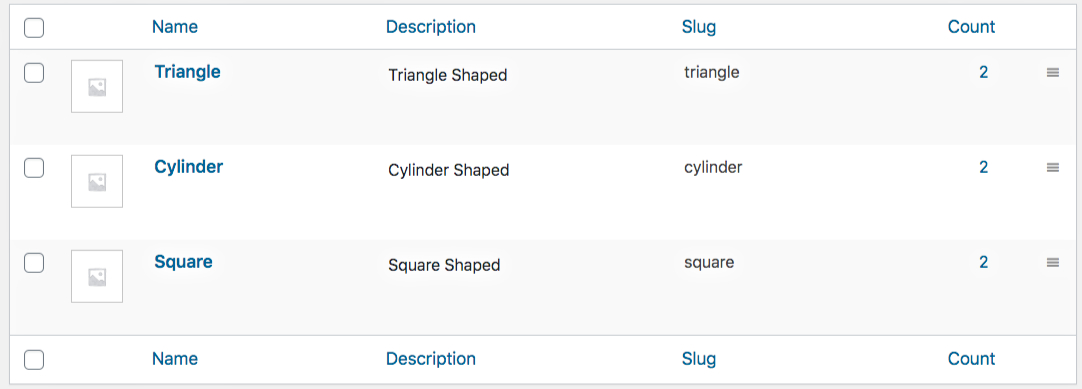
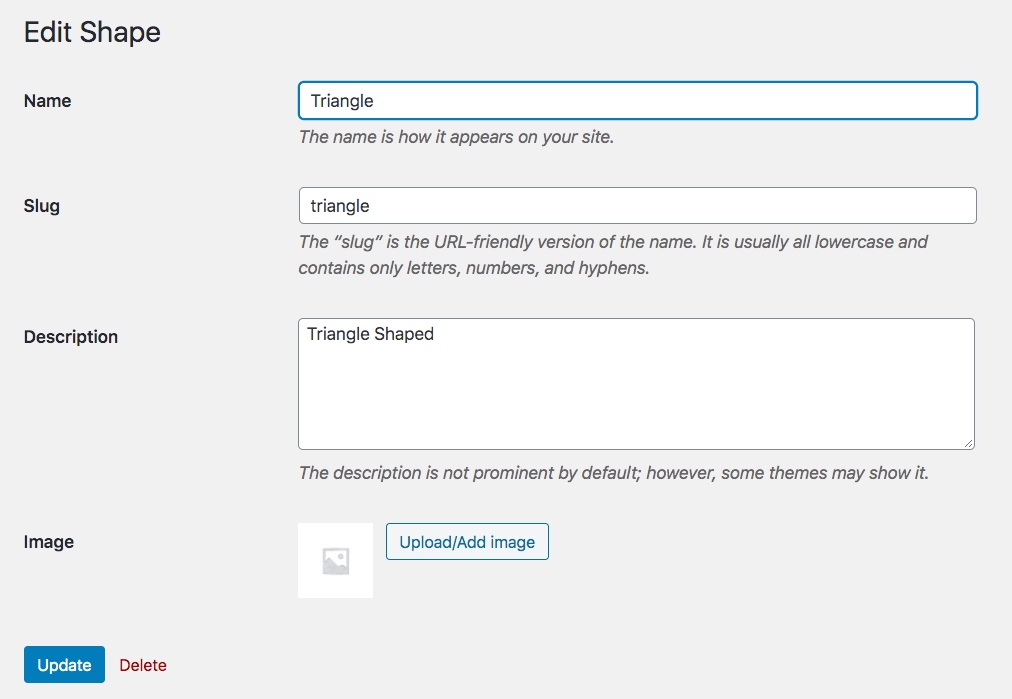
⬥ Extra Product Attributes

You may submit some additional traits or attributes for your products. to increase the possibility of reaching more appropriate prospects.

The most commonly used attributes (depending on the product) are:
– material
– shape
– pattern
– texture
– color
– decor
– style
– dimensions

You may add additional custom attributes if you want to. For example, you may include an attribute “Type” to mention that the bed is a double bed.

We recommend you do not submit more than 5 attributes.
<Attributes>
<Attribute>
<Attribute_name>Material</Attribute_name>
<Attribute_value>solid wood, beech</Attribute_value>
</Attribute>
<Attribute>
<Attribute_name>Type</Attribute_name>
<Attribute_value>double bed</Attribute_value>
</Attribute>
</Attributes>
⬥ EAN

If you have the product EAN available, then it’s best to submit it for better listing performance.
<EAN_code>142654634124</EAN_code>

Example Feed Structure Of Favi Compari & Árukereső XML Feed

<?xml version="1.0" encoding="UTF-8" ?>
<Products>
	<Product>
		<Identifier>1031</Identifier>
		<Name>Wooden double bed MERIDA, 160x200 cm</Name>
		<Product_url>https://www.yourdomain.cz/products/bed-merida-160x200</Product_url>
		<Price>1499.99</Price>
		<Image_url>https://www.yourdomain.cz/bed-merida-img1.png</Image_url>
		<Category><![CDATA[Bedroom > Beds]]</Category>
		<Description>
			<![CDATA[
				<p>This beech MERIDA double bed comes from a series of tall beds.
			 	<br>It features a central partition with a foot.<br>
				**Supplied without grate and mattress.</p>
			]]>
		</Description>
		<Delivery_Time>3</Delivery_Time>
		<Manufacturer>Furniture XYZ</Manufacturer>
		<Attributes>
		   <Attribute>
		       <Attribute_name>Material</Attribute_name>
		       <Attribute_value>solid wood, beech</Attribute_value>
		   </Attribute>
		   <Attribute>
		       <Attribute_name>Type</Attribute_name>
		       <Attribute_value>double bed</Attribute_value>
		   </Attribute>
		</Attributes>
		<EAN_code>142654634124</EAN_code>
		<GroupId>1030</GroupId>
	</Product>
</Products>

Now that you have a good idea about all the required attributes, let us look at a simple tool that can help you generate a proper XML feed for Favi in minutes.

7 Steps To Generate Favi Product Feed In Your WooCommerce Store

Manually creating an XML feed for all of your products is no longer required. You will find several tools out there that you can use to easily generate a product feed for Favi Compari & Árukereső.

In the following simple steps, I will show you how you can generate a product feed for Favi using Product Feed Manager for WooCommerce. It is one of the most efficient plugins to use and you will get a pre-built template to generate Favi XML feed in just a few clicks. 

Follow these 7 quick steps below to use the plugin easily and generate Favi product feed real quick.

Step 1 – Install & Activate Product Feed Manager For WooCommerce

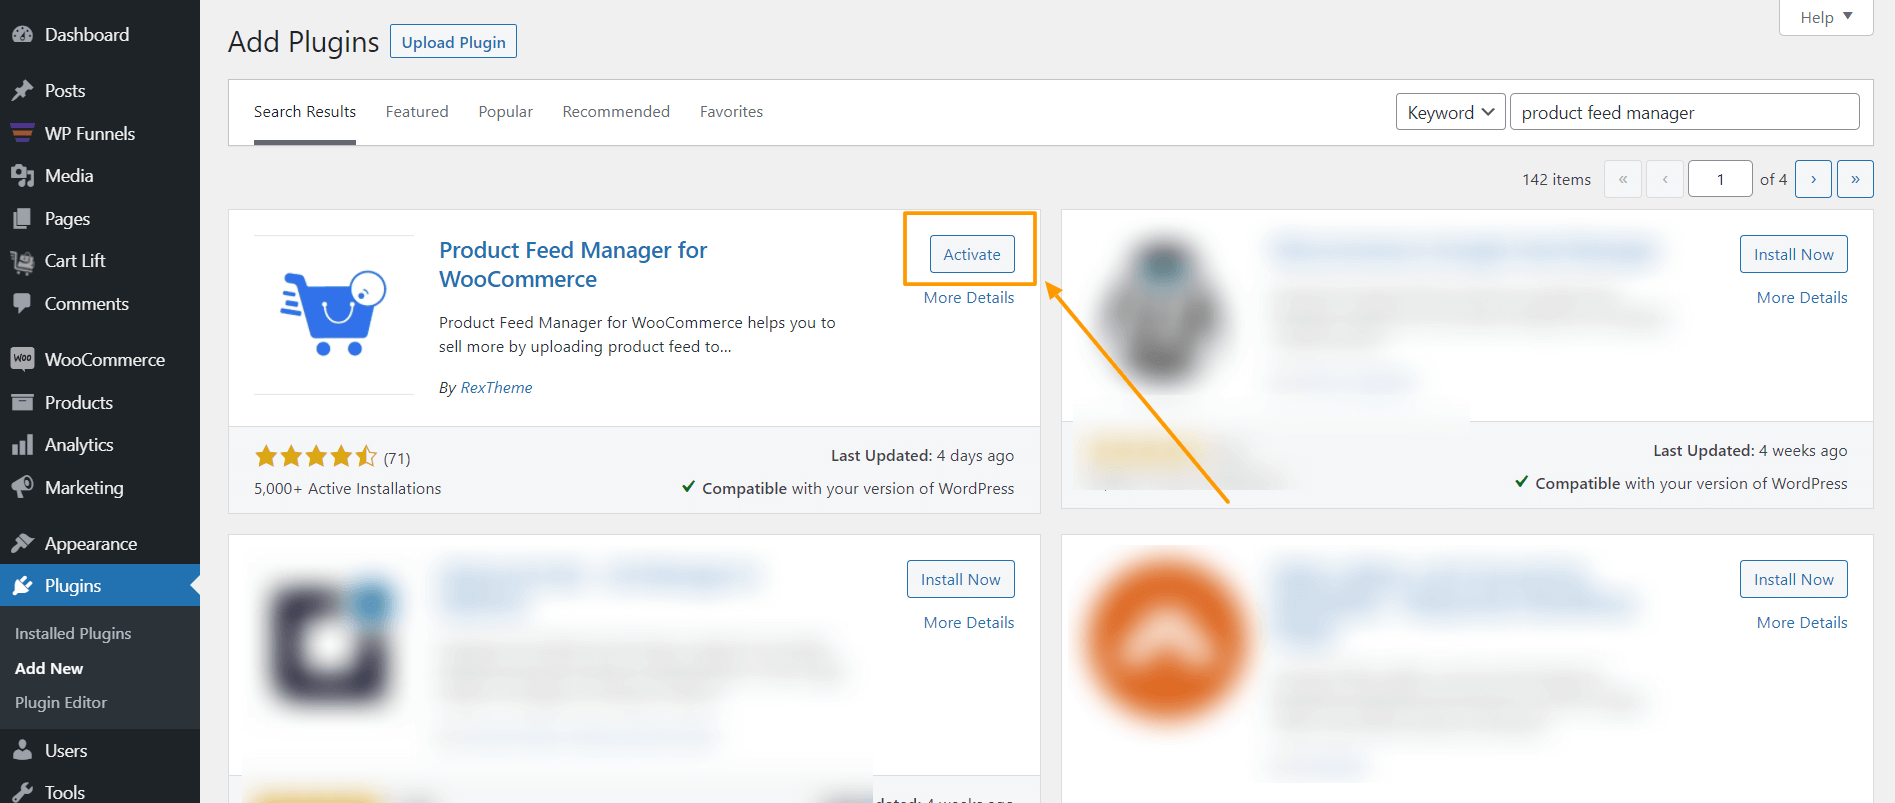
1. First, go to Dashboard > Plugins and click on Add New.

WordPress Dashboard - Nieuwe plugin toevoegen

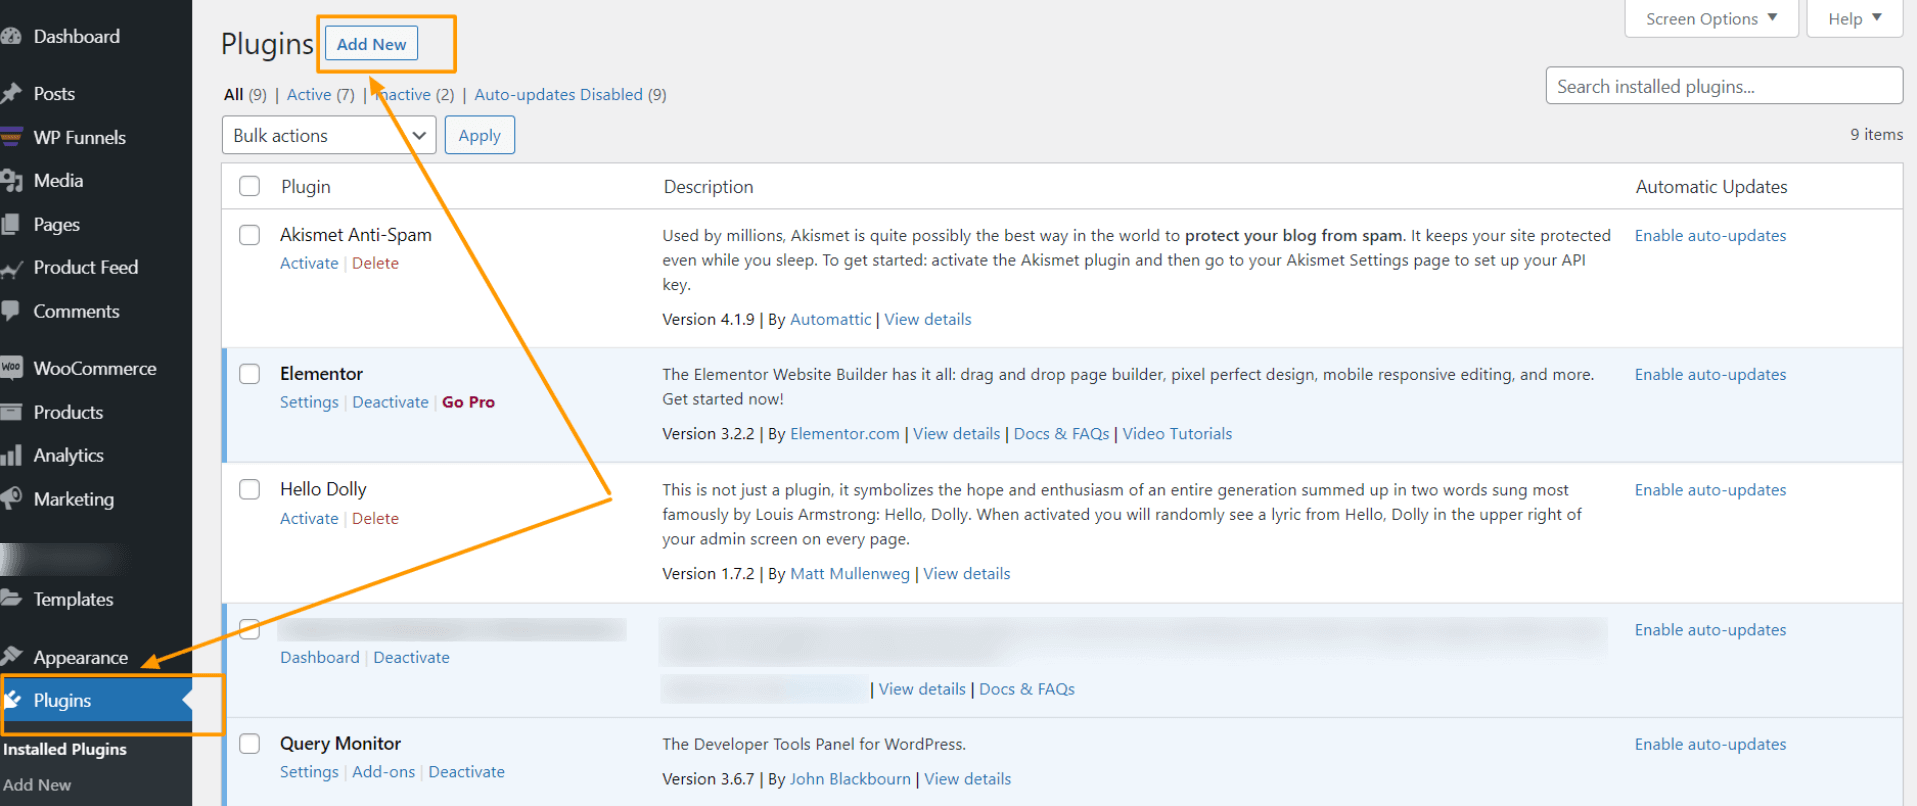
2. On the search box, type “Product Feed Manager” and you will find the plugin with a blue cart icon.

WordPress Dashboard - Zoeken naar de plugin

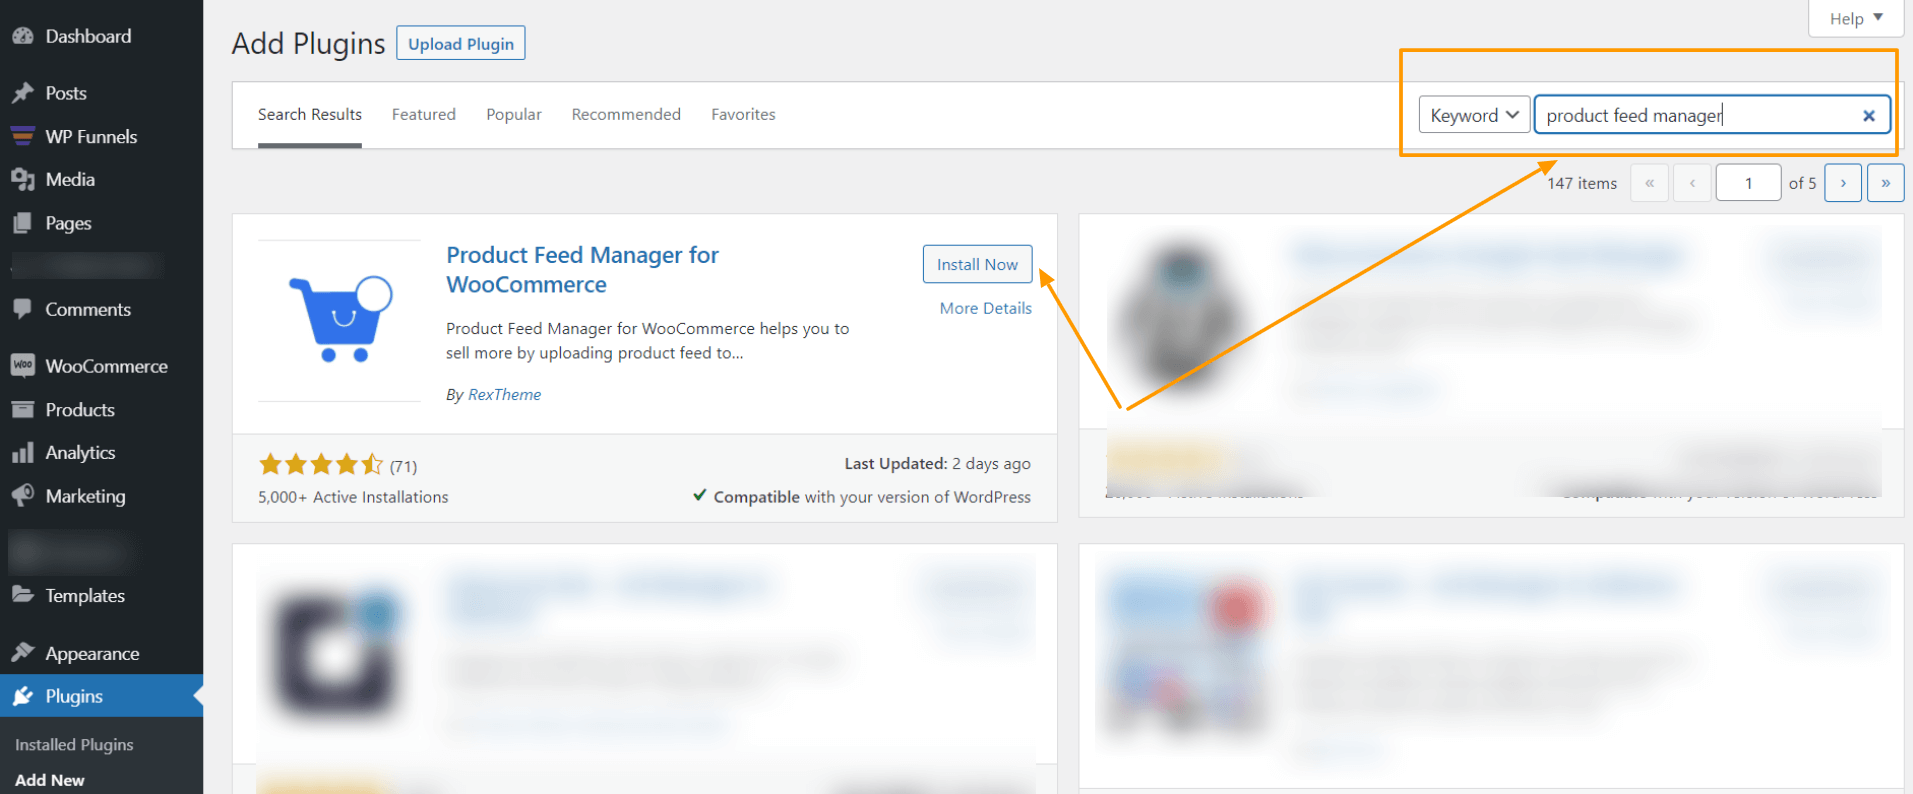
3. Click on the Install Now. Then click on the Activate button to activate the plugin.

Product Feed Manager activeren

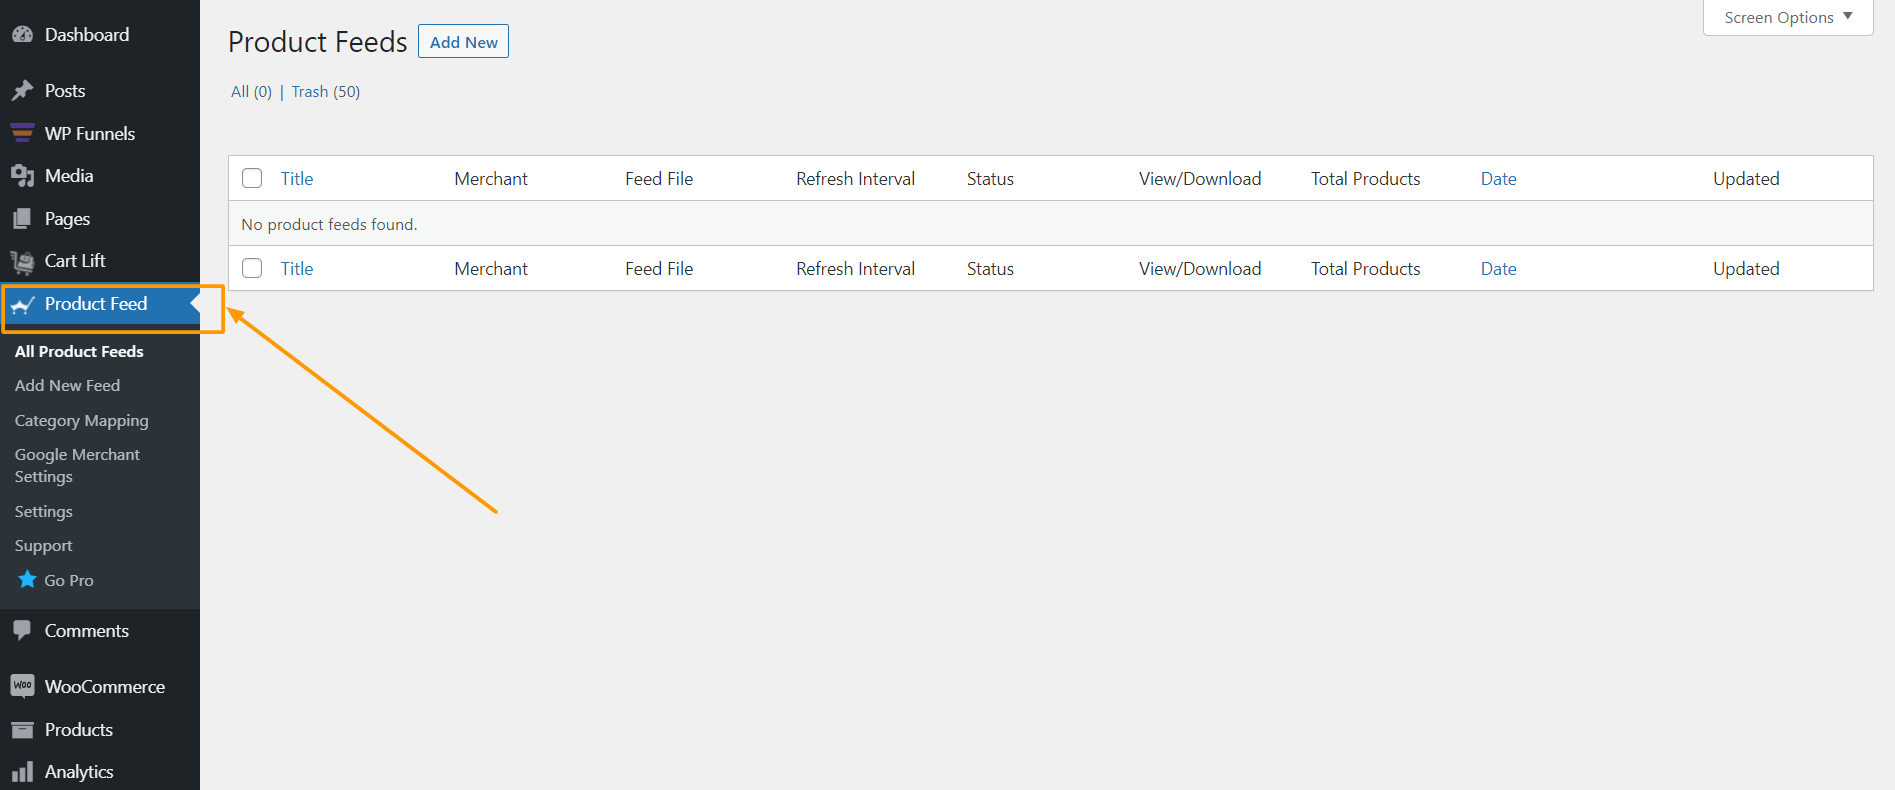
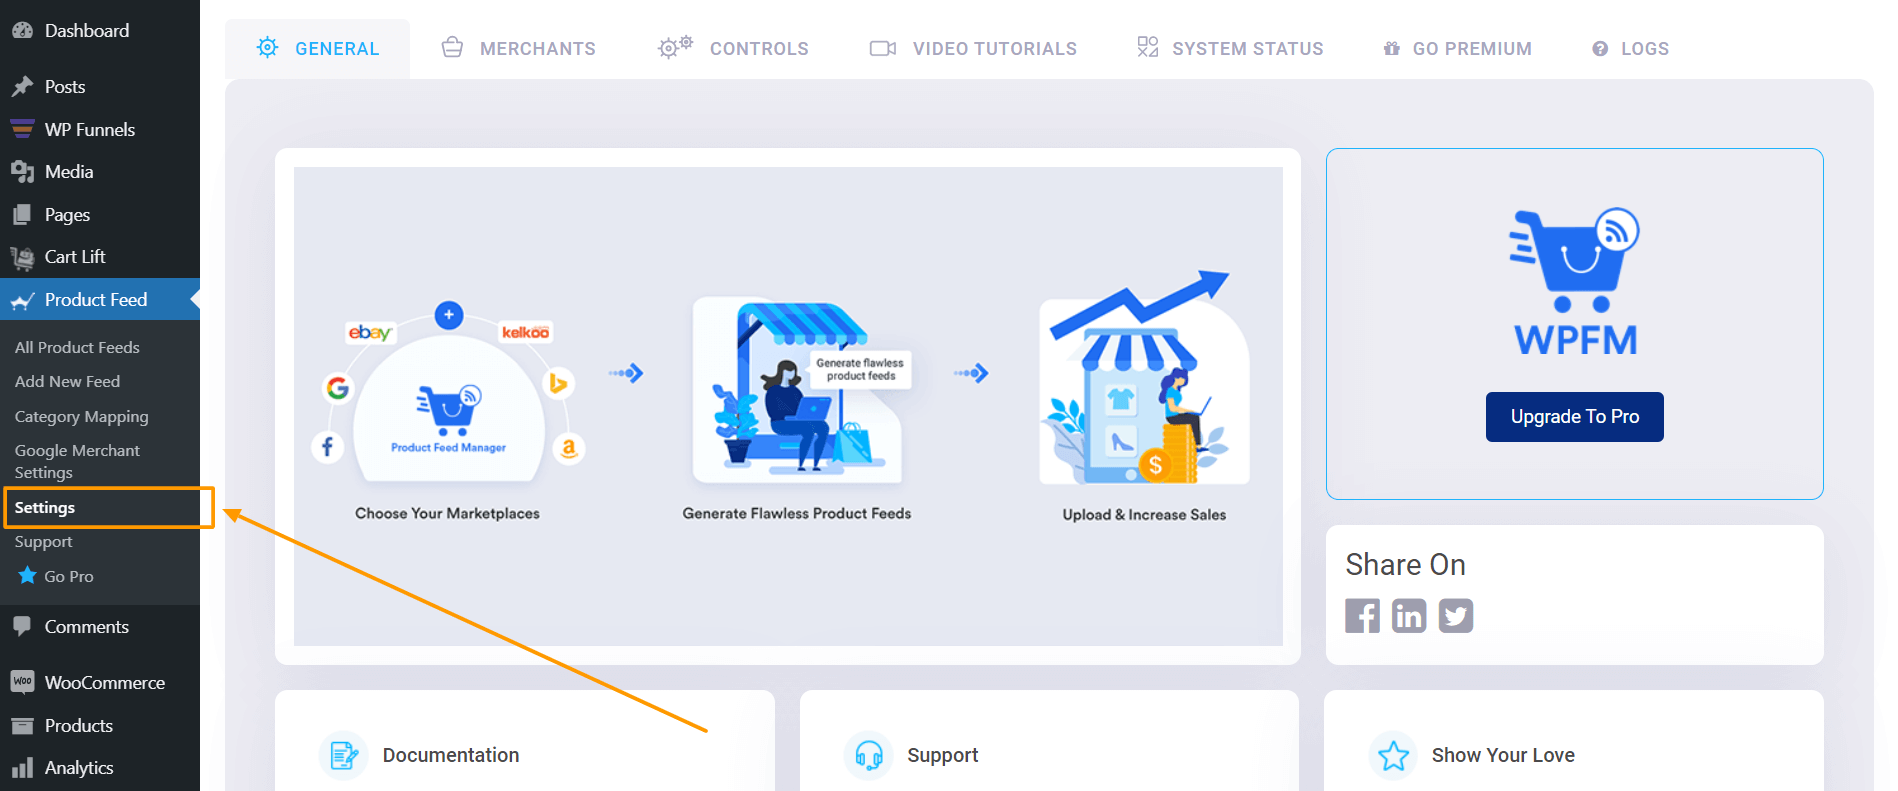
Once activated, you will find the Product feed menu on your dashboard menus.

Step 2 – Import Favi Template For Feed Generation

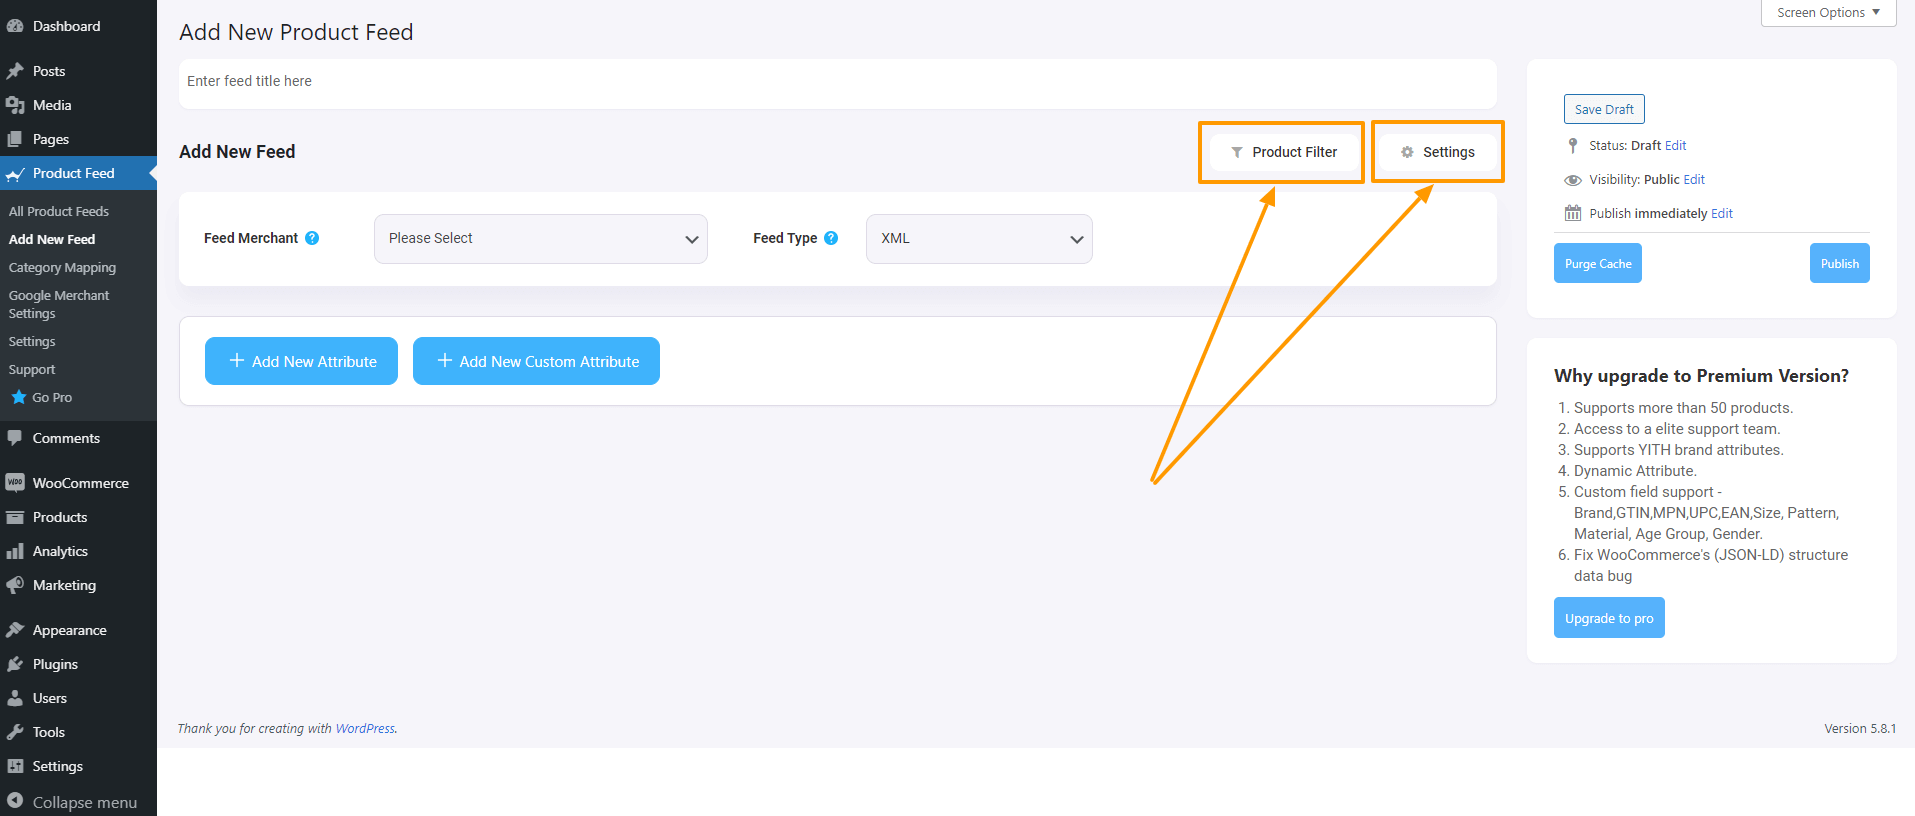
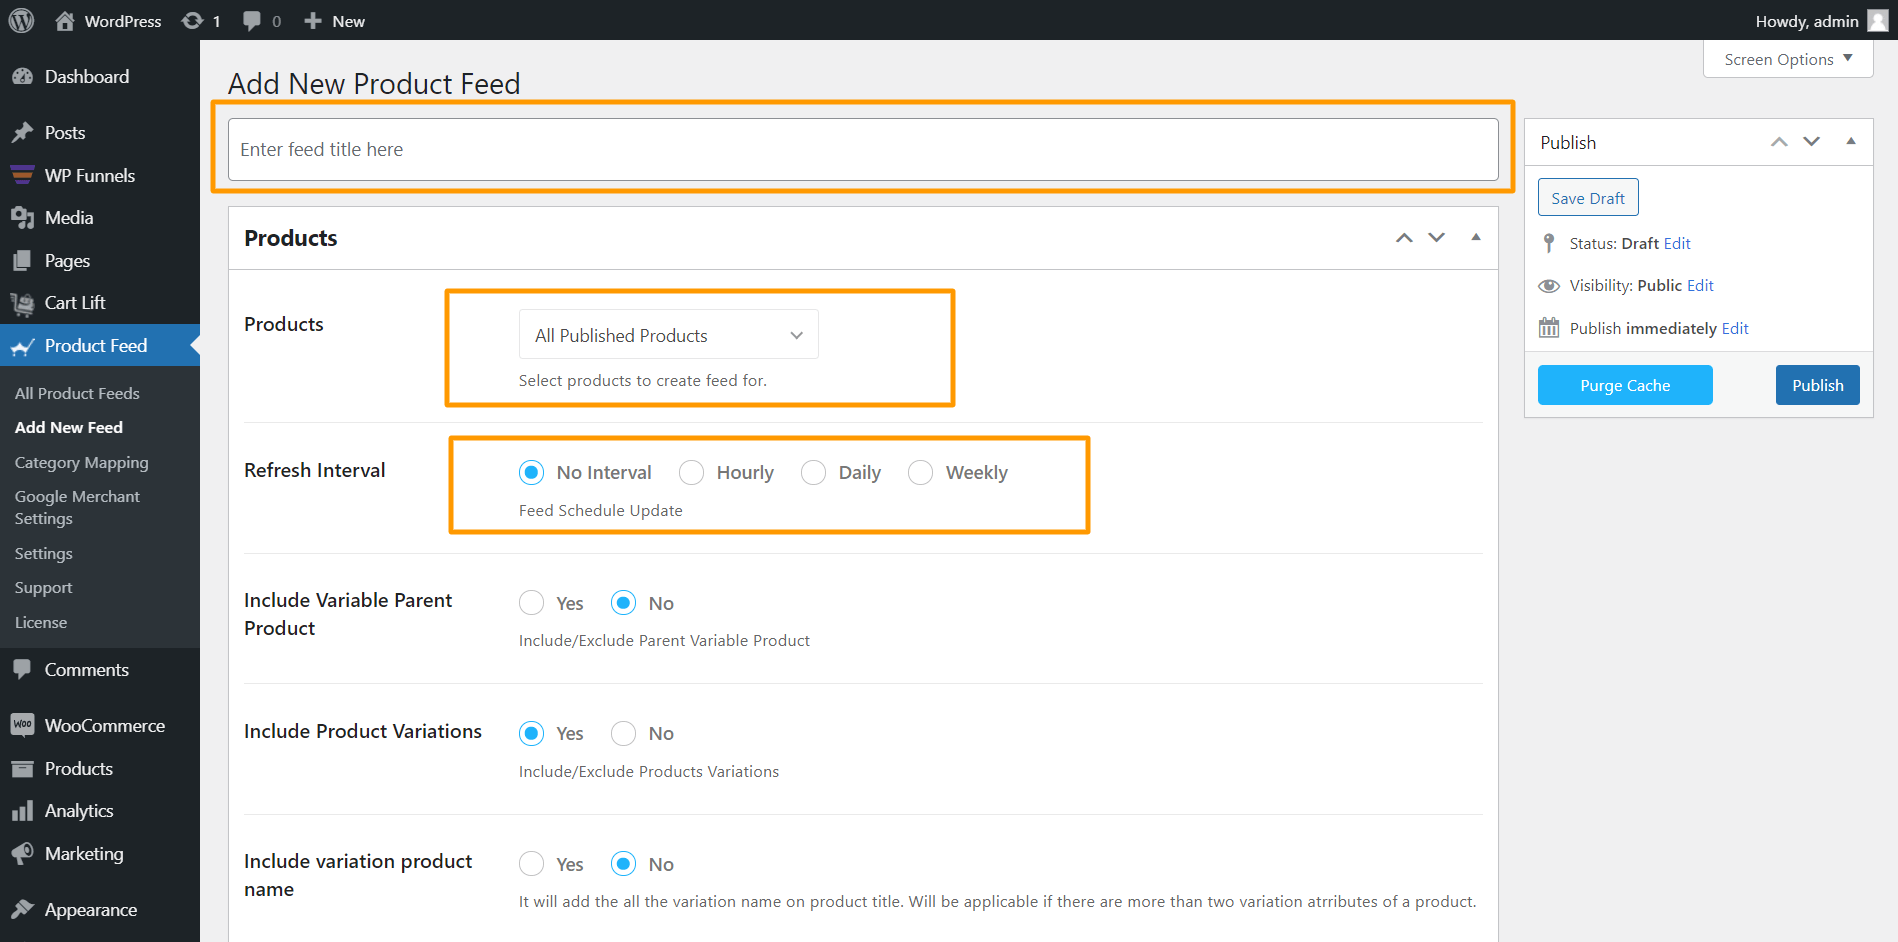
1. On your dashboard, click on Product Feed and then click on Add New Feed option.

Nieuwe voeding toevoegen

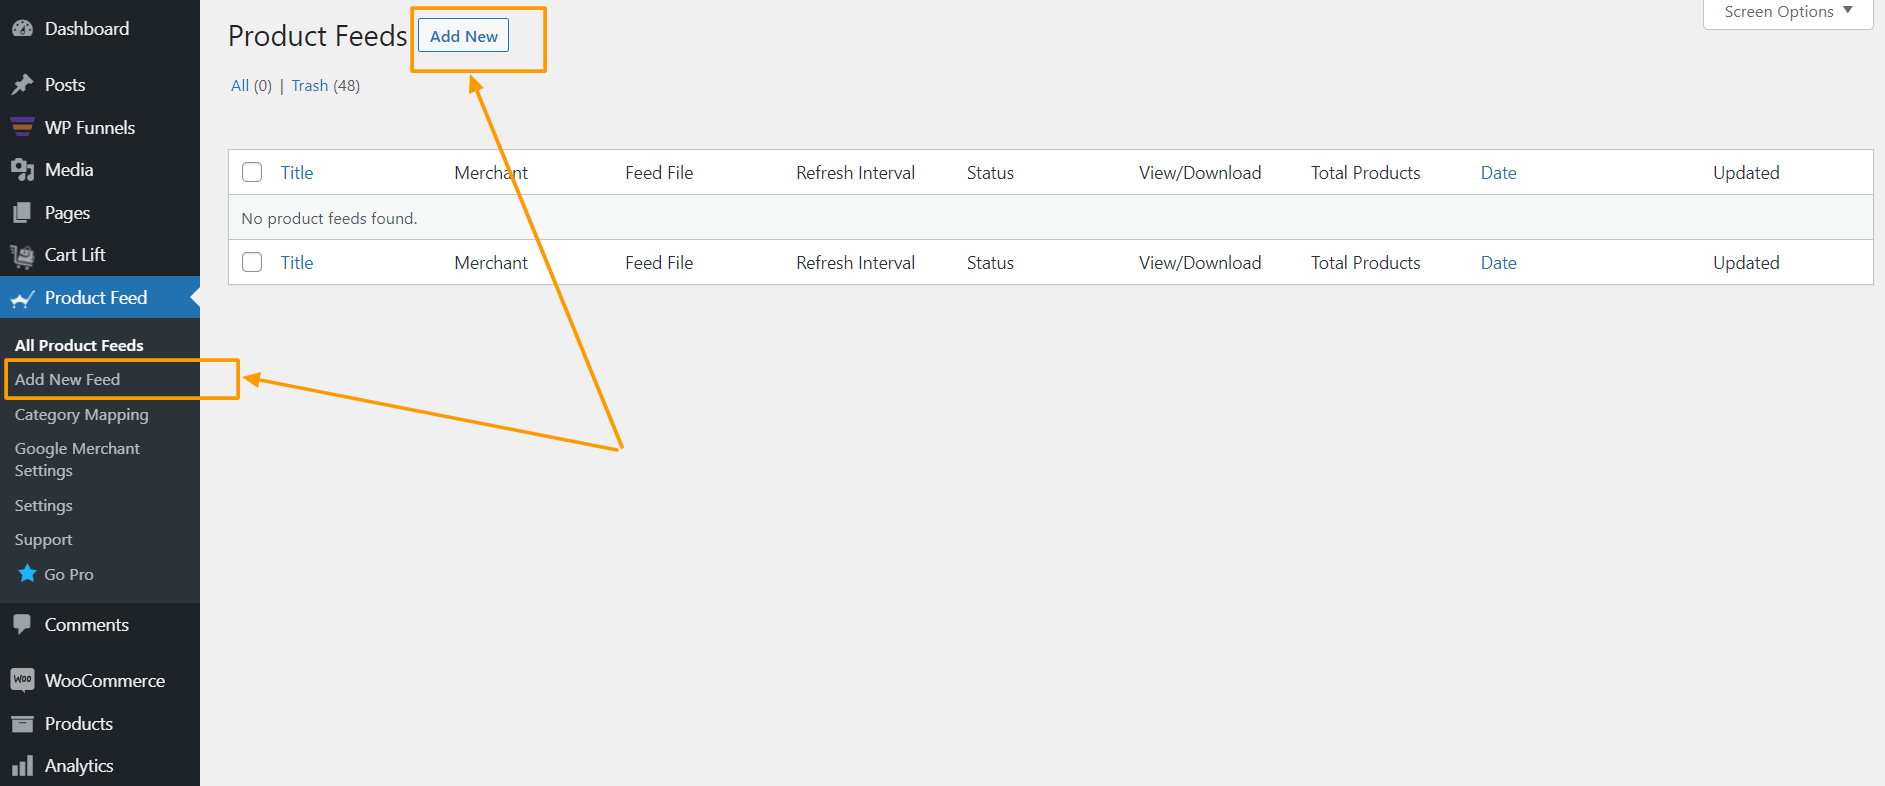
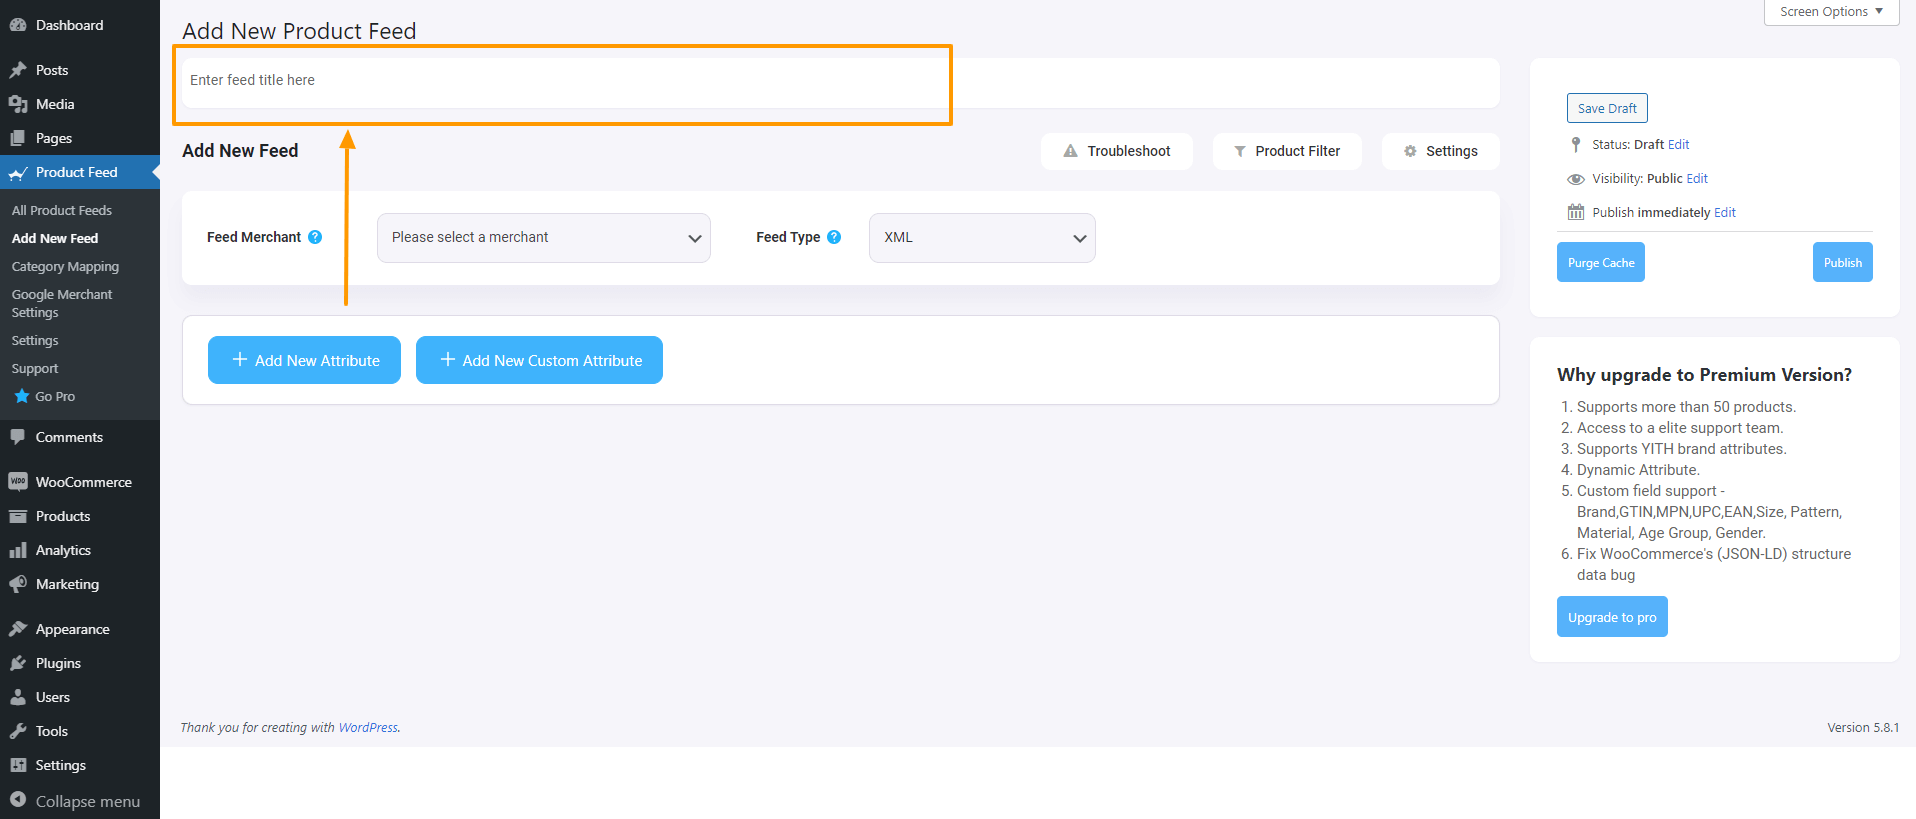
It will take you to the feed creation page.

Nieuwe voeding toevoegen

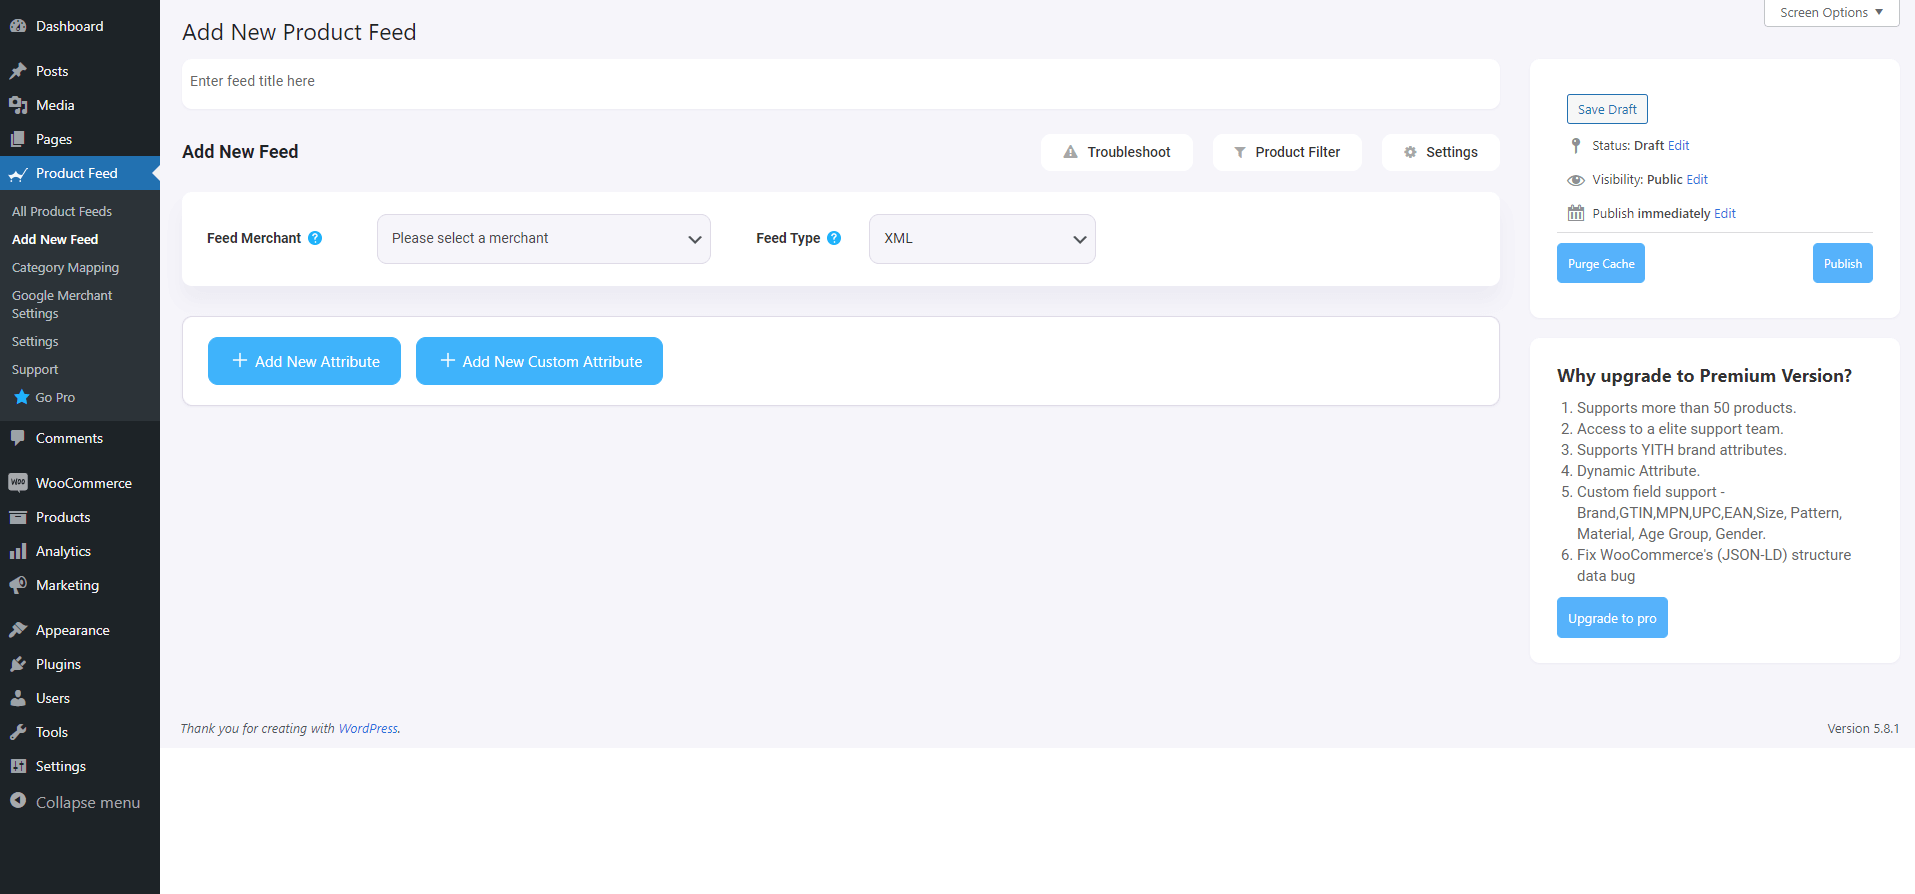
Here, on the top you will get an option to give a name to your feed, you can skip it too.

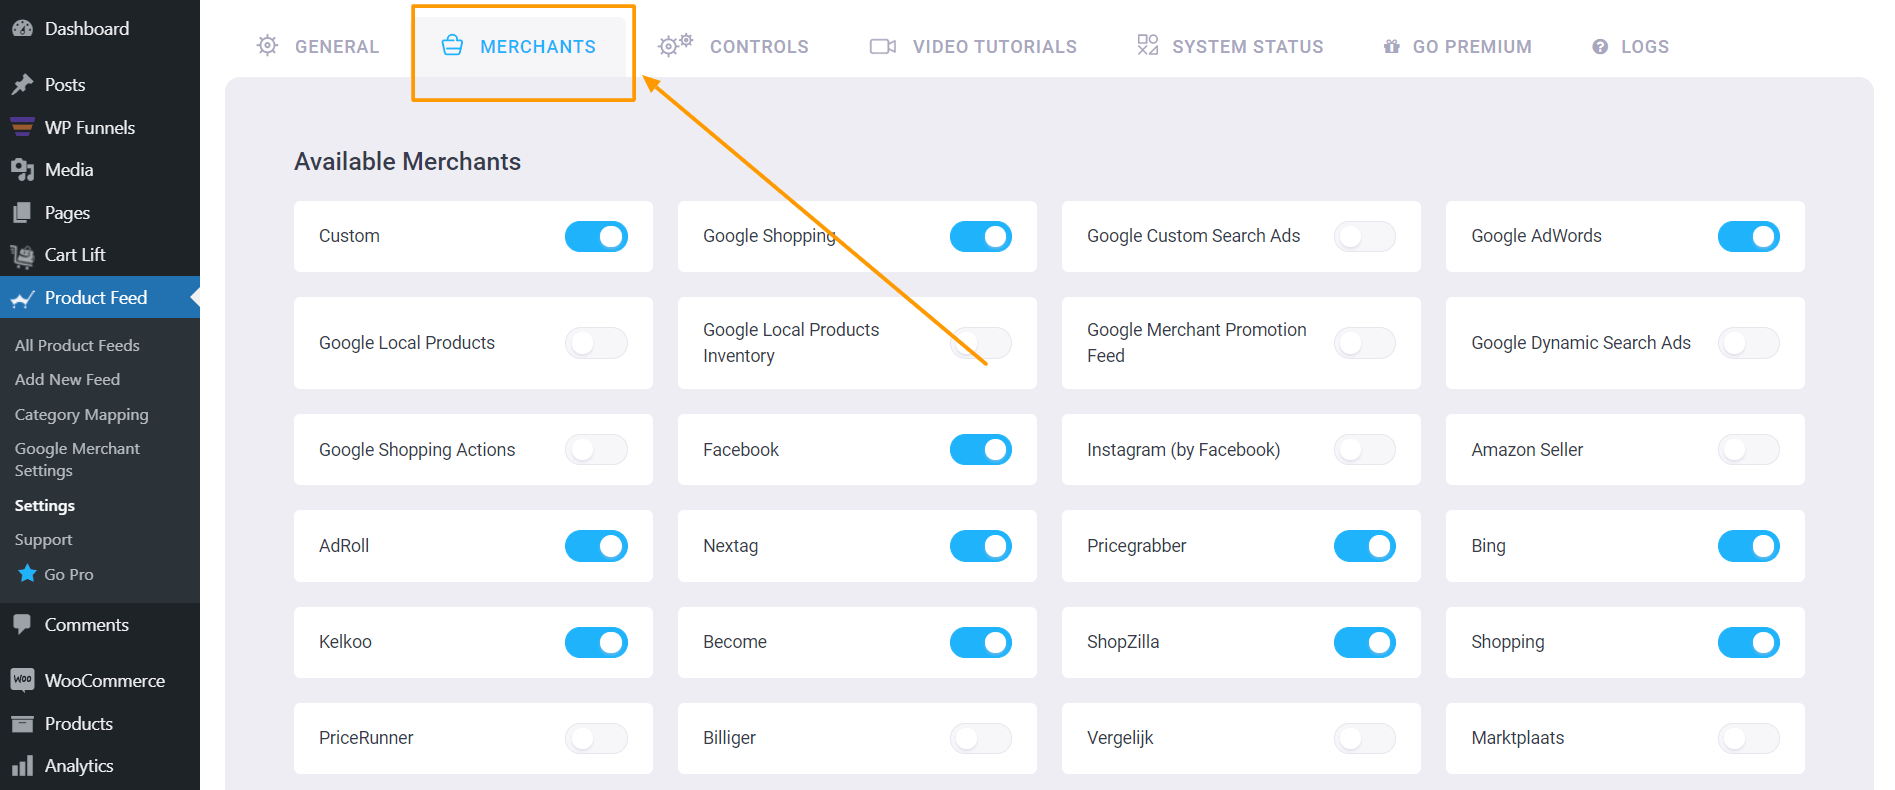
2. Click on the Feed Merchant Dropdown and you will get the list of all the supported merchants.

You can scroll down this merchant dropdown list or you can type Favi in the search box, and you will get the Favi option in the list.

Favi Merchnat Option

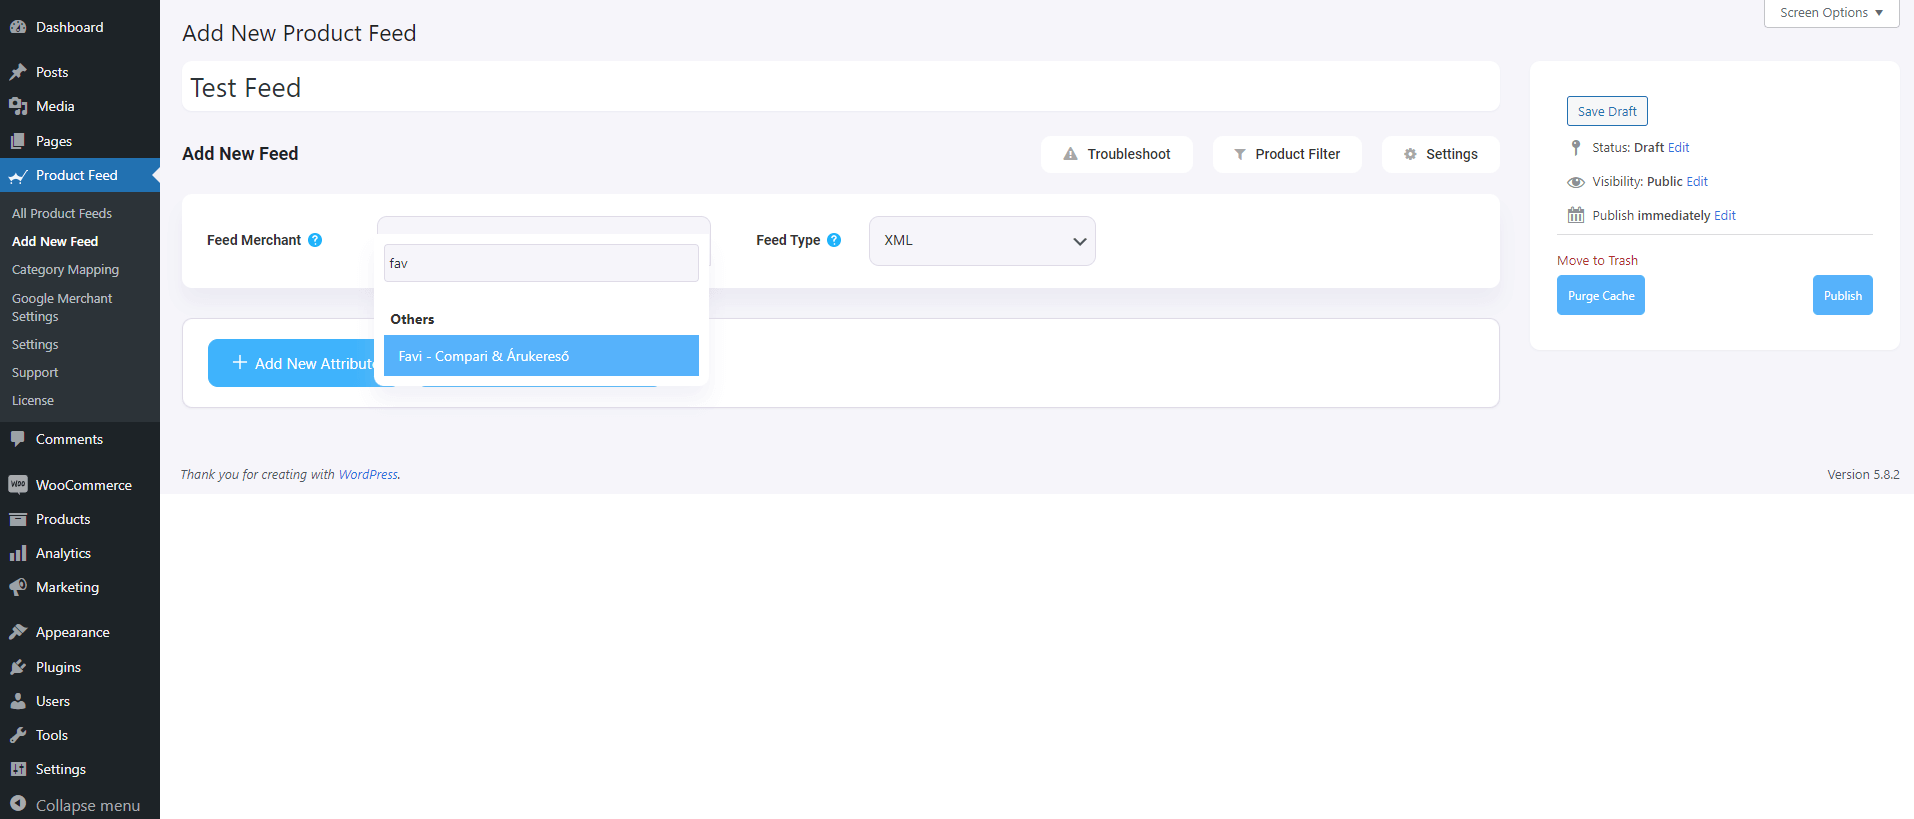
Select Favi, and all the required attributes of Favi will be loaded below.

Favi Required Attributes

Step 3 – Create A New Product Feed

Now, you can see three buttons under the Feed Title text box, Troubleshoot, Product Filter, and Settings.

1. If you are having any issues generating feed, click on this Troubleshoot button, it will take you to the Troubleshoot page, which could be helpful for you.

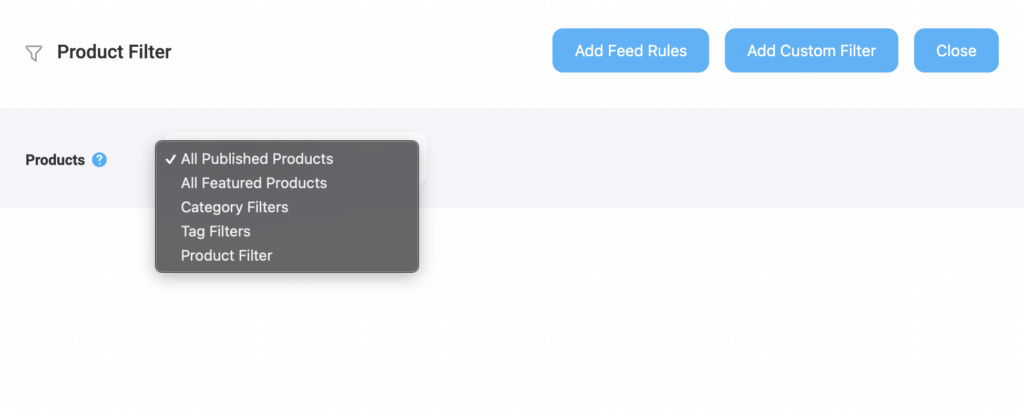
2. If you want to use any filter or condition, you can click on the Product Filter option, and a drawer will slide in from the right side of the window, and there you will get the following filters:

  • All Featured Items
  • Custom Filter
  • Category Filter
  • Tag Filter
  • Product Filter (Pro)

You can select any filter option and use them as per your need and click on the Close button when done.

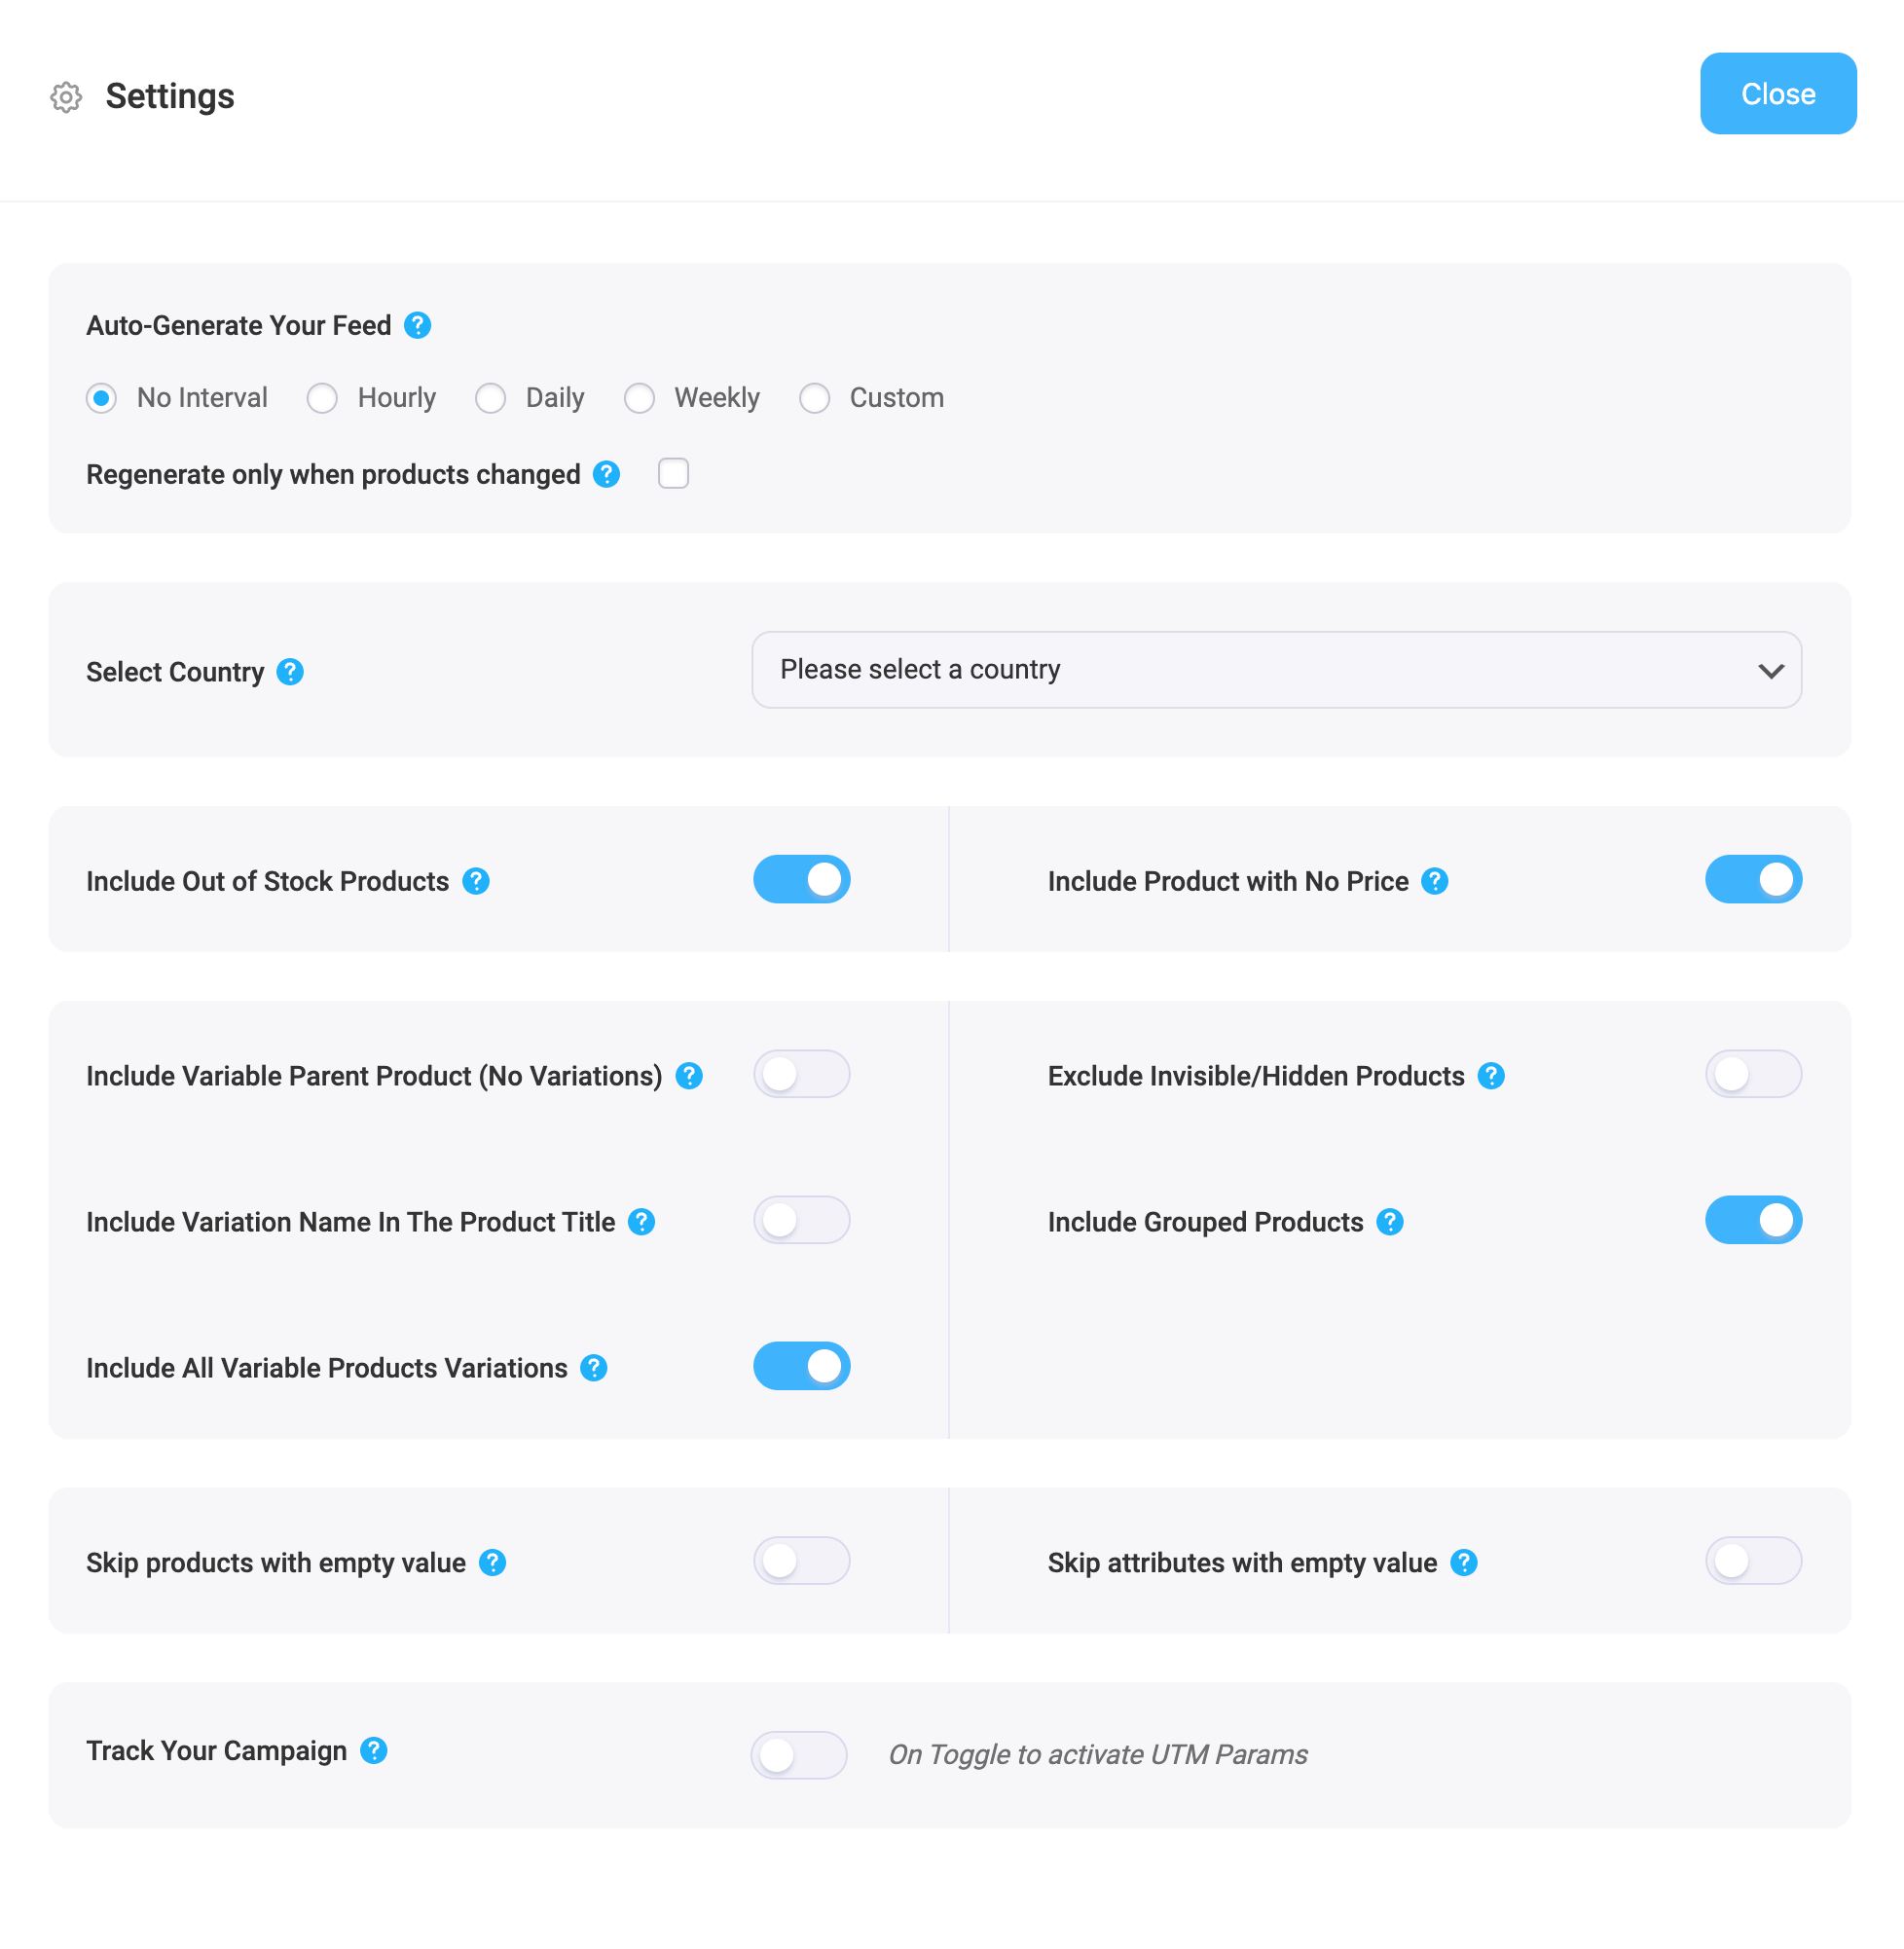
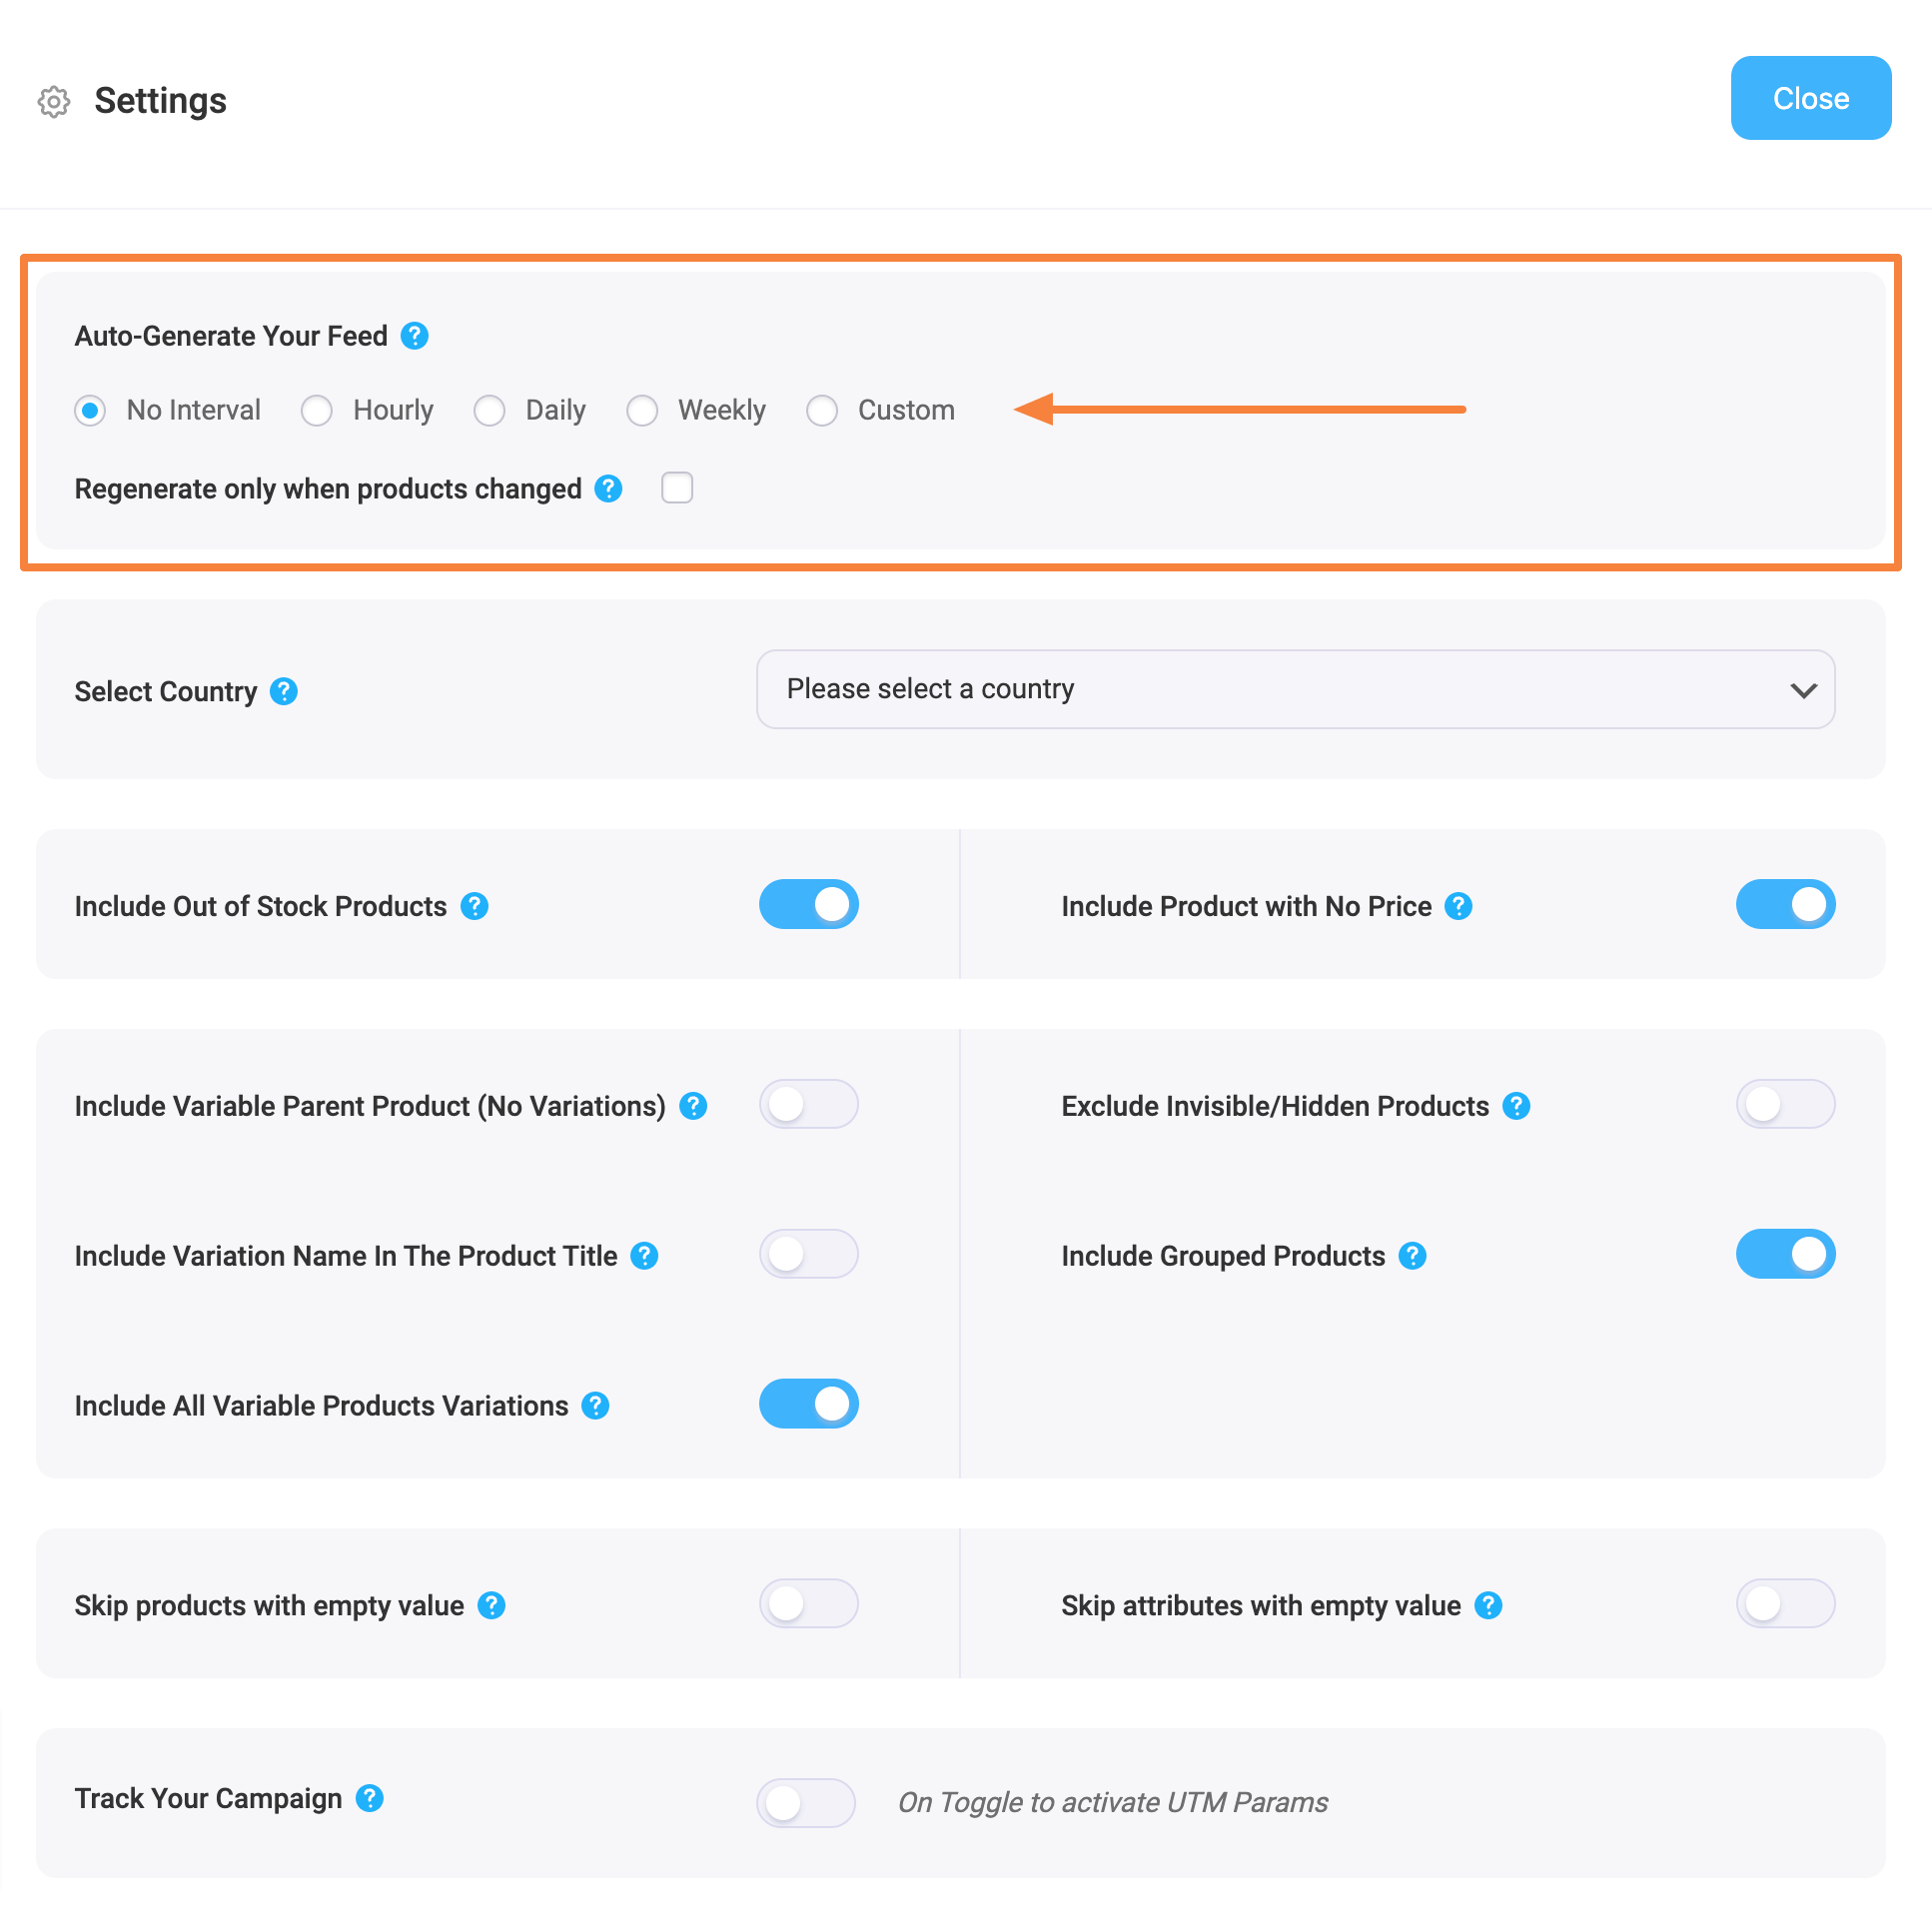
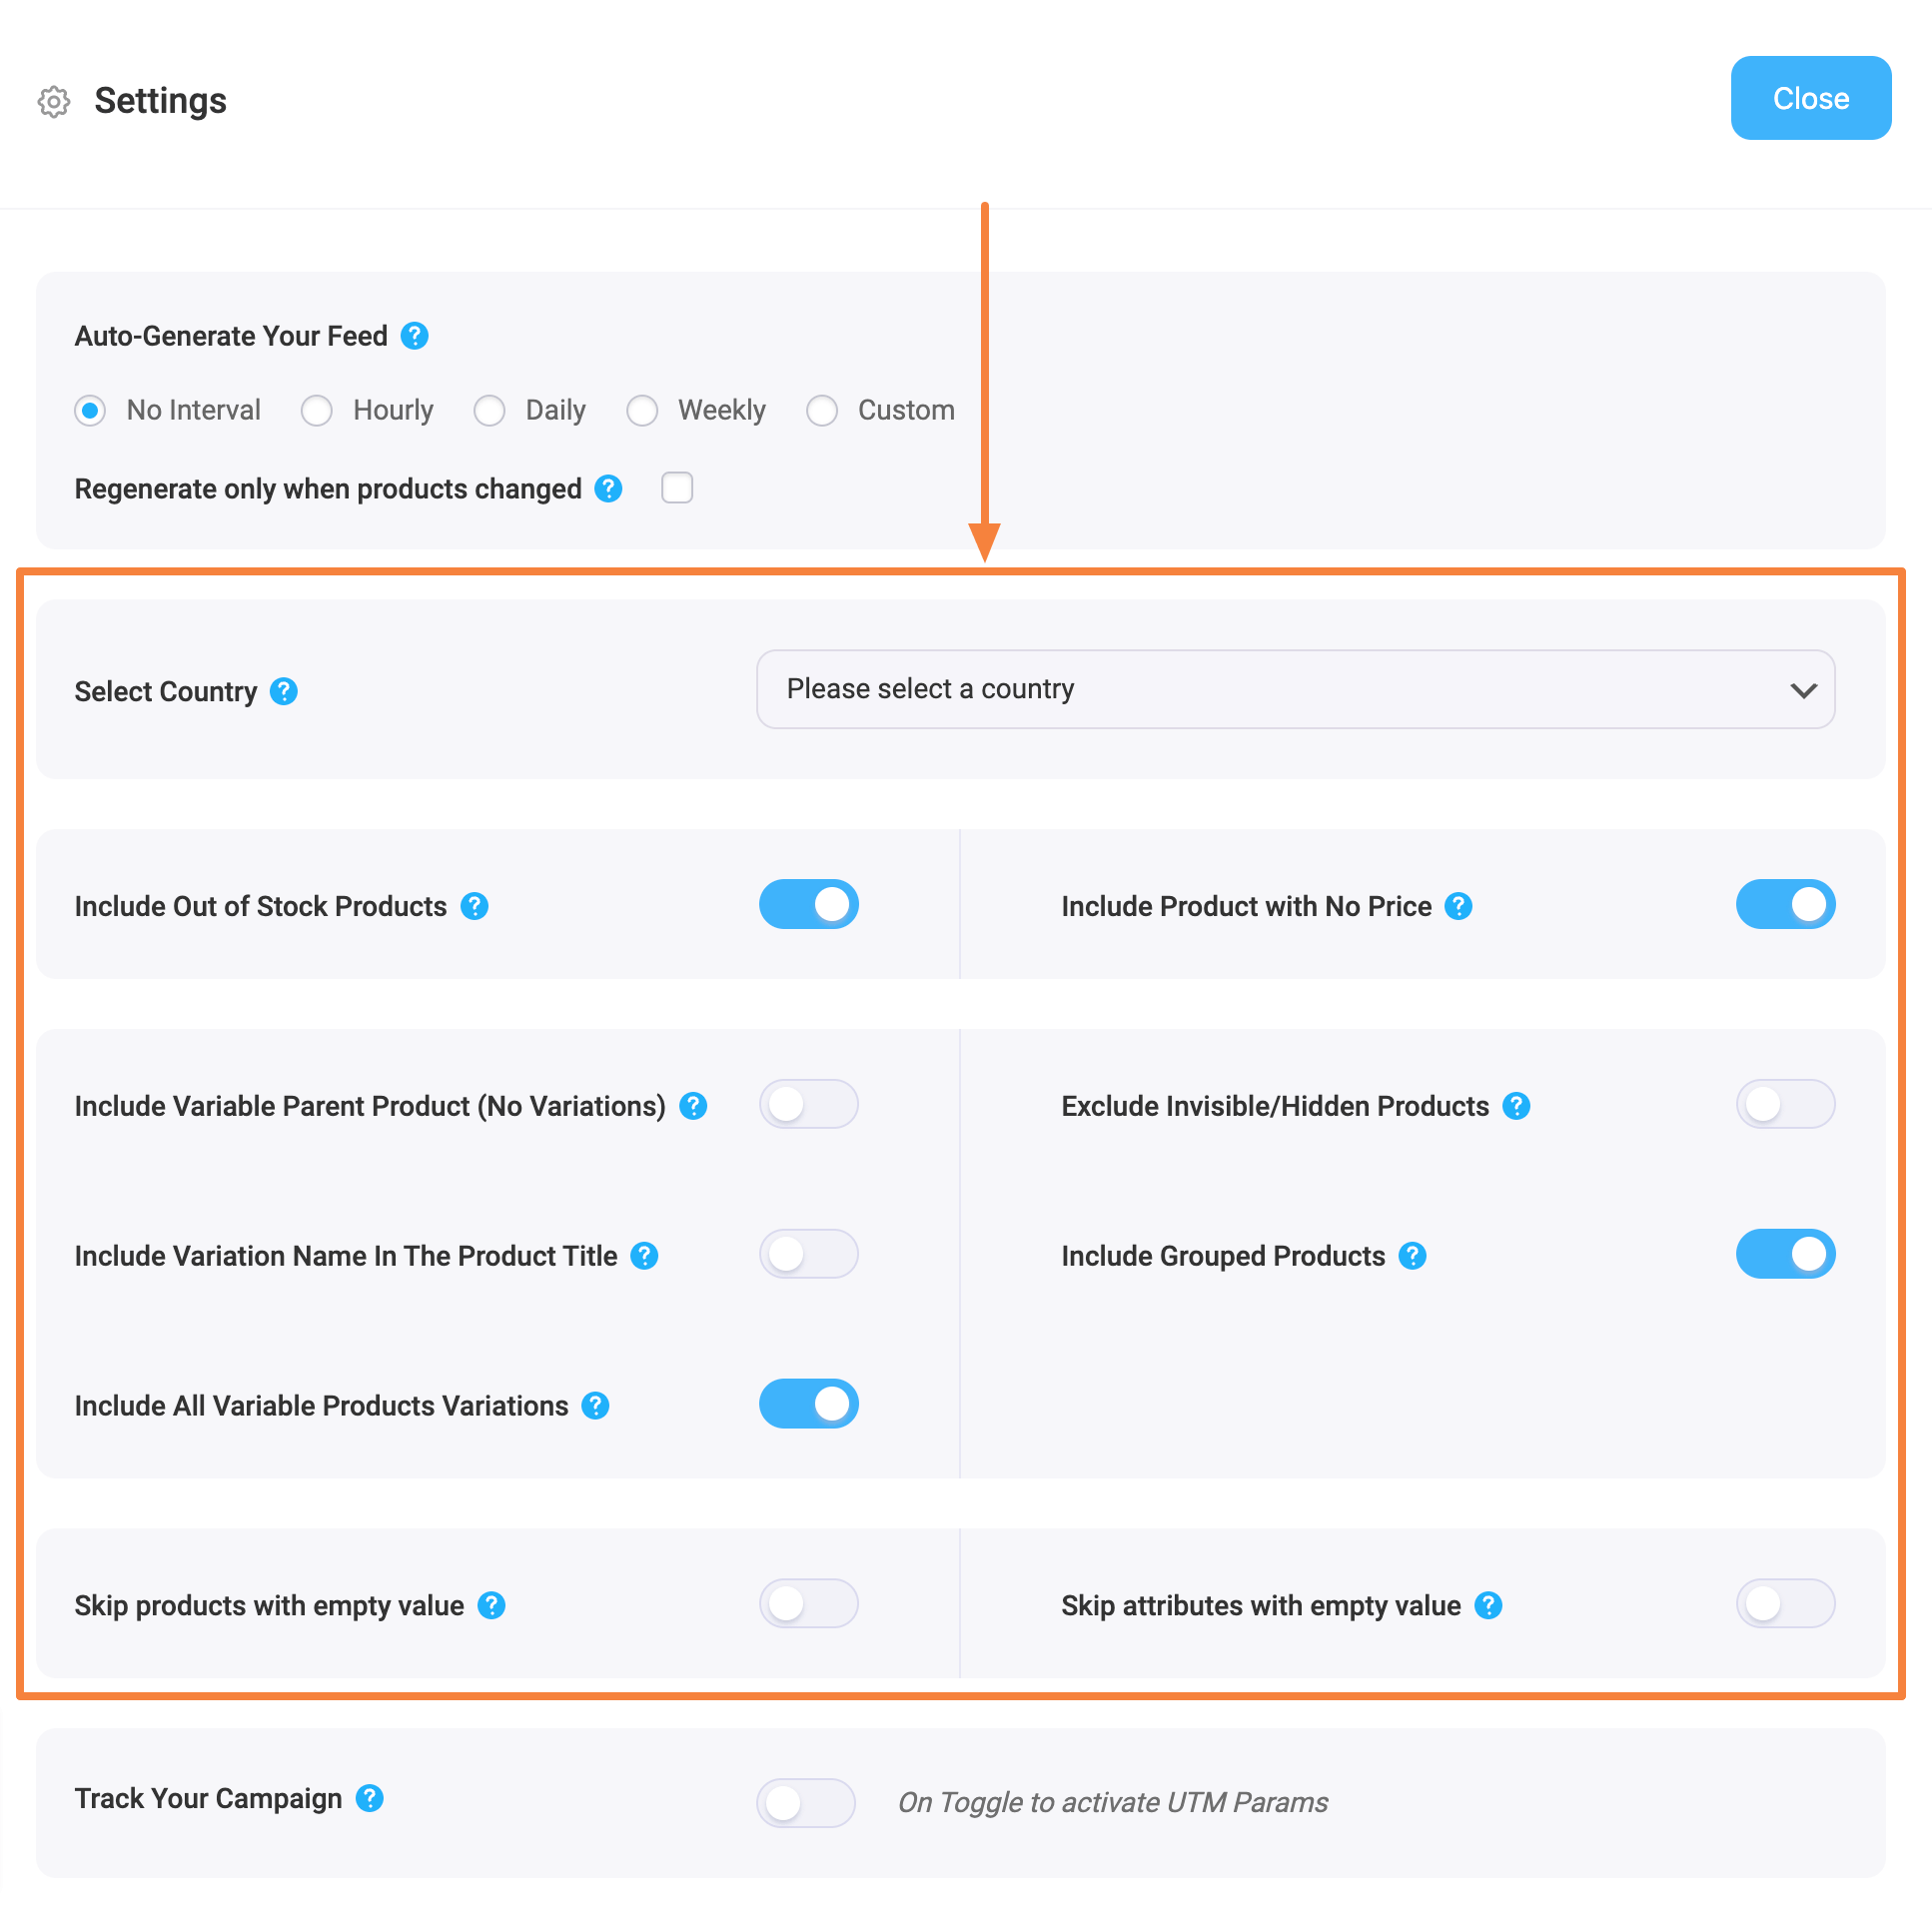
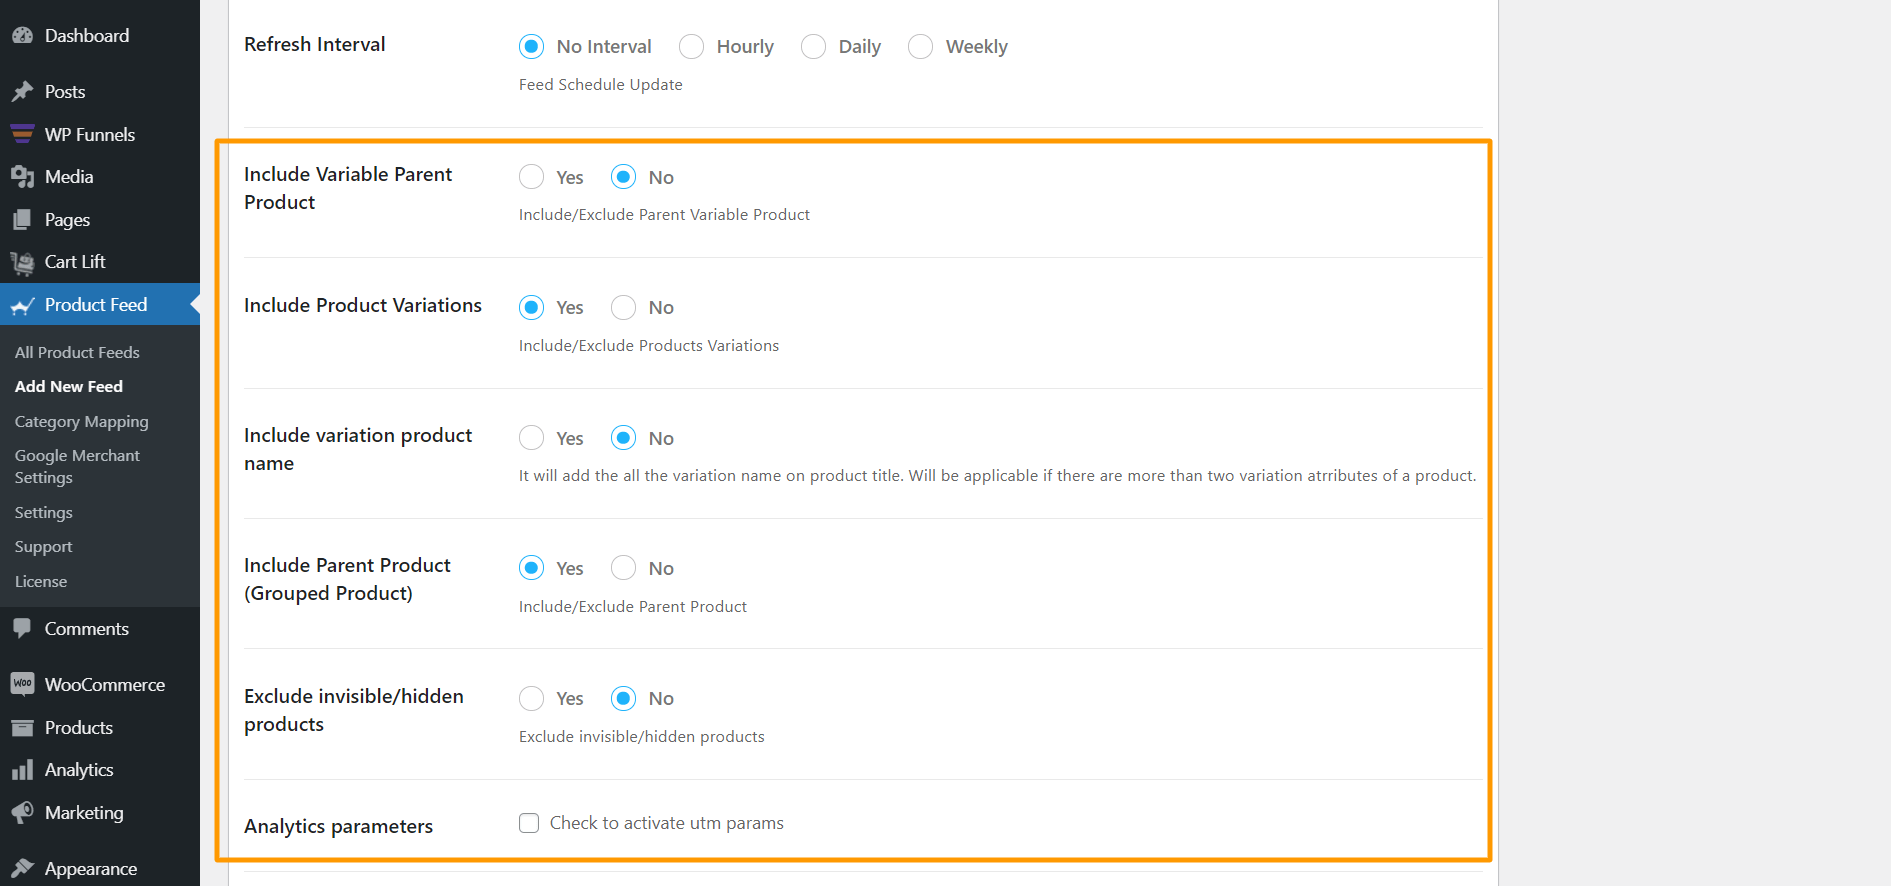
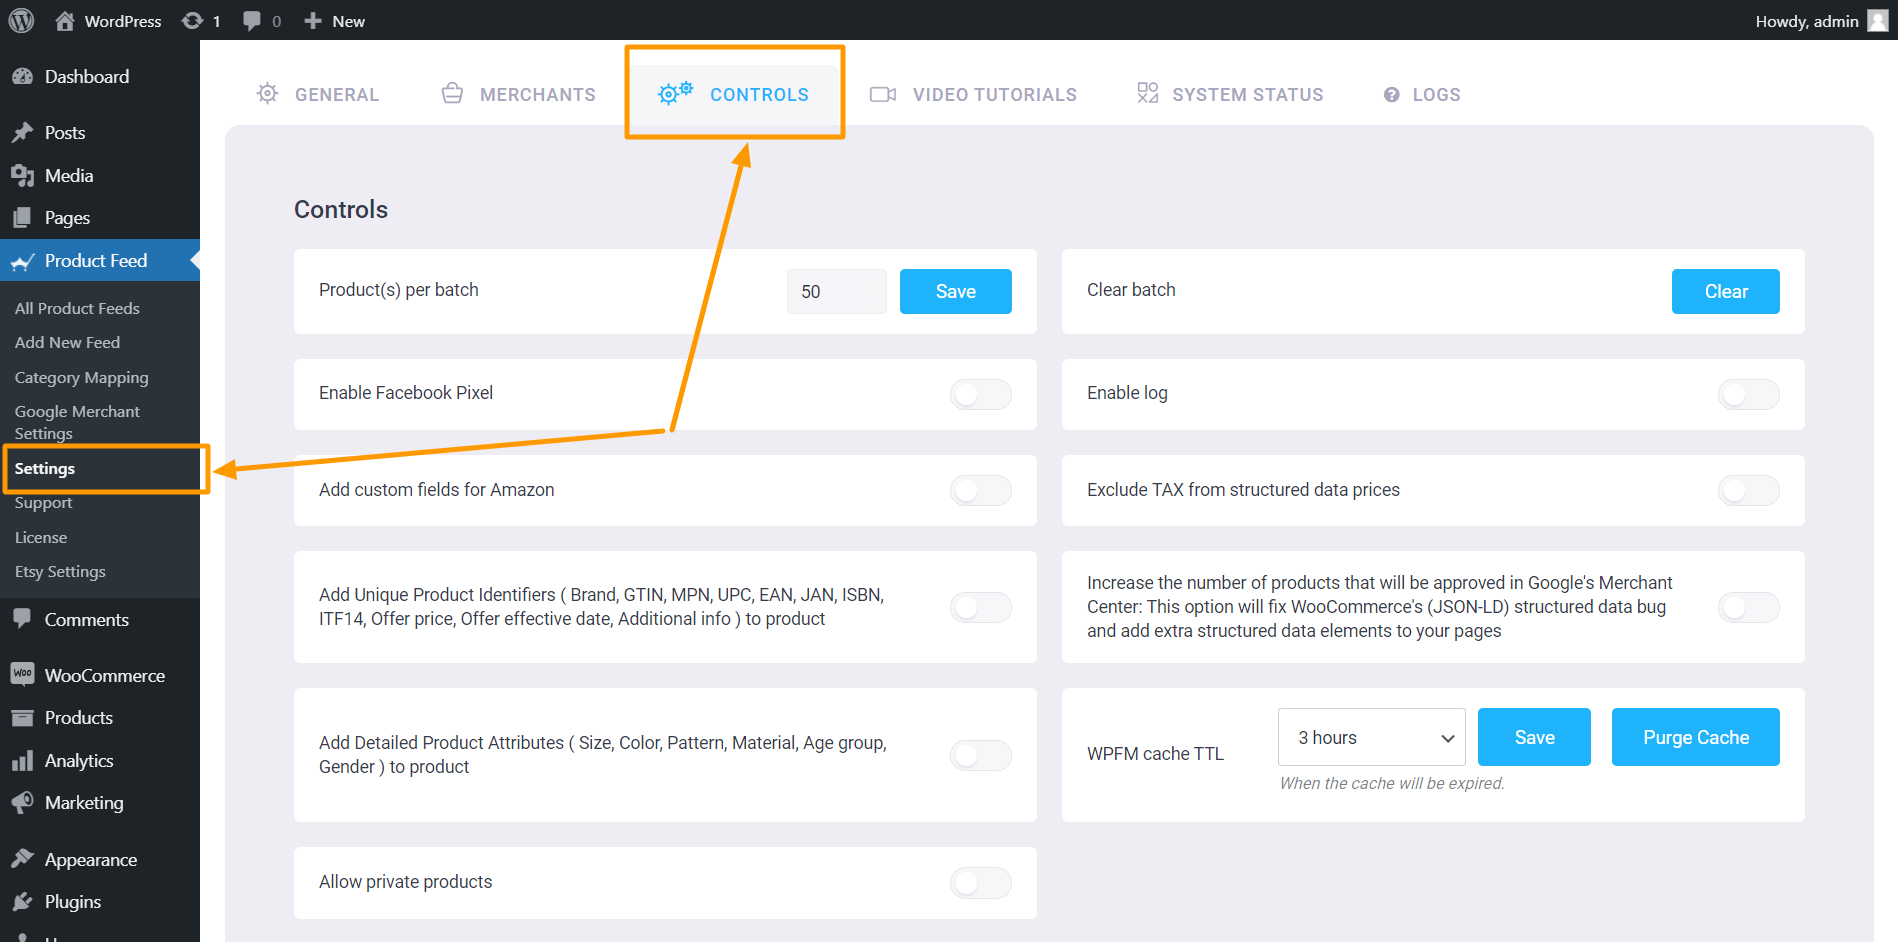
3. Now, to schedule your feed or to choose which type of products will be included in your feed, click on the Settings button, and you will get a list of options to exclude or include products.

Change the options as per your need and click on the Close button when done.

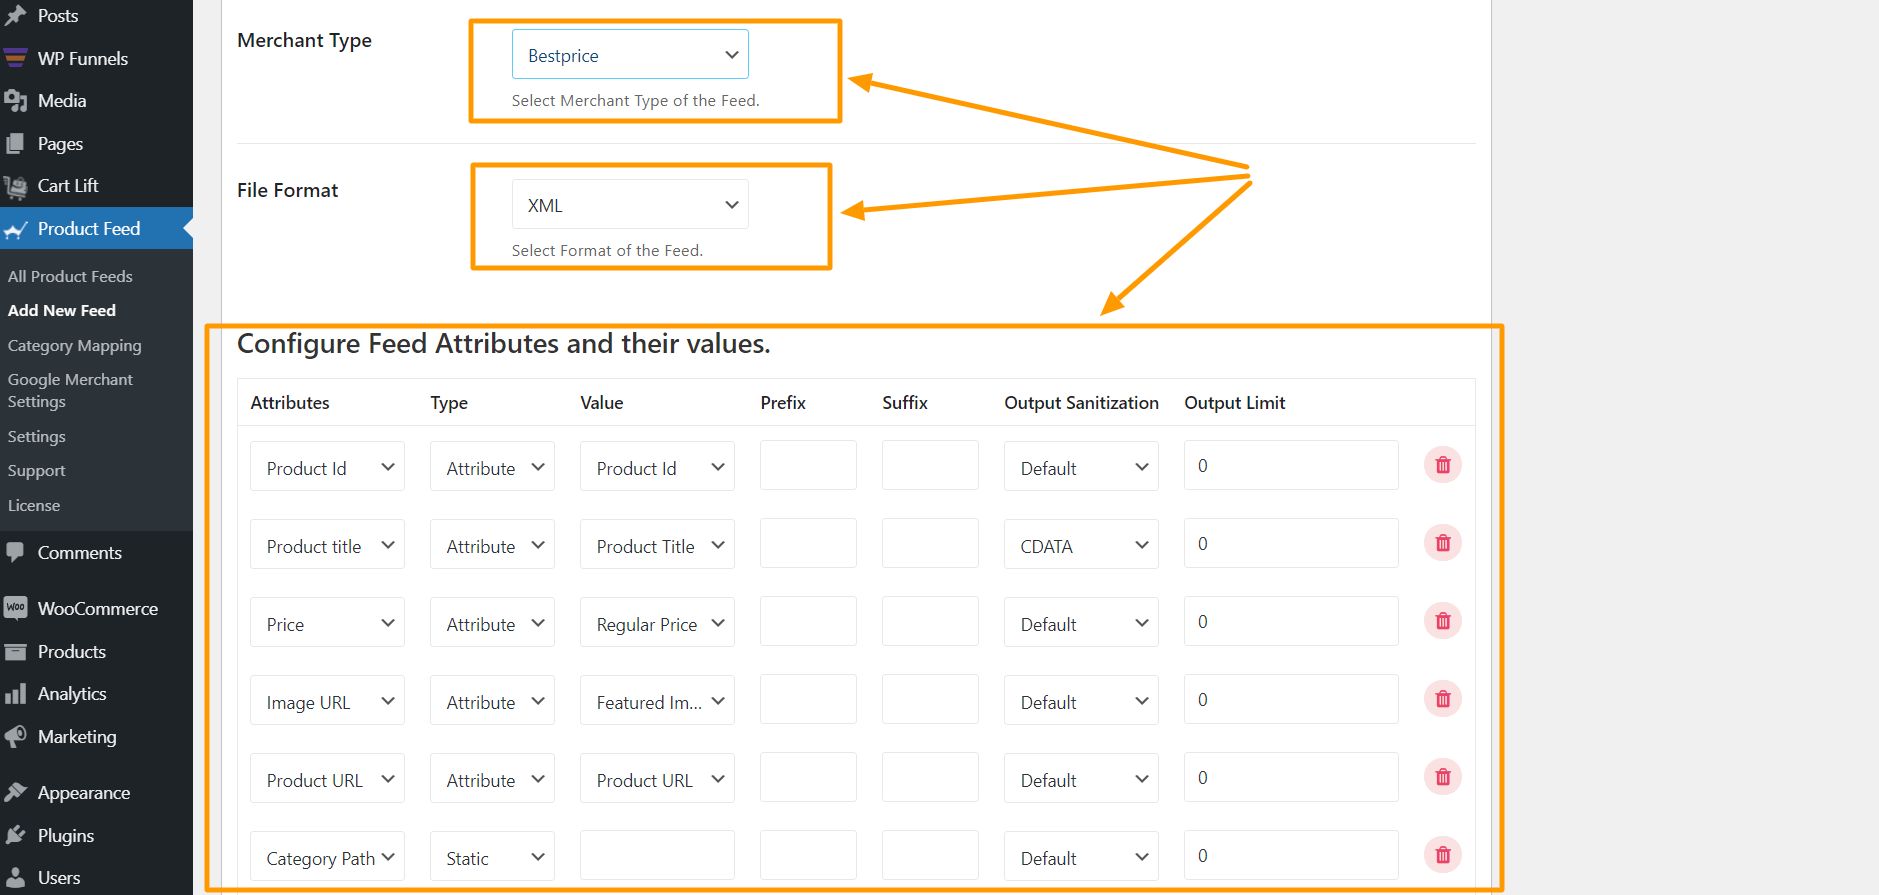
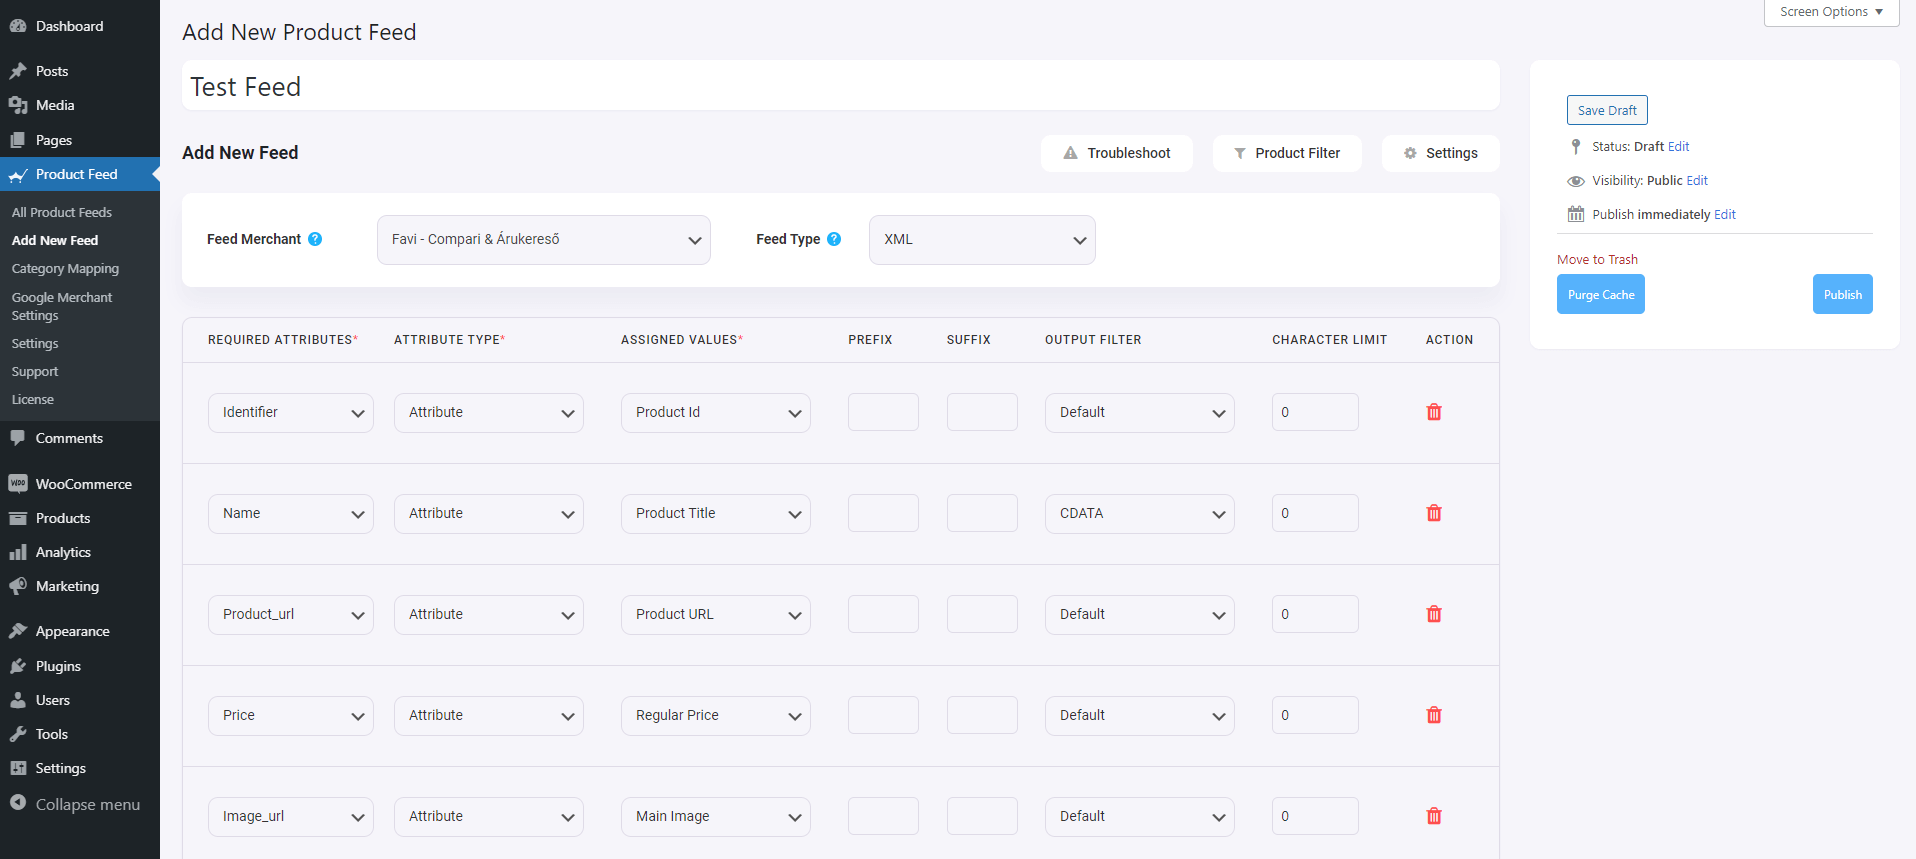
Step 4 – Use The Favi Compari & Árukereső XML Feed Template

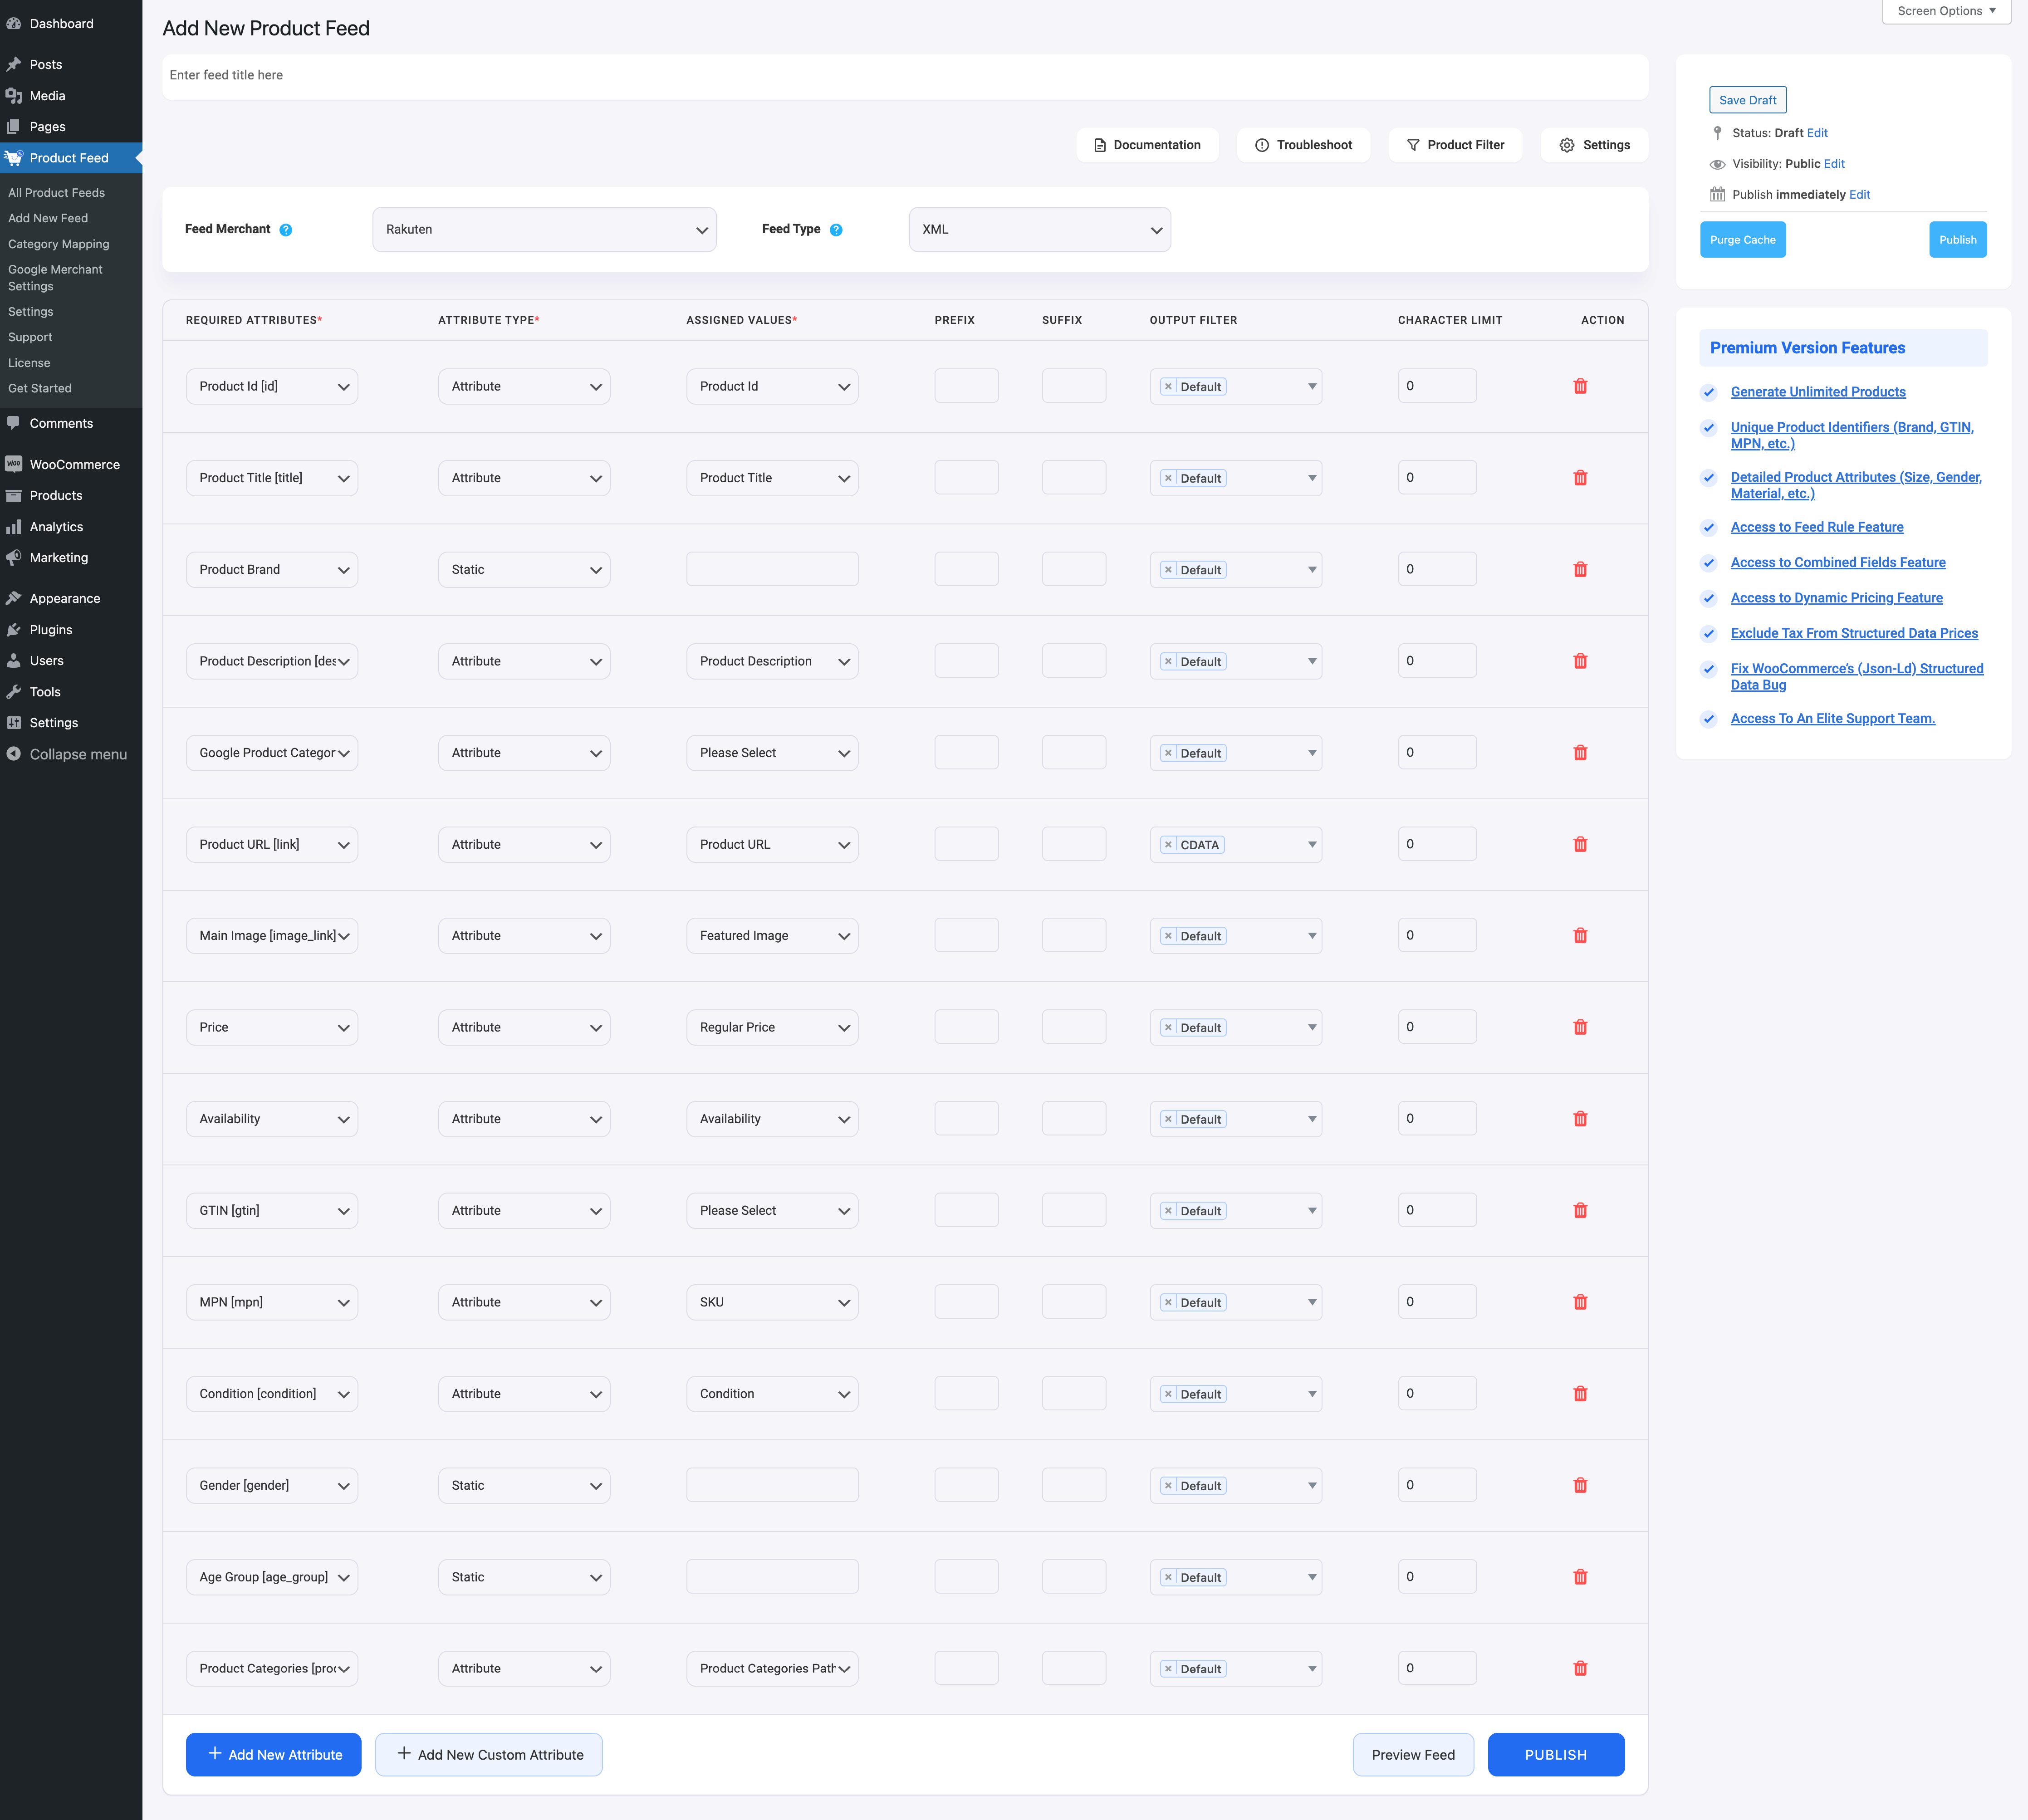
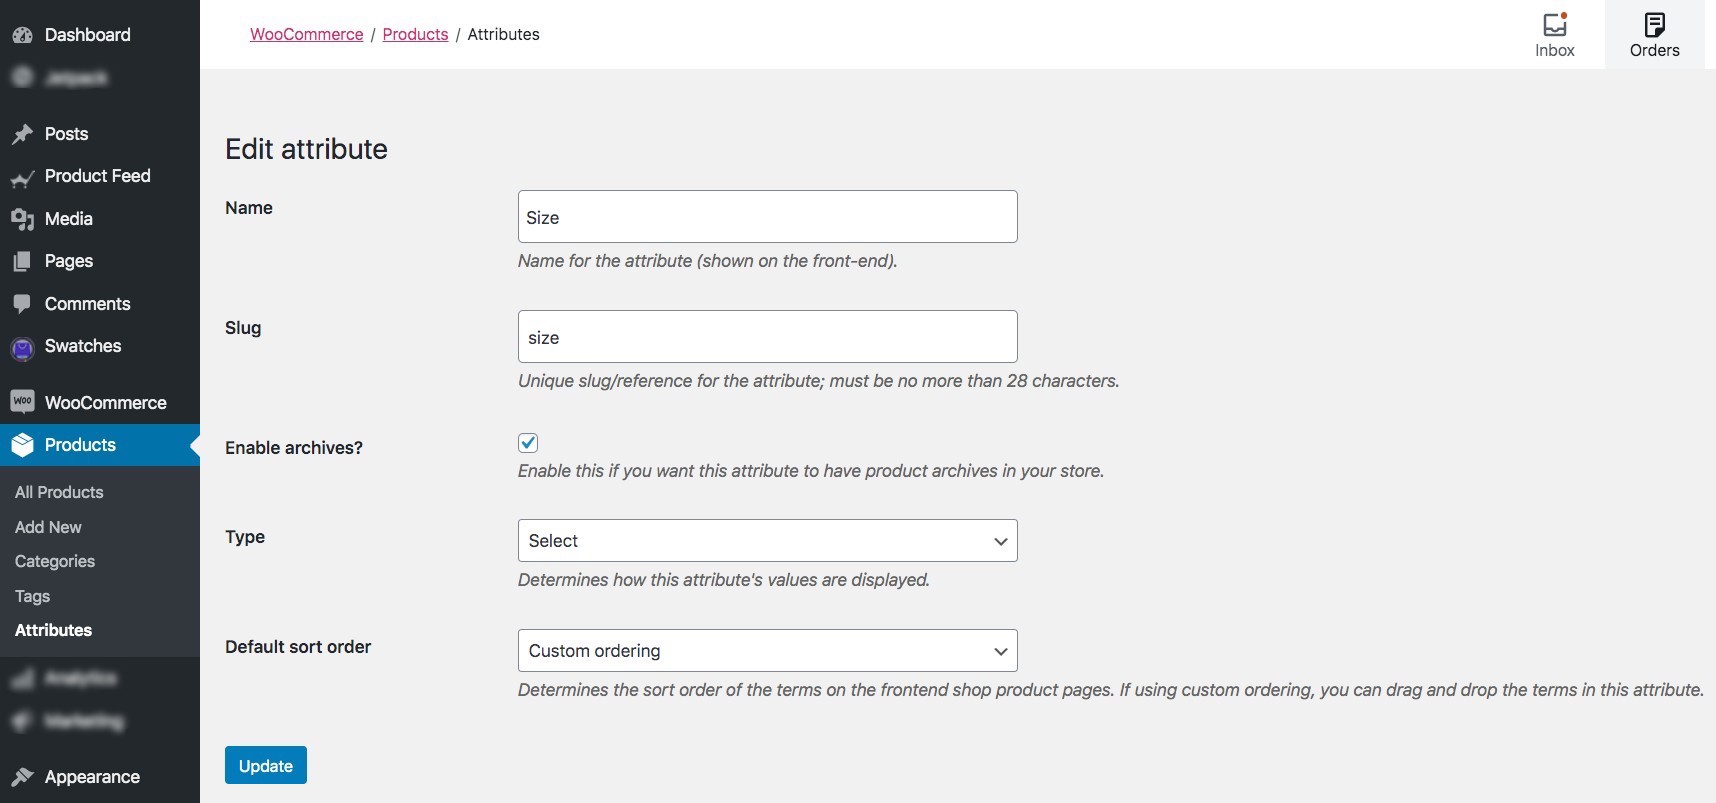
1. If you look at the Feed Merchant dropdown button, there you will get another dropdown “Feed Type”, you can click here to set the type of this feed. You can set different types of feeds depending on what types of feeds this merchant supports or what types of feeds this Product Feed Manager has the support for.

For Favi, XML will be selected by default.

2. Now, in the attributes section, you will see that all the attributes are under the Required Attributes column, and their values are set according to the attributes under the Assigned Values column.

You can change any values to any attributes, simply click on the value dropdown, and select your preferred value.

All the required attributes will appear below. Now, most of the attributes will already be configured but notice that some of these attributes are unassigned.

Step 5 – Assign The Right Values To Unassigned Attributes

You simply need to configure the following:
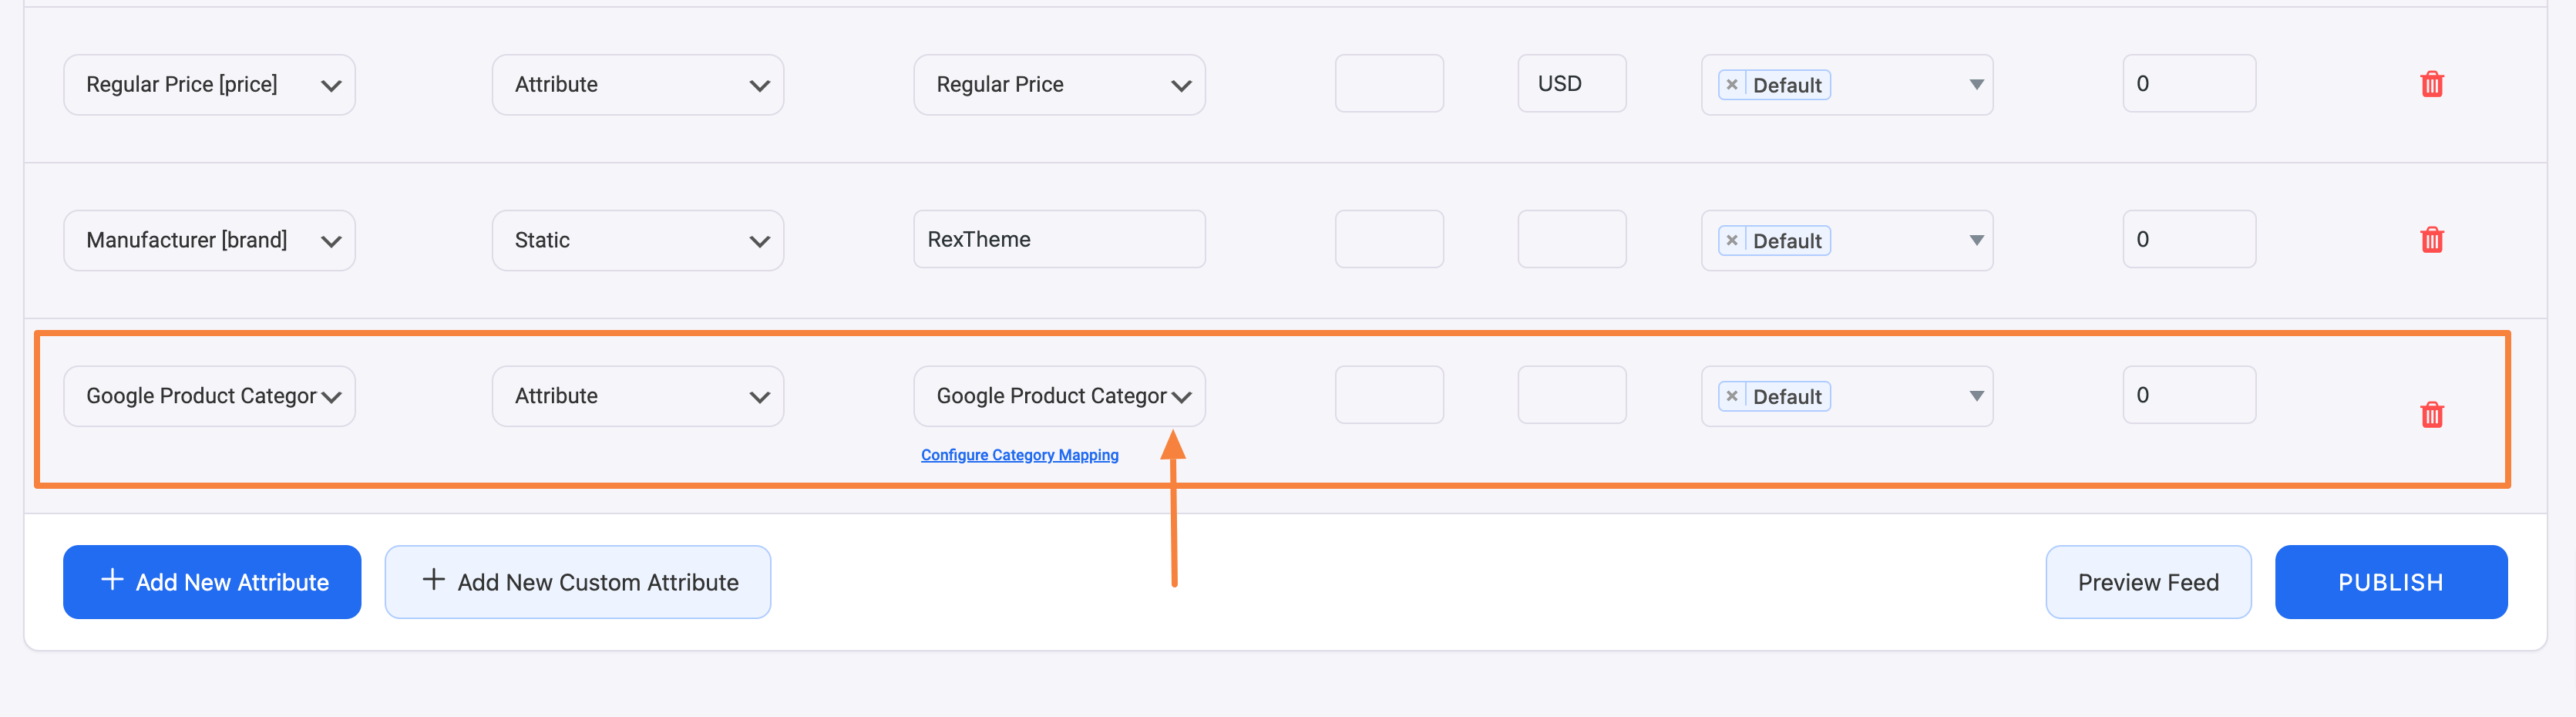
  • Category
    – You will need to set up Category Mapping for this. So for now leave it as is. You will work on this on the next step.
  • Delivery_Time
    – You may use a static value of 0, 1, 2, or 3 to indicate the delivery time.
    – Or ifyou have different delivery time for different products, then you need to save that value in a custom feed in WooCommerce anduse that value here.
  • Manufacturer
    – If you are the manufacturer or if all the products are manufactured by the same company, then use a Static value here.
    – If different products have different manufacturers, then you can either save them on custom fields within products and use that value, add them as WooCommerce attributes for products and use them as values here, or use the plugin Perfect Brands for WooCommerce to assign the manufacturers to the products and then use that value here.
Configure Static Manufacturer and Delivery Time

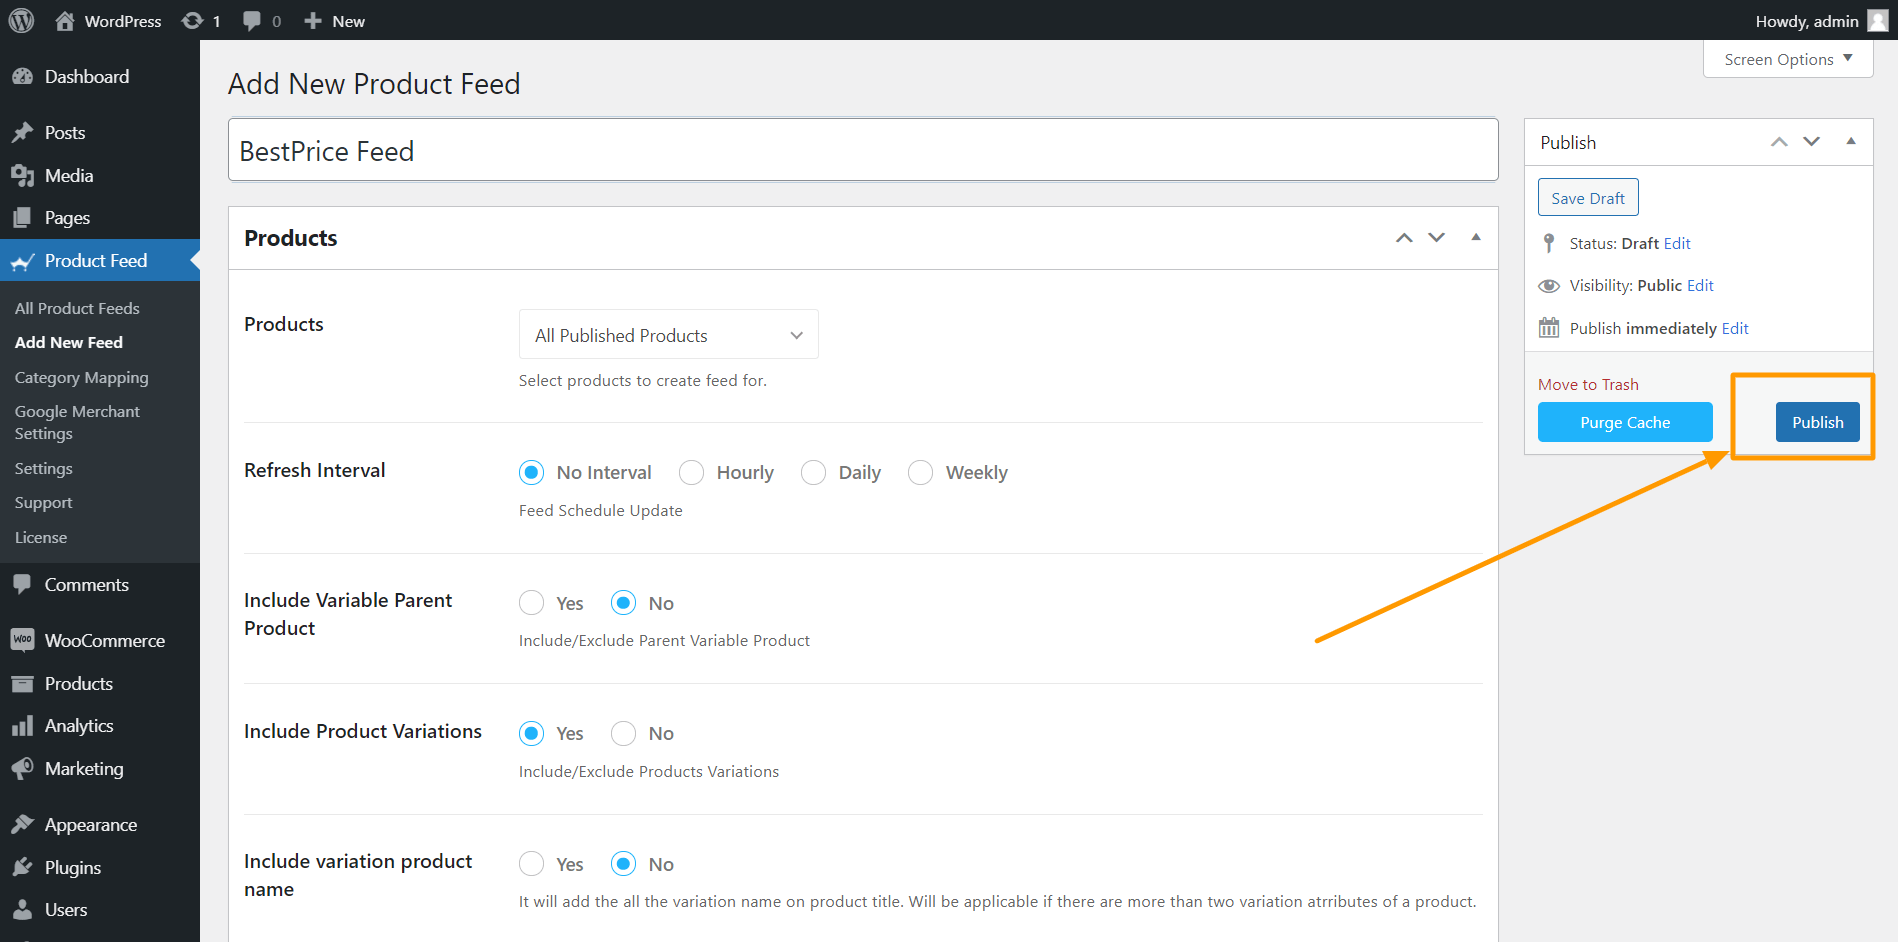
Step 6 – Publish & Setup Category Mapping

1. Scroll up and click on Publish.

Product Feed Manager Publish Feed

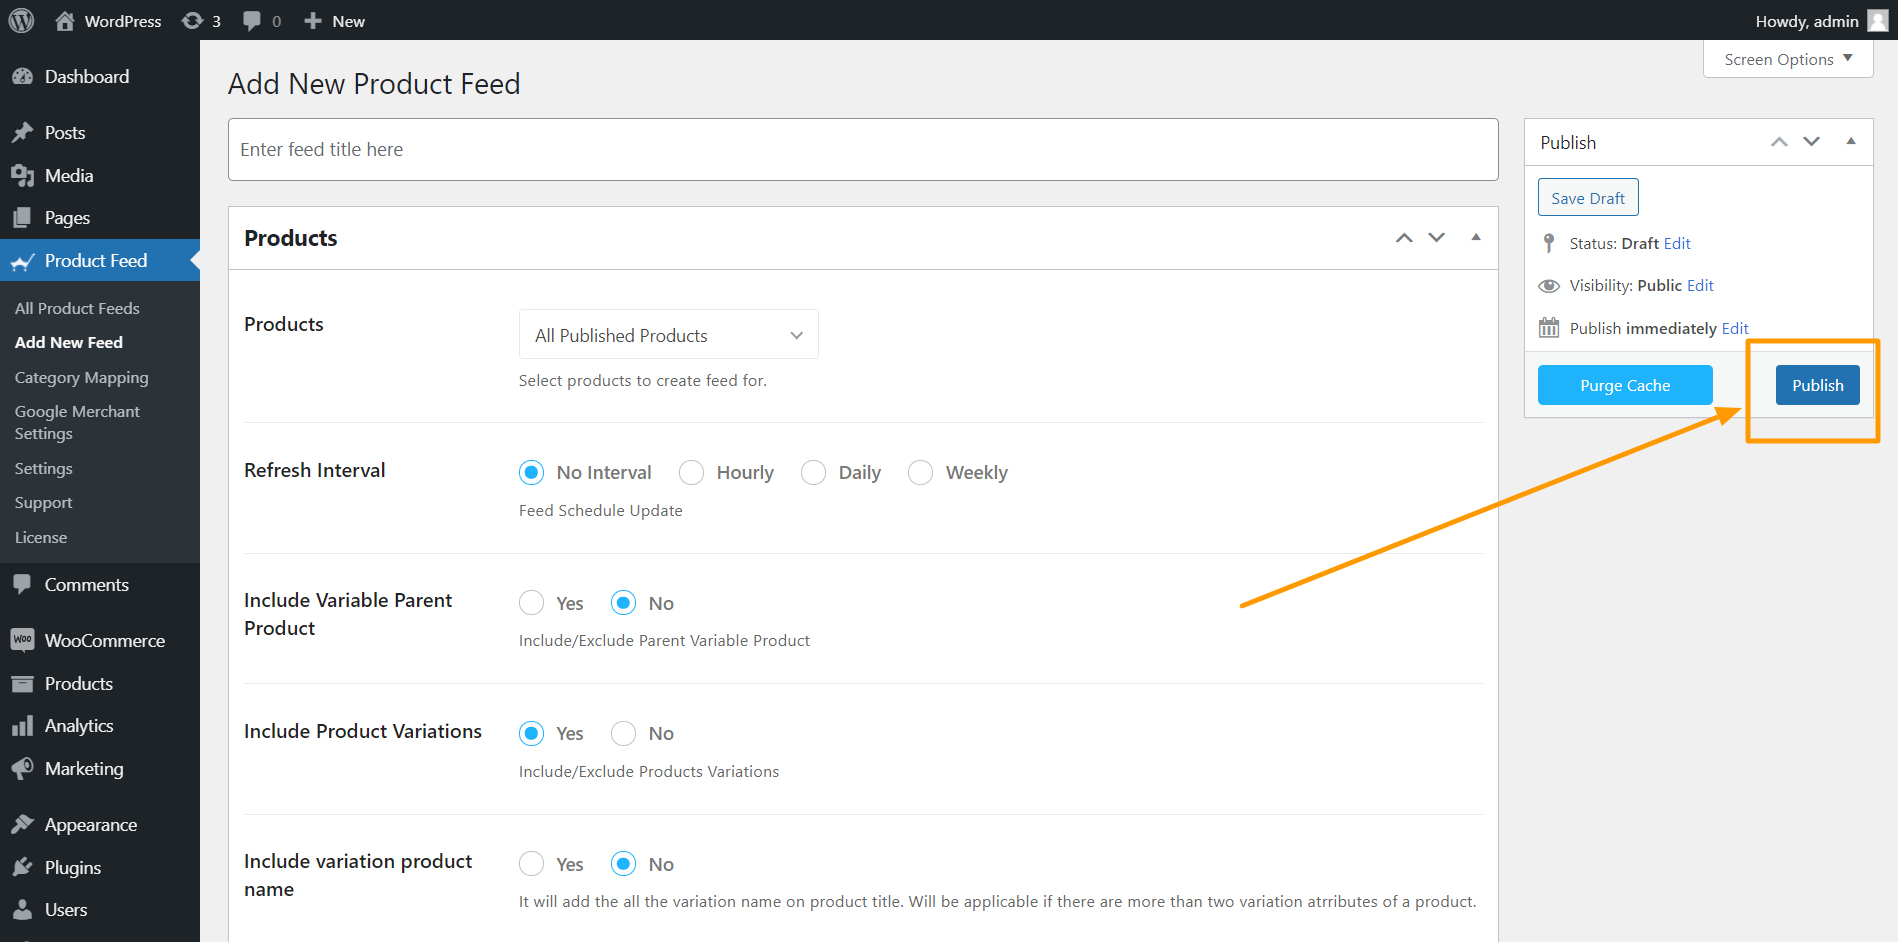
The feed will be generated, but the category is not configured yet.

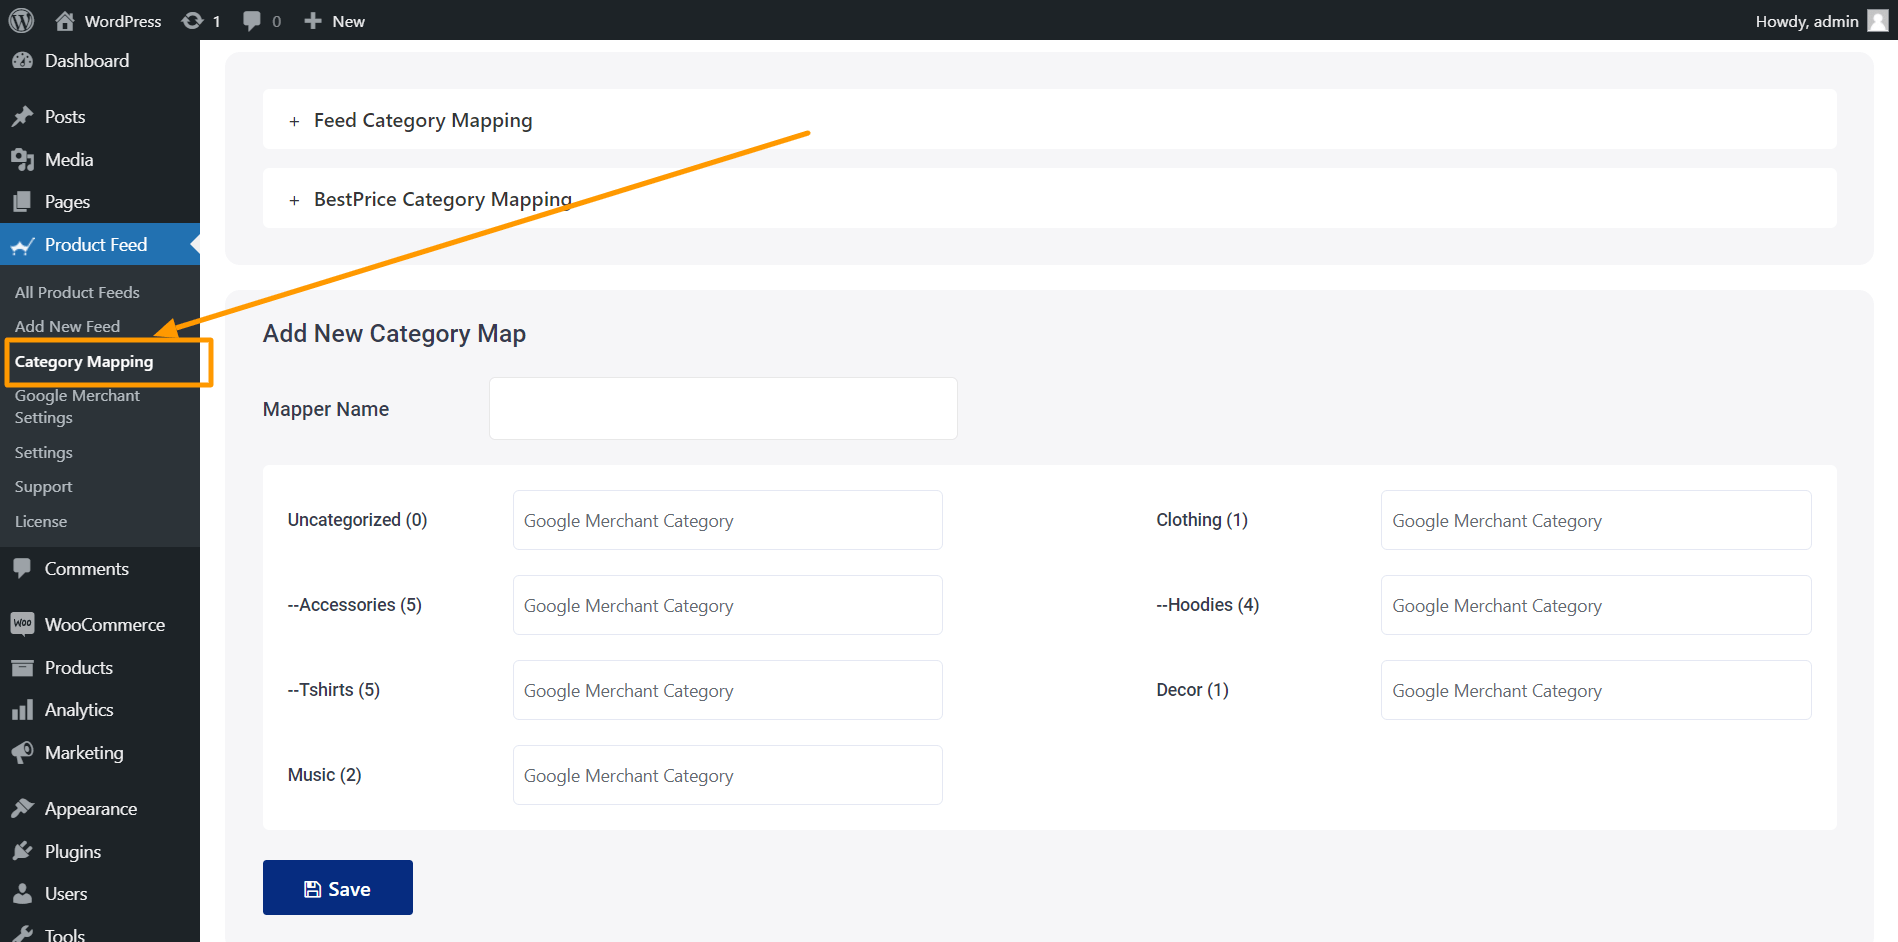
2. Now, go to Dashboard > Product Feed > Category Mapping.

Product Feed Manager Category Mappingg

Here, you can see all the categories in your store are listed.

Product Feed Manager Category Mapping - Category List

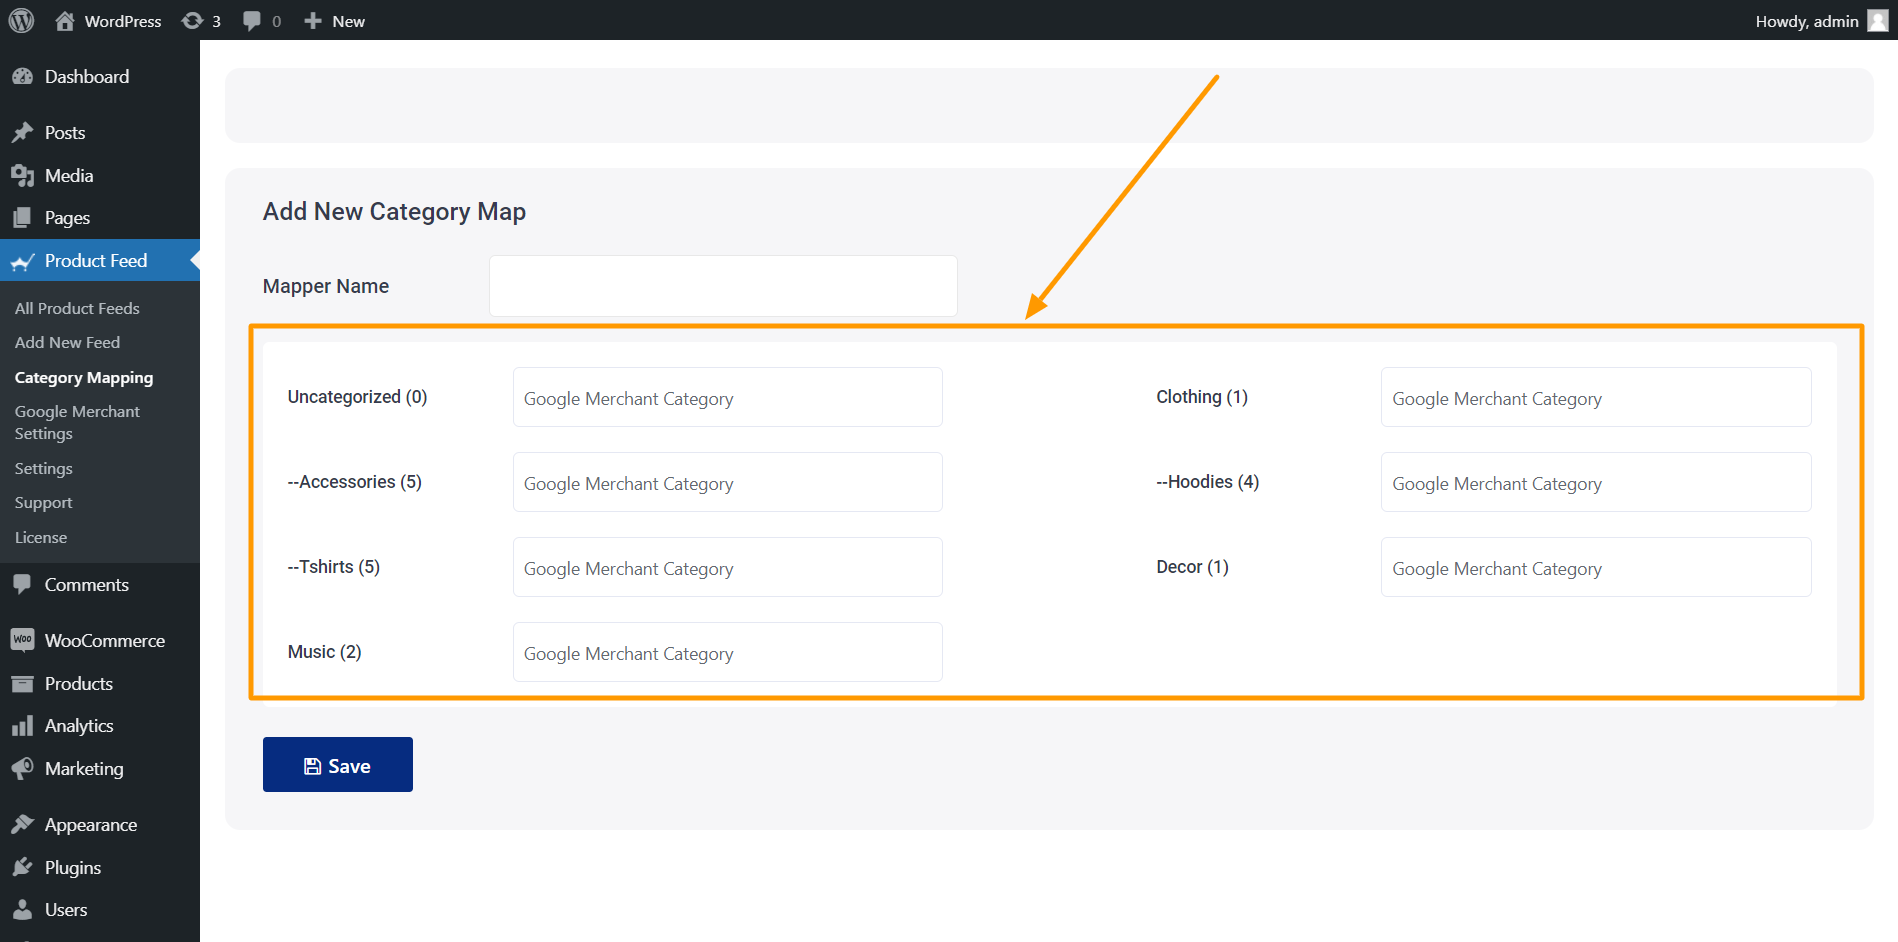
3. Give a name to this Category Map

Product Feed Manager Category Mapper Name

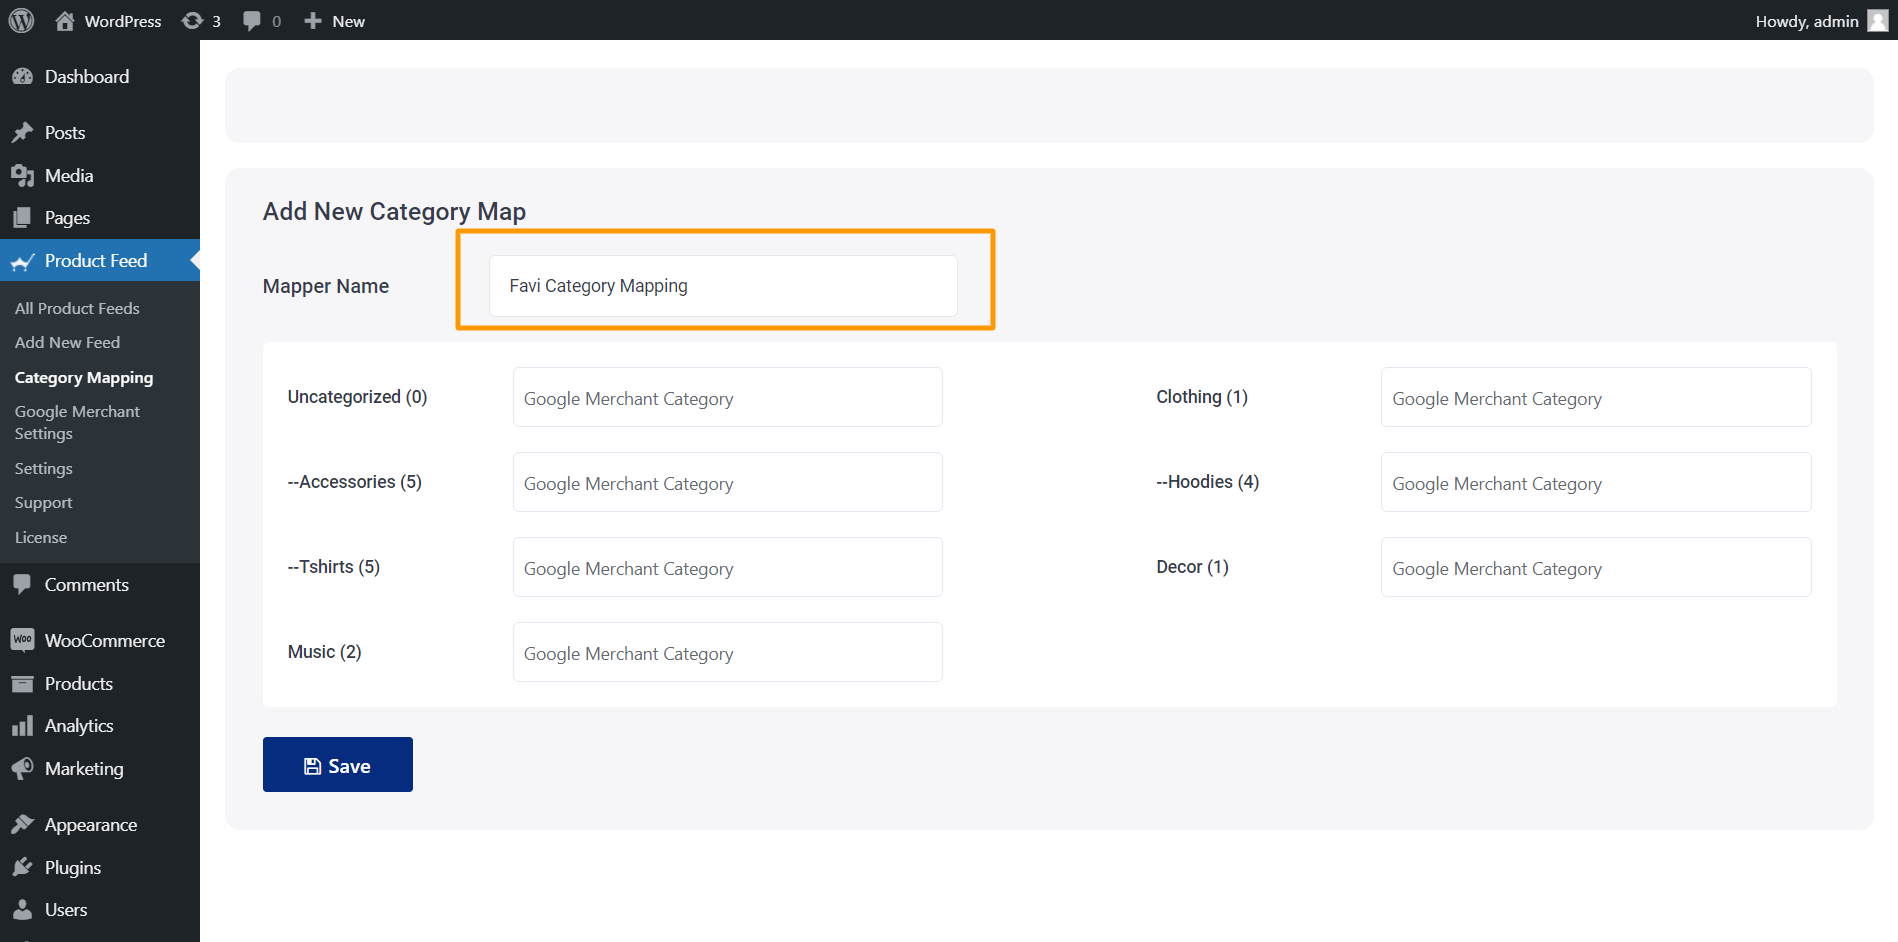
4. Map these categories according to Favi’s category list.
**To find the accepted category list for your store, click here.
– For every category in your store, search for appropriate category in Favi’s category list.
– Copy that and paste it in the field beside your store’s category. Do this for all the categories there.

5. Then click on the Save button below.

Step 7 – Finalize Feed Generation

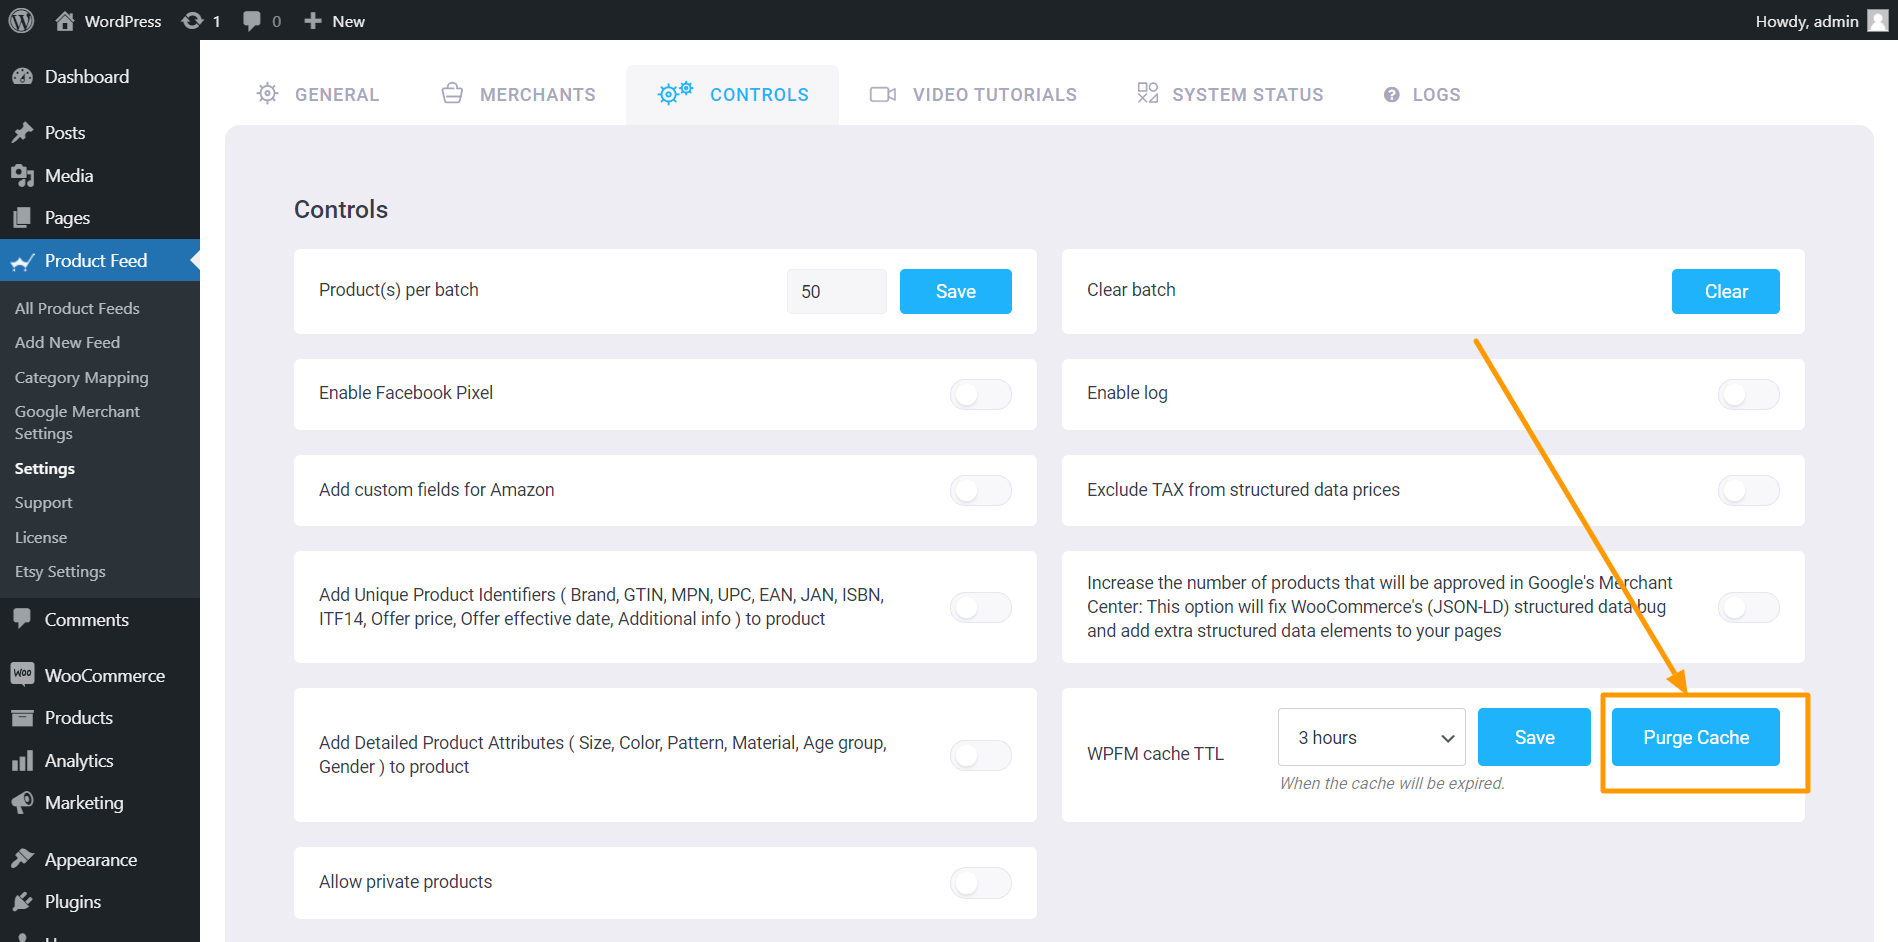
1. Go To Product Feed > All Product Feeds and edit the feed you created just now for Favi.

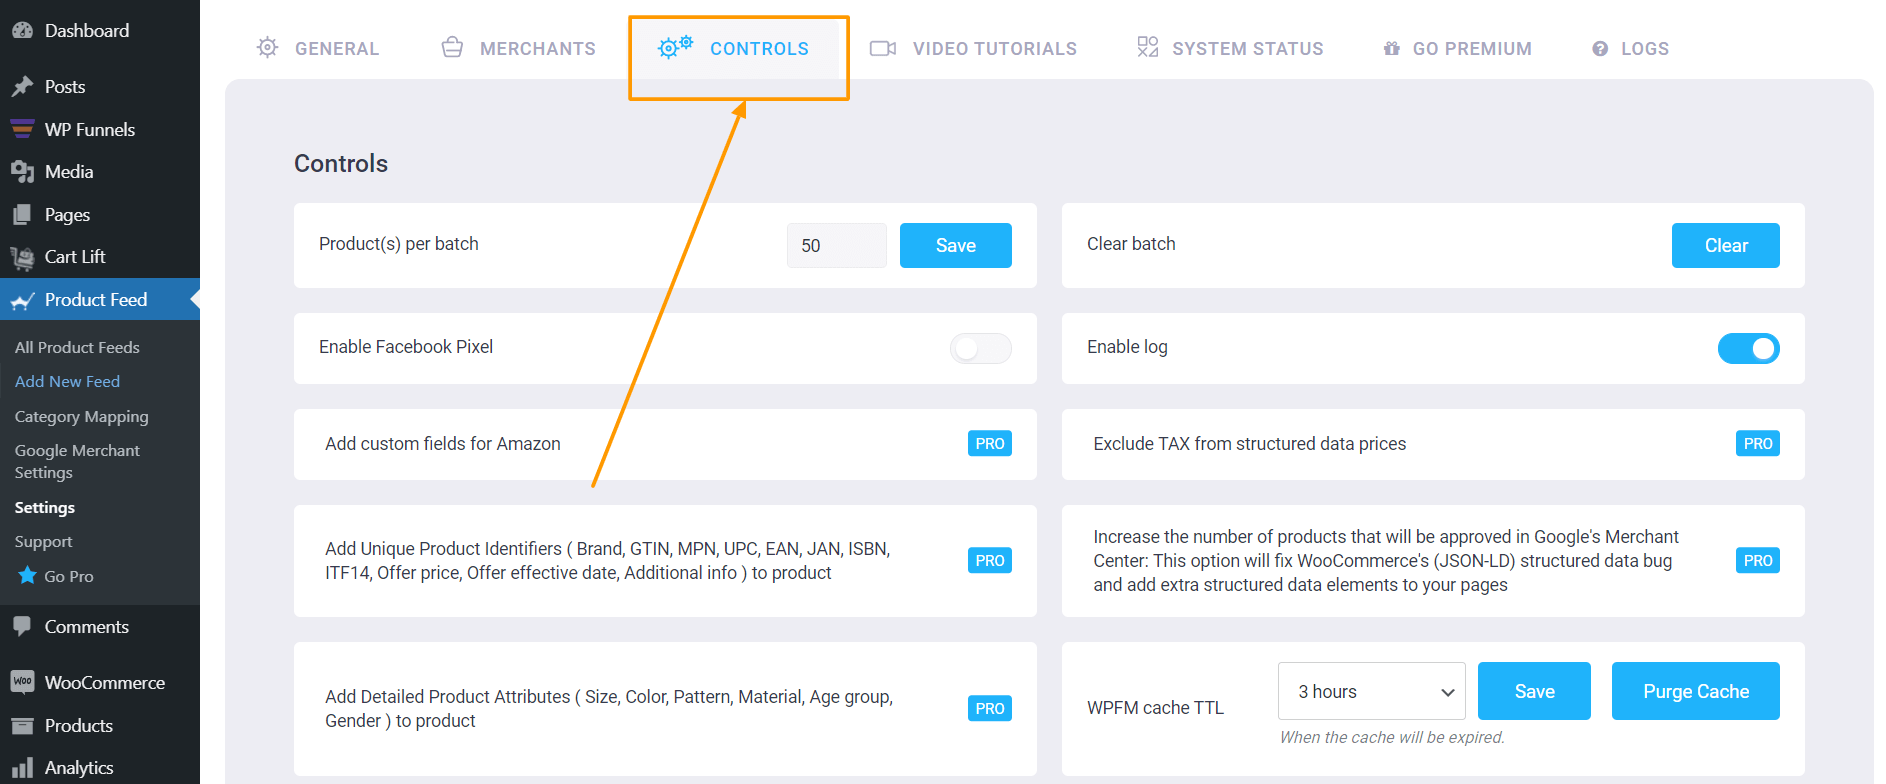
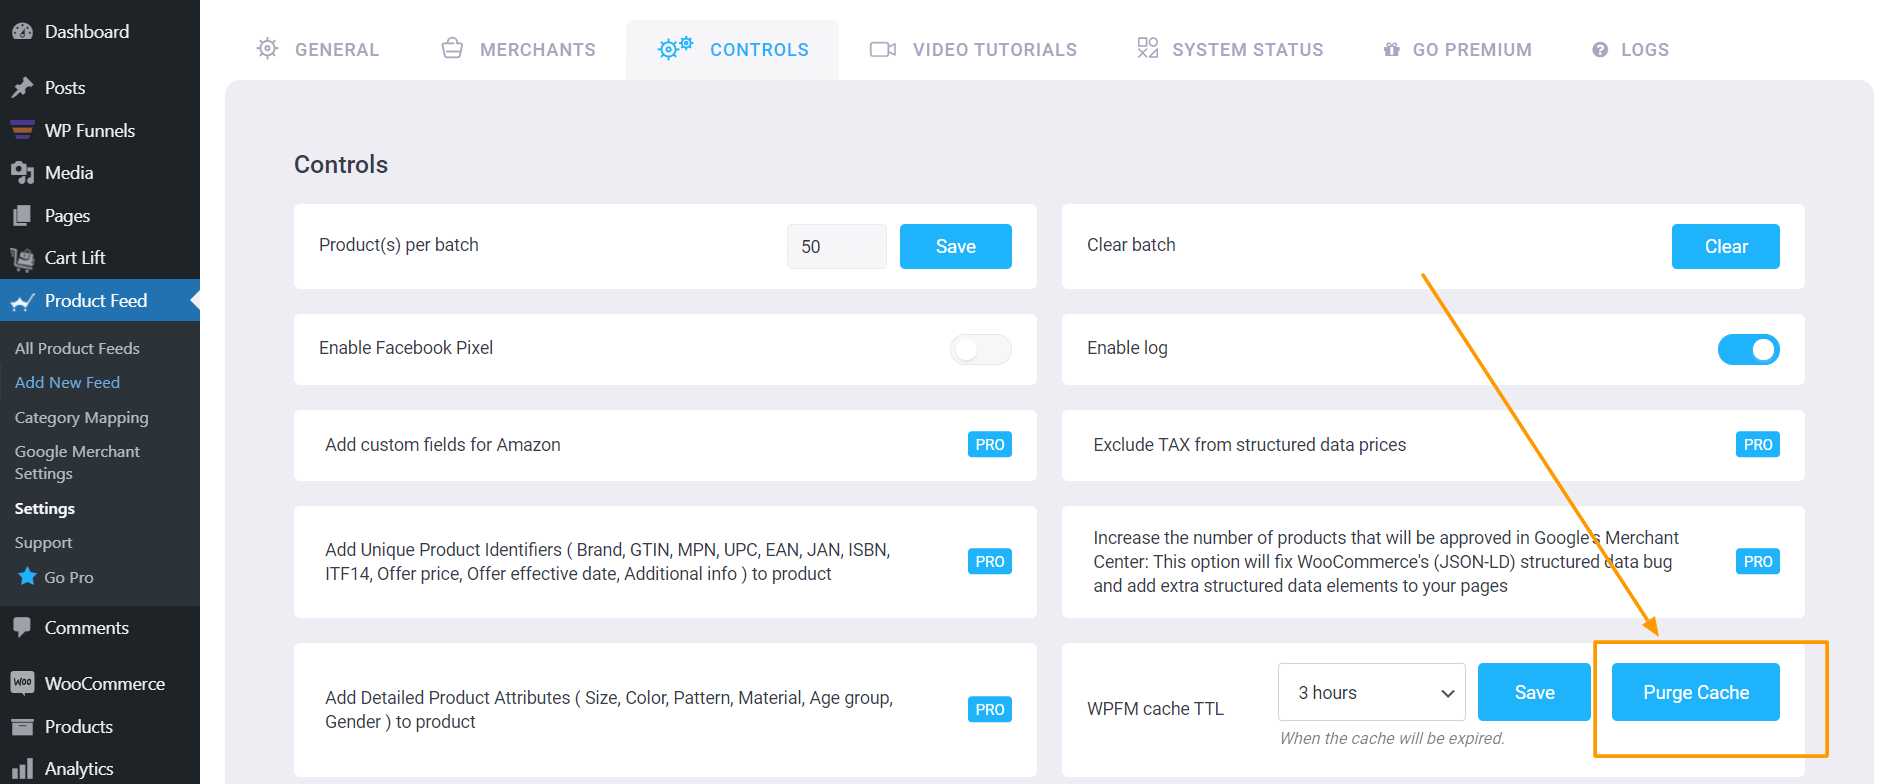
2. Once on the edit mode, on the right side, click on Purge Cache.

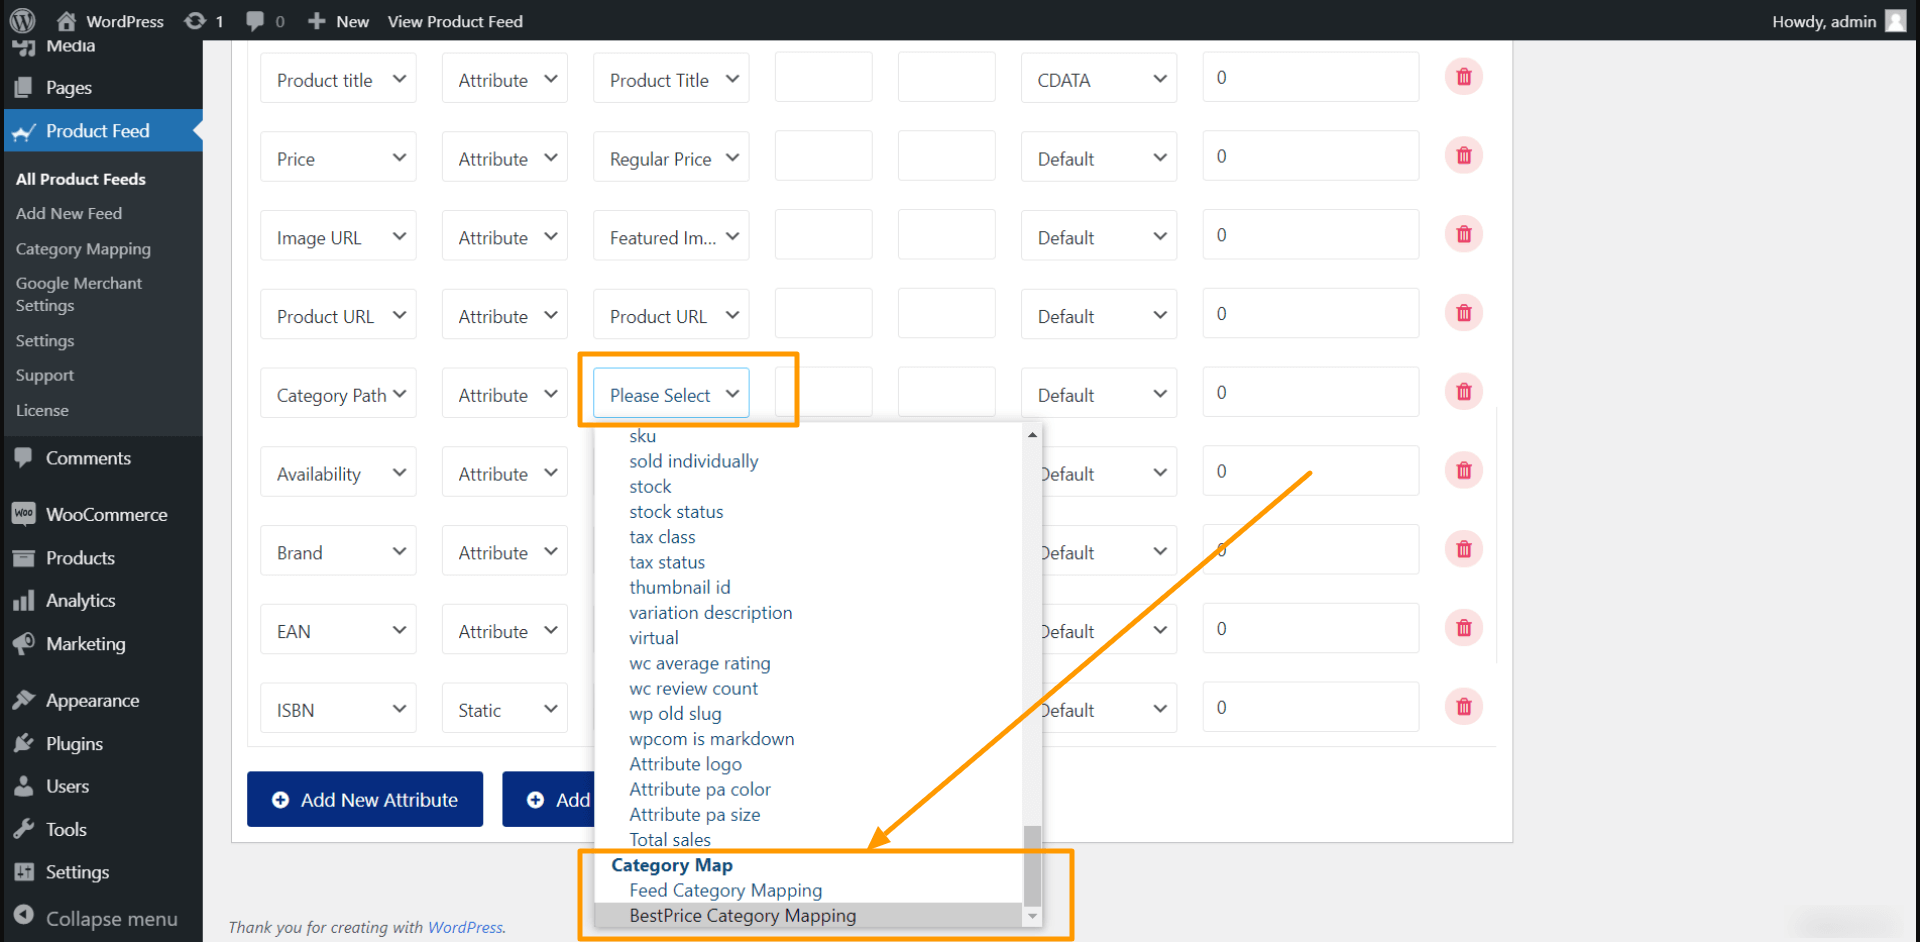
3. Now, scroll down to the feed configurations section and click on the Value field for Category.

Choose Category Mapping Favi

4. Scroll to the very bottom and you will find the Category Map that you just created. Select it.

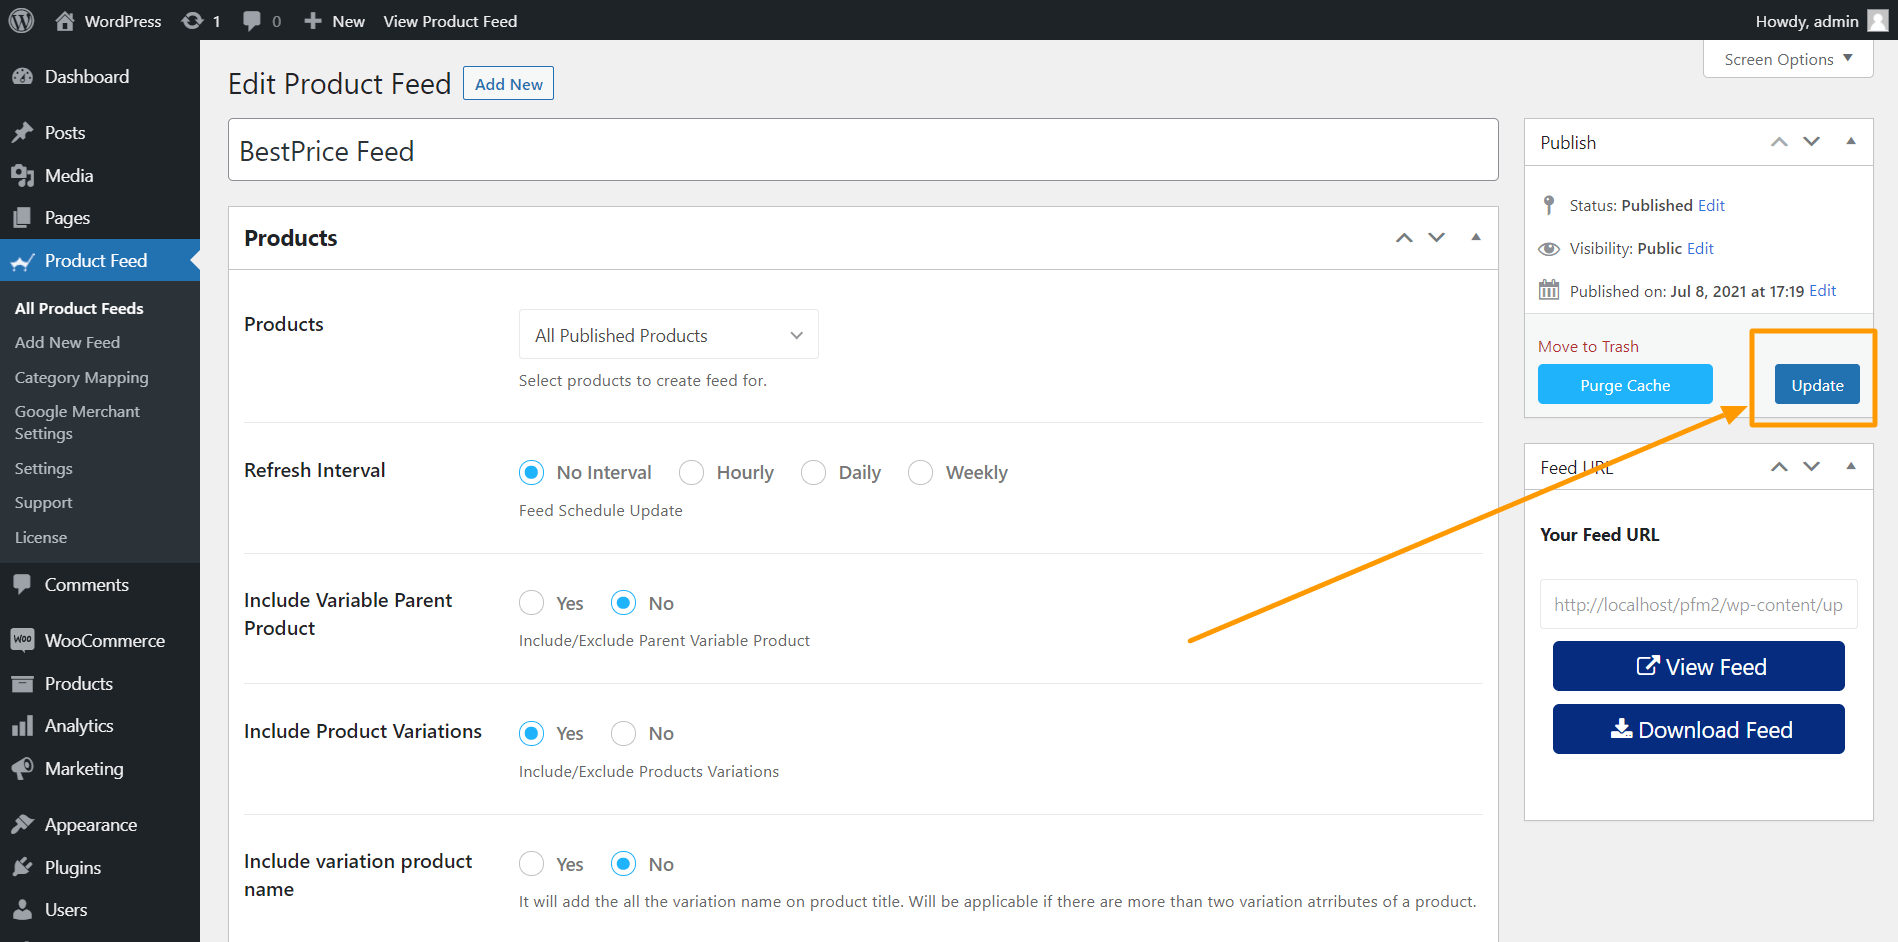
5. Now scroll up and click on Update

Product Feed Manager Update Feed

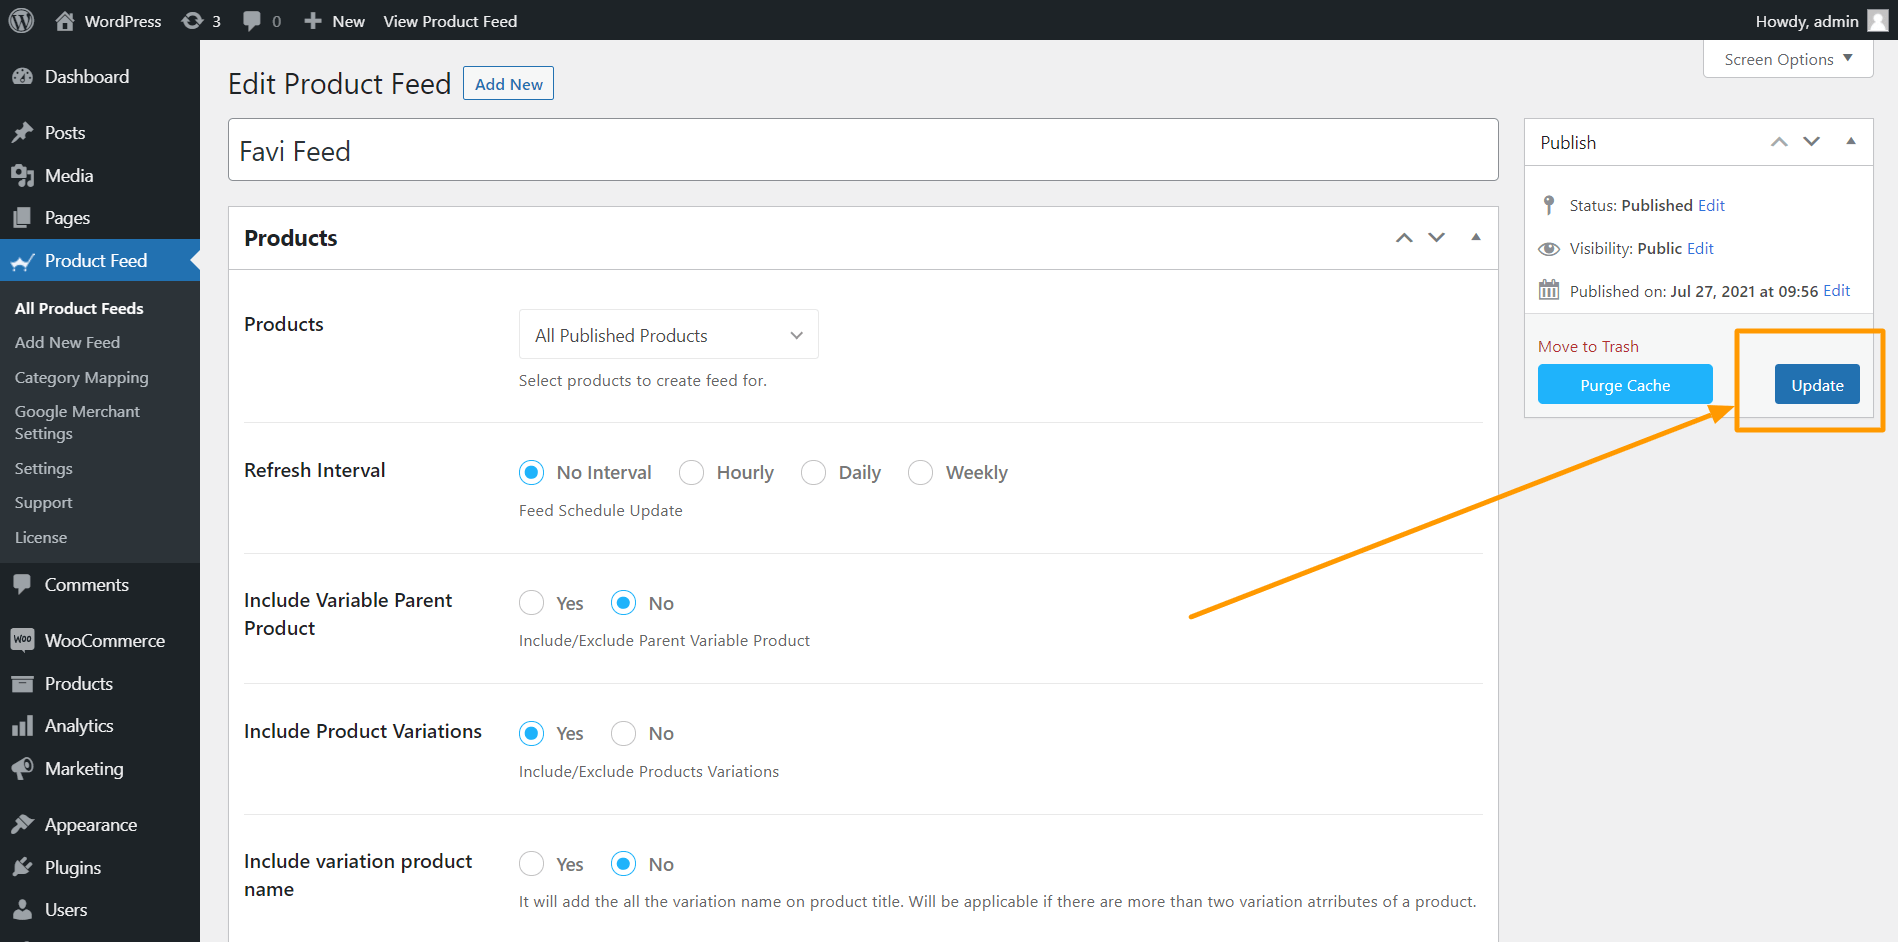
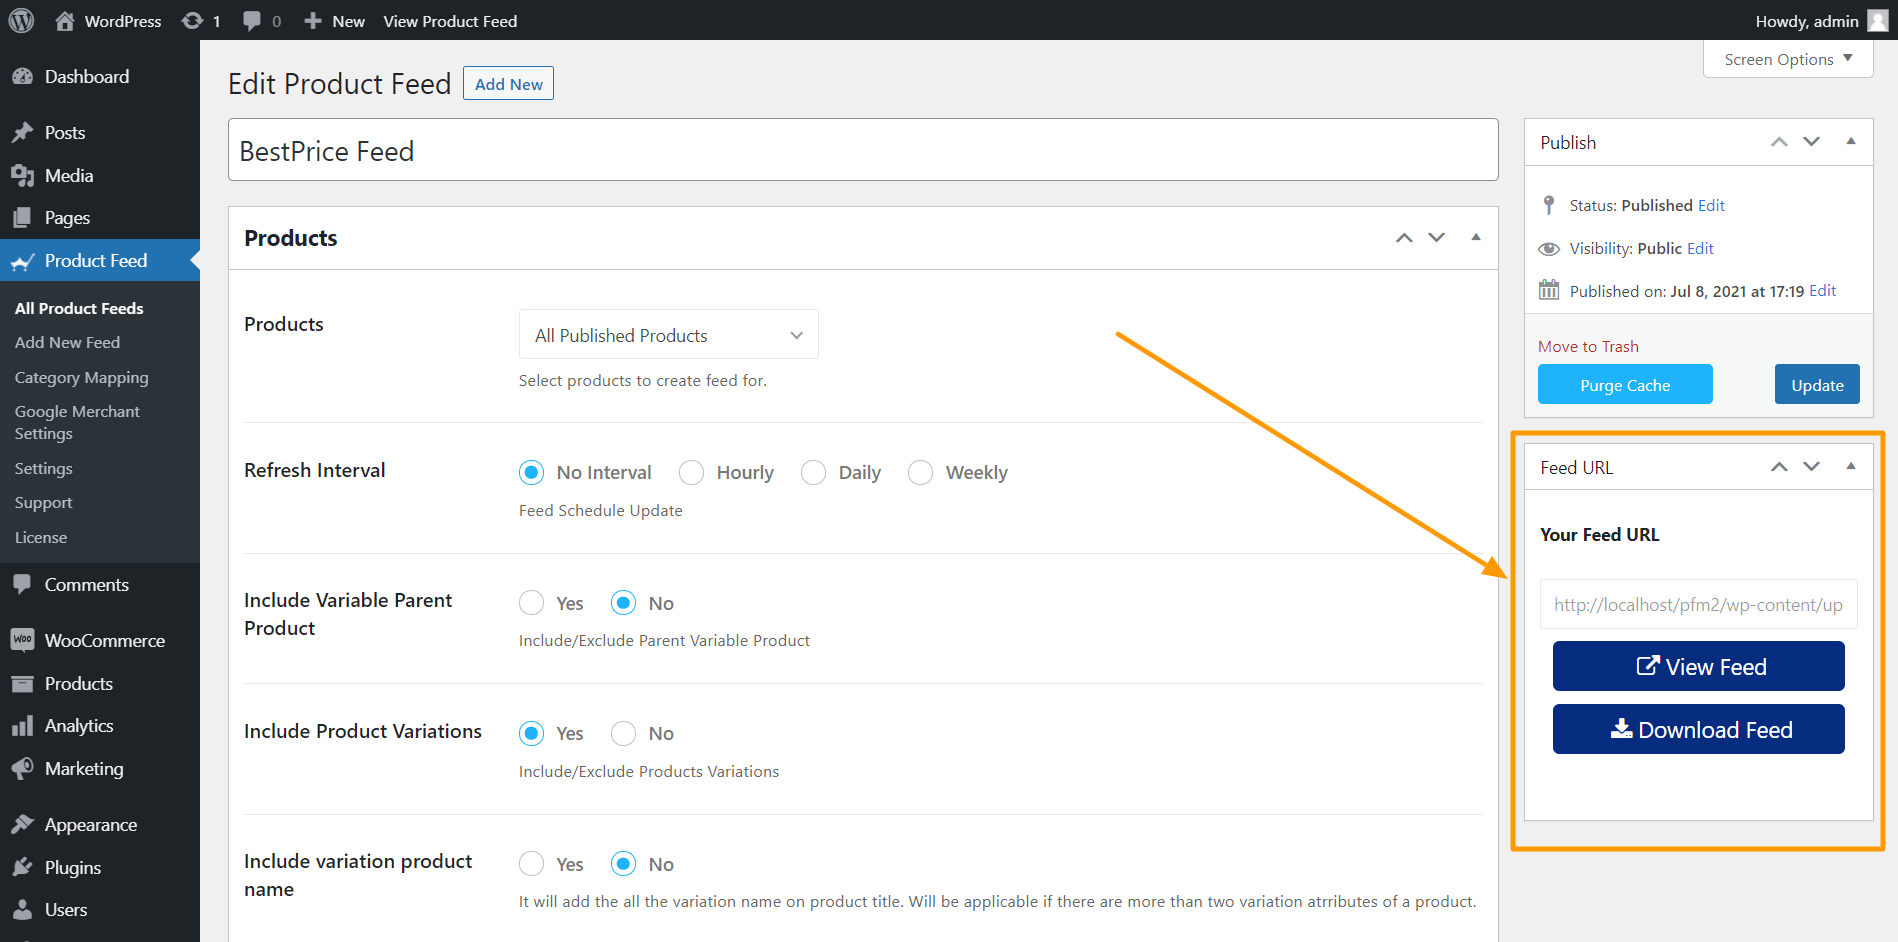
And that’s it. Your feed generation is complete.

Once the feed is generated, you may now review your progress on meeting the requirements, and go ahead and register on Favi.

Conclusie

Favi has made a significant impact in increasing revenue for many local furniture brands and it’s time you take advantage of this reliable price comparison platform yourself.

As you just saw how easy it is to generate an XML feed, you can use Product Feed Manager for WooCommerce and start promoting your WooCommerce products on Favi real quick.

Check out the plugin here:
– https://wordpress.org/plugins/best-woocommerce-feed/
– Product Feed Manager for WooCommerce Pro

In eerste instantie, test de gratis versie van de plugin, en zodra je zeker weet dat de plugin doet wat het beweert, kun je doorgaan en upgraden naar Pro.

Grab this opportunity and boost your revenue locally.

Categorieën
Guide Product Feed Manager For WooCommerce WooCommerce

Simple Guide To Generate Rakuten Product Feed – WooCommerce [2024]

Een e-commerce bedrijf runnen kan moeilijk zijn. Een van de beste manieren om uw omzet snel te verhogen is echter door uw producten te promoten op grote marktplaatsen.

Rakuten is zo'n marktplaats waarop u kunt vertrouwen. Met meer dan een miljard actieve gebruikers in 30 landen is Rakuten een van de topverkopers die u kan helpen uw verkoop te stimuleren zonder veel moeite.

En als je WooCommerce gebruikt, dan is het super eenvoudig om je producten op Rakuten marketplace te plaatsen.

U hoeft alleen maar een Rakuten productfeed aan te maken met de juiste attributen en uw producten te uploaden naar de marktplaats. En al snel zult u meer potentiële kopers op uw site krijgen.

In deze gids krijgt u stapsgewijze instructies voor het nauwkeurig aanmaken van een productfeed voor de Rakuten marktplaats.

Na het lezen van deze gids zul je leren,

  • De vereiste attributen om in de productfeed op te nemen
  • Voorbeelden van in te dienen productgegevens voor elk kenmerk.
  • Hoe genereer je Rakuten product feed in een paar klikken.

Dus laten we beginnen.

Gids voor het genereren van Rakuten Product Feed

Laten we eerst leren over alle vereiste gegevens voor elk product die je in de productfeed moet opnemen. Daarna bekijken we hoe u deze productfeed in het juiste formaat kunt genereren.

Specificatie productgegevens voor Rakuten Product Feed

Een productfeed voor Rakuten wordt meestal gegenereerd in CSV-formaat. Maar u kunt ook TXT- of TSV-formaten gebruiken om uw productgegevens in te dienen.

Vereiste productkenmerken om in te dienen bij Rakuten

Hieronder volgen de verplichte kenmerken voor elk product:

Attribuut kopInstructiesVoorbeeld
idDit fungeert als een unieke identificatie voor een product. Je kunt je WooCommerce product ID of product SKU gebruiken als waarde voor dit attribuut.102
titel Vermeld de naam van het product (niet meer dan 70 tekens).Pullover Hoodie met Logo
merkWijs een merknaam toe aan het product dat u op de Rakuten marketplace wilt aanbieden.

Als u de fabrikant bent, kunt u uw eigen bedrijfsnaam als merknaam toewijzen.
Lacoste
beschrijving Voeg een korte beschrijving van uw product toe met details over het gebruik en de voordelen ervan.Deze pullover hoodie is gemaakt van 100% biologisch katoen voor extreem comfort. Met de nieuwste generatie stijl en mesh voering, zal deze hoodie je een speciaal gevoel geven, terwijl het comfort behouden blijft.
google_product_categorieU moet ook een categorie opgeven uit de taxonomielijst van Google, waarvoor dit product relevant is.Kleding & Accessoires
linkDit zou de link naar uw product moeten zijnhttp://yourwebsite.com/product/pullover-hoodie-with-logo
Afbeelding_link U moet voor elk product minstens één afbeelding indienen.

*De afbeelding moet minstens 600×600 groot zijn.
http://yourwebsite.com/wp-content/uploads/2022/04/pullover-hoodie-with-logo-1.jpg
prijs Geef de werkelijke prijs van het product op. Als er een korting geldt, geef dan de normale prijs op voor dit kenmerk, en gebruik het sale_price kenmerk om de gereduceerde prijs op te geven.

Neem de valuta op als achtervoegsel.
45.00 EUR
beschikbaarheid Vermeld de beschikbaarheid van de voorraad, d.w.z. of het product nog in voorraad is voor aankoop.

*Aangevaarde waarden:
- op voorraad
- niet op voorraad
- voorbestelling
- nabestelling 
op voorraad
gtinGTIN is een unieke productidentificatie die u in het voer moet opnemen.

Dit staat ook voor alle andere vormen van identificatie, zoals UPC, EAN, JAN, en alle vormen van GTIN.
401234512343
mpnDien ook het MPN in, dat een specifiek product uniek identificeert tussen alle producten van dezelfde fabrikant.HSC0424PP
voorwaardeVermeld de toestand van het product dat u verkoopt.

*Geaccepteerde waarden:
- Nieuw
- Gereviseerd
- Gebruikt
Nieuw
geslachtHet is verplicht te vermelden voor welk geslacht uw product geschikt is.

*Aanvaardbare waarden zijn:
- Man
- Vrouw
- Unisex.
Unisex
leeftijdsgroepU moet ook de leeftijdsgroep opgeven van de prospects waarvoor uw producten geschikt zijn.

*Aanvaardbare waarden:
- Volwassen
- Kinderen
Volwassen
producttypeDit kenmerk staat voor de productcategorie die je hebt toegewezen aan je producten in je WooCommerce winkel.

*Het is sterk aanbevolen om dit kenmerk in te dienen voor betere zoekresultaten, maar het is niet verplicht.
Heren Hoodies
item_groep_idAls u variabele producten hebt, dan moet u een gemeenschappelijke item_group_id opnemen voor elke variant van hetzelfde product. Dat is in feite de ID of de SKU van het bovenliggende product.1001

Voorwaardelijk vereiste attributen om op te nemen in de feed

Enkele attributen zijn niet altijd vereist, maar moeten vaak onder bepaalde voorwaarden worden ingediend. Laten we deze kenmerken in detail bekijken.

Attribuut kopInstructiesVoorbeeld
verkoopprijsDit kenmerk is alleen nodig als je een korting in je winkel hebt lopen. Neem in dat geval de afgeprijsde prijs op als verkoopprijs in de feed.35.00 EUR
kleurHet kleurkenmerk is verplicht voor producten die onder de categorie Kleding vallen, maar u kunt het ook gebruiken voor producten in andere categorieën.

Ook als u variabele producten hebt die variëren door de kleur, moet u het kleurkenmerk indienen.
Rood
formaat U moet het kenmerk Grootte indienen voor producten die onder de categorie Kleding vallen. U kunt het ook voor producten in andere categorieën gebruiken.

Ook als u variabele producten hebt die variëren door de maat, moet u het maatkenmerk indienen.
XXL
materiaalU moet dit kenmerk indienen voor variabele producten die variëren door het patroon (of het grafisch ontwerp).Leder
patroon Voor variabele producten die variëren door het patroon (of het grafisch ontwerp), moet u dit kenmerk indienen.Gestript
verzendgewichtAls u in uw koopcentrum een regel hebt ingesteld voor verzendkosten op basis van het verzendgewicht, dan moet u dit kenmerk indienen.

*U kunt de eenheid als achtervoegsel indienen, dat hetzelfde moet zijn als u in uw koopcentrum hebt ingesteld.
1.2 kg
volwassenAls u een product voor volwassenen verkoopt, d.w.z. artikelen of afbeeldingen met naaktheid of suggestieve inhoud, moet u dit kenmerk voor die producten indienen.

*Accepted values:
- yes
- no
ja

Andere optionele kenmerken die u kunt opgeven

Naast de bovenstaande kenmerken zijn er nog een paar kenmerken die u kunt opgeven indien dat nodig of van toepassing is.

Attribuut kopInstructiesVoorbeeld
verkoopprijs ingangsdatumAls uw product in de uitverkoop is en de verkoopprijs heeft een beperkte tijd, kunt u dit attribuut gebruiken om de datum en tijd te vermelden waarop de uitverkoop afloopt.

**Dit attribuut is niet verplicht, maar u kunt het gebruiken als het nodig is.
2022-10-29T23:07:31​+0100

extra_afbeelding_link
Als u extra afbeeldingen voor uw producten wilt indienen, kunt u de links naar uw producten indienen onder het kenmerk additional_image_link, waarbij u de afbeeldingslinks scheidt door komma's.http://yourwebsite.com/wp-content/uploads/2022/04/image1.jpg,http://yourwebsite.com/wp-content/uploads/2022/04/image2.jpg,http://yourwebsite.com/wp-content/uploads/2022/04/image3.jpg
belastingGewoonlijk moet u de belastingtarieven instellen in uw Merchant Center-account. Maar als u voor bepaalde producten een uniek belastingtarief wilt indienen, dan kunt u daarvoor dit attribuut gebruiken.15
verzendingU moet de verzendkosten voor uw producten instellen in uw Merchant Center-account. Maar als u voor bepaalde producten een unieke verzendkosten wilt opgeven, dan kunt u daarvoor dit attribuut gebruiken.3.99 EUR
multipackAls u meerdere hoeveelheden van hetzelfde product tegen één prijs wilt verkopen, dan kunt u die hoeveelheid opgeven als de waarde voor het multipack attribuut.

U kunt er bijvoorbeeld voor kiezen om 6 t-shirts als multipack te verkopen.
In dit geval moet de prijs de totale kosten van het pakket zijn, d.w.z. in het geval van de 6 t-shirts moet de prijs de totale kosten voor alle zes t-shirts vertegenwoordigen.
6

Voorbeeld Voerstructuur van Rakuten

Hier is een voorbeeld van een Rakuten CSV feed. U kunt het downloaden en bekijken met een CSV-viewer.

Nu je volledig begrijpt hoe de Rakuten feed werkt en welke vereiste attributen je in je productgegevens moet opnemen, laten we eens kijken hoe je gemakkelijk een productfeed voor Rakuten kunt genereren.

7 eenvoudige stappen om Rakuten Product Feed te genereren in je WooCommerce winkel

Ten eerste hoeft u niet handmatig een CSV feed te maken voor al uw producten. Op dit moment zijn er verschillende tools waarmee u gemakkelijk een productfeed voor Rakuten kunt genereren.

In de volgende stappen laat ik je zien hoe je een productfeed voor Rakuten kunt genereren met Product Feed Manager voor WooCommerce. Het is een van de gemakkelijkste plugins om te gebruiken en heeft een vooraf gemaakt sjabloon met alle noodzakelijke attributen om je te helpen Rakuten CSV feed te genereren in slechts een paar klikken. 

Volg deze 7 eenvoudige stappen om te leren hoe je een Rakuten feed template gebruikt, en maak je CSV feed snel klaar.

Stap 1 - Product Feed Manager installeren en activeren

1. Ga naar Dashboard > Plugins en klik dan op de knop Nieuw toevoegen.

WordPress Dashboard - Nieuwe plugin toevoegen

2. Typ "Product Feed Manager" in het zoekvak, en je vindt de plugin in het zoekresultaat.

WordPress Dashboard - Zoeken naar de plugin

3. Klik op de knop Nu installeren.

4. Klik vervolgens op de knop Activeren om de plugin te activeren.

Product Feed Manager activeren

Zodra je de plugin hebt geactiveerd, vind je het menu, Product feed, onder je dashboard menu's.

Stap 2 - Rakuten-sjabloon en kaartattributen importeren

1. Klik op uw dashboard op Product Feed.

Product Feed Manager Dashboard

2. Klik vervolgens op de knop Nieuwe feed toevoegen.

Product Feed Manager - Nieuwe feed toevoegen

U komt op een lege pagina voor het genereren van feed.

Product Feed Manager Nieuwe feed toevoegen

3. Bovenaan krijg je de optie om een titel aan de feed toe te voegen. Geef je feed een naam.

Product Feed Manager Feed Titel

4. Net onder de titel ziet u een optie om uw voorkeursverkoper te selecteren. Klik gewoon op de Feed Merchant dropdown knop en selecteer de handelaar van uw voorkeur uit de dropdown of u kunt zoeken in de dropdown box.

Selecteer de handelaar van uw voorkeur, en alle vereiste attributen worden hieronder geladen.

Selecteer Rakuten in de keuzelijst.

Vereiste attributen voor Rakuten Feed

**Let op: voor Rakuten kunt u alleen CSV, TXT of TSV feed aanmaken. U kunt uw voorkeursfeedformaat kiezen in de Feed Type file format selection dropdown naast de Feed Merchant dropdown optie.

Hier zullen we een CSV feed voor Rakuten maken, dus laten we CSV selecteren in de Feed Type dropdown optie.

3. U ziet dat de meeste attributen al zijn geconfigureerd - hun waarden zijn correct toegewezen; u kunt de toegewezen waarden naar behoefte wijzigen of ze laten zoals ze zijn.

De rest van de attribuutwaarden moet u echter handmatig toewijzen.

Voor Rakuten moet u waarden toekennen aan de volgende attributen:

  • Merk -
    Dit moet de merknaam zijn van het product dat u verkoopt. Als u de fabrikant bent, kunt u het type instellen als Statisch en hier uw bedrijfsnaam invoeren.
    Als u verschillende merknamen hebt voor verschillende producten, moet u de waarde opslaan in een aangepast veld of productkenmerk en vervolgens die waarde hier gebruiken.
    **U kunt ook Perfect Brands for WooCommerce gebruiken om merken toe te wijzen, die u in de feed kunt gebruiken.
  • Google Productcategorie -

Category Mapping is in feite het samenvoegen van je WooCommerce productcategorieën met de Google productcategorieën.

Je kunt categoriemapping op twee manieren configureren. De eerste is dat je een vooraf gemaakte category mapper kunt gebruiken, die standaard is gemaakt voor Google Shopping - je kunt deze ook gebruiken voor Facebook of andere marktplaatsen. En de tweede is het maken van een nieuwe Category Mapper.

Om de standaard categoriemapper te gebruiken die voor Google is gemaakt, selecteert u gewoon de Googe Product Category mapper in de Category Mapping dropdown-waarde:

Optie voor categorietoewijzing

Dit is een lege Category Mapper. Klik op de knop Category Mapping configureren die u vindt onder de waarde Category Mapping, en er wordt een nieuw tabblad geopend met de standaard category mapper - Google Product Category. Breng hier uw categorieën in kaart en klik op de knop Bijwerken en sluiten om terug te gaan naar het attribuutgedeelte.

Je kunt echter ook een nieuwe Category Mapper aanmaken. Je moet op de knop Category Mapping klikken vanuit het WordPress dashboard en daar krijg je de optie om een nieuwe Category Mapper aan te maken en de mapper te configureren.

U kunt deze docu volgen om te leren hoe u een nieuwe Category Mapper voor uw feed kunt maken.

  • GTIN -
    Dit is gewoonlijk uniek voor elk product. U moet deze waarde dus opslaan in een aangepast veld binnen elk product en die waarde hier gebruiken.
  • MPN -
    Het MPN moet uniek zijn voor elk product. U moet deze waarde dus opslaan in een aangepast veld binnen elk product en die waarde hier gebruiken.
  • Leeftijdsgroep -
    De bevolkingsgroep waarvoor uw product bestemd is. De enige twee geaccepteerde waarden van dit kenmerk zijn Volwassenen en Kinderen.
  • Geslacht -
    Het geslacht waarvoor uw product bestemd is. Drie vooraf gedefinieerde waarden worden geaccepteerd: Man, Vrouw en Unisex.

Stap 4 - Basisconfiguratie-instellingen voor de feed

1. Scroll naar boven en hier ziet u dat er twee opties zijn, Productfilter en Productinstellingen.

  • Producten Instellingen
  • Product Filter
Product Feed Manager Invoeropties

2. Laten we eerst de functies configureren in de Productinstellingen. Klik op de knop Productinstellingen, en aan de rechterkant van het scherm wordt een lade geopend.

Product Feed Manager Gedeelte voerinstellingen

3. De eerste optie die je ziet is Automatisch je feed genereren.

Product Feed Manager Schedule Feed Optie

Deze optie wordt gebruikt om een automatische update van de feed te plannen na bepaalde intervallen. Kies een optie om een auto-update in te stellen of laat het staan op "Geen interval" als je geen auto-update van de feed wilt instellen.

4. Gebruik vervolgens indien nodig de volgende opties.

Product Feed Manager Feed-instellingen voor producten
  • Selecteer land/regio
  1. Selecteer een regio uit dit vervolgkeuzemenu als je de verzendgegevens in je feed wilt opnemen. Zodra je de regio hebt geselecteerd, moet je het kenmerk Verzenden aan je feed toevoegen om de waarden voor Verzenden te krijgen.
  2. U kunt dit document volgen om te leren hoe u de verzendinformatie in uw feed kunt opnemen.
  • Inclusief uitverkochte producten
    -Als je de uitverkochte producten wilt opnemen, kun je de optie inschakelen.
    -Voor deze feed gebruiken we deze optie niet en houden we de waarde op "Nee".
  • Inclusief variabel ouderproduct (zonder variaties)
    -Als je de ouderfeed voor variabele producten wilt opnemen, kun je de optie inschakelen.
    -Bij weinig verkopers, zoals Google Shopping of Facebook, hoef je geen ouderproducten in te dienen, maar bij veel andere verkopers, zoals eBay MIP, moet je wel productproducten in de feed opnemen.
    -Voor deze feed gebruiken we deze optie niet en houden we de waarde op "Nee".
  • Include All Variable Products Variations -
    -Als je alleen eenvoudige producten wilt opnemen in de feed en geen variabele producten, houd de waarde dan op "No".
    -Als je zowel eenvoudige producten als variabele producten wilt indienen bij Google Shopping, houd de waarde dan op "Yes".
    -Laten we deze functie gebruiken en markeren als "Yes", voor deze feed.
  • Variantnaam opnemen in de producttitel
    -Weinig handelaren, zoals Google Shopping, raden je aan de variatieterm toe te voegen aan de productnaam als je variabele producten uploadt, maar het is volledig optioneel.
    -Dus als je de variatieterm wilt opnemen in de variabele productnamen, dan kun je de waarde ervan instellen als "Ja".
    -Laten we deze functie gebruiken en markeren als "Ja", voor deze feed.
  • Inclusief gegroepeerde producten
    -Als u gegroepeerde producten hebt, dan kunt u het beste het bovenliggende product van het gegroepeerde product dat u hebt gemaakt indienen.
    -Dus moet u deze optie aanvinken met "Ja".
  • Onzichtbare/verborgen producten uitsluiten
    -Je hebt misschien bepaalde producten in je winkel die in WooCommerce zijn gemarkeerd als verborgen of onzichtbaar.
    -Als je alleen feed wilt genereren voor eenvoudige producten, kun je deze optie markeren als "Ja" om onzichtbare producten uit te sluiten van de feed.
    -Maar productvarianten zijn standaard gemarkeerd als onzichtbaar in WooCommerce. Dus als je variabele producten opneemt in de feed, dan moet je dit markeren als "Nee".
    -Omdat we in deze feed productvarianten opnemen, zullen we deze functie niet gebruiken en deze op "Nee" houden.
  • Elk attribuut overslaan als de waarde leeg is
    -Inschakelen van deze functie sluit alle attributen van een product uit als de waarde van het attribuut ontbreekt.
    -Voor deze feed zullen we deze optie niet gebruiken en de waarde ervan op "Nee" houden.

5. U vindt dan een optie om Track Your Campaign (Analytics parameters) toe te voegen.

Gebruik deze optie als u analyseparameters wilt toevoegen aan productlinks in uw productfeed, zodat u de prestaties van de producten op Google Shopping kunt volgen.

6. Sluit nu de lade en klik op de optie Productfilter. Een nieuwe lade wordt geopend aan de rechterkant van het venster.

Bovenaan krijgt u de optie om het Aangepaste filter of de functie Feed Rules (PRO) te gebruiken.

En u krijgt de feed filteropties uit het Filter dropdown menu.

Product Toevoermanger - Toevoer Filter Sectie

Kies de producten die je in de feed wilt opnemen met behulp van een filter. Standaard is "Alle gepubliceerde producten" geselecteerd

U kunt alle andere filteropties, Aangepast filter, Categoriefilter en Tagfilter, gebruiken om de producten die u nodig hebt op te nemen (of uit te sluiten die u niet wilt opnemen).

Voor een basisvoeding kun je het houden zoals het is.

Stap 6 - De WooCommerce Product Feed voor Rakuten publiceren

Nu je feedconfiguratie klaar is, is het tijd om de feed te publiceren.

Scroll terug naar boven, en u vindt rechts een knop Publiceren.

Klik op de knop Publiceren, uw feed wordt gegenereerd.

Zodra het genereren van uw feed voltooid is, kunt u de feed bekijken of downloaden.

Dat is het. Uw CSV feed voor Rakuten is gegenereerd. U kunt dit bestand nu downloaden en uploaden naar uw merchant account en uw producten aanbieden op de Rakuten Advertising marktplaats.

Conclusie

Rakuten is een enorme merknaam en de reputatie van hun marktplaats is immens. Het promoten van je WooCommerce producten op dit multinationale platform kan je helpen je inkomsten aanzienlijk te verhogen.

Zoals je hebt gezien, is dit hoe eenvoudig het is om een productfeed voor Rakuten te genereren met Product Feed Manager voor WooCommerce.

Je kunt de plugin hier krijgen:
- https://wordpress.org/plugins/best-woocommerce-feed/
- Product Feed Manager voor WooCommerce Pro

In eerste instantie, test de gratis versie van de plugin, en zodra je zeker weet dat de plugin doet wat het beweert, kun je doorgaan en upgraden naar Pro.

Dus als je de kans hebt, ga je gang en begin te promoten op Rakuten.

Categorieën
Guide Product Feed Manager For WooCommerce WooCommerce

How To Generate Product XML Feed For BestPrice Greece – WooCommerce (2024)

Wist u dat u uw omzet gemakkelijk kunt verhogen door reclame te maken op lokale prijsvergelijkingssites?

Als u een retailer bent in Griekenland of eigenaar van een Griekse online e-commerce site, dan kunt u gemakkelijk uw verkoop stimuleren via BestPrice.gr.

BestPrice is een van de top drie prijsvergelijkingssites in Griekenland. Met een gemiddelde van 5,6 miljoen maandelijks verkeer, kan het promoten van uw producten hier een game-changer zijn voor uw bedrijf om u te helpen uw inkomsten te laten groeien.

Om je producten op BestPrice.gr te plaatsen, hoef je alleen maar lid te worden van hun marktplaats als Merchant, een product XML feed te genereren in het juiste formaat, en deze te uploaden naar je merchant account om te beginnen met verkopen. Dat is het.

Als je een WooCommerce winkel runt om producten te verkopen binnen Griekenland, dan kun je met de juiste tool eenvoudig in een paar klikken een productfeed genereren voor BestPrice.

In deze gids leer je over,

  • Hoe toetreden tot BestPrice.gr marktplaats
  • Het juiste XML formaat om producten op BestPrice.gr te plaatsen
  • De verplichte kenmerken om dit productfeed te genereren
  • Hoe maak je WooCommerce feed voor BestPrice in een paar klikken.

En zodra je de feed klaar hebt, kun je je producten uploaden naar BestPrice en direct beginnen met verkopen.

Dus laten we beginnen.

Gids voor het genereren van BestPrice Product Feed

Het eerste wat je moet doen is lid worden van het BestPrice.gr merchant programma.

U kunt de BestPrice voor handelaren pagina bezoeken, en daar zult u alle details te weten komen die nodig zijn om toe te treden tot de marktplaats. Meld u aan en configureer uw Merchant Affiliates Platform instellingen zoals Verzending, Belasting, Beleid, en andere dergelijke gegevens.

Deelnemen aan deze marktplaats vereist een kleine vergoeding, maar dat is heel weinig vergeleken met de duizenden dollars aan business die het zal opleveren.

Zodra u een handelaar bent, is het volgende wat u moet doen uw producten in het juiste formaat naar de marktplaats uploaden.

Specificatie voor BestPrice productgegevens

Bij het genereren van een data feed om je producten te uploaden op BestPrice.gr, moet je het volgende XML formaat aanhouden:

<?xml version="1.0" encoding="ISO-8859-7"?>
<store>
<date>--date-- --time--</date>	
        <products>		
                <product>			
                        ---PRODUCT ATTRIBUTES AND DATA HERE---		
                </product>	
        </products>
</store>

Hier moet je de datum en tijd waarop je de feed hebt gegenereerd en de juiste productattributen voor elk product opnemen.

Maar als je een WooCommerce-winkel hebt, hoef je je geen zorgen te maken over het zelf maken van dit formaat. Je kunt gewoon de plugin Product Feed Manager for WooCommerce gebruiken om in een paar klikken een XML-feed te genereren.
**We zullen later in dit artikel meer over deze plugin bespreken.

Laten we eens kijken naar de gegevens over de productattributen die u voor elk product moet opnemen.

Vereiste productattributen voor BestPrice Feed - met voorbeelden

De volgende zijn de verplichte attributen die u moet indienen voor elk product op BestPrice -.

AttribuutInstructiesVoorbeeld
productId 

Format:
<productId>…</productId>
Dit moet een unieke ID zijn voor het product. U kunt de product-ID van uw winkel of de SKU van het product als waarde voor dit kenmerk gebruiken.  <productId>15</productId>
title 

Format:
<title>…</title>
De producttitel moet de productnaam bevatten en aanvullende informatie zoals de naam van de fabrikant/merk, de unieke kenmerken, de modelnaam, enz.<title>Lacoste Hoodie With Logo – Grey</title>
productURL 

Format:
<productURL>…</productURL>
Dit is de directe URL van het product.

Voor variabele producten moet dit uniek zijn voor elke variant.
<productURL>https://www.yourdomain.gr/products/lacoste-hoodie-grey</productURL>
imageURL 

Format:
<imageURL>…</imageURL>
U moet ten minste één afbeelding voor uw product opgeven.

**Voor meerdere afbeeldingen moet u de tag 'imagesURL' gebruiken, die in de volgende rij wordt uitgelegd.
<imageURL>
https://www.yourdomain.gr/productimage1.png
</imageURL>
imagesURL

Format:
<imagesURL>
<img1>…</img1>
<img2>…</img2>
</imagesURL>
Als je meerdere afbeeldingen voor je producten wilt indienen, moet je dit attribuut gebruiken in plaats van 'imageURL'.

<imagesURL>
<img1>https://www.yourdomain.gr/productimage1.png</img1>
<img2>https://www.yourdomain.gr/productimage2.png</img2>
</imagesURL>
price

Format:
<price>…</price>
Voer de huidige verkoopprijs van het product in, d.w.z. als het product is afgeprijsd, moet je de afgeprijsde prijs invoeren; anders moet je gewoon de oorspronkelijke prijs invoeren.

In WooCommerce, als je een verkoopprijs hebt toegewezen aan een product, moet je de verkoopprijs invoeren als de prijs van het product in de feed.
<price>59.99</price>
category_path 

Format:
<category_path>…</category_path>
Voeg de naam van de productcategorie toe, indien mogelijk, met het volledige categoriepad met een '->' scheidingsteken.

*Als alternatief kunt u de categorie-id opgeven als u dat wilt.
<category_path>Τεχνολογία->Κινητή Τηλεφωνία->Κινητά τηλέφωνα</category_path>
availability

Format:
<availability>…</availability>
Dit kenmerk wordt voornamelijk gebruikt om de levertijd te bepalen.

De aanvaarde waarden voor beschikbaarheid zijn:
- Σε απόθεμα
- Παράδοση σε 1-3 ημέρες
- Παράδοση σε 4-7 ημέρες
- Παράδοση σε 4-10 ημέρες
- Παράδοση σε 8-14 ημέρες
- Κατόπιν παραγγελίας
- Προπαραγγελία
- Εξαντλήθηκε

** Σε απόθεμα (op voorraad betekent dat het product kan worden afgehaald.
<availability>Παράδοση σε 1–3 ημέρες</availability>
brand 

Format:
<brand>…</brand>
Geef de merknaam van uw producten op. Als u de fabrikant bent, kunt u uw bedrijfsnaam als merknaam gebruiken.<brand>Market προσφορέσ</brand>
EAN / Barcode /MPN / SKU 

Format: 
<MPN>…</MPN>
U moet het onderdeelnummer van de fabrikant van uw producten vermelden.

**Als u geen MPN hebt, kunt u het EAN, de streepjescode of het artikelnummer als waarde voor dit kenmerk opgeven.
<MPN>MN8X2ZD/A</MPN> 

Zodra je deze vereiste attributen hebt toegevoegd, is je feed vrijwel klaar om te worden geüpload naar de BestPrice marktplaats.

Er zijn echter meer attributen die je nodig hebt of wilt opnemen om dit voer verder te optimaliseren.

Voorwaardelijk Vereiste Attributen

U moet een aantal kenmerken opgeven, afhankelijk van specifieke factoren. Is uw product bijvoorbeeld een boek, dan moet u een ISBN opgeven.

Laten we deze voorwaardelijke attributen eens bekijken.

AttribuutInstructiesVoorbeeld
ISBN 

Format:
<ISBN>…</ISBN>
Als uw product een boek is, moet u het ISBN indienen in plaats van het MPN of EAN.<ISBN>960-6604-92-6</ISBN>
size 

Format:
<size>…</size>
Als uw product een kleding- of schoenenproduct is, moet u het maatkenmerk opgeven.

U kunt gewoon alle beschikbare maten opgeven via dit kenmerk, waarbij u komma's gebruikt om ze te scheiden.

**Dit kan ook worden gebruikt voor producten in elke andere categorie, indien relevant.
<size>S,M,L,XL</size>
color 

Format:
<color>…</color>
Voor variabele producten die in kleur variëren, moet elke variant als een afzonderlijk product worden gegenereerd. En u moet er het kenmerk kleur aan toevoegen om de kleur te specificeren.<color>Red</color>
weight 

Format:
<weight>…</weight>
U moet het gewichtskenmerk indienen als u bij het definiëren van de verzendkosten via het Merchant Affiliatie Platform kiest voor de berekening van de verzendkosten op basis van het gewicht.

U kunt de waarde indienen als een numerieke waarde (geheel getal of decimaal) of een alfanumerieke waarde (gewicht + eenheid).
**Als u de alfanumerieke waarde gebruikt, moet de eenheid van het gewicht overeenkomen met de eenheid die u in het Merchant Affiliatieplatform hebt gedefinieerd.
<weight>5.2</weight>

Optionele attributen om de feed verder te optimaliseren

U kunt er ook voor kiezen enkele optionele kenmerken op te nemen om de indiening van uw productgegevens te optimaliseren.

AttribuutInstructiesVoorbeeld
stock 

Format: 
<stock>Y</stock>
Gebruik dit kenmerk om aan te geven of het product al dan niet op voorraad is.

Geef de waarde op als "Y" als het product op voorraad is en "N" als het product niet op voorraad is.

**Dit is een optioneel veld. Als u dit kenmerk niet opgeeft, of als de waarde voor dit kenmerk voor een product leeg is, dan wordt de voorraadstatus beschouwd als "Κατόπιν Παραγγελίας" (d.w.z. "op bestelling").
<stock>Y</stock> 
categoryID

Format:
<categoryID>…</categoryID>
U kunt de categorie-id samen met het categoriepad indienen om de nauwkeurigheid te verbeteren.

**Als u een categorie-id indient die niet correct is volgens het categoriepad dat u indient, wordt dit kenmerk genegeerd.
<categoryID>223</categoryID>
warranty_provider 

Format:
<warranty_provider>…</warranty_provider>
U kunt dit kenmerk indienen als er een garantie beschikbaar is voor een product.

De volgende waarden worden geaccepteerd:
- GR: als het product wordt gegarandeerd door de officiële Griekse dealer en/of geautoriseerde servicepunten binnen Griekenland.
- EU: als het product een Europese garantie heeft van de fabrikant (dealer of erkende servicepunten binnen de Europese Unie), die NIET de Griekse delegatie omvat.
- STORE: als de garantie wordt verleend door de winkel zelf of de winkelpartner. 
<warranty_provider>STORE</warranty_provider>
warranty_duration 

Format:
<warranty_duration>…</warranty_duration>
Dit is de geldigheidsduur van de garantieperiode in maanden.
**Indien u het kenmerk "warranty_provider" toevoegt, moet u dit verplicht indienen.
<warranty_duration>24</warranty_duration>
bundle 

Format:
<bundle>…</bundle>
Voor een gebundeld product kunt u dit attribuut gebruiken om de productID's van de gebundelde producten aan te geven.<bundle>B1C2, A2B6</bundle>
features 

Format
<features>
<power>…</power>
<voltage>…</voltage>
</features>
Als u een elektronisch product hebt dat een meetbaar vermogen en een meetbare spanning heeft, dan kunt u dit attribuut gebruiken om de waarden aan te geven.<features>
<power>1000W</power>
<voltage>230V/50Hz</voltage>
</features>
shipping 

Format:
<shipping>…</shipping>
Als u voor een bepaald product unieke verzendkosten wilt opgeven, d.w.z. andere verzendkosten dan de kosten die u in het Merchant Affiliate Platform hebt gedefinieerd, kunt u dit attribuut gebruiken.

**Als u gratis verzending wilt aangeven, geef dan een waarde 0 op voor dit attribuut.
<shipping>2.99</shipping>

Voorbeeld feed voor BestPrice in het juiste formaat

Hier is een voorbeeld van een BestPrice feed structuur met voorbeeld data.

<?xml version="1.0" encoding="ISO-8859-7"?>
<store>
<date>2022-05-28 07:05</date>
        <products>
                <product>
                        <productId>13</productId>
                        <title>Lacoste Hoodie with Logo - Black</title>
                        <price>45.00</price>
                        <productURL>
                                https://www.yourdomain.gr/products/lacoste-hoodie-grey
                        </productURL>
                        <imagesURL>
                                <img1>https://www.yourdomain.gr/productimage1.png</img1>
                                <img2>https://www.yourdomain.gr/productimage1.png</img1>
                        </imagesURL>
          		<category_path>
                                Τεχνολογία->Κινητή Τηλεφωνία->Κινητά τηλέφωνα
          		</category_path>
         		<availability>Παράδοση σε 1–3 ημέρες</availability>
                        <brand>Market προσφορέσ</brand>
                        <MPN>MN8X2ZD/A</MPN>
                        <size>S,M,L,XL</size>
                        <color>Black</color>
                </product>
        </products>
</store>

Nu je een goed idee hebt van de benodigde productgegevens die je moet indienen op BestPrice.gr, laten we eens kijken hoe je een XML feed kunt genereren van je WooCommerce producten in slechts een paar klikken.

7 stappen om BestPrice Product Feed te genereren in je WooCommerce winkel

In WooCommerce vind je een efficiënte tool om in een paar klikken een XML feed te genereren voor al je producten.

In deze gids laat ik je zien hoe je een productfeed voor BestPrice kunt genereren met behulp van Product Feed Manager voor WooCommerce. Het is een van de makkelijkste plugins om te gebruiken en heeft een voorgebouwde template voor BestPrice.gr. 

Bekijk deze 7 snelle stappen om de plugin gemakkelijk te gebruiken en de BestPrice XML feed snel te genereren.

Stap 1 - Product Feed Manager installeren en activeren

1. Ga naar Dashboard > Plugins en klik op de knop Nieuw toevoegen.

WordPress Dashboard - Nieuwe plugin toevoegen

2. Typ "Product Feed Manager" in het zoekvak, en je vindt de Product Feed Manager plugin in het zoekresultaat.

WordPress Dashboard - Zoeken naar de plugin

3. Klik op de knop Nu installeren.

4. Klik vervolgens op de knop Activeren om de plugin te activeren.

Product Feed Manager activeren

Zodra je de plugin activeert, vind je het Product feed menu op je dashboard menu's.

Stap 2 - BestPrice inschakelen als Merchant Type voor de Plugin

Als u een nieuwe productfeed voor uw favoriete Merchant aanmaakt, moet u die Merchant eerst inschakelen.

1. Ga naar Dashboard > Productfeed > Instellingen.

Product Feed Manager Instellingen Home

2. Klik op het tabblad Handelaren, en de lijst toont alle ondersteunde handelaren.

Product Feed Manager Handelslijst

3. Zoek naar BestPrice en schakel het in.

4. Klik nu op het tabblad Controls.

Product Feed Manager Instellingen

5. Klik hier op de knop Cache wissen.

Product Feed Manager Cache wissen

Nu bent u klaar om uw productfeed te genereren.

Stap 3 - Een nieuwe feed aanmaken

1. Klik op uw dashboard op Product Feed.

Product Feed Manager Dashboard

2. Klik vervolgens op Nieuwe feed toevoegen.

Product Feed Manager - Nieuwe feed toevoegen

U komt op een lege pagina voor het genereren van feed.

Product Feed Manager - New Feed

Stap 4 - Basisinstellingen voor de feed configureren

Het genereren van BestPrice Feed

1. Geef een naam aan je feed.

2. In de dropdown Producten kun je kiezen of je deze feed wilt genereren voor al je producten, of je kunt een filteroptie kiezen.

3. Als je wilt dat deze feed op vaste tijdstippen automatisch wordt bijgewerkt, kun je deze plannen op Uurlijk, Dagelijks of Maandelijks in het onderdeel Verversingsinterval.

4. Houd de "Include Variable Parent Product" op Nee en de "Include Product Variations" op Ja.

5. Markeer "Include variation product name" als Ja.

6. U kunt de rest van de opties laten zoals ze zijn of ze desgewenst gebruiken.

BestPrice Griekenland Feed Instellingen

Stap 5 - Gebruik de BestPrice Griekenland Feed Sjabloon

1. Scroll naar beneden naar de Feed Configuratie sectie, en selecteer BestPrice als Merchant Type en houd het Bestandsformaat op XML.

BestPrice Feed Configuratie

Eens je het Merchant Type gekozen hebt, zal je merken dat alle vereiste attributen voor BestPrice hieronder verschijnen.

2. U zult zien dat de meeste attributen zijn geconfigureerd. U hoeft alleen het volgende te configureren:

ελληνικά BestPrice Categorie Pad, Beschikbaarheid, Merk &amp; MPN velden
  • Category Path -
    U moet category mapping gebruiken om de categoriepaden te definiëren, dus laat dit attribuut voorlopig leeg. We zullen dit attribuut in een van de volgende stappen configureren.
  • Beschikbaarheid -
    Als u een vaste levertijd hebt voor alle producten, stel dan het type in als statisch en voer een van de eerder genoemde geaccepteerde waarden in. Als u verschillende levertijden hebt voor verschillende producten, dan moet u de waarde opslaan in een aangepast veld en die waarde hier gebruiken.
  • Merk -
    Dit moet de merknaam zijn van het product dat u verkoopt. Als u de fabrikant bent, kunt u het type instellen als Statisch en hier uw bedrijfsnaam invoeren.
    Als u verschillende merknamen hebt voor verschillende producten, moet u de waarde opslaan in een aangepast veld of productattribuut en vervolgens die waarde hier gebruiken.
    **U kunt ook Perfect Brands for WooCommerce gebruiken, wat het gemakkelijker maakt om merknamen toe te wijzen en te gebruiken.
  • MPN -
    Deze waarde moet uniek zijn voor elk product. U moet deze waarde dus opslaan in een aangepast veld binnen elk product en die waarde hier gebruiken.

Stap 6 - De feed aanvankelijk publiceren

1. Zodra je klaar bent met je feed configuratie, scroll je naar boven en klik je op Publiceren, waarna de feed wordt gegenereerd.

BestPrice Feed publiceren

Vergeet niet dat je het categoriepad leeg hebt gelaten.

Stap 7 - Stel de waarde van het categoriepad in en werk de feed bij

1. Ga naar Product feed > Category Mapping en stel een nieuwe category map in met de juiste Category paths.

Product Feed Manager Instellingen voor categorietoewijzing

2. Zodra u een Mapper hebt opgeslagen, gaat u naar Product feed > Instellingen en klikt u op het tabblad Controls.

Product Feed Manager Instellingen &gt; Bedieningselementen

3. Klik hier onder op Cache wissen.

Product Feed Manager Instellingen &gt; Cache wissen

4. Ga naar Dashboard > Productfeed > Alle productfeed en bewerk de feed die je eerder hebt gemaakt.

5. Scroll naar beneden naar de sectie feedconfiguratie. Klik op het waardeveld voor Category Path en scroll helemaal naar beneden om de mapper te kiezen die je hebt gemaakt.

BestPrice Merchant Template Kies Categorie Mapping

6. Scroll naar boven en klik op update.

BestPrice Update Feed

7. Uw feed wordt gegenereerd en u kunt de feed bekijken of downloaden.

Product Feed Manager Feed bekijken/downloaden

Het volgende wat je moet doen is inloggen op je BestPrice merchant account en de feed URL indienen om je producten op BestPrice te vermelden.

Dat is het. Dat is hoe gemakkelijk u een product feed kunt genereren en uw producten kunt vermelden als BestPrice.gr markt προσφορέσ.

Conclusie

BestPrice is al een one-stop-oplossing geworden voor veel winkeliers in Griekenland omdat het bewezen heeft goede resultaten op te leveren in termen van verkoop.

Aangezien je een Griekse WooCommerce winkel hebt, is het het beste als ook jij kunt profiteren van het enorme lokale publiek dat BestPrice te bieden heeft.

En nu dat je weet hoe makkelijk het is om een product feed te genereren ga je gang en gebruik Product Feed Manager voor WooCommerce om je producten aan te maken en te uploaden op BestPrice.gr.

Categorieën
Guide WP VR

How To Make A Virtual Tour With iPhone Panorama – Simple Guide [2024]

A virtual tour is one of the most effective technologies that can bring you the attention of your viewers.

If you have a virtual tour for your business, then you can surely get an edge over your competitors and attract more prospects.

Now, you might think that creating a virtual tour costs a fortune since nowadays professional 360 photography may cost up to $1000.

What if I tell you that if you own an iPhone, then you can capture high-quality panoramic images and create a virtual tour by spending less than $120?

In fact, it’s possible to capture an iPhone panorama image, on your own, and turn it into a virtual tour without any professional help at all.

All you will need is your iPhone, an app to capture Panoramic images, a monopod if possible, and a simple virtual tour creator, WPVR.

Today, you will get a step-by-step guide so that you can learn how to make a virtual tour with iPhone panorama and WPVR easily.

After you read this article, you will learn:

  • How to take a panorama on iPhone.
  • The best iOS apps you can use for panorama or 360 photography.
  • How to use a reliable plugin to create a virtual tour.
  • Start getting more prospects using that virtual tour.

Laten we beginnen.

How To Make A Virtual Tour With iPhone Panorama And WPVR

Create Virtual Tour Using iPhone Panorama

According to recent studies, websites with virtual tours get 87% more visits and 5-10 times longer stays.

Whether you sell properties, own a hotel or restaurant, or simply have a corporate business, having a quality virtual tour will help you to attract more relevant visitors to your site, make your prospects stay longer on your website, and create instant interest in prospects to make a decision.

So, it’s highly convenient for you to be able to create a virtual tour without any complications and within the budget.

Let’s look at the steps on how to make a virtual tour with iPhone.

When creating a virtual tour, you will go through 3 quick processes:

  1. Capture Panoramic Images Using An iPhone Panorama App.
  1. Turn Those Panoramic Photos Into Virtual Tours Easily Using WPVR.
  1. Use This Virtual Tour On Your Site And Attract More Prospects.

Follow the quick steps below to carry out these processes easily.

1. Take Panorama On iPhone – Using An App

To capture a panoramic image with your iPhone, you need to use a VR app that is dedicated to capturing panoramas.

This app will assist you to capture a wide-angle panoramic image of your surroundings, which is difficult to do on your own.

You may try out the following two iPhone panorama apps in the Apple Store:

  • DMD Panorama
  • Virtual Tours & Panoramas: P360

Both of them are suitable iPhone panorama apps with useful features and have a user-friendly interface. But we recommend DMD Panorama app as it’s easier to use. Additionally, for those concerned with online privacy while uploading and sharing your virtual tours, using a service to hide IP can provide an extra layer of security, ensuring that your internet activity remains confidential.

Once you get the app, follow the steps below.

5 Steps To Capture A Panoramic Image Using DMD Panorama App

Step 1 – Open The DMD Panorama App In Your iPhone

In the app, you will get the option to capture a panorama.

Step 2 – Hold The iPhone at Your Preferred Height

You may either hold the iPhone with your hands or use a monopod (which would be ideal).

Step 3 – Ensure The Proper Angle to Capture The Panoramic Image

Point the phone camera at the rightmost angle of the view where you wish to capture the panoramic image.

Step 4 – Start Capturing Your Panoramic Image

On your app, you will find two markers. Match the markers and capture, and one section is captured. You’ll then get a new pair of markers to the left. Rotate the phone to the left to match these two markers and capture them again. Continue the same process.

Keep the phone steady and do not tilt the phone too much when doing this.

Step 5 – Continue Till Your Panorama Is Captured

Follow this process until all angles have been captured and the app starts processing the panoramic image.

And that’s it. Your panoramic image will be generated.

FYI – The panoramic image you capture using your iPhone panorama app is often referred to as a partial panorama. That’s because it is rather a 180-degree panorama.

But no worries – I will show you how you can use this image to create an engaging virtual tour.

Here’s a video to show the app in action:

As you can see, it’s really simple and if done right, your panoramic image will be as good as a professionally captured panorama photo.

Now that you have captured the required panoramic image, it’s time to create a virtual tour.

2. Turn Your Panorama Into A Virtual Tour Easily Using WPVR

Convert to Virtual Tour iPhone

Once you have captured the panoramic images, the next step is to use a reliable virtual tour builder to convert this panoramic image into a virtual tour.

If you run a WordPress site, then you can easily do it using the plugin, WPVR – Virtual Tour Builder for WordPress.

WPVR is currently the most popular and stable plugin for creating virtual tours on WordPress websites.

In the next few steps, you will get a guide to turning your panoramic image into a fully-functional virtual tour.

5 Steps To Convert A Partial Panorama Into A Virtual Tour

The first thing to do is to install and activate the plugin, WPVR on your WordPress site.

Once you have WPVR on your site, follow the steps below to turn your panoramic image into a virtual tour.

Step 1 – Create A New Tour

Go to your WordPress Dashboard > WP VR and click on Add New Tour. It will take you to the tour creation page.

Start Creating Virtual Tour -iPhone
Step 2 – Upload And Preview Your Panoramic Image To The Plugin

i. First give a title to the tour.

ii. Then go to the Scenes tab.

Virtual Tour Title - iPhone

iii. Set this scene as the Default scene.

iv. Assign a unique Scene ID.

v. Click on the blue Upload button and upload the panoramic image you had captured with your iPhone.

vi. Now scroll down to the bottom and click on the Preview button.

Virtual Tour Preview iPhone

A preview of your scene will appear on the Tour Preview section on the right side.

Step 3 – Optimize The Tour For Partial Panorama

Once you preview the tour, you’ll notice that the virtual tour is not proper; the image is overly stretched out than what is expected.

This is because a partial panorama does not cover a full 360 view. You need to make some small adjustments to make it proper. Let me show you how.

i. Use the following settings in the plugin:

  • In the Vertical Angle of View field, set the value as 100.
  • In the Horizontal Angle of View field, set the value as 300 degrees.
Control Virtual Tour View iPhone

ii. Now, scroll down and click on the Preview button.

**The values of Horizontal & Vertical Angle of Views will be different depending on the dimensions of each individual panoramic image. So sometimes you have to play around with the numbers and preview a few times until you find the right angle.

Optimized Virtual Tour View iPhone

However, when you move around in the virtual tour, you’ll find that there are now some blank spaces in the tour view as shown in the image below.

Customized Virtual Tour View iPhone

These are there because of the custom angle of views we’ve applied. Let’s fix them.

We will apply the following advanced settings to this scene in the next few steps:

  • Limit Vertical Scene Grab.
  • Limit Horizontal Scene Grab.
  • Customize Scene Zoom.
Control Scene Grab iPhone
Sep 4 – Set A Vertical Grab Limitation To The Tour

i. Scroll down and turn on the Limit Vertical Scene Grab option.

ii. You’ll find 2 new fields, Max Pitch and Min Pitch. These 2 fields will help you to restrict the view of the dark sections of the virtual tour vertically.

iii. Since the Vertical Angle of view is set to 100 degrees, the ideal value of the Max Pitch would be 50 and the ideal value of the Min Pitch would be -50.

Control Vertical Scene Grab - iPhone
Sep 5 – Use A Horizontal Grab Limitation To The Tour

i. Turn on the Limit Horizontal Scene Grab option.

ii. You’ll find 2 new options, Max Yaw and Min Yaw. These 2 fields will help you to restrict the view of the dark sections of the virtual tour horizontally.

iii. Since the Horizontal Angle of view is 300 degrees, the ideal value of the Max Yaw would be 150 and the ideal value of the Min Yaw would be -50.

Control Horizontal Scene Grab - iPhone

iv. Click on Preview and check out the output. You will see that the black spaces are no longer accessible.

That’s it. You have created a virtual tour using the panoramic image that you captured using your iPhone. You can then Publish the tour and use it on your website.

You may also add more scenes to the tour if you have captured multiple panoramas, and connect them via hotspots to make the virtual tour more realistic and engaging.

Now, before I show you how you can publish the tour on your site, I would like to give you a few tips to customize this virtual tour and make it even better for greater results.

Tips To Customize Your Virtual Tour Into An Attractive Experience

Let’s look at how you can use different features of WPVR to make it more interactive.

i. Add A Scene Gallery

If you’ve created the tour using multiple images, you can activate a scene gallery on your tour.

This will allow a visitor to get a quick glance at the available scenes in the virtual tour, and visit any desired scenes by double-clicking on the image from the gallery.

This is a great way to allow visitors to explore the tour with more interest.

ii. Use Interactive Hotspots Buttons

The plugin’s hotspot feature is one of the most useful mediums to get visitors more interested.

Among several uses, one of its uses is to view content inside the tours in an engaging way. You can allow a visitor to view content

  • By hovering on the hotspot icon or,
  • By clicking on the hotspot icon.

The content section is HTML compatible and you can design and view content such as:

  • Texts
  • Afbeeldingen
  • Buttons
  • YouTube videos
  • Vimeo videos
  • Self-hosted videos
  • GIFs
  • Download buttons
  • URLs

Here’s a glimpse of how it works.

Follow this guide to set interactive content on hotspots.

Also, you can use any 360 video editing software for this as well.

You can try all-purpose video editing software too.

iii. Set A Background Audio

To give your viewers a more realistic experience and keep them entertained, you can add relevant background audio to your virtual tour.

You can choose to set the audio to:

  • Play automatically after any interaction.
  • Play in Loop.

Here is a guide on how you can set background audio for your virtual tour.

iv. Turn On The Gyroscope

A huge number of viewers will be visiting your virtual tour from their mobile devices.

Allow them to have a realistic experience and take advantage of using the mobile device by enabling the Gyroscope feature.

Then your viewers can move the mobile device and the tour will respond to the movements. They can also turn on or off the Gyroscope support.

Follow this guide to enable the Gyroscope feature.

v. Show Company Logo and Description:

Since virtual tours are interesting content and viewers tend to spend more time viewing them.

You can take advantage of it by always showing your Company logo design inside the tour.

Here is how you can set your company logo and description.

There are many more ways you can customize your tour and add more functionalities. Learn more about them here.

3. Publish The Virtual Tour on Your Website

After successfully creating the tour and applying all your desired customization, you’re ready to publish the tour on your WordPress website.

Simply follow the steps in this guide to embed a virtual tour using the WPVR Gutenberg block.

Or watch the video below:

You may also embed the virtual tour on your site in other ways if you do not want to use Gutenberg:

Whichever builder you use, it’s really simple to embed the virtual tour on your site real quickly.

That’s it. Now you can share your webpage with your audience and hopefully, you will get more engagements, thanks to your virtual tour.

Since your goal of using a virtual tour is to increase conversion by creating more engagement with your viewers, make sure to set some interactive content inside your virtual tours.

Summarizing

Now you know, how to make a virtual tour with iPhone Panorama and WPVR. And the best part of it is that it will not cost you a fortune, while still giving you the opportunity to increase your revenue.

Now that you know the easiest way to create a virtual tour, go ahead, and start using virtual tours to grow your business.

  1. Get DMD Panorama app to capture a panoramic image.
  2. Get WPVR (it has a free version) to convert the image into a virtual tour
  3. Use your virtual tour to attract more prospects.

Start growing your business with virtual tours without any exclusive or expensive professional help.

Categorieën
Guide WooCommerce

How to Create A Global Product Attribute – WooCommerce [2024]

Als je een WooCommerce-winkel runt, kun je meer relevante kopers aantrekken door zoveel mogelijk unieke kenmerken van een product te benadrukken.

Met WooCommerce kun je productattributen toevoegen die je kunt gebruiken om de opvallende kenmerken van je producten te definiëren.

Wanneer u bijvoorbeeld een overhemd verkoopt, kunt u productkenmerken gebruiken om het patroon of de kleur ervan te bepalen.

Om tijd te besparen en de beste resultaten te behalen, is het echter noodzakelijk om de productkenmerken op een georganiseerde manier te kunnen gebruiken.

Vandaag krijg je een stap-voor-stap handleiding over hoe je gemakkelijk Globale Productattributen kunt toevoegen aan je WooCommerce producten.

Dus laten we beginnen.

Wat is een WooCommerce productkenmerk?

Een productkenmerk wordt gewoonlijk gebruikt om een bepaald kenmerk van een product weer te geven. En attribuuttermen definiëren de verschillende manieren waarop dat kenmerk van toepassing is op een product.

Bijvoorbeeld:
- Kleur is een kenmerk en kan een attribuut worden genoemd.
- Blauw, Rood en Groen zijn verschillende soorten kleuren en kunnen attribuuttermen worden genoemd.

U kunt productattributen gebruiken om uw product verder te beschrijven, u kunt bijvoorbeeld een t-shirt aanbieden en vermelden dat het rood van kleur is.

Je kunt ze ook gebruiken om productvariaties te maken binnen je WooCommerce winkel waar mensen uit kunnen kiezen. Je kunt bijvoorbeeld een t-shirt in 3 kleuren hebben.

Nu zijn er twee soorten productattributen.

  1. Globaal productkenmerk
    - Productkenmerk dat voor veel verschillende producten kan worden gebruikt.
  2. Aangepast productkenmerk
    - Productkenmerk alleen gebruikt voor een specifiek product

In deze gids laat ik je zien hoe je een Globaal Productkenmerk kunt maken en gebruiken voor je WooCommerce producten. Later, in een tweede gids, laat ik je zien hoe je een Custom Product Attribute kunt maken voor een individueel product.

Dus laten we erin duiken.

Hoe maak je een globaal productkenmerk in WooCommerce?

Als je de onderstaande stappen volgt, kun je gemakkelijk globale productattributen toevoegen in je WooCommerce winkel.

Stap 1 - Een nieuw attribuut toevoegen

1. Ga op uw dashboard naar Producten > Attributen.

WooCommerce Globale Productattributen

Hier ziet u de mogelijkheid om een nieuw attribuut toe te voegen.

**Elk attribuut dat u hier toevoegt, wordt beschouwd als een globaal attribuut.

2. Voer een naam en slug voor het kenmerk in hun respectievelijke velden in.

U kunt het bijvoorbeeld "Kleur" noemen en de slug "kleur" toekennen.

3. Klik vervolgens op de onderstaande knop 'Kenmerk toevoegen'.

U zult zien dat het kenmerk aan de rechterkant is toegevoegd.

Globaal productkenmerk bewerken

Hier heb ik een attribuut genaamd Kleur toegevoegd.

Stap 2 - Attribuuttermen toevoegen

1. Aan de rechterkant van het attribuut, onder de Voorwaarden, ziet u een optie genaamd Voorwaarden configureren. Klik daarop.

Voorwaarden instellen voor globaal productkenmerk

U komt dan op de pagina waar u termen voor dit kenmerk kunt toevoegen.

Een attribuut instellen

U ziet dat bovenaan Productkleur staat. Dat komt omdat ik eerder het attribuut Kleur heb genoemd. Als ik het attribuut Size zou noemen, dan zou er Product Size staan. (Hetzelfde geldt voor de knop Add new color hieronder).

De termen die u hier maakt, zijn de attribuuttermen die u kunt gebruiken om de kenmerken van een product te definiëren (die ik u straks laat zien).

2. Voer een attribuutnaam en slug in hun respectievelijke velden in, en voeg er desgewenst een beschrijving aan toe.

U kunt het bijvoorbeeld "Blauw" noemen en de slug "blauw" toekennen.

3. Klik dan op de knop Nieuwe kleur toevoegen onderaan. U zult zien dat de kleurterm aan de rechterkant is toegevoegd.

Je kunt op dezelfde manier meer termen toevoegen. Ik heb er nog twee toegevoegd, Groen en Rood.

Voorwaarden van een WooCommerce attribuut bewerken

Tot nu toe hebt u een globaal productkenmerk genaamd Collor en de bijbehorende attribuuttermen - Blauw, Groen en Rood.

U kunt het hele proces herhalen om meer globale attributen met hun termen toe te voegen.

Hoe gebruikt u een globaal productkenmerk voor uw producten?

Zodra u een globaal productkenmerk hebt gemaakt, kunt u het gebruiken om uw producten te beschrijven.

Volg de onderstaande stappen om te leren hoe u het kunt gebruiken.

1. Bewerk of creëer eerst een product en scroll naar beneden naar de sectie Productgegevens.

WooCommerce sectie productgegevens

Kies hier het producttype (bijvoorbeeld Eenvoudig product of Variabel product) en vul de vereiste basisgegevens in in de menu's Algemeen, Inventaris, Verzending en Gekoppelde producten.

2. Ga naar het Attributen menu.

WooCommerce Productgegevens

3. Hier ziet u dat er een dropdown menu is dat zegt Aangepast productkenmerk.

Klik erop en u krijgt de lijst met Globale productattributen die u hebt gemaakt.

Aangepast productkenmerk

Kies degene die je wilt gebruiken.

4. We hebben eerder het kenmerk Kleur gemaakt. U kunt dat dus selecteren en op de knop Toevoegen klikken.

Het zal daar een sectie Kleur aanmaken.

Een bestaande term van het attribuut bewerken

5. Als u onder waarden op het veld klikt, krijgt u de keuze uit de termen die u eerder voor dit Attribuut hebt aangemaakt.

Aangezien we Blauw, Groen en Rood hebben gemaakt, kunt u door hier te klikken kiezen uit deze 3 opties.

6. U kunt kiezen welke u voor dit product wilt gebruiken.

Als u bijvoorbeeld wilt aangeven dat de kleur van dit product Blauw is, dan kunt u Blauw kiezen.

Attribuuttermen voor kleur

En aan de linkerkant ziet u de optie "Zichtbaar op de productpagina". Dat is standaard aangevinkt, wat betekent dat deze attribuutterm wordt weergegeven op de productpagina.

Als het een variabel product is en u wilt dit kenmerk gebruiken om variaties te maken, dan kunt u meerdere termen kiezen, of u kunt klikken op Alles selecteren om ze allemaal toe te voegen.

Productattributen toegevoegd

U kunt dan het vakje aanvinken dat zegt gebruikt voor variaties (vlak boven de knop Attribuut opslaan), en later varianten genereren op het tabblad Variaties aan de linkerkant.

7. Klik vervolgens op de knop Attribuut opslaan en dit attribuut wordt opgeslagen voor dit product.

Ter herinnering: als u deze attributen wilt gebruiken voor uw productvariaties, vinkt u de optie "Gebruikt voor variaties" aan, anders vindt u deze attributen niet in het venster Productvariaties.

Dus op basis van uw thema zal dit attribuut worden weergegeven op de productpagina.

Wanneer moet u een globaal productkenmerk gebruiken?

Met WooCommerce kun je globale attributen aanmaken die later kunnen worden toegepast op nieuwe of bestaande producten.

In principe is een globaal productkenmerk een gemeenschappelijk kenmerk dat je misschien voor meerdere producten in je WooCommerce winkel wilt gebruiken.

Stel u heeft een kledingwinkel die T-shirts, broeken, sokken en schoenen verkoopt. Een gemeenschappelijk kenmerk voor al deze producten zou de maat kunnen zijn.

In plaats van een nieuw aangepast attribuut in te stellen voor de grootte van elk nieuw product dat u toevoegt, kunt u beter een globaal productattribuut genaamd Grootte maken, en de termen ervan definiëren om de verschillende maten weer te geven.

Vervolgens kunt u het kenmerk Grootte toevoegen aan uw producten en verschillende termen toekennen om aan te geven welke maat ze hebben, op dezelfde manier als u in deze gids hebt gedaan voor kleur.

Kortom, je moet globale productattributen maken en gebruiken als je ze opnieuw wilt gebruiken om de kenmerken van meerdere producten in je WooCommerce winkel te definiëren.

Het zal je tijd besparen en je WooCommerce winkel overzichtelijker houden.

Laatste gedachten

Zoals u ziet, is het echt handig om een globaal productkenmerk te gebruiken, en hopelijk was deze gids gemakkelijk te volgen.

In de volgende gids leert u hoe u een aangepast productkenmerk kunt maken en gebruiken voor uw producten.

Een aangepast productkenmerk is vooral nuttig wanneer u een uniek productkenmerk wilt toevoegen dat u waarschijnlijk niet in de meeste andere producten zult gebruiken. Het heeft dus zijn eigen voordelen.

Laat ons gerust weten wat je van deze gids vindt in de commentaren hieronder.

Proost.

Categorieën
Gids

Effect van COVID19 op eCommerce in de VS - Statistieken & Infographic

COVID19 had a big impact on the world economy in both good and bad ways. The eCommerce industry saw a drastic rise in online sales and many online stores actually made more than expected during the pandemic.

In the USA, the eCommerce industry broke all records during and after the lockdown since end of March 2020, while keeping lasting influence in online purchasing.

Here is a detailed infographic to explain how various industries prospered due to an increase in regular buyers from online stores.

COVID19 On eCommerce In The USA – Statistics & Infographic

COVID19 On eCommerce In The USA - Infographic

Key takeaways:

  • The US eCommerce industry saw an average sales growth of over 64% when comparing 2020 to 2019 during the COVID19 lockdown period (April-July).
  • Industries with essential supplies such a food supplies, grocery, office supplies, etc., saw a growth of over 40% in terms of website traffic from March to July 2020 compared to 2019.
  • Industries selling luxury items or gift items saw little to no growth in website traffic from March to July 2020, compared to 2019. Rather, some experienced a fall in website traffic. For example, the jewelry industry suffers a 7.5% fall in traffic compared to last year.
  • There was over 20.8% eCommerce penetration between April to June 2020, which is an increase of over 6% compared to the same period last year, and over 4.5% compared to the 1st quarter of 2020 (January to March 2020).
  • Consumer spending on online sales during the 2020 lockdown went up by an immense amount compared to 2019.
    • The 1st quarter of 2020, January to March, saw an increase of around 14.63% in online consumer spending compared to 2019.
    • The second quarter of 2020, April to June (which was the core lockdown period), saw a whopping increase of over 44.4% in online consumer spending compared to 2019.
  • Online shops saw an average increase of over 80% page views during the lock-down between April to June 2020, when compared to 2019.
  • An overall increase in average order count, over 78% per month, was achieved during the lockdown (April to June 2020), compared to 2019.

It can be said that the eCommerce industry saw a big boost due to the COVID19 outbreak.

The lockdown encouraged people to order more online as it was unsafe to visit stores physically.

As per consumers, most of them will continue ordering online even after the pandemic is over, which is a positive side for all online stores in the USA.

Categorieën
Guide WooCommerce

Hoe speciale Halloween-variatiestalen te gebruiken om de WooCommerce-verkopen te verhogen [2023]

Trick or Treat! The spooky Halloween season is here.

Halloween is currently the fourth most lucrative holiday for WooCommerce businesses, after Christmas, Thanksgiving, and Easter.

It’s an event that WooCommerce entrepreneurs cannot afford to ignore.

During Halloween, it is expected to get huge online sales, especially in the last 3 days till Halloween, as people are making last-minute preparations. And you can get huge sales if you do it right.

The first thing to do is give your buyers a Halloween festive feeling as soon as they come to your site. Along with that, little customizations to create engagements can take your store a long way.

You must specifically focus on customizing product pages to grab the buyers’ attention such as changing Add to Cart button text, or by adding an on-page offer, etc.

A more simple but effective way to attract buyers is to use beautiful image variation swatches to present product variations.

Today you will learn how you can present different types of Halloween products in an attractive way using variation swatches on the product page and possibly, get higher engagements.

Dus, laten we beginnen.

Special Halloween Variation Swatches Ideas You Can Use

People love to decorate their homes during Halloween and naturally, decorative sell the most during this time. But besides that, people are also fond of t-shirts, masks, candies, costumes, and many other Halloween items.

If you do sell some of these products, it’s best to make sure your buyers know all about your offers in the most simple way possible, while still getting the Halloween vibes.

I’m not talking about a costly re-design of your website. Rather than making your Halloween offers easier to redeem, and adding simple visuals such as variations swatches can catch the eye of the buyers during Halloween.

Here’s a quick Actionable Tip

You might often think that adding tons of Halloween products will attract more buyers. But that is not really the best concept.

The best way to sell more is to tell your buyers about all the products and offers you have for Halloween, as soon as possible.

The easier they find to buy your products the better.

One way to make it happen is, rather than posting multiple products of the same type, add them as variants.

For example, if you sell Masks in different shapes, simply create one variable product called, let’s say, ‘Spooky Halloween Masks’ in WooCommerce, and add the different types of masks as the variants.

That way, people will be able to choose the masks from one place and make a faster purchase decision, rather than spending a long time through the shop when browsing different masks from the shop page.

You can do the same for costumes in different patterns, candies in different shapes, lanterns in if various shapes and colors, and even t-shirts.

Let us look at how you can use cool icons as variation swatches for common Halloween products.

Catchy T-shirt Icon Variation Swatches

For t-shirts that are available in various colors, you can present the option to choose the colors using attractive image swatches.

This can be a great attraction around a holiday to the buyers and they will know which colors are available for that design.

For example, a Halloween themed t-shirt might come in several colors. So using colored image swatches of t-shirts is a great way to grab the buyer’s attention.

special halloween T-shirt icon swatches

As you can see above, you can specify the available colors for this t-shirt and make it look charming using tiny image swatches.

This will often get buyers curious to click and choose multiple colors of the same t-shirt, even if they did not intend to in the first place.

Delicious Fancy Candy Swatches

Candies are the most desirable delicacy during Halloweens and kids get well dressed in costumes to collect candies in the neighborhood. So you can expect to get a lot of orders for various candies.

And you can offer your candies in an exciting way using tiny candy icons.

The idea is to put up different shaped candies as variants and present them using attractive variation swatches on your WooCommerce store.

This will work really well especially if you have fancy candies that are prepared and shaped just for Halloween.

candy variation swatches

For example, you can use image variation swatches such as a spider icon to represent spider-shaped candy, and pumpkin icons to represent pumpkin face candies, and so on.

The swatches will let the buyers know that you have all the Halloween candies they were looking for and will surely help to trigger more sales.

Spooky Mask Image Swatches

Costumes are in high demand during Halloween, so naturally, they are a bit expensive during the occasion. So many rather buy scary masks along with Halloween t-shirts.

If you are an online clothing store or costume store, I am expecting that you will consider stocking up Scary Masks to sell at least during Halloween.

And to get people excited about the different masks you have, you can present the variants using mask icons.

For instance, if your store is selling V-killer venomed masks this year, make sure to include a gallery with the different types of killer masks you have in stock.

Spooky Mask Swatches

And spice it up a little more with tiny mask icons to choose the shapes. This might seem like small customization, but it will help to make the buyer more curious about what they might get.

Haunting Lantern Icons To Choose From

On Halloween, the witching hour starts as soon as the sun sets, so people love to decorate the house with some festive lanterns.

If you do sell lanterns, get various lantern icons to use as variation swatches and offer the buyers the different shapes and colors you can deliver.

lantern image variation swatches

Normally, images for lanterns look amazing. But the dull dropdown selection on default WooCommerce doesn’t look too appealing.

You can see in the image above, the small image swatches of the lanterns look much more festive for Halloween.

Witch Hats In Various Spooky Patterns

As I said, costumes have high demand during Halloween, and witch hats are among the most popular ones that girls and ladies love to wear at Halloween parties.

Offer witch hats in various patterns using relative image swatches on the product page.

witch hat variations

Clicking on the icons will display the hats in that pattern. A great way to engage with interested buyers.

How To Find Halloween Icons For Variation Swatches

So far you just saw how it will look with variation swatches, but how will you get those icons?

It’s best to use images or icons that are relative to the product itself when using image variation swatches.

I only showed you examples of 5 products, but there are tons of other products, and preparing custom swatches might be a hassle. Rather you can find these icons or vector images to use as Halloween variation swatches easily.

Here is a list of sites where you can collect your desired icons or images in high quality, and most often, for free.

How To Use Image Variation Swatches Real Quick

Adding variation swatches is really easy in WooCommerce.

Simply use the plugin Variation Swatches for WooCommerce, and in just a few minutes, you can set up image swatches for product variants.

This is probably the smallest customization you can make, for a great advantage in increasing your sales.

Moreover, you are able to do it without any extra cost. So go ahead and start using smart variation swatches to boost your Halloween sales.

Laatste gedachten

Special occasions should always be considered a great opportunity for any WooCommerce store to increase sales, and Halloween is one of the biggest occasions there.

So it’s best to find unique ideas to boost your Halloween sales, and using smart image variation swatches can be a great way to attract more buyers.

There are many more unique techniques you can use to make your Halloween more profitable. Here is an actionable guide you can follow to successfully sell more products during Halloween:

I wish you good luck to get a high number of sales this year.

Happy Halloween!!

Categorieën
Gids

What Is Cloud Service? – Detailed Infographic [2024]

Nowadays, cloud service is way more convenient rather than using shared or dedicated hosting servers. With data centers situated all over the world, cloud services ensure your constant uptime and superfast data transfer rate with the ultimate data backup solution.

Here, you will learn why you should use cloud services and the basic structure of cloud computing.

You will be able to get some key insights into

  • how cloud services are growing over the years,
  • public cloud adoption for enterprises, and
  • basic price comparison of the top cloud storage.

Take a look at the detailed infographic.

What Is Cloud Service

Key Take-Aways:

What Is Cloud Service?

Cloud services offer you a wide range of services over the internet, including cloud-based video conferencing. These services provide you easy & affordable access to your web applications and resources from almost any device without the need for any internal infrastructure or hardware.

Why Use Cloud Service?

  • Save money
    Cloud storage offers you a pay-as-you-go service, through which you will only pay for the storage space you use, hence you can reduce your overall hosting costs significantly.
  • Increase page loading speed
    Cloud storage optimizes your site data and serves from the super-fast web server, as a result, your site will be faster than ever.
  • Backup site data
    Cloud copies your data into multiple locations and syncs your data as you make changes, hence if you accidentally delete files, or if one of the server crashes, your data will still be safe.
  • Maximum security for your sensitive data
    Cloud providers offer you native security products such as WAF, DDoS protection, etc., which provide you the maximum security for your sensitive information.

Some Interesting Facts

  • 53% of users leave a site that takes longer than three seconds to load

And you can overcome both of these issues by using a Cloud service!

Cloud Computing Structure

Cloud Deployment Types
Public
Private
Hybrid
Community
Cloud Service Models
SaaS
IaaS
PaaS
Cloud Service Providers
AWS S3
DO
GCS
Azure
  • Cloud Deployment Types
    The cloud deployment model is an infrastructure owned by a single business. It offers you a more controlled environment, through which you will have the access to the IT resources with a more centralized business model. This model can be built on external hosting or in-house.

    The cloud deployment types are:
    • Public
    • Private
    • Hybrid
    • Community
  • Cloud Service Models –
    Cloud models serve different purposes based on various businesses. Also, they can interact with each other to form one comprehensive model of cloud computing.

    Cloud models come in three types:
    • SaaS (Software as a Service),
    • IaaS (Infrastructure as a Service), and
    • PaaS (Platform as a Service).
  • Reliable Cloud Service Providers
    Among many cloud service providers, here are some of the most reliable ones:
    • Amazon S3
    • DigitalOcean
    • Google Cloud Storage
    • Microsoft Azure

More Facts About Cloud Service

Cloud Migration Service
  • This infographic is based on the following regions:
  • North America
    • US
    • Canada
  • Europe
    • United Kingdom
    • Germany
    • France
    • Rest of Europe
  • Asia Pacific (APAC)
    • China
    • Japan
    • Australia and New Zealand (ANZ)
    • Rest of APAC
  • Middle East and Africa (MEA)
    • Middle East
    • Africa
  • Latin America
    • Brazil
    • Mexico
    • Rest of Latin America

You can also create a detailed static chart with the WordPress Chart plugin.

Compound Annual Growth Rate, 2018-2022

Compound Annual Growth Rate 2018

From this Comparing Compound Annual Growth Rates (CAGRs) graph, we can see the future forecast of the rapidly growing IaaS platform. In here, it is anticipated that by the end of the year 2022, Cloud System Infrastructure Services (IaaS) growth will be more than 20%.

Cost comparison between Amazon S3, Google Cloud Storage, Microsoft Azure and DigitalOcean

AWS LightsailGoogle CloudDigitalOceanAzure
Geheugen21.722
CPU1 vCPU1 vCPU1 vCPU1 vCPU
Opslag60 GB SSD50 GB SSD50 GB SSD50 GB SSD
Monthly Price$10/mo$26.76/mo est$10/mo$28/mo
Here’s a basic price comparison chart for AWS, GCP DO and Microsoft Azure.

Public Cloud Adoption for Enterprises

Public Cloud Adoption -Info 1

From this Public Cloud Adoption for Enterprises graph, we can see that Microsoft Azure is closing the gap with AWS, followed by Google Cloud Platform. Although DigitalOcean is far behind, it’s trying to catch up fast.

Not every company will migrate to the cloud, not yet, but the way Cloud computing is advancing, the sooner you adopt Cloud service, the better your chances of staying ahead of your competitors.

So, should you use a cloud service?

The answer is Yes.

Categorieën
Guide WooCommerce

10 Unique Marketing Techniques To Increase Halloween Sales For A WooCommerce Store [2024]

Halloween is just a few weeks away, and candy & costumes aren’t the only reasons to get excited. It’s also one of the best times for shopping.

US consumers spent approximately 8.8 billion USD during the Halloween season last year.

This year, it could go higher, thanks to the rise in online shopping since May 2020. A surge in internet spending is expected throughout October.

This a great opportunity you can’t miss out on. If you own a WooCommerce shop, it’s a chance to boost your revenue quite easily.

However, you have to make sure you take the right steps and make your shop ready for Halloween sales.

For example, you have to make sure you use proper funnels to upsell or downsell more products to buyers. (Read along to learn how.)

In this guide, you will learn 10 unique and actionable techniques that will help you increase your Halloween Sales by a significant amount. Some of these exciting ideas will surely give you an edge over your competitors.

Dus laten we beginnen.

Inhoudstafel

01. Stock Up With Halloween Items To Spice Up The Occasion
Get ideas to make your products desirable on Halloween even if you are in other niches such as Electronics.
02. Issue A Daily Countdown Flash Sale
Learn about a rare promotional sales technique for eCommerce sites to increase sales on special occasions.
03. Make Buyers Curious To Add More Products To The Cart
Get tips on smart product page offers and customization to make buyers purchase more products.
04. Run Unique Promotions That Your Competitors Can’t Think Of
Rather than just using common marketing such as pop-ups or banner ads, get 3 unique ideas to make your buyers more excited.
05. Make Checkout Sales Funnels The Trump-Card
Checkout Sales Funnels work like a charm. Learn to implement them in the correct way and see the difference.
06. Make Your Halloween Email Campaigns More Productive
Create email campaigns that will help to get your Halloween products noticed. Get an actionable idea on how to make it more successful.
07. Leverage The Reach Of Large Marketplaces
Get interesting facts on why you should promote on large marketplaces and learn about a reliable tool to do so without much effort.
08. Use Videos To Show Your Spooky Collection
Videos always work but you can make them more engaging. Get tips to write proper video scripts to make promotional videos successful.
09. Optimize Smart Suggestions On Product Page
Learn to use proper product suggestions when a person is on the product page and get noticed.
10. Create A Special Page Just For Halloween
Make the occasion more visible with a dedicated Halloween page. Learn how to organize the page for maximum results
Special Tips For Halloween
Get a few experts’ tips on handling high website traffic during Halloween sales.

10 Unique Marketing Techniques To Increase Halloween Sales 

Each of the tips here is highly useful, and I suggest you follow as many of them as possible if you want to boost your revenue.

Now before I start with the guide, I would like to note a common practice that you should follow.

During any special occasion, you should re-design your website for the occasion.

For example, during Halloween sales, you should put up a Halloween face to add to the excitement of the buyers. You may buy Halloween templates for your theme or from your preferred page builders. This might seem a bit of hard work, but the Halloween sales will make up for it.

Now, let’s look into unique ways you can increase Halloween sales for your WooCommerce store.

1. Stock Up With Halloween Items To Spice Up The Occasion

Stock Up With Halloween Items To Spice Up The Occasion

Decorative, costumes, and candies sell the most during Halloween. But it doesn’t mean that other items are not desirable.

You have to find a way to include products that compliment Halloween in order to meet the demand of your target customers.

There are creative ways to achieve this, no matter what you sell. Here are some examples.

  • If you are a clothing store, you may sell t-shirts with a Halloween theme, such as Dracula, on the t-shirt design. Alternatively, you may sell spooky masks just during Halloween sales.
  • When selling electronics such as Computer Accessories, you may offer Halloween themed skins on items. For example, you may sell merchandise from your store like a Mouse which has a Ghost painting on its body.
  • For grocery stores, you may offer high-quality Pumpkins at affordable prices.
  • Chocolate shops may offer pumpkin-face candies.

This will give people reasons to purchase from your shop during Halloween sales. They might then browse through and purchase more products from your store other than just the Halloween items.

2. Issue A Daily Countdown Flash Sale

Issue A Daily Countdown Flash Sale

This might not be easy to pull off, but you can make people crave more by issuing a daily countdown flash sale for two weeks before Halloween.

What I mean is, every day, you put up a few items for sale at a discount. And this offer will be accessible only for a day. The next day, new items will be offered at a discount.

This is a great way to keep people optimistic about buying from your store. They will probably look forward to finding out what other items you may put on sale the next day, so they might come back just to find out.

You may spice it up more by showing what products will be on discount sale tomorrow, but not reveal the discount amount. In this case, if a person doesn’t like the offers today but finds an interesting product to be on sale the next day, he/she will come back.

A popular example of a countdown Flash sale is by an international site called AliExpress. (They do this on a regular basis, but you can take this idea and use it just for special occasions such as Halloween.)

3. Make Buyers Curious To Add More Products To The Cart

Make Buyers Curious To Add More Products To The Cart

Let’s say you have a brand-new Halloween themed t-shirt for sale, with variants Red, Green, and Orange.

Once a person visits the product page, you can customize the product page to make the buyers curious about all its available variants and possibly, purchase multiple variants.

Or you may offer special conditional discounts that are hard to resist for buyers.

There are many ways to handle this. Let us look at a few:

i. Use A Catchy CTA On The Add To Cart Button

You can Change the Add To Cart button text and design it into something more catchy.

Let’s say instead of ‘Add To Cart,’ you may use the text ‘Grab It Now!!’

**You can achieve this with plugins such as WC Custom Add To Cart Button.

ii. Use smart variation swatches to present product variants

This is a very effective way to make buyers curious about looking into the variants. The swatches help the buyer to understand the colors available at a glance.

If you use relative image swatches, for example, little colored pumpkins, it will be more engaging.

**You may try using the plugin Variation swatches for WooCommerce to achieve this.

iii. Offer discounts on the quantity purchased

You can set a discount offer on purchasing a certain number of the same product.

For example, you can offer a 10% discount on three t-shirts bought at once.

iv. Create a bundle offer for a relevant product

You may create a bundle of relative products and display it on the product page as a suggestion, or offer the bundle as an upsell.

You can also easily create a bundle of multiple variants of the same product and assign it as an upsell product when a buyer views the t-shirt.

Let’s say a person clicks on buy now on the product page for a Red t-shirt, then you can set up an Upsell offer, offering him a bundle of 3 colors of the t-shirt at a 10% discount on the total.

v. Mark a best-selling variant

You may highlight the best-selling variant of your product on the product page. People may want to choose that more, just to follow the trend.

These are great ways to trigger potential buyers into purchasing more of the same product.

4. Run Unique Promotions That Your Competitors Can’t Think Of

Run Unique Promotions

You can focus on Discount banners, Pop-up coupons, or a Notification Bar with a Halloween offer, all with a Halloween design.

But, these are common stuff.

However, here are 3 unique marketing ideas you can apply to increase sales:

i. Issue a special gift based on purchase amount

You may offer special Halloween gift packs to buyers based on a target purchase total.

For example, anyone who will purchase products for a total of $500, he/she will get a surprise Halloween gift box.

ii. Run a Halloween lottery draft

Issue a lottery draft to get your buyers excited to make a purchase.

Let’s say anyone who purchases $500 or more will get a special code. After the Halloween campaign is over, you can announce a winner and send a special gift.

iii. Issue a point-based competition for a special prize

Let’s say you can announce that each dollar a person spends on your store will earn a point.

After Halloween, the top 3 people with the highest points will get special gifts.

**Of course, remember to keep a policy that people will only be eligible if they are local and have purchased over $500 in total; or something around those lines.

To make these ideas more effective, you can present these as Pop-ups when a person enters the site, or as the first Ad Banner, the buyer will see when entering the site for the first time.

Keeping a Static section about it besides the website’s Menu bar can be a good way to grab more attention.

5. Make Checkout Sales Funnels The Trump-Card

Make Checkout Sales Funnels The Trump-Card

Sales funnels are always effective for WooCommerce stores, no matter what you sell or when you sell. During Halloween sales, you can use special checkout sales funnels to make the most out of your buyers.

Since more people will visit your site, it will definitely be wise to make sure each buyer purchases as many products as possible. And to achieve that, you can use smart sales funnels for products that might sell more during Halloween sales.

Here’ how you can use checkout sales funnels during Halloween sales.

i. Add an order-bump on the checkout page

When a buyer is on the checkout page, it means he/she is ready to purchase. At this point, you can offer a small related product at a minimum cost, which the buyer can add to the bill with just a click.

For example, if he is buying a T-shirt, you can offer a hand band at a discounted price on the checkout page. If it is within budget, the chances are, the buyer will consider taking the offer.

(ii) Use Smart Checkout Upsell Offers With Special Halloween Discounts 

Once a product is paid for, now it’s your chance to try and sell more to the same customer. You can trigger a good upsell offer with something relative to what was bought, right after completing a purchase.

For example, suppose someone bought a few Halloween decorative. In that case, you can then insist on buying Halloween Special Printed Cards at a discounted price, let’s say 10 cards at only $40.

(iii) Give A Last-Attempt Downsell Offer 

If you used an upsell offer, you should also be prepared with an alternative offer in case the upsell offer is rejected. This will help to make the buyer think about at least purchasing the latter.

For example, consider the 10 cards you offered as an upsell (as per the previous example). If the buyer passes on that, you can counter-offer with 2 cards at only $10.

This drop from $40 to $10 in the amount to be spent can trigger a desire in the buyer’s mind to at least try out the cheaper offer.

6. Make Your Halloween Email Campaigns More Productive

Make Your Halloween Email Campaigns More Productive

Many are not aware, but email campaigns work really well during Halloween sales season. In fact, people are looking for good deals and tend to read more Halloween emails to get the best offers.

You can take advantage of that if you work smart.

Now, first, you will need to understand your users and the products you sell. Your email offers will only be fruitful if you have the right Halloween offers for your users.

Let us look at an example.

Suppose most of your users buy t-shirts from your store.

During Halloween, let’s say you put up a few Halloween themed t-shirts and brought in a few Scary Masks to sell during the occasion.

Now, here, you know your t-shirts will sell easily. It’s the Masks that you want people to notice. However, you cannot simply bring in new items and directly offer them to your users. You have to be technical about it.  

Here’s what you can do. You can send an email with offers on Halloween t-shirts. In the same email, you can then give a small offer on the Masks

Bijvoorbeeld:

“Hi John, Halloween’s here, and it’s time to get ready with spooky t-shirts.

Check out these wicked t-shirts that can create a mystic feel this Halloween:

T-shirt 1T-shirt 2T-shirt 3T-shirt 4

Get them now at a 20% discount!!

Also, take a look at this howling Scary Masks.

Mask 1Mask 2

Get any one of the masks along with a t-shirt and get a 10% discount on the Mask!!

Set your Halloween attire now!!”

The idea is to offer something your users are more likely to buy and then insist on buying the new item alongside.

This will help to sell your popular products and possibly promote your new Halloween collections at ease.

7. Leverage The Reach Of Large Marketplaces

Leverage The Reach Of Large Marketplaces

This is now a common norm that if you own a WooCommerce store, you probably are already promoting on Google Shopping.

Similarly, there are several more marketplaces you can promote your products on, especially during bustling occasions such as Halloween.

Did you know?

The top 3 popular marketplaces with the highest Halloween sales are Amazon, eBay, and Google Shopping.

This is because people are used to these platforms and tend to purchase products on a regular basis.

So, even if you haven’t considered it, it is wise to promote your products in multiple marketplaces, including Google Shopping, Amazon, and eBay Seller Center, during the Halloween sales campaign. They will let you reach millions of potential buyers without much effort.

Plus, you can also upload your products to popular local marketplaces. For example, if you are in the Netherlands, then you should promote your products on Marktplaats.

It’s actually easier than you think to promote on other marketplaces. You may use a WooCommerce extension called Product Feed Manager For WooCommerce.

With this plugin, you can generate an accurate product feed for several marketplaces in minutes. And then, you just have to upload the product feed to your preferred marketplaces.

Hopefully, this will give you a big boost and help you get sold out sooner than expected.

8. Use Videos To Show Your Spooky Collection

Use Videos To Show Your Spooky Collection

Whether you own a physical store or an online store, one of the best ways to reach more buyers is to use videos.

You can create engaging videos of the best products using a video editor that you expect to sell during the Halloween sales campaign. Additionally, it’s worth considering the use of a video trimmer to refine your content, ensuring it remains both concise and engaging.

Since people regularly watch videos on Youtube or Facebook, you can upload your product videos there. In fact, if you do ship internationally, then you must post a video on Twitter.

However, the video cannot be just a product showcase and music with no words. You have to make sure you tell the viewers what this product is and why they should buy it. To make more interactive videos you can get help from AI-powered tools that can convert text-to-speech if you face trouble with voice-over.

In each of your videos, try to tell your buyers:

  • the best features of the product
  • why this product is perfect for Halloween
  • examples of how to use the product
  • how to order the product at the best price.

If you, let’s say, create 5 videos of five different products, then each video should tell the buyers all this information.

It is not mandatory to use real-life visuals for the examples you say; you can simply say it while displaying the product. (Though the visuals would be better.)

Here’s an example video script for a Pumpkin Lantern –

“The Urban Pumpkin Lantern – the perfect way to spookify your house for Halloween.

With dim orange LED lighting inside and backup power included, you can welcome Halloween with a smile of fright.

Place it near the doorway, or in the corner of your living room, or just hang it in the porch ceiling. Let everyone know that Halloween is here.

Collect your own now from RexHalloweenShop.

The link is in the description below.”

Make sure to use a piece of good background music that sounds soothing and spooky at the same time.

**Paid video Ads on Youtube and Twitter are also a very popular trend nowadays, and many are successfully using it. You may look into doing such promotions.

9. Optimize Smart Suggestions On Product Page

Optimize Smart Suggestions On Product Page

When a person enters the product page, it indicates that the person is looking to purchase it sooner or later.

During Halloween, people will look to purchase several things to prepare for the occasion. For example, people will buy candies, decorative, face paint, costumes or custom masks, and many more.

If you supply multiple Halloween products, then you can make good use of the product suggestions.

When someone is on the product page for, let’s say, a Pumpkin Lantern, you can offer to buy Decorative Fairy Lights in the suggestion area on the right or below.

In this case, the buyer may notice that the two required products for Halloween are available here. So, chances are he/she will decide to purchase both from here and maybe look for more Halloween items here rather than buying them from different stores.

You can even display such suggestions on the Cart Page just before the checkout. When people are at the cart page, they are ready to buy, so product suggestions there will be more effective.

Setting up such suggestions is actually very easy to handle through the default Upsell and Cross-sell features in WooCommerce.

First, list down the products for which you want to optimize suggestions. Then edit each of the products and assign relevant Upsell and Cross-sell items. It’s as simple as that.

The challenge here is to use the right suggestions. As a result, you have to do some research in understanding what products would make sense for people to buy together.

As per the example above, if someone is looking at a Pumpkin Lantern, then he/she will probably like to set some lighting decorations as well. So suggesting Decorative Fairy Lights would make perfect sense.

10. Create A Special Page Just For Halloween

Create A Special Page Just For Halloween

A best practice followed by most large online stores is to create a dedicated Halloween page.

You can do the same on your WooCommerce store so that only Halloween products, bundles, and offers will be displayed in the same way as on the Shop page.

This will make it easier for buyers to notice your Halloween collection and offers. And if you do have good offers, people will definitely purchase more from you.

Now, you have to make sure that you organize the page properly in a way so that the best deals are shown first.

Or you can segment the page into 3 sections

  • Halloween Offers
  • Special Halloween Bundles
  • All Halloween Products

This will make it easier for you to display your offers and let people choose from the best deals. (Naturally, your best offers should be on the products you want to sell more.)

Special Tips –

Keep in mind, Halloween will bring in more traffic. So you have to ensure your server doesn’t fail to deliver fast loading time and a smooth browser for your users. You can either choose to take higher plans for hosting during Halloween or choose to find other ways to optimize your site for the occasion.

One way could be to serve website media from Cloud Storage or CDN servers. That way, the server load due to media files will not be as intense. Plus, Cloud storage services will never fail to deliver content due to having multiple hubs available.

For WordPress, you may use Media Storage To Cloud to easily offload and serve your website media files from cloud storage services such as Amazon S3, Google Cloud storage, or DigitalOcean.

Another activity you have to focus on is handling abandoned carts. Along with high traffic, a higher number of Abandoned carts are expected during Halloween sales. You can easily reach back to these abandoned buyers and win back around 20% of them using reliable plugins such as Cart Lift – Abandoned Cart Recovery.

Noot van de auteur

Remember, Halloween is not exciting for buyers unless you make it for them. The more exciting offers you have for your buyers, the more sales you can expect.

You may also consider some additional creative options for marketing and talk with some good media buying agencies for their suggestions.

So do put an extra effort into giving offers that people will love to take on. And use most of the unique ideas you just learned here, to make the most out of all the visitors you will get during Halloween sales.

Btw, you can take a look at amazing Halloween deals for WordPress themes and plugins here.

Share any more new ideas you may have, in the comments section. With that note, let’s all have a spooky Halloween.

Categorieën
Gids

Complete Guide To Offload WordPress Media Files Using Cloud Storage And Reduce Hosting Cost [2023]

Your website performance depends a lot on your hosting plan and the number of media files you load on your site.

If you run a WordPress site that has a lot of media files and assets, then chances are, over time, your site will get slower and there will be more server requests when hosting your files.

This will have a great impact on your ROI as people will tend to leave your site if it’s too slow. Plus, if the server requests exceed your hosting provider’s limit, then your website server may even crash, thus losing more business.

Did you know
53% of users leave a site that takes longer than three seconds to load
a faster web page results in a 16.5% increase in conversion rate?

One of the best solution to this is to host and serve your website media files from cloud storage.

Offloading your website media files to cloud storage can help you avoid exceeding your hosting storage limits. And if you serve these media files from cloud to your website, then it will significantly speed up the loading time of your website media.

In the long run, you will save more on hosting costs.

Today, I will give you a step-by-step guide on how you can offload your WordPress media files to your preferred cloud storage easily.

After reading this guide, you will be able to –

  • Learn how you are losing money through your hosting provider
  • Understand how cloud storages is a better solution
  • Learn about the most reliable cloud storage services
  • Easily offload your WordPress media files to cloud storage

Once you learn all that, eventually, you will be able to get a faster website, with no server overload, and reduced hosting costs.

So let’s gets started.

Why Use Cloud Storage Service To Serve Website Media Files

The first question in your mind is probably that why you should rely on a cloud service to serve media files, rather than your trusted hosting provider.

There could be many reasons, but let me give you the most significant ones.

  1. Stop Wasting Tons Of Money On Hosting Cost
  2. Avoid Server Failure During Traffic Surge
  3. To Get Better Website Performance At All Times

So let’s learn exactly how these are possible.

1. Stop Wasting Tons Of Money On Hosting Cost

If you are using a dedicated server from providers such as WP Engine, or GoDaddy, you probably know that you have a limited Storage per plan. The moment you exceed that limit, you need to jump to the next plan to get more storage which may be an extra $10 to $15 per month.

In such situations, cloud storages are much more convenient. For example, Amazon S3 has a standard plan where you only pay a low amount such as 0.023 per GB which amounts to USD = 1.15 USD per month for up to 50 GB data space. That’s a big saver per, totaling over $90 per year.

2. Avoid Server Failure During Traffic Surge

For the above-mentioned hosting providers, one big issue they face is the ability to handle huge concurrent traffic. If you get a sudden surge in concurrent traffic, let’s say about 1000 visitors to your site at a time, chances are your server will crash.

This is something that cloud storages excel at since they have tons of more data centers than a hosting provider. So, even if tons of people are viewing the same media file at the same time, there will be no chance of server failure.

3. Get High Website Performance At All Times

Now, you might come across shared hosting providers such as Bluehost or Dreamhost who is running a crazy marketing scheme, claiming that you will get unlimited bandwidth and 50 GB data space for less than $5 a month.

Wow, that’s a great offer, right? But there are a few catches.

  • First, even if they claim that you will get unlimited bandwidth, once you reach a certain limit, you will face hosting throttle, i.e., your server loading time will be significantly slowed down on purpose.

    This is a common practice for most shared hosting providers to avoid over-usage of the server that is shared among many other users.
  • Second, such shared hosting providers assume that you will not exceed your limit.
    The moment you do, they will inform you that they are unable to provide you high performance at a shared hosting environment and will suggest you use their dedicated hosting server.
    However, even if you go with their dedicated servers, it will still have the same issue with handling concurrent traffic.
  • Finally, another significant thing to look at is the ability to choose a data center to serve media from, in cloud storage.
    Suppose most of your ideal prospects are from Germany. Then you can choose a nearby data center for your cloud storage to serve media from. In the case of an ordinary hosting provider, you do not have the option to do such.
    This is has a good effect on the site’s loading speed, especially when you have large media files, or when you have many media files on a single web page.

Now that you understand how a hosting provider is not always the best to rely on when serving huge website media files, let’s look at the most reliable Cloud Storages out there.

Best Cloud Storage Services To Offload And Serve WordPress Media Files

There are many cloud storage services available, but let us look at the best cloud storage services that we recommend for your WordPress site.

1. Amazon S3 (AWS)

Amazon S3 Banner

Amazon S3 is a core part of Amazon Web Services through which you can store and retrieve any amount of data, at any time, from anywhere on the web.

It has a proven track record of being very fast, reliable, and offers you comparatively very low storage costs.

Netflix, Airbnb, SmugMug, Nasdaq, etc. are some of the prominent users of Amazon S3. For building or migrating applications to AWS, certain AWS application development services can be useful. However, organizations may choose to migrate to alternate cloud platforms like Microsoft Azure for various reasons. In such cases, enlisting AWS to Azure Migration Services can greatly facilitate the transition.

Some notable perks of Amazon S3 –

  • Highly secured
  • Easy to manage & migration
  • Comprehensive documentation
  • Developers friendly
  • Multiple regions
  • Server-side encryption

2. Google Cloud Storage

Google Cloud Platform Banner

Google Cloud Storage is a part of the Google Cloud Platform, which helps you with your business meet online storage requirements.

The cloud platform itself can help you host software or even websites; however, it is more popular for its cloud storage service.

Google Cloud offers you the performance and scalability of Google’s advanced security and sharing capabilities.

It also offers you three types of storage services:

  1. Persistent Disks for block storage
  2. Filestore for network file storage
  3. Cloud Storage for object storage

These services are the core of the platform and are used by the majority of the Google Cloud service users.

Some notable perks of Google Cloud service-

  • Improved Performance
  • Better Pricing Plans
  • Redundant Backups
  • Easy integration
  • Extensive documentation
  • Many regions available to store your data

3. DigitalOcean

DigitalOcean Spaces Banner

DigitalOcean is well-known for providing high-performance servers. Nowadays, it is definitely one of the top choices to host your website assets and data.

It mainly focuses on three key selling points — simplicity, pricing, and high-performance virtual servers.

Even though their main focus is on cloud computing, many rather prefer using their DigitalOcean Spaces service, which includes 250 GB of storage and 1 TB of outbound bandwidth at only $5 per month.

If you exceed this allocated space and bandwidth, you will be charged $0.01 per additional GB transferred and $0.02 per additional GB stored. This is a great deal if you have tons of media files to offload.

Some notable perks of DigitalOcean-

  • Reduced physical distance
  • Load static content from the cloud
  • Reduced file size to increase site speed
  • Software Development friendly
  • Excellent documentation.
  • User-friendly UI

How To Offload Media Files From WordPress To Cloud Storage?

There could be multiple ways to offload media files to cloud storage from your WordPress site.

But, if you choose one of the three cloud storage services that I mentioned earlier, then the best option is to use a reliable plugin that will let you handle this matter easily.

One such plugin is called Media Storage to Cloud.

Media Storage To cloud

Media Storage to Cloud Banner

Media Storage to Cloud s a WordPress plugin that will help offload your WordPress media files to your desired cloud storage easily, which includes Amazon S3, Google Cloud Service, and DigitalOcean. Plus, you can serve your WordPress website media files directly from your cloud storage via this plugin.

Best features of Media Storage To Cloud (M2C)

  • Easy to offload WordPress media files to cloud storage
    -You can easily offload all of your WordPress media files to cloud storage in just a few clicks.
  • Serve your website media and content directly from cloud storage
    -Once you offload media files to cloud storage, you can then serve WP media files directly from your cloud storage server in a single click. No manual hassle and no time wasted.
  • Auto-sync with cloud storage for changes in your media and files
    -You can auto-sync your WordPress media library. When you upload images to your media library, they will be automatically offloaded to your cloud storage.

So, if you are looking for a plugin to connect your WordPress site with a cloud storage service, you should definitely use Media Storage to Cloud.

Now, let us look at how you can offload your WordPress media files to each of these cloud storage using Media Storage To Cloud.

  1. How to offload WordPress media files to Amazon S3
  2. How to offload WordPress media files to Google Cloud Storage
  3. How to offload WordPress media files to Digital Ocean Spaces

How To Offload WordPress Media Files To Amazon S3

Follow the steps below to connect and offload your WordPress media files to Amazon S3 cloud storage.

**Make sure you have Media Storage To Cloud installed and activated.

To connect your site with Amazon S3 bucket, make sure you already have an IAM user account on AWS.

Step 1 – Connect Your WordPress To Amazon S3

1. On your Dashboard, look for the menu WP Cloud. Click on it.

It will take you to the plugin interface, and initially, you will be in the Storages tab.

M2C AWS Dashboard

Here, Amazon S3 will be selected by default.

2. Input the required data to connect Amazon S3

AWS Dashboard Credentials

Here, you need to provide the following Amazon S3 credentials:

3. Now, click on the Save button, and you will get a confirmation message on the top right corner.

Success Message

This means that now you have successfully connected Media Storage To Cloud with Amazon S3.

Step 2 – Offload Media Files To Amazon S3

1. Now, go to the Sync tab and choose Amazon S3.

Amazon S3 Sync

You can see there is an option called Select sync option.

AWS Sync options

Here you can choose to offload media in two ways.

  • Send all data to storage
    -Select this option if you want to offload all of your media files to Amazon S3.
  • Send unsynced data to storage
    -Select this option if you wish to offload new media to Amazon S3, and not the ones you have already offloaded earlier.

If you are a first time user, then select Send all data to storage.

2. Next, click on the Sync button.

AWS Syncing Progress

A progress bar will appear while offloading media files to Amazon S3 bucket.

It may take some time to offload all the media files, but do not change the tab as it may hamper the syncing process.

After syncing is complete, a success message will appear on the top right corner.

That’s it. You can then check your Amazon S3 bucket. You will see that all your WordPress media files have been copied to Amazon S3 bucket.

How To Offload WordPress Media Files To Google Cloud Storage

Follow the steps below to connect and offload your WordPress media files to Google Cloud Storage.

**Make sure you have Media Storage To Cloud installed and activated.

To connect your site with Google Cloud Storage, make sure that you already have a Google Service Account and a Google Cloud Storage Bucket.

Step 1 – Connect Your WordPress To Google Cloud Storage

1. On your Dashboard, look for the menu WP Cloud. Click on it.

It will take you to the plugin interface, and initially, you will be in the Storages tab.

M2C Dashboard GCS

Here, choose Google Cloud Storage.

2. Input the required data to connect Google Cloud Storage.

GCS required credentials

Here, you need to provide the following Google Cloud Storage credentials:

  • GCS Service Account Key JSON Data
    -You need to collect the Service Account Key JSON Data from your Google Cloud Storage account. (You can collect it from here.)

3. Now, click on the Save button, and you will get a confirmation message on the top right corner.

Success Message

This means that now you have successfully connected Media Storage To Cloud with Google Cloud Storage.

Step 2 – Offload Media Files To Google Cloud Storage

1. Now, go to the Sync tab and choose Google Cloud Storage.

Google Cloud Storage Sync

You can see there is an option called Select sync option.

GCS Sync options

Here you can choose to offload media in two ways.

  • Send all data to storage
    -Select this option if you wish to offload all of your media files to Google Cloud Storage.
  • Send unsynced data to storage
    -Select this option if you want to offload new media to Google Cloud Storage, and not the ones you have already offloaded earlier.

If you are a first time user, then select Send all data to storage.

2. Next, click on the Sync button.

GCS Syncing Progress

A progress bar will appear while offloading media files to Google Cloud Storage.

It may take some time to offload all the media files, but do not change the tab as it may hamper the syncing process.

After syncing is complete, a success message will appear on the top right corner.

That’s it. You can then check your Google Cloud Storage folders. You will see that all your WordPress media files have been copied to Google Cloud Storage.

How To Offload WordPress Media Files To DigitalOcean Spaces

Follow the steps below to connect and offload your WordPress media files to DigitalOcean Spaces.

**Make sure you have Media Storage To Cloud installed and activated.

To connect your site with DigitalOcean, make sure you already have a DigitalOcean account and a DigitalOcean Space created.

Step 1 – Connect Your WordPress To DigitalOcean

1. On your Dashboard, look for the menu WP Cloud. Click on it.

It will take you to the plugin interface, and initially, you will be in the Storages tab.

M2C Dashboard DOS

Here, choose DigitalOcean.

2. Input the required data to connect DigitalOcean.

M2C DigitalOcean Dashboard

Here, you need to provide the following DigitalOcean credentials:

3. Now, click on the Save button, and you will get a confirmation message on the top right corner.

Success Message

This means that now you have successfully connected Media Storage To Cloud with DigitalOcean.

Step 2 – Offload Media Files To DigitalOcean Spaces

1. Now, go to the Sync tab and choose DigitalOcean.

DigitalOcean Sync

You can see there is an option called Select sync option.

DigitalOcean Sync options

Here you can choose to offload media in two ways.

  • Send all data to storage
    -Select this option if you wish to offload all of your media files to Google Cloud Storage.
  • Send unsynced data to storage
    -Select this option if you want to offload new media to Google Cloud Storage, and not the ones you have already offloaded earlier.

If you are a first time user, then select Send all data to storage.

2. Next, click on the Sync button.

DigitalOcean Syncing Progress

A progress bar will appear while offloading media files to DigitalOcean Spaces.

It may take some time to offload all the media files, but do not change the tab as it may hamper the syncing process.

After syncing is complete a success message will appear on the top right corner.

That’s it. You can then check your DigitalOcean Spaces. You will see that all your WordPress media files have been copied to DigitalOcean.

How To Serve WordPress Media Files From Cloud Servers

Once you offload your WordPress media files to your preferred cloud storage, you may choose to serve your website media directly from the cloud storage.

For example, if you offloaded your media files to Amazon S3, you can set it up so that your website media files are hosted and served from Amazon S3.

Follow the simple steps below to do so.

1. Click on the Settings and choose the cloud storage where you offloaded your media files.

Serve Settings

Here you will find the following three options:

Serving media files
  • Serve Media File From Bucket
    -Enable this option to Serve your website media files from the selected cloud storage.
  • Upload Media Files On Bucket When Uploaded On Media Library
    -If you enable this option, it will create a full auto-sync when uploading new files to your media library. This means, whenever you upload a new media file to WordPress, it will automatically be copied to your synced cloud storage.
  • Delete Media From Bucket When Deleted From The Media Library
    -If you enable this option, it will create a full auto-sync when deleting files from your media library. This means, whenever you delete a media file from WordPress, it will also automatically be removed from your cloud storage.

2. Enable the first option to start serving website media from cloud storage, and you may enable the other two if you wish to apply auto-sync. Then click on Save.

3. Now, you can check in your WordPress media library that the links of the media files have been changed.

Serve website media from Amazon S3
Media’s link is changed when serving from Amazon S3

The media files are now being served from your cloud storage.

That’s it. It’s this simple to offload and serve your website media from Amazon S3, Google Cloud Storage, or DigitalOcean.

Noot van de auteur

As you can see, it is really easy to connect your cloud storage to WordPress using Media Storage to Cloud.

Sure, you might have the question that, what if you use some other cloud storage. My advice would be to use one of the three I mentioned here because they are reliable. Other clouds are good, but these three are renounced for security and performance and will give better output any day.

In this guide, I was more focused on offloading media files. In my next guide, I will give you a detailed insight into serving website media files through the three cloud storage that we mentioned here.

Categorieën
Guide WooCommerce

Complete Guide On Using WooCommerce Variation Swatches Smartly [2022]

To increase sales in your online store, the first step is to impress your potential customers visually. And to do so, you must optimize your product pages.

The easier you make for buyers to choose their products, the higher the conversion.

If you have variable products in your store, you want to display all the variations of a product in a user-friendly way.

One of the latest trends that have seen great results is the use of swatches to present variations, rather than drop-down menus.

Hence, use WooCommerce variation swatches to present product variants in a more engaging and appealing way.

Create greater buyers’ intent because:

  • Buyers will get a preview of the variants rather than text. For example, they will see the color red visually, rather than selecting a text ‘Red’, hence helping to take a practical decision.
  • It’s easier to browse through variants by clicking on swatch buttons, rather than drop-down menus.
  • The swathes will attract the buyers to check through the variants, and possibly create a buyer’s intent. As they say, the more you spend time on a product, the more you wish to buy it.

Today we will discuss how you can use variation swatches on your WooCommerce store in the most result-driven way.

You will learn how to apply the right type of variations swatches depending on your product variants to enhance the buyers’ intent.

Na het lezen van deze gids, zult u in staat zijn om:

  • Understand how each variation swatch type is important
  • Set up color, image or label swatches for variants on your own
  • Examples of great use of variation swatches
  • Enhance buyers’ intent and increase your sales

Dus laten we erin duiken.

When And Why Use Different Variation Swatches?

Use WooCommerce Variation Swatches

Your variable products may have different types of variations. You can’t set up unique variation swatches for different variants to create maximum engagements.

Color Variation Swatches

A product may be available in various colors.For example, let’s say you are selling a t-shirt that has three colors, Red, Blue, and Yellow.

Then you can use color variation swatches to let your customers choose from the variants.

By default, WooCommerce lets people choose through a boring drop-down menu. But you can make it more engaging with colored swatch buttons.

See the difference yourself:

Default

Default color variation selection
Default WooCommerce variations selection for color

Using Color Variation Swatches

WooCommerce Color Variation Swatches
Using WooCommerce Color Variation Swatches

As you see, the colors are clearly visible. So a person will find the selection easier and more practical.

Image Variation Swatches

Certain products are more versatile and you may present the variants using image variation swatches.

For example, let’s say you sell gift boxes with different shapes. So rather than presenting the drop-down selections, you may display variants with image swatches.

Here’s how amazing it becomes:

Default

Default image variation selection
Default WooCommerce variations selection for shape

Using Image Variation Swatches

WooCommerce Image Variation Swatches
Using WooCommerce Image Variation Swatches

As you can see, the variants are presented in small swatches for the shapes thus making it more attractive.

Tip:
It is always ideal to have an image with all variants together as the featured image for the product. In case you don’t have any, then use the image of the most popular variant as the featured image.

Label Variation Swatches

Certain factors such as Size or Length are difficult to portray visually.

For example, if you are selling a t-shirt with sizes, L (for large), M (for Medium), and S (for Small), then you have no way to visually show the actual sizes.

In that case, you can still make it attractive by presenting the variants using label variation swatch buttons.

Here’s how it will still make a difference:

Default

Default variation selection
Default WooCommerce variations selection for size

Using Label Variation Swatches

WooCommerce Label Variation Swatches
Using WooCommerce Label Variation Swatches

Despite no size visualization, the swatches make the selection more appealing. People will often click on the swatches just out of curiosity.

Text Variation Swatches

Similar to sizes, few other variation factors such as material or age-group related variations, etc, can not portrayed visually, nor they can be portrayed as labels.

For example, let’s say you are selling a hat in the Kids size, Teen size and Grow-up size.

In that case, you can turn them in to attractive buttoned text swatches.

The advantage here is that all the variations available will be listed in front of the buyer and he/she can make the selection simply by clicking on the button(s).

Here’s a preview:

Default

Default variation selection
Default WooCommerce variations selection for size

Using Text Variation Swatches

WooCommerce Text Variation Swatches
Using WooCommerce Text Variation Swatches

Tip:
If you have size labels other than numbered values, then keep a chart in your site to find the exact values of the sizes. Stores often lose sales due to the lack of this chart. Customers are not patient enough to knock you on customer care to find out the exact size.

As you saw, changing variation menus to swatches make it so much more attractive and engaging.

Now, if you want to implement these attractions, then you can easily do so using the plugin Variation Swatches For WooCommerce.

Variation Swatches For WooCommerce

Variation Swatches for WooCommerce is a simple plugin with which you can change the basic dropdown selection of variants to button swatches easily. It takes only a few clicks.

Let me give you a step by step guide on how you can easily set up variation swatches on your online shop using Variation Swatches for WooCommerce.

How To change dropdown to button swatches for WooCommerce variations?

As discussed earlier, WooCommerce displays variations as dropdown options on the product page.

However, you can easily convert the variation options from dropdown to button swatches in just a few clicks, using the plugin.

Here’s how you can do it step by step.

1. First, install and activate Variation Swatches for WooCommerce.

On your admin dashboard, you will get a new menu called Swatches. Click on it.

Variatie Swatches

It will take you to the plugin dashboard.

Variation Swatches for WooCommerce Dashboard
Variation Swatches for WooCommerce Dashboard.

2. Set basic swatch style and design

On General Settings, you will find the options to set color and border of swatches as normally displayed, when hovered, or when selected.

Plus you will be able to set the font size.

Configure these settings as you like.

3. Go To Controls Tab

Click on the Controls tab on the left.

Besturingselementen

The Controls tab will have many options.

Controls tab

4. Enable Dropdown To Button Swatches

Here, turn On the Dropdown To Button Swatches option.

Dropdown to button swatches

Then save settings. Now you will see that the variations on product pages will be displayed in the form of button swatches.

Default Dropdown Selection

Default Dropdown Selection

Button Swatches For Variations

Button Swatches for Variations

Once you have enabled the dropdown to button swatches for your store, now you can customize the swatches into color, image or label swatches easily, in few simple steps.

How to Set Up WooCommerce Color Swatches for Color Variations

By using Color swatches, you can give a visual idea of the color the buyer will be choosing. So the there will be no hesitation.

And as you saw earlier, color swatches are very attractive compared to the ordinary dropdown selection.

To to set set up color swatches, follow the steps below.

1. Enable Dropdown To Button Swatches

First follow the steps to enable dropdown to button swathes as explained earlier.

(Click here to read how to enable dropdown to button swatches.)

2. Go To Your Created Attributes

The variation terms are usually grouped in to attributes.

Go to Dashboard > Products > Attributes and you will find the list of attributes you have already created in your store, and the option to add new attributes.

Attributes Overview

On the right side, you can see the list of created attributes you have.

Global Attributes

3. Change Your Desired Attribute As Color Type

Hover your mouse on the attribute name for which you want to use color swatches.

Edit color attribute

You will get the options to Edit or Delete. Click on Edit and it will take you to the Edit attribute page.

Edit Attribute for Color

Once you are on the Edit Attribute page, you will see you have a field for Type.

Attribute type field for color

Click on it and choose the option “Color”.

Color type attribute

Then click on the Update button below.

4. Set Color Swatches For Variation Terms

Once you have set the attribute type to “Color”, now you can assign color swatches to the variant terms under this attribute.

Go back to Dashboard > Products > Attributes and on the right side of the attribute (you just set as Color type), you will get the option to “Configure terms”.

Configure Terms For Color Variation Swatches

Click on Configure terms and it will take you to the the following page:

Configure Terms Page

Here, you can either add terms for color variations or, on the right side you can see the variant terms that you all ready have for colors on your store.

Color Variation Terms List

Hover your mouse on one color term and you will find the option to Edit.

Edit Variant Term

Click on edit and it will take you to the edit page. Here, below you will see that you have the option to choose a color.

Edit Color Mode

Click on “Select Color” and you will get the option to assign a color.

Color for swatch

Choose an appropriate color and click on Select Color again.

Then click on the Update button below.

Once updated, go back and you will see that a preview of the color is there just beside the name of the respective color variant term.

Color variation swatch
Blue color swatch selected for Blue variation term

Do the same for the rest of the color variations and that’s it. Now your products will have color variation swatches instead of dropdown selection for color variants.

Using Color Variation Swatches

WooCommerce Color Variation Swatches

How to set up image swatches for WooCommerce product variations?

By using Image swatches, you can display certain variants as attractive swatches when viewing product(s).

And as you saw earlier, image swatches are very engaging, compared to the ordinary dropdown selection.

To to set set up images swatches, follow the steps below.

1. Enable Dropdown To Button Swatches

First follow the steps to enable dropdown to button swathes as explained earlier.

(Click here to read how to enable dropdown to button swatches.)

2. Go To Your Created Attributes

The variation terms are usually grouped in to attributes.

Go to Dashboard > Products > Attributes and you will find the list of attributes you have already created in your store, and the option to add new attributes.

Attributes Overview

On the right side, you can see the list of created attributes you have.

Global Attributes

3. Assign Your Desired Attribute As Image Type

Hover your mouse on the attribute name for which you want to use image swatches.

Edit image attribute

You will get the options to Edit or Delete. Click on Edit and it will take you to the Edit attribute page.

Edit Attributes for Image

Once you are on the Edit Attribute page, you will see you have a field for Type.

Edit Attributes for image

Click on it and choose the option “Image”.

Image type attribute

Then click on the Update button below.

4. Set Color Swatches For Variation Terms

Once you have set the attribute type to “Image”, now you can assign image swatches to the variant terms under this attribute.

Go back to Dashboard > Products > Attributes and on the right side of the attribute (you just set as Image type), you will get the option to “Configure terms”.

Configure Terms For Image Variation Swatches

Click on Configure terms and it will take you to the the following page:

Configure Terms Page For Image Swatches

Here, you can either add terms for variations or, on the right side you can see the variant terms that you already have (under this attribute).

Image Variation Terms List

Hover your mouse on one term and you will find the option to Edit the term.

Edit Variant Term

Click on edit and it will take you to the edit page. Here, below you will see that you have the option to upload or add an image.

Edit Image Mode

Click on “Upload/Add Image” and you can either upload an image or choose an image from your media library.

image For Swatch

Choose an appropriate image then click on the Update button below.

Once updated, go back and you will see that a preview of the image is there just beside the name of the variant term.

Image variation swatch
Triangle image swatch selected for Triangle Shaped variation term

Do the same for the rest of the variants and that’s it. Now your products will have image variation swatches instead of dropdown selection for these variants.

Using Image Variation Swatches

WooCommerce Image Variation Swatches

How to set up a label variation swatches for variable products?

By using Label swatches, you can display certain variants that can be recognized with single letters or numbers.

And as you saw earlier, Label swatches are more catchy, compared to the ordinary dropdown selection.

To to set set up label swatches, follow the steps below.

1. Enable Dropdown To Button Swatches

First follow the steps to enable dropdown to button swathes as explained earlier.

(Click here to read how to enable dropdown to button swatches.)

2. Go To Your Created Attributes

The variation terms are usually grouped in to attributes.

Go to Dashboard > Products > Attributes and you will find the list of attributes you have already created in your store, and the option to add new attributes.

Attributes Overview

On the right side, you can see the list of created attributes you have.

Global Attributes

3. Assign Your Desired Attribute As Label Type

Hover your mouse on the attribute name for which you want to use label swatches.

Edit label attribute

You will get the options to Edit or Delete. Click on Edit and it will take you to the Edit attribute page.

Edit Attributes for label

Once you are on the Edit Attribute page, you will see you have a field for Type.

Edit Attributes for label

Click on it and choose the option “Label”.

Label type attribute

Then click on the Update button below.

4. Set Label Swatches For Variation Terms

Once you have set the attribute type to “Label”, now you can assign label swatches to the variant terms under this attribute.

Go back to Dashboard > Products > Attributes and on the right side of the attribute (you just set as Label type), you will get the option to “Configure terms”.

Configure Terms For Label Variation Swatches

Click on Configure terms and it will take you to the following page:

Configure Terms Page For Label Swatches

Here, you can either add terms for variations or, on the right side you can see the variant terms that you already have (under this attribute).

Label Variation Terms List

Hover your mouse on one term and you will find the option to Edit the term.

Edit Variant Term

Click on edit and it will take you to the edit page. Here, below you will see that there is a field for you to enter a Label character.

Edit Label Mode

Input the Label you want to display.

Label for swatch

Then click on the Update button below.

Once updated, go back and you will see that a preview of the label is there just beside the name of the variant term.

Label variation swatch

Do the same for the rest of the variants and that’s it. Now your products will have label variation swatches instead of dropdown selection for these variants.

Using Label Variation Swatches

WooCommerce Label Variation Swatches

Conclusie

It is clear that dropdown selection for variable products is no longer preferred. The best way to offer variations is by using swatches.

And the best part is, it’s super easy to implement and can be done in just a few clicks using the plugin Variation Swatches for WooCommerce.

So I suggest you try out the plugin and leverage the benefit of WooCommerce variation swatches. Take advantage of attracting buyers easily without much effort.

If you want to learn how to create a variable product, you can follow this guide:

Categorieën
Guide Product Feed Manager For WooCommerce

Google kondigt gratis Google Shopping Promoties aan [2022]

The Corona outbreak is a big threat to humanity. We all know how dangerous the virus is. However, it also comes with another big threat – an economic crisis.

Due to the lockdown, most offices are incapable of running operations, and consumers have no option but to stay at home. And every business saw a drastic fall in its revenue.

However, a few local online shops are able to continue running their business, despite earning a lot less than usual.

Since people are not able to go out, they may order products online and get them delivered to their homes, thus creating a little opportunity for the eCommerce business to somehow survive.

However, things might just get better for your shop.

Selling On Google Shopping Is Free Of Cost During Corona Crisis

Earlier on 21st April 2020, Google made a huge announcement.

Within 1 week, Google will start allowing merchants to sell their products through Google Shopping completely free of cost!

According to Google, “as consumers increasingly shop online, they’re searching not just for essentials but also things like toys, apparel, and home goods.”

So Google wants to extend out a helping hand to both the consumers and the merchants. Free online listing means more merchant shops will be able to sell products through Google Shopping, and consumers will get more products to buy from.

This is great news for all online shops, especially the sites that deliver locally and the stores that sell digital products.

If you are running a WooCommerce store and deliver locally, then this is your biggest opportunity to get the maximum exposure and increase sales during this global crisis.

How To Make The Most Out Of This Opportunity

This could be your best chance to sustain during the economic crisis threat. And there is still one week time before Google starts this initiative.

So, let us look at how you can make the most out of this golden opportunity that Google is offering.

With one week at hand, we suggest you do the following:

  1. Prepare your shop by optimizing product details for SEO
  2. Identify your best selling products and plan a discount campaign
  3. Identify products that might be necessities and plan a discount campaign
  4. Make arrangement for selling a few digital products if possible
  5. Get your products listed on Google Shopping ASAP

Let us look at how you can pull this off.

1. Prepare your shop by optimizing product details for SEO

Product Details For SEO

SEO is always important if you want your products to be found on Google. Even if you list your products on Google shopping, SEO optimization will determine how relevant your product is based on your customer’s search term.

**Make sure to use an SEO plugin, such as Yoast or RankMath, on your WooCommerce store.

For example, if you are selling a T-shirt with Avengers’ design on it, then obviously you want your ideal customers to be the ones who are looking for Avengers themed t-shirts.

In that case, you can set the t-shirt title, Special Marvel Avengers Tshirt – Red, and set the keyword to Marvel Avengers Tshirt. Within the description, use this keyword a couple of times in the product description, and include it in the product link as well. These will indicate that the product is relevant to the keyword.

Your SEO tool will give you a score to understand if it was well optimized.

If you have a few products in your shop, then apply SEO optimization on every product. If you have too many products, then conduct SEO optimization at least for your best selling products.

2. Plan A Discount Campaign For Your Best-Selling Products

Browse through your website’s analytics or reports, and find out which products performed the best in the last two months.

Collect their titles, links, and the price.

Now, the 1st thing to do is to optimize them for SEO.

Next, plan out a discount campaign for your best selling products, such as a 20% discount for the 1st twenty sales from Google Shopping, or a 10% discount throughout the lockdown.

Plan A Discount Campaign

You might assume that since these are bestsellers, they will sell automatically through Google’s immense reach.

However, keep in mind, just like you, there are tons of other online shops that also plan to take advantage of this opportunity. Hence, along with more exposure, you will face more competition as well.

Consumers will look to purchase products either based on higher rating, or lower price. Nowadays, a lower price will get a high priority since everyone is trying to save money in response to the crisis.

Hence, it is only logical to run discounts and increase your sales.

3. Plan A Discount Campaign For Products That Might Be Necessities

Certain products are a necessity nowadays besides food and beverages, for example, bathing products, cleaning products, tissues, tampons, etc.

Also, certain electronics such as water purifiers, ovens, hair trimmers, etc might also be considered necessities at this time.

You may identify such products, optimize them for SEO, and decide on a discount campaign for them as well.

**Since we are focusing on local sales, it would be even better if you could deliver free of cost. But that’s totally your decision to make.

4. Make Arrangement For Selling A Few Digital Products If Possible

You might have a fixed category of products that you sell.

However, if you are an online retail shop that sells various types of products, then you might consider adding a few digital products (if you don’t have any already) such as movies, music collections, games, or books.

Most people are sitting idle at home, and looking for ways to make their days more entertaining. Hence, these digital products are pretty demanded in the current situation.

Even though there is no guarantee that if you arrange such products they will have maximum sales, it is still a high possibility.

5. Get Your Products Listed On Google Shopping ASAP

With this free of cost opportunity at hand, you should list your products on Google Shopping ASAP. You need to be prepared to upload your products right from the start.

Get Products Listed On Google Shopping ASAP

To do so, you first need to understand that Google Shopping has a fixed set of instructions that you must follow for your products to get approved.

It will look for specific data in the right format that is accepted by Google Shopping. Plus, Google has its own set of categories that you must indicate through your feed.

Here’s a guide to set up your WooCommerce Product data in an optimized way for Google Shopping:

In the guide, you will get actionable instructions on what data to submit and how to optimize them for approval on Google Shopping.

For example, if you have a t-shirt with 3 color variations, red, blue, and green, then you have to submit each variation separately and include the color name in the Product title. So if the product is called “New Cotton T-shirt”, for its the red variant, then the title should be “New Cotton T-shirt – Red”.

Similar to this, there are several other tips that you will find in that guide to optimize your feed data.

Now, to create the product feed, it’s really not convenient to do so manually. Rather use a product feed generation tool to generate a feed for all of your products in a few minutes.

If you own a WooCommerce store, then you can use Product Feed Manager For WooCommerce. It is a plugin that already has a set template for Google Shopping.

All you need to do is create a new feed, choose Google Shopping as the merchant, and assign a few attributes with the right values.

Let us look at a few reasons for you to use Product Feed Manager For WooCommerce.

Product Feed Manager For WooCommerce

WPFM banner for Google Shopping promotions

The plugin as a few features that are dedicated to helping you generate an accurate product feed for Google Shopping.

1. Pre-Built Google Shopping Feed Template

Google specifically requires you to submit 12 mandatory data for your products:

  • Product ID
  • Titel van het product
  • Productbeschrijving
  • Product Link/URL
  • Productcategorie
  • Google Product Categorie
  • Productafbeelding URL
  • Voorraadbeschikbaarheid
  • Normale prijs
  • Productvoorwaarde
  • Fabrikant/Merknaam
  • GTIN or MPN

And there are a few more conditional attributes that you need to submit depending on your niche.

The plugin by default has these attributes set. When you choose Google Shopping, the plugin will display the template which includes all the mandatory fields and values assign (except for 3 which I will explain in a bit).

So, you don’t need hours to set it up, and nor do you need exclusive knowledge to set up the feed. 80% of your work is already done.

2. Auto-sync WooCommerce Products To Google Shopping

One of the notable features this plugin has is the option to auto-sync your generated product feed to Google Shopping.

Once you generate the product feed, you can send the feed to your Google Merchant Center in just a click. Once you send the feed to Google, any changes you make later to the products and the feed, they will automatically be updated on Google Shopping.

You won’t have to manually upload new feed files to Google every time you make changes.

Here’s a written guide on how it works:

Here’s a video to show you how it works:

3. Category Mapping For Accepted Google Categories

On the mandatory attributes mentioned above, there is one called Google Product Category. You need to assign each of your products to a category that Google accepts.

Don’t worry, you do not need to change any data or category names on your shop for this.

The plugin has a Category Mapping feature where you can map your shop categories to that of Googles. Durig feed generation simply assigns the mapping values as the values for Google Product Category.

It’s really easy to use. Here’s a written guide on it:

Here’s a video to show you how it works:

4. Special Custom Attribute Fields

On the mandatory attribute list mentioned above, you can see that there certain attributes, Manufacturer/Brand, GTIN, and MPN.

However, WooCommerce by default has no field(s) for these attributes.

Product Feed Manager For WooCommerce comes with the feature of including these fields to your products where you can assign the values.

You also get extra custom fields for conditional attributes such as Gender, Color, Size, or Pattern which you need to submit if you sell products in the Apparels category.

Here’s a guide about it:

5. Avoid Price Mismatch Error When Uploading Feed

Many people face a common error, “Price mismatch” when uploading the feed and many of their products get rejected.

The reason behind this is, for a variable product, if you have different pricing for different variations, WooCoomerce displays both the highest price and the lowest price when Google crawls that product page for a particular variation. This causes a mismatch in the price you submitted.

Product Feed Manager For WooCommerce holds the option to fix JSON LD structured data so that only the accurate price is displayed when Google crawls a variant of a variable product.

It’s just a single click in the plugin’s settings to activate it. Here’s how:

Hence, you will be able to avoid facing the “Price mismatch” error on Google Shopping.

6. Exclusive Filter For Efficient Feed Generation

The plugin allows you to generate a product feed for all the products, or you may use it’s filter options to generate a feed for specific products only.

For example, if you have products that are no longer in stock and you do not want to submit them on Google, then you can use the custom filter to exclude all products that are out of stock.

It also has a category filter and tag filter where you can simply choose certain categories or tags to generate a product feed for the products under those categories or tags only.

Here’s a video to show you how it works:

This really saves time and you can upload only the products that you want to sell through Google Shopping.

7. Easily Add Variant Values To The Product Title

Now, as I have mentioned above, Google advises to include the variant value to the Product title (though not mandatory).

However, it is not necessary to change the title in your store to achieve this. The plugin allows you to choose to add the variant names to Product titles in the product feed that you generate.

As you can see, this plugin is a great help in generating an accurate product feed quickly, and optimize the feed for getting the best results through Google Shopping.

Conclusie

Google is taking a very honorable initiative to help both the consumers and sellers. There is no way you should lose this opportunity.

So, go ahead and prepare your store right away if you want the best results out of free promotion through Google Shopping and increase your sales to sustain during this world crisis.