Kategorien
Guide Product Feed Manager For WooCommerce WooCommerce

Generate WooCommerce Product Feed For Favi Compari & Árukereső To Sell Furniture (2024)

Recently, online sales of furniture and home decor are on the rise in Europe.

In the Czech Republic, online Furniture and appliance sales lead to revenue growth of over 20% on average for eCommerce sites compared to 2020.

If you run a WooCommerce store to sell furniture and home decor in the Czech Republic or Slovakia, then you too can easily boost your sales.

You simply need to promote your products through a local price comparison site that can deliver a high traffic volume.

Favi is one such site that has proven to deliver great results for furniture businesses in the Czech Republic or Slovakia. It is one of the largest price comparison sites in Europe, with over 3 million monthly traffic.

And today, you will learn how you can upload your products on Favi and start getting more sales.

In this guide you will learn:

  • Requirements to join the Favi marketplace
  • The correct format to generate XML product feed
  • Examples of product data and attributes to include in the feed
  • How to generate Favi XML feed in just a few clicks.

And once you learn all these, you will be able to start promoting on Favi and boost your revenue.

Fangen wir also an.

Joining The Favi Marketplace

Favi currently operates in around 9 European countries that include:

Although it’s pretty popular in all these countries, Favi is more popular in the Czech Republic and Slovakia.

Requirements To Join The Favi Marketplace

To register on Favi, you first need to make sure you meet the following requirements:

  1. Your website is SSL certified.
  2. You must have a valid telephone number and email address, which should be mentioned on your website’s Contact page.
  3. A valid Terms Of Use page should be available.
  4. All rules, validities, and processes related to returns, refunds, or complaints, should be clearly specified on your site.
  5. No fake reviews should be added. (This may be checked for an independent server of the reviewer for verification.)
  6. You must submit an XML feed in the right format, which should be hosted on your site and fully accessible.
  7. It is recommended to have a responsive website.
  8. Having multiple payment methods is a plus.
  9. Make sure the products you submit are in stock.

Once you meet all these requirements, you can then proceed to registration.

After registration, you will be contacted by a Favi account manager and you can then proceed with the campaigns.

FYI:
Favi’s fees follow a CPC policy that varies from category to category.
You may check out the pricing here.

Now, let us learn how you can generate a product feed so that you can upload your WooCommerce products on Favi.

Guide To Generate XML Feed for Favi Compari & Árukereső

Favi accepts feed submission in many formats – feed formats of Google shopping, Zbozi, Ceneo, Comapri, and Árukereső.

In this guide, we will explain the feed generation process for Favi Compari & Árukereső.

First, let us look at the attributes and their example values you need to submit for each product. Then you will learn how you can generate an accurate product feed in the right format using a reliable tool.

Feed Specification For Favi XML Feed With Example Values

When creating a new feed for Favi, you will need to include a few specific data in the right format.

Normally, the feed structure is as follows:

<products>
        <product>
                ---PRODUCT BASIC/REQUIRED ATTRIBUTES AND DATA HERE---
        </product>
</products>

Now, let us look at a list of the required product attributes that you should include on your product feed with example values.

Required Product Attributes For The XML Feed

The following are the mandatory attributes you need to submit for each product.

Product AttributeFormat With Example
1. Identification Number (i.e., Product ID)

This is the unique ID for a product.

Ideally, you should use the Product ID from your WooCommerce store as the value for this attribute.
<Identifier>1031</Identifier>
2. Product Name

Use a proper product name. Do not use a generic name which may lead to confusion of what this product actually is.

For product variants, you may add the variation term to the title.
<Name>Wooden double bed MERIDA, 160×200 cm</Name>
3. Product URL

This should be the URL to the product page on your site. The product page should include the product details you submit here, such as the price and description, and a button to purchase should be there.

Make sure the URL is valid and has no spaces. Also, all special characters should be submitted in HTML form, and there should not be any diacritics in the link.
<Product_url>https://www.yourdomain.cz/products/bed-merida-160×200</Product_url>
4. Price Including VAT

Submit the original product price, including VAT.

Do not use commas or dots to separate thousands. They are only to be used as decimals for fractional charges.
<Price>499.99</Price>
5. Product Main Image URL

You must submit a real image of the product. It should not have any graphics, watermarks, or promotional texts.

The specifications mentioned in the description or via attributes, such as color, should match the product in the image. For example, you can not use an image of a Brown bedsheet when you mentioned it is Red.

Also, there should not be any other objects visible in the image other than the product itself.
The URL should not have any spaces or diacritics, and special characters must be in the HTML format.

The image must be at least 400×400 px.
<Image_url>https://www.yourdomain.cz/bed-merida-img1.png</Image_url>
6. Product Category

Use a specific category under which your product should be listed on Favi.

This should be specific to the category list from Favi themselves.

**Later, we will show you how you can map these categories in the feed without changing the category names within your WooCommerce store.
<Category>Bedroom > Beds</Category>
7. Description

Include a product description that is keyword optimized but specific to the product itself. If it’s a variant of a variable product, the description should only be about that particular variant.

Do not include any external URLs, contact info, or email address in the description.

You may use a handful of HTML tags for formating the description which includes:
– <p> </p>
– <b> </b>
– <strong> </strong>
– <i> </i>
– <em> </em>
– <ul> </ul>
– <ol> </ol>
– <li> </li>
– <br>
No other tags are allowed.
<Description><![CDATA[<p>This beech MERIDA double bed comes from a series of tall beds and features a central partition.<br>
**Supplied without grate and mattress.</p>]]></Description>
8. Delivery Time

This is the time you take to deliver the product since order.

The accepted values for this attribute are 0, 1, 2, and 3.

Use 0 to indicate same-day delivery.
<Delivery_Time>3</Delivery_Time>
9. Product Parent ID

In case you are submitting multiple variants of the same product, then you may use this attribute to indicate that they are variants of the same product.

Ideally, you should use the Parent Product ID. of your variable products as the value for this attribute.
<GroupId>1030</GroupId>

Other Recommended Product Attributes To Include

These are some extra attributes that you may include if you want to but are not mandatory.

AttributBeispiel
⬥ Manufacturer

You may submit the name of the manufacturer of the product you are selling.
<Manufacturer>Furniture One</Manufacturer>
⬥ Delivery Cost

If you want to indicate free shipping for any particular product, then you may use this attribute to mention that.

Accepted values may include FREE, gratuit, gratis, fara cost, ingyenes, ingyen, or ingyenesen.
<Delivery_Cost>FREE</Delivery_Cost>
⬥ Additional Images

In case you want to submit more images for your product, you can submit up to 8 additional images.

Use the tags Image_url_2, Image_url_3, and so on until Image_url_9.

<Image_url_2>https://www.yourdomain.cz/bed-merida-img2.png</Image_url_2>
<Image_url_3>https://www.yourdomain.cz/bed-merida-img3.png</Image_url_3>
⬥ Extra Product Attributes

You may submit some additional traits or attributes for your products. to increase the possibility of reaching more appropriate prospects.

The most commonly used attributes (depending on the product) are:
– material
– shape
– pattern
– texture
– color
– decor
– style
– dimensions

You may add additional custom attributes if you want to. For example, you may include an attribute “Type” to mention that the bed is a double bed.

We recommend you do not submit more than 5 attributes.
<Attributes>
<Attribute>
<Attribute_name>Material</Attribute_name>
<Attribute_value>solid wood, beech</Attribute_value>
</Attribute>
<Attribute>
<Attribute_name>Type</Attribute_name>
<Attribute_value>double bed</Attribute_value>
</Attribute>
</Attributes>
⬥ EAN

If you have the product EAN available, then it’s best to submit it for better listing performance.
<EAN_code>142654634124</EAN_code>

Example Feed Structure Of Favi Compari & Árukereső XML Feed

<?xml version="1.0" encoding="UTF-8" ?>
<Products>
	<Product>
		<Identifier>1031</Identifier>
		<Name>Wooden double bed MERIDA, 160x200 cm</Name>
		<Product_url>https://www.yourdomain.cz/products/bed-merida-160x200</Product_url>
		<Price>1499.99</Price>
		<Image_url>https://www.yourdomain.cz/bed-merida-img1.png</Image_url>
		<Category><![CDATA[Bedroom > Beds]]</Category>
		<Description>
			<![CDATA[
				<p>This beech MERIDA double bed comes from a series of tall beds.
			 	<br>It features a central partition with a foot.<br>
				**Supplied without grate and mattress.</p>
			]]>
		</Description>
		<Delivery_Time>3</Delivery_Time>
		<Manufacturer>Furniture XYZ</Manufacturer>
		<Attributes>
		   <Attribute>
		       <Attribute_name>Material</Attribute_name>
		       <Attribute_value>solid wood, beech</Attribute_value>
		   </Attribute>
		   <Attribute>
		       <Attribute_name>Type</Attribute_name>
		       <Attribute_value>double bed</Attribute_value>
		   </Attribute>
		</Attributes>
		<EAN_code>142654634124</EAN_code>
		<GroupId>1030</GroupId>
	</Product>
</Products>

Now that you have a good idea about all the required attributes, let us look at a simple tool that can help you generate a proper XML feed for Favi in minutes.

7 Steps To Generate Favi Product Feed In Your WooCommerce Store

Manually creating an XML feed for all of your products is no longer required. You will find several tools out there that you can use to easily generate a product feed for Favi Compari & Árukereső.

In the following simple steps, I will show you how you can generate a product feed for Favi using Product Feed Manager for WooCommerce. It is one of the most efficient plugins to use and you will get a pre-built template to generate Favi XML feed in just a few clicks. 

Follow these 7 quick steps below to use the plugin easily and generate Favi product feed real quick.

Step 1 – Install & Activate Product Feed Manager For WooCommerce

1. First, go to Dashboard > Plugins and click on Add New.
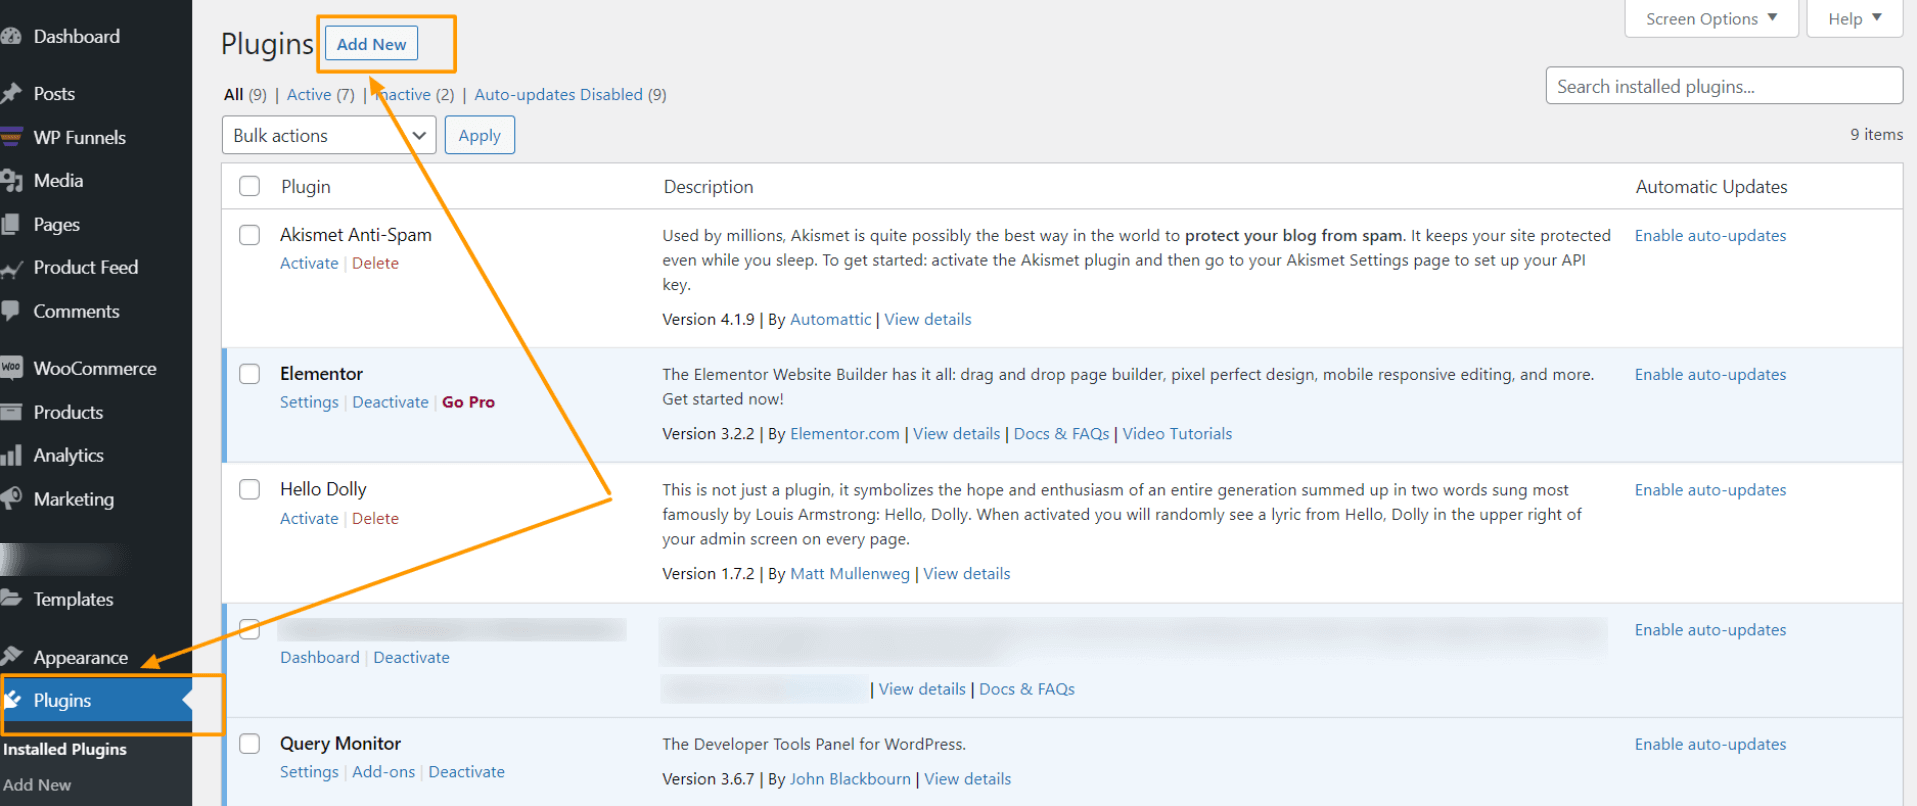
WordPress Dashboard - Add New Plugin

2. On the search box, type “Product Feed Manager” and you will find the plugin with a blue cart icon.
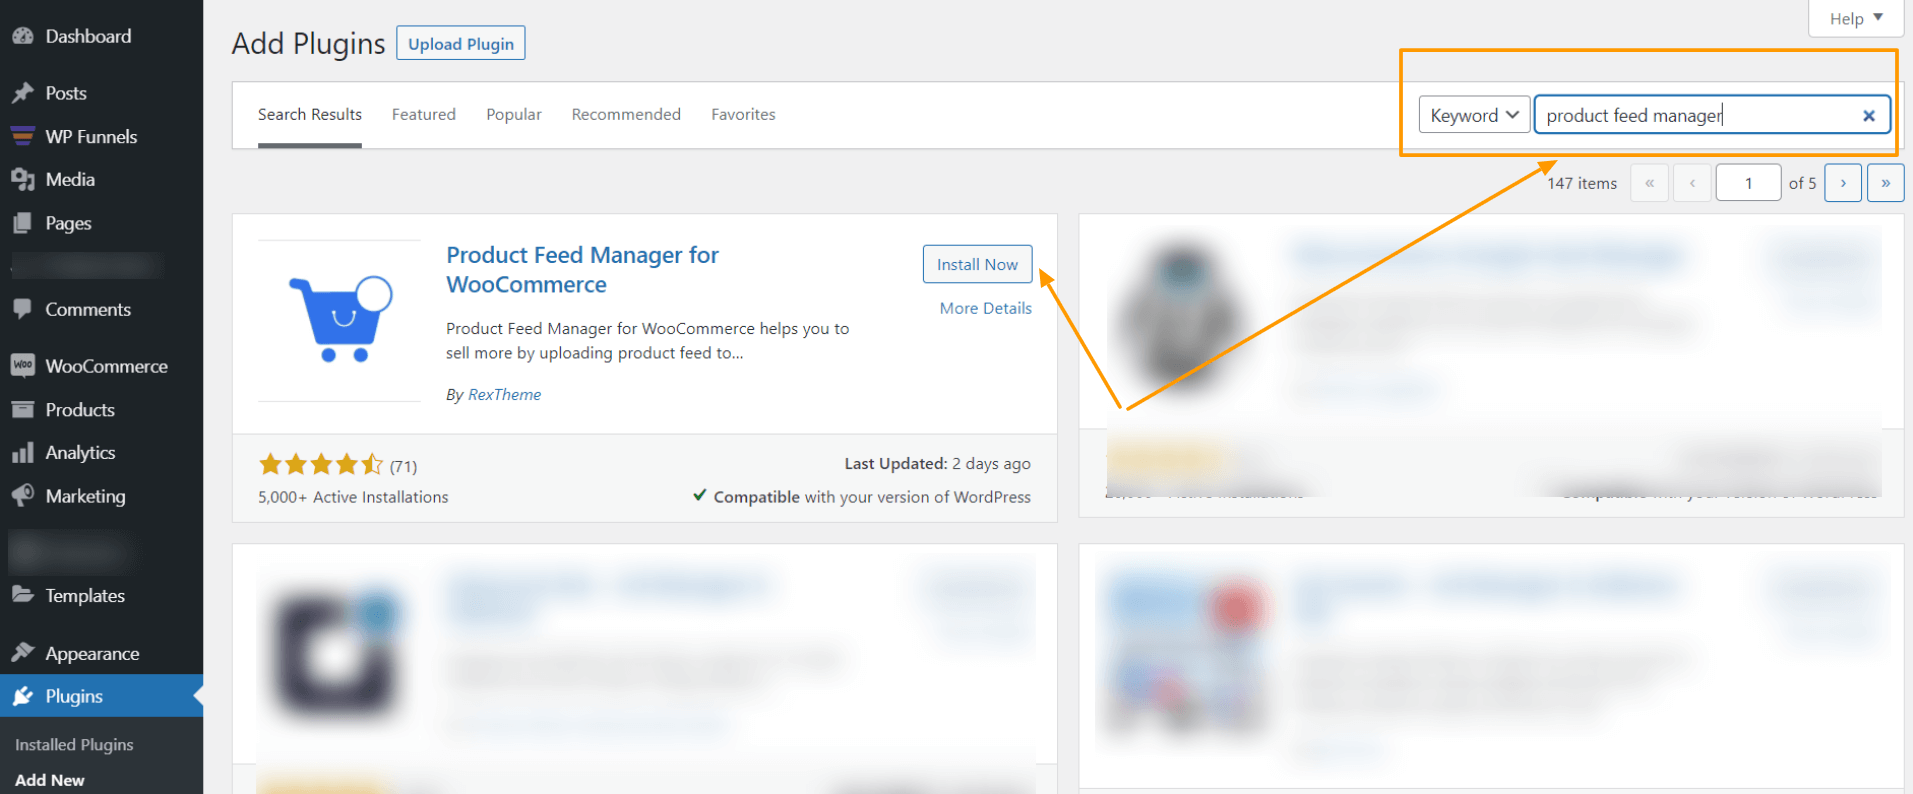
WordPress Dashboard - Search For Plugin

3. Click on the Install Now. Then click on the Activate button to activate the plugin.
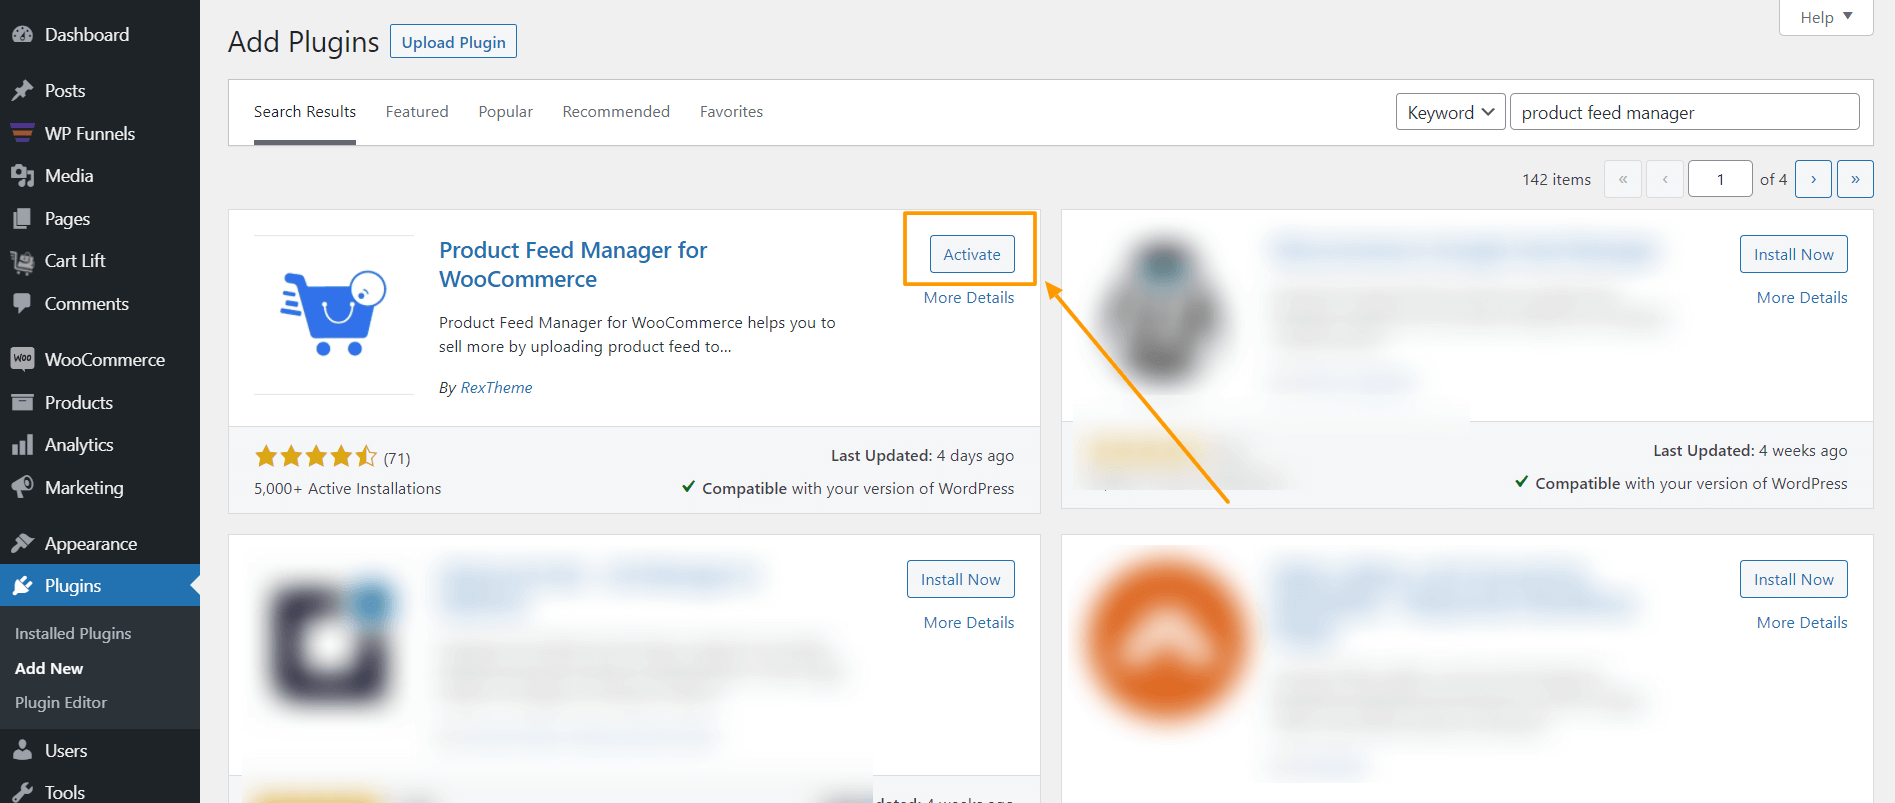
Activate Product Feed Manager

Once activated, you will find the Product feed menu on your dashboard menus.

Step 2 – Import Favi Template For Feed Generation

1. On your dashboard, click on Product Feed and then click on Add New Feed option.

Neuen Feed hinzufügen

Sie gelangen dann zur Seite für die Erstellung des Feeds.
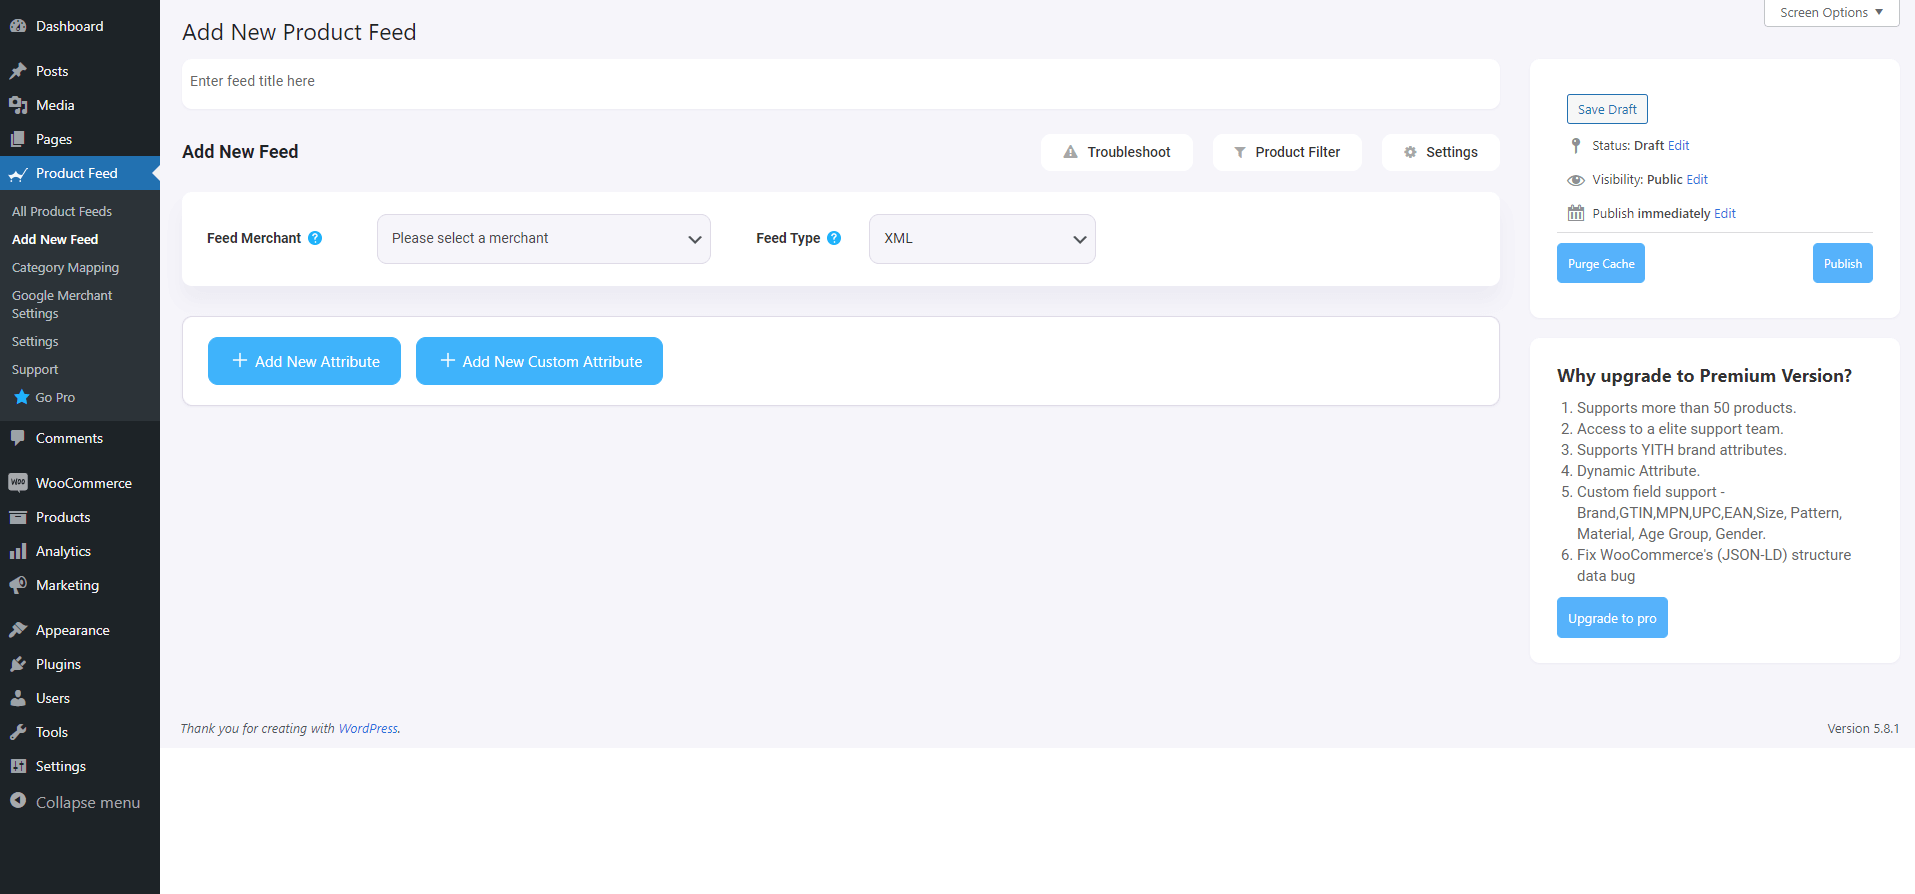
Neuen Feed hinzufügen

Here, on the top you will get an option to give a name to your feed, you can skip it too.

2. Click on the Feed Merchant Dropdown and you will get the list of all the supported merchants.

You can scroll down this merchant dropdown list or you can type Favi in the search box, and you will get the Favi option in the list.
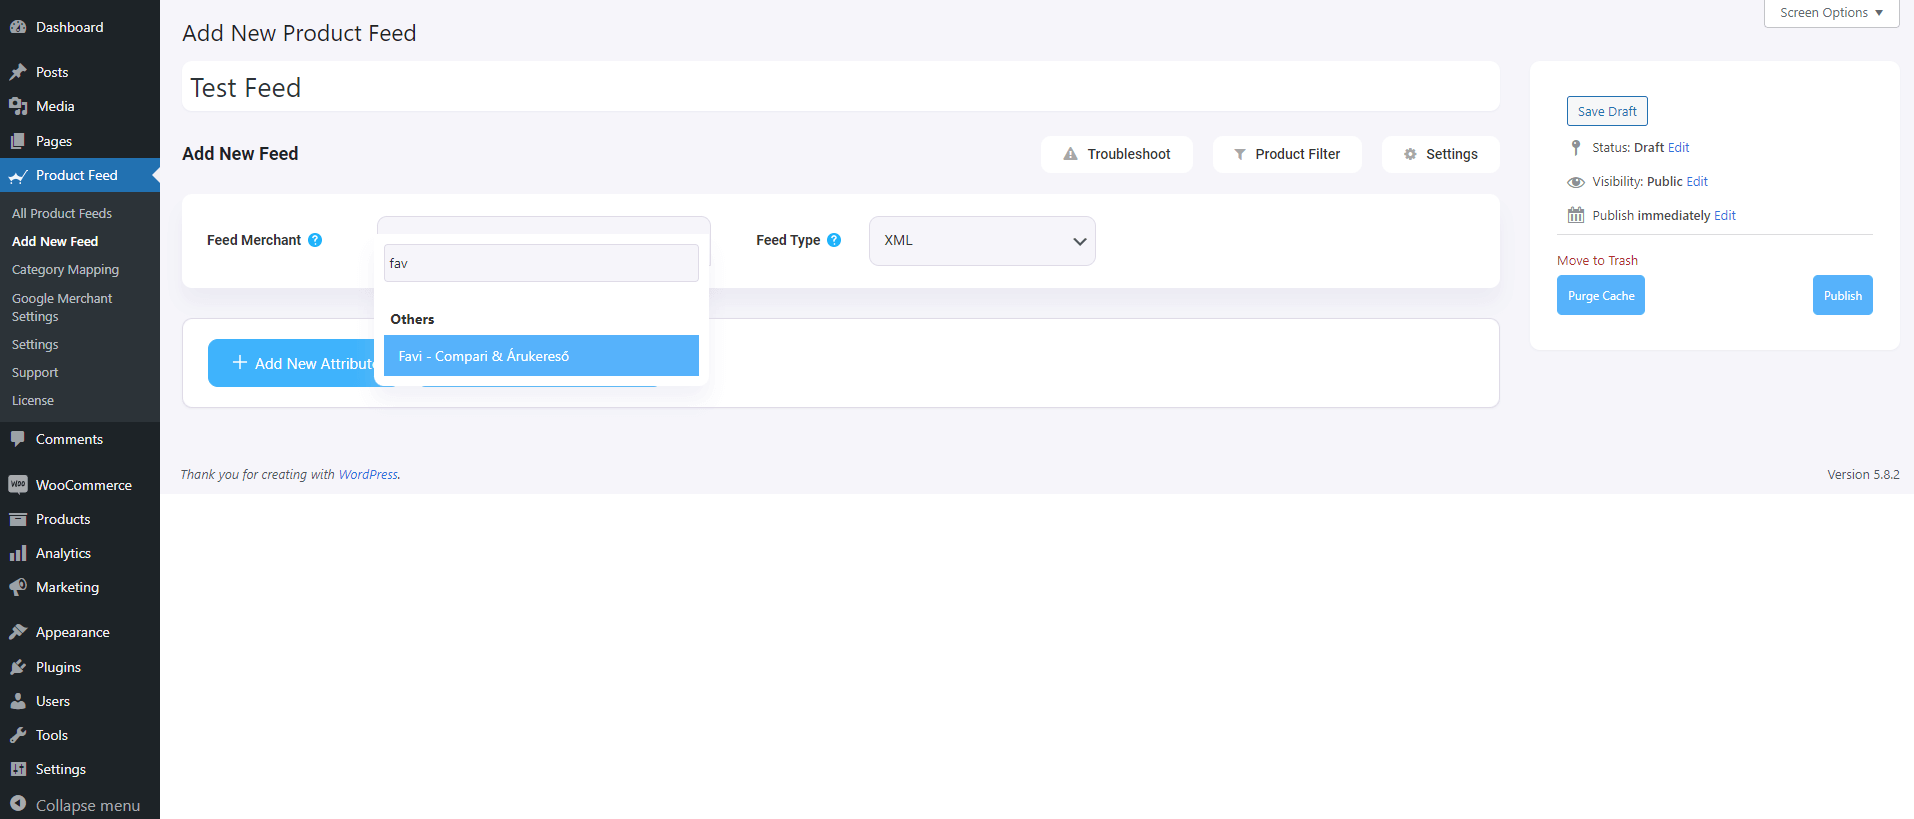
Favi Merchnat Option

Select Favi, and all the required attributes of Favi will be loaded below.
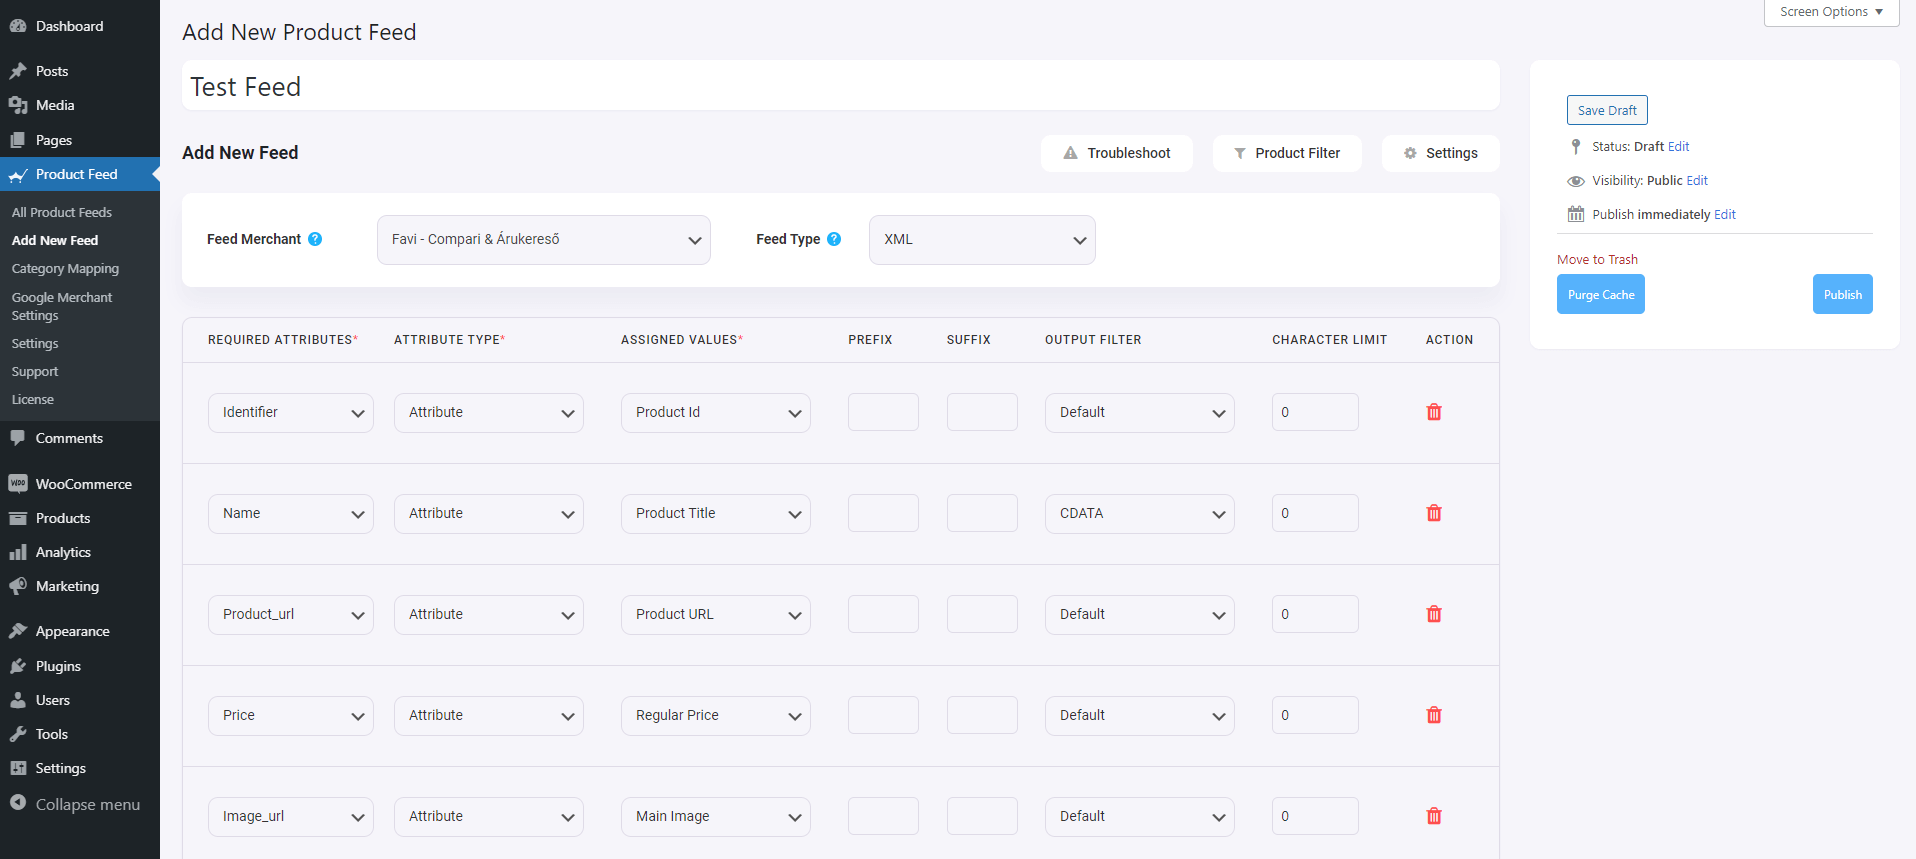
Favi Required Attributes

Step 3 – Create A New Product Feed

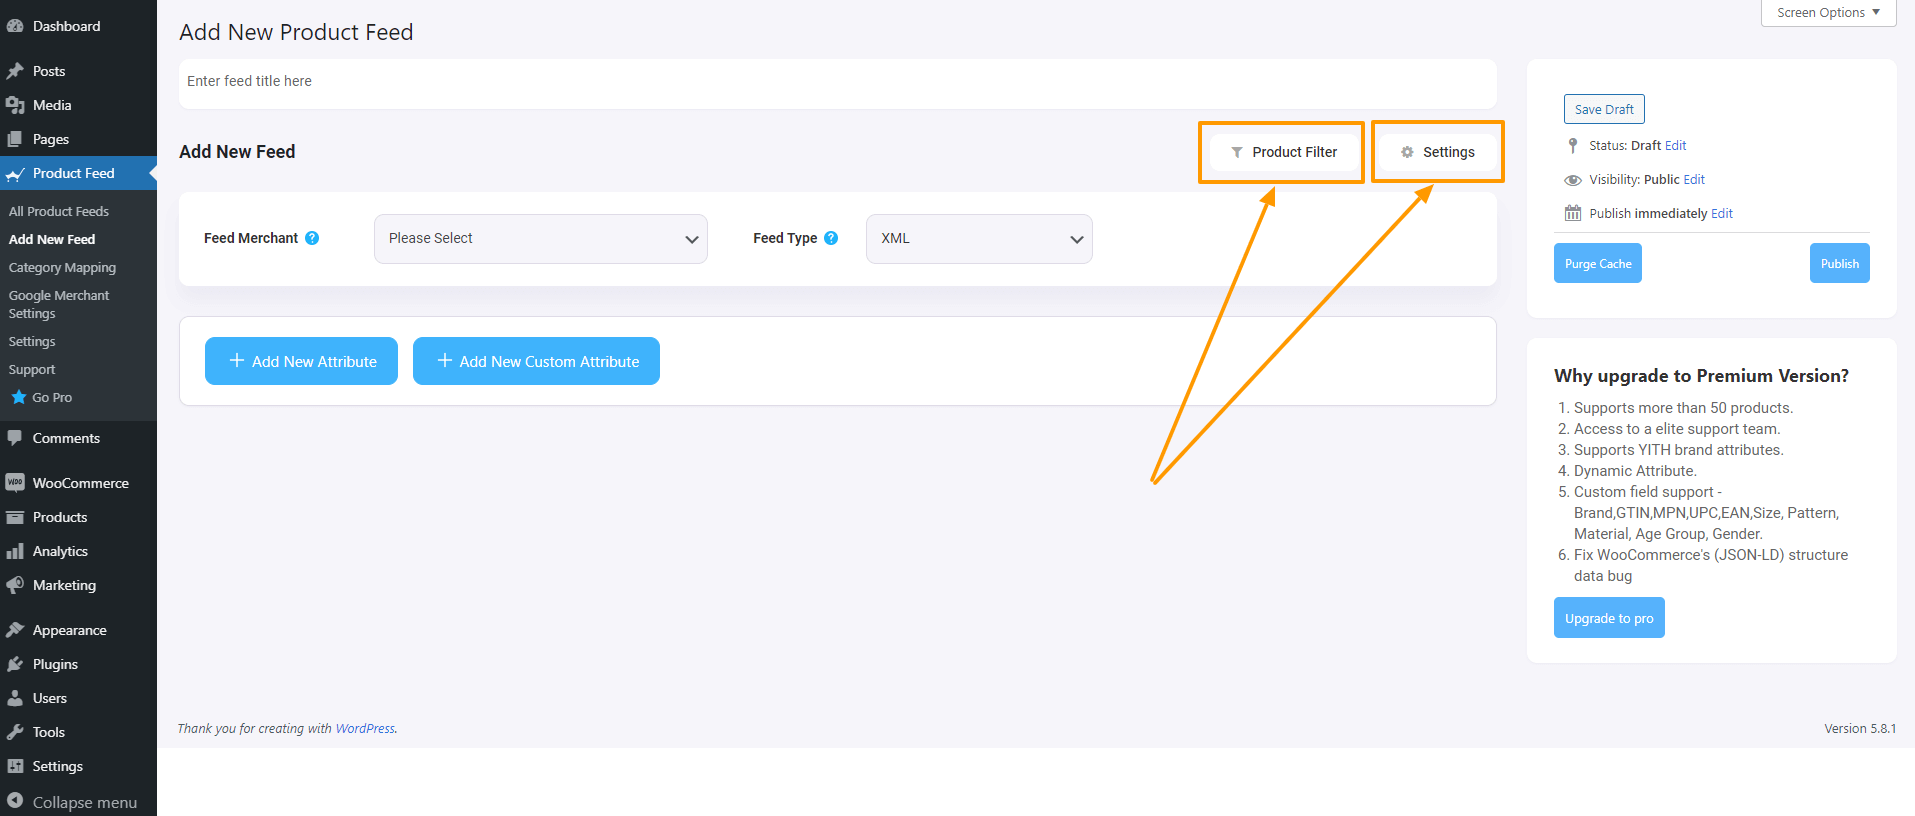
Now, you can see three buttons under the Feed Title text box, Troubleshoot, Product Filter, and Settings.

1. If you are having any issues generating feed, click on this Troubleshoot button, it will take you to the Troubleshoot page, which could be helpful for you.

2. If you want to use any filter or condition, you can click on the Product Filter option, and a drawer will slide in from the right side of the window, and there you will get the following filters:

  • All Featured Items
  • Custom Filter
  • Category Filter
  • Tag Filter
  • Product Filter (Pro)

You can select any filter option and use them as per your need and click on the Close button when done.

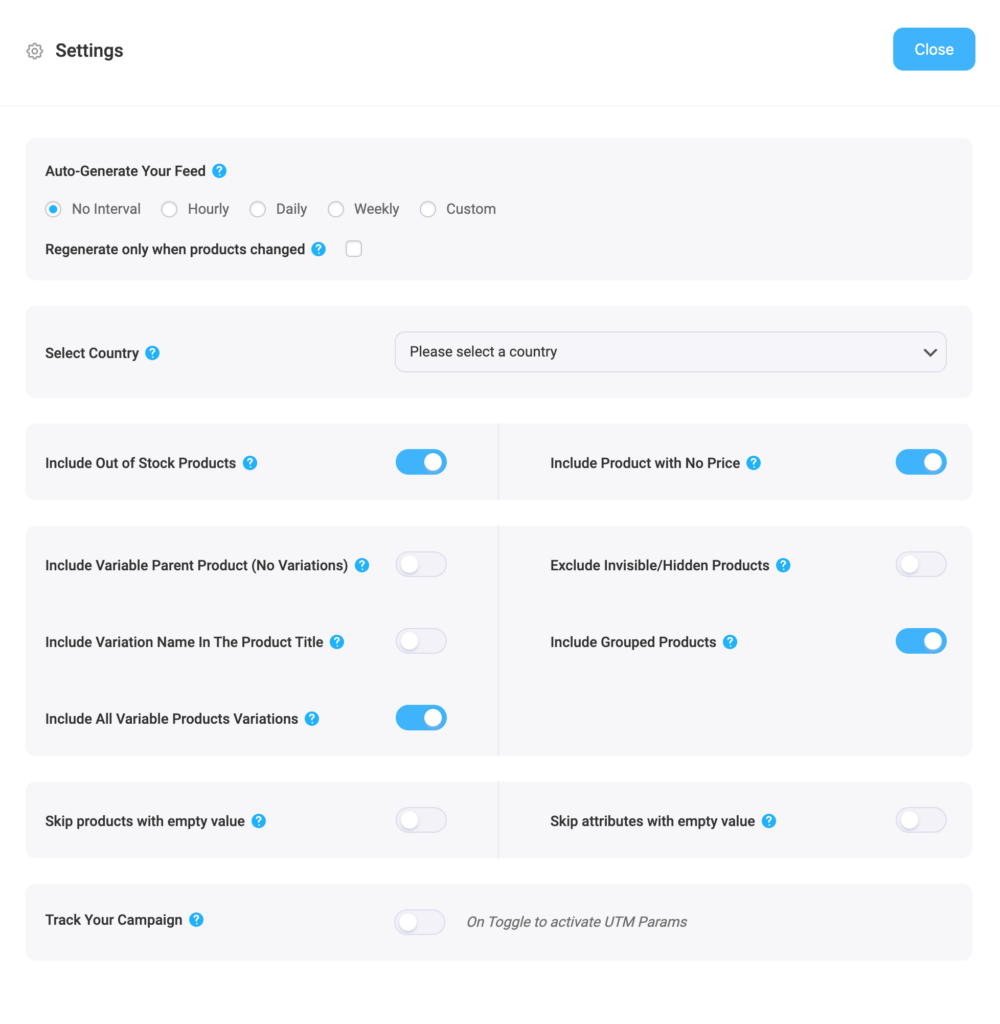
3. Now, to schedule your feed or to choose which type of products will be included in your feed, click on the Settings button, and you will get a list of options to exclude or include products.

Change the options as per your need and click on the Close button when done.

Step 4 – Use The Favi Compari & Árukereső XML Feed Template

1. If you look at the Feed Merchant dropdown button, there you will get another dropdown “Feed Type”, you can click here to set the type of this feed. You can set different types of feeds depending on what types of feeds this merchant supports or what types of feeds this Product Feed Manager has the support for.

For Favi, XML will be selected by default.

2. Now, in the attributes section, you will see that all the attributes are under the Required Attributes column, and their values are set according to the attributes under the Assigned Values column.

You can change any values to any attributes, simply click on the value dropdown, and select your preferred value.

All the required attributes will appear below. Now, most of the attributes will already be configured but notice that some of these attributes are unassigned.

Step 5 – Assign The Right Values To Unassigned Attributes

You simply need to configure the following:

  • Category
    – You will need to set up Category Mapping for this. So for now leave it as is. You will work on this on the next step.
  • Delivery_Time
    – You may use a static value of 0, 1, 2, or 3 to indicate the delivery time.
    – Or ifyou have different delivery time for different products, then you need to save that value in a custom feed in WooCommerce anduse that value here.
  • Manufacturer
    – If you are the manufacturer or if all the products are manufactured by the same company, then use a Static value here.
    – If different products have different manufacturers, then you can either save them on custom fields within products and use that value, add them as WooCommerce attributes for products and use them as values here, or use the plugin Perfect Brands for WooCommerce to assign the manufacturers to the products and then use that value here.
Configure Static Manufacturer and Delivery Time

Step 6 – Publish & Setup Category Mapping

1. Scroll up and click on Publish.

Product Feed Manager Publish Feed

The feed will be generated, but the category is not configured yet.

2. Now, go to Dashboard > Product Feed > Category Mapping.

Product Feed Manager Category Mappingg

Here, you can see all the categories in your store are listed.

Product Feed Manager Category Mapping - Category List

3. Give a name to this Category Map

Product Feed Manager Category Mapper Name

4. Map these categories according to Favi’s category list.
**To find the accepted category list for your store, click here.
– For every category in your store, search for appropriate category in Favi’s category list.
– Copy that and paste it in the field beside your store’s category. Do this for all the categories there.

5. Then click on the Save button below.

Step 7 – Finalize Feed Generation

1. Go To Product Feed > All Product Feeds and edit the feed you created just now for Favi.

2. Once on the edit mode, on the right side, click on Purge Cache.

3. Now, scroll down to the feed configurations section and click on the Value field for Category.
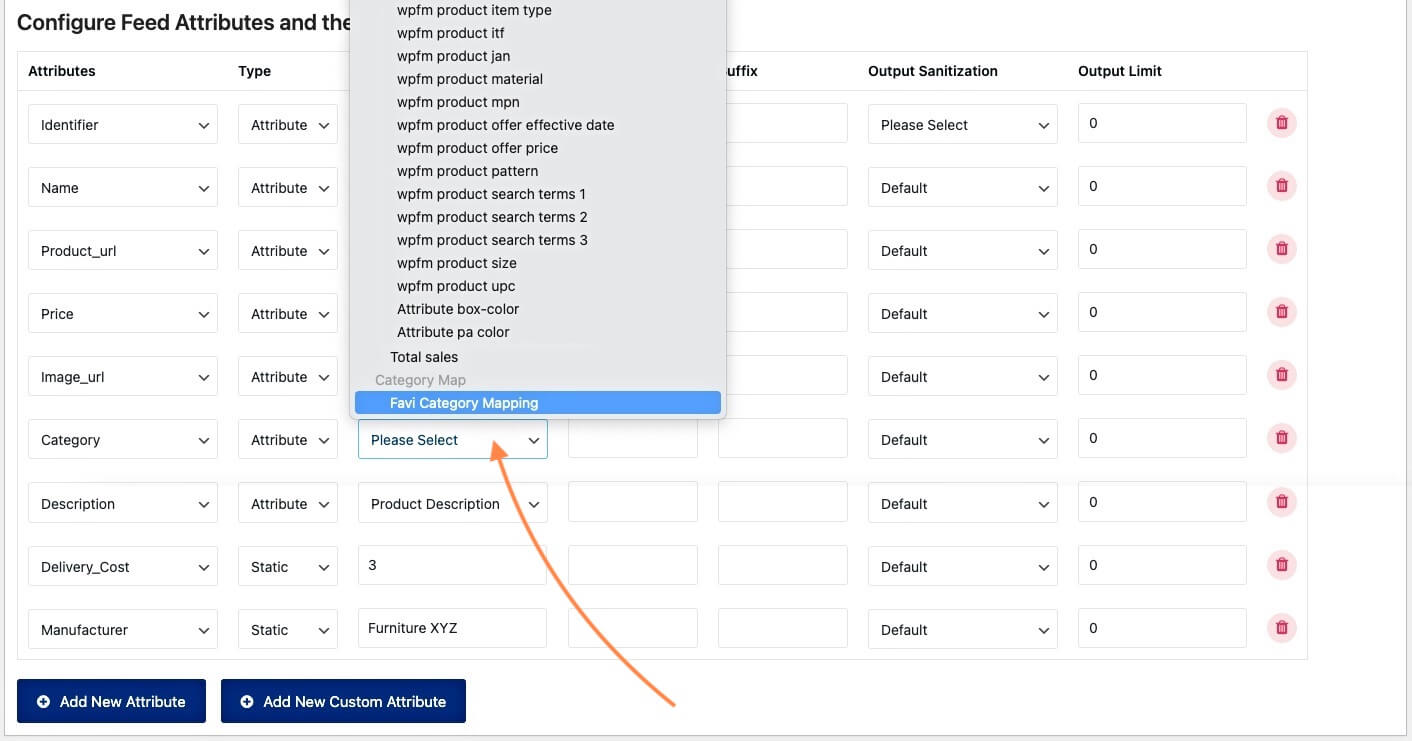
Choose Category Mapping Favi

4. Scroll to the very bottom and you will find the Category Map that you just created. Select it.

5. Now scroll up and click on Update

Product Feed Manager Update Feed

And that’s it. Your feed generation is complete.

Once the feed is generated, you may now review your progress on meeting the requirements, and go ahead and register on Favi.

Schlussfolgerung

Favi has made a significant impact in increasing revenue for many local furniture brands and it’s time you take advantage of this reliable price comparison platform yourself.

As you just saw how easy it is to generate an XML feed, you can use Product Feed Manager for WooCommerce and start promoting your WooCommerce products on Favi real quick.

Check out the plugin here:
– https://wordpress.org/plugins/best-woocommerce-feed/
– Product Feed Manager for WooCommerce Pro

Initially, test out the free version of the plugin, and once you are sure the plugin does what it claims, you can go ahead and upgrade to Pro.

Grab this opportunity and boost your revenue locally.

Kategorien
Guide Product Feed Manager For WooCommerce WooCommerce

Simple Guide To Generate Rakuten Product Feed – WooCommerce [2024]

Running an eCommerce business can be difficult. However, one of the best ways to increase your sales fast is by promoting your products on large marketplaces.

Rakuten is one such marketplace that you can rely on. With more than a billion active users across 30 countries, Rakuten is one of the top merchants that can help you boost your sales without much effort.

And if you use WooCommerce, then it’s super easy to list your products on Rakuten marketplace.

All you need is to create a Rakuten product feed with the right attributes and upload your products to the marketplace. And soon enough, you will start to get more potential buyers visiting your site.

In this guide, you will get step-by-step instructions on creating a product feed accurately for the Rakuten marketplace.

After reading this guide, you will learn,

  • The required attributes to include on the product feed
  • Examples of product data to submit for each attribute.
  • How to generate Rakuten product feed in just a few clicks.

Fangen wir also an.

Guide To Generate Rakuten Product Feed

First, let us learn about all the required data for each product that you need to include in the product feed. Then we will look at how you can generate this product feed in the right format.

Product Data Specification For Rakuten Product Feed

A product feed for Rakuten is usually generated in CSV format. But you can also use TXT or TSV formats to submit your product data.

Required Product Attributes To Submit to Rakuten

The following are the mandatory attributes for each product:

Attribute HeaderInstructionsBeispiel
idThis acts as a unique identifier for a product. You may use your WooCommerce product ID or product SKU as the value for this attribute.102
Titel Include the name of the product (no more than 70 characters).Pullover Hoodie with Logo
MarkeAssign a brand name to the product you want to list on the Rakuten marketplace.

If you are the manufacturer, then you can assign your own company name as the brand name.
Lacoste
Beschreibung Include a short description of your product with details of its use and benefits.This pullover hoodie is made from 100% organic cotton for extreme comfort. With the latest generation style and mesh lining, this hoodie is will make you feel special, while still maintaining comfort.
google_produkt_kategorieYou also need to submit a category from Google’s taxonomy list, to which this product is relevant.Clothing & Accessories
LinkThis should be the link to your producthttp://yourwebsite.com/product/pullover-hoodie-with-logo
Image_link You need to submit at least one image for every product.

*The image size should be at least 600×600 in size.
http://yourwebsite.com/wp-content/uploads/2022/04/pullover-hoodie-with-logo-1.jpg
Preis Submit the actual price of the product. If you have a discount running, then submit the regular price for this attribute, and use the sale_price attribute to submit the discounted price.

Include the currency as the suffix.
45.00 EUR
Verfügbarkeit Include the stock availability, i.e., if the product is still in stock for purchase.

*Accepted values:
– in stock
– out of stock
– preorder
– backorder 
vorrätig
gtinGTIN is a unique product identifier that you must include in the feed.

This represents all other forms of identifiers as well, such as UPC, EAN, JAN, and all forms of GTIN.
401234512343
mpnAlso, submit the MPN, which uniquely identifies a specific product among all products from the same manufacturer.HSC0424PP
BedingungMention the condition of the product you are selling.

*Accepted values:
– New
– Refurbished
– Used
Neu
GeschlechtIt is mandatory to mention the target gender for which your product is suitable.

*Accepted values are:
– Male
– Female
– Unisex
Unisex
Alter_GruppeYou also have to submit the age group of the prospects your products are suitable for.

*Accepted values:
– Adult
– Kids
Adult
produkt_typThis attribute represents the product category you have assigned to your products in your WooCommerce store.

*It is highly recommended to submit this attribute for better search results, but it’s not mandatory.
Men’s Hoodies
item_gruppen_idIf you have variable products, then you need to include a common item_group_id for every variant of the same product. It is basically the ID or the SKU of the parent product.1001

Conditional Required Attributes To Include In The Feed

A few attributes are not always required but are often mandatory to submit based on certain conditions. Let us look at these attributes in detail.

Attribute HeaderInstructionsBeispiel
sale_priceThis attribute is only required if you have a discount running on your store. In that case, include the discounted price as the sale price in the feed.35.00 EUR
FarbeThe color attribute is mandatory for products that fall under the Apparel category, but you may use it for products in other categories as well.

Also, if you have variable products that vary due to color, then you must submit the color attribute.
Red
Größe You must submit the size attribute for products that fall under the Apparel category. You may choose to use it for products in other categories as well.

Also, if you have variable products that vary due to size, then you need to submit the size attribute.
XXL
MaterialYou need to submit this attribute for variable products that vary due to the pattern (or graphic design).Leder
Muster For variable products that vary due to the pattern (or graphic design), then you must submit this attribute.Stripped
shipping_weightIn your merchant center, if you set up a rule for shipping cost based on the shipping weight, then you must submit this attribute.

*You may submit the unit as a suffix, which has to be the same as you set up in your merchant center.
1.2 kg
ErwachseneIf you are selling any type of adult product, i.e., items or images containing nudity or suggestive content, you must submit this attribute for those products.

*Accepted values:
– yes
– no
ja

Other Optional Attributes You May Choose To Submit

Apart from the attributes above, there are a few more attributes that you may choose to submit if required or applicable.

Attribute HeaderInstructionsBeispiel
sale price effective dateIf your product is on sale and its sale price has a limited time, you can use this attribute to mention the date and time when the sale will expire.

**This attribute is not mandatory, but you may use it when required.
2022-10-29T23:07:31​+0100

additional_image_link
If you want to submit additional images for your products, you can submit the links to your products under the additional_image_link attribute, separating the image links by commas.http://yourwebsite.com/wp-content/uploads/2022/04/image1.jpg,http://yourwebsite.com/wp-content/uploads/2022/04/image2.jpg,http://yourwebsite.com/wp-content/uploads/2022/04/image3.jpg
taxUsually, you need to set up the tax rates in your Merchant Center account. But if you want to submit a unique tax rate for certain products, then you can use this attribute to do so.15
shippingYou need to set up the shipping cost for your products in your Merchant Center account. But if you want to submit a unique shipping cost for certain products, then you can use this attribute to do so.3.99 EUR
MultipackIf you want to sell multiple quantities of the same product at a single price, then you can submit that quantity as the value for the multipack attribute.

For example, you may choose to sell 6 t-shirts as a multipack.
In this case, the price should be the total cost of the pack, i.e., in the case of the 6 t-shirts, the price should represent the total cost for all six t-shirts.
6

Example Feed Structure Of Rakuten

Here’s an example of a Rakuten CSV feed. You may download it and view it using a CSV viewer.

Now that you have a complete understanding of how the Rakuten feed works and what required attributes you need to include in your product data, let us look at how you can generate a product feed for Rakuten easily.

7 Easy Steps To Generate Rakuten Product Feed In Your WooCommerce Store

First of all, you do not have to create a CSV feed for all of your products manually. Right now, there are several tools out there that you can use to generate a product feed for Rakuten easily.

In the next few steps, I will show you how you can generate a product feed for Rakuten using Product Feed Manager for WooCommerce. It is one of the easiest plugins to use and has a pre-made template with all the necessary attributes to help you generate Rakuten CSV feed in just a few clicks. 

Follow these 7 easy steps to learn how to use Rakuten feed template, and get your CSV feed ready real quick.

Step 1 – Install & Activate Product Feed Manager

1. Go to Dashboard > Plugins and then click on the Add New button.

WordPress Dashboard - Add New Plugin

2. Type “Product Feed Manager” on the search box, and you will find the plugin on the search result.

WordPress Dashboard - Search For Plugin

3. Click on the Install Now button.

4. Then click on the Activate button to activate the plugin.

Activate Product Feed Manager

Once you have the plugin activated, you will find the menu, Product feed, among your dashboard menus.

Step 2 – Import Rakuten Template & Map Attributes

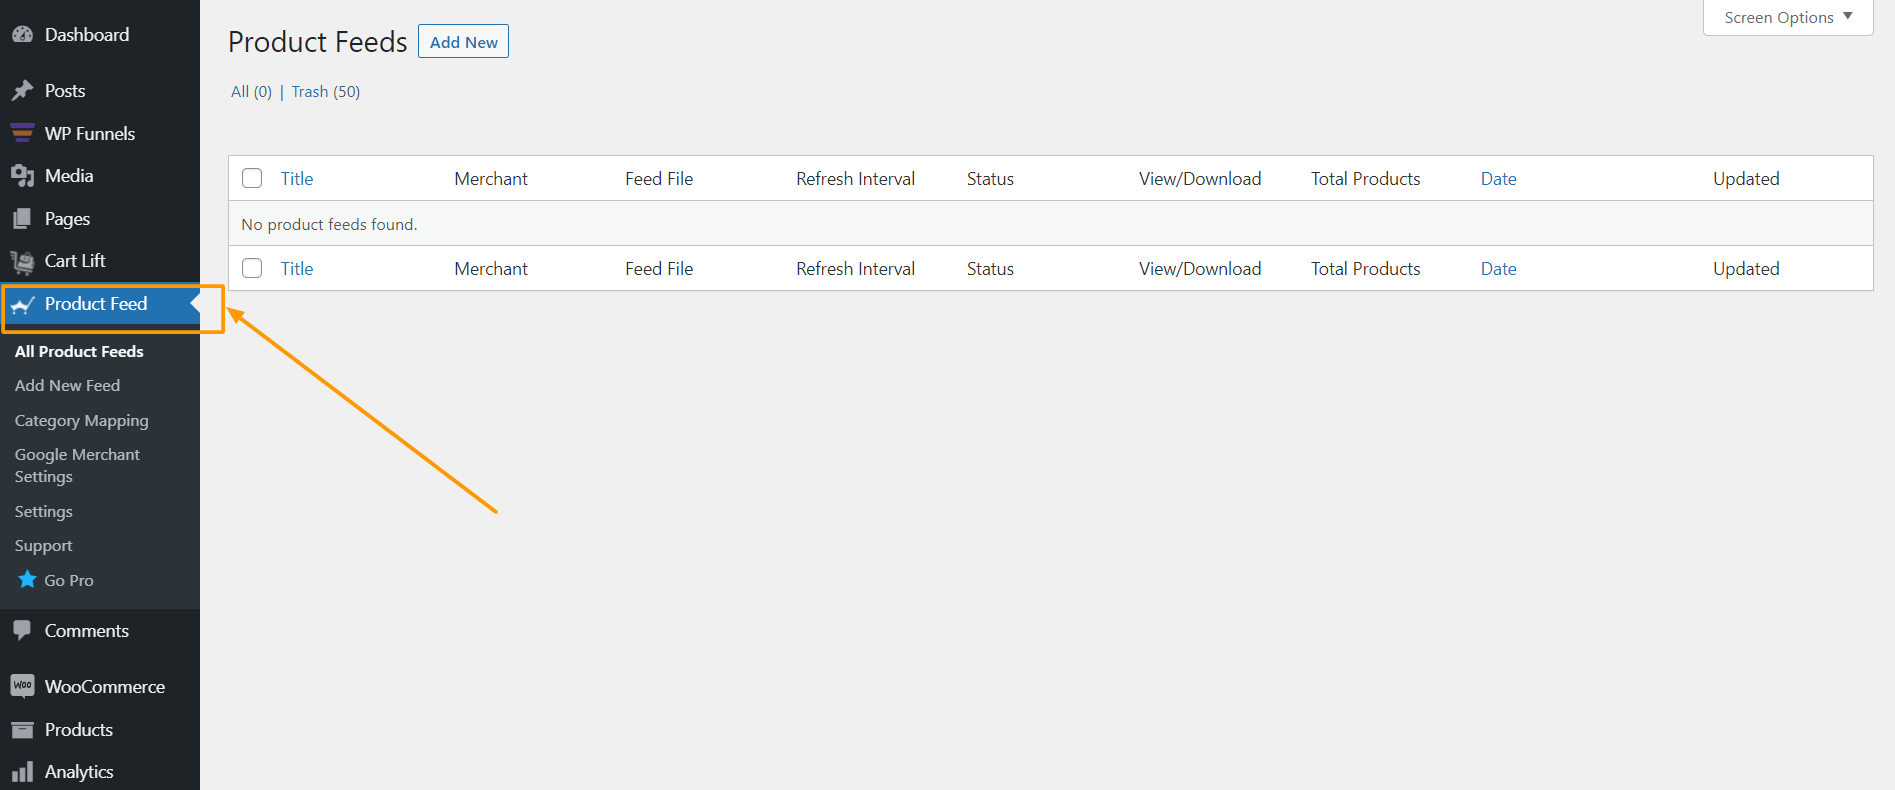
1. On your dashboard, click on Product Feed.

Product Feed Manager Dashboard

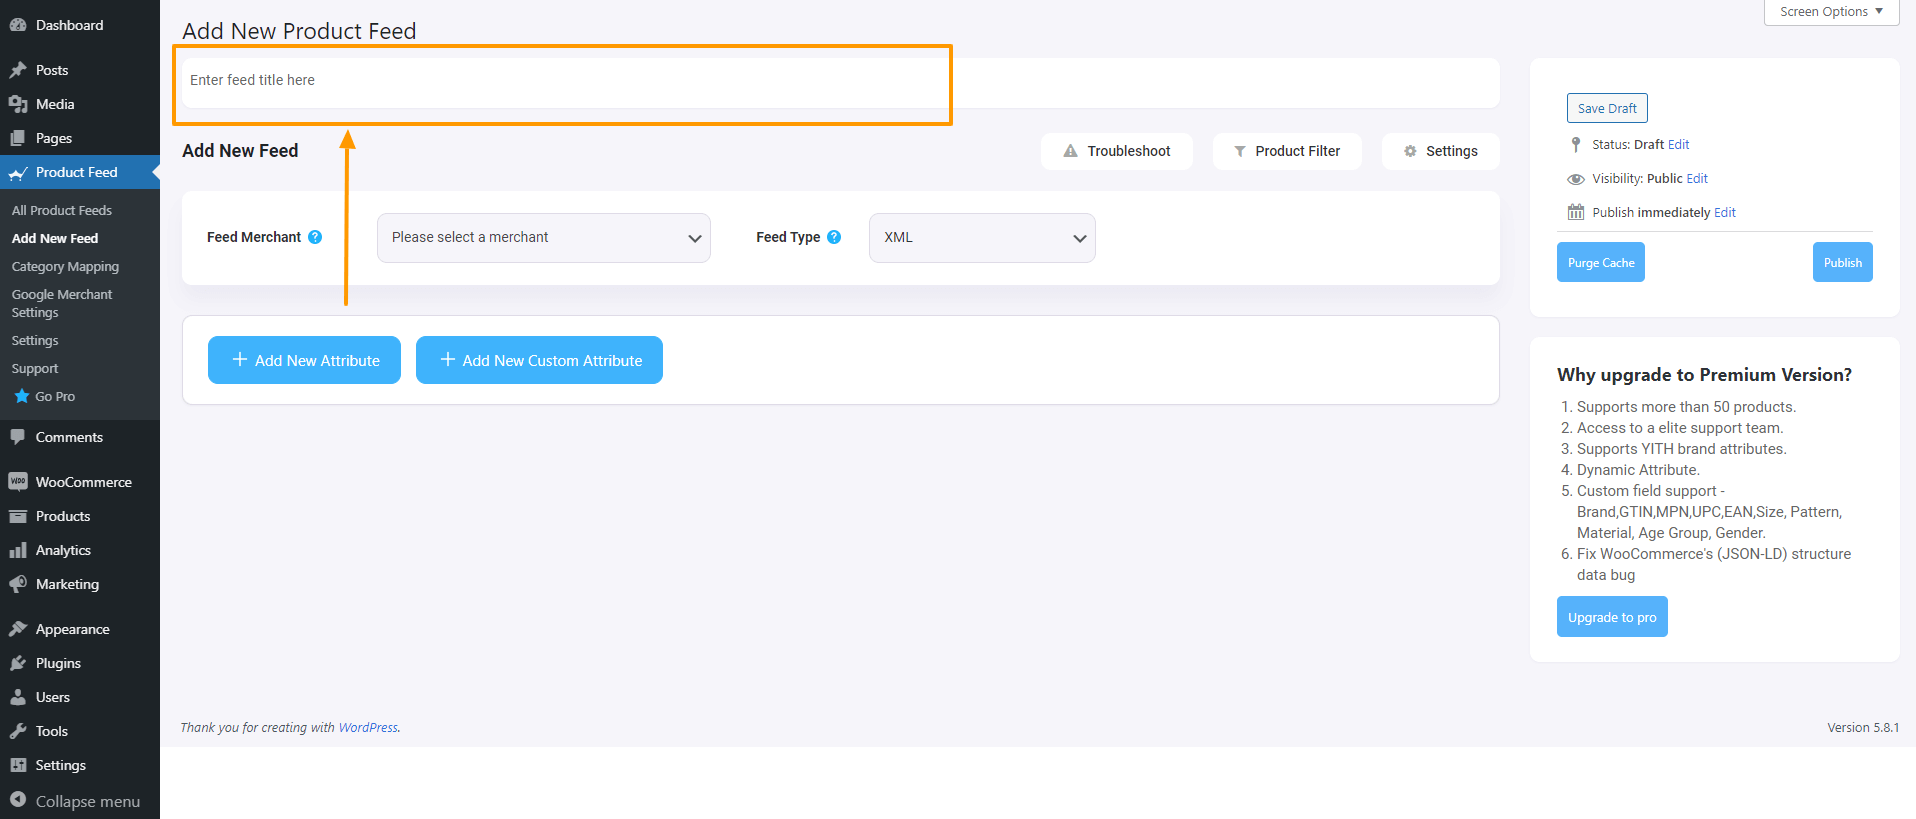
2. Next, click on Add New Feed button.

Product Feed Manager - Add New Feed

You will be taken to a blank feed generation page.

Produkt-Feed-Manager Neue Feed-Option hinzufügen

3. On top, you will get the option to add a title to the feed. Give your feed a name.

Produkt Feed Manager Feed Titel

4. Just under the title, you will see an option to select your preferred merchant. Simply click on the Feed Merchant dropdown button and select your preferred merchant from the dropdown or you can search in the dropdown box.

Wählen Sie Ihren bevorzugten Händler aus, und alle erforderlichen Attribute werden unten geladen.

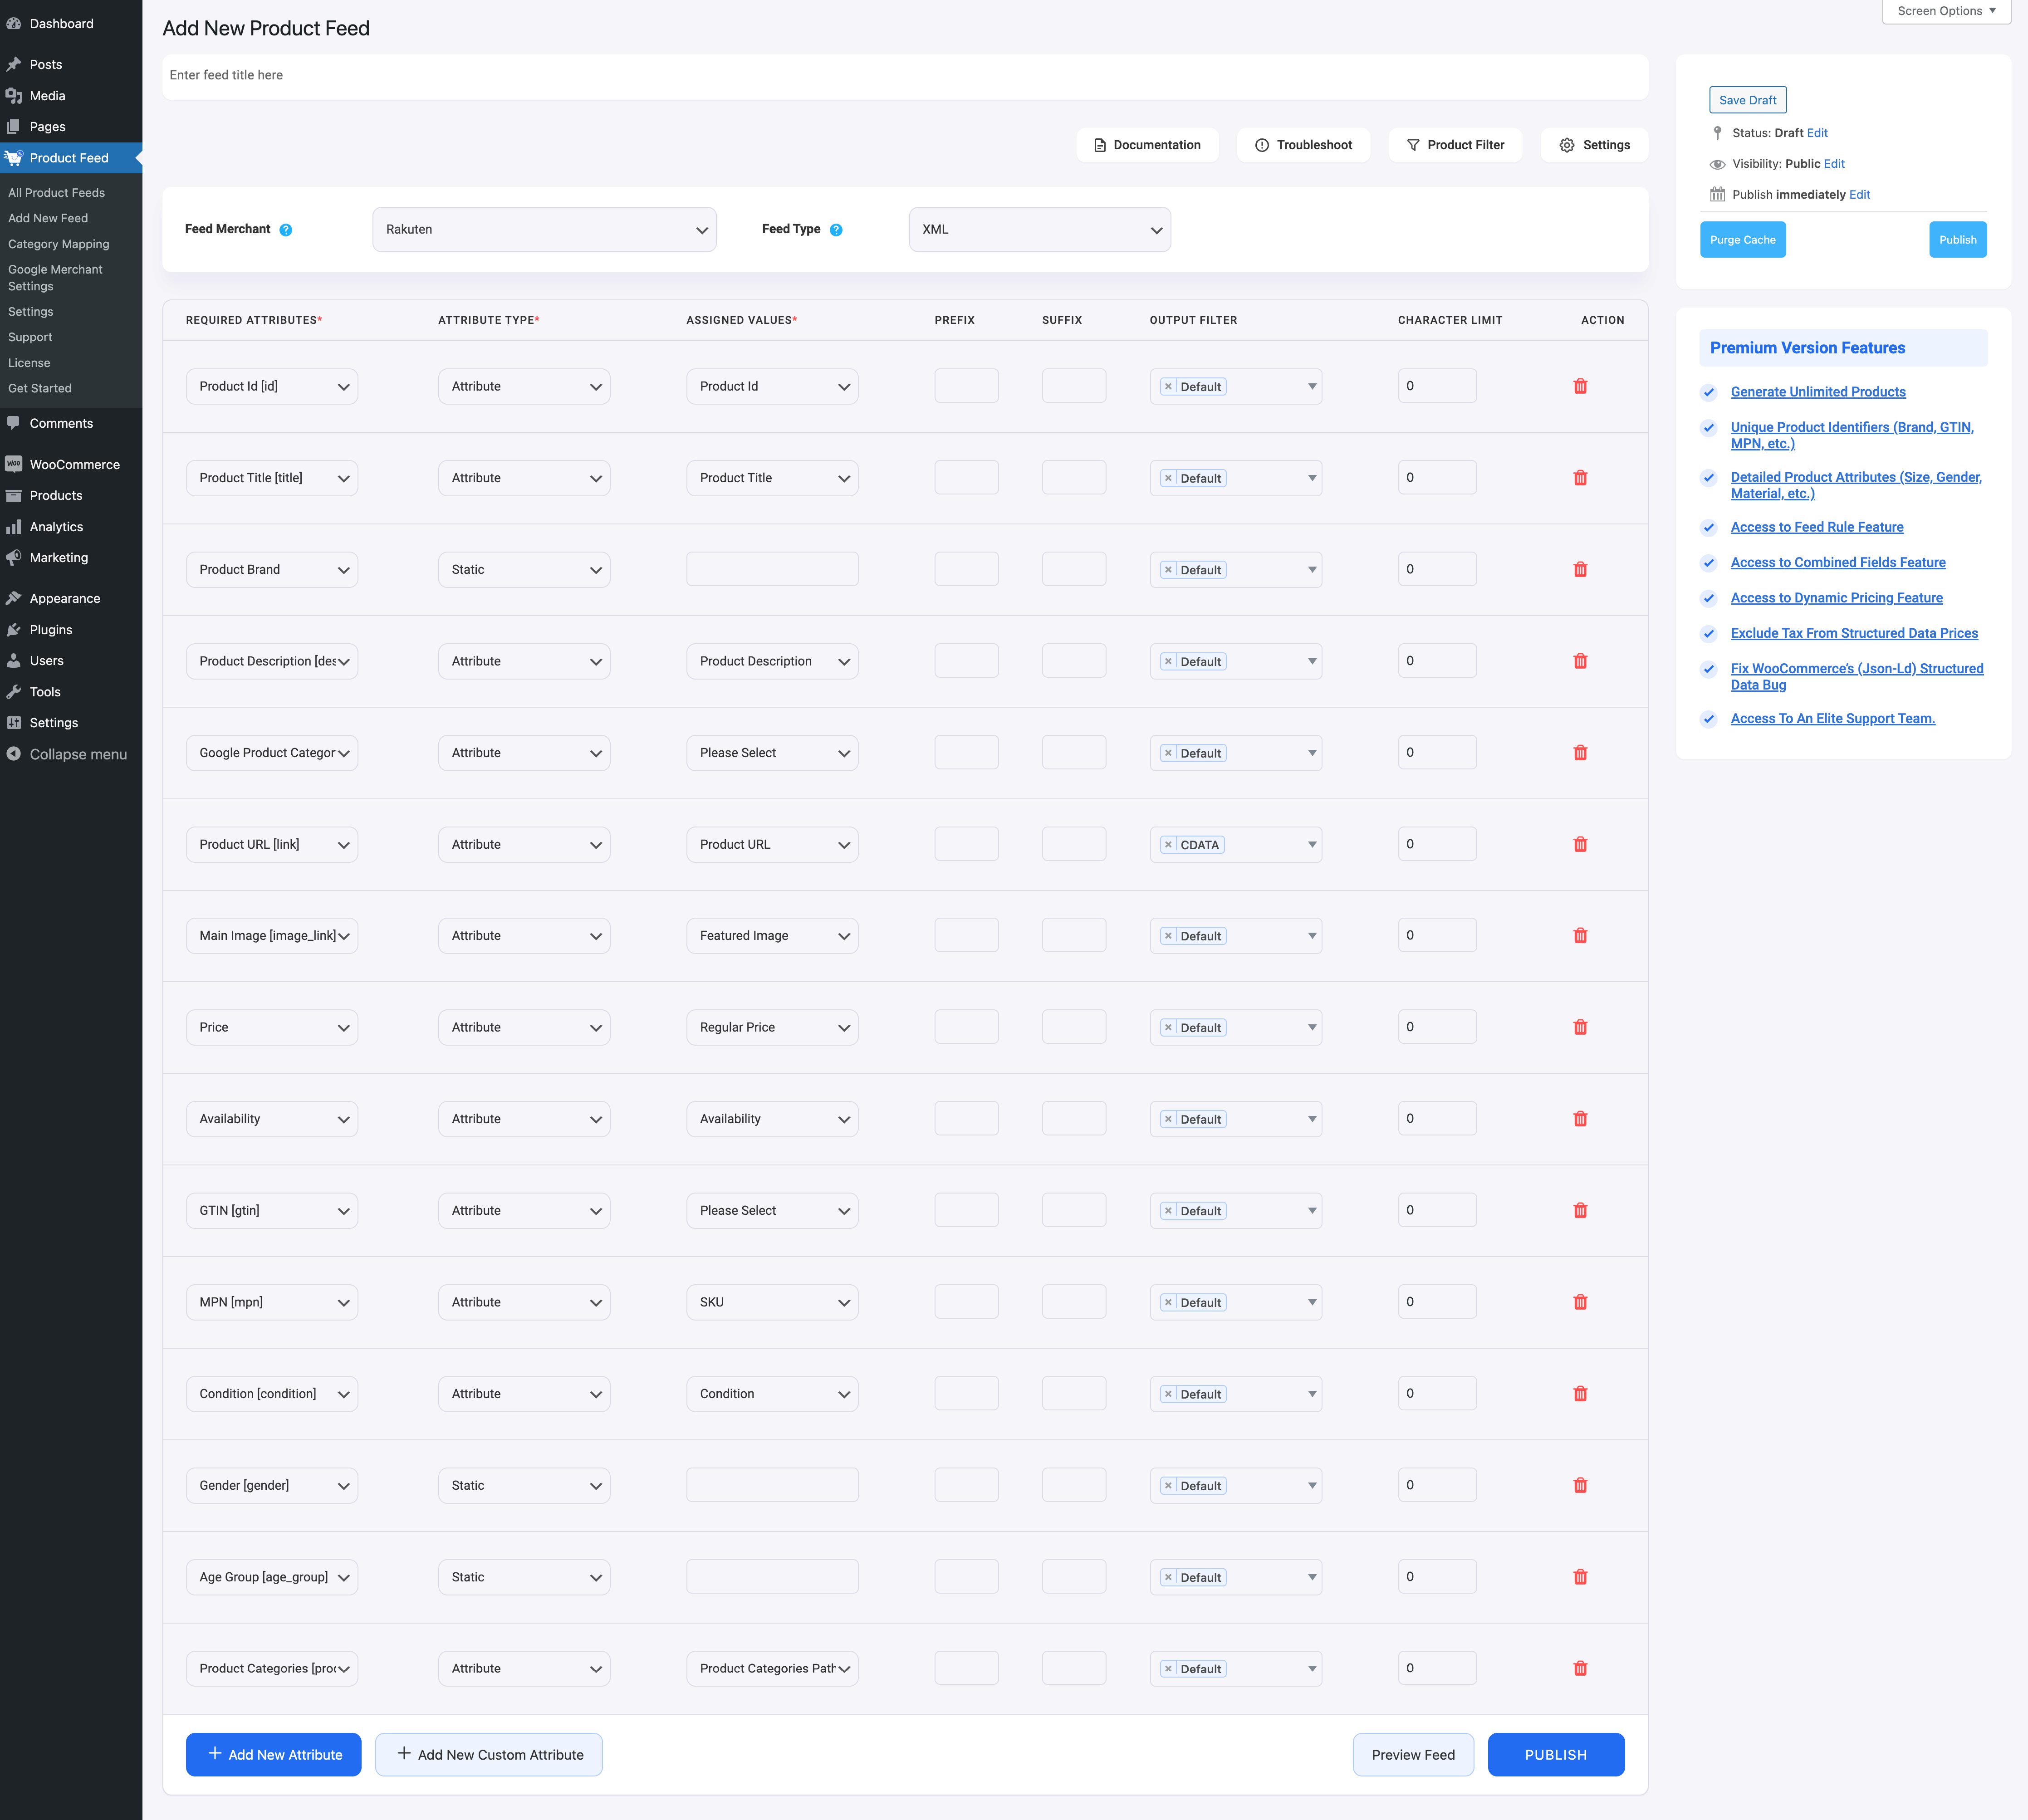
Select Rakuten from the dropdown list.

Rakuten Feed Required Attributes

**Please note that for Rakuten you can only create CSV, TXT, or TSV feed, you can choose your preferred feed format from the Feed Type file format selection dropdown next to the Feed Merchant dropdown option.

Here, we will create a CSV feed for Rakuten, so let’s select CSV from the Feed Type dropdown option.

3. Sie können sehen, dass die meisten Attribute bereits konfiguriert sind - ihre Werte sind ordnungsgemäß zugewiesen, Sie können die zugewiesenen Werte nach Bedarf ändern oder sie so belassen, wie sie sind.

Die übrigen Attributwerte müssen Sie jedoch manuell zuweisen.

For Rakuten, you need to assign values for the following attributes:

  • Brand –
    This should be the Brand name of the product you are selling. If you are the manufacturer, you can set the type as Static and input your company name here.
    If you have different brand names for different products, you will have to save the value in a custom field or product attribute and then use that value here.
    **You may also use Perfect Brands for WooCommerce to assign brands, which you can use in the feed.
  • Google Product Category –

Category Mapping is basically merging your WooCommerce product categories with the Google product categories.

You can configure category mapping in two ways. The first one is that you can use a pre-made category mapper, which is created for Google Shopping by default – you can use this for Facebook or other marketplaces too. And the second one is creating a new Category Mapper.

To use the default category mapper which was created for Google simply select the Googe Product Category mapper from the Category Mapping dropdown value:

Category Mapping Option

This is an empty Category Mapper. Click on the Configure Category Mapping button which you will find under the Category Mapping value, and a new tab will be opened with the default category mapper – Google Product Category. Map your categories here and click on the Update and Close button to go back to the attribute section.

However, you can create a new Category Mapper too. You need to click on the Category Mapping button from the WordPress dashboard and there you will get the option to create a new Category Mapper and to configure the mapper.

You can follow this doc to learn how to create a new Category Mapper for your feed.

  • GTIN –
    This is usually unique for each product. So you have to save this value in a custom field within each product and use that value here.
  • MPN –
    The MPN should be unique to each product. So you have to save this value in a custom field within each product and use that value here.
  • Age Group –
    The demographic for which your product is intended. The only two accepted values of this attribute are Adult, and Kids.
  • Gender –
    The gender for which your product is intended. Three predefined values are accepted: Male, Female, and Unisex.

Step 4 – Basic Configuration Settings For The Feed

1. Scroll up to the top and here, you will see that there are two options, Product Filter and Product Settings.

  • Produkte Einstellungen
  • Produkt-Filter
Produkt-Feed-Manager Feed-Optionen

2. First, let us configure the features in the Product Settings. Click on the Product Settings button, and a drawer will open from the right side of the screen.

Produkt-Feed-Manager Feed-Einstellungen Abschnitt

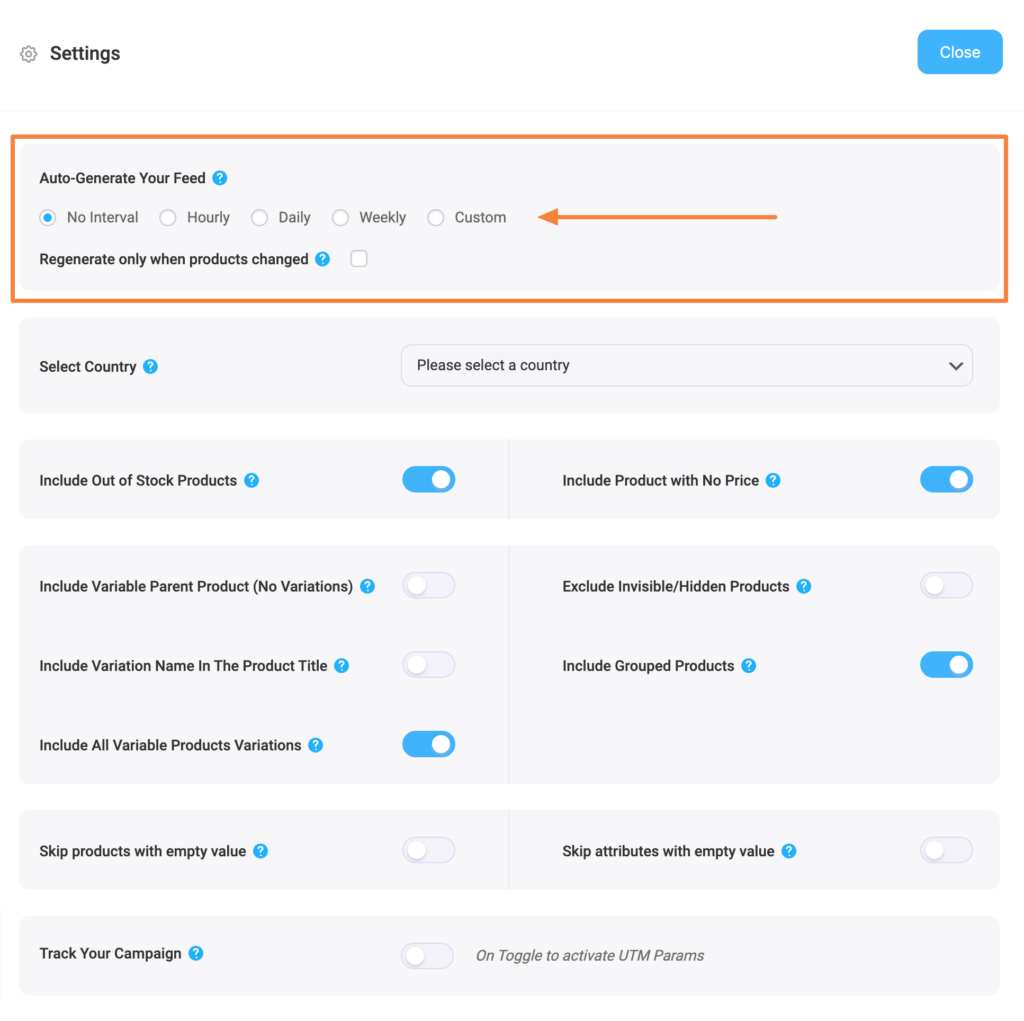
3. Die erste Option, die Sie sehen, ist Auto-Generate Your Feed.

Produkt-Feed-Manager Zeitplan-Feed-Option

Mit dieser Option können Sie eine automatische Aktualisierung des Feeds in bestimmten Abständen planen. Wählen Sie eine Option, um eine automatische Aktualisierung einzustellen, oder belassen Sie es bei "Kein Intervall", wenn Sie keine automatische Aktualisierung des Feeds einstellen möchten.

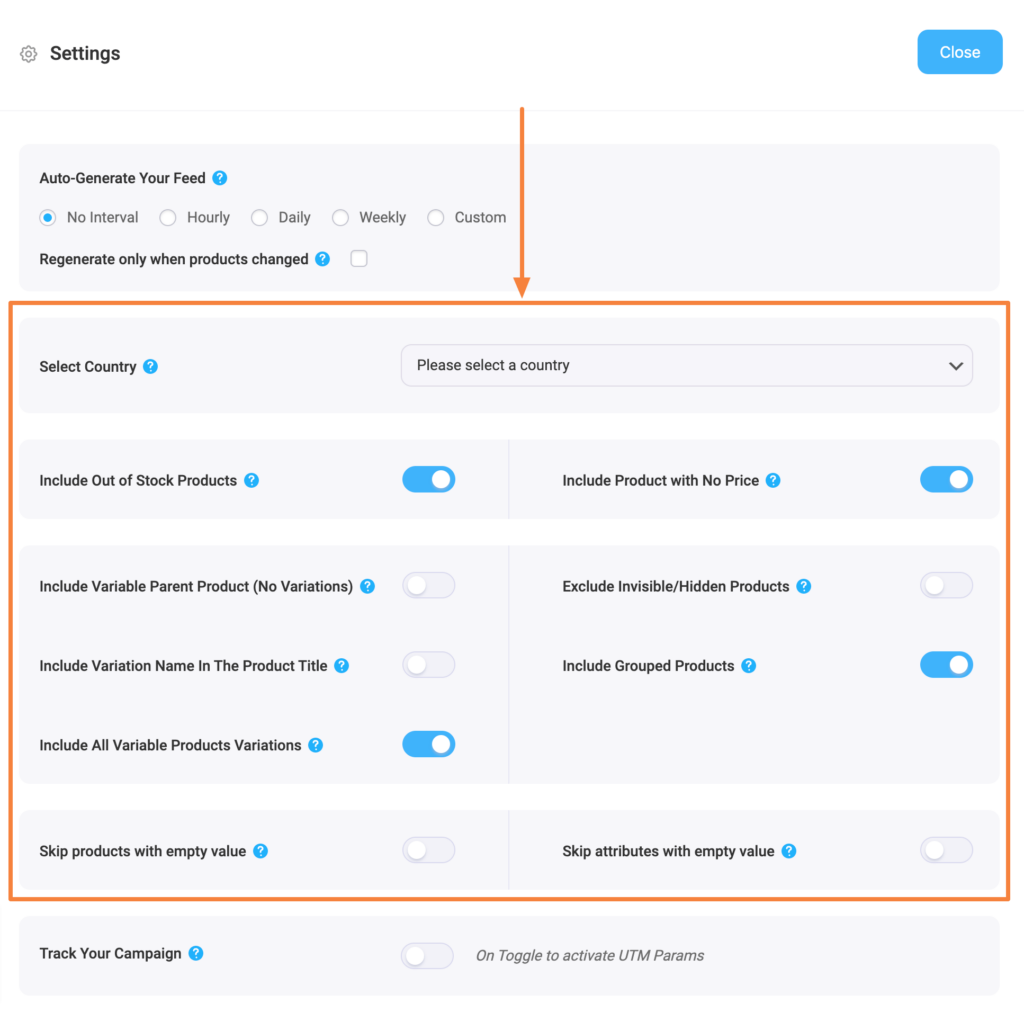
4. Verwenden Sie dann je nach Bedarf die folgenden Optionen.

Produkt-Feed-Manager Feed-Einstellungen für Produkte
  • Land/Region auswählen
  1. Wählen Sie eine Region aus diesem Dropdown-Menü, wenn Sie die Versandinformationen in Ihren Feed aufnehmen möchten. Sobald Sie die Region ausgewählt haben, müssen Sie das Attribut Versand in Ihren Feed einfügen, um die Versandwerte zu erhalten.
  2. In diesem Dokument erfahren Sie, wie Sie die Versandinformationen in Ihren Feed aufnehmen können.
  • Nicht vorrätige Produkte einbeziehen
    - Wenn Sie nicht vorrätige Produkte einbeziehen möchten, können Sie die Option aktivieren.
    - Für diesen Feed sollten wir diese Option nicht verwenden und den Wert auf "Nein" belassen.
  • Include Variable Parent Product (Without Variations)
    -Wenn Sie den Parent-Feed für variable Produkte einschließen möchten, können Sie die Option aktivieren.
    - Wenige Händler wie Google Shopping oder Facebook verlangen nicht, dass Sie Parent-Produkte übermitteln, jedoch gibt es viele andere Händler wie eBay MIP, die verlangen, dass Sie Produktprodukte im Feed übermitteln.
    - Für diesen Feed sollten wir diese Option nicht verwenden und den Wert auf "Nein" belassen.
  • Include All Variable Products Variations -
    -Wenn Sie nur einfache Produkte in den Feed aufnehmen möchten und keine variablen Produkte, dann belassen Sie den Wert auf "Nein".
    -Wenn Sie sowohl einfache Produkte als auch variable Produkte an Google Shopping übermitteln möchten, dann wählen Sie den Wert "Ja".
    -Lassen Sie uns diese Funktion nutzen und markieren Sie sie als "Ja" für diesen Feed.
  • Include Variation Name In The Product Title
    - Wenige Händler, wie z.B. Google Shopping, schlagen Ihnen vor, den Variationsbegriff zum Produktnamen hinzuzufügen, wenn Sie variable Produkte hochladen.
    - Wenn Sie also die Variationsbegriffe zu den variablen Produktnamen hinzufügen möchten, können Sie den Wert auf "Ja" setzen.
    - Nutzen wir diese Funktion und markieren sie als "Ja" für diesen Feed.
  • Gruppierte Produkte einbeziehen
    - Wenn Sie gruppierte Produkte haben, ist es am besten, das übergeordnete Produkt des von Ihnen erstellten gruppierten Produkts einzureichen.
    - Markieren Sie daher diese Option als "Ja".
  • Unsichtbare/versteckte Produkte ausschließen
    - Möglicherweise haben Sie bestimmte Produkte in Ihrem Shop, die in WooCommerce als versteckt oder unsichtbar gekennzeichnet sind.
    - Wenn Sie nur einen Feed für einfache Produkte erstellen möchten, können Sie diese Option als "Ja" markieren, um unsichtbare Produkte aus dem Feed auszuschließen.
    - Produktvarianten sind in WooCommerce jedoch standardmäßig als unsichtbar gekennzeichnet. Wenn Sie also variable Produkte in den Feed aufnehmen, sollten Sie diese Option als "Nein" markieren.
    - Da wir in diesem Feed Produktvarianten einbeziehen, werden wir diese Funktion nicht verwenden und sie auf "Nein" belassen.
  • Jedes Attribut überspringen, wenn der Wert leer ist
    - Wenn Sie diese Funktion aktivieren, werden alle Attribute eines Produkts ausgeschlossen, wenn der Attributwert fehlt.
    - Für diesen Feed wollen wir diese Option nicht verwenden und den Wert auf "Nein" belassen.

5. You can then find an option to add Track Your Campaign (Analytics parameters).

Use this option if you wish to add analytics parameters to product links on your product feed so that you can keep track of the products’ performance on Google Shopping.

6. Now, close the drawer and click on the Product Filter option. A new drawer will open from the right side of the window.

Oben haben Sie die Möglichkeit, den benutzerdefinierten Filter oder die Funktion Feed-Regeln (PRO) zu verwenden.

Über das Dropdown-Menü Filter erhalten Sie die Feed-Filteroptionen.

Product Feed Manger - Feed Filter Section

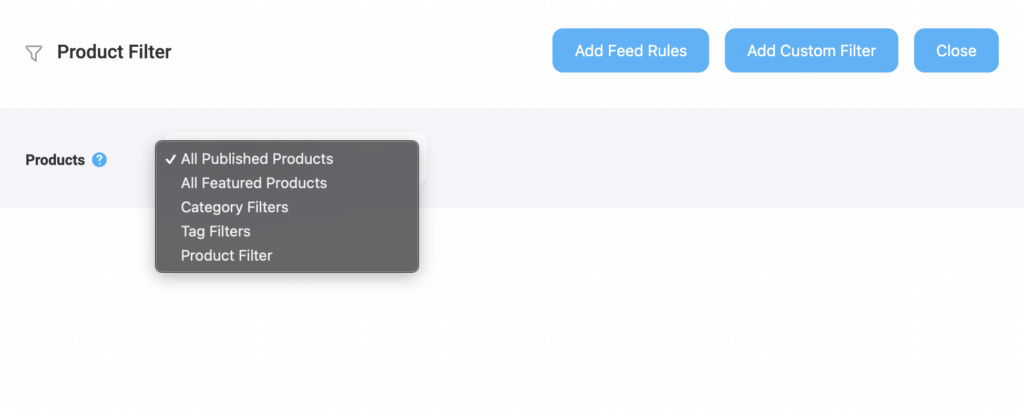
Choose the Products you want to include in the feed using any filter. The “All Published Products” is selected by default

Sie können alle anderen Filteroptionen, wie z. B. den benutzerdefinierten Filter, den Kategoriefilter und den Tag-Filter, verwenden, um die gewünschten Produkte einzuschließen (oder die Produkte auszuschließen, die Sie nicht einschließen möchten).

Für ein Basisfutter können Sie es so lassen, wie es ist.

Step 6 – Publish The WooCommerce Product Feed for Rakuten

Now, that your feed configuration is ready, it is time to publish the feed.

Scrollen Sie zurück nach oben, und Sie finden auf der rechten Seite eine Schaltfläche Veröffentlichen.

Klicken Sie auf die Schaltfläche Veröffentlichen, und Ihr Feed wird erstellt.

Sobald die Erstellung des Feeds abgeschlossen ist, können Sie den Feed anzeigen oder herunterladen.

That’s it. Your CSV feed for Rakuten is generated. You can now download and upload this file to your merchant account and list your products on the Rakuten Advertising marketplace.

Schlussfolgerung

Rakuten is a huge brand name out there and the reputation of their marketplace is immense. Promoting your WooCommerce products in this multinational platform could help you boost your revenue significantly.

As you have seen, this is how easy it is to generate a product feed for Rakuten using Product Feed Manager for WooCommerce.

You can get the plugin here:
– https://wordpress.org/plugins/best-woocommerce-feed/
– Product Feed Manager for WooCommerce Pro

Initially, test out the free version of the plugin, and once you are sure the plugin does what it claims, you can go ahead and upgrade to Pro.

So if you have the opportunity, go ahead and start promoting on Rakuten.

Kategorien
Guide Product Feed Manager For WooCommerce WooCommerce

How To Generate Product XML Feed For BestPrice Greece – WooCommerce (2024)

Did you know you could easily increase your sales by promoting on local price comparison sites?

If you are a retailer in Greece or own a Greek online eCommerce site, then you can easily boost your sales through BestPrice.gr.

BestPrice is amongst the top three price comparison sites in Greece. With an average of 5.6 million monthly traffic, promoting your products here could be a game-changer for your business to help you grow your revenue.

To list your products on BestPrice.gr, all you need is to join their marketplace as a Merchant, generate a product XML feed in the right format, and upload it to your merchant account to start selling. That’s it.

If you run a WooCommerce store to sell products within Greece, then you can easily generate a product feed for BestPrice in just a few clicks, using the right tool.

In this guide, you’ll learn about,

  • How to join BestPrice.gr marketplace
  • The right XML format to submit products on BestPrice.gr
  • The mandatory attributes to generate this product feed
  • How to generate WooCommerce feed for BestPrice in just a few clicks.

And once you have the feed ready, you can go ahead and upload your products to BestPrice to start selling immediately.

Fangen wir also an.

Guide To Generate BestPrice Product Feed

The first thing to do is to join BestPrice.gr merchant program.

You may visit the BestPrice for merchants page, and there, you will get to know all the details required to join the marketplace. Sign up and configure your Merchant Affiliates Platform settings such as Shipping, Taxation, Policies, and other such data.

Joining this marketplace requires a small fee, but that is very little compared to the thousands of dollars worth of business it will generate.

Once you are a merchant, the next thing to do is to upload your products to the marketplace in the right format.

Feed Specification For BestPrice Product Data

When generating a data feed to upload your products on BestPrice.gr, you will need to maintain the following XML format:

<?xml version="1.0" encoding="ISO-8859-7"?>
<store>
<date>--date-- --time--</date>	
        <products>		
                <product>			
                        ---PRODUCT ATTRIBUTES AND DATA HERE---		
                </product>	
        </products>
</store>

Here, you have to include the date and time when you generated the feed and the correct product attributes for each product.

But if you have a WooCommerce store, you do not need to worry about creating this format on your own. You can simply use the plugin, Product Feed Manager for WooCommerce, to generate XML feed in just a few clicks.
**We will discuss more on this plugin later on in this article.

Let us look at the product attributes’ data you need to include for each product.

Required Product Attributes For BestPrice Feed – With Examples

The following are the mandatory attributes you need to submit for each product on BestPrice —

AttributInstructionsBeispiel
productId 

Format:
<productId>…</productId>
This should be a unique ID for the product. You could use your store’s Product ID or the Product SKU as value for this attribute.  <productId>15</productId>
title 

Format:
<title>…</title>
The product title should include the product name and additional information such as Manufacturer/Brand name, its unique features, model name, etc.<title>Lacoste Hoodie With Logo – Grey</title>
productURL 

Format:
<productURL>…</productURL>
This is the direct URL of the product.

For variable products, it must be unique for each variant.
<productURL>https://www.yourdomain.gr/products/lacoste-hoodie-grey</productURL>
imageURL 

Format:
<imageURL>…</imageURL>
You need to submit at least one image for your product.

**For multiple images, you have to use the tag, ‘imagesURL’ instead, which is explained in the next row.
<imageURL>
https://www.yourdomain.gr/productimage1.png
</imageURL>
imagesURL

Format:
<imagesURL>
<img1>…</img1>
<img2>…</img2>
</imagesURL>
If you want to submit multiple images for your products, then you need to use this attribute tag instead of ‘imageURL.’

<imagesURL>
<img1>https://www.yourdomain.gr/productimage1.png</img1>
<img2>https://www.yourdomain.gr/productimage2.png</img2>
</imagesURL>
price

Format:
<price>…</price>
Submit the current selling price of the product, i.e., if the product is on a discount, then you have to submit the discounted price; else, just submit the original price.

In WooCommerce, if you have a sale price assigned for a product, you have to submit the sale price as the product’s price in the feed.
<price>59.99</price>
category_path 

Format:
<category_path>…</category_path>
Include the product category name, if possible, with the complete category path with a ‘->’ separator.

*Alternatively, you can submit the category Id if you want.
<category_path>Τεχνολογία->Κινητή Τηλεφωνία->Κινητά τηλέφωνα</category_path>
availability

Format:
<availability>…</availability>
This attribute is mainly used to define the delivery time.

The accepted values for availability are:
– Σε απόθεμα
– Παράδοση σε 1–3 ημέρες
– Παράδοση σε 4–7 ημέρες
– Παράδοση σε 4–10 ημέρες
– Παράδοση σε 8–14 ημέρες
– Κατόπιν παραγγελίας
– Προπαραγγελία
– Εξαντλήθηκε

** Σε απόθεμα (which means ‘in stock’ signifies that the product is available for pickup.
<availability>Παράδοση σε 1–3 ημέρες</availability>
brand 

Format:
<brand>…</brand>
Submit the brand name of your products. If you are the manufacturer, then you can use your company name as the brand name.<brand>Market προσφορέσ</brand>
EAN / Barcode /MPN / SKU 

Format: 
<MPN>…</MPN>
You need to include the Manufacturer’s Part Number for your products.

**If you do not have an MPN, then you may submit the EAN, Barcode, or product SKU as value for this attribute.
<MPN>MN8X2ZD/A</MPN> 

Once you include these required attributes, your feed is pretty much ready to be uploaded to the BestPrice marketplace.

However, there are more attributes you may need or want to include to optimize this feed further.

Conditional Required Attributes

You have to submit a few attributes depending on specific factors. For example, if your product is a Book, then you must submit an ISBN.

Let us look at these conditional attributes.

AttributInstructionsBeispiel
ISBN 

Format:
<ISBN>…</ISBN>
If your product is a book, then you must submit the ISBN instead of MPN or EAN.<ISBN>960-6604-92-6</ISBN>
size 

Format:
<size>…</size>
If your product is a clothing or footwear product, then you must submit the size attribute.

You can simply submit all available sizes via this attribute, using commas to separate them.

**This can be used for products in any other category as well, if relevant.
<size>S,M,L,XL</size>
color 

Format:
<color>…</color>
For variable products that vary in color, each variant should be generated as a separate product. And you have to include the color attribute to it to specify its color.<color>Red</color>
weight 

Format:
<weight>…</weight>
You will need to submit the weight attribute if you choose the shipping cost calculation based on weight when defining the shipping cost through the Merchant Affiliation Platform.

You can submit the value as a numeric value (integer or decimal) or an alphanumeric value (weight + unit).
**If you use the alphanumeric value, then the unit of weight must match the unit you defined in the Merchant Affiliation Platform.
<weight>5.2</weight>

Optional Attributes To Further Optimize The Feed

You may also choose to include a few optional attributes to optimize your product data submission.

AttributInstructionsBeispiel
stock 

Format: 
<stock>Y</stock>
Use this attribute to indicate if the product is in stock or not.

Submit the value as ‘Y’ if the product is in stock and ‘N’ if the product is not in stock.

**This is an optional field. If you do not submit this attribute, or if the value for this attribute is empty for any product, then the stock status will be considered as “Κατόπιν Παραγγελίας” (i.e., “upon order”).
<stock>Y</stock> 
categoryID

Format:
<categoryID>…</categoryID>
You may submit the category Id along with the category path to improve accuracy.

**If you submit a category id that is not correct as per the category path you submit, then this attribute will be ignored.
<categoryID>223</categoryID>
warranty_provider 

Format:
<warranty_provider>…</warranty_provider>
You may submit this attribute if there is a warranty available for a product.

Following are accepted values:
– GR: if the product is guaranteed by the official Greek dealership and/or authorized service points within Greece. 
– EU: if the product has a European warranty from the manufacturer (dealership or authorized service points within the European Union), which does NOT include the Greek delegation. 
– STORE: if the guarantee is provided by the store itself or the store partner. 
<warranty_provider>STORE</warranty_provider>
warranty_duration 

Format:
<warranty_duration>…</warranty_duration>
This is the duration of validity of the warranty period in months.
**It is mandatory to submit if you include the ‘warranty_provider’ attribute.
<warranty_duration>24</warranty_duration>
bundle 

Format:
<bundle>…</bundle>
For a bundled product, you can use this attribute to indicate the productIDs of the products that were bundled together.<bundle>B1C2, A2B6</bundle>
features 

Format
<features>
<power>…</power>
<voltage>…</voltage>
</features>
If you have an electronic product that has a measurable power and voltage, then you can use this attribute to indicate the values.<features>
<power>1000W</power>
<voltage>230V/50Hz</voltage>
</features>
shipping 

Format:
<shipping>…</shipping>
If you want to include a unique shipping cost for a certain product, i.e., a different shipping cost than the one you defined in the Merchant Affiliate Platform, then you can use this attribute.

**If you want to indicate free shipping, then submit a value of 0 for this attribute.
<shipping>2.99</shipping>

Example Feed For BestPrice In The Right Format

Here’s a sample BestPrice feed structure with example data.

<?xml version="1.0" encoding="ISO-8859-7"?>
<store>
<date>2022-05-28 07:05</date>
        <products>
                <product>
                        <productId>13</productId>
                        <title>Lacoste Hoodie with Logo - Black</title>
                        <price>45.00</price>
                        <productURL>
                                https://www.yourdomain.gr/products/lacoste-hoodie-grey
                        </productURL>
                        <imagesURL>
                                <img1>https://www.yourdomain.gr/productimage1.png</img1>
                                <img2>https://www.yourdomain.gr/productimage1.png</img1>
                        </imagesURL>
          		<category_path>
                                Τεχνολογία->Κινητή Τηλεφωνία->Κινητά τηλέφωνα
          		</category_path>
         		<availability>Παράδοση σε 1–3 ημέρες</availability>
                        <brand>Market προσφορέσ</brand>
                        <MPN>MN8X2ZD/A</MPN>
                        <size>S,M,L,XL</size>
                        <color>Black</color>
                </product>
        </products>
</store>

Now that you have a good idea of the required product data you need to submit on BestPrice.gr, let us look at how you can generate an XML feed of your WooCommerce products in just a few clicks.

7 Steps To Generate BestPrice Product Feed In Your WooCommerce Store

In WooCommerce, you will find an efficient tool to generate an XML feed for all of your products in just a few clicks.

In this guide, I will show you how you can generate a product feed for BestPrice using Product Feed Manager for WooCommerce. It is one of the easiest plugins to use and has a pre-built template for BestPrice.gr. 

Take a look at these 7 quick steps to use the plugin easily and generate the BestPrice XML feed real quick.

Step 1 – Install & Activate Product Feed Manager

1. Go to Dashboard > Plugins and click on the Add New button.

WordPress Dashboard - Add New Plugin

2. Type “Product Feed Manager” on the search box, and you will find the Product Feed Manager plugin from the search result.

WordPress Dashboard - Search For Plugin

3. Click on the Install Now button.

4. Then click on the Activate button to activate the plugin.

Activate Product Feed Manager

Once you activate the plugin, you will find the Product feed menu on your dashboard menus.

Step 2 – Enable BestPrice As A Merchant Type For The Plugin

While creating a new product feed for your preferred Merchant, you need to enable that Merchant first.

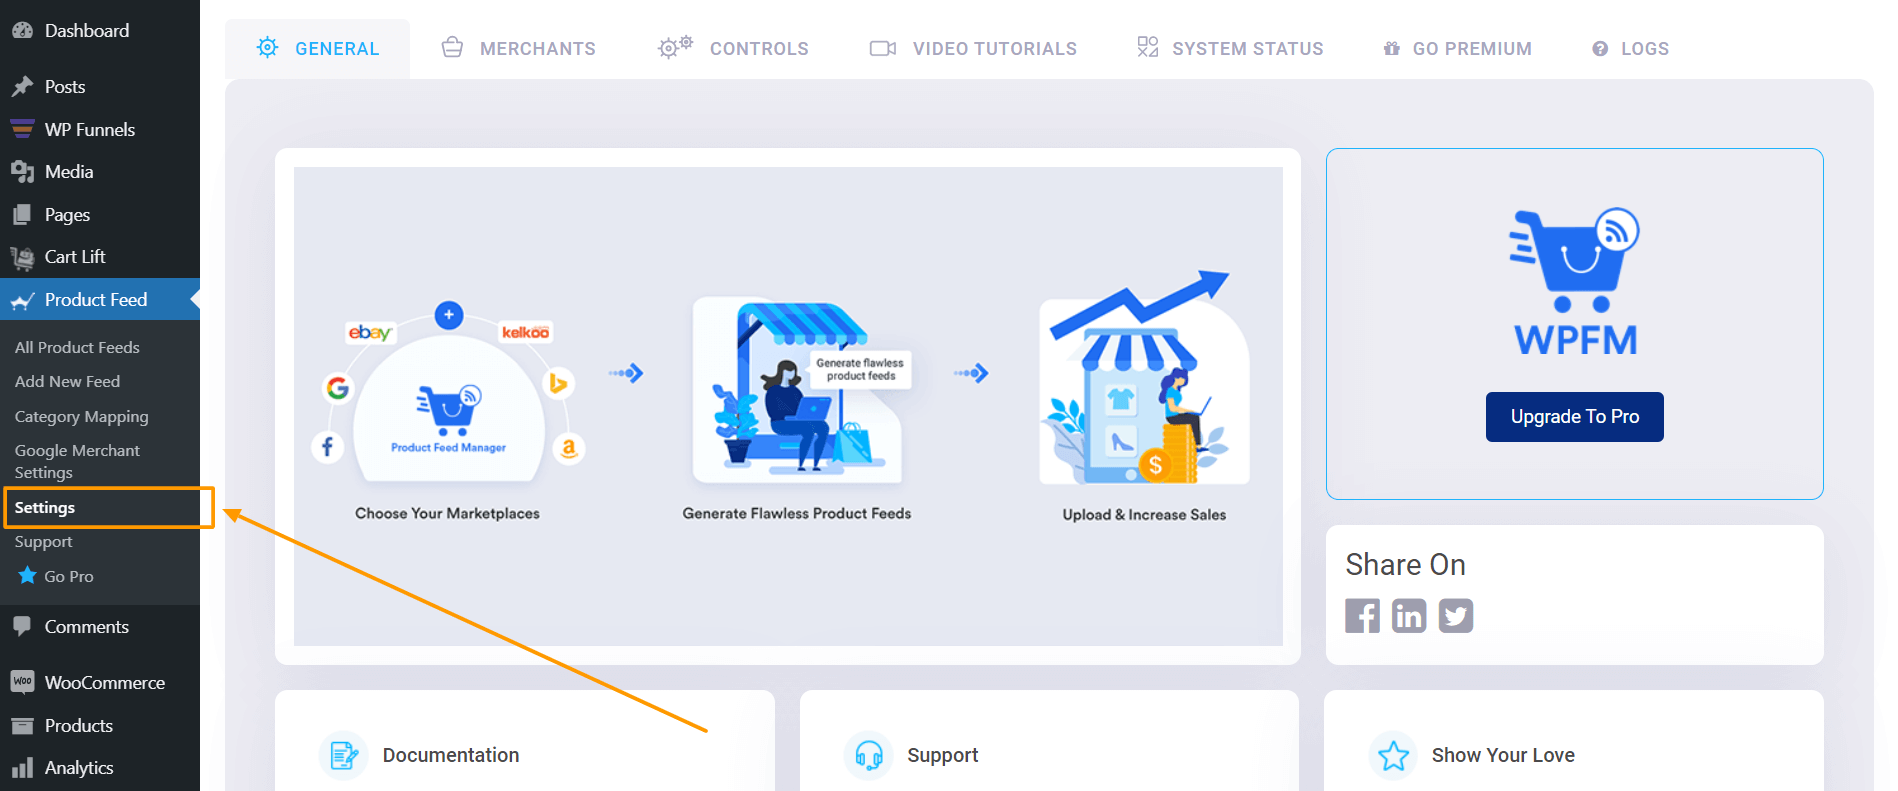
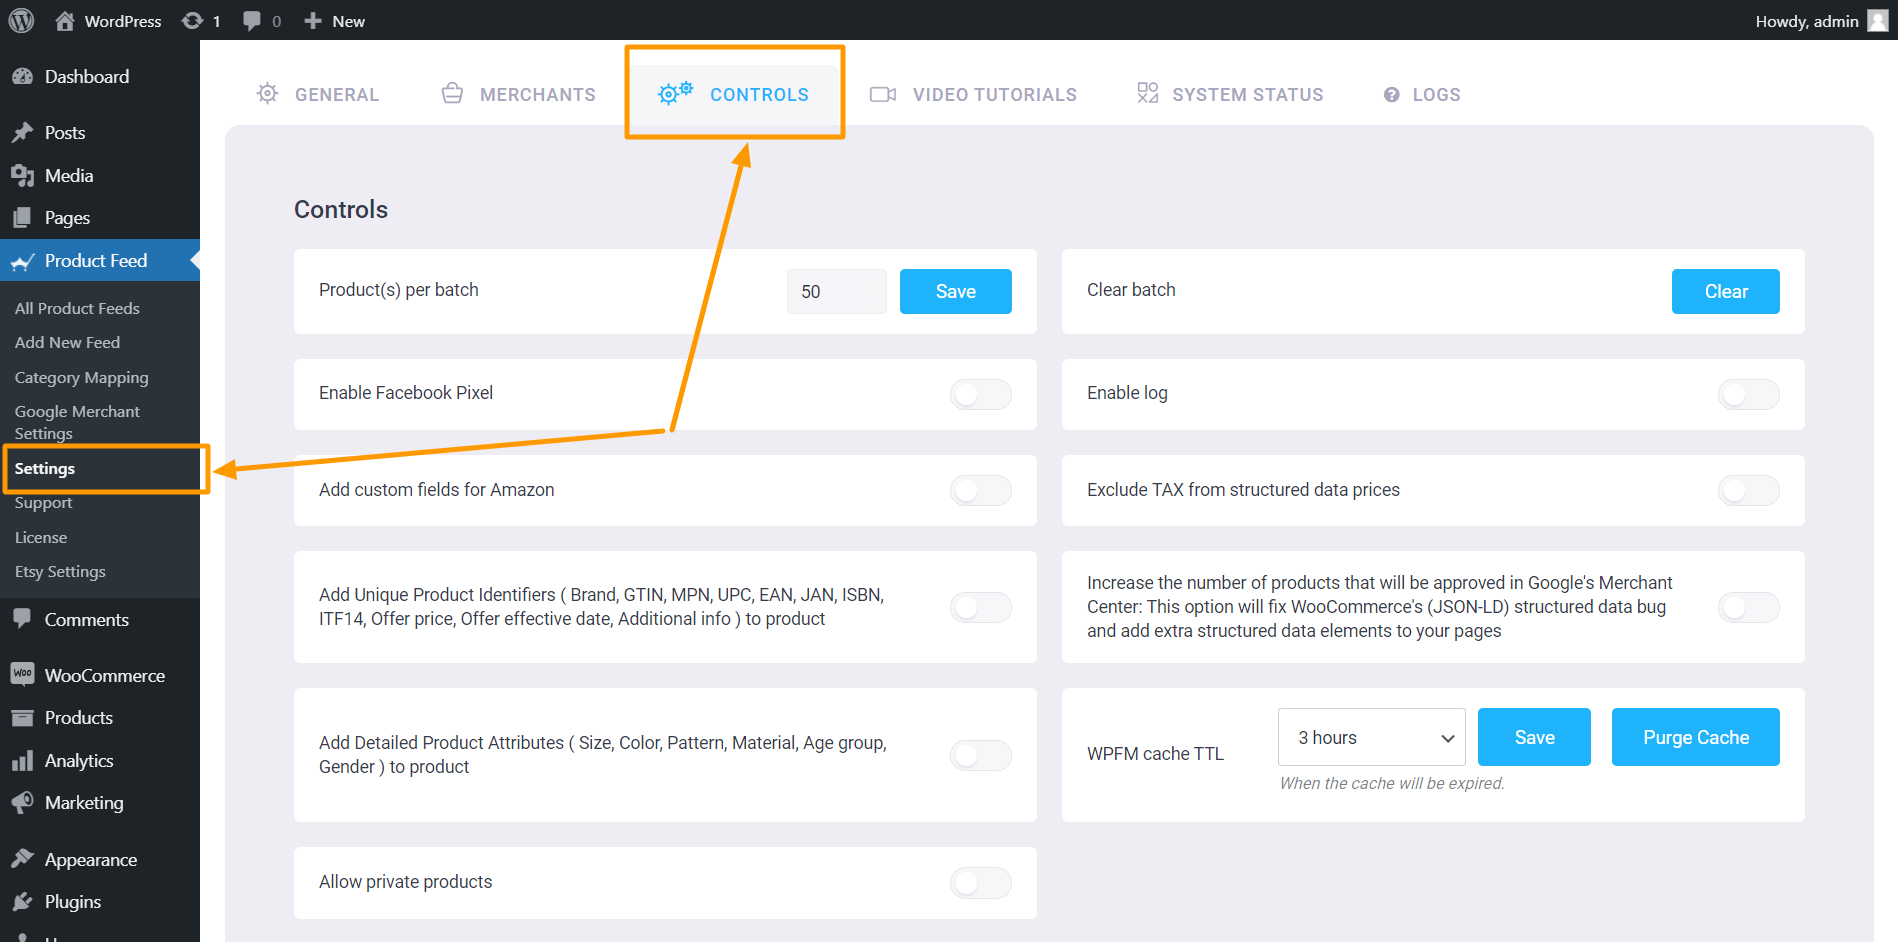
1. Go to Dashboard > Product feed > Settings.

Product Feed Manager Settings Home

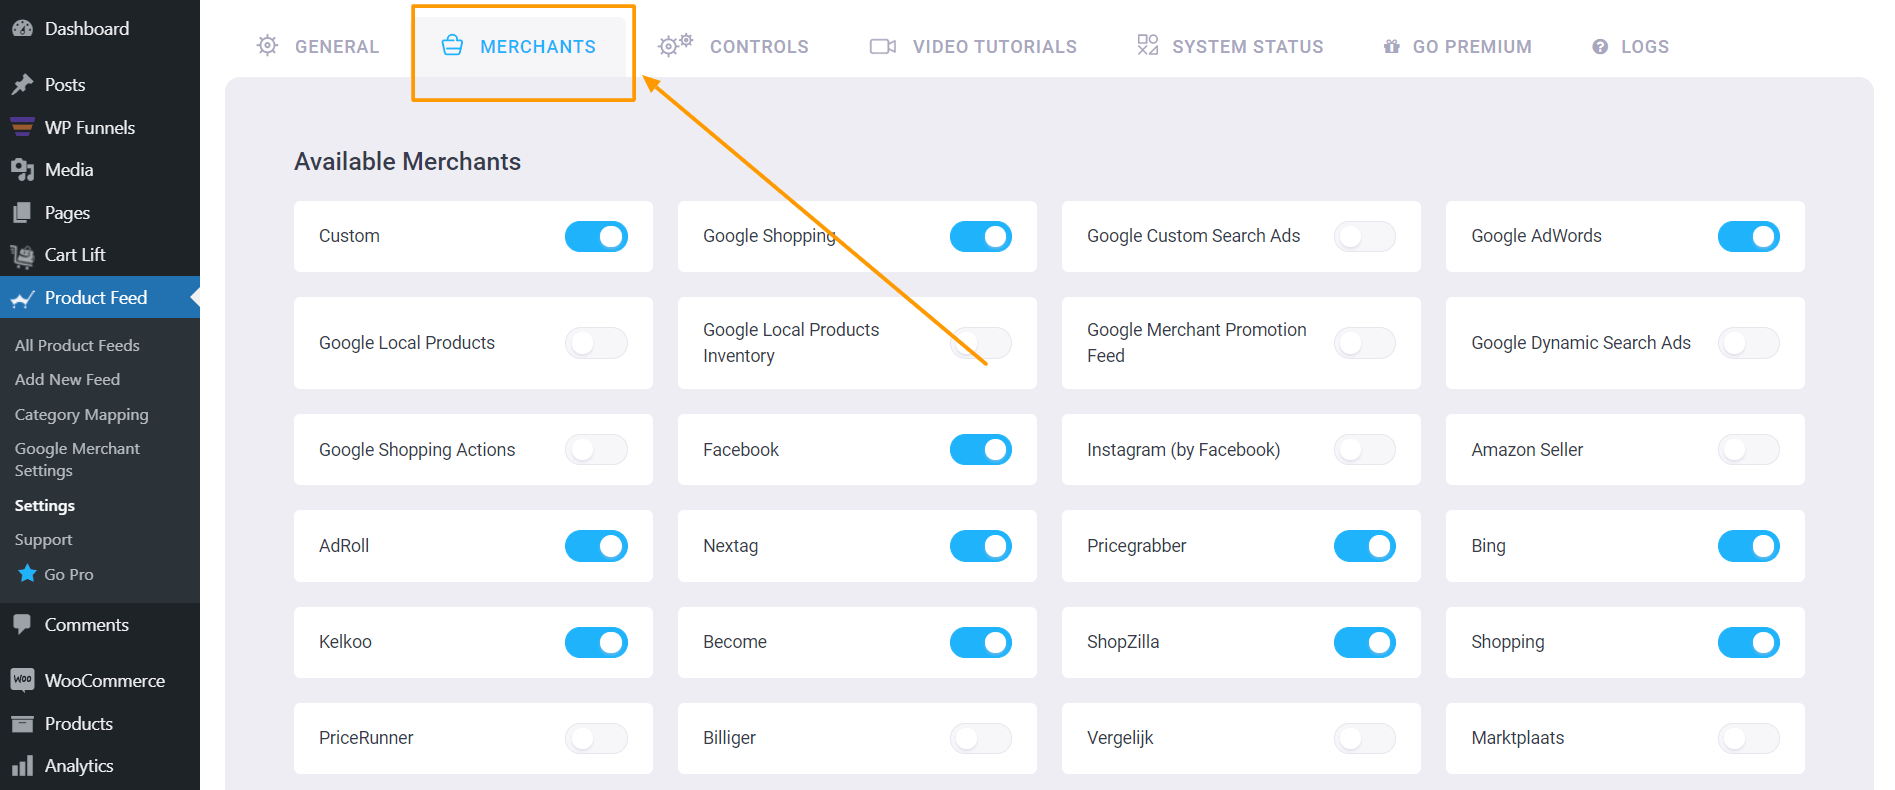
2. Click on the Merchants tab, and it will show you all the supported Merchants list.

Product Feed Manager Merchants List

3. Search for BestPrice and enable it.

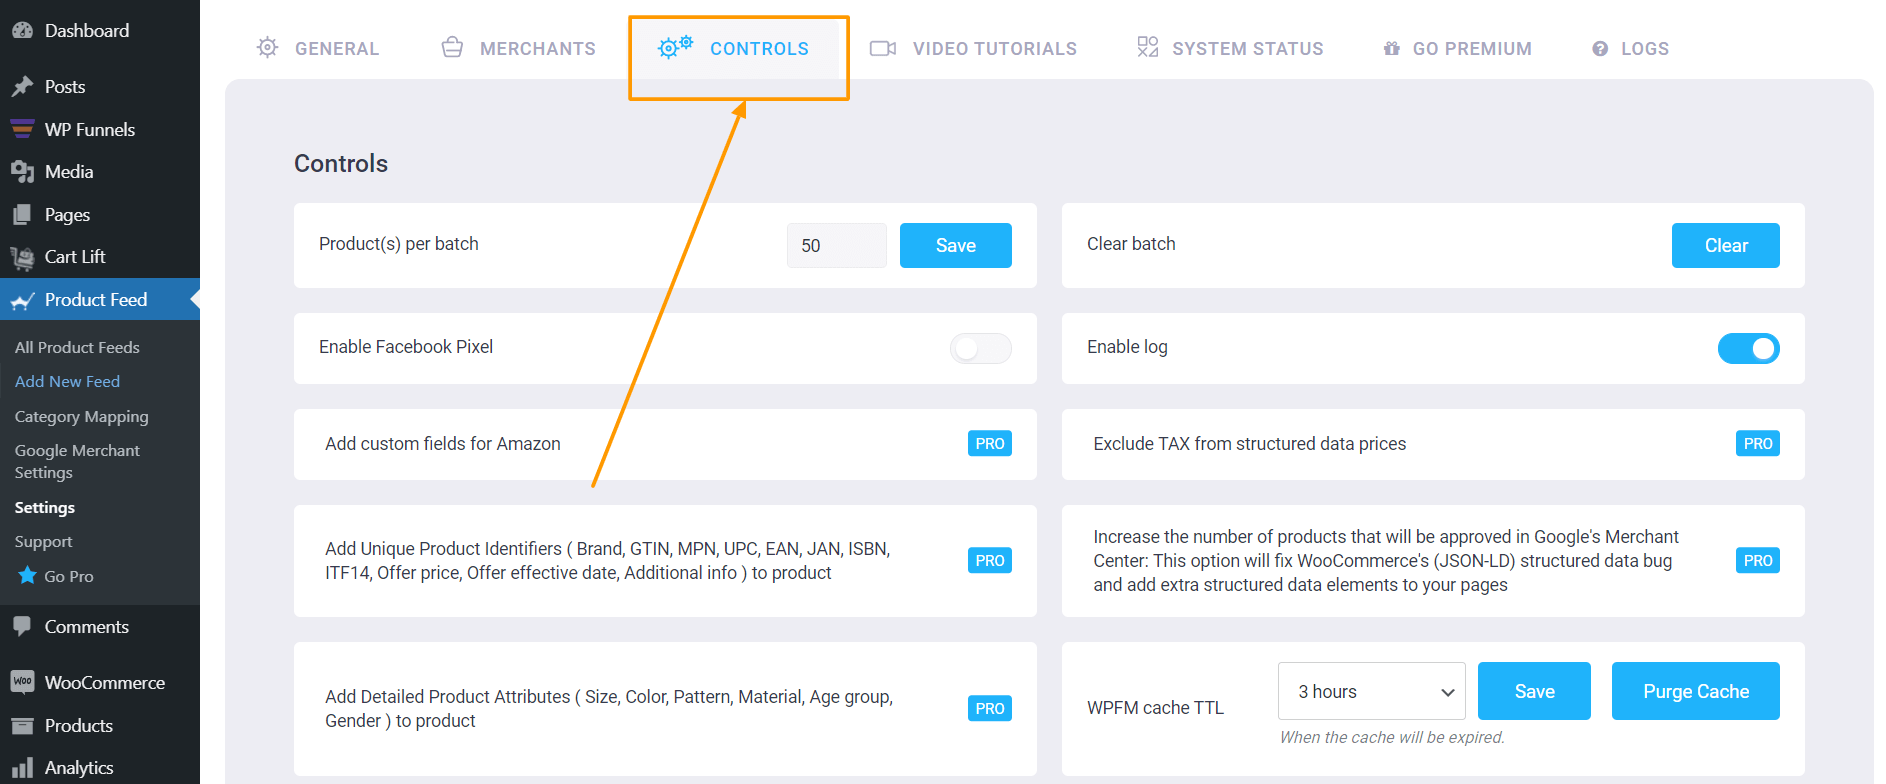
4. Now, click on the Controls tab.

Product Feed Manager Controls Settings

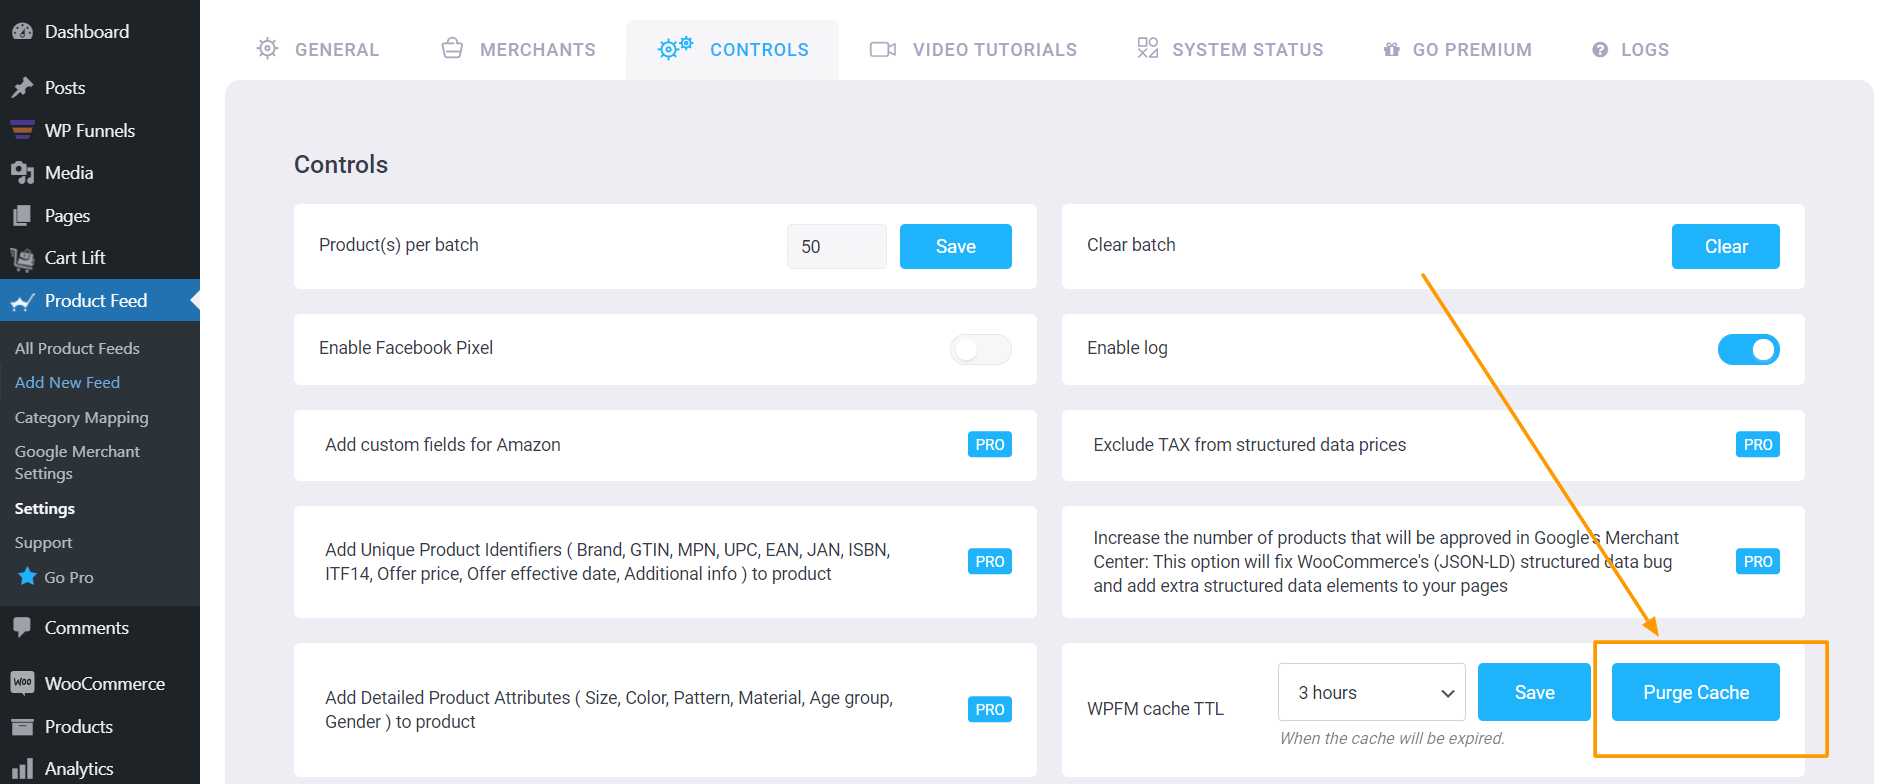
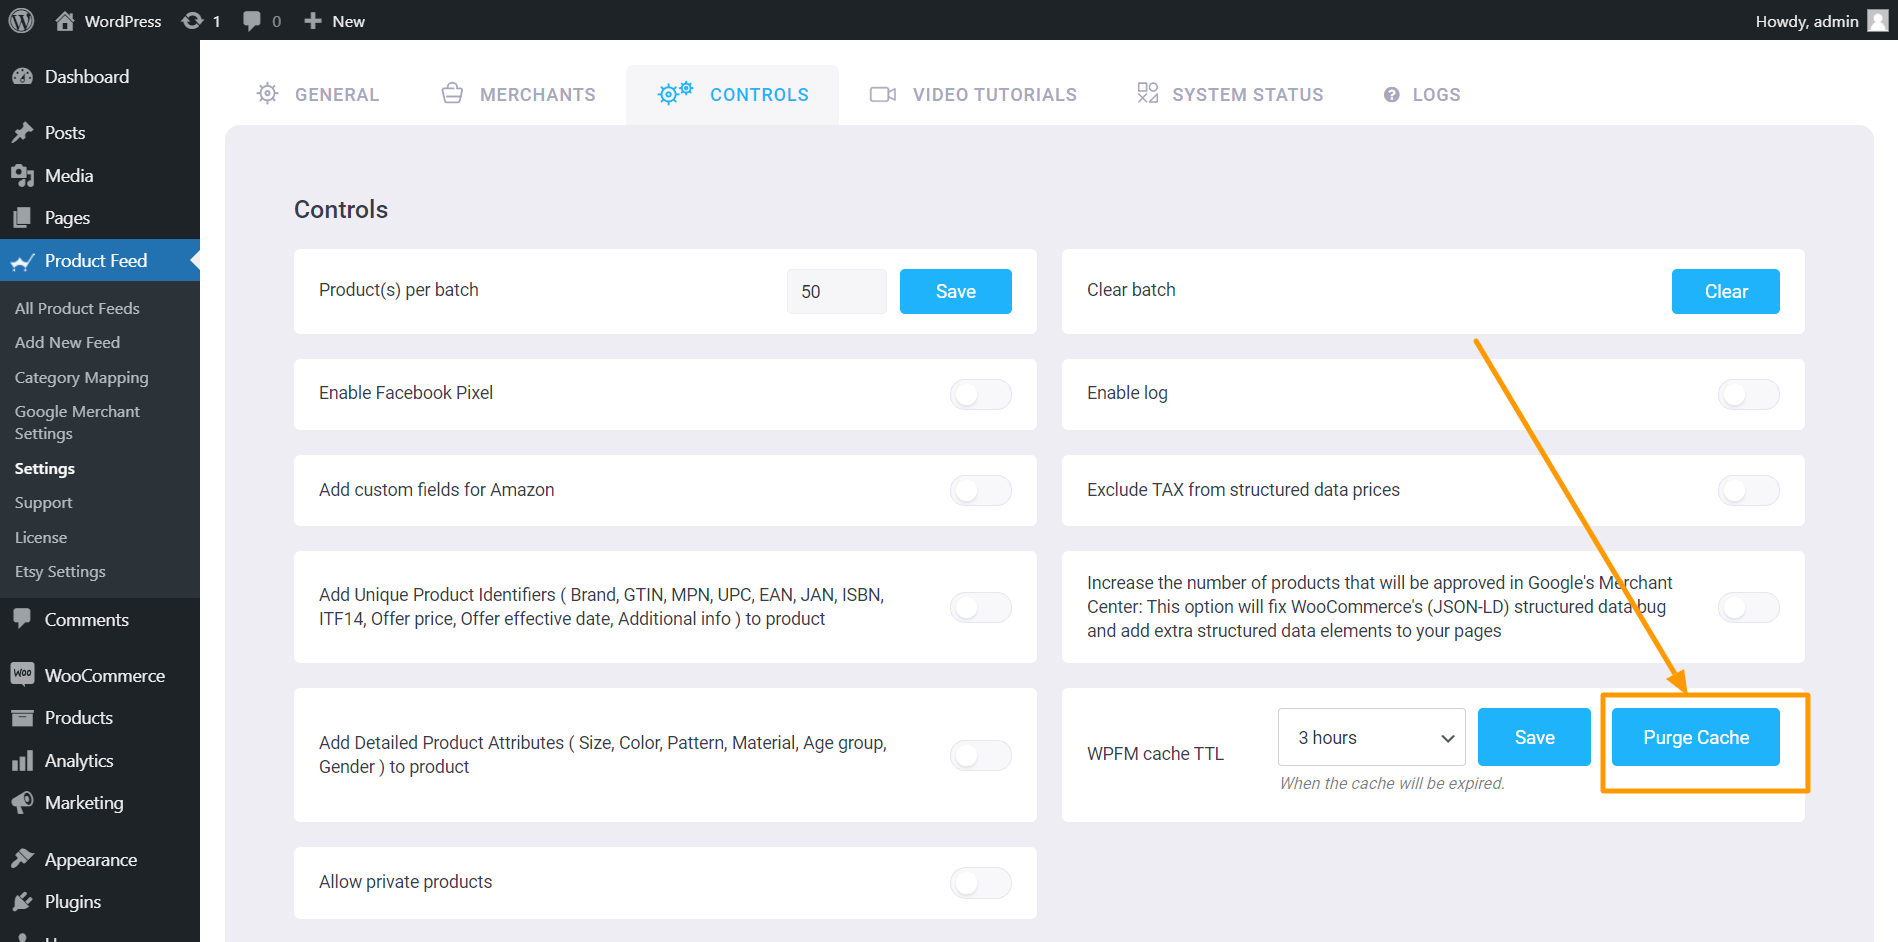
5. Here, click on the Purge Cache button.

Product Feed Manager Purge Cache

Now you are ready to generate your product feed.

Step 3 – Start Creating A New Feed

1. On your dashboard, click on Product Feed.

Product Feed Manager Dashboard

2. Next, click on Add New Feed.

Product Feed Manager - Add New Feed

You will be taken to a blank feed generation page.

Product Feed Manager - New Feed

Step 4 – Configure Basic Settings For The Feed

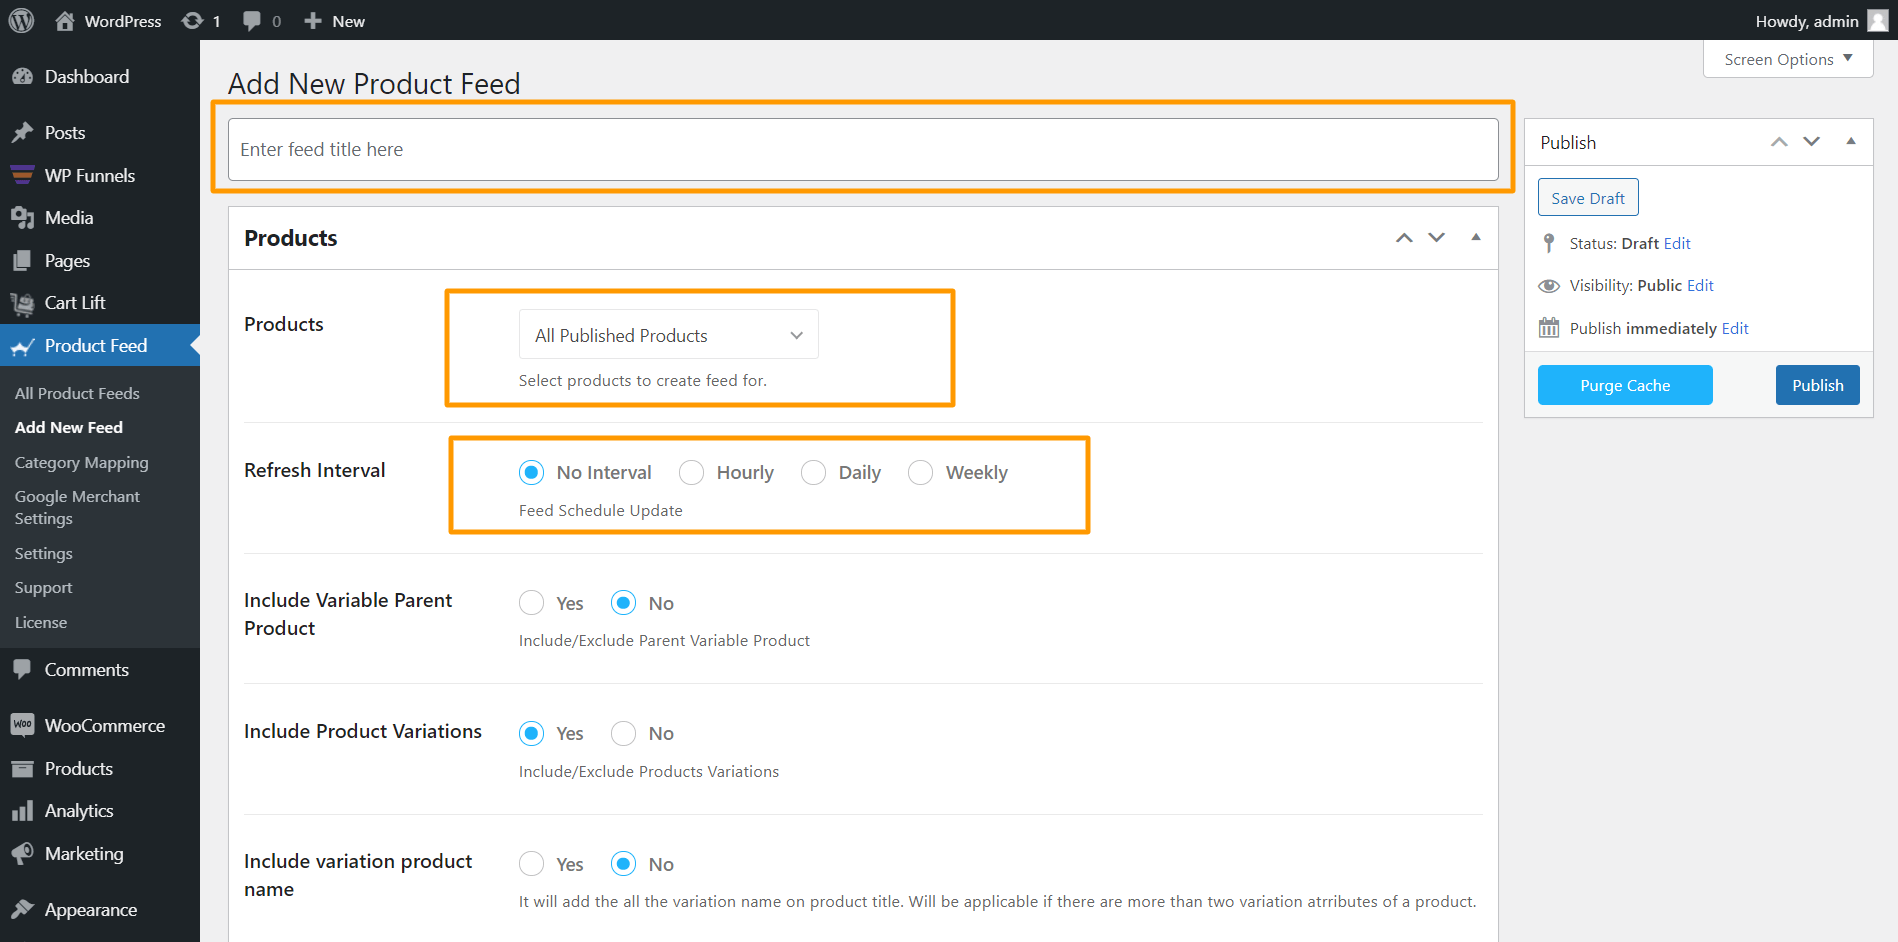
Generating BestPrice Feed

1. Give a name to your feed.

2. From the Products dropdown, you can select whether you would like to generate this feed for all of your products, or you can choose a filter option.

3. If you want this feed to auto-update on fixed intervals, you can schedule it to Hourly, Daily, or to Monthly from the Refresh Interval section.

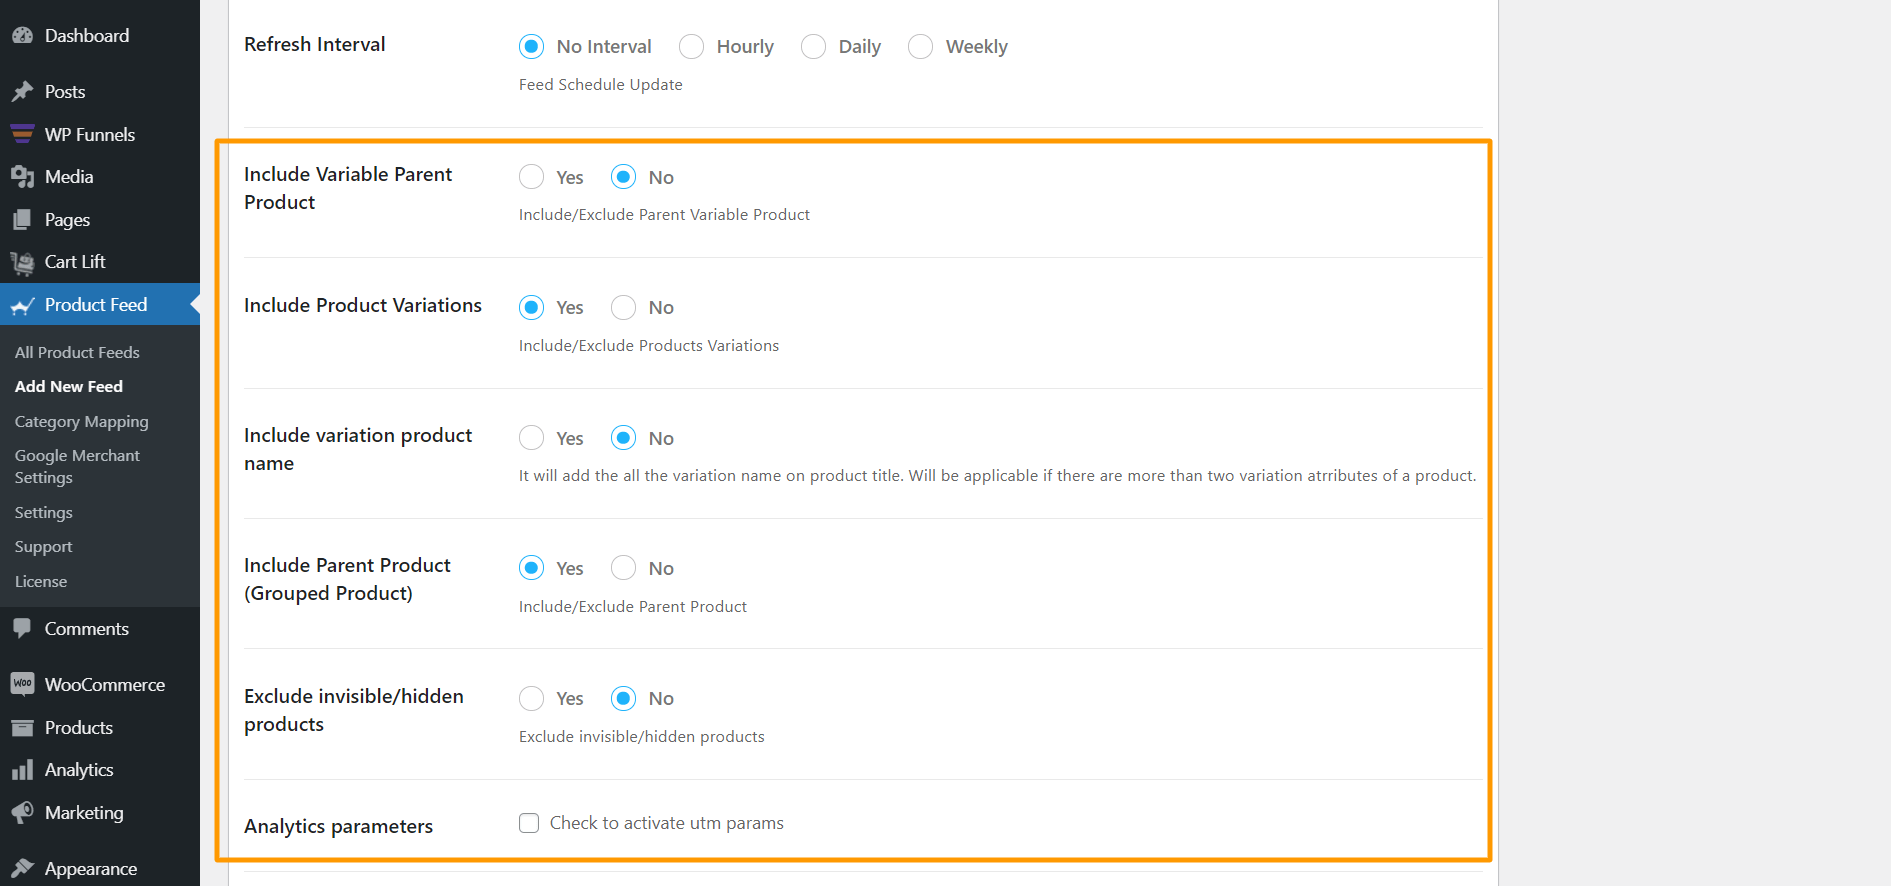
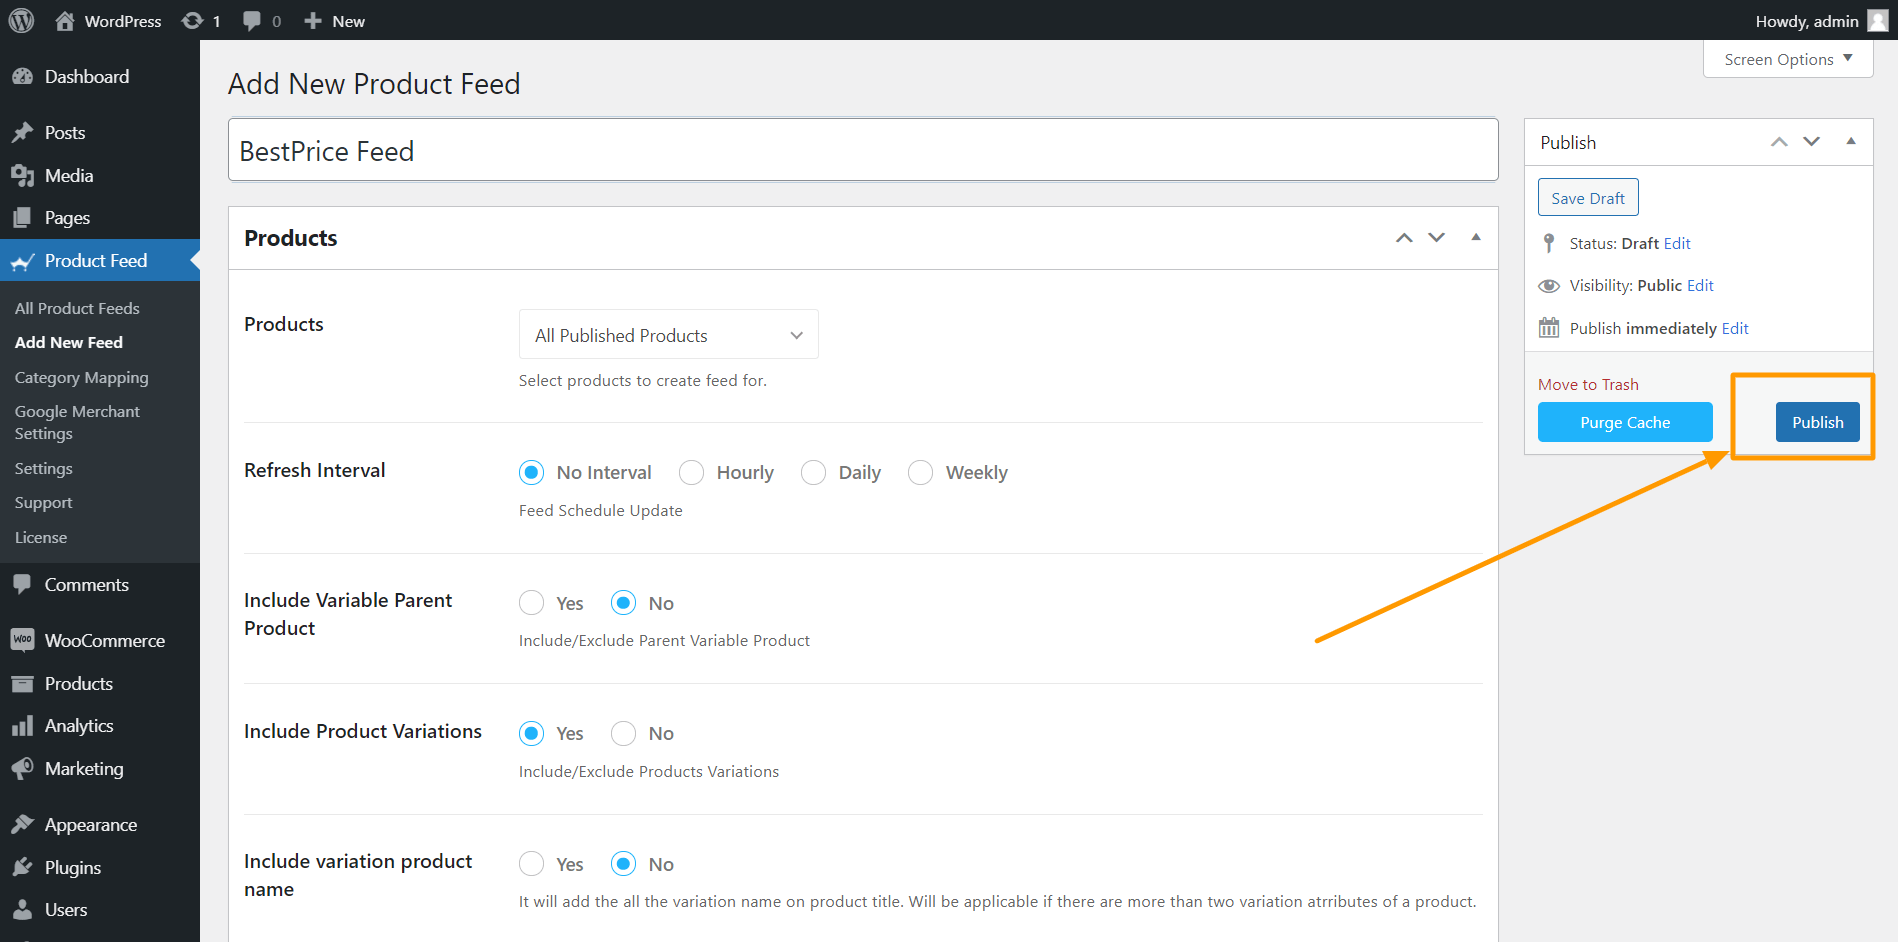
4. Keep the “Include Variable Parent Product” as no and the “Include Product Variations” as Yes.

5. Mark “Include variation product name” as Yes.

6. You can keep the rest of the options as it is or use them if required.

BestPrice Greece Feed Settings

Step 5 – Use The BestPrice Greece Feed Template

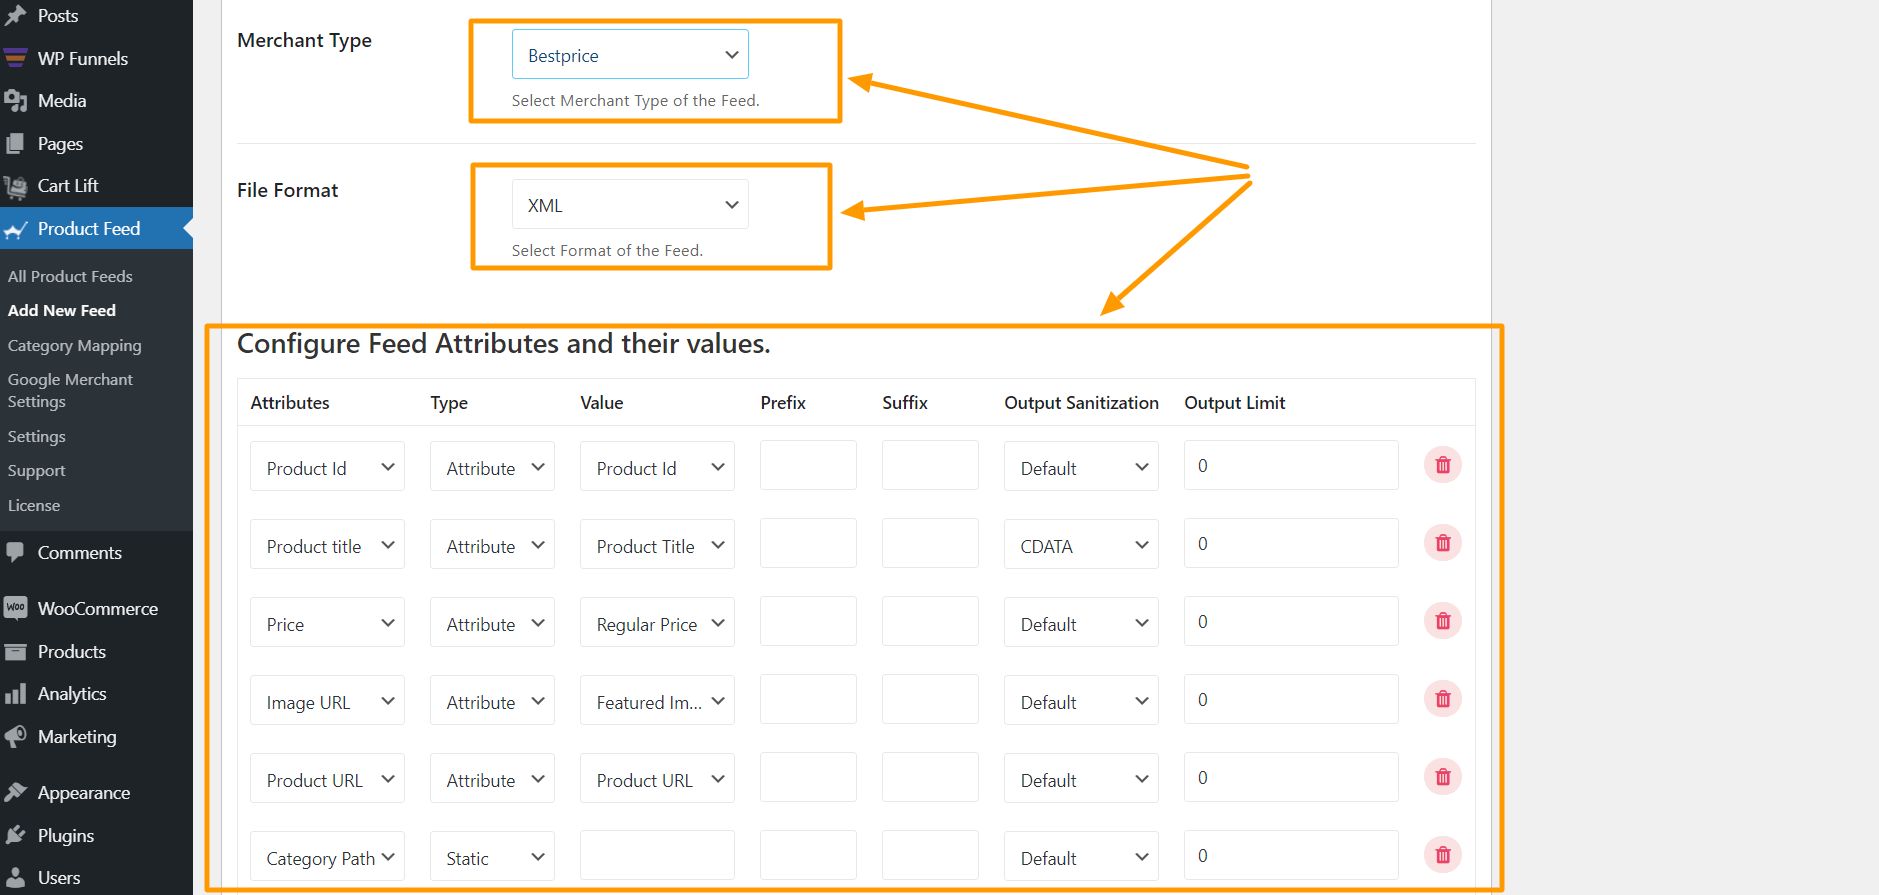
1. Scroll down to the Feed Configuration section, and select BestPrice as the Merchant Type and keep the File Format as XML.

BestPrice Feed Configuration

Once you choose the Merchant Type, you will notice that all the required attributes for BestPrice will appear below.

2. You will see that most of the attributes are configured. You will simply need to configure the following:

ελληνικά BestPrice Category Path, Availability, Brand &amp; MPN fields
  • Category Path
    You need to use category mapping to define the category paths, so for now, keep this attribute empty. We will configure this attribute in one of the next couple of steps.
  • Availability
    If you have a fixed delivery time for all products, then set the type as static and input one of the accepted values mentioned earlier. If you have different delivery times for different products, then you will have to save the value in a custom field and use that value here.
  • Brand
    This should be the Brand name of the product you are selling. If you are the manufacturer, you can set the type as Static and input your company name here.
    If you have different brand names for different products, you will have to save the value in a custom field or product attribute and then use that value here.
    **You may also use Perfect Brands for WooCommerce, which will make it easier to assign and use brand names.
  • MPN
    This value should be unique to each product. So you have to save this value in a custom field within each product and use that value here.

Step 6 – Publish The Feed Initially

1. Once you are ready with your feed configuration, scroll up and click on Publish and the feed will be generated.

BestPrice Publish Feed

Now, remember you have left the Category Path empty.

Step 7 – Set Category Path Value & Update The Feed

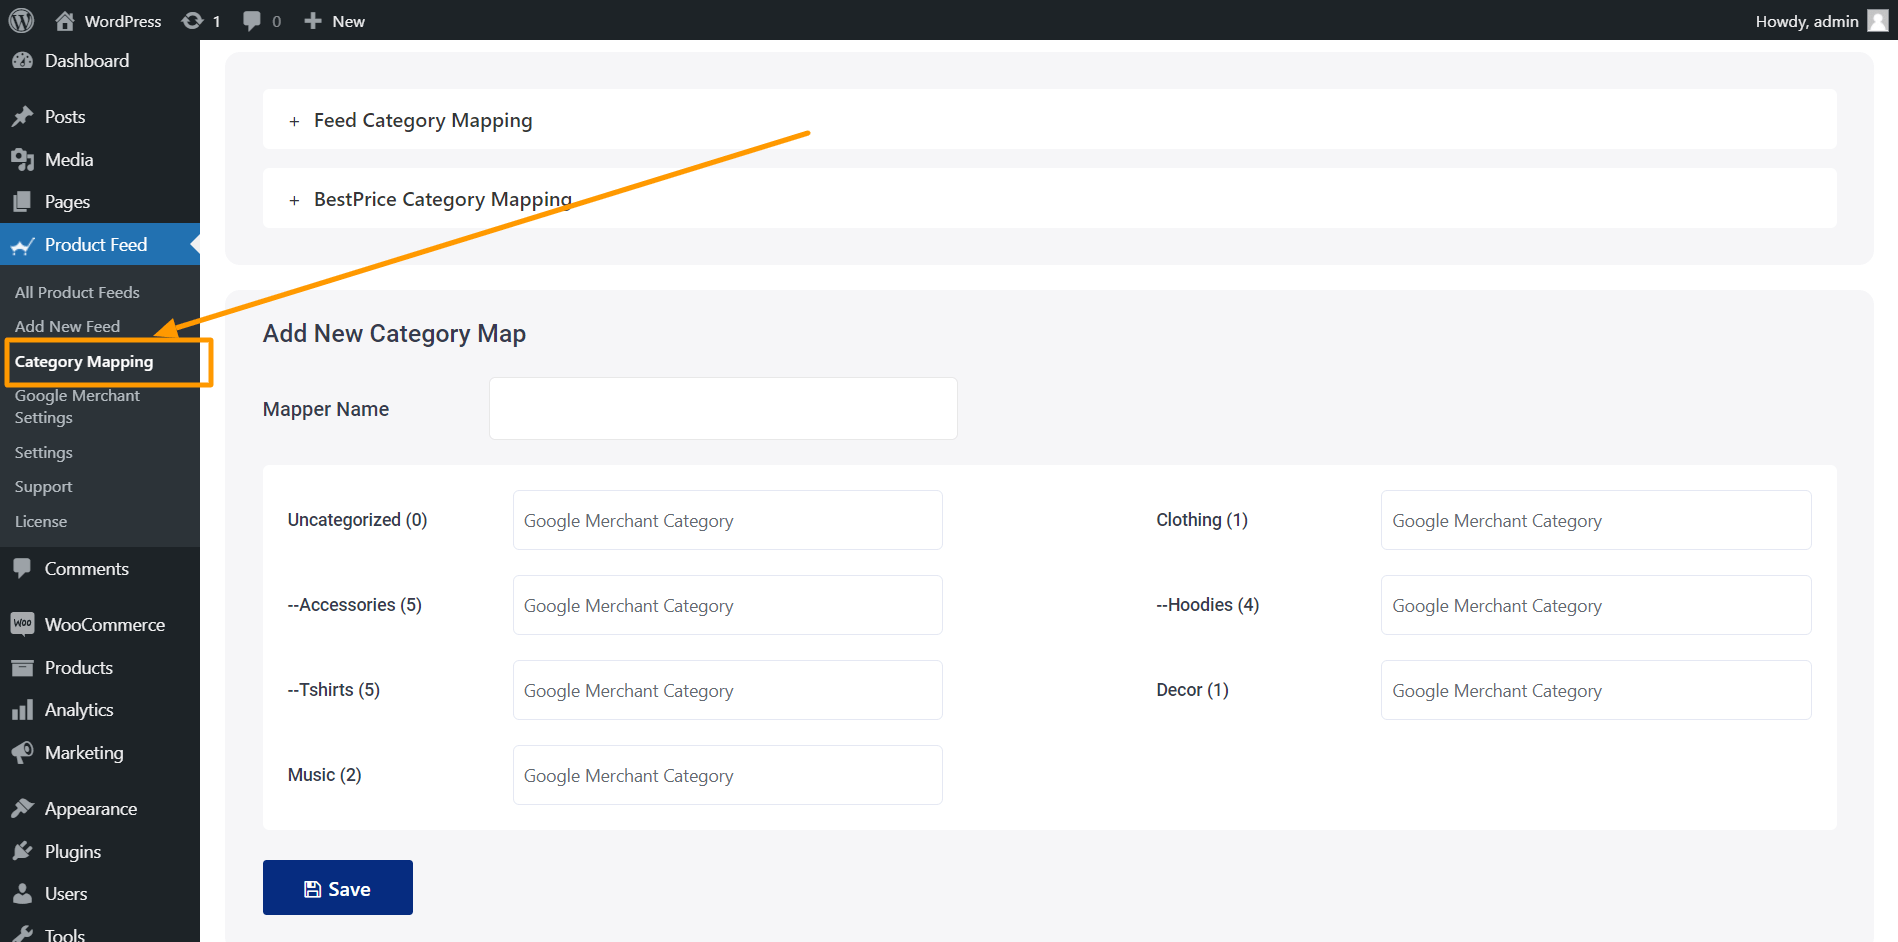
1. Go to Product feed > Category Mapping and set up a new category map with the right Category paths.

Product Feed Manager Category Mapping Settings

2. Once you have a Mapper saved, go to Product feed > Settings and click on the Controls tab.

Product Feed Manager Settings &gt; Controls

3. Here, below, click on Purge cache.

Product Feed Manager Settings &gt; Purge Cache

4. Go to Dashboard > Product feed > All product feed and edit the feed you created earlier.

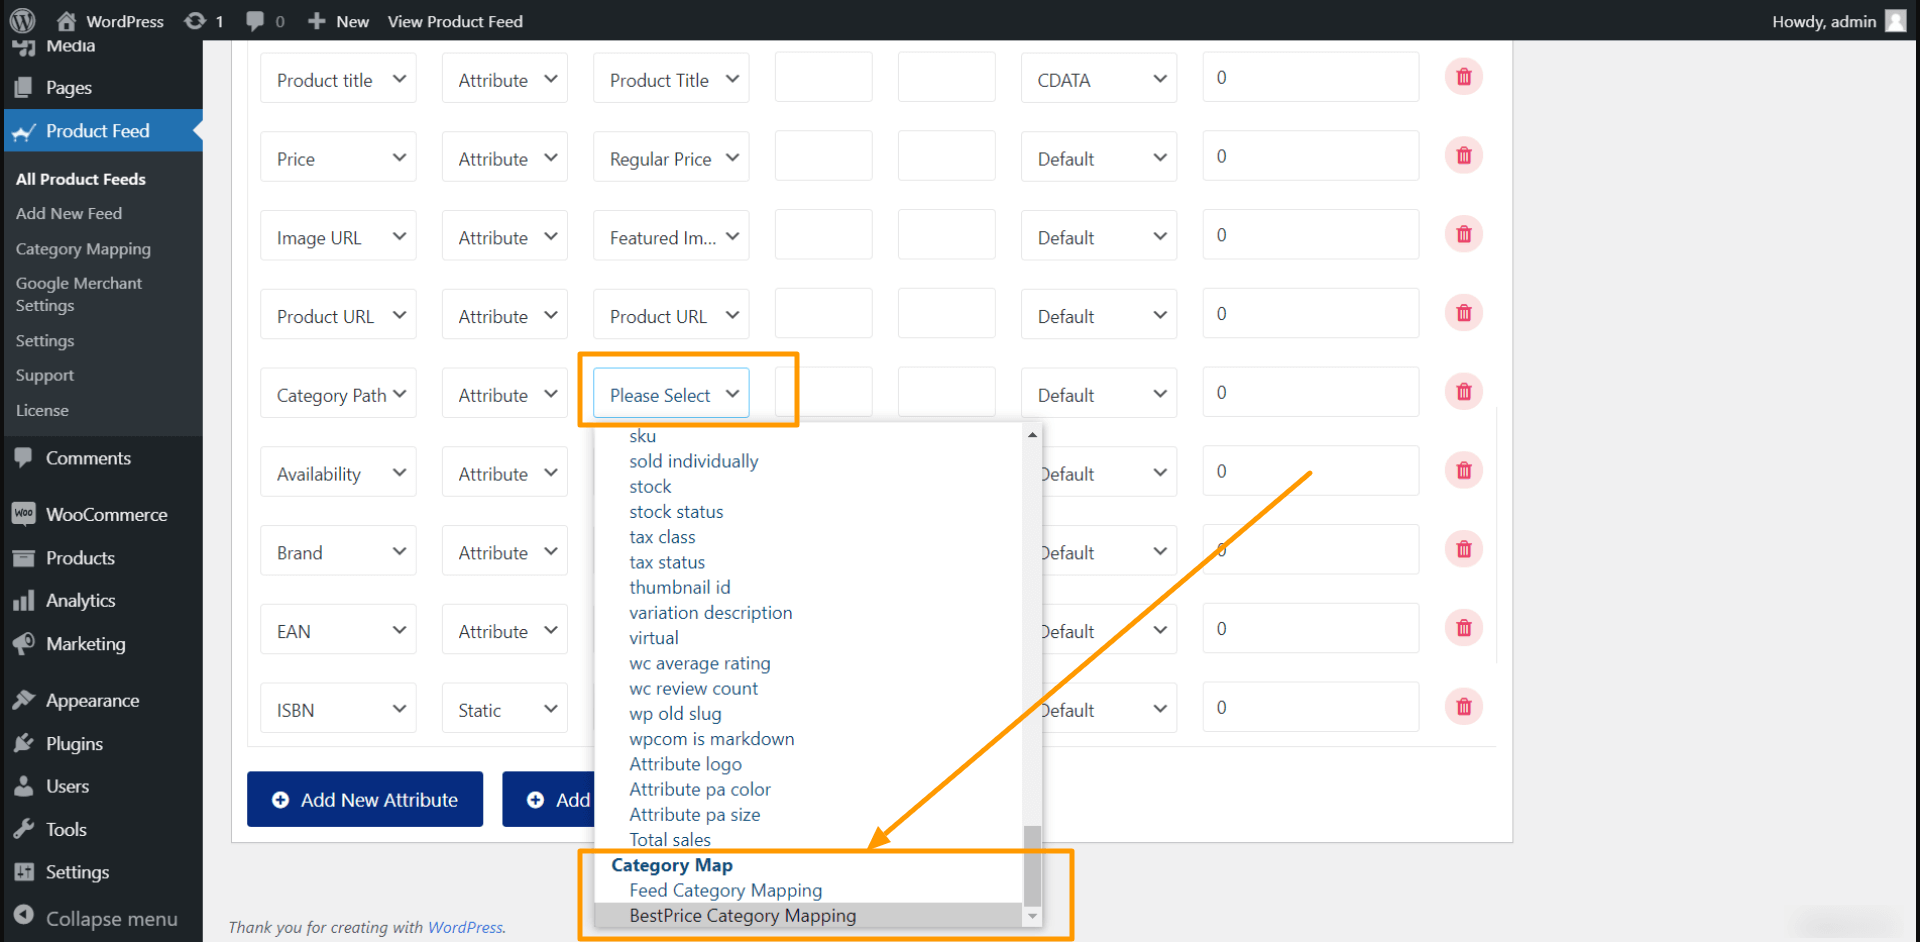
5. Scroll down to the feed configuration section. Click on the value field for Category Path and scroll down to the very bottom to choose the mapper you created.

BestPrice Merchant Template Choose Category Mapping

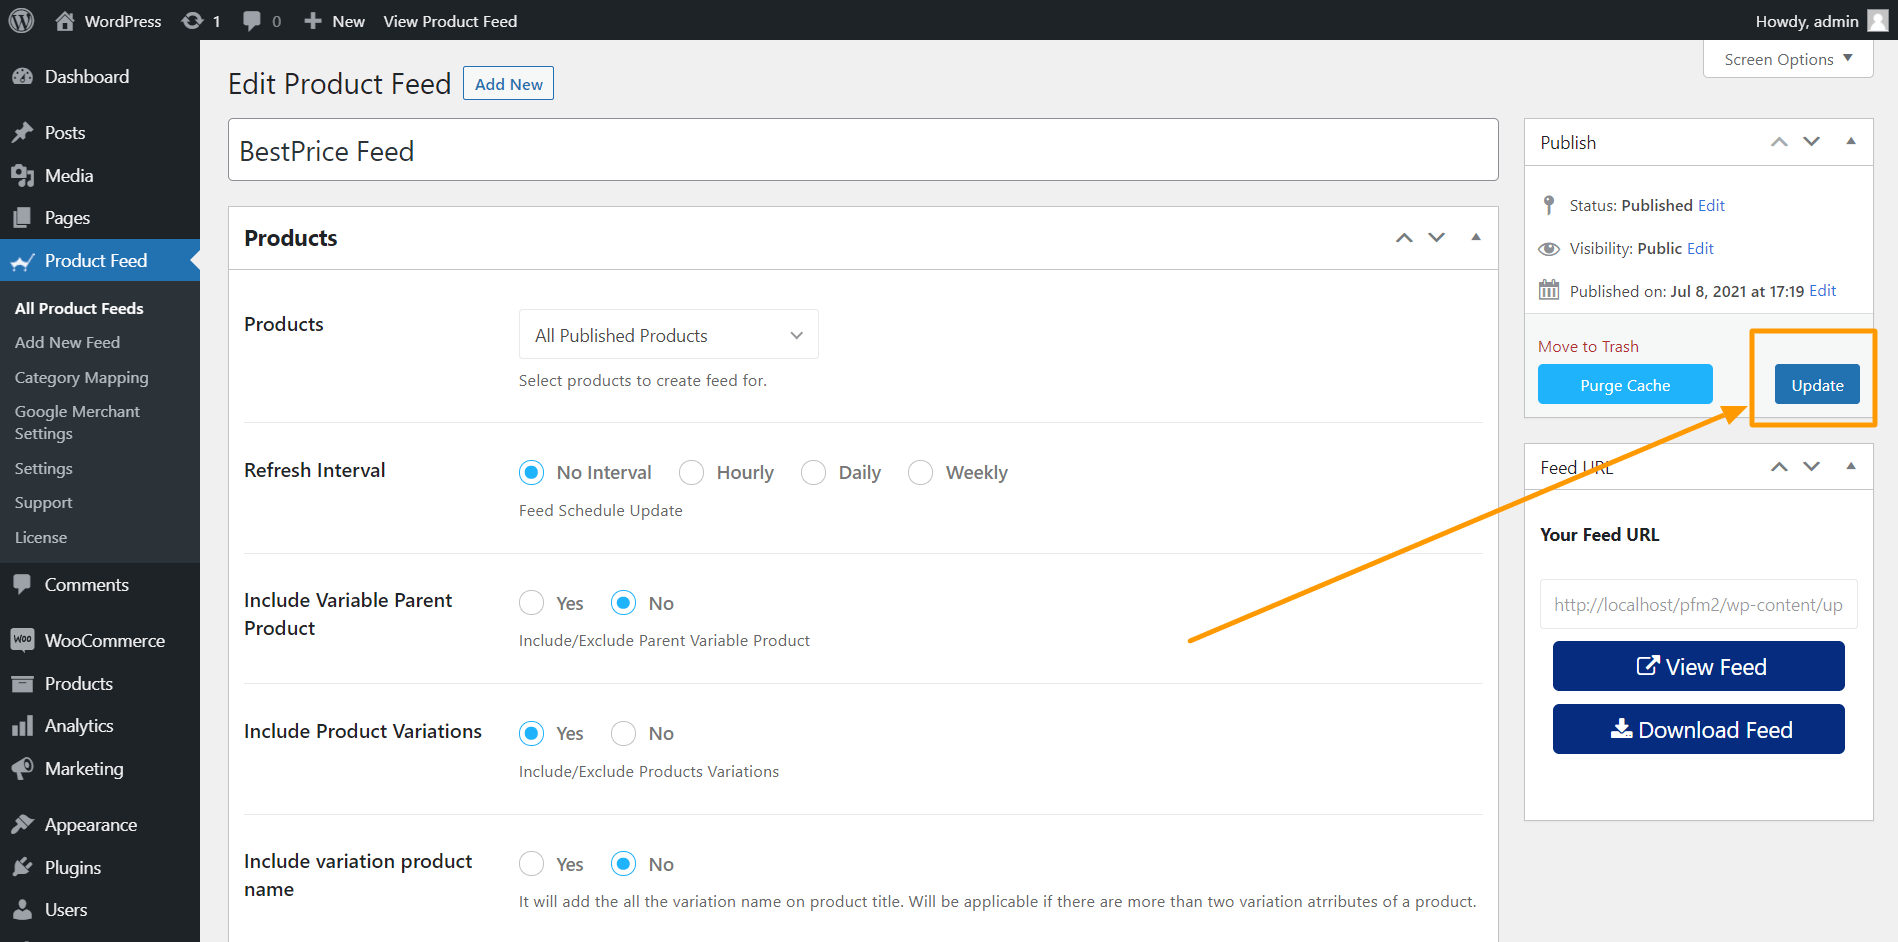
6. Scroll up and click on update.

BestPrice Update Feed

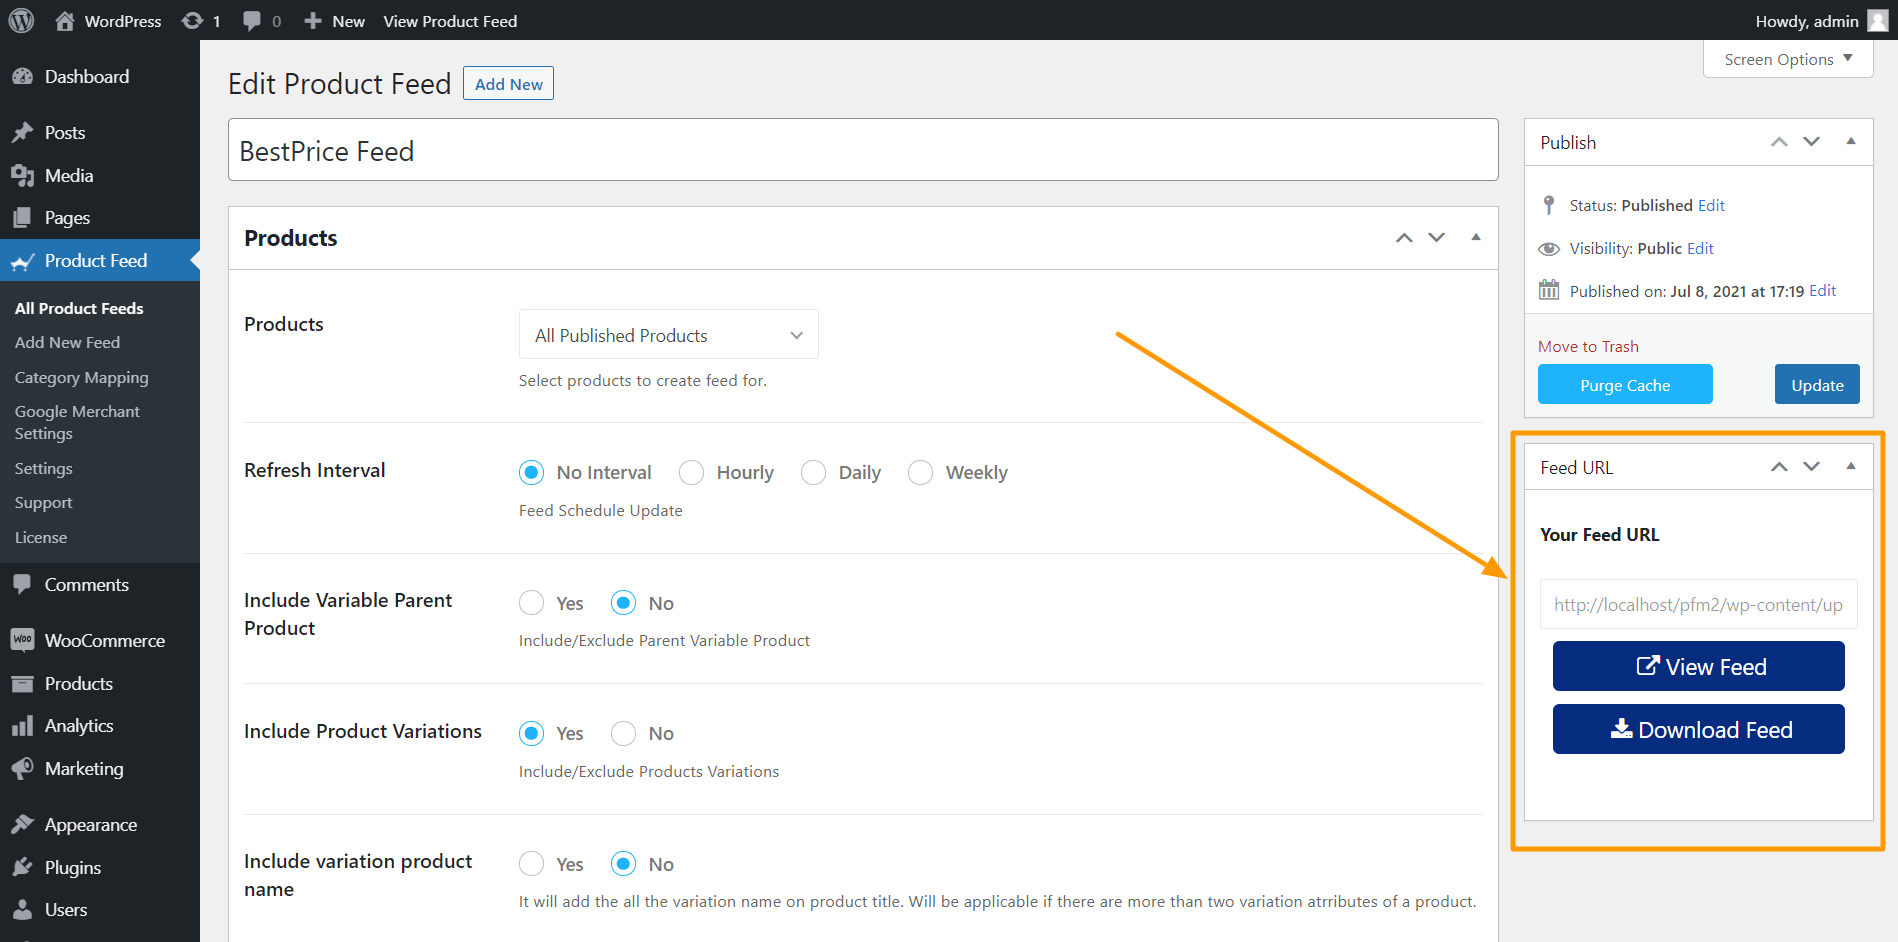
7. Your feed will be generated, and you will be able to view or download the feed.

Product Feed Manager View/ Download Feed

The next thing to do is to log in to your BestPrice merchant account and submit the feed URL to list your products on BestPrice.

That’s it. That’s how easily you can generate a product feed and list your products as BestPrice.gr market προσφορέσ.

Schlussfolgerung

BestPrice has already become a one-stop solution for many retailers in Greece as it has proven to deliver great results in terms of sales.

Since you own a Greek WooCommerce store, it’s best if you, too, can take advantage of the huge local audience that BestPrice has to offer.

And now that you know how easy it is to generate a product feed go ahead and use Product Feed Manager for WooCommerce to create and upload your products on BestPrice.gr.

Kategorien
Guide WP VR

How To Make A Virtual Tour With iPhone Panorama – Simple Guide [2024]

A virtual tour is one of the most effective technologies that can bring you the attention of your viewers.

If you have a virtual tour for your business, then you can surely get an edge over your competitors and attract more prospects.

Now, you might think that creating a virtual tour costs a fortune since nowadays professional 360 photography may cost up to $1000.

What if I tell you that if you own an iPhone, then you can capture high-quality panoramic images and create a virtual tour by spending less than $120?

In fact, it’s possible to capture an iPhone panorama image, on your own, and turn it into a virtual tour without any professional help at all.

All you will need is your iPhone, an app to capture Panoramic images, a monopod if possible, and a simple virtual tour creator, WPVR.

Today, you will get a step-by-step guide so that you can learn how to make a virtual tour with iPhone panorama and WPVR easily.

After you read this article, you will learn:

  • How to take a panorama on iPhone.
  • The best iOS apps you can use for panorama or 360 photography.
  • How to use a reliable plugin to create a virtual tour.
  • Start getting more prospects using that virtual tour.

Fangen wir an.

How To Make A Virtual Tour With iPhone Panorama And WPVR

Create Virtual Tour Using iPhone Panorama

According to recent studies, websites with virtual tours get 87% more visits and 5-10 times longer stays.

Whether you sell properties, own a hotel or restaurant, or simply have a corporate business, having a quality virtual tour will help you to attract more relevant visitors to your site, make your prospects stay longer on your website, and create instant interest in prospects to make a decision.

So, it’s highly convenient for you to be able to create a virtual tour without any complications and within the budget.

Let’s look at the steps on how to make a virtual tour with iPhone.

When creating a virtual tour, you will go through 3 quick processes:

  1. Capture Panoramic Images Using An iPhone Panorama App.
  1. Turn Those Panoramic Photos Into Virtual Tours Easily Using WPVR.
  1. Use This Virtual Tour On Your Site And Attract More Prospects.

Follow the quick steps below to carry out these processes easily.

1. Take Panorama On iPhone – Using An App

To capture a panoramic image with your iPhone, you need to use a VR app that is dedicated to capturing panoramas.

This app will assist you to capture a wide-angle panoramic image of your surroundings, which is difficult to do on your own.

You may try out the following two iPhone panorama apps in the Apple Store:

  • DMD Panorama
  • Virtual Tours & Panoramas: P360

Both of them are suitable iPhone panorama apps with useful features and have a user-friendly interface. But we recommend DMD Panorama app as it’s easier to use. Additionally, for those concerned with online privacy while uploading and sharing your virtual tours, using a service to hide IP can provide an extra layer of security, ensuring that your internet activity remains confidential.

Once you get the app, follow the steps below.

5 Steps To Capture A Panoramic Image Using DMD Panorama App

Step 1 – Open The DMD Panorama App In Your iPhone

In the app, you will get the option to capture a panorama.

Step 2 – Hold The iPhone at Your Preferred Height

You may either hold the iPhone with your hands or use a monopod (which would be ideal).

Step 3 – Ensure The Proper Angle to Capture The Panoramic Image

Point the phone camera at the rightmost angle of the view where you wish to capture the panoramic image.

Step 4 – Start Capturing Your Panoramic Image

On your app, you will find two markers. Match the markers and capture, and one section is captured. You’ll then get a new pair of markers to the left. Rotate the phone to the left to match these two markers and capture them again. Continue the same process.

Keep the phone steady and do not tilt the phone too much when doing this.

Step 5 – Continue Till Your Panorama Is Captured

Follow this process until all angles have been captured and the app starts processing the panoramic image.

And that’s it. Your panoramic image will be generated.

FYI – The panoramic image you capture using your iPhone panorama app is often referred to as a partial panorama. That’s because it is rather a 180-degree panorama.

But no worries – I will show you how you can use this image to create an engaging virtual tour.

Here’s a video to show the app in action:

As you can see, it’s really simple and if done right, your panoramic image will be as good as a professionally captured panorama photo.

Now that you have captured the required panoramic image, it’s time to create a virtual tour.

2. Turn Your Panorama Into A Virtual Tour Easily Using WPVR

Convert to Virtual Tour iPhone

Once you have captured the panoramic images, the next step is to use a reliable virtual tour builder to convert this panoramic image into a virtual tour.

If you run a WordPress site, then you can easily do it using the plugin, WPVR – Virtual Tour Builder for WordPress.

WPVR is currently the most popular and stable plugin for creating virtual tours on WordPress websites.

In the next few steps, you will get a guide to turning your panoramic image into a fully-functional virtual tour.

5 Steps To Convert A Partial Panorama Into A Virtual Tour

The first thing to do is to install and activate the plugin, WPVR on your WordPress site.

Once you have WPVR on your site, follow the steps below to turn your panoramic image into a virtual tour.

Step 1 – Create A New Tour

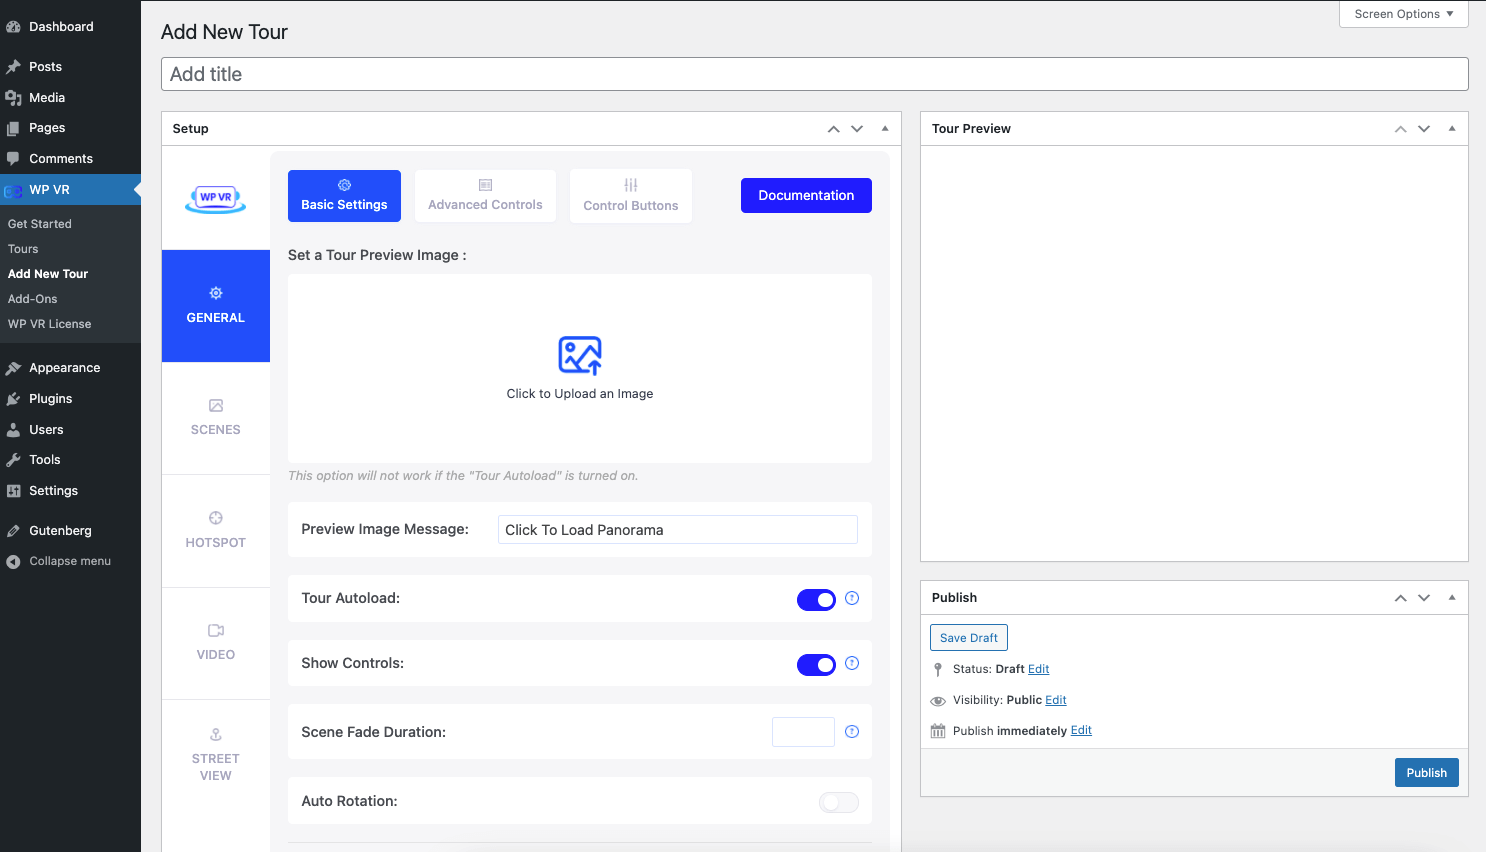
Go to your WordPress Dashboard > WP VR and click on Add New Tour. It will take you to the tour creation page.

Start Creating Virtual Tour -iPhone
Step 2 – Upload And Preview Your Panoramic Image To The Plugin

i. First give a title to the tour.

ii. Then go to the Scenes tab.

Virtual Tour Title - iPhone

iii. Set this scene as the Default scene.

iv. Assign a unique Scene ID.

v. Click on the blue Upload button and upload the panoramic image you had captured with your iPhone.

vi. Now scroll down to the bottom and click on the Preview button.

Virtual Tour Preview iPhone

A preview of your scene will appear on the Tour Preview section on the right side.

Step 3 – Optimize The Tour For Partial Panorama

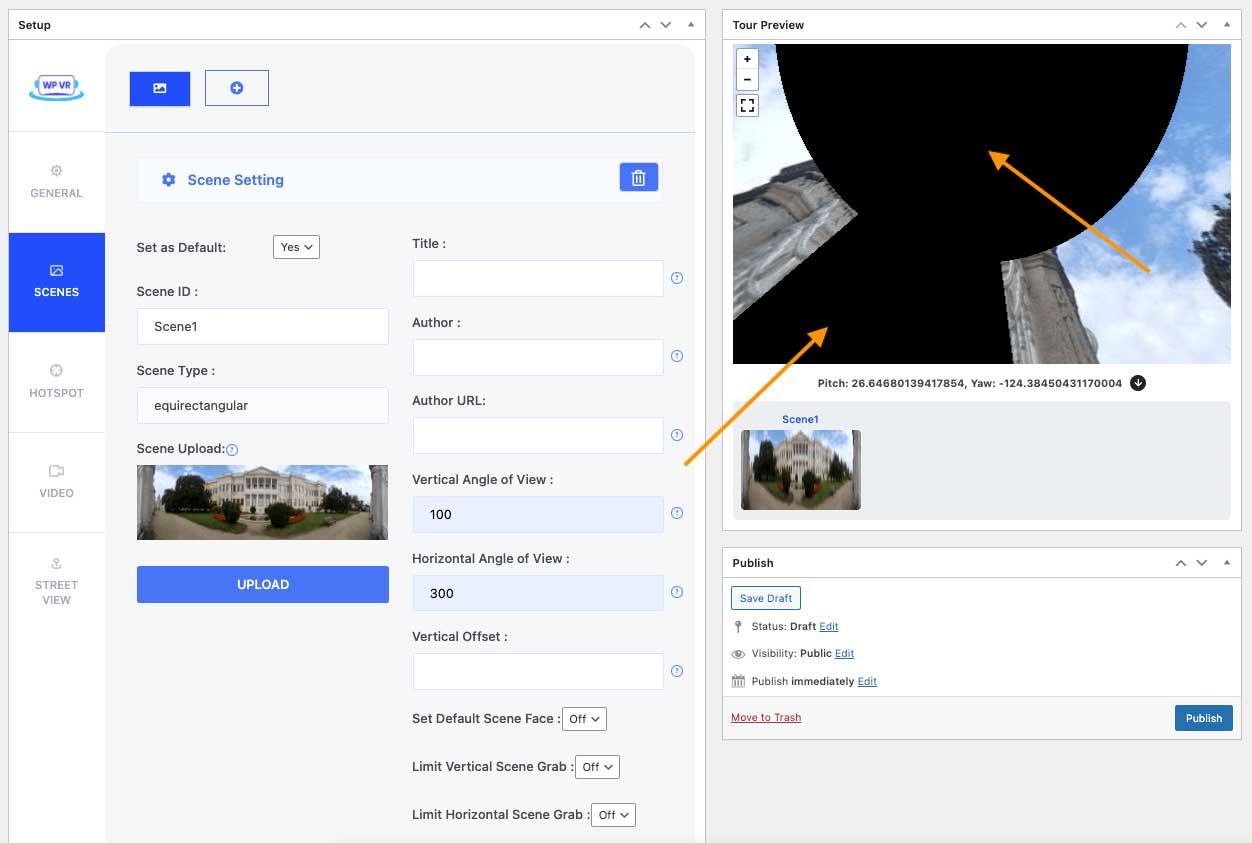
Once you preview the tour, you’ll notice that the virtual tour is not proper; the image is overly stretched out than what is expected.

This is because a partial panorama does not cover a full 360 view. You need to make some small adjustments to make it proper. Let me show you how.

i. Use the following settings in the plugin:

  • In the Vertical Angle of View field, set the value as 100.
  • In the Horizontal Angle of View field, set the value as 300 degrees.
Control Virtual Tour View iPhone

ii. Now, scroll down and click on the Preview button.

**The values of Horizontal & Vertical Angle of Views will be different depending on the dimensions of each individual panoramic image. So sometimes you have to play around with the numbers and preview a few times until you find the right angle.

Optimized Virtual Tour View iPhone

However, when you move around in the virtual tour, you’ll find that there are now some blank spaces in the tour view as shown in the image below.

Customized Virtual Tour View iPhone

These are there because of the custom angle of views we’ve applied. Let’s fix them.

We will apply the following advanced settings to this scene in the next few steps:

  • Limit Vertical Scene Grab.
  • Limit Horizontal Scene Grab.
  • Customize Scene Zoom.
Control Scene Grab iPhone
Sep 4 – Set A Vertical Grab Limitation To The Tour

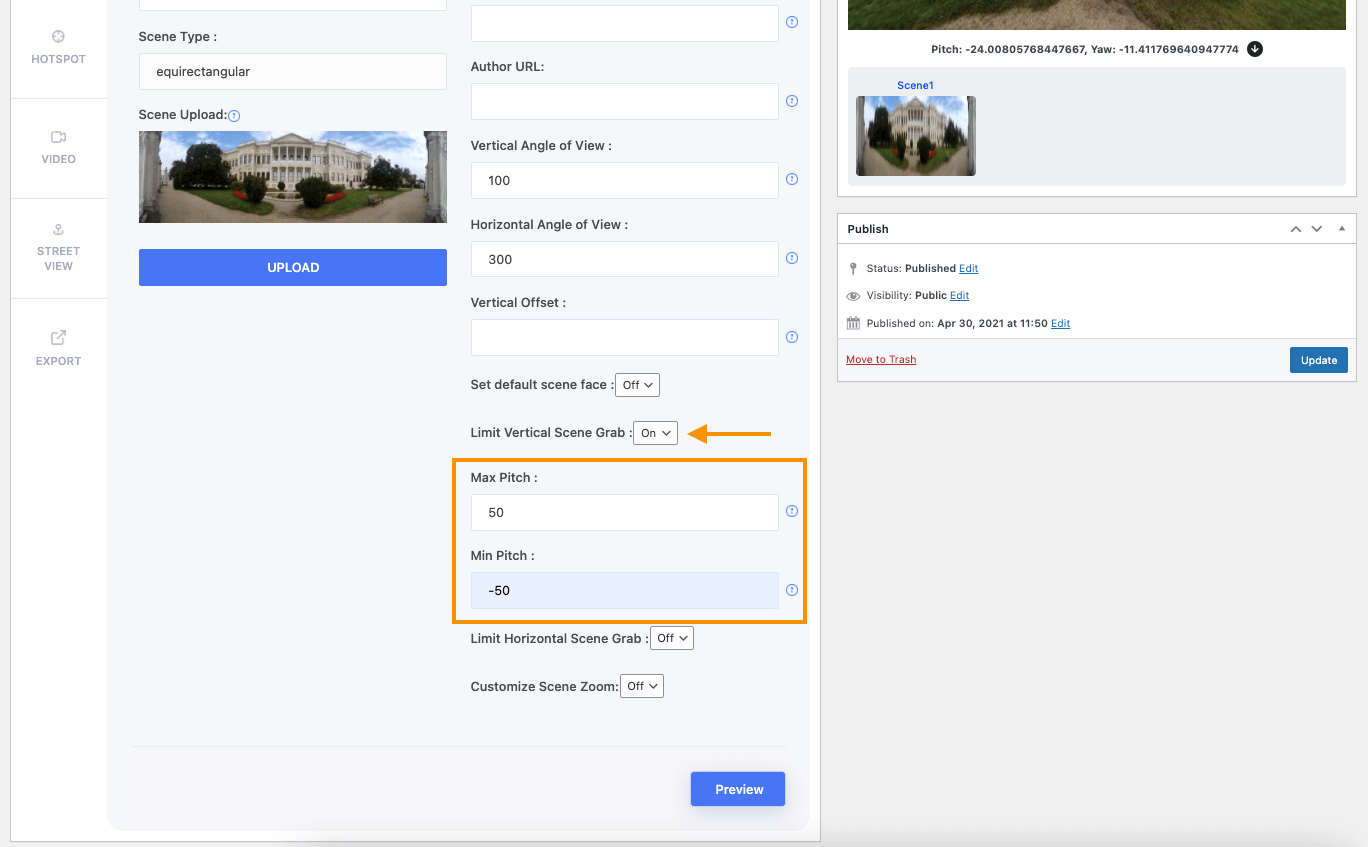
i. Scroll down and turn on the Limit Vertical Scene Grab option.

ii. You’ll find 2 new fields, Max Pitch and Min Pitch. These 2 fields will help you to restrict the view of the dark sections of the virtual tour vertically.

iii. Since the Vertical Angle of view is set to 100 degrees, the ideal value of the Max Pitch would be 50 and the ideal value of the Min Pitch would be -50.

Control Vertical Scene Grab - iPhone
Sep 5 – Use A Horizontal Grab Limitation To The Tour

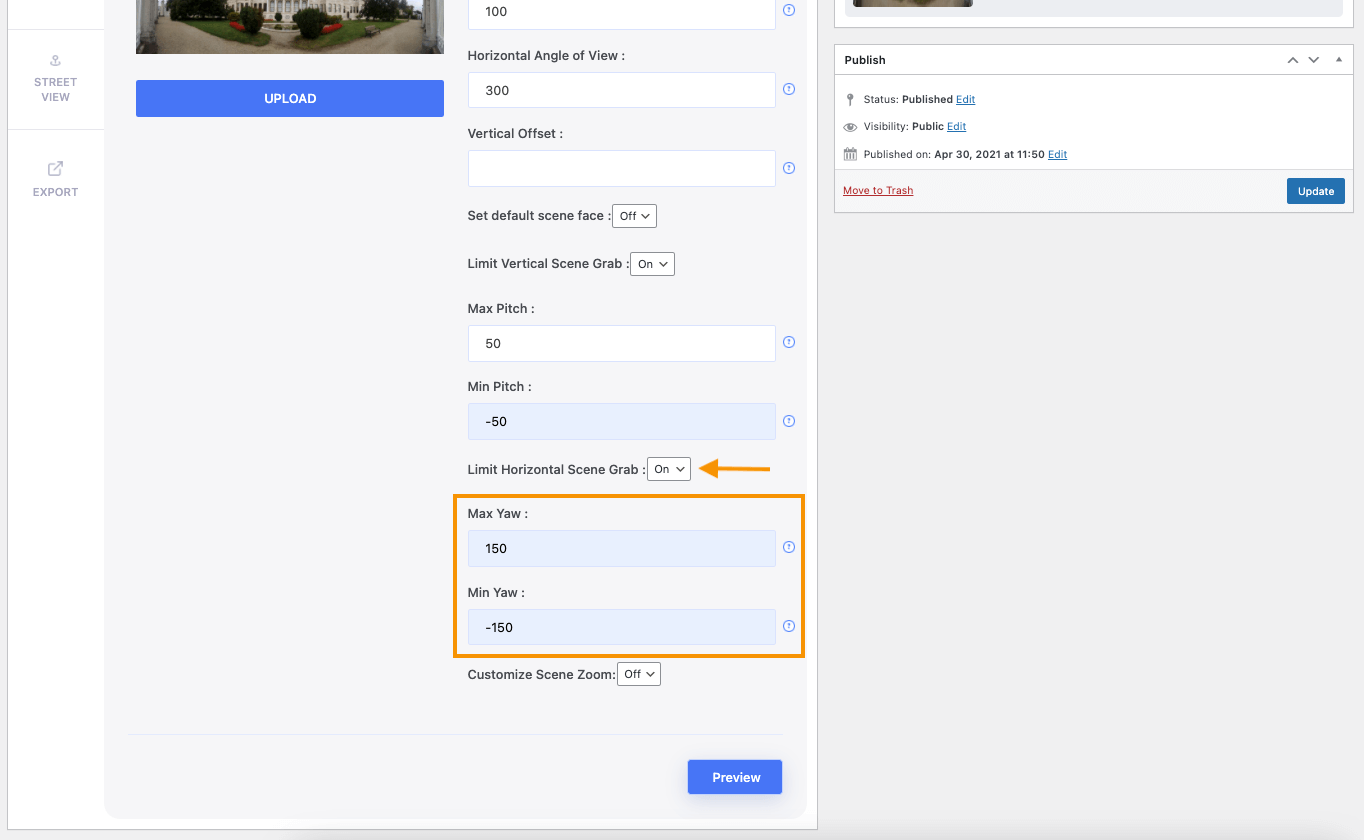
i. Turn on the Limit Horizontal Scene Grab option.

ii. You’ll find 2 new options, Max Yaw and Min Yaw. These 2 fields will help you to restrict the view of the dark sections of the virtual tour horizontally.
iii. Since the Horizontal Angle of view is 300 degrees, the ideal value of the Max Yaw would be 150 and the ideal value of the Min Yaw would be -50.

Control Horizontal Scene Grab - iPhone

iv. Click on Preview and check out the output. You will see that the black spaces are no longer accessible.

That’s it. You have created a virtual tour using the panoramic image that you captured using your iPhone. You can then Publish the tour and use it on your website.

You may also add more scenes to the tour if you have captured multiple panoramas, and connect them via hotspots to make the virtual tour more realistic and engaging.

Now, before I show you how you can publish the tour on your site, I would like to give you a few tips to customize this virtual tour and make it even better for greater results.

Tips To Customize Your Virtual Tour Into An Attractive Experience

Let’s look at how you can use different features of WPVR to make it more interactive.

i. Add A Scene Gallery

If you’ve created the tour using multiple images, you can activate a scene gallery on your tour.

This will allow a visitor to get a quick glance at the available scenes in the virtual tour, and visit any desired scenes by double-clicking on the image from the gallery.

This is a great way to allow visitors to explore the tour with more interest.

ii. Use Interactive Hotspots Buttons

The plugin’s hotspot feature is one of the most useful mediums to get visitors more interested.

Among several uses, one of its uses is to view content inside the tours in an engaging way. You can allow a visitor to view content

  • By hovering on the hotspot icon or,
  • By clicking on the hotspot icon.

The content section is HTML compatible and you can design and view content such as:

  • Texts
  • Bilder
  • Buttons
  • YouTube videos
  • Vimeo videos
  • Self-hosted videos
  • GIFs
  • Download buttons
  • URLs

Here’s a glimpse of how it works.

Follow this guide to set interactive content on hotspots.

Also, you can use any 360 video editing software for this as well.

You can try all-purpose video editing software too.

iii. Set A Background Audio

To give your viewers a more realistic experience and keep them entertained, you can add relevant background audio to your virtual tour.

You can choose to set the audio to:

  • Play automatically after any interaction.
  • Play in Loop.

Here is a guide on how you can set background audio for your virtual tour.

iv. Turn On The Gyroscope

A huge number of viewers will be visiting your virtual tour from their mobile devices.

Allow them to have a realistic experience and take advantage of using the mobile device by enabling the Gyroscope feature.

Then your viewers can move the mobile device and the tour will respond to the movements. They can also turn on or off the Gyroscope support.

Follow this guide to enable the Gyroscope feature.

v. Show Company Logo and Description:

Since virtual tours are interesting content and viewers tend to spend more time viewing them.

You can take advantage of it by always showing your Company logo design inside the tour.

Here is how you can set your company logo and description.

There are many more ways you can customize your tour and add more functionalities. Learn more about them here.

3. Publish The Virtual Tour on Your Website

After successfully creating the tour and applying all your desired customization, you’re ready to publish the tour on your WordPress website.

Simply follow the steps in this guide to embed a virtual tour using the WPVR Gutenberg block.

Or watch the video below:

You may also embed the virtual tour on your site in other ways if you do not want to use Gutenberg:

Whichever builder you use, it’s really simple to embed the virtual tour on your site real quickly.

That’s it. Now you can share your webpage with your audience and hopefully, you will get more engagements, thanks to your virtual tour.

Since your goal of using a virtual tour is to increase conversion by creating more engagement with your viewers, make sure to set some interactive content inside your virtual tours.

Summarizing

Now you know, how to make a virtual tour with iPhone Panorama and WPVR. And the best part of it is that it will not cost you a fortune, while still giving you the opportunity to increase your revenue.

Now that you know the easiest way to create a virtual tour, go ahead, and start using virtual tours to grow your business.

  1. Get DMD Panorama app to capture a panoramic image.
  2. Get WPVR (it has a free version) to convert the image into a virtual tour
  3. Use your virtual tour to attract more prospects.

Start growing your business with virtual tours without any exclusive or expensive professional help.

Kategorien
Guide WooCommerce

How to Create A Global Product Attribute – WooCommerce [2024]

When running a WooCommerce store, you can attract more relevant buyers by highlighting as many unique features of a product as possible.

WooCommerce allows you to add product attributes that you can use to define your products’ notable features.

For example, when selling a shirt, you can use product attributes to define its pattern or color.

However, it is necessary to be able to use product attributes in an organized way to save time and get the best results.

Today, you will get a step-by-step guide on how you can add Global Product Attributes to your WooCommerce products easily.

Fangen wir also an.

What Is A WooCommerce Product Attribute

A product attribute is usually used to represent a certain feature of a product. And attribute terms define the different ways that feature applies to a product.

For example,
– Color is a feature and can be called an attribute.
– Blue, Red, and Green are different types of colors and can be referred to as attribute terms.

You can use product attributes to further describe your product, for example, you can offer a t-shirt and state that it is red in color.

You can also use them to create product variations within your WooCommerce store for people to choose from. For example, you can have a t-shirt in 3 colors.

Now there are two types of product attributes.

  1. Global Product Attribute
    – Product attribute that can be used for many different products
  2. Custom Product Attribute
    – Product attribute used for a specific product only

In this guide, I will show you how you can create and use a Global Product Attribute for your WooCommerce products. Then later, in a second guide, I will show you how you can create a Custom Product Attribute for an individual product.

Tauchen wir also ein.

How To Create A Global Product Attribute In WooCommerce

Once you follow the steps below, you will be able to add global product attributes easily in your WooCommerce store.

Step 1 – Add A New Attribute

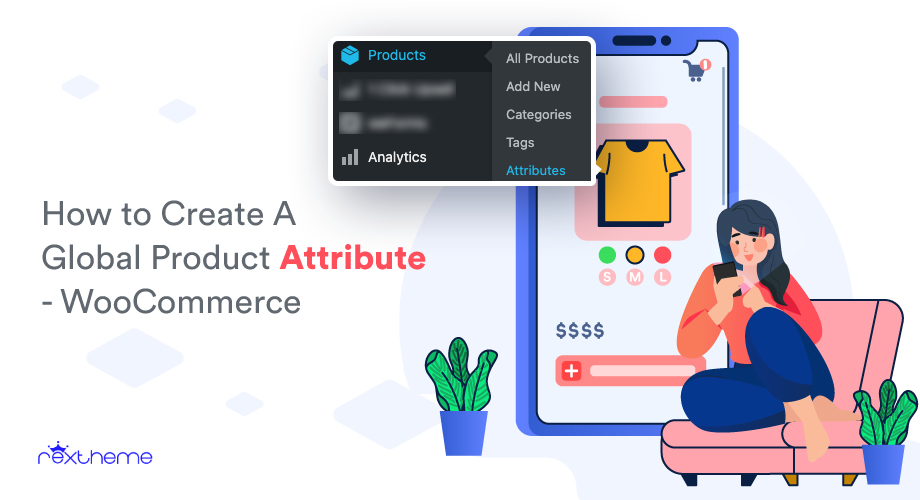
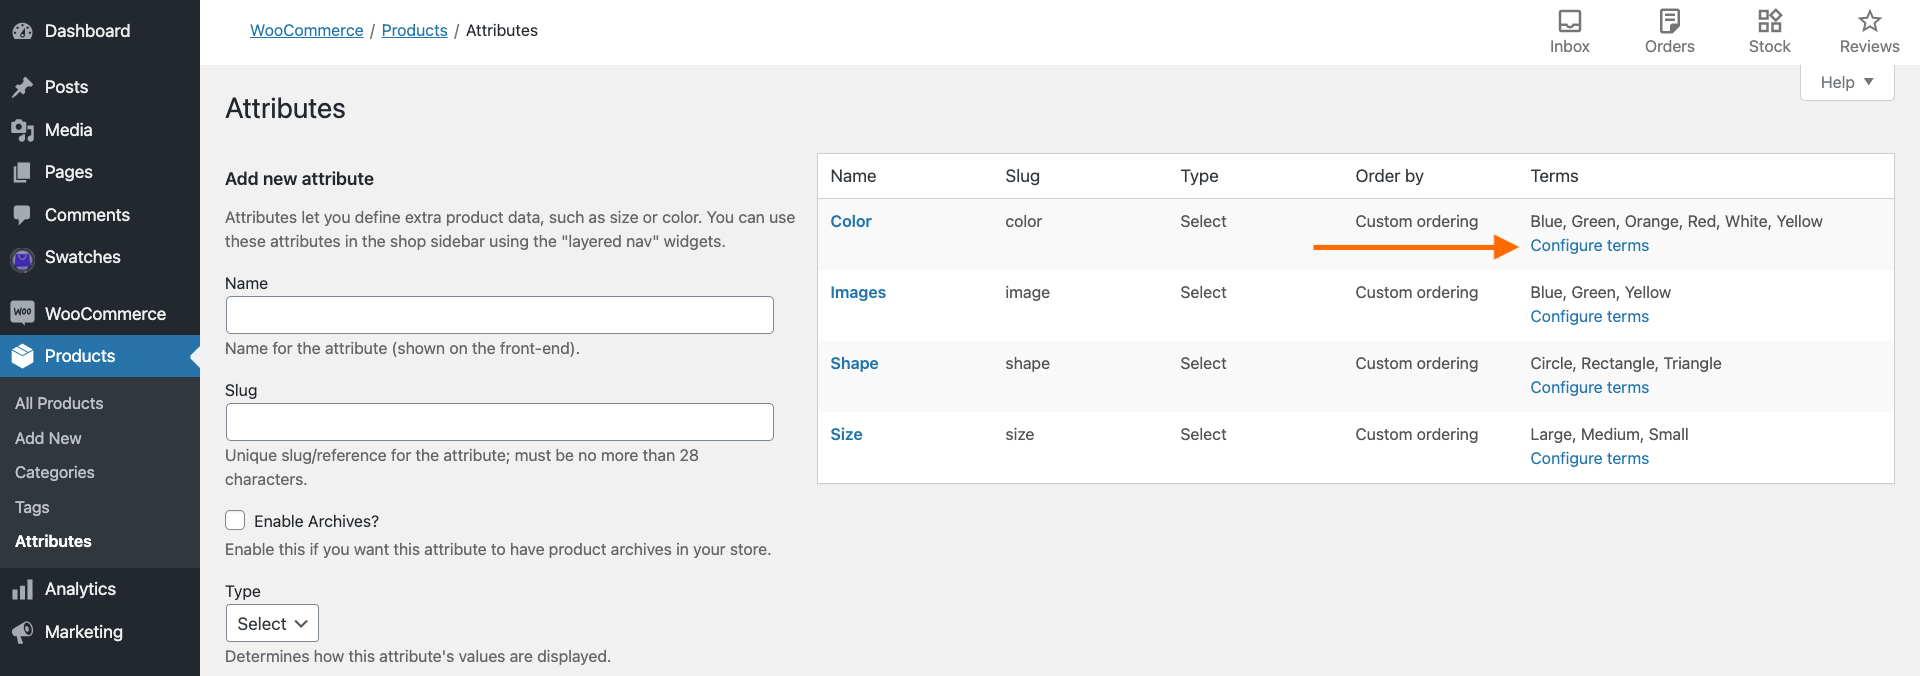
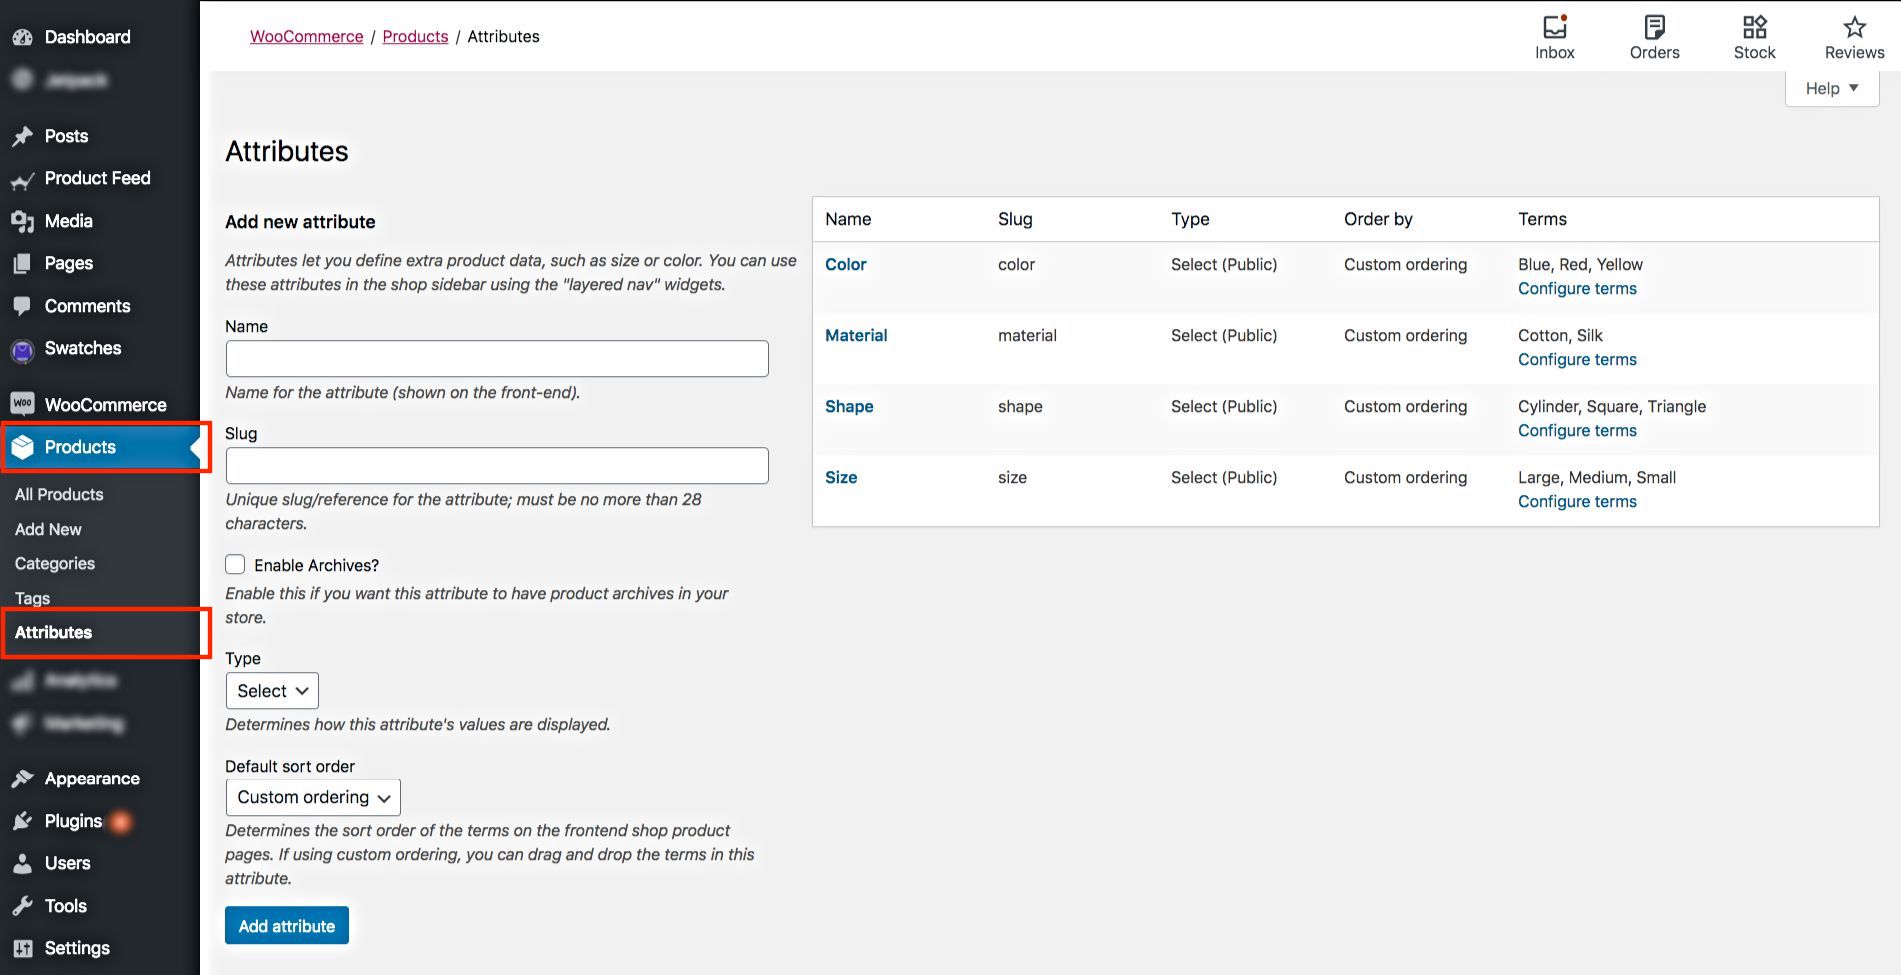
1. On your dashboard, go to Products > Attributes.

WooCommerce Global Product Attributes

Here, you will see the option to add a new attribute.

**Any attribute you add here is considered a global attribute.

2. Input a name and slug for the attribute in their respective fields.

For example, you can name it ‘Color’ and assign the slug, ‘color.’

3. Then click on the ‘Add attribute‘ button below.

You will see that the attribute is added on the right side.

Edit Global Product Attribute

Here, I have added an attribute called Color.

Step 2 – Add Attribute Terms

1. On the right side of the attribute, under the Terms, you will see an option called Configure Terms. Click on it.

Set Terms for Global Product Attribute

It will take you to the page where you can add terms for this attribute.

Set Up An Attribute

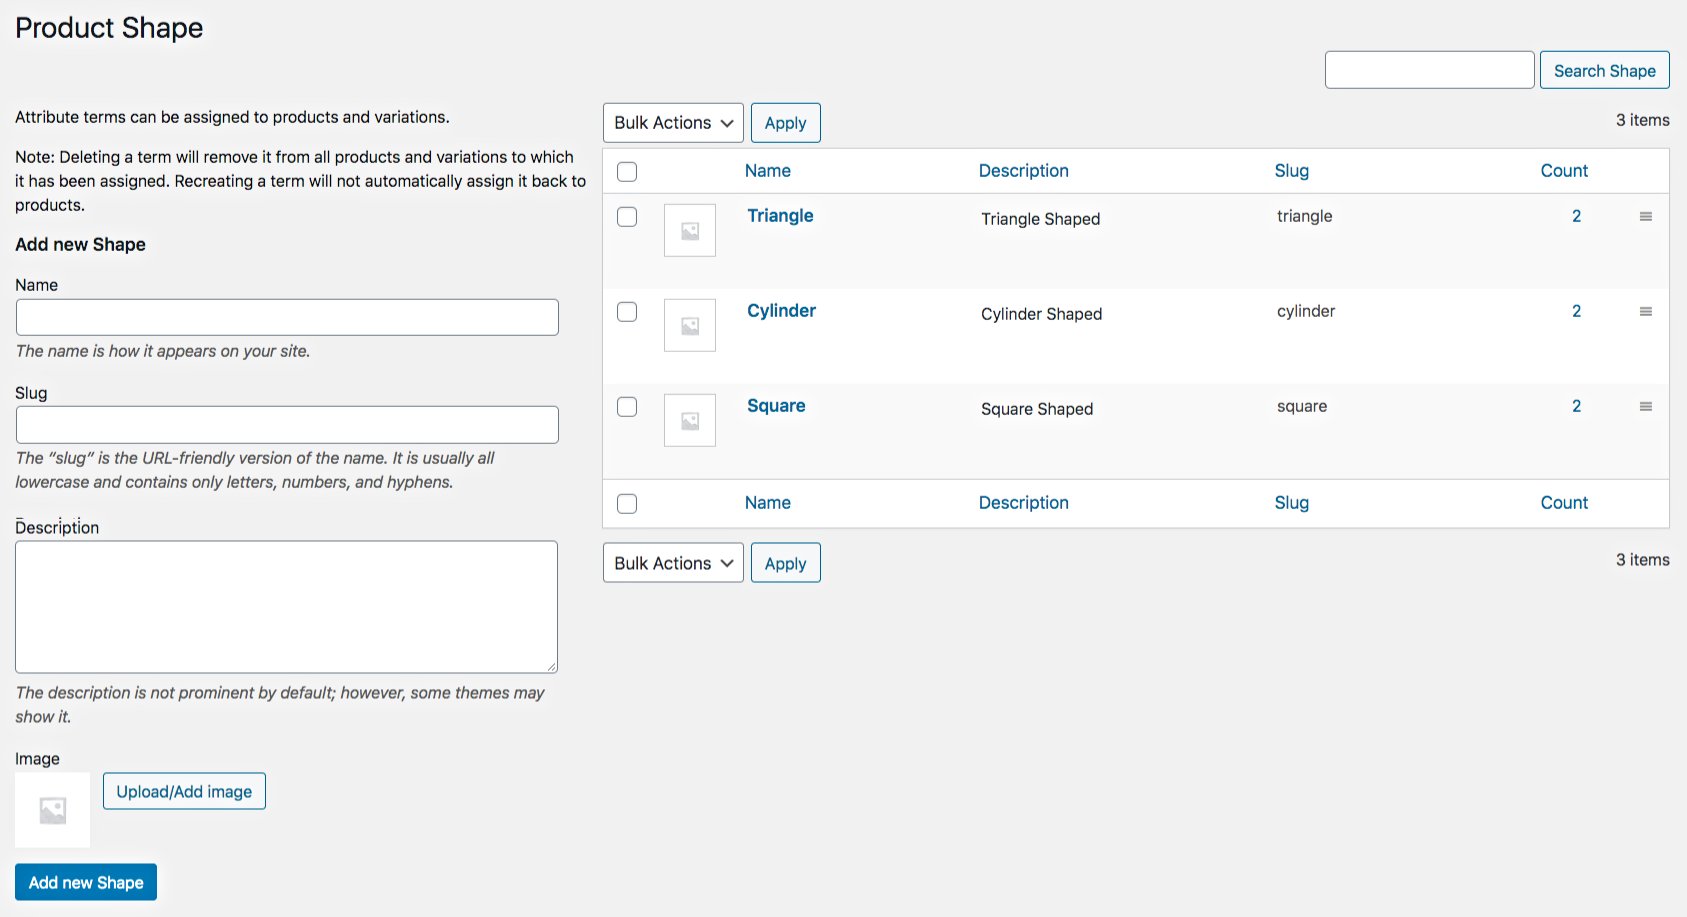
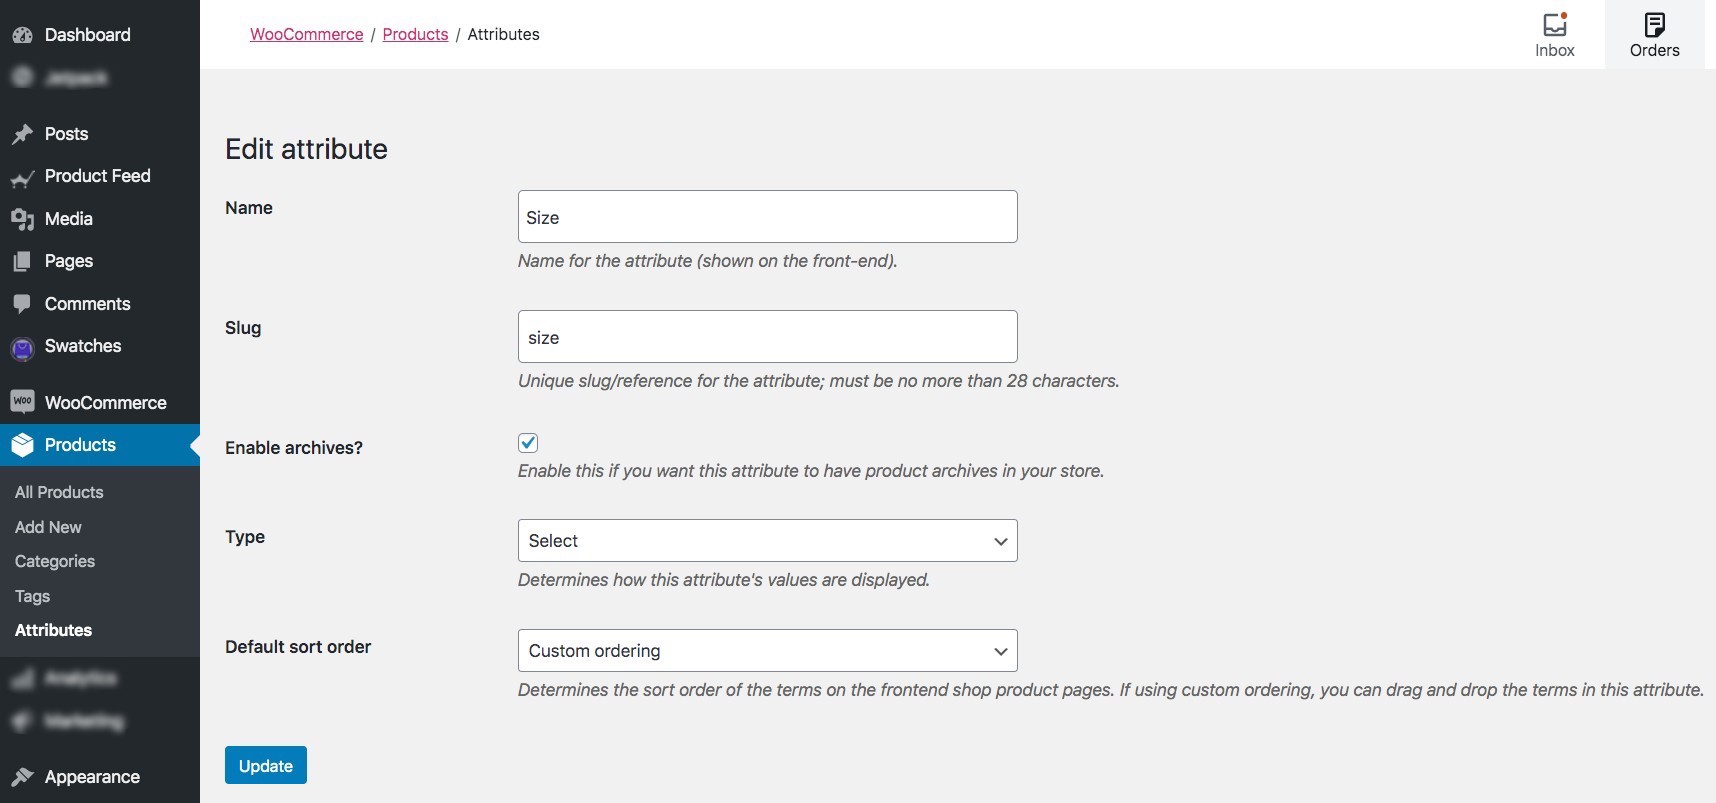
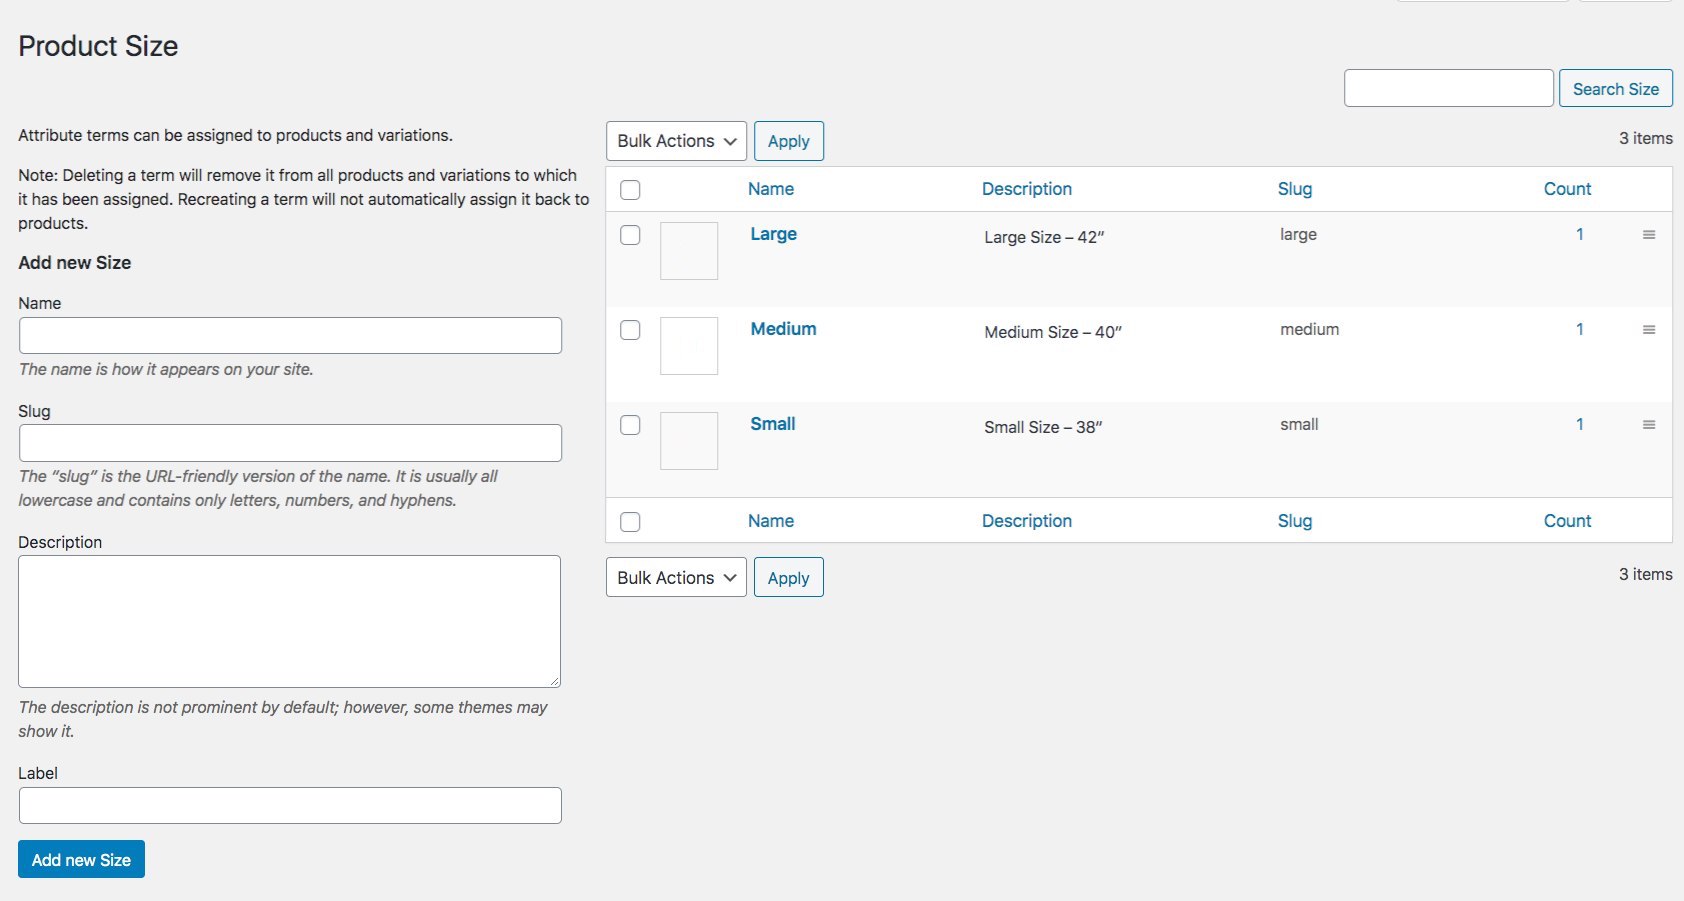
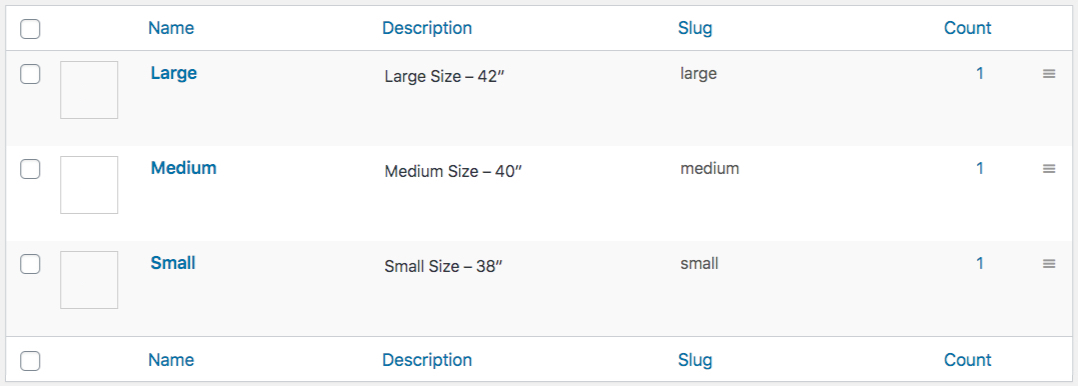
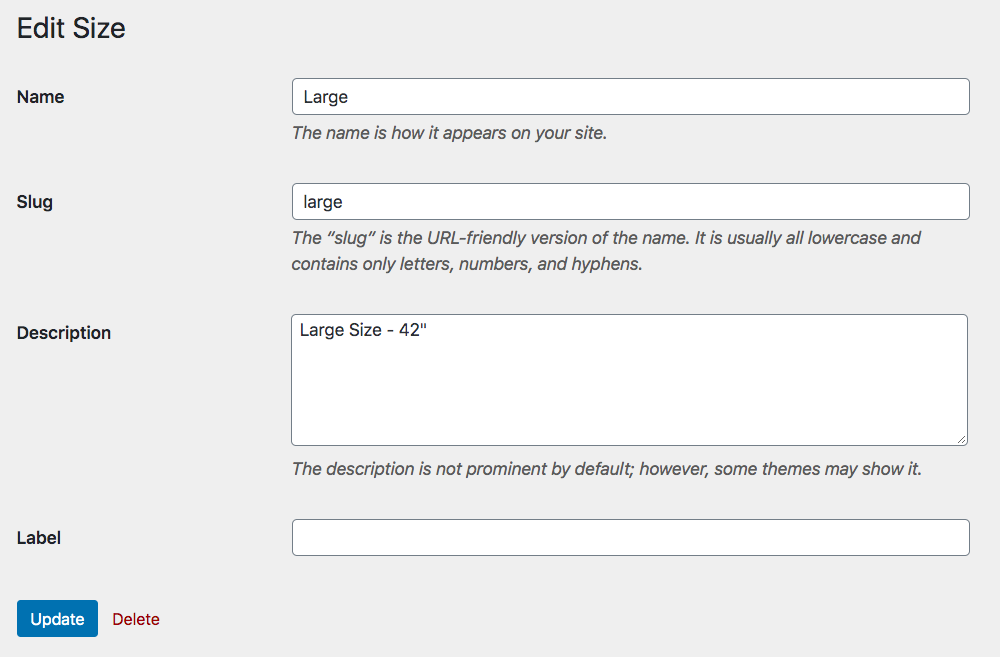
You can see on top it says Product Color. That’s because earlier, I named the attribute as Color. If I would name the attribute as Size, then it would say Product Size. (Same goes for the button below that says Add new color.)

The terms you create here will be the attribute terms you can use to define the features of a product (which I’ll show you in a bit later).

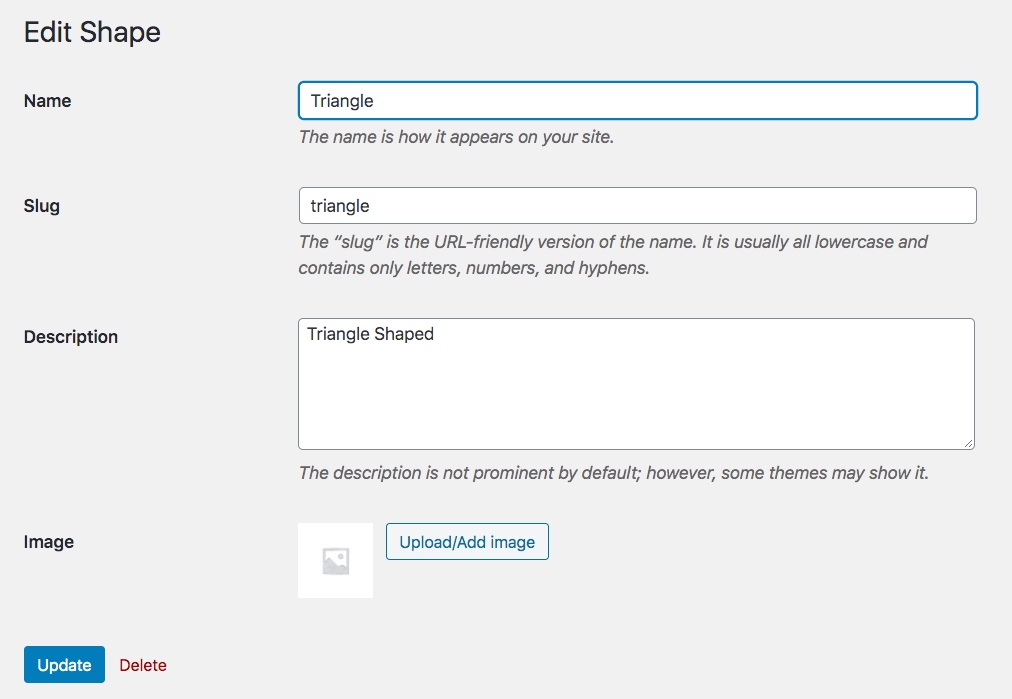
2. Input an attribute term name and slug in their respective fields, and add a description to it if you want to.

For example, you can name it ‘Blue,’ and assign the slug ‘blue.’

3. Then click on the Add New Color button below. You will see that the color term is added on the right side.

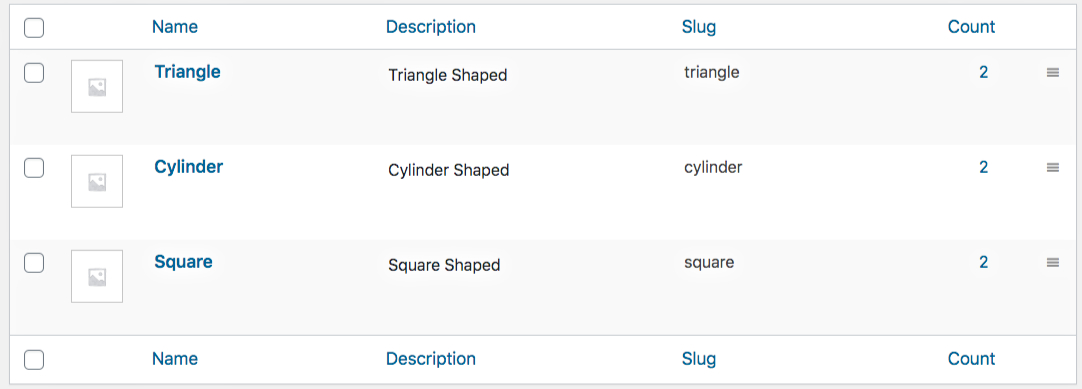
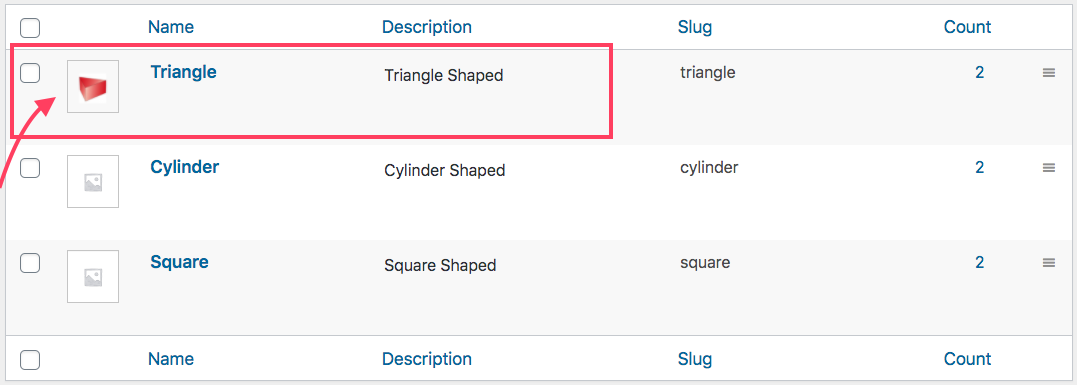
You can add more terms in the same way. I have added two more, Green and Red.

Editing Terms of An WooCommerce Attribute

So far, you have a global product attribute called Collor and its corresponding attribute terms – Blue, Green, and Red.

You can repeat the whole process to add more global attributes along with their terms.

How To Use A Global Product Attribute For Your Products

Once you have created a global product attribute, now you can use it to describe your products.

Follow the steps below to learn how you can use it.

1. First Edit or Create a Product and scroll down to the Product Data Section.

WooCommerce Product Data Section

Wählen Sie hier den Produkttyp (z. B. Einfaches Produkt oder Variables Produkt) und geben Sie die erforderlichen Grunddaten in den Menüs Allgemein, Bestand, Versand und Verknüpfte Produkte ein.

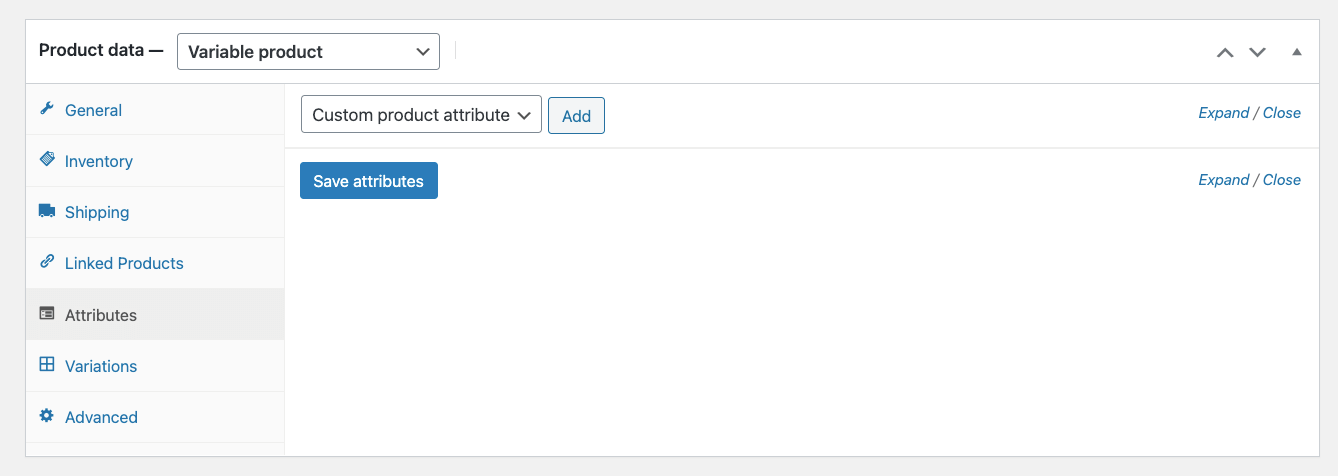
2. Go to the Attributes menu.

WooCommerce Product Data

3. Here, you can see there is a dropdown menu that says Custom product attribute.

Click on it and you will get the list of Global product attributes you created.

Custom Product Attribute

Select the one you want to use.

4. We created the Color attribute earlier. So you can select that and click on the Add button.

It will create a Color section there.

Editing An Existing Term of The Attribute

5. Under values, if you click on the field, you will get to choose from the terms you created earlier for this Attribute.

Since we created Blue, Green, and Red, clicking here should let you choose from these 3 options.

6. You can choose the one you want to use for this product.

For example, if you want to state that this product’s color is Blue, then you can choose Blue.

Attribute Terms for Color

Und auf der linken Seite sehen Sie die Option "Sichtbar auf der Produktseite". Diese ist standardmäßig markiert, was bedeutet, dass dieser Attributbegriff auf der Produktseite angezeigt wird.

If it’s a variable product and you want to use this attribute to create variations, then you can choose multiple terms, or you can click on Select all to add all of them.

Product attributes added

You can then mark the check box that says used for variations (right above the Save Attribute button), and later, generate variants from the Variations tab on the left side.

7. Then click on the Save attribute button and this attribute will be saved for this product.

Just a reminder that if you want to use these attributes to your product variations, check the “Used for variations” option, otherwise you won’t find these attributes in the product variations window.

Je nach Thema wird dieses Attribut also auf der Produktseite angezeigt.

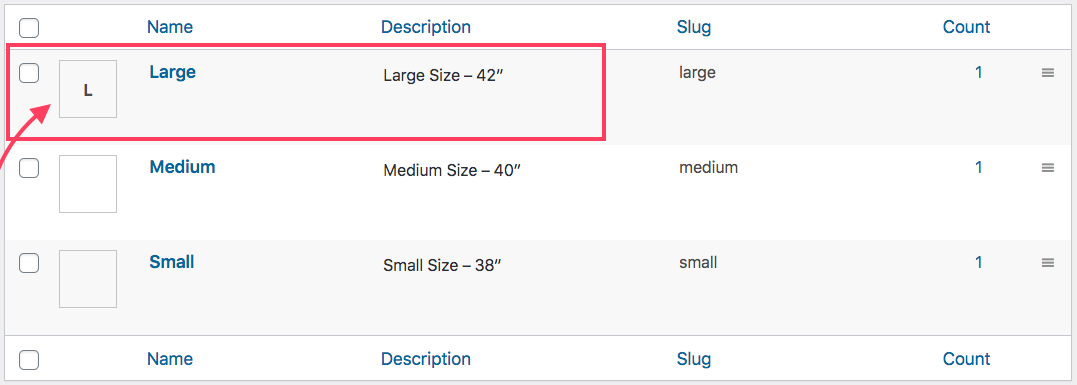
When Should You Use A Global Product Attribute

WooCommerce allows you to create global attributes that can be applied later to any new or existing products.

Basically, a global product attribute is a common attribute that you might want to use for several products in your WooCommerce store.

Let’s say you have a clothing store that sells T-shirts, trousers, socks, and shoes. A common attribute for all of these products could be the Size.

Instead of setting up a new custom attribute for the size of each new product you add, you can rather create a global product attribute called Size, and define its terms to represent the various sizes.

Then you can add the Size attribute to your products and assign different terms to indicate what size they are in, in the same way as you did in this guide for color.

So to conclude, you should create and use global product attributes when you want to re-use them to define the features of multiple products in your WooCommerce store.

It will save you time and keep your WooCommerce store more organized.

Schlussbemerkungen

As you can see, it is really convenient to use a global product attribute, and hopefully, this guide was easy to follow.

In the next guide, you will learn how you can create and use a custom product attribute for your products.

A custom product attribute is mainly useful when you want to add a unique product feature that you will probably not use in most other products. So it has its own benefits.

Teilen Sie uns Ihre Meinung zu diesem Leitfaden in den unten stehenden Kommentaren mit.

Zum Wohl.

Kategorien
Leitfaden

Effect Of COVID19 On eCommerce In The USA – Statistics & Infographic

COVID19 had a big impact on the world economy in both good and bad ways. The eCommerce industry saw a drastic rise in online sales and many online stores actually made more than expected during the pandemic.

In the USA, the eCommerce industry broke all records during and after the lockdown since end of March 2020, while keeping lasting influence in online purchasing.

Here is a detailed infographic to explain how various industries prospered due to an increase in regular buyers from online stores.

COVID19 On eCommerce In The USA – Statistics & Infographic

COVID19 On eCommerce In The USA - Infographic

Key takeaways:

  • The US eCommerce industry saw an average sales growth of over 64% when comparing 2020 to 2019 during the COVID19 lockdown period (April-July).
  • Industries with essential supplies such a food supplies, grocery, office supplies, etc., saw a growth of over 40% in terms of website traffic from March to July 2020 compared to 2019.
  • Industries selling luxury items or gift items saw little to no growth in website traffic from March to July 2020, compared to 2019. Rather, some experienced a fall in website traffic. For example, the jewelry industry suffers a 7.5% fall in traffic compared to last year.
  • There was over 20.8% eCommerce penetration between April to June 2020, which is an increase of over 6% compared to the same period last year, and over 4.5% compared to the 1st quarter of 2020 (January to March 2020).
  • Consumer spending on online sales during the 2020 lockdown went up by an immense amount compared to 2019.
    • The 1st quarter of 2020, January to March, saw an increase of around 14.63% in online consumer spending compared to 2019.
    • The second quarter of 2020, April to June (which was the core lockdown period), saw a whopping increase of over 44.4% in online consumer spending compared to 2019.
  • Online shops saw an average increase of over 80% page views during the lock-down between April to June 2020, when compared to 2019.
  • An overall increase in average order count, over 78% per month, was achieved during the lockdown (April to June 2020), compared to 2019.

It can be said that the eCommerce industry saw a big boost due to the COVID19 outbreak.

The lockdown encouraged people to order more online as it was unsafe to visit stores physically.

As per consumers, most of them will continue ordering online even after the pandemic is over, which is a positive side for all online stores in the USA.

Kategorien
Guide WooCommerce

How to Use Special Halloween Variation Swatches To Increase WooCommerce Sales [2023]

Trick or Treat! The spooky Halloween season is here.

Halloween is currently the fourth most lucrative holiday for WooCommerce businesses, after Christmas, Thanksgiving, and Easter.

It’s an event that WooCommerce entrepreneurs cannot afford to ignore.

During Halloween, it is expected to get huge online sales, especially in the last 3 days till Halloween, as people are making last-minute preparations. And you can get huge sales if you do it right.

The first thing to do is give your buyers a Halloween festive feeling as soon as they come to your site. Along with that, little customizations to create engagements can take your store a long way.

You must specifically focus on customizing product pages to grab the buyers’ attention such as changing Add to Cart button text, or by adding an on-page offer, etc.

A more simple but effective way to attract buyers is to use beautiful image variation swatches to present product variations.

Today you will learn how you can present different types of Halloween products in an attractive way using variation swatches on the product page and possibly, get higher engagements.

Also, lassen Sie uns anfangen.

Special Halloween Variation Swatches Ideas You Can Use

People love to decorate their homes during Halloween and naturally, decorative sell the most during this time. But besides that, people are also fond of t-shirts, masks, candies, costumes, and many other Halloween items.

If you do sell some of these products, it’s best to make sure your buyers know all about your offers in the most simple way possible, while still getting the Halloween vibes.

I’m not talking about a costly re-design of your website. Rather than making your Halloween offers easier to redeem, and adding simple visuals such as variations swatches can catch the eye of the buyers during Halloween.

Here’s a quick Actionable Tip

You might often think that adding tons of Halloween products will attract more buyers. But that is not really the best concept.

The best way to sell more is to tell your buyers about all the products and offers you have for Halloween, as soon as possible.

The easier they find to buy your products the better.

One way to make it happen is, rather than posting multiple products of the same type, add them as variants.

For example, if you sell Masks in different shapes, simply create one variable product called, let’s say, ‘Spooky Halloween Masks’ in WooCommerce, and add the different types of masks as the variants.

That way, people will be able to choose the masks from one place and make a faster purchase decision, rather than spending a long time through the shop when browsing different masks from the shop page.

You can do the same for costumes in different patterns, candies in different shapes, lanterns in if various shapes and colors, and even t-shirts.

Let us look at how you can use cool icons as variation swatches for common Halloween products.

Catchy T-shirt Icon Variation Swatches

For t-shirts that are available in various colors, you can present the option to choose the colors using attractive image swatches.

This can be a great attraction around a holiday to the buyers and they will know which colors are available for that design.

For example, a Halloween themed t-shirt might come in several colors. So using colored image swatches of t-shirts is a great way to grab the buyer’s attention.

special halloween T-shirt icon swatches

As you can see above, you can specify the available colors for this t-shirt and make it look charming using tiny image swatches.

This will often get buyers curious to click and choose multiple colors of the same t-shirt, even if they did not intend to in the first place.

Delicious Fancy Candy Swatches

Candies are the most desirable delicacy during Halloweens and kids get well dressed in costumes to collect candies in the neighborhood. So you can expect to get a lot of orders for various candies.

And you can offer your candies in an exciting way using tiny candy icons.

The idea is to put up different shaped candies as variants and present them using attractive variation swatches on your WooCommerce store.

This will work really well especially if you have fancy candies that are prepared and shaped just for Halloween.

candy variation swatches

For example, you can use image variation swatches such as a spider icon to represent spider-shaped candy, and pumpkin icons to represent pumpkin face candies, and so on.

The swatches will let the buyers know that you have all the Halloween candies they were looking for and will surely help to trigger more sales.

Spooky Mask Image Swatches

Costumes are in high demand during Halloween, so naturally, they are a bit expensive during the occasion. So many rather buy scary masks along with Halloween t-shirts.

If you are an online clothing store or costume store, I am expecting that you will consider stocking up Scary Masks to sell at least during Halloween.

And to get people excited about the different masks you have, you can present the variants using mask icons.

For instance, if your store is selling V-killer venomed masks this year, make sure to include a gallery with the different types of killer masks you have in stock.

Spooky Mask Swatches

And spice it up a little more with tiny mask icons to choose the shapes. This might seem like small customization, but it will help to make the buyer more curious about what they might get.

Haunting Lantern Icons To Choose From

On Halloween, the witching hour starts as soon as the sun sets, so people love to decorate the house with some festive lanterns.

If you do sell lanterns, get various lantern icons to use as variation swatches and offer the buyers the different shapes and colors you can deliver.

lantern image variation swatches

Normally, images for lanterns look amazing. But the dull dropdown selection on default WooCommerce doesn’t look too appealing.

You can see in the image above, the small image swatches of the lanterns look much more festive for Halloween.

Witch Hats In Various Spooky Patterns

As I said, costumes have high demand during Halloween, and witch hats are among the most popular ones that girls and ladies love to wear at Halloween parties.

Offer witch hats in various patterns using relative image swatches on the product page.

witch hat variations

Clicking on the icons will display the hats in that pattern. A great way to engage with interested buyers.

How To Find Halloween Icons For Variation Swatches

So far you just saw how it will look with variation swatches, but how will you get those icons?

It’s best to use images or icons that are relative to the product itself when using image variation swatches.

I only showed you examples of 5 products, but there are tons of other products, and preparing custom swatches might be a hassle. Rather you can find these icons or vector images to use as Halloween variation swatches easily.
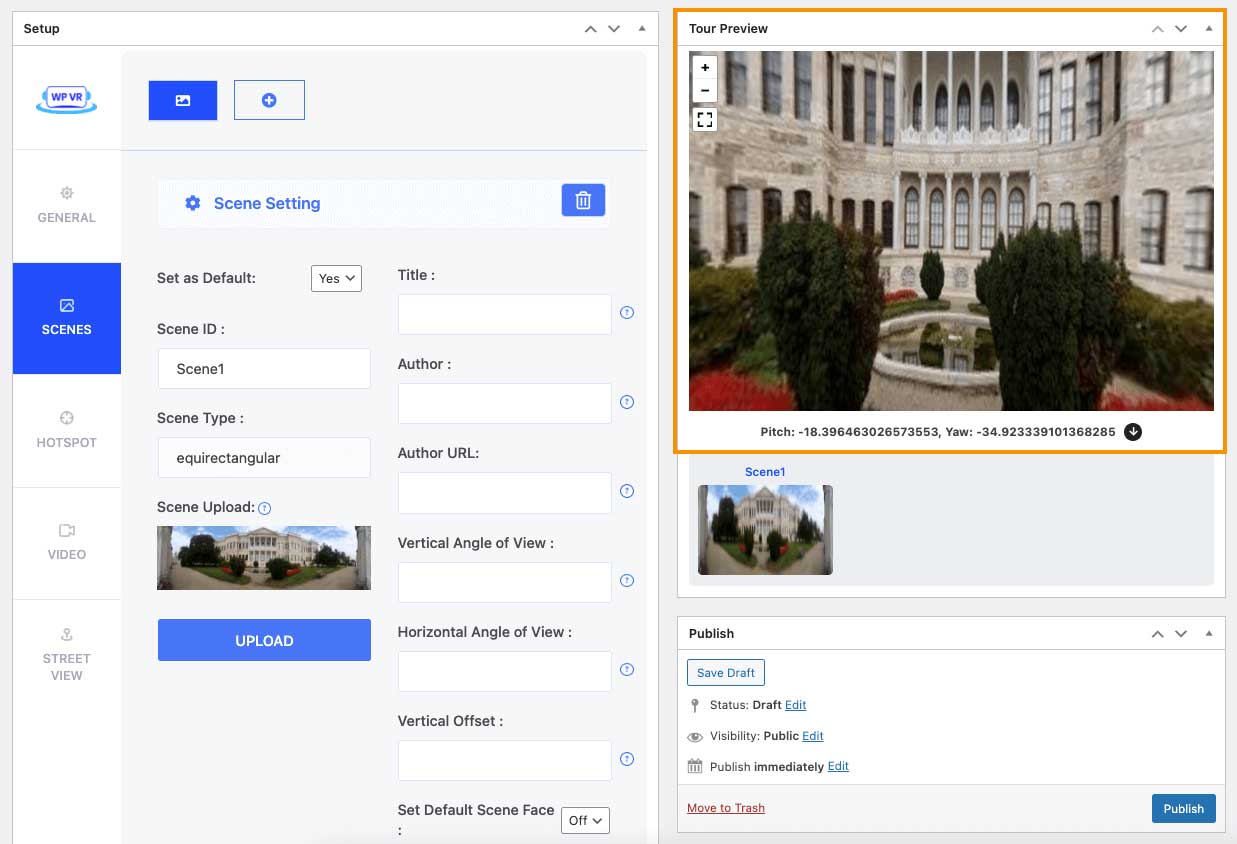
Here is a list of sites where you can collect your desired icons or images in high quality, and most often, for free.

How To Use Image Variation Swatches Real Quick

Adding variation swatches is really easy in WooCommerce.

Simply use the plugin Variation Swatches for WooCommerce, and in just a few minutes, you can set up image swatches for product variants.

This is probably the smallest customization you can make, for a great advantage in increasing your sales.

Moreover, you are able to do it without any extra cost. So go ahead and start using smart variation swatches to boost your Halloween sales.

Schlussbemerkungen

Special occasions should always be considered a great opportunity for any WooCommerce store to increase sales, and Halloween is one of the biggest occasions there.

So it’s best to find unique ideas to boost your Halloween sales, and using smart image variation swatches can be a great way to attract more buyers.

There are many more unique techniques you can use to make your Halloween more profitable. Here is an actionable guide you can follow to successfully sell more products during Halloween:

I wish you good luck to get a high number of sales this year.

Happy Halloween!!

Kategorien
Leitfaden

What Is Cloud Service? – Detailed Infographic [2024]

Nowadays, cloud service is way more convenient rather than using shared or dedicated hosting servers. With data centers situated all over the world, cloud services ensure your constant uptime and superfast data transfer rate with the ultimate data backup solution.

Here, you will learn why you should use cloud services and the basic structure of cloud computing.

You will be able to get some key insights into

  • how cloud services are growing over the years,
  • public cloud adoption for enterprises, and
  • basic price comparison of the top cloud storage.

Take a look at the detailed infographic.

What Is Cloud Service

Key Take-Aways:

What Is Cloud Service?

Cloud services offer you a wide range of services over the internet, including cloud-based video conferencing. These services provide you easy & affordable access to your web applications and resources from almost any device without the need for any internal infrastructure or hardware.

Why Use Cloud Service?

  • Save money
    Cloud storage offers you a pay-as-you-go service, through which you will only pay for the storage space you use, hence you can reduce your overall hosting costs significantly.
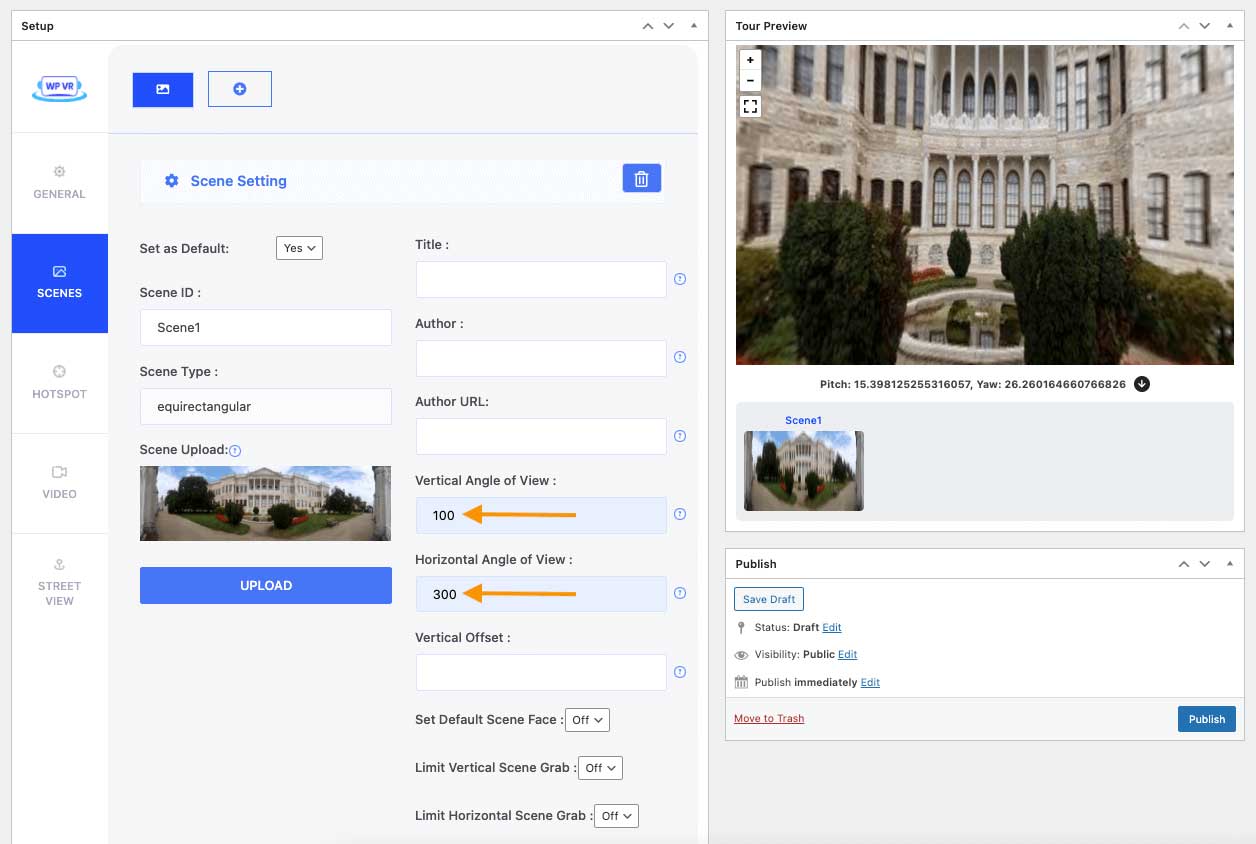
  • Increase page loading speed
    Cloud storage optimizes your site data and serves from the super-fast web server, as a result, your site will be faster than ever.
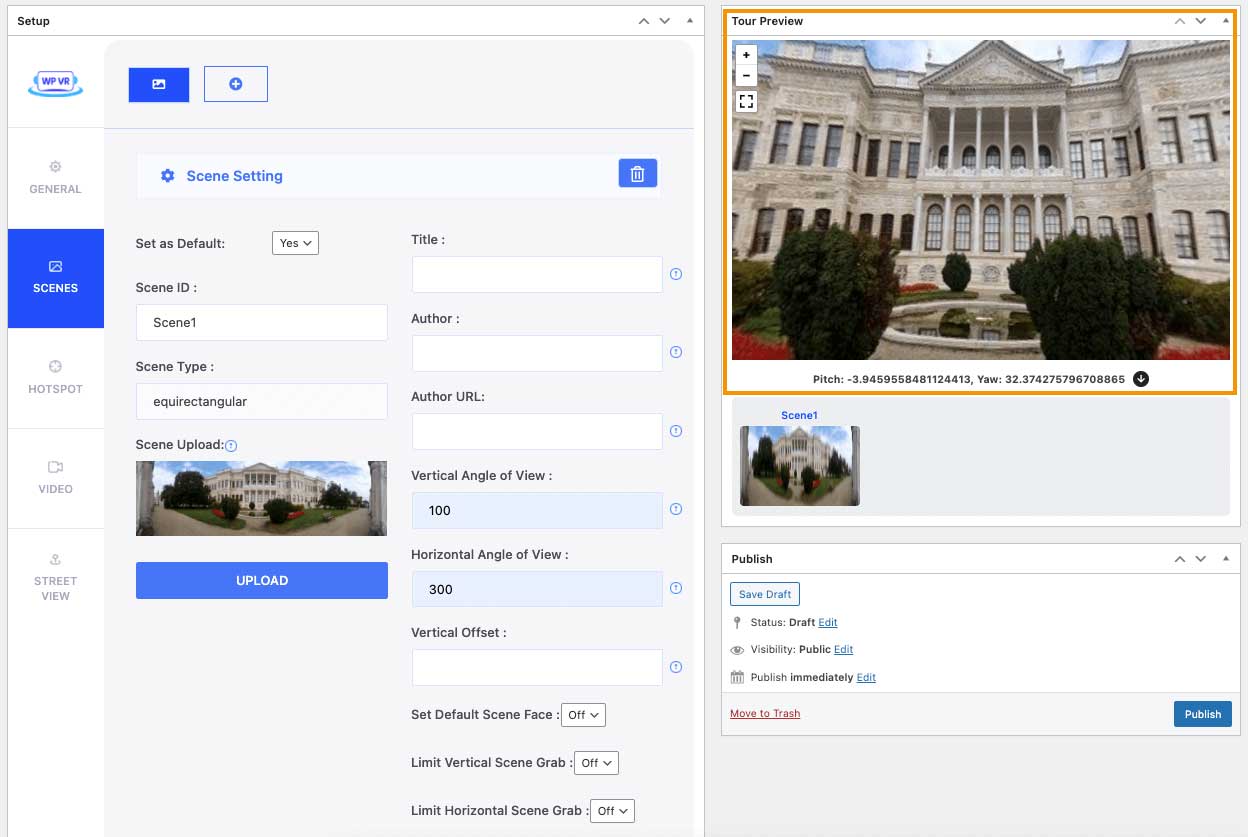
  • Backup site data
    Cloud copies your data into multiple locations and syncs your data as you make changes, hence if you accidentally delete files, or if one of the server crashes, your data will still be safe.
  • Maximum security for your sensitive data
    Cloud providers offer you native security products such as WAF, DDoS protection, etc., which provide you the maximum security for your sensitive information.

Some Interesting Facts

  • 53% of users leave a site that takes longer than three seconds to load

And you can overcome both of these issues by using a Cloud service!

Cloud Computing Structure

Cloud Deployment Types
Öffentlich
Private
Hybrid
Community
Cloud Service Models
SaaS
IaaS
PaaS
Cloud Service Providers
AWS S3
DO
GCS
Azure
  • Cloud Deployment Types
    The cloud deployment model is an infrastructure owned by a single business. It offers you a more controlled environment, through which you will have the access to the IT resources with a more centralized business model. This model can be built on external hosting or in-house.

    The cloud deployment types are:
    • Öffentlich
    • Private
    • Hybrid
    • Community
  • Cloud Service Models –
    Cloud models serve different purposes based on various businesses. Also, they can interact with each other to form one comprehensive model of cloud computing.

    Cloud models come in three types:
    • SaaS (Software as a Service),
    • IaaS (Infrastructure as a Service), and
    • PaaS (Platform as a Service).
  • Reliable Cloud Service Providers
    Among many cloud service providers, here are some of the most reliable ones:
    • Amazon S3
    • DigitalOcean
    • Google-Wolkenspeicher
    • Microsoft Azure

More Facts About Cloud Service

Cloud Migration Service
  • This infographic is based on the following regions:
  • Nord-Amerika
    • US
    • Kanada
  • Europa
    • Vereinigtes Königreich
    • Deutschland
    • Frankreich
    • Rest of Europe
  • Asia Pacific (APAC)
    • China
    • Japan
    • Australia and New Zealand (ANZ)
    • Rest of APAC
  • Middle East and Africa (MEA)
    • Middle East
    • Africa
  • Latin America
    • Brasilien
    • Mexiko
    • Rest of Latin America

You can also create a detailed static chart with the WordPress Chart plugin.

Compound Annual Growth Rate, 2018-2022

Compound Annual Growth Rate 2018

From this Comparing Compound Annual Growth Rates (CAGRs) graph, we can see the future forecast of the rapidly growing IaaS platform. In here, it is anticipated that by the end of the year 2022, Cloud System Infrastructure Services (IaaS) growth will be more than 20%.

Cost comparison between Amazon S3, Google Cloud Storage, Microsoft Azure and DigitalOcean

AWS LightsailGoogle CloudDigitalOceanAzure
Memory21.722
CPU1 vCPU1 vCPU1 vCPU1 vCPU
Storage60 GB SSD50 GB SSD50 GB SSD50 GB SSD
Monthly Price$10/mo$26.76/mo est$10/mo$28/mo
Here’s a basic price comparison chart for AWS, GCP DO and Microsoft Azure.

Public Cloud Adoption for Enterprises

Public Cloud Adoption -Info 1

From this Public Cloud Adoption for Enterprises graph, we can see that Microsoft Azure is closing the gap with AWS, followed by Google Cloud Platform. Although DigitalOcean is far behind, it’s trying to catch up fast.

Not every company will migrate to the cloud, not yet, but the way Cloud computing is advancing, the sooner you adopt Cloud service, the better your chances of staying ahead of your competitors.

So, should you use a cloud service?

The answer is Yes.

Kategorien
Guide WooCommerce

10 Unique Marketing Techniques To Increase Halloween Sales For A WooCommerce Store [2024]

Halloween is just a few weeks away, and candy & costumes aren’t the only reasons to get excited. It’s also one of the best times for shopping.

US consumers spent approximately 8.8 billion USD during the Halloween season last year.

This year, it could go higher, thanks to the rise in online shopping since May 2020. A surge in internet spending is expected throughout October.

This a great opportunity you can’t miss out on. If you own a WooCommerce shop, it’s a chance to boost your revenue quite easily.

However, you have to make sure you take the right steps and make your shop ready for Halloween sales.

For example, you have to make sure you use proper funnels to upsell or downsell more products to buyers. (Read along to learn how.)

In this guide, you will learn 10 unique and actionable techniques that will help you increase your Halloween Sales by a significant amount. Some of these exciting ideas will surely give you an edge over your competitors.

Fangen wir also an.

Inhaltsverzeichnis

01. Stock Up With Halloween Items To Spice Up The Occasion
Get ideas to make your products desirable on Halloween even if you are in other niches such as Electronics.
02. Issue A Daily Countdown Flash Sale
Learn about a rare promotional sales technique for eCommerce sites to increase sales on special occasions.
03. Make Buyers Curious To Add More Products To The Cart
Get tips on smart product page offers and customization to make buyers purchase more products.
04. Run Unique Promotions That Your Competitors Can’t Think Of
Rather than just using common marketing such as pop-ups or banner ads, get 3 unique ideas to make your buyers more excited.
05. Make Checkout Sales Funnels The Trump-Card
Checkout Sales Funnels work like a charm. Learn to implement them in the correct way and see the difference.
06. Make Your Halloween Email Campaigns More Productive
Create email campaigns that will help to get your Halloween products noticed. Get an actionable idea on how to make it more successful.
07. Leverage The Reach Of Large Marketplaces
Get interesting facts on why you should promote on large marketplaces and learn about a reliable tool to do so without much effort.
08. Use Videos To Show Your Spooky Collection
Videos always work but you can make them more engaging. Get tips to write proper video scripts to make promotional videos successful.
09. Optimize Smart Suggestions On Product Page
Learn to use proper product suggestions when a person is on the product page and get noticed.
10. Create A Special Page Just For Halloween
Make the occasion more visible with a dedicated Halloween page. Learn how to organize the page for maximum results
Special Tips For Halloween
Get a few experts’ tips on handling high website traffic during Halloween sales.

10 Unique Marketing Techniques To Increase Halloween Sales 

Each of the tips here is highly useful, and I suggest you follow as many of them as possible if you want to boost your revenue.

Now before I start with the guide, I would like to note a common practice that you should follow.

During any special occasion, you should re-design your website for the occasion.

For example, during Halloween sales, you should put up a Halloween face to add to the excitement of the buyers. You may buy Halloween templates for your theme or from your preferred page builders. This might seem a bit of hard work, but the Halloween sales will make up for it.

Now, let’s look into unique ways you can increase Halloween sales for your WooCommerce store.

1. Stock Up With Halloween Items To Spice Up The Occasion

Stock Up With Halloween Items To Spice Up The Occasion

Decorative, costumes, and candies sell the most during Halloween. But it doesn’t mean that other items are not desirable.

You have to find a way to include products that compliment Halloween in order to meet the demand of your target customers.

There are creative ways to achieve this, no matter what you sell. Here are some examples.

  • If you are a clothing store, you may sell t-shirts with a Halloween theme, such as Dracula, on the t-shirt design. Alternatively, you may sell spooky masks just during Halloween sales.
  • When selling electronics such as Computer Accessories, you may offer Halloween themed skins on items. For example, you may sell merchandise from your store like a Mouse which has a Ghost painting on its body.
  • For grocery stores, you may offer high-quality Pumpkins at affordable prices.
  • Chocolate shops may offer pumpkin-face candies.

This will give people reasons to purchase from your shop during Halloween sales. They might then browse through and purchase more products from your store other than just the Halloween items.

2. Issue A Daily Countdown Flash Sale

Issue A Daily Countdown Flash Sale

This might not be easy to pull off, but you can make people crave more by issuing a daily countdown flash sale for two weeks before Halloween.

What I mean is, every day, you put up a few items for sale at a discount. And this offer will be accessible only for a day. The next day, new items will be offered at a discount.

This is a great way to keep people optimistic about buying from your store. They will probably look forward to finding out what other items you may put on sale the next day, so they might come back just to find out.

You may spice it up more by showing what products will be on discount sale tomorrow, but not reveal the discount amount. In this case, if a person doesn’t like the offers today but finds an interesting product to be on sale the next day, he/she will come back.

A popular example of a countdown Flash sale is by an international site called AliExpress. (They do this on a regular basis, but you can take this idea and use it just for special occasions such as Halloween.)

3. Make Buyers Curious To Add More Products To The Cart

Make Buyers Curious To Add More Products To The Cart

Let’s say you have a brand-new Halloween themed t-shirt for sale, with variants Red, Green, and Orange.

Once a person visits the product page, you can customize the product page to make the buyers curious about all its available variants and possibly, purchase multiple variants.

Or you may offer special conditional discounts that are hard to resist for buyers.

There are many ways to handle this. Let us look at a few:

i. Use A Catchy CTA On The Add To Cart Button

You can Change the Add To Cart button text and design it into something more catchy.

Let’s say instead of ‘Add To Cart,’ you may use the text ‘Grab It Now!!’

**You can achieve this with plugins such as WC Custom Add To Cart Button.

ii. Use smart variation swatches to present product variants

This is a very effective way to make buyers curious about looking into the variants. The swatches help the buyer to understand the colors available at a glance.

If you use relative image swatches, for example, little colored pumpkins, it will be more engaging.

**You may try using the plugin Variation swatches for WooCommerce to achieve this.

iii. Offer discounts on the quantity purchased

You can set a discount offer on purchasing a certain number of the same product.

For example, you can offer a 10% discount on three t-shirts bought at once.

iv. Create a bundle offer for a relevant product

You may create a bundle of relative products and display it on the product page as a suggestion, or offer the bundle as an upsell.

You can also easily create a bundle of multiple variants of the same product and assign it as an upsell product when a buyer views the t-shirt.

Let’s say a person clicks on buy now on the product page for a Red t-shirt, then you can set up an Upsell offer, offering him a bundle of 3 colors of the t-shirt at a 10% discount on the total.

v. Mark a best-selling variant

You may highlight the best-selling variant of your product on the product page. People may want to choose that more, just to follow the trend.

These are great ways to trigger potential buyers into purchasing more of the same product.

4. Run Unique Promotions That Your Competitors Can’t Think Of

Run Unique Promotions

You can focus on Discount banners, Pop-up coupons, or a Notification Bar with a Halloween offer, all with a Halloween design.

But, these are common stuff.

However, here are 3 unique marketing ideas you can apply to increase sales:

i. Issue a special gift based on purchase amount

You may offer special Halloween gift packs to buyers based on a target purchase total.

For example, anyone who will purchase products for a total of $500, he/she will get a surprise Halloween gift box.

ii. Run a Halloween lottery draft

Issue a lottery draft to get your buyers excited to make a purchase.

Let’s say anyone who purchases $500 or more will get a special code. After the Halloween campaign is over, you can announce a winner and send a special gift.

iii. Issue a point-based competition for a special prize

Let’s say you can announce that each dollar a person spends on your store will earn a point.

After Halloween, the top 3 people with the highest points will get special gifts.

**Of course, remember to keep a policy that people will only be eligible if they are local and have purchased over $500 in total; or something around those lines.

To make these ideas more effective, you can present these as Pop-ups when a person enters the site, or as the first Ad Banner, the buyer will see when entering the site for the first time.

Keeping a Static section about it besides the website’s Menu bar can be a good way to grab more attention.

5. Make Checkout Sales Funnels The Trump-Card

Make Checkout Sales Funnels The Trump-Card

Sales funnels are always effective for WooCommerce stores, no matter what you sell or when you sell. During Halloween sales, you can use special checkout sales funnels to make the most out of your buyers.

Since more people will visit your site, it will definitely be wise to make sure each buyer purchases as many products as possible. And to achieve that, you can use smart sales funnels for products that might sell more during Halloween sales.

Here’ how you can use checkout sales funnels during Halloween sales.

i. Add an order-bump on the checkout page

When a buyer is on the checkout page, it means he/she is ready to purchase. At this point, you can offer a small related product at a minimum cost, which the buyer can add to the bill with just a click.

For example, if he is buying a T-shirt, you can offer a hand band at a discounted price on the checkout page. If it is within budget, the chances are, the buyer will consider taking the offer.

(ii) Use Smart Checkout Upsell Offers With Special Halloween Discounts 

Once a product is paid for, now it’s your chance to try and sell more to the same customer. You can trigger a good upsell offer with something relative to what was bought, right after completing a purchase.

For example, suppose someone bought a few Halloween decorative. In that case, you can then insist on buying Halloween Special Printed Cards at a discounted price, let’s say 10 cards at only $40.

(iii) Give A Last-Attempt Downsell Offer 

If you used an upsell offer, you should also be prepared with an alternative offer in case the upsell offer is rejected. This will help to make the buyer think about at least purchasing the latter.

For example, consider the 10 cards you offered as an upsell (as per the previous example). If the buyer passes on that, you can counter-offer with 2 cards at only $10.

This drop from $40 to $10 in the amount to be spent can trigger a desire in the buyer’s mind to at least try out the cheaper offer.

6. Make Your Halloween Email Campaigns More Productive

Make Your Halloween Email Campaigns More Productive

Many are not aware, but email campaigns work really well during Halloween sales season. In fact, people are looking for good deals and tend to read more Halloween emails to get the best offers.

You can take advantage of that if you work smart.

Now, first, you will need to understand your users and the products you sell. Your email offers will only be fruitful if you have the right Halloween offers for your users.

Let us look at an example.

Suppose most of your users buy t-shirts from your store.

During Halloween, let’s say you put up a few Halloween themed t-shirts and brought in a few Scary Masks to sell during the occasion.

Now, here, you know your t-shirts will sell easily. It’s the Masks that you want people to notice. However, you cannot simply bring in new items and directly offer them to your users. You have to be technical about it.  

Here’s what you can do. You can send an email with offers on Halloween t-shirts. In the same email, you can then give a small offer on the Masks

For example:

“Hi John, Halloween’s here, and it’s time to get ready with spooky t-shirts.

Check out these wicked t-shirts that can create a mystic feel this Halloween:

T-shirt 1T-shirt 2T-shirt 3T-shirt 4

Get them now at a 20% discount!!

Also, take a look at this howling Scary Masks.

Mask 1Mask 2

Get any one of the masks along with a t-shirt and get a 10% discount on the Mask!!

Set your Halloween attire now!!”

The idea is to offer something your users are more likely to buy and then insist on buying the new item alongside.

This will help to sell your popular products and possibly promote your new Halloween collections at ease.

7. Leverage The Reach Of Large Marketplaces

Leverage The Reach Of Large Marketplaces

This is now a common norm that if you own a WooCommerce store, you probably are already promoting on Google Shopping.

Similarly, there are several more marketplaces you can promote your products on, especially during bustling occasions such as Halloween.

Did you know?

The top 3 popular marketplaces with the highest Halloween sales are Amazon, eBay, and Google Shopping.

This is because people are used to these platforms and tend to purchase products on a regular basis.

So, even if you haven’t considered it, it is wise to promote your products in multiple marketplaces, including Google Shopping, Amazon, and eBay Seller Center, during the Halloween sales campaign. They will let you reach millions of potential buyers without much effort.

Plus, you can also upload your products to popular local marketplaces. For example, if you are in the Netherlands, then you should promote your products on Marktplaats.

It’s actually easier than you think to promote on other marketplaces. You may use a WooCommerce extension called Product Feed Manager For WooCommerce.

With this plugin, you can generate an accurate product feed for several marketplaces in minutes. And then, you just have to upload the product feed to your preferred marketplaces.

Hopefully, this will give you a big boost and help you get sold out sooner than expected.

8. Use Videos To Show Your Spooky Collection

Use Videos To Show Your Spooky Collection

Whether you own a physical store or an online store, one of the best ways to reach more buyers is to use videos.

You can create engaging videos of the best products using a video editor that you expect to sell during the Halloween sales campaign. Additionally, it’s worth considering the use of a video trimmer to refine your content, ensuring it remains both concise and engaging.

Since people regularly watch videos on Youtube or Facebook, you can upload your product videos there. In fact, if you do ship internationally, then you must post a video on Twitter.

However, the video cannot be just a product showcase and music with no words. You have to make sure you tell the viewers what this product is and why they should buy it. To make more interactive videos you can get help from AI-powered tools that can convert text-to-speech if you face trouble with voice-over.

In each of your videos, try to tell your buyers:

  • the best features of the product
  • why this product is perfect for Halloween
  • examples of how to use the product
  • how to order the product at the best price.

If you, let’s say, create 5 videos of five different products, then each video should tell the buyers all this information.

It is not mandatory to use real-life visuals for the examples you say; you can simply say it while displaying the product. (Though the visuals would be better.)

Here’s an example video script for a Pumpkin Lantern –

“The Urban Pumpkin Lantern – the perfect way to spookify your house for Halloween.

With dim orange LED lighting inside and backup power included, you can welcome Halloween with a smile of fright.

Place it near the doorway, or in the corner of your living room, or just hang it in the porch ceiling. Let everyone know that Halloween is here.

Collect your own now from RexHalloweenShop.

The link is in the description below.”

Make sure to use a piece of good background music that sounds soothing and spooky at the same time.

**Paid video Ads on Youtube and Twitter are also a very popular trend nowadays, and many are successfully using it. You may look into doing such promotions.

9. Optimize Smart Suggestions On Product Page

Optimize Smart Suggestions On Product Page

When a person enters the product page, it indicates that the person is looking to purchase it sooner or later.

During Halloween, people will look to purchase several things to prepare for the occasion. For example, people will buy candies, decorative, face paint, costumes or custom masks, and many more.

If you supply multiple Halloween products, then you can make good use of the product suggestions.

When someone is on the product page for, let’s say, a Pumpkin Lantern, you can offer to buy Decorative Fairy Lights in the suggestion area on the right or below.

In this case, the buyer may notice that the two required products for Halloween are available here. So, chances are he/she will decide to purchase both from here and maybe look for more Halloween items here rather than buying them from different stores.

You can even display such suggestions on the Cart Page just before the checkout. When people are at the cart page, they are ready to buy, so product suggestions there will be more effective.

Setting up such suggestions is actually very easy to handle through the default Upsell and Cross-sell features in WooCommerce.

First, list down the products for which you want to optimize suggestions. Then edit each of the products and assign relevant Upsell and Cross-sell items. It’s as simple as that.

The challenge here is to use the right suggestions. As a result, you have to do some research in understanding what products would make sense for people to buy together.

As per the example above, if someone is looking at a Pumpkin Lantern, then he/she will probably like to set some lighting decorations as well. So suggesting Decorative Fairy Lights would make perfect sense.

10. Create A Special Page Just For Halloween

Create A Special Page Just For Halloween

A best practice followed by most large online stores is to create a dedicated Halloween page.

You can do the same on your WooCommerce store so that only Halloween products, bundles, and offers will be displayed in the same way as on the Shop page.

This will make it easier for buyers to notice your Halloween collection and offers. And if you do have good offers, people will definitely purchase more from you.

Now, you have to make sure that you organize the page properly in a way so that the best deals are shown first.

Or you can segment the page into 3 sections

  • Halloween Offers
  • Special Halloween Bundles
  • All Halloween Products

This will make it easier for you to display your offers and let people choose from the best deals. (Naturally, your best offers should be on the products you want to sell more.)

Special Tips –

Keep in mind, Halloween will bring in more traffic. So you have to ensure your server doesn’t fail to deliver fast loading time and a smooth browser for your users. You can either choose to take higher plans for hosting during Halloween or choose to find other ways to optimize your site for the occasion.

One way could be to serve website media from Cloud Storage or CDN servers. That way, the server load due to media files will not be as intense. Plus, Cloud storage services will never fail to deliver content due to having multiple hubs available.

For WordPress, you may use Media Storage To Cloud to easily offload and serve your website media files from cloud storage services such as Amazon S3, Google Cloud storage, or DigitalOcean.

Another activity you have to focus on is handling abandoned carts. Along with high traffic, a higher number of Abandoned carts are expected during Halloween sales. You can easily reach back to these abandoned buyers and win back around 20% of them using reliable plugins such as Cart Lift – Abandoned Cart Recovery.

Anmerkung des Autors

Remember, Halloween is not exciting for buyers unless you make it for them. The more exciting offers you have for your buyers, the more sales you can expect.

You may also consider some additional creative options for marketing and talk with some good media buying agencies for their suggestions.

So do put an extra effort into giving offers that people will love to take on. And use most of the unique ideas you just learned here, to make the most out of all the visitors you will get during Halloween sales.

Btw, you can take a look at amazing Halloween deals for WordPress themes and plugins here.

Share any more new ideas you may have, in the comments section. With that note, let’s all have a spooky Halloween.

Kategorien
Leitfaden

Complete Guide To Offload WordPress Media Files Using Cloud Storage And Reduce Hosting Cost [2023]

Die Leistung Ihrer Website hängt stark von Ihrem Hosting-Plan und der Anzahl der Mediendateien ab, die Sie auf Ihre Website laden.

Wenn Sie eine WordPress-Website mit vielen Mediendateien und Assets betreiben, wird Ihre Website mit der Zeit wahrscheinlich langsamer und es werden mehr Serveranfragen beim Hosten Ihrer Dateien gestellt.

Dies hat große Auswirkungen auf Ihren ROI, da die Besucher dazu neigen, Ihre Website zu verlassen, wenn sie zu langsam ist. Und wenn die Serveranfragen das Limit Ihres Hosting-Anbieters überschreiten, kann Ihr Website-Server sogar abstürzen, was zu weiteren Geschäftseinbußen führt.

Wussten Sie, dass
- 53% der Nutzer eine Website verlassen, die länger als drei Sekunden zum Laden braucht
- eine schnellere Webseite zu einer 16,5%igen Steigerung der Konversionsrate führt?

Eine der besten Lösungen hierfür ist das Hosten und Bereitstellen der Mediendateien Ihrer Website in einem Cloud-Speicher.

Wenn Sie die Mediendateien Ihrer Website in den Cloud-Speicher auslagern, können Sie vermeiden, dass Sie die Speichergrenzen Ihres Hostings überschreiten. Und wenn Sie diese Mediendateien aus der Cloud auf Ihrer Website bereitstellen, wird dies die Ladezeit Ihrer Website-Medien erheblich beschleunigen.

Langfristig sparen Sie dadurch mehr an Hosting-Kosten.

Heute werde ich Ihnen eine Schritt-für-Schritt-Anleitung geben, wie Sie Ihre WordPress-Mediendateien ganz einfach auf Ihren bevorzugten Cloud-Speicher auslagern können.

Nach der Lektüre dieses Leitfadens werden Sie in der Lage sein -

  • Erfahren Sie, wie Sie über Ihren Hosting-Anbieter Geld verlieren
  • Verstehen Sie, warum Cloud-Speicher eine bessere Lösung ist
  • Erfahren Sie mehr über die zuverlässigsten Cloud-Speicherdienste
  • Einfaches Auslagern Ihrer WordPress-Mediendateien in einen Cloud-Speicher

Wenn Sie all das gelernt haben, werden Sie schließlich in der Lage sein, eine schnellere Website zu erstellen, ohne dass der Server überlastet wird, und die Hostingkosten zu senken.

Fangen wir also an.

Warum Cloud Storage Service für Website-Mediendateien verwenden

Die erste Frage, die sich Ihnen stellt, ist wahrscheinlich, warum Sie sich bei der Bereitstellung von Mediendateien auf einen Cloud-Dienst verlassen sollten und nicht auf Ihren vertrauten Hosting-Anbieter.

Dafür kann es viele Gründe geben, aber ich möchte Ihnen die wichtigsten nennen.

  1. Hören Sie auf, Unmengen von Geld für Hosting-Kosten zu verschwenden
  2. Vermeiden Sie Serverausfälle bei starkem Datenverkehr
  3. Bessere Website-Leistung zu jeder Zeit

Lassen Sie uns also genau erfahren, wie dies möglich ist.

1. Hören Sie auf, tonnenweise Geld für Hosting-Kosten zu verschwenden

Wenn Sie einen dedizierten Server von Anbietern wie WP Engine oder GoDaddy nutzen, wissen Sie wahrscheinlich, dass Sie einen begrenzten Speicherplatz pro Plan haben. In dem Moment, in dem Sie dieses Limit überschreiten, müssen Sie auf den nächsten Plan wechseln, um mehr Speicherplatz zu erhalten, was zusätzliche 10 bis 15 US-Dollar pro Monat kosten kann.

In solchen Situationen sind Cloud-Speicher viel bequemer. Amazon S3 bietet beispielsweise einen Standardtarif an, bei dem Sie nur einen geringen Betrag zahlen, z. B. 0,023 pro GB, was einem Betrag von 1,15 USD pro Monat für bis zu 50 GB Datenvolumen entspricht. Das ist eine große Ersparnis, die sich auf über 90 USD pro Jahr beläuft.

2. Vermeiden Sie Serverausfälle bei starkem Datenverkehr

Ein großes Problem für die oben genannten Hosting-Anbieter ist die Fähigkeit, großen gleichzeitigen Datenverkehr zu bewältigen. Wenn Sie einen plötzlichen Anstieg des gleichzeitigen Datenverkehrs haben, sagen wir etwa 1000 Besucher auf einmal, besteht die Gefahr, dass Ihr Server abstürzt.

Dies ist etwas, was Cloud-Speicher besonders gut können, da sie über viel mehr Datenzentren verfügen als ein Hosting-Anbieter. Selbst wenn viele Menschen dieselbe Mediendatei zur gleichen Zeit abrufen, besteht also keine Gefahr eines Serverausfalls.

3. Hohe Website-Leistung zu jeder Zeit

Jetzt könnten Sie auf Shared-Hosting-Anbieter wie Bluehost oder Dreamhost stoßen, die mit einem verrückten Marketing-Schema werben und behaupten, dass Sie unbegrenzte Bandbreite und 50 GB Speicherplatz für weniger als 5 Dollar pro Monat erhalten.

Wow, das ist ein tolles Angebot, oder? Aber es gibt ein paar Haken.

  • Erstens: Auch wenn behauptet wird, dass Sie unbegrenzte Bandbreite erhalten, werden Sie, sobald Sie eine bestimmte Grenze erreicht haben, mit einer Hosting-Drosselung konfrontiert, d. h., die Ladezeit Ihres Servers wird absichtlich erheblich verlangsamt.

    Dies ist eine gängige Praxis der meisten Shared-Hosting-Anbieter, um eine Überlastung des Servers zu vermeiden, der von vielen anderen Benutzern gemeinsam genutzt wird.
  • Zweitens gehen solche Shared-Hosting-Anbieter davon aus, dass Sie Ihr Limit nicht überschreiten werden.
    In dem Moment, in dem Sie das tun, werden sie Ihnen mitteilen, dass sie nicht in der Lage sind, Ihnen eine hohe Leistung in einer Shared-Hosting-Umgebung zu bieten und werden Ihnen vorschlagen, ihren dedizierten Hosting-Server zu nutzen.
    Doch selbst wenn Sie sich für ihre dedizierten Server entscheiden, wird es immer noch das gleiche Problem mit der Handhabung von gleichzeitigem Datenverkehr geben.
  • Ein weiterer wichtiger Punkt ist die Möglichkeit, ein Rechenzentrum für die Bereitstellung von Medien in einem Cloud-Speicher auszuwählen.
    Angenommen, die meisten Ihrer potenziellen Kunden kommen aus Deutschland. Dann können Sie für Ihren Cloud-Speicher ein nahe gelegenes Rechenzentrum wählen, von dem aus Sie Medien bereitstellen. Bei einem gewöhnlichen Hosting-Anbieter haben Sie diese Möglichkeit nicht.
    Dies wirkt sich positiv auf die Ladegeschwindigkeit der Website aus, insbesondere wenn Sie große Mediendateien oder viele Mediendateien auf einer einzigen Webseite haben.

Da Sie nun wissen, dass ein Hosting-Anbieter nicht immer die beste Wahl ist, wenn es darum geht, riesige Mediendateien für eine Website bereitzustellen, wollen wir uns die zuverlässigsten Cloud-Speicher ansehen, die es gibt.

Beste Cloud-Speicherdienste zum Auslagern und Bereitstellen von WordPress-Mediendateien

Es gibt viele Cloud-Speicherdienste, aber lassen Sie uns einen Blick auf die besten Cloud-Speicherdienste werfen, die wir für Ihre WordPress-Website empfehlen.

1. Amazon S3 (AWS)

Amazon S3-Banner

Amazon S3 ist ein Kernbestandteil von Amazon Web Services, mit dem Sie beliebige Datenmengen speichern und abrufen können, und zwar jederzeit und überall im Web.

Sie ist nachweislich sehr schnell und zuverlässig und bietet Ihnen vergleichsweise sehr niedrige Speicherkosten.

Netflix, Airbnb, SmugMug, Nasdaq, etc. are some of the prominent users of Amazon S3. For building or migrating applications to AWS, certain AWS application development services can be useful. However, organizations may choose to migrate to alternate cloud platforms like Microsoft Azure for various reasons. In such cases, enlisting AWS to Azure Migration Services can greatly facilitate the transition.

Einige bemerkenswerte Vorteile von Amazon S3 -

  • Hochgradig gesichert
  • Einfache Verwaltung und Migration
  • Umfassende Dokumentation
  • Entwicklerfreundlich
  • Mehrere Regionen
  • Server-seitige Verschlüsselung

2. Google Cloud-Speicher

Google Cloud Platform-Banner

Google Cloud Storage ist ein Teil der Google Cloud Platform, die Sie bei der Erfüllung der Online-Speicheranforderungen Ihres Unternehmens unterstützt.

Die Cloud-Plattform selbst kann Ihnen helfen, Software oder sogar Websites zu hosten; sie ist jedoch eher für ihren Cloud-Speicherdienst bekannt.

Google Cloud bietet Ihnen die Leistung und Skalierbarkeit der erweiterten Sicherheits- und Freigabefunktionen von Google.

Außerdem bietet es Ihnen drei Arten von Speicherdiensten:

  1. Persistente Festplatten für Blockspeicher
  2. Filestore für die Speicherung von Netzwerkdateien
  3. Cloud-Speicher für Objektspeicher

Diese Dienste sind das Herzstück der Plattform und werden von der Mehrheit der Nutzer der Google Cloud-Dienste verwendet.

Einige bemerkenswerte Vorteile des Google Cloud-Dienstes.

  • Verbesserte Leistung
  • Bessere Preisgestaltungspläne
  • Redundante Backups
  • Einfache Integration
  • Ausführliche Dokumentation
  • Viele Regionen zum Speichern Ihrer Daten verfügbar

3. DigitalOcean

DigitalOcean Spaces-Banner

DigitalOcean ist für die Bereitstellung von Hochleistungsservern bekannt. Heutzutage ist es definitiv eine der ersten Wahl, um Ihre Website-Assets und -Daten zu hosten.

Es konzentriert sich vor allem auf drei wichtige Verkaufsargumente - Einfachheit, Preisgestaltung und leistungsstarke virtuelle Server.

Obwohl der Schwerpunkt auf Cloud Computing liegt, bevorzugen viele den Service DigitalOcean Spaces, der 250 GB Speicherplatz und 1 TB ausgehende Bandbreite für nur 5 US-Dollar pro Monat umfasst.

Wenn Sie den zugewiesenen Speicherplatz und die zugewiesene Bandbreite überschreiten, werden Ihnen $0,01 pro zusätzlichem GB übertragen und $0,02 pro zusätzlichem GB gespeichert berechnet. Dies ist ein großartiges Angebot, wenn Sie tonnenweise Mediendateien zu übertragen haben.

Einige bemerkenswerte Vorteile von DigitalOcean-

  • Geringere räumliche Entfernung
  • Laden statischer Inhalte aus der Cloud
  • Reduzierte Dateigröße zur Erhöhung der Website-Geschwindigkeit
  • Software-Entwicklung freundlich
  • Ausgezeichnete Dokumentation.
  • Benutzerfreundliche UI

Wie kann man Mediendateien von WordPress auf einen Cloud-Speicher auslagern?

Es gibt mehrere Möglichkeiten, Mediendateien von Ihrer WordPress-Website in den Cloud-Speicher zu verlagern.

Wenn Sie sich jedoch für einen der drei bereits erwähnten Cloud-Speicherdienste entscheiden, ist es am besten, ein zuverlässiges Plugin zu verwenden, mit dem Sie diese Angelegenheit problemlos erledigen können.

Ein solches Plugin heißt Media Storage to Cloud.

Medienspeicher In die Wolke

Medienspeicher in der Cloud Banner

Media Storage to Cloud ist ein WordPress-Plugin, mit dem Sie Ihre WordPress-Mediendateien ganz einfach auf den gewünschten Cloud-Speicher auslagern können, darunter Amazon S3, Google Cloud Service und DigitalOcean. Außerdem können Sie Ihre WordPress-Website Mediendateien direkt von Ihrem Cloud-Speicher über dieses Plugin dienen.

Die besten Eigenschaften von Media Storage To Cloud (M2C)

  • Einfaches Auslagern von WordPress-Mediendateien in einen Cloud-Speicher
    - Sie können alle Ihre WordPress-Mediendateien mit nur wenigen Klicks in einen Cloud-Speicher auslagern.
  • Bedienen Sie Ihre Website-Medien und -Inhalte direkt vom Cloud-Speicher
    - Sobald Sie Mediendateien in den Cloud-Speicher ausgelagert haben, können Sie WP-Mediendateien mit einem einzigen Klick direkt von Ihrem Cloud-Speicher-Server bedienen. Kein manueller Aufwand und keine Zeitverschwendung.
  • Automatische Synchronisierung mit dem Cloud-Speicher bei Änderungen in Ihren Medien und Dateien
    - Sie können Ihre WordPress-Mediathek automatisch synchronisieren. Wenn Sie Bilder in Ihre Mediathek hochladen, werden sie automatisch in Ihren Cloud-Speicher übertragen.

Wenn Sie also auf der Suche nach einem Plugin sind, das Ihre WordPress-Website mit einem Cloud-Speicherdienst verbindet, sollten Sie unbedingt Media Storage to Cloud verwenden.

Schauen wir uns nun an, wie Sie Ihre WordPress-Mediendateien auf jeden dieser Cloud-Speicher mit Media Storage To Cloud auslagern können.

  1. Wie man WordPress-Mediendateien auf Amazon S3 auslagert
  2. Wie man WordPress-Mediendateien in Google Cloud Storage auslagert
  3. Wie man WordPress-Mediendateien auf Digital Ocean Spaces überträgt

Wie man WordPress-Mediendateien auf Amazon S3 überträgt

Führen Sie die folgenden Schritte aus, um Ihre WordPress-Mediendateien mit dem Amazon S3-Cloud-Speicher zu verbinden und auszulagern.

**Stellen Sie sicher, dass Sie Media Storage To Cloud installiert und aktiviert haben.

Um Ihre Website mit dem Amazon S3-Bucket zu verbinden, stellen Sie sicher, dass Sie bereits ein IAM-Benutzerkonto bei AWS haben.

Schritt 1 - Verbinden Sie Ihr WordPress mit Amazon S3

1. Suchen Sie in Ihrem Dashboard nach dem Menü WP Cloud. Klicken Sie es an.

Sie gelangen zur Plugin-Oberfläche und befinden sich zunächst auf der Registerkarte " Speicher".

M2C AWS Dashboard

Hier wird standardmäßig Amazon S3 ausgewählt.

2. Geben Sie die erforderlichen Daten ein, um Amazon S3 zu verbinden

AWS Dashboard-Anmeldeinformationen

Hier müssen Sie die folgenden Amazon S3-Anmeldedaten angeben:

3. Klicken Sie nun auf die Schaltfläche " Speichern", und Sie erhalten eine Bestätigungsmeldung in der oberen rechten Ecke.

Erfolgsmeldung

Das bedeutet, dass Sie jetzt erfolgreich Media Storage To Cloud mit Amazon S3 verbunden haben.

Schritt 2 - Auslagern von Mediendateien auf Amazon S3

1. Gehen Sie nun auf die Registerkarte Sync und wählen Sie Amazon S3.

Amazon S3-Synchronisation

Sie können sehen, dass es eine Option namens Synchronisierungsoption auswählen gibt.

AWS-Sync-Optionen

Hier können Sie wählen, ob Sie Medien auf zwei Arten entladen möchten.

  • Alle Daten an den Speicher
    senden - Wählen Sie diese Option, wenn Sie alle Ihre Mediendateien an Amazon S3 übertragen möchten.
  • Unsynchronisierte Daten an den Speicher
    senden - Wählen Sie diese Option aus, wenn Sie neue Medien an Amazon S3 übertragen möchten, und nicht die, die Sie bereits zuvor übertragen haben.

Wenn Sie ein Erstbenutzer sind, wählen Sie Alle Daten in den Speicher senden.

2. Klicken Sie anschließend auf die Schaltfläche Synchronisieren .

Fortschritt der AWS-Synchronisierung

Während des Entladens von Mediendateien in den Amazon S3-Bucket wird ein Fortschrittsbalken angezeigt.

Es kann einige Zeit dauern, bis alle Mediendateien entladen sind, aber ändern Sie nicht die Registerkarte, da dies den Synchronisierungsprozess behindern könnte.

Nachdem die Synchronisierung abgeschlossen ist, erscheint oben rechts eine Erfolgsmeldung.

Das war's. Sie können dann Ihren Amazon S3-Bucket überprüfen. Sie werden sehen, dass alle Ihre WordPress-Mediendateien in den Amazon S3-Bucket kopiert wurden.

WordPress-Mediendateien auf Google Cloud Storage auslagern

Führen Sie die folgenden Schritte aus, um Ihre WordPress-Mediendateien mit Google Cloud Storage zu verbinden und dorthin zu übertragen.

**Stellen Sie sicher, dass Sie Media Storage To Cloud installiert und aktiviert haben.

Um Ihre Website mit Google Cloud Storage zu verbinden, vergewissern Sie sich, dass Sie bereits ein Google Service-Konto und ein Google Cloud Storage Bucket haben.

Schritt 1 - Verbinden Sie Ihr WordPress mit Google Cloud Storage

1. Suchen Sie in Ihrem Dashboard nach dem Menü WP Cloud. Klicken Sie es an.

Sie gelangen zur Plugin-Oberfläche und befinden sich zunächst auf der Registerkarte " Speicher".

M2C Dashboard GCS

Wählen Sie hier Google Cloud Storage.

2. Geben Sie die erforderlichen Daten ein, um Google Cloud Storage zu verbinden.

Erforderliche GCS-Zeugnisse

Hier müssen Sie die folgenden Anmeldedaten für Google Cloud Storage angeben:

  • GCS Service Account Key JSON Data
    - Sie müssen die Service Account Key JSON Data von Ihrem Google Cloud Storage-Konto sammeln.(Sie können sie hier abrufen.)

3. Klicken Sie nun auf die Schaltfläche " Speichern", und Sie erhalten eine Bestätigungsmeldung in der oberen rechten Ecke.

Erfolgsmeldung

Das bedeutet, dass Sie jetzt erfolgreich Media Storage To Cloud mit Google Cloud Storage verbunden haben.

Schritt 2 - Auslagern von Mediendateien auf Google Cloud Storage

1. Gehen Sie nun auf die Registerkarte " Sync" und wählen Sie Google Cloud Storage.

Google Cloud Storage Sync

Sie können sehen, dass es eine Option namens Synchronisierungsoption auswählen gibt.

GCS-Sync-Optionen

Hier können Sie wählen, ob Sie Medien auf zwei Arten entladen möchten.

  • Alle Daten an den Speicher
    senden - Wählen Sie diese Option, wenn Sie alle Ihre Mediendateien an Google Cloud Storage übertragen möchten.
  • Unsynchronisierte Daten an den Speicher senden
    - Wählen Sie diese Option, wenn Sie neue Medien an Google Cloud Storage übertragen möchten, und nicht die, die Sie bereits zuvor übertragen haben.

Wenn Sie ein Erstbenutzer sind, wählen Sie Alle Daten in den Speicher senden.

2. Klicken Sie anschließend auf die Schaltfläche Synchronisieren .

Fortschritt der GCS-Synchronisierung

Während des Entladens von Mediendateien in Google Cloud Storage wird ein Fortschrittsbalken angezeigt.

Es kann einige Zeit dauern, bis alle Mediendateien entladen sind, aber ändern Sie nicht die Registerkarte, da dies den Synchronisierungsprozess behindern könnte.

Nachdem die Synchronisierung abgeschlossen ist, erscheint oben rechts eine Erfolgsmeldung.

Das war's. Sie können dann Ihre Google Cloud Storage-Ordner überprüfen. Sie werden sehen, dass alle Ihre WordPress-Mediendateien in Google Cloud Storage kopiert wurden.

Wie man WordPress-Mediendateien auf DigitalOcean Spaces auslagert

Führen Sie die folgenden Schritte aus, um Ihre WordPress-Mediendateien mit DigitalOcean Spaces zu verbinden und auszulagern.

**Stellen Sie sicher, dass Sie Media Storage To Cloud installiert und aktiviert haben.

Um Ihre Website mit DigitalOcean zu verbinden, stellen Sie sicher, dass Sie bereits ein DigitalOcean-Konto und einen DigitalOcean-Space eingerichtet haben.

Schritt 1 - Verbinden Sie Ihr WordPress mit DigitalOcean

1. Suchen Sie in Ihrem Dashboard nach dem Menü WP Cloud. Klicken Sie es an.

Sie gelangen zur Plugin-Oberfläche und befinden sich zunächst auf der Registerkarte " Speicher".

M2C Dashboard DOS

Wählen Sie hier DigitalOcean.

2. Geben Sie die erforderlichen Daten für die Verbindung mit DigitalOcean ein.

M2C DigitalOcean Dashboard

Hier müssen Sie die folgenden DigitalOcean-Anmeldedaten angeben:

3. Klicken Sie nun auf die Schaltfläche " Speichern", und Sie erhalten eine Bestätigungsmeldung in der oberen rechten Ecke.

Erfolgsmeldung

Das bedeutet, dass Sie jetzt erfolgreich Media Storage To Cloud mit DigitalOcean verbunden haben.

Schritt 2 - Auslagern von Mediendateien auf DigitalOcean Spaces

1. Gehen Sie nun auf die Registerkarte Sync und wählen Sie DigitalOcean.

DigitalOcean Sync

Sie können sehen, dass es eine Option namens Synchronisierungsoption auswählen gibt.

DigitalOcean Sync-Optionen

Hier können Sie wählen, ob Sie Medien auf zwei Arten entladen möchten.

  • Alle Daten an den Speicher
    senden - Wählen Sie diese Option, wenn Sie alle Ihre Mediendateien an Google Cloud Storage übertragen möchten.
  • Unsynchronisierte Daten an den Speicher senden
    - Wählen Sie diese Option, wenn Sie neue Medien an Google Cloud Storage übertragen möchten, und nicht die, die Sie bereits zuvor übertragen haben.

Wenn Sie ein Erstbenutzer sind, wählen Sie Alle Daten in den Speicher senden.

2. Klicken Sie anschließend auf die Schaltfläche Synchronisieren .

DigitalOcean-Synchronisierungsfortschritt

Während des Entladens von Mediendateien auf DigitalOcean Spaces wird ein Fortschrittsbalken angezeigt.

Es kann einige Zeit dauern, bis alle Mediendateien entladen sind, aber ändern Sie nicht die Registerkarte, da dies den Synchronisierungsprozess behindern könnte.

Nach Abschluss der Synchronisierung wird in der oberen rechten Ecke eine Erfolgsmeldung angezeigt.

Das war's. Sie können dann Ihre DigitalOcean Spaces überprüfen. Sie werden sehen, dass alle Ihre WordPress-Mediendateien auf DigitalOcean kopiert wurden.

Wie man WordPress-Mediendateien von Cloud-Servern bereitstellt

Sobald Sie Ihre WordPress-Mediendateien in Ihren bevorzugten Cloud-Speicher geladen haben, können Sie die Medien Ihrer Website direkt aus dem Cloud-Speicher bereitstellen.

Wenn Sie zum Beispiel Ihre Mediendateien auf Amazon S3 ausgelagert haben, können Sie es so einrichten, dass die Mediendateien Ihrer Website von Amazon S3 gehostet und bereitgestellt werden.

Befolgen Sie dazu die nachstehenden einfachen Schritte.

1. Klicken Sie auf die Einstellungen und wählen Sie den Cloud-Speicher, in den Sie Ihre Mediendateien ausgelagert haben.

Serve-Einstellungen

Hier finden Sie die folgenden drei Optionen:

Servieren von Mediendateien
  • Serve Media File From Bucket
    - Aktivieren Sie diese Option, um Ihre Website-Mediendateien aus dem ausgewählten Cloud-Speicher bereitzustellen.
  • Upload Media Files On Bucket When Uploaded On Media Library
    - Wenn Sie diese Option aktivieren, wird beim Hochladen neuer Dateien in Ihre Medienbibliothek eine vollständige automatische Synchronisierung durchgeführt. Das heißt, wenn Sie eine neue Mediendatei in WordPress hochladen, wird sie automatisch in Ihren synchronisierten Cloud-Speicher kopiert.
  • Delete Media From Bucket When Deleted From The Media Library
    - Wenn Sie diese Option aktivieren, wird beim Löschen von Dateien aus Ihrer Medienbibliothek eine vollständige automatische Synchronisierung durchgeführt. Das heißt, wenn Sie eine Mediendatei aus WordPress löschen, wird sie auch automatisch aus Ihrem Cloud-Speicher entfernt.

2. Aktivieren Sie die erste Option, um die Bereitstellung von Website-Medien aus dem Cloud-Speicher zu starten, und aktivieren Sie die beiden anderen, wenn Sie die automatische Synchronisierung anwenden möchten. Klicken Sie dann auf Speichern.

3. Jetzt können Sie in Ihrer WordPress-Mediathek überprüfen, ob die Links der Mediendateien geändert wurden.

Website-Medien von Amazon S3 bereitstellen
Der Link der Medien wird bei der Bereitstellung von Amazon S3 geändert

Die Mediendateien werden jetzt von Ihrem Cloud-Speicher bereitgestellt.

Das war's. So einfach ist es, Ihre Website-Medien von Amazon S3, Google Cloud Storage oder DigitalOcean auszulagern und bereitzustellen.

Anmerkung des Autors

Wie Sie sehen können, ist es wirklich einfach, Ihren Cloud-Speicher mit WordPress zu verbinden, indem Sie Media Storage to Cloud verwenden.

Sicherlich könnten Sie sich fragen, was ist, wenn Sie einen anderen Cloud-Speicher verwenden. Mein Rat wäre, eine der drei hier genannten zu verwenden, weil sie zuverlässig sind. Andere Clouds sind gut, aber diese drei sind in Bezug auf Sicherheit und Leistung unschlagbar und liefern jeden Tag ein besseres Ergebnis.

In diesem Leitfaden habe ich mich mehr auf das Offloading von Mediendateien konzentriert. In meinem nächsten Leitfaden werde ich Ihnen einen detaillierten Einblick in die Bereitstellung von Mediendateien für Websites über die drei hier erwähnten Cloud-Speicher geben.

Kategorien
Guide WooCommerce

Vollständige Anleitung zur Verwendung WooCommerce Variation Swatches Smartly [2022]

To increase sales in your online store, the first step is to impress your potential customers visually. And to do so, you must optimize your product pages.
The easier you make for buyers to choose their products, the higher the conversion.

If you have variable products in your store, you want to display all the variations of a product in a user-friendly way.

One of the latest trends that have seen great results is the use of swatches to present variations, rather than drop-down menus.

Hence, use WooCommerce variation swatches to present product variants in a more engaging and appealing way.

Create greater buyers’ intent because:

  • Buyers will get a preview of the variants rather than text. For example, they will see the color red visually, rather than selecting a text ‘Red’, hence helping to take a practical decision.
  • It’s easier to browse through variants by clicking on swatch buttons, rather than drop-down menus.
  • The swathes will attract the buyers to check through the variants, and possibly create a buyer’s intent. As they say, the more you spend time on a product, the more you wish to buy it.

Today we will discuss how you can use variation swatches on your WooCommerce store in the most result-driven way.

You will learn how to apply the right type of variations swatches depending on your product variants to enhance the buyers’ intent.

Nachdem Sie diesen Leitfaden gelesen haben, werden Sie in der Lage sein:

  • Understand how each variation swatch type is important
  • Set up color, image or label swatches for variants on your own
  • Examples of great use of variation swatches
  • Enhance buyers’ intent and increase your sales

Tauchen wir also ein.

When And Why Use Different Variation Swatches?

Use WooCommerce Variation Swatches

Your variable products may have different types of variations. You can’t set up unique variation swatches for different variants to create maximum engagements.

Color Variation Swatches

A product may be available in various colors.For example, let’s say you are selling a t-shirt that has three colors, Red, Blue, and Yellow.

Then you can use color variation swatches to let your customers choose from the variants.

By default, WooCommerce lets people choose through a boring drop-down menu. But you can make it more engaging with colored swatch buttons.

See the difference yourself:

Default

Default color variation selection
Default WooCommerce variations selection for color

Using Color Variation Swatches

WooCommerce Color Variation Swatches
Using WooCommerce Color Variation Swatches

As you see, the colors are clearly visible. So a person will find the selection easier and more practical.

Image Variation Swatches

Certain products are more versatile and you may present the variants using image variation swatches.

For example, let’s say you sell gift boxes with different shapes. So rather than presenting the drop-down selections, you may display variants with image swatches.

Here’s how amazing it becomes:

Default

Default image variation selection
Default WooCommerce variations selection for shape

Using Image Variation Swatches

WooCommerce Image Variation Swatches
Using WooCommerce Image Variation Swatches

As you can see, the variants are presented in small swatches for the shapes thus making it more attractive.

Tip:
It is always ideal to have an image with all variants together as the featured image for the product. In case you don’t have any, then use the image of the most popular variant as the featured image.

Label Variation Swatches

Certain factors such as Size or Length are difficult to portray visually.
For example, if you are selling a t-shirt with sizes, L (for large), M (for Medium), and S (for Small), then you have no way to visually show the actual sizes.

In that case, you can still make it attractive by presenting the variants using label variation swatch buttons.

Here’s how it will still make a difference:

Default

Default variation selection
Default WooCommerce variations selection for size

Using Label Variation Swatches

WooCommerce Label Variation Swatches
Using WooCommerce Label Variation Swatches

Despite no size visualization, the swatches make the selection more appealing. People will often click on the swatches just out of curiosity.

Text Variation Swatches

Similar to sizes, few other variation factors such as material or age-group related variations, etc, can not portrayed visually, nor they can be portrayed as labels.

For example, let’s say you are selling a hat in the Kids size, Teen size and Grow-up size.

In that case, you can turn them in to attractive buttoned text swatches.

The advantage here is that all the variations available will be listed in front of the buyer and he/she can make the selection simply by clicking on the button(s).

Here’s a preview:

Default

Default variation selection
Default WooCommerce variations selection for size

Using Text Variation Swatches

WooCommerce Text Variation Swatches
Using WooCommerce Text Variation Swatches

Tip:
If you have size labels other than numbered values, then keep a chart in your site to find the exact values of the sizes. Stores often lose sales due to the lack of this chart. Customers are not patient enough to knock you on customer care to find out the exact size.

As you saw, changing variation menus to swatches make it so much more attractive and engaging.

Now, if you want to implement these attractions, then you can easily do so using the plugin Variation Swatches For WooCommerce.

Variation Swatches For WooCommerce

Variation Swatches for WooCommerce is a simple plugin with which you can change the basic dropdown selection of variants to button swatches easily. It takes only a few clicks.
Let me give you a step by step guide on how you can easily set up variation swatches on your online shop using Variation Swatches for WooCommerce.

How To change dropdown to button swatches for WooCommerce variations?

As discussed earlier, WooCommerce displays variations as dropdown options on the product page.

However, you can easily convert the variation options from dropdown to button swatches in just a few clicks, using the plugin.

Here’s how you can do it step by step.

1. First, install and activate Variation Swatches for WooCommerce.

On your admin dashboard, you will get a new menu called Swatches. Click on it.

Variation Farbfelder

It will take you to the plugin dashboard.

Variation Swatches for WooCommerce Dashboard
Variation Swatches for WooCommerce Dashboard.

2. Set basic swatch style and design

On General Settings, you will find the options to set color and border of swatches as normally displayed, when hovered, or when selected.

Plus you will be able to set the font size.

Configure these settings as you like.

3. Go To Controls Tab

Click on the Controls tab on the left.

Steuert

The Controls tab will have many options.

Controls tab

4. Enable Dropdown To Button Swatches

Aktivieren Sie hier die Option Dropdown zu Schaltflächenfeldern.

Dropdown to button swatches

Then save settings. Now you will see that the variations on product pages will be displayed in the form of button swatches.

Default Dropdown Selection

Default Dropdown Selection

Button Swatches For Variations

Button Swatches for Variations

Once you have enabled the dropdown to button swatches for your store, now you can customize the swatches into color, image or label swatches easily, in few simple steps.

How to Set Up WooCommerce Color Swatches for Color Variations

By using Color swatches, you can give a visual idea of the color the buyer will be choosing. So the there will be no hesitation.

And as you saw earlier, color swatches are very attractive compared to the ordinary dropdown selection.

To to set set up color swatches, follow the steps below.

1. Dropdown-Felder für Schaltflächen aktivieren

First follow the steps to enable dropdown to button swathes as explained earlier.

(Click here to read how to enable dropdown to button swatches.)

2. Go To Your Created Attributes

The variation terms are usually grouped in to attributes.

Go to Dashboard > Products > Attributes and you will find the list of attributes you have already created in your store, and the option to add new attributes.

Attributes Overview

Auf der rechten Seite sehen Sie die Liste der erstellten Attribute, die Sie haben.

Global Attributes

3. Ändern Sie Ihr gewünschtes Attribut als Farbtyp

Hover your mouse on the attribute name for which you want to use color swatches.

Edit color attribute

You will get the options to Edit or Delete. Click on Edit and it will take you to the Edit attribute page.

Edit Attribute for Color

Once you are on the Edit Attribute page, you will see you have a field for Type.

Attribute type field for color

Click on it and choose the option “Color”.

Color type attribute

Then click on the Update button below.

4. Set Color Swatches For Variation Terms

Once you have set the attribute type to “Color”, now you can assign color swatches to the variant terms under this attribute.

Go back to Dashboard > Products > Attributes and on the right side of the attribute (you just set as Color type), you will get the option to “Configure terms”.

Configure Terms For Color Variation Swatches

Click on Configure terms and it will take you to the the following page:

Configure Terms Page

Here, you can either add terms for color variations or, on the right side you can see the variant terms that you all ready have for colors on your store.

Color Variation Terms List

Hover your mouse on one color term and you will find the option to Edit.

Edit Variant Term

Click on edit and it will take you to the edit page. Here, below you will see that you have the option to choose a color.

Edit Color Mode

Click on “Select Color” and you will get the option to assign a color.

Color for swatch

Wählen Sie eine geeignete Farbe und klicken Sie erneut auf Farbe auswählen.

Then click on the Update button below.

Gehen Sie nach der Aktualisierung zurück und Sie werden sehen, dass eine Vorschau der Farbe direkt neben dem Namen des jeweiligen Farbvariantenbegriffs angezeigt wird.

Color variation swatch
Blue color swatch selected for Blue variation term

Do the same for the rest of the color variations and that’s it. Now your products will have color variation swatches instead of dropdown selection for color variants.

Using Color Variation Swatches

WooCommerce Color Variation Swatches

How to set up image swatches for WooCommerce product variations?

By using Image swatches, you can display certain variants as attractive swatches when viewing product(s).

And as you saw earlier, image swatches are very engaging, compared to the ordinary dropdown selection.

To to set set up images swatches, follow the steps below.

1. Dropdown-Felder für Schaltflächen aktivieren

First follow the steps to enable dropdown to button swathes as explained earlier.

(Click here to read how to enable dropdown to button swatches.)

2. Go To Your Created Attributes

The variation terms are usually grouped in to attributes.

Go to Dashboard > Products > Attributes and you will find the list of attributes you have already created in your store, and the option to add new attributes.

Attributes Overview

Auf der rechten Seite sehen Sie die Liste der erstellten Attribute, die Sie haben.

Global Attributes

3. Assign Your Desired Attribute As Image Type

Hover your mouse on the attribute name for which you want to use image swatches.

Edit image attribute

You will get the options to Edit or Delete. Click on Edit and it will take you to the Edit attribute page.

Edit Attributes for Image

Once you are on the Edit Attribute page, you will see you have a field for Type.

Edit Attributes for image

Click on it and choose the option “Image”.

Image type attribute

Then click on the Update button below.

4. Set Color Swatches For Variation Terms

Once you have set the attribute type to “Image”, now you can assign image swatches to the variant terms under this attribute.

Go back to Dashboard > Products > Attributes and on the right side of the attribute (you just set as Image type), you will get the option to “Configure terms”.

Configure Terms For Image Variation Swatches

Click on Configure terms and it will take you to the the following page:

Configure Terms Page For Image Swatches

Here, you can either add terms for variations or, on the right side you can see the variant terms that you already have (under this attribute).

Image Variation Terms List

Hover your mouse on one term and you will find the option to Edit the term.

Edit Variant Term

Click on edit and it will take you to the edit page. Here, below you will see that you have the option to upload or add an image.

Edit Image Mode

Click on “Upload/Add Image” and you can either upload an image or choose an image from your media library.
image For Swatch

Choose an appropriate image then click on the Update button below.
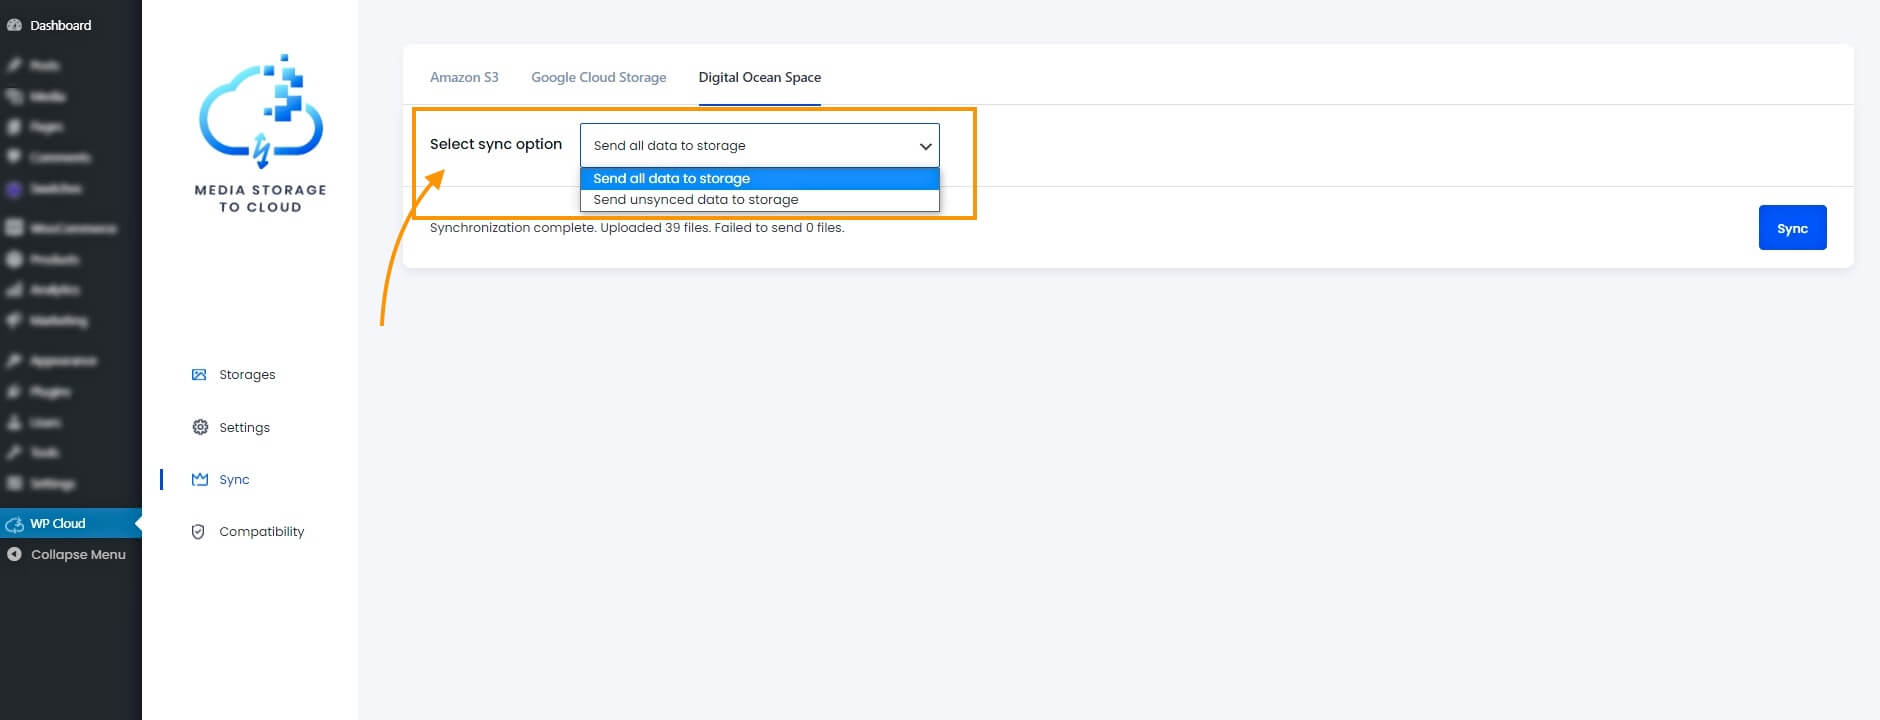
Once updated, go back and you will see that a preview of the image is there just beside the name of the variant term.

Image variation swatch
Triangle image swatch selected for Triangle Shaped variation term

Do the same for the rest of the variants and that’s it. Now your products will have image variation swatches instead of dropdown selection for these variants.

Using Image Variation Swatches

WooCommerce Image Variation Swatches

How to set up a label variation swatches for variable products?

By using Label swatches, you can display certain variants that can be recognized with single letters or numbers.

And as you saw earlier, Label swatches are more catchy, compared to the ordinary dropdown selection.

To to set set up label swatches, follow the steps below.

1. Dropdown-Felder für Schaltflächen aktivieren

First follow the steps to enable dropdown to button swathes as explained earlier.

(Click here to read how to enable dropdown to button swatches.)

2. Go To Your Created Attributes

The variation terms are usually grouped in to attributes.

Go to Dashboard > Products > Attributes and you will find the list of attributes you have already created in your store, and the option to add new attributes.

Attributes Overview

Auf der rechten Seite sehen Sie die Liste der erstellten Attribute, die Sie haben.

Global Attributes

3. Assign Your Desired Attribute As Label Type

Hover your mouse on the attribute name for which you want to use label swatches.

Edit label attribute

You will get the options to Edit or Delete. Click on Edit and it will take you to the Edit attribute page.

Edit Attributes for label

Once you are on the Edit Attribute page, you will see you have a field for Type.

Edit Attributes for label

Click on it and choose the option “Label”.

Label type attribute

Then click on the Update button below.

4. Set Label Swatches For Variation Terms

Once you have set the attribute type to “Label”, now you can assign label swatches to the variant terms under this attribute.

Go back to Dashboard > Products > Attributes and on the right side of the attribute (you just set as Label type), you will get the option to “Configure terms”.

Configure Terms For Label Variation Swatches

Click on Configure terms and it will take you to the following page:

Configure Terms Page For Label Swatches

Here, you can either add terms for variations or, on the right side you can see the variant terms that you already have (under this attribute).

Label Variation Terms List

Hover your mouse on one term and you will find the option to Edit the term.

Edit Variant Term

Click on edit and it will take you to the edit page. Here, below you will see that there is a field for you to enter a Label character.

Edit Label Mode

Input the Label you want to display.

Label for swatch

Then click on the Update button below.

Once updated, go back and you will see that a preview of the label is there just beside the name of the variant term.

Label variation swatch

Do the same for the rest of the variants and that’s it. Now your products will have label variation swatches instead of dropdown selection for these variants.

Using Label Variation Swatches

WooCommerce Label Variation Swatches

Schlussfolgerung

It is clear that dropdown selection for variable products is no longer preferred. The best way to offer variations is by using swatches.

And the best part is, it’s super easy to implement and can be done in just a few clicks using the plugin Variation Swatches for WooCommerce.

So I suggest you try out the plugin and leverage the benefit of WooCommerce variation swatches. Take advantage of attracting buyers easily without much effort.

If you want to learn how to create a variable product, you can follow this guide:

Kategorien
Guide Product Feed Manager For WooCommerce

Google kündigt kostenfreie Google Shopping-Aktionen an [2022]

The Corona outbreak is a big threat to humanity. We all know how dangerous the virus is. However, it also comes with another big threat – an economic crisis.

Due to the lockdown, most offices are incapable of running operations, and consumers have no option but to stay at home. And every business saw a drastic fall in its revenue.

However, a few local online shops are able to continue running their business, despite earning a lot less than usual.

Since people are not able to go out, they may order products online and get them delivered to their homes, thus creating a little opportunity for the eCommerce business to somehow survive.

However, things might just get better for your shop.

Selling On Google Shopping Is Free Of Cost During Corona Crisis

Earlier on 21st April 2020, Google made a huge announcement.

Within 1 week, Google will start allowing merchants to sell their products through Google Shopping completely free of cost!

According to Google, “as consumers increasingly shop online, they’re searching not just for essentials but also things like toys, apparel, and home goods.”

So Google wants to extend out a helping hand to both the consumers and the merchants. Free online listing means more merchant shops will be able to sell products through Google Shopping, and consumers will get more products to buy from.

This is great news for all online shops, especially the sites that deliver locally and the stores that sell digital products.

If you are running a WooCommerce store and deliver locally, then this is your biggest opportunity to get the maximum exposure and increase sales during this global crisis.

How To Make The Most Out Of This Opportunity

This could be your best chance to sustain during the economic crisis threat. And there is still one week time before Google starts this initiative.

So, let us look at how you can make the most out of this golden opportunity that Google is offering.

With one week at hand, we suggest you do the following:

  1. Prepare your shop by optimizing product details for SEO
  2. Identify your best selling products and plan a discount campaign
  3. Identify products that might be necessities and plan a discount campaign
  4. Make arrangement for selling a few digital products if possible
  5. Get your products listed on Google Shopping ASAP

Let us look at how you can pull this off.

1. Prepare your shop by optimizing product details for SEO

Product Details For SEO

SEO is always important if you want your products to be found on Google. Even if you list your products on Google shopping, SEO optimization will determine how relevant your product is based on your customer’s search term.

**Make sure to use an SEO plugin, such as Yoast or RankMath, on your WooCommerce store.

For example, if you are selling a T-shirt with Avengers’ design on it, then obviously you want your ideal customers to be the ones who are looking for Avengers themed t-shirts.

In that case, you can set the t-shirt title, Special Marvel Avengers Tshirt – Red, and set the keyword to Marvel Avengers Tshirt. Within the description, use this keyword a couple of times in the product description, and include it in the product link as well. These will indicate that the product is relevant to the keyword.

Your SEO tool will give you a score to understand if it was well optimized.

If you have a few products in your shop, then apply SEO optimization on every product. If you have too many products, then conduct SEO optimization at least for your best selling products.

2. Plan A Discount Campaign For Your Best-Selling Products

Browse through your website’s analytics or reports, and find out which products performed the best in the last two months.

Collect their titles, links, and the price.

Now, the 1st thing to do is to optimize them for SEO.

Next, plan out a discount campaign for your best selling products, such as a 20% discount for the 1st twenty sales from Google Shopping, or a 10% discount throughout the lockdown.

Plan A Discount Campaign

You might assume that since these are bestsellers, they will sell automatically through Google’s immense reach.

However, keep in mind, just like you, there are tons of other online shops that also plan to take advantage of this opportunity. Hence, along with more exposure, you will face more competition as well.

Consumers will look to purchase products either based on higher rating, or lower price. Nowadays, a lower price will get a high priority since everyone is trying to save money in response to the crisis.

Hence, it is only logical to run discounts and increase your sales.

3. Plan A Discount Campaign For Products That Might Be Necessities

Certain products are a necessity nowadays besides food and beverages, for example, bathing products, cleaning products, tissues, tampons, etc.

Also, certain electronics such as water purifiers, ovens, hair trimmers, etc might also be considered necessities at this time.

You may identify such products, optimize them for SEO, and decide on a discount campaign for them as well.

**Since we are focusing on local sales, it would be even better if you could deliver free of cost. But that’s totally your decision to make.

4. Make Arrangement For Selling A Few Digital Products If Possible

You might have a fixed category of products that you sell.

However, if you are an online retail shop that sells various types of products, then you might consider adding a few digital products (if you don’t have any already) such as movies, music collections, games, or books.

Most people are sitting idle at home, and looking for ways to make their days more entertaining. Hence, these digital products are pretty demanded in the current situation.

Even though there is no guarantee that if you arrange such products they will have maximum sales, it is still a high possibility.

5. Get Your Products Listed On Google Shopping ASAP

With this free of cost opportunity at hand, you should list your products on Google Shopping ASAP. You need to be prepared to upload your products right from the start.

Get Products Listed On Google Shopping ASAP

To do so, you first need to understand that Google Shopping has a fixed set of instructions that you must follow for your products to get approved.

It will look for specific data in the right format that is accepted by Google Shopping. Plus, Google has its own set of categories that you must indicate through your feed.

Here’s a guide to set up your WooCommerce Product data in an optimized way for Google Shopping:

In the guide, you will get actionable instructions on what data to submit and how to optimize them for approval on Google Shopping.

For example, if you have a t-shirt with 3 color variations, red, blue, and green, then you have to submit each variation separately and include the color name in the Product title. So if the product is called “New Cotton T-shirt”, for its the red variant, then the title should be “New Cotton T-shirt – Red”.

Similar to this, there are several other tips that you will find in that guide to optimize your feed data.

Now, to create the product feed, it’s really not convenient to do so manually. Rather use a product feed generation tool to generate a feed for all of your products in a few minutes.

If you own a WooCommerce store, then you can use Product Feed Manager For WooCommerce. It is a plugin that already has a set template for Google Shopping.

All you need to do is create a new feed, choose Google Shopping as the merchant, and assign a few attributes with the right values.

Let us look at a few reasons for you to use Product Feed Manager For WooCommerce.

Produkt-Feed-Manager für WooCommerce

WPFM banner for Google Shopping promotions

The plugin as a few features that are dedicated to helping you generate an accurate product feed for Google Shopping.

1. Pre-Built Google Shopping Feed Template

Google specifically requires you to submit 12 mandatory data for your products:

  • Produkt-ID
  • Produkt-Titel
  • Produktbeschreibung
  • Produkt-Link/URL
  • Produkt-Kategorie
  • Google-Produktkategorie
  • Produkt-Bild-URL
  • Verfügbarkeit der Bestände
  • Regulärer Preis
  • Produkt-Zustand
  • Hersteller/Markenname
  • GTIN or MPN

And there are a few more conditional attributes that you need to submit depending on your niche.

The plugin by default has these attributes set. When you choose Google Shopping, the plugin will display the template which includes all the mandatory fields and values assign (except for 3 which I will explain in a bit).

So, you don’t need hours to set it up, and nor do you need exclusive knowledge to set up the feed. 80% of your work is already done.

2. Auto-sync WooCommerce Products To Google Shopping

One of the notable features this plugin has is the option to auto-sync your generated product feed to Google Shopping.

Once you generate the product feed, you can send the feed to your Google Merchant Center in just a click. Once you send the feed to Google, any changes you make later to the products and the feed, they will automatically be updated on Google Shopping.

You won’t have to manually upload new feed files to Google every time you make changes.

Here’s a written guide on how it works:

Here’s a video to show you how it works:

3. Category Mapping For Accepted Google Categories

On the mandatory attributes mentioned above, there is one called Google Product Category. You need to assign each of your products to a category that Google accepts.

Don’t worry, you do not need to change any data or category names on your shop for this.

The plugin has a Category Mapping feature where you can map your shop categories to that of Googles. Durig feed generation simply assigns the mapping values as the values for Google Product Category.

It’s really easy to use. Here’s a written guide on it:

Here’s a video to show you how it works:

4. Special Custom Attribute Fields

On the mandatory attribute list mentioned above, you can see that there certain attributes, Manufacturer/Brand, GTIN, and MPN.

However, WooCommerce by default has no field(s) for these attributes.

Product Feed Manager For WooCommerce comes with the feature of including these fields to your products where you can assign the values.

You also get extra custom fields for conditional attributes such as Gender, Color, Size, or Pattern which you need to submit if you sell products in the Apparels category.

Here’s a guide about it:

5. Avoid Price Mismatch Error When Uploading Feed

Many people face a common error, “Price mismatch” when uploading the feed and many of their products get rejected.

The reason behind this is, for a variable product, if you have different pricing for different variations, WooCoomerce displays both the highest price and the lowest price when Google crawls that product page for a particular variation. This causes a mismatch in the price you submitted.

Product Feed Manager For WooCommerce holds the option to fix JSON LD structured data so that only the accurate price is displayed when Google crawls a variant of a variable product.

It’s just a single click in the plugin’s settings to activate it. Here’s how:

Hence, you will be able to avoid facing the “Price mismatch” error on Google Shopping.

6. Exclusive Filter For Efficient Feed Generation

The plugin allows you to generate a product feed for all the products, or you may use it’s filter options to generate a feed for specific products only.

For example, if you have products that are no longer in stock and you do not want to submit them on Google, then you can use the custom filter to exclude all products that are out of stock.

It also has a category filter and tag filter where you can simply choose certain categories or tags to generate a product feed for the products under those categories or tags only.

Here’s a video to show you how it works:

This really saves time and you can upload only the products that you want to sell through Google Shopping.

7. Easily Add Variant Values To The Product Title

Now, as I have mentioned above, Google advises to include the variant value to the Product title (though not mandatory).

However, it is not necessary to change the title in your store to achieve this. The plugin allows you to choose to add the variant names to Product titles in the product feed that you generate.

As you can see, this plugin is a great help in generating an accurate product feed quickly, and optimize the feed for getting the best results through Google Shopping.

Schlussfolgerung

Google is taking a very honorable initiative to help both the consumers and sellers. There is no way you should lose this opportunity.

So, go ahead and prepare your store right away if you want the best results out of free promotion through Google Shopping and increase your sales to sustain during this world crisis.