As a WooCommerce store owner, you always want to scale up the sales of your store in the most optimized way.
One of the most effective ways to increase the number of sales in your store is to promote your store products in the largest marketplaces, especially if you own a relatively new online store.
With 2.31 billion monthly visitors, which means 77 million daily shoppers, Amazon is the largest marketplace in the world where you can promote your products.
Promoting on a giant marketplace like Amazon Seller Central will benefit your business because:
- On Amazon, your products will reach way more shoppers than your own store, with much less effort.
- Amazon has detailed information about their shoppers, so, your products will be shown to the shoppers who will have a genuine tendency to buy.
- Shoppers trust Amazon and it’s listed products, whereas you may face trust issues on your store from first-time buyers.
By generating a product feed, you can upload products on Amazon at a bulk amount, which will save you a huge amount of time.
You can easily submit products on Amazon, which will automatically create structured products and perform better on search results.
But first, you need to know how to create an accurate product feed of your products to submit on Amazon Seller Central.
There are certain ways for you to optimize the product feed for maximum sales through Amazon Seller Central.
After reading this guide, you’ll be able to:
- Create an accurate and perfect product feed for Amazon Marketplace.
- Successfully promote and market your WooCommerce products on Amazon and increase your sales.
So, let’s get started.
How To Open an Amazon Seller Central Account To Promote Your Products
Before you start promoting your products from the WooCommerce store to the Amazon Marketplace, you have to open an account on Amazon seller central.
But first, let’s look at the necessary things you need before opening the account.
Requirements To Open An Amazon Seller Central Account
1. Internationally Accepted Credit Card
You must own a credit card that can is internationally accepted and is connected to your valid email address.
2. Tax Identification Information
Amazon will ask for the tax identification number ( EIN if you’re in the states) of you or your business.
3. Business Information
Your legal business name, address, email and other contact information will be required.
4. Bank Account Information
You will also require a bank account and other related basic information.
Once you have these gathered and organized, follow the steps below to create an Amazon Seller Central account.
Step 1 – Start Signing Up
Go to the following link to start the signup process:
Here, we will show you how to open an account for an individual seller.
Once you go to the link above, you will see a yellow, Start Selling button.

Click on the Start Selling button, and you will be taken to the registration page for Amazon Seller Central.
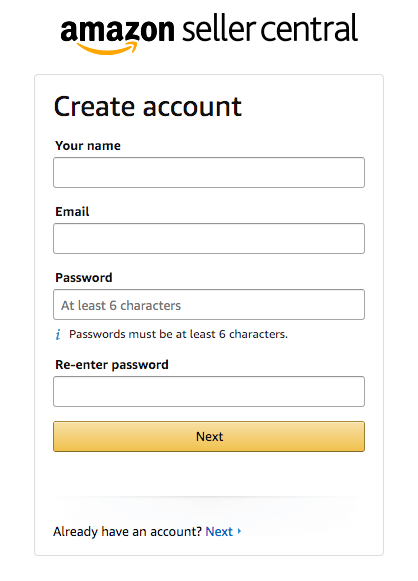
Provide your like name and email address, set up a password and click on the Next button.
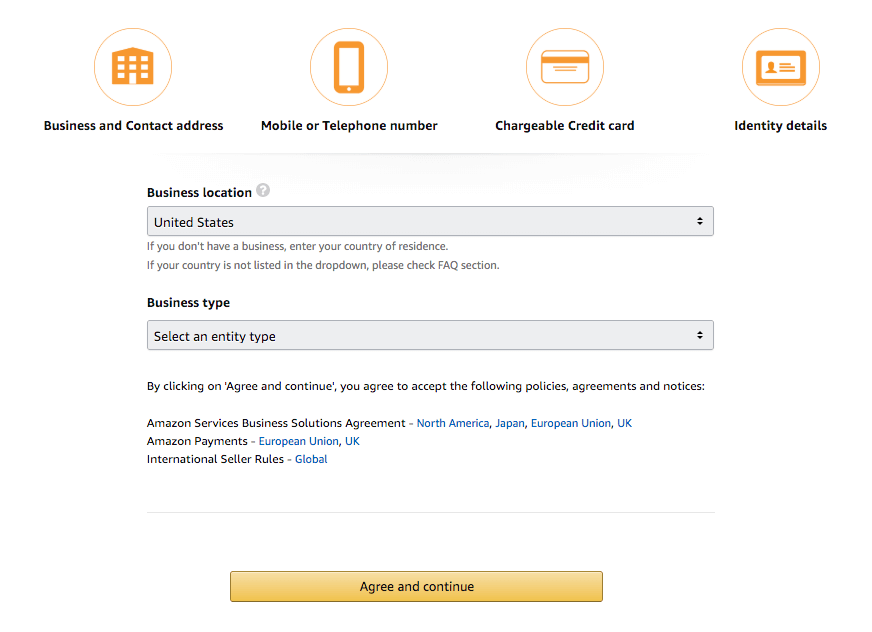
Step 2 – Set Up Your Business Information
On the next step, you have to provide your business information such as Business Location, Business Type, etc.
Step 3 – Personal Information
Here, you have to provide more information such as the country of your citizenship, the country of your birth, your date of birth and the full business address.
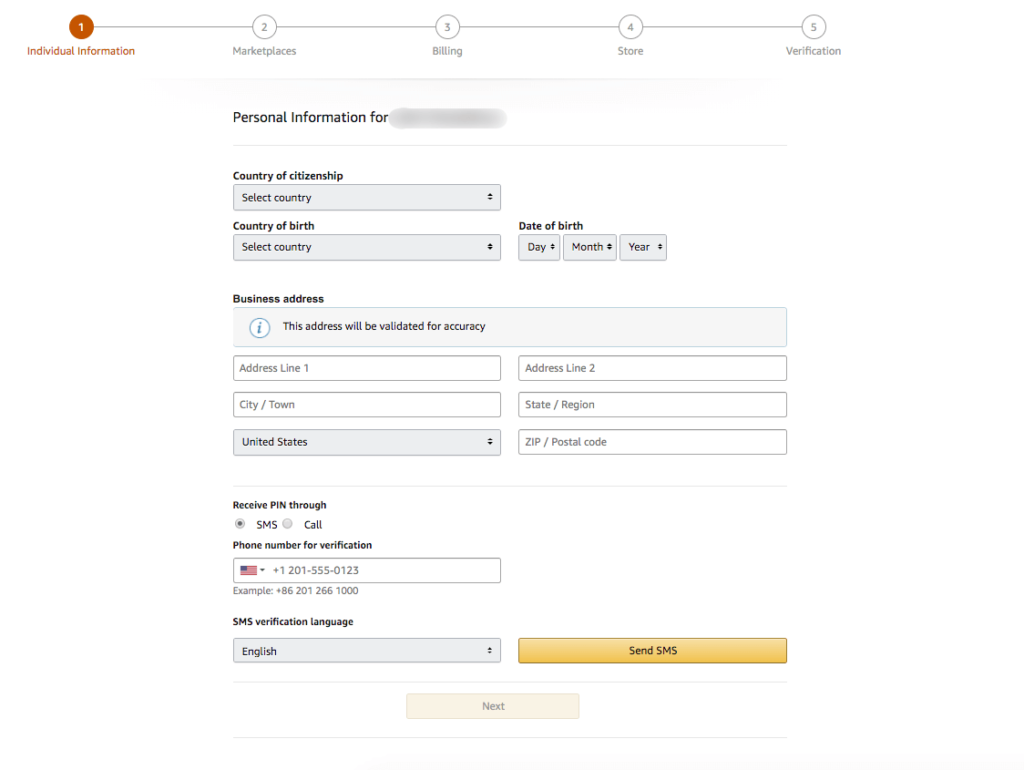
You will also need to provide your contact number, which you will get a call or SMS to verify that it’s your valid number.
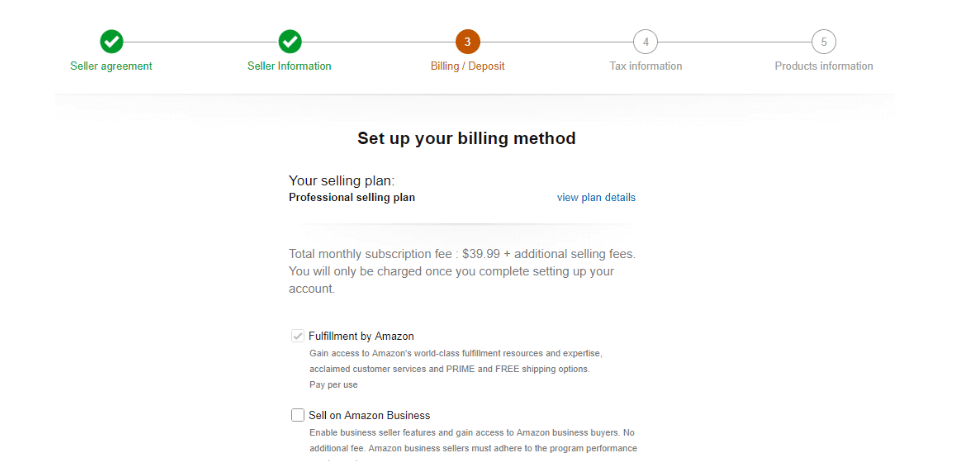
Step 4 – Set Up Your Billing Method
In this step, you have to set up the billing method for your Amazon Seller Central account. You’ll see the cost details of your plan.
There are 2 plans you can choose from:
- Professional plan – $39.99 monthly subscription plan.
- Individual plan – $0.99 per sold product.
The individual plan is perfect for you if you’re planning to sell less than 40 products per month. (It really depends on the category.)
The professional selling plan is a better choice for you if you’re planning to sell more than 40 products per month.
Step 5 – Complete A Tax Interview
In this step, you have to provide your tax information through a tax interview.

In this interview, Amazon will verify if you’re an individual seller or a professional business.
You may use your social security number instead of the employer identification number as your tax identification number.
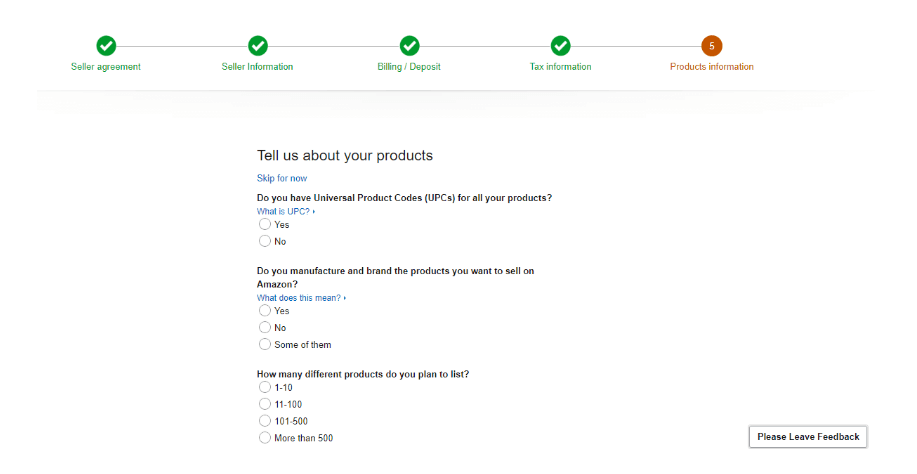
Step 6 – Provide Your Product Information
This is the last step. Here, you have to provide some basic information about your products such as:
- If you have Universal Product Codes (UPCs) for your products.
- If you are a manufacturer or you have your own brand.
- How many different types of products you want to list on Amazon.
List of Dedicated Amazon Marketplaces
Right now, Amazon operates in 16 different countries with local domains and languages.
However, Amazon can ship products almost all over the world.
How To Create An Optimized WooCommerce Product Feed For Amazon
Similar to most other marketplaces, Amazon also requires you to submit data in specific formats. In fact, there are a few details that are mandatory to provide to be approved for selling.
Product Data Specification
A typical amazon product feed looks as follows:
<?xml version="1.0" encoding="UTF-8" ?>
   <products>
        <product>
		Product Data Attributes
        </product>
  </products>
</rss>
On the feed, you need to provide the following data attributes.
Necessary Data Attributes
- Product Title
- Product URL
- Product Category
- Price
- SKU
- Image URL
- Brand
- UPC/EAN
- Product Description
- MPN
- Shipping Cost
- Bullet Points
- Height
- Length
- Weight
- Width
- Item Package Quantity
- Model Number
- Keywords
- Other Image URL
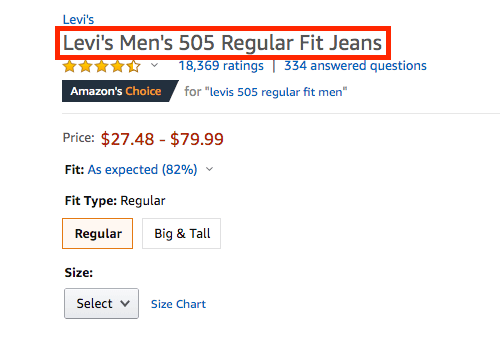
Product Title
| Attribute | title |
| Example | Beanie with Logo |
| Feed Data | <title><![CDATA[Beanie with Logo]]></title> |
This is the name of your product which will be displayed.
Now, there are some criteria for the product title on Amazon. Such as:
- The product title must not exceed 200 characters, including spaces.
- A product title must not contain promotional or marketing phrases like “free shipping” or “100% quality guaranteed”.
A product title must not contain special characters like ~ ! * $ ? _ ~ { } # < > | * ; ^ ¬ ¦
This is what a perfect product title on Amazon looks like.
Product URL
| Attribute | link |
| Example | https://yourwebsite.com/product/beanie-with-logo |
| Feed Data | <link> <![CDATA[https://yourwebsite.com/product/beanie-with-logo]]> </link> |
This is the URL of a particular product page.
Your product URLs should start with HTTPS or HTTP.
Product Category
| Attribute | product_type |
| Example | Clothing, Accessories |
| Feed Data | <g:product_type> <![CDATA[ Clothing, Accessories ]]> </g:product_type> |
You should always provide which category your products fall under.
If you have sub-categories in your store, try to specify them as it will give you better results.
Price
| Attribute | price |
| Example | 20.00 GBP |
| Feed Data | <price>20.00 GBP</price> |
The Price attribute should be submitted with the currency as the Suffix. Like GBP or USD.
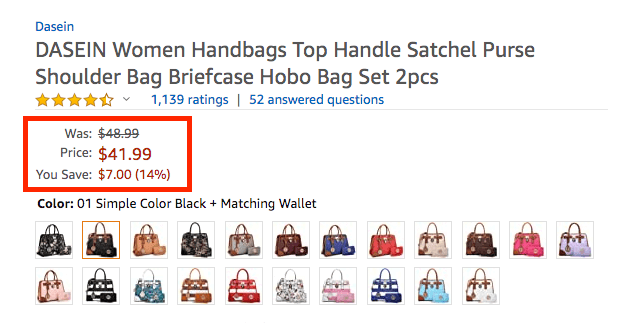
This is how the product price shows up on Amazon product pages (Here, you can also see the discount details).
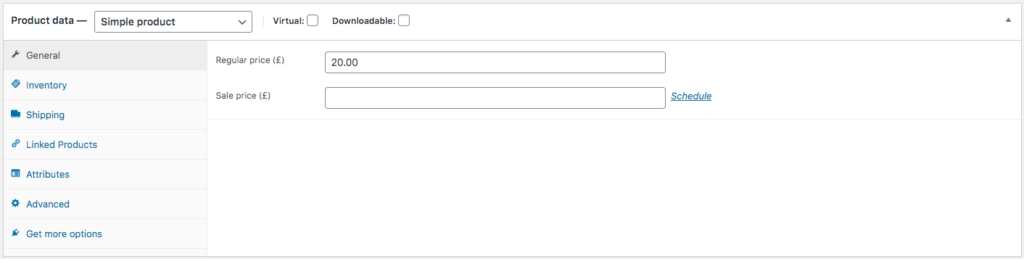
You can set the product prices from here on your WooCommerce store.
SKU
| Attribute | sku |
| Example | Woo-beanie-logo |
| Feed Data | <sku>Woo-beanie-logo</sku> |
KU or Stock Keeping Unit is an inventory management term that you can use to identify the stocks available from lists, order forms, and invoices.
Here are the conditions for SKU in Amazon:
- Each product in your product feed must have a unique SKU value.
- Every SKU value uploaded on Amazon creates a new record.
- As each SKU value is unique, you’re not allowed to change it. These values will remain on your feed until you delete it.
- If you upload a product with an already existing SKU value, the new product data will replace the old product data against that SKU.
Image URL
| Attribute | image |
| Example | https://yourwebsite.com/beanie-with-logo-1.jpg |
| Feed Data | <image> https://yourwebsite.com/beanie-with-logo-1.jpg </image> |
Here, provide the URL of your product image. The URL should start with ‘HTTP’ or ‘HTTPS’ as other formats are not supported.
Here are the guidelines for product images on Amazon:
Supported Image formats for Amazon: PNG, JPG, JPEG, and TIFF.
Non-supported image formats for Amazon: AI, PSD, PDF or EPS.
Requirements:
- You must submit one large product image with a minimum of 500 pixels and a maximum of 2100 pixels on the longest dimension.
- The image must be clear and focused.
- The image must fill the 85% area of the frame.
- The background color has to be pure white.
- The image color must be in RGB mode.
- Any background image or other object in the image is not allowed.
- The image has to be a professional image or cover art.
- The entire product must be in the image, no cropping allowed.
- No watermarks, logos, texts or borders are not allowed in the image.

Here is how you can show product images.
Brand
| Attribute | brand |
| Example | RexTheme |
| Feed Data | <brand><![CDATA[AmazonRex]]></brand> |
Provide the Brand of the product here. You can set your own Brand or Store name as well.
EPC/EAN
| Attribute | ean |
| Example | 4856349589328 |
| Feed Data | <ean>4856349589328</ean> |
This field is for the product identifier numbers.
If you’re promoting your products in Europe, you have to provide the EAN or European Article Numbers for your products.
Or you can provide the EPC or Electronic Product Code which is applicable all over the world.
Here are all the accepted forms of product identifiers:
- UPC-E ( Which is 6 digits)
- EAN-8/UCC-8/GTIN-8 ( Which is 8 digits)
- UPC-A/GTIN-12 ( Which is 12 digits)
- EAN-13/UCC-13/GTIN-13 ( Which is 13 digits)
- EAN-14/UCC-14/GTIN-14 ( Which14 digits)
According to the rules of promoting on Amazon, you must provide any of these valid identifier numbers.
Product Description
| Attribute | description |
| Example | This is a travel backpack. |
| Feed Data | <description> <![CDATA[This is a travel backpack.]]> </description> |
You have to describe the products in your own way here.
Here are the violations to avoid while writing product descriptions:
- Using offensive, pornographic or obscene words.
- Including Phone numbers, Emails, or any contact information.
- Using words like ‘The best’ and ‘The most’.
- Capitalizing the entire description.
- Requesting a positive customer review.
- Using any review or testimonials.
- Links to any website.
- Time-related information like dates.

This is an example of a Product Description on Amazon.
You can also use a product description generator for this.
MPN
| Attribute | mpn |
| Example | 4856349589328 |
| Feed Data | <mpn>4856349589328</mpn> |
You have to provide the Manufacturer part numbers for your products here.
If you have already assigned the EAN/EPC to your products, you don’t need to provide MPNs for your products.
Shipping Cost
| Attribute | shipping_cost |
| Example | 9.99 USD |
| Feed Data | <shipping_cost>9.99 USD</shipping_cost> |
You have to set the Shipping Cost of your products here and Amazon suggests you simplify it as much as you can.
You can set the Shipping Cost in 3 ways:
- Item/Weight-Based Shipping
- Product-banded Shipping
- Weight-tiered Shipping.
Follow these Amazon instructions on shipping rates to set your shipping costs.
Bullet Points
| Attribute | bullet_point1 |
| Example | This product is waterproof! |
| Feed Data | <bullet_point1>This product is waterproof!</bullet_point1> |
Bullet points are part of your product description. This attribute allows highlighting the key feature of your products in bullet points.
Amazon allows the vendors to add up to 10 bullet points. Sellers can add up to 5 bullet points.
You are allowed to only describe your product features on these bullet points.
The bullet point violations are the same as the product description violations.
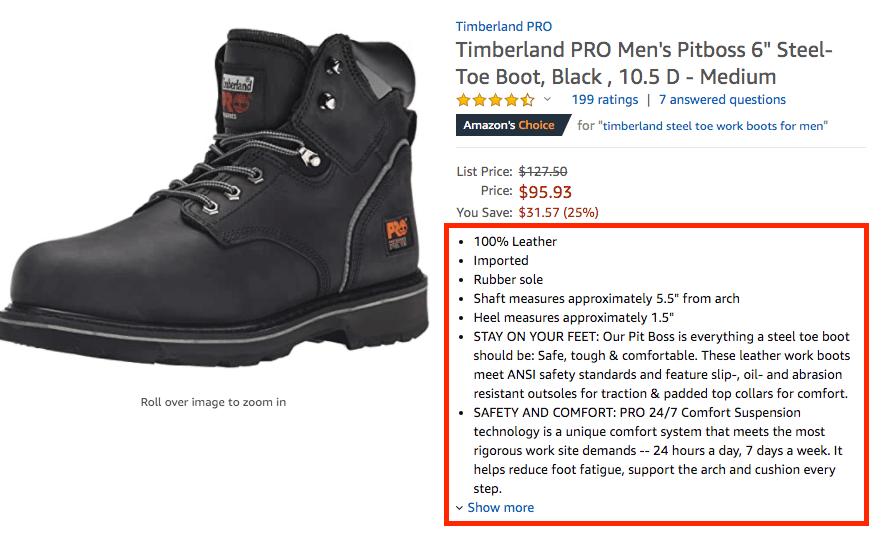
Here you can see an example of the bullet points on Amazon product pages.
Height
| Attribute | height |
| Example | 2 M |
| Feed Data | <height><[Product height]></height> |
Here, you have to mention the height of each of your products.
Length
| Attribute | length |
| Example | 2M |
| Feed Data | <length><[Product length]></length> |
Here, you have to mention the length of each of your products.
Width
| Attribute | width |
| Example | 2M |
| Feed Data | <width><[Product width]></width> |
Here, you have to mention the width of each of your products.
Weight
| Attribute | weight |
| Example | 2 KG |
| Feed Data | <weight><[Product weight]></weight> |
Here, you have to mention the weight of each of your products. This attribute can be crucial depending on your shipping rules.
Item Package Quantity
| Attribute | item_package_quantity |
| Example | 2 |
| Feed Data | <item_package_quantity><[package quantity]></item_package_quantity> |
If you’re selling products in packs or bundles, you have to mention the Item Package Quantity here.
Suppose you have a Coffe Bundle including coffee beans and sugar cubes, you have to mention 2 products here.
Model Number
| Attribute | model_number |
| Example | 2384 |
| Feed Data | <model_number>2384</model_number> |
If you sell your own branded or manufactured products, you may have to assign the model number to your products.
Otherwise, you don’t have to use this attribute.
Keywords
| Attribute | Keywords1 |
| Example | Lavender Wood Brown Large |
| Feed Data | <Keywords1>Lavender Wood Brown Large</Keywords1> |
You can set Keywords to your products for better results on Amazon searches.
Follow this Amazon instruction to know about the conditions and restrictions of using keywords and perfectly set them up for your products.
Other Image URL
| Attribute | other_image_url1 |
| Example | https://yourwebsite.com/beanie-with-logo-2.jpg |
| Feed Data | <other_image_url1> https://yourwebsite.com/beanie-with-logo-2.jpg </other_image_url1> |
If you want to add more images to your products, use this attribute and provide the URLs of your additional product images.
Amazon allows you to display up to 9 product images per page. But usually, 7 product images are displayed on each product page.
Upload Your Product Feed to Amazon
Once you’ve created your product feed:
- Go to the Inventory page on your Amazon Seller Central account.
- Click on the Upload Your Inventory File to upload the products through a product feed file. You can also select the file type from the File Type section.
Here is what a product feed for Amazon looks like in the TEXT format.
Here is what a product feed for Amazon looks like in the XML format.
Follow this Amazon Seller Central documentation to upload your products through a product feed.
Final Thoughts
Promoting on the major marketplaces will always bring you more sales with the least amount of effort.
Amazon is the best place for you if wish to increase the sales of your WooCommerce store. Hence, it’s high time you start promoting your products through Amazon Seller Central.
Here are the guides to creating accurate and optimized product feeds for more popular marketplaces:
- A Complete Guide to eBay Product Feed.
- Guide to Kelkoo Product Feed to Increase Sales.
- Guide To Product Feed For Google And Facebook
Also, if you have any specific marketplace, for which you want a guide on the product feed, let me know in the comments. I will try to create one for you.