Kategorien
Guide Product Feed Manager For WooCommerce WooCommerce

A Complete Guide On Amazon Seller Central Product Feed [2021]

Als Besitzer eines WooCommerce-Shops möchten Sie den Umsatz Ihres Shops immer auf die bestmögliche Art und Weise steigern.

Eine der effektivsten Möglichkeiten, die Anzahl der Verkäufe in Ihrem Geschäft zu erhöhen, besteht darin, die Produkte Ihres Geschäfts auf den größten Marktplätzen zu bewerben, insbesondere wenn Sie einen relativ neuen Online-Shop besitzen.

Mit 2,31 Milliarden monatlichen Besuchern, d.h. 77 Millionen täglichen Käufern, ist Amazon der größte Marktplatz der Welt, auf dem Sie für Ihre Produkte werben können.

Die Werbung auf einem gigantischen Marktplatz wie Amazon Seller Central wird Ihrem Unternehmen zugute kommen, weil

  • Bei Amazon erreichen Ihre Produkte mit viel weniger Aufwand weit mehr Käufer als Ihr eigenes Geschäft.
  • Amazon verfügt über detaillierte Informationen über ihre Käufer, so dass Ihre Produkte den Käufern gezeigt werden, die eine echte Kaufneigung haben werden.
  • Käufer vertrauen Amazon und den dort gelisteten Produkten, während Sie bei Erstkäufern mit Vertrauensproblemen in Ihrem Geschäft konfrontiert sein können.

Durch die Generierung eines Produkt-Feeds können Sie Produkte in großen Mengen auf Amazon hochladen, was Ihnen eine enorme Zeitersparnis bringt.

Sie können ganz einfach Produkte bei Amazon einreichen, wodurch automatisch strukturierte Produkte erstellt werden und bei den Suchergebnissen besser abschneiden.

Aber zuerst müssen Sie wissen, wie Sie einen genauen Produkt-Feed Ihrer Produkte erstellen, um sie bei Amazon Seller Central einzureichen.

Es gibt bestimmte Möglichkeiten für Sie, den Produkt-Feed für maximale Verkäufe über Amazon Seller Central zu optimieren.

Nachdem Sie diesen Leitfaden gelesen haben, werden Sie in der Lage sein:

  • Erstellen Sie einen genauen und perfekten Produkt-Feed für den Amazon Marketplace.
  • Bewerben und vermarkten Sie Ihre WooCommerce-Produkte erfolgreich auf Amazon und steigern Sie Ihren Umsatz.

Also, lassen Sie uns anfangen.

Wie Sie ein zentrales Amazon-Verkäufer-Konto eröffnen, um Ihre Produkte zu bewerben

Bevor Sie beginnen, Ihre Produkte vom WooCommerce-Shop auf dem Amazon Marketplace zu bewerben, müssen Sie ein Konto bei der Amazon-Verkäuferzentrale eröffnen.

Doch zunächst wollen wir uns ansehen, was Sie vor der Eröffnung des Kontos benötigen.

Voraussetzungen zur Eröffnung eines zentralen Amazon-Verkäufer-Kontos

1. International akzeptierte Kreditkarte

Sie müssen im Besitz einer Kreditkarte sein, die international akzeptiert werden kann und mit Ihrer gültigen E-Mail-Adresse verbunden ist.

2. Informationen zur Steueridentifikation

Amazon wird nach der Steueridentifikationsnummer (EIN, wenn Sie sich in den Staaten befinden) von Ihnen oder Ihrem Unternehmen fragen.

3. Geschäftliche Informationen

Ihr gesetzlicher Firmenname, Ihre Adresse, E-Mail-Adresse und andere Kontaktinformationen werden benötigt.

4. Informationen zum Bankkonto

Außerdem benötigen Sie ein Bankkonto und andere grundlegende Informationen.

Sobald Sie diese gesammelt und organisiert haben, befolgen Sie die folgenden Schritte, um ein Amazon Seller Central-Konto zu erstellen.

Schritt 1 - Beginnen Sie mit der Anmeldung

Gehen Sie auf den folgenden Link, um den Anmeldeprozess zu starten:

Hier zeigen wir Ihnen, wie Sie ein Konto für einen einzelnen Verkäufer eröffnen können.

Sobald Sie auf den obigen Link gehen, sehen Sie eine gelbe Schaltfläche Verkaufen starten.

Konto auf Amazon Seller Central erstellen

Klicken Sie auf die Schaltfläche Start Selling (Verkauf starten), und Sie werden zur Registrierungsseite für Amazon Seller Central weitergeleitet.

Konto-Berechtigungsnachweise Amazon-Verkäufer Zentral

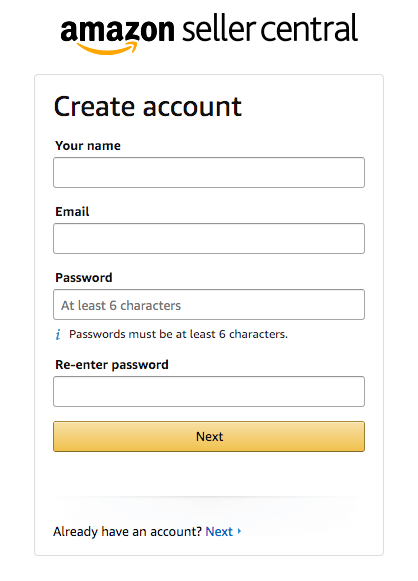
Geben Sie Ihren Namen und Ihre E-Mail-Adresse an, legen Sie ein Passwort fest und klicken Sie auf die Schaltfläche Weiter.

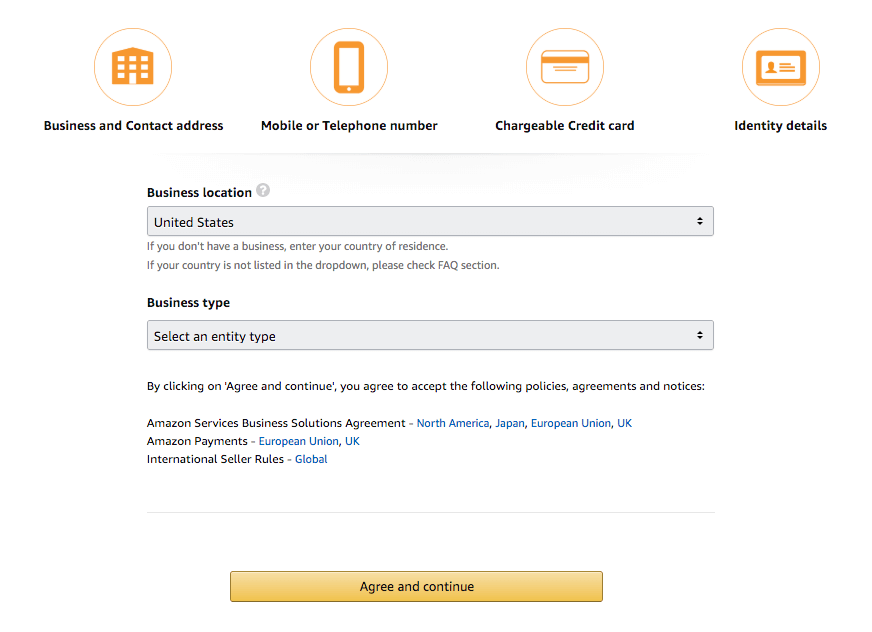
Schritt 2 - Einrichten Ihrer Geschäftsinformationen

Im nächsten Schritt müssen Sie Ihre Geschäftsinformationen wie Geschäftsstandort, Geschäftstyp usw. angeben.

Geschäftstyp und Standort auf Amazon

Schritt 3 - Persönliche Informationen

Hier müssen Sie weitere Informationen wie das Land Ihrer Staatsbürgerschaft, Ihr Geburtsland, Ihr Geburtsdatum und die vollständige Geschäftsadresse angeben.

Persönliche Informationen für Amazon Verkäuferzentrale

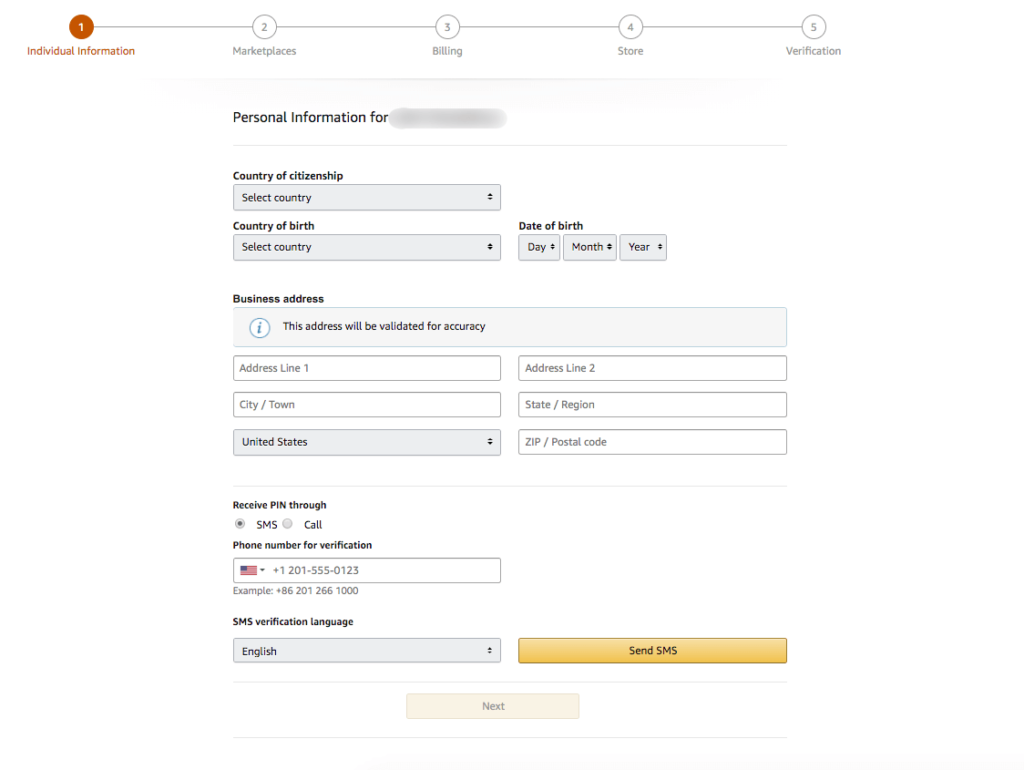
Sie müssen auch Ihre Kontaktnummer angeben. Sie erhalten einen Anruf oder eine SMS, um zu bestätigen, dass es sich um Ihre gültige Nummer handelt.

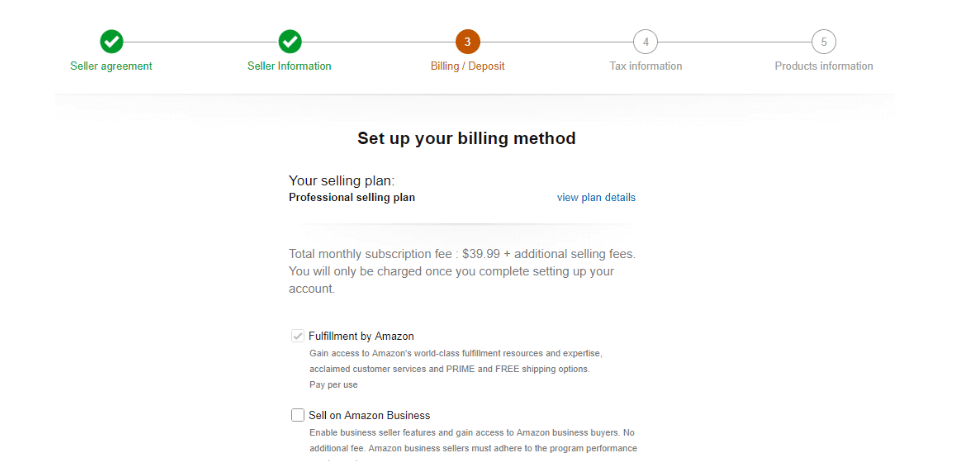
Schritt 4 - Einrichten Ihrer Abrechnungsmethode

In this step, you have to set up the billing method for your Amazon Seller Central account. You’ll see the cost details of your plan.

Es gibt 2 Pläne, aus denen Sie wählen können:

  • Professional-Plan - $39,99 monatliches Abonnement.
  • Individueller Plan - $0,99 pro verkauftes Produkt.

Der individuelle Plan ist perfekt für Sie, wenn Sie planen, weniger als 40 Produkte pro Monat zu verkaufen. (Es kommt wirklich auf die Kategorie an).

Der professionelle Verkaufsplan ist die bessere Wahl für Sie, wenn Sie planen, mehr als 40 Produkte pro Monat zu verkaufen.

Abrechnungsmethode für Amazon
Hier ist eine Seite zur Rechnungsstellung für den professionellen Plan eingerichtet.

Schritt 5 - Ein Steuerinterview durchführen

In diesem Schritt müssen Sie im Rahmen eines Steuergesprächs Ihre steuerlichen Angaben machen.

Steuerinformationen Amazon Verkäufer Zentrale

In diesem Interview wird Amazon überprüfen, ob Sie ein Einzelverkäufer oder ein professionelles Unternehmen sind.

Sie können Ihre Sozialversicherungsnummer anstelle der Arbeitgeberidentifikationsnummer als Steueridentifikationsnummer verwenden.

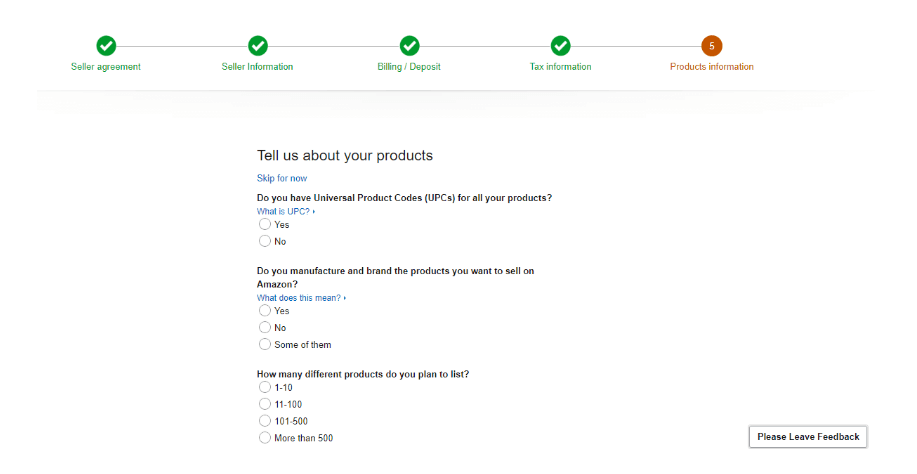
Schritt 6 - Stellen Sie Ihre Produktinformationen zur Verfügung

Dies ist der letzte Schritt. Hier müssen Sie einige grundlegende Informationen über Ihre Produkte angeben, wie z.B:

  • Wenn Sie Universal Product Codes (UPCs) für Ihre Produkte haben.
  • Wenn Sie ein Hersteller sind oder Ihre eigene Marke haben.
  • Wie viele verschiedene Arten von Produkten Sie bei Amazon auflisten möchten.
Produktinformation Amazon

Liste dedizierter Amazon-Marktplätze

Zurzeit ist Amazon in 16 verschiedenen Ländern mit lokalen Domains und Sprachen tätig.

Amazon kann jedoch Produkte fast in die ganze Welt verschicken.

Wie erstellt man einen optimierten WooCommerce-Produkt-Feed für Amazon?

Wie bei den meisten anderen Marktplätzen müssen Sie auch bei Amazon Daten in bestimmten Formaten übermitteln. In der Tat gibt es einige Details, die zwingend erforderlich sind, um für den Verkauf zugelassen zu werden.

Produktdaten-Spezifikation

Ein typisches Amazonas-Produktfutter sieht wie folgt aus:

<?xml version="1.0" encoding="UTF-8" ?>
   <products>
        <product>
		Product Data Attributes
        </product>
  </products>
</rss>

Auf dem Feed müssen Sie die folgenden Datenattribute angeben.

Erforderliche Datenattribute

  • Produkt-Titel
  • Produkt-URL
  • Produkt-Kategorie
  • Preis
  • SKU
  • Bild-URL
  • Marke

  • UPC/EAN
  • Produktbeschreibung
  • MPN
  • Versandkosten
  • Aufzählungspunkte
  • Höhe
  • Länge
  • Gewicht
  • Breite
  • Menge des Artikelpakets
  • Modell-Nummer
  • Schlüsselwörter
  • Andere Bild-URL

Produkt-Titel

AttributTitel
BeispielMütze mit Logo
Feed-Daten<title><![CDATA[Beanie with Logo]]></title>

Dies ist der Name Ihres Produktes, der angezeigt wird.

Nun gibt es einige Kriterien für den Produkttitel bei Amazon. Zum Beispiel:

  • Der Produkttitel darf 200 Zeichen einschließlich Leerzeichen nicht überschreiten.
  • Ein Produkttitel darf keine Werbe- oder Marketingphrasen wie "kostenloser Versand" oder "100% garantierte Qualität" enthalten.

A product title must not contain special characters like ~ ! * $ ? _ ~ { } # < > | * ; ^ ¬ ¦

Produkttitel auf Amazon-Verkäufer zentral

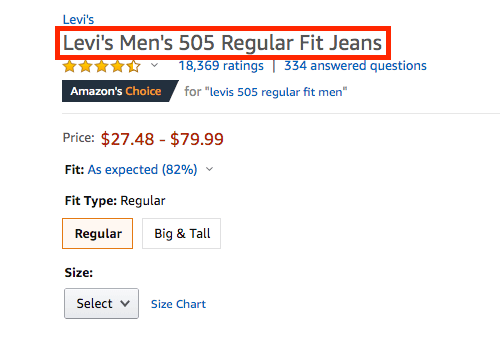
So sieht ein perfekter Produkttitel auf Amazon aus.

Produkt-URL

AttributLink
Beispielhttps://yourwebsite.com/product/beanie-with-logo
Feed-Daten<link>
<![CDATA[https://yourwebsite.com/product/beanie-with-logo]]>
</link>

Dies ist die URL einer bestimmten Produktseite.

Die URLs Ihrer Produkte sollten mit HTTPS oder HTTP beginnen.

Produkt-Kategorie

Attributprodukt_typ
BeispielBekleidung, Accessoires
Feed-Daten<g:product_type>
<![CDATA[ Clothing, Accessories ]]>
</g:product_type>

Sie sollten immer angeben, unter welche Kategorie Ihre Produkte fallen.

Wenn Sie in Ihrem Geschäft Unterkategorien haben, versuchen Sie, diese anzugeben, da Sie dadurch bessere Ergebnisse erzielen.

Preis

AttributPreis
Beispiel20.00 GBP
Feed-Daten<price>20.00 GBP</price>

Das Attribut Preis sollte mit der Währung als Suffix eingereicht werden. Wie GBP oder USD.

Produktpreis auf Amazon-Verkäufer zentral

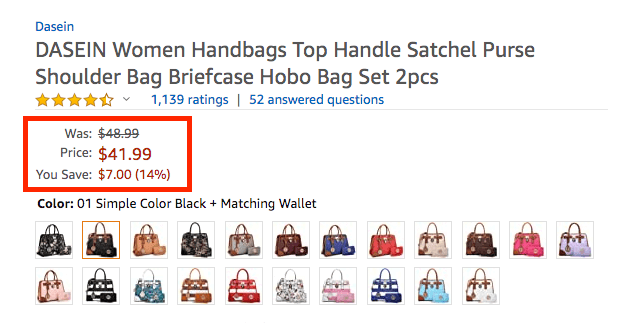
So wird der Produktpreis auf den Produktseiten von Amazon angezeigt (hier können Sie auch die Rabattdetails einsehen).

Produktpreis auf WooCommerce festlegen

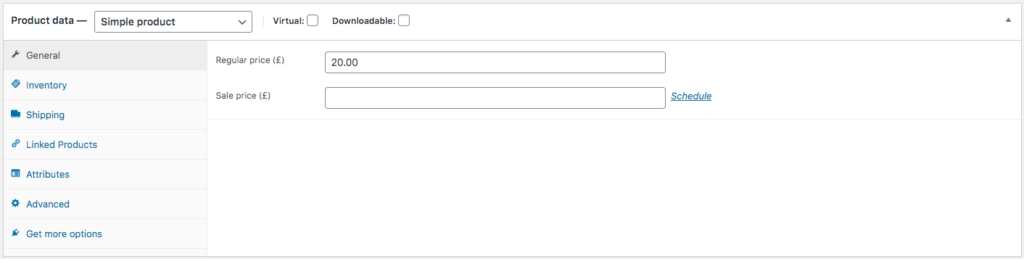
Sie können die Produktpreise von hier aus in Ihrem WooCommerce-Shop einstellen.

SKU

Attributsku
BeispielWoo-Bohnen-Logo
Feed-Daten<sku>Woo-beanie-logo</sku>

KU oder Lagerhaltungseinheit ist ein Begriff aus der Bestandsführung, den Sie verwenden können, um die verfügbaren Bestände aus Listen, Bestellformularen und Rechnungen zu identifizieren.

Hier sind die Bedingungen für SKU in Amazonien:

  • Jedes Produkt in Ihrem Produktfeed muss einen eindeutigen SKU-Wert haben.
  • Jeder SKU-Wert, der auf Amazon hochgeladen wird, erzeugt einen neuen Datensatz.
  • Da jeder SKU-Wert einzigartig ist, dürfen Sie ihn nicht ändern. Diese Werte bleiben auf Ihrem Feed, bis Sie ihn löschen.
  • Wenn Sie ein Produkt mit einem bereits vorhandenen SKU-Wert hochladen, ersetzen die neuen Produktdaten die alten Produktdaten für diese SKU.
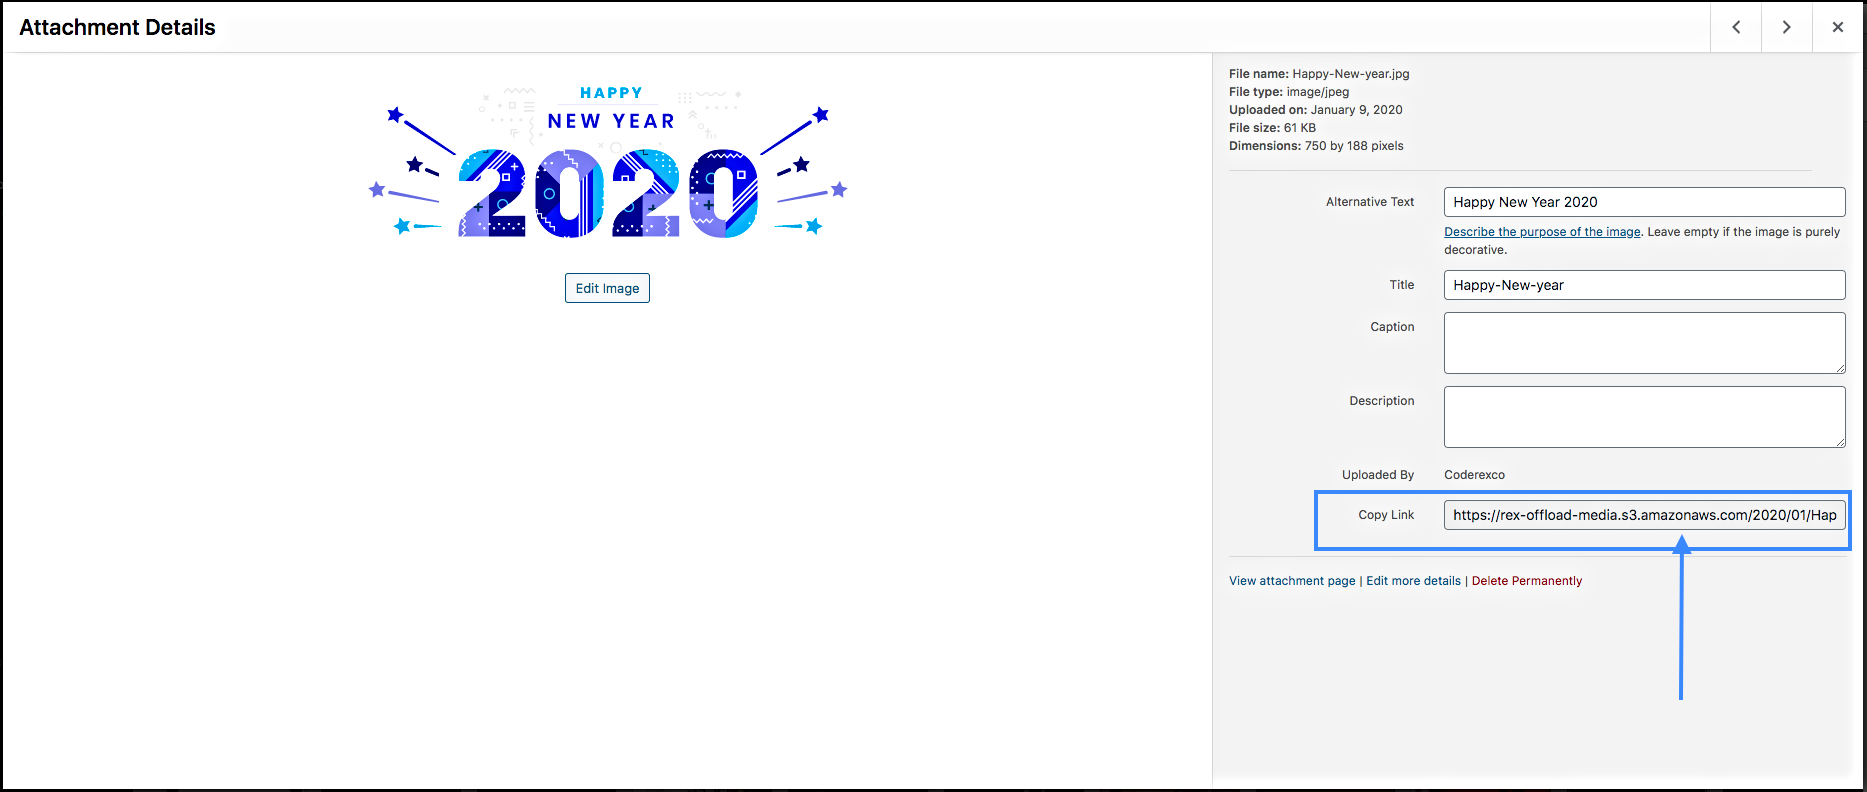
Bild-URL

AttributBild
Beispielhttps://yourwebsite.com/beanie-with-logo-1.jpg
Feed-Daten<image>
https://yourwebsite.com/beanie-with-logo-1.jpg
</image>

Geben Sie hier die URL Ihres Produktbildes an. Die URL sollte mit 'HTTP' oder 'HTTPS' beginnen, da andere Formate nicht unterstützt werden.

Hier sind die Richtlinien für Produktbilder auf Amazon:

Unterstützte Bildformate für Amazon: PNG, JPG, JPEG und TIFF.

Nicht unterstützte Bildformate für Amazon: KI, PSD, PDF oder EPS.

Anforderungen:

  • Sie müssen ein großes Produktbild mit mindestens 500 Pixeln und maximal 2100 Pixeln auf der längsten Dimension einreichen.
  • Das Bild muss klar und scharf sein.
  • Das Bild muss den 85%igen Bereich des Rahmens ausfüllen.
  • Die Hintergrundfarbe muss rein weiß sein.
  • Die Bildfarbe muss sich im RGB-Modus befinden.
  • Ein Hintergrundbild oder ein anderes Objekt im Bild ist nicht erlaubt.
  • Bei dem Bild muss es sich um ein professionelles Bild oder Titelbild handeln.
  • Das gesamte Produkt muss auf dem Bild sein, ein Beschneiden ist nicht erlaubt.
  • Wasserzeichen, Logos, Texte oder Rahmen sind im Bild nicht erlaubt.
Produktbild auf Amazon-Verkäuferzentrale

Hier erfahren Sie, wie Sie Produktbilder anzeigen können.

Marke

AttributMarke
BeispielRexThema
Feed-Daten<brand><![CDATA[AmazonRex]]></brand>

Geben Sie hier die Marke des Produkts an. Sie können auch Ihren eigenen Marken- oder Store-Namen festlegen.

EPC/EAN

Attributean
Beispiel4856349589328
Feed-Daten<ean>4856349589328</ean>

Dieses Feld ist für die Produktidentifikationsnummern.

Wenn Sie für Ihre Produkte in Europa werben, müssen Sie die EAN oder Europäischen Artikelnummern für Ihre Produkte angeben.

Oder Sie können den EPC oder Electronic Product Code zur Verfügung stellen, der weltweit gültig ist.

Hier sind alle akzeptierten Formen von Produktidentifikatoren aufgeführt:

  • UPC-E (6-stellig)
  • EAN-8/UCC-8/GTIN-8 (8-stellig)
  • UPC-A/GTIN-12 (12-stellig)
  • EAN-13/UCC-13/GTIN-13 ( Das sind 13 Ziffern)
  • EAN-14/UCC-14/GTIN-14 ( Welche14 Ziffern)

Gemäß den Regeln für die Werbung bei Amazon müssen Sie eine dieser gültigen Identifizierungsnummern angeben.

Produktbeschreibung

AttributBeschreibung
BeispielDies ist ein Reiserucksack.
Feed-Daten<description>
<![CDATA[This is a travel backpack.]]>
</description>

Hier müssen Sie die Produkte auf Ihre eigene Art und Weise beschreiben.

Hier sind die Verstöße, die beim Schreiben von Produktbeschreibungen zu vermeiden sind:

  • Verwendung anstößiger, pornografischer oder obszöner Wörter.
  • Einschließlich Telefonnummern, E-Mail-Adressen oder andere Kontaktinformationen.
  • Mit Worten wie "die Besten" und "die Meisten".
  • Großschreibung der gesamten Beschreibung.
  • Antrag auf eine positive Kundenbewertung.
  • Verwendung von Rezensionen oder Erfahrungsberichten.
  • Links zu jeder Website.
  • Zeitbezogene Informationen wie Termine.
Produktbeschreibung auf Amazon Seller Central

Dies ist ein Beispiel für eine Produktbeschreibung bei Amazon.

Sie können dafür auch einen Produktbeschreibungsgenerator verwenden.

MPN

Attributmpn
Beispiel4856349589328
Feed-Daten<mpn>4856349589328</mpn>

Hier müssen Sie die Hersteller-Teilenummern für Ihre Produkte angeben.

Wenn Sie Ihren Produkten bereits die EAN/EPC zugewiesen haben, brauchen Sie keine MPNs für Ihre Produkte bereitzustellen.

Versandkosten

AttributVersand_Kosten
Beispiel9.99 USD
Feed-Daten<shipping_cost>9.99 USD</shipping_cost>

Sie müssen die Versandkosten für Ihre Produkte hier einstellen, und Amazon schlägt vor, dies so weit wie möglich zu vereinfachen.

Sie können die Versandkosten auf 3 Arten festlegen:

  • Artikel/Gewichtsabhängiger Versand
  • Produktgebundener Versand
  • Versand in Gewichtsklassen.

Folgen Sie diesen Amazon-Anweisungen zu den Versandkosten, um Ihre Versandkosten festzulegen.

Aufzählungspunkte

AttributAufzählungszeichen_Punkt1
BeispielDieses Produkt ist wasserdicht!
Feed-Daten<bullet_point1>This product is waterproof!</bullet_point1>

Aufzählungspunkte sind Teil Ihrer Produktbeschreibung. Dieses Attribut ermöglicht es, das Hauptmerkmal Ihrer Produkte in Aufzählungspunkten hervorzuheben.

Amazon erlaubt den Verkäufern, bis zu 10 Aufzählungspunkte hinzuzufügen. Verkäufer können bis zu 5 Aufzählungspunkte hinzufügen.

In diesen Aufzählungspunkten dürfen Sie nur Ihre Produktmerkmale beschreiben.

Die Verletzungen des Aufzählungspunktes sind die gleichen wie die Verletzungen der Produktbeschreibung.

Bullet Points zum Amazonas-Verkäufer Central

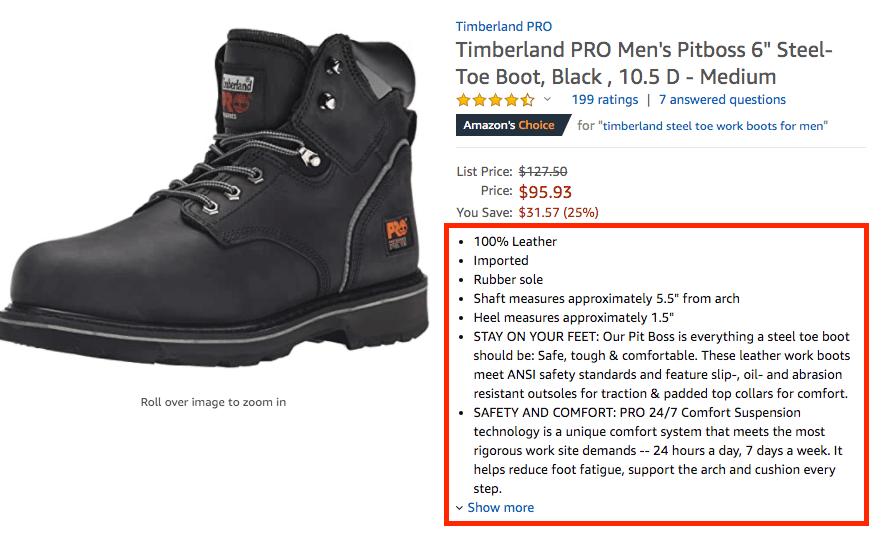
Hier sehen Sie ein Beispiel für die Aufzählungspunkte auf den Produktseiten von Amazon.

Höhe

AttributHöhe
Beispiel2 M
Feed-Daten<height><[Product height]></height>

Hier müssen Sie die Höhe jedes Ihrer Produkte angeben.

Länge

AttributLänge
Beispiel2M
Feed-Daten<length><[Product length]></length>

Hier müssen Sie die Länge jedes Ihrer Produkte angeben.

Breite

AttributBreite
Beispiel2M
Feed-Daten<width><[Product width]></width>

Hier müssen Sie die Breite jedes Ihrer Produkte angeben.

Gewicht

AttributGewicht
Beispiel2 KG
Feed-Daten<weight><[Product weight]></weight>

Hier müssen Sie das Gewicht jedes Ihrer Produkte angeben. Dieses Attribut kann je nach Ihren Versandregeln entscheidend sein.

Menge des Artikelpakets

AttributPosten_Paket_Menge
Beispiel2
Feed-Daten<item_package_quantity><[package quantity]></item_package_quantity>

Wenn Sie Produkte in Packungen oder Bündeln verkaufen, müssen Sie hier die Artikelpaketmenge angeben.

Angenommen, Sie haben ein Kaffeepaket mit Kaffeebohnen und Zuckerwürfeln, dann müssen Sie hier 2 Produkte erwähnen.

Modell-Nummer

AttributModell_Nummer
Beispiel2384
Feed-Daten<model_number>2384</model_number>

Wenn Sie Ihre eigenen Marken- oder Fertigprodukte verkaufen, müssen Sie Ihren Produkten möglicherweise die Modellnummer zuweisen.

Ansonsten brauchen Sie dieses Attribut nicht zu verwenden.

Schlüsselwörter

AttributSchlüsselwörter1
BeispielLavendelholz braun groß
Feed-Daten<Keywords1>Lavender Wood Brown Large</Keywords1>

Sie können Ihren Produkten Schlüsselwörter zuordnen, um bessere Ergebnisse bei der Amazon-Suche zu erzielen.

Folgen Sie dieser Amazon-Anleitung, um sich über die Bedingungen und Einschränkungen bei der Verwendung von Schlüsselwörtern zu informieren und diese perfekt für Ihre Produkte einzurichten.

Andere Bild-URL

Attributanderes_Bild_url1
Beispielhttps://yourwebsite.com/beanie-with-logo-2.jpg
Feed-Daten<other_image_url1>
https://yourwebsite.com/beanie-with-logo-2.jpg
</other_image_url1>

Wenn Sie weitere Bilder zu Ihren Produkten hinzufügen möchten, verwenden Sie dieses Attribut und geben Sie die URLs Ihrer zusätzlichen Produktbilder an.

Bei Amazon können Sie bis zu 9 Produktbilder pro Seite anzeigen lassen. Normalerweise werden jedoch 7 Produktbilder auf jeder Produktseite angezeigt.

Laden Sie Ihren Produkt-Feed zu Amazon hoch

Sobald Sie Ihren Produkt-Feed erstellt haben:

  1. Go to the Inventory page on your Amazon Seller Central account.
  2. Klicken Sie auf die Datei Upload Your Inventory File, um die Produkte über eine Produkt-Feed-Datei hochzuladen. Sie können den Dateityp auch aus dem Abschnitt Dateityp auswählen.

Hier sehen Sie, wie ein Produkt-Feed für Amazon im TEXT-Format aussieht.

Hier sehen Sie, wie ein Produkt-Feed für Amazon im XML-Format aussieht.

Folgen Sie dieser Dokumentation von Amazon Seller Central, um Ihre Produkte über einen Produkt-Feed hochzuladen.

Schlussbemerkungen

Werbung auf den großen Marktplätzen wird Ihnen immer mehr Verkäufe mit dem geringsten Aufwand bringen.

Amazon ist der beste Ort für Sie, wenn Sie die Verkäufe Ihres WooCommerce-Shops steigern möchten. Daher ist es höchste Zeit, dass Sie beginnen, Ihre Produkte über Amazon Seller Central zu bewerben.

Hier sind die Anleitungen zur Erstellung genauer und optimierter Produkt-Feeds für die beliebtesten Marktplätze:

Wenn Sie einen bestimmten Marktplatz haben, für den Sie einen Leitfaden für den Produkt-Feed wünschen, lassen Sie es mich in den Kommentaren wissen. Ich werde versuchen, einen für Sie zu erstellen.

Kategorien
Guide Social Media

How To Revive Old Post To Increase Blog Traffic [2024]

Social Media Marketing Strategy
Revive Old Post To Increase Blog Traffic

If you already have a blog site for a while, then you probably have a lot of articles posted. Think about the amount of money and resources you have spent on so many good contents in the past that are now lost in your website’s archives.

New visitors to your website hardly ever go to very old posts. You might have posted amazing guides, infographics, or knowledgeable articles on topics that are still valuable.

But they are probably getting forgotten since you didn’t update them, or just because you have so much more content posted afterward.

Here’s the thing. Your old posts can still be refined and valuable. You may start re-sharing your old posts via social media and get an amazing response.

To do this you need to

Now let us learn how to do all these in the best way possible, step-by-step.

Identify Potential Old Blog Posts

Identify Potential To Revive Old Post

Follow the steps below to identify the most potential old blogs.

Step1 – Find Old Posts With Good Keywords

  1. Check back through your archives and round up all of your old blog posts (that are no longer getting traffic).
  2. Separate the ones that are evergreen, i.e., knowledgeable for everyone. For example, listicles of a few best plugins, or guide to content marketing, and similar posts.
  3. You can use special tools to detect any old posts on your blog. For example, one such tool is Website SEO Checker by Sitechecker.
  4. Now, list their keywords on a document and use an SEO tool to find out which keywords among them are currently ranking high on SERPs. (This is because, you will be reviving them not just for Social Media, but also for normal SERPs.) You may use good tools such as Ahref or SEM Rush.
  5. Rearrange the blog topics and URLs on a document, based on the highest performing keyword to the lowest reasonably performing keyword.

    **Not all of your old posts had good keywords, and some of the keywords used back then are no longer usable.

You can immediately consider the top ten blogs with good keywords for reviving.

Step 2 – Separate Old Posts Based On Collaboration Opportunity

Once you separate the blogs that are in the top ten in terms of keyword popularity, the next is to identify potential blogs based on collaboration opportunities from the remaining blogs.

From these blogs, you will separate the ones where you have some opportunity to collaborate for better results.

By collaboration opportunity, I mean getting backlinks.

Lassen Sie mich das erklären.

Let’s say you have written a blog on “10 Best WooCommerce plugins in WordPress”. You can surely update it with the latest best plugins to start getting traction again.  

However, you can do something even better.

You can reach out to some of the latest good WooCommerce plugins, and offer them a collaboration.

You can offer a company to include their plugin(s) on this list with a “do follow” link to their product page, while they will also give you a “do follow” link to your product(s) on one of their articles.

“The best way to build up the online visibility of your business or website is by building relationships with your industry peers. Links will naturally occur as a result of these partnerships.”

Donald Chan, founder of MarTech Wise
Revive Old Post for Collaboration Opportunity

Now, many will say “backlink exchange” can be penalized by Google. But not if you do it smartly, especially when these premium links offer a solid ROI, enhancing your site’s value without direct link exchanges. Remember, quality always prevails over quantity in such strategies.

You will be penalized if they give a backlink to the same article of yours, on which you gave a backlink to them, i.e., a direct link exchange.

Lassen Sie mich das an einem Beispiel erläutern.

Suppose you have a post, Article 1. And another site has a post, Article 2.

Now, let’s say you gave them a backlink for their post, Article 2, on your post, Article 1. And they in return gave you a backlink for your post, Article 1, on their post, Article 2.

This is a direct backlink exchange and will, most likely, be penalized by Google.

However, if it’s not a direct exchange, there is no penalty for it.

Let’s say you have a post, Listicle 1, and a product page, Product 1. And another site has a post, Listicle 2, and a product page, Product 2.

So you can include their page, Product 2, on your post, Listicle 1. And in return, they can include your page, Product 1, on their post, Listicle 2.

Here, there is no direct exchange of links, and is a good collaboration.

So go ahead and separate the blogs with a potential collaboration opportunity.

**Even if you do not do a direct link exchange, frequent exchange of links with the same site is also seen as direct promotion and disliked by Google. So try not to exchange more than 2 links with the same site in a month. 

**Also many do collaborations with affiliate links. Keep in mind, Google can trace affiliate links and often penalizes sites with too many affiliate links in them. So do not create any posts with too many affiliate links in them.

Step 3 – Find Old Blog Posts Based On Potential Main Content

Now, for the remaining blogs, you need to identify potential blogs based on lucrative content.

  1. Open each blog and give a quick read.
  2. Find out if there is more opportunity with this article by improving keywords and content.

    First, check if it is possible to re-write it for a similar keyword that performs above average. In this case, you can be creative and think of a couple of relevant keywords yourself and then check if they rank higher on SERPs, compared to their current keyword.

    You can also directly get suggestions from SEO tools. For example, Ahref gives you more keyword ideas that are ranking high for any keyword term you analyze. So you may choose one from there if it sounds relevant to your content.
  3. It’s also best to choose articles among these that will need the least amount of research when re-writing, i.e., you can write about it on your own, without much help from other similar contents or SERP research.

From here, choose around 5 articles that seem potential to rewrite into good content.

So now, you will have around 15 to 20 blogs on your hand that you can work on to revive.

**I am assuming you have many articles, but it’s also okay if you have fewer. Just follow the steps here. The number of blogs is not too important unless you have more than 20 old blogs to revive.

Re-work On The Selected Potential Blogs

Re-work on Potential Old Blogs

In order to revive old posts, you have to make changes to the posts.

Some people simply start sharing the old posts on social media or via e-mail and expect that this social traffic will add value to the post. But that is totally wrong.

SERPs do not rank contents that are not up-to-date. Even if you get a sudden surge of traffic through social media, Google will still crawl and compare your post with old crawling data. And if the content has no change, then the post will still be ranked low.

  • First of all, Google values referrals and new backlinks.
  • Second, Google wants to present the latest data that are still valuable, to its audience. So along with backlinks, Google also values updates.
  • Third, Google values organic traffic over click-through/referred traffic from another site or social site.

So it is a must that you put some effort into revamping your old posts.

Here are a few things you can do to get better results out of each post.

The old featured image you used is probably no longer trendy in terms of design.

Create a new featured image with improved design.

Changing the featured image with the latest trendy design will give you the following advantages:

  • This will be an update that SERPs will see as a major change.
  • A newer design will be more engaging with readers.
  • The post will be more attractive on social media (if you do not create a separate image for social media).

2. Work on Improving Post Permalinks (URLs)

With time, the trend for setting a permalink has also improved.

Here are a few things to do:

  1. Check and remove any counting numbers or years from the permalink.

    For example, let’s say you have a post with the permalink:

    https://www.yourwebsite.com/10-best-checkout-plugins-2011

    Here, “10” is a counting number so remove it. This will allow you to add more than ten plugins to the post if you want to, thus removing the limit.

    Also “2011” indicates which year this is for. Remove it so that you can rework on the post every year with improved data. Thus carrying the post value along the way.

    No need to make new posts for the same topic every year.
  2. Nowadays, we prefer that the shorter a permalink, the better. So, remove any extra text on the permalink that is not necessary to indicate what this post is about and that is not part of the keyword.

    For example, let’s say you have a post with the keywords, “SEO tactics” and permalink:

    https://www.yourwebsite.com/the-best-seo-tactics-that-you-never-knew

    Here, at first “the” is not necessary. Any post with “the” at the beginning, do not include it on the permalink.

    The “that-you-never-knew” part was simply a hook, used to attract readers, in the title. It is not necessary on the permalink.

    So you may keep the “best-seo-tactics” portion. You can also remove the “best” from the link if you want and it won’t have any effect as long as the keyword is available on the permalink. But it’s best to keep one or two words along with the keyword to make more sense.

    Also, you may exclude any helping words or unnecessary prepositions in the link. For example, instead of “best-plugins-in-wordpress”, you may remove “in” and set the permalink to “best-plugins-wordpress”.
  3. Any changes you make to the permalink will mean that it will be considered as a new post by SERPs, which is a bit bad since it will lose all the value it had in the past. So it is best to use a 301 redirection from the old link to the new one.

3. Update the Content with the Latest Data

Update the content

Since this post was lost, there is a possibility that the data in this post could be back-dated or obsolete.

So here’s what you should do to improve the content:

  1. Separate all headings within the post. Search on Google with each heading and find out the current data available. Read a few articles and collect important points.
  2. Compare the data on those articles with yours and find out
    • What data you have, that has changed over the years, i.e. back-dated data.
       
    • Any information you have, that is good but missing from the other popular posts.
    • Any new ideas that you haven’t used in your post.
  3. Use these data to create a more refined, updated content based on each section. While improving, keep in mind, you are not updating this post for your sake only; your post must be helpful to whoever reads it.

Once the content is updated with the latest data, you can be sure to get more attention from SERPs.

The structure of content matters a lot these days. People no longer like to read essays or long descriptive paragraphs.

Even if you improve your content data, if you do not restructure it, it will result in a higher bounce rate, i.e., people will leave your blog without reading most of the content.

According to SERPs, a higher bounce rate is considered as an indication that the content is either not useful, or not attractive to readers, hence bad content.

Here are a few suggestions on what you should do.

● A Small Introductory Summary

Make the introduction short but precise on what this is about, and what people will be learning from it. You can use a small section stating what they will learn after reading this article. Here’s an example:

Introductory summary

You may create bullet points to give a summary of the things viewers will learn. This part will help the reader to understand if they will find what they were looking for. You might take the help of an AI-powered chat PDF to streamline the summarization process, and quickly extract key insights and takeaways from the document.

● Table Of Content

Include a table of contents to allow readers to jump to different sections in the post.

Here’s an example of how an attractive blog may look at the beginning. You can see the summary of what a reader will learn, followed by the table of contents to jump to different sections.

Table of contents

The “table of contents” is necessary because, sometimes, a reader does not wish to read the whole post; he/she is probably looking for something specific, which is a small part of your article.

So a table of content will help the reader understand and read what he/she needs.

● Engaging Blog Structures

Apply more engaging structures such as numbered bullet points, tables, and columns. Rather than reading paragraphs, people find it easier to read bullet points.

So, create a proper mix of paragraphs and bullet points throughout the post for a better connection with readers. For example, here is a portion of an article regarding US online shops for clothing.

Good Structure To Revive Old Post
A good structure to follow to revive old post

You can see that it has a heading, a numbered sub-heading, a small paragraph, and bullet points to explain a few details.

This is an ideal structure that readers find more attractive.

● Use Tables Or Columns

Use tables and columns when listing a lot of points for a topic, or when creating comparisons. Here is an example of using tables.

Example of Table
Using tables to provide data.

● More Media Throughout

Use More Media ThroughOut. Images and videos are always more engaging than plain text. So it’s best to use more images and videos.

On top of that, you can always convert some images to video online to make them more engaging.

For every heading section, you may use an image to represent that section.

You can check out this post for learning how to create better videos for your business.

If you have a summary video of the whole post, you may include that right after the introduction or the table of contents.

Hier ist ein Beispiel:

Video example
Here’s how we used a video to increase engagements in the blog above.

The idea is, to try to include a media for every 300 words written. This will keep the reader more engaged. So, an article with 1200 words, technically, should have a minimum of 4-5 images.

Any section of a post that is very long, you can input one image at the beginning and one image in the middle, to avoid boring the readers.

● Avoid using dull images

 Often people take a few image elements from online, place them on a colored background, and then use that as a section image, which is a terrible thing to do.

People lose interest just because of these images.

Hier ist ein Beispiel:

Poor image
An example of poor image choice

This article talks about things to look at when hiring a web designer. However, the images are like the one above. You can see that there are image elements in the middle, and a green background; an image that piques no interest.

Plus, you may notice another error. The image is placed above the section heading. It should rather be placed below the section heading.

Here’s an example of how it should be:

Good Image
A Section from an article about virtual tours for real estate.

This is a section out of an article that talks about the advantages of using a virtual tour on a website for realtors.

You can clearly see the heading of the section, followed by an image that is relevant to the section, and not at all boring.

**It is not necessary for the images to be so graphical, but at least it should be relevant to the section and not completely blunt. Maybe use color gradients or at least use images that won’t repel readers.

You can also include infographics or PowerPoint slides to present statistics on the topic. to present statistics on the topic. In a later article, we will learn about the creation and implementation of infographics.

Start Re-Sharing Your Content For Traffic

Re-Sharing Your Content

Once you are ready with the new and improved content, it’s time to start working on getting traffic on it again.

So here are the steps you should follow.

1. Change the Post Date As Appropriate

Sometimes, after you have completely revamped a blog post, you may change the publish date to a recent date.

This is often a good idea for blogs that didn’t perform well for a very long time, or never performed well in the past at all.

In this case, SERPs will completely ignore any old crawling data and consider this as a new post.

So, in this case, take the following actions:

  • make a change to the permalink of the post,
  • then set a 301 redirection from the old link to the new one,
  • and follow up by changing the publish date to a recent one.

This way, in most cases, Google will still consider any old crawling value the post had in the old permalink and will consider the updated post as new content.

2. Share On Social Media To Kick-start traffic

Revive old post and share on social media

Now that you are ready with your content with a complete makeover, it’s time to start applying Social Media Marketing.

  1. First one all, follow the Effective Tactics To Optimize Social Share For Bloggers. In this way, your social shares with result in more engagements.
  2. Then follow the Tactics to Automate Social Sharing. There you will get useful social automation tactics to follow, and you will learn about a reliable social automation tool, Social Booster.
  3. Set schedules for the blogs to be shared at the right hours using the social automation tool.
  4. Reach out to influencers to make social shares.
  5. Reach out to any sites for whom you gave links, for social shares.
  6. If you have any collaboration plan then inform them right away and finalize the deal.
  7. Boost the post if it’s evergreen content.
  8. About 2-3 days after your social share, e-mail it out to your subscribers.
  9. Post a summary video of the blog on Youtube and put the post link in the video description.
  10. One week after sharing on social media, share the Youtube video on social media and add the post link in the caption.
  11. Schedule automated retweets (on Twitter) of the post after every week, for 3 weeks.
  12. Make sure to reply actively to any comments.

And that’s it. Follow this procedure for every post you revive. Within a couple of months, your old posts will start getting good organic traffic, as a result of your patience and hard work.

Schlussbemerkungen

Social Media Marketing is a broad topic, and one of its parts is to revive old posts and share them on social media.

If all the steps mentioned here are followed properly, then you can easily rely on social media to help you revive old posts with good traffic.

In the next guide, we will discuss how to create videos, which you can share on social media to get the highest reach and engagements.

Kategorien
Guide Social Media

How To Implement Social Media Automation For Blogging Success [2024]

Leitfaden zum Social Media Marketing - Strategien Teil 3
Social Media Automation für erfolgreiches Bloggen nutzen

Sobald Sie die Arbeit an einem Inhalt abgeschlossen haben, sollten Sie am besten so schnell wie möglich mit der Arbeit am nächsten Inhalt beginnen, um das Beste aus Ihrem Inhaltsplan herauszuholen.

Sharing your newly published blogs on social media may take some time as you have to post them on several social media accounts.

Außerdem ist es ziemlich ermüdend, sich manuell einzuloggen und auf jeder sozialen Website zu posten, jedes Mal, wenn Sie Ihre Inhalte teilen möchten.

Um diesen Ärger zu verringern, sollten Sie also damit beginnen, Social Media Automation zu implementieren.

Die Automatisierung der sozialen Medien ist einer der neuesten Trends, dem man folgen sollte, um die Effizienz und Effektivität des Bloggens zu steigern.

You can focus more on creating content and spend less time making social posts, while still getting a high social reach.

Nach der Lektüre dieses Artikels werden Sie Folgendes erfahren

  • Warum Social-Media-Automatisierung einsetzen?
  • Actionable tactics to automate social sharing
  • Leitfaden zu einem zuverlässigen sozialen Automatisierungswerkzeug für WordPress

 Fangen wir also an.

Warum Social Media Automation einsetzen?

Warum Social Media-Automatisierung verwenden?

Als Blogger hilft Ihnen ein Tool zur Automatisierung von sozialen Medien, Blogs auf sozialen Kanälen zu teilen, ohne sich bei jeder sozialen Website anmelden zu müssen.

The is idea is to stop wasting time manually logging in and posting on social media for every content you produce.

Verwenden Sie lieber ein Social Media-Automatisierungstool, das einfach zu bedienen und effizient ist.

There are several tools out there that will allow you to share your published content on all of your social channels with just a single click. Some of these tools might slow up your device for that you can always use defragmentation to free up more space for smooth usage.

Die Vorteile der Verwendung eines Social-Media-Automatisierungstools sind

  • Sie müssen sich nicht die Mühe machen, die Bildunterschriften zu kopieren und einzufügen, während Sie sich bei verschiedenen sozialen Kanälen einloggen. Es wird alles von einem Ort aus ohne Komplikationen erledigt werden.
  • Sie brauchen nicht mehr zu verfolgen, wo Sie gepostet haben und wo nicht. Das Tool wird den Überblick darüber behalten.
  • Sie müssen keine Zeit mehr damit verschwenden, sich anzumelden und manuell auf jedem sozialen Kanal zu posten. Die Freigabe erfolgt einfach von einem Ort aus mit einem einzigen Klick. Dann können Sie mit Ihren nächsten Aufgaben fortfahren, wie z. B. der Suche nach neuen Inhalten oder der Analyse vergangener Inhaltsleistungen.

Irgendwann werden Sie mehr Inhalte produzieren und immer noch ohne Komplikationen sozialen Verkehr erhalten.

Umsetzbare Taktiken zur Automatisierung des sozialen Teilens 

Lassen Sie uns nun einige Aktionstaktiken betrachten, die Sie anwenden können, um das Beste aus der Automatisierung der sozialen Medien herauszuholen.

i. Verwenden Sie ein zuverlässiges Werkzeug zur Herstellung von Sofort-Aktien

Zuverlässiges Werkzeug zur sofortigen Freigabe

Ein Vorteil der Automatisierung der sozialen Medien besteht darin, dass Sie Ihre Blog-Inhalte in sozialen Medien freigeben, sobald Sie sie veröffentlichen.

Let’s say you have a content plan to write two long articles in a week. Now, to maintain quality, you will already be using a lot of time in researching for useful data, and constructing a proper structure, let alone creating content properly.

Wenn Sie nach der Veröffentlichung des Artikels mäßig aktiv in sozialen Medien sind, dann stehen die Chancen gut, dass Sie Konten in über 4 sozialen Kanälen haben.

Nun dauert es sicher einige Zeit, den Artikel manuell aufzurufen und zu posten und die Überschrift immer wieder neu zu setzen.

Sie würden es vorziehen, mit der Arbeit am nächsten Artikel zu beginnen.

In diesem Fall können Sie ein zuverlässiges Tool zur sozialen Automatisierung verwenden, das in Ihre sozialen Kanäle integriert ist. Sie können die Bildunterschrift nur einmal festlegen, und mit nur einem Klick wird Ihr veröffentlichter Beitrag in sozialen Medien freigegeben.

You will find great tools such as SocialBee, Buffer, Hubspot, or Hootsuite to help you with social media automation.

Wenn Sie jedoch eine WordPress-Site haben, dann sollten Sie versuchen, Social Booster zu verwenden.

Es handelt sich um ein Plugin zur Automatisierung der sozialen Kommunikation, mit dem WordPress-Inhalte (Seiten, Blogs, Bilder, Videos, Produkte usw.) auf mehreren sozialen Websites gleichzeitig ausgetauscht werden können.

Das Beste an diesem Plugin ist, dass Sie Ihren veröffentlichten Beitrag direkt von der Nachbearbeitungsseite aus sofort freigeben können.

Sie brauchen nicht einmal die Editierseite Ihres Artikels zu verlassen. Veröffentlichen Sie einfach, scrollen Sie nach unten zu den Plugin-Optionen und geben Sie Ihren Artikel mit einem einzigen Klick in Ihren sozialen Medien frei. 

You can also use social automation tools to schedule posts to be shared on specific hours and days, which is very handy. We will be discussing tactics regarding this matter within this article.

**Ich werde später in diesem Artikel einen Leitfaden über Social Booster geben.

Eine weitere effektive Methode, die Sie anwenden können, ist die Wiederbelebung alter Blog-Einträge. Sie können alte Blog-Beiträge, die nicht mehr funktionieren, neu gestalten und die gemeinsame Nutzung (Resharing) in Ihren sozialen Medien planen, um großartige Ergebnisse zu erzielen. Wir werden diese Angelegenheit in einem späteren Artikel ausführlich besprechen.

ii. Planen Sie die Sozialanteile zu den produktivsten Stunden

The performance of content shared on social media depends a lot on the day and the hour you share it.

It is important to consider the audience you are trying to reach and the channel you are sharing on. For a thorough understanding of these dynamics, reviewing a detailed social media report can provide valuable insights.

Laut Sproutsocial ist zum Beispiel die beste Zeit für die Freigabe von Beiträgen auf Facebook von 11:00 bis 13:00 Uhr am Mittwoch.

SproutSozialer Bericht
SproutSocial-Bericht über beste Zeiten zum Posten auf Facebook

Es gibt mehr Daten für andere soziale Kanäle wie Instagram, Twitter und LinkedIn, und die Menschen in den verschiedenen sozialen Kanälen haben unterschiedliche Zeiten, zu denen sie aktiver sind.

Abgesehen von den grundlegenden aktiven Stunden, zu denen Sie posten sollten, können Sie die Stunden auch danach wählen, welche Art von Publikum Sie erreichen wollen, ob Unternehmen oder Verbraucher.

Wenn Sie versuchen, Unternehmen zu erreichen, dann müssen Sie bedenken, dass Geschäftsleute meistens beschäftigt sind und während der Arbeitszeit kaum stöbern, außer zu einigen wenigen bestimmten Zeiten.

Laut dem Bericht von Hootsuite sind zum Beispiel Menschen in Unternehmen aktiver auf LinkedIn

  • in den frühen Morgenstunden zwischen 07:45 Uhr und 10:45 Uhr. 
  • in den Mittagspausen, etwa gegen 12.45 Uhr. 
  • am Ende der Schicht gegen 17:45 Uhr.

Außerdem sind sie mittwochs und donnerstags aktiver (da der Rest der Tage in der Regel mit mehr Arbeit ausgefüllt ist).

Verbraucher zu erreichen, funktioniert am besten zu etwas anderen Zeiten.

Laut einem Umfragebericht von CoSchedule sind die Verbraucher morgens zwischen 08:00 und 10:00 Uhr, mittags, d.h. um 12:00 Uhr, und spät am Tag zwischen 19:00 und 21:00 Uhr auf Twitter aktiver.

We will be discussing more with the exact best hours to post for every social channel at a later article.

Sie werden viele solcher Berichte online finden, und sie werden meist ähnlich sein, mit leichten Unterschieden in den Stunden. Sie können in Erwägung ziehen, sich an diese Zeitvorgaben zu halten, da sie sich für viele bewährt haben.

So, every content you wish to share, use a social media automation tool to schedule the post for your social media marketing. Set the schedules according to the best day and hours as per various social channels, mentioned in these statistics.

Mit Social Booster können Sie beliebige WordPress-Inhalte auf Ihren sozialen Kanälen zu der von Ihnen gewünschten Zeit und an dem von Ihnen gewünschten Tag zur Verfügung stellen.

Sie müssen nicht manuell in sozialen Medien posten, auch wenn Sie den Inhalt viel früher als zu den besten Zeiten veröffentlicht haben.

Tatsächlich ermöglicht es Ihnen, den Beitrag für die Freigabe zu Ihrer bevorzugten Zeit auf Ihrem bevorzugten sozialen Kanal zu planen, direkt von der Nachbearbeitungsseite oder vom Plugin-Dashboard aus.

iii. Planen Sie fortlaufende Postaktien für Werbekampagnen

Häufig ist es notwendig, innerhalb weniger Tage mehrmals dieselbe Stelle zu besetzen, um maximale Ergebnisse zu erzielen.

Ja, Sie können sie manuell auf sozialen Websites wie Facebook oder Twitter weitergeben oder retweeten. Dazu müssen Sie sich jedoch anmelden und den Beitrag für jeden sozialen Kanal manuell freigeben.

Verwenden Sie stattdessen Ihr Social Media-Automatisierungstool, um die Artikel, die auf den sozialen Kanälen geteilt werden sollen, an ein paar aufeinanderfolgenden Tagen zu den besten Zeiten zu planen.

Lassen Sie mich erklären, warum Sie Ihren Posten an aufeinander folgenden Tagen teilen sollten.

Nehmen wir als Beispiel an, Sie könnten während des Schwarzen Freitags einen Beitrag erstellen, um Ihre neuesten Rabattpläne für Ihre Interessenten anzuzeigen.

Now, there are tons of others that are sharing similar discount posts on the occasion of the event. Within a few hours of sharing your post, it will no longer be visible on people’s timelines.

Es ist jedoch sehr wahrscheinlich, dass Sie eine Rabattaktion für ein paar Tage bis zu einer Woche durchführen. Daher ist es notwendig, dass die Leute Ihren gemeinsamen Beitrag häufiger sehen.

Die beste Option ist hier, aufeinander folgende Postaktien für eine Zeitspanne von einigen Tagen zu planen.

Sie können ein Automatisierungstool verwenden, um zu planen, dass Ihr ermäßigter Beitrag jeden Tag (zu den aktivsten Stunden) auf Ihren sozialen Kanälen freigegeben wird, bis zu der Anzahl von Tagen, an denen Sie Ihre Rabattkampagne durchführen möchten. 

Auf diese Weise erscheint Ihr Artikel jeden Tag als neuer Beitrag auf der Zeitachse Ihrer Anhänger. 

Tip:
Some social channels see this as spamming if you share the same post for too many days. So we advise you to share such consecutive posts with a day’s gap in between every post. So in a span of 5 days, you may share it on the 1st day, 3rd day, and 5th day.

Die Zeitplanfreigabeoption des Plugins, Social Booster, ermöglicht es Ihnen, mehrere Zeitpläne für denselben Beitrag zu erstellen, die Sie über den Inhaltskalender auf dem Dashboard des Plugins verfolgen können.

Now, throughout this article, I mentioned Social Booster. Let me give you a short overview and guide on this social media automation plugin for WordPress.

Using A Tool For Social Media Automation

Social media management could be a great hustle if you don’t have the right tools.

However, Social Champ would be a great choice if you are looking for an affordable social media management tool.

Providing you with a handful of excellent automation features, it has got some unique and impressively defined features on the basis of which a business can manage its social profiles.

From the bulk uploading of content to the scheduling of the posts, Social Champ supports various personas like startups, SMBs, and agencies with the best automation features.

You can bring all the major social media profiles (Facebook, Instagram, LinkedIn, YouTube, Google My Business, Pinterest) to one dashboard and can connect them all together for future postings.

It lets you edit and create the posts instantly with the available built-in platforms of Canva, Crello, Pixelied, and Wave videos.

How fun and easy it is to manage all the social profiles of your business in one place with Social Champ!

Click here to get started with Social Champ.

Schlussbemerkungen

Einer der neuesten Trends im Social Media Marketing ist die Implementierung von Social Media-Automatisierung beim Austausch von Blogs auf sozialen Kanälen.

The schedule feature is specifically useful as it takes time and effort to remember and share your post on various social media manually. Rather, set schedules, and the post will be shared on the social media channels automatically. 

Ich schlage vor, Sie versuchen es mit Social Booster, und hoffentlich werden Sie bald bessere Ergebnisse sehen.

Im nächsten Artikel werden wir erörtern, wie Sie Ihre alten Blog-Einträge wiederbeleben und den Website-Verkehr erhöhen können.

Kategorien
Guide Social Media

How To Optimize A Social Media Post To Promote Your Blogs Effectively [2024]

Guide To Social Media Marketing — Strategies Part 2
Optimize A Social Media Post To Promote Your Blogs Effectively

If you run a blog, then you have a community of readers and other bloggers around it.

They definitely love to read your blogs and articles, however, most of them will not visit your blog too often unless they get a trigger.

Yes, you might have an e-mail list where you can send updates on new content. However, that is limited to those who subscribed.

The social media world is limitless.

Besides conducting SEO and other basic marketing tactics, it is important to promote your blog posts and content on social media.

Few good reasons to promote blog posts on social media:

  • Almost everyone uses social channels such as Facebook, Twitter, etc. And there are millions of such users that are interested in any particular same niche.
  • In social media, there is the advantage of notifications. If you follow a blogger, let’s say on Twitter, then you will get notifications every time that person tweets or retweets i.e. makes a new post. So, no extra effort is required.
  • Most social channels allow you to boost your posts in the form of Ads or Ad posts to reach more people who never heard of you, thus generating new followers. (We will learn more about these in a later article.)

Now, even if you create great content and share them on social media, the most difficult part is to make people click on the post and visit your website.

In this article, you will learn effective actions to take to make a proper social media post for blog posts and other content.

After reading this article, you will be able to:

  • Share your blogging content on social media in the most optimized way.
  • Learn the do’s and don’ts when making a social media post.
  • Get more people to click on your social posts and visit your blog.

Fangen wir also an.

1. Use A Specialized Social Media Post Image

Social Media Post Image

The image is the first content that catches a person’s attention when browsing through social media. Without a proper image, a social media post becomes just a wasted effort.

Most people tend to use the basic featured image of the original website content as the social media post image. However, that is often not the best idea.

When you create a featured image for your content on your website, you create it to match your website’s outlook and theme.

However, to get attention on social media, you have to create an image that connects with the viewer.

Let us look at an example.

Here’s the featured image of one of our blogs, which is an article to learn about the advantages of using Kelko and a guide to the Kelkoo marketplace.

Now, if I share it on our Facebook page and choose to boost this post, then this post will not perform too well. This Image is not at all ideal to use for a social media post.

Here’s why.

Boosting a post on Facebook means your post will appear in the timelines of several people that look like an ordinary post.

However, people nowadays know that there are tons of advertisements that appear on their timelines. So people tend to avoid any posts that they do not find interesting or useful at first glance.

The Kelkoo image simply looks like an advertisement image which, people will assume, may cost money without benefit. So, people will not click on the shared post or, in most cases, even bother to read the captions and title.

Here’s an example of an image that does work.

This is the image we created for social sharing for one of our articles, a Guide To WooCommerce Product Feed.

Here are the reasons why this image helped to increase the number of engagements for this post:

  • It clearly states what this post is about in a short sentence on the image.
  • It has contrasting colors that help to grab attention.
  • The illustrations on the right side give an idea about what niche it is related to.

You can use a small amount of text on the image to create a better connection with the audience.

Most importantly, the image does not look like an advertisement, rather, it looks like a helpful post for the relevant audience.

2. Choose A Caption That Connects With the Readers

A Caption That Connects With Readers

When you create any blog post or content, it is obviously intended to help people with information or help them solve certain problems.

Your caption should reflect your intentions and possible benefits for viewers. So, here’s what you should do. 

Use the caption to inform people of

  • The value they will get from your content.
  • What the content is about.

It’s best if you can keep the caption within 3 sentences.

People usually screen through a timeline post for around 2-5 seconds. So a short caption is the best way to grab more attention.


If you are not an expert at writing an intentional caption in a short sentence, then you may consider using an AI sentence generator. Just provide the AI sentence generator with a topic, and it will provide you with a unique and compelling sentence caption.

Long captions often discourage viewers. People would rather scroll down the timeline, than stop at a post that has a long caption.

Here’re a couple of examples:

Example 1

WPFM Guide caption
WooCoomerce Product Feed Guide

Example 2

VT guide caption
Guide To Create a Virtual Tour

The captions in these posts-

  • Is within three sentences.
  • States the benefits of the main topic.
  • States what the viewers will be reading about.

It is important that you talk directly with the viewers through the caption.

You may make your captions read more naturally by converting them from sound to text.

Here’s an example of a bad caption:

“WooCommerce is a great tool to create an eCommerce website. It has several features to set up the shop such as cart options, organized products, proper shipping information, and many more. Here is an article that can help to learn more about WooCommerce.”

This caption is not at all good because:

  • It is not directly communicating with the reader.
  • More informative, hence boring for social engagements.
  • It is more like a paragraph rather than 3 short sentences.

So it will perform less than average on social media.

3. Use Hashtags Wisely

HashTag #

If you look at the above examples, there are a number of hashtags mentioned below the caption text.

Hashtags allow you to indicate which relevant topics this post falls under.

People searching for any terms, related to the hashtags, will find your post in the search results.

Plus, it also acts as a category that people can click to find more posts (by others) shared under the same hashtag.

Choosing a hashtag depends on the –

  • Keywords you wish to rank for on social search results.
  • Hashtags search group you want your post to be a part of.
  • Frequency of a hashtag’s use on social media.

For example, if you wrote a blog post on online marketing tactics, you may use the hashtag ‘#onlinemarketing’ when sharing on social media. You can check the frequency of a hashtag on social media using hashtag analytics tools.

  • This hashtag has a good search volume.
  • People will search for the term ‘online marketing’ on social sites which is relevant to this hashtag.
  • Anyone clicking on this hashtag will find your post in the search results.

Many don’t know why hashtags are used and often use wrong, valueless hashtags.

For example, in the case of the blog post about a virtual tour guide, if I wanted, I could add a hashtag called “#virtualtourmayhem” when sharing it on social media.

But why would I?

This would not add any value to the post because,

  • Sure enough, nobody will search for “virtual tour mayhem” or “#virtualtourmayhem”.
  • Also, since this term was never used as a hashtag before, there is no chance that someone will click on it to find the post.

Only use hashtags that are actually used by others and are relevant to the search terms of your ideal target audience. Moreover, hashtags must be used precisely by businesses that choose to do marketing on social media. For example, if you sell jewelry, your hashtag should be #weddingring or #engagementring. But if you sell sports equipment, your hashtag should be #sportswear or #fitnessroutine

**One trick is to search for the hashtag term on the search bar of the desired social channel. The number of results with the same hashtag will indicate how much this tag was used.

If it’s used more often, it’s better to use it on your social media post as well. (Some sites such as Twitter and LinkedIn give suggestions on popular hashtags when you start typing the hashtag keyword.)

For example, if I search for #vr on Twitter, I will get results that include people that have #vr on their profile description, and a list of tweets that have a caption that includes #vr. This is an indication that the hashtag #vr is a good one to use on a social media post.

4. Use Custom Title & Description For More Social Engagements

Custom Title &amp; Description

Naturally, when you share blog content on social media, it uses the title and meta description of the original content on your site, as the social media post title and description.

However, it is better to set a different Title or Description on social media for more engagements.

Setting A Suitable Title

If you have a lengthy blog title, then you may use a shorter title for social media.

Let us look at an example:

We have an article with a Title –

Beste Marktplätze für den Online-Verkauf von Kleidung in den USA, die Sie nicht kannten [2020]

Now, though this title is fine for our website, it is very long, and most social channels won’t be able to display the full name, resulting in a view like this:

“Best Marketplaces To Sell Clothes Online In Th….”

**In the case of Facebook, the title will take two lines, and exclude the description which is also very important.

This reduces viewer impressions.

So for sharing on social media, I would rather use the Title:

Best Marketplaces To Sell Clothes Online In the USA [2020]

This will be visible on any social media channels in full and won’t take too long for viewers to read.

Sometimes, it’s wise to use a completely different Title for sharing on social media than the title of the original content on your site.

For example, let us say you wrote an informative blog with the title:

“Psychology on Blogging For Marketing [2020]”

This Title will do pretty well on SERPs but not on social media.

So in this case, you can use a different name on social media such as:

“How To Understand Reader’s Mind – Marketing Blog Guide”

You might say this heading will also work on SERPs, so why not use this as the main Blog title? Well, that’s because the original content title really depends on the keywords you wish to rank for on SERPs.

In the case of a Title on social media, the title has an extra purpose of creating an instant engagement. |People searching on SERPs will look into the top-ranking results that appear when relevant keywords are searched.

In the case of social media, the Tile has multiple purposes:

  • We will be more focused on engaging with prospects on their timelines or news feed.

    Anyone following your social page will find your blog’s social media posts while scrolling through their timelines or news feed. Depending on its image, title and description, he/she will decide whether to click on it or not. An interesting title will definitely help.
  • If possible, we will optimize it for social search results, but it is not mandatory.

    Most social media search engines provide post results that have the keywords in the caption or the hashtags. The title is the third priority. So it is not mandatory, but you may try to optimize it for social search results.

There are a few Instagram plugins for WordPress that can help you with that.

Social Media Post Description

The description is also an important thing to look at.

The meta description we set for any post is optimized for SERPs. However, the description section for a social media post is usually very small and, similar to the title, is used to create instant engagement.

Hence, you may use a shorter, engaging description when making a social media post for an article.

This can be easily done using the right tools.

On WordPress, if you use an SEO plugin such as Yoast or Rank Math, you will be able to assign a separate image, title, and description for Facebook and Twitter, for any particular blog post, from the post edit page.

For example, on Rank Math, you can edit a post’s social snippet.

Social Preview

Social Snippet preview

Edit Title, Description & Image

Social snippet post edit

However, this is limited to Facebook and Twitter only. For all other social sites, it’s best to use a tool that allows Open Graph Post customization, i.e., you can edit the title, description, and image of a post for social posting on any social channel.

**It is best to automate the whole process of social media marketing. We will learn more about social automation in a later article.

Schlussbemerkungen

All the tactics mentioned in this article are proven and effective for maximum results.

It’s high time you start optimizing social media posts for any content you create on your blog site, and take advantage of the immense audience you can get through social media. Hence streamlining customer communication or communication with the audience is extremely important. 

These are all simple tactics, but they matter a lot more than you think.

With time, you will get used to these, and combined with all other strategies that we will cover, you will be able to see positive results with social media marketing in no time.

In the next article, we will discuss one of the latest tactics to follow, social automation.

After reading the next article, you will learn

  • Warum Social-Media-Automatisierung einsetzen?
  • Umsetzbare Taktiken zur Automatisierung des sozialen Austauschs
  • Leitfaden zu einem zuverlässigen sozialen Automatisierungswerkzeug für WordPress

Read the next article now:

Kategorien
Guide WooCommerce

3 Effective Ways To Recover Abandoned Cart: Best Actionable Guide [2024]

The average abandoned cart rate is 70% throughout all industries, and it is a major concern.

But there’s nothing to be worried about.

why?

here’s the answer :

Abandoned carts are not a problem, rather they are an OPPORTUNITY.

Even if you can not stop the remaining 50% from abandoning your cart, you can take effective steps to get a lot of them back. 

And the ones who will be back will be more loyal and dedicated to you than a direct buyer.

In this guide, you will be looking at proven steps to follow and recover abandoned cart prospects most effectively.

After you have finished reading this guide, you will be able to:

  • Set up a proper abandoned cart recovery campaign.
  • Get back at least 30% of all your abandoned cart clients (HIGH CHANCE OF GETTING MORE)

You will be learning:

  • Different situation-based pop-ups (Structure and text examples)
  • Proper guide to abandoned cart emails
  • Unique tips to follow for better results
  • Best abandonment recovery tools to help with abandoned cart campaigns

Let’s start.

Why Shopping Cart Abandonment Happens

Before learning how you can recover your abandoned cart, first know about the reason and check if you have any on your site :

Technical Issues:

24% of customers cite “Website Crashed” and 15% cite “Website Timed Out” as reasons for not completing a purchase.

Slow-loading websites and poor performance can turn your targeted shoppers away.

Mobile Incompatibility:

With approximately 4 billion mobile phone owners and 25% using them as their sole method of internet access.

if your websites aren’t mobile-optimized lead to higher abandonment rates.

Complicated Checkout Process:

87% of online shoppers would abandon their carts if the checkout process is too difficult. A lengthy, complex checkout flow can deter customers from completing their purchases.

Poor User Experience:

More than a third (35%) of customers are turned off by just one bad experience. An unintuitive interface or lack of mobile optimization can drive potential buyers away.

So you can there are many reasons for the abandoned cart issues.

While you apply strategies to recover your abandoned cart, you must keep tracking on your abandoned cart.

You can use plugins like Cart Lift to get comprehensive cart recovery performance Insights.

Effective Actions To Recover Abandoned Cart Immediately

We’ve well-researched and come up with 3 ways to recover these abandoned cart issues :

  • Last moment Pop-up Strategy.
  • Retargeting Ads.
  • Abandoned Cart e-mail campaigns.

Let us look at each of them in detail.

1. Last Moment Pop-up Strategy

Pop-up Strategy

Pop-ups are a great marketing tool if you can use them with proper tactics.

It is one of the first steps you can take to recover a person from abandoning the cart.

Here’s the idea, the moment a person will attempt to leave the site (either by crossing the tab or by inputting another site on the browser), a pop-up will appear with a last push to the prospect to make the purchase.

How can you set it?

For example, let’s say a lady added a Black Purse to the cart worth $45. But all of a sudden, she attempted to close the site without going to the checkout.

At this point, you may set up a pop-up with the following message:

You forgot to complete the purchase of your product(s):
    ⭑ Black Purse

[Proceed To Checkout]

This will give the lady a reminder that she was interested in a purse and probably forgot to complete the purchase.

Similar to this, you can set pop-ups for various causes. Let us look at the types of pop-ups to use for different purposes:

1.1 Reminder Pop-up

This is the same case as the example above.

So, if a prospect added a product to the cart, but never went to the checkout page, then you can set up a pop-up reminder about the cart when the prospect attempts to leave the page.

How can you set it?

Here, we will assume that the prospect either forgot about the cart or was about to exit the page by mistake. A pop-up reminder is a good option in this case.

Here’s how it may look:

Pop-Up Reminder

1.2 Pop-Up at Checkout Exit

Suppose a prospect is at the checkout page.

However, instead of finalizing the purchase or crossing out the products from the cart list, he attempted to cross out the tab.

Immediately you can give a pop-up stating as following:

Your checkout process is not complete!!
    
Your product(s) might be Out of Stock soon if you don't purchase it now!!

[Proceed To Checkout]

Here’s how it may look:

Pop-Up on Checkout Exit

This will make the prospect think twice, and more often than later, they stay back to complete the purchase.

1.3 Discount Offer Pop-up At Checkout Exit

Now, in the last case, you can rather take an alternative step and offer a discount such as:

Your checkout process is not complete!!
    
Complete your purchase now and get an extra 10% discount!!

[Proceed To Checkout]

Here’s a sample:

Pop-Up Discount

This works best when a person is interested in a product that is already under an offer, for example, if you have a product on sale.

1.4 Pop-up With Offer Deadline

The offer deadline approach is when you have some sort of promotions or discount campaigns running on the site, either on the whole site or for specific products.

How can you set it?

For example, let’s say you are running a discount campaign for the 1st week of the holidays with a 10% site-wide discount. 

Now, if a person attempts to leave the site during the checkout process, you can initiate a pop-up as follows:

You are about to leave without completing your purchase.
    
The 10% holiday discount is about to end soon!!!
(if possible display a timer or end date)

Do not miss out on this!!

[Proceed To Checkout]

Here’s a sample of how it may look:

Pop-Up Discount Deadline

Let us look at another example.

Let’s say you have a handbag on sale, which is reduced from $35 to $20.

If a person was about to buy it but decided to leave the site from the checkout page, then you can issue a pop-up as follows:

Are you sure you do not want to purchase your product?
    
Special Handbag   at $20 (not $35)

Do not miss out on this sale!!

Sale will be over soon!!
(if possible display a timer or the end date)

[Proceed To Checkout]

Here’s a sample of how it may look:

Pop-Up Sale

1.5 Urgency Trigger Pop-up

Certain products are very popular and often get sold quickly. And there might be a case where you may have a very few of them available on stock.

In this case, you can use an “urgency” pop-up to indicate a lack of stock.

For example, let’s say you have a Lady’s Hat that is very popular but only 2 are left in stock.

Now, if a person was about to purchase it but attempted to leave the site from the checkout page, then you can use a pop-up as follows:

You did not complete the purchase for:
    
      ⭑ Ladies Fancy Hat

Do not miss out on this sale!!

Please note: Only two item(s) left for the above product.
It might run out of stock if you do not purchase it today!!

[Purchase Now]

Here’s a sample:

Pop-Up Stock Urgency

**You can often combine a discount offer with these pop-ups to get better results.

2. Retargeting Ads

Retargeting Ads

Another form of chasing abandoned cart prospects is Retargeting Ads.

Let’s say a person added 3 products to the cart but never completed the purchase process. Then you can set up a re-targeting ads campaign so that the person sees those products as re-targeted ads when he/she browses the internet.

For example, let’s assume a man added a “Premium quality red bow-tie” to the cart before abandoning it. If you have re-targeting Ads set up for Google Ads, then while browsing, any sites that show Google Ads, will often display this product as an Ad banner. 

The same goes for Facebook, where the person will see the product as banner Ads on the right site.

So basically, you will be chasing a prospect through Ad banners to try and give a reminder about the product that he/she had a prior interest in.

How can you set it?

To set this up, you will need to add a Google Adwords snippet and Facebook pixel snippet to your website cart page. We will discuss this in detail in a later article.

3. Abandoned Cart Recovery E-mail Campaigns 

The most popular approach for recovering abandoned cart prospects is to initiate an abandoned cart recovery e-mail campaign.

This can be effectively put to practice when you have the e-mail addresses of prospects who abandoned the cart.

You can easily do it by asking the prospect to subscribe or register before going to the checkout page. Some popular sites also ask for registration to view the cart.

Once you have their e-mails, the next thing to do is to create a complete campaign with proper strategy.

Here are the steps to follow to set up an abandoned cart campaign:

Step 1 – Planning Out A Proper Recovery E-mail Campaign

The first thing to do is to set up a campaign plan.

Based on your online shop, you can choose to take several approaches in deciding the best time frames to send e-mails for the recovery campaign and the number of e-mails to be sent.

Sending a proper email to the ideal person, at the right time, will ensure maximum results.

The fact is, you will be spending your time and money to set up an abandoned cart recovery campaign and you wouldn’t want it all go to waste.

So having a proper strategy is always the best option.

◈ Understanding The Hours To Send Recovery E-mails

Let us look at the hours you should send the recovery e-mails.

 i. The One-Hour Concept (The First Step of The Plan)

Think about the prospect who just abandoned the cart on your site a minute ago. What do you think could be the reason?

There could be 3 possible reasons:

  • suddenly got busy,
  • needs time to decide,
  • is comparing the price on other sites.

In either case, if the prospect does not come back to your site within 1 hour, then chances are, he/she will forget about it and end up purchasing it from another site, or won’t purchase that product at all.

However, there definitely was an interest in your product, or else the prospect would not bother to add it to the cart.

Here’s your opportunity.

You should remind the prospect of the product so that the prospect doesn’t forget about his/her interest.

And the best time to do so is around 1-hour of abandoning the cart.

A survey run by Rejoiner concludes that abandoned cart emails are most successful when sent just 1 hour after the cart abandonment.

Conversion Rate By Sending Time
Survey Report by Rejoiner

The SaleCycle analyzed the times of sending abandoned cart emails and the conversion ratio of some giant companies. They published an article with great insights on abandoned cart emails.

It was seen that abandoned cart emails were highly successful when sent 30 minutes after the cart was abandoned.

So, the idea is, not to send the e-mail too soon, i.e. sooner than 30mins, or too late, i.e. later than 1hour.

This step is crucial if you want maximum success.

**It is advised to send a maximum of 2 e-mails on a particular day, for any single purpose. Most people prefer sending only 1 e-mail on a given day, to avoid spamming.

The first e-mail is usually a simple reminder. For example:

Hi (Customer Name), how are you?

You forgot to complete your purchase for your product(s):

(product images and names)

You can still come back and buy the item(s) you want now.

[Go To Checkout Now]

So people who had a genuine interest, or were not sure what to decide, will in most cases go through with the purchase.

ii. The Same-day Urgency Approach  (The Situational Step)

If you have the opportunity to use the “Fear Of Missing Out” (FOMO) method, then you can use this approach.

After sending the 1st e-mail within one hour of cart abandonment, you can send a second e-mail on the same day, with an “urgency trigger”, about 3 to 6 hours after the cart abandonment.

An “Urgency trigger” is when you make a prospect feel the need to make an urgent decision.

You can easily achieve this in 3 ways:

  • Creating a one-time offer for that particular day only, such as
    • A small discount.
    • Free shipping.
    • Combo offer.
    • Future discount voucher
  • Highlighting the offer deadline, if it is the last day for a particular offer on the site or selected products
  • Claiming a shortage of stock so that the prospect may feel the product will be sold out soon

For any of these cases, sending a second e-mail on the same day can be very fruitful.

You may even send the 1st e-mail with the urgency trigger, then send a second e-mail on the same day, with a deadline reminder for example:

The urgency trigger on the 1st e-mail may:

Only 8 Hours Left For Free Shipping Offer!!

Then the second email on the same day will be:

Only 2 Hours Left! Order Now And Get A Free Shipping!!

 So the Same-day Urgency Approach will really depend on your choice.

  • It is most effective when you have certain offers running on your site.
  • It is least effective if you are selling expensive products.
iii. The Follow-up Email (The 2nd Step Of The Plan)

There are many reasons why you should send abandoned cart emails on multiple days, but we will assume only one:

  • People may miss your one-hour email unintentionally, due to:
    • not being able to access their e-mail account for the moment,
    • got really busy on that day,
    • didn’t have enough money in the account,
    • didn’t notice the e-mail among many others.

The ideal time to send the follow-up e-mail the very next day.

In this case, you can use a different subject line, or if you didn’t use the urgency trigger on the 1st e-mail, you can initiate it here.

Changing the subject line is more effective for people who opened your first email but did not convert.

You also have to decide what time of the day you want your follow-up e-mail to be sent.

CoSchedule ran research on 10 different studies by email service providers such as HubSpot, MailChimp, etc.

This is what they came up with:

Best Time To Send Emails

As per this report, the best time to send the follow-up email is within an hour of 8 am, 4 am and 12 am.

Sending the e-mail between 8 am to 9 am is the best choice as that is when most people check their e-mails every day.

However, for people who marked you as a trusted e-mail and receive fewer e-mails from other companies comparatively, the best time to send the follow-up e-mails to them is between 4 am – 5 am. This will ensure that the prospect will see your e-mail among the first few e-mails.

iv. The Best Day of The Week Approach (The 3rd Step)

Now, if you have followed the previous e-mail steps and still got no results, then the last attempt to try to recover abandoned cart prospects is to reach him/her one last time, on the best day of the week.

The idea is to send a final e-mail with an attempt to recover within the next 7 days.

study conducted by Omnisend says that:

  • Thursday is the best day of the week to send promotional emails.
  • Monday is the worst day of the week to send promotional emails.

Another detailed research by Klaviyo showed interesting results. According to them:

  • The best open rate of e-mail is on Tuesday.
  • Though Thursday is not among the best in terms of open rate, it is the best day to generate revenue from promotional e-mails.
  • Saturday is the worst day in terms of revenue generation.

Based on these two reports, we can decide:

  • Thursday would be the ideal day of the week to send the final abandoned cart recovery e-mail, as people make more financial decisions on that day.
  • Tuesday would be the second-best day to send the e-mail due to getting a higher open rate.
  • Monday and Saturday are always a big ‘no’ when sending any promotional e-mails.

Ideally, the one-hour e-mail and the next-day follow-up email are a must and do not depend on the day of the week. However, the final e-mail depends a lot on the day you send it out.

For example, suppose a prospect abandoned a cart at your store on a Sunday. So you sent an email after an hour, and sent the follow-up email the next morning, Monday.

Now, Monday is the busiest day of the week for anyone, and the chances are, that the person who abandoned the cart will not read your e-mail sent on Monday.

So the next logical thing to do is to send another e-mail on Thursday.

Thursday is the day when people are most relaxed, having the least weekly chores and a lot of free time to check e-mails. So they will be more obliged to make purchase decisions.

**What if a person abandons a cart on Thursday?

In this case, we will resort to the second-best choice, next Tuesday to schedule the final e-mail.

The 3rd e-mail (or 4th in a FOMO campaign) is usually straightforward in terms of the subject line and e-mail body.

For example:

Come back and finish your purchase!!

Here’s another example on FOMO,

The discount is running out. Purchase your products Now!

◈ Organizing The Campaign With A Flow Chart

Abandoned cart Email Campaign Flow Chart

Now that you know how many e-mails to send, the best time of the day, and the best days of the week to send emails for abandoned cart recovery, it’s time to create an initial plan.

Decide on the number of e-mails you wish to send and the type of approach you wish to take for the e-mails. Draw a basic flowchart of the e-mail campaign.

For example, you may decide to go for a 3-step email campaign where you will shoot out an e-mail about 1 hour after a person abandons a cart. Then you can set an automation to send a second reminder 24 hours later. And then third, a final reminder on next Thursday/Tuesday.

Or you can use the urgency trigger approach and plan a 4-step e-mail campaign. Here is a rough flow-chart for the 4-step campaign:

Abandon Cart Campaign Flow Chart
Example Of An Abandoned Cart Email Campaign Flow Chart

Initially, you can make a rough one, and then, while following the next few steps, you can make changes where necessary.

**You can set conditional e-mails based on whether the e-mail was opened or not, and whether the link inside was clicked or not.

Step 2 – Deciding The Abandoned Cart Email Subject Line 

The first thing a person will notice about your e-mail is the subject of the e-mail.

Depending on the subject, a person will decide whether to open an e-mail tor not.

The main purpose of a subject line is to make a prospect open your e-mail.

Around 35% recipient opens an e-mail based on the subject line alone.

If your prospect does not open the email, then it does not matter how well-written and attractive your e-mail is.

The subject line should make the prospect feel 2 crucial things: 

  • This email is personalized for him/her only, showing that you care.
  • The benefits they will get from opening this email.

The ideal length of a subject is below 60 characters; 82% of email marketing experts send emails with a subject line of 60 characters or less.

Here are some ideas you can use when writing a perfect abandoned cart email subject for your online shop:

i. Don’t Sound Desperate Or Pushy To Make A Sale

This sounds pretty easy, but you have no idea how many desperate e-mails I receive every day and ignore.

Try to keep the subject simple, yet a bit tempting. For anything that looks pushy, people tend to avoid them thinking they are advertisements.

For example, if you see an e-mail with a subject:

The discount of 10% is up for grabs!

The chance of you opening this e-mail is less than 20%.

However, in the case of a subject such as:

Did you get what you were looking for?

It will create a curiosity and make you question “What was I looking for?” You might end up opening the e-mail just to find out the answer.

For every stage of your e-mail campaign, you have to decide on a proper subject that will generate a higher open rate, but not sound too desperate.

ii. Product-Related Subject Lines

Using a subject related to a product, that the prospect was interested in earlier, can be very effective.

If the person is really interested, then he/she will definitely open an e-mail regarding that product later on.

For example, let us say a person added a pair of SkullCandy headphones to the cart.

You can set the subject line,

The SkullCandy headphones you wanted is still available.

As you can see, this subject line is really simple, to the point, and connects with the reader.

In case a person abandons the cart after adding an expensive product, you can send an e-mail with a slight discount.

For example:

You can get the SkullCandy headphones at 10% less!!

You might think this sounds bad, but actually, it is not. The reader will find it more relative since he/she recently wanted to buy a pair of headphones.

iii. FOMO Subject Lines

FOMO Subject Lines

FOMO subject lines are often very productive if done right.

Here are a couple of examples of FOMO abandoned cart e-mail subject lines:

Time scarcity -
Hey [Name], the Discount On Your Cart is Expiring.
Product scarcity - 
You Left A [Product] In Your Cart, And It's Almost Out Of Stock.

The FOMO subject line works best if you have any special offers or discounts going on, and the person abandoned the cart with products that were eligible for the offer or discounts.

For example, if a person was about to buy a Cotton Shirt on sale, but left at the last moment, your e-mail subject may be:

The sale on your desired Cotton Shirt is almost over!

The FOMO approach is not so effective in the 1st e-mail, one-hour email. But it is very effective in the follow-up e-mail or a second, same-day e-mail.

iv. Personalized Subject Lines

Personalizing the subject line is always a good idea. But you have to know when the personalization becomes too much and you should stop.

Personalized email subject lines have 12% more open rates than generic subject lines, however, it requires you to have the prospects name.

Here are some personalized subject line examples:

Hey [Name], did you forget about this?
Hello [Name], are you still thinking about it?
Dear [Name], come back and complete your purchase

◈ Example of Subject Lines On Each Stage Of An Abandoned Cart Recovery Campaign

Let’s say a person abandoned a cart that had a Gaming Mouse. So you may set the subject lines as follows

For a basic recovery e-mail campaign (3-stages):

1st Email -
The Gaming Mouse you wanted is still available
2nd Email -
Did you get the Gaming Mouse you were looking for?
3rd Email -
Come back and purchase your desired Gaming Mouse

For an FMO recovery e-mail campaign (4-stages):

1st Email -
The Gaming Mouse you wanted is still here on discount
2nd Email -
Get your Gaming Mouse now for extra 10% less!
3rd Email -
Do not miss out! Only 3 days left on Gaming Mouse discount!
4th Email -
Purchase your Gaming Mouse at 20% off. Last Chance!!

Step 3 – Prepare A Body For Each Stage of Your Plan 

Once you’ve planned the subject lines of your abandoned cart emails, It’s time to prepare an effective body for each abandoned cart email.

But first, let’s learn about some important elements for your abandoned cart recovery emails.

◈ A Few Important Factors Of Abandoned Cart Emails

Here are some important facts you should utilize on your abandoned cart emails.

i. Visual content

Keep in mind that your prospects have already seen so many boring and generic emails. Visual content will help you to stand out from others.

I will explain more about the visual contents and images in detail at a later segment of this guide.

ii. Personalization & Humor

While personalization is always considered great for connecting with your customers and making them trust you, humor will add spice to it.

Combining these two will amuse your prospects and make them read your entire email.

iii. Reviews & Testimonials
Review and Testimonials

72% of your prospects won’t take any action until they read reviews about the product.

Tip: Display the review (stars) just below the products in the e-mail.

The reviews and testimonials let you create authority and trust for your products once after the shopper has ignored your email.

iv. Cart Link & Call To Action

A link to the abandoned cart is one of the most important elements in your abandoned cart email body.

So keep a highlighted button with CTA, that leads the prospect to their cart, in the lower middle section of your email.

Tip: Along with the name of the person who abandoned the cart, you can add a personalized product recommendation after the CTA button.

Now, let’s look at the email bodies for each stage of the abandoned cart email campaign:

◈ Example of E-mail Body For Each Stage Of The Abandoned Cart Recovery Campaign

i. The One-hour Email Body

Since you will be sending this e-mail within just one hour after the cart is abandoned, this email is better to be just a reminder for the prospect who initiated the abandoned cart.

Suppose, the abandoned cart included coffee beans and milk.

Here is how it may be organized:

Hey [Name], did you forget about this?

You have added the following to the cart:

(Coffee beans product preview), (Milk product preview)

We have saved your cart. You can come back and purchase your products now.

[Complete Your Order Now] --**This is the button with CTA

You may also like:
(1 Related Product Suggestion)

If you decide to run the FOMO campaign including the one-hour e-mail, then here’s how it should be organized:

Hey [Name], the coffee beans you wanted are almost out of stock!

(Coffee beans product preview) --**Include quantity

Get it before it get's sold out!!

[Complete Your Order Now] --**This is the button with CTA

You may also like:
(1 Related Product Suggestion)

You have to send a reminder email after 3 or 6 hours, to remind them of this urgency (which will be similar to the 1st e-mail, just the quantity will decrease).

ii. The Follow-up email body

The follow-up e-mail, which you’ll send the next day, aims to create a connection with the prospect and convince him/her to come back and complete the purchase.

This email should also focus on attracting the prospects who opened your first email and did not take any action.

Here is an example of how it should look like:

Hi [Name], did you buy the Coffee Beans you wanted?

We still have your desired one available, plus the other product(s) you added to the cart.

(Product previewof max 3 products,
if more products were abandoned.
add a text such as "+ 3 more products")

[Complete Your Order Now] --**This is the button with CTA

You may also like:
(1 Related Product Suggestion)

If it’s a FOMO approach, then here’s an example:

Hi [Name], did forget about your Coffee Beans?

Save $10 on Coffee Beans today.

(Coffee Beans product preview) --**Include price change

[Complete Your Order Now] --**This is the button with CTA

You may also like:
(1 Related Product Suggestion)

Tip: It is a good practice to suggest a related product to any product(s) that was in the cart that was abandoned.

3. The Best Day Of The Week E-mail Body (Last e-mail)

The last email is usually very straightforward. You can use a direct approach and ask them to complete the purchase. You may use urgency trigger in a very direct manner.

Hi [Name], get your Coffee Beans on A 15% discount.
Today's the last day of the offer.

(Coffee Beans product preview) --**show discount amount

[Order Now] --**This is the button with CTA

You can see, it is very straight forward and anyone who has a little interest in real will think about purchasing the product(s).

Step 4 – Visual Content For Your Abandoned Cart Email

Visual Content Abandoned Cart

People remember visual content more than written content, as it’s easier to perceive information from visual content and takes less time.

It’s also easier for your prospect to interact with visual content and the most desired thing you want from an abandoned cart email is to make your prospect interact with it.

There are many types of visual content you can use in your email:

  • Product images.
  • Illustrations.
  • Screenshots (Reviews, Comments).

But you can go beyond these and use moving and out of box visual content like:

  • GIFs.
  • Videos.
  • Memes.

Moving content like videos and GIFs will make reading the email fun and make it easier to interact with.

You can try even more creative visual content and apply innovative strategies to attract your prospect.

No matter what visual content you use, it should always:

  • Reflect on your brand value.
  • It must not be irrelevant to your product or customer.
  • It contains something offensive.

So here is how you should structure your ideal abandoned cart email:

  • Personalized greetings.
  • A discount offer / FOMO method.
  • Product image.
  • Product details.
  • Call To Action text and button.
  • Other relevant images.
  • Product review information.

It’s also handy to run A/B tests on your emails. This way, you can discover which approach and emails are working out best for you.

How to recover an abandoned shopping cart with Cart Lift

By now you’ve learned:

  • How you can create different situation-based popup
  • How effectively you can apply retargeting ads
  • How you can prepare an abandoned cart email campaign
  • When and how to execute these methods and steps for maximum ROI.

Now, you’ve come to the bonus section.

In this section, I’ll tell you about how you can recover your abandoned cart easily.

So you can:

  • Spend the least amount of resources.
  • Get the same results.

Here is an amazing abandoned cart recovery tool Cart Lift that you can use in your store:

Cart lift home page

Schlussfolgerung

Winning back a chunk of all the abandoned carts in your store is not hard to achieve.

However, you need to have an organized plan and use the methods efficiently to ensure maximum ROI.

If you can apply them accurately, and make smart changes in your plan for your store, based on the reports and analytic results, you can convert around 30% of your abandoned carts to successful purchases.

And if you want to apply these strategies easily with less time then simply rely on Cart Lift.

If you’re using WooCommerce, here is an informative guide on how you can create a product feed to promote your products on marketplaces.

If you have more ideas and suggestions for recovering abandoned carts, feel free to drop it in the comment box.

Kategorien
Guide Product Feed Manager For WooCommerce

Accepted Google Country Codes List For All Google Ads [2024]

Google is currently the largest marketplace to promote WooCommerce products through various Ad campaigns such as Shopping Ads, Adwords, Dynamic Remarketing, and many more.

Hier finden Sie eine Liste der Google-Ländercodes, die Sie in Google Ads verwenden können, wenn Sie auf Länder verweisen, für die Sie werben oder in die Sie versenden.

Google-Ländercodes-Liste

In der Regel bestehen die Google-Ländercodes aus zwei Buchstaben (Groß- und Kleinschreibung wird nicht berücksichtigt).

A | B | C | D | E | F | G | H | I | J | K | L | M | N | O | P | Q | R | S | T | U | V | W | Y | Z

A

LandLändercodes
🇦🇫 Afghanistanaf
🇦🇱 Albanienal
🇩🇿 Algeriendz
🇦🇸 Amerikanisch-Samoawie
🇦🇩 AndorraAnzeige
🇦🇴 Angolaao
🇦🇮 Anguillaai
🇦🇶 Antarktisaq
🇦🇬 Antigua & Barbudaag
🇦🇷 Argentinienar
🇦🇲 Armenienam
🇦🇼 Arubaaw
🇦🇺 Australienau
🇦🇹 Österreichunter
🇦🇿 Aserbaidschanaz

B

LandLändercodes
🇧🇸 Bahamasbs
🇧🇭 Bahrainbh
🇧🇩 Bangladeschbd
🇧🇧 Barbadosbb
🇧🇾 Belarusvon
🇧🇪 Belgiensein.
🇧🇿 Belizebz
🇧🇯 Beninbj
🇧🇲 Bermudabm
🇧🇹 Bhutanbt
🇧🇴 Bolivienbo
🇧🇦 Bosnien und Herzegowinaba
🇧🇼 Botswanabw
🇧🇻 Bouvet-Inselbv
🇧🇷 Brasilienbr
🇮🇴 Britisches Territorium im Indischen Ozeanio
🇧🇳 Brunei Darussalambn
🇧🇬 Bulgarienbg
🇧🇫 Burkina Fasobf
🇧🇮 Burundibi

C

LandLändercodes
🇰🇭 Kambodschakh
🇨🇲 Kameruncm
🇨🇦 Kanadaca
🇨🇻 Kap VerdeLebenslauf
🇰🇾 Kaimaninselnky
🇨🇫 Zentralafrikanische Republikvgl.
🇹🇩 Tschadtd
🇨🇱 Chilecl
🇨🇳 Chinacn
🇨🇽 Weihnachtsinselcx
🇨🇨 Cocos (Keeling)-Inselncc
🇨🇴 Kolumbienmit
🇰🇲 Komorenkm
🇨🇬 Kongocg
🇨🇩 Kongo, Die Demokratische Republik Kongocd
🇨🇰 Cook-Inselnck
🇨🇷 Costa Ricacr
🇨🇮 Elfenbeinküsteci
🇭🇷 Kroatienhr
🇨🇺 Kubacu
🇨🇾 Zyperncy
🇨🇿 Tschechische Republikcz

D

LandLändercodes
🇩🇰 Dänemarkdk
🇩🇯 Dschibutidj
🇩🇲 Dominicadm
🇩🇴 Dominikanische Republiktun

E

LandLändercodes
🇪🇨 Ecuadorec
🇪🇬 Ägyptenz.B.
🇸🇻 El Salvadorsv
🇬🇶 Äquatorialguineagq
🇪🇷 Eritreaer
🇪🇪 Estlandee
🇪🇹 Äthiopienund

F

LandLändercodes
🇦🇨 Falkland-Inseln (Malwinen)fk
🇫🇴 Färöer-Inselnfür
🇫🇯 Fidschifj
🇫🇮 Finnlandfi
🇫🇷 Frankreichfr
🇬🇫 Französisch-Guayanagf
🇵🇫 Französisch-Polynesienpf
🇹🇫 Französische Südterritorientf
Produkt-Feed-Manager für WooCommerce

G

LandLändercodes
🇬🇦 Gabunga
🇬🇲 Gambiagm
🇬🇪 Georgienge
🇩🇪 Deutschlandde
🇬🇭 Ghanagh
🇬🇮 Gibraltargi
🇬🇷 Griechenlandgr
🇬🇱 Grönlandgl
🇬🇩 Grenadagd
🇬🇵 Guadeloupegp
🇬🇺 Guamgu
🇬🇹 Guatemalagt
🇬🇳 Guineagn
🇬🇼 Guinea-Bissaugw
🇬🇾 Guyanagy

H

LandLändercodes
🇭🇹Haitiht
🇭🇲 Heard Island und Mcdonald Islandshm
🇻🇦 Heiliger Stuhl (Staat Vatikanstadt)va
🇭🇳 Hondurashn
🇭🇰 Hongkonghk
🇭🇺 Ungarnhu

I

LandLändercodes
🇮🇸 Islandist
🇮🇳 Indienin
🇮🇩 Indonesienid
🇮🇷 Iran, Islamische Republikir
🇮🇶 Irakiq
🇮🇪 Irlandd.h.
🇮🇱 Israelil
🇮🇹 Italienes

J

LandLändercodes
🇯🇲 Jamaikajm
🇯🇵 Japanjp
🇯🇴 Jordanienjo

K

LandLändercodes
🇰🇿 Kasachstankz
🇰🇪 Keniake
🇰🇮 Kiribatiki
🇰🇵 Korea, Demokratische Volksrepublikkp
🇰🇷 Korea, Republikkr
🇰🇼 Kuwaitkw
🇰🇬 Kirgisistankg

L

LandLändercodes
🇱🇦 Demokratische Volksrepublik Laosla
🇱🇻 Lettlandlv
🇱🇧 Libanonlb
🇱🇸 Lesothols
🇱🇷 Liberialr
🇱🇾 Libysch-Arabische Dschamahirijaly
🇱🇮 Liechtensteinli
🇱🇹 Litauenlt
🇱🇺 Luxemburglu

M

LandLändercodes
🇲🇴 Macaomo
🇲🇰 Mazedonien, Ehemalige Jugoslawische Republik Mazedonienmk
🇲🇬 Madagaskarmg
🇲🇼 Malawimw
🇲🇾 Malaysiameine
🇲🇻 Maledivenmv
🇲🇱 Maliml
🇲🇹 Maltamt
🇲🇭 Marshall-Inselnmh
🇲🇶 Martiniquemq
🇲🇷 MauretanienHerr
🇲🇺 Mauritiusmu
🇾🇹 Mayotteyt
🇲🇽 Mexikomx
🇫🇲 Mikronesien, Föderierte Staaten vonfm
🇲🇩 Moldawien, Republikmd
🇲🇨 Monacomc
🇲🇳 Mongoleimn
🇲🇸 MontserratFrau
🇲🇦 Marokkoma
🇲🇿 Mosambikmz
🇲🇲 Myanmarmm
Produkt-Feed-Manager für WooCommerce

N

LandLändercodes
🇳🇦 Namibiana
🇳🇷 Naurunr
🇳🇵 Nepalnp
🇳🇱 Niederlandenl
| | Niederländische Antillenan
🇳🇨 Neukaledoniennc
🇳🇿 Neuseelandnz
🇳🇮 Nicaraguani
🇳🇪 Nigerne
🇳🇬 Nigeriang
🇳🇺 Niuenu
🇳🇫 Norfolkinselnf
🇲🇵 Nördliche Marianen-Inselnmp
🇧🇻 Norwegennein

O

LandLändercodes
🇴🇲 Omanom

P

LandLändercodes
🇵🇰 Pakistanpk
🇵🇼 Palaupw
🇵🇸 Palästinensische Gebiete, besetzteps
🇵🇦 Panamapa
🇵🇬 Papua-NeuguineaSeite
🇵🇾 Paraguaypy
🇵🇪 Perupe
🇵🇭 Philippinenph
🇵🇳 Pitcairnpn
🇵🇱 Polenpl
🇵🇹 Portugalpt
🇵🇷 Puerto Ricopr

Q

LandLändercodes
🇶🇦 Katarqa

R

LandLändercodes
🇷🇪 Réunionüber
🇷🇴 Rumänienro
🇷🇺 Russische Föderationru
🇷🇼 Ruandarw

S

LandLändercodes
🇸🇭 Heilige Helenash
🇰🇳 St. Kitts und Neviskn
🇱🇨 St. Lucialc
🇵🇲 Saint Pierre & Miquelonpm
🇻🇨 St. Vincent und die Grenadinenvc
🇼🇸 Samoaws
🇸🇲 San Marinosm
🇸🇹 São Tomé und Príncipest
🇸🇦 Saudi-Arabiensa
🇸🇳 Senegalsn
🇷🇸 Serbien & 🇲🇪 Montenegrocs
🇸🇨 Seychellensc
🇸🇱 Sierra Leonesl
🇸🇬 Singapursg
🇸🇰 Slowakeisk
🇸🇮 Sloweniensi
🇸🇧 Salomon-Inselnjdn
🇸🇴 Somaliaso
🇿🇦 Südafrikaza
🇬🇸 Südgeorgien und die Südlichen Sandwichinselngs
🇪🇸 Spanienes
🇱🇰 Sri Lankalk
🇸🇩 Sudansd
🇸🇷 Surinamsr
🇸🇯 Svalbard & Jan Mayensj
🇸🇿 Swasilandsz
🇸🇪 Schwedense
🇨🇭 Schweizch
🇸🇾 Arabische Republik Syriensy

T

LandLändercodes
🇹🇼 Taiwan, Provinz Chinatw
🇹🇯 Tadschikistantj
🇹🇿 Tansania, Vereinigte Republiktz
🇹🇭 Thailandth
🇹🇱 Timor-Lestetl
🇹🇬 Togotg
🇹🇰 Tokelautk
🇹🇴 Tongaan
🇹🇹 Trinidad und Tobagott
🇹🇳 Tunesientn
🇹🇷 Türkeitr
🇹🇲 Turkmenistantm
🇹🇨 Turks- und Caicosinselntc
🇹🇻 Tuvalutv

U

LandLändercodes
🇺🇬 Ugandaug
🇺🇦 Ukraineua
🇦🇪 Vereinigte Arabische Emirateae
🇬🇧 Vereinigtes KönigreichGroßbritannien
🇺🇸 Vereinigte Staatenuns
🇺🇲 Kleinere abgelegene Inseln der Vereinigten Staatenum
🇺🇾 Uruguayuy
🇺🇿 Usbekistanuz

V

LandLändercodes
🇻🇺 Vanuatuvu
🇻🇪 Venezuelave
🇻🇳 Vietnamvn
🇦🇨 Jungferninseln, Britischvg
🇻🇮 Jungferninseln, U.S.vi

W

LandLändercodes
🇼🇫 Wallis und Futunawf
🇪🇭 Westsaharaeh

Y

LandLändercodes
🇾🇪 Jemenja

Z

LandLändercodes
🇿🇲 Sambiazm
🇿🇼 Simbabwezw

Verbotene Länder

Due to the sanctions imposed by the OFAC, Google Ads isn’t available to advertisers in certain countries mentioned below:

  • Krim
  • Kuba
  • Iran
  • Nordkorea
  • Sudan
  • Syrien
Keine Google-Anzeigen - Google-Ländervorwahlen

Schlussfolgerung

Verwenden Sie gegebenenfalls die Ländercodes für Google.

Wenn Sie über Google Shopping Ads werben möchten, finden Sie hier eine vollständige Anleitung zur Erstellung eines WooCommerce-Produkt-Feeds für Google Shopping.

Kategorien
Guide Product Feed Manager For WooCommerce WooCommerce

Generate Kelkoo Product Feed : Increase WooCommerce Sales

Most WooCommerce seller promote their products through large marketplaces such as Google Shopping, Facebook Dynamic Ads, Amazon, and eBay.

But There are certain sites that can get you more local prospects than the popular market places mentioned above.

One such site is Kelkoo.

This article will explain the concept of a product feed, detail the mandatory and optional data fields for Kelkoo product feeds.

And also guide you through creating and maintaining a Kelkoo product feed using a best product feed generator plugin.

Why Promote on Kelkoo?

Kelkoo is one of the most successful marketplaces, that operates in over 20 countries.

It is rather a price comparison site that displays the best and affordable deals on products; prospects can compare multiple products to choose the ones that suit them.

Here’s a report from Crunchbase on Kelkoo

Kelkoo

Kelkoo operates through the Kelkoo Group Network which allows you to promote the same products in more sites such as LeGuide, Pricesavvy, Prisvis and many more, from one place.

A case study from ThinkWithGoogle suggests that,

“Due to its advertising in Shopping Ads through the Google Comparison Shopping program, most store owners start to see extra traffic very soon.”

A top 30 retailer, in the baby and nursery category, saw conversion rate jump by 42% and cost per sale decrease by 9% in a very little time, thanks to Google Comparison Shopping program through Kelkoo.

All these details already show how dependable this marketplace is. It also has a simple, effective mobile app. Here’s a preview of the app.

Countries Kelkoo Operates On

Currently, the site operates in around 26 different countries, mostly with respective suffixed websites.

How to promote on Kelkoo?

Kelkoo

You need to Register on Kelkoo Group Network to be able to submit your products.

Here’s the link to Register: https://merchant.kelkoogroup.com/app/login

Once you are registered, you will be able to upload products.

These products will be automatically listed on your country-specific Kelkoo site.

For example, if you are from the USA, then your products will be listed on kelkoo.us.com.

They will handle the marketing aspects through their Shopping Ads, and Publishers’ channels. You simply need to make sure that the data you provided, when uploading products, are accurate.

Now let us look at the data you need to provide your products.

Start Your Kelkoo Journey with product data specification

When you upload your products, Kelkoo will look for some specific data.

Let us look into what data you must include on your feed and I will give you examples for each data so that you know the most optimized way to generate the Kelkoo product feed.

A proper Kelkoo product feed (in XML format) of a single product usually looks like the following:

<?xml version="1.0" encoding="UTF-8" ?>
    <products>
        <product>
            Product data attributes
        </product>
    </products>
</rss>

**Here the product tag ( <product> </product> ) encapsulates the data of a product.

For multiple products, you simply add more product tags and the product data within, and the rest remains the same.

Nun enthalten die Produktdaten eine Menge Informationen, die Sie den jeweiligen Attribut-Tags innerhalb des Artikel-Tags zuordnen müssen.

The following are the necessary product attributes that you need to submit on Kelkoo for all products.

Necessary Product Attributes

Let’s look into the details to understand how you should include proper data, the format on the feed file, and examples of data.

Produkt-Titel

Attribut Titel
Beispiel Pullover Hoodie
Feed-Daten <title>
    <![CDATA[Pullover Hoodie]]>
</title>

This is the name of the product to be displayed. It is limited to 80 characters.

Produkt-URL

Attribut product-url
Beispiel https://www.yourwebsite.com/pullover-hoodie/
Feed-Daten <product-url>
    <![CDATA[https://www.yourwebsite.com/pullover-hoodie/]]>
</product-url>

This is the URL of a particular product page. Make sure the URL starts with either “http://” or “https://”. Any other format will be rejected.

Price Of Product

Attribut Preis
Beispiel https://www.yourwebsite.com/products/
Feed-Daten <price>99.00</price>

The price of the product should be submitted without any currency symbols or suffixes. Also, the price should not include any voucher discount.

Currency

Attribut currency
Beispiel EUR
Feed-Daten <currency>
    <![CDATA[EUR]]>
</currency>

The currency should be submitted as a suffix, not as a symbol.

However, this is an optional attribute. Even if you don’t submit this attribute, Kelkoo will assign a currency based on the operating country you specify.

Produktmarke

Attribut Marke
Beispiel Brand1
Feed-Daten <brand>
    <![CDATA[Brand1]]>
</brand>

Here, you can either provide the brand of the product or use your store name as a manufacturer.

Produktbeschreibung

Attribut Beschreibung
Beispiel This Pullover hoodies has a stylish look.
Feed-Daten <description>
    <![CDATA[This Pullover hoodies has a stylish look.]]>
</description>

Here, describe the product in your own way within 300 characters.

Bild-URL

Attribut image-url
Beispiel https://www.yourwebsite.com/phoodie1.png
Feed-Daten <image-url>
    <![CDATA[https://www.yourwebsite.com/phoodie1.png]]>
</image-url>

Here, provide the link to your Product’s image that doesn’t have any watermark or logo of trade.

It is best to use images on a white background in jpg, png or gif.

The recommended minimum size of the image is 300 × 300. And an image should not exceed 6 600 000 pixels. For example, 1024 × 768 = 786 432 pixel is accepted, but 1518 × 5908 = 8 968 344 pixel is not accepted.

Product Identifier (EAN)

Attribut ean
Beispiel 4856349257328
Feed-Daten <ean>4856349257328</ean>

It is important that you submit the product EAN (for European countries), which is a unique product identification set when products are created. For countries outside of Europe, you may provide the respective identifiers.

Hier sind alle akzeptierten Formen von Produktidentifikatoren aufgeführt:

  • UPC-E (6 digits)
  • EAN-8/UCC-8/GTIN-8 (8 digits)
  • UPC-A/GTIN-12 (12 digits)
  • EAN-13/UCC-13/GTIN-13 (13 digits)
  • ISBN-13 (13 digits for books)
  • EAN-14/UCC-14/GTIN-14 (14 digits)

In case you do not have this data, then you have to contact your Kelkoo account manager and follow the instructions provided.

Availability

Attribut Verfügbarkeit
Beispiel 1
Feed-Daten <availability>1</availability>

Kelkoo has numeric values to represent the availability of a product.

  • 1 = In Stock
  • 4 = Preorder
  • 5 = Available on Order

So based on the availability, submit the value accordingly.

Delivery Cost

Attribut delivery-cost
Beispiel 50.00
Feed-Daten <delivery-cost>50.00</delivery-cost>

Kelkoo expects you to have a fixed delivery cost for home deliveries in a country. So you should specify the exact amount you will charge for home deliveries.

Delivery Time

Attribut delivery-time
Beispiel 1-5 days
Feed-Daten <delivery-time>
    <![CDATA[1 – 5 days]]>
</delivery-time>

You may specify an estimated time to denote how long you might take to deliver a product.

Here are the accepted formats:

  • x – y days — Example: 1 – 5 days
  • x days — Example: 5 days
  • x – y hours — Example: 24 – 48 hours
  • y hours — Example: 24 hours
  • x – y weeks — Example: 2 – 3 weeks
  • y weeks — Example: 3 weeks

MPN (Hersteller-Teilenummer)

Attribut mpn
Beispiel PH0011
Feed-Daten <mpn>
    <![CDATA[PH0011]]>
</mpn>

Here you need to provide the product MPN code. In case you do not have an MPN, you may use the SKU as the value.

Merchant Category

Attribut merchant-category
Beispiel Clothing – Men – Hoodies
Feed-Daten <merchant-category>
    <![CDATA[Clothing - Men - Hoodies]]>
</merchant-category>

It is highly recommended to provide the category this product falls under. If there are sub-categories, then you need to use ‘-‘ as separators.

Try to specify sub-categories for better promotion results rather than putting a product in a generic category such as Clothing.

Produkt-Zustand

Attribut Bedingung
Beispiel 0
Feed-Daten <condition>0</condition>

Use this attribute to signify if your product is brand new or refurbished or in any other specific condition.

Kelkoo has numeric values to represent the condition of a product. Here are the accepted conditions.

  • 0 = new (default value)
  • 1 = used
  • 2 = refurbished
  • 3 = open box
  • 4 = returned
  • 5 = damaged
  • 6 = overstock
  • 7 = liquidation
  • 8 = unknown
  • 9 = download (pure-bits products)
  • 10 = professional offers

So based on the condition, submit the value accordingly.

Product Color

Attribut Farbe
Beispiel Red
Feed-Daten <color>
    <![CDATA[Red]]>
</color>

Specify the color of the product for better traction, though it is not mandatory.

If the product is available in several colors, you can specify multiple colors, or use the delimiter “;” to separate each value.

Environmental Tax

Attribut ecotax
Beispiel 10.00
Feed-Daten <ecotax>10.00</ecotax>

You can submit the tax amount on the product due to environmental tax.

Although this field is not mandatory, it is highly recommended.

If the tax amount is added to the price or if the tax doesn’t apply, then you may assign the value as “0”.

These are all the mandatory attributes that you must submit for products.

However, there are more recommended attributes that you may include based on the product type. Let us look at some of them:

Product-based Recommended Attributes

Here, let me discuss a few attributes that you may include based on your niches.

Product Attributes For Fashion and accessories

For products under this category, it is recommended that you include the following attributes for better results:

Fashion Type

Attribut fashion-type
Beispiel Shoes
Feed-Daten <fashion-type>
    <![CDATA[Shoes]]>
</fashion-type>

Specifying the fashion type will make it easier to promote to the right audience.

Geschlecht

Attribut fashion-gender
Beispiel Man
Feed-Daten <fashion-gender>
    <![CDATA[Man]]>
</fashion-gender>

It is seen that most people search for clothing or fashion products online, usually searching with their gender in the search term. For example, a woman looking to buy t-shirts may input the phrase “t-shirt for women”.

So it is better to submit a designated gender for Kelkoo to present the right product.

You may use the following terms to assign gender:

  • Man
  • Woman
  • Children
  • Male
  • Female
  • Unisex

Größe des Produkts

Attribut fashion-size
Beispiel 36
Feed-Daten <fashion-size>
    <![CDATA[36]]>
</fashion-size>

When selling clothes, size really matters. You may assign the size in EU format such as 34 or 35 or so on, or you may assign international size formats such as M, L or XL, etc.

**You may include a size card among the product images to explain the size of the product. To add multiple images, you may include the attributes image-URL-2, image-URL-3, and so on.

Product Attributes For Software and video games

Software and video games are pretty straightforward forward but it is wise to add one extra attribute for better search volume relevance.

Compatible Platform
Attribut software-platform
Beispiel PlayStation 4
Feed-Daten <software-platform>
    <![CDATA[PlayStation 4]]>
</software-platform>

Here you can mention the platform or console this product is compatible with or usable on.

People who use consoles usually search for a particular software or game along with the console name in the search term. For example, “Fifa 2019 Xbox”.

“Real estate” Product Attributes

Kelkoo also allows you to submit properties for promotion. More details you provide, the better the chance to attract buyers.

So we recommended that you also include the following attributes for a higher chance of success.

  • Property Type
  • Garage/Parking Space
  • City (Location)
  • Zip Code
  • Number Of Rooms
  • Surface Area

Property Type

Attribut property-type
Beispiel Renting
Feed-Daten <property-type>
    <![CDATA[Renting]]>
</property-type>

Here you will mention the purpose of this property listing, i.e. if the property is for rent, up for buying, etc.

The following are the accepted values:

  • Buy
  • Renting
  • Flatsharing
  • Life Annuity
  • Rental investment

Garage/Parking Space

Attribut propery-garage-parking
Beispiel With garage and parking
Feed-Daten <propery-garage-parking>
    <![CDATA[With garage and parking]]>
</propery-garage-parking>

A garage or parking space is always a plus point for a property. Hence, this attribute can help to inform prospects if a garage or parking space is available for a property.

Here are the accepted values:

  • Garage
  • With garage and parking
  • With parking
  • Without a garage and parking

City (Location)

Attribut property-city
Beispiel Manchester
Feed-Daten <property-city>
    <![CDATA[Manchester]]>
</property-city>

The geolocation function of search engines will automatically display the properties to people in the area you operate in. You may mention the city where the property is located to narrow down potential prospects.

Zip Code

Attribut property-zip-code
Beispiel M1 1WR
Feed-Daten <property-zip-code>
    <![CDATA[M1 1WR]]>
</property-zip-code>

Mentioning the zip code will allow a prospect to research the neighbourhood.

Number Of Rooms

Attribut property-number-rooms
Beispiel 3
Feed-Daten <property-number-rooms>3</property-number-rooms>

Here, mention the number of bedrooms available in the property. If you are renting, then mention the number of bedrooms up for rent.

Surface Area

Attribut property-surface
Beispiel 200 ⨉ 300
Feed-Daten <property-surface>200 ⨉ 300></property-surface>

Mention the surface area of the property.

Product Attributes For Wine and Champagne

When selling liquor, we suggest you add two more attributes:

Country Of Production
Attribut wine-country
Beispiel Irland
Feed-Daten <wine-country>
    <![CDATA[Ireland]]>
</wine-country>

Let prospects know where this wine or champagne was created. Most people prefer foreign brands when it comes to drinking.

Year

Attribut wine-year
Beispiel 1980
Feed-Daten <wine-year>1980;</wine-year>

The older the wine the better it tastes. And hence, the date of the liquor matters. You may provide the year through this attribute.

Capacity

Attribut wine-capacity
Beispiel 700ml
Feed-Daten <wine-capacity>
    <![CDATA[700ml]]>
</wine-capacity>

Provide the capacity of the liquor you are selling.

**There are more available attributes for different types of products. Here’s a complete product feed list for Kelkoo.

If you run a WooCommerce store, then it’s really easy to generate your desired product feed. Simply use the plugin Product Feed Manager For WooCommerce and generate the product feed in just a few clicks.

Here’s a video to show you how it works.

Once you have the product feed ready, now it’s time to upload it to the marketplace.

Uploading products

To upload products, you need to first rename the product feed as:

kelkoo_<countryprefix>.xml or kelkoo_<countryprefix>.txt

Next, you can initiate file transfer in 3 ways:

  • HTTP transfer mode
  • FTP transfer mode
  • FTP upload using Internet Explorer

Or you may upload through Kelkoo directly.

Once the file is uploaded, you have to wait until the data is updated by Kelkoo.

There are specific times when the data is updated. Set the timings as per the country when the data is updated.

And that’s it. You are now ready to get more sales through Kelkoo.

Final Thought

It is always wise to use more options when promoting your online products if you want maximum sales.

And Kelkoo is one of the most reliable online marketplaces out there to increase online sales.

Remember, it is important that you do not sound overly promotional with any of your products. Rather be honest and detailed and it will automatically attract the right audience.

Kategorien
Guide WooCommerce

Learn WooCommerce Completely – Ultimate Guides For WooCommerce Mastery [2024]

Lernen Sie WooCommerce vollständig
Ultimative Anleitungen für die WooCommerce-Beherrschung
Lassen Sie uns anfangen.

1.1 EIN HANDBUCH FÜR ANFÄNGER

Bevor Sie WooCommerce in vollem Umfang nutzen, ist es am besten, die Nutzung und die Funktionen des WooCommerce zu verstehen.

Im Folgenden finden Sie eine beschreibende Anleitung zu allen grundlegenden Funktionen von WooCommerce, die Sie zur Konfiguration Ihres Online-Shops kennen müssen.

Mit großartigen Screenshots und präzisen Details und Beispielen sind diese Artikel die besten Anleitungen für Online-Shop-Besitzer, um sich als Anfänger mit den Funktionen des Plugins vertraut zu machen.

1.2 EINRICHTUNG DER RICHTIGEN WOOCOMMERCE-SEITEN

Sie müssen die richtigen Seiten einrichten, um einen erfolgreichen Online-Shop zu betreiben. Mit WooCommerce können Sie alle obligatorischen Seiten wie Warenkorbseite, Checkout-Seite, Produktseite usw. erstellen und anpassen. Hier ist ein Leitfaden, der Ihnen hilft, alle notwendigen Seiten effektiv einzurichten.

2.1 DIE STANDARDMÄßIGEN WOOCOMMERCE-PRODUKTTYPEN

Um einen Online-Shop mit WooCommerce betreiben zu können, müssen Sie über die verschiedenen Produkttypen Bescheid wissen. Viele Funktionen und die Schnittstelle variieren je nach Produkttyp.

Dies ist ein kleiner Artikel, der alle standardmäßigen WooCommerce-Produkttypen im Detail und mit Beispielen erklärt.

2.2 ERSTELLEN EINES BENUTZERDEFINIERTEN PRODUKTTYPS

Häufig haben Sie Produkte, die Sie nicht mit den standardmäßigen WooCommerce-Produkttypen in Verbindung bringen können. Und es gibt keine Möglichkeit, benutzerdefinierte Produkttypen innerhalb des Plugins hinzuzufügen.

Es gibt jedoch eine Möglichkeit, sie manuell einzurichten. Hier ist ein Artikel, der eine Anleitung zum Hinzufügen eines benutzerdefinierten Produkttyps mit Hilfe einer benutzerdefinierten Klasse enthält. Sie enthält die erforderlichen Codes und die richtigen Anweisungen, um Ihnen zu helfen.

Bitte beachten Sie, dass Sie für diesen Versuch einige Programmierkenntnisse haben sollten.

3.1 LEITFÄDEN ZUM VERSAND VON WOOCOMMERCE

Wenn Sie einen WooCommerce-Shop betreiben, sind die Versandmethoden wichtig, die Sie sich ansehen sollten. Sie müssen einen festen Plan für die Versandoptionen haben und Ihr Geschäft mit den richtigen Versandmethoden richtig integrieren.

Diese Schritt-für-Schritt-Anleitung hilft Ihnen, mit korrekten Screenshots Anweisungen zu erhalten, wie die WooCommerce-Versandoptionen funktionieren und wie sie genau integriert werden können.

Sie werden über die Grundlagen des WooCommerce-Versands, die verschiedenen Versandmethoden des WooCommerce und deren Definition sowie die Integration der idealen Versandmethode in Ihre Produkte informiert.

Wenn Sie sich jedoch eingehender mit jedem einzelnen Punkt des WooCommerce-Versands befassen möchten, können Sie den folgenden wissensbasierten Artikel lesen.

3.2 WOOCOMMERCE-PAUSCHALVERSAND LERNEN

Um eine Filiale mit einem pauschalen Versandtarif zu betreiben, müssen Sie den Tarif entweder 'pro Artikel', 'pro Versandklasse' oder 'pro Auftrag' zuordnen.

Hier finden Sie einige Leitfäden, die Ihnen ein besseres Bild davon geben, wie der Pauschalversand funktioniert und wie Sie ihn richtig einrichten können.

Sie erhalten auch Einrichtungshinweise und Plugin-Vorschläge für die Einrichtung des Pauschalversands.

**Wenn Sie spezielle, auf der Stadt basierende Versandtarife hinzufügen möchten, können Sie das Plugin WooCommerce Table Rate Shipping Pro verwenden.

Hier finden Sie eine Anleitung zur Verwendung dieses Plugins, um Ihnen bei der Konfiguration der Versandtarife für verschiedene Städte zu helfen.

3.3 BENUTZERDEFINIERTE VERSANDMETHODE ERSTELLEN

WooCommerce bietet standardmäßig nur 3 Versandmethoden an:

  • Pauschale
  • Kostenloser Versand
  • Lokale Abholung

Wenn Sie weitere Versandmethoden hinzufügen müssen, gibt es keine Möglichkeit, dies innerhalb von WooCommerce zu tun.

Sie können dies jedoch manuell erreichen. Hier finden Sie einen Artikel, der Sie darüber informiert, wie Sie benutzerdefinierte Versandmethoden manuell über die Versandmethoden-API hinzufügen können.

Bitte beachten Sie, dass Sie für diesen Versuch einige Programmierkenntnisse haben sollten.

Wie Sie sehen können, wurde im Artikel die API verwendet, um eine neue benutzerdefinierte Versandmethode einzurichten.

Um mehr über die WooCommerce-Versandmethoden-API zu erfahren, klicken Sie hier.

Es gibt einige WooCommerce-Erweiterungen, die Ihnen helfen, einige zusätzliche Versandmethoden zu erstellen, wie

**Es gibt tatsächlich ein Plugin, das Ihnen bei der benutzerdefinierten Versandmethode hilft.

Diese Plugins sind sehr effizient und nützlich.

4.1 VERWALTUNG DES INVENTARS IM WOOCOMMERCE

Die Verwaltung eines WooCommerce-Geschäfts mit einer großen Anzahl von Produkten kann eine Herausforderung werden. WooCommerce ermöglicht Ihnen daher eine mühelose Bestandsverwaltung.

Dies ist ein netter Artikel, der erklärt, wie die Bestandsverwaltung funktioniert.

4.2 EINZELPRODUKT-BESTAND

Wenn Sie erst einmal verstanden haben, wie die Bestandsverwaltung funktioniert, sollten Sie sich jetzt mit der Bestandsverwaltung einzelner Produkte vertraut machen, damit Sie den Bestand, Rückstände und andere erforderliche Details verwalten können.

Daher wird Ihnen dieser Artikel ein richtiges Verständnis dafür vermitteln, wie man den Bestand für einzelne Produkte verwaltet.

**Es gibt ein großartiges Plugin für die Lagerverwaltung.
Schauen Sie sich ATUM Inventory Management für WooCommerce an.

5.1 LEITFADEN ZUM WOOCOMMERCE DROPSHIPPING

Es gibt mehrere WooCommerce Leitfäden, die Drop-Shipping zu erklären, aber diese besonderen Artikel geben Ihnen fundiertes Wissen darüber, wie Drop-Shipping funktioniert und wie man es für WooCommerce besser als irgendwo sonst zu implementieren.

Dies ist ein ziemlich langer Artikel mit allen Details, die Sie über Dropshipping benötigen. Sie können jedoch auch direkt zur Schritt-für-Schritt-Anleitung für die Einrichtung von Drop-Shipping gehen, falls Sie nicht genug Zeit haben (wir empfehlen Ihnen jedoch dringend, den gesamten Artikel zu lesen, um Drop-Shipping erfolgreich einzurichten).

Das manuelle Einrichten des Streckengeschäfts ist großartig, da Sie die vollständige Kontrolle über das System haben. Sie können jedoch auch großartige Plugins erhalten, die sich dem Dropshipping widmen.

**Hier ist ein Artikel (von Cloudways), der Ihnen eine Liste von 11 "Must-Have WooCommerce Dropshipping Plugins" im Jahr 2019 gibt.

6.1 VERSTEHEN UND KONFIGURIEREN VON PRODUKTEN

Es ist wichtig, die grundlegenden Kriterien der Produkte in Ihrem WooCommerce-Shop einzurichten und zu konfigurieren. Daher gibt es einige WooCommerce-Leitfäden, die alle Optionen für die Einrichtung von Produkten erklären.

6.2 EIN LEITFADEN ZUM HINZUFÜGEN VON PRODUKTEN IM WOOCOMMERCE

Sobald Sie die grundlegenden Produkteinstellungen eingerichtet haben, kommt der Zeitpunkt, an dem Sie Produkte hinzufügen können. Das manuelle Hinzufügen von Produkten ist nicht so schwierig, aber man vergisst oft, bestimmte wichtige Details hinzuzufügen oder zuzuweisen.

Wenn Sie Produkte hinzufügen, können Sie einige Tools zum Schreiben von Produktbeschreibungen verwenden, um optimierte Beschreibungen für Ihre WooCommerce-Produkte zu erstellen.

In den folgenden Anleitungen erfahren Sie, wie Sie Produkte manuell zu WooCommerce hinzufügen können, ohne wichtige Informationen zu vergessen. Außerdem erhalten Sie einen Überblick über alle Produkttypen und ihre Eigenschaften.

7.1 LEITFADEN ZUM PRODUKT-IMAGE

Das Hauptverkaufsargument für ein Produkt in Ihrem WooCommerce-Shop ist das Image. Hier finden Sie eine Anleitung zum Erstellen von Qualitätsbildern, die Sie auf Ihre Website hochladen können. Es werden verschiedene Möglichkeiten besprochen, wie Sie die Bilder vor dem Hochladen bearbeiten und optimieren können.

7.2 EINRICHTEN EINER PRODUKTBILDGALERIE

Es ist immer ratsam, mehrere Bilder eines Produkts aus verschiedenen Blickwinkeln hinzuzufügen, um potenzielle Kunden besser zu erreichen. WooCommerce ermöglicht Ihnen die Einrichtung einer Produktbildgalerie.

Hier ist ein Leitfaden, der Ihnen bei der Einrichtung hilft.

**Wenn Sie möchten, können Sie lieber einige Fotogalerie-Plugins verwenden, um eine bessere Produktbildgalerie zu erhalten.

Hier ist eine Liste (von Kinsta) einiger der besten WordPress-Fotogalerie-Plugins, die Sie zur Erstellung einer lukrativen Bildergalerie für Ihre Produkte verwenden können.

7.3 VERWALTUNG DER BILDGRÖßEN VON WOOCOMMERCE-PRODUKTEN

Sie mögen großartige Bilder für Ihre Produkte haben, aber wie wollen Sie die Größe verwalten?

Dieser Artikel gibt Ihnen eine komplexe Möglichkeit, wie Sie die Bildgrößen für die Produkte einstellen können. Es stellt Ihnen Code-Schnipsel zur Verfügung, die Sie verwenden können.

(Bitte beachten Sie, dass Sie über große Kenntnisse in der Bearbeitung des Themen-Backends verfügen sollten, um dies zu versuchen).

8.1 ZAHLUNGSMETHODEN IM WOOCOMMERCE

Als erstes müssen Sie die Zahlungsmethoden einrichten. Innerhalb von WooCommerce können Sie standardmäßig 4 verschiedene Zahlungsmethoden einrichten:

  • Direkte Banküberweisung
  • Scheck
  • Nachnahme (CoD)
  • PayPal

Der folgende Artikel soll Ihnen helfen, sich an diese Zahlungsmethoden zu gewöhnen und detaillierte Schritte zu erhalten, die Sie bei der Einrichtung Ihrer Zahlungsmethoden befolgen müssen.

8.2 ZAHLUNGS-GATEWAYS FÜR WOOCOMMERCE

Um nun Online-Zahlungen akzeptieren zu können, müssen Sie Zahlungs-Gateways im WooCommerce einrichten.

Die folgenden Artikel informieren Sie über die wichtigsten Zahlungsgateways, die Sie zur Annahme von Online-Zahlungen verwenden können, und geben Ihnen einen Überblick über die Integration von Zahlungsgateways in Ihren WooCommerce-Shop.

8.3 ZOLL-ZAHLUNGS-GATEWAY

Sie könnten auf einen lokalen Zahlungs-Gateway-Dienst stoßen, den Sie nicht in WooCommerce integrieren können, auch nicht mit Hilfe von Plugins.

Man muss also einen komplexen Weg gehen, um dies zu tun. Dieser Artikel gibt Ihnen Anweisungen und Codes, um ein benutzerdefiniertes Zahlungs-Gateway zu Ihrem WooCommerce-Shop hinzufügen zu können.

(Bitte beachten Sie, dass Sie gute Kenntnisse in PHP und WooCommerce haben sollten, um dies zu versuchen)

9.1 EINRICHTUNG DER BESTEUERUNG IM WOOCOMMERCE

Es ist wichtig, dass Sie wissen, wie Sie die Besteuerung für Ihren WooCommerce-Shop richtig einrichten können.

Sie müssen lernen, wie die Steuern angewendet und wie sie den Interessenten angezeigt werden. Dieser detaillierte Leitfaden wird Ihnen bei der Einrichtung der Besteuerung helfen.

**Es gibt ein paar Plugins, die großartige Funktionen zur Unterstützung der Steuerverwaltung bieten. Sehen Sie sich diesen Artikel (von GoldenOakWebDesign) an, der eine Liste der Top 4 Umsatzsteuer-Plugins für Ihre WooCommerce-Website enthält.

10.1 EINRICHTUNG VON WOOCOMMERCE UPSELL & CROSS-SELL

Most people think they need plugins to run cross-selling and upselling campaigns but guess what, WooCommerce already includes these features.

Hier ist ein Artikel, der Ihnen hilft, diese leistungsstarken Marketingfunktionen innerhalb von WooCommerce einzurichten. Es enthält Screenshots und eine Anleitung, die Ihnen die Einrichtung von Upsell und Cross-Selling erleichtert.

In diesem Artikel werden auch einige alternative Möglichkeiten zur Nutzung der Upsell- und Cross-Selling-Funktionen vorgeschlagen, die Sie für bessere Marketing-Ergebnisse einsetzen können.

**Es gibt ein Plugin, mit dem Sie individuelle Upsell- und Cross-Sell-Vorschläge für Ihre Kunden in Ihrem WooCommerce-Shop erstellen können. Probieren Sie es doch mal mit WooCommerce Boost Sales aus.

11.1 GUTSCHEIN-CODES IM WOOCOMMERCE ERSTELLEN

Es ist immer ratsam, ab und zu eine Art Gutscheinrabatt zu nutzen, um mehr Interessenten anzuziehen. WooCommerces verfügt über eine einfache Schnittstelle, die Sie bei der Erstellung von Gutschein-Codes unterstützt, um diesen Zweck zu erfüllen.

Dieser Artikel gibt eine richtige Schritt-für-Schritt-Anleitung, damit Sie einen Gutscheincode für Ihr Geschäft einfach erstellen können.

Jetzt können die Gutscheine für viele verschiedene Zwecke eingerichtet werden, wenn Sie die Standard-Gutscheincode-Funktion von WooCommerce verwenden. Am besten informieren Sie sich über die Art der Gutscheine, die Sie erstellen und verwenden können.

Obwohl die meisten Leute es vorziehen, die Standard-Coupon-Funktion innerhalb von WooCommerce zu verwenden, gibt es viele Plugins, die Ihnen auch dabei helfen.

Mit verschiedenen Plugins erhalten Sie auch einige einzigartige Zusatzfunktionen wie dynamische Produktpreise oder die Einrichtung von Gutscheinen für bestimmte Kategorien und vieles mehr.

**Hier ist eine Liste (von Flycart) der 10 besten WooCommerce-Gutscheincode-Plugins, die Sie sich ansehen können.

(Bitte beachten Sie, dass für die Bearbeitung der Schaltfläche In den Warenkorb" Codes erforderlich sind und Sie daher über Programmierkenntnisse verfügen sollten, um die in diesem Abschnitt vorgeschlagenen Anleitungen zu befolgen).

12.1 ANZEIGEN/VERBERGEN DER SCHALTFLÄCHE "IN DEN WARENKORB LEGEN".

Es kann viele Gründe dafür geben, dass Sie die Schaltfläche In den Warenkorb" deaktivieren möchten, entweder weil Sie ein Produkt anzeigen möchten, das nicht auf Lager ist, oder weil Sie auf Ihrer Produktangebotsseite auf bevorstehende Produkte hinweisen möchten.

Dieser Artikel gibt Ihnen eine gute Anleitung, um dies zu erreichen.

12.2 ERSETZEN SIE DIE SCHALTFLÄCHE "IN DEN WARENKORB".

Oftmals möchten Sie die Schaltfläche "In den Warenkorb" durch eine andere Schaltfläche ersetzen, wahrscheinlich um einen Link zu einer anderen Seite zu erstellen.

Dieser Artikel enthält eine Videoanleitung und einen Codeschnipsel, mit denen Sie dies erreichen können.

12.3 TEXT DER SCHALTFLÄCHE "IN DEN WARENKORB" ÄNDERN

Vielleicht möchten Sie den Text "In den Warenkorb" in etwas anderes wie "In die Tasche" oder "Wählen Sie mich" oder in etwas anderes ändern, das die Aufmerksamkeit potenzieller Kunden auf sich ziehen könnte.

Dies ist ein Artikel, der Ihnen mit den spezifischen Codes helfen wird, die dafür erforderlich sind.

Sie können auch unser populäres Plugin "WooCommerce ändern, Text zum Warenkorb hinzufügen" verwenden, um benutzerdefinierten Text und Themenbibliothekssymbole auf der Schaltfläche "Zum Warenkorb hinzufügen" hinzuzufügen.

12.4 WARENKORBSEITE UND KASSE AUF EINER EINZIGEN SEITE KOMBINIEREN

Oft ist es bequemer, einen Schritt zu überspringen und den Kunden die Möglichkeit zu geben, ihre Einkaufswagen einzusehen und die Kasse von einer einzigen Seite aus zu bearbeiten.

Dieser Artikel gibt Ihnen eine gute Anleitung, wie Sie Ihre Warenkorb- und Kassenseite effizient zusammenführen können.

12.5 NACH DEM HINZUFÜGEN ZUM WARENKORB AUF EINE ANDERE SEITE WEITERLEITEN

Sie können es so einrichten, dass jemand, nachdem er ein Produkt in den Einkaufswagen gelegt hat, auf die Einkaufswagenseite, die Produktseite oder eine andere Webseite weitergeleitet wird. Dieser Artikel wird Sie bei der Einrichtung unterstützen.

In diesem Artikel lernen Sie auch, wie man Parameter einstellt, z.B. dass nur das Hinzufügen einer bestimmten Anzahl von Produkten auf die Warenkorbseite umgeleitet wird oder dass nur Produkte einer bestimmten Kategorie die Umleitung verursachen. Diese können sehr praktisch sein.

13.1 ANPASSUNG DER CHECKOUT-SEITE

Vielleicht möchten Sie Änderungen an der Checkout-Seite vornehmen, indem Sie Felder neu organisieren oder benutzerdefinierte Felder hinzufügen, oder andere mögliche Änderungen vornehmen.

Dieser Leitfaden behandelt die meisten Anpassungen, die Sie vornehmen können, sowie Vorschläge für Codes zur Durchführung der Änderungen. Außerdem erhalten Sie auch Vorschläge zu WooCommerce-Erweiterungen, die Ihnen bei diesen Methoden helfen.

(Bitte beachten Sie, dass Sie gute Kenntnisse in CSS haben sollten, um dies zu versuchen).

Sie können auch den folgenden Leitfaden verwenden, der Ihnen exklusive Codes zur Verfügung stellt, mit denen Sie Ihren WooCommerce-Warenkorb, Ihre Kasse und Ihre Kontoseiten mit CSS anpassen können.

13.2 WARENKORB-BASIERTE ZUSATZGEBÜHR WÄHREND DES BESTELLVORGANGS

Häufig gibt es Fälle, in denen Sie bestimmte Produkte haben, die aus einem besonderen Grund zusätzliche Gebühren erfordern.

Wenn Sie z.B. international liefern, können außer Steuern und Versandgebühren auch zusätzliche Verpackungs- oder Zollgebühren anfallen.

WooCommerce erlaubt es Ihnen nicht, solche Bedingungen hinzuzufügen, und es kann kompliziert werden, diese Bedingungen in Ihren Shop aufzunehmen. Am besten ist es also, ein gutes Plugin zu verwenden, um diesen Zweck zu erfüllen.

Der folgende Artikel ist eine Übersicht und Anleitung zur Verwendung des Plugins WooCommerce Conditional Product Fees for Checkout Plugin. Sie können während des Bestellvorgangs beliebige Bedingungen hinzufügen, um zusätzliche Gebühren, basierend auf dem Warenkorb, zu erheben.

Das Plugin ist sehr zuverlässig. Abgesehen von den Grundbedingungen können Sie mit diesem Plugin auch die Gebühren für das Zahlungsgateway in den Gesamtbetrag für die Kasse einbeziehen.

14.1 WOOCOMMERCE-STANDARD-E-MAIL-VORLAGENANPASSUNG LERNEN

WooCommerce ermöglicht Ihnen standardmäßig die Bearbeitung der E-Mail-Vorlage. Es ist einfach, aber man muss klug vorgehen. Hier finden Sie einige Artikel, die Ihnen bei der Änderung des E-Mail-Formats und des Textes helfen sollen, sowie Tipps, wie Sie den Text überzeugender gestalten können.

14.2 E-MAIL-VORLAGE IM WOOCOMMERCE MIT HILFE VON CODES ANPASSEN

Sie können die Funktionen in der Standard-E-Mail-Vorlage in WooCommerce ändern und sie auf Ihre eigene Weise anpassen. Dieser Artikel gibt Ihnen Codes, mit denen Sie die E-Mail-Vorlagen optimieren können.

(Bitte beachten Sie, dass Sie gute Kenntnisse in der Programmierung haben sollten, um dies zu versuchen).

14.3 WOOCOMMERCE-E-MAIL-ANPASSUNG

Neben der Erstellung von benutzerdefinierten E-Mail-Vorlagen gibt es Plugins, die Ihnen bei der Erstellung attraktiver E-Mail-Designs helfen sollen.

Es ist bequemer, ein Tool zu verwenden, das auf die Anpassung von E-Mails spezialisiert ist, wenn Sie mit Ihrem Design oder Ihren Programmierkenntnissen nicht so vertraut sind. Hier ist ein Artikel, der eines dieser Instrumente hervorhebt.

In diesem Handbuch finden Sie die richtigen Anleitungen zur Verwendung des Kadence WooCommerce E-Mail-Designers und zur Erstellung erstaunlicher E-Mail-Designs für Ihren WooCommerce-Shop.

**Es gibt auch andere Plugins, die Ihnen bei der Erstellung attraktiver E-Mail-Designs helfen können. Sie können sich die YITH WooCommerce E-Mail-Vorlagen ansehen, die mit mehreren vorgefertigten E-Mail-Vorlagen geliefert werden, die Sie verwenden können.

15.1 WOOCOMMERCE-MITGLIEDSCHAFTEN

WooCommerce hat eine Erweiterung, die Sie verwenden können, die WooCommerce-Mitgliedschaft. Hier ist eine Schritt-für-Schritt-Anleitung, die Ihnen bei der Einrichtung einer Mitgliedschafts-Website für Ihren WooCommerce-Shop mit dieser Erweiterung hilft.

Abgesehen von der Erstellung einer Mitgliedschaftsseite gibt es noch mehr Dinge, die in Bezug auf Mitglieder- oder Kundenportale zu verwalten sind. Sie müssen in der Lage sein, Abonnements, wiederkehrende Zahlungsmodelle, Kaufhistorie und andere wichtige Daten zu verwalten.

Hier ist also ein Artikel für Sie, der Ihnen einige der besten Tools vorschlägt, die Sie für die Nutzung und Verwaltung der Abonnements und anderer Mitglieder Ihrer Website wählen können.

16.1 KUNDENVERFOLGUNG UND GOOGLE-ANALYSE

Sie können eine Möglichkeit einrichten, um die Kundenaktivitäten in Ihrem WooCommerce-Shop zu verfolgen und eine vollständige Analyse der Produktleistung zu erhalten, mit der Sie wichtige Marketingentscheidungen treffen können.

Dieser Artikel zeigt Ihnen, wie Sie das MonsterInsights-Plugin verwenden können, um Analysen Ihres Shops über Google Analytics zu erhalten.

16.2 AUTO-SYNC-WOOCOMMERCE-PRODUKTE MIT GOOGLE-HÄNDLERSHOP

Die meisten Menschen werben für ihre Shop-Produkte in anderen großen Händlergeschäften wie Amazon, Google Merchant Shop, Facebook Dynamics, eBay usw. Daher gibt es ein Plugin, das Ihnen helfen kann, einen Feed für die großen Shops zu generieren.

Außerdem können Sie Ihre Shop-Produkte automatisch mit Google Merchant Shop synchronisieren. Welche Änderungen Sie auch immer an den Produkten Ihres Shops vornehmen, sie können mit diesem Plugin automatisch in Ihrem Google Merchant Shop aktualisiert werden. Dieser Artikel gibt Ihnen einen vollständigen Leitfaden.

16.3 FACEBOOK-INTEGRATION FÜR WOOCOMMERCE

Sie können Ihren WooCommerce-Shop auch in Ihren Facebook-Shop integrieren. In diesem Artikel wird erklärt, wie Sie dies mit einer großartigen WooCommerce-Erweiterung tun können.

16.4 WOOCOMMERCE MIT AMAZON INTEGRIEREN

Es ist möglich, Ihren WooCommerce-Shop in vielerlei Hinsicht mit Amazon zu integrieren, z. B. bei der Synchronisierung von Lagerbeständen und Inventar, der Auftragsverfolgung, Produktaktualisierungen usw. In diesem Artikel lernen Sie Erweiterungen kennen, die Ihnen dabei helfen werden.

17.1 TECHNIKEN ZUR FÖRDERUNG DES WOOCOMMERCE-VERKAUFS

Es gibt verschiedene Techniken, die Sie anwenden können, um den Verkauf für Ihren WooCommerce-Shop zu starten. Ein neuer Trend zur Steigerung der Verkäufe besteht beispielsweise darin, Werbevideos Ihrer beliebten Produkte zu erstellen und sie in sozialen Medien zu verbreiten. Einfach so gibt es eine Menge anderer Methoden, denen man folgen kann.

Hier ist ein Artikel, der Ihnen helfen soll, die orthodoxsten Techniken kennen zu lernen, mit denen Sie Ihre Verkäufe steigern können.

Sie können sich auch für einige andere einzigartige Wege entscheiden, um für Ihre Produkte zu werben, die den meisten anderen nicht bekannt sind.

So können Sie beispielsweise auf großen lokalen Online-Marktplätzen für Ihre Produkte werben, auf beliebten Marktplätzen wie eBay oder Amazon werben oder auf Facebook live gehen und Ihre Produkte ausstellen.

** Wenn Sie Ihre WooCommerce-Verkäufe steigern wollen, können Sie das Plugin WooCommerce Sales Booster Pack verwenden. Als Kunden wollen, dass besondere Push, oder Motivation, ein Produkt zu kaufen. Mit Sales Booster Pack können Sie ganz einfach effektive Konversionsstrategien für Ihren Shop einrichten.

**Wussten Sie, dass Sie sogar einen eigenen WooCommerce-Shop aus Amazon Affiliates erstellen könnten? Sie können es als Nebenbeschäftigung ausprobieren.

Hier sind einige Artikel, die Ihnen solche einzigartigen Ideen zur Förderung Ihrer WooCommerce-Produkte geben.

Im Idealfall beginnen die meisten WooCommerce-Shops damit, ihre Produkte im Google Merchant Center über Google Shopping Ads, Google Adwords oder Google Dynamic Re-marketing zu bewerben. Aber der Erfolg bei Google hängt wirklich davon ab, dass man die Regeln beim Erstellen und Einreichen des Produkt-Feeds befolgt.

** Wenn Sie Ihre Marketingstrategie automatisieren möchten, finden Sie hier ein kostenloses Google Ads und Google Shopping Plugin, das die ganze Arbeit für Sie erledigen kann, mit der Garantie eines Premier Google Partners. Laden Sie Ihre Produkte in Ihr Google Merchant Center hoch, und Clever e-Commerce erstellt Ihre Smart Shopping-Kampagne. Es kann auch Ihren Google Shopping Feed für Sie erstellen und optimieren.

Hier finden Sie einen Leitfaden, der Ihnen hilft, den Produkt-Feed Ihres Shops so vorzubereiten, dass er von Google besser bewertet wird.

17.2 SEO LEITFADEN, HILFE & TIPPS FÜR WOOCOMMERCE

Ein wichtiger Teil des Marketings ist SEO. Jetzt ist SEO nicht mehr auf die Optimierung von Schlüsselwörtern und Backlinks beschränkt. Sie können mehr tun, um eine bessere SEO-Traktion in Ihrem WooCommerce-Shop zu erhalten.

Hier sind ein paar Leitfäden, die Ihnen helfen, Ihren WooCommerce-Shop für SEO zu optimieren.

Alle diese Artikel helfen Ihnen, die WooCommerce SEO-Techniken zu erlernen, um die Leistung Ihres Geschäfts zu verbessern. Außerdem werden Ihnen SEO-Plugins vorgestellt, die Sie effektiv nutzen können.

17.3 MARKETING-AUTOMATISIERUNG

Bei so vielen Dingen, die gemeinsam zu erledigen sind, wie z. B. die Bearbeitung von Interessenten, die Optimierung von Websites, die Verbesserung von Produktdaten, die Anwendung von Marketingtechniken und vieles mehr, kann die Automatisierung wirklich nützlich sein.

Der erste Schritt besteht darin, sicherzustellen, dass Sie eine E-Mail-Automatisierungskampagne eingerichtet haben. Egal, ob es sich um E-Mails an wiederkehrende Interessenten oder um Werbung für neue Interessenten handelt, richten Sie eine geeignete E-Mail-Automatisierung ein, um die Konversionsrate zu erhöhen.

Hier ist ein Artikel, dem Sie Hilfe entnehmen können.

**Sie können auch in Betracht ziehen, Ihre beliebten Produkte auf Ihren sozialen Kanälen zu teilen, um sie attraktiver zu machen. Versuchen Sie, mit Hilfe des Social-Automatisierungstools Social Booster Ihre Zeit zu sparen und die automatische Freigabe Ihrer Produkte für alle Ihre sozialen Medien mit nur wenigen Klicks zu planen.

WERTVOLLERE RESSOURCEN

18.1 LEITFADEN ZU DEN WICHTIGSTEN ASPEKTEN DES WOOCOMMERCE

WooCommerce ist eine große Plattform mit vielen relativen Themen, die es abzudecken gilt. Es gibt keinen endgültigen Leitfaden, der alle Aspekte des WooCommerce optimal abdeckt. Daher haben wir oben einige Artikel hervorgehoben, die für jeden Abschnitt spezialisiert sind.

Es gibt jedoch diesen einen Leitfaden, der alle wichtigen Bereiche des WooCommerce zu einem guten Teil abdeckt. Sie können diesen Leitfaden lesen, um die allgemeine Idee der Einrichtung eines WooCommerce-Shops zu verstehen, und dann die anderen Artikel oben verwenden, um über die Bereiche zu improvisieren, in denen Sie sich nicht sicher sind.

18.2 WARUM WOOCOMMERCE ÜBER ANDERE PLATTFORMEN NUTZEN?

Neben WooCommerce gibt es noch weitere eCommerce-Plattformen wie Shopify, BigCommerce usw.

WooCommerce erwies sich in letzter Zeit jedoch als die beste Plattform, um Online-Shops zum Erfolg zu verhelfen. Sie ist sehr gut organisiert, um Produkte zur Website hinzuzufügen, und lässt sich leicht anpassen. Es gibt so viele weitere Gründe, warum WooCommerce eine ideale Wahl ist.

Hier sind einige Artikel, die Ihnen helfen können, alle Zweifel über WooCommerce auszuräumen.

Dies sind Artikel, die als ehrliche Rezensionen fungieren, und Sie werden sie bei der Verwendung von WooCommerce glaubwürdig finden.

18.3 PLUGINS, ERWEITERUNGEN, ADDONS UND THEMEN

Als Plugin von WordPress wird WooCommerce mit einer Vielzahl von Plugins, Erweiterungen und Addons geliefert, die die Erfahrung mit WooCommerce verbessern sollen.

Hier sind ein paar Listen, die die besten dieser Plugins, Erweiterungen und Addons getestet und gesammelt haben.

Der letzte Artikel ist eine Auflistung der 32 wichtigsten (und nützlichsten) WooCommerce-Plugins. Diese Plugins helfen Ihnen, die Leistung Ihres Shops zu verbessern, E-Mails zuverlässiger zu versenden, die Kommunikation zu verbessern, mehr Besucher in Kunden zu verwandeln und vieles mehr.

Gleichzeitig bietet WordPress eine Vielzahl von Themen, die auf die Optimierung des Designs von WooCommerce-Shops spezialisiert sind. Hier sind einige Listen, die Ihnen bei der Auswahl der besten verfügbaren Themen für WooCommerce helfen sollen.

Dieser Artikel hilft Ihnen bei der Auswahl der besten WooCommerce-Themes für den Aufbau eines profitablen Online-Shops.

Es handelt sich um eine Auflistung der besten WooCommerce-Themes, die anhand von Faktoren wie Geschwindigkeit und Leistung, Design und Anpassungsmöglichkeiten, Mobilfreundlichkeit und Plugin-Kompatibilität sowie SEO-Freundlichkeit aufgelistet werden.

Kategorien
Leitfaden

Supercharge Your Website – Offload WordPress Files To Cloud Storage [2022]

Gute Nachrichten für alle WordPress-Benutzer!

Wir sind stolz, die Veröffentlichung unseres neuesten Plugins anzukündigen:

Die Verwaltung einer Website mit vielen Medien ist oft sehr schwierig und bisweilen unsicher. Außerdem nimmt sie viel Platz in Anspruch, was Sie am Ende viel Geld für das Hosting kosten kann.

Wie kann man also mit dieser Situation umgehen?

Lösung:
Verwenden Sie ein Cloud-Storage-System, um WordPress-Dateien auszulagern und die Medien und Inhalte Ihrer Website von dort aus bereitzustellen.

Mit Media Storage to Cloud können Sie dies leicht erreichen.

Es ist erstaunlich, wie bequem es ist, Cloud-Storage-Systeme nicht nur zur Sicherung von Dateien zu verwenden, sondern Ihre WordPress-Dateien auszulagern und sie für Ihre Website-Medien/Inhalte bereitzustellen, wodurch die Leistung Ihrer Website erheblich gesteigert wird.

Auf diese Weise können Sie:

  • Hosting-Kosten senken
  • Reduzieren Sie die Nutzung von überschüssigem Server-Speicher
  • Bereitstellung von Medien und Inhalten über ein sicheres Portal
  • Beschleunigen Sie die Ladegeschwindigkeit Ihrer Website
  • Reduzieren der Server-Belastung

Was ist Medienspeicherung in der Cloud? 

Media Storage to Cloud is a WordPress plugin that will help you enhance your website performance by serving media and other files in a smart way.

Medienspeicher in die Wolke - WordPress-Dateien entladen

Sie können WordPress-Dateien auf Ihr gewünschtes Cloud-Storage-System wie Amazon S3 oder Google Cloud Storage auslagern und mit diesem Plugin Medien und Inhalte Ihrer WordPress-Website direkt aus Ihrem Cloud-Storage bereitstellen.

Synchronisieren Sie einfach Ihre WordPress-Website mit Ihrem Cloud-Speicher über Media Storage to Cloud, und alle Ihre Medien und andere wichtige Dateien werden auf Ihrem Cloud-Speicher gespeichert. 

Stellen Sie dann die Medien und Inhalte Ihrer Website über Ihr gesichertes Cloud-Portal bereit und beobachten Sie, wie Ihre Website schneller und effizienter wird. 

Vorteile der Verwendung von Medienspeichern in der Cloud  

Dieses Plugin bietet Ihnen mehrere Vorteile, darunter die folgenden:

  • Synchronisieren Sie Ihre Medien und andere Dateien mit einem einzigen Klick mit Ihrem Cloud-Storage, so dass Sie WordPress-Dateien ganz einfach auf den Cloud-Storage auslagern können.
  • Einfache Ein-Klick-Einstellungen zum automatischen Ersetzen Ihrer Website-Medien/Datei-URLs durch Cloud-Storage-URLs (und umgekehrt) ohne jeglichen manuellen Aufwand.
  • Allow auto-sync of your WordPress site to cloud storage so that whenever a media/file is added or deleted from your website storage, it will also be added or deleted from your cloud storage.

Derzeit unterstützte Cloud-Speichersysteme

  • Amazon S3
  • Google-Wolkenspeicher

Exklusive Merkmale 

  • Einfache Schnittstelle
  • Einfaches Auslagern von WordPress-Dateien in einen Cloud-Speicher
  • Ein-Klick-Synchronisierung des WordPress-Medienspeichers mit dem Cloud-Speicher
  • Option zur Bereitstellung von Website-Medien aus Cloud-Speichern
  • Auto-sync option: New media added to the media library will be uploaded to cloud storage automatically
  • Option für automatische Synchronisierung: Alle Medien, die aus der Medienbibliothek gelöscht werden, werden automatisch aus dem Cloud-Speicher gelöscht.

Bevorstehende Features 

  • Filter zur Auswahl von Dateitypen, die an Cloud-Storage gesendet werden
  • Mit Digital Ocean verbinden
  • CDN based media serve (such as CloudFront, Cloudflare, etc)
  • Andere Medientypen wie pdf, zip usw. hochladen
Medienspeicherung in der Cloud

Wie lädt man WordPress-Dateien auf Cloud Storage aus?

Sie können damit beginnen, den Media Storage To Cloud zu verwenden, um WordPress-Dateien in nur wenigen Schritten auf Ihr Cloud-Storage-System auszulagern:

  1. Installieren und Aktivieren von Medienspeichern in der Cloud
  2. Schließen Sie Ihr gewünschtes Cloud-Storage-System an
  3. Wählen Sie die Option zum automatischen Synchronisieren und Bereitstellen von Medien aus Cloud-Storage
  4. WordPress-Site mit Cloud Storage mit einem Klick synchronisieren
  5. Entladen Sie WordPress-Dateien und stellen Sie Medien und Inhalte aus dem Cloud-Storage bereit.

Schauen wir uns nun die Schnittstelle an und erklären, wie jeder Schritt funktioniert.

1. Installieren und Aktivieren von Medienspeichern in der Cloud 

Gehen Sie zu Ihrem WordPress-Dashboard und wählen Sie Plugin > Neu hinzufügen. Suchen Sie nach dem Plugin mit "Media Storage To Cloud RexTheme" und Sie werden unser Plugin finden.

Medienspeicher zur Cloud-Suche

Installieren und aktivieren Sie das Plugin und Sie werden ein Menü mit dem Namen "WP Cloud" zu Ihrem Dashboard hinzugefügt sehen.

WP-Wolke

2. Verbinden Sie Ihr gewünschtes Cloud-Storage-System

Sobald Sie auf WP-Cloud klicken, gelangen Sie auf die Registerkarte Speicher des Plugins.

Speicher

Wählen Sie hier Ihr gewünschtes Cloud-Storage-System (derzeit von Amazon S3 oder Google Cloud Storage) und stellen Sie die benötigten Daten zur Verfügung.

Klicken Sie dann auf Speichern und autorisieren. Bei erfolgreicher Autorisierung wird es sagen, dass es "Bereit zum Synchronisieren" ist.

Bereit zur Synchronisierung

Das bedeutet, dass Sie jetzt bereit sind, Ihre Medien mit Cloud-Storage zu synchronisieren.

3. Wählen Sie die Option zum automatischen Synchronisieren und Bereitstellen von Medien aus der Cloud-Storage

Gehen Sie auf die Registerkarte Einstellungen. Hier erhalten Sie die folgenden Optionen:

  • Serve Media Files From Bucket (Mediendateien aus dem Speicherbereich bereitstellen) - Wenn Sie diese Option
    aktivieren, werden die Medien-URLs Ihrer Website durch URLs aus Ihrem Cloud-Storage ersetzt, so dass alle Medien auf Ihrer Website aus Ihrem Cloud-Storage bereitgestellt werden.
  • Mediendateien im Eimer hochladen, wenn sie in der Medienbibliothek hochgeladen werden
    - Mit dieser Option wird eine automatische Synchronisierung erstellt, so dass alle Medien, die Sie auf den Medienspeicher Ihrer Website hochladen, automatisch an Ihren Cloud-Speicher gesendet werden.
  • Medien beim Löschen aus der Medienbibliothek aus dem Bereich löschen
    - Mit dieser Option wird eine automatische Synchronisierung erstellt, so dass alle Medien, die Sie auf dem Medienspeicher Ihrer Website löschen, automatisch auch aus Ihrem Cloud-Speicher gelöscht werden.
M2C-Einstellungen

4. WordPress-Medien mit einem Klick mit Cloud Storage synchronisieren

Sobald Sie bereit sind, gehen Sie zur Registerkarte Sync. Hier können Sie alle Ihre Medien mit einem einzigen Klick an den Cloud-Speicher senden.

Sync

Wählen Sie Ihren angeschlossenen Cloud-Storage und klicken Sie auf die Schaltfläche Sync. Ein Fortschrittsbalken wird angezeigt und Ihre Medien werden an Ihren Cloud-Storage gesendet. 

Das war's. Sie sind alle bereit.

5. Medien aus Cloud-Storage bereitstellen und eine schnellere Website erhalten

Wenn Sie jetzt zu Ihrem Medienordner gehen und die Details zu den Bildern öffnen, werden Sie sehen, dass die URL auf die URL des Mediums auf dem Cloud-Speicher umgeschaltet ist.

Bild-Link

Auch bei allen anderen nützlichen Dateien, die Sie mit Ihrem Cloud-Storage synchronisiert haben, werden die URLs durch URLs aus Ihrem Cloud-Storage ersetzt.

Use these media and files for your website, and you will see a significant increase in website speed.

Medienspeicher in die Cloud bringen

Es ist höchste Zeit, dass Sie ein zuverlässiges Plugin verwenden, um WordPress-Dateien zu synchronisieren und in Ihr Cloud-Storage-System auszulagern, das einfach zu bedienen und effizient ist.

Holen Sie sich Medienspeicher aus dem WordPress Repository in die Wolke.

Wenn Sie irgendwelche Verwirrung haben, können Sie Hilfe in der Plugin-Dokumentation finden.

Hoffentlich hilft Ihnen dieses Plugin, bei der Skalierung Ihres Unternehmens einen Schritt weiter zu gehen.

Kategorien
Guide WordPress

WordPress.com VS WordPress.org – Useful Review & Comparison [2024]

WordPress ist das beliebteste Content-Management-System der Welt und oft das CMS der Wahl für kleine Unternehmen und große Organisationen.

Wussten Sie, dass The Huffington Post auf WordPress läuft? Ziemlich erstaunlich, nicht wahr? Viele kleine Blogger beginnen mit einem einfachen WordPress-Blog, da es einfach einzurichten und zu benutzen ist.

Was viele Leute jedoch nicht wissen, ist, dass es zwei Versionen von WordPress gibt - WordPress.com und WordPress.org.

Für ahnungslose Benutzer sieht dies nur nach einem einfachen Unterschied zwischen den URLs aus. Tatsache ist jedoch, dass WordPress.com und WordPress.org sehr unterschiedliche Plattformen sind.

Wer eine Website mit WordPress starten möchte, muss wissen, wie sich WordPress.com und WordPress.org unterscheiden und was sie bieten.

In diesem Beitrag werden wir Ihnen helfen, diese beiden Plattformen zu verstehen.

Nachdem Sie diesen Artikel gelesen haben, können Sie sich entscheiden, welches für Ihr Unternehmen am besten geeignet ist und Sie sollten es wählen.

Was ist WordPress.org?

WordPress.org

WordPress.org ist auch bekannt als 'self-hosted WordPress' oder 'das echte WordPress'. Da es selbst gehostet wird, müssen die Benutzer es manuell auf einem lokalen oder Online-Server installieren.

This means you will have to get web hosting and a domain name to use WordPress.org.

Natürlich gibt es Vor- und Nachteile bei der Verwendung dieser WordPress-Variante, auf die ich in den späteren Abschnitten dieses Artikels eingehen werde.

Um es kurz zu sagen: Der Hauptvorteil der Verwendung von WordPress.org besteht darin, dass Sie die volle Kontrolle über die Plattform haben und alles anpassen können. Außerdem ist es völlig kostenlos herunterzuladen und zu benutzen.

Vorteile von WordPress.org

Nur einige Vorteile der Nutzung von WorPress.org aufzulisten, ist eine harte Arbeit. Aber heute habe ich die wichtigsten zusammengefaßt.

1. Anpassbarkeit

Wie ich bereits erwähnt habe, öffnet die Verwendung von selbst gehosteten WordPress die Tür zur Anpassung.

So profitieren Sie davon:
WordPress.org ist quelloffen, so dass Sie alles nach Herzenslust verändern können (wenn Sie die Fähigkeit dazu haben). Um dies zu nutzen, müssen Sie natürlich ziemlich gut in PHP und anderen Programmierkonzepten sein.

Diese Anpassbarkeit ist es, die WordPress.org den Vorteil gegenüber konkurrierenden Plattformen wie Squarespace und Wix verschafft.

Sie werden niemals sehen, dass eine große Verlagsseite Wix oder Squarespace verwendet, da diese in Bezug auf die Anpassbarkeit recht begrenzt sind.

Im Grunde macht sie Sie frei von den Einschränkungen.

Still, if you think Squarespace could be a good choice for you then Squarespace SEO Expert specializes in optimizing Squarespace sites to enhance visibility and performance, providing a crucial service for businesses aiming to stand out.

2. Kostenlos

WordPress.org ist völlig kostenlos herunterzuladen, zu verwenden und zu modifizieren, auch für kommerzielle Zwecke. Alles, was Sie für die Nutzung von WordPress.org benötigen, ist ein Webhosting-Angebot, ein Domainname, und das war's.

Viele Web-Hosts bieten sogar eine 1-Klick-WordPress.org-Installation an, so dass Sie sie eigentlich gar nicht erst einrichten müssen.

Einfach ausgedrückt: Die technische Komplexität wird kein Grund sein, WordPress.org abzulehnen.

3. Daten und Datenschutz

Bei WordPress.org müssen Sie Ihr eigenes Webhosting organisieren. Aber das kann tatsächlich eine ausgezeichnete Sache sein.

Here’s how:
Since all your website data, including customer information, is being kept on your hosting plan, you’re in charge of it.

Einige Blog-Sites wie Tumblr haben Regeln darüber implementiert, welche Art von Inhalt geteilt werden darf, und haben Daten gelöscht, die gegen diese Regeln verstoßen.

Mit WordPress.org müssen Sie sich keine Sorgen um irgendwelche Regeln machen. Sie sind verantwortlich dafür, was hochgeladen und was gelöscht wird.

4. Plugins, Plugins, Plugins

Lassen Sie uns das klarstellen.

WordPress ist für seine umfangreiche Bibliothek von Plugins bekannt. Es gibt buchstäblich Tausende von kostenlosen und kostenpflichtigen Plugins, die alle Arten von Anforderungen an das CMS abdecken, die Sie haben könnten.

Das einzige Problem besteht darin, dass die Besitzer von WordPress-Sites dazu neigen, mit der Verwendung von Plugins zu übertreiben, was dazu führen kann, dass Websites träge und fehlerhaft sind.

Wie kann man das also vermeiden?

Einfach. Verwenden Sie nur Plugins, für die Sie eine echte Verwendung haben, und überprüfen Sie diese vor der Installation durch Lesen von Online-Rezensionen.

**Btw, Sie können diese erstaunlichen WooCommerce-Erweiterungs-Plugins ausprobieren.

5. WooCommerce

WooCommerce ist ein eCommerce-Plugin, das WordPress von einem großartigen Content-Management-System in eine großartige eCommerce-Plattform verwandelt.

WooCommerce wird weltweit von eCommerce-Unternehmen aller Größenordnungen genutzt. Es ist in hohem Maße anpassbar, skalierbar und natürlich kostenlos herunterzuladen und zu verwenden.

Die WordPress-Muttergesellschaft Automattic hat es erworben. Daher wird es regelmäßig aktualisiert, und alle Sicherheitsmängel werden schnell behoben.

Es ist eine ausgezeichnete Wahl für Sie, wenn Sie noch heute ein eCommerce-Geschäft starten wollen.

Nachteile von WordPress.org

WordPress.org ist zweifelsohne eine ausgezeichnete Wahl, wenn es um Content-Management-Systeme geht. Aber wie bei allem, gibt es auch hier gewisse Nachteile, die man beachten muss, bevor man sich dafür entscheidet.

Was verwirrend sein könnte, ist, dass diese Nachteile von einigen Leuten als vorteilhaft angesehen werden können, aber ich habe versucht, sie einfach zu halten.

1. Domain- und Webhosting-Kosten

Domain- & Webhosting-Kosten können Ihnen Kopfschmerzen bereiten.

Hier ist das Wie:
Für selbst gehostetes WordPress(.org) müssen Sie Ihr eigenes Webhosting und Ihre eigene Domain einrichten, was natürlich mit Kosten verbunden ist.

Der Betrag, den Sie dafür ausgeben, hängt von Ihren Anforderungen ab. Für kleine Unternehmen wird dieser Betrag nicht viel mehr als 25 bis 40 Dollar pro Monat betragen.

Wenn Ihr Unternehmen jedoch wächst und Sie ein dediziertes Hosting benötigen, kann das ziemlich teuer werden.

Dedizierte Server sind teuer zu mieten, und diese Kosten können Sie überrumpeln, wenn Sie nicht vorher das Budget für das Online-Wachstum haben.

2. Sicherheit und Instandhaltung

Dies ist eine Art 'Erfolgserlebnis'.

Da es das beliebteste CMS der Welt ist, wird es zwangsläufig ein Hauptziel für Hacker und andere bösartige Akteure sein.

Users need to be vigilant about their WordPress installations, as security patches are released quite frequently.

As such, WordPress must be updated immediately to the latest patch to avoid any unfortunate events. Staying on top of updates is crucial for maintaining a secure site and drupal upgrade and migrate services can be used for automate the process, automation can be handy too.

Was ist WordPress.com?  

WordPress.com

WordPress.com ist die gehostete Version von WordPress und funktioniert auf ähnliche Weise wie Squarespace und Wix. Die Benutzer müssen sich nur für ein Konto registrieren und erhalten sofort Zugang zu ihrem eigenen WordPress-Kontrollzentrum, so dass sie mit der Anpassung ihrer Website beginnen können.

Dies gilt natürlich auch für die kostenlose Version, da WordPress.com in mehreren Preisstufen erhältlich ist.

Der Hauptvorteil von WordPress.com besteht darin, dass Sie sich nicht um die Installation von WordPress oder den Umgang mit Webhosting oder Domainnamen kümmern müssen. Die gesamte schwierige Arbeit wird von WordPress erledigt.

And you can take help from many WordPress customization services to personalize your website.

WordPress.com ist das, was Sie sehen werden, wenn Sie auf eine Website wie 'xyz.wordpress.com' stoßen.

Es ist die beliebte Wahl für den Start von Bloggern, da dieser Dienst kostenlos, wenn auch mit Einschränkungen, genutzt werden kann.

Also, for both small and growing businesses you can manage WordPress websites with quality web hosting services. Hosting services that are specifically built for WordPress sites offer dedicated memory and storage space. A good hosting service allows you to access specific tools and services that can facilitate the creation, management, and fine tuning of your website.

Um Ihren eigenen Domainnamen zu erhalten und Anzeigen auf kostenlosen WordPress-Sites zu entfernen, müssen Sie sich für einen kostenpflichtigen WordPress.com-Plan entscheiden.

WordPress.com Preise

Hier sind die Preispläne für WordPress.com

  • Freier Plan
  • Persönlich - $5 pro Monat (wird jährlich in Rechnung gestellt)
  • Prämie - $8 pro Monat (wird jährlich in Rechnung gestellt)
  • Business - 25 Dollar pro Monat (wird jährlich in Rechnung gestellt)

The plan worth talking about here is the Business plan, as it’s the only plan which offers users the ability to install WordPress plugins.

Pläne darunter haben diese Funktion einfach nicht, was ein großes Versäumnis ist. Der Reiz von WordPress liegt in seiner Plugin-Bibliothek, und ohne diese Option haben Sie nicht viel Flexibilität, wenn es um die Funktionen geht.

Vorteile von WordPress.com

Sehen wir uns die wichtigsten Vorteile von WordPress.com an.

1. Bequemlichkeit

Der größte Grund, WordPress.com gegenüber WordPress.org in Betracht zu ziehen, ist die Bequemlichkeit.

Einfach ausgedrückt: Sie müssen sich nur für einen WordPress-Account anmelden, und Sie erhalten sofort Zugang zum WordPress-Dashboard. Von dort aus können Sie beginnen, Webseiten zu erstellen und Ihre WordPress-Site nach Ihren Wünschen anzupassen.

Dies erleichtert Anfängern die Nutzung von WordPress erheblich und ist der Grund, warum die Plattform so beliebt ist.

2. Sicherheit und Instandhaltung

Im Gegensatz zu WordPress.org, wo Sie die Installation manuell auf die neuesten Sicherheitspatches und Fehlerbehebungen aktualisieren müssen, wird WordPress.com automatisch aktualisiert.

Dies ist der Funktionsweise von Wix und Squarespace sehr ähnlich, da sich die Benutzer keine Sorgen um die Sicherheit machen müssen.

Mit WordPress.com ist Ihre Website immer auf der neuesten Version, wobei für Sicherheitspatches gesorgt ist.

WordPress.com Nachteile

Nun. schauen wir uns die Nachteile von WordPress.com an.

1. Datenschutz und Kontrolle

Bei WordPress.com werden alle Ihre Daten auf WordPress-Servern gespeichert, was Ihnen keinerlei Kontrolle über diese Daten gibt.

Wenn Sie gegen die Nutzungsbedingungen der Website verstoßen, können diese Daten gelöscht werden, und Sie werden einfach von der Plattform verbannt.

2. Anpassung

WordPress.com ist nicht so anpassbar wie das selbst gehostete WordPress, und Pläne auf den unteren Ebenen haben keinen Zugriff auf die riesige Plugin-Bibliothek.

Der Business-Plan ermöglicht die Installation von Plugins, ist aber mit 25 Dollar pro Monat sehr teuer.

3. Website-Analysen

Abgesehen von dem teuren Geschäftsplan erlaubt WordPress.com keinerlei Integration von Google Analytics.

Während die in WordPress eingebaute Analyse für die grundlegende Verwendung in Ordnung ist, werden Benutzer, die nach mehr Daten suchen, sehr enttäuscht sein.

Abschließende Gedanken  

Da haben Sie es also, einen Überblick über die wichtigsten Unterschiede zwischen WordPress.com und WordPress.org!

Die Wahl zwischen den beiden kommt darauf an, was Sie jetzt und in Zukunft wollen.

Wenn Sie Ihre Website wachsen sehen, ist WordPress.org die offensichtliche Wahl. Es ist einfach anzupassen, und Sie zahlen keinen Aufpreis nur für den Zugang zur Plugin-Bibliothek.

Für kleine Blogger, die nicht an den Features oder Funktionen herumbasteln wollen, ist WordPress.com ein großartiges CMS.

Wir nennen keine technischen Gründe als Entscheidungskriterium zwischen den beiden, da Webhoster heutzutage eine 1-Klick-WordPress-Installation anbieten.


Besonderer Dank geht an Ammar Zahid für seine hilfreichen Beiträge zu diesem Artikel.

Contributing Author Bio:
Ammar Zahid from Logic Inbound is an editor and a passionate writer. He is very knowledgeable about WordPress and very reliable with his research and execution.

Kategorien
Guide WooCommerce

Optimize Local SEO For Your Online Store And Increase Sales [2024]

Did you know selling products locally and optimizing local SEO can boost your online sales?

Well, the recent upsurge in online business has made changed how products are sold. A seller can now work from home with no physical appearance whatsoever and still achieve high sales.

Now, sellers can use third-party warehousing or dropshipping, and they do not have to bear the rent of a brick-and-mortar storefront anymore.

You might ask if being “local” has any benefit when you are selling products online. Well, guess what, being a local seller will favor you a lot, even if your business solely operates online.

Today, I’ll explain why being a local seller is profitable and how you need to optimize your online store for local SEO.

Let’s dive in right now.

1. Focus On Location-Based  Mobile Searches

Location-based search

Currently, more than 50% of all searches occur on mobile devices, and nearly one-third of these searches are location-based.

This is because, nowadays, almost all mobile devices have a GPS tracking system. Google can use this GPS data to draw inferences and produce more relevant results.

For example, if you search for “grocery store” on your smartphone, you will get results that mostly include nearby high-rated grocery stores. For businesses looking to capitalize on local searches, partnering with local SEO agencies in London and big cities like New York, Toronto can provide invaluable expertise in optimizing your online presence to target local customers effectively.

So what happens is that the basic search strings are appended by Google along the way, with location getting thrown in (i.e., along with “grocery store” essentially returning results for “grocery store in [your location].”

To rank more locally, you need to produce location-specific content and rank for location-specific keywords, for example, ‘grocery stores in Manchester’, rather than just ‘grocery stores.’ (I will tell you why it is not a good idea to rank for general topics for local SEO, as you read along at a later point.)

2. Leverage Authority Review Sites For Local Reviews 

There are review compilers like Yelp and TripAdvisor, which allow users to search businesses via niche and location. Prospects will readily trust businesses with good reviews found on these authority sites. 

It helps if you have a physical location along with your online store. Then you can register your business on these sites and can expect to get more prospects.

However, you need to focus on picking up good reviews. Review signals are thought to affect Google’s rankings. So a bad review on a site like Yelp can negatively impact you in two ways:

  • Discourage Yelp visitors to trust your business.
  • Lower your rankings on Google SERPs.

These are great to improve your local SEO performance.

3. Optimize Local SEO For Google’s Algorithm 

Optimize Local SEO for Google's Algorithm

Search engine crawling has been redesigned many times over the years, and it will continue to improve. In spite of being updated so many times, Google’s algorithm is still not humane. It needs you to point out a lot of things for accurate crawling.

Your store could exclusively serve your local area, only distributing within a small region, but still, get no recognition for it in the rankings. All because you did not state it to Google in the right way.

Here is a redirection plugin you can use to optimize your site’s SEO for Google’s algorithm by solving redirection issues, 404 errors, and other overlooked issues.

You need to keep in mind that Google pays attention to how you present your store. It might be a local store, but do you market it as a local store?  The point is, don’t sit back and expect the Google algorithm to figure everything out without you needing to state it.

If you want to get more local traffic, you may make it clear to Google in the following ways:

  • Fill in your Google My Business page and identify the local area(s) you operate in
  • Rank for location-specific keywords
  • Write contents with your location in the heading
  • Illustrate your content with region-specific imagery

The more you talk about your location, the more it will be considered a crucial part of your business.

A good SEO agency from your location can help you achieve it.

4. Rank More Easily With Location-Specific Keywords 

It is a difficult task to compete with top brands in online search engines based on generic keywords.

For example, ranking on the generic keyword “bookstore” will be difficult. There are tons of popular multinational stores that are ranked well under this keyword. If your store is still new, then ranking on this keyword will be too difficult.

However, you might be among the best bookstores in your region. This is an excellent opportunity to rank if you chose to rank with location-specific keywords.

Let’s say you have an online store that delivers in Manchester. Now, consider writing content on the topic ‘making cheap meals.’ This is not a good idea to rank for since there are tons of high-authority sites ranking for this keyword all over the world.

However, if you write an article called ‘Budget Eating in Manchester,’ or ‘Where To Find Cheap Ingredients In Manchester,’ you will have a better chance to get local traffic since there are a limited amount of businesses in your area that rank on these topics.

The fact is, even if you sell globally, it is better to be more location-specific, i.e., optimized on local SEO for your website content in order to get more traction. Creating and ranking for local content is much easier than ranking for general keywords.

5. Local Sales Will Generate Lasting Profit

Local SEO for lasting profit

Finally, this is the most crucial reason why you should optimize your online store for local traffic. There are three simple benefits that all online stores long for:

  • First, it is easy to fulfill orders locally at a low cost. Whether you deliver or use a click-and-collect scheme, you will not have to spend much on completing a given order.
    You will even be able to offer free shipping or cut down on shipping fees and still maintain a healthy profit margin.
  • Second, it is easier to get loyal and dedicated customers. If you can impress someone who lives in your area, they will keep coming back to you out of regional trust and convenience.
    One reason for this is that ordering from a local or national retailer assures the buyer of some kind of in-person support in case something goes wrong.
  • Third, local businesses are great for generating referrals (if you don’t already have a referral program, you need to implement one). People like to let their friends and family members know about the businesses they prefer. Since people will recognize you locally, referrals will be much easier.

You can even improve your local SEO by hosting some local events. Run a weekend stall in a busy area, and talk to local people about what you offer, encouraging them to follow you on social media and visit your website.

Bonus: Display Rich Snippets to Increase Click-through Rate

Google uses schema to create “rich snippets” that display key information such as user ratings on the search results page.

When your pages have rich snippets the click-through rate from Google search results increases instantly.

To implement schema makeup in your user reviews and ratings you can use StarCat Reviews WordPress plugin. “

And as a small local business, you can focus on video conferencing as well.

Schlussfolgerung 

With location-tagged mobile searching now being the most common variety, and huge international retailers dominating the rankings for generic search terms, it’s clear that online sellers face a huge struggle to stand out without optimizing for local traffic.

You can also take advantage of promoting on Google Shopping and take advantage of their Geo-location tracking option. Here’s a guide on how you can set up and upload products on Google Merchant Shop.

If you are rooted in a particular location in any sense, like:

  • You have an office there
  • Your distribution network is based there
  • You live there
  • And if you see sufficient demand

Then turn your online store into a local business and optimize it with a local SEO company. It will help your business grow much more easily.


Special thanks to Kayleigh Alexandra for her helpful contributions to this article.

Contributing Author Bio:
Kayleigh Alexandra from MicroStartups is a writer and small business owner. She is an expert in all things content, freelance, marketing, and commercial strategy.

Kategorien
Leitfaden

Ein Leitfaden für Anfänger zum Inhalt der Langform - 5 einfache Schritte

Es ist eine große Leistung, ein loyales Publikum zu gewinnen, das wirklich an Ihrer Website und ihrem Inhalt interessiert ist. Einen großen Teil dieses Publikums zu halten und wesentlich zu vergrößern, ist eine weitere überwältigende Aufgabe für Web-Content-Autoren.

Especially, if you’re new to content writing and only learning about how to start a blog, this might seem like a huge challenge for you.

Der Schlüssel zum Erfolg jeder Website ist ihr Inhalt. Der Inhalt ist der wichtigste Faktor, der das Engagement für jede Website bestimmt.

Je nach Art einer Website kann der Inhalt entweder in Kurz- oder Langform vorliegen. 

On one hand, short content caters to an audience that is always in a rush. On the other hand, if you want to go about content that really is inspirational and engaging on many levels, long form content is the best option.

You should also note that Google’s top 10 results are always dominated by long form content pieces. Today we will discuss “long form content” and provide a brief guide on how to prepare them so that you can successfully start blogging.

Was ist Inhalt der Langform?

We often come across crisp write-ups that range anywhere from 500 to 700 words. These are referred to as Short-form content.

Long Form content is usually an article or landing page that is longer than 1,500 words, where the main topic is explained in detail with several organized sub-sections to make the article more helpful and innovative.

Inhalt der Langform

A report from Data Lab says that an ideal long form content piece should take about seven minutes to read and comprehend. This constitutes around 1600 words. However, nowadays, longer content is encouraged to provide in-depth details.

The main concept of long form content is that these articles are about informing readers about the entirety of the subject matter. A long form article should tell stories that matter, and offer guidelines that are helpful to readers.

Aber es hängt auch von Ihrem Zielpublikum ab. Wenn es bei Ihrer Zielgruppe um das Lesen von Texten in Leichter Schrift geht, sollten Sie wahrscheinlich davon absehen, Inhalte in Langform für Ihre Websites zu entwickeln.

Die meisten Leser ziehen es jedoch vor, ausführliche Anleitungen oder Informationen zu erhalten. Ein Leitfaden in Langform ist daher in den meisten Fällen die beste Wahl.

Vorteile der Verwendung von Langform-Inhalten

Hier sind einige der Vorteile der Verwendung von Langforminhalten:

  • Long form contents ensure that visitors spend more time on your site. The average time on your site is a key factor in improving your domain authority.
  • Long form content are developed after a good amount of research and insights. While you are providing detailed accurate information, your website will prove to be credible to readers due to its authenticity.
  • Ihre wachsende Glaubwürdigkeit wird sich ergeben, wenn Sie neue Leser zu Stammkunden machen.
  • Long content with high reading time and less bounce rate can also have a positive impact on a page’s rank in the SERPs.
  • Articles that are truly helpful and cover every aspect of a topic, are likely to get quality backlinks from authority sites, resulting in an increase in page authority.
  • As long as you maintain proper topic relevancy throughout an article, i.e. an SEO-optimized article, your long form article will get more organic search hits than other similar short articles.
  • Long form content can serve as a comprehensive base for creating PowerPoint presentations that are both informative and engaging. When you type “do my PowerPoint“, you can leverage the depth of long-form articles to produce detailed presentations that accurately convey your topic’s nuances to the audience.

Wie Sie sehen, kann die Verwendung von Inhalten in Langform einen großen Einfluss darauf haben, die Autorität Ihrer Website zu verbessern und schließlich regelmäßige Perspektiven zu gewinnen.

Worauf sollte man sich konzentrieren, wenn man Langform-Inhalte schreibt? 

Now let us focus on the crux of this article, which is to help you create long form content on your own WordPress website. Before planning to write long-form content for your WordPress site, it’s essential to concentrate on several key aspects that can enhance the depth and engagement of your articles. Firstly, ensure your topic has enough breadth to sustain a longer discussion, which is crucial for maintaining reader interest.

Structuring your content with clear headings, subheadings, and logical sections helps in guiding the reader through your narrative. Engaging storytelling combined with data-driven insights can enrich the reader’s experience.

Additionally, incorporating SEO strategies, like the strategic use of keywords such as “professional coursework writing service,”, proper keywords can be used to boost your visibility and attract the right audience. Focus on providing value through comprehensive research and expert opinions to establish credibility and authority in your domain. Remember, the goal is not just to inform but also to captivate and inspire your audience to return for more insightful content.

Here’s a step-by-step guide.

1. Forschung und Auswahl nischenrelevanter Themen

Das Erstellen von Langforminhalten ist kein Kinderspiel. Jedes Thema braucht solide Forschung und Einsichten, um als ein großartiges Stück Inhalt herauszukommen, das für Ihre Leser wirklich hilfreich sein wird.

Wählen Sie relevante Themen

Der erste Schritt besteht immer darin, Ihr Publikum und Ihre Branche zu recherchieren und zu verstehen, welche Themen für Ihre Leser am besten geeignet sein könnten.

Denken Sie daran, dass Ihr Artikel eine Möglichkeit sein sollte, Menschen dabei zu helfen, ein Problem zu lösen oder ein neues Konzept zur Verbesserung zu erhalten.

You also have to ensure that the topics you are selecting are relevant to the keywords that you desire to rank for.

Scout your competitors to find out what keywords they rank for and find out the articles that are the most popular on their sites. At the same time, do organic keyword research to find out the search terms that people generally look for.

Read a lot of resources that rank for specific keywords and think of topics where you can combine and provide all the important details into one article, plus add some helpful ideas of your own. You can even use them as sources, like this article on semaglutide pills vs. injection, listing and linking to them at the end. Additionally, consider leveraging tools to scrape Google for valuable insights into keyword trends and user preferences.

You may use tools such as Ahref, or SEMRush to conduct SEO research.

2. Erstellen einer Gliederung der Inhaltselemente

Nachdem Sie die Themen ausgewählt haben, müssen Sie als nächstes eine Themenübersicht erstellen. Denken Sie an Abschnitte, die Sie innerhalb des Themas abdecken werden, und notieren Sie die Überschriften und Unterüberschriften.

Dies wird dazu beitragen, die Recherchemöglichkeiten beim Verfassen des Inhalts zu erweitern. Jeden Abschnitt so detailliert wie möglich zu gestalten, ist der Schlüssel zur Erstellung überzeugender Langform-Inhalte.

3. Verwenden eines Inhaltskalenders

Sobald Sie sich entschieden haben, über welche Themen Sie schreiben möchten, bereiten Sie einen Inhaltskalender vor.

Inhalt Kalender

Legen Sie Zieldaten fest, wann jeder Artikel veröffentlicht werden soll, wobei Sie genügend Zeit für Marketing und Austausch einplanen sollten.

Halten Sie den Inhaltskalender so detailliert wie möglich. Versuchen Sie beispielsweise, Daten wie das Zielschlüsselwort, das Zielpublikum, das Übergangsziel, relevante Ressourcen und eine Aufschlüsselung der Themen einzubeziehen.

Diese Angaben werden Ihnen helfen, sich auf Ihren Zweck zu konzentrieren, wenn Sie mit dem Schreiben von Inhalten beginnen.

Für Ihre WordPress-Website können Sie in Erwägung ziehen, das Plugin Editorial Calendar zu verwenden, um einen ordnungsgemäßen Inhaltskalender zu pflegen.

4. Fokus auf Content-Optimierung

Ein Stück Langform-Inhalt ist in der Tat ein langer Artikel und wird einige Zeit zum Lesen benötigen. Daher ist es wichtig, den Inhalt so zu optimieren, dass die Leser sich nicht langweilen.

Even if the content is helpful, if it is stale in appearance, people might not get interested to read it.

Hier ist, was Sie tun können, um mehr Aufmerksamkeit zu erhalten.

i. Organisierter Inhalt und einfache Navigation

Long form content pieces have a lot of information to go through. To make it easier for readers, use a Table of Contents section at the beginning to enlist the number of topics you will cover throughout the article.

You can link the table of contents so that clicking on a topic will take him to that section in the article. The Easy Table of Contents Plugin will help you with this one.

Organisierte Inhalte für die Zielgruppe

Fügen Sie in Ihrer Einleitung einen Absatz hinzu, der zusammenfasst, was die Leser lernen und erreichen werden, nachdem sie den ganzen Artikel durchgegangen sind.

Zum Beispiel: "Am Ende dieses Artikels werden Sie ..... neue Techniken lernen, um ...... zu erreichen, und Sie werden in der Lage sein, ........ ohne Schwierigkeiten .....

Make sure this introduction is written with a conversational tone to connect the reader. You consider using an AI paragraph rewriter to refresh and restructure your text until you find something appealing and easier to understand.

Gliedern Sie sie in Ihrem Artikel für jede Überschrift in weitere Unterüberschriften auf, um die Abschnitte detaillierter und verständlicher zu erklären, anstatt lange Absätze zu schreiben.

Sie können den CoSchedule Headline Analyzer verwenden, um auf der Grundlage Ihres Themas Überschriften und Unterüberschriften zu bestimmen, um Wirkung zu erzielen.

ii. Mit statistischen Daten Glaubwürdigkeit gewinnen

Die Menschen werden Ihren Artikel nur dann schätzen, wenn Sie ihnen erfolgreich zeigen können, was sie nach der Lektüre des Artikels erwarten können. Daher ist die Verwendung von Fakten die beste Option.

Versuchen Sie, Statistiken und Berichte zu den von Ihnen behandelten Themen bereitzustellen. Wenn Sie z.B. behaupten, dass ein Prozess die Konvertierung erhöht, stellen Sie einen Bericht zur Verfügung, um zu zeigen, wie er sich auf die Sites ausgewirkt hat, die den Prozess verwendet haben.

Stellen Sie Berichte von statistischen Stellen zur Verfügung, die eine Schätzung der Branche vornehmen. Wenn Sie zum Beispiel über die Verbesserung der Leistung von WooCommerce-Shops schreiben, zeigen Sie Statistiken darüber, wie groß die WooCommerce-Branche in den kommenden Jahren werden wird.

Besides in-depth explanations, relevant statistical data and other fact pieces of evidence will enhance the value of your content and will engage more readers.

iii. Attraktive grafische Inhalte hinzufügen

Eine intelligente Art und Weise, mit Ihrem Publikum in Kontakt zu treten, ist die Verwendung grafischer Inhalte. Verwenden Sie von Zeit zu Zeit Bilder. Wenn es sich um eine Anleitung zur Verwendung eines bestimmten Werkzeugs handelt, verwenden Sie Screenshots des verwendeten Werkzeugs, um jeden Schritt zu beschreiben.

Das Hinzufügen von Bildern, die ihnen helfen, eine visuelle Verbindung mit Ihrem Inhalt herzustellen, hilft, die Absprungrate zu senken.

Attraktiver grafischer Inhalt

However, you must keep in mind that you do not want to reduce your server performance by uploading too much content that is large in size.

Sie können WordPress-Plugins wie den EWWW Image Optimizer und das Smush Image-Komprimierungs-Plugin verwenden, um Ihre Bilder beim Hochladen auf eine beträchtliche Menge zu komprimieren.

Other than images, you can consider creating videos and adding them to the article where appropriate. You may also create infographics to summarize sections or provide graphs using a simple graph maker to show statistics.

More graphical content will result in more engagement with the audience.

5. Content Originality

Creating high-quality, long-form content is crucial for achieving your desired goals. However, the most important factor in determining the success of your content is uniqueness. If your content is not 100% original, it is essentially worthless.

Even if your content is informative, helpful, and addresses the pain points of your visitors, plagiarized content will not be ranked by search engines. This means that it will not be indexed and will be useless to you.

That’s why it is essential to always create original content, no matter how much time or effort it takes. It is also important to check your content for plagiarism using a free plagiarism checker. This tool can help you locate any plagiarized portions in your content, remove AI detection, remove copyright infringements, and ensure that your content complies with search engine guidelines.

6. Other Basic Activities To Maintain

Abgesehen von all den bisher vorgeschlagenen Aktivitäten müssen Sie regelmäßig noch ein paar weitere Aktivitäten durchführen.

i. Optimieren Sie Ihre Langform-Inhalte für SEO

One of the most important steps in your long form content creation is search engine optimization.

Take assistance from plugins to understand where you might be lacking in terms of keyword optimization, readability optimization, and other quality factors. WordPress offers tools like the Yoast SEO Plugin, Rank Math, and the All-in-One SEO Plugin to fine-tune the SEO of your long form content. You can also use ChatGPT prompts for SEO content creation.

Achten Sie darauf, keine Schlüsselwörter zu spammen, d.h. den Artikel nicht mit Ihrem Zielschlüsselwort zu überfluten, wo es nicht angebracht ist. Verwenden Sie eine Metabeschreibung, die dem Publikum genau sagt, was es durch diesen Artikel erreichen wird.

ii. Verwendung verbesserter Schreibtaktiken

Schreibstil verbessern

Dieser Teil wird von vielen oft ignoriert. Denken Sie daran, dass Sie für ein Publikum schreiben, nicht für sich selbst. Sie müssen Ihre Worte und Sätze so einfach wie möglich halten.

Using difficult words will not prove you to be more expert. It will simply make you lose a few potential audiences who seek simple, understandable articles.

Dazu brauchen Sie eine Strategie zur Umsetzung von Schreibtaktiken, die mehr mit den Lesern zu tun hat.

Verwenden Sie Schreibtaktiken wie zum Beispiel

  • Listicles to list out tools or ideas.
  • Bullet points to highlight details.
  • Problem-solution style – stating a problem and providing an immediate solution.
  • Answer the questions “why” and “how” with examples, when supporting a point.
  • Short paragraphs and sentences where possible.
  • Offering reference resources to more elaborate explanations.
  • Personalized content rather than general (by talking directly to each reader using 1st person uses such as “You, “Your,” etc).

Dies sind einige der wichtigen Schreibtaktiken, die Sie für bessere Ergebnisse einsetzen können.

You can also take help from some of the best writing review sites online when writing long form content.

iii. Vorbereitung auf Social Media Marketing

Sie können diesen Vorschlägen für ein besseres Ergebnis folgen.

Once you have your content ready or at least properly planned out, start creating hype on social media even before the post goes live.

  • Create short videos with small summaries of a section from your long form content and share it on your social sites even before posting the long form content. Add a caption stating that the main content is coming soon.
  • Teilen Sie Infografiken, die Sie in Ihrem Artikel verwenden möchten.
  • Create relevant images with small useful tips from your article written on them. Share them on social media while mentioning in the caption that a complete article is on the way.

Dies wird dazu beitragen, beim Publikum Vertrauen zu schaffen, noch bevor der Inhalt veröffentlicht wird.

Once you post your long-form content, share your guide on social media. For WordPress, you may consider using the Social Booster plugin to help you out.

SB

Social Booster is a Social Media Auto Post and Scheduling plugin that can help you share your ready article on your social networks, such as Facebook, Twitter, and Tumblr, in just a few clicks.

You can also schedule posts to be shared later, and set a recurring schedule to share content repeatedly at certain intervals. It will not leave any hint on the post that you used any tools. Thus saving you a lot of time in social sharing.

iv. Credit the Content Creators

After your long-form content is finished and ready to be published, don’t forget to credit the creator of the content.

Crediting content creators is especially important when you use guest authors who bring a fresh perspective to your site. Also, many readers are very eager to learn who came up with content pieces they love reading.

The easiest way of making this happen is by using author boxes. These website elements contain the author’s name, gravatar, description, and a lot more.

The most practical way of creating them is the Simple Author Box plugin. This plugin creates responsive author boxes which are fully customizable.

Simple Author Box supports guest authors and co-authors, has a Gutenberg block, link control, a most popular authors widget, and many more features.

Und so geht es weiter:

  • Go to the previous content you shared and leave a comment at the end, stating that the main content has arrived, and leave the link. This will notify anyone who reacted or commented on those posts, thus bringing back the same visitors for a broader read.
  • Create a summary video of your long form article, keeping it as small as 2-3 minutes, and share it with your social audience after a week after the post goes live, leaving the guide link on the caption or on the video description.
  • Create new relevant images with small useful tips from your article written on them. Share them on social media while mentioning the article link in your caption.

Dies sind einige der Dinge, die Sie tun können, um sofortige Aufmerksamkeit von Ihrem Zielpublikum zu erhalten. Es könnten noch viele weitere Dinge getan werden, aber diese Schritte sollten für den Anfang ausreichen.

Schlussfolgerung

This is just a beginner’s guide to help you understand and plan out a long-form content. With time you will get better at it and start seeing higher conversion results.

With our brief guide above, we hope that now you will be able to begin creating long-form content for your WordPress website with utmost ease and garner higher online visibility for your content pieces and website.


Besonderer Dank gilt Mark Coleman für seine hilfreichen Beiträge zu diesem Artikel.

Beitragender Autor Bio:
Mark Coleman ist ein leidenschaftlicher Autor, der derzeit als Redakteur bei MarkupTrend arbeitet. MarkupTrend bietet kostenlose Ressourcen für Entwickler, Designer und Webmaster und wird täglich aktualisiert. Mark kann für Produkt- und Unternehmenspromotionen gemietet werden.