Kategorien
Leitfaden

7 Common Google Feed Errors And How To Avoid Them [2025]

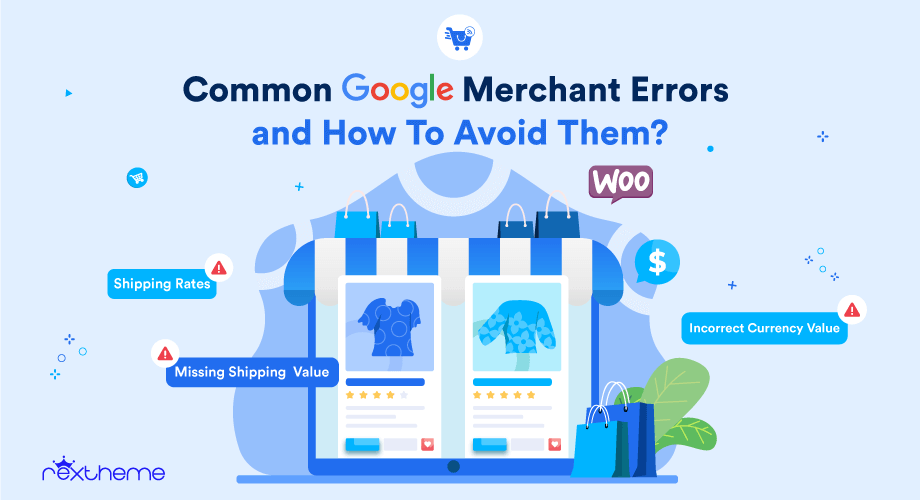
Google Shopping is a great way to get your WooCommerce products in front of the right people—more visibility, more clicks, more sales.

Simple, right? Not always.

If you’ve ever submitted products to Google Merchant Center, you might’ve noticed something frustrating—some of them don’t get approved. No explanation, just errors staring back at you.

Here’s the thing: Google is picky.

It has strict rules about what product data you need and how it should be structured. Miss a detail, and your listings won’t make the cut.

But don’t worry—this happens all the time. The key is knowing how to fix these Google errors so your products actually show up and start getting traction.

Let’s go over 10 common Google feed errors and, more importantly, how to avoid them.

What Are Google Feed Errors?

Google feed errors are issues in your product data that prevent your products from appearing in Google Shopping. These Google errors occur when required product details are missing, incorrect, or don’t meet Google’s guidelines. If not fixed, they can lead to product disapproval or even account suspension.

feed error

For example, imagine you’re running an online store selling sneakers. You upload your product feed to Google Merchant Center, expecting your ads to show up. But later, you notice that some of your products aren’t approved. After checking, you realize that key details like GTIN (Global Trade Item Number) or product availability are missing.

If you’re unsure what GTIN and MPN are or how to add them to your WooCommerce products, check out this guide on GTIN & MPN.

Google flags these errors, stopping your ads from running. That means fewer potential customers seeing your products and fewer sales.

To avoid this, you need to understand the different types of Google errors and how they affect your product listings.

Types of Google Errors

Not all Google errors are the same. Some need immediate attention, while others are just recommendations. Here’s how Google categorizes them:

  • Errors – These are critical. If not fixed, your products won’t be listed, and in some cases, your account could be suspended.
  • Warnings – These won’t block your products right away, but they affect performance. If ignored, they might turn into errors.
  • Notifications – These are suggestions from Google to improve your product feed. They don’t impact visibility but can help your ads perform better.

Fixing errors should be your top priority, while warnings and notifications should be addressed to improve your campaign’s success. Next, let’s go over the most common Google feed errors and how to resolve them.

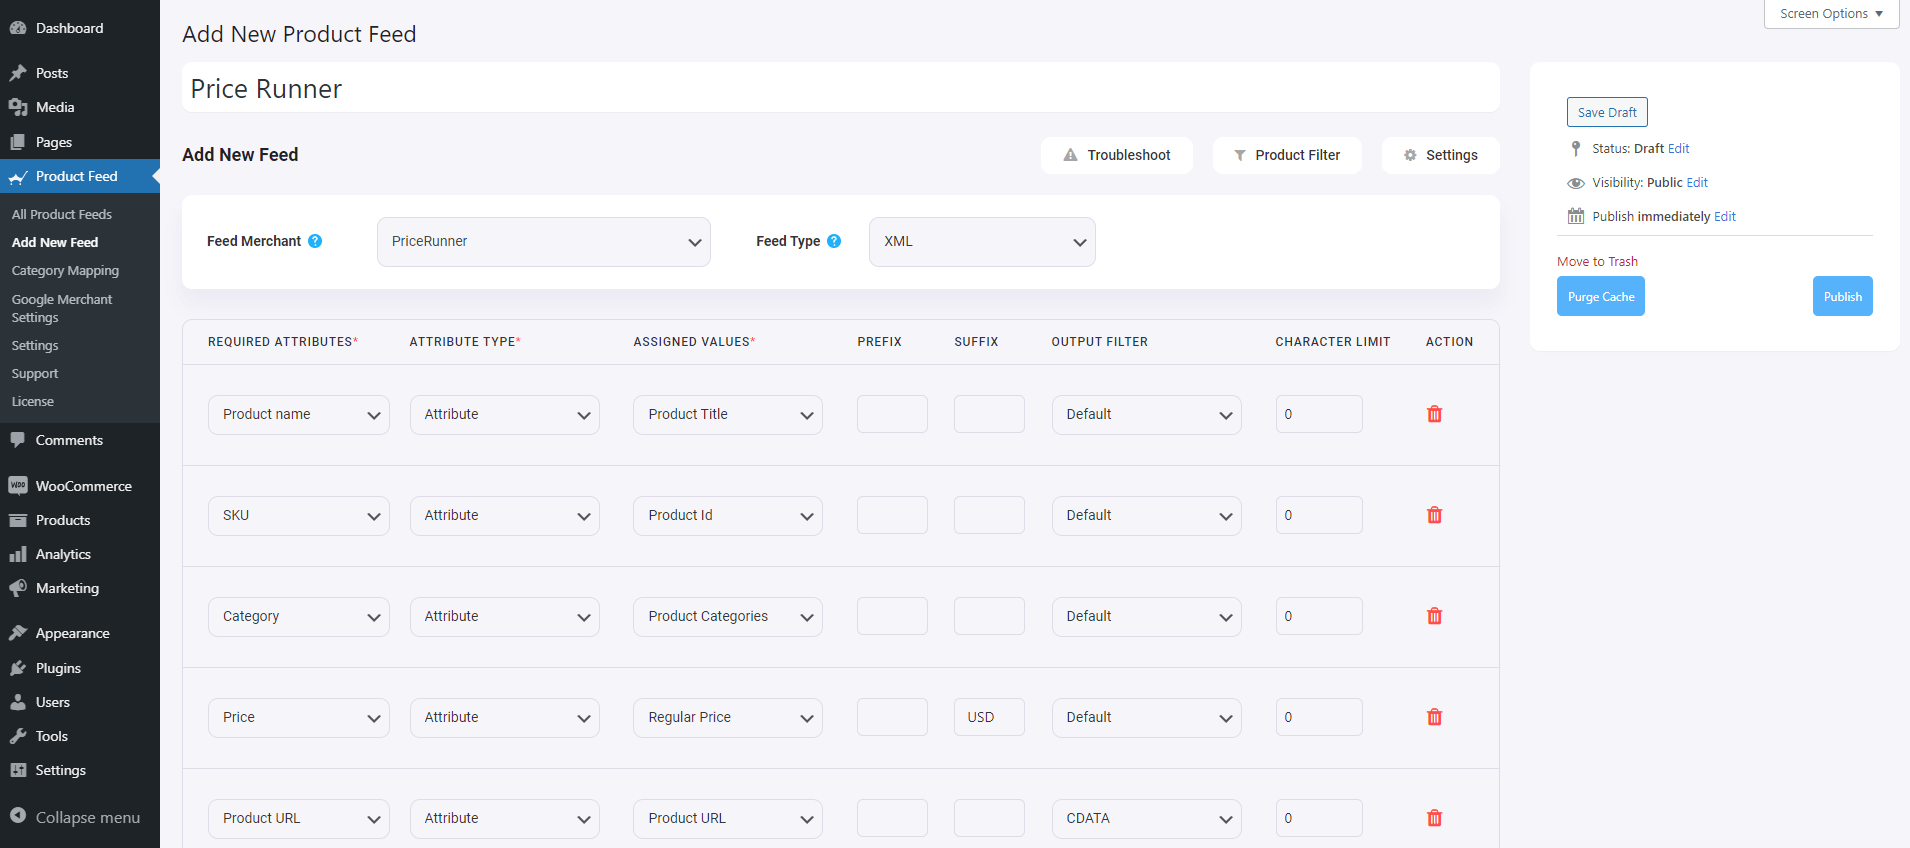
Basic Google Shopping Requirement – Mandatory Product Attributes

The very first step of a successful product listing is ensuring the right product attributes. Google requires specific attributes to be included in your product listings. So that it can ensure they meet their quality standards and offer a seamless shopping experience for customers.

Following are the common product data Google requires you to submit for any products:

  • Produkt-ID
  • Titel
  • Beschreibung
  • Product Link
  • Image Link
  • Availability
  • Current Price
  • Condition
  • Eindeutiger Bezeichner

And depending on the product type or your offer type, you may have to submit additional fields. For example, if you have different shipping costs for different locations, then you need to submit the attributes for Shipping fees.

If you do not submit these attributes, then, in most cases, your products will be rejected. Most other Google feed errors you will get also revolve around these attributes.

Finding Out If Your Google Product Feed Is Approved Or Rejected & Why

After you submit your product feed on Google Shopping, you may check the status of your listings in the Diagnostics tab.

To view the diagnostics,

  • Log in to your Google Merchant Center account.
  • Navigate to the ‘Products’ section in the left-hand menu.
  • Click on ‘Diagnostics’ from the dropdown menu.
Diagnostics to identify Google feed errors
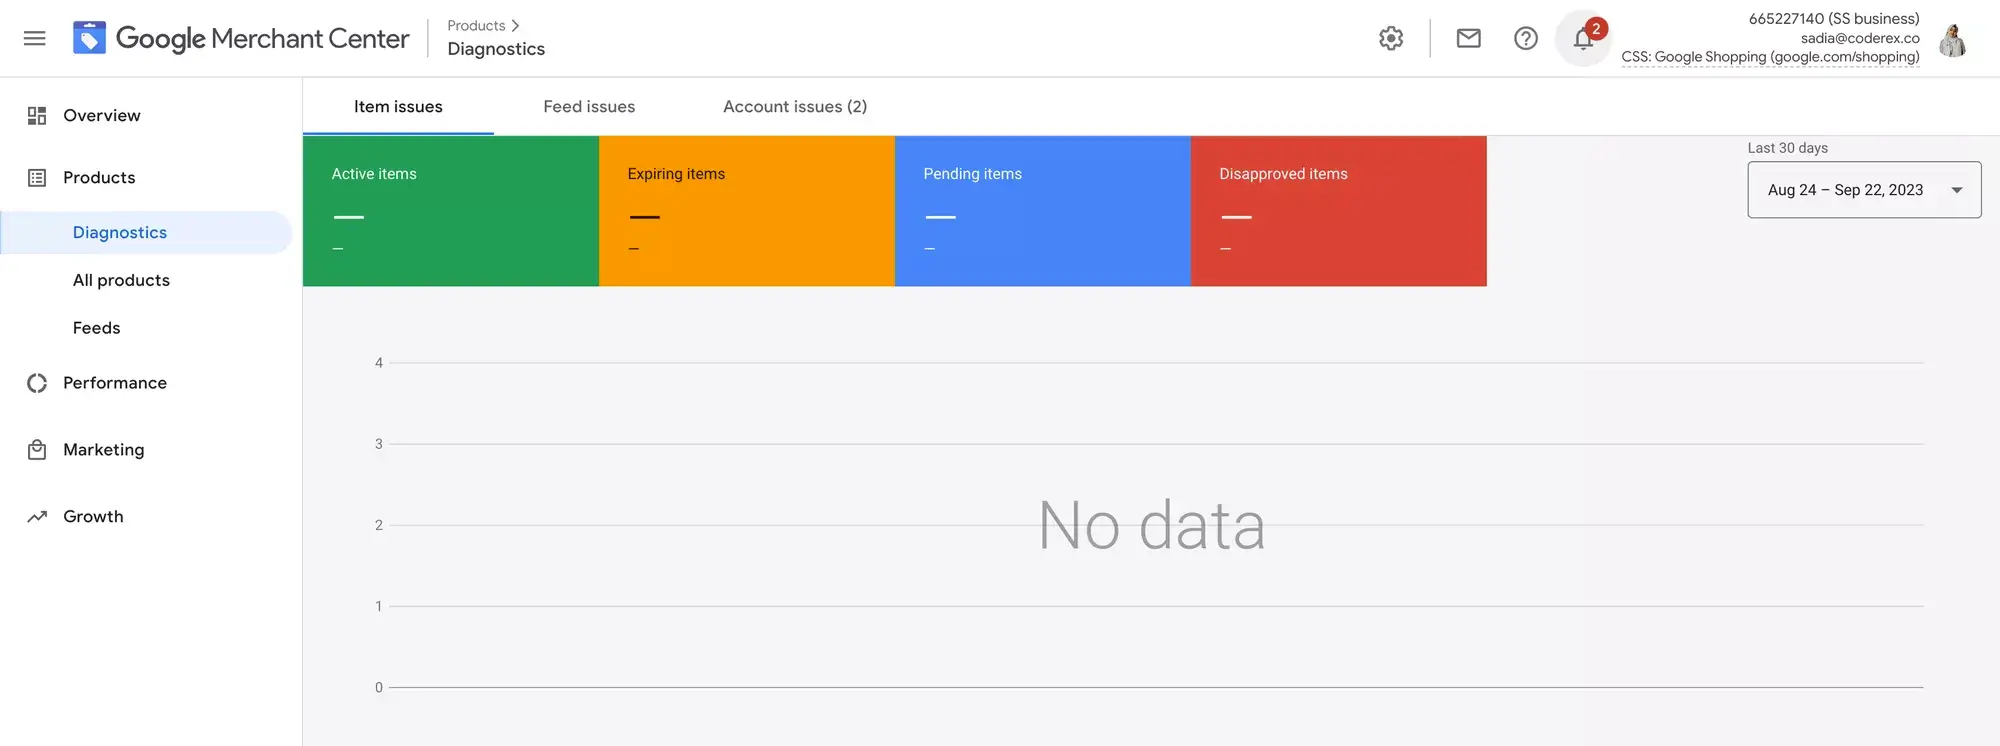
  • In the Diagnostics dashboard, you’ll find a detailed breakdown of any issues affecting your product feed.
Google merchant center item issues
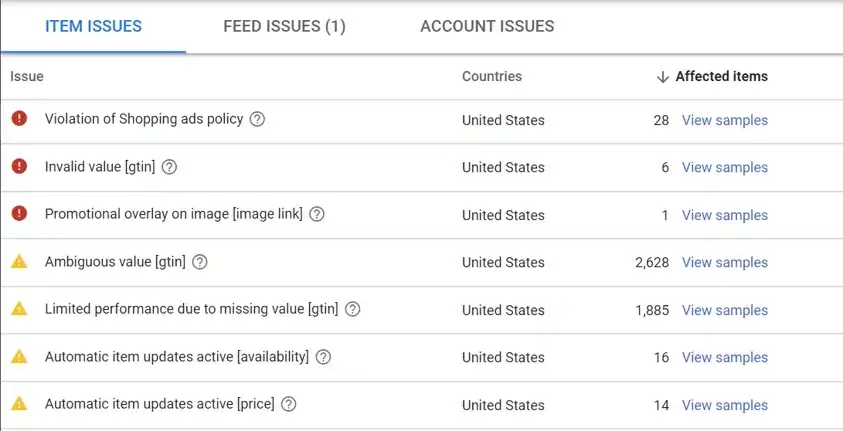
  • Clicking on an error or warning will show a list of affected products. It allows you to focus on specific items.
  • Each error comes with suggested actions to rectify the issue. You have to follow these recommendations to fix the problem.

Now, let’s see the common Google errors you might face and how to solve them for a successful promotion.

The Most Common Google Feed Errors & Ways To Avoid Them

Following are the most common Google errors you may get when your products get rejected in Google Shopping.

  1. Missing or Incorrect Price Attribute
  2. Missing Shipping Value
  3. Pending Initial Review
  4. Policy Violation
  5. Invalid Value Availability
  6. Invalid Images, Product Titles, or Descriptions
  7. Missing or Invalid Identifier

Let us look at each of them more closely and learn how you can avoid them.

1. Missing or Incorrect Price Attribute

The product price is really important, and if your product price has issues, then your Google shopping feed will be rejected.

There are 4 common price mismatch issues that may arise.

i. Currency Mismatch

You may often get a Google feed error called

  • Mismatched Value (Page Crawl) [Price]

And then, when you click on the warning, you notice the Google errors

  • Invalid Currency or Currency Mismatch

What this indicates is that you submitted the feed with one currency, but when the Google bot crawled your product page, it found a different currency value.

Google expects you not to confuse customers with different currency values.

Solution:
You either have to update the currency on your Product page or submit the same currency in the product feed.

ii. Mismatched Price

A similar case to currency may occur with price value itself. You may notice the following Google feed error:

  • Mismatched Value (Page Crawl) [Price]

And then, when you click on the warning, you notice the Google errors

  • Mismatch Price or inconsistent pricing

This happens when the pricing value in your feed and the value on your product page is not the same.

Solution:
Make sure you are displaying the same product price on your product page that you have submitted.
If you are running a sale, then the sale price should be clearly indicated on the product page under the price for structured data.

iii. Price Mismatch For Product Variation

Google Shopping requires you to submit each variant of a variable product as a separate listing with a common item group ID.

When you do that, the problem you will face is the same error message:

  • Mismatched Value (Page Crawl) [Price]

You will notice that the price is showing accurately on your product page and is correct in your Google shopping feed. So what could be the issue?

Well, the issue is mainly due to wrong-structured data.

WooCommerce, or most e-commerce platforms does not handle the price format of variable products in the structured data. Instead, for each variant, they show the same price range, for example, $20-$50.

The only way to avoid this is to fix your JSON-LD structured data format for WooCommerce.

Solution:
Use a reliable tool to fix the JSON-LD structured data format in WooCommerce that is aligned with the requirements of Google Shopping.
In WordPress, you my use Product Feed Manager for WooCommerce, which helps to configure the correct structured data format for variable products.

iv Missing or Zero Value for Price

The error you will get for this case is

  • Invalid or missing required attribute: price

This error will be triggered if you forget to submit the price attribute or submit no value for it.

Alternatively, if you submit the price as “0,” this Google feed error will be issued.

Google Shopping does not allow the promotion of free products, so ensure that you exclude any products with a price of zero from your Google merchant center feed.

Solution:
Ensure you have submitted a valid price for your product.
Do not submit any “0” priced product to Google Shopping

2. Missing Or Incorrect Shipping Value

Another common Google shopping feed mistake most people make is submitting incorrect shipping value for your products.

You will most likely notice the following error.

  • Missing value: shipping [shipping]

Or you may also get a Google error about the shipping weight.

  • Missing Value: Shipping Weight [shipping_weight]

Normally, you may set up shipping rates in your Google Merchant Center, which are considered a fixed shipping cost for any product delivered to a certain location.

However, you may want to use different criteria, such as shipping cost based on product weight, which you have to handle with attributes for each product in your Google product feed.

Now, if you have different shipping charges for different products, you need to ensure you submit the right values in the right format.

Similar to price, you first need to make sure the values match your product page. Second, you need to submit the right currency.

Then, you need to ensure you submit the shipping attribute using the required format. Basically, it has sub-attributes that you need to include for each shipping service you offer per product.

<g:shipping>
  <g:country>US</g:country>
  <g:region>MA</g:region>
  <g:service>Ground</g:service>
  <g:price>6.49 USD</g:price>
  <g:min_handling_time>1</g:min_handling_time>
  <g:max_handling_time>3</g:max_handling_time>
  <g:min_transit_time>2</g:min_transit_time>
  <g:max_transit_time>5</g:max_transit_time>
</g:shipping>

Here, you must include the Country and the price. The rest are optional.

Along with this, you may add the Shipping weight attribute if you have a weight-based shipping cost.

Solution:
Use the required format to submit shipping data on a product level.
Make sure to include the shipping country and price along with proper currency.
The values you submit should match what is mentioned on the product page and the structured data.

3. Pending Initial Review

An interesting barrier that many often face with Google Shopping is the error,

  • Pending Initial Review.

This is quite unclear, and you have no specific information on why your products did not yet get past that initial review.

Normally, it should take 3-5 business days for the review. But, if you notice that the status is the same for more than 7 business days, then you should start investigating how you can fix it.

Solution:

  • Go to Diagnostics and check if there are any pending issues on an account level, product level, or feed level for this particular product data feed. Resolve any pending issues there.
  • Make sure your Google Merchant Center account is properly configured.
  • Ensure you are not violating any Google Shopping policies.
  • Maintain an up-to-date policy page, terms and conditions, delivery page, returns page, and a contact page with business address, telephone, email, and contact form on your website.
  • Consult with your hosting to make sure your website is not blocking GoogleBot from indexing.
  • If everything is properly set, then you may submit a request here.

Overall, this may take about a week to a month, but if you do everything right, you will be able to get past this tricky situation.

4. Google Shopping Policy Violation

Google is very strict when it comes to their policies and if you violate one, they will disapprove your products without any fixed indication as to where you violated the terms.

You will simply get a warning:

  • Preemptive Item Disapproval (PID): Policy Violation

At this point, you need to read the policies and make sure you haven’t violated any of their rules or terms. You may have to check for unaccepted terms used in product descriptions, disallowed product types, illegal products or information, etc.

Solution:
Make sure you are following Google shopping policies 100% and follow their guidelines.

5. Invalid Or Missing Availability

Availability is a required attribute for your product data to be approved on Google shipping, and the accepted values for it are “in stock,” “out of stock,” and “pre-order.”

You may often get the error,

  • Invalid value [availability]

It means you submitted the wrong value.

And you may get the error,

  • Missing required attribute: [availability]

It means you did not submit this attribute at all.

Solution:

  • Make sure to submit the “availability” attribute as it is one of the required product data that Google Shopping requires.
  • Use the accepted values, “in stock,” “out of stock,” and “pre-order” for your products.

6. Invalid Images And Product Titles

These are 3 common issues that you may face due to not following the Google Shopping guidelines.

i. Invalid Image

You may come across the following Google feed error,

  • Invalid image: image link [image_link]

It means the image URL you provided is either unresponsive or incorrect, i.e., you submitted the wrong URL.

There could also be an error called,

  • Promotional Overlay on Image [image link]

Google Shopping is strict about your product images. There shouldn’t be any promotional overlay. The product should be clearly visible. So, if you have used promotional text or images over your product image, then it will not be approved.

A third image issue you may face is related to the size.

  • Image Too Small or Low Image Quality [image link]

This usually happens when you have not submitted product images that are not in the right size. The minimum size for almost all product images is 100×100 pixels. In the case of clothing, the required image size is 250×250 pixels.

Solution:

  • Check the product URL and ensure it is working properly on your website or if it is marked as Public and not Private.
  • Avoid using promotional overlays on product images.
  • Maintain high-quality images with the right image size.

ii. Invalid Product Titles

Sometimes, you will get a Google feed error called,

  • Invalid Value [Title]

This happens when you have used a very long product title (seemingly longer than 80 characters) or used a special character that Google Shopping does not recognize.

So, you need to optimize your product title accordingly.

Another issue you may face is,

  • Excessive capitalization [title]

It’s as the error states, you probably have used too much capitalization that may affect customer experience. For example, you probably have used all-caps for two large words while the others are in the usual standard.

There is no fixed limitation here, but Google makes the decision, and you have to improve your title accordingly.

Solution:

  • Do not use product titles that are too long; limit product titles to 80 characters.
  • Avoid using special characters in product titles.
  • Use capitalization in a way that it doesn’t get annoying.

7. Missing or Invalid Identifier

To submit products on Google Merchant Center, you must submit the brand name and one of the two identifiers, GTIN and MPN.

You will get the following Google errors if you do not submit them.

  • Limited performance due to missing value [gtin]
  • Limited performance due to missing identifiers [gtin, mpn, brand]

While this is not something that will restrict listing your products on Google shopping, not submitting this data will not list the product on surfaces across Google, such as DRM or Local Feed.

So the performance will be significantly less.

Normally, if your product has a GTIN and MPN, then you should submit it. In case your product is manufactured on your own and doesn’t have a GTIN or MPN, you have to submit another attribute called “Identifier Exists” and assign the value “No.”

In case you are selling a non-branded product, you may submit your store’s name as the brand name.

By the way, if GTIN is not the identifier in your country, no problem. The value of GTIN is equivalent to UPC, EAN, JAN, ISBN (for books), etc., whichever is used in your country.

Solution:

  • Try to submit a GTIN or MPN with every product.
  • If you do not have a GTIN or MPN available, submit an additional attribute, “Identifier Exists,” with the value “no.”
  • Submit the product brand. If it’s a non-branded product, use your store’s name as the brand name.

To sum up, if your product data doesn’t match between WooCommerce and Google Merchant Center, it can lead to disapprovals. To prevent this, set up automatic syncing between WooCommerce and Google.

Here’s a guide on how to auto-sync WooCommerce products to Google Merchant Center.

Summing Up

As you saw above, these are the 7 common Google feed errors that most people face, and they all have simple solutions.

If you put some effort into avoiding these errors in your Google product feed, then you can achieve a higher approval rate on Google Shopping and start getting your products listed without any issues.

The sooner you have your products listed, the sooner you can get potential buyers.

So go ahead.

FAQs

1. How can I identify Google errors in my product listings?

Start by checking your Google Merchant Center account for any disapproval notices. A quick review of your product feed should help pinpoint specific issues.

2. What are the main causes of product disapprovals?

Disapprovals often occur due to missing or incorrect data. Ensuring that your product information aligns with Google’s requirements can resolve most issues.

3. How do I fix Google errors in my feed quickly?

You can address feed errors by updating product details according to Google’s guidelines. Regularly checking your feed for discrepancies helps maintain approval.

4. How do I perform a product feed error diagnosis?

To perform a product feed error diagnosis, check for missing attributes or incorrect data in your feed. Use Google’s error messages to guide you to the exact issue.

5. Why do some warnings impact my campaigns?

Warnings can affect your product visibility and overall campaign performance. While not critical, they should be addressed to avoid potential disapprovals or suspensions.

Kategorien
Guide Plugins

4 Ways To Improve Online Customer Support Using HelpGent

Customer support is one of the most important factors of a successful business, especially if you are a SaaS business or sell digital products.

As per a recent study, 83% of people are more likely to be loyal to a brand for a long time due to high-quality customer support.

Hence, if you sell digital products and want to build a profitable MRR, you must ensure you offer the best online customer support experience.

In WordPress, you will find a few plugins to help you offer customer support on your website. However, most of them are the usual stuff – traditional chat support, email & ticketing system, and prompting chatbot.

But what if you could offer a more improved customer experience by allowing your clients to record screens, upload videos, send audio messages, etc., besides the general ways?

Today, we will look at a tool called HelpGent that will help you take online customer support to the next level with all the above features plus more.

Here, you will learn about four unique ways HelpGent can help you provide customer support easily and more approvingly to your clients.

Fangen wir also an.

A Closer Look At HelpGent

HelpGent for online customer support in WordPress

HelpGent, developed by wpWax, is a powerful tool designed to meet the demands of asynchronous customer communication.

This support plugin will help you with amazing features such as video messaging, screen sharing, audio, and text messaging to contact your support team with more details.

Unlike traditional customer service channels that require you to hire live agents to help out with even trivial matters, HelpGent can help you revolutionize the customer support process.

When set up, customers will be able to send asynchronous messages to you at any time, and you can respond at a later, more suitable moment.

At the same time, customers won’t have to deal with explaining the problem they are facing with your product. They can simply record a video of the issue or explain it via audio and send it to you.

This combination will not annoy customers because they are able to submit the extra details. Meanwhile, you get a clear picture of the customer’s issue, and with the help of call monitoring software, you can assist them more effectively.

So, it’s a win-win for both of you, while delivering quality online customer support.

The Core Features of HelpGent 

  • Asynchronous video messaging
  • Voice recording & transferring
  • Screen recording & sharing
  • Text message support
  • Attractive builder with customization
  • Two distinct types of forms
  • Color font size customization
  • Search & sorting by text videos and voice
  • Nice filtering system by tag
  • Search conversations by name & email
  • Keep messages unread for the future reply
  • Quick name edit 

How To Use HelpGent To Improve Online Customer Support For Online Businesses?

Let us focus on the four unique features that have made HelpGent stand out in WordPress.

  1. Asynchronous video messaging
  2. Voice recording & transferring
  3. Screen recording & sharing
  4. Text message support

Let’s explore how each of these features contributes to enhancing efficiency and boosting conversion of your business with smoother communication with your clients.

1. Asynchronous video messaging

The plugin comes with an innovative solution to revolutionize communication through asynchronous video messaging. This groundbreaking feature enables you and your customers to exchange video messages conveniently leading to improved customer experience, eliminating the need for real-time conversations. 

In this case, both you and your customer can express yourselves authentically, addressing pre-sale inquiries, product issues, and any other queries with ease and flexibility.

2. Screen recording & sharing

Your customers can easily capture and share videos of their problems using the screen recording feature. This will greatly help you understand their issues on a personal level, with no confusion or misunderstandings.

You can also use screen recording to demonstrate the solution and quickly send it to your customers, thus offering solutions much faster.

3. Voice recording & transferring 

Another unique feature this plugin has is the ability to submit voice recordings.

The customer may not have the time or arrangement to write you about his problem. He can record his voice while explaining the issue or asking his questions really fast. In response, you can also send an audio reply with the solution or answers.

Whether it’s troubleshooting, brainstorming, or simply having a conversation with your customer, this feature will provide an authentic and convenient way for both of you to be clear about what you want to say.Also by utilizing advanced text to speech algorithms, written text converts into natural-sounding audio, allowing for seamless communication and enhanced accessibility across various applications.

4. Text Messaging 

There’s no doubt that sending text messages is something many people do to communicate. You will get the same on HelpGent. In this case, instead of live support, you will get to look at customer queries in your WordPress dashboard and reply back when you are available.

In Short, HelpGent Improves Online Customer Support Experience With The Following Added Benefits

  • Make your customer support process more customer-centric with the intention to help ASAP.
  • Customer issues are resolved more quickly and efficiently.
  • Saves the customer from frustration due to not being able to explain the issue.
  • Makes communication with customers more meaningful and helps to build a better relationship.
  • A great way to show high-quality support that can lead to long-term customer loyalty and repeat business.
  • Delivers higher customer satisfaction scores that may influence them to submit positive ratings.

Overall, it checks out all the ticks that you would expect from a modern WordPress support plugin.

Technical Features Of HelpGent That Will Benefit Your Business

So far, you’ve learned about the 4 unique ways you can improve online customer support using HelpGent. But the plugin comes with a few more features that you may want to look into.

i. Scheduled Deletion Of Closed Tickets

The plugin will let you define a duration after which the media attachment will be removed from your media storage folder.

So, after you are done helping a customer, you can have them removed automatically (as they will no longer be needed in the future). 

ii. Offload Media & Support Data Google Drive

You don’t have to store all the media files in your WordPress media folder. The plugin allows you to offload all the media to your Google Drive.

In a scenario where you may get regular support queries, especially if your business is reasonably large (for example, if you are using the plugin to provide product support with over 100k users), you may need to worry about the storage limit. But this feature will ensure you are in control of the whole situation.

Besides media, you could also back up your chats, conversations, and associated files in an organized manner within Google Drive.

iii. Integration With Directorist

Directorist is another amazing plugin by wpWax that allows you to create a directory website.

They have made sure that HelpGent is fully compatible with Directorist so that you will be able to service your audience with quality customer support while maintaining an organized directory site in WordPress.

iv. Integrated Contact Form To Get Queries & Leads

You will be able to create and use contact forms through which people will submit queries or pre-sale questions. Hence, it’s a convenient way to collect leads.

How To Get HelpGent – Links To Plugin & Pricing Options

After reading this article, if you are interested in getting HelpGent for your WordPress site, then here’s how you can get the plugin.

i. HelpGent Free Version

You may get the free version of the plugin on the WordPress repository, which comes with most of the great features of the plugin.

ii. HelpGent Pro

In order to get access to more advanced features and no limits in media submissions, you may go for one of the premium plans of HelpGent.

First, you can go for the yearly plans.

  • Grow plan priced at $79
  • Business plan priced at $179
  • Ultimate plan priced at $329

**Note: There is a discount going on right now, which is why you are seeing lower prices.

HelpGent Yearly Plans

Or, you can go for the lifetime plans.

  • Grow plan priced at $249
  • Business plan priced at $449
  • Ultimate plan priced at $749
HelpGent Lifetime Plans

Einpacken

As you saw, it is now possible to improve online customer support in WordPress.

Even though HelpGent is quite new, it won’t be long before it becomes one of the key plugins people use for better business outcomes through quality customer support experience.

So go ahead and start using HelpGent. Keep your customers satisfied with reduced efforts to get higher customer satisfaction.

We’re excited to offer you a coupon code, CODEREX20

If you use this during the checkout, you’ll get an exclusive 20% discount on HelpGent!

Kategorien
Guide Product Feed Manager For WooCommerce WooCommerce

9 Best UK Online Marketplaces To Promote Your WooCommerce Products Successfully [2025]

Let me ask you a quick question. If you’re a WooCommerce seller in the UK, what’s one of the biggest challenges you face when trying to grow your sales?

Chances are, you’re already aware of how competitive the e-commerce world is.

With 62.1 million e-commerce users in the UK expected by 2025, standing out among thousands of online stores is no easy feat.

But here’s the good news: You don’t have to go it alone. The power of online marketplaces can help you promote your WooCommerce products and boost your sales in ways that you might not have thought of.

Wondering how to tap into these opportunities?

In this guide, I’ll walk you through the 9 best UK online marketplaces that can help skyrocket your business. Plus, I’ll share expert strategies to help you make the most of each platform and increase your sales effectively.

Ready to take your WooCommerce store to the next level?

Let’s dive in!

Why Sell on Online Marketplaces?

Why sell on online marketplaces

For any new business or a small e-commerce website, now it’s quite difficult to reach more people any time soon, even if there is a high popularity for online shopping.

87% of UK consumers shop online, with 55% of them placing orders at least once a week.

This is where UK online marketplaces play a big role.

These marketplaces usually have tons of buyers who regularly visit the sites and place orders.

But the main reason why you should value their audience is because you can list your WooCommerce products in these popular online marketplaces.

This means your products will be visible to a larger audience even if your business isn’t popular yet.

Sounds great, Right?

This way more people will be able to see your brand, especially those interested in your niche.

If you have submitted optimized properly, then your products will appear as OPTIONS when buyers search for them.

Eventually, you will start getting visitors and sales without struggling for years.

Listing in any random marketplace will not give you the desired results.

You have to research and find out which one is the best fit for promoting YOUR WooCommerce products.

That is what I will help you out with today.

Below, I’ve listed down 9 popular UK online marketplaces where you will be able to list your products and get results [REAL QUICK]

Some of these are great for any product, and some of them will give you extra results for certain types of products.

I will discuss all of these below.

Top 9 UK Online Marketplaces to Promote Your WooCommerce Products

Following are 9 UK online marketplaces that have statistically proven to generate the highest sales for most other e-commerce businesses.

1. Amazon UK

Amazonas Großbritannien

With millions of daily visitors, Amazon UK is a marketplace where potential buyers are already searching for items similar to what you offer.

According to cybercrew, 86% of people in UK shop at Amazon.

Amazon provides free shipping for many products. Their tagline is “Spend less. smile more

and it’s totally TRUE!

If you list your products on Amazon UK, you can get a significant boost without spending a fortune.

When To Promote on Amazon UK

You should promote your WooCommerce products on Amazon UK when your goal is to expand your customer reach and your business has been around for a while.

Amazon charges quite high to list your products there.

You will definitely get good results if you list your products there, but it may not be a good ROI if you are a startup.

So, the only time you may list your products there as a startup is when you have a good amount of budget available.

The monthly fee for promoting on Amazon is $39.99. Plus, every sale you make has a commission fee of $0.99.

Another important consideration is the niche you are selling.

People rely on Amazon UK, especially in these niches electronics, health & beauty, Home and Kitchen, Books, Sports – DIY, etc.

While products in other categories also sell quite well, most of Amazon’s customer base are consumers of products in these categories.

So you will get more benefits if you are selling products in those niches. For those interested in exploring the online trading sphere, checking out a maverick trading review could provide valuable insights.”

How To Promote on Amazon UK

To promote on Amazon UK, you can follow the steps below –

  • Create a seller account on Amazon UK. Provide your business information, set up shipping options, and choose a product category.
  • List your products in the appropriate categories on Amazon UK. Make sure your listings are informative and go with Amazon’s guidelines.
  • Choose your shipping and fulfillment options.
  • If you want, you can also take advantage of Amazon’s advertising options.

2. eBay UK

ebay UK

With over 132 million active buyers, eBay offers you almost the same benefits as Amazon.

The main attraction of eBay is the auction and “BUY IT NOW” listings, which sets it apart.

The auction allows you to sell any product, even second-hand ones, fast and often, on a higher profit margin.

If a product is in high demand but rare, it may even sell at 2 to 3 times higher prices.

eBay UK also has “Promoted Listings,” which allows you to highlight your products at the top of search results to the right audience and ensure maximum visibility.

You may even observe the performance of your products on the eBay analytics dashboard to understand what changes you may require to improve your product data.

When To Promote on eBay UK

eBay serves almost all product category niches, so there’s no specific category to highlight.

For any niche you are selling on, you can take advantage of different types of listings on eBay and get fast exposure.

However, the different types of listings come with different selling fees.

So choose the one that suits you the most. (Most people simply go for the AUCTION.)

How To Promote on eBay UK

To sell on eBay,

  • You need to create a seller account and set up your store.
  • Next, you have to upload your product listing with high-quality images and competitive pricing.
  • Then You need to optimize your product listing to get the best results regularly.

You may also consider selling on eBay MIP which gives you better visibility and control over how your products are exposed

3. Etsy UK

Etsy UK

Etsy UK is the go-to marketplace for personalized, creative, and artistic products.

If your WooCommerce store offers HANDMADE OR UNIQUE ITEMS, Etsy is the best option FOR YOU.

Here, you are promoting products only to consumers that you know are interested. This will increase conversion rates and help you increase sales really quickly.

One of the biggest advantages of Etsy is that this marketplace has a collaborative community to connect sellers with buyers.

As a WooCommerce store owner, being part of this community can help you build brand loyalty, gain feedback, and engage with customers who share your passion for unique products.

Moreover, Etsy makes it quite easy to list products, track inventory, and monitor exposure with its interactive dashboard.

When To Promote on Etsy UK

As mentioned above, Etsy will be the best option if you want to sell handcrafted and unique items.

Plus, if you are running a small business, Etsy will open up great opportunities for you because they are flexible with their fees.

How To Promote on Etsy UK

Selling on Etsy is pretty simple. You can make single listings or set up a whole store.

  • First, you need to answer some basic questions related to your products.
  • Then, you’ll create an Etsy account, build your shop, set up payment info, and manage your listings.

4. Google Shopping

Google-Shopping

Google is the number one search engine in the UK and offers you a powerful advantage for product promotion.

Basically, when people search for products on Google, they get some product suggestions on top of the search results.

All you need to do here is to make sure you have submitted the correct data about your products to Google Shopping. They will verify and match every detail you submit with your website before exposing them to potential buyers.

How To Promote on Google Shopping

  • First, you will need a Google Merchant Account, which you need to configure properly.
  • Next, you need to submit your product data in their required format along with the attributes they have requested (depending on the product category).
  • If there are any errors, you will be able to see the reasons in the Google Merchant Center.

5. Zalando

Zalando Marketplace to sell woocommerce products

Zalando is one of Europe’s largest online fashion and lifestyle marketplaces.

Zalando offers an intuitive shopping experience, making it easy for customers to explore and discover new products.

It has a variety of advertising and marketing options that can enhance your product visibility within its marketplace.

Moreover, you can access all your analytics and business insights through a powerful platform tool called zDirect.

When To Promote on Zalando

If your WooCommerce store specializes in fashion, accessories, or lifestyle products, then you can take advantage of a massive customer base who are interested in your niche.

Also, you might need to consider the promotion cost for selling on Zalando. The selling fee on Zalando has 2 categories:

  • Selling Commission
  • Fixed monthly charges

The commission depends on the product type and the price of the product. It usually ranges between 5% and 25%.

How To Promote on Zalando

To sell on Zalando, you need to join their partner program.

You must register your business on the platform. Then, you can decide the product range and prices.

Zalando can also handle payment processing and customer service. Plus, with additional fees, you can use Zalando Fulfillment Services and other marketing options.

6. OnBuy

On buy

OnBuy is the fastest-growing online marketplace in the UK right now.

Since it’s new, OnBuy offers a typically lower fee structure compared to most UK marketplaces. Also, it covers a wide range of product categories, from electronics and fashion to home and garden.

So, you can easily find a suitable category for their offerings and take advantage of its diverse customer base.

When To Promote on OnBuy

The most popular categories of OnBuy are – Electronic, entertainment, home furniture, household, gardening, care, fitness, etc.

So, if you are selling products in one of these niches, OnBuy should be among your go-to marketplaces.

The fee is 5% for consumer electronics and 9% for everything else.

And there are no listing fees. So it is perfect for startups to explore.

How To Promote on OnBuy

To promote OnBuy, you need to first sign up as a seller on OnBuy and provide the necessary business details. Next, you have to create your product listings.

Once you are a seller, you can use OnBuy’s promotional tools like deals, discounts, and bundle offers to make your listings more attractive.

7. Fruugo

Fruggo

Fruugo is a UK-based marketplace that currently has sellers from all over Europe.

One of the best aspects of Fruugo is that it translates product data depending on the location of the buyer. So it’s much easier for buyers to understand if they want to purchase.

As a seller, you will get a dedicated account manager to help you list products and plan proper advertisements.

This personalized approach is why many large businesses consider Fruugo as their go-to online marketing place for the UK.

When To Promote on Fruugo

Consider promoting your WooCommerce products on Fruugo when you clearly understand your target audience.

You have to make sure you identify the correct category for each of your products because Fruugo’s display algorithms will display products to buyers based on category.

If you provide offers during peak shopping seasons, holidays, or special events, Fruugo would be great as its traffic goes up by over 60% during such events.

How To Promote on Fruugo

To start selling on Fruugo, you need to follow some requirements of the marketplace.

  • You need to provide your company information, contact information, fulfillment capabilities, product information, and other technical information.
  • For product listing, Fruggo has some specific requirements.

All your products must have GTIN, product image background, and up-to-date product information.

8. Wayfair UK

Wayfair UK is a leading online marketplace dedicated to home goods, offering a wide range of furniture, decor, and other home essentials.

Wayfair UK

If your WooCommerce store specializes in FURNITURE, HOME DECOR, OR HOUSEHOLD GOODS, Wayfair is the ideal platform for you.

Wayfair connects sellers with millions of customers actively searching for home-related products. By listing your products on Wayfair, you tap into a highly targeted market, increasing the likelihood of higher sales and visibility. The platform provides robust marketing tools that help showcase your products to the right audience.

One of the major perks of selling on Wayfair is its user-friendly interface, which allows you to easily manage listings, track inventory, and adjust your products as needed.

When To Promote on Wayfair UK

Wayfair UK is the best marketplace for WooCommerce store owners in the home goods, furniture, and decor industries. If you have products related to improving living spaces, this platform is a great fit.

How To Promote on Wayfair UK

To sell on Wayfair, you’ll need to,

  • Create a seller account and list your products.
  • After registration, you’ll set up your store, manage your inventory, and make use of Wayfair’s marketing tools to boost visibility and sales.

9. ASOS UK

ASOS UK is a popular online fashion marketplace known for trendy clothing, accessories, and footwear.

ASOS UK

If your WooCommerce store offers CLOTHING, SHOES, OR ACCESSORIES, ASOS is an excellent choice to expand your brand’s reach.

ASOS attracts millions of fashion-forward shoppers, providing a fantastic opportunity to promote your products to a large audience. It offers a seamless shopping experience with personalized recommendations, making it easier for buyers to discover your products. Additionally, ASOS’ strong brand presence can increase your credibility and sales.

For WooCommerce store owners in the fashion niche, ASOS also simplifies the process of listing and managing products, ensuring your items get maximum exposure.

When To Promote on ASOS UK

ASOS UK is perfect for WooCommerce store owners in the fashion, footwear, and accessories categories. If your business focuses on trendy, stylish products, ASOS is the marketplace for you.

How To Promote on ASOS UK

Selling on ASOS is simple.

  • First, you’ll need to sign up as a seller,
  • Then upload your products and start managing your inventory.

ASOS also provides helpful tools to track sales and improve your product listings.

**If you’re looking to expand your reach beyond the UK and tap into international markets, check out our guide on the 5 Best Global Online Marketplaces for International Promotion [2025] to discover platforms that can help you grow your business on a global scale.

How To List Your WooCommerce Products on UK Marketplaces Easily

Now you have a good idea of where to promote your WooCommerce products.

But you also need to learn how to list your products on these UK marketplaces without spending hours manually compiling product data or spending a fortune by hiring people.

Manually listing products is quite challenging if you have a large number of products.

Since you use WooCommerce, you can use different tools to make the process much easier.

And to promote your WooCommerce products on UK marketplaces,

You will find a reliable plugin that will help you generate product data in the right format for most UK online marketplaces in just a few clicks.

It’s called Product Feed Manager for WooCommerce (PFM).

Product Feed Manager For Woocommerce

This plugin has pre-built templates so that you can generate the feed for almost any online selling sites UK and list your products real quickly. So you should check it out.

Einpacken

Now, it’s time you start looking into your options & budget and decide which marketplace you want to embrace.

The main focus here should be a balance between how much you may earn and how much you may have to spend. Only then you will get a high ROI.

So, which UK marketplaces do you think you will list your products on?

Share it with us in the comments below.

Zum Wohl.

Frequently ask question(FAQs)

FAQ1: What is the most used online marketplace in the UK?

Amazon is generally considered the most used UK marketplace online. It has a dominant market share and is widely popular among British consumers for its vast product selection, competitive pricing, and convenient delivery options.
Other significant online marketplaces in the UK include eBay, Etsy, and Wayfair, but Amazon maintains a clear lead in terms of user base and sales volume.

FAQ2: How can I promote my products on UK selling sites?

Promoting on UK selling sites involves optimizing product listings, utilizing paid ads, and leveraging customer reviews to boost visibility and attract more buyers.

FAQ3: What are the best UK selling websites for WooCommerce store owners?

Some of the top UK selling websites for WooCommerce stores include Amazon UK, eBay UK, and Etsy UK, offering massive visibility and sales potential.

FAQ4: How do I choose the right UK selling sites for my products?

To select the best UK selling sites, consider your niche, product type, and target audience. Popular platforms like ASOS and Wayfair UK are great for specific categories.

FAQ5: What is the difference between UK marketplace and a direct online store?

A UK marketplace offers a platform where multiple sellers can list products, whereas a direct store allows you to manage everything independently, like with your WooCommerce setup.

Kategorien
Guide Real Estate Virtual Reality WP VR

How to Use Real Estate Floor Plans in Virtual Tours [2024]

When selling houses, you will see that one of the major reasons your buyers may reject a house is due to the way the property was planned or built.

For many clients, it’s important that they are able to find a home that will resemble their desired house plan.

As a result, if you are using virtual tours to showcase properties, you should consider including real estate floor plans in the tours.

It will not only make a tour more interesting but also help eliminate any confusion about the architecture of the house. Plus, you will get a few additional benefits that will help you impress clients even more.

Today, you will learn how to add a floor map to your virtual tour to enhance the overall experience of your visitors.

In this article, you will learn,

  • The key benefits of using house plans with virtual tours,
  • how to embed a real estate floor plan into your property virtual tour,
  • examples of great floor plans with virtual tours.

Fangen wir an.

Benefits of Using Real Estate Floor Plans With Virtual Tours

Virtual floor plans nowadays will provide potential buyers with an immersive and interactive experience to explore properties and gain a deeper understanding of their layouts. And if you can combine your virtual tours with floor plans, it will take the experience to the next level.

Following are some of the key benefits of using real estate floor plans with virtual tours.

1. Clear Property Plan & Layout For Better Decision-Making

The main benefit of using real estate floor plans is to ensure buyers get a clear idea about the layout of the house.

Normally, when you have images or a video, you are only looking at the house from a certain angle and can’t really imagine how it may be in reality.

When it comes to a virtual tour, yes, you get a near-perfect idea about the scene you see. But again, you can’t accurately guess the directions and the layouts of how each scene is connected to the other in real life.

A floor plan solves this problem. While taking the tour, if a person can get a glance at the interactive floor plan and understand where he is in the house, it will make it much easier for buyers to decide if this is what they are looking for.

Clear Property Plan &amp; Layout For Better Decision-Making

For example, a family considering a property can better visualize if the bedrooms are located close to each other or apart, the kitchen is conveniently situated, and there’s a logical separation between private and communal spaces.

Hence, it will help buyers make decisions more confidently. And you are less likely to get a deal rejected due to the layout of the house.

2. Maps Out The Important Spots In Your Virtual Tour

In the floor map, you may name the rooms and areas available in the tour. You may leave pointers to indicate the spots from where visitors will be observing the view.

You may also contrast color the areas that you want the visitors to visit, i.e., the specialty of the property.

This could be maybe the dining room, or maybe the swimming pool area, or even the balcony to get a soothing view outside. This approach will work really well for furnished homes or luxury homes.

How to Use Real Estate Floor Plans in Virtual Tours [2024] 1

So, basically, you may use this as another way to connect with potential buyers.

3. Makes Navigation Easier With Click To View Scene

Modern floor maps in virtual tours allow you to add hotspots on the map, which people can click to visit that scene directly.

Makes Navigation Easier With Click To View Scene

This helps to attract buyers who are more concerned about specific rooms in the house.

For example, many want to make sure they get a spacious kitchen before all else. Hence, you may allow them to visit the kitchen just by clicking on the map.

4. Avoid Misunderstandings With Room Dimensions & Directions

A virtual does create a very realistic environment for the buyer, but it still doesn’t answer a few important questions the buyers may have.

Add dimensions and directions of the house

For example, a buyer may wonder about the dimensions or measurements of the rooms.

That is something you can cover in the real estate floor plan. You may easily add the measurements of each side of the rooms/scenes on the map, thus removing such confusion.

The directions could be another piece of information that you can include on the floor plan.

5. Define the Authenticity Of Your Listings

The use of real estate floor plans in your virtual tours will act as a psychological trigger and help you gain authority.

Having The floor maps will create a sense of authenticity. People will believe that you are more trustworthy with the listings as you even have access to the floor plans.

This will make it easier for people to choose you over your competitors.

Pro Tip: You can collect the floor plan from the owner or have someone inspect the house and prepare one for you. Do not use fake floor plans. It will rather make you lose potential clients.

How To Embed Real Estate Floor Plans To Your Virtual Tours

The ability to add a real estate floor plan to your virtual tour will really depend on what tool you are using to create your virtual tours.

Some tools have this feature built-in, while for others, you may need to customize it into the tours or compromise and use a floor map as an image below the virtual tours on a web page.

We highly recommend you choose a virtual tour software that has an interactive floor plan feature that allows you to connect the map to the virtual tour via hotspots and indicates the location of the currently viewed scene on the map.

In WordPress, you will find WPVR, which allows you to create and embed high-quality virtual tours on your website, along with interactive floor plans.

Here’s how you can craft a virtual tour along with a real estate floor plan using WPVR.

1. Create A Virtual Tour Using WPVR

First, you need to upload 360 panoramic images, which WPVR will convert into a virtual environment.

Next, connect the scenes to each other to make it into a complete tour of the house.

And finally, customize the tour with more details such as company information, tooltips, additional details on the house, and booking forms.

~ Here’s a simple guide to creating a Real Estate Virtual Tour To Increase Property Sales ~

2. Enable & Upload The Real Estate Floor Plan

Once you have the tour ready, it’s time to add the virtual tour house plans.

First, go to WPVR settings and enable the floor plan feature.

Enable floor plan

Next, upload the real estate floor map.

Upload a floor plan image

Then, set up hotspots and connect them to the associated scenes in the tour.

Add hotspots and Pointers in Floor plans

Here’s a video guide in case you need more help,

3. Embed Your Virtual Tour On The Website

Now that you have your floor plan virtual tour ready, you may easily embed it on any page on your website using shortcodes or widgets in one of the supported page builders.

For example, if you use Elementor, you may use the WPVR widget from Elementor to place the tour on a page, which you may link on your listing page for the associated house for sale.

~Here’s how you can easily embed a WPVR virtual tour anywhere on your WordPress site.

Examples Of Floor Plans With Virtual Tours

1. Interactive Floor Plan by WPVR

Following is an example of a virtual tour with a real estate floor plan that was created using WPVR. Go through the tour and explore how amazing this virtual tour is and how engaging this interactive floor map is.

2. Property Map Showcase by Zillow

You’ve surely heard of Zillow. Here’s how they present the floor maps with virtual tours.

Zillow Virtual Floor Plan

3. Basic House Plans With Virtual Tours by Panoee

Panoee Floor Plan

4. 3D Floor Plan Virtual Tour by WayneHomes (created using Matterport)

Matterport Floor plan

This one is a bit unique (and expensive). It’s the dollhouse effect by Matterport, which is probably not something most realtors would go for unless it’s for a very expensive luxury house.

Schlussfolgerung

As you can see, you get so many benefits from using real estate floor plans along with your virtual tours, and it is super easy to embed.

So go ahead and start using virtual tours with floor plans and convince more potential buyers to consider making a purchase decision.


If you want to use a reliable virtual tour creator that is reliable, cost-effective, and has a high-quality interactive floor plan feature, then WPVR would be a great choice.

Try using WPVR today and start making virtual tours that are more optimized for converting clients.

** FAQs **

Can virtual floor plans really enhance my property listings?

  • Yes, integrating virtual floor plans can greatly enhance your property listings. It provides potential buyers with clear insights into the layout and structure of the house.

Will adding floor plans to my virtual tours require a lot of technical expertise?

  • Not at all, with user-friendly tools like WPVR, embedding floor plans into your virtual tours is simple, even for those without technical skills.

Are virtual floor plans compatible with different devices for easy viewing?

  • Yes, virtual floor plans are optimized for seamless viewing across various devices. It ensures accessibility and engagement for all potential buyers.

How can virtual floor plans help me stand out from other realtors?

  • By incorporating virtual floor plans into your listings, you demonstrate attention to detail and professionalism. It helps you to set yourself apart as a realtor who goes the extra mile to assist buyers.

Can virtual floor plans really make a difference in attracting potential buyers?

  • Indeed, real estate virtual floor plans provide buyers with a comprehensive understanding of the property layout. It increases their confidence and likelihood of making a purchase decision.
Kategorien
Guide Virtual Reality

Guide to Panoramic Photography – How To Shoot Panorama Photos Efficiently [2024]

“Content is King,” as stated by Bill Gates, is quite true today. Most businesses nowadays rely on online presence and digital marketing.

You will find so many unique ways businesses are trying to use content to stay ahead of the competition. And one such unique content is “Panorama.”

A panoramic image is a processed form of photography that gives you a wide and expansive view of a location. You can then convert it into a 360 virtual tour quite easily.

Virtual tours are right now one of the most interactive forms of content in the real estate, hotel, and travel industry to increase sales.

However, panoramic photography can be quite challenging. You have to consider the lighting, the right equipment, and the proper angle of view to capture a high-quality panorama.

In this guide, you will learn how to shoot panorama photos in the right way, with the best possible captures.

After reading this article, you will learn:

  • The equipment needed for panoramic photography.
  • Proper shooting techniques to capture panoramas.
  • Ways to optimize capturing 360 panoramic images.

And eventually, you will be able to capture high-quality panoramas that you can use to create the best virtual tours.

Fangen wir also an.

Step By Step Guide To Panoramic Photography

Taking panoramic images will need you to follow three main steps:

  1. Collect the required equipment for efficient panoramic photography.
  2. Use the right shooting techniques to capture images for the panorama.
  3. Stich the captured images into a 360 panoramic image.

Let us look at each of them one by one.

Step 1 – Collecting The Required Equipment For Efficient Panoramic Photography

The first step to capturing panoramic images is to choose the right equipment.

Following are the tools you need to collect before you can proceed to capture your panoramic images.

1. High-Resolution Camera With A Wide-angle Lens

If you want to capture a high-quality panoramic image, you will need to choose a high-resolution camera and a wide-angle/fish-eye lens for the 360 effects.

Ideally, a camera with at least 24 megapixels and a wide-angle lens with a focal length of 35mm or less will serve your purpose.

The idea is to combine the camera and the lens to help you capture the full grandeur of a scene (which is not possible with a traditional lens).

  • The camera’s high resolution will ensure all the details are captured to the last detail.
  • The fish-eye lens will create a concave effect to help capture a 360 view.

Tips On Using Your Camera & Lens Properly

  • Set your camera to manual mode.
  • Use a decent shutter speed – 1/10th or 1/20th is ideal during the day.
  • Set the aperture to about F11 and ISO to around 640 or more during the day.
  • Set manual white balance to 4000 Kelvin

**Remember, these settings are suggested based on ideal photogenic lighting conditions. You may have to toggle the white balance and ISO a bit to get the best output.

Best Cameras To Consider For Panoramic Photo Shooting
Best Wide-angle Lenses For Panoramic Photography

2. A Tripod For Stable Photography

You’ll need a stable tripod for panoramic photography to avoid noise and jitters caused by camera shakes.

Plus, you will be able to raise or tone down the height of the camera easily, to capture at just the right angle for the best panoramic view.

Tips On Using A Tripod Properly

  • Try to keep the tripod on an even surface.
  • Adjust the height and angle of the tripod for your desired composition.
  • Notice the bubble of the tripod. If it’s in the center, it means the tripod is standing straight.
Best Tripods for Panoramic Photography

3. Remote Shutter Release

The remote shutter release will allow you to trigger the camera without physically touching it. This will remove the possibility of camera shakes.

Best Remote Shutter Releases

3. Automated Pano Head/Nodal Head For Controlled Photoshoot

Since you need to cover every angle of a view, you must maintain a fixed rotation angle. An automated pano head will help you maintain that angle.

You may set the amount of angle you want the camera to rotate after every shot (and set a timer to define how soon the camera will rotate next).

This will help you capture all angles of a 360 view without any manual effort.

Best Automated Pano Heads for Panoramic Photography

5. Leveling Tools

In case your tripod doesn’t; have a leveling tool attached, you may buy one. They are useful to ensure your tripod is on level, i.e., standing straight against gravity.

There are mainly 2 types of leveling tools

  • Bubble levels
  • Electronic levels.

Bubble levels are the most common ones used.

Best Leveling Tools for Panoramic Photography

Step 2 – Use The Right Shooting Techniques For The Best Panoramic Photography

Once you have all your equipment ready, it’s time to capture panoramas.

1. Choosing the Right Spot

The first step in capturing a great panorama is finding the right spot.

You may want to take a panoramic image of your office interior. Or you may want to take an exclusive panorama just outside your resort to capture your resort and the environment around it.

The spot to place your camera and other equipment will vary. The spot you choose will determine the quality of your image, and using an AI image enhancer can further improve sharpness and clarity in every detail of the captured scene.

  • Interior photoshoot
    In the case of interior photography, the best location is always the center. However, you have to work on maintaining a constant light balance throughout. For example, if there are windows on one side, find a way to block the sunlight from coming through. You do not want half of your image to be bright and half of your image to be dark.
  • Exterior photography
    When taking external panoramas, you should find a wide-open view where the elements around are not too close, and you get a soothing view of what you want to capture. You may stand in the spot and crouch a bit to judge if the angle is right before placing your equipment there.

2. Set Up The Tripod And The Panohead

Once you have decided on the spot, place the tripod in the middle and adjust the bubble level to the center. Also, adjust the height of the tripod to the height you found suitable when observing the view prior.

Next, set the pano head and adjust the pano head to rotate to an angle of 60 degrees after every shot. This will help to capture 6 photos horizontally.

Best Practice: Avoid using the center column of the tripod as it may cause instability. Instead, use the tripod’s legs to adjust the camera’s height.

Once these are set up, attach the camera to the pano head.

3. Configure Camera Settings

As mentioned above, if you capture the image during the day, set the following configurations:

  • Camera Mode: Manual
  • Shutter speed – 1/10th or 1/20th
  • Aperture: F11
  • ISO: 640
  • Manual white balance: 4000 Kelvin

If the weather is not too bright or too cloudy, these settings will help to get the best possible panoramic quality.

Before you start the shooting session, rotate the camera manually and check if you are satisfied with the lighting and angles. Make changes to the settings if required as per your observation.

Always use manual mode when capturing professional photos. It will give you more control over the image quality.

And finally, attach the remote shutter release to the camera.

4. Capturing Your Panoramic Photo

Once the setup is ready, go ahead and initiate the photoshoot.

Most automated pano heads come with a remote. So you may set it up and initiate the capture from afar.

You could either stand behind the photo view or go sit in your car to avoid getting caught up in the image.

First, initiate the shutter release once and then initiate the pano head rotation using their remotes respectively.

Every time the pano head rotates, clip the shutter release ones.

Once you have covered a 360 angle horizontally, stop the rotation. Since it’s a fish-eye lens, it already covers 180 degrees vertically. However, it will still keep the top and bottom ends missing around the center.

So, you need to manually move the camera view up to 90 degrees and down 90 degrees to capture 2 photos.

Now, you have a total of 8 images from all angles on the shooting spot.

Your photo session is complete for this spot. You may then follow the steps you followed in this section to capture images for more spots that you have in mind.

Once you are ready with your images, it’s time to stitch them into 360 panoramas.

Step 3 – Stitching Images Into Panorama Photos

Stitching images for panoramas is not a manual process. You simply need to use good stitching software, and it will be done in just a few clicks.

1. Good Photo Stitching Software To Choose From

There are several software options available for stitching your panoramic shots.

Some of the most popular ones include:

Each of these software has unique features, but they all follow a similar stitching process.

2. Step-by-Step Stitching Process

The stitching process involves aligning and merging multiple overlapping shots to create a single panoramic image.

Here’s a standard process to stitch your panoramas:

Step 1: Import your images into the stitching software.

Step 2: Identify the order of the images and which ones are the upper and downward views.

Step 3: The software will automatically align the images using control points or features in the images.

Step 3: The images will then be merged into a seamless panoramic image.

Step 4: Adjust the cropping and straighten the image if necessary.

Step 5: Generate the final stitched panorama.

Now, your panorama is ready. But there’s more work.

3. Optimizing The Stitched Panorama

You will notice that the stitched image will have a few issues, such as low brightness, dull color balance, or some blurry areas. You may edit the image to improve these issues.

Tip 1: Adjust the exposure and color to ensure the final image looks natural and has balanced colors.

Tip 2: Improve blurred areas with custom sharpening.

Tip 3: Adjust the image tilt if necessary.

Caution: Avoid over-editing the image as it can result in an unnatural and over-processed final image.

Once ready, export the image, and that’s it. You now have a complete 360 panoramic image that you captured and generated.

Tips for Advanced Panoramic Photography

1. Use A Polarizing Filter

A polarizing filter will help you capture more vibrant and natural-looking images.

It reduces glare and reflections on water and other reflective surfaces. Plus, it can improve color saturation and contrast.

Practical Use: Screw it onto the front of your lens and adjust it until you achieve the desired effect.

Best Practice: Use a circular polarizing filter, as it is more effective than linear polarizers with autofocus cameras.

Also, try to position yourself at an angle to the sun when using the filter to get the best results.

2. Be Mindful Of Exposure Changes

While you’re capturing panoramic photos, the exposure can change from one shot to the next, especially if you are shooting during the golden hour or other times of changing lights.

After the 6 photos are captured, if you notice unsatisfactory exposure at a certain angle, capture from that angle again after adjusting the white balance and ISO to get a better shot.

Best Practice: Shoot during times of consistent light, such as midday or overcast days.

Use exposure bracketing, which takes multiple shots at different exposures, to ensure you capture the perfect exposure.

3. Avoid Moving Objects

Any moving object will ruin a panoramic photo by creating a ghosting or blurring effect.

So, before you start capturing, make sure there are no moving objects, at least around the scenery that you want, with the utmost quality in your panorama.

If there are trees around, avoid holding the photo session during windy weather.

Best Practice: In the case of external photography, shoot during times of low activity, such as early morning or late evening.

Tip: Use a fast shutter speed to freeze motion.

4. Experiment with Different Perspectives

Don’t be afraid to experiment with different perspectives when shooting panoramas.

Try shooting from high vantage points or low angles to add interest to your images.

Tips: Use a drone, if possible, to shoot from a high vantage point.

Alternatively, try shooting from a low angle by placing your camera on the ground or using a tripod with adjustable legs.

Best practice: Use leading lines, such as a road or path, to create depth and interest in your images.

Turning Your Panoramic Images Into A 360 Virtual Tour

Once you have your panoramic images, you may use them by creating a virtual tour for your business.

And it’s actually quite easy. In WordPress, you will find a plugin called WPVR, which lets you create stunning virtual tours in just a few clicks.

All you have to do is upload your 360 images, and the plugin will turn it into a realistic, interactive virtual tour. And then, you will be able to customize it and make it more engaging using tooltips, images, and videos, and even connect multiple views through a click-to-move button.

On top of these, you may use a lead form to collect leads, include your company information, add an explainer video, include a floor map, and even set it to be viewed using a VR Box.

This means your hard work in capturing panoramic images will pay off, as you will then have amazing virtual tours to stay ahead of your competition online.

Schlussbemerkungen

If you have the right tools, you can capture 360 panoramic images without many complications.

The quality of the outcome may be a bit shaky at the beginning, but as you gain experience, it will all become super easy.

And once you are good at panoramic photography, you may go ahead and create your own virtual tours. or offer panoramic photography services to other businesses that may want to use virtual tours.

So go ahead and get your camera equipment ready. start capturing high-quality panoramas now.

P.S. If you own a drone, then you can avoid these steps and do aerial photography instead to capture high-quality 360 panoramic images. Here’s a complete guide.

Kategorien
Guide Virtual Reality

Best 5 Panoramic Camera App for Android to Capture 360-Degree Images [2024]

Since you’re interested in Panorama images, you know how the popularity of panoramic photography increased among smartphone users in recent years.

However, you also know that traditional Android smartphone cameras have limitations in capturing high-quality panoramic images.

But don’t worry! There are some perfect panoramic camera app for Android in the market that offer a range of features to capture immersive 360-degree photos.

This article will discuss the top 5 panoramic camera apps available for your Android smartphone.

Once you go through this, you can choose the most suitable panoramic camera app for Android for you.

Let’s dive in.

Not an android user? Do you use iPhone? Here’s are some of the best panoramic camera apps for iPhones

Features to Look for in a Panoramic Camera App for Android

First, let’s have a look at the features or options a good panoramic camera app for Android should have.

You need to consider these features that contribute to the quality of 360-degree images.

Here are some of the features to look for:

i. Image Resolution:

Higher-resolution images provide more details and clarity, resulting in better-quality panoramic photos.

ii. Stitching Accuracy:

A good panoramic camera app should be able to stitch together multiple images accurately, without any visible seams or distortions.

iii. Ease of Use:

A user-friendly interface and straightforward navigation can make it easier to capture panoramic images on your Android device.

Top 5 Panoramic Camera Apps for Android

You’ll find many panoramic camera app for Android on the Google Play Store.

Here are the top 5 apps, along with their unique features and capabilities:

1. Panorama 360:

Panorama 360 is a popular panoramic camera app that will allow you to capture 360-degree images with your Android devices.

Panoramic Camera App for Android - Panorama 360

It allows you to capture 360-degree photos in high resolution and even supports VR viewing.

The app features a user-friendly interface, high-resolution image capture, and an auto-stitching feature for seamless panoramic images.

It also offers social sharing options, allowing users to share their panoramic photos directly from the app or send them via email.

The app comes with a variety of editing tools and filters to enhance your photos.

You can easily share your panoramic photos on social media platforms.

Features of Panorama 360 Android App:

  • 360-degree photos.
  • High-resolution photos.
  • VR viewing support.
  • Editing tools and filters.
  • Social media sharing.

Pros & Cons of Panorama 360 Android App:

Pros:

  • Easy to use.
  • Good image quality.
  • Variety of editing tools.

Cons:

  • Limited free version.
  • Some features require in-app purchases.

Average User Rating: 3.7 out of 5

App Reviews: 108k

App Downloads: 10M+

App Link: Panorama 360.

2. Cardboard Camera

Cardboard Camera is a panoramic camera app developed by Google.

Panoramic Camera App for Android - Cardboard Camera

It allows you to capture 360-degree photos and view them in VR with a Google Cardboard device.

The app features high-quality image capture, an auto-stitching feature for seamless panoramic images, and a virtual reality mode for viewing photos in 3D.

It also allows you to add sound to your photos for a more immersive experience.

With Cardboard Camera, you can easily share your panoramic photos with friends and family.

Features of Cardboard Camera:

  • 360-degree photos.
  • VR viewing with Google Cardboard.
  • Sound capture.
  • Sharing options.

Pros & Cons of Cardboard Camera:

Pros:

  • Good image quality.
  • User-friendly interface.
  • VR viewing support.

Cons:

  • Limited editing options.
  • Requires Google Cardboard for VR viewing.

Average User Rating: 4.4 out of 5

App Reviews: 162k

App Downloads: 10M+

App Link: Cardboard Camera.

3. Insta360

Panoramic Camera App for Android - Insta360

The Insta 360 camera is a cutting-edge panoramic camera designed to capture immersive 360-degree photos and videos. With its advanced features and intuitive interface, it allows you to create stunning panoramic content with ease.

Whether for personal use or professional projects, the Insta360 camera offers unparalleled versatility and quality, making it a must-have app for capturing life’s moments from every angle.

Features of Insta360 Panorama Camera:

  • Easy 360-degree photo capture.
  • Real-time preview and editing capabilities.
  • Advanced stitching algorithms for high-quality panoramic images.
  • Integration with social media platforms for easy sharing.
  • Additional features such as filters, effects, and virtual reality (VR) support.

Pros & Cons of Insta360 Panorama Camera:

Pros:

  1. Easy 360-degree photo capture for immersive experiences.
  2. Real-time preview and editing features enhance user experience.
  3. Integration with social media platforms simplifies sharing.

Cons:

  • Require significant storage space for high-resolution images.
  • Some advanced features may be locked behind in-app purchases.
  • Compatibility with certain Android devices may vary.

Average User Rating: 4.2 out of 5

App Reviews: 20.8k

App Downloads: 1M+

App Link: Insta360

4. Wide Camera – Panorama 360 HD

The Wide Camera – Panorama 360 HD is a powerful panoramic camera app for your Android device.

Panoramic Camera App for Android -Wide Camera Panorama 360 HD

It allows users to take 360-degree photos and offers a variety of features for editing and sharing them.

The app uses advanced algorithms to stitch together multiple images into a seamless panoramic view, resulting in high-quality images that capture the entire scene.

Features of Wide Camera – Panorama 360 HD:

  • High-resolution panoramic images.
  • Real-time capture and preview.
  • Automatic image stitching.
  • Advanced photo editing tools.
  • VR viewing support.
  • Social media sharing.
  • Live wallpaper creation.

Pros & Cons of Wide Camera – Panorama 360 HD:

Pros:

  • High-quality panoramic images.
  • Real-time capture and preview.
  • Wide range of editing tools.
  • Supports VR viewing.
  • Live wallpaper creation.
  • No ads.

Cons:

  • Some features require in-app purchases.
  • Limited free version.
  • Large file sizes may take up significant device storage.

Average User Rating: 3.5 out of 5

App Reviews: 1.17k

App Downloads: 500k+

App Link: Wide Camera – Panorama 360 HD.

5. Photaf Panorama by Bengigi

Photaf Panorama is a pretty good 360 camera app for Android that comes with a gyro sensor to guide you when taking 360 panoramas.

Panoramic Camera App for Android- Photaf Panorama by Bengigi

This panoramic photography app is well suited to capture 360 photos on the go as its sensor will indicate which angle to take pictures from next. If you are able to stay stable while capturing the images, then the app will automatically stitch the captured images into a 360-degree panorama.

You can even transfer your photos to your phone or desktop and use them to create virtual tours.

Features of Photaf Panorama:

  • Guided 360 image capture
  • Gyro sensor for compass & direction
  • Automatic Image Stitching
  • 360 Panorama creation
  • HD Panoramas (in Pro)

Pros & Cons of Google Street View:

Pros:

  • Guided photography to avoid flaws
  • Fast panorama generation
  • Access to their own featured photo library
  • 360 image capture for free

Cons:

  • Limited editing options.
  • Complicated UI
  • Sometimes errors in stitching

Average User Rating: 3.6 out of 5

App Reviews: 68.8k

App Downloads: 5M+

App Link: Photaf Panorama

How to Take Better Panoramic Photos

Capturing high-quality panoramic photos can be a challenging task, even with the best panoramic camera app.

Here are some tips to help you take better panoramic photos:

Choose A Good Location:

Look for a location with a scenic view or an interesting subject.

The more interesting the location, the better the panoramic photo will be.

Keep Your Camera Steady:

Avoid moving your camera while capturing the images for the panoramic photo.

This can result in blurred images or visible seams in the final photo.

Overlap Your Shots:

Make sure to overlap your shots by around 30% to ensure accurate stitching of the images.

Use Tripod & Gimbal:

Using a tripod can help keep your camera steady and make it easier to capture accurate shots for your panoramic photo.

Using Gimbal will keep your 360 images and videos super steady if you’re taking the shot by hand.

Use the right settings:

Adjust the settings on your panoramic camera app to ensure you capture high-quality images.

This includes adjusting the exposure, focus, and white balance settings.

Wrapping Up:

These were the top five panoramic camera apps for your Android device.

Each of these apps comes with its own unique features, pros, and cons.

Whether you’re looking for high-resolution photos, VR viewing support, or 3D effects, there’s an app on this list that will suit your needs.

Download these apps, experiment with their features, and capture stunning panoramic photos on your Android device. You can go through our next guide If you don’t know how to take a panoramic photo with drones.

** FAQs **

How do I know if my Android phone supports panoramic photography?

  • Most modern Android smartphones come with built-in panoramic photography features. Check your camera app for panorama mode. If unavailable, download panoramic camera apps from the Google Play Store.

Can I use panoramic camera apps on older Android devices?

  • Yes, you can use them on older devices if they meet minimum requirements. However, older models may face slower processing speeds or feature limitations compared to newer ones.

Are there specific techniques for capturing better panoramic photos?

  • Yes, techniques like selecting stable locations, keeping the camera steady, overlapping shots, and using tripods or gimbals can enhance stability and quality in panoramic photography.

Do panoramic camera apps require a lot of storage space on my Android device?

  • Panoramic camera apps may consume storage space, especially with high-resolution images or video recordings. Regularly delete old files or consider cloud storage options for managing space.

Can I use panoramic photos taken with these apps for professional purposes?

  • Yes, you can utilize panoramic photos professionally in real estate, travel websites, or virtual tours. It ensures high-quality representation and accuracy in depicting subjects or locations

Not satisfied with the quality of 360 images via Androids or iPhones? Then why not explore some of the best digital 360 cameras? It may turn out to be less hard work and better results. Here’s a list of the best 360 cameras out there.

Kategorien
Guide Product Feed Manager For WooCommerce

Integrate Pinterest For WooCommerce & Maximize Your Reach [2024]

Running a WooCommerce store can be extremely beneficial to your online business. However, to scale up, you need to put in extra effort to promote your products.

One of the best ways to increase WooCommerce sales is to list your products on large online marketplaces that have the potential to reach more potential buyers.

One of the platforms that can drive tons of sales without much effort is Pinterest.

With 518 million active users, Pinterest is currently the number one visual search engine that most WooCommerce rely on.

However, to promote on Pinterest, you first need to upload your products to the Pinterest merchant center in the right format. Moreover, you need to work on improving your title and description to maximize conversion.

In this article, you’ll get a complete guide on how you can prepare a WooCommerce Pinterest feed in the most optimized way, without wasting hours on formatting.

After reading the article, you will be able to

  • Create a proper Pinterest product feed with your WooCommerce products real quick.
  • Optimize the product data for higher conversion on Pinterest
  • Promote on Pinterest and start getting more sales.

Let’s dive in.

How Promoting WooCommerce Products On Pinterest Works?

Your Pinterest for WooCommerce strategy is entirely dependent on Pinterest product pins. By uploading your feed, you publish your products as product pins on Pinterest.

Product Pins contain information that customers want to know about, such as product name, description, price, availability, etc., and direct them to your website on click.

These pins show up organically when people search for relevant keywords on Pinterest or are displayed on other Ad platforms for Pinterest.

Pinterest For WooCommerce

Once a prospect finds your pin,

  1. Users can click on your pins and see website links, titles, buttons, etc. They get ideas about your product through these pins.
  2. When they click on the image, they get more detailed information about your product.
  3. If they are convinced enough, they can directly go to your WooCommerce product feed from the link you provided.

This ensures that the prospects you get have more potential as they already have a visualized idea of your product.

For a store with 5-10 products, it’s quite easy to add your products as pins manually, but, if you have a WooCommerce store with more than 100 products, it can get quite hectic and time-consuming.

Rather, it’s more feasible to prepare a Pinterest catalog feed with all your products and upload them in bulk. And that is easily possible if you have all your products hosted on a WooCommerce website.

**Before you start uploading your products, make sure you have set up your Pinterest business account properly.

Let’s look at how you can generate a Pinterest shopping feed to upload your WooCommerce store to Pinterest.

How To Set Up Pinterest Product Feed In The Right Way

Pinterest For WooCommerce

In order to upload your products, Pinterest merchant comes with specific guidelines. Your product feed must have certain attributes.

Pinterest Feed Required Attributes

Following are seven product attributes that you must include for all of your products

Here’s a sample CSV template of a Pinterest product feed.

1. Product ID (id)

This is the unique identifier of a product. You may use your product ID or SKU as the value for this attribute.

2. Product Name (title)

This is the name of your product. When submitting the title in your Pinterest feed, you need to focus on highlighting the core features of a product.

In fact, doing the same in your WooCommerce store itself will get more results and SEO rankings than simply naming the product as what it is.

For example, if you are selling a t-shirt from Versace, rather than naming it “Round-neck t-shirt,” name it “Black round-neck t-shirt by Versace.”

This is highlighting not only the product itself but also the color and the brand of the t-shirt.

Besides the image, this is a great way to grab the attention of the right buyers.

3. Product Description (description)

This will be a quick description of what features the product has and it’s the benefit of buying your product.

It’s best to write an SEO-optimized description so that it may rank for more potential search terms.

4. Product URL (link)

This will simply be the link to your product page where a buyer will be able to place an order for your product.

**You may add UTM parameters to your product links to get a useful performance report on your Google Analytics dashboard.

5. Product Image (image_link)

You should submit links to a few good images of your products. Make sure they are of high quality.

6. Product Price (price)

This will be the price of your product.

Try to observe other stores and offer a competitive price. People often decide to purchase a product based on the price.

7. Stock Availability (availability)

It refers to the stock status of your product. Usually, you may submit the value “in stock.”

Often you may have certain products that are no longer in stock, but you want your buyers to know you had them in the past. These are the products that you may upload to your Pinterest feed with an availability value of “out of stock” or “back order.”

Example of a Pinterest product feed:

pinterest product feed - Pinterest For WooCommerce
Beschriftung (optional)

Apart from these attributes, there are some other optional Pinterest feed attributes.

These attributes help Pinterest better match your products with shoppers. The more attributes you add, the more Pinterest understands your product and who it is intended for.

So, make sure you add the optional attributes to your feed to enhance relevancy.

How To Generate An Accurate Product Feed For Pinterest From Your WooCommerce Store

To create a successful Pinterest product feed for WooCommerce, you can use a reliable plugin that can help you generate the feed in just a few clicks.

Product Feed Manager for WooCommerce is a WooCommerce-specialized plugin that helps you to create perfect product feeds with only 3 clicks.

The plugin comes with more than 170+ pre-defined marketplace feed templates so you can promote products not only on Pinterest, but also on other popular marketplaces such as Google Shopping, eBay MIP, Idealo, or even on local marketplaces with custom feed data.

Let us look at how quickly you can generate a Pinterest shopping feed using this plugin.

First, install and activate the plugin, Product Feed Manager for WooCommerce.

Now, follow the steps below.

  1. On your product feed dashboard, you’ll find a button that says ‘Add New Feed.’
add a new product feed - Pinterest For WooCommerce
Beschriftung (optional)

When you click the button, it will take you to the feed creation page.

  1. On this page,
  • Give a title to your feed.
  • Select your preferred merchant.
  • Select your feed type.
generating product feed of pinterest for woocommerce
Beschriftung (optional)

Once you do that, you’ll see the list of required attributes will appear automatically.

  1. Now, if you want you can add any new or custom attribute. You can also configure the feed with different filters and settings options.
  2. Once you’re done with configuring the feed, you can click on the ‘Publish’ button.
publishing feed - Pinterest For WooCommerce
Beschriftung (optional)

And that’s it. Your feed will be generated.

You can download and upload the file to your merchant account for listing your products on Pinterest for your WooCommerce store.

To easily do the process, I’m recommending you to go through this guideline ‘Before you get started with Catalogs’

Tips To Optimize Your Pinterest Product Feed For A Better Result

Now, let me share some valuable tips to optimize your Pinterest product feed for even better results.

1. Auto Update Your Feed In Certain Intervals

Pinterest investigates your feed every 24-48 hours and notifies you of any changes.

If it finds any mistakes while reviewing your feed, then your feed will be rejected.

Hence you should ensure that your product information is accurate and up to date.

The good news is Product Feed Manager for WooCommerce has an Auto Feed Generate feature that allows you to schedule your feed update in certain intervals.

This means that Pinterest will get the most up-to-date feed and save you from rejection.

2. Optimize Your Product Title For More Engagement

Product titles should be engaging enough to convince the pinners to be interested.

Hence, you should make the titles as descriptive as possible.

Include distinguishing features such as brand names, size, size type, color, gender, and age group in your title. This information is particularly useful if these attributes are not visible in the image.

Now, going to your WooCommerce products and manually updating the titles isn’t something you want. This would mean you would have to spend hours editing product titles, assuming you have 100+ products in your store.

This is why Product Feed Manager for WooCommerce allows you to combine multiple attributes to produce a detailed and engaging title.

3. Ensure Proper Categorization To Appear In Relevant Searches

A proper product categorization makes it easier to find your product and provides a good structure for your Pinterest shopping campaigns.

You can add the Google product category attribute to map your WooCommerce products according to the categories of Google product taxonomy.

You can easily achieve this using the Category Mapping Feature of the plugin Product Feed Manager for WooCommerce.

4. High-Quality Images and Rich Pins:

Using top-notch images and Rich Pins is key to supercharging your Pinterest shopping feed. Think about it like this: when you’re scrolling through Pinterest, what catches your eye? It’s those stunning visuals, right?

That’s what you want for your products too, high-quality images make your pins stand out and grab attention. And with Rich Pins, you’re giving users all the info they need right there on the pin – no extra clicks required.

It’s like having a mini storefront right on Pinterest. Plus, when people see your pins, they’re more likely to click through and check out your website. So, don’t skip on the visuals – they’re your secret weapon for Pinterest success.

5. Consistent Pinning Schedule:

Maintain a consistent pinning schedule to keep your audience engaged and your products visible. By regularly sharing new pins and content, you stay active in users’ feeds and increase the probability of your products being discovered.

Moreover, you can aim for a balance between promoting your products and sharing relevant content from others in your niche to keep your feed fresh and appealing.

Consistency is key to building a loyal following and maximizing your reach on Pinterest for WooCommerce. Additionally, using a scheduling tool can help you plan and maintain your pinning routine effortlessly.

Conclusion

As you’ve seen, it’s incredibly easy to generate a Pinterest product feed with your WooCommerce products. This process can significantly boost your visibility and engagement on Pinterest.

However, there are different WooCommerce plugins for Pinterest feeds available, but that can be overwhelming, as many of them are complex and not user-friendly. To simplify this process and enhance your productivity, try the Product Feed Manager.

This tool simplifies the creation of your Pinterest product feed and saves you time and money. By utilizing it, you can focus on other aspects of your business while effectively generating more revenue through Pinterest.

This easy integration ensures that your products reach a broader audience with minimal effort on your part. So try it now.

** FAQs **

How often should I update my Pinterest product feed?

  • It’s best to update your Pinterest product feed at least once every 24-48 hours to ensure that your product information is always accurate and up-to-date. This prevents feed rejections and keeps your listings current.

Can I schedule automatic updates for my Pinterest product feed?

  • Yes, using Product Feed Manager for WooCommerce, you can set up automatic updates for your feed at specific intervals. This ensures your products are always up-to-date without manual intervention.

How can I make my product titles more engaging on Pinterest?

  • To make your titles more engaging, include key details such as brand names, size, color, and other unique features. Use the Product Feed Manager to combine multiple attributes into a detailed and appealing title effortlessly.

What should I include in my product descriptions for Pinterest?

  • Your product descriptions should highlight the key features and benefits of your products. You should also ensure that they are SEO-optimized to rank better in search results and attract more potential buyers.

How do I ensure my products are properly categorized on Pinterest?

  • Proper categorization helps your products appear in relevant searches. You can use the Category Mapping feature in Product Feed Manager to map your WooCommerce products to appropriate Google product categories. It helps to improve visibility and search accuracy.
Kategorien
Guide WooCommerce

Leitfaden für den Verkauf von Schmuck online - 5 Tipps zur Steigerung der Schmuckverkäufe in WooCommerce

Die Online-Schmuckbranche floriert, und es gibt viele neue und etablierte Unternehmen auf dem Markt.

Laut Statista wird der Online-Schmuckmarkt bis 2027 voraussichtlich 58,9 Milliarden Dollar erreichen.

Und damit ist der Markt heute sehr wettbewerbsintensiv. Wenn Sie in der Schmuckbranche tätig sind, dann ist es nicht mehr so einfach, eine Website zu betreiben oder auf einer Facebook-Seite zu werben.

Man muss anfangen, zuverlässigere Taktiken anzuwenden, um der Konkurrenz voraus zu sein.

Heute werden Sie über ein paar bewährte Taktik, die Sie heute umarmen können und starten Sie den Verkauf von Schmuck online effektiver in Ihrem WooCommerce-Shop zu lernen.

Dies sind alles einzigartige Taktiken, die sich auf lange Sicht als Wendepunkt für Ihr Unternehmen erweisen können.

Am Ende dieses Artikels werden Sie in der Lage sein, -

  • Ermutigen Sie mehr Online-Schmuckkäufer zum Kauf in Ihrem WooCommerce-Shop,
  • Schmuckprodukte effektiv vermarkten, um den Umsatz zu steigern, und
  • Setzen Sie einzigartige Taktiken ein, um das Wachstum Ihres Online-Schmuckgeschäfts zu fördern.

Und mit der Zeit werden Sie mehr Geld mit Online-Bestellungen verdienen.

Fangen wir also an.

5 Einzigartige Wege, Schmuck online zu verkaufen

Nachfolgend finden Sie sieben einzigartige Taktiken, mit denen Sie Ihr Online-Schmuckmarketing verbessern können.

1. Bewerben Sie Neuankömmlinge mit einem lukrativen Angebot

In der Regel kaufen die Menschen Schmuck eher aus Emotionen heraus als aus der Notwendigkeit heraus. Und oft können neue Kollektionen sie mehr begeistern. Daher ist es wichtig, die Bestände von Zeit zu Zeit mit neuen Designs und trendigen Schmuckstücken aufzufüllen.

Wenn Sie jedoch neue Artikel einführen, ist es notwendig, diese aktiv zu bewerben, da die Wahrscheinlichkeit groß ist, dass die Leute sie noch gar nicht kennen.

Und eine Möglichkeit, die Begeisterung für neue Artikel zu wecken, besteht darin, attraktive Angebote zu machen.

Im Folgenden finden Sie einige Möglichkeiten, wie Sie für Ihre Neuzugänge werben können:

  • Bieten Sie einen kleinen Rabatt für die erste Woche nach der Ankunft an
    Rabatte sind immer aufregend, und ein Rabatt von nur 5-10 % ist mehr als genug, um die Aufmerksamkeit potenzieller Käufer zu erregen.

    Führen Sie also eine Rabattkampagne für Ihre neue Schmuckkollektion durch und bewerben Sie sie über Banner auf der Startseite, Benachrichtigungsleisten und per E-Mail. Und machen Sie auf jeden Fall über Facebook und Instagram Werbung dafür.
  • Führen Sie ein Gewinnspiel durch
    Wenn Sie eine große Anzahl von Stammkäufern in Ihrem Geschäft haben, kann es eine gute Idee sein, ein Gewinnspiel durchzuführen.

    Sie können zum Beispiel einen Zielbetrag festlegen, der ausgegeben werden muss, um am Gewinnspiel teilzunehmen. Nehmen wir an, jeder Käufer, der $1000 ausgibt, nimmt einmal am Wettbewerb teil. Nach Ablauf des Wettbewerbs wird eine Lotterie durchgeführt, um einen zufälligen Gewinner zu ermitteln. Und Sie können attraktive Schmuckstücke als Gewinn verschenken.
  • Upsells & Order Bumps zusammen mit alten Artikeln einrichten
    Wenn Sie neuen Schmuck anbieten, ist es üblich, den Preis für die älteren Artikel zu senken. Und viele Käufer neigen dazu, von Zeit zu Zeit alte Schmuckstücke zu bestellen.

    In diesem Fall können Sie relevante neue Schmuckstücke zusammen mit alten als Upsell anbieten. Wenn zum Beispiel jemand ein Paar Ohrringe aus Ihrer alten Kollektion kaufen möchte, können Sie auf der Bestellseite eine Nasenbrosche aus Ihrer neuen Schmuckkollektion anbieten, vielleicht mit einem Preisnachlass von 10 %. Dadurch werden Ihre neuen Anstecknadeldesigns hervorgehoben, und viele werden das Angebot auch annehmen.

    Sie können auch Upsell-Angebote nach der Kaufabwicklung mit einem besseren Design als das, was jemand aus Ihrer alten Kollektion kauft, einrichten. Wenn jemand zum Beispiel ein Armband kauft, können Sie ihm ein besseres Armband aus Ihrer neuen Kollektion mit einem Rabatt als Upsell anbieten.

Welche Taktik Sie auch immer anwenden, um für Ihre neue Schmuckkollektion zu werben, stellen Sie sicher, dass Sie die Neuigkeiten über E-Mail und soziale Medien an Ihre Stammkunden weitergeben.

2. Verkaufen Sie auf Online-Marktplätzen, um eine größere Reichweite zu erzielen

Wenn Sie bereits ein etablierter Schmuckanbieter sind, dann haben Sie wahrscheinlich viele Anhänger und regelmäßige Käufer. Aber als Start-up könnte der Online-Verkauf von Schmuck ohne zusätzliche Unterstützung ziemlich schwierig sein.

Wie dem auch sei, Sie können immer noch mehr Aufträge bekommen, wenn Sie sich auf Online-Marktplätze verlassen.

As a WooCommerce store owner, one of the best ways to promote any product is by listing them on popular online marketplaces to enhance their online presence. And it’s no different for a jewelry business.

Sie bieten Ihren Schmuck auf einem Online-Marktplatz an, der über ein großes Stammpublikum verfügt. Wenn ein Käufer Ihr Produkt dort findet, wird er bei Interesse auf Ihre Website weitergeleitet, wo er den Kauf abschließen oder sich weitere Ihrer Produkte ansehen kann.

This works well because people already trust these online marketplaces, and you are more likely to get more potential traffic from them than on your own organically, this can help to build an online presence.

Zu den besten Plattformen, auf denen Sie für Schmuck werben und viele potenzielle Käufer finden können, gehören Amazon, eBay, Etsy, Walmart und Google Shopping. Sie sollten Ihre Schmuckkollektionen auf jeden Fall auf diesen Marktplätzen anbieten, wenn Sie eine regelmäßige Resonanz wünschen.

Daneben sollten Sie auch die Marktplätze unter den großen Social-Media-Kanälen berücksichtigen.

  • Facebook und Instagram sind zwei der besten sozialen Kanäle der Welt und haben ihre eigenen Marktplätze, auf denen Sie die Schmuckkollektion Ihrer Website bewerben können.

    **Sie können auf Facebook und Instagram auch über bezahlte Anzeigen mit kurzen Videos werben. Ein gutes Video, das die Qualität und Schönheit des Schmuckstücks hervorhebt, wirkt Wunder bei der Gewinnung der richtigen Käufer.
  • Pinterest ist einer der besten sozialen Marktplätze für den Online-Verkauf von Schmuck. Da sich auf dieser Plattform alles um Bilder dreht, ist es viel einfacher, Ihre Kollektion dort zu präsentieren.

    Gleichzeitig können Käufer, die nach bestimmten Designs suchen, auf Pinterest stöbern. Wenn Sie also einen ansprechenden Produkttitel mit den richtigen Produktdetails und einem hochwertigen Bild haben, können Sie von dort aus mehrere potenzielle Käufer anziehen. Klicken Sie hier, um zu erfahren, wie Sie auf Pinterest werben können.
Pinterest für den Online-Verkauf von Schmuck
Beschriftung (optional)
  • Snap-Feed ist ein weiterer großartiger Marktplatz von Snapchat. Menschen, die Snapchat nutzen, sind begeistert davon, schön auszusehen, und das Einstellen von Schmuck kann dort großartige Ergebnisse erzielen.

Es ist ganz einfach, WooCommerce-Produkte auf Online-Marktplätzen anzubieten

Das manuelle Einstellen von Produkten auf Online-Marktplätzen ist eine schwierige Aufgabe, aber wenn Sie mit WooCommerce Schmuck online verkaufen, ist das nur eine Frage von ein paar Klicks.

Product Feed Manager For WooCommerce ist ein zuverlässiges Plugin, das die Produktauflistung nahtlos macht, indem es Ihnen ermöglicht, Feeds für die gewünschten Marktplätze zu erstellen. Sie müssen nur den Feed-Link auf den Marktplätzen einreichen, und Ihre Produkte werden dort in wenigen Minuten aufgeführt.

3. Exklusive Rabatte zu besonderen Anlässen anbieten

Dies ist die gängigste Verkaufstaktik für jedes Online-Geschäft, und sie lässt sich nicht vermeiden. Die Menschen kaufen Schmuck häufig zu besonderen Anlässen. Deshalb ist es wichtig, den Käufern das Gefühl zu geben, dass Ihre Kollektion erschwinglich ist.

  • Valentinstag
  • Muttertag
  • Frauentag
  • Weihnachten
  • Silvester
  • Schwarzer Freitag
  • Erntedankfest

All dies könnten gute Gelegenheiten sein, um Rabattaktionen durchzuführen. Sie können einfach eine standortweite Rabattaktion anbieten.

Noch besser wäre es jedoch, Rabatte auf Schmuckstücke anzubieten, die zu einem bestimmten Anlass besonders gefragt sind.

Zum Beispiel wäre ein klassischer Ring oder eine individuelle Halskette zum Valentinstag angebracht.

Valentinstag-Taktik für den Online-Verkauf von Schmuck
Beschriftung (optional)

Ein schönes Paar Weihnachtsohrringe wäre ein besonderes Geschenk für Weihnachten.

Ein einzigartiges Armband oder ein Ring zum Muttertag kann jedoch ein perfektes Geschenk für die Mutter sein.

Als Verkäufer müssen Sie die Nachfrage nach Schmuck je nach Anlass kennen und entsprechende Angebote machen.

4. Verlockende Angebote für Schmucksets machen

Sie wissen vielleicht schon, dass die Produktbündelung eine erstklassige Taktik zur Umsatzsteigerung ist. Aber nicht jedes Bündel bringt Umsatz. Sie müssen bei der Planung der Angebote für Schmucksets taktvoll vorgehen.

Die Idee ist, ein Bündel zu erstellen, in dem einige Schmuckstücke gemischt werden, die die Leute gerne zusammen kaufen würden.

Hier sind einige Ideen für die Organisation eines guten Schmucksets -

  • Passendes Set: Sie können ein Set aus 3 oder 4 Schmuckstücken zusammenstellen. Zum Beispiel wäre ein mehrfarbiges Set (Ohrringe + Ring + Armband) eine hervorragende Kombination, um einen flippigen Look zu kreieren.
  • Lässiges Set: Sie können ein Set zusammenstellen, das sich für das tägliche Tragen eignet. Ein schlichter Anhänger mit Ohrsteckern wäre ein perfektes Freizeit-Set.
  • Kategorie mischen: Hier geht es darum, einen unbeliebten Artikel mit einem beliebten Artikel zu mischen, den Sie verkaufen. Sie können zum Beispiel den meistverkauften Ring mit einer nicht verkauften Anstecknadel kombinieren.

Sobald Sie das Set fertig haben, achten Sie darauf, dass Sie es zu einem niedrigeren Preis bewerten, als der Käufer zahlen würde, wenn er/sie jeden Artikel einzeln kaufen würde.

5. Kostenloser Versand für Luxuskollektionen

Der kostenlose Versand spielt für Käufer eine wichtige Rolle bei der Kaufentscheidung. Sie können eine Strategie des kostenlosen Versands einführen, um mehr Verkäufe für Ihre Luxus-Schmuckkollektionen zu erzielen, die normalerweise teurer sind.

Dies ist eher eine psychologische Taktik als eine Marketingmaßnahme. Die Versandgebühr ist in der Regel nicht viel für einen Käufer, der bereit ist, einen hohen Betrag für Schmuck auszugeben, aber dieses Sonderangebot gibt ihnen das Gefühl, etwas Besonderes zu sein und hilft ihnen, einen Kauf bei Ihnen in Betracht zu ziehen.

Es kann aber auch eine Möglichkeit sein, internationale Käufer anzuziehen. Wenn Sie eine Lizenz für den Versand von Schmuck ins Ausland haben, kann das Angebot eines kostenlosen Versands eine große Sache sein.

Abgesehen davon können Sie den kostenlosen Versand auch auf kreative Weise nutzen.

Sie können zum Beispiel einen kostenlosen Versand anbieten, wenn jemand mehr als zwei Artikel auf einmal kauft.

Oder Sie können einen Zielbetrag für den Warenkorb festlegen, der einen kostenlosen Versand ermöglicht.

Sie können sogar einen Rabatt oder einen Gutschein für Erstkäufer in Betracht ziehen.

Bonus-Tipp: Bereiten Sie sich auf die Hochzeitssaison vor

Ein großer Teil des Umsatzes, den große Juweliergeschäfte machen, ist auf Hochzeiten zurückzuführen. Die Leute wollen nicht nur schönen Schmuck für die Braut kaufen, sondern auch ihre Familien und Freunde wollen neue Schmucksets, die sie bei der Zeremonie tragen können.

Das sollten Sie sich zunutze machen und während der Hochzeitssaison attraktive Rabattaktionen durchführen.

Nach Angaben von TheKnot finden 80 % aller Hochzeiten zwischen Sommer und Frühherbst statt. Es scheint, dass Juni, August und Oktober die Zeiten sind, in denen die meisten Hochzeitstage zu erwarten sind.

Während dieser Zeit sollten Sie in Ihrem WooCommerce-Shop eine eigene Kategorie nur für Hochzeitskollektionen einrichten und spezielle Rabattangebote für diese Kollektionen anbieten.

Außerdem sollten Sie bezahlte Anzeigen schalten, um Ihre Angebote hervorzuheben, indem Sie Personen ansprechen, die sich kürzlich Diamantensets oder Eheringe angesehen haben.

Darüber hinaus sollten Sie sicherstellen, dass die Schmuckstücke, die Sie für Hochzeiten anbieten, alle eine detaillierte Galerie haben, um das Stück aus jedem Blickwinkel zu zeigen. Die Idee ist, den Käufer mit den Bildern zu locken und sich nicht zu viele Gedanken über den Preis zu machen. Und wenn Sie dann noch einen Rabatt anbieten, ist das nur noch das Tüpfelchen auf dem i.

Achten Sie auch darauf, bestimmte Artikel wie Eheringe, Diademe, breite Halsketten und Nasenstecker hervorzuheben. Diese Artikel werden mit größerer Wahrscheinlichkeit verkauft, wenn Sie sie mit einem guten Angebot richtig bewerben können.

Ehering-Angebote - Leitfaden für den Online-Verkauf von Schmuck
Ein Ehering kann ziemlich teuer sein. Deshalb nehmen sich die Menschen Zeit, um Verlobungs- oder Eheringe mit Bedacht zu kaufen.
Mit dem richtigen Angebot können Sie Eheringe an das richtige Paar verkaufen.

Neben Eheringen können Sie sich auch auf Verlobungsringe konzentrieren, für die die meisten Männer ein Vermögen ausgeben, um ihrer geliebten Lebenspartnerin einen Heiratsantrag zu machen.

Hier sind einige Angebotsideen, die Sie nutzen können, um mehr Trauringe zu verkaufen:

Idee 1 - Ein preisgünstiges Schmuckset zwischen teuren Schmuckstücken aufbewahren

Normalerweise ist Hochzeitsschmuck recht teuer, und viele möchten vielleicht nicht weiter in Ihrem Online-Shop einkaufen, wenn sie sehen, dass alles ihr Budget übersteigt.

Um dies zu vermeiden, können Sie mindestens ein Schmuckstück behalten, das im Vergleich zum restlichen Schmuck sowohl attraktiv als auch erschwinglich ist.

Menschen mit einem geringeren Budget werden sicherlich dieses günstige Angebot in Betracht ziehen. Und diejenigen mit einem höheren Budget werden sich für besseren Schmuck entscheiden, der teurer ist. Sie haben also die Chance, Menschen aus einem breiteren Budgetbereich anzusprechen.

Idee 2 - Ein Angebot für Braut und Bräutigam machen

Für Paare, die ihr eigenes Hochzeitsprogramm planen, kann ein Hochzeitsschmuckpaket für Braut und Bräutigam eine große Attraktion sein.

Passende Ringe, Armbänder und Manschettenknöpfe und sogar die Einführung passender Armbänder und Uhren können großartige Bündel sein.

Und wenn Sie einen Preisnachlass anbieten, werden viele Paare Ihr Angebot vielleicht annehmen.

Idee 3 - Nehmen Sie Vorbestellungen für begrenzte Stückzahlen einzigartiger Designs an.

Dies ist eine ausgefallene Idee, mit der Sie Paare ansprechen können, denen es wichtig ist, ihren Status und ihre modischen Vorlieben zu zeigen.

Sie können scheinbar ein exquisites Design von Hochzeitsschmuck anbieten, das auf dem Markt nicht erhältlich ist. Sie können einen Vorgeschmack auf diesen exklusiven Schmuck anbieten und Paare dazu bringen, ihn vorzubestellen, noch bevor Sie weitere Stücke herstellen.

Der Haken dabei ist, dass Sie eine bestimmte Anzahl von Exemplaren versprechen müssen, die Sie von diesem Design verkaufen werden. Sie könnten zum Beispiel sagen, dass Sie nur 20 Exemplare dieses Stücks verkaufen werden und Vorbestellungen entgegennehmen.

Da dies nicht für die breite Masse verfügbar sein wird, werden sich viele dafür entscheiden, nur um sich von anderen abzuheben.

**Natürlich muss das Design wirklich einzigartig und schön sein. Deshalb müssen Sie wahrscheinlich einen guten Schmuckdesigner beauftragen.

Dies sind nur 3 Möglichkeiten, um für Hochzeitsschmuck zu werben. Es gibt aber noch unzählige andere kreative Möglichkeiten, um Ihre Angebote während der Hochzeitssaison zu bewerben.

Anmerkung des Autors

Der Online-Verkauf von Schmuck kann manchmal eine ziemliche Herausforderung sein, aber wenn Sie genug Aufwand in die Planung effektiver Marketingmaßnahmen für Schmuck investieren können, können Sie Ihre Online-Reichweite viel schneller vergrößern.

Die oben genannten Maßnahmen sind hochwirksame Marketing-Taktiken, um den Umsatz Ihres Online-Schmuckgeschäfts schnell zu steigern.

Taktiken wie die Werbung auf Online-Marktplätzen sind heute ein Muss. Fangen Sie also damit an, wenn Sie es nicht schon tun.

Und die Durchführung von Rabattaktionen von Zeit zu Zeit ist entscheidend, um regelmäßige Verkäufe zu erzielen.

Machen Sie also weiter und nutzen Sie die in diesem Artikel genannten Taktiken, um Ihre Verkaufsstrategie für Schmuck zu verbessern.

Kategorien
Guide Virtual Reality WP VR

How To Create A Virtual Art Gallery in WordPress [2024]

‘Art’ is always among the most appreciated element in the creative industry. However, the recent pandemic (COVID-19 crisis) has changed how people cherish art galleries.

According to Artsy, the art gallery business went down by 22% since the start of the pandemic due to a decline in visitors.

However, this also means they saw a rise in auctions and painting sales ONLINE.

If you are an artist or own an art gallery, then it’s crucial that you start investing more in the online realm as soon as possible.

Sure, you can run an eCommerce site with all your paintings there, but that is not the best option.

Remember, buying and selling art are more influenced by emotions than the price. The more you can connect with the viewer, the higher the chance of a good bid.

That’s where a virtual art gallery comes in.

A virtual art gallery will help you create a real-life impression for buyers even when they are sitting at home and double your chances of selling more paintings in the process.

And learning how to sell art online will make it really easy for you.

In this article, you will learn:

  • Why you must use a virtual art gallery and how it can grow your revenue?
  • How you can easily create such a tour in WordPress, on your own?
  • The best way to make the virtual tour more engaging.

And eventually, you will be able to trigger more responses from interested buyers.

Fangen wir also an.

What is An Ideal Virtual (VR) Art Gallery Tour?

A virtual art gallery tour is basically a 360 virtual tour where you let viewers take a closer look at your paintings or art without a live visit.

The tour will allow buyers to zoom into the images, get extra details on the arts, and maybe, get an option to bid to purchase. As you can tell, this will intrigue art lovers and give them a real-life experience remotely.

The Biggest Benefits Of Using A Virtual Art Gallery

Why Go Virtual with your Art Gallery

As an artist, there is no better way to blend in with technological advancement than working with VR. If you do some research, you will see that almost all creative sectors are slowly embracing Augmented Reality or Virtual Reality.

Whether you are a painter, photographer, sculptor, or a vivid creative artist, you can easily get into the limelight with your virtual art gallery online.

In fact, it will help you connect more with the prospects and help you get more recognition.

Let us look at some of the main benefits you can enjoy using a virtual tour of your art gallery on your website.

  1. An Emotional Connection Without Fail
    • A virtual tour means the visitor will have full control over the navigation – the prospect will get to move around the gallery on their own and find their favorite piece of art.
    • You can further increase the engagement by adding tool tooltips beside your arts, which viewers can click or hover to get more details on them.
    • Overall, it will be a personalized experience and the visitor will surely remember it in the near future.
  1. A Comfortable Visit At A Suitable Time
    • Since the tour is available online, there is no restriction on the time of visit. So a viewer will get to visit whenever he/she is free and will be able to spend more time choosing the best art.
    • Plus, there will be no distraction – no crowd or annoying noises of any kind. This means every viewer will be able to view the best pieces of arts and observe their quality and appreciate the beauty as long as they want, without others standing around them.
    • Art is often difficult to read without proper concentration and while in the virtual tour, the viewer will be able to focus in complete silence and give full attention to the art. Thus, a greater chance of emotional connection.
  1. Educational And Entertaining At The Same time
    • Modern virtual tours always have ways to make the tour more valuable. You can provide details on the arts using a video, audio, or written text, where you can explain the meaning of the art or the history behind the idea.
    • Buyers always love emotional stories. So if you can provide a good story behind your art, you can attract more buyers that may want to purchase just because of the depth of the story this art holds.
  1. A Proven Business Solution
    • It’s obvious that your art gallery is not just for promotion or recognition, you also have a business goal. It could be a service you provide, paintings you sell, or products you want to auction out. A physical gallery always has its limitations. A virtual tour will enhance the possibilities of reaching more prospects.
    • You can get great international reach with a planned launch online. If you embrace proper product launch strategies, you can expect to get a great number of visitors right from the get-go. Maybe you can host a limited-time auction of antiques or collectibles or simply want to put your paintings up for sale. Or, you could showcase your talents and expect service inquiries for custom art. Simply create a virtual tour with a contact form for the right purpose and get the best bids from prospects all over the world.
  1. No Time Limitations
    • One of the barriers to a live art gallery or art museum is there is a limited time you can keep your doors open. Plus, while people are there, you are always on the run talking to different visitors at different times. So time management is quite hectic. You can overcome these via a virtual art gallery tour.
    • A prospect may not have time to visit when you are open. But, he can surely hop onto your website and take a tour whenever he is free. People who are passionate about art will love to get a visit and this tour will ensure they will not miss out on your fabulous art due to lack of time.
    • Plus, an engaging virtual tour will mean you won’t need to personally guide them on the art. Proper use of audio and custom text will keep the visitors engaged and guided, while you can wait for them to reach out when they are ready to get in touch.

If you own antiques, you can create a virtual art museum tour to show off your antiques, and get greater value for any items you want to put up for auctions.

How To Create A Virtual Art Gallery Tour Easily on Your WordPress Site

When you think of a virtual tour, it may sound like it’s complicated. But guess what, creating a virtual art gallery tour is rather quite easy, especially in WordPress.

You will find a few VR tools in WordPress that makes it super easy to create virtual tours. And among them, the best one out there is WP VR.

WP VR is a virtual tour builder that has every feature you need to create a complete virtual art gallery that is engaging and can help to convert more prospects effectively. The plugin will make it easy for you to create virtual tours which will allow your prospects to get a 360 panoramic view of your art gallery and get a sense of how it looks in actuality.

Step 1 – Take Finest 360 Photos of Your Art Gallery

WPVR requires you to provide 360 images of the location you want to turn into a virtual tour. So it is important for you to take high-quality panoramic images of your art gallery from the center of different areas.

You can take pictures using a DSLR Camera and then use a stitching app to turn them into 360 panoramic images. Or you can take 360 images using an iPhone which can be directly turned into a virtual tour via WVPR.

The quality is super important since these will be viewed by art enthusiasts all over the world.

Step 2 – Install & Activate WP VR

The first important step is to install and activate WP VR into your WordPress Dashboard.

  • Go to Plugins & Search for WP VR.
  • Install & Activate the plugin once you’ve located it. Or download the free version of WP VR from the WordPress repository.
  • Next, Upgrade to the premium version of WP VR

Here’s some further guidance if you face trouble installing the WP VR plugin.

Note: You can build a complete virtual tour with the free version. But with the premium version, you can make the tour more delightful.

Step 3 – Create a Virtual Tour

After installing the plugin, go to the WP VR General Settings.

General Settings - VR Art Gallery
  • Disable WordPress Large Image Handler on WP VR – this will keep the image quality intact for a better tour experience.
  • Enable Mobile Media Resizer – it will resize the tour for mobile and smartphone devices.
  • Disable On Hover Content For Mobile – this will remove the confusion between on-click and on-hover content from smartphones.
  • Front-End Notice for Mobile Visitors – it’s a great option where you can notify smartphone users with a pre-written notice.

Afterward, hover over the WP VR & Click Add New Tour.

Add new Virtual Art Gallery tour

After adding a tour, Add a title to the tour.

Add Title to VR Art Gallery
  • Enable Tour Autoload & Controls option.
  • Also, enable the Auto Rotation for the tour. And keep the auto rotation slow so that the doesn’t load too fast.
Tour Autoload and Auto-rotation

Step 4 – Upload a Scene

The next important task is to upload a scene. Go to the Scenes menu, provide a Scene ID, and click on Upload.

Upload Panorama Image to VR Gallery

Give the necessary information with the scene as well. If your art has a title, a dedicated author, and a portfolio of the author, you can add that information accordingly.

Image Title Art Gallery

After you’ve uploaded the scene and added the necessary information, click on Preview,

Preview Art Gallery Museum Tour

Afterward, you’ll be able to see a Tour Preview on the top right corner of your tour.

If the tour looks okay to you then click publish & your tour will be saved.

Publish Art Gallery Virtual Tour

Step 5: Add Hotspots to Increase User Engagement

Hotspots are specifically created to make a tour more engaging and interesting. In this case, you can pinpoint an art and add basic details of the art.

How to Add a Hotspot:

  • Just below the Scenes menu, go to the hotspot menu.
  • Click on a place on the virtual tour where you want to add a hotspot and some coordinates will appear under the Tour Preview section.
  • Select the coordinates of Pitch & Yaw. Simply click on the down arrow icon and it’ll be set automatically.
  • Provide a unique Hotspot ID.
  • Select the type of hotspot you want to have. For now, we’re creating an Info-type Hotspot.
  • Add an On Hover Content where you can display text, images, gifs, and even video files.
Hotspot on Virtual Art Museum Tour

After you’ve filled in all the necessary fields, you’ll need to update the tour from the bottom right corner of the Tour Preview.

Let’s check the hotspot directly from the website.

Hotspot Content on VR Gallery Tour

There are four types of Hotspots available for the free & premium versions collectively.

Info-Type Hotspots: The Info-type hotspots allow you to display art information, related images, videos, and combinations of all these on a hotspot.

Click here to learn more about Info-type hotspots.

Scene Type Hotspots: You can capture panorama images of your different rooms or halls and connect them using this hotspot.

Your guest can use these to move between all the locations inside your virtual art gallery tour.

Click here to learn more about Scene-type hotspots.

Fluent Form Hotspots: The Fluent Forms Addon is included with the premium version of WPVR. You can set contact forms or submission forms inside your virtual tours using this.

**I’ll tell you more about this later in this guide. So, keep on reading.

WooCommerce Product Hotspots: If you’re using WooCommerce and selling your arts or paintings through it, you can set the products on your hotspots.

Viewers can add them to their cart while roaming inside the virtual art gallery. This one is also available as a premium add-on.

Learn how to sell your arts using a virtual tour.

Step 6 – Advanced Controls & Control Buttons

You’ve created an awesome virtual art gallery tour for your visitors.

Now, what can we do next?

Let me tell you: making your tour better and more captivating using Advanced Controls and Control Buttons.

Advanced Controls

Advanced Controls for Art Gallery Museum Tour

The important set of features that you can enable to make the tour engaging are:

i. Gyroscope Control

A large number of your viewers will choose to view your art gallery virtual tour from mobile devices.

And you can really impress these viewers if you provide an interactive experience.

Enabling the gyroscope support on your VR gallery will make it respond to their movement and hook them with surprise.

ii. Scene Gallery

Your virtual art gallery will surely have multiple panorama images.

To give your viewers an idea of how large your gallery is, turn on the Scene Gallery option.

It’ll make it easier for your viewers to navigate inside the VR gallery as well.

iii. Tour Background Music

Enhance the experience of your viewers by adding background music.

A soothing background audio that matches the arts or paintings in your gallery will only complement the entire experience.

iv. Explainer Video

An explainer video is a helpful option for your viewers that can make their journey easier and provide some additional information as well.

It will guide your viewers on how to experience the tour, what they can expect in it and a heads up on some of the most interesting pieces of art they’ll experience in it.

Furthermore, you can enable or disable all these Control Buttons, based on how much control you want to give to your viewers.

Control Buttons of VR Art Gallery

Bonus Step – Let Your Viewers Easily Contact You

Once you have impressed your visitors with virtual art gallery tours, why leave the chance to connect with them and lead it to something more potential?

With the WPVR Fluent Forms Add-on, you can easily set contact forms inside your virtual art gallery.

You can add them in each scene, so they can choose to contact you any time, especially if one of your artifacts or paintings has got their attention.

This is something that’ll take you one step ahead of your competitors.

Add Contact Form in VR Art Gallery with WP VR
Beschriftung (optional)

Here is what a form will look like inside the tour.

Set Contact Form In VR Art Gallery

Author’s Notes

Last year, the number of sales of art and artifacts was 13.3 Billion U.S dollars. So this is a great sign that you too should start using a virtual art gallery to increase your audience engagements and hopefully, grow your business.

So go ahead and create a virtual art gallery for your website using WPVR.

Take help from the latest technology and get the recognition you deserve.

Kategorien
Guide Product Feed Manager For WooCommerce WooCommerce

How To List WooCommerce Products In Pricerunner DK – Product Feed Guide [2024]

There are many ways you can increase WooCommerce sales. One of the best ways today is to promote your WooCommerce products on large price comparison sites that have a high amount of active users.

If you run a WooCommerce store in Europe and ship your products to Denmark, Sweden, UK, or other nearby EU countries, then you must promote your products on Pricerunner DK.

Pricerunner is currently one of the largest price comparison sites in Europe with over 2 million visits every month. And it is trusted by sellers to increase their online sales by a significant amount.

Right now, it’s easier than ever to list your products on the Pricerunner’s price list. All you need to do is signup as a merchant and upload your products with the right product data.

In this guide, you will learn how you can start promoting on Pricerunner and get step-by-step instructions on generating your WooCommerce product feed to upload products on Pricerunner real quick.

Fangen wir also an.

1. How To Start Promoting On Pricerunner DK

The first thing to do is to sign up for listing your store products on Pricerunner DK.

FYI, you may list your products on Pricerunner for free and pay on a CPC basis.

However, it’s quite different from other marketplaces. You may increase your CPC amount, i.e. set a higher spending budget to increase your visibility for certain products or products in certain categories, similar to how social media dynamic Ads work.

This means you may choose to spend a bit extra to promote your best sellers so that you can get a higher number of sales without much effort.

Though this makes the marketplace a bit competitive, at the end of the day, this won’t matter too much if you sell quality products.

Once you have registered your store to list products on Pricerunner, the second step is to upload your product data in the right format.

So let us look at the required product attributes that you must submit to list your products on Pricerunner.

2. Mandatory Attributes & Product Feed Specification For PriceRunner DK

Following are the product attributes that you may include in the product feed when trying to list your WooCommerce products on the PriceRunner price list.

Some of them are mandatory to be accepted in the marketplace. Others are optional attributes that you may choose to submit for a better chance of appearing on users’ search results.

**The ones marked in Pink color are required attributes and the ones marked Grey are optional attributes.

Product ID/ SKU (ProductId)

Example Format:

<ProductId>12340-004_1300_34_34</ProductId>

You can use the WooCommerce Product ID or the SKU for this attribute.

Product Name (ProductName)

Example Format:

<ProductName>

<![CDATA[ PriceRunner Tapered Jeans (Navy – W34 / L34) ]]>

</ProductName>

Use the product Title in your WooCommerce store. For variable products, it’s recommended to include the variation term to the tile for each variant.

Product Price (Price)

Example Format:

<Price>549.00 GBP</Price>

Use the current price of the product on your site, i.e., if you have a sale running, then submit the sale price, else submit the regular price.

Shipping Cost (ShippingCost )

Example Format:

<ShippingCost>49.00 GBP</ShippingCost>

The product’s shipping cost. Shipping cost needs to combine all shipping/order costs for the consumer, like for example environmental surcharge, freight surcharge, handling surcharge, packaging fee etc.

Stock Status (StockStatus)

Example Format:

<StockStatus>in stock</StockStatus>

If you manage stock in your WooCommerce store, then you may use the number of products available in stock to submit this attribute.

Delivery Time (LeadTime)

Example Format:

<LeadTime>1-3 days</LeadTime>

This is the promised delivery time from the time of the order in the number of days. It’s important that the delivery time in the feed corresponds to the info on your site.

Brand/ Manufacturer (Brand)

Example Format:

<Brand>PR Jeans</Brand>

If the product is manufactured by a renounced Brand, then you have to include the brand name in the product name as well as under this attribute.

Manufacturer SKU/MPN (Msku)

Example Format:

<Msku>PRjeans1231</Msku>

Manufacturer’s unique article number. Used by us to automatically match many product types.

EAN/GTIN (Ean)

Example Format:

<Ean>4051015130000</Ean>

EAN code. Unique barcode number. Used by us to automatically match many product types and make the products searchable in the barcode scanner in our app.

Product URL (Url)

Example Format:

<Url>https://www.example.com/Product.html</Url>

Submit the product link. For variable products, the URL should be unique for each variant.

Image URL (ImageURL)

Example Format:

<ImageUrl>https://www.example.com/images/Product.jpg</ImageUrl>

URL to the product image. The CMYK format is not supported.

Product Category (Category)

Example Format:

<Category>

<![CDATA[ Clothing > Mens > Pants > Jeans ]]>

</Category>

Use > to separate multiple levels in a category. Also, include a space before and after the > symbol.

Product Description (Description)

Example Format:

<Description>

<![CDATA[ Cotton blend Flex twill – Sleek tapered cut – YKK zip-fly – Jeans-style pockets – Authentic tailored details ]]>

</Description>

Detailed information about the product. PriceRunner’s search engine and filters work using the information in this field. Try to include the keywords you want to be found for.

Adult Content (AdultContent) – optional

Example Format:

<AdultContent>No</AdultContent>

Indicate a product includes sexually suggestive content (yes/no)

Age Group (AgeGroup) – optional

Example Format:

<AgeGroup>Adult</AgeGroup>

The demographic for which your product is intended

Bundled (Bundled) – optional

Example Format:

<Bundled>No</Bundled>

Indicates a product is a merchant-defined custom group of different products featuring one main product (yes/no)

Color (Color) – optional

Example Format:

<Color>Blue</Color>

This is the color of the product

Energy Efficiency Class (EnergyEfficiencyClass) – optional

Example Format:

<EnergyEfficiencyClass>A</EnergyEfficiencyClass>

This is your product’s energy label.

Gender (Gender) – optional

Example Format:

<Gender>Male</Gender>

The gender for which your product is intended

Condition (Condition) – optional

Example Format:

<Condition>New</Condition>

The condition of your product at time of sale e.g. “new”, “used”, “refurbished”, “demo”. PriceRunner only lists and compares new products atm, but we are looking into the possibility to expand this in the future. Until then its important these types of products are tagged correct in your product feed.

GroupId (GroupId) – optional

Example Format:

<GroupId>123</GroupId>

ID for a group of products that come in different versions (variants)

Material (Material) – optional

Example Format:

<Material>Demin</Material>

Your product’s fabric or material

Multipack (Multipack) – optional

Example Format:

<Multipack>No</Multipack>

The number of identical products sold within a merchant-defined multipack (yes/no)

Pattern (Pattern) – optional

Example Format:

<Pattern>Plain</Pattern>

Your product’s pattern or graphic print

Size (Size) – optional

Example Format:

<Size>32W 34L</Size>

Your product’s size

Size System (SizeSystem) – optional

Example Format:

<SizeSystem>UK</SizeSystem>

The country of the size system used by your product

Example Feed Data With Required Attribute

<?xml version="1.0" encoding="UTF-8"?>
<products>
	<product>
		<ProductId>1001</ProductId>
		<ProductName>Hoodie with Logo
		</Product_name>
		<price>45.00 GBP</price>
		<ShippingCost>15.00 GBP</ShippingCost>
		<StockStatus>in stock</StockStatus>
		<LeadTime>1-3 days</LeadTime>
		<Brand>Lacoste</Brand>
		<MSku>woo-hoodie-with-logo</MSku>
		<Ean>012345678900</Ean>
		<Product_URL>https://yourwebsite.com/product/hoodie-with-logo/</Product_URL>
		<Image_URL>https://yourwebsite.com/wp-content/uploads/2022/08/hoodie-with-logo-2.jpg</Image_URL>
		<Description>Grab this incredible hoodie to change your style in to comfort.</Description>
	</product>
</products>

How To Generate PriceRunner Product Feed In WooCommerce

In WooCommerce, you will find an easy-to-use plugin, Product Feed Manager for WooCommerce (PFM), with which you can generate an XML feed in just a few clicks.

This is because the plugin has a pre-built template for PriceRunner with the right XML format and product attributes.

Then, follow the step-by-step instructions below to successfully generate a product feed for Pricerunner DK.

Step 1 – Import PriceRunner Template For Feed Generation

1. On your dashboard, click on Product Feed and then click on Add New Feed option.

Product Feed Manager - Add New Feed

Sie gelangen dann zur Seite für die Erstellung des Feeds.

Neuen Feed hinzufügen

Here, on the top you will get an option to give a name to your feed, you can skip it too.

2. Click on the Feed Merchant Dropdown and you will get the list of all the supported merchants.

You can scroll down this merchant dropdown list or you can type PriceRunner in the search box, and you will get the PriceRunner option in the list.

PriceRunner Merchant Option

Select PriceRunner, and all the required attributes of PriceRunner will be loaded below.

PriceRunner Required Attributes

Step 2 – Feed Configuration

Now, you can see three buttons under the Feed Title text box, Troubleshoot, Product Filter, and Settings.

1. If you are having any issues generating feed, click on this Troubleshoot button, it will take you to the Troubleshoot page, it could be helpful for you.

2. If you want to use any filter or condition, you can click on the Product Filter option, and a drawer will slide in from the right side of the window, and there you will get the following filters:

PriceRunner Product Settings Options
  • All Featured Items
  • Custom Filter
  • Category Filter
  • Tag Filter
  • Product Filter (Pro)

You can select any filter option and use them as per your need and click on the Close button when done.

3. Now, to schedule your feed or to choose which type of products will be included in your feed, click on the Settings button, and you will get a list of options to exclude or include products.

PriceRunner Settings Options

Change the options as per your need and click on the Close button when done.

Step 3 – Use The PriceRunner XML Feed Template

1. If you look at the Feed Merchant dropdown button, there you will get another dropdown Feed Type, you can click here to set the type of this feed. You can set different types of feeds depending on what types of feeds this merchant supports or what types of feeds this Product Feed Manager has the support for.

For PriceRunner, keep the Feed Type as XML.

2. Now, in the attributes section, you will see that all the attributes are under the Required Attributes column, and their values are set according to the attributes under the Assigned Values column.

You can change any values to any attributes, simply click on the value dropdown, and select your preferred value.

All the required attributes will appear below. Now, most of the attributes will already be configured but notice that some of these attributes are unassigned.

Step 4 – Assign The Right Values To Unassigned Attributes

1. You will need to assign values for the following:

  • Versandkosten
  • LeadTime
  • Marke
  • Ean

**For these 4 attributes, WooCommerce doesn’t have default fields in the product data section to assign these values to the products. So the best option here is to add custom fields and save these values there. You may then use those values in the feed.

Watch these videos – Video1 & Video2 – to see how you can get custom fields with PFM.

Step 5 – Publish The Feed And Use The Feed To List Them In the Marketplace

1. Once the attributes are all set, scroll up and click on Publish and the feed will be generated.

2. You will be able to view or download the feed.

That’s it. You have created your required product feed. The next thing to do is upload your products to PriceRunner.

Schlussfolgerung

As you saw above, this is how easily you can generate PriceRunner product feed using Product Feed Manager for WooCommerce.

If you want, you can check out the plugin here:
– https://wordpress.org/plugins/best-woocommerce-feed/
– Product Feed Manager for WooCommerce Pro

Initially, test out the free version of the plugin, and once you are sure the plugin does what is required, you can go ahead think about upgrading to Pro.

It’s high time you take advantage of the PriceRunner DK marketplace and start getting more sales on your Danish WooCommerce store.

Kategorien
Guide Virtual Reality

What Is A Virtual Tour? – Learn All About Virtual Tours – Detailed Guide [2024]

Virtual reality has been booming since late 2019. And after the Covid-19 outbreak & lockdowns, more and more people started to embrace advanced technology.

In fact, virtual reality is now one of the prime technologies in demand.

It is estimated that the VR industry will reach about $57.55 billion market value by the year 2027.

The most significant form of VR technology today is virtual reality tours or simply virtual tours.

Today, you will be able to get a thorough in-depth understanding of ‘what is a virtual tour’.

I’ve gathered all the essential information you need to learn.

I started with the basic definitions and went to the advanced uses of the virtual tour.

Today, you will be able to get a thorough understanding of ‘what is a virtual tour’.

I have gathered every essential information you may want to learn, starting with the basic definitions to advanced uses of the virtual tour.

After reading this article, you’ll learn:

  • What a virtual tour is and it’s purpose
  • Knowledge on different type of virtual tours
  • How a virtual tour is beneficial to your business
  • Affordable solution to creating a virtual tour
  • Basic knowledge on creating a virtual tour on your own
  • Example implementation of virtual tours.

In short, you will know exactly why you should start using virtual tours to grow your business.

Fangen wir also an.

Learn All About Virtual Tours

What is A Virtual Tour?

To fully understand what is a virtual tour, you need to know the meaning, definition and need to be clear about confusion that commonly arrise.

Let’s Understand What Virtual Tour Mean First:

A panoramic view or video simulation of an existing or conceptual place that can be viewed online, i.e., exploring a realistic place virtually.

Imagine you live somewhere in the US and you always wanted to visit the Eiffel Tower in Paris.

What you can do is use your smartphone and search for ‘Eiffel Tower virtual tour’ on Google or Duckduckgo. On the search results, you will find the first choice is a virtual tour of the Eiffel Tour. Click on it and you will be looking directly at the Eiffel Tower through your phone screen!

Notice that you can listen to the tourists’ chitchat and move your phone to look around the place. It’s as if you are really there and you are enjoying a tour of the Eiffel Tower.

This is exactly the realistic experience you can get with any virtual tour.

A virtual tour is usually a virtual representation of a real place, which you can explore remotely from your phone or computer.

Just like the Eiffel Tower, you can create virtual tours of any place for various reasons. For example, realtors often use virtual tours of properties to attract buyers.

Let’s look at Virtual Tour Definition Elaborately:

A virtual tour is a type of semi-immersive virtual reality where you view a virtual environment for a semi-realistic experience.

Let us look at it more elaborately.

Virtual reality comes in many forms and the virtual tour is one of them. While defining a virtual tour, you may look at a few features that make a virtual tour different from other forms of VR.

It’s when you view a virtual environment through a device, but you do not necessarily need to move to view the tour. Neither you control a character.

You simply get a view of the environment as if you are looking at it in reality (often referred to as the first-person view), and you can look around using a mouse or a keyboard on a PC, or by swiping your fingers on a smartphone screen.

The first example of a virtual tour dates back to 1994 (as per Wikipedia). An interpretive tour was created for a museum that included a 3D walkthrough of Dudley Castle (1550) virtually reconstructed.

Most virtual tours have Gyroscope support, which somewhat gives you a near-realistic experience since you have to move the phone to look around.

The ones that are supported by VR boxes, those virtual tours feel more realistic as when you experience one, you will feel like you are standing in the center of the place.

However, you will only be moving your face or turning around – movements of your body parts won’t have any impact on the tour.

Nevertheless, it is still the most effective and affordable VR solution.

Let’s Clear The Confusion : Virtual Tour And Virtual Reality

Virtual reality can be referred to as any form of a virtual environment that requires engagement. This could be fully immersive (e.g. virtual medical training), non-immersive (e.g. RPG strategy games), semi-immersive (e.g. virtual tour), etc.

A virtual tour is a type of semi-immersive virtual reality experience.

2. Types Of Virtual Tours

As you now understand what virtual reality is, I will now explain these 5 types of virtual tours below :

5 types of virtual tours

Let us look at these types of virtual tours in depth :

1. Guided Video Tours

When thinking about developing virtual experience, the early so-called virtual tours were actually guided video tours where a sequence of videos was used to give you a tour of a location.

Explainer video adding in virtual tour


Apparently, virtual tours evolved gradually with technology to increase the engagement it has today.

In the past, guided video tours were often referred to as virtual tours.

Though it can be considered as a virtual experience, it is rather a tour where you, as a viewer, have no control. You will only look at what is being shown in the video.

As per modern-day knowledge, a guided video tour is no longer considered a VR experience.

 2. 360 Virtual Tours 

People have long advanced from guided video tours and started using 360 virtual tours.

A 360 virtual tour is basically where you can get a complete virtual 360-degree view of the environment – you can view the place from the center, with more control over navigation.

Virtual 360 Degree Meaning
You will be able to completely turn in a circle in any direction whether top and around or sideways within a virtual environment.

This is the modern-day virtual tour that most businesses use nowadays. In fact, it is the most affordable form of virtual tour solution out there today.

3. Google Street View Tour

Google also came up with an exclusive solution for virtual tours. Since Google already has the Street View feature in the maps, they decided to allow users to extract the virtual view of a certain location and embed it on their website or mobile app.

This Street View tour is a typical virtual tour connected to the Street View world in Google maps. So initially, you will start at the intended location, but then you can navigate yourself to other places just like you do in Google Earth. As this technology gains popularity, often near tourist attractions scanable brochures or banners can be seen for virtual tours on a QR code.

 4. Virtual 360 Video Tours   

Then emerged the new form of virtual reality, 360 video tour. It is a form of a virtual tour where you get to experience a 360 video and navigate in a 360 view while the video is playing.

These types of virtual tours became possible thanks to the high-quality 360 digital cameras that were invented and released in the last two decades.

However, as amazing as it sounds, it still didn’t get as much popularity as an ordinary 360 virtual tour simply because of the high expenses involved, and the lack of engagements compared to a traditional virtual tour.

 5. Visual 3D Dollhouse 

The most advanced form of a virtual tour was developed by a handful of companies, the most notable one being Matterport.

They introduced the Visual 3D Dollhouse form of virtual tours. It’s the only form of a virtual tour that is closest to a real walking tour.

However, it is also the most expensive form of a virtual tour (ranging from 2k to 8k dollars for a single tour).

Initially, you will get a 3D model of the house, and then you may enter the house to get a virtual tour where you can click to move here and there within the house. It doesn’t stay limited to the center of a room; rather you can move positions within a room.

The dollhouse concept was mainly used by Home Development Companies and Architects before a house was built. But many large firms invested in creating a Dollhouse virtual tour for themselves and to get more online traction.

Comparing A 360 Virtual Tour And A Virtual 360 Video Tour

360 Virtual TourVirtual 360 Video Tour
Created by converting a 360 panoramic image into an equirectangular virtual environment.A 360 video can be directly recorded using digital 360 cameras.
More scope of interaction with tooltips, click-to-play videos, multiple scenes, custom hotspot icons, etc.Limited to the video itself with just 360-degree navigation from the center.
Less expensive to create and develop professionally.More expensive when hiring a professional.
Tools to embed a virtual tour on a website offer more interactive customizations to increase engagements.Embedding a 360 video tour on a website has no extra customization scopes, hence no extra engagements.
Gives more control to the visitor and creates more interactions, thus helping to trigger a buyer’s interest when using virtual tours for business purposes such as selling a house, promoting hotel rooms, etc.It is more ideal for fun and social activities such as traveling, vlogging, or parties, but not engaging enough to help in boosting business revenue.,

So in short, use 360 virtual tours when it is a business purposes, and use virtual 360 video tours when it is for fun and entertainment.

3. Who Uses Virtual Tours And Why?

In parallel, the field of enterprise mobile application development is increasingly integrating virtual reality elements to enhance user engagement and provide innovative solutions in various sectors.

Here is the list of industries or businesses that should use virtual tours (if not using already) as a part of their marketing strategies.

Virtual tour users industries

i. Real Estate

This is probably the industry that is using virtual tours more than any other.

When selling a house or property, or simply renting out an apartment, a virtual tour can help buyers get hooked immediately.

The potential client will get to experience a realistic view of your property, which is way more engaging than regular images.

So you will have a better chance to get calls from interested clients.

Sadly, many prominent realtors are still hesitant about using such technology and prefer going the old traditional way.

This will have to change soon if they want to stay in the competition for long.

ii. Hotel & Resort

You will find that a lot of international hotels are now using hotel virtual tours to attract tourists and travelers.

Most people usually like to find out how a hotel looks and get information on the services and charges, before deciding where to reside during vacation or tourism.

And you can show them every little detail about the rooms you’re offering by adding a ton of information inside the virtual tour itself using tooltip hotspots and other customizations.

iii. Museums:

Since the pandemic began, most museums have gone through some really tough times.

But a few museums managed to keep their reputations up by offering free virtual tours of some of their sections while promoting paid virtual tours on other sections.

Virtual tours are also a great way to preserve historic relics online.

iv. Restaurants & Bars

When visiting a bar or restaurant, people tend to notice if the environment is suitable for hanging out or comfortable, else they refrain from coming back.

If you are confident about your restaurant or bar, then you may create a virtual tour and place it on your website. This will help to grab the attention of the people who are researching online to find out a suitable place to hang out or probably dine in.

A well-made virtual tour of your restaurant will always encourage your customers to consider taking a visit and if they enjoy their first visit, they will definitely become returning customers.

You may also provide your menu and contact details on the tour, or even add a contact form for home delivery.

v. Art Gallery or Exhibition Halls

One of the more potential industries that can flourish using virtual tours is Art Galleries or Exhibition Halls.

Most art galleries and exhibitions regularly organize live events to showcase the artworks which are often open to auctions or purchasing.

The good news is, these creative arts can be auctioned and sold online as well. But rather than creating an e-commerce style online market, you can consider using a virtual tour.

In that regard, online visitors will enjoy the tour and will get to view all the available arts in a realistic way.

Plus, you can use tooltip hotspots to provide extra details about the arts such as the meaning or the thought behind the artwork or the artist details, etc. And you may even add a contact form for inquiries related to purchasing and auctions.

If your artworks are not for sale and you are organizing a paid event, then you can use virtual tours for two exclusive purposes:

  • All a free virtual tour of a small section of the exibit and ask your visitors to buy tickets to the actual event.
  • You can run an online virtual event and allow people to take access to the exibit for a small fee.

Whichever way you use virtual tours, it will get you great exposure and good business.

In fact, a virtual tour will mean people from all over the world can take part, and you can get visitors 24/7.

4. Traditional Virtual Tour Creation

Traditional Virtual Tour Creation

Once you know the basics about virtual tours, your next question is probably “How to create a virtual tour?”.

Creating a typical virtual tour can be very affordable or expensive depending on how you create it or what purpose you are creating it for.

Normally, to create a 360 virtual tour, you will need 360 panoramic images and a virtual tour builder.

360 Panoramic Image –

A type of image that is captured through Panoramic photography and can be converted into a 360 virtual tour using an appropriate tool.

You may seek professional help to create virtual tours, which can be quite expensive since 360 photography costs a lot (ranging from 1500 to over 3000 dollars), and agencies tend to charge a high fee when building virtual tours (commonly around $500). But you will get quality output.

However, it is possible to reduce that cost by capturing 360 panoramas on your own and using an online virtual tour builder.

Creating A Virtual Tour On Your Own

If you have time, then it’s best to create your own virtual tour without any professional help and believe me, it’s not as complicated as it sounds.

To create a virtual tour on your own, you will simply need to follow the 3 steps below-

i. Collect the right virtual tour equipment to capture 360 images

When capturing 360 images, you will need a digital 360 camera and a Monopod. We suggest you use the Ricoh Theta V camera.

Initially, a digital 360 camera may seem expensive. However, as you saw earlier, professionals would charge almost twice as much just to create one single tour. But with your own camera, you can capture as many as you want.

Once you have the two pieces of equipment, you can capture the 360 panoramic images easily. Simply follow few smart tips and you will be good to go.

It’s best to capture images of multiple scenes or locations of your house/property that you can include in the virtual tour. For example, if you are creating a virtual tour of a house, you may capture a panoramic image for each room it has.

ii. Use a reliable virtual tour creator

You will find several tools out there that you can use to create virtual tours.

However, you should go for a virtual tour builder that is

  • Easy to use and has actionable tutorials,
  • Customizable for optimized engagements,
  • Cost-effective with quality output.

If you run a WordPress site, then you will find a reliable plugin, called WPVR.

WPVR is currently the best virtual tour builder in WordPress that is both cost-effective and convenient as it has detailed actionable tutorials to start using the plugin immediately.

Plus, you will be amazed with some of the tours that it’s users have made so far. Take a look.

Simply use the virtual tour creator to convert your captured 360 panoramic images into a virtual tour.

iii. Optimize the virtual tour for your target audience

Now, a virtual tour is only as good as its engagement potential.

Even if you use high-quality panoramic images, how well the visitors will respond to it completely depends on how you optimized it for engagement.

Most VT creators will allow you to add extra details such as tooltip hotspots, website links, custom hotspot icons, etc.

But it’s up to you how well you make use of them.

For example, in an art gallery tour, it’s ideal to add a small tooltip for every artwork to give more details about the art and the artist.

For restaurants, you may rather use a hotspot near the counter to add a click-to-view menu.

Plus, as I mentioned earlier, it’s best to have multiple panoramic images so that you can allow visitors to move between each scene within a single virtual tour for a realistic feel.

You may also include a scene gallery to let the visitor know of all the available scenes in a quick preview.

Try to use all the relevant features you will get with the tool and aim to create a welcoming and engaging virtual experience.

For example, in the case of WPVR, you can use:

  • Auto-rotation.
  • Company Logo and Information.
  • Tour Location Details.
  • Interactive hotspots.
  • Custom Controls.
  • Gyroskop-Unterstützung.

You may also use engaging hotspot actions to view:

  • Text.
  • Audio.
  • Video.
  • Website URL.
  • Contact Form.

Und viele mehr.

The idea is to use the engaging elements that you think your target audience will find appealing. Give the visitor the most interactive experience possible and get him/her interested and intrigued right away.

5. Affordable Solution For Virtual Tour

By now I believe you probably can realize that a good virtual tour depends a lot on the tool you choose. But you should also look at the cost.

Simply put, using an expensive solution may not generate as many conversions as required to cover up the cost.

Choosing a tool that is both affordable and provides enough features to create engaging virtual tours is a vital factor for your business.

If you’re using WordPress, then you won’t have to worry about it. WPVR is a plugin that was built to meet these requirements.

Take a look.

 Virtual Tour Pricing

i. WPVR Yearly Plans

WPVR pricing

ii. WPVR Lifetime Plans

WPVR

The lifetime plans may seem a bit high at first glance. But keep in mind that, you’ll be paying only once and you can use the plugin for as long as you want (One-time virtual tour pricing).

WPVR comparatively costs way less than most other virtual tour creators when considering the quality of output and ease of use.

6. Some Example Virtual Tour Ideas Implementation

Below is the implementation of some virtual tour ideas that you can experience:

i. Virtual Tour of A Property

Here is a virtual tour idea of a real estate property.

Here you can see how beautifully the hotspots were used to make it engaging.

You can create a similar virtual tour for your house as well.

ii. Virtual Tour of Hotel Room

Take a look at this hotel room tour which is ideal for tourists.

**Click on the Form Icon on the yellow wall. You will see, there is a contact form to book the room.

Hotel Room Tour For Tourists

This is a great way to promote hotel room booking.

iii. Virtual Tour of A Car Showroom 

You can even promote your car showroom using a virtual tour.

**Hover on the hotspots above the cars to see how you can highlight the car details elegantly.

Whether you are the manufacturer or simply own a car showroom to sell cars from multiple brands, a virtual showroom tour such as this one can be a great medium to increase sales.

iv. Virtual Tour of Grocery Store

Online sales have seen a great surge since the pandemic, And online grocery sales have reached their peak this year.

And having. a virtual grocery store tour can be a great way to sell your grocery products.

**Click on the hotspot icons for each product to see how you can sell WooCommerce grocery products through a virtual tour.

Grocery Store Virtual Tour

Here is a virtual grocery store tour you can check out.

This is a great, modern way to sell on eCommerce sites. You can use the same type of tours to promote a supermarket, bakery, general convenience store, clothing store, or whichever store you may have.

v. Virtual Tour of Pub

So local bars or pubs have embraced virtual tours to attract more local regulars.

Most people want to feel comfortable about how a pub looks like when visiting and a virtual tour online can definitely attract the ideal prospects.

Take a look at how this virtual tour of a Pub is so welcoming to the locals.

Just like these amazing virtual tours, you may use your creativity to craft your own virtual tours that can bring you more business.

Common Questions & Answers Regarding Virtual Tours

Let us look at some common questions people have regarding virtual tours.

1. Do People Like Virtual Tours?

Do People Like Virtual Tours

People will stay 5 to 10 times longer on your website if have at least one virtual tour.

This is justified since virtual tours are interactive and users can control and look around them.

So the answer is Yes, people love virtual tours.

2. Do Virtual Tours Increase Sales?

According to TIG Global, using virtual tours as a marketing method resulted in up to a 67% rise in conversion and successful bookings.

Remember, engagement is the key to conversion. And a virtual tour can definitely connect with visitors more effectively than texts and images, or at times, even videos.

3. How Big Is The Virtual Reality Market?

The global virtual reality market was estimated at $59.96 billion in value in 2022.
By the end of the year 2024, it is expected to grow at a compound annual rate 27.5%

4. How Many People Are Interested In VR?

Needless to say, this is the century of the millennials, i.e., people aged between 18 to 34. Any technology that can target this age group successfully will definitely flourish.

– The millennial population of the US is 72 million.
44% of the millennials are interested in purchasing a VR device.

This is a clear indication that any VR content is ideal to grab the attention of millennials.

– According to Yulio Technologies, 41% of all adults would give VR technology a try, if they’re more available.

So the question is how many VR users are there in 2021?

– Approximate 58.9 million people are using VR technology once a month in the US.

This number is around 17.7% of the total US population, i.e., almost 1 out of every 5 US citizens are now using VR technology every month.

Though it’s hard to craft an exact number on how many people may prefer virtual tours, looking at the numbers in the US, it can easily be said that billions of users are interested in VR technology all over the world.

5. How Do I Make A Virtual Tour for Free?

Some of you may have the question “Are virtual tours free?”

Well, most VR tools are very expensive, while a few are more affordable.

The good news is, there are a few virtual tour creators that released a FREE version with limited features.

In WordPress, you will find the plugin WPVR, which will allow you to create great virtual tours for free.

Though many of its exclusive premium features are not available, WPVR free version will still let you create high-quality virtual tours which you may use on your website.

– Follow this guide to learn to make a virtual tour for free.

6.  What Makes A Good Virtual Tour?

A quality virtual tour for your business should have these features:

– Proper indications to help you move around the tour.
– List of the rooms and spaces in the tour.
– High-quality image support.
– Hotspots or pointers where you can learn more about any specific place or object.
– A way to contact your business for inquiries or booking.

At the end of the day, the tour has to be interactive.

8. How Do I Create A Virtual Tour Completely On My Own?

It’s quite easy to create a virtual tour on your own with a little guide.

– Read this complete guide to create a virtual tour on your own.

9.  What Is A Virtual Tour of A Property? / What Are Real Estate Virtual Tours? / What’s A Virtual Apartment Tour?

What Are Real Estate Virtual Tours

Real estate virtual tours are created using multiple 360 degree panorama images of that property combined together. They give you a realistic view of a property or apartment and move in and out inside the property.

You can visit different locations inside the house, choose to view every room, and interact with the materials inside the apartment.

10. How Do You Do A Virtual Apartment Tour? 

You can easily create a virtual tour of your property or apartment using panorama images taken by you.

Use a 360 virtual tour software to convert the panorama images into a functional apartment virtual tour.

However, if you’re aiming for superior quality, you can use a camera specialized for capturing 360 degree panorama images.

Then your job will become even easier with the 360 virtual tour software.

11. How Much Does A Virtual Tour Cost? 

The average cost for 360-degree photography is around $350 in the US.

A quality 360-degree shot takes time to perfect and adjust for the photographer.

You’ll be paying this price one time only and then you can keep on using them.

12. Are Virtual Tours Profitable? 

According to Entrepreneur, A virtual tour business can generate up to $100,000 per year in revenue.

On the other hand, if you’re planning to use virtual tours as a marketing strategy for your business, you can consider these 2 stats:

– In the real estate industry, using virtual tours decreased wasted viewings by 40%.

– For the hospitality industry, customers aged between 18 to 34 are 130% more likely to book a place if there is a virtual tour.

13. Should I Start A Virtual Tour Business? / How Do I Start A 360 Virtual Tour Business?

If you’re already providing any photography service, then adding 360-degree photography to your list will give you an opportunity for extra income.

Most of the latest DSLR cameras can capture 360-degree panoramic images and there are a few moderately priced 360 virtual tour software that will help you to create the tour.

At first, you’ll have to invest some time to learn 360-degree photography and the virtual tour software itself (which is less than $100).

However, since you can charge around $350 for a single project, you can find it profitable after just 3 projects.
In the beginning, you should focus on creating virtual tours for your local businesses like:

– Your local real estate agents.
– Small shops, cafes, & restaurants.

Once you’ve gathered some experience and learned your way around it, you can move to expand your service even more.

14. Do Virtual Tours Help Sell Houses?

Here’s a simple rundown of the impact of virtual tours in the real estate industry, run by realtor.com:

– Property listings with a virtual tour received 87% more views than the regular ones.
54% of the potential buyers choose to skip a listing that doesn’t offer any virtual tours.
– 75% of the buyers think that virtual tours are a significant factor in taking decisions like, whether to visit the property in person & rent/purchase the property.

15. What Is The Best Virtual Tour Software? 

This actually depends on the requirements and features you’re looking for in the virtual tour software.

There are 2 tools that you can check out:
Matterport – Popular for their Dollhouse virtual tour. However, they do have a simplified virtual tour creator. Price: $200 to $7000+ per year.

WPVR – A plugin that is currently the best virtual tour creator for WordPress. It includes the features you actually need to create an engaging virtual tour and has an easy-to-use interface. Plus, it is among the most affordable virtual tour solutions out there. Price: $79.99 to $269.99 per year.

16. What Is The Best Free Virtual Tour Software? 

If your website is made with WordPress, the best free virtual tour software for you is WPVR – Virtual Tour Creator.

This free virtual tour software has the following features:
– Unlimited virtual tours.
– Super high-quality image support.
– Image, Text, Video, & GIF file support inside the tours.
– Keyboard, mouse, & mobile control.
– Made with a mobile-first approach.  

Einpacken

“What is a virtual tour?” is probably no longer a question in your mind. You also saw how a virtual tour can help businesses attract prospects. Plus, you now have the guidelines to start creating a virtual tour on your own.

Now the next question is when will you start using a modern-day virtual tour?

If you run a WordPress site or run an agency that develops WordPress sites, I suggest you try using WPVR once just to see how you may benefit from using this virtual tour builder.
Try WPVR Free version
Get WPVR Premium

If you have more questions regarding virtual tours or if you find any particular topic regarding virtual tours was missed in this article, feel free to let us know in the comments section.

Kategorien
Guide Product Feed Manager For WooCommerce WooCommerce

Guide To Sell On Ceneo.pl Using Accurate Ceneo XML Feed – WooCommerce (2024)

The eCommerce industry is growing every day. One of the prime reasons for this growth is the increased popularity of large local online marketplaces. If you run a WooCommerce store in Poland, then you must promote your products on Ceneo, the most popular Polish online marketplace.

With an average of 7.5 Million (avg) monthly traffic, Ceneo helped the worldwide e-Commerce industry grow at least 26%, with approximately 22 billion euros in revenue in 2020.

In fact, most small to medium local online shops in Poland have benefitted by promoting their products on Ceneo.pl, and it’s high time you take advantage of their huge audience.

To promote your products on Ceneo, all you need is to create a Ceneo XML feed in the right format and upload your products to their marketplace.

Now, the main issue most people face is that Ceneo has a unique required format for the XML feed structure, and it’s not possible to prepare manually.

However, if you run a WooCommerce store, then you can easily generate a Ceneo product feed in just a few clicks using a reliable tool.

Today, you will learn how to generate an accurate Ceneo XML feed and promote your products to a huge audience. After reading this guide, you will learn

  • The mandatory attributes to include in the product data
  • The dedicated Ceneo XML feed structure to follow
  • How to generate WooCommerce product feed for Ceneo.pl in just a few clicks

Then, you can go ahead and start getting more sales from this huge local online marketplace.

Fangen wir an.

The Right Ceneo XML Feed Format With WooCommerce Product Data

When creating a new feed for Ceneo, you will need to include a few specific data in the right format.

Normally, the feed structure is as follows:

<?xml version="1.0" encoding="utf-8"?>
<offers xmlns:xsi="http://www.w3.org/2001/XMLSchema-instance" version="1">
  <o id="1" url="https://www.yourwebsite.pl/your-product-1" price="99.99" avail="1" weight="4" stock="2" basket="1">
    <cat>
      <![CDATA[Komputery/Monitory]]>
    </cat>
    <name>
      <![CDATA[LG 27" 27UK650-W (27UK650W)]]>
    </name>
    <imgs>
      <main url="https://www.yourwebsite.pl/your-product-1/img1.jpg"/>
      <i url="https://www.yourwebsite.pl/your-product-1/img2.jpg"/>
      <i url="https://www.yourwebsite.pl/your-product-1/img3.jpg"/>
      <i url="https://www.yourwebsite.pl/your-product-1/img4.jpg"/>
    </imgs>
    <desc>
      <![CDATA[<strong>Nastała era UHD 4K HDR</strong><br><br>Oglądaj nieskazitelny obraz o
      niespotykanym bogactwie kolorów na monitorze LG UHD 4K HDR.Twórcy pracujący z treścią
      HDR ucieszą się z możliwości odtwarzania jasności i kontrastu dopodglądu i edycji.<br>
      <br><strong>HDR Effect do treści SDR</strong><br><br>Monitor LG UHD 4K HDR może
      przekonwertować standardową treść na format HDR wprost na ekranie. Specjalny algorytm
      poprawia mapowanie tonalne i luminancję treści SDR, zapewniając jakość zbliżoną do HDR.
      <br><br><strong>Prawdziwe kolory i szeroki kąt patrzenia</strong><br><br>Monitor LG IPS
      odznacza się wyjątkową dokładnością odwzorowania kolorów – pokrywa 99% gamy sRGB. 
      Ponadto ma szeroki kąt patrzenia, dzięki czemu łatwiej jest cieszyć się doskonałą 
      jakością kolorów.<br><br><strong>Czystszy i płynniejszy obraz</strong><br><br> 
      Technologia AMD FreeSync™ zapewnia płynną i niczym niezakłóconą rozrywkę w wysokiej 
      rozdzielczości nawet w dynamicznych grach. Całkowicie eliminuje rozrywanie i zacinanie
      obrazu.<br><br><strong>Indywidualne ustawienia dla każdej gry </strong><br><br><strong> 
      Wrogowie nie mają gdzie się ukryć</strong><br><br>Funkcja Black Stabilizer zapewnia
      wyraźny obraz nawet w mrocznych grach. Synchronizuje i rozjaśnia najciemniejsze zakątki, 
      dzięki czemu znajdziesz wrogów czających się w ciemności i zaatakujesz przed nimi.<br> 
      ]]>
    </desc>
    <attrs>
      <a name="Producent">
        <![CDATA[LG]]>
      </a>
      <a name="EAN">
        <![CDATA[8806098110254]]>
      </a>
      <a name="Kod producenta">
        <![CDATA[27UK650W]]>
      </a>
    </attrs>
  </o>

</offers>

Now let us look at the product attributes that you need to include in the feed.

Mandatory Product Data To Include In the Ceneo Product Feed

Following are the product data that you may submit with your products when uploading the XML feed to Ceneo.

*The ones marked green are mandatory attributes. The ones marked blue are optional.

Product ID (id)

You can use the WooCommerce Product ID or the SKU for this attribute.

Price (price)

Use the current price of the product on your site, i.e., if you have a sale running, then submit the sale price, else submit the regular price.

Product URL (url)

Submit the product link. For variable products, the URL should be unique for each variant.

Availability (avail)

You have to mention how soon you can ship out the product or if some other cases apply.

Accecpted values are 1, 3, 7, 14, 90, 99 and 110.

  • 1 – available, the store will send the product within 24 hours
  • 3 – the store will send the product within 3 days
  • 7 – the store will send the product within a week
  • 14 – the store will send the product within 14 days
  • 90 – goods on request
  • 99 – no information about availability – status “check in store”
  • 110 – pre-sale
Category (cat)

You need to submit the exact category your product falls under as per Ceneo’s category list.

Product Name (name)

Use the product Title in your WooCommerce store. For variable products, it’s recommended to include the variation term to the tile for each variant.

Main And Additional Images (imgs)

You must submit at least one image. Use the product’s main image and if you want, you may include extra five additional images as well.

Product Description (desc)

Use a benefit-rich description. You may choose to use the product description or the short description, whichever suits you better.

You may use the following HTML tags for their respective purposes and organize the description into an attractive format:

  • <p> – paragraph
  • <h1> – title
  • <h2> – subtitle
  • <br/> – new line
  • <ol> – a numbered list
  • <ul> – an unnumbered list
  • <i> – list item
  • <i> – italics
  • <b> or <strong> – bold
  • <em> – Highlighted text
Extra Product Attributes (attrs) – recommended + optional

Based on the category, you may be required to submit a few extra attributes for certain products.

Here is a list of attributes that you may submit for the products under their respective categories:

After submitting your feed on Ceneo initially, if you are asked to add more attributes for products in certain categories, then first, list down those categories. Next, visit this attribute list and look for each of these categories to find their available extra attributes that you can submit.

Here, you will see, for each attribute, there is a tag, <iskeyattribute>. Some of them have values False and some of them have values True. Collect the attributes that have the <iskeyattribute> value as True, i.e., <iskeyattribute>True</iskeyattribute>.

These are the attributes that you need to include in the feed for the products in their respective categories.

In WooCommerce, for most of them, you have to save these attributes’ data in Product data via custom fields. Then you can use the values of the custom fields in the feed.

Weight (weight) – optional

You may submit the product weight if you want to.

Simply use the value in kilograms – no need to add the unit of measurement.

Stock (stock) – optional

If you manage stock in your WooCommerce store, then you may use the number of products available in stock to submit this attribute.

Basket (basket) – optional

If you are part of the special Ceneo “Kup Teraz” program, then you may submit a positive value for this attribute.

Accepted values are:

  • 1 – to confirm inclusion of a product to the Kup Terz program.
  • 0 – to indicate that a product is not part of the Kup Terz program.

Now that you have a good idea of the required product data you need to submit on Ceneo, let us look at how you can generate an XML feed of your WooCommerce products in just a few clicks.

7 Steps To Generate Ceneo Product Feed In Your WooCommerce Store

In WooCommerce, you will find a reliable plugin called Product Feed Manager For WooCommerce with which you can generate an XML feed for all of your products in just a few clicks.

In the steps below, I will show you how you can generate a product feed for Ceneo.pl using this plugin in minutes.

Step 1 – Import Ceneo Template For Feed Generation

1. On your dashboard, click on Product Feed and then click on Add New Feed option.

Neuen Feed hinzufügen

It will take you to the feed creation page

Neuen Feed hinzufügen

Here, on the top you will get an option to give a name to your feed, you can skip it too.

2. Click on the Feed Merchant Dropdown and you will get the list of all the supported merchants.

You can scroll down this merchant dropdown list or you can type Ceneo in the search box, and you will get the Ceneo option in the list.

Ceneo Merchant Option

Select Ceneo, and all the required attributes of Ceneo will be loaded below.

Step 2 – Create A New Product Feed

Now, you can see three buttons under the Feed Title text box, Troubleshoot, Product Filter, and Settings.

1. If you are having any issues generating feed, click on this Troubleshoot button, it will take you to the Troubleshoot page, which could be helpful for you.

2. If you want to use any filter or condition, you can click on the Product Filter option, and a drawer will slide in from the right side of the window, and there you will get the following filters:

  • All Featured Items
  • Custom Filter
  • Category Filter
  • Tag Filter
  • Product Filter (Pro)

You can select any filter option and use them as per your need and click on the Close button when done.

3. Now, to schedule your feed or to choose which type of products will be included in your feed, click on the Settings button, and you will get a list of options to exclude or include products.

Change the options as per your need and click on the Close button when done.

Step 3 – Use The Ceneo Feed Template

1. If you look at the Feed Merchant dropdown button, there you will get another dropdown “Feed Type”, you can click here to set the type of this feed. You can set different types of feeds depending on what types of feeds this merchant supports or what types of feeds this Product Feed Manager has the support for.

For Ceneo, select XML as the Feed Type.

2. Now, in the attributes section, you will see that all the attributes are under the Required Attributes column, and their values are set according to the attributes under the Assigned Values column.

You can change any values to any attributes, simply click on the value dropdown, and select your preferred value.

All the required attributes will appear below. Now, most of the attributes will already be configured but notice that some of these attributes are unassigned.

Step 4 – Assign The Right Values To Unassigned Attributes

  1. You will see that all the required attributes for Ceneo will appear below and it is already configured, except a few.
  1. Update the value for Avail attribute if required.

You can see, the value of avail is by default set to 1. This means you will send out the product for delivery within 24 hours. But if that’s not the case, i.e., let’s say you rather ship out the product within 3 days, then change the value to 3.

Avail attribute

**However, if you require different times to ship out different products, in that case, you need to save the values in a custom field in each of your WooCommerce product data and then use the value of that field here.

Step 5 – Publish The Feed Initially And Set Up Category Mapping

The category attribute is also not configured, but to assign that, you first need to set up a category mapping.

  1. Scroll up and click on Publish, and the feed will be generated.
  1. Go to Product feed > Category Mapping.

    Here, you will find all of your WooCommerce categories listed, with empty fields beside them.
  1. Give a Mapper Name.
  1. Set up the category mapping.

Since Ceneo has its own category list, what you have to do is you need to find out which category in your WooCommerce store matches the category in Ceneo’s marketplace category list.

Simply visit this list and search for categories that match your store’s category. Once you find a suitable one, copy that category path, and paste it in the respective empty field beside it in your Category mapping page in the plugin.

Do the same for all the categories listed here.

  1. Scroll down and Save it.

Now that you have saved a category mapper, it’s time to use it in the feed.

Step 6 – Assign Your Category Mapping List To The Category Attribute

  1. Go to Product feed > All Product Feeds and edit the feed you created earlier.
  1. Here, first, click on the Purge cache button on the right side.
  1. Next, scroll down to the feed configuration section. Click on the value field for Product Category and scroll down to the very bottom to choose the mapper you just created.
  1. Scroll up and click on update.
  1. Your feed will be generated, and you will be able to view or download the feed.

Step 7 – Start Promoting Your Products On Ceneo.pl

Now that you have the feed generated, the next thing to do is to log in to your Ceneo merchant account and submit the feed URL to list your products on Ceneo.

That’s it. That’s how easily you can generate a product feed and start promoting your products in Ceneo.

Schlussfolgerung

If you are a local online shop owner in Poland, then it’s high time you start promoting your WooCommerce products on Ceneo and take advantage of its huge audience.

Use Product Feed Manager for WooCommerce to generate the product feed in minutes and start boosting your sales.

Check out the plugin here:
– https://wordpress.org/plugins/best-woocommerce-feed/
– Product Feed Manager for WooCommerce Pro

Initially, test out the free version of the plugin, and once you are sure the plugin does what it claims, you can go ahead and upgrade to Pro.

Go ahead and start getting more sales through Ceneo.pl.