As a WooCommerce store owner, establishing a market presence is one of the most challenging aspects that you may face. If you own a newly rising online store, then it can take quite some time to become popular.
At this point, selling products only in the WooCommerce store is surely not enough. So you can try other Strategies & Facebook marketplace is one of the effective methods to sell your products easily.
In this article, I will discuss why you must promote your WooCommerce products in the Facebook Marketplace. You can also know how to easily generate and upload your store products to the marketplace in just a few clicks.
So let’s begin.
Why Should You Rely on Facebook for WooCommerce Product Promotion?
Facebook Marketplace has grown to assist digital stores in promoting their products to a greater audience and it is one of the best social marketplaces in the world. Its super-friendly business features can highlight your brand efficiently.
The Facebook business suit allows you to manage your business profile and Facebook page & shop around the Facebook community easily. So, you can leverage the marketplace to drive traffic and potential buyers into your WooCommerce store quite smoothly.
This social marketplace allows buyers to search for products, and if your product matches their intent, it will be available for the buyer to choose from.
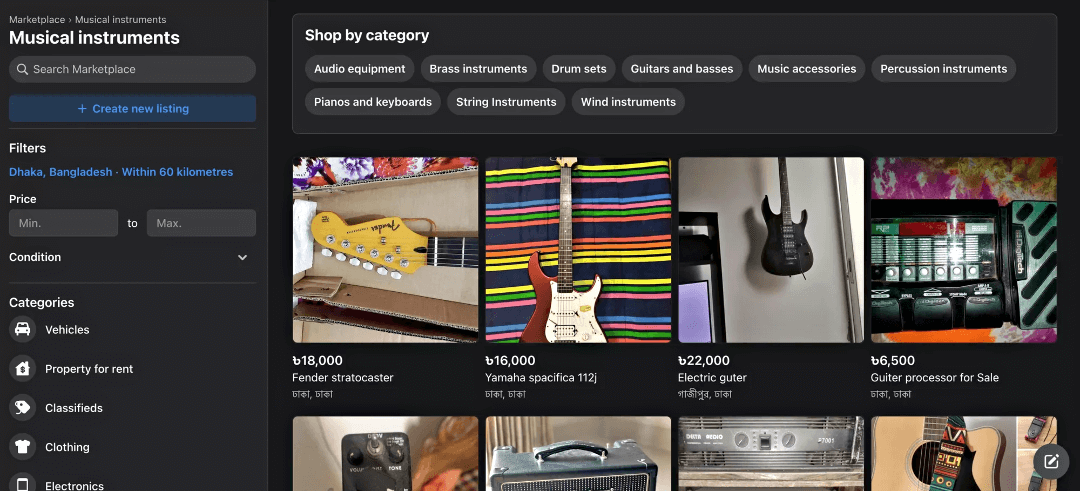
Suppose a buyer is looking to purchase a musical instrument. He can simply go to Facebook Marketplace and search for the desired instrument.
If the buyer clicks on the product, you can set it up to take the buyer to your Facebook shop page or your website.
The main difference between selling products only on a Facebook page and selling products from your WooCommerce to the Facebook marketplace is that you will get more trust from the people.
A buyer tends to order more from a business with its Brand value than buying from a private seller on Facebook. So having an up-and-running website is crucial if you want to stay in the eCommerce business for a long time.
In the next section, I will explain what you should have before creating a Facebook catalog as it is an important part of the process.
Necessary Things Before Creating a Facebook Catalog
Now I am going to explain necessary things that you need to prepare before creating a perfect Facebook catalog.
1. Website:
Ensure you have a functional and professional website where your products are listed. This is essential as your product catalog will link directly to your website.
How to Do It: Set up a website with a user-friendly design and clear product listings. Make sure the site is secure and optimized for mobile devices.
2. Accurate Product Information:
Gather detailed and precise information about each product, including titles, descriptions, images, prices, and stock levels.
How to Do It: Use a spreadsheet or a product information management system to organize and maintain accurate product data. Regularly update this information to reflect any changes.
3. Facebook Commerce Manager:
This is the tool where you will create and manage your catalog. It integrates with your Business Manager to provide a centralized location for your product data.
How to Do It: Log into your Facebook Business Manager, navigate to Commerce Manager, and follow the steps to set up your catalog.
4. Product Feed:
A product feed is a file that contains all the information about your products in a format that Facebook can read. This feed is uploaded to your catalog.
How to Do It: Create a WooCommerce product feed in CSV, TSV, or XML format. Include all necessary fields such as product ID, title, description, image URL, price, and availability. Validate the feed to ensure it meets Facebook’s requirements.
5. Facebook Tracking Pixel:
The Facebook Pixel is a piece of code that tracks actions on your website, such as views, adds to cart, and purchases. This data is crucial for dynamic ads and audience targeting.
How to Do It: Install the Facebook Pixel on your website by copying the pixel code from Facebook and adding it to your website’s header. Verify that it’s working correctly using Facebook’s Pixel Helper tool.
6. Facebook Page:
A Facebook Page is necessary to represent your business on Facebook and connect your catalog to your audience.
How to Do It: Create a Facebook Page if you don’t already have one. Fill out all relevant information, including business details, profile picture, cover photo, and contact information.
7. E-commerce Platform Integration:
If you use an e-commerce platform. you can easily connect WooCommerce to the Facebook marketplace. This Facebook WooCommerce integration simplifies the catalog creation process.
How to Do It: Follow the integration guides provided by Facebook and your e-commerce platform to sync your product data automatically.
8. Compliance with Policies:
Ensure your products and business practices comply with Facebook’s commerce policies to avoid disapproval or restrictions.
How to Do It: Review Facebook’s commerce policies and advertising guidelines, and make sure all your product listings meet these standards.
9. High-Quality Product Images:
Use clear, high-resolution images to showcase your products effectively. Good images can significantly enhance the appeal of your ads.
How to Do It: Ensure images are at least 500×500 pixels, well-lit, and showcase the product. Avoid cluttered backgrounds.
10. Accurate and Functional Product URLs:
Make sure each product URL in your feed correctly links to the specific product page on your website.
How to Do It: Test all URLs to ensure they lead to the right product pages. Correct any broken or incorrect links.
11. Inventory Management System:
Keep your inventory data up-to-date to avoid advertising out-of-stock products, which can frustrate customers. How to Do It: Use an inventory to sync stock levels with your product feed management system. Update the feed regularly to reflect the current stock.
12. Consistent Pricing:
Ensure all prices in your catalog match the currency and pricing strategy for your target market.
How to Do It: Verify that prices in your product feed are accurate and consistent with those displayed on your website.
13. Permissions and Roles:
Assign the right roles and permissions to team members to manage the catalog efficiently without compromising security.
How to Do It: In Business Manager, assign roles such as admin, editor, or analyst to relevant team members. Control access based on their responsibilities.
14. Customer Support Readiness:
Be prepared to handle customer inquiries and support requests that may arise from your product listings.
How to Do It: Set up a system for managing customer messages and comments on your Facebook Page. Train your team to respond promptly and effectively.
15. Analytics Setup:
Set up analytics tools to track the performance of your catalog and ads, helping you make data-driven decisions.
How to Do It: Use Facebook Analytics and other tools like Google Analytics to monitor key metrics such as click-through rates, conversions, and sales.
By following these steps, you’ll be well-prepared to create a Facebook Catalog that enhances your advertising efforts and helps you connect with potential customers more effectively.
Having said all that, you still have to upload your product data to the Facebook marketplace.
Now, manually adding products from WooCommerce to your Facebook marketplace can be quite frustrating. But there is an easy way to upload all of your products into Facebook for WooCommerce in just a few clicks.
Product Feed Manager for WooCommerce – Facebook Product Feed Generator
This tool will let you generate a product feed file in the right Facebook Catalog format with just a few clicks. Then, you can simply upload it to your Facebook for WooCommerce in the commerce center to list all of your products in the Facebook Marketplace in just a few minutes.
Now, yes, you will get some Facebook for WooCommerce plugins in WordPress that do a similar function, and some may even have more active installations.
But, what makes PFM unique is its super simple UI. You can start using the plugin and generate a Facebook Catalog feed with as low as 4 clicks. And if you have certain customized data in your store, you will still need as little as 3 minutes to configure and generate a perfect Facebook product feed.
Since you are running an eCommerce shop, you do not have a lot of time on your hands. The faster you can start promoting your products, the sooner you make money. That is why this tool is designed to save you time by uploading products on Facebook for the WooCommerce store.
You do not need to learn about the Facebook Catalog feed structure or format, and you do not need to spend hours configuring the feed generation. The plugin will lead you to achieve it real quickly.
Now, let’s take a look at how you can generate a product feed with all your WooCommerce products to upload to the Facebook Marketplace.
How to Quickly Generate Your Facebook Product Feed with WooCommerce Products
First, make sure you have the Product Feed Manager for WooCommerce installed and activated in your WooCommerce store.
Then, follow the two steps below to generate a Facebook product feed with your WooCommerce products.
Step 1 – Create A Product Feed
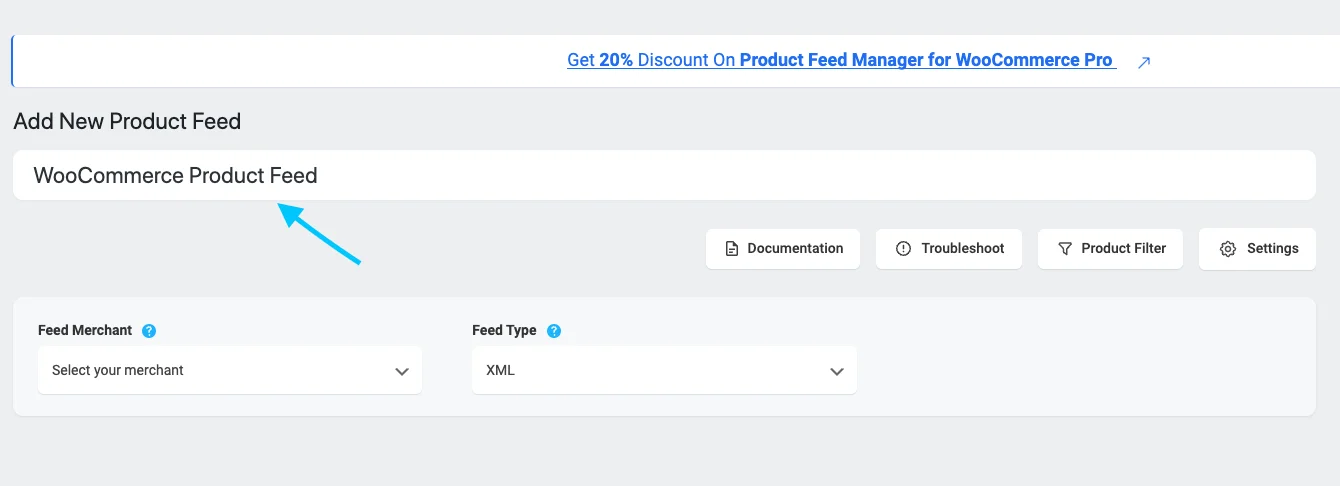
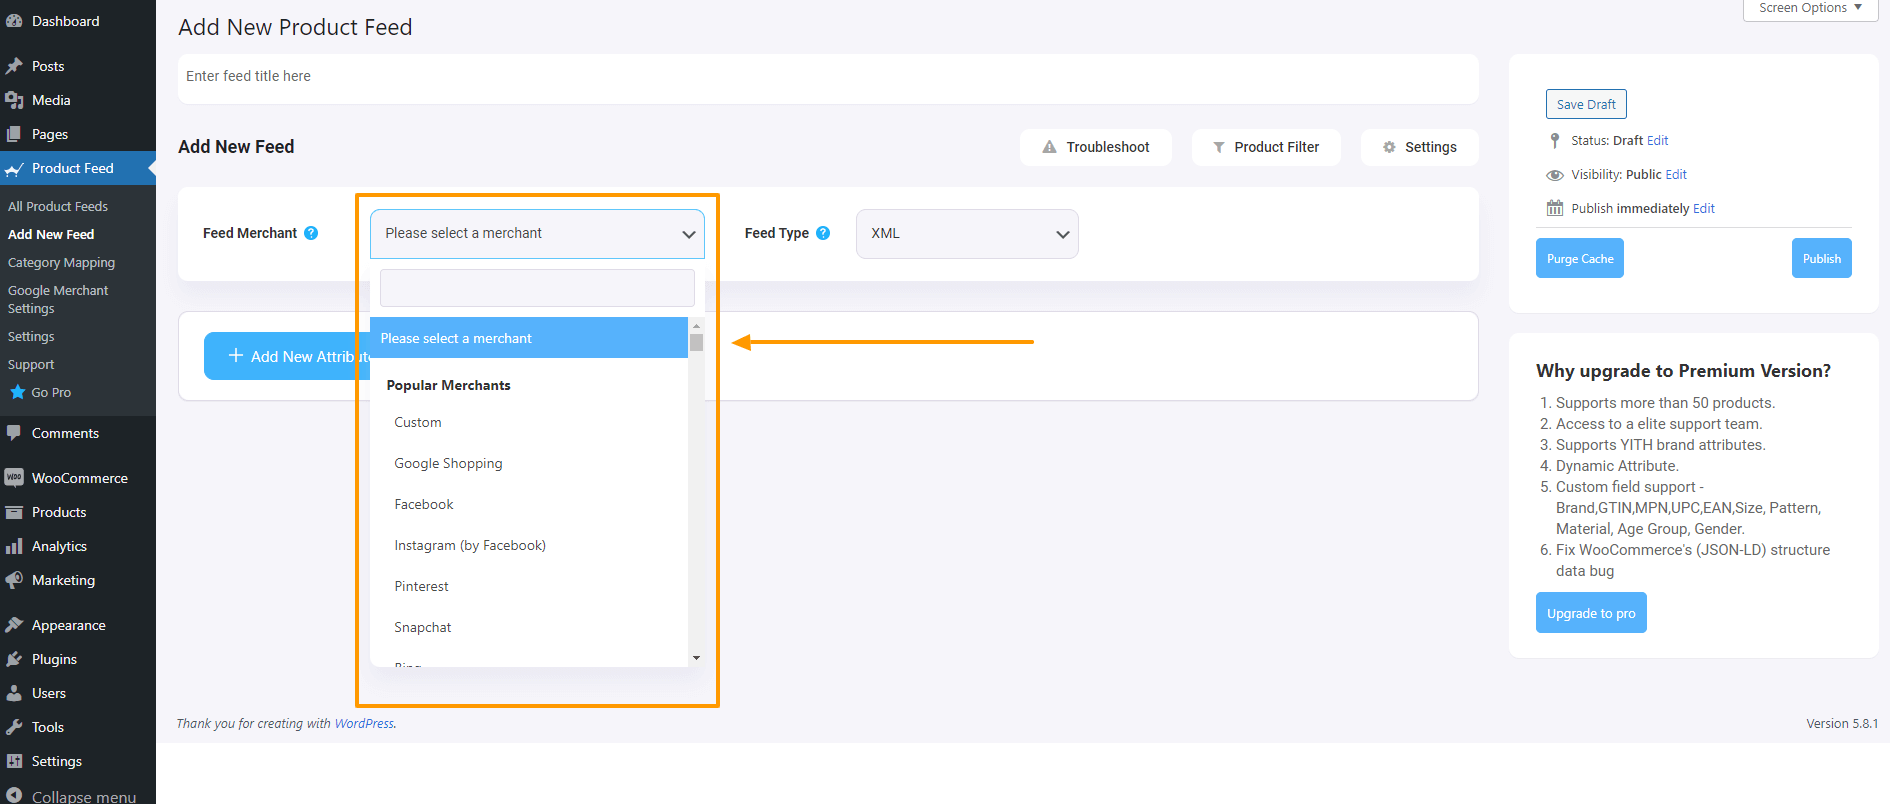
Once the plugin is activated, on your dashboard menus, you will find the option Product feed.
Hover on it and click on ‘Add New Feed’, and it will take you to the following page:
Here, first set a feed title.
Then choose the Feed Merchant as Facebook.
It will then load all the fields that will be included in your product feed for each of your products.
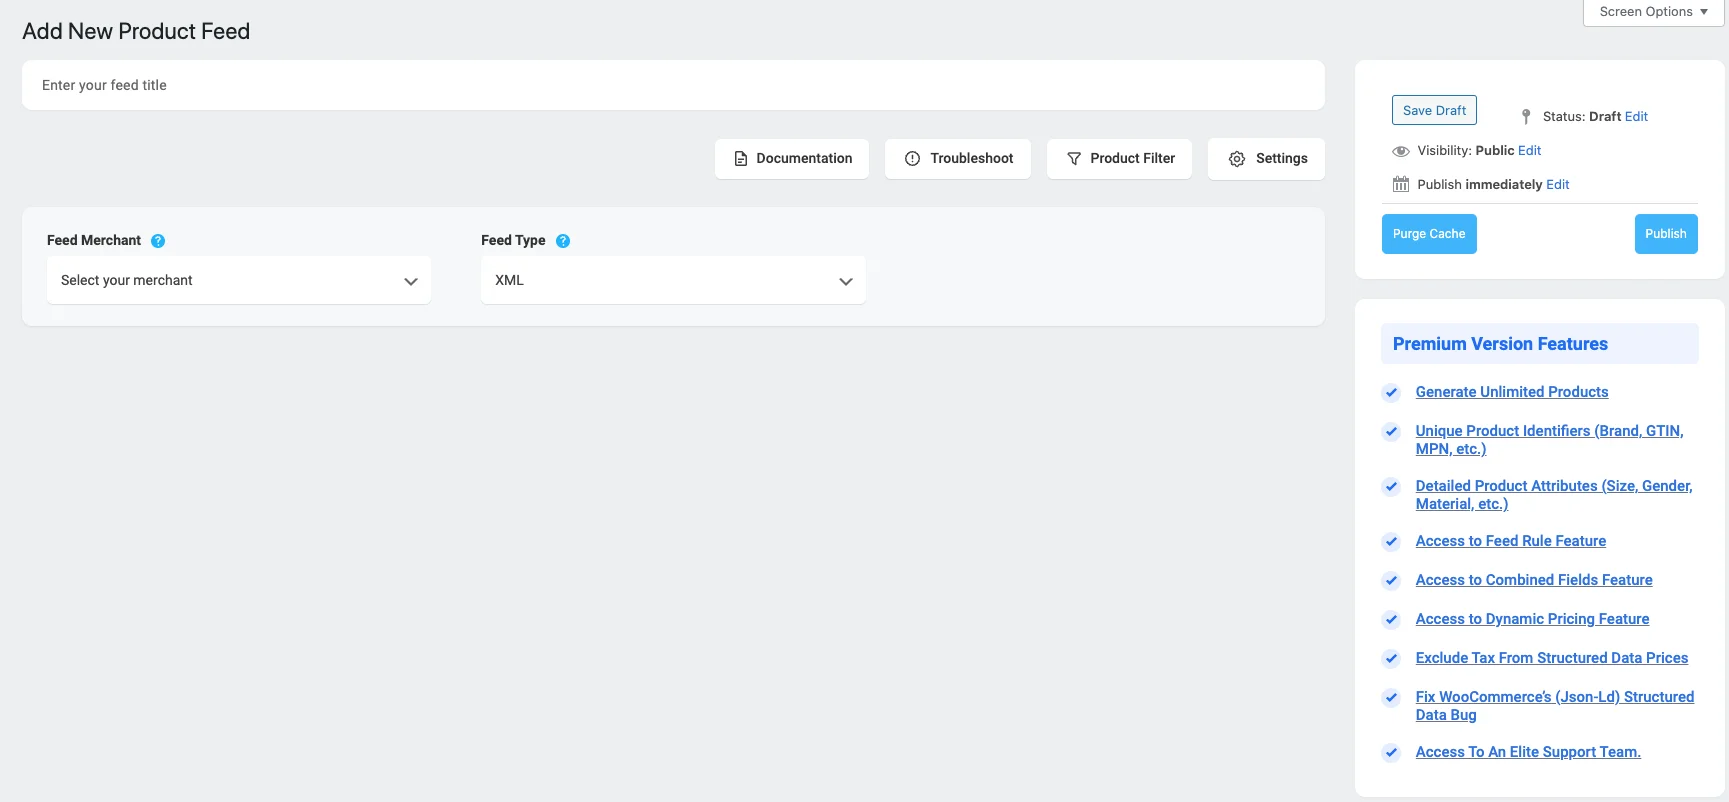
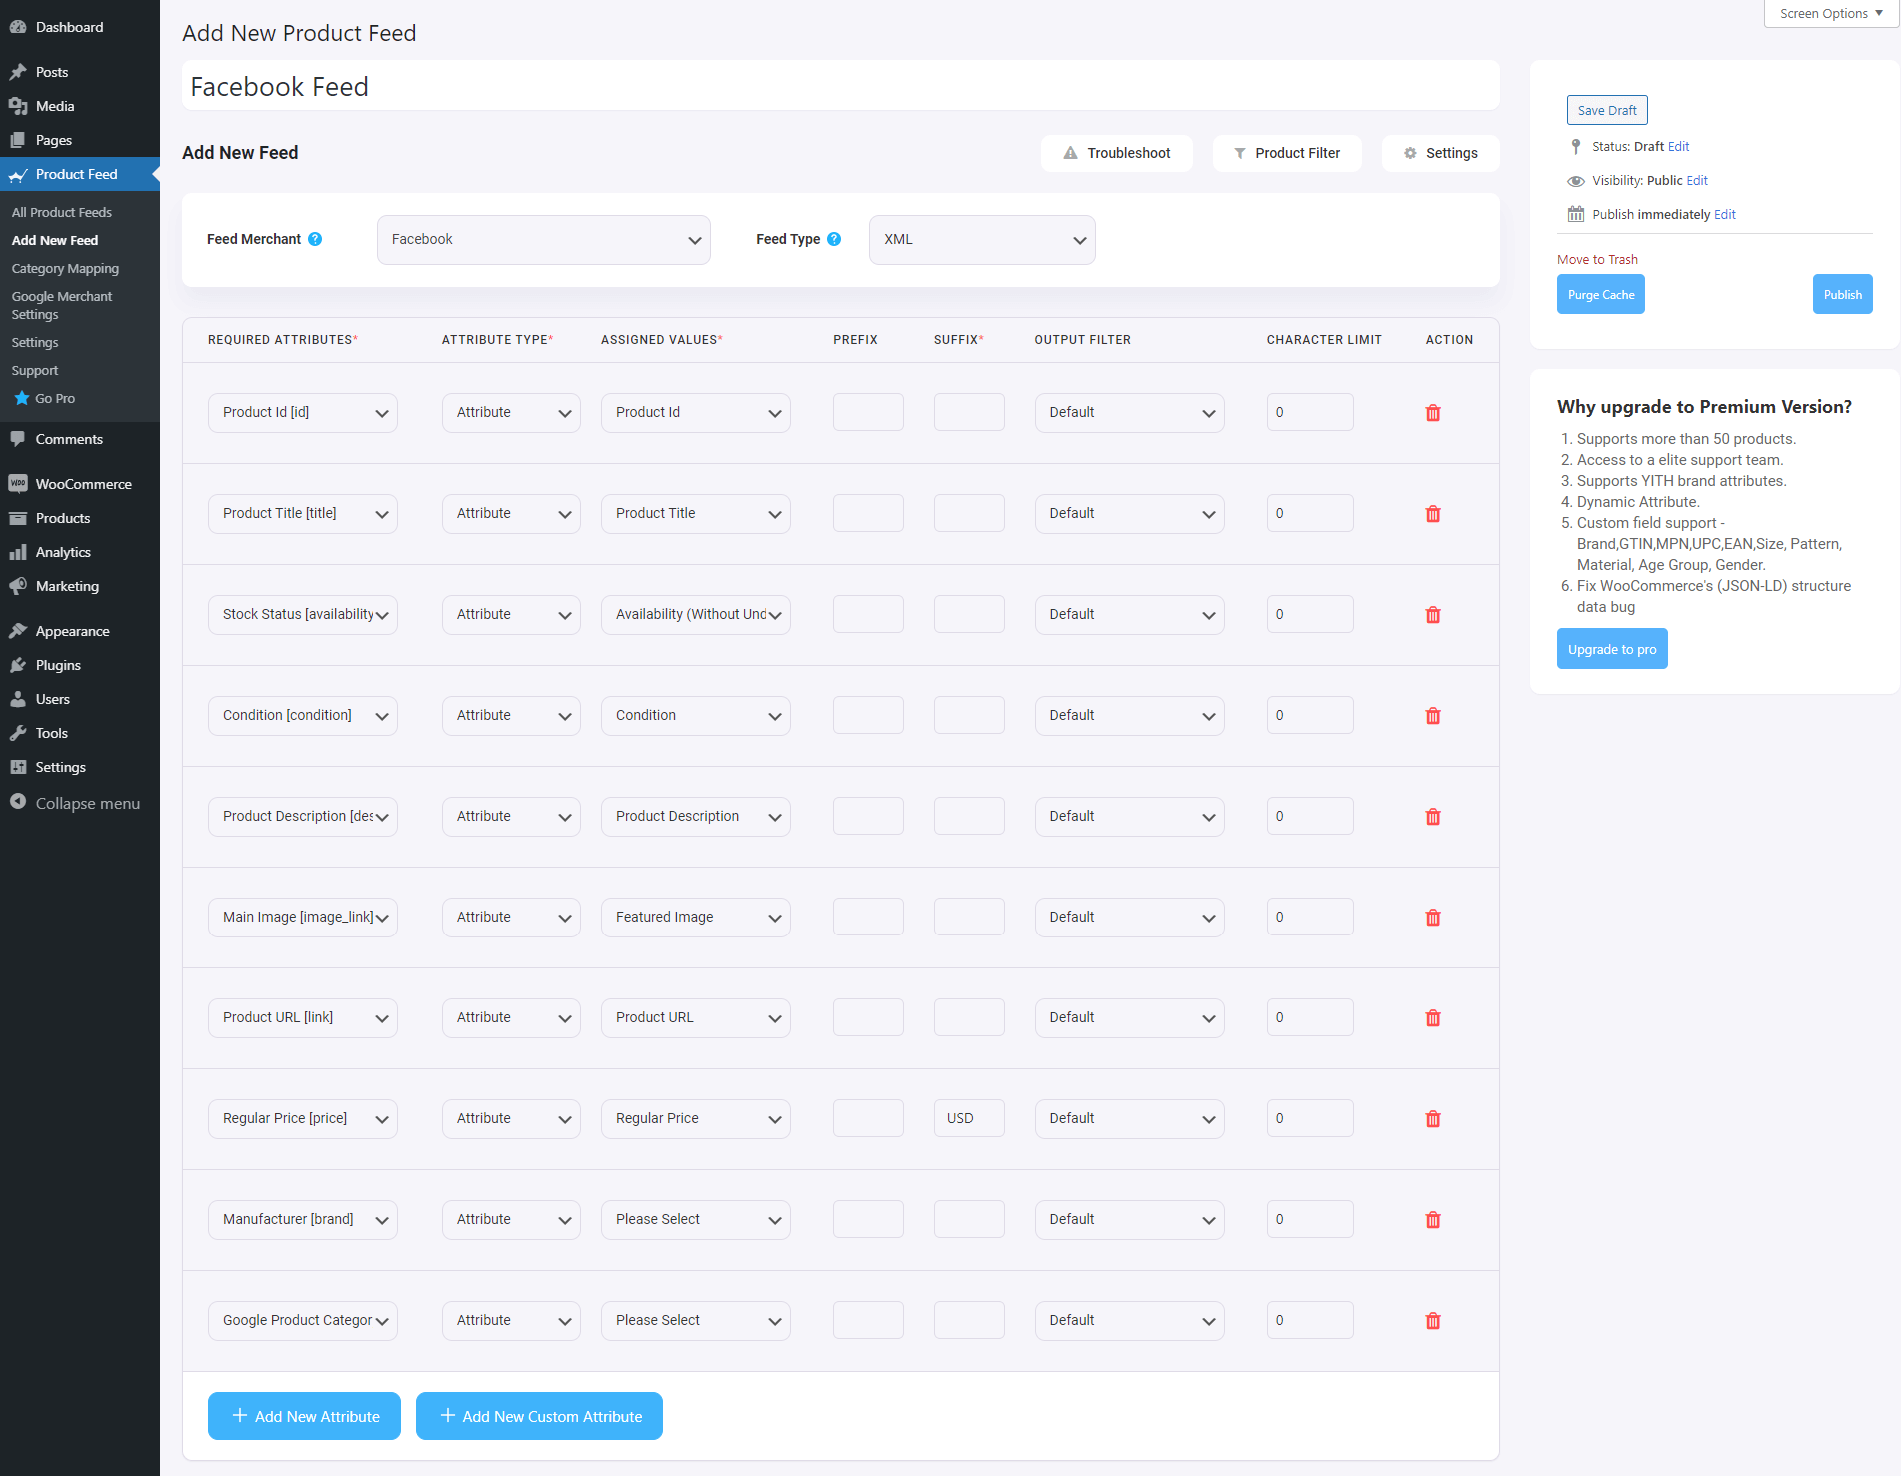
Step 2 – Configure Your Facebook Product Feed
You will notice that almost everything is already configured. All you have to do is assign the right values for the Manufacturer/Brand, and the Google Product Category
– Assigning The Manufacturer/Brand:
This should be the Brand name of the product you are selling. If you are the manufacturer, you can set the type as Static and input your company name here.
If you have different brand names for different products, you will have to save the value in a custom field or product attribute and then use that value here.
**You can also use a brand plugin, which will make it easier to assign and use brand names.
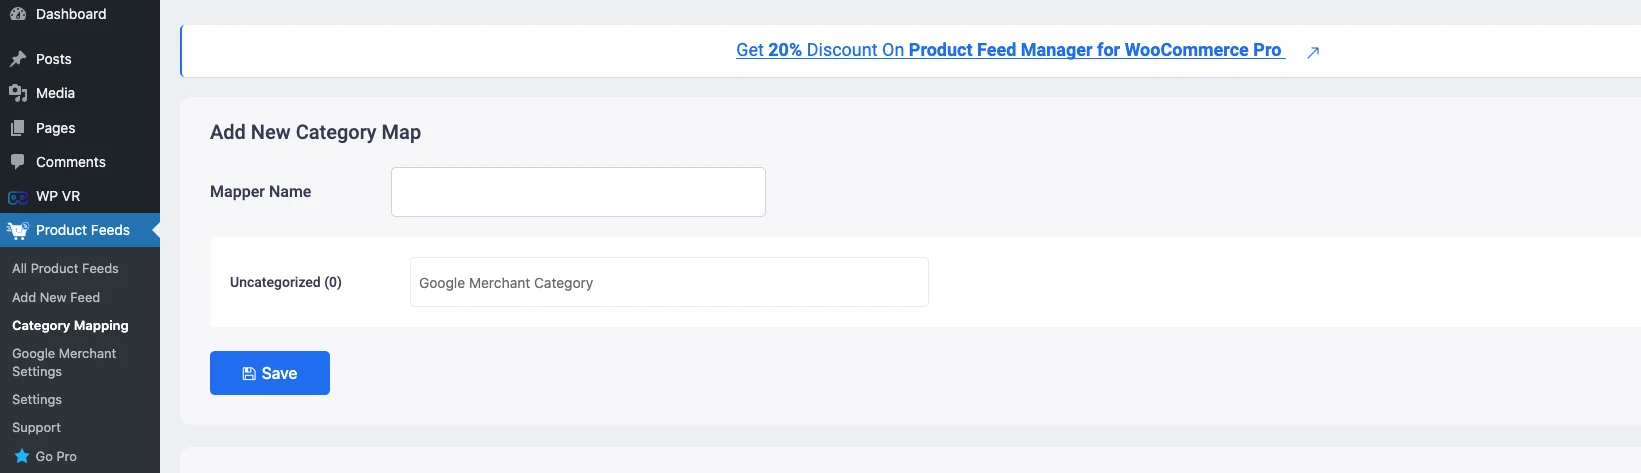
– Configuring the Google Product Category:
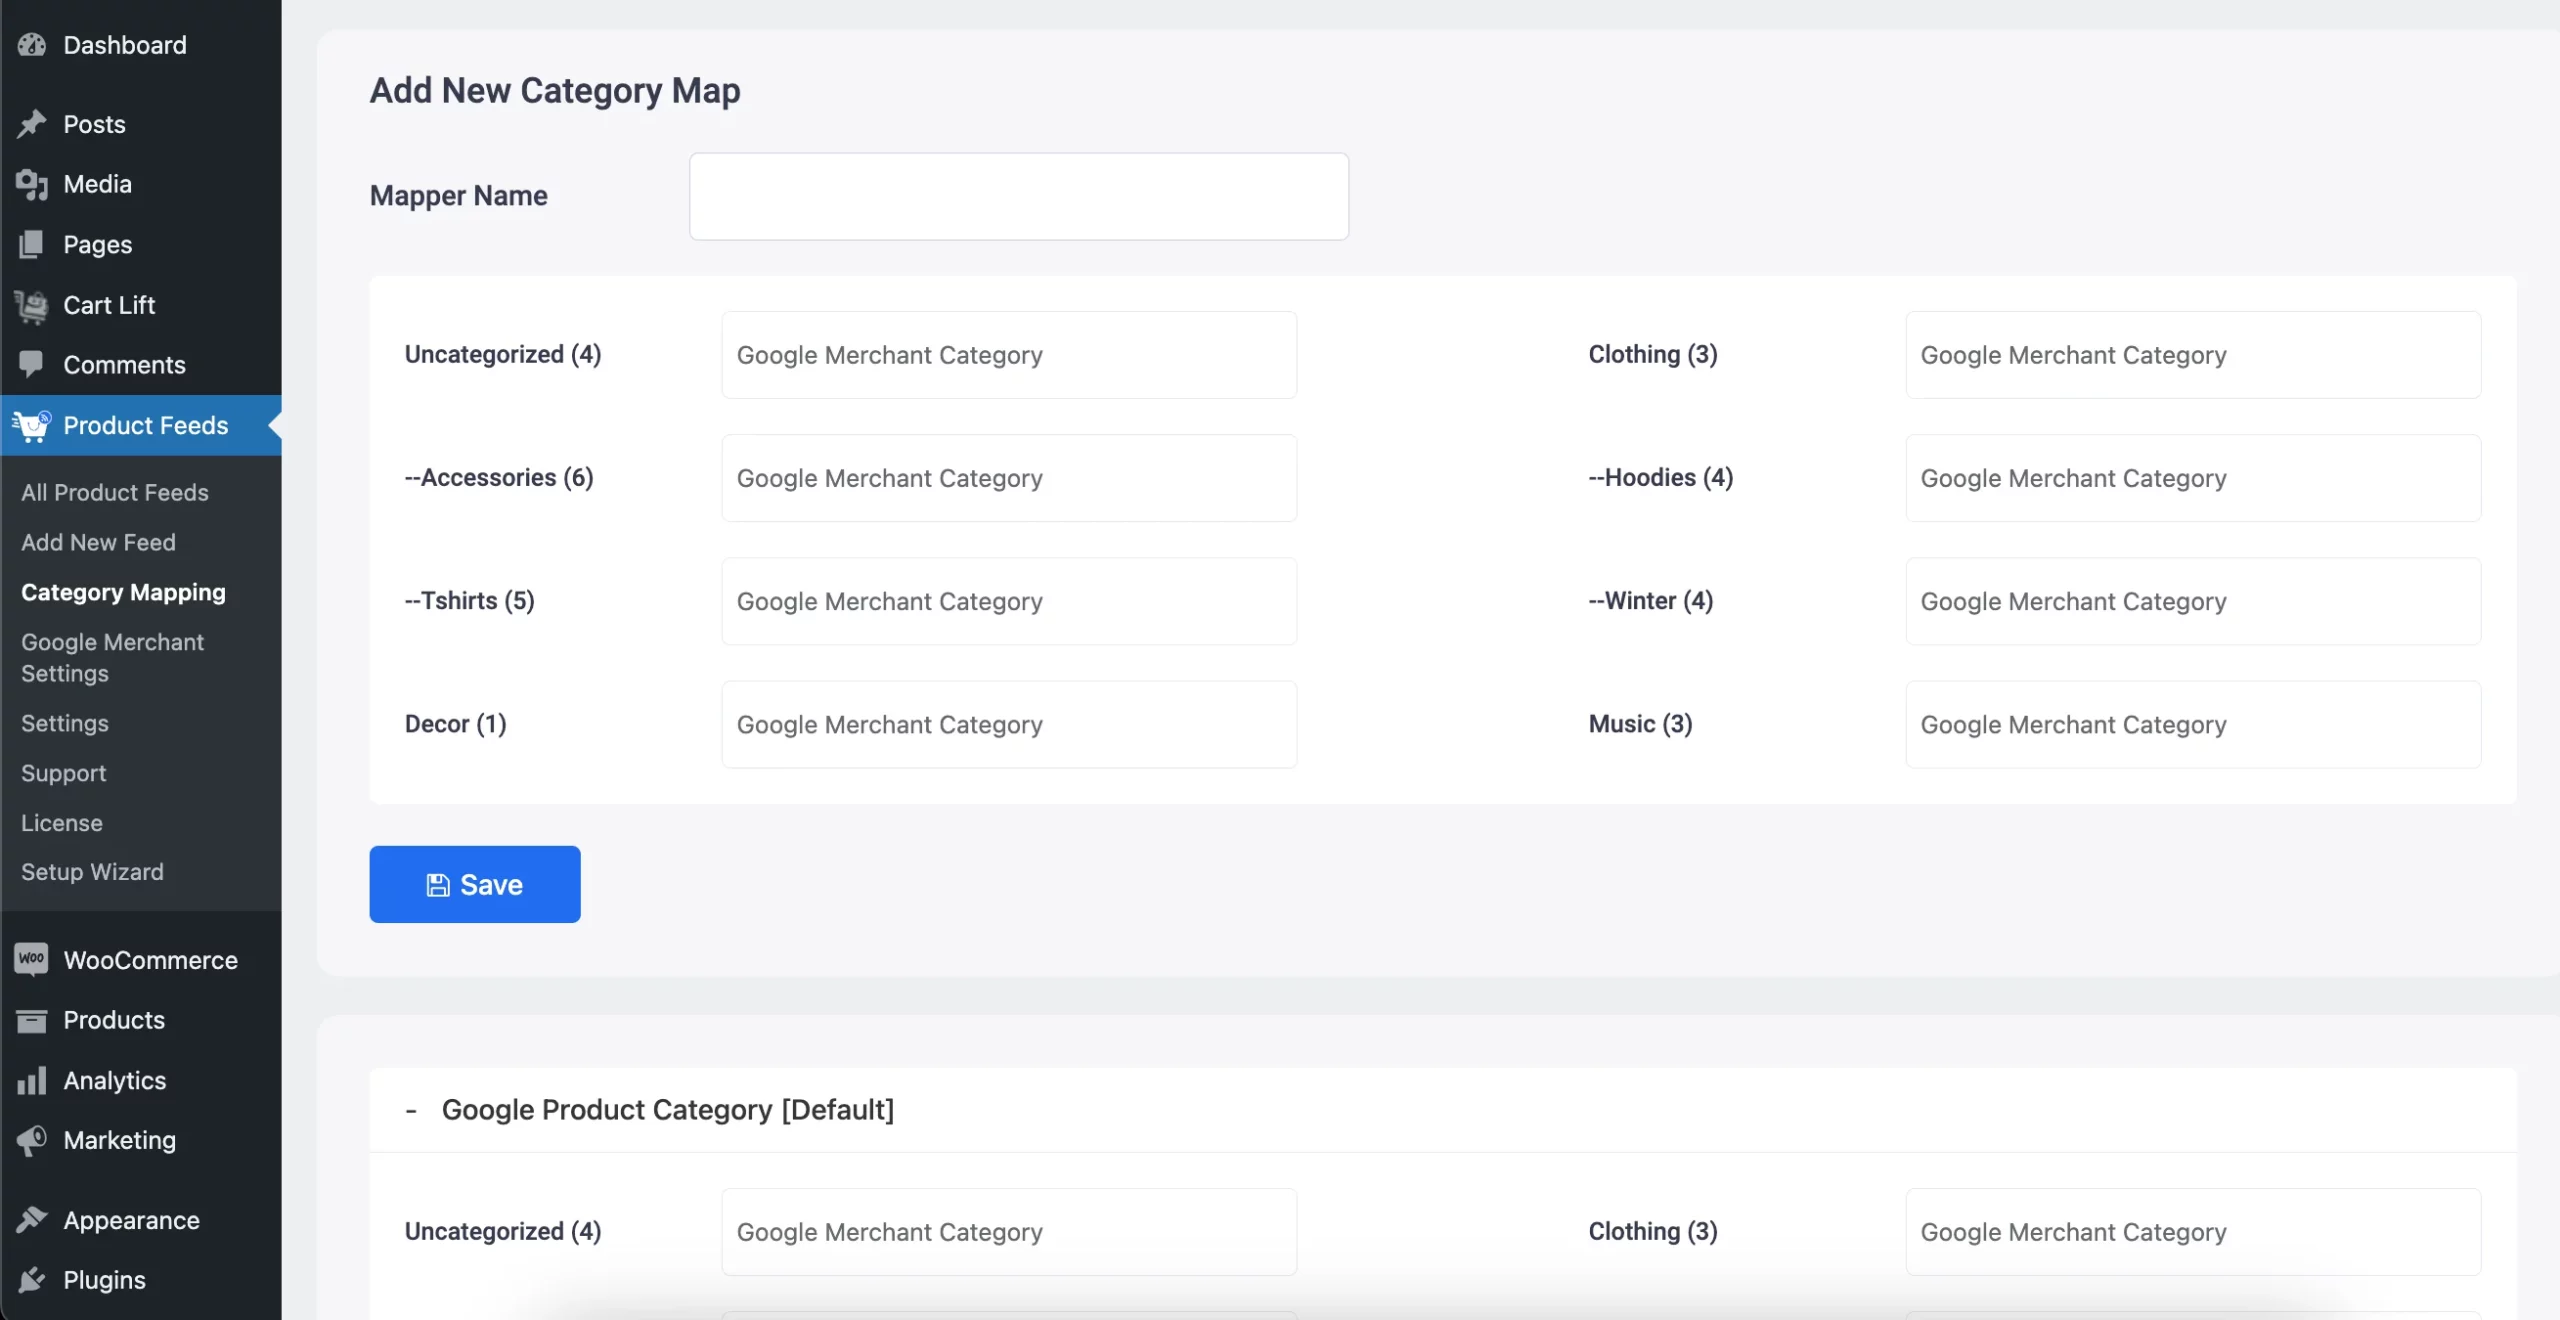
Facebook Marketplace has its own set of categories (that match Google) that, most often, don’t match the categories in your store. But you do not have to change it in your store. You can simply use the category mapping feature to set up the mapping and use it as the value here.
You can further customize the feed if you need to use Product filters, a few basic feed settings, auto-update intervals, and feed rules. Normally, they are already configured in an optimized way for the Facebook Marketplace.
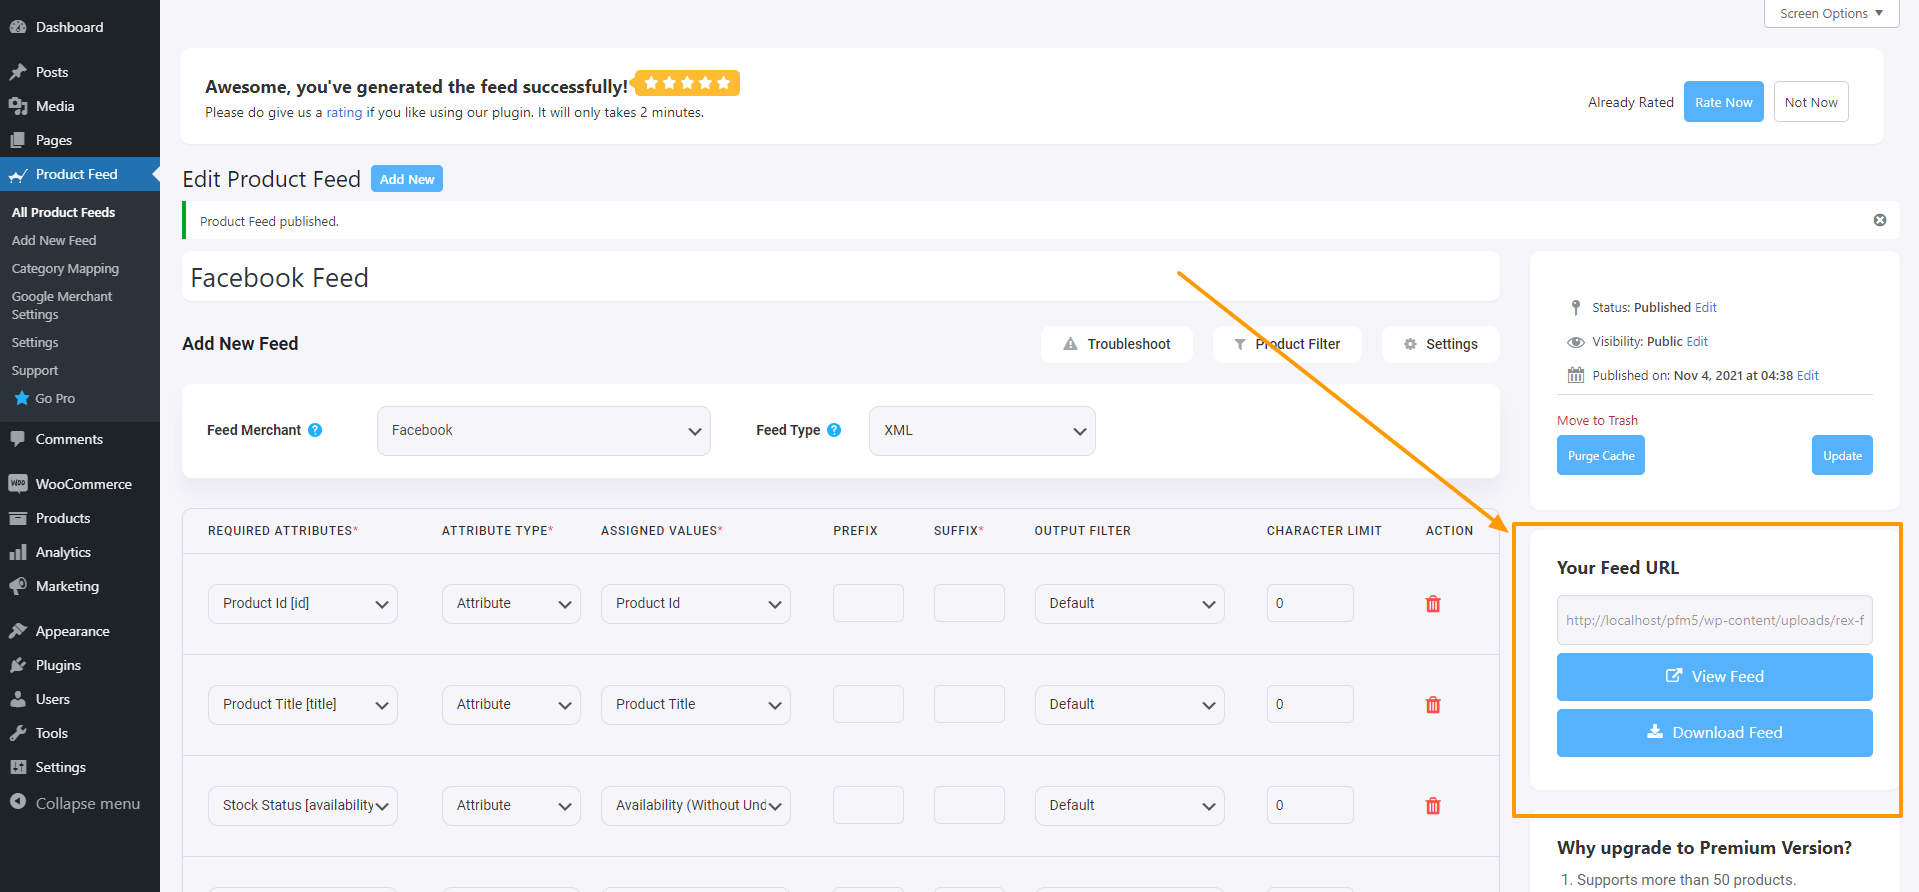
Once you have configured the feed, simply click on the Publish button on the right, and the feed will be generated in seconds.
And that’s it. You have successfully generated a product feed for the Facebook Marketplace. You will be able to collect the feed link or download the feed file from the right side.
How to Upload Your Product Feed to Facebook Commerce Manager
Once you have generated the product feed, it’s time to get your WooCommerce products on the Facebook marketplace.
Before you do, it’s always best to create a Facebook business page if you want to leverage more exposure from Facebook for WooCommerce. You may read this guide to create a Facebook business page if you do not have one already.
Simply follow the steps below.
Step 1 – Create A Catalog
Login to your Facebook account and access the Facebook Commerce Manager.
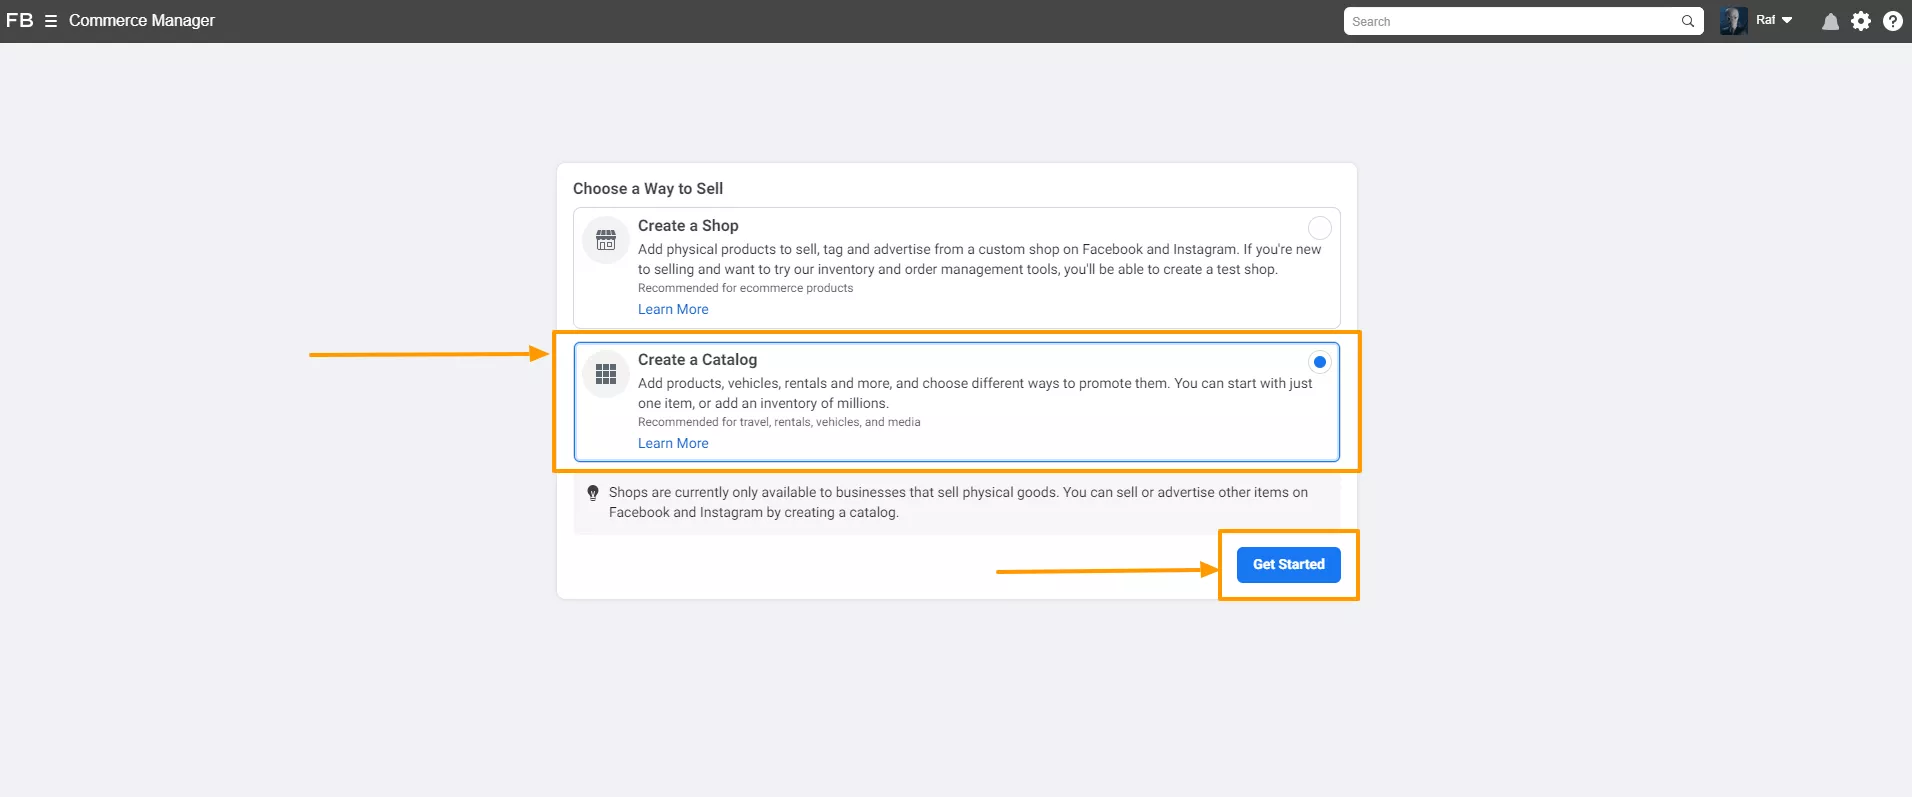
Select your preferred way to sell your products on Facebook. Here, select the ‘Create a Catalog’ option. Then click on ‘Get Started.’
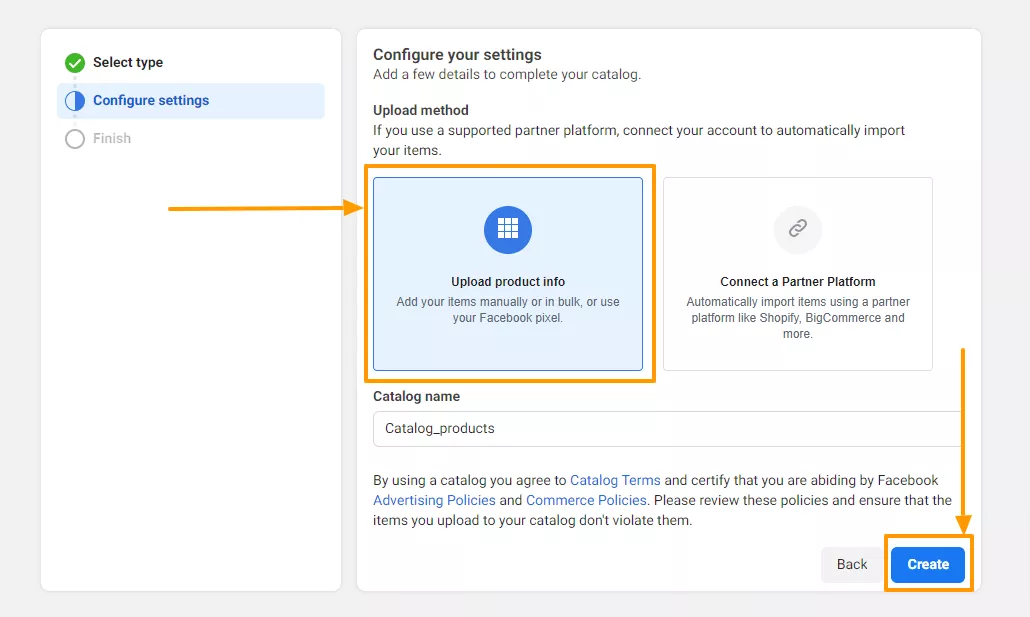
Now, choose your catalog type.
Next, Select Upload Product Info and click on the ‘Create’ button.
Then click on finish, and it will redirect you to your Facebook Commerce Manager Dashboard.
Step 2 – Upload Your Product Feed to The Facebook Marketplace
Now that you have the Catalog prepared, you are ready to upload your products on the Facebook marketplace for your WooCommerce store.
On your Commerce Manager menus, you will see a new menu called Catalog. Click on it, and then click on Data Sources.
Then select Data Feed.
Here, you will get three options – File Upload, Scheduled Feed, and Google Sheets. Choose Scheduled Feed.
Then you will get the option to provide the link to the feed file. Earlier, when you generated the feed in your WooCommerce store, it gave you a feed link. Copy that link and paste it here.
Now, choose a suitable time for the schedule fetch and click on Next.
And finally, give a name to your catalog feed, choose the currency for your store, and click on Upload.
And that’s it. Your feed will be uploaded in a few minutes to the Facebook Marketplace, which you will be able to view in the Items menu under Catalog.
Key Benefits of Setting up Facebook Catalogs for WooCommerce
Now I will tell you some key benefits of setting up your Facebook catalog for WooCommerce so that you can be inspired more.
Easy Integration: You can easily integrate WooCommerce with Facebook. It allows for automatic syncing of product information. It also saves you time and reduces manual data entry errors by automatically updating your Facebook Catalog whenever changes are made in WooCommerce.
Enhanced Product Visibility: Products in your catalog can be featured across various Facebook and Instagram placements. It helps you to increase exposure and potential reach to millions of customers on these platforms.
Dynamic Ads: Dynamic ads use your catalog to show personalized products to customers based on their behavior and interactions. It boosts your conversion rates by targeting buyers with products they’ve shown interest in, leading to higher ROI.
Improved Shopping Experience: Customers can find and browse products directly from your Facebook and Instagram. It provides an easy shopping experience, reducing friction and making it easier for them to purchase.
Automated Inventory Management: Syncing your WooCommerce store with Facebook ensures real-time inventory updates. It prevents advertising out-of-stock products, reducing customer frustration and potential lost sales.
Advanced Analytics: Track performance metrics of your products and ads through Facebook’s detailed analytics tools. It enables data-driven decisions to make optimized product listings and advertising strategies.
Multi-Channel Sales: Extend your sales channels by listing products on both your WooCommerce site and Facebook/Instagram. It helps to diversify revenue streams and reaches a broader audience.
Easy Product Management: You can easily manage product listings, descriptions, prices, and inventory from a single platform. It simplifies catalog management, saving time and effort.
Retargeting Opportunities: Using data from the Facebook Pixel helps to recapture your potential lost sales and increases conversion rates.
Cost-Effective Advertising: Dynamic ads and personalized targeting are often more cost-effective than traditional advertising. It maximizes your budget efficiency by focusing on high-intent users.
Enhanced Customer Insights: Gaining valuable insights can help you tailor marketing strategies and product offerings to better meet your customer needs.
Increased Engagement: Engaging product posts and ads can attract likes, comments, and shares. It boosts your brand visibility and engagement on social media platforms.
By setting up Facebook Catalogs for WooCommerce, you can significantly enhance your e-commerce operations, improve customer experiences, and drive more sales through advanced targeting and easy integration.
Conclusion
In conclusion, Facebook Marketplace for your WooCommerce store can significantly enhance your product visibility and boost sales.
Following the steps outlined, you can easily transfer your products to Facebook. It allows you to reach a broader audience and simplify your sales process.
The integration offers numerous benefits, including dynamic ads, automated inventory management, and advanced analytics, all of which contribute to more efficiency & effectiveness.
For an effortless transfer process, use the Product Feed Manager to simply generate and upload your WooCommerce products to Facebook Marketplace with ease.
How can I increase the visibility of my WooCommerce products on Facebook Marketplace?
To increase visibility, ensure your product titles and descriptions are clear and keyword-rich. Engage with your audience through your Facebook business page and use targeted ads to reach potential buyers. Additionally, leveraging Facebook’s algorithm by frequently updating your product listings can keep your store relevant and visible.
What should I do if my product feed fails to upload correctly?
If your product feed fails to upload, double-check the feed link and ensure it is formatted correctly. Also, verify that all mandatory fields, such as product titles and categories, are filled out. If issues persist, consider reaching out to support both WooCommerce and Facebook Commerce Manager for assistance.
How often should I update my product feed on Facebook?
It’s beneficial to update your product feed regularly, ideally daily, to reflect any changes in inventory, pricing, or new product additions. This keeps your listings accurate and up-to-date, improving customer trust and satisfaction.
Can I customize my product feed to match Facebook’s requirements?
Yes, you can customize your product feed using the Product Feed Manager for WooCommerce. Map your WooCommerce categories to Facebook’s, assign brand names, and adjust other attributes to ensure compatibility. This customization helps in displaying your products correctly on Facebook Marketplace.
How can I measure the success of my product listings on Facebook Marketplace?
You can measure success by tracking key metrics such as click-through rates, conversion rates, and sales figures through Facebook Commerce Manager. Additionally, utilize Facebook Insights to monitor engagement and adjust your strategy based on performance data to continually improve your listings.
Online shopping has been on the rise over the past decade. Over 85% of people worldwide prefer online shopping over visiting physical stores (according to alphr.com).
Many WooCommerce stores are doing exceptionally well and have achieved three times more sales than they used to about a few years ago.
Did you know that you could easily triple your store sales in no time as well?
But what’s the secret?
Well, the key is … If you generate your Product Feed in the right way and promote through Google Shopping Ads and Facebook Dynamic Ads, you may see your sales go up right away.
Let me explain.
Google and Facebook hold the largest audience. Promoting on their merchant platforms can boost your sales in no time IF PROPERLY DONE.
Today, you will get a complete step-by-step guide on how to generate your WooCommerce Product Feed in the most optimized way and skyrocket your store performance.
By the end of this guide, you will be able to
Set up proper WooCommerce product feed in the most optimized way for Google Shopping and Facebook Dynamic Ads
Generate accurate and performance-driven product feed in minutes
Upload the feed on your desired platform and see your sales go up
Once you have an account, you will need to upload your WooCommerce Product Feed in order to promote through Google. However, Google has a few feed specifications that you need to follow. So let us look into it in more detail.
How To Set Up WooCommerce Google Product Feed In The Most Optimized Way
When you upload your products, Google will look for some specific data.
Let us look into what data you must include on your feed and I will give you examples for each data so that you know the most optimized way to generate the WooCommerce Google product feed.
A proper Google product feed (in XML format) of a single product usually looks like the following:
<rss xmlns:g="http://base.google.com/ns/1.0" version="2.0" >
    <channel>
    <title> The name of the feed file </title>
    <link> Your website link </link>
    <description> Description of the content </description>
    <item>
        Product data attributes
    </item>
    </channel>
</rss>
**Here the item tag ( <item> </item> ) encapsulates the data of a product. For multiple products, you simply add more item tags and the product data within, and the rest remains the same.
Now, the product data includes a lot of information that you need to assign to their respective attribute tags within the item tag.
Google Shopping Ads require the following data for each of your products:
Product ID
Product Title
Product Description
Product Link/URL
Product Category
Google Product Category
Product Image URL
Stock Availability
Regular Price
Product Condition
Manufacturer/Brand Name
GTIN (Global Trade Item Number)
MPN (Manufacturer Part Number)
Identifier
Adult Content
Multipack
Bundle
Material
Age Group
Color
Gender
Size
Pattern
Item Group ID
Some of these attributes depend on the product type and its variants. Below is a more detailed explanation with examples of how each of these data should be on your store for the maximum output.
Each attribute is included in the following format on the feed:
<g: Attribute name > Attribute Data </g: Attribute name >
You will get a sample product feed file link later on in this article after I go over detailed instructions on the attributes and some tips.
Let’s look into the details to understand how you should include these data, the format on the feed file, and which ones to include/exclude based on the products on your WooCommerce Store.
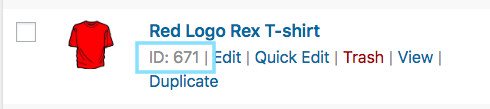
Product ID
Attribute
id
Example Value
671
Feed Structure
<g:id>671</g:id>
It is a unique identifier for your product in your store. On WooCommerce, you should see the ID when you browse the product list.
However, you may also use the product SKU as the product ID.
Product Title
Attribute
title
Example Value
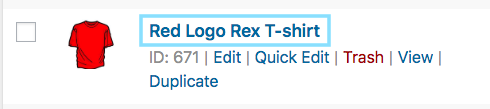
Red Logo Rex T-shirt
Feed Structure
<g:title> <![CDATA[ Red Logo Rex T-shirt ]]> </g:title>
It is the name of the product to be displayed. On WooCommerce, you should see the Product’s Title when you browse the product list.
When you set the product title, do specify any special feature, such as its color and the brand name, along with the product. This will create more attraction for buyers.
However, you are not allowed to use any other promotional touch to the tile (for example, adding “free shipping” or “discounted price” or using all caps).
In the case of variable products, include the brand name in the title. Rather than including just ‘any’ feature to the main title, mention the feature that makes it a variant of the product.
For example, if a product is a Logo Rex T-shirt and has variations of Red and Blue, then on your Google Product Feed, one variation should be named “Logo Rex T-shirt – Red” and the other one “Logo Rex T-shirt – Blue”.
So, the feed data view will look like this individually:
<g:title>
    <![CDATA[ Logo Rex T-shirt - Red ]]>
</g:title>
<g:title>
    <![CDATA[ Logo Rex T-shirt - Blue ]]>
</g:title>
Product Description
Attribute
description
Example Value
This is a Red T-shirt. It was created for testing purposes only.
Feed Structure
<g:description> <![CDATA[ This is a Red T-shirt. It was created for testing purposes only. ]]> </g:description>
Add a proper description of the product you are selling. Make sure to highlight all the major features it may have, that will attract buyers.
When you edit a product, you get to set its tile, link, and description as shown in the picture below:
Even though you should mention the exclusive features and benefits of the description, you are not allowed to use any extensive promotional touch in the description (for example, adding “free shipping” or “discounted price” or using all caps to highlight a certain point).
Also, you shouldn’t include any links to a different webpage or compare the products to any competitors.
This is the product type or category that you set on your store. When editing a product on WooCommerce, on the right side, you will have the option to set a Category.
This attribute is optional, but we recommend you use it to create a better visualization for viewers.
Google has a category list of its own, which you need to use to categorize your products on Google Shopping. You must set this attribute according to their required taxonomy in order to get your Google Product Feed approved.
Hence, you can either set your WooCommerce store categories accordingly or have your own categories mapped to Google’s using a plugin when generating product feed.
This will be the link to the main image of your product. When editing a product, on the right side, scroll down and you should find the option to add a Product image.
Whichever image you use here, you need to provide the URL to that image for the “image_link” attribute.
You should provide a compelling picture of the product without any promotional text or watermark. Also, avoid using any placeholder image.
Remember, this image is the most important factor to get more customers. Most people will notice your product only if they like what they see. So make sure to provide a clear picture with high quality.
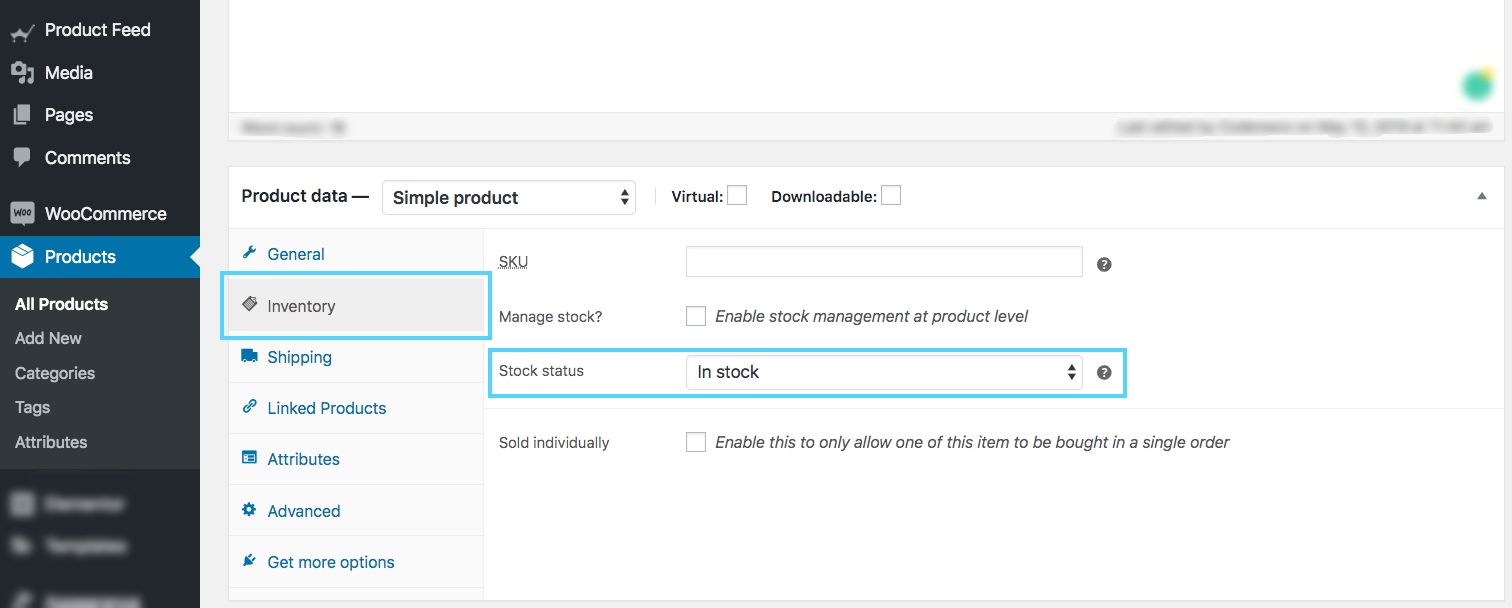
Stock Status/Availability
Attribute
availability
Example Value
in_stock
Feed Structure
<g:availability>in_stock</g:availability>
This will signify if the product is still in stock, or all sold out. On the product edit page, scroll down to the product data section. Choose Inventory and you should get the option to set the Stock Status.
This value will be added under the attribute “availability” when generating a Google product feed. Google accepts the values “in_stock”, “out_of_stock”, or “preorder.”
WooCommerce will give you the options “in stock” and “out of stock” by default. For the “preorder” option, you will need to use extra coding or another plugin.
Tip: You might think, why you should add products that are “out of stock.” Well, sometimes you can use the “out of stock” option as a psychological tactic.
Here’s an example: Let’s say you have a T-shirt with 2 variations, Red and Black and let’s say the black ones are sold out.
Now, when prospects will view the products, they will see that there are two similar products, and one variation is sold out.
This could mean that this t-shirt is pretty popular. Hence, it will tempt certain prospects to think about buying the Red one.
Regular Price
Attribute
price
Example Value
26.53 USD
Feed Structure
<g:price>26.53 USD</g:price>
This is the price of the product (usually before taxes). On the product edit page, scroll down to the product data section. On the General tab, you will get the option to set the Regular Price.
This value will be added under the attribute “price” when generating a WooCommerce Google product feed.
Make sure you are inputting the accurate price, with the ISO currency code as the suffix.
Please note that the price cannot be “0”. (The price “0” is only acceptable for mobile devices sold on a contractual basis.)
Also, if your products are for the US or Canada, then do not add any tax to the price. For any other country, make sure to add VAT or GST or whichever regional tax that may apply.
Product Condition
Attribute
condition
Example Value
New
Feed Structure
<g:condition> <![CDATA[ New ]]> </g:condition>
Use this attribute to signify if your product is brand new or refurbished. You can use the values “new”, “refurbished” or “used” to define the condition.
WooCommerce doesn’t have any field to define the condition of the product, hence you have to add it on your own to the product feed.
However, Product Feed Manager For WooCommerce will have the option for you to add the product condition field for all products.
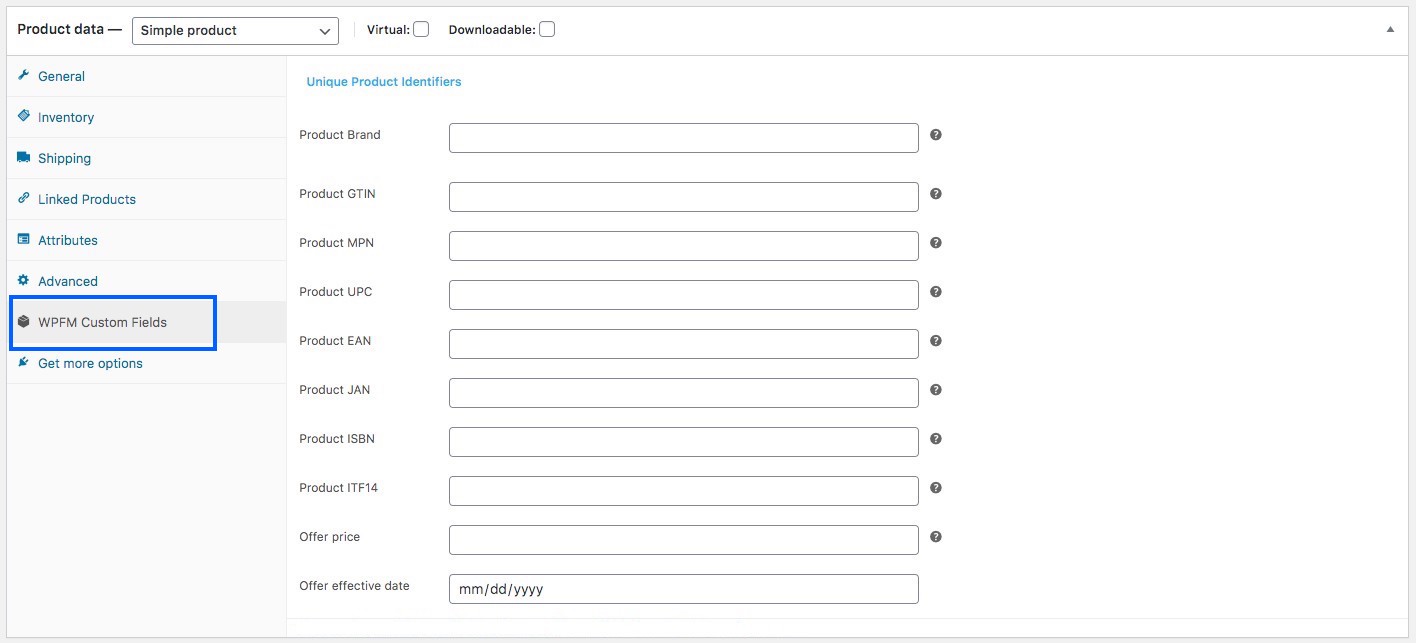
Manufacturer/Brand Name
Attribute
brand
Example Value
RexTest
Feed Structure
<g:brand> <![CDATA[ RexTest ]]> </g:brand>
It is mandatory to provide the manufacturer/brand name in order to add a product to Google Shopping. Ideally, you should also mention the brand name on the product tile.
But WooCommerce doesn’t include a “brand” field for your products. Hence, you can create a custom field for every product or use a plugin to add the brand field to every product on your WooCommerce store.
However, movies, books, or musical records don’t require you to include a brand name. In that case, you can keep the brand section empty.
GTIN (Global Trade Item Number)
Attribute
gtin
Example value
123465465464
Feed structure
<g:gtin> <![CDATA[ 123465465464 ]]> </g:gtin>
In order to promote products through Google Shopping Ads, manufacturers from the US or Canada that are GTIN certified must provide the GTIN number for every product on your Google Product Feed.
For other manufacturers
in North America, provide UPC
in Europe, provide EAN
in Japan, provide JAN
However, for a book, you need to provide ISBN instead, and for multipacks, you need to provide the ITF-14.
MPN (Manufacturer Part Number)
Attribute
MPN
Example value
Rex0011Test
Feed structure
<g: MPN> <![CDATA[ Rex0011Test ]]> </g: MPN>
In case a product does not have a GTIN (or UPC, EAN, JAN), then you need to provide the MPN instead.
You may also use the product SKU as the value of its MPN when you do not have both GTIN or MPN (provided that you didn’t use the SKU as its product id).
Now, WooCommerce doesn’t provide fields for Brand, GTIN, or MPN by default. Hence, you need to input custom fields for every product manually.
However, I use the Product Feed Manager For the WooCommerce plugin whichincludes those fields on every product, as shown below:
I’ll just have to input the correct data and use them as values of the required attributes when generating my WooCommerce Product feed.
Identifier Exists
Attribute
identifier_exists
Example Value
no
Feed Structure
<g:identifier_exists>no</g:identifier_exists>
You already learned earlier that providing either GTIN or MPN is mandatory. However, some products don’t have a GTIN or MPN.
For example, some products are just locally produced and don’t incorporate a GTIN or MPN.
In this case, you have to use the “identifier_exists” attribute and assign the value “no”.
Adult Content
Attribute
adult
Example Value
yes
Feed Structure
<g:adult>yes</g:adult>
You might have some erotic or adult products. It’s totally fine to promote them on Google Shopping as long as you label them as adult content. When submitting a product that’s in the adult industry, you need to use the “adult” attribute and assign the value “yes”.
In case you run a business that is completely in the adult industry, for example, a licensed erotic shop, then you do not need any attributes. You should rather go to your Google Merchant Center settings, and select the option that says that your business delivers adult products.
Multipack
Attribute
multipack
Example Value
8
Feed Structure
<g:multipack>8</g:multipack>
A multipack is when you sell a group of several identical products as a single unit; for example, 8 pens together.
This attribute is required for promotion in certain locations such as Australia, Brazil, Czechia, France, Germany, Italy, Japan, Netherlands, Spain, Switzerland, the UK, and the US.
You must include this attribute and assign its value to the number of products you assembled into a multipack.
If the multipack is assembled by its actual manufacturer, and not you, then you do not need to include this attribute.
Tip: Try to include multipacks on your store with a small amount of discount.
For example, if 1 pen cost 10 dollars, and you set a multipack for 8 pens, then rather than charging 80 dollars, try to give a discount and charge 70 or 75 dollars maybe. This little discount will create more attraction.
Bundle
Attribute
is_bundle
Example
yes
Feed Data
<g:is_bundle>yes</g:is_bundle>
A bundle is when you take multiple products and sell them as one single package. Usually, all the products in a bundle are somewhat related and can be sold individually without the bundle.
Here, one product acts as the main product, and the rest are sub-products offered in a bundle.
For example, you can create a product bundle that includes a camera, a memory card, and a carry bag. Here, the camera is the main product, while the memory card and the carry bag are related sub-products in a bundle.
For promoting bundles in Australia, Brazil, Czechia, France, Germany, Italy, Japan, Netherlands, Spain, Switzerland, the UK, and the US, you must use this attribute and assign its value as “yes” or “true”.
Material
Attribute
material
Example
Leather
Feed Data
<g:material>Leather</g:material>
In case you wish to upload a product whose material is a notable feature, then you may use this attribute. You need to use valid material names.
In case the product is made using multiple materials, mention all the materials while separating them with “/” between them. For example, cotton/leather/polyester.
**For promoting Apparel & Accessories in Brazil, France, Germany, Japan, the UK, and the US, you need to provide more attributes, including age group, color, gender, and size. For variable products, you must include an extra attribute called item_group_id. So let’s learn more about them.
Age Group
Attribute
age_group
Example Value
kids
Feed Structure
<g:age_group>kids</g:age_group>
(This field is required only if your product falls under the Apparel & Accessories category or its sub-category)
You have to assign which age group this product is for.
Google will accept the following values:
newborn
infant
toddler
kids
adult
In the case of variable products, assign a separate age group for each variant.
Color
Attribute
color
Example Value
Tango Red
Feed Structure
<g:color>Tango Red</g:color>
(This field is required only if your product falls under the Apparel & Accessories category or its sub-category).
You need to describe the color of the product (but not color codes or single letters).
If there are multiple colors, mention all the colors while separating them with a “/”. For example, Red/Blue/Green.
For variable products, assign a separate color for each variant and add it to the product title.
Tip: It is not necessary that you have to give a generic color. You can rather use catchy color names such as “Tango Red” instead of just “Red”, which is more appealing to buyers.
Gender
Attribute
gender
Example Value
male
Feed Structure
<g:gender>male</g:gender>
(This field is required only if your product falls under the Apparel & Accessories category or its sub-category).
When selling apparel, you should identify which particular gender the product is for.
Google will accept the following genders:
male
female
unisex
Size
Attribute
size
Example Value
XL
Feed Structure
<g:size>XL</g:size>
(This field is required only if your product falls under the Apparel & Accessories category or its sub-category).
You have to assign an appropriate size value for the product.
For example, “XL” to define extra-large, or “15/32 slim” to define a 15-inch neck size, 32 inches sleeves, and a slim fit.
For a free-size product, you should assign the value “one size”, “OS”, “one size fits all”, “OSFA”, “one size fits most”, or “OSFM.”
In case of variable products, assign a separate size for each variant and you may also add it to the title of the product.
Tip: Keep a measurement table on your site to define the sizes you mentioned here.
For example, if you assigned the size as XL, then on the table explain the height, width, chest size, etc. in inches or cms, to give your customers a way to check if that size is the right fit.
Different countries have different measurements for the same size codes, hence this will be helpful.
Pattern
Attribute
pattern
Example Value
striped
Feed Structure
<g:pattern>Striped</g:pattern>
This field is only applicable to variable products. If you have different pattern designs for the same product, then you need to mention separate patterns for each variant using this attribute.
Item Group ID
Attribute
item_group_id
Example Value
AB12345
Feed Structure
<g:item_group_id>AB12345</g:item_group_id>
For variable products, if the variations occur due to any of the following:
For variable products, if the variations occur due to any of the following:
color
size
pattern
material
age group
gender
then you must use the “item_group_id” attribute.
All the variants of the same variable product will have the same Item Group ID. This will indicate that they are variants of a single product. So, you need to choose a unique Group ID for each variable product.
Google Product Feed Samples
Now that you know what details you require to generate your WooCommerce Product Feed for Google, now let us look at some samples to understand the structure.
Google accepts several file formats of product feed to be uploaded. However, the recommended format is XML.
● Google Product Category ● GTIN (Global Trade Item Number) ● MPN (Manufacturer Part Number) ● Size ● Color ● Gender ● Pattern ● Special Limited Offer ● Special Limited Offer Duration
Some of these attributes depend on the product type and its variants. Below is a more detailed explanation with examples of how each of these attributes should be assigned on your Facebook product feed for maximum output.
You will get samples of Facebook product feeds later on in this article after I go over detailed instructions on the attributes and some tips.
Let’s look into the details to understand what values you should assign to each attribute, and which ones to include/exclude based on the products on your WooCommerce Store.
Product ID
Attribute
id
Example Value
671
It is a unique identifier for your product on your store. On WooCommerce, you should see the ID when you browse the product list.
It is advised to use the existing SKU of the product as ID since that is always unique.
If multiple products have the same IDs, only the first one on the list will be considered. The rest will be ignored. So make sure each product has a unique ID.
Product Title
Attribute
title
Example Value
Red Logo Rex T-shirt
It is the name of the product to be displayed. On WooCommerce, you should see the product title when you browse the product list.
When you set the product title, specify any special feature such as its color, and the brand name, along with the product. This will grab the attention of the buyers.
However, you are not allowed to use any other promotional touch to the tile (for example adding “free shipping” or “discounted price” or using all caps).
In case of variable products include the brand name to the title. Rather than including just any feature in the main title, mention the feature that makes it a variant of the product.
For example, if a product is a Logo Rex T-shirt and has variations of Red and Blue, then one variation should be named “Logo Rex T-shirt – Red” and the other one “Logo Rex T-shirt – Blue”.
So on the CSV file, they will have different values for the title:
id
title
872
Logo Rex T-shirt – Red
873
Logo Rex T-shirt – Blue
Stock Availability
Attribute
availability
Example Value
in stock
This will signify if the product is still in stock, or all sold out. On the product edit page, scroll down to the product data section. Choose Inventory and you should get the option to set the Stock Status.
This value will be added under the attribute “availability” when generating WooCommerce Facebook product feed for Facebook Dynamic Ads.
Facebook accepts the following values:
in stock – when the product is ready for immediate shipping
out of stock – when the product is not available in stock
preorder – can order in advance for future restock
available for order – if the product is available, but will require a couple of weeks for shipping
discontinued – if the product is discontinued
WooCommerce will give you the options “in stock” and “out of stock” by default.
For the rest of the values, you will need to use extra coding or another plugin.
Tip: Did you know that adding products that are “out of stock” can be a great psychological tactic?
Here’s an example: Let’s say you have a T-shirt with 2 variations, Red and Black and let’s say the black ones are sold out.
Now, when prospects will view the products, they will see that there are two similar products, and one variation is sold out.
This could mean that this t-shirt is pretty popular. Hence, it will tempt certain prospects to think about buying the Red one.
Product Condition
Attribute
condition
Example Value
new
Use this attribute to signify if your product is brand new or refurbished. You can use the values “new”, “refurbished” or “used” to define the condition.
WooCommerce doesn’t have any field to define the condition of the product, hence you have to add it on your own to the product feed.
However, the Product Feed Manager For WooCommerce will have the option for you to add the product condition field for all products.
Product Description
Attribute
description
Example value
This is a Red T-shirt. It was created for testing purposes only.
Add a proper description of the product you are selling. Make sure to highlight all the major features it may have, that will attract buyers.
When you edit a product, you get to set its title, link, and description as shown in the picture below:
You should mention the exclusive features and benefits of the description.
However, you are not allowed to use any extensive promotional touch in the description (for example adding “free shipping” or “discounted price” or using all caps to highlight a certain point).
Also, you shouldn’t include any links to a different webpage or compare the products to any competitors.
Product Image URL
Attribute
image_link
Example Value
https://www.yourwebsite.com/redtee394.png/
This will be the link to the main image of your product. When editing a product, on the right side, scroll down and you should find the option to add a Product image.
Whichever image you use here, you need to provide the URL to that image for the “image_link” attribute.
Remember, this image is the most important factor to get more customers. Most people will notice your product only if they like what they see. So make sure to provide a clear picture with high quality.
It’s best if the image is a clear picture of the product without any promotional text watermark, or any placeholder image (although I am using one just for test purposes).
However, you need to maintain proper image resolution.
If you use a square image for carousel ads, then the dimensions should be 600×600 px.
For Dynamic Ads with a single image, you need a minimum resolution of 1200×630 px with a minimum aspect ratio of 4 : 5 and a maximum aspect ratio of 1: 91: 1.
Anything outside the mentioned maximum aspect ratios will be cropped out.
Product URL
Attribute
link
Example Value
https://www.yourwebsite.com/red-logo-rex-t-shirt/
This is the link to your product page. When editing a product, you will see the Permalink just below the Title box. That is the URL to your product.
It’s best to include the product title on the link, however many prefer to use the product Id instead, and some use both.
Also, You must make sure your website domain is verified and starts with http or https.
Regular Price
Attribute
price
Example Value
26.53 USD
This is the price of the product to be displayed. On the product edit page, scroll down to the product data section. On the General tab, you will get the option to set the Regular Price.
This value will be added under the attribute “price” when generating a product feed for Facebook.
Please note that the price cannot be “0” and any product with “0” or no price value will result in rejection from Facebook Dynamic Ads.
Make sure you are inputting the accurate price with the ISO currency code as the suffix.
Manufacturer/Brand
Attribute
brand
Example Value
RexTest
In case a product doesn’t have a GTIN, then it is mandatory to provide the manufacturer/brand name in order to add that product on Facebook.
If the product falls under the Daily Deals Inventory, then you must also include MPN alongside brand.
But WooCommerce doesn’t include a “brand” field for your products. Hence, you can create a custom field for every product or use a plugin to add the brand field to every product on your WooCommerce store.
Google Product Category
Attribute
google_product_category
Example Value
Apparel & Accessories > Clothing
Facebook uses the same taxonomy and category specifications that Google uses. Hence, to categorize your products, you must set this attribute according to Google’s taxonomy, for your WooCommerce Facebook Product Feed to be approved.
For a manufacturer in the US or Canada, that is GTIN certified, it is necessary to provide the GTIN number for every product on your Facebook Product Feed.
Alternatively, you can also use UPC, EAN, JAN, or ISBN in place of GTIN if you are from a different location.
MPN (Manufacturer Part Number)
Attribute
mpn
Example Value
Rex0011Test
In case a product does not have a GTIN (or UPC, EAN, JAN, ISBN), then you need to provide the MPN instead. It is a unique manufacturer ID for a product that doesn’t have a GTIN.
For products that are under the Daily Deals Inventory, if you provide a Brand name, then it is also mandatory to include MPN.
Now, WooCommerce doesn’t provide fields for Brand, GTIN, or MPN by default. Hence, you need to input custom fields for every product manually.
However, I use the Product Feed Manager For the WooCommerce plugin includes those fields on every product, as shown below:
I’ll just have to input the correct data and use them as values of the required attributes when generating Facebook Product feed.
Size
Attribute
size
Example Value
Large
This field is required only for variable products with size variants.
You may use words such as Small, Medium, or Large, or you may use numbers such as 20, 25, etc, whichever is appropriate to define the size of a product.
Tips: You should keep a measurement table on your site to define the sizes you mentioned for your products.
For example, if you assigned the size as Large, then on the table explain the height, width, chest size, etc. in inches or cms, to give your customers a way to check if that size is the right fit.
Different countries have different measurements for the same size codes, hence this will be helpful.
Color
Attribute
color
Example Value
Tango Red
This field is required only for variable products with color variants.
You need to describe the color of the product (but not color codes or single letters).
If there are multiple colors, mention all the colors while separating them with a “/”. For example, Red/Blue/Green.
In the case of variable products, assign a separate color for each variant and add it to the product title.
Tip: You may use a creative way to describe the color, rather than simply using generic colors. For example, you can rather use catchy color names such as “Tango Red” instead of just “Red”, which is more appealing to buyers.
Gender
Attribute
gender
Example Value
unisex
You need to mention which gender the product is for.
Facebook will accept the following genders:
male
female
unisex
Pattern
Attribute
pattern
Example Value
Flannel
This field is required only for variable products with pattern variants. Use proper pattern names such as “Striped”, “Flannel”, etc.
Special Limited Offer
Attribute
offer_price
Example Value
9.99 USD
This is a unique option you get only on Facebook Dynamic Ads.
You can set a product to be on a special discounted price for certain hours every day (during the offer period), or in other words, the product will be under the Daily Deals Inventory.
Tip: Sometimes a single day discount on certain popular products on your store can boost your sales.
For example, if you have a watch on your store, that people are buying more than other products, you can give a surprise single day special discount offer. This may double your sales on that day and grab more attention from future prospects.
Simply include the “offer_price” attribute to your WooCommerce Facebook product feed and set a discounted price as it’s value to define the special price offered (including a proper ISO currency code as the suffix.). The offer price must be at least 15% less than the regular price, or else Facebook will reject it.
Special Limited Offer Duration
Attribute
offer_price_effective_date
Example Value
2018-06-01T12:00-0300/2018-12-01T00:00-0300
If you want to give a special offer for a product under the Daily Deals Inventory on Facebook, then along with “offer_price”, you must also add this attribute to specify the start and end date, with time, for the special offer.
Mention the start date and hours of the offer, then use a slash, and then mention the end date and hours of the offer.
Tip: Before any major festivals, international occasions or holidays, sometimes, giving special offers on certain relative products can boost your sales.
For example, a week before Christmas, you may implement a special discounted offer on Christmas Hats. This will definitely boost your sales.
Facebook Product Feed Samples
Now that you know what details you require to generate your WooCommerce Product Feed for Facebook Dynamics, now let us look at some samples to understand the structure.
Facebook accepts several file formats of product feeds to be uploaded. However, the recommended format is CSV.
These feeds can easily be generated using the plugin, Product Feed Manager For WooCommerce. Once you have the product feed file, you can now manually upload it to your Facebook Business Account.
Now, you have learned all about WooCommerce Google Product Feed and WooCommerce Facebook Product Feed.
So, let me give you a proper guide on the tool that I use to generate WooCommerce product feed easily, in a few seconds.
How To Generate WooCommerce Product Feed Easily Using The Right Tool
Product Feed Manager For WooCommerce is a plugin with which you can easily generate product feed without any coding skills or any advanced technological expertise.
Why use this plugin?
There are several reasons, why Product Feed Manager For WooCommerce is an ideal choice to help you generate feed:
Manually uploading products takes hours. This plugin will generate feed within seconds.
The plugin has a clean and easy interface with proper documentation. Thus, easy to use and learn.
Generate flawless feeds no matter how many products you have.
Filter options allow you to generate feed only for the products you require.
It provides a Google Category Mapping option that saves us from changing the categories on our WooCommerce store.
It allows you to auto-sync with Google Shopping Center, i.e., your WooCommerce product feed will automatically be sent to Google, without you having to manually upload it.
It comes with a pre-built list of all the required attributes of Google and Facebook, hence you do not need to manually add attributes.
Add certain custom fields such as GTIN, MPN, Brand, and UPC to your products, which are not available by default on WooCommerce.
A very active and useful support team helps you out with any confusion you may have.
Now let’s go through how you can easily generate product feed using Product Feed Manager For WooCommerce.
How to get a Product Feed Manager For WooCommerce?
Product Feed Manager For WooCommerce has a free version that you can use to test out its basic features and understand its interface.
But it’s recommended to get the pro version since it comes with more refined features.
Install and activate the plugin on your WordPress dashboard and you should see something like this:
Now you are ready to generate product feed.
How to Generate WooCommerce Product Feed using Product Feed Manager?
Product Feed Manager For WooCommerce is so easy to use.
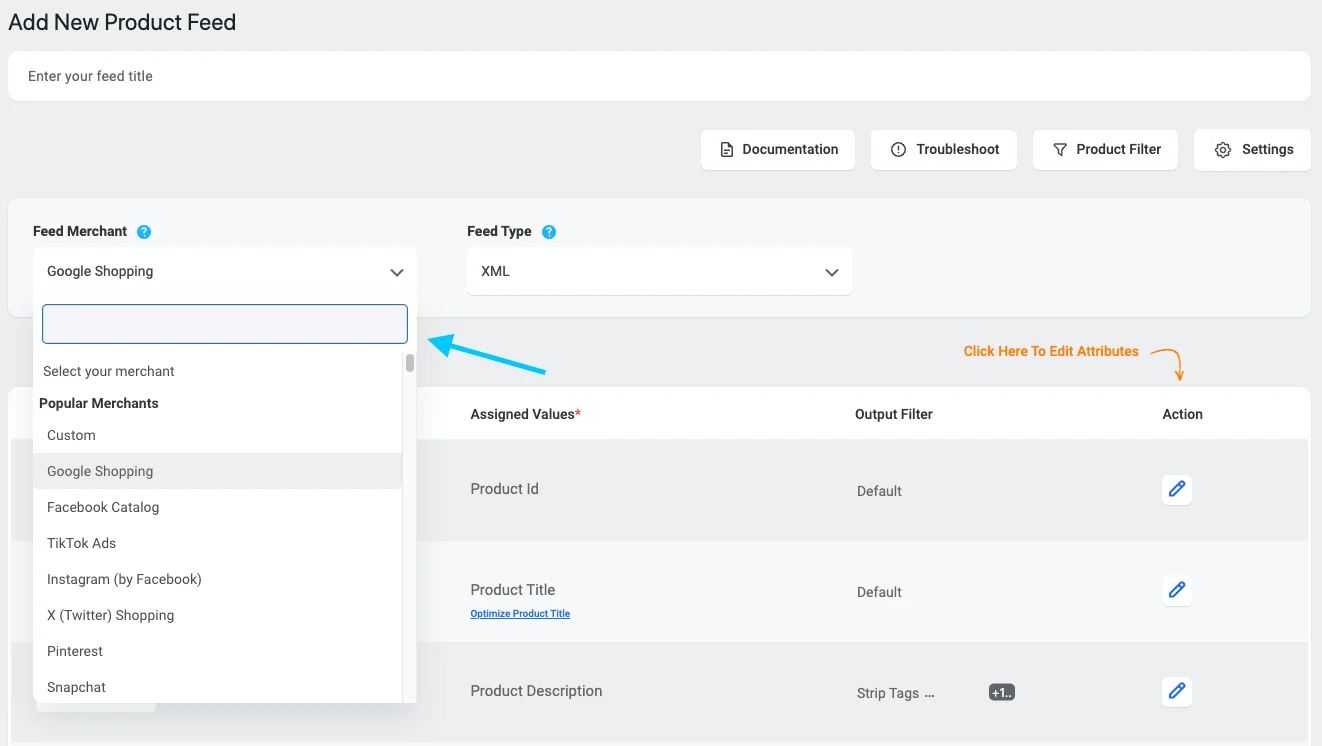
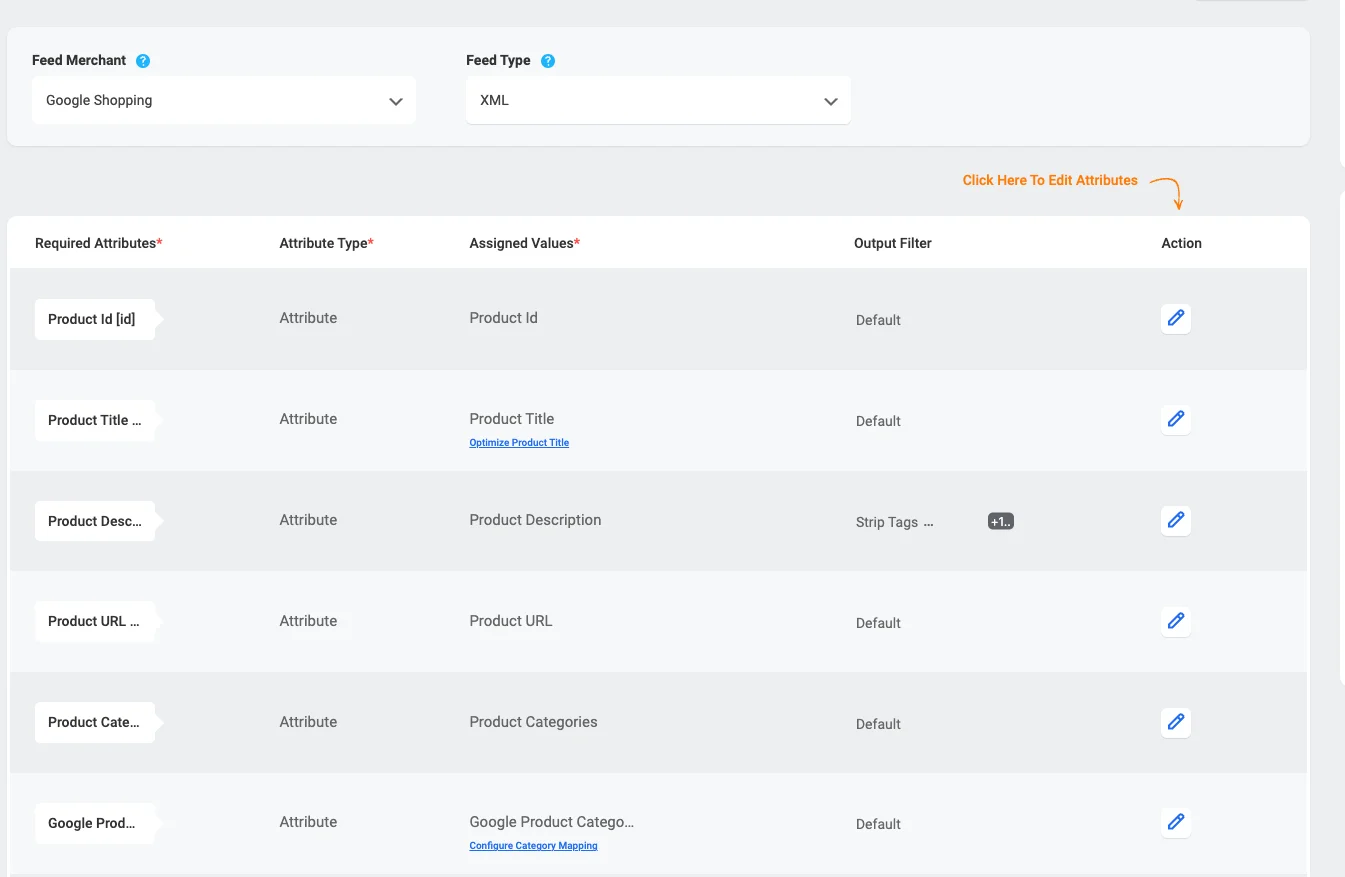
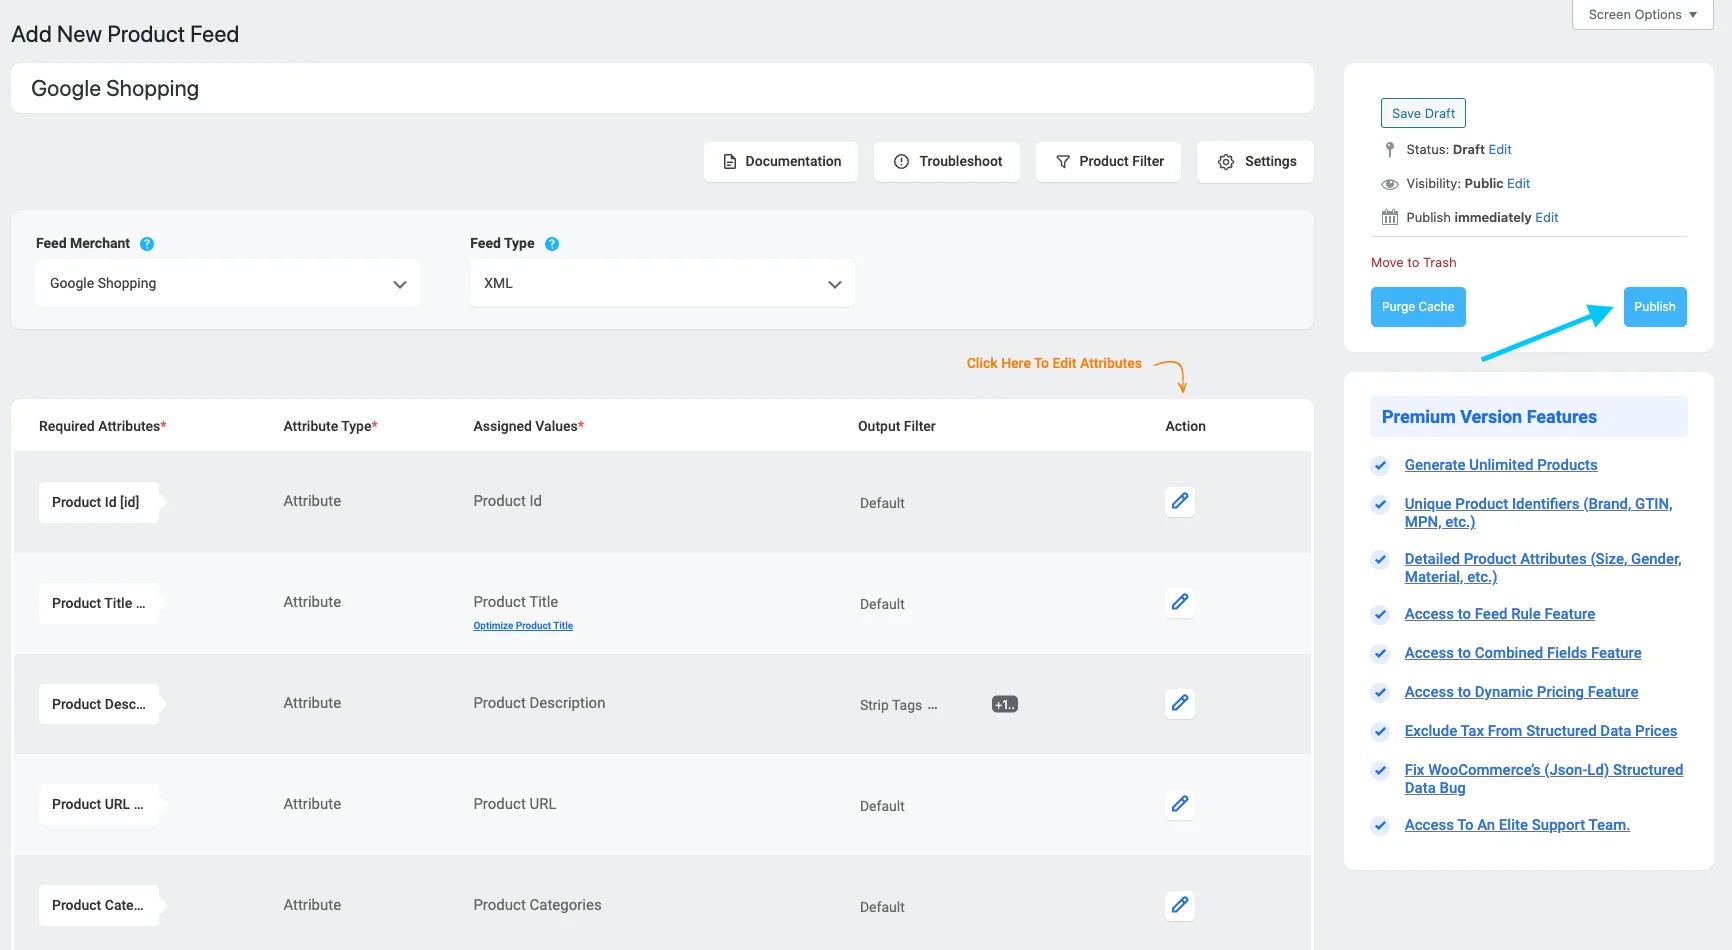
1. Simply click on “Add New Feed” and you shall see the Add New Product Feed page:
2. On top, you will get the option to add a title to the feed.
First, give a title to the feed file. Then, you can set which products to include in your feed.
3. Just under the title, you will see an option to select your preferred merchant. Simply click on the Feed Merchant dropdown button and select your preferred merchant from the dropdown or you can search in the dropdown box.
Select your preferred merchant and all the required attributes will be loaded below.
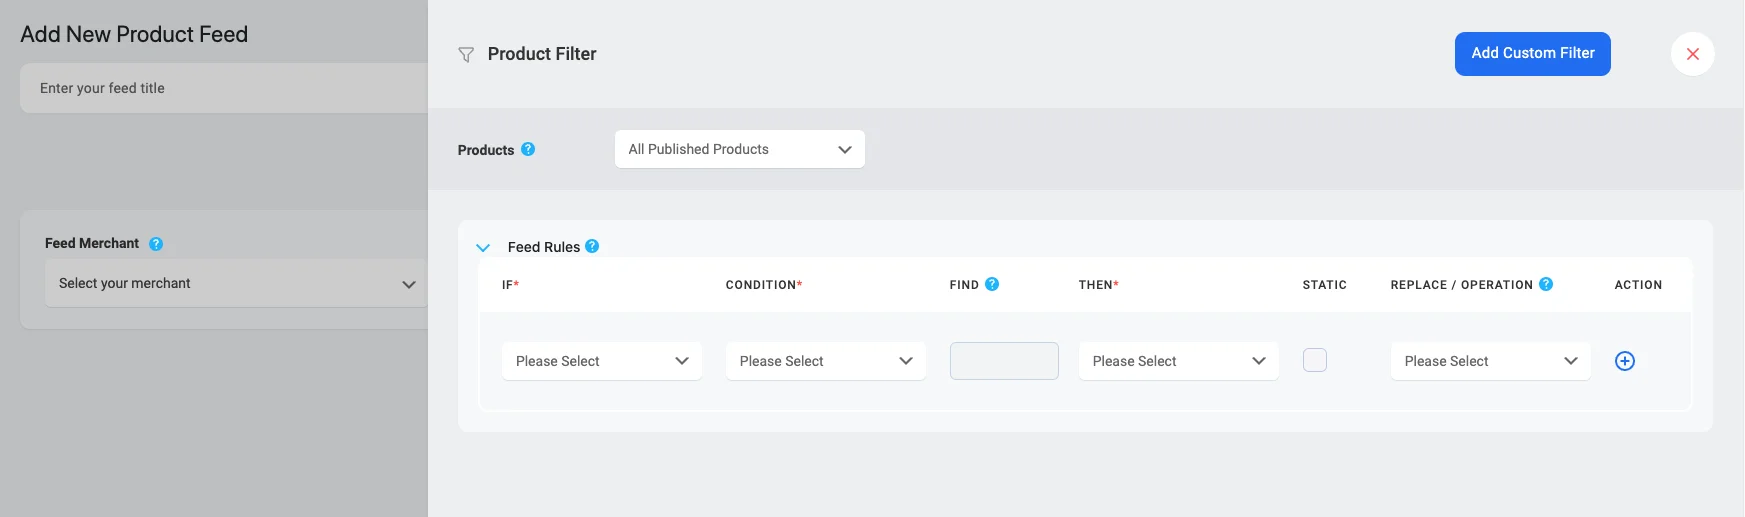
Product Filter
With the Product Feed Manager for the WooCommerce plugin, you will have the option to choose which products to include in your feed.
To see the options, simply click on the Product Filter button.
Once you click on the Product Filter button, the Product Filter drawer will slide in from the right side of the window.
Here, you will see that the “All Published Products” option is selected by default – this option will include each and every product on your WooCommerce store.
If you want, then you can use other filter options. Click on the dropdown, and you will see some filter options in the dropdown list:
You can choose
All Featured Products – only publish the featured products
Category Filter – choose products using categories
Product Filter – use this custom filter to set a conditional filter
Tag Filter – choose a product using tags
Watch this video to see how amazing the filter options of are. You can easily choose the products you want to include or exclude from your product feed.
Schedule Auto-update
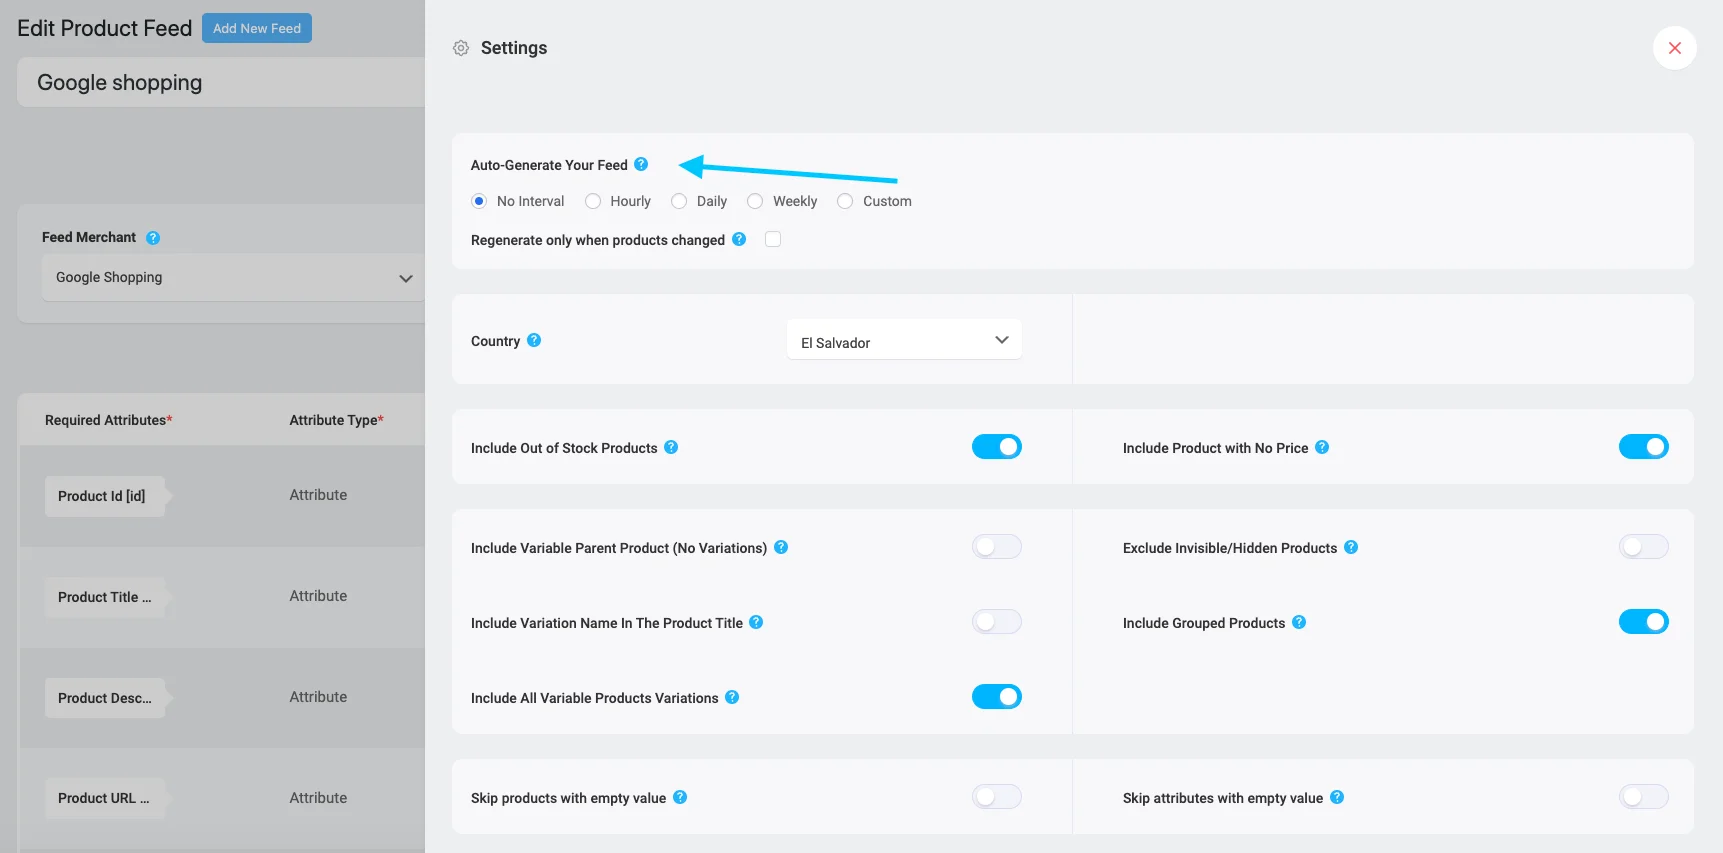
To set a schedule fetch time, click on the Product Settings button first.
Once you click on the Product Settings button, the Product Settings drawer will slide in from the right side of the window
Here, on the top of the Settings options, you will find an option Auto-Generate Your Feed.
You can set the scheduled update to be daily, hourly, or weekly.
After that, you will get the options to either include or exclude variation products, and whether to include parent products in case of the grouped products.
WPML Support
If you use WPML to set different language versions of your products, you will find a WPML section here.
You can have a look at this doc for a better understanding of how you can generate a feed with WPML:
To generate a feed, at first, you need to select your preferred merchant.
For Google Product Feed, select Merchant Type “Google Shopping“. For Facebook Product Feed, select Merchant Type “Facebook.”
Once you select, you will see the page refresh and the required attributes will automatically appear.
Now, here, the Attributes are on the left, and the values of the attributes are set under the Assigned Values column.
Choose the Type as Attribute and then select the Value this attribute will hold from your WooCommerce store.
If you think any Attribute is missing, you can add it by pressing the button “ADD NEW ATTRIBUTE.”
In this page, you will find some language-related options if you are using WPML.
You can have a look at this doc for a better understanding of how you can generate a feed with WPML translation.
Generate WooCommerce Product Feed
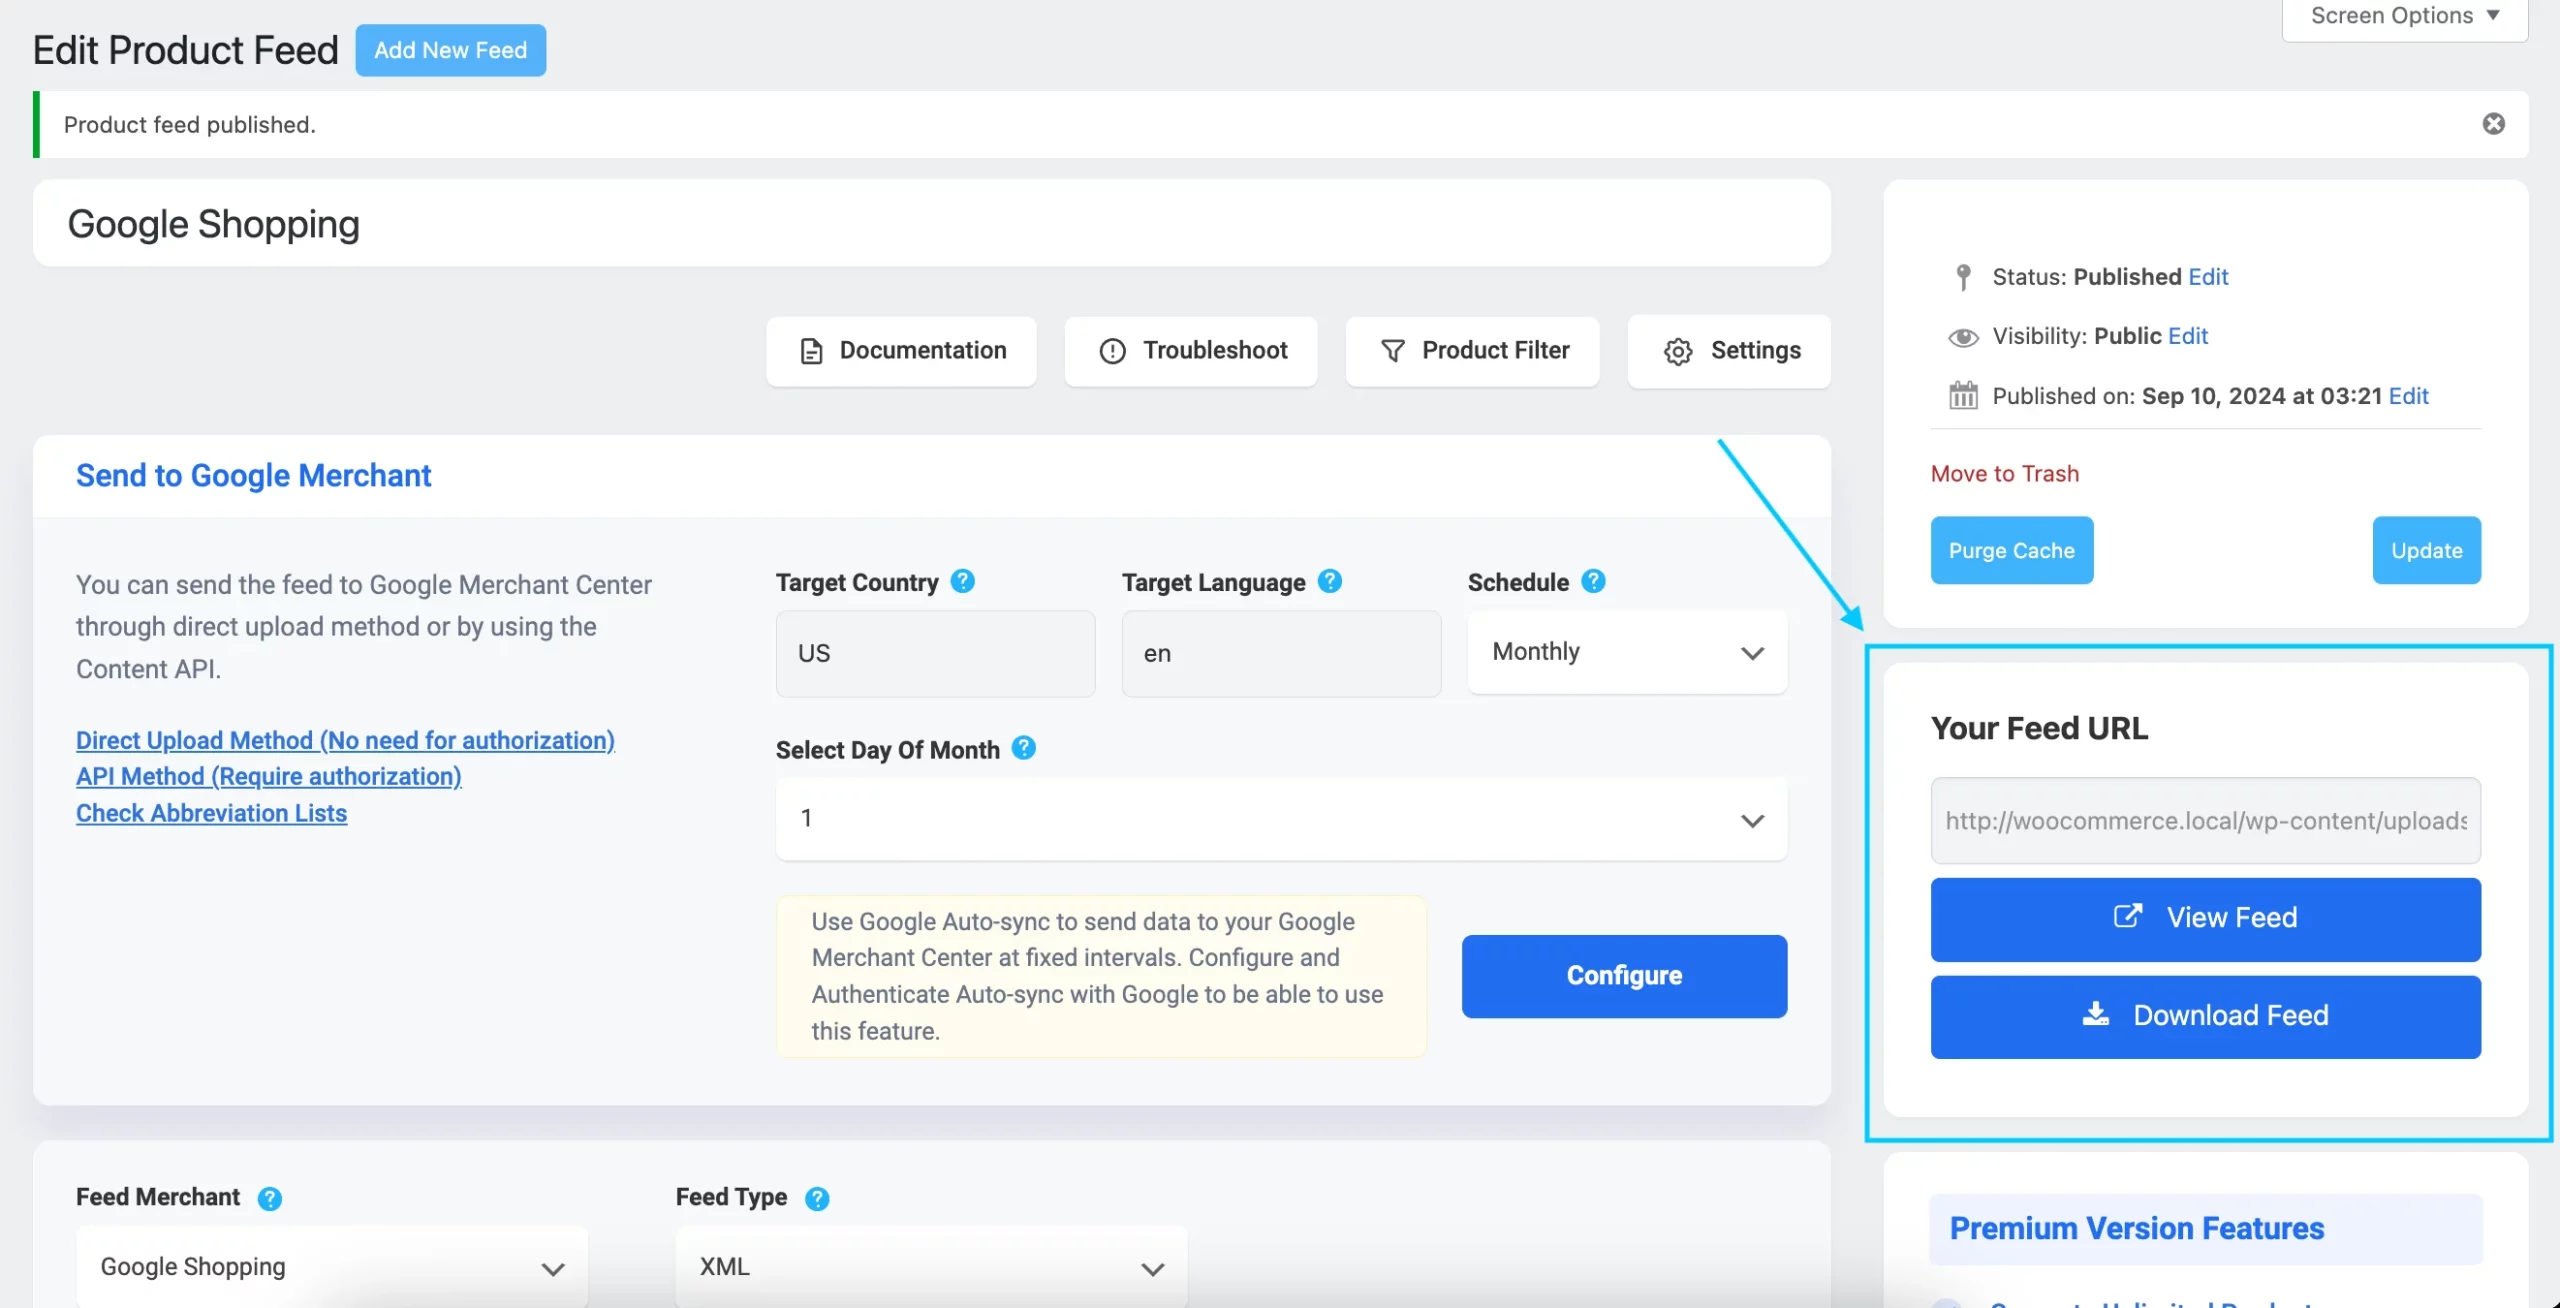
Once the feed is configured, you can now click on “Publish” on the right side and you will see a loading bar.
Once this is complete, the “Publish” button will change to an “Update” button and you will get the feed link or feed download button right below the “Update button.”
Then you can set your product data feed to be updated automatically using the “Auto-Generate Your Feed” feature. So you won’t need to manually update your feed everytime you add new products or update any product individually.
Now you can download this feed and upload it to your desired merchant shop and watch your store sales get a boom.
Category Mapping
Now, as I mentioned earlier, this plugin offers category mapping options. Check out this video to see how to use its category mapping feature easily:
Auto-sync With Google Shopping Center
One of the best features that Product Feed Manager For WooCommerce offers is that you can auto-sync your WooCommerce product feed directly to Google Shopping Center.
You can schedule the auto-sync to take place either hourly, weekly, or monthly. This means that every change you make to your products of the product feed. They will automatically be updated on your Google Shopping Center. You do not have to download and upload the feed every time.
It is always important to learn and implement the best ways available out there, to increase your ROI.
Product Feed Manager For WooCommerce is a powerful tool that you can use to achieve the goal of tripling your store performance, along with other marketing campaigns.
Hence, go ahead and start your journey towards success!!
Feel free to leave comments if you have any confusion or suggestions.
Frequently Asked Question
What is a Product Feed?
A product feed is basically a file (could be CSV, XML, RSS, etc.) containing comprehensive data about products, including titles, images, descriptions, prices, categories, availability, quantities, and other relevant attributes or data.
By providing your customers with accurate and engaging product information in various marketplaces, a well-structured product feed will help with informed purchasing decisions and targeted advertising campaigns.
What are the Benefits of Using Product Feeds For WooCommerce?
Here are some of the significant benefits of using product feeds for your business,
Get more visibility for your products by listing them on popular marketplaces and comparison shopping engines. This opens up your business to a much larger customer base who may have never discovered your store otherwise.
Product feed management tools help ensure the product information you provide stays consistent and accurate across all platforms. No more worrying about errors that could leave customers feeling misled or dissatisfied.
Updating product details like pricing and availability with product feeds. Make any changes once, and they’ll automatically sync across every channel where your feed is distributed.
What criteria should I consider before selecting a Product Feed Management tool that suits my business?
Before you invest in a Product Feed Management tool you should check whether the tool has these or not,
WooCommerce compatibility
Easy-to-use interface
Customizable feed attributes
Automated Feed Updates
Performance analytics and reporting
Product Feed Manager For WooCommerce has all these – Check it out
How do Product Data Feeds work?
Once you create product feeds for your preferred marketplace, you can upload and promote them on those marketplaces to increase your sales without any effort. If you change anything in your WooCommerce store, and they’ll automatically sync across every channel where your feed is distributed.


![Complete Guide To WooCommerce Product Feed - Google Shopping & Facebook [2024] 1](https://staging-rextheme.kinsta.cloud/wp-content/uploads/2019/05/005-Product-Category.png)

![Complete Guide To WooCommerce Product Feed - Google Shopping & Facebook [2024] 2](https://staging-rextheme.kinsta.cloud/wp-content/uploads/2019/05/007-G-Product-Image-URL.png)


![Complete Guide To WooCommerce Product Feed - Google Shopping & Facebook [2024] 3](https://staging-rextheme.kinsta.cloud/wp-content/uploads/2019/05/Facebook-feed-CSV.png)