Categorieën
Product Feed Manager For WooCommerce Update

Generate WooCommerce Product Feed Optimized For Effective Promotion [2024]

Your WooCommerce store conversion can significantly increase by promoting on renounced 180+ merchant platforms such as Google Shopping, Facebook Dynamics, eBay, Amazon, etc with our product feed manager for the Woocommerce plugin.

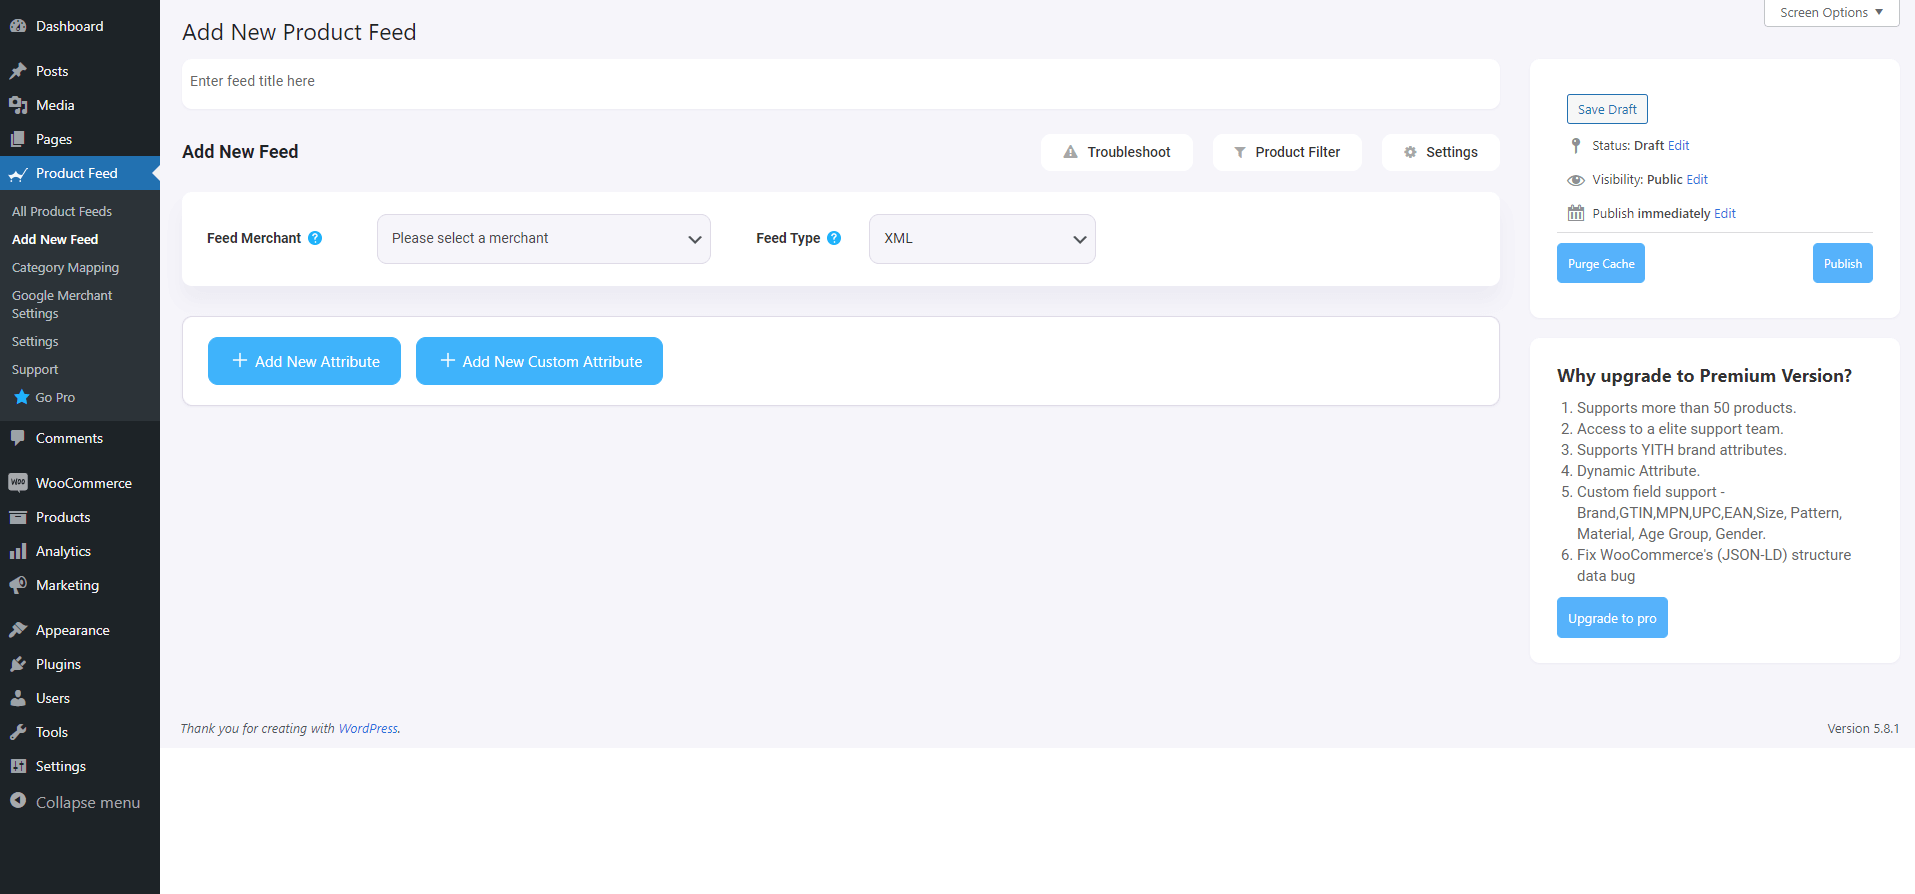
Product Feed Manager (PFM) for WooCommerce is here to help you generate a product feed for all the products on your WooCommerce store with just a few clicks and without any hassle.

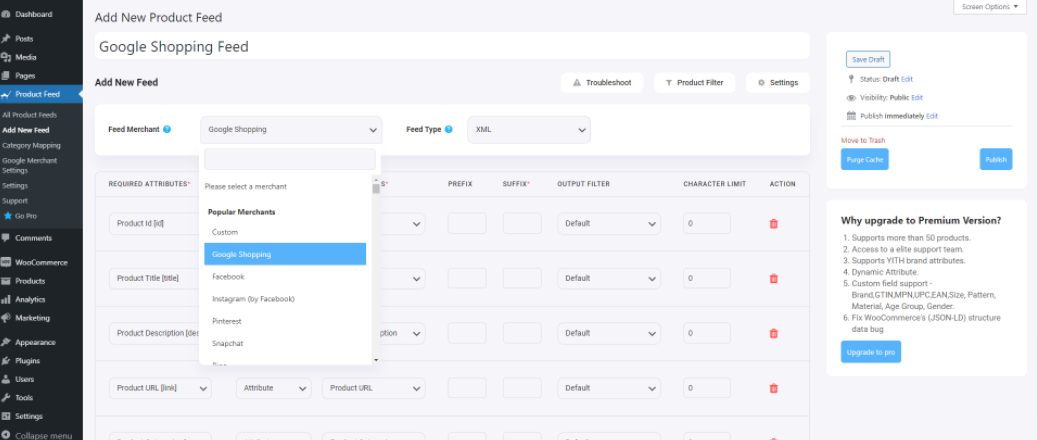
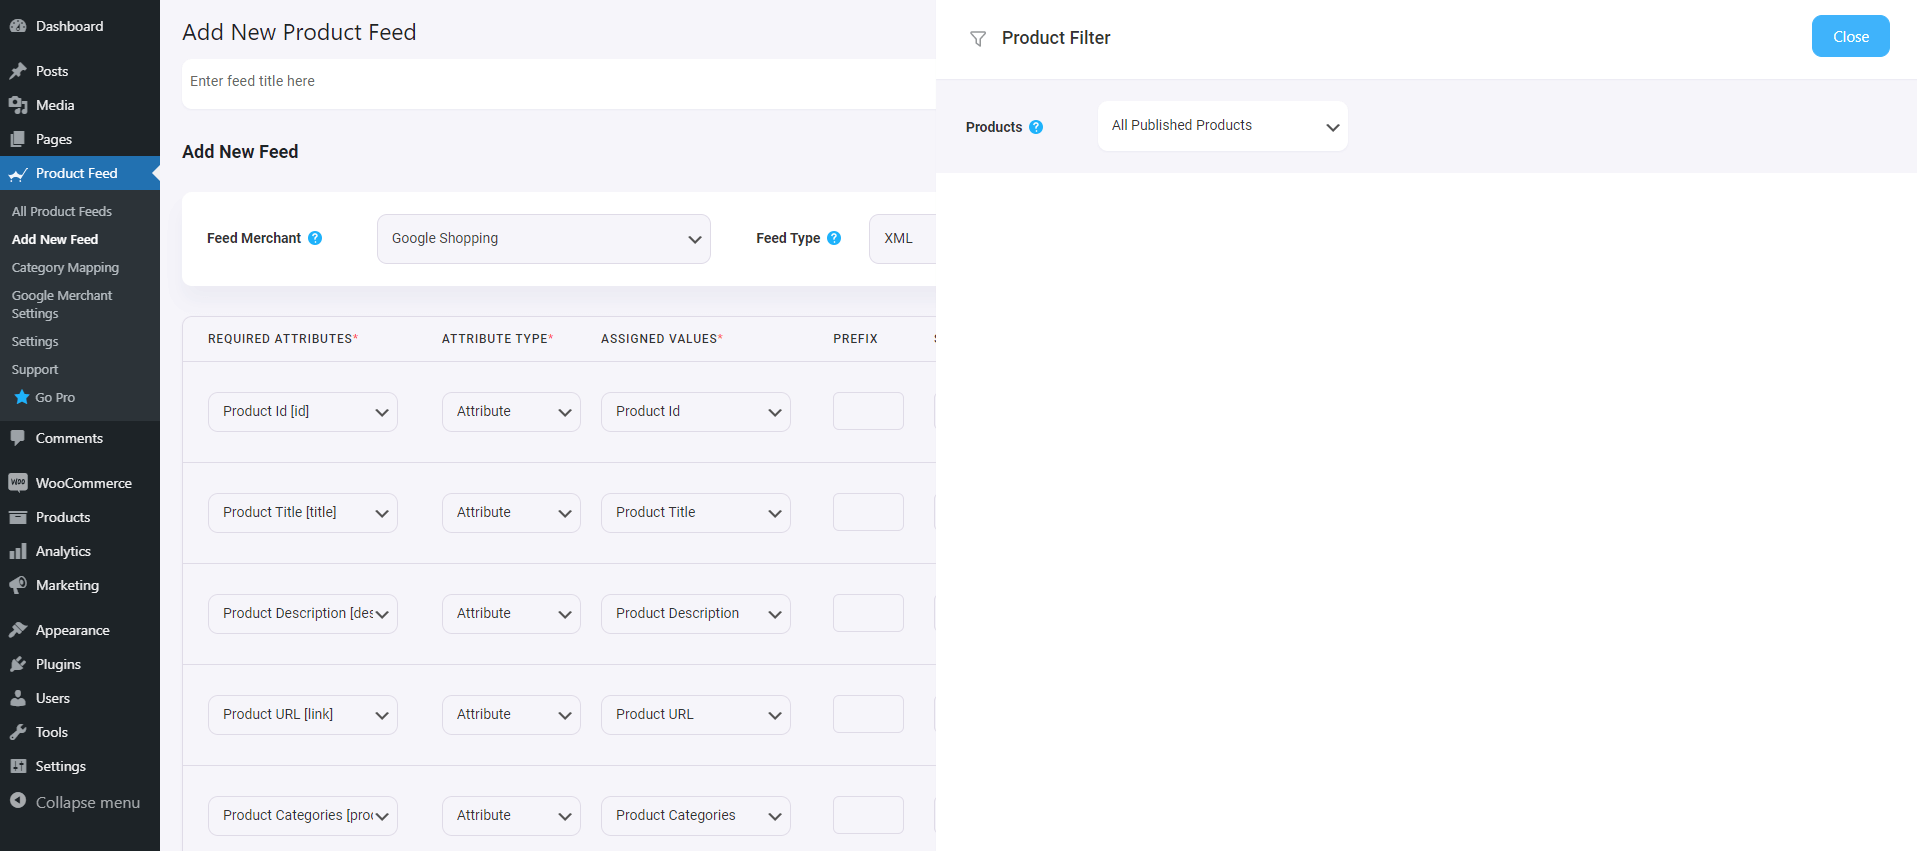
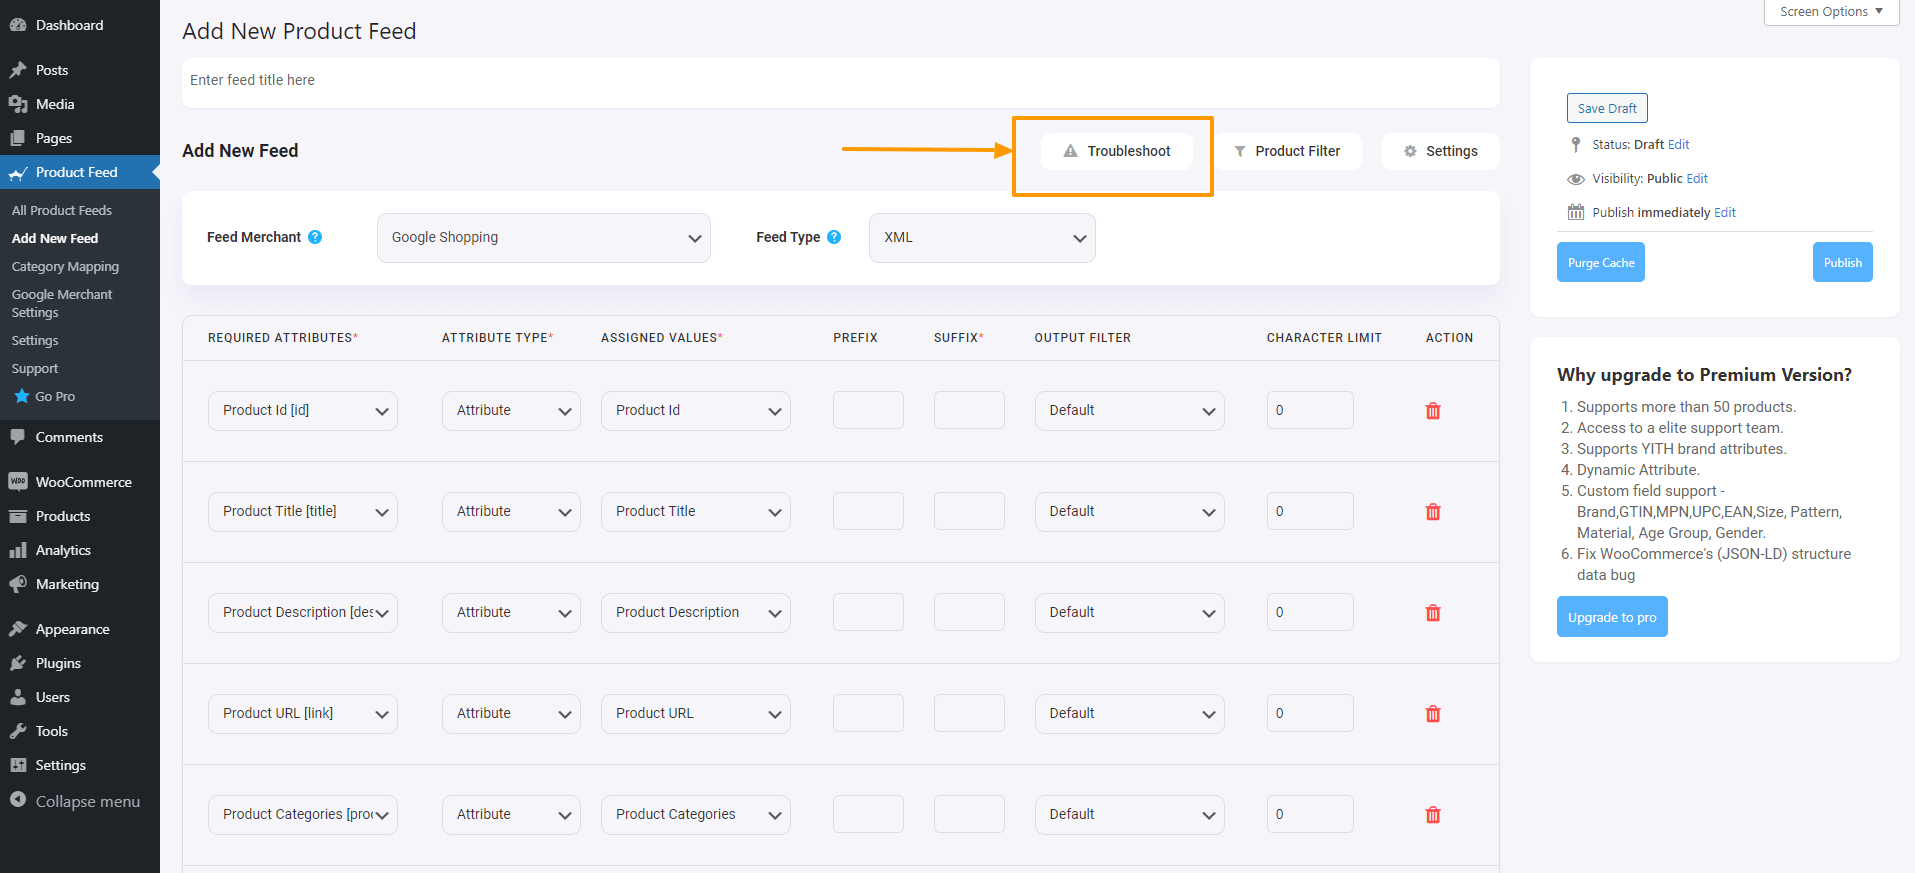
WPFM allows you to generate flawless WooCommerce product data feed in the correct format for your desired merchant shop. All you need to do is select the merchant type, assign the correct attribute values, and generate the product feed.

Download dan gewoon het feed-bestand en upload het op het door u gewenste handelsplatform.

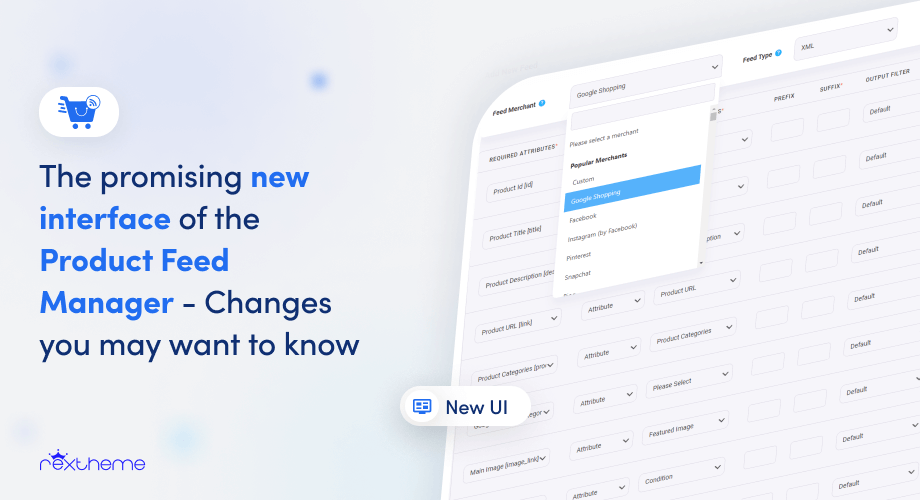
New And Improved Product Feed Manager For WooCommerce 

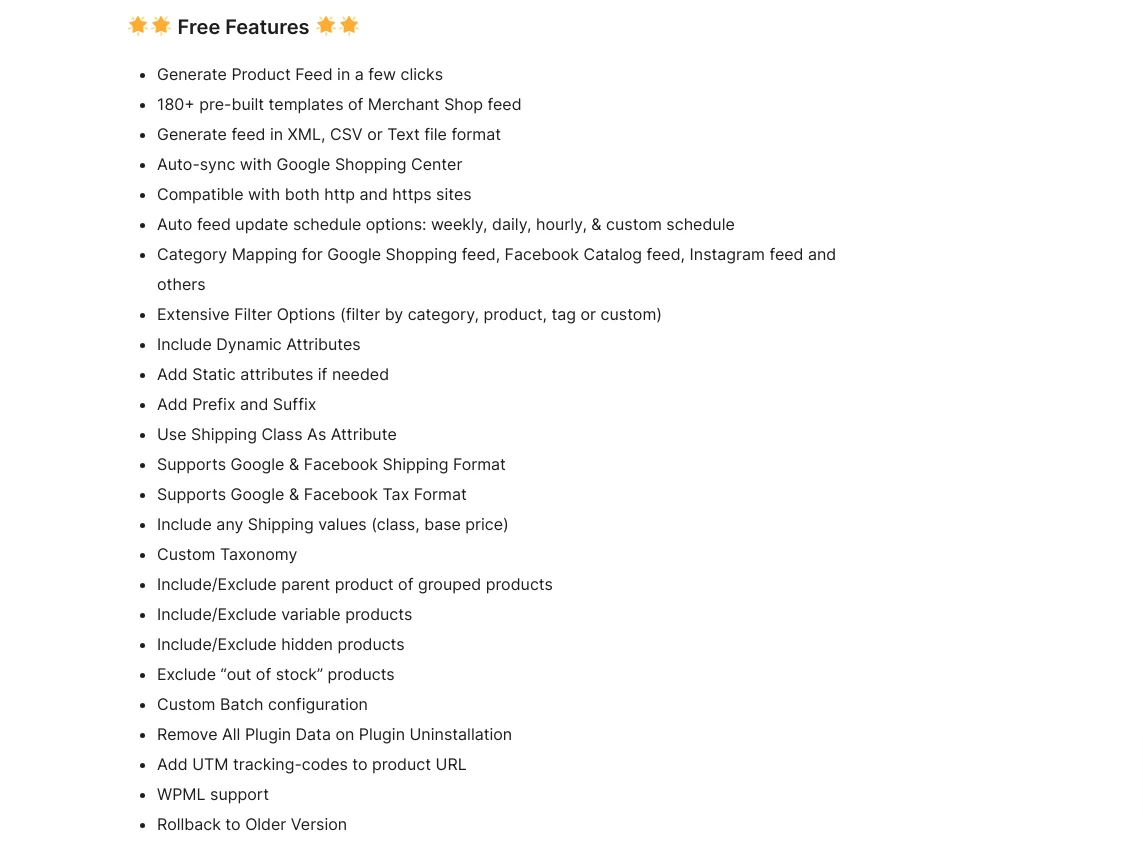
Product Feed Manager For WooCommerce already has set templates for major merchant shops for free.

PFM Repo

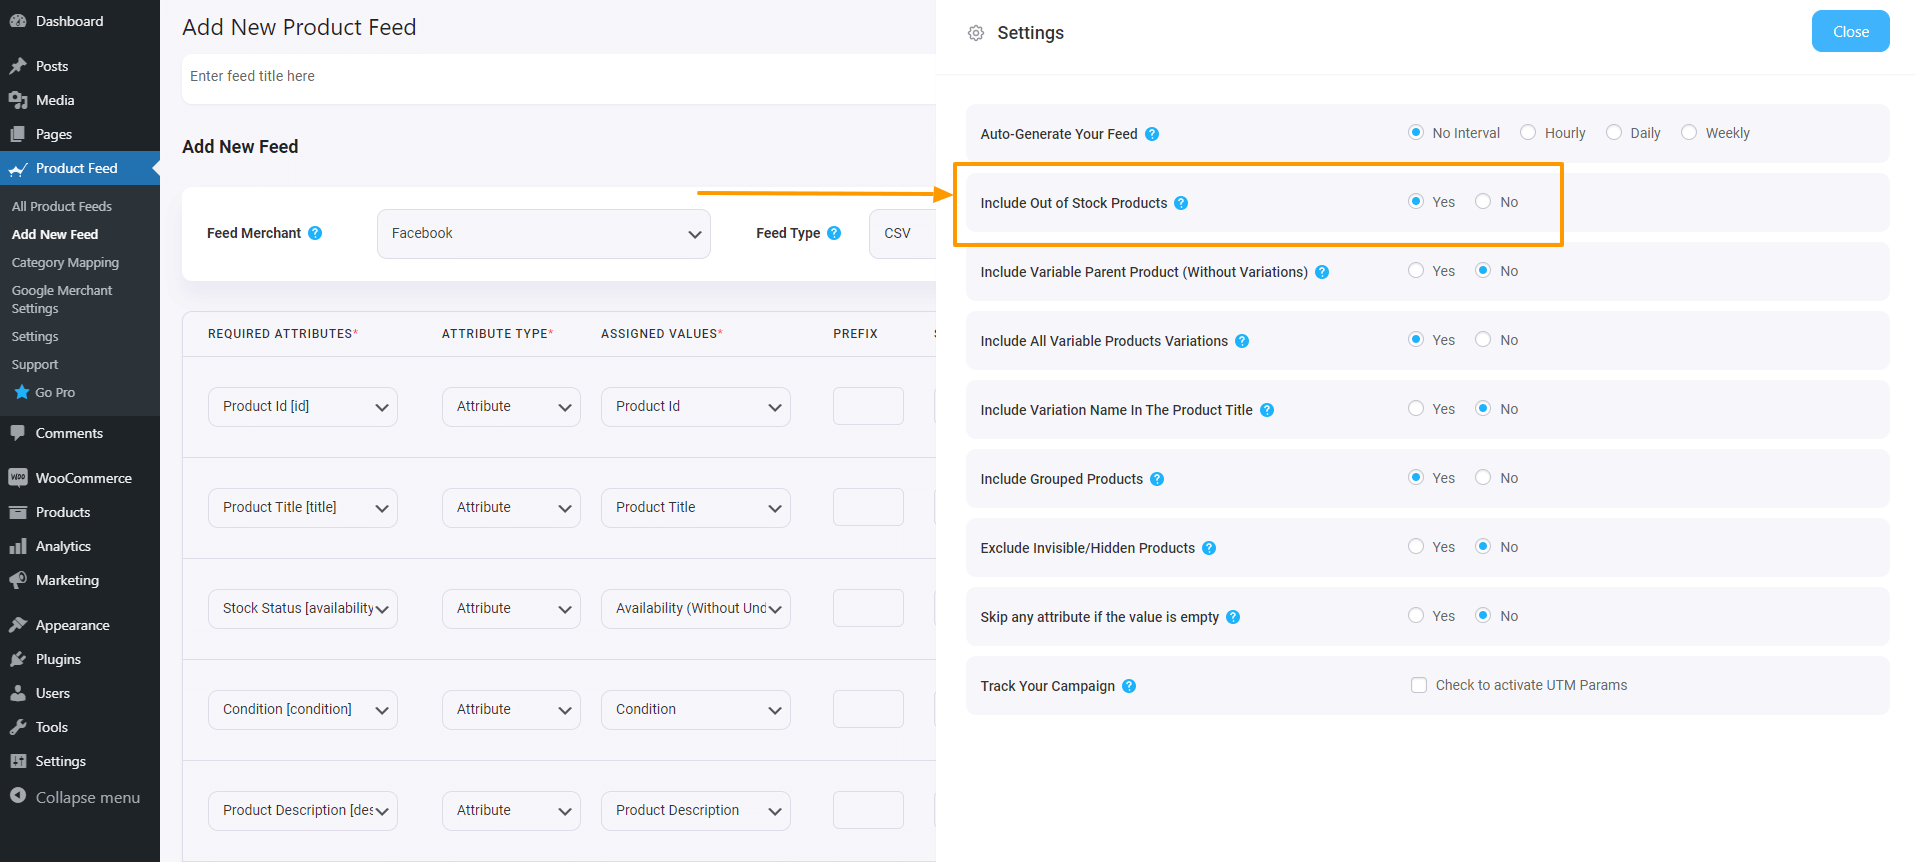
It also has many useful features including Auto-sync with google shopping center, Extensive Filter options (category, tag, custom), and more, in the free version. Have a look below :

PFM free features

Upgrading to pro allows you to generate unlimited product feeds and many more. Have a look below :

PFM premium features

So as you can see, we have introduced a few more impressive features that will help you generate product feeds more efficiently and without any hassle.

Let us look at the new features of Product Feed Manager For WooCommerce.

1. Grote hoeveelheden productvoer genereren zonder problemen

Het is altijd een grote zorg over de efficiëntie bij het genereren van productvoer voor een groot aantal producten.

Er zijn veel tools die vaak overbelast raken en niet goed voer genereren. Ze stoppen na het genereren van een paar duizend productaanvoer of ze crashen gewoon. Ook zullen sommige tools beweren dat de productfeed volledig wordt gegenereerd, maar als u de feed controleert, zult u zien dat er verschillende gegevens ontbreken. 

Unlike most other such plugins, Product Feed Manager For WooCommerce generates feed using batch processing.

Which means, there is no chance of getting overloaded. Whether you have 50 products or 50,000 products or more, it does not matter; the plugin will successfully generate a product feed without any flaws.

2. Aangepaste velden voor identificatoren (Pro) 

Some products have assigned GTIN, MPN, UPC, or other forms of such product identifiers.

Om producten op Google Shopping te promoten, moet u ten minste één van deze identifiers opgeven, als u de merknaam van uw product wilt bekendmaken.

Zoals u weet, biedt WooCommerce dergelijke velden niet standaard aan. Dus uw opties zouden zijn om aangepaste velden te gebruiken, handmatig attributen toe te voegen aan de feed, of een andere plugin te gebruiken om deze velden toe te voegen.

But now, you will not need to do any extra work. Product Feed Manager For WooCommerce now helps you to get these fields.

Aangepaste velden toevoegen

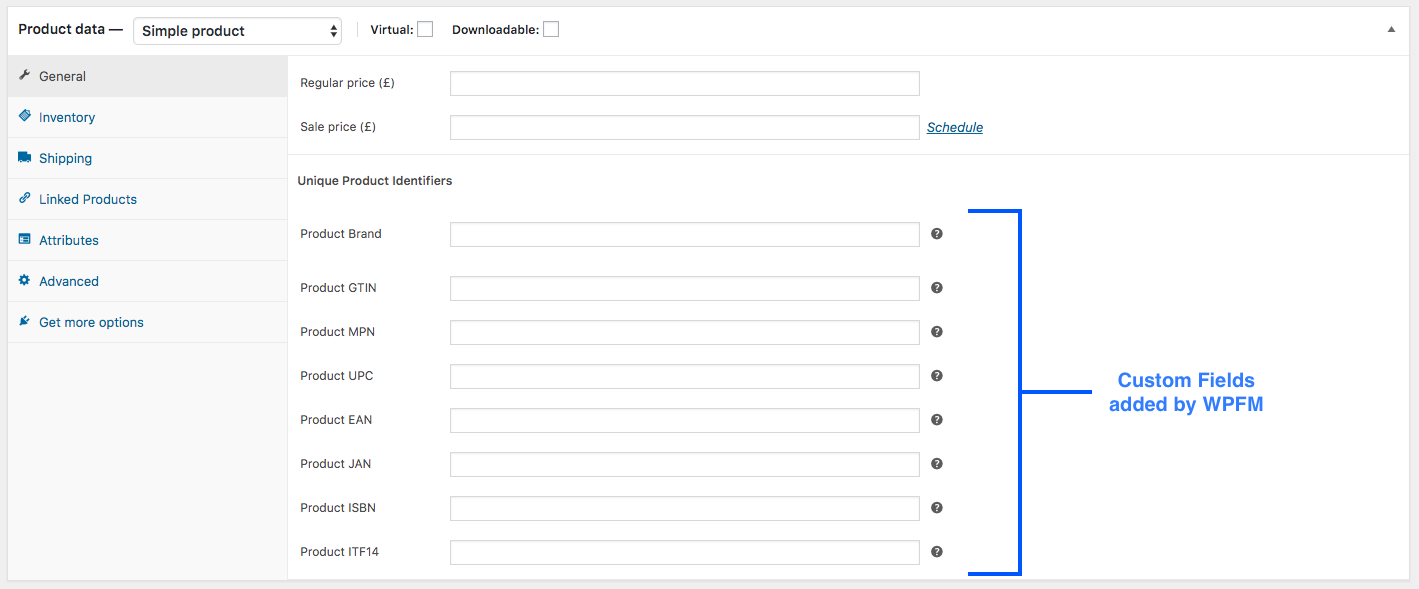
U hoeft alleen maar de juiste gegevens in te voeren en de productaanvoer te genereren. 

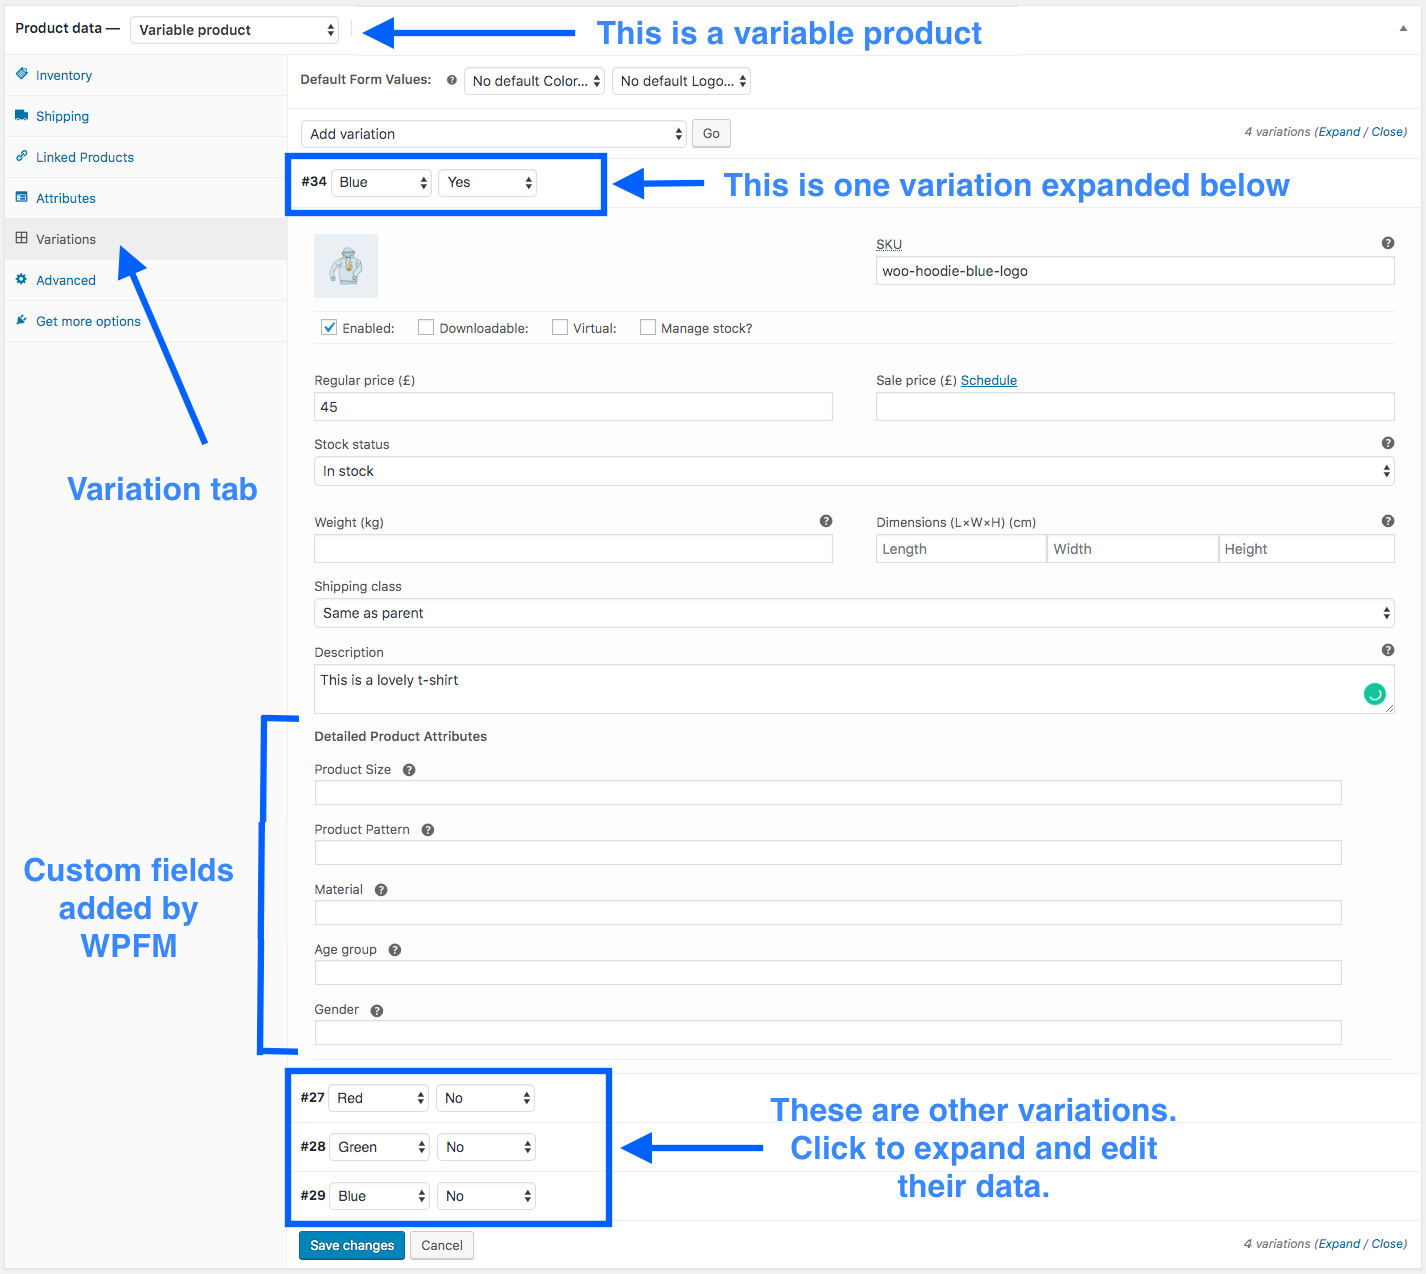
Voor een enkel product zouden deze velden handmatig kunnen worden toegevoegd met behulp van WooCommerce aangepaste velden, maar hoe zit het met variabele producten?

Om u te laten weten dat de identifiers uniek zijn voor elke variatie van een product onder hetzelfde merk. WooCommerce staat alleen toe om aangepaste velden toe te voegen voor het moederproduct, niet de variaties.

Product Feed Manager For WooCommerce gives you the solution to this. The custom fields you get with our plugin will add the identifier fields within each variation for variable products.

Aangepaste velden voor variabele producten

Dat scheelt u veel complicaties.

You don’t need to use any extra plugins or get expert assistance to add the custom fields. Product Feed Manager For WooCommerce will help you add these fields without any extra effort.

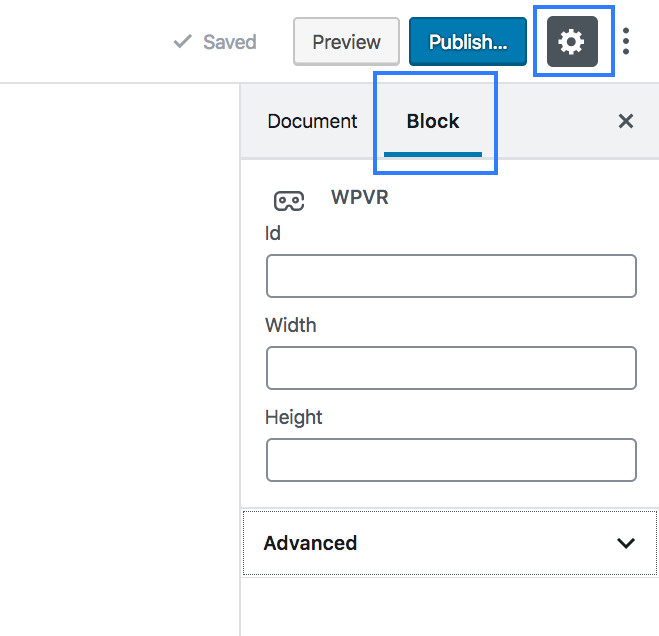
Enabling custom identifier fields:
If you have activated the license for Product Feed Manager For WooCommerce Pro, then you should be able to enable or disable custom identifier fields from the dashboard.

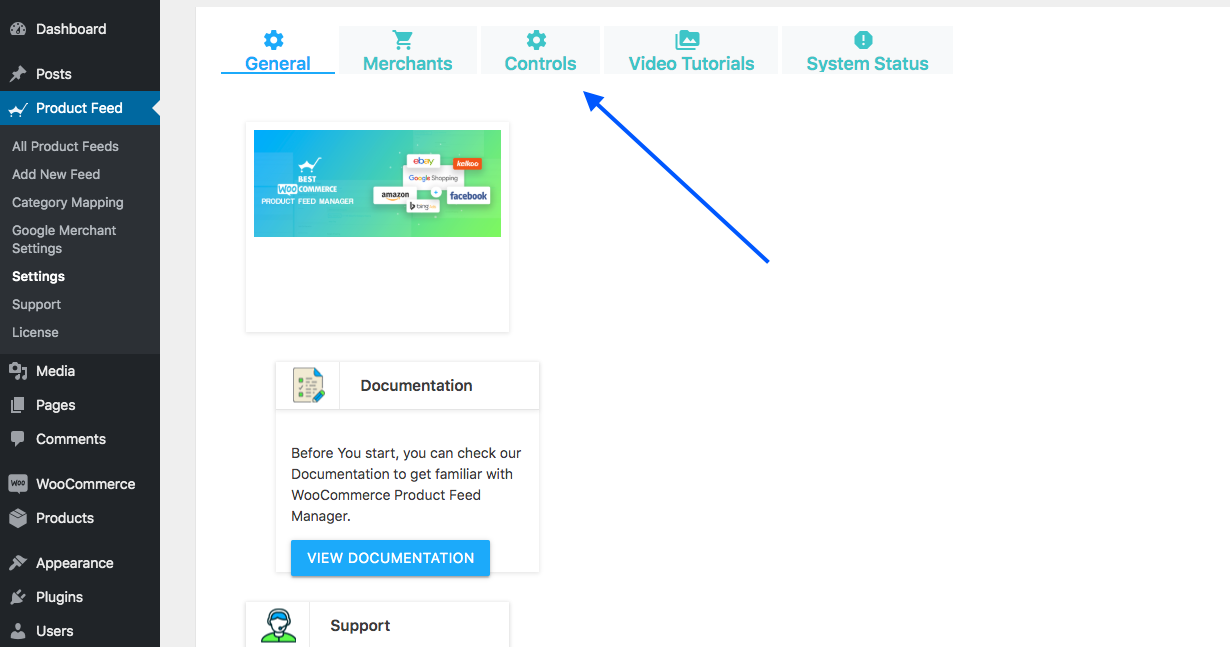
Go to Dashboard > Product Feed> Settings. On the top, go to the tab called Controls.

Besturingselementen

Zodra u daarheen gaat, krijgt u de optie om aangepaste identificatievelden in of uit te schakelen.
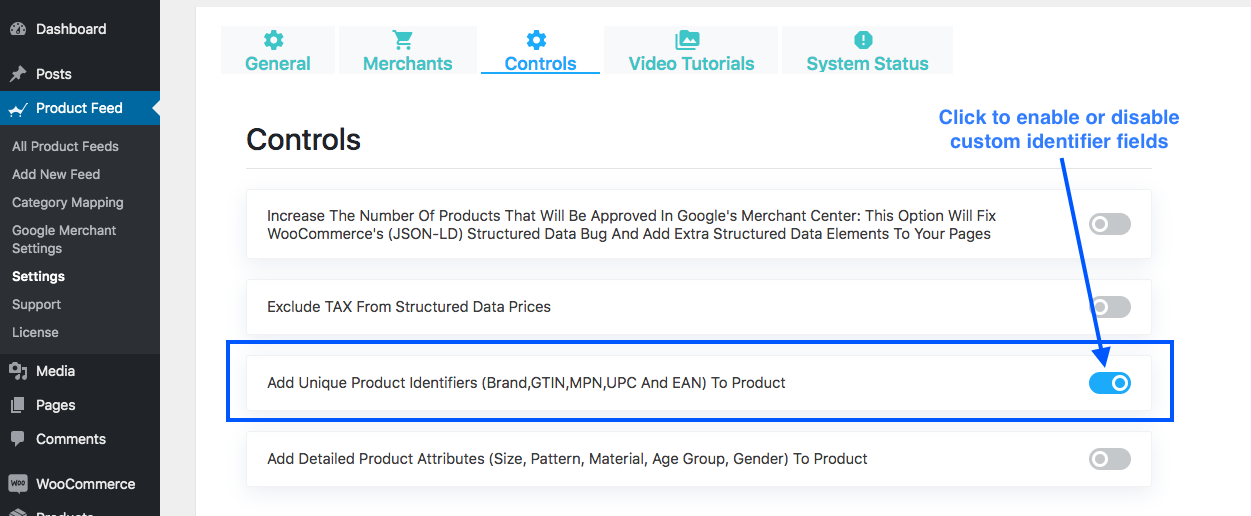
Identificatoren inschakelen

Zo simpel is het.

3. Aangepaste velden voor extra attributen (Pro)

Some attributes are very important for prospects to make decisions but WooCommerce doesn’t have fields for that. For example, age group, size, material, etc.

Also, if you have apparel products, to promote them on Google Shopping, it is mandatory to provide extra data which includes size, pattern, material, age group, and gender, for which each product is suitable.

You can add the custom fields for these attributes through Product Feed Manager For WooCommerce.

Voor enkelvoudig product:

Enkelvoudig product Custom Attribute toegevoegd

Voor variabele producten:

Variabel product Custom Attribute toegevoegd

Due to this, you can easily assign these attributes and use them for generating product feeds.

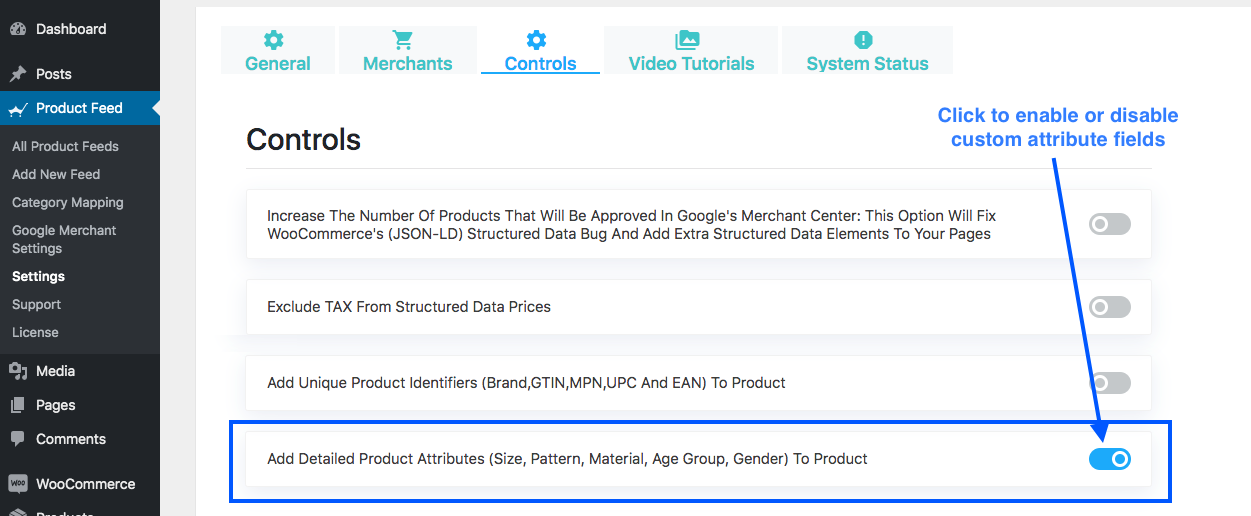
Enabling custom attribute fields:
If you have activated the license for Product Feed Manager For WooCommerce Pro, then you should be able to enable or disable custom attribute fields from the dashboard.

Ga naar Dashboard > productaanvoer > Instellingen. Ga bovenaan naar het tabblad Controls.

Besturingselementen

Zodra u daarheen gaat, krijgt u de optie om aangepaste attribuutvelden in of uit te schakelen.

Aangepaste attribuutvelden inschakelen

Als u deze velden eenmaal hebt, is er dus geen kans meer dat u informatie mist bij het uploaden van producten naar andere handelswinkels.

4. eBay MIP-feedgeneratie 

Voederformaten zijn cruciaal bij het uploaden op andere platformen. Sommige platformen hebben echter verschillende feedformaten. eBay MIP is daar één van.

You can generate a product feed for eBay MIP in the correct format using Product Feed Manager For WooCommerce.

Most merchant shops accept a feed format similar to what Google accepts. But eBay MIP requires a completely unique feed format.

Hier is een blik op de verschillen:

Google en eBay-feedformaat vergelijken

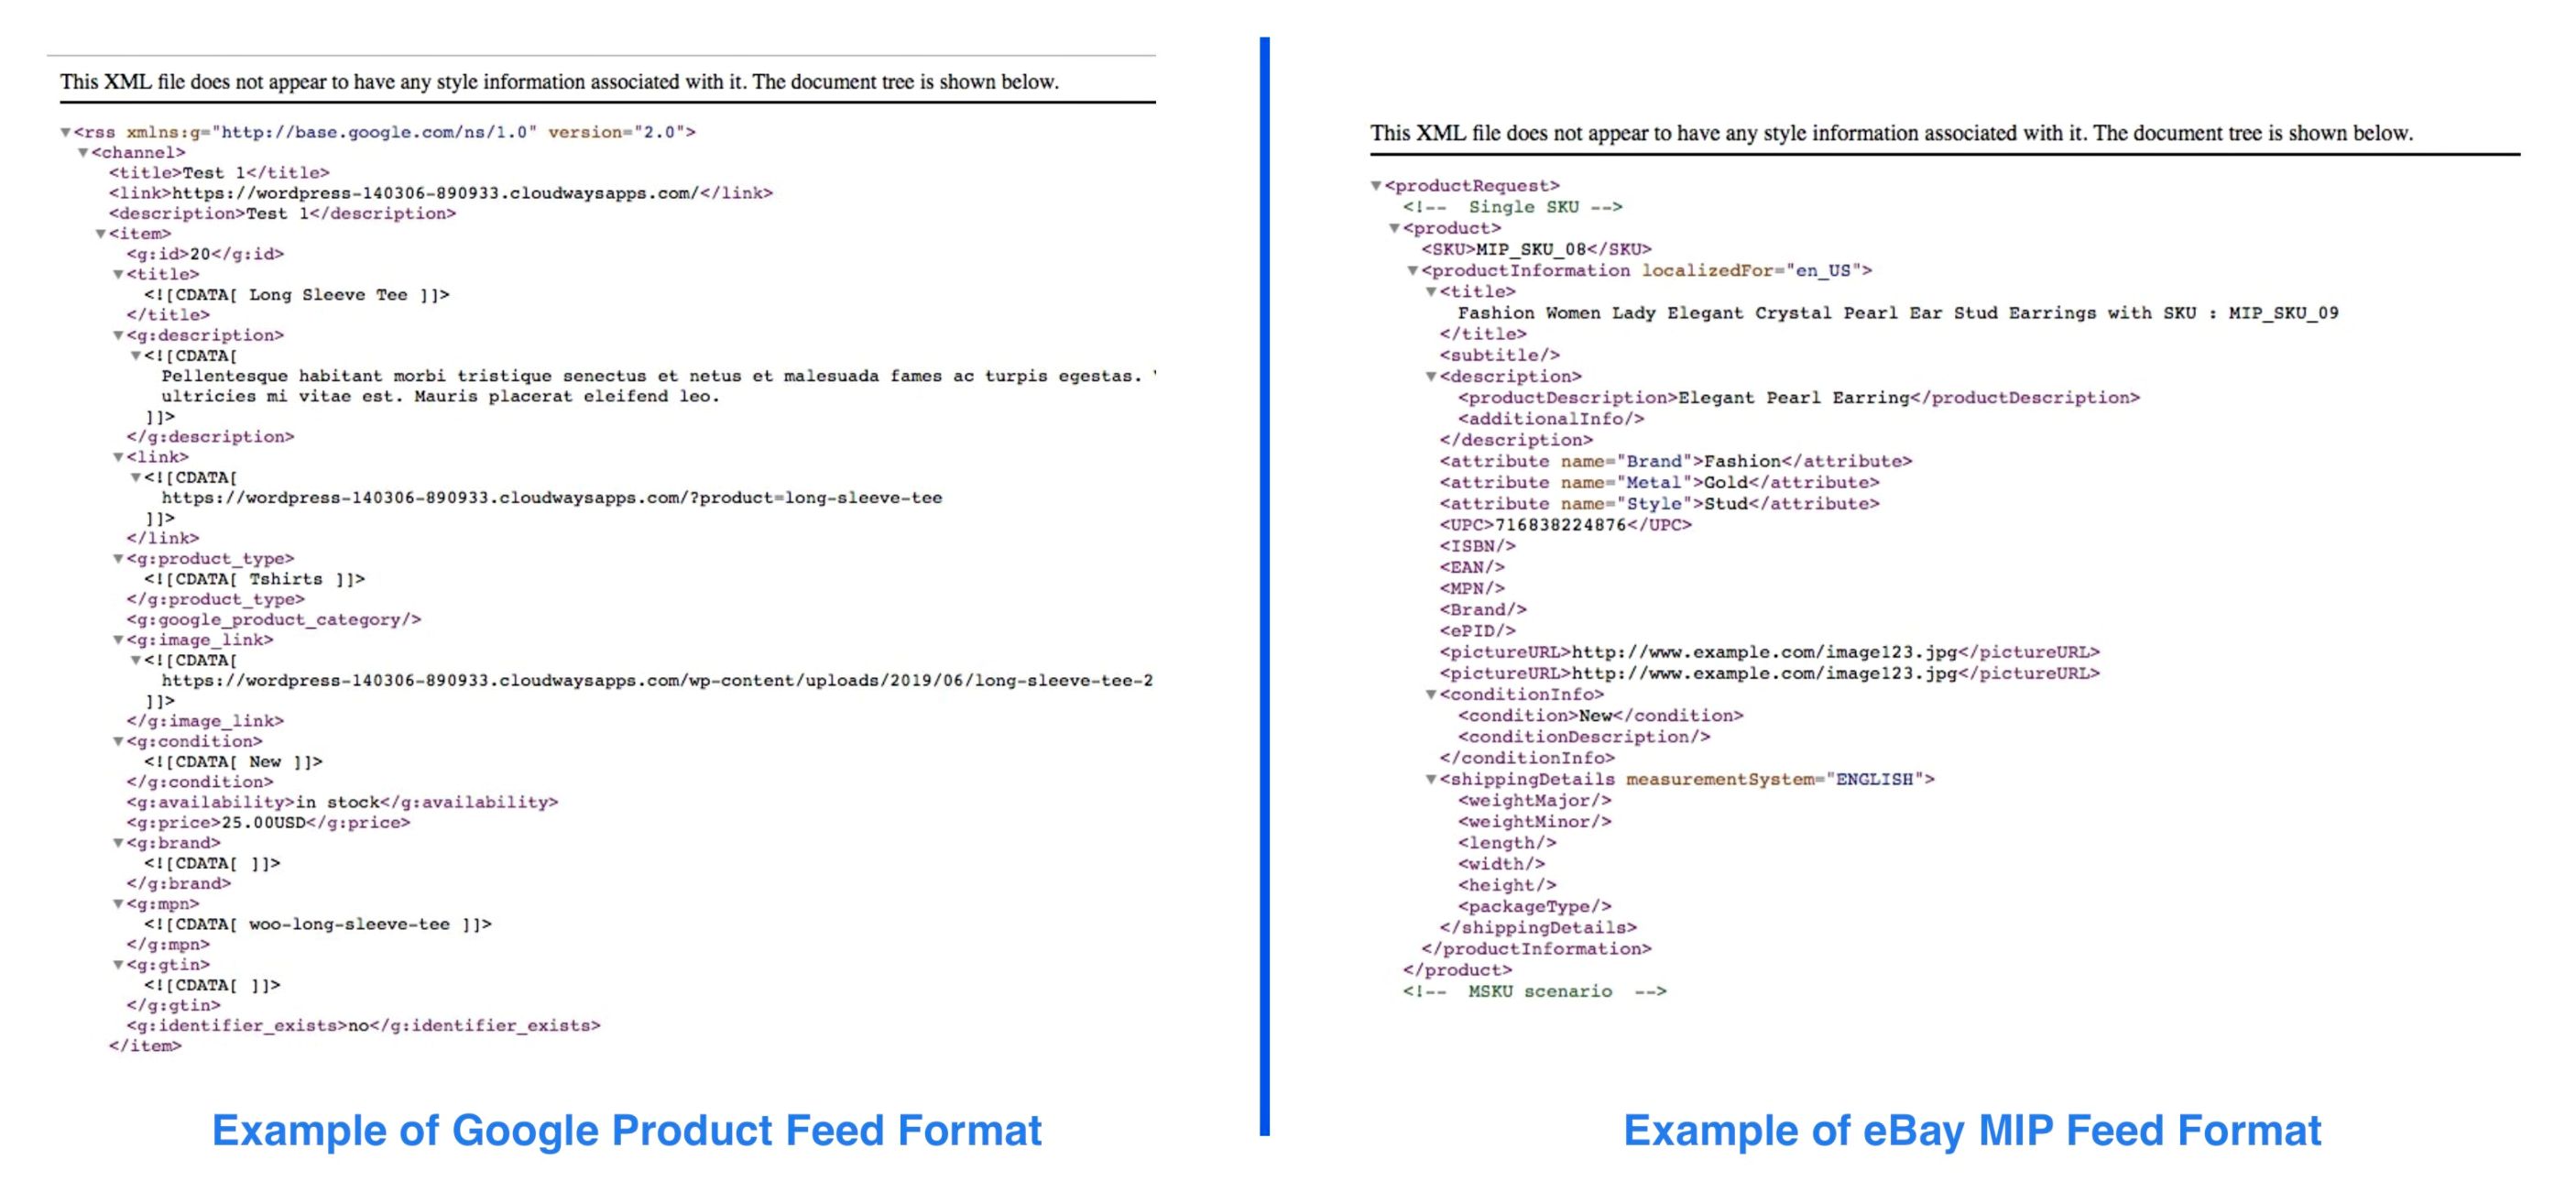
Nou, met behulp van WooCommerce Product Feed Manager, krijgt u de feed formaat vereist door eBay MIP zonder enige fouten.

So maybe it’s time you promote on eBay MIP as well.

5. Meer verbazingwekkende winkel winkel feed sjablonen 

The improved WooCommerce Product Feed Manager also supports major merchant shops.

As you know, different merchant shops have different feed formats, it is difficult to read and apply their instructions and create product feed manually.

You don’t need to. We have done that for you. Now, you will be able to generate product feeds for over 20 merchant shops.

Apart from these merchant shops in the free plugin,

Once you upgrade to Pro, you will also be able to generate a product feed for the following:

Al deze handelsplatformen zijn zeer populair en als u internationaal opereert, kunt u profiteren van promotie op welke manier u maar wilt.

Daarnaast zijn er tonnen nieuwe handelaren toegevoegd in de gratis versie. Je kunt ze hier bekijken: Alle ondersteunde marktplaatsen.

Het mogelijk maken van meer merchant feed formaten:
Ga naar
Dashboard > productfeed > Instellingen om de extra handelsformaten van de productfeed te activeren. Ga bovenaan naar de tab Merchants.

Handelaren tabblad

Zodra u daarheen gaat, krijgt u de optie om feedgeneratie in of uit te schakelen voor elke ondersteunde winkel.

Alle ondersteunde handelaren

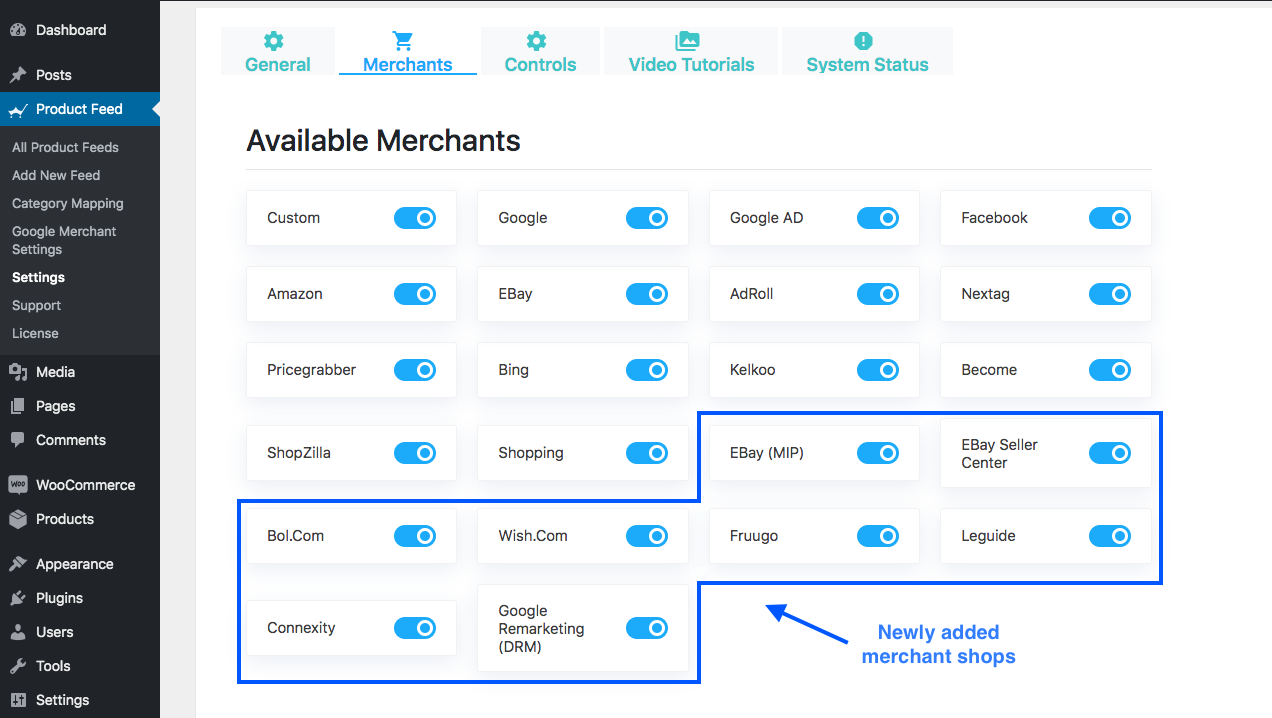
Here, enable the ones you wish to promote, and then go ahead and generate a product feed to upload on those platforms.

Komende functies 

We werken aan het toevoegen van meer en meer functies, zodat u gemakkelijker feed kunt genereren en een tool hebt die waar voor zijn geld biedt.

Amazone Auto-Sync - Amazone is een groot platform. We proberen verbinding te maken met Amazon en een auto-synchronisatie functie voor Amazon op te zetten. Dit zal zeker veel tijd en moeite besparen.

>>E-mail product feed – You will be able to send the generated feed via e-mail to anyone you want. If you have someone else handling a certain merchant account for you, you can simply generate a product feed, and e-mail it to him. This feature is in the process of creation.

Er zijn nog veel meer nieuwe functies die nog moeten worden ontwikkeld.

Product Feed Manager For WooCommerce is a stable and powerful tool that you can benefit from.

WPFM click

Bespaar uw tijd en moeite en promoot uw producten wereldwijd zonder problemen.

Take advantage of the Product Feed Manager For Woocommerce plugin and generate product feeds with ease.


Categorieën
Update WP VR

Enhanced Virtual Tour Creation & Marketing Options – New WPVR Features [2024]

We’re thrilled to announce that WPVR has undergone a significant transformation, making virtual tour creation not just easier, but also more aligned with your marketing needs.

In the 2024 update, we’ve introduced features that redefine the ease and and increase efficiency of creating virtual tours with WPVR.

One of the standout improvements is the time it takes to create a tour.

Now, you can put together a simple yet stunning virtual tour in less than five minutes.

That’s right!

This leap forward in efficiency means you can focus more on creativity and less on the technicalities.

We’ve brought some more significant features.

Let’s have a look at them.

The WPVR Improvements You Will Love!

As we dive into the specifics, you’ll see how each new feature in the WPVR update is designed to enhance your virtual tour experience, making it more intuitive, engaging, and marketable.

Whether you’re showcasing properties, hotels, or any other spaces, these updates are set to elevate your virtual tours to new heights.

Stay tuned as we explore each of these exciting new WPVR features in detail.

1. Call To Action (CTA) Button on the Tour

The first major enhancement in WPVR is the addition of a Call To Action (CTA) button directly on your virtual tours.

Now you can link to an external page, opening up new opportunities for interaction and marketing with this feature.

Here’s how you can use them:

  • Real Estate Showcasing: Direct potential buyers to a contact page or more detailed property information, enhancing the likelihood of engagement and inquiries.
  • Hotel Virtual Tours: Embed a CTA that leads to a booking page, seamlessly connecting the virtual experience with the convenience of making a reservation.
  • Promotional Campaigns: Use the CTA to highlight special offers or deals, guiding viewers to a landing page where they can learn more or take advantage of these promotions.
Call To Action (CTA) Button on the Tour

Following the exciting addition of the CTA button, another standout feature in WPVR is the ability to password-protect your virtual tours.

2. Password Protected Virtual Tour

Continuing our journey of innovation, we now offer password protection for your virtual tours. This password protected tour feature is all about exclusivity and privacy, allowing you to control who accesses your tours.

Here’s the value you’ll find:

  • Exclusive Access for Clients: Share private, password-protected tours with clients, providing them with a unique and exclusive experience.
  • Monetization Opportunities: Create a subscription model for your tours, offering paid access to exclusive content and adding a revenue stream.
Password Protected Virtual Tour creation

Once you publish or update your tour with this setting, it becomes accessible only to those who have the password.

Password protected tour - frontend

With password protection, your virtual tours become a versatile tool for both exclusive marketing and potential revenue generation.

Especially if you’re in the museum or art gallery business, it can be an amazing addition!

3. Private Tour Creation Access

We’ve also brought another layer of control with “Private Tour Creation Access”.

Make a tour private and specifically choose who can edit it.

Here’s what this means for you:

  • Tailored Access for Clients and Team Members: You can now grant editing access to selected clients or team members, ensuring that your tours are being refined by the right hands.
  • Controlled Collaboration: This feature is perfect for collaborative projects where you need to manage who contributes and views the tour during its creation phase.
Private Tour Creation

This private setting gives you more control over your virtual tours, ensuring that access is limited to a select group.

It’s a straightforward way to manage who sees and contributes to your project, keeping it secure and focused.

4. Easy Scene Navigation Menu

To make the user experience better, we’ve introduced another option, “Easy Scene Navigation Menu” to WPVR. This feature is designed to make navigating through your virtual tour very easy.

Here’s what it does for your tours:

  • Streamlined Scene Selection: Visitors can now easily toggle through different scenes in your tour. With an expandable and collapsible menu, finding and viewing specific scenes is straightforward and user-friendly.
  • Improved User Interaction: This navigation menu ensures that visitors engage with every aspect of your tour, enhancing their overall experience and interaction with your content.
Easy Scene Navigation Menu

This new menu is all about making things easy and quick for your visitors.

They can see everything you have to offer in your virtual tour without getting lost or missing anything important.

5. Dedicated Tour QR Code

Another exciting feature you’re getting is the “Dedicated Tour QR Code” feature in WPVR. This innovative addition allows you to generate a QR code for each virtual tour, it can be shown on the landing page too.

Here’s how it elevates your tour experience:

  • Instant Access Anywhere: Place the QR code in strategic locations, like brochures or physical ads, allowing people to scan and access your virtual tour instantly.
  • Seamless Integration: This feature, available with the embed add-on, bridges the gap between offline and online marketing, offering a quick entry point to your digital space.
Dedicated Tour QR Code

It’s a smart way to bridge the gap between physical and digital marketing, giving your audience a direct and effortless path to experiencing your virtual spaces.

6. Social Share Options For Tour

To further enhance the reach of your virtual tours, the WPVR update introduces Social Share Options. This feature is all about extending your tour’s visibility.

Here are advantages,

  • Easy Sharing on Social Platforms: Now, your viewers can share your virtual tour directly on social media, expanding your audience with just a few clicks.
  • Better Online Presence: These share options, available with the embed add-on, integrate smoothly into your tour, making it more interactive and shareable.
Social Share Options For Tour
Social channels available For Tour

7. Optimization For The Virtual Tour Creation Process

In our quest to make your experience better, WPVR has introduced key optimizations to the tour creation process.

Here’s what these updates mean for you:

i. Save Tour with “No Tour Reload”

Now, when you publish or update your tour, the page won’t reload and send you back to the start. This means you can keep editing right where you left off, making the process smoother and more time-efficient.

ii. Dynamic Scene & Hotspot IDs

Forget the hassle of manually assigning IDs to each scene and hotspot.

With our new update, these IDs are automatically generated, simplifying your workflow and saving you valuable time during the tour creation process.

8. Tour-specific Custom CSS

And lastly, we’re excited to introduce another feature that amplifies your creative freedom: Tour-specific Custom CSS.

This update is all about personalization and fine-tuning the aesthetics of your virtual tours. Here’s how it elevates your tour creation:

  • Enhanced Customization: You now can add custom CSS snippets to individual tours. This means you can tailor the look and feel of each tour to match your specific vision or branding requirements.
  • Creative Control: With this feature, the power to craft a unique and immersive virtual experience is in your hands. Whether it’s adjusting layouts, colors, or styles, your tours can now fully reflect your creative intent.
Tour-specific Custom CSS

This level of customization ensures that your virtual tours aren’t just about showcasing spaces but also about presenting them in a way that aligns with your unique brand and style.

Wrapping Up

With these updates, we hope that creating virtual tours will now become not just easier, but also more aligned with your marketing and promotional needs.

These updates are a way of making WPVR the go-to tool for virtual tour creation, where ease of use meets marketing efficacy.

Ready to take your virtual tours to the next level?

Upgrade to WPVR Pro and unlock the full potential of these amazing new features.

And if you haven’t used WPVR yet, go ahead and start using it now.

Categorieën
Real Estate Update Virtual Reality WP VR

Interactive Virtual Floor Plan For Your Virtual Tours! [2024]

Great news for all VR lovers!

We have just released one of the best features for WPVR so far!

  • The Virtual Floor Plan

You can now include an interactive floor plan in your virtual tour where your buyers can see where they are in your tour and navigate to different scenes from right within the map!

And the best part, it’s super easy to use and can be applied to your existing tours as well.

Let us get a closer look at this amazing new feature.

Make The Tour More Meaningful With An Engaging Floor Map

Until now, you could create a complete virtual tour with WPVR and make it super engaging with hotspots, audio, and company details.

However, while a prospect takes the tour, it is often confusing to understand how the whole property is architected. What rooms are connected to the living room? Which direction is the balcony? Where is the kitchen in the house?

So far, your audience had to look around and find the rooms themselves, which, though enjoyable, often left many in a dilemma when taking a buying decision.

The virtual floor plan will change this completely.

If you have a floor plan ready for your place, you can now view it inside your virtual tour and map it out with your scenes so that a prospect will know exactly where they are on the property, and where to look to find various rooms or locations in your property.

It will give a clear idea of how the rooms in the house are distributed, thus making it easier to navigate on the tour.

But that’s not all. You can also place pointers on the map to indicate the locations of the scenes you have created in the virtual tour. And you can connect these pointers to their respective scenes so that viewers can click on them to move into that scene.

This will make the experience more engaging and meaningful for your prospects.

How Does It Work?

When you place the map in your tour, your audience will get an icon on the bottom right corner to click and view it.

Here you can check out the video on how it works for your viewers:

Here’s how it’ll work on your published tours.

On the map, you can click on the points to go to the associated scenes:

Virtual Floor Plan - Thumbnail

Your position on the tour will be highlighted on the map so that you know where you are.

This will make your audience aware of their position and make the navigation much more exciting.

You can also double-click on it to enlarge the virtual floor plan and have a better idea of your property.

Virtual Floor Plan Zoom

How To Set Virtual Floor Plan using WPVR

This is a Pro feature and is included in all WPVR Pro Plans.

Once you have WPVR Pro Installed and Activated, go to one of your tours, and visit the Floor Plan tab.

Virtual Floor Plan - WPVR

And Activate the Floor Plan.

You’ll find options to:

  • Upload the Floor Plan Image.
  • Floor Plan Pointers List.
  • Color Option for Floor Plan Pointers.
Upload Floor Plan to Virtual Tour

Once you upload the floor plan image, you can preview it.

And on the Preview, you can click on any position of the virtual floor plan and a pointer will be automatically set for that position.

Panorama Pointer on Floor Plan

You can drag the pointer over the virtual floor plan and you can also choose to delete it.

But most importantly, you can connect any of your scenes to this hotspot.

House Plans with Virtual Tours

Your viewers can click on these pointers to load the scenes.

That makes the transition really interactive!

From now, not only they can visit different scenes of your tour using the hotspot directions or the scene gallery, and they can navigate through an aerial view using this virtual floor plan.

On top of that, you can choose your desired color for the pointers as well.

Set Color to Floor Plan Pointers

To learn the details on how you can utilize it, follow this guide to set virtual floor plans.

Start making your virtual tours more interactive from today.

What’s Next With WPVR?

We are now focusing on making WPVR more user-friendly for you.

The next update of WPVR will Include:

  • Translation Support

We’re working on making all the strings of WPVR translatable so you can start using the plugin in your own language.

This is planned for our next sprint, and at this moment, we’re researching to find ideas that can help you make more engaging and impressive virtual tours.

For now, if you have any great suggestions, do reach us with your ideas and we will love to look into them.

And if you haven’t already, get WPVR now to create your own virtual tours in WordPress, easily!

Categorieën
Update WP VR

Goed nieuws voor Divi-gebruikers! De WPVR Panorama Module is hier!

If you are a fan of Divi and want to use virtual tours on your site, then we have got great news for you.

Until now, you had to use shortcodes to embed a VR tour when using Divi. But not anymore.

You can now use a dedicated panorama module to place the virtual tour on your website easily!

  • Simply use the WPVR Panorama Module!

Laten we eens kijken hoe het werkt.

Embedding A Virtual On Divi Using WPVR Panorama Module

First, you have to create a virtual tour in WPVR. And once you have it ready, go to the page where you want to embed it.

Edit the page with Divi Visual builder and in the section where you want to embed the tour, search for the module called WPVR.

WPVR Panorama Module Divi

In the module settings, choose the virtual tour you have created earlier from a dropdown list and define its Width, Height, Radius, and Mobile Height.

Divi WPVR module

And then publish/save the page.

Now, if you exit the visual editor, the virtual will appear on the page and you can take the tour right away. It’s as simple as that.

No more using shortcodes!

Tip: Make sure to define a mobile height and test it afterward to ensure the tour size is right on your mobile device. Most people tend to view virtual tours via their cell phones.

This will make it so much easier to edit pages with virtual tours.

What’s Next With WPVR?

We are now focusing on more features that can help you make the virtual tour even more engaging and attractive.

Some of our upcoming features include:

Floor Plan:

You will be able to include a floor plan on the tour where people can get a birdseye view of the place and get an idea of where they are on the tour.

Translation Support:

We’re working on making all the strings of WPVR translatable so you can start using the plugin in your own language.

These are all 2 of our planned features for the upcoming sprints, and many more are being researched to find ideas that can help to devise the best virtual tours.

Laatste gedachten

Now that it’s much easier to embed virtual tours in Divi, go ahead and start designing your web pages with more control. And if you were not sure if WPVR will work with Divi, well, now you can use it without any hesitation.

  • Get WPVR and start using virtual tours now.
Categorieën
Update Virtual Reality WP VR

Groot nieuws! Introductie van VR Headset Mode - de meest meeslepende virtuele tour ervaring

Team WPVR is back with a massive feature!

Since the release of the plugin, one of the most demanded features was support for VR Headsets.

And after months of development and testing, we are excited to announce that it’s finally here!

You can now allow your audience to experience virtual tours via VR headsets!

Offer A Realistic VR Experience Like Never Before

The VR Headset support will change the way your audience will take the tour from now on.

VR Headset support for WPVR

Anyone who has a VR Headset or VR Cardboard will be able to enjoy your virtual tour in a near-realistic experience as if he is physically visiting your place.

And it’s really simple. All you need to do is to allow the VR Headset mode in your virtual tours and your prospects will be able to get a fully immersive experience via their mobile and the VR headset.

How does it work?

Your audience will get an option to enable the VR Headset mode right on the tour. Upon enabling it, the tour will turn into a bi-angular view as shown below.

VR Headset Mode In WPVR

Next, all your prospect needs to do is to place his mobile device into his VR Headset and that’s it! He will be in a whole new virtual world, away from reality.

But it’s not just a tour to look around. You will notice that while on the VR Headset mode, there will be a small indicator in the center of your tour.

When you look around, place the indicator on any hotspot for about 3 seconds, and it will act as a click.

So if it’s an information hotspot, it will open up the details, and if it’s a scene-type hotspot, then you will be taken to the next scene!

So your visitors will not just take a look around, but they will also engage and interact within the tour, thus making the tour much more appealing.

How To Allow Support For VR Headset for Mobile

This is a Pro feature, so to use this, you have to get WPVR Pro.

Once you have WPVR Pro, go to WPVR > Get Started > Settings, and there you will find an option that says VR Glass Support.

Enable The VR Headset Support for Mobile Devices

Simply enable this feature and that’s it – now, all the virtual tours you created will have an option to enable VR Headset mode when viewed on a mobile device.

What’s Coming Next?

The VR Headset for mobile is one of the best features yet, but this is just a start.

As promised earlier, we have refactored our plugin so that we can come up with more amazing features to help you create even better virtual tours. Hence, more amazing features are in store.

Following are some of the planned features for next quarter:

Individual Colors For Every Hotspot Icon

Right now, you can only use one single color for all hotspot icons. But we are working on allowing you to set different colors for different hotspots.

This will help you make the hotspots more meaningful, and help you highlight certain hotspots for special purposes.

WPVR Divi Module To Embed Virtual Tours

Divi is one of the best themes and builders out there. But until now, to embed tours in a Divi site, you had to use our shortcodes.

But we are working on creating a dedicated Divi Module to embed virtual tours on your site more easily.

A Fully Translatable WPVR

‘Translation’ is crucial and has been a barrier for many when using WPVR for a while.

But that will change soon as we are working on making WPVR fully translatable and will release support for at least 10 more languages in the core WPVR plugin.

Interactive Floor Plan

We are conducting research to bring in another out-of-the-box feature, interactive floor plan support for virtual tours.

However, as amazing as it sounds, it’s still quite a difficult feature to achieve within WordPress.

But we are determined to find a way to make it happen. Fingers crossed!

Do You Have Any Brilliant Ideas Or Suggestions?

We are also looking for great ideas to work on and we would love to hear your ideas.

If you have any suggestions or ideas to improve the plugin, feel free to suggest them in the WPVR product roadmap.

Wrapping Up

The VR Glass Support is one of the many features WPVR has to help you create high-quality virtual tours in WordPress, easily.

If you want to grow your business with advanced technology, then using virtual tours is a no-brainer.

So go ahead and start using WPVR and create amazing virtual tours for your business.

Get WPVR Pro now!

Categorieën
Update Virtual Reality WP VR

Een nieuwe reis is begonnen - WPVR is vernieuwd en klaar

The WPVR team is excited to announce the release of the refactored versions of both WPVR Free and Pro.

We always have placed a priority on catering to the desires of WPVR users and wanted to bring in the features you asked for.

However, due to some complexity with the previous codes of the plugin, it was getting difficult.

But, those issues are in the past now!

Earlier this year, we decided to refactor the code of WPVR entirely.

And that would make the task of bringing in new features much easier.

Although so many possibilities were open in front of us, we also had some serious concerns:

  • How much the refactored version would affect the functionalities?
  • How our existing users will react to the changes?
  • What effect will it have on the virtual tours that our users have already created and using actively?

Keeping all these in mind, we continue the work.

And now, it’s here for you to test and try out.

Let’s have a look at what awaits you in this version.

1. Guide The Way – Setup Wizard

For the first-time users of WPVR, it was always a bit confusing to understand and start creating the tours.

Not anymore!

We have brought a Guided tour for the users – follow it and learn how you can create the tours most effectively.

Just click on the Setup Wizard Option under WP VR after installing the plugin.

WPVR - Refactored Virtual Tour Plugin

After that, you can go ahead a create the tours as you’ve seen in the wizard.

2. Efficient User Interface

There are a few changes we’ve made to our user interface.

In our older version, you had to move from the General Tab to the Scene Tab in order to upload a scene.

But in the new version, you’ll start from the Scenes tab – making the tour creation faster.

Once the panorama images are uploaded, you can go ahead and make additional changes.

Awaited Features - Virtual Tour Builder

Also, we’ve set global positions for the Preview button and tour shortcode.

Now, you can preview the tour anytime you want and copy the shortcode whenever you needed.

3. No More Annoying Tab Switching

Previously while creating the tour, when you click on Preview, it would take you to the default (General) section of the plugin.

And you had to manually go back to the tab where you started.

Now, this won’t happen anymore.

From now, when you’ll click on Preview, it’ll load your exact tab and position.

What’s Coming Next?

Since the refactored version is live, we are focusing on the features and improvements you’ve been asking for a while.

One of them, is obviously, Carboard support for your virtual tours.

The status of the feature and other details are already updated on our Public Roadmap.

To learn more about our upcoming features, checkout the WPVR Roadmap.

You can add more feature requests to the Ideas section of this Roadmap and upvote the ideas you’d love to see coming next.

Wrapping Up

Right now, the goal of the WPVR team is to continue making it robust and bring the demanding features one by one.

And for this, we need your help.

Try out the refactored version and check if everything is working on your end. See if you face any issues.

Think of the features that will make WPVR better and better.

Add them to our roadmap.

Together, we’ll make WPVR awesome!

Categorieën
Product Feed Manager For WooCommerce Update

De veelbelovende nieuwe interface van Product Feed Manager voor WooCommerce

Generating a WooCommerce product feed is sometimes complicated, but with Product Feed Manager for WooCommerce, we always tried to provide you with the best possible options and make the feed generation process as simple as possible.

And recently, we’ve made some major changes to our plugin, that will really make your feed generation process so much easier. 

Over the past few months, we considered our users’ suggestions, feedback, problematic areas and came up with a solution that will help you overcome major obstacles when generating product feed in WooCommerce.

The plugin is going through a huge makeover that will ensure

  • Less complications.
  • Faster feed generation.
  • Super easy user interface.
  • Less time wasted to learn the plugin.

Let us look at the major changes you will experience.

Easy Feed Generation Without Complications

The first major change you will experience is the feed generation area. You will notice the following:

  1. The new user interface is so neat and clean – you know exactly what you need to do.
  2. You will no longer see unnecessary additional settings options unless you need them.
  3. Now you don’t have to take additional steps to enable your merchant for feed generation.
PFM New User Interface

There were numerous feedbacks from users who indicated that they were confused at the first glance when they tried to generate a product feed.

This urged us to try and find out what could be causing this confusion. And after thorough observation and testing, we figured this could be due to the additional options you see initially when you try creating a feed. This seemed more logical as those settings were mostly pre-set and you didn’t really have to configure them unless there was an exception.

On top of that, in the last version, you first had to go to a separate tab and enable your required merchant before you could find it in the list during feed generation. As you can tell, this was just an unnecessary additional step which we should have avoided a long time ago.

To solve these issues, we made the following changes.

  • The first step you take when you create a feed will be choosing your merchant. The second step will be verifying the feed attribute values. And the third step could be generating the feed.
    **This used to be over 5 steps process due to the additional settings you had to configure first, which we moved.
PFM Feed Generating Steps
  • You no longer have to enable your required merchant prior to feed generation. Once you decide to create a feed, search for your required merchant on a smart search bar (where you can scroll or type-and-search) and select it. The merchant will be immediately enabled and the feed template will load below.
Search Merchant Template
  • We moved the additional settings for a feed into a separate section which you can view by clicking on a button. So this won’t act, in anyway, to create confusion. You can use the settings only when you need them.
PFM Settings Option
  • The filter options are also moved to another section which you can access by clicking on a button. Not everyone uses filters so it’s best to keep it separate unless required. By default the filter will be “All available products.”
PFM Product Filter Options

The main benefit of this change is that you don’t need to waste time trying to understand the additional settings or going through additional steps.

You can generate a product feed in as low as 3 steps (which may increase depending on the merchant but without the additional steps we had before).

More Useful Changes

1. You can now choose whether to include or exclude the ‘out of stock’ products in your feed using our new “Include Out of Stock Products” option. 

You will find this option in the Settings drawer.

Exclude Out of Stock Products

2. PFM custom fields are now useable for Grouped and Affiliate products in your WooCommerce store..

PFM Custom Fields for Grouped Products

3. A Troubleshoot option is added. You can click on the Troubleshoot option to get the list of possible issues that are commonly faced along with their solutions.

**The Troubleshoot page will be regularly updated.

PFM Troubleshoot Button

Sounds interesting?

Start exploring our new user interface and enjoy this new and unique feed generation experience with no limits.

Categorieën
Update WP VR

Aantrekken met kwaliteitsvolle virtuele reizen - WPVR

WPVR is aan het verbeteren en is nu beter dan ooit.

Zoals u weet, kunt u met WPVR onweerstaanbare virtuele tours maken zonder enige moeite. U hoeft alleen maar 360 panoramische beelden aan te leveren en onze richtlijnen te volgen, en u kunt in enkele minuten kwalitatieve virtuele tours creëren. U heeft geen deskundige hulp nodig.

De vorige keer hebben we een paar maanden geleden een heleboel features gepost die we hebben toegevoegd. Lees het hier.

Onlangs hebben we een aantal belangrijke Pro-functies toegevoegd om uw virtuele tour creatie ervaring nog beter te maken.

Laten we eens kijken naar deze nieuwe functies.

Wat is er nieuw in WPVR? 

 1. 2. Scènes in de galerij op virtuele reizen

Samen met een bevredigende virtuele tour, kunt u nu ook de galerij van de scènes laten zien voor een betere navigatie van de tour.

Scènegalerie voor kijkers:
De kijkers kunnen een kleine pijl zien in het onderste gedeelte van de rondleiding.

Demogalerij

Als ze erop klikken, zal een galerij van alle scènes naar boven glijden.

Tour Gallery

Daar kunnen kijkers op elke scène dubbelklikken en direct naar die scène gaan.

Tot nu toe konden kijkers alleen van de ene scène naar de andere gaan door op de hotspots te klikken. Nu kunnen ze direct vanuit de galerie naar elke gewenste scène gaan.

Schakel eenvoudigweg de optie 'Toon Scène Gallery' in op het tabblad ALGEMEEN.

Scènegalerie inschakelen

En de galerij zal beschikbaar zijn voor de kijkers.

Scène Gallery On Tour Preview:
De galerij is ook beschikbaar aan de achterkant, onder de tour preview, zodat u de volgorde van de scènes op uw tour kunt bekijken en begrijpen.

Tour Preview Galerij

Hierdoor wordt het spannender om de virtuele tour te maken en te bekijken.

2. 2. Gyroscoop op mobiele apparaten

U kunt kijkers die mobiele apparaten gebruiken, een gyroscoop-ervaring van de tour laten beleven.

Indien ingeschakeld, zullen kijkers tijdens het maken van een tour op een mobiel apparaat het pictogram kunnen zien om de gyroscoopmodus in te schakelen.

WPVR-gyroscoop Aan of uit

Hierdoor kunnen bezoekers hun telefoon verplaatsen en krijgen ze een beeld alsof ze de plek live in de gaten houden.

Laat deze functie toe door 'Gyroscope Control' in te schakelen op het tabblad GENERAL.

Gyroscoop ingeschakeld

Eenmaal ingeschakeld, zal het gyroscoop-icoontje op de tour verschijnen als het wordt bekeken op mobiele apparaten.

3. 3. Duplicaat Tour 

Wilt u twee keer dezelfde virtuele tour toevoegen op dezelfde pagina?

Of wilt u een kopie van de virtuele tour maken, gewoon om kleine wijzigingen aan te brengen en voor een ander doel te gebruiken?

Maak gewoon een duplicaat van de tour.

Ga naar Dashboard > WPVR > Tours. Hier vindt u een lijst van alle tours die u heeft gemaakt.

Zoek de tour die u wilt dupliceren en beweeg de muis erop en u zou een Duplicaatknop moeten zien.

Duplicaat tour

Klik erop en er wordt direct een conceptversie van de tour gemaakt met een nieuwe tour Id. U wordt doorgestuurd naar de tour setup pagina.

U kunt elke gewenste wijziging aanbrengen en de nieuwe tour publiceren om deze te kunnen gebruiken.

4. 4. Importeren/exporteren WPVR Tour 

Met WPVR kunt u nu tours importeren en exporteren op verschillende sites waar WPVR Pro is geactiveerd.

Dus als u meerdere sites heeft, maar u wilt dezelfde virtuele tours bekijken op beide sites, dan kunt u de tours gewoon exporteren en importeren tussen de websites; u hoeft niet de hele tour opnieuw te maken.

En het is makkelijk te gebruiken, dus ook.

Het exporteren van een tour:
Zodra u een tour publiceert, verschijnt er een nieuw Export tabblad op de tour bewerkingspagina.

Exporteren

Ga naar dit tabblad en klik op de downloadknop.

Downloaden

Uw tour zal worden gedownload in zip-formaat.

Het importeren van een tour:
Als u een WPVR virtuele tour heeft geëxporteerd, dan kunt u deze importeren op elke website waarop ook WPVR Pro is geïnstalleerd en geactiveerd.

Ga naar Dashboard > WPVR > Aan de slag. Aan de rechterbovenkant ziet u dat er een tabblad is met de naam Import.

Importeer

Ga naar dat tabblad. Hier ziet u een roodgekleurde knop. Dit is de importknop.

Importeren

Klik erop en upload de tour die je eerder hebt gedownload. Klik dan op verzenden. Dit zal de tour uploaden op uw site en u doorverwijzen naar de tour bewerkingspagina.

5. 5. De 'fullwidth' tag

Er zijn verschillende verbeteringen aangebracht op WPVR, bij het controleren van de breedte en hoogte van de tour, waaronder het toestaan van een percentage om de grootte van de tour te controleren. Onlangs hebben we ook de implementatie van de tourradius geïntroduceerd.

De laatste toevoeging was de 'fullwidth' tag. Voor de tourbreedte, in plaats van het toekennen van een vaste grootte of een percentage, als je 'fullwidth' schrijft, zal dit de containergrootte negeren en zal de tour verschijnen op een full-width view van uw webpagina.

Fullwidth kwaliteitsvolle virtuele tours
Zoals u kunt zien, is deze tour op volle breedte te zien op de webpagina.

Gebruik de 'fullwidth' tag correct:

Gebruik op Gutenberg block editor het WPVR-blok en wijs breedte toe als volledige breedte.

Gutenberg op volle breedte

Gebruik op Elementor page builder de WPVR-widget en wijs de breedte toe als volledige breedte.

Elementor fullwidth tag

En voor Classic-editor of andere paginabouwers, pas de tour shortcode toe (op html-blokken of editor voor paginabouwers). Bewerk de shortcode en voeg de width tag toe, met de waarde fullwidth, en voeg de height tag toe met elke gewenste waarde.

Klassieke editor op ware grootte

Publiceer dan de pagina/het bericht en laat uw kijkers een volledig beeld krijgen van uw virtuele tour.

Komende functies 

Zoals u weet, hebben we een heleboel spannende functies gepland en in ontwikkeling.

Grondkaart - U zult in staat zijn om een kaart te maken van de locatie waar u een virtuele tour van heeft gemaakt. En gebruikers zullen in staat zijn om te klikken op wijzers op de kaart om direct naar die specifieke scène van de tour te gaan. Dit stelt u in staat om een gedetailleerde tour van grote locaties te maken en stelt gebruikers in staat om een beter navigatiesysteem te krijgen.

Meerdere tours verbinden - We proberen een functie te implementeren zodat u twee verschillende virtuele tours kunt verbinden, hetzij door ze direct samen te voegen, hetzij door eenvoudigweg via een hotspot van op naar een andere te gaan.

Resize beelden voor telefoons - Op dit moment werkt de plugin alleen met de 360 panoramische beelden die door u worden geleverd. Maar als de resolutie te hoog is (schijnbaar hoger dan 4096×2048), dan kan de tour niet worden bekeken op mobiele apparaten. We proberen een resizing-optie te integreren, zodat de plugin de beelden voor mobiele apparaten desgewenst kan aanpassen.

Er zijn nog zoveel meer functies die we willen opnemen en mettertijd zullen ze allemaal snel beschikbaar zijn.

Er is geen limiet aan hoeveel u kunt bereiken met behulp van virtuele tours van hoge kwaliteit op uw site. Of u nu onroerend goed, musea, hotels, pretparken, spa, campus of een ander doel wilt belichten, een virtuele tour zal het zeker geloofwaardiger en betrouwbaarder maken.

Upgrade naar pro om te genieten van alle spannende functies en gebruik te maken van kwaliteitsvolle virtuele tours zonder beperkingen.

Ga daarom door met het gebruik van WPVR en creëer verbazingwekkende virtuele tours voor uw websitebezoekers.

Categorieën
WP VR Update

Wat is er nieuw bij WPVR? Grote updates [2019]

It’s a wonder how fantastic WordPress is. You have a countless number of plugins that help you simplify all your efforts easily. WPVR is one of the few VR plugins that allow you to create a Virtual Tours on your WordPress website.

Since the start, WPVR managed to deliver with stable and quality output. And with time, the plugin developed into something amazing.

Now you can create a virtual tour, on your own, with tons of customization. That too, with a simple and user-friendly interface.

Let us look at some of the exciting features that WPVR incorporated since we launched our first stable version.

What’s New With WPVR?

1. GUTENBERG BLOCK SUPPORT

The time when this plugin was launched, WordPress was on the verge of upgrading to WordPress 5.0 with a major change. They made Gutenberg the default editor, replacing the Classic Editor.

Hence, WPVR was modified to provide Gutenberg block support.

You will get a separate block called “WP VR” under the common blocks.

Gutenberg block WPVR

You simply need to use the block and provide the tour id to the block.

Blok Data Update

And your tour will be added to the post/page.

2. ELEMENTOR SUPPORT – WPVR WIDGET

For those of you, who love to use the Elementor page builder, you will now get a separate Widget to embed the virtual tours created using WPVR.

WPVR Elementor Widget

Simply drag-and-drop this widget to any section. Provide the widget with ID, height, and width; you will be able to see the virtual tour added.

Tour added through WPVR  Elementor Widget

Hence, customize your page and add a virtual tour wherever you want by directly using the Wpvr widget.

3. AUTO ROTATION

The plugin allows you to create an auto-rotation effect on your tour. Once you have created a tour, you can set it up so that, if not touched, the tour will rotate automatically.

You can control the auto rotation speed and direction, and you can set a timer for auto-rotation to start again when stopped by visitors.

4. COMPASS (PRO)

Sometimes it makes more sense to include a compass to your tour.

Compass on tour

Now you can display a small compass on the bottom right corner of the tour.

5. DEFAULT SCENE FACE (PRO)

You will be able to set the view that will appear first by default when the tour is loaded on the page.

Simply define the pitch and yaw of face you wish to show at first and that will be the face that will appear first when a tour is loaded on the page.

6. SCENE BOUNDARY (PRO)

This is one of the great features that let you have more control over the tour you create.

You can set horizontal or vertical boundaries to control how much a person can look left or right, and up and down.

7. ZOOM CONTROL (PRO)

You can even control how much a visitor can zoom in or out.

You can limit the max zoom in or max zoom out and you can set it up so that the tour is already zoomed in a bit when loaded.

8. HOTSPOT CUSTOM ICONS WITH COLOR CUSTOMIZATION (PRO)

This is a brilliant feature that allows you to make the tour more attractive.

You get to choose from 900+ font-awesome icons as your hotspot icons. This is ideal to make the tour more meaningful.

For example, you can set a person icon to indicate ‘walk this way’.

Hotspot with custom icon and color

On top of this, you can even change the color of these icons. The plugin gives you the color customizer option to choose the color you desire for your hotspot icons.

Hotspot custom icon color

9. TITLE AND AUTHOR (PRO)

For every scene, you can give a title the scene and give an author name.

Scene title

For example, let’s say you created a virtual tour for a house, and for the scene of the bedroom, you can add the title ‘Bed Room’.

10. 360 VIDEO SUPPORT

You can also embed 360 Degree Video tours, rather than creating a virtual tour using images.

Either provide a video link from Youtube or Vimeo or upload a 360 Degree Video and let visitors take a virtual video tour.

WHAT’S NEXT ON WPVR?

We are constantly trying to add more and more features while keeping it out of any sign of complications. The idea is for everyone to be able to create virtual tours easily and have full control over it. We are currently working on more exciting features.

UPCOMING FEATURES OF WPVR:

>>Google Cardboard Support: A VR box can really take a virtual tour to the next level. Hence, it only makes sense for us to integrate the virtual with a VR box so that visitors can get an enhanced feeling of reality.

>>Cubemap Virtual Tour: We are also planning to introduce a second type of virtual tour Cubemap. Currently, we have the Equirectangular virtual tour which requires a 360 panoramic image. The Cubemap will rather require 6 flat images of the same height and width. This will create a cube space for visitors to take a tour.

>>Background Tour Music: Often people use virtual tours to preview or showcase their location. A piece of delightful background music could only make it even better. Hence, we are working on a way for users to add music to a tour. Imagine visitors taking a tour while listening to soothing music and enjoying the tour.

These are a few of the many upcoming features that we have lined up for the future.

There is no limit to how much you can achieve using a quality virtual tour on your site. Whether you wish to highlight real estate properties, museums, hotel amusement parks, spa, campus or any other purpose, a virtual tour will certainly make it more credible and reliable.

Upgrade to pro to enjoy all exciting features and use virtual tours with no limitations.

Hence, go ahead and start using WPVR and create amazing virtual tours for your site visitors.

Categorieën
Update WP VR

[Update] WP VR is Gutenberg compatibel [2019].

We are happy to announce that WPVR is now completely Gutenberg compatible. This means, you can embed virtual tours on any web page, whether you use a Classic Editor or Gutenberg block editor.

Since November 2018, the latest virtual tour creator in WordPress has been released. WPVR, an exclusive WordPress virtual tour creator plugin, allows users to create amazing virtual tours using 360 Panoramic Images.

You simply need to upload a proper 360 degree panoramic images and this plugin will turn them into an amazing virtual tour, where you can move about, zoom in or out, and get information as if it is a real tour. 

Let me show you how you can embed a virtual tour using Gutenberg block editor.

How To Embed A WPVR Virtual Tour using Gutenberg 

Once you have created a virtual tour, collect the ID generated and go to the web page you wish to embed it on. 

This virtual tour creator automatically adds a WPVR block type under the common blocks of Gutenberg.

Gutenberg block WPVR

Ga naar een bericht of een pagina en klik op voeg blokicoon toe (het +-icoon) en selecteer bloktype als "WPVR". En er wordt een blok toegevoegd zoals in de volgende afbeelding:

WPVR-blok toegevoegd

Zodra Block is toegevoegd, klikt u op het Instellingen icoontje in de rechterbovenhoek van de pagina en selecteert u het menu Block voor de werkbalk van WPVR-blok.

WPVR-blokinstellingen

Here, you can see you need to provide “id”, “Width” and “Height”.  Once you provide data in the field, the block will update the data.

WPVR block data inputted

Nu kunt u de pagina bekijken of publiceren en u zult zien dat het virtueel op uw pagina is ingebed.

Why Was It Important to Make WPVR Gutenberg Compatible?

WPVR is Gutenberg compatible

As you know, WordPress has integrated Gutenberg block editor as the default editor since the end of November 2018. And this virtual tour creator was not Gutenberg compatible at that time. 

Since the release, the uniqueness of the plugin got people hyped quickly, and the installations kept on increasing. But people using Gutenberg was having compatibility issues.

This is because this plugin was configured to generate shortcodes in order to embed the virtual tours on web pages.

When Gutenberg became the default editor, you could create virtual tours, everything would work properly at the back-end. But Gutenberg didn’t support the shortcode that the plugin generated, hence you would not be able to embed a virtual tour on any web page.

In January 2019, our developers made a long-awaited update. WPVR is now fully Gutenberg compatible and will work with both Classic Editor and Gutenberg block editor. You can now create and embed virtual tours on your webpage without any issues.

Conclusie

As you can see, it is so simple and easy to embed a virtual tour created by WPVR whether you use Gutenberg or Classic Editor.

It is time you start using this amazing virtual tour creator and connect with visitors. Start enjoying the benefits of using virtual tours on your website.