Categorieën
Product Feed Manager For WooCommerce WooCommerce

How To Create Instagram Product Feed For WooCommerce – A Complete Guide [2025]

Instagram isn’t just for food pics and cute puppy videos any more—it’s practically a digital mall.

And guess what?

Over 54% of users end up buying something they see there.

You know what that means: your products should be front and center.

And all it takes is setting up an Instagram product feed for your WooCommerce store. It’s easier than convincing yourself you don’t need another pair of shoes after scrolling through Instagram.

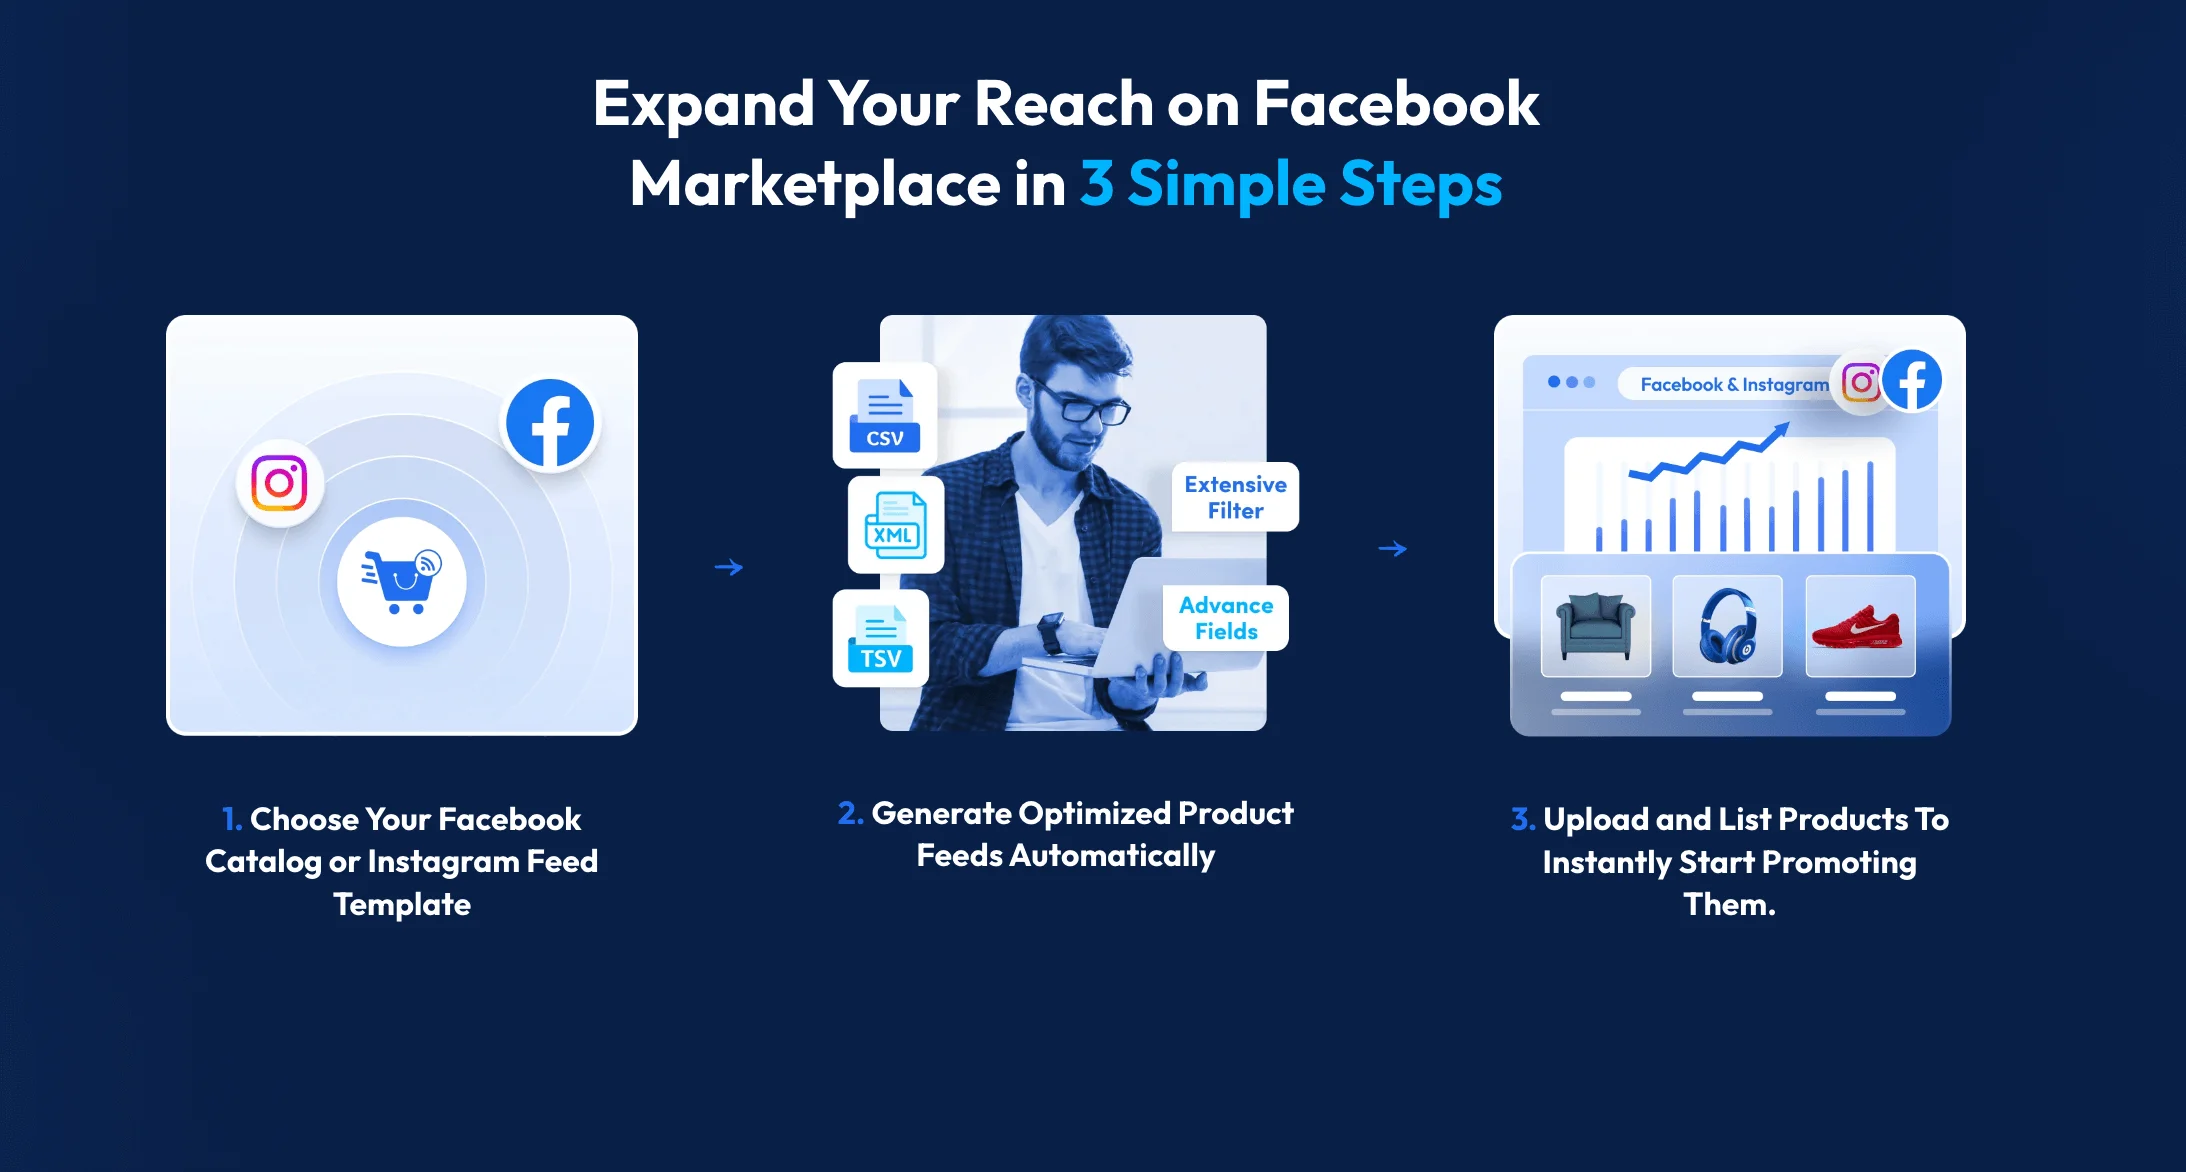
In this guide, I’ll walk you through the exact process that smart WooCommerce owners use to drive traffic and boost sales.

Let’s jump in.

What is Instagram Product Feed?

A WooCommerce Instagram Product feed is a spreadsheet containing all your product information, including titles, prices, categories, tags, descriptions, and more.

For example, an Instagram product feed for WooCommerce could be a simple Excel spreadsheet, and you can enter your product data with titles like ID, title, description, link, condition, price, etc.

Attributes Of Instagram Product Feed

Knowing Instagram Product Feed’s terms will help you understand the process better.

Instagram Feed Attributes For Woocommerce

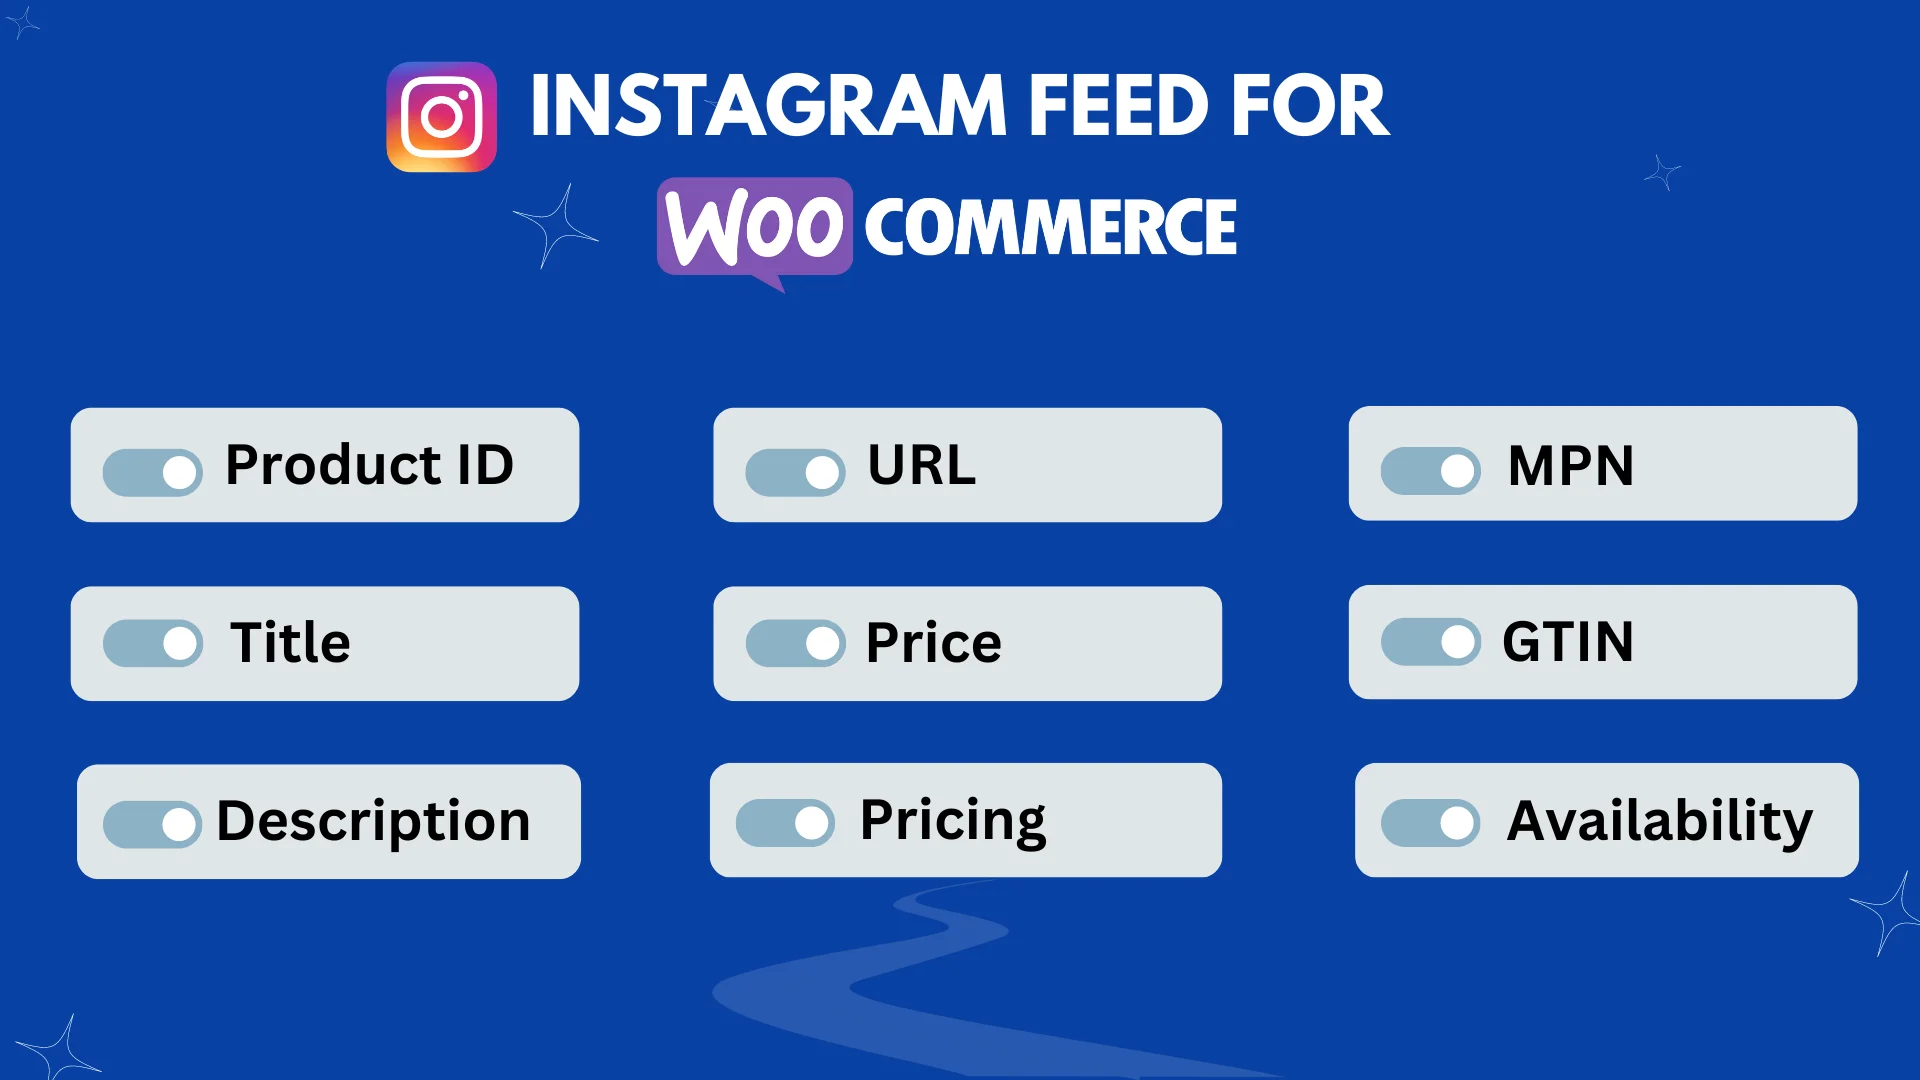
Here’s a list of things you should know:

  • Product ID: A special number every item has to make it easy to find and keep track of.
  • Title: A heading to describe the product clearly so everyone knows exactly what it is.
  • Description: A brief paragraph containing all the important info so buyers can make a decision.
  • Product URL: This is the link that takes you right to the product on any website.
  • Image URL: This is the web address for the picture of a product on a website.
  • Availability: To let your customers know if it’s in stock or not so they know what to expect.
  • Condition: To tell buyers if the product you are selling is brand new, gently used, or refurbished.
  • Manufacturer This is the name of the company that makes the product you are selling. If you are the one making the product, just put your company name here. If you have different brand names for different products, you’ll need to save that info somewhere else and then use it here.
  • GTIN(Global Trade Item Number)– This is a special number that helps identify your product. It helps Google show your products to more people. The GTIN number is given to you by the company that makes the product. If you don’t have this number, just leave the field blank. Don’t put in a random number!
  • MPN (Manufacturer Part Number)– This is a unique number for each product as a product identification number given by the manufacturer.
  • Google Product Category – This is about matching up your product categories with Google’s categories.

Each platform on Meta, like Instagram Shop, has different requirements for attributes than other platforms.

Make sure you check the specific guidelines for the Instagram platform before creating your product feed.

Create an Instagram Product Feed for Your WooCommerce Store

Let’s now create an Instagram Product Feed for the WooCommerce Store.

I am using the free version of the plugin product feed manager for Woocommerce to demonstrate the process step-by-step.

Make sure you have installed Woocommerce on your WordPress site.

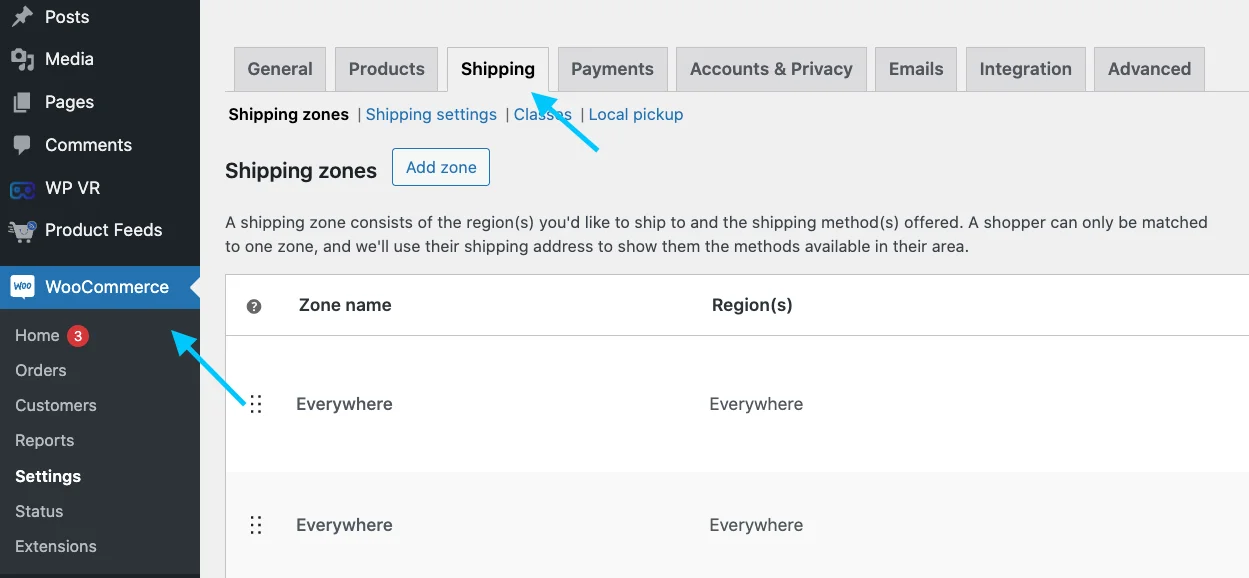
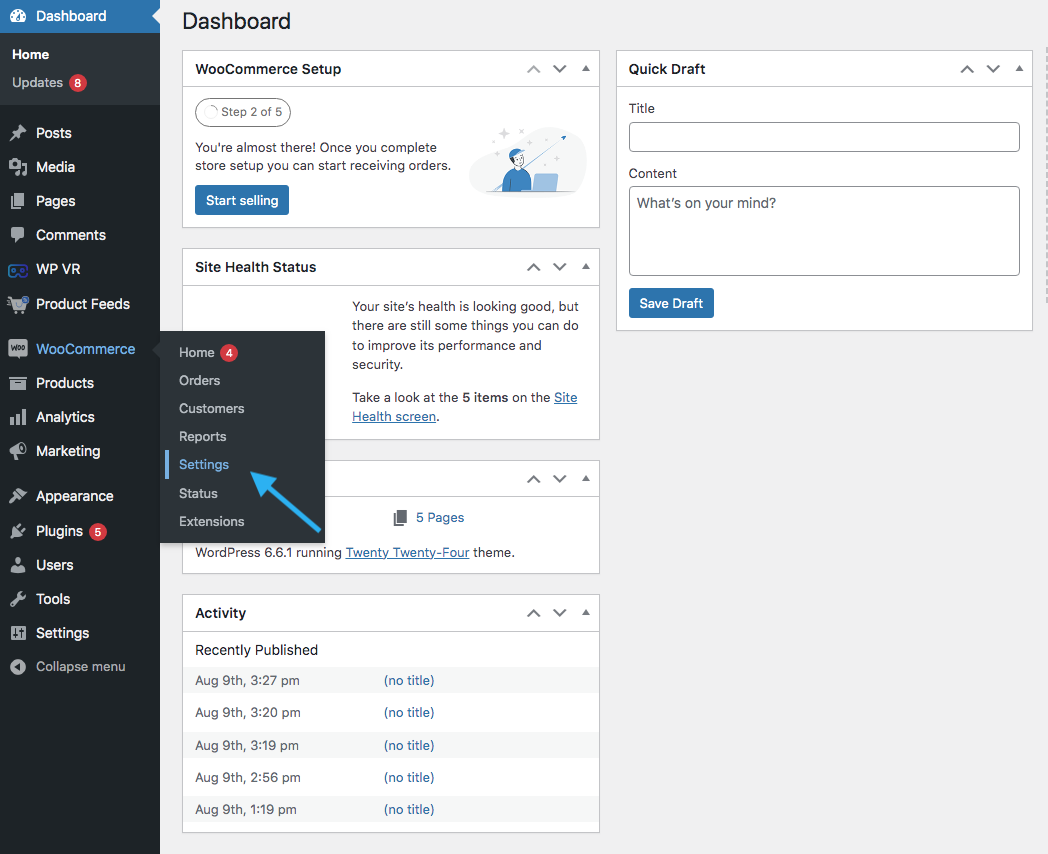
Go to your Dashboard> Plugins> Add new plugin.

add new plugin

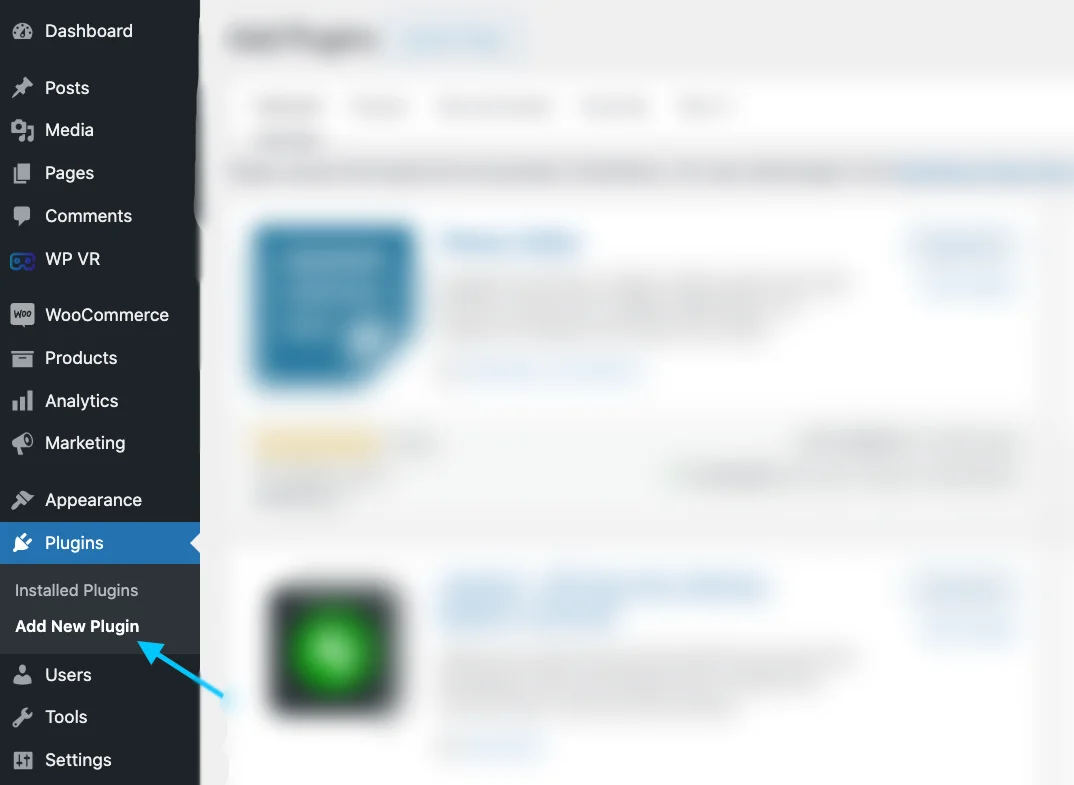
Type ‘Product Feed Manager For WooCommerce‘ in the search bar and hit enter.

Install Product feed manager For WooCommerce

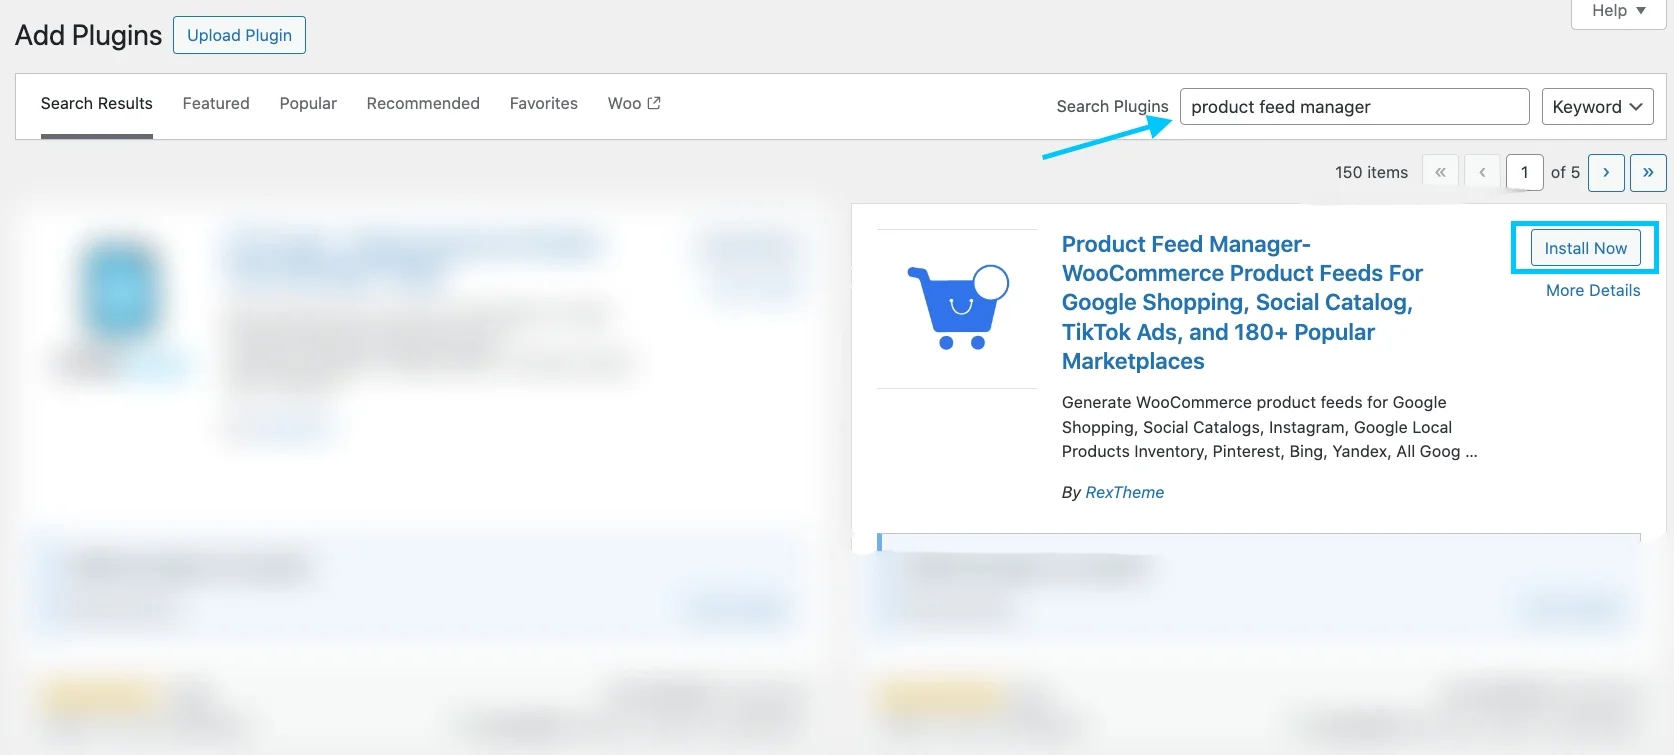
The plugin will pop up in the search results for you to install. Click on the button install.

That’s all. The product feed manager for WooCommerce is installed on your site.

Step 1: Create New Feed & Feed Mapping

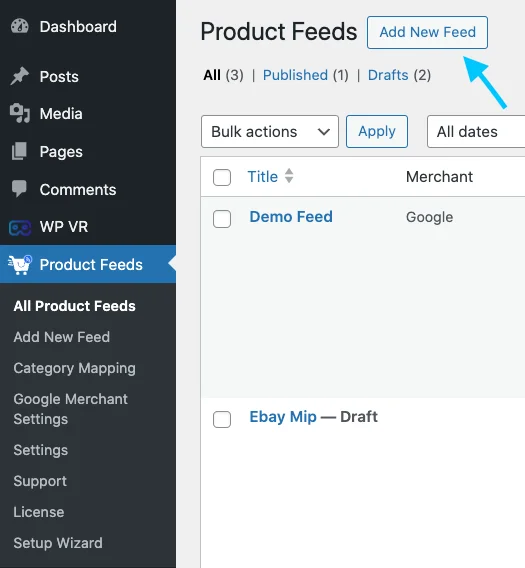
Head over to your product feeds dashboard.

Find the button that says Add New Feed and give it a click.

add new feed

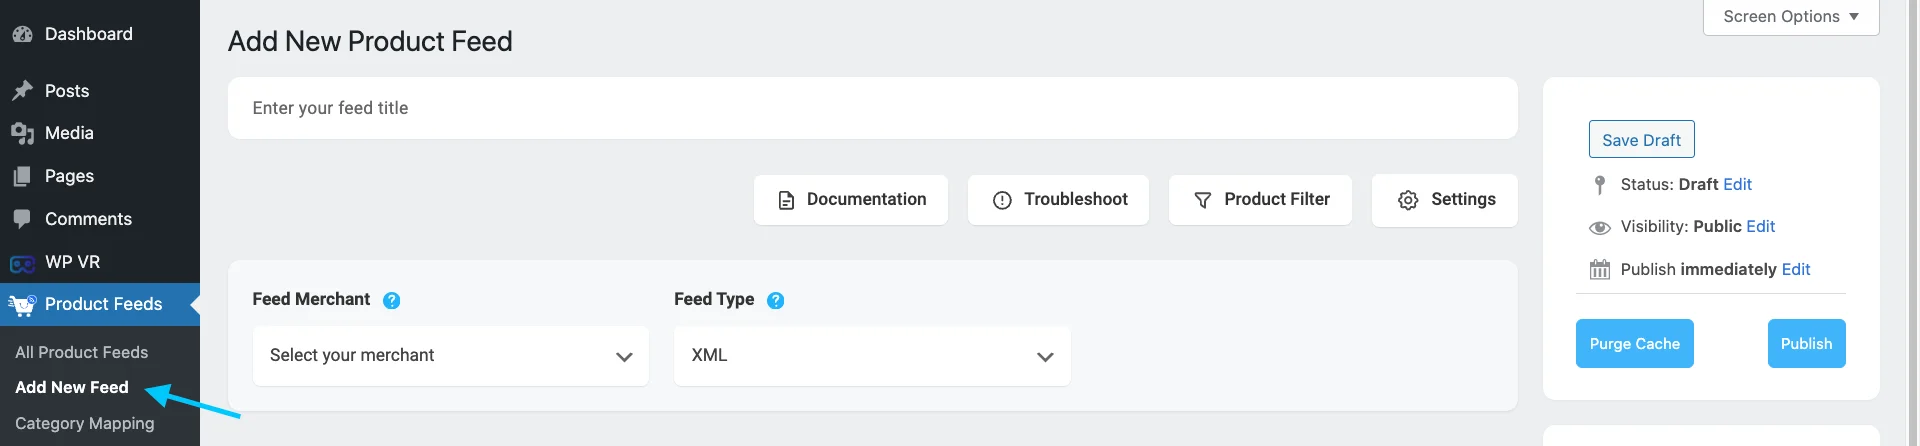
This will bring you to the page where you can create your feed.

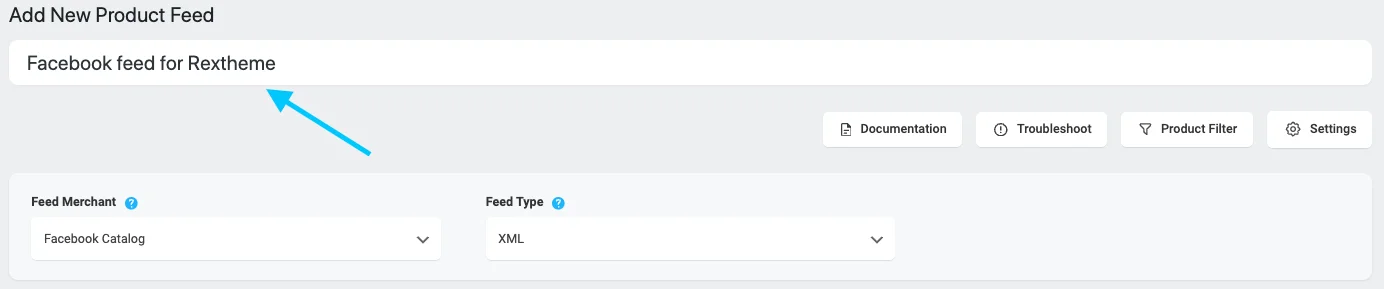
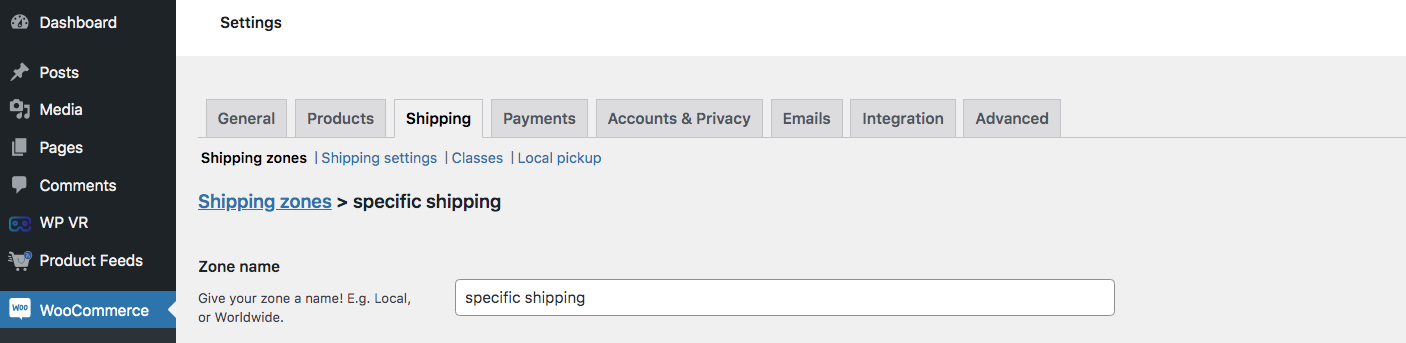
At the top, you can choose a title for your feed. Think of a name that aligns with your brand identity to give your feed!

asdd feed name

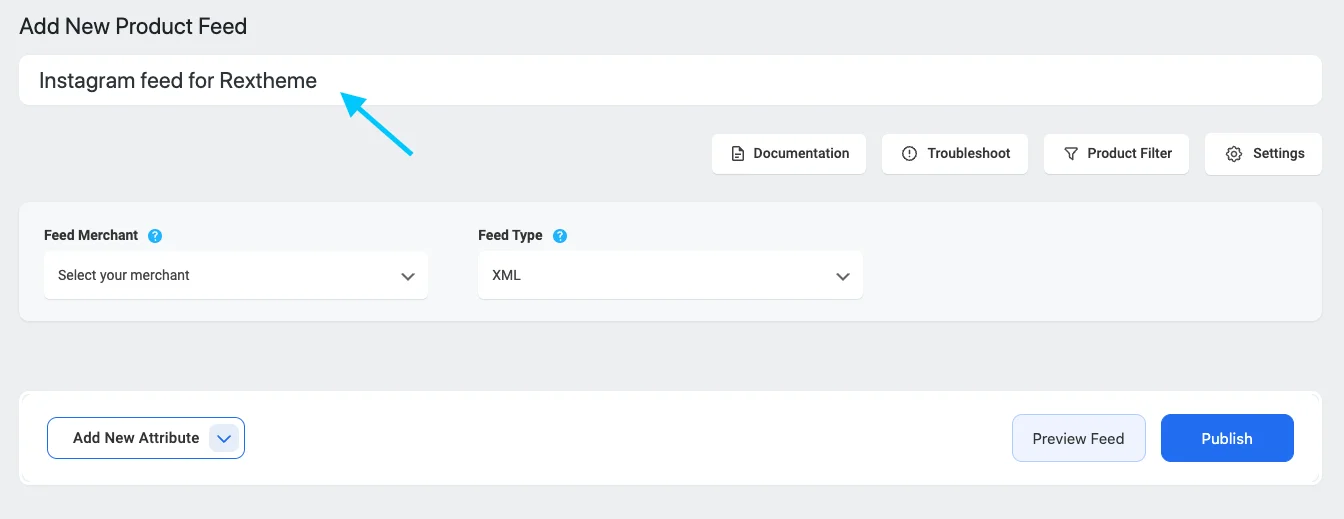
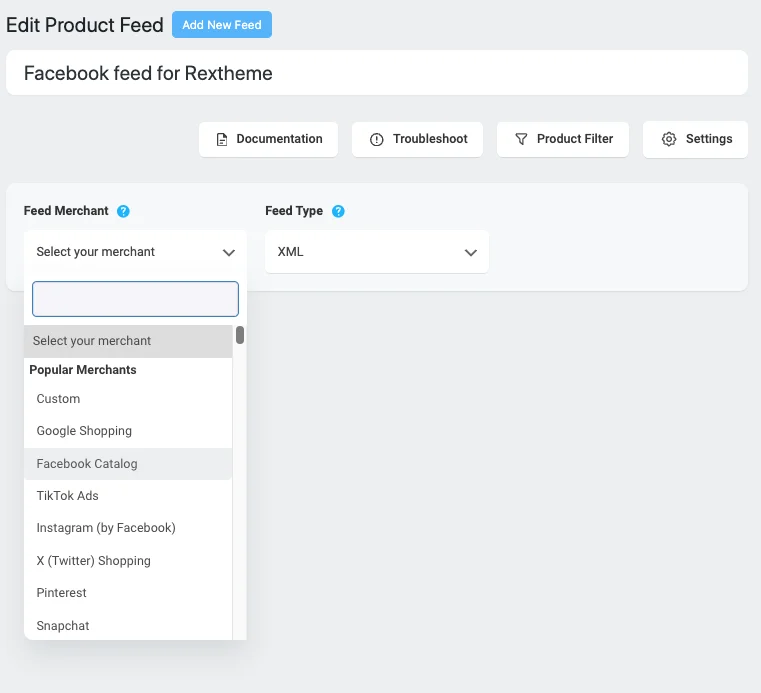
Choose the merchant you want to use.

select merchant in PFM

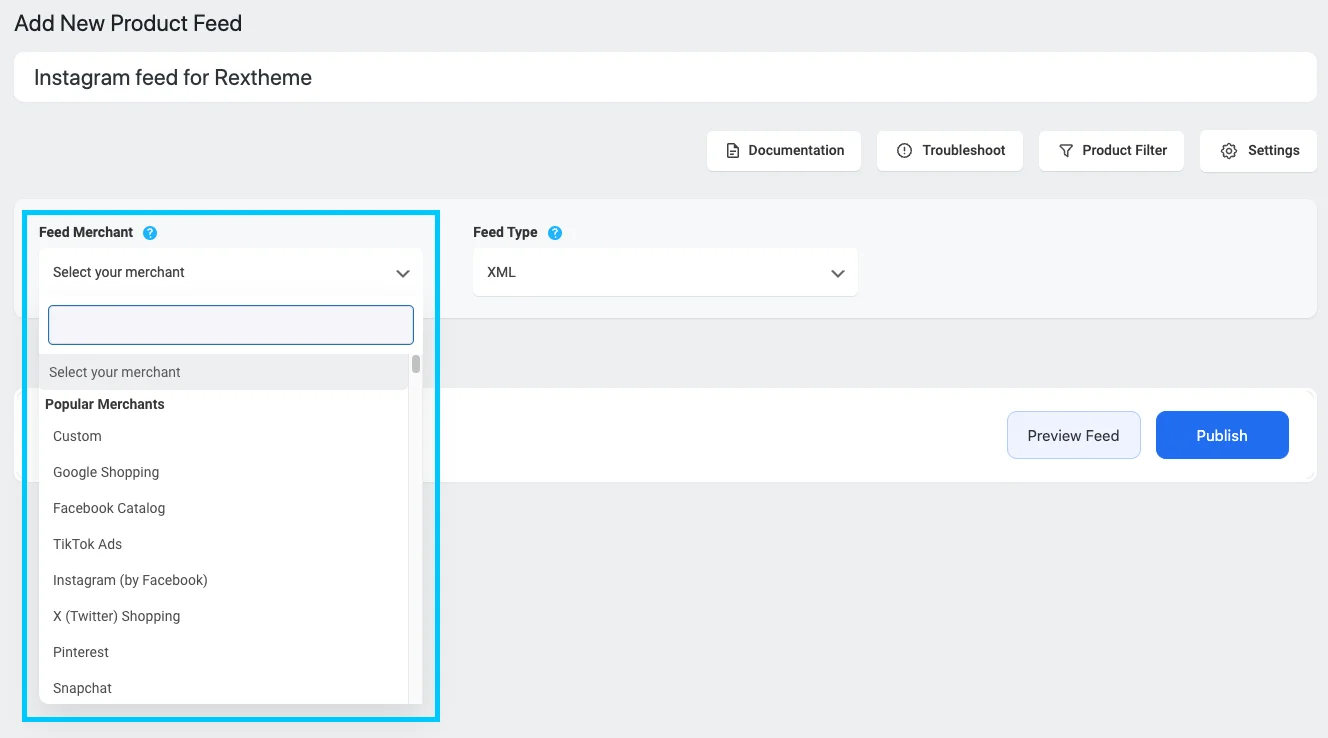
I am going to pick Instagram.

select instagram merchant

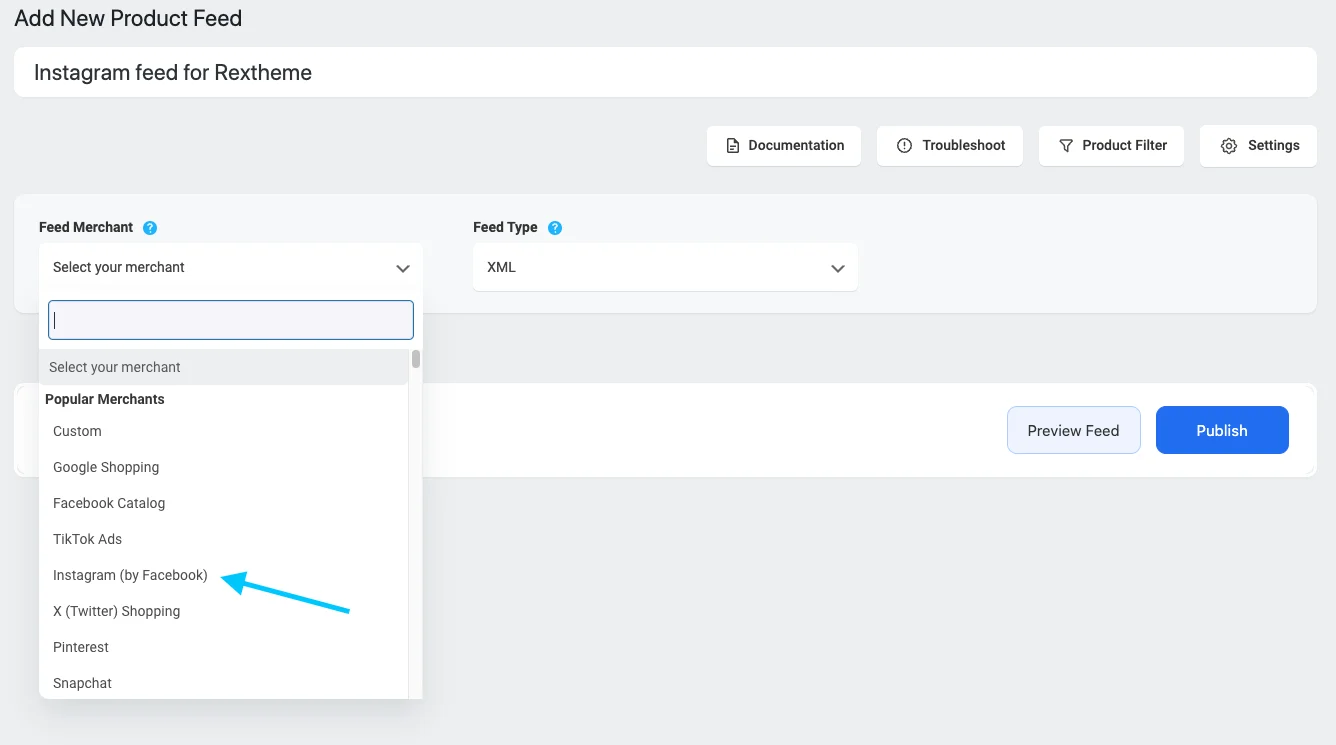
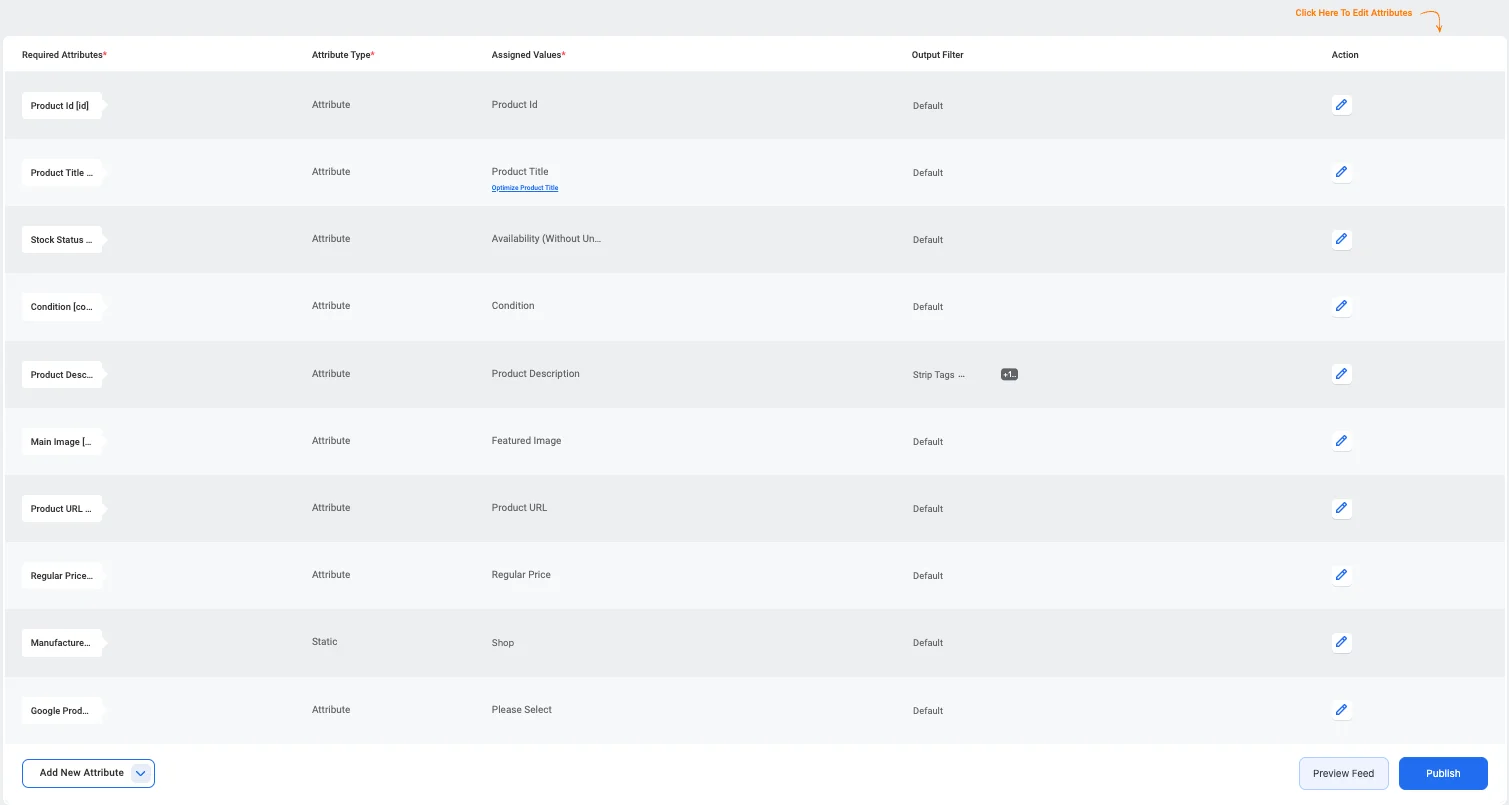
All the important details are shown below.

You’ll see that many details are already set up for you, but you might need to adjust a few things. Feel free to change anything you need to.

Feed page

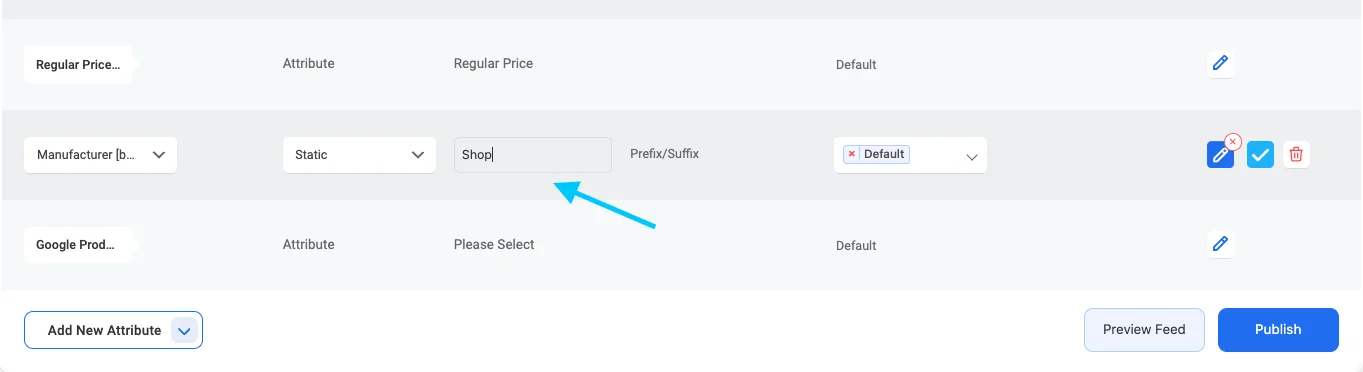
For Instagram, there are a couple of details that need to be fixed.

  • Manufacturer – This is the name of the company that makes the product you are selling.
  • GTIN – The GTIN number is given to you by the company that makes the product
  • MPN– The MPN number is a special code of a product given by the company that made it.
  • Google Product Category– This is about matching up your product categories with Google’s categories.

Now, let’s map the Google product category.

You can do category mapping in two ways. You can use a category mapper that’s already set up for Google Shopping, which you can also use for Instagram. Or you can create your category mapper.

For the first one,

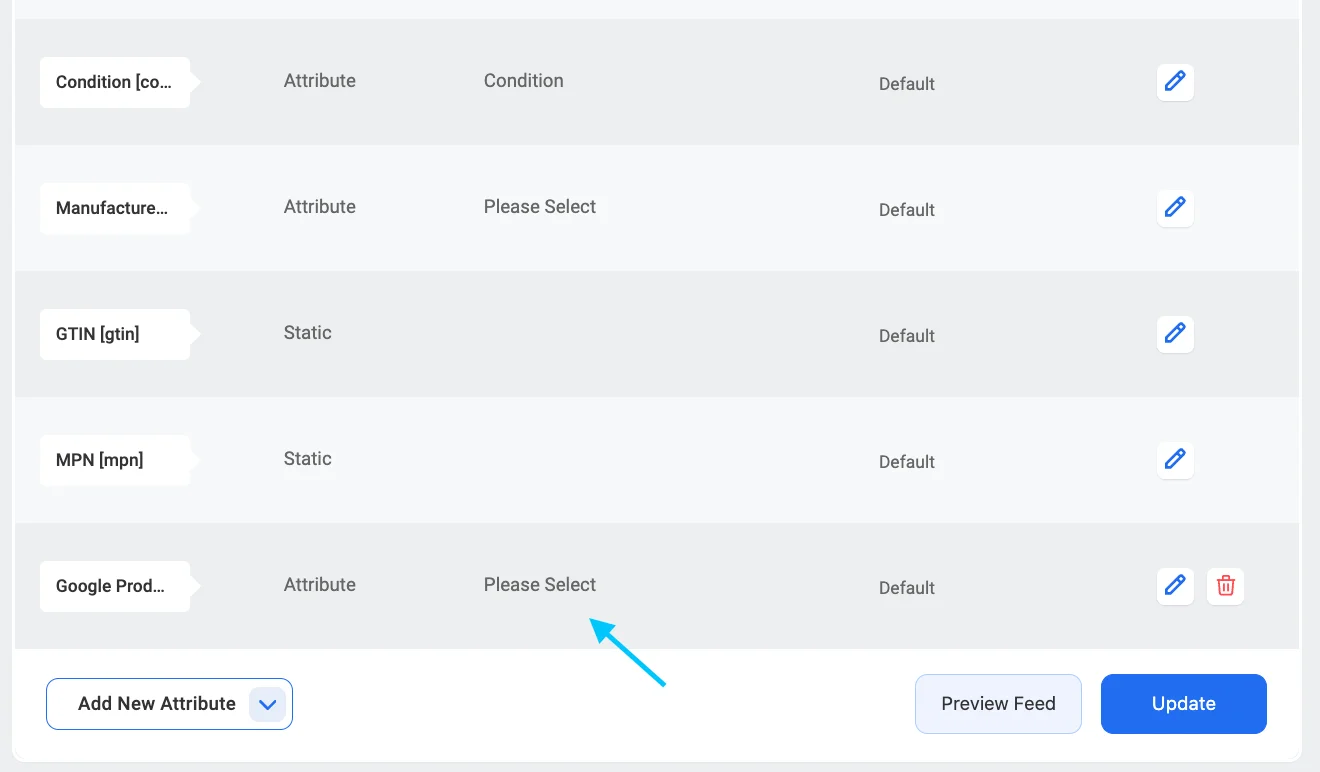
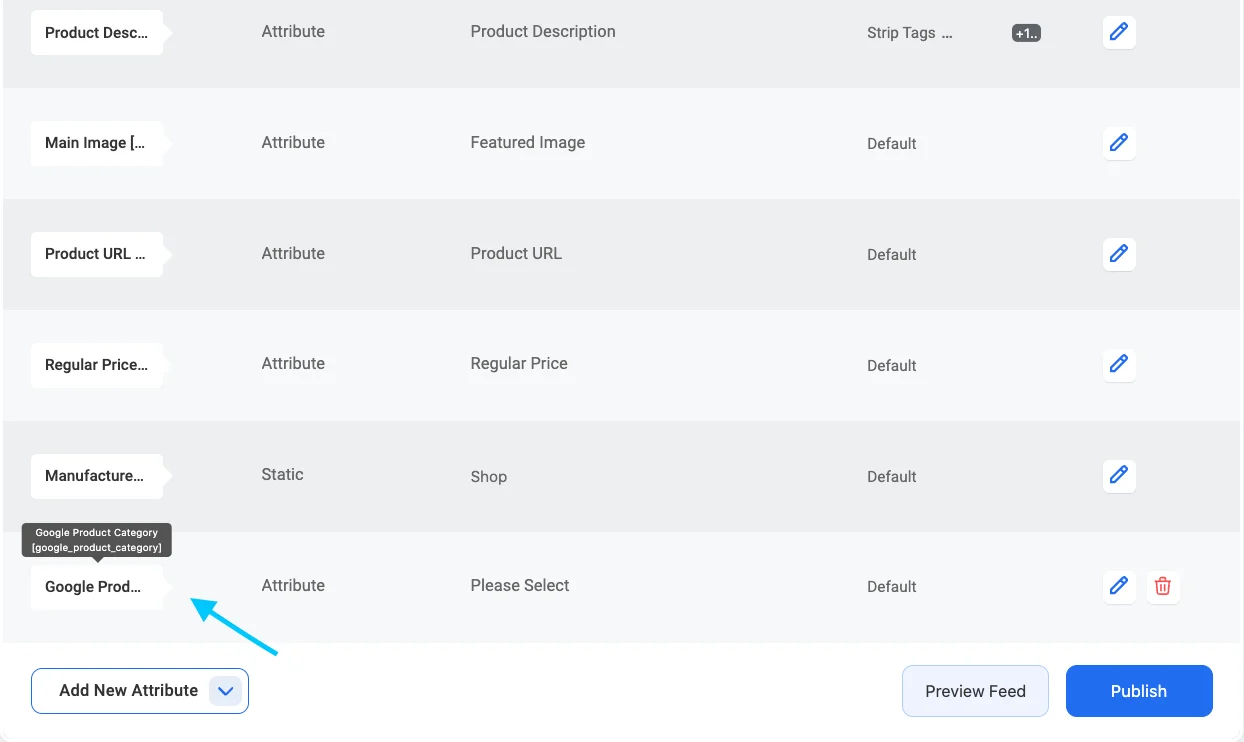
Scroll down on the attribute list, you will find the Google product category attribute at the end.

choose google product category attribute

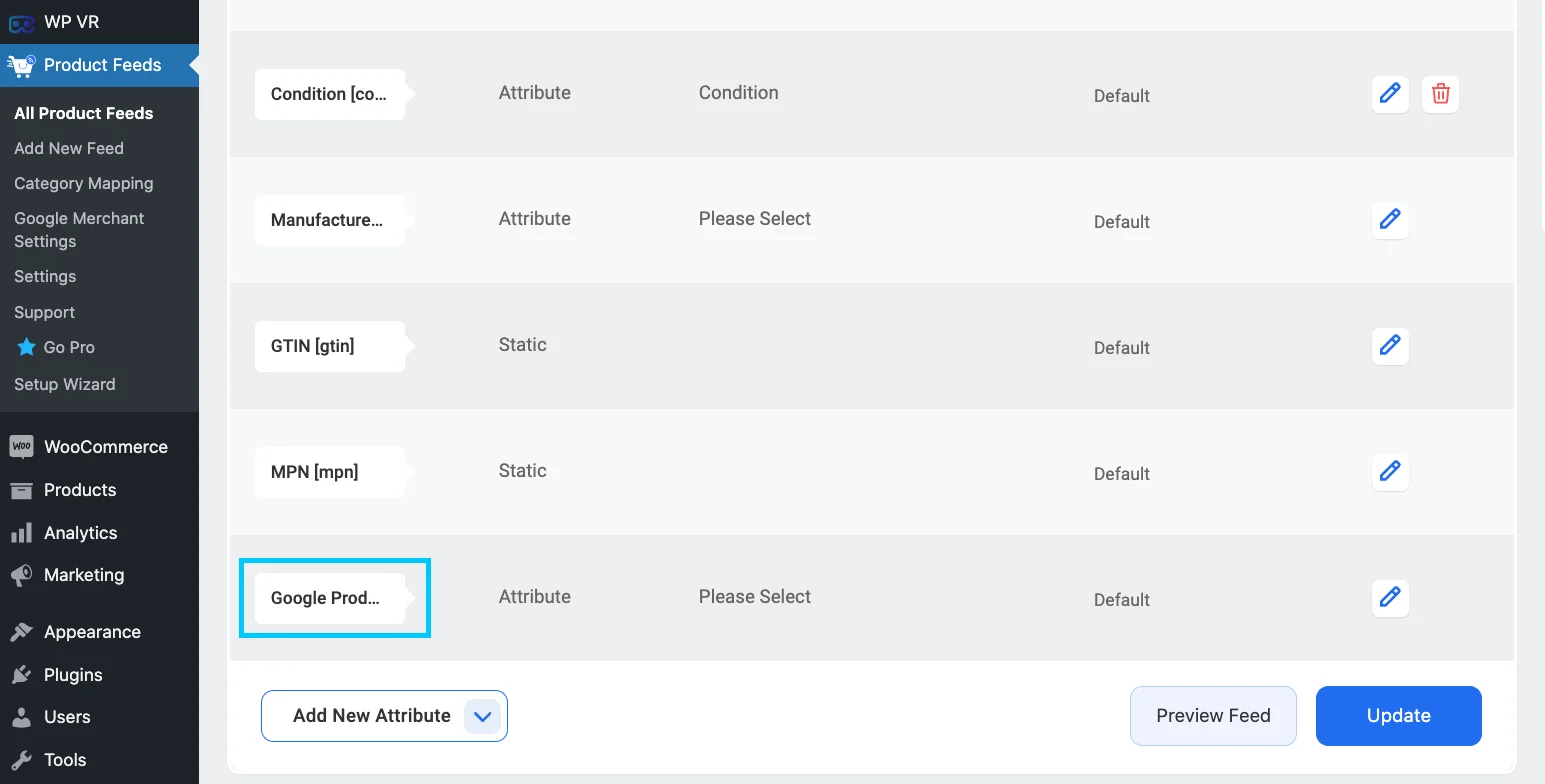
Click on the assigned value option beside the Google product category attribute. Click on the edit button on the right. Then click on the assign value button shown in the image :

 select assign value option in google category in PFM

As you can see, a scroll-down list will come up, from here select the Google product category[default] option.

google category mapping

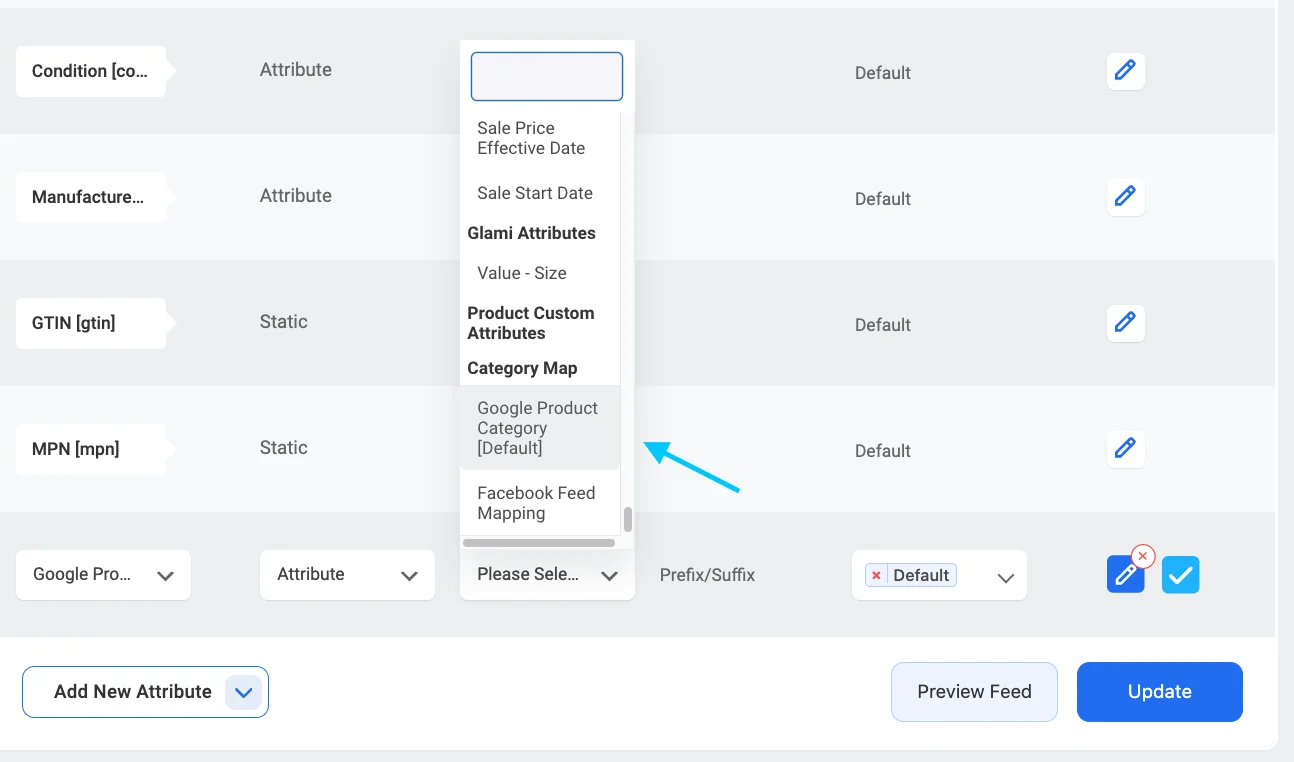
As you select it, you see a blue write-up “configure category mapping” below the selected assigned value.

google category mapping set up

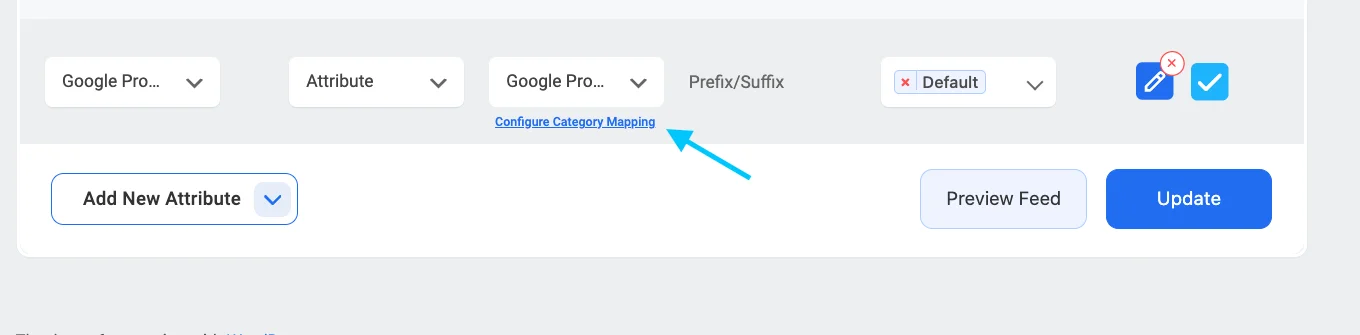
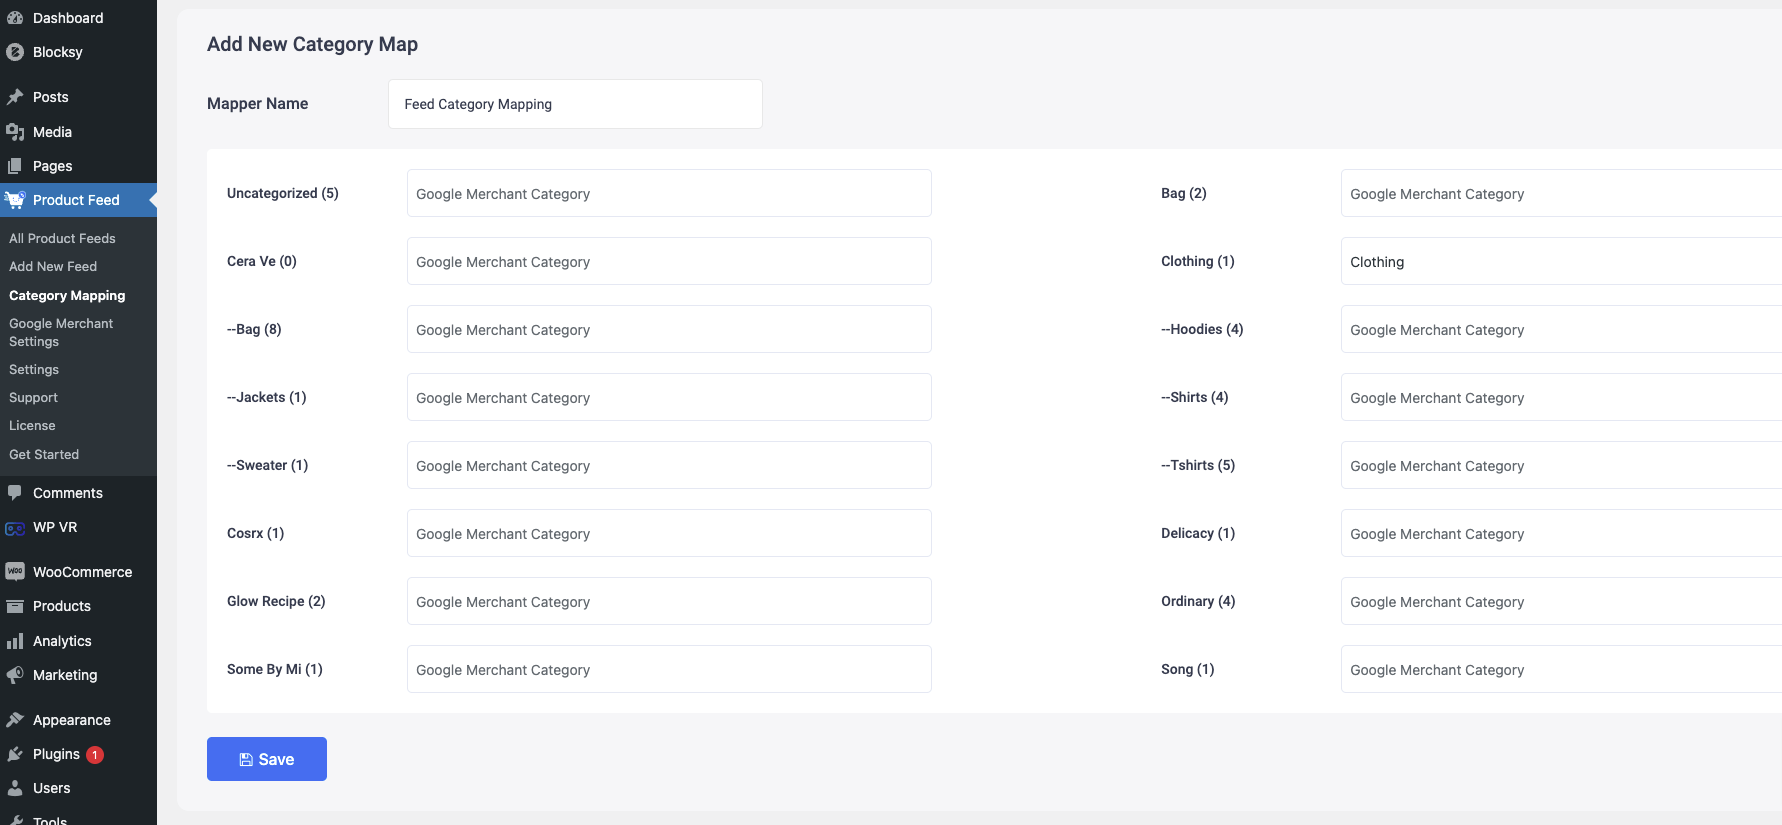
Click on the Configure Category Mapping button which you will find under the Category Mapping value, and a new tab will be opened with the default category mapper – Google Product Category.

google category mapping set up

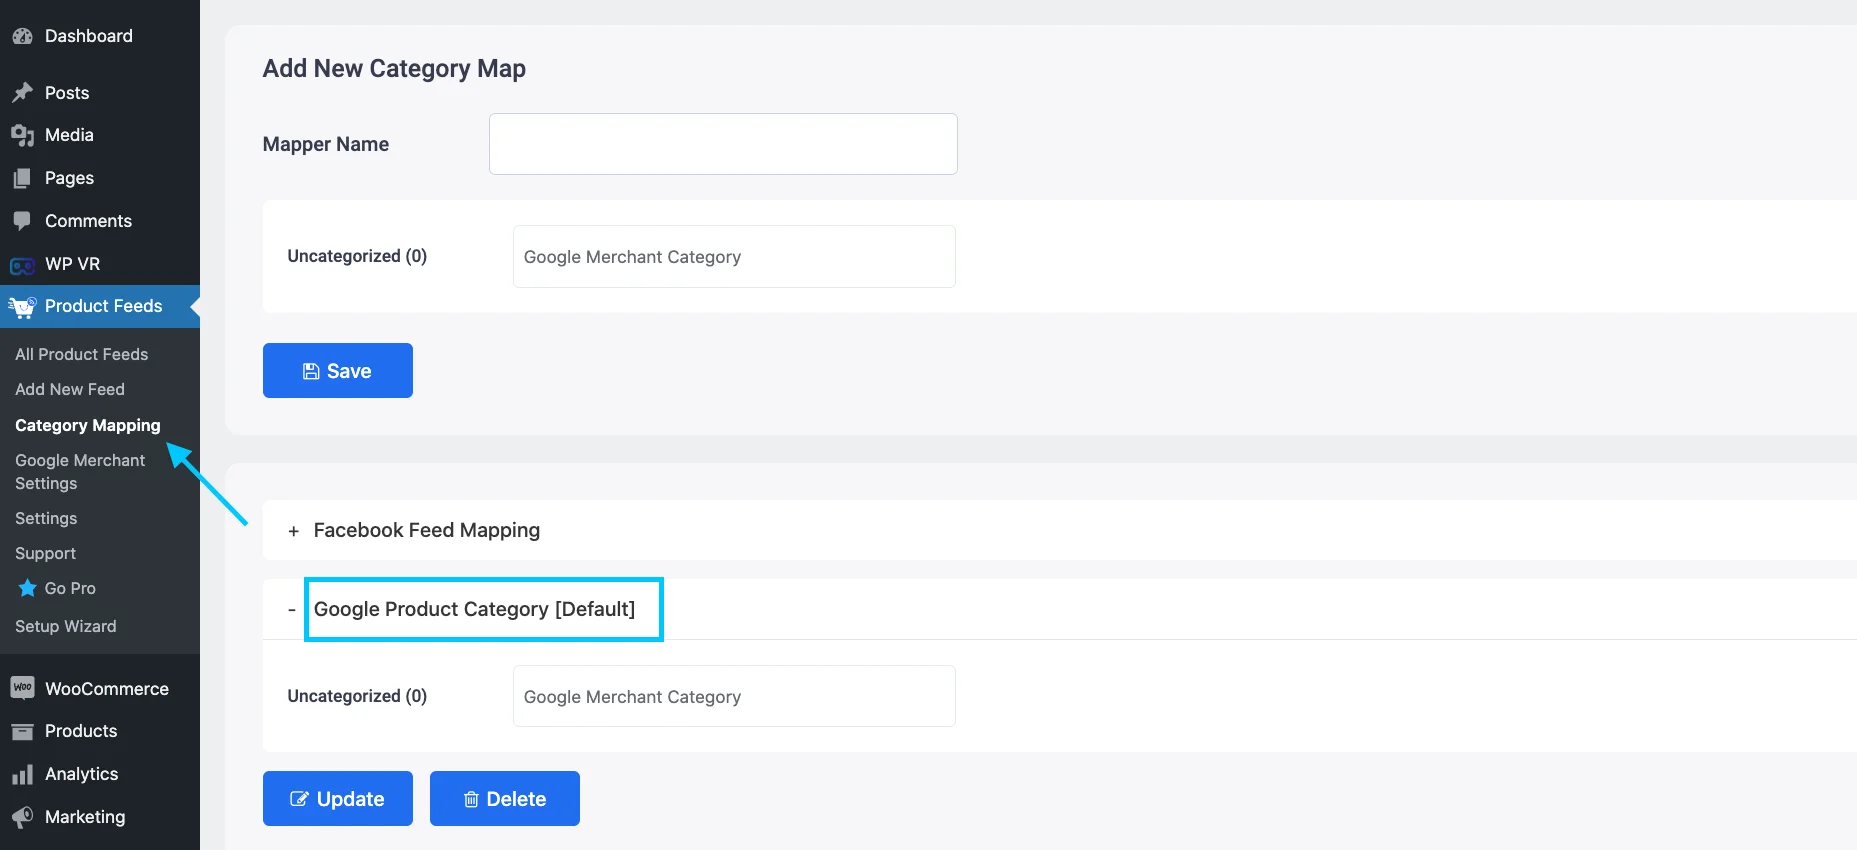
Map your categories here and click on the Update and Close button to go back to the attribute section.

However, you can create a new Category Mapper too. You need to click on the Category Mapping button from the WordPress dashboard and there you will get the option to create a new Category Mapper and to configure the mapper.

You can follow this doc to learn how to create a new Category Mapper for your feed.

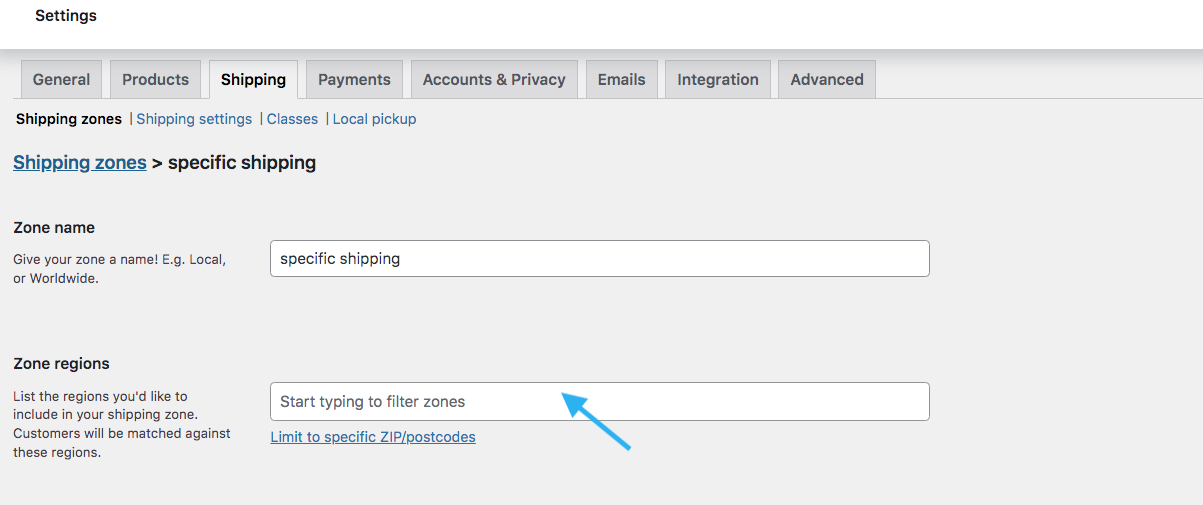
Now, you need to choose the feed type. Click on the Feed Type labeled box and all the available types will come.

feed type

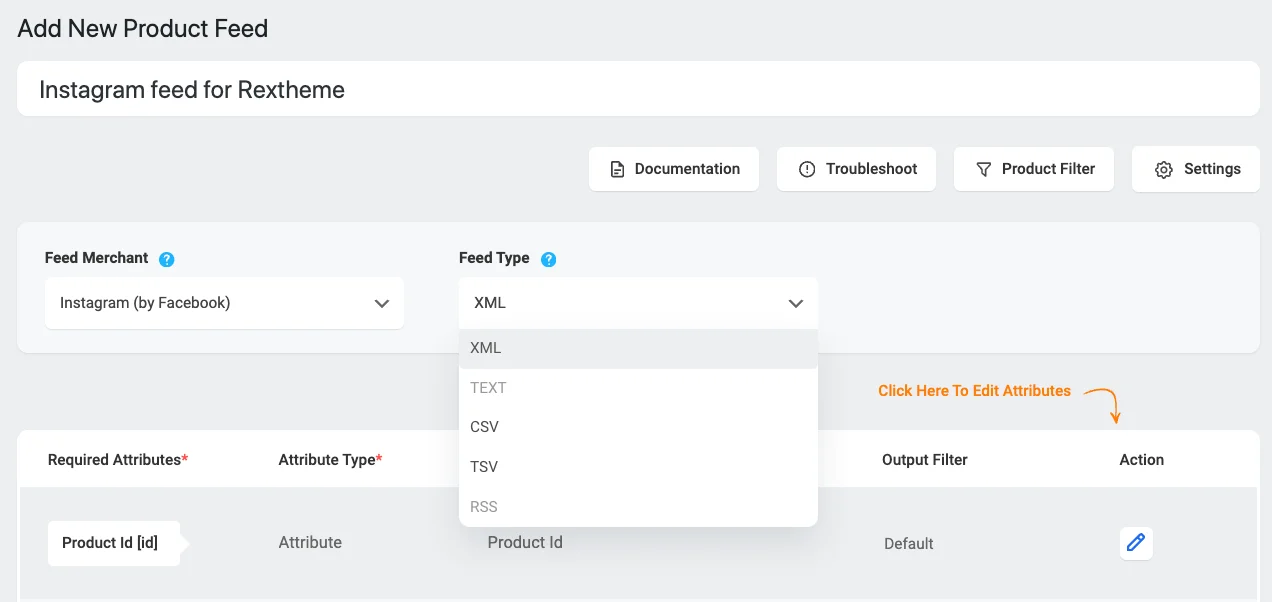
Just so you know, Instagram can handle XML, CSV, and TSV feeds. You can pick which type of feed you want from the dropdown menu. CSV is usually the best choice.

Step 2: Feed Configuration

Go back to the top of the page and you’ll see four choices.
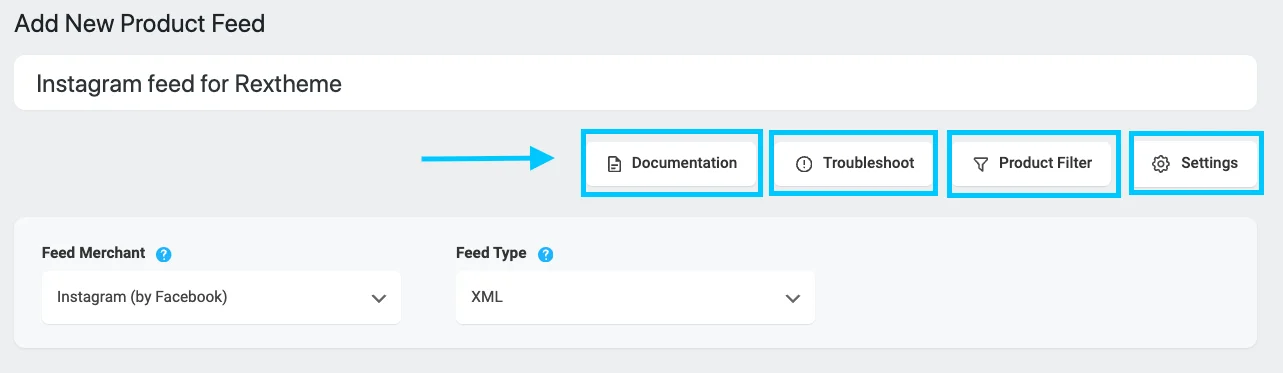
feed configuration in pfm
  • Documentatie
  • Problemen oplossen
  • Product Filter
  • Instellingen

Let’s start by setting up the Product Settings.

Click on the Product Settings button, and a menu will pop out from the right side of the screen.

feed configuration setting option

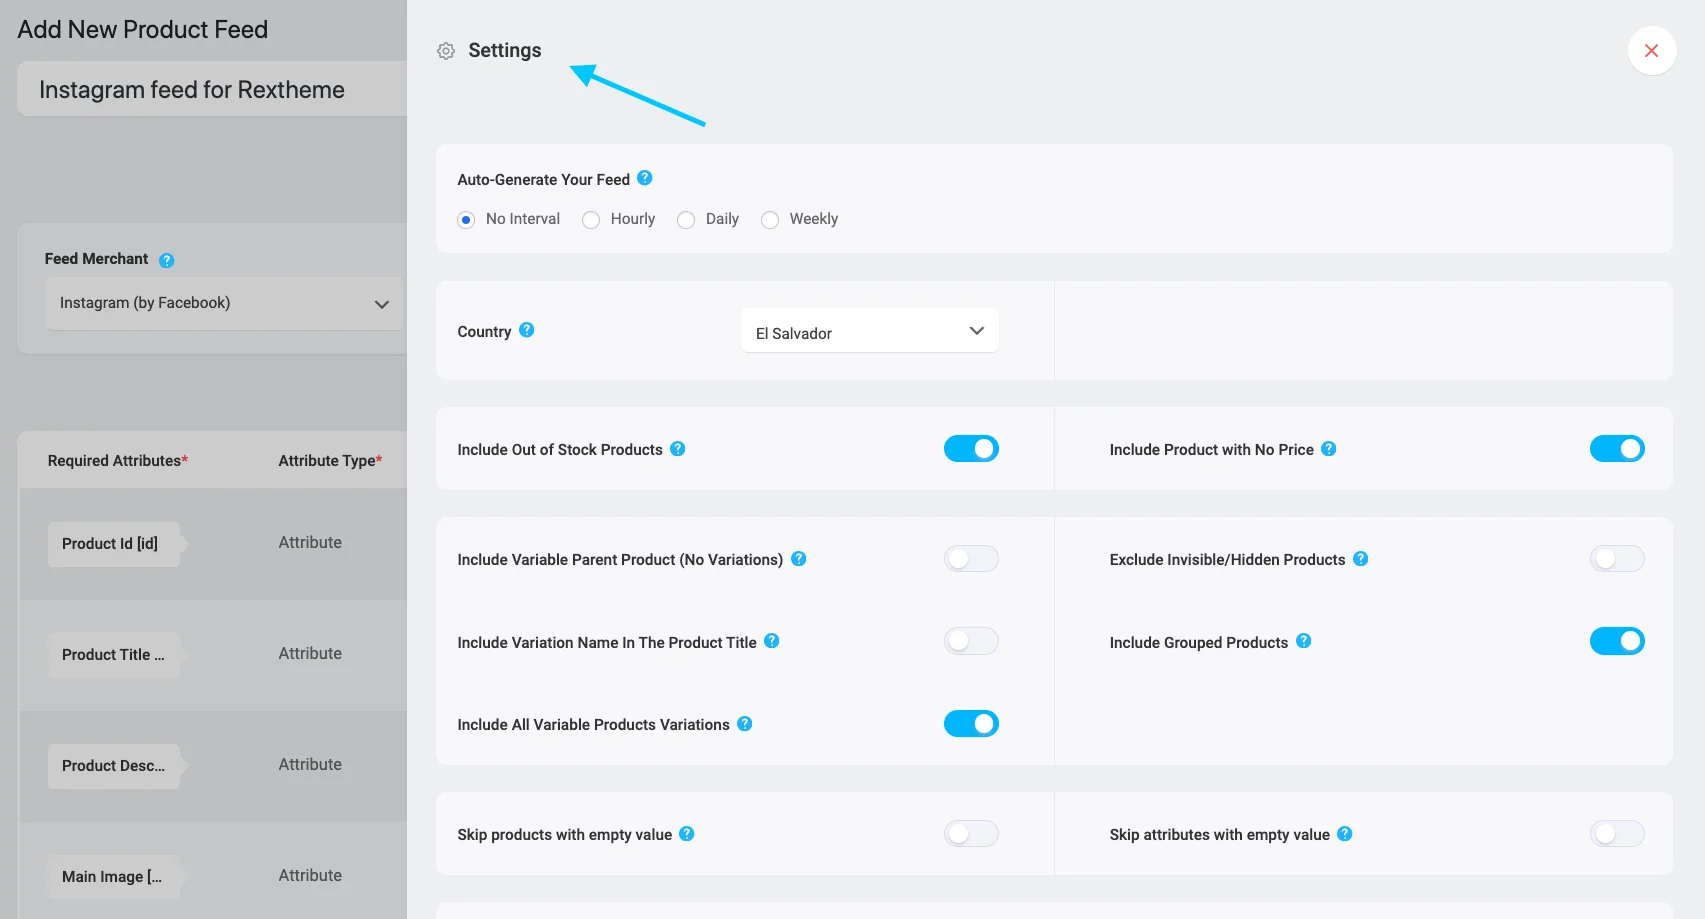
The first thing you’ll see is Auto-Generate Your Feed.

auto generate feed

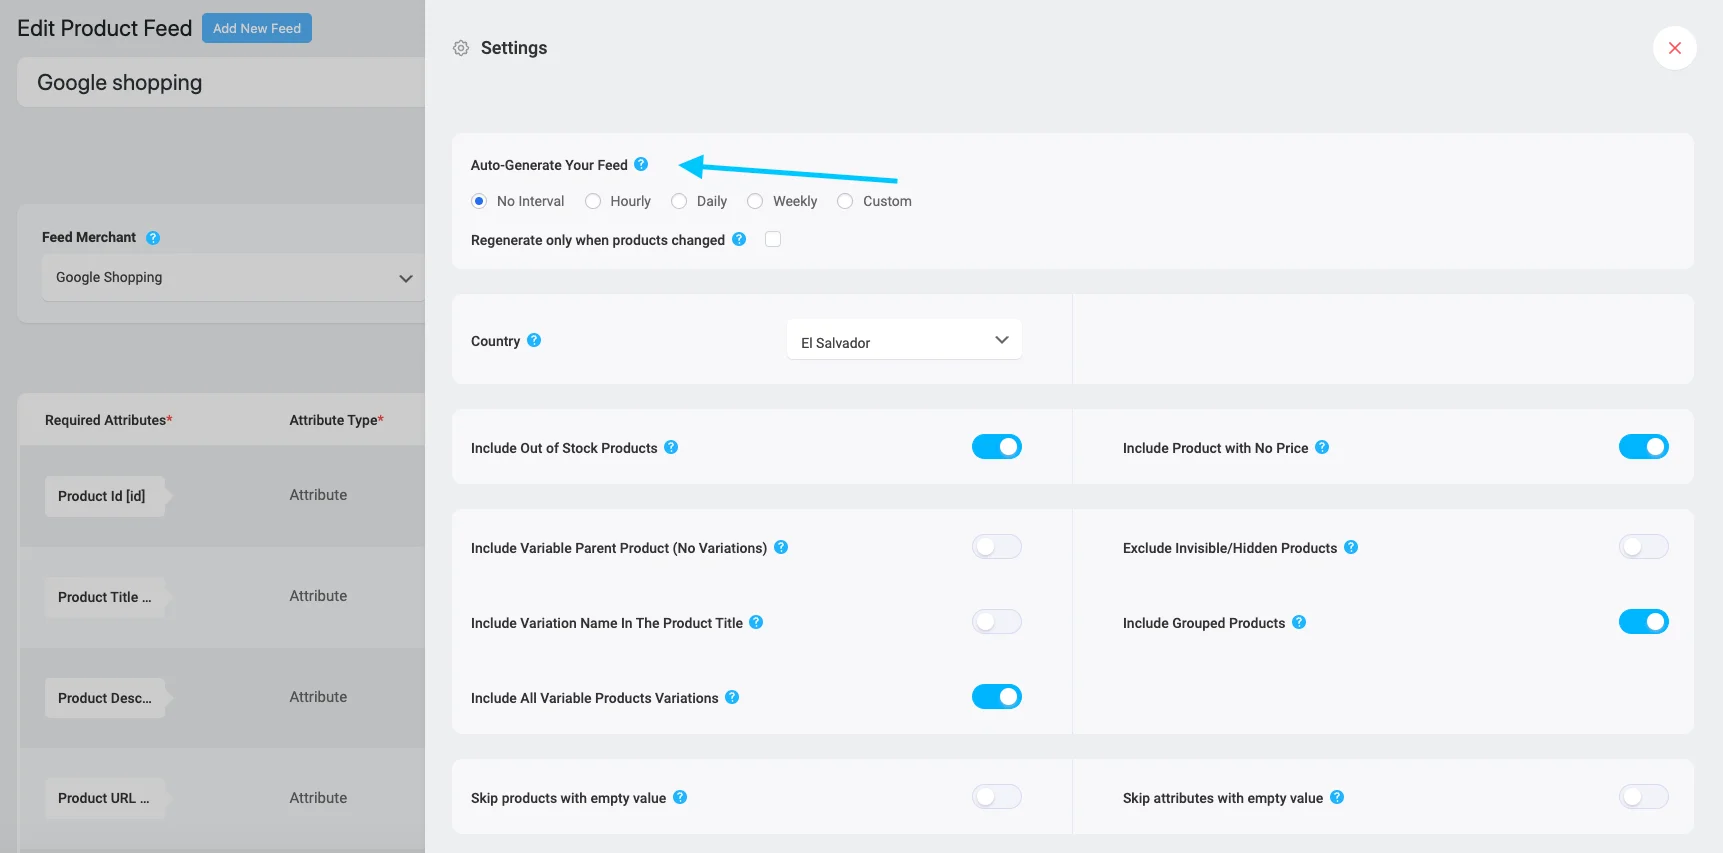
This lets you schedule when your feed updates automatically.

Choose a time interval or select “No interval” if you don’t want it to update on its own.

Now,

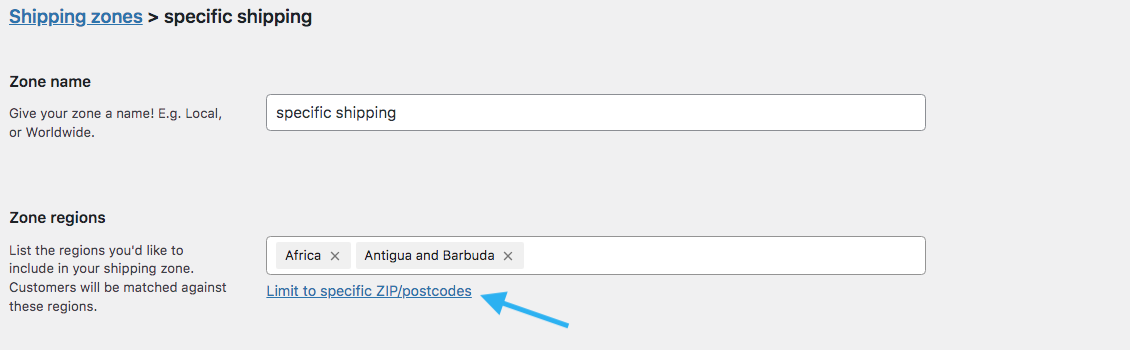
Close the menu and click on Product Filter. Another menu will pop out from the right side.

select product filter option in pfm

You can choose which products to include in your feed.

product filter option

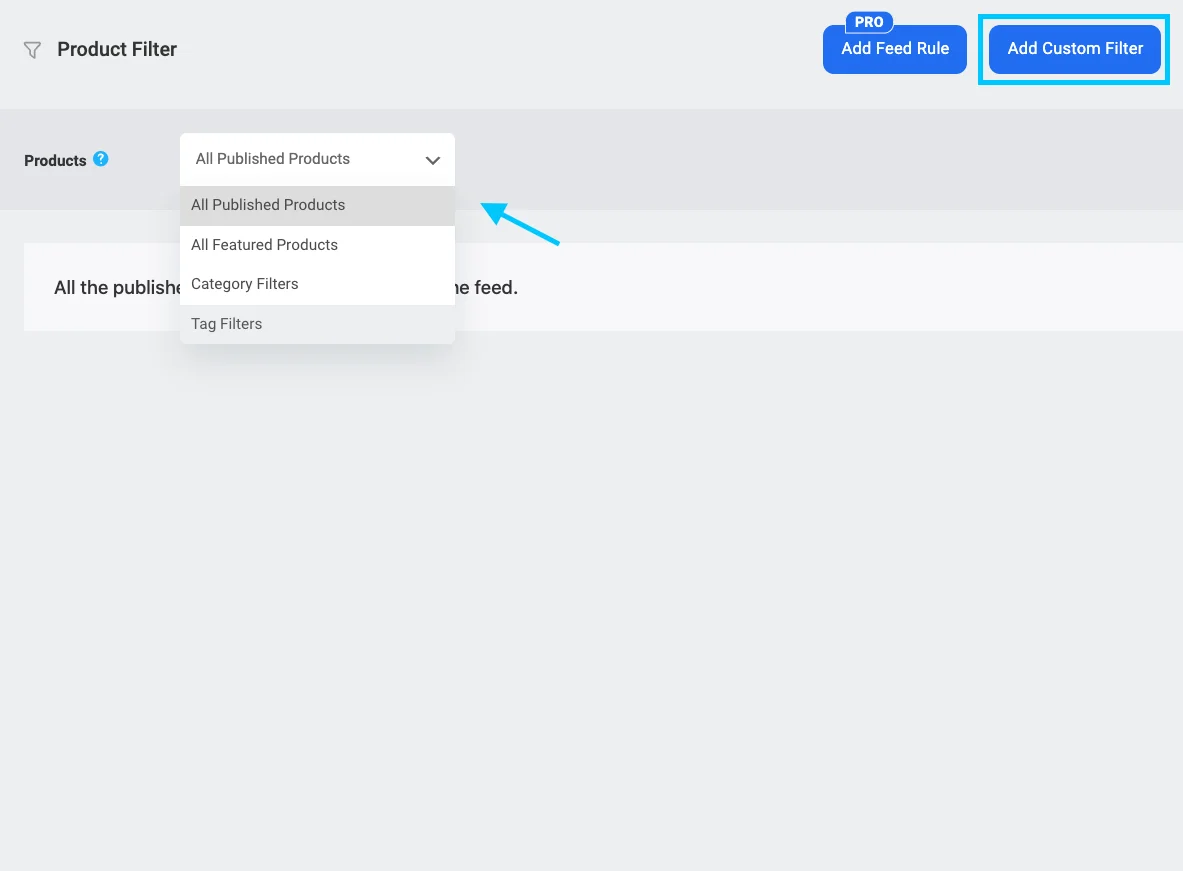
You can include all your products, or use filters Category Filter, and Tag Filter to select specific products.

If you want to add a custom filter, on the right side you can click on the add custom filter.

Here’s an example,

custom product filtering

All of it you can do in the free version. For a simple feed, that’s enough.

If you want to add any Feed Rule, you can take the pro version.

Here’s how you can set up Feed Rules,

Feed Rule Feature in Product Feed

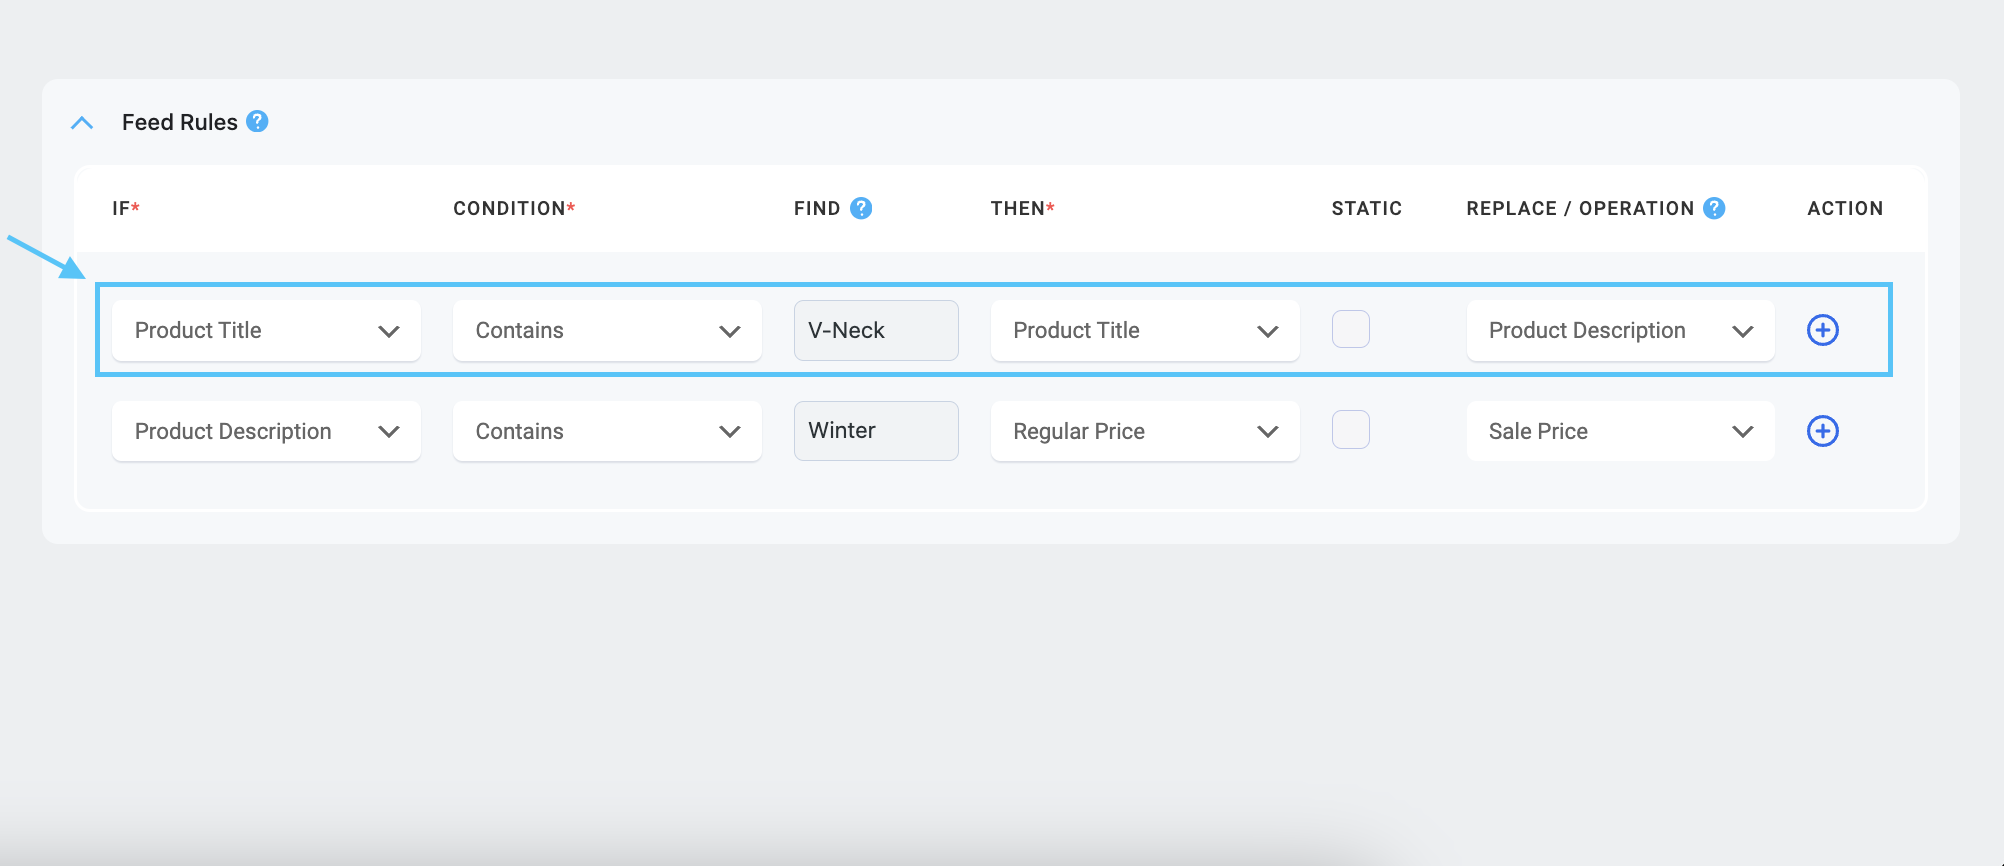
Learn more about Feed Rules from this doc. ->

Step 3: Publish The Instagram Product Feed for WooCommerce

Alright, now that you’ve set up your feed just the way you want it, it’s time to publish it!

Just go back up to the top of the page and look for the big button that says “Publish” on the right side.

publish feed option in product feed manager

Click that button and your feed will be published.

Once you publish your feed you’ll get the URL or the download link of the Feed.

Publish Instagram Product feed

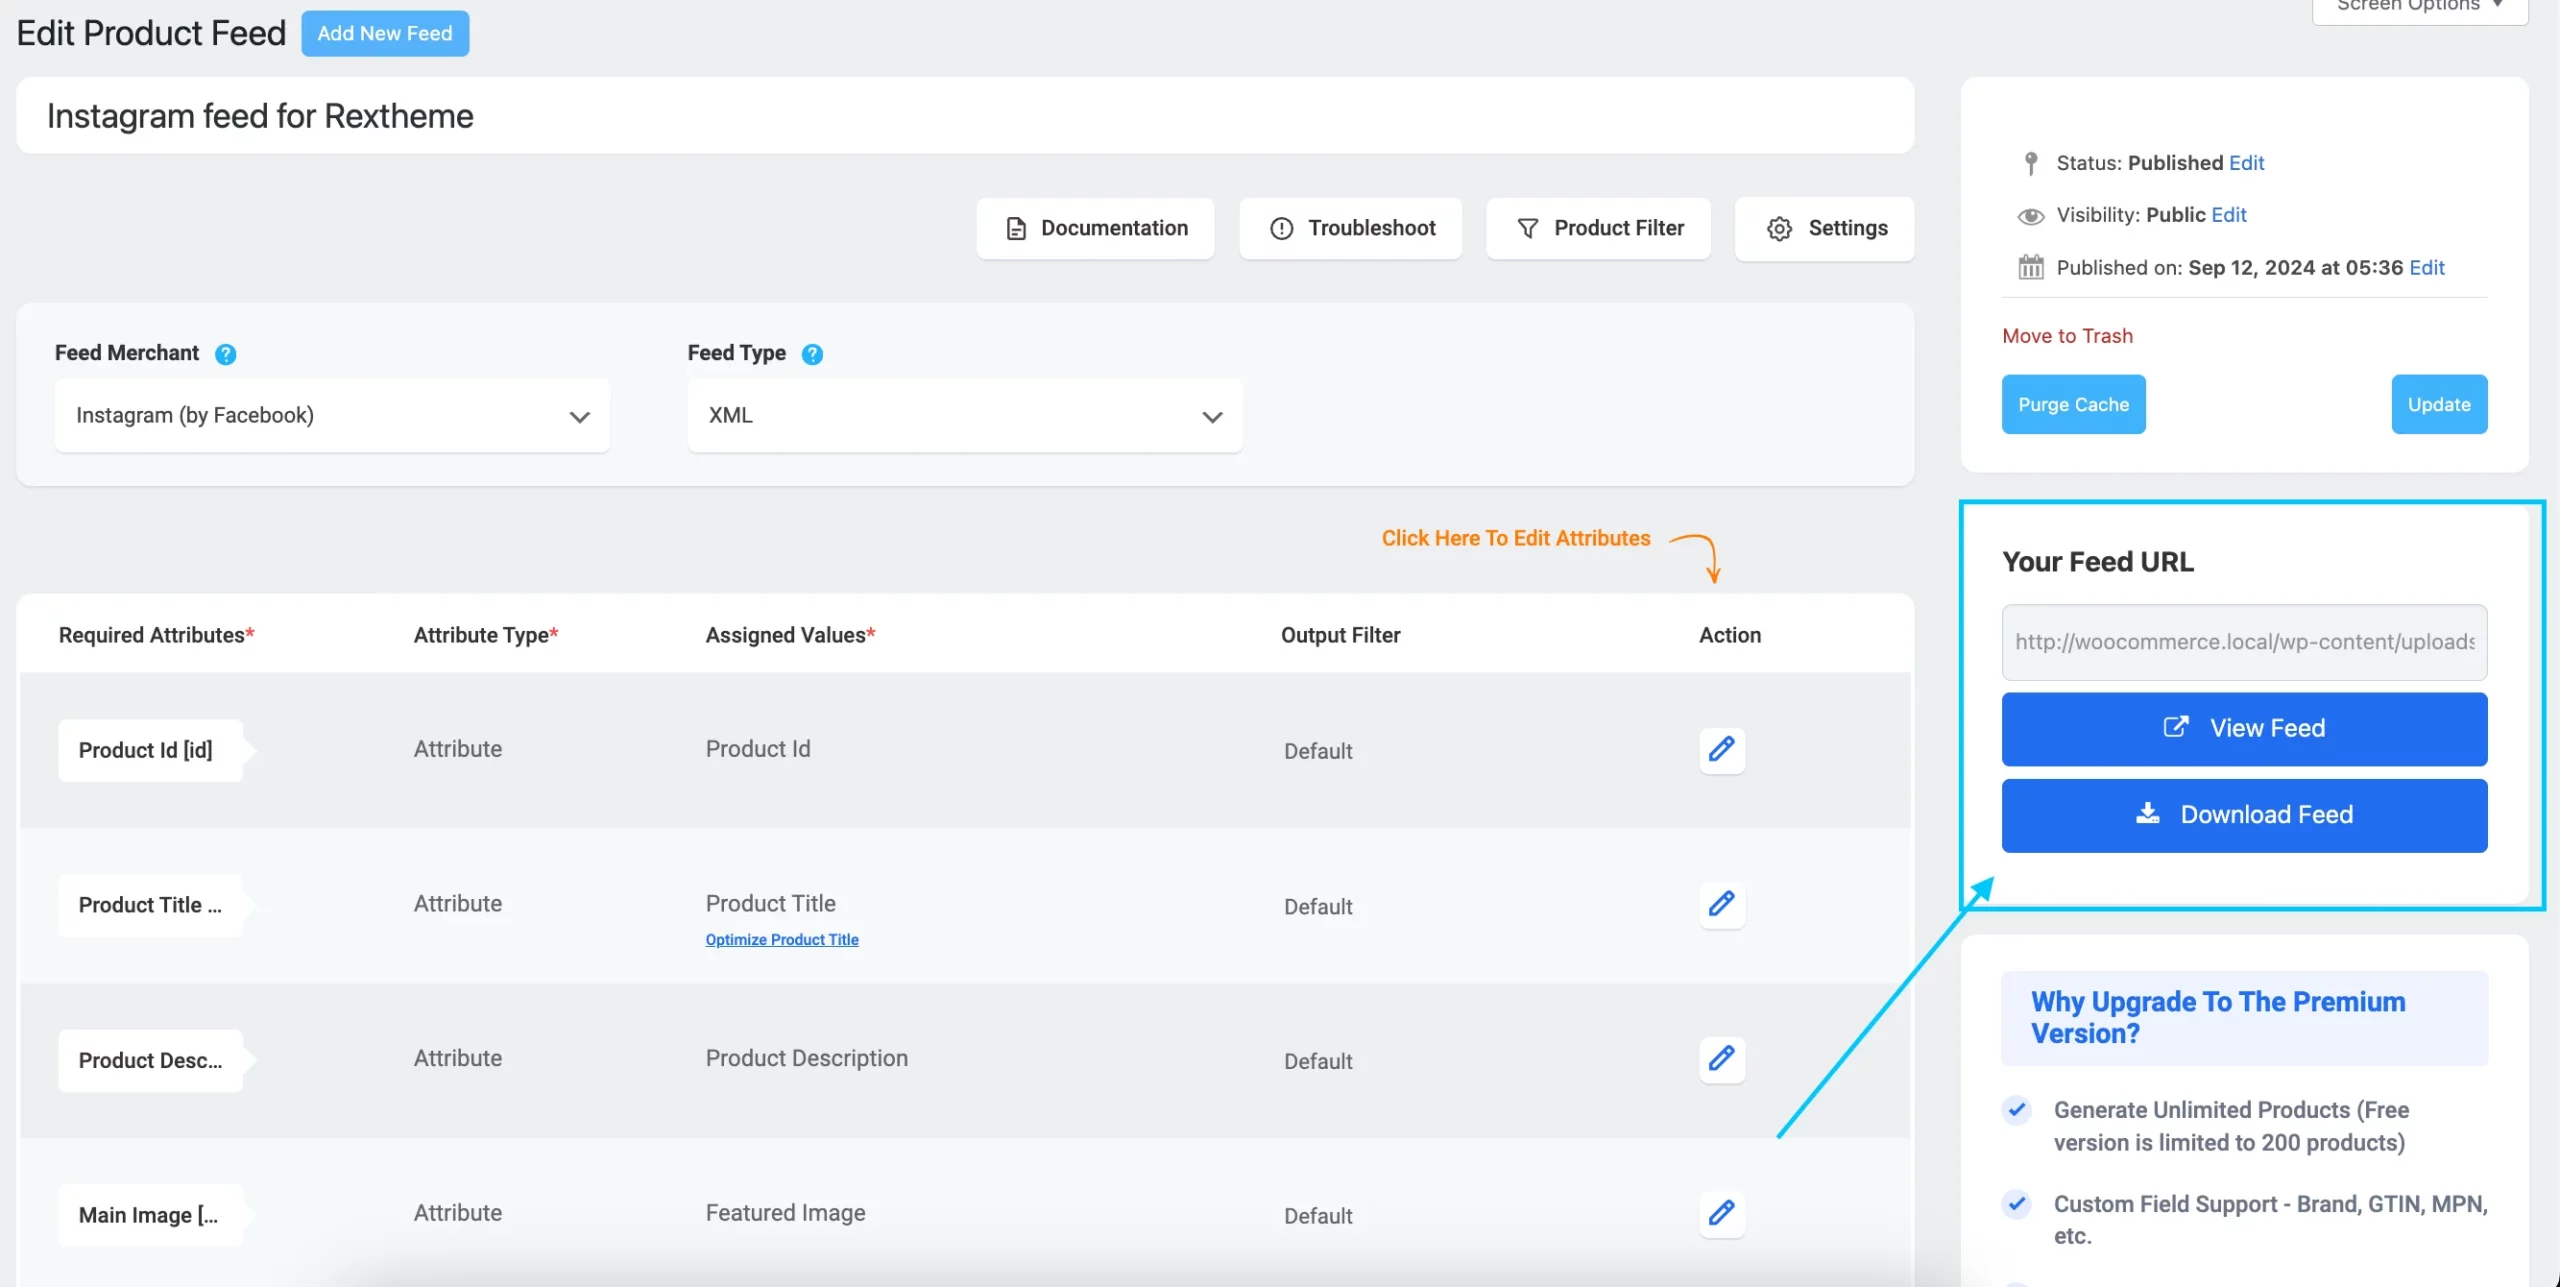
On the right panel, you will find the button “Update”. If you want to make any changes you can simply click on these options and update.

How To Create Instagram Product Feed For WooCommerce – A Complete Guide [2025] 1
Type caption (optional)

That’s all! Your Instagram product feed is ready!

Integrate WooCommerce Store With Instagram Shop

Just creating an Instagram product feed is half done work, You need to connect your Woocommerce store with the Instagram shop.

Headache is:

How would you connect it?

First, Go to your Facebook business page.

create business account in commerce manmager
Type caption (optional)

If you already have a Facebook account, log in and head over to your Facebook Business page. If you don’t have an account yet, create one.

Once you’re on your Facebook Business page, you’ll be redirected to the dashboard.

home page of business account
Type caption (optional)

Next, is to set up your Instagram Business account.

Go to the Instagram account and click on the three bars in the top right corner.

Select “Settings” and then “Business“.

Click on “Connect to Facebook” and follow the prompts to link your accounts.

Now, it’s time to create a Catalog where you can showcase all your products.

To do this, go to Facebook Commerce Manager and click on the Add Catalog button.

Add catalogue
Type caption (optional)

Choose the type of Catalog you want to create, and once it’s confirmed, you can start adding products.

Select type of catalogue
Type caption (optional)

Give a name to your catalog select the upload method and click on the Create button.

configure settings
Type caption (optional)

Click on View Catalog to begin adding items.

catalogue create
Type caption (optional)

When you click on View Catalog, you’ll see the Category Overview section.

Click on Add Item to start adding products to your Catalog.

overview section of facebook commerce manager
Type caption (optional)

To add products from your Facebook feed, click on Data Sources and then Add Items.

This will take you to the Add Items window where you can start uploading your products.

set uo commerce manager
Type caption (optional)

Select Data Feed and click on the Next button.

set up commerce manager
Type caption (optional)

Here you will some new options to set the data feed source. Select Yes and click on the Next button.

Set up commerce manager
Type caption (optional)

Now, you have to submit your feed here.

You can upload a feed from your Computer, from an external URL, or by using Google Sheets.

set up facebook commerce manager
Type caption (optional)

that’s how you upload your data feed to Facebook Commerce Manager.

As you upload it on Facebook Commerce Manager, It will automatically upload to your Instagram feed.

Now that you’ve met the prerequisites, you’re ready to connect your Woocommerce store:

Now,

  • Log in to your Woocommerce store’s WordPress dashboard.
  • Go to “Plugins” and click on “Add New“.
  • Search for “Instagram Shopping” and select the plugin from the search results.
  • Install and activate the plugin.

After you’ve added the plugin and turned it on, you’ll need to set it up.

Here’s how:

  • Go to your Woocommerce store’s WordPress dashboard and pick Instagram Shopping from the menu.
  • Click on Connect to Instagram and follow the instructions to link your Instagram Business Account to the plugin.
  • On the plugin settings page, make sure to turn on Enable Instagram Shopping.
  • Customize the other settings however you want, like syncing products and tagging options.

Alright, so now it’s time to link your Woocommerce store to Instagram:

  • Go to your Woocommerce store’s WordPress dashboard and find the Instagram Shopping option in the menu.
  • Click on Connect to Instagram and then just follow the instructions to give your store permission to connect to your Instagram Business Account.
  • Once everything is connected, your products will automatically show up on both your Woocommerce store and Instagram

Reasons To Avoid Manual WooCommerce Instagram Feed Creation

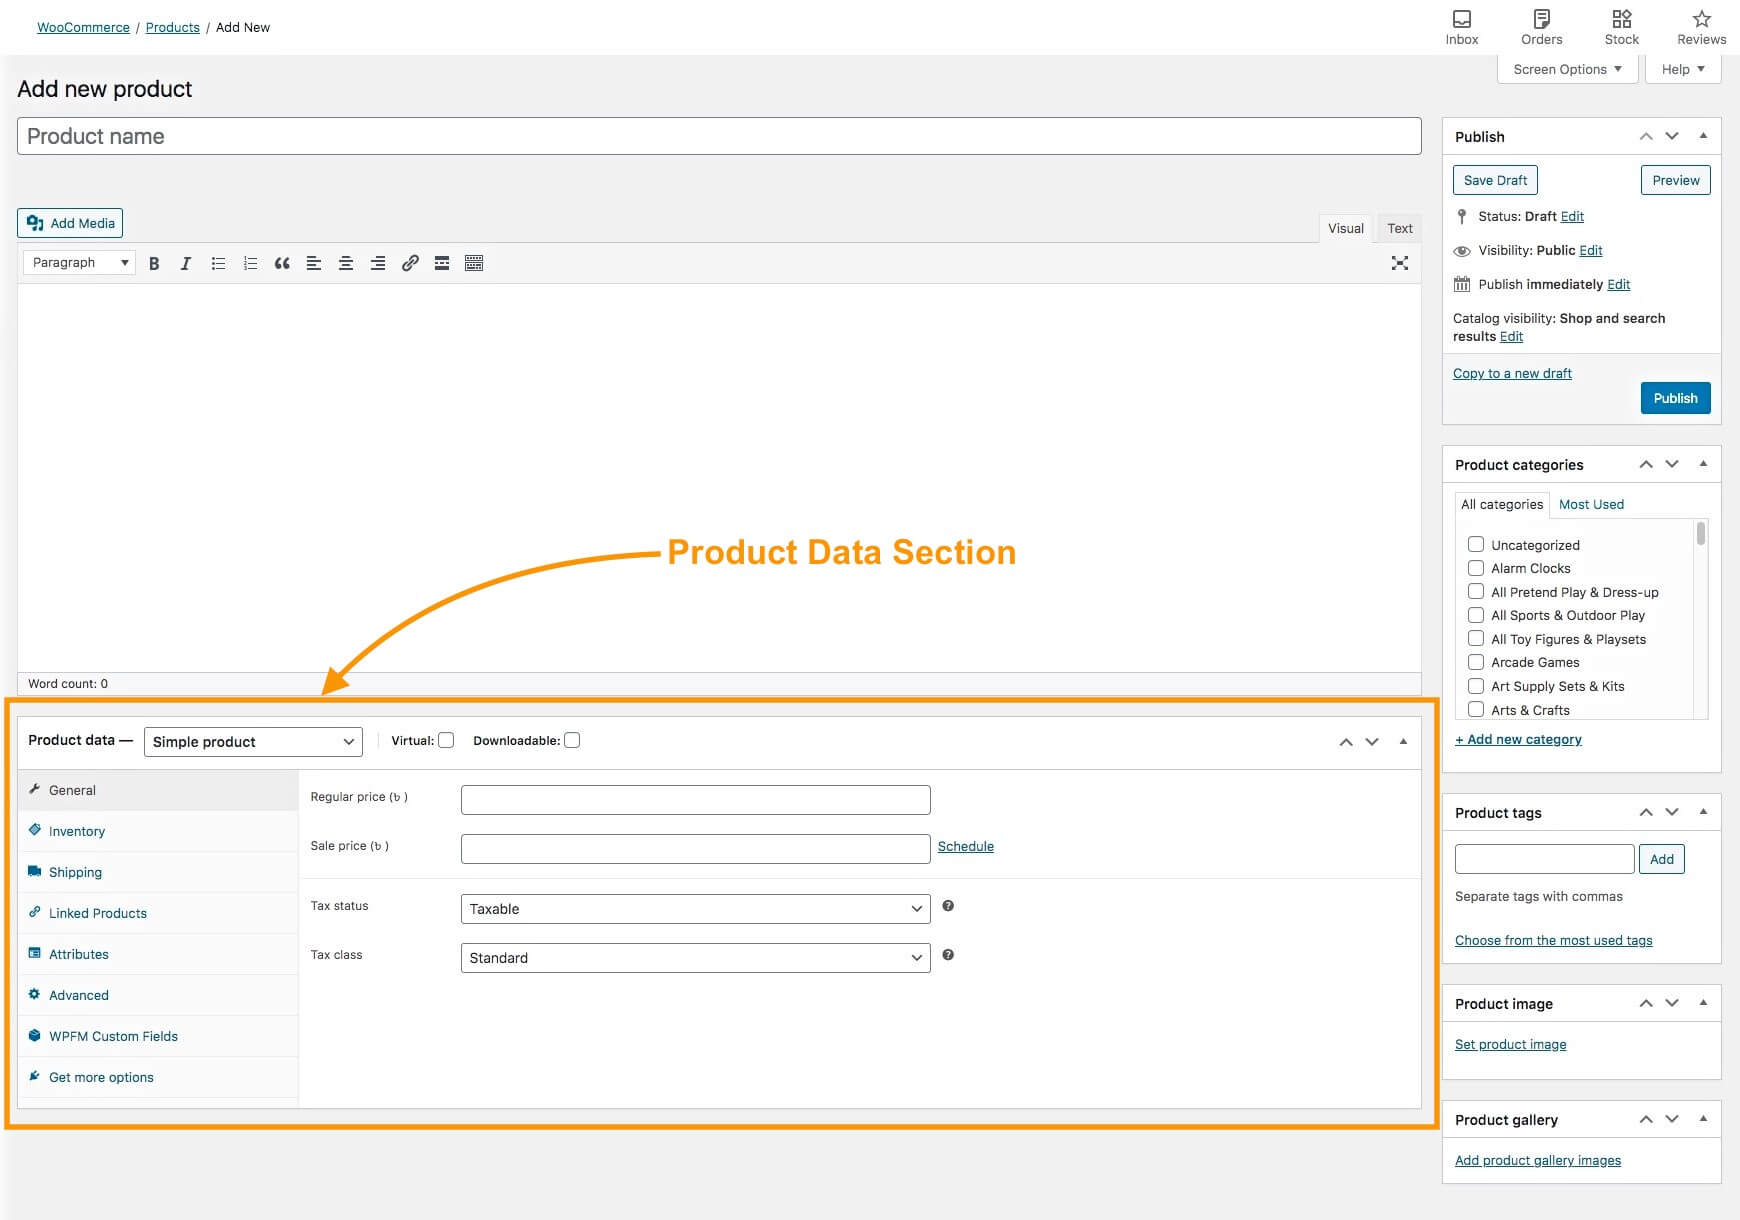
To create a WooCommerce Instagram Product Feed Manually, You need to organize the data of all of your products in a spreadsheet.

You can use Google Sheets or Excel for this.

You have to make sure to put each detail in a separate column at the top of the spreadsheet.

It’s kind of like filling out a long form! Which is very TIME CONSUMING!

If you have a big online store with lots of products, it’s not a good idea to manually create a data feed.

Another important thing for online stores is running sales and offering discounts. This means you’ll need to change your product prices often.

For example, if you’re having a Black Friday sale, you’ll need to update your prices for that specific time.

If you’re selling your products on different platforms, like Instagram, it’s crucial to keep everything in sync.

This means you need to update prices and sale details everysheet your products listed.

Managing all this manually can be a real headache.

Every time you make a change to your store, you’ll have to update all your product feeds with the latest info and upload them to every platform.

That’s why my suggestion is to use a Product Feed plugin.

You can SURELY choose the Product Feed Manager For Woocommerce that I have demonstrated here.

In the free version, you can generate product feed for up to 200 products per feed.

With this plugin, you can generate the feed in 3 simple and easy steps. It also takes much less time than manual setup.

If you are satisfied with the result, you can upgrade to the pro version and use this plugin to the full extent.

Benefits of Integrating Your Woocommerce Store With Instagram

81% of consumers trust a brand that has a strong brand identity.

By linking WooCommerce & Instagram together, you can create a strong brand identity that will help you attract more customers.

There are some more insightful data regarding Instagram marketing

  • Instagram has 2 billion active monthly users, which means if you integrate your Woocommerce store you get massive traffic and increase your brand visibility.
  • Instagram has been gaining a ton of new users every year, around 70 million to be exact. This has been happening since 2020 and it’s been staying pretty steady.

When you connect your WooCommerce store to Instagram, you open the door to a more interactive shopping experience for your customers. Here’s what you gain:

  • Increased Product Visibility: Showcase your products to millions of potential buyers on Instagram’s visually-driven platform.
  • Seamless Shopping Experience: Customers can browse and purchase directly from Instagram without leaving the app.
  • Real-Time Product Updates: Automatically sync inventory, prices, and descriptions for accurate product listings.
  • Boosted Engagement: Tagging products in posts and stories encourages more interaction and click-throughs.
  • Improved Sales Insights: Access Instagram’s analytics to track performance and refine your marketing strategy.

That means you can have a high growth rate if you integrate and market on Instagram properly.

Getting Started With WooCommerce Products on Instagram

To get these benefits, get started promoting your products on Instagram.

Just do it the right way so that you can save your time.

The manual process of creating an Instagram product feed is highly challenging.

As you can see, you have more work left to promote on Instagram like

  • Connecting it with your WooCommerce store
  • Researching trending hashtags
  • Work on graphics or product images and more.

It’s better just to use a plugin to create an Instagram product feed.

You can simply generate it the way I’ve shown you with the Product Feed Manager For Woocommerce.

Here’s a video you can go through for more clarity-

If you have any questions about this article, just comment below!

FAQs

1. How do I show my WooCommerce products on Instagram?

You’ll need to complete the Instagram shopping feed setup so your store products sync directly to Instagram.

2. What’s the best way to sync product updates with Instagram?

Using an Instagram product feed plugin ensures your product descriptions, prices, and stock updates stay accurate.

3. Can I automate product listings on Instagram?

Yes, the right Instagram product feed plugin automatically syncs new products and updates in real-time.

4. What’s required to get my WooCommerce store approved for Instagram Shopping?

Your Instagram shopping feed setup should include accurate product info and a Facebook catalog linked to WooCommerce.

5. How do I tag products in Instagram posts and stories?

After setting up your Instagram product feed, you’ll be able to tag products in posts for easy shopping.

Categorieën
Guide Virtual Reality

Top 3 Panoramic Camera Apps for Your iPhone

Panoramic pictures are super popular right now in the area of photography & VR.

Panoramic photography is way easier with an iPhone.

And the best part is, you don’t need any other fancy equipment to try it out with your iPhone.

Even though your iPhone is equipped with a built-in panoramic camera, it can be quite challenging to use on its own to capture high-quality panoramic images, which is why using an iPhone panorama app can make a big difference.

With panoramic apps, you can take panoramic photos right on your iPhone without even having to move it around.

You don’t have to buy a tripod or expensive pieces of equipment either!

You can also use a panoramic camera app for Android if you are an Android user.

But in this article, we’ll look at 3 of the best panoramic camera apps for iPhone

Also at the end of the blog, I provide you guidelines on how you can create virtual tours easily with your panoramic photos and revisit virtually.

Dus laten we beginnen.

Why Use A Panoramic Camera App Instead Of iPhone’s Built-in Panoramic Camera?

The built-in panoramic camera that the iPhone comes with has a lot of limitations and it becomes way more challenging if you want to take panoramic photos.

Here are side-by-side comparisons:

Panoramic Apps VS Built-in-Panorama

If you want to take panoramic pictures, there are a bunch of apps that can help you do that.

If you look at the iTunes store, you’ll see a whole bunch of different app icons to choose from. Some are free, some you pay for once, and some you pay for extra features while using the app—so you can even find a free 360 camera app for iPhone if you’re looking to save on costs.

I have well researched most of the apps and chose 3 apps that can easily solve the issues that you will face using the in-built panorama of your iPhone.

Advantages of Using a Panoramic Camera App

Let’s have a look at some advantages you’ll have by using a panoramic camera app:

  • You’ll capture more of the scene in a single shot.
  • Panoramic camera apps will give you high-resolution images with impressive detail.
  • They’ll provide you with an experience with no visible stitching marks in the final panoramic image.
  • These panoramic camera apps are easy to use and require no professional photography skills.

Overall, a good panoramic camera app will save you from manual flaws and help you capture high-resolution panoramic photos with your iPhone quite easily.

Then, you can use them to show off a location or your property on Facebook or even via virtual tours on your website.

Top 3 Panoramic Camera Apps for iPhone

Here are three apps that I’ve chosen to provide in-depth information on quality & features to help you get 360 panoramic photos using an iPhone with the help of a 360 camera app for iPhone:

1. DMD Panorama

DMD Panorama is a pretty neat app and better than the iPhone’s panorama feature in many ways.

You can take full 360-degree panoramas with this app (both horizontal and vertical angles), which is awesome.

It uses the gyro and compass in your iPhone to help make sure your panorama turns out great.

So, if you want to take some great quality panoramic photos, this app is worth checking out!

Key Features of DMD Panorama:

  • Works with the front camera of the iPhone for panoramic selfies
  • Take panoramas with 3 different Exposure settings
  • Up to 100MP panoramas
  • The ultra-wide lens on the newest phones captures panoramas with floors and ceilings

Notes : In DMD panaroma app, selfie panorama mode unlocks after you capture and save 10 regular panoramas.

Feedback From DMD Panorama User’s:

I have read all the reviews of DMD panorama users that I got and summed up their feedback here below:

Panoramic Camera App for iPhone - DMD Panorama

Average User Rating: 4.4 stars out of 5.

App Link: DMD Panorama.

2. Panorama 360

Panorama 360 is a powerful panoramic app that will allow you to capture 360-degree panoramic photos with your iPhone easily.

The app offers a range of editing tools and filters to enhance your photos.

Key Features of Panorama 360:

  • Capture panoramas blazing fast
  • View your iPhone camera app panoramas in the 360-degree viewer
  • Embed panoramas in your website or blog
  • HD+ capture

Feedback from Panorama 360 App Users:

Well, there are much fewer 1st hand reviews I got on this app than the DMD panorama app.

I have jotted down the positives and also the negatives below:

Panoramic Camera App for iPhone - Panorama 360

Average User Rating: 4.2 stars out of 5.

App Link: Panorama 360 for iPhone.

3. Bimostitch

With Bimostitch, You can combine different photos to make one big panoramic image that looks perfect.

Now to mention that this is not a 360 panorama capturing app but a panorama stitching app. But I had to keep this on the list because this stitching is a very important aspect of 360 panorama images and in iPhone, this is one of the best apps you can find for that.

It won’t take up much space on your device and the panoramas will be super clear. You can make panoramas on the go, like when you’re on a trip, and you don’t need to be connected to the internet.

Bimostitch Panorama Stitcher has been downloaded 570 thousand times.

You don’t even need any fancy equipment or sensors to use this app. Whether you’re a pro or just starting, this app is perfect for making great panoramic photos.

Key Features of Bimostitch:

  • Stitch High-resolution, single-row, multi-row, vertical, horizontal, 360° panoramas.
  • Stitch many (2 to 200+) overlapping photos into impressive wide-view panoramas.
  • Compress large panoramas to save space on your device.
  • Video-to-panorama for converting videos of panning motion into panoramas
  • View source images in panorama while in preview mode

Feedback From Bimostitch User’s:

Though it’s not an image-capturing app but rather a stitching app, I got the highest positive reviews on this app. I summed up the positive reviews in 4 points.

In regards to negative reviews, I only got 1. Take a look:

Panoramic Camera App for iPhone - Bimostitch

Average User Rating: 4.6 out of 5.

App Link: Bimostitch

If you want a seamless way to capture high-quality 360 panoramic photos on your iPhone, a 360 camera app is a great choice. If you need more advanced features, explore custom iOS app development services to create a tailored solution for your specific needs.

Creative Ways To Use Panorama Images

Panorama images aren’t just stunning—they’re incredibly versatile. Here are some creative, actionable ways to use them:

1. Create Virtual Tours for Websites

Transform your panorama images into immersive virtual tours. If you’re a realtor, use them to showcase properties. As a resort owner, highlight your rooms, amenities, or scenic views. Tools like WP VR or Kuula can help you upload your panoramic shots and turn them into interactive experiences that visitors can explore from any device.

2. Design Eye-Catching Social Media Posts

Panoramic images stand out on platforms like Facebook and Instagram. You can upload them as scrollable photos or use third-party tools to convert them into engaging videos or carousels. Think of it as a way to grab your audience’s attention while telling a story.

3. Use Panoramas in Presentations

If you’re preparing a pitch or a creative presentation, panoramic images can serve as impactful visuals. For example, a tourism business could embed panoramic views of destinations into their slides to wow the audience.

4. Personalize Travel Albums

Want your travel photos to feel more immersive? Use panorama shots to capture breathtaking landscapes or cityscapes. Instead of flipping through flat photos, you’ll feel like you’re revisiting the entire scene. Print them as fold-out albums or large wall posters for an extra wow factor.

5. Create 3D-Printed Keepsakes

Panoramas can be converted into unique 3D models or keepsakes. Some services let you use panoramic shots to create printed snow globes, crystal engravings, or even 3D postcards.

6. Plan and Share Home Renovations

If you’re remodeling, take panoramic photos of each room before and after. Share these with your contractor to ensure they understand your vision or use them to inspire others when you post your home transformation online.

7. Capture Before-and-After Shots

If you’re in a creative field like landscaping, architecture, or event planning, panoramic photos are perfect for showing transformations. A side-by-side comparison of panoramic shots can be a compelling way to market your services.

By thinking outside the box, you can turn your panoramic photos into more than just pretty pictures—they become tools for storytelling, marketing, and memory-making.

Get a complete guide on how you can create a virtual tour using the iPhone Panorama picture that you took using one of the suggested plugins,

Wrapping Up

Each of these panoramic camera apps has its unique features and benefits.

Whether you’re looking for a user-friendly interface or powerful stitching tools, there is an app on this list that will meet your needs and could be considered the best 360 camera app for iPhone for capturing stunning panoramic shots.

So why wait?

Download one of these apps today and start capturing stunning panoramic photos with your iPhone.

Keep in mind that while these apps are great for capturing panoramic photos, the quality of the photos will also depend on the camera quality of your iPhone.

It’s recommended to use the latest iPhone models for best results.

Categorieën
Virtual Reality WP VR

Amazing WPVR Virtual Tours Created By Users [2024]

If you’re thinking of a new and innovative marketing strategy to convert more website visitors to real customers, a virtual tour is the most suitable solution for you.

Especially, if your business has a physical location of any kind, a virtual tour is a great way to show your service, products, and facilities to your prospects online.

For a WordPress site, WPVR is right now the easiest plugin to create quality virtual tours.

Since its release, the plugin has gone a long way, with great interface improvements, and now it is considered a reliable plugin to create virtual tours.

And within that time, many WPVR users have created a few amazing virtual tours. You will be amazed at their creativity in using the plugin to create stunning virtual tours.

So, we’ve decided to share some of these WPVR virtual tours with you so you can take ideas and inspiration from them and hopefully, make a few great ones yourself.

In this article, I will highlight some of the virtual tours that WPVR users created for their businesses.

And I have classified them within different industries so that you can find the ideal ones to learn from for your business.

Dus laten we beginnen.

Stunning WPVR Virtual Tours Created By Users

I am really excited to show all these virtual tours as I am sure you will find something to learn and you will be able to understand how people in your industry are using virtual tours.

1. Virtual Tours of Real Estate Properties and Housing

If you’re in the real estate industry, you can create a virtual tour of your properties and add them to your online listings.

It will allow your prospects to have a realistic experience of your place and thus a better idea about the property.

This, in turn, will increase the conversion rate as people calling with inquiries will probably already be interested in how the property looks.

Here is a virtual tour of a real estate property created by a WPVR user.

You can navigate this tour, move around between the scenes, and check out all the features on this tour.

Here are some virtual real estate tours created by WPVR users:

i. Marfuse Studio

Marfuse Studio is specialized in creating content to help with Virtual Reality, Augmented Reality, and 3D Animation for their clients. Among many tools, they are also using WPVR to showcase some of the properties.

Below are two virtual tours created by this WPVR user.

Marfuse WPVR Virtual Tours for Real Estate
Marfuse Real Estate Virtual Tour

Click on the images to visit the tours.

ii. UN Reality

UN Reality is a Real Estate Service Provider operating in South Korea.

They’ve created multiple virtual tours for their properties using WPVR and are using them to highlight their properties to potential buyers through their website.

Here are the virtual tours they created.

UN Property Virtual Tour
Virtual Tour UN Property

Click on the images to visit the tours.

2. Virtual Tours of Hotels, Motels, Resorts, and Guest Houses

If you’re involved in the hotel or resort business, then you can largely benefit from using virtual tours on your site.

Most people who want to visit a resort or book hotel rooms, browse through the websites of several places. And if you provide an engaging virtual tour, it will surely create a great experience online.

This will increase the possibility to get more bookings and create a good first impression of your hotel/resort.

Using a quality virtual tour that is informative and realistic, will get you a higher rate of conversion over using only stale images.

Here is an informative virtual tour of a hotel room created using WPVR:

You can navigate this tour and check out all the features on this tour.

Here are a few virtual hotel tours created by WPVR users:

i. Pearl Tree

Pearl Tree is a 4-star boutique hotel located in Purulia, West Bengal. They have created a few wonderful virtual tours for most of their hotel rooms.

Click on the images below to take a tour of their hotel.

Pearl Tree Hotel Room Tour
Pearl Tree Hotel Tour

ii. Shar Barr Casa

Shar Barr Casa is a beautiful vacation home in the Caribbeans. They’ve created virtual tours of both the interior and exterior of the home.

You can take a tour and experience their enjoyable resort by clicking on the images below.

Shar Barr Casa Virtual Tour
Shar Barr Casa Interior Tour

3. Virtual Tours of Pubs and Bars

We all love to take a break every now and then and spend some time in a pub or bar.

And you will be surprised to know that many do search online for good pubs to hang out in. If you provide a virtual tour of your pub and can present a great environment, people will be hooked immediately and will probably visit soon.

A virtual tour that represents your service quality and interior well, will make them more likely to choose you as their regular pub.

Here is an example of a Pub virtual tour that represents the interior really well.

Try clicking on the hotspots in the virtual tour and see how more information is provided.

Here are a few more virtual tours of pubs and bars that WPVR users created.

i. KluBar Gastropub

Located in Kranj, Slovenia, KluBar Gastropub is a concert space, a day bar, a nightclub, a cafe, and an exhibition space altogether.

Klubar Gastropub created a virtual tour using WPVR. Take a tour and experience their place.

KluBar Virtual Tour
Klubar Gastropub Virtual Tour

You can see the tour on the website of the KluBar Gastropub.

ii. Whiskey Licker Up

Whiskey Licker Up is a bar and cafe in Las Vegas. They have created a simple virtual tour that looks amazing.

Here’s their tour. Click on it to take a visit.

Whiskey Licker Up Virtual Tour
Whishkey Licker Virtual Tour

4. Virtual Tours of Restaurants and Cafes

Locally, people tend to search online for good restaurants and cafes on a regular basis.

Besides good food and ratings, a person also values the environment. If you manage a restaurant, you can consider using virtual tours to attract more customers and increase sales under your management.

If you can show how great your restaurant is using a virtual tour, it will surely attract people to try your restaurant out.

Here are a couple of restaurants that used virtual tours to highlight their lovely interior. Click on the images below to experience their virtual tours.

The Renaissance
The Renaissance
Avalon Cafe Virtual Tour
Avalon Cafe

5. Virtual Tour of Beauty Parlors and Salons

When a person looks for a beauty parlor or salon, they usually prefer the ones that feel peaceful to visit with a lovely interior.

One way to highlight your sweet beauty parlor is to use a virtual tour on your site.

Here is an example of a virtual tour for a beauty salon.

You can see how you can use hotspots to provide information about each of your services and showcase your parlor easily.

A couple of WPVR users happened to be owners of Beauty salons. Take a look at the tours they created.

Studio L Salon
Studio L Salon
Creative Hair Salon
Creative Hair Salon

You can have a look around their entire salon and learn about all of their services easily.

6. Virtual Tours of Schools and Colleges

When choosing schools, parents do value the campus and the interior of the school. It creates an impression of where their kids will study and if they feel safe about it.

A virtual tour is a great way to showcase your school’s environment online so that the parents know beforehand how amazing your school is. And whether the students enroll or not, they will definitely take a live visit if they enjoy the virtual tour, which increases your chances of taking a new student onboard.

i. Sherborne International School:

Sherborne International School created virtual tours of their classrooms, dorms, and other facilities.

Here is the virtual tour of their school premises:

Sherborne Chemistry Lab Virtual Tour
You can see their chemistry in this scene. On another tour, you can see the common room of their dormitory.

You can see their chemistry lab in this scene. On another tour, you can see the common room of their dormitory.

This tour clearly speaks with the parents about the reliability of the school.

7. Virtual Tours of Museums, Art Galleries, and Exhibitions

If you own a museum or art gallery, creating a virtual tour of them is a great way to attract more visitors to your site.

This way, you’ll not only get popularity online but people will be tempted to visit your gallery or museum in person.

In fact, if you regularly host art exhibitions, you can create virtual tours of your past events and use them to promote your upcoming exhibitions.

Here are some virtual tours created by WPVR users for museums and art exhibitions.

i. Melissa Morgan Fine Art

Melissa Morgan Fine Art created a stunning virtual tour of their entire exhibition and it’s so amazing.

These are the scenes from the entrance and the inside of the exhibition. Click on the images to visit the tour.

Melissa Morgan Entrance Tour
Melissa Morgan Exhibition Virtual Tour

ii. Rolling Hills Studio

Rolling Hills Studio has created a clean and simple virtual tour of its fabric art studio. They used a high-quality 360 panoramic image and the virtual tour elegantly showcased the whole place.

Click on it to take a look.

Rolling Hills Virtual Tour
Rolling Hills Art Virtual Tour

iii. Mao Jianhua’s Personal Website

Mao Jianhua is a renowned artist and entrepreneur from China whose paintings are often a symbol of ‘Zhuo Weng’, which translates as a wise man dedicated to a simple and austere life.

His paintings have been exhibited in the famous galleries of Italy and the United Kingdom.

Here is a virtual tour of one of his exhibitions. I request you to take a tour of his exhibition:

Mao Jianhua Art Gallery Virtual Tour
Mao Jianhua Gallery Virtual Tour

iv. Virtual Museum of the National Institute of Health (Peru)

In commemoration of its 126 years of its creation, visitors will find a gallery of the Chiefs who led a firm response to various diseases and epidemics that devastated Peru.

Additionally, They have access to the Book of Royal Orders and Acts relating to the philanthropic vaccine expedition which details the events from 1806 to 1820 that served to avoid the smallpox disease.

Here’s how they used WPVR to create Virtual Tours,

Museum of the National Institute of Health Virtual Tour
Museum of the National Institute of Health

More Brilliant Virtual Tours Created By WPVR Users

Apart from these virtual tours, there are also a lot of amazing virtual tours created by WPVR users of other industries and businesses.

Let’s take a look at more virtual tours created by WPVR users.

i. Far Out Ride – Van Tour

This is a unique virtual tour of a mobile home created by Far Out Ride.

They’re specialists in building custom automobile homes for all your living accommodations.

Here is a virtual tour of one of their mobile homes:

Far Out Ride - Van Virtual Tour
Van Virtual Tour - FarOutRide

ii. Virtual Fair and Virtual Stalls by EEST

ESST created some really professional virtual tours with custom-made high-quality 360-degree images.

This is mind-blowing as they created the image from scratch and used WPVR to turn it into a masterpiece.

I insist you take this tour. You won’t be disappointed.

ESST Virtual Venue Tour
ESST Virtual Stall Tour

iii. 360 Degree Drawing and A 3D Self Portrait By Karen Nijst

Karen Nijst is a Web Developer from Hapert, the Netherlands who made some wonderful 360-degree drawings of herself and her surroundings.

In her own words:

“As you can see, I like to draw a lot.

Because I also enjoy making animations, you will find a fully drawn digital tour through our living room and garden (where I prefer to draw) and through our village Hapert (Noord-Brabant NL) below.”

Karen Nijst Self
Karen Nijst Garden

Click on the images to visit her virtual tour and experience these beautiful images.

iv. Patrick Gerola’s Atelier

Patrick Gerola is an artist painter from Belgium.

Here are the virtual tours of his excellent studio:

Patrick Gerola Studio 1
Patrick Gerola Studio 2

Click on the images to visit these tours.

v. Zirzow Gallery by Amanda Zirzow

Zirzow Gallery was formed in 2020 with the desire to showcase the beautiful, unique art of Amanda Zirzow.

Zirzow Gallery sells original art, fine art prints, and gift items. It is also the hub of her artistic community.

Click on the images to visit her gallery.

Zirzow WPVR Gallery Virtual Tour

Inspiration for Amanda’s paintings comes from her experiences in nature, adventures, and stories.

Through her art, she captures impressions from her imagination and infuses her subjects with color to bring them to life.

WPVR Virtual Gallery Tour - Zirzow

Amanda’s mission is to share her artwork to inspire and help others. She is an active member of her community, a teacher, and an artist based in Fort Myers, Florida.

vi. Studio immobiliare Valsesia

Studio Immobiliare Valsesia gives you access to Valesesian real estate, and they’ll handle everything needed for selling or renting a property for you.

They have a huge number of properties listed on their website, so you can easily find your desired property here.

They have created virtual tours for almost every one of their properties using WPVR.

Studio immobiliare Valsesia 2

Click on the images to view the actual virtual tours on their website.

Studio immobiliare Valsesia

They’re right now in collaboration with Fiaip, the largest association of Italian professional real estate agents.

vii. CBS Spol – Virtual Tours with Areal Photography

Areal Photography Virtual Tour

CBS Spol, s.r.o. is a Slovak airline company and also the publisher of the largest edition of books on aerial photography in the world.

CBS’s mission is to provide a unique view of the landscape, and aerial view is one of the most unusual for humans.

Shooting is performed by a small fleet of Slovak-made aircraft.

You can check out one of their 360-degree videos here.

viii. Fischhalle – Cultural Center

If you own a restaurant that also hosts musical events, Fishchhalle’s virtual tour of its cultural center is a perfect inspiration for you. Take a look.

Fischhalle Center Virtual Tour
Fischhalle Cultural Center Tour

ix. Web Multimedia Solutions By Matt Jones

Matt works as a multimedia professional in Tampa, Florida. He produces websites, brand films, and 3D animations that let companies communicate their passion with the world and come to life. 

Here is one of the Virtual Tours he created,

Amazing WPVR Virtual Tours Created By Users [2024] 2

Conclusie

As you saw earlier, just like them over 10000 WPVR users are actively using WPVR to create brilliant virtual tours.

I’m sure you’ve learned a lot from these virtual tours that you can apply.

I’d love to see your creation with WPVR.

So, let us know once you’ve created a virtual tour yourself.

Categorieën
WooCommerce

8 Best WooCommerce Shipping Plugins for Your Store

As a WooCommerce owner, you can go with a manual WooCommerce shipping setup.

But the problem is –

WooCommerce default shipping setup doesn’t have all the features or options that you need, also setting up manually is very time-consuming!

And there’s a huge chance of losing a lot of your potential customers if you fail to provide them if you fail to set up properly.

But don’t worry, there are tons of WooCommerce shipping plugins out there that can help you execute your shipping process like a pro.

In terms of WooCommerce shipping plugins :

  • Some plugins allow you to create shipping rules and methods for cash-on-delivery (COD)
  • Some tools offer you real-time UPS shipping rates, automate the printing of UPS labels, and more.

In this article, I’ve rounded up 8 reliable Woocommerce shipping plugins for your store that can reduce your shipping-related costs.

So, let’s begin.

Why Do You Need Woocommerce Shipping Plugins For Your Store?

Plugins for shipping are essential for improving your customer experience as a whole.

Real-time shipping rates which you can add with a shipping plugin, will allow your customers to select the most convenient solutions for them at the point of checkout.

Suppose, for any reason your shipping carrier increases their rate, the shipping cost of your site will automatically update. Your customer will choose the most low-cost one amount the list and you will not need to offer free shipping.

Because of this transparency and the knowledge that they are not being overcharged, customers will have greater faith in your company.

Apart from this automated calculation benefit, there are other benefits like customizing shipping rules, setting shipping restrictions, better shipping process that you will get using a shipping plugin.

Think of yourself as a customer who wants to make an online transaction,

If you find out that the shipping costs are too high or that the delivery time has to be shortened after putting the item in your cart and checking out., you will probably give up on your cart and look for alternatives.

That’s why using a shipping plugin is a wise idea to make your shipping process effective.

Now let’s go through some key points you should check before choosing a plugin,

Factors to Consider When Choosing the Best WooCommerce Shipping Plugin

Four primary elements are generally what you should be searching for in a WooCommerce shipping plugin. I’ve listed the factors below,

  • Ease Of Use

Make sure you choose a plugin with a simple setup process and user interface. You ought to pick a plugin that has an easy-to-use interface that makes it simple for you to set up and manage shipping options. A plugin’s simple setup procedure and convenience of use will save you time and lower the possibility of installation and configuration mistakes.

  • Regulations For Customs Shipping

To customize shipping alternatives to your business needs, you must create custom shipping rules based on order value, product weight, or destination. You should select a plugin that will assist you in establishing the rules for your online business from the many alternatives available.

Make sure you verify whether a plugin has conditional logic enabled to show or conceal shipping options according to particular parameters, like cart contents or client location.

  • Support For Logistics

Your customers will receive a well-earned shipping benefit when you choose a quality WooCommerce plugin that offers both domestic and international shipping options.

  • Shipping Tracking System

One of the most important features that you need is shipment tracking for WooCommerce. The ability to follow your package as it makes its way through the logistics chain gives your customers more confidence and creates trust.

So, you should search for shipment tracking information in a WooCommerce plugin.

You need these factors to guarantee quick and flexible delivery to the intended location. Having a flexible shipping solution that enables you different delivery options, pricing, and methods is highly important for this.

Top 10 WooCommerce Shipping Plugins for Woocommerce Shipping

Here are the top 10 Woocommerce shipping plugins to make your online store shipping operation easy.

1. Table Rate Shipping for WooCommerce by Flexible Shipping

table rate shipping

The Table Rate for WooCommerce is a shipping plugin that lets you calculate shipping charges based on the weight of the items or the total cost of the cart.

It provides you with the capability to assign names and descriptions to your shipping methods. It also allows you to create shipping rules, and methods for cash-on-delivery (COD), and implement handling fees or insurance costs once the order value crosses a specific threshold.

Key Features of Table Rate Shipping for WooCommerce:

Here are some best features of this plugin :

  • Create multiple shipping methods: You can create an unlimited number of shipping methods for your store. Each shipping method can have its own unique set of rules, rates, and conditions. You can offer different shipping options to your customers, such as Standard Shipping, Express Shipping, or even separate methods for different product categories or regions.
  • Set shipping rates based on various conditions: The Table Rate Shipping extension allows you to set shipping rates based on a wide range of conditions like Cart weight, Cart subtotal, Shipping destination, product quantity and more.
  • Offer custom shipping options: This extension provides you with the ability to offer custom shipping options to your customers. You can create shipping options based on various factors, such as Delivery date or time slot, Special handling requirements (e.g., fragile items, refrigerated items), Pickup options (e.g., in-store pickup, curbside pickup) Delivery instructions or preferences.

Pricing

This plugin has a free version. The pro pricing of Table Rate Shipping for WooCommerce by Flexible Shipping plugin starts from $99/ year. This plan is for 1 site. This plugin has two more plans :

  • Flexible Shipping Bundle: $139.00/ year
  • All Plugins Bundle: $219.00/ year

2. Advanced Shipment Tracking By Zorem

advanced shipment tracking

The Advanced Shipment tracking for the WooCommerce plugin provides smooth shipment tracking capabilities. And you can keep your buyers in the loop every step of the way.

With support from over 850+ providers and shipping carriers, you can effortlessly include detailed tracking information.

Also, you can include the carrier, tracking number, and date in your WooCommerce order completion emails.

Key Features of Advanced Shipment Tracking:

Here are some best features of this plugin :

  • Multiple Carrier Support: This plugin supports integration with a wide range of shipping carriers (850+), including USPS, FedEx, UPS, DHL, Canada Post, and many more.
  • Shipment Tracking: One of the standout features of this plugin is its ability to provide detailed shipment tracking information to customers.
  • Shipment Status Emails: The plugin can automatically send shipment status emails to customers, keeping them informed about the progress of their orders.
  • Order Status Updates: The plugin automatically updates the order status in WooCommerce based on the shipment status received from the carrier.

Pricing

The plugin is available in both free & pro versions. You can download the free version from their official WordPress repository.

The pricing of the pro version is structured as follows:

  • Single site license: $129/year
  • Up to 5 sites license: $399/year
  • Up to 10 sites license: $699/year

3. Advanced Shipping For WooCommerce

Advanced Shipping offers you the simplest shipping process to improve your customer experience and increase your sales. It offers highly customizable shipping options to fit any business model so that you can offer fair and logical shipping costs.

Advanced shipping for WooCommerce

Not just this, you can have the flexibility to adapt to changing shipping requirements or carrier options as it offers custom shipping methods within zones.

This plugin can adapt to different business models and tax situations, so you can easily provide transparent pricing to your customers without any error.

It offers pre-configured shipping scenarios so that you can set your shipping conditions more quickly.

Key Features Advanced Shipping For WooCommerce:

  • Quantity-Based Shipping: You may set up WooCommerce shipping rules based on item quantities or cart line items to handle bulk orders and maximum quantity items.
  • Time-based Shipping: A special feature that this plugin offers is time based shipping with which you can set up shipping based on time of the day and day of the week and run promotional campaigns for that.
  • Flexible Cost Calculation: You can use multiple rule calculations (Sum, Highest, or Lowest) and cart calculations based on your physical or virtual products.
  • Advanced Conditional Rules: You can set shipping rules based on various conditions including fixed amounts, price ranges, specific product, product categories, user roles, and product weight.

Pricing

The pricing of this plugin is structured as follows:

  • Single site license: $49.99/ year
  • Up to 5 sites license: $99.99/ year
  • Up to 10 sites license: $149.99/year

4. Track Orders for WooCommerce By WP Swings

Track order plugin

The Track Orders for WooCommerce Pro plugin is a comprehensive order-tracking solution designed for WooCommerce stores. It allows merchants to deliver accurate information to customers about their order fulfillment, from the moment they place an order to the final doorstep delivery.

This plugin offers a range of innovative features to simplify the delivery process and enhance customer satisfaction. 

Key Features of Track Orders for WooCommerce:

Here are some best features of this plugin :

  • Shortcodes for Tracking Pages & Forms: Customizable order tracking pages and forms using shortcodes. 
  • Track Your Order Popup: Convenient order monitoring within the My Account section. 
  • Reliable Shipment Integrations: Integration with third-party shipment tracking services like USPS and Canada Post. 
  • Custom Order Status: Ability to create custom order statuses tailored to specific order fulfillment workflows. 

Pricing 

  • Pro Plan: $49.00 per year
  • Free Version on WordPress

5. Advanced FedEx Shipping Plugin By One Team Software

FedEx shipping plugin

The Advanced FedEx Shipping plugin takes your WooCommerce shipping to new heights.

With a wide range of account options like FedEx Express, SmartPost, and Freight,

you gain complete control over your shipping processes.

Even for international shipments, you can effortlessly request essential export documents such as the Certificate of Origin, Commercial Invoice, Pro Forma Invoice, and Export Declaration.

Key Features of Advanced FedEx Shipping:

Here are some best features of this plugin :

  • Automatic Rate Retrieval: This feature allows you to automatically retrieve real-time shipping rates from FedEx based on various factors such as package weight, dimensions, destination, and service type.
  • Address Validation: The plugin includes an address validation feature that verifies the accuracy of shipping addresses entered by customers.
  • Shipment Tracking: With this feature, you can provide your customers with detailed tracking information for their shipments.
  • Shipping Label Generation: The Advanced FedEx Shipping plugin enables you to generate shipping labels directly from your website or online store.
  • Customs Documentation: For international shipments, the plugin can automatically generate the necessary customs documentation, such as commercial invoices and certificates of origin.

Pricing

Advanced FedEx Shipping offers a free version. However, the premium version costs $15 monthly on the official website.

6. ELEX WooCommerce USPS Shipping Plugin

Elex WooCommerce Shipping Plugin

You can add a professional touch to your online store’s shipping experience with the ELEX WooCommerce USPS Shipping Plugin with Print Label. This plugin is designed to give you a product delivery process while offering flexible and powerful features.

By providing live shipping rates based on the shipping destination, weight, and dimensions of your products, it brings transparency and clarity to your customers.

Key Features of ELEX WooCommerce USPS Shipping:

Here are some best features of this plugin :

  • Automatic Rate Calculation: This feature allows you to retrieve real-time shipping rates from USPS based on factors such as package weight, dimensions, destination address, and shipping service.
  • USPS Shipping Service Selection: The plugin provides options to offer various USPS shipping services to your customers, including Priority Mail, Priority Mail Express, First-Class Mail, Media Mail, and more.
  • Address Validation: The ELEX WooCommerce USPS Shipping Plugin includes an address validation feature that verifies the accuracy of shipping addresses entered by customers.
  • Shipment Tracking: With this option, you can track your shipments through the USPS tracking system integrated into the plugin.
  • Shipping Label Generation: The plugin allows you to generate USPS shipping labels directly from your WooCommerce store.

Pricing

this plugin has a free version. The pricing for this plugin is structured as follows:

  • Single site license: $89
  • Up to 5 sites license: $199
  • Up to 25 sites license: $499

7. ReachShip Shipping Carrier

Reachship WooCommerce plugin

The ReachShip WooCommerce Multi-Carrier Shipping Plugin allows you to display real-time shipping rates from leading carriers. This versatile plugin aims to be a one-stop shop for all your shipping needs, eliminating the hassle of managing multiple carriers and provide you a smooth delivery experience for your customers.

Key Features of ReachShip Shipping Carrier:

Here are some best features of this plugin :

  • Shipment Creation and Tracking: The plugin allows for the creation and automation of shipments, as well as bulk printing of shipping labels, all from the WordPress admin dashboard.
  • Real-Time Rates and Label Printing: The plugin enables you to save time and cost on shipping by displaying real-time shipping rates to your customers and printing labels efficiently from the admin panel.
  • Intelligent Packaging: The plugin employs a sophisticated packaging algorithm that ensures items added to the cart are efficiently packed into appropriately sized boxes, taking into account their dimensions.
  • Conditional Shipping: The Conditional Shipping feature allows for the customization of flat-rate and carrier-based shipping options. These conditions can be based on multiple factors such as items, shipping classes, cart values, product types, and shipping addresses.

Pricing

The ReachShip Multi-Carrier Shipping Plugin for WooCommerce is available for free download.

It offers integration with several leading shipping carriers like FedEx, USPS, UPS, DHL, Australia Post, and more.

With additional carriers planned for future integration.

8. WooCommerce UPS Shipping Plugin with Print Label

WooCommerce UPS Shipping Plugin with Print Label

The WooCommerce UPS Shipping Plugin with Print Label seamlessly integrates UPS shipping services into your WooCommerce store. This plugin automatically calculates real-time UPS shipping rates based on weight, dimensions, and destination, providing customers with accurate shipping costs at checkout. It also supports the automatic generation of shipping labels and order tracking, streamlining the fulfillment process and reducing manual errors.

Key Features of WooCommerce UPS Shipping Plugin:

  • Real-Time UPS Shipping Rates: Get live shipping rates directly from UPS for accurate cost calculations at checkout based on weight, dimensions, and destination.
  • Automated Label Printing: Generate UPS shipping labels automatically when an order is placed, saving you time and reducing errors.
  • Tracking Information & Customer Notifications: Automatically send customers UPS tracking numbers and shipping status updates via email for a smoother post-purchase experience.
  • Support for Multiple UPS Services: Offer a range of UPS shipping options, including UPS Ground, UPS 2nd Day Air, UPS Worldwide Express, and more, for both domestic and international shipments.

Pricing

  • Single Site License: $99.00 (1-Year Subscription with Support & Updates)
  • 30-Day Money-Back Guarantee

Laatste gedachten

We hope that our selection of the top WooCommerce shipping plugins was useful to you.

To facilitate your decision-making, we have attempted to highlight the most important features of each plugin.

You can choose the option that best meets your needs,

whether you’re searching for a solution with a lot of features or just a few key features.

With the ideal plugin, you can completely integrate your business goals with the delivery efficiency and customer pleasure of your online store.

Let me know if you have any inquiries!

Categorieën
Product Feed Manager For WooCommerce WooCommerce

Generate Facebook Product Feed For Woocommerce – A Complete Guide [2024]

Facebook is the third most visited site in the whole world right now!

More than one-third of the people who use Facebook shop there too.

Why? Here’s the answer-

Ads and posts in Facebook feeds come automatically when people randomly scroll to spend time.

And, if anyone clicks on a certain product suppose I clicked on a bag.

Facebook will automatically suggest all the online bag stores near me in my Facebook feed.

So, If you have an online store using WooCommerce, you must pay attention to Facebook.

With much less effort you can get sales instantly.

You can set up a whole store on Facebook, run ads that change based on who’s looking at them, and even list your products on Facebook Marketplace.

Facebook has many cool features that can help you sell your products without you doing ALMOST NOTHING.

All you need to do is create a Facebook product feed for WooCommerce. [We have shown below the easiest steps]

Before going into the process, let’s gather some knowledge about the WooCommerce Facebook feed :

What is WooCommerce Facebook Product Feed?

WooCommerce Facebook Product Feed is like a file that has all the important info about the stuff you’re selling on your online store in the Facebook marketplace or shop.

You can use this file to show your products on Facebook in real-time.

Facebook Marketplace

Facebook Marketplace makes it easy for businesses that sell directly to customers to promote their products.

Here are some important things about Facebook Marketplace:

  • You can make catalogs of your products.
  • Reach more people who might want to buy your stuff.
  • Connect your online store data with Facebook.
  • Show ads that change based on what people like.
  • Let people buy your products right on Facebook.

One great thing about Facebook Marketplace is that you don’t need to be a tech expert to set up your store.

With the RIGHT TOOL to make WooCommerce Facebook Product Feeds, you can easily connect your online store with Facebook Marketplace.

You need to create a catalog on Meta Commerce Manager and use one single Facebook catalog feed to list your products on both platforms.

Before going deep into these, let’s know some requirements you need to create your Woocommerce Facebook product feed.

Facebook Product Feed Requirements

Different channels have their own rules for what information you need to include about your products.

These rules are called product feed guidelines. Attributes are the specific details about your products that you need to include in your product feed.

For example, when you’re creating a product feed for Facebook, you’ll need to include things like the title, availability, price, and category of each product. These details are called attributes.

Here are some examples of the attributes you’ll need to include in your Facebook product feed:

  • ID
  • Titel
  • Beschrijving
  • Availability
  • Voorwaarde
  • Prijs
  • Link
  • Image link
  • Brand, MPN, or GTIN (include at least one)

Each platform on Meta, like Instagram Shop or Facebook Marketplace, may have slightly different requirements for attributes.

Make sure you check the specific guidelines for each platform before creating your product feed.

Now that you know what attributes are, let’s dive into how to create a product feed for Facebook.

Creating a Facebook Product Feed Using The Product Feed Manager

Remember when we talked about how to make a list of all your products for Facebook?

Well, you can do it by copying and pasting some important details into an Excel file. Then, you just add in all your product info underneath.

But what if you change your products a lot, like adding new ones or changing prices?

You’ll need to update your list every time you make a change. To remove this hassle you must use a product feed plugin.

I am going to use Product Feed Manager For Woocommerce to create a Facebook product feed.

This awesome WooCommerce plugin helps you connect your products to Facebook easily and quickly, so you can spend less time worrying about it and more time making sales. You can create Facebook product feed with 3 SIMPLE STEPS.

Create WooCommerce Facebook Product Feed in 3 steps

So, now I will go through step by step and create a Facebook product feed.

Generate WooCommerce Facebook product feeds

First, you need to generate a Woocommerce Facebook product feed.

Go to your WordPress dashboard and install the Product Feed Manager For Woocommerce. Then activate the plugin and set the license key.

Step 1: Create a new feed for Facebook

Now, go to the left panel, and click on the plugin. Next, look for the Add New Feed button and give it a click.

Woocommerce facebook product feed

This will bring you to the feed creation page :

Now, here’s what you need to do:

i. At the top, you’ll see a spot to give your feed a title. Go ahead and name your feed.

Add New Feed in PFM Woocommerce Facebook product feed

I’ve named my feed “ Facebook feed for Rextheme”

ii. Just below the title, you’ll find a dropdown menu to choose your preferred merchant. Click on Select Your merchant option.

Woocommerce Facebook Product Feed

Click on the Feed Merchant dropdown button and pick your favorite merchant from the list or search for them in the box.

As you scroll, you will find the Facebook catalog option. Click on it and then it’s time to choose your feed types.

You will get 2 feed types :

 Woocommerce Facebook product feed feed type
  • XML: A text file format that uses extensible markup language.
  • CSV: A text file format that uses commas to separate values, and newlines to separate records.

Once you’ve selected your merchant, all the necessary attributes will pop up below.

Step 2: Mapping Facebook Attributes

Now you gotta connect your WooCommerce Product Fields with Facebook attributes. The plugin will do most of the work for you by matching up the right fields.

But if you want to get fancy and customize things even more, you can use the drop-down menu to manually connect the fields yourself.

Step 3: Mapping WooCommerce Categories with Facebook categories

So once you’re selected you will see all the record attributes will be listed below :

Woocommerce facebook product feed

You’ll also find the attributes are already configured.

what you have to do is assign any unmapped attribute with the right product data now for Facebook.

You will see two unmapped attributes the first one is manufacturer or brand

Now Facebook requires you to submit either a brand name or GTL or MPM so if you have any brand value saved in your Woocommerce store.

you can simply select this option from this drop-down menu but if you’re the sole manufacturer you don’t need to change it as it is already set as static.

Now select the edit button on the left.

Then you can provide your company name from here :

Woocommerce facebook product feed

Then click the correct mark and you will be saved.

Alright, now you have to set the Google product category.

If you scroll down you will find you will get the Google Product Category field :

google product category

Now, fill out all the other sections and be ready to share your feed with the world.

Then go back up to the top of the page and hit the Publish button to make your feed live.

But wait, it’s not quite finished yet!

Next up, it’s time to configure the Google Product Category.

Applying Category Mapping :

Once you’ve set up a category mapping rule, you can make it work when you’re creating a new feed by picking the category mapper you made under “Value for an attribute.”

category mapping for Google

First, make sure you remember the name of the Mapper you saved.

In this case, we have saved it as Feed Category Mapping.

Click on the “Assigned Values” option for the Google Product Category attribute. Scroll down and you’ll find the Mapper you created.

choose-mapper

Choose the mapper you need. For Google Shopping, you have to use it as the value for the Google Product Category attribute.

Next, it’s time to publish the feed. Go back to the top, see on the right panel, and click on the “Publish” button.

Pubish WooCommerce Facebook Product Feed

Now, when you update the feed, you’ll see the value of the attribute that will use the mapped value based on the category you assigned to the product.

That’s it! Now you can go ahead and use it to create a perfect product feed for Facebook.

Laatste gedachten

When you start promoting your WooCommerce store’s products on Facebook Marketplace, it makes it easier for people to find and buy your stuff.

Since most people already use Facebook, they’ll feel right at home browsing your products on Facebook Marketplace.

Plus, you can chat with customers in real-time using Messenger and the comment section. That means you can increase customer engagement with your store.

All you need to pick the right plugin and start generating your Woocommerce Facebook product feed. If you don’t want to research plugins, you can simply go for the most reliable plugin Product Feed Manager for WooCommerce.

I hope this article helped you learn more about WooCommerce Facebook Product Feeds.

If you found it useful, drop a comment and let us know!

Frequently Asked Questions (FAQs)

FAQ 1: How can I use Facebook for WooCommerce Integration?

-Integrating Facebook with WooCommerce can greatly enhance your e-commerce capabilities. Start by installing and activating the “Facebook for WooCommerce” plugin on your WordPress site.

Once activated, connect your Facebook account and either create a new Facebook page or select an existing one for your business. Next, set up your product catalog in Facebook Business Manager. Configure the product sync settings in the plugin to ensure your WooCommerce products are accurately represented on Facebook

FAQ2: How do I integrate a website with a Facebook page?

Begin by adding Facebook social plugins to your website, such as Like and Share buttons, and the Comments feature. Install the Facebook Pixel on your site for comprehensive tracking and analytics. Implement Facebook Login to offer users an easy authentication method. Add the Facebook Page Plugin to showcase your Facebook page’s feed directly on your website. Create Facebook Open Graph tags for your web pages to control how your content appears when shared on Facebook.

Categorieën
WooCommerce WooCommerce Sellkit

5 Best WooCommerce Product Recommendations Plugins In 2024

“Out of sight is out of mind”- You must have heard this proverb.

And it’s the exact thing that happens with your customers when they scroll on online marketplaces or on your site.

If you can’t properly show them what products you have, chances are you might LOSE YOUR BUYING CUSTOMERS!

So, increasing your product visibility as a Woocommerce store owner is highly important.

You can achieve this through an effective product recommendation strategy and a top-quality product recommendation plugin that can implement the strategies successfully.

You need the best WooCommerce product recommendation plugins that have features such as up-selling, cross-selling, “frequently bought together” suggestions, related product displays, best-seller carousels, and more.

This article with assist you with details information and side-by-side comparison so that you can find the right solution.

So, Let’s begin.

Why Use Product Recommendation Plugins In WooCommerce?

why use product recommendation plugin

Product recommendations in WooCommerce can transform your store’s performance and drive significant growth.

Personalized recommendations make shopping more relevant and efficient.

Salesforce reports that 73% of customers expect businesses to understand their unique needs, and targeted product suggestions fulfill this demand.

In eCommerce, the impact of personalized recommendations is striking.

McKinsey highlights that such recommendations contribute up to 35% of Amazon’s revenue.

Smaller online stores also benefit, with effective recommendation systems often leading to a 10-30% increase in sales.

In the below, I’ve listed down how integrating product recommendations into your WooCommerce store can benefit you:

  • Increase Sales: Tailored recommendations can increase conversion rates. So, you may show items that shoppers are more likely to buy.
  • More Customer Engagement: Personalized suggestions create a more enjoyable shopping experience and your customers can engage more.
  • Increase Average Order Value (AOV): Techniques like cross-selling and up-selling increase the value of each purchase.
  • Customer Retention: Customized shopping experiences create repeat buyers.
  • Optimize Inventory: You can easily make your inventory clutter-free by clearing out less popular or overstocked items.

Adding product recommendations to your WooCommerce store improves the overall customer experience and drives substantial business growth. You can turn browsing into buying and maximize your sales potential by recommending relevant products.

4+ Best WooCommerce Product Recommendations Plugins

Here are 5 best WooCommerce product recommendation plugins highly recommended options that have received favorable feedback from WooCommerce store owners:

1. Leo Product Recommendations For WooCommerce

Leo Product Recommendations is an effective WooCommerce plugin that helps you to show recommendations in a visually appealing popup.

This popup appears after a customer adds a product to their cart.

Leo product recommendations

The plugin features a user-friendly and fully customizable settings panel, allowing you to manually and dynamically tailor product recommendations according to your marketing strategy.

Major Features of Leo Product Recommendations

Here are some major features of Leo product recommendation plugins :

  • Flexible Recommendation Popup Heading (Heading & Description)
  • Recommended Products Grid Settings
  • Slider Layouts (Pro)
  • Dynamic Selection(Pro)
  • Modal Color Settings (Pro)

The Benefit You Will Get Using Leo Product Recommendations

With its fully customizable and easy-to-use settings panel, you can tailor both manual and dynamic recommendations to suit your marketing needs.

For example, after a customer buys a smartphone, the plugin can instantly suggest relevant accessories like cases or headphones, driving additional sales.

Pricing

This plugin has its free version but with limited features.

If you want to grab their advanced features you need to take their pro plans that start at $79 in a yearly payment system.

Leo Product Recommendations for WooCommerce pricing

2. Product Recommendations for WooCommerce

With this plugin, you can upsell and cross-sell smoothly, and keep your customers hooked with personalized product suggestions to increase your order values.

Product recommendation by rextheme- best woocommerce product recommendation

With this plugin, you can suggest products commonly purchased together and make it easy for your shoppers to find complementary items using the “Frequently Bought Together” Option.

You can help your customers to find perfect product pairings based on real customer behavior. Increase order value and convenience for customers using this cross-selling strategy.

It has Out-of-Stock Backup Options, and with it, you can explain how to find similar products when an item is unavailable. This way you can retain a customer without any hassle.

Major Features of Product Recommendations for WooCommerce

Here are some major features of product recommendations for WooCommerce:

  • Frequently bought together option
  • Exclude or hide out-of-stock options
  • Top-Rated Product Showcase
  • Best Sellers Display
  • New Arrival Alerts

The Benefit You Will Get Using Product Recommendations for WooCommerce

With strategic product placement and various recommendation styles, you can expect higher conversion rates across your store.

The plugin’s intelligent handling of out-of-stock situations ensures you never lose a sale. It offers suitable alternatives to keep customers engaged.

with this plugin, you can showcase new arrivals and top-rated items that might otherwise go unnoticed.

Finally, by strategically highlighting discounted products, you can maximize the impact of your promotional campaigns, attracting deal-seekers and driving sales during high sale periods.

Pricing

This plugin has a free version and offers you the most flexible plans for pro plans. As you can see below, its price starts at only $47.99/year.

Product recommendations for woocommerce pricing

3. UpsellWP

upsellwp

Top-rated All-in-One WooCommerce Upsell Plugin allows you to create one-click upsell offers, making it easy to increase your Average Order Value and increase sales.

The plugin enables you to present exclusive offers right on the checkout page.

Your customers can add these special offers to their existing orders with just a single click.

It presents exclusive deals at checkout to capture your customers’ attention and drive additional purchases.

Major Features of UpsellWP

Here are some major features of Upsell :

  • Conditional upsell offers
  • Simple setup
  • Advanced conditions for campaigns
  • Product & Cart add-ons

The Benefit You Will Get Using UpsellWP

This plugin is highly targeted and you can create personalized product recommendations for every shopper category in your store.

Its advanced algorithm handles the heavy lifting of generating smart recommendations, eliminating the need for manual upsells and cross-sells.

You can make each customer feel like your store was designed just for them.

Pricing

UpsellWP has a free version but you can’t get their pro features in it. To get the pro plans it will cost you $69 to $199 in a yearly payment system according to your site’s needs.

UpsellWP pricing

4. WooCommerce Product Recommendations

The related products for the WooCommerce plugin allow you to display customized related products in your WooCommerce store.

product recommendation by webtoffee

You can showcase related items based on categories, and tags, or manually select products to feature on the product details page of individual items.

By recommending related products, you capture customers’ interest in other items within your store, encouraging them to explore and purchase more. This approach helps increase the average order value.

Utilize this plugin’s related product functionality to suggest additional items to your customers, boosting your sales and enhancing their shopping experience.

Major Features of WooCommerce Product Recommendations

Here are some WooCommerce product recommendations:

  • Multiple pre-built recommendation templates
  • Advanced filters for recommendations
  • Display product recommendations on multiple store pages
  • Create custom recommendations with custom rules
  • Customize the recommendation widgets
  • Hide out-of-stock products
  • Advanced sorting options

The Benefit You Will Get Using WooCommerce Product Recommendations

To make your store even more appealing, you can transform the related products section into an eye-catching slider.

This not only enhances the visual appeal of your product pages but also lets you showcase more items without cluttering the layout.

You’re in charge of how many products appear, ensuring the perfect balance for your store’s design.

One of the most valuable features for you as a store owner is the automatic removal of out-of-stock items from recommendations.

This saves you time and prevents customer frustration, keeping your product suggestions current and purchasable.

Pricing

WooCommerce Product Recommendations By WebToffee prices start at $89.

5. Alternate Product Recommendations for WooCommerce

Customers often leave empty-handed When they can’t find what they’re looking for due to out-of-stock or discontinued items.

The Alternate Product Recommendations for WooCommerce plugin addresses this issue by suggesting similar products when the desired item is unavailable.

Alternate Product Recommendations for WooCommerce

Additionally, for in-stock items, the plugin recommends complementary products to increase sales potentially.

This approach aims to improve customer satisfaction and boost revenue by providing alternatives and upsell opportunities.

Major Features of Alternate Product Recommendations

Here are the major features of alternate product recommendations :

  • Disable default WooCommerce product functionality
  • Choose custom-related products
  • Option to set up associated products for the entire store (by category, tags)
  • Set up related products for individual products (by category, attributes, tags, or products)
  • Exclude selected categories from showing as related products

The Benefit You Will Get Using Alternate Product Recommendations

When customers encounter out-of-stock items, instead of leaving disappointed, they’re presented with relevant alternatives that may meet their needs. This thoughtful approach of this plugin keeps shoppers engaged on your site, increasing the likelihood of a purchase.

Moreover, for customers who already have items in their cart, you can offer alternatives to out-of-stock products with a plugin which can significantly reduce cart abandonment rates.

Pricing

The pro plans of this plugin start at $49 and it’s billed annually.

Comparison Between 5 Best Product Recommendations Plugins

FeaturesLeo Product RecommendationsProduct Recommendations for WooCommerceUpsellWPWooCommerce Product RecommendationsAlternate Product Recommendations
Product suggestion methodsResponsive Popup, Manual & Global Selection, Slider Layouts, Dynamic Selection.Frequently Bought Together, Top Rated Products, Best Selling Products, Sale products.Checkout upsell, frequently bought together, double order, upsell pop-up.custom-related products, Upsells, Cross-sell.Before/After the Product Price, Carousel/Slider type
Advanced Customization OptionsYesYesNoCustomize the recommendation widgetsLimited customization
Out-of-Stock optionNoOut Of Stock Product AlternativesNoExclude or hide
out-of-stock products
No
New Arrival AlertsNoYesNoNoNo
Placement ControlYesYesOffer display controlNo Track the products viewed & purchases
PrijsStarts at $79Starts at $47.99Starts at $69Starts at $89Starts at $49

Laatste gedachten

When selecting a recommendation plugin, it’s crucial to consider your specific store needs and target audience.

As I’ve discussed earlier, product recommendations put a highlight on your store and your customers easily get clear about the offers you are providing.

Using a top-rated plugin with features that you need, can reduce your time and cost. Amidst all the plugins I’ve made a small list of only five plugins that most WooCommerce store owners choose.

For any queries, comment below!

Categorieën
WooCommerce

4 Best Product Feed Plugins for WooCommerce in 2024

There are many online marketing strategies to improve your Woocommerce business to drive constant sales.

Among them the most effective and quick marketing strategy is, promoting your products through an online marketplace, social media platforms, or Google shopping.

However, promoting manually on any platform is a ton of work as you need to buckle up almost all the details of all of your products in one single tab.

No worries!

If you take time and choose the right Woocommerce product feed plugin you can generate your product feed in minutes and manage it easily without any headache.

That’s why I’ve well-researched all the plugins available on Woocommerce right now and picked out 4 best product feed plugins that have higher reviews & installation than the rest.

So, let’s begin.

Why Use Product Feed Plugins?

best product feed plugins

Google shopping, Facebook, and online marketplaces are full of shoppers who are roaming on the site to buy products online.

As a Woocommerce store owner, you need to create a proper product feed file (XML, TXT, CSV, XLS, or TSV file format) to promote on these platforms.

Creating a proper product feed file is a hassle of work, as the product feed file contains all the product information of your online store.

That’s where product feed plugins came to the rescue.

With product feed plugins, you can automate the whole product feed file format process and half cut your hassle and time.

Also with the right product feed that aligns with your needs, you can :

  • Increase your product visibility
  • Upload complete product information
  • Reach to a larger audience

To help you to pick the right plugin, I’ve found out 4+ best product feed plugins [WELL RESEARCHED]

4 Best Product Feed Plugins for WooCommerce

Here I’ve listed down 4 best product feed plugins with details you need to know. These plugins have a high rating and high installation rates.

I will start with the Product feed manager for Woocommerce by Rextheme.

Product Feed Manager For Woocommerce [180+ Marketplaces]

Product Feed Manager For Woocommerce has the maximum online marketplace coverage with a 5-star rating and 10,000+ installations.

This plugin provides a super easy UI & pre-configure templates so that you can generate the most accurate product feed file in minutes.

product feed manager for woocommerce

With PFM, You can also automate the feed generation process whenever you make changes to your store such as,

  • Adding a new product, or
  • Changing product details, etc

Not only these, it also provides certain fields Brands, GTIN, UPC, age group, Gender, etc that WooCommerce doesn’t provide.

It supports right-to-left languages like Arabic and Hebrew. The user interface will automatically adjust for RTL languages.

Major Features of Product Feed Manager For Woocommerce [All in One]

Here are some major features of the product feed manager for Woocommerce that you will get :

  • Supports maximum types of file formats (XML, CSV, TEXT, TSV, RSS)
  • Custom Fields for Unique Identifiers
  • Advanced Category Mapping
  • Variable Product Support
  • Accurate Structured Data Format
  • Auto-sync With Google Merchant Center
  • A Custom Feed For Any Merchant
  • Mogelijkheid om belasting uit te sluiten van de prijzen van gestructureerde gegevens
  • Multi-vendor compatibility

Now let’s talk about the benefits you will get from this plugin.

The Benefit You Will Get Using Product Feed Manager For Woocommerce

The most amazing feature that I already wrote about is pre-made templates.

Think about it, that manual effort goes for feed design, and organizing it is huge.

You can customize the premade data and you can :

  • Add advanced filter options to generate feed with selected products,
  • Create a custom feed for merchants that we do have a template for.
  • Combine Multiple Attributes In The Feed
  • Fix WooCommerce’s (Json-Ld) Structured Data Bug
  • Belastingen uitsluiten van de prijzen van gestructureerde gegevens

You can also use the smooth filter options to include or exclude the required products of your store from the product feed. You can filter by categories, or tags, or apply custom filters using other attributes.

You also get custom filter options and with this, you can generate feed more precisely.

In business, any changes can come up. With PFM, you can set a schedule for your product feed to be updated automatically.

If you are planning to promote on Google Shopping, then PFM is the most ideal plugin for you.

Google shopping feature page : Product feed manager

You will get everything you need from the Google merchant feed. You can :

  • Add additional product data
  • Do category mapping with Google’s category
  • Add and configure Google Analytics UTM tracking codes to your product URLs.
  • Get Google Dynamic Remarketing Pixel support.

In terms of Facebook product feed, you can track Products With Facebook Pixel. You can also add custom fields for Unique Identifiers.

You can not only generate feeds but also fetch custom images using ACF to your product feed easily without any hassle.

It often happens that your product is listed on the feed but there is no stock left.

With PFM, you can easily exclude “out of stock” products from your product feed file.

As you are starting new, you might get confused about getting an email notification if your feed is not generated properly.

Pricing Structure

Product Feed For Woocommerce offers 25 features in its free version. You can also take a live preview and get a preview now.

PFM- best product feed plugins

In the pro version, you will get almost 15 advanced-level features for just $79.99 in a yearly payment system for 1 site.

Product Feed Pricing- best product feed plugins

The price plan increases with the number of sites you buy for.

Product Feed Pro By Adtribes

You can generate product feeds in various formats (XML, CSV, TXT, YML) for multiple e-commerce platforms and marketing channels with the Product Feed Pro By Adtribes plugin.

Product feed by adtribes

This plugin includes Google Shopping, Meta/Facebook, Bing Shopping, and numerous comparison sites like Billiger.de, Pricerunner, and Skroutz.

It provides 100 pre-configured templates for popular marketplaces, comparison engines, and search platforms. You can also create custom feeds tailored to your specific requirements.

This tool is ideal for businesses seeking high-quality product feeds for Google Shopping, Meta/Facebook Catalog, and other major e-commerce marketing channels.

Major Features of Product Feed By Adtribes

  • Unlimited number of products & product feeds
  • This plugin supports the usage of Custom Attributes, Dynamic Attributes, and Product Attributes.
  • Google Analytics support
  • Google Dynamic Remarketing Pixel supports.
  • Fix for WooCommerce structured data bug (Elite version)
  • Add critical Google Shopping Feed fields to your store (Elite version)
  • Polylang support (Elite version)

The Benefit You Will Get Using Product Feed By Adtribes

Using this plugin offers numerous advantages for e-commerce businesses. It streamlines product feed management across multiple platforms, saving time and effort.

The plugin’s support for unlimited products and feeds, coupled with advanced features like category mapping and rule-based filtering, ensures precise control over product data.

Its integration of pixels and Conversion API enhances tracking capabilities, and can potentially improve your marketing effectiveness.

Pricing Structure

The price plan of this plugin starts from the growth plan of $99/year.

Product Feed by attributes

Its elite version comes in the Business plan and that will cost you $199/year.

CTX Feed By WebAppick

This powerful WooCommerce plugin provides product feed management support for over 100 marketing channels, including major platforms like Google Shopping, Facebook Catalog, and TikTok.

It simplifies the creation of optimized, error-free feeds for various marketplaces, search engines, and comparison sites.

CTX Feed

With features like automated updates and flexible scheduling, it ensures your product information stays current across all channels.

The plugin’s user-friendly interface and wide compatibility make it an essential tool if you are looking to expand your reach.

Major Features of CTX Feed By WebAppick

Here are some major features of CTX Feed By WebAppick :

  • Unlimited products & feeds
  • 100+ pre-configured templates
  • Output types to avoid errors
  • Category mapping

The Benefit You Will Get Using CTX Feed By WebAppick

The plugin can provide you with flexible options for updating product information, supports multiple file formats, and includes advanced features like attribute formatting and identifier add-ons.

With its user-friendly interface and tailored solutions based on user feedback, CTX Feed simplifies product feed management, enhances marketing efforts, and improves your product visibility across various e-commerce platforms and marketplaces.

Pricing Structure

CTX feed pro offers 3 different price plans, for one single site it will cost you $119/year. Their most popular one offers features for five sites for $199 and another one will cost you $229/year.

Product feed by WebToffee

Product feed by WebToffee generates optimized product feeds in various formats, including XML, CSV, XLSX, and TXT.

It enables smooth integration with major sales channels such as Google Merchant Center, Facebook, Instagram, TikTok Ads, Pinterest, Snapchat, and Bing.

4 Best Product Feed Plugins for WooCommerce in 2024 4
Type caption (optional)

The plugin’s functionality extends to transforming your social media presence into effective sales channels, offering opportunities for free listings and ads on several platforms.

Additionally, it provides automated synchronization with Facebook catalogs and simplifies the process of connecting your WooCommerce store to Google Merchant Center. In this way, this plugin enhances your product visibility and marketing reach across multiple digital marketplaces.

Major Features of Product Feed By WebTofee

Here are some major features of product feed by WebTofee :

  • Dynamic Price & Feed Update
  • Advanced product filtering options for generating product feed
  • Supports WooCommerce Multilingual & Multicurrency for WPML
  • Exclude out-of-stock products
  • Server cron for managed hosting
  • Auto-catalog sync for Facebook catalog
  • Multi-vendor compatibility

The Benefit You Will Get Using Product Feed By WebTofee

This plugin is made to eliminate any complexities you face in generating WooCommerce product feeds.

Here are some benefits you will get by using this plugin :

  • Smart filtering – It lets you filter product categories to specifically include or exclude from the product feeds generated.
  • Batch sync – You can sync thousands of WooCommerce products with Facebook, Google, or Instagram shops by enabling batch sync. This will reduce the server load and ensure successful product synchronization.
  • Category mapping – You can quickly map the categories in your store with the Facebook and Google Shops categories and save the mapping for future use.
  • Edit mapping – This allows you to edit the existing Facebook category mapping.
  • Product sync log – You can view failed product syncs for easy debugging.

Pricing Structure

Product Feed By Web Tofee offers 3 pricing plans based on how many sites you need. For single sites, this plugin cost you $89.00/year.

Now I compared these 4 best product feed plugins for Woocommerce below based on the features you must need :

Comparison Between 4 Best Product Feed Manager Plugins

FeaturesPFM By RexthemeProduct Feed Pro By AdtribesCTX Feed By WebAppickProduct Feed By WebTofee
Automatic Feed GenerationYesYesYesYes
CustomizationYesYes YesYes
Number of Marketplaces180+100+100+20+
Automatic UpdatesYesNoYesYes
Number of Supported Plugins2723jaja
Category / Taxonomy mappingYesYesYesYes
Pre-Configured Templates180+100+100+20+
PrijsStarting from $79.99Starting from
$ 99.50
Starting from
$199
Starting from
$89
Rating4.8/5.00
(191 reviews)
4.7/5.00
(908 reviews)
4.6/5.00
(696 reviews)
4.8/5.00
(19 reviews)

Laatste gedachten

Implementing a product feed for your WooCommerce store is a crucial step toward enhancing your brand’s visibility and popularity.

By generating product feeds with Woocommerce product feed plugins, you open up new ways to gain traction in the e-commerce market.

Various plugins are available that simplify the process of creating and optimizing product feeds for major platforms such as Google Shopping, Bing, Amazon, eBay, and other popular websites.

I have listed down the best product feed plugins for Woocommerce in this article, you can make a proper decision from here.

These tools make it easier for store owners to expand their reach and showcase their products across multiple channels.

Frequently Asked Questions (FAQs)

FAQ1: Why are product feed plugins important for WooCommerce stores?

Product feed plugins are crucial for WooCommerce stores because they:

  • Allow for easy customization of product data for different platforms
  • Save time by automating feed creation and updates
  • Ensure accurate product information across multiple channels
  • Improve product visibility on shopping platforms and search engines
  • Increase sales potential by reaching a wider audience
FAQ 2: What features should I look for in a top-rated product feed plugin?

When choosing a highly-rated best product feed plugin for WooCommerce, look for the following features:

  • Support for multiple platforms and feed formats
  • Automatic feed updates, Custom field mapping, and attribute creation
  • Category mapping and product filtering options
  • Performance optimization for large product catalogs
  • Integration with popular WooCommerce extensions
  • User-friendly interface
Categorieën
WooCommerce Guide

WooCommerce Shipping Setup – Guide To Follow [2024]

As a Woocommerce owner, you might often be scared that your potential customer will abandon their almost-buying cart.

One of the reasons for abandoning your cart may be unclear shipping methods and payment sections.

WooCommerce Shipping settings are often confusing because there are plenty of options in the WooCommerce Dashboard.

So, in this article, I focused on making things as simple as possible for you when setting up the WooCommerce Shipping.

I gave proper directions for every step and used several pictures to let you follow the steps with your dashboard [EASILY].

Follow all the steps properly and your WooCommerce shipping settings will be ready.

So let’s begin.

WooCommerce Shipping Setup (Basic Steps)

WooCommerce Shipping is a feature that allows you to control shipping options.

WooCommerce Shipping consists of basic three options. You can say these are the foundation-setting options that you must set.

Here are these 3 options :

  • Verzendklasse
  • Shipping Zone
  • Shipping Method

I’ll go over them one by one :

Create WooCommerce Shipping Classes

In this section, you will learn how to create shipping classes :

Stap 1

First, Go to WooCommerce > Settings > Shipping

Woocommerce Shipping

You’ll see four options: Shipping Zones, Shipping Settings, Classes, and Local Pickup.

Notice the blue line under the panel, you will find the option “Classes

Verzendklasse

Stap 2

After clicking on Add Shipping Classes, you will see a page as follows :

add shipping class

You will need to enter the following details:

  • Shipping Class: what kind of shipping approach do you want? For example: if you want free shipping, you must write free shipping. (This is mandatory).
  • Slug: A slug is created based on your shipping classes in your database. In most cases, you won’t need them unless you are working with several shipping classes. If you don’t provide a slug name, it will be created automatically.
  • Description: It is a good practice to provide a brief description of your shipping classes; the specific nature of products that put them under the same class, etc. This is completely optional.

Step 3

Once you provide the information, click on Save.

In my case, the shipping class looks like this:

Shipping class

You can create as many shipping classes as you want.

Then assign products to your shipping classes. The next step is to create your desired shipping zone.

Create WooCommerce Shipping Zones

Your shipping zone specifies the set of regions you are willing to ship your products to.

You can set multiple shipping regions based on the name, country/province, postal codes, etc.

You can also set different shipping rates for different regions based on the shipping methods available within this option.

P.S: When you set regions, users only from those regions will see your shipping options.

Now let’s learn how to create a new shipping zone :

Stap 1

On your dashboard go to WooCommerce > Settings and on the page, click on Shipping

Shipping option

Stap 2

Under Shipping, you will get 3 options. Click on the Shipping Zones option.

Shipping zone option

Stap 3

As you can see, To create one, click on Add zone.

add shipping zone

Step 4

In the first option, you will see the zone name. Fill the box accordingly.

Zone name

When you select a zone region on the box, all the regions under that zone will be previewed in the list. You will be able to select multiple regions among them.

Add shipping region

In my case, the box looks like this.

shipping region set up

Click on Save Changes to save your newly created shipping zone.

shipping region set up

You are done with creating a Shipping Zone.

Then you need to select “Add Shipping Method” to Free Shipping or Flat Rate.

Which I am now going to discuss elaborately on how you can set up shipping methods :

Set Up A WooCommerce Shipping Method [Manual]

So, There are 3 types of shipping methods you can go for :

  • i. Free Shipping
  • ii. Flat Shipping
  • iii. Local shipping

First I will guide you with free shipping.

Then I will give you an overview of the other two WooCommerce shipping methods.

So let’s go ahead :

i. Free Shipping Method

If you want to give your customers shipping free of charge then you need to set up a free shipping method.

So, now go to the WooCommerce settings option. Then select the button Shipping< Add Zone

As you scroll down you will see the option shipping methods on the left side :

add shipping method

On the right panel, you will see a blue button labeled “Add shipping Method

Add shipping method

As you click on the button this list will come up :

shipping method option

Here, you will see a 2 option. select Free Shipping and click on the Continue button.

This is what the Free shipping Settings look like:

Set up free shipping

As you can see, first you have to put a name on it and then fill out the requirements.

You have to enter the following information:

1. Title:

This is the name of your shipping method. The name you set here is what users will see while checking out.

You can set the title from Free shipping to anything you want (for example, ‘No shipping fee’) but the method of shipment will remain the same.

2. Free shipping requirements :

You can either choose to give free shipping without any condition, or you can choose from 4 conditions to make free shipping applicable:

  • A valid free shipping coupon: The customer has to have a coupon to get free shipping
  • A minimum order amount: The customer has to order that’s worth a certain amount or more to get free shipping
  • A minimum order amount or a coupon: Customer can have either a free shipping coupon or a certain target amount worth of the order; any one of them will avail of free shipping
  • A minimum order amount AND a coupon: The customer needs to have a free shipping coupon and order a certain amount worth of order; both have to be achieved to avail of the free shipping option
  • Minimum order amount: In case you set the condition above to have a minimum order amount (i.e. you chose one of the last three options for “Free shipping requires“.

I will select the “No requirement” option.

Now, in the shipping method box, free shipping has been added. Now, look at the right side of the dashboard, you will find the option to edit.

edit free shipping option

Click on Edit and it will take you to the free shipping settings. Update any changes you want.

Your Free shipping method is set up.

The next shipping method is flat rate shipping :

ii. Flat Rate Shipping Method

Flat-rate shipping charges a fixed rate for shipping.

To set this method up, follow the steps below :

To access Flat Rate Settings, Go to WooCommerce > Settings > Shipping > Shipping Zones > Shipping method.

flat rate

Then choose the option flat rate and click on the button Continue.

It will take you to the flat rate settings.

flat rate set up

In the Flat Rate Settings, you have to enter your estimated cost, shipping class cost, and some other relevant information accordingly.

Terms you need to know :

  • Method Title: This is the name of your shipping method. The name you set here is what users will see while checking out. You can set the title from Flat Rate to anything you want (for example, ‘Flat shipping fee’) but the method of shipment will remain the same.
  • Tax status: Choose whether shipping products are taxable or not.
  • Cost: It is the base cost you set, that adds up as the initial flat rate cost. It is charged for all the products even if they don’t fall in any specific class.
  • Shipping Class Cost: Set an additional cost you want to imply on your products that fall under certain shipping classes. For example, I have set my shipping class cost to 5 for the class ‘Heavy’. Anyone who is buying an item that falls under the class ‘Heavy’, will be charged an additional $5, along with the flat rate cost.
  • No Shipping Class Cost: Set up your shipping rates for the products that fall under no specific classes. I set it up as 2. Anyone who is buying an item that falls into no shipping classes will get an extra charge of $2 along with the flat rate cost.
  • Calculation Type: When you have multiple shipping classes, you can choose the types of calculation you want to imply with your shipping classes cost. In the Flat rate method, you will have two ways to do that: Per Class & Per Order

After you fill up all box, click on the button “Create & Save

Now let’s look at the Local pickup shipping method.

iii. Local Pickup Shipping Method

Go to Shipping zone> shipping method> add shipping method> local shipping

Local shipping set up

This is what the Local pickup Settings look like :

add local shipping

Now click on the option “Enable local pickup”.

Scroll down and tick on the label line “Add a price for customers who choose local pickup”.

local shipping set up

By default, the local pickup shipping method is free. but if you can charge an extra fee for local pickup you can assign it here. Usually, store owners do not charge anything extra, but it is an option you can use.

Tax status: Here, you have the option to choose between Taxable or None.

local shipping set up

It is by default assigned as Taxable, which means when using a local pickup, store base taxes will apply regardless of customer address.

This is the ideal choice for most store owners, however, you can choose not to charge for taxes and select Non-Taxable instead.

Now, scroll down and you will see the option to pick locations. On the left side, you will see the button “Add pickup location

add local shipping

As you click, you see this page with these options :

add pick up location

Once these are inputted, click on the Save Changes button, and your Local pickup shipping method is set up.

How to Calculate Shipping Rates & fees

There are two calculation types available :

  • Per Class

For any order that will include products in multiple classes, the shipping class cost for each of those classes will be added on top of the flat rates.

Also if the order includes products with no particular class, then the cost for no shipping class will be present as well.

For instance, let’s assume that I have another shipping class named ‘Light’ and I assigned a shipping class cost of $3 to it.

Now, let’s say a buyer ordered 4 products, out of which two products fall under the class ‘Heavy’, one product falls under the class ‘Light’ and another falls under the no shipping class.

Then the total shipping cost will include a $2 charge for no shipping class cost, a $5 charge for the shipping class cost of ‘Heavy’, and a $3 charge for the shipping class cost of ‘Light’, on top of the flat rate cost of $5. So the total shipping cost will add up to $15.

  • Per Order

In this case, for any orders that will include products from multiple classes, the shipping class cost that is the highest among these classes will be added on top of the flat rate cost. Suppose, I have another shipping class named ‘Light’ and I assigned a shipping class cost of $3 to it.

Now, let’s say a buyer ordered 4 products, out of which two products fall under the class ‘Heavy’, one product falls under the class ‘Light’ and another falls under the no shipping class.

Here, among the three, the highest shipping class cost is $5. Hence, only $5 will be added on top of the flat rate cost, the other two shipping class costs will be ignored. Therefore, the total shipping cost will add up to $10.

Once these are inputted, click on the Save changes button, and your Flat rate shipping method is set up.

Set Up Payment Methods

In the WordPress dashboard, navigate to and click on the Payments tab within the WooCommerce > Settings menu.

setting payment

You can choose from these options :

Direct bank transfer: Take payments in person via BACS. More commonly known as direct bank/wire transfer.

Check payments: Take payments in person via checks. This offline gateway can also be useful to test purchases.

Cash on delivery: Have your customers pay with cash (or by other means) upon delivery.

Click on the button manage, you will get the settings page of any option :

setting of payments

As you can see here the setting page of cash on delivery. Fill up accordingly with your credentials. Clock on save changes. Your payment setup is done.

Set Up Weight-based Shipping [Additional]

Some might think configuring WooCommerce shipping based on weight would be a hard task.

When you know the RIGHT process, it’s very simple.

Let us walk you through all the steps.

How to Turn On WooCommerce weight-based shipping class

Jump to WooCommerce >> Settings >> Shipping and add a shipping class.

I will name this WooCommerce weight-based shipping class:

Now, in the same way, create other classes for other weight ranges.

Next, you have to assign the classes to the products according to their weight categories.

For example, I have a product that is under kg, so I would send it to under the Up to kg class.

Looks like a time-consuming task, right? You can also bulk assign WooCommerce weight-based shipping classes.

Go to All Products and filter your products according to your requirements. Select all of them and click the Quick Edit button.

On the Quick Edit window, assign the appropriate class and update.

Finally, you need to create or edit a flat shipping method. Go to your designated shipping zone and add/edit the flat rate method.

Scroll down the flat rate window, and you will find all the classes you created.

Finally, set your rates for every class.

Integrate shipping with An Advanced Shipping Plugin

As you see in WooCommerce, you might not get every option you need.

You can integrate a shipping plugin into your WooCommerce. I am showing you a plugin named “Advanced Shipping

First, install and activate the plugin.

Now go to the Shipping zone > Shipping method>Advanced shipping.

Advanced shipping plugin

And now see how easy it is now to set up your shipping process. You will get all the options under one panel.

Advanced shipping plugin

You don’t have to go back and forth to different pages to set up separately.

Laatste gedachten

A well-defined shipping strategy can make your shipping process smooth.

In this guide, I provided a step-by-step guide for setting up shipping in WooCommerce.

I added how you can make the process easy with the Advanced shipping plugin.

By following the steps outlined and carefully considering your customer’s need, you can establish both a user-friendly and sale-focused shipping system.

Comment below any question you have on your mind! I’d love to answer and solve your queries.

Frequently Asked Questions (FAQs)

FAQ 1: Which of the following shipping methods is commonly available in WordPress?

-Common shipping methods available in WooCommerce include:

  1. Flat Rate shipping
  2. Gratis verzending
  3. Local Pickup
  4. Table Rate Shipping (with plugin)
  5. Live rates from carriers (with extensions)

FAQ 2: What are the shipping variations in WooCommerce?

– Configuring shipping in WooCommerce is a straightforward process that begins in the WooCommerce Settings under the Shipping tab.

Here, you’ll set up shipping zones, which are geographical areas you ship to, and add appropriate shipping methods for each zone.

These methods can include options like flat rate, free shipping, or local pickup. For each method, you’ll need to configure specific settings such as costs and conditions.

FAQ 3: How to offer multiple shipping options in WooCommerce?

– WooCommerce offers several shipping variations to help tailor the shipping process to your business model. Shipping zones allow you to define different rates for different geographical areas. Shipping classes help you group products with similar shipping requirements.

Various shipping methods provide different ways to calculate shipping costs. You can base shipping calculations on factors like weight, dimensions, or cart total.

Categorieën
WooCommerce

5+ Best Free Virtual Tour Creators [All Ranked]

With virtual tours, people can experience different areas and spaces from wherever they are.

Nowadays people prefer virtual tours more than static views. Also, it takes less time to understand any place, space, and other amenities easily.

And as a business owner, realtor, or teacher, you can take advantage of it by using virtual tours.

However, Virtual tour builders are pretty expensive nowadays

You must be thinking about high camera costs, manpower, and most importantly the high cost of virtual tour creators!

That’s why I’ve researched almost 20+ virtual tour creators and found the ones that provide amazing features for FREE!

Yes! That’s right!

You will get the most needed features to make a virtual tour without spending a single penny!

Let’s get started with knowing what features you need to make a virtual tour.

Must-Need Features of Free Virtual Tour Creators

Here are some features that make a virtual tour creator stand out:

1. 360-degree views: The ability to create and stitch together 360-degree images is fundamental for an immersive experience.

2. Hotspot creation: Interactive hotspots allow users to navigate through the tour and access additional information.

3. Customization options: The ability to brand tours with logos, custom colors, and other design elements is essential for businesses.

4. Mobile compatibility: With the majority of internet users accessing content via mobile devices, a responsive design is crucial.

5. Easy sharing and embedding: Tours should be easily shareable across various platforms and embeddable on websites.

6. User-friendly interface: An intuitive design ensures that even non-technical users can create professional-looking tours.

7. VR compatibility: Support for virtual reality headsets can enhance the immersive experience.

Now, let’s explore six free virtual tour creators that offer these features and MORE.

6 Best Free Virtual Tour Creators in 2024

To explore the best free and open-source virtual tour tool for your business, check out the following top-quality list of 6 virtual tour creators.

1. WPVR

WPVR has a simple & user-friendly interface, designed for you to create virtual tours real quickly, even without any expertise.

You can showcase your showroom, hotel, classroom, museum, or real estate spaces with 360 panoramic views.

WPVR- Free virtual tour creator

WP VR offers a modern and customizable navigation layout, where you can customize the colors and branding of the navigation operators in the virtual showcase.

It supports 360-degree videos from various sources, enables full-window and VR glass experiences, and integrates with WordPress through shortcodes, Gutenberg blocks, and Elementor widgets.

The plugin provides live previews, autoload options, scene transitions, and privacy controls.

You will get all of these features with multi-site support and more in its free version.

Best Features:

  • 360 Degree Video Support (Self-hosted, Youtube, & Vimeo Videos).
  • Full-window Virtual Tours.
  • Hotspot Customization with Custom CSS
  • VR Glass support for 360 Video Tours.
  • Live Preview of Tour On The Back-end.
  • Private and Password Protected Tour
  • Auto Rotation with Speed Control
  • Mobile Media Resize Option

Availability:

WPVR has no trial period. You will get all of these features free without any limitations. For the beginning stage, these features are all you need to meet your needs for a virtual tour.

as you keep growing or want to make your virtual tour extra lucrative with an explainer video or QR code or more, then you can switch to WPVR Pro. [ALSO VERY AFFORDABLE THAN OTHERS]

Use case:

  • Realtors can provide a true virtual experience to generate more quality bookings.
  • Hotel and resort owners can showcase your hotel’s elegance 24/7 with interactive virtual tours.
  • If you are associated with the museum sector, you can create virtual exhibitions, and virtual museum & art gallery tours using WPVR.

Pricing:

WPVR offers a free version with the mentioned features and a few more.

Its premium plans start normally at $79.99/ per year but now you can get it for $63.99/Year [Save 20%]

WPVR Pro offers additional functionality for more advanced users.

2. Teleport Me

TeliportMe is the only company that offers its own 360 photo capture on both Android and iOS. Also, TeliportMe never compromises with image quality and resolution when it comes to providing you with high-quality virtual tours.

TeleportMe

Its support for high-resolution tours up to 32 megapixels ensures stunning visual quality.

The platform enables the creation of customized, pre-recorded virtual host tours. Personalization options let you incorporate branding elements.

Best Features:

  • High-resolution Images
  • 3D Dollhouse similar to Matterport
  • Polygon Hotspot
  • Eye-catching 3D media
  • HD Green Screen Videos
  • Password Protection.
  • Floor Plan
  • Magic Embed
  • Chatbot integration

Notes: These are available in paid plans. However, you can try them in their unlimited trial period.

Availability:

Teleport Me doesn’t have any free version. It comes up with unlimited trial periods. Also,

It’s not super easy to set up and maintain. The user interface can be hard for you if you are a complete beginner.

Use case:

This plugin is perfect for small businesses, photographers, and individuals looking to create quick, shareable virtual tours with high resolution and less camera equipment.

Pricing:

Teleport Me doesn’t offer any free plan. Paid plans start at $19/per month where you will get these features :

  • Unlimited storage
  • Unlimited tours
  • 1 brand
  • 16K max resolution
  • 30Mb max panorama size
  • 1 user

To get access to all of their features to need to take their unlimited plan which costs $83/per month.

3. Panoee

Panoee provides most highest types of hotspots among all other virtual tour software.

Panoee possesses a stunning 360 photography portfolio that works as your sales tool.

This free virtual tour software enhances property presentations by incorporating essential features such as floor plans, Google Maps integration, and virtual staging options.

Panoee Free virtual tour creator

Best Features:

  • 11 types of hotspot
  • 360 Panorama & Tour Builder
  • Google street view
  • Cloud Storage to manage 360 Panorama & Media
  • Virtual Staging

Availability:

Panoee offers a free version [Only for 14 days] but with minimal features.

These are the features you will get in their free plan :

  • 3 gb storage
  • 7 types of hotspot
  • high-quality upload

For the best features, you need to take their pro plans.

Use case:

Suitable for businesses in real estate, hospitality, factory, office, and tourism industries looking for a comprehensive virtual tour solution.

Pricing:

Panoee offers a free plan with basic features as I mentioned earlier.

Their premium plans are available for users requiring more storage and advanced features. It has a yearly plan that costs $166.

4. Theasys

Theasys is a virtual tour creator known for its powerful customization options and high flexibility. Also, it is renowned as a creative virtual creator.

The virtual tour software stands out for its comprehensive functionality, user-friendly interface, and professional-grade output.

theasys free virtual tour creator

You can create visually stunning and sophisticated panoramic experiences.

Best Features:

  • Unlimited Panoramas & Virtual Tours
  • Sophisticated Linking Module
  • Live Panorama Enhancing
  • Powerful Hotspot Editor
  • Hotspot Transitions & Effects
  • Virtual Tour Share Links
  • Cookies Consent Popup
  • Multiple Embeds

Availability

Theasys offers a free plan but limited features such as :

  • Up to 5 panoramas per account
  • Limited Support

If you want to download the tour you will make, you need to pay $10 for each download.

Use case:

It provides a diverse range of professionals including real estate agents, photographers, web designers, hoteliers, and travel agencies.

Ideal for photographers, real estate agents, and small businesses looking for a balance between simplicity and advanced features.

Pricing:

Theasys offers a free plan with limited storage and features.

Their Essentials plan starts at $19.99/ month (billed yearly)

5. Lapentor

This virtual tour platform offers a unique combination of simplicity and advanced features, with a focus on user-friendly design and flexibility.

It has self-hosting on personal domains and offers a free-to-use model with optional premium features.

The interface enables quick creation and updates of virtual tours without coding skills.

Best Features:

  • Add information without any line of code
  • Display high-resolution Panos & improve load speed on multiple devices
  • No limit on the number of Projects or time to use with premium plan
  • Customizable meta title, description & social media thumbnail

Availability:

Lapentor provides a free plan but only with 4 features :

  • Update & Publish projects instantly
  • Embed anywhere
  • Only 3 projects &
  • 15 Panos

For all the extra features you need to take their premium plans.

Use case:

Suitable for professional photographers, real estate agencies, and businesses looking for highly customizable virtual tour solutions.

Pricing:

Lapentor offers a free plan with basic features. Premium plans cost $25/month.

6. Paneek

Paneek is one of the leading virtual tour software options available today.

It offers a wide range of features, including floor plans, maps, panoramas, virtual reality, and little planet views. Additionally, it is accessible as a mobile app, allowing for convenient work on the go.

Best Features:

  • 360 Degree Views
  • High-Resolution Images
  • Social Media Sharing
  • Customizable Themes
  • Offline Access
  • Cloud Storage
  • Integration With CRM
  • Custom Url
  • Password Protection
  • Custom Branding
  • Vr Compatibility
  • Audio Narration
  • Video Embedding

Availability:

Paneek provides free plans but with limited features.

Use case:

Perfect for individuals and small businesses looking to create simple virtual tours without extensive technical knowledge.

Pricing:

Paneek offers a free plan with limited features. For Paid plans, you need to contact them.

Comparison Between 6 Best Free Virtual Tour Creators

To help you choose the right virtual tour creator for your needs, let’s compare these six platforms across key factors:

FeaturesWPVRTeleport MePanoeeTheasysLapentorPaneek
360 viewsjajajaYesYesYes
Free Plan LimitationsUnlimited Virtual ToursLimited Scenes and HotspotsOnly free trial Yes, limited features.NoYes, limited features.
Mobile CompatibilityhighYesYesLowhighhigh
Hotspot Hotspot  Customization with Custom CSSNo7 types of hotspots (no customization)Hotspot Editor, views, Transitions & Effects ( no customization)8 types of hotspotsYes
VR Glass support for video toursjaNoNoNoNoNo
Shortcode SupportYesNoNoNoNoNo
Live Preview of TourYesNoNoLive Panorama EnhancingNoNo
Site SupportMulti-Site SupportNoNoNoOnly phoneNo
Tour navigation controAuto Rotation Direction, Pause, Speed, and Stop controlNoNoNoNogeen
SecurityPassword ProtectionNoNoPassword ProtectiongeenPassword protection
Ease of useEasy for beginnersHard for beginnersHard for beginnersMediumEasyeasy
Public/ Private tourPrivate publicpublicprivatepublicPrivate
Total free features37Only free trial524N/a

Laatste gedachten

Choosing the right free virtual tour creator depends on your specific needs, technical expertise, and the platform you’re using to showcase your tours.

Here’s a quick summary to guide your decision:

  • For WordPress users: WPVR is a clear choice, it is easy to use and provides 37 free features which means you will be able to make and execute your virtual tour without spending.
  • For beginners seeking simplicity and fewer features: Paneek and Lapentor are user-friendly interfaces with quick tour creation.
  • For customization enthusiasts: The WPVR and Theasys offer the most customizable with their extensive plugin library and custom code support.
  • For lead generation: The Panoee would be the most suitable one.

Always consider your long-term needs and growth potential when selecting a virtual tour maker.

Frequently Asked Questions (FAQs)

FAQ1. Can I use these virtual tour creators for commercial purposes?

Yes, all of these platforms allow commercial use of tours created with their free plans. However, some may have limitations on features or the number of tours you can create.

FAQ2. Do I need special equipment to create virtual tours?

While professional 360-degree cameras can enhance the quality of your tours, many of these platforms allow you to upload standard panoramic photos taken with smartphones or consumer-grade cameras.

FAQ3. Can I embed these virtual tours on my website?

While the basic plans are free, some platforms may have usage limits or watermarks.

Always check the terms of service and consider if the free tier meets your needs or if a paid plan would be more suitable.

FAQ4. Are there any hidden costs with these free virtual tour creators?

While the basic plans are free, some platforms may have usage limits or watermarks. Always check the terms of service and consider if the free tier meets your needs or if a paid plan would be more suitable.

FAQ5. Can I upgrade to a paid plan later if I need more features?

Yes, all of these platforms offer paid plans with additional features and resources. You can typically upgrade at any time without losing your existing tours.

Categorieën
WooCommerce

Setup WooCommerce Free Shipping: 4 Proven Methods [With Practical Tips]

Free shipping eats into your profits- You might hear this statement from many!

But it’s not true.

Offering free shipping can be a game-changer for your business.

How?

Free shipping can motivate your customers to complete their purchases. It will also minimize cart abandonment on a large scale.

According to a 2016 research by Walker Sands, free shipping motivates 9 out of 10 users to shop online more frequently.

As a result, your SALES WILL BE DOUBLE!

All you have to do is apply the correct methods of free shipping to avoid any loss.

In this article, I will show you how you can apply 4 PROVEN FREE SHIPPING METHODS that works. Also with practical tips.

First, let’s go through when and how you should offer free shipping without cutting your pocket!

Ways To Offer WooCommerce Free Shipping Without Losing Money

Limited locations are one of the ways to maintain profitability while offering free shipping.

You can offer free shipping to locations that are close to your distribution center or your local retail outlet.

Offer free shipping on your high-end products.

This can help you cover the shipping cost as your consumers spend more money buying high-end products.

You can also offer free shipping in stock clearance sales.

With this strategy, those older items that are lying in your store become way more attractive, with free delivery on top.

not only ways but timing is very important in terms of offering free shipping.

Let’s go through it :

Be Cautious About Timing of Offering WooCommerce Free Shipping

In terms of timing, you can’t just offer free shipping out of nowhere.

Short-term campaigns like seasonal sales, new product releases, and other promotional events are already planned properly to get profit from sales. So, you can apply free shipping in these short-term campaigns.

You can use free shipping as a loss leader.

The concept of a loss leader can be applied to free shipping as well.

For example, if you have an eCommerce business with a subscription model, offering free shipping on the first order may increase conversions, even though you may be absorbing the cost of shipping.

4 Proven Methods To Setup WooCommerce Free Shipping

As you already know about how, why, and when you should apply your free shipping, you should plan your free shipping according to your business size.

There 4 methods to set up Woocommerce free shipping.

I will take you through the process step by step. I will start with the basic settings that will be needed for any method application.

Set Up WooCommerce Shipping Zones

After that, you need to set up your desired shipping zone. The shipping zone is the area you want to offer your shipping.

You can select several countries and regions as per your needs.

To set it up,

Go to your WordPress dashboard. Then select Settings.

Woocommerce setting option

Now notice the panel under settings and go to the tab “Shipping”.

Woocommerce Setting Shipping

Now look for the shipping zone sections. See the highlighted point and select the “shipping zone button”.

Woocommerce shipping zone

As you scroll down you will find a default zone name “Rest of the world”.

Now to set your desired zone, click on the button “Add Zone

Add zone in Woocommerce shipping

Here, give your new zone a name.

For example: here I’m creating a zone with the name “Specific Shipping”

Shipping Zone Name

Scroll down and you will find a button for Zone Regions.

Zone region means which locations fall under your desired zone. Click on the left box labeled as start typing to filter zones.

Select zone region

You can choose from:

setting region
  • Countries: You can select your desired multiple countries.
  • States: If you just want to select states, not the entire country you can separately do that.

After that, in the blue line, you will see an option named “Limit to specific ZIP/postcodes”.

set ZIP

As you click you will get this box as below.

Save option

Once you’ve defined the zone name and region, click the “Save Changes” button at the bottom of the page to save your zone.

Method 1: Set Up WooCommerce Free Shipping on All Products

Next, you need to add a shipping method.

Now I will explain how you can set up Woocommerce free shipping on all products.

As you scroll down to the shipping zone, under the zone region button, you will see the option shipping method.

shipping method option

add shipping method

options of shipping method

From the pop-up menu, select “Free Shipping“. And then, hit Continue.

free shipping options

After that, in the “Free shipping requires” option you will get 5 options.

Here’s what each means:

  • No requirement: Free shipping is automatically applied to all orders regardless of order value or coupon use.
  • Valid free shipping coupon: Customers must enter a specific promotional code to receive free shipping on their order.
  • Minimum order amount: Orders must reach or exceed a set purchase total to qualify for free shipping.
  • Minimum order amount OR coupon: Free shipping is granted if either the order meets a minimum value or a valid coupon is applied.
  • Minimum order amount AND coupon: Customers must both meet a minimum purchase threshold and use a valid coupon to receive free shipping.

To set up WooCommerce free shipping on all products, select the option “no requirement”.

Then press the button “Create and save”.

after that, check out and check whether the offer is applied to all products properly or not.

Method 2: Set up WooCommerce Free Shipping on a Single Product

As you have learned how you can set free shipping on all products, now I‘ll show you how you can set up free shipping on a single product.

First, set up the shipping zone and region as you did last time. Then you need to create a shipping class.

Step 1: Add shipping zone & method

Follow the process of setting the zone name and zone region as before.

After that click on “Add shipping method”.

From the pop-up choose “Flat Rate” and hit on Continue.

Shipping methof -flat rate

After that, a pop-up with these options will come up.

  • Name
  • Tax status
  • Cost
flat rate options

Your customers will see the name of this shipping method during checkout.

Step 2: Create a Shipping Class

Go to the dashboard, right after the option shipping settings you will find the option shipping class.

Adding shipping class

Then, click on “Add shipping class”.

Setup WooCommerce Free Shipping: 4 Proven Methods [With Practical Tips] 5

Once you click on it, a pop-up will appear. You’ll get the following options:

  • Shipping class
  • Slug(Optional)
  • Beschrijving
WooCommerce free shipping

Now on the shipping class write Free shipping. Then write down the slug and description for it.

Step 3: Add Selected Products in Shipping Class

Now, you need to assign the created free shipping method to your products.

To do that you need to go to the Products section> All Products

adding free shipping to products in woocommerce

Then click on the edit button. then you will get on this page.

product data- edit option

Scroll down and on the left panel, You will find the option Product data.

Product data option

Click on the box and you will find these options. from there select variable products.

Then from the left panel select “shipping”. Then fill in the Weight (kg) & Dimensions (cm) accordingly.

shipping in product data setting

Then in the below dimension box, you will see a dropdown bar named Shipping class.

As you click on it, you will find two options :

  • No shipping class
  • Free shipping(The one that you set earlier)
options of shipping class setting

Now select the free shipping class and your setup is done.

Method 3: Set WooCommerc Free Shipping for Orders Over a Set Amount

As before, set your shipping zone and region. Then click on the add shipping zone button.

Then, create a new shipping zone or edit an existing one where you want to offer free shipping over a certain amount.

After creating the zone, add the shipping method. For, shipping methods, select Free Shipping. From the list of options, select the option “A minimum order amount”

Sipping method set up

Set the minimum order amount there and tick the checkbox under it.

Then click on the button Create and Save.

Method 4: Set Up a Free Shipping Coupon in WooCommerce

Now, let’s learn how you can set up a free shipping coupon in Woocommerce.

To set up this method, you need to go to Shipping Zones> Zone> Add shipping method> Free shipping.

From the “free shipping requires” option you will get these options for coupons:

options in free shipping setting
  • Valid free shipping coupon.
  • Minimum order amount OR coupon.
  • Minimum order amount AND coupon.

Now select a valid free shipping coupon.

To set up further you need to enable the coupon option from general settings.

Step 1: Enable coupon option from general settings

Go to general from the dashboard.

general setting

Keep scrolling down, you will find out enable coupon option :

Click on the box and enable the option.

Step 2: Create a coupon

From the dashboard menu select Marketing> Coupons

Coupon option set up

Click on the button Create your first coupon”.

Add coupon

Step 3: Set free Shipping On Coupon

Now go to “General” on the coupon page. From there tick on the box of Allow free shipping. Provide coupon expiry date.

coupon settings

Then go to “usage restrictions”.

Usage restriction setting in coupon

Fill up the details & data accordingly.

Then move to Usage limits. Now, you just have to set the 2 sections according to your offer plan.

usage limit setting

Now click on the publish button. Then, click the Update button.

That’s all it takes to set up a free shipping coupon in WooCommerce.

Practical Tips To Make Your Woocommerce Free Shipping Work

So as of now, you have learned how you can set up Woocommerce free shipping.

While applying free shipping you need to keep in mind certain factors so that you can avoid losses.

Here are 3 practical tips that you can use to make your Woocommerce free shipping work 100%.

1. Hide Other Shipping Methods When “Free Shipping” is Available

When offering free shipping, it’s a good idea to hide other shipping methods from the checkout page.

This way your customer’s focus will be only on the free shipping option.

2. Extend the delivery timeframe in Woocommerce Free Shipping

Since you’re not charging for shipping, it’s reasonable to set a longer delivery timeframe for the free shipping option.

This gives you more flexibility in managing your logistics and costs.

3. Make it for members only

You can make the free shipping offer exclusive to members or registered customers on your WooCommerce site.

If you limit free shipping to members, you can also better control your costs and ensure that the free shipping promotion is targeted toward your most engaged and valuable customers.

Laatste gedachten

So, as you can see adding free shipping can be very profitable if you apply it properly. In this article, I gave a step-by-step tutorial and provided provides all the essential information to begin.

Don’t delay – implement free shipping now and watch your WooCommerce store become irresistible to customers.

Frequently Asked Questions(FAQs)

FAQ 1: How do I restrict the shipping location in WooCommerce?

You need to create your shopping zones and limit them by zip codes you are ready to ship to. If the manual process seems harder, you can use additional free plugins, like advanced shipping to do this step easily.

FAQ2: How do I do WooCommerce shipping settings when some products are shipped to some areas and others are not?

To add specific areas to specific products you need to use an additional plugin.

Manual WooCommerce doesn’t provide this option to set up.

Categorieën
Guide Virtual Reality

What Are The Best 360 Panoramic Cameras You Can Buy [2024]

In 2024, visually consumed information will be highly accepted as people want to know it all without investing a much longer time.

Whether you are a traveler, resort owner, or realtor,

your consumer list won’t be satisfied if your site provides images or videos with a conventional 2D camera.

For a proper virtual tour of a home, place, or resort with a photo-first model, you need to use a high-quality 360 camera.

With that kept in mind, here’s my top-picked suggestion list of 360 cameras for 2024.

Laten we beginnen.

Consideration Points Before Purchasing A 360 Panoramic Camera

Key Factors of 360 Panoramic Cameras you can buy

Before going to the list, go through these key factors you need to focus on while buying a 360 camera.

1. Dynamic Range Ability:

Capturing the full 360 angle of the scene is highly important in 360 photography.

Without a high dynamic range in the camera you are using, you will fail terribly in terms of the sharpness of your product.

2. Lens Quality:

In terms of lens, You should go for a single-lens mode camera.

A 4k single-lens mode camera would be the best as you will need very little editing time to give finishing to your images.

3. Easy & fast workflow :

You need to pick up a camera that speeds up the entire action cam workflow, from stabilizing, reframing, and editing to transferring files with an easy user interface.

4. Battery Life:

You must not want any overheating and crash issues with your camera.

Since panoramic cameras are power-hungry, choose one with a long battery life.

You should consider cameras with removable batteries or the ability to charge via USB, so you can keep the camera charged on the go.

5. Durability:

If you plan to take your panoramic camera on outdoor adventures or use it in harsh environments, look for models that are built to withstand the elements.

Weather sealing, rugged construction, and shock resistance are the features that you should consider.

6. Aligned with your need :

There are many amazing 360 cameras but every camera has its own unique value.

Some are really good at night mode, while others can tolerate the hot weather of sunny days.

Now considering all these, let’s have a look at the best 5 Panoramic cameras for you.

Best 360 Cameras For Capturing 360 Panoramic Images in 2024

As panoramic photography gains in popularity, more and more manufacturers are producing panoramic cameras that cater to this niche market.

So I’ve gathered the top five 360 panoramic cameras in the market right now, along with their standout features, pros, cons, and best use cases.

1. INSTA 360 X3

Insta 360 X3

The Insta360 X3 is an updated version of the Insta 360 X2 with improved HDR for better quality in difficult lighting.

It has 50% faster wifi transfer compared to X2.

You can easily mount the camera, and record any bouncy action with proper stabilization.

With this virtual tour camera, you can quickly share to social media in a few clicks without losing video quality.

Specs :

  • Sensor Size 1/2″
  • Battery Capacity 1800mAh
  • 360° Video 5.7K
  • 360° Active HDR Yes
  • 360° Photo 72MP
  • Single-Lens Mode 4K30fps
  • Screen Size 2.29″
  • Waterproof 10m (33ft)
  • FlowState Stabilization + 360° Horizon Lock Yes

Buy It If :

  • You want to edit on your mobile as it has photo format INSP, that can be exported via mobile app or desktop Studio.
  • You want to charge your battery in 90min(5V/3A)
  • You want a high dynamic range.

Don’t Buy It If :

  • Your operating temperature isn’t between -4°F to 104°F (-20℃ to 40℃).

Pricing

Insta360X3 pricing

2. INSTA360 ONE RS 1-Inch

Insta360 One 1-inch


The advantage of buying the Insta360 One RS 1-inch edition is that it has more impressive features than smaller sensor cameras.

With Leica co-engineered lenses, dual one-inch sensors, and 6K 360-degree recording capabilities, it delivers superior image quality and can provide you with low-light performance.

Specs :

  • Aperture F2.2
  • Focal Length 6.52mm
  • Photo Resolution 6528×3264 (2:1)
  • Dimensions (W x H x D) 53.2×129.3×49.5mm
  • Max Video Bitrate 120Mbps
  • ISO Range Photo: 100-3200, Video: 100-3200
  • Audio Modes Wind Reduction & Stereo
  • White Balance 2000K-10000K

Buy It If :

  • You have limited filming experience as Insta360 ONE RS 1-Inch easy to use right out of the box. The camera setup process is quick and intuitive.
  • You want to connect the camera to the smartphone app.
  • You want the app-to-camera connection to be stable and uninterrupted.
  • If you want to connect it with multiple devices (watch, AirPods). As the connection remains strong.

Don’t Buy It If You :

  • You want to format in mobile as RAW files of this device require software on PC/Mac to export.

Pricing

Insta360 one RS 1 inch

3. RICOH THETA Z1

Ricoh Theta Z1 Review Panoramic Camera

The Ricoh Theta Z1 is your premium choice for immersive 360-degree photography.

With its high-end features, it delivers detailed and captivating images, perfect for capturing your surroundings in stunning clarity.

Specs :

  • Image Sensor Size 1 inch (x2)
  • Image Sensor Effective Pixels Approx. 20M (x2)
  • File Size (still images) RAW: 7296 x 3648, JPEG: 6720 x 3360
  • Lens F2.1, 3.5, 5.6
  • OLED Panel 0.93 inch Organic light emitting display Panel, 128 x 36 dots
  • Usage temperature range 0°C – 40°C
  • Dimensions 48mm (W) x 132.5mm (H) x 29.7mm (24mm *7) (D)
  • Shutter speed Still image: (AUTO) 1/25000 sec. to 1/8 sec.

Buy It If :

  • You want to capture incredibly detailed images with excellent color accuracy and dynamic range as it has dual 1-inch CMOS sensors.
  • You want advanced image processing capabilities.
  • You want a large storage capacity.

Don’t Buy It If :

  • You require a huge amount of video recording as it has limited video recording capabilities.
  • You want longer battery life.

Pricing

Ricoh Theta Z1

4. QOOCAM 3

Qoocam 3

QooCam 3, is a 360-degree camera with two ultra-wide fisheye lenses that capture 5.7K photos and videos in all directions simultaneously.

With the “invisible” selfie stick, you can remove the footage by the camera’s algorithm.

Specs

Qoocam 3 specs
  • Aperture F1.6
  • Exposure Compensation ±2EV
  • White Balance Auto, 2500K-8000K
  • Maximum Resolution of Photos 62MP (11136×5568)
  • Video Bitrate 120Mbps
  • Water and Dust Resistant IP68 Waterproof
  • Audio output AAC (16 bit/Quadraphonic/48 KHz)

Buy It If :

  • You want an easy-to-use camera
  • You want a compact and travel-friendly camera.
  • You want a well-built and weather-resistant camera.

Don’t Buy :

  • Down on resolution and some features from its predecessor.
  • Built-in JPEG processing is only so-so, with the need to use DNG to get the best out of the camera

Pricing

Qoocam 3

5. PANOX V2

panox V2

PanoX V2 stands out for its exceptional performance, especially in capturing high-resolution still photos.

Its intuitive interface makes it a pleasure to carry and operate in the field.

And will allow you to focus on capturing stunning images without worrying about the fragility of the equipment.

Specs

  • 360°Video 5.7K@30FPS
  • 360° Photo 72MP
  • Sensors 1/2” CMOS
  • HDR Photo   12K
  • Photo  Format JPG+DNG
  • Live Streaming  4K 360° YouTube &Facebook
  • Timelapse. 5.7K 360°

Buy It If :

  • You want higher density and higher resolution as it has 8K 5 FPS mode
  • You want a built-in GPS.
  • You want to just drag the files right into the desktop uploader without other processing as it has on device stitching of 360s.
  • You don’t want to buy an adapter as it has a standard tripod camera mount.

Don’t Buy It :

  • If you want high sharpness, the UI on the camera feels a bit less polished
  • If you want fast GPS tracking, acquiring GPS satellites can take a bit of time.

Pricing

Panox V2

Comparison of The Best 360 Degree Cameras

Now that you know all the details about each of the best 360 cameras, let us look at a few comparison tables to understand which one is ideal for you to choose and which 360 cameras are affordable.

Video & Image Resolution

360 Cameras360 Video Resolution360 Image Resolution
Insta360 X3⬩ 5.7K: 5760×2880@30/25/24fps
⬩ 4K: 3840×1920@60/50/30/25/24fps
⬩ 3K: 3008×1504@100fps
72MP (11968×5984)
18MP (5952×2976)
Insta360 One 1-inch⬩ 5888×2944@30fps
⬩ 6144×3072@25/24fps
⬩ 3840×1920@30/25/24fps
⬩ 3040×1520@50fps
6528×3264 (2:1)
Ricoh Theta Z1 ⬩3840×1920 (30fps 4K)14 Megapixels
Kandao QooCam 3⬩ 8K Video (30fps)
⬩ 4K Video (120fps)
29.4 Megapixels
PANOX V2⬩ 5760 x 2880  (30fps).
⬩ 360 Degree 4K (60fps).
⬩ VR180 Degree 3D
18 Megapixels

Audio, Mounting & Durability

360 CamerasAudioMountingWaterproof
Insta360 X3⬩ 48 kHz, 16bits, AAC
⬩ Directional audio for vlogging.
⬩ Wind noise reduction & stereo quality sound.
Invisible Selfie StickYes, 10m (33ft)
Insta360 One 1-inch⬩ 4 Mic 360 Degree Audio.
⬩Wind Reduction
⬩ Stereo
Flip-out Mounting FeetYes, 10m (33ft)
Ricoh Theta V⬩ 4 microphones to record 360 degrees of spatial audio.
⬩ Option to use an additional external microphone.
Stands, Sticks, &
Smartphone holders (Optional extra)
No
Kandao QooCam 3⬩ 4 MEMS 48KHz Microphones.
⬩ 3.5mm Mic Port for external professional Mic.
Third-party stands
and sticks
No
Panox V2⬩ 4 MEMS 48KHz Microphones.Tripod SocketWith Case (Up To 30m)

Control Options & Pricing

360 CamerasMobile AppTouchscreenVoice CommandPrijs
Insta360 X3YesYes14 Voice Commands$399
Insta360 One 1-inchYesYes4 Voice Commands$429.99
Ricoh Theta Z1YesYesOnly for Image Capture$376.95
Kandao QooCam 3YesYesNo$559.99
Panox V2YesNoNo$399

You can now compare different features and aspects of these 5 cameras and decide which one matches your requirements best.

How You Can Make Money with 360 Panoramic Cameras – Industry Use Cases

Let’s have a look at how panoramic cameras are being used and can be used in different industries to make you money.

1. Onroerend goed

If you’re a real estate agent, you can use 360 panoramic cameras to create virtual tours of your properties, providing a 360-degree view of the property to potential buyers.

This will help to increase engagement with your clients and provide them with a more immersive viewing experience.

Pair your camera with WPVR to easily create immersive virtual tours and integrate them directly into your website.

Here’s an example of how it will look,

2. Travel and Tourism

If you work in a travel company, you can use these 360 panoramic cameras to capture immersive footage of destinations where you operate and create virtual tours.

It allows your potential customers to explore a location before booking a trip.

They can explore rooms just like the one below,

3. Education and Training

You can use 360 panoramic cameras for education or to train employees or students by creating immersive training videos.

For example, medical students can get familiar with real-life challenges & learn how to act using 360-degree footage of surgeries.

4. Museums and Exhibitions

You can create interactive exhibits and virtual museum tours using 360 panoramic cameras and make your exhibitions open to your online viewers.

5. Automotive Industry

If you own a car dealership, you can use 360 panoramic cameras to create a virtual car showroom to showcase the interior and exterior of your vehicles.

They may check car details like this,

6. Architecture and Design

If you’re an architect or designer, 360 panoramic cameras will help you create immersive visualizations of your projects.

It allows your clients to have a better idea of the space before it’s built or designed.

7. Photography & Videography

360 panoramic cameras will let you capture unique perspectives and create stunning visuals.

Their compact size and portability make them a great option for your on-the-go shoots.

8. Event Planning

In the event planning business, you can use 360 panoramic cameras to capture your events from multiple angles, providing a more comprehensive view of the event and a dynamic showcase.

Also, utilizing 360 panoramic cameras to capture your events from multiple angles not only provides a more comprehensive view but also enhances the invitation-making process by offering dynamic visual content for the invitation maker app.

For those looking to elevate their event documentation further, hiring professional event photographers can add a layer of professionalism and creativity to your visuals.

It’ll make your job easier to impress your potential clients with your previous work.

9. Construction and Real Estate Development

If you have a construction business, you can utilize 360 panoramic cameras to create virtual site visits and track construction progress.

It’ll let your stakeholders monitor the progress of the project remotely.

10. Sports and Action

You can use 360 panoramic cameras to capture your extreme sports and outdoor activities in high-quality footage.

This will be useful for athletes like you looking to document their experiences.

11. Film and Entertainment

If you’re in the entertainment industry, you can use these panoramic cameras to capture live events, such as concerts and festivals, to capture 360-degree footage for your online audiences.

12. Security and Surveillance

In the case of monitoring large crowds or events, 360-degree footage can provide a comprehensive view of the area being monitored.

Wrapping Up

In summary, the Insta360 One X3 offers the best image stabilization and editing capabilities, making it a great choice for those who want to capture smooth, professional-looking footage.

The Kandao QooCam 8K is the best choice for those prioritizing image quality, as it offers the highest resolution and dynamic range.

The Ricoh Theta Z1 is a great option for those who want advanced features like live streaming and remote control.

The Insta 360 ONE RS 1-Inch offers amazing photo quality even in low light so it’s great for using in all weathers.

Lastly, PanoX V2 is great for its exceptional performance, especially in capturing high-resolution photos.

No matter which camera you choose, a 360 panoramic camera can open up creative possibilities for photographers and videographers.

Whether you’re looking to capture immersive footage of your travels or create virtual tours of real estate properties, these cameras can help you easily achieve your vision.


If you want to use a reliable virtual tour creator that is reliable, cost-effective, and has a high-quality interactive floor plan feature, then WPVR would be a great choice.

Try using WPVR today and start making virtual tours that are more optimized for converting clients.

FAQs

Are 360 panoramic cameras difficult to use for beginners?

  • Not necessarily. While they may have a learning curve, many models offer user-friendly interfaces and intuitive controls to simplify the shooting process.

Can I use a 360 panoramic camera for everyday photography?

  • Yes, 360 panoramic cameras are universal tools that can capture a wide range of scenes, from everyday moments to epic landscapes. It enhances your photography experience.

Are 360 panoramic cameras only suitable for professional photographers?

  • No, they’re for everyone. Whether you’re a professional photographer, an enthusiast, or just someone who loves capturing memories. A 360 panoramic camera can elevate your photography game.

Do 360 panoramic cameras require special editing software?

  • While some advanced editing software can enhance your images, many panoramic cameras come with built-in editing features. It helps to make it easy to edit and share your photos directly from the camera.

Can I use a 360 panoramic camera for live streaming?

  • Yes, some models, like the GoPro MAX and Ricoh Theta Z1, offer live-streaming capabilities. It allows you to share immersive experiences in real-time with your audience.
Categorieën
Guide WooCommerce

How To Create WooCommerce Custom Product Attributes [2024]

Amidst all the features of Woocommerce, the custom product attribute is the most simple yet effective one.

If you have various products with different features, you must learn how to create custom product attributes.

With custom product attributes you can get rid of disorganized listings, ineffective searches, and unclear descriptions that make it difficult for your customers to navigate your site

Unlike global product attributes, a custom attribute is used to define a feature of a specific product; it does not apply to most other products.

Today, you will get a step-by-step guide on how you can add Custom Product Attributes to your WooCommerce products easily.

Dus laten we beginnen.

How To Create And Use A WooCommerce Custom Product Attribute

A custom product attribute has to be created while adding/editing a product, from within the Product Data section.

Once you follow the steps below, you will then be able to use custom product attributes easily.

Step 1 – Add a New Product or Edit an Existing Item

Go to ‘Products’ from the left menu bar. You can add either a new item or edit an existing one.

1. Edit or Create a Product and scroll down to the Product Data Section.

Product data section

Here, choose the product type (for example Simple product or Variable Product).

Now, fill out the basic required data in the General, Inventory, Shipping, and Linked Products menus.

Step 2 – Add the Custom Product Attribute

Go to the Attributes menu.

Attribute menu

Here, you can see there is a dropdown menu that says Custom product attribute and an ‘Add’ button beside it.

Add custom product attributes

Click on the ‘Add’ button.

Step 3 – Complete the Custom Product Attribute Details

You will see that a custom attribute section has been created.

Add Custom product attribute

The ‘Name’ field refers to the Attribute name, and the ‘Value(s)’ field refers to the Attribute terms.

Fill out the required values as per your requirements.

Let’s say I am selling a T-shirt that has both Long sleeves and short sleeves. So let’s name it ‘Sleeves’.

For the ‘Value(s)’, you have to add values with a ‘|’ separator. So let’s add the terms ‘Long|Short’.

Custom Product Attributes - Sleeves

En aan de linkerkant ziet u de optie "Zichtbaar op de productpagina". Dat is standaard aangevinkt, wat betekent dat deze attribuutterm wordt weergegeven op de productpagina.

If it’s a variable product, then you may wish to use these attribute terms to create variants. In that case, you can mark the check box that says used for variations (right above the Save Attribute button), and later, generate variants from the Variations tab on the left side.

Then click on the “Save” attribute button and this attribute will be saved for this product.

Dus op basis van uw thema zal dit attribuut worden weergegeven op de productpagina.

When Should You Use Custom Product Attributes

As mentioned earlier, a custom product attribute can be created when you edit or add a product in the product data section.

You should use the custom product attribute when you want to define a feature for a product that is applicable to that product only.

For example,

if you are selling ‘Organic Tea’ in bulk, you might want to sell them in packs of 10 Sachets, 20 Sachets, and 50 Sachets per order. However, this sort of custom order package might not apply to other products in your WooCommerce store.

Here’s another example :

Example of custom attribute

In this case, you should use a custom product attribute to define this feature, and possibly use it for WooCommerce product variations.

So you should create and use custom product attributes when you want to define a feature that applies to a particular product only.

This will save you time from creating a global attribute separately and help optimize the use of server resources.

If you are planning to promote on Google Shopping, you should be aware of this following fact :

Google Shopping requires additional product attributes for items in a few industry-based categories:

  1. Grootte
  2. Kleur
  3. Patroon
  4. Materiaal
  5. Age group
  6. Geslacht

WooCommerce doesn’t have default fields for these attributes.

However, Product Feed Manager allows you to add custom fields to your WooCommerce products to include this important information for Google Shopping.

PFM- Home page

You can go through this video tutorial to learn more :

Conclusie

As you can see, using a custom product attribute is often more convenient, and hopefully, this guide was easy to follow.

Laat ons gerust weten wat je van deze gids vindt in de commentaren hieronder.

Proost.