An IT graduate, with a passion for Digital Marketing. Loves helping WordPress companies to curate their stories. Content writing is the heart of everything she does!
A product’s value and demand can be highly influenced by its brand. And if you run a WooCommerce store and sell products of certain well-known brands, it’s definitely something to highlight.
According to CrowdSpring, 77% of all buyers make purchases based on a brand name.
For example, if you say you are selling a “Leather belt,” it will get some attention. But if you say you are selling a “Gucci leather belt,” it will attract a lot more buyers.
Now, when you add products to your WooCommerce store, normally, you do not have an option to add brands. You either have to mention it in the title or use the global attributes to assign them – though these are pretty convenient, they make the task more complicated.
So what’s the best way to add and manage brands on your WooCommerce store? Well, simply use a reliable WooCommerce brand plugin.
Some of them are so easy to use and free. Learn all about them later in this article.
These plugins allow you to add logos and links to your brands, as well as create custom pages for each Brand. And then, you can assign the brands to your desired products.
In this article, we have listed down some of the best WooCommerce brands plugins that you can choose from to make your life easier.
After reading this article, you will
Know what features a typical WooCommerce brand plugin should have
Be able to choose the right brand plugin for your WooCommerce store.
Let’s begin.
What Features Should A WooCommerce Brand Plugin Have?
Normally, a WooCommerce brand plugin should make your life easier when assigning brands to your products.
Let’s take a look at the features that a WooCommerce brand plugin should have:
Add and Manage Unlimited Brands: To begin, it should enable you to create and manage an unlimited number of brands that may be assigned to the items for improved cataloging, product search, and other marketing and branding possibilities.
Filter Products by Brands: Customers should be able to filter products by brand on your WooCommerce store in order to find what they’re looking for easily and quickly.
Compatible with WooCommerce Themes and Extensions: The plugin should be compatible with all of the major WooCommerce themes and extensions.
The brand plugins that we have listed in this article all incorporate these crucial features.
5 Best WooCommerce Brand Plugins For Yoru Store
Let us look at the best plugins that you can choose from to manage WooCommerce brands.
1. Perfect Brands for WooCommerce By QuadLayers
Perfect Brands for WooCommerce By QuadLayers is by far the most popular and reliable brand plugin for WooCommerce.
This is a free plugin that comes with a super easy UI. You will be able to add product brands to your WooCommerce store and arrange them in lists, dropdowns, thumbnails, and even as a WordPress widget with relative ease.
You may also personalize the brand’s slug and have products displayed in a loop, as well as associate a banner and a link to each brand.
Key Features:
Very lightweight, minimalist design, and fully responsive.
Associating a banner and a link to each brand.
Display brands as dropdown, list and filter products by brand.
Customizable brands slug.
Translation supported (English, Spanish).
Support for Visual Composer.
WooCommerce REST API support.
Rating: 4.7 out of 5 stars (WordPress repository).
YITH WooCommerce Brands Add-on allows you to create brands, designate a logo, and provide a description for each one.
You may also use it to give your brand many additional capabilities for a single product. Furthermore, you can manage the whole branding with just a few clicks.
The settings are so simple that even someone with no prior experience might accomplish them real quick.
This plugin is translated into English, Dutch, Italian, and Spanish.
Key Features:
Use taxonomy “Brands”.
Create a brand and assign a logo, a name, and a description.
Manage brands hierarchically.
Assign one or more brands to each product.
Show brands on the product detail page.
Display archive page for each brand.
Associate a banner and a link to each brand.
Rating: 3.8 out of 5 stars (WordPress repository).
Active Installations: 20,000+
Pricing: It does have a free version. However, you can upgrade to one of its premium versions for additional features. The premium tiers start at $69 annually.
Brands for WooCommerce by BeRocket is another free WooCommerce brands plugin that allows you to add brands to your products easily, so customers can see what brands they’re buying from. You can add brand logos and descriptions, which buyers can view by hovering over the brand name on a product page.
You can display products with the brand ID and create unique images and pages for your brands using shortcodes.
It also includes a widget that may be used to link to brand websites, among other things.
Exclusive Feature:
Brands hierarchy included to Brands List and Catalogue.
Brand tab for single product page.
Custom images and pages for brands: thumbnail and banner.
Shortcode to Display Brand List, Category, Description, and Image.
Widget with brand page links.
Rating: 4.9 out of 5 stars (WordPress repository).
Premmerce Brands for WooCommerce allows you to manage brands as separate taxonomies that can be reused anywhere on your WordPress site.
You may create dedicated brand archive pages and SEO optimize them with SEO plugins such as RankMath or Yoast to rank on SERPs.
You may also use shortcodes to display the list of brands you have available in your store.
Key Feature:
Creating, editing, and deleting brands.
Assigning a brand to a product.
Shortcode for displaying the list of brands.
Displaying the page of a particular brand and the possibility to sort products by category.
Widget for displaying selected brands on the site.
Semantic markup for the brand on the product page.
Rating: 4.5 out of 5 stars (WordPress repository).
Active Installations: 5000+
Pricing: It does have a free version. However, you can upgrade to one of its premium versions for additional features. The premium tiers start at $149 annually.
The WooCommerce Brands is a pro plugin developed by developers of WooCommerce itself. This is, in most cases, the go-to brand solution for many, as this plugin has no chance of compatibility issues.
This plugin provides you with plenty of customization options. You can choose how brands are displayed on your product pages, and you can even set up brand logos.
Its best feature is the ability to filter products via brands, which makes it easier to keep track of the branded products you have in your WooCommerce store.
Key Feature:
Display all brands with an A-Z filter.
Drop-down & Multi-select filter in 3 different style.
Compatible with Visual Composer plugin.
7 Awesome Shortcode options, and it also lets you create your own custom shortcodes.
Dedicated Brand widgets.
Pricing: This premium plugin starts at $29 a year.
As you can see, their plugins make it so much easier for you to assign proper brands to your WooCommerce products, and in return, you get to attract more buyers without much effort.
All of the plugins we have mentioned in this list are reliable and easy to use; however, we suggest you try as many of them as you can before choosing the one you feel is the best choice.
Yes, you are very busy at times, but if this is something that can save you time in the future, and help you earn more in the long run, then this is rather a smart investment.
So ahead and start using a brand plugin and optimize your WooCommerce store for more sales.
Also, check out these free WooCommerce plugins that can help you double your WooCommerce sales in no time.
Generating a WooCommerce product feed is sometimes complicated, but with Product Feed Manager for WooCommerce, we always tried to provide you with the best possible options and make the feed generation process as simple as possible.
And recently, we’ve made some major changes to our plugin, that will really make your feed generation process so much easier.
Over the past few months, we considered our users’ suggestions, feedback, problematic areas and came up with a solution that will help you overcome major obstacles when generating product feed in WooCommerce.
The plugin is going through a huge makeover that will ensure
Less complications.
Faster feed generation.
Super easy user interface.
Less time wasted to learn the plugin.
Let us look at the major changes you will experience.
Easy Feed Generation Without Complications
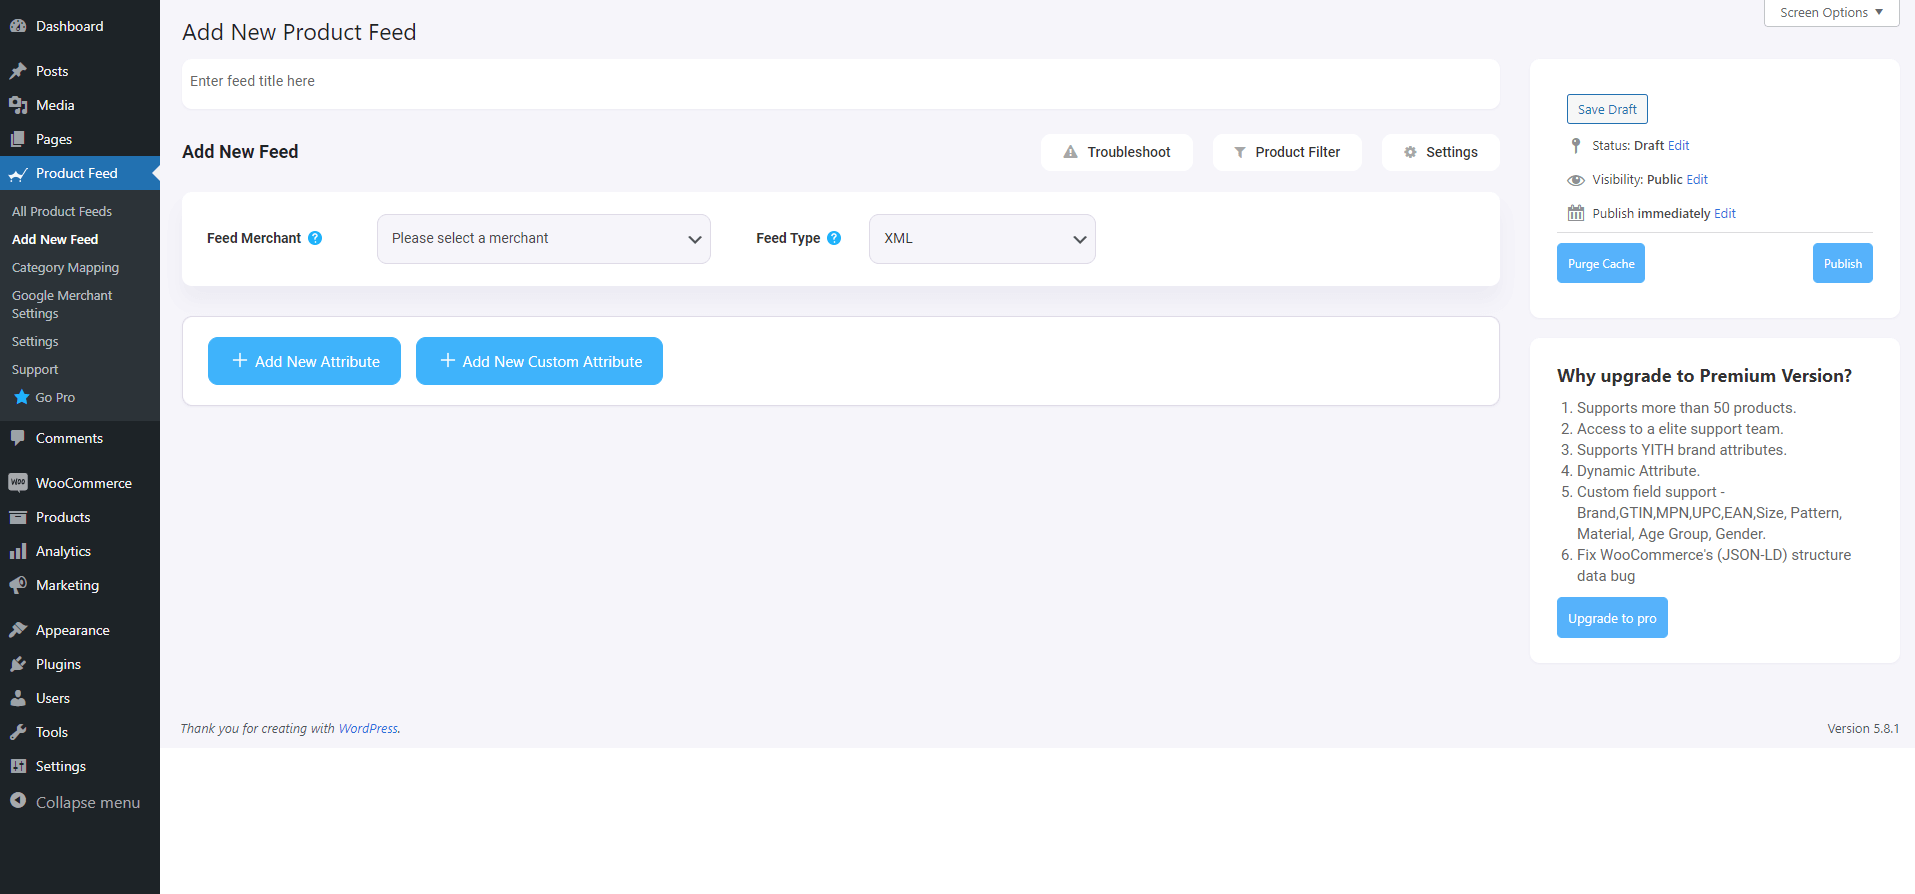
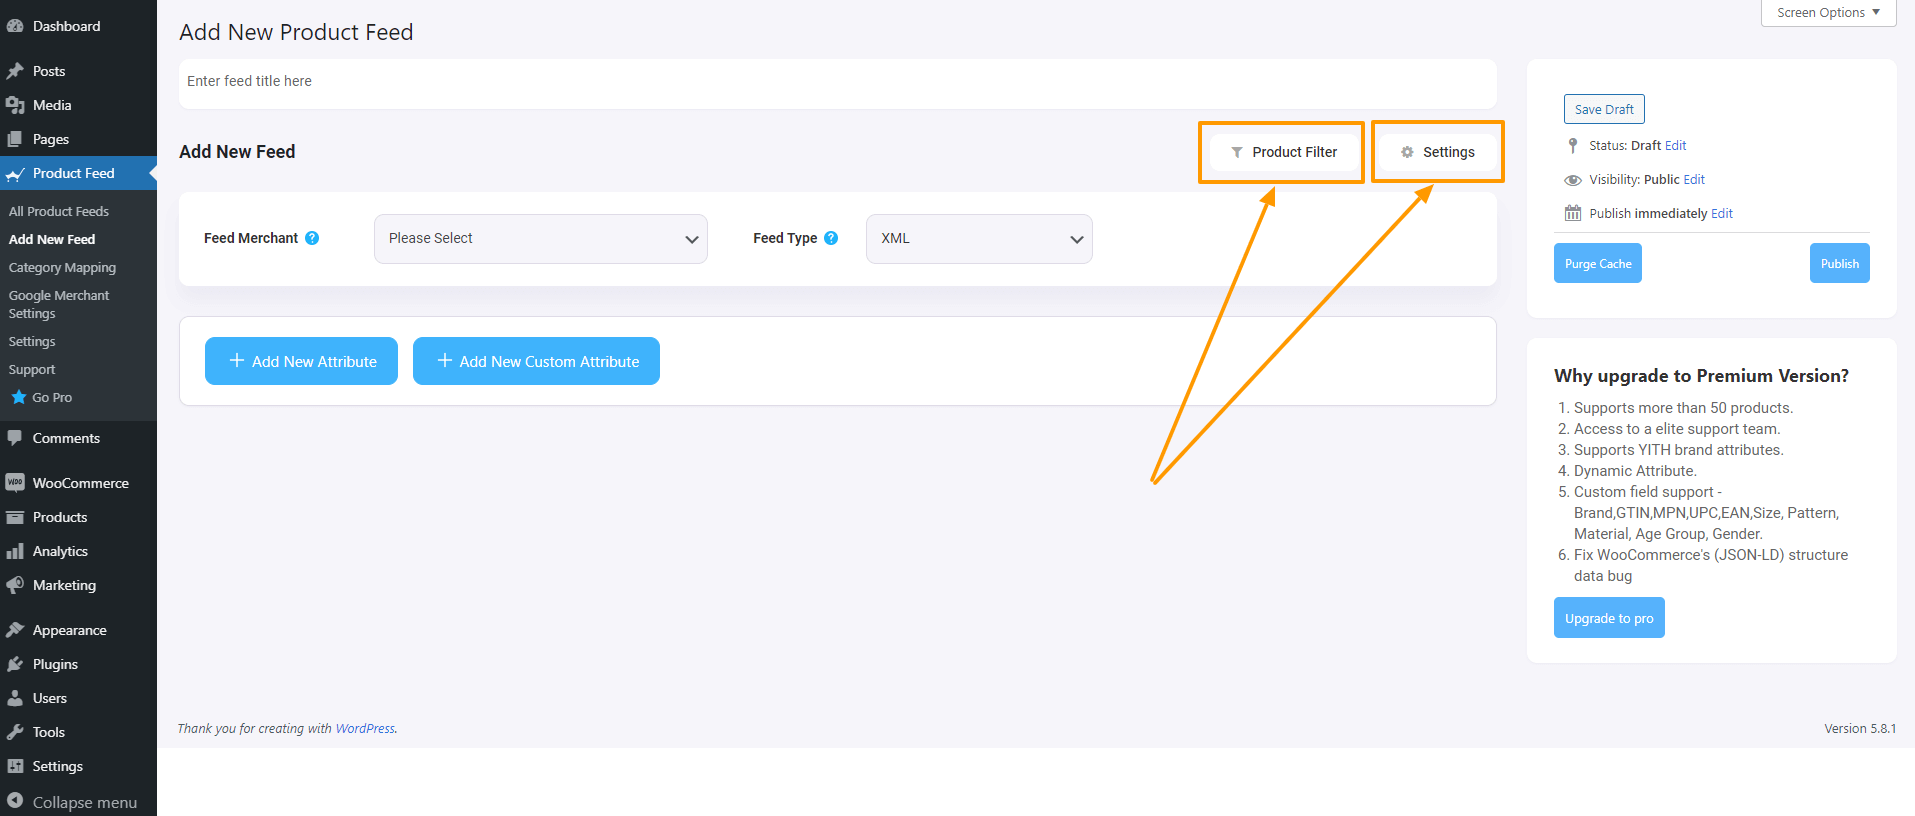
The first major change you will experience is the feed generation area. You will notice the following:
The new user interface is so neat and clean – you know exactly what you need to do.
You will no longer see unnecessary additional settings options unless you need them.
Now you don’t have to take additional steps to enable your merchant for feed generation.
There were numerous feedbacks from users who indicated that they were confused at the first glance when they tried to generate a product feed.
This urged us to try and find out what could be causing this confusion. And after thorough observation and testing, we figured this could be due to the additional options you see initially when you try creating a feed. This seemed more logical as those settings were mostly pre-set and you didn’t really have to configure them unless there was an exception.
On top of that, in the last version, you first had to go to a separate tab and enable your required merchant before you could find it in the list during feed generation. As you can tell, this was just an unnecessary additional step which we should have avoided a long time ago.
To solve these issues, we made the following changes.
The first step you take when you create a feed will be choosing your merchant. The second step will be verifying the feed attribute values. And the third step could be generating the feed. **This used to be over 5 steps process due to the additional settings you had to configure first, which we moved.
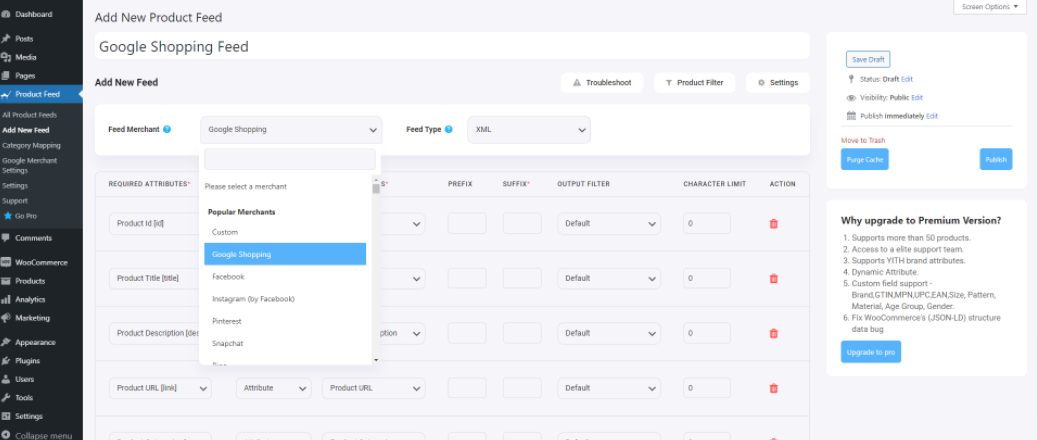
You no longer have to enable your required merchant prior to feed generation. Once you decide to create a feed, search for your required merchant on a smart search bar (where you can scroll or type-and-search) and select it. The merchant will be immediately enabled and the feed template will load below.
We moved the additional settings for a feed into a separate section which you can view by clicking on a button. So this won’t act, in anyway, to create confusion. You can use the settings only when you need them.
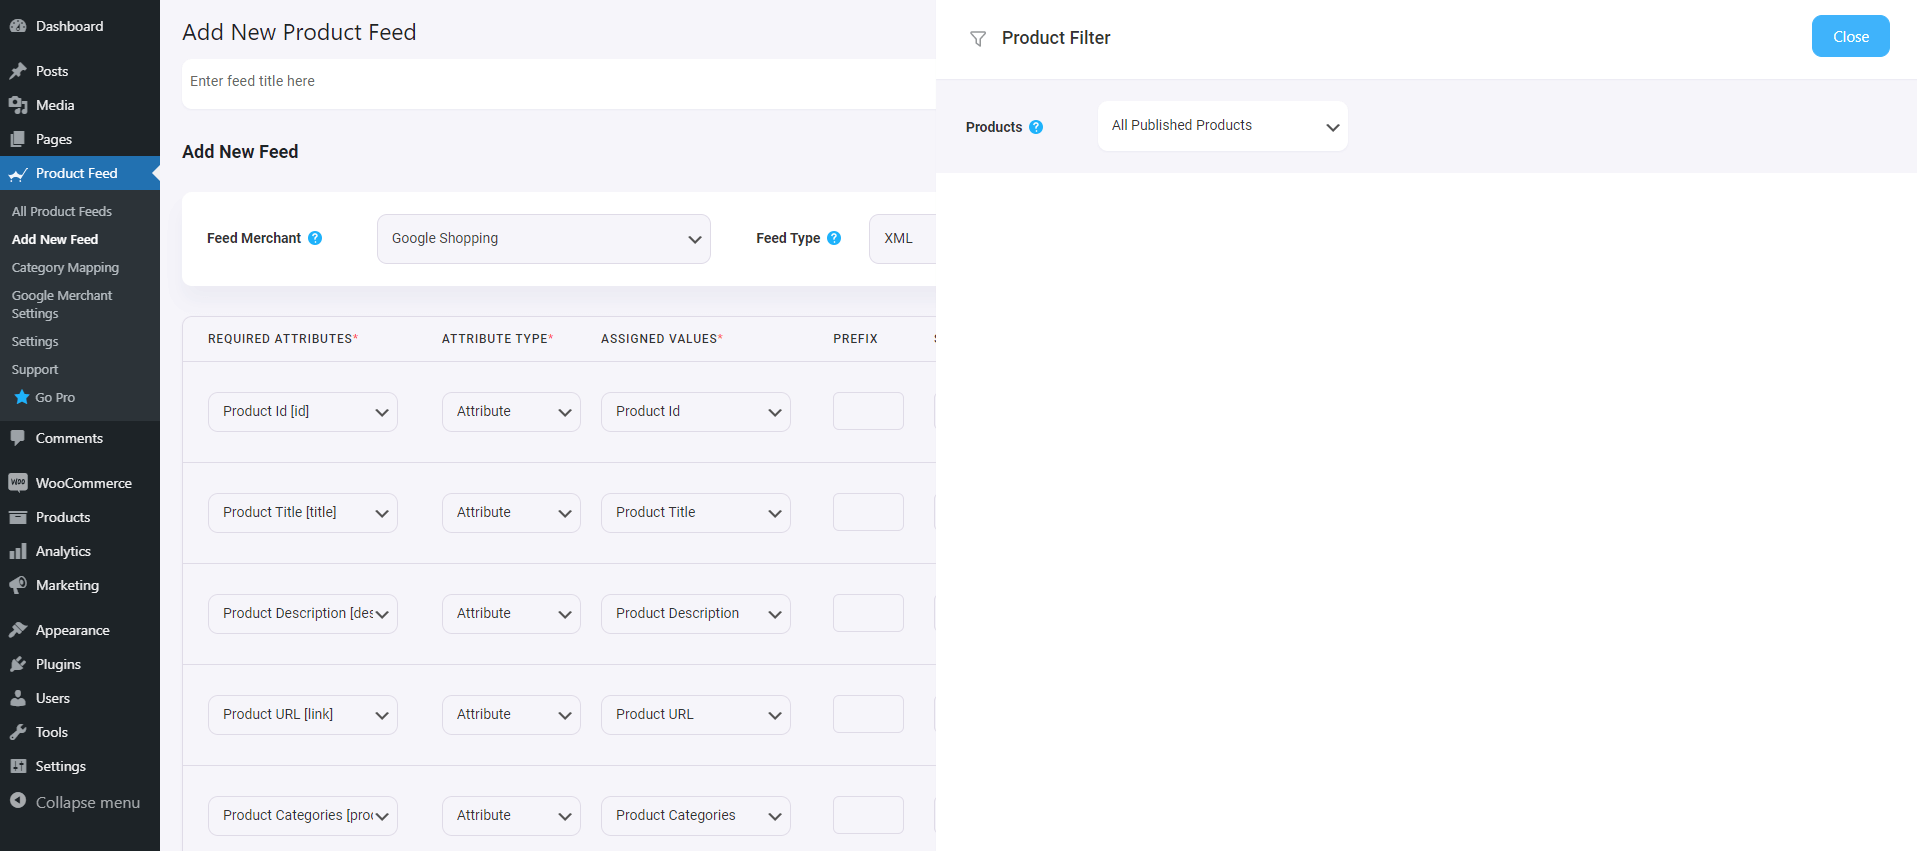
The filter options are also moved to another section which you can access by clicking on a button. Not everyone uses filters so it’s best to keep it separate unless required. By default the filter will be “All available products.”
The main benefit of this change is that you don’t need to waste time trying to understand the additional settings or going through additional steps.
You can generate a product feed in as low as 3 steps (which may increase depending on the merchant but without the additional steps we had before).
More Useful Changes
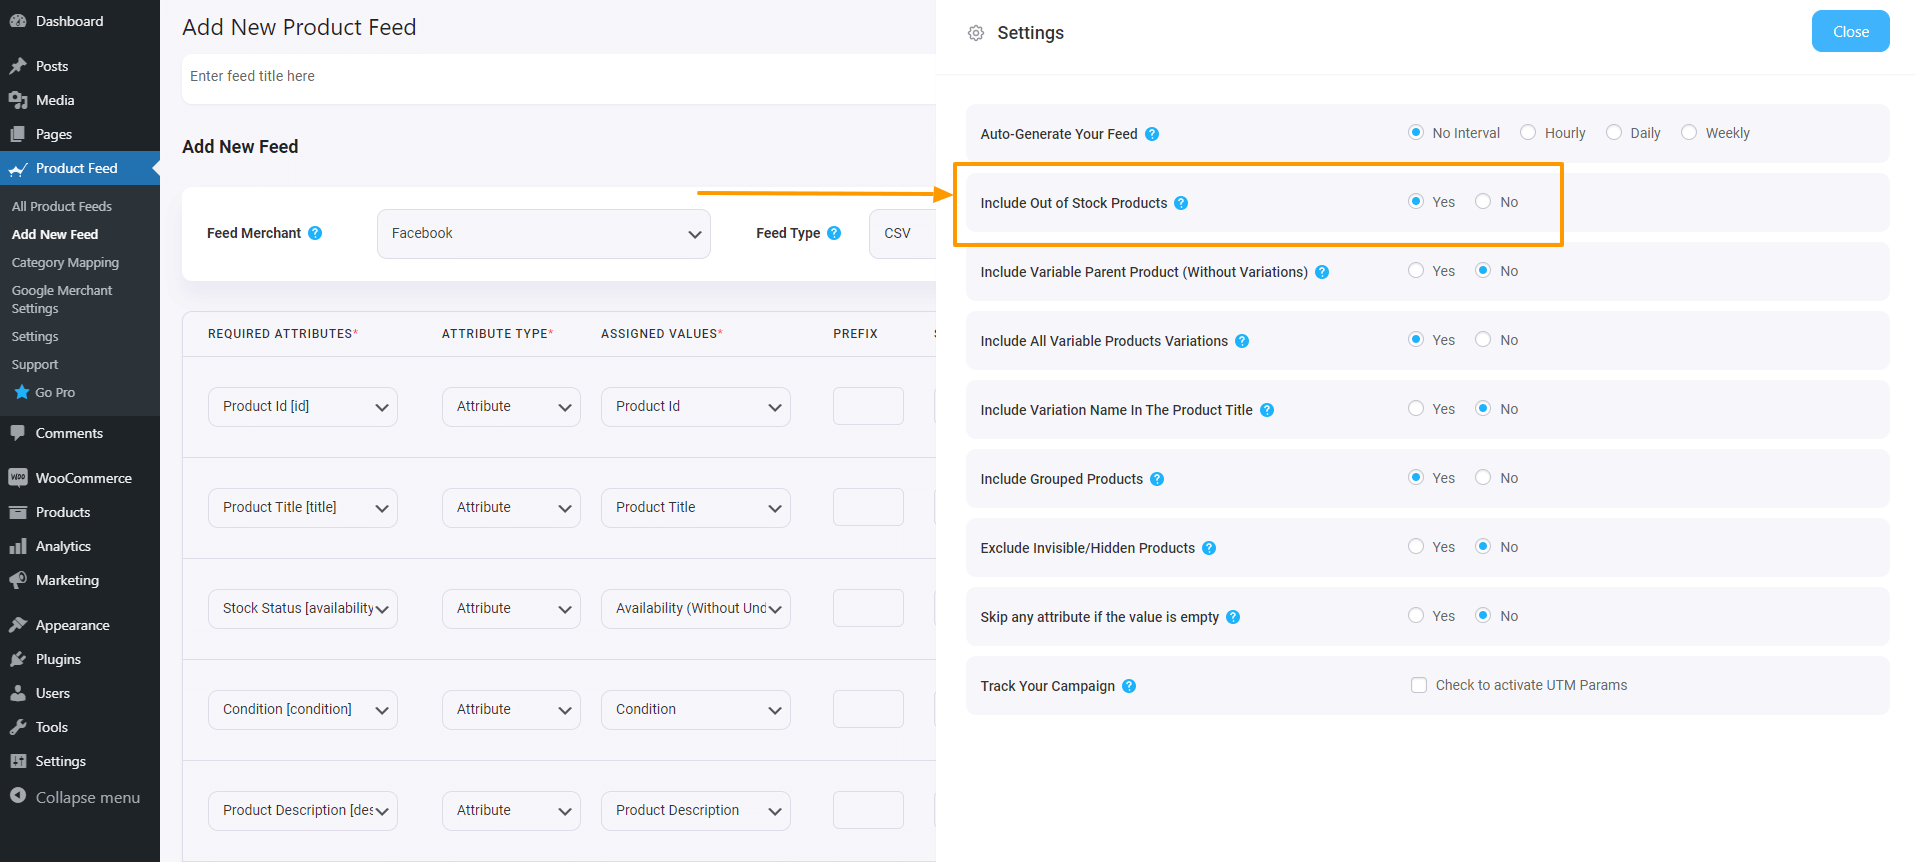
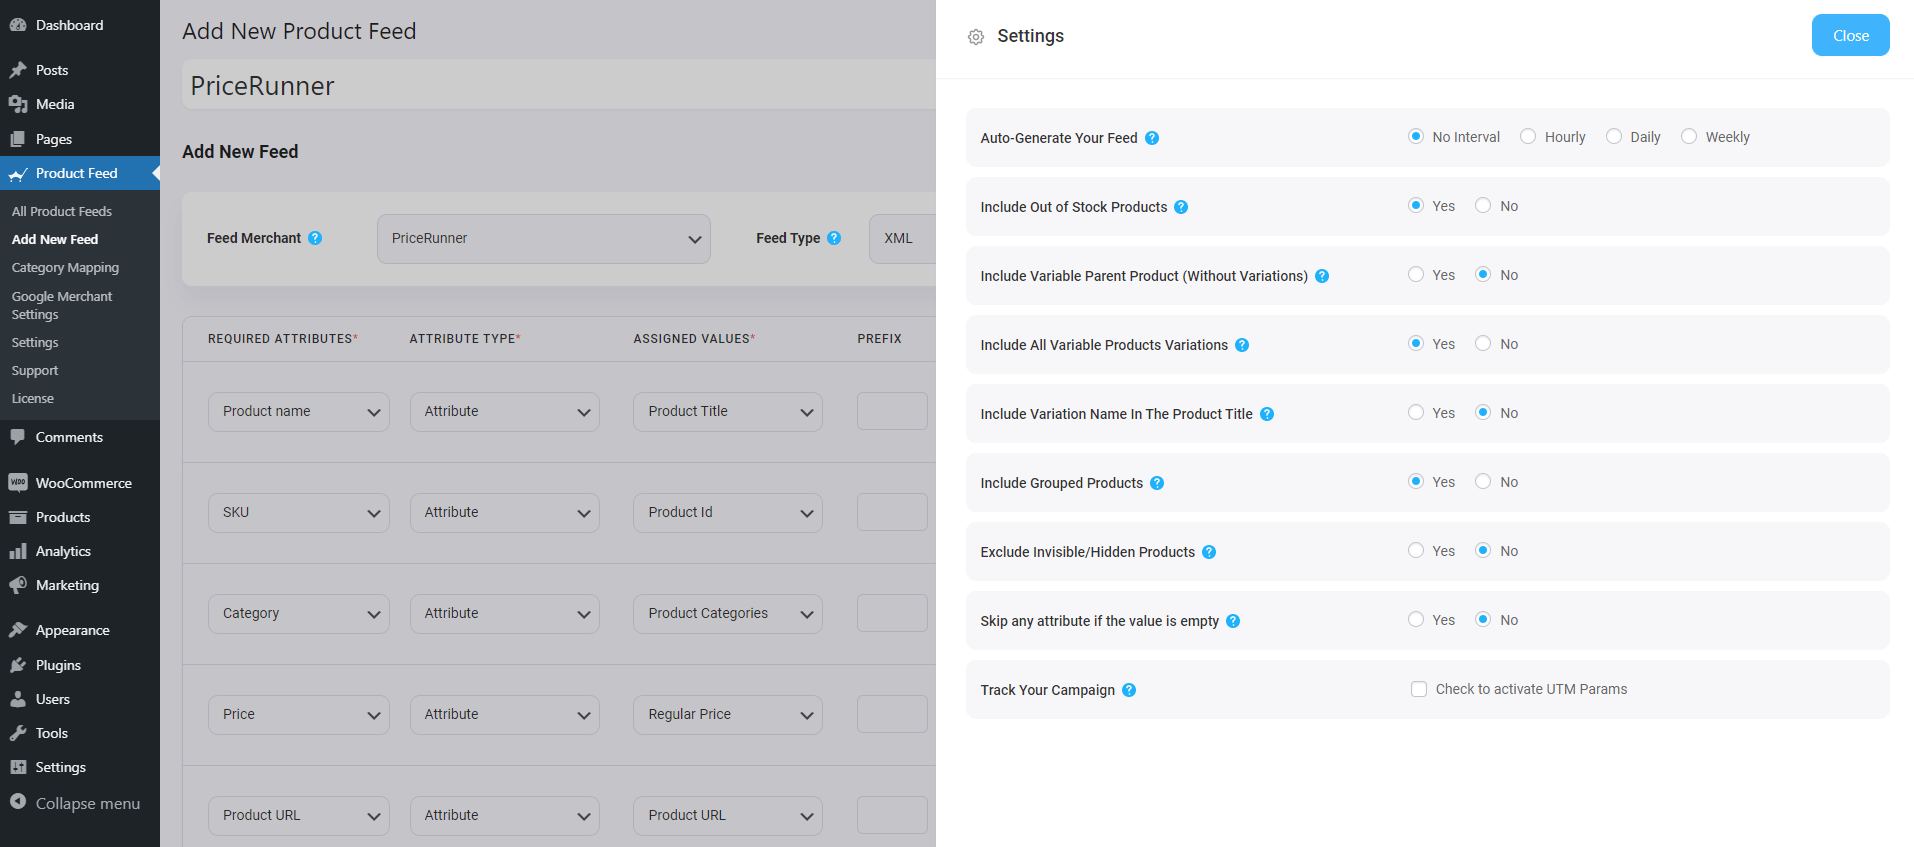
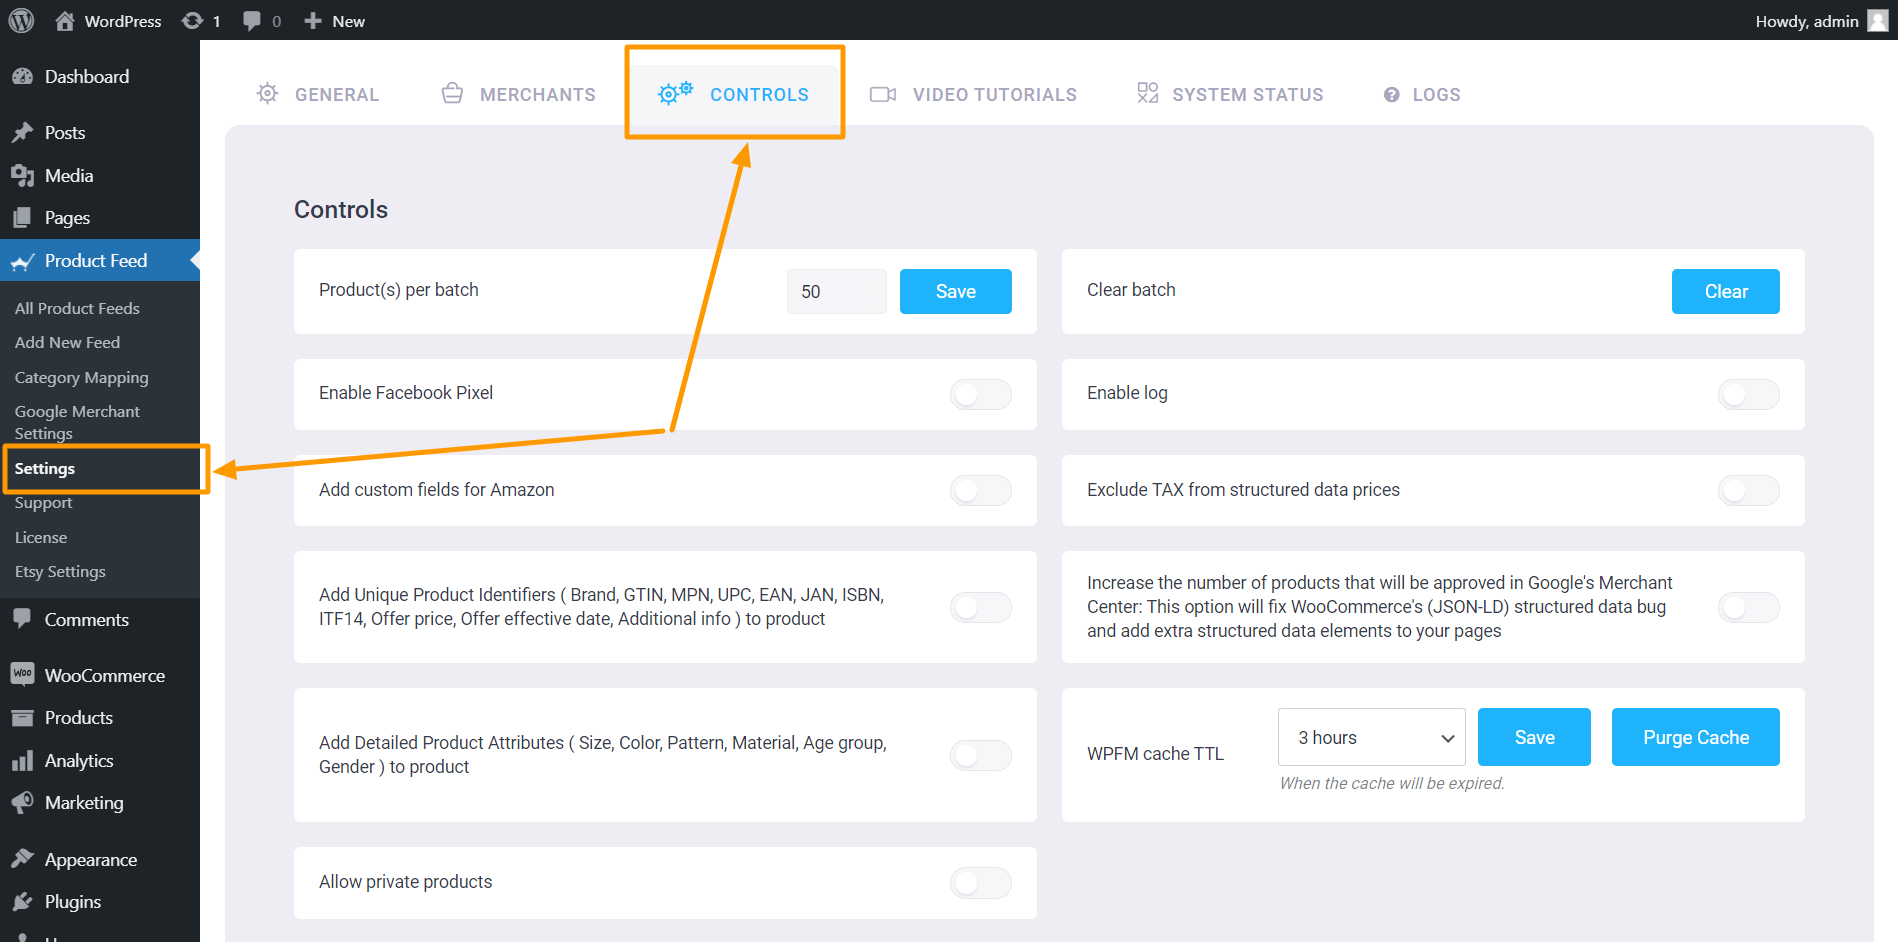
1. You can now choose whether to include or exclude the ‘out of stock’ products in your feed using our new “Include Out of Stock Products” option.
You will find this option in the Settings drawer.
2. PFM custom fields are now useable for Grouped and Affiliate products in your WooCommerce store..
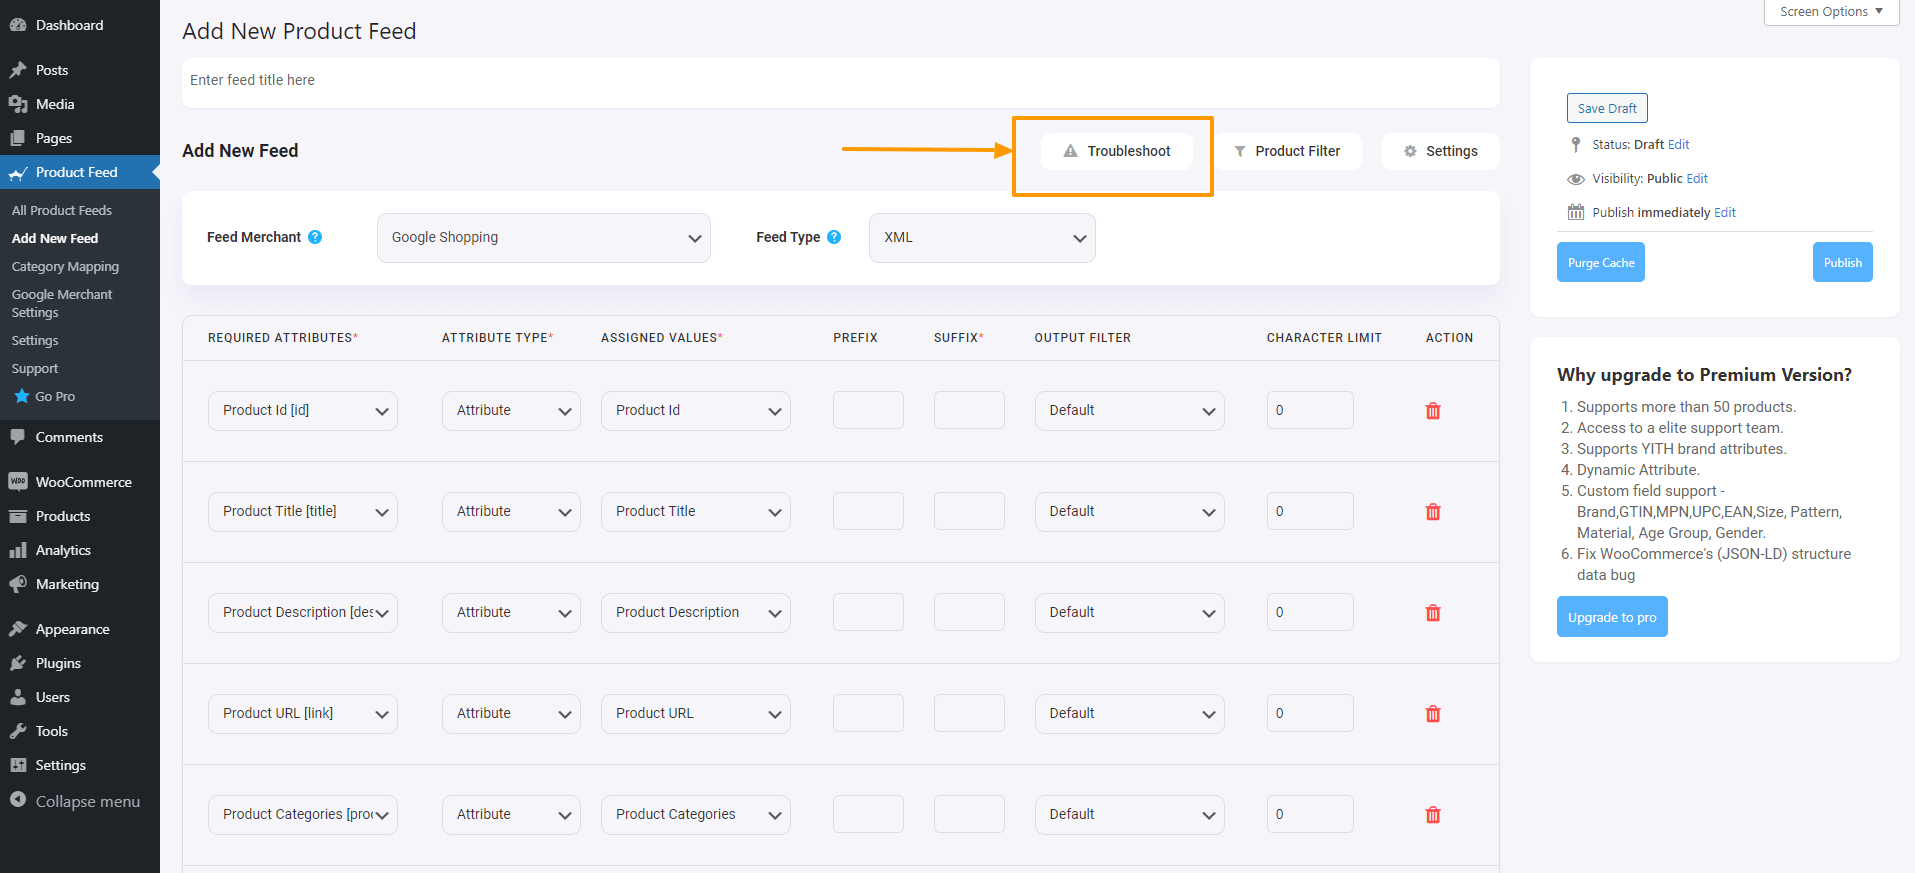
3. A Troubleshoot option is added. You can click on the Troubleshoot option to get the list of possible issues that are commonly faced along with their solutions.
**The Troubleshoot page will be regularly updated.
Sounds interesting?
Start exploring our new user interface and enjoy this new and unique feed generation experience with no limits.
There are many ways you can increase WooCommerce sales. One of the best ways today is to promote your WooCommerce products on large price comparison sites that have a high amount of active users.
If you run a WooCommerce store in Europe and ship your products to Denmark, Sweden, UK, or other nearby EU countries, then you must promote your products on Pricerunner DK.
Pricerunner is currently one of the largest price comparison sites in Europe with over 2 million visits every month. And it is trusted by sellers to increase their online sales by a significant amount.
Right now, it’s easier than ever to list your products on the Pricerunner’s price list. All you need to do is signup as a merchant and upload your products with the right product data.
In this guide, you will learn how you can start promoting on Pricerunner and get step-by-step instructions on generating your WooCommerce product feed to upload products on Pricerunner real quick.
So let’s get started.
1. How To Start Promoting On Pricerunner DK
The first thing to do is to sign up for listing your store products on Pricerunner DK.
FYI, you may list your products on Pricerunner for free and pay on a CPC basis.
However, it’s quite different from other marketplaces. You may increase your CPC amount, i.e. set a higher spending budget to increase your visibility for certain products or products in certain categories, similar to how social media dynamic Ads work.
This means you may choose to spend a bit extra to promote your best sellers so that you can get a higher number of sales without much effort.
Though this makes the marketplace a bit competitive, at the end of the day, this won’t matter too much if you sell quality products.
Once you have registered your store to list products on Pricerunner, the second step is to upload your product data in the right format.
So let us look at the required product attributes that you must submit to list your products on Pricerunner.
2. Mandatory Attributes & Product Feed Specification For PriceRunner DK
Following are the product attributes that you may include in the product feed when trying to list your WooCommerce products on the PriceRunner price list.
Some of them are mandatory to be accepted in the marketplace. Others are optional attributes that you may choose to submit for a better chance of appearing on users’ search results.
**The ones marked in Pink color are required attributes and the ones marked Grey are optional attributes.
Product ID/ SKU (ProductId)
Example Format:
<ProductId>12340-004_1300_34_34</ProductId>
You can use the WooCommerce Product ID or the SKU for this attribute.
Use the product Title in your WooCommerce store. For variable products, it’s recommended to include the variation term to the tile for each variant.
Product Price (Price)
Example Format:
<Price>549.00 GBP</Price>
Use the current price of the product on your site, i.e., if you have a sale running, then submit the sale price, else submit the regular price.
Shipping Cost (ShippingCost )
Example Format:
<ShippingCost>49.00 GBP</ShippingCost>
The product’s shipping cost. Shipping cost needs to combine all shipping/order costs for the consumer, like for example environmental surcharge, freight surcharge, handling surcharge, packaging fee etc.
Stock Status (StockStatus)
Example Format:
<StockStatus>in stock</StockStatus>
If you manage stock in your WooCommerce store, then you may use the number of products available in stock to submit this attribute.
Delivery Time (LeadTime)
Example Format:
<LeadTime>1-3 days</LeadTime>
This is the promised delivery time from the time of the order in the number of days. It’s important that the delivery time in the feed corresponds to the info on your site.
Brand/ Manufacturer (Brand)
Example Format:
<Brand>PR Jeans</Brand>
If the product is manufactured by a renounced Brand, then you have to include the brand name in the product name as well as under this attribute.
Manufacturer SKU/MPN (Msku)
Example Format:
<Msku>PRjeans1231</Msku>
Manufacturer’s unique article number. Used by us to automatically match many product types.
EAN/GTIN (Ean)
Example Format:
<Ean>4051015130000</Ean>
EAN code. Unique barcode number. Used by us to automatically match many product types and make the products searchable in the barcode scanner in our app.
Product URL (Url)
Example Format:
<Url>https://www.example.com/Product.html</Url>
Submit the product link. For variable products, the URL should be unique for each variant.
Detailed information about the product. PriceRunner’s search engine and filters work using the information in this field. Try to include the keywords you want to be found for.
Adult Content (AdultContent) – optional
Example Format:
<AdultContent>No</AdultContent>
Indicate a product includes sexually suggestive content (yes/no)
Age Group (AgeGroup) – optional
Example Format:
<AgeGroup>Adult</AgeGroup>
The demographic for which your product is intended
Bundled (Bundled) – optional
Example Format:
<Bundled>No</Bundled>
Indicates a product is a merchant-defined custom group of different products featuring one main product (yes/no)
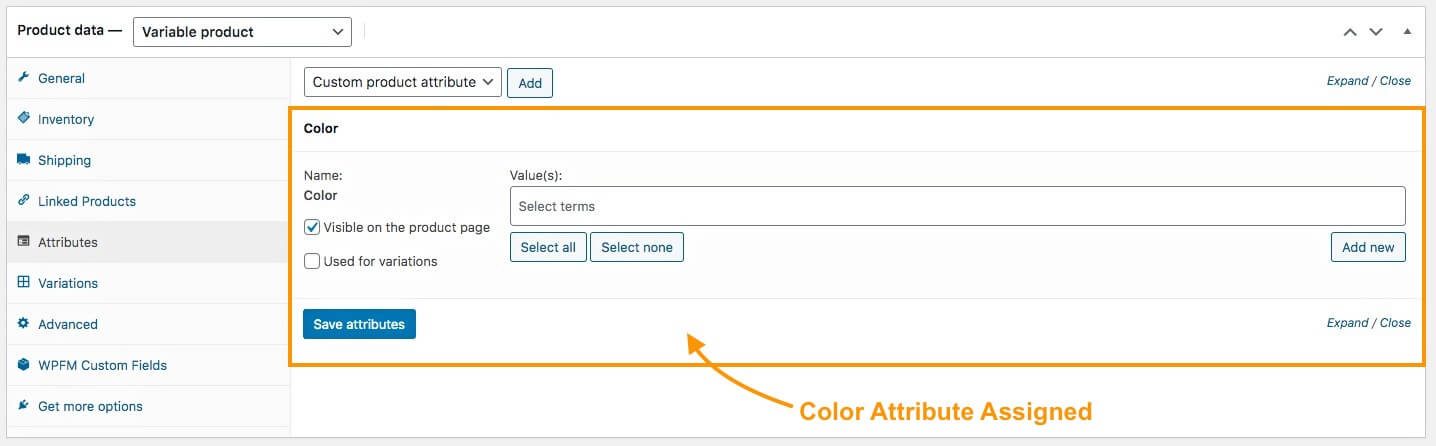
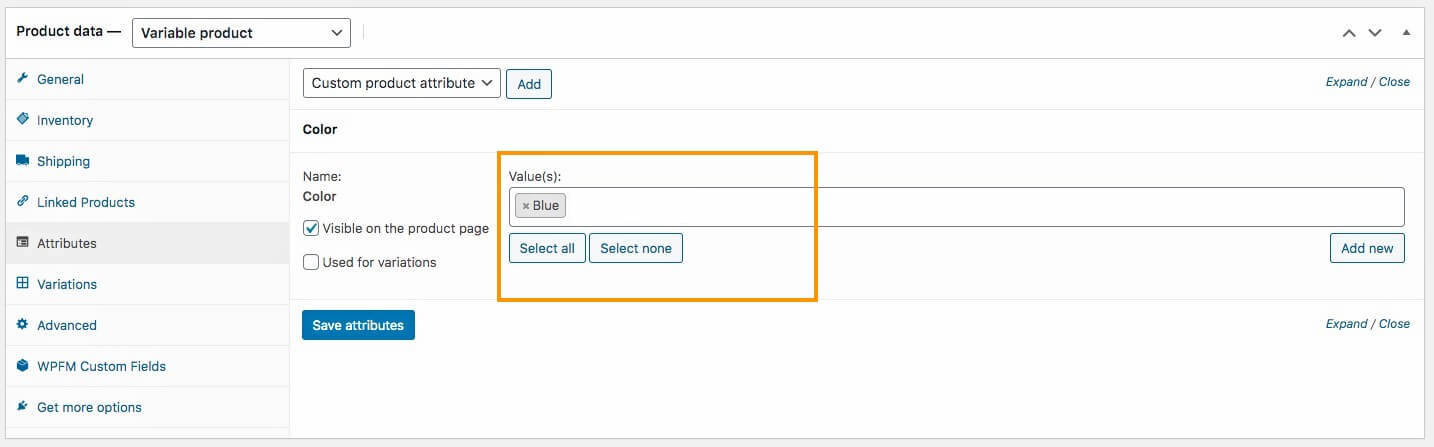
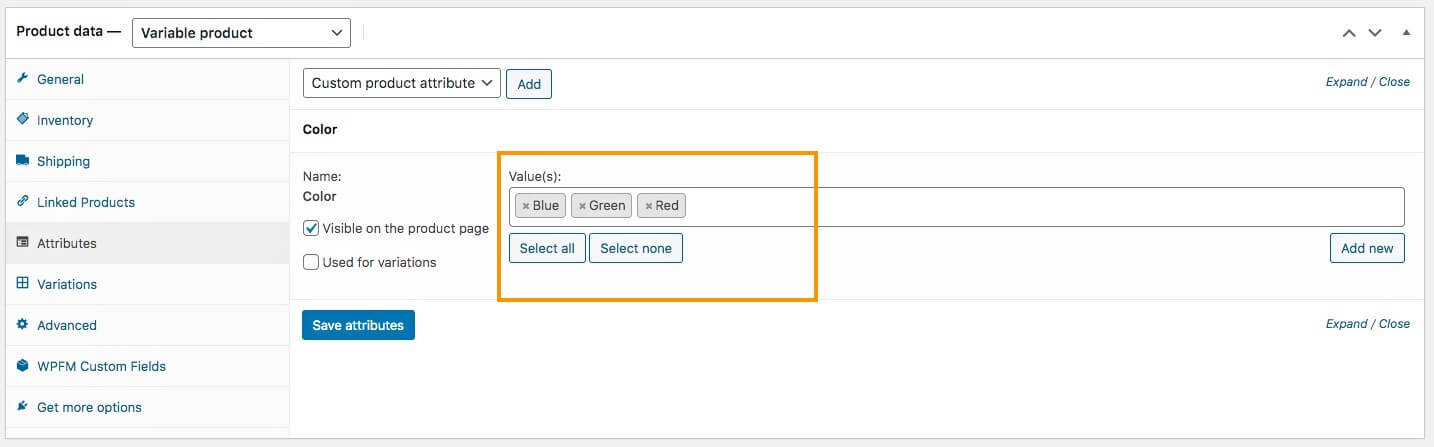
Color (Color) – optional
Example Format:
<Color>Blue</Color>
This is the color of the product
Energy Efficiency Class (EnergyEfficiencyClass) – optional
Example Format:
<EnergyEfficiencyClass>A</EnergyEfficiencyClass>
This is your product’s energy label.
Gender (Gender) – optional
Example Format:
<Gender>Male</Gender>
The gender for which your product is intended
Condition (Condition) – optional
Example Format:
<Condition>New</Condition>
The condition of your product at time of sale e.g. “new”, “used”, “refurbished”, “demo”. PriceRunner only lists and compares new products atm, but we are looking into the possibility to expand this in the future. Until then its important these types of products are tagged correct in your product feed.
GroupId (GroupId) – optional
Example Format:
<GroupId>123</GroupId>
ID for a group of products that come in different versions (variants)
Material (Material) – optional
Example Format:
<Material>Demin</Material>
Your product’s fabric or material
Multipack (Multipack) – optional
Example Format:
<Multipack>No</Multipack>
The number of identical products sold within a merchant-defined multipack (yes/no)
Pattern (Pattern) – optional
Example Format:
<Pattern>Plain</Pattern>
Your product’s pattern or graphic print
Size (Size) – optional
Example Format:
<Size>32W 34L</Size>
Your product’s size
Size System (SizeSystem) – optional
Example Format:
<SizeSystem>UK</SizeSystem>
The country of the size system used by your product
Example Feed Data With Required Attribute
<?xml version="1.0" encoding="UTF-8"?>
<products>
	<product>
		<ProductId>1001</ProductId>
		<ProductName>Hoodie with Logo
		</Product_name>
		<price>45.00 GBP</price>
		<ShippingCost>15.00 GBP</ShippingCost>
		<StockStatus>in stock</StockStatus>
		<LeadTime>1-3 days</LeadTime>
		<Brand>Lacoste</Brand>
		<MSku>woo-hoodie-with-logo</MSku>
		<Ean>012345678900</Ean>
		<Product_URL>https://yourwebsite.com/product/hoodie-with-logo/</Product_URL>
		<Image_URL>https://yourwebsite.com/wp-content/uploads/2022/08/hoodie-with-logo-2.jpg</Image_URL>
		<Description>Grab this incredible hoodie to change your style in to comfort.</Description>
	</product>
</products>
How To Generate PriceRunner Product Feed In WooCommerce
In WooCommerce, you will find an easy-to-use plugin, Product Feed Manager for WooCommerce (PFM), with which you can generate an XML feed in just a few clicks.
This is because the plugin has a pre-built template for PriceRunner with the right XML format and product attributes.
Then, follow the step-by-step instructions below to successfully generate a product feed for Pricerunner DK.
Step 1 – Import PriceRunner Template For Feed Generation
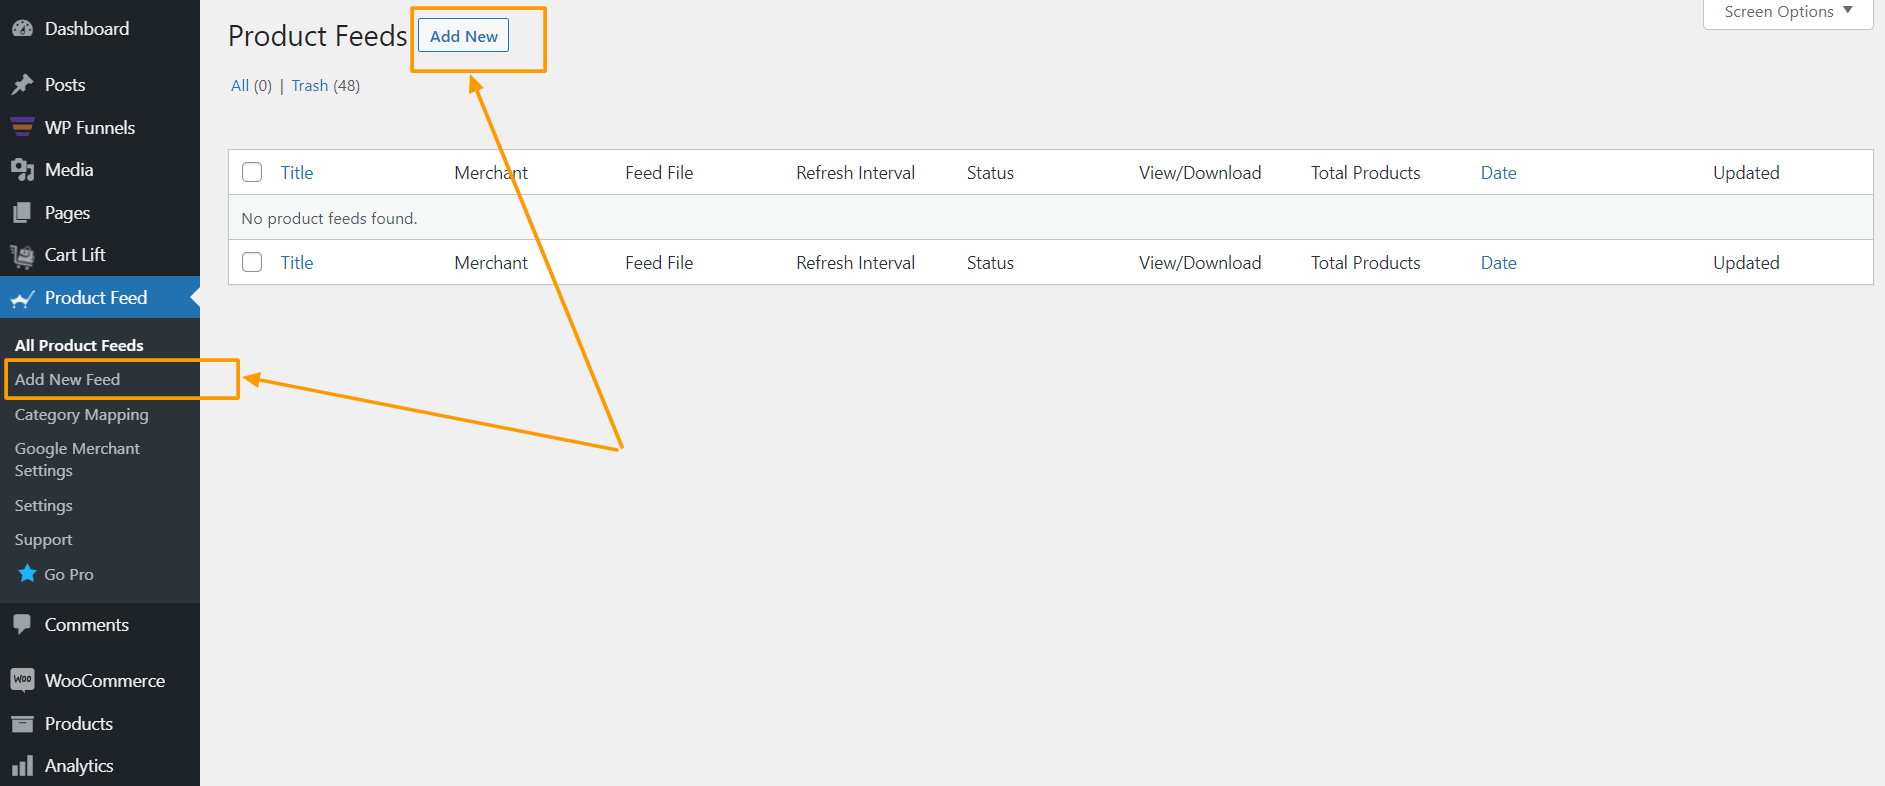
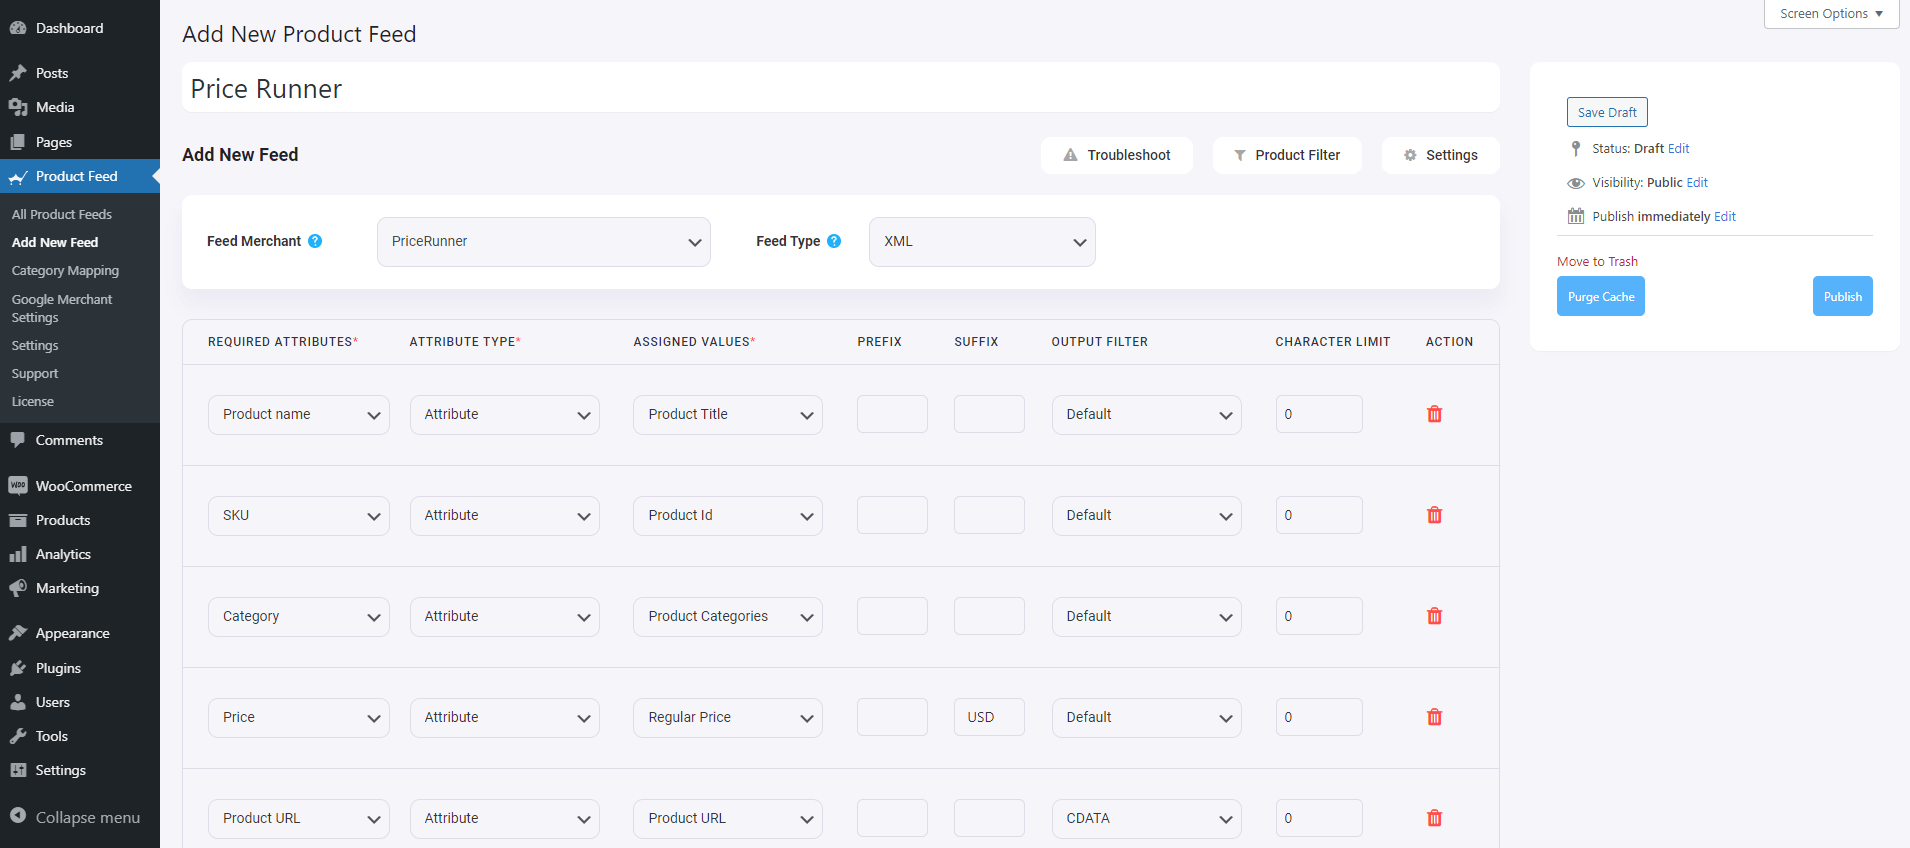
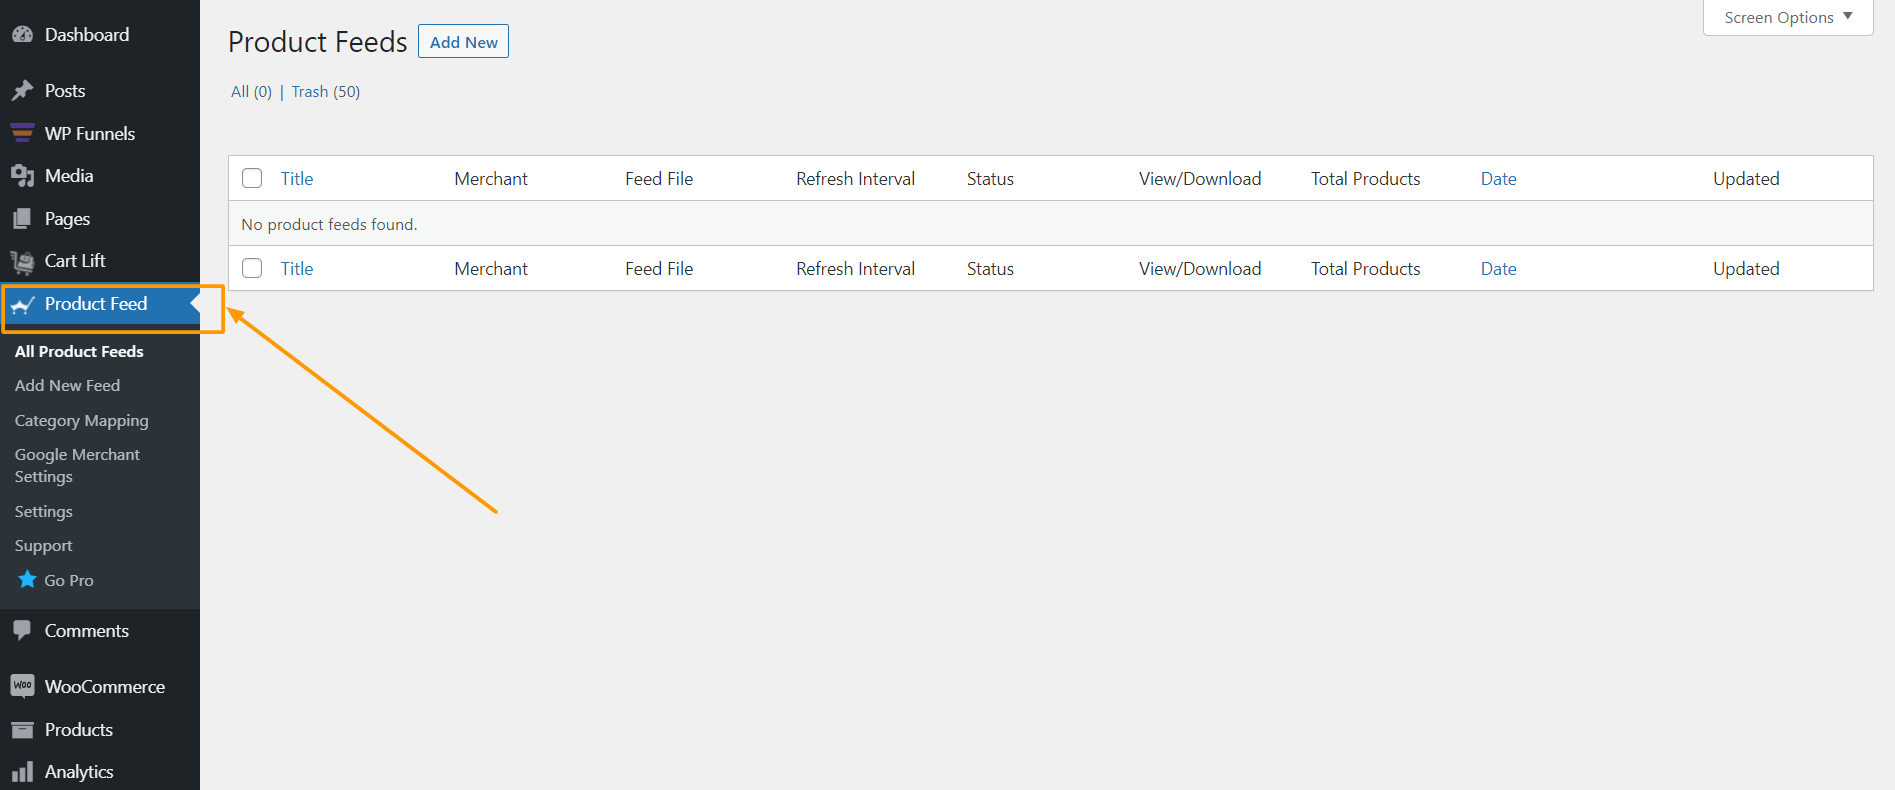
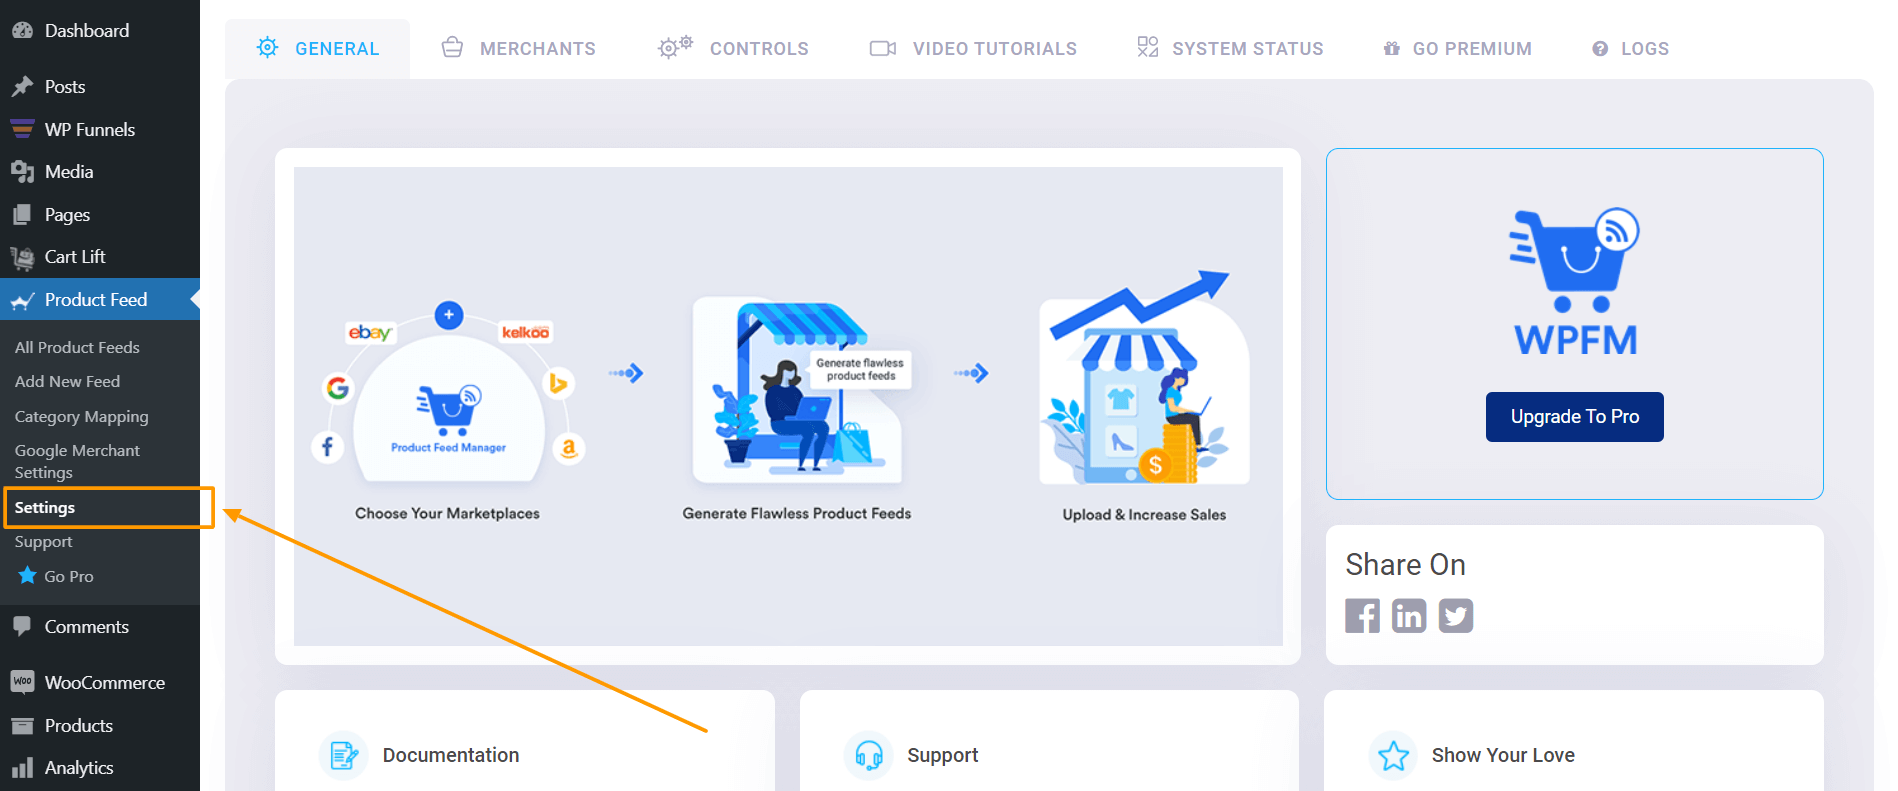
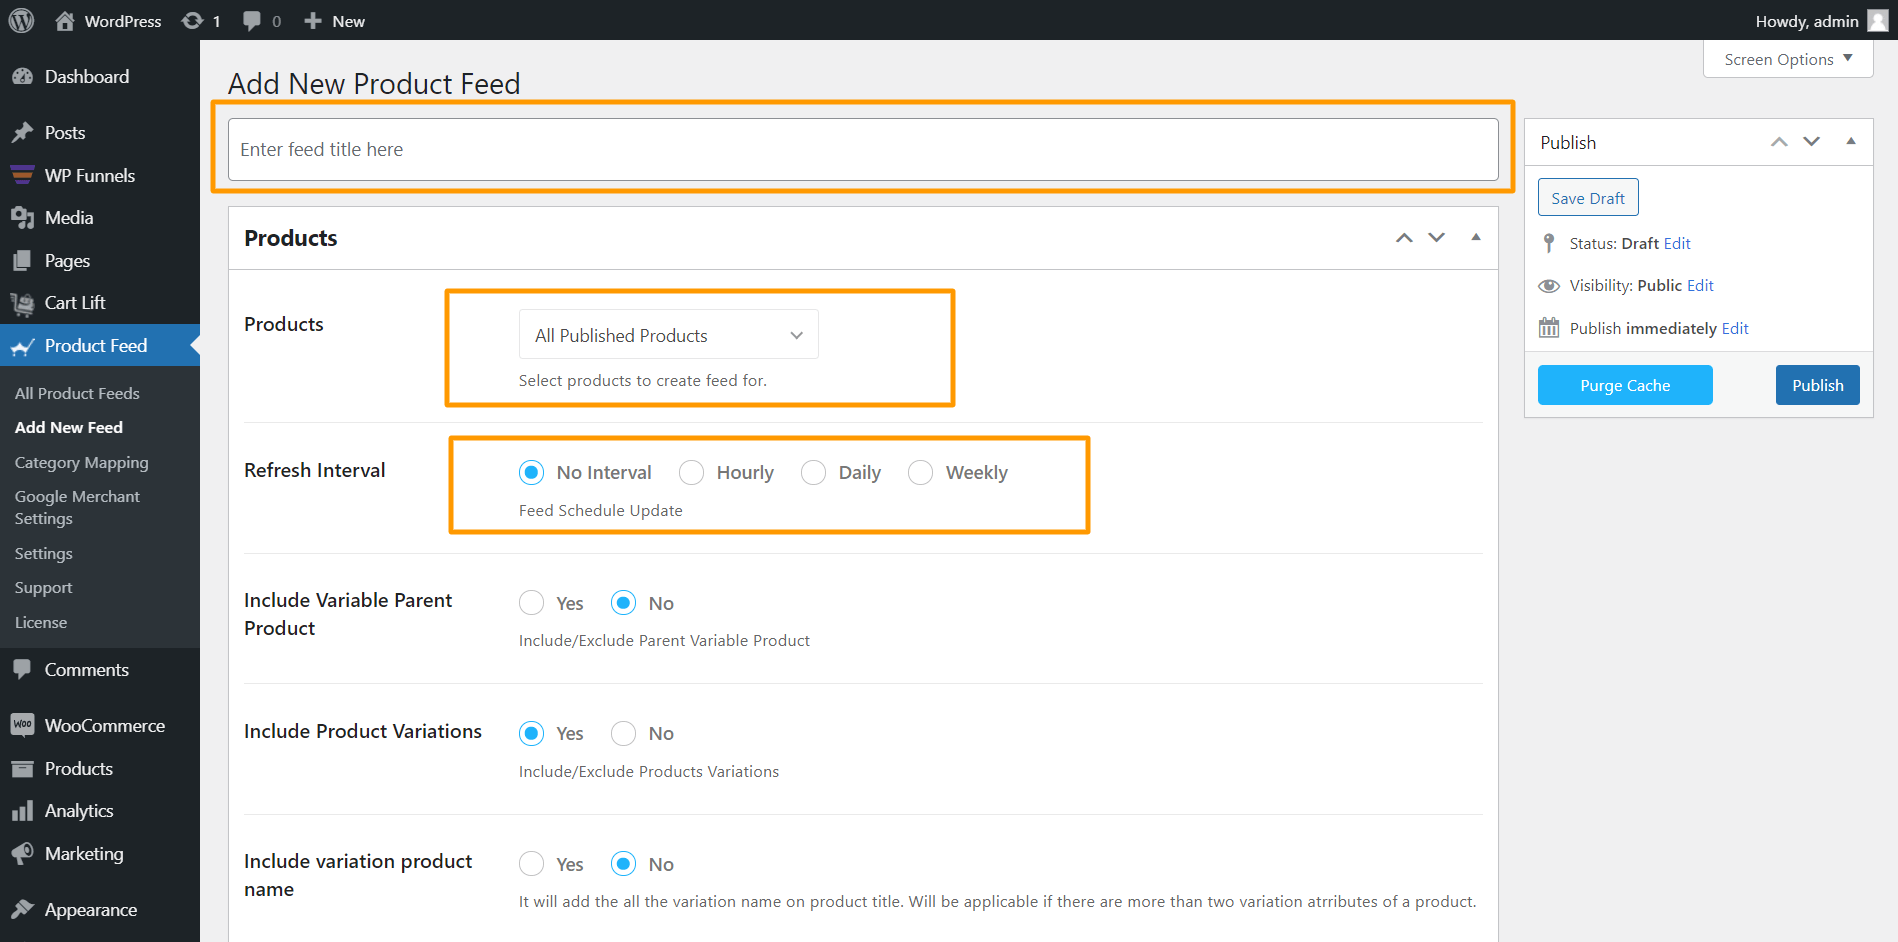
1. On your dashboard, click on Product Feed and then click on Add New Feed option.
It will take you to the feed creation page.
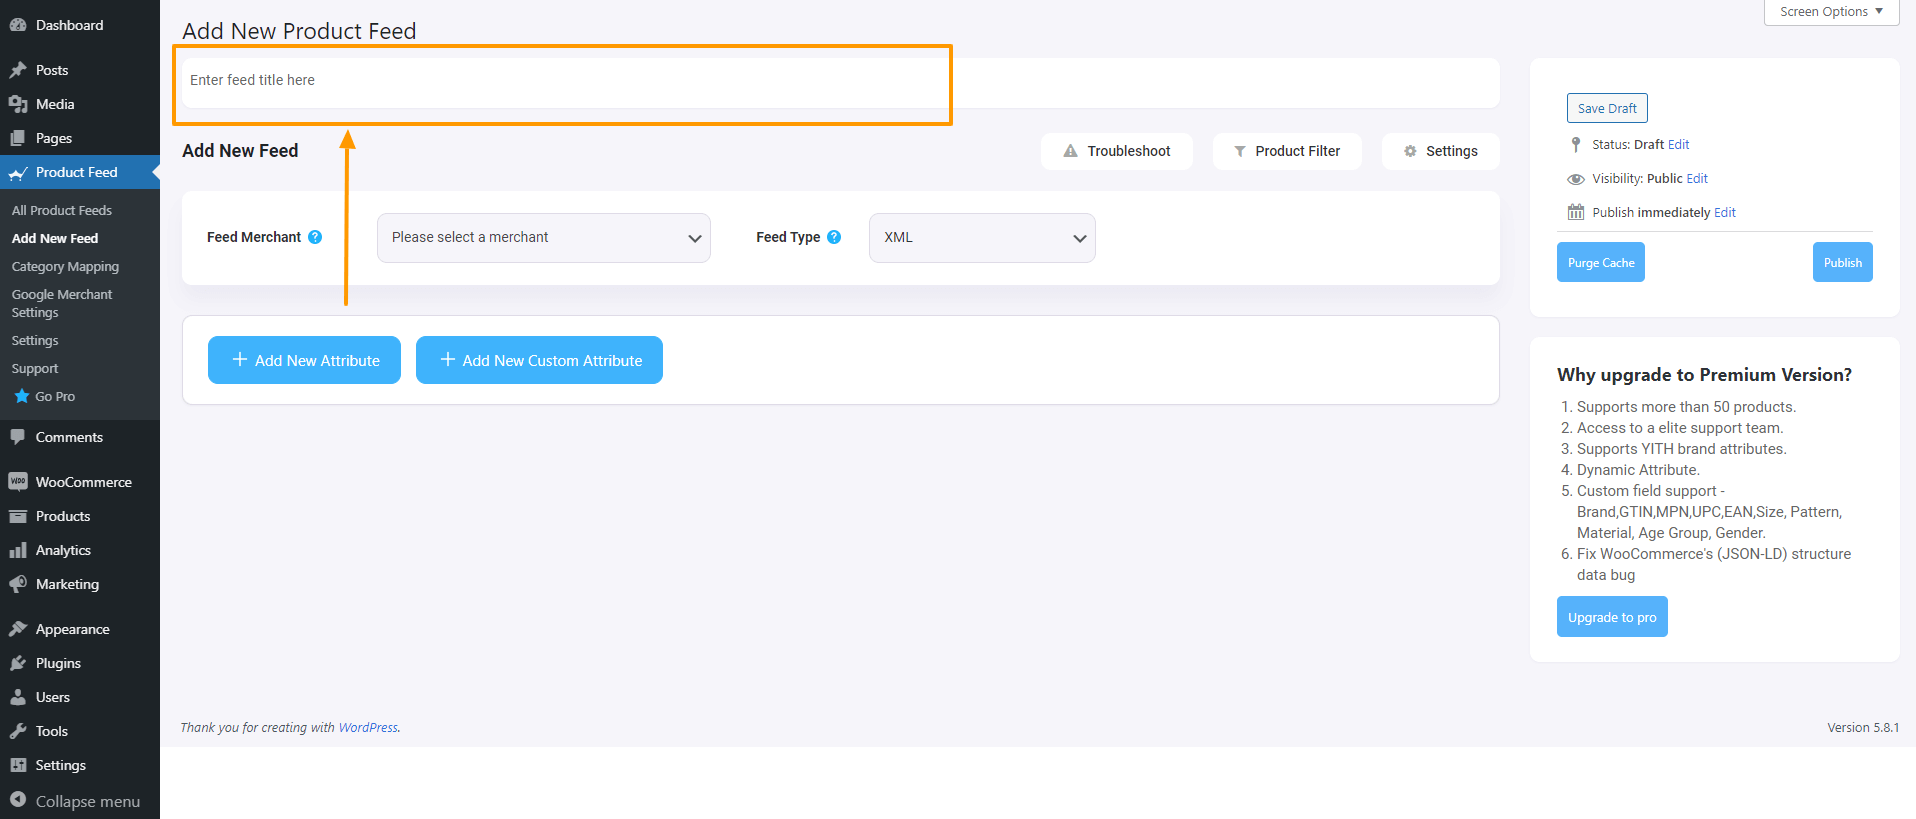
Here, on the top you will get an option to give a name to your feed, you can skip it too.
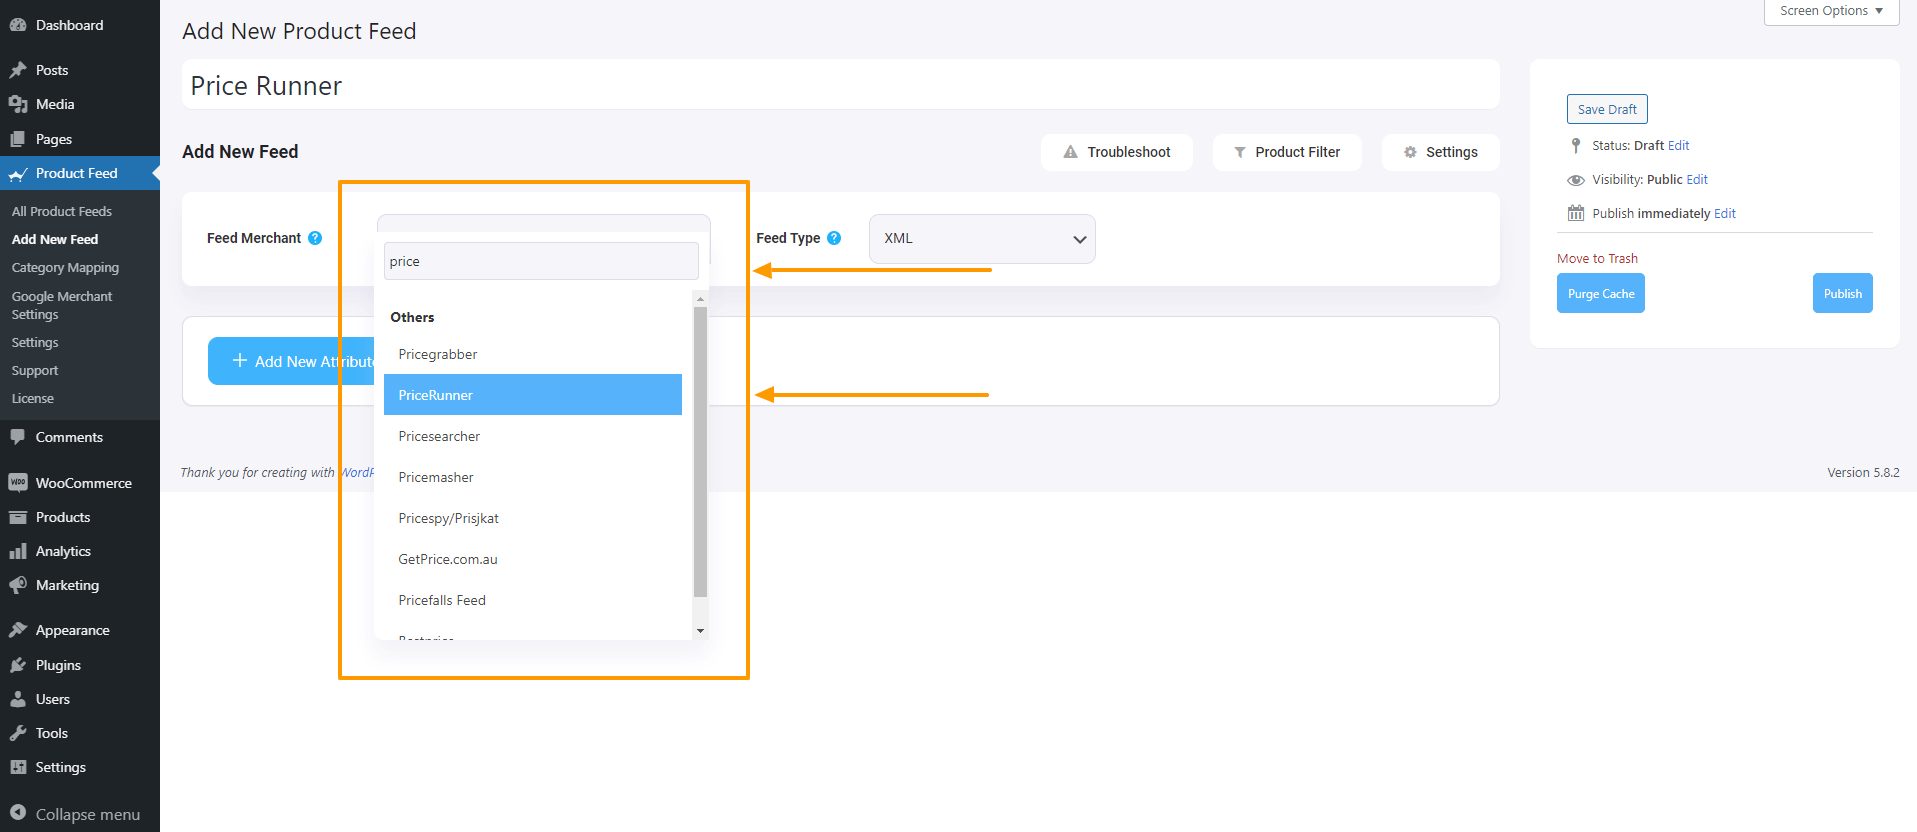
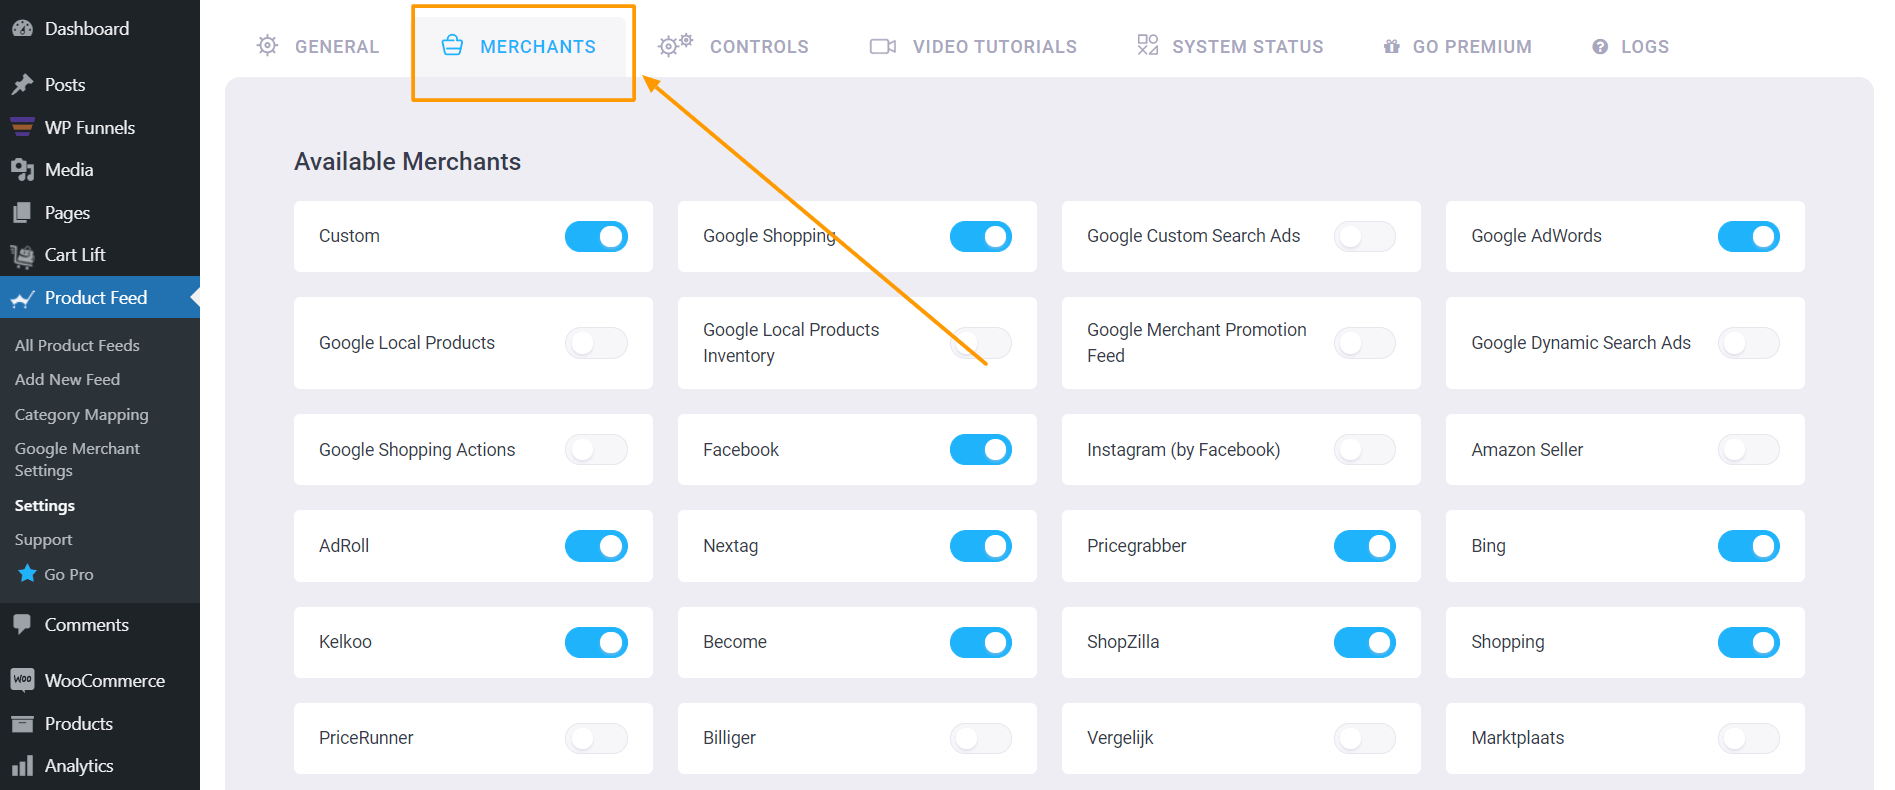
2. Click on the Feed Merchant Dropdown and you will get the list of all the supported merchants.
You can scroll down this merchant dropdown list or you can type PriceRunner in the search box, and you will get the PriceRunner option in the list.
Select PriceRunner, and all the required attributes of PriceRunner will be loaded below.
Step 2 – Feed Configuration
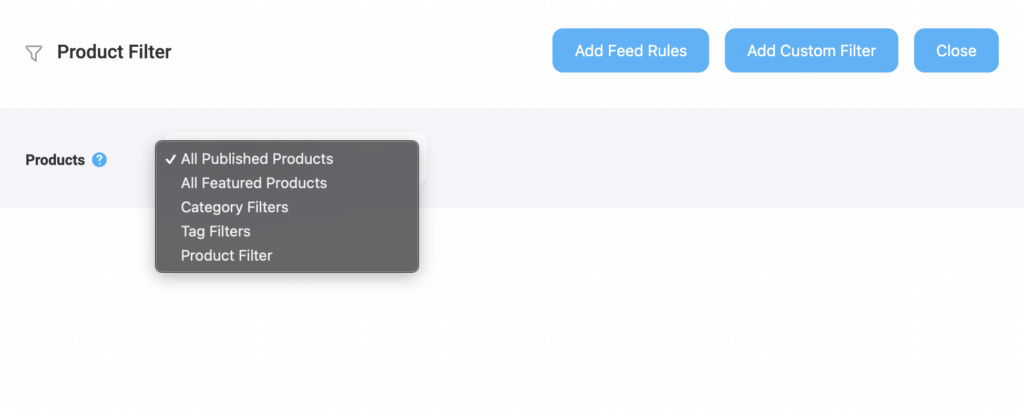
Now, you can see three buttons under the Feed Title text box, Troubleshoot, Product Filter, and Settings.
1. If you are having any issues generating feed, click on this Troubleshoot button, it will take you to the Troubleshoot page, it could be helpful for you.
2. If you want to use any filter or condition, you can click on the Product Filter option, and a drawer will slide in from the right side of the window, and there you will get the following filters:
All Featured Items
Custom Filter
Category Filter
Tag Filter
Product Filter (Pro)
You can select any filter option and use them as per your need and click on the Close button when done.
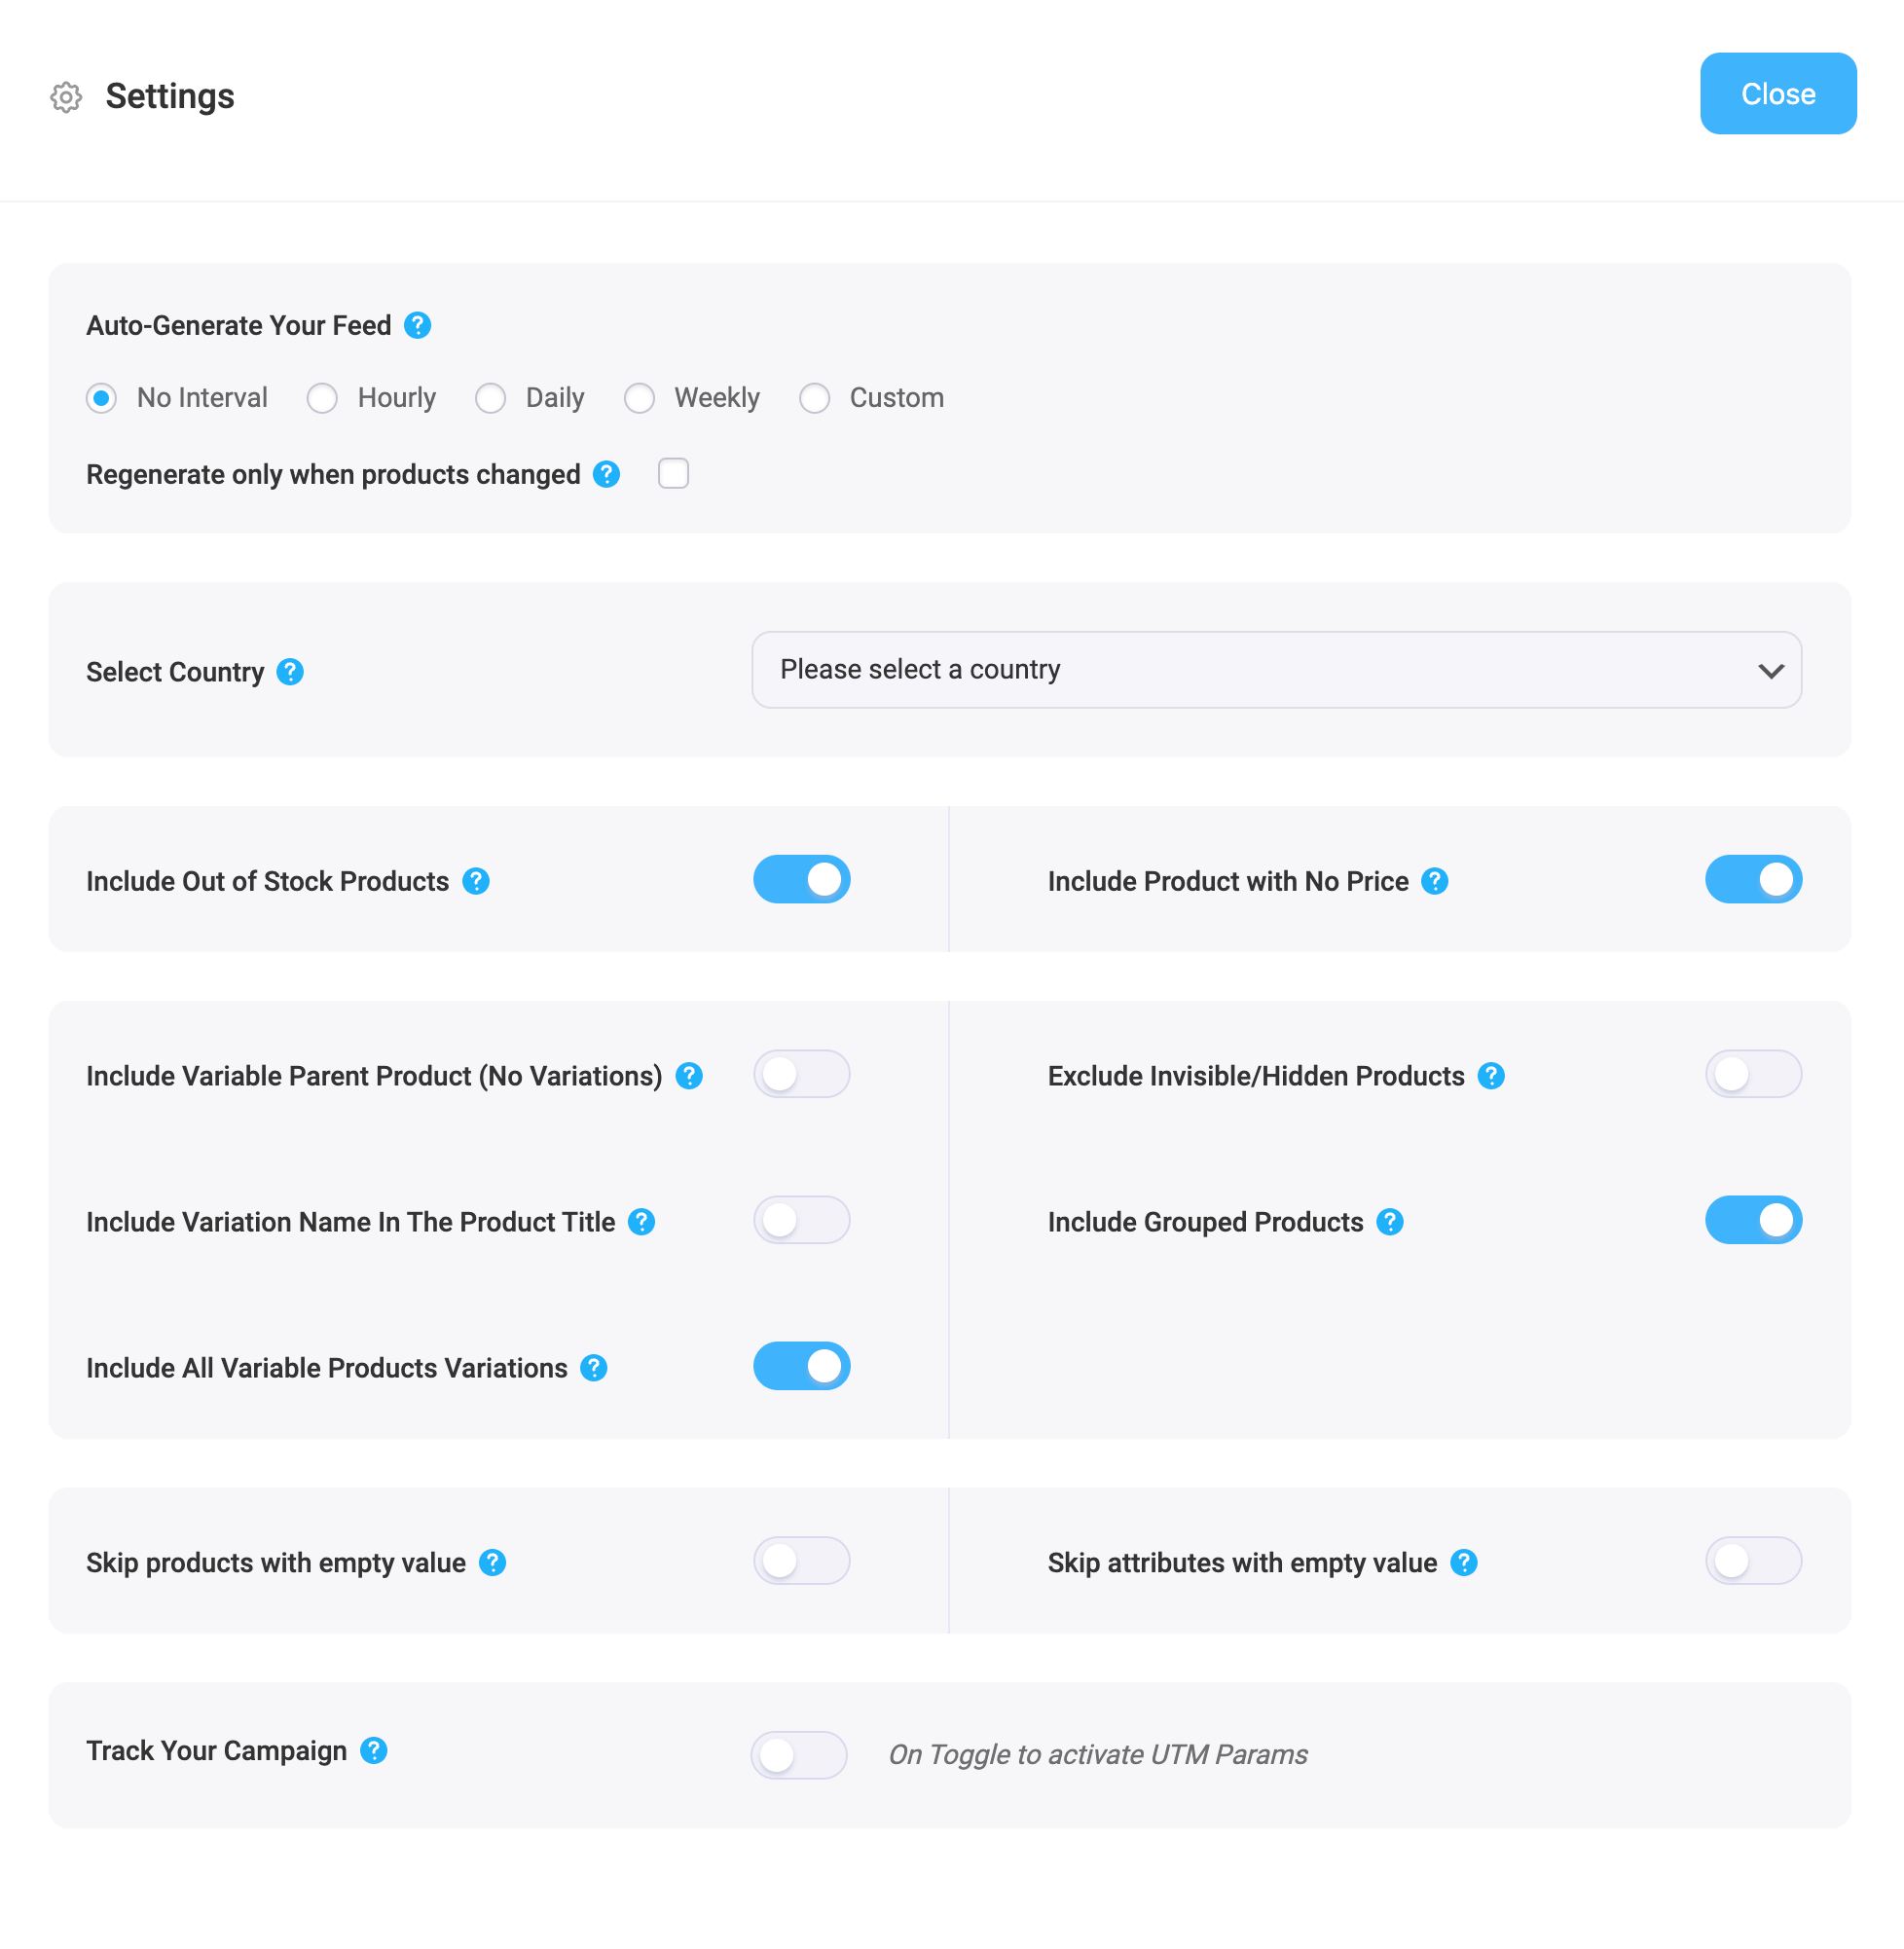
3. Now, to schedule your feed or to choose which type of products will be included in your feed, click on the Settings button, and you will get a list of options to exclude or include products.
Change the options as per your need and click on the Close button when done.
Step 3 – Use The PriceRunner XML Feed Template
1. If you look at the Feed Merchant dropdown button, there you will get another dropdown Feed Type, you can click here to set the type of this feed. You can set different types of feeds depending on what types of feeds this merchant supports or what types of feeds this Product Feed Manager has the support for.
For PriceRunner, keep the Feed Type as XML.
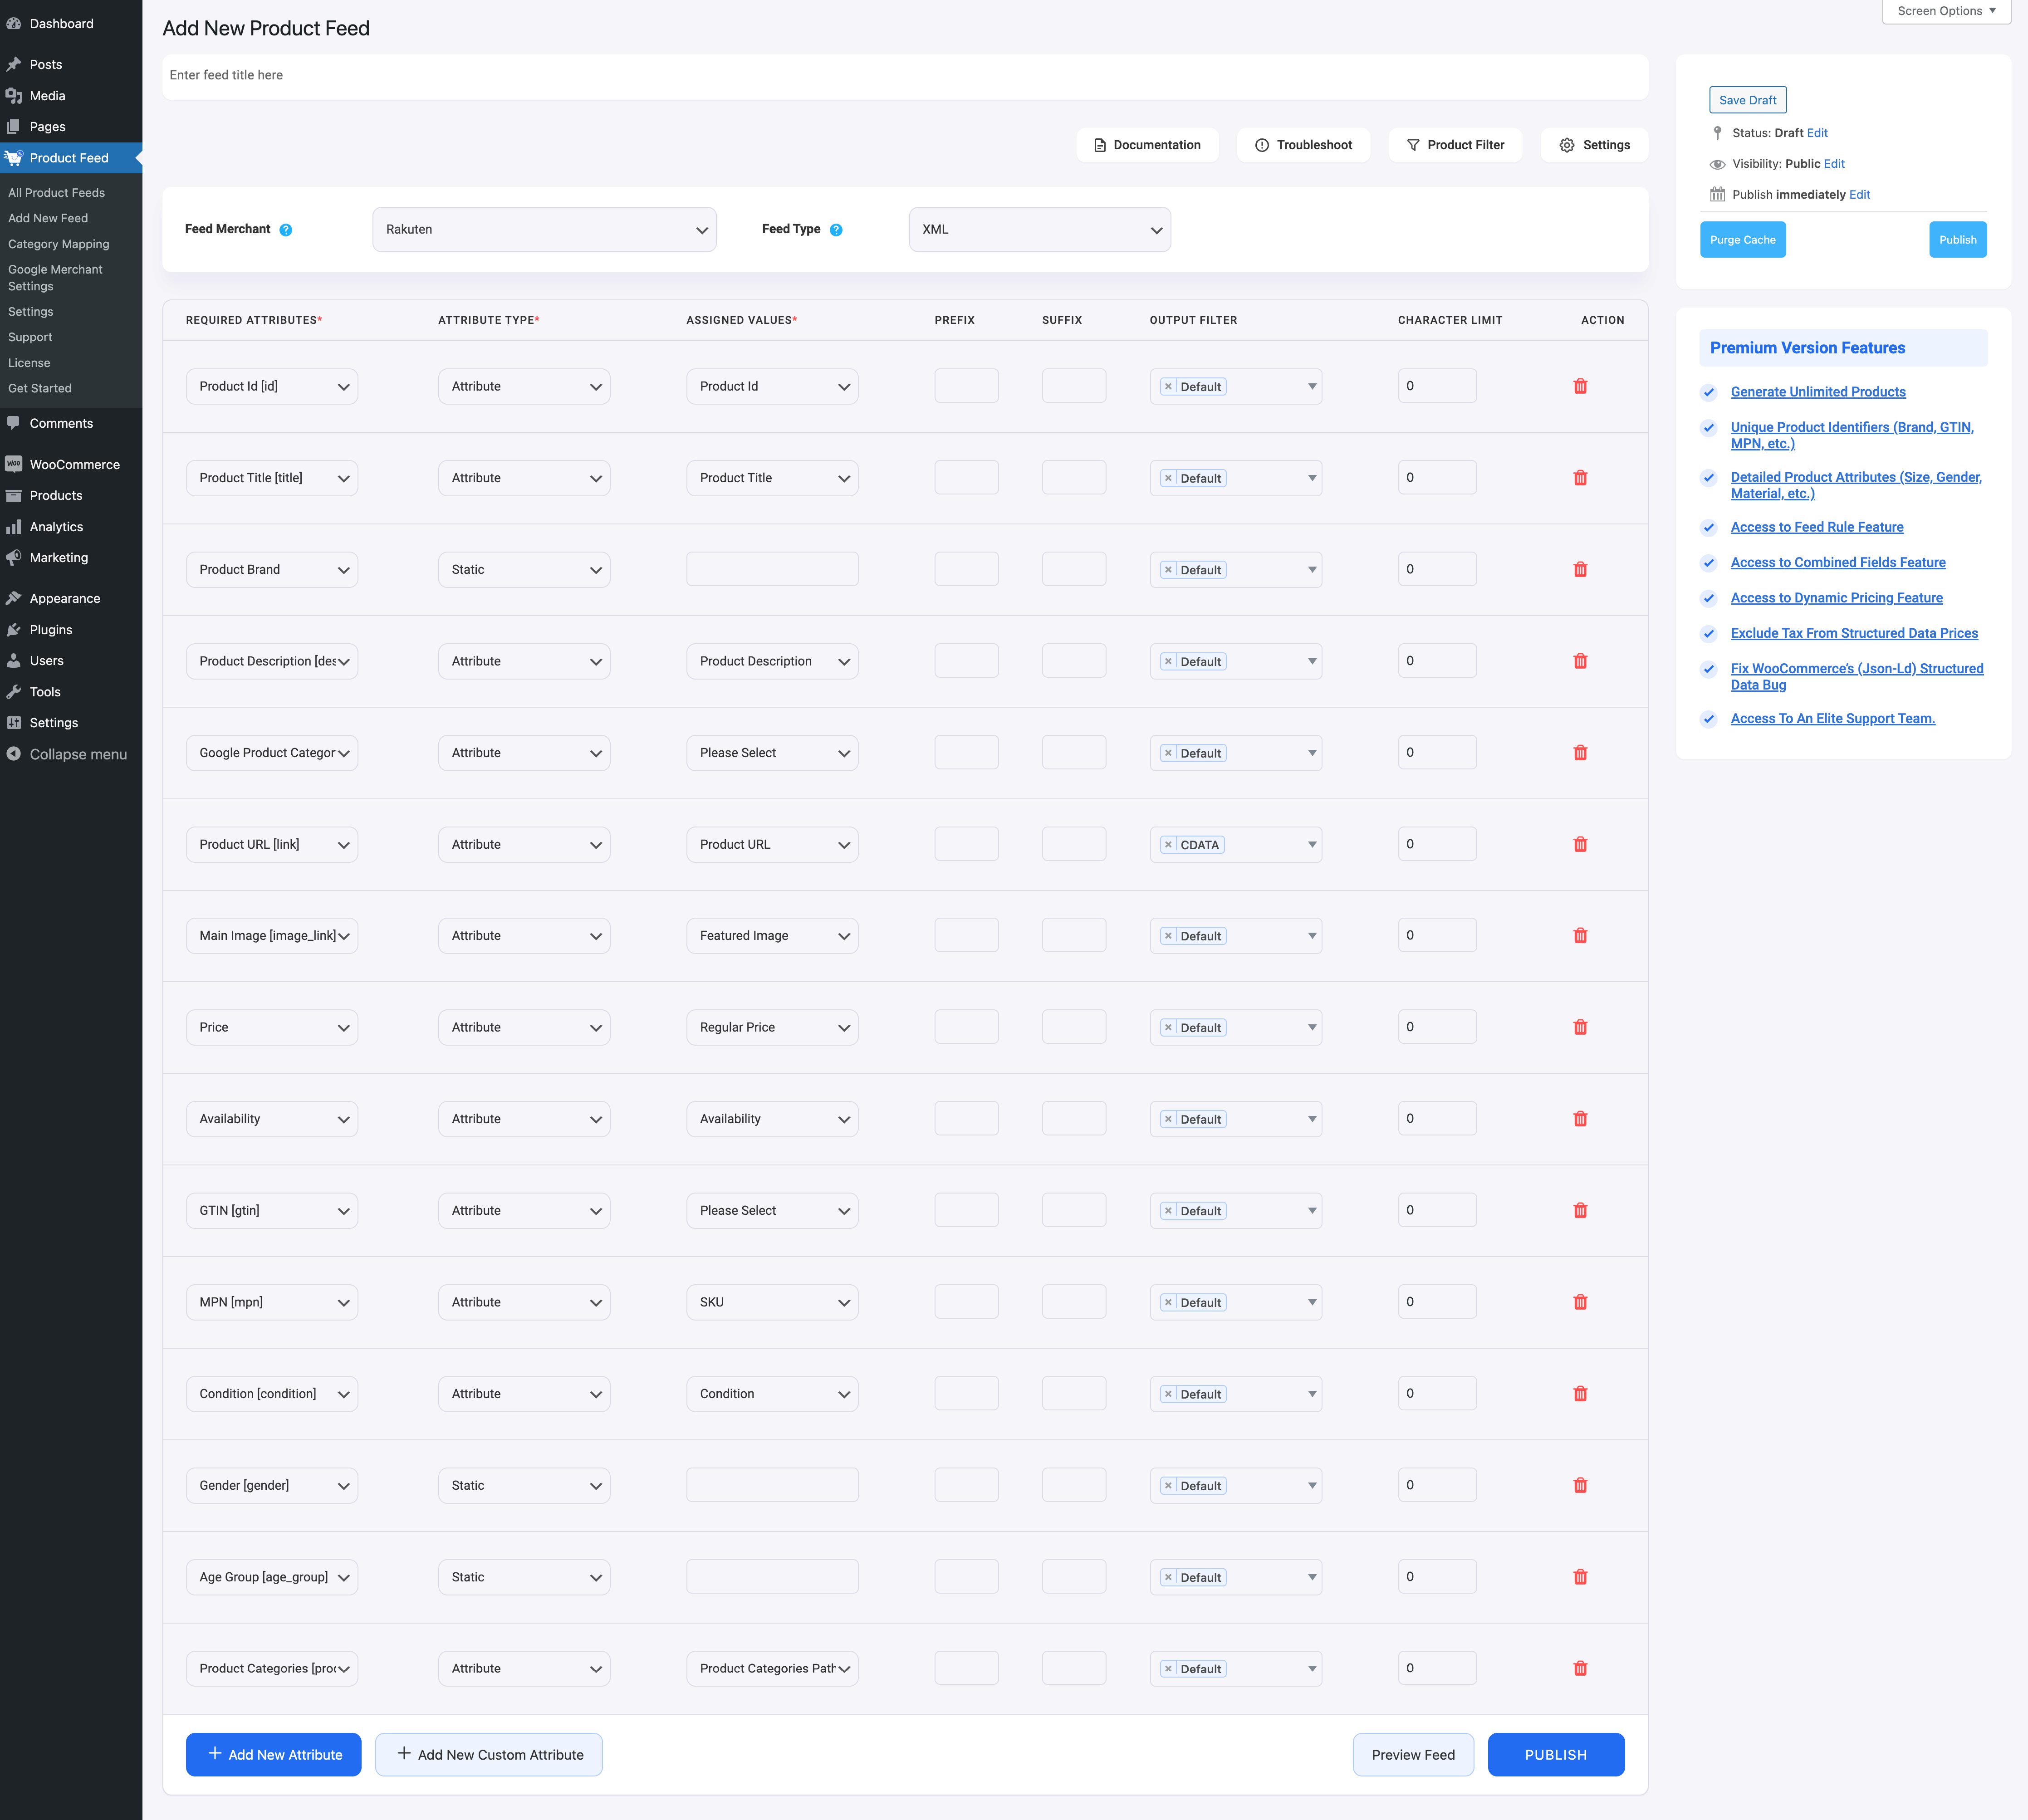
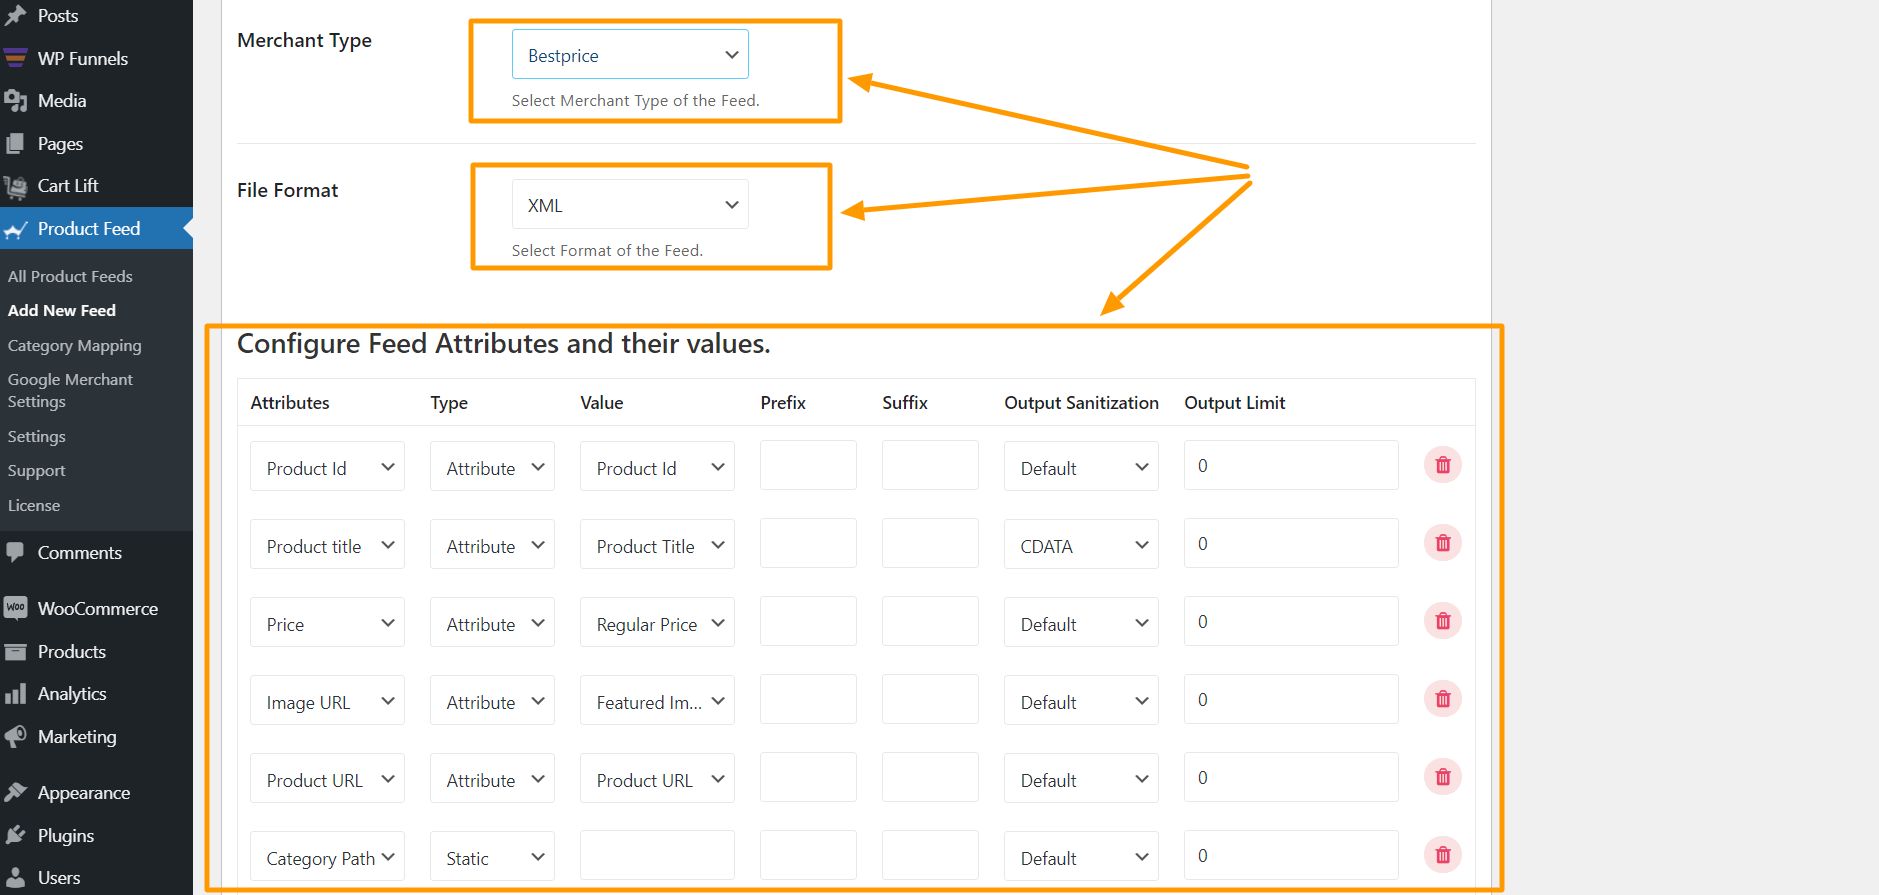
2. Now, in the attributes section, you will see that all the attributes are under the Required Attributes column, and their values are set according to the attributes under the Assigned Values column.
You can change any values to any attributes, simply click on the value dropdown, and select your preferred value.
All the required attributes will appear below. Now, most of the attributes will already be configured but notice that some of these attributes are unassigned.
Step 4 – Assign The Right Values To Unassigned Attributes
1. You will need to assign values for the following:
Shipping Cost
LeadTime
Brand
Ean
**For these 4 attributes, WooCommerce doesn’t have default fields in the product data section to assign these values to the products. So the best option here is to add custom fields and save these values there. You may then use those values in the feed.
Watch these videos – Video1 & Video2 – to see how you can get custom fields with PFM.
Step 5 – Publish The Feed And Use The Feed To List Them In the Marketplace
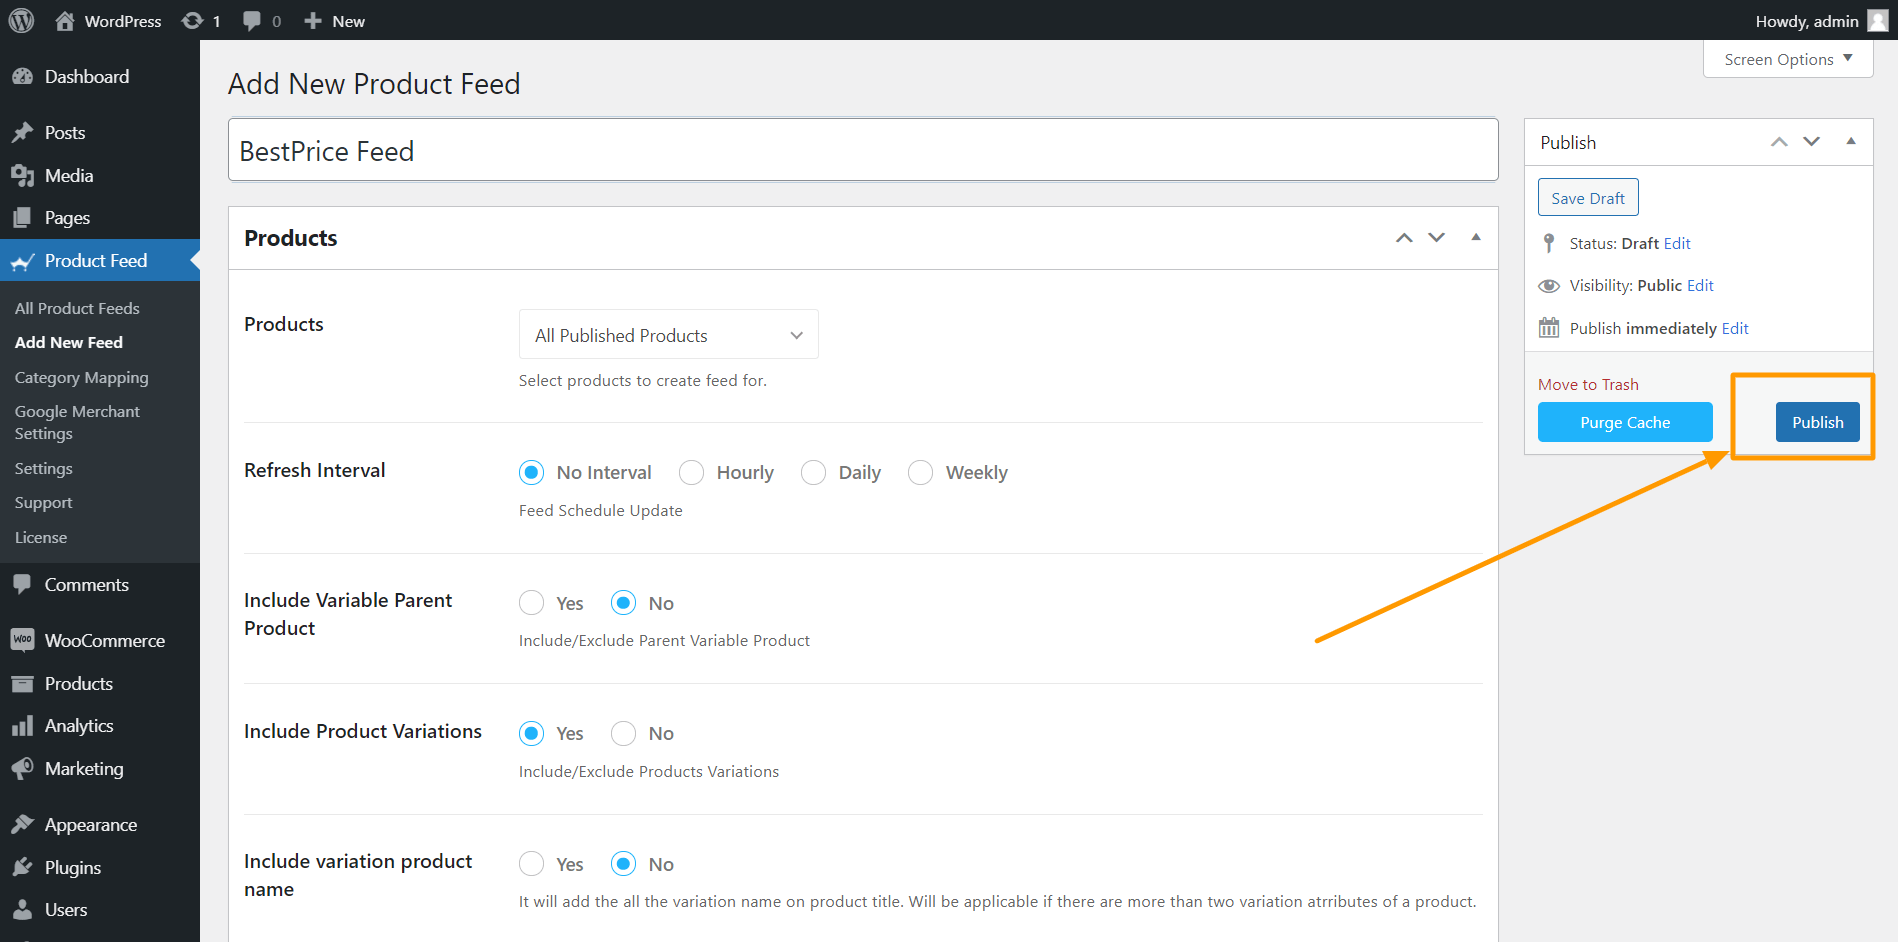
1. Once the attributes are all set, scroll up and click on Publish and the feed will be generated.
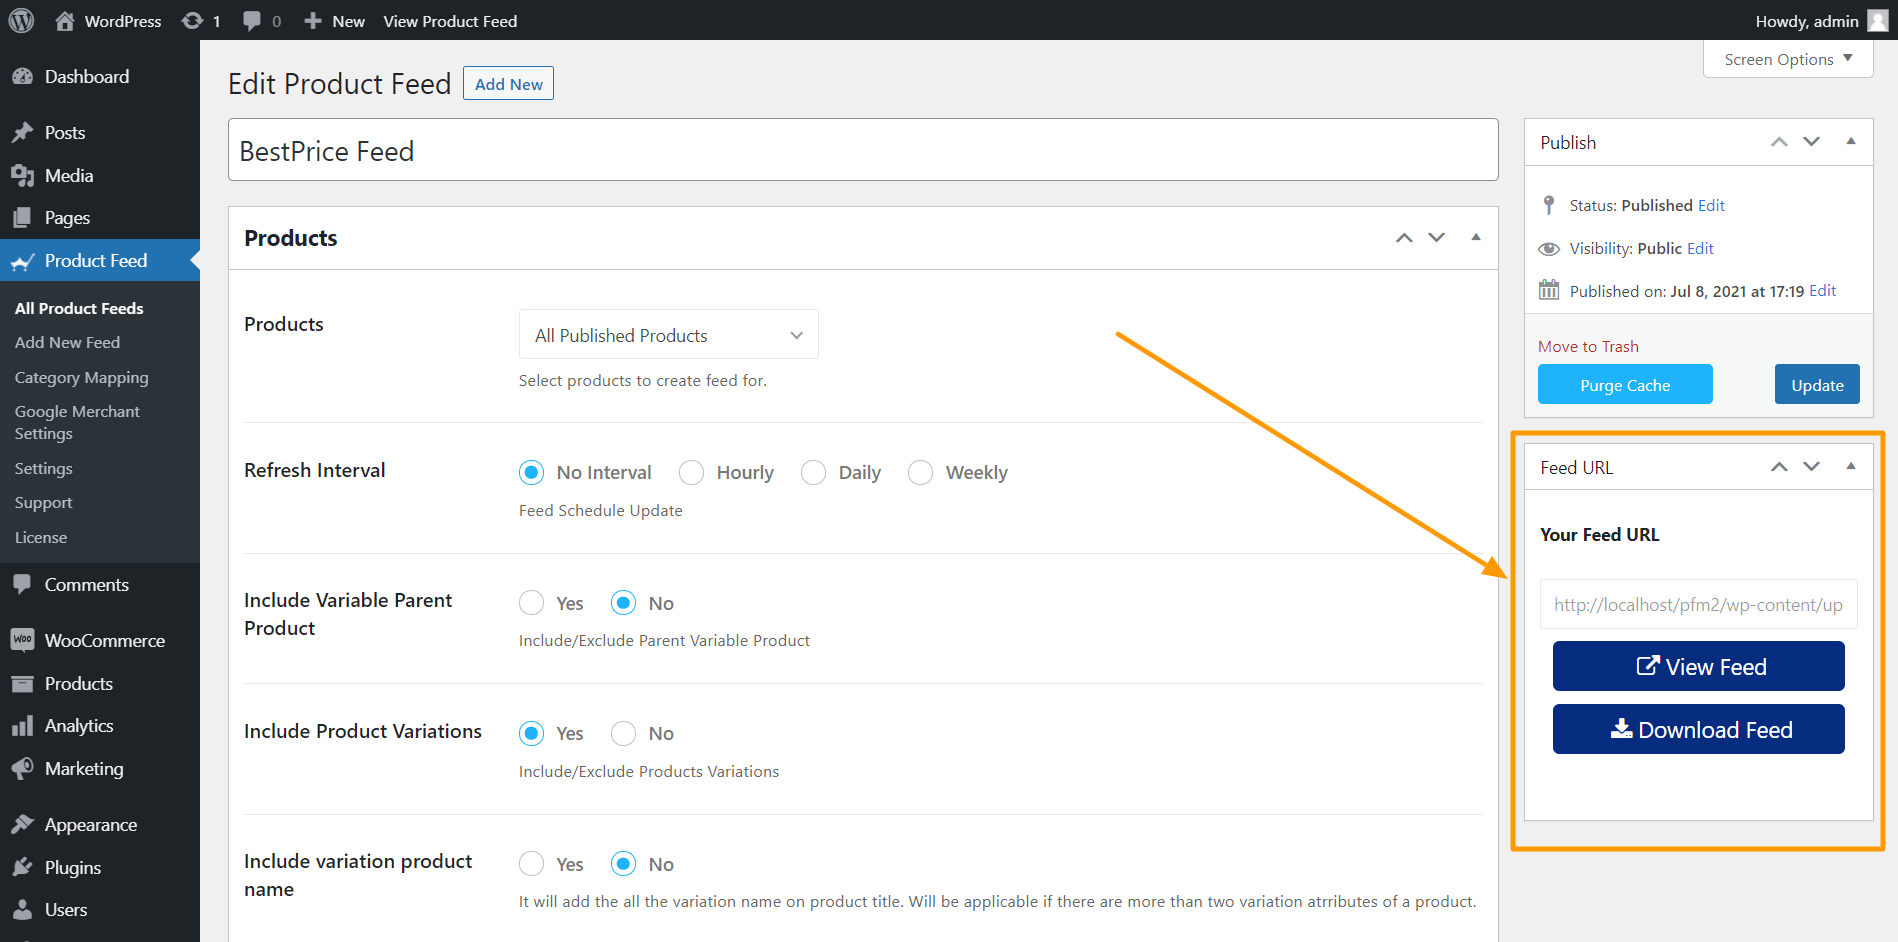
2. You will be able to view or download the feed.
That’s it. You have created your required product feed. The next thing to do is upload your products to PriceRunner.
Conclusion
As you saw above, this is how easily you can generate PriceRunner product feed using Product Feed Manager for WooCommerce.
Initially, test out the free version of the plugin, and once you are sure the plugin does what is required, you can go ahead think about upgrading to Pro.
It’s high time you take advantage of the PriceRunner DK marketplace and start getting more sales on your Danish WooCommerce store.
The eCommerce industry is growing every day. One of the prime reasons for this growth is the increased popularity of large local online marketplaces. If you run a WooCommerce store in Poland, then you must promote your products on Ceneo, the most popular Polish online marketplace.
With an average of 7.5 Million (avg) monthly traffic, Ceneo helped the worldwide e-Commerce industry grow at least 26%, with approximately 22 billion euros in revenue in 2020.
In fact, most small to medium local online shops in Poland have benefitted by promoting their products on Ceneo.pl, and it’s high time you take advantage of their huge audience.
To promote your products on Ceneo, all you need is to create a Ceneo XML feed in the right format and upload your products to their marketplace.
Now, the main issue most people face is that Ceneo has a unique required format for the XML feed structure, and it’s not possible to prepare manually.
However, if you run a WooCommerce store, then you can easily generate a Ceneo product feed in just a few clicks using a reliable tool.
Today, you will learn how to generate an accurate Ceneo XML feed and promote your products to a huge audience. After reading this guide, you will learn
The mandatory attributes to include in the product data
The dedicated Ceneo XML feed structure to follow
How to generate WooCommerce product feed for Ceneo.pl in just a few clicks
Then, you can go ahead and start getting more sales from this huge local online marketplace.
The Right Ceneo XML Feed Format With WooCommerce Product Data
When creating a new feed for Ceneo, you will need to include a few specific data in the right format.
Normally, the feed structure is as follows:
<?xml version="1.0" encoding="utf-8"?>
<offers xmlns:xsi="http://www.w3.org/2001/XMLSchema-instance" version="1">
  <o id="1" url="https://www.yourwebsite.pl/your-product-1" price="99.99" avail="1" weight="4" stock="2" basket="1">
    <cat>
      <![CDATA[Komputery/Monitory]]>
    </cat>
    <name>
      <![CDATA[LG 27" 27UK650-W (27UK650W)]]>
    </name>
    <imgs>
      <main url="https://www.yourwebsite.pl/your-product-1/img1.jpg"/>
      <i url="https://www.yourwebsite.pl/your-product-1/img2.jpg"/>
      <i url="https://www.yourwebsite.pl/your-product-1/img3.jpg"/>
      <i url="https://www.yourwebsite.pl/your-product-1/img4.jpg"/>
    </imgs>
    <desc>
      <![CDATA[<strong>Nastała era UHD 4K HDR</strong><br><br>Oglądaj nieskazitelny obraz o
      niespotykanym bogactwie kolorów na monitorze LG UHD 4K HDR.Twórcy pracujący z treścią
      HDR ucieszą się z możliwości odtwarzania jasności i kontrastu dopodglądu i edycji.<br>
      <br><strong>HDR Effect do treści SDR</strong><br><br>Monitor LG UHD 4K HDR może
      przekonwertować standardową treść na format HDR wprost na ekranie. Specjalny algorytm
      poprawia mapowanie tonalne i luminancję treści SDR, zapewniając jakość zbliżoną do HDR.
      <br><br><strong>Prawdziwe kolory i szeroki kąt patrzenia</strong><br><br>Monitor LG IPS
      odznacza się wyjątkową dokładnością odwzorowania kolorów – pokrywa 99% gamy sRGB.
      Ponadto ma szeroki kąt patrzenia, dzięki czemu łatwiej jest cieszyć się doskonałą
      jakością kolorów.<br><br><strong>Czystszy i płynniejszy obraz</strong><br><br>
      Technologia AMD FreeSync™ zapewnia płynną i niczym niezakłóconą rozrywkę w wysokiej
      rozdzielczości nawet w dynamicznych grach. Całkowicie eliminuje rozrywanie i zacinanie
      obrazu.<br><br><strong>Indywidualne ustawienia dla każdej gry </strong><br><br><strong>
      Wrogowie nie mają gdzie się ukryć</strong><br><br>Funkcja Black Stabilizer zapewnia
      wyraźny obraz nawet w mrocznych grach. Synchronizuje i rozjaśnia najciemniejsze zakątki,
      dzięki czemu znajdziesz wrogów czających się w ciemności i zaatakujesz przed nimi.<br>
      ]]>
    </desc>
    <attrs>
      <a name="Producent">
        <![CDATA[LG]]>
      </a>
      <a name="EAN">
        <![CDATA[8806098110254]]>
      </a>
      <a name="Kod producenta">
        <![CDATA[27UK650W]]>
      </a>
    </attrs>
  </o>

</offers>
Now let us look at the product attributes that you need to include in the feed.
Mandatory Product Data To Include In the Ceneo Product Feed
Following are the product data that you may submit with your products when uploading the XML feed to Ceneo.
*The ones marked green are mandatory attributes. The ones marked blue are optional.
Product ID (id)
You can use the WooCommerce Product ID or the SKU for this attribute.
Price (price)
Use the current price of the product on your site, i.e., if you have a sale running, then submit the sale price, else submit the regular price.
Product URL (url)
Submit the product link. For variable products, the URL should be unique for each variant.
Availability (avail)
You have to mention how soon you can ship out the product or if some other cases apply.
Accecpted values are 1, 3, 7, 14, 90, 99 and 110.
1 – available, the store will send the product within 24 hours
3 – the store will send the product within 3 days
7 – the store will send the product within a week
14 – the store will send the product within 14 days
90 – goods on request
99 – no information about availability – status “check in store”
110 – pre-sale
Category (cat)
You need to submit the exact category your product falls under as per Ceneo’s category list.
After submitting your feed on Ceneo initially, if you are asked to add more attributes for products in certain categories, then first, list down those categories. Next, visit this attribute list and look for each of these categories to find their available extra attributes that you can submit.
Here, you will see, for each attribute, there is a tag, <iskeyattribute>. Some of them have values False and some of them have values True. Collect the attributes that have the <iskeyattribute> value as True, i.e., <iskeyattribute>True</iskeyattribute>.
These are the attributes that you need to include in the feed for the products in their respective categories.
In WooCommerce, for most of them, you have to save these attributes’ data in Product data via custom fields. Then you can use the values of the custom fields in the feed.
Weight (weight) – optional
You may submit the product weight if you want to.
Simply use the value in kilograms – no need to add the unit of measurement.
Stock (stock) – optional
If you manage stock in your WooCommerce store, then you may use the number of products available in stock to submit this attribute.
Basket (basket) – optional
If you are part of the special Ceneo “Kup Teraz” program, then you may submit a positive value for this attribute.
Accepted values are:
1 – to confirm inclusion of a product to the Kup Terz program.
0 – to indicate that a product is not part of the Kup Terz program.
Now that you have a good idea of the required product data you need to submit on Ceneo, let us look at how you can generate an XML feed of your WooCommerce products in just a few clicks.
7 Steps To Generate Ceneo Product Feed In Your WooCommerce Store
In WooCommerce, you will find a reliable plugin called Product Feed Manager For WooCommerce with which you can generate an XML feed for all of your products in just a few clicks.
In the steps below, I will show you how you can generate a product feed for Ceneo.pl using this plugin in minutes.
Step 1 – Import Ceneo Template For Feed Generation
1. On your dashboard, click on Product Feed and then click on Add New Feed option.
It will take you to the feed creation page
Here, on the top you will get an option to give a name to your feed, you can skip it too.
2. Click on the Feed Merchant Dropdown and you will get the list of all the supported merchants.
You can scroll down this merchant dropdown list or you can type Ceneo in the search box, and you will get the Ceneo option in the list.
Select Ceneo, and all the required attributes of Ceneo will be loaded below.
Step 2 – Create A New Product Feed
Now, you can see three buttons under the Feed Title text box, Troubleshoot, Product Filter, and Settings.
1. If you are having any issues generating feed, click on this Troubleshoot button, it will take you to the Troubleshoot page, which could be helpful for you.
2. If you want to use any filter or condition, you can click on the Product Filter option, and a drawer will slide in from the right side of the window, and there you will get the following filters:
All Featured Items
Custom Filter
Category Filter
Tag Filter
Product Filter (Pro)
You can select any filter option and use them as per your need and click on the Close button when done.
3. Now, to schedule your feed or to choose which type of products will be included in your feed, click on the Settings button, and you will get a list of options to exclude or include products.
Change the options as per your need and click on the Close button when done.
Step 3 – Use The Ceneo Feed Template
1. If you look at the Feed Merchant dropdown button, there you will get another dropdown “Feed Type”, you can click here to set the type of this feed. You can set different types of feeds depending on what types of feeds this merchant supports or what types of feeds this Product Feed Manager has the support for.
For Ceneo, select XML as the Feed Type.
2. Now, in the attributes section, you will see that all the attributes are under the Required Attributes column, and their values are set according to the attributes under the Assigned Values column.
You can change any values to any attributes, simply click on the value dropdown, and select your preferred value.
All the required attributes will appear below. Now, most of the attributes will already be configured but notice that some of these attributes are unassigned.
Step 4 – Assign The Right Values To Unassigned Attributes
You will see that all the required attributes for Ceneo will appear below and it is already configured, except a few.
Update the value for Avail attribute if required.
You can see, the value of avail is by default set to 1. This means you will send out the product for delivery within 24 hours. But if that’s not the case, i.e., let’s say you rather ship out the product within 3 days, then change the value to 3.
**However, if you require different times to ship out different products, in that case, you need to save the values in a custom field in each of your WooCommerce product data and then use the value of that field here.
Step 5 – Publish The Feed Initially And Set Up Category Mapping
The category attribute is also not configured, but to assign that, you first need to set up a category mapping.
Scroll up and click on Publish, and the feed will be generated.
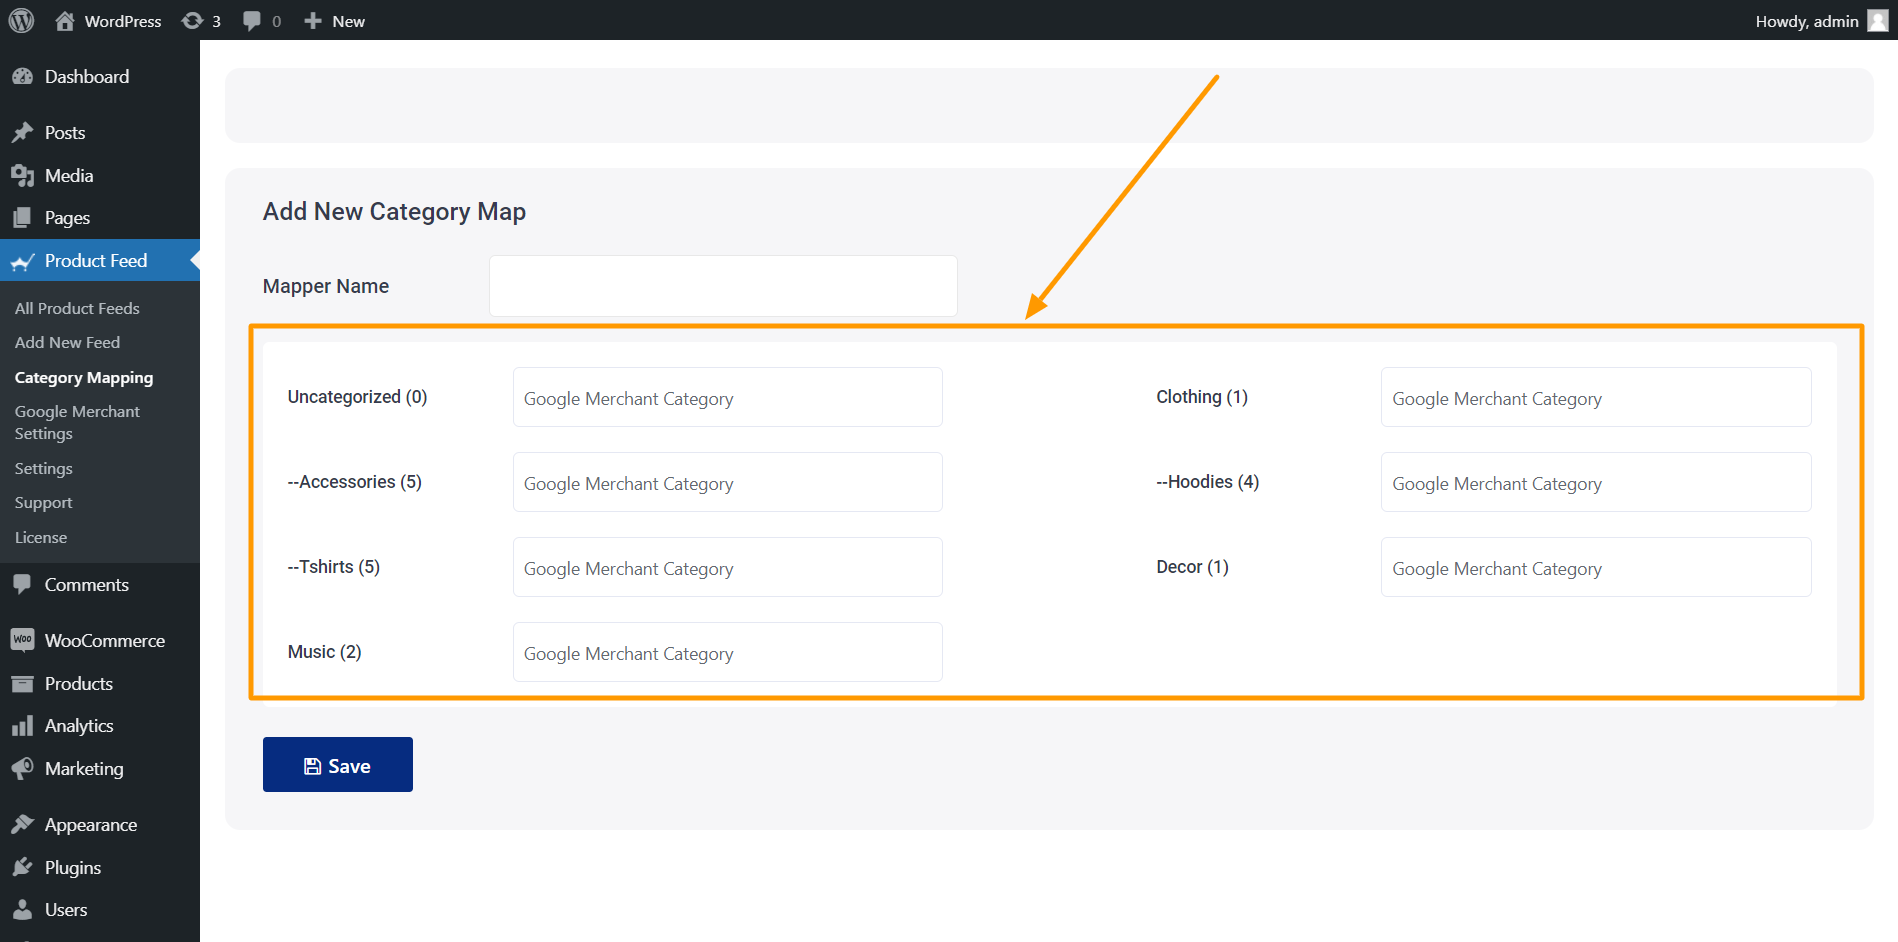
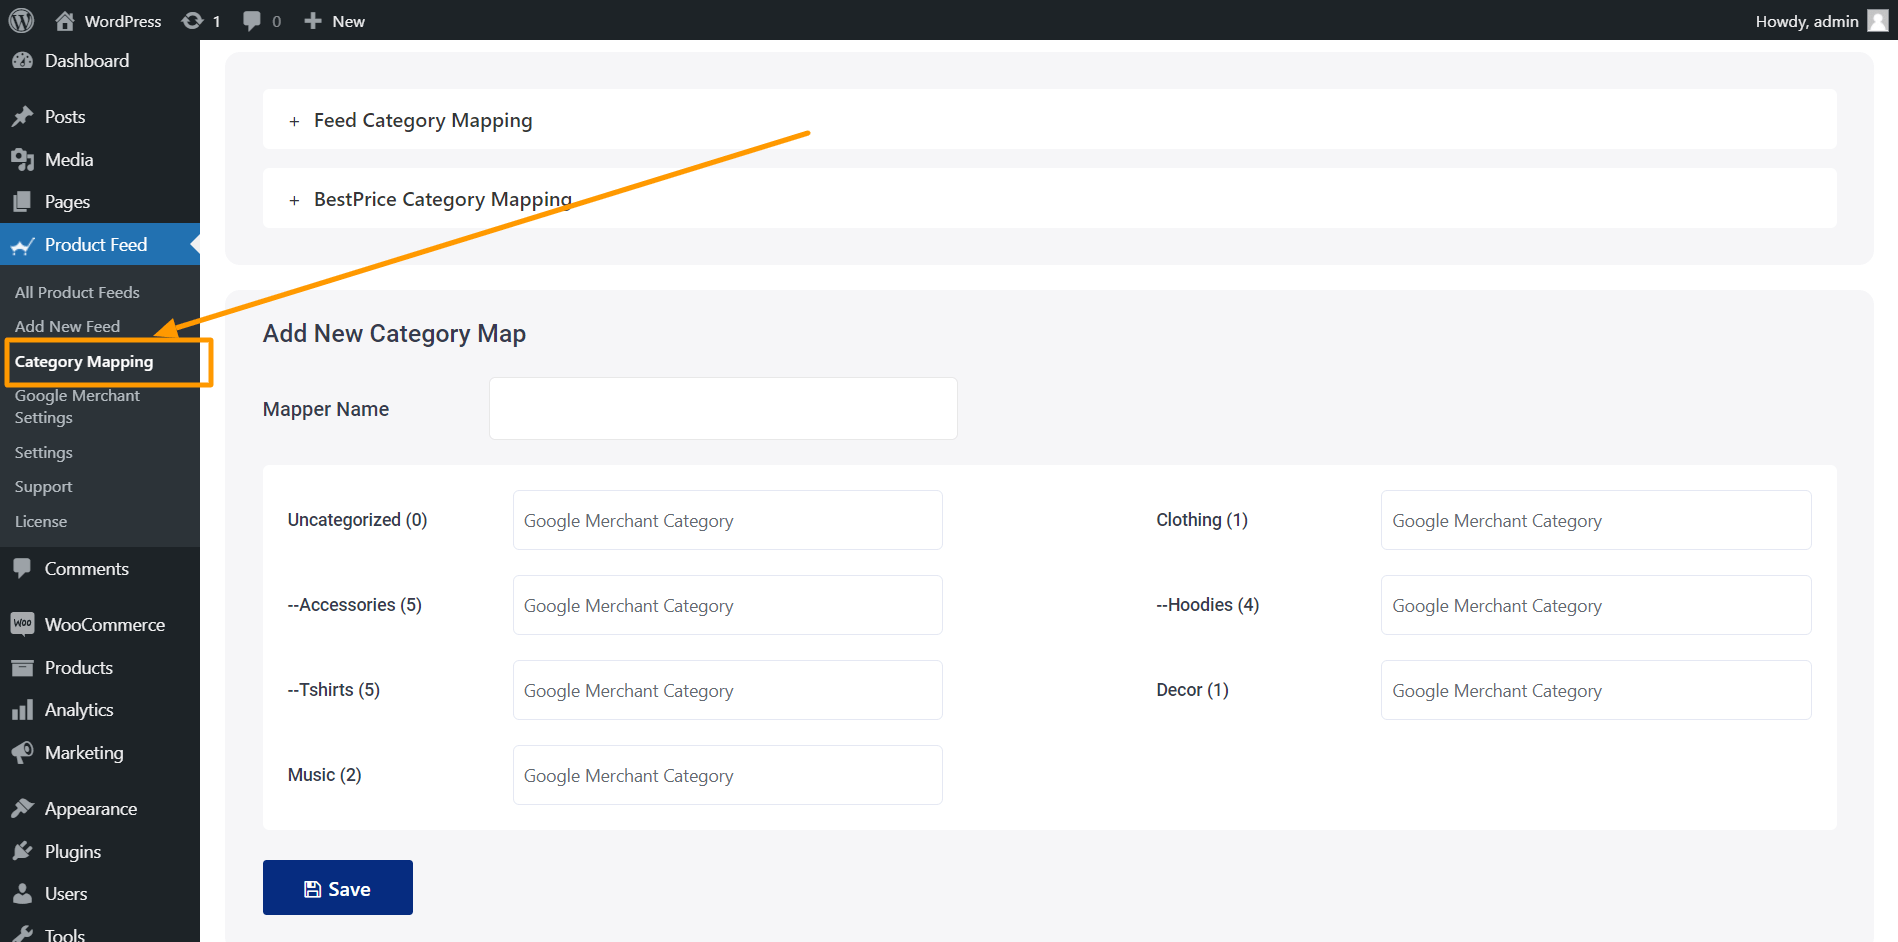
Go to Product feed > Category Mapping.
Here, you will find all of your WooCommerce categories listed, with empty fields beside them.
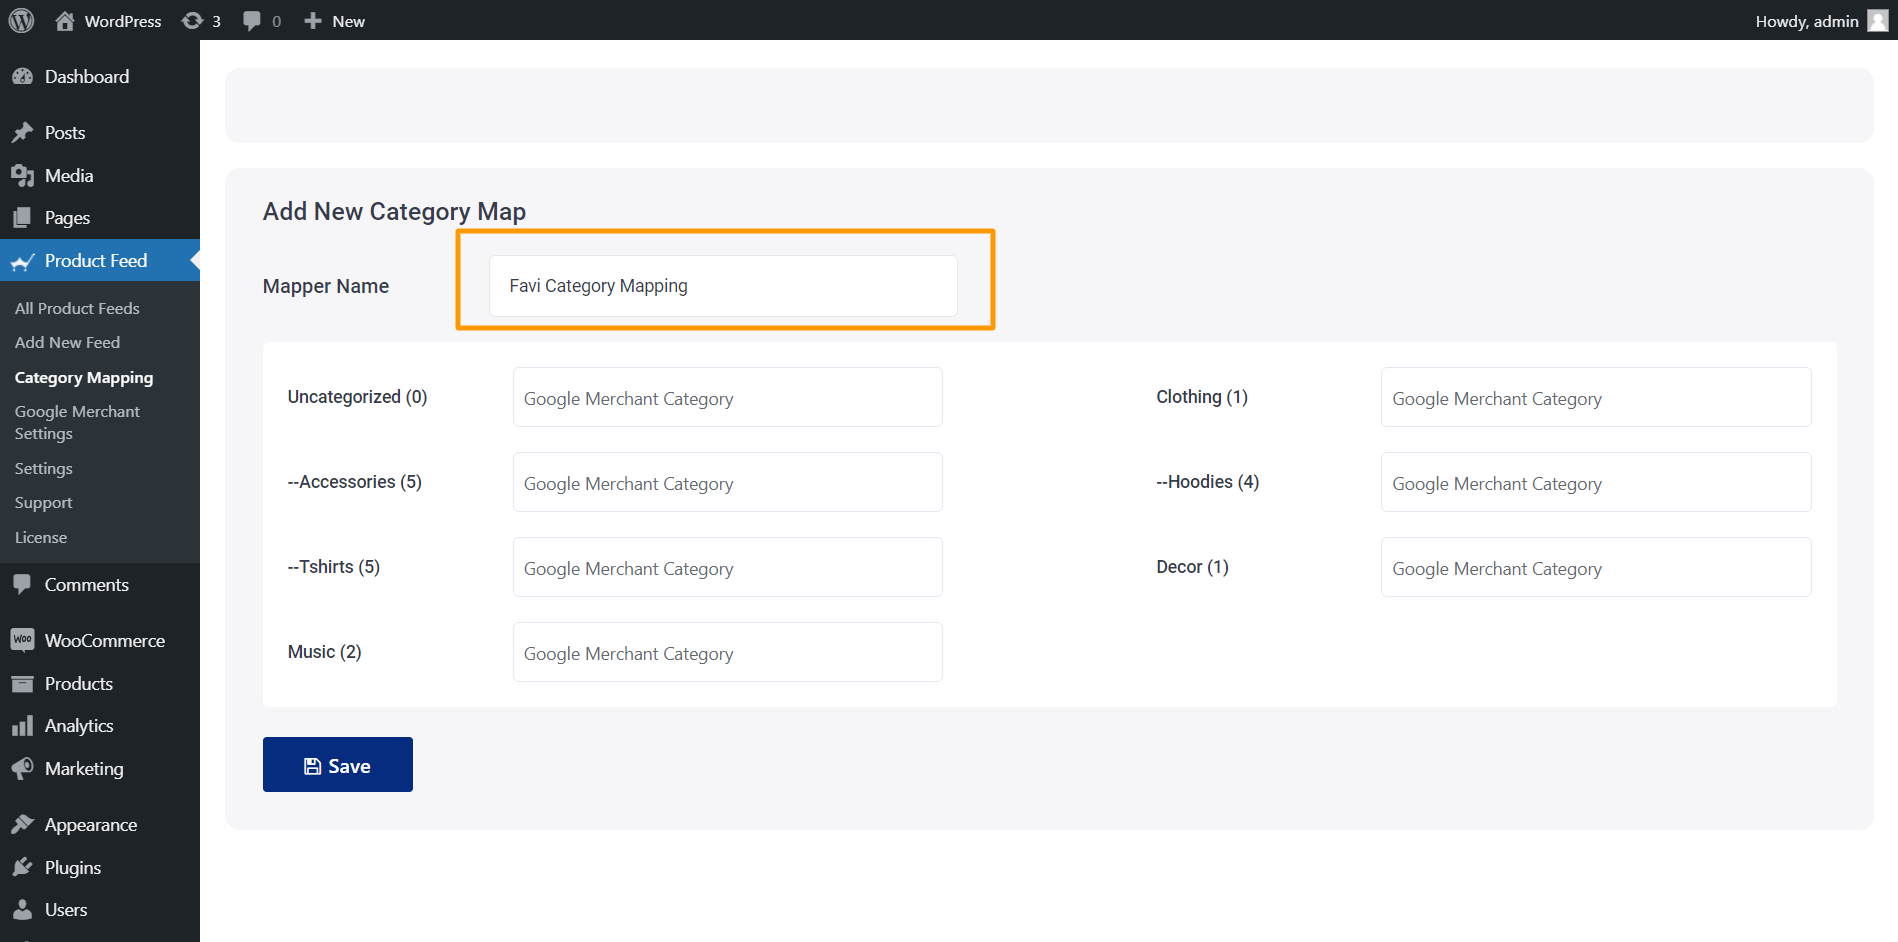
Give a Mapper Name.
Set up the category mapping.
Since Ceneo has its own category list, what you have to do is you need to find out which category in your WooCommerce store matches the category in Ceneo’s marketplace category list.
Simply visit this list and search for categories that match your store’s category. Once you find a suitable one, copy that category path, and paste it in the respective empty field beside it in your Category mapping page in the plugin.
Do the same for all the categories listed here.
Scroll down and Save it.
Now that you have saved a category mapper, it’s time to use it in the feed.
Step 6 – Assign Your Category Mapping List To The Category Attribute
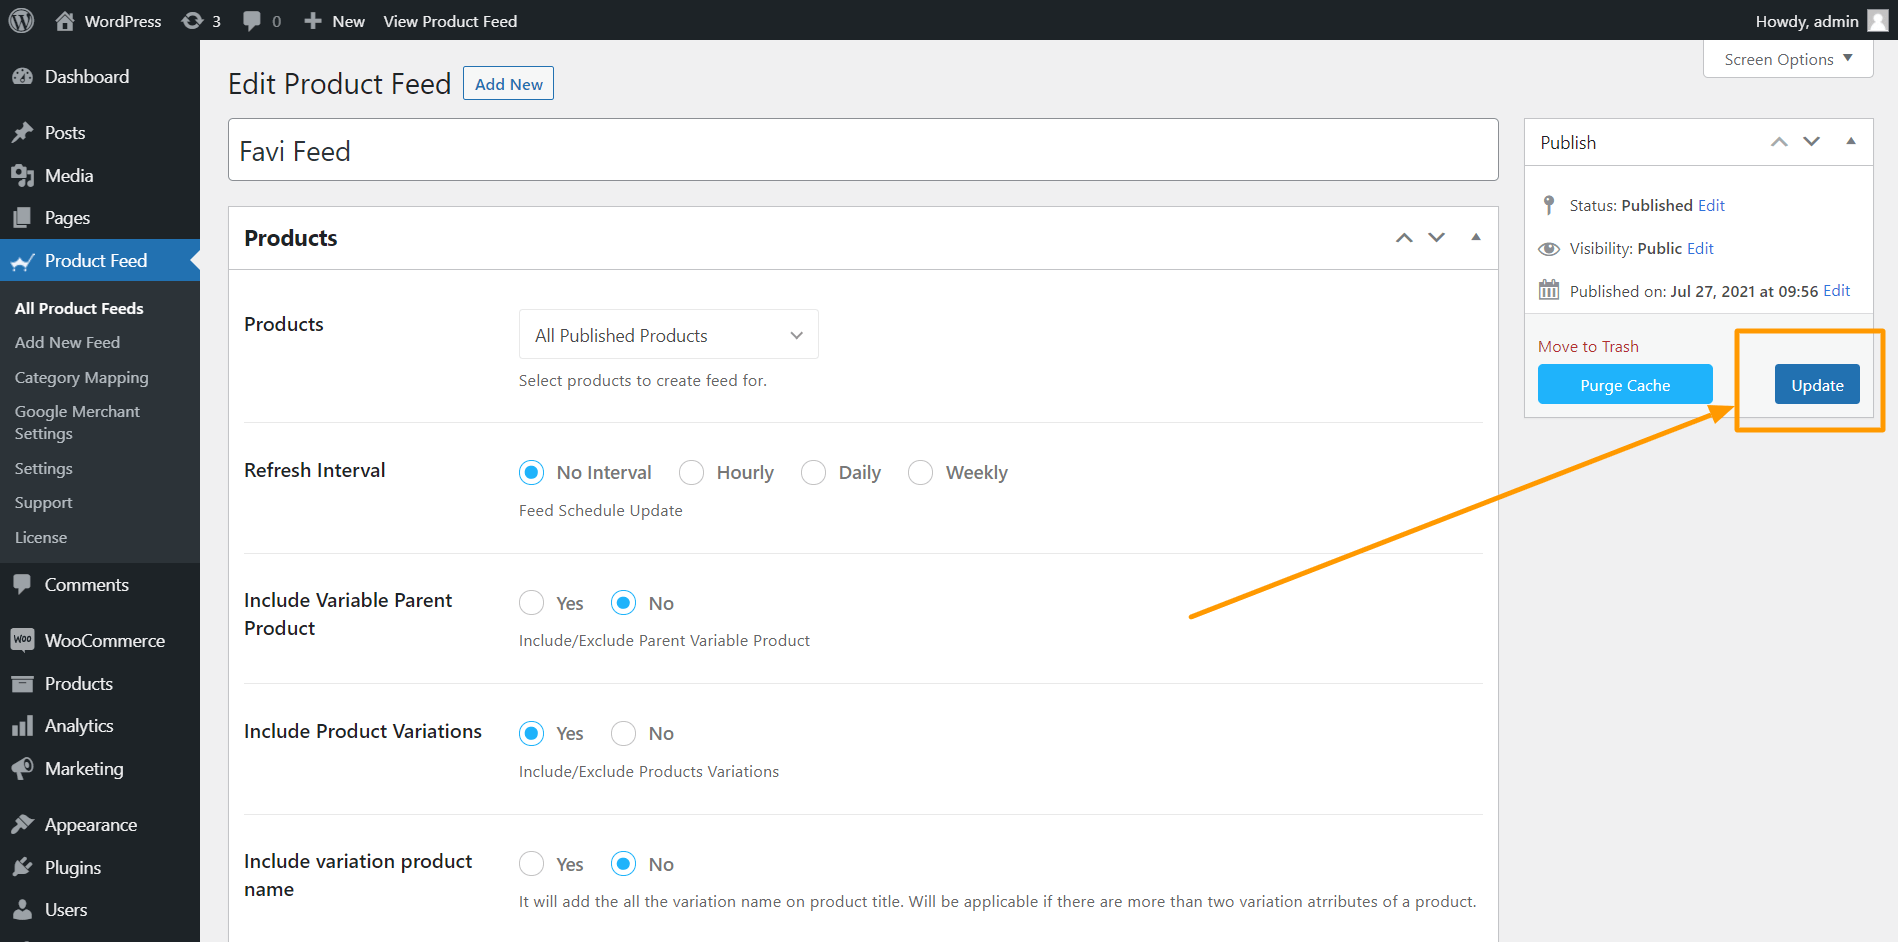
Go to Product feed > All Product Feeds and edit the feed you created earlier.
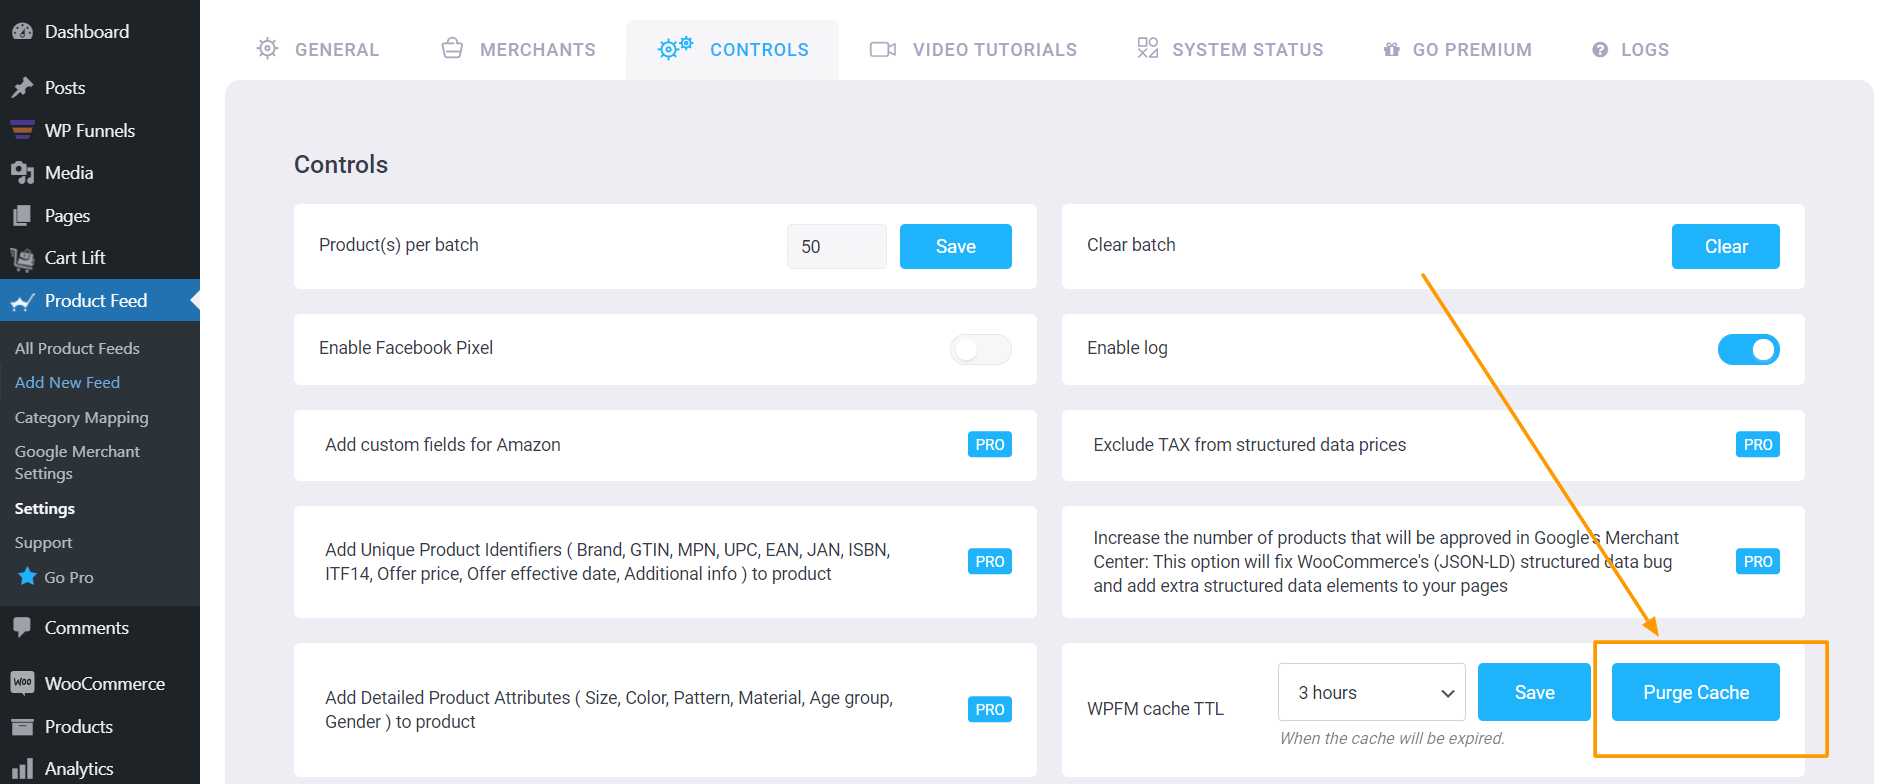
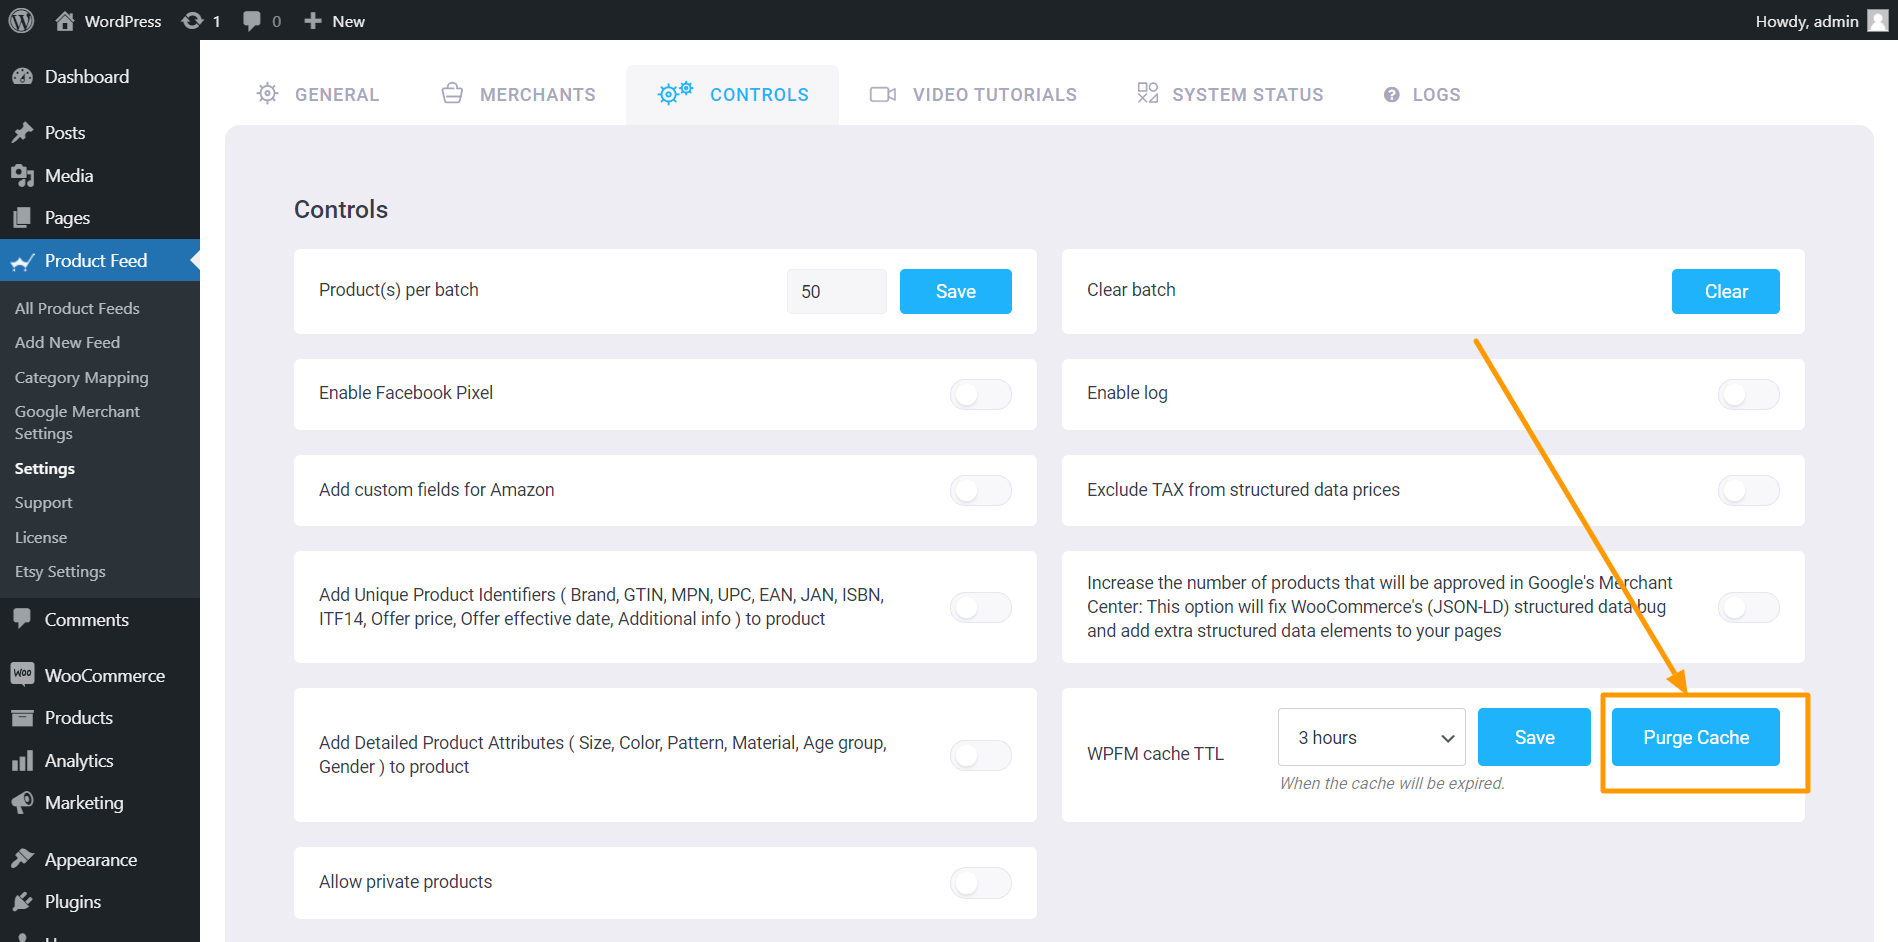
Here, first, click on the Purge cache button on the right side.
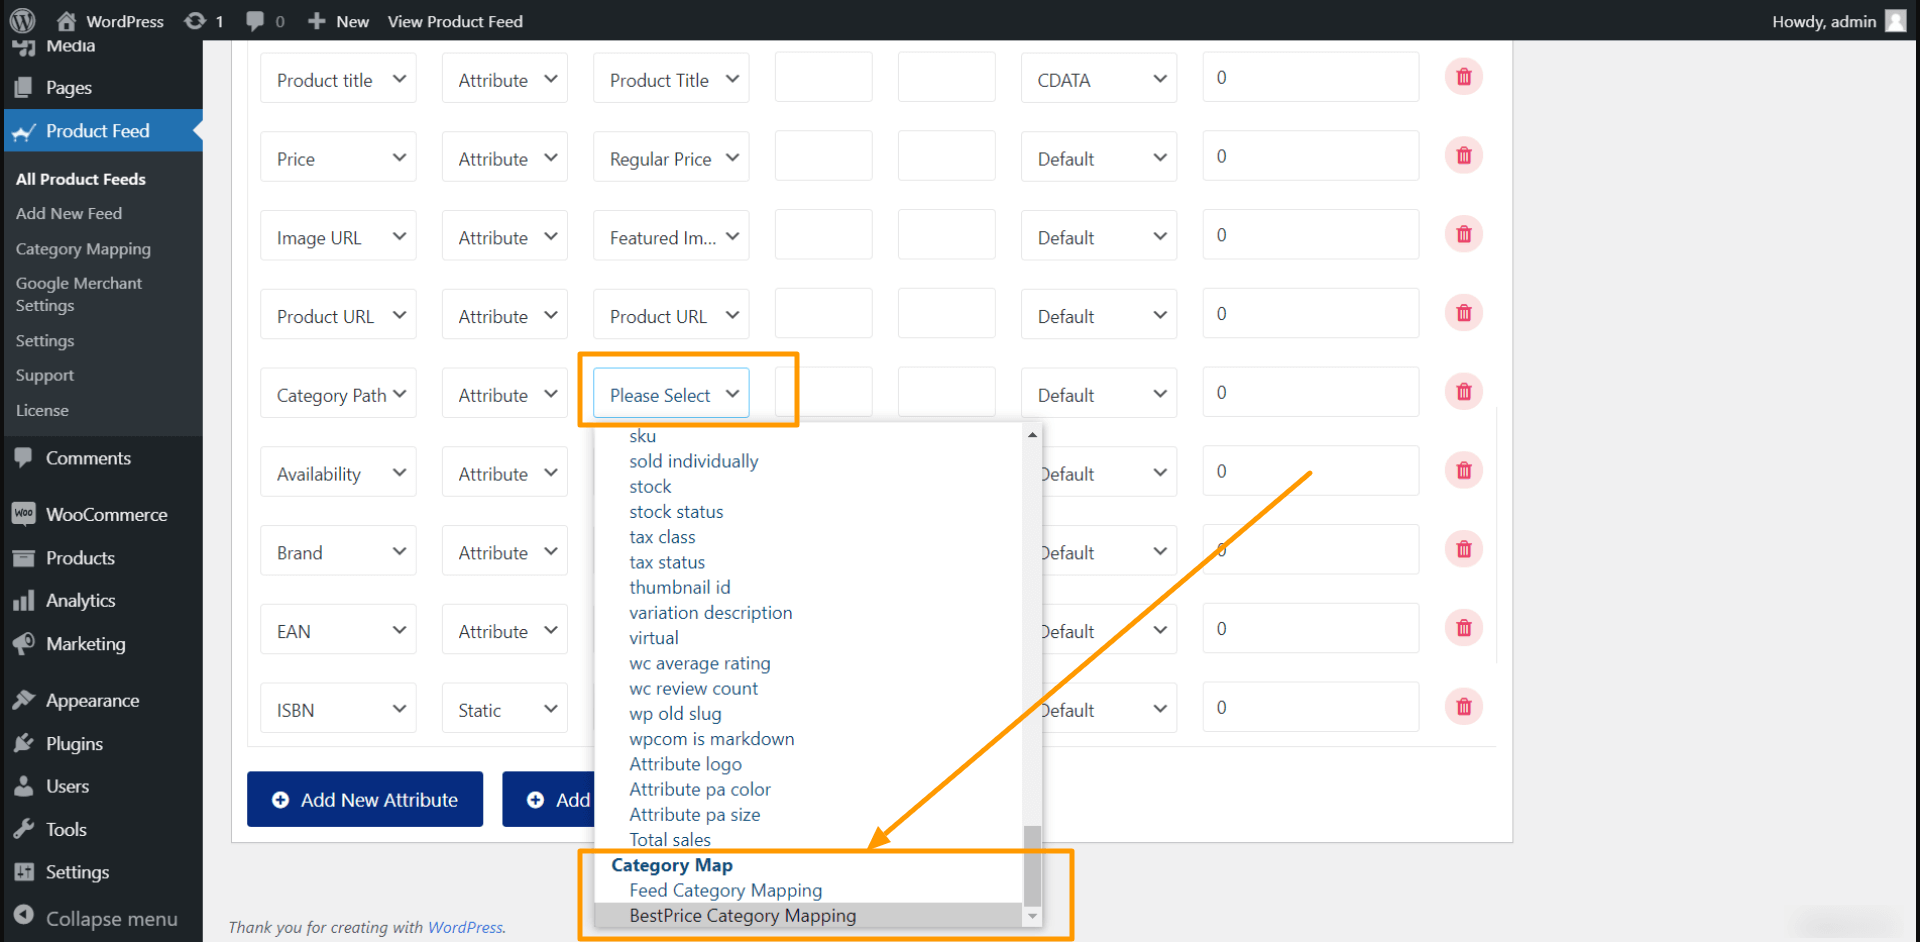
Next, scroll down to the feed configuration section. Click on the value field for Product Category and scroll down to the very bottom to choose the mapper you just created.
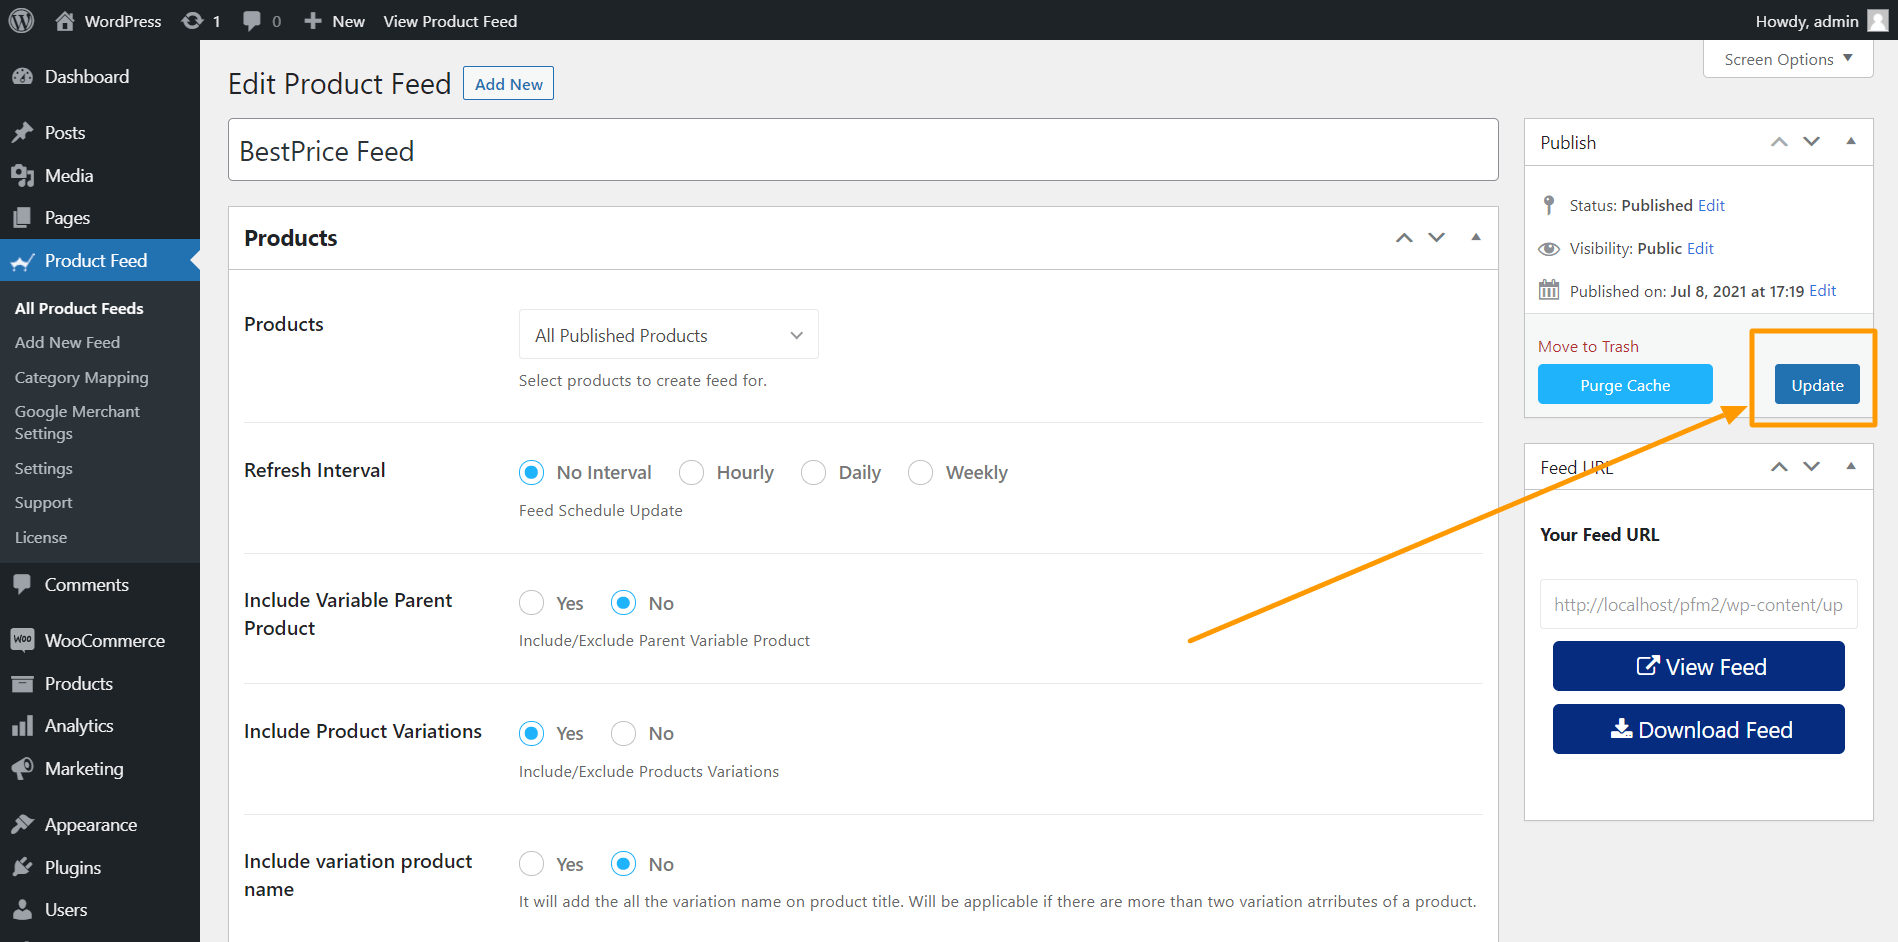
Scroll up and click on update.
Your feed will be generated, and you will be able to view or download the feed.
Step 7 – Start Promoting Your Products On Ceneo.pl
Now that you have the feed generated, the next thing to do is to log in to your Ceneo merchant account and submit the feed URL to list your products on Ceneo.
That’s it. That’s how easily you can generate a product feed and start promoting your products in Ceneo.
Conclusion
If you are a local online shop owner in Poland, then it’s high time you start promoting your WooCommerce products on Ceneo and take advantage of its huge audience.
Use Product Feed Manager for WooCommerce to generate the product feed in minutes and start boosting your sales.
Recently, online sales of furniture and home decor are on the rise in Europe.
In the Czech Republic, online Furniture and appliance sales lead to revenue growth of over 20% on average for eCommerce sites compared to 2020.
If you run a WooCommerce store to sell furniture and home decor in the Czech Republic or Slovakia, then you too can easily boost your sales.
You simply need to promote your products through a local price comparison site that can deliver a high traffic volume.
Favi is one such site that has proven to deliver great results for furniture businesses in the Czech Republic or Slovakia. It is one of the largest price comparison sites in Europe, with over 3 million monthly traffic.
And today, you will learn how you can upload your products on Favi and start getting more sales.
In this guide you will learn:
Requirements to join the Favi marketplace
The correct format to generate XML product feed
Examples of product data and attributes to include in the feed
How to generate Favi XML feed in just a few clicks.
And once you learn all these, you will be able to start promoting on Favi and boost your revenue.
Now, let us learn how you can generate a product feed so that you can upload your WooCommerce products on Favi.
Guide To Generate XML Feed for Favi Compari & Árukereső
Favi accepts feed submission in many formats – feed formats of Google shopping, Zbozi, Ceneo, Comapri, and Árukereső.
In this guide, we will explain the feed generation process for Favi Compari & Árukereső.
First, let us look at the attributes and their example values you need to submit for each product. Then you will learn how you can generate an accurate product feed in the right format using a reliable tool.
Feed Specification For Favi XML Feed With Example Values
When creating a new feed for Favi, you will need to include a few specific data in the right format.
Normally, the feed structure is as follows:
<products>
        <product>
                ---PRODUCT BASIC/REQUIRED ATTRIBUTES AND DATA HERE---
        </product>
</products>
Now, let us look at a list of the required product attributes that you should include on your product feed with example values.
Required Product Attributes For The XML Feed
The following are the mandatory attributes you need to submit for each product.
Product Attribute
Format With Example
1. Identification Number (i.e., Product ID)
This is the unique ID for a product.
Ideally, you should use the Product ID from your WooCommerce store as the value for this attribute.
<Identifier>1031</Identifier>
2. Product Name
Use a proper product name. Do not use a generic name which may lead to confusion of what this product actually is.
For product variants, you may add the variation term to the title.
<Name>Wooden double bed MERIDA, 160×200 cm</Name>
3. Product URL
This should be the URL to the product page on your site. The product page should include the product details you submit here, such as the price and description, and a button to purchase should be there.
Make sure the URL is valid and has no spaces. Also, all special characters should be submitted in HTML form, and there should not be any diacritics in the link.
Do not use commas or dots to separate thousands. They are only to be used as decimals for fractional charges.
<Price>499.99</Price>
5. Product Main Image URL
You must submit a real image of the product. It should not have any graphics, watermarks, or promotional texts.
The specifications mentioned in the description or via attributes, such as color, should match the product in the image. For example, you can not use an image of a Brown bedsheet when you mentioned it is Red.
Also, there should not be any other objects visible in the image other than the product itself. The URL should not have any spaces or diacritics, and special characters must be in the HTML format.
Use a specific category under which your product should be listed on Favi.
This should be specific to the category list from Favi themselves.
**Later, we will show you how you can map these categories in the feed without changing the category names within your WooCommerce store.
<Category>Bedroom > Beds</Category>
7. Description
Include a product description that is keyword optimized but specific to the product itself. If it’s a variant of a variable product, the description should only be about that particular variant.
Do not include any external URLs, contact info, or email address in the description.
You may use a handful of HTML tags for formating the description which includes: – <p> </p> – <b> </b> – <strong> </strong> – <i> </i> – <em> </em> – <ul> </ul> – <ol> </ol> – <li> </li> – <br> No other tags are allowed.
<Description><![CDATA[<p>This beech MERIDA double bed comes from a series of tall beds and features a central partition.<br> **Supplied without grate and mattress.</p>]]></Description>
8. Delivery Time
This is the time you take to deliver the product since order.
The accepted values for this attribute are 0, 1, 2, and 3.
Use 0 to indicate same-day delivery.
<Delivery_Time>3</Delivery_Time>
9. Product Parent ID
In case you are submitting multiple variants of the same product, then you may use this attribute to indicate that they are variants of the same product.
Ideally, you should use the Parent Product ID. of your variable products as the value for this attribute.
<GroupId>1030</GroupId>
Other Recommended Product Attributes To Include
These are some extra attributes that you may include if you want to but are not mandatory.
Attribute
Example
⬥ Manufacturer
You may submit the name of the manufacturer of the product you are selling.
<Manufacturer>Furniture One</Manufacturer>
⬥ Delivery Cost
If you want to indicate free shipping for any particular product, then you may use this attribute to mention that.
Accepted values may include FREE, gratuit, gratis, fara cost, ingyenes, ingyen, or ingyenesen.
<Delivery_Cost>FREE</Delivery_Cost>
⬥ Additional Images
In case you want to submit more images for your product, you can submit up to 8 additional images.
Use the tags Image_url_2, Image_url_3, and so on until Image_url_9.
If you have the product EAN available, then it’s best to submit it for better listing performance.
<EAN_code>142654634124</EAN_code>
Example Feed Structure Of Favi Compari & Árukereső XML Feed
<?xml version="1.0" encoding="UTF-8" ?>
<Products>
	<Product>
		<Identifier>1031</Identifier>
		<Name>Wooden double bed MERIDA, 160x200 cm</Name>
		<Product_url>https://www.yourdomain.cz/products/bed-merida-160x200</Product_url>
		<Price>1499.99</Price>
		<Image_url>https://www.yourdomain.cz/bed-merida-img1.png</Image_url>
		<Category><![CDATA[Bedroom > Beds]]</Category>
		<Description>
			<![CDATA[
				<p>This beech MERIDA double bed comes from a series of tall beds.
			 	<br>It features a central partition with a foot.<br>
				**Supplied without grate and mattress.</p>
			]]>
		</Description>
		<Delivery_Time>3</Delivery_Time>
		<Manufacturer>Furniture XYZ</Manufacturer>
		<Attributes>
		   <Attribute>
		       <Attribute_name>Material</Attribute_name>
		       <Attribute_value>solid wood, beech</Attribute_value>
		   </Attribute>
		   <Attribute>
		       <Attribute_name>Type</Attribute_name>
		       <Attribute_value>double bed</Attribute_value>
		   </Attribute>
		</Attributes>
		<EAN_code>142654634124</EAN_code>
		<GroupId>1030</GroupId>
	</Product>
</Products>
Now that you have a good idea about all the required attributes, let us look at a simple tool that can help you generate a proper XML feed for Favi in minutes.
7 Steps To Generate Favi Product Feed In Your WooCommerce Store
Manually creating an XML feed for all of your products is no longer required. You will find several tools out there that you can use to easily generate a product feed for Favi Compari & Árukereső.
In the following simple steps, I will show you how you can generate a product feed for Favi using Product Feed Manager for WooCommerce. It is one of the most efficient plugins to use and you will get a pre-built template to generate Favi XML feed in just a few clicks.
Follow these 7 quick steps below to use the plugin easily and generate Favi product feed real quick.
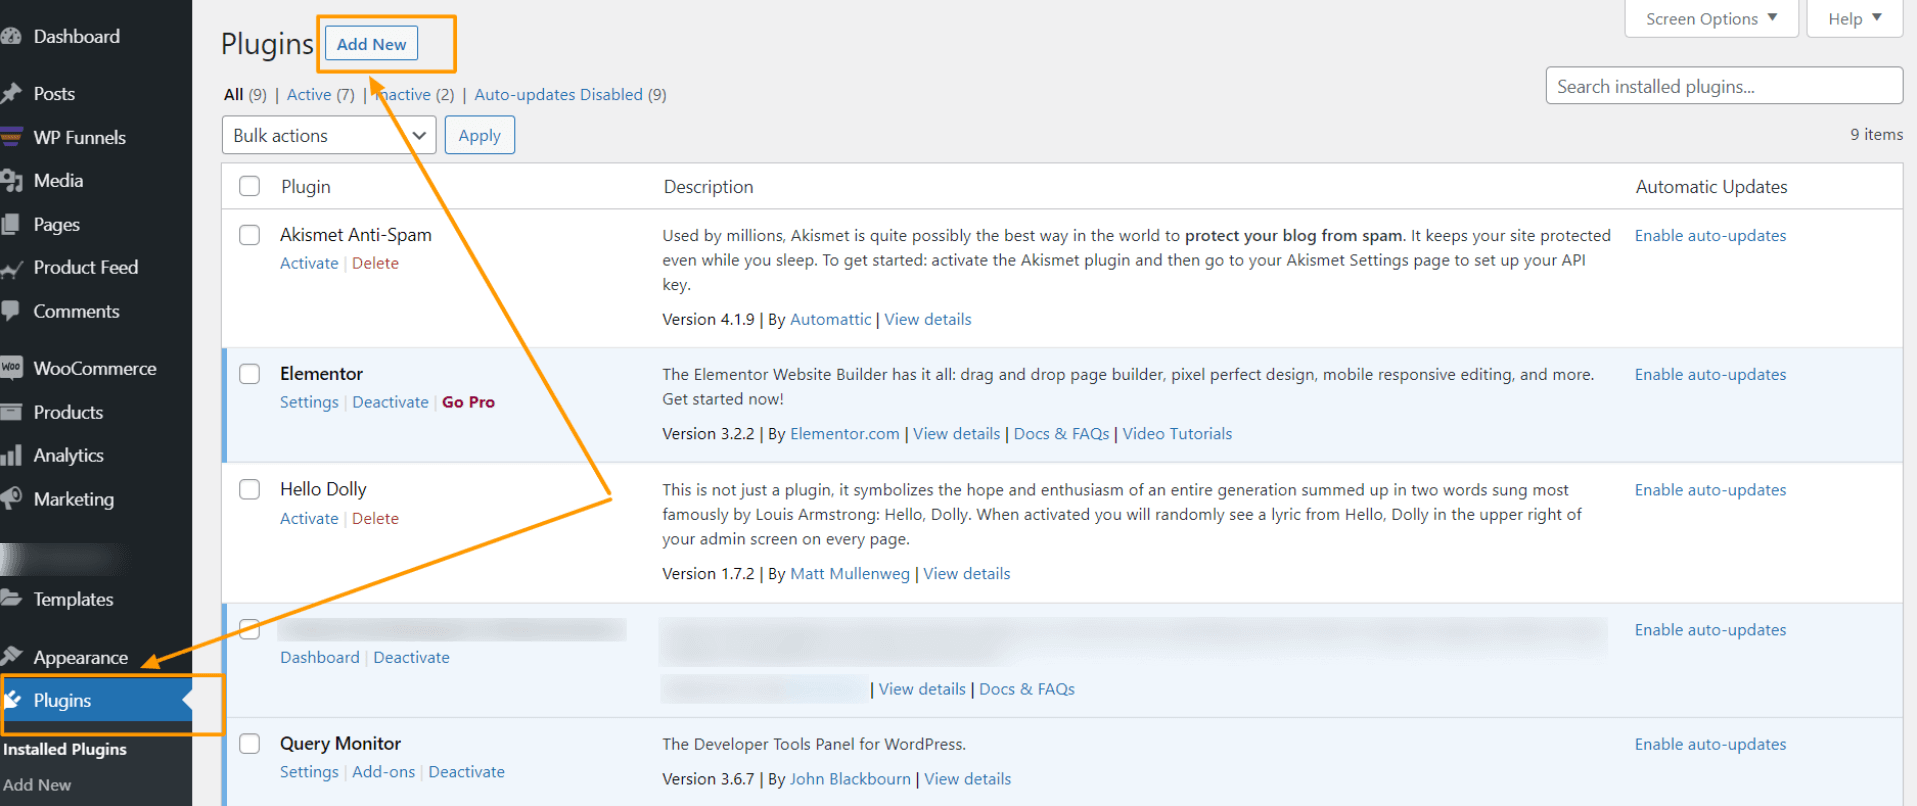
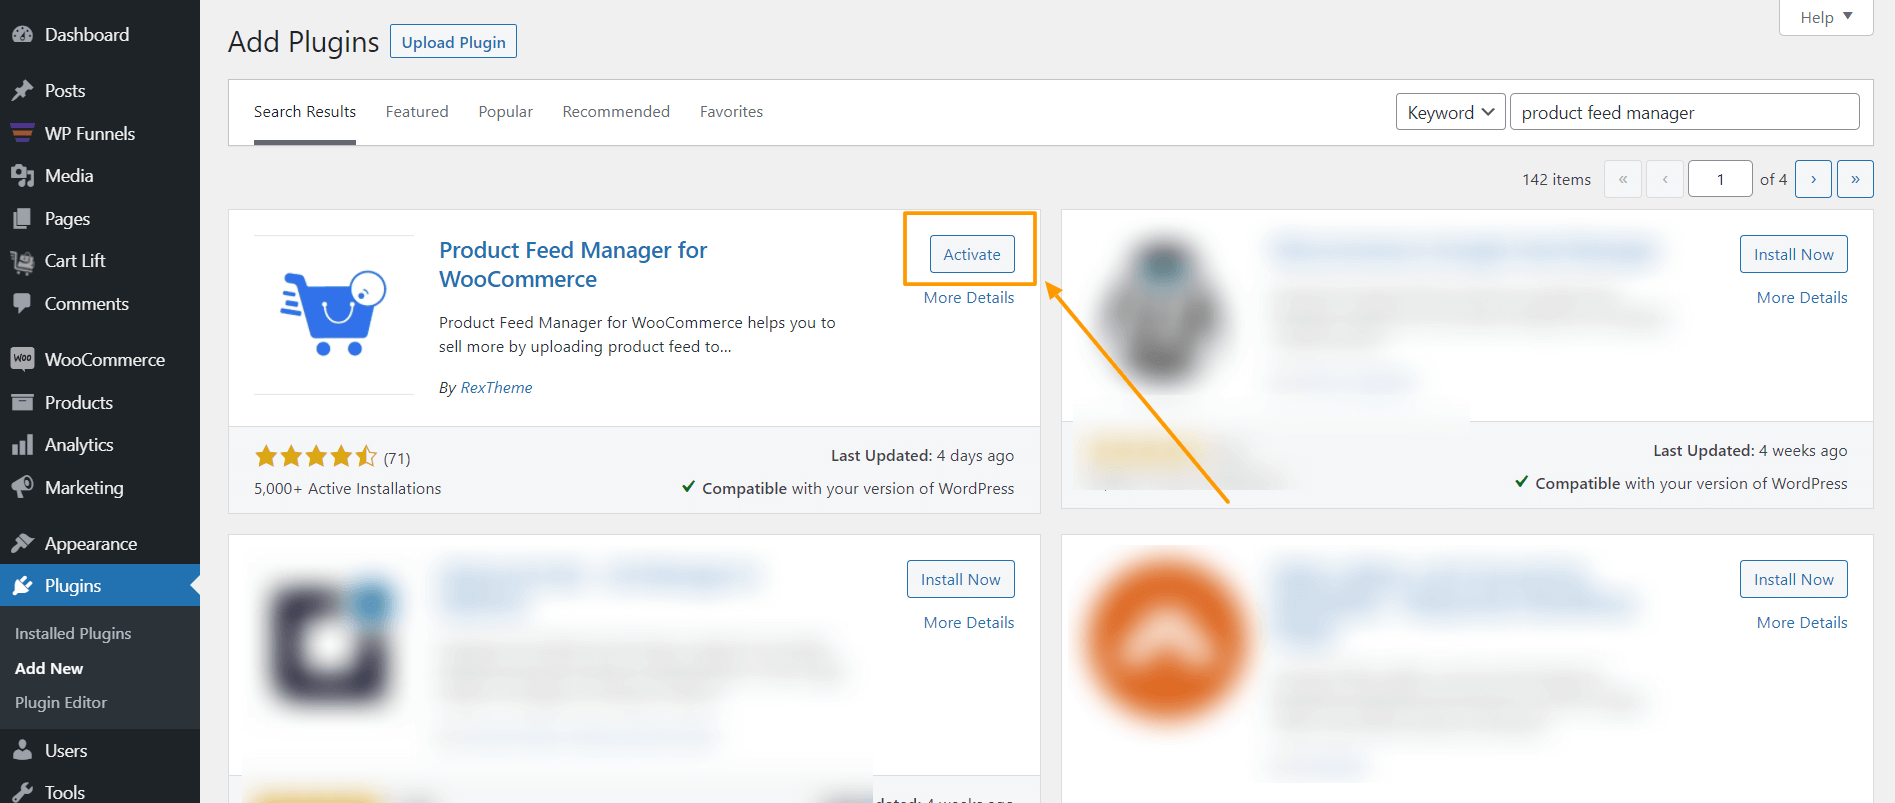
1. First, go to Dashboard > Plugins and click on Add New.
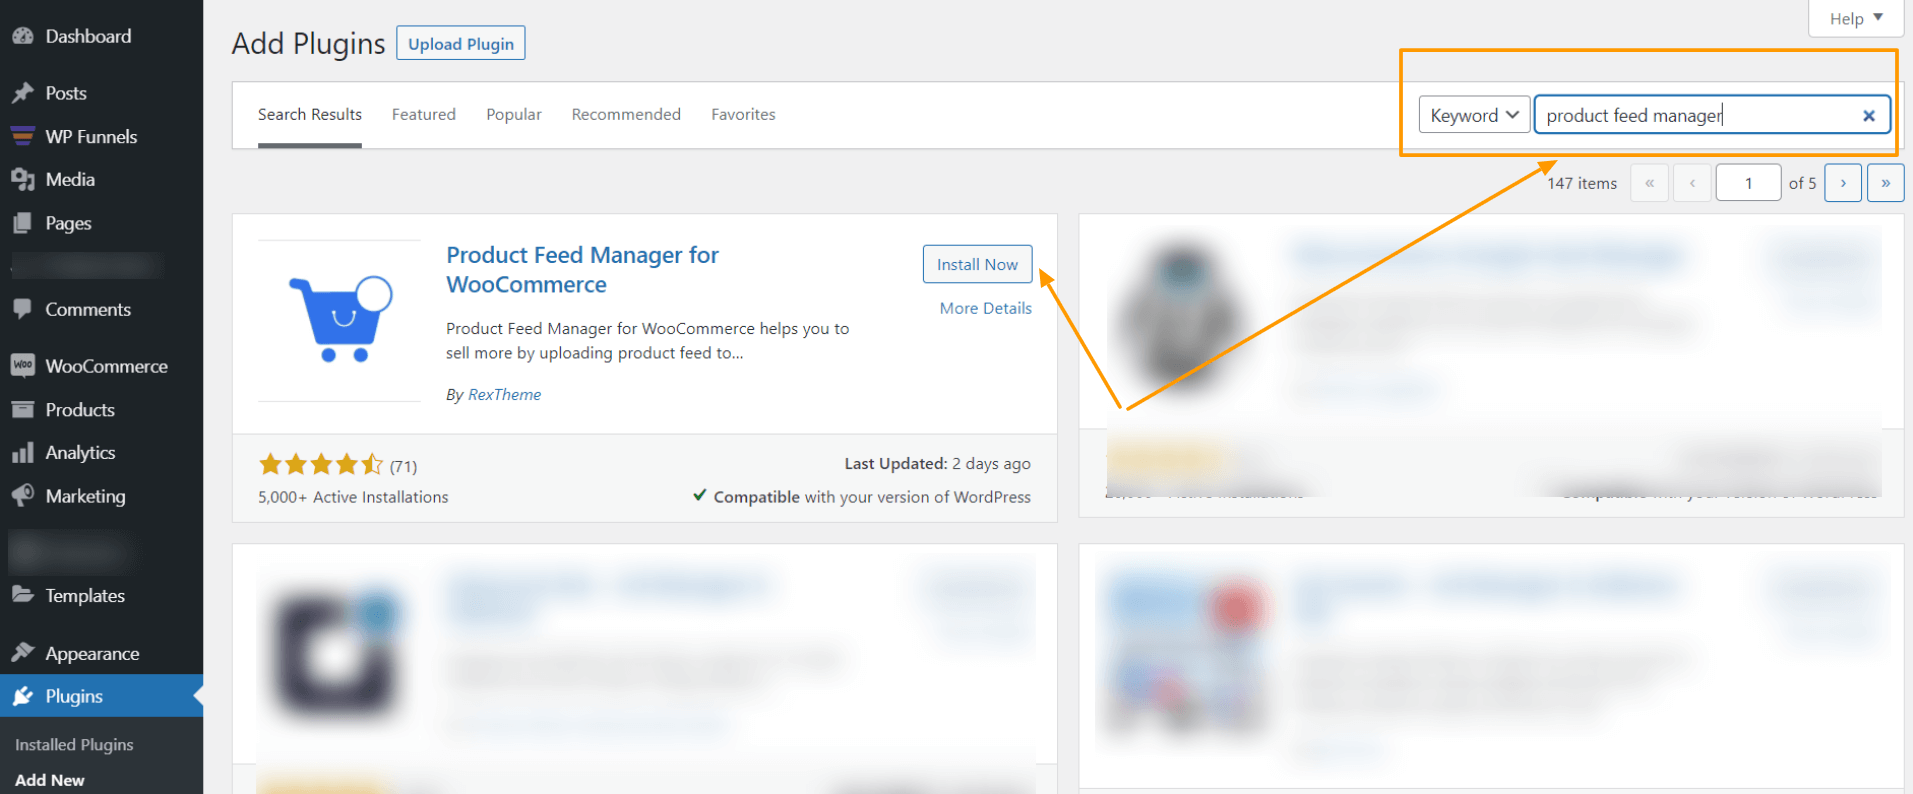
2. On the search box, type “Product Feed Manager” and you will find the plugin with a blue cart icon.
3. Click on the Install Now. Then click on the Activate button to activate the plugin.
Once activated, you will find the Product feed menu on your dashboard menus.
Step 2 – Import FaviTemplate For Feed Generation
1. On your dashboard, click on Product Feed and then click on Add New Feed option.
It will take you to the feed creation page.
Here, on the top you will get an option to give a name to your feed, you can skip it too.
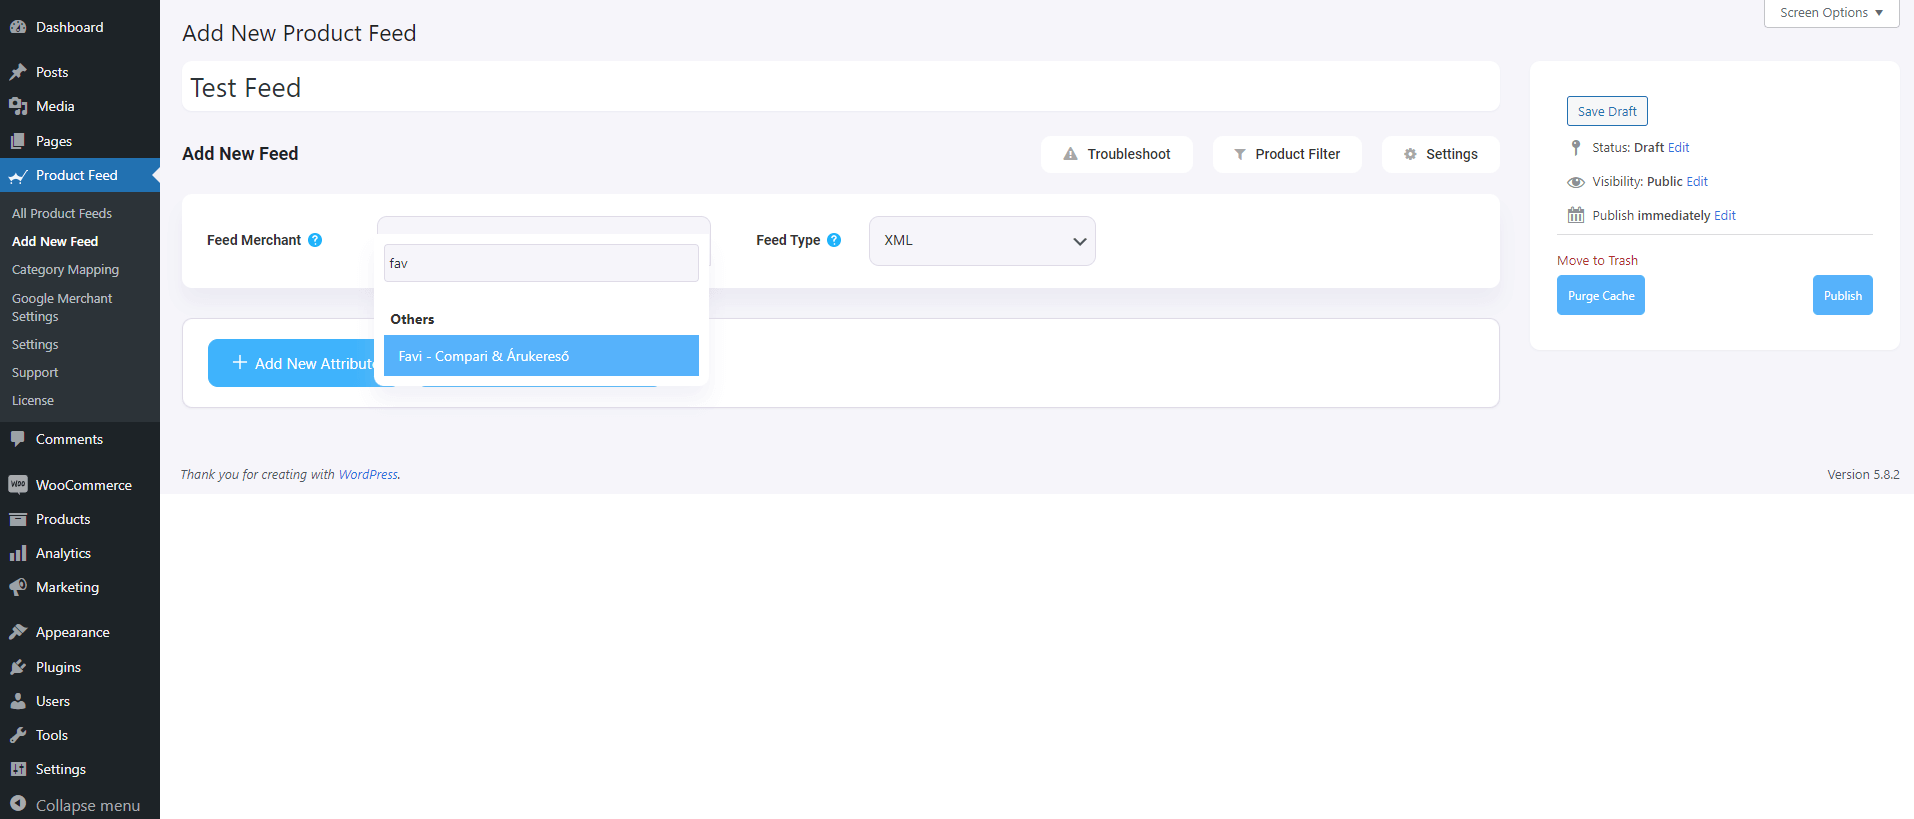
2. Click on the Feed Merchant Dropdown and you will get the list of all the supported merchants.
You can scroll down this merchant dropdown list or you can type Favi in the search box, and you will get the Favi option in the list.
Select Favi, and all the required attributes of Favi will be loaded below.
Step 3 – Create A New Product Feed
Now, you can see three buttons under the Feed Title text box, Troubleshoot, Product Filter, and Settings.
1. If you are having any issues generating feed, click on this Troubleshoot button, it will take you to the Troubleshoot page, which could be helpful for you.
2. If you want to use any filter or condition, you can click on the Product Filter option, and a drawer will slide in from the right side of the window, and there you will get the following filters:
All Featured Items
Custom Filter
Category Filter
Tag Filter
Product Filter (Pro)
You can select any filter option and use them as per your need and click on the Close button when done.
3. Now, to schedule your feed or to choose which type of products will be included in your feed, click on the Settings button, and you will get a list of options to exclude or include products.
Change the options as per your need and click on the Close button when done.
Step 4 – Use The Favi Compari & ÁrukeresőXML Feed Template
1. If you look at the Feed Merchant dropdown button, there you will get another dropdown “Feed Type”, you can click here to set the type of this feed. You can set different types of feeds depending on what types of feeds this merchant supports or what types of feeds this Product Feed Manager has the support for.
For Favi, XML will be selected by default.
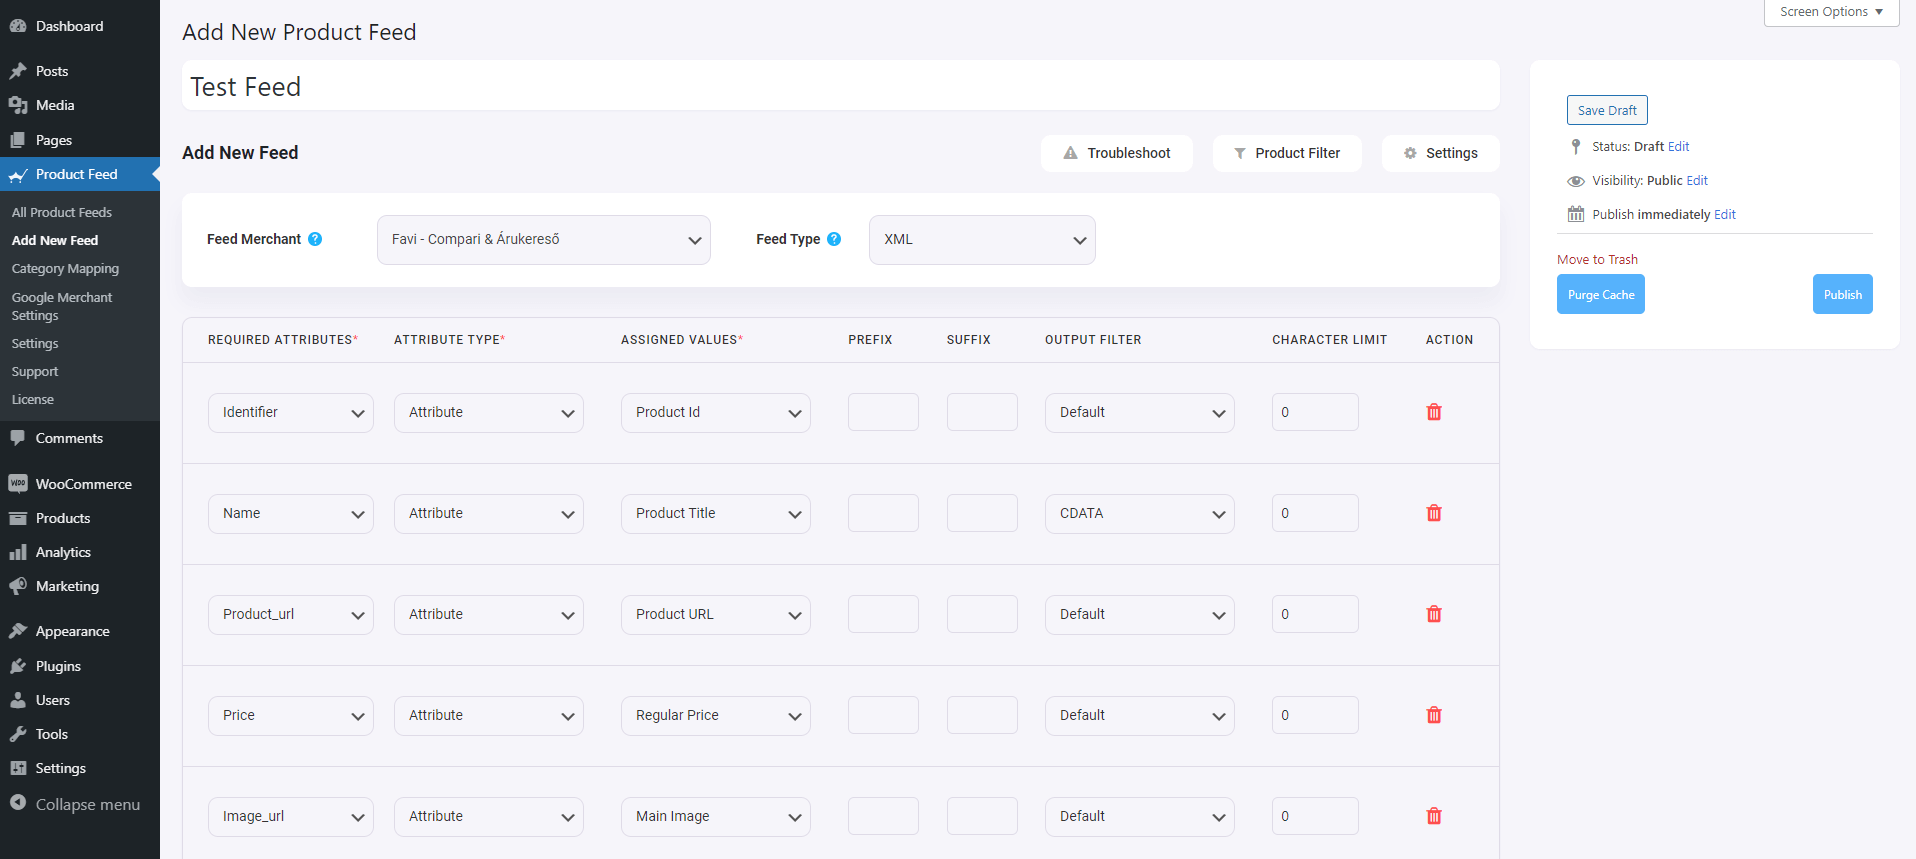
2. Now, in the attributes section, you will see that all the attributes are under the Required Attributes column, and their values are set according to the attributes under the Assigned Values column.
You can change any values to any attributes, simply click on the value dropdown, and select your preferred value.
All the required attributes will appear below. Now, most of the attributes will already be configured but notice that some of these attributes are unassigned.
Step 5 – Assign The Right Values To Unassigned Attributes
You simply need to configure the following:
Category – You will need to set up Category Mapping for this. So for now leave it as is. You will work on this on the next step.
Delivery_Time – You may use a static value of 0, 1, 2, or 3 to indicate the delivery time. – Or ifyou have different delivery time for different products, then you need to save that value in a custom feed in WooCommerce anduse that value here.
Manufacturer – If you are the manufacturer or if all the products are manufactured by the same company, then use a Static value here. – If different products have different manufacturers, then you can either save them on custom fields within products and use that value, add them as WooCommerce attributes for products and use them as values here, or use the plugin Perfect Brands for WooCommerce to assign the manufacturers to the products and then use that value here.
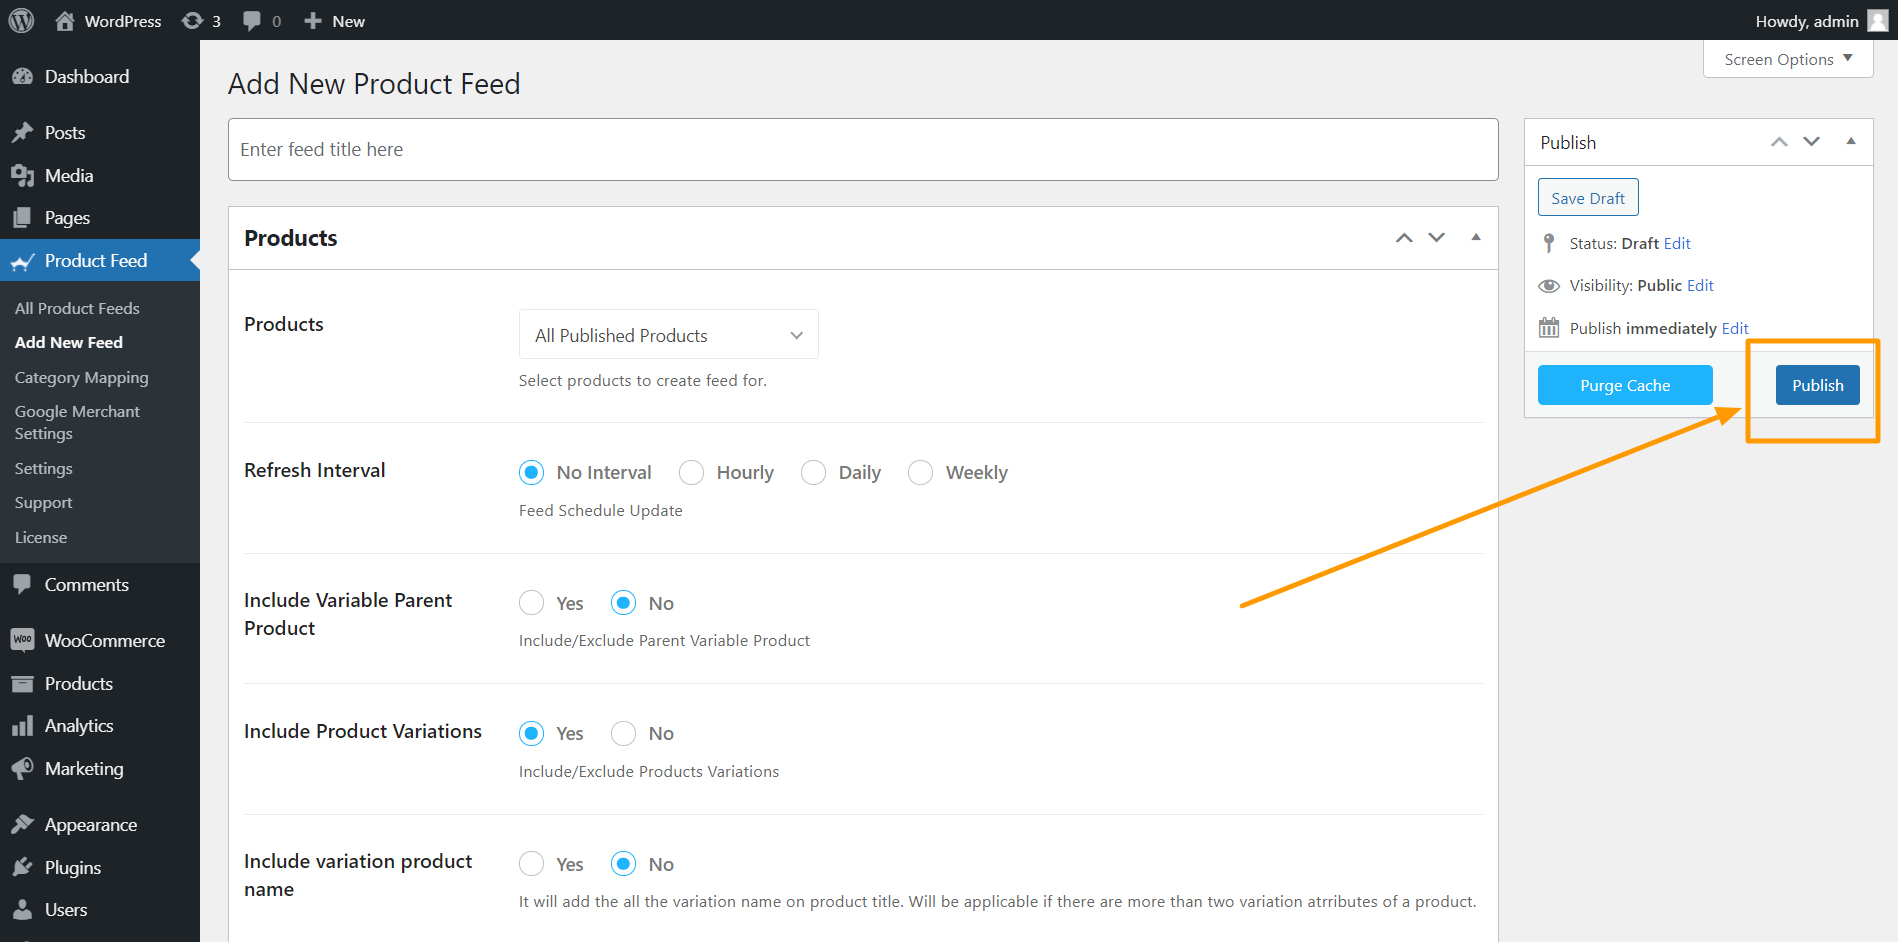
Step 6 – Publish & Setup Category Mapping
1. Scroll up and click on Publish.
The feed will be generated, but the category is not configured yet.
2. Now, go to Dashboard > Product Feed > Category Mapping.
Here, you can see all the categories in your store are listed.
3. Give a name to this Category Map
4. Map these categories according to Favi’s category list. **To find the accepted category list for your store, click here. – For every category in your store, search for appropriate category in Favi’s category list. – Copy that and paste it in the field beside your store’s category. Do this for all the categories there.
5. Then click on the Save button below.
Step 7 – Finalize Feed Generation
1. Go To Product Feed > All Product Feeds and edit the feed you created just now for Favi.
2. Once on the edit mode, on the right side, click on Purge Cache.
3. Now, scroll down to the feed configurations section and click on the Value field for Category.
4. Scroll to the very bottom and you will find the Category Map that you just created. Select it.
5. Now scroll up and click on Update
And that’s it. Your feed generation is complete.
Once the feed is generated, you may now review your progress on meeting the requirements, and go ahead and register on Favi.
Conclusion
Favi has made a significant impact in increasing revenue for many local furniture brands and it’s time you take advantage of this reliable price comparison platform yourself.
As you just saw how easy it is to generate an XML feed, you can use Product Feed Manager for WooCommerce and start promoting your WooCommerce products on Favi real quick.
Running an eCommerce business can be difficult. However, one of the best ways to increase your sales fast is by promoting your products on large marketplaces.
Rakuten is one such marketplace that you can rely on. With more than a billion active users across 30 countries, Rakuten is one of the top merchants that can help you boost your sales without much effort.
And if you use WooCommerce, then it’s super easy to list your products on Rakuten marketplace.
All you need is to create a Rakuten product feed with the right attributes and upload your products to the marketplace. And soon enough, you will start to get more potential buyers visiting your site.
In this guide, you will get step-by-step instructions on creating a product feed accurately for the Rakuten marketplace.
After reading this guide, you will learn,
The required attributes to include on the product feed
Examples of product data to submit for each attribute.
How to generate Rakuten product feed in just a few clicks.
First, let us learn about all the required data for each product that you need to include in the product feed. Then we will look at how you can generate this product feed in the right format.
Product Data Specification For Rakuten Product Feed
A product feed for Rakuten is usually generated in CSV format. But you can also use TXT or TSV formats to submit your product data.
Required Product Attributes To Submit to Rakuten
The following are the mandatory attributes for each product:
Attribute Header
Instructions
Example
id
This acts as a unique identifier for a product. You may use your WooCommerce product ID or product SKU as the value for this attribute.
102
title
Include the name of the product (no more than 70 characters).
Pullover Hoodie with Logo
brand
Assign a brand name to the product you want to list on the Rakuten marketplace.
If you are the manufacturer, then you can assign your own company name as the brand name.
Lacoste
description
Include a short description of your product with details of its use and benefits.
This pullover hoodie is made from 100% organic cotton for extreme comfort. With the latest generation style and mesh lining, this hoodie is will make you feel special, while still maintaining comfort.
google_product_category
You also need to submit a category from Google’s taxonomy list, to which this product is relevant.
Submit the actual price of the product. If you have a discount running, then submit the regular price for this attribute, and use the sale_price attribute to submit the discounted price.
Include the currency as the suffix.
45.00 EUR
availability
Include the stock availability, i.e., if the product is still in stock for purchase.
*Accepted values: – in stock – out of stock – preorder – backorder
in stock
gtin
GTIN is a unique product identifier that you must include in the feed.
This represents all other forms of identifiers as well, such as UPC, EAN, JAN, and all forms of GTIN.
401234512343
mpn
Also, submit the MPN, which uniquely identifies a specific product among all products from the same manufacturer.
HSC0424PP
condition
Mention the condition of the product you are selling.
*Accepted values: – New – Refurbished – Used
New
gender
It is mandatory to mention the target gender for which your product is suitable.
*Accepted values are: – Male – Female – Unisex
Unisex
age_group
You also have to submit the age group of the prospects your products are suitable for.
*Accepted values: – Adult – Kids
Adult
product_type
This attribute represents the product category you have assigned to your products in your WooCommerce store.
*It is highly recommended to submit this attribute for better search results, but it’s not mandatory.
Men’s Hoodies
item_group_id
If you have variable products, then you need to include a common item_group_id for every variant of the same product. It is basically the ID or the SKU of the parent product.
1001
Conditional Required Attributes To Include In The Feed
A few attributes are not always required but are often mandatory to submit based on certain conditions. Let us look at these attributes in detail.
Attribute Header
Instructions
Example
sale_price
This attribute is only required if you have a discount running on your store. In that case, include the discounted price as the sale price in the feed.
35.00 EUR
color
The color attribute is mandatory for products that fall under the Apparel category, but you may use it for products in other categories as well.
Also, if you have variable products that vary due to color, then you must submit the color attribute.
Red
size
You must submit the size attribute for products that fall under the Apparel category. You may choose to use it for products in other categories as well.
Also, if you have variable products that vary due to size, then you need to submit the size attribute.
XXL
material
You need to submit this attribute for variable products that vary due to the pattern (or graphic design).
Leather
pattern
For variable products that vary due to the pattern (or graphic design), then you must submit this attribute.
Stripped
shipping_weight
In your merchant center, if you set up a rule for shipping cost based on the shipping weight, then you must submit this attribute.
*You may submit the unit as a suffix, which has to be the same as you set up in your merchant center.
1.2 kg
adult
If you are selling any type of adult product, i.e., items or images containing nudity or suggestive content, you must submit this attribute for those products.
*Accepted values: – yes – no
yes
Other Optional Attributes You May Choose To Submit
Apart from the attributes above, there are a few more attributes that you may choose to submit if required or applicable.
Attribute Header
Instructions
Example
sale price effective date
If your product is on sale and its sale price has a limited time, you can use this attribute to mention the date and time when the sale will expire.
**This attribute is not mandatory, but you may use it when required.
2022-10-29T23:07:31+0100
additional_image_link
If you want to submit additional images for your products, you can submit the links to your products under the additional_image_link attribute, separating the image links by commas.
Usually, you need to set up the tax rates in your Merchant Center account. But if you want to submit a unique tax rate for certain products, then you can use this attribute to do so.
15
shipping
You need to set up the shipping cost for your products in your Merchant Center account. But if you want to submit a unique shipping cost for certain products, then you can use this attribute to do so.
3.99 EUR
multipack
If you want to sell multiple quantities of the same product at a single price, then you can submit that quantity as the value for the multipack attribute.
For example, you may choose to sell 6 t-shirts as a multipack. In this case, the price should be the total cost of the pack, i.e., in the case of the 6 t-shirts, the price should represent the total cost for all six t-shirts.
6
Example Feed Structure Of Rakuten
Here’s an example of a Rakuten CSV feed. You may download it and view it using a CSV viewer.
Now that you have a complete understanding of how the Rakuten feed works and what required attributes you need to include in your product data, let us look at how you can generate a product feed for Rakuten easily.
7 Easy Steps To Generate Rakuten Product Feed In Your WooCommerce Store
First of all, you do not have to create a CSV feed for all of your products manually. Right now, there are several tools out there that you can use to generate a product feed for Rakuten easily.
In the next few steps, I will show you how you can generate a product feed for Rakuten using Product Feed Manager for WooCommerce. It is one of the easiest plugins to use and has a pre-made template with all the necessary attributes to help you generate Rakuten CSV feed in just a few clicks.
Follow these 7 easy steps to learn how to use Rakuten feed template, and get your CSV feed ready real quick.
Step 1 – Install & Activate Product Feed Manager
1. Go to Dashboard > Plugins and then click on the Add New button.
2. Type “Product Feed Manager” on the search box, and you will find the plugin on the search result.
3. Click on the Install Now button.
4. Then click on the Activate button to activate the plugin.
Once you have the plugin activated, you will find the menu, Product feed, among your dashboard menus.
Step 2 – Import Rakuten Template & Map Attributes
1. On your dashboard, click on Product Feed.
2. Next, click on Add New Feed button.
You will be taken to a blank feed generation page.
3. On top, you will get the option to add a title to the feed. Give your feed a name.
4. Just under the title, you will see an option to select your preferred merchant. Simply click on the Feed Merchant dropdown button and select your preferred merchant from the dropdown or you can search in the dropdown box.
Select your preferred merchant, and all the required attributes will be loaded below.
Select Rakuten from the dropdown list.
**Please note that for Rakuten you can only create CSV, TXT, or TSV feed, you can choose your preferred feed format from the Feed Type file format selection dropdown next to the Feed Merchant dropdown option.
Here, we will create a CSV feed for Rakuten, so let’s select CSV from the Feed Type dropdown option.
3. You can see that most of the attributes are already configured – their values are assigned properly, you can change the assigned values as per your need or you can keep them as it is.
However, you need to assign the rest of the attribute values manually.
For Rakuten, you need to assign values for the following attributes:
Brand – This should be the Brand name of the product you are selling. If you are the manufacturer, you can set the type as Static and input your company name here. If you have different brand names for different products, you will have to save the value in a custom field or product attribute and then use that value here. **You may also use Perfect Brands for WooCommerce to assign brands, which you can use in the feed.
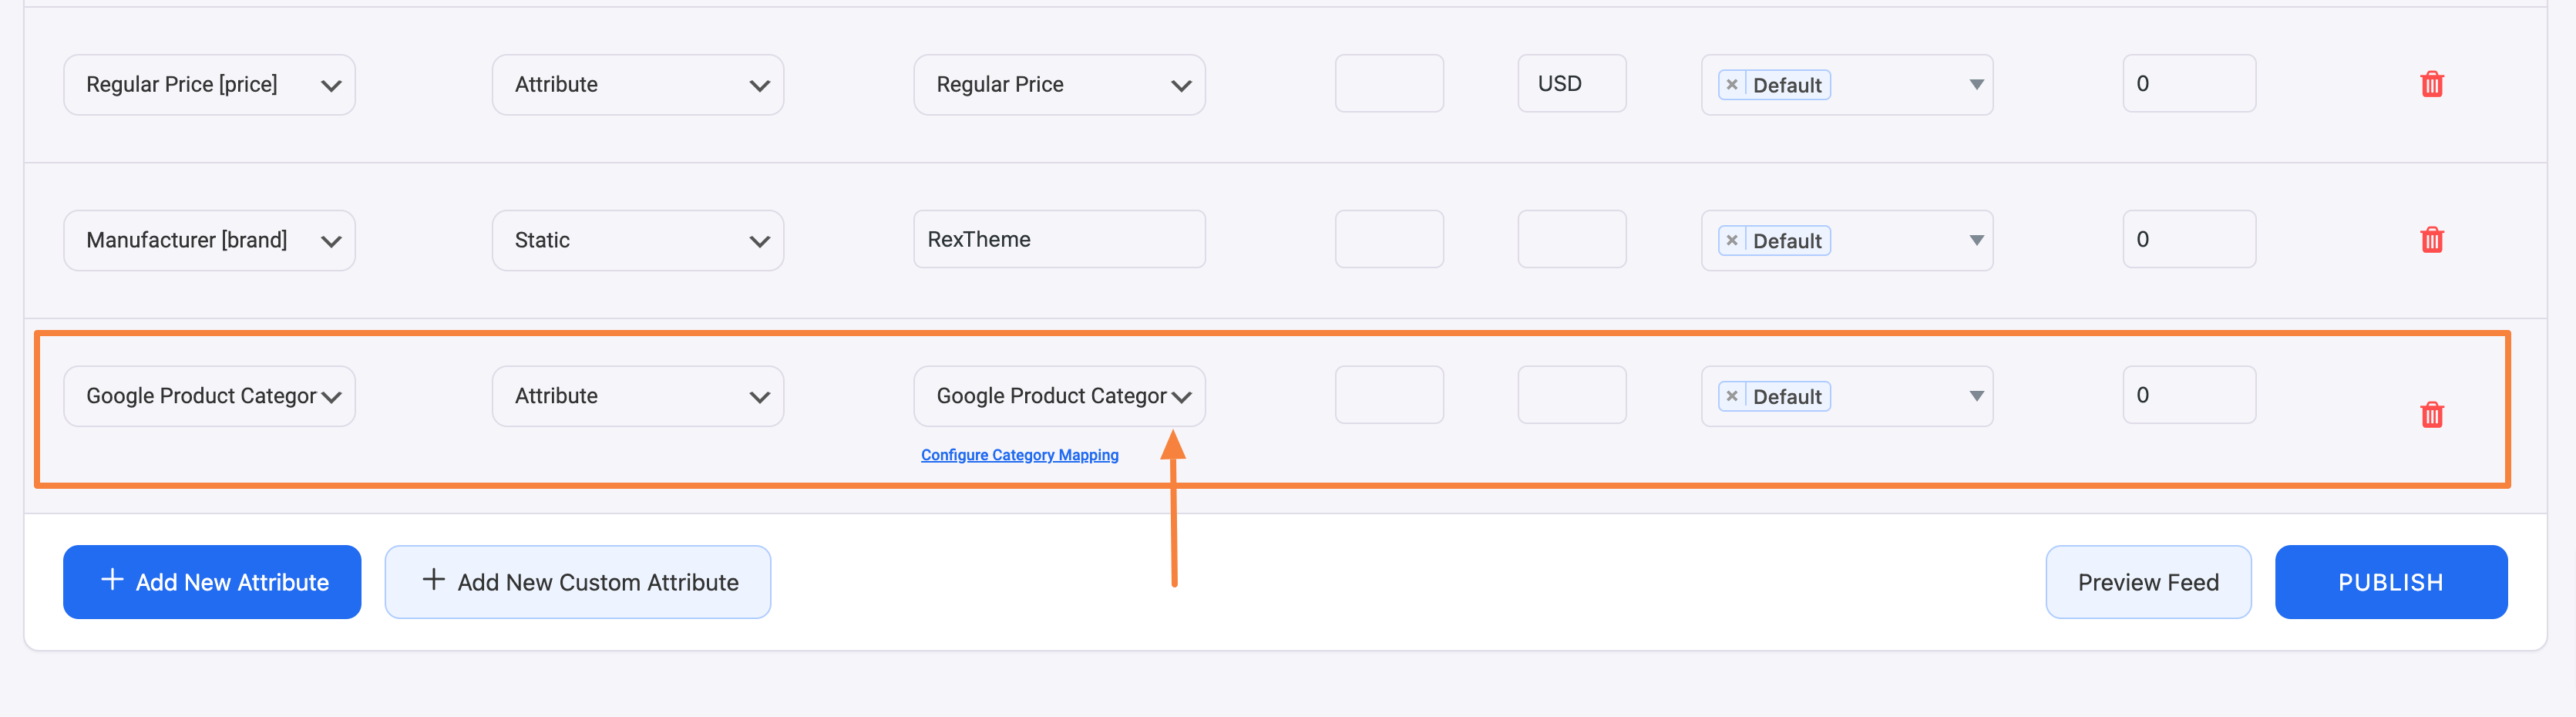
Google Product Category –
Category Mapping is basically merging your WooCommerce product categories with the Google product categories.
You can configure category mapping in two ways. The first one is that you can use a pre-made category mapper, which is created for Google Shopping by default – you can use this for Facebook or other marketplaces too. And the second one is creating a new Category Mapper.
To use the default category mapper which was created for Google simply select the Googe Product Category mapper from the Category Mapping dropdown value:
This is an empty Category Mapper. Click on the Configure CategoryMapping button which you will find under the Category Mapping value, and a new tab will be opened with the default category mapper – Google Product Category. Map your categories here and click on the Update and Close button to go back to the attribute section.
However, you can create a new Category Mapper too. You need to click on the Category Mapping button from the WordPress dashboard and there you will get the option to create a new Category Mapper and to configure the mapper.
You can follow this doc to learn how to create a new Category Mapper for your feed.
GTIN – This is usually unique for each product. So you have to save this value in a custom field within each product and use that value here.
MPN – The MPN should be unique to each product. So you have to save this value in a custom field within each product and use that value here.
Age Group – The demographic for which your product is intended. The only two accepted values of this attribute are Adult, and Kids.
Gender – The gender for which your product is intended. Three predefined values are accepted: Male, Female, and Unisex.
Step 4 – Basic Configuration Settings For The Feed
1. Scroll up to the top and here, you will see that there are two options, Product Filter and Product Settings.
Products Settings
Product Filter
2. First, let us configure the features in the Product Settings. Click on the Product Settings button, and a drawer will open from the right side of the screen.
3. The first option you will see is Auto-Generate Your Feed.
This option is used to schedule an auto-update of the feed after certain intervals. Choose an option to set an auto-update or leave it as “No interval” if you do not want to set an auto-update of the feed.
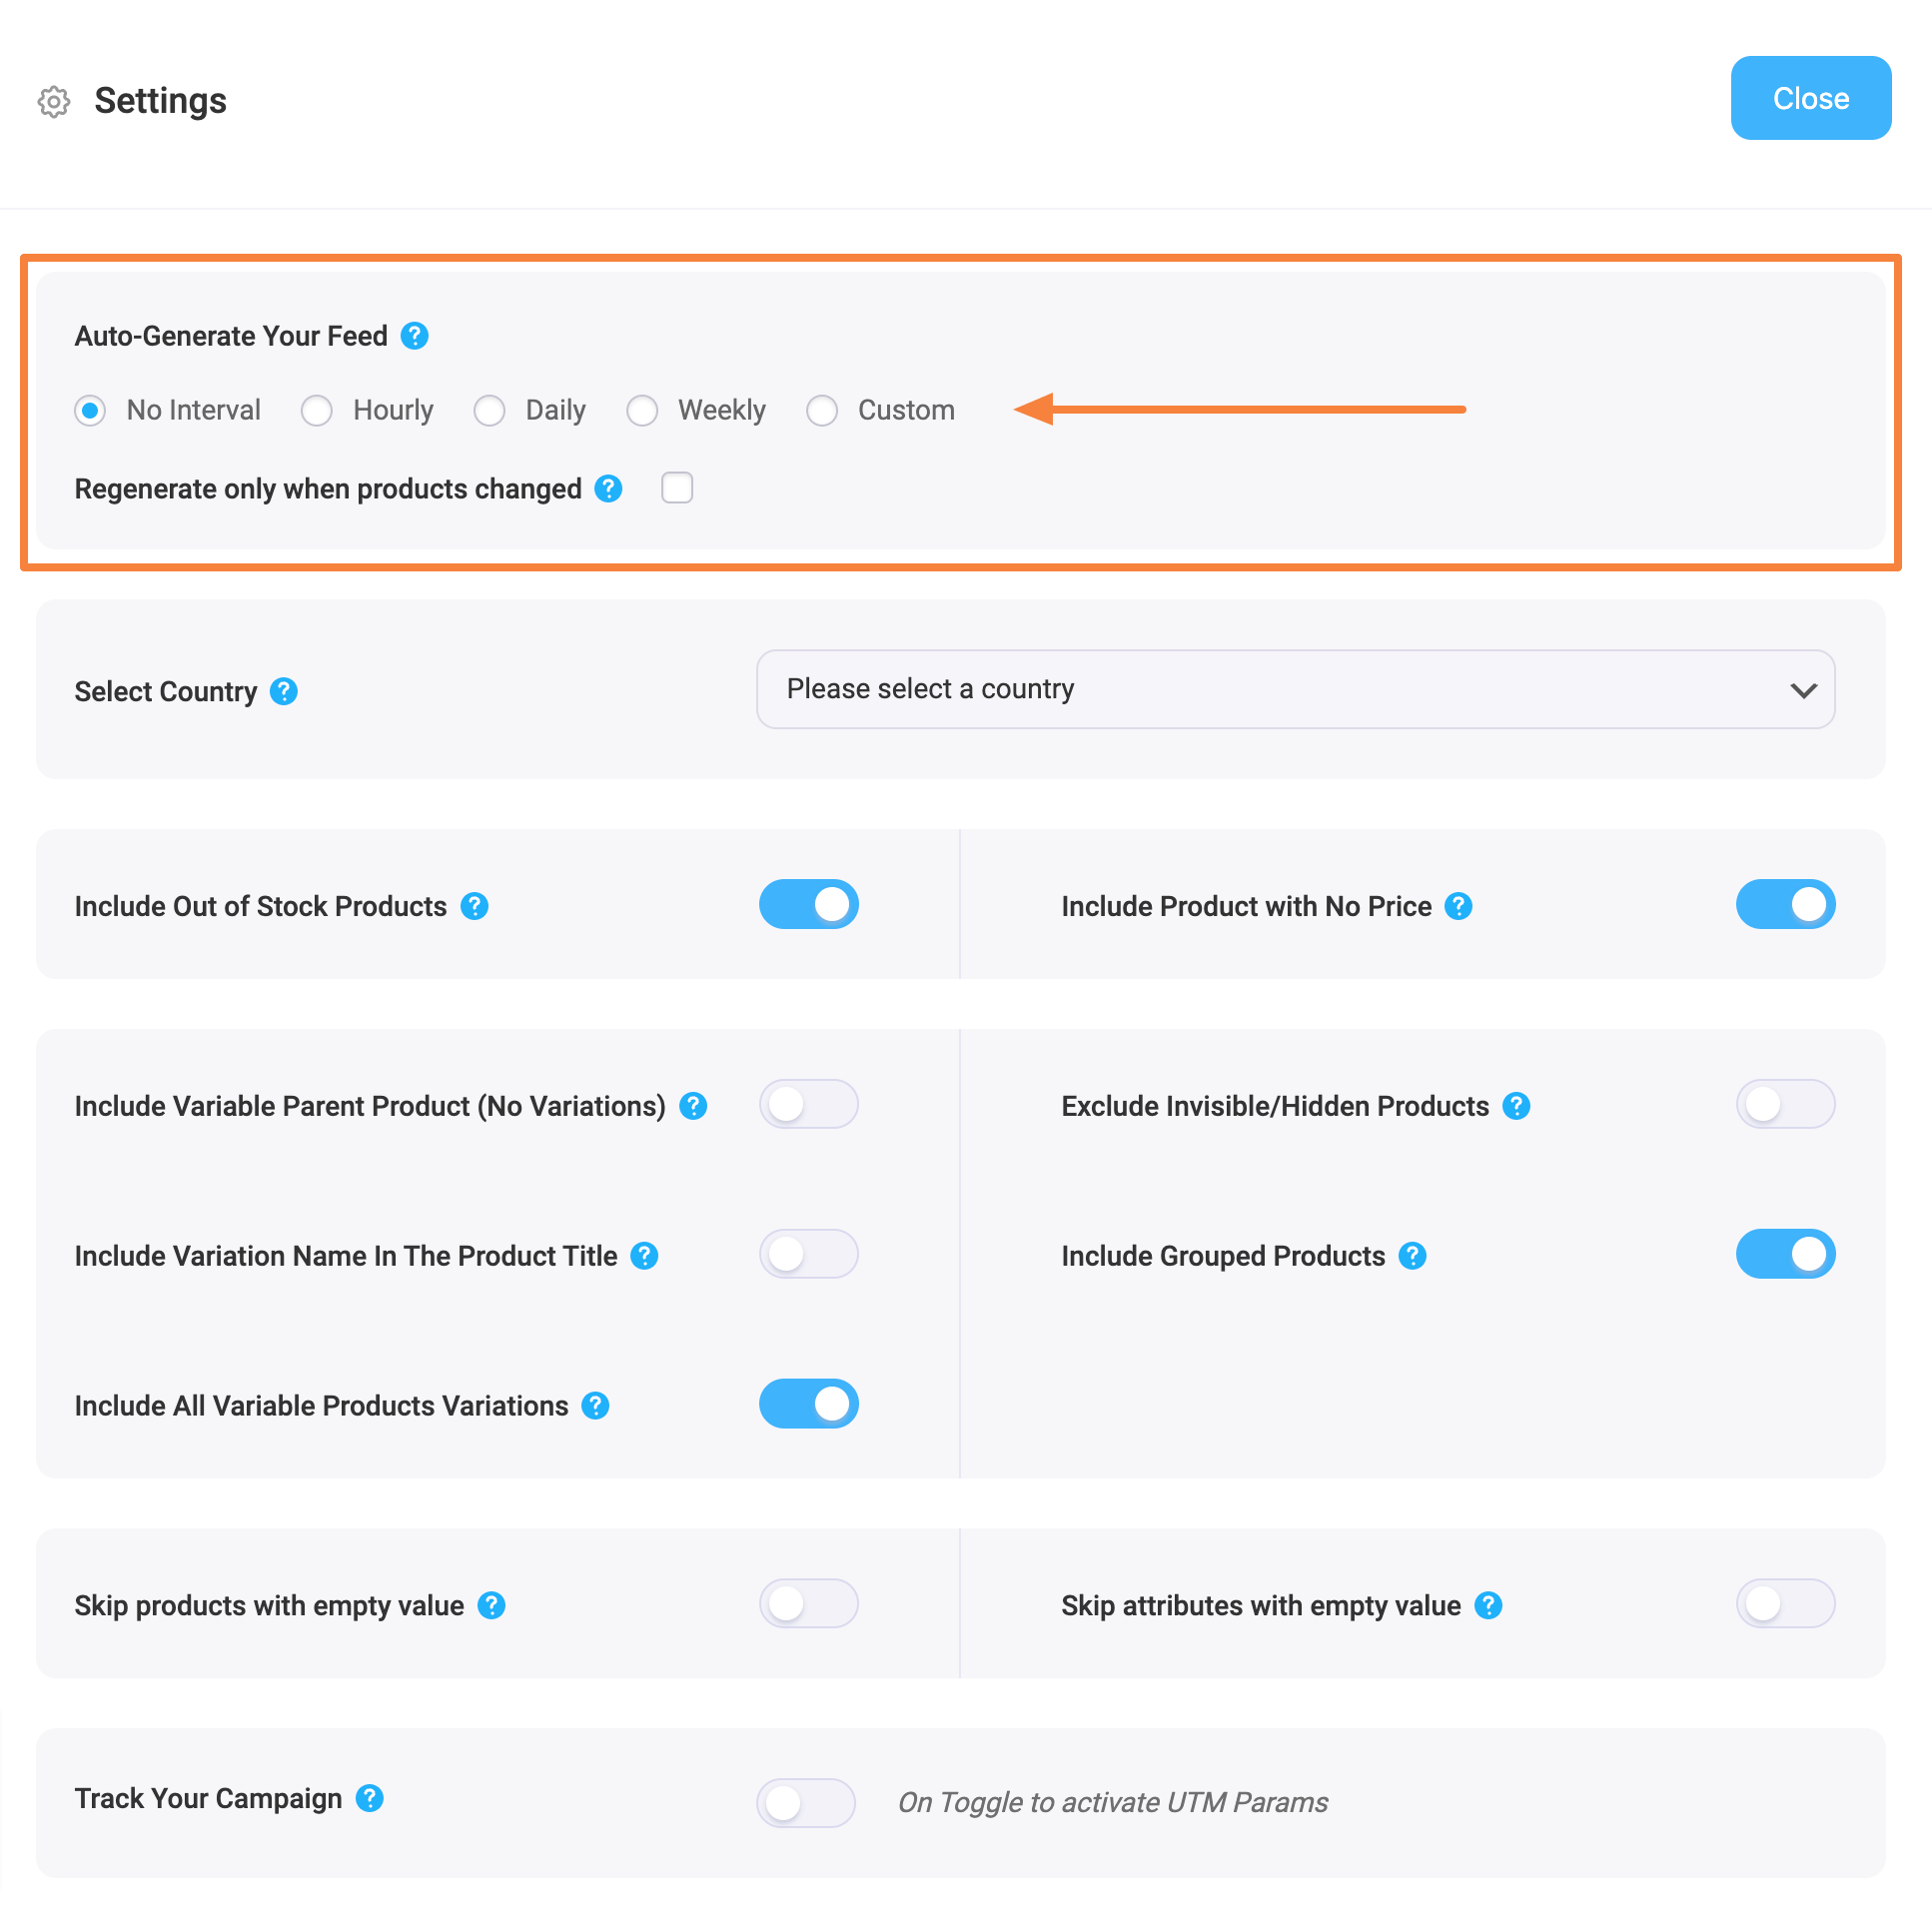
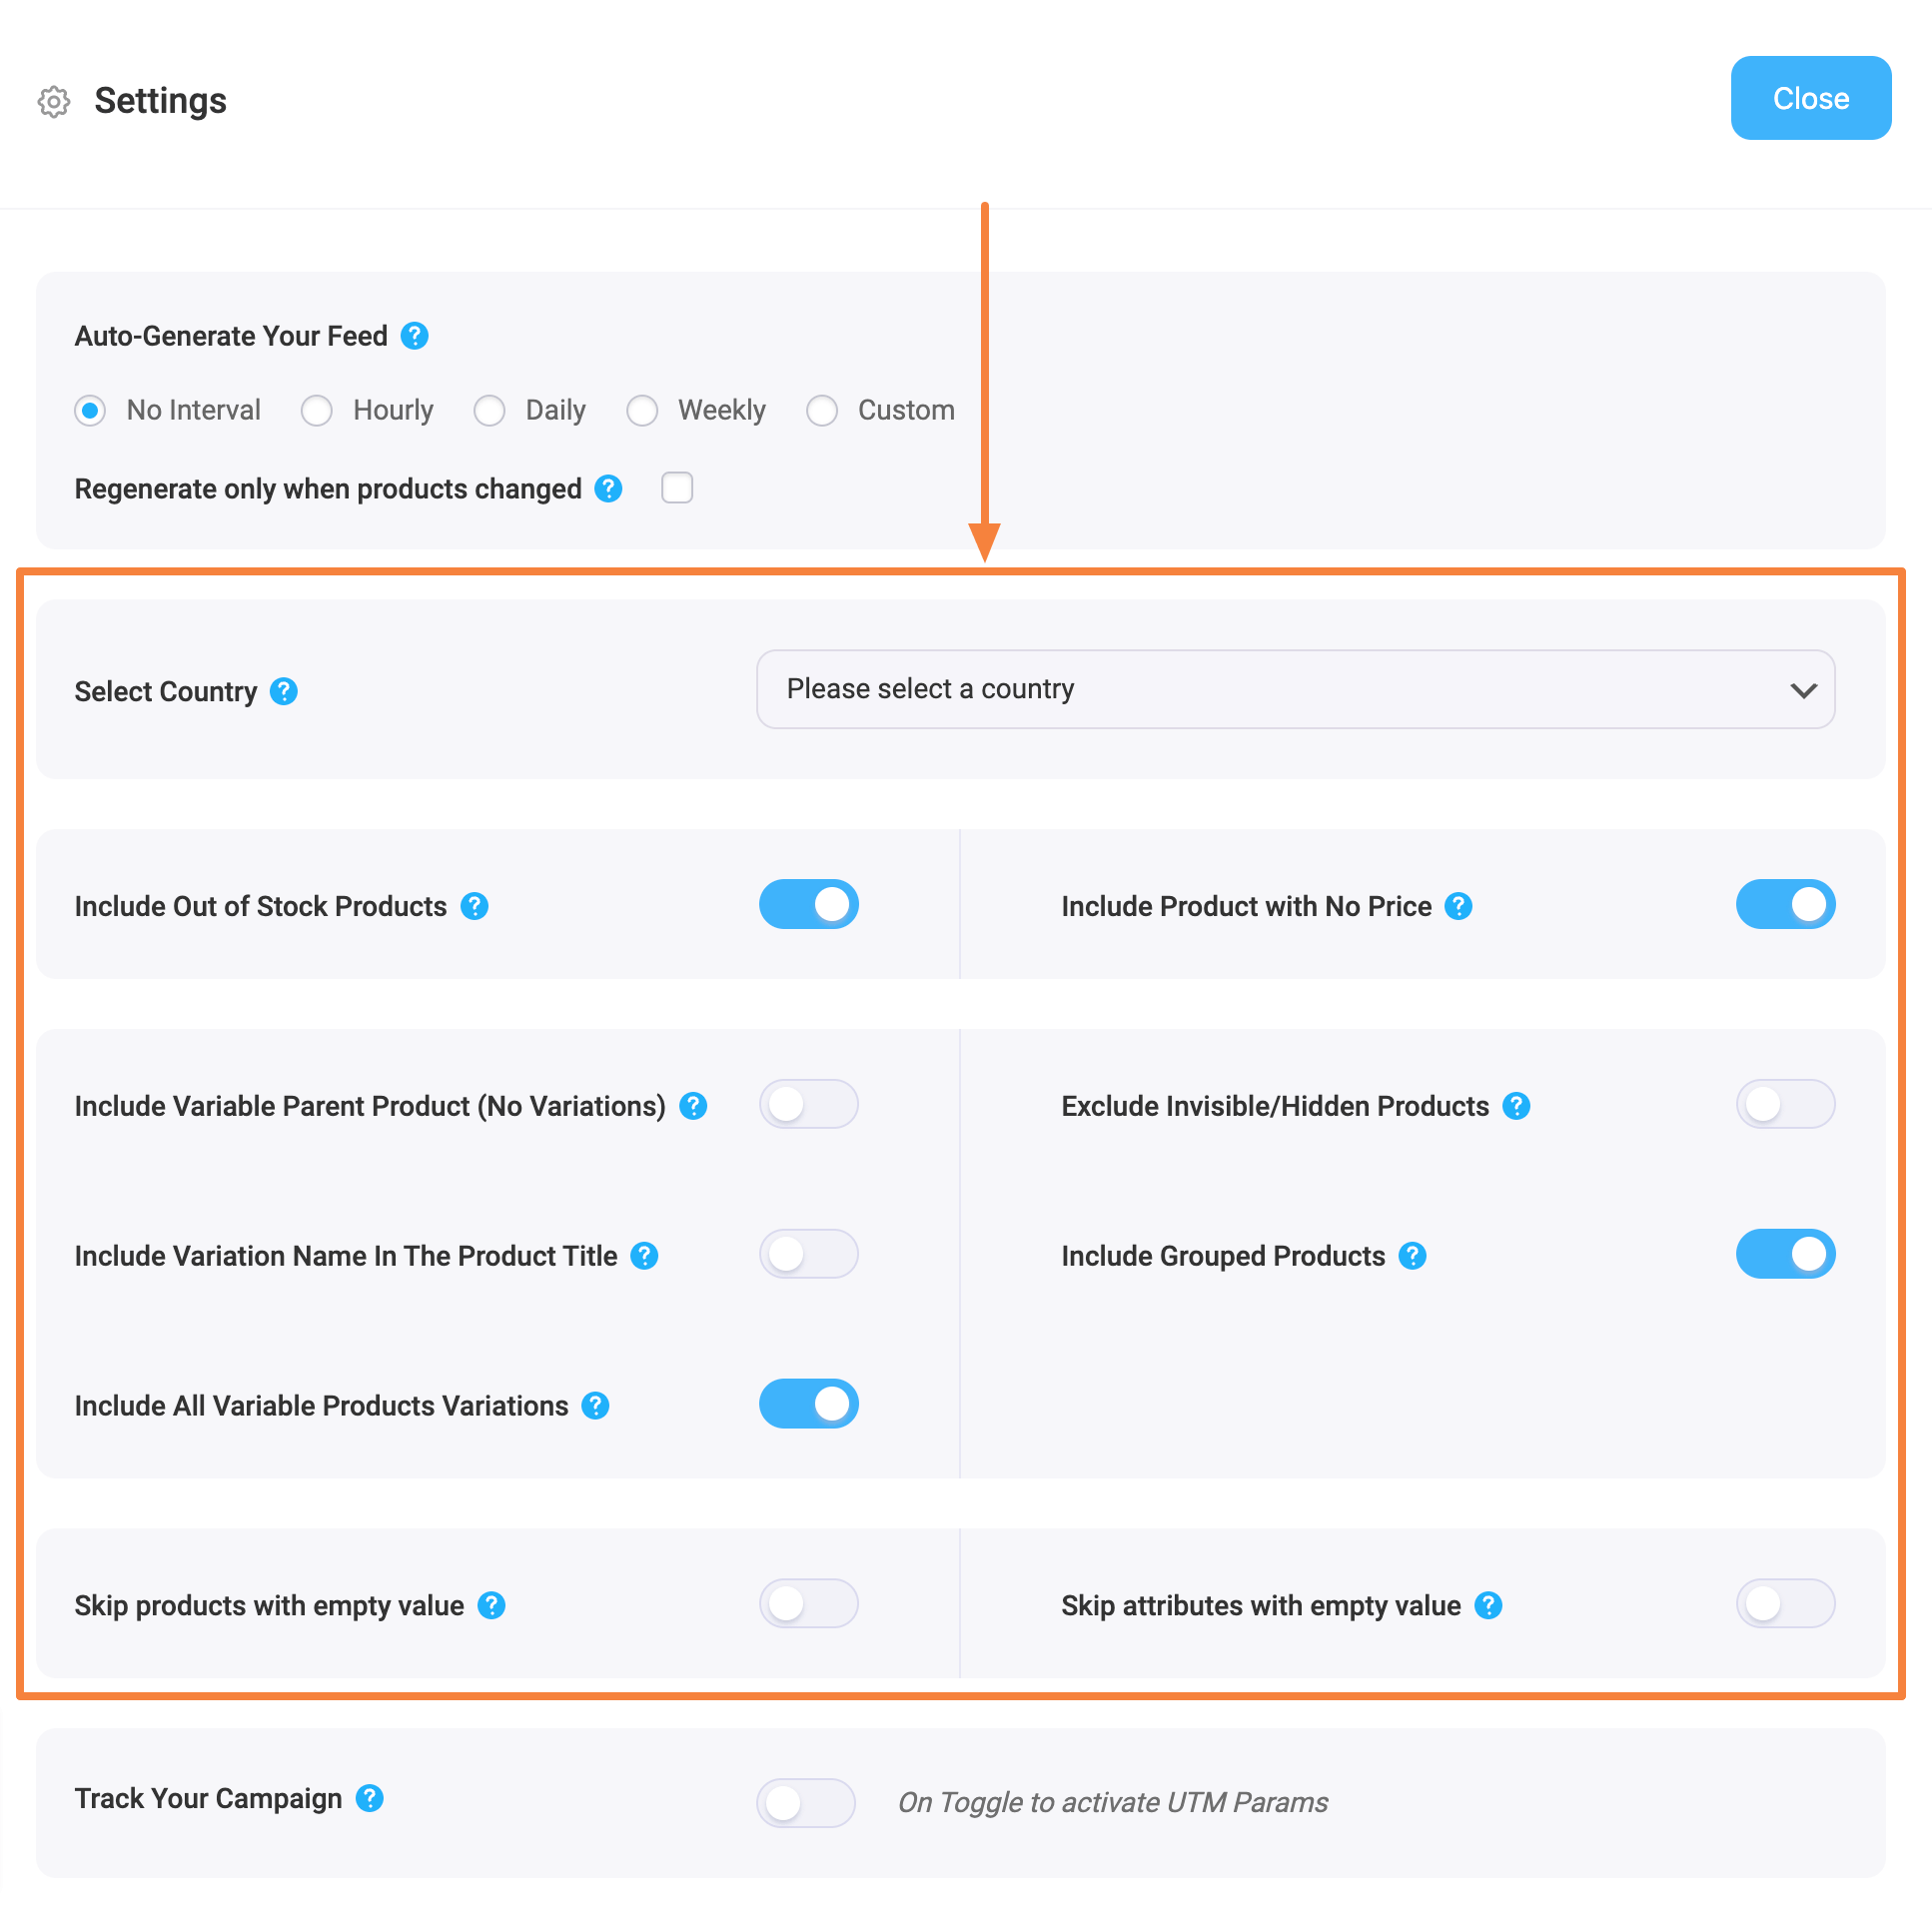
4. Next, use the following options as needed.
Select Country/ Region
Select a Region from this dropdown menu if you want to include the Shipping info to your feed. Once you select the region, you will have to insert the Shipping attribute to your feed to get the Shipping values.
You can follow this doc to learn how to include the Shipping info in your feed.
Include Out of Stock Products -If you want to include the out of stock products, then you can enable the option. -For this feed, let’s not use this option and keep its value as “No“.
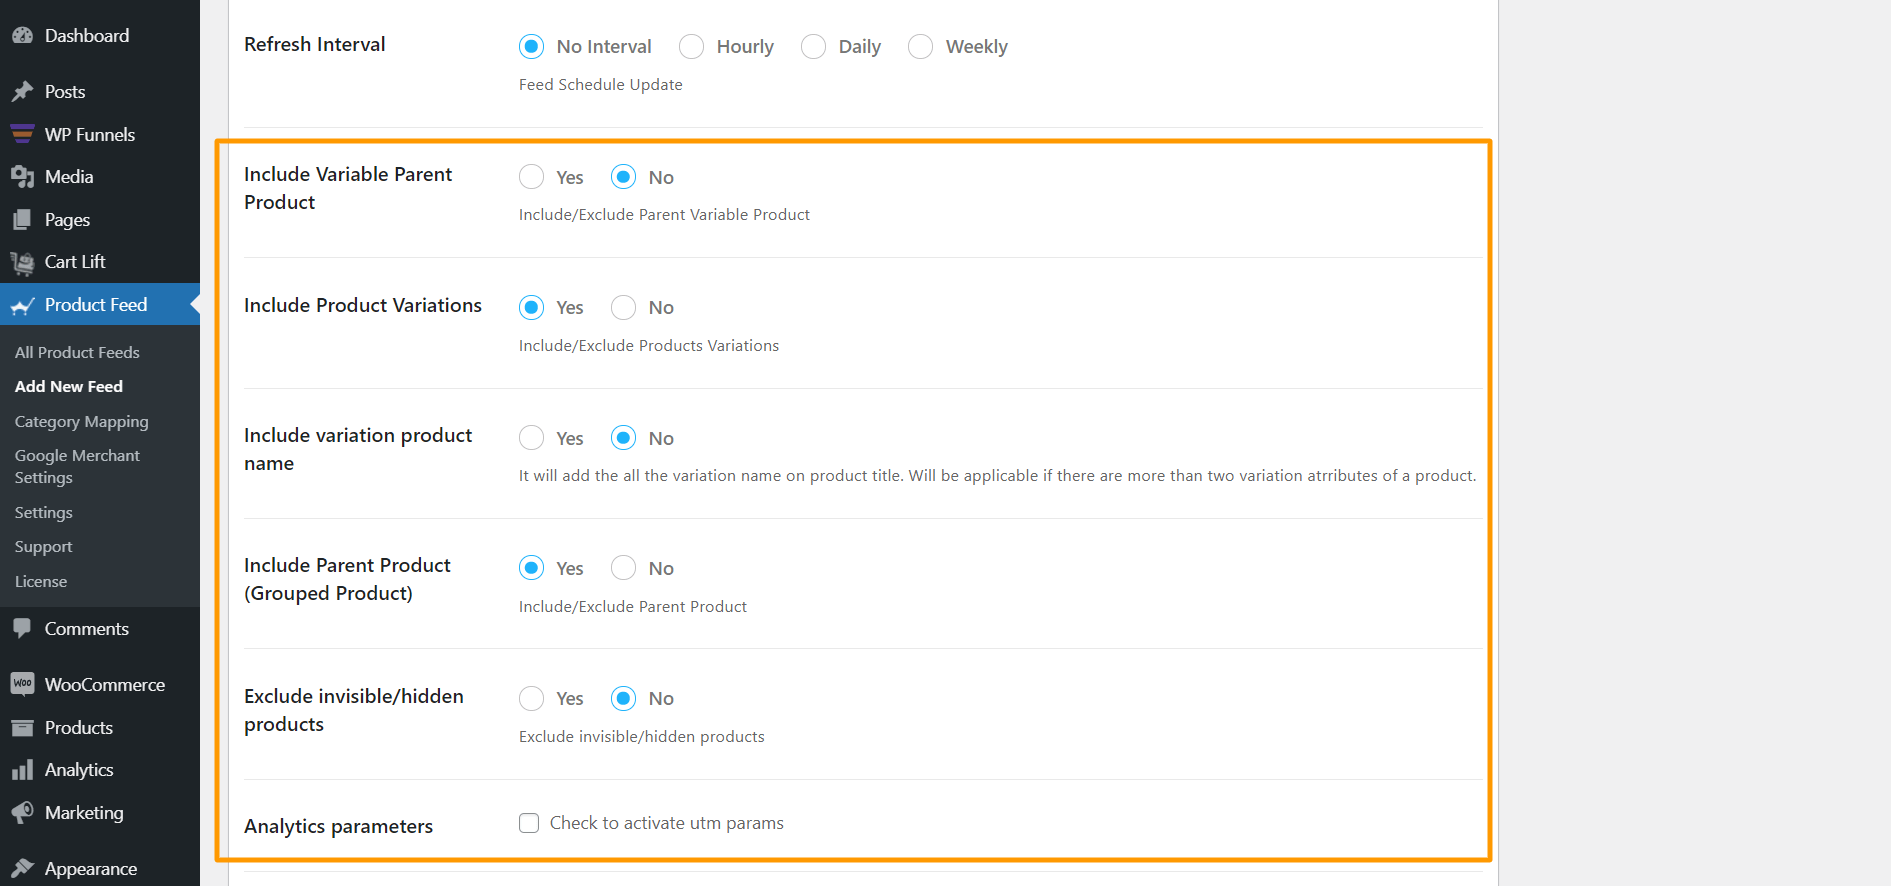
Include Variable Parent Product (Without Variations) -If you want to include the parent feed for variable products, then you can enable the option. -Few merchants such as Google Shopping or Facebook doesn’t require you to submit parent products, however, there are many other merchants such as eBay MIP, that requires you to submit product products in the feed. -For this feed, let’s not use this option and keep its value as “No“.
Include All Variable Products Variations – -If you want to only include simple products to the feed and no variable products, then keep its value as “No“. -If you want to submit both simple products and variable products to Google Shopping, then choose its value as “Yes“. -Let’s use this feature, and mark it as “Yes“, for this feed.
Include Variation Name In The Product Title -Few merchants such as Google Shopping, suggest you to add the variation term to the Product name in case you are uploading variable products, however, it is completely optional. -So if you want to include the variant terms to the variable product names, then you can set its value as “Yes“. -Let’s use this feature, and mark it as “Yes“, for this feed.
Include Grouped Products -If you have Grouped Products, then it’s best to submit the parent product of the Grouped product you created. -So you should mark this option as “Yes“.
Exclude Invisible/Hidden Products -You might have certain products on your store that are marked as hidden or invisible on WooCommerce. -If you want to generate feed for Simple products only, then you can mark this option as “Yes” to exclude invisible products from the feed. -However, product variants are by default marked as Invisible on WooCommerce. So if you include variable products to the feed, then you should mark this as “No“. -Since in this feed we are including product variants, so we will not use this feature and keep it as “No“.
Skip any attribute if the value is empty -Enabling this feature will exclude any attributes of a product if the attribute value is missing. -For this feed, let’s not use this option and keep its value as “No“.
5. You can then find an option to add Track Your Campaign (Analytics parameters).
Use this option if you wish to add analytics parameters to product links on your product feed so that you can keep track of the products’ performance on Google Shopping.
6. Now, close the drawer and click on the Product Filter option. A new drawer will open from the right side of the window.
On the top, you will get the option to use the Custom Filter or the Feed Rules feature (PRO).
And you will get the feed filter options from the Filter dropdown menu.
Choose the Products you want to include in the feed using any filter. The “All Published Products” is selected by default
You may use any other filter options, Custom Filter, Category Filter, and Tag Filter, to include the products you require (or exclude the ones you do not want to include).
For a basic feed, you can keep it as it is.
Step 6 – Publish The WooCommerce Product Feed for Rakuten
Now, that your feed configuration is ready, it is time to publish the feed.
Scroll back to the top, and you will find a Publish button on the right.
Click on the Publish button, your feed will be generated.
Once your feed generation is complete, you will be able to view or download the feed.
That’s it. Your CSV feed for Rakuten is generated. You can now download and upload this file to your merchant account and list your products on the Rakuten Advertising marketplace.
Conclusion
Rakuten is a huge brand name out there and the reputation of their marketplace is immense. Promoting your WooCommerce products in this multinational platform could help you boost your revenue significantly.
As you have seen, this is how easy it is to generate a product feed for Rakuten using Product Feed Manager for WooCommerce.
Did you know you could easily increase your sales by promoting on local price comparison sites?
If you are a retailer in Greece or own a Greek online eCommerce site, then you can easily boost your sales through BestPrice.gr.
BestPrice is amongst the top three price comparison sites in Greece. With an average of 5.6 million monthly traffic, promoting your products here could be a game-changer for your business to help you grow your revenue.
To list your products on BestPrice.gr, all you need is to join their marketplace as a Merchant, generate a product XML feed in the right format, and upload it to your merchant account to start selling. That’s it.
If you run a WooCommerce store to sell products within Greece, then you can easily generate a product feed for BestPrice in just a few clicks, using the right tool.
In this guide, you’ll learn about,
How to join BestPrice.gr marketplace
The right XML format to submit products on BestPrice.gr
The mandatory attributes to generate this product feed
How to generate WooCommerce feed for BestPrice in just a few clicks.
And once you have the feed ready, you can go ahead and upload your products to BestPrice to start selling immediately.
The first thing to do is to join BestPrice.gr merchant program.
You may visit the BestPrice for merchants page, and there, you will get to know all the details required to join the marketplace. Sign up and configure your Merchant Affiliates Platform settings such as Shipping, Taxation, Policies, and other such data.
Joining this marketplace requires a small fee, but that is very little compared to the thousands of dollars worth of business it will generate.
Once you are a merchant, the next thing to do is to upload your products to the marketplace in the right format.
Feed Specification For BestPrice Product Data
When generating a data feed to upload your products on BestPrice.gr, you will need to maintain the following XML format:
<?xml version="1.0" encoding="ISO-8859-7"?>
<store>
<date>--date-- --time--</date>
        <products>
                <product>
                        ---PRODUCT ATTRIBUTES AND DATA HERE---
                </product>
        </products>
</store>
Here, you have to include the date and time when you generated the feed and the correct product attributes for each product.
But if you have a WooCommerce store, you do not need to worry about creating this format on your own. You can simply use the plugin, Product Feed Manager for WooCommerce, to generate XML feed in just a few clicks. **We will discuss more on this plugin later on in this article.
Let us look at the product attributes’ data you need to include for each product.
Required Product Attributes For BestPrice Feed – With Examples
The following are the mandatory attributes you need to submit for each product on BestPrice —
Attribute
Instructions
Example
productId
Format: <productId>…</productId>
This should be a unique ID for the product. You could use your store’s Product ID or the Product SKU as value for this attribute.
<productId>15</productId>
title
Format: <title>…</title>
The product title should include the product name and additional information such as Manufacturer/Brand name, its unique features, model name, etc.
<title>Lacoste Hoodie With Logo – Grey</title>
productURL
Format: <productURL>…</productURL>
This is the direct URL of the product.
For variable products, it must be unique for each variant.
Submit the current selling price of the product, i.e., if the product is on a discount, then you have to submit the discounted price; else, just submit the original price.
In WooCommerce, if you have a sale price assigned for a product, you have to submit the sale price as the product’s price in the feed.
<price>59.99</price>
category_path
Format: <category_path>…</category_path>
Include the product category name, if possible, with the complete category path with a ‘->’ separator.
*Alternatively, you can submit the category Id if you want.
This attribute is mainly used to define the delivery time.
The accepted values for availability are: – Σε απόθεμα – Παράδοση σε 1–3 ημέρες – Παράδοση σε 4–7 ημέρες – Παράδοση σε 4–10 ημέρες – Παράδοση σε 8–14 ημέρες – Κατόπιν παραγγελίας – Προπαραγγελία – Εξαντλήθηκε
** Σε απόθεμα (which means ‘in stock’ signifies that the product is available for pickup.
<availability>Παράδοση σε 1–3 ημέρες</availability>
brand
Format: <brand>…</brand>
Submit the brand name of your products. If you are the manufacturer, then you can use your company name as the brand name.
<brand>Market προσφορέσ</brand>
EAN / Barcode /MPN / SKU
Format: <MPN>…</MPN>
You need to include the Manufacturer’s Part Number for your products.
**If you do not have an MPN, then you may submit the EAN, Barcode, or product SKU as value for this attribute.
<MPN>MN8X2ZD/A</MPN>
Once you include these required attributes, your feed is pretty much ready to be uploaded to the BestPrice marketplace.
However, there are more attributes you may need or want to include to optimize this feed further.
Conditional Required Attributes
You have to submit a few attributes depending on specific factors. For example, if your product is a Book, then you must submit an ISBN.
Let us look at these conditional attributes.
Attribute
Instructions
Example
ISBN
Format: <ISBN>…</ISBN>
If your product is a book, then you must submit the ISBN instead of MPN or EAN.
<ISBN>960-6604-92-6</ISBN>
size
Format: <size>…</size>
If your product is a clothing or footwear product, then you must submit the size attribute.
You can simply submit all available sizes via this attribute, using commas to separate them.
**This can be used for products in any other category as well, if relevant.
<size>S,M,L,XL</size>
color
Format: <color>…</color>
For variable products that vary in color, each variant should be generated as a separate product. And you have to include the color attribute to it to specify its color.
<color>Red</color>
weight
Format: <weight>…</weight>
You will need to submit the weight attribute if you choose the shipping cost calculation based on weight when defining the shipping cost through the Merchant Affiliation Platform.
You can submit the value as a numeric value (integer or decimal) or an alphanumeric value (weight + unit). **If you use the alphanumeric value, then the unit of weight must match the unit you defined in the Merchant Affiliation Platform.
<weight>5.2</weight>
Optional Attributes To Further Optimize The Feed
You may also choose to include a few optional attributes to optimize your product data submission.
Attribute
Instructions
Example
stock
Format: <stock>Y</stock>
Use this attribute to indicate if the product is in stock or not.
Submit the value as ‘Y’ if the product is in stock and ‘N’ if the product is not in stock.
**This is an optional field. If you do not submit this attribute, or if the value for this attribute is empty for any product, then the stock status will be considered as “Κατόπιν Παραγγελίας” (i.e., “upon order”).
<stock>Y</stock>
categoryID
Format: <categoryID>…</categoryID>
You may submit the category Id along with the category path to improve accuracy.
**If you submit a category id that is not correct as per the category path you submit, then this attribute will be ignored.
<categoryID>223</categoryID>
warranty_provider
Format: <warranty_provider>…</warranty_provider>
You may submit this attribute if there is a warranty available for a product.
Following are accepted values: – GR: if the product is guaranteed by the official Greek dealership and/or authorized service points within Greece. – EU: if the product has a European warranty from the manufacturer (dealership or authorized service points within the European Union), which does NOT include the Greek delegation. – STORE: if the guarantee is provided by the store itself or the store partner.
<warranty_provider>STORE</warranty_provider>
warranty_duration
Format: <warranty_duration>…</warranty_duration>
This is the duration of validity of the warranty period in months. **It is mandatory to submit if you include the ‘warranty_provider’ attribute.
<warranty_duration>24</warranty_duration>
bundle
Format: <bundle>…</bundle>
For a bundled product, you can use this attribute to indicate the productIDs of the products that were bundled together.
<bundle>B1C2, A2B6</bundle>
features
Format <features> <power>…</power> <voltage>…</voltage> </features>
If you have an electronic product that has a measurable power and voltage, then you can use this attribute to indicate the values.
If you want to include a unique shipping cost for a certain product, i.e., a different shipping cost than the one you defined in the Merchant Affiliate Platform, then you can use this attribute.
**If you want to indicate free shipping, then submit a value of 0 for this attribute.
<shipping>2.99</shipping>
Example Feed For BestPrice In The Right Format
Here’s a sample BestPrice feed structure with example data.
Now that you have a good idea of the required product data you need to submit on BestPrice.gr, let us look at how you can generate an XML feed of your WooCommerce products in just a few clicks.
7 Steps To Generate BestPrice Product Feed In Your WooCommerce Store
In WooCommerce, you will find an efficient tool to generate an XML feed for all of your products in just a few clicks.
In this guide, I will show you how you can generate a product feed for BestPrice using Product Feed Manager for WooCommerce. It is one of the easiest plugins to use and has a pre-built template for BestPrice.gr.
Take a look at these 7 quick steps to use the plugin easily and generate the BestPrice XML feed real quick.
Step 1 – Install & Activate Product Feed Manager
1. Go to Dashboard > Plugins and click on the Add New button.
2. Type “Product Feed Manager” on the search box, and you will find the Product Feed Manager plugin from the search result.
3. Click on the Install Now button.
4. Then click on the Activate button to activate the plugin.
Once you activate the plugin, you will find the Product feed menu on your dashboard menus.
Step 2 – Enable BestPrice As A Merchant Type For The Plugin
While creating a new product feed for your preferred Merchant, you need to enable that Merchant first.
1. Go to Dashboard > Product feed > Settings.
2. Click on the Merchants tab, and it will show you all the supported Merchants list.
3. Search for BestPrice and enable it.
4. Now, click on the Controls tab.
5. Here, click on the Purge Cache button.
Now you are ready to generate your product feed.
Step 3 – Start Creating A New Feed
1. On your dashboard, click on Product Feed.
2. Next, click on Add New Feed.
You will be taken to a blank feed generation page.
Step 4 – Configure Basic Settings For The Feed
1. Give a name to your feed.
2. From the Products dropdown, you can select whether you would like to generate this feed for all of your products, or you can choose a filter option.
3. If you want this feed to auto-update on fixed intervals, you can schedule it to Hourly, Daily, or to Monthly from the Refresh Interval section.
4. Keep the “Include Variable Parent Product” as no and the “Include Product Variations” as Yes.
5. Mark “Include variation product name” as Yes.
6. You can keep the rest of the options as it is or use them if required.
Step 5 – Use The BestPrice Greece Feed Template
1. Scroll down to the Feed Configuration section, and select BestPrice as the Merchant Type and keep the File Format as XML.
Once you choose the Merchant Type, you will notice that all the required attributes for BestPrice will appear below.
2. You will see that most of the attributes are configured. You will simply need to configure the following:
Category Path – You need to use category mapping to define the category paths, so for now, keep this attribute empty. We will configure this attribute in one of the next couple of steps.
Availability – If you have a fixed delivery time for all products, then set the type as static and input one of the accepted values mentioned earlier. If you have different delivery times for different products, then you will have to save the value in a custom field and use that value here.
Brand – This should be the Brand name of the product you are selling. If you are the manufacturer, you can set the type as Static and input your company name here. If you have different brand names for different products, you will have to save the value in a custom field or product attribute and then use that value here. **You may also use Perfect Brands for WooCommerce, which will make it easier to assign and use brand names.
MPN – This value should be unique to each product. So you have to save this value in a custom field within each product and use that value here.
Step 6 – Publish The Feed Initially
1. Once you are ready with your feed configuration, scroll up and click on Publish and the feed will be generated.
Now, remember you have left the Category Path empty.
Step 7 – Set Category Path Value & Update The Feed
1. Go to Product feed > Category Mapping and set up a new category map with the right Category paths.
2. Once you have a Mapper saved, go to Product feed > Settings and click on the Controls tab.
3. Here, below, click on Purge cache.
4. Go to Dashboard > Product feed > All product feed and edit the feed you created earlier.
5. Scroll down to the feed configuration section. Click on the value field for Category Path and scroll down to the very bottom to choose the mapper you created.
6. Scroll up and click on update.
7. Your feed will be generated, and you will be able to view or download the feed.
The next thing to do is to log in to your BestPrice merchant account and submit the feed URL to list your products on BestPrice.
That’s it. That’s how easily you can generate a product feed and list your products as BestPrice.gr market προσφορέσ.
Conclusion
BestPrice has already become a one-stop solution for many retailers in Greece as it has proven to deliver great results in terms of sales.
Since you own a Greek WooCommerce store, it’s best if you, too, can take advantage of the huge local audience that BestPrice has to offer.
And now that you know how easy it is to generate a product feed go ahead and use Product Feed Manager for WooCommerce to create and upload your products on BestPrice.gr.
A product attribute is usually used to represent a certain feature of a product. And attribute terms define the different ways that feature applies to a product.
For example, – Color is a feature and can be called an attribute. – Blue, Red, and Green are different types of colors and can be referred to as attribute terms.
You can use product attributes to further describe your product, for example, you can offer a t-shirt and state that it is red in color.
You can also use them to create product variations within your WooCommerce store for people to choose from. For example, you can have a t-shirt in 3 colors.
Now there are two types of product attributes.
Global Product Attribute – Product attribute that can be used for many different products
Custom Product Attribute – Product attribute used for a specific product only
In this guide, I will show you how you can create and use a Global Product Attribute for your WooCommerce products. Then later, in a second guide, I will show you how you can create a Custom Product Attribute for an individual product.
So let’s dive into it.
How To Create A Global Product Attribute In WooCommerce
Once you follow the steps below, you will be able to add global product attributes easily in your WooCommerce store.
Step 1 – Add A New Attribute
1. On your dashboard, go to Products > Attributes.
Here, you will see the option to add a new attribute.
**Any attribute you add here is considered a global attribute.
2. Input a name and slug for the attribute in their respective fields.
For example, you can name it ‘Color’ and assign the slug, ‘color.’
3. Then click on the ‘Add attribute‘ button below.
You will see that the attribute is added on the right side.
Here, I have added an attribute called Color.
Step 2 – Add Attribute Terms
1. On the right side of the attribute, under the Terms, you will see an option called Configure Terms. Click on it.
It will take you to the page where you can add terms for this attribute.
You can see on top it says Product Color. That’s because earlier, I named the attribute as Color. If I would name the attribute as Size, then it would say Product Size. (Same goes for the button below that says Add new color.)
The terms you create here will be the attribute terms you can use to define the features of a product (which I’ll show you in a bit later).
2. Input an attribute term name and slug in their respective fields, and add a description to it if you want to.
For example, you can name it ‘Blue,’ and assign the slug ‘blue.’
3. Then click on the Add New Color button below. You will see that the color term is added on the right side.
You can add more terms in the same way. I have added two more, Green and Red.
So far, you have a global product attribute called Collor and its corresponding attribute terms – Blue, Green, and Red.
You can repeat the whole process to add more global attributes along with their terms.
How To Use A Global Product Attribute For Your Products
Once you have created a global product attribute, now you can use it to describe your products.
Follow the steps below to learn how you can use it.
1. First Edit or Create a Product and scroll down to the Product Data Section.
Here, choose the product type (for example Simple product or Variable Product) and fill out the basic required data in the General, Inventory, Shipping, and Linked Products menus.
2. Go to the Attributes menu.
3. Here, you can see there is a dropdown menu that says Custom product attribute.
Click on it and you will get the list of Global product attributes you created.
Select the one you want to use.
4. We created the Color attribute earlier. So you can select that and click on the Add button.
It will create a Color section there.
5. Under values, if you click on the field, you will get to choose from the terms you created earlier for this Attribute.
Since we created Blue, Green, and Red, clicking here should let you choose from these 3 options.
6. You can choose the one you want to use for this product.
For example, if you want to state that this product’s color is Blue, then you can choose Blue.
And on the left side, you can see the option “Visible on the product page”. That is check-marked by default, which means this attribute term will be displayed on the Product page.
If it’s a variable product and you want to use this attribute to create variations, then you can choose multiple terms, or you can click on Select all to add all of them.
You can then mark the check box that says used for variations (right above the Save Attribute button), and later, generate variants from the Variations tab on the left side.
7. Then click on the Save attribute button and this attribute will be saved for this product.
Just a reminder that if you want to use these attributes to your product variations, check the “Used for variations” option, otherwise you won’t find these attributes in the product variations window.
So based on your theme, this attribute will be displayed on the product page.
When Should You Use A Global Product Attribute
WooCommerce allows you to create global attributes that can be applied later to any new or existing products.
Basically, a global product attribute is a common attribute that you might want to use for several products in your WooCommerce store.
Let’s say you have a clothing store that sells T-shirts, trousers, socks, and shoes. A common attribute for all of these products could be the Size.
Instead of setting up a new custom attribute for the size of each new product you add, you can rather create a global product attribute called Size, and define its terms to represent the various sizes.
Then you can add the Size attribute to your products and assign different terms to indicate what size they are in, in the same way as you did in this guide for color.
So to conclude, you should create and use global product attributes when you want to re-use them to define the features of multiple products in your WooCommerce store.
It will save you time and keep your WooCommerce store more organized.
Final Thoughts
As you can see, it is really convenient to use a global product attribute, and hopefully, this guide was easy to follow.
In the next guide, you will learn how you can create and use a custom product attribute for your products.
A custom product attribute is mainly useful when you want to add a unique product feature that you will probably not use in most other products. So it has its own benefits.
Feel free to let us know your thoughts on this guide in the comments below.
Cheers.
You were not leaving your cart just like that, right?
Enter your email below to save your shopping cart for later. And, who knows, maybe we will even send you a sweet discount code.