Een afgestudeerde IT-er, met een passie voor Digital Marketing. Houdt ervan om WordPress bedrijven te helpen hun verhalen te cureren. Content schrijven is het hart van alles wat ze doet!
Unlike other marketplaces, you don’t need to update again and again.
This marketplace updates itself, so you can get sales without much effort also without investing in advertising.
If you want to promote your products on the Bonanza marketplace, you need to make sure you submit your Bonanza feed in the right format.
Bonanza has its own set of required product data that you need to include in the product feed, which you need to prepare in a CSV format.
In this guide, you will get a good understanding of
why you should sell on Bonanza,
what product data you need for your products to be accepted on Bonanza, and
how you can generate an accurate product feed quickly.
So let’s begin.
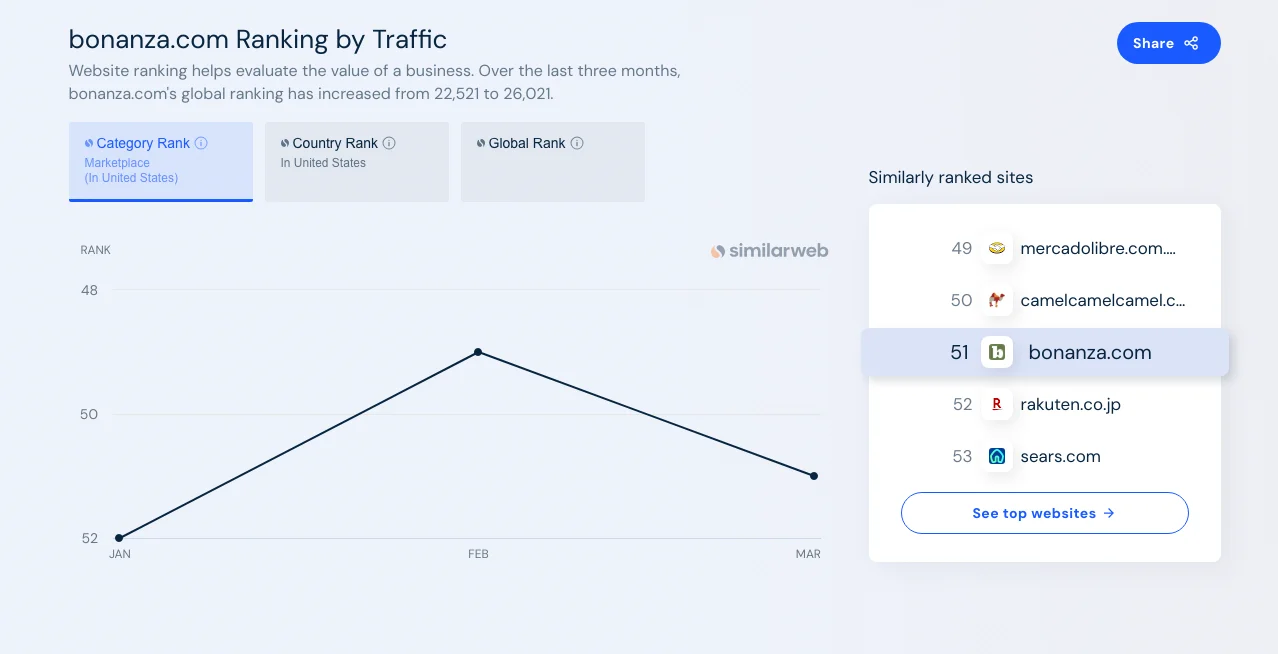
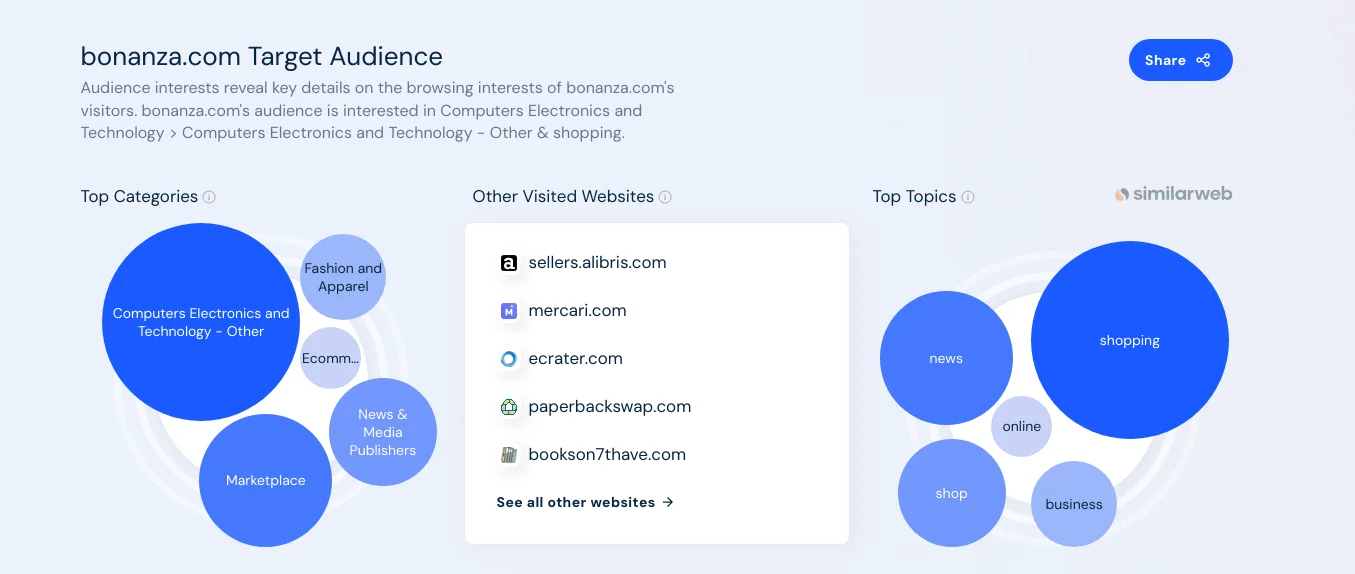
1. Why Sell On Bonanza?
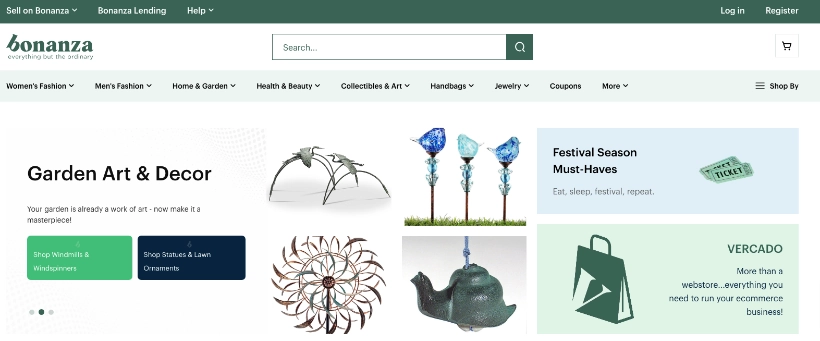
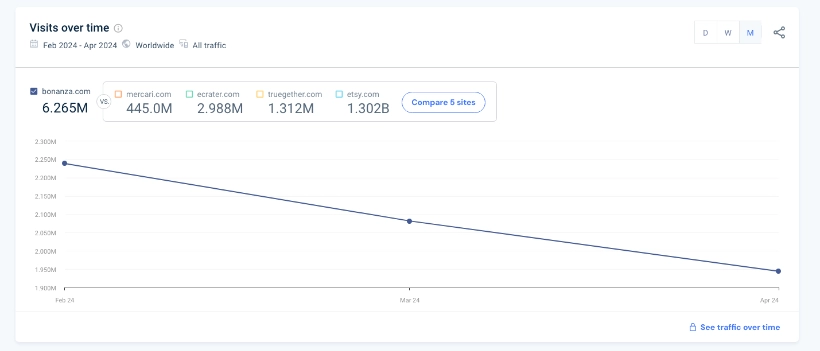
Bonanza has already built up a reputation for helping WooCommerce stores increase their revenue.
This is possible mainly due to a high buyer-to-seller ratio, seemingly 1300: 1.
This means there are a lot more active users than the number of sellers in the marketplace, that’s why the Bonanza selling platform can be a good choice for you.
There are more reasons. Such as :
Bonanza provides sellers like you with a “Seller Stats Dashboard”.
This stats dashboard offers sellers comprehensive data on item views and revenue.
The dashboard also highlights TurboTraffic activity.
So, you can visualize its impact on your store’s performance at a glance.
You can choose from advertising rates of 9%, 13%, 19%, or 30%, with higher rates resulting in increased buyer traffic from platforms like Google Shopping and other sources.
And the best part is, there are no upfront or monthly fees to register on Bonanza!
Don’t make these mistakes
Bonanza makes sure all its sellers are selling genuine products.
They run several checks for example :
products with images that are not real, edited, enhanced, or vague are rejected immediately.
2. If a Seller has a bad reputation, then there is no chance of registration.
3. If your online store is spammy with too many Ads, your products won’t be accepted unless you fix it.
Make sure you don’t make these mistakes.
Now that you know why it’s beneficial to sell on Bonanza, let us look at how you can prepare a product feed in the right format to list your products on this marketplace.
2. The Right Product Data To Upload WooCommerce Products On Bonanza
Since Bonanza wants to maintain quality, you are required to submit the following product data for each of your products.
**The ones marked in Green color are required attributes and the ones marked in Grey are optional attributes.
Product ID (id)
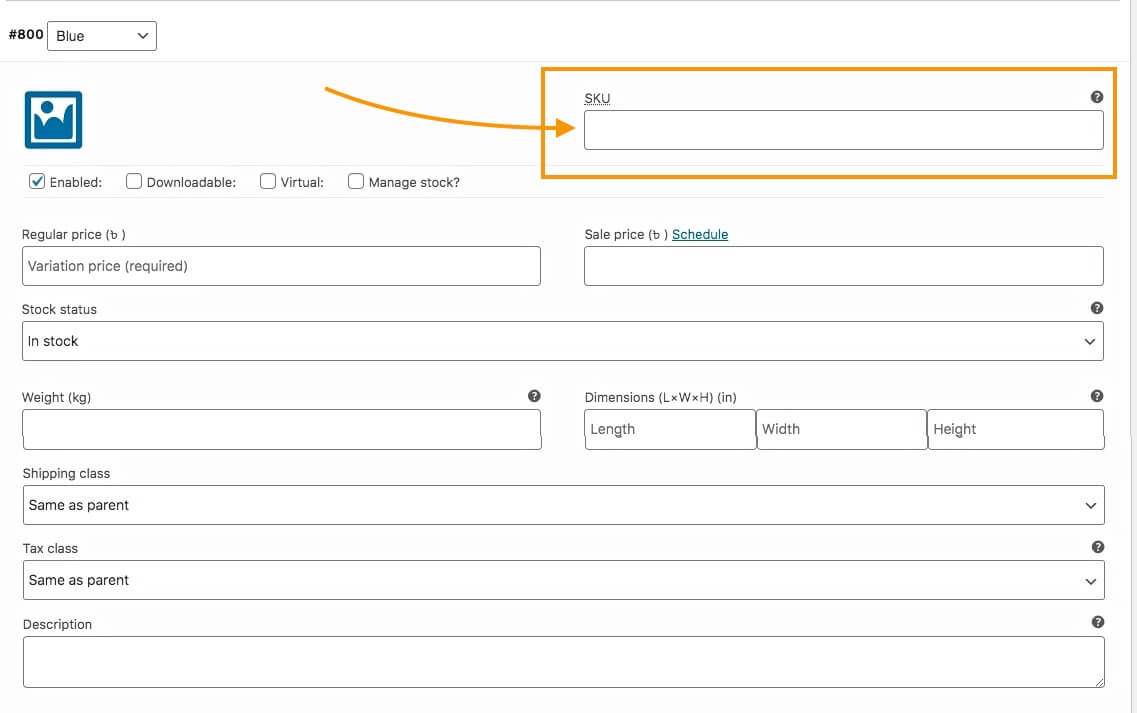
You can use the WooCommerce Product ID or the SKU for this attribute.
Product Name (title)
Use the product Title in your WooCommerce store and if possible, include extra traits such as color, size, gender, Brand name, etc to the title.
For variable products, it’s recommended to include the variation term to the tile for each variant.
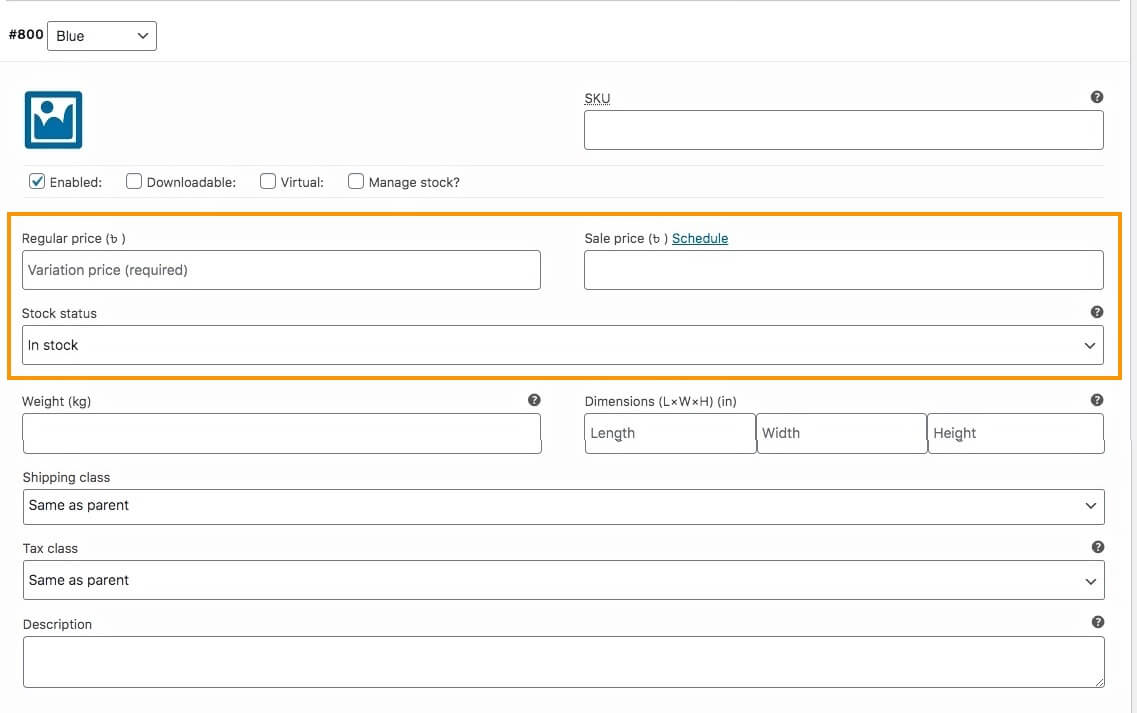
Product Price (price)
Use the current price of the product on your site, i.e., if you have a sale running, then submit the sale price, else submit the regular price.
Do not include the currency for the price.
Category (category)
You need to submit the exact category path or category Id your product falls under as per Bonanza’s category list.
You can easily do that by using a category mapping feature when generating product feed. I will show you how later on in this article.
Product Description (description)
Use a benefit-rich description. You may choose to use the WooCommerce product description or the short description, whichever suits you better.
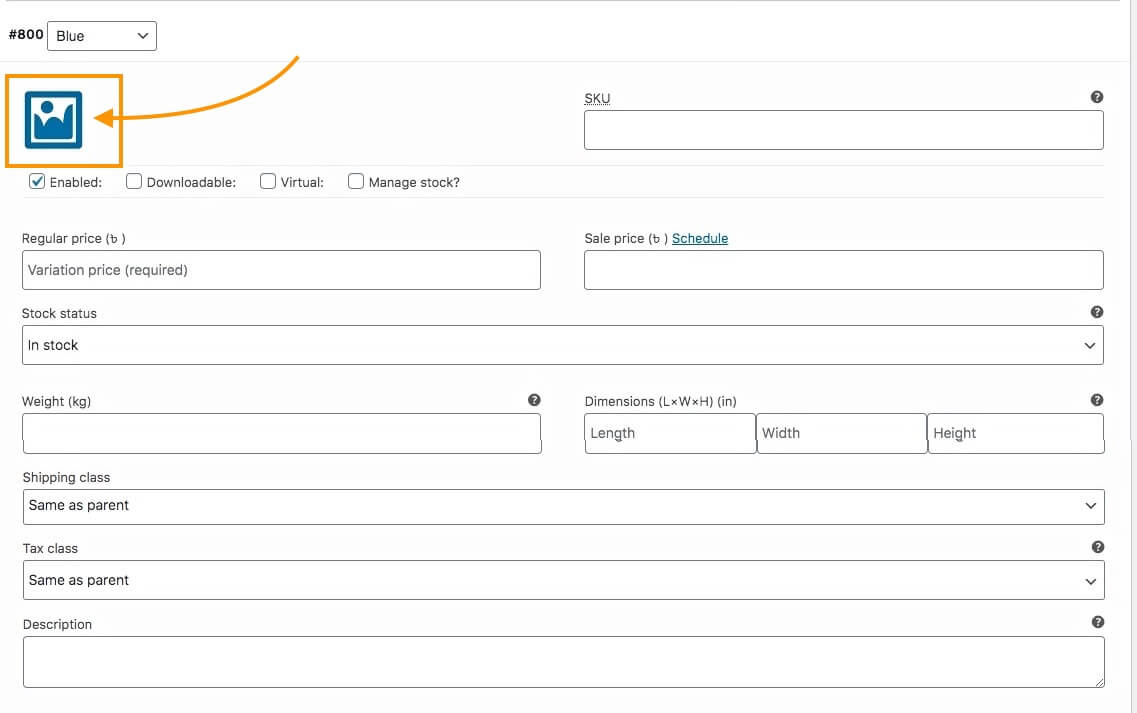
You may submit 3 additional images for every product.
Shipping Type (shipping type) – optional
Indicate the shipping cost type for your products using this attribute.
Accepted values are:
flat-rate
calculated
gratis
Shipping Price (shipping_price) – optional
If you include a shipping type as “flat-rate”, then indicate the shipping price here.
Shipping Service (shipping_service) – optional
Indicate the shipping service you use to deliver your products.
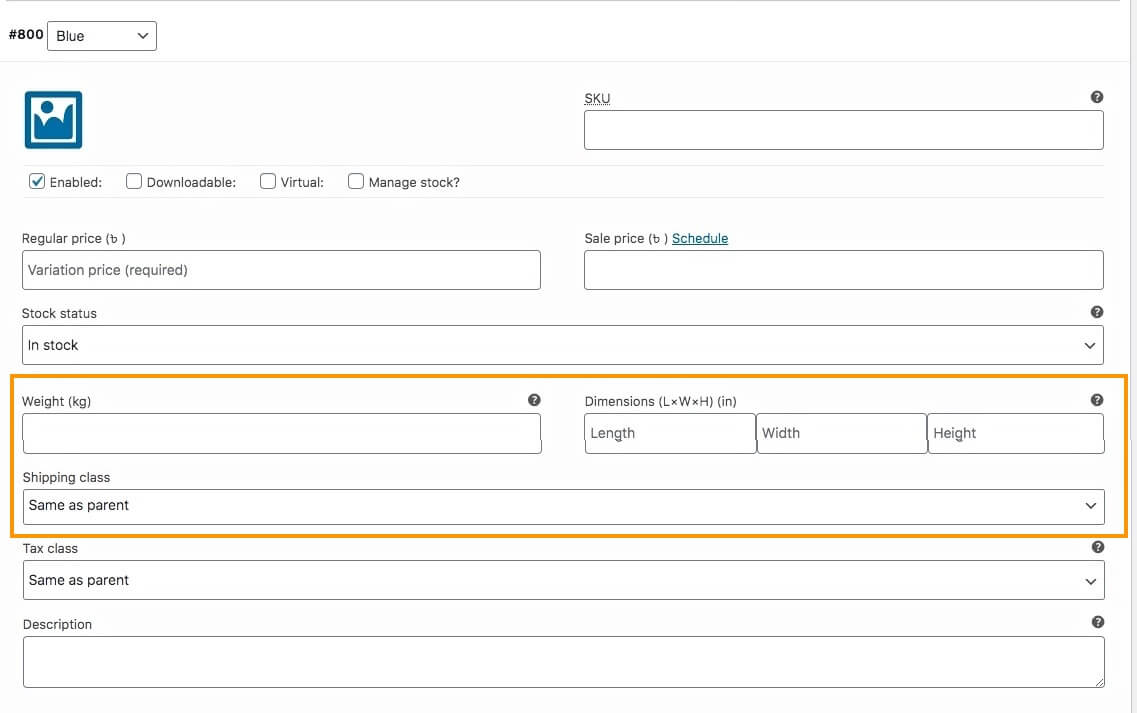
shipping_lbs – optional
If your shipping type is “calculated,” then you may specify the weight of your package in pounds using this attribute.
Do not include the unit of measurement in the value.
shipping_oz – optional
If the shipping type is “calculated,” specify the weight of your package in ounces using whole numbers only.
shipping_carrier – optional
If the shipping type is “calculated,” specify the carrier such as “ups”, “usps”, or “fedex”.
shipping_package – optional
If the shipping type is “calculated,” use this field to specify the packaging type such as “envelope”, “normal”, “large”, or “very large”.
worldwide_shipping_type – optional
If you ship outside the USA, then indicate the shipping cost type for your products using this attribute.
Accepted values:
flat-rate
calculated
gratis
worldwide_shipping_price – optional
If you include a worldwide shipping type as “flat-rate”, then indicate the international shipping price here.
worldwide_shipping_carrier – optional
For sellers located in the US that wish to offer “calculated” shipping to worldwide addresses, use this attribute to specify the shipping carrier.
Accepted values are:
usps
ups
fedex
Now that you know about the required product attributes and optional attributes you can submit to upload your products on Bonanza, let us learn how you can generate a CSV feed for Bonanza easily.
3. How To Generate WooCommerce Product Feed For Bonanza Marketplace
In WooCommerce, you will find a reliable plugin called Product Feed Manager For WooCommerce with which you can generate a CSV feed for all of your products in just a few clicks.
Watch the video below to generate a Bonanza CSV feed in just a few minutes.
As you just saw, it’s really easy to create a product feed.
The next thing to do is set up your Bonanza Booth and upload your clothing products to the Bonanza marketplace to start getting more sales.
Conclusie
As you saw above, this is how easily you can generate Bonanza product feed using Product Feed Manager for WooCommerce.
Initially, check out the plugin easily with the live preview option.
Once you are sure the plugin does what is required, you can go ahead and think about upgrading to Pro.
It’s high time you take advantage of the Bonanza marketplace and start getting more sales.
Running a WooCommerce store for wholesale can be challenging, especially in attracting bulk-buying clients without relying on costly paid ads.
A great alternative is to list your products on Alibaba wholesale marketplaces. For businesses in Europe or Japan, selling on Alibaba is a top choice.
Alibaba is one of the world’s largest online marketplaces. It allows you to list your WooCommerce wholesale products and achieve regular sales with less effort.
With over 903 billion active users, Alibaba marketplace is a valuable platform for wholesale businesses looking to expand their reach.
Today, you’ll get a guide on how to sell on Alibaba. You’ll also learn how to list your WooCommerce products and start boosting your sales.
On Alibaba, you can browse detailed product listings, complete with descriptions, images, and pricing, making it easy to find what you need.
To ensure secure transactions, Alibaba provides a Trade Assurance program, protecting you regarding product quality and shipping times.
Plus, this global online marketplace supports various payment methods and offers financing options, simplifying your transaction management.
What Types of Products Can You Sell on Alibaba?
You can sell a wide range of products across numerous categories. Here are some of the main types of products commonly sold on Alibaba:
Electronics: Mobile phones, computers, cameras, audio equipment, and accessories.
Apparel and Textiles: Clothing, footwear, fabrics, and fashion accessories.
Home and Garden: Furniture, home decor, kitchenware, gardening tools, and outdoor furniture.
Beauty and Personal Care: Cosmetics, skincare products, hair care, and grooming tools.
Machinery and Industrial Equipment: Manufacturing machines, construction equipment, agricultural machinery, and tools.
Automobiles and Motorcycles: Vehicles, auto parts, motorcycle parts, and accessories.
Health and Medical: Medical equipment, health care products, fitness equipment, and supplements.
Toys and Hobbies: Children’s toys, games, hobby supplies, and educational materials.
Sports and Entertainment: Sporting goods, musical instruments, and outdoor recreation equipment.
Packaging and Printing: Packaging materials, printing supplies, and promotional products.
Office Supplies: Office furniture, stationery, and school supplies.
Consumer Electronics: Home appliances, smart devices, and wearable technology.
Food and Beverage: Packaged foods, beverages, agricultural products, and food ingredients.
Jewelry and Watches: Fashion jewelry, fine jewelry, watches, and accessories.
These categories contain a broad range of products, making Alibaba shopping a good platform for various business needs.
Why Sell on Alibaba?
As mentioned earlier, the Alibaba shopping website currently has over 903 billion active buyers. This means if you list your products there from Europe, Japan, or any other country, you have 10 times more chance to get potential buyers there than you normally would via Paid Ads.
Alibaba provides robust marketing tools and services that can attract new customers and increase your brand visibility.
Type caption (optional)
For example, depending on your membership, Alibaba allows you to define your target audience based on Interests, buying behaviors, and customer demographics so that your products are displayed to the right audience.
This gives you a chance to narrow down who you want to reach and increase your chances of conversions.
How to Start Selling on Alibaba?
First of all, the Alibaba marketplace is not free. You have to pay over $166 per month to actively use their platform. However, considering you are an Alibaba wholesaler, the ROI is huge (unless you are a startup business).
Normally, you can go for the two usual plans, Basic or Plus. or you can also speak with a consultant for customized plans for a higher focus on the Ads budget for your Alibaba store.
Once you become a member, you can then design your store for the Alibaba platform and upload your products there using a CSV.
What Product Data is Needed to Sell on Alibaba?
To list your products on the Alibaba shopping website, it’s important to ensure that you provide all the necessary product data with keyword-optimized content so that you can get maximum exposure.
The information in your product feed depends on your product category. For every Alibaba product feed, there are 8 important pieces of information that you need to consider:
1. Basic information
In the basic information, you’ll add product type, product name, and the product keyword.
2. Product Details
The product photo and videos will go to the product details. So, If you want, you can add a custom description here.
3. General Product Details
General product details depend on the category you are selling. The details are material, variety, size, color, pattern, etc category-specific attributes.
4. Product Features
This section will include all product features you have.
5. Customize Features
Here you’ll add more details of your product features.
6. Variable Pricing
You’ll add the product unit and quantity-based pricing in this attribute.
7. Trade Information
This is simply the trade information of your products. You can also receive the options trade alerts for your product.
8. Acceptable Payment
Here, you’ll add the payment option for your products
When your product data is ready, you need to focus on uploading the products on the Alibaba platform.
But, it’s really tough and time-consuming if you try to upload them all manually. But, there is a solution to upload your WooCommerce product feed easily. Keep reading to explore that.
How to Bulk Upload Your Products on Alibaba
Uploading your products on Alibaba can be a time-consuming process, especially if you have a large number of products to list. Now, you may have a question about how to sell on Alibaba in terms of bulk uploading.
Don’t worry. Fortunately, Alibaba provides a bulk upload feature that allows you to upload multiple products at once.
Here’s how to use it:
Prepare your product data: Before you can upload your products in bulk, you need to prepare your product data in a CSV (comma-separated values) file format. You can use a spreadsheet program like Microsoft Excel or Google Sheets to create your CSV file.
Navigate to the “Product” tab: Once you have your CSV file ready, log in to your Alibaba account and navigate to the “Product” tab.
Select “Bulk Upload”: Click on the “Bulk Upload” button and select “CSV File Upload” from the dropdown menu.
Upload your CSV file: Select your CSV file from your computer and upload it to Alibaba. Make sure to review your file to ensure that all of the product data is accurate and complete.
Map your product data: After uploading your CSV file, map your product data to the corresponding fields on Alibaba. It ensures that your product data is correctly aligned with Alibaba’s product data requirements.
Submit your products: Once you’ve mapped your product data, you can submit your products to Alibaba. Alibaba will review your products and let you know if there are any issues. So, you can fix them before you publish your products.
This bulk upload feature can save you time. And, you can efficiently upload multiple products to the marketplace.
Now, let’s find out how you can make this process easier with a reliable plugin.
How to Easily Promote Your WooCommerce Products on Alibaba
If you are a WooCommerce store owner and looking to promote on the Alibaba shopping website, then we have a solution!
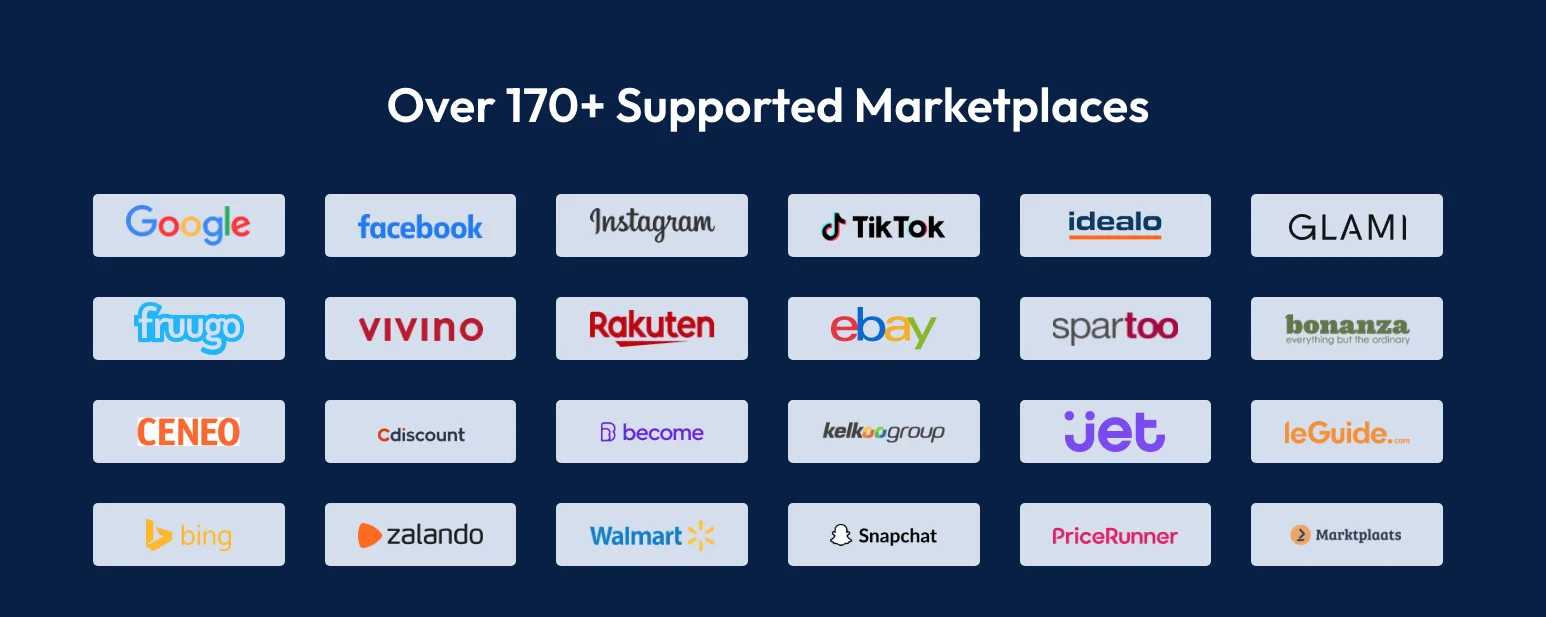
With the plugin, you can easily promote your WooCommerce products on 170+ online marketplaces. This plugin provides you pre-built merchant template so you don’t need to worry about merchant specifications and get your products accepted.
It also has a custom feed option, so you can customize your feed to get your expected exposure.
Here’s how you can easily promote your WooCommerce products on Alibaba using a Product Feed Manager for WooCommerce:
Step 1: Create a product feed
Once you have installed and activated the plugin, create a product feed for your WooCommerce products.
Follow the simple steps:
Go to Add New Feed
Set a feed title
Select the Custom option from the merchant drop-down
Set feed file type
Below this, you will see an attribute already listed which is the Product ID.
Now, you will add your preferred attributes which you need to sell on Alibaba.
Once you do that, your product feed will be ready.
Step 2: Export your product feed
Once your product feed is ready, you can export it in the required format for Alibaba. The product feed manager supports CSV, TXT, and XML formats, which are all compatible with Alibaba wholesale advertising.
Click on the Publish button and your feed will be automatically downloaded.
Type caption (optional)
Step 3: Upload your product feed to Alibaba
Now, it’s time to upload your product feed to the Alibaba shopping website.
Follow the steps to upload your product feed to Alibaba:
Login to your Alibaba account: Firstly, log in to your Alibaba account. You need to create one if you haven’t already.
Go to “My Alibaba”: Once you log in, click on “My Alibaba”. It is located in the upper-right corner of the homepage.
Navigate to “Product Posting Management”: From the dropdown menu, select “Product Posting Management.”
Choose your product category: Choose the product category that best suits your product.
Click “Bulk Upload”: Under the “Product Management” section, click on “Bulk Upload”. After that, select “CSV” as the file format.
Upload your CSV file: Upload your CSV file by clicking on the “Upload File” button. You can either drag and drop your file or select it from your computer.
Map your product attributes: Alibaba provides a product attribute mapping feature. It allows you to match the product attributes in your CSV file to the attributes required by Alibaba. This step ensures that your product data is correctly formatted for Alibaba.
Preview and submit: Preview your product information to ensure that it is accurate and complete. If everything looks good, click “Submit” to publish your products on Alibaba.
Now, After listing your products successfully on Alibaba, the next step for you is to promote your product.
Step-4: Promote Your Products on Alibaba
To successfully promote your products on Alibaba and enhance sales for your WooCommerce store you can do the following:-
Utilize Alibaba Advertising: Consider using Alibaba’s advertising options to increase product visibility.
Offer Competitive Pricing: Set competitive prices and run promotions to attract buyers.
Highlight Unique Selling Points: Emphasize what sets your products apart from competitors.
Provide Excellent Customer Service: Respond promptly to inquiries and address customer concerns professionally.
Use Alibaba’s Social Media Channels: Engage with customers and share product updates on Alibaba’s social platforms.
Participate in Promotional Events: Join Alibaba’s sales campaigns for increased exposure.
Use Data Analytics: Analyze customer behavior and product performance to optimize your strategies.
Encourage Reviews and Ratings: Positive feedback builds credibility and trust.
Monitor and Adjust: Regularly assess your performance and adapt your approach accordingly.
By following these steps, you can effectively promote your products on Alibaba and drive sales for your WooCommerce store. So, cheers!
Conclusie
Selling on Alibaba can expand your WooCommerce wholesale business globally. If you’re ready for more orders and have the budget, promoting on Alibaba Marketplace is crucial.
Understanding how to sell on Alibaba effectively helps you tap into its wide reach for wholesale trade. It also connects you with potential buyers around the globe and expands your market presence.
Generating product data files from your WooCommerce store for Alibaba’s shopping site is straightforward with a product feed manager (PFM), making listing easy.
This can boost visibility and attract Alibaba wholesale buyers. Take this opportunity to grow your revenue and establish your presence as an Alibaba seller.
How can I increase traffic to my WooCommerce store without using paid ads?
You can increase traffic by listing your products on popular online marketplaces like Alibaba. This platform provides exposure to millions of potential buyers and includes robust marketing tools to attract new customers.
What are the benefits of selling on Alibaba?
Selling on Alibaba gives you access to over 800 million active buyers. The platform also offers marketing tools to target specific audiences, which can help increase your brand visibility and sales.
How do I upload my WooCommerce products to Alibaba?
To upload products, prepare a CSV file with your product data. Then, log in to your Alibaba account, navigate to “Product Posting Management,” and use the bulk upload feature to upload your CSV file. Map your product attributes and submit.
What product data is required to list on Alibaba?
You need to provide basic information (product type, name, and keyword), detailed photos and videos, category-specific attributes, product features, variable pricing, trade information, and acceptable payment options.
How can I promote my products on Alibaba?
To promote your products, use Alibaba’s advertising options, set competitive prices, highlight unique selling points, provide excellent customer service, engage on social media, participate in promotional events, and encourage customer reviews and ratings.
As a WooCommerce store owner, establishing a market presence is one of the most challenging aspects that you may face. If you own a newly rising online store, then it can take quite some time to become popular.
At this point, selling products only in the WooCommerce store is surely not enough. So you can try other Strategies & Facebook marketplace is one of the effective methods to sell your products easily.
In this article, I will discuss why you must promote your WooCommerce products in the Facebook Marketplace. You can also know how to easily generate and upload your store products to the marketplace in just a few clicks.
So let’s begin.
Why Should You Rely on Facebook for WooCommerce Product Promotion?
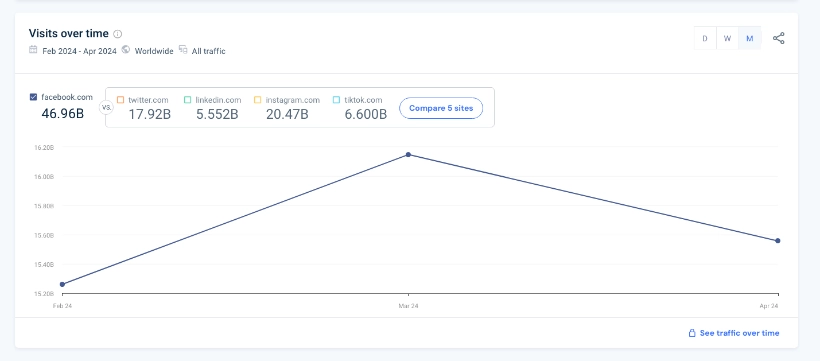
Facebook Marketplace has grown to assist digital stores in promoting their products to a greater audience and it is one of the best social marketplaces in the world. Its super-friendly business features can highlight your brand efficiently.
The Facebook business suit allows you to manage your business profile and Facebook page & shop around the Facebook community easily. So, you can leverage the marketplace to drive traffic and potential buyers into your WooCommerce store quite smoothly.
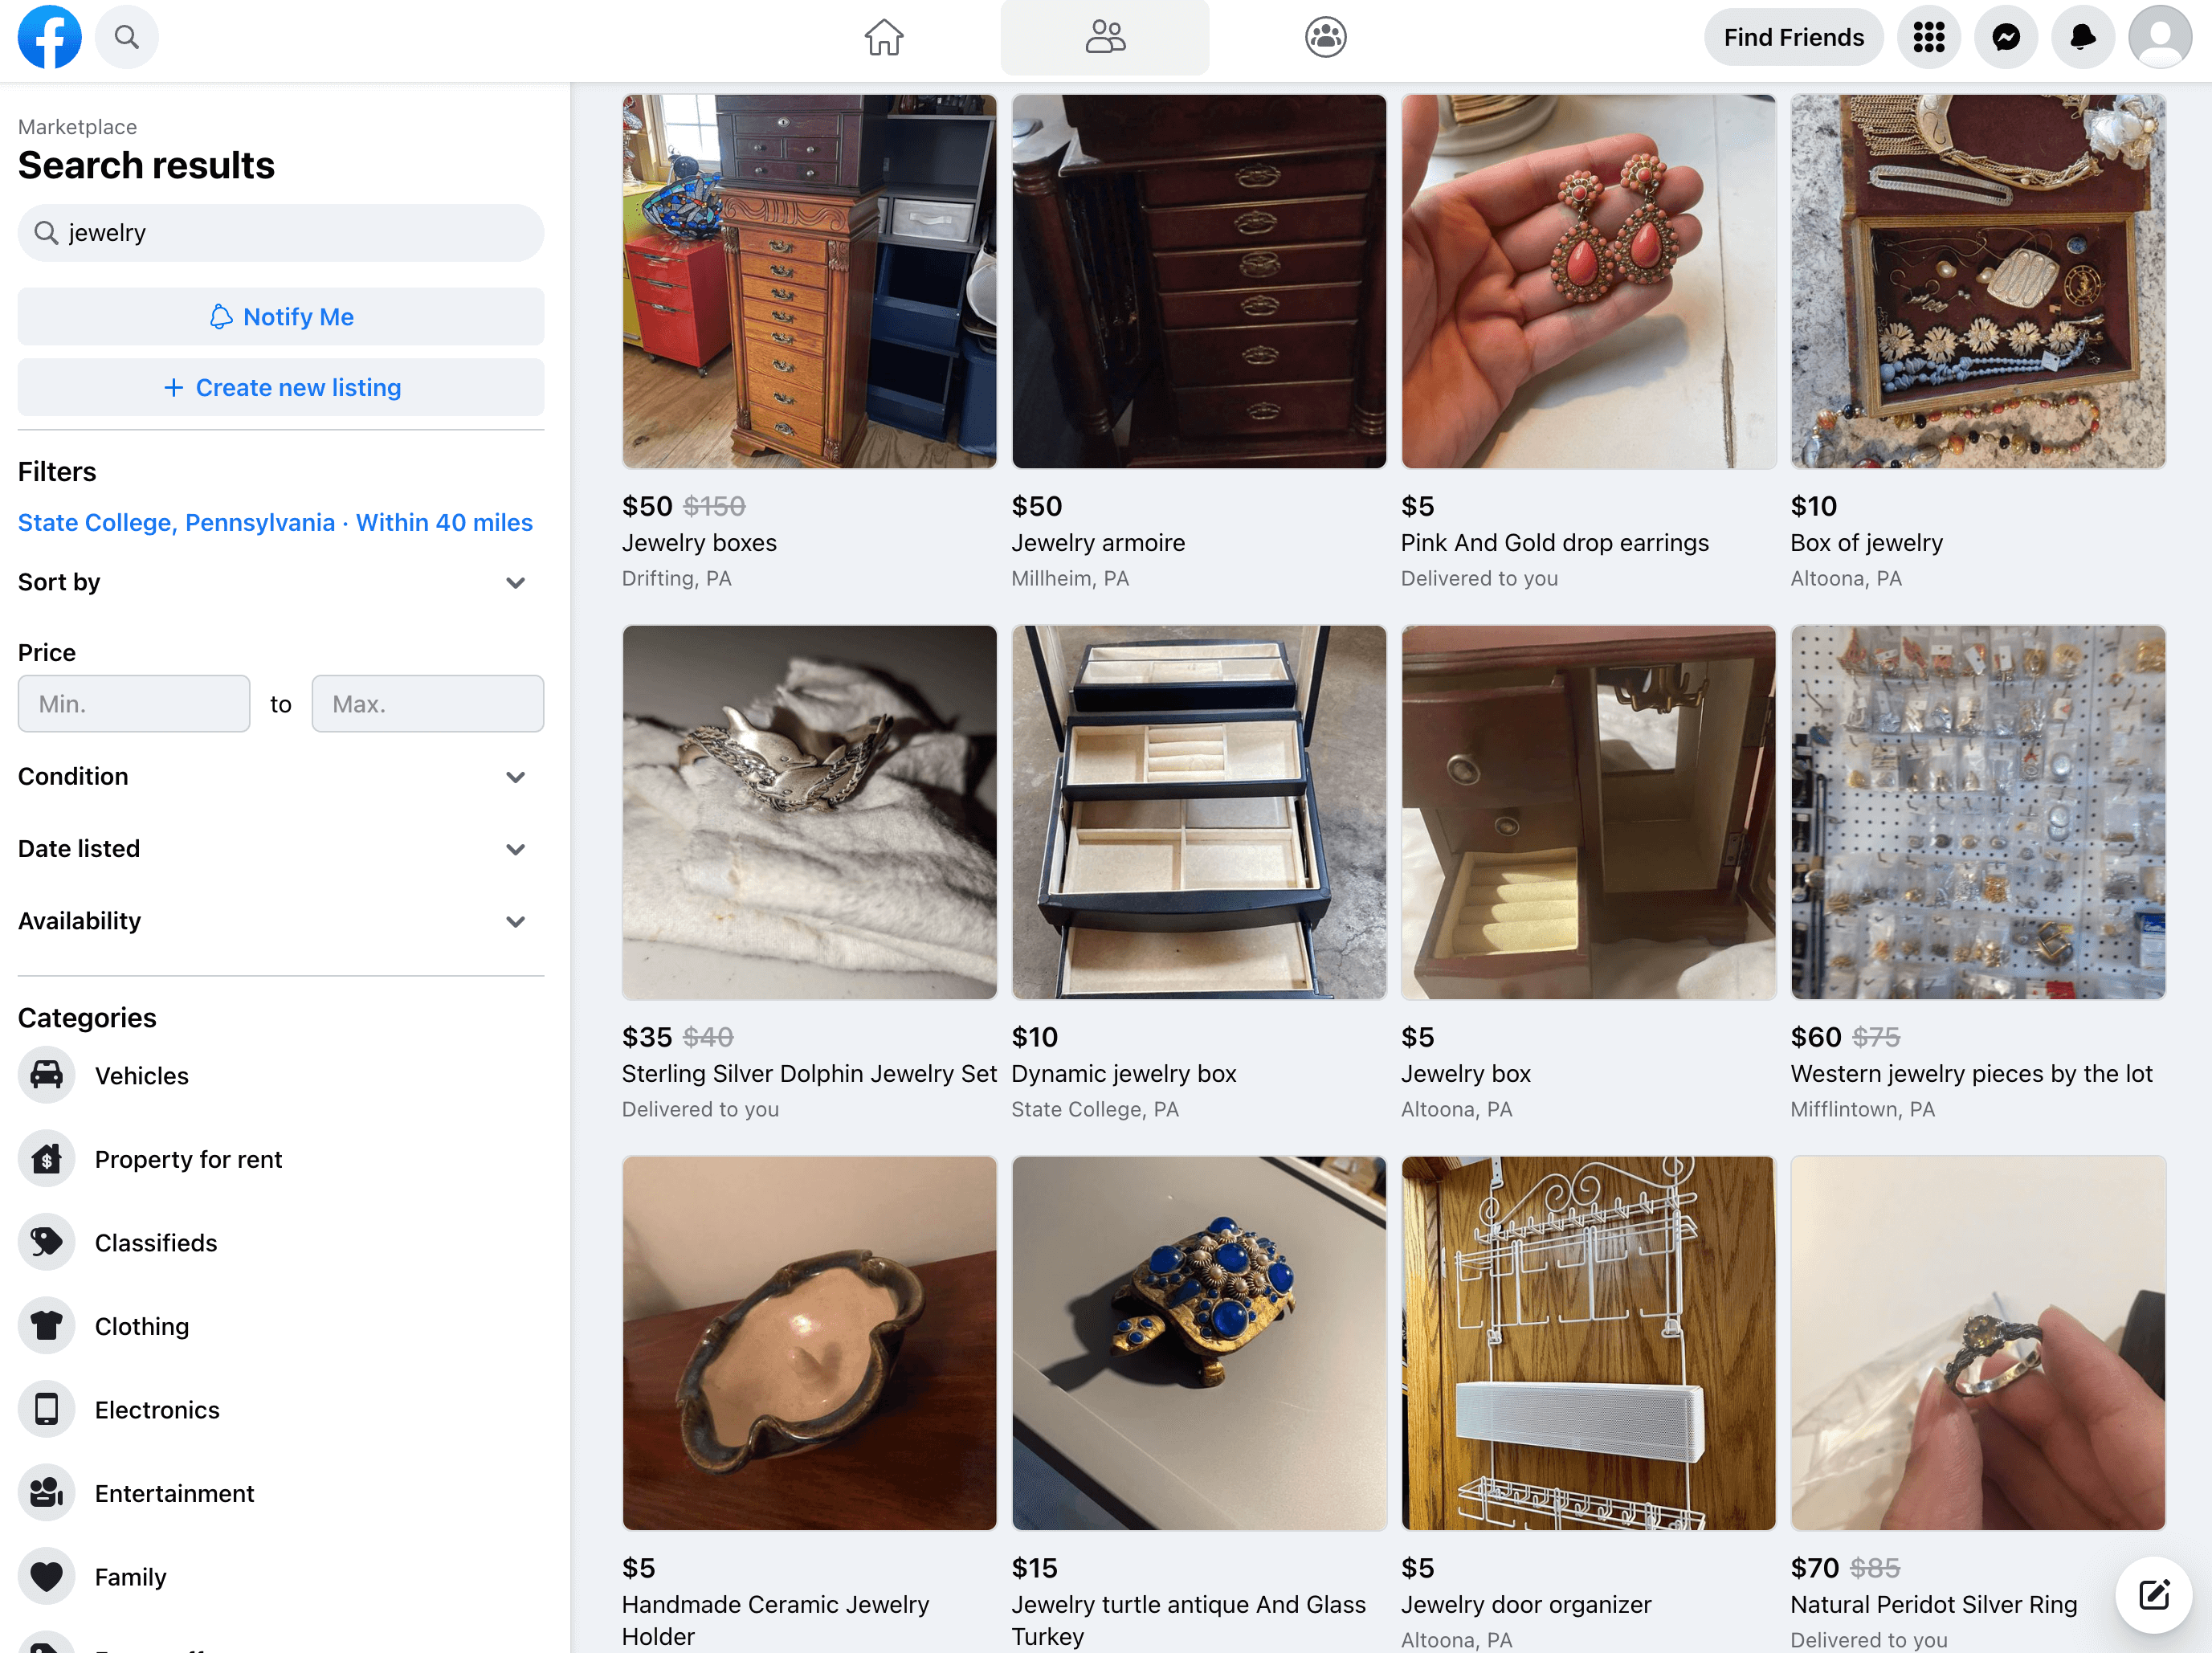
This social marketplace allows buyers to search for products, and if your product matches their intent, it will be available for the buyer to choose from.
Suppose a buyer is looking to purchase a musical instrument. He can simply go to Facebook Marketplace and search for the desired instrument.
If the buyer clicks on the product, you can set it up to take the buyer to your Facebook shop page or your website.
The main difference between selling products only on a Facebook page and selling products from your WooCommerce to the Facebook marketplace is that you will get more trust from the people.
A buyer tends to order more from a business with its Brand value than buying from a private seller on Facebook. So having an up-and-running website is crucial if you want to stay in the eCommerce business for a long time.
In the next section, I will explain what you should have before creating a Facebook catalog as it is an important part of the process.
Necessary Things Before Creating a Facebook Catalog
Now I am going to explain necessary things that you need to prepare before creating a perfect Facebook catalog.
1. Website:
Ensure you have a functional and professional website where your products are listed. This is essential as your product catalog will link directly to your website.
How to Do It: Set up a website with a user-friendly design and clear product listings. Make sure the site is secure and optimized for mobile devices.
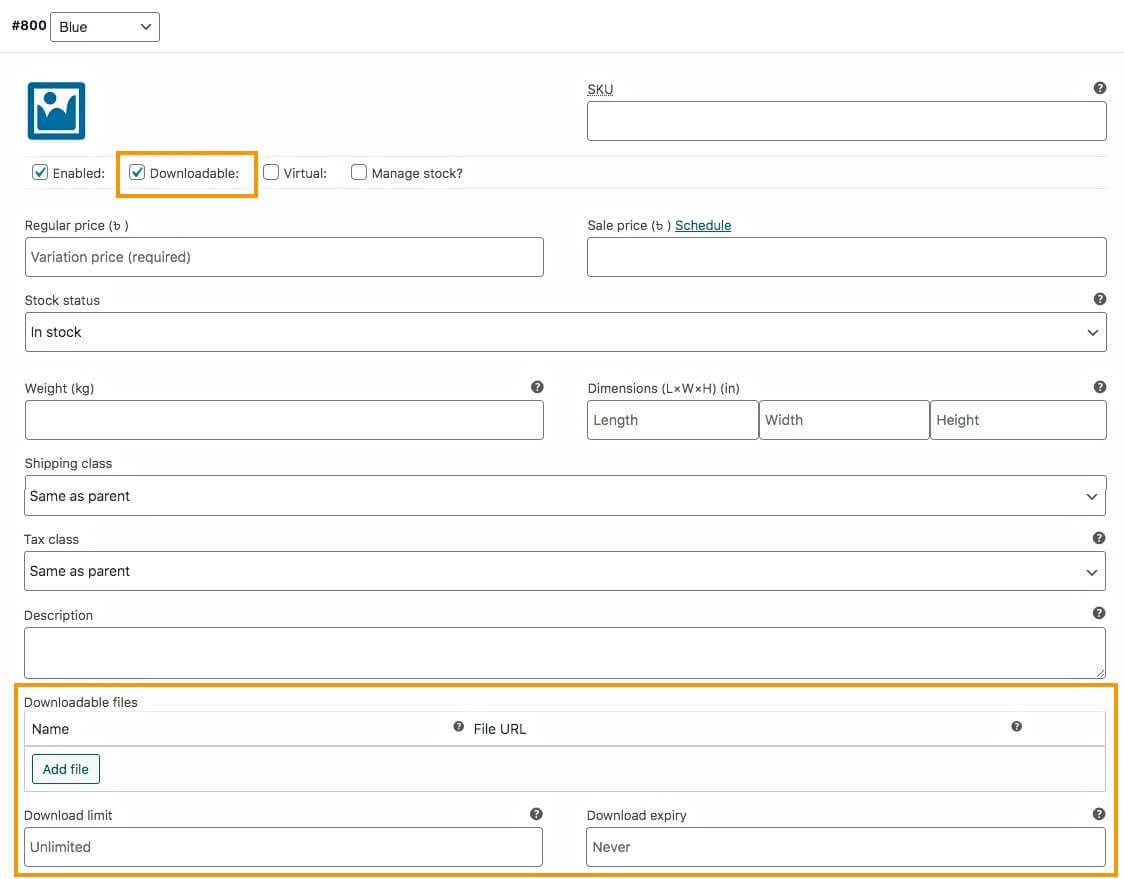
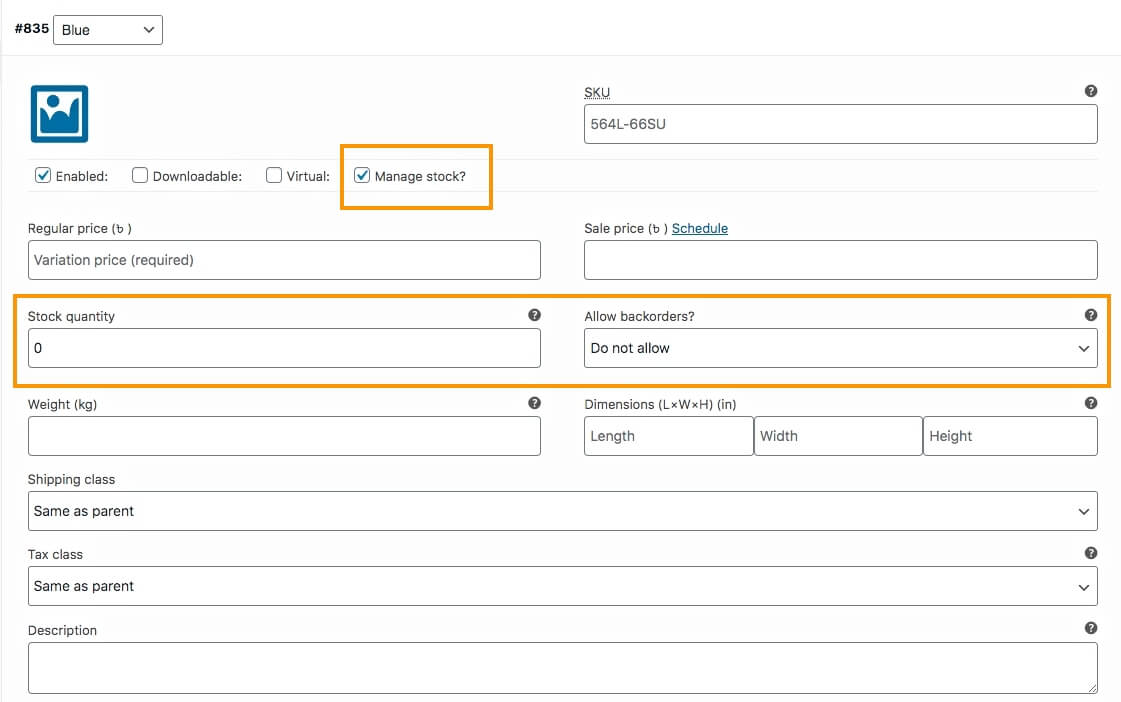
2. Accurate Product Information:
Gather detailed and precise information about each product, including titles, descriptions, images, prices, and stock levels.
How to Do It: Use a spreadsheet or a product information management system to organize and maintain accurate product data. Regularly update this information to reflect any changes.
3. Facebook Commerce Manager:
This is the tool where you will create and manage your catalog. It integrates with your Business Manager to provide a centralized location for your product data.
How to Do It: Log into your Facebook Business Manager, navigate to Commerce Manager, and follow the steps to set up your catalog.
4. Product Feed:
A product feed is a file that contains all the information about your products in a format that Facebook can read. This feed is uploaded to your catalog.
How to Do It: Create a WooCommerce product feed in CSV, TSV, or XML format. Include all necessary fields such as product ID, title, description, image URL, price, and availability. Validate the feed to ensure it meets Facebook’s requirements.
5. Facebook Tracking Pixel:
The Facebook Pixel is a piece of code that tracks actions on your website, such as views, adds to cart, and purchases. This data is crucial for dynamic ads and audience targeting.
How to Do It: Install the Facebook Pixel on your website by copying the pixel code from Facebook and adding it to your website’s header. Verify that it’s working correctly using Facebook’s Pixel Helper tool.
6. Facebook Page:
A Facebook Page is necessary to represent your business on Facebook and connect your catalog to your audience.
How to Do It: Create a Facebook Page if you don’t already have one. Fill out all relevant information, including business details, profile picture, cover photo, and contact information.
7. E-commerce Platform Integration:
If you use an e-commerce platform. you can easily connect WooCommerce to the Facebook marketplace. This Facebook WooCommerce integration simplifies the catalog creation process.
How to Do It: Follow the integration guides provided by Facebook and your e-commerce platform to sync your product data automatically.
8. Compliance with Policies:
Ensure your products and business practices comply with Facebook’s commerce policies to avoid disapproval or restrictions.
How to Do It: Review Facebook’s commerce policies and advertising guidelines, and make sure all your product listings meet these standards.
9. High-Quality Product Images:
Use clear, high-resolution images to showcase your products effectively. Good images can significantly enhance the appeal of your ads.
How to Do It: Ensure images are at least 500×500 pixels, well-lit, and showcase the product. Avoid cluttered backgrounds.
10. Accurate and Functional Product URLs:
Make sure each product URL in your feed correctly links to the specific product page on your website.
How to Do It: Test all URLs to ensure they lead to the right product pages. Correct any broken or incorrect links.
11. Inventory Management System:
Keep your inventory data up-to-date to avoid advertising out-of-stock products, which can frustrate customers. How to Do It: Use an inventory to sync stock levels with your product feed management system. Update the feed regularly to reflect the current stock.
12. Consistent Pricing:
Ensure all prices in your catalog match the currency and pricing strategy for your target market.
How to Do It: Verify that prices in your product feed are accurate and consistent with those displayed on your website.
13. Permissions and Roles:
Assign the right roles and permissions to team members to manage the catalog efficiently without compromising security.
How to Do It: In Business Manager, assign roles such as admin, editor, or analyst to relevant team members. Control access based on their responsibilities.
14. Customer Support Readiness:
Be prepared to handle customer inquiries and support requests that may arise from your product listings.
How to Do It: Set up a system for managing customer messages and comments on your Facebook Page. Train your team to respond promptly and effectively.
15. Analytics Setup:
Set up analytics tools to track the performance of your catalog and ads, helping you make data-driven decisions.
How to Do It: Use Facebook Analytics and other tools like Google Analytics to monitor key metrics such as click-through rates, conversions, and sales.
By following these steps, you’ll be well-prepared to create a Facebook Catalog that enhances your advertising efforts and helps you connect with potential customers more effectively.
Having said all that, you still have to upload your product data to the Facebook marketplace.
Now, manually adding products from WooCommerce to your Facebook marketplace can be quite frustrating. But there is an easy way to upload all of your products into Facebook for WooCommerce in just a few clicks.
Product Feed Manager for WooCommerce – Facebook Product Feed Generator
This tool will let you generate a product feed file in the right Facebook Catalog format with just a few clicks. Then, you can simply upload it to your Facebook for WooCommerce in the commerce center to list all of your products in the Facebook Marketplace in just a few minutes.
Now, yes, you will get some Facebook for WooCommerce plugins in WordPress that do a similar function, and some may even have more active installations.
But, what makes PFM unique is its super simple UI. You can start using the plugin and generate a Facebook Catalog feed with as low as 4 clicks. And if you have certain customized data in your store, you will still need as little as 3 minutes to configure and generate a perfect Facebook product feed.
Since you are running an eCommerce shop, you do not have a lot of time on your hands. The faster you can start promoting your products, the sooner you make money. That is why this tool is designed to save you time by uploading products on Facebook for the WooCommerce store.
You do not need to learn about the Facebook Catalog feed structure or format, and you do not need to spend hours configuring the feed generation. The plugin will lead you to achieve it real quickly.
Now, let’s take a look at how you can generate a product feed with all your WooCommerce products to upload to the Facebook Marketplace.
How to Quickly Generate Your Facebook Product Feed with WooCommerce Products
First, make sure you have the Product Feed Manager for WooCommerce installed and activated in your WooCommerce store.
Then, follow the two steps below to generate a Facebook product feed with your WooCommerce products.
Step 1 – Create A Product Feed
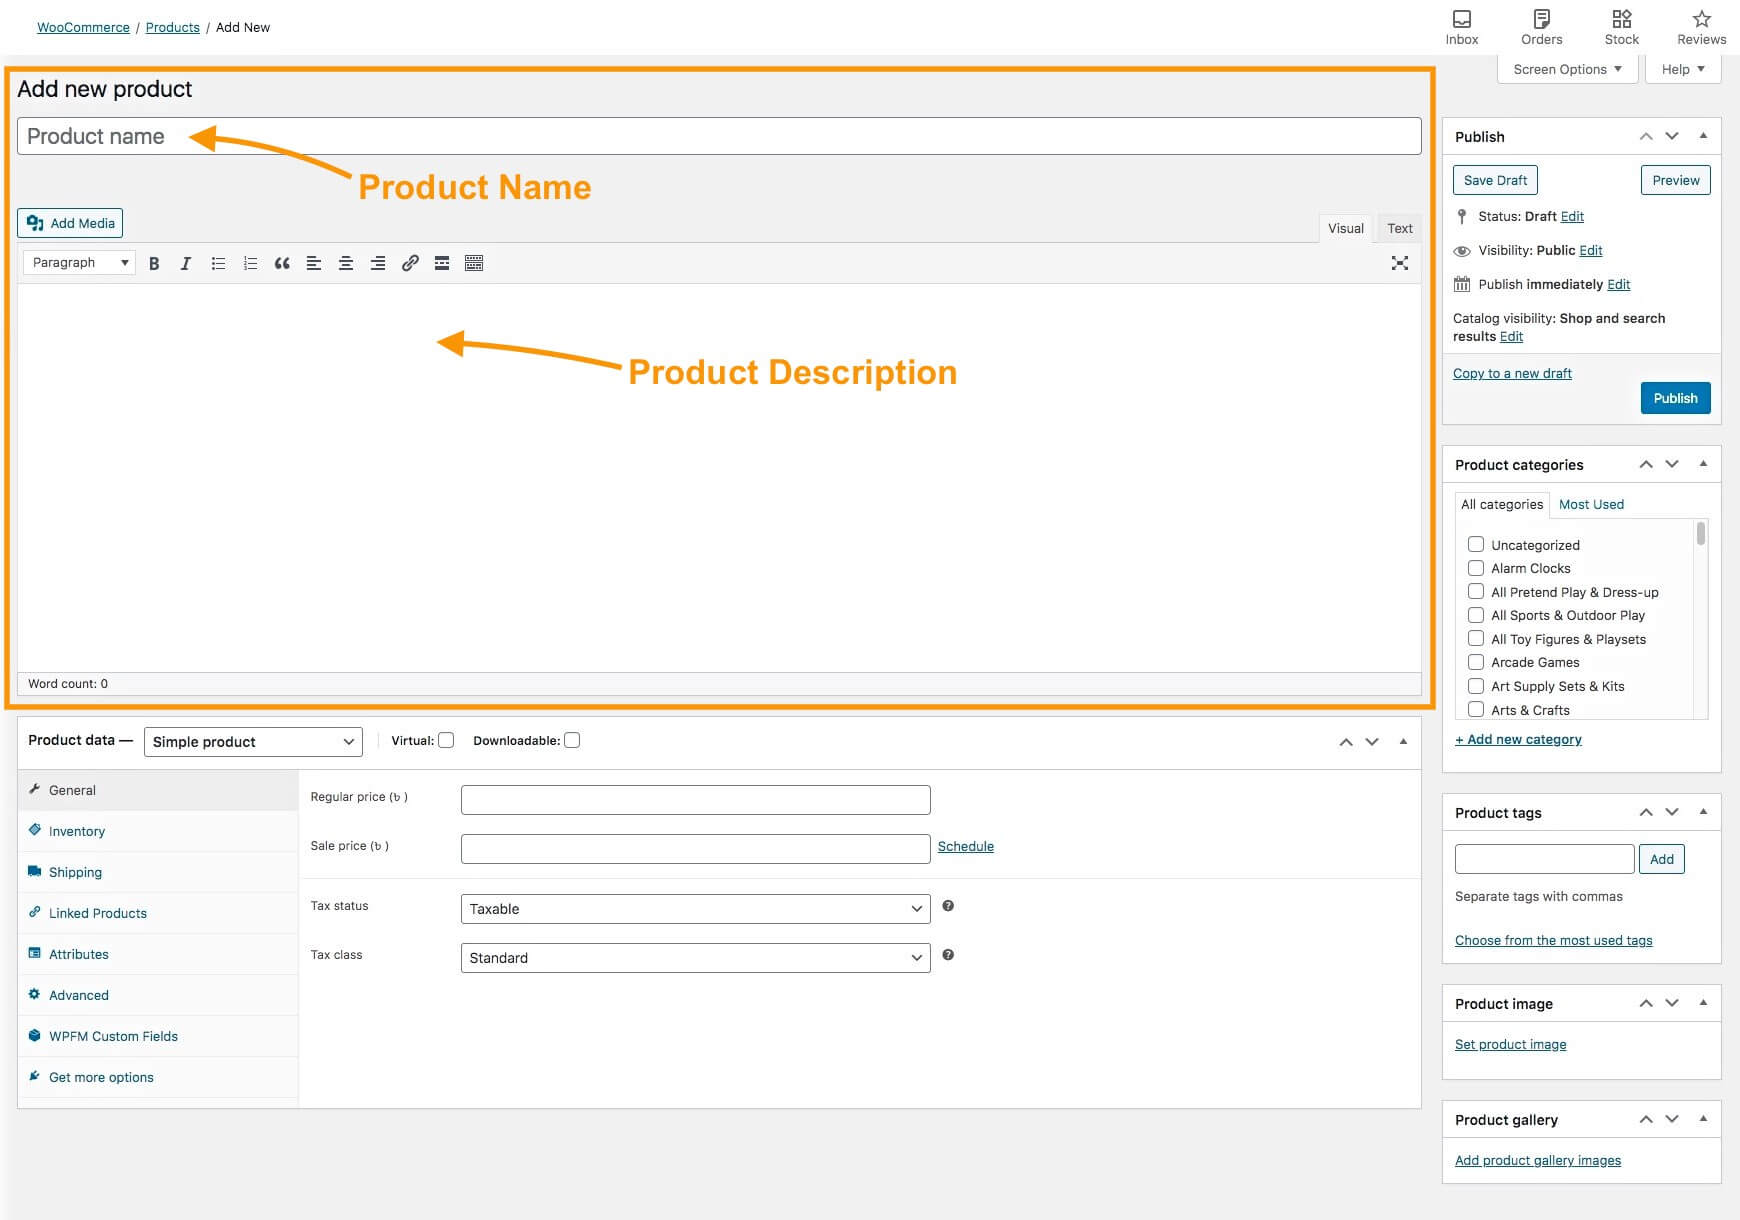
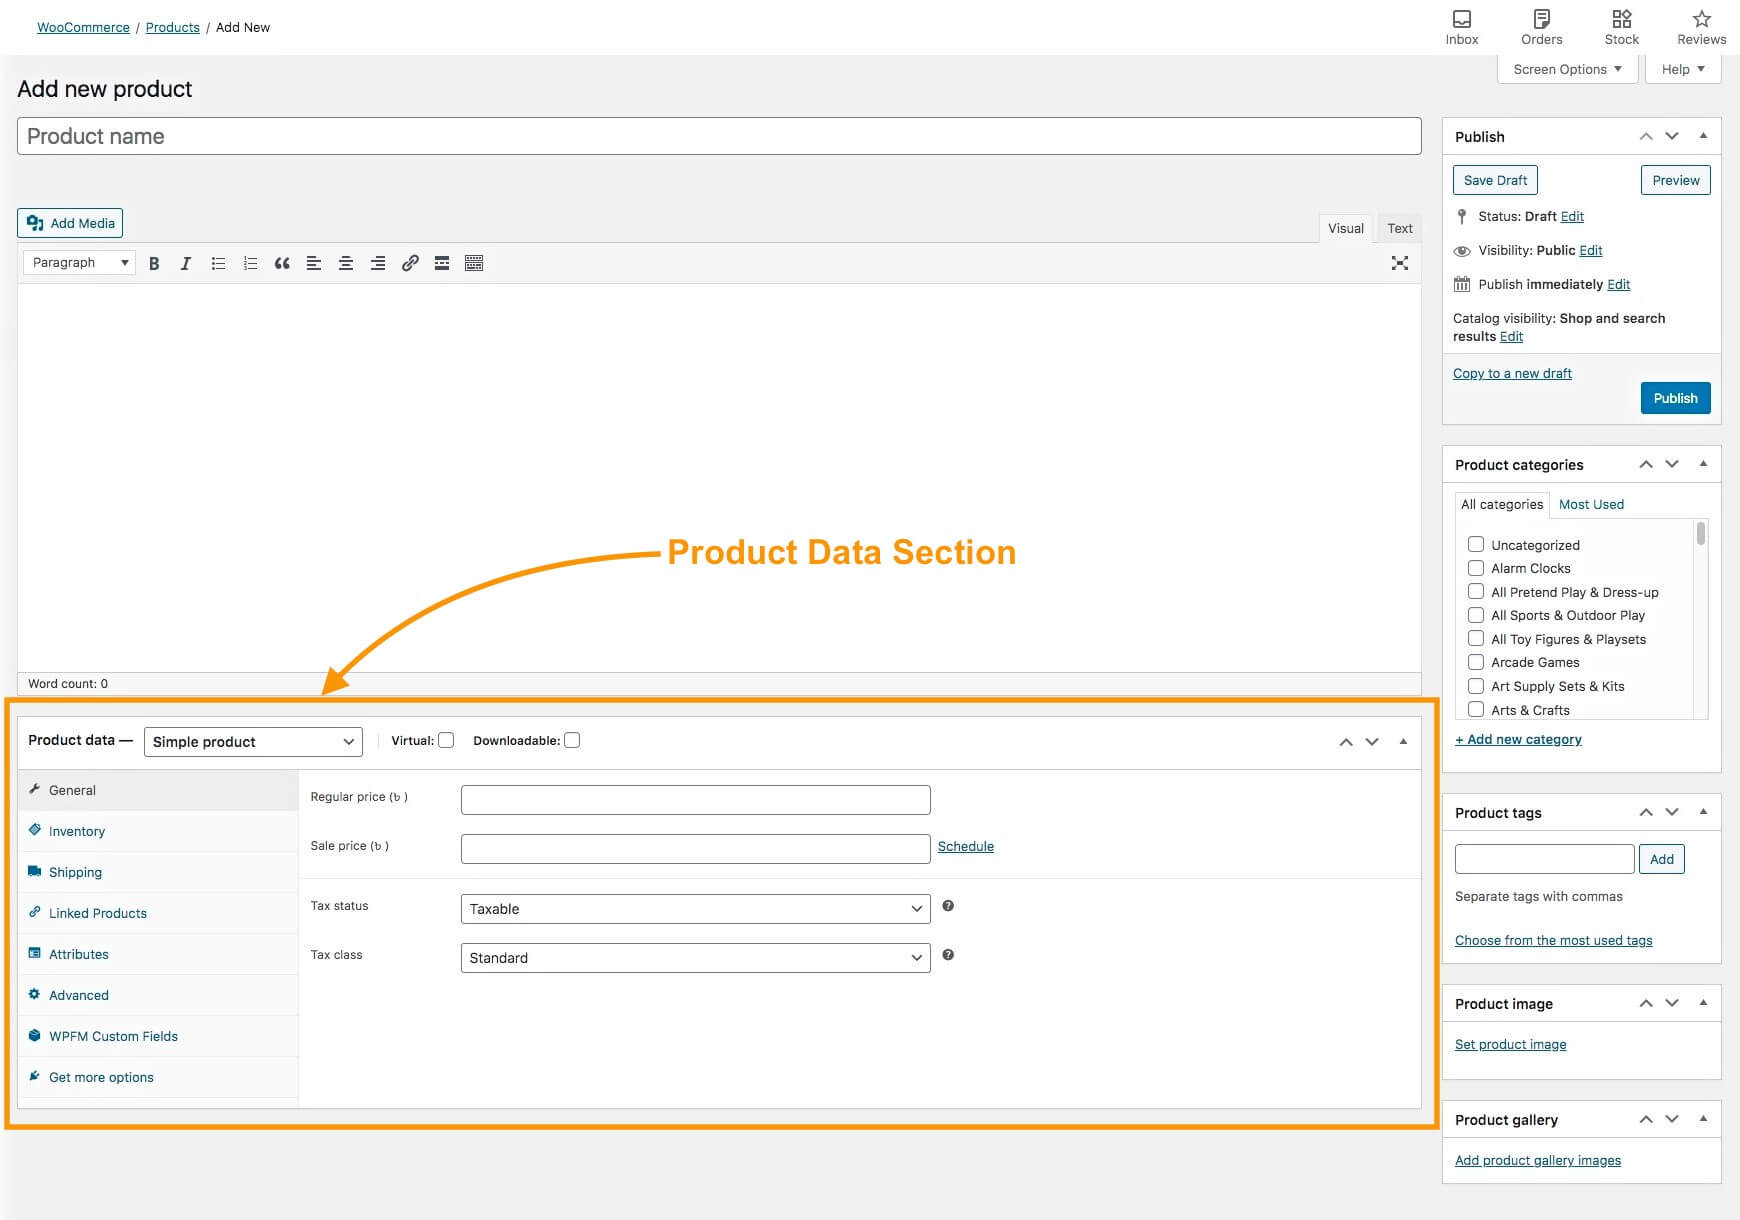
Once the plugin is activated, on your dashboard menus, you will find the option Product feed.
Hover on it and click on ‘Add New Feed’, and it will take you to the following page:
Here, first set a feed title.
Then choose the Feed Merchant as Facebook.
It will then load all the fields that will be included in your product feed for each of your products.
Step 2 – Configure Your Facebook Product Feed
You will notice that almost everything is already configured. All you have to do is assign the right values for the Manufacturer/Brand, and the Google Product Category
– Assigning The Manufacturer/Brand:
This should be the Brand name of the product you are selling. If you are the manufacturer, you can set the type as Static and input your company name here.
If you have different brand names for different products, you will have to save the value in a custom field or product attribute and then use that value here.
**You can also use a brand plugin, which will make it easier to assign and use brand names.
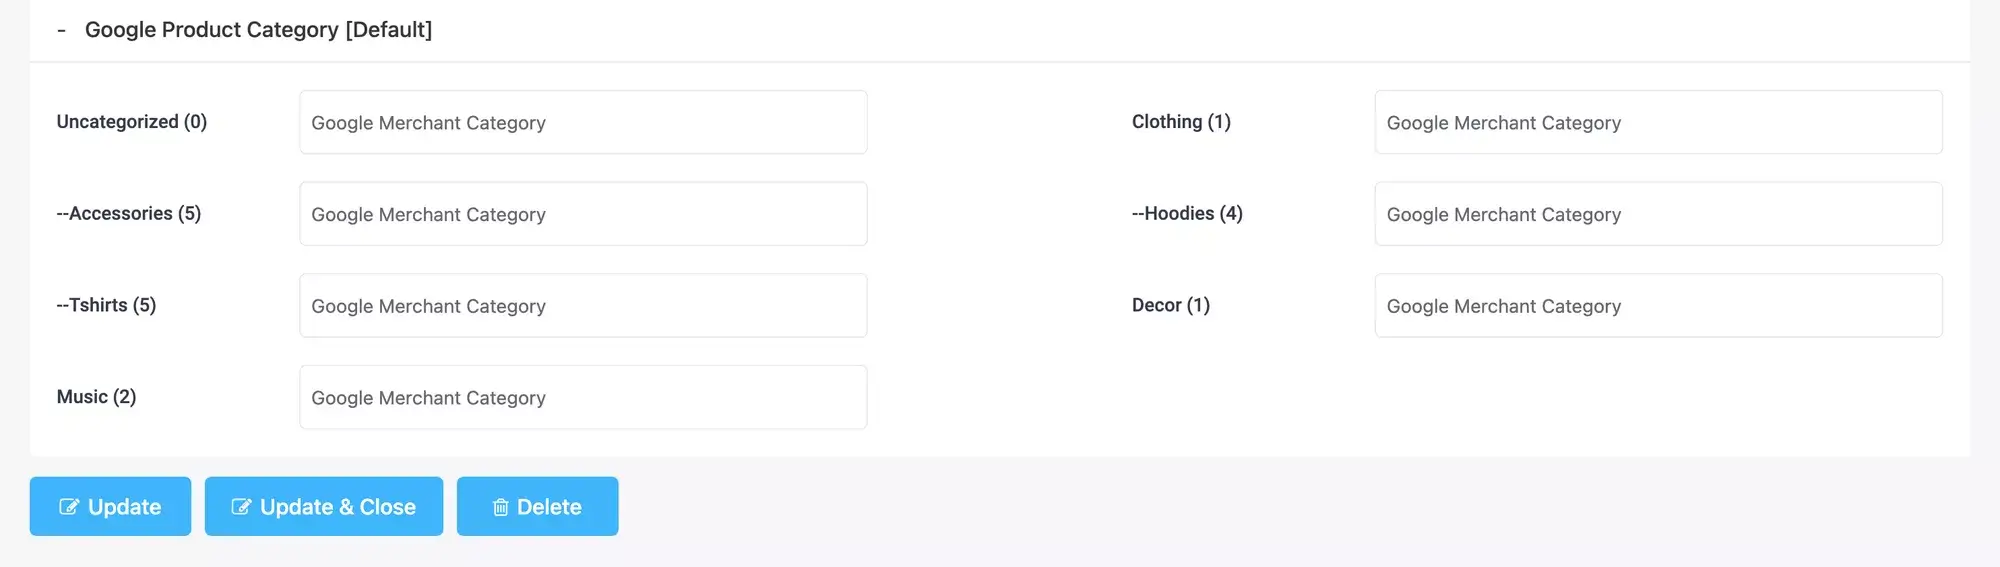
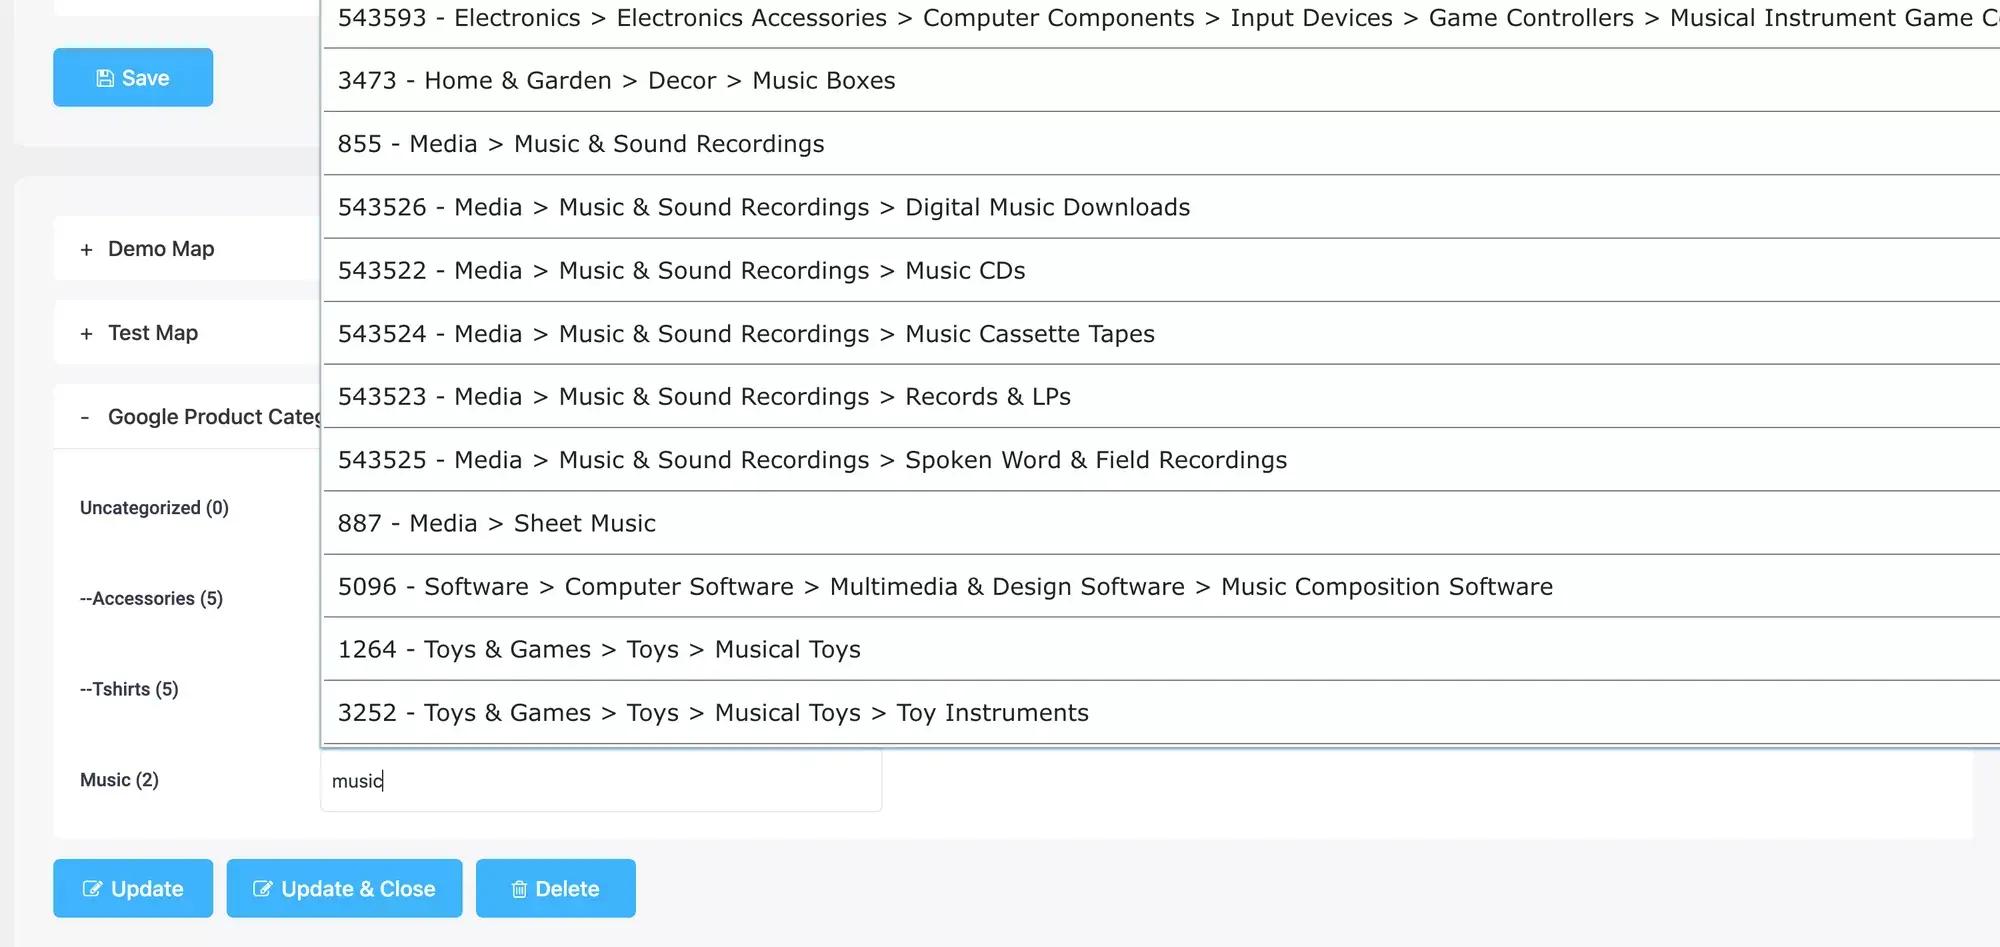
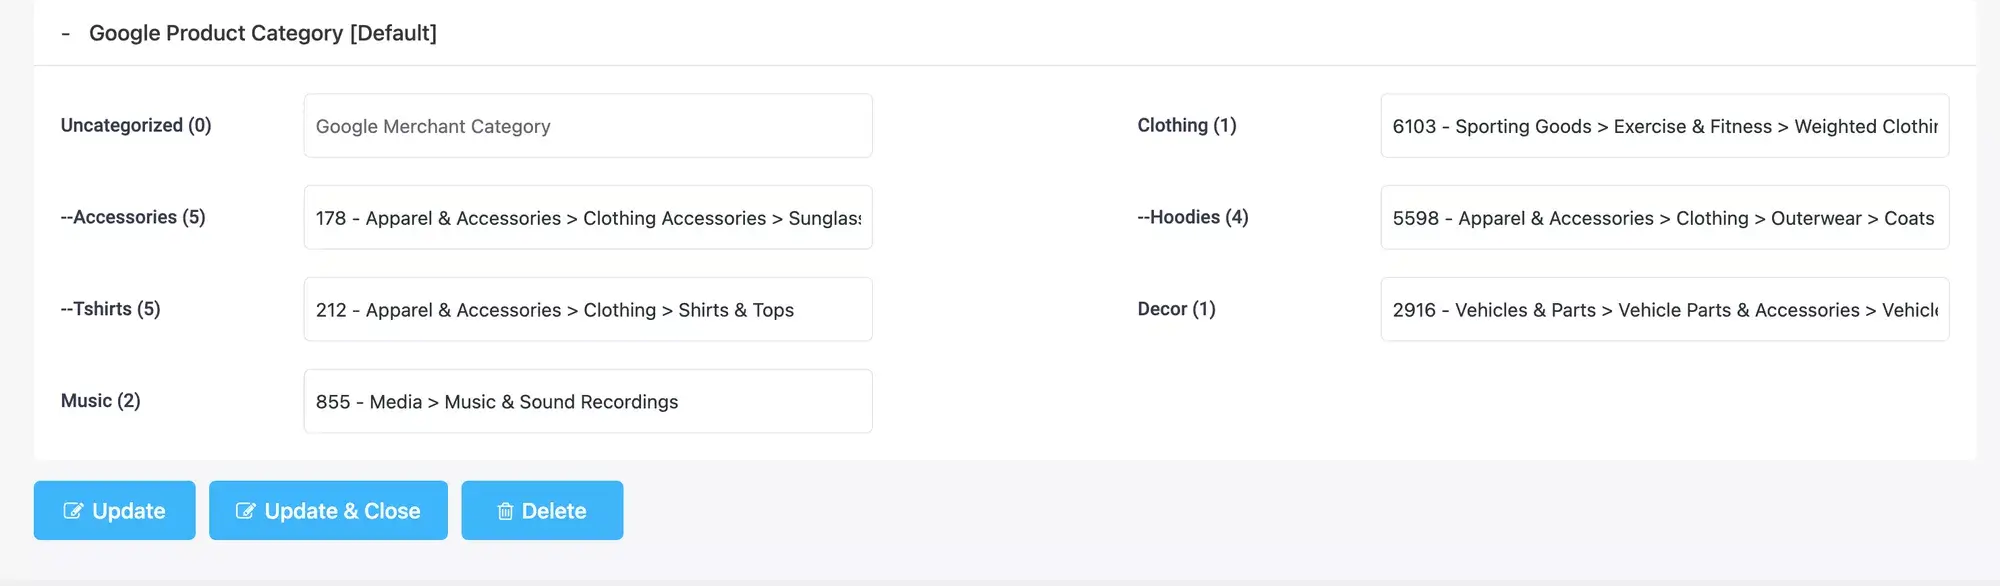
– Configuring the Google Product Category:
Facebook Marketplace has its own set of categories (that match Google) that, most often, don’t match the categories in your store. But you do not have to change it in your store. You can simply use the category mapping feature to set up the mapping and use it as the value here.
You can further customize the feed if you need to use Product filters, a few basic feed settings, auto-update intervals, and feed rules. Normally, they are already configured in an optimized way for the Facebook Marketplace.
Once you have configured the feed, simply click on the Publish button on the right, and the feed will be generated in seconds.
And that’s it. You have successfully generated a product feed for the Facebook Marketplace. You will be able to collect the feed link or download the feed file from the right side.
How to Upload Your Product Feed to Facebook Commerce Manager
Once you have generated the product feed, it’s time to get your WooCommerce products on the Facebook marketplace.
Before you do, it’s always best to create a Facebook business page if you want to leverage more exposure from Facebook for WooCommerce. You may read this guide to create a Facebook business page if you do not have one already.
Simply follow the steps below.
Step 1 – Create A Catalog
Login to your Facebook account and access the Facebook Commerce Manager.
Select your preferred way to sell your products on Facebook. Here, select the ‘Create a Catalog’ option. Then click on ‘Get Started.’
Now, choose your catalog type.
Next, Select Upload Product Info and click on the ‘Create’ button.
Then click on finish, and it will redirect you to your Facebook Commerce Manager Dashboard.
Step 2 – Upload Your Product Feed to The Facebook Marketplace
Now that you have the Catalog prepared, you are ready to upload your products on the Facebook marketplace for your WooCommerce store.
On your Commerce Manager menus, you will see a new menu called Catalog. Click on it, and then click on Data Sources.
Then select Data Feed.
Here, you will get three options – File Upload, Scheduled Feed, and Google Sheets. Choose Scheduled Feed.
Then you will get the option to provide the link to the feed file. Earlier, when you generated the feed in your WooCommerce store, it gave you a feed link. Copy that link and paste it here.
Now, choose a suitable time for the schedule fetch and click on Next.
And finally, give a name to your catalog feed, choose the currency for your store, and click on Upload.
And that’s it. Your feed will be uploaded in a few minutes to the Facebook Marketplace, which you will be able to view in the Items menu under Catalog.
Key Benefits of Setting up Facebook Catalogs for WooCommerce
Now I will tell you some key benefits of setting up your Facebook catalog for WooCommerce so that you can be inspired more.
Easy Integration: You can easily integrate WooCommerce with Facebook. It allows for automatic syncing of product information. It also saves you time and reduces manual data entry errors by automatically updating your Facebook Catalog whenever changes are made in WooCommerce.
Enhanced Product Visibility: Products in your catalog can be featured across various Facebook and Instagram placements. It helps you to increase exposure and potential reach to millions of customers on these platforms.
Dynamic Ads: Dynamic ads use your catalog to show personalized products to customers based on their behavior and interactions. It boosts your conversion rates by targeting buyers with products they’ve shown interest in, leading to higher ROI.
Improved Shopping Experience: Customers can find and browse products directly from your Facebook and Instagram. It provides an easy shopping experience, reducing friction and making it easier for them to purchase.
Automated Inventory Management: Syncing your WooCommerce store with Facebook ensures real-time inventory updates. It prevents advertising out-of-stock products, reducing customer frustration and potential lost sales.
Advanced Analytics: Track performance metrics of your products and ads through Facebook’s detailed analytics tools. It enables data-driven decisions to make optimized product listings and advertising strategies.
Multi-Channel Sales: Extend your sales channels by listing products on both your WooCommerce site and Facebook/Instagram. It helps to diversify revenue streams and reaches a broader audience.
Easy Product Management: You can easily manage product listings, descriptions, prices, and inventory from a single platform. It simplifies catalog management, saving time and effort.
Retargeting Opportunities: Using data from the Facebook Pixel helps to recapture your potential lost sales and increases conversion rates.
Cost-Effective Advertising: Dynamic ads and personalized targeting are often more cost-effective than traditional advertising. It maximizes your budget efficiency by focusing on high-intent users.
Enhanced Customer Insights: Gaining valuable insights can help you tailor marketing strategies and product offerings to better meet your customer needs.
Increased Engagement: Engaging product posts and ads can attract likes, comments, and shares. It boosts your brand visibility and engagement on social media platforms.
By setting up Facebook Catalogs for WooCommerce, you can significantly enhance your e-commerce operations, improve customer experiences, and drive more sales through advanced targeting and easy integration.
Conclusie
In conclusion, Facebook Marketplace for your WooCommerce store can significantly enhance your product visibility and boost sales.
Following the steps outlined, you can easily transfer your products to Facebook. It allows you to reach a broader audience and simplify your sales process.
The integration offers numerous benefits, including dynamic ads, automated inventory management, and advanced analytics, all of which contribute to more efficiency & effectiveness.
For an effortless transfer process, use the Product Feed Manager to simply generate and upload your WooCommerce products to Facebook Marketplace with ease.
How can I increase the visibility of my WooCommerce products on Facebook Marketplace?
To increase visibility, ensure your product titles and descriptions are clear and keyword-rich. Engage with your audience through your Facebook business page and use targeted ads to reach potential buyers. Additionally, leveraging Facebook’s algorithm by frequently updating your product listings can keep your store relevant and visible.
What should I do if my product feed fails to upload correctly?
If your product feed fails to upload, double-check the feed link and ensure it is formatted correctly. Also, verify that all mandatory fields, such as product titles and categories, are filled out. If issues persist, consider reaching out to support both WooCommerce and Facebook Commerce Manager for assistance.
How often should I update my product feed on Facebook?
It’s beneficial to update your product feed regularly, ideally daily, to reflect any changes in inventory, pricing, or new product additions. This keeps your listings accurate and up-to-date, improving customer trust and satisfaction.
Can I customize my product feed to match Facebook’s requirements?
Yes, you can customize your product feed using the Product Feed Manager for WooCommerce. Map your WooCommerce categories to Facebook’s, assign brand names, and adjust other attributes to ensure compatibility. This customization helps in displaying your products correctly on Facebook Marketplace.
How can I measure the success of my product listings on Facebook Marketplace?
You can measure success by tracking key metrics such as click-through rates, conversion rates, and sales figures through Facebook Commerce Manager. Additionally, utilize Facebook Insights to monitor engagement and adjust your strategy based on performance data to continually improve your listings.
Let’s face it: when people want to buy electronics, their first stop isn’t your website—it’s Google.
And guess what? If your products show up as suggestions on Google Shopping, they’re just a click away from landing in someone’s cart.
Listing your products on Google Shopping isn’t just a nice-to-have; it is one of the best techniques you can apply while selling electronics online.
In fact, with consumer electronics projected to hit $977 billion in sales by 2025, the stakes are higher than ever.
But here’s the burning question:
How do you ensure your products actually show up in search results?
When buyers do find you, how can you nudge them into buy now mode?
And most importantly—how do you get set up on Google Shopping without losing your mind?
You’ll get all those answers here. Let’s break it down step-by-step and show you how to sell electronics online with confidence and ease.
Why Sell Electronics Online?
Before we jump into the guide, let’s take a minute to talk about why selling electronic products online is such a big deal. Once you see the advantages, you’ll get how online selling can really level up your business.
1. Buyers Are Already Searching for Electronics Online
Think about your own buying habits. When you need a new phone or a set of earbuds, where do you start? Most likely, it’s online. Customers are constantly comparing prices, reading reviews, and hunting for deals. By listing your electronics online, you’re placing your products exactly where people are looking.
2. Expand Your Customer Base Beyond Local Shoppers
A physical store limits you to whoever walks through the door. But selling online? You’re not tied to one location. You can reach buyers across the country—or even the world. Whether someone is browsing from their living room or another time zone, your products are just a click away.
3. Your Store Is Open 24/7
In a physical shop, you rely on foot traffic and business hours. But when you sell online, there are no closing times. Customers can browse, compare, and buy whenever it’s convenient for them—whether it’s at 2 p.m. or 2 a.m. This “always open” approach means more sales opportunities, no matter the time of day.
4. Easier to Stand Out with Personalization
Online selling lets you tailor the experience in ways a physical store can’t. You can showcase product recommendations, run flash sales, or even offer personalized deals based on a customer’s browsing history. These small touches can create a more engaging shopping experience that turns visitors into loyal buyers.
5. Faster Adaptation to Trends and Customer Preferences
Tech trends move fast. Today it’s noise-canceling headphones, tomorrow it’s VR headsets. Selling online allows you to adjust your offerings quickly—no need to rearrange shelves or print new signage. Just update your listings and promotions, and you’re ready to go.
6. Lower Overhead, Higher Profit Potential
No rent, utilities, or in-store staff means you can reinvest that money into marketing, product improvements, or offering more competitive pricing. With fewer expenses, your profit margin can grow faster than it would with a traditional brick-and-mortar setup.
7. Build Trust with Reviews and Transparency
Online stores thrive on social proof. Customer reviews and testimonials can help build credibility and give potential buyers confidence. Plus, you can share detailed product descriptions, FAQs, and even video demos to answer any lingering questions before customers hit “buy.”
By selling electronics online, you’re giving yourself more reach, flexibility, and the ability to stay competitive in a fast-moving market. You’re not just offering products—you’re creating convenience and confidence for your customers.
How To Create An Effective Product Listing via Google Shopping
The first step to getting your products into the product suggestions is to upload your products on Google Shopping.
Following are some of the ways you can optimize your product listings for maximum results :
1. Include Core Keywords In The Title
The first factor in ranking product suggestions is the product title.
When it comes to electronics, people usually call them by multiple specific terms.
But you have to find the terms that are used by the majority.
For example, a trimmer is also often called an electronic shaver.
But the majority calls it a trimmer. So the term “trimmer” must be in the product title.
Second, buyers are often attracted to the brand. Third, in some products the model is important.
So, you need to have the product brand, the model, and the common term of the product name should be included in the product title.
This will increase impressions and allow the right buyers to recognize the product they are looking for.
2. Curated Product Images That Catch The Eye
Product images play a big part in attracting buyers. If you use a typical image similar to everyone else, it may not work.
You may try the following:
Use alternate colors. Search for your product on Google and find out how the typical results are. Then design your image to have a unique color that may make it stand out. One way is to have the product on a white background, but add a colored border so that is stands out.
For the image you choose to submit, update its tile and alternate text to be the same as the product title.
Do not add any promotional text to the image as Google Shopping reject it.
Overall, these are changes we recommend for you to make on the image that you submit in your product data.
3. Indicate Specific Google Product Categories In Your Product Data
Google Shopping allows you to submit the appropriate category for selling electronics online of which you want your products to be part.
You can easily do that by including an attribute “Google Product Category” and indicating which category your product is best suited in.
This will help to display your products as related or similar product suggestions when a buyer is not sure of the product name.
4. Include all the right attributes for Google Shopping
When you submit your product data feed on Google Merchant Center to sell electronics online, make sure you have the following data included:
Product ID
Titel van het product
Productbeschrijving
Product Link/URL
Productcategorie
Google Product Categorie
Productafbeelding URL
Voorraadbeschikbaarheid
Normale prijs
Fabrikant/Merknaam
GTIN or MPN
Identifier Bestaat
Other than these, you may add additional attributes that are related to electronic products.
Product Condition – To indicate if these are new or refurbished.
Product Dimensions – The product length, width, and height.
Product Weight- The weight of the product.
Product Detail – Include additional specifications of the product.
Product Highlight – Link to a video of the product showcase.
Custom Labels – To mention non-attribute values as attributes such as model, technology, etc.
Shipping Information
You will be able to easily generate the product feed from your WooCommerce store in just a few clicks using a simple plugin – Product Feed Manager for WooCommerce.
5. Increase Local Visibility (if applicable)
If you are shipping a product to local areas only, then you have to be clear about it in your product listings and Google Shopping.
Use the country name (or city name) in the product description. For example “Get it anywhere in CA in just 3 days!”
Include the country name as a custom label.
If feasible, offer a special discount on shipping on local deliveries. Many tend to offer free shipping.
Allow an option of local pick-up.
Other than these, an important thing to do is to submit your products for selling electronics online as local product inventory other than the basic Google shopping listing.
This will ensure you get extra preference when local buyers search for your products. You can generate a local product inventory easily.
6. Use Google Merchant Promotions For Better Conversions
In your Google Merchant Center, you will find an option to apply for Google Promotions which allows you to run momentary discounts for the products you already listed in the Shopping feed.
The specialty of this is you can highlight that you have a special offer for your products rather than waiting for people to click on the product display Ads and visit your site to see the offer.
For this, you have to submit a separate Google promotion feed with details on the offers you have.
You can do a single promotion for all the products or submit unique promotion details for specific products.
This will give you an edge when people view the Shopping Ads.
There will be a special highlighted text such as “Special offer: 15% off” below the product Ad to grab the attention of the buyers.
7. Optimize Structured Data & Product Page To Get Approved
After you submit your feed, a Google bot will crawl your website and try to match the product data to your JSON-LD structured data and the product data on the page to confirm authenticity.
You need to ensure you have a proper JSON-LD format set for your structured data.
You can do it manually or via using a plugin. Product Feed Manager for WooCommerce allows you to do it with just a click.
Plus, you need to ensure there aren’t any mismatches on the main required product data. For example, the prices must match.
8. Customer Reviews and Ratings Can Create A Huge Difference
Positive reviews build trust, making potential buyers more confident in purchasing from you.
You can encourage satisfied customers to leave reviews by sending follow-up emails or offering small incentives like discounts. Highlight top reviews and ratings on your product pages to draw attention and establish credibility.
Your authentic testimonials can be showcased not only on Google Shopping but also in your marketing materials and social media, adding a personal touch.
A Quick Look At Product Feed Manager For WooCommerce
Product Feed Manager for WooCommerce is a unique plugin that allows you to generate WooCommerce product feed for Google Shopping, and other Google Merchant product promotion surfaces in just a few clicks.
The plugin ensures the product feed is generated in the right format with all the required attributes.
Plus, you will have full control over what product data you want to include and what products you do not want to list on Google Shopping.
Additionally, you will get pre-built feed templates for Google Shipping, Google Product Promotions, Local Inventory Feed, and Google Dynamic Remarketing Ads so that you can prepare them all in one place without wasting hours.
If you are selling electronics online using a WooCommerce store, then check out Product Feed Manager. It will save you hours in creating the product data file.
These are some of the ways your product listings will be optimized to sell electronics online and get more views with click-throughs on Google product suggestions.
Next, it’s time to ensure, that whoever clicks the Shopping Ads and lands on your website, you are able to convert. as many of them as possible.
How To Implement Conversion Tactics In Your WooCommerce Store For More Sales
So, you optimized your Google feed and started getting a lot of traffic on your website.
Now, losing these prospects would mean wasting your acquisition cost.
To avoid this, you may try a few techniques to ensure a high conversion rate for selling electronics online.
Offer a Discount for First-Time Buyers: When customers visit your store for the first time, they’ll receive a special 10-20% discount to encourage an immediate purchase. This welcome discount helps them get the best deal right away.
Use Target-Based Discounts to Trigger Higher AOV: As they shop for electronics online, take advantage of attractive discounts for orders over $500. This encourages them to add more items to their cart.
Highlight the CTA Button & Special Offers on the Product Page: While browsing products, they’ll notice the “Buy Now” button highlighted with eye-catching colors. Special offers like “20% off today” are prominently displayed to ensure they don’t miss out on great deals.
Use a Distraction-Free Checkout Page: When Your customers are ready to check out, the page is kept simple and straightforward. Options like multi-step, express, or one-page checkout are available to help them stay focused on completing their purchase without distractions.
Initiate Abandoned Cart Recovery Campaigns: If they add items to their cart but leave without completing the purchase, friendly reminder emails will be sent. These reminders encourage them to return and finish their shopping.
Make Post-Purchase Offers for Higher Sales: After completing a purchase, relevant upsell offers are presented. For example, if they buy a $150 monitor, a $300 monitor at 10% off might be offered to enhance their setup.
Special Coupon for Second-Time Purchase: Once they complete their first order, a special coupon for your next purchase will be sent via email. This encourages them to return and shop for electronics online again.
Learn more about the electronics marketing strategies in detail from this blog.
Conclusie
In conclusion, to effectively sell electronics online, especially on Google Shopping, it’s important to focus on both your website and your product data feed.
With the product feed manager plugin, you can simplify this process.
When done right, you’ll see a significant rise in sales and conversions.
Complementing your Google Shopping efforts with paid ads on Facebook can further enhance profitability.
Building a popular online electronics store takes time. Even with these strategies, you’ll need to test and refine your product data continuously to identify what works best.
It can take anywhere from three months to over a year to achieve steady results, so patience and persistence are key.
Once you start seeing growth, you can then concentrate on well-planned promotional campaigns to boost sales further.
The apparel industry is one of the promising sectors right now.
The estimated worldwide apparel market revenue for 2023 was over 1.73 trillion US dollars, expected to rise to almost 2 trillion by 2026.
So, if you’re selling t-shirts online, you will be glad to know that according to Business Insider, the t-shirt industry will be valued at more than $10 billion by 2025.
But, as much as it is a booming business niche, it is also quite competitive.
To stay ahead of the competition, you should know how to start your t-shirt selling journey and you need to apply some unique techniques.
I have shared a step-by-step guide & gathered 7 unique tactics that can help you boost your t-shirt sales in your WooCommerce store.
After reading this article, you will be able to plan your sales strategy more effectively and work towards reaching your target sales.
Dus, laten we beginnen.
How to Sell T-Shirts Online – Step by Step
Starting an online t-shirt business isn’t complicated, but you need a clear plan to make it work. Follow these steps to set up your store and start selling successfully.
i. Find a Niche
First, decide on the type of T-shirts you want to sell. Instead of trying to sell to everyone, focus on a specific audience. For example, you could sell:
Gym and fitness t-shirts
Anime-themed designs
Funny quotes for office workers
Custom pet-themed shirts
A focused niche helps you attract the right customers and stand out from competitors.
ii. Create Designs
Once you have a niche, the next step is creating eye-catching designs.
If you’re not a designer, you have two options:
Hire an in-house artist – If you plan to release new designs regularly, having a dedicated designer makes sense.
Work with freelancers – You can hire designers on Fiverr or Upwork to create custom designs for you.
Accept custom designs from customers – Many brands let customers submit their own designs for printing. This is a budget-friendly way to start when hiring isn’t an option. Once your business grows, you can keep both options open to maximize t-shirt sales.
Keep an eye on trending topics, memes, or viral themes to create designs people will want to buy.
iii. Set Up an Online Store
Now that you have your designs, it’s time to set up your online store. You can:
Build your own website using WooCommerce or Shopify
Sell on marketplaces like Etsy, Amazon, or eBay using tools like product feed manager.
Having your own store gives you full control over branding and pricing, while marketplaces help you reach a built-in audience faster.
iv. Source Materials
Next, you need to find a reliable printing company to produce your t-shirts. Some options include:
Print-on-demand services like Printful or Printify, where the company prints and ships orders for you.
Bulk ordering from a local supplier, if you want to manage stock yourself.
Choosing high-quality materials ensures customers are happy with their purchase and more likely to buy again.
v. Set Up Payment
Before you can start selling, you need a way to accept payments. If you’re using WooCommerce, you can set up:
PayPal
Stripe
Credit/debit card payments
Make sure your payment system is easy to use and secure so customers can buy without hassle.
vi. Market Your Store
Once your store is live, the next step is getting people to visit and buy from it. Here are some effective ways to promote your business:
Work with influencers – Find small influencers in your niche and send them free t-shirts to promote your brand.
Use Facebook Communities – Join relevant groups and share your designs naturally. Avoid spammy promotions.
Offer pre-sale discounts – Run special offers before launch to attract early buyers.
Run retargeting ads – Use Facebook ads to target people who visited your store but didn’t buy.
Marketing is an ongoing process. The more effort you put into promoting your store, the more sales you’ll make.
vii. Ship Orders
Finally, once you start getting orders, make sure they are shipped quickly. If you’re using print-on-demand, they will handle shipping for you. If you manage inventory, work with reliable shipping services to deliver orders on time.
Now I’ll share some valuable tips that you can implement for your t-shirt business.
Unique Tips To Selling T-Shirts Online Like Never Before
Each of the tips you read here is a proven tactic that can help you grow your online t-shirt business significantly.
Let’s unfold the tips one by one :
Tip #1 – Actively Embrace Famous Trends to Boost T-Shirt Sales
You can browse through social media such as Facebook or Twitter to find a trend you want to follow.
But a more sensible approach is to use Google Trends.
Google Trends will help you find out the latest trends either locally or internationally.
You can find out the latest trends in your area and then re-stock t-shirts in that theme.
For example, when the famous movie ‘Avengers: End Game’ was released, it created quite the hype all over the world.
Image of avenger
People were busy getting tickets for the movie in the theaters, and it was the hottest topic on all social media.
At that time, many shops started selling t-shirts online with ‘The Avengers’ characters which sold crazily.
In the same way, you can look to embrace any trends.
It could be a famous movie, a famous incident, a trendy occasion, etc.
Using an online t-shirt maker, you can easily create custom designs that align with the latest trends, helping you attract potential customers while keeping your costs within budget.
Tip #2 – Create Irresistible Bundle Offers for Selling T-shirts Online
People love purchasing bundles.
The challenge with this approach is creating a bundle with the right combinations.
Most online stores fail to sell bundles because they fail to combine the right products together.
You cannot just bundle up two random t-shirts and expect them to sell. You need to have a plan behind it.
Let us look at a few ways you can devise great bundles for your t-shirts.
i. Out-of-the-box Themed Bundle
You can combine a T-shirt with a pair of shorts and probably a wristband of the same color to create a complete bundle. It’s even better if they are all of the same themes.
For example, you can offer a Batman-themed t-shirt, shorts, and wristband together at an attractive price.
People who love Batman will find this bundle appealing and may take the offer.
Now, this seems great if your online store sells more than just t-shirts. But what if you sell only T-shirts?
No worries. Chances are, this will bring in even better results.
Sometimes it’s best to surprise your audience. You can make such bundle offers in your store from time to time and amaze your audience with something different.
And if you have the right bundle and an attractive theme, then this may even trigger more sales than usual.
P.S. The bundle combination should not be limited to shorts or wristbands. You can even consider jeans, chinos, or other clothes if they fit well.
ii. Special Occasion Or Seasonal Bundle
Certain occasions or seasons call for specific clothes that people look to purchase.
For example, during the summer, women may look to purchase more cotton products, t-shirts with short sleeves, etc. You can create a bundle of several light-colored t-shirts specifically for women during the summer.
Again, if you consider winter, you can look to offer multiple sweatshirts in a bundle at a discount. P.S. During winter, most people will consider purchasing up to 3 of the same type of sweatshirts. So a bundle of 3 with different color variants might be a great idea.
Similarly, during Halloween, you can bundle up multiple t-shirts with the Halloween theme, such as t-shirts designed with Jack-O-Lantern.
The idea here is to honor the occasion or the season by offering a reasonable bundle.
iii. Couples Bundle
You probably already know this one, but couples usually love to wear similar t-shirts. So selling couple-themed t-shirt bundles will help to get more sales.
These are just some of the bundle tactics you can use to drive more t-shirt sales.
Remember, you need to be able to define the purpose that a bundle will serve its buyer. Only then will your bundle make more sense for them to purchase.
Tip #3 – Run Category-Based Discounts to Increase Selling T-Shirts Online
You can offer discounts on ‘couple t-shirts’ prior to Valentine’s Day. Most make the mistake of running a site-wide discount at that time and terribly fail.
You can also consider offering discounts on cotton T-shirts during the Summer or maybe offer discounts on sports-themed T-shirts during any international sports events.
Now, this tactic will only work if you have different categories of t-shirts in your WooCommerce store, such as Couples T-shirts, Biker’s t-shirts, Cotton t-shirts, Sports t-shirts, etc.
If you have such categories, it will be easier for you to plan discounts during different periods throughout the year.
Tip #4 – Sell T-shirts on Large Marketplaces to Maximize Your Reach
Your WooCommerce site won’t rank in one day.
It will take time to start getting organic traffic. Until then, you have 3 ways to bring in traffic:
Run Paid Ads on SERPs & social media
Get referrals from friends & family via social media
Sure, you can successfully run paid Ad campaigns and get good traffic. But more often than not, it ends up costing a fortune.
But did you know you could actually get more value for money by promoting on large online marketplaces?
An online marketplace is a popular website where several online businesses list their products. Usually, these marketplaces are popular and have regular buyers, so listing products there often results in more sales than other methods.
Promoting t-shirts on large marketplaces is a must to expand your reach.
Normally, you can look into promoting on the most popular marketplaces worldwide, including Google Shopping, Facebook Marketplace, Amazon, eBay, etc. Promoting in these marketplaces is great but is very competitive.
However, you can rather look to promote marketplaces that are more well-known locally. For example, in the USA, people prefer buying from Bonanza, Fruugo, or Etsy, and in most European countries, there is Kelkoo, PriceSpy, and many more.
So the best possible option here is to list your WooCommerce products in Google Shopping & Facebook Marketplace and then promote them on a couple of local marketplaces.
The advantage you get here is that most online marketplaces do not charge anything upfront. You only have to pay a small percentage on every sale you make. And since they have a huge audience, this amount usually pays for itself as you will get several buyers purchasing your products thanks to their loyal buyers.
Btw if you think it’s a lot of work to list products in those marketplaces, then don’t worry; you won’t have to do it all manually.
You can generate a custom feed for any merchant you choose.
The custom feed option of PFM will allow you to create a personalized feed for any marketplace you want.
With it, you can –
Select your preferred feed attributes
Choose a custom feed type
Include/Exclude XML header
Add Wrapper Element
Add Item Wrapper
See below how amazing offers this plugin is offering :
Before investing, check out the plugin with the live preview option.
So there is no reason for you to be reluctant to use this strategy. Start expanding your reach ASAP.
Tip #5 – Promote Free Shipping on Selected T-shirts to Enhance Online Sales
Free shipping is often a great strategy to trigger more sales.
You can run ‘Free Shipping’ campaigns for a selected number of t-shirts so that people are more encouraged to order them.
Waiving off the shipping fee can be a great offer on premium quality t-shirts that usually cost more.
Another ingenious way to leverage free shipping could be running a ‘Weekly Free Shipping Day.’ On that day, any orders placed will be without any shipping fees.
However, in this case, it’s best to keep certain conditions to claim this offer. For example, all this offer on a certain quantity of t-shirts, or a certain amount spent. This will persuade buyers to order more and save you from losing money on low-cost t-shirts.
You may think of some other great ways to use Free Shipping to generate more sales. So, Let us know in the comments if you come up with any great ideas.
Tip #6 – Early Purchase Offer on New Collection
Often you may be excited to bring in a new collection of amazing t-shirts that you know people will love. But how do you get instant hype?
You can try using the Early Purchase Offer strategy. It is when you promote a special offer on your new collection for a limited time.
For example, you can put up a banner on the home page that a new collection is here and it’s on a discount for the first 3 days.
This will help to gain some instant attention.
You can share the same banner on social media, email, or via paid Ads which will drive more instant sales.
Now, you can get creative with the type of offer you want to make. You may
offer a discount on a certain quantity,
make a time based-offer,
offer a bundle with a discount,
promote free shipping,
and many more.
FYI, the discount doesn’t have to be a large amount for this tactic to work. You simply need to make sure to spread the word about this offer.
Since it’s a new collection, people will already be excited about these t-shirts, and a little discount is more than enough to trigger sales.
Tip #7 – Add a ‘Selling Fast’ Tag to Boost T-shirt Sales
Now, this tactic sounds quite obvious, yet, many do not bother using it.
‘Fear Of Missing Out,’ or FOMO, has been one of the most powerful marketing tactics for ages.
A ‘Selling Fast’ tag not only grabs the attention of potential buyers it also gives them a sense of FOMO.
Normally, you should use this tactic on t-shirts that are genuinely popular and are frequently bought from your shop. Since it’s the most popular product in your store, you know people love it. And this simple tag can get it to sell even faster.
Now, this is just a tag to highlight a product and has no offers involved with it. So why does it work?
As simple as it sounds, this tactic is rather a psychological trigger that makes the buyers think of two things:
This product seems very popular; hence, it must be very attractive or trendy.
It may get sold out soon, so let’s check it out and see if I want it.
When these two thoughts are combined, most people cannot resist but visit the product page.
And many end up purchasing it, that too, with no special offer at all.
Laatste gedachten
The 7 tactics above are just a few of the hundreds of other marketing tactics you may use. But these are unique and have proven to generate t-shirt sales for many WooCommerce stores over the years.
It’s fine if you cannot embrace all of them right away. But start using as many of them as possible as soon as possible because these ideas will surely help you grow your business and make selling t-shirts online easier.
If you have any great ideas that helped you sell more t-shirts in your WooCommerce store, then feel free to share them with us in the comments below.
If you are willing to promote on online marketplaces, then checkout our plugin Product Feed Manager for WooCommerce to generate product feed in minutes.
Focus on niche markets and trending topics. You can use design tools like Canva or hire freelance designers to create eye-catching, unique designs that resonate with your target audience.
What is the best place to sell t-shirts online?
The best place to sell t-shirts online isn’t one but many that include platforms like Shopify, Etsy, or a custom-built website to reach a larger audience.
What’s the most effective way to sell t-shirts online?
Focus on building a strong brand, use retargeting ads, and market your t-shirts through influencers to boost sales and learn how to sell t-shirts effectively.
What pricing strategy should I use for my t-shirts?
Research your competitors and consider your production costs. You can offer competitive prices and consider discounts or bundle deals to attract more customers.
How can I handle customer feedback and reviews?
Encourage satisfied customers to leave positive reviews and address negative feedback promptly. Use customer feedback to improve your products and services.
Bundles are a great way to sell products online, no matter your niche.
However, if you can create bundles the right way, then you can be dynamic in selling baby clothes online much more than you would expect.
But as mentioned above, you need to plan your bundles properly, and there are 3 things to consider:
You have to ensure all products in the bundle are somewhat relevant.
The bundle price should result in attractive savings for the buyer.
You must choose the right ‘bundle theme’ at the right time.
Let us look at some examples.
i. A Bundle That Offers A Specific Benefit
When it comes to baby clothing, most of your customers would prefer getting body suits, while others prefer sleeveless t-shirts and underwear, for girls, a skirt is a common choice.
Now, how can you plan a bundle that will deliver more results?
Normally, everyone focuses on promoting how cute the clothes are or how comfortable they are to wear.
Instead, you can create a special newborn clothing bundle highlighting the theme ‘easy to put on or take off.’ This bundle may include body suits or baby footies.
The idea here is that you will focus on solving a particular pain point of most parents – dressing up their child.
With the newborn bundle concept, you will be able to promote a special benefit to parents or nannies that they will be able to change the babies in no time.
ii. Bundle On Specific Occasions
Summer brings the desire to visit the pool or beach, especially for the little ones. So, you can make good use of the time and develop a lucrative swimmers bundle.
This bundle can include a swimsuit, swimming goggles, a breathing tube, and flappers.
If priced with a good discount, this bundle will sell a lot during the Summer holidays. Thus you can prepare your WooCommerce store for the holidays.
**You probably don’t sell goggles, flappers, or anything other than clothes, but for this tactic, you may make an exception to create a surprise offer.
Just like this, you can create a bundle of winter clothes for babies in winter.
The idea is to offer a bundle that goes well with the season or the seasonal trend.
But it doesn’t have to be limited to the season. You can even consider creating bundles for special occasions, such as a bundle of Halloween-themed baby clothes during the Halloweens. This you can increase Halloween sales for your store.
The current occasion or season will automatically be relevant to your buyers’ needs and, if offered at the right time, can trigger more sales.
When I say ‘right time’, you have to know when your people shop for these products.
For example, let’s consider the Halloween-themed bundle. If you offer it just on the day before Halloween, it won’t get you many sales.
Instead, you should offer it for at least 2 weeks before the event date. The same can be said about the Swimmers’ bundle. That bundle has to be on your WooCommerce store at least 2 weeks before the summer vacation.
Key Takeway: You may create bundles that are specialized for a specific occasion or the season to attract more buyers, but you have to make sure you stock up at least 2 weeks before the event.
iii. Multi-Packs With A Twist
Since most baby clothes are delicate, parents tend to purchase more quantities of the same clothes. In this case, you can offer a discount on multi-packs, such as ‘10% off if 5 or more Bodysuits are purchased.
Now, these offers are common in most WooCommerce stores. So how can you make it unique?
Here’s an idea. Typically, parents don’t need a lot of clothes of the same size. Since most babies grow rapidly, you can rather create a bundle of more quantities of the same product, but each being a bit larger than the other.
So as the baby grows, the parents will have another piece of the baby’s clothing right then and there.
What you need to focus on is that your Product page should highlight this fact – “Kids grow rapidly! Get an incremental size bundle and be ready with the same comfort while your baby grows older.”
The idea here is, that you will point out a possible issue the prospect may face and then convince him to take your offer as a solution. The ‘growth’ concept almost works when selling baby clothes online.
Key Takeways: Multi-packs or quantity based-bundles alway work well. But you can make it extra conversion-optimized by teaching your buyers what to worry about, and then providing it’s solution in the bundle.
Just like this, you can think of several ways to create meaningful bundles to drive more sales for your baby clothes business. Higher sales and expenses also need to be tracked and for that invoicing software can be used.
2. Use Order Bumps To Trigger More Sales
Since buying clothes for babies has an emotional devotion, parents do not just buy the clothes they need. They often buy products on a whim just because they feel it would be adorable for their child.
One way you can take advantage of this is by using order bumps right on the checkout page which is the best way to sell baby clothes.
Let’s say a mom is buying a couple of Pink Bodysuits for her baby girl. You can present an adorable skirt dress at a small discount on the checkout page. When going to pay, if the mom sees this, she might imagine her kid in this dress and get excited. At this point, if she has the budget, she might go ahead and add it to the order as well.
This is a great technique; if you can make the right order bump offers while purchasing certain products, it can result in a high conversion rate.
Key Takeaway: Make a great order bump offer to buyers on the checkout page and if done right, your average order value will increase, meaning more revenue for you.
3. Sell On Large Online Marketplaces
Your marketing goal is aligned with the promotion of your WooCommerce products. Simply optimizing your site for more conversion is not enough to drive more sales.
The fact is you do not just get exposure; these marketplaces have a unique algorithm that displays products as per the correct search term.
At the same time, you can also consider listing your products in specific local marketplaces from which people from your neighborhood love to purchase. For example, if you know how to sell baby clothes online in the Czech Republic, then Heureka is the perfect marketplace to promote your products.
The advantage here is these marketplaces already have thousands of loyal buyers. So your products, if listed there, will be available for all those potential buyers, giving you higher odds of selling.
So listing your products in online marketplaces is a must if you want rapid growth.
Key Takeway: Invest some time to find suitable online marketplaces to promote your products on. It will give you a great boost in sales even if you are a startup.
Listing products on online marketplaces means you have to submit your product data there.
But don’t worry, it’s not as difficult as you think.
You don’t have to prepare your product data manually. Rather, you may consider using a reliable plugin, Product Feed Manager For WooCommerce to help you generate a product feed with all your product data in minutes.
3. Follow Baby Apparel Market Trends
In recent years, parents have shown a greater interest in keeping their children’s fashion up to date.
So, you may follow the latest trends and stock up on clothes that represent these trends.
For example, rompers and jumpsuits are popular choices for parents to dress their children up during special occasions.
Other than that, you can look into the latest trending topics on the internet to plan on your next stock.
For example, when the movie, Batman: The Dark Knight was released in the theatres, people started dressing up their kids in Batman and Joker-themed clothes such as a Batman embroidered Beanie or a Dark Knight-themed bodysuit.
So that was a great time to stock up on kids’ clothes with images or designs related to Batman.
Key Takeway: Stock up with the content related to the latest trend to see more sales.
5. Initiate Target Based Discounts
Discounts are a strong element of successful marketing campaigns in any eCommerce business. The same goes for baby clothes. However, the challenge here is to ensure you are offering discounts at the right time and with a purpose.
Normally, parents purchase baby products from various places from time to time to find the ones that they like the most for their babies. And you can take advantage of this with the right discount campaign.
Simply giving a discount at the beginning of every month makes no sense. Rather, you can go for a target-based discount campaign.
That means you can set up a target for a certain category of products. For example, any purchase above $500 will result in a $30 discount, or for certain products, purchasing more than 5 will result in a $20 discount, and so on.
The idea here is, that you allow your buyers to decide if they want the discount.
If they do, they will buy more products and hit the target to claim a discount. So you sell more products and make more money, while your buyers are happy with the discount.
You can also plan a mystery gift, which will be a random prize from maybe 5 selected items if a certain target is achieved.
This can be promoted via a homepage, email, or even a social media banner. People may try to hit the target more if the selected gifts are good.
Key Takeaway: Give a target-based discounts to persuade buyers to purchase more, while both of you are happy.
Bonus Tip: Use Scarcity & Urgency
‘Scarcity’ and ‘Urgency’ are two of the most commonly used marketing tactics used for decades and still work to date.
The idea is to make your buyers feel that a certain product of their choice may be sold out soon, and so the buyer has to buy it before stock runs out.
In the case of an offer, a reference to how soon the offer will end can often drive urgent decisions out of buyers to purchase a product they like.
And you should try to leverage these techniques on your shop page or the product page.
For instance, let’s say you are offering a discount on Bodysuits for the week. You can put up a banner on the shop page that only 2-days left to get the discount, and the buyer shouldn’t miss out on this opportunity.
**A countdown timer can be a great way to promote urgency for a certain sitewide offer.
Again, you may disclose a lack of stock availability information, for example, ‘only 2 items left’ on your product previews or right on the product page, to make a buyer make a quick decision. In this case, the buyer will think that, since a smaller number of the product is left, he/she may not be able to get it later.
Similarly, you can also leverage the same on abandoned cart recovery campaigns where in the recovery email, you can state that the product is selling out soon or ‘only 2 items left’ so he should complete the purchase before it’s too late.
So try using urgency and scarcity throughout your website to trigger more sales.
Conclusie
While you may be familiar with some of these tips I mentioned, if you haven’t implemented them yet, it’s high time to reconsider.
I highly recommend integrating as many of these tactics as possible into your WooCommerce store.
If you want to save time in the process, you can simply generate your feed using the product feed manager tool.
Doing so will undoubtedly lead to a notable increase in sales in a short span of time. If you’ve already tested with any of these methods, feel free to share your results in the comments.
How can I effectively create bundled offers to sell baby clothes?
Creating bundled offers involves selecting complementary items. It ensures attractive savings for buyers, and timing the offers strategically. You can utilize dynamic discounts for WooCommerce tools to create your bundle offer.
What are order bumps, and how can they boost sales?
Order bumps are additional offers presented to customers at the checkout page. It temps them to add more items to their purchases. By showcasing relevant and enticing products, order bumps capitalize on impulse buying tendencies, increasing average order values and overall sales.
How do I leverage online marketplaces for selling baby clothes?
Selling baby clothes on popular online marketplaces like Google Shopping or Facebook Marketplace exposes your products to a broader audience and capitalizes on existing buyer traffic.
What are some effective ways to follow baby apparel market trends?
Staying updated on current fashion trends and parental preferences is crucial for stalking trendy baby clothes. Monitoring social media, fashion blogs, and entertainment releases can provide insights to utilize the trends well.
How can I implement target-based discounts to drive sales?
Target-based discounts incentivize customers to increase their purchase quantities to qualify for discounts. It boosts both sales volume and revenue. By setting targets based on specific product categories or purchase thresholds, you encourage customers to buy more.
Let me ask you something—how confident are you in your WooCommerce product feeds?
Because here’s the thing: Your product feed isn’t just a list of items. It’s the bridge between your store and potential buyers.
A messy or unoptimized feed means missed opportunities, wasted ad spend, and products buried in search results.
And let’s be honest—managing product feeds can feel like a never-ending battle. Errors pop up, updates pile on, and different platforms demand different formats. It’s exhausting.
But here’s the good news: You don’t have to struggle with it anymore.
In this guide, I’ll show you the Six Best Tactics to take control of your product feeds—so your listings stand out, your ads perform better, and your sales skyrocket.
So, ready to make your product feeds work for you instead of against you?
Let’s dive in.
What is Product Feed Management?
Think about how customers find your products online. They search, scroll, and compare before making a purchase. But if your product details aren’t accurate or visible, they’ll move on to someone else.
That’s where product feed management comes in. It’s all about organizing and optimizing your product data—titles, descriptions, images, and prices—so they appear correctly across different sales channels.
Whether you’re selling on Google Shopping, Amazon, or social media, a well-structured product feed ensures your products reach the right people at the right time.
If your product feed is messy or incomplete, your listings might not even appear in searches. Worse, they could get rejected by platforms, costing you potential sales.
Why Product Feed Management Is Important for Visibility and Sales
You can have great products, but if no one sees them, they won’t sell. A properly managed product feed helps your listings get noticed, rank higher, and drive more clicks. Here’s why it matters:
More visibility = more sales – Platforms like Google Shopping and Amazon rank listings based on data quality. If your product details are well-optimized, they’re more likely to appear in front of the right customers.
Better ad performance – Running paid ads? Clean and structured product feeds help you target the right audience and improve conversion rates.
Fewer errors, less hassle – Platforms have strict listing requirements. If your feed isn’t formatted correctly, your products can be rejected or removed.
Saves time with automation – Manually updating product details across multiple platforms is exhausting. A well-managed feed lets you automate updates and avoid constant manual fixes.
Essential for multi-channel selling – Different platforms have different rules. With a properly optimized feed, your products meet the specific requirements of each marketplace, social platform, or ad channel.
Channels That Use Product Feeds
To increase sales, you need to list your products on multiple platforms. But each platform has its own requirements, so your product feed must be tailored accordingly. Here’s where your product feed plays a crucial role:
Online Marketplaces – Platforms like Amazon, eBay, and Walmart pull product details from your feed. If your feed is optimized, your listings will be more accurate and rank higher in searches.
Social Media – Facebook, Instagram, and Pinterest use product feeds for their shopping features. A structured feed ensures your products display correctly and appear in relevant searches.
Paid Advertising – Google Shopping, Microsoft Ads, and other PPC platforms rely on product feeds to show relevant ads. The more optimized your feed, the better your ads perform, leading to higher ROI.
Challenges of Product Feed Management
As mentioned before, Product feed management is one of the most essential tasks if you want to increase your sales and conversion rates in your WooCommerce store.
But, there are several challenges you might face in your product feed management.
Let’s have a look at them:
Inconsistent Data When managing your product feeds, inconsistent data can be a common issue that you may face. As a store owner, you may encounter missing or inaccurate product data, which can result in low-quality product listings. This can lead to pricing inconsistencies between your product feed and your actual store. And your items get rejected by merchant sites. This potentially causes you to face financial losses.
Unoptimized Product Titles and Descriptions You might fail to optimize your product titles and descriptions, resulting in low visibility on marketplaces. For example, you might have used generic product titles and descriptions that don’t highlight the unique features of the products. This will make it difficult for buyers to find your products.
Competing with Similar Products You may often face huge competition from similar products on marketplaces. It’s challenging to make your products stand out in a sea of similar products.
For example, you might be selling t-shirts and may face competition from hundreds of other stores selling similar t-shirts. Which makes it difficult to attract buyers.
Adapting to Changing Marketplace Requirements Different marketplaces have different product feed requirements that change frequently. So, you must adapt to these changes to ensure that your product feeds remain optimized. For that, you have to update your product feed file to comply with Facebook’s new advertising policies. Which can be time-consuming and challenging.
No worries! let’s overcome these challenges with 6 proven Product Feed Management tactics.
Proven Product Feed Management Tips To Overcome The Challenges
I listed down 6 proven product feed management tactics that you can follow for proper feed management :
Tip 1 – Create Product Titles That Convert
Titles are one of the key attributes that search engines use to determine when to display your products.
Putting effort into optimizing titles is worth it. It not only helps you rank higher for a product but also increases your chances of conversion.
Now, the title is the very first thing your potential buyer notices. Your product titles should create interest among your potential buyers. This will encourage them to click on your product and you probably make a sale. Highlighting a product’s key features in the title is one of the best ways to optimize product titles. Let’s have a look at the key factors of product title optimization:
Use relevant keywords Including relevant keywords in your product title helps search engines understand what your product is about. For example, if you sell women’s shoes, include relevant keywords such as “comfortable women’s shoes” or “affordable women’s shoes” in your title.
Highlight unique features If your product has a unique feature, make sure to highlight it in the title. For example, if you sell a foldable laptop stand, use a title like “Compact and Foldable Laptop Stand for Easy Storage”.
Keep it simple and clear Your title should convey what your product is about without being too complicated. Avoid using jargon or overly technical terms that your potential buyers may not understand.
Test different variation It’s always a good idea to test different variations of your product title to see what works best. Use tools like Google Ads to run A/B tests and optimize your titles based on performance.
Tip 2 -Segment Your Product Catalog For A Better Profit
Segmenting your product catalog can help you maximize your profit by focusing on the products that perform well.
Not all products are equal, and some may not be worth promoting.
For example, if you have products that haven’t sold in a long time, it’s better to exclude them from your feed. This is particularly important since most merchants charge based on the number of items in your feed.
To make it easier to segment your products, you can use custom labels based on different criteria such as top-selling items, price range, profit margin, etc.
Adding a category filter will take your segmentation to the most perfect level.
This way, you can easily identify which products are generating the most profit and prioritize them in your campaign strategy. If you’re running Google Ads or Facebook Ads, you can focus on the products that are likely to bring in the most revenue.
For example, if you’re selling shoes, you can create custom labels based on the brand, style, or price range. This will help you to identify the products that are most popular among your customers and promote them more effectively.
If you notice that a particular brand or style is performing well, you can increase the bid for that product to increase its visibility and sales.
Tip 3 – Provide Consistent And Updated Data Everywhere
Consistent and accurate product data is crucial for a successful product feed management strategy.
Your product data must match across all platforms to avoid confusion among your potential customers.
For example, if you have listed a product on Google Shopping and your product data mismatches with your website, your product will be disapproved. This may lead to lost sales opportunities and eventually harm your business’s reputation.
Moreover, your product feed should always contain updated information about your product’s availability, price, and other attributes. If your product is out of stock or its price has changed, it’s crucial to update the product feed as soon as possible.
If you don’t update your product data, your potential customers may see different information on your website and marketplace, leading to confusion and mistrust.
To avoid such issues,
regularly update your product feed to reflect the latest changes. This will not only help you avoid disapproval but also improve your product’s visibility and sales potential.
So, always provide consistent and updated product data everywhere to ensure a seamless shopping experience for your potential customers.
Tip 4 – Appropriate Product Category For Proper Product Feed Management
When you assign a product to a specific category, it helps the search engines to understand the nature of that, which in turn helps your products to appear in relevant search results.
When choosing a category for your product, it’s important to choose the most specific category possible. Because the more specific the category, the easier it is for customers to find your product.
For example, if you are selling a laptop, simply assigning it to a category like “Electronics” may not be enough. You should rather choose a more specific category like “Computers & Tablets > Laptops” to make it easier for customers to find your product when searching for laptops.
Using relevant categories also helps improve the overall user experience of your online store. When your products are organized and categorized logically, it makes it easier for customers to find what they are looking for.
This helps reduce the bounce rate and increases the chances of customers staying on your website longer and potentially making a purchase.
Tip 5 – Prioritize The Optional Attributes With Product Feed
Normally, when you submit the product feed, you are mostly concerned about the mandatory fields of your merchant.
But, the optional attributes can have a big impact on your listing.
These fields can provide additional context and information about your products that can make them more appealing to potential customers.
For example, let’s say you’re selling clothing on your WooCommerce store. By including the optional field for “size” in your product feed, customers can easily filter and find the size that they need, which can improve their overall shopping experience and increase the likelihood of a purchase.
Another benefit of prioritizing optional fields is that it can improve your product’s visibility in search results. By providing more detailed information about your products, search engines like Google can better understand what your products are and display them in more relevant search results.
So, when creating your product feed, it’s important to prioritize these optional fields and include as much relevant information as possible.
This can help increase your product’s visibility, improve the customer shopping experience, and ultimately lead to more sales.
Tip 6 – Analyze Your Feed Performance
Regularly monitoring and analyzing your product feed performance is crucial in identifying areas for improvement and better-optimizing product feed.
Track your store’s key metrics such as clicks, impressions, conversions, and sales across various channels and platforms. It helps you to track your shortcomings.
Use Google Analytics to track your feed performance on Google Shopping. Identify which products or categories are performing well and which ones need improvement.
Use Facebook Ads Manager to monitor the performance of your product feed on Facebook and Instagram.
Regularly monitor and analyze your feed performance, also you can use extensive analytics tools to gain valuable insights into your customers’ behavior and preferences.
This can help you make data-driven decisions and improve your overall business performance. You can do this easily with proper product feed management.
Why Product Feed Management Is Important For Visibility and Sales?
Product data feed management is crucial if you want to attract potential customers and drive sales. Optimized product feeds provide the most accurate and highly relevant data, which allows you to
Rank higher for your products
And eventually, drive more sales.
The question here is why you need to optimize product feed. Let’s discover the reasons behind the need for product data feed optimization.
Avoid Rejected Feeds Due to Incorrect Structure
Feed structure is one of the crucial factors when you’re selling WooCommerce products on different marketplaces. The marketplaces you promote have different required feed structures and formats.
For example, Google accepts only XML feed. On the other hand, for listing products on Bing, you need to provide a TEXT feed format.
So, it depends on which merchant you’re using. But you need to make sure you are using the accurate feed structure and feed format. Otherwise, your feed will be rejected.
Overcome Merchant Approval Challenges
For feed structure, different merchants have different criteria for product approval.
For example, Google requires a brand name with GTINor MPN, while Rakuten requires age and gender attributes in your feed.
If your product feed data doesn’t match your site or doesn’t meet the merchant’s requirements, your products may be disapproved. Optimizing your product feeds ensures that you’re providing the most accurate and up-to-date information. Also, increasing your chances of getting approved.
Improve Feed Performance and Increase Sales
Sometimes, even if your feed is approved, it may not perform as expected. But, following product feed management tactics, you can improve your feed’s quality. This will lead to more sales for your store.
Automate Your Product Feed With The Most Reliable Tool
So, by now you must understand how important it is to do product feed management correctly.
The tactics mentioned above can significantly increase your sales performance, but manually handling these tasks can be time-consuming and inefficient.
Creating optimized product feeds for your WooCommerce store has never been easier with this product feed management tool. Even if you’re new to this, you can generate flawless feeds in just three simple steps:
Choose Your Marketplace: Select the platform where you want to sell your products.
Customize Your Product Details: Adjust your product information to match the requirements of your chosen marketplace.
Generate the Feed: With a single click, your feed is ready to go.
That’s it!
In no time, you’ll have a perfectly optimized product feed, ready to showcase your offerings and drive sales on your desired marketplace among 180+ marketplaces. Also, you can customize your email signature with links to your store, social media profiles, or even landing pages and promotions to enhance your email marketing campaign.
This plugin empowers you to fine-tune your feeds for maximum impact.
You can experience this plugin through a live preview before you invest in it.
And if you get confused on any level, this plugin has 96 documentation to help you out at any level you feel puzzled.
So, why wait? Get the plugin today and be one of the happy users among 10000+ users!
Wrapping Up
These products feed management tactics mentioned above, can significantly improve the sales performance of your WooCommerce store.
Simplify your feed management tasks and automate them with the right tool, to save time and get better results. Optimizing your product feed is also crucial for success.
The electronics niche is quite interesting for E-commerce and the industry is getting more and more competitive every day.
Selling your electronic products online is great as you cut down on many operational costs.
But if you fail to break the cutter of overcrowded marketers, you will face very small profit margins.
To compete with the online oversaturated electronic market and beat the leading brands of your niche, you need to constantly update your marketing strategy.
No need to feel worried about which marketing strategy you will pick as there are a lot of strategies.
In this article, I will share 6 unique online electronics marketing strategies that will help you drive more sales in your WooCommerce store.
I am going to go over the sales tactics that are working the best at the moment.
So, Keep reading.
Why Does the Electronics Sector Need a Proper Electronic Marketing Strategy?
The Electronics e-commerce store is full of difficulties. You must be thinking a lot about how to sell electronic products online!
Not only do you need to nail down your pricing strategy, but you also need to work out exactly what marketing strategy you’re going to use too to keep up your online sales at a good level.
Your marketing budget isn’t unlimited, and in many cases, you might have to pick between different marketing strategies.
Strategic Marketing will benefit you in many ways, such as :
Clearly define the business’s unique identity and differentiate it from its competitors.
Conduct a comprehensive analysis of the business’s strengths, weaknesses, opportunities, and threats (SWOT analysis).
Effectively convey the established goals and objectives to the business’s intended customer base.
Drive targeted traffic to your online store by focusing on high-converting channels like paid ads and social media marketing.
Increase brand loyalty and repeat purchases by implementing customer retention strategies, such as email marketing and loyalty programs.
Measure marketing efforts accurately through analytics to refine your strategies and improve return on investment (ROI).
Stay ahead of trends by using market research and customer feedback to adapt your product offerings and marketing strategies to evolving demands. Use a residential IP proxy server to gather accurate market data and conduct seamless competitive research.
I have rounded up 6 of the best marketing strategies for electronic products as an answer to the question ‘how to sell electronics’?
6 Best Electronics Marketing Strategies For A WooCommerce Store
Following are 6 electronic marketing strategies that have great potential to boost your marketing campaigns and increase sales.
1. The ‘Back Order Offer’ For Out of Stock Products
When making a buying decision for electronics, people tend to take time to research which brand and model would be a good choice.
But, what if someone came to your store in search of that product but it’s out of stock and due to be re-stocked after a week or two?
This was a sure sale opportunity. And the buyer may now buy it from your competitor sites. Thus you can sell your products without having inventory stocks.
Well, that’s where the “Back Order Offer” comes in.
What you can do is, you can allow your buyers to pre-order this out-of-stock product, which you will later manufacture and deliver. But, this is also a common practice is many stores.
You can make it more unique by offering a discount to people who do agree to backorder.
Let’s say someone wanted to purchase a certain model of laptop worth $300, but it went out of stock in your store. Since you are sure you will re-stock in a week or two, you can offer $30 off to pre-order right then and there.
Some buyers will see this as a great offer and may go for the back-order offer. And you now have a guaranteed sale after re-stocking.
For electronics, this is a great tactic as you have a high investment, and a pre-determined sale is always an extra boost to reaching your revenue goals.
P.S. This tactic will only work for products that you are sure you will manufacture at the set price. If you pre-sell at a lower price than your profit margin, then this is not a good approach. So be very careful when choosing what products you want to make this offer on when planning an electronics marketing strategy.
2. Persuasive Upsell Offers
Upselling is currently a trending sales approach that works most in marketing for electronics products. People tend to spend more if you can make the right offer, right after they have spent money on your products.
However, you need to have an electronics marketing strategy behind using upsell offers. You cannot just make a random offer and expect to get a sale. For example, if someone is purchasing a fridge, offering him a laptop as an upsell won’t get you much success.
Rather, a good approach is to offer a better version of the product they are purchasing, or offer something relevant that goes together with what they are buying.
For example, let’s say someone purchased a camera from your store. Right after checkout, you may display an upsell offer on a lens, maybe at a 5% discount.
Since they both are relevant, and people with cameras are more like to buy a lens sooner or later, a discounted offer on it can be quite attractive.
You can even choose to offer a better camera, let’s say a Canon 850D at a discount when someone purchases a Canon 250D.
However, in this case, make sure not to offer something that is too far off in terms of price. Keep the difference within $100 so that it is within the buyer’s budget, while still saving him some money.
3. Sell Electronics On Large Online Marketplaces
Online marketplaces such as eBay, Amazon, Walmart, and Rakuten, are some of the popular international marketplaces that have made online electronic sales more popular nowadays.
However, they do not manufacture their own products. The products are actually listed by several other online stores such as yours.
If you aren’t already, then you must list your product on these large online marketplaces, and other local online marketplaces to get more sales.
As a WooCommerce store owner, this is a must-to-implement tactic to ensure regular sales and high exposure to your products.
Listing WooCommerce Products On Online Marketplaces Easily
When you’ve selected marketplaces to sell electronics on, it’s time to list your products. But each marketplace has its own dedicated format.
Now, preparing your product list manually is quite challenging. But it is highly important!
Your increase in sales mostly depends on the perception your visitors have of your website after browsing it.
What will satisfy your customer?
Product pages with intuitively arranged categories.
A menu for navigating that is easy to understand.
A straightforward layout without cluttering up the view.
Text fonts that make sense.
If you’re selling electronics online using WooCommerce, you can easily confirm these in just a few clicks using a reliable plugin- Which is Product Feed Manager For WooCommerce.
This is a great plugin that helps you generate accurate product feeds for almost all merchants real quickly.
You just need to select a marketplace, generate the feed, and submit the link to your desired marketplace.
4. Give Special Discounts For Recently Viewed Items
Often, people take time in deciding to finally, place an order for a certain electronics. This means, they will visit your store to view the product, but will not order it right away. Your site visitors will wait until he is sure he has the budget and wants to get it.
For example, let’s say you have a 64-inch curved TV in your Woocommerce store.
Now, it is quite expensive, and a buyer will need time to decide if he can afford to get it.
The concern here is that he may also be looking into this product in other online stores. So when he is ready, there is no guarantee that he will surely purchase from you. He can end up buying the product from somewhere else.
In this case, what you can do is run a special campaign every week, where you will give special discounts to buyers on their recently viewed products.
So if a buyer viewed a TV in your WooCommerce store but did not purchase it within that week, shoot him an email with a special discount coupon, let’s say 10%, with a week’s validity.
You must be thinking that setting a discount is such a hassle to deal with. To make this easier, you can use the Dynamic Discount plugin to set your desired discount offer and an email writer tool to quickly create an effective and persuasive email copy.
In your email copy, you can focus on highlighting that this is a one-time offer and the buyer should not miss out on this.
Many will find this lucrative and will end up purchasing right away.
5. Sell Off The Older Models Easily
With such fast growth in technology, every electronic product gets an upgrade in its features, and brands introduce new models now and then. To keep up, businesses must tap into the right startup resources to adapt and stay competitive.
This means it’s time you start planning to sell off products on older models as they have just dropped in prices. Holding onto them longer means the prices will go even lower, causing you to lose money.
In this case, whenever a new model is here, you can run special discount campaigns for the older models to try and convert buyers that did not purchase it due to a lack of budget.
However, it’s better to go with an electronics marketing strategy that will get you more profit.
Let us look at the strategies you can follow.
The Pre-Price-Drop Campaign
If are aware of when a new model of a product will be released, you can run a discount campaign on the older models before the release. Simply email or SMS your existing buyers about it and it will trigger a few sales.
For example, let’s say you know when the next iPhone will be released. So, 2 months before it is released, you may offer 15% off on the current model of the iPhone. Run this campaign for a month and end it 1 month before the release.
This will trigger a few sales even before the price drops, and since the next release is not until 1 month, you won’t have to worry about refunds when the new model is out.
The Clearance Campaign
Right after the new model is out and the, add the old models’ prices have dropped, you may add the old models to your clearance sale list, and offer a discount on them.
Now, you might ask, “The price has already dropped. What’s the point of a discount now? Shouldn’t we wait and see how many purchase these models without a discount?”
This is a great question. Well, you see, when the price dropped, it didn’t drop just for your store. The price for the model has dropped globally. So the lower price isn’t really a factor for conversion. A buyer could get the product from any other store.
So, an added discount would mean, you are offering the same product at a lower price than what is on the market. Hence, many will consider buying it from your store.
6. Use Of Social Media To Target More Potential Customers
Social media is now becoming very important for any e-commerce store, especially electronics. Your customers are scrolling through social media most of their hours. So, present your product on as many social channels as possible.
For example, HP has executed several successful campaigns on this platform. For the #BendTheRules campaign, HP collaborated with celebrities and influencers to create videos that inspired others to push the boundaries of their creativity. This project garnered recognition, earning a nomination for “Best Music and Brand Partnership” at the 2016 Music Week Awards.
With Product Feed Manager, you can promote your products on Facebook, Instagram, and more.
Challenges of Online Electronics Marketing
While the strategies shared above are essential for growing your WooCommerce electronics store, it’s equally important to recognize the challenges you might face in this competitive market. Knowing these obstacles will help you prepare and adjust your approach to achieve better results.
Here are some common and real-life challenges you may encounter as an electronics seller or marketer:
Standing out among well-known brands Competing against established names can make it harder for you to grab attention and gain customer trust, especially if you’re just starting out.
Dealing with product returns and warranty claims Electronics often come with issues like defects or customer dissatisfaction, which means you’ll need a solid system to handle returns and warranties efficiently.
Explaining complex product features to customers Your customers might struggle to understand technical specifications, and if you don’t simplify these, they could lose interest in buying from you.
Managing price-sensitive buyers Many buyers actively compare prices before making a purchase. You’ll need to balance competitive pricing while still protecting your profit margins.
Keeping up with the fast pace of new technology Electronics evolve quickly, and you’ll find yourself constantly needing to update your inventory and marketing materials to reflect the latest trends.
Building trust for high-value purchases Since electronics are a significant investment, your customers will need extra assurance, such as positive reviews, guarantees, and secure payment options.
Handling fragile and expensive products during shipping Ensuring safe delivery of electronics without damage can be a challenge, especially with high shipping costs or handling errors.
Navigating marketplace rules and fees If you’re selling on platforms like Amazon or eBay, their policies around product listings, commissions, and customer service can create additional hurdles for your business.
By identifying these electronic marketing challenges early on, you can better prepare your store and strategies to handle them effectively. Let’s now wrap things up with some final thoughts on boosting your WooCommerce electronics sales.
Laatste gedachten
Selling electronics online can be quite challenging without help from external sources. So promoting in online marketplaces is a must. And since people have too many choices out there, using special tactics to convert more buyers is inevitable.
So go ahead and start using these online electronics marketing strategies and increase your sales.
Build your WooCommerce store in a way that your buyers will love and stay ahead of the competition.
Frequently Asked Questions(FAQs)
FAQ1: How can I increase sales in electronics?
-Increasing sales in the electronics industry and across various e-commerce channels requires a multifaceted approach. First and foremost, it’s crucial to have a competitive pricing strategy. 2nd is to use social media and more.
FAQ2: What strategy can you deploy to increase sales on various e-commerce channels?
– To increase sales on various e-commerce channels, businesses can optimize product listings on popular marketplaces, collaborate with influencers and affiliates for promotion, email, and influencer marketing, adopt an omnichannel approach, and implement personalized recommendation engines based on customer data.
FAQ3: How can I attract more traffic to my electronics store?e sales on various e-commerce channels?
– Use SEO strategies, social media ads, and content marketing to drive traffic.
FAQ4: How do I handle price competition in the electronics market?
– Offer unique value through bundles, exclusive deals, or exceptional customer service to differentiate your store from competitors.
FAQ5: How important is pricing in electronics marketing?
– Competitive pricing combined with value-added offers is crucial to win over customers.
You must know that the USA is the second-largest e-commerce market.
This means e-commerce within the USA is full of challenges! Such as :
Low population density, large distances, slow delivery, excess sales taxes, and more!
One smart way to remove these kinds of obstacles and tap into new audiences- is to start selling on Top marketplaces.
As you are a Woocommerce store owners, you must be looking for top platforms in USA to sell your Woocommerce products.
In this article, I will show you 8 options for your- WooCommerce stores with statistics and their current market demand so that you can choose the right one for you.
so, let’s get started.
7 Top Marketplaces In USA To Promote WooCommerce Products Easily
Following are 7 global online marketplaces where you can promote your products and expect to get great results real quickly.
First, let’s see how many visits these marketplaces get per month.
Let’s go through this list of online marketplaces in the USA one by one:
1. Amazon
Amazon Marketplace USA
From a seller’s perspective, Amazon Marketplace USA is a smart way to get international market reach. Even on the Standard listings, you can expect a large number of sales. For consultants, a consulting invoice receipt template ensures smooth and professional billing.
In 2023, the net sales of Amazon were close to 574.78U.S. dollars!
Plus, Amazon comes with great assistive approaches such as handling its shipping, offering Fulfillment by Amazon, and initiating a strict fraud protection system.
This means your store viewers won’t be able to sell ripped-off products at a ridiculous price – products have to be real and sellers should pass the Amazon background check.
But one of the best advantages you get from a marketing perspective is Amazon has tons of Affiliate promoters. Bloggers, eCommerce sites, and several Ad Firms regularly promote products from Amazon as affiliates to get some commission.
According to DigitalGYD – Amazon Associates has the highest market share of affiliate networks at 44.68%, with over 90,777 companies currently using the program.
Let’s go through some data insights that will help you to choose the right platform :
This large number indicates that your products are most likely to get sold but yes, you have to pay more fees.
The Top Categories And Topics That Rank High on Amazon
Social Traffic of Amazon
Suggestion You Need To Take To Sell via Amazon
As you saw the most-selling categories are video game consoles, accessories, Programming, and developer software, Computers, electronics, and mostly technological staff.
So if your niche is relatable to these categories, You can go for Amazon.
In the social traffic of the Amazon section, you can see that most traffic is on YouTube, which means you need to add affiliate marketing to your marketing strategy to achieve success.
2. eBay
eBay Marketplace USA
Suppose you have a jewelry business and you are searching for a marketplace to sell jewelry online, in that case, eBay is the best option to show your products to the maximum number of people.
Apart from high traffic, one special aspect of eBay is its auction.
You can list products for auction on eBay with a minimum price so that buyers can bid and you get to earn the highest amount possible on your products.
Plus, their Promoted Listings can display your products to the right audience, much better than most other marketplaces, making it a good value for money.
And like Amazon, eBay is also considered by most sellers that want to sell internationally.
The Top Categories And Topics That Rank High On eBay
Social Traffic On eBay
Suggestion To Sell via eBay
As you can see the audience’s highest interest is educational. If your niche is relatable to it you can go for eBay.
You can also consider selling on eBay MIP which increases your business success to a great extent.
For those inspired by eBay’s success and looking to venture into the e-commerce space, understanding how to create an online marketplace like eBay from scratch could be the next big step in realizing your business dreams.
3. Walmart
Walmart Marketplace USA
Walmart’s eCommerce business in USA is streamlining faster every year and last year, their net sales went over642.64 billion.
Walmart makes it super easy for buyers to choose and get products delivered. They offer 2-day free shipping which helps to drive more conversion.
Plus, since Walmart has at least one store in every community, almost every knows the company and trusts them with its website products. And they do make sure to take necessary measures to ensure that the products sold in their marketplace are of high quality.
You will need a pre-approval to be able to list your products on Walmart. You must have fast fulfillment capabilities, a diverse range of products, and competitive selling prices. So not all WooCommerce stores can qualify to list their products on Walmart.
Another reason the Walmart Marketplace USA is famous is its fast and reliable customer support. So your potential buyers will not doubt you and will remain loyal to Walmart, ensuring more sales for a while.
Having your products listed on such a reliable marketplace is always an advantage in terms of sales.
The Top Categories And Topics That Rank High On Walmart
The Social Traffic Data On Walmart
Suggestion To Sell via Walmart
Suggestion To Sell via Walmart As you can see Walmart’s audience’s highest interest is in video game consoles and accessories. if your niche is relatable to it, you can choose Walmart as our online marketplace.
4. Target Plus
Target Plus – One of the best premium US marketplaces
Target Plus is a third-party seller platform run by the American retail company, Target which has become a premium marketplace in USA for trending and seasonal products.
And they are among the top marketplaces that deliver only in the US states.
One specialty of Target is its focus on product promotion based on current trends. They have people who handle the changes so that buyers always get products that are related to a recent trend, season, occasion, or even location of the buyers.
This increases the chances of conversion and if you have trending products, you too will get the exposure.
Another advantage of Target Plus is its large pool of local buyers. Certain buyers are so satisfied with its quality delivery that they always consider Target Plus first, before going to other online shops.
The Top Categories And Topics That Rank High On Target
The Social Traffic Data On Target Plus
Suggestion to Sell via Target Plus
As you can see the target Audience’s interests are mostly in Banking credit and finance. If your niche is relatable to that you can choose Target Plus.
5. Wayfair
Wayfair online marketplace
If you’re targeting household goods, Wayfair is a marketplace in USA with highly relevant potential buyers.
The Top Categories And Topics That Rank High On Wayfair
The Social Traffic Data On Wayfair
Suggestions To Sell via Wayfair
If you supply or sell household goods, then Wayfair is one of the best places to rely on due to the relevant potential buyers, and the low-cost promotion modules.
Their detailed analytics provide you with quality customer demand data that may help you make decisions on re-stocking or stocking new products.
Plus, if you are a retailer and your products sell well, they may even offer to purchase your products and sell themselves as a supplier.
6. Overstock
Overstock USA
Overstock is well-trusted by its buyers when it comes to quality home decor at an affordable price. The website is serious about user experience and makes sure to remove any listed product that buyers report to be faulty, it even has records of banning sellers for false promotion.
Meanwhile, it has tons of loyal buyers who are solely interested in home decor products. So if you are part of that industry, then this site can be more beneficial than even Amazon or eBay.
Overstock is a brilliant USA marketplace to promote home decor products having a wide variety of options for its users. This means that if you sell products that fall under the ‘Home Decor’ category, then Overstock can help you get more sales.
The Top Categories And Topics That Rank High On Overstock
The Social Traffic Data On Overstock
Suggestions To Sell via Overstock
Overstock is a brilliant marketplace to promote home decor products having a wide variety of options for its users.
This means that if you sell products that fall under the ‘Home Decor’ category, then Overstock can help you get more sales.
7. Bonanza
Bonanza marketplace
Bonanza is one of the best online USA marketplaces that most sellers often call an alternative to eBay.
It is well-known for quality clothing products. However, to sellers, the Bonanza marketplace is rather popular due to generating more sales real quickly.
There is a reason why Bonanza is called an alternative to eBay. It’s due to higher odds of selling. Compared to eBay, Bonanza has a 1300: 1 buyer-to-seller ratio (whereas on eBay, it’s 10: 1).
One of the main reasons for this higher ratio is that Bonanza only accepts sellers based out of the USA and have a physical location. So, this is not your typical online marketplace. Bonanza wants to make sure both its buyers and sellers are happy, so, it is strict about listing products from local suppliers only, and likewise, it is strict about selling to local buyers only.
The Top Categories And Topics That Rank High On Bonanza
The Social Traffic Data On Bonanza
Suggestion To Sell via Bonanza
As you can see, the audience’s interest in this site is firstly computers and electronics. Secondly, fashion and apparel. If your niche is relatable to these, you can choose Bonanza as your online marketplace.
How To List WooCommerce Products On Large Marketplaces
Since you use WooCommerce, you have the advantage of using its Addons.
To generate an accurate product feed for any list of online marketplaces in the USA, you can go for a reliable plugin called Product Feed Manager for WooCommerce (PFM).
It goes beyond just providing pre-made feed templates, Such as :
With it, you can supplement your product data with additional details.
You can map out your product categories to Google’s category structure.
You can offer advanced filtering capabilities to generate feeds with specific products.
Enables the creation of customized feeds for merchants without existing templates.
Not only that you can automate your product feed generation process with this plugin.
Any modifications made to product data can be scheduled for automatic updates to the product feed, eliminating the need for manual intervention.
It allows you to create various types of feed files tailored to your merchant’s requirements.
After selecting your merchant, you can choose the desired feed type to generate, including:
XML Product Feed
CSV Product Feed
TEXT Product Feed
TSV Product Feed
RSS Product Feed
To get all things done easily, you can go through our documentation and video tutorials for clear understanding.
Wrapping Up
As you saw in the statistics above, these marketplaces have a huge audience and can generate more sales in no time. Plus, each of them has its specialty, which you can take advantage of. You can also visit UK online marketplaces to get an idea of other countries in terms of selling WooCommerce products.
So go ahead and choose the top marketplaces in USA that best suit you and start getting more sales!
FAQ 1: Why should I consider selling my WooCommerce products on marketplaces?
– Selling your WooCommerce products on popular online marketplaces can offer several advantages, such as increased visibility, access to a wider customer base, and streamlined selling processes. Marketplaces often have established trust and brand recognition, which can help boost your sales and reach more potential buyers.
FAQ 2: What are some of the top marketplaces in the USA for selling WooCommerce products?
– Some of the top marketplaces in the USA for selling WooCommerce products include Amazon, eBay, Etsy, and Walmart Marketplace. These platforms offer user-friendly interfaces, robust selling tools, and integration options that can make it easier to list and manage your WooCommerce products.
FAQ 3: How can I start selling on a marketplace in USA?
– To start selling on a marketplace in USA, sign up as a seller on platforms like Amazon or Walmart and list your products.
FAQ 4: What are the fees for selling on a marketplace in USA?
– Fees vary, but most Ecommerce marketplaces in USA charge a combination of listing fees, transaction fees, and subscription costs.
FAQ 5: Is a marketplace in USA suitable for international sellers?
– Yes, many marketplaces in USA, such as eBay and Amazon, support international sellers with global shipping options.
It’s particularly excellent when you need to list products that come in different variations like size or color. But, getting these variable products right can be a bit tricky at first.
Today, I will give you a complete guide on how you can add WooCommerce variable products.
After reading this guide, you’ll able to:
Add products to your store accurately and without wasting time
Create product variations for your variable products efficiently
Optimize your store’s product data to increase sales
Get actionable tips to improve your variable product page to increase your conversion rate
Let’s get your products set up properly and make your store work harder for you.
Understanding WooCommerce Variable Product
You might have a few products that have multiple variations. For example, let’s say you are selling a t-shirt in 3 different colors. In this case, the t-shirt is a variable product, and each colored version of the t-shirt is a variant.
In WooCommerce, when you add products, you may choose the product type as “Variable product” and then add variants easily.
Once you add a variable product to your WooCommerce, the product page will look like this:
As you can see, you may click on the dropdown menu to select a variant of the product.
Next, you will be able to customize the product page in many ways, such as using suitable plugins, applying a WooCommerce theme, or by customizing the page’s design on your own.
For example, you can use a plugin, Variation Swatches for WooCommerce, to display the variants in the form of swatches.
As you can see, you may click on the dropdown menu to select a variant of the product.
Now, let me give you a step-by-step guide on adding and optimizing variable products to your WooCommerce store.
Dus laten we beginnen.
Step-by-step Guide On Adding And Optimizing A WooCommerce Variable Product
Once you follow the steps below, you will be able to add variable products to your WooCommerce store easily. And later, you will get actionable tips that you can use to achieve a higher conversion rate real quickly.
Step 1 – Create Variable Product Attributes
The first step to properly adding a WooCommerce variable product is to create a variation product attribute and assign its variants.
A variation product attribute is basically the factor by which a product may vary. For example, if a product has 3 color variants, then ‘Color’ is a Variation Product Attribute, and each color is a variant.
So let us learn how to create one.
1. On your dashboard, go to Products > Attributes.
Here, you will see the option to create variation attributes.
2. Input a name and slug for the attribute in their respective fields. For example, you can name it ‘Color’ and assign the slug, ‘color.’
Then click on the ‘Add attribute‘ button below.
U zult zien dat het kenmerk aan de rechterkant is toegevoegd.
Here, I have added a variable product attributes called Color.
3. On the right side of the attribute, under the Terms, you will see an option called Configure Terms. Click on it.
It will take you to the page where you can add variants.
4. Input a variant name and slug in their respective fields, and add a description to it if you want to.
U kunt het bijvoorbeeld "Blauw" noemen en de slug "blauw" toekennen.
5. Then click on the Add New Color button below. You will see that the variant is added on the right side.
You can add more variants here. I have added two more, Green and Red.
It will take you to the page where you can add variants.
So far, you have a variation product attribute, and it’s corresponding variants. You can repeat the whole step to add more variations of product attributes and their variants.
These will be used to set up variations when adding variable products to your WooCommerce store.
Step 2 – Add A New Product
The next step is to add a product and set it up as a variable product.
1. On your Dashboard, go to Products > Add New.
It will take you to a blank product edit page to input the necessary data for the product.
Here, you will need to add a few product data; make sure the data is optimized.
As you read on, I will give you relative examples to help you understand how you can optimize the data.
2. Add a Product Name and Description.
Try to avoid using too many marketing schemes on the Product name, but do include the unique features that may make it stand out. And, in some cases, you may include the variant term on the name as well.
For example,
You may use: Super Heroes T-shirt – Red/Blue/Green
But do not use: Red T-shirt – Buy 3 Get 1 Free
In the description, try to explain all the product features so people may learn what to expect when purchasing the product.
If you have size variants, then it is best to include a size chart in the description as well.
Make sure to highlight all the advantages and special features of the product here.
3. On the right side, you will get the option to assign Product Categories.
Here, you may choose a suitable category that already exists or create a new category for this product.
Putting the product within a relevant category is important because people will often search for products based on categories in your store.
4. Add images to your product.
On the right side, you will get the option to add a Product image. Click on Set product image to upload an image.
This is the main image of the product. A person usually notices this image first when viewing the product page.
For the main image, it’s best to use an image that is a collection of all the variations in a single picture, so that people know that they have options.
**You will be able to add images based on variants, which I will show you later.
Make sure the image is clear and matches the product you are selling. Avoid using fake images or enhanced images that look way better than the actual product.
Remember. You are here to do business on a long-term basis. Deceiving people may result in them not buying from you again. The more original you are, the more people will be your regular buyers.
Below the Product Image section, you will be able to add more images in the Gallery.
Try adding multiple images from different angles of the product to showcase it properly.
These are the basic data of the product that you need to add. However, there are more options available such as Short Description and Tags. I will give you tips on how you can optimize them later in this article.
Step 3 – Configure The Product As A Variable Product
Once you have inputted the basic details, you need to configure this product into a variable product.
1. Below, you can see the Product Data Section.
You will see that on the Product data field, it is set as a Simple product.
2. Click on Simple Product and change it to Variable Product.
You will see that the menus below will change.
Here, by default, you will get 7 main menus on the left side (and there may be more depending on other plugins you use).
3. First, configure the General menu.
Here you will get two options:
Tax Status – Here, you can choose if the product is taxable, or if the tax applies to the shipping cost only, or select the option ‘None’ if the product is not taxable.
Tax Class – If you mark a product as ‘taxable,’ then you will need to choose a Tax Class, from the ones created when setting up WooCommerce.
4. Next, configure the Inventory menu.
Here you will get three options:
SKU – This is the parent SKU of the product. Even if you assign this, you will still need to assign unique SKUs to product variants (which I will show you in a bit).
Manage Stock – If you enable this, you will be able to
specify the available quantity of your product,
choose if you allow backorders or not, and
set a threshold to be notified if the stock is low. **For variable products, it’s best to manage stock within each variant rather than here.
Sold Individually – You can enable this if you accept only 1 item per order for this product.
5. Now, move on to the Shipping menu.
Here, you can assign the Weight and Dimensions of the product, which may affect the shipping cost.
And if you have created a Shipping class when setting up WooCommerce, you can assign that here if it applies.
6. Then comes the Linked Products menu.
Here you can assign products for Upsell or Cross-sell for this product.
Here’s a guide on how to use them effectively.
It’s best to assign similar products that are better and more expensive, as upsell. They will be displayed as suggested products on the product page.
For example – if it’s a Leather Jacket, then you can suggest more leather jackets that are better in quality and more expensive.
You may also assign products that are related to this product, as cross-sell. They will be suggested to the buyer in the cart.
For example – if it’s a Shirt, you can suggest suitable Jeans to go with it.
I will explain the Attributes menu, and the Variations menu in the next Step as these hold the main options to set up a WooCommerce variable product. For now, let’s take a look at the Advanced menu.
7. Go to the Advanced menu.
Here, you can leave a note for the buyer during purchase and enable reviewing by buyers.
Step 4 – Add Variation Attributes To The Product
You have set up all the basic data in the last two steps. Now, you will learn to create variants for your product.
1. Go to the Attributes menus
2. You can see there is an option that says Custom product attribute. Click on it.
You will be able to select from the variation product attribute(s) that you created in Step 1 of this guide.
I have created three more along with ‘color,’ so you can see four options in the image above.
3. Choose the one you want to use to create product variation for this product and click on Add.
For example, let’s say you want to create color variants for this product. Then choose Color.
You can see, the Color attribute has been assigned.
4. Under values, if you click on the field, you will get the option to choose from the variants you created for this Attribute.
If you think all the variants apply to this product, you may click on Select All, and all the color variants will be added.
You can see that I have decided to add all the variants, Blue, Green, and Red, that I created in Step 1.
**On the right side, you can see there is an Add New button. If you need to add a color that is only applicable to this product, but you won’t need to use it for any other products, you can click on it to add it here.
5. Next, checkmark on the ‘Used for variations‘ option.
This will allow you to create variants of this product, using the variant terms you assigned. Once this is done, click on Save Attributes below.
You have successfully assigned a variation product attribute to this product.
You can repeat the process in Step 4 up until here to add more variation product attributes.
Bonus conditional steps –
The variation product attribute(s) that you learned to create in Step 1 is used globally. Any product you create, you can assign those attributes to them.
However, there may be a case where you have a product with variants that do not resemble any other products in your store.
For example, let’s say you decided to sell a unique jacket with variants based on the closure — one having a zip-closure and the other having a button closure. In this case, it is less likely that there will be more products having similar variants.
Here, what you can do is, rather than creating a global variation product attribute, you can directly create custom variation attributes just for this product.
Here’s how.
i. In the Attributes menu, instead of choosing a variation product attribute, choose Custom Product Attribute and click on Add.
It will add a blank Attribute below.
ii. Here, name the attribute and assign values in the form ‘Variant1|Variant2’.
iii. And checkmark the Used for Variations option.
iv.Then click on Save Attributes.
Next, it’s time to generate product variants based on the attribute variants you added.
Step 5 – Generate Product Variations
Now that your attributes have been added to your product, it’s time to generate product variations.
1. Go to the Variations menu.
2. Here, click on Add variation, and select, ‘Create variations from all attributes‘.
3. Then click on Go, and WooCommerce will ask for your confirmation. Once you confirm, variants of this product will be added.
**If you marked multiple attributes for variants in Step 4, then WooCommerce will generate every possible combination between the variants here.
For example, if you used a Size attribute with 3 variant terms and a Color attribute with 3 variant terms, then a total of 9 Product variants will be generated.
You can then remove the ones you don’t need.
Step 6 – Configure Each Variant Properly
Now, you have to configure each of the generated variants and input proper data.
1. Click on a variant, and it will expand.
2. First, assign a unique value as its SKU.
3. Next, input the Price and Stock Status for this product.
If you have a promotion running, you can include a Sale Price.
You can assign the Stock status as ‘In stock’, ‘Out of stock,’ or ‘On Backorder.’
4. Upload a suitable Image dedicated to this variant.
This will mean that this image will be viewed if someone selects this variant on the product page.
Make sure to include a good image here.
6. Add a Description and assign a Tax class if applicable.
Even if you have added a description earlier, it is still a great idea to add a short description within each variant.
When a person chooses this variant, he/she will get a description dedicated to this variant. So you will have a chance to highlight the uniqueness of this particular variation of the product.
And, if you want, you can enable a Tax class just for this variant; you can change the value from ‘Same as parent’ to one of the classes you created when setting up WooCommerce.
7. You can also assign Weight, Dimensions, and a Shipping class to this variant.
8. Just below the image, you will see a few options. Choose the ones that apply to your requirements.
You will get the following options:
Enabled – If you uncheck this option, this variant will not appear as a choice on the product page.
Downloadable – If your product is has a downloadable file required along with the product, then checkmark this option.
**When you mark a product as Downloadable, you will get additional options — attach the file, add a link to the file, assign a download limit, or assign an expiry date as download time.
Virtual – If you mark your product as Virtual, it means that this product cannot be shipped because it is an online product.
**When you mark a product as Virtual, you will see the fields for Weight, Dimensions, and Shipping Class will no longer be visible.
Manage Stock – If you want to manage stock for every variant, then you can enable this option.
**If you enable Manage Stock, the stock status field will no longer be visible. Instead, you will get the option to input the quantity available and indicate if you allow backorder or not.
It is best to manage stock based on each variant because there are times when a certain variant may be sold out earlier. Managing it at a product level and not the variant level may result in you answering many inquiries about the variant that is not available.
9. Now click on Save Changes below. Then repeat all the tasks in Step 6 for every variant you generated for this product.
10. Scroll up and on the top right side, click on Publish, and the product will be published.
That’s it. You have successfully created a WooCommerce variable product.
How To Optimize Product Data To Increase Sales
Now, I will give you some tips on optimizing the product data, which will help you to increase your conversion rate.
Most people will give you advice such as ‘Use optimized images that highlight your product’, or ‘Optimize SEO in your product description’, and so on. Now, it’s true that all those are important.
But here, I will provide you with some unique ideas that might give you the edge in increasing your sales even further.
i. Choose A Feature Specific Product Name With ‘Smart Adjectives’
When choosing the product name, you have to keep in mind that this will be the first thing people will notice after the image.
The name should be decided in such a way so that people can instantly know what it is and its most special feature. Plus, you need to use adjectives to describe the product smartly.
For example, let’s say you are selling a t-shirt with a Super Heroes theme.
So its best feature is Super Heroes. You can set a name as ‘Super Heroes T-shirt.’
Next, you have to understand the purpose of this product.
The t-shirt is an element of style, so you would probably want to use the adjective, Stylish. However, you have to consider the fact that the word ‘Stylish’ will probably have less influence on most men. You might want to use an adjective that’s gender friendly.
In this case, you can consider the fact that ‘Super Heroes’ brings excitement or amazement among people.
So, the adjective ‘Exciting’ or ‘Amazing’ could be a great fit. And if it’s a new design, then pointing it out is also helpful.
So you may name it ‘The Amazing New Super Heroes T-shirt.’
If it’s a rare t-shirt, you can go with ‘The Rare Collection – Super Heroes T-shirt’.
If the Super Heroes theme is popular, you might wish to go with ‘The Trending Super Heroes T-shirt’.
The three names suggested above are just examples. However, it is not mandatory to use adjectives on all product names in the same category.
For example – if it’s a single color t-shirt with not exclusive design, then you might be better off naming it ‘Comfortable Plain T-shirt.’ (The word, comfortable is almost always relative when it comes to clothing products.)
If the product has variants, you may mention the variant terms in the product name when someone selects a particular variant.
For example, let’s say you have 3 color variants for the Super Heroes T-shirt, being Blue, Green, and Red. Then, when a person chooses the Blue color for this t-shirt, you could display the name ‘The Trending Super Heroes T-shirt – Blue.’
**In WooCommerce, this cannot be done by default. So you have to use some custom coding to achieve it.
You may also choose to mention all the variation terms in the product name.
For example, you could name it ‘The Trending Super Heroes T-shirt In Blue, Green Or Red’.
Though this may not be as attractive as individual variant names, it is still effective in letting people know of the available choices.
Also, try to avoid using marketing schemes in the Product name.
For example, avoid using product names such as ‘Super Heroes T-shirt – Buy 3 Get 1 Free’.
For such matters, try mentioning such offers in the Product image, in the Description, or use a Short Description. But do not use it in the title as it will confuse people about what the product is.
ii. Make The Product Description Worth Their While
When a person reads a product description, it means that the person is interested in the product, but wants to confirm if it has the features he/she needs. And it is your task to grab this opportunity and make the prospect realize that this is the product he/she was looking for.
Most people do not value the product description as much. They simply mention the product features, and that’s it. But believe me, a product description can be a big push towards making a purchase decision.
Here’s a format I recommend that you follow. Create a description in the following order:
What benefit will the person get with this product? -Write a short paragraph explaining the main benefits or results people will get if they purchase this product.
For example, let’s say you are selling a pair of Earphones with good sound quality. So the paragraph could be something like this:
“Get the exclusive XYZ Earphones and get into a different world when listening to the music. This earphone is specially designed to enhance the music quality so that you feel every beat of the music, along with the soothing feeling flowing through your ears. Enjoy every bit of music on the go!!”
The main features of the product in a benefit-specific way -In this section, use bullet points to mention the features, while stating the benefits where possible.
For example, in the case of the XYZ Earphones, it could be something like this:
Long wire for better portability – Cable Size: 2.5m
Easy to fit in the ears with a suitable In-ear style.
Enhanced base control for the maximum music experience
2:1 surround system for a realistic music experience
Compatible with almost all devices – 3.5mm jack
As you can see, I have mentioned the features and stated one benefit for each, all in bullet points.
Why a person should buy this product over other similar ones
Here, you can use a paragraph to mention the unique reason why people should buy this product. And you can mention here if it has any variants.
Also, if the product comes with something extra, you can mention it here. (However, if it’s a promotional item, you should rather mention that in the 1st paragraph.)
Bijvoorbeeld:
“What makes XYZ Earphones better than others is that it comes with an Ultra base control technology, which makes sure no noise spikes are experienced to hurt your ear. Rather, you will be able to enjoy smooth music at all times.
The XYZ Earphones come with a pouch to carry it at all times.
Plus, you can choose from three stylish colors, Blue, Green, or Red, to be your ears’ companion.”
A call to action -Finally, mention what people will get in the order and use a call to action.
Bijvoorbeeld:
“When you order, you will get:
1 x XYZ Earphones
1 x Earphone pouch
Buy XYZ Earphones now and start listening to awesome music.”
Now, this format is only my suggestion, but it works.
Often swapping the third paragraph with the 1st may be a good idea. In the case of some products that are too simple, it’s best if you do not use the third paragraph; rather, combine that with the 1st paragraph.
iii. Use A Short Description
I have mentioned earlier that the main Description either comes below the basic product details or with a tab to click and view.
So, you may rather use the Short Description feature in WooCommerce, which appears just below the title on the product page.
When you edit a product, go to the screen options and enable the Product Short Description option, and it will appear just below the Product Data section.
Here, explain within 3 lines, the product’s main features that people are looking for.
This will help people to realize first hand that it is the right product for them.
iv. Update the slug according to the main product name
When you use adjectives and variant terms in the Product name, publishing it also adds them to the slug or product link.
However, it’s best to use a simple URL slug, rather than a long one.
For example, in the case of the Super Heroes T-shirt, when you name it ‘The Trending Super Heroes T-shirt’, you will see that the slug will be something like this:
You can see the product slug is ‘the-trending-super-heroes-t-shirt’
To make it simple, change it to a ‘super-heroes-t-shirt’.
You can assign a slug when creating a product. Simply go to the screen options and enable the Slug option. A Slug section will appear just below the Product Data section. There, you can input the slug you want.
Or, after publishing the product, you can go to Dashboard > Products > All Products. There look for the product and quickly edit it. Here, you will get the option to input your desired slug.
v. Try managing stock based on each variant
In WooCommerce, you have the option to manage stock, i.e., the quantity of your products, and backorder service.
When editing a variable product, you can either do it in the Inventory tab in the product data section or within each variant.
It’s best to use the manage stock option within each variant rather than the one in Inventory. This will allow you to control how many of each variant is available. In case one variant is sold out, you can mention that in your store.
Here, if you control quantities from the Inventory tab, buyers will not know if a particular variant is available.
Let us look at an example.
Suppose you are selling a pair of running shoes that vary based on the sizes, 36, 37, 38, and 39.
You have a total of 4 for each variant, which is a total of 16 shoes.
Let’s say the size 37 is sold out.
Heres’ what will happen if you manage stock in the Inventory tab:
On the product page, when a person will choose the size 37, it will still indicate that it is available.
Since you are using the Inventory tab, it counts the total number of products. So, after 4 shoes in size 37 is sold, the inventory will count that 12 more shoes are remaining. Hence, it will mark it as ‘In Stock,’ no matter what variant a prospect may choose.
Here’s how using Stock Management within a variant will help:
Since the size 37 is sold out, choosing it on the product page will indicate that it is out of stock. Choosing any other variant will display the available individual quantity of each of the variants.
Apart from these 5 tips above, do remember that it is still very important to apply SEO optimization on the Product description. And it’s best to use optimized images that highlight the best features of the product.
I’ll repeat another important tip. Please refrain from using fake images to sell your products.First, many people use images of a product and then deliver replicas that do not look identical. They do not meet the feature requirements that were claimed in the description. For example, If you are saying it’s an original Jersey, then it should be original. You can’t just send a replica.Second, do not edit your product images to such extent that it looks way better than it actually is, or looks different from the actual product. For example, do not turn a purple dress into a pink dress. Stating that ‘Color will slightly vary from real life’ doesn’t justify such high difference.
How To Customize The Product Page To Increase Engagements
Sure, optimizing product data is very important. But it is also equally important to optimize the product page.
And you can get an extra edge with variable products, and there are more scopes of customization.
Here are a few tips on customizing the product page that is currently working really well for many.
i. Customize your product page to be simple and less congested
Look for a WooCommerce product page template that is not too congested, and makes it easy for a prospect to take a decision on the product.
Many people use templates where too many details are presented right in the first view, which may confuse buyers.
You can display product variants in the form of button swatches. For example, you can use colored swatches to present color variants, or image swatches to let people choose variants.
It’s a great way to grab the attention of buyers and create curiosity to choose a variant.
Here’s an example of the use of color swatches to display product variants.
One way to ensure the conversion is to make a buyer purchase as soon as he/she is interested in a product.
So, what you can do is you can make it so that a person can complete the purchase instantly. You may achieve this using the plugin Buy Now For WooCommerce.
It’s a simple plugin where a buyer can click on the Buy Now button, and the checkout page will appear as a pop-up so that the buyer can make the payment instantly and get done with the purchase without having to leave the page.
Running a WooCommerce store can be hectic if you do not organize your shop properly. Hence, it is best to learn the proper steps and actions to take when adding products, especially variable products.
Hopefully, if you follow the steps in this guide, you will be able to run a successful WooCommerce store with no difficulties whatsoever. When it comes to selling variable products, the tips will come in handy for you.
Though there are so many more to learn about WooCommerce, it’s best to learn one step at a time. Learning to add variable products in an optimized way is definitely an important step that you covered in this guide.
Also, here is a list of guides you can use to learn WooCommerce in detail. Take your time and learn to set up a proper WooCommerce store so that you can achieve a high conversion rate and increased ROI in the near future.
** FAQs **
How do I manage stock for each product variant?
To manage stock for each variant, go to the “Variations” menu under the “Product Data” section. Click on a variant to expand it, and you will see the option to input the stock quantity. This allows you to specify how many units of each variant you have available. It ensures accurate stock management for each variant separately.
Can I add unique descriptions for each product variant?
Yes, you can add unique descriptions for each variant. When you expand a variant in the “Variations” menu, you’ll find a field to add a description specific to that variant. This helps highlight the unique features and benefits of each variant. It provides more detailed information to your customers.
How do I set different prices for each variant?
To set different prices for each variant, go to the “Variations” menu. Expand a variant, and you will see fields to input the regular price and sale price (if applicable). This allows you to price each variation according to its features or market demand.
How can I add images for each product variant?
You can add specific images for each variant by expanding a variant in the “Variations” menu and uploading an image in the designated field. This ensures that when a customer selects a variant, the corresponding image is displayed. It provides a visual representation of the chosen option.
What should I do if I want to add a unique attribute just for one product?
If you need to add a unique attribute for a single product, you can create a custom attribute directly in the “Attributes” menu of the product. Select “Custom Product Attribute” and click “Add.” Then, name the attribute and input the values separated by a vertical bar (|). Check the “Used for variations” option and save it. This allows you to create product-specific attributes without affecting other products in your store.
Google Shopping is one of the best ways to drive new traffic and generate Woocomerce sales simultaneously.
According to a Google survey, 49% of shoppers search on Google to discover a new product.
However, simply listing your products on Google Shopping is not enough to ensure your Google Shopping campaign’s success.
You can increase your relevance, ranking, and visibility by categorizing your products according to the Google Product Category.
Your products may not appear in relevant search results without proper categorization. Which will result in lost sales and frustration.
Here we have gathered some proven Google Product Category optimization tactics that you can implement for the best results. After reading this article, know about-
Why it is essential to use Google Product Category
How to categorize your products according to Google Product Category
How to optimize Google Product Category for the best results
By the end of the blog, you can use Google Product Category to boost your sales on Google Shopping.
So, let’s dive in.
Why Categorization with Google Product Category Matters
When you submit your product data to Google Merchant Center, you must select the most appropriate Google Product Category for each product.
Categorizing your products with Google Product Category is essential for below reasons:
Improved Visibility on Google Shopping Your products will appear in the right search results If you categorize them accurately. This will lead to improved visibility and higher click-through rates.
For example, suppose you sell running shoes on your website and categorize them correctly under “Apparel & Accessories > Shoes > Athletic Shoes > Running Shoes.”
In that case, your products will appear when someone searches for “running shoes” on Google Shopping, increasing your visibility and chances of making a sale.
The enhanced user experience when searching Often it hampers user experience if you do not categorize your products properly. Product categorization helps users find what they’re looking for more easily. and, thus, improves user experience.
For instance, suppose you sell furniture on your website and categorize your products under “Home & Garden > Furniture > Sofas.”
In that case, users searching for sofas will find your products easily, leading to a better user experience and higher chances of conversion.
But sometimes, our thinking pattern differs from that of our customers. To ensure a great UX, it’s advised to run online card sorting tests – a type of user research.
Complying with Google’s policies Google has strict policies about the use of Google Product Category. By categorizing your products accurately, you ensure that you comply with Google’s policies, reducing the risk of your product feed being rejected or your account being suspended.
For example, if you sell clothing on your website and categorize them under “Apparel & Accessories > Clothing,” you comply with Google’s policies.
In contrast, if you categorize them under “Electronics,” Google may consider it a policy violation and reject your product feed.
Now you know the benefits of categorization. Let’s find out how to categorize your products properly.
How To Categorize Products with Google Product Category?
Like optimizing other data in your product feed, such as title, color, and description, you need to select the most suitable option from Google product category taxonomy to deliver the most relevant results to your potential customers.
For example, if you sell running shoes and categorize them as simply “Shoes”instead of“Shoes > Athletic Shoes > Running Shoes,” your products may not appear in relevant search results for customers looking specifically for running shoes, resulting in fewer clicks and potentially lower sales.
Categorizing your products with Google Product Category is a simple process. You can do it manually or use a tool to automate the process.
Let’s look at both the categorization processes:
Manual Categorization
To manually categorize your products according to Google Product Category, follow these steps:
Now, Google auto-categorizes your products if you leave the google_product_category attribute blank. But it’s better to assign categories of your choices rather than leave it to Google’s algorithm.
You can use a SaaS like Channable or an affordable WordPress plugin to easily implement the product categorization process.
When you create your Google Shopping Feed with the plugin, you’ll see the google_product_category attribute on the feed creation page.
Type caption (optional)
As you can see, a default category mapper is already assigned; you just need to configure the category map. To do this, click on the “Configure Category Mapping” page, which will take you to the configuration page.
Type caption (optional)
Map your WooCommerce product categories according to Google Product Category.
Step -2: Map WooCommerce Product Categories
In the category mapping configuration page, you just need to type the category, and you will get suggestions for the most relative Google Category.
For example, if you type ‘Music,’ you’ll see the relevant category suggestions.
Type caption (optional)
Now, you just need to choose the right path for your product category, and you’re done!
Type caption (optional)
By using this category mapping system, you can reduce the risk of product disapproval in your Merchant Center.
Tips to Set Google Product Category List for Increasing Sales
Tip 1 : Use the most specific category possible
When categorizing your products, use the most specific category possible. It helps to ensure that your products appear in relevant search results and increase the chances of a sale.
For example, if you sell women’s shoes, **instead of categorizing them as “shoes.” Use a more specific category,” women’s athletic shoes” or “women’s high heels.”
Tip 2: Understand the Difference Between Product Type and Google Product Category
The product type attribute organizes bidding and reporting in your Google Ads Shopping campaigns.
On the other hand, Google Product Category is used by Google to ensure that your ad is displayed alongside relevant search results.
The main objective of Google Shopping is to showcase your ads to the right audience as frequently as possible. Both the Product Type and Google Product Category help achieve this goal.
Tip 3: Emphasize Localized Category
Pay attention to localized categories to categorize products with Google Product Category.
Let’s say; you’re selling electronics in the United States and Japan, and you find that the categories for electronic products are named differently in each country.
Thus, you can improve the visibility in local search results and increase your chances of attracting potential customers. Therefore, emphasizing local categories helps maximize your sales and revenue potential in different regions.
Tip 4: Check If The Category Is Related To Any Google Shopping Policy
Properly categorizing your products with Google Product Category is essential for better visibility and sales. It also plays a crucial role in ensuring your products comply with Google Shopping policies.
Let’s Say; You sell products related to alcohol; you must use the correct category (Food, Beverages & Tobacco > Beverages > Alcoholic Beverages) to meet the strict policy requirements.
Similarly, if you sell subscriptions, gift cards, or mobile devices with a contract or installment plan, you must use the appropriate category to ensure your products comply with Google’s policies.
Therefore, checking if your product category applies to any Google Shopping policy is essential to avoid disapproval or account suspension.
Tip 5: Optimize your product titles and descriptions
Optimize your product titles and descriptions with relevant keywords to improve the visibility of your products on Google Shopping. Include the category name in your title and description.
Tip 6: Keep up-to-date product data
Regularly updating your product data can also improve your visibility on Google Shopping. Ensure to update your product category data whenever product or inventory changes occur.
Tip 7: Maintain a clear product category hierarchy
Maintaining a clear and well-structured product category hierarchy is essential for your business if you deal with a large number of products. A well-organized category hierarchy can help your customers find products easily, improving their overall shopping experience.
Optimize Your Google Product Category with Product Feed Manager
When trying to get more sales on Google Shopping, using the right tools makes a big difference. Putting your products in the correct Google product categories helps customers find them easily.
But, doing this manually takes a lot of time and effort, especially if you have many products.
Using a tool like a product feed manager that can automatically map your product categories to Google’s categories saves your time and ensures accuracy. This not only helps customers discover your products but also follows Google’s rules to avoid issues.
One of its standout features is the Advanced Category Mapping capability, which allows you to easily map your WooCommerce product categories to their proper Google product categories.
To Sum Up
Categorizing your products with Google Product Category is essential for any eCommerce store wanting to boost Google Shopping sales.
By categorizing your products correctly, you are providing Google with important information about your products, which can lead to increased visibility, traffic, and sales.
Use the tips mentioned above to leverage the Google Product Category and boost your sales on Google Shopping.
Frequently Asked Question(FAQs)
FAQ 1: What are Google Product Categories and why are they important for WooCommerce stores?
-Google Product Categories are predefined categories that help Google better understand what types of products you sell in your WooCommerce store. Properly assigning these categories to your products can significantly improve their visibility in Google Shopping listings, leading to more qualified traffic and higher conversion rates.
FAQ 2: How do I optimize Google Product Categories for my WooCommerce store?
-To optimize Google Product Categories, you’ll need to first map your existing product categories to the appropriate Google Product Categories. This can be done manually or by using a plugin/extension. Next, ensure that your product titles, descriptions, and other details align with the assigned categories. Also, regularly review and update your categories as your product offerings change or expand.
The online jewelry industry has seen impressive growth in recent years and is estimated to be valued at $19.88 billion by 2024.
So, if you sell jewelry online then you probably realize how competitive the industry has become. And besides trying several sales tactics to increase conversion, you have to look for ways to reach more potential buyers.
And one of the best ways to do this is to promote on a large & popular online marketplace for jewelry. For example, Overstock is a well-known online marketplace where people regularly order jewelry online.
So, you need to know about the best place to sell jewelry online and if you have your products listed there, you too can get great exposure and more sales.
Today, I will show you 6 online marketplaces where you can list your jewelry products and expect to reach more potential clients than you normally can in your WooCommerce store.
So, let’s begin.
Top 6 Marketplaces To Sell Jewelry Online And Increase Sales
Below, I have compiled some of the best USA marketplaces where you can list your jewelry and start seeing a real difference in your sales figures. Let’s check them out.
1. eBay – Effortless Selling Jewelry Online
With over 159 million active buyers, eBay offers plenty of product-promoting opportunities. As the largest auction site, it helps you list your jewelry quickly and get good value for unique items.
Traffic & Engagement Stat’2024
Source- https://www.similarweb.com/
Why Should You Sell Jewelry via eBay
Besides being the third largest store in the world, eBay also has a reputation for being the 2nd best place to sell jewelry.
The eBay MIP marketplace and the auction center make this a unique and preferred place to shop from.
Walmart Marketplace is one of the fastest-growing online marketplaces for household products in the USA, with over 120 million active users. However, it has also got a new-found fame in the jewelry industry with a lot of local vendors listing products on their online marketplace.
Since Walmart handles the delivery itself, it’s a brilliant place to list your products and get more sales.
About 6.5% of Walmart’s listings consist of jewelry items, but they seem to see a lot of orders. This means that there is less competition but more possibility of conversion.
Hence, if you offer a good price, people will love to purchase your jewelry items.
Apart from a user-friendly marketplace, Walmart offers free 2-day shipping, which helps to attract more buyers easily.
Highlights of Selling Jewelry On Walmart
To sell on Walmart, you must include a GTIN for each of your products
Walmart goes by the “Customer is priority” module and has strict no-question return and shipping policies.
As a seller, it’s wise to take advantage of its own delivery system, saving you the hassle of handling shipping.
Since Walmart is locally popular in every state, people will trust to purchase your products from their site, more than via your own WooCommerce store.
Listing products on Walmart is free. Plus, there are no monthly fees.
Walmart charges a specific 6-15% referral fee for each sale depending on how expensive your product is.
3. Facebook Marketplace – Best Place to Sell Jewelry
Facebook is the leading social platform in the world today, and likewise, its online marketplace makes it easy for businesses to expose their products to tons of Facebook users.
Why Should You Sell Jewelry via Facebook Marketplace
A few years back, besides the shop page, Facebook introduced its own online marketplace where online store owners can list their products to drive potential buyers to their site.
The way it works is, that once you list your jewelry items on the Facebook marketplace, these appear on the search results for people who search for specific jewelry that matches your products. At the same time, you may run Ads for each of your jewelry locally and share your personalized flyer templates to reach even more potential buyers. Also, you can consider a few flyer design online tools to create visually appealing materials that enhance your jewelry marketing efforts.
Recently, Facebook Live has become more popular for connecting with jewelry lovers and providing them with an interactive shopping experience.
There are no fees for listing products on the Facebook Marketplace.
At the current demand level (2024) for jewelry, it will cost you $0.26 – $0.30 per click or $1.01 – $3.00 per 1,000 impressions.
4. Bonanza – A great online marketplace for jewelry
Bonanza is an emerging marketplace in jewelry eCommerce. Most buyers use the Bonanza App to shop online via their mobile phones. And this marketplace is quite popular for selling jewelry.
Bonanza comes with a seller-centric nature to help local sellers have a platform of their own. And WooCommerce store owners like yourself can take advantage of this.
The marketplace has this special feature called the Bonanza booth that allows you to create a complete store within the Bonanza marketplace. So you will be able to design your own booth and highlight the products you want. Buyers will be able to visit this personalized shop of yours when purchasing via Bonanza.
Bonanza has a significant representation of jewelry on the market, including artisan jewelry, fashion jewelry, and diamond jewelry.
Bonanza is strict about local product listings, giving you the edge over the international competition.
Buyers in Bonanza love discounts, hence if you run discount campaigns, you are more like to get more sales.
The Bonanza booth will help you rank as a shop within Bonanza if you have on-demand products listed.
Costing of Promoting On Bonanza
There are monthly fees or listing fees.
For products worth below $500, you are entitled to pay a fee of 3.5% per sale
In the case of products worth $500 or above, you are entitled to pay a fee of 1.5% per sale.
5. Etsy – Best Online Marketplace for Jewelry
Etsy is the go-to online marketplace for selling handmade or vintage jewelry products. With around 500 million active users, Etsy is ideal for promoting your jewelry products.
When listing jewelry on Etsy, you’re simply promoting products in front of a massive audience of interested buyers. With a proper listing, you can always expect many sales here.
On top of that, Etsy is a high-ranked platform and its listings have better visibility on search engines. It even has a built-in ads platform. So, if you list your jewelry items with appealing pictures and optimized keywords, it’ll help to reach even more potential buyers.
Besides, Etsy has a super easy dashboard to handle product listing, inventory tracking, and monitoring the exposure. Also, you can try out strategies like appealing pictures, optimized keywords, and seamless Etsy Integrations, so your jewelry items can reach an even broader audience, maximizing your potential sales.
Currently, there are over 40 million pieces of jewelry listed on Etsy, making it a prime marketplace that consumers look at when thinking of purchasing jewelry.
Prices are quite competitive, and if you can give a lucrative offer, then people will buy your products more.
Esty product’s SEO rank drop on Google will not happen if you provide a compelling title and product description.
Cost Of Promoting On Etsy
Setting up an account on Etsy is free, however, you have to sign up for a plan depending on your needs.
Standard: Good for starting a business. There are no monthly fees on it.
Plus: Good for expanding business. It has a $10 monthly charge.
Apart from the account plans, there are a few small fees for listing and selling products:
To upload a single product listing, you will have to pay $0.20, with 4-month validity.
There is a 6.5% fee for every sale you make.
If you run offside Ads via Etsy, then there is a 15% Ads fee when you make a sale via Ads.
6. Overstock for selling Jewelry online
With over 30 million active users, overstock is one of the most popular online marketplaces in the USA for fashion products, jewelry, and home decor.
Promoting on Overstock lets you connect with millions of unique and potential buyers every month. Most of the buyers at Overstock are housewives, and homemakers, thus increasing the chances of selling jewelry.
The marketplace has made a name for itself for eliminating fraudulent products – only real manufacturers are allowed to sell via their marketplace.
Here, renewing inventory is easier. It also offers fulfillment through shipping.
If you are in the USA, then selling jewelry via Overstock is a no-brainer.
Highlights of Selling Jewelry Online via Overstock
Overstock is a great auction site for expensive products.
Fine jewelry and classic jewelry are top sellers in the jewelry section of Overstock.
Buyers at Overstock seek offers on diamonds, gold, and handmade items. So discount campaigns will work really well in this marketplace.
Overstock provides its own fulfillment service, saving you from worrying about logistics.
Costing of Promoting On Overstock
The following costs apply when listing products on Overstock:
Listing costs on Overstocks may vary between $0.10 to $3.15.
You may subscribe at $6.95 per month to add up to 25 listings with no extra listing fees.
Following are the commissions you pay when you sell via this marketplace:
For products under $25, you are entitled to pay a 3% commission per sale. For products with higher prices, it will vary depending on your store’s reputation. You will be informed of your possible fees after you submit an application to sell via their platform.
You may pay $1 to display bold text and $5 for highlighted background for your products
A featured auction will cost $13.17 for a single product.
Start Listing Your WooCommerce Products On Large Marketplaces Without Any Hassle
So far, you’ve learned about the places where you can sell jewelry online and get more sales.
Now the question comes “How you can sell ?”
As a WooCommerce store owner,
The first step to selling on these marketplaces is to start listing. it could be quite time-consuming to manage listings on multiple marketplaces while still managing your own WooCommerce store.
You can start from zero and create perfect product feeds in as low as 3 simple steps!
Select Your Preferred Merchant
Configure Product Data For Your Feed
Generate Feed by clicking The Publish Button.
And that’s it. It’s That Easy! You can watch this video to list your products with the Product feed manager.
And then, all you have to worry about is delivering your products when you receive your orders and updating your WooCommerce stock. Later, can generate the lists again with the new stocks with a few clicks and update your feed in your marketplaces.
Above these are the online marketplaces where to sell jewelry and can have great profit.
Wrapping Up
Selling jewelry online via global online marketplaces is the key to establishing a successful online presence in jewelry eCommerce, especially if you are a startup or a medium-level business.
So, besides applying all the sales tactics and conversion optimization strategies, start promoting on large online marketplaces to get more sales.
Reach more potential buyers with the best online marketplace for jewelry and grow your WooCommerce sales easily.
FAQs
1. What are the top online marketplaces to sell handmade jewelry?
Etsy, Amazon Handmade, and eBay are leading jewelry marketplaces for handmade products.
2. How can I optimize my WooCommerce store for selling jewelry online?
Use SEO keywords, high-quality images, and plugins like Mail Mint to improve sales.
3. Is it better to sell jewelry on a marketplace or my WooCommerce store?
A jewelry marketplace offers exposure, but WooCommerce provides better branding control.
4. What fees should I expect when selling jewelry on these marketplaces?
Expect fees like 6.5% on Etsy, 15% on Amazon Handmade, and around 12.9% on eBay.
5. How do I drive traffic from a marketplace to my WooCommerce store?
Use packaging inserts, social media, and email campaigns to promote your WooCommerce store.
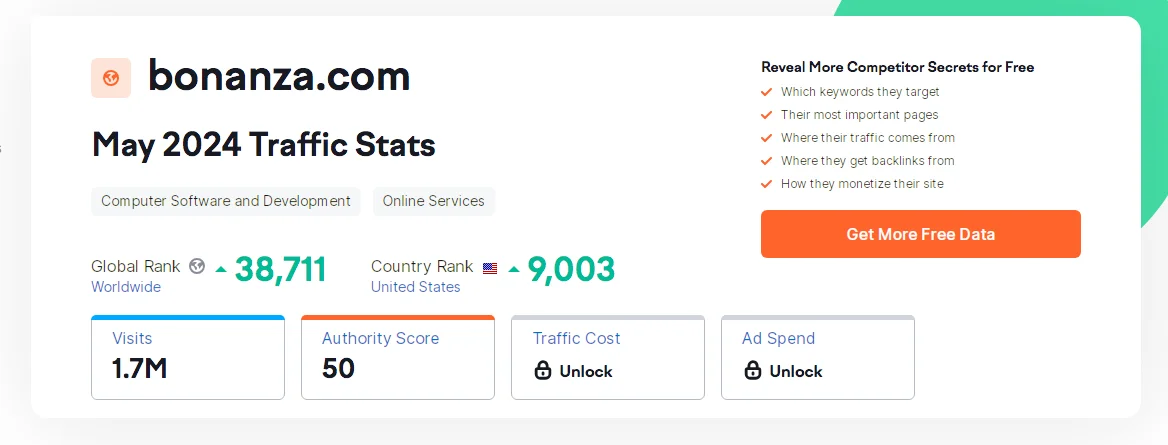
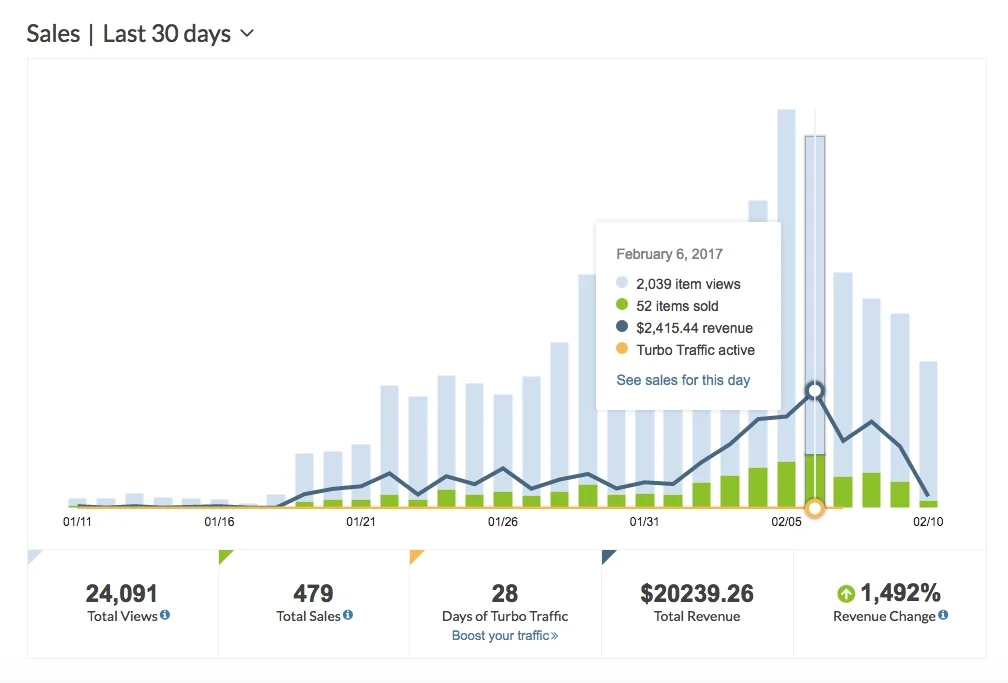


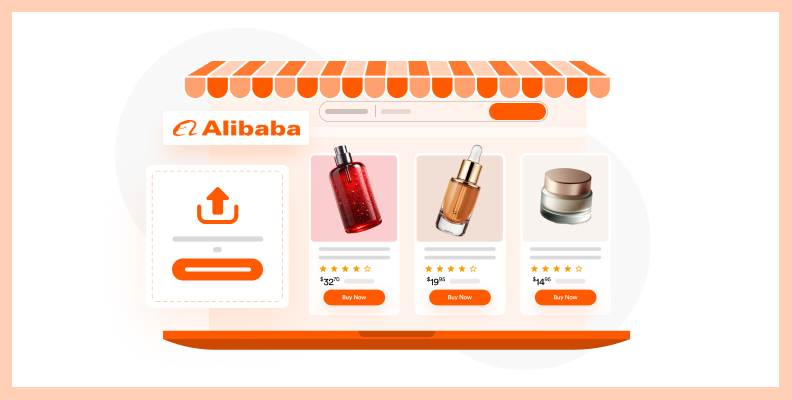
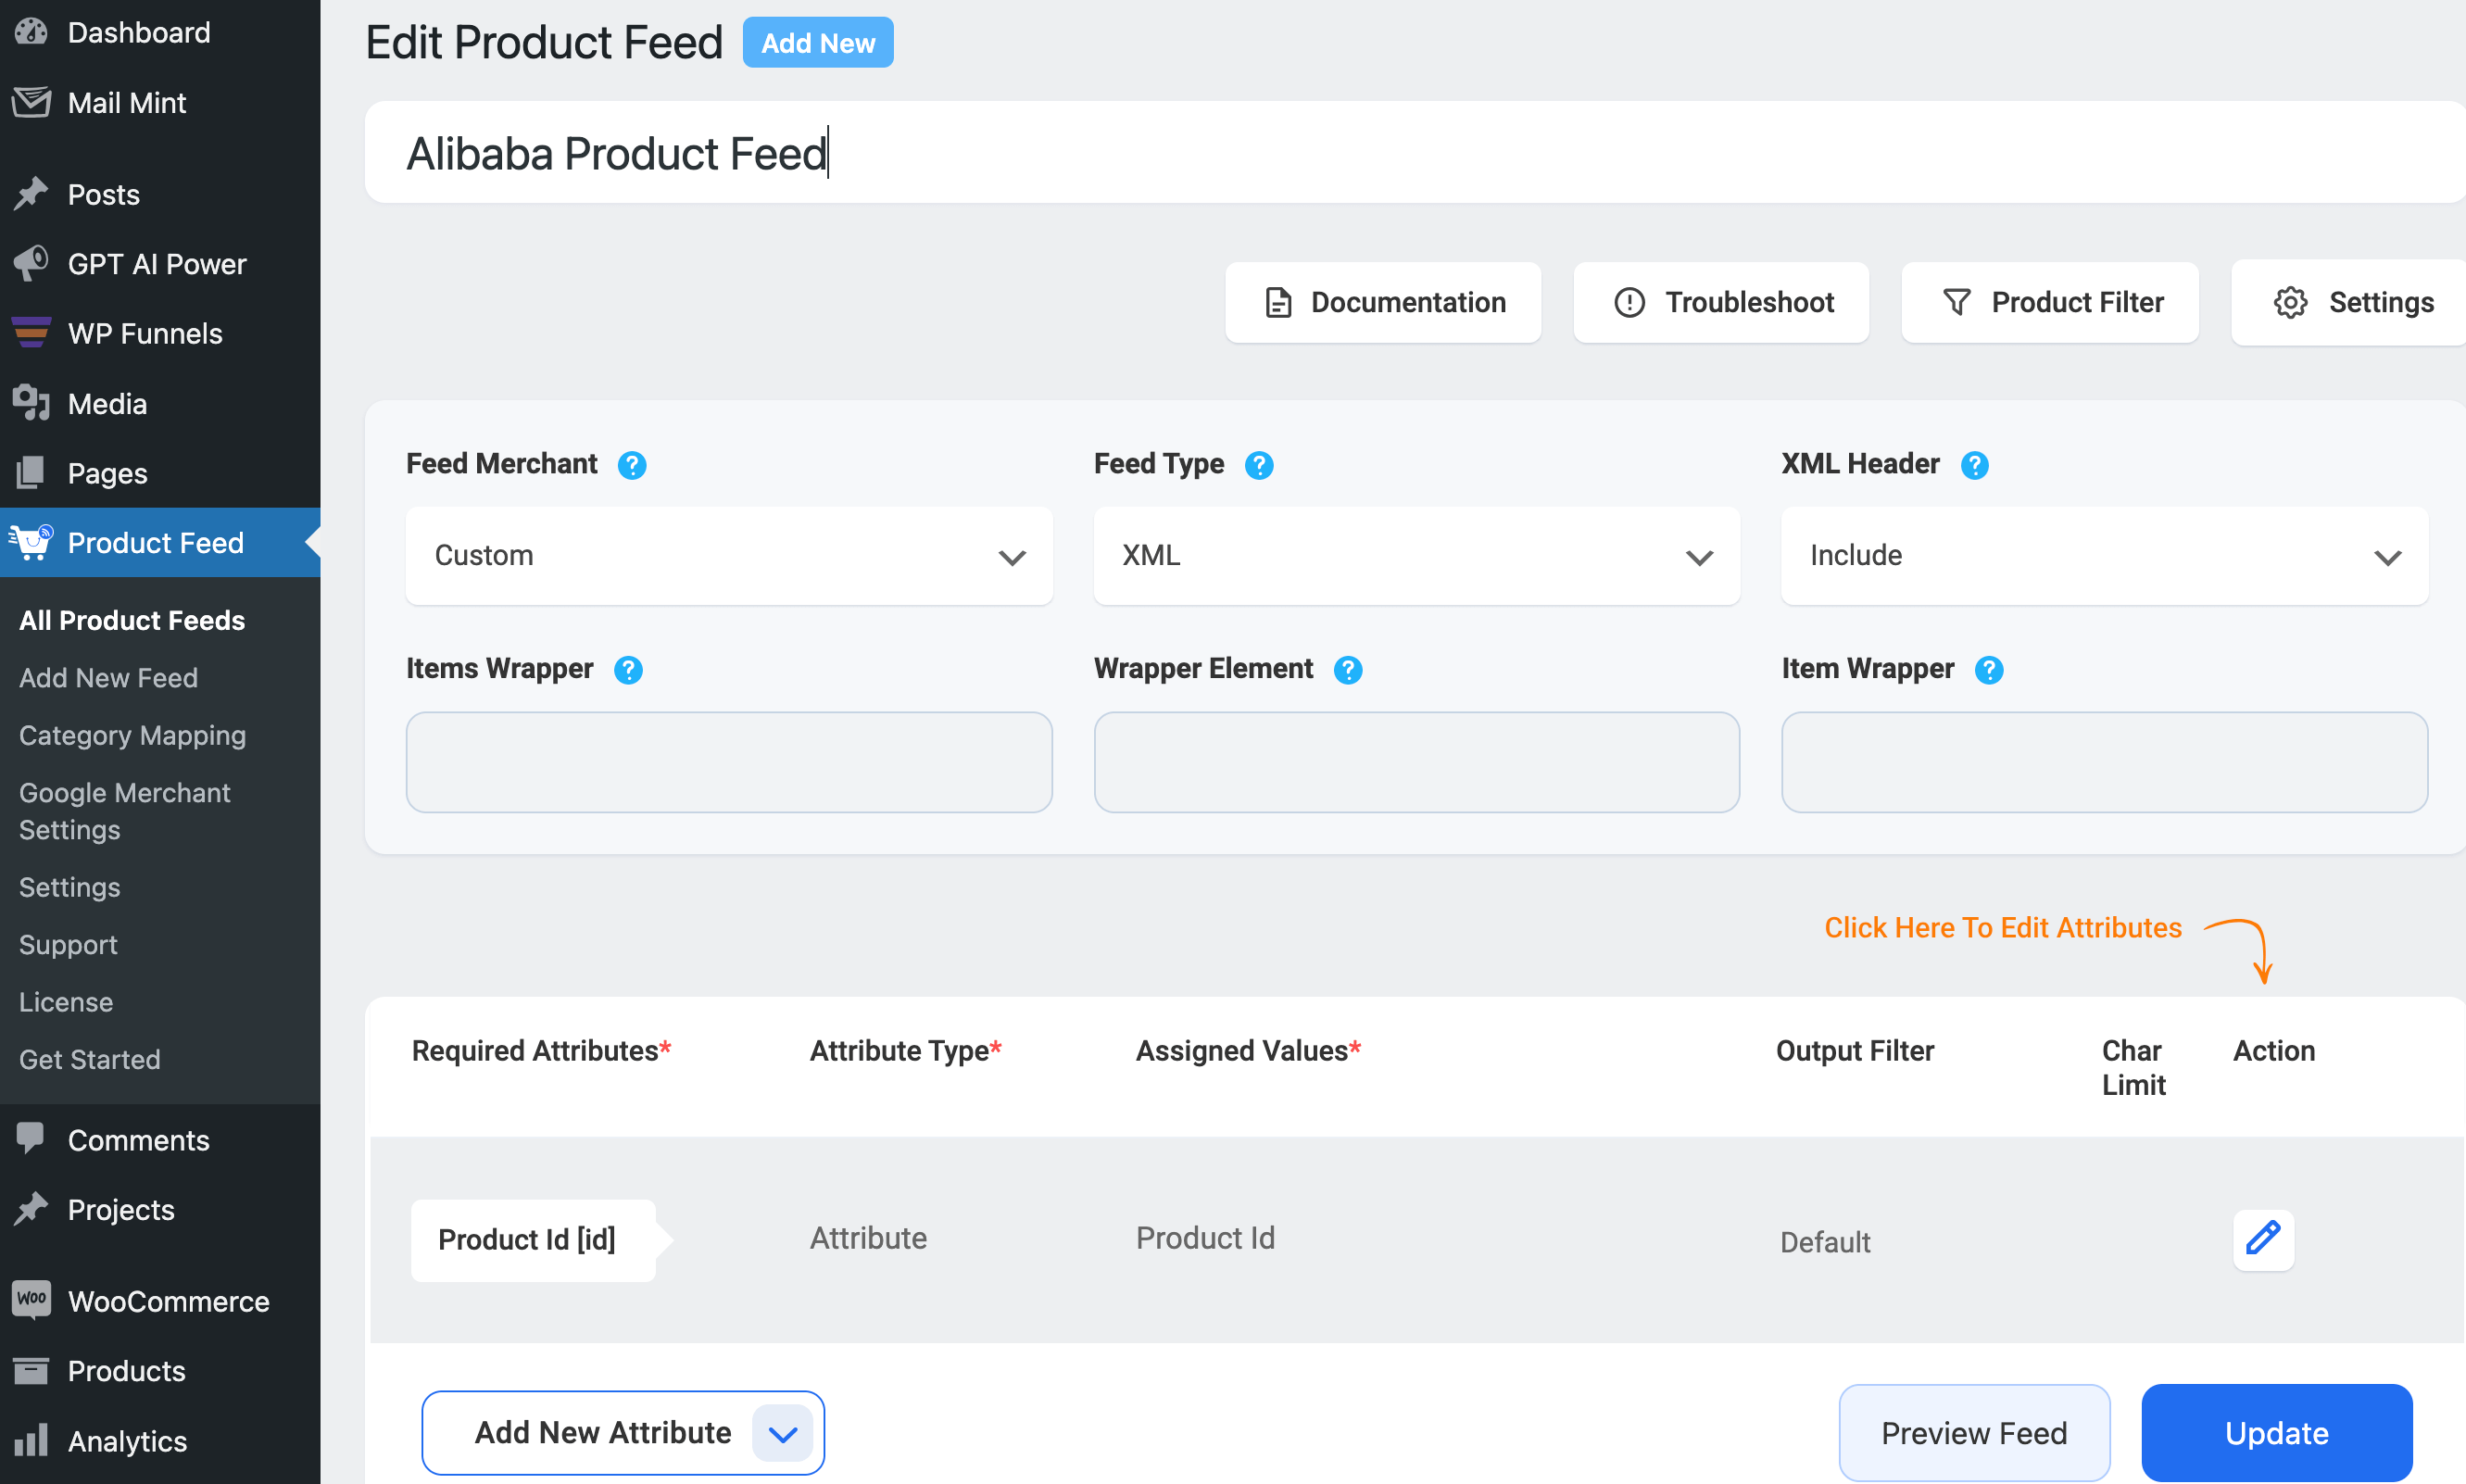
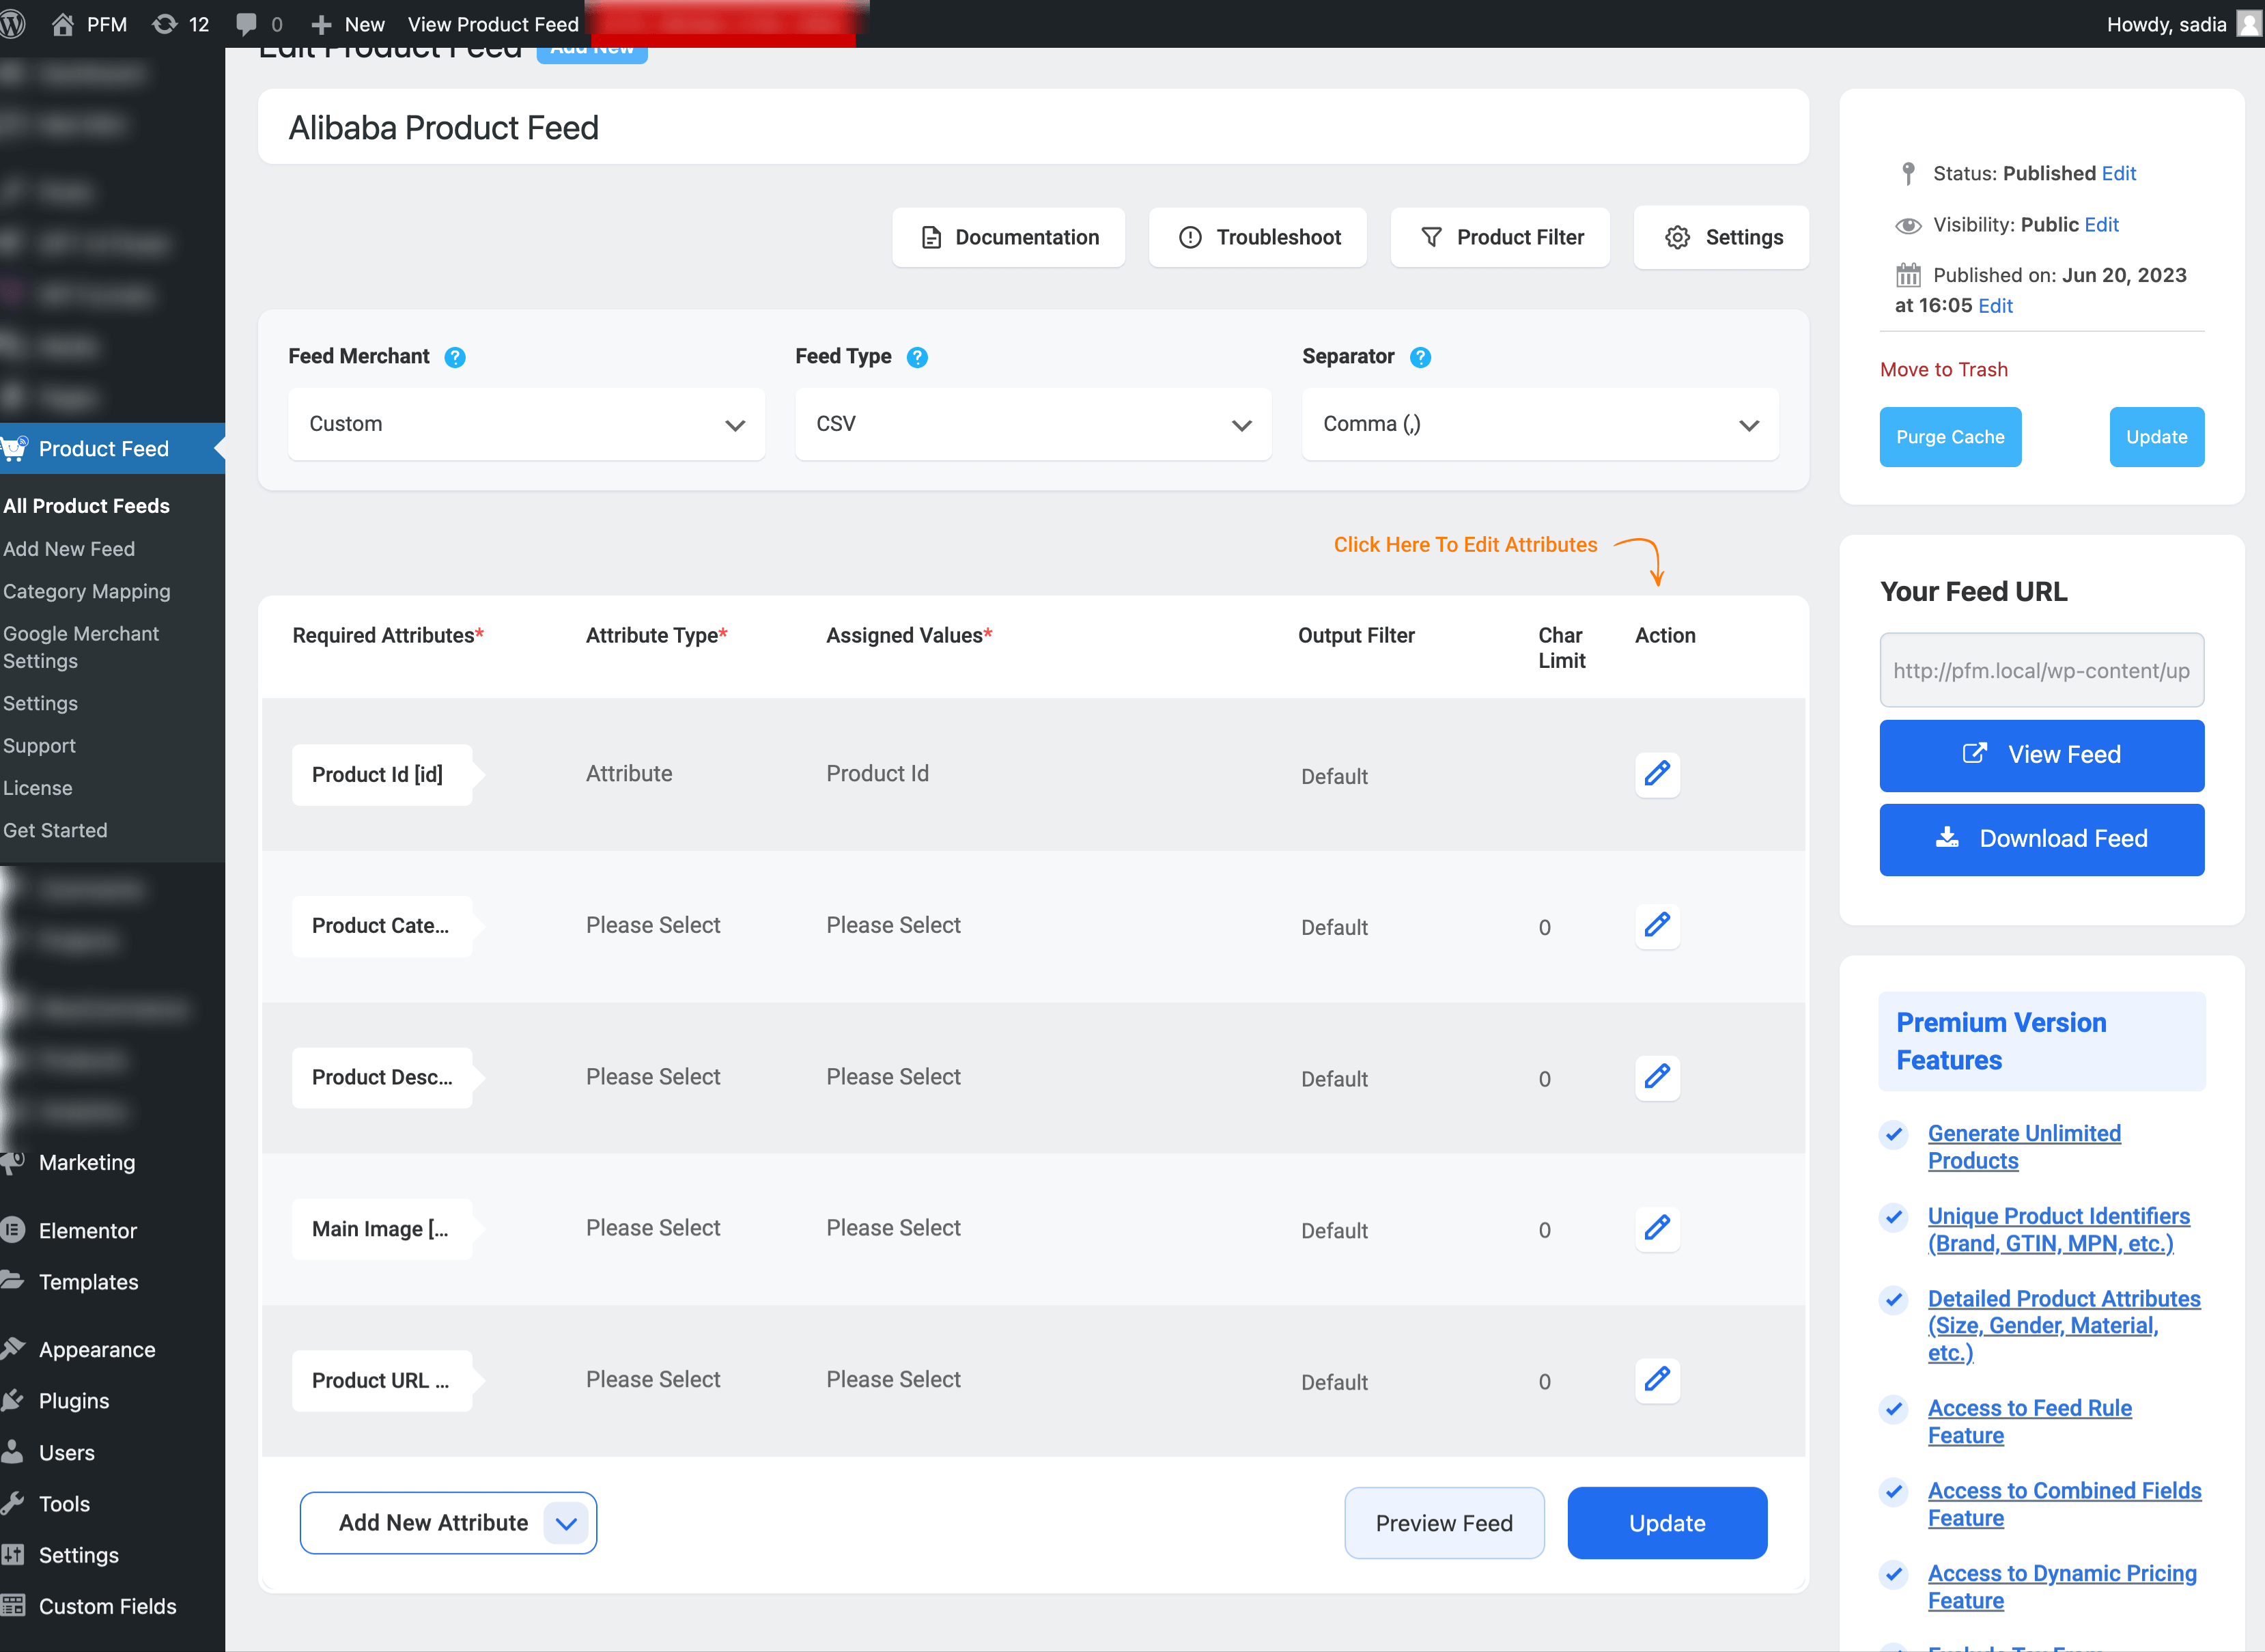
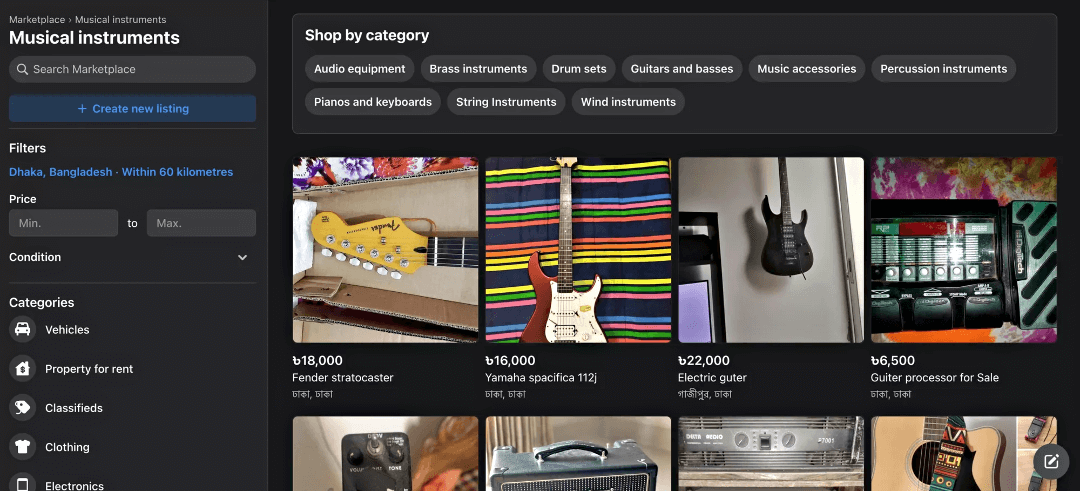


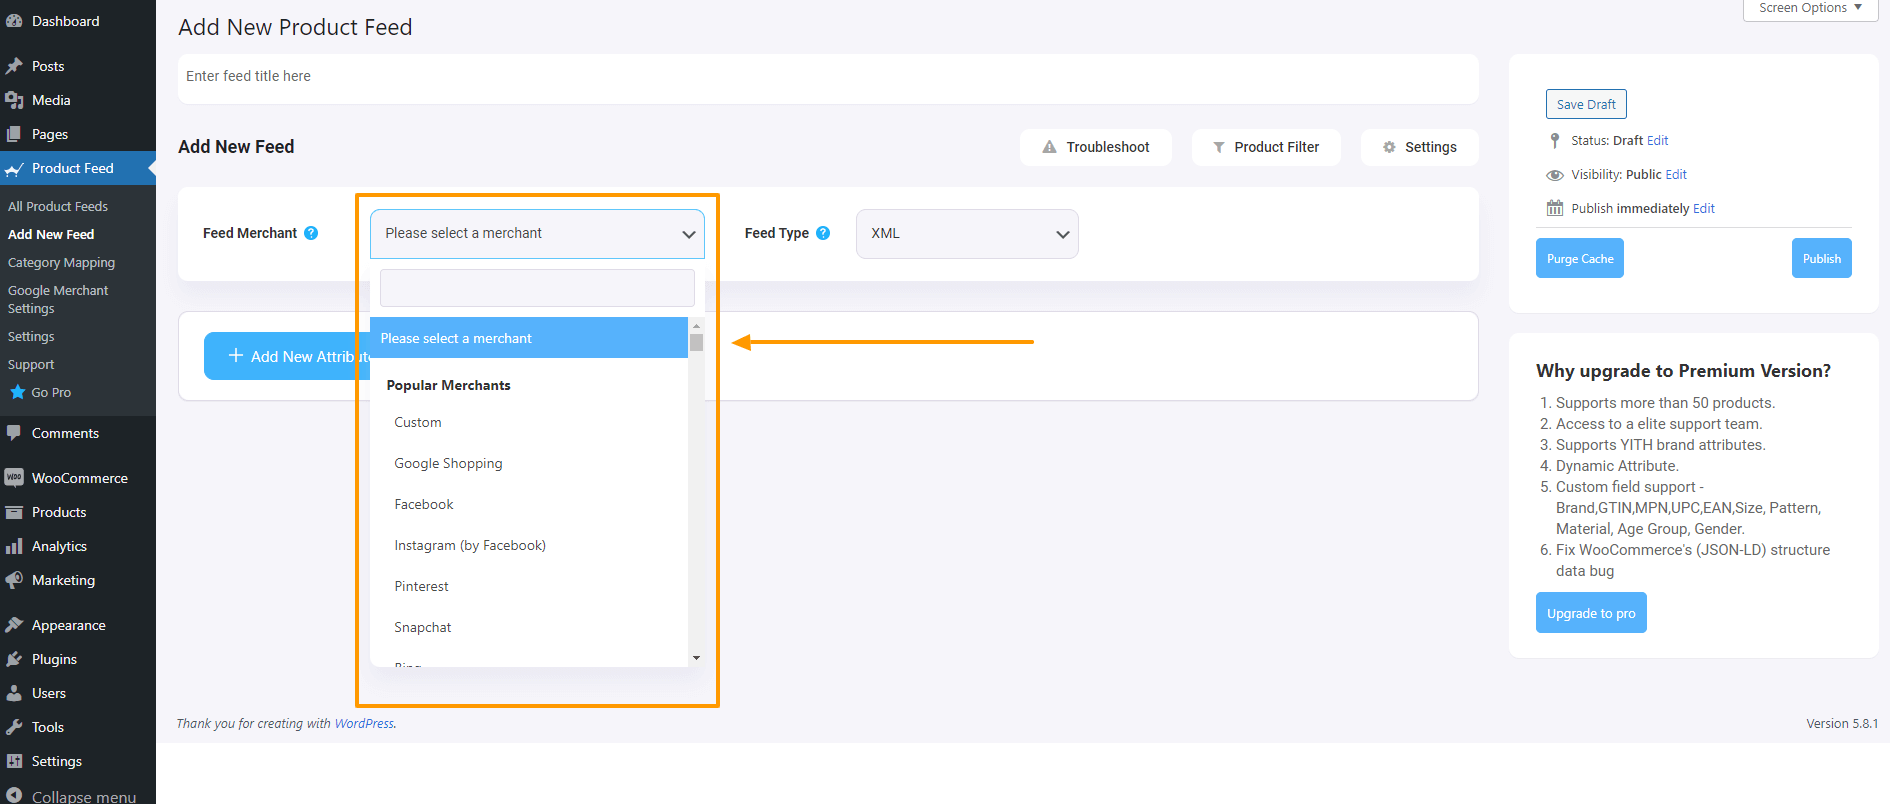
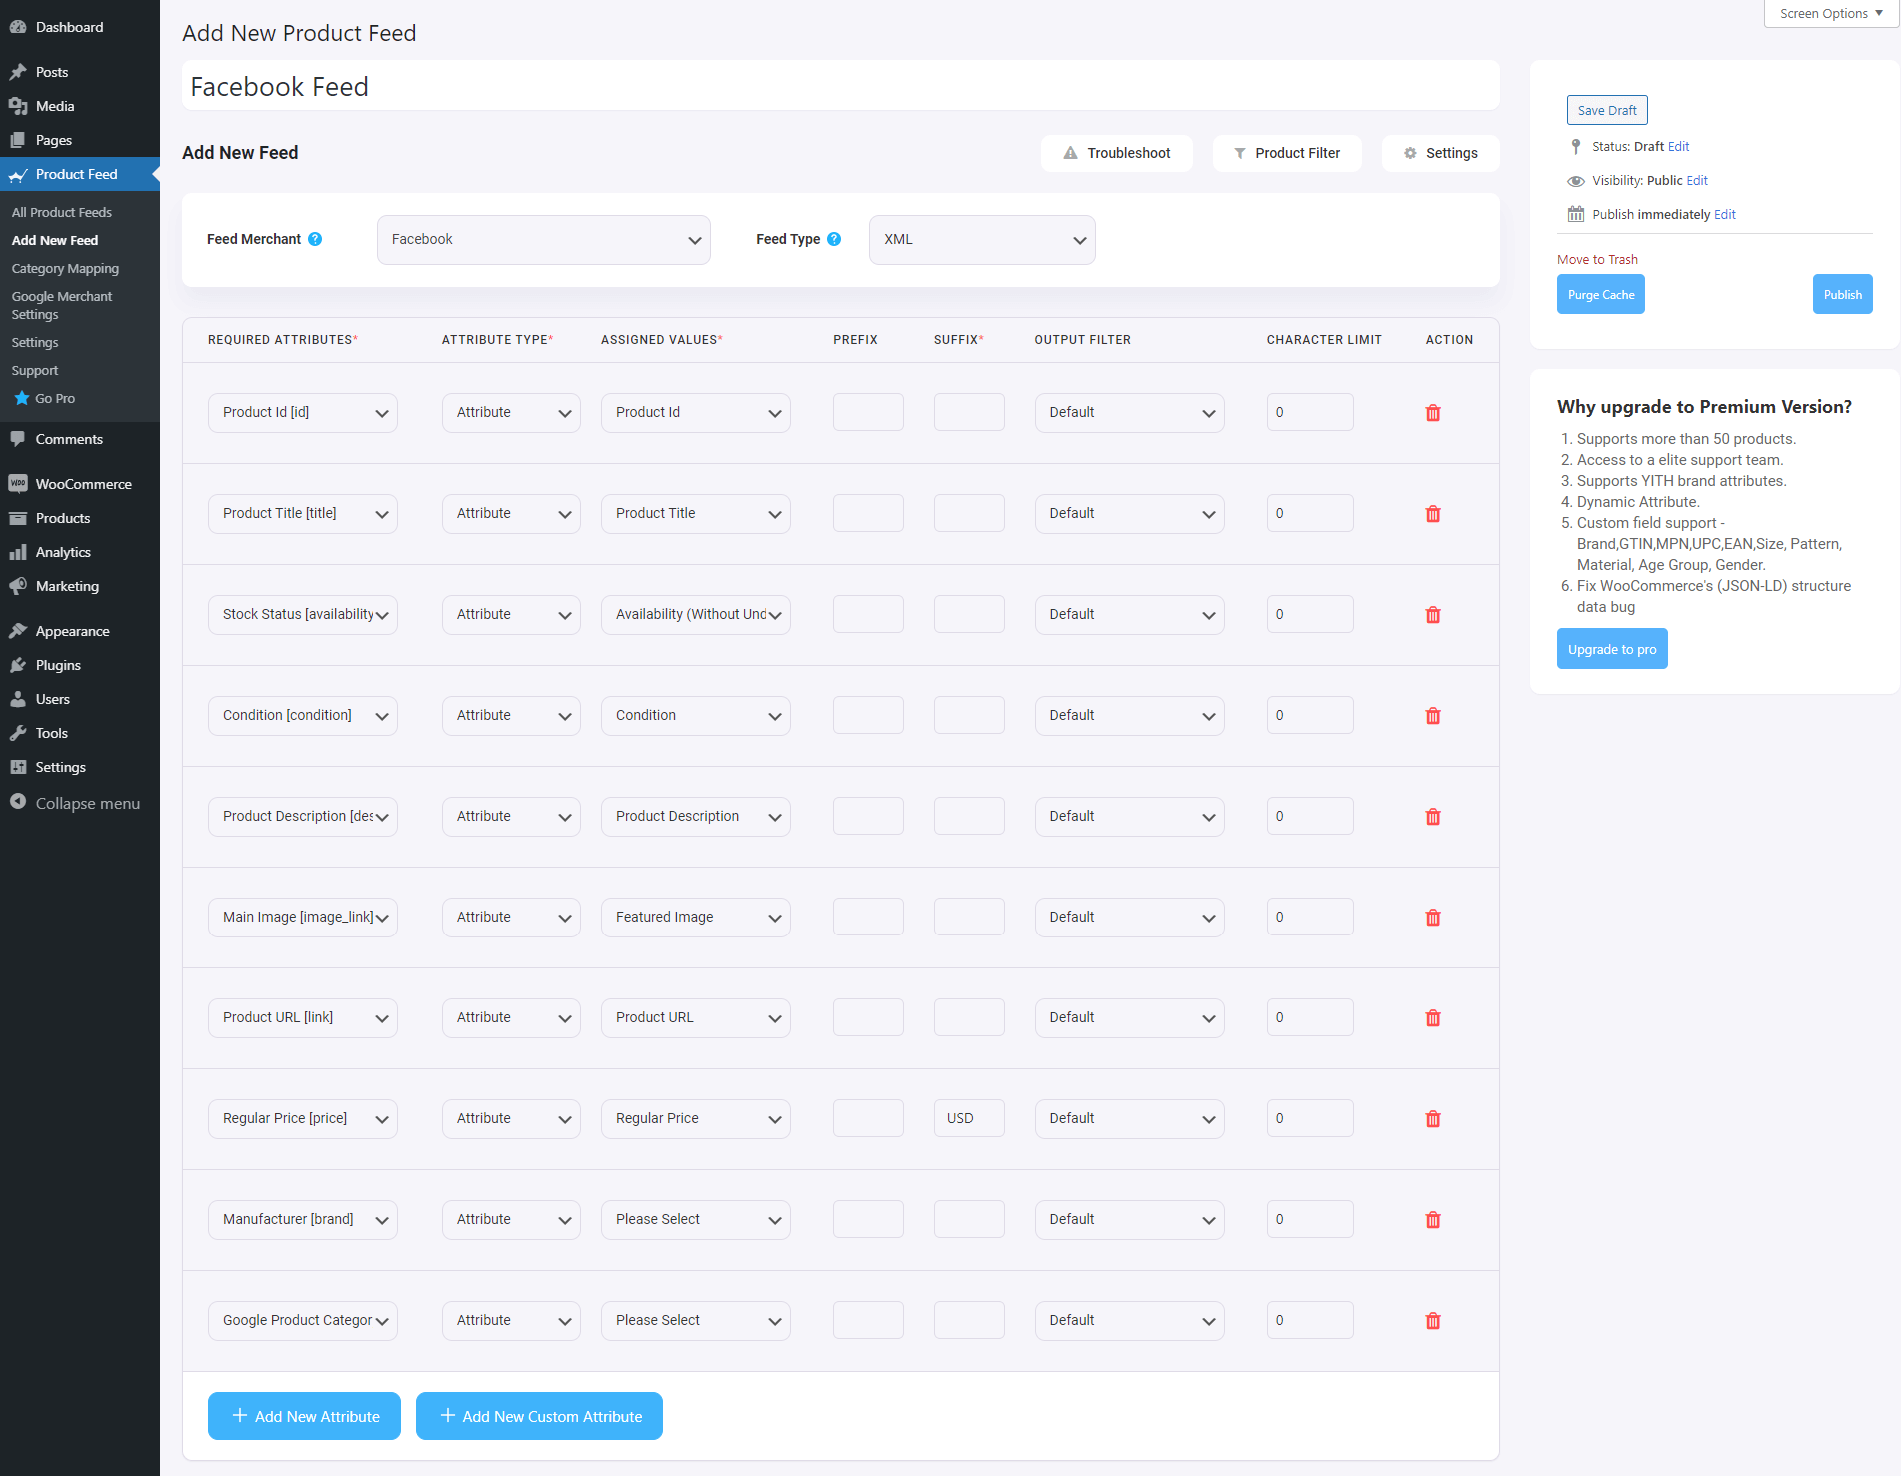

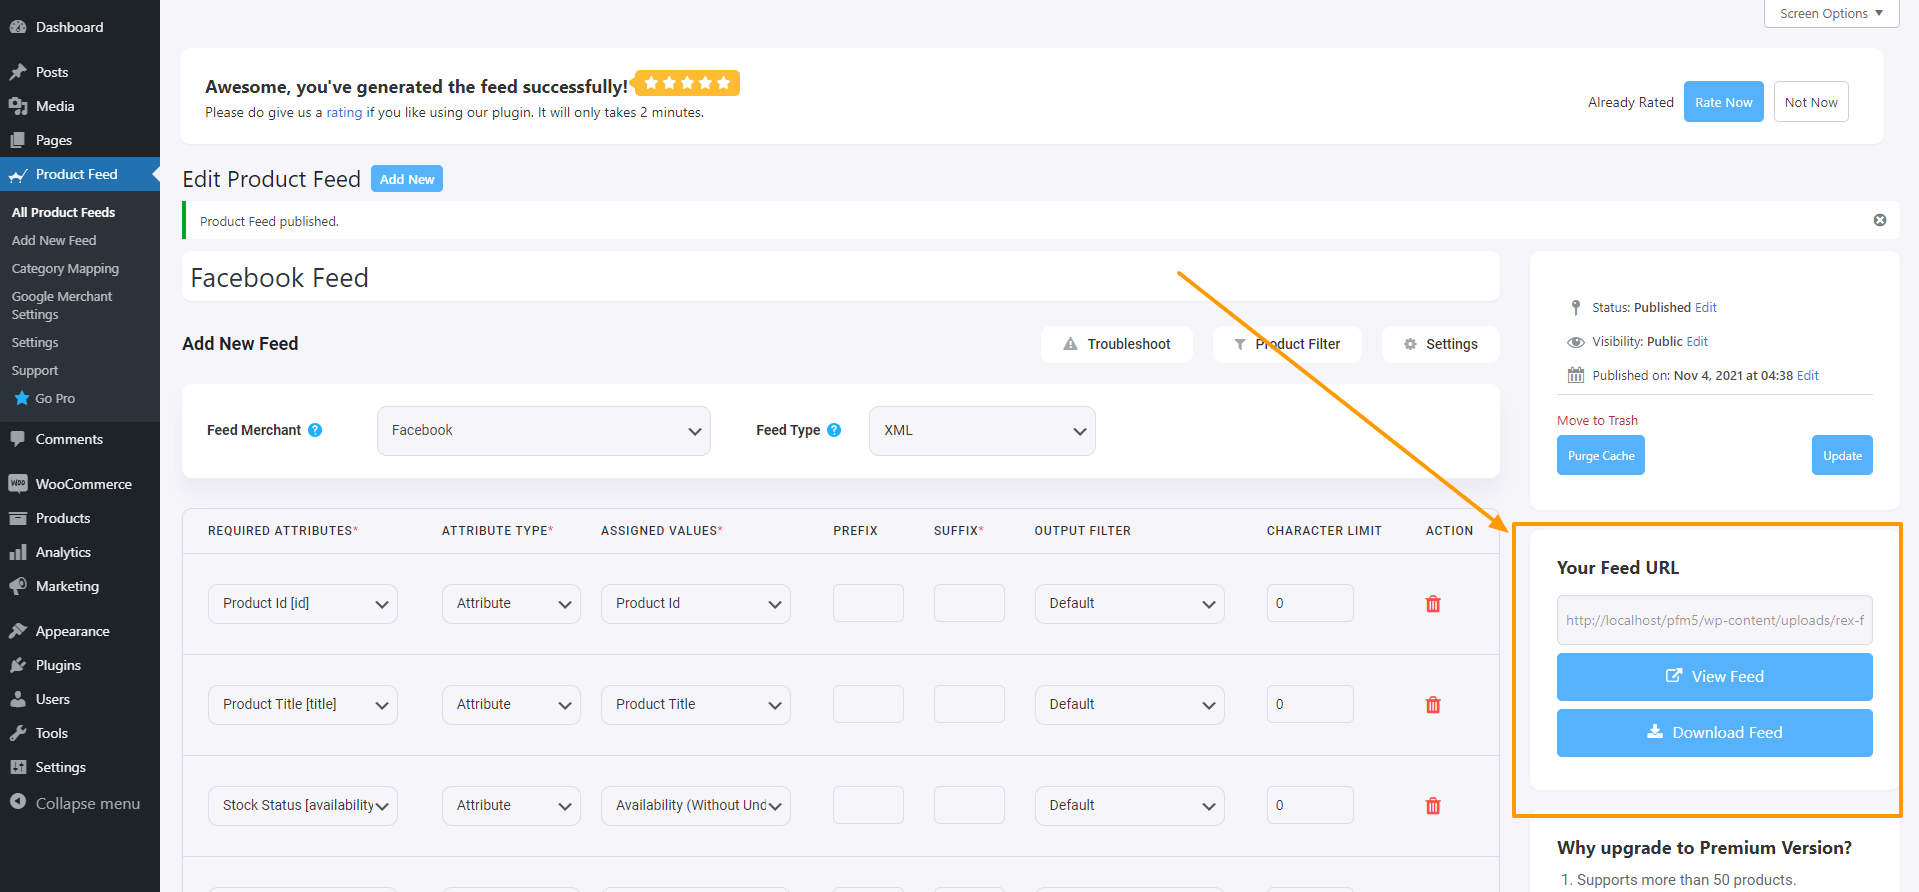
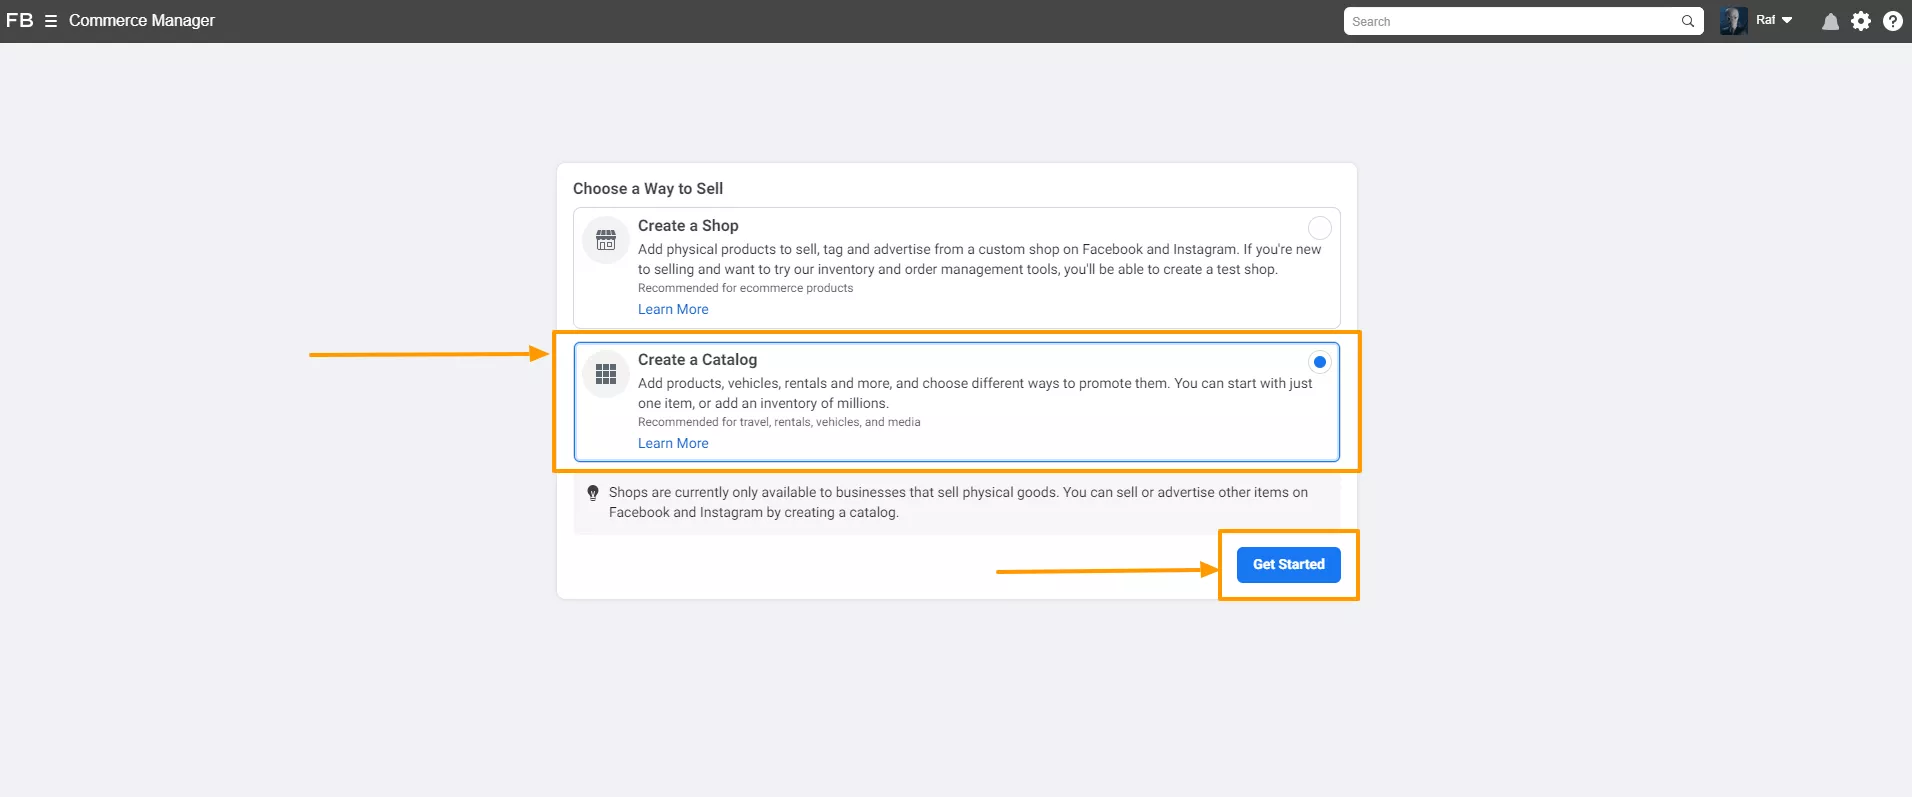

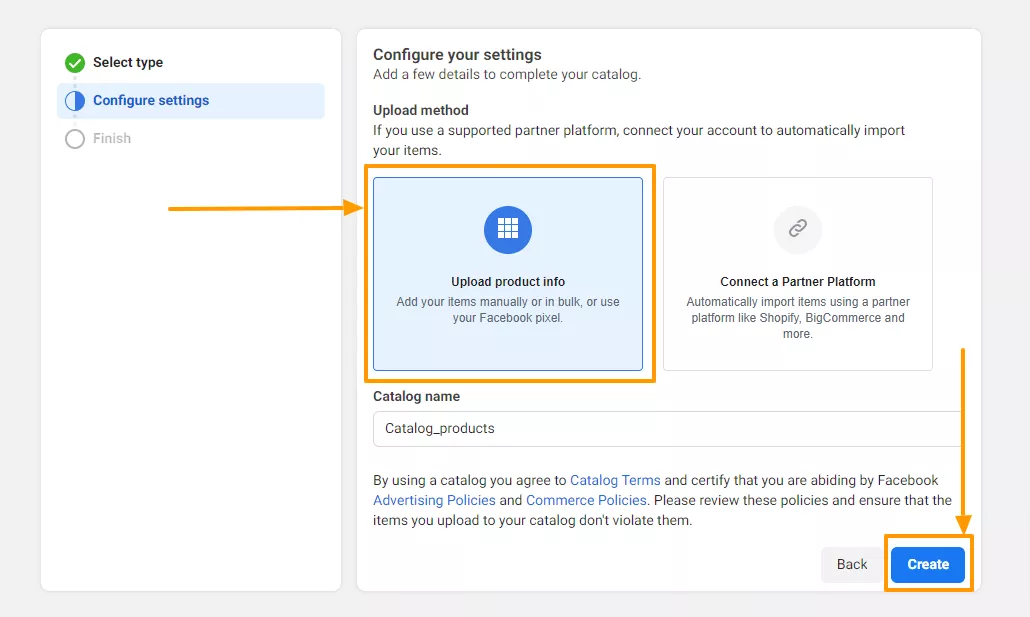


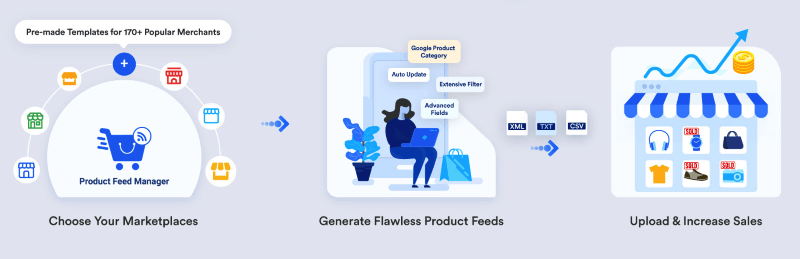

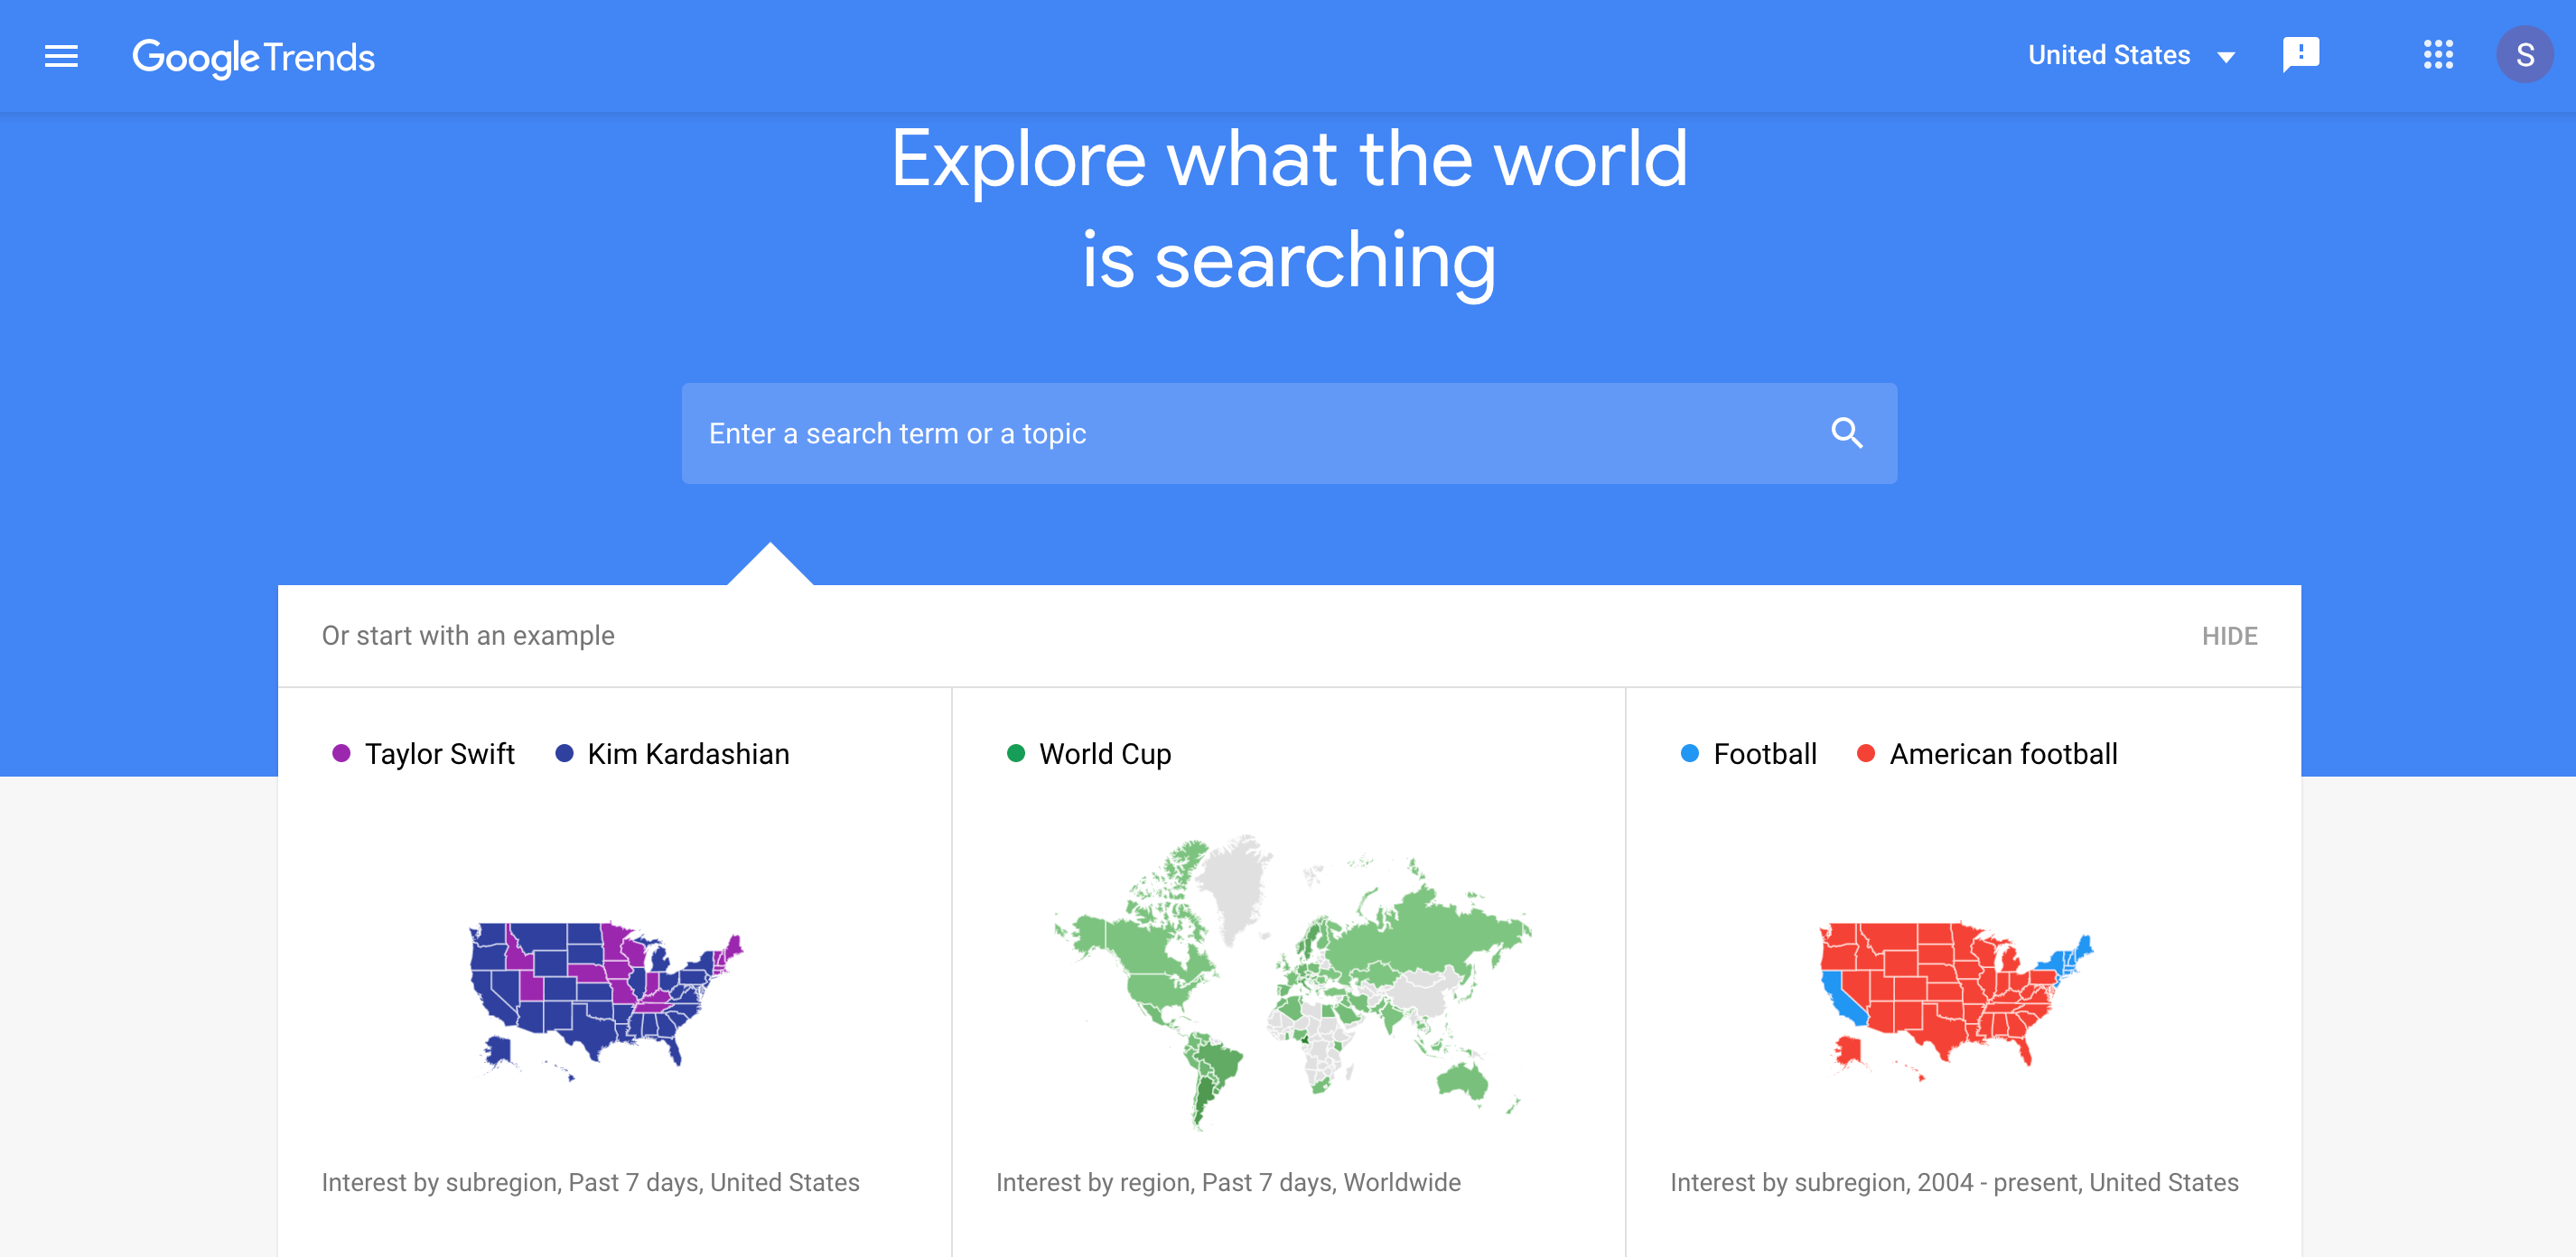

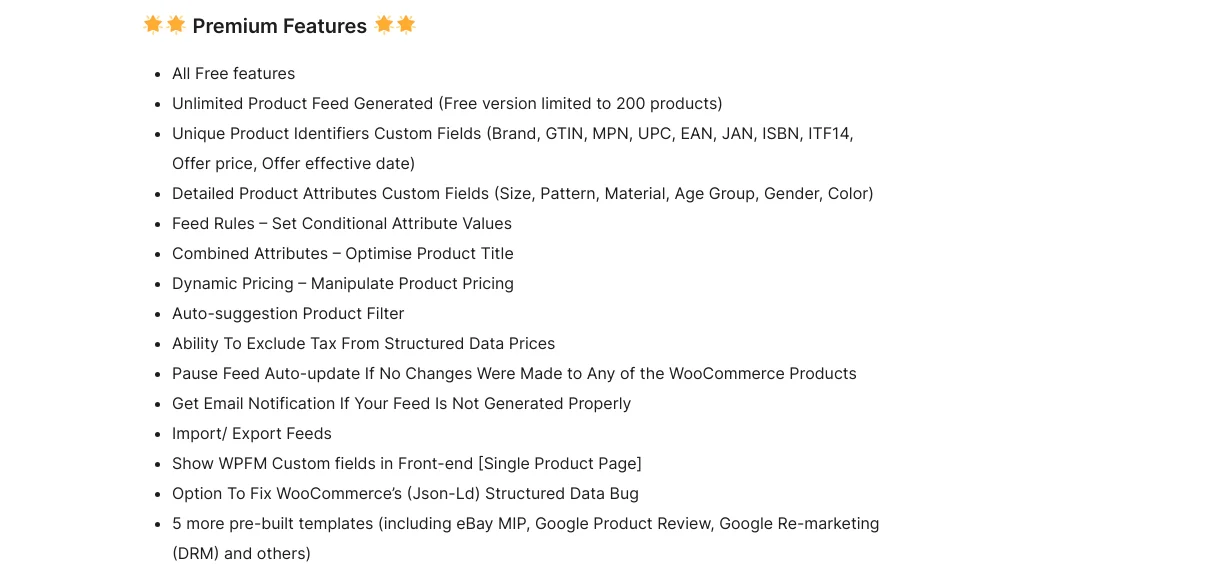
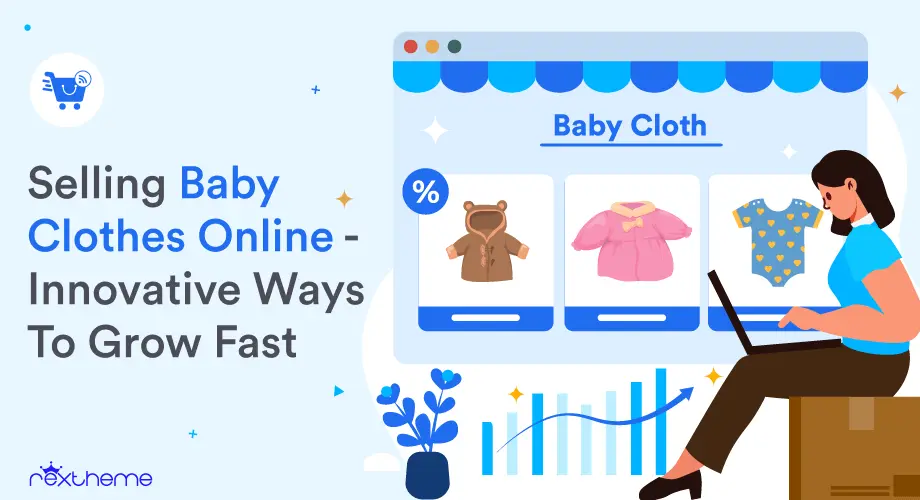

![What Is Product Feed Management? 6 Proven Tactics To Drive Sales [2025] 2](https://staging-rextheme.kinsta.cloud/wp-content/uploads/2024/06/product-feed-management-scaled.webp)
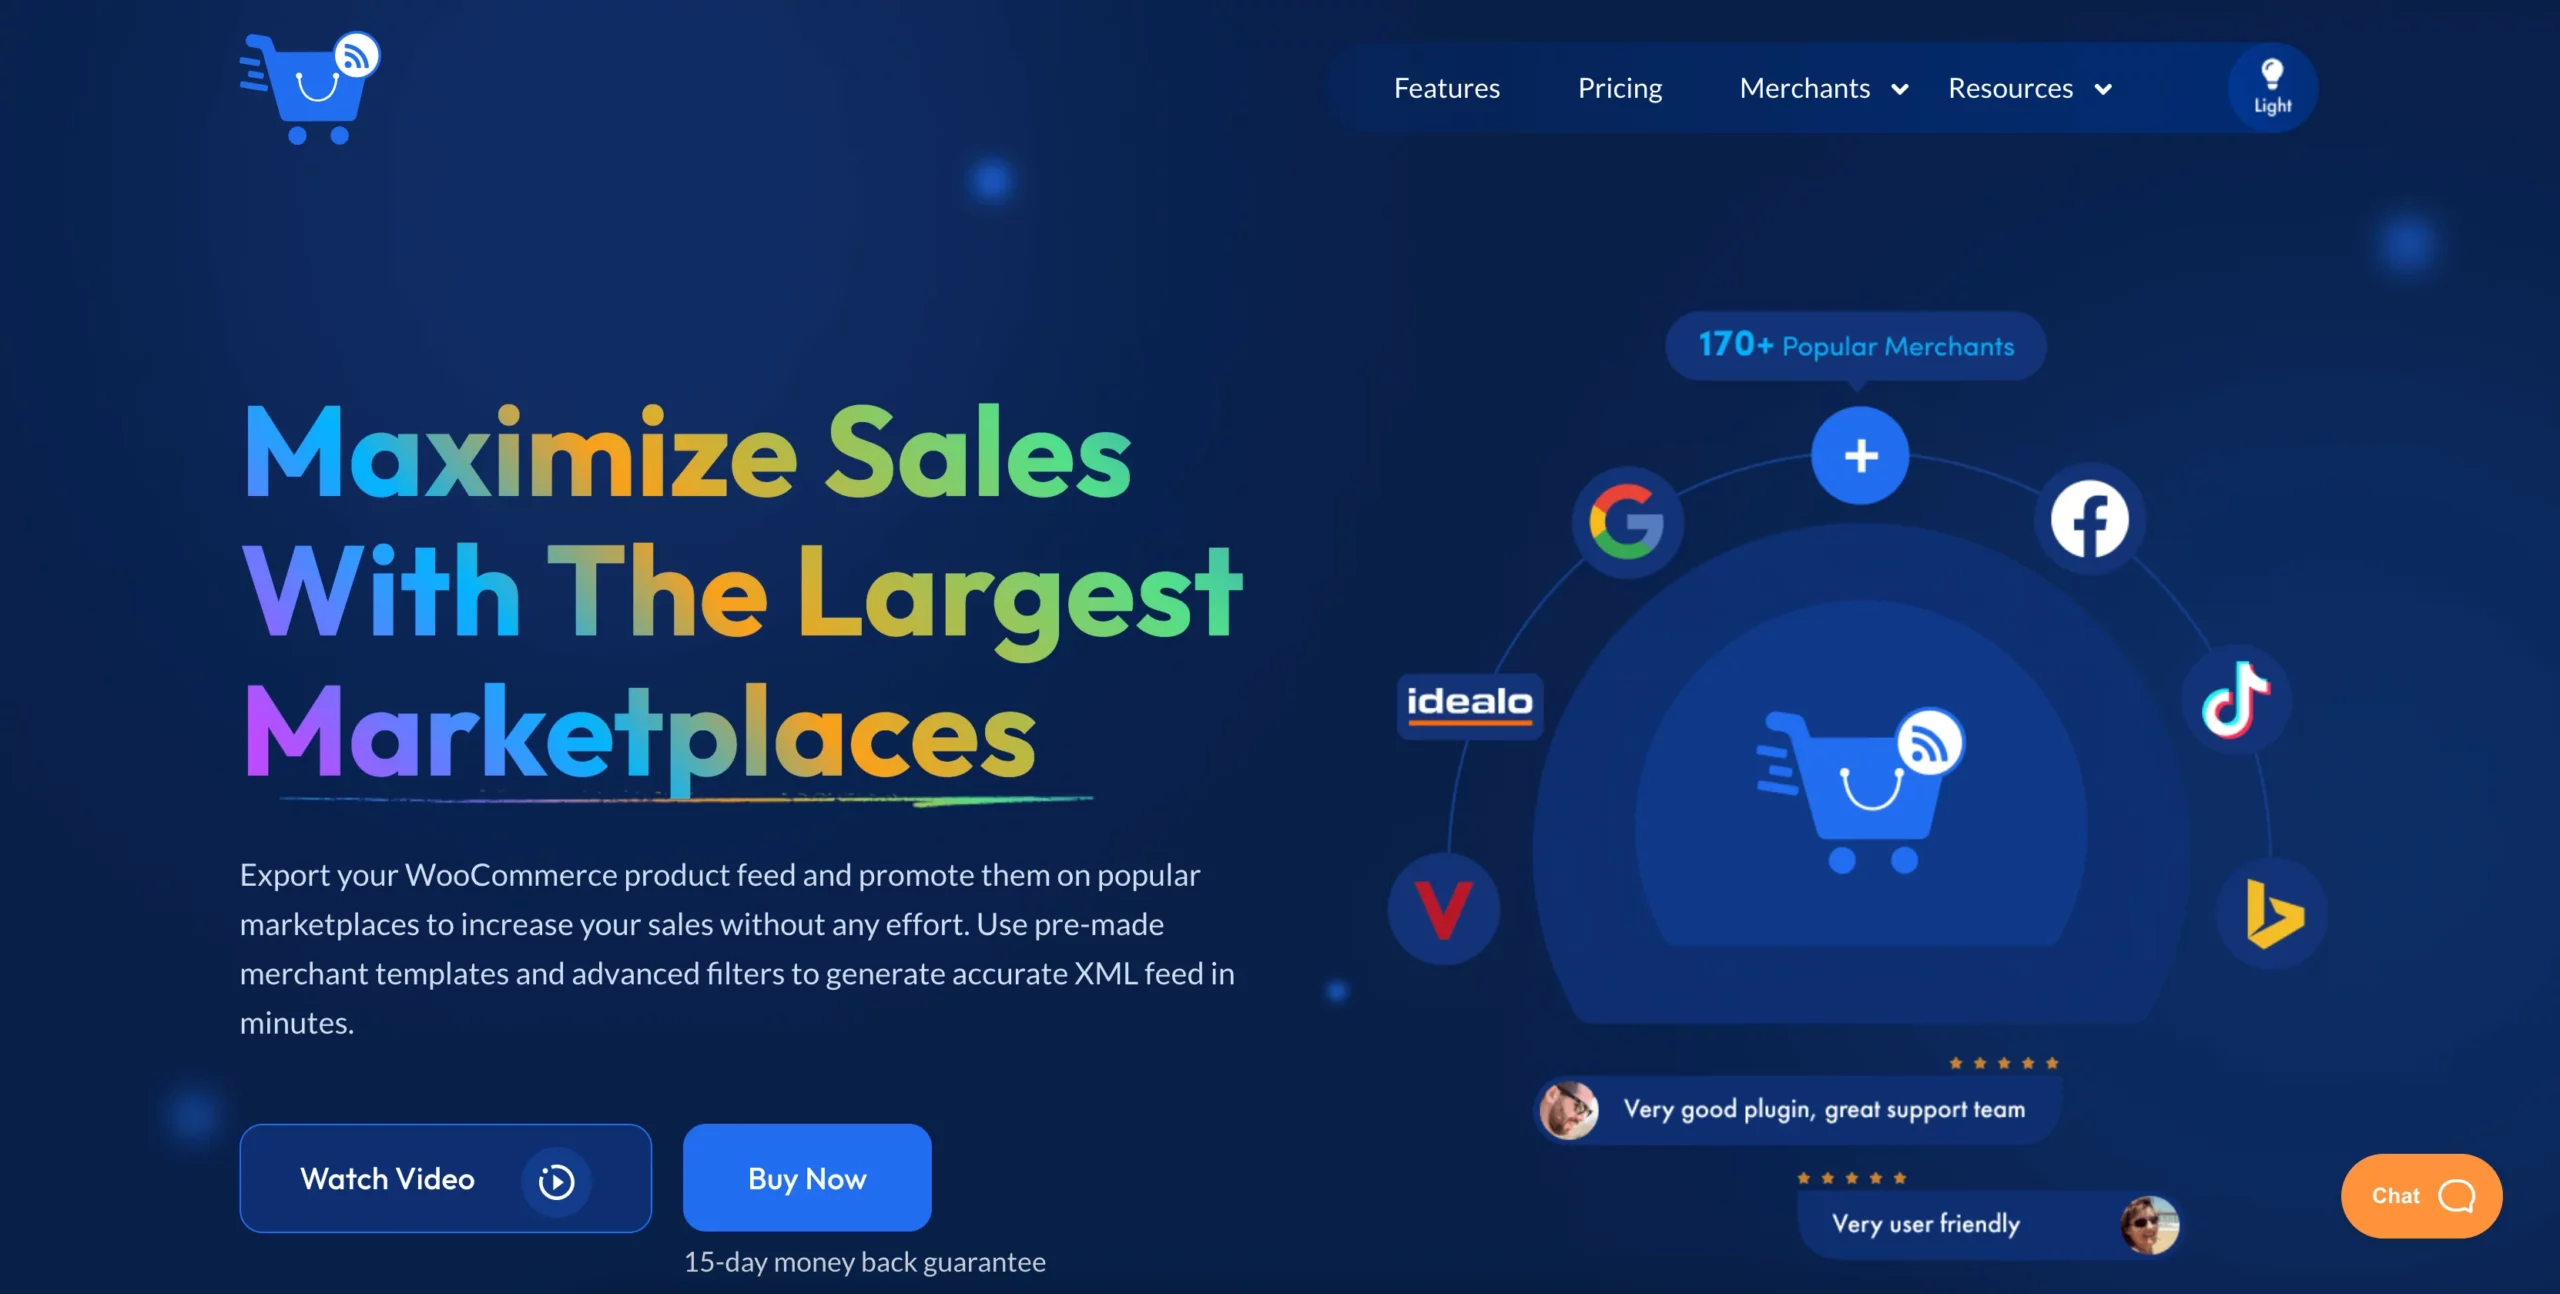
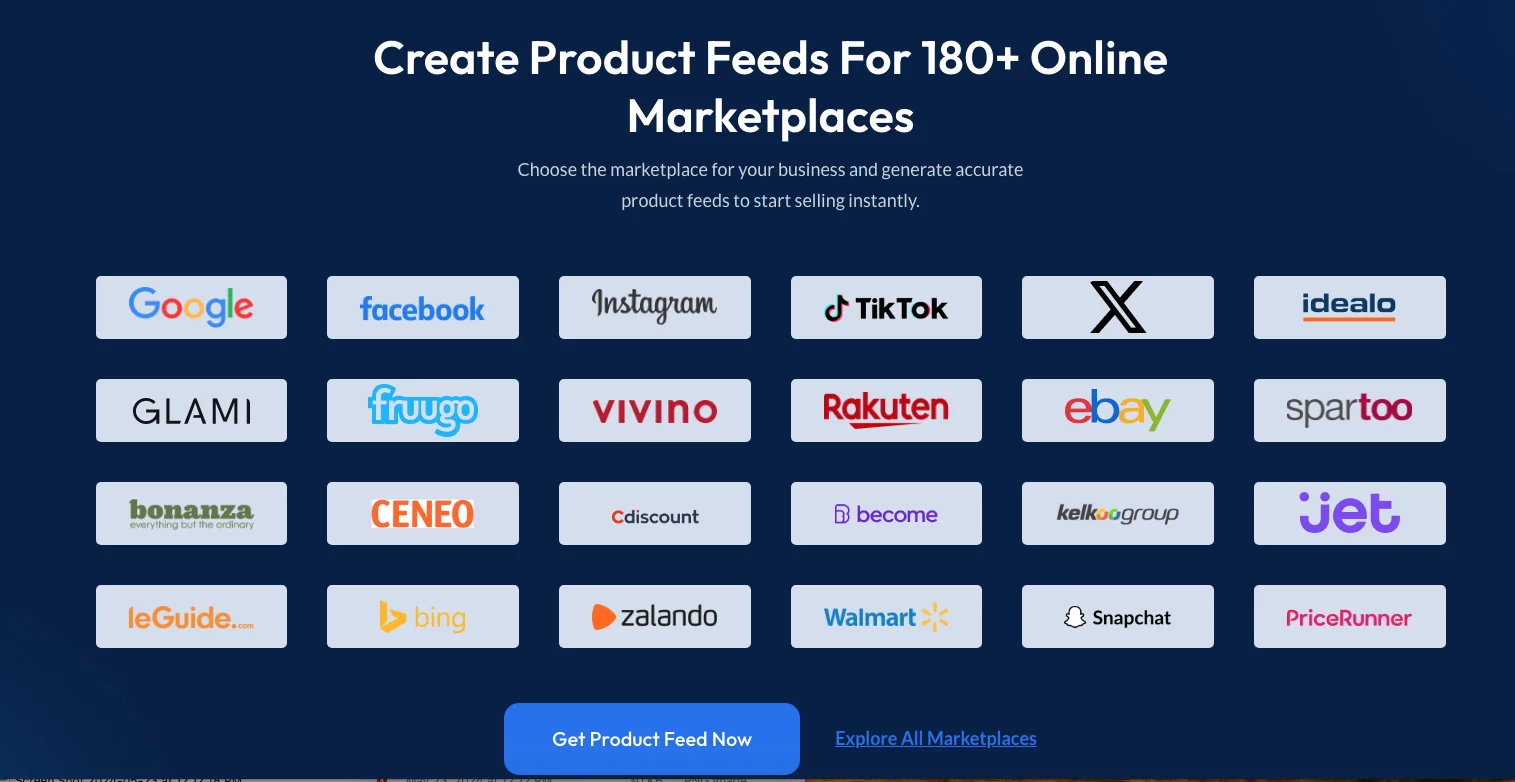
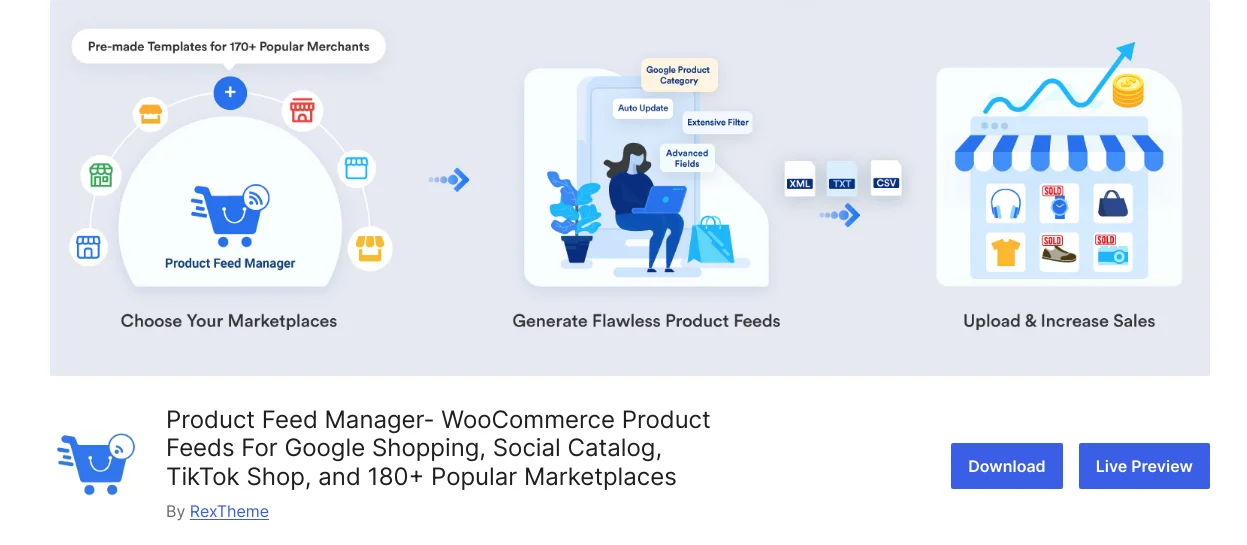
![What Is Product Feed Management? 6 Proven Tactics To Drive Sales [2025] 3](https://staging-rextheme.kinsta.cloud/wp-content/uploads/2024/06/PFM-documentation.webp)