Skip to the content
RexThemeRexTheme
We Make Amazing WordPress Plugins
  • Special Offer
  • Plugins
    • WP VR – Quality WP Virtual Tour Creator
    • Product Feed Manager For WooCommerce
    • Cart Lift To Recover Abandoned Carts
    • Checkoutify Checkout Field Manager for WooCommerce
    • Catalog Mode For WooCommerce
    • Dynamic Discount for WooCommerce
    • Advanced Shipping for WooCommerce
    • Marketplace Auto Sync for WooCommerce
    • View All Plugins
  • Bundle
  • Blog
  • Resources
    • Docs
    • Support
    • Brand Assets
  • My Account
    • Log In
    • Log Out
doc-cart

Cart Lift

16
  • Getting started
    • A Basic Plugin Overview – Cart Lift
    • Install And Activate Cart Lift
    • Introduction To Cart Lift
    • Configure And Use Cart Lift Effectively
  • Troubleshooting Common Issues
    • Troubleshooting For Common Issues – Cart Lift
  • Upgrade To Cart Lift Pro
    • How To Upgrade To Pro – Cart Lift
    • License Plan Upgrade Guide for Cart Lift Pro
  • Abandoned Cart Recovery Conditions
    • How To Use Twilio SMS Service To Recover Abandoned Carts – Cart Lift Pro
    • Get Full Analytics Report On Recovery Campaign
    • How To Track Abandoned Carts Automatically
    • How To Set Up Your Abandoned Cart Recovery Campaign
    • How To Get Notifications For Abandoned Carts And Recovery
    • Shortcodes for Email Fields in Cart Lift
    • Exclude Carts From Abandoned Cart Recovery Campaigns Based On Conditions
    • How To Set Condition To Automatically Delete Abandoned Orders After A Particular Number Of Days
    • How to Pause / Resume Individual Abandoned Cart Recovery
doc-pfm

Product Feed Manager

103
  • Getting Started
    • Product Feed Manager – Documentation
    • Introduction To Product Feed Manager For WooCommerce
    • Basic Plugin Overview – Product Feed Manager Pro WooCommerce
    • How To Generate Product Feed For The First Time
    • How To Install And Activate PFM
    • Getting Started With Product Feed Manager For WooCommerce
    • How To Generate A Custom Product Feed Easily
  • Upgrade To PFM Pro
    • License Plan Upgrade Guide for Product Feed Manager Pro
    • Product Feed Manager VAT/TAX Policy
    • License Renewal for Product Feed Manager Pro
  • Auto-Sync To Google Shopping
    • Upload your WooComerce product feed directly to the Google Merchant Center – (No Need For Authorization)
    • How To Auto-sync Product Feed To Google Merchant Center
  • Category Mapping
    • How To Use Category Mapping For Product Feed
    • How To Use Category Mapping For Google Product Category
    • How To Configure Category Mapping For Facebook Product Category
  • Feed Generation Instructions
    • How To Create A Feed For eBay Seller Center
    • How to Generate WooCommerce Product Feed for Skroutz
    • How to generate WooCommerce Product Feed for Zbozi
    • How to generate WooCommerce Product Feed for Amazon
    • How to upload products on Instagram Shop
    • How to create a WooCommerce product feed for Instagram Catalog
    • How to create a WooCommerce product feed for Walmart
    • How to create a WooCommerce product feed for NewEgg Marketplace
    • How to create a WooCommerce product feed for Sears Marketplace
    • How to create a WooCommerce product feed for Wish.com
    • How to create a Target Product feed for Target Marketplace
    • How To Create A Feed For eBay MIP
    • How to generate WooCommerce Product Feed for Google With Product Feed Manager
    • How to generate WooCommerce Product Feed for Facebook
    • How to Upload your WooCommerce Products on the Facebook Store
  • Understanding Basic Feed Configuration For Required Attributes
    • How To Exclude Draft Products From The Feed
    • Understanding The Use of Different Price Attributes
    • How To Use RankMath Primary Category In The Feed
    • How To Use Yoast Primary Category In The Feed
    • How To Add Currency To Your Product Price
    • How To Use A Custom Field Value In The Product Feed
    • How To Replace Space With Hyphen In A Feed Attribute Data
    • How To Remove Decimal From Price For Marktplaats Feed
    • How To Include CDATA In An XML Feed Attribute Tag
    • How To Convert Symbols To HTMLEntities In A Feed Attribute Value
    • How To Use UTF-8 Encode To Convert HTMLEntities To Symbols In A Feed Attribute Value
    • How To Remove HTML Tags Or Shortcodes From A Feed
    • Understanding And Configuring Feed Attributes and Their Values
    • Optimize Product Feed Data With Effective Output Filters
    • Learning About Feed File Types And How To Download Or View Feed
    • How To Add Or Remove An Additional Product Attribute In The Feed
    • How To Add A Custom Attribute To The Feed
    • How To Add A Static Prefix or Suffix To An Attribute In The Feed
    • Product Feed Optimization with Yoast SEO Product Title, Meta Description and Primary Category
  • Useful Control Options
    • How to set 5-Minutes Time Interval for Updating Feed
    • How To Exclude Tax From Structured Data Prices
    • How To Add Extensive Custom Fields To WooCommerce Products
    • Add Custom Fields For Important Product Attributes
    • Add Extensive Custom Fields Of Unique Identifiers For WooCommerce Products
    • Connect Facebook Pixel With WooCommerce For Dynamic Ads
    • Control Products Per Batch In Batch Processing
    • Useful Options On Settings Tab
  • Useful Features For Feed Generation
    • How to use the Feed Rules feature to manipulate your product price
    • How to use the Product Filter option to include/ exclude specific products
    • How To Exclude Invisible Products / Hidden Products From Product Feed
    • How To Use Category Filter When Generating Product Feed
    • How To Use Custom Filter When Generating Product Feed
    • How To Use Tag Filter When Generating Product Feed
    • How To Use Feed Filter Options When Generating Feed
    • How To Schedule Auto-update of Feed On Set Intervals
    • How To Include Variable Products To The Feed
    • How To Include Private Products In Product Feed
    • How To Include Product Variation Term To The Product Name
    • How To Add UTM Parameters To Product URLs
    • How to use the Feed Rule feature to manipulate attribute values
    • How to combine multiple attributes values together with the Combined Attributes feature
    • How To Set Custom Time Intervals For Auto-Feed Update
  • Fix JSON-LD Structured Data For Variable Products
    • Fix WooCommerce (JSON-LD) Structured Data For Approval In Google Shopping
  • Others
    • How to generate product feed in multiple languages with TranslatePress
    • How To Include Discount Rules In The Feed Using Discount Rules For WooCommerce And PFM
    • How to generate product feed in multiple languages with Polylang
    • How to convert product feed price with WPML / WCML
    • Update your feed only if any changes were made to any of your products
    • How to generate a WooCommerce product feed with the top sold products to sell more
    • How to include Tax values into your WooCommerce Product Feed (Google & Facebook)
    • How to include Shipping values into WooCommerce product feed (Google & Facebook)
    • Enable Error Log for Product Feed Manager For WooCommerce
    • How To Include Brand Name In Feed Using Perfect Brands For WooCommerce And PFM
    • How To Generate Product Feed In Multiple Languages With WPML
  • Troubleshoot
    • Troubleshooting Common Issues – Product Feed Manager For WooCommerce
    • Google Shopping Product Feed Specification – Attributes List
  • All Google Feeds
    • How to create a WooCommerce product feed for Google Dynamic Search Ads
    • How to create a WooCommerce product feed for Google Custom Search Ads
    • How to create a WooCommerce product feed for Google Local Inventory Ads
    • How to create a WooCommerce product feed for Google Express (Former Google Shopping Actions Program)
    • How to create a WooCommerce product feed for Google Dynamic Display Ads (Google Ads)
    • How to create a WooCommerce product feed for Google Shopping Actions
    • How to create a WooCommerce feed for Google Merchant Center Promotion Using Product Feed Manager
    • How to create a WooCommerce product feed for Google Manufacturer Center
    • How to create a WooCommerce product feed for Google Local Products Inventory
    • How to create a WooCommerce product feed for Google Local Products
    • How to create a WooCommerce product feed for Google Remarketing (DRM)
    • How to create a WooCommerce product feed for Google Review
doc-wpvr

WP VR

89
  • Getting Started
    • Getting Started With WP VR
    • WP VR Basic Plugin Overview
    • How To Create A Simple Virtual Tour In 2 Minutes – WP VR
    • How To Install And Activate WP VR
  • Upgrade To WPVR Pro
    • License Plan Upgrade Guide for WP VR Pro
    • How To Upgrade To Pro – WPVR
    • WP VR VAT/TAX Policy
    • License Renewal Guide for WP VR Pro
  • Using WPVR Premium Add-ons
    • How To Integrate WooCommerce To A Virtual Tour
    • How To Embed Virtual Tours On Non-WordPress Websites
    • WP VR Embed Addon – Features Overview
    • How To Integrate Fluent Forms On A Virtual Tour
  • How To - Basic Settings
    • How to Customize the Tour Layout
    • How to Enable Auto Rotation For Your 360 Virtual Tour – WP VR
    • How To Add A Preview Image To Your Virtual Tour – WPVR
    • How To Use Exclusive Features On General Settings To Customize A Virtual Tour
  • Using Advanced Settings
    • How to Add A Virtual Tour Icon or Your Company Logo in 360 Degree Tours – WPVR
    • How To Set Scene Transition (Scene Entrance Animation)
    • How to do SEO optimization for Embeded tour
  • Setting Up Control Buttons
    • Using Custom Icons For Navigation And Control Buttons In A Virtual Tour
  • Turn Panorama Images Into Live Scenes
    • How To Set Custom Zoom Settings On A Scene In Your Virtual Tour – WPVR
    • How To Set Default Scene Face On A Virtual Tour
    • How To Add A Scene To Your Virtual Tour
  • Use Hotspots for Navigation & Information
    • How To Customize Hotspot Icons And Color
    • How to use the Custom Icon Class
    • How To Add Hotspots To A Scene In Your Virtual Tour
  • Create 360 Degree Video Tours
    • How To Embed A Youtube 360 Video On Your Website Using WPVR
  • Embed Google Street Views
    • How To Embed A Google Street View Tour On Your Website Using WPVR
  • Partial Panorama & Full View Virtual Tours
    • How To Create A Virtual Tour With Partial Panoramas or iPhone Panoramas
    • How To Create A Virtual Tour With Mobile Phone Panorama Images
    • How To Create Full Screen Virtual Tours – WPVR
    • How To Set A 360 Panorama Background Virtual Tour
  • Publish Virtual Tours on Your Website
    • How To Configure A Call To Action (CTA) Button in Virtual Tour
    • How to Share Virtual Tours on Social Media
    • How to Publish Virtual Tours Using QR Code
    • How to Set Up Password Protection For Your 360 Virtual Tour – WP VR
  • Import, Export, & Duplicate Virtual Tours
    • How To Export And Import Virtual Tours
    • How To Duplicate A Virtual Tour
  • Troubleshooting - Solve Common Issues
    • WP VR Troubleshooting Guide: Embedding 360 Tours on External Platforms
    • WP VR Tour Not Displaying on Review and On the Published Webpage
    • How To Solve Virtual Tour Not Showing Up – WPVR
  • Optimize Virtual Tour for Mobile Devices
    • How To Set A Dynamic Front End Notice On Virtual Tours For Mobile Phone Viewers
    • How To Auto Resize Images On Mobile Devices for Virtual Tours
    • How To Set Custom Height for Mobile Devices to Your Virtual Tours
  • Demo Virtual Tours
    • Demo Partial Panorama Virtual Tour – WPVR Pro
    • Basic Virtual Tour
  • Advanced Settings for Virtual Tours
    • How To Set Up WPVR Exclusive Settings
    • Control Script And Style Loading For The Virtual Tours
    • How To Disable WordPress Large Image Handler For Virtual Tours
    • How to Control Video.js Loading for Virtual Tour Pages – WPVR
  • WP VR Plugin Integrations
    • WP VR & Dokan Integration: Empower Vendors to Create 360° Virtual Tours
doc-recommendtions

Product Recommendations for WooCommerce

3
  • Getting Started
    • How To Install & Activate Product Recommendations for WooCommerce
    • How to Create a Recommendation Engine For the First Time
    • Basic Plugin Overview – Product Recommendations for WooCommerce
doc-dynamic

Dynamic Discounts for WooCommerce

9
  • Getting Started
    • How To Install & Activate the Dynamic Discounts for WooCommerce
    • How To Create A Discount Rule For The First Time
    • Basic Plugin Overview – Dynamic Discounts for WooCommerce
  • Discount Conditions
    • How To Set Discount Conditions Based on Customer Purchase History
    • How To Set Discount Conditions For Product Variations
    • How To Apply discount To The cheapest product In The Cart
    • How to Set Discount Conditions for Bulk Purchases in WooCommerce
    • How To Set Cart Based Discount
    • How To Set Product Based Discount
doc-checkoutify

Checkoutify

4
  • Getting Started
    • How to create a custom field in checkoutify
    • How To Create and Customise an Order Bump
    • How To Install & Activate Checkoutify Pro – Checkout Customizer
    • How to Replace Your WooCommerce Checkout Using Checkoutify – Checkout Customizer
doc-advance

Advanced Shipping for WooCommerce

12
  • Getting Started
    • Basic Plugin Overview – Advanced Shipping For Woocommerce
    • How To Add Advanced Shipping To An Existing Shipping Zone
    • How To Install & Activate The Advanced Shipping For Woocommerce
  • Shipping Conditions
    • How To Set Shipping Conditions Based on Product’s Weight, Volume, Length, Height, and Width
    • How To Set Shipping Conditions Based On WooCommerce User Role
    • How To Set Shipping Conditions Based On WooCommerce Product Tag
    • How To Set Category-Based Shipping Conditions
    • How To Set Product-Specific Shipping Conditions
    • How to Add Weight Based Shipping Conditions in Advanced Shipping
    • How to Add Quantity Based Shipping Conditions in Advanced Shipping
    • How to Add Price Based Shipping Conditions in Advanced Shipping
    • How to Add Shipping Conditions For All Purchases in Advanced Shipping
Catalog Mode For WooCommerce Logo

Catalog Mode for WooCommerce

3
  • Getting Started
    • Basic Plugin Overview – Catalog Mode For WooCommerce
    • How To Install & Activate the Catalog Mode for WooCommerce
  • Settings
    • How To Set Users Rules For Catalog Mode
Marketplace-Autosync

Marketplace Auto-Sync for WooCommerce

3
  • Getting Started
    • How To Set Up A Auto Sync For The First Time
    • Basic Plugin Overview – Marketplace Auto Sync
    • How To Install & Activate Marketplace Auto Sync
View Categories
  • Home
  • Docs
  • Product Feed Manager
  • Category Mapping

How To Use Category Mapping For Product Feed

Merchants or marketplaces such as Google Shopping, Facebook Dynamic Ads, eBay MIP, etc, have their own set of categories that you need to follow.

Hence, you need to use the Category Mapping feature in Product Feed Manager For WooCommerce.

You can map the product categories in your store, according to the categories of your desired merchant or marketplace, without making changes to the actual categories in your store, using this feature.

For example, Google Shopping and Facebook require you to submit an attribute called Google Product Category, for which, they want you to follow the Google Taxonomy List when assigning the value.

So you can use Category Mapping to assign these values.

In this guide, you will learn to use the Category Mapping feature properly.

Set Up Category Mapping #

Follow the steps below.

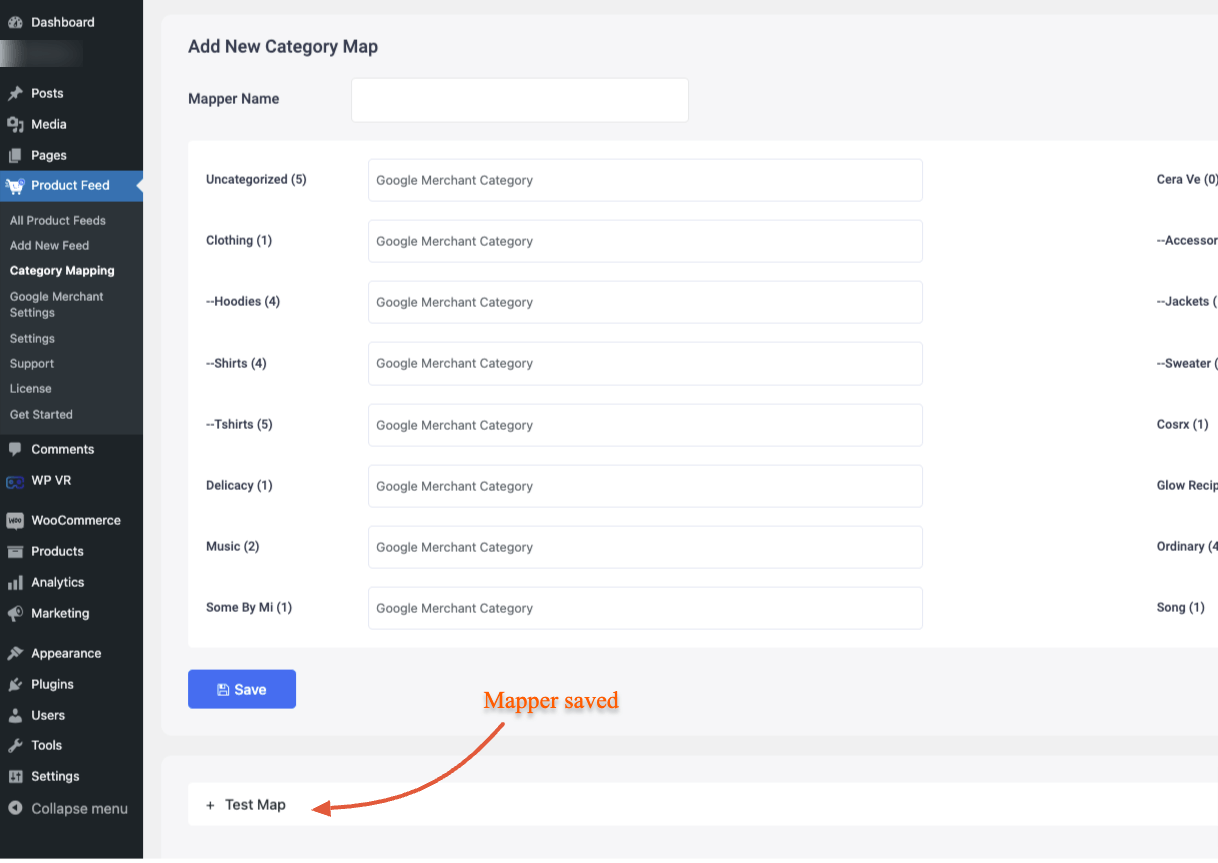
1. Go to Dashboard > Product feed and click on the Category Mapping menu option.

Category mapper name

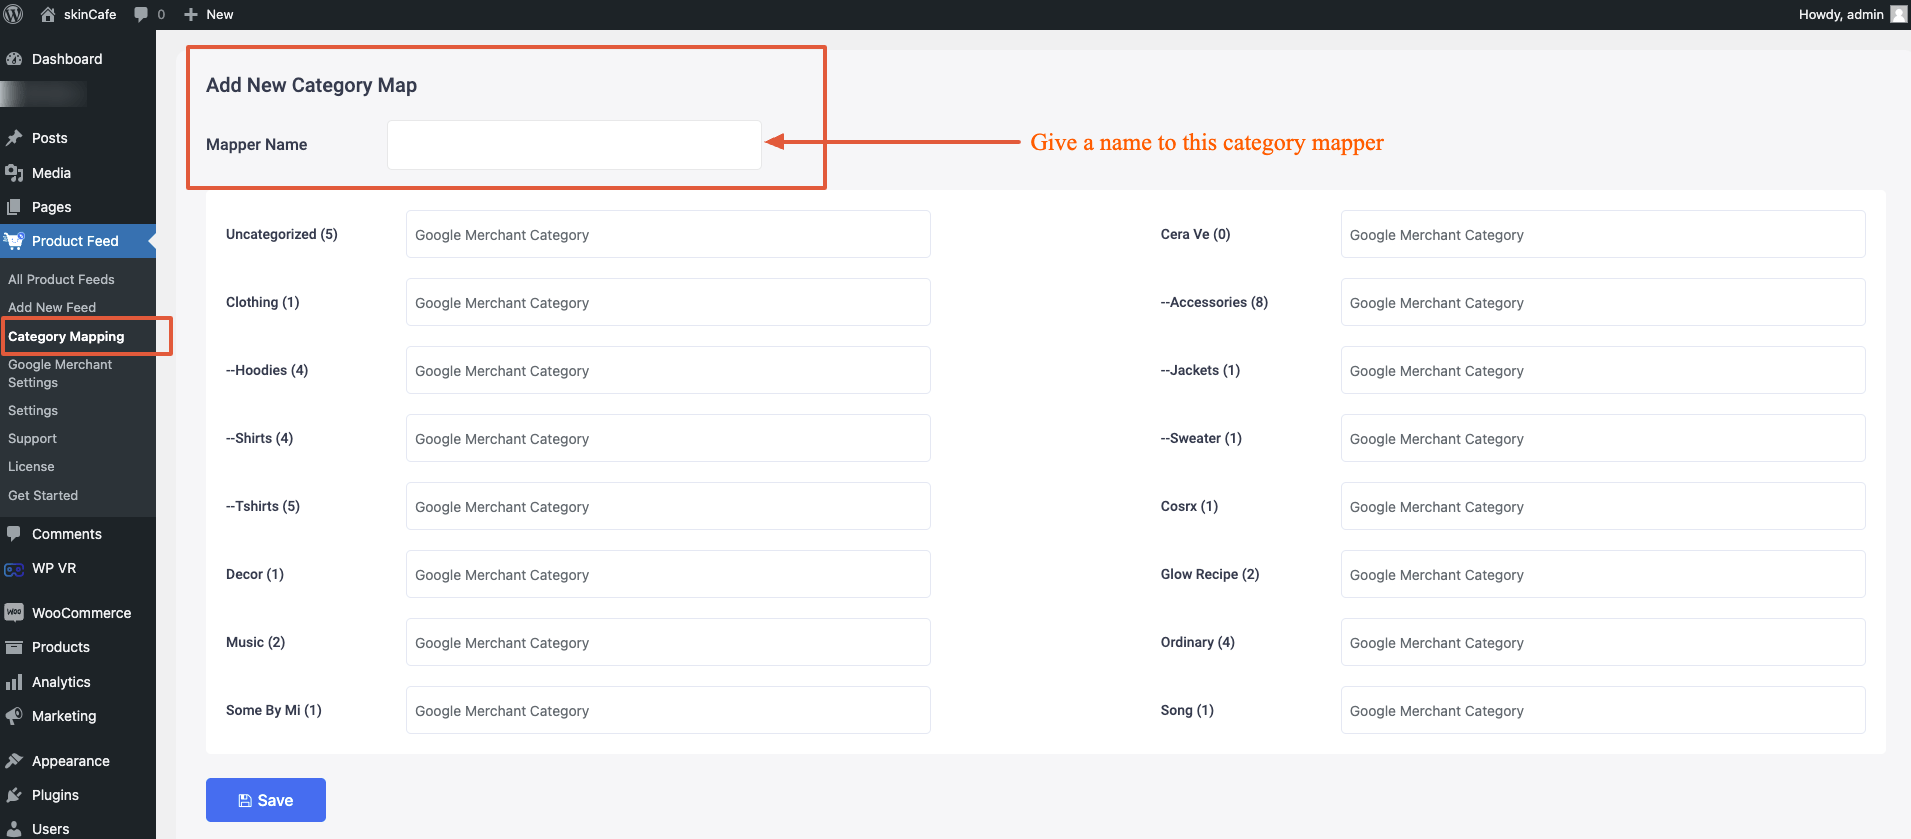
Here, all the categories available in your store will be listed.

And on the right side of each category, you will find the empty fields where you need to assign the Category you want to be mapped in your product feed.

2. First, give a Mapper Name.

3. Now map your categories as required on the respective fields.

Mapping Categories

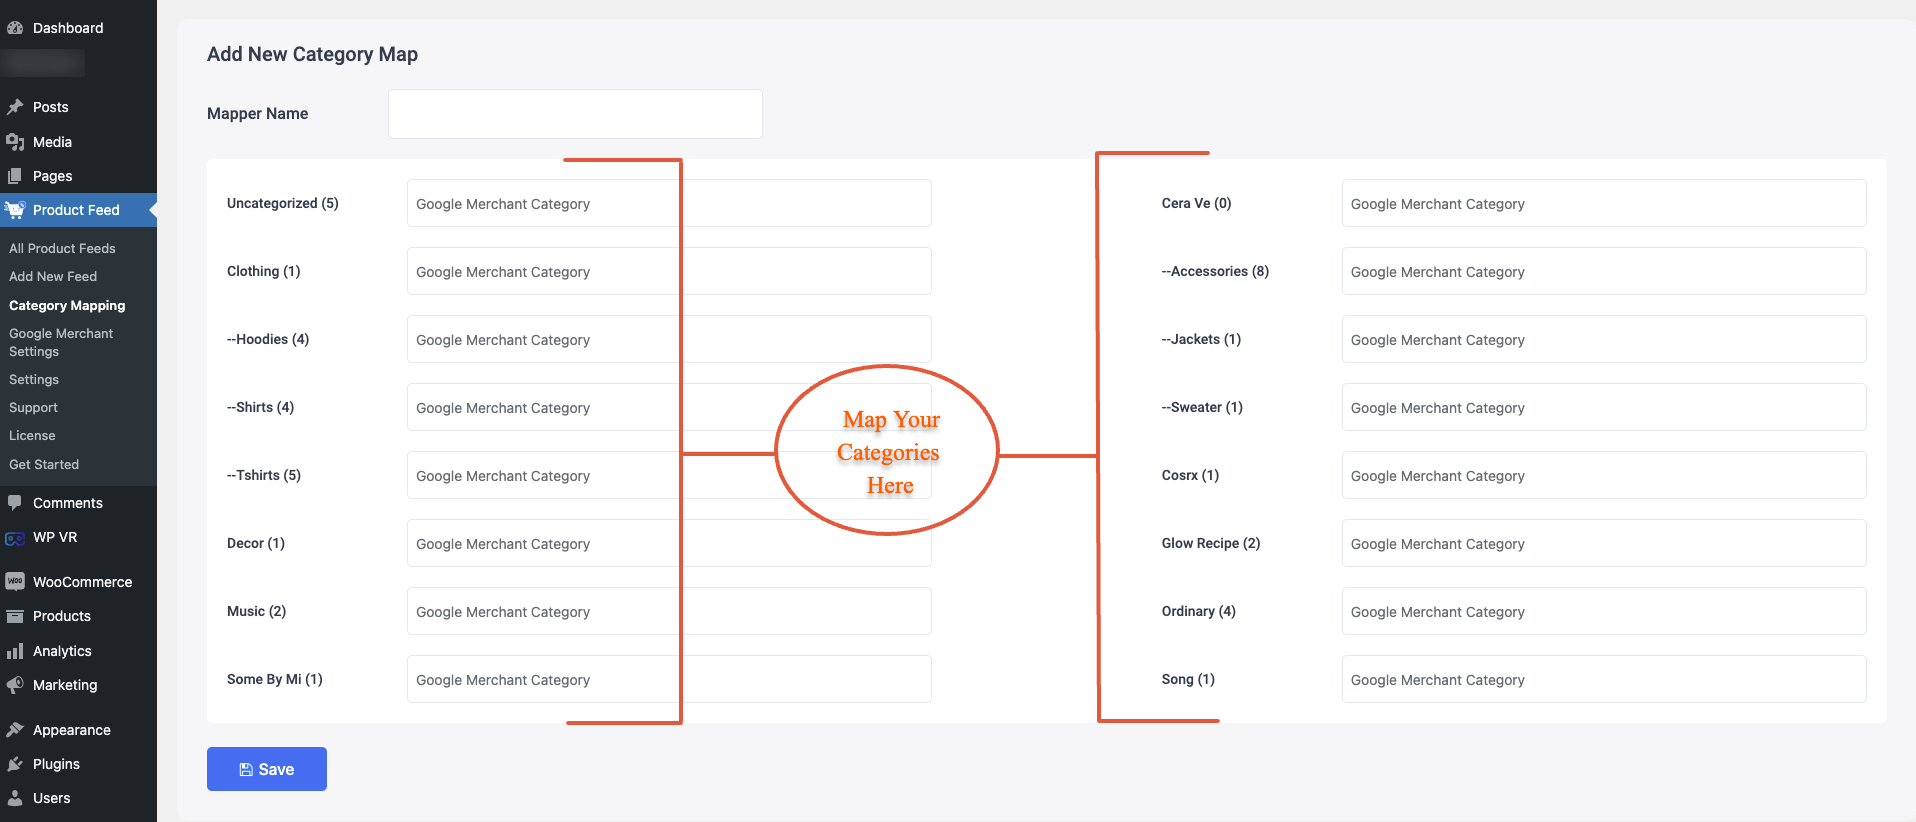
You need to assign the Category you want to be mapped in your product feed.

What this means is that, if you assign this mapper as the value of an attribute, then the values you input here will be generated as the value of that attribute, for the products in the respective categories.

For example, let’s say, for the category “Delicacy”, you inputted the value here as “Desserts”.

Category-Mapping Delicacy

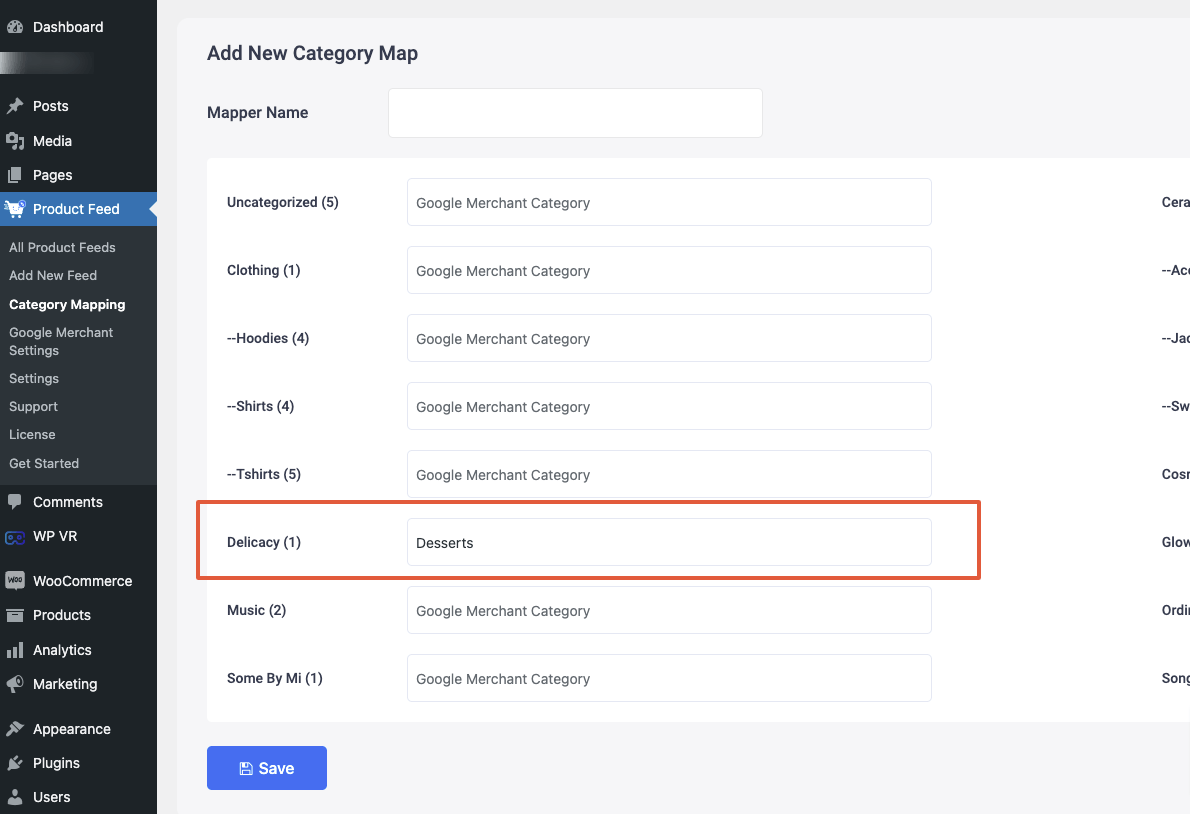
So, if you use this mapper for a value of an attribute in a feed, then any products in the category Delicacy, will generate the value Desserts for that attribute.

Now, the category mapping fields are integrated with the Google Taxonomy list, which means you will get smart suggestions with Google Product Categories, while you type your required category.

Smart suggestions

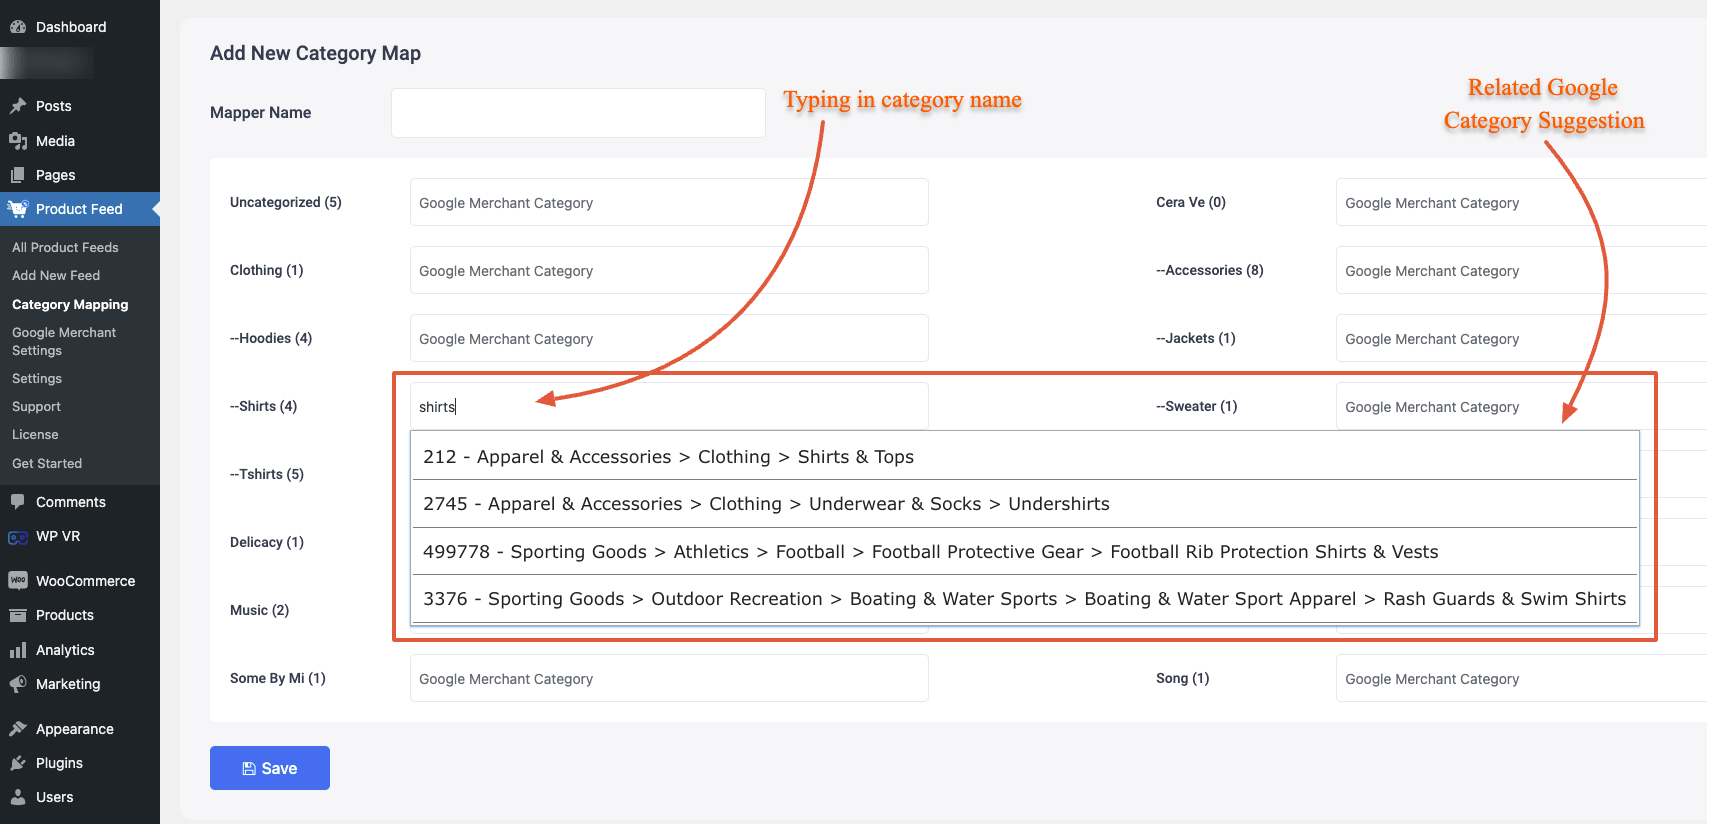
For example, let’s say you have a category called Shirts. You can simply type in the “shirts” and you will get suggestions for the most relative Google Categories available.

But we advise that you look for the relevant category from Google’s Taxonomy list, and then copy and paste the category code in the fields.

**If you are setting up Category Mapping for Google Shopping or Facebook, then make sure you input at least the category code here.

For other marketplaces, simply copy the relevant category they suggest, and paste them into the respective fields. It will work in the same way.

4. Once you have assigned categories to map to, click on the Save button below.

The Mapper will be saved and listed below. You can click on it to expand and edit it if need.

How To Use Category Mapping For Product Feed 1

Now that you have set up Category Mapping, you will be able to use it when generating the feed.

Applying Category Mapping When Generating Product Feed #

Once you have set up a category mapping rule, you can make it effective when creating a new feed by choosing the Category mapper you created under Value for an attribute.

First, remember the Mapper name you saved it with. Then follow the steps below.

1. When generating feed, on the value of an attribute, scroll to the very bottom and you will find the Mappers you created. Choose your required mapper.

Category Mapper you saved

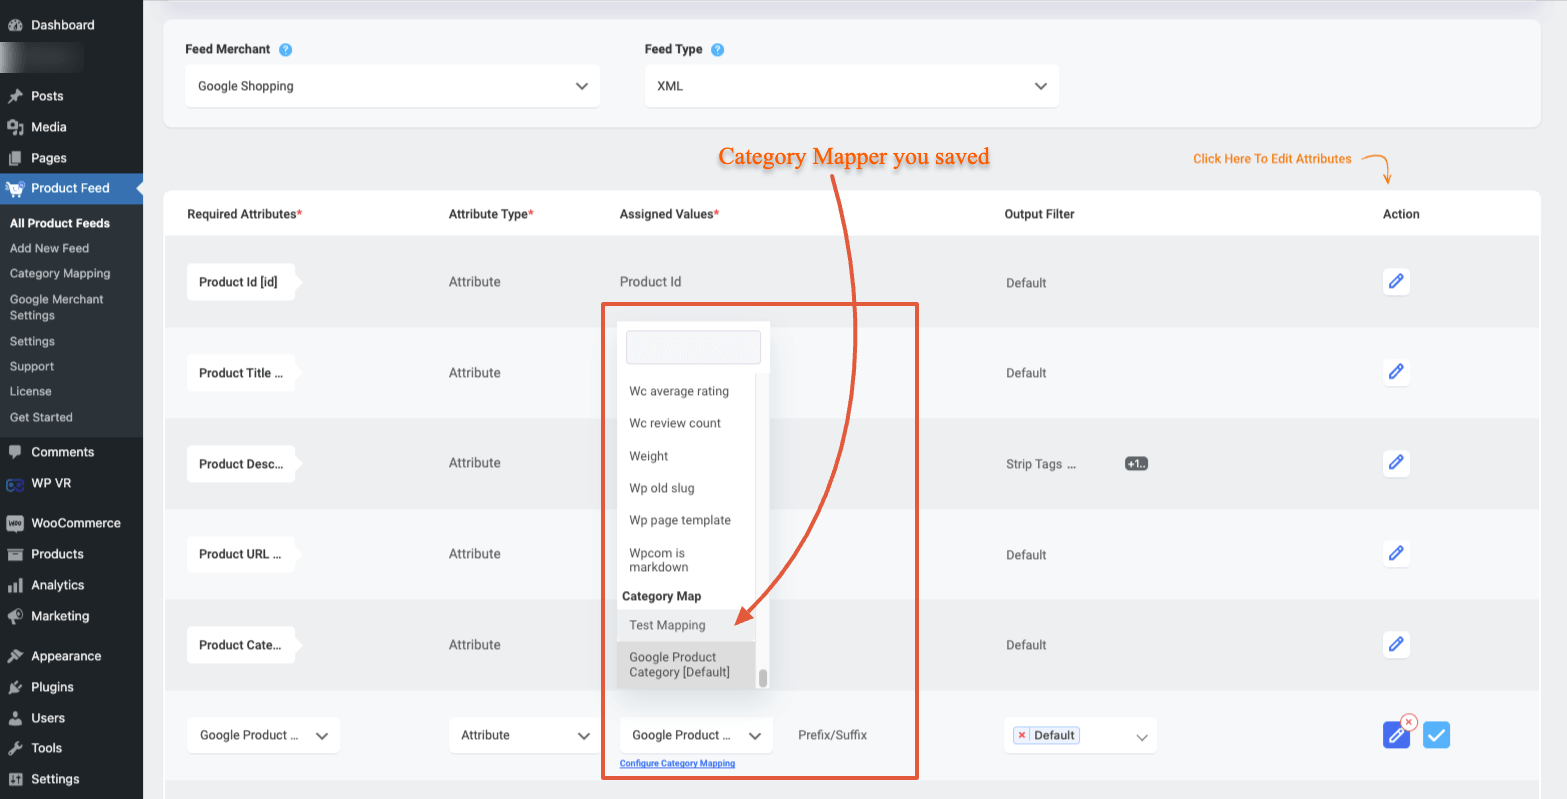
For Google Shopping or Facebook, you have to use it as the value for the attribute Google Product Category.

2. Now, once you publish the feed, you will see the value of the attribute that will use the mapped value as per the product category you assigned.

That’s it. Now, you can go ahead and use it to generate flawless product feeds.

Updated on August 21, 2023

What are your Feelings

  • Happy
  • Normal
  • Sad
Share This Article :
  • Facebook
  • X
  • LinkedIn
  • Pinterest
Table of Contents
  • Set Up Category Mapping
  • Applying Category Mapping When Generating Product Feed

© 2025 RexTheme

Privacy Policy

Powered by WordPress

To the top ↑ Up ↑

You were not leaving your cart just like that, right?

Enter your email below to save your shopping cart for later. And, who knows, maybe we will even send you a sweet discount code.

The email is invalid.
Thank you. Happy shopping.
No Thanks!
  • NL
  • DE