Skip to the content
RexThemeRexTheme
We Make Amazing WordPress Plugins
  • Special Offer
  • Plugins
    • WP VR – Quality WP Virtual Tour Creator
    • Product Feed Manager For WooCommerce
    • Cart Lift To Recover Abandoned Carts
    • Checkoutify Checkout Field Manager for WooCommerce
    • Catalog Mode For WooCommerce
    • Dynamic Discount for WooCommerce
    • Advanced Shipping for WooCommerce
    • Marketplace Auto Sync for WooCommerce
    • View All Plugins
  • Bundle
  • Blog
  • Resources
    • Docs
    • Support
    • Brand Assets
  • My Account
    • Log In
    • Log Out
doc-cart

Cart Lift

16
  • Getting started
    • A Basic Plugin Overview – Cart Lift
    • Install And Activate Cart Lift
    • Introduction To Cart Lift
    • Configure And Use Cart Lift Effectively
  • Troubleshooting Common Issues
    • Troubleshooting For Common Issues – Cart Lift
  • Upgrade To Cart Lift Pro
    • How To Upgrade To Pro – Cart Lift
    • License Plan Upgrade Guide for Cart Lift Pro
  • Abandoned Cart Recovery Conditions
    • How To Use Twilio SMS Service To Recover Abandoned Carts – Cart Lift Pro
    • Get Full Analytics Report On Recovery Campaign
    • How To Track Abandoned Carts Automatically
    • How To Set Up Your Abandoned Cart Recovery Campaign
    • How To Get Notifications For Abandoned Carts And Recovery
    • Shortcodes for Email Fields in Cart Lift
    • Exclude Carts From Abandoned Cart Recovery Campaigns Based On Conditions
    • How To Set Condition To Automatically Delete Abandoned Orders After A Particular Number Of Days
    • How to Pause / Resume Individual Abandoned Cart Recovery
doc-pfm

Product Feed Manager

103
  • Getting Started
    • Product Feed Manager – Documentation
    • Introduction To Product Feed Manager For WooCommerce
    • Basic Plugin Overview – Product Feed Manager Pro WooCommerce
    • How To Generate Product Feed For The First Time
    • How To Install And Activate PFM
    • Getting Started With Product Feed Manager For WooCommerce
    • How To Generate A Custom Product Feed Easily
  • Upgrade To PFM Pro
    • License Plan Upgrade Guide for Product Feed Manager Pro
    • Product Feed Manager VAT/TAX Policy
    • License Renewal for Product Feed Manager Pro
  • Auto-Sync To Google Shopping
    • Upload your WooComerce product feed directly to the Google Merchant Center – (No Need For Authorization)
    • How To Auto-sync Product Feed To Google Merchant Center
  • Category Mapping
    • How To Use Category Mapping For Product Feed
    • How To Use Category Mapping For Google Product Category
    • How To Configure Category Mapping For Facebook Product Category
  • Feed Generation Instructions
    • How To Create A Feed For eBay Seller Center
    • How to Generate WooCommerce Product Feed for Skroutz
    • How to generate WooCommerce Product Feed for Zbozi
    • How to generate WooCommerce Product Feed for Amazon
    • How to upload products on Instagram Shop
    • How to create a WooCommerce product feed for Instagram Catalog
    • How to create a WooCommerce product feed for Walmart
    • How to create a WooCommerce product feed for NewEgg Marketplace
    • How to create a WooCommerce product feed for Sears Marketplace
    • How to create a WooCommerce product feed for Wish.com
    • How to create a Target Product feed for Target Marketplace
    • How To Create A Feed For eBay MIP
    • How to generate WooCommerce Product Feed for Google With Product Feed Manager
    • How to generate WooCommerce Product Feed for Facebook
    • How to Upload your WooCommerce Products on the Facebook Store
  • Understanding Basic Feed Configuration For Required Attributes
    • How To Exclude Draft Products From The Feed
    • Understanding The Use of Different Price Attributes
    • How To Use RankMath Primary Category In The Feed
    • How To Use Yoast Primary Category In The Feed
    • How To Add Currency To Your Product Price
    • How To Use A Custom Field Value In The Product Feed
    • How To Replace Space With Hyphen In A Feed Attribute Data
    • How To Remove Decimal From Price For Marktplaats Feed
    • How To Include CDATA In An XML Feed Attribute Tag
    • How To Convert Symbols To HTMLEntities In A Feed Attribute Value
    • How To Use UTF-8 Encode To Convert HTMLEntities To Symbols In A Feed Attribute Value
    • How To Remove HTML Tags Or Shortcodes From A Feed
    • Understanding And Configuring Feed Attributes and Their Values
    • Optimize Product Feed Data With Effective Output Filters
    • Learning About Feed File Types And How To Download Or View Feed
    • How To Add Or Remove An Additional Product Attribute In The Feed
    • How To Add A Custom Attribute To The Feed
    • How To Add A Static Prefix or Suffix To An Attribute In The Feed
    • Product Feed Optimization with Yoast SEO Product Title, Meta Description and Primary Category
  • Useful Control Options
    • How to set 5-Minutes Time Interval for Updating Feed
    • How To Exclude Tax From Structured Data Prices
    • How To Add Extensive Custom Fields To WooCommerce Products
    • Add Custom Fields For Important Product Attributes
    • Add Extensive Custom Fields Of Unique Identifiers For WooCommerce Products
    • Connect Facebook Pixel With WooCommerce For Dynamic Ads
    • Control Products Per Batch In Batch Processing
    • Useful Options On Settings Tab
  • Useful Features For Feed Generation
    • How to use the Feed Rules feature to manipulate your product price
    • How to use the Product Filter option to include/ exclude specific products
    • How To Exclude Invisible Products / Hidden Products From Product Feed
    • How To Use Category Filter When Generating Product Feed
    • How To Use Custom Filter When Generating Product Feed
    • How To Use Tag Filter When Generating Product Feed
    • How To Use Feed Filter Options When Generating Feed
    • How To Schedule Auto-update of Feed On Set Intervals
    • How To Include Variable Products To The Feed
    • How To Include Private Products In Product Feed
    • How To Include Product Variation Term To The Product Name
    • How To Add UTM Parameters To Product URLs
    • How to use the Feed Rule feature to manipulate attribute values
    • How to combine multiple attributes values together with the Combined Attributes feature
    • How To Set Custom Time Intervals For Auto-Feed Update
  • Fix JSON-LD Structured Data For Variable Products
    • Fix WooCommerce (JSON-LD) Structured Data For Approval In Google Shopping
  • Others
    • How to generate product feed in multiple languages with TranslatePress
    • How To Include Discount Rules In The Feed Using Discount Rules For WooCommerce And PFM
    • How to generate product feed in multiple languages with Polylang
    • How to convert product feed price with WPML / WCML
    • Update your feed only if any changes were made to any of your products
    • How to generate a WooCommerce product feed with the top sold products to sell more
    • How to include Tax values into your WooCommerce Product Feed (Google & Facebook)
    • How to include Shipping values into WooCommerce product feed (Google & Facebook)
    • Enable Error Log for Product Feed Manager For WooCommerce
    • How To Include Brand Name In Feed Using Perfect Brands For WooCommerce And PFM
    • How To Generate Product Feed In Multiple Languages With WPML
  • Troubleshoot
    • Troubleshooting Common Issues – Product Feed Manager For WooCommerce
    • Google Shopping Product Feed Specification – Attributes List
  • All Google Feeds
    • How to create a WooCommerce product feed for Google Dynamic Search Ads
    • How to create a WooCommerce product feed for Google Custom Search Ads
    • How to create a WooCommerce product feed for Google Local Inventory Ads
    • How to create a WooCommerce product feed for Google Express (Former Google Shopping Actions Program)
    • How to create a WooCommerce product feed for Google Dynamic Display Ads (Google Ads)
    • How to create a WooCommerce product feed for Google Shopping Actions
    • How to create a WooCommerce feed for Google Merchant Center Promotion Using Product Feed Manager
    • How to create a WooCommerce product feed for Google Manufacturer Center
    • How to create a WooCommerce product feed for Google Local Products Inventory
    • How to create a WooCommerce product feed for Google Local Products
    • How to create a WooCommerce product feed for Google Remarketing (DRM)
    • How to create a WooCommerce product feed for Google Review
doc-wpvr

WP VR

89
  • Getting Started
    • Getting Started With WP VR
    • WP VR Basic Plugin Overview
    • How To Create A Simple Virtual Tour In 2 Minutes – WP VR
    • How To Install And Activate WP VR
  • Upgrade To WPVR Pro
    • License Plan Upgrade Guide for WP VR Pro
    • How To Upgrade To Pro – WPVR
    • WP VR VAT/TAX Policy
    • License Renewal Guide for WP VR Pro
  • Using WPVR Premium Add-ons
    • How To Integrate WooCommerce To A Virtual Tour
    • How To Embed Virtual Tours On Non-WordPress Websites
    • WP VR Embed Addon – Features Overview
    • How To Integrate Fluent Forms On A Virtual Tour
  • How To - Basic Settings
    • How to Customize the Tour Layout
    • How to Enable Auto Rotation For Your 360 Virtual Tour – WP VR
    • How To Add A Preview Image To Your Virtual Tour – WPVR
    • How To Use Exclusive Features On General Settings To Customize A Virtual Tour
  • Using Advanced Settings
    • How to Add A Virtual Tour Icon or Your Company Logo in 360 Degree Tours – WPVR
    • How To Set Scene Transition (Scene Entrance Animation)
    • How to do SEO optimization for Embeded tour
  • Setting Up Control Buttons
    • Using Custom Icons For Navigation And Control Buttons In A Virtual Tour
  • Turn Panorama Images Into Live Scenes
    • How To Set Custom Zoom Settings On A Scene In Your Virtual Tour – WPVR
    • How To Set Default Scene Face On A Virtual Tour
    • How To Add A Scene To Your Virtual Tour
  • Use Hotspots for Navigation & Information
    • How To Customize Hotspot Icons And Color
    • How to use the Custom Icon Class
    • How To Add Hotspots To A Scene In Your Virtual Tour
  • Create 360 Degree Video Tours
    • How To Embed A Youtube 360 Video On Your Website Using WPVR
  • Embed Google Street Views
    • How To Embed A Google Street View Tour On Your Website Using WPVR
  • Partial Panorama & Full View Virtual Tours
    • How To Create A Virtual Tour With Partial Panoramas or iPhone Panoramas
    • How To Create A Virtual Tour With Mobile Phone Panorama Images
    • How To Create Full Screen Virtual Tours – WPVR
    • How To Set A 360 Panorama Background Virtual Tour
  • Publish Virtual Tours on Your Website
    • How To Configure A Call To Action (CTA) Button in Virtual Tour
    • How to Share Virtual Tours on Social Media
    • How to Publish Virtual Tours Using QR Code
    • How to Set Up Password Protection For Your 360 Virtual Tour – WP VR
  • Import, Export, & Duplicate Virtual Tours
    • How To Export And Import Virtual Tours
    • How To Duplicate A Virtual Tour
  • Troubleshooting - Solve Common Issues
    • WP VR Troubleshooting Guide: Embedding 360 Tours on External Platforms
    • WP VR Tour Not Displaying on Review and On the Published Webpage
    • How To Solve Virtual Tour Not Showing Up – WPVR
  • Optimize Virtual Tour for Mobile Devices
    • How To Set A Dynamic Front End Notice On Virtual Tours For Mobile Phone Viewers
    • How To Auto Resize Images On Mobile Devices for Virtual Tours
    • How To Set Custom Height for Mobile Devices to Your Virtual Tours
  • Demo Virtual Tours
    • Demo Partial Panorama Virtual Tour – WPVR Pro
    • Basic Virtual Tour
  • Advanced Settings for Virtual Tours
    • How To Set Up WPVR Exclusive Settings
    • Control Script And Style Loading For The Virtual Tours
    • How To Disable WordPress Large Image Handler For Virtual Tours
    • How to Control Video.js Loading for Virtual Tour Pages – WPVR
  • WP VR Plugin Integrations
    • WP VR & Dokan Integration: Empower Vendors to Create 360° Virtual Tours
doc-recommendtions

Product Recommendations for WooCommerce

3
  • Getting Started
    • How To Install & Activate Product Recommendations for WooCommerce
    • How to Create a Recommendation Engine For the First Time
    • Basic Plugin Overview – Product Recommendations for WooCommerce
doc-dynamic

Dynamic Discounts for WooCommerce

9
  • Getting Started
    • How To Install & Activate the Dynamic Discounts for WooCommerce
    • How To Create A Discount Rule For The First Time
    • Basic Plugin Overview – Dynamic Discounts for WooCommerce
  • Discount Conditions
    • How To Set Discount Conditions Based on Customer Purchase History
    • How To Set Discount Conditions For Product Variations
    • How To Apply discount To The cheapest product In The Cart
    • How to Set Discount Conditions for Bulk Purchases in WooCommerce
    • How To Set Cart Based Discount
    • How To Set Product Based Discount
doc-checkoutify

Checkoutify

4
  • Getting Started
    • How to create a custom field in checkoutify
    • How To Create and Customise an Order Bump
    • How To Install & Activate Checkoutify Pro – Checkout Customizer
    • How to Replace Your WooCommerce Checkout Using Checkoutify – Checkout Customizer
doc-advance

Advanced Shipping for WooCommerce

12
  • Getting Started
    • Basic Plugin Overview – Advanced Shipping For Woocommerce
    • How To Add Advanced Shipping To An Existing Shipping Zone
    • How To Install & Activate The Advanced Shipping For Woocommerce
  • Shipping Conditions
    • How To Set Shipping Conditions Based on Product’s Weight, Volume, Length, Height, and Width
    • How To Set Shipping Conditions Based On WooCommerce User Role
    • How To Set Shipping Conditions Based On WooCommerce Product Tag
    • How To Set Category-Based Shipping Conditions
    • How To Set Product-Specific Shipping Conditions
    • How to Add Weight Based Shipping Conditions in Advanced Shipping
    • How to Add Quantity Based Shipping Conditions in Advanced Shipping
    • How to Add Price Based Shipping Conditions in Advanced Shipping
    • How to Add Shipping Conditions For All Purchases in Advanced Shipping
Catalog Mode For WooCommerce Logo

Catalog Mode for WooCommerce

3
  • Getting Started
    • Basic Plugin Overview – Catalog Mode For WooCommerce
    • How To Install & Activate the Catalog Mode for WooCommerce
  • Settings
    • How To Set Users Rules For Catalog Mode
Marketplace-Autosync

Marketplace Auto-Sync for WooCommerce

3
  • Getting Started
    • How To Set Up A Auto Sync For The First Time
    • Basic Plugin Overview – Marketplace Auto Sync
    • How To Install & Activate Marketplace Auto Sync
View Categories
  • Home
  • Docs
  • Product Feed Manager
  • Auto-Sync To Google Shopping

How To Auto-sync Product Feed To Google Merchant Center

When you own a WooCommerce store and want to sell your products in Google Shopping for more exposure and sales, you need to upload your product feed to the Google Merchant Center.

You can list your products to the Google Merchant Center either in a manual way or you can use the Content API method to send the feed through the Product Feed Manager plugin.

To send the feed in a manual way, you need to login to your Google Merchant Center and submit the feed manually. This is the easier process to submit your feed to the Google Merchant Center, but there’s a catch to this. You will have to login to the Google Merchant Center and upload the feeds manually every time.

But if you use the Content API method, you can send the feed from the Product Feed Manager plugin with one click. No matter how many feeds you want to send, you only have to click on the Send to Google option after the feed generation is completed, and your feed will be sent to the Google Merchant Center.

However, to use this you need to authorize with the Google Merchant Center first, and to do so you will need the following information:

  1. Client ID
  2. Client Secret
  3. Merchant ID
  4. Redirect URL
Google Merchant Center Authorization Section

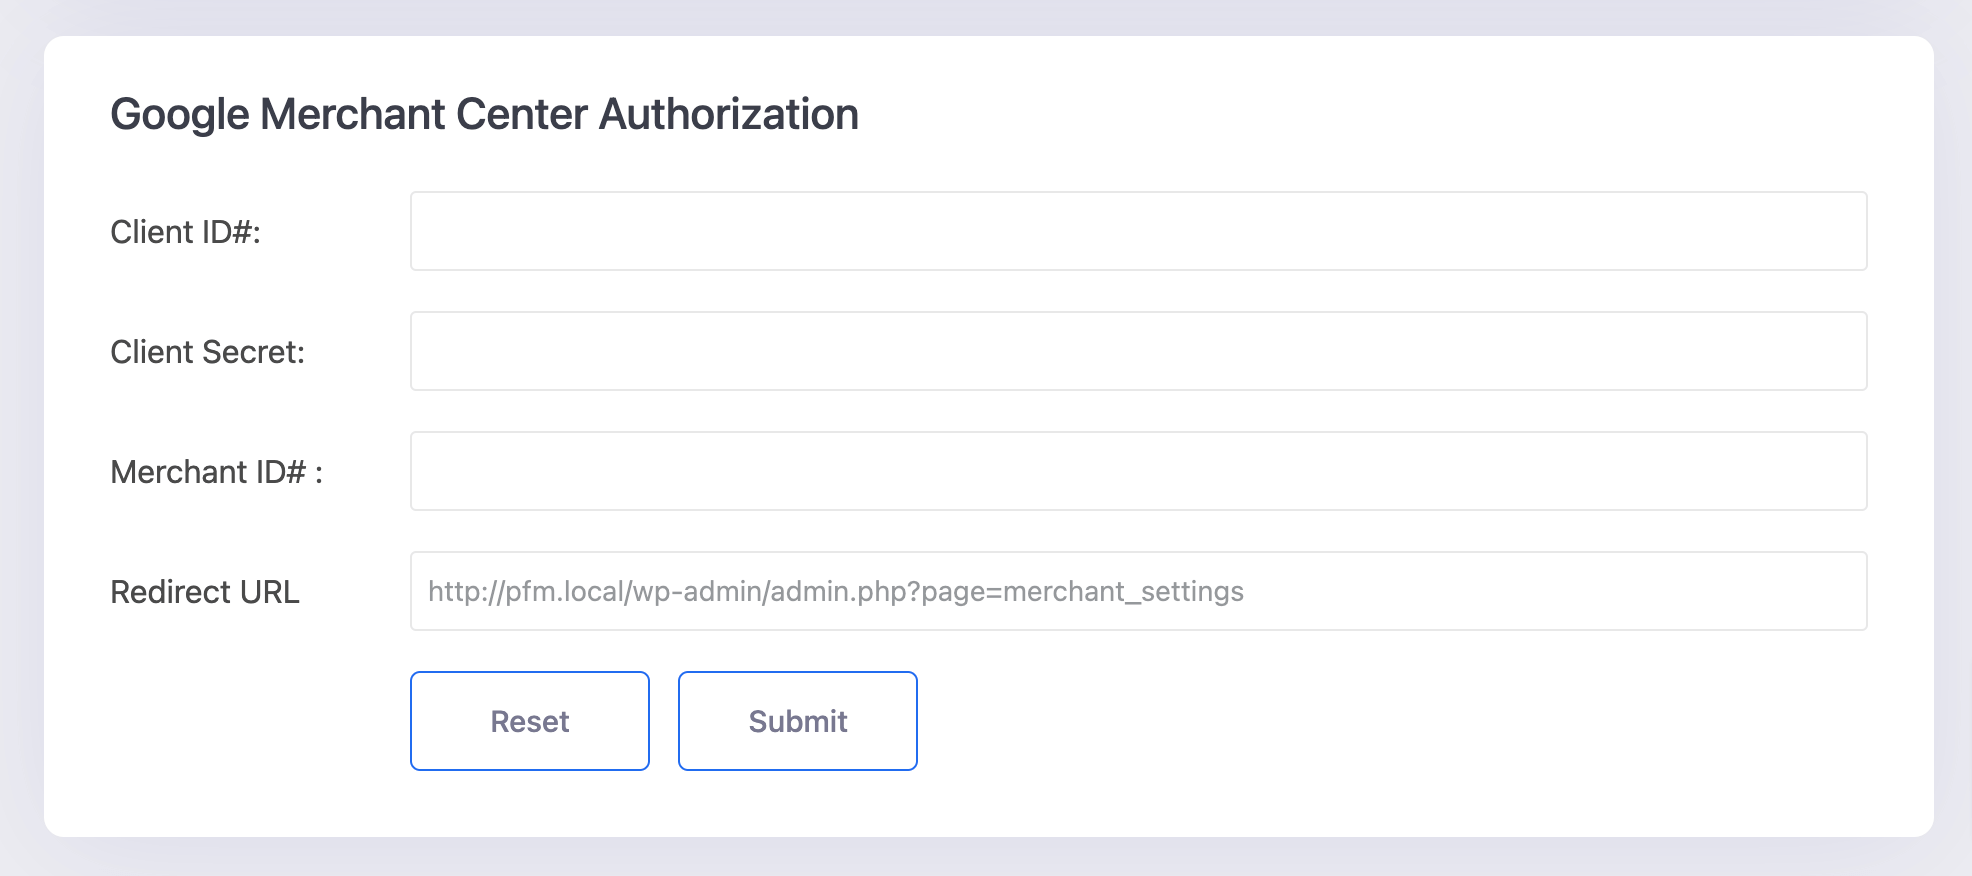
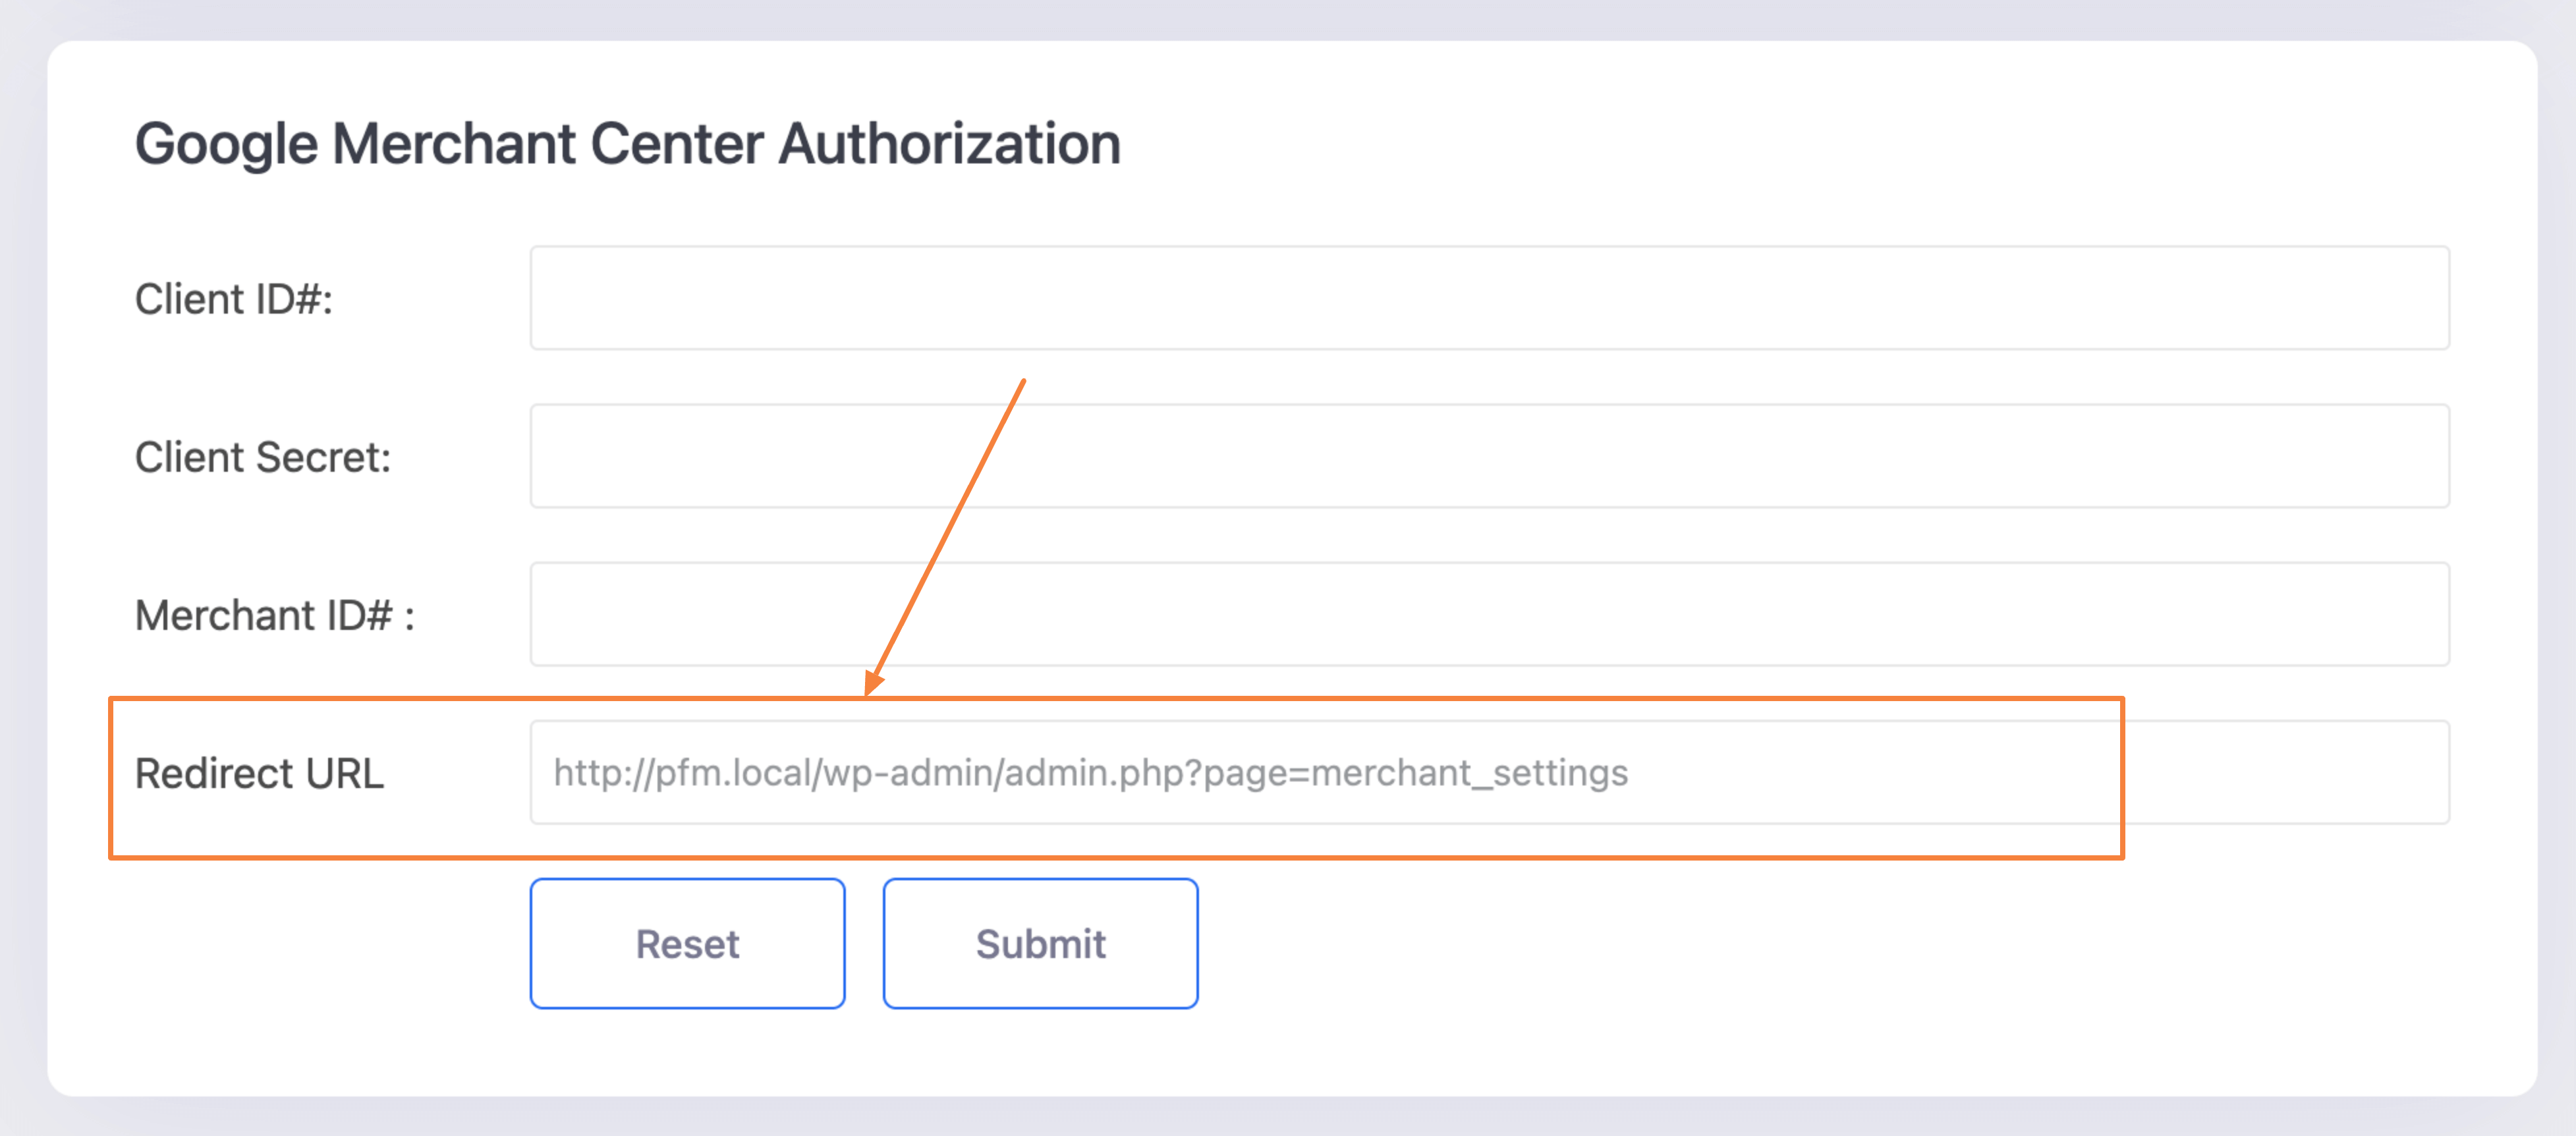
You will see that the Redirect URL is already added, but you need to collect the Client ID, Client Secret, and Merchant ID to authorize with the Google Merchant Center.

Follow the steps to learn how to auto-sync product feed to Google Merchant Shop:

**To view links, please right-click and Open In New Tab to avoid leaving the page every time.

Step 1: Create a Project #

1. Go to https://console.developers.google.com/ or https://console.cloud.google.com/

Google Cloud Platform - Developers Console

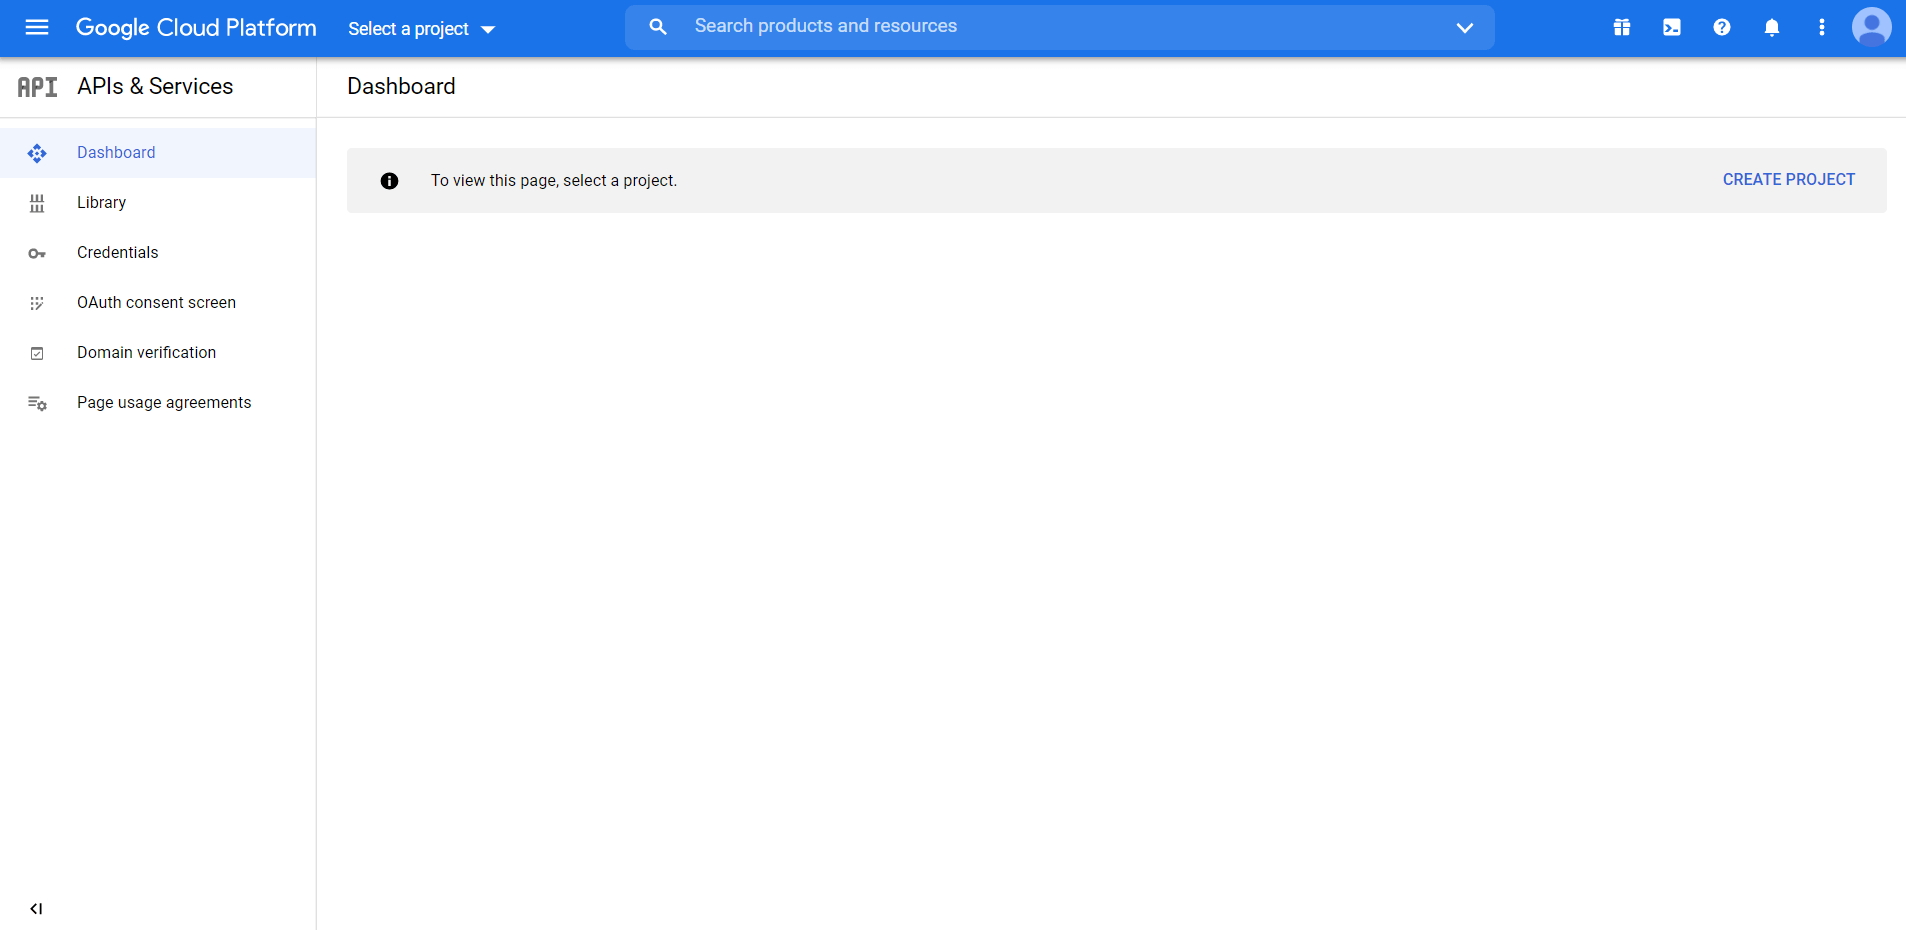
2. On the top-left side, click on Select Project.

3. Choose an existing Project or create a new one.

Google Cloud Platform - Select Project

4. If you choose to create a Project, it will take you to New Project Page.

5. Here choose Project Name, and Organization (if you have a G-suite acc). If you want you can edit the project Id as well, (which cannot be changed once the project is created).

Google Cloud Platform - Create New Project

Step 2: Enable Content API for Shopping #

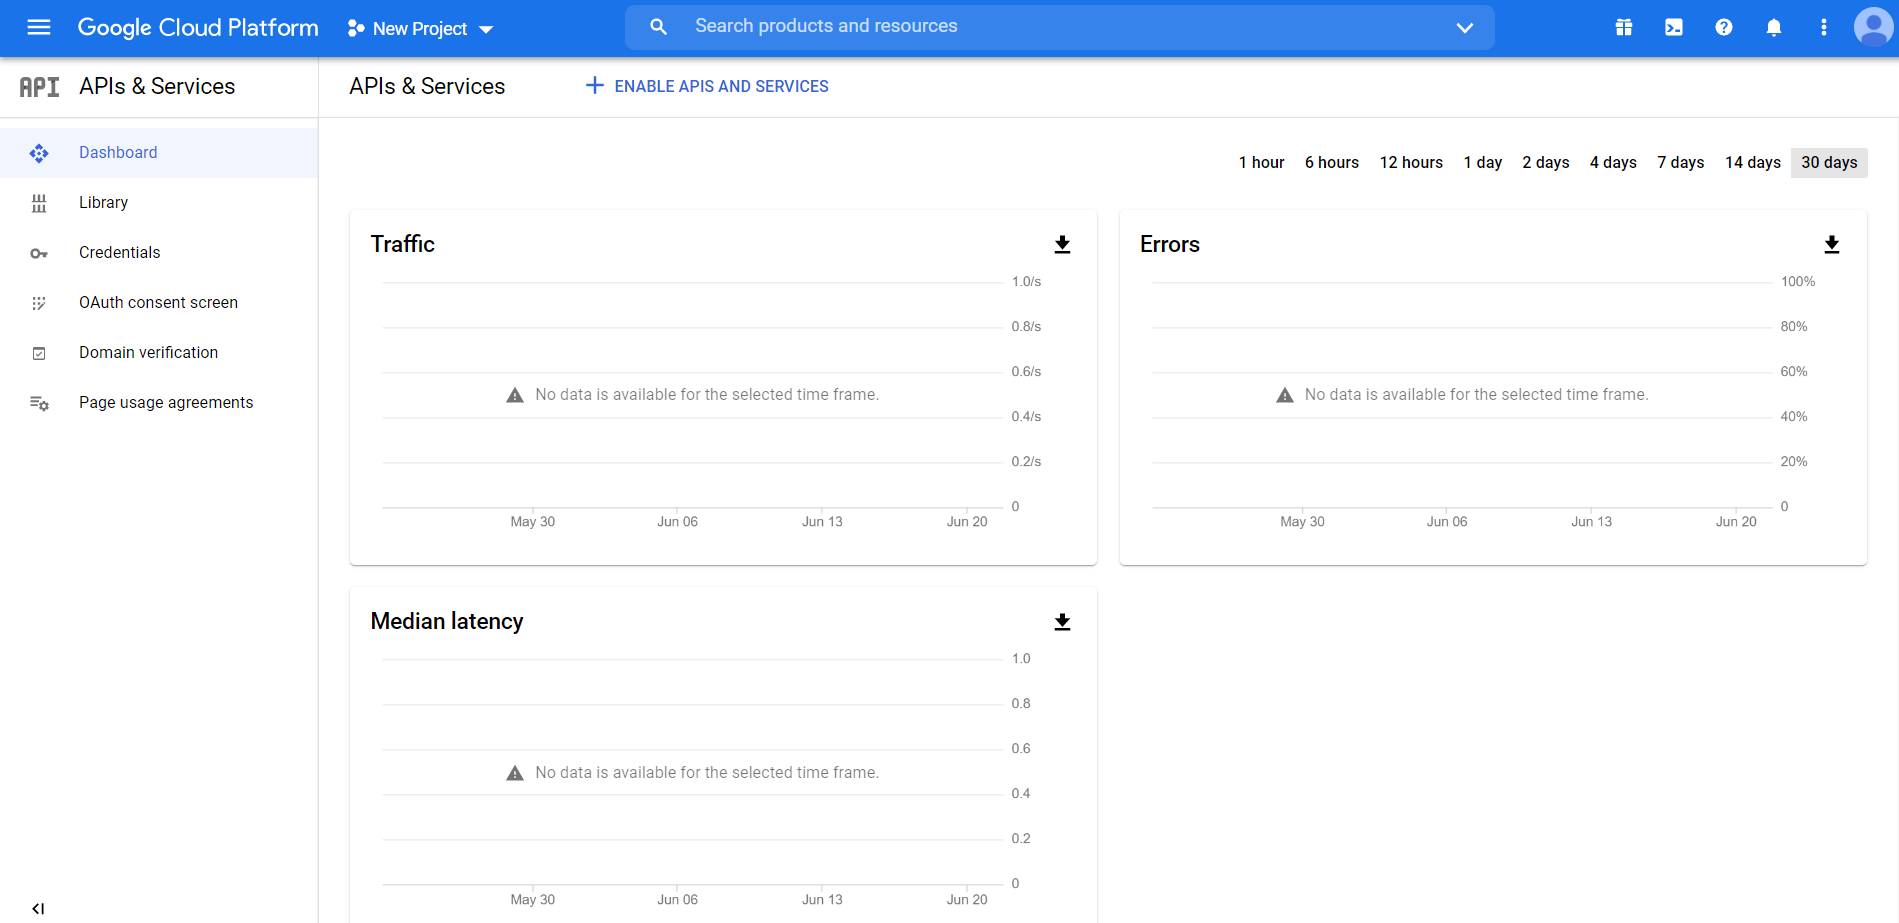
1. Once the Project is created, it will take you to the project dashboard. On the left Menu panel, click on APIs & Services.

2. Here, click on Enable APIs and Services. It will take you to the API library.

Google Cloud Platform - Create New Project

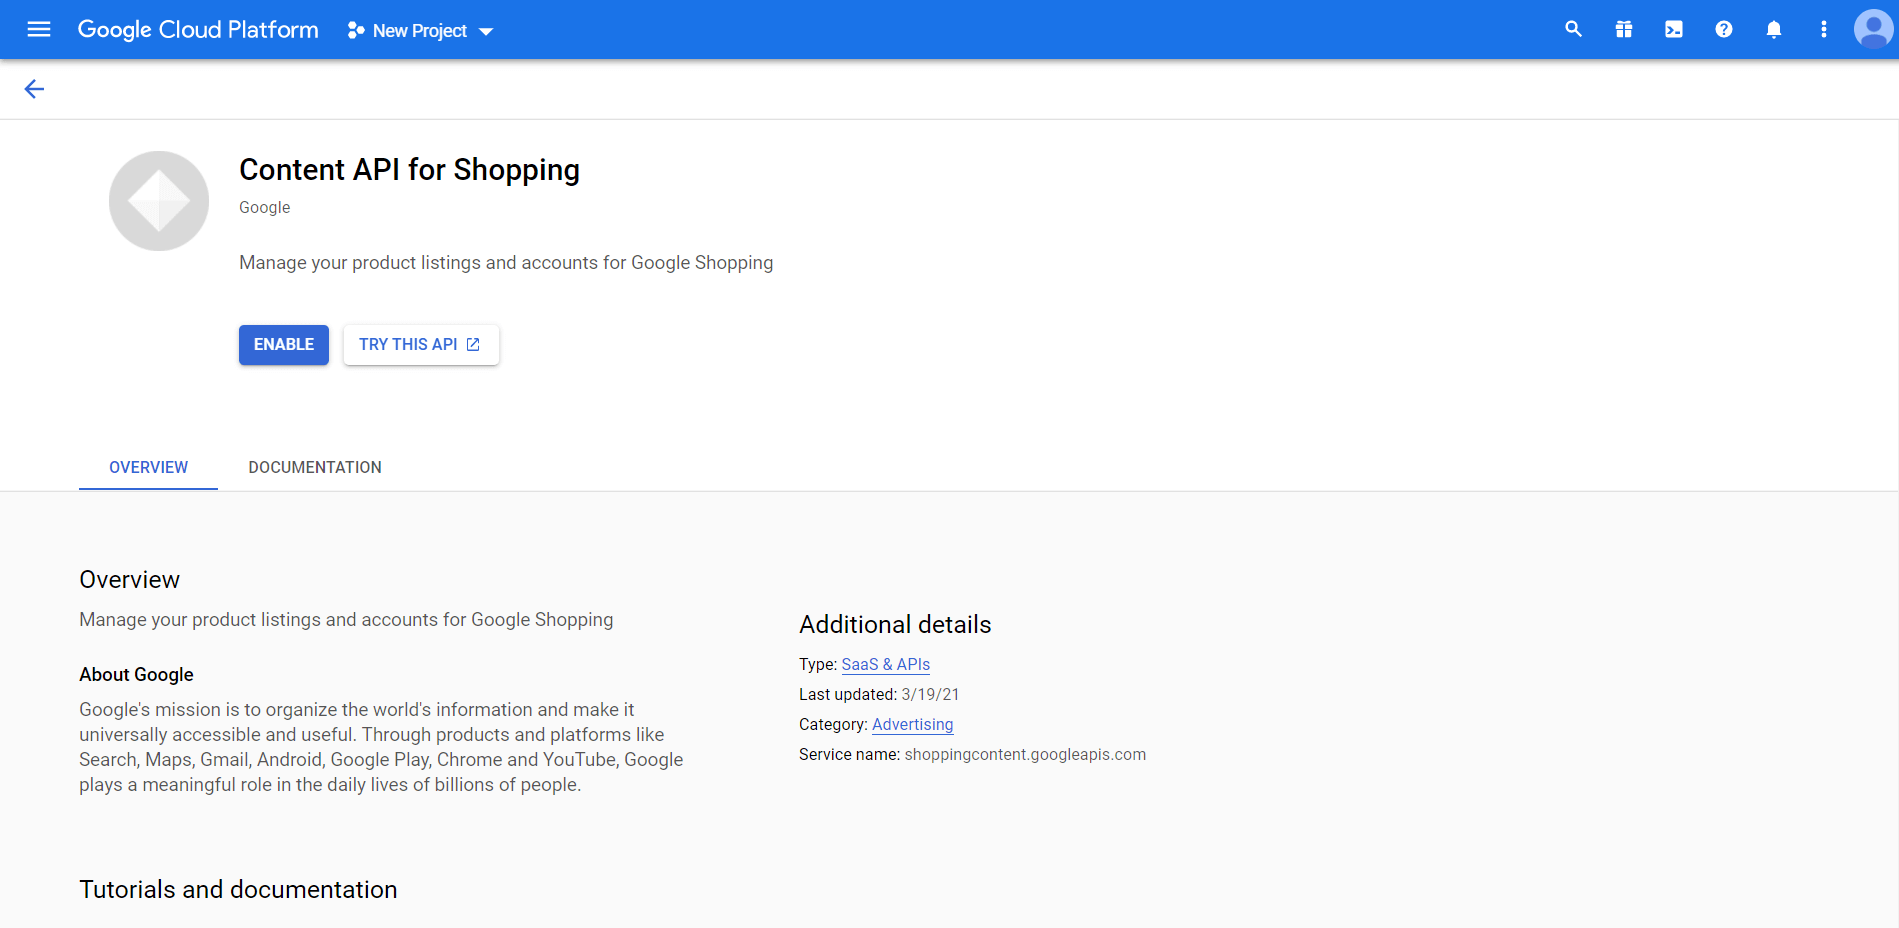
3. Search with “Content API for Shopping” and you will find an API service with the same name.

Google Cloud Platform - Choose P

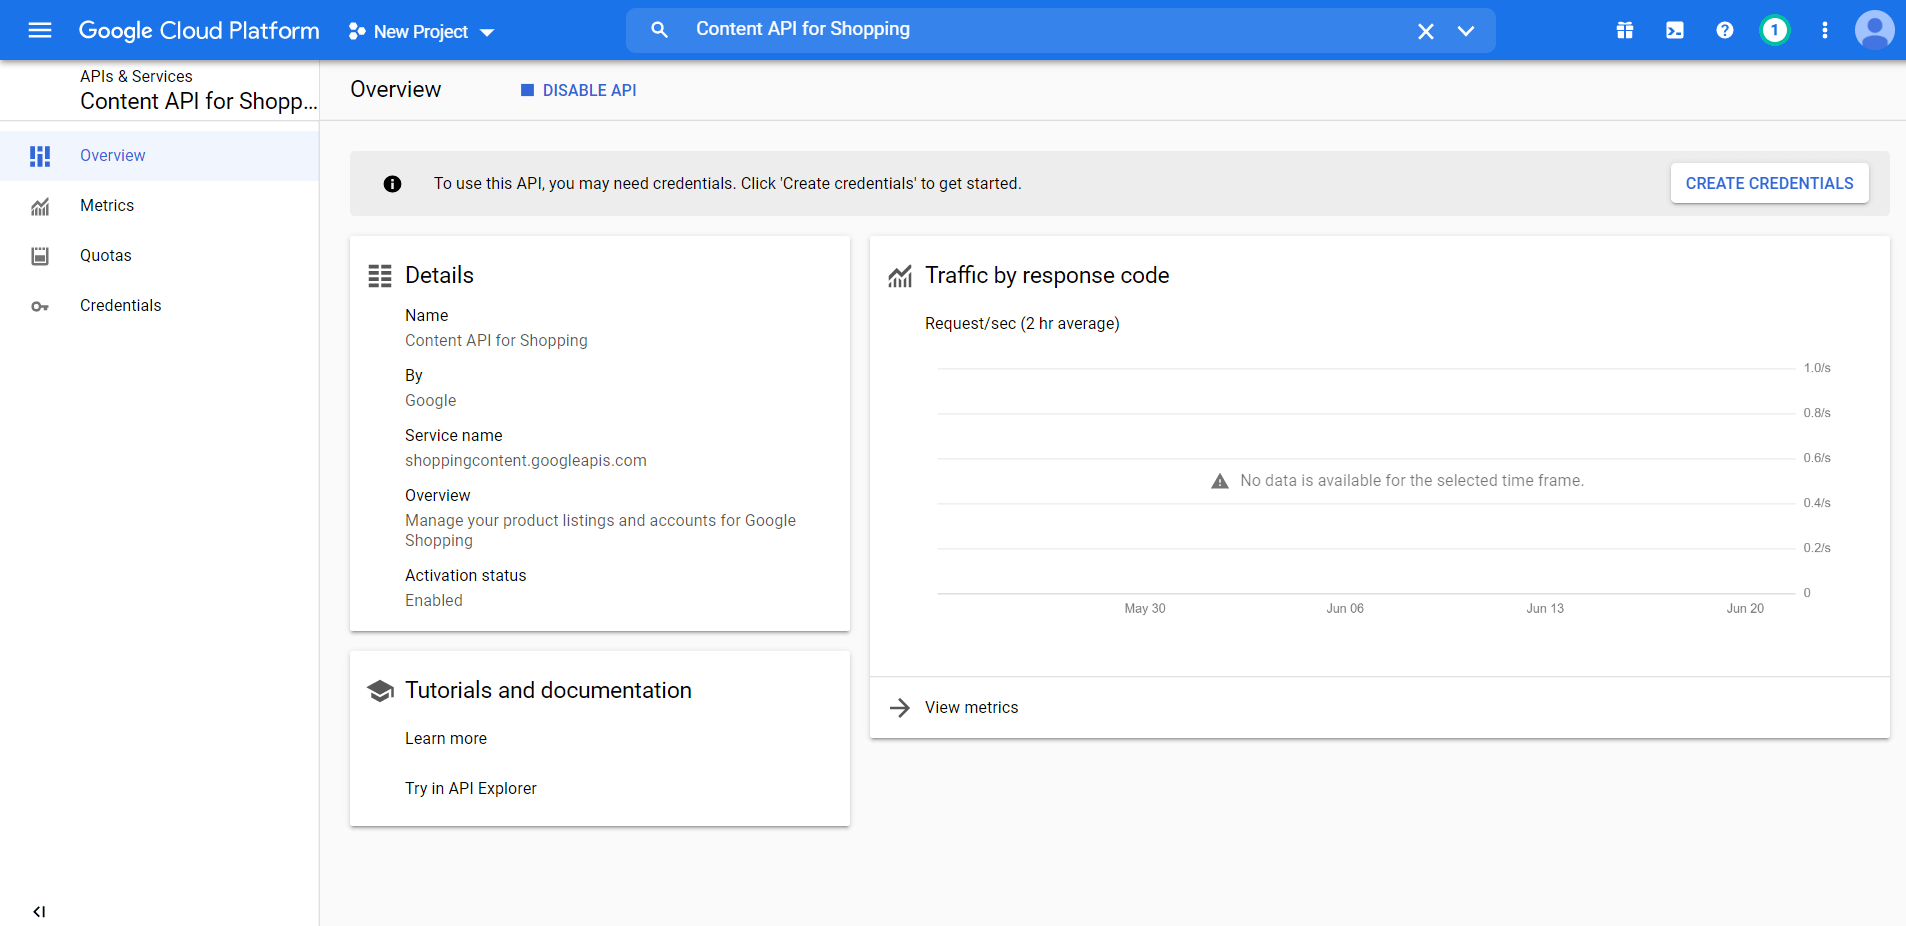
4. Click on it to view the API service overview and Enable it.

Enable Content API for Shopping

Step 3: Configure OAuth Consent Screen #

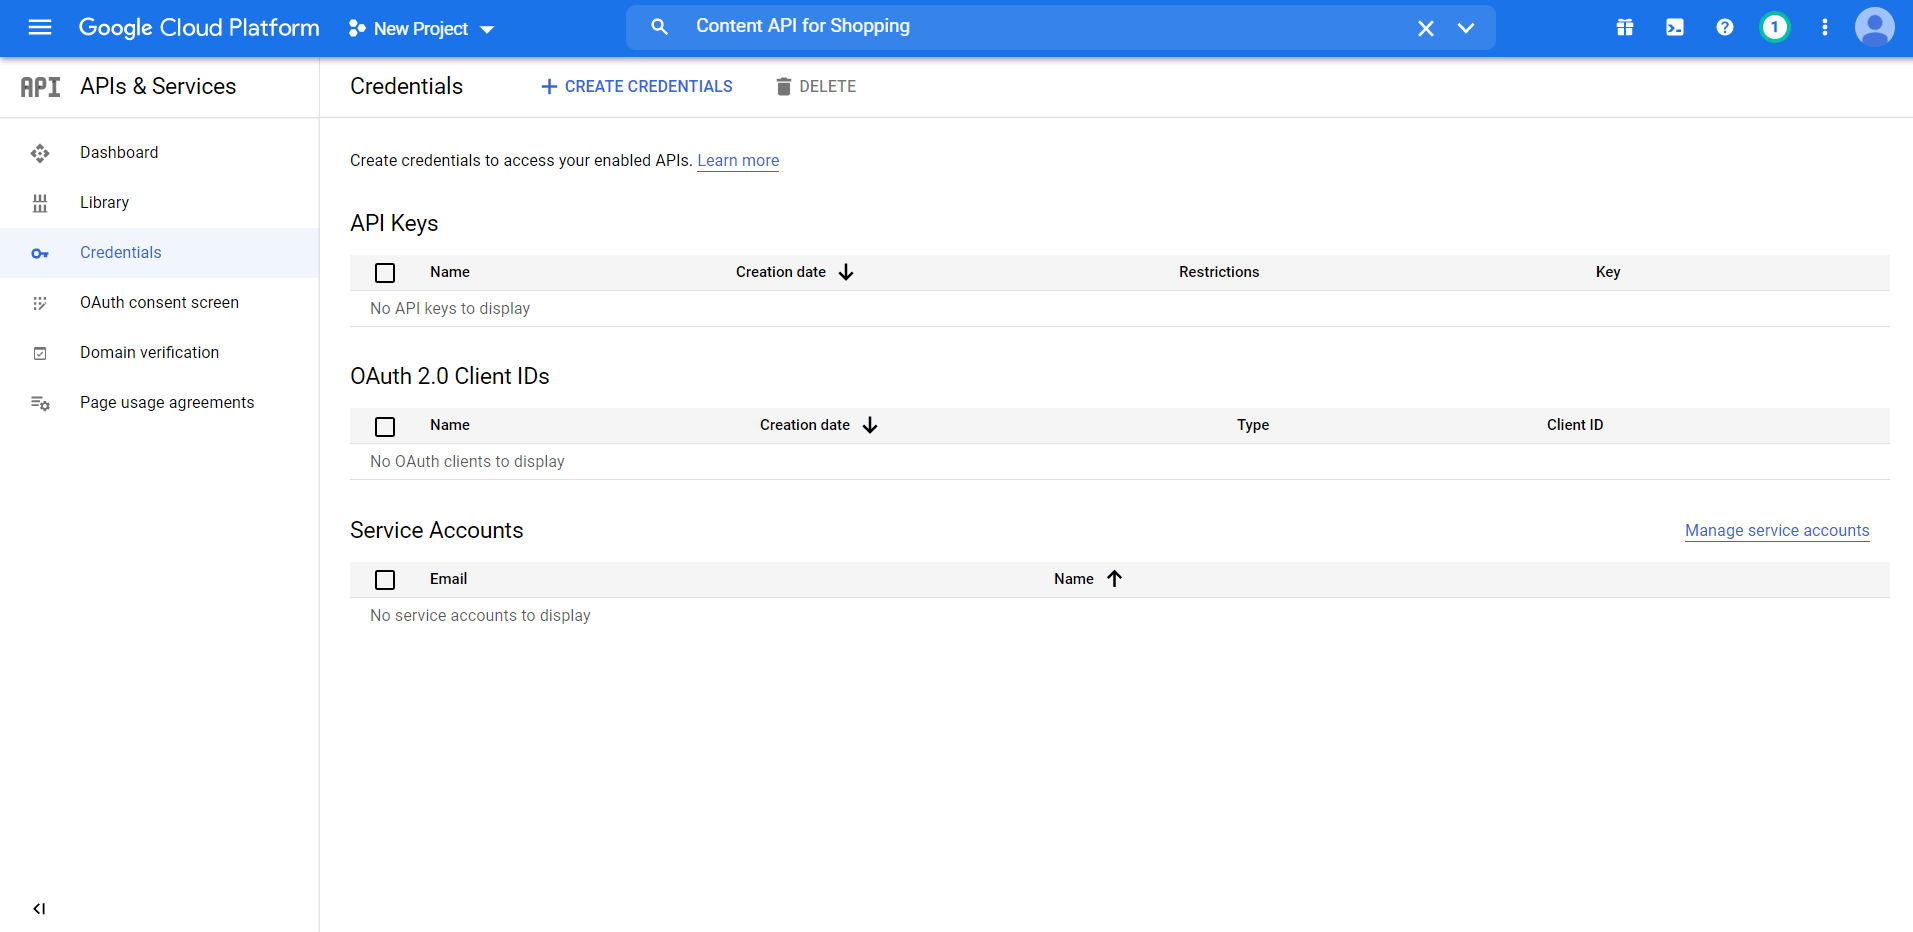
1. Once you enable the Content API for Shopping, it will take you to the Content API for the Shopping Overview dashboard.

Google Content API Content API for Shopping Overview dashboard

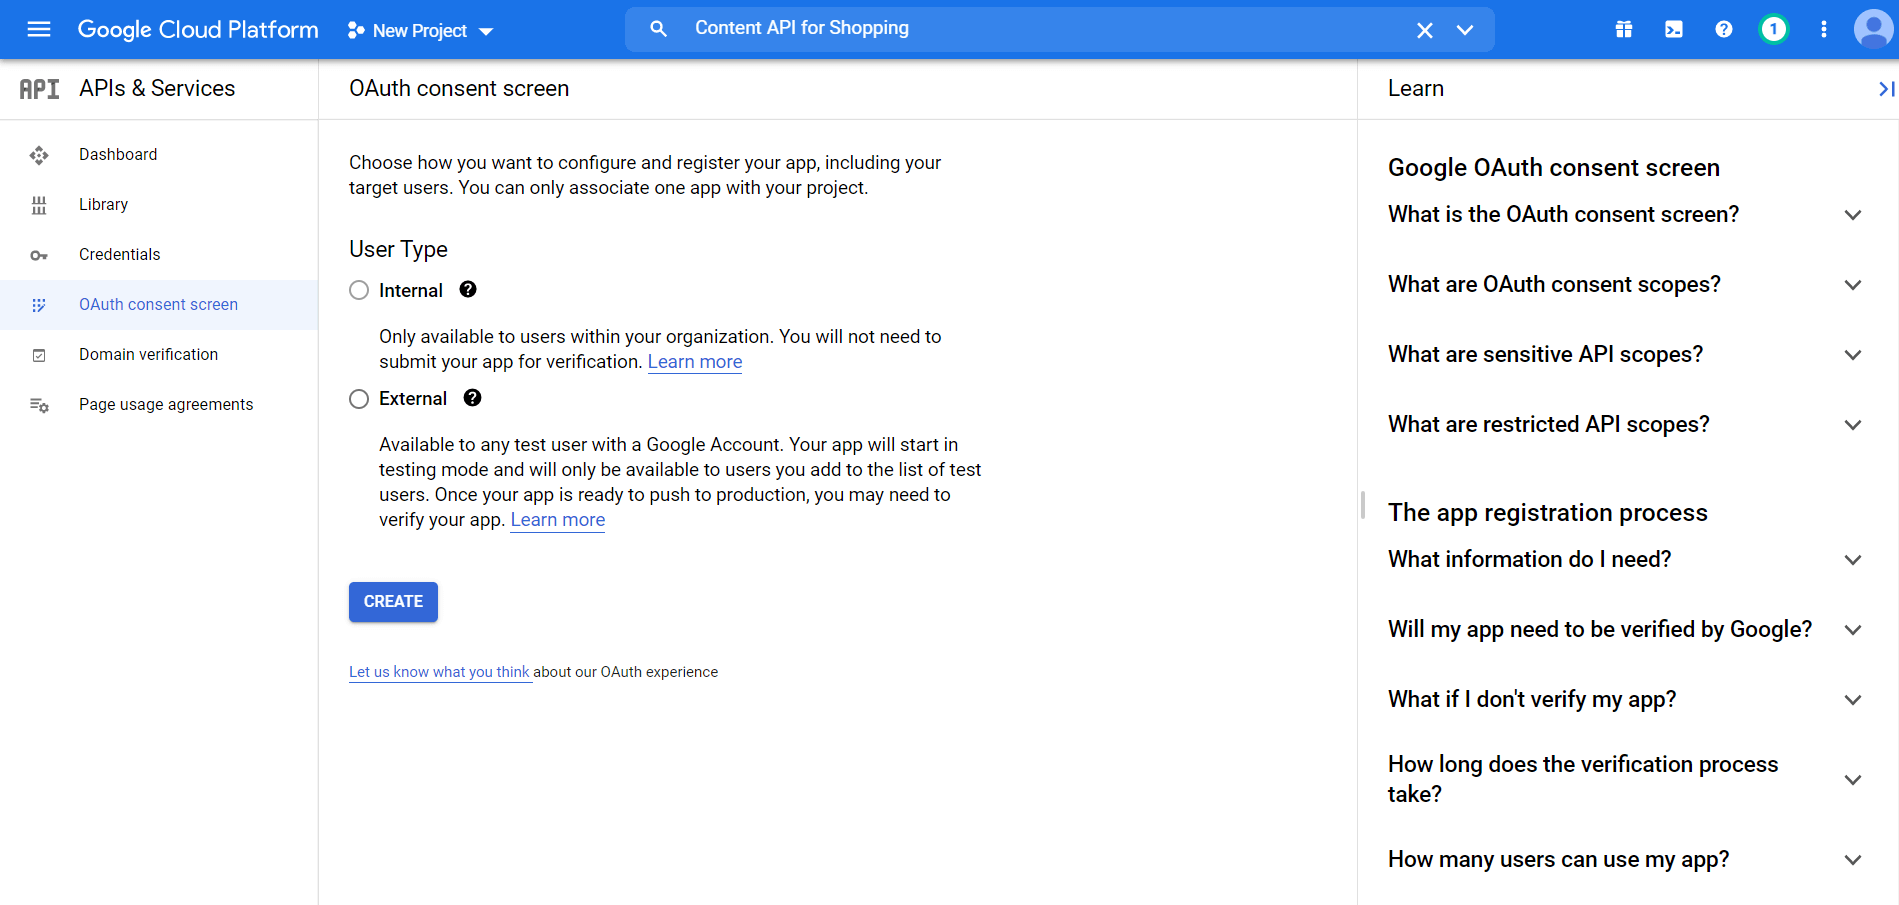
2. Here click on the Credentials menu option from the left side of the window and then click on the “Configure Consent Screen” button on the right side.

3. It will take you to the OAuth consent screen page. Here choose External and click on Create.

Google Cloud Platform OAuth Consent Screen

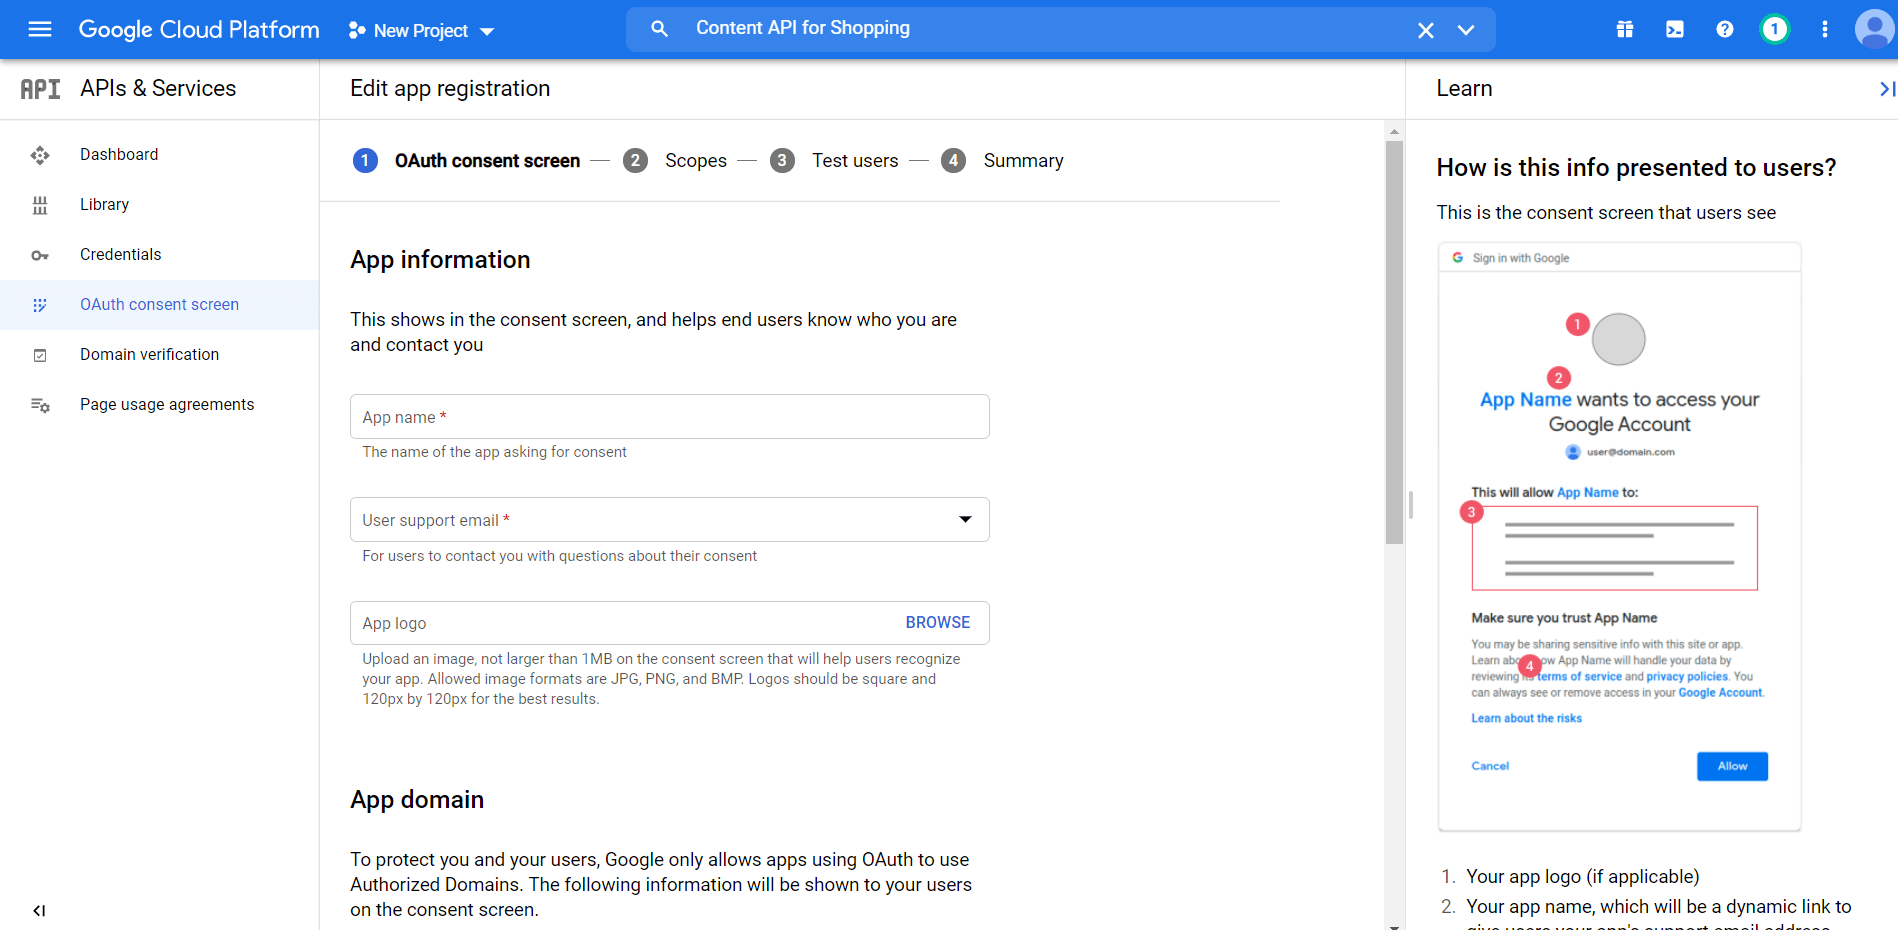
Here you will need the following information:
–App Information – Give a name to your app and provide your support e-mail address. You may
also, upload a logo for your app.
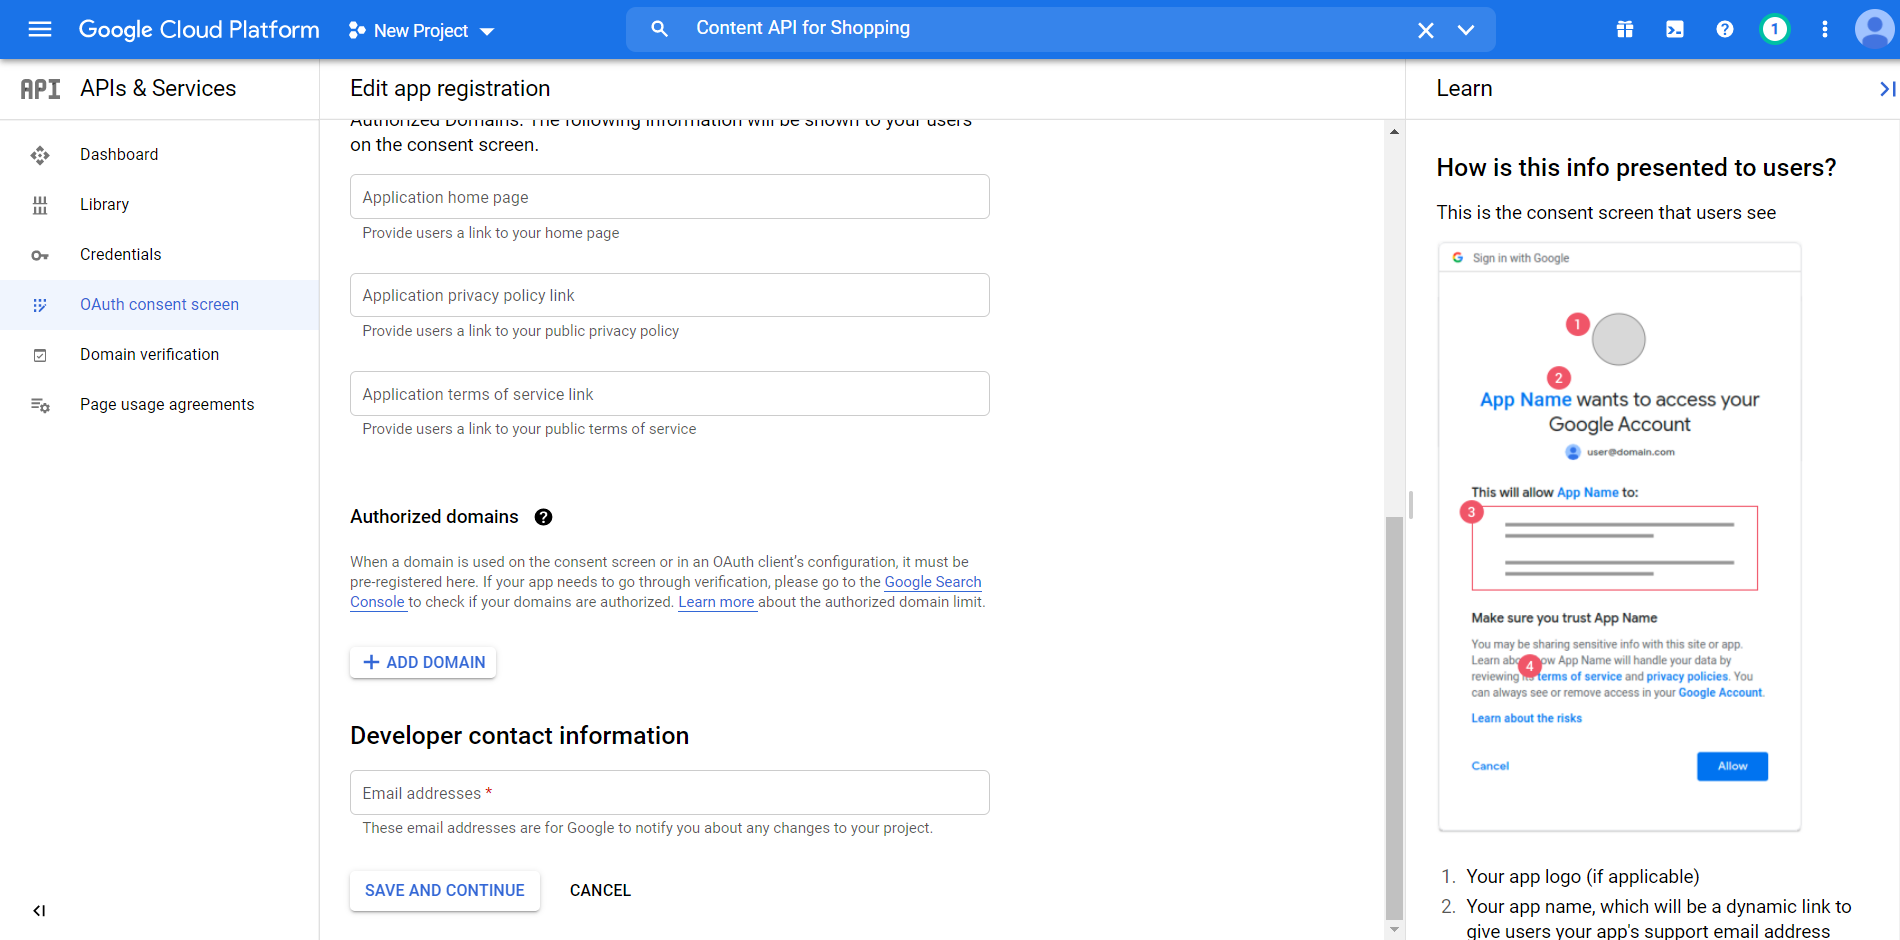
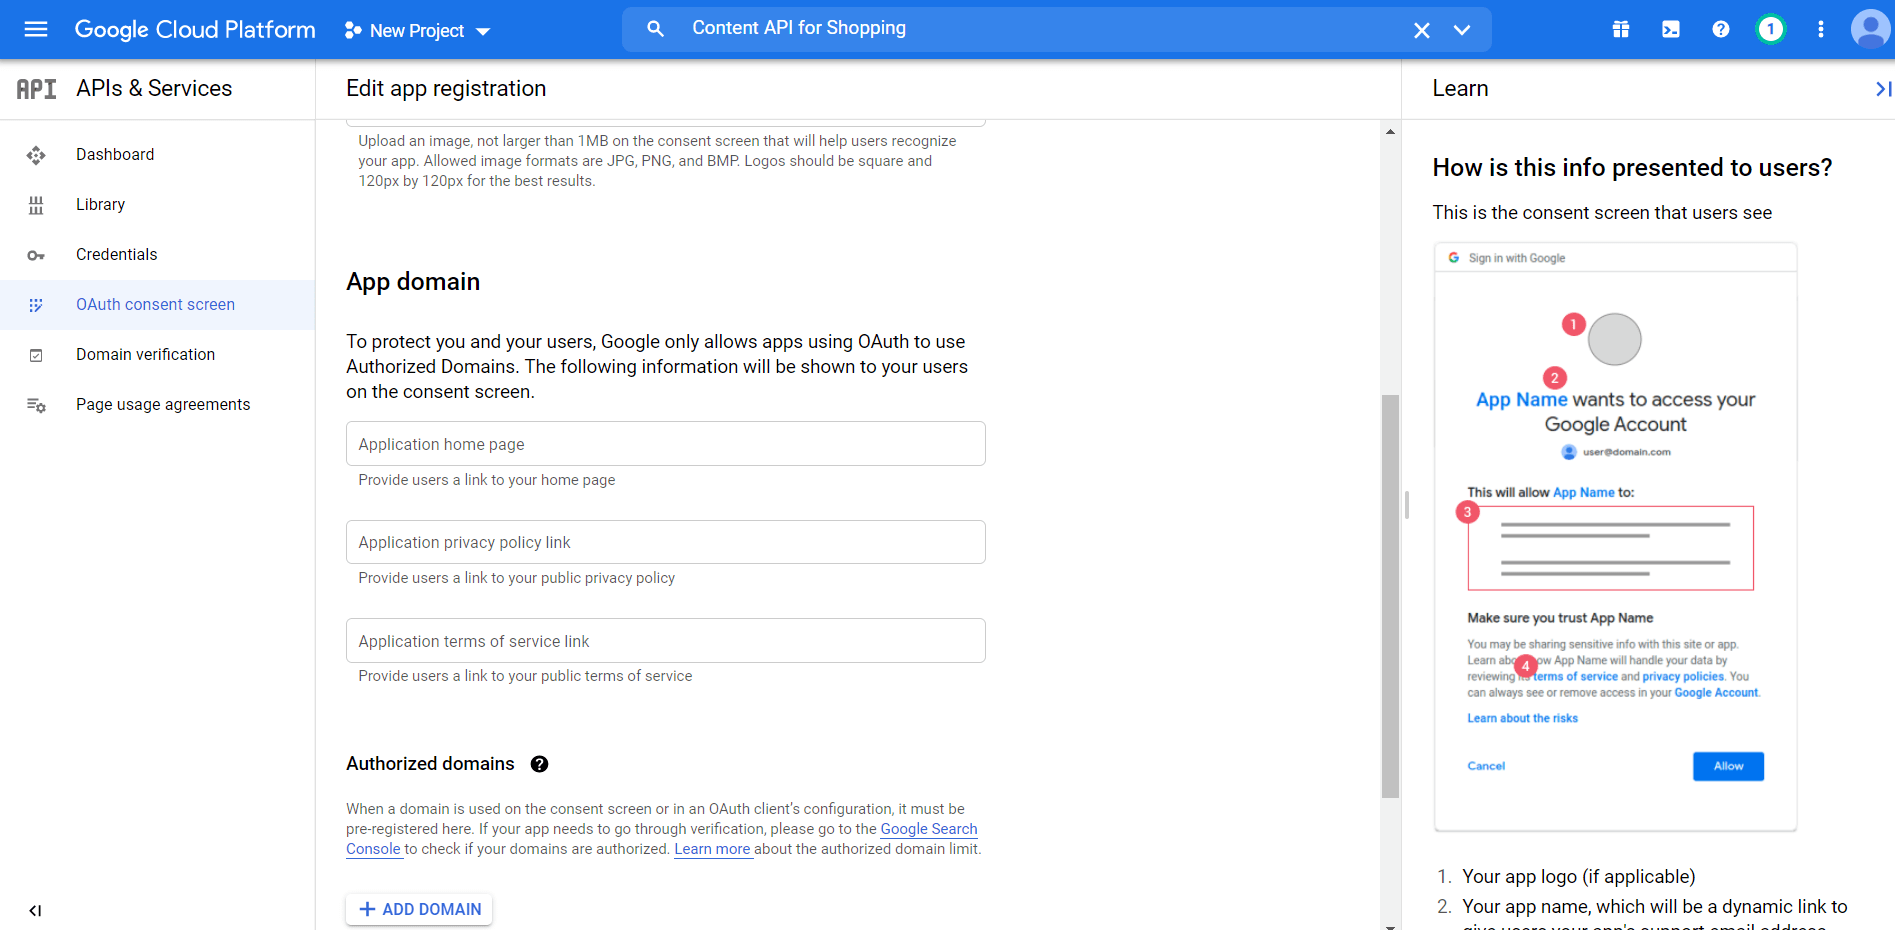
-App domain – Here you may provide links to your site’s home page, privacy policy page, and Terms of
Service page. Then click on the Add Domain button and submit your website’s domain name without ‘“https://www.”. (If you have an authorized domain, then this may already be added by default). FYI: The domain you submit here must be a top-level domain, I.e. it should be a normal domain with a .com, .org, or other such cases. So a dev server domain such as “dev.website.com” will not be accepted.
-Developer contact information – Here you may use a personal e-mail to get Google notifications.

–App Information

How To Auto-sync Product Feed To Google Merchant Center 1

–Developer contact information

How To Auto-sync Product Feed To Google Merchant Center 2

-App domain

How To Auto-sync Product Feed To Google Merchant Center 3

4. Once you set the values, click on Save And Continue.

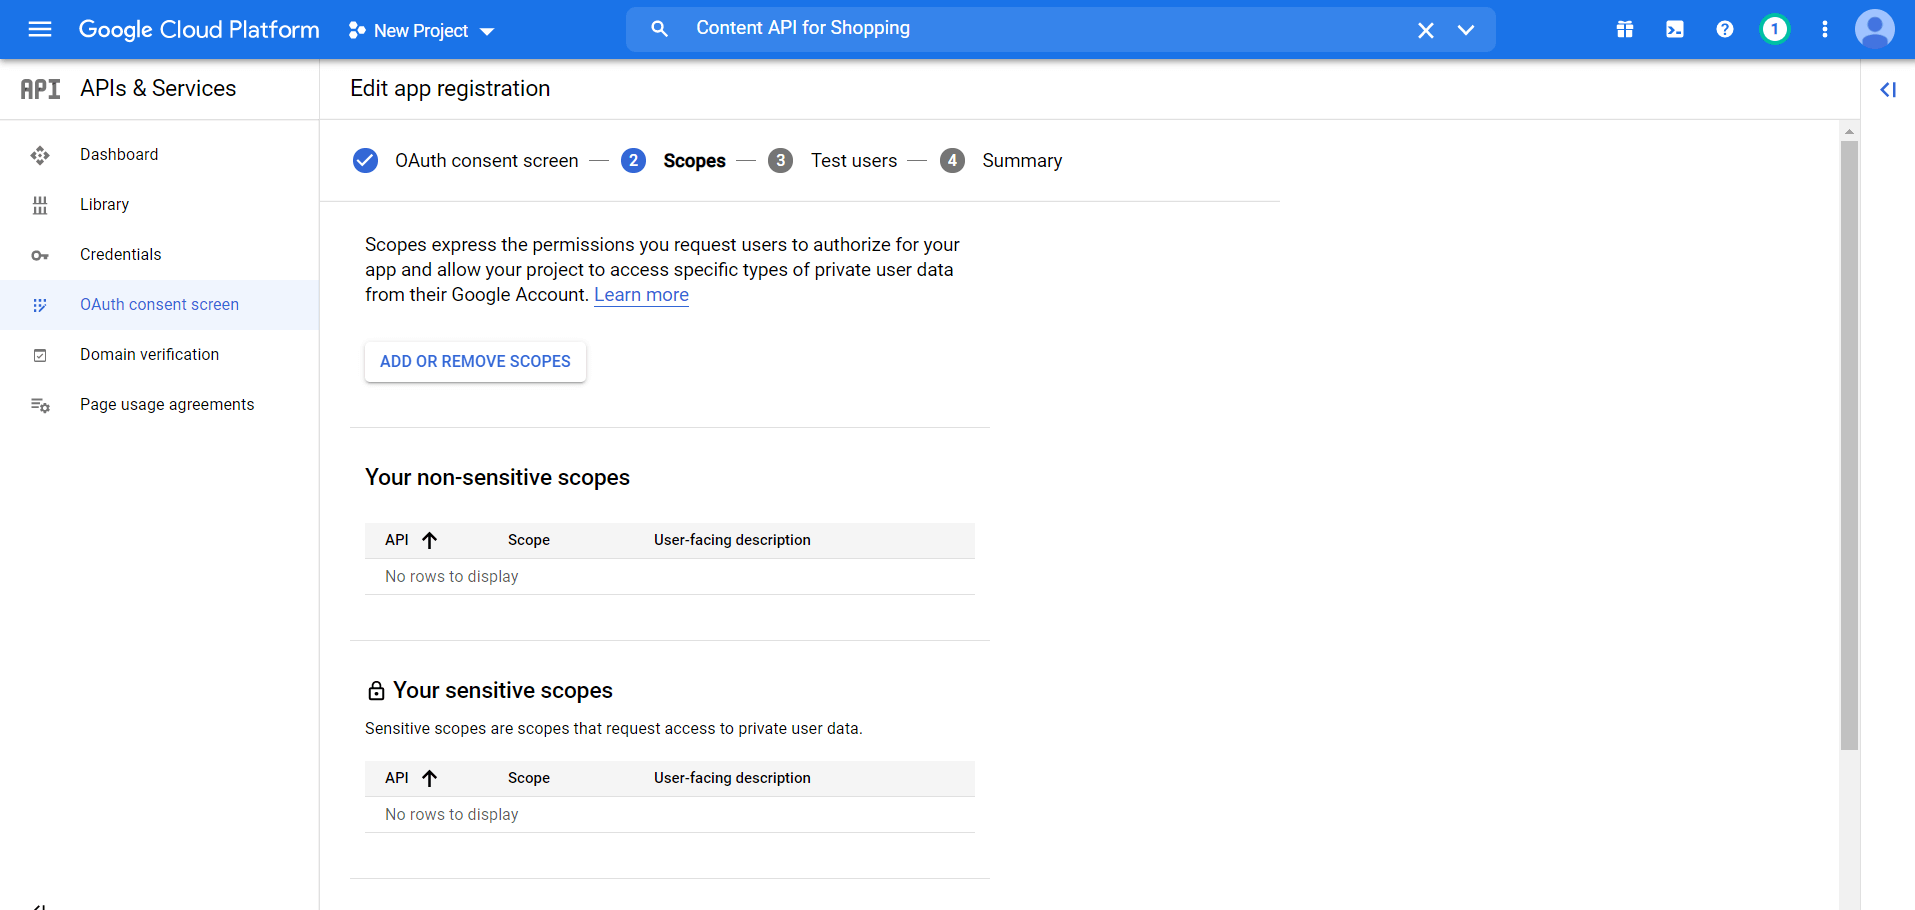
Next, it will take you to the Scopes tab. Simply ignore and click on Save And Continue.

How To Auto-sync Product Feed To Google Merchant Center 4

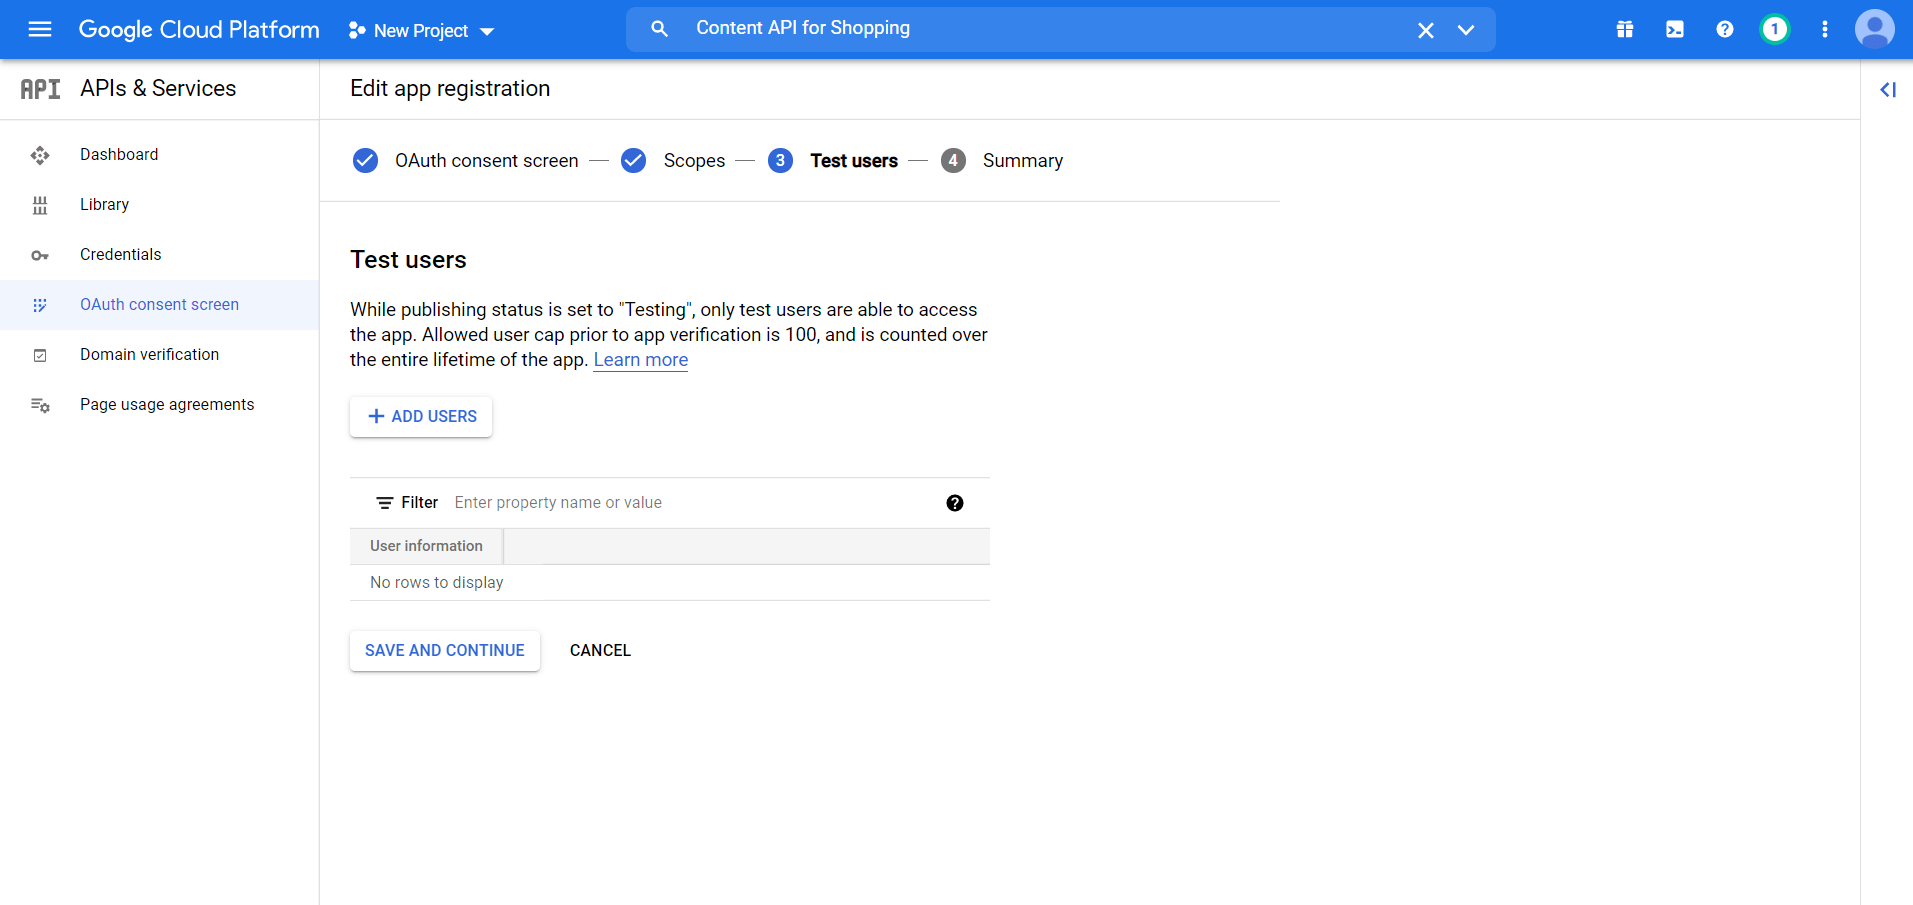
5. Next, the Test users tab, you may ignore that as well and click on Save And Continue. And then click on the Back to Dashboard button.

How To Auto-sync Product Feed To Google Merchant Center 5

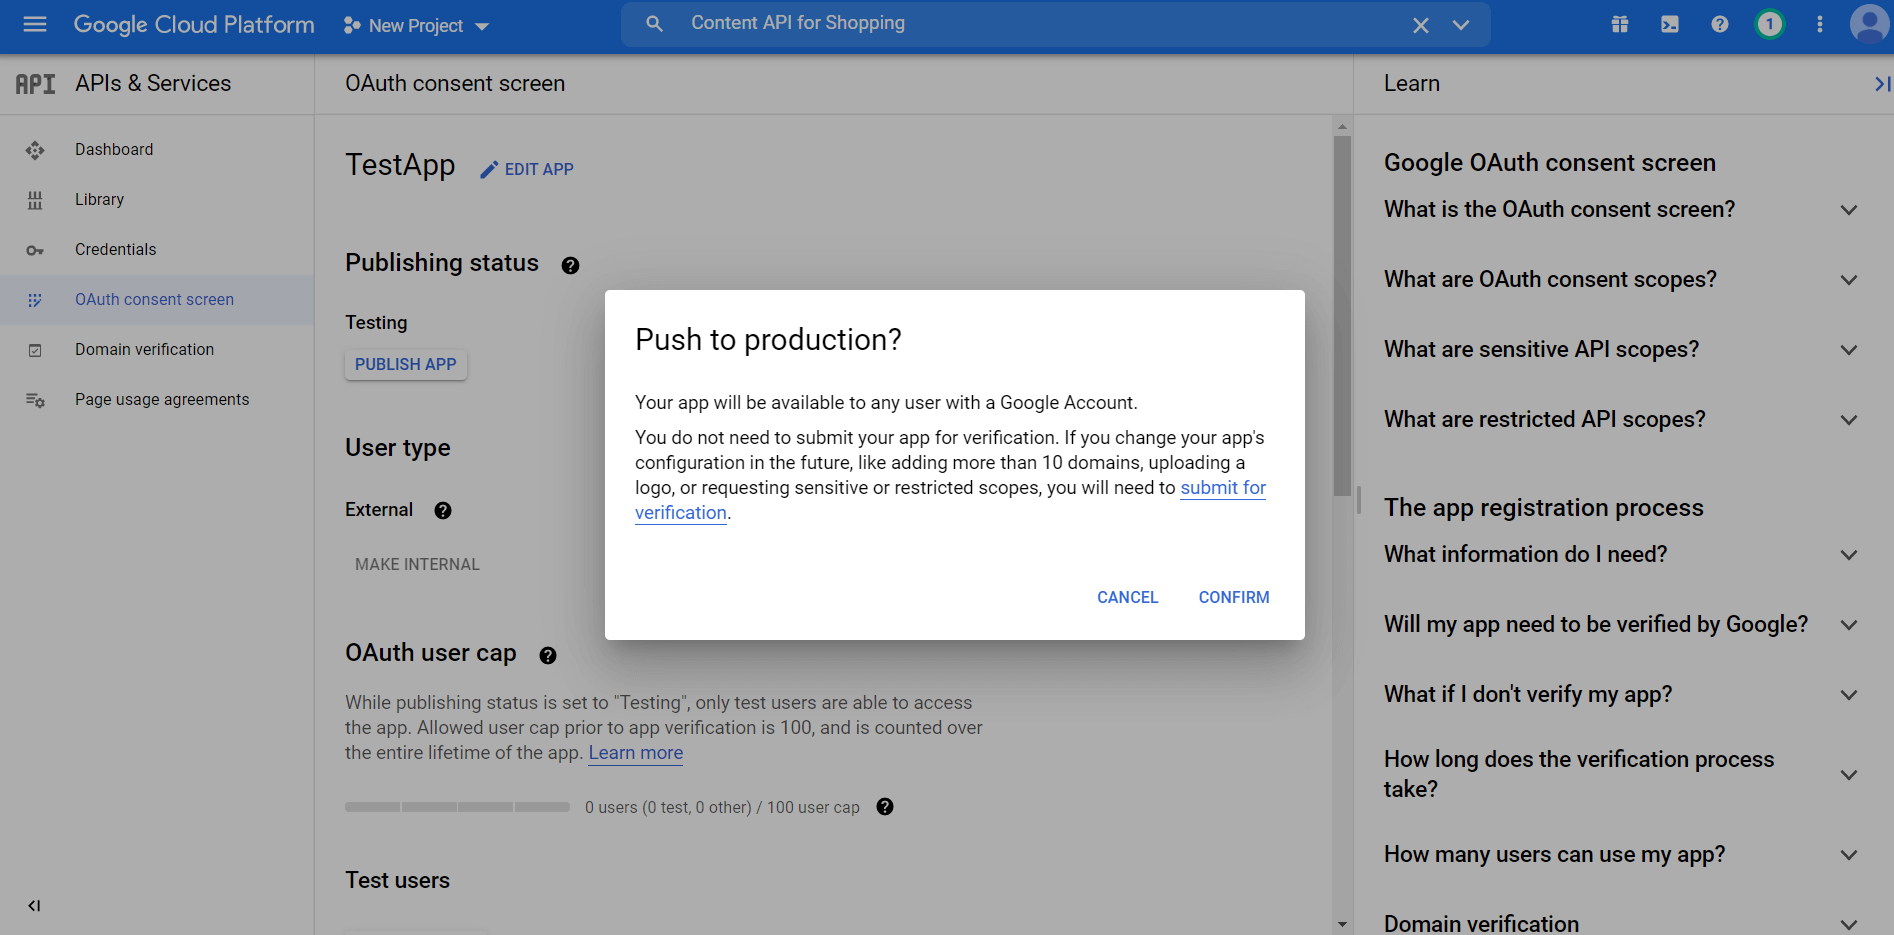
6. Now it will show you an overview of your App and that it is still under testing mode. Here, under Publishing Status, click on Publish App.

How To Auto-sync Product Feed To Google Merchant Center 6

7. Click CONFIRM from the Push to the production dialog box.

How To Auto-sync Product Feed To Google Merchant Center 7

Step 4: Create Credentials & Authorize With Google Merchant Center #

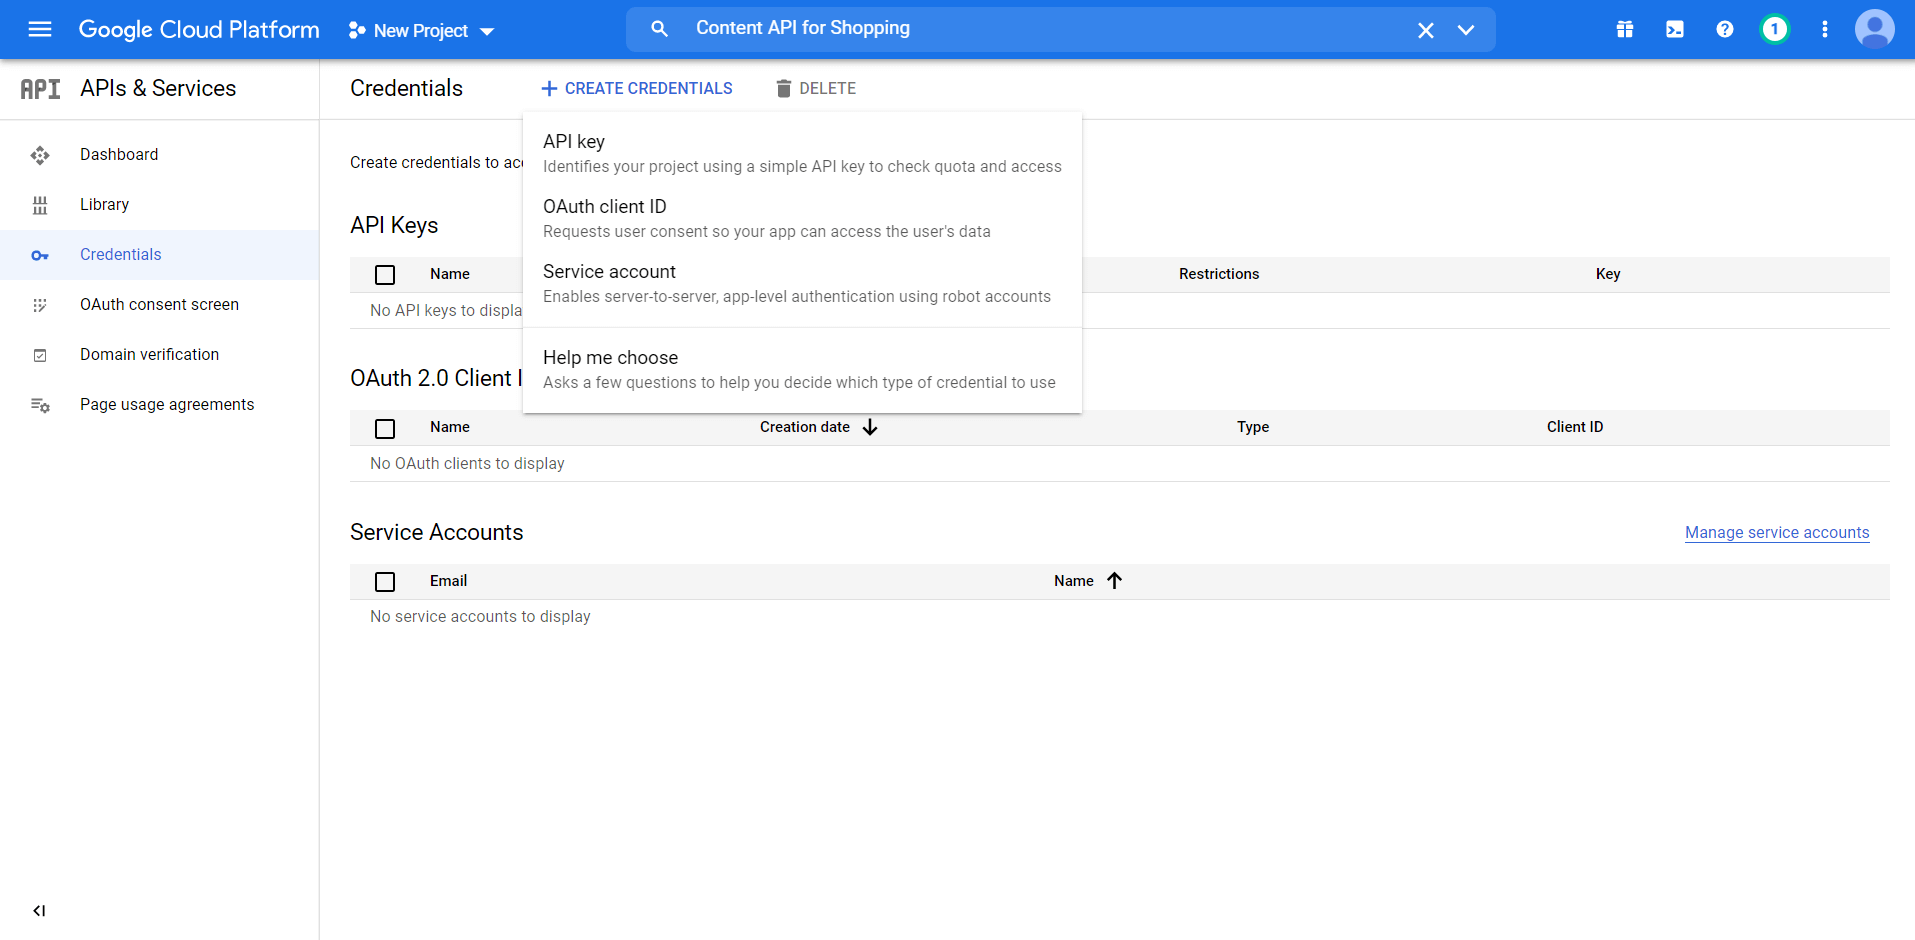
1. Go to the Credentials menu on the left side and click on Create Credentials.

How To Auto-sync Product Feed To Google Merchant Center 8

2. Choose OAuth client ID.

How To Auto-sync Product Feed To Google Merchant Center 9

3. Give a name to the Application Type.

How To Auto-sync Product Feed To Google Merchant Center 10

4. Now, on a new tab, go to your website’s dashboard.

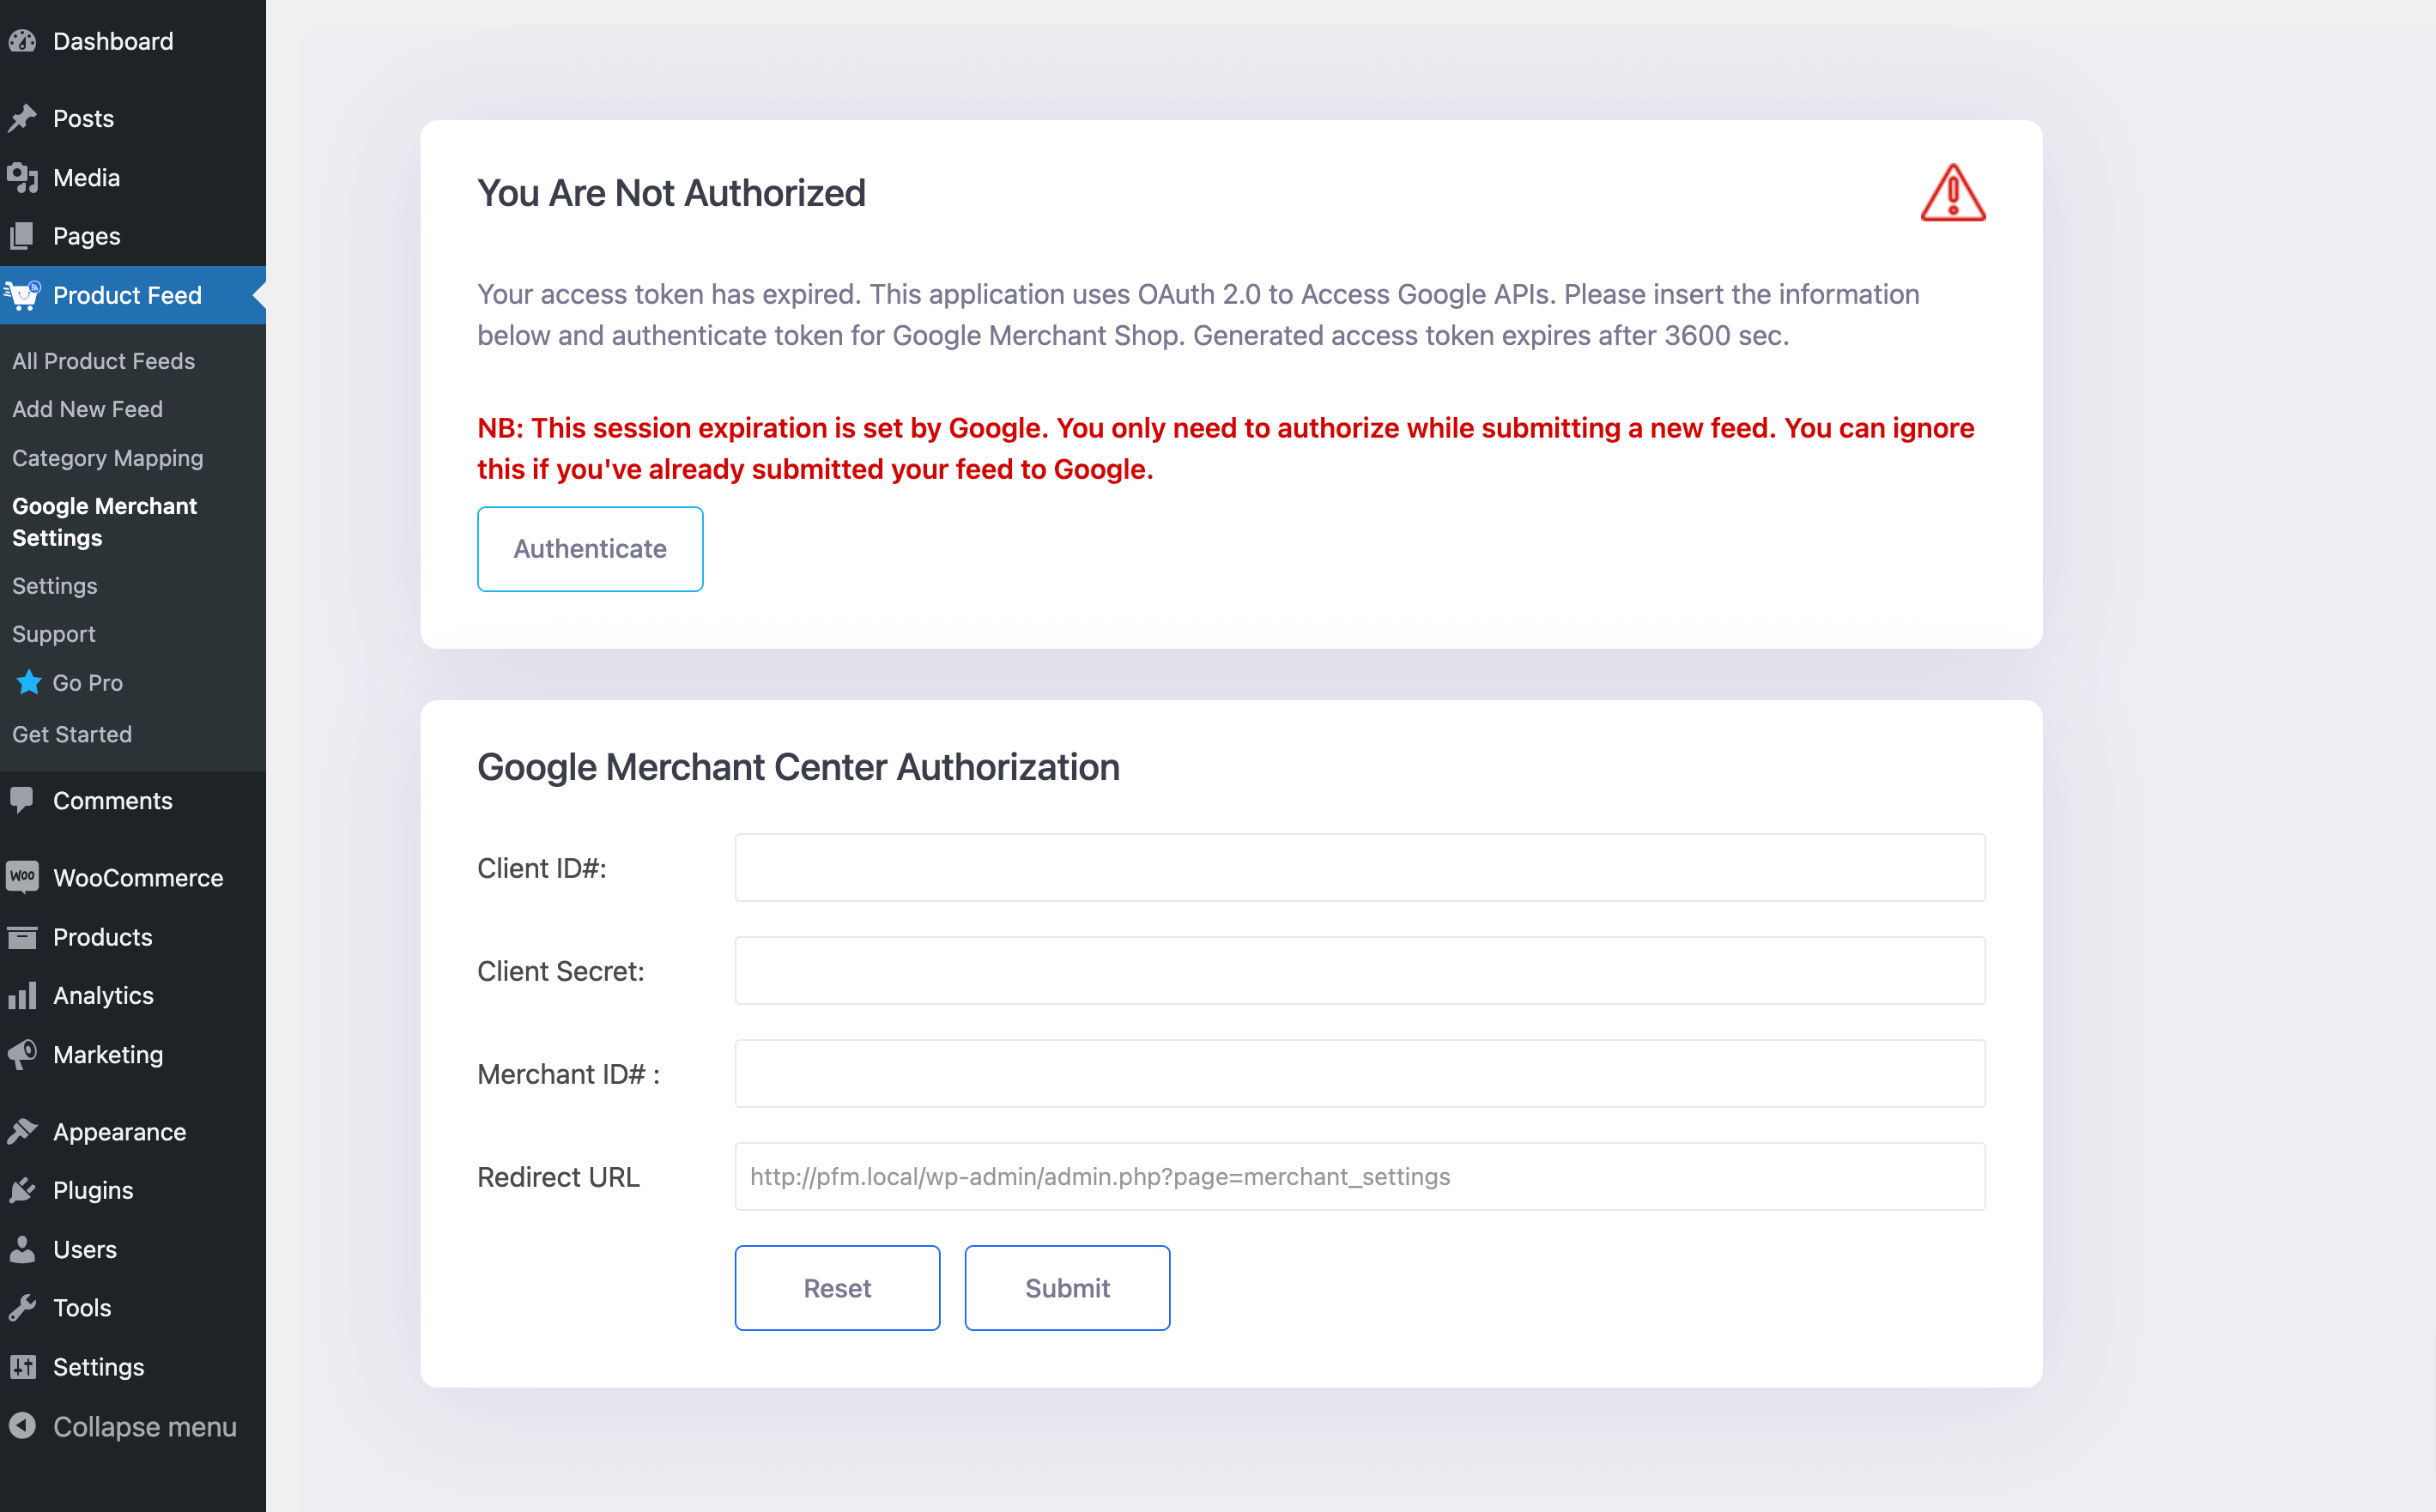
Go to Product Feed > Google Merchant Settings. Here copy the Redirect URL from the Redirect URL field.

Product Feed Manager Redirect URL For Google

5. Now go back to your Google console tab.

Click on ADD URI for Authorized redirect URIs. Here add the Redirect URL that you just copied from the plugin. Then click on Create.

How To Auto-sync Product Feed To Google Merchant Center 11

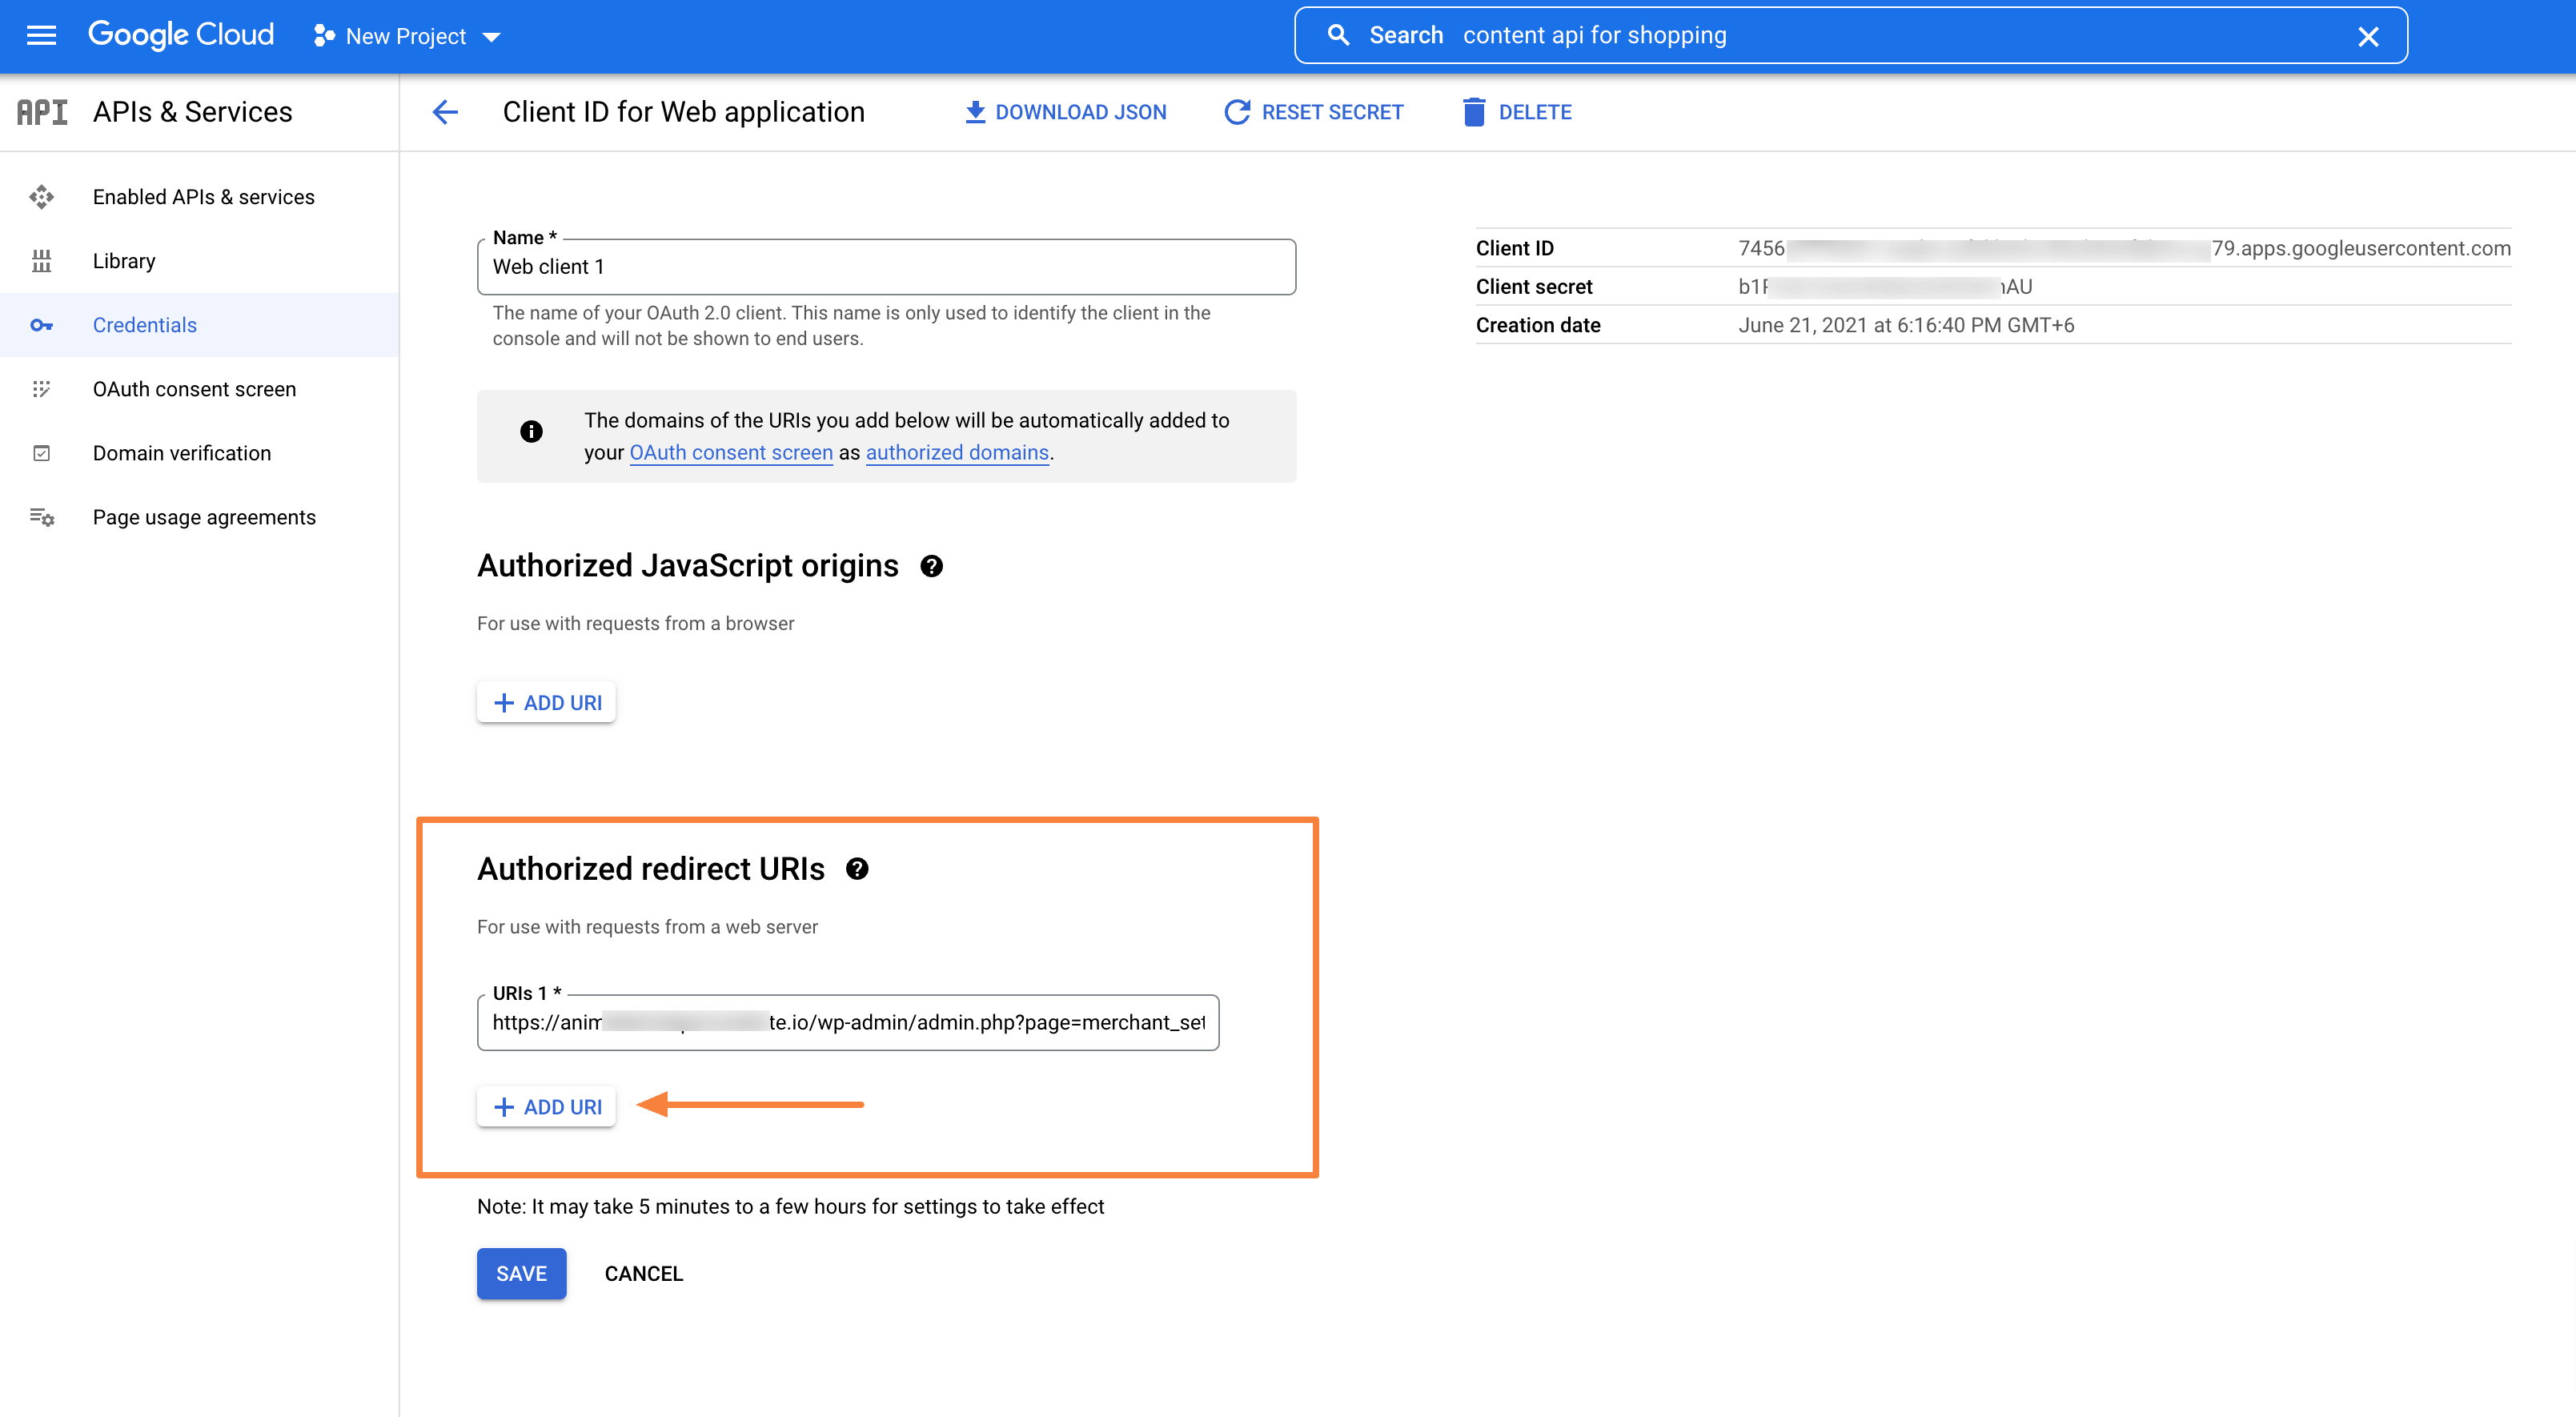
6. Your OAuth client will be created and a Client ID and Client secret will be generated. Copy them.

Google Console Authorized Redirect URIs Options

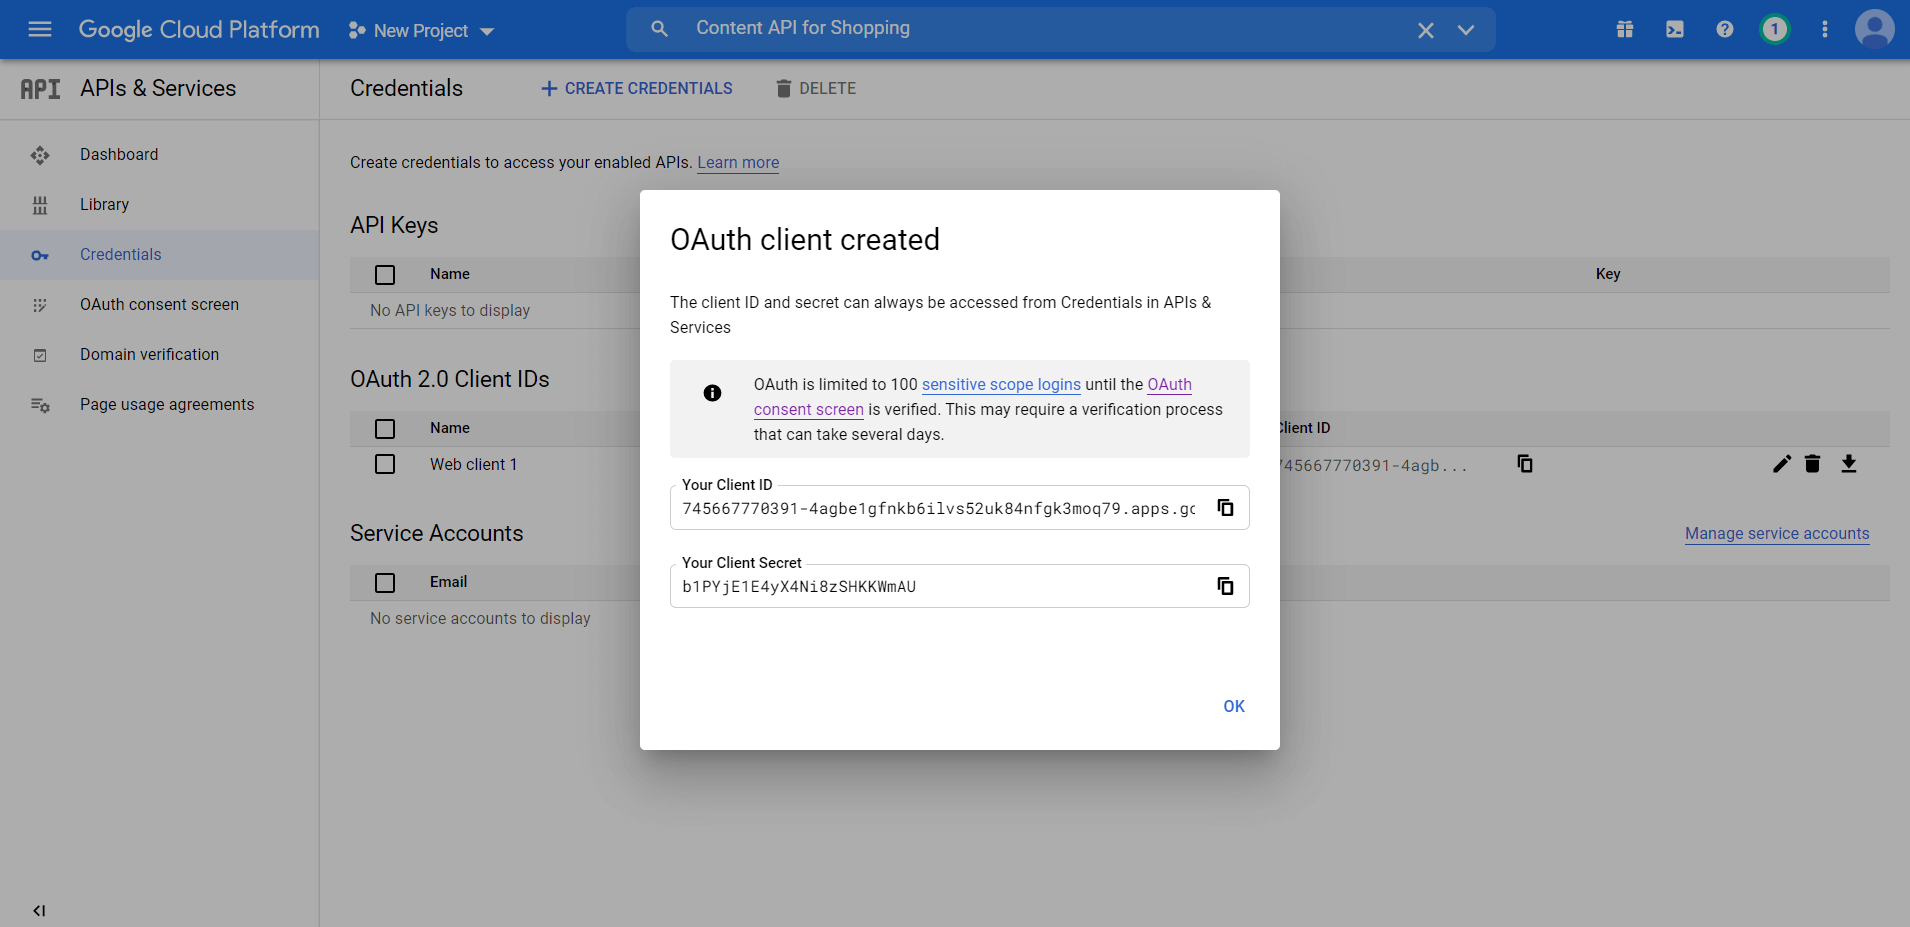
7. Copy the Client ID and Client Secret, go to Tab where you have the Plugin’s Google Merchant Settings page open, and paste them into the respective fields.

Product Feed Manager - Google Merchant Center Authorization Section

8. Now, on another tab, go to https://merchants.google.com/ and log in to your Google Merchant Account. (Make sure your Google Merchant Account Settings are properly configured). Collect your Merchant ID from the top right corner of the window.

Google Merchant Center Merchant ID

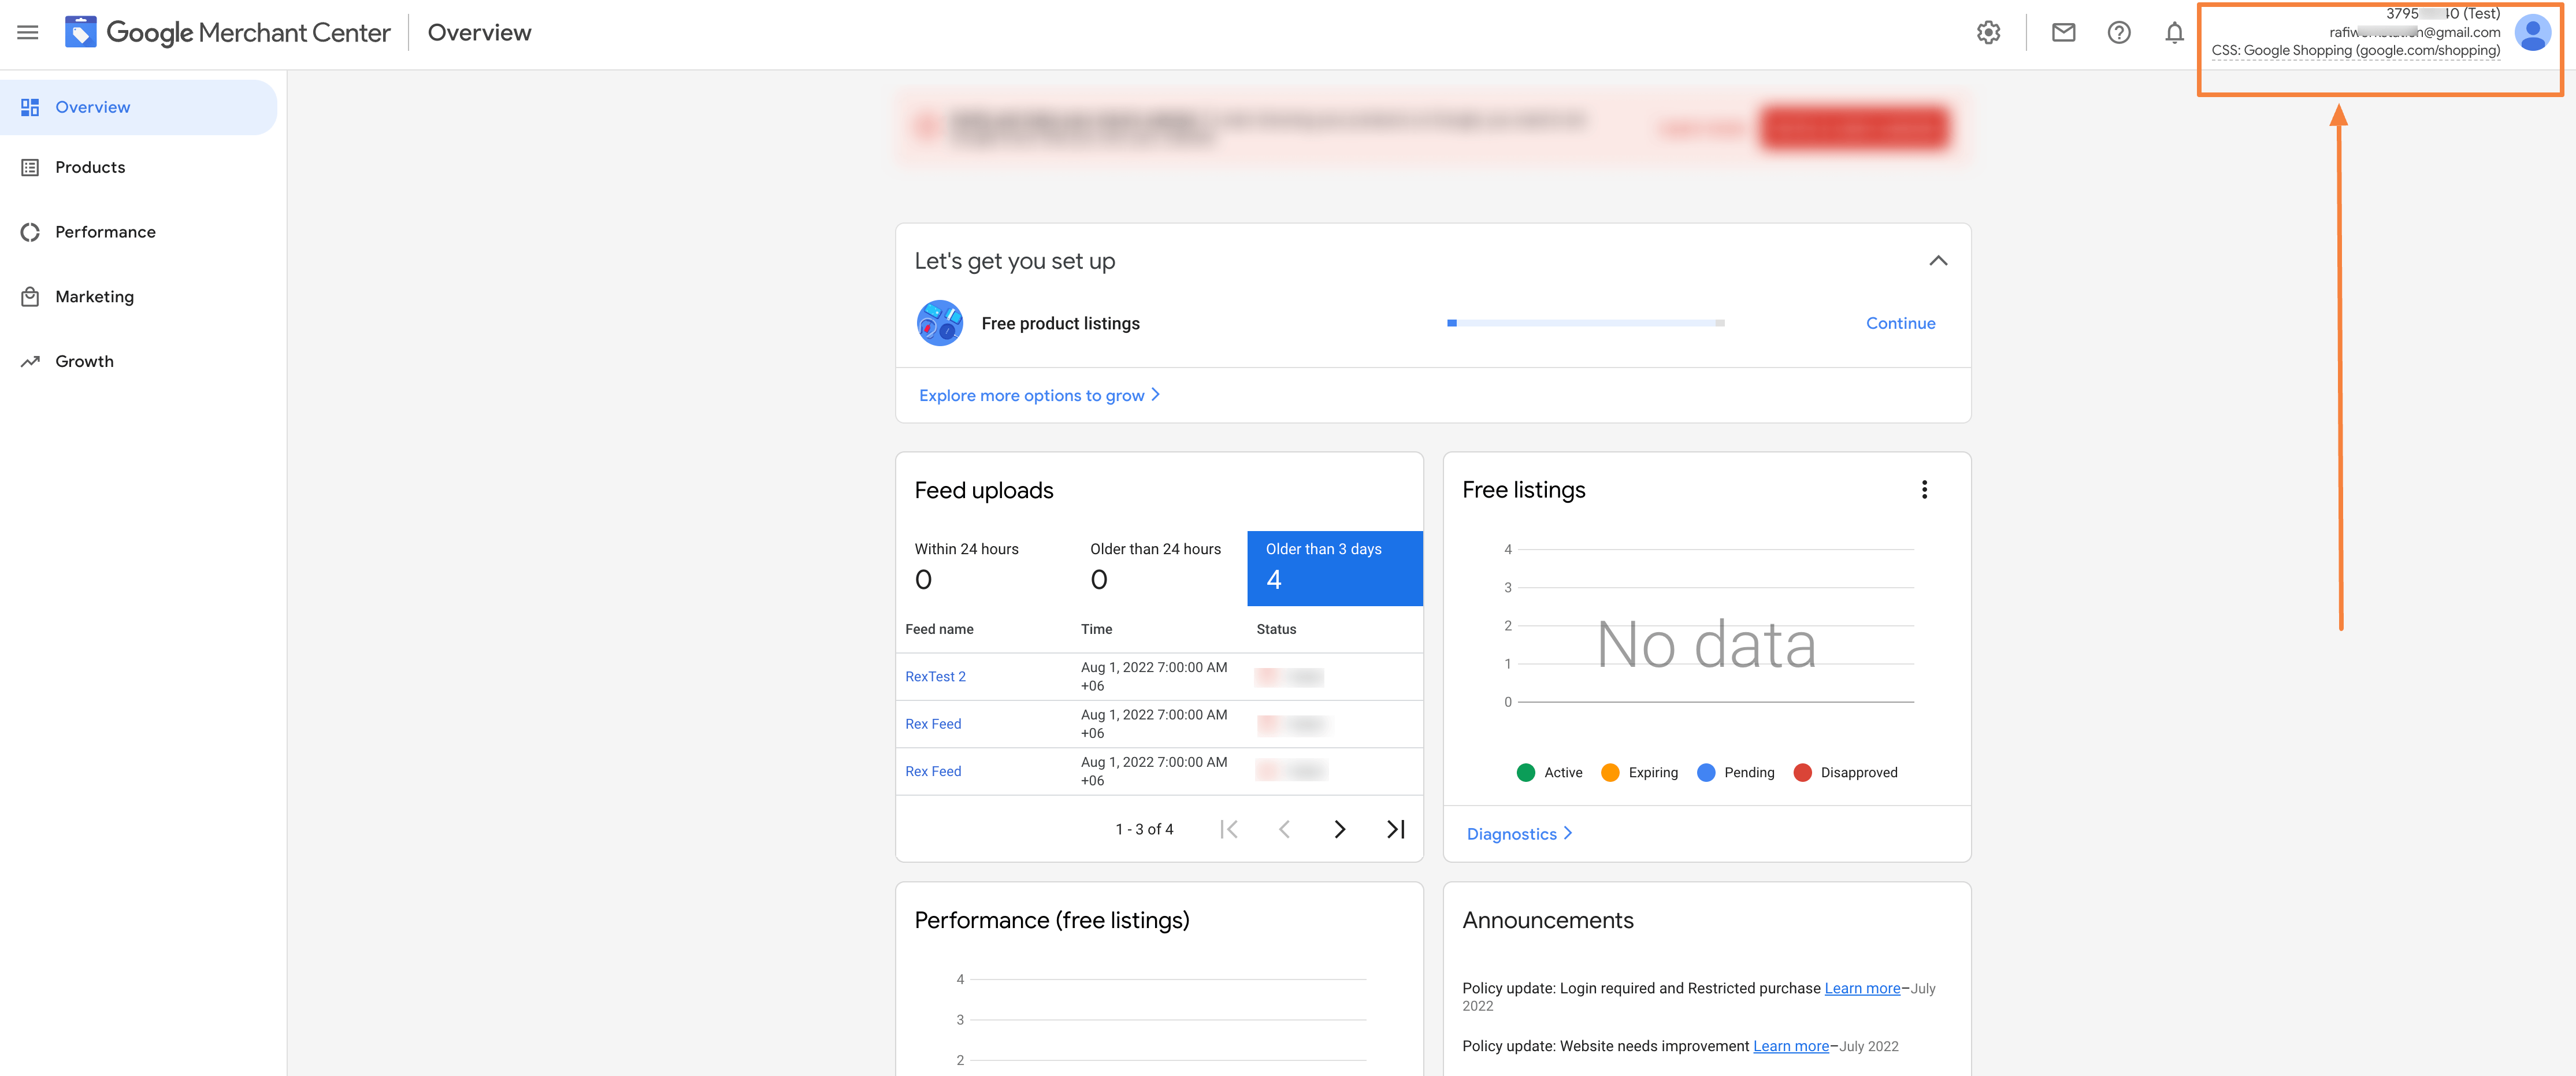
9. Go back to the Tab where you have the Plugin’s Google Merchant Settings page open and paste the Merchant Id in its Merchant ID field.

Product Feed Manager - Google Merchant Center Authorization Section

10. Click on Submit and a section will appear above asking you to Authenticate. Click on it and it will
confirm that you are authorized.

Step 5: Send Feed to Google Merchant Center #

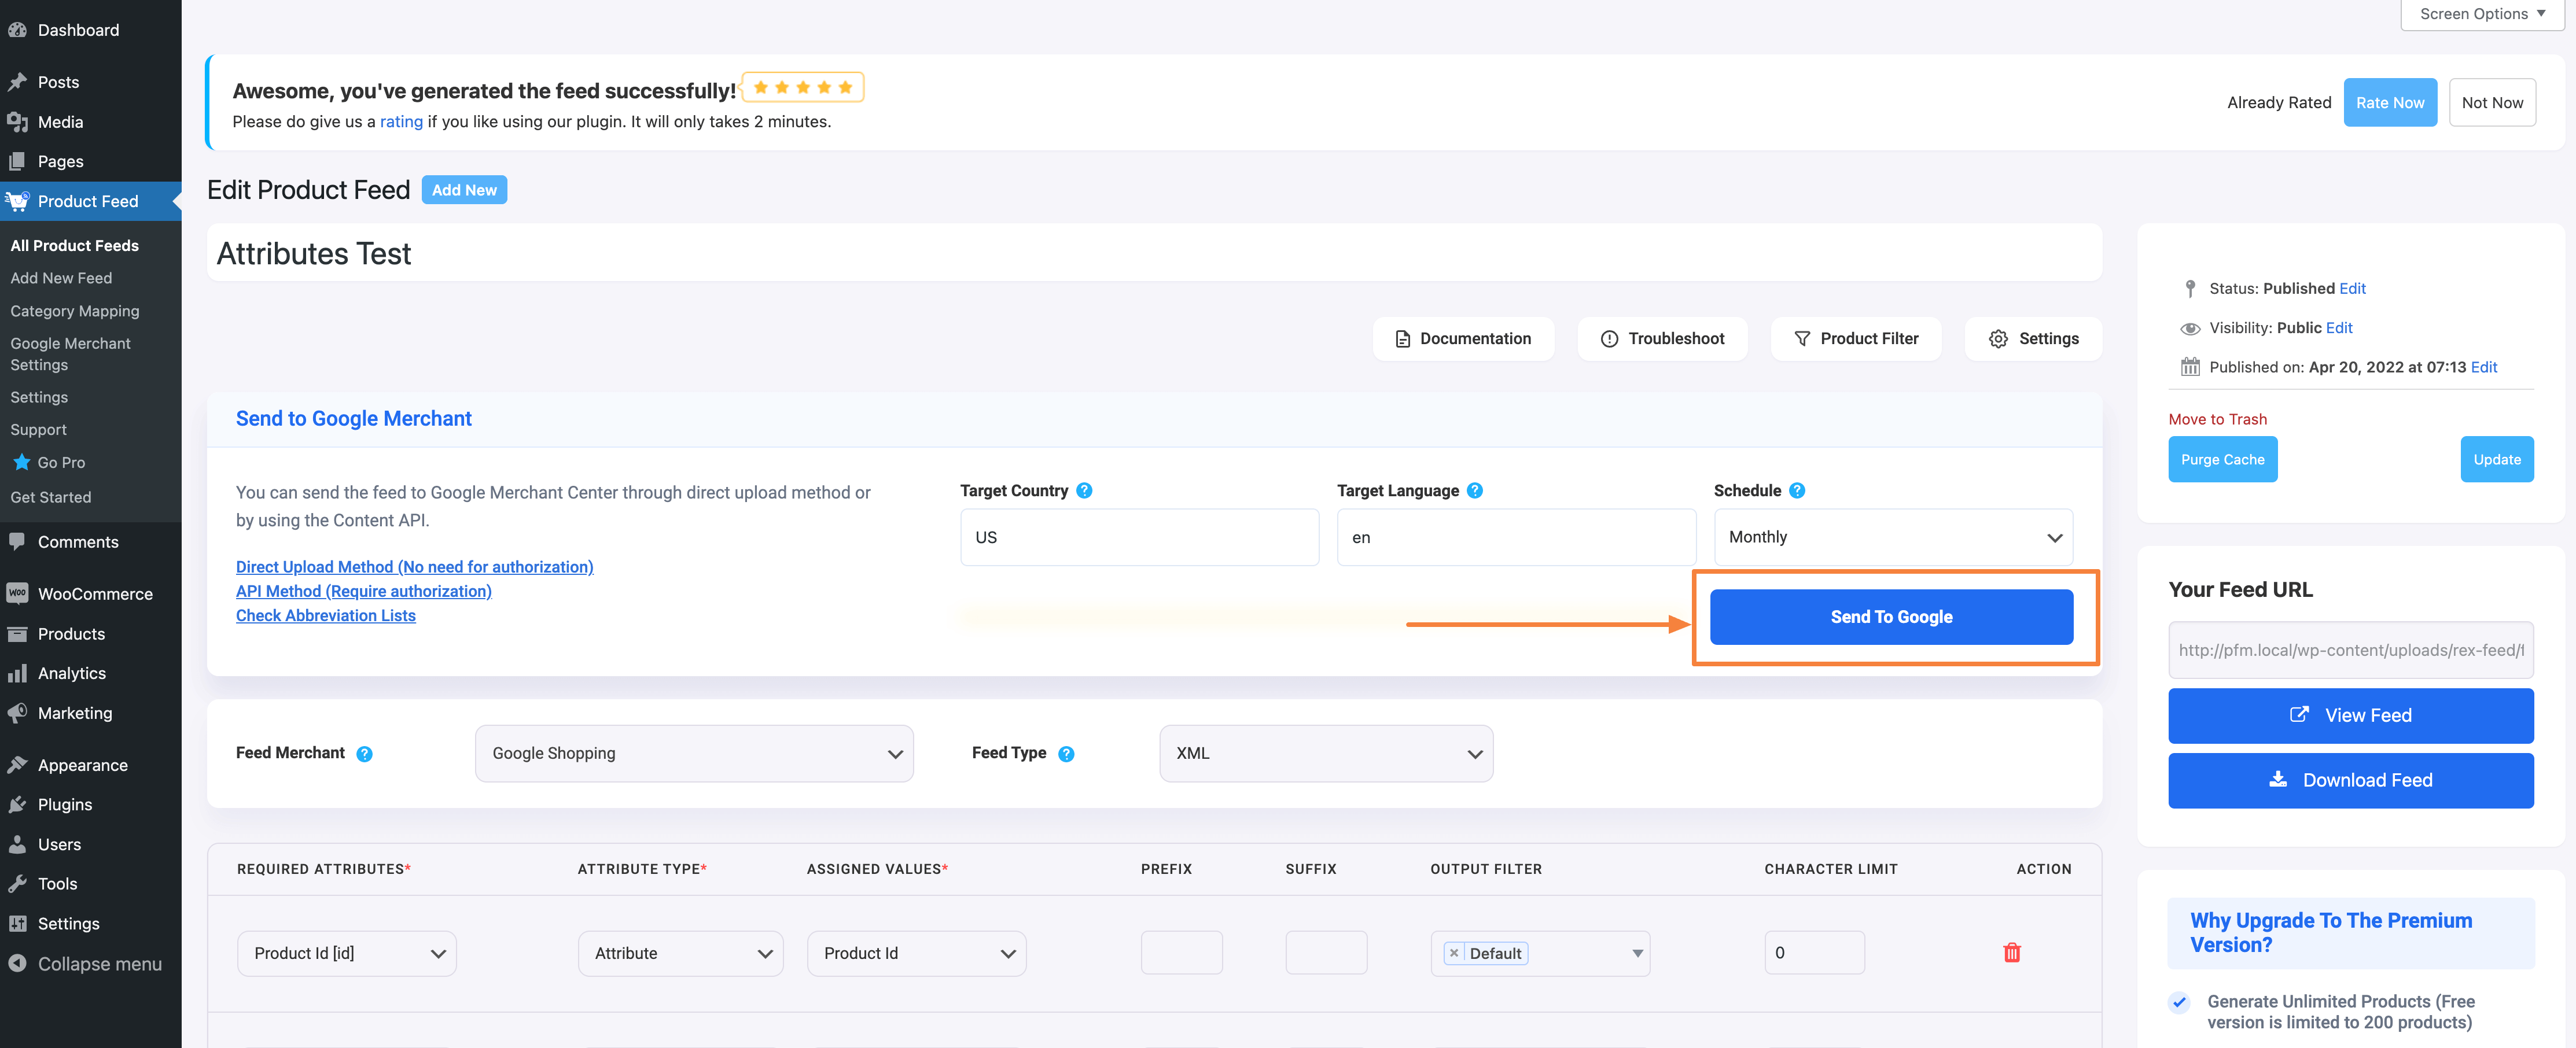
11. Once you are authorized with Google Merchant Center, now when you generate a Google feed, you will get an option Send to Google under the feed title. Select a schedule, and click on Send To Google and your feed will be sent to Google Merchant Center.

Product Feed Manager - Send To Google Option

That’s it. You have set up an Auto-sync successfully and your products will be visible on Google Merchant Center after being processed by Google

Updated on August 21, 2023

What are your Feelings

  • Happy
  • Normal
  • Sad
Share This Article :
  • Facebook
  • X
  • LinkedIn
  • Pinterest
Table of Contents
  • Step 1: Create a Project
  • Step 2: Enable Content API for Shopping
  • Step 3: Configure OAuth Consent Screen
  • Step 4: Create Credentials & Authorize With Google Merchant Center
  • Step 5: Send Feed to Google Merchant Center

© 2025 RexTheme

Privacy Policy

Powered by WordPress

To the top ↑ Up ↑

You were not leaving your cart just like that, right?

Enter your email below to save your shopping cart for later. And, who knows, maybe we will even send you a sweet discount code.

The email is invalid.
Thank you. Happy shopping.
No Thanks!
  • NL
  • DE