Skip to content
RexTheme
  • Plugins
    • WP VR
      WP VR – Quality WP Virtual Tour CreatorCreate stunning virtual tours easily, on your own, using 360 Panoramas.
    • Product Feed Manager
      Product Feed Manager For WooCommerceMaximize Sales With The Largest Marketplaces.
    • Cart Lift
      Cart Lift To Recover Abandoned CartsRecover abandoned carts for your WooCommerce Store easily.
    • Checkoutify
      Checkoutify Checkout Field Manager for WooCommerceThe Ultimate WooCommerce Checkout Customizer.
    • Catalog Mode for WooCommerce
      Catalog Mode For WooCommerceTurn your WooCommerce store into a product showcase catalog.
    • Dynamic Discount
      Dynamic Discount for WooCommerceBoost your AOV significantly with custom dynamic discount offers.
    • Advanced Shipping for WooCommerceSet conditional shipping and boost customer satisfaction.
    • Marketplace Auto-sync for WooCommerce
      Marketplace Auto Sync for WooCommerceAuto-sync products with leading marketplaces.
    • Product Recommendations
      Product Recommendations for WooCommerceImprove the shopping experience across your entire store.
    • View All Plugins
  • Bundle
  • Blog
  • Resources
    • Docs
    • Support
    • Brand Assets
  • My Account
    • Log In
  • NL
  • DE

How can we help you?

Documentation

Cart Lift

16
  • Getting started
    • Introduction To Cart Lift
    • Install And Activate Cart Lift
    • A Basic Plugin Overview – Cart Lift
    • Configure And Use Cart Lift Effectively
  • Troubleshooting Common Issues
    • Troubleshooting For Common Issues – Cart Lift
  • Upgrade To Cart Lift Pro
    • How To Upgrade To Pro – Cart Lift
    • License Plan Upgrade Guide for Cart Lift Pro
  • Abandoned Cart Recovery Conditions
    • How To Track Abandoned Carts Automatically
    • How To Set Up Your Abandoned Cart Recovery Campaign
    • How To Use Twilio SMS Service To Recover Abandoned Carts – Cart Lift Pro
    • How To Get Notifications For Abandoned Carts And Recovery
    • Get Full Analytics Report On Recovery Campaign
    • Shortcodes for Email Fields in Cart Lift
    • How to Pause / Resume Individual Abandoned Cart Recovery
    • How To Set Condition To Automatically Delete Abandoned Orders After A Particular Number Of Days
    • Exclude Carts From Abandoned Cart Recovery Campaigns Based On Conditions

Product Feed Manager

103
  • Getting Started
    • Introduction To Product Feed Manager For WooCommerce
    • Getting Started With Product Feed Manager For WooCommerce
    • How To Install And Activate PFM
    • How To Generate Product Feed For The First Time
    • Basic Plugin Overview – Product Feed Manager Pro WooCommerce
    • How To Generate A Custom Product Feed Easily
    • Product Feed Manager – Documentation
  • Upgrade To PFM Pro
    • License Renewal for Product Feed Manager Pro
    • Product Feed Manager VAT/TAX Policy
    • License Plan Upgrade Guide for Product Feed Manager Pro
  • Auto-Sync To Google Shopping
    • How To Auto-sync Product Feed To Google Merchant Center
    • Upload your WooComerce product feed directly to the Google Merchant Center – (No Need For Authorization)
  • Category Mapping
    • How To Use Category Mapping For Product Feed
    • How To Use Category Mapping For Google Product Category
    • How To Configure Category Mapping For Facebook Product Category
  • Feed Generation Instructions
    • How to generate WooCommerce Product Feed for Google With Product Feed Manager
    • How to generate WooCommerce Product Feed for Facebook
    • How to Upload your WooCommerce Products on the Facebook Store
    • How To Create A Feed For eBay MIP
    • How to create a Target Product feed for Target Marketplace
    • How to create a WooCommerce product feed for Wish.com
    • How to create a WooCommerce product feed for Sears Marketplace
    • How to create a WooCommerce product feed for NewEgg Marketplace
    • How to create a WooCommerce product feed for Walmart
    • How to create a WooCommerce product feed for Instagram Catalog
    • How to upload products on Instagram Shop
    • How to generate WooCommerce Product Feed for Amazon
    • How to generate WooCommerce Product Feed for Zbozi
    • How to Generate WooCommerce Product Feed for Skroutz
    • How To Create A Feed For eBay Seller Center
  • Understanding Basic Feed Configuration For Required Attributes
    • Product Feed Optimization with Yoast SEO Product Title, Meta Description and Primary Category
    • How To Add A Static Prefix or Suffix To An Attribute In The Feed
    • How To Add A Custom Attribute To The Feed
    • How To Add Or Remove An Additional Product Attribute In The Feed
    • Learning About Feed File Types And How To Download Or View Feed
    • Optimize Product Feed Data With Effective Output Filters
    • How To Use RankMath Primary Category In The Feed
    • Understanding The Use of Different Price Attributes
    • Understanding And Configuring Feed Attributes and Their Values
    • How To Remove HTML Tags Or Shortcodes From A Feed
    • How To Use UTF-8 Encode To Convert HTMLEntities To Symbols In A Feed Attribute Value
    • How To Convert Symbols To HTMLEntities In A Feed Attribute Value
    • How To Include CDATA In An XML Feed Attribute Tag
    • How To Remove Decimal From Price For Marktplaats Feed
    • How To Replace Space With Hyphen In A Feed Attribute Data
    • How To Use A Custom Field Value In The Product Feed
    • How To Add Currency To Your Product Price
    • How To Use Yoast Primary Category In The Feed
    • How To Exclude Draft Products From The Feed
  • Useful Control Options
    • Add Extensive Custom Fields Of Unique Identifiers For WooCommerce Products
    • Add Custom Fields For Important Product Attributes
    • How To Add Extensive Custom Fields To WooCommerce Products
    • How To Exclude Tax From Structured Data Prices
    • Useful Options On Settings Tab
    • Control Products Per Batch In Batch Processing
    • Connect Facebook Pixel With WooCommerce For Dynamic Ads
    • How to set 5-Minutes Time Interval for Updating Feed
  • Useful Features For Feed Generation
    • How To Exclude Invisible Products / Hidden Products From Product Feed
    • How To Use Category Filter When Generating Product Feed
    • How To Use Tag Filter When Generating Product Feed
    • How To Use Feed Filter Options When Generating Feed
    • How To Schedule Auto-update of Feed On Set Intervals
    • How To Include Variable Products To The Feed
    • How To Include Private Products In Product Feed
    • How To Include Product Variation Term To The Product Name
    • How To Add UTM Parameters To Product URLs
    • How to use the Feed Rule feature to manipulate attribute values
    • How to combine multiple attributes values together with the Combined Attributes feature
    • How To Set Custom Time Intervals For Auto-Feed Update
    • How To Use Custom Filter When Generating Product Feed
    • How to use the Product Filter option to include/ exclude specific products
    • How to use the Feed Rules feature to manipulate your product price
  • Fix JSON-LD Structured Data For Variable Products
    • Fix WooCommerce (JSON-LD) Structured Data For Approval In Google Shopping
  • Others
    • How To Include Brand Name In Feed Using Perfect Brands For WooCommerce And PFM
    • Enable Error Log for Product Feed Manager For WooCommerce
    • How to include Shipping values into WooCommerce product feed (Google & Facebook)
    • How to include Tax values into your WooCommerce Product Feed (Google & Facebook)
    • How to generate a WooCommerce product feed with the top sold products to sell more
    • Update your feed only if any changes were made to any of your products
    • How to convert product feed price with WPML / WCML
    • How to generate product feed in multiple languages with Polylang
    • How To Generate Product Feed In Multiple Languages With WPML
    • How To Include Discount Rules In The Feed Using Discount Rules For WooCommerce And PFM
    • How to generate product feed in multiple languages with TranslatePress
  • Troubleshoot
    • Google Shopping Product Feed Specification – Attributes List
    • Troubleshooting Common Issues – Product Feed Manager For WooCommerce
  • All Google Feeds
    • How to create a WooCommerce product feed for Google Remarketing (DRM)
    • How to create a WooCommerce product feed for Google Local Products
    • How to create a WooCommerce product feed for Google Local Products Inventory
    • How to create a WooCommerce product feed for Google Manufacturer Center
    • How to create a WooCommerce feed for Google Merchant Center Promotion Using Product Feed Manager
    • How to create a WooCommerce product feed for Google Shopping Actions
    • How to create a WooCommerce product feed for Google Dynamic Display Ads (Google Ads)
    • How to create a WooCommerce product feed for Google Express (Former Google Shopping Actions Program)
    • How to create a WooCommerce product feed for Google Local Inventory Ads
    • How to create a WooCommerce product feed for Google Custom Search Ads
    • How to create a WooCommerce product feed for Google Dynamic Search Ads
    • How to create a WooCommerce product feed for Google Review

WP VR

89
  • Getting Started
    • Getting Started With WP VR
    • How To Install And Activate WP VR
    • How To Create A Simple Virtual Tour In 2 Minutes – WP VR
    • WP VR Basic Plugin Overview
  • Upgrade To WPVR Pro
    • How To Upgrade To Pro – WPVR
    • License Renewal Guide for WP VR Pro
    • WP VR VAT/TAX Policy
    • License Plan Upgrade Guide for WP VR Pro
  • Using WPVR Premium Add-ons
    • How To Integrate Fluent Forms On A Virtual Tour
    • How To Integrate WooCommerce To A Virtual Tour
    • How To Embed Virtual Tours On Non-WordPress Websites
    • WP VR Embed Addon – Features Overview
  • How To - Basic Settings
    • How To Use Exclusive Features On General Settings To Customize A Virtual Tour
    • How To Add A Preview Image To Your Virtual Tour – WPVR
    • How to Enable Auto Rotation For Your 360 Virtual Tour – WP VR
    • How to Customize the Tour Layout
  • Using Advanced Settings
    • How to Add A Virtual Tour Icon or Your Company Logo in 360 Degree Tours – WPVR
    • How to do SEO optimization for Embeded tour
    • How To Set Scene Transition (Scene Entrance Animation)
  • Setting Up Control Buttons
    • Using Custom Icons For Navigation And Control Buttons In A Virtual Tour
  • Turn Panorama Images Into Live Scenes
    • How To Add A Scene To Your Virtual Tour
    • How To Set Default Scene Face On A Virtual Tour
    • How To Set Custom Zoom Settings On A Scene In Your Virtual Tour – WPVR
  • Use Hotspots for Navigation & Information
    • How To Add Hotspots To A Scene In Your Virtual Tour
    • How To Customize Hotspot Icons And Color
    • How to use the Custom Icon Class
  • Create 360 Degree Video Tours
    • How To Embed A Youtube 360 Video On Your Website Using WPVR
  • Embed Google Street Views
    • How To Embed A Google Street View Tour On Your Website Using WPVR
  • Partial Panorama & Full View Virtual Tours
    • How To Create A Virtual Tour With Partial Panoramas or iPhone Panoramas
    • How To Create A Virtual Tour With Mobile Phone Panorama Images
    • How To Create Full Screen Virtual Tours – WPVR
    • How To Set A 360 Panorama Background Virtual Tour
  • Publish Virtual Tours on Your Website
    • How to Set Up Password Protection For Your 360 Virtual Tour – WP VR
    • How to Publish Virtual Tours Using QR Code
    • How to Share Virtual Tours on Social Media
    • How To Configure A Call To Action (CTA) Button in Virtual Tour
  • Import, Export, & Duplicate Virtual Tours
    • How To Export And Import Virtual Tours
    • How To Duplicate A Virtual Tour
  • Troubleshooting - Solve Common Issues
    • How To Solve Virtual Tour Not Showing Up – WPVR
    • WP VR Tour Not Displaying on Review and On the Published Webpage
    • WP VR Troubleshooting Guide: Embedding 360 Tours on External Platforms
  • Optimize Virtual Tour for Mobile Devices
    • How To Set A Dynamic Front End Notice On Virtual Tours For Mobile Phone Viewers
    • How To Auto Resize Images On Mobile Devices for Virtual Tours
    • How To Set Custom Height for Mobile Devices to Your Virtual Tours
  • Demo Virtual Tours
    • Basic Virtual Tour
    • Demo Partial Panorama Virtual Tour – WPVR Pro
  • Advanced Settings for Virtual Tours
    • How To Set Up WPVR Exclusive Settings
    • Control Script And Style Loading For The Virtual Tours
    • How To Disable WordPress Large Image Handler For Virtual Tours
    • How to Control Video.js Loading for Virtual Tour Pages – WPVR
  • WP VR Plugin Integrations
    • WP VR & Dokan Integration: Empower Vendors to Create 360° Virtual Tours

Product Recommendations for WooCommerce

3
  • Getting Started
    • How To Install & Activate Product Recommendations for WooCommerce
    • How to Create a Recommendation Engine For the First Time
    • Basic Plugin Overview – Product Recommendations for WooCommerce

Dynamic Discounts for WooCommerce

9
  • Getting Started
    • How To Install & Activate the Dynamic Discounts for WooCommerce
    • How To Create A Discount Rule For The First Time
    • Basic Plugin Overview – Dynamic Discounts for WooCommerce
  • Discount Conditions
    • How To Set Product Based Discount
    • How To Set Cart Based Discount
    • How to Set Discount Conditions for Bulk Purchases in WooCommerce
    • How To Set Discount Conditions Based on Customer Purchase History
    • How To Set Discount Conditions For Product Variations
    • How To Apply discount To The cheapest product In The Cart

Checkoutify

4
  • Getting Started
    • How To Install & Activate Checkoutify Pro – Checkout Customizer
    • How to Replace Your WooCommerce Checkout Using Checkoutify – Checkout Customizer
    • How To Create and Customise an Order Bump
    • How to create a custom field in checkoutify

Advanced Shipping for WooCommerce

12
  • Getting Started
    • How To Install & Activate The Advanced Shipping For Woocommerce
    • How To Add Advanced Shipping To An Existing Shipping Zone
    • Basic Plugin Overview – Advanced Shipping For Woocommerce
  • Shipping Conditions
    • How to Add Shipping Conditions For All Purchases in Advanced Shipping
    • How to Add Price Based Shipping Conditions in Advanced Shipping
    • How to Add Quantity Based Shipping Conditions in Advanced Shipping
    • How to Add Weight Based Shipping Conditions in Advanced Shipping
    • How To Set Product-Specific Shipping Conditions
    • How To Set Category-Based Shipping Conditions
    • How To Set Shipping Conditions Based On WooCommerce Product Tag
    • How To Set Shipping Conditions Based On WooCommerce User Role
    • How To Set Shipping Conditions Based on Product’s Weight, Volume, Length, Height, and Width

Catalog Mode for WooCommerce

3
  • Getting Started
    • How To Install & Activate the Catalog Mode for WooCommerce
    • Basic Plugin Overview – Catalog Mode For WooCommerce
  • Settings
    • How To Set Users Rules For Catalog Mode

Marketplace Auto-Sync for WooCommerce

3
  • Getting Started
    • How To Install & Activate Marketplace Auto Sync
    • Basic Plugin Overview – Marketplace Auto Sync
    • How To Set Up A Auto Sync For The First Time
  • Home
  • Docs
  • Cart Lift
  • Abandoned Cart Recovery Conditions
View Categories

How To Set Up Your Abandoned Cart Recovery Campaign

In the previous guide, you learned how to enable automatic tracking of abandoned carts.

Now, it’s time to set up your automatic recovery campaign.

First go to Dashboard > Cart Lift, and click on the Campaigns Tab.

Cart Lift - Campaigns

This is the Campaigns Dashboard.

Here, by default, a 2-email campaign will already be created by default.

You can change, configure, and activate these if you wish to.

Or, you can add a new campaign email and create it from scratch.

Campaigns Dashboard #

The Campaigns dashboard is basically a quick preview of the email campaigns you have created for abandoned cart recovery.

Here, you will find the following details for every email campaign:

Campaigns basic details

• Status –
Under the status, you will get a button to activate or deactivate the campaign.
*White color indicates that the campaign is not active.
*Purple indicates that the campaign is active.

• Name –
Next to status, you will get the Name, i.e. the Template name you set for the campaign. And just below the name, you will get to see the time after which this email will be sent to a customer since cart abandonment.

• Sent –
It’s the count of how many times this email was sent successfully.

• Conversions –
It indicates how many carts were recovered after this email was sent, before the next scheduled email, along with the calculated conversion rate (percentage).

• Revenue –

It refers to the amount of revenue recovered through this email.

• Action –
Under action, you will see three icons for each email campaign.

*The two-squared icon allows you to duplicate a campaign, i.e., a copy of the campaign will be added to the campaigns list which you can then edit and activate.

*If you wish to delete a campaign, you have to click on the cross icon on the right.

*To edit a campaign, click on the pencil icon in the middle and it will take you to the campaign edit mode.

Creating / Editing A Recovery Email Campaign #

Let us look at how you can create and activate your own campaign.

Follow the 4 simple steps below to create a campaign in just a few minutes.

01. Add A New Email Campaign #

Click on the ‘+ Add Campaign’ button on the top-right side. Then an email campaign will be added and you will be redirected to the email edit mode.

Edit an email campaign - Cart Lift

02. Input The Basics Details For The Email #

First, input the very basics for an email.
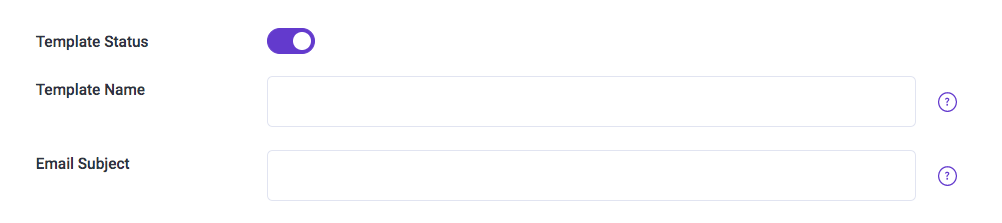
Email campaign basics

• Template Status –
You can activate or deactivate the campaign using this button.
*White color indicates that the campaign is not active.
*Purple indicates that the campaign is active (default).

• Template Name –
Give a name to this email campaign template.

• Email Subject –
Set a compelling email subject line for this email.

*Keep in mind, this email is for abandoned cart recovery. So you have to use a subject line that is appropriate for the order/level of this email in the whole recovery campaign (i.e. the subject line of the third follow-up email should usually be different from the first email).

03. Use A Compelling Email Copy    #

Cart Lift will by default come with 2 email campaigns, which already have compelling email copies added, but you can change it if you wish to.

You will get a Rich Text Editor to edit your email copy.

Edit Email Body

Decide on a proper email copy and insert the email text.

If you write on Visual view, you will get all the settings required to format the text visually.

Visual Mode - Email Edit

Plus, if you notice on the right side, there is a dropdown menu for Cart lift fields.

Custom Variable Fields

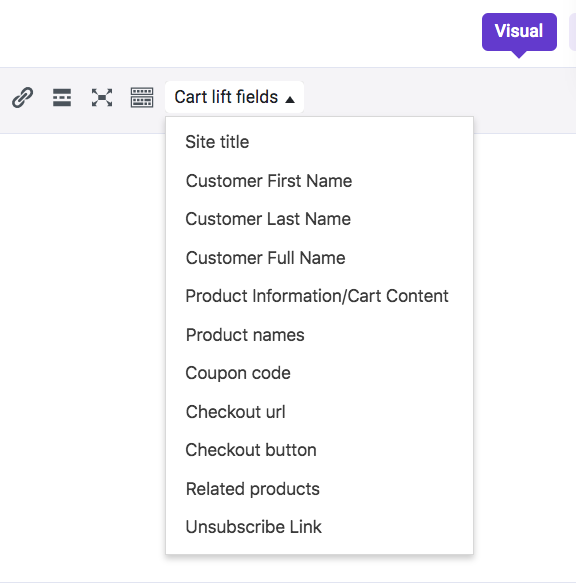
You can use these within emails to input dynamic data such as customer name, or product name, etc.

If you switch to Text view, you will get all the tags required.

Edit email - Text mode

To add a Media, just click on the ‘Add Media’ button above the email editing sections.

Add Media to email

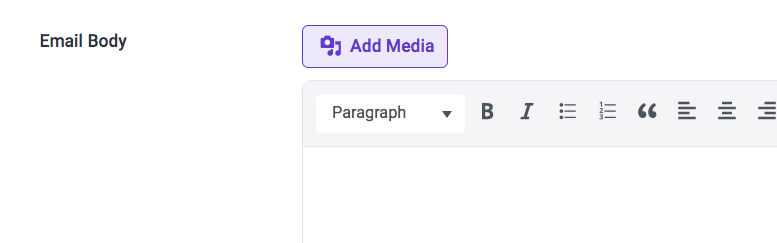
Clicking on it will let you select a media from your Media Library and once you select, the image will be added to where your cursor was on the email body.

Format and organize your email copy properly.

04. Campaign Finishing Touches #

Now that your email copy is ready, just a few more small settings to configure.

Campaign end features

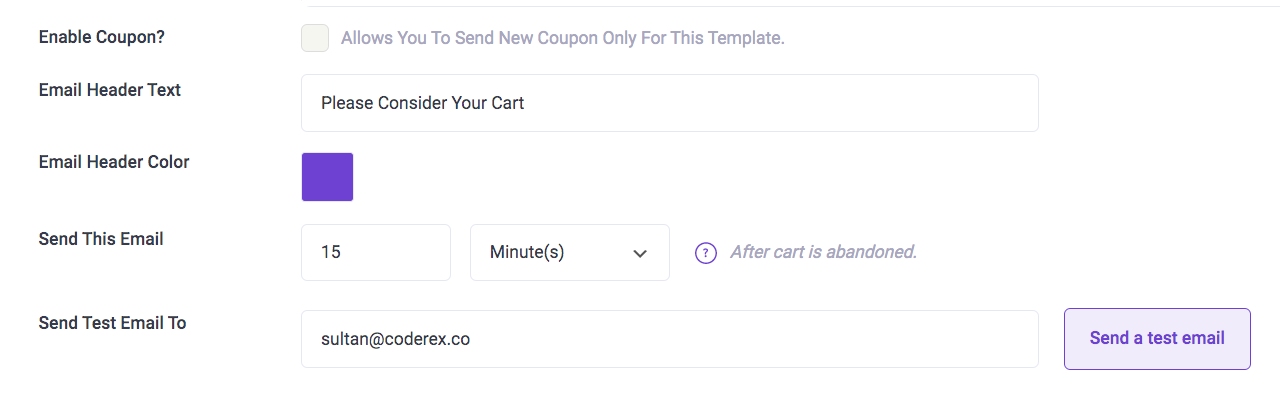
• Use A Coupon (If needed) –
Depending on the type and the order of this email for your recovery campaign, you can choose to include a coupon for the customers.
*You can set the coupon conditions and a coupon code will be generated on your WooCommerce or EDD default coupon section. Then you an use the Cart Lift Field, Coupon Code, on your email body to insert the coupon code.

**Learn how to configure Coupon Code here.

• Email Header Text –
This will be the text displayed as the header when the email is sent.

• Email Header Color –
This will be the background color for your email header.

• Email Sending Interval –
You can see an option for “Send This Email” and then a field to assign time. This is the time interval you will set after which this email will be sent to an abandoned customer, since cart abandonment. You can set the time in minutes, hours, or days.
*However, the minimum time allowed in 15 minutes.
*We advise not to use the same time intervals for multiple active email campaigns, or people will get multiple emails at a time, which might look like a spam.
*Also, try to keep at least 45mins difference between two email campaigns as sending multiple emails too soon may discourage buyers to come back.

 iii. Test It Yourself Before Activating 

Before putting this campaign to use, it’s best to test it out. So at the bottom input your email and send a test email to see if your email format was correct.

*Please note that this test email will only work if you have an SMTP set up for your website or you have integrated SMTP through Cart Lift settings. Without either of them, the email will not be sent.

Once you are done editing and formatting your email campaign, click on the “Save Change” button at the bottom left side and the campaign will be saved.

That’s it, you have created a campaign on your own.

Now you can click on the ‘Back To Campaign’ button if you wish to go back to the Campaigns Dashboard.

So, you have not now created and activated your automated email recovery campaign for abandoned carts.

Now you can enable notifications to get updates every time someone abandons the cart and every time you win back a potential buyer.

Let’s learn how.

How To Get Notifications For Abandoned Carts And Recovery ➜
Still stuck? How can we help?

How can we help?

Updated on January 29, 2025
Table of Contents
  • Campaigns Dashboard
  • Creating / Editing A Recovery Email Campaign
    • 01. Add A New Email Campaign
    • 02. Input The Basics Details For The Email
    • 03. Use A Compelling Email Copy   
    • 04. Campaign Finishing Touches
RexTheme

Stay updated with our latest releases and useful guides.

By subscribing RexTheme you agree to Privacy Policy.

Products

  • WP VR
  • Product Feed Manager
  • Cart Lift
  • Checkoutify
  • Dynamic Discount
  • Advanced Shipping
  • Catalog Mode
  • Marketplace Auto-sync
  • Product Recommendations
  • Bundled Products

Resources

  • Terms of Service
  • Privacy Policy
  • Refund Policy
  • Affiliate Policy
  • Support Policy
  • Bug Bounty Program

Company

  • Blog
  • Documentations
  • Affiliate Program
  • Brand Assets
  • Contact Us

Copyright © 2013 - RexTheme

You were not leaving your cart just like that, right?

Enter your email below to save your shopping cart for later. And, who knows, maybe we will even send you a sweet discount code.

The email is invalid.
Thank you. Happy shopping.
No Thanks!