Categories
Guide WooCommerce

How to Setup Woocommerce from Scratch (An Easy 6 Step Process)

Setting up Woocommerce might feel difficult at first, Maybe that’s the reason you are looking for an easy beginner-friendly guide to follow and apply.

This beginner’s guide on how to setup WooCommerce covers the entire process from start to finish with VERY EASY STEPS(also I make sure none of the steps miss out)

I will cover all the basic settings you need to configure (with images) when you install WooCommerce for the first time before adding your products.

So let’s begin.

Why Use WooCommerce?

Investing too much right from the start would probably increase your startup expenses.

So, in the beginning, it’s best to start by keeping expenses to a minimum level.

how to setup Woocommerce

You won’t be locked into any subscription fees or contracts to use the core WooCommerce plugin because it’s free.

Also, The hosting fees for a WordPress site are quite affordable and you can choose according to your needs.

Woocommerce hosting

That is why it has been the leading eCommerce platform for a while now.

With over 25% of all eCommerce businesses in the world using WooCommerce.

These businesses are using Woocommerce because it is very much beneficial.

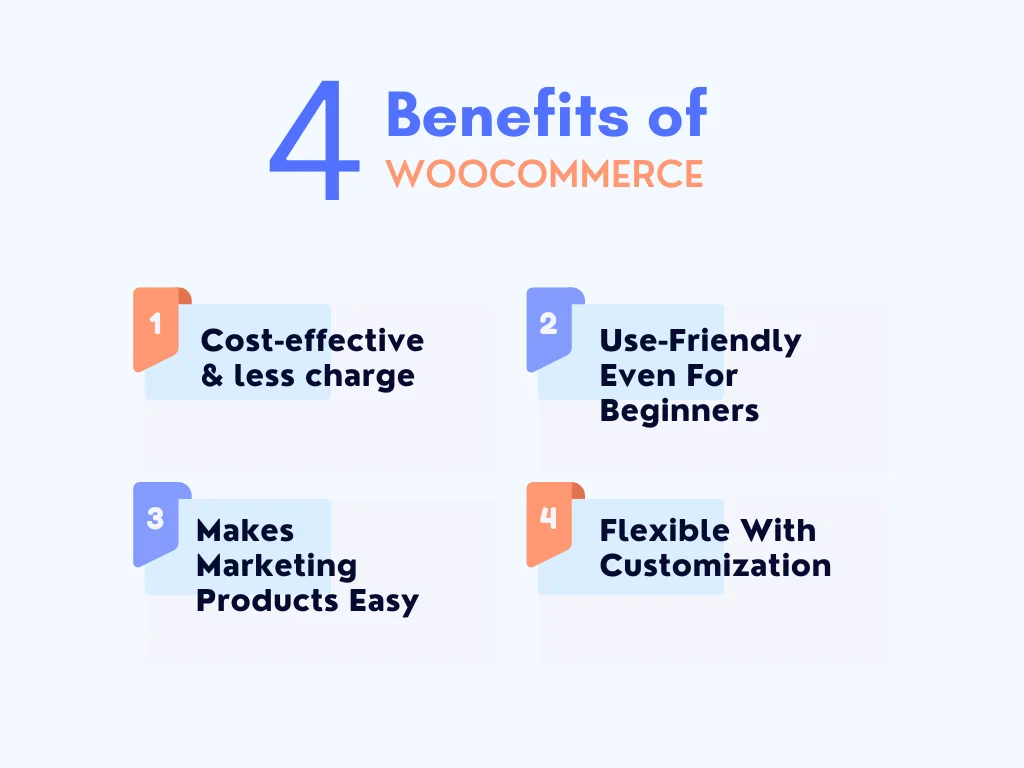
I am going to discuss 4 benefits of Woocommerce here :

Benefits of Woocommerce

Let’s go deeper one by one :

Cost-effective

As explained above, The only cost you need to cover is hosting & domain fees.

The hosting cost depends on the hosting plan you choose. If you have generic shared web hosting, you can get hosting at as low as $3 a month.

The only drawback of this low-budget plan is that it has fewer resources.

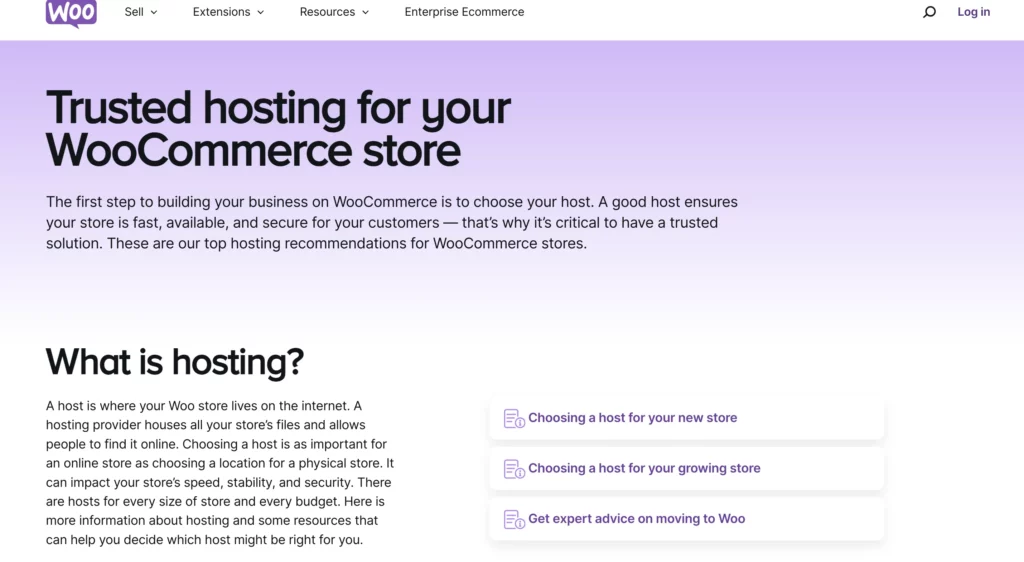
If you want more facilities, you can choose from these Woocommerce recommended hosts
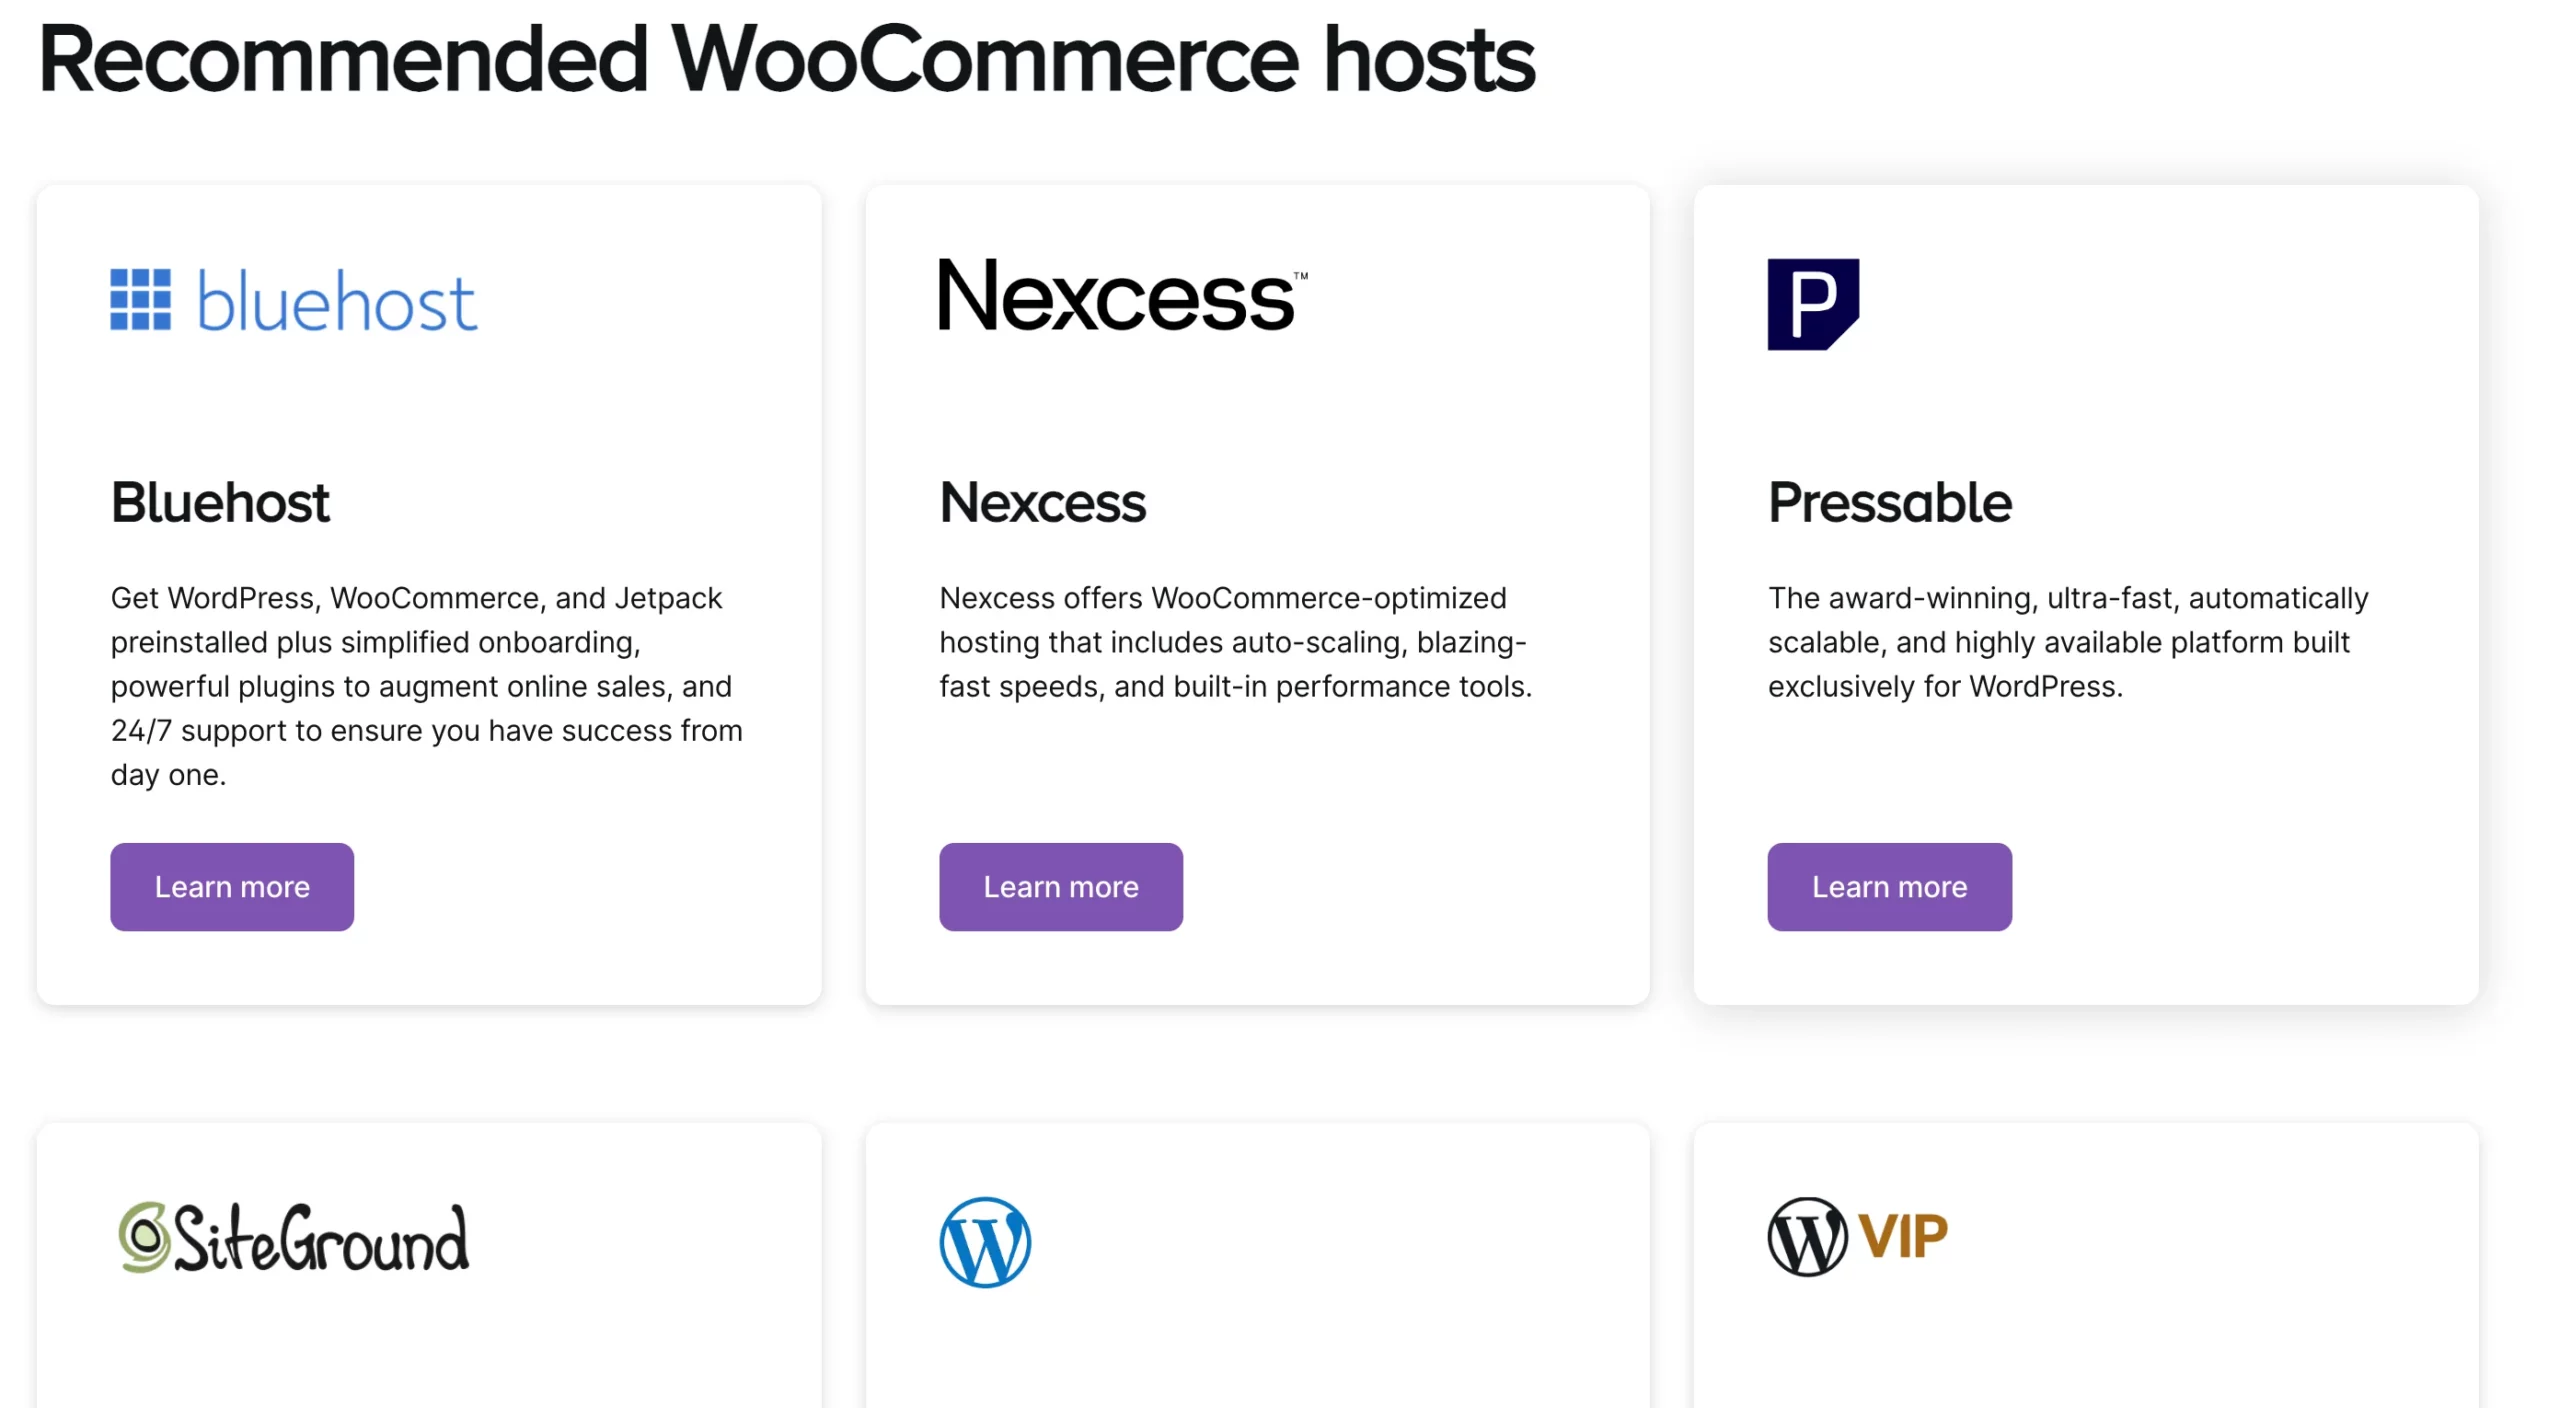
Woocommerce recommended hostings

You can choose any of the web hosting services as per your needs. For example, Bluehost stands out for its reliability and affordability. With various web hosting offers by Bluehost, you can find plans that fit your needs while staying within your budget.

Flexible With Customization

You may easily customize your whole online store, whether it is the Shop Page, Product Page, or even the Checkout page. If you need more specialized skills, you can hire a WooCommerce developer to tailor your site to your specific needs. P.S. You will find a plugin for almost any custom changes you may want in your store.

Makes Marketing Products Easy

The product page, shop page, and product data are all well-organized and programmed for SERP ranking, you can easily customize the pages using a theme or page builder.

Use-Friendly Even For Beginners

One of the strong suites of WooCommerce is its ease of use. As you read along, you will find out that WooCommerce doesn’t take too much effort to set up.

Now, let us look at how you can set up WooCommerce for the first time and configure the basic settings.

Get Started With WooCommerce

Follow the steps below to install and configure your WooCommerce store for the first time.

Step 1 – Install & Activate WooCommerce

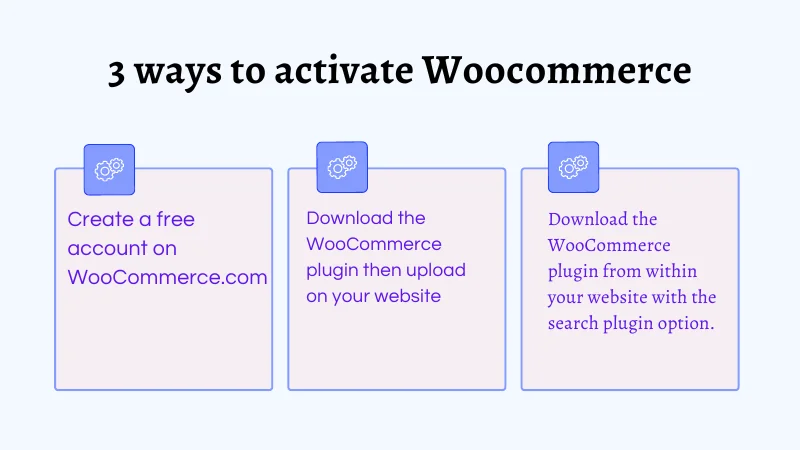
There are 3 ways you can activate Woocommerce :

Ways to activate Woocommerce

Here, I am going to pick the last option & explain it in detail.

If you have a running WordPress website, you can easily install WooCommerce from within your WordPress dashboard.

So first,

Go to Dashboard > Plugins and click on Add New

Then, on the search bar, write the keyword WooCommerce. You’ll see the plugin in the first search result.

Install WooCommerce
Type caption (optional)
  1. Click on Install Now and wait for a few seconds. Once it’s ready, click on the Activate button.
activate WooCommerce
Type caption (optional)

Step 2 – The WooCommerce Setup Wizard

When you activate the plugin, it will show you a Run the Setup Wizard.

Click the Run the Setup Wizard button. If you accidentally hit the Skip setup button, you can still run it from Help → Setup Wizard.

Here’s how you should go through it.

  1. On the first page of the setup wizard, you will need to input your location and business address. Fill them up and click on Continue.
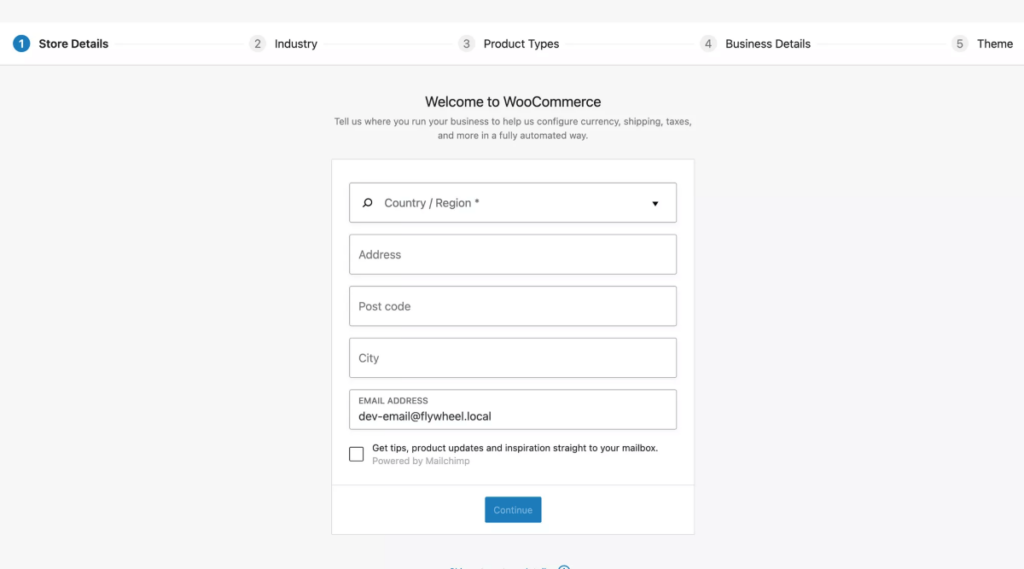
setup WooCommerce store details
Type caption (optional)
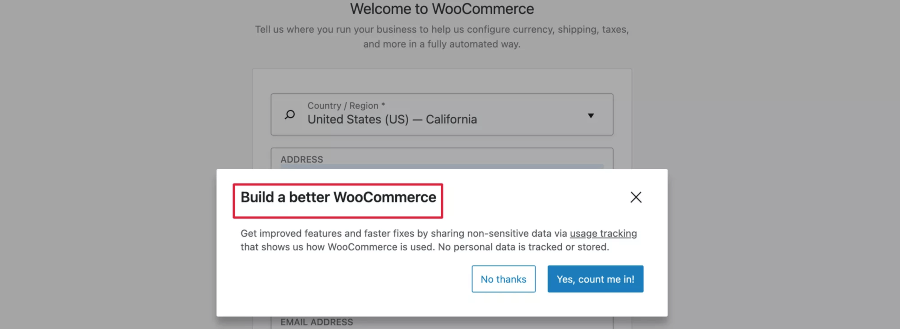
  1. Once you click on Continue, you’ll see a pop-up that says, “Build a better WooCommerce.
woocommerce default extensions
Type caption (optional)

**These are data that help WooCommerce to learn a few non-sensitive data on how you use WooCommerce so that they can come up with better improvements in the future. So you may choose “Yes, count me in!” Or you may choose not to allow it. It’s totally up to you.

  1. Next, you will be asked which industry your business is a part of. You may choose one of the options there or choose Other and define your own industry. Then click on Continue.
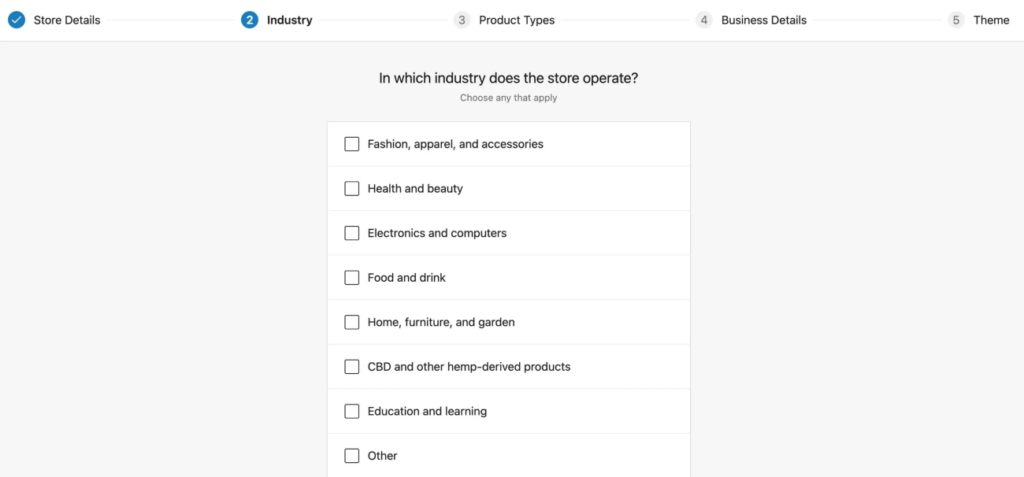
woocommerce industry details
Type caption (optional)
  1. Now, you will be asked what type of products you sell.
    • For products that you have to deliver physically, choose Physical products.
    • If you sell downloadable products, choose Downloads.
    • To sell subscription-type products with recurring fees, you may choose Subscriptions.
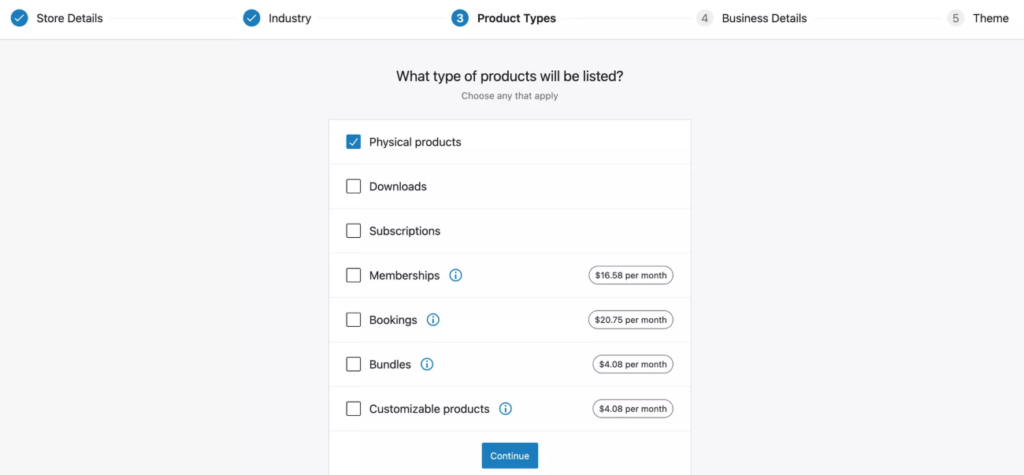
woocommerce product types
Type caption (optional)
  1. Then click on Continue and it will ask a couple of business-related questions. Answer and click on Continue.
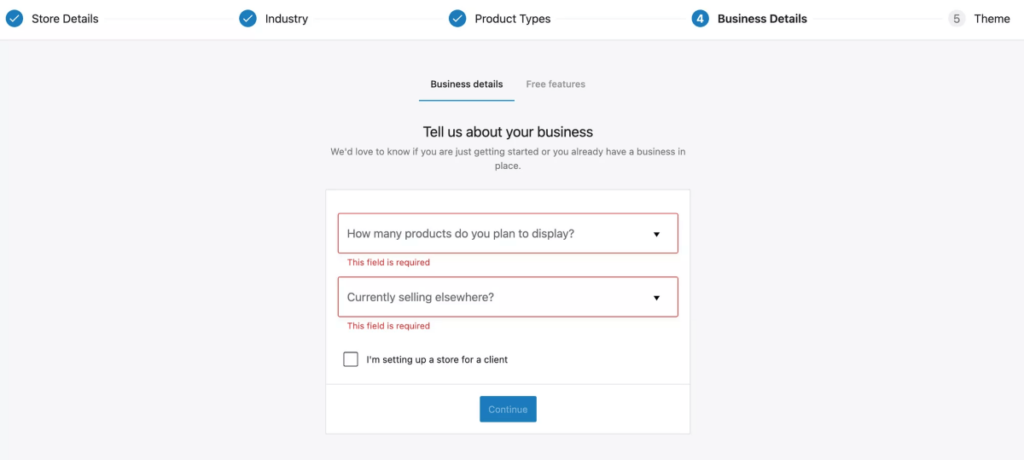
woocommerce business details
Type caption (optional)
  1. Right after these, you will be referred to install a few free WooCommerce plugins that they recommend. We recommend unchecking this option.
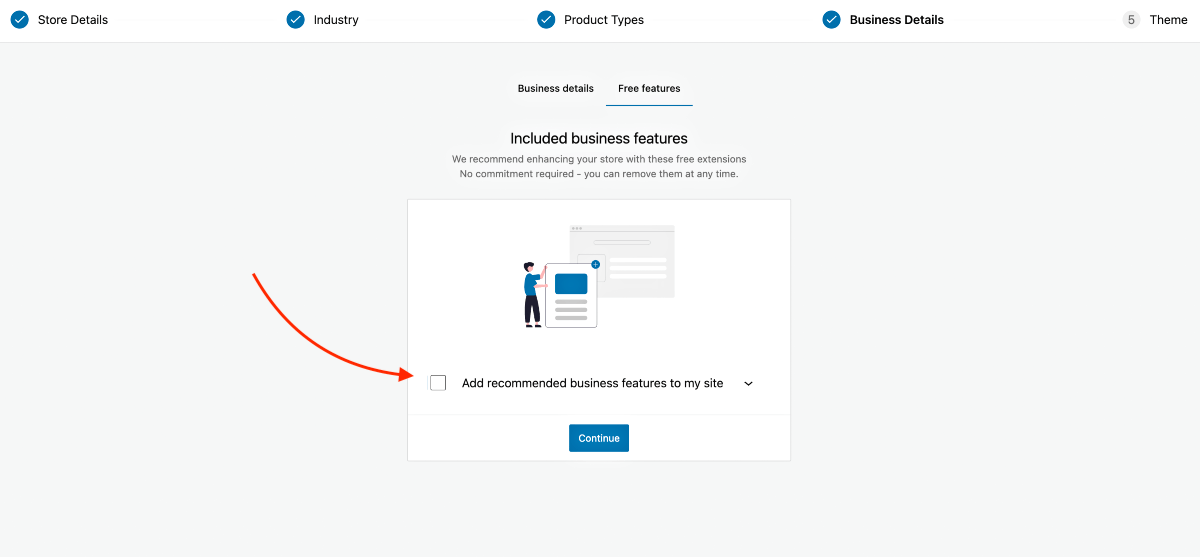
Recommended plugins by woo

P.S. As a beginner, so many extra plugins may be too overwhelming for you. It’s best to go step-by-step. So we recommend not to get these plugins now. We will create more guides to help you choose the right plugins later on when the time comes.

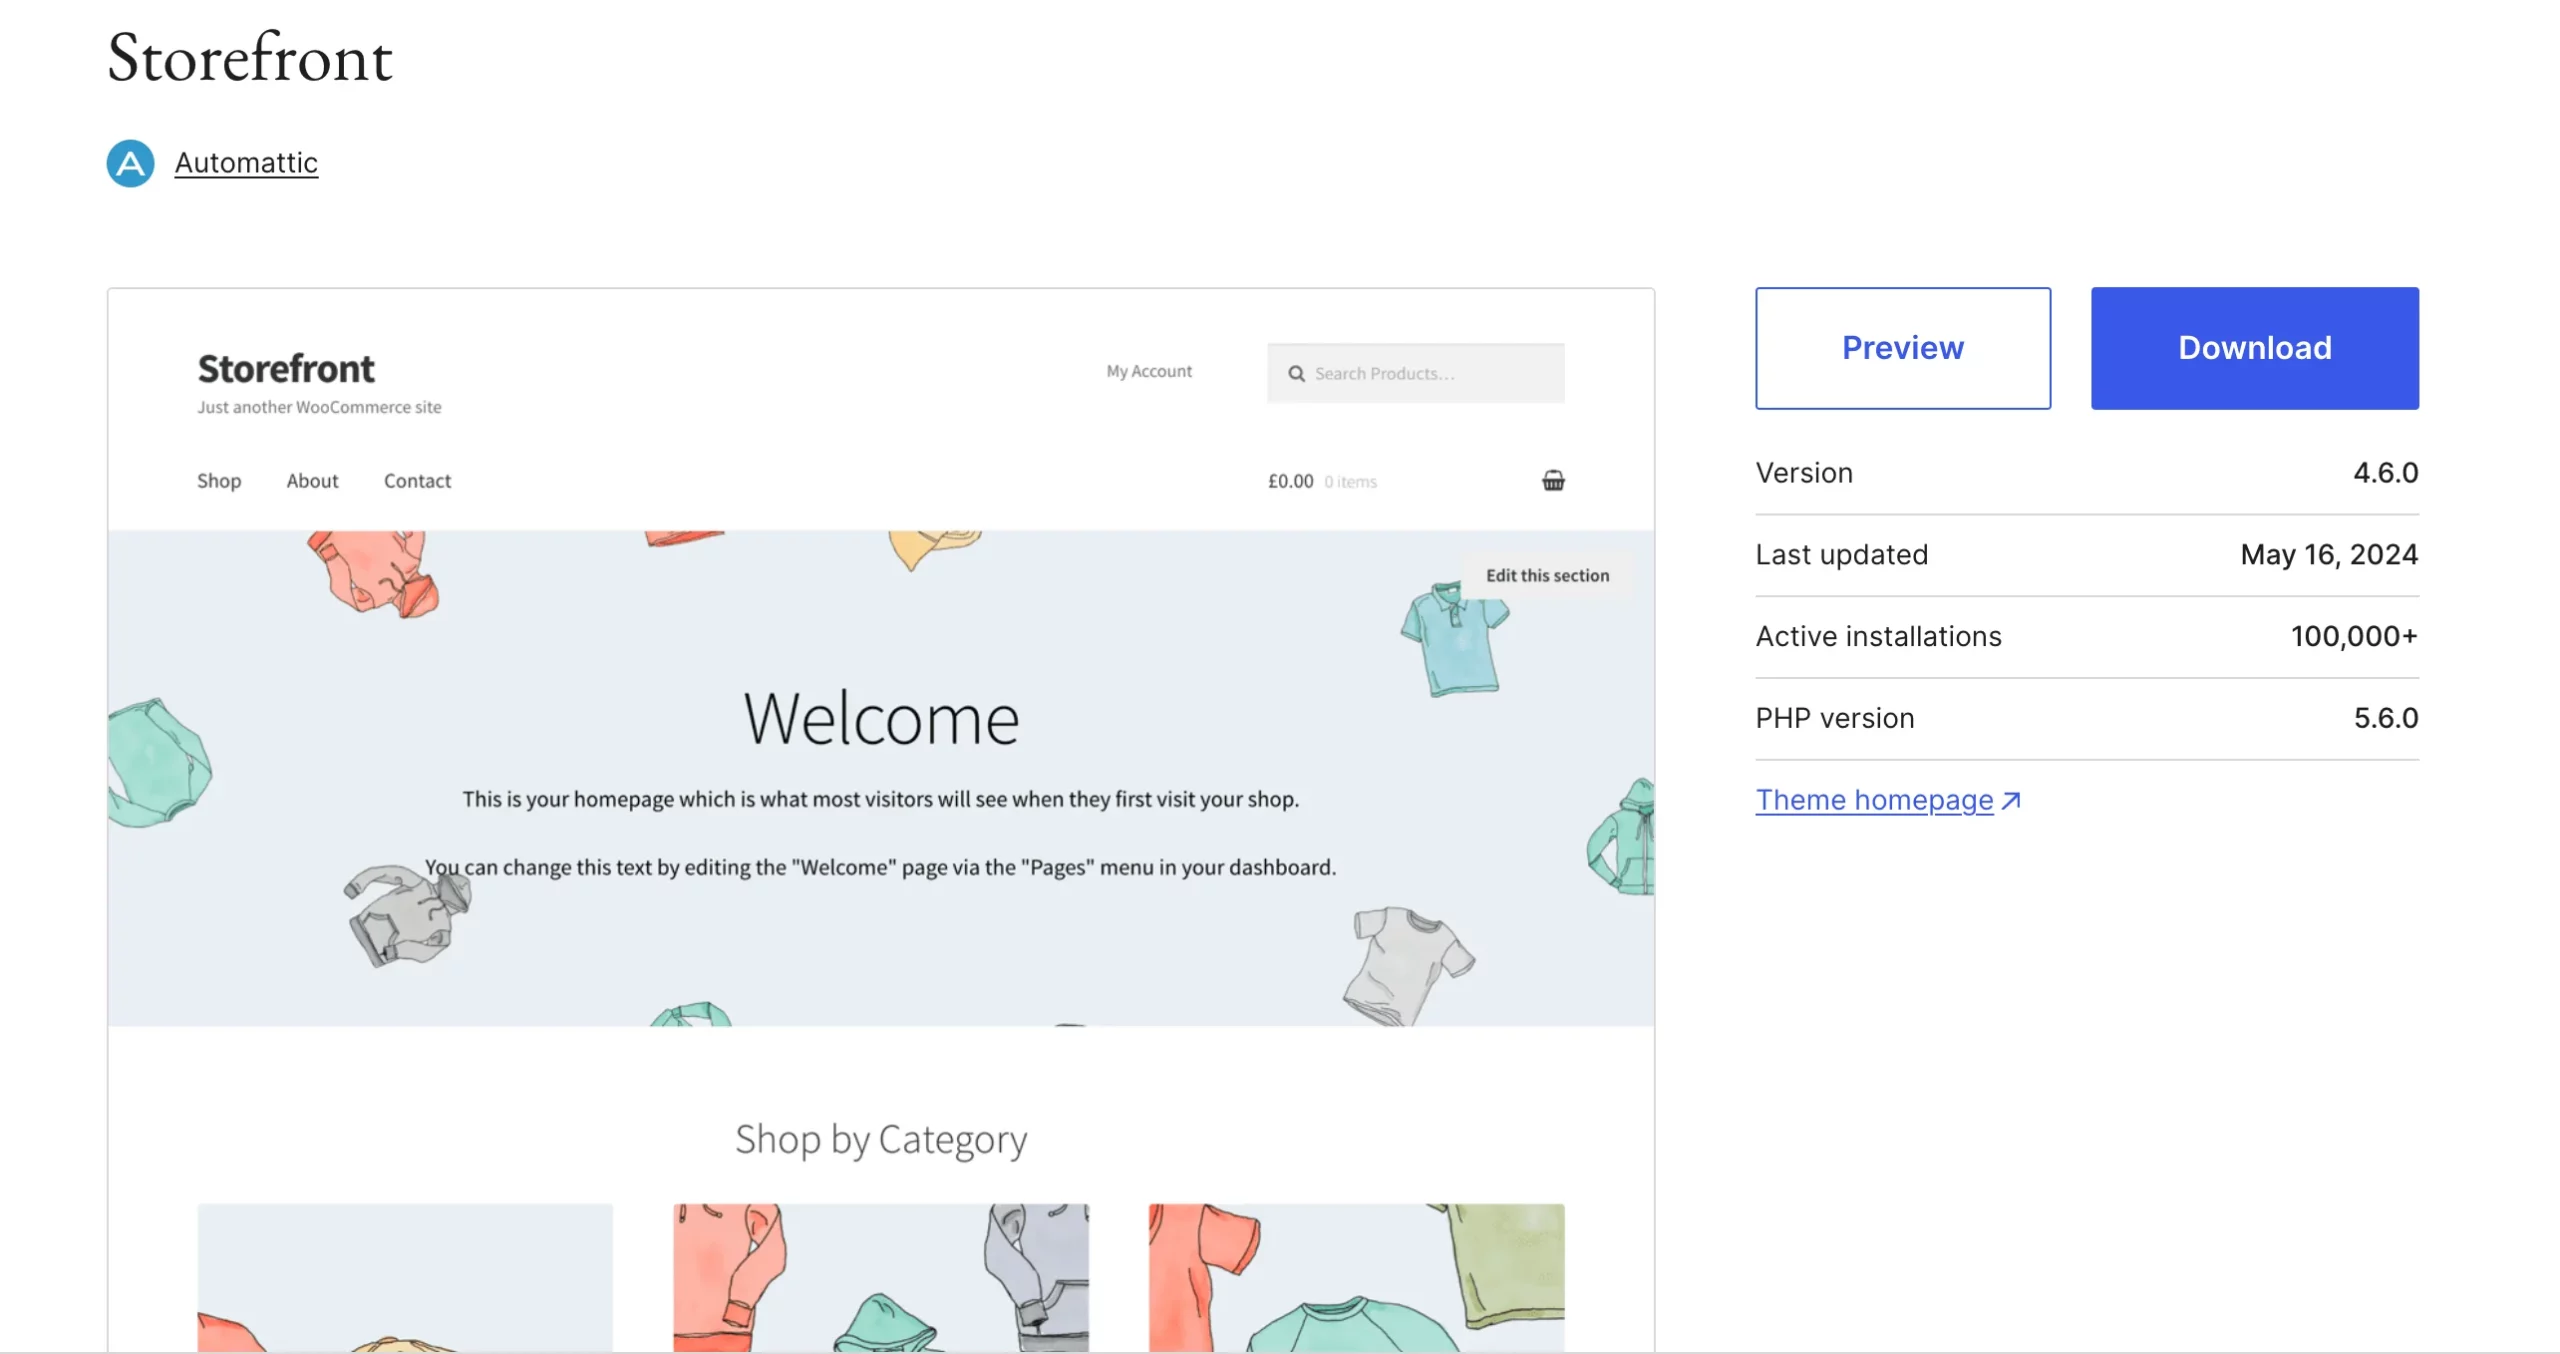
  1. Finally, you will be asked to install a theme that’s more suitable for WooCommerce. We recommend StoreFront as it is built by the creators of WooCommerce and is fully compatible.
Storefront theme

**Later, you may consider going for better premium themes that allow more customization options, such as WoodMart, Bloksy, Porto, etc., to improve buyers’ experience.
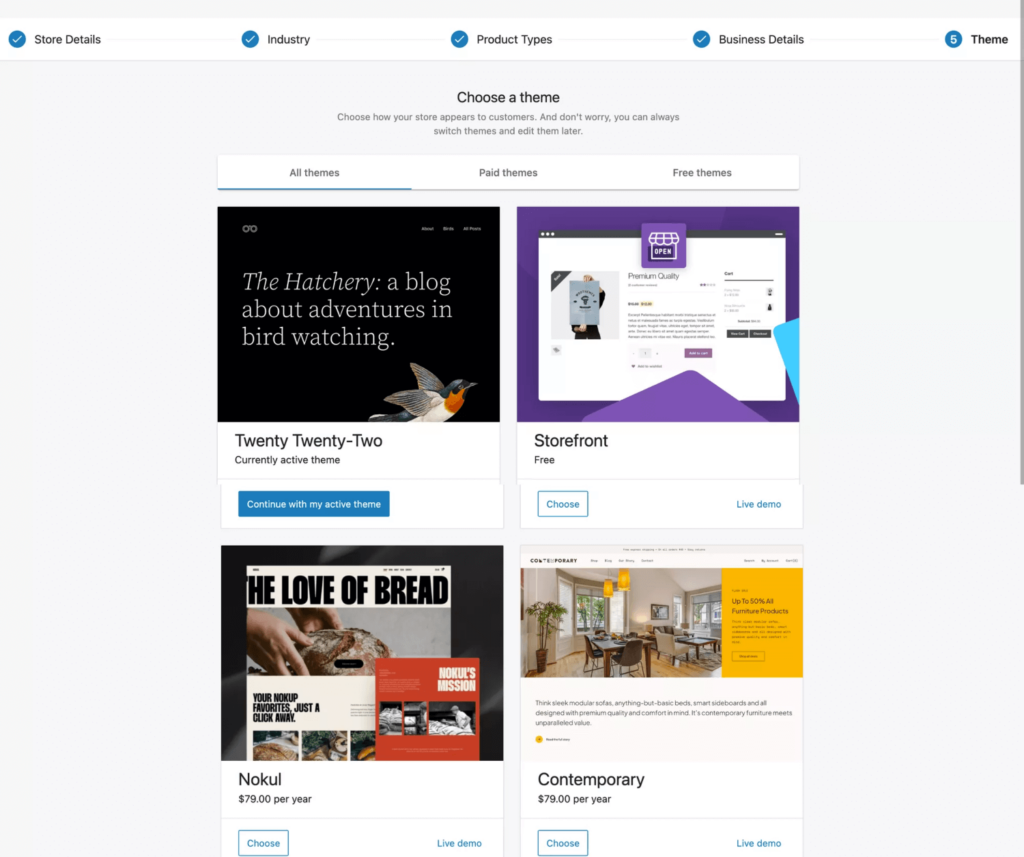
woocommerce themes
Type caption (optional)

Step 3 – Configure The WooCommerce General Settings

You now have access to WooCommerce. But before adding products or setting up other necessary elements, you first need to configure a few basic settings.

  1. Go to WooCommerce > Settings, and you will see several tabs to configure. For now, we will focus on the General, Products, and Accounts & Privacy tabs.
WooCommerce Settings Menu
  1. Initially, you will be on the General Tab. Here, first, Input your Store Address (if you haven’t during the Setup Wizard).
How to Setup Woocommerce from Scratch (An Easy 6 Step Process) 1
Type caption (optional)
  1. Next, configure where you want to sell your products.
woocommerce selling location
Type caption (optional)

You will get the following options:

  • Selling Location
    This will let you define the country where people will be able to view and purchase your products.
  • Shipping Location
    Here, you will define where you ship your products to in case you sell physical products.
  • Default Custom Location
    This option will let you geolocate a customer and automatically input the address on the checkout page. If you choose an option here, it will install a plugin that you need to configure for geolocation tracking. For now, let’s not use this option.
  1. Next, choose if you want to enable Tax rates and calculations. You will need this option but for now, let’s leave it unchecked. At a later guide, we will teach you when to enable this and what to do next.
woocommerce enable tax and coupon
Type caption (optional)
  1. Right after the tax option, you have options related to coupons.
    • Select “Enable the use of coupon codes” if you plan to run discount promotions via coupons in the near future.
    • The next option, “Calculate coupon discounts sequentially,” is not so commonly used as people usually do not allow a stack of discounts via multiple coupons in the same order.
  1. And finally, you have the currency options, where you define the currency and other useful settings for price.
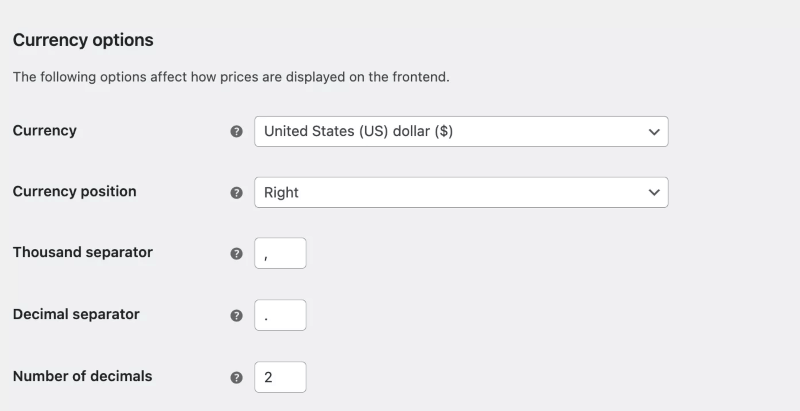
woocommerce currency options
Type caption (optional)

Once the data are ready, make sure to save them.

Step 4 – Configure Basic Product Settings

Go to the Products tab. You will see there are a few important settings that need to be configured before you proceed with adding products.

For now, we will look into the General and Inventory settings. The other options you see there are pre-configured and don’t require much change.
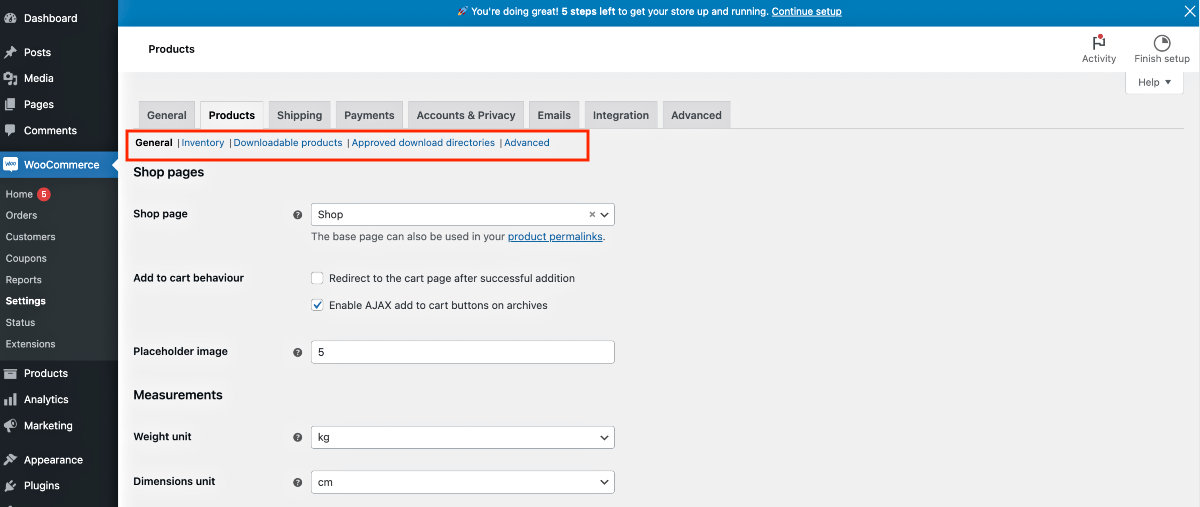
Woo Basic Product settings

Let’s configure each of them 1-by-1.

1. Products > General

In the general product settings, you will get the following options:

Shop Pages:

Product Settings - Shop Pages
  • Shop Page
    To choose which page should be considered the shop page. You may leave it as is for now.
  • Add to cart behavior
    • Enable “Redirect to the cart page after successful addition “if you want the buyer to be re-directed to the cart page after adding a product to the cart.
    • “Enable AJAX add to cart buttons on archives” option will allow you to show the “Add to cart” button for products on archive pages as well.
  • Placeholder image
    Here, you may input an image URL or the image ID you want as the placeholder image for products for which you did not upload an image.

Measurements:

Product Settings - Measurements
  • Weight unit
  • Dimensions unit

These values are useful, especially for shipping purposes.

Reviews:

Product Settings - Review
  • Enable Reviews
    • Here, first, you may Enable product reviews and ensure that the person is a verified owner, as in, the review was left by someone who has an account.
  • Product Ratings
    • You may also allow star ratings on the product page.

2. Products > Inventory
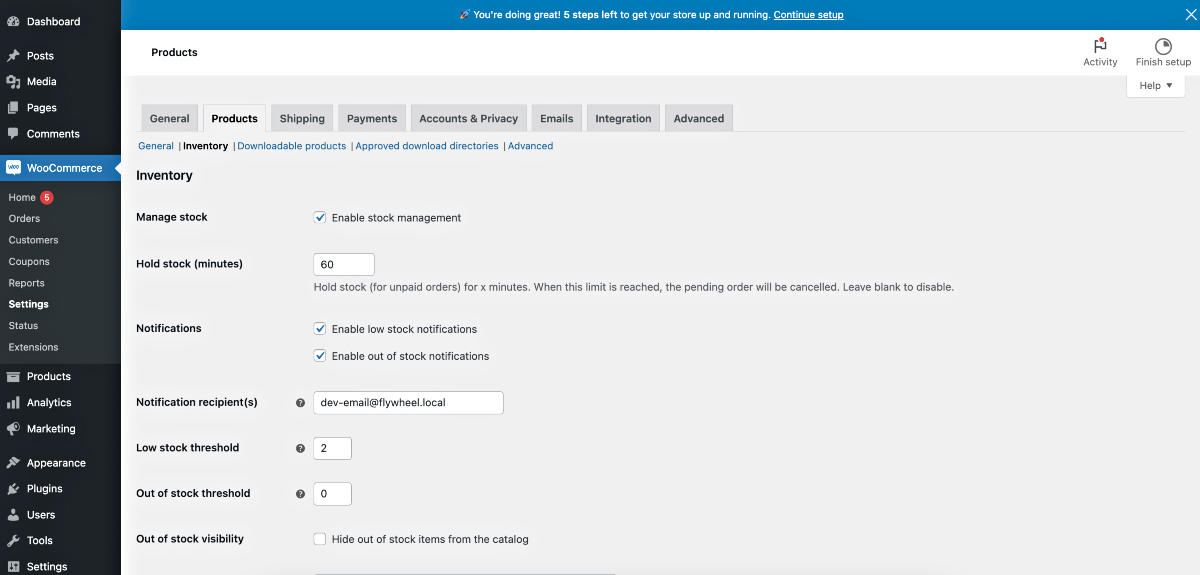
Product Inventory settings

Here, you will get important options to configure how you want to manage your product stocks and other inventory-related aspects.

Enabling it will mean you will mention the quantity of the products you have available, and WooCommerce will keep count every time a product is sold until it gets out of stock, i.e., buyers won’t be able to place orders anymore.

The following are the options:

  • Manage stock
    • If you check “Enable stock management,” then it means you are willing to input product quantities.
  • Hold stock (minutes)
    • Here, you can define a time, in minutes, to hold stock for an unpaid order. So, let’s say someone tried to purchase a product, but the card declined. So this product will be held for the time you define here before someone else can buy it instead.
  • Notifications
    • The “Enable low stock notifications” option means if you have fewer units of a product remaining, you will get an admin notification email to inform you about it.
    • The “Enable out of stock notifications” is similar except you get an email notification when all units of the product are sold out.
  • Notification recipient(s)
    • Email address where you want to receive notifications.
  • Low stock threshold
    • Mention what number is considered as low stock.
  • Out of stock threshold
    • Mention what number is considered out of stock.
  • Out of stock visibility
    • Enabling “Hide out of stock items from the catalog” means people will see this product on the shop page but won’t be able to order.
  • Stock display format
    • You choose if you want to show the quantity of the product on your product page or not, or only show it when stock is low.

Step – 5 – Accounts & Privacy Settings

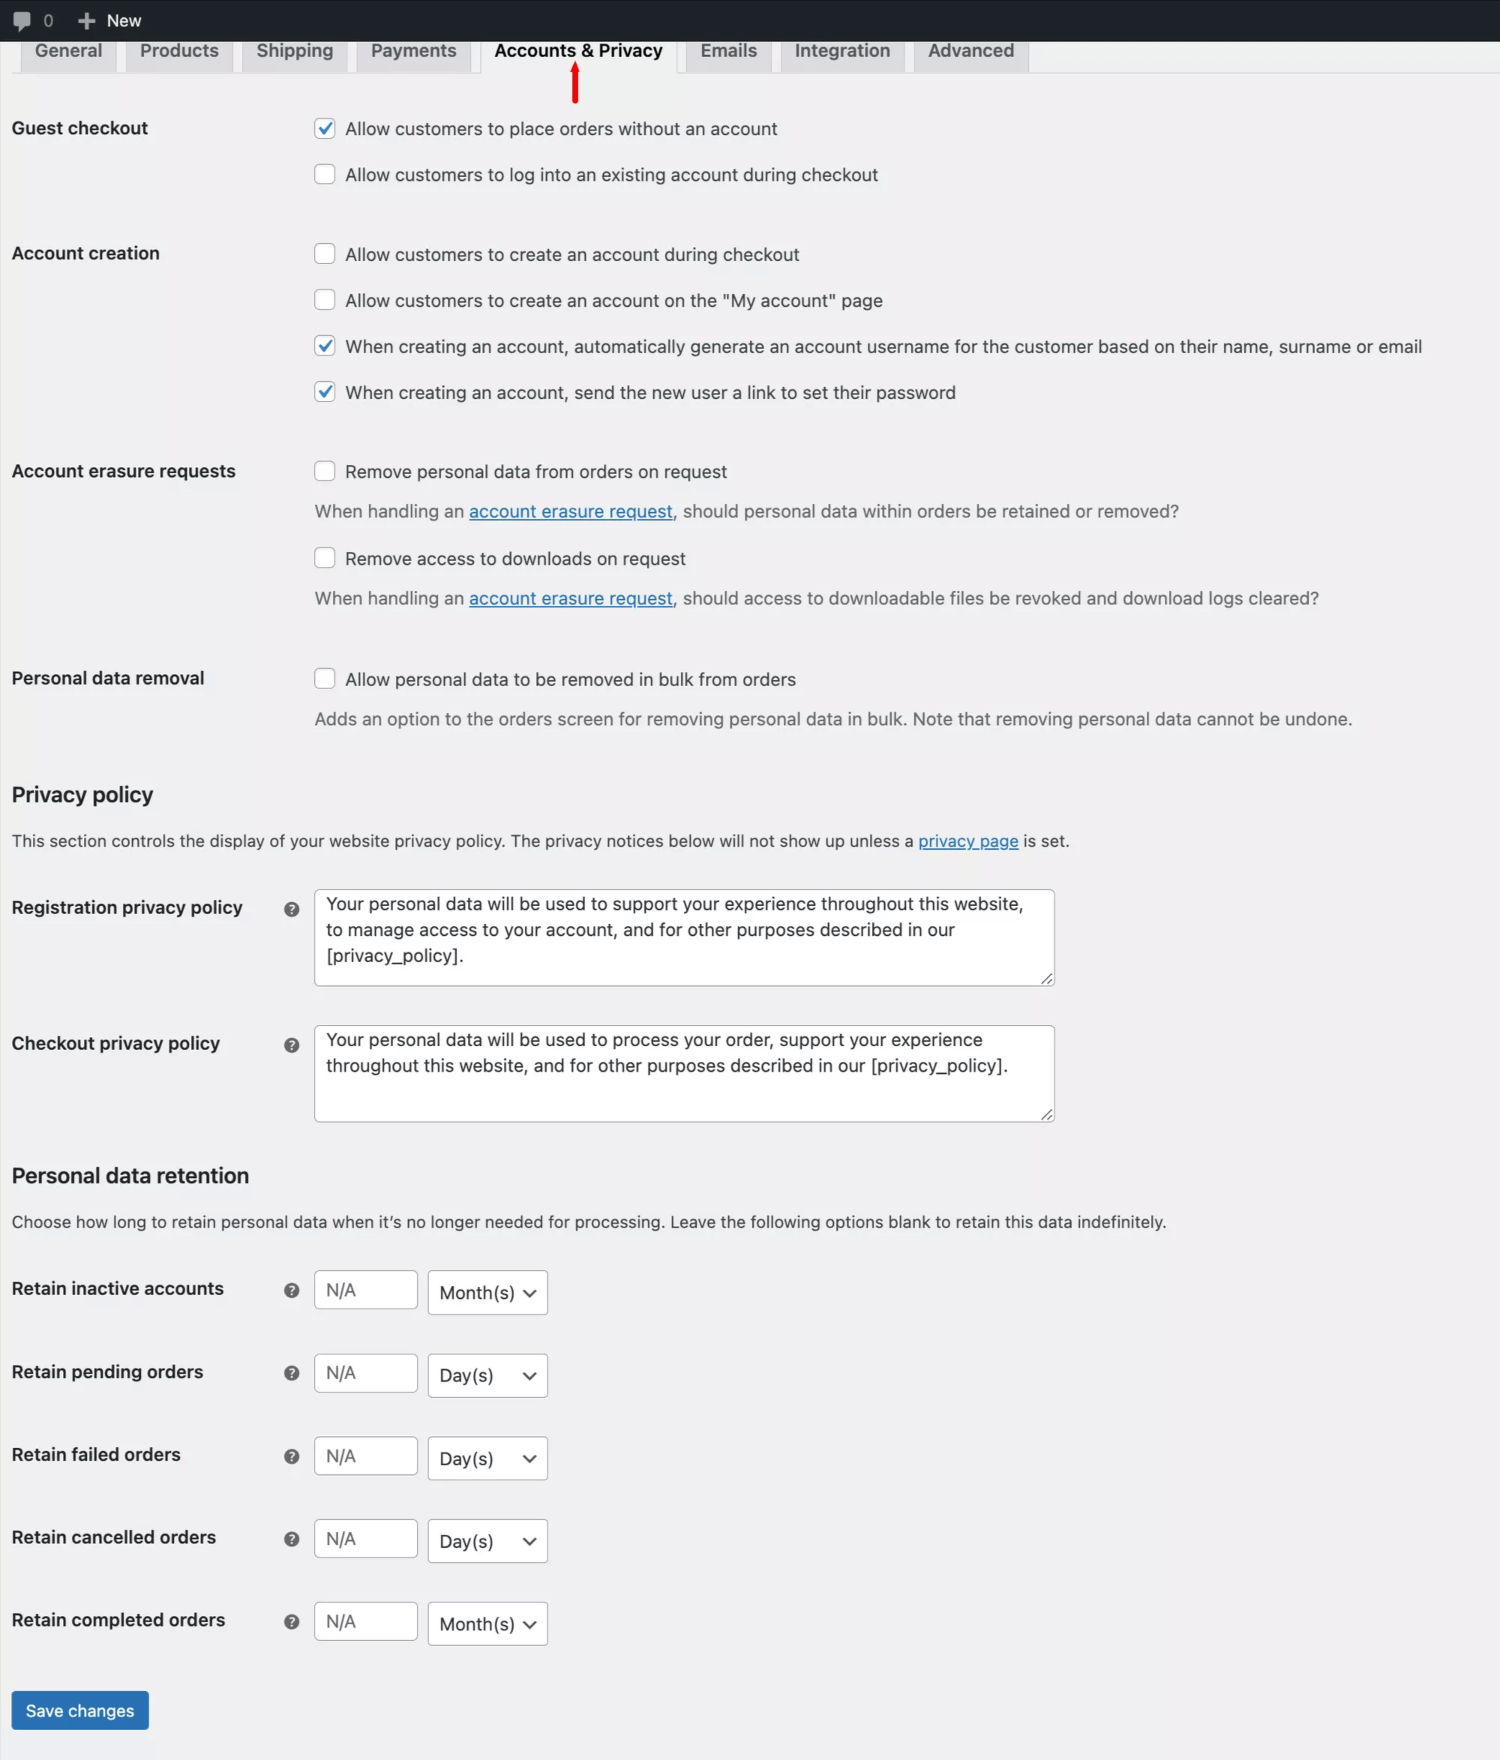
Account and privacy settings are important because you want your customers to be able to create accounts where they can track the products they ordered, change the delivery address, etc.

Also, ensure your WooCommerce store is secure, especially for email protection. Missing DMARC records can expose you to email spoofing or phishing risks, so setting them up is crucial for protection.

Plug, you may choose various checkout settings such as allowing guest checkout, create account during checkout, etc.

woocommerce account and privacy settings
Type caption (optional)

Here you will get several self-explanatory options.

  • Guest checkout
    You will get a couple of options to define if you would accept an order without an order or allow the user to log in while on that page.
  • Account Creation
    Under this, you will get a few options for controlling the account creation of prospects, such as creating an account during checkout, auto-generating the username and password during checkout, and so on.
  • Account eraser requests
    Here, you may define if you want the buyer to have control over his data.
  • Personal data removal
    Allow users to remove their personal data.
  • Privacy policy
    You may provide privacy policy details during registration and checkout.
  • Personal data retention
    Here you can define how long you want to retain one’s personal data.

And that’s it.

Make sure to Save the changes you made and you are ready for the next step of running your eCommerce business.

The Next Step

So far, you have seen how easily you managed to configure your WooCommerce store.

To learn Woocommerce completely, you can go through the Woocommerce tutorial.

Keep learning and start selling on this popular place.

Frequently Asked Question(FAQ)

What is the easiest way to create a Woocommerce site?

The easiest way to create a WooCommerce site is:

  • Choose a hosting provider that supports WordPress.
  • Go through this blog on “How to Install Woocommerce” and set up.
  • Select and install a WooCommerce-compatible theme.
  • Install the free WooCommerce plugin from the WordPress plugin directory.
  • Run the WooCommerce setup wizard to configure basic store settings.
  • Add your products and customize your store design.

Many hosting providers offer one-click WordPress and WooCommerce installations to simplify the process further. You can also find one with low hosting fees.

How long will it take me on average to be an expert on Woocommerce?

Becoming an expert in WooCommerce can take varying amounts of time depending on your background and dedication.

On average:

  • Basic proficiency: 1-3 months of regular use and learning
  • Intermediate level: 6-12 months of active development and problem-solving
  • Expert level: 1-2 years of consistent work with WooCommerce, including customization, troubleshooting, and keeping up with updates

Continuous learning is key, as WooCommerce trends evolve regularly

What are some tips for beginners to effectively use Woocommerce?

Here are some tips for beginners to effectively use WooCommerce:

  • Test your checkout process regularly to ensure a smooth customer experience
  • Start with a good WooCommerce-optimized theme to ensure compatibility
  • Take time to properly set up your store’s basic settings (payment, shipping, taxes)
  • Learn to use product categories and tags for better organization
  • Optimize your product images and descriptions for SEO
  • Install only necessary plugins to avoid slowing down your site
  • Regularly update WooCommerce, WordPress, and all plugins
  • Use WooCommerce’s built-in analytics to track your store’s performance

Familiarize yourself with WooCommerce shortcodes for easy customization

Categories
Guide Virtual Reality WP VR

How To Create A Virtual Art Gallery in WordPress [2024]

‘Art’ is always among the most appreciated element in the creative industry. However, the recent pandemic (COVID-19 crisis) has changed how people cherish art galleries.

According to Artsy, the art gallery business went down by 22% since the start of the pandemic due to a decline in visitors.

However, this also means they saw a rise in auctions and painting sales ONLINE.

If you are an artist or own an art gallery, then it’s crucial that you start investing more in the online realm as soon as possible.

Sure, you can run an eCommerce site with all your paintings there, but that is not the best option.

Remember, buying and selling art are more influenced by emotions than the price. The more you can connect with the viewer, the higher the chance of a good bid.

That’s where a virtual art gallery comes in.

A virtual art gallery will help you create a real-life impression for buyers even when they are sitting at home and double your chances of selling more paintings in the process.

And learning how to sell art online will make it really easy for you.

In this article, you will learn:

  • Why you must use a virtual art gallery and how it can grow your revenue?
  • How you can easily create such a tour in WordPress, on your own?
  • The best way to make the virtual tour more engaging.

And eventually, you will be able to trigger more responses from interested buyers.

So let’s begin.

What is An Ideal Virtual (VR) Art Gallery Tour?

A virtual art gallery tour is basically a 360 virtual tour where you let viewers take a closer look at your paintings or art without a live visit.

The tour will allow buyers to zoom into the images, get extra details on the arts, and maybe, get an option to bid to purchase. As you can tell, this will intrigue art lovers and give them a real-life experience remotely.

The Biggest Benefits Of Using A Virtual Art Gallery

Why Go Virtual with your Art Gallery

As an artist, there is no better way to blend in with technological advancement than working with VR. If you do some research, you will see that almost all creative sectors are slowly embracing Augmented Reality or Virtual Reality.

Whether you are a painter, photographer, sculptor, or a vivid creative artist, you can easily get into the limelight with your virtual art gallery online.

In fact, it will help you connect more with the prospects and help you get more recognition.

Let us look at some of the main benefits you can enjoy using a virtual tour of your art gallery on your website.

  1. An Emotional Connection Without Fail
    • A virtual tour means the visitor will have full control over the navigation – the prospect will get to move around the gallery on their own and find their favorite piece of art.
    • You can further increase the engagement by adding tool tooltips beside your arts, which viewers can click or hover to get more details on them.
    • Overall, it will be a personalized experience and the visitor will surely remember it in the near future.
  1. A Comfortable Visit At A Suitable Time
    • Since the tour is available online, there is no restriction on the time of visit. So a viewer will get to visit whenever he/she is free and will be able to spend more time choosing the best art.
    • Plus, there will be no distraction – no crowd or annoying noises of any kind. This means every viewer will be able to view the best pieces of arts and observe their quality and appreciate the beauty as long as they want, without others standing around them.
    • Art is often difficult to read without proper concentration and while in the virtual tour, the viewer will be able to focus in complete silence and give full attention to the art. Thus, a greater chance of emotional connection.
  1. Educational And Entertaining At The Same time
    • Modern virtual tours always have ways to make the tour more valuable. You can provide details on the arts using a video, audio, or written text, where you can explain the meaning of the art or the history behind the idea.
    • Buyers always love emotional stories. So if you can provide a good story behind your art, you can attract more buyers that may want to purchase just because of the depth of the story this art holds.
  1. A Proven Business Solution
    • It’s obvious that your art gallery is not just for promotion or recognition, you also have a business goal. It could be a service you provide, paintings you sell, or products you want to auction out. A physical gallery always has its limitations. A virtual tour will enhance the possibilities of reaching more prospects.
    • You can get great international reach with a planned launch online. If you embrace proper product launch strategies, you can expect to get a great number of visitors right from the get-go. Maybe you can host a limited-time auction of antiques or collectibles or simply want to put your paintings up for sale. Or, you could showcase your talents and expect service inquiries for custom art. Simply create a virtual tour with a contact form for the right purpose and get the best bids from prospects all over the world.
  1. No Time Limitations
    • One of the barriers to a live art gallery or art museum is there is a limited time you can keep your doors open. Plus, while people are there, you are always on the run talking to different visitors at different times. So time management is quite hectic. You can overcome these via a virtual art gallery tour.
    • A prospect may not have time to visit when you are open. But, he can surely hop onto your website and take a tour whenever he is free. People who are passionate about art will love to get a visit and this tour will ensure they will not miss out on your fabulous art due to lack of time.
    • Plus, an engaging virtual tour will mean you won’t need to personally guide them on the art. Proper use of audio and custom text will keep the visitors engaged and guided, while you can wait for them to reach out when they are ready to get in touch.

If you own antiques, you can create a virtual art museum tour to show off your antiques, and get greater value for any items you want to put up for auctions.

How To Create A Virtual Art Gallery Tour Easily on Your WordPress Site

When you think of a virtual tour, it may sound like it’s complicated. But guess what, creating a virtual art gallery tour is rather quite easy, especially in WordPress.

You will find a few VR tools in WordPress that makes it super easy to create virtual tours. And among them, the best one out there is WP VR.

WP VR is a virtual tour builder that has every feature you need to create a complete virtual art gallery that is engaging and can help to convert more prospects effectively. The plugin will make it easy for you to create virtual tours which will allow your prospects to get a 360 panoramic view of your art gallery and get a sense of how it looks in actuality.

Step 1 – Take Finest 360 Photos of Your Art Gallery

WPVR requires you to provide 360 images of the location you want to turn into a virtual tour. So it is important for you to take high-quality panoramic images of your art gallery from the center of different areas.

You can take pictures using a DSLR Camera and then use a stitching app to turn them into 360 panoramic images. Or you can take 360 images using an iPhone which can be directly turned into a virtual tour via WVPR.

The quality is super important since these will be viewed by art enthusiasts all over the world.

Step 2 – Install & Activate WP VR

The first important step is to install and activate WP VR into your WordPress Dashboard.

  • Go to Plugins & Search for WP VR.
  • Install & Activate the plugin once you’ve located it. Or download the free version of WP VR from the WordPress repository.
  • Next, Upgrade to the premium version of WP VR

Here’s some further guidance if you face trouble installing the WP VR plugin.

Note: You can build a complete virtual tour with the free version. But with the premium version, you can make the tour more delightful.

Step 3 – Create a Virtual Tour

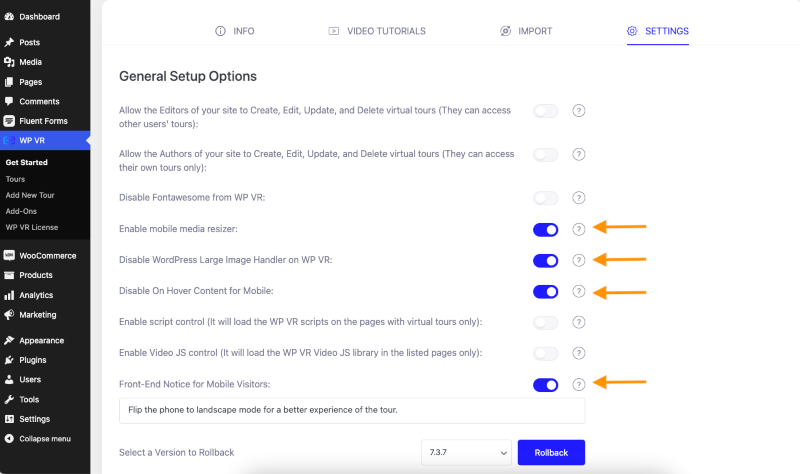
After installing the plugin, go to the WP VR General Settings.

General Settings - VR Art Gallery
  • Disable WordPress Large Image Handler on WP VR – this will keep the image quality intact for a better tour experience.
  • Enable Mobile Media Resizer – it will resize the tour for mobile and smartphone devices.
  • Disable On Hover Content For Mobile – this will remove the confusion between on-click and on-hover content from smartphones.
  • Front-End Notice for Mobile Visitors – it’s a great option where you can notify smartphone users with a pre-written notice.

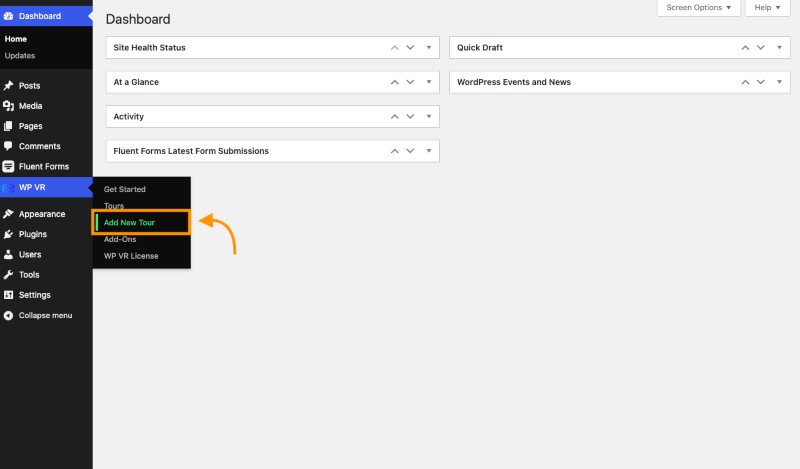
Afterward, hover over the WP VR & Click Add New Tour.

Add new Virtual Art Gallery tour

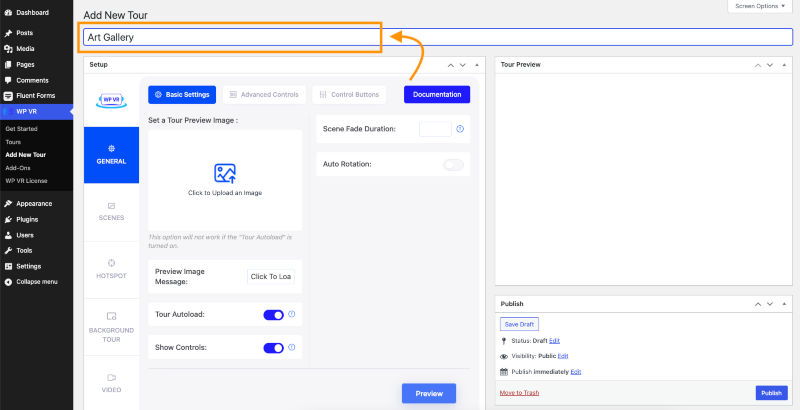
After adding a tour, Add a title to the tour.

Add Title to VR Art Gallery
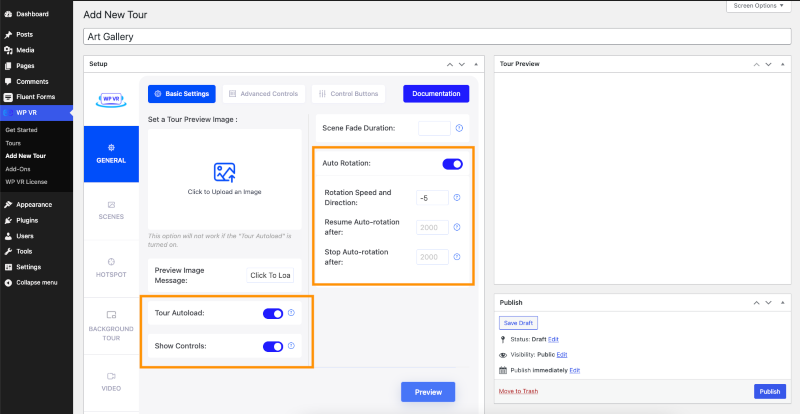
  • Enable Tour Autoload & Controls option.
  • Also, enable the Auto Rotation for the tour. And keep the auto rotation slow so that the doesn’t load too fast.
Tour Autoload and Auto-rotation

Step 4 – Upload a Scene

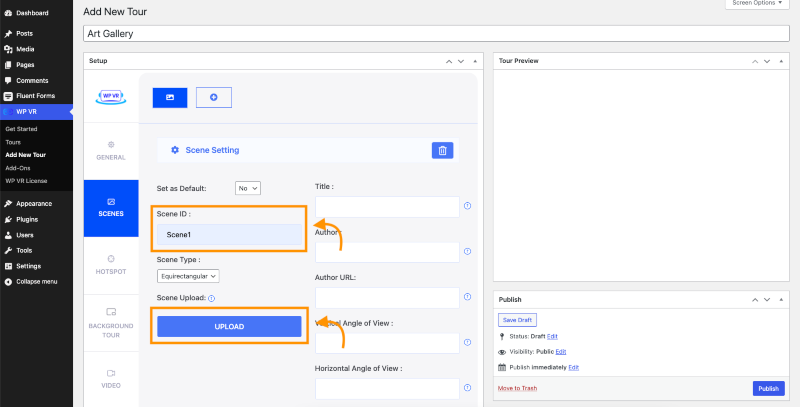
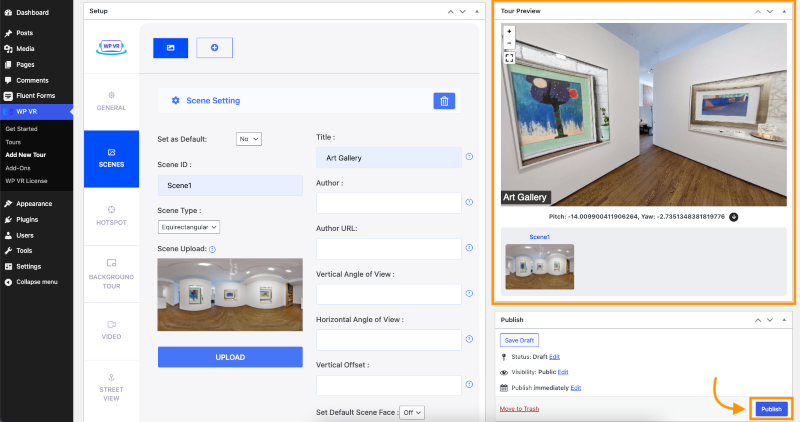
The next important task is to upload a scene. Go to the Scenes menu, provide a Scene ID, and click on Upload.

Upload Panorama Image to VR Gallery

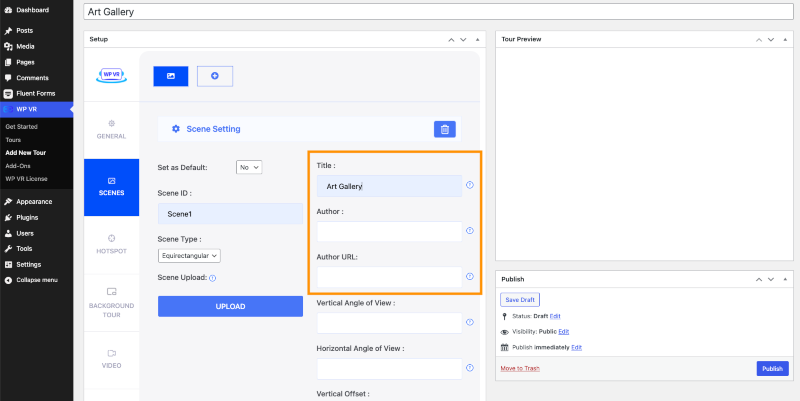
Give the necessary information with the scene as well. If your art has a title, a dedicated author, and a portfolio of the author, you can add that information accordingly.

Image Title Art Gallery

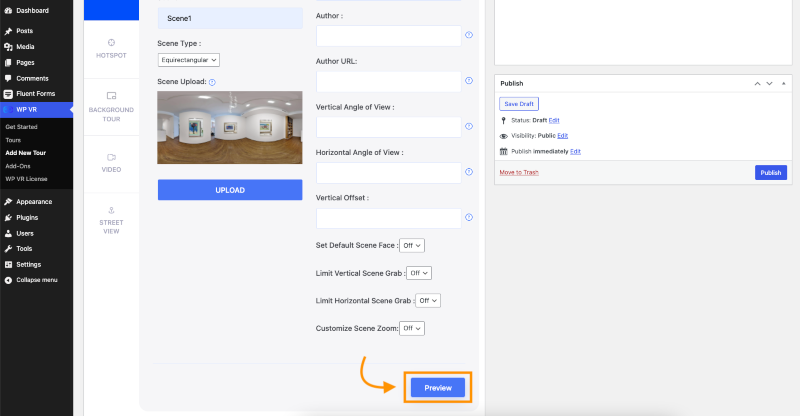
After you’ve uploaded the scene and added the necessary information, click on Preview,

Preview Art Gallery Museum Tour

Afterward, you’ll be able to see a Tour Preview on the top right corner of your tour.

If the tour looks okay to you then click publish & your tour will be saved.

Publish Art Gallery Virtual Tour

Step 5: Add Hotspots to Increase User Engagement

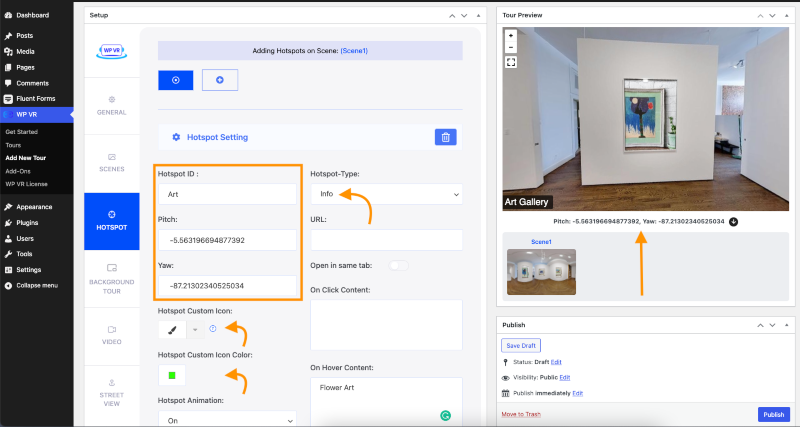
Hotspots are specifically created to make a tour more engaging and interesting. In this case, you can pinpoint an art and add basic details of the art.

How to Add a Hotspot:

  • Just below the Scenes menu, go to the hotspot menu.
  • Click on a place on the virtual tour where you want to add a hotspot and some coordinates will appear under the Tour Preview section.
  • Select the coordinates of Pitch & Yaw. Simply click on the down arrow icon and it’ll be set automatically.
  • Provide a unique Hotspot ID.
  • Select the type of hotspot you want to have. For now, we’re creating an Info-type Hotspot.
  • Add an On Hover Content where you can display text, images, gifs, and even video files.
Hotspot on Virtual Art Museum Tour

After you’ve filled in all the necessary fields, you’ll need to update the tour from the bottom right corner of the Tour Preview.

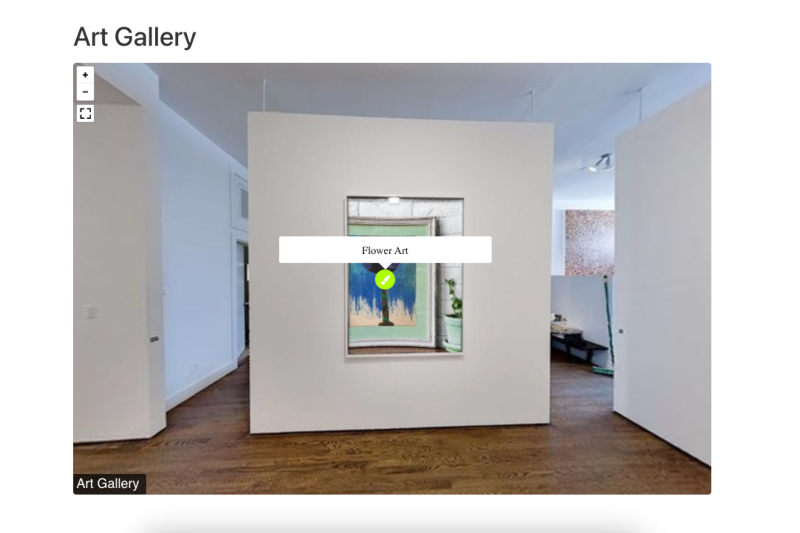
Let’s check the hotspot directly from the website.

Hotspot Content on VR Gallery Tour

There are four types of Hotspots available for the free & premium versions collectively.

Info-Type Hotspots: The Info-type hotspots allow you to display art information, related images, videos, and combinations of all these on a hotspot.

Click here to learn more about Info-type hotspots.

Scene Type Hotspots: You can capture panorama images of your different rooms or halls and connect them using this hotspot.

Your guest can use these to move between all the locations inside your virtual art gallery tour.

Click here to learn more about Scene-type hotspots.

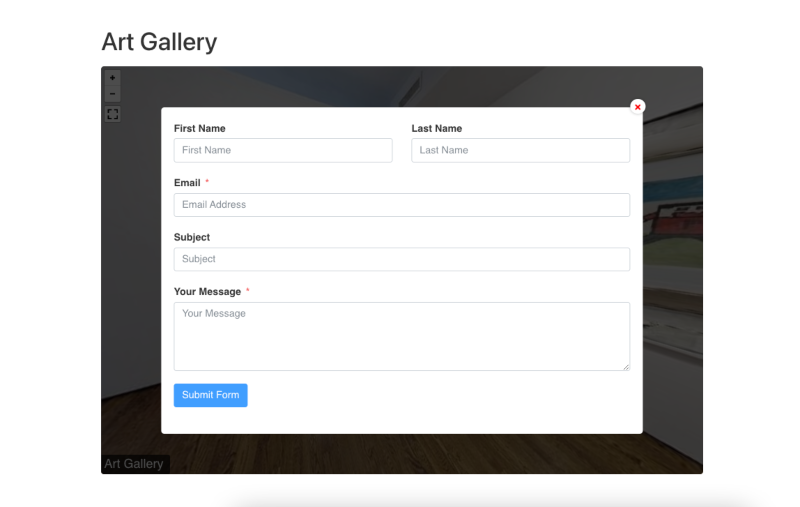
Fluent Form Hotspots: The Fluent Forms Addon is included with the premium version of WPVR. You can set contact forms or submission forms inside your virtual tours using this.

**I’ll tell you more about this later in this guide. So, keep on reading.

WooCommerce Product Hotspots: If you’re using WooCommerce and selling your arts or paintings through it, you can set the products on your hotspots.

Viewers can add them to their cart while roaming inside the virtual art gallery. This one is also available as a premium add-on.

Learn how to sell your arts using a virtual tour.

Step 6 – Advanced Controls & Control Buttons

You’ve created an awesome virtual art gallery tour for your visitors.

Now, what can we do next?

Let me tell you: making your tour better and more captivating using Advanced Controls and Control Buttons.

Advanced Controls

Advanced Controls for Art Gallery Museum Tour

The important set of features that you can enable to make the tour engaging are:

i. Gyroscope Control

A large number of your viewers will choose to view your art gallery virtual tour from mobile devices.

And you can really impress these viewers if you provide an interactive experience.

Enabling the gyroscope support on your VR gallery will make it respond to their movement and hook them with surprise.

ii. Scene Gallery

Your virtual art gallery will surely have multiple panorama images.

To give your viewers an idea of how large your gallery is, turn on the Scene Gallery option.

It’ll make it easier for your viewers to navigate inside the VR gallery as well.

iii. Tour Background Music

Enhance the experience of your viewers by adding background music.

A soothing background audio that matches the arts or paintings in your gallery will only complement the entire experience.

iv. Explainer Video

An explainer video is a helpful option for your viewers that can make their journey easier and provide some additional information as well.

It will guide your viewers on how to experience the tour, what they can expect in it and a heads up on some of the most interesting pieces of art they’ll experience in it.

Furthermore, you can enable or disable all these Control Buttons, based on how much control you want to give to your viewers.

Control Buttons of VR Art Gallery

Bonus Step – Let Your Viewers Easily Contact You

Once you have impressed your visitors with virtual art gallery tours, why leave the chance to connect with them and lead it to something more potential?

With the WPVR Fluent Forms Add-on, you can easily set contact forms inside your virtual art gallery.

You can add them in each scene, so they can choose to contact you any time, especially if one of your artifacts or paintings has got their attention.

This is something that’ll take you one step ahead of your competitors.

Add Contact Form in VR Art Gallery with WP VR
Type caption (optional)

Here is what a form will look like inside the tour.

Set Contact Form In VR Art Gallery

Author’s Notes

Last year, the number of sales of art and artifacts was 13.3 Billion U.S dollars. So this is a great sign that you too should start using a virtual art gallery to increase your audience engagements and hopefully, grow your business.

So go ahead and create a virtual art gallery for your website using WPVR.

Take help from the latest technology and get the recognition you deserve.