Kategorien
Real Estate WP VR

8 Surprising Airbnb Virtual Tour Benefits For Property Owners

Attention property owners! Are you looking to elevate your rental experience? If so, you need a game-changer Airbnb virtual tour in your property showcasing.

With captivating 360-degree views, these tours grab the attention of guests instantly. Imagine potential guests immersed in your space, visualizing their stay before booking.

It’s the ultimate attention-grabber, But it doesn’t stop there. These tours increase interest by offering an immersive experience. Guests are drawn in, eager to explore every detail of your property. And as they navigate through, desire turns into action.

Bookings make sure that guests are convinced that your rental is the perfect choice for their stay. So, are you ready to transform your property into a booking magnet?

Let’s take the journey from attention to action so that you can turn the guests into customers.

What is an Airbnb Virtual Tour?

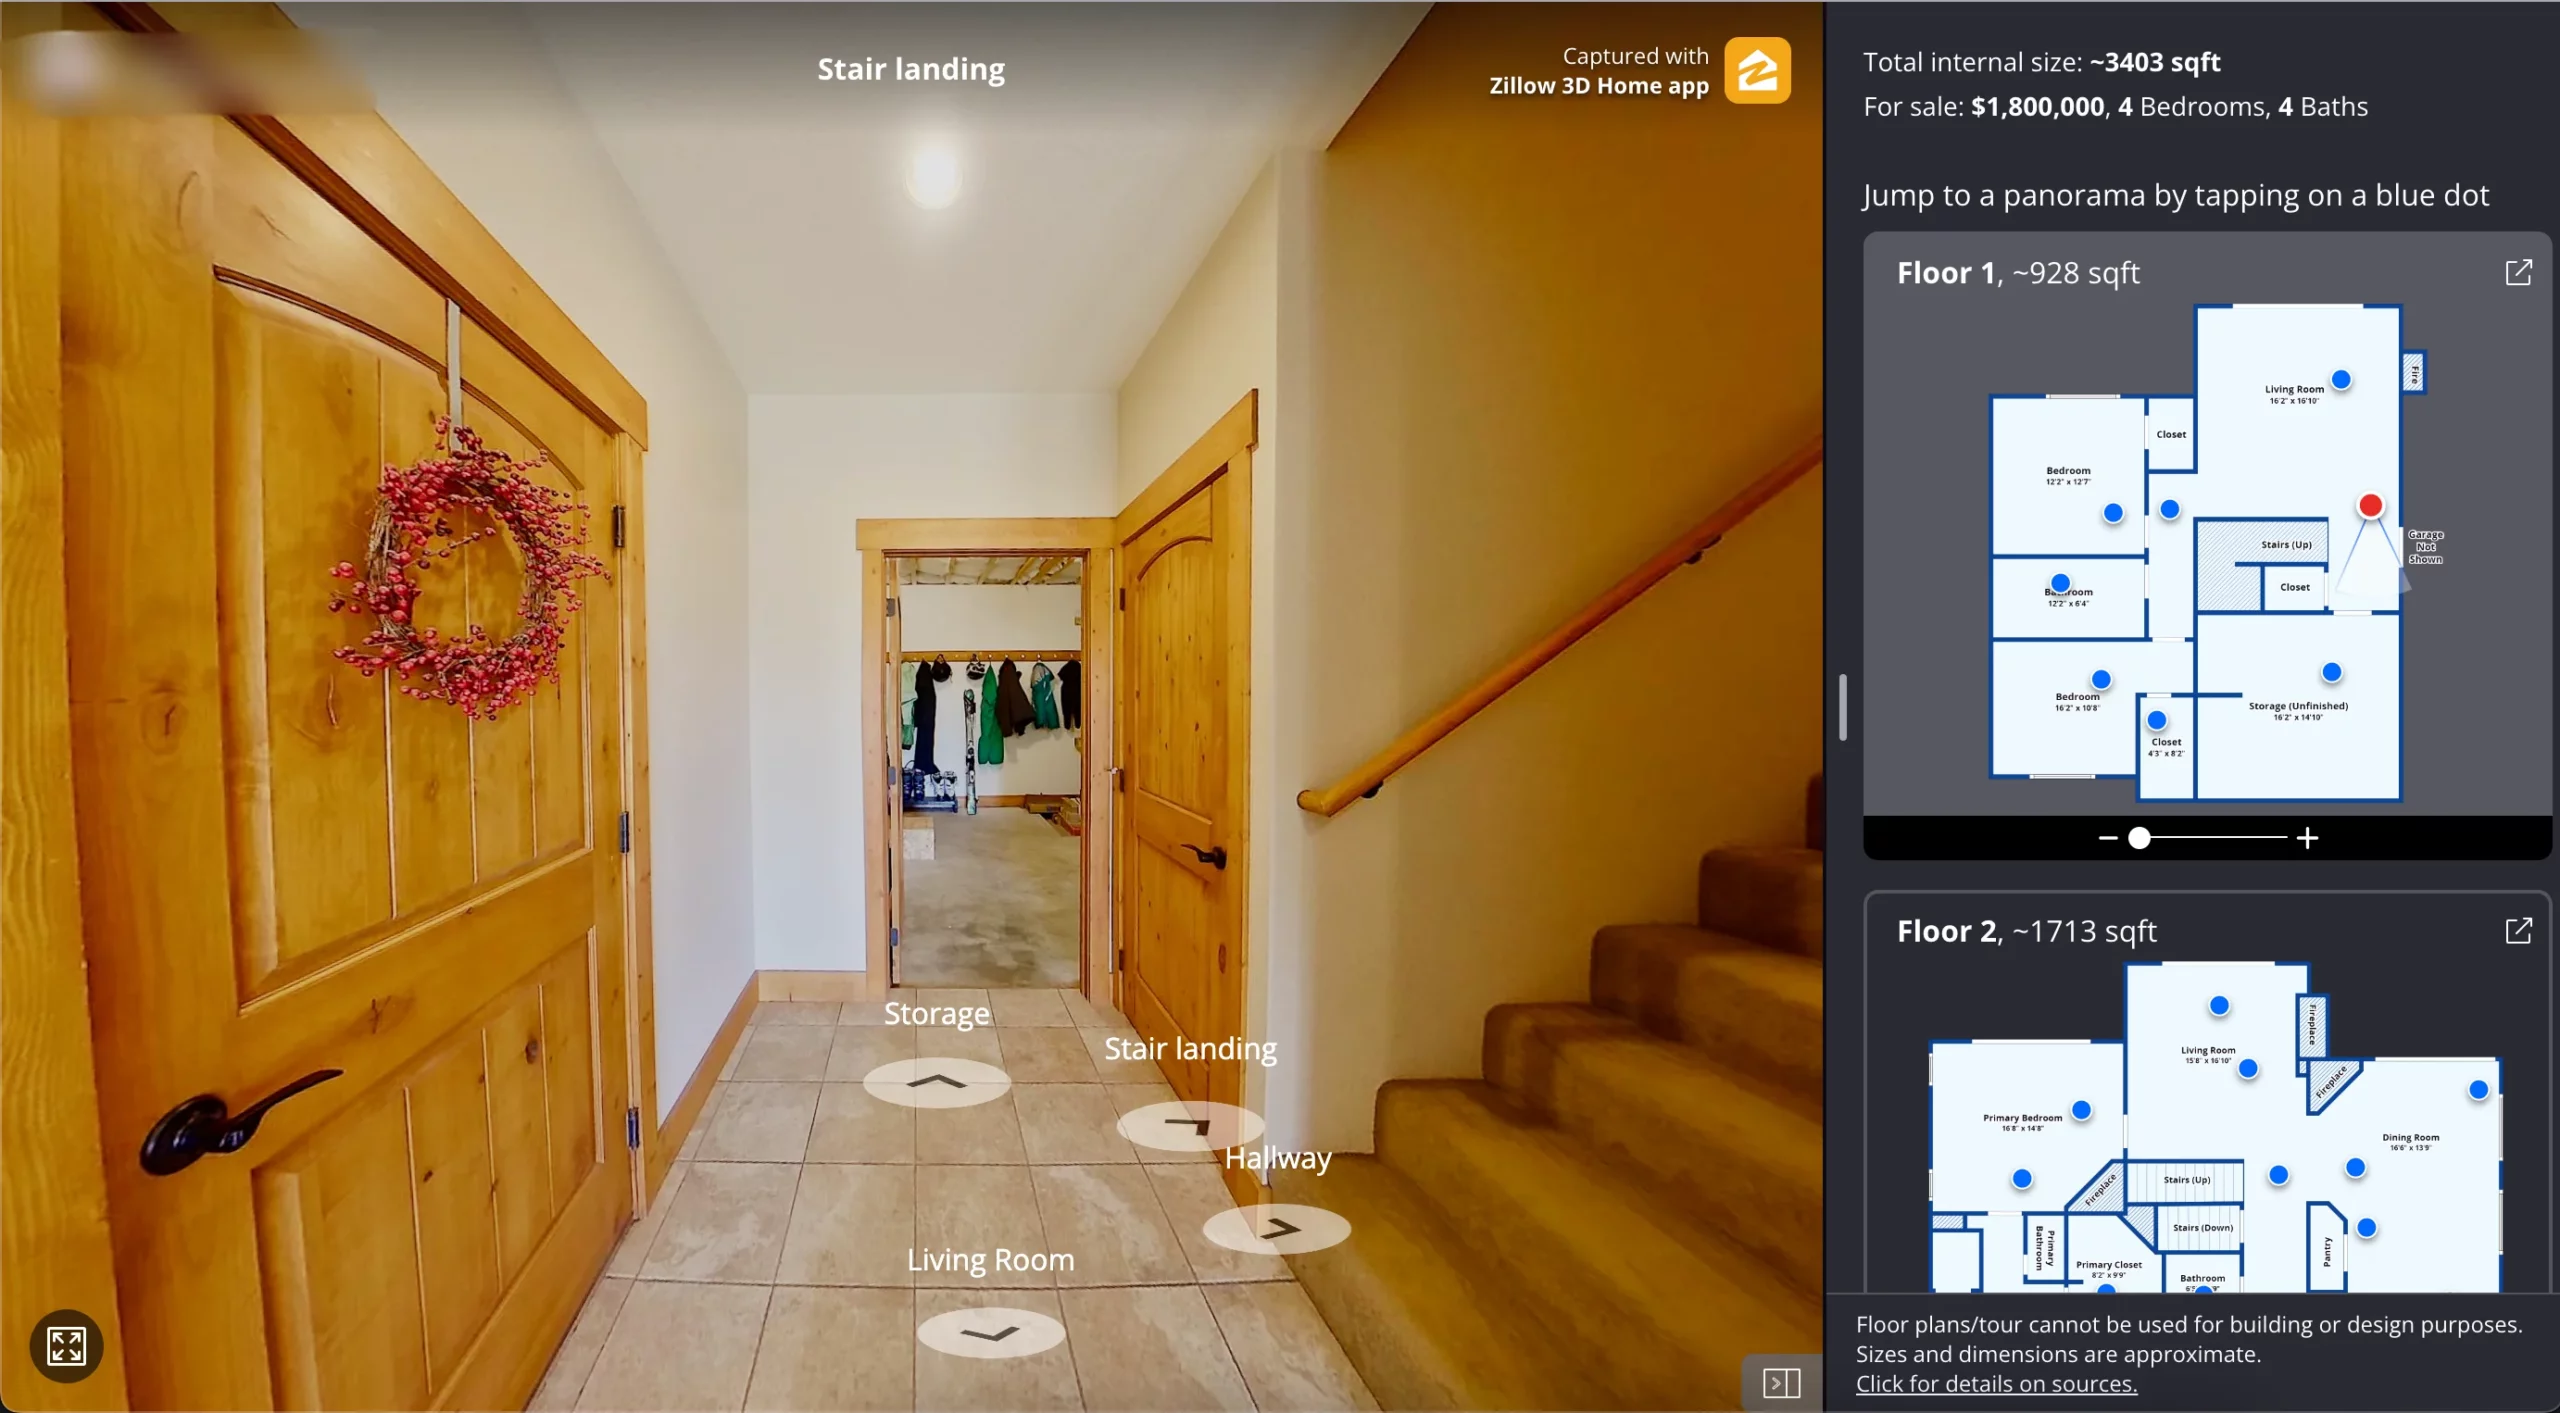
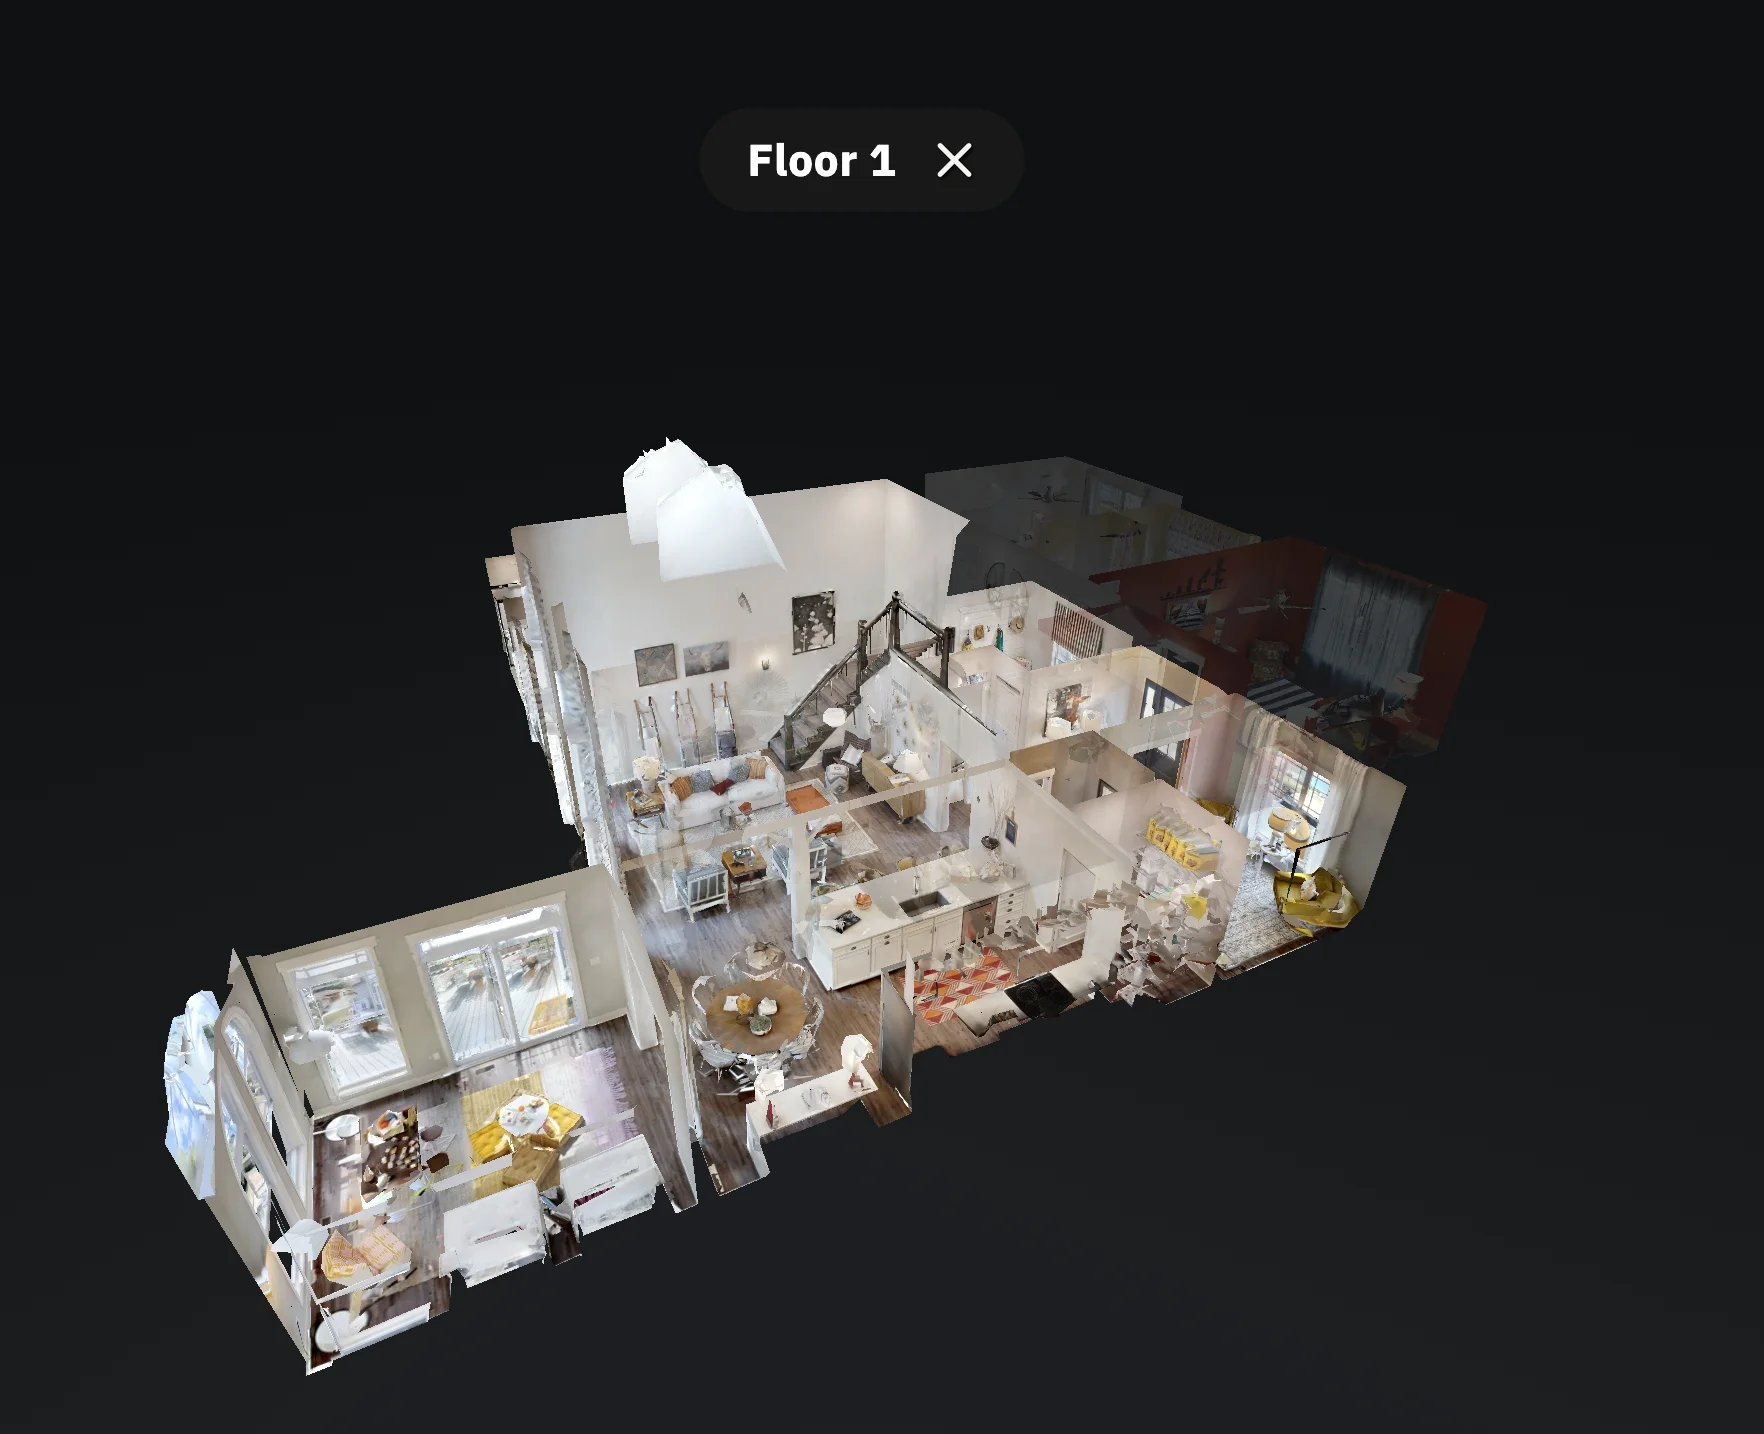
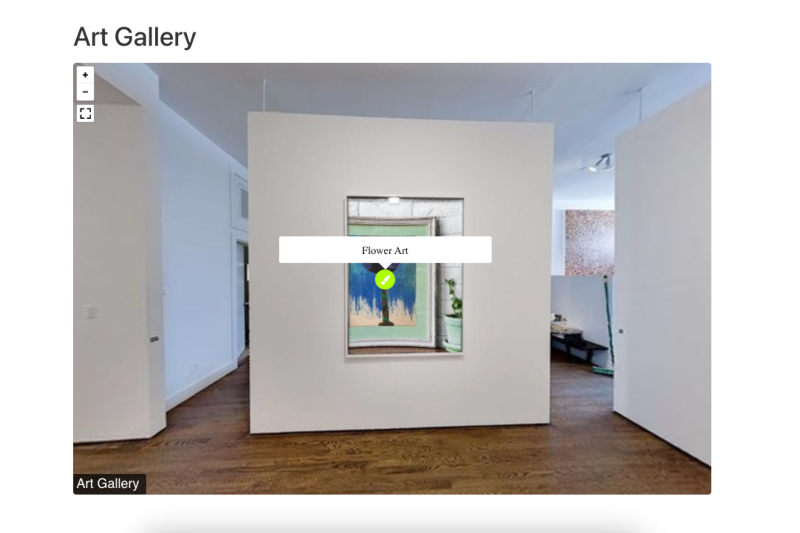
An Airbnb virtual tour means bringing your rental property to life on the screen. It’s a way for potential guests to explore every nook and corner of your place without even stepping inside.

With stunning 360-degree views, guests can virtually walk through your property. They can check out each room and get a feel for the space. It’s giving them a sneak peek before they book and it’s super convenient for you too.

Instead of scheduling multiple in-person viewings, you can showcase your property to countless guests from anywhere in the world.

So, whether it’s a cozy cabin in the mountains or a chic city apartment tour, an Airbnb virtual tour lets you show off your space in all its glory. Thus you can make it irresistible to guests.

Important Key Elements of Airbnb Virtual Tour

Airbnb virtual tour typically includes several key elements to provide a comprehensive and immersive experience for potential guests. Some key elements are given below:

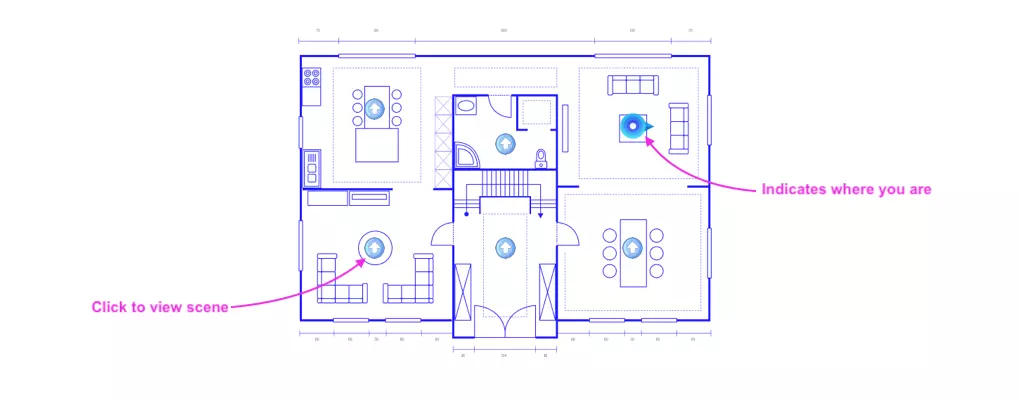
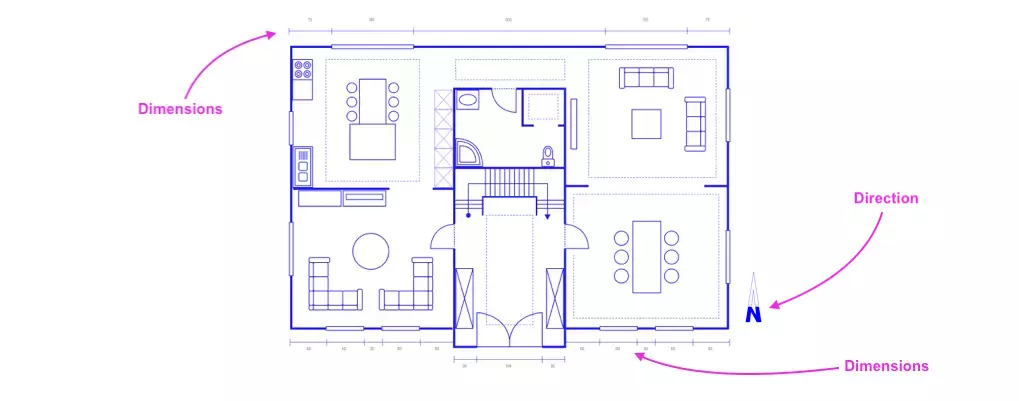
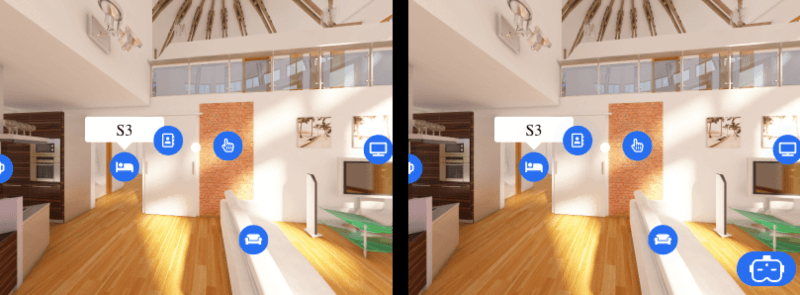
  1. 360-Degree Views: Take in the full scope of the space with a panoramic view. It provides a comprehensive understanding of the environment from all angles.
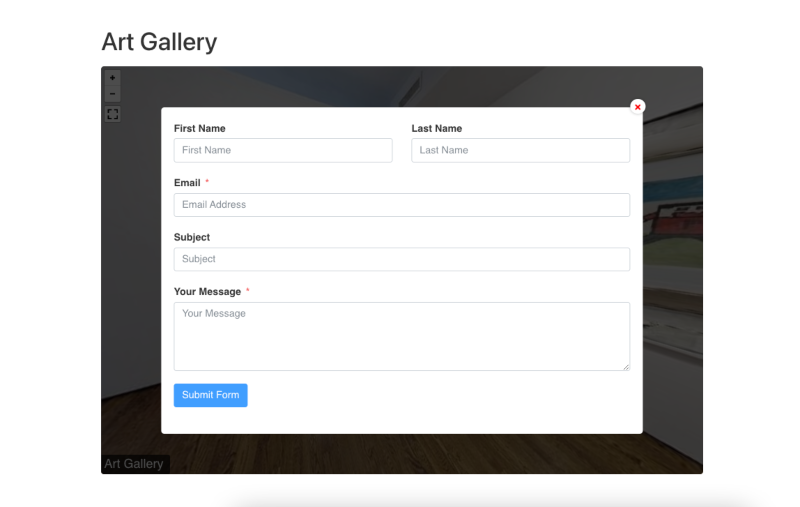
  2. Interactivity: Engage with the tour through interactive features. It allows guests to navigate your rooms, zoom in on details, and interact with specific elements within the space.
  3. Multimedia Elements: Experience the space through various multimedia components such as high-quality images, videos, and audio narration. It enhances the realism and depth of the virtual home tour.
  4. Accessibility: Ensure inclusivity by making the virtual tour accessible to all guests. Regardless of their abilities, through features like alternative text descriptions and keyboard navigation.
  5. Realistic Experience: Provide a true-to-life experience that accurately represents the property. It enables guests to visualize themselves within the space and make informed booking decisions.

8 Surprising Airbnb Virtual Tour Benefits for Property Owners

Airbnb Virtual Tour Benefits

Today, I’ll reveal 8 unexpected benefits of Airbnb virtual tours for real estate property owners. It revolutionizes the way by showcasing your space and attracting guests.

1. Increase More Visibility and Reach

Airbnb virtual tours enhance visibility and reach by offering potential guests a comprehensive preview of your property. It attracts a wider audience and increases exposure across the platform. Some more tactics to increase visibility and reach are given below:

  1. Increase exposure to potential guests: Your property gains increased exposure worldwide with the best Airbnb virtual tour. It maximizes visibility and booking opportunities.
  2. Minimize expansion of target audience: Utilizing Airbnb experiences minimizes the need to expand your target audience manually. It effortlessly attracts diverse guests from across the globe.
  3. Global accessibility: Enjoy global accessibility with Airbnb virtual tour. It offers an easy and good experience for guests to explore your property. It also enhances engagement and booking convenience.

Having explored how personalized panoramas increase visibility and reach, let’s focus on how they also provide significant benefits in terms of time and cost efficiency.

2. Time and Cost Savings

Discovering the magic of the top Airbnb virtual tour brings incredible time and cost savings. It also helps to make the booking process fast and easy. Let’s learn how it helps to bring time and cost efficiency:

  1. Reduced time spent on physical showings: With Airbnb virtual experiences, save time previously spent on in-person tours. It allows potential guests to explore your property remotely with ease and convenience.
  2. Minimization of associated expenses: By leveraging the efficiency of Airbnb virtual tour, cut down on costs related to travel, staging, and preparation for physical showings, optimizing your budget allocation for other aspects of your business.
  3. Easy booking process: Simplify the guest booking journey with easy integration of virtual experiences. It offers a hassle-free and intuitive way for guests to book your property directly from the virtual tour.

Utilizing time and cost efficiency will improve guest experiences and in the next section, I am going to describe it.

3. Improve Guest Experience

Airbnb Virtual Tour Benefits

It’s easy to elevate guest satisfaction to new heights with the best Airbnb virtual tour. It provides an unparalleled experience that enhances understanding and confidence. Now, let’s dive into more to know how it improves guest experience:

  1. Enhanced understanding of property layout and amenities: With an Airbnb virtual tour, guests can gain a comprehensive view of your property’s layout and amenities. It ensures they know exactly what to expect.
  2. Higher guest satisfaction and confidence: By offering immersive Airbnb virtual tours, guests feel more confident in their booking decisions. It leads them to increased satisfaction with their stay and a higher likelihood of positive reviews and repeat bookings.
  3. Reduced likelihood of cancellations or misunderstandings: With the clarity provided by Airbnb virtual tours, guests have a clearer picture of your property. It minimizes the chances of cancellations or misunderstandings due to mismatched expectations. ultimately leading to smoother booking processes and happier guests.

You improved your guest experience with the Airbnb virtual tour but now competition is the main challenge. But don’t worry, I will discuss how virtual experiences can avoid competition in the next paragraph.

4. Beat the Competition:

You can gain a competitive edge in the market with Airbnb virtual tour technology as it positions your properties as top choices for modern travelers seeking immersive experiences.

Let’s explore some more competitive advantages:

  1. Setting properties apart from competitors: With the best Airbnb virtual tour, showcase your properties in a unique and captivating way. It distinguishes them from competitors and attracts determining travelers looking for standout accommodations.
  2. Appealing to tech-savvy travelers: By offering Airbnb virtual experiences, cater to the preferences of tech-savvy travelers who prioritize convenience and digital innovation. It helps to position your properties as desirable destinations for the modern traveler.
  3. Leveraging innovative marketing strategies: Utilize Airbnb virtual tours as part of your innovative marketing approach. It captures the attention of potential guests and showcases your properties dynamically and engagingly. Ultimately It drives bookings and boosts your market presence.

Now let’s shift the next focus to how these tours offer flexibility and convenience for both you and your guests.

5. More Flexibility & Convenience

Get the flexibility and convenience with Airbnb virtual tour solutions. it provides seamless accessibility and catering to diverse guest preferences for an enhanced booking experience. Some benefits are described as follows:

  1. Accessibility anytime, anywhere: With the flexibility of Airbnb experiences, guests can explore your properties at their convenience, from anywhere in the world. It ensures accessibility around the clock and accommodates busy schedules.
  2. Catering to diverse guest preferences: Utilize the best Airbnb virtual tour to cater to diverse guest preferences. It offers various tour options and customization features to accommodate different tastes and needs. Ultimately it enhances overall guest satisfaction.
  3. Facilitating remote bookings: By combining Airbnb virtual tours into your property listings, facilitate remote bookings by providing guests with a comprehensive understanding of your accommodations. It simplifies the booking process and eliminates the need for in-person visits.

let’s now turn our attention to how personalized panoramas offer flexibility and convenience while minimizing risks for both hosts and guests.

6. Risk Management:

It helps to mitigate risks and ensure peace of mind with Airbnb virtual tour solutions. It offers enhanced safety measures and minimizes potential security concerns for both property owners and guests.

  1. Spread safety concerns during the pandemic: With the best Airbnb virtual tour, clear safety concerns by providing virtual alternatives to in-person viewings. It allows guests to explore properties from the comfort and safety of their own homes, thereby reducing exposure risks during the pandemic.
  2. Minimizing security risks associated with in-person viewings: Utilize Airbnb virtual experiences to minimize security risks traditionally associated with in-person viewings. Such as unauthorized access to properties, by offering virtual tours that safeguard the security and integrity of your accommodations.
  3. Protection against property damage or theft: Incorporate Airbnb virtual tours as a protective measure against property damage or theft. It provides an additional layer of security by minimizing physical access to properties and reducing the probability of incidents that could result in damage or theft.

Personalized panoramas not only minimize risks but also serve as a long-term investment in your property’s success and guest satisfaction. Let’s explore the next section.

7. Long-Term Investment

Airbnb virtual tour helps to achieve long-term success. It offers sustainable marketing tools and adaptability to industry trends for continual property improvement and future rentals. Let’s explore more investment benefits:

  1. Sustainable marketing tool for future rentals: Utilize the best Airbnb virtual tour app as a sustainable marketing tool for future rentals. It provides lasting impressions and entices potential guests with immersive experiences that showcase your properties effectively. It helps to ensure long-term visibility and rental opportunities.
  2. Continual improvement of property presentation: With Airbnb experiences, continually improve property presentation by updating virtual tours to reflect any enhancements or changes. It ensures that your listings remain attractive and competitive in the ever-evolving rental market, ultimately maximizing booking potential.
  3. Adaptability to evolving industry trends: Embrace adaptability to evolving industry trends with Airbnb virtual tours. It helps to stay ahead of the curve by incorporating new features and technologies that enhance the guest experience and meet changing preferences.

To ensure inclusivity and comfort for all visitors, you need to enhance accessibility for your guests according to their special needs. In the next section, I am going to describe how virtual tours can achieve this benefit.

8. Accessibility with Special Needs

If you want to elevate your hospitality standards with enhanced accessibility, the Airbnb virtual tour is the best option. It helps to showcase your commitment to inclusivity and diversity for guests with special needs. let’s explore more:

  1. Catering to guests with mobility challenges or disabilities: Utilize Airbnb virtual experiences to cater to guests with mobility challenges or disabilities. It offers them the opportunity to explore your properties virtually and ensure that your accommodations meet their specific needs and preferences.
  2. Providing detailed accessibility information before booking: With the best Airbnb virtual tour, provide detailed accessibility information before booking. It guides the guests to make informed decisions and ensures that they have a seamless and enjoyable experience during their stay.
  3. Demonstrating commitment to inclusivity and diversity in hospitality: Showcase your commitment to inclusivity and diversity in hospitality by offering virtual tours through the Airbnb virtual tour. It demonstrates your dedication to providing accessible accommodations for all guests, regardless of their abilities or limitations.

Top 3 Tools to Create Airbnb Virtual Tour

Discover the top 3 tools for creating virtual tours, including WPVR for immersive WordPress-based experiences, EyeSpy360 for professional-grade 360-degree tours, and Matterport for seamless property showcasing.
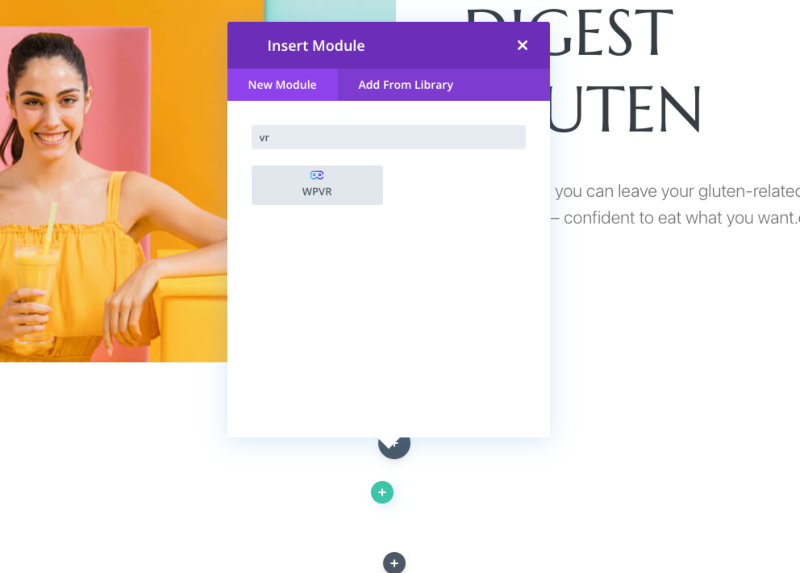
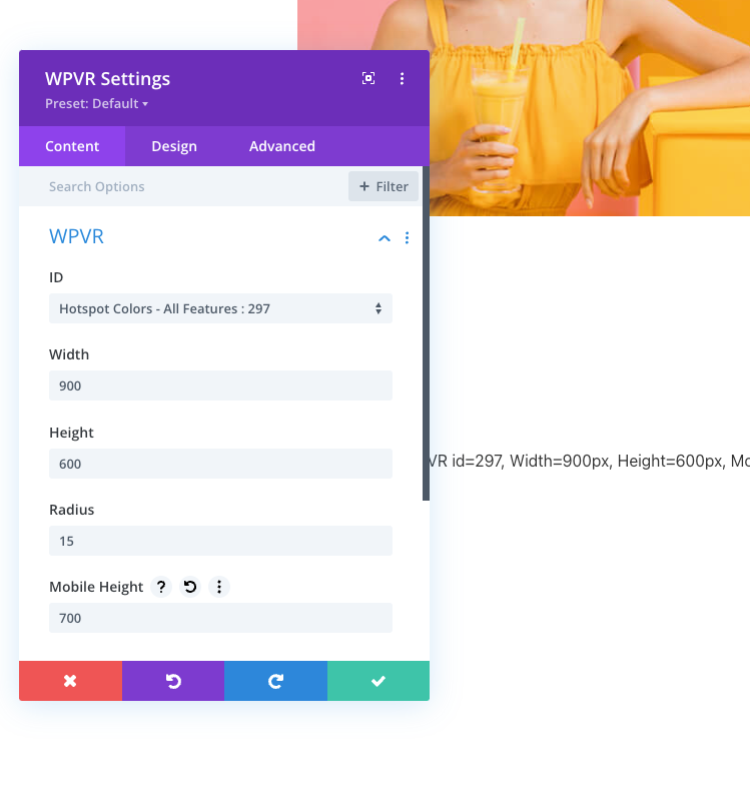
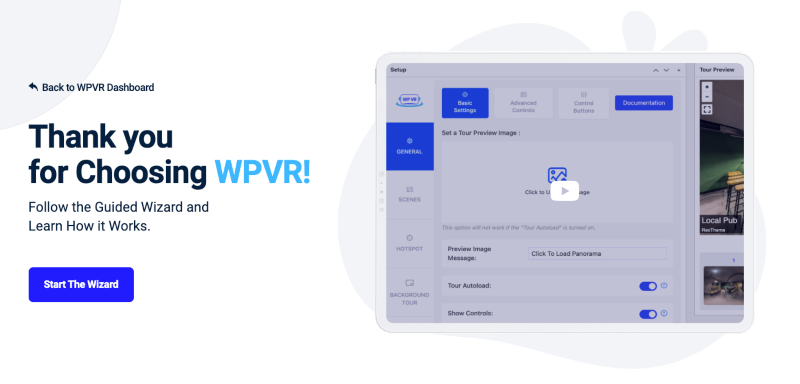
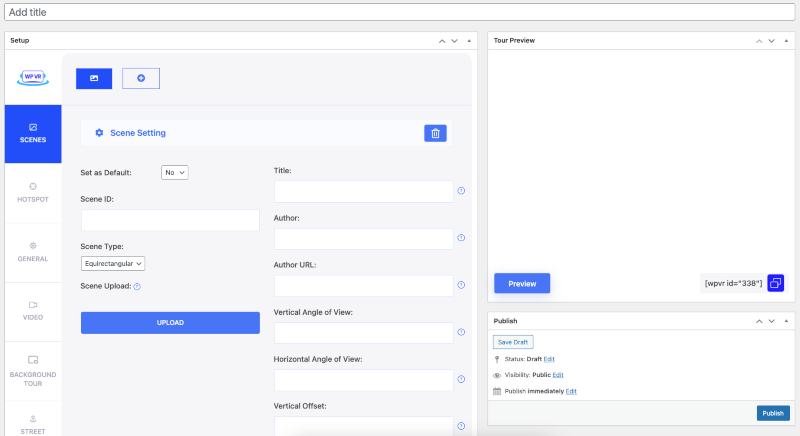
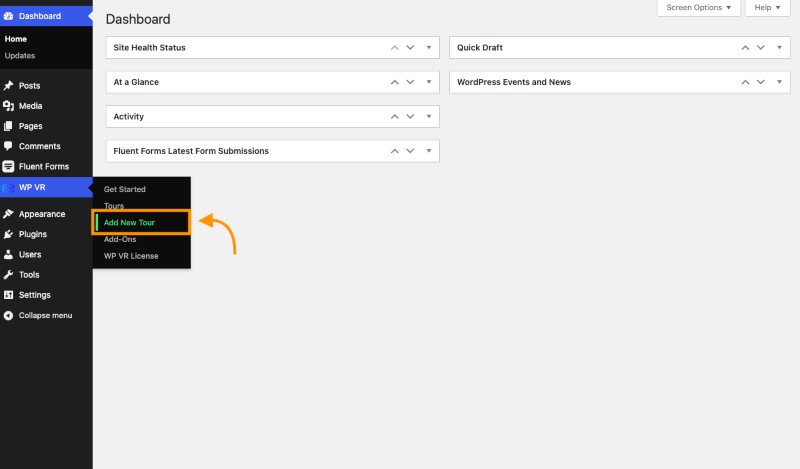
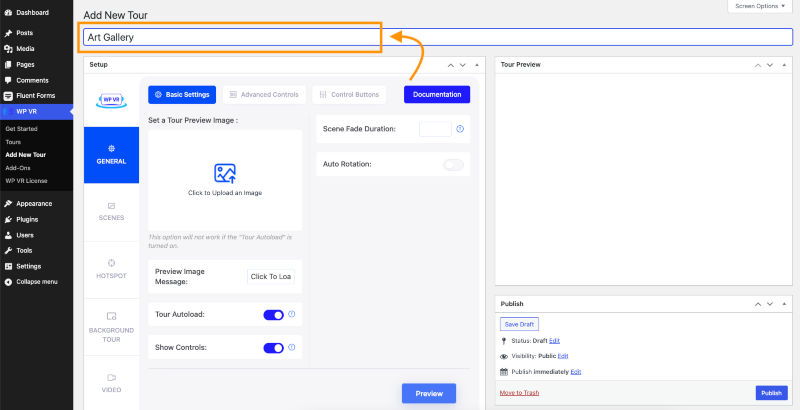
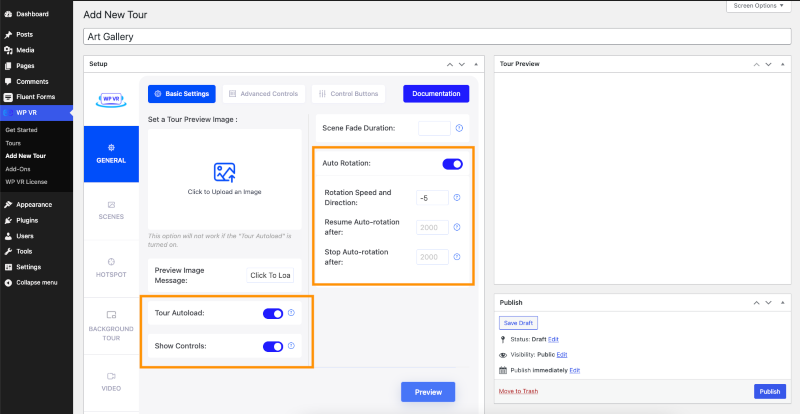
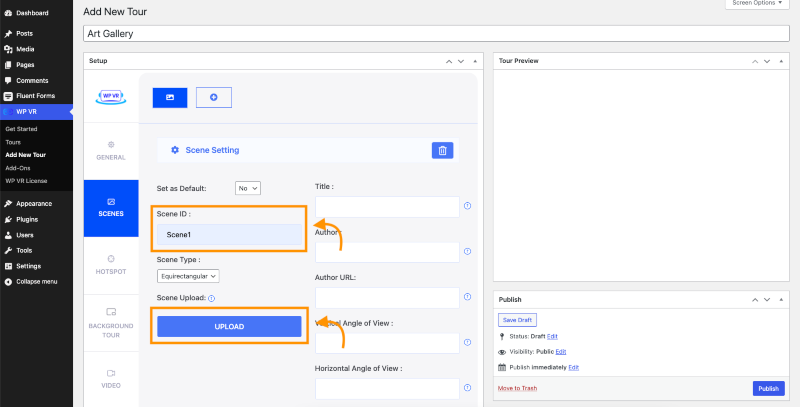
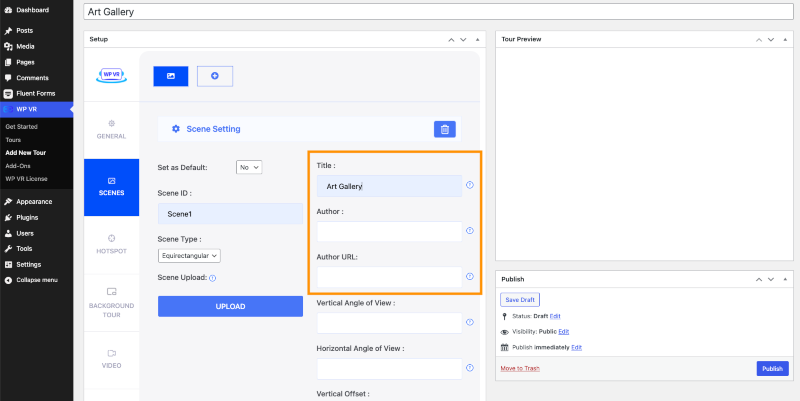
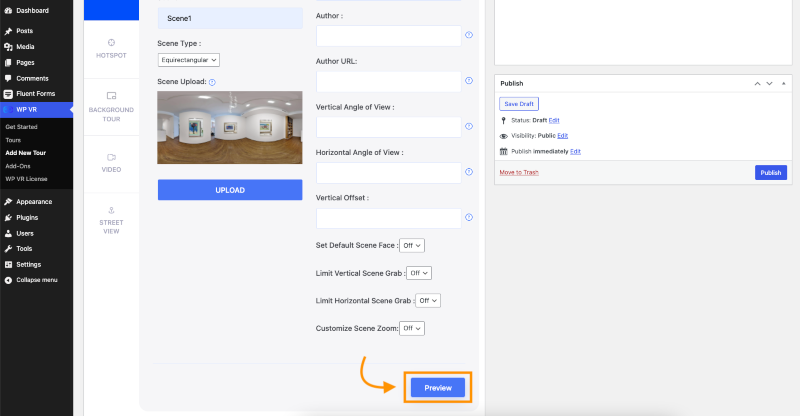
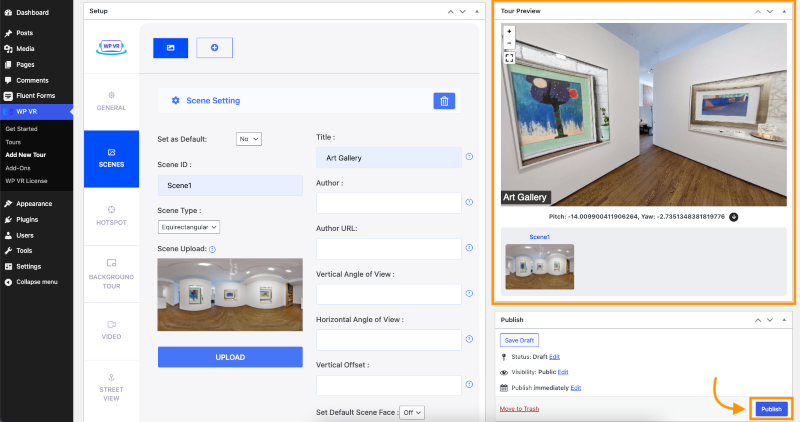
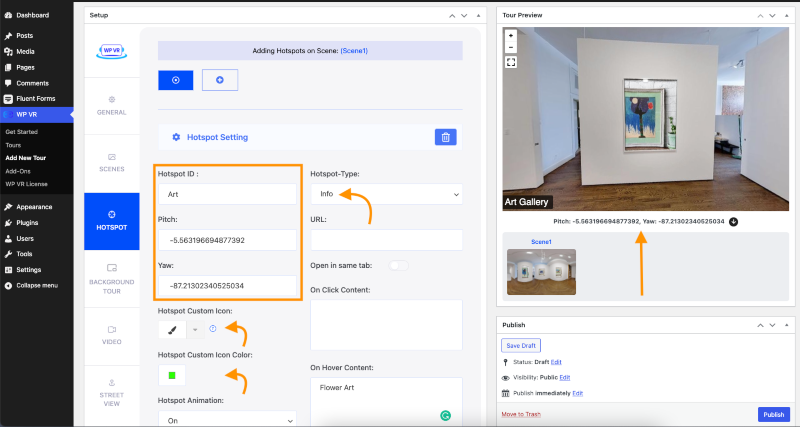
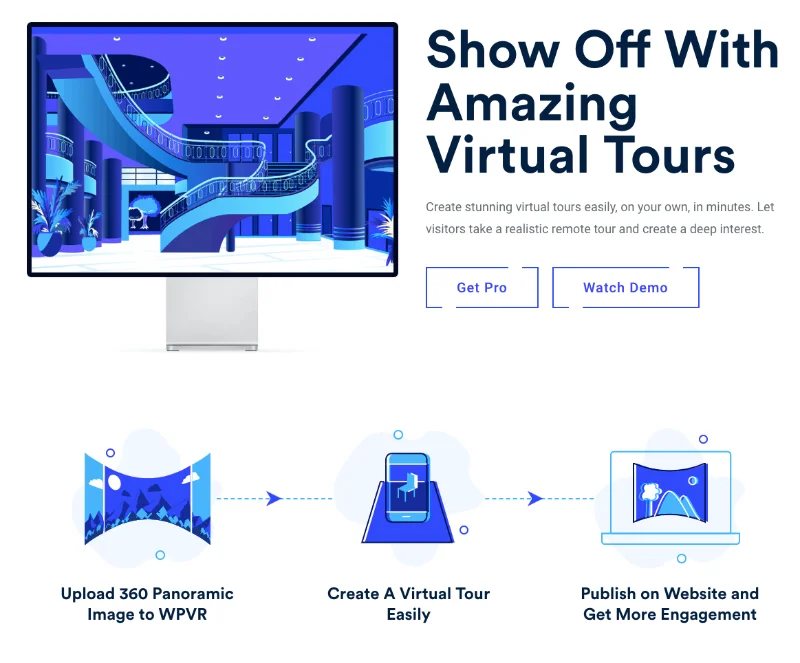
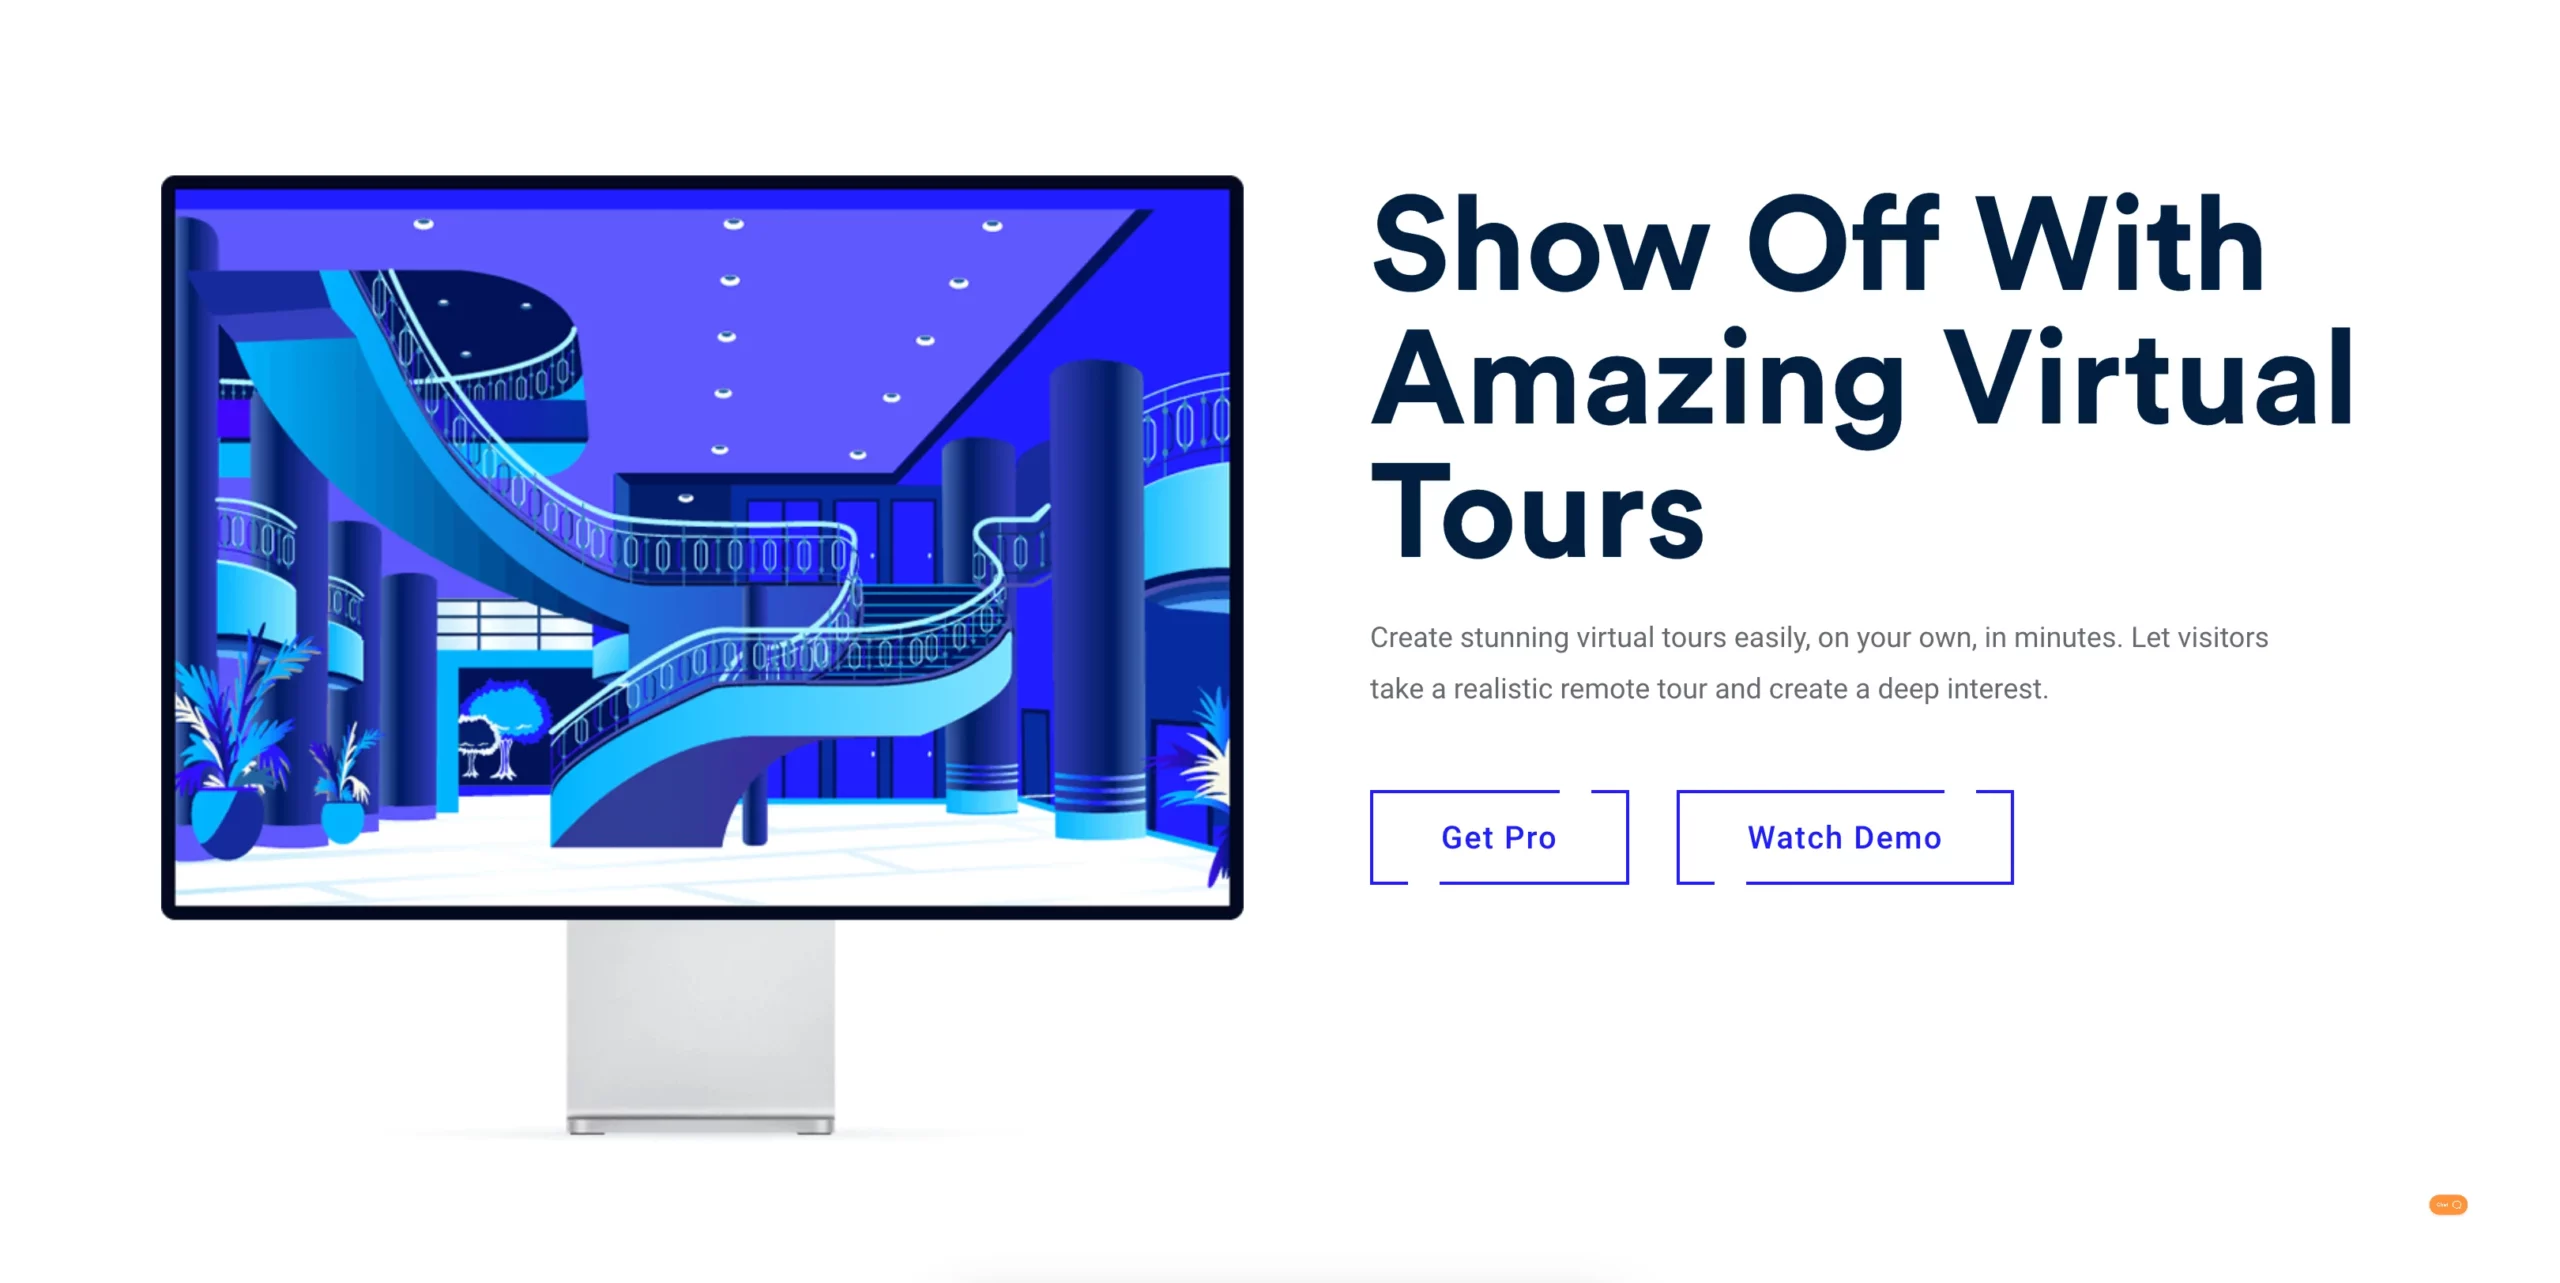
1. WPVR

Airbnb Virtual Tour - WPVR

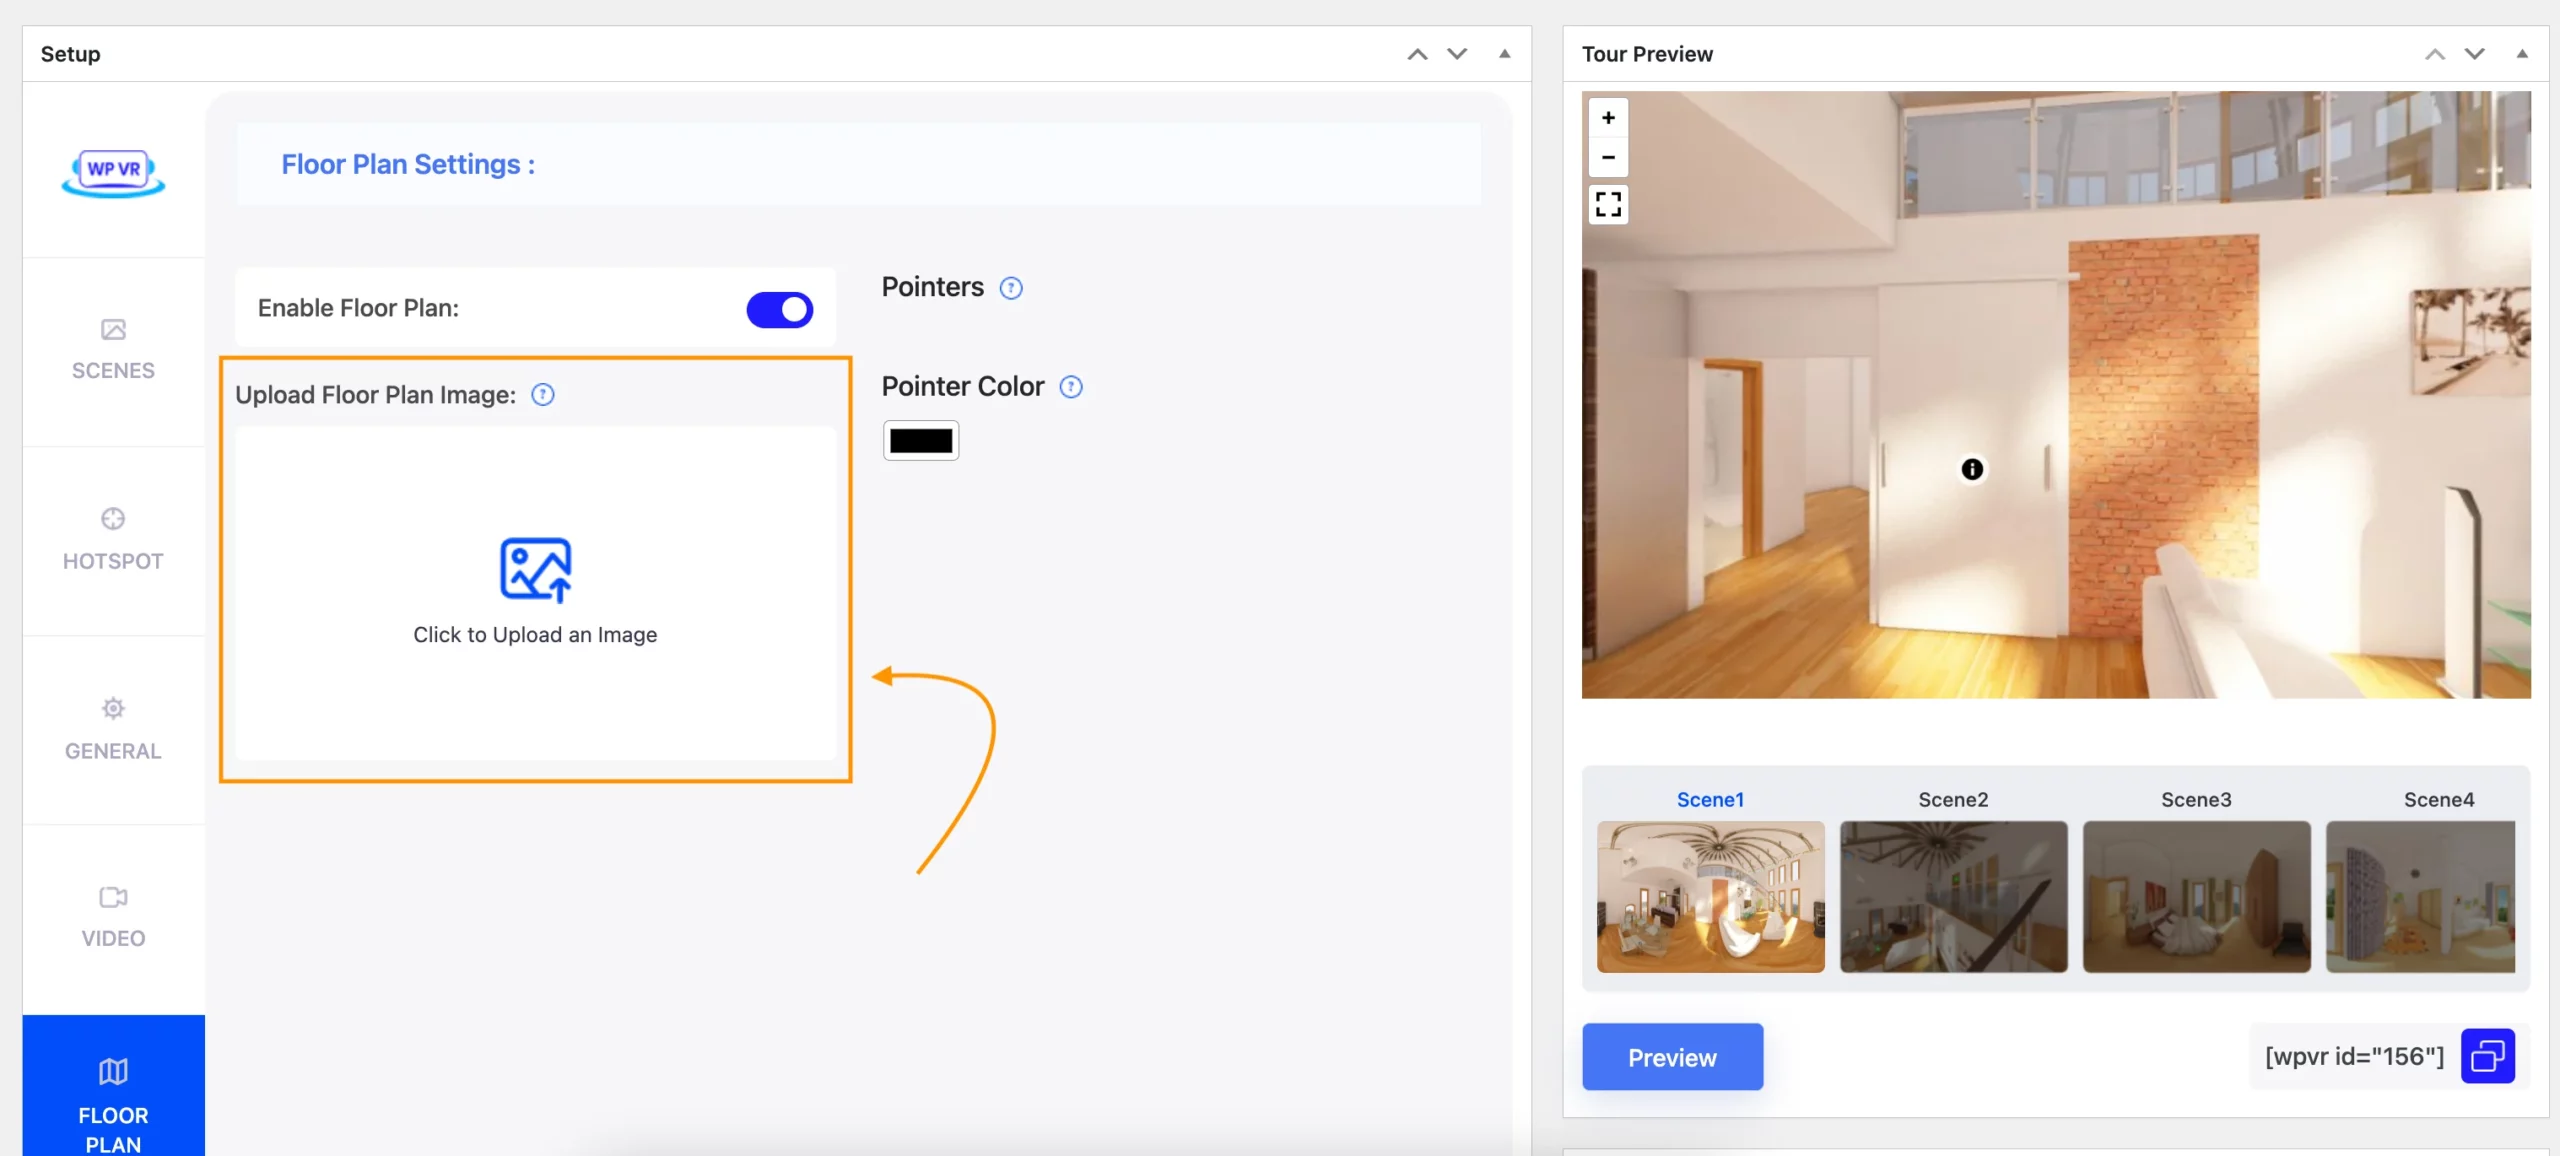
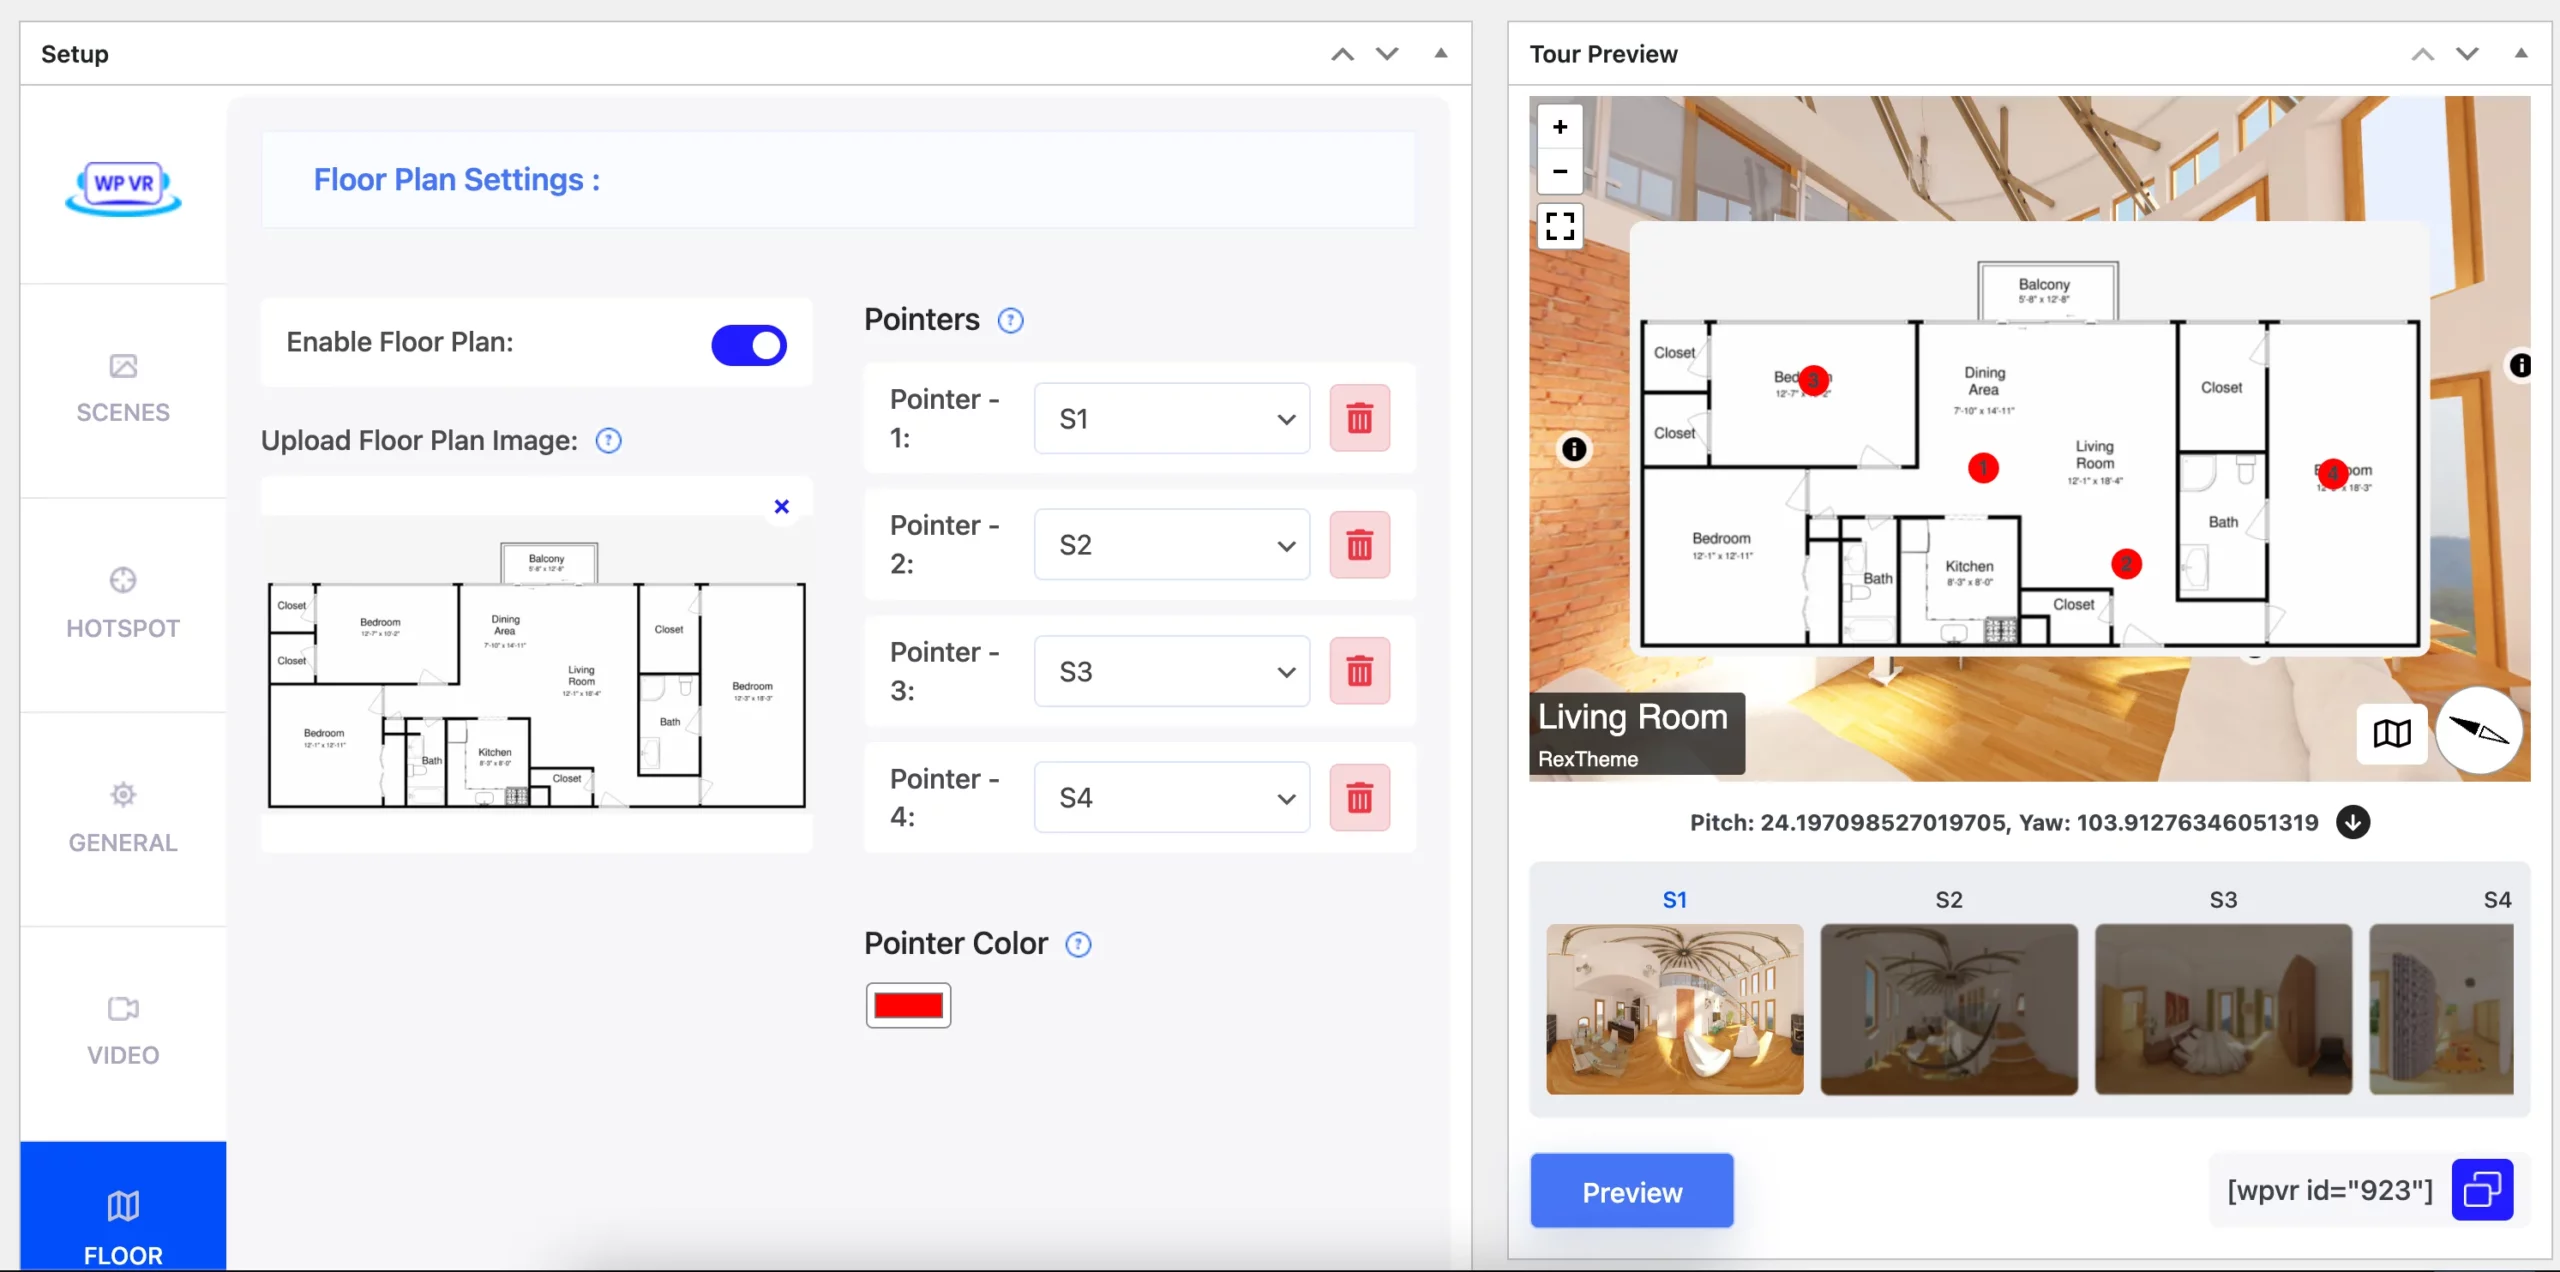
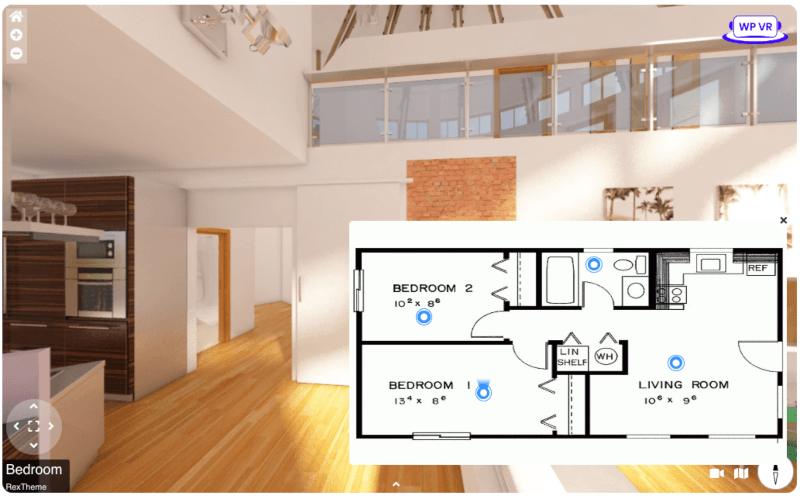
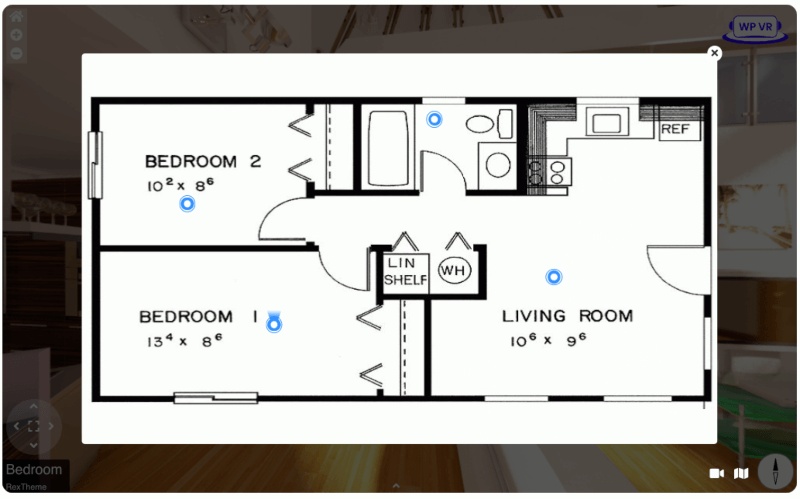
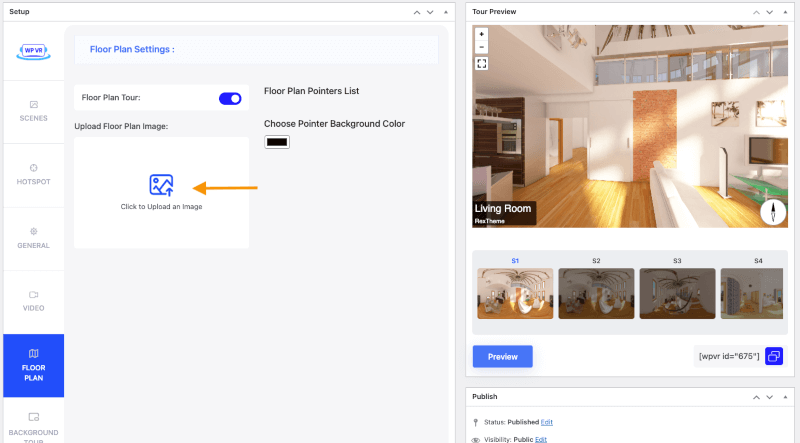
WPVR stands out as the ideal tool for crafting exceptional Airbnb virtual tours. As the premier Airbnb virtual tour app, WPVR offers exceptional functionality and ease of use. It allows you to create immersive experiences that elevate your listings.

With its intuitive interface and robust features, including customizable 360-degree views and interactive elements, WPVR ensures that you can showcase your properties in the best light possible.

By leveraging WPVR, you can provide guests with the ultimate Airbnb virtual experiences. It enhances their booking potential and sets their listings apart as the best Airbnb virtual tours available.

Preisgestaltung:

  • Free Plan: Basic features free on WordPress repo (link)
  • Starter Annual Plan: $79.99 per year for 1 website
  • Pro Annual Plan: $169.99 per year for 10 websites
  • Agency Annual Plan: $269.99 per year for unlimited websites
Airbnb Virtual Tour - WPVR Pricing

2. EyeSpy360

Airbnb Virtual Tour - Eye Spy 360

EyeSpy360 is the go-to tool for crafting Airbnb virtual tours. It ensures seamless experiences, making it the best choice for unforgettable Airbnb experiences.

As a top-notch Airbnb virtual tour app, EyeSpy360 simplifies the process. It also allows you to create captivating tours effortlessly.

With customizable 360-degree views and interactive features, it offers guests immersive experiences they won’t forget. By utilizing EyeSpy360, you can showcase your listings as the best Airbnb virtual tours, attracting more guests and maximizing bookings.

Its user-friendly interface and advanced functionalities make it a must-have for any host like you looking to elevate their Airbnb game.

Preisgestaltung:

  • Pay-as-you-go plan: $15 per tour creation for 1 year of hosting, 1 user & 1 brand
  • Monthly Plan: $12.99 per month for unlimited hosting, 3 users & 3 brands
Airbnb Virtual Tour - EyeSpy360 Pricing

3. Matterport

Airbnb Virtual Tour - Matterport

Matterport is a trusted tool for crafting immersive Airbnb virtual tours. It stands out as the best option for elevating guest experiences.

As an Airbnb virtual tour app, Matterport simplifies the process. It enables you to create stunning tours effortlessly. With its user-friendly interface and advanced features, it ensures that your listings are showcased as the best Airbnb virtual tours available.

By utilizing Matterport, you can offer guests unforgettable virtual experiences that highlight every detail of your property. Its seamless integration with Airbnb enhances visibility and attracts more potential guests, ultimately leading to increased bookings and revenue.

With Matterport, you can provide guests with unparalleled virtual experiences that leave a lasting impression.

Preisgestaltung:

  • Free Plan: Basic features free forever 1 active space for 2 users
  • Starter Annual Plan: $9.99 per month (billed annually) 5-10 active spaces for 3 users
  • Professional Annual Plan: $55 per month (billed annually) 20-150 active spaces for 10 users
  • Business Annual Plan: $269 per month (billed annually) 100-300 active spaces for 50 users
  • Enterprise Annual Plan: You have to contact for custom pricing
Airbnb Virtual Tour - Matterport pricing

Conclusion:

In conclusion, all three tools, WPVR, EyeSpy360, and Matterport, offer valuable features for creating Airbnb virtual tours. WPVR emerges as the optimal choice.

While you can use any of these tools according to your preferences, WPVR stands out as the ultimate solution for crafting the best Airbnb virtual tours.

With its intuitive interface, robust features, and seamless integration with Airbnb, WPVR enables you to showcase their properties in the most captivating and immersive way possible.

You can elevate your listings, attract more guests, and ultimately maximize your rental income. Whether you’re a seasoned host or just starting, WPVR helps you create virtual experiences that truly stand out in the competitive Airbnb market.

** FAQs **

Can I use virtual tours for properties other than residential homes?

  • Yes, virtual tours can be utilized for various properties like commercial spaces, vacation rentals, event venues, and more. It’s a versatile tool for showcasing any space remotely.

Are virtual tours compatible with mobile devices?

  • Yes, most virtual tour platforms are mobile-friendly. It ensures seamless viewing experiences on smartphones and tablets. You can easily explore properties on the go.

How long does it take to create a virtual tour?

  • The time to create a virtual tour varies depending on factors like the size of the property and the complexity of the tour. However, with user-friendly tools like WPVR, you can create immersive tours efficiently.

Can virtual tours be customized to match my branding?

  • Many virtual tour platforms offer customization options. It allows you to incorporate your branding elements such as logos, colors, and fonts. This ensures consistency with your brand identity.

Are virtual tours secure?

  • Yes, virtual tours are secure as they don’t require physical access to the property. Additionally, reputable platforms employ encryption and privacy measures to protect sensitive data and ensure a safe viewing experience for both hosts and guests.
Kategorien
Leitfaden

How to Generate Real Estate Leads: 14 Proven Tips

Like people require oxygen, To be a successful real estate agent you need leads.

And it’s true – without a steady process of generating qualified leads,

it’s nearly impossible to scale up your real estate business.

We know you nod in agreement,

That’s why you’re reading the countless ‘how-to generate leads’ articles

-all promising the secret to generating a never-ending supply of leads.

To save you time from digging into 100 resources,

we have rounded up 14 proven tips on

how to generate real estate leads” and

will shower you with lots of “want to know/buy your home” calls!

Keep reading!

Why Applying the Right Strategies is Crucial for Real Estate Leads

Before diving into the tips and tactics,

Let you know why it is important to pick the right strategies.

Implementing the right lead-generation strategies is not just about finding any leads,

it’s about targeting the right prospects, maximizing your return on investment, and

building a sustainable pipeline of high-quality leads.

Here are the benefits of picking the right strategies for your real estate growth :

  1. Receive More Website Traffic: When you implement the right mix of lead gen tactics, you’re able to draw more qualified prospects to your real estate website.
  2. Reduced Costs: Using lots of lead generation tactics often leads to wasted time and resources. But strategic, data-driven methods allow you to maximize your return on investment.
  3. Reduce Your Site’s Bounce Rate: Irrelevant or untargeted leads are more likely to click away from your website quickly.
  4. Increased Closing Rates: Strategic lead generation helps you focus on the prospects who are truly ready to buy.

How to Generate Real Estate Leads – 14 Tried-and-True Methods

From receiving more website traffic to increasing sales,

these proven 14 tips will help you generate leads faster :

14. Optimize your SEO for local leads

As a real estate agent, your bread and butter comes from local leads – after all,

your expertise and network are rooted in your community.

So, when it comes to your digital marketing strategy,

optimizing your SEO for local search is an absolute must.

Real estate lead generation tools like keyword planners and

local SEO services can greatly

enhance your visibility without significant costs.

Incorporating SEO lead generation techniques ensures that

your property listings get the maximum exposure to potential local buyers,

effectively increasing your chances of closing more deals.

Generate Local leads

Source

Let’s dive into a few key tactics to help you get found by the right local prospects :

  • Create Content Based on Local News Stories or Events: By creating content that taps into the latest news, trends, or happenings in your market, you position yourself as a trusted, in-the-know resource in front of your potential leads
  • Hone in on Local Keywords: To attract local leads, you need to laser-focus on location-specific search terms.
  • Use Location Pages or a Location-Specific “About Us” Page: In this way, you can more real estate to showcase your community expertise, highlight local listings, and make it crystal clear to search engines (and prospective clients) that you’re the go-to agent in that local.

13. Optimize your landing pages for conversions

Only focusing on local leads will limit your lead-generation process.

To reach out broadly you need to optimize your landing pages.

It can dive deep into the metrics that matter most like –

High click-through rates, low bounce rates, conversion rates, and more.

This is how you can optimize your landing page for conversion :

  • Make your visitor think, “Wow, this page speaks to me!”- Craft captivating headlines that grab your audience’s attention and communicate your unique value proposition.
  • Don’t make them wait for “what’s next.”- Create compelling copy that addresses your audience’s pain points and highlights the benefits of your offer. Keep it concise, engaging, and focused.
  • Attractive Design – Visually appealing layouts that guide visitors toward your desired action. Remove any clutter or distractions that could dilute your message and conversion potential.
  • Conversion Monitoring- Always measure key metrics like click-through rates, bounce rates, and conversion rates.

12. Network with home professionals

Networking is the cheapest way to get real estate leads and

can create a foundation for referral-based leads which often come without any upfront cost.

You can start building your network even before obtaining your real estate license.

Here are some key professionals you should look to connect with:

  1. Mortgage Lenders: Having a reliable lender in your network can speed up the pre-approval process for your buyers and ensure they avoid predatory lenders.
  2. Home Inspectors: Building a relationship with home inspectors can help you secure quick turnaround times for your clients, especially in competitive markets.
  3. Appraisers: Like home inspectors, having a connection with appraisers can help you get faster service for your buyers and sellers.
  4. Attorneys: Attorneys can be a valuable lead source, especially those working with clients going through divorce or other life events that may necessitate real estate transactions.
  5. Financial Planners: Financial planners often have clients looking to invest in real estate, so being the go-to agent for these professionals can lead to new opportunities.
  6. Property Managers: Referring your investor clients to reliable property managers can strengthen your relationships and lead to more business.
  7. REO Asset Managers: Building connections with REO asset managers at banks can provide a steady stream of foreclosed properties to sell.
  8. Builders and Contractors: Even if you don’t represent builders directly, having relationships with local construction professionals can help you serve your land-buying clients or receive referrals.

11. Contact clients on their birthdays and other events

As a real estate agent, maintaining strong client relationships is key to generating referrals and repeat business.

Contacting clients on special occasions is an effective and cheapest way to get real estate leads.

Birthdays, in particular, are often a happy time for your clients.

They want to surround themselves with people who put them in a good mood – and

you can be one of those people.

Giving each of your top clients a personalized birthday call is one of the easiest,

most thoughtful gestures you can make.

Even if you’re not the sentimental type,

setting aside time for these calls in a consistent, efficient manner can pay huge dividends.

Go through your list of best clients and make sure to give each one a call on their special day.

Generate Real Estate Leads

Source

10. Join online homeowner groups from your area on social media

As a real estate agent, you’ve got to be tapping into the power of online homeowner communities in your local area.

These groups can be goldmines for how to get leads in real estate for free.

Take those “buy, sell, and swap” groups, for example.

When people are posting about having a big clear-out,

that’s a telltale sign they could be getting ready to move or downsize.

Promoting your business in these groups is a fantastic way to go the extra mile to get a high number of qualified leads.

Not just that, but this is how you can get leads in real estate for free.

09. Be an active participant

It is necessary that you participate actively in whichever groups you join.

Being helpful and providing valuable information is a great strategy for how to get leads in real estate for free.

Give them information that will be helpful.

Remember that no one joins a local interest group to receive sales pitches;

don’t think of them as a sales platform.

Gaining the trust of local homeowners can be achieved by exhibiting your involvement in the neighborhood and

demonstrating your concern for the area.

For this reason, you should incorporate groups into all aspects of your digital marketing strategy.

08. Host a real estate webinar

As a real estate agent, hosting a webinar is one of the greatest real estate lead-generation tools to

position yourself as an expert and attract qualified leads.

Here’s how you can go about hosting an impactful real estate webinar:

  • Choose a Relevant, Valuable Topic: Think about the pain points, questions, or trends that your potential clients are most interested in to make valuable content.
  • Promote the Webinar Across Multiple Channels: Once you’ve got your topic nailed down, start promoting the webinar across your website, email list, social media platforms, and any other relevant channels.
  • Use Webinar Software for a Polished Presentation: Tools like Zoom, GoToWebinar, or WebEx make it easy to host a professional-looking webinar complete with screen sharing, Q&A sessions, and audience engagement features.
  • Deliver Genuinely Helpful Content: Share insights, tips, and actionable advice that position you as a trusted resource.

07. Create interesting, helpful content for your blogs

Not only can your real estate blogs and articles benefit your clients,

but they also keep you in the forefront of potential clients’ eyes as a real estate authority.

This is another method for how to get leads in real estate for free.

06. Make It Easy To Contact You

If a consumer likes what you are offering,

you need to make it as simple as possible for them to contact you.

Including a contact form would be the most appropriate way to do it.

05. Segment and score leads with marketing automation software

The power of marketing automation can be a total game-changer for real estate agents looking to

supercharge their lead generation and nurturing efforts.

These powerful tools are vital real estate lead-generation tools that

allows you to segment your leads based on behavior and demographics,

ensuring your outreach is hyper-personalized and relevant.

Along with these tools, lead generation forms can also help with segmentation,

because they often include specific fields that capture customer behavior, demographics, and other information.

04. Create Facebook Ads to Generate Quality Leads

Facebook ads are another essential tool in the modern real estate agent’s toolkit.

With laser-targeted reach, diverse ad formats, and robust performance tracking, Facebook enables you to connect with your ideal audience and convert them into high-quality leads.

So, employ targeted Facebook ads, which can be both the cheapest way to get real estate leads and a method to use real estate lead generation tools effectively.

  • Diverse Ad Formats: From eye-catching image and video ads to lead generation forms and dynamic creative, Facebook offers a range of ad formats to capture attention and drive results. You can get creative with your messaging and visuals to make a lasting impression.
  • Retargeting Opportunities: Facebook’s pixel tracking enables you to retarget ads to users who have already engaged with your content or website. This keeps you top-of-mind and increases the chances of converting them into leads or clients.
  • Detailed Performance Insights: The Facebook Ads Manager platform provides robust reporting and analytics, allowing you to track key metrics like impressions, clicks, conversions, and cost-per-lead. This data empowers you to continuously optimize your campaigns for better results.

03. Optimize social media pages and post regularly

Social media is a powerful tool for real estate agents like you to boost your brand,

attract new clients, and find quality leads.

  • Using LinkedIn helps you to connect with business clients and share expertise. By optimizing your profiles with keywords and location tags, you can improve visibility.
  • Engaging with followers on platforms like Instagram and Twitter and sharing helpful content r local in your local market.
  • Joining online communities can also help you build relationships and find new leads.
  • Collaborating with influencers such as Instagram influencers can expand their reach and credibility.
Generate Real Estate Leads

Source

In terms of social media marketing, You need to transfer all of your home profiles to your social media feed.

So that, your viewer knows that you have a good number of resources with facilities that your buyers need.

We know that’s tiresome work.

But you can easily simplify this hassle task with the product feed manager.

With this tool, you can export your WooCommerce product feed and

promote it on your social media profile to

increase your brand visibility without any effort.

Generate real estate leads

02. Feature video walk-throughs

Apart from just pictures of your homes,

you can also use video walk-throughs to give a real feel of the properties,

using this technique as the cheapest way to get real estate leads.

As home buying is a big investment,

you should always think about how you can build the trust level of your customers online.

Without in-person viewings, That’s difficult to gain trust.

Here’s the solution.- Walkthrough videos.

A walkthrough video provides your viewers with a comprehensive look at your listed property and

highlights hidden or unique features that may go unnoticed with pictures.

By adding AI voice generator technology,

you can enhance these 360-degree videos with detailed narration,

providing viewers with informative and engaging insights into the listed properties.

01. Create virtual home visits for busy prospects

Not just video walkthrough videos, you can also offer virtual tours to save time and

engage prospects effectively, a perfect example of how to get leads in real estate for free.

Your busy prospect might not have that much time to go through your whole website,

profiles, and home details. But they definitely will click and

watch virtual tours as it is convenient also that’s proof that you are a real seller

whom they can trust and invest in.

Also, a virtual tour gives the impression that your viewer is taking a real live tour,

it will generate higher engagement than flat photographs.

Why?- Because live tours will give them the experience of having your home and that feeling will trigger them to buy from you.

not just that, with virtual tours you can give them 360 panoramic views and

they can get an overall idea of how your home will look in real life.

Which will result in saving your wasted hours on in-person home visits.

We know what you are thinking back in your head!

The business handling paperwork is so much there is less time, resources, or manpower to create virtual tours.

No worries, You can rely on WPVR.

WP VR Reviews

With WPVR’s easy-to-use interface, You can easily create virtual tours without any technical knowledge.

You can make a basic virtual tour in just five minutes!

Because with WPVR, you can build a comprehensive virtual tour of any property or area.

Here are the steps :

  • Utilize 360° panorama photographs to construct scenes that include various rooms, corners, or locations.
  • Make a connection between these panoramic scenes.
  • To connect all of the 360-degree photos, use scene-type hotspots.
  • Press “Publish” to display information utilizing info hotspots in virtual tours!

You’ve just finished creating a virtual tour!

With this virtual tour, your viewers may navigate about as if it is an actual tour! In the free edition,

you can link up to five scenes and add five hotspots to each scene on a virtual tour.

You can also create a comprehensive floor plan for your house, business, showroom, or any other location with ease.

Realtors and real estate agencies love using real estate floor plans, and

you can use them to add some flair to your real estate tours.

To construct 360 panorama scenes :

  • Upload the floor plan to WPVR
  • Place pointers for each scene on the floor map
  • And then connect the pointers to the scenes. And that’s it!

You can also :

  • Include A Gallery To View All Available Scenes
  • Cover Every Inch Of The Property For An Interactive Tour

To Get More Real Estate Leads Through Your Virtual Tour with your site here are a few more techniques :

  • Add direct CTA – Add a CTA button that will directly take your site visitor to your virtual tour. In this way, you can get even the busiest/ uninterest lead.
  • Market your virtual tour – Market your virtual tour on social platforms to maximize your reach.
  • WordPress restriction – Often time WordPress automatically lowers the quality of panorama images through compression. A high-quality 360-degree panorama photograph typically has a resolution of 3000 x 1500 pixels.

With WPVR, you can choose to remove this limitation, making it simple to post panorama photos with a width of more than 3000 pixels. WPVR allows you to generate virtual tours from any high-quality panorama photograph, including jpeg, png, and web.

Not just that, with WPVR you can add a direct CTA button to your site that will take your viewers directly to the virtual tour.

Also, with WP VR you can easily share your virtual tours on different Social Media Platforms:

  • Facebook,
  • LinkedIn,
  • Twitter,
  • Email, and
  • Reddit

without having it published on the Web page!

Bottom Line

You need to keep a consistent flow of qualified leads

if you want your property business to succeed. Try to establish yourself as an authority in your field,

be visible online, and prioritize your customers at all times.

If you use a proper strategy aligning with your needs and resources,

Lead generation will quickly become simpler and more affordable for you.

Frequently Asked Questions (FAQs)

FAQ 1: How does community involvement factor into real estate lead gen?

Getting involved locally through sponsorships, volunteering, hosting events, and partnering with businesses can help raise your profile and connect you with potential clients in your market.

FAQ 2: What online lead gen advice is recommended?

To generate leads online easily most impactful way is to add a virtual tour. As seeing the tour you can gain trust and also save your valuable hours this one is highly recommended.

Kategorien
Immobilien

How to Sell Commercial Real Estate – 10 Proven Steps

Have you ever felt the rush of closing a deal on a commercial property? If you’re nodding along, you know that learning how to sell commercial real estate isn’t just about putting up a ‘For Sale‘ sign.

It’s about the strategy and expertise it takes to attract the right buyers and seal the deal.

Many realtors think that selling fast means cutting the price, but I’ve found that you can move quickly and still get your asking price—or better.

In this guide, I’ll walk you through 10 proven steps that you can use to transform your commercial real estate sales from mere transactions to profitable ventures. From the prep work to the final negotiations, these steps are crafted to help you navigate the complexities of the market and really pump up your property’s value.

So, let’s dive into these essential strategies together.

What Is Commercial Real Estate?

When you hear the term “commercial real estate,” it refers to properties used solely for business purposes. These properties are leased to tenants to conduct various types of businesses, providing a steady income to the property owner.

Different Types Of Commercial Real Estate

Let’s explore the different types of commercial real estate you might consider investing in or selling.

  • Office Spaces: These are commercial properties primarily used for professional and administrative purposes. They include single-tenant and multi-tenant office buildings, business parks, and coworking spaces.
  • Retail and Malls: Retail properties are designed for businesses to sell goods and services directly to consumers. This category includes shopping malls, strip malls, standalone stores, and storefronts in mixed-use developments.
  • Restaurants and Eateries: Properties designated for dining establishments. It includes fast-food outlets, cafes, fine-dining restaurants, and food courts within malls or entertainment complexes.
  • Industrial: Industrial properties are used for manufacturing, warehousing, distribution, and logistics. They include warehouses, distribution centers, manufacturing plants, industrial parks, and flex spaces.
  • Multifamily: These properties consist of residential buildings with multiple units, such as apartment complexes, condominiums, townhouses, and mixed-use developments with residential components.
  • Special Purpose: Special purpose properties are uniquely designed for specific uses. This category includes gas stations, car washes, self-storage facilities, hotels, motels, recreational facilities, healthcare facilities, and educational institutions.

Each type of commercial real estate offers distinct investment opportunities and considerations, catering to different market demands and investor preferences.

Top 10 Steps to Successfully Sell Commercial Real Estate

Selling commercial real estate involves more than just putting a property on the market. It requires a structured approach to ensure you not only attract the right buyers but also secure the best possible deal.

Here’s a step-by-step guide that lays out each stage clearly to help you manage the sale from beginning to end.

1. Preparation and Research:

The first step in selling your commercial property is thorough preparation and research. Begin by investigating the current market conditions in your area.

For instance, if you’re selling an office space, look at recent sales of similar properties in the neighborhood. Note their selling prices, time on the market, and any features that might have influenced buyers’ decisions. Also, there are a few property management consultancy firms that can be leveraged, such as CRE project management consulting, These types of firms can provide invaluable insights and strategies, ensuring that every aspect of the sale is managed effectively to maximize returns.

This data helps you understand what buyers might expect and what they’re willing to invest.

Also, assess the unique selling points of your property—are there newly upgraded systems or is it located in a booming part of town? These are key details that can attract buyers.

2. Set Clear Objectives:

After thoroughly preparing & researching, and before you put your property on the market, it’s crucial to define your objectives. What are you aiming to achieve with this sale? Consider whether your priority is to sell quickly or to maximize the selling price.

For example, if your goal is a quick sale, you might price the property slightly below market value to attract more interest.

On the other hand, if maximizing return is your objective, you might invest in making improvements to the property to enhance its appeal and justify a higher asking price.

Setting these goals early on helps steer your strategy for marketing the property and negotiating with potential buyers.

3. Evaluate Property Value:

Once you set clear objectives, you must accurately evaluate the value of your property when undertaking how to sell commercial real estate. This step is particularly important if you don’t know how long it takes to sell a commercial property. It also ensures you set a competitive price that attracts potential buyers.

Consider various factors such as location, size, condition, and market trends to determine the fair market value. If your goal is to sell for cash or to sell your commercial property fast, pricing it appropriately is essential.

Additionally, factor in the costs associated with selling a commercial property and the typical timeline for completing a sale. By conducting a complete evaluation of your property’s value, you’ll position yourself for a successful transaction that meets your objectives and maximizes your returns.

4. Enhance Curb Appeal and Presentation:

First impressions are critical in real estate; they set the stage for potential buyer interest and can influence the selling price. To enhance your property’s curb appeal and presentation, consider the following steps:

  • Update Exterior Paint: A fresh coat of paint can revitalize the look of your property, making it more attractive to prospective buyers.
  • Improve Landscaping: Well-maintained landscaping enhances the visual appeal of your property. Simple changes like trimming overgrown bushes, adding new mulch, and planting flowers can make a significant difference.
  • Make Minor Repairs: Address any noticeable defects that might discourage buyers. This could include fixing broken windows, replacing outdated fixtures, or patching cracks in the walkway.
  • Clean and Organize Interiors: Ensure the inside of your property is clean, decluttered, and well-organized. This helps create a welcoming environment in which buyers can envision themselves.
  • Stage the Interiors: Staging involves arranging furniture and decor to showcase the potential of the space. It helps buyers visualize their business in the setting, potentially making the property more appealing and justifying a higher price.

Implementing these improvements can greatly enhance your property’s marketability, attracting more buyers and possibly increasing the final sale price.

5. Market the Property:

The next vital step is to market the property. This ensures that the improved features are effectively communicated to potential buyers, maximizing the property’s visibility and attractiveness in the market.

Utilize various channels such as online listings, social media platforms, and networking with other real estate professionals to showcase your property to a wide audience.

Highlight its key features and benefits to capture the attention of interested buyers. While marketing efforts may incur some costs, they are essential investments that can help you achieve a successful sale.

By implementing a comprehensive marketing strategy, you’ll increase visibility and generate more interest. Ultimately it maximizes your chances of selling your commercial property quickly and profitably.

6. Qualify Potential Buyers:

Once you’ve effectively marketed your property, the next essential step is qualifying potential buyers. This ensures that your marketing efforts attract genuine interest, guiding you towards serious inquiries and ultimately facilitating a successful sale.

Whether you’re selling commercial property by the owner or aiming for a quick sale for cash, identifying serious and financially capable buyers is essential. Require proof of funds or pre-approval letters from lenders to ensure that interested parties are qualified to purchase your property with proper comprehensive purchase management.

This process helps streamline the selling process and minimizes the risk of deals falling through due to financing issues. While qualifying buyers may require some effort, it is a necessary step to expedite the sale and achieve your desired outcome.

By focusing on qualified buyers, you can increase the probability of a successful transaction and reduce the time it takes after knowing the impact of how to sell commercial real estate properly.

7. Negotiate Offers:

After qualifying potential buyers, the next crucial step in the process of selling commercial real estate is negotiating offers. Whether you’re selling commercial property or aiming for a quick cash sale, effective negotiation with qualified buyers can significantly impact the outcome of the transaction.

But remember, negotiating offers is more than just agreeing on a price. Here are key points to consider:

  • Analyze Offer Details: Examine all aspects of the offer, including price, payment terms, contingencies, and closing timeline.
  • Strategic Counteroffers: If the initial offer isn’t acceptable, prepare a counteroffer that better meets your terms while still being attractive to the buyer.
  • Consult with Experts: Work with your real estate agent or lawyer to craft responses that protect your interests and move the sale forward.

8. Due Diligence Process:

After accepting an offer, the buyer will likely conduct a due diligence investigation.

During the due diligence process, the buyer inspects and verifies various aspects of the property:

  • Property Inspections: Allow access for the buyer to conduct thorough physical inspections of the property.
  • Document Verification: Provide all necessary documentation, such as leases, service contracts, and property management records.
  • Address Issues: Responsively address any concerns that arise to prevent delays or deal breakage.

By being transparent and responsive throughout the due diligence process, you can maximize the sale and minimize delays, ultimately leading to a successful transaction.

9. Finalize Closing Details:

As the due diligence phase concludes in the semi-final stages of how to sell commercial real estate, and all conditions are met, move to finalize the closing details.

Finalizing the closing usually involves below steps:

  • Set a Closing Date: Agree on a date that suits both parties, considering any final checks or adjustments needed.
  • Finalize Paperwork: Ensure all contractual documents are accurate and reflect the agreed terms.
  • Prepare for Transfer: Coordinate with legal professionals to prepare the deed and other necessary documents for property transfer.

10. Close the Deal:

The final step is the actual closing, where the sale is officially completed.

Closing the deal is the culmination of the sales process:

  • Sign Legal Documents: Execute all closing documents, including the deed and settlement statements.
  • Transfer Funds: Ensure that funds are transferred securely, typically via a cashier’s check or wire transfer.
  • Record the Sale: File the deed and any other required documents with the appropriate local government to officially record the sale.

Once everything is signed and exchanged, congratulations are in order—you’ve successfully sold your commercial real estate!

Following these steps in order ensures a thorough and professional approach to selling your commercial property, from the moment you list it to the moment you close the deal.

How to sell commercial property fast with WPVR

Now, I will introduce a tool named WPVR that can significantly streamline and enhance the process of selling your commercial property quickly. Here’s how this powerful tool can be specifically tailored to meet the demands of the commercial real estate market:

How to Sell Commercial Real Estate

i. Craft Captivating Virtual Tours:

WPVR allows you to create dynamic, 360-degree virtual tours of your commercial property. These tours provide an in-depth look at the property, covering all angles and giving potential buyers a realistic sense of space and layout without having to visit in person. This is especially useful for how to sell commercial property fast, particularly for large spaces like warehouses, office buildings, or retail centers where understanding the layout is crucial.

ii. Share Widely to Engage:

Maximize exposure by sharing your virtual tours on various platforms. WPVR supports easy integration with websites, social media, and email campaigns, ensuring that your property reaches a broad audience. Increased visibility in the market can significantly speed up the process, ideal for selling commercial property by the owner and reducing the costs of selling a commercial property.

iii. Explore Anywhere, Anytime:

Virtual tours created with WPVR can be viewed from any device, offering convenience and accessibility. This feature is particularly valuable for commercial real estate, catering to busy professionals and investors who might be interested in how to sell commercial real estate for cash and may not have time for multiple in-person viewings.

iv. Spotlight What Matters:

Highlight the key features of your property using hotspots and interactive elements within WPVR. Draw attention to important attributes like high-traffic locations, unique architectural designs, and modern facilities. These details are crucial for making your property stand out to potential investors and business owners looking for specific features, thus selling commercial property fast.

v. Capture Interest with Integrated Lead Forms:

Incorporate lead capture forms directly into your virtual tours. This feature allows you to collect contact information from interested parties effortlessly, enabling immediate follow-up. Quick and efficient communication with potential buyers can lead to faster negotiations and closings, which is essential for those wondering how long does it take to sell a commercial property.

vi. Build Confidence:

Providing a comprehensive virtual view builds trust and confidence among prospective buyers. WPVR’s realistic tours help buyers understand exactly what they are purchasing, reducing doubts and questions that can delay decision-making. This is particularly beneficial for those needing clarity on the costs of selling a commercial property.

vi. Make Informed Choices, Fast:

The detailed presentations within WPVR tours mean potential buyers receive all the necessary information upfront. This clarity facilitates quicker, more informed decision-making, accelerating the sales cycle—ideal for how to sell commercial property fast.

vii. Convenient Access, Anytime:

Ensure your virtual tours are accessible around the clock. This non-stop availability allows potential buyers to explore the property at their convenience, catering to different time zones and schedules. This accessibility is essential for attracting international or interstate investors, often a key demographic in how to sell commercial real estate for cash.

Conclusion:

In conclusion, successfully selling commercial real estate requires a strategic approach that optimizes visibility and buyer engagement.

By following the steps outlined in this blog—from preparing your property and setting clear objectives to engaging with potential buyers and closing the deal—you can enhance your chances of a quick and profitable sale.

Are you ready to streamline your commercial property sales process?

Explore WPVR now to unlock powerful tools that can transform how you sell commercial real estate.

** FAQs **

What are the advantages of selling commercial property by owner?

  • Selling your commercial property by owner allows you to save on commission fees typically paid to real estate agents. You also have full control over the sales process, including pricing, marketing strategies, and negotiations.

How to Sell Commercial Real Estate for Cash?

  • Yes, selling commercial real estate for cash is quite common, especially for motivated sellers looking for a quick transaction. Cash buyers often offer faster closings and greater certainty, as they don’t rely on financing approvals.

What Are The Typical Costs of Selling a Commercial Property?

  • Typical costs of selling a commercial property include closing costs, attorney fees, property taxes, and any necessary repairs or renovations to prepare the property for sale.

How to Sell Commercial Property Fast?

  • If you don’t know how to sell commercial property fast, consider pricing it competitively based on market trends. It enhances its curb appeal and utilizes digital marketing techniques such as virtual tours, WPVR, and targeted advertising.

How Long Does It Take to Sell a Commercial Property?

  • The timeframe for selling a commercial property can vary depending on factors such as location, market conditions, property type, and pricing. While some properties may sell within a few months. Others could take several months or even years to find the right buyer.

Kategorien
WP VR

5 Ways To Use VR In Construction For Efficient Execution


Have you ever imagined walking through a building that hasn’t been built yet? With virtual reality (VR) technology, that’s exactly what we’re doing in the construction industry today. As someone who’s been on both traditional and tech-forward construction sites, I can tell you the contrast is stark.

VR in construction isn’t just about cool tech—it’s about solving real problems in ways we only dreamed of a few years ago.

But here’s the thing: despite its potential, many construction companies are still hesitant. They wonder if VR is more of a shiny new toy than a practical tool. I was skeptical too until I saw what it could do first-hand.

In this article, I’ll share the top five ways VR has revolutionized the way we build. From making 3D models you can virtually walk through, to improving how we train for safety, VR is changing the game.

By the end of this, I hope you’ll see the possibilities for your projects too.

Ready to explore how VR can change the way you build? Let’s get into it.

Was ist Virtuelle Realität?

Virtual reality (VR) is a computer-generated environment that lets you experience a different reality. A VR headset displays images and sounds, making you feel like you’re in a new place. You can look around, move objects, and sometimes even walk around. It’s like being inside a video game, but it’s used for much more than just playing games.

Let’s say you’re planning to build a house. VR for construction can show you how your living room will look with different furniture or paint colors before you even start building. This way, you get a real feel of the space and make changes if needed, all before any real construction begins.

Why is it a good idea to use VR in construction industry?

VR in construction brings your projects to life before they even start. Here’s how it makes a difference:

  • Visualizing Projects Before They’re Built: With VR in construction, you can walk through your project in a virtual world. This helps you catch design issues early, saving time and money.
  • Enhancing Client Presentations: Show your clients exactly what you’re building in a way that blueprints can’t match. They can take a virtual tour, getting a real feel for the project and making better-informed decisions.
  • Improving Team Collaboration: VR brings architects, engineers, and clients together in a virtual space to review and agree on project details. This collaboration ensures everyone is on the same page, reducing misunderstandings.
  • Training for Safety: Use VR to simulate real-world construction hazards in a safe environment. This prepares your team for actual site conditions, enhancing on-site safety.
  • Efficient Planning and Design: VR allows for more accurate and detailed planning, helping to streamline the design process and reduce the need for costly changes later.

Incorporating VR in your construction projects means stepping up your planning, client interactions, teamwork, and safety measures. It’s a practical, forward-thinking approach that can elevate the quality and efficiency of your construction work.

Ways To Use VR In Construction For Efficient Execution

When it comes to efficiently executing construction projects, VR opens up some powerful new techniques. Here are they:

1. Meaningful Model Visualization

In construction, VR is a powerful tool for creating visual models of homes before they are built. This technology allows for an immersive experience, where you can virtually walk through a home, understanding the layout and spatial dynamics in a way traditional blueprints can’t provide. It’s particularly useful for identifying design issues early on.

For instance, you might notice that a room feels smaller than intended or that the lighting isn’t as effective as it could be. Addressing these issues in the VR stage can save significant time and resources during actual construction.

Moreover, VR models are invaluable for client presentations. Clients can take a virtual tour of their future home, offering them a clear and realistic understanding of the design. This helps in aligning expectations and ensures that the final construction is in line with what was envisioned, minimizing costly revisions and changes later in the project.

2. Sensible Floor Plan Demonstration

VR takes the concept of a floor plan to a whole new level. Instead of just looking at a flat diagram, you can use VR to walk through the floor plan of a concept house.

This method shows you the layout in a realistic, three-dimensional space. You can see how each room connects to the next, get a feel for the flow of the house, and even check out views from different windows.

This realistic demonstration helps in making informed decisions about room sizes, furniture placement, and overall design, ensuring the final build meets your expectations.

3. Creating Interactive Proposals

VR elevates construction proposals by making them interactive. In a virtual tour, you can integrate tooltips, clickable images, and mini-videos. These elements provide detailed information, showcase design alternatives, or highlight specific features of the construction project.

This method not only engages clients more deeply but also gives them a thorough understanding of the project’s scope and details. It’s a practical way to present your construction plans, offering a clear and detailed view of what to expect in the final build.

4. Better Collaboration Among Architects, Engineers, and Clients

VR fosters enhanced collaboration in construction projects. With its visual representation, architects, engineers, and clients can view and discuss the project in a shared virtual space. This unified perspective ensures everyone understands the project’s a to z, from structural details to aesthetic choices.

It’s like being on the actual site, discussing and making decisions together. This approach minimizes misunderstandings and keeps all stakeholders aligned with the project’s progress and changes, leading to more efficient decision-making and a smoother construction process.

You may also consider collaborating with a software engineering company to customize your virtual tour and further enhance the customer experience to meet the unique demands of the construction industry.

5. Easier Safety Training Programs With Advanced VR for Construction

Safety training in construction is crucial, and VR offers an innovative way to conduct it. Through VR, trainees can experience realistic job site environments and face potential hazards in a controlled setting. This method allows them to understand and react to various scenarios, from minor incidents to major emergencies, without any real-world risks.

It’s an effective way to prepare workers for the challenges they might encounter, ensuring they’re well-equipped with the knowledge and reflexes to maintain safety on the actual construction site. This hands-on experience in a safe virtual environment is invaluable for building a skilled and safety-conscious workforce.

Reliable VR Tools For Amateur Construction Modeling

When you’re stepping into the world of virtual reality for construction modeling, having the right tools can make all the difference.

Here are five VR tools that are perfect for creating virtual tours and integrating them into your website:

1. WPVR:

WPVR

This is a standout choice for creating virtual tours in WordPress. Its user-friendly interface allows you to easily upload 360-degree images and transform them into immersive virtual tours. WPVR is known for its cube map format and interactive floor map features, making it a great tool for detailed and realistic virtual representations of spaces. The cost for WPVR starts at around $79.99 for the basic annual plan.

2. SketchUp VR:

Sketchup VR

SketchUp is a favorite for 3D modeling, and its VR component allows you to step inside your designs. It’s ideal for detailed architectural work and offers a comprehensive suite of modeling tools. SketchUp VR’s pricing starts at approximately $119 per year.

3. Enscape:

Enscape

Enscape is a modeling plugin that exports 3D scenes created in programs like SketchUp into VR walkthroughs. It streamlines VR visualization for architects and designers. The pro license starts at approximately $922.80.

4. Unity Reflect:

Unity Reflect

Unity Reflect lets you create real-time 3D experiences from your design data. It’s compatible with various design tools and is perfect for collaborative reviews. Pricing for Unity Reflect is around $690 per year.

5. Unreal Engine:

Unreal Engine

While known for game development, Unreal Engine is also a powerful tool for VR architectural visualization. It offers high-quality graphics and interactive experiences. Unreal Engine is free for creators, with a 5% royalty on gross revenue after the first $1 million.

Each of these tools offers unique features and capabilities, allowing you to choose the one that best fits your project’s needs and budget.

Einpacken

As we’ve seen, virtual reality (VR) is making a big impact in the construction industry. This technology helps you visualize projects in full scale before a single foundation is laid, reducing errors and saving time. With VR, you can walk through your future buildings, make real-time modifications, and collaborate more effectively with everyone involved in the project.

I encourage you to consider how VR can improve your construction processes. It’s a straightforward tool that enhances planning, safety, and communication. By adopting VR, you can achieve better results with considerably less effort and make your workflow more efficient.

Let’s appreciate the advancements VR brings to our field and make the most of these opportunities. Integrating VR into your construction activities today could set you ahead of the curve tomorrow.

  • Try using WPVR today!

Frequently Asked Questions (FAQs)

1. How much does VR cost for construction companies?

Affordable VR tools like WPVR and IrisVR start under $100/month. High-end options go up to $500/month. The cost is minor compared to the efficiency gains.

2. What skills do I need to implement VR?

No advanced 3D modeling expertise is needed. User-friendly tools like Enscape simplify the creation and sharing of VR models. Focus on design vs technical skills.

3. How can VR aid collaboration in construction?

VR allows stakeholders to visually immerse themselves in the same 3D models and discuss details from an intuitive first-person perspective.

4. Does VR work for large commercial projects?

Yes, VR scales well. Tools like Matterport allow accurate capturing of even huge spaces through 360-degree photography. The digital model reflects real-world dimensions.

5. Can VR detect possible constructability issues?

Absolutely – visualizing designs in VR makes it easy to identify spacing, sizing, accessibility or layout issues early, when changes are cheaper.

Kategorien
Guide Real Estate Virtual Reality WP VR

How to Use Real Estate Floor Plans in Virtual Tours [2024]

When selling houses, you will see that one of the major reasons your buyers may reject a house is due to the way the property was planned or built.

For many clients, it’s important that they are able to find a home that will resemble their desired house plan.

As a result, if you are using virtual tours to showcase properties, you should consider including real estate floor plans in the tours.

It will not only make a tour more interesting but also help eliminate any confusion about the architecture of the house. Plus, you will get a few additional benefits that will help you impress clients even more.

Today, you will learn how to add a floor map to your virtual tour to enhance the overall experience of your visitors.

In this article, you will learn,

  • The key benefits of using house plans with virtual tours,
  • how to embed a real estate floor plan into your property virtual tour,
  • examples of great floor plans with virtual tours.

Fangen wir an.

Benefits of Using Real Estate Floor Plans With Virtual Tours

Virtual floor plans nowadays will provide potential buyers with an immersive and interactive experience to explore properties and gain a deeper understanding of their layouts. And if you can combine your virtual tours with floor plans, it will take the experience to the next level.

Following are some of the key benefits of using real estate floor plans with virtual tours.

1. Clear Property Plan & Layout For Better Decision-Making

The main benefit of using real estate floor plans is to ensure buyers get a clear idea about the layout of the house.

Normally, when you have images or a video, you are only looking at the house from a certain angle and can’t really imagine how it may be in reality.

When it comes to a virtual tour, yes, you get a near-perfect idea about the scene you see. But again, you can’t accurately guess the directions and the layouts of how each scene is connected to the other in real life.

A floor plan solves this problem. While taking the tour, if a person can get a glance at the interactive floor plan and understand where he is in the house, it will make it much easier for buyers to decide if this is what they are looking for.

Clear Property Plan & Layout For Better Decision-Making

For example, a family considering a property can better visualize if the bedrooms are located close to each other or apart, the kitchen is conveniently situated, and there’s a logical separation between private and communal spaces.

Hence, it will help buyers make decisions more confidently. And you are less likely to get a deal rejected due to the layout of the house.

2. Maps Out The Important Spots In Your Virtual Tour

In the floor map, you may name the rooms and areas available in the tour. You may leave pointers to indicate the spots from where visitors will be observing the view.

You may also contrast color the areas that you want the visitors to visit, i.e., the specialty of the property.

This could be maybe the dining room, or maybe the swimming pool area, or even the balcony to get a soothing view outside. This approach will work really well for furnished homes or luxury homes.

How to Use Real Estate Floor Plans in Virtual Tours [2024] 1

So, basically, you may use this as another way to connect with potential buyers.

3. Makes Navigation Easier With Click To View Scene

Modern floor maps in virtual tours allow you to add hotspots on the map, which people can click to visit that scene directly.

Makes Navigation Easier With Click To View Scene

This helps to attract buyers who are more concerned about specific rooms in the house.

For example, many want to make sure they get a spacious kitchen before all else. Hence, you may allow them to visit the kitchen just by clicking on the map.

4. Avoid Misunderstandings With Room Dimensions & Directions

A virtual does create a very realistic environment for the buyer, but it still doesn’t answer a few important questions the buyers may have.

Add dimensions and directions of the house

For example, a buyer may wonder about the dimensions or measurements of the rooms.

That is something you can cover in the real estate floor plan. You may easily add the measurements of each side of the rooms/scenes on the map, thus removing such confusion.

The directions could be another piece of information that you can include on the floor plan.

5. Define the Authenticity Of Your Listings

The use of real estate floor plans in your virtual tours will act as a psychological trigger and help you gain authority.

Having The floor maps will create a sense of authenticity. People will believe that you are more trustworthy with the listings as you even have access to the floor plans.

This will make it easier for people to choose you over your competitors.

Pro Tip: You can collect the floor plan from the owner or have someone inspect the house and prepare one for you. Do not use fake floor plans. It will rather make you lose potential clients.

How To Embed Real Estate Floor Plans To Your Virtual Tours

The ability to add a real estate floor plan to your virtual tour will really depend on what tool you are using to create your virtual tours.

Some tools have this feature built-in, while for others, you may need to customize it into the tours or compromise and use a floor map as an image below the virtual tours on a web page.

We highly recommend you choose a virtual tour software that has an interactive floor plan feature that allows you to connect the map to the virtual tour via hotspots and indicates the location of the currently viewed scene on the map.

In WordPress, you will find WPVR, which allows you to create and embed high-quality virtual tours on your website, along with interactive floor plans.

Here’s how you can craft a virtual tour along with a real estate floor plan using WPVR.

1. Create A Virtual Tour Using WPVR

First, you need to upload 360 panoramic images, which WPVR will convert into a virtual environment.

Next, connect the scenes to each other to make it into a complete tour of the house.

And finally, customize the tour with more details such as company information, tooltips, additional details on the house, and booking forms.

~ Here’s a simple guide to creating a Real Estate Virtual Tour To Increase Property Sales ~

2. Enable & Upload The Real Estate Floor Plan

Once you have the tour ready, it’s time to add the virtual tour house plans.

First, go to WPVR settings and enable the floor plan feature.

Enable floor plan

Next, upload the real estate floor map.

Upload a floor plan image

Then, set up hotspots and connect them to the associated scenes in the tour.

Add hotspots and Pointers in Floor plans

Here’s a video guide in case you need more help,

3. Embed Your Virtual Tour On The Website

Now that you have your floor plan virtual tour ready, you may easily embed it on any page on your website using shortcodes or widgets in one of the supported page builders.

For example, if you use Elementor, you may use the WPVR widget from Elementor to place the tour on a page, which you may link on your listing page for the associated house for sale.

~Here’s how you can easily embed a WPVR virtual tour anywhere on your WordPress site.

Examples Of Floor Plans With Virtual Tours

1. Interactive Floor Plan by WPVR

Following is an example of a virtual tour with a real estate floor plan that was created using WPVR. Go through the tour and explore how amazing this virtual tour is and how engaging this interactive floor map is.

2. Property Map Showcase by Zillow

You’ve surely heard of Zillow. Here’s how they present the floor maps with virtual tours.

Zillow Virtual Floor Plan

3. Basic House Plans With Virtual Tours by Panoee

Panoee Floor Plan

4. 3D Floor Plan Virtual Tour by WayneHomes (created using Matterport)

Matterport Floor plan

This one is a bit unique (and expensive). It’s the dollhouse effect by Matterport, which is probably not something most realtors would go for unless it’s for a very expensive luxury house.

Schlussfolgerung

As you can see, you get so many benefits from using real estate floor plans along with your virtual tours, and it is super easy to embed.

So go ahead and start using virtual tours with floor plans and convince more potential buyers to consider making a purchase decision.


If you want to use a reliable virtual tour creator that is reliable, cost-effective, and has a high-quality interactive floor plan feature, then WPVR would be a great choice.

Try using WPVR today and start making virtual tours that are more optimized for converting clients.

** FAQs **

Can virtual floor plans really enhance my property listings?

  • Yes, integrating virtual floor plans can greatly enhance your property listings. It provides potential buyers with clear insights into the layout and structure of the house.

Will adding floor plans to my virtual tours require a lot of technical expertise?

  • Not at all, with user-friendly tools like WPVR, embedding floor plans into your virtual tours is simple, even for those without technical skills.

Are virtual floor plans compatible with different devices for easy viewing?

  • Yes, virtual floor plans are optimized for seamless viewing across various devices. It ensures accessibility and engagement for all potential buyers.

How can virtual floor plans help me stand out from other realtors?

  • By incorporating virtual floor plans into your listings, you demonstrate attention to detail and professionalism. It helps you to set yourself apart as a realtor who goes the extra mile to assist buyers.

Can virtual floor plans really make a difference in attracting potential buyers?

  • Indeed, real estate virtual floor plans provide buyers with a comprehensive understanding of the property layout. It increases their confidence and likelihood of making a purchase decision.
Kategorien
Guide Virtual Reality

Guide to Panoramic Photography – How To Shoot Panorama Photos Efficiently [2024]

“Content is King,” as stated by Bill Gates, is quite true today. Most businesses nowadays rely on online presence and digital marketing.

You will find so many unique ways businesses are trying to use content to stay ahead of the competition. And one such unique content is “Panorama.”

A panoramic image is a processed form of photography that gives you a wide and expansive view of a location. You can then convert it into a 360 virtual tour quite easily.

Virtual tours are right now one of the most interactive forms of content in the real estate, hotel, and travel industry to increase sales.

However, panoramic photography can be quite challenging. You have to consider the lighting, the right equipment, and the proper angle of view to capture a high-quality panorama.

In this guide, you will learn how to shoot panorama photos in the right way, with the best possible captures.

After reading this article, you will learn:

  • The equipment needed for panoramic photography.
  • Proper shooting techniques to capture panoramas.
  • Ways to optimize capturing 360 panoramic images.

And eventually, you will be able to capture high-quality panoramas that you can use to create the best virtual tours.

Fangen wir also an.

Step By Step Guide To Panoramic Photography

Taking panoramic images will need you to follow three main steps:

  1. Collect the required equipment for efficient panoramic photography.
  2. Use the right shooting techniques to capture images for the panorama.
  3. Stich the captured images into a 360 panoramic image.

Let us look at each of them one by one.

Step 1 – Collecting The Required Equipment For Efficient Panoramic Photography

The first step to capturing panoramic images is to choose the right equipment.

Following are the tools you need to collect before you can proceed to capture your panoramic images.

1. High-Resolution Camera With A Wide-angle Lens

If you want to capture a high-quality panoramic image, you will need to choose a high-resolution camera and a wide-angle/fish-eye lens for the 360 effects.

Ideally, a camera with at least 24 megapixels and a wide-angle lens with a focal length of 35mm or less will serve your purpose.

The idea is to combine the camera and the lens to help you capture the full grandeur of a scene (which is not possible with a traditional lens).

  • The camera’s high resolution will ensure all the details are captured to the last detail.
  • The fish-eye lens will create a concave effect to help capture a 360 view.

Tips On Using Your Camera & Lens Properly

  • Set your camera to manual mode.
  • Use a decent shutter speed – 1/10th or 1/20th is ideal during the day.
  • Set the aperture to about F11 and ISO to around 640 or more during the day.
  • Set manual white balance to 4000 Kelvin

**Remember, these settings are suggested based on ideal photogenic lighting conditions. You may have to toggle the white balance and ISO a bit to get the best output.

Best Cameras To Consider For Panoramic Photo Shooting
Best Wide-angle Lenses For Panoramic Photography

2. A Tripod For Stable Photography

You’ll need a stable tripod for panoramic photography to avoid noise and jitters caused by camera shakes.

Plus, you will be able to raise or tone down the height of the camera easily, to capture at just the right angle for the best panoramic view.

Tips On Using A Tripod Properly

  • Try to keep the tripod on an even surface.
  • Adjust the height and angle of the tripod for your desired composition.
  • Notice the bubble of the tripod. If it’s in the center, it means the tripod is standing straight.
Best Tripods for Panoramic Photography

3. Remote Shutter Release

The remote shutter release will allow you to trigger the camera without physically touching it. This will remove the possibility of camera shakes.

Best Remote Shutter Releases

3. Automated Pano Head/Nodal Head For Controlled Photoshoot

Since you need to cover every angle of a view, you must maintain a fixed rotation angle. An automated pano head will help you maintain that angle.

You may set the amount of angle you want the camera to rotate after every shot (and set a timer to define how soon the camera will rotate next).

This will help you capture all angles of a 360 view without any manual effort.

Best Automated Pano Heads for Panoramic Photography

5. Leveling Tools

In case your tripod doesn’t; have a leveling tool attached, you may buy one. They are useful to ensure your tripod is on level, i.e., standing straight against gravity.

There are mainly 2 types of leveling tools

  • Bubble levels
  • Electronic levels.

Bubble levels are the most common ones used.

Best Leveling Tools for Panoramic Photography

Step 2 – Use The Right Shooting Techniques For The Best Panoramic Photography

Once you have all your equipment ready, it’s time to capture panoramas.

1. Choosing the Right Spot

The first step in capturing a great panorama is finding the right spot.

You may want to take a panoramic image of your office interior. Or you may want to take an exclusive panorama just outside your resort to capture your resort and the environment around it.

The spot to place your camera and other equipment will vary. The spot you choose will determine the quality of your image, and using an AI image enhancer can further improve sharpness and clarity in every detail of the captured scene.

  • Interior photoshoot
    In the case of interior photography, the best location is always the center. However, you have to work on maintaining a constant light balance throughout. For example, if there are windows on one side, find a way to block the sunlight from coming through. You do not want half of your image to be bright and half of your image to be dark.
  • Exterior photography
    When taking external panoramas, you should find a wide-open view where the elements around are not too close, and you get a soothing view of what you want to capture. You may stand in the spot and crouch a bit to judge if the angle is right before placing your equipment there.

2. Set Up The Tripod And The Panohead

Once you have decided on the spot, place the tripod in the middle and adjust the bubble level to the center. Also, adjust the height of the tripod to the height you found suitable when observing the view prior.

Next, set the pano head and adjust the pano head to rotate to an angle of 60 degrees after every shot. This will help to capture 6 photos horizontally.

Best Practice: Avoid using the center column of the tripod as it may cause instability. Instead, use the tripod’s legs to adjust the camera’s height.

Once these are set up, attach the camera to the pano head.

3. Configure Camera Settings

As mentioned above, if you capture the image during the day, set the following configurations:

  • Camera Mode: Manual
  • Shutter speed – 1/10th or 1/20th
  • Aperture: F11
  • ISO: 640
  • Manual white balance: 4000 Kelvin

If the weather is not too bright or too cloudy, these settings will help to get the best possible panoramic quality.

Before you start the shooting session, rotate the camera manually and check if you are satisfied with the lighting and angles. Make changes to the settings if required as per your observation.

Always use manual mode when capturing professional photos. It will give you more control over the image quality.

And finally, attach the remote shutter release to the camera.

4. Capturing Your Panoramic Photo

Once the setup is ready, go ahead and initiate the photoshoot.

Most automated pano heads come with a remote. So you may set it up and initiate the capture from afar.

You could either stand behind the photo view or go sit in your car to avoid getting caught up in the image.

First, initiate the shutter release once and then initiate the pano head rotation using their remotes respectively.

Every time the pano head rotates, clip the shutter release ones.

Once you have covered a 360 angle horizontally, stop the rotation. Since it’s a fish-eye lens, it already covers 180 degrees vertically. However, it will still keep the top and bottom ends missing around the center.

So, you need to manually move the camera view up to 90 degrees and down 90 degrees to capture 2 photos.

Now, you have a total of 8 images from all angles on the shooting spot.

Your photo session is complete for this spot. You may then follow the steps you followed in this section to capture images for more spots that you have in mind.

Once you are ready with your images, it’s time to stitch them into 360 panoramas.

Step 3 – Stitching Images Into Panorama Photos

Stitching images for panoramas is not a manual process. You simply need to use good stitching software, and it will be done in just a few clicks.

1. Good Photo Stitching Software To Choose From

There are several software options available for stitching your panoramic shots.

Some of the most popular ones include:

Each of these software has unique features, but they all follow a similar stitching process.

2. Step-by-Step Stitching Process

The stitching process involves aligning and merging multiple overlapping shots to create a single panoramic image.

Here’s a standard process to stitch your panoramas:

Step 1: Import your images into the stitching software.

Step 2: Identify the order of the images and which ones are the upper and downward views.

Step 3: The software will automatically align the images using control points or features in the images.

Step 3: The images will then be merged into a seamless panoramic image.

Step 4: Adjust the cropping and straighten the image if necessary.

Step 5: Generate the final stitched panorama.

Now, your panorama is ready. But there’s more work.

3. Optimizing The Stitched Panorama

You will notice that the stitched image will have a few issues, such as low brightness, dull color balance, or some blurry areas. You may edit the image to improve these issues.

Tip 1: Adjust the exposure and color to ensure the final image looks natural and has balanced colors.

Tip 2: Improve blurred areas with custom sharpening.

Tip 3: Adjust the image tilt if necessary.

Caution: Avoid over-editing the image as it can result in an unnatural and over-processed final image.

Once ready, export the image, and that’s it. You now have a complete 360 panoramic image that you captured and generated.

Tips for Advanced Panoramic Photography

1. Use A Polarizing Filter

A polarizing filter will help you capture more vibrant and natural-looking images.

It reduces glare and reflections on water and other reflective surfaces. Plus, it can improve color saturation and contrast.

Practical Use: Screw it onto the front of your lens and adjust it until you achieve the desired effect.

Best Practice: Use a circular polarizing filter, as it is more effective than linear polarizers with autofocus cameras.

Also, try to position yourself at an angle to the sun when using the filter to get the best results.

2. Be Mindful Of Exposure Changes

While you’re capturing panoramic photos, the exposure can change from one shot to the next, especially if you are shooting during the golden hour or other times of changing lights.

After the 6 photos are captured, if you notice unsatisfactory exposure at a certain angle, capture from that angle again after adjusting the white balance and ISO to get a better shot.

Best Practice: Shoot during times of consistent light, such as midday or overcast days.

Use exposure bracketing, which takes multiple shots at different exposures, to ensure you capture the perfect exposure.

3. Avoid Moving Objects

Any moving object will ruin a panoramic photo by creating a ghosting or blurring effect.

So, before you start capturing, make sure there are no moving objects, at least around the scenery that you want, with the utmost quality in your panorama.

If there are trees around, avoid holding the photo session during windy weather.

Best Practice: In the case of external photography, shoot during times of low activity, such as early morning or late evening.

Tip: Use a fast shutter speed to freeze motion.

4. Experiment with Different Perspectives

Don’t be afraid to experiment with different perspectives when shooting panoramas.

Try shooting from high vantage points or low angles to add interest to your images.

Tips: Use a drone, if possible, to shoot from a high vantage point.

Alternatively, try shooting from a low angle by placing your camera on the ground or using a tripod with adjustable legs.

Best practice: Use leading lines, such as a road or path, to create depth and interest in your images.

Turning Your Panoramic Images Into A 360 Virtual Tour

Once you have your panoramic images, you may use them by creating a virtual tour for your business.

And it’s actually quite easy. In WordPress, you will find a plugin called WPVR, which lets you create stunning virtual tours in just a few clicks.

All you have to do is upload your 360 images, and the plugin will turn it into a realistic, interactive virtual tour. And then, you will be able to customize it and make it more engaging using tooltips, images, and videos, and even connect multiple views through a click-to-move button.

On top of these, you may use a lead form to collect leads, include your company information, add an explainer video, include a floor map, and even set it to be viewed using a VR Box.

This means your hard work in capturing panoramic images will pay off, as you will then have amazing virtual tours to stay ahead of your competition online.

Schlussbemerkungen

If you have the right tools, you can capture 360 panoramic images without many complications.

The quality of the outcome may be a bit shaky at the beginning, but as you gain experience, it will all become super easy.

And once you are good at panoramic photography, you may go ahead and create your own virtual tours. or offer panoramic photography services to other businesses that may want to use virtual tours.

So go ahead and get your camera equipment ready. start capturing high-quality panoramas now.

P.S. If you own a drone, then you can avoid these steps and do aerial photography instead to capture high-quality 360 panoramic images. Here’s a complete guide.

Kategorien
Guide Virtual Reality

Best 5 Panoramic Camera App for Android to Capture 360-Degree Images [2024]

Since you’re interested in Panorama images, you know how the popularity of panoramic photography increased among smartphone users in recent years.

However, you also know that traditional Android smartphone cameras have limitations in capturing high-quality panoramic images.

But don’t worry! There are some perfect panoramic camera app for Android in the market that offer a range of features to capture immersive 360-degree photos.

This article will discuss the top 5 panoramic camera apps available for your Android smartphone.

Once you go through this, you can choose the most suitable panoramic camera app for Android for you.

Let’s dive in.

Not an android user? Do you use iPhone? Here’s are some of the best panoramic camera apps for iPhones

Features to Look for in a Panoramic Camera App for Android

First, let’s have a look at the features or options a good panoramic camera app for Android should have.

You need to consider these features that contribute to the quality of 360-degree images.

Here are some of the features to look for:

i. Image Resolution:

Higher-resolution images provide more details and clarity, resulting in better-quality panoramic photos.

ii. Stitching Accuracy:

A good panoramic camera app should be able to stitch together multiple images accurately, without any visible seams or distortions.

iii. Ease of Use:

A user-friendly interface and straightforward navigation can make it easier to capture panoramic images on your Android device.

Top 5 Panoramic Camera Apps for Android

You’ll find many panoramic camera app for Android on the Google Play Store.

Here are the top 5 apps, along with their unique features and capabilities:

1. Panorama 360:

Panorama 360 is a popular panoramic camera app that will allow you to capture 360-degree images with your Android devices.

Panoramic Camera App for Android - Panorama 360

It allows you to capture 360-degree photos in high resolution and even supports VR viewing.

The app features a user-friendly interface, high-resolution image capture, and an auto-stitching feature for seamless panoramic images.

It also offers social sharing options, allowing users to share their panoramic photos directly from the app or send them via email.

The app comes with a variety of editing tools and filters to enhance your photos.

You can easily share your panoramic photos on social media platforms.

Features of Panorama 360 Android App:

  • 360-degree photos.
  • High-resolution photos.
  • VR viewing support.
  • Editing tools and filters.
  • Social media sharing.

Pros & Cons of Panorama 360 Android App:

Pros:

  • Easy to use.
  • Good image quality.
  • Variety of editing tools.

Cons:

  • Limited free version.
  • Some features require in-app purchases.

Average User Rating: 3.7 out of 5

App Reviews: 108k

App Downloads: 10M+

App Link: Panorama 360.

2. Cardboard Camera

Cardboard Camera is a panoramic camera app developed by Google.

Panoramic Camera App for Android - Cardboard Camera

It allows you to capture 360-degree photos and view them in VR with a Google Cardboard device.

The app features high-quality image capture, an auto-stitching feature for seamless panoramic images, and a virtual reality mode for viewing photos in 3D.

It also allows you to add sound to your photos for a more immersive experience.

With Cardboard Camera, you can easily share your panoramic photos with friends and family.

Features of Cardboard Camera:

  • 360-degree photos.
  • VR viewing with Google Cardboard.
  • Sound capture.
  • Sharing options.

Pros & Cons of Cardboard Camera:

Pros:

  • Good image quality.
  • User-friendly interface.
  • VR viewing support.

Cons:

  • Limited editing options.
  • Requires Google Cardboard for VR viewing.

Average User Rating: 4.4 out of 5

App Reviews: 162k

App Downloads: 10M+

App Link: Cardboard Camera.

3. Insta360

Panoramic Camera App for Android - Insta360

The Insta 360 camera is a cutting-edge panoramic camera designed to capture immersive 360-degree photos and videos. With its advanced features and intuitive interface, it allows you to create stunning panoramic content with ease.

Whether for personal use or professional projects, the Insta360 camera offers unparalleled versatility and quality, making it a must-have app for capturing life’s moments from every angle.

Features of Insta360 Panorama Camera:

  • Easy 360-degree photo capture.
  • Real-time preview and editing capabilities.
  • Advanced stitching algorithms for high-quality panoramic images.
  • Integration with social media platforms for easy sharing.
  • Additional features such as filters, effects, and virtual reality (VR) support.

Pros & Cons of Insta360 Panorama Camera:

Pros:

  1. Easy 360-degree photo capture for immersive experiences.
  2. Real-time preview and editing features enhance user experience.
  3. Integration with social media platforms simplifies sharing.

Cons:

  • Require significant storage space for high-resolution images.
  • Some advanced features may be locked behind in-app purchases.
  • Compatibility with certain Android devices may vary.

Average User Rating: 4.2 out of 5

App Reviews: 20.8k

App Downloads: 1M+

App Link: Insta360

4. Wide Camera – Panorama 360 HD

The Wide Camera – Panorama 360 HD is a powerful panoramic camera app for your Android device.

Panoramic Camera App for Android -Wide Camera Panorama 360 HD

It allows users to take 360-degree photos and offers a variety of features for editing and sharing them.

The app uses advanced algorithms to stitch together multiple images into a seamless panoramic view, resulting in high-quality images that capture the entire scene.

Features of Wide Camera – Panorama 360 HD:

  • High-resolution panoramic images.
  • Real-time capture and preview.
  • Automatic image stitching.
  • Advanced photo editing tools.
  • VR viewing support.
  • Social media sharing.
  • Live wallpaper creation.

Pros & Cons of Wide Camera – Panorama 360 HD:

Pros:

  • High-quality panoramic images.
  • Real-time capture and preview.
  • Wide range of editing tools.
  • Supports VR viewing.
  • Live wallpaper creation.
  • No ads.

Cons:

  • Some features require in-app purchases.
  • Limited free version.
  • Large file sizes may take up significant device storage.

Average User Rating: 3.5 out of 5

App Reviews: 1.17k

App Downloads: 500k+

App Link: Wide Camera – Panorama 360 HD.

5. Photaf Panorama by Bengigi

Photaf Panorama is a pretty good 360 camera app for Android that comes with a gyro sensor to guide you when taking 360 panoramas.

Panoramic Camera App for Android- Photaf Panorama by Bengigi

This panoramic photography app is well suited to capture 360 photos on the go as its sensor will indicate which angle to take pictures from next. If you are able to stay stable while capturing the images, then the app will automatically stitch the captured images into a 360-degree panorama.

You can even transfer your photos to your phone or desktop and use them to create virtual tours.

Features of Photaf Panorama:

  • Guided 360 image capture
  • Gyro sensor for compass & direction
  • Automatic Image Stitching
  • 360 Panorama creation
  • HD Panoramas (in Pro)

Pros & Cons of Google Street View:

Pros:

  • Guided photography to avoid flaws
  • Fast panorama generation
  • Access to their own featured photo library
  • 360 image capture for free

Cons:

  • Limited editing options.
  • Complicated UI
  • Sometimes errors in stitching

Average User Rating: 3.6 out of 5

App Reviews: 68.8k

App Downloads: 5M+

App Link: Photaf Panorama

How to Take Better Panoramic Photos

Capturing high-quality panoramic photos can be a challenging task, even with the best panoramic camera app.

Here are some tips to help you take better panoramic photos:

Choose A Good Location:

Look for a location with a scenic view or an interesting subject.

The more interesting the location, the better the panoramic photo will be.

Keep Your Camera Steady:

Avoid moving your camera while capturing the images for the panoramic photo.

This can result in blurred images or visible seams in the final photo.

Overlap Your Shots:

Make sure to overlap your shots by around 30% to ensure accurate stitching of the images.

Use Tripod & Gimbal:

Using a tripod can help keep your camera steady and make it easier to capture accurate shots for your panoramic photo.

Using Gimbal will keep your 360 images and videos super steady if you’re taking the shot by hand.

Use the right settings:

Adjust the settings on your panoramic camera app to ensure you capture high-quality images.

This includes adjusting the exposure, focus, and white balance settings.

Wrapping Up:

These were the top five panoramic camera apps for your Android device.

Each of these apps comes with its own unique features, pros, and cons.

Whether you’re looking for high-resolution photos, VR viewing support, or 3D effects, there’s an app on this list that will suit your needs.

Download these apps, experiment with their features, and capture stunning panoramic photos on your Android device. You can go through our next guide If you don’t know how to take a panoramic photo with drones.

** FAQs **

How do I know if my Android phone supports panoramic photography?

  • Most modern Android smartphones come with built-in panoramic photography features. Check your camera app for panorama mode. If unavailable, download panoramic camera apps from the Google Play Store.

Can I use panoramic camera apps on older Android devices?

  • Yes, you can use them on older devices if they meet minimum requirements. However, older models may face slower processing speeds or feature limitations compared to newer ones.

Are there specific techniques for capturing better panoramic photos?

  • Yes, techniques like selecting stable locations, keeping the camera steady, overlapping shots, and using tripods or gimbals can enhance stability and quality in panoramic photography.

Do panoramic camera apps require a lot of storage space on my Android device?

  • Panoramic camera apps may consume storage space, especially with high-resolution images or video recordings. Regularly delete old files or consider cloud storage options for managing space.

Can I use panoramic photos taken with these apps for professional purposes?

  • Yes, you can utilize panoramic photos professionally in real estate, travel websites, or virtual tours. It ensures high-quality representation and accuracy in depicting subjects or locations

Not satisfied with the quality of 360 images via Androids or iPhones? Then why not explore some of the best digital 360 cameras? It may turn out to be less hard work and better results. Here’s a list of the best 360 cameras out there.

Kategorien
Real Estate Update Virtual Reality WP VR

Interactive Virtual Floor Plan For Your Virtual Tours! [2024]

Great news for all VR lovers!

We have just released one of the best features for WPVR so far!

  • The Virtual Floor Plan

You can now include an interactive floor plan in your virtual tour where your buyers can see where they are in your tour and navigate to different scenes from right within the map!

And the best part, it’s super easy to use and can be applied to your existing tours as well.

Let us get a closer look at this amazing new feature.

Make The Tour More Meaningful With An Engaging Floor Map

Until now, you could create a complete virtual tour with WPVR and make it super engaging with hotspots, audio, and company details.

However, while a prospect takes the tour, it is often confusing to understand how the whole property is architected. What rooms are connected to the living room? Which direction is the balcony? Where is the kitchen in the house?

So far, your audience had to look around and find the rooms themselves, which, though enjoyable, often left many in a dilemma when taking a buying decision.

The virtual floor plan will change this completely.

If you have a floor plan ready for your place, you can now view it inside your virtual tour and map it out with your scenes so that a prospect will know exactly where they are on the property, and where to look to find various rooms or locations in your property.

It will give a clear idea of how the rooms in the house are distributed, thus making it easier to navigate on the tour.

But that’s not all. You can also place pointers on the map to indicate the locations of the scenes you have created in the virtual tour. And you can connect these pointers to their respective scenes so that viewers can click on them to move into that scene.

This will make the experience more engaging and meaningful for your prospects.

How Does It Work?

When you place the map in your tour, your audience will get an icon on the bottom right corner to click and view it.

Here you can check out the video on how it works for your viewers:

Here’s how it’ll work on your published tours.

On the map, you can click on the points to go to the associated scenes:

Virtual Floor Plan - Thumbnail

Your position on the tour will be highlighted on the map so that you know where you are.

This will make your audience aware of their position and make the navigation much more exciting.

You can also double-click on it to enlarge the virtual floor plan and have a better idea of your property.

Virtual Floor Plan Zoom

How To Set Virtual Floor Plan using WPVR

This is a Pro feature and is included in all WPVR Pro Plans.

Once you have WPVR Pro Installed and Activated, go to one of your tours, and visit the Floor Plan tab.

Virtual Floor Plan - WPVR

And Activate the Floor Plan.

You’ll find options to:

  • Upload the Floor Plan Image.
  • Floor Plan Pointers List.
  • Color Option for Floor Plan Pointers.
Upload Floor Plan to Virtual Tour

Once you upload the floor plan image, you can preview it.

And on the Preview, you can click on any position of the virtual floor plan and a pointer will be automatically set for that position.

Panorama Pointer on Floor Plan

You can drag the pointer over the virtual floor plan and you can also choose to delete it.

But most importantly, you can connect any of your scenes to this hotspot.

House Plans with Virtual Tours

Your viewers can click on these pointers to load the scenes.

That makes the transition really interactive!

From now, not only they can visit different scenes of your tour using the hotspot directions or the scene gallery, and they can navigate through an aerial view using this virtual floor plan.

On top of that, you can choose your desired color for the pointers as well.

Set Color to Floor Plan Pointers

To learn the details on how you can utilize it, follow this guide to set virtual floor plans.

Start making your virtual tours more interactive from today.

What’s Next With WPVR?

We are now focusing on making WPVR more user-friendly for you.

The next update of WPVR will Include:

  • Translation Support

We’re working on making all the strings of WPVR translatable so you can start using the plugin in your own language.

This is planned for our next sprint, and at this moment, we’re researching to find ideas that can help you make more engaging and impressive virtual tours.

For now, if you have any great suggestions, do reach us with your ideas and we will love to look into them.

And if you haven’t already, get WPVR now to create your own virtual tours in WordPress, easily!

Kategorien
Update WP VR

Gute Nachrichten für Divi-Benutzer! Das WPVR Panorama Modul ist da!

If you are a fan of Divi and want to use virtual tours on your site, then we have got great news for you.

Until now, you had to use shortcodes to embed a VR tour when using Divi. But not anymore.

You can now use a dedicated panorama module to place the virtual tour on your website easily!

  • Simply use the WPVR Panorama Module!

Let us look at how it works.

Embedding A Virtual On Divi Using WPVR Panorama Module

First, you have to create a virtual tour in WPVR. And once you have it ready, go to the page where you want to embed it.

Edit the page with Divi Visual builder and in the section where you want to embed the tour, search for the module called WPVR.

WPVR Panorama Module Divi

In the module settings, choose the virtual tour you have created earlier from a dropdown list and define its Width, Height, Radius, and Mobile Height.

Divi WPVR module

And then publish/save the page.

Now, if you exit the visual editor, the virtual will appear on the page and you can take the tour right away. It’s as simple as that.

No more using shortcodes!

Tip: Make sure to define a mobile height and test it afterward to ensure the tour size is right on your mobile device. Most people tend to view virtual tours via their cell phones.

This will make it so much easier to edit pages with virtual tours.

What’s Next With WPVR?

We are now focusing on more features that can help you make the virtual tour even more engaging and attractive.

Some of our upcoming features include:

Floor Plan:

You will be able to include a floor plan on the tour where people can get a birdseye view of the place and get an idea of where they are on the tour.

Translation Support:

We’re working on making all the strings of WPVR translatable so you can start using the plugin in your own language.

These are all 2 of our planned features for the upcoming sprints, and many more are being researched to find ideas that can help to devise the best virtual tours.

Schlussbemerkungen

Now that it’s much easier to embed virtual tours in Divi, go ahead and start designing your web pages with more control. And if you were not sure if WPVR will work with Divi, well, now you can use it without any hesitation.

  • Get WPVR and start using virtual tours now.
Kategorien
Update Virtual Reality WP VR

Große Neuigkeiten! Einführung des VR-Headset-Modus - das realistischste virtuelle Tour-Erlebnis

Team WPVR is back with a massive feature!

Since the release of the plugin, one of the most demanded features was support for VR Headsets.

And after months of development and testing, we are excited to announce that it’s finally here!

You can now allow your audience to experience virtual tours via VR headsets!

Offer A Realistic VR Experience Like Never Before

The VR Headset support will change the way your audience will take the tour from now on.

VR Headset support for WPVR

Anyone who has a VR Headset or VR Cardboard will be able to enjoy your virtual tour in a near-realistic experience as if he is physically visiting your place.

And it’s really simple. All you need to do is to allow the VR Headset mode in your virtual tours and your prospects will be able to get a fully immersive experience via their mobile and the VR headset.

How does it work?

Your audience will get an option to enable the VR Headset mode right on the tour. Upon enabling it, the tour will turn into a bi-angular view as shown below.

VR Headset Mode In WPVR

Next, all your prospect needs to do is to place his mobile device into his VR Headset and that’s it! He will be in a whole new virtual world, away from reality.

But it’s not just a tour to look around. You will notice that while on the VR Headset mode, there will be a small indicator in the center of your tour.

When you look around, place the indicator on any hotspot for about 3 seconds, and it will act as a click.

So if it’s an information hotspot, it will open up the details, and if it’s a scene-type hotspot, then you will be taken to the next scene!

So your visitors will not just take a look around, but they will also engage and interact within the tour, thus making the tour much more appealing.

How To Allow Support For VR Headset for Mobile

This is a Pro feature, so to use this, you have to get WPVR Pro.

Once you have WPVR Pro, go to WPVR > Get Started > Settings, and there you will find an option that says VR Glass Support.

Enable The VR Headset Support for Mobile Devices

Simply enable this feature and that’s it – now, all the virtual tours you created will have an option to enable VR Headset mode when viewed on a mobile device.

What’s Coming Next?

The VR Headset for mobile is one of the best features yet, but this is just a start.

As promised earlier, we have refactored our plugin so that we can come up with more amazing features to help you create even better virtual tours. Hence, more amazing features are in store.

Following are some of the planned features for next quarter:

Individual Colors For Every Hotspot Icon

Right now, you can only use one single color for all hotspot icons. But we are working on allowing you to set different colors for different hotspots.

This will help you make the hotspots more meaningful, and help you highlight certain hotspots for special purposes.

WPVR Divi Module To Embed Virtual Tours

Divi is one of the best themes and builders out there. But until now, to embed tours in a Divi site, you had to use our shortcodes.

But we are working on creating a dedicated Divi Module to embed virtual tours on your site more easily.

A Fully Translatable WPVR

‘Translation’ is crucial and has been a barrier for many when using WPVR for a while.

But that will change soon as we are working on making WPVR fully translatable and will release support for at least 10 more languages in the core WPVR plugin.

Interactive Floor Plan

We are conducting research to bring in another out-of-the-box feature, interactive floor plan support for virtual tours.

However, as amazing as it sounds, it’s still quite a difficult feature to achieve within WordPress.

But we are determined to find a way to make it happen. Fingers crossed!

Do You Have Any Brilliant Ideas Or Suggestions?

We are also looking for great ideas to work on and we would love to hear your ideas.

If you have any suggestions or ideas to improve the plugin, feel free to suggest them in the WPVR product roadmap.

Einpacken

The VR Glass Support is one of the many features WPVR has to help you create high-quality virtual tours in WordPress, easily.

If you want to grow your business with advanced technology, then using virtual tours is a no-brainer.

So go ahead and start using WPVR and create amazing virtual tours for your business.

Get WPVR Pro now!

Kategorien
Update Virtual Reality WP VR

Eine neue Reise hat begonnen - WPVR ist überarbeitet und bereit

The WPVR team is excited to announce the release of the refactored versions of both WPVR Free and Pro.

We always have placed a priority on catering to the desires of WPVR users and wanted to bring in the features you asked for.

However, due to some complexity with the previous codes of the plugin, it was getting difficult.

But, those issues are in the past now!

Earlier this year, we decided to refactor the code of WPVR entirely.

And that would make the task of bringing in new features much easier.

Although so many possibilities were open in front of us, we also had some serious concerns:

  • How much the refactored version would affect the functionalities?
  • How our existing users will react to the changes?
  • What effect will it have on the virtual tours that our users have already created and using actively?

Keeping all these in mind, we continue the work.

And now, it’s here for you to test and try out.

Let’s have a look at what awaits you in this version.

1. Guide The Way – Setup Wizard

For the first-time users of WPVR, it was always a bit confusing to understand and start creating the tours.

Not anymore!

We have brought a Guided tour for the users – follow it and learn how you can create the tours most effectively.

Just click on the Setup Wizard Option under WP VR after installing the plugin.

WPVR - Refactored Virtual Tour Plugin

After that, you can go ahead a create the tours as you’ve seen in the wizard.

2. Efficient User Interface

There are a few changes we’ve made to our user interface.

In our older version, you had to move from the General Tab to the Scene Tab in order to upload a scene.

But in the new version, you’ll start from the Scenes tab – making the tour creation faster.

Once the panorama images are uploaded, you can go ahead and make additional changes.

Awaited Features - Virtual Tour Builder

Also, we’ve set global positions for the Preview button and tour shortcode.

Now, you can preview the tour anytime you want and copy the shortcode whenever you needed.

3. No More Annoying Tab Switching

Previously while creating the tour, when you click on Preview, it would take you to the default (General) section of the plugin.

And you had to manually go back to the tab where you started.

Now, this won’t happen anymore.

From now, when you’ll click on Preview, it’ll load your exact tab and position.

What’s Coming Next?

Since the refactored version is live, we are focusing on the features and improvements you’ve been asking for a while.

One of them, is obviously, Carboard support for your virtual tours.

The status of the feature and other details are already updated on our Public Roadmap.

To learn more about our upcoming features, checkout the WPVR Roadmap.

You can add more feature requests to the Ideas section of this Roadmap and upvote the ideas you’d love to see coming next.

Einpacken

Right now, the goal of the WPVR team is to continue making it robust and bring the demanding features one by one.

And for this, we need your help.

Try out the refactored version and check if everything is working on your end. See if you face any issues.

Think of the features that will make WPVR better and better.

Add them to our roadmap.

Together, we’ll make WPVR awesome!

Kategorien
Guide Virtual Reality WP VR

How To Create A Virtual Art Gallery in WordPress [2024]

‘Art’ is always among the most appreciated element in the creative industry. However, the recent pandemic (COVID-19 crisis) has changed how people cherish art galleries.

According to Artsy, the art gallery business went down by 22% since the start of the pandemic due to a decline in visitors.

However, this also means they saw a rise in auctions and painting sales ONLINE.

If you are an artist or own an art gallery, then it’s crucial that you start investing more in the online realm as soon as possible.

Sure, you can run an eCommerce site with all your paintings there, but that is not the best option.

Remember, buying and selling art are more influenced by emotions than the price. The more you can connect with the viewer, the higher the chance of a good bid.

That’s where a virtual art gallery comes in.

A virtual art gallery will help you create a real-life impression for buyers even when they are sitting at home and double your chances of selling more paintings in the process.

And learning how to sell art online will make it really easy for you.

In this article, you will learn:

  • Why you must use a virtual art gallery and how it can grow your revenue?
  • How you can easily create such a tour in WordPress, on your own?
  • The best way to make the virtual tour more engaging.

And eventually, you will be able to trigger more responses from interested buyers.

Fangen wir also an.

What is An Ideal Virtual (VR) Art Gallery Tour?

A virtual art gallery tour is basically a 360 virtual tour where you let viewers take a closer look at your paintings or art without a live visit.

The tour will allow buyers to zoom into the images, get extra details on the arts, and maybe, get an option to bid to purchase. As you can tell, this will intrigue art lovers and give them a real-life experience remotely.

The Biggest Benefits Of Using A Virtual Art Gallery

Why Go Virtual with your Art Gallery

As an artist, there is no better way to blend in with technological advancement than working with VR. If you do some research, you will see that almost all creative sectors are slowly embracing Augmented Reality or Virtual Reality.

Whether you are a painter, photographer, sculptor, or a vivid creative artist, you can easily get into the limelight with your virtual art gallery online.

In fact, it will help you connect more with the prospects and help you get more recognition.

Let us look at some of the main benefits you can enjoy using a virtual tour of your art gallery on your website.

  1. An Emotional Connection Without Fail
    • A virtual tour means the visitor will have full control over the navigation – the prospect will get to move around the gallery on their own and find their favorite piece of art.
    • You can further increase the engagement by adding tool tooltips beside your arts, which viewers can click or hover to get more details on them.
    • Overall, it will be a personalized experience and the visitor will surely remember it in the near future.
  1. A Comfortable Visit At A Suitable Time
    • Since the tour is available online, there is no restriction on the time of visit. So a viewer will get to visit whenever he/she is free and will be able to spend more time choosing the best art.
    • Plus, there will be no distraction – no crowd or annoying noises of any kind. This means every viewer will be able to view the best pieces of arts and observe their quality and appreciate the beauty as long as they want, without others standing around them.
    • Art is often difficult to read without proper concentration and while in the virtual tour, the viewer will be able to focus in complete silence and give full attention to the art. Thus, a greater chance of emotional connection.
  1. Educational And Entertaining At The Same time
    • Modern virtual tours always have ways to make the tour more valuable. You can provide details on the arts using a video, audio, or written text, where you can explain the meaning of the art or the history behind the idea.
    • Buyers always love emotional stories. So if you can provide a good story behind your art, you can attract more buyers that may want to purchase just because of the depth of the story this art holds.
  1. A Proven Business Solution
    • It’s obvious that your art gallery is not just for promotion or recognition, you also have a business goal. It could be a service you provide, paintings you sell, or products you want to auction out. A physical gallery always has its limitations. A virtual tour will enhance the possibilities of reaching more prospects.
    • You can get great international reach with a planned launch online. If you embrace proper product launch strategies, you can expect to get a great number of visitors right from the get-go. Maybe you can host a limited-time auction of antiques or collectibles or simply want to put your paintings up for sale. Or, you could showcase your talents and expect service inquiries for custom art. Simply create a virtual tour with a contact form for the right purpose and get the best bids from prospects all over the world.
  1. No Time Limitations
    • One of the barriers to a live art gallery or art museum is there is a limited time you can keep your doors open. Plus, while people are there, you are always on the run talking to different visitors at different times. So time management is quite hectic. You can overcome these via a virtual art gallery tour.
    • A prospect may not have time to visit when you are open. But, he can surely hop onto your website and take a tour whenever he is free. People who are passionate about art will love to get a visit and this tour will ensure they will not miss out on your fabulous art due to lack of time.
    • Plus, an engaging virtual tour will mean you won’t need to personally guide them on the art. Proper use of audio and custom text will keep the visitors engaged and guided, while you can wait for them to reach out when they are ready to get in touch.

If you own antiques, you can create a virtual art museum tour to show off your antiques, and get greater value for any items you want to put up for auctions.

How To Create A Virtual Art Gallery Tour Easily on Your WordPress Site

When you think of a virtual tour, it may sound like it’s complicated. But guess what, creating a virtual art gallery tour is rather quite easy, especially in WordPress.

You will find a few VR tools in WordPress that makes it super easy to create virtual tours. And among them, the best one out there is WP VR.

WP VR is a virtual tour builder that has every feature you need to create a complete virtual art gallery that is engaging and can help to convert more prospects effectively. The plugin will make it easy for you to create virtual tours which will allow your prospects to get a 360 panoramic view of your art gallery and get a sense of how it looks in actuality.

Step 1 – Take Finest 360 Photos of Your Art Gallery

WPVR requires you to provide 360 images of the location you want to turn into a virtual tour. So it is important for you to take high-quality panoramic images of your art gallery from the center of different areas.

You can take pictures using a DSLR Camera and then use a stitching app to turn them into 360 panoramic images. Or you can take 360 images using an iPhone which can be directly turned into a virtual tour via WVPR.

The quality is super important since these will be viewed by art enthusiasts all over the world.

Step 2 – Install & Activate WP VR

The first important step is to install and activate WP VR into your WordPress Dashboard.

  • Go to Plugins & Search for WP VR.
  • Install & Activate the plugin once you’ve located it. Or download the free version of WP VR from the WordPress repository.
  • Next, Upgrade to the premium version of WP VR

Here’s some further guidance if you face trouble installing the WP VR plugin.

Note: You can build a complete virtual tour with the free version. But with the premium version, you can make the tour more delightful.

Step 3 – Create a Virtual Tour

After installing the plugin, go to the WP VR General Settings.

General Settings - VR Art Gallery
  • Disable WordPress Large Image Handler on WP VR – this will keep the image quality intact for a better tour experience.
  • Enable Mobile Media Resizer – it will resize the tour for mobile and smartphone devices.
  • Disable On Hover Content For Mobile – this will remove the confusion between on-click and on-hover content from smartphones.
  • Front-End Notice for Mobile Visitors – it’s a great option where you can notify smartphone users with a pre-written notice.

Afterward, hover over the WP VR & Click Add New Tour.

Add new Virtual Art Gallery tour

After adding a tour, Add a title to the tour.

Add Title to VR Art Gallery
  • Enable Tour Autoload & Controls option.
  • Also, enable the Auto Rotation for the tour. And keep the auto rotation slow so that the doesn’t load too fast.
Tour Autoload and Auto-rotation

Step 4 – Upload a Scene

The next important task is to upload a scene. Go to the Scenes menu, provide a Scene ID, and click on Upload.

Upload Panorama Image to VR Gallery

Give the necessary information with the scene as well. If your art has a title, a dedicated author, and a portfolio of the author, you can add that information accordingly.

Image Title Art Gallery

After you’ve uploaded the scene and added the necessary information, click on Preview,

Preview Art Gallery Museum Tour

Afterward, you’ll be able to see a Tour Preview on the top right corner of your tour.

If the tour looks okay to you then click publish & your tour will be saved.

Publish Art Gallery Virtual Tour

Step 5: Add Hotspots to Increase User Engagement

Hotspots are specifically created to make a tour more engaging and interesting. In this case, you can pinpoint an art and add basic details of the art.

How to Add a Hotspot:

  • Just below the Scenes menu, go to the hotspot menu.
  • Click on a place on the virtual tour where you want to add a hotspot and some coordinates will appear under the Tour Preview section.
  • Select the coordinates of Pitch & Yaw. Simply click on the down arrow icon and it’ll be set automatically.
  • Provide a unique Hotspot ID.
  • Select the type of hotspot you want to have. For now, we’re creating an Info-type Hotspot.
  • Add an On Hover Content where you can display text, images, gifs, and even video files.
Hotspot on Virtual Art Museum Tour

After you’ve filled in all the necessary fields, you’ll need to update the tour from the bottom right corner of the Tour Preview.

Let’s check the hotspot directly from the website.

Hotspot Content on VR Gallery Tour

There are four types of Hotspots available for the free & premium versions collectively.

Info-Type Hotspots: The Info-type hotspots allow you to display art information, related images, videos, and combinations of all these on a hotspot.

Click here to learn more about Info-type hotspots.

Scene Type Hotspots: You can capture panorama images of your different rooms or halls and connect them using this hotspot.

Your guest can use these to move between all the locations inside your virtual art gallery tour.

Click here to learn more about Scene-type hotspots.

Fluent Form Hotspots: The Fluent Forms Addon is included with the premium version of WPVR. You can set contact forms or submission forms inside your virtual tours using this.

**I’ll tell you more about this later in this guide. So, keep on reading.

WooCommerce Product Hotspots: If you’re using WooCommerce and selling your arts or paintings through it, you can set the products on your hotspots.

Viewers can add them to their cart while roaming inside the virtual art gallery. This one is also available as a premium add-on.

Learn how to sell your arts using a virtual tour.

Step 6 – Advanced Controls & Control Buttons

You’ve created an awesome virtual art gallery tour for your visitors.

Now, what can we do next?

Let me tell you: making your tour better and more captivating using Advanced Controls and Control Buttons.

Advanced Controls

Advanced Controls for Art Gallery Museum Tour

The important set of features that you can enable to make the tour engaging are:

i. Gyroscope Control

A large number of your viewers will choose to view your art gallery virtual tour from mobile devices.

And you can really impress these viewers if you provide an interactive experience.

Enabling the gyroscope support on your VR gallery will make it respond to their movement and hook them with surprise.

ii. Scene Gallery

Your virtual art gallery will surely have multiple panorama images.

To give your viewers an idea of how large your gallery is, turn on the Scene Gallery option.

It’ll make it easier for your viewers to navigate inside the VR gallery as well.

iii. Tour Background Music

Enhance the experience of your viewers by adding background music.

A soothing background audio that matches the arts or paintings in your gallery will only complement the entire experience.

iv. Explainer Video

An explainer video is a helpful option for your viewers that can make their journey easier and provide some additional information as well.

It will guide your viewers on how to experience the tour, what they can expect in it and a heads up on some of the most interesting pieces of art they’ll experience in it.

Furthermore, you can enable or disable all these Control Buttons, based on how much control you want to give to your viewers.

Control Buttons of VR Art Gallery

Bonus Step – Let Your Viewers Easily Contact You

Once you have impressed your visitors with virtual art gallery tours, why leave the chance to connect with them and lead it to something more potential?

With the WPVR Fluent Forms Add-on, you can easily set contact forms inside your virtual art gallery.

You can add them in each scene, so they can choose to contact you any time, especially if one of your artifacts or paintings has got their attention.

This is something that’ll take you one step ahead of your competitors.

Add Contact Form in VR Art Gallery with WP VR
Beschriftung (optional)

Here is what a form will look like inside the tour.

Set Contact Form In VR Art Gallery

Author’s Notes

Last year, the number of sales of art and artifacts was 13.3 Billion U.S dollars. So this is a great sign that you too should start using a virtual art gallery to increase your audience engagements and hopefully, grow your business.

So go ahead and create a virtual art gallery for your website using WPVR.

Take help from the latest technology and get the recognition you deserve.