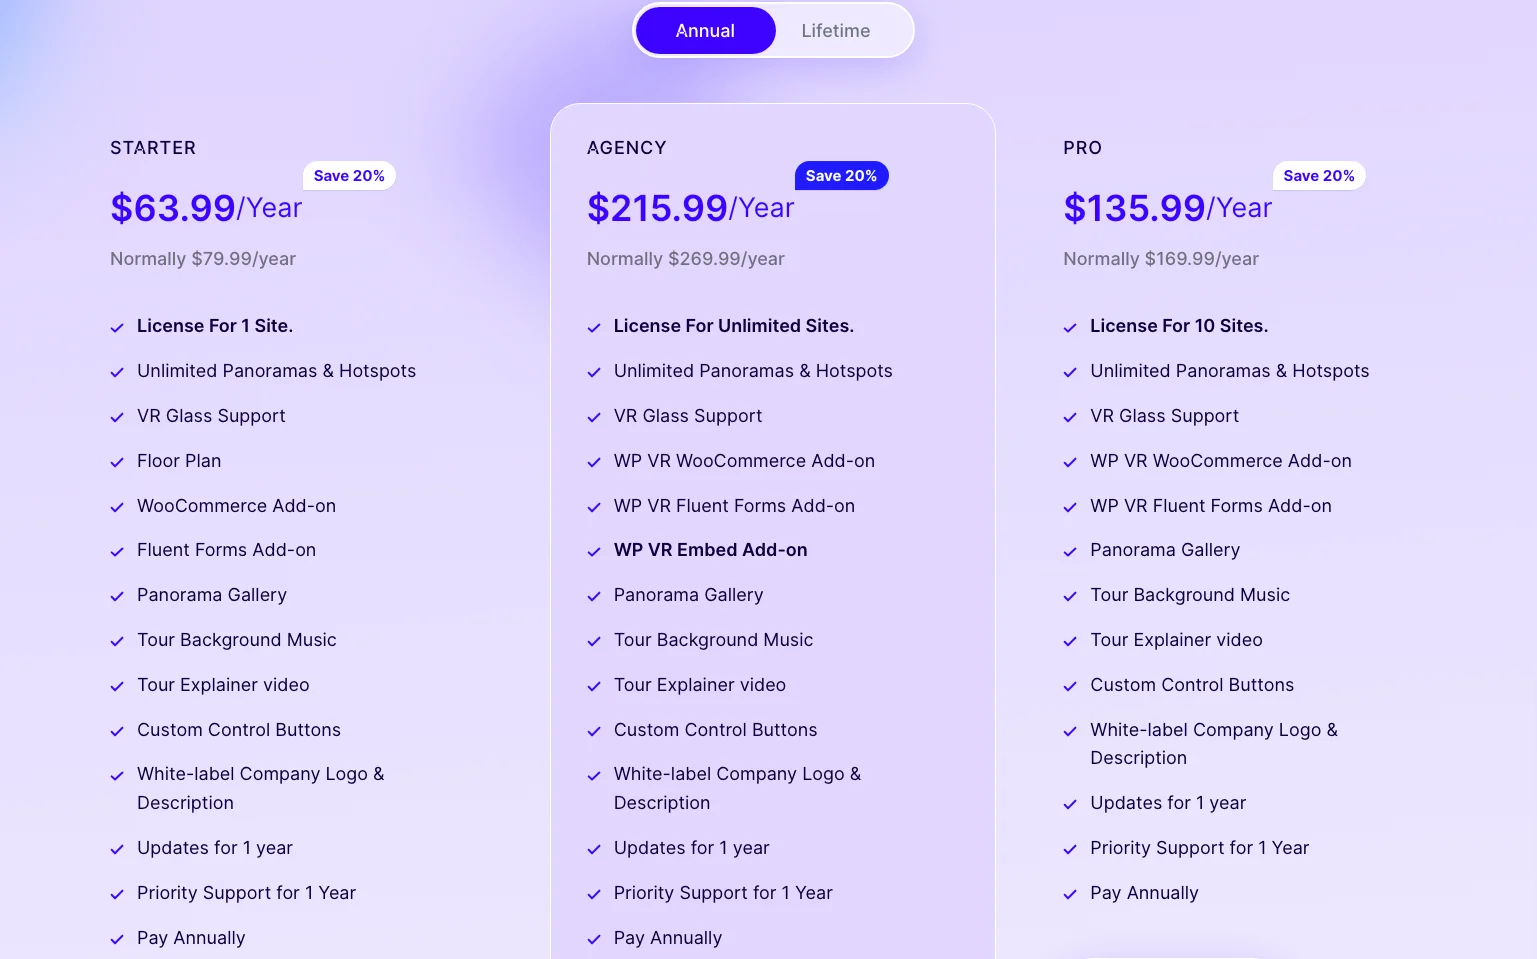
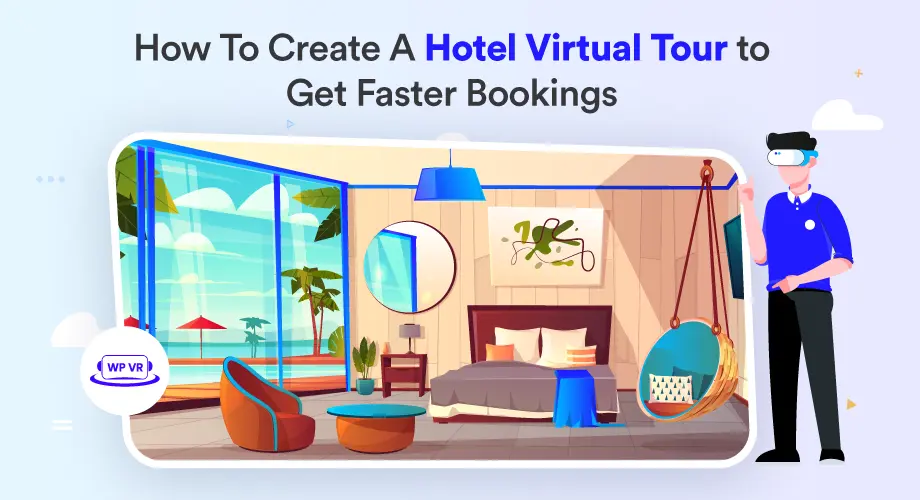
Choosing a college is one of the most important decisions a student will make. It’s not just about academics—it’s about finding a place that feels right, offers great facilities, and has a campus students can’t wait to call home.
If you manage a college or are responsible for showcasing its appeal, having a virtual campus tour on your website isn’t just an option—it’s essential.
Why?
Because most students and parents begin their college search online. An engaging online campus tour can be the difference between someone scrolling past your site and a family deciding your college is worth exploring further.
In this article, I’ll show you how to create a virtual campus tour that grabs attention and builds excitement. You’ll learn:
Why a virtual tour is a must-have for your college website
How to create one step-by-step
Tips to optimize it for maximum impact
By the end, you’ll have everything you need to attract local and international students—and get them to picture themselves walking your campus.
Let’s dive in.
What is a Virtual Campus Tour?
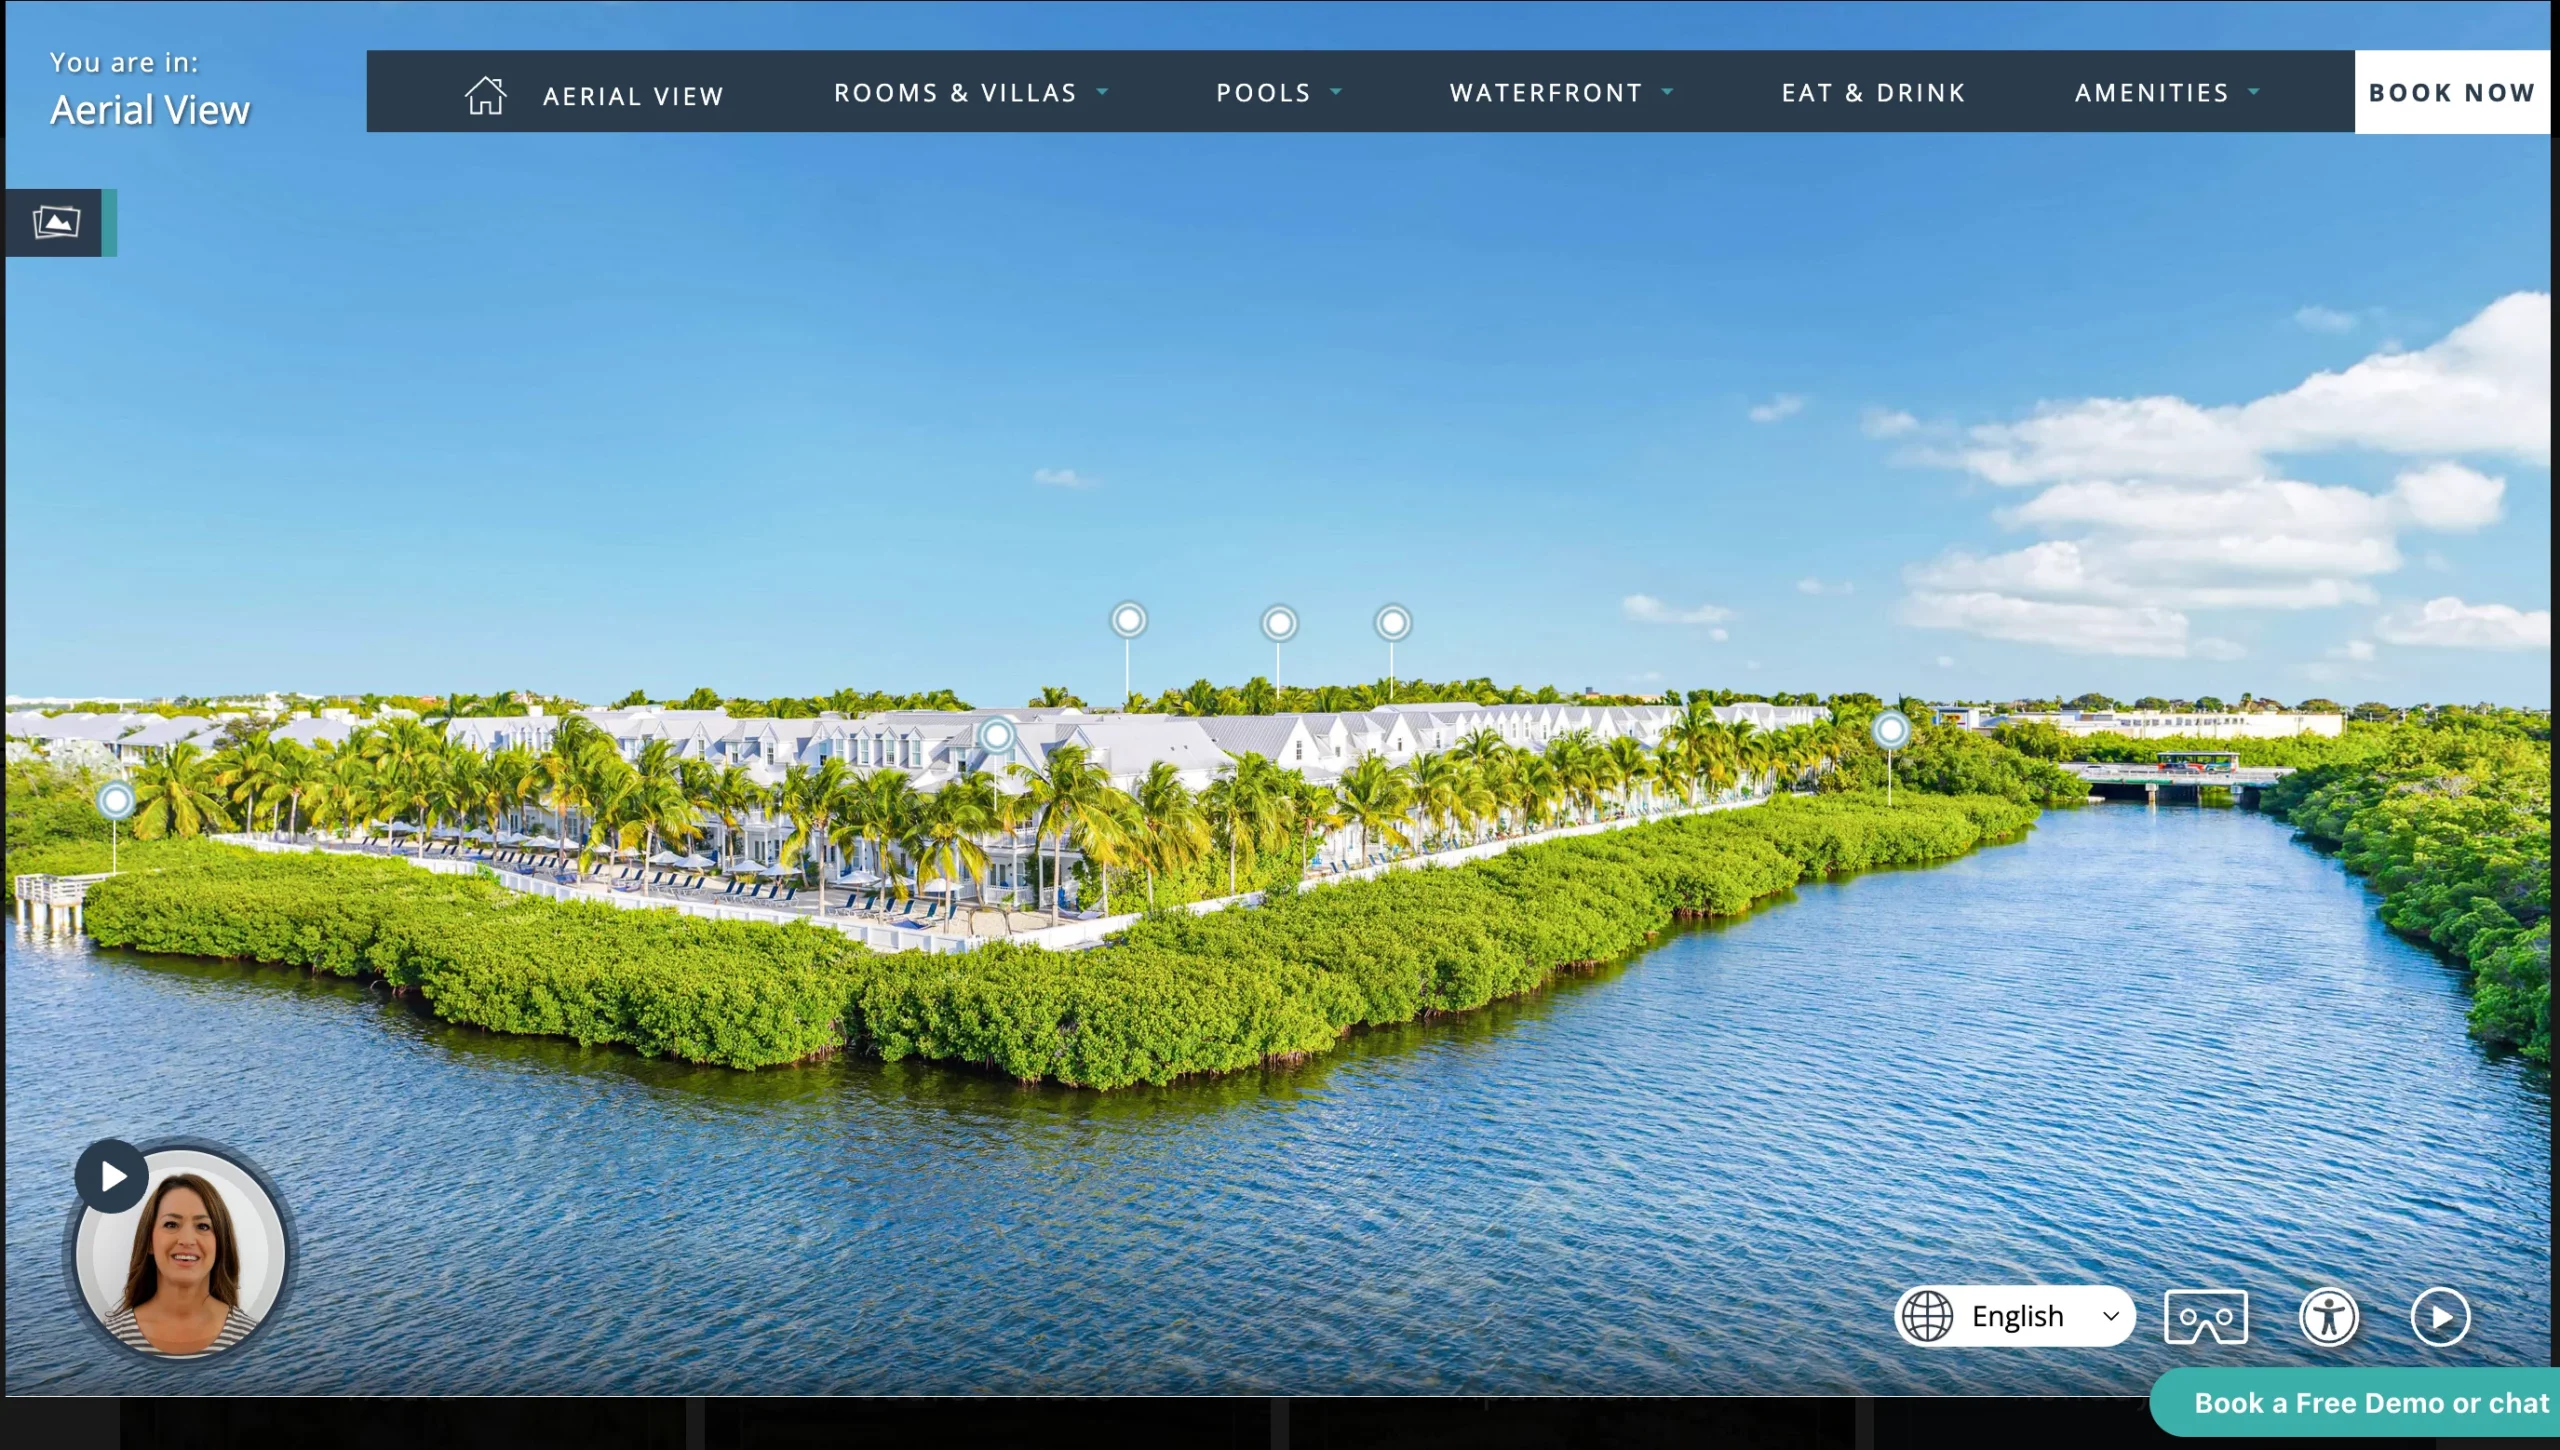
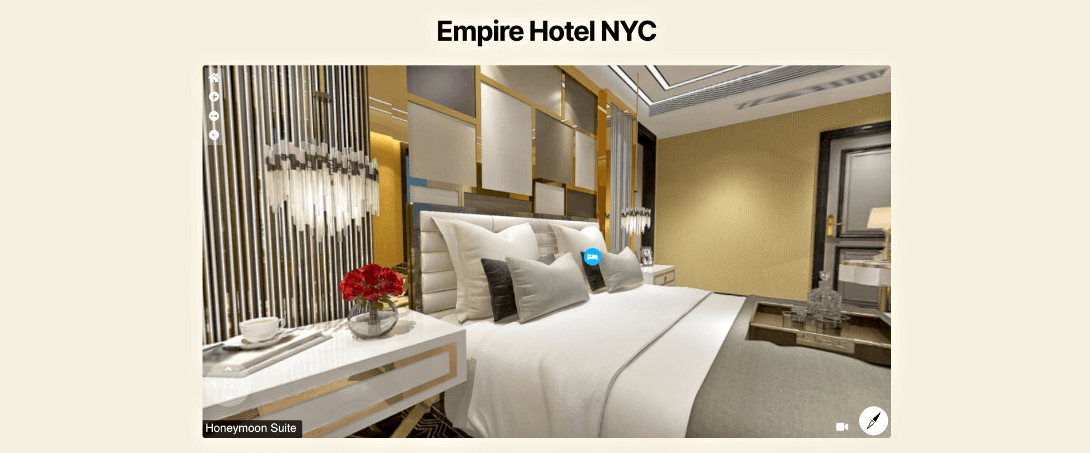
A virtual campus tour is an online experience that lets students and parents explore your college from wherever they are. It’s like walking through your campus, but instead of being there in person, they navigate it through photos, videos, or 360-degree views on your website.
For example, imagine a student looking for a college with modern science labs and vibrant student areas. With a virtual campus tour, they can click through high-quality 360-degree views of your biology or chemistry faculty buildings, lecture halls, dorms, and recreational spaces.
They get a feel for what it’s like to study and live on campus, all from the comfort of their home.
Why Do You Need To Have A Virtual Campus Tour?
A virtual campus tour will let your prospective students get a glimpse of how the campus is in reality.
Through this virtual campus visit, you will have a chance to show off all the best areas of your college, including hallways, college rooms, faculty areas, dormitories, classrooms, labs, etc.
And if you can make it more engaging with additional information in the tour, it may help connect with them even more.
Let us look at some key reasons you must have a virtual campus tour.
1. Have An Engaging Strategy To Attract New Students
A virtual tour is probably the most engaging piece of content that you could have to connect with potential students.
While having the right subjects and faculties are essential, the campus is just as important.
If you have an attractive virtual college tour in place, most students would want to spend more time finding out about your college.
You could also add contact forms within the tour so that students can easily inquire for more information while taking the tour – a perfect way to connect with them on the go.
In the process, you could get more inquiries and have a chance to register more new students.
2. Attract Both Local And International Students
Local students can take a college tour directly. But if you do admit international students, they aren’t lucky enough to get a tour before taking admission.
Hence, they need to either observe images & video tours, or you could entice them more effectively with a VR campus tour.
A near-realistic tour will help remove any doubts about your college campus and may influence international students to put you on their priority lists.
The same can be said about distant local students, who can travel to the college, but the virtual tour would make it much easier to attract them while they are researching your college.
3. Impress The Students With Your High-Standards
Your virtual tour should show off how well-built your campus is and that it is of the highest standards.
They want a campus they can be proud of. Similarly to that for students quality education is another major factor they can be proud of, and writing help for university students from experts is necessary.
Similarly, Images and videos can hardly do that. But, a quality virtual campus tour can be the best way to present the high standards to the students.
4. Captivate The Parents With Quality and Well-being
Parents are more interested in finding out if the college campus is safe and well-groomed for the upbringing of their children in the next few years.
You have to demonstrate the safety measures, culture, quality, and innovation within the tour.
To do so, you may add additional information on every important aspect of the tour, such as the lab facilities, sports & fitness areas, club facilities, surveillance for security, etc.
5. Highlight The Key Features Of Your College
As mentioned before, the college virtual tour allows you to showcase the best areas & facilities of your college.
For example, some students want dedicated sports fields, while some parents may want to observe if a good library is available. In the case of international students, vr tours of the dorms would be a huge plus.
Requirements To Create A Virtual College Tour
When creating a VR college tour, you need to do the following:
Take Aerial 360 Photos For Larger Attractions Of Your College To highlight larger areas, such as the football field or the birds-eye view of the whole campus, you could take 360 photos using a drone. ~ Here is a guide on how you can capture 360 photos using drone.
Use A Virtual Tour Creator To Craft An Engaging Virtual Campus Tour Choose a reliable virtual tour creator to build a virtual tour and make it engaging with more details.
We recommend you use a WordPress website and use WPVR, which is a brilliant VR tour creator.
Once you have a basic tour in place, you may then use WPVR Pro to add more engaging elements such as a college map, introductory video etc.
Place Your Virtual Tour On The Website Create a separate page to host the virtual tour. You may also add it to the home page of your college.
Encourage More Students To Take A Tour Add pop-ups and CTAs on your home page and other website pages to take a tour. You may also do the same via social posts.
Now, let us look at how you can craft a virtual campus tour using the tool we recommended, WPVR.
How To Create Virtual Campus Tours For Your College Using WPVR
First, install and activate WPVR in your WordPress Dashboard. Here’s how
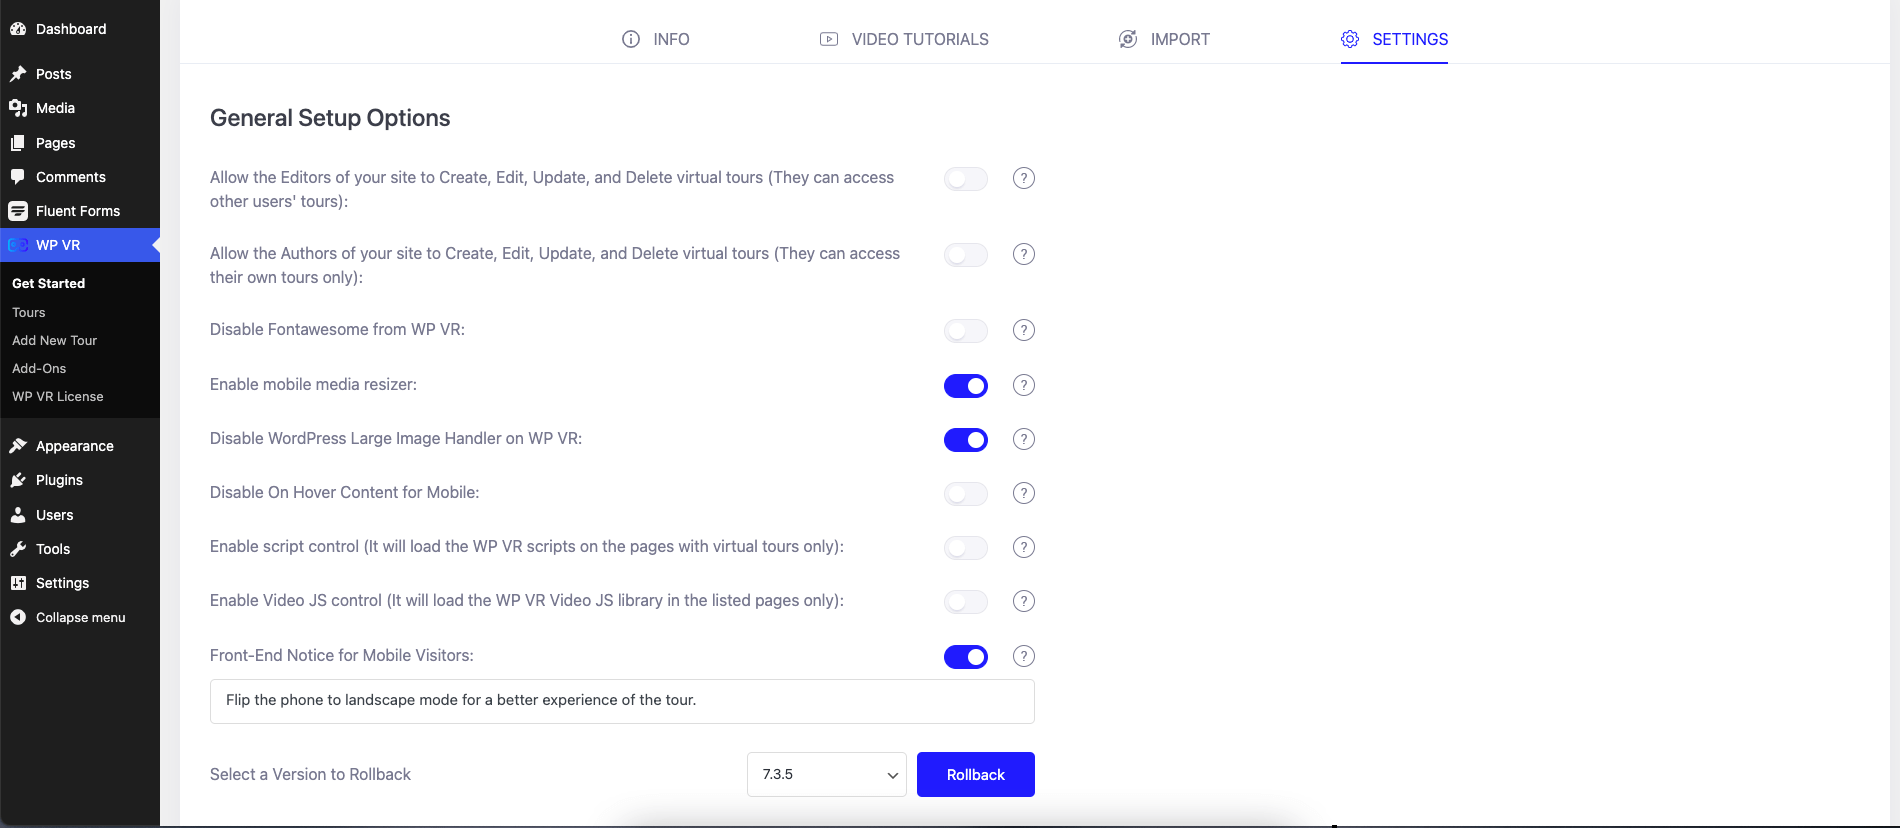
Go to WPVR Get Started Page & configure the basic Settings
Here are the options that you may enable so that your Virtual Tour is flawless.
1. Create Your First Virtual Campus Tour Scene
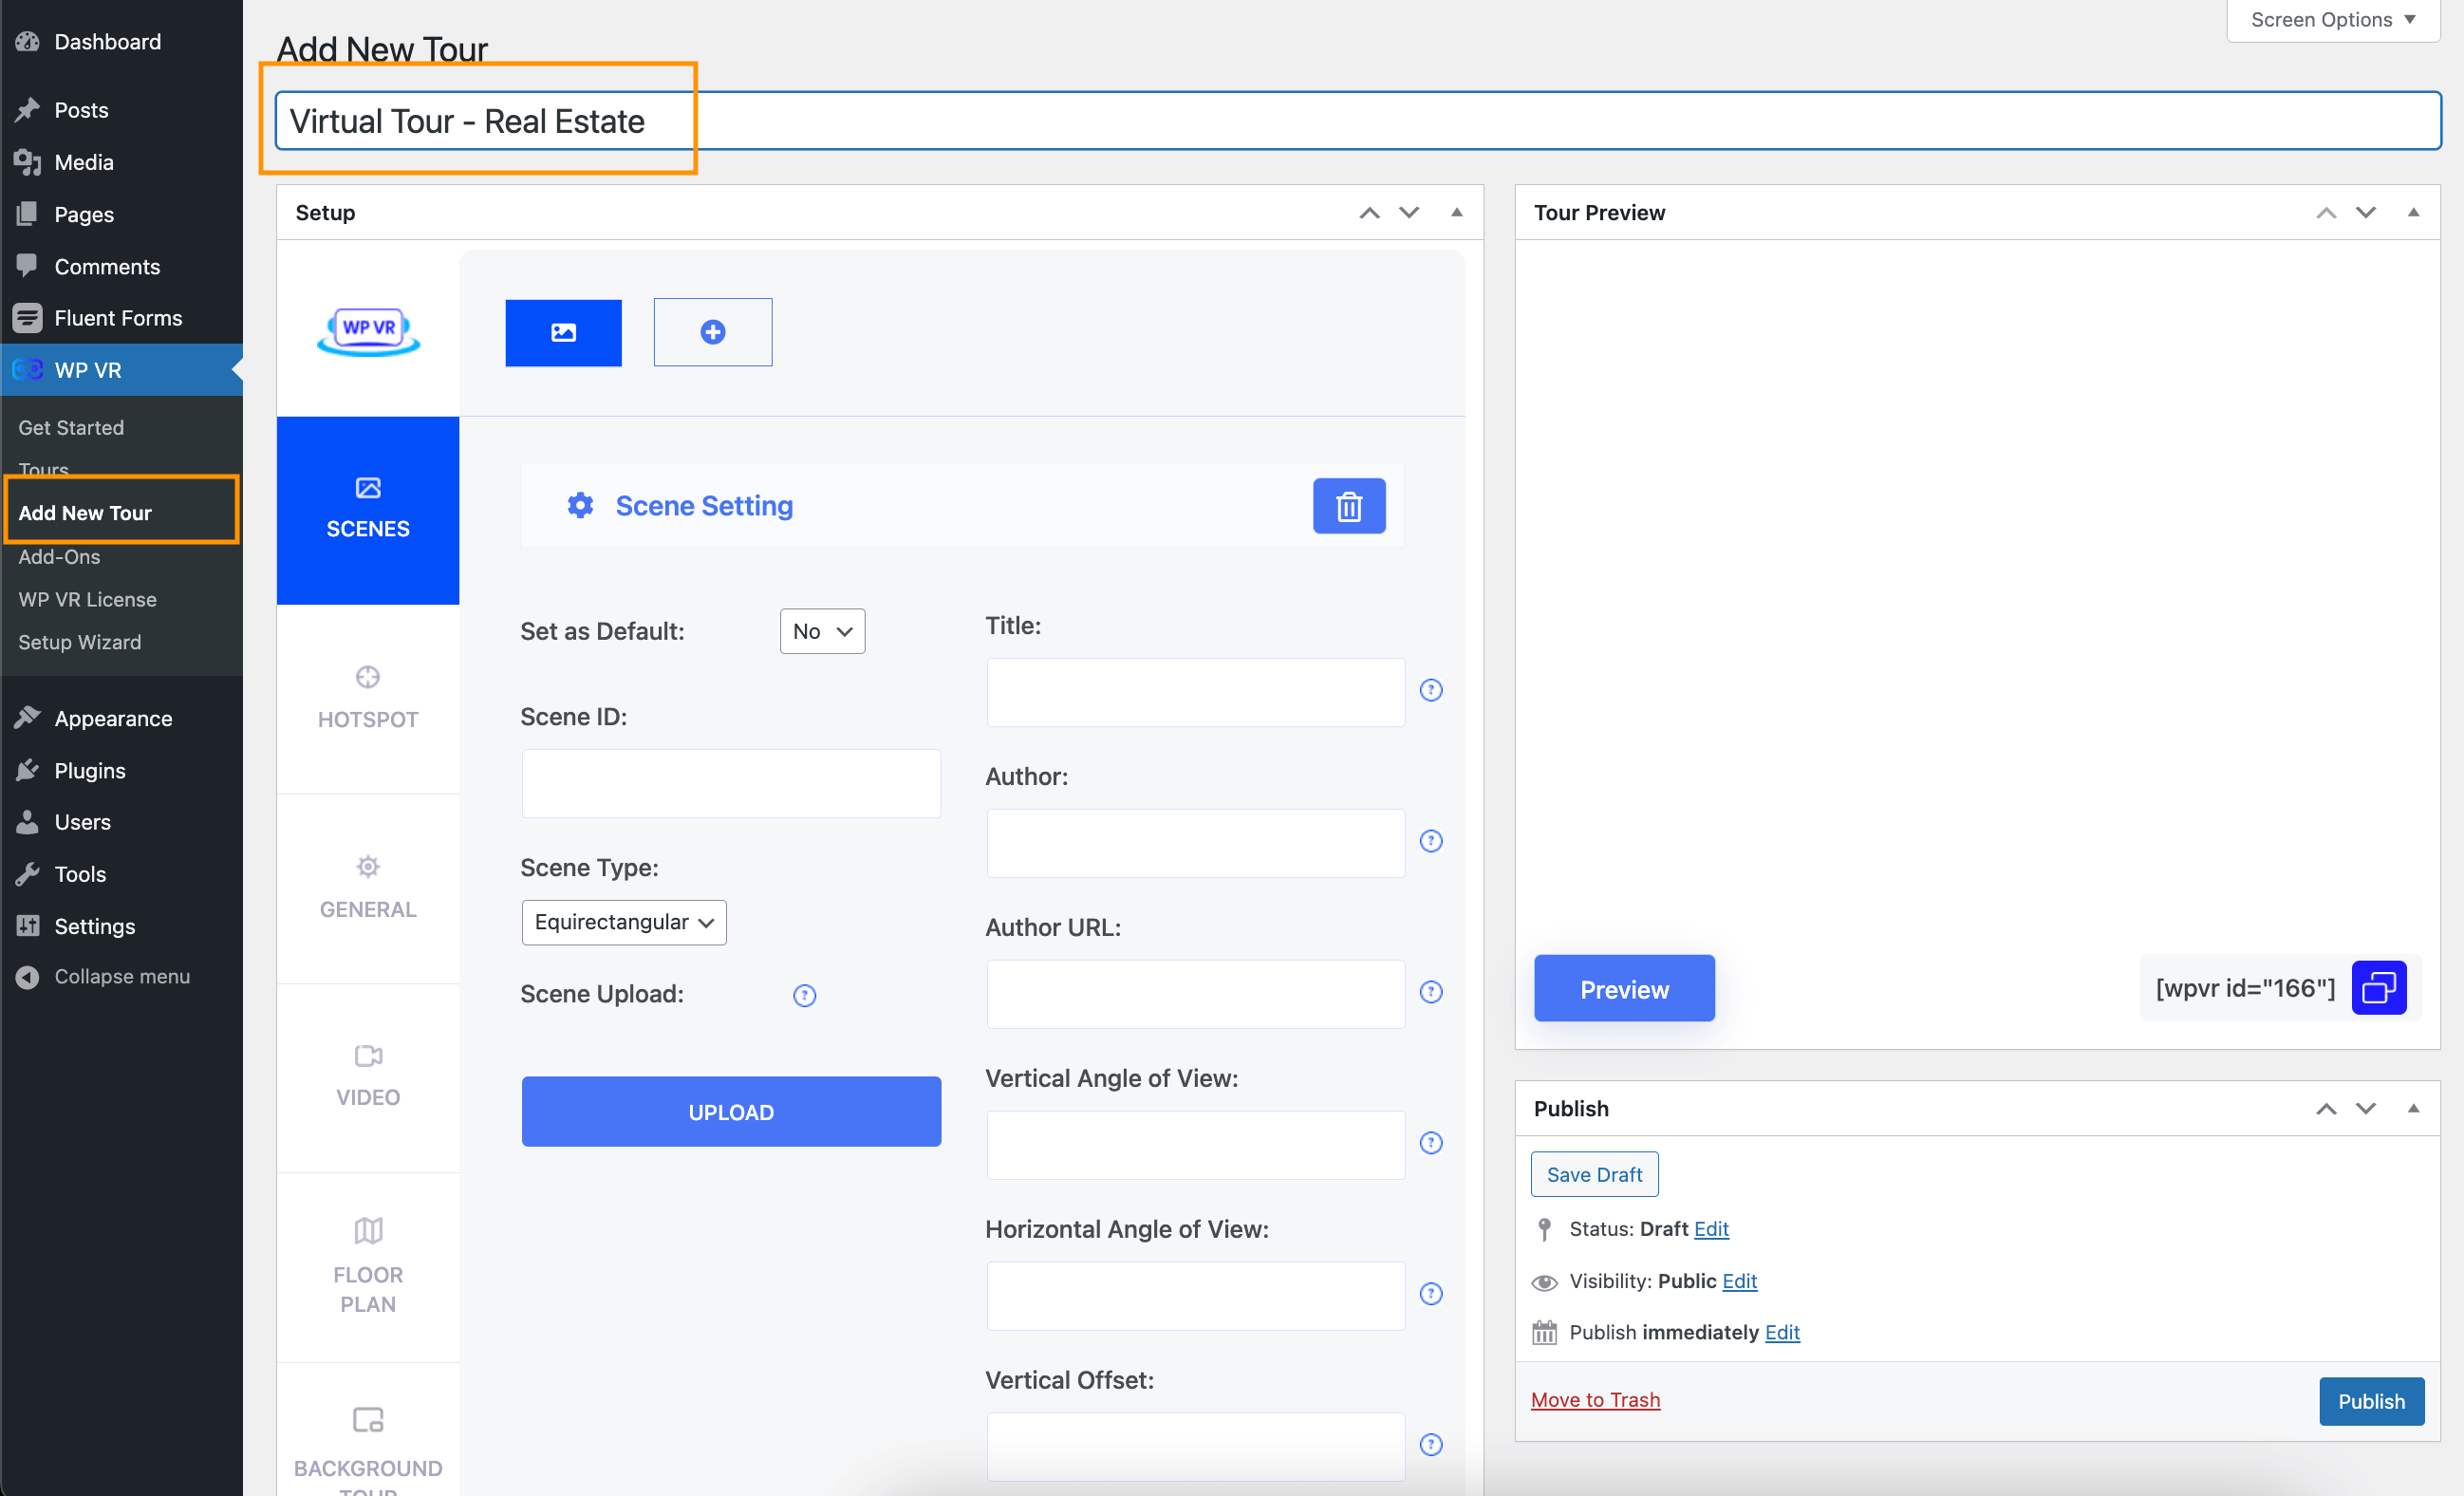
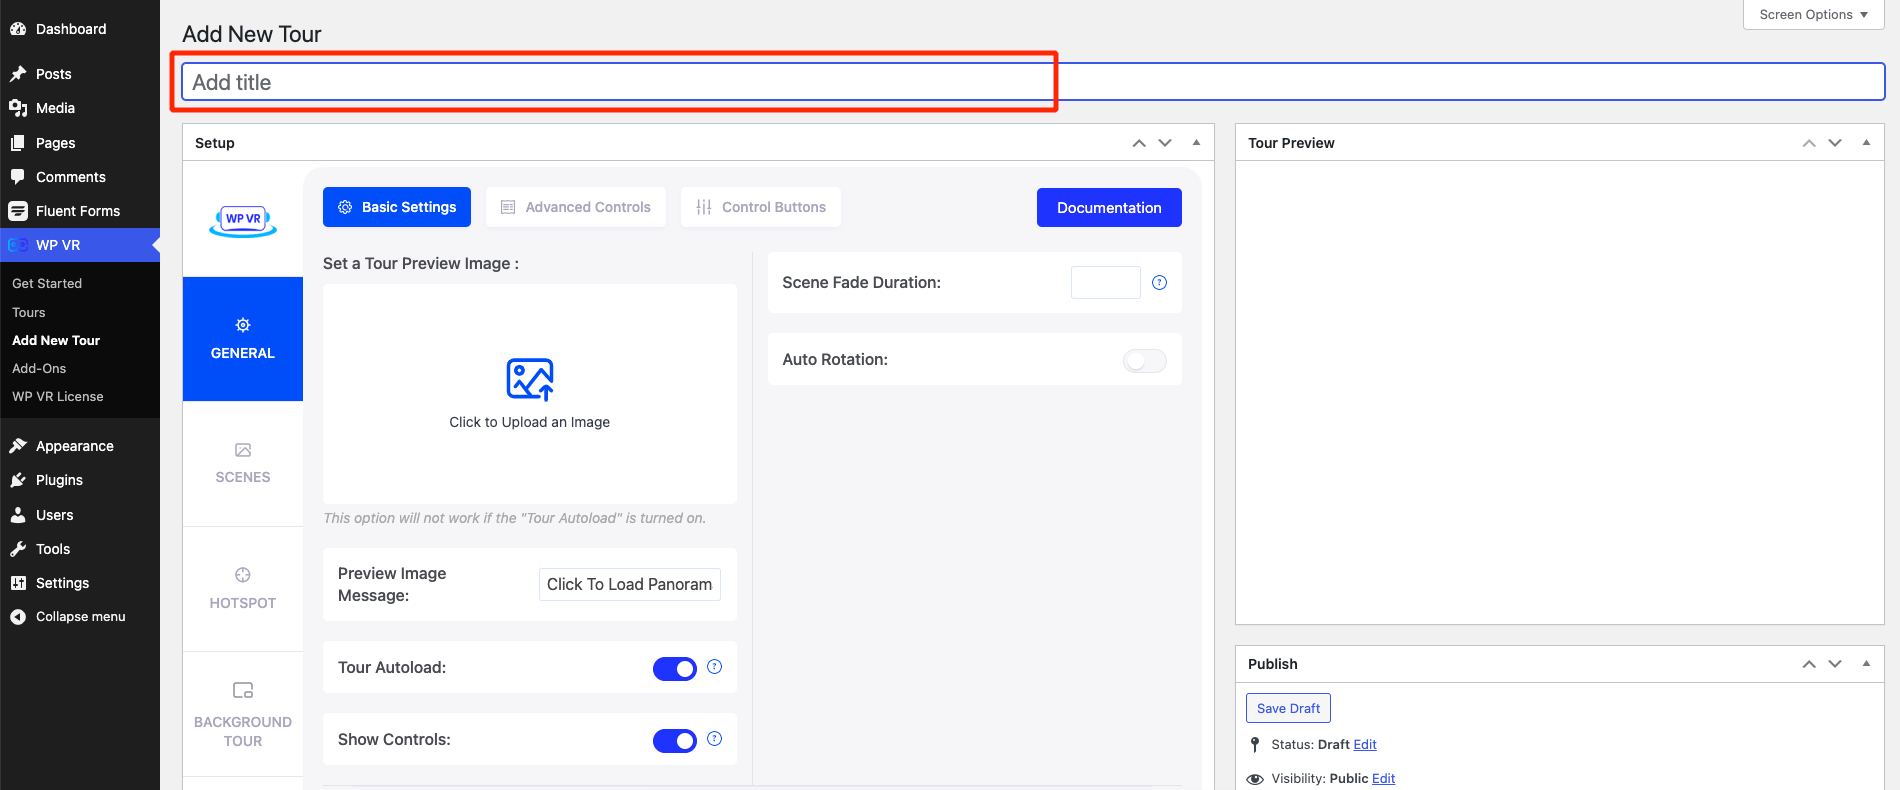
At first, Add a New Tour,
Now, Add the title of the tour,
Then,
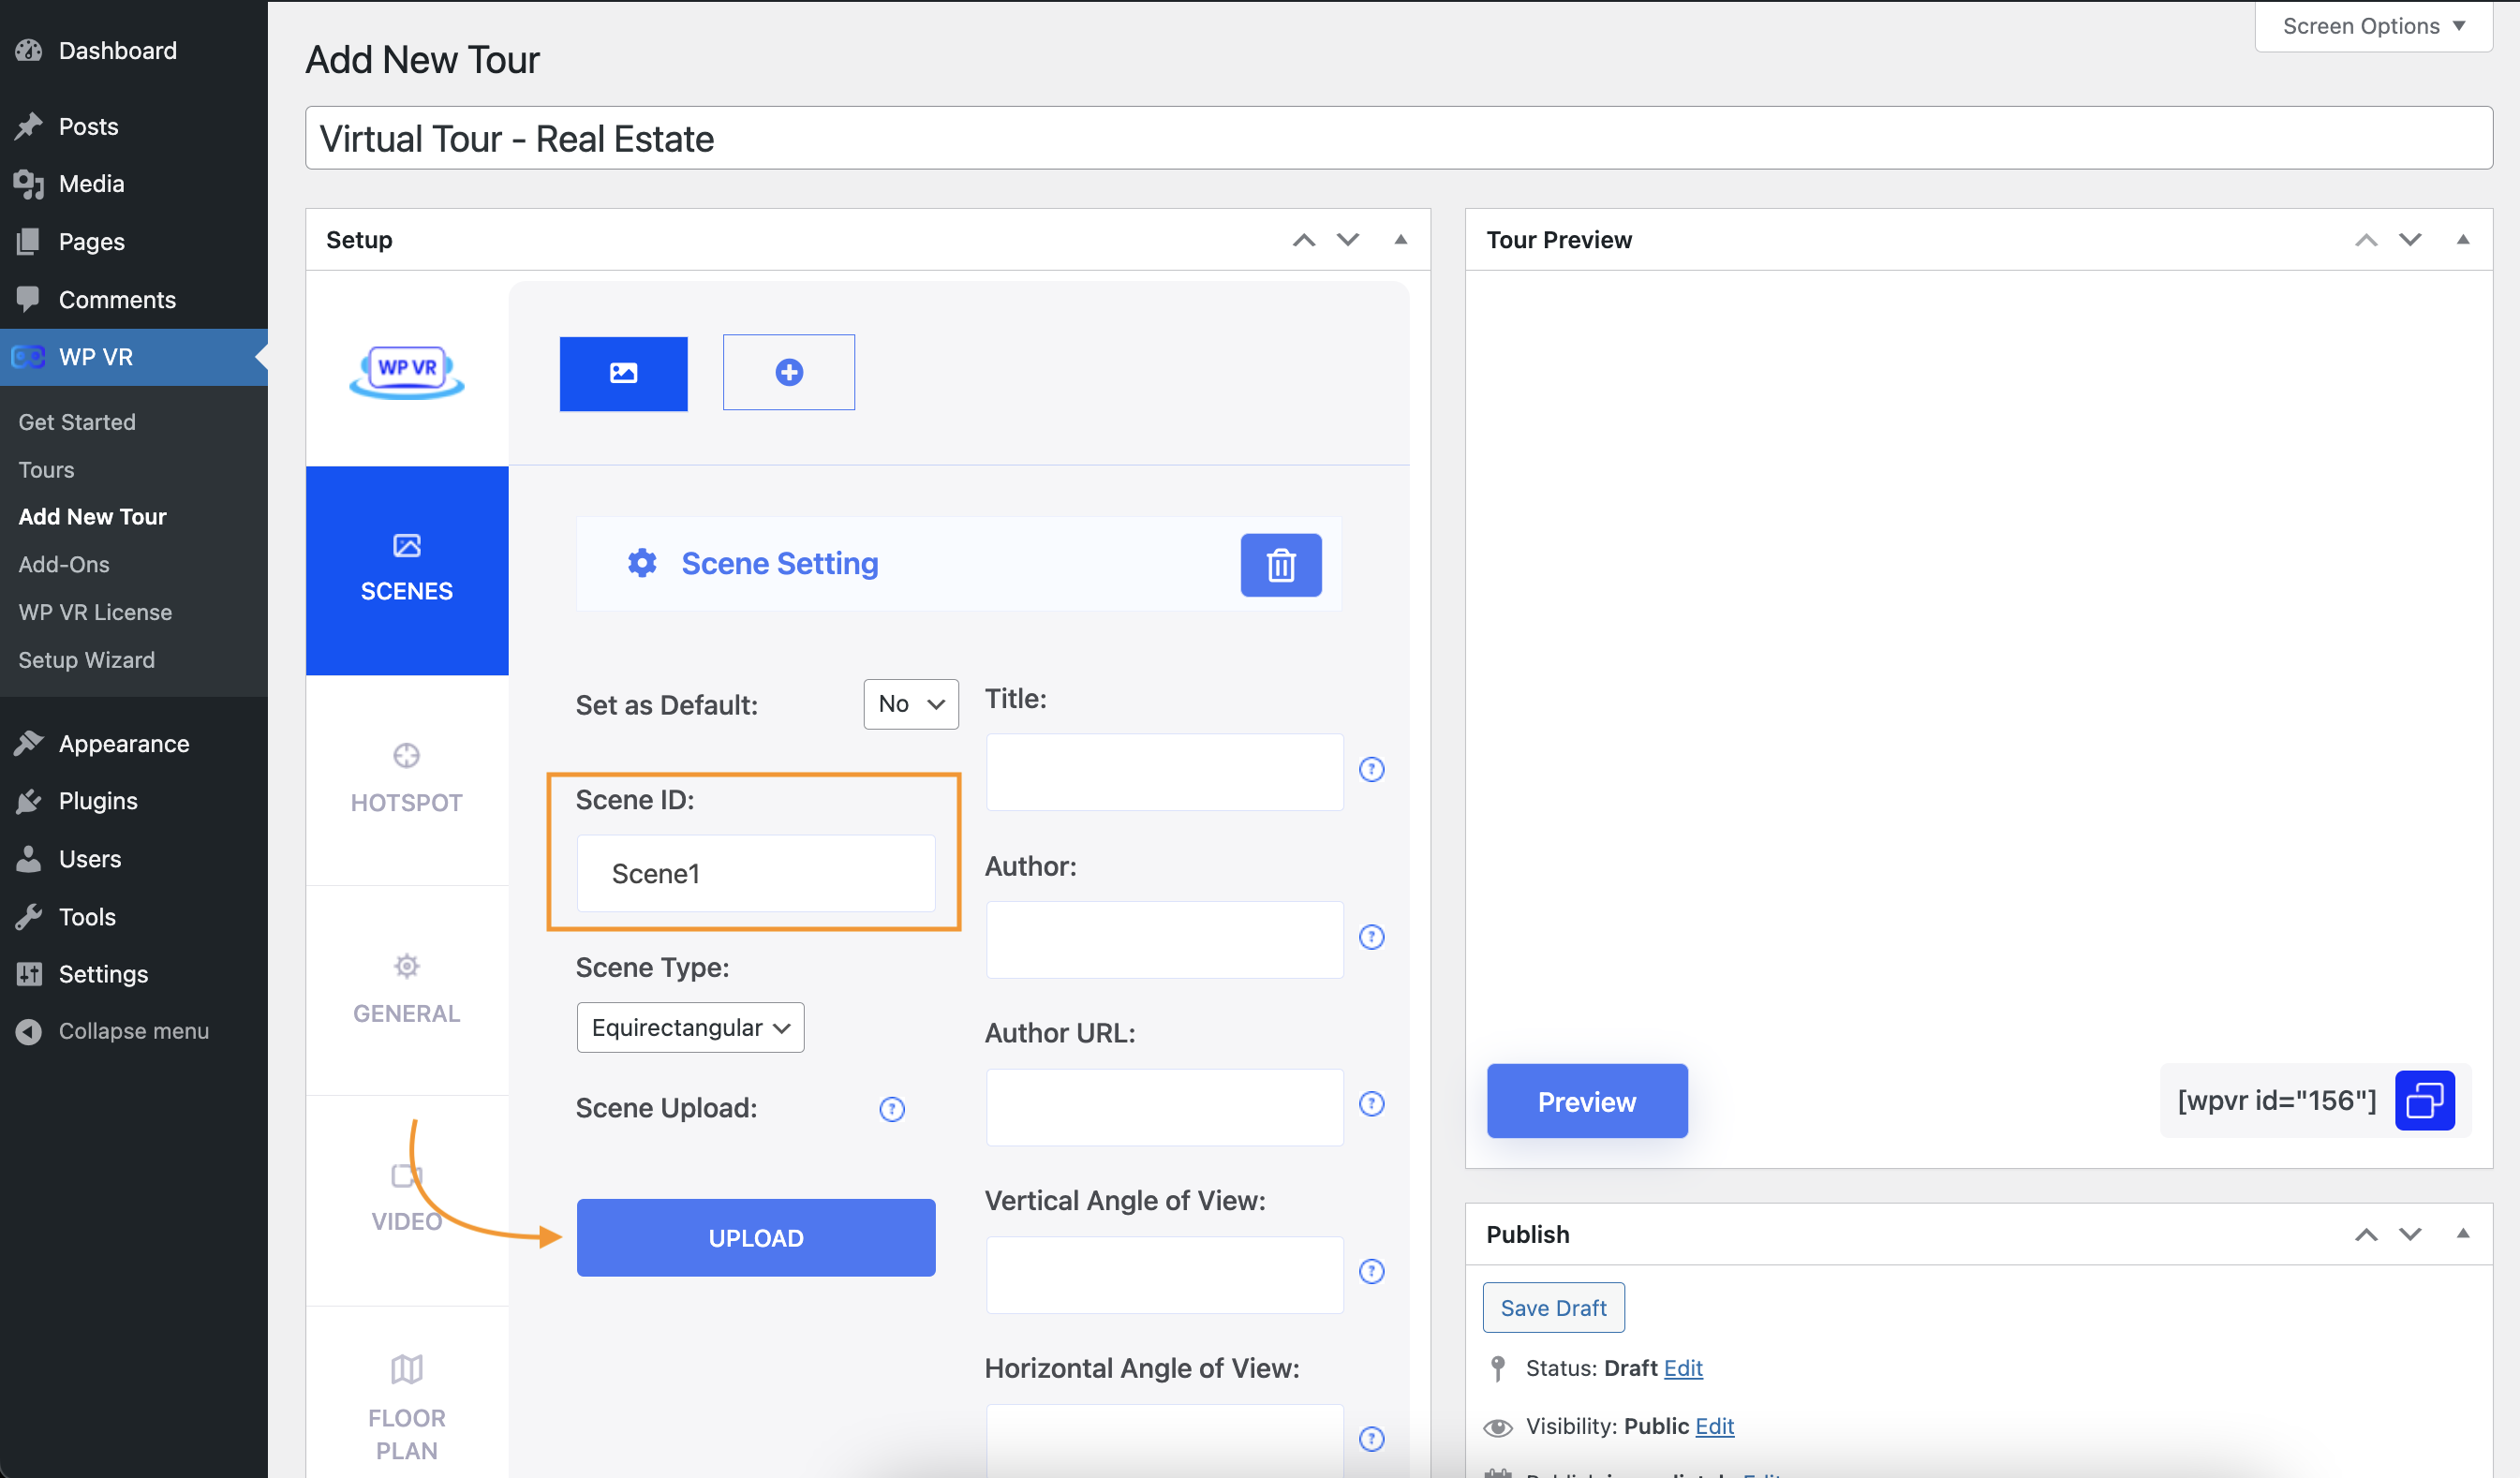
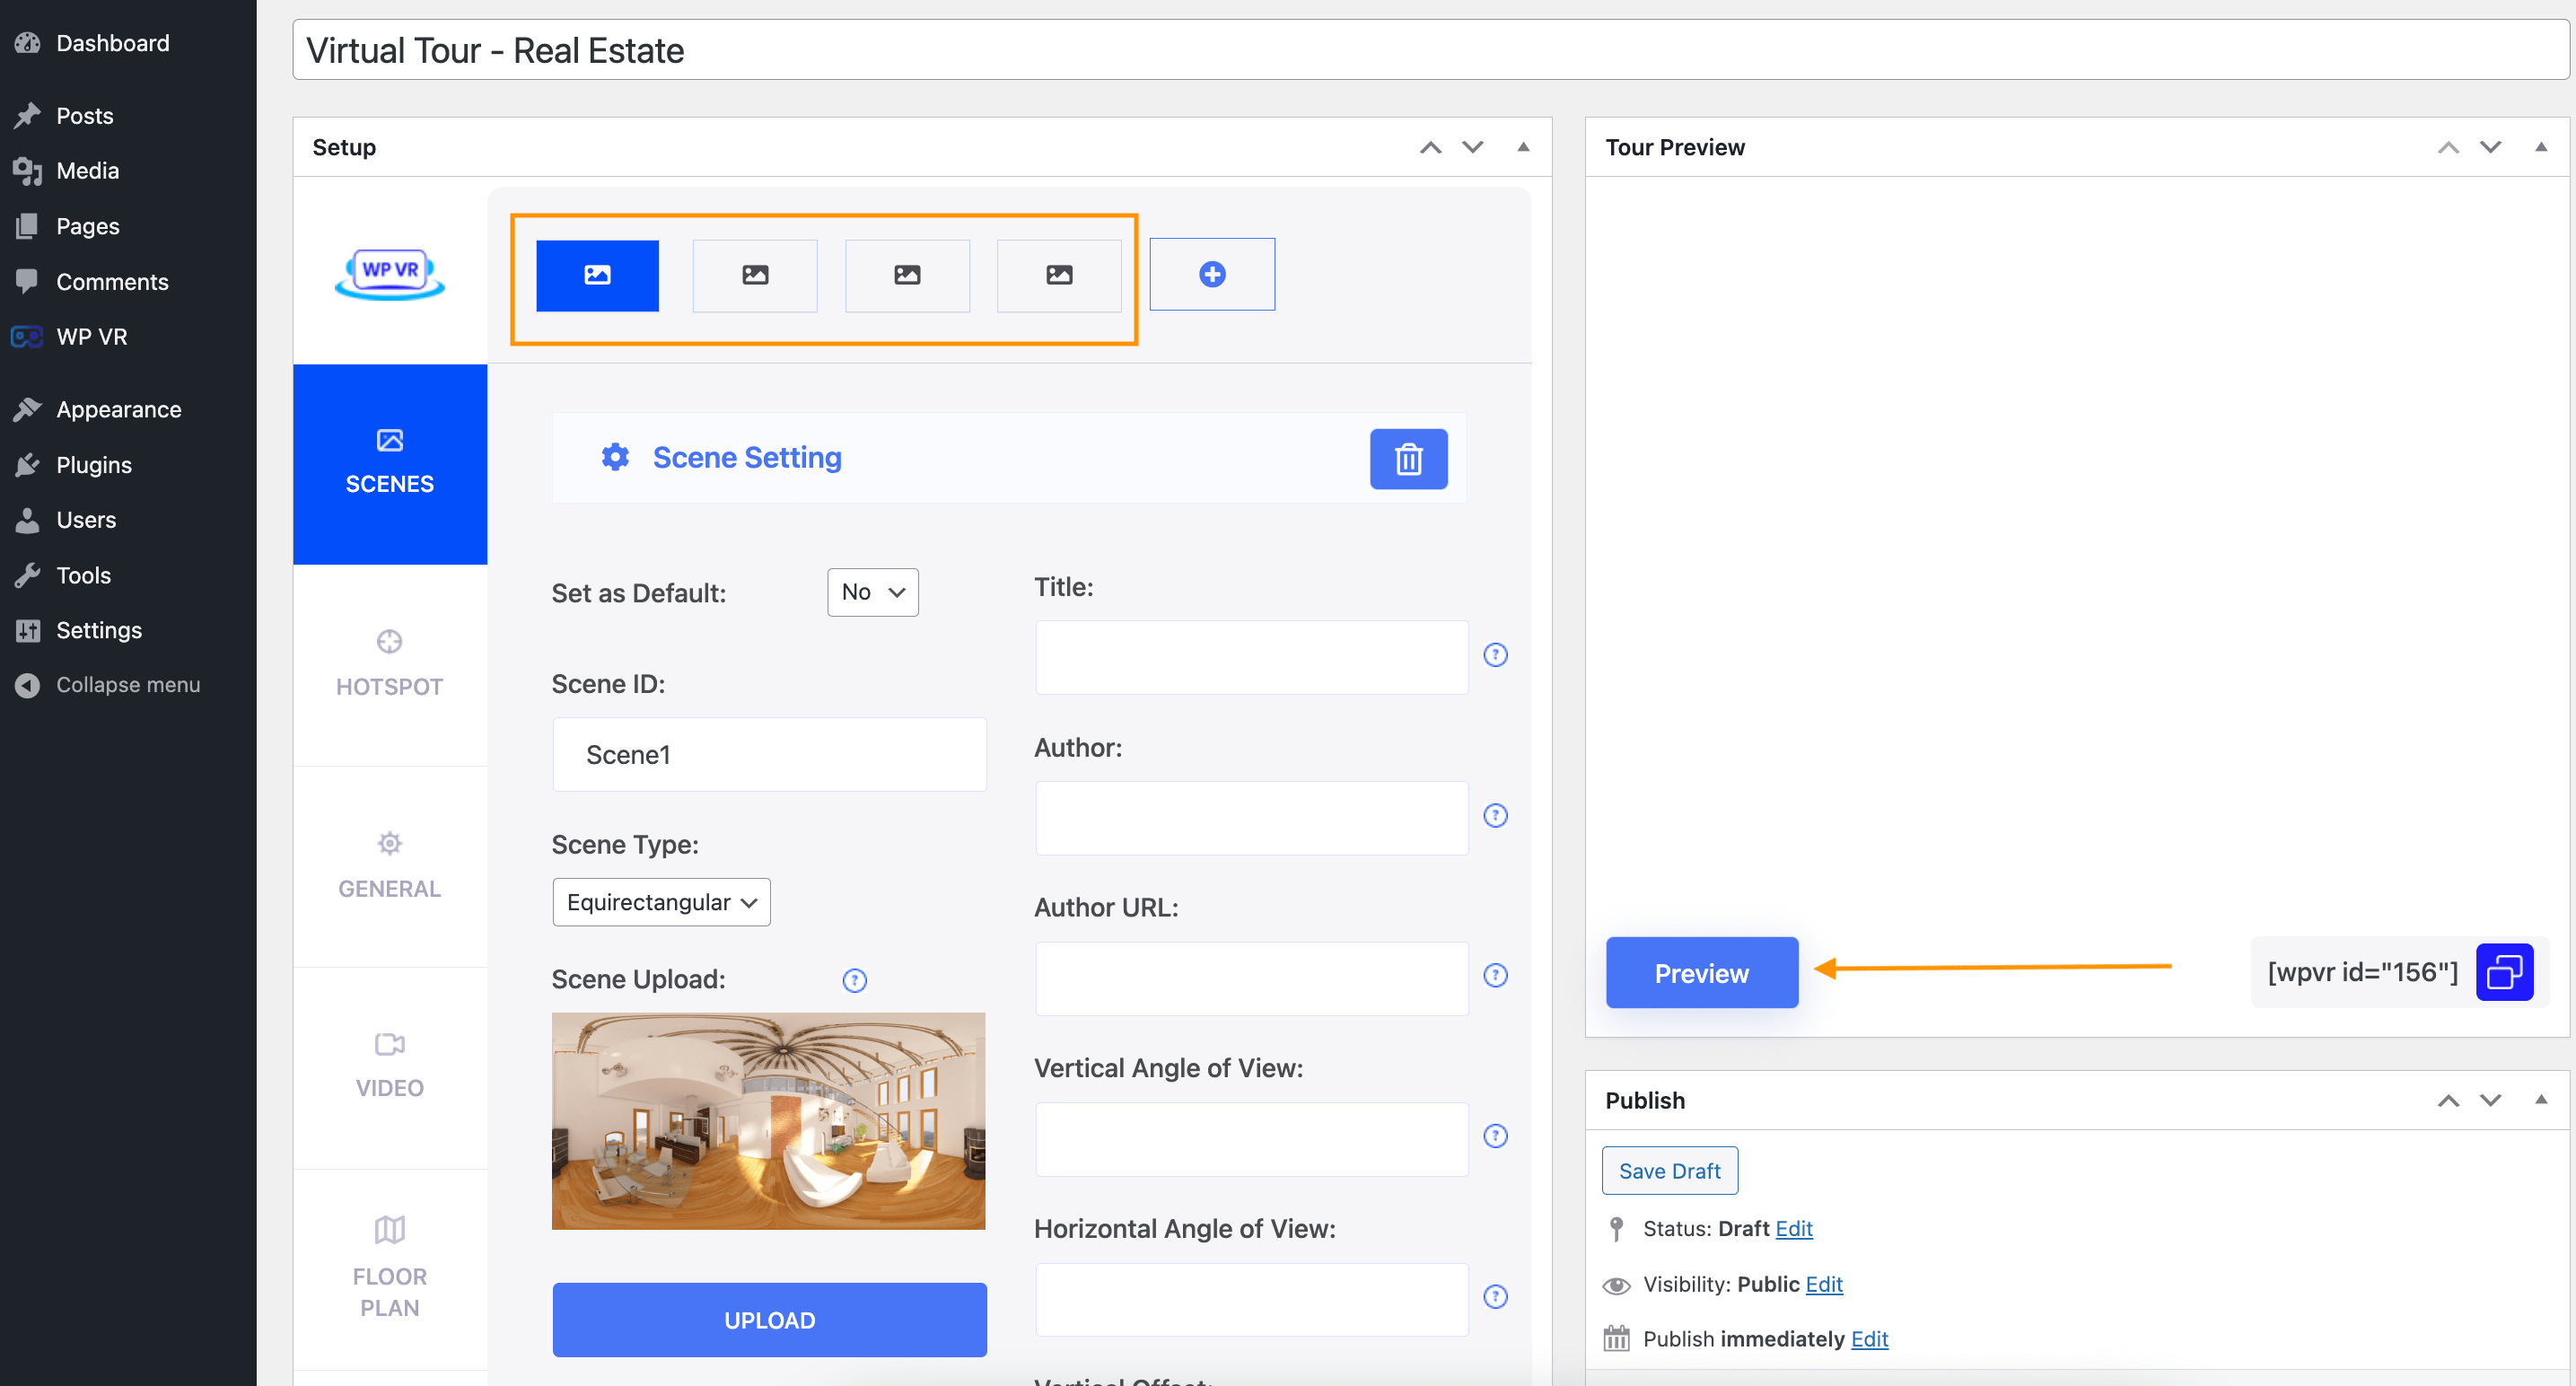
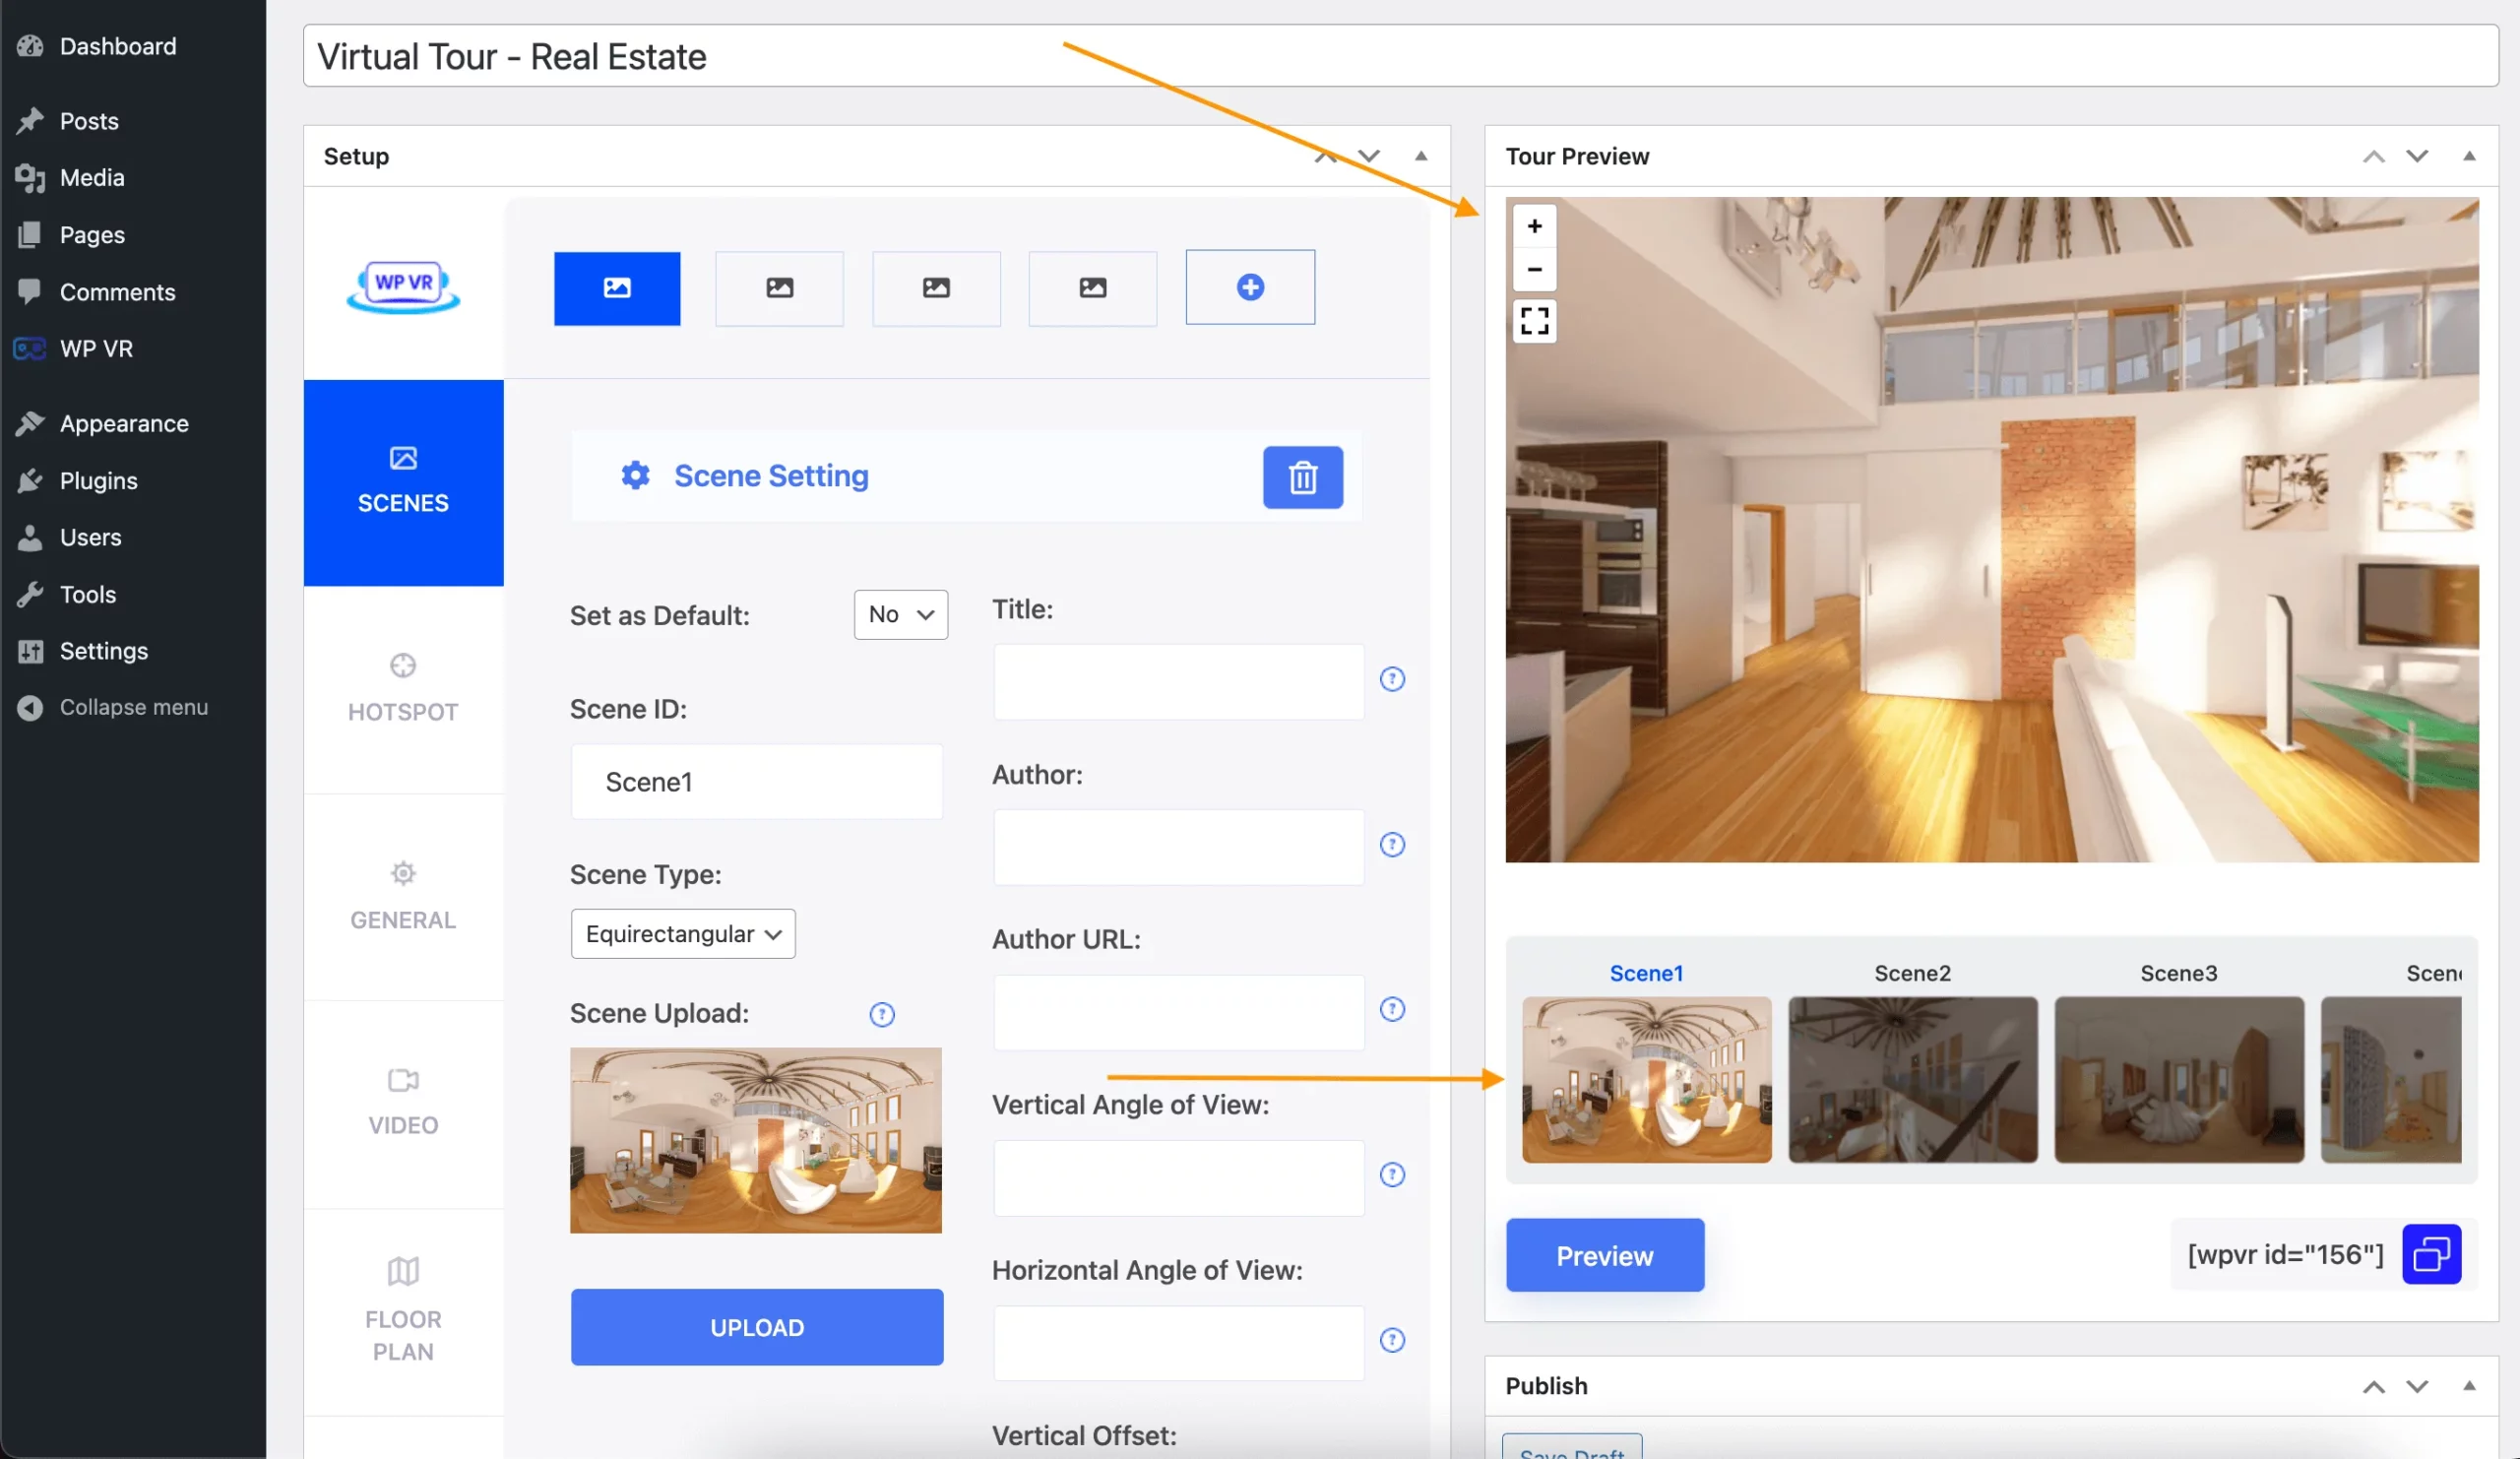
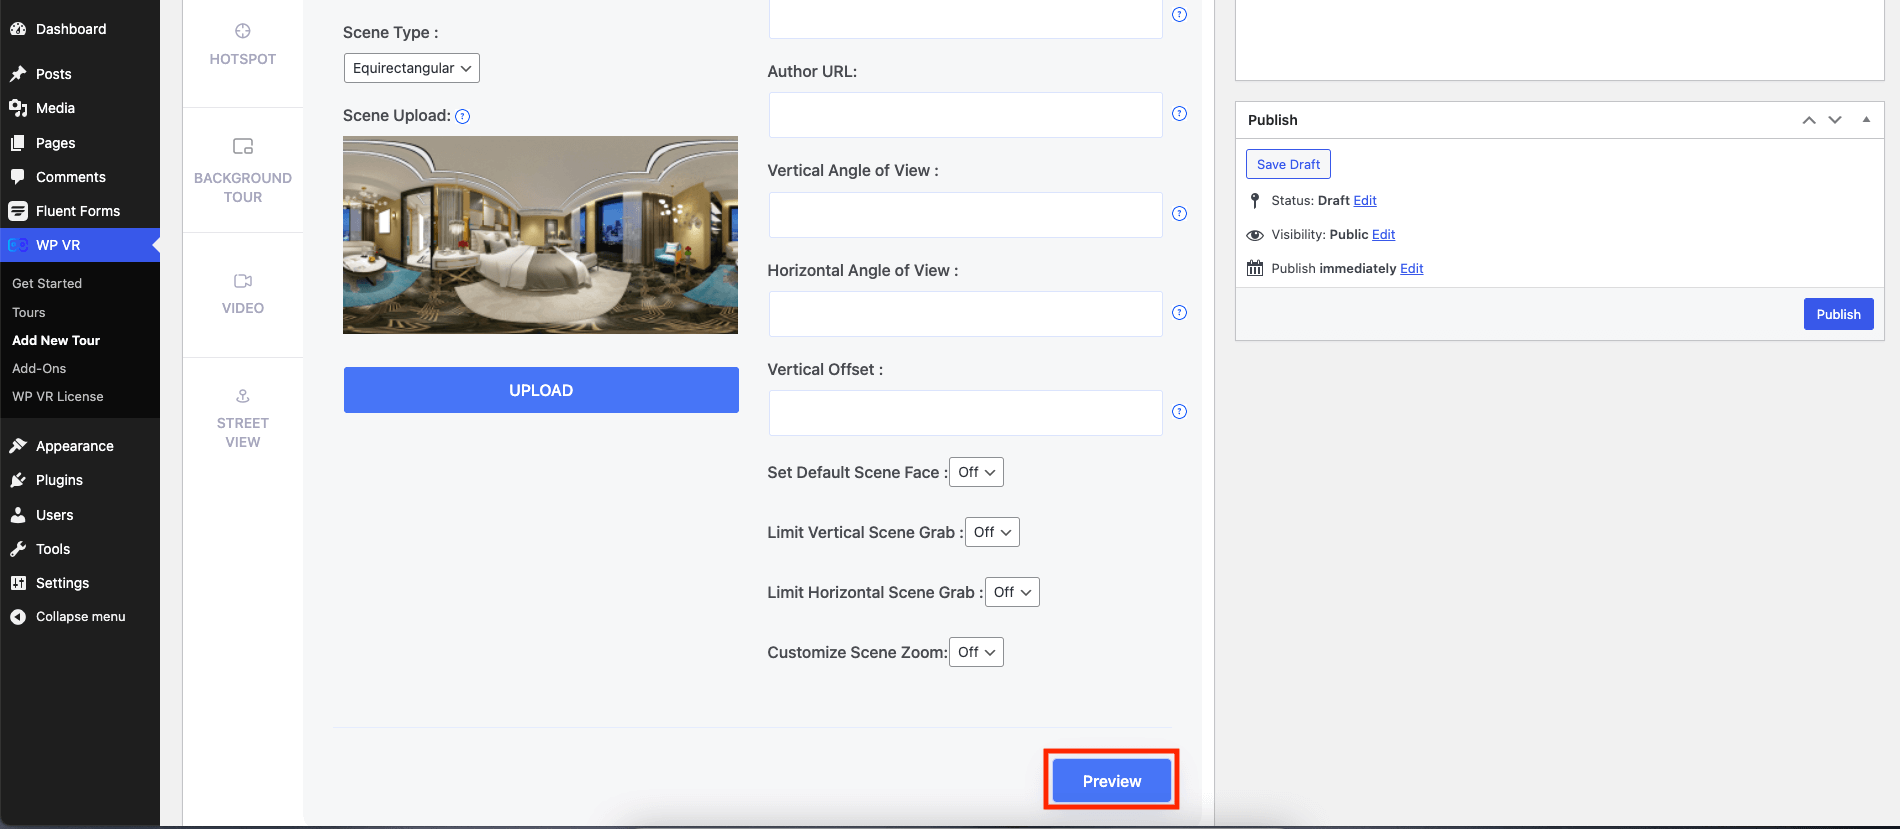
Click on Upload to add a Scene
Provide a Scene ID
Click Preview to check how the virtual campus tour will look
If you like how the tour looks, then click on Publish.
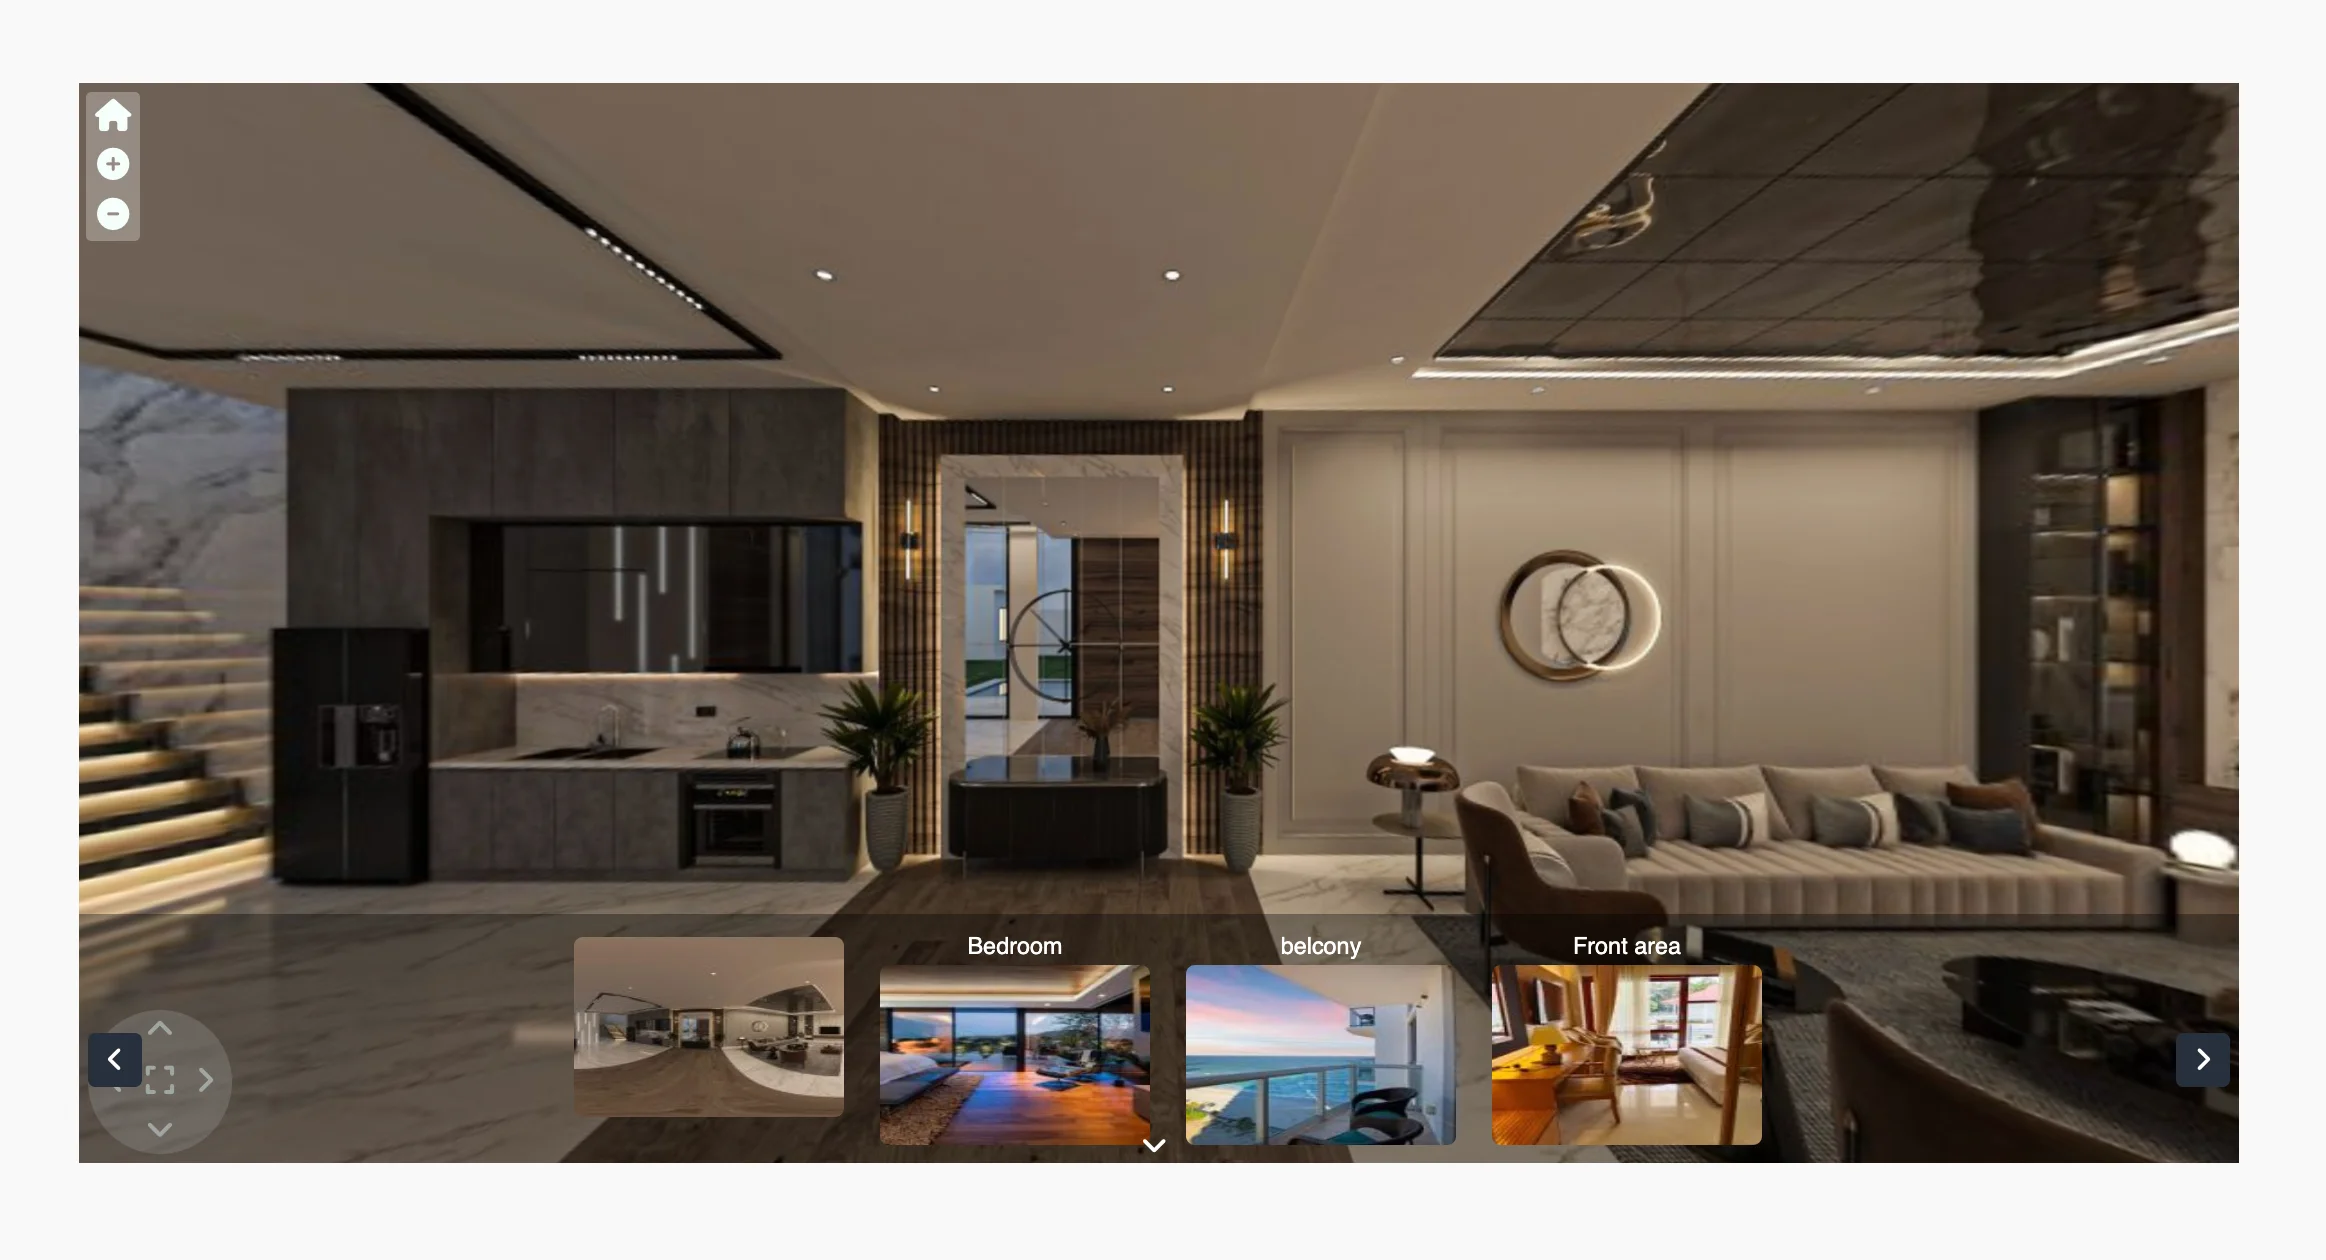
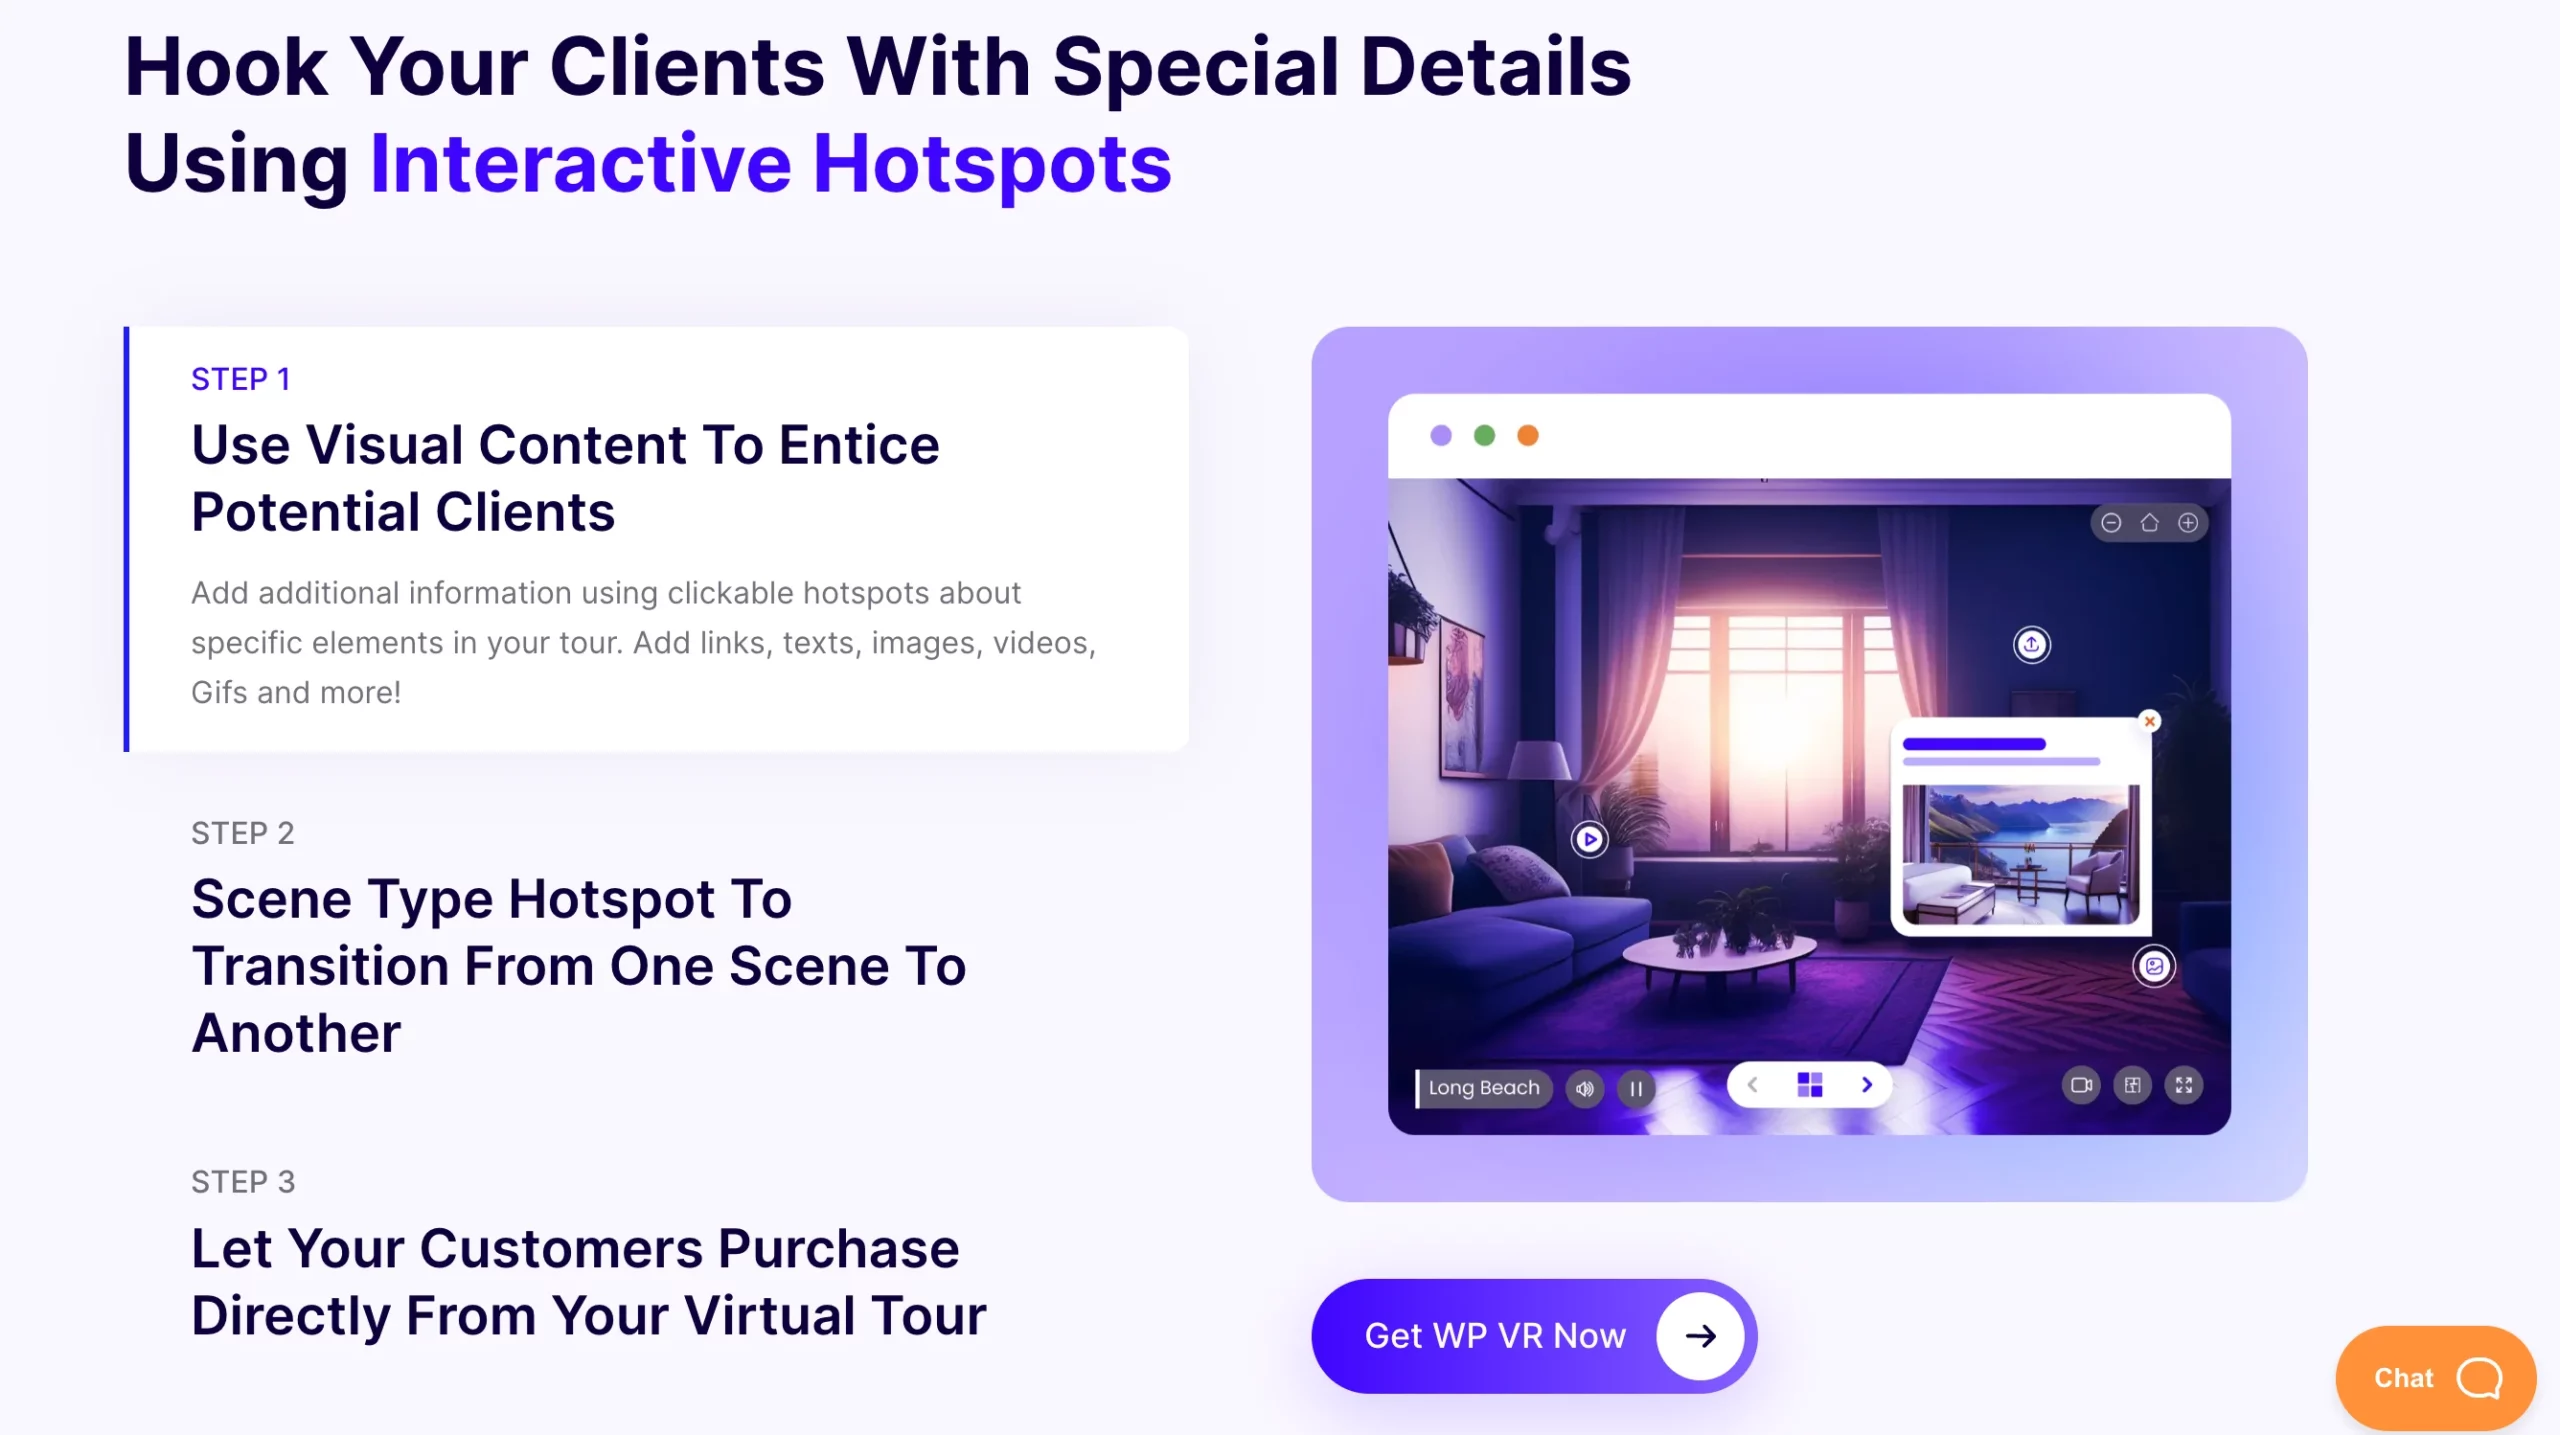
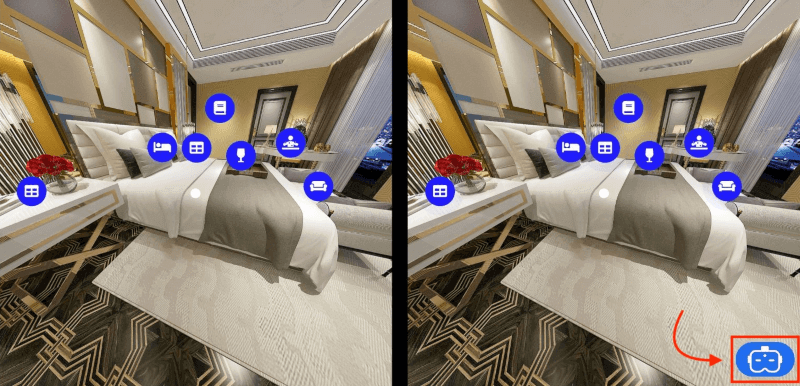
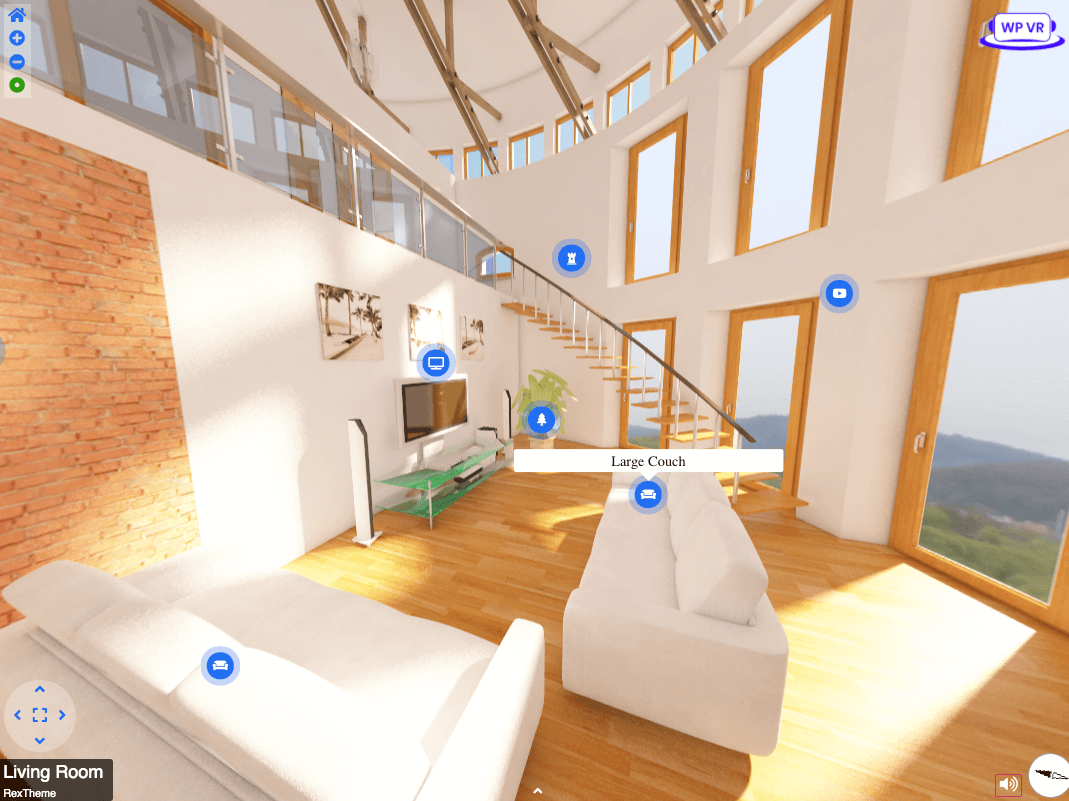
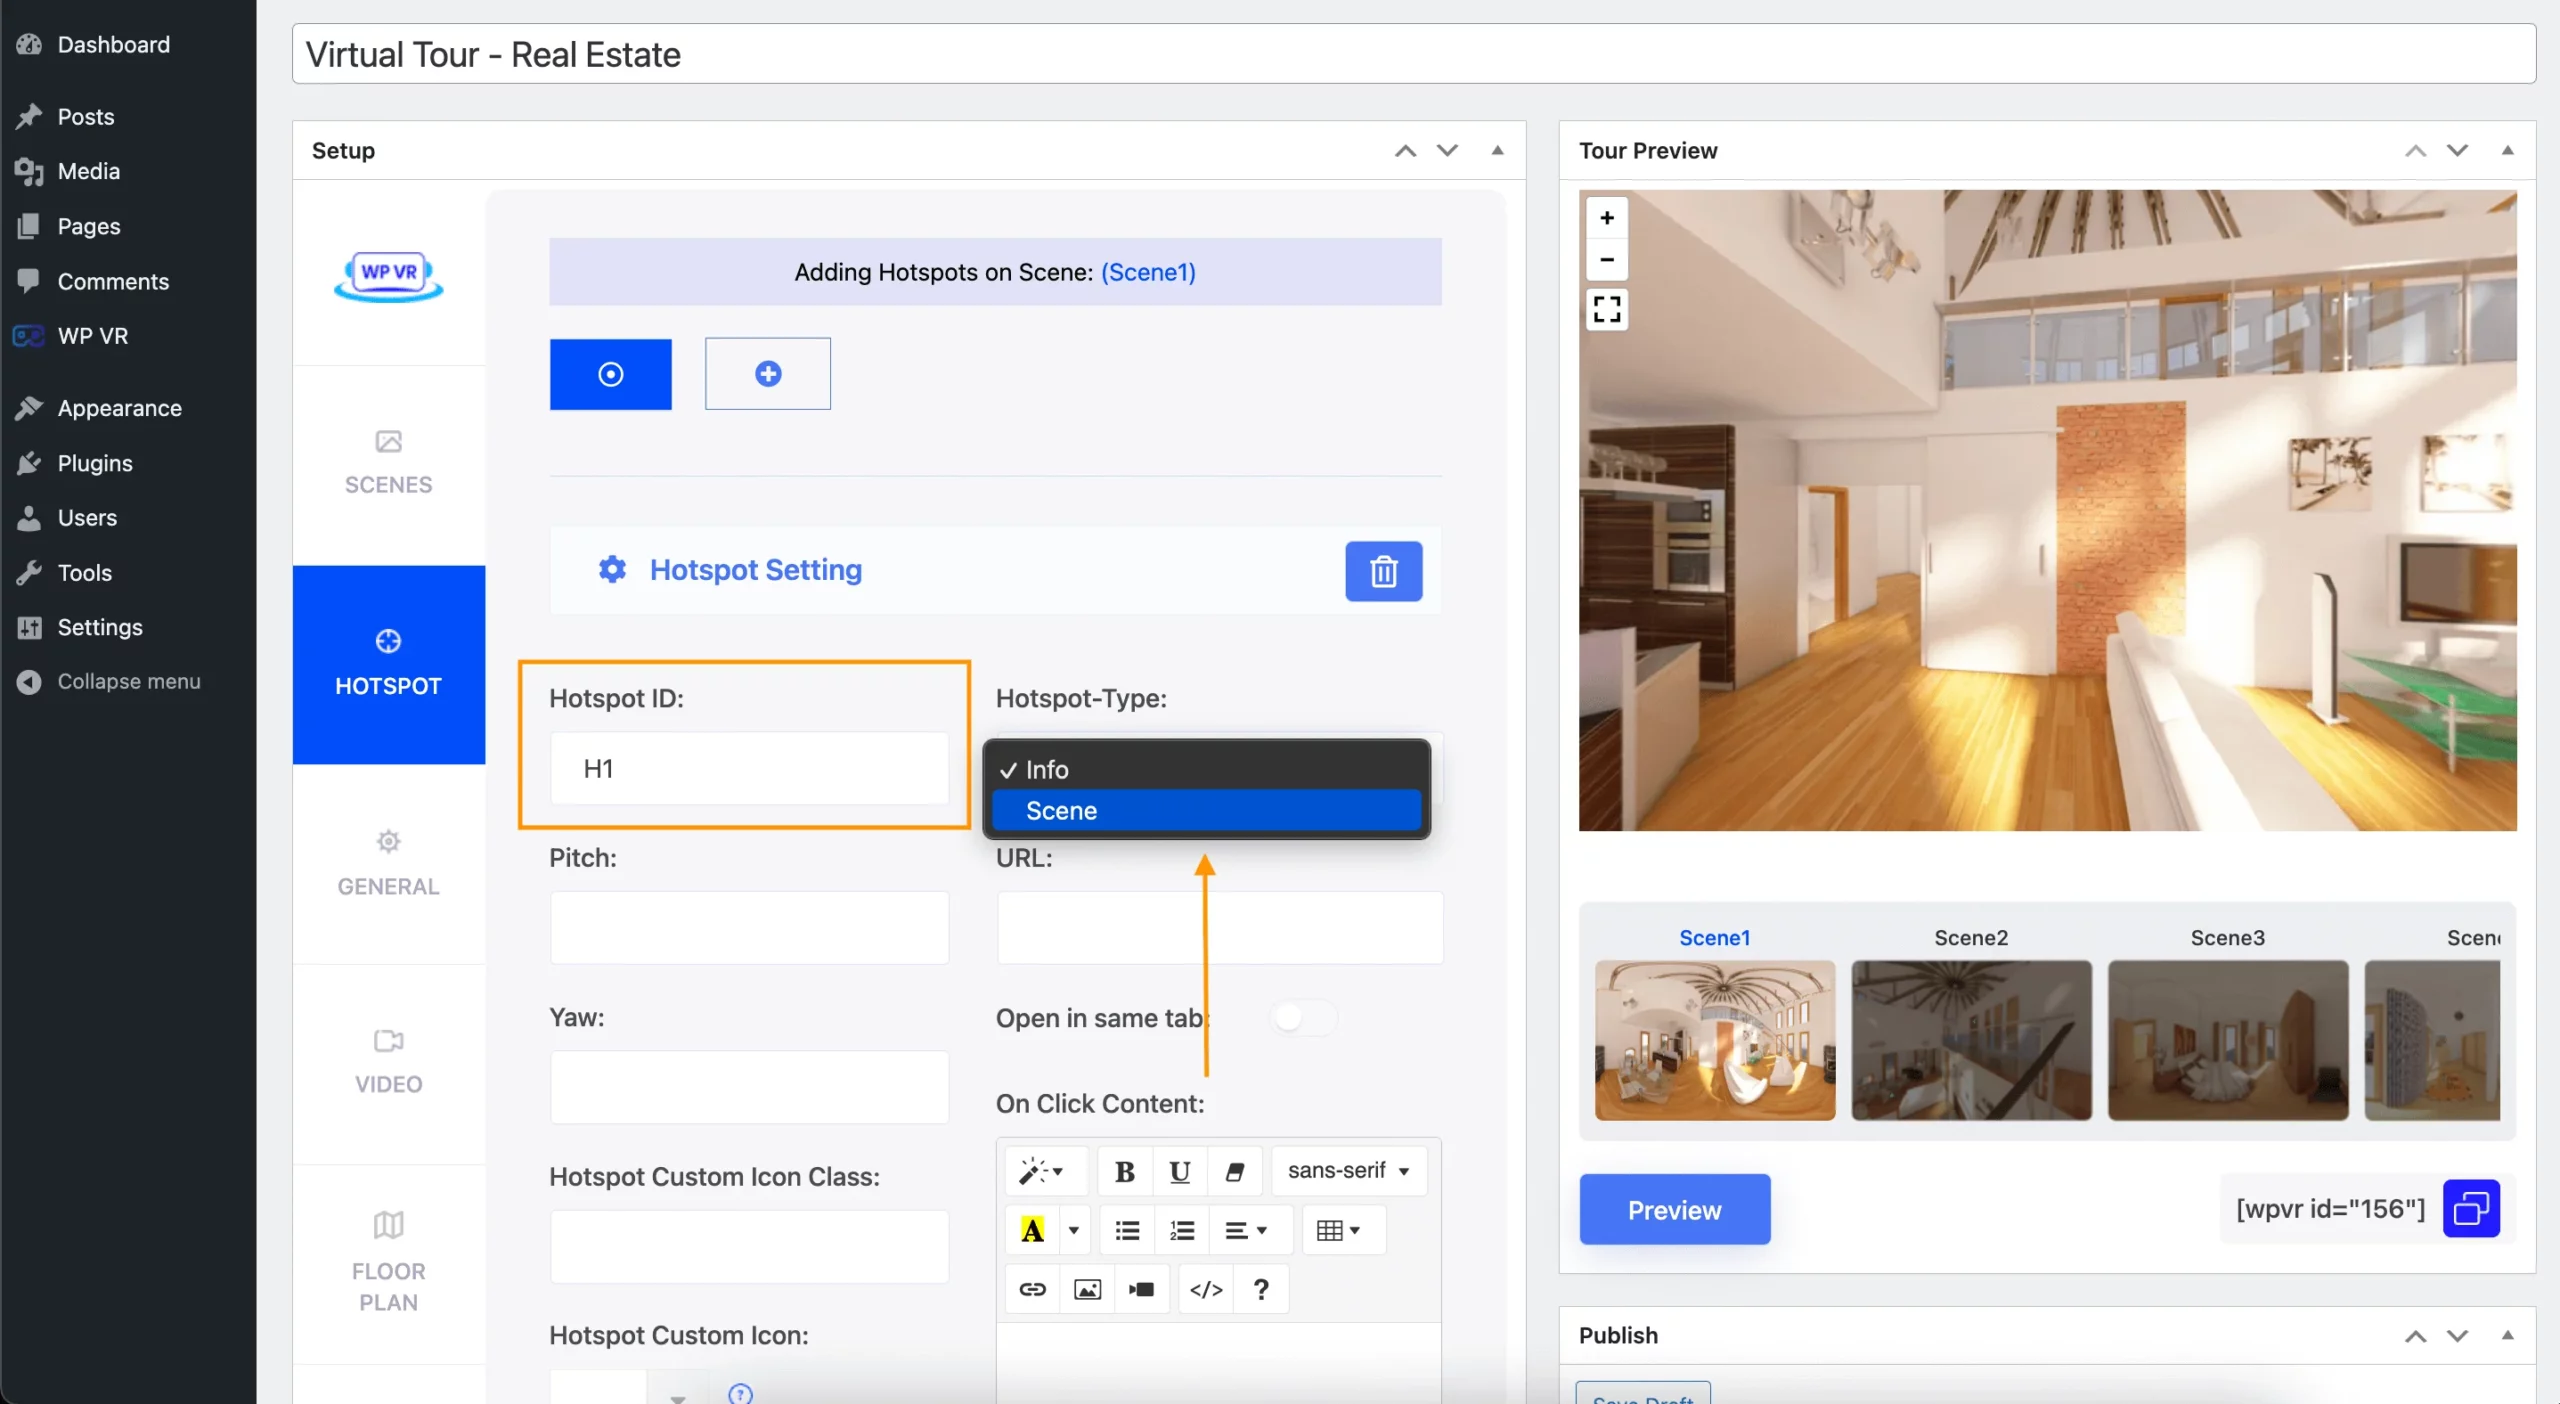
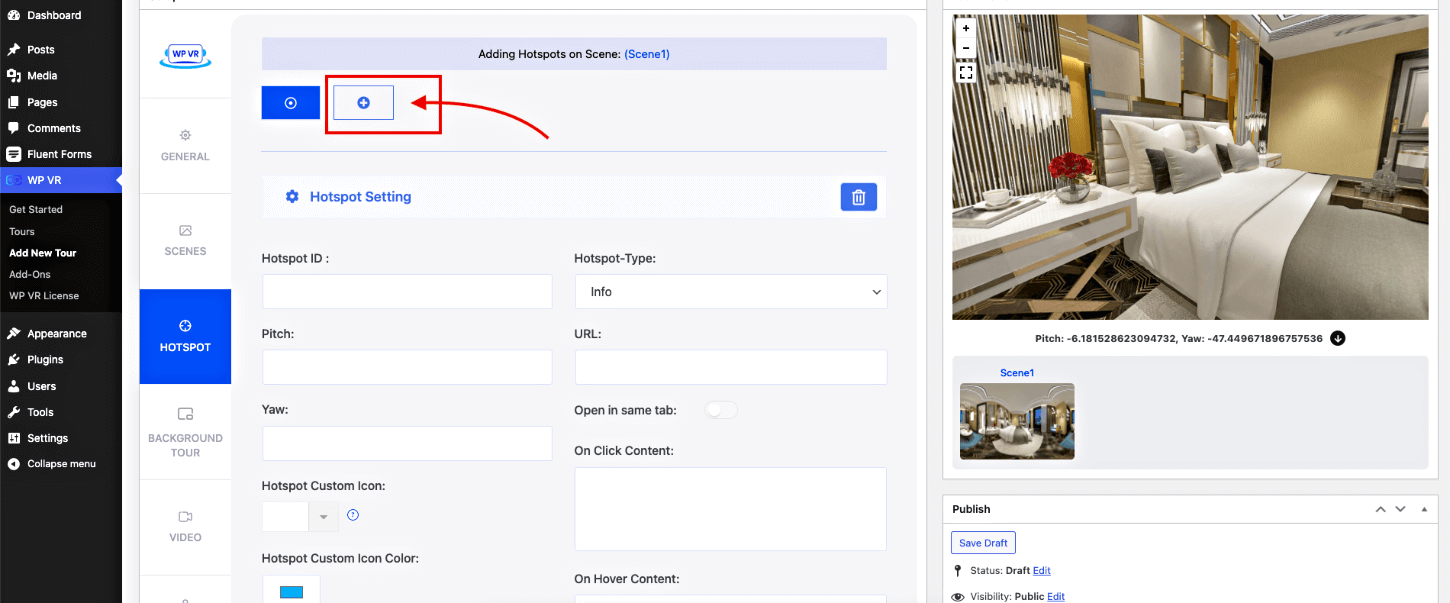
2. Add Engaging Hotspots To Add Interactive Content
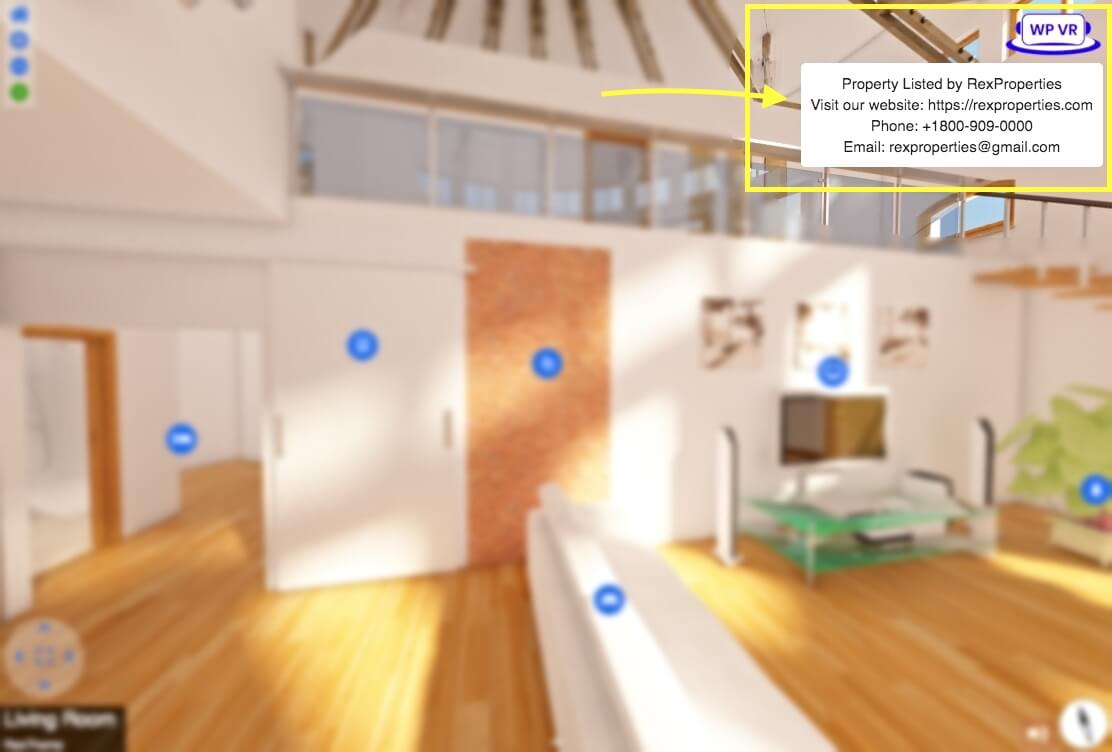
Hotspots are different pointers that give information about something from a virtual tour. It can be texts, images, videos, and other media files.
Here’s how you can add a hotspot to a Virtual Tour,
Click on the spot you want to add a hotspot on. You will notice the values of Pitch & Yaw appear below the tour preview. Then click on the arrow icon to assign these coordinates to place the hotspot there.
You may add some On-Hover Content and On-Click Content in the hotspots
There’s a Hotspot Custom Icon and a Custom Color Option to show the hotspot in a more interactive manner.
Once you’ve added the hotspot, Preview the tour to see if the hotspot is in the right place. If it is, then update the tour.
*Note that the Hotspot Custom Icon & Hotspot Custom Icon Color will not be visible in the backend. You’ll need to place the tour on a page and preview it to get a glimpse of how it looks.
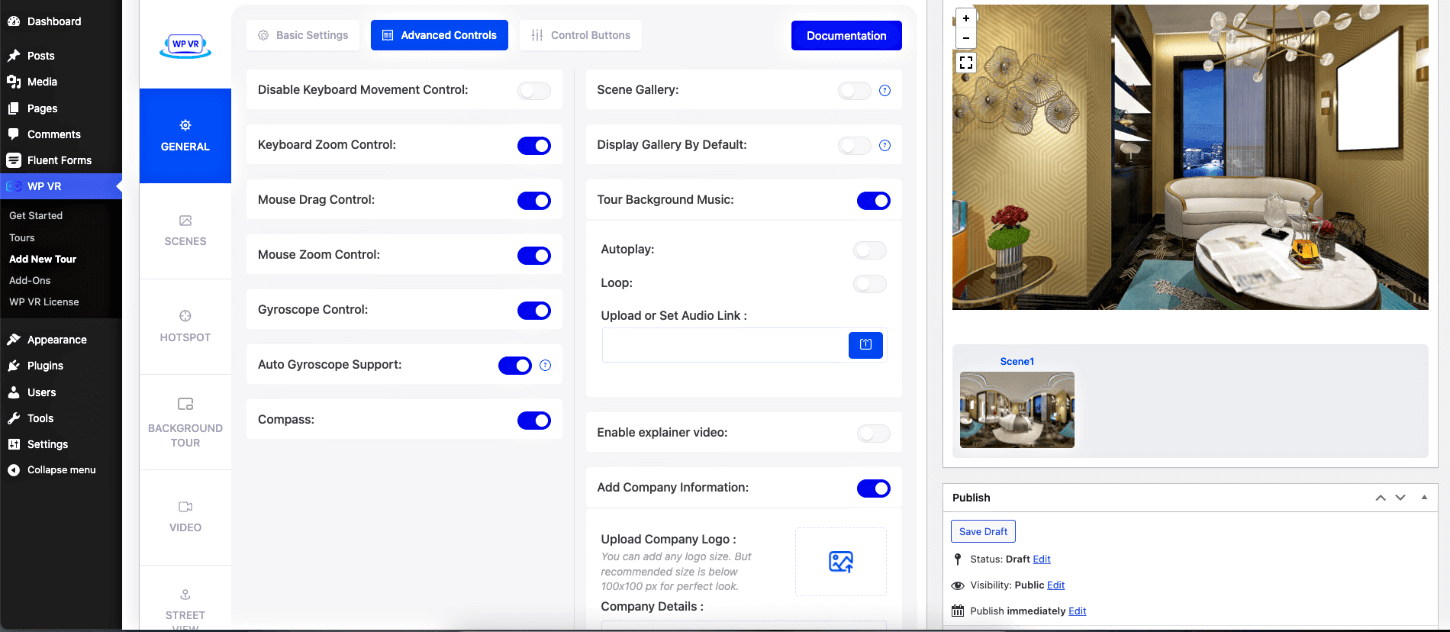
3. Use Advanced Features For Connecting With Students
There are many advanced features in the WPVR Pro Version that will let you add more interactional elements in a Virtual Tour in order to connect with your students more.
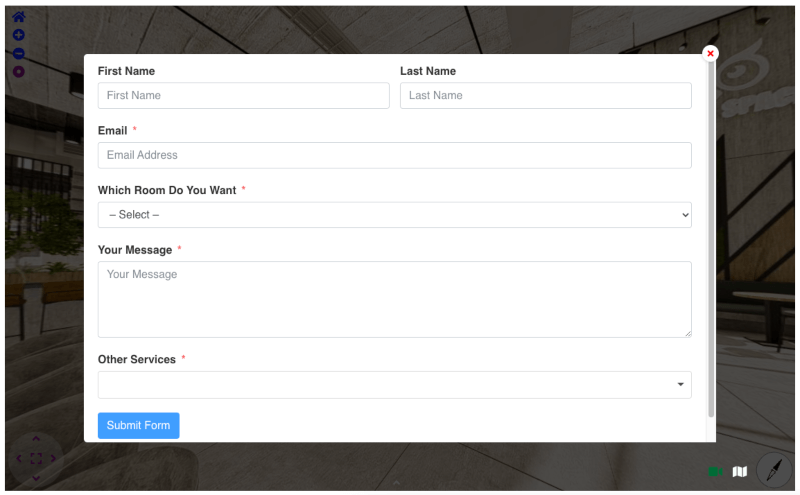
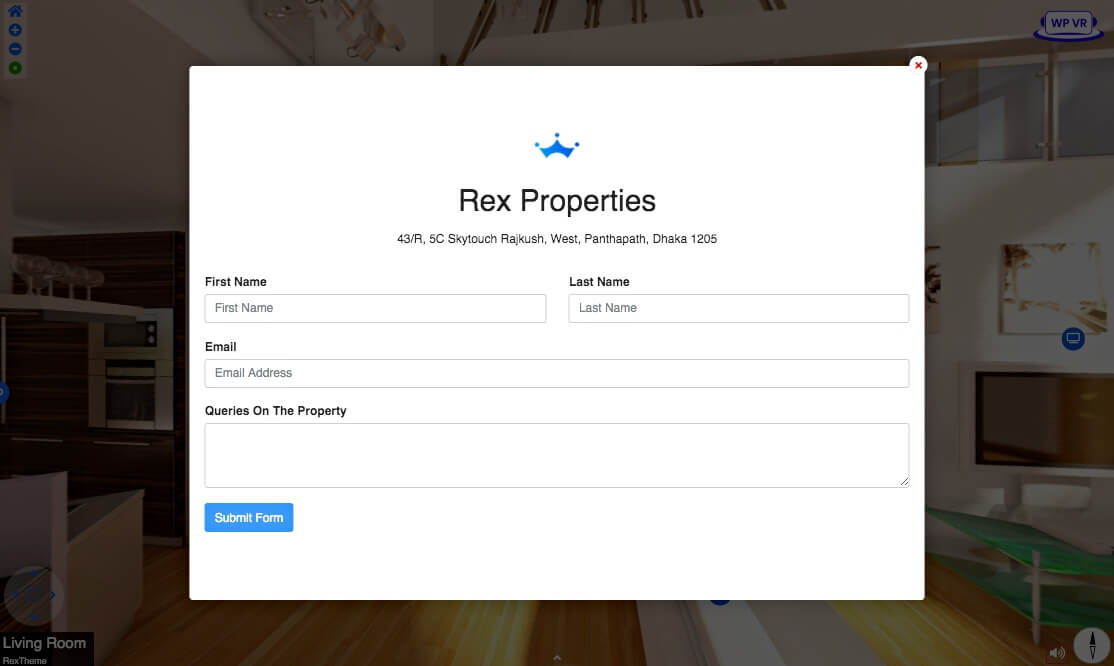
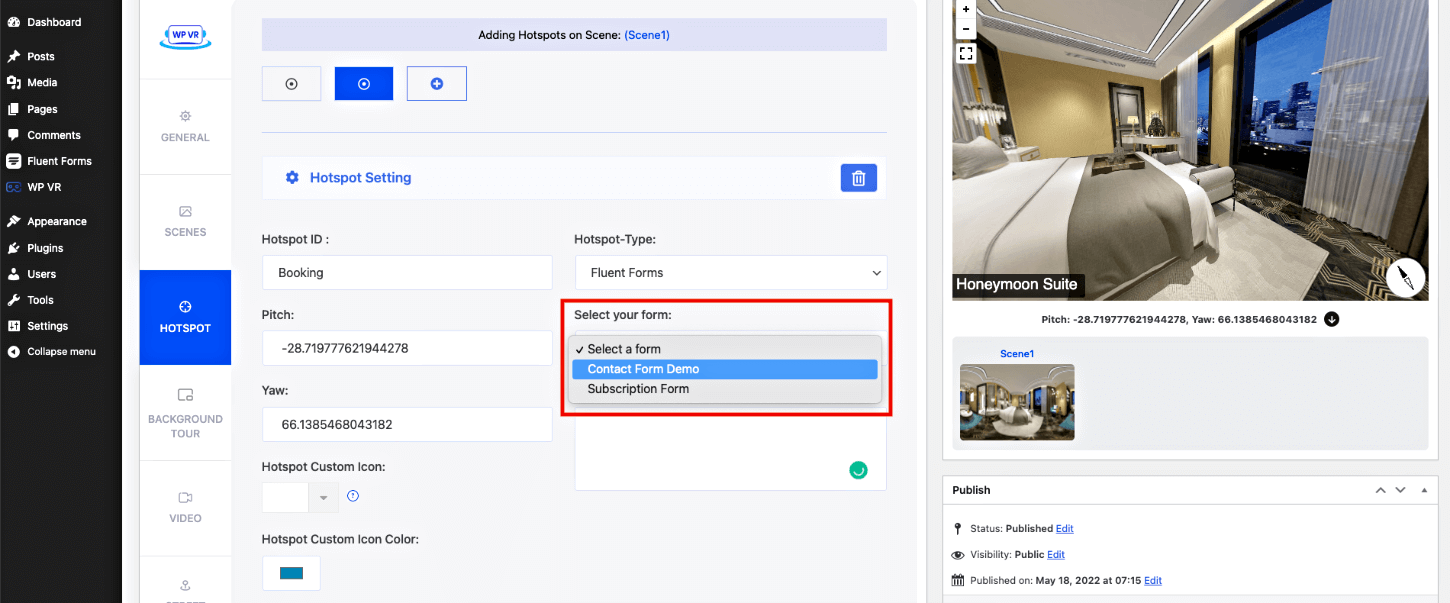
i. Contact Form For Student Query
Your students might have different questions about college facilities or maybe the application process. So why not add a contact form within the Virtual Tour?
With WPVR Fluent Forms Addon, you can now add Contact Forms in the hotspots. In fact you may add multiple forms inside a virtual tour.
Here’s how it looks in a virtual tour,
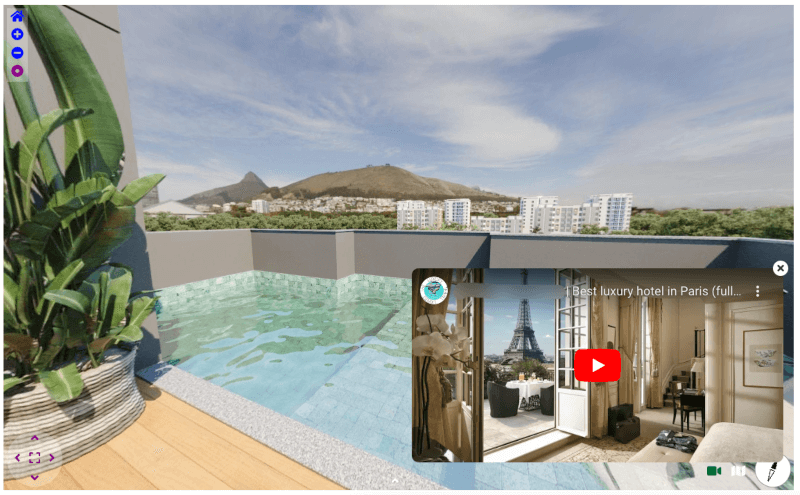
ii. Add Explainer Video
The Explainer Video feature will let you add an introductory video inside of the Virtual Tour. Your prospective students can play the video and take the tour at the same time.
Use this feature to showcase College’s history, present opportunities, and all the other exceptional trademarks.
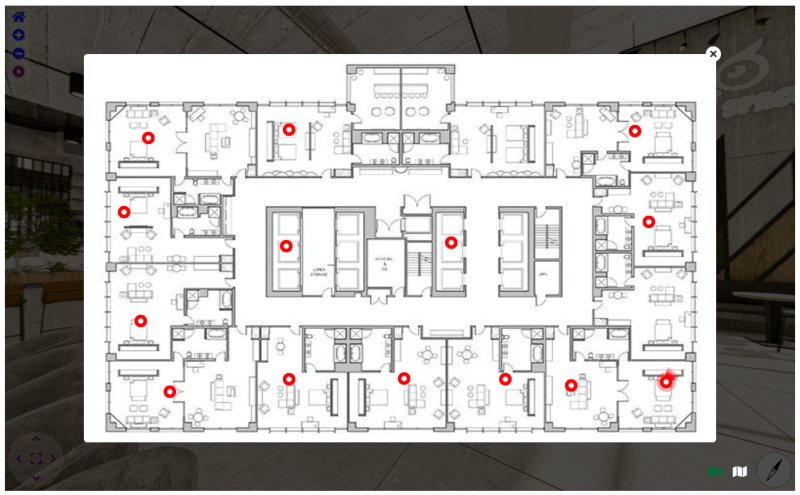
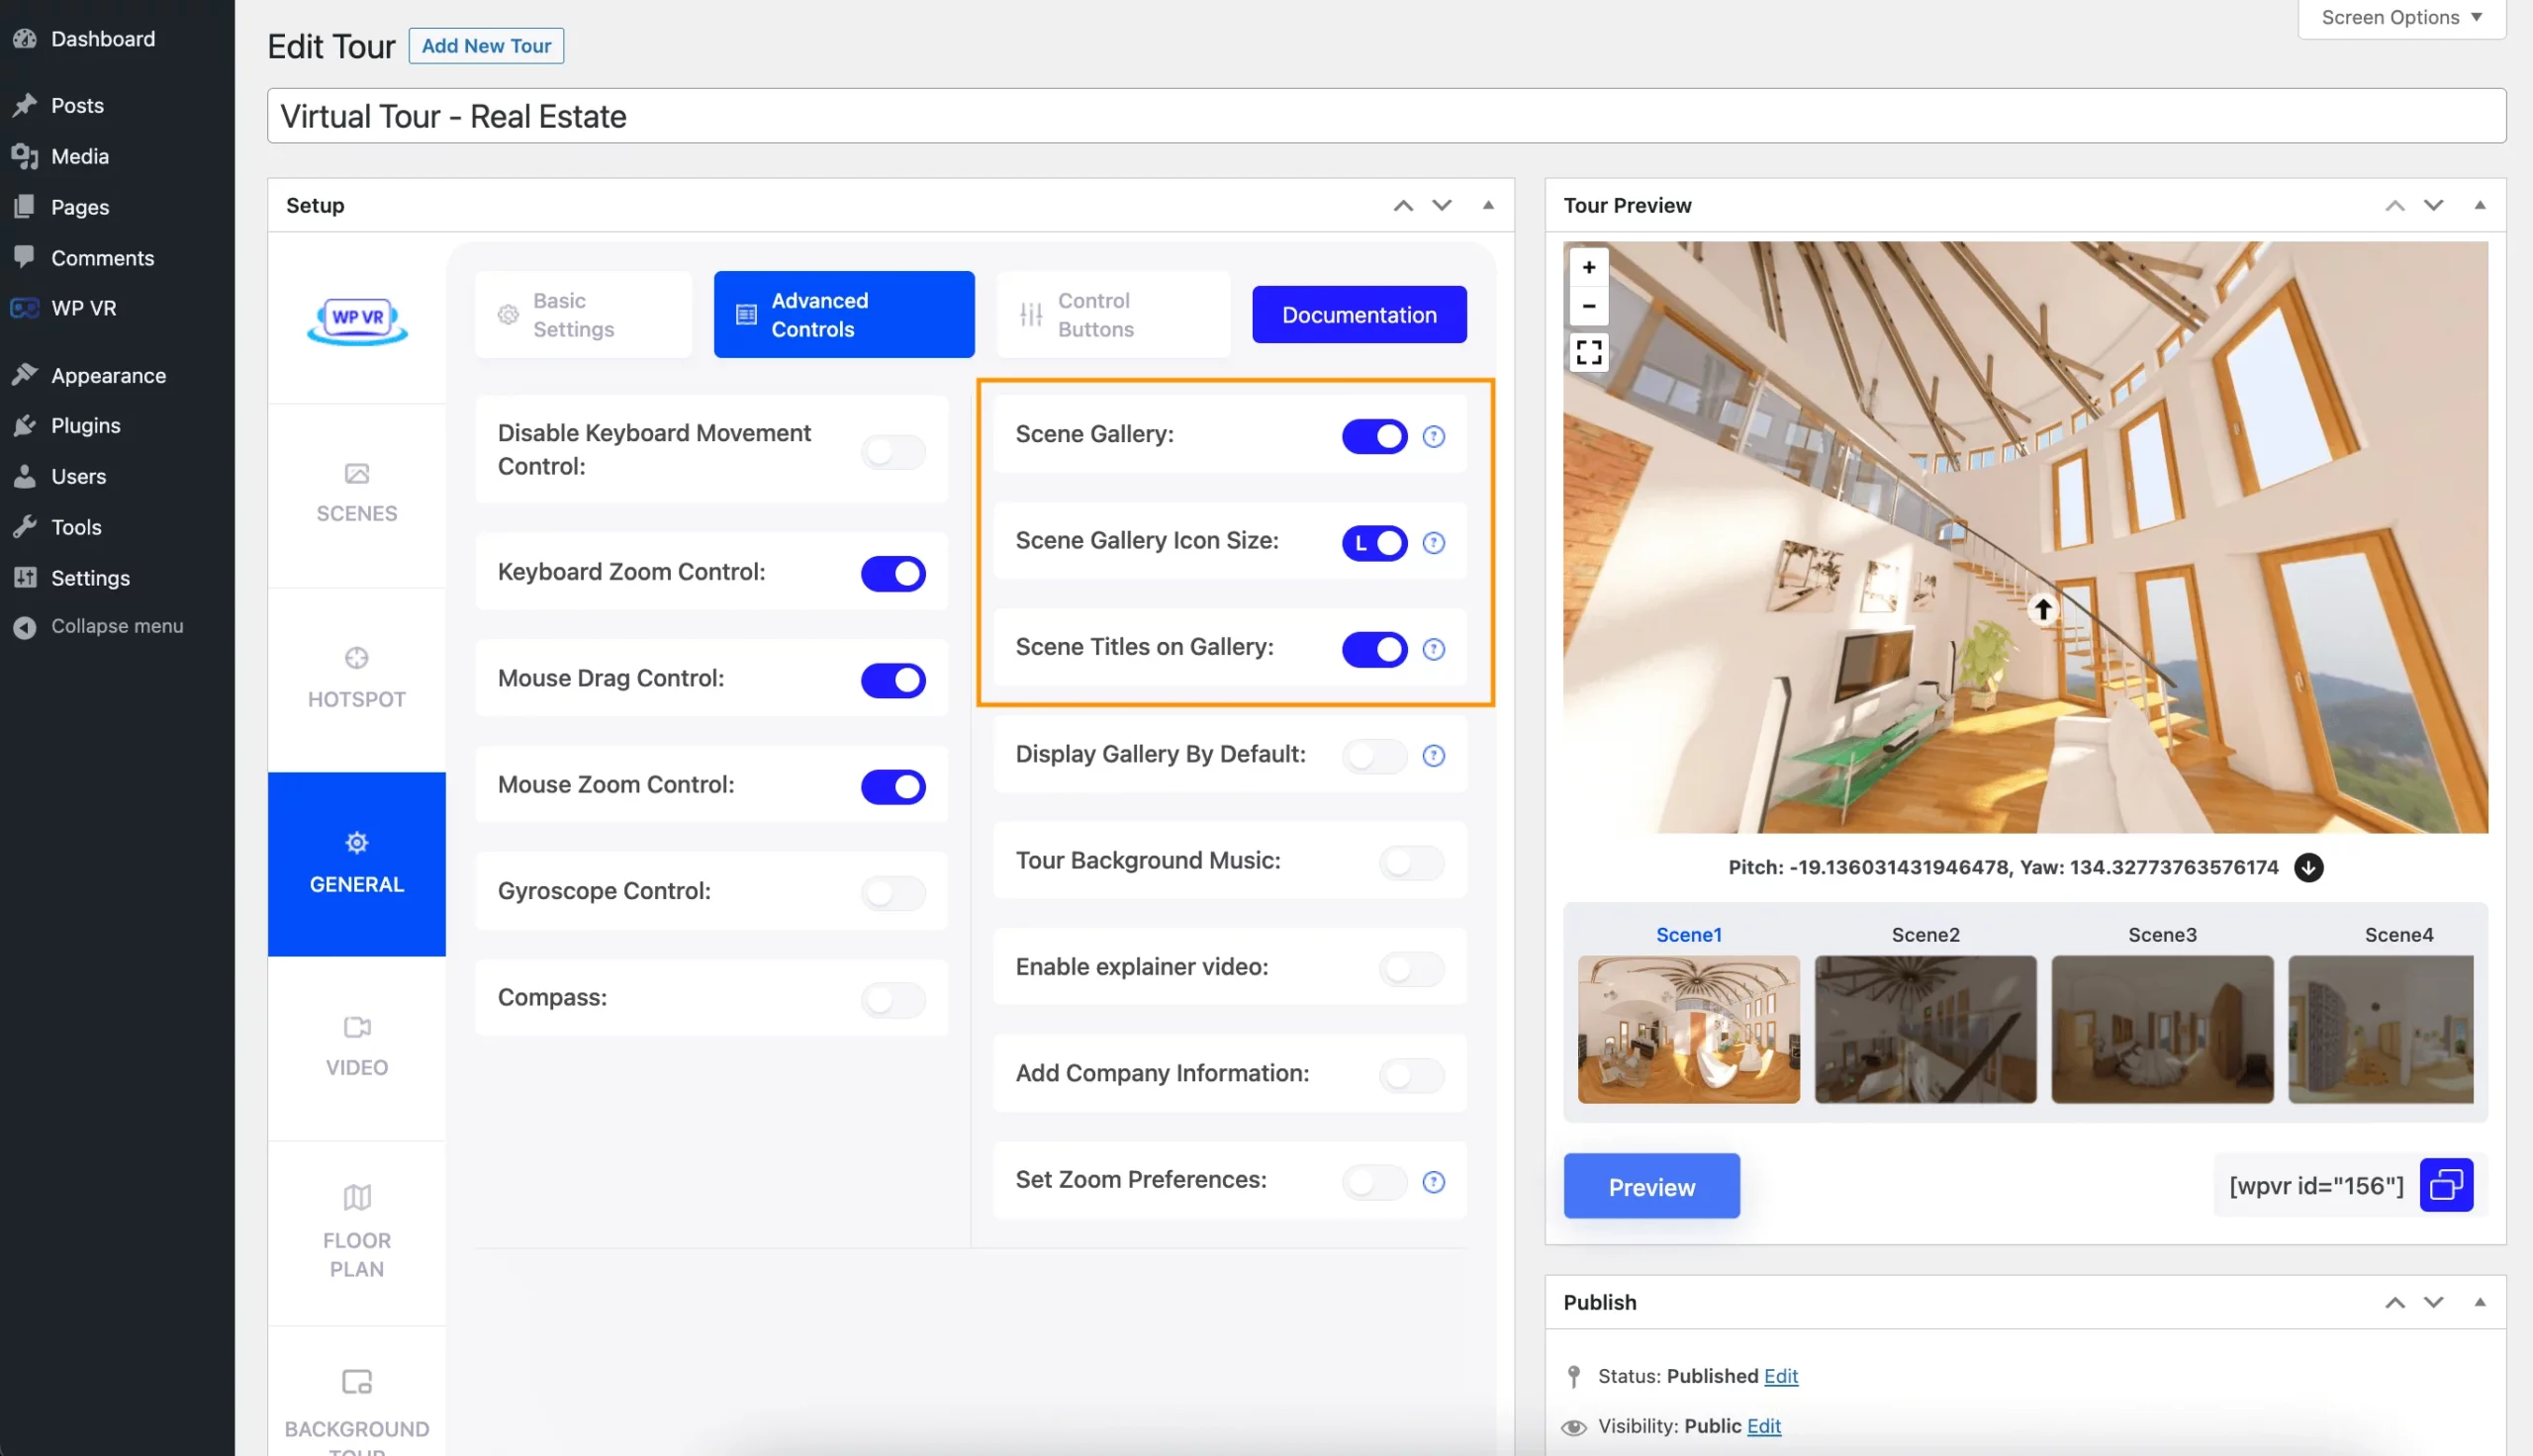
iii. Scene Gallery To Show All Campus Grounds
You may add multiple Scenes in a Virtual Tour and show them in a gallery.
Take 360 panorama images of all the spaces of your college covering the sports grounds, study halls, dormitory, and canteens, then add them as scenes in your Virtual Campus Tour.
Your prospective students can move from one scene to another using the Scene Gallery option.
And that’s it.
4. Embed Your VR College Tour On Your Website
The next thing to do is to embed your tour on your website.
You may use the virtual tour shortcode or use blocks/widgets to place it.
However, creating a virtual campus tour is more than just uploading pictures and videos. To make it effective, you need to focus on providing a meaningful experience that reflects your campus’s best features.
Best Practices to Create a Virtual Campus Tour
Let’s go over some best practices to ensure your virtual campus tour stands out.
Use high-quality visuals: Include clear, professional 360-degree photos and videos of key areas like lecture halls, dorms, libraries, and recreational spaces. Make sure everything looks inviting and well-lit.
Keep navigation simple: Design your virtual tour with an easy-to-use interface. Ensure visitors can click or tap to move through different areas without any confusion.
Add engaging descriptions: Include short, detailed descriptions for every location. Highlight what makes each area special, such as modern equipment in labs or unique study spaces.
Incorporate student stories: Use audio clips or captions to share student experiences and testimonials. Hearing from current students makes the tour feel more relatable.
Make it mobile-friendly: Ensure the tour works smoothly on smartphones and tablets, as many visitors will use their mobile devices to explore your campus.
Include calls to action: Add buttons or links that encourage viewers to schedule a physical visit, request more information, or start the application process.
Update regularly: Keep your tour current by adding new features, renovated spaces, or updated visuals. An outdated tour can leave a negative impression.
When you apply these practices, your virtual campus tour becomes an engaging and effective tool for reaching prospective students. It’s all about making the experience as informative and user-friendly as possible.
Final Thoughts
As you saw, it’s super easy to create and embed a virtual campus tour on your website.
Having an online college tour that is engaging and revealing about your college standards and best campus facilities could be a game changer to grow your educational institution significantly.
So go ahead and get WPVR now. Create your own campus tour now and start admitting more students.
Cheers.
FAQs
1. How can virtual tours help colleges attract more students?
A virtual campus tour gives students a real feel for the college without visiting in person, making it easier for them to decide.
2. What makes a virtual reality campus tour project successful?
High-quality visuals, smooth navigation, and accurate details about the campus are essential for creating an engaging experience.
3. Are virtual campus tours mobile-friendly?
Yes, a well-designed virtual campus tour is accessible on smartphones, ensuring students can explore from anywhere.
4. Can a virtual campus tour project include interactive features?
Interactive elements like clickable maps and student testimonials make tours more engaging and informative.
5. Do virtual campus tours require advanced equipment to create?
With the right tools, like 360-degree cameras and software, you can create an impressive tour without needing costly gear.
Running a travel & tourism business can be quite exciting. You will regularly deal with new faces and try to help them get the best traveling experiences.
However, the main challenge here is the competition. The tourism industry is quite competitive, and you have to find smart ways to attract potential clients for your tourism packages.
Sure, you can put up images and videos of the locations you cover on your website or social media to attract a few potential clients.
However, there are better ways. And one of the options that work best is virtual reality in tourism.
The fact is, for some people, a tour during their vacation is the most part of the year. They plan for it for months and research every possible option. At this point, if you can hook them with something unique that is both affordable and attractive, they are more likely to take your service.
Likewise, VR has more important benefits in the tourism industry.
In this post, I’ll share 8 powerful ways VR can elevate your travel business.
After reading this article, you will get a clear answer to your question: How could a travel and tourism company utilize virtual reality to enhance their business?
So, let’s begin.
What is VR Tourism?
The concept of VR Tourism is to give people a glimpse of an actual tour in a realistic virtual environment.
Basically, you capture 360 panoramic images of the locations you cover in your tourism packages and turn them into virtual tours.
You can then place them on your website for potential clients to visit. Many clients will get hooked thanks to the realistic feeling they get and will be more curious to visit in person.
So basically, virtual tourism can be a great tool to convert prospects into clients in a unique way that’s more engaging and attractive than your competitors.
8 Reasons To Use Virtual Reality In Tourism Business
The way you use VR will vary depending on the packages you offer.
For example, you could offer a package where you take Kilimanjaro Hiking Tour with a group of people via caravan and visit multiple locations in a span of 3 to 5 days. So the package may include the key tourist spots, hotels/resorts to reside at, food & other facilities, and a certified travel guide.
In this case, you could create a virtual tour that will include at least 1 scene from each of the tourist spots, a scene of the entrance of the resort, and the room where the travelers will lodge.
Then, you may connect each of these scenes so that people can explore all of them in the virtual environment before deciding to book this package with you.
Plus, you may even have the trainer record an introductory video which you can use along with your.
**Make sure to include tooltips and additional details in the VR tours so that people stay excited.
Another package could be a visit to a single resort.
In this case, you could have a virtual tour of the resort for people to browse through where they will be visiting.
Here are the key benefits of virtual Reality in tourism and the reasons why you should invest in having such virtual tours on your website.
1. Get Increased Bookings
As mentioned above, virtual reality tourism will get people curious about the places you offer in your tourism packages.
If you include a booking form or a contact form in the virtual tour, chances are many will end up booking a package while taking this tour.
Of course, just a basic 360 environment is not enough. You need to include crucial elements such as relevant tooltips to share knowledge on specific locations or items, engaging click-to-view content such as videos or gifs, background music, and even a mini video to invite them in.
If your package only includes a hotel tour, then you can create a virtual tour of a hotel by highlighting the main areas of focus – the central public space, the rooms, the swimming pool (if any), the canteen, the bar (if any), etc. Overall, you should include all the areas that a visitor may find attractive.
Simply place the tour on the package landing page, and you will see how it will deliver a lot more results than a video.
The main reason why a virtual tour can get more results is the freedom of control and the engaging elements in the tour. People love to have more control when researching and this will definitely help convince them to book a package with you.
Read this guide if you are looking for ideas to increase your hotel bookings.
2. Time-Saving and Cost-Effective
A couple of concerns many people have is
they think it will get too expensive and
they feel it may take up too much time to create a virtual tour.
However, virtual reality in tourism is not as expensive as you think.
It is possible to create a tour for less than $100 spent a year. And the best part is that if you have the right tool, it won’t take more than 10 to 15 minutes to craft a complete virtual tour.
All you need is a digital 360 camera to capture panoramic images and a reliable virtual tour creator to turn these images into a virtual tour.
Using virtual tourism as part of your marketing plan can help you achieve a higher “time spent on page” and low “bounce rate.”
These are crucial because, as the concept goes, the longer a person spends time on your website, the higher the chances of him placing an order or making some commitment.
So, you can actively use virtual reality in tourism and achieve these higher marketing metrics, which will eventually lead to higher conversion rates and more packages sold.
4. Significant Competitive Advantage
Virtual reality is not so popular in the tourism industry simply due to the lack of knowledge on how much it can deliver.
So, if you start using it now, you will be one step ahead of your competitors. You will have a higher chance of getting customers excited about your tourism offers, provided that you are not overcharging and are advocating for high-quality services.
Moreover, it shows your commitment to providing the best possible experience for your customers. It’s a clear message that you’re investing in technology to make their journey more engaging, informative, and enjoyable. This level of dedication can earn you trust and loyalty. Additionally, offering seamless travel services, such as reliable airport taxis, can further enhance the overall customer experience, ensuring convenience from the start of their journey.
5. Make It Easier For Clients To Make A Decision
Virtual tours offer a fast lane to decision-making when it comes to booking accommodations or travel experiences.
In the traditional booking process, travelers often find themselves sifting through brochures, photos, and descriptions, trying to piece together potential destinations they will enjoy. This process can sometimes be frustrating.
Virtual tours will give them a visual understanding of how the environment is, what they can expect in the surroundings, and how aligned it is to serve their traveling purpose, such as peace, adventure, modernness, rural tranquility, etc.
Images & videos may not always be satisfactory as they are often manipulated to make the locations look better than they actually are. A virtual tour will nullify the possibility of false promotion regarding understanding the surroundings.
Hence, it is the best way to help prospects make a decision on which travel package they want.
6. Elevate Client Education and Cultural Awareness
When travelers understand more about a destination’s culture and history, their experience becomes much richer. Imagine a virtual tour of Kyoto’s ancient temples, complete with clickable spots that explain the history behind each shrine or ceremony. This gives your clients an authentic preview of what to expect.
You can break it down with:
Interactive Highlights: Add clickable points that explain local traditions, like food etiquette or seasonal festivals.
Storytelling: Incorporate short narrated clips about local legends or historical events that are unique to the destination.
This approach helps travelers feel more prepared and excited. You’re helping them make better choices, and they’ll feel more connected to the experience once they arrive.
7. Advance Staff Training and Skill Development
Training your staff to be more knowledgeable and confident improves customer satisfaction. Virtual tours can play a major role here.
Take this scenario: You run a tour company that specializes in historical landmarks. Instead of relying solely on training manuals, you create a virtual tour of each site with key facts, trivia, and storytelling prompts embedded in the tour.
Here’s how this can help:
Guided Practice: Staff can explore these virtual tours repeatedly until they’re confident in explaining each site to travelers.
On-Demand Training: New hires or part-time staff can train at their own pace, reducing the need for in-person sessions.
Better Engagement: A more visual and hands-on approach keeps employees interested in learning compared to reading static documents.
Ultimately, you’re creating a more professional and knowledgeable team, which helps you deliver a better experience to your clients.
8. Offer Travel-Like Experiences for Non-Travelers
Not everyone can hop on a plane and travel to far-off destinations. Virtual tours can offer these individuals an experience that feels close to real travel without leaving home.
Picture a family curious about visiting Greece but unable to travel due to health or financial limitations. You provide a virtual tour of Athens that explores landmarks like the Acropolis with detailed, 360-degree views.
This approach benefits you and your audience:
Accessibility: Anyone can experience new places, expanding your potential customer base beyond just travelers.
Increased Interest: Some may feel inspired to book a trip once their situation changes, simply because they already feel connected to the destination.
Educational Use: Schools or institutions may also use these tours as part of their curriculum, giving you new partnership opportunities.
With these virtual experiences, you’re broadening horizons for those who can’t physically travel while still fostering a desire to explore more.
Examples Of Virtual Reality Tourism
Virtual reality tourism has already proven its value in creating more engaging and informative travel experiences.
To show how this works in practice, let’s explore a few real-world examples where businesses have used VR for tourism to improve their services and attract more customers.
Virtual Tour of a Hotel
Here’s an example of a virtual tour of a hotel with interactive hotspots to let the audience know what they are offering in a room.
This lets the audience have a better look at the available rooms and choose from the best ones for them to book.
This Virtual 360 Tour Atlantis Dubai shows almost every unique feature that clients can see and explore before they even step there.
Hamilton Island 360 VR Tourism
In this virtual 360 video, you can easily explore everything from stepping onto the island to experiencing underwater adventures.
Final Thoughts
If you are in the travel and tourism business, then this is a great opportunity to stay ahead of the competition. Using virtual reality in tourism businesses is yet to get popular, and the sooner you start investing in it, the better your chances to become the go-to solution for offering the best tourism packages.
You can easily create virtual tours in WordPress thanks to the plugin WPVR.
WPVR is currently the #1 virtual tour plugin in WordPress, which has every feature you need to create engaging virtual tours without any complications.
If your website is created using WordPress, then you must try using WPVR. You will amazed at how simple yet effective this plugin is to help you grow your business using virtual reality.
Ever wished you could teleport? Well, creating a virtual tour is the next best thing—minus the sci-fi complications and potential teleportation mishaps.
Imagine giving people a full, immersive tour of your business, property, or event space without them having to leave their couch (or even change out of their pajamas).
With a virtual tour, your audience can explore every nook and cranny as if they were there in person—without you having to clean up first.
In this guide, I’ll walk you through everything you need to know: from the basics of virtual reality to capturing stunning 360° images and building a tour that wows.
Once you complete this guide, you won’t rely on anyone to create virtual tours.
You’ll know how to create a virtual tour completly on your own, at the lowest cost.
So let’s get started.
First, Let’s Clear The Confusion!
If you gather clear knowledge of the basic terms it will be easier for you to understand the process of virtual tour creation.
Now, most people get confused between Virtual Reality and Virtual Tours!
Here’s a clear definition :
What Is Virtual Reality?
Virtual Reality is a computerized environment or projection that you can experience visually.
You can observe, listen to, and interact with this environment.
Now, there are many types of VR technologies. The 5 most popular ones are listed below :
Types of Virtual Reality
Non-immersive virtual reality Non-immersive virtual reality refers to a computerized virtual experience where you can control some characters or activities within the software, but the environment is not directly interacting with you. Example: Simulation games such as God of War.
Fully immersive virtual reality A fully immersive virtual technology ensures that you have a realistic experience within the virtual world. This is an expensive form of virtual reality which involves helmets, gloves and body connectors with sense detectors, to transfer your every physical moments within the virtual world. Example: Virtual shooting game zone.
Semi-immersive virtual reality A semi-immersive virtual reality can be in the form of a 3D space or a virtual environment which you can move about on your own either through a computer using a mouse and keyboard, or on mobile devices by touching and swiping to move about the place. You do not control any character, you control the view on your own. Some VR headsets are semi-immersive. Most semi-immersive virtual environments support Gyroscope. Example: A Virtual Tour.
Augmented virtual reality Augmented Reality is when a certain entity or device seems to be present in reality, but is actually not. Rather than putting you into a virtual world, a virtual entity is placed in the real world through any device. Example: The game Pokemon Go displays Pokemons through your phone.
Collaborative virtual reality This is a form of virtual world where different people from various locations can come into contact within a virtual environment, usually in the form of 3D or projected characters. People can interact with each other through microphones, headsets and chatting. Example: Games such as PUBG (Players Unknown Battle Ground)
**To learn more about types of VR in detail click here.
Virtual Reality And Businesses
Over the years, virtual reality has increased its influence in tons of businesses to create better interactions with their customers.
Businesses such as Real Estate, Hotels & Resorts, Restaurants, Universities, Schools & Colleges, Super shops, Antique shops, Art Galleries, Showrooms, Museums, etc can engage with more prospects using virtual tours.
Read along to learn about how businesses can benefit from virtual tours (your business might be one of them).
Along with VR technology many VR devices such as VR Headsets, Virtual Game Spaces, Virtual Simulation, and training devices, and many more devices are being created day by day. Similarly, in the tech industry, companies specializing in igaming software development can leverage virtual tours to showcase their cutting-edge solutions and engage potential clients effectively.
Since you have an idea about virtual reality and its different formats, I’ll move to our main objective today – virtual tours.
What Is A Virtual Tour?
A virtual tour is a form of semi-immersive (one of the types of virtual reality)VR technology that allows you to experience a certain location remotely.
Basically, represents a real place in a virtual platform. You will feel like as if you are there.
Usually, a virtual tour is created by transforming a 360 seamless panoramic image into a realistic Equirectangular 3D space.
You will be able to rotate the screen 360 degrees in all directions. Plus you will be able to move from one panoramic image to another.
There are other forms of panorama images used to create virtual tours such as Cube Map, Little Planet, or Fish Eye. But we will be discussing the most efficient one, the Equirectangular virtual tour.
Recently, virtual tours gained huge popularity in several businesses due to the high engagement potential with prospects.
The latest forms of virtual tours are more advanced and attractive. You will find a scene gallery, click-to-view information tags, background music, Gyroscope support, some even support VR boxes, and many more. Proper platform development can also significantly enhance these virtual tours.
As you read along, you will learn how you can create virtual tours on your own.
Let us look at the advantages of using a virtual tour for most businesses.
Advantages Of Using A Virtual Tour On Your Website
Now, virtual tours are more beneficial to businesses that rely on highlighting their location to attract prospects.
So, Real Estate Firms, Hotels, Museums, Universities, Schools and Colleges, Amusement Parks, Fancy Restaurants, and most other such businesses can use virtual tours to attract more potential prospects.
Yes, using high-quality images is not a bad idea, but a virtual tour can have a greater connection with the viewer since they feel personalized and engaged as they take the tour.
Here are some of the benefits you can expect for your business using a virtual tour.
1. Instant Engagement
The use of a virtual tour is still very new and people visiting your site will be instantly hooked.
The fact is, people are already well-accustomed to looking at flat images or videos. A virtual tour will be something new and interesting to all viewers.
The main reason a virtual tour is more effective is because the viewers are in full control of the tour.
Flat images can only create an imaginative visual which might not be accurate. And videos can only be watched with no control. We have to watch the place from the angle of the cameraman.
In a virtual tour, viewers can move and look around from any angle or direction. They can go from one scene to another easily and can take their time to inspect the location.
Once they take the tour, they will have a more accurate visual of the actual location.
Thus, even if someone is not willing to purchase a website visit, a virtual tour might grab his attention and possibly turn him into a potential buyer.
Realtors and hotel owners will benefit the most in this case, compared to most other businesses.
However, anything unique, that’s interesting and exciting, can always get you better results no matter what business you run.
2. Give A Better Visual To Prospects
The main concept of a virtual tour is to give a realistic vision of a place. And almost any business can use virtual tours to give a more informed visual to the prospects.
Previously, the most advanced remote tours were video tours.
However, the problem with video tours is that you can only watch from the point of view or angle of the cameraman.
You have no way to inspect from another angle.
Also, as I mentioned earlier, flat images can create an imaginative visual which might not be accurate.
So here’s the main issue. Through videos or images, people can visualize in their minds and this creates a certain assumptive expectation of how the place will look when visited in person.
Now, when a person visits, if it does not match his imagination, he will lose interest almost immediately.
A virtual tour rather creates a near-perfect visual of the place.
A person taking a virtual tour will develop an expectation that very much matches the place in reality.
Thus creating more potential prospects.
So whether it is a hotel, an amusement park, a school, or any form of business, a virtual tour can generate more potential prospects.
3. Help Prospects To Take A Decision
As you just read, a virtual tour gives a better visual of the location.
Almost every detail can be inspected through a virtual tour and the close resemblance to the actual location makes it a great instrument of choice.
Let me explain.
Let’s say you’re searching online for good restaurants in your area. You found three restaurants that have good reviews based on the taste of their food.
But which one you’ll choose to visit?
Let’s assume all three of these restaurants have virtual tours on their site. Once you take a virtual tour of each of them, you will be able to understand which one has the environment that you were looking for.
The decorations and the seating arrangements would be more clear and you could choose your preferred restaurant.
Similarly, on a real estate website, people will be able to take tours of various houses in a location. This will let them choose the ones that they feel are suitable.
Almost all businesses can use virtual tours to influence prospects’ choices.
4. Avoid Unnecessary Visits And Rejection
Using a huge number of photos is a common practice for realtors.
However, no matter how many images you use, it’s not possible to have a clear idea of the property structure and planning.
You may see each individual room and each important location clearly but don’t know how the spots are connected and how to move around inside the property.
Plus the latest photo editors can even transform a dull place to look stunning.
There is a high possibility that most people, willing to visit the location, might end up being disappointed since they had better or lower expectations.
At the same time, if you are giving a live tour to people during every visit, then you will be wasting a lot of time and effort since there is a high rejection rate.
The main reason is, as I explained earlier, failure to meet expectations.
A virtual tour will allow viewers to carefully inspect the property and decide if it’s suitable for them.
As a result, calls to visit will mostly come from prospects who are already interested and satisfied with the location, i.e., more potential prospects and fewer rejections.
According to a report, using 360-degree virtual tours in the real estate industry will reduce the number of wasted viewings by 40%.
That’s a substantial amount of time and money you can save.
5. Technological Advantage Over Competitors
Even though virtual tour is a relatively new term for a lot of people, it already has become a key marketing strategy for industries like real estate, hospitality business, museums, etc.
However, almost every business has the scope to utilize virtual tours as a part of its marketing strategy.
This is actually an advantage for your business if you have not used virtual tours on a large scale.
For example, if you own a super shop, you can create a virtual tour that will let visitors get a tour of the shop remotely.
They will be able to see the various sections and types of goods you have. Plus, they will notice how organized and clean your super shop is.
Many viewers might choose to take a visit after noticing a certain section on your super shop, expecting to meet the quality they require.
Other super shops that don’t have a virtual tour on their site will not get this added advantage to convert an online visitor to a live prospect.
Similarly, if you own a hotel, then a virtual tour will give you an added advantage over other hotels in your area.
People visiting your site will be able to get a virtual experience remotely, compared to other hotels that rely on just images and videos.
If your hotel is well-decorated and affordable, most people will probably prefer your hotel to others after taking a virtual tour.
As you can see, every business can be ahead of its competitors through a virtual tour. You will achieve more trust from prospects, and gain a good reputation for reliability and up-to-date technology.
These are 5 major advantages that almost all businesses can enjoy despite the niche.
There could be more advantages such as being more cost-effective compared to creating virtual video tours (due to hiring expert camera crews), and more efficient and effective towards prospects.
List Of Businesses That Can Benefit From Virtual Tours
Real Estate
Hotels & Resorts
Restaurants
Casinos
Art Gallery
Fashion House
Wedding Venues
Conference Halls
Car Showrooms
Aquarium Shops
Antique Shops
Shopping Malls
Super Shops
Movie Theatres
Home/Interior Decors
Historic Locations
Travel/Tourism Industry
Gym/Fitness Centers
Universities, Schools & Colleges
Virtual Learning Centers
Research Facilities
Production House
Corporate Office
Virtual Gaming Zones
Indoor Gaming Zones/Clubs
Handcraft/Furniture Shops
Theme/Amusement Park
Airports & Airlines
Orchids & Flower Gardens
Natural/Safari Parks
Museums
Hospitals
Later in this article, we will also learn how each of these businesses can take advantage of using virtual tours. You will get niche-specific information on how you can use virtual tours to get more prospects.
If your business is on this list, then you will find this guide very helpful. And if you haven’t used virtual tours yet, then it’s time you start thinking about using them.
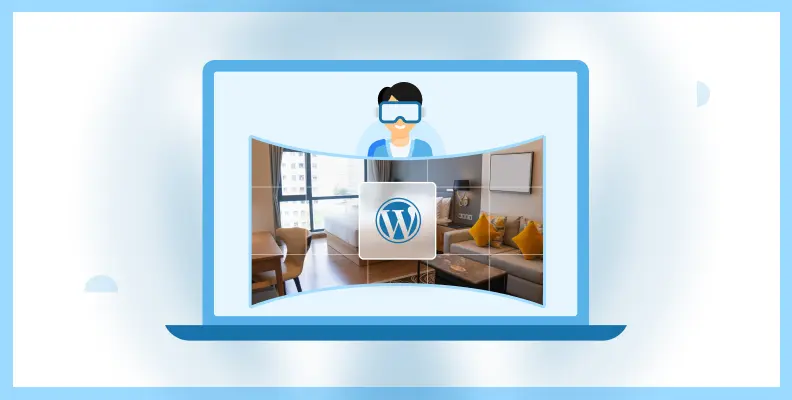
How To Create a Virtual Tour
To use a virtual tour you need to create one. To create a virtual tour you need some materials and need to know the process.
Let’s start with materials :
Resources You Need To Create a Virtual Tour
To create a virtual tour you will need two specific things.
You can go for any type of virtual tour.
For this article, I am going to use an equirectangular type to create a virtual tour.
In the case of an Equirectangular virtual tour, the main elements are:
360 panoramic images, and
A Virtual Tour Creator Tool.
What Is A 360 Panoramic Image?
First, understand what a panoramic image is.
A panoramic image is different from the usual photographs.
They are usually very wide and the pictures are taken in different ways for different types of panoramic images.
Now, a 360-degree panoramic image takes a 360-degree angle of a place or thing.
Once processed using a virtual tour creator, it becomes an Equirectangular virtual tour.
Here is an example:
A 360-degree Panorama Image
Converted To A Basic Virtual Tour
Once you have seamless 360 panoramic images, you can now easily create amazing virtual tours using a virtual tour creator.
In the example above, I used WPVR which is currently the best virtual tour creator for WordPress.
Creating a virtual tour sounds like a difficult task, but in reality, it is pretty simple as long as you are using the right tool.
**Careful with production companies. Many will claim that video tours are virtual tours, but that’s not true. Yes, there are virtual video tours, but they are not ideal for complete control and inspections. Plus they cost more to produce.
There are many tools and services that can help you convert your 360 panoramic images into a virtual tour.
However, today I will show you a step-by-step process on how to create a virtual tour for your WordPress site using the WPVR plugin.
With WPVR, you can easily learn how to make a virtual tour with the simplest steps.
There are more virtual tour plugins, but this one comes with an easy interface and quality output.
Here’s a step-by-step guide on how you can generate a quality virtual tour using WPVR easily, on your own.
Step-by-Step Guide To Create Virtual Tour Using WPVR
First, let’s look at how you can create a virtual tour using the free version. Then I will discuss some of its Pro features that you can use to make the virtual tour more attractive.
To create a 360° virtual tour from your WordPress dashboard, follow 9 simple steps:
Go to your WordPress Dashboard > Plugin > Add New.
Search for WPVR and you will find a blue icon of the plugin as shown in the image below:
Click on “Install” and after that “Activate” will appear. Click on the button of the plugin.
Once the plugin is activated, you will get this page :
Click on the “Let’s create your first tour” button.
you will see on your Dashboard that a new menu called “WP VR” has been added. And this page will appear :
Now give a title to your virtual tour. If you don’t want to give title now then just press the cross button.
Then, as you proceed a pop up of scene id will come up :
Step 2 – Create A Virtual Tour
As you proceed, this dashboard will appear :
On the left side, you will see 8 tabs:
:
General
Scenes
Hotspot
Video
Floor plan
Background Tour
Street View
Export
For a virtual tour, you will need to set the proper settings of the first three tabs.
Step 3 – Configure General Settings
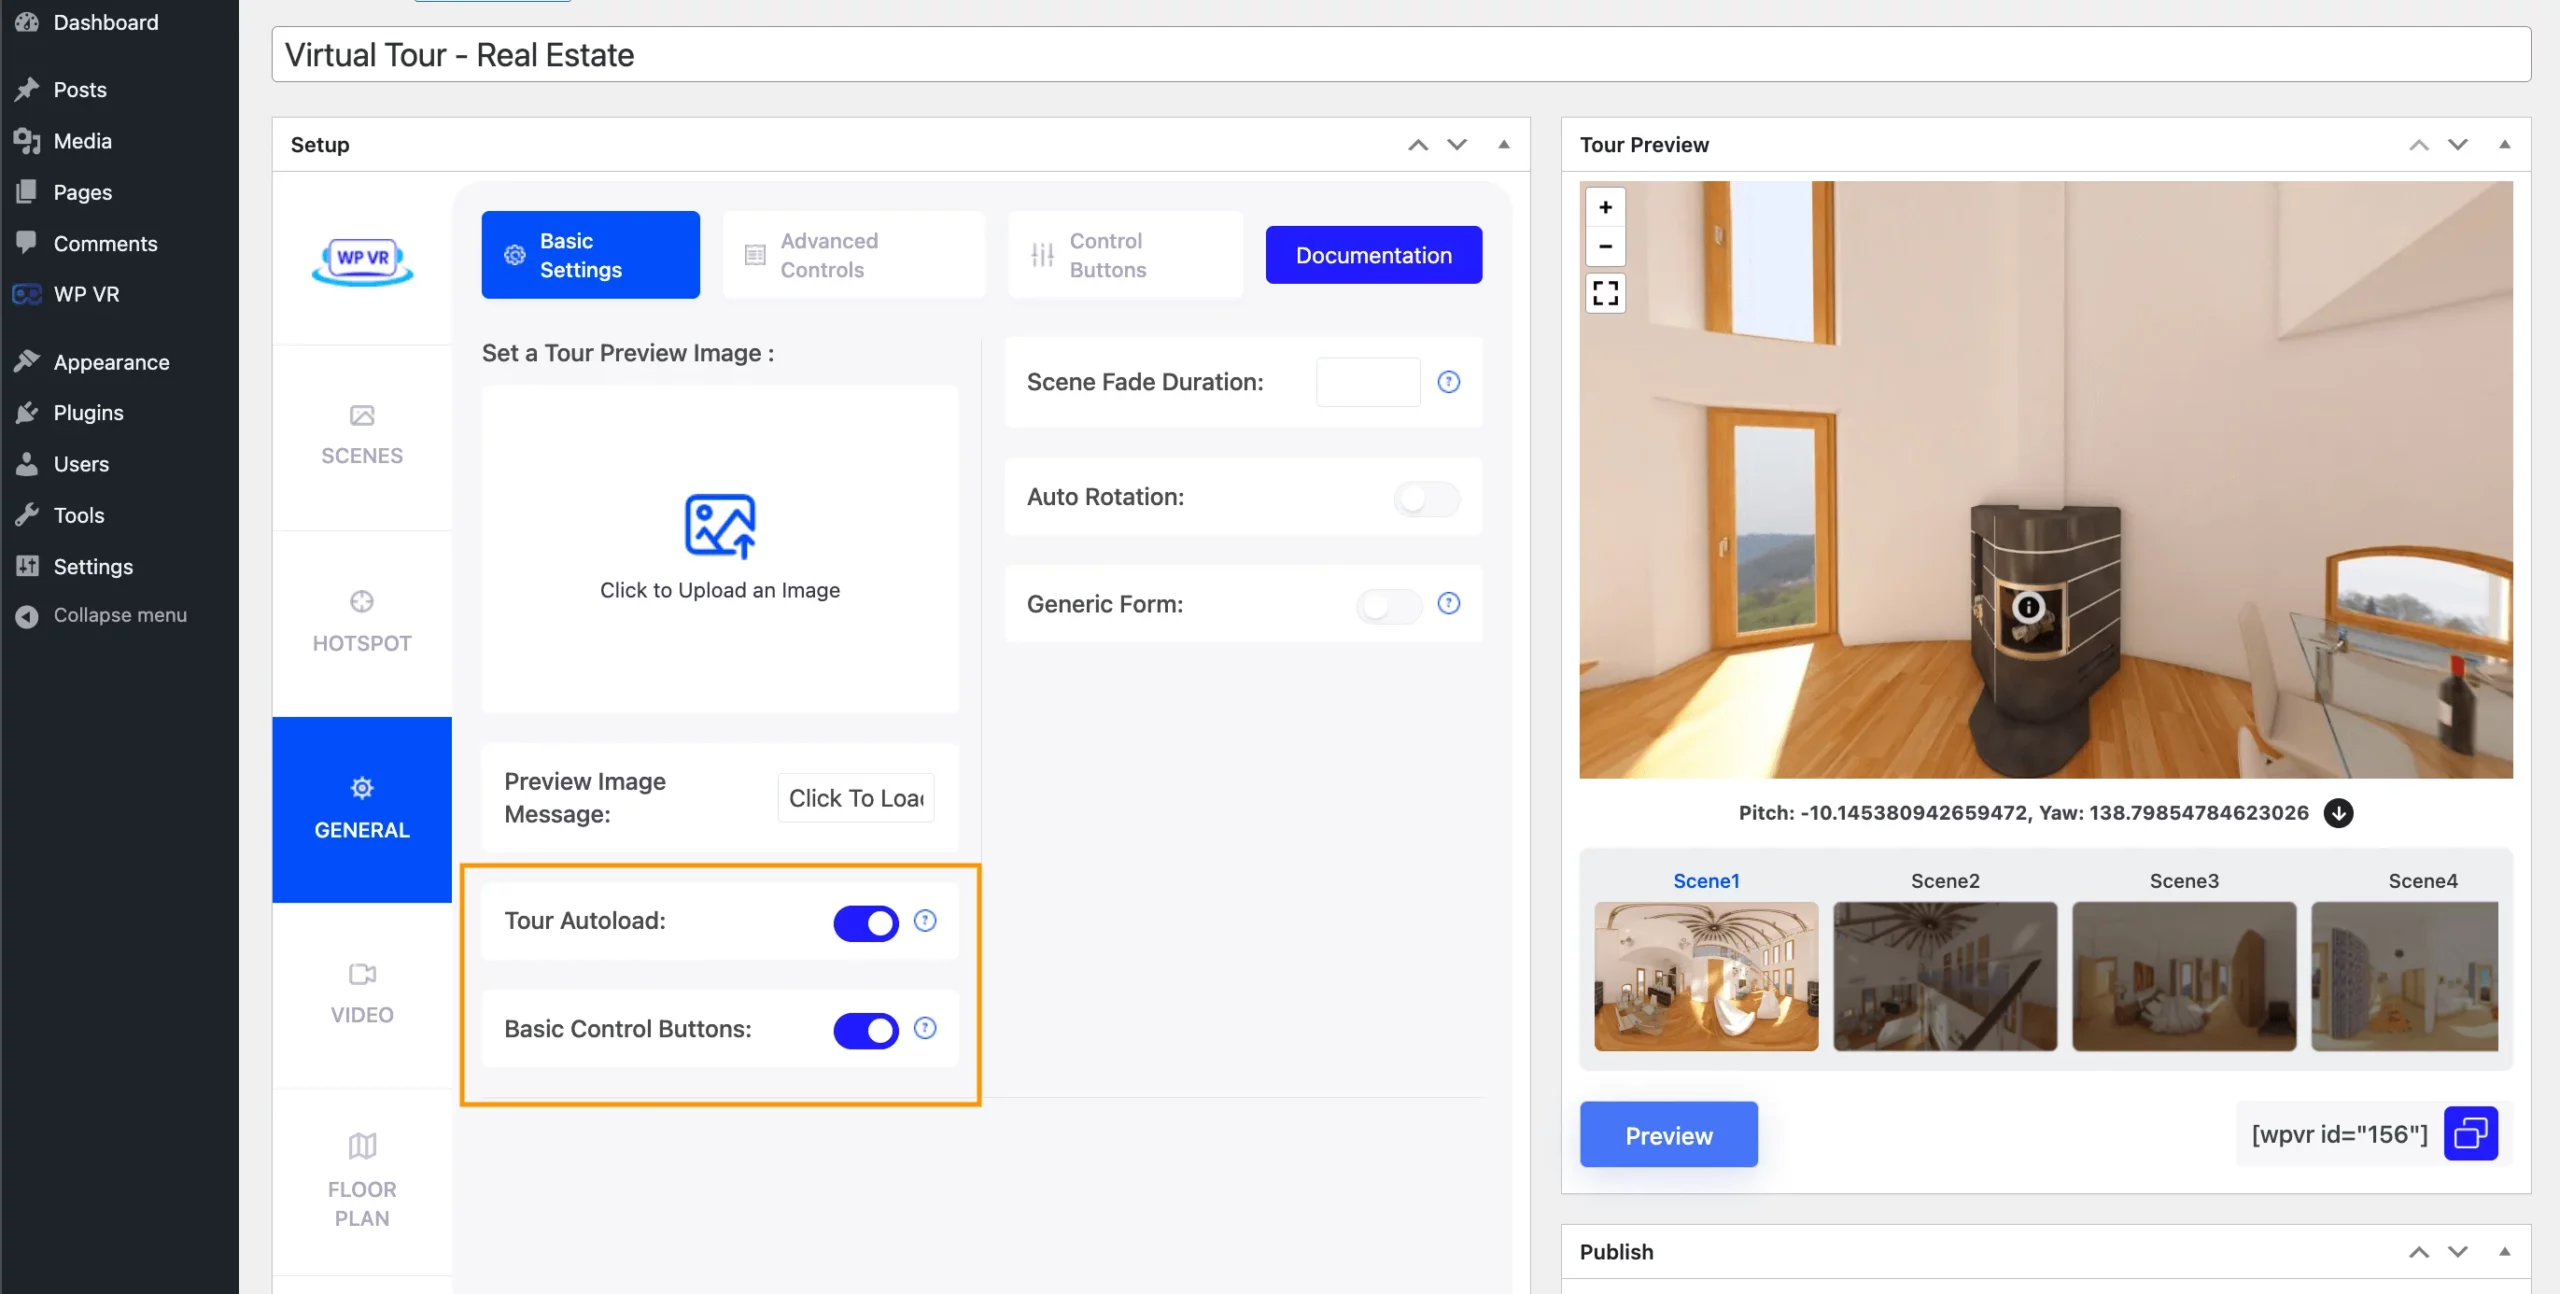
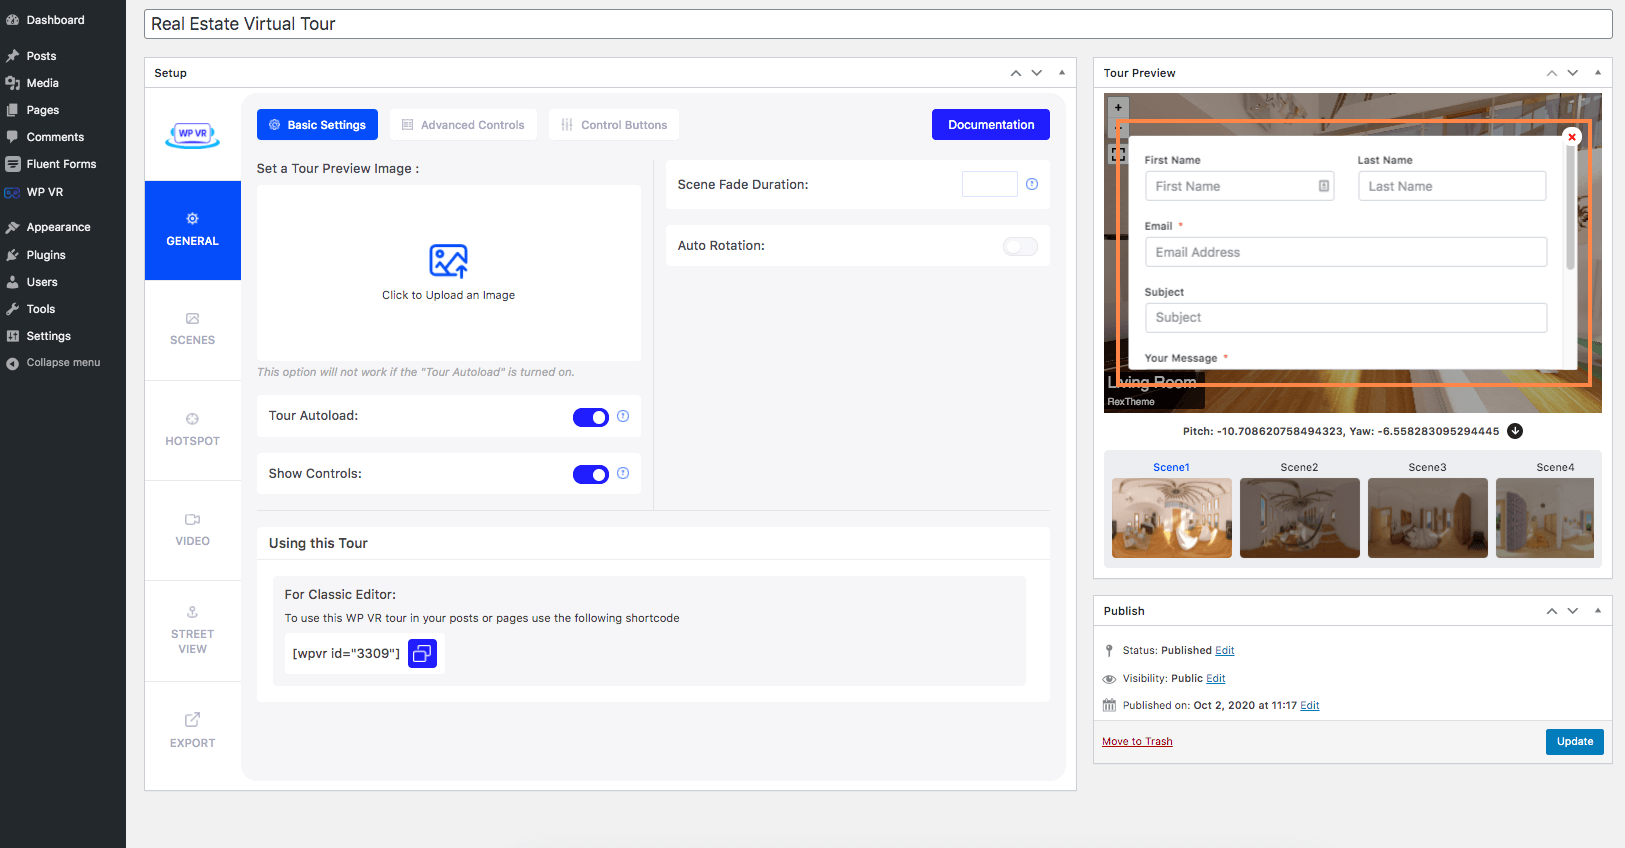
Go to the General>Basic Settings tab and you will see the following options:
Set A Tour Preview Image:
When you keep Autoload option “Off”, there is a netted placeholder visible. However. you can replace that by uploading a Preview image.
Simply click on the “UPLOAD” button and add a media image. (You should use a flat image for this, rather than a 360 panoramic image)
Or you can provide a link to the image. (Make sure if your site is SSL certified i.e. “https”, then the image link should also have “https”.)
Once you upload the image, a thumbnail will appear above the upload button.
This means the preview image was uploaded successfully.
Now once you Preview the tour (or view the tour on a live page), if the Autoload option is “Off”, you will see that this image is in place of the tour until you click on it.
And if the Autoload option is “On”, then this image will be there until the tour loads. And if not you need to click on the button preview.
Now, the tour preview image won’t appear on the tour, if you’ve turned on the Autoload option.
Tour Autoload:
If the autoload is turned on, the panorama you upload will load automatically. Otherwise, it will load on-click on the option “preview“
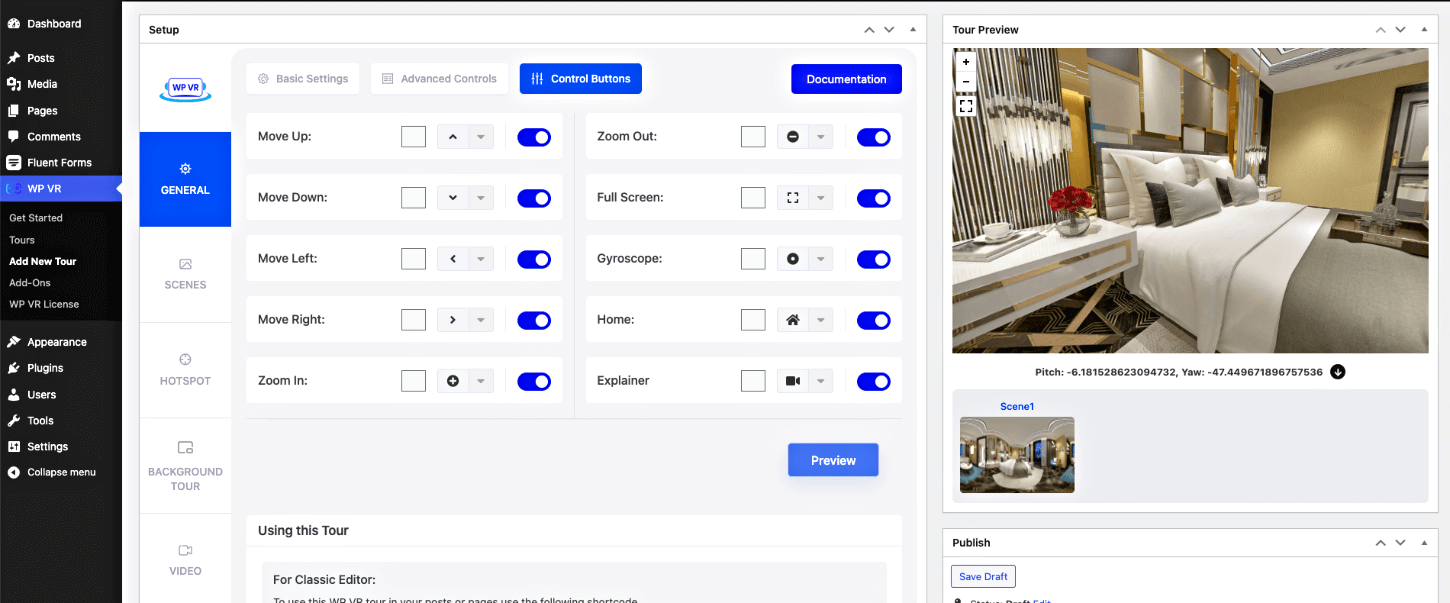
Basic Control Buttons:
Turning it “On” will view the on-screen control button, such as zoom in/out and full-screen mode.
Scene Fade Duration:
The scene fade duration can be added in milliseconds for the transition between two scenes.
According to this image, the scene fade duration is set to 1000 milliseconds i.e. 1 second. Hence there will be a 1-second fading effect to transit from one scene to another.
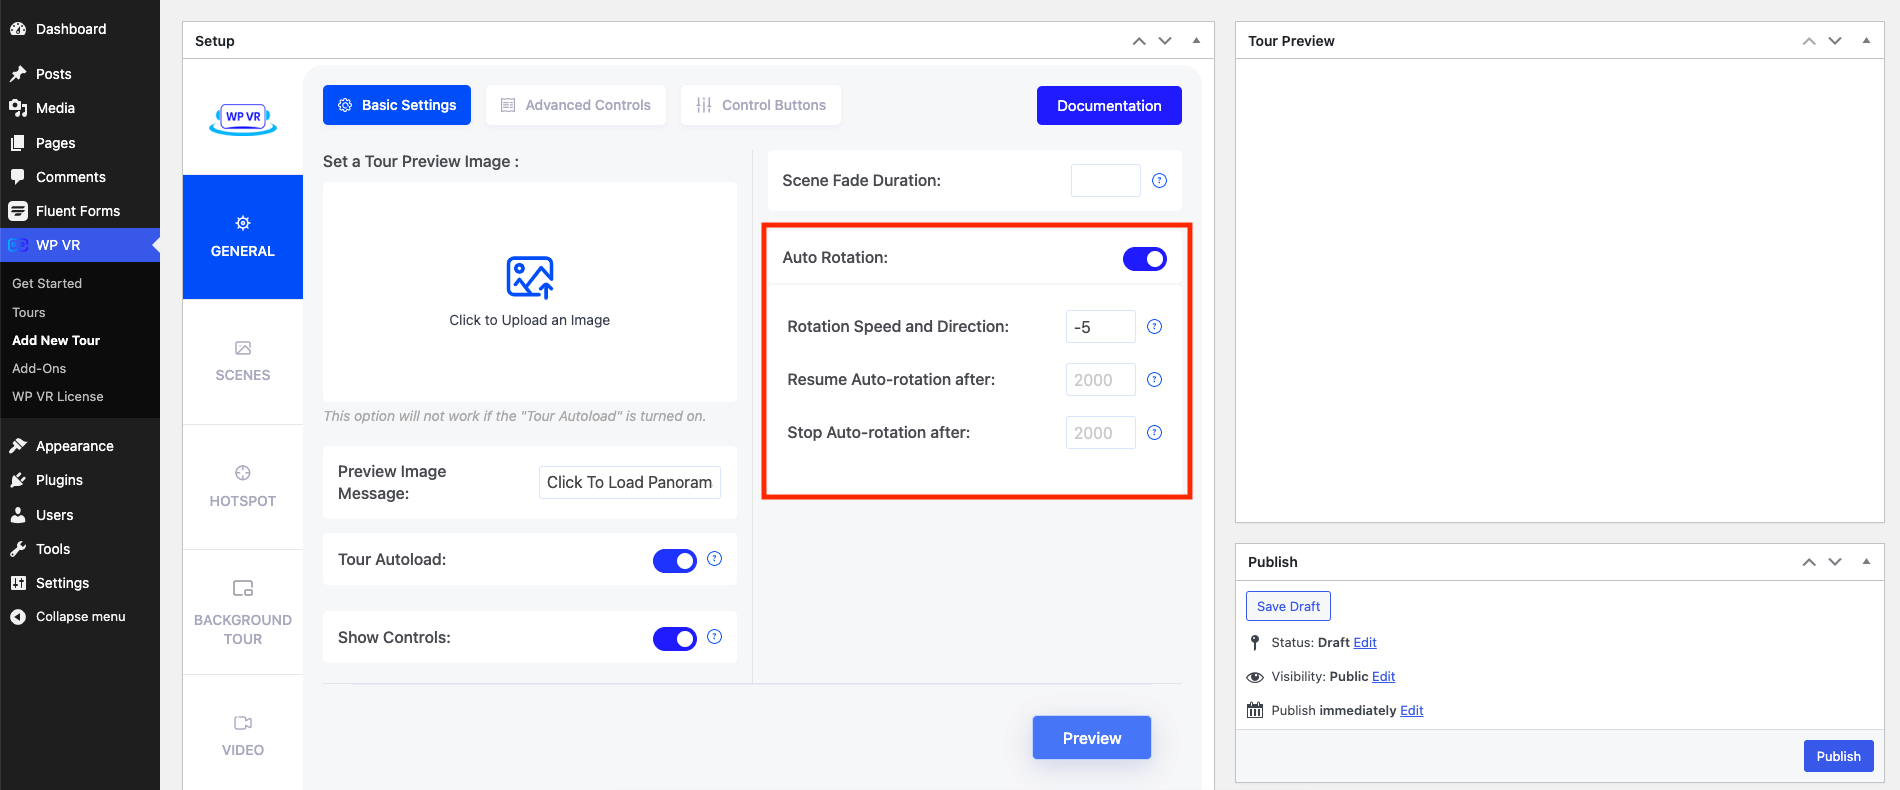
Auto Rotation:
Turning it “On” will show three more fields for you to add an auto-rotation feature to your virtual tour.
Rotation Speed and Direction
These are to set the speed of auto rotation on your tour. We suggest you keep this speed within the range of -20 to 20, or else the rotation will probably be too fast.
A negative number will rotate the tour anti-clockwise and a positive number will make it rotate clockwise.
Resume Auto Rotation After
This lets you set a time, in milliseconds, so that if you stop the rotation, then after this amount of time, it will start rotating again.
According to the image above, it is set to 2000 milliseconds, i.e., 2 seconds.
Stop Auto Rotation After
This lets you set a time after which the tour will stop auto-rotating.
However, this will not work if you input the value on Auto Rotation Inactive Delay. According to the image above, it is set to 2000 milliseconds, i.e., 2 seconds.
These are all the options in the General settings. Configure the settings as you require
Step 4 – Set Up Scenes
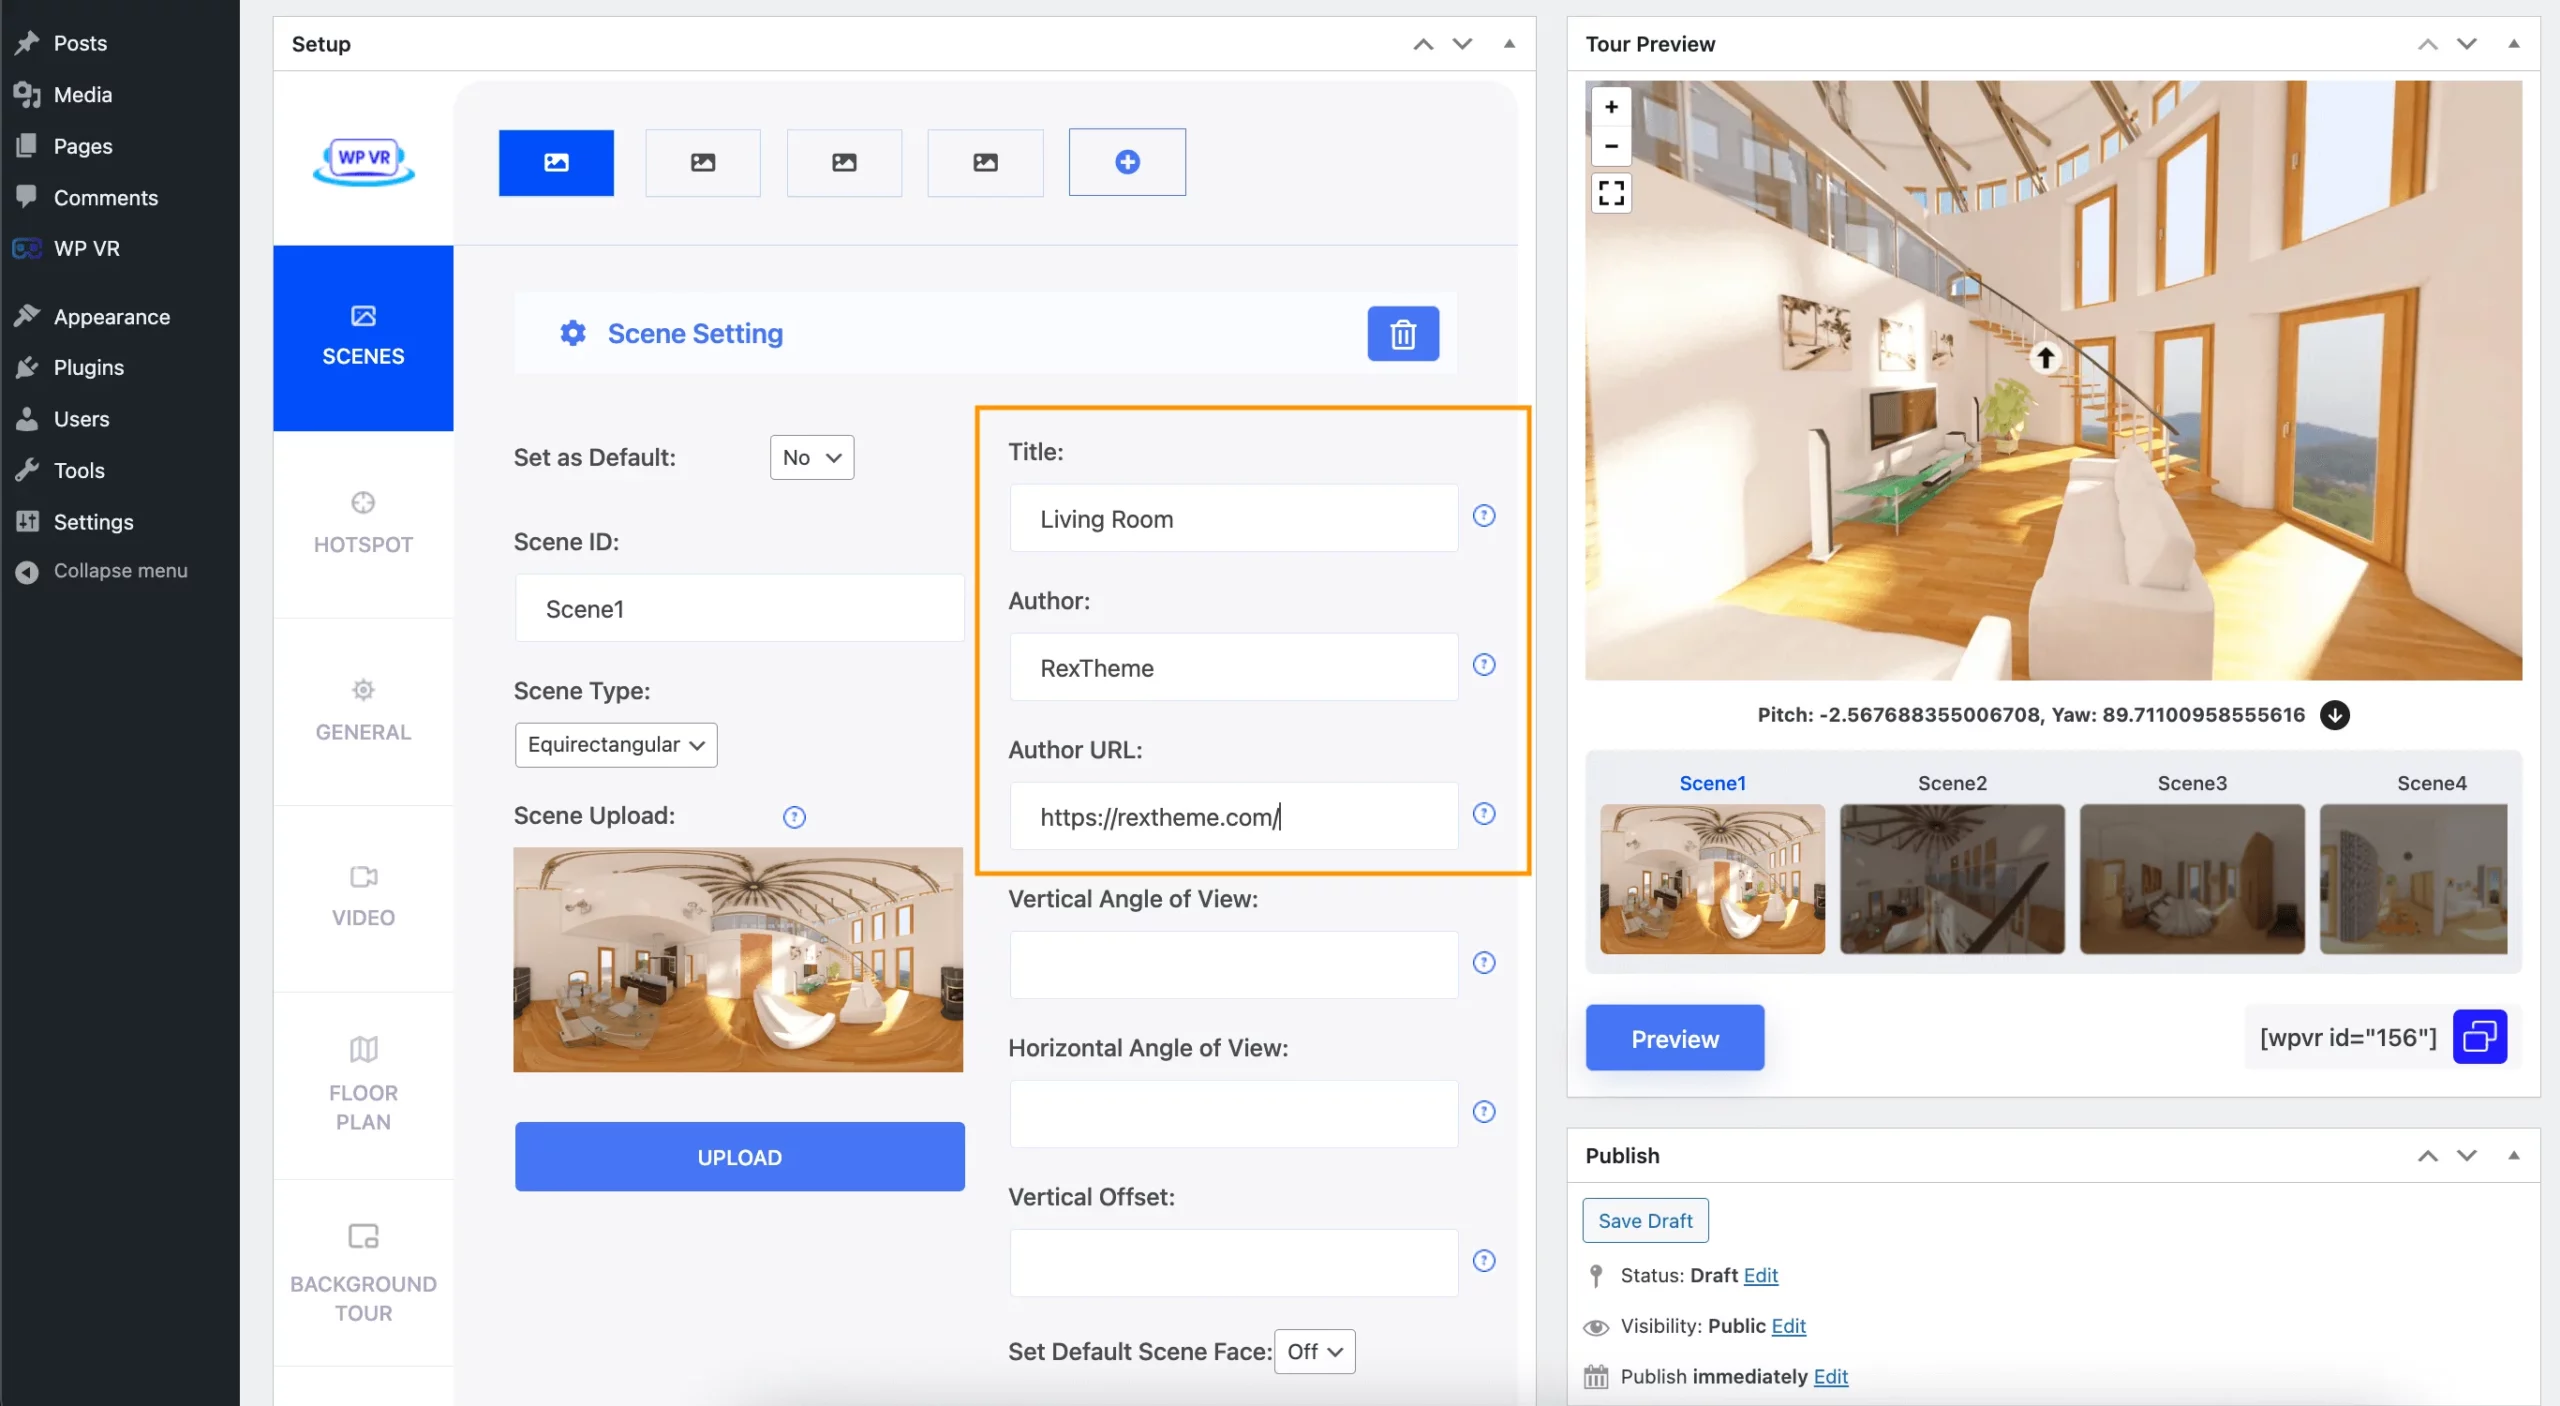
Basically, every single panorama you want to include in your Virtual tour is a scene. Go to the Scenes tab and you get the following options:
Set as default:
If you select “Yes” then the current scene will be the default scene to be viewed at first when the virtual tour is loaded. (FYI: The first scene is considered the default scene naturally.
If you want another scene to be the default scene, then mark that scene as “Yes” for Set as default.
Scene ID:
Scene ID is the initialization of a scene. You need to assign a unique scene ID to every scene you wish to upload.
You can later use this Scene ID to assign a scene as the Target Scene under Hotspot, i.e. clicking on the hotspot will take you to this scene. You will get a guide to this under the “HotSpot” section.
Scene Type:
The scene type is set as ‘equirectangular’ by default. It means that it will view the Equirectangular format of the scene.
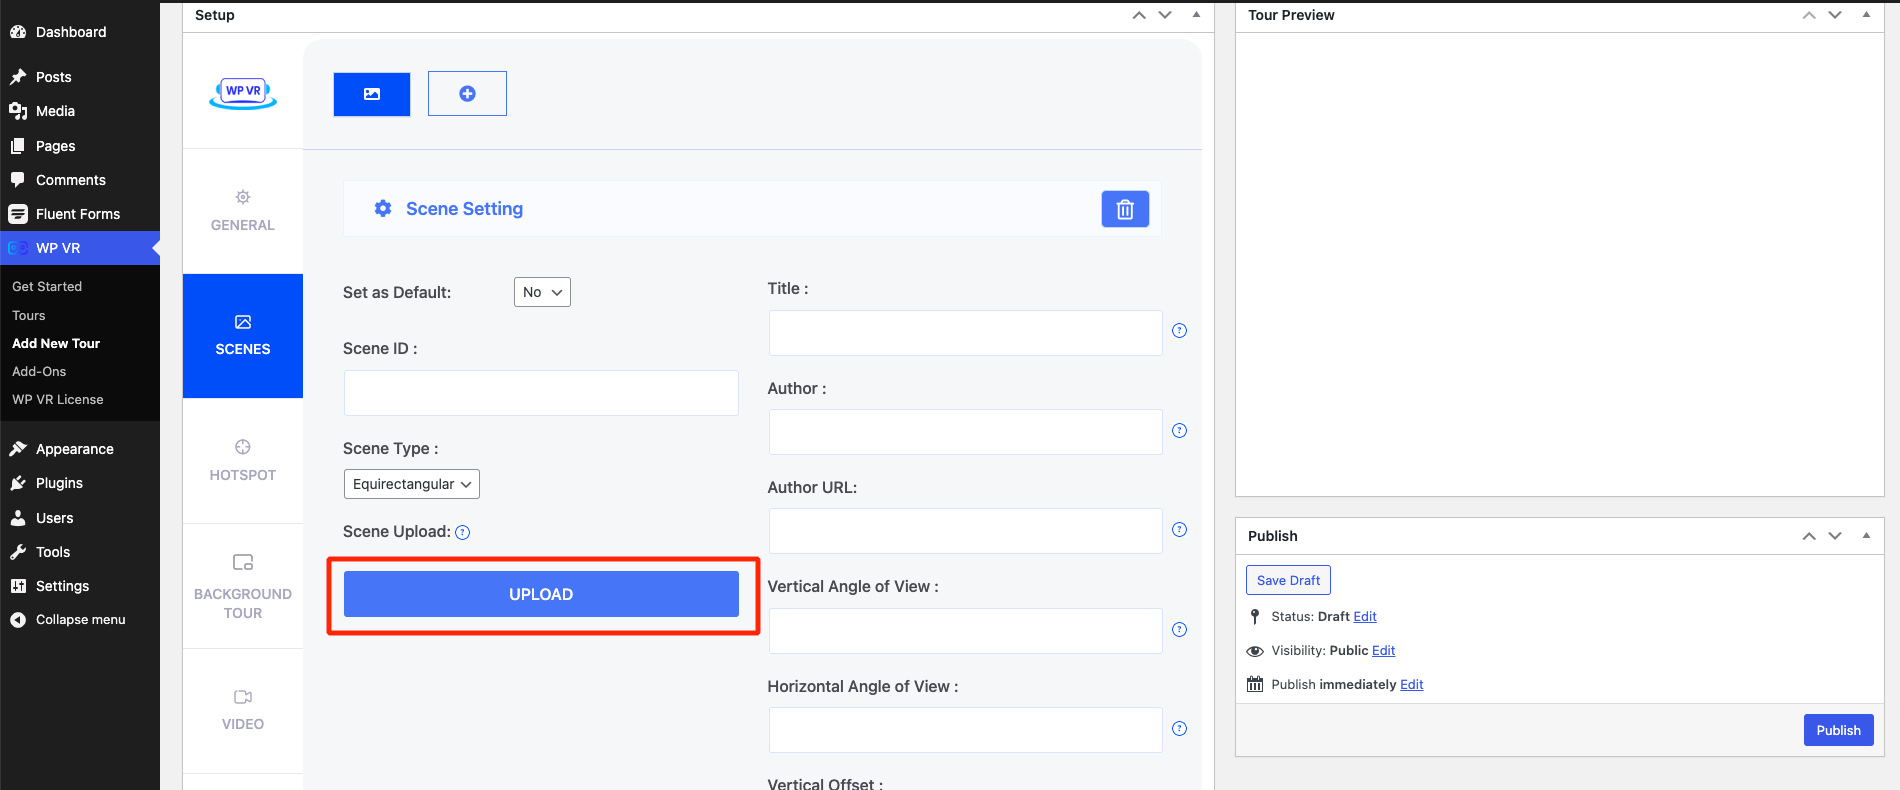
Scene Upload:
Here, click on the “UPLOAD” button and upload a 360-degree panoramic image to use it as your current scene.
Once you upload the image, a thumbnail will appear above the upload button.
This will mean that the image is uploaded as the current scene image.
FYI: Most mobile devices have restrictions on the resolution; they can support a maximum of 4096 px by 2048 px.
Hence, we suggest you use a panoramic image within these dimensions for the virtual tour to be responsive on all devices. (However, the plugin works with any resolution. You can upload high resolution images if you just want to view the tour on PC).
Preview:
Once you have uploaded the image, you can now click on the Preview button.
You will get a Tour Preview of the tour just beside the Scene Settings.
Every time you make changes to any settings, you can click on the Preview button to see the changes taking effect on the tour preview.
**The Tour Preview has a scene gallery below. You can double-click on a thumbnail there to go to any scene in the tour preview.
To add a second scene, on top, click on the “+” button.
And a new blank scene will be added.
To switch between scenes, click on the icons above. The currently viewed scene will be marked blue.
To delete a scene, you can simply go to the scene, then click on the “Trash Bin” icon and the scene will be deleted.
Here are more fields that you get :
Title: Specifies the name or title of the panoramic scene.
Author: Identifies the creator or photographer of the panoramic image.
Author URL: Provides a link to the author’s website or portfolio.
Vertical Angle of View: Determines the vertical field of view for the panoramic scene.
Horizontal Angle of View: Sets the horizontal field of view for the panoramic scene.
Set accordingly the field as per your needs.
That’s it with the basics of Scene Settings.
Now, add Hotspots to make the tour more meaningful and engaging.
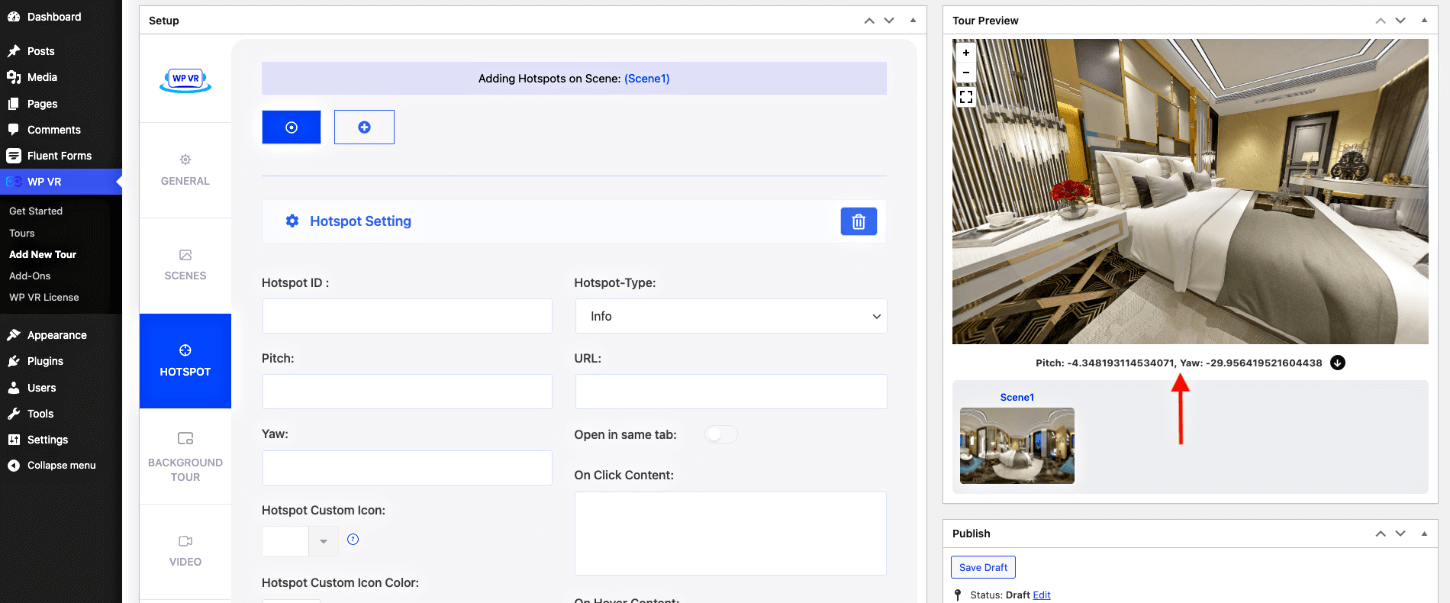
Step 5 – Use Hotspot Efficiently
For an active scene, you can add multiple hotspots. With this option, you can link any of your scenes with other scenes.
Also, you can add images, links, or video information via this option.
While on a Scene, go to the HotSpot tab and you get the hotspots you added for that particular Scene.
To add a hotspot for another scene, first, go to the Scene tab, select the desired Scene, then go to the Hotspot tab to view its respective Hotspots.
For a hotspot of a scene, initially, you will get the following options:
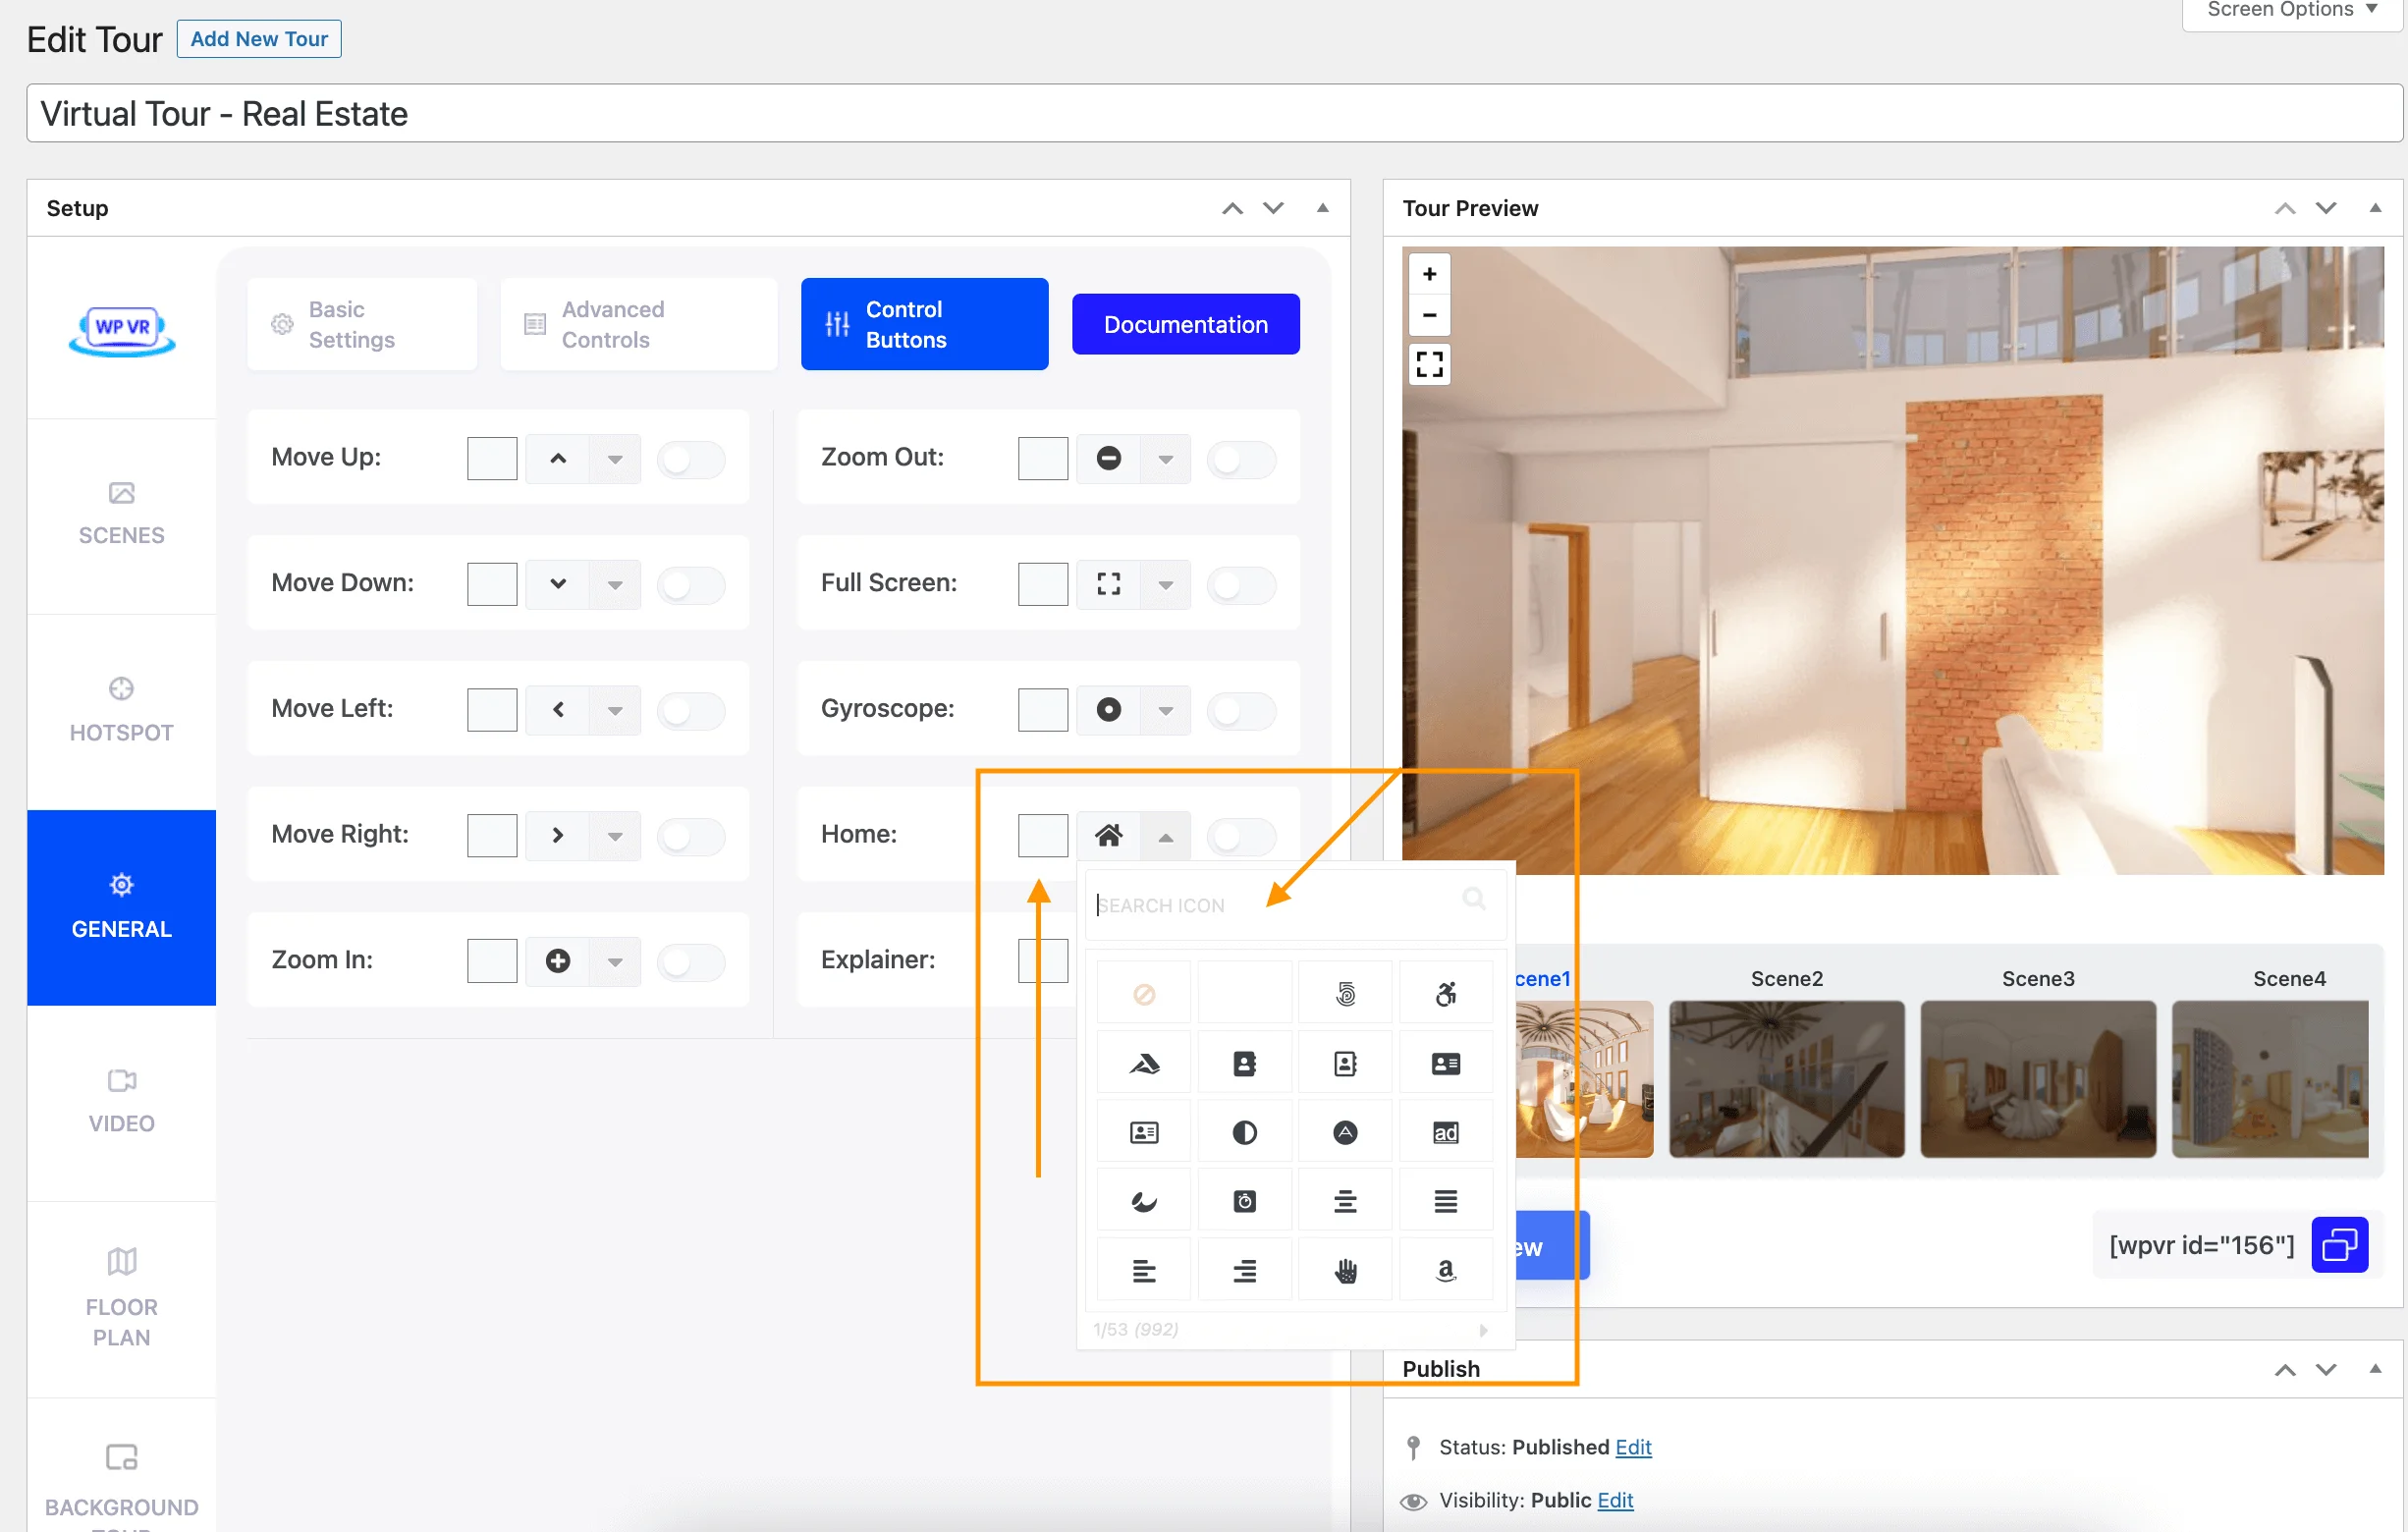
HotSpot ID:
You have to provide a unique Hotspot ID for every hotspot you create in a scene.
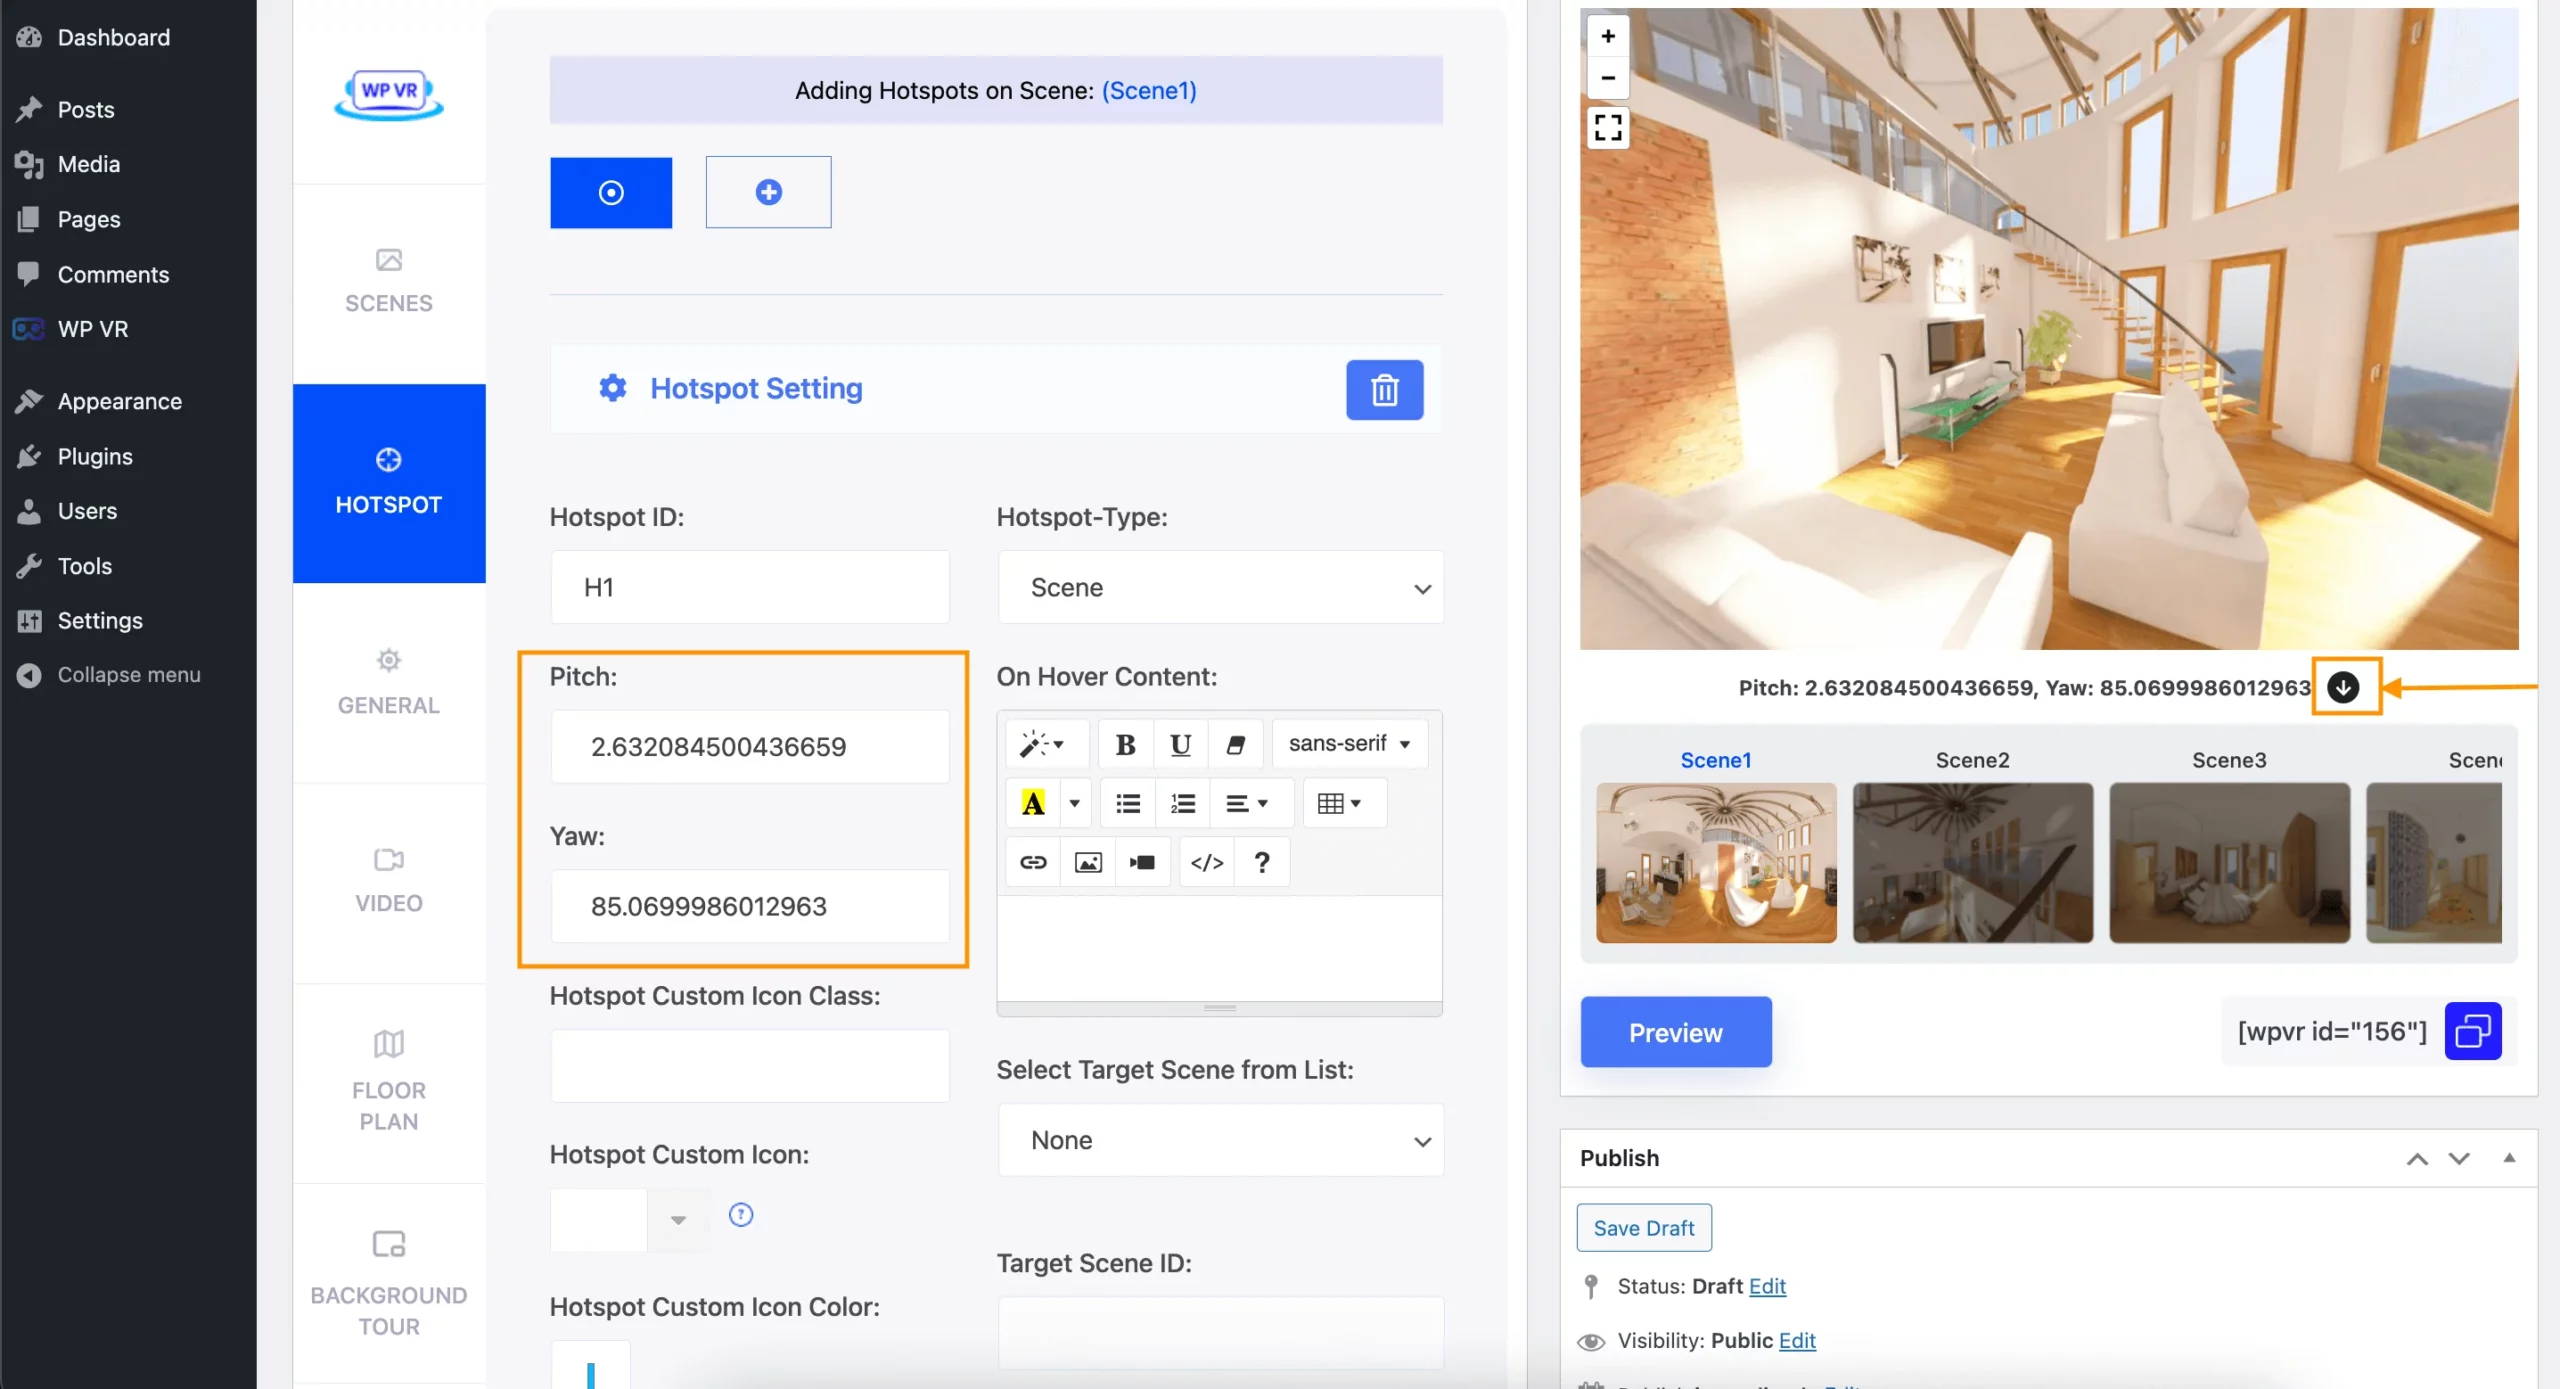
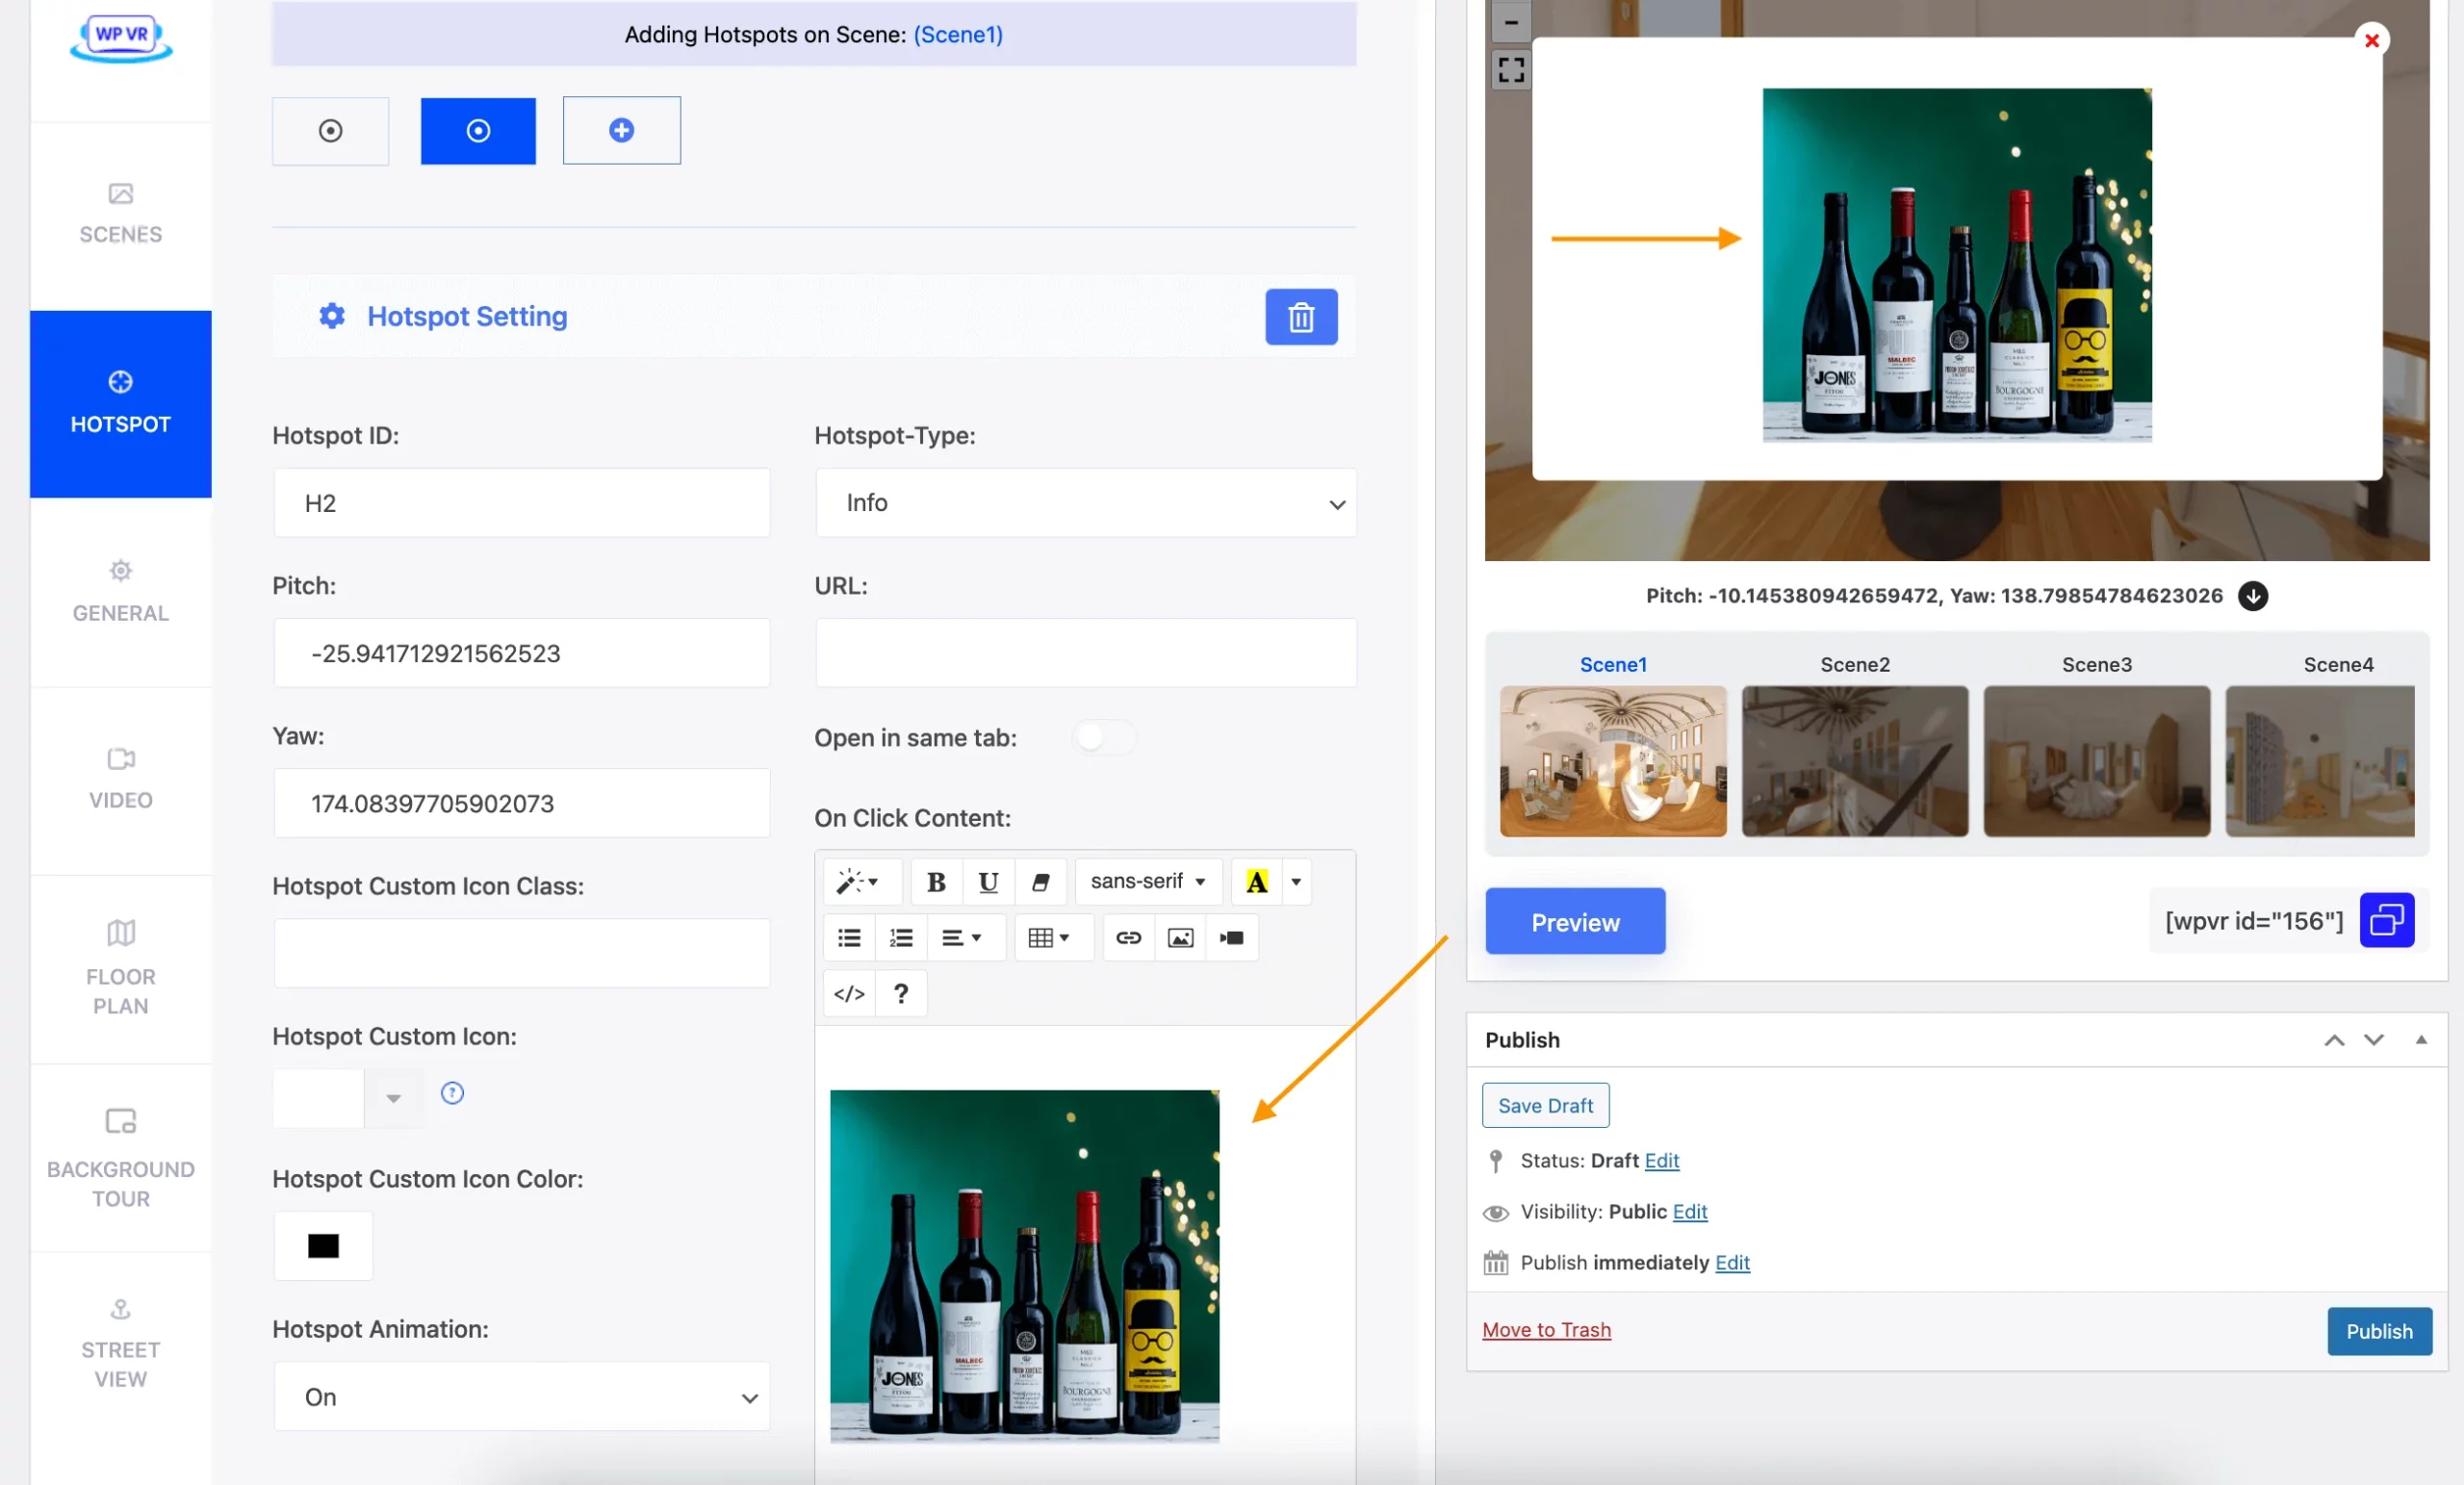
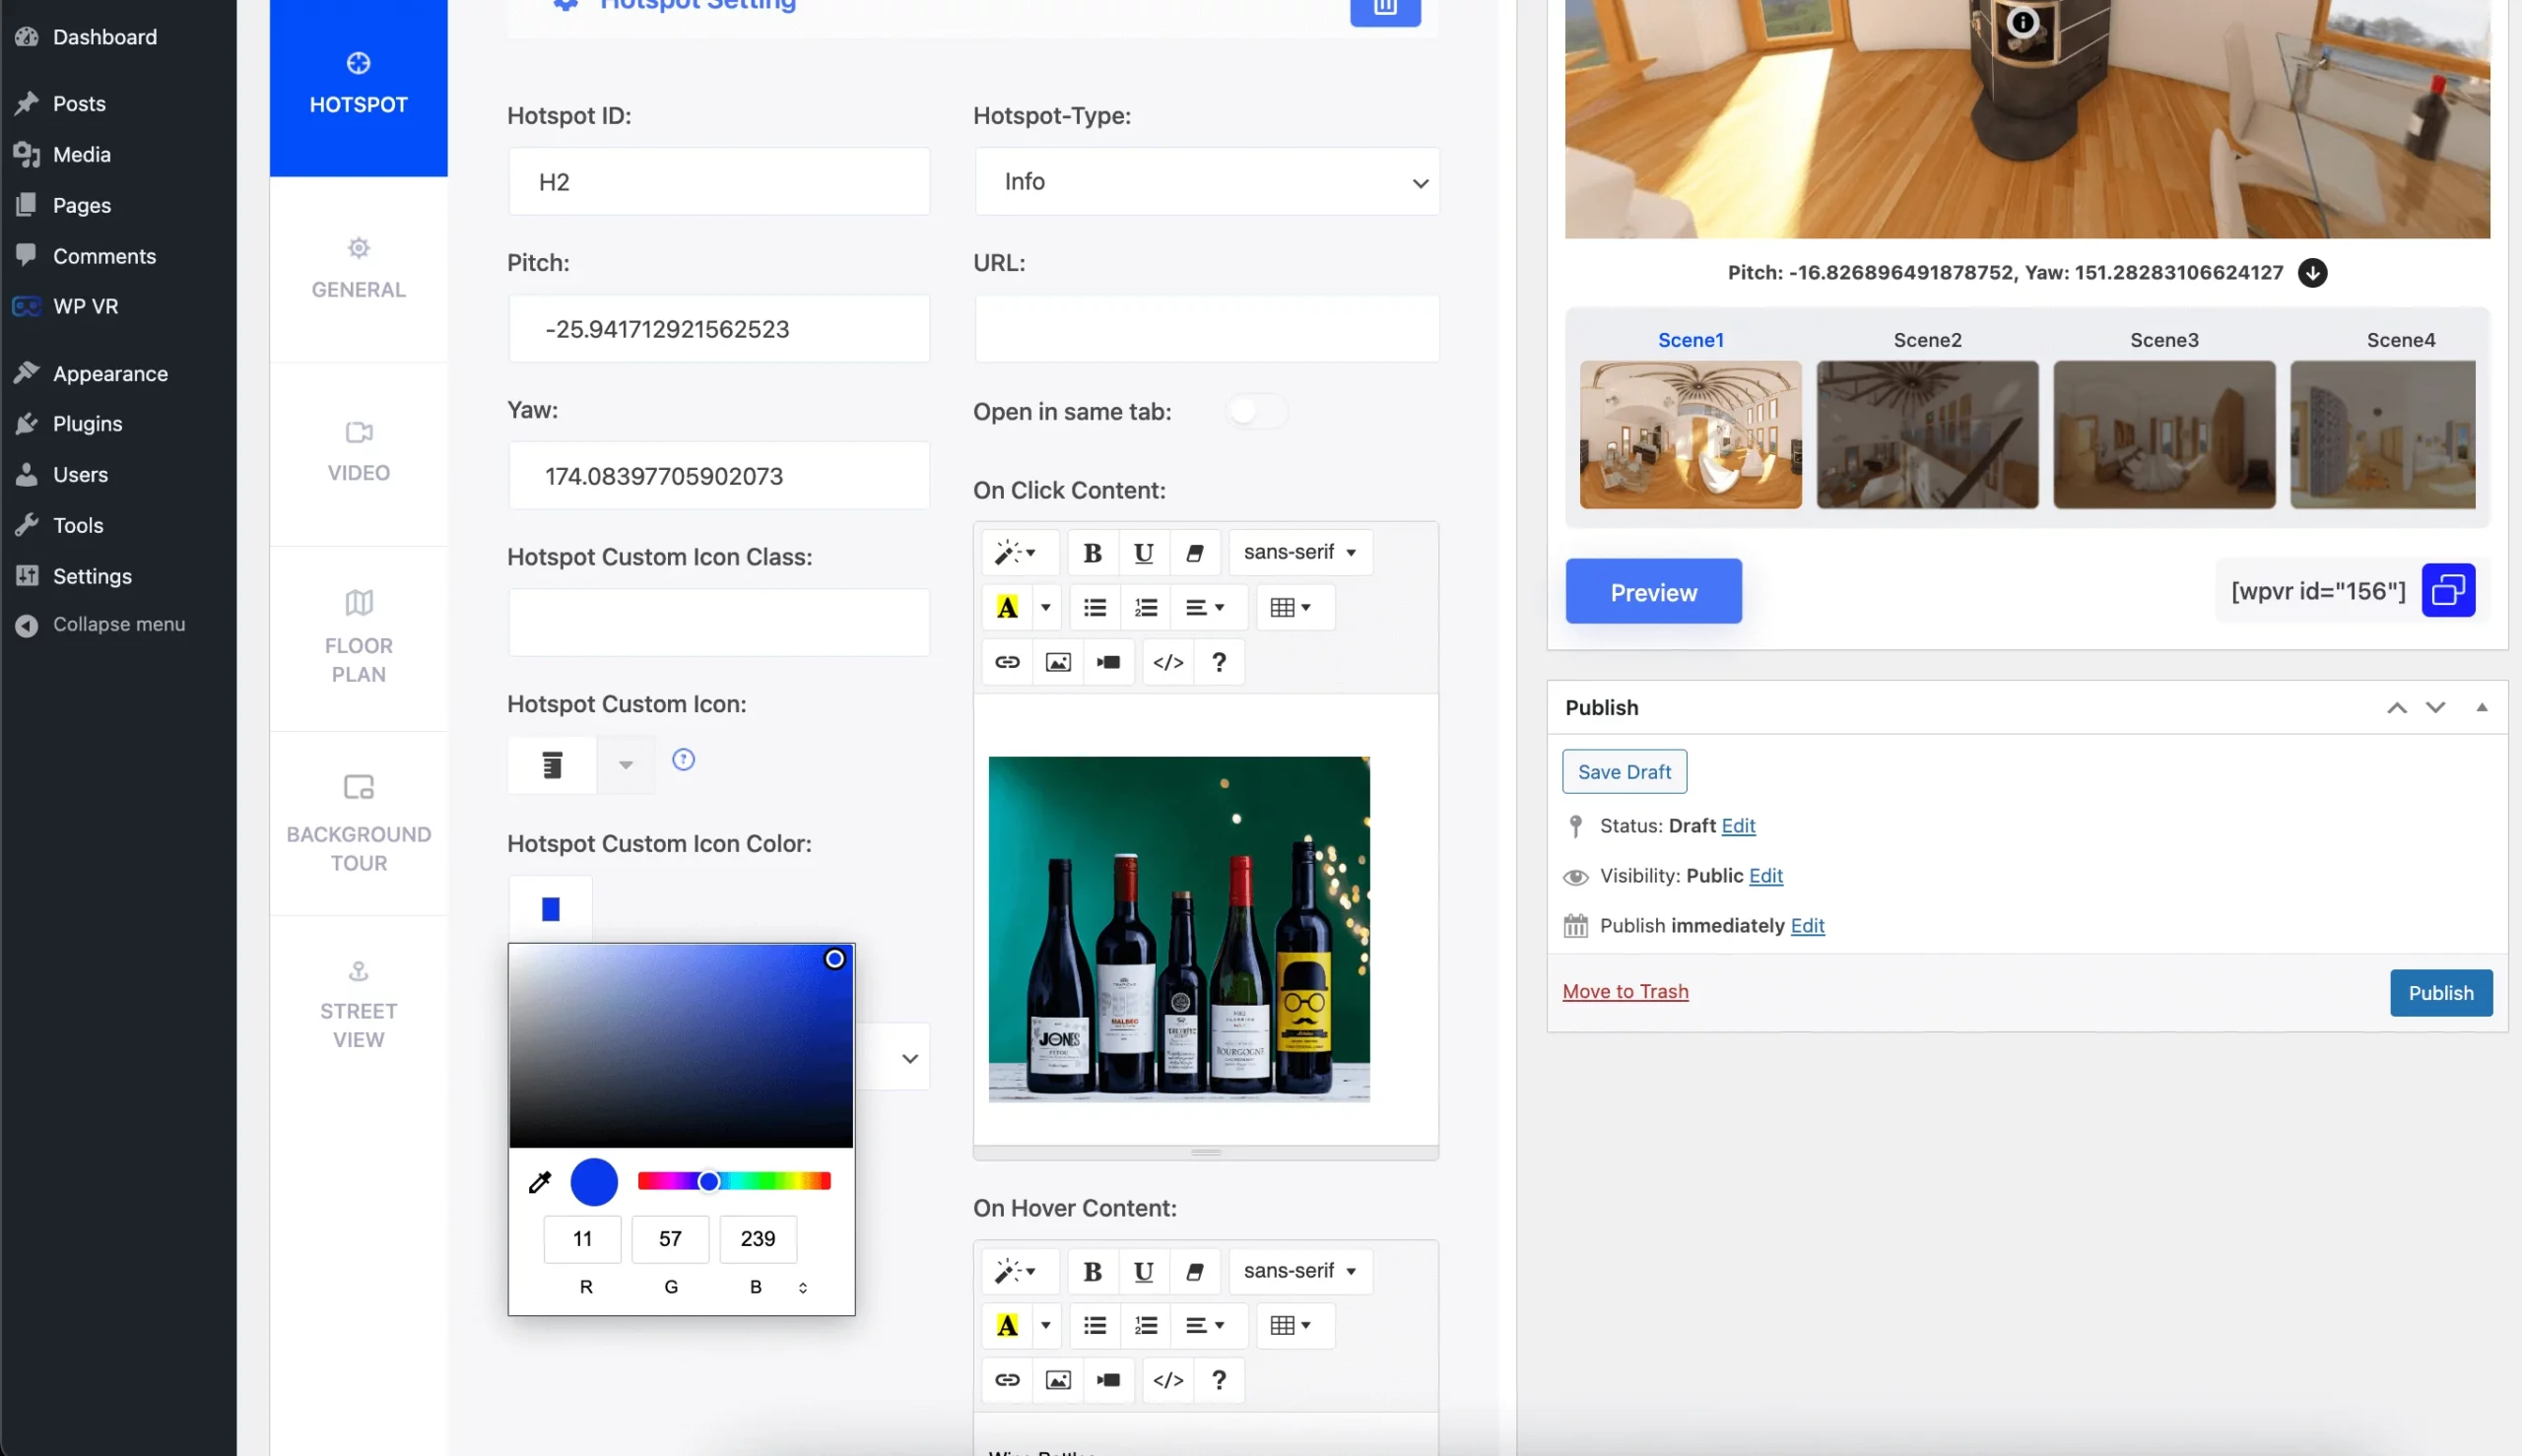
Pitch And Yaw:
The Pitch and Yaw are the coordinates required to define the point where the Hotspot will be placed.
You will be able to collect these from the Preview Tour.
Previously you set up the scene and clicked on Preview. The Preview Tour will be still there.
Scroll down to the Preview Tour and click on the point on the tour, where you want to place the Hotspot. You will see that the pitch and yaw coordinates will appear below the Preview Tour.
You can copy the Pitch and Yaw and input them in the required fields.
Or, you can click on the arrow button (beside the Pitch and Yaw coordinates under the Tour preview) to automatically collect and place Pitch and Yaw values in the Pitch and Yaw fields for a Hotspot.
Once you are done setting up the hotspot, click on the Preview button, and a hotspot icon will appear in the current scene on the spot from where you collected the coordinates of the Pitch and Yaw.
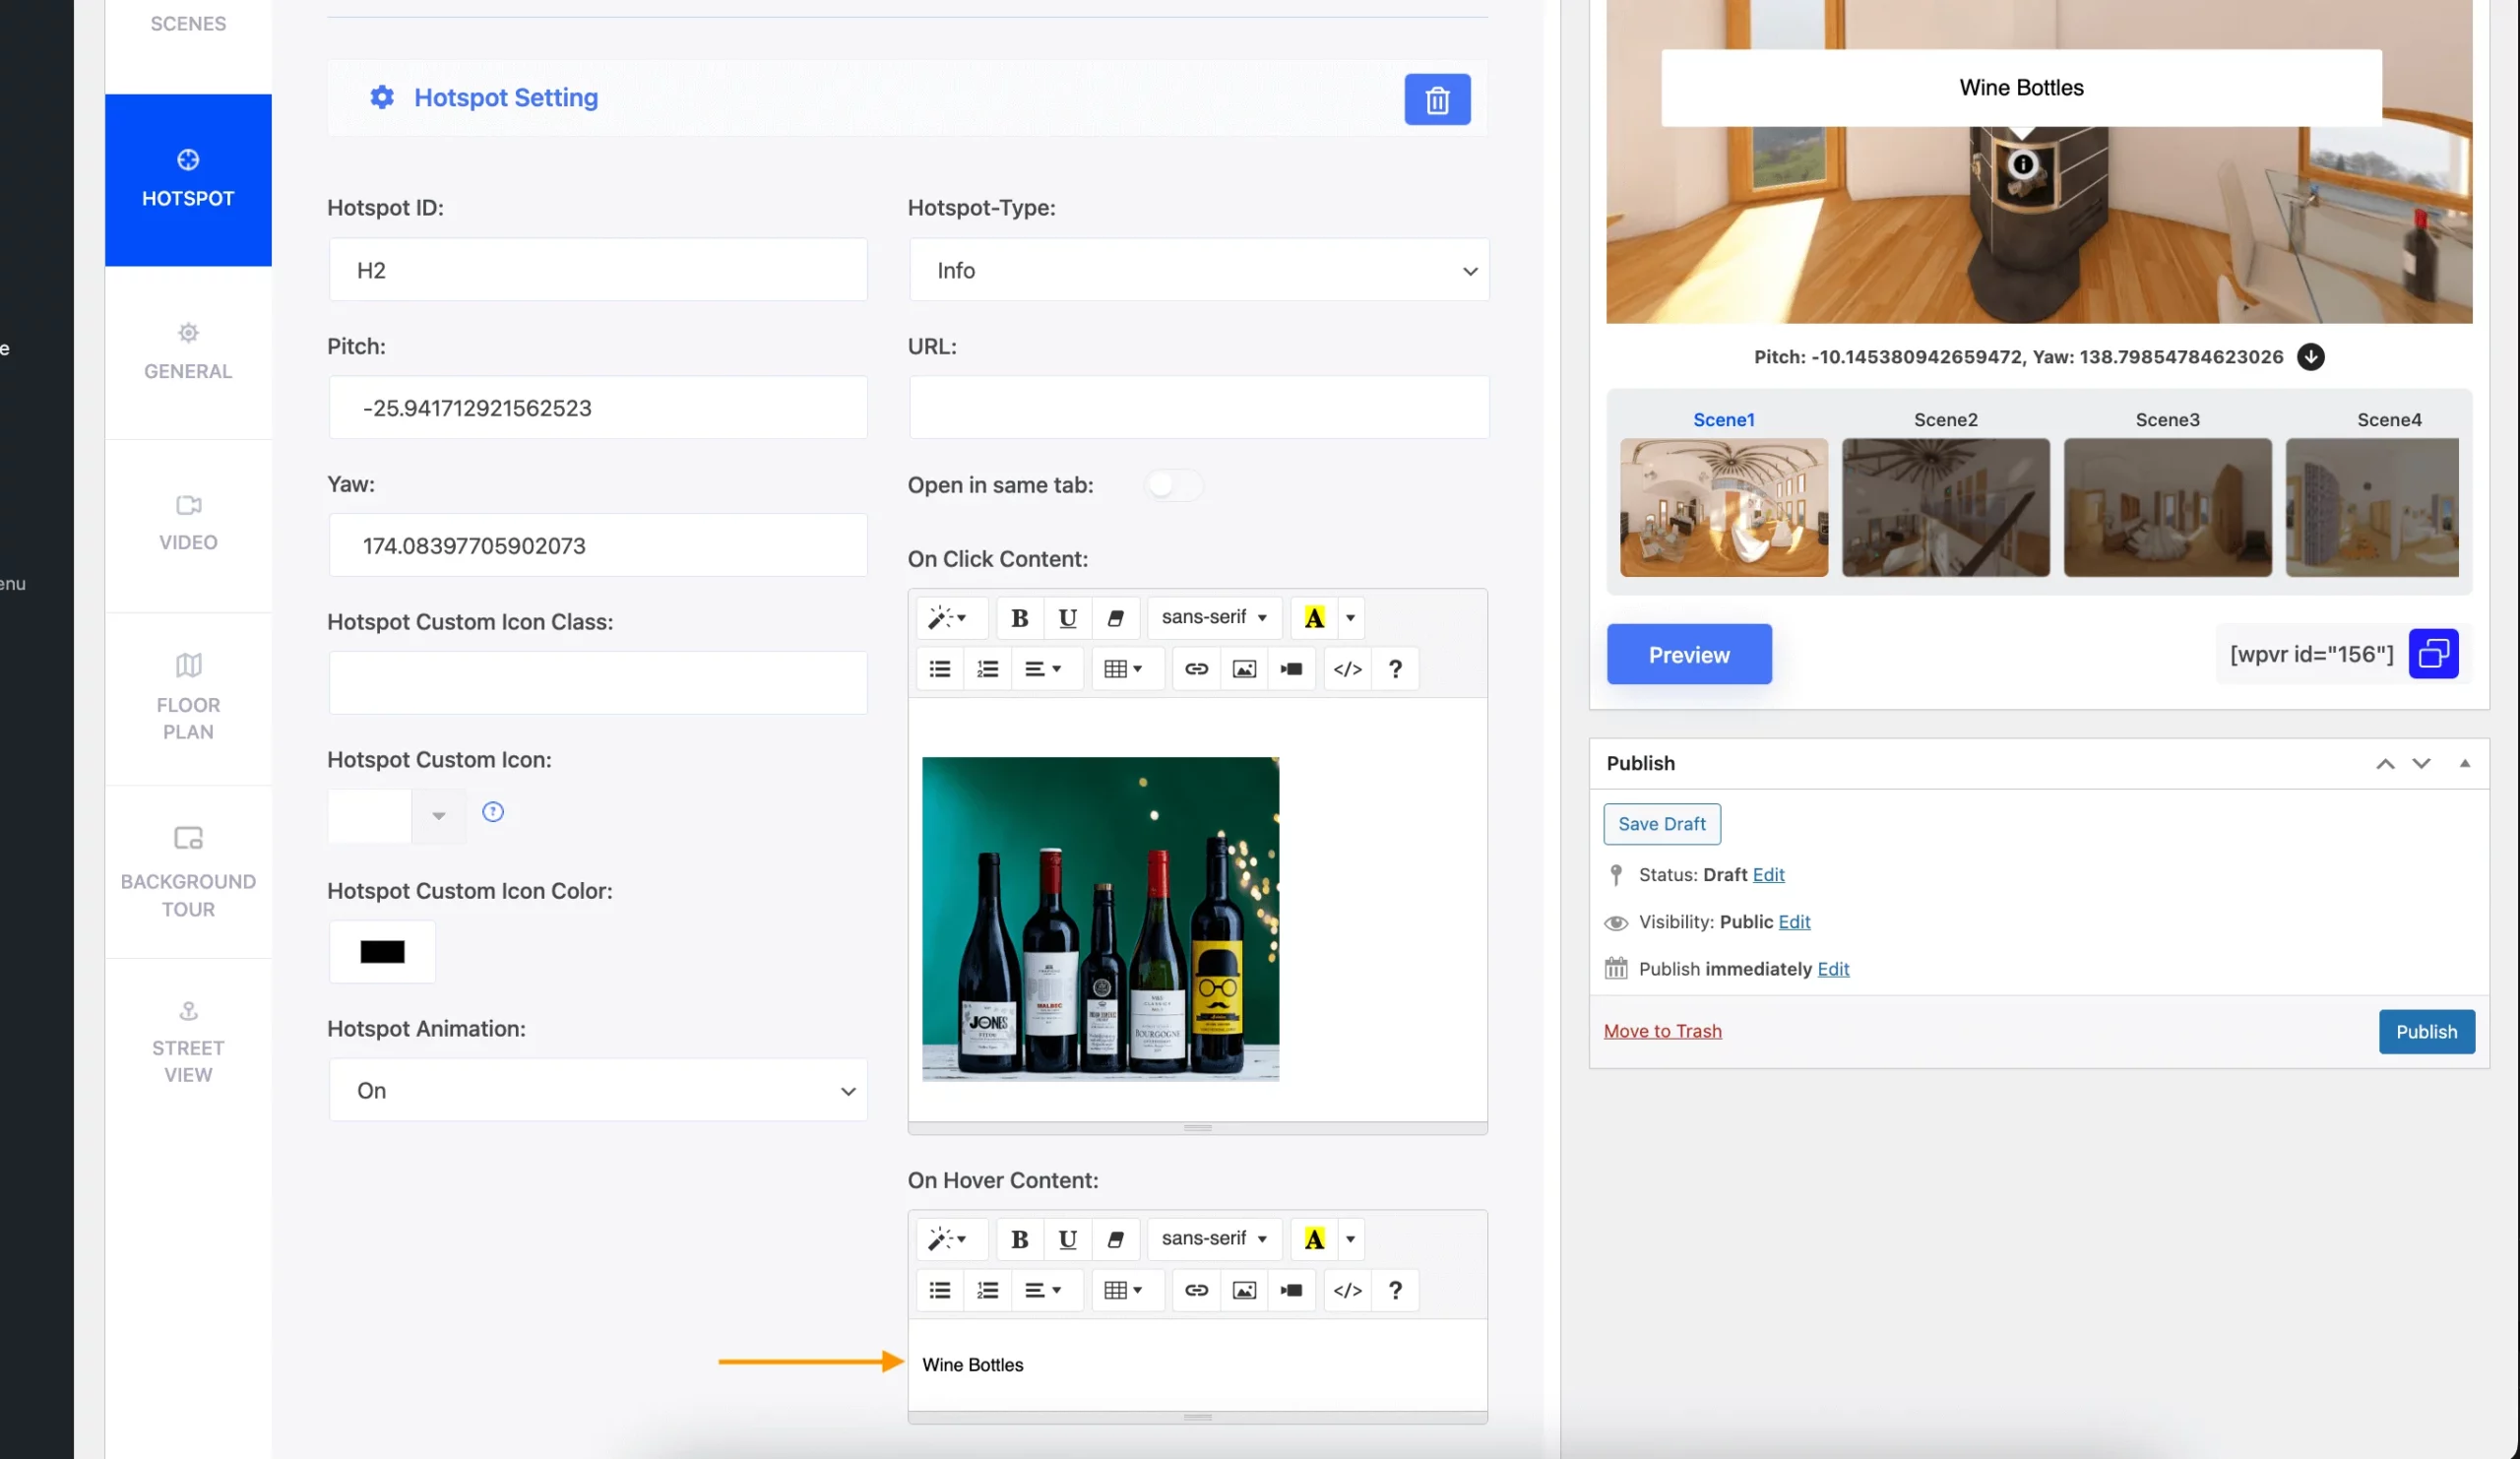
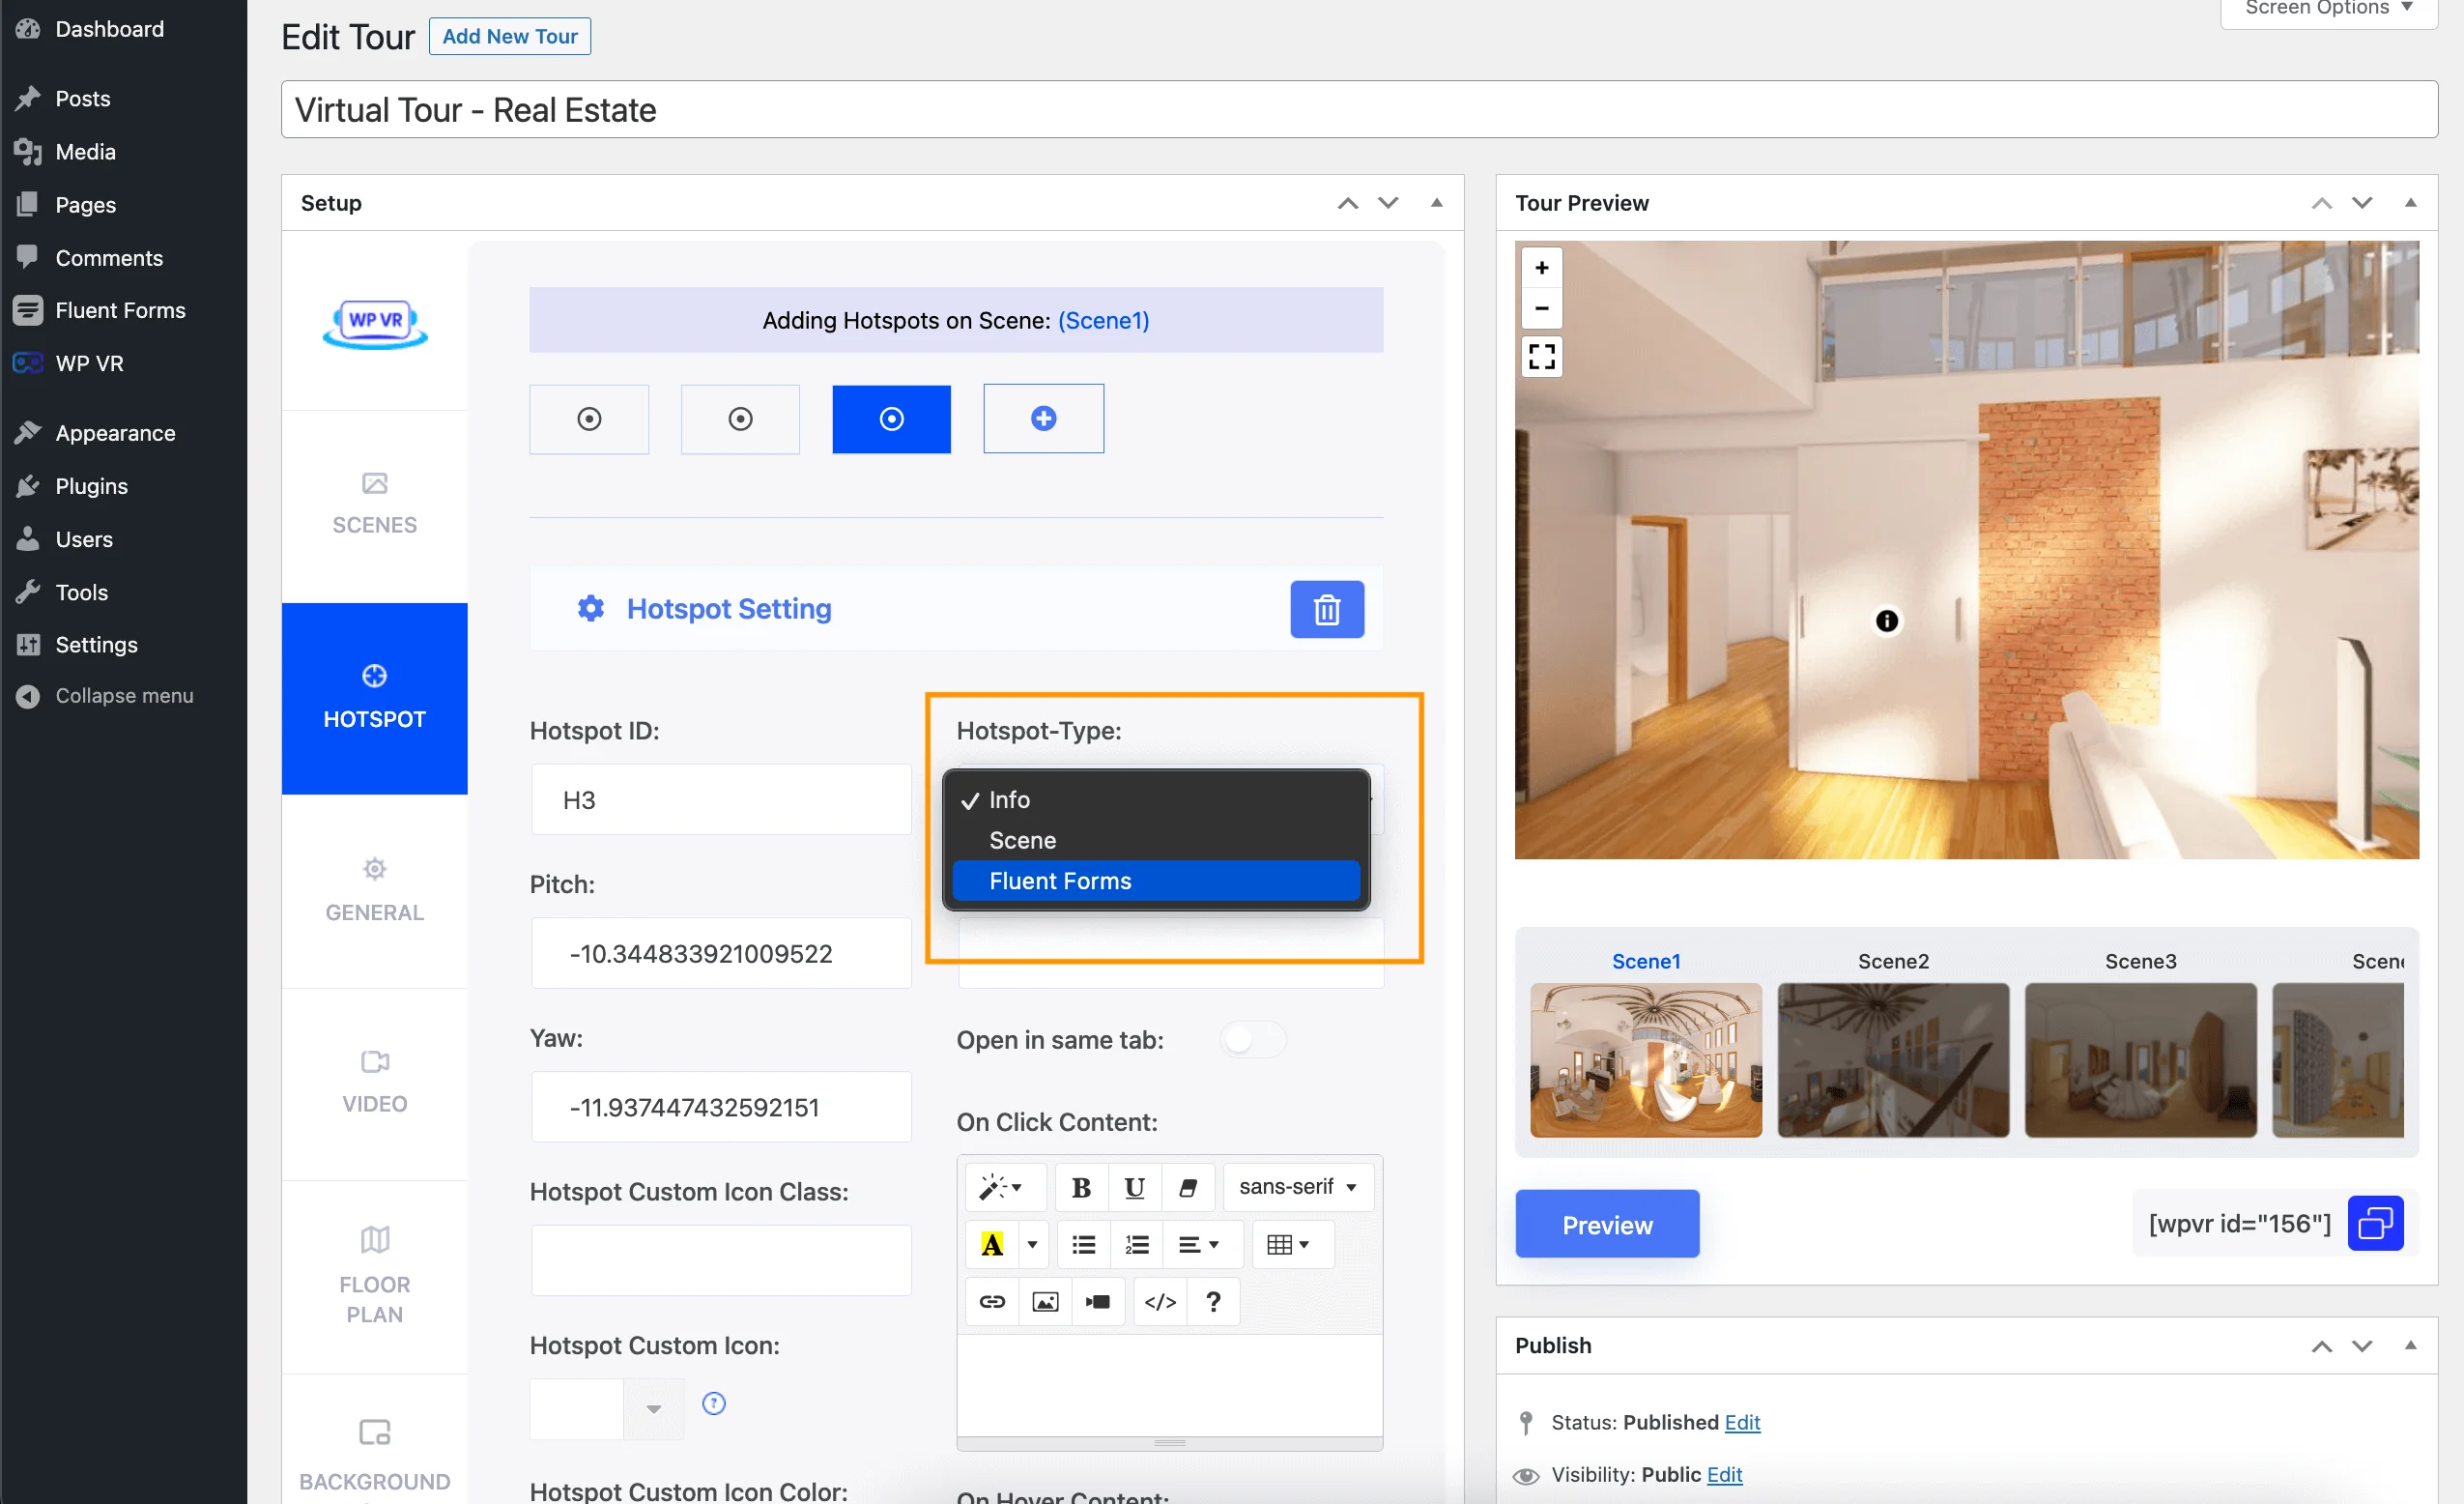
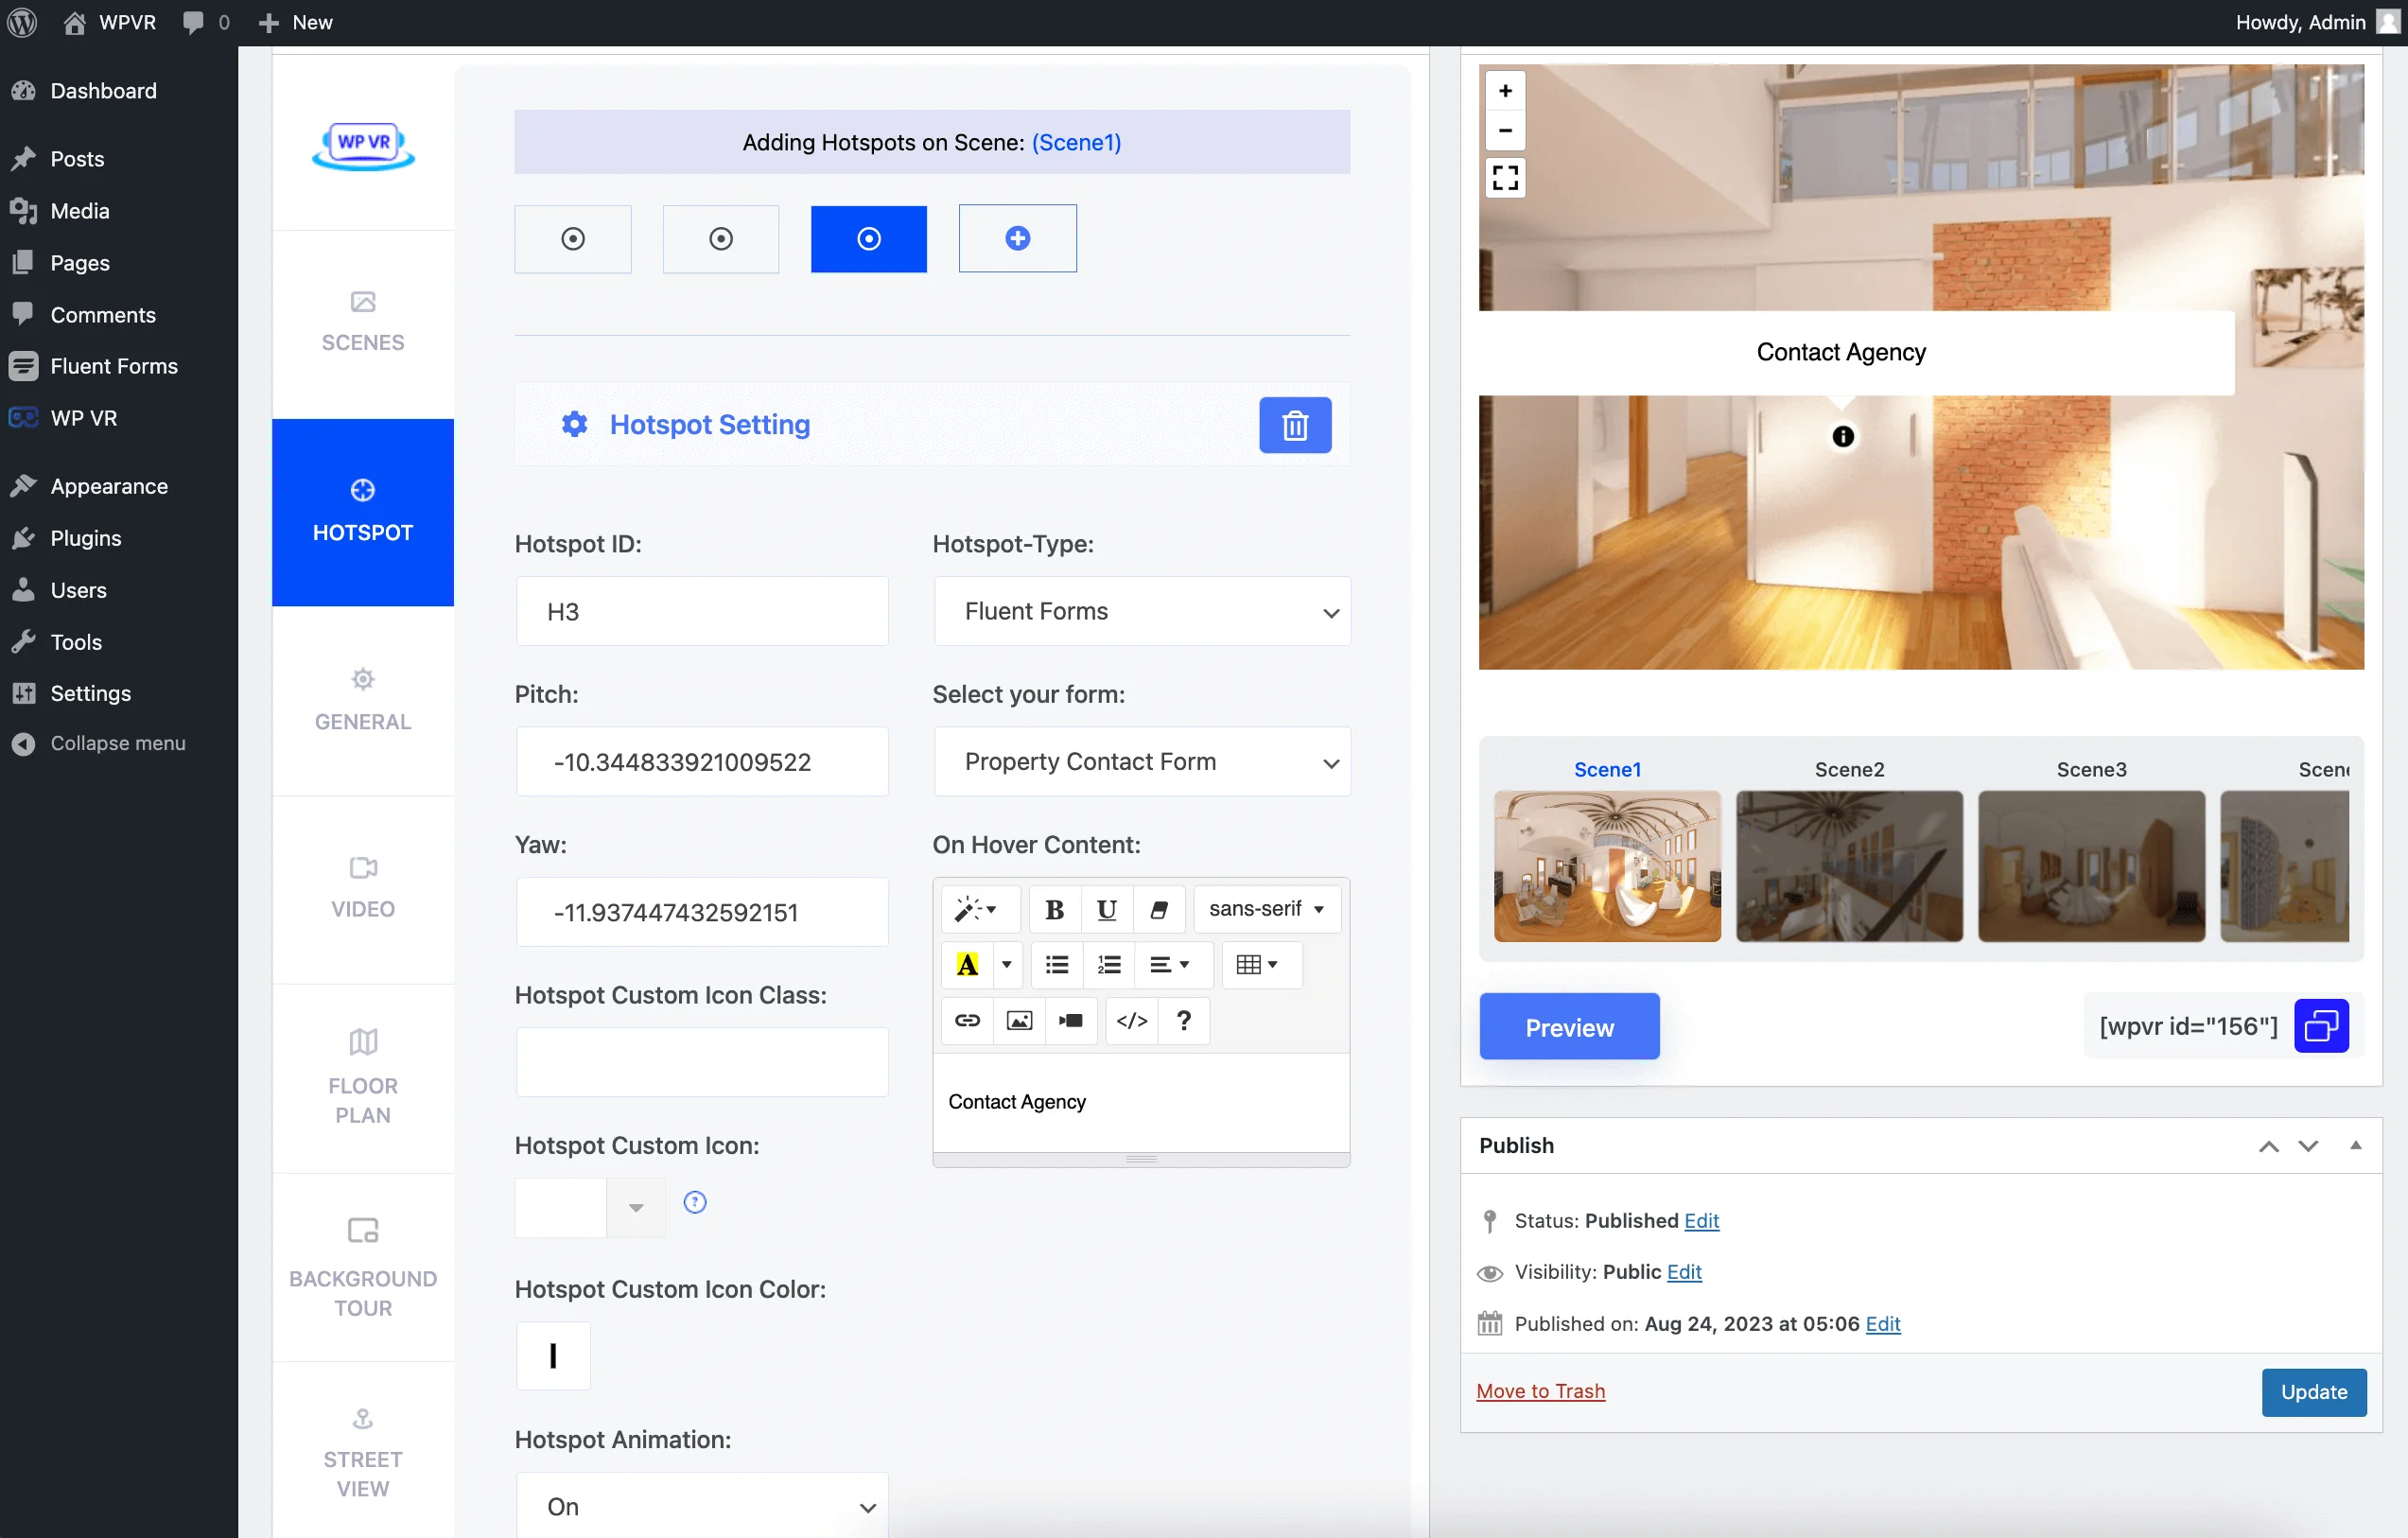
HotSpot Type:
There are two types of hotspots available:
Info
Scene
It comes as “Info” by default and you will view these fields:
URL.
On Click Content.
On Hover Content.
URL:
Provide the URL of a website, so clicking on the hotspot will take you to that website on a new tab.
On Click Content:
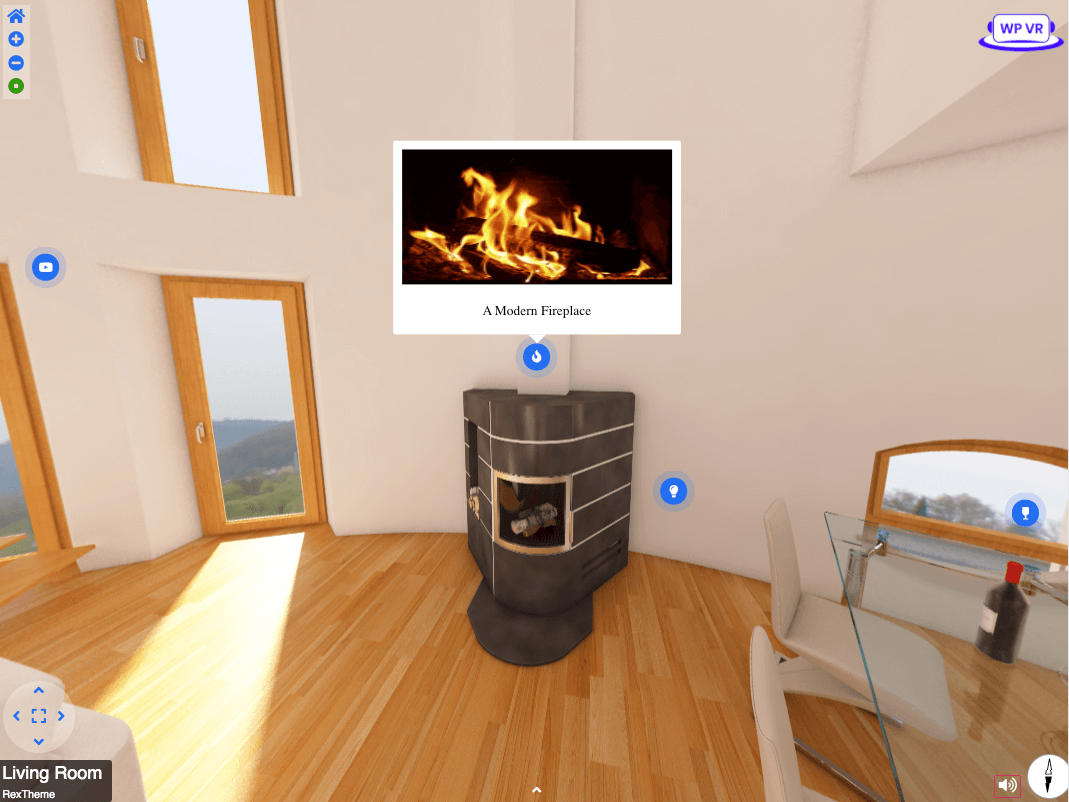
Here you can add content to your hotspot so that clicking on the hotspot will display a pop-up window over the tour with the content you entered. There are options to add text, images, videos, gifs and more!
On Hover Content:
Here you can add content to your hotspot so that if you just hover your mouse on the hotspot, the content will appear. And similar to the on click content, you can add whatever type of content you want.
You can also add images using the <img src> tag or add a video using the <iframe> snippet of the video to display them when you hover the mouse on the hotspot.
Now, let’s look at the Scene type hotspot.
A scene-type hotspot is used to connect two scenes, i.e., clicking on the hotspot will transmit you to another scene (assigned here).
If you change the hotspot style to Scene, then you will view these fields:
On Hover Content.
Select Target Scene from the List.
Target Scene ID.
On Hover Content:
Here you can add content to your hotspot so that if you just hover your mouse on the hotspot, the content will appear. In the content, you’ll be able to add image [maybe of the scene that you’re guiding them to], videos, images etc.
Here’s an example:
You can also add images using the <img src> tag or add a video using the <iframe> snippet of the video to display them when you hover the mouse on the hotspot.
Select Target Scene and the ID from the List:
For every Scene you create, their Scene IDs get listed here for you to choose from. Whichever you choose will be the scene where the hotspot will take you. This field shows you the Id of the Scene that you selected from the Target Scene from the List.
The ID automatically gets loaded.
**When you choose a hotspot to be Scene type, the hotspot icon on the tour will change to a small Arrow.
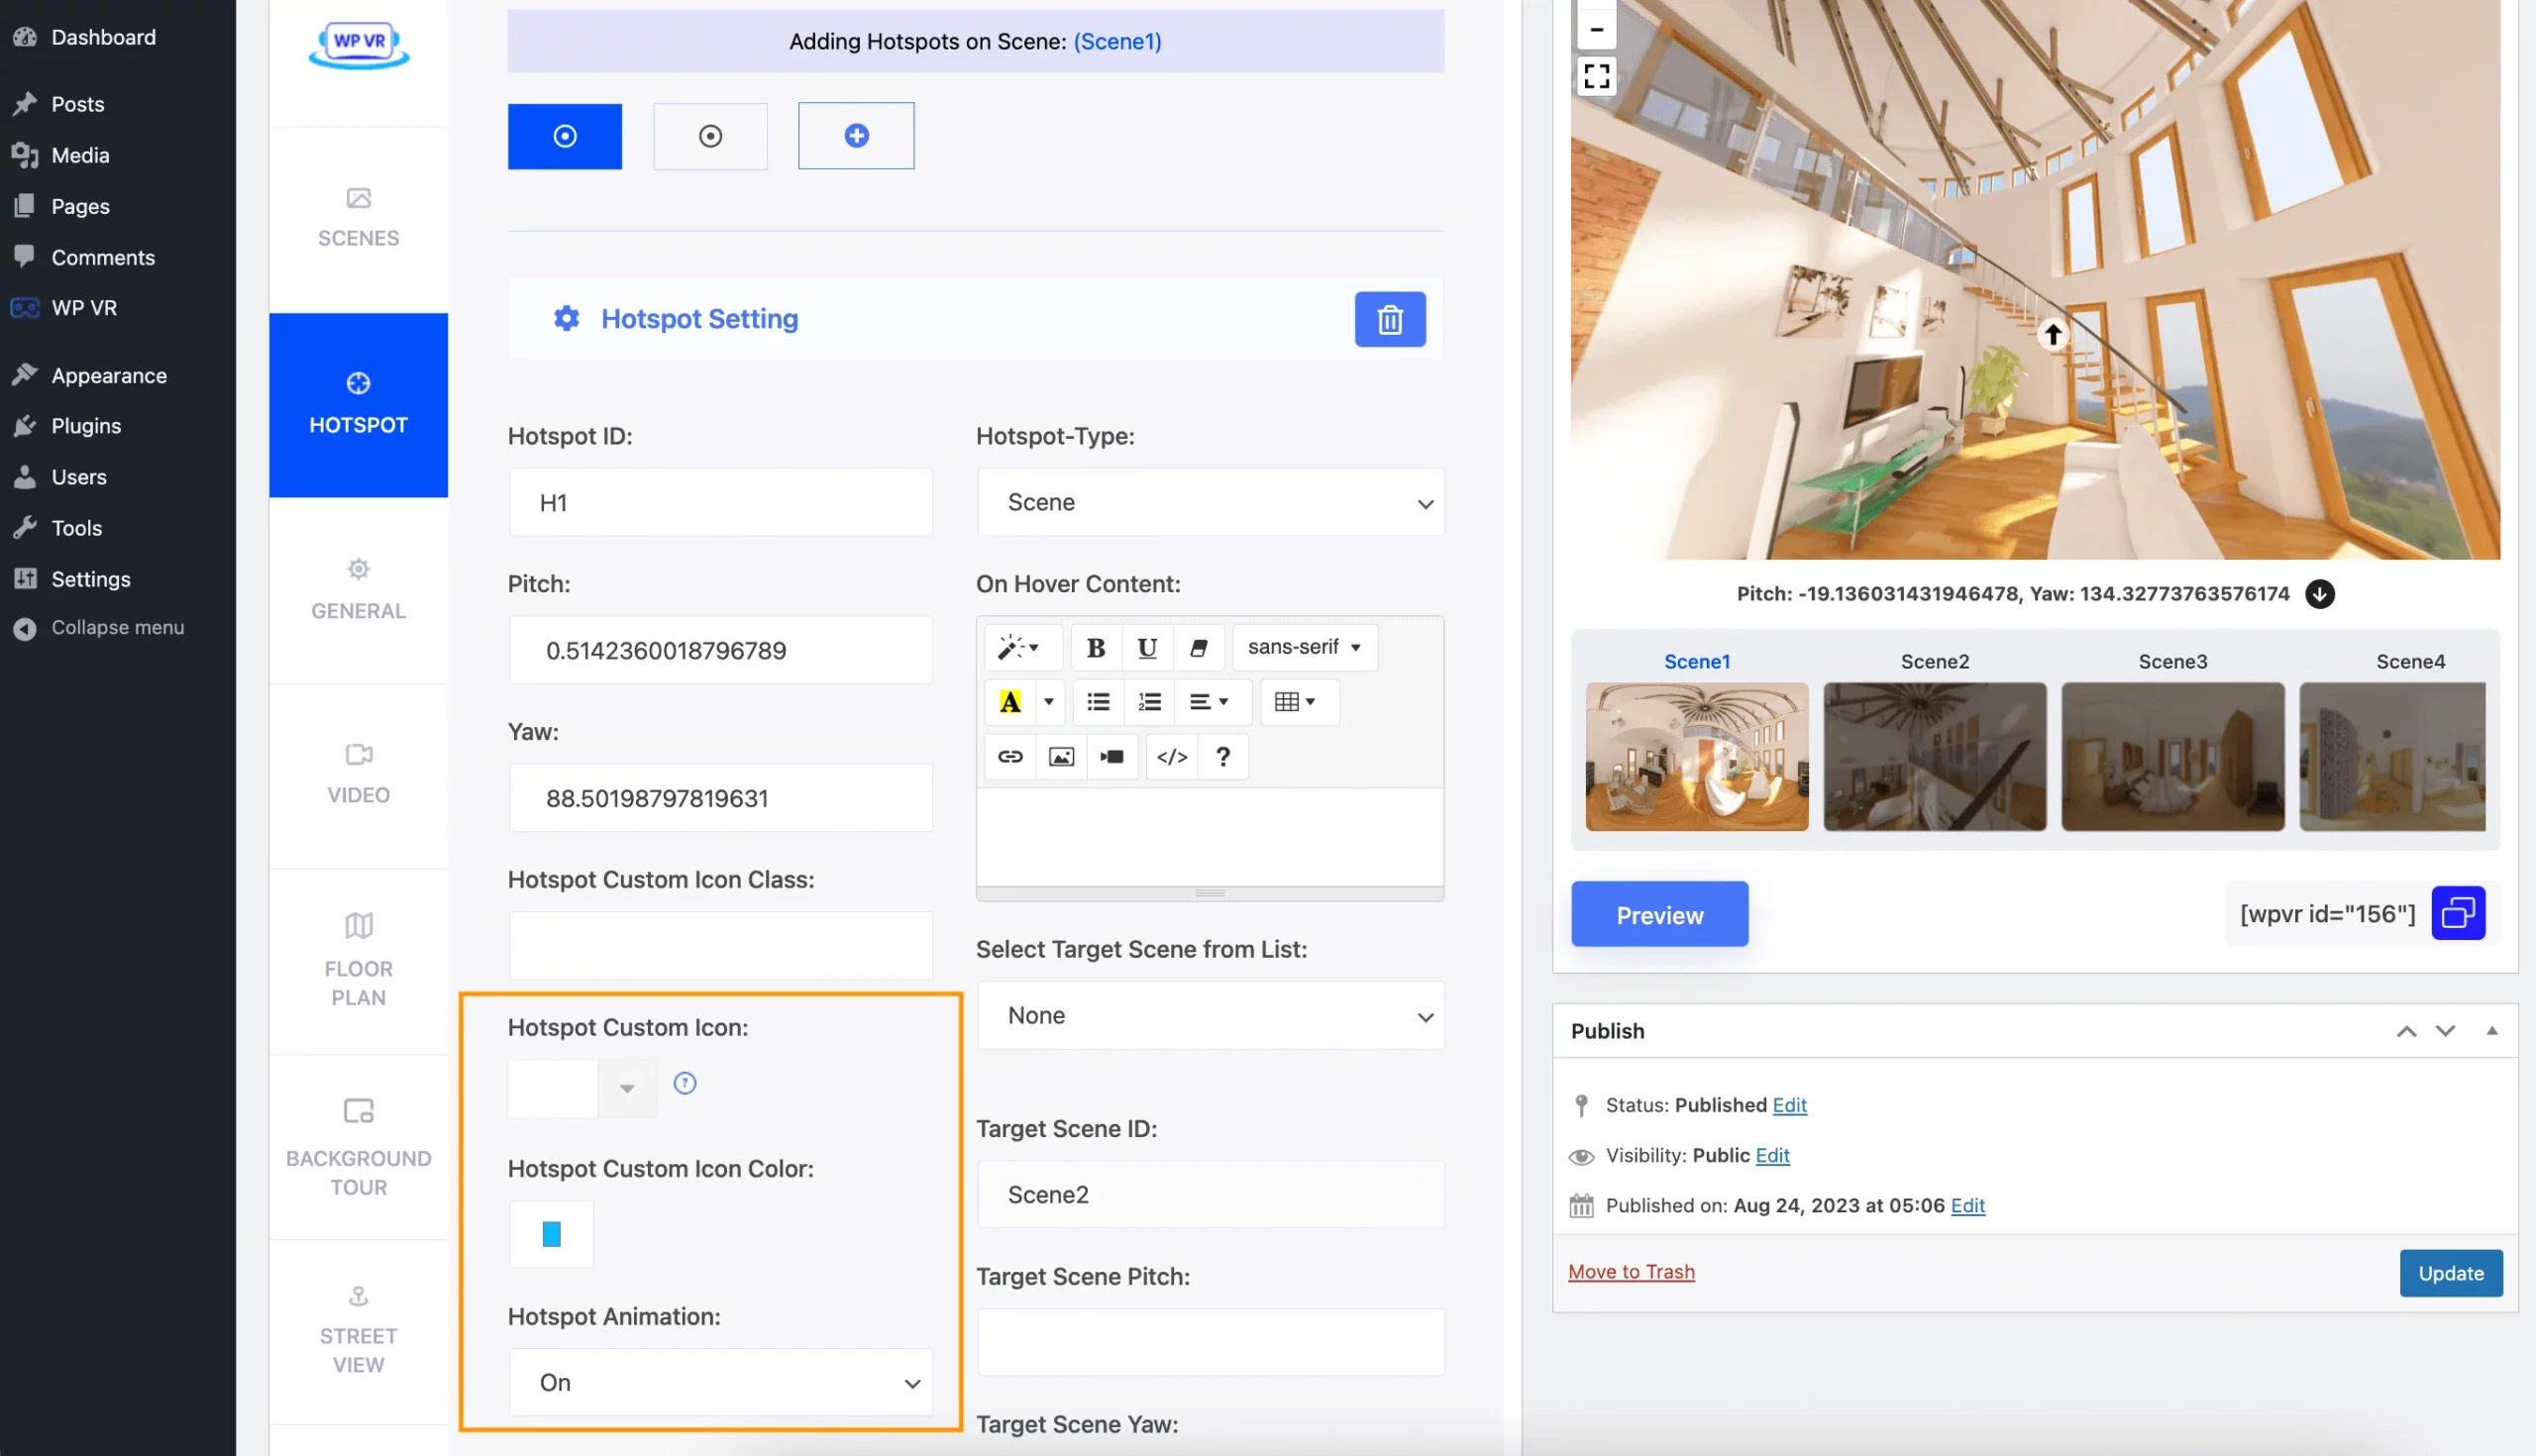
Hotspot Custom Icon Class:
This field is there to allow you to implement customizations of the hotspot content.
Here you can apply customization to the hotspot icon. You may use any icon of your own choice. Let me give you an example.
To customize your hotspot icon, go to your Appearance > Editor. Choose the style sheet of your current theme, or you may go to Appearance > Customize > Additional CSS.
Here, create a class and under the class, add your custom style CSS code for customization. Click Save. For example:
Here I set the class name as “custom-icon” but you can give any name you want. Then set the height and width of the image (ideally 26px by 26px for icons). Then provide the image URL. You can add a border radius if you want the icon to be circular.
Here’s how my one looks:
Then Publish.
Hotspot Custom Icon Class:
Now go to your tour and input the class name “custom-icon” on the “Hotspot custom icon class” field for the hotspot you wish this icon to apply on.
Then update the tour. This icon won’t show at the back end, but it will appear on the front-end.
Hence, embed the tour on a page and preview it to see the result.
Add More Hotspot As You Move On:
To add a second hotspot, click on the “+” button above and a new blank hotspot will be added.
To remove a hotspot, simply click on the trash icon and the hotspot will be deleted.
That’s it, that’s all you need to know about setting up a hotspot for now.
Hotspot Special Features In WPVR PRO
Now utilize Steps 3, 4, and 5 to add more scenes and set up a virtual tour.
You can also customize your icon with these options :
Hotspot Custom Background Color: This allows you to set a specific background color for hotspots in the panoramic scene.
Hotspot Custom Background Shape: This allows you to set specific background shapes for hotspot icons like circles, rectangles or hexagon.
Hotspot Custom Icon Color: Enables customization of the color of the icon used for hotspots in the panoramic view.
Hotspot Animation: Provides options to add visual effects or movements to hotspots, making them more noticeable or interactive. This icon won’t show at the back end, but it will appear on the front end.
Step 6 – Publish The Tour and Collect Tour ID
Once done, move to the next step.
Publish The Tour: Once you have successfully set the settings for General settings, Scene settings, and Hotspots settings, click on the Publish button on the top right side of the page.
Once you publish, that button will change to Update.
Collect Tour ID: On the tour setting pages, you will see a box named Using This Tour where the shortcode and the Tour ID is provided. You will need the Tour ID to embed your virtual tour on the website.
You can also get the Tour ID from the tours section.
All the tours you have created will be stored under Dashboard > WPVR > Tours.
You will see the list of the tours you have created. You can collect the Shortcode or tour ID.
Step 7 – Place The Virtual Tour On Your Website
Placing the virtual tour on your website depends on the page editor you use.
Classic editor: For Classic Editor, copy and paste the shortcode of your virtual tour. You can add height, width, radius, or any designs you want within the shortcode.
Preview or Publish the page to find the virtual tour added.
Other page editors (such as Visual Composer):
For page builders such as Beaver Builder, Visual Composer, etc, you need to use an “HTML” block (such as Raw HTML block) and input the shortcode there.
Step 8 – Enjoy The Benefits Of Using A Virtual Tour
Now that you know how to create, set up, and present the virtual tour on your website. The next thing to do is to sit and see your audience getting excited, visitors becoming dedicated prospects, and prospects turning into customers.
As you can see, it is super easy to create a virtual tour for your WordPress site. Go ahead and start using virtual tours ASAP.
In a later section, I will discuss how many business niches can use and benefit from using virtual tours. You will definitely be able to relate.
Anyways, now most of us are not familiar with panoramic images since they cannot be taken without a few equipment and methods. And as you saw in the last section, in order to create a virtual tour, you will need to use a Seamless 360 Panoramic Image.
Now, let us look at how you can capture 360 panoramic images on your own.
Capturing A Perfect 360 Panoramic Image
You can capture and create 360 panoramic images in 3 ways:
Digital 360 Degree Cameras are the best for this case. They are easy to use, less hassle, and cost-effective.
However, I will give you a proper guide to follow all the 3 methods with suggestions on the equipment required, and tips and directions to successfully create 360 Panoramic Images.
1. Using Digital 360 Degree Cameras
There are certain cameras available just for 360-degree photography. These are digital cameras that usually have multiple built-in Fisheye lenses that cover a complete 360 degrees in one go.
Here, we will give a brief guide on using the Ricoh Theta V to take seamless 360 panoramic images.
Let us look at the tools required.
Equipment Required:
1. Ricoh Theta V
A Ricoh Theta V is a slim camera with two Fisheye lenses in opposite directions. Each lens captures a complete 180 degrees both horizontally and vertically.
The main advantage of this camera is that it has an auto-stitching function, i.e., once you take a photo, the output will automatically be a 360 panoramic image. You do not need to do any manual stitching or take multiple images.
2. Monopod
A Monopod is a camera that has 1 extendable leg, fixable at specific heights. Since the Ricoh Theta covers a complete 360 degrees, a tripod would be obstructive with its 3 legs. A Monopod will not appear in the image at all.
The app gives you features to control white balance, ISO, bracketing, and shutter timer.
The main reason to use the app is to be able to take photos remotely. Since the 360 camera covers all directions in one go, you clicking manually would mean that you would be on the image.
With the help of the app, you can set the devices up, go to the next room and use the app to capture the image.
Tips And Directions To Use
Place the Monopod on the stand and attach the camera to it. Place the devices at a point near the center of the room.
Toggle the Monopod to place the camera at a height similar to the height of an average person’s eyes or shoulder. This will create a more realistic effect when creating a virtual tour.
Connect the phone app to the camera, and go on live view mode. Here, it will show the image in a 360 Equirectangular format, to see if you have adjusted all the settings correctly and if the image looks good.
During the day, it is advised to keep the ISO between 200-400 based on the surrounding light. At night you should lower the ISO to 100 or below to get less noise in the image.
Enable the “noise reduction” option from the app to improve image quality.
Go outside the room and prepare to shoot the image.
Turn the live view mode “off” since it can causes a shutter lag if turned “on”.
Capture the photo which will be saved either on your phone’s photo gallery or in the memory card of the camera.
The device automatically does the stitching and processing so you do not have to do any extra hard work.
That’s it! You now have a seamless 360 panoramic image. You can upload this image to WPVR and create a stunning virtual tour.
2. Using DSLR To Capture 360 Panoramic Images
DSLRs are usually used for professional photography and can capture high-quality images. However, it is quite difficult to capture 360 panoramic images using a DSLR.
You will need to capture several images to cover complete 360 degrees in all directions, and then do some editing to achieve a proper 360 panoramic image.
Here’s a brief guide to help you out.
Equipment Required:
1. A Quality DSLR Body
Use a DSLR body with high dpi that has a bracketing feature.
**Bracketing refers to taking a certain photo multiple times at different exposures and then merging them together to form a photo with a balanced exposure.
A Panohead/Nodalhead is a piece of equipment to that you attach your camera to. You can then can set the camera to rotate at fixed horizontal angles using the Panohead rings. This will ensure you cover a complete 360 degrees horizontally, without overlapping.
If you are willing to capture images on an uneven or unbalanced ground location, then you may use a Ball head to balance your camera on a proper horizontal axis.
A tripod is a camera stand with 3 legs that are extendable and fixable to specific heights. It has a horizontal 360 spinnable top section, with a handle, on which the ball head or the Panohead (in case you don’t use a ball head) is attached.
The Panohead ring will help to control the angles you can spin the camera.
Chose a time of the day when there is suitable light from all directions to take photographs. If you’re shooting at night, make sure you have proper lighting all around.
Set up the equipment and place it in the center of the room.
Toggle the tripod to place the camera at a height similar to the height of an average person’s eyes or shoulder.
Toggle camera for best settings. Here are my suggestions in case there is sufficient daylight:
Put the camera in full manual mode
Keep a decent shutter speed; 1/10th or 1/20th is ideal at daytime
Set apparture to about F11, and ISO to around 640 or more
Set manual white balance to 4000Kelvin
Set bracketing to 3 exposure levels at a difference of 2 levels between them.
Apply auto timer to capture these bracketing images, maybe within 3-5seconds.
FYI: Photography completely depends on the light, and these settings might not give the best output at different light exposures. Hence, you need to toggle settings based on the amount of light available.
Now to take pictures.
Capturing Necessary Images Using DSLR
Now, you need to take a number of photographs depending on the width your Fisheye lens can cover.
Let’s take an example:
If you are using a Fisheye lens that cover 90 degrees vertically and 60 degrees horizontally, then here’s what you need to do:
Set your Panohead to rotate 60 degrees.
Take 6 bracketed photographs by rotating the camera to 60 degrees after each capture.
Set the camera upwards and take 2 photographs by rotating the camera 180 degrees after the 1st shot.
Set the camera downwards and take 2 photographs by rotating the camera 180 degrees after the 1st shot.
Separate the DSLR body from rest of the equipment and take a handheld photo of the center of the room where the tripod was placed earlier.
So as per this example, you will now have 6 horizontal photos, two ceiling photos, and 3 ground photos.
Stitching The Photos
Now that you have the required images, you have to stitch them into a seamless 360 panoramic image.
Four Steps Guide To Capture 360 Panoramas With Smartphone
Whether you use an Android device or an IOS device, the process is the same.
Step 1 – Download The App
The Google Street View app lets you easily take 360 photos with your Android smartphone. It is the most stable 360-degree photography app for smartphones to date.
The app will give you some welcome tips and then take you to the homepage. In the bottom-right corner, there is a camera option.
Choose the camera option, and a menu will appear. You have to choose the third option to take 360 photos.
Step 3 – Take The Pictures
You will be taken to the camera screen and the app will give you guidance for the capture process. Hold the phone close to you, choose a suitable position, and stand up still.
Once you click on the start button, you will have a hollow circle in the center of your screen. And some orange circles will start appearing in different directions.
Move the phone, match the center circle with an orange circle, and click the snap button. That orange circle will turn blue/green and will disappear, while a photo is captured.
Another orange circle will appear in a different direction. Move the phone to the next orange circle to do the same. Keep doing it until all the orange spots are captured.
The app is designed so that once you have snapped all the orange circles, a full 360 view was captured.
Once done, the app will take you to the homepage again.
Step 4 – Image Output
At this point, the app is already stitching the photos together to make a 360 image. You will be able to see the progress of stitching on a loading bar.
After stitching is complete, you will find the 360-degree image saved in your photo gallery. You can then use this photo to upload it on WPVR and create a virtual tour.
**Please note that the latest update of the Google Camera App has some major back-end changes, due to which it might not be compatible with many Android devices.
There you go, now you know what is virtual reality, what is a virtual tour, how to create a virtual tour, what a seamless 360 panoramic image is, and how to capture 360 panoramic images on your own.
Now, you can simply choose a method to take a 360 panoramic image, upload it on the virtual tour creator (WPVR) and present it on your website to engage with your audience with more authority and opportunity for conversion.
How Your Business Can Benefit From Virtual Tours
Previously, I have listed a number of businesses that can benefit from using virtual tours on their websites.
If your business was part of that list, then you already know that virtual tours are ideal for your business.
Every business can have a virtual tour on its website. However, some businesses can dramatically increase revenue by implementing a virtual tour on their site.
Now let us look at the major benefits of using a virtual tour on your site, focusing on the major niches.
Find out how a virtual tour can positively impact your business.
1. Real Estate
People visiting real estate sites are mostly looking to buy properties or houses within the next 2-3 months. However, the main issue is indecisiveness.
Though prospects mostly look for houses in specific locations and within a suitable price range, they find it difficult to choose among multiple properties that match their requirements.
One of the reasons for this is that they are visualizing how the house looks based on flat images. They are not able to understand if the structure of the house is suitable for them since they are visualizing in their imagination.
End result? They tend to physically visit several properties before choosing one that resembles their imagination and requirements.
Here, you are losing a lot of time while giving them the live tour, and effort by pitching to prospects who might end up buying from other realtors (yes, people will talk with several realtors when searching for a house).
A real estate virtual tour can ensure that the prospects you are dealing with are already interested to buy.
The visit is just for credibility. People will be able to remotely visit the place and explore.
Hence, they will call you for a visit, with the intent to buy.
Rather than taking several live tours of many properties, they will only wish to visit a few which they might end up purchasing, thanks to the remote virtual tour.
2. Hotel & Resorts
Tourists, travelers, or international businessmen tend to look for suitable hotels to lodge at when going to distant locations. So, it is natural for them to browse through the websites of hotels available at the location they are visiting.
You can take steps to attract as many prospects as possible through your website. A simple hotel or resort virtual tour can take you a long way.
Here’s the idea. People always look for hotels that are both affordable and comfortable to stay at. Most people tend to browse through photos of rooms when choosing. Why not give them a better visual with a virtual tour?
Create virtual tours for each room available for lodging and place them on your website. Try to add a virtual tour of your reception, hall room, bar, and dining area on your home page.
These will act as big attractions, especially for foreigners. A quality virtual tour will mean that people will be able to understand the quality and beauty of your hotel, and will probably consider calling in for reservations immediately, rather than looking into more hotels.
For Resorts, you should create a broad virtual tour, highlighting all of your special facilities such as swimming pools, beach areas, parks, ballrooms, spas, and other specialties besides the lodging and basic entertainment.
Virtual tours will definitely get prospects excited and influence more site visitors to convert into interested prospects.
3. Restaurants
Having a restaurant means a lot of competition since currently, it is among to top business niches.
People love to try out restaurants with good food, as well as well interior design.
Whether it’s a fancy restaurant or a classic restaurant, they have their own set of admirers.
Now, food quality is the most important thing. If you get good ratings about your food from customers, more people will probably take a visit soon.
However, the second most important aspect is the interior.
Nowadays, prospects tend to visit the websites of several restaurants before choosing to visit one.
There, they not only look at the menus but also look at the gallery of your restaurant photos to understand if it is a suitable place to visit.
A better way to catch their attention is by allowing them to take a virtual tour of your restaurant from home.
They will be able to see the seating arrangement, spaciousness, decoration, quality, and overall interior arrangement. This will inspire them to choose your restaurant over others.
Here’s an example:
Let’s say you are a burger joint. A group of teenagers is willing to eat burgers in your area. So they will visit the websites of several burger joints in your area before choosing one.
You can stand out by displaying your amazing interior decorations besides your delicious food, through a virtual tour.
Through this remote tour, they might realize that the seating arrangements are comfortable and the decorations are great for taking selfies with friends.
Thus, they will end up visiting your place. Your next task is to impress them with the food.
For a fancy or theme-based restaurant, a virtual tour is more lucrative since you will be able to highlight your specialty to remote prospects on your website.
This will raise more awareness and influence more people to visit your restaurant.
4. Wedding Venues
A wedding is among the most important milestones that a person achieves in life. And it is natural for anyone to wish to have a wedding ceremony like no other. The wedding venue plays an important role in making the wedding a memorable one.
Usually, fiances choose the wedding venue together. They tend to browse through the websites of several wedding venues and shortlist a few that they feel are perfect for their wedding.
A virtual tour can make your wedding venue the ideal one. Let the couple take a remote visit and experience how grand the venue is.
The venue entrance, the stage, the dining halls, the chandeliers, the photo session room, and all the specialties of your venue can be highlighted easily through a virtual tour.
Send the couple into a world of imagination so that they can feel their walk in the venue, and the bride walking down the carpet towards the priest and her fiance, ready to get married; the tossing of the bouquet and toasts from friends and family.
This little journey within the venue will help them set their future and choose your venue to be the ideal venue that will mark their togetherness in days to come.
Hence, a virtual tour on your website is only the right thing to do.
5. Universities, Schools & Colleges
Though newly implemented in many, a lot of universities, schools, and colleges achieved greater student reach by creating virtual tours of their institutions.
Whether you run a large institution or a small one, students and their parents are more concerned about quality dorms and attractive campuses, after quality education.
While they visit your website to find out about the courses you offer, you can also present a virtual tour of your campus to give them a remote experience of being part of the institution.
Let them take a stroll around your faculty buildings, sports facilities, dorms, research labs, fitness centers, etc, and understand the quality you offer besides education.
This is very important for international students. They will be moving to a new location, therefore, the quality environment and surroundings are among their main concerns and priorities.
Plus, the virtual tour will act as a symbol of credibility, highlighting your ability to accommodate students with high quality, while within your premises.
6. Travel/Tourism Industry
If you are promoting holiday or travel packages, then getting more prospects depends a lot on the locations you are taking them to, besides the price.
People are often reluctant to purchase travel packages since they have doubts about the quality of their journey. You may easily gain their trust by using a virtual tour.
You can include virtual tours for several iconic locations that your travel package will cover. You may also highlight great tourist resorts or historic places that your travel package will take travelers to.
The idea is to give viewers a glimpse of the attractive zones that the tour will include remotely through a virtual tour. Let them inspect, in full control, the amazing locations they will be able to visit.
This will not only create more excitement but also influence onlookers into interested prospects.
7. Gym / Fitness Centers
People tend to choose a gym or fitness center based on the various types of equipment and fitness machines available there. Plus, it also depends on the quality of the Equipment.
You can use virtual tours to attract people online and gain credibility for your fitness center. Create a quality virtual tour, covering every section of your center. And on each section, leave click bubbles beside the machines which will give information about the machine model and quality.
At the same time, create short videos of the fitness trainer of the center, training and demonstrating the use of every piece of fitness equipment.
Leave a hotspot on each piece of fitness equipment available within the virtual tour, to be clicked to watch the relevant video.
This will not only highlight the equipment but also demonstrate the expertise of the fitness trainer, thus inspiring more people to join your fitness center.
8. Shopping Mall
Shopping is among the favorite activities of most women and some men. However, it often gets difficult to find the right shops in an ideal shopping mall.
There are tons of shops selling various products and services. Although every shopping mall provides a directions map on every floor, it often gets difficult to look for any desired shop only by interpreting the map.
For a large mall, people often run around in circles while messing up the directions. This is frustrating to customers and often limits them to purchase items.
Whether you are part of the ownership of a shopping mall or a shop owner at a mall, you could guide more prospects in the right direction through a virtual tour on your site.
On the virtual tour, a person will be able to follow directions as if in person and eventually reach their desired shops.
Since it’s a realistic visualization, the directions will be much easier to remember. Then when the prospect visits the mall, it will not take long to find his/her desired shop.
As a shop owner, this could help you drive more customers and not lose potential ones to competitors.
People with the internet on their phones can access your website while in the mall, hence they won’t need to use the flat map, rather they can get a realistic guide on their mobile.
As you can see, it is beneficial to add a showroom virtual tour on the website of either the shopping mall or any particular shop, to provide better navigation for prospects.
9. Museums
People often love to visit museums due to the incredible historical display of various tools, items and reminisces of the past.
But the problem is, due to visual entertainment available on mobile phones or computers, most people do not try to seek out how great a visit to a museum might be.
Most museums are facing a decline in visitors over time. However, this can be changed by using virtual tours.
Create a virtual tour for a certain section of your museum. Let’s assume this section contains items from World War II. Within the virtual tour, you can place clickable information bubbles for people to get historical information about any particular item.
This will create a good amount of interest among site visitors. The key is to create curiosity among viewers so that they feel like they need to visit other sections of your museum to learn more.
You can also offer a paid virtual tour for the rest of the sections. This will allow people overseas to take a tour of your museum remotely.
You will see a rise in visitors and also let people from overseas appreciate your museum.
10. Art Gallery
Do you draw and contribute to exhibit art galleries? Or do you have an art gallery of your own?
Then you probably know how excited people are about art when they visit an art gallery. Not only that, several collectors tend to visit and often purchase works of art with great value.
However, when it comes to online business, art galleries are often underrated. Why not? Most art galleries do not make much out of their website.
Let me tell you why. It’s because owners tend to flood their websites with individual pictures of their art. With so much art to look at, how long will a person browse through the collection?
Eventually, people only check the first few and then leave if nothing amazes them among the early collection.
But this means that they are avoiding pictures that are in a later queue. It is possible that one of those photos could have been the one to connect with them.
This can be drastically changed with an art gallery virtual tour. Create a virtual tour of your gallery and let art enthusiasts take a remote tour. This will be similar to a live visit and viewers will be able to walk around the gallery while observing your artwork.
You can leave little click bubbles beside every piece of art so that viewers can click to view the piece of art as a pop-up image, or on a new tab.
Provide a unique ID for every piece of art so that prospects can order online or request a visit to view the piece of art.
That’s how effective a virtual tour can be. Go ahead and attract more prospects to buy your art online.
So far, I’ve explained the benefits of using virtual tours in 10 different business niches. If your business niche was not among these 10 businesses, then don’t get disappointed.
Read the following article to learn about the benefits of virtual tours for all 32 niches mentioned in this article.
Conclusion
So, after reading this article, you should have a good knowledge of virtual reality, virtual tours and their benefits, and what you need to create virtual tours.
You have also learned how you can create a virtual tour and include it on your WordPress site using WPVR.
And you got a detailed guide on how to take 360 panoramic images on your own and use them to create virtual tours.
Finally, we discussed how different businesses can benefit from virtual tours.
Now, you should be able to create your own virtual tours without any expert assistance. Hence, why waste any more time?
Go ahead and start using virtual tours to take your business to the next level. Engage and connect with your prospects from your website, and see them turn into valuable customers.
What if you could let potential buyers experience the elegance of a luxury home from anywhere, at any time?
Selling luxury homes is quite different than selling the usual homes. Aside from the expense, a luxury house has a lot to do with how well it is decorated, furnished, and architected.
As a realtor, you have to work on creative ways to highlight the best features of the luxury homes you sell, and at the same time, make them feel emotionally connected to the property.
The best way to do this is –to use virtual luxury home tours.
A virtual tour will ensure that your potential buyers will get a chance to explore this wonderful property in their own free time, even if they have a tight schedule.
In this article, I’ll discuss:
How luxury home virtual tours can help you close more deals?
How can you create a luxury home tour easily?
And why does this work?
And eventually, you will be able to target prospects easily and sell more properties.
So let’s begin.
Why Create Virtual Luxury Home Tours?
A virtual tour allows potential buyers to explore a property in a realistic way, helping them decide if it’s the right fit for them.
Here’s why you should consider offering virtual tours for luxury homes:
i. Showcase Unique Features:
Luxury homes come in all styles, and each buyer has different tastes.
For example: – One client may appreciate the industrial aesthetic with intricate mechanical structures. – Another might be drawn to antique statues and terracotta features.
A virtual tour allows you to highlight these distinctive features, making it easier for buyers to see if the property fits their preferences.
ii. Give Your Potential Buyers Full Control:
With a virtual tour, buyers can navigate the home as they wish, taking the time to explore the aspects that matter most to them.
iii. Enhanced Details To Make The Tour Engaging:
You can add interactive elements to the tour, like:
Tooltips explaining the history or significance of decorations.
Background audio to set the mood and create a more immersive experience.
By offering these personalized touches, you not only give clients a thorough look at the property, but you also increase the chances of scheduling an in-person visit.
How to Create A Compelling Virtual Luxury Home Tour
As you saw above, a virtual tour will give you an edge when it comes to selling luxury homes. But much like the house itself, you need to make sure you go out of your way to make the virtual tour the best virtual experience ever.
Creating a virtual tour is actually quite easy. All you need are 360 images of the location you want to highlight, and the right virtual tour builder.
If you use WordPress, then WPVR is currently the most affordable solution you will find to create virtual tours. Simply upload the 360 panoramic images and the tool will turn that into an amazing 3D virtual tour.
The plugin has everything you need to create stunning 3D Luxury Home Tours with advanced features such as hotspots, embedded explainer video, company contact info, etc.
Once you have the basic tour ready, now it’s time to optimize this tour for conversion.
Let us look at the ways you can improve your virtual tour.
1. Make The Virtual Luxury Home Tour More Interactive
Hotspots help to pinpoint an element inside a virtual tour with different Contents. Hotspots let you add contents inside of a Virtual Tour with specified coordinates.
There are four types of hotspots available in the WPVR.
You can add different content like Text, Video, Images, GIFs, and so on. It’s possible to add all the content in one single hotspot as well.
Also, there are options to customize the color and hotspot of the hotspot.
Here’s an example of how hotspot content looks,
There’s another option which is the Scene-Type Hotspot. Multiple rooms in luxury homes can be uploaded as Scenes and displayed in one Virtual Tour.
Here’s what the Scene-Type Hotspot looks like,
2. Contact Forms To Let Your Clients Reach You
A contact form is crucial for your virtual tour so that you can allow interested buyers to get in touch with you without any hassle.
WPVR Pro has the Fluent Forms Addon that lets you add a Contact Form for the clients to contact you. You can use this form to let your clients contact you for an appointment.
4. Scene Gallery To Display All The Scenes In One Place
Scene Gallery offers a gallery where all the Scenes of a Virtual Tour are displayed in one place.
There are several rooms present in a luxury home virtual tour. So, with the help of the Scene Gallery, clients can easily move from one scene to another with a click.
Your potential clients with a VR headset or VR cardboard will be able to experience your luxury home virtual tour in a setting as if they’re already inside the house.
This will help them decide if they want to live in a house like the virtual tour showing them.
It’s also helpful in figuring out how spacious a place is or how they can decorate the house.
Ways to Optimize Your Website To Connect With The Right Clients
Now that you know how you can create an engaging luxury house tour, let us look at how you can effectively optimize your so that your high-end clients are hooked with the properties you have listed.
1. Add A Short Promo Video On The Home Page
This is a tactic that most realtors avoid because they don’t want to invest in a video that includes properties that may be sold soon.
The idea is, you can create a promo video, maybe of 2mins max, that will show a glimpse of various luxury vr properties that you have under you.
Here, you have to capture the view that will highlight the best features of the property, and also express its theme, i.e., what type of luxury home it is.
This can help to make buyers curious and take a look at your available luxury homes listings.
2. Make It Easier To Look For The Right Luxury Homes
Even if you know your luxury homes are quite expensive, some are way too expensive compared to others. So a price filter can be useful when a certain buyer has a fixed budget.
For example, if a prospect has a budget ranging from $3-5 million, then he should be able to view the available homes in that price range.
Again, some of the homes have a cultural or historical significance which you can easily identify as Modern, Contemporary, Mediterranean, Greek Revival, Victorian, etc.
So categorizing the homes under such titles can help buyers to find the right type of homes they are looking to purchase.
Then there are luxury homes that are available for renting as well. So you can have a single filter to separate the ones that are available for rent.
3. Include The Virtual Tour On The First Section Of The Property Page
Whenever someone enters the property page, he should be welcomed with an interactive virtual tour. This will lead to many of them taking the tour immediately and getting interested even before looking into further details.
It will also have a psychological impact as later on, every detail they find out will sound more exciting than they normally would.
4. Highlight The Best Details In The Product Description
Despite having a virtual tour available, you still need to work on highlighting the best features of the luxury home in question. So in the description, create sub-headings with the special features and mention the details on them along with images or short videos.
This extra effort can make a difference in how interested buyers will get while checking out the property.
5. Collect Leads & Inquiries On The Property Page
Many realtors make the mistake of taking the buyers to a separate form on another page to submit an inquiry or quotation. Rather, you may design the page in a way so that they have access to an inquiry form right on the property page, if possible, with an option to request a call from you.
This will increase your chances of speaking directly with your potential clients, and hopefully, booking a visit.
Final Thoughts
Managing luxury home sales may take some extra effort, but when it sells, it brings in a fortune.
And virtual luxury home tours can have a significant impact on converting more prospects into buyers if you have created one correctly. Make sure to keep things as fabulous as possible, and highlight all the best features of your luxury home in the virtual tour.
So go ahead and start using WPVR and increase your chances of selling more luxury homes.
FAQs
1. What are virtual luxury home tours?
Virtual luxury home tours are immersive online experiences that allow potential buyers to explore high-end properties remotely with interactive features.
2. Why are virtual tours important for selling luxury homes?
They let buyers view properties realistically and highlight unique features, increasing engagement and interest in scheduling a visit.
3. How can virtual tours boost property sales?
By offering 24/7 access and personalization, virtual tours attract more qualified leads and help buyers make faster decisions.By offering 24/7 access and personalization, virtual tours attract more qualified leads and help buyers make faster decisions.
4. What tools are needed for creating virtual luxury home tours?
You can use tools like WP VR to create professional, detailed, and engaging virtual tours for any property.
5. Can virtual tours be customized for luxury homes?
Yes, you can add tooltips, background music, and unique visuals to showcase specific details of luxury properties.
When guardians can’t visit your school in person, a virtual tour becomes their window into your world. And if you’re managing school admissions or marketing, you know that first digital impression can make or break a family’s decision to enroll.
But here’s the thing – putting together a virtual tour that actually engages viewers isn’t as straightforward as it seems. Many schools end up with tours that feel flat or fail to showcase what makes them special.
In this guide, I’ll share six practical tips to help you create a school virtual tour that captures attention and gives families a genuine feel for your school’s environment.
Let’s dive in and make your school virtual tour stand out.
What is a School Virtual Tour?
Before jumping into the tips, let’s quickly understand what you’re creating. A school virtual tour is simply a digital walkthrough of your campus that lets families explore your school from their devices. It’s more like an online open house – available 24/7.
Your virtual tour can be as basic as a photo gallery or as detailed as a 360-degree interactive experience. You can show off your classrooms, labs, library, playground, and other facilities that make your school unique. You can even add videos of teachers, students, and events to give viewers a better sense of your school life.
The best part is while you’re busy running the school, parents and students can check out your campus anytime, from anywhere. This makes it easier for families who live far away or have busy schedules to get a real feel for your school.
Why School Virtual Tour is Important?
School virtual tours basically help bridge the gap between you and prospective families, allowing them to “experience” your school before making the decision to enroll or even visit in person.
Here’s how a virtual school tour can work for everyone involved:
For Students
Allows students to see their future classrooms, labs, and common areas, helping them picture their daily life on campus.
Eases concerns about adjusting to a new environment by giving a clear sense of the school’s layout and atmosphere.
Highlights spaces where students can engage in extracurriculars, study, and socialize, making them feel more connected before they even arrive.
For Parents
Offers a detailed look at your school’s safety features, facilities, and resources to help parents feel confident in their choice.
Provides transparency around classroom quality, extracurricular options, and amenities, so parents understand the full value of what you offer.
Lets parents evaluate how well the school environment matches their expectations and values for their child’s education and growth.
For Teachers
Gives prospective teachers an inside look at classrooms, labs, and other facilities to understand the tools and resources available to them.
Showcases the culture of your school, helping teachers decide if it aligns with their professional goals and teaching style.
Highlights your commitment to a supportive work environment, which can attract enthusiastic educators who want to be part of your community.
So, you can say virtual school tours are invaluable for students, teachers, and parents alike. Now, let’s go straight into the tips to creating an engaging school virtual tour.
6 Essential Tips for creating an engaging school virtual tour
Creating an engaging and logical virtual tour for schools is about more than just showing off your school grounds. It’s about guiding viewers through an experience that feels as close to real life as possible, making them feel connected to your school from wherever they are.
1. Plan Your Tour Route Strategically:
To make your virtual school tour flow naturally, start with a well-planned route that guides viewers through your school step-by-step. Here’s a simple way to approach it:
Welcome Visitors at the Entrance: Begin at the main entrance or lobby to give a warm, inviting first impression. This is where your virtual tour should create an immediate sense of welcome and professionalism.
Show Core Learning Spaces: Guide viewers through key areas like classrooms, labs, and the library. These are essential parts of any school, and showing them early on establishes the focus on learning.
Highlight Unique Areas: If your school has specialized spaces, like an art studio or a tech lab, this is the time to showcase them. These areas can set your school apart, so give viewers an up-close look.
End with Social or Outdoor Spaces: Finish with areas where students socialize, like the cafeteria, gym, or outdoor spaces. These spots provide a sense of community and balance out the tour with something familiar and inviting.
When you build your school virtual tour with a clear, strategic route, viewers will have an experience that feels natural, engaging, and organized—just like a real visit.
2. Focus on High-Quality Visuals and Multimedia:
To keep viewers engaged and help them experience your school, it’s essential to use high-quality visuals and multimedia. Clear, vibrant images and videos make each area of your school feel real, giving your audience a true-to-life perspective.
Use High-Resolution Images and Videos: Start by capturing images and videos in high resolution. Each classroom, lab, and social area should be sharp and visually appealing. This clarity allows viewers to appreciate the details in each space, from desk arrangements to equipment.
Incorporate 360-Degree Views: If possible, add 360-degree views of larger spaces, like the gym or auditorium, to provide a more immersive experience. This allows viewers to look around as if they’re standing in the room, giving them control over what they see.
Add Narration or Background Music: Consider adding light background music or narration to guide viewers through the tour. A welcoming voiceover can provide context for each area while keeping viewers’ attention.
Highlight Key Features with Text Overlays: Use text overlays to point out specific features, like interactive boards in classrooms or safety features in labs. This provides extra information without overwhelming the viewer.
By focusing on high-quality visuals and engaging multimedia, you’re ensuring your virtual school tour is visually captivating and informative. This attention to detail makes it easy for viewers to picture themselves at your school, making a lasting impression.
3. Ensure User-Friendly Navigation:
Your school virtual tour should be easy to navigate, so viewers can explore your school without any confusion. Simple, user-friendly navigation lets them focus on the spaces and information rather than how to move around.
Create a Clear Menu or Map: Provide a menu or clickable map that allows viewers to jump to specific areas of interest, like the library, science labs, or outdoor facilities. This helps them find what they’re looking for right away, whether they want to explore the entire tour or just certain sections.
Use Intuitive Controls for Moving Around: Make sure the controls for moving through the tour are intuitive, with clear arrows or “next” buttons to guide viewers from one area to the next. This way, they can easily move forward, backtrack, or pause to take a closer look.
Include a Progress Indicator: A simple progress bar or indicator can show how far they’ve gone in the tour, helping them keep track and encouraging them to view the full experience. This adds a subtle guide without pushing them through too quickly.
Offer a Restart Option: Make it easy to start over with a “restart” button or option at the end, in case they want to go through it again or view sections they missed.
By keeping navigation straightforward and intuitive, you’re giving your viewers control and a smooth experience, which keeps them focused on your school and what it has to offer.
4. Promote Interactivity and Engagement:
To make your virtual school tour more engaging, it’s important to promote interactivity. Giving viewers the chance to actively participate will keep them interested and make the experience feel more personal.
Add Clickable Hotspots: Use clickable hotspots in each area of the tour that provide extra details. For example, clicking on a classroom might show information about the teacher-student ratio or the subjects taught in that room. This keeps viewers engaged and lets them learn more without interrupting the flow of the tour.
Include Virtual Q&A or Chat Features: If possible, add a Q&A section or live chat feature where viewers can ask questions as they go through the tour. This allows them to interact with a school representative or get immediate answers to any inquiries.
Offer Interactive 360° Views: Let viewers control what they see by incorporating interactive 360° views. This way, they can explore different angles of a room or space, making them feel like they’re truly in the environment.
Allow for Customizable Paths: If your virtual tour platform allows it, let viewers choose their own path. For instance, they could opt to visit certain areas first, like sports facilities, or focus on academic spaces. Giving them some control over their experience makes it feel more tailored and engaging.
By adding these interactive elements, you’re encouraging viewers to actively participate, making them more likely to stay engaged and remember your school when it’s time to make decisions.
5. Optimize for Seamless Integration and Sharing:
Making your virtual tour easy to share and integrate with other platforms is key to getting the most out of it. The easier it is for people to share, the more exposure your school will get, and the more likely it is that prospective students and parents will see it.
Ensure Easy Sharing on Social Media: Make sure your virtual school tour has clear options for sharing on social media platforms like Facebook, Twitter, and LinkedIn. Adding social share buttons at the end of the tour encourages visitors to share their experience with others, helping you reach a larger audience.
Embed Your Tour on Your Website: Embed the virtual tour on your school’s homepage or dedicated tour page. This allows prospective students and parents to easily access it whenever they visit your website. The more accessible it is, the more likely people will take the time to view it.
Provide a Shareable Link: For convenience, provide a direct link to the virtual tour that viewers can easily copy and share with others. This ensures the tour can be distributed via email or text, allowing people to share it directly with friends or family members who may be interested.
Integrate with Other Tools and Platforms: If you use CRM systems, email marketing tools, or other platforms, make sure your school virtual tour can be easily integrated with them. This will allow you to track engagement, follow up with viewers, or include the tour in your promotional materials.
By making your virtual tour easy to share and integrate with different platforms, you expand its reach and ensure that more people get the chance to see what your school has to offer.
6. Seek Feedback and Continuous Improve:
Once your virtual tour is live, it’s important to keep improving it. Feedback from users can provide valuable insights that help you make adjustments and ensure the tour stays relevant and effective.
Ask for Feedback from Users: After visitors complete the tour, encourage them to provide feedback. Keep it simple, like asking what they liked, what could be better, or if they encountered any issues during the tour. This helps you identify areas for improvement.
Analyze User Behavior: Track how people interact with the tour. Are they spending more time in certain areas? Do they skip some parts? Use this data to understand what works and what doesn’t, then adjust the tour to make it more engaging or easier to navigate.
Regularly Update the Tour Content: Make sure the content in the virtual tour stays up to date. If there are any changes in the school—like new facilities, programs, or staff—update the tour accordingly. This ensures that prospective students and parents always get an accurate representation of your school.
Test New Features or Improvements: If you add new features or make changes, test them with a small group of users first. See how they react and make any necessary tweaks before rolling out the updates to a wider audience.
By seeking continuous feedback and making regular improvements, you ensure that your virtual tour remains fresh, relevant, and effective in attracting potential students and parents.
Top 3 Tools to Create Interactive School Virtual Tour
Now, I’m going to share the top three school virtual tour app or tools to create interactive virtual reality. It ensures that you have the best options for different types of virtual reality at your fingertips.
1. WPVR
WPVR revolutionizes the process of creating immersive school virtual tours directly within the WordPress platform.
As someone interested in exploring school options, imagine having the ability to navigate through different classrooms, facilities, and campus grounds—all from the comfort of your own device.
With WPVR, you can do just that. For instance, a parent considering various schools for their child. By utilizing WPVR, you can take a virtual tour of each campus, gaining insights into the environment and facilities to make an informed decision.
It’s akin to attending an open house event but with the convenience of being accessible anytime, anywhere. WPVR helps you explore schools at your own pace, providing a dynamic and engaging experience that helps you visualize yourself and your family as part of the school community.
2. Cupix:
Cupix is a dynamic platform designed for creating magnetic 3D virtual tours, perfect for showcasing school campuses and facilities in stunning detail.
As someone eager to explore educational options, picture yourself navigating through realistic 3D renderings of classrooms, labs, and common areas—all from the convenience of your computer or mobile device.
With Cupix, you can easily evaluate different schools for your teacher, students, and parents. By utilizing Cupix, you can take immersive virtual tours of each campus, gaining valuable insights into the learning environment and amenities to make informed decisions.
It’s like stepping into the school itself but with the flexibility to explore at your own pace and convenience. Cupix helps you to experience schools in a whole new dimension, providing an engaging and interactive platform to visualize your family’s educational journey.
3. Matterport:
Matterport is a cutting-edge platform that revolutionizes the creation of immersive 3D virtual school tour, ideal for showcasing school campuses and facilities with unparalleled realism.
Imagine yourself navigating through lifelike 3D models of classrooms, libraries, and sports facilities, all from the comfort of your own device.
Picture yourself as a parent exploring various school options for your child. By leveraging Matterport, you can take virtual tours of each campus, gaining valuable insights into the learning environment and amenities to make informed decisions.
It’s like stepping into the school itself, but with the convenience of being accessible anytime, anywhere. Matterport allows you to explore schools in exquisite detail, providing a dynamic and interactive experience.
Conclusion:
In conclusion, the utilization of advanced virtual tour platforms such as WPVR, Cupix, and Matterport presents a transformative opportunity for educational institutions, prospective students, and parents alike.
A school virtual tour app or tools offers a dynamic and immersive way to explore school campuses and facilities, providing invaluable insights and experiences that transcend traditional methods of school evaluation.
Moreover, By harnessing the power of virtual reality technology, individuals can visualize themselves as part of the school community. It helps them to make informed decisions about their educational journey.
As the digital landscape continues to evolve, the adoption of virtual tour platforms appears as a vital component in shaping the future of education, fostering greater accessibility, engagement, and connectivity within the school environment.
**FAQ**
Is WPVR compatible with VR headsets for a more immersive experience?
Yes, WPVR virtual tours can be experienced with VR headsets. It provides users with a truly immersive and lifelike exploration of school campuses.
Are virtual tours compatible with mobile devices?
Most virtual tour platforms are optimized for mobile devices and it ensures easy exploration on smartphones and tablets.
Is it possible to embed virtual tours on our school’s website?
Certainly! Virtual tours can be easily embedded into your school’s website. It provides visitors with direct access to explore your campus digitally.
Can I edit or update my WPVR virtual tour after it’s been published?
Yes, WPVR allows you to edit and update virtual tours at any time, ensuring that your school’s digital showcase remains up-to-date and relevant.
Can I customize the virtual tour to match our school’s branding?
Yes, you can personalize virtual tours with your school’s logo, colors, and branding elements to maintain consistency with your institution’s identity.
Panoramic pictures are super popular right now in the area of photography & VR.
Panoramic photography is way easier with an iPhone.
And the best part is, you don’t need any other fancy equipment to try it out with your iPhone.
Even though your iPhone is equipped with a built-in panoramic camera, it can be quite challenging to use on its own to capture high-quality panoramic images, which is why using an iPhone panorama app can make a big difference.
With panoramic apps, you can take panoramic photos right on your iPhone without even having to move it around.
You don’t have to buy a tripod or expensive pieces of equipment either!
But in this article, we’ll look at 3 of the best panoramic camera apps for iPhone
Also at the end of the blog, I provide you guidelines on how you can create virtual tours easily with your panoramic photos and revisit virtually.
So let’s get started.
Why Use A Panoramic Camera App Instead Of iPhone’s Built-in Panoramic Camera?
The built-in panoramic camera that the iPhone comes with has a lot of limitations and it becomes way more challenging if you want to take panoramic photos.
Here are side-by-side comparisons:
If you want to take panoramic pictures, there are a bunch of apps that can help you do that.
If you look at the iTunes store, you’ll see a whole bunch of different app icons to choose from. Some are free, some you pay for once, and some you pay for extra features while using the app—so you can even find a free 360 camera app for iPhone if you’re looking to save on costs.
I have well researched most of the apps and chose 3 apps that can easily solve the issues that you will face using the in-built panorama of your iPhone.
Advantages of Using a Panoramic Camera App
Let’s have a look at some advantages you’ll have by using a panoramic camera app:
You’ll capture more of the scene in a single shot.
Panoramic camera apps will give you high-resolution images with impressive detail.
They’ll provide you with an experience with no visible stitching marks in the final panoramic image.
These panoramic camera apps are easy to use and require no professional photography skills.
Overall, a good panoramic camera app will save you from manual flaws and help you capture high-resolution panoramic photos with your iPhone quite easily.
Then, you can use them to show off a location or your property on Facebook or even via virtual tours on your website.
Top 3 Panoramic Camera Apps for iPhone
Here are three apps that I’ve chosen to provide in-depth information on quality & features to help you get 360 panoramic photos using an iPhone with the help of a 360 camera app for iPhone:
1. DMD Panorama
DMD Panorama is a pretty neat app and better than the iPhone’s panorama feature in many ways.
You can take full 360-degree panoramas with this app (both horizontal and vertical angles), which is awesome.
It uses the gyro and compass in your iPhone to help make sure your panorama turns out great.
So, if you want to take some great quality panoramic photos, this app is worth checking out!
Key Features of DMD Panorama:
Works with the front camera of the iPhone for panoramic selfies
Take panoramas with 3 different Exposure settings
Up to 100MP panoramas
The ultra-wide lens on the newest phones captures panoramas with floors and ceilings
Notes : In DMD panaroma app, selfie panorama mode unlocks after you capture and save 10 regular panoramas.
Feedback From DMD Panorama User’s:
I have read all the reviews of DMD panorama users that I got and summed up their feedback here below:
With Bimostitch, You can combine different photos to make one big panoramic image that looks perfect.
Now to mention that this is not a 360 panorama capturing app but a panorama stitching app. But I had to keep this on the list because this stitching is a very important aspect of 360 panorama images and in iPhone, this is one of the best apps you can find for that.
It won’t take up much space on your device and the panoramas will be super clear. You can make panoramas on the go, like when you’re on a trip, and you don’t need to be connected to the internet.
You don’t even need any fancy equipment or sensors to use this app. Whether you’re a pro or just starting, this app is perfect for making great panoramic photos.
Stitch many (2 to 200+) overlapping photos into impressive wide-view panoramas.
Compress large panoramas to save space on your device.
Video-to-panorama for converting videos of panning motion into panoramas
View source images in panorama while in preview mode
Feedback From Bimostitch User’s:
Though it’s not an image-capturing app but rather a stitching app, I got the highest positive reviews on this app. I summed up the positive reviews in 4 points.
In regards to negative reviews, I only got 1. Take a look:
If you want a seamless way to capture high-quality 360 panoramic photos on your iPhone, a 360 camera app is a great choice. If you need more advanced features, explore custom iOS app development services to create a tailored solution for your specific needs.
Creative Ways To Use Panorama Images
Panorama images aren’t just stunning—they’re incredibly versatile. Here are some creative, actionable ways to use them:
1. Create Virtual Tours for Websites
Transform your panorama images into immersive virtual tours. If you’re a realtor, use them to showcase properties. As a resort owner, highlight your rooms, amenities, or scenic views. Tools like WP VR or Kuula can help you upload your panoramic shots and turn them into interactive experiences that visitors can explore from any device.
2. Design Eye-Catching Social Media Posts
Panoramic images stand out on platforms like Facebook and Instagram. You can upload them as scrollable photos or use third-party tools to convert them into engaging videos or carousels. Think of it as a way to grab your audience’s attention while telling a story.
3. Use Panoramas in Presentations
If you’re preparing a pitch or a creative presentation, panoramic images can serve as impactful visuals. For example, a tourism business could embed panoramic views of destinations into their slides to wow the audience.
4. Personalize Travel Albums
Want your travel photos to feel more immersive? Use panorama shots to capture breathtaking landscapes or cityscapes. Instead of flipping through flat photos, you’ll feel like you’re revisiting the entire scene. Print them as fold-out albums or large wall posters for an extra wow factor.
5. Create 3D-Printed Keepsakes
Panoramas can be converted into unique 3D models or keepsakes. Some services let you use panoramic shots to create printed snow globes, crystal engravings, or even 3D postcards.
6. Plan and Share Home Renovations
If you’re remodeling, take panoramic photos of each room before and after. Share these with your contractor to ensure they understand your vision or use them to inspire others when you post your home transformation online.
7. Capture Before-and-After Shots
If you’re in a creative field like landscaping, architecture, or event planning, panoramic photos are perfect for showing transformations. A side-by-side comparison of panoramic shots can be a compelling way to market your services.
By thinking outside the box, you can turn your panoramic photos into more than just pretty pictures—they become tools for storytelling, marketing, and memory-making.
Get a complete guide on how you can create a virtual tour using the iPhone Panorama picture that you took using one of the suggested plugins,
Each of these panoramic camera apps has its unique features and benefits.
Whether you’re looking for a user-friendly interface or powerful stitching tools, there is an app on this list that will meet your needs and could be considered the best 360 camera app for iPhone for capturing stunning panoramic shots.
So why wait?
Download one of these apps today and start capturing stunning panoramic photos with your iPhone.
Keep in mind that while these apps are great for capturing panoramic photos, the quality of the photos will also depend on the camera quality of your iPhone.
It’s recommended to use the latest iPhone models for best results.
If you’re thinking of a new and innovative marketing strategy to convert more website visitors to real customers, a virtual tour is the most suitable solution for you.
Especially, if your business has a physical location of any kind, a virtual tour is a great way to show your service, products, and facilities to your prospects online.
For a WordPress site, WPVR is right now the easiest plugin to create quality virtual tours.
Since its release, the plugin has gone a long way, with great interface improvements, and now it is considered a reliable plugin to create virtual tours.
And within that time, many WPVR users have created a few amazing virtual tours. You will be amazed at their creativity in using the plugin to create stunning virtual tours.
So, we’ve decided to share some of these WPVR virtual tours with you so you can take ideas and inspiration from them and hopefully, make a few great ones yourself.
In this article, I will highlight some of the virtual tours that WPVR users created for their businesses.
And I have classified them within different industries so that you can find the ideal ones to learn from for your business.
So let’s get started.
Stunning WPVR Virtual Tours Created By Users
I am really excited to show all these virtual tours as I am sure you will find something to learn and you will be able to understand how people in your industry are using virtual tours.
1. Virtual Tours of Real Estate Properties and Housing
If you’re in the real estate industry, you can create a virtual tour of your properties and add them to your online listings.
It will allow your prospects to have a realistic experience of your place and thus a better idea about the property.
This, in turn, will increase the conversion rate as people calling with inquiries will probably already be interested in how the property looks.
Here is a virtual tour of a real estate property created by a WPVR user.
You can navigate this tour, move around between the scenes, and check out all the features on this tour.
Here are some virtual real estate tours created by WPVR users:
i. Marfuse Studio
Marfuse Studio is specialized in creating content to help with Virtual Reality, Augmented Reality, and 3D Animation for their clients. Among many tools, they are also using WPVR to showcase some of the properties.
Below are two virtual tours created by this WPVR user.
Click on the images to visit the tours.
ii. UN Reality
UN Reality is a Real Estate Service Provider operating in South Korea.
They’ve created multiple virtual tours for their properties using WPVR and are using them to highlight their properties to potential buyers through their website.
Here are the virtual tours they created.
Click on the images to visit the tours.
2. Virtual Tours of Hotels, Motels, Resorts, and Guest Houses
If you’re involved in the hotel or resort business, then you can largely benefit from using virtual tours on your site.
Most people who want to visit a resort or book hotel rooms, browse through the websites of several places. And if you provide an engaging virtual tour, it will surely create a great experience online.
This will increase the possibility to get more bookings and create a good first impression of your hotel/resort.
Using a quality virtual tour that is informative and realistic, will get you a higher rate of conversion over using only stale images.
Here is an informative virtual tour of a hotel room created using WPVR:
You can navigate this tour and check out all the features on this tour.
Here are a few virtual hotel tours created by WPVR users:
i. Pearl Tree
Pearl Tree is a 4-star boutique hotel located in Purulia, West Bengal. They have created a few wonderful virtual tours for most of their hotel rooms.
Click on the images below to take a tour of their hotel.
ii. Shar Barr Casa
Shar Barr Casa is a beautiful vacation home in the Caribbeans. They’ve created virtual tours of both the interior and exterior of the home.
You can take a tour and experience their enjoyable resort by clicking on the images below.
3. Virtual Tours of Pubs and Bars
We all love to take a break every now and then and spend some time in a pub or bar.
And you will be surprised to know that many do search online for good pubs to hang out in. If you provide a virtual tour of your pub and can present a great environment, people will be hooked immediately and will probably visit soon.
A virtual tour that represents your service quality and interior well, will make them more likely to choose you as their regular pub.
Here is an example of a Pub virtual tour that represents the interior really well.
Try clicking on the hotspots in the virtual tour and see how more information is provided.
Here are a few more virtual tours of pubs and bars that WPVR users created.
i. KluBar Gastropub
Located in Kranj, Slovenia, KluBar Gastropub is a concert space, a day bar, a nightclub, a cafe, and an exhibition space altogether.
Klubar Gastropub created a virtual tour using WPVR. Take a tour and experience their place.
Whiskey Licker Up is a bar and cafe in Las Vegas. They have created a simple virtual tour that looks amazing.
Here’s their tour. Click on it to take a visit.
4. Virtual Tours of Restaurants and Cafes
Locally, people tend to search online for good restaurants and cafes on a regular basis.
Besides good food and ratings, a person also values the environment. If you manage a restaurant, you can consider using virtual tours to attract more customers and increase sales under your management.
If you can show how great your restaurant is using a virtual tour, it will surely attract people to try your restaurant out.
Here are a couple of restaurants that used virtual tours to highlight their lovely interior. Click on the images below to experience their virtual tours.
The Renaissance
Avalon Cafe
5. Virtual Tour of Beauty Parlors and Salons
When a person looks for a beauty parlor or salon, they usually prefer the ones that feel peaceful to visit with a lovely interior.
One way to highlight your sweet beauty parlor is to use a virtual tour on your site.
Here is an example of a virtual tour for a beauty salon.
You can see how you can use hotspots to provide information about each of your services and showcase your parlor easily.
A couple of WPVR users happened to be owners of Beauty salons. Take a look at the tours they created.
Studio L Salon
Creative Hair Salon
You can have a look around their entire salon and learn about all of their services easily.
6. Virtual Tours of Schools and Colleges
When choosing schools, parents do value the campus and the interior of the school. It creates an impression of where their kids will study and if they feel safe about it.
A virtual tour is a great way to showcase your school’s environment online so that the parents know beforehand how amazing your school is. And whether the students enroll or not, they will definitely take a live visit if they enjoy the virtual tour, which increases your chances of taking a new student onboard.
i. Sherborne International School:
Sherborne International School created virtual tours of their classrooms, dorms, and other facilities.
Here is the virtual tour of their school premises:
You can see their chemistry lab in this scene. On another tour, you can see the common room of their dormitory.
This tour clearly speaks with the parents about the reliability of the school.
7. Virtual Tours of Museums, Art Galleries, and Exhibitions
If you own a museum or art gallery, creating a virtual tour of them is a great way to attract more visitors to your site.
This way, you’ll not only get popularity online but people will be tempted to visit your gallery or museum in person.
In fact, if you regularly host art exhibitions, you can create virtual tours of your past events and use them to promote your upcoming exhibitions.
Here are some virtual tours created by WPVR users for museums and art exhibitions.
i. Melissa Morgan Fine Art
Melissa Morgan Fine Art created a stunning virtual tour of their entire exhibition and it’s so amazing.
These are the scenes from the entrance and the inside of the exhibition. Click on the images to visit the tour.
ii. Rolling Hills Studio
Rolling Hills Studio has created a clean and simple virtual tour of its fabric art studio. They used a high-quality 360 panoramic image and the virtual tour elegantly showcased the whole place.
Click on it to take a look.
iii. Mao Jianhua’s Personal Website
Mao Jianhua is a renowned artist and entrepreneur from China whose paintings are often a symbol of ‘Zhuo Weng’, which translates as a wise man dedicated to a simple and austere life.
His paintings have been exhibited in the famous galleries of Italy and the United Kingdom.
Here is a virtual tour of one of his exhibitions. I request you to take a tour of his exhibition:
iv.Virtual Museum of the National Institute of Health(Peru)
In commemoration of its 126 years of its creation, visitors will find a gallery of the Chiefs who led a firm response to various diseases and epidemics that devastated Peru.
Additionally, They have access to the Book of Royal Orders and Acts relating to the philanthropic vaccine expedition which details the events from 1806 to 1820 that served to avoid the smallpox disease.
Here’s how they used WPVR to create Virtual Tours,
More Brilliant Virtual Tours Created By WPVR Users
Apart from these virtual tours, there are also a lot of amazing virtual tours created by WPVR users of other industries and businesses.
Let’s take a look at more virtual tours created by WPVR users.
i. Far Out Ride – Van Tour
This is a unique virtual tour of a mobile home created by Far Out Ride.
They’re specialists in building custom automobile homes for all your living accommodations.
Here is a virtual tour of one of their mobile homes:
ii. Virtual Fair and Virtual Stalls by EEST
ESST created some really professional virtual tours with custom-made high-quality 360-degree images.
This is mind-blowing as they created the image from scratch and used WPVR to turn it into a masterpiece.
I insist you take this tour. You won’t be disappointed.
iii. 360 Degree Drawing and A 3D Self Portrait By Karen Nijst
Karen Nijst is a Web Developer from Hapert, the Netherlands who made some wonderful 360-degree drawings of herself and her surroundings.
In her own words:
“As you can see, I like to draw a lot.
Because I also enjoy making animations, you will find a fully drawn digital tour through our living room and garden (where I prefer to draw) and through our village Hapert (Noord-Brabant NL) below.”
Click on the images to visit her virtual tour and experience these beautiful images.
iv. Patrick Gerola’s Atelier
Patrick Gerola is an artist painter from Belgium.
Here are the virtual tours of his excellent studio:
Click on the images to visit these tours.
v. Zirzow Gallery by Amanda Zirzow
Zirzow Gallery was formed in 2020 with the desire to showcase the beautiful, unique art of Amanda Zirzow.
Zirzow Gallery sells original art, fine art prints, and gift items. It is also the hub of her artistic community.
Click on the images to visit her gallery.
Inspiration for Amanda’s paintings comes from her experiences in nature, adventures, and stories.
Through her art, she captures impressions from her imagination and infuses her subjects with color to bring them to life.
Amanda’s mission is to share her artwork to inspire and help others. She is an active member of her community, a teacher, and an artist based in Fort Myers, Florida.
vi. Studio immobiliare Valsesia
Studio Immobiliare Valsesia gives you access to Valesesian real estate, and they’ll handle everything needed for selling or renting a property for you.
They have a huge number of properties listed on their website, so you can easily find your desired property here.
They have created virtual tours for almost every one of their properties using WPVR.
Click on the images to view the actual virtual tours on their website.
They’re right now in collaboration with Fiaip, the largest association of Italian professional real estate agents.
vii. CBS Spol – Virtual Tours with Areal Photography
CBS Spol, s.r.o. is a Slovak airline company and also the publisher of the largest edition of books on aerial photography in the world.
CBS’s mission is to provide a unique view of the landscape, and aerial view is one of the most unusual for humans.
Shooting is performed by a small fleet of Slovak-made aircraft.
If you own a restaurant that also hosts musical events, Fishchhalle’s virtual tour of its cultural center is a perfect inspiration for you. Take a look.
ix. Web Multimedia Solutions By Matt Jones
Matt works as a multimedia professional in Tampa, Florida. He produces websites, brand films, and 3D animations that let companies communicate their passion with the world and come to life.
Here is one of the Virtual Tours he created,
Conclusion
As you saw earlier, just like them over 10000 WPVR users are actively using WPVR to create brilliant virtual tours.
I’m sure you’ve learned a lot from these virtual tours that you can apply.
I’d love to see your creation with WPVR.
So, let us know once you’ve created a virtual tour yourself.
In 2024, visually consumed information will be highly accepted as people want to know it all without investing a much longer time.
Whether you are a traveler, resort owner, or realtor,
your consumer list won’t be satisfied if your site provides images or videos with a conventional 2D camera.
For a proper virtual tour of a home, place, or resort with a photo-first model, you need to use a high-quality 360 camera.
With that kept in mind, here’s my top-picked suggestion list of 360 cameras for 2024.
Let’s get started.
Consideration Points Before Purchasing A 360 Panoramic Camera
Before going to the list, go through these key factors you need to focus on while buying a 360 camera.
1. Dynamic Range Ability:
Capturing the full 360 angle of the scene is highly important in 360 photography.
Without a high dynamic range in the camera you are using, you will fail terribly in terms of the sharpness of your product.
2. Lens Quality:
In terms of lens, You should go for a single-lens mode camera.
A 4k single-lens mode camera would be the best as you will need very little editing time to give finishing to your images.
3. Easy & fast workflow :
You need to pick up a camera that speeds up the entire action cam workflow, from stabilizing, reframing, and editing to transferring files with an easy user interface.
4. Battery Life:
You must not want any overheating and crash issues with your camera.
Since panoramic cameras are power-hungry, choose one with a long battery life.
You should consider cameras with removable batteries or the ability to charge via USB, so you can keep the camera charged on the go.
5. Durability:
If you plan to take your panoramic camera on outdoor adventures or use it in harsh environments, look for models that are built to withstand the elements.
Weather sealing, rugged construction, and shock resistance are the features that you should consider.
6. Aligned with your need :
There are many amazing 360 cameras but every camera has its own unique value.
Some are really good at night mode, while others can tolerate the hot weather of sunny days.
Now considering all these, let’s have a look at the best 5 Panoramic cameras for you.
Best 360 Cameras For Capturing 360 Panoramic Images in 2024
As panoramic photography gains in popularity, more and more manufacturers are producing panoramic cameras that cater to this niche market.
So I’ve gathered the top five 360 panoramic cameras in the market right now, along with their standout features, pros, cons, and best use cases.
1. INSTA 360 X3
The Insta360 X3 is an updated version of the Insta 360 X2 with improved HDR for better quality in difficult lighting.
It has 50% faster wifi transfer compared to X2.
You can easily mount the camera, and record any bouncy action with proper stabilization.
With this virtual tour camera, you can quickly share to social media in a few clicks without losing video quality.
Specs :
Sensor Size 1/2″
Battery Capacity 1800mAh
360° Video 5.7K
360° Active HDR Yes
360° Photo 72MP
Single-Lens Mode 4K30fps
Screen Size 2.29″
Waterproof 10m (33ft)
FlowState Stabilization + 360° Horizon Lock Yes
Buy It If :
You want to edit on your mobile as it has photo format INSP, that can be exported via mobile app or desktop Studio.
You want to charge your battery in 90min(5V/3A)
You want a high dynamic range.
Don’t Buy It If :
Your operating temperature isn’t between -4°F to 104°F (-20℃ to 40℃).
Pricing
2. INSTA360 ONE RS 1-Inch
The advantage of buying the Insta360 One RS 1-inch edition is that it has more impressive features than smaller sensor cameras.
With Leica co-engineered lenses, dual one-inch sensors, and 6K 360-degree recording capabilities, it delivers superior image quality and can provide you with low-light performance.
Specs :
Aperture F2.2
Focal Length 6.52mm
Photo Resolution 6528×3264 (2:1)
Dimensions (W x H x D) 53.2×129.3×49.5mm
Max Video Bitrate 120Mbps
ISO Range Photo: 100-3200, Video: 100-3200
Audio Modes Wind Reduction & Stereo
White Balance 2000K-10000K
Buy It If :
You have limited filming experience as Insta360 ONE RS 1-Inch easy to use right out of the box. The camera setup process is quick and intuitive.
You want to connect the camera to the smartphone app.
You want the app-to-camera connection to be stable and uninterrupted.
If you want to connect it with multiple devices (watch, AirPods). As the connection remains strong.
Don’t Buy It If You :
You want to format in mobile as RAW files of this device require software on PC/Mac to export.
Pricing
3. RICOH THETA Z1
The Ricoh Theta Z1 is your premium choice for immersive 360-degree photography.
With its high-end features, it delivers detailed and captivating images, perfect for capturing your surroundings in stunning clarity.
Specs :
Image Sensor Size 1 inch (x2)
Image Sensor Effective Pixels Approx. 20M (x2)
File Size (still images) RAW: 7296 x 3648, JPEG: 6720 x 3360
Lens F2.1, 3.5, 5.6
OLED Panel 0.93 inch Organic light emitting display Panel, 128 x 36 dots
Usage temperature range 0°C – 40°C
Dimensions 48mm (W) x 132.5mm (H) x 29.7mm (24mm *7) (D)
Shutter speed Still image: (AUTO) 1/25000 sec. to 1/8 sec.
Buy It If :
You want to capture incredibly detailed images with excellent color accuracy and dynamic range as it has dual 1-inch CMOS sensors.
You want advanced image processing capabilities.
You want a large storage capacity.
Don’t Buy It If :
You require a huge amount of video recording as it has limited video recording capabilities.
You want longer battery life.
Pricing
4. QOOCAM 3
QooCam 3, is a 360-degree camera with two ultra-wide fisheye lenses that capture 5.7K photos and videos in all directions simultaneously.
With the “invisible” selfie stick, you can remove the footage by the camera’s algorithm.
Specs
Aperture F1.6
Exposure Compensation ±2EV
White Balance Auto, 2500K-8000K
Maximum Resolution of Photos 62MP (11136×5568)
Video Bitrate 120Mbps
Water and Dust Resistant IP68 Waterproof
Audio output AAC (16 bit/Quadraphonic/48 KHz)
Buy It If :
You want an easy-to-use camera
You want a compact and travel-friendly camera.
You want a well-built and weather-resistant camera.
Don’t Buy :
Down on resolution and some features from its predecessor.
Built-in JPEG processing is only so-so, with the need to use DNG to get the best out of the camera
Pricing
5. PANOX V2
PanoX V2 stands out for its exceptional performance, especially in capturing high-resolution still photos.
Its intuitive interface makes it a pleasure to carry and operate in the field.
And will allow you to focus on capturing stunning images without worrying about the fragility of the equipment.
Specs
360°Video 5.7K@30FPS
360° Photo 72MP
Sensors 1/2” CMOS
HDR Photo 12K
Photo Format JPG+DNG
Live Streaming 4K 360° YouTube &Facebook
Timelapse. 5.7K 360°
Buy It If :
You want higher density and higher resolution as it has 8K 5 FPS mode
You want a built-in GPS.
You want to just drag the files right into the desktop uploader without other processing as it has on device stitching of 360s.
You don’t want to buy an adapter as it has a standard tripod camera mount.
Don’t Buy It :
If you want high sharpness, the UI on the camera feels a bit less polished
If you want fast GPS tracking, acquiring GPS satellites can take a bit of time.
Pricing
Comparison of The Best 360 Degree Cameras
Now that you know all the details about each of the best 360 cameras, let us look at a few comparison tables to understand which one is ideal for you to choose and which 360 cameras are affordable.
⬩ 4 MEMS 48KHz Microphones. ⬩ 3.5mm Mic Port for external professional Mic.
Third-party stands and sticks
No
Panox V2
⬩ 4 MEMS 48KHz Microphones.
Tripod Socket
With Case (Up To 30m)
Control Options & Pricing
360 Cameras
Mobile App
Touchscreen
Voice Command
Price
Insta360 X3
Yes
Yes
14 Voice Commands
$399
Insta360 One 1-inch
Yes
Yes
4 Voice Commands
$429.99
Ricoh Theta Z1
Yes
Yes
Only for Image Capture
$376.95
Kandao QooCam 3
Yes
Yes
No
$559.99
Panox V2
Yes
No
No
$399
You can now compare different features and aspects of these 5 cameras and decide which one matches your requirements best.
How You Can Make Money with 360 Panoramic Cameras – Industry Use Cases
Let’s have a look at how panoramic cameras are being used and can be used in different industries to make you money.
1. Real Estate
If you’re a real estate agent, you can use 360 panoramic cameras to create virtual tours of your properties, providing a 360-degree view of the property to potential buyers.
This will help to increase engagement with your clients and provide them with a more immersive viewing experience.
Pair your camera with WPVR to easily create immersive virtual tours and integrate them directly into your website.
Here’s an example of how it will look,
2. Travel and Tourism
If you work in a travel company, you can use these 360 panoramic cameras to capture immersive footage of destinations where you operate and create virtual tours.
It allows your potential customers to explore a location before booking a trip.
They can explore rooms just like the one below,
3. Education and Training
You can use 360 panoramic cameras for education or to train employees or students by creating immersive training videos.
For example, medical students can get familiar with real-life challenges & learn how to act using 360-degree footage of surgeries.
4. Museums and Exhibitions
You can create interactive exhibits and virtual museum tours using 360 panoramic cameras and make your exhibitions open to your online viewers.
5. Automotive Industry
If you own a car dealership, you can use 360 panoramic cameras to create a virtual car showroom to showcase the interior and exterior of your vehicles.
They may check car details like this,
6. Architecture and Design
If you’re an architect or designer, 360 panoramic cameras will help you create immersive visualizations of your projects.
It allows your clients to have a better idea of the space before it’s built or designed.
7. Photography & Videography
360 panoramic cameras will let you capture unique perspectives and create stunning visuals.
Their compact size and portability make them a great option for your on-the-go shoots.
8. Event Planning
In the event planning business, you can use 360 panoramic cameras to capture your events from multiple angles, providing a more comprehensive view of the event and a dynamic showcase.
Also, utilizing 360 panoramic cameras to capture your events from multiple angles not only provides a more comprehensive view but also enhances the invitation-making process by offering dynamic visual content for the invitation maker app.
For those looking to elevate their event documentation further, hiring professional event photographers can add a layer of professionalism and creativity to your visuals.
It’ll make your job easier to impress your potential clients with your previous work.
9. Construction and Real Estate Development
If you have a construction business, you can utilize 360 panoramic cameras to create virtual site visits and track construction progress.
It’ll let your stakeholders monitor the progress of the project remotely.
10. Sports and Action
You can use 360 panoramic cameras to capture your extreme sports and outdoor activities in high-quality footage.
This will be useful for athletes like you looking to document their experiences.
11. Film and Entertainment
If you’re in the entertainment industry, you can use these panoramic cameras to capture live events, such as concerts and festivals, to capture 360-degree footage for your online audiences.
12. Security and Surveillance
In the case of monitoring large crowds or events, 360-degree footage can provide a comprehensive view of the area being monitored.
Wrapping Up
In summary, the Insta360 One X3 offers the best image stabilization and editing capabilities, making it a great choice for those who want to capture smooth, professional-looking footage.
The Kandao QooCam 8K is the best choice for those prioritizing image quality, as it offers the highest resolution and dynamic range.
The Ricoh Theta Z1 is a great option for those who want advanced features like live streaming and remote control.
The Insta 360 ONE RS 1-Inch offers amazing photo quality even in low light so it’s great for using in all weathers.
Lastly, PanoX V2 is great for its exceptional performance, especially in capturing high-resolution photos.
No matter which camera you choose, a 360 panoramic camera can open up creative possibilities for photographers and videographers.
Whether you’re looking to capture immersive footage of your travels or create virtual tours of real estate properties, these cameras can help you easily achieve your vision.
If you want to use a reliable virtual tour creator that is reliable, cost-effective, and has a high-quality interactive floor plan feature, then WPVR would be a great choice.
Try using WPVR today and start making virtual tours that are more optimized for converting clients.
Are 360 panoramic cameras difficult to use for beginners?
Not necessarily. While they may have a learning curve, many models offer user-friendly interfaces and intuitive controls to simplify the shooting process.
Can I use a 360 panoramic camera for everyday photography?
Yes, 360 panoramic cameras are universal tools that can capture a wide range of scenes, from everyday moments to epic landscapes. It enhances your photography experience.
Are 360 panoramic cameras only suitable for professional photographers?
No, they’re for everyone. Whether you’re a professional photographer, an enthusiast, or just someone who loves capturing memories. A 360 panoramic camera can elevate your photography game.
Do 360 panoramic cameras require special editing software?
While some advanced editing software can enhance your images, many panoramic cameras come with built-in editing features. It helps to make it easy to edit and share your photos directly from the camera.
Can I use a 360 panoramic camera for live streaming?
Yes, some models, like the GoPro MAX and Ricoh Theta Z1, offer live-streaming capabilities. It allows you to share immersive experiences in real-time with your audience.
As a resort or luxury hotel owner, you are committed to providing your guests with a top-notch experience.
However, the problem is how you can build trust that your resort won’t give a money-wasting experience to your visitors.
One great approach to convince your clients is a virtual tour of your resort.
A resort virtual tour will allow you to connect with potential clients by giving them a realistic, immersive experience. It will eventually help to amaze guests into booking it for their next trip or event.
Today, I will discuss how you can use a virtual tour to showcase your resort online.
Through this article, you will learn:
How you can organize a complete virtual tour of your resort or luxury hotel.
The right tools to create a compelling virtual tour.
How to make your virtual tour more interactive and optimized for bookings.
Eventually, you will have an edge over your local competitors online.
So let’s begin.
How Virtual Tours Influence More Online Bookings
In 2024, people are becoming enthusiastic about traveling. And many tend to look for resorts to experience amazing elite service.
As digitalization becomes stronger, more and more people are getting comfortable booking resorts directly from websites.
So, it is crucial for you to make it super easy and exciting for your potential guests to book or reserve your resort.
Sure, high-quality pictures or high-definition videos are a great way to present your exquisite hotel.
A virtual tour here can make a huge difference in people’s decisions.
Your potential clients may get a unique personalized experience.
Also, they can get more eager to visit your resort just by looking at all the magnificent decor and top-notch services you offer.
Let’s go through a few resorts that are using virtual tours to show their resort online :
Resort virtual tour of Tranquility Bay Resort
This project involved creating an immersive virtual tour for Tranquility Bay Resort, designed to portray its luxurious amenities, stunning location, and spectacular views.
The tour features:
Over 80 interactive 360° scenes
A central aerial 360° image with custom navigation
Optimization for fast loading across all devices and browsers
Custom branding aligned with the resort’s existing site
“Micro tours” for specific areas (e.g. 3-bed beach house)
Another great example of using a resort virtual tour is Parrot Key Resort.
In this project, Parrot Key Resort :
Features over 70 interactive 360° scenes that showcase the resort’s best features.
Designed to be responsive across devices and includes a content management system for easy updates.
Implemented Custom features like extractable scenes, information pop-ups, and photo galleries.
The design of the tour was branded to match the resort’s aesthetic, and Google display banner ads were created to drive client interest.
You can do the same and make your resort a prime choice during trips.
With the interactive and immersive experience, your guests can get a feel for the resort’s environment and plan their itinerary before arrival.
This level of engagement and personalized experience can build trust among your targeted travelers.
And they will be more likely to book a villa at your resort directly from your website.
Planning & Crafting Your Resort Virtual Tour
By now you must understand the advantages of using a resort virtual tour.
Now let’s look at how you can plan one for your website.
1. Capture 360-degree Resort Room Images
First, you will need a good 360 camera to capture panoramic images of your resort.
In this case, it’s best to choose a high-quality camera so that you don’t miss out on any single detail.
Once you have the camera, you can get a gizmo or a tripod (or maybe a drone) and capture 360 panoramic images of your resort facilities.
In case you are uncomfortable with taking pictures on your own, you may hire professional photographers to do it for you.
Quality is a key factor here because we are talking about a resort here, not a random local hotel.
Sometimes WordPress can automatically compress and reduce the panorama image quality.
A good 360 panorama image usually comes with a very high resolution that can easily go over 3000×1500 pixels.
This comes with the option to disable this restriction so that you can easily upload panorama images that can be more than 3000 pixels in width.
2. Use A Virtual Tour Creator That’s Easy To Use & of High Quality
Once you have the 360 images of all of your villas or sports of your resort ready, you may go ahead and upload them to a reliable virtual tour creator to craft stunning virtual tours.
There are several tools out there. It’s important to choose one that has all the features that can make your virtual tour more immersive.
If you have a WordPress site, then you may use WPVR, which is the no. 1 VR plugin out there, and perfect to showcase your virtual resort tour online.
With WPVR, you can give your viewers unrestricted virtual exploration.
Your audience can explore your virtual tours however they want with the easiest navigation buttons with a mouse, keyboards, or VR headsets.
Using WPVR you can go for a luxurious button color and the button icon aligns with your brand identity.
3. Create Virtual Tours For Each of Your Facilities
Since it’s a luxury hotel, you likely have a lot of facilities available for your customers.
And a single virtual tour of the whole hotel will be quite difficult for your clients to browse through in full.
It may often confuse people and drive away potential clients.
In this case, create separate virtual tours for specific room types along with the bedroom and bathroom, plus the added facilities such as a private pool or jacuzzi.
Then, create more tours for each of your grand luxurious halls, garden, game zone, fitness center, food cuisines, or maybe the casino (if you have one).
Then, create a central landing page to highlight all your facilities and allow clients to visit the facilities they are interested in.
Having separate tours for each will help clients only to visit what they are looking for and not waste their time.
Watch this video to learn how you can add a scene to each of your separate tours.
You can also use a QR code generator to make it easy for guests to access specific virtual tours instantly.
In fact, you can have a separate landing page for each of your facilities which will allow you to rank higher on SERPs for your potential clients.
How To Optimize Your Resort Virtual Tour For More Engagements
Creating your resort virtual tours is just half the task. Making them more engaging and resourceful is the main challenge here.
Rather than giving a playing 360 environment to browse through, include a few elements to it to make it feel more realistic and personalized.
The hotspots are like small icons that visitors can click to get more information, such as:
Texts.
Images.
Promotional Banners.
Videos.
Room details.
GIFs, etc.
In your tour, you may level these information bubbles on top of specific items or resources to give more details to your clients.
For example, if there is a rooftop pool for members only, then you can add a hotspot at the ergonomic desk by the pool to give details on becoming a member, along with a video of how enjoyable it is to relax in the rooftop pool.
This is a great way to personalize with potential clients.
With WPVR, You can enjoy full access to an HTML Editor and WYSIWYG interface for crafting hotspot content.
This platform offers a vast library of over 900 customizable icons for your hotspots.
You can further personalize these icons by adjusting their colors and adding optional ripple animations.
Watch this video to learn easily how you can interactive virtual tour of your resort.
2. Communicate Through An Explainer Video
The hotspot option sounds great, but what if you could communicate directly with your prospects when they visit the tour?
That’s exactly what an explainer video will allow you to do.
An explainer video on a virtual tour is a small video screen on the right corner of the tour which visitors can play while taking the tour.
Suppose, Your resort has 3 types of villas. One is a mud house, one with a swimming pool, and the other has a jacuzzi.
Only with pictures and description, it can be confusing what type of villa has more facilities.
But with a guided explainer video your clients can fully understand all the facilities each type of villa has.
In this way, you can also reduce the amount of resort or hotel booking cancellations.
To add an explainer video, You have to pick a VR tool like WPVR that has the feature of adding an explainer video.
Worried about how you will create an explainer video? Watch this video to understand the process clearly.
So that you can leave an introductory video or explain your facilities in detail via a well-planned video.
This could act as an elevator sales pitch to convince the client to book your resort.
3. Villa Bookings Within The Resort Virtual Tours
Let’s say a prospect browsed your Premium Room with a private pool. What now?
Does he have to go to an external page to confirm the booking, or maybe call you?
No need! Let your clients place bookings while experiencing the virtual tour.
This will help to increase your number of hotel bookings as the prospect will have no chance of getting distracted from his decision.
4. Guide Your Clients With An Interactive Floor Plan
In case you do choose to include a central virtual tour that leads to various facilities, you may include a floor plan of your hotel or resort to help the visitor navigate through the tour.
This will help the clients to get accustomed to your luxury hotel even before visiting it in person.
Plus, it will act as an added element to get the prospect more excited about the tour.
5. Offer A Realistic Experience With VR Headsets
Apart from taking a realistic tour on a desktop or a mobile, you may also allow your clients to get a complete VR experience via VR headsets.
People who love virtual reality often enjoy direct virtual tours.
If your resort is well-decorated, it will help pique the interest of such clients.
Naturally, they are excited to travel and visit beautiful places. If your resort is well-decorated, it will help pique the interest of such clients.
It will not only make the experience near-perfect to reality, but it will leave a long-term good impression on your quality.
6. Share Your Resort Virtual Tour on Social Media
Virtual tours provide an effective “hook” for initiating and maintaining social media interactions with your audience.
Increase engagement with the brand
Generate user-generated content
Drive Conversations About Your Tour and Business
Gather valuable feedback for future improvements
See below how the tranquility of Bay Beach Resort shares its virtual tour on its social media :
They use the power of interactive, immersive content in digital marketing.
And the result came up as below :
Up to 15x more user engagement compared to traditional methods
Improved customer research and decision-making process
Increased return on investment through higher online hotel bookings and engagement
So, you can start using this digital marketing strategy using a virtual tour.
Make sure you use industry-specific hashtags when posting tour-related content
Encourage audience participation by asking them to share personal experiences related to showcased spaces
If you are using WPVR, then you can easily share your resort virtual tour on your social media platforms.
7. Optimize Your 360-Degree Luxury Hotel Virtual Tour For Smartphones
Since this is the age of smartphones, it’s evident that you should make your virtual hotel tour optimized for smartphones.
Responsive Tour:
In most VR plugins, you will find a way to make the tour responsive for mobile devices with a Mobile Media Resizer and make the tour smoother and more enjoyable.
Gyroscope Support:
Gyroscope will let your visitors enjoy the virtual tour by moving their smartphone devices around just like they would have to move on a live visit.
Overall, if you can make the experience hassle-free and attractive at the same time.
8. Use QR Code
Your clients can explore rooms, check out features, and get a real feel for the space – all just from your site in an easy way.
Using QR code generators is super convenient for your clients. They just have to scan the code and they’re in!
Using A Virtual Tour Creator You Can Rely On – WPVR
Now that you know how you can start using luxury hotel virtual tours and attract more clients, a crucial part of your whole plan will be choosing the right tool.
In WordPress, the best plugin to help you create the stunning virtual tours you want is WPVR.
It is the only WordPress plugin that comes with all the amazing features that help to increase engagement in your virtual tour while being reasonable in price.
According to Statista, number of home sales have been fallen from 5.03M to 4.09M in 2023 compared to previous year.
However, the number of licensed realtors in the USA increased to over 2 million in 2023 compared to 1.6 million in 2022.
As a realtor, you must find new ways to stay ahead of the high competition and attract more potential buyers.
One of the best ways to connect with clients in 2024 is to use real estate virtual tours.
The fact is, people no longer want to watch polished images and optimized videos to choose properties.
Your only options would be to make them visit your properties or get a virtual walkthrough of the homes for sale.
Today, you will learn how you can create a virtual tour for real estate easily.
Eventually, you will be able to create stunning virtual tours of homes for sale to attract the right buyers.
So let’s begin.
Benefits Of Virtual Tour For Real Estate To Sell Properties
It’s 2024. Even Zillow started using virtual tours a long time ago. As a realtor, you must accept that virtual tours for the real estate sector are now an essential element in your sales strategy.
Your Buyers Expect A Virtual Tour
As more and more realtors are using commercial real estate virtual tours to sell and rent their properties, your clients are now getting used to experiencing VR property tours.
54% of the buyers will not look up to a property if it doesn’t have 360-degree images.
50% of the buyers found virtual tours really useful.
This indicates that if you do not use visual tours, there is a possibility that you may end up losing up to half of your potential buyers to your competitors.
Having said that, there are more reasons why a commercial virtual tour for real estate can help you to sell more properties effectively.
i. Keep Visitors Engaged & Connected
A virtual tour will create more engagement than regular flat images as the viewers feel like they are taking an actual live tour.
Integrating virtual tours into listings for shared apartments can significantly enhance the appeal to potential renters by providing a comprehensive view of the communal living spaces and amenities.
Since the view seems realistic, they will know exactly how the property is built and if it’s something they would like in real life.
Images make it difficult to imagine the house in reality – after a visit, you may notice some areas are smaller than expected or less coordinated than in the images.
A virtual tour will help avoid this sort of situation to a great extent.
ii. Trigger Buyers To Make A Decision
Usually, a buyer tends to look into several listings based on his budget and location preference before inquiring about the ones he finds suitable as per the images. If you create a virtual tour, you can have a chance to land a deal more easily.
Basically, people already know that images can be altered and misleading at times. Plus, useful information on the home listing page can not be easy to relate to while looking at the images.
Hence buyers tend to call several agents to find out more about the houses and often visit multiple properties before making a decision. (Your time invested can not always be fruitful.)
With a virtual tour, you have the option to add relevant information at the right spots via tooltips or click-to-view content within the tour.
This will help to eliminate all unnecessary questions and convince a few to make a temporary decision. When they call you, it will be much easier for you to invite them for a live visitation.
These people are already interested, and you will have a greater chance of closing the deal during the live tours of houses.
As a real estate agent, one of the most irritating issues you have to face is wasted viewings of your properties.
Many people visit the properties, and you take time and effort to give them a good tour, but most of them end up declining your offers.
If someone requests a live visit after taking a virtual tour, then he/she is probably serious about the deal, thus increasing the possibility of closing deals for your property with less effort. If you’re dealing with niche properties like tiny homes, virtual tours can help attract only genuinely interested buyers.
Steps to Create A Real Estate Virtual Tour
Now that you know the benefits of using a virtual tour for real estate to sell more properties, let us look at how to make a virtual tour for real estate.
1. How To Take 360 Photos Of Your Properties
The first step of this process is to take 360 panoramic images of your houses or properties, which you can then convert into a 360 virtual tour.
In this case, you have 5 possible options:
Use a professional assistant to capture & edit 360 images. The best option is always to get professional help. But sometimes, the expenses can not result in a good ROI. So you have to be calculative in terms of expenses before seeking professional virtual tour creators.
Get a tripod & DSLR to capture images in all directions and stitch them into a panoramic image. In this case, you have to capture images at fixed angles in all directions manually, after that use a stitching app to turn them into a 360 panoramic image.
Use 360 panorama apps on your iPhone. If you don’t have an iPhone, don’t worry you can also use an Android app to take 360 panoramas. You can also use You will find amazing apps to help you capture great panoramic images via a guided photo session.
Capture 360 images using a drone. Aerial photography using drones can be an amazing experience while delivering high-quality output.
Use a QR code for photo sharing. QR codes are a convenient way to share your 360 images. It allows prospects to access them with just a simple scan. Placing them on any marketing collateral will help you promote your property.
Your panoramic images together will become a 360 virtual tour using the right VR software.
2. Choosing The Right Virtual Tour Software
You want to make sure you can create a property virtual tour that not only gives a realistic tour but also keeps the visitors engaged with the right details.
Now I am going to help you choose the right tool to make a virtual tour of real estate.
Crucial Features To Look For In An Ideal Real Estate Virtual Tour Software
i. Ability To Display Information Inside The Virtual Tour
You can make the tour more meaningful for your buyers while property searches by providing additional information on the property before visiting.
So, you will need a virtual tour creator that will allow you to place relevant information at suitable spots in the tour.
For example, let’s say the fireplace is an exotic one. You may include a tooltip on top of the fireplace where people can hover to learn what type of fireplace it is, along with a preview of how it looks when lit.
Or, let’s say there is a swimming pool on the property. Then you can let people click on an icon to learn about its dimensions.
You may even consider providing information such as the floor type, ceiling material, etc. All of these will make it easier for the buyer to realize if this is what he/she is looking for. So find a tool that lets you add such engaging materials.
ii. Make It Easy To Contact You
After taking the tour, you would want the visitor to contact you ASAP. Hence, you have to make it easy for the buyer to reach out to you if they like what they see.
The best option here would be to include a contact form within the tour.
Since the buyer is interested, why make him look for your contact details elsewhere? Simply get him to book a call with you during the tour.
This means the contact form is an important feature you want to have in your virtual tour creator. You might also consider using a software localization platform to translate your website and contact form into multiple languages, making it accessible to a wider global audience.
iii. Use Company Branding
While contacting you is great, many may still want to decide on this later. Hence, you need to find a way to create a place in the prospect’s mind so that he trusts you in dealing with the house.
In that case, you can include your Company logo on a corner of the virtual tour for real estate so that clicking on it will give people further details about your business location, the service you offer, and additional contact information.
This is partially a brand promotion. People will remember you more easily if they see your logo. Plus, it will help to gain trust now that they know you have a physical location.
It will also help your re-targeting Ads to get noticed more effectively. So, branding opportunity is a good feature to have in your VR software.
iv. Option To Include A Gallery To View All Available Scenes
The easier your buyers can navigate the tour, the more time they’ll spend on it.
If the property has a lot of rooms or scenes, then the virtual tour for real estate can be confusing when navigating back and forth between different scenes in the tour.
A logical thing to do here is to include a gallery that will show all the available rooms/scenes on the property, which people can click to view right away.
v. Cover Every Inch Of The Property For An Interactive Tour
Keep in mind that the virtual tour for real estate should be a replication of a real-life tour. So make sure you manage to highlight all the rooms or views of the property.
For example, if a house has 5 rooms, then you should include at least 5 scenes in the virtual tour (1 for each from the middle of the room).
Plus, it’s an added benefit if you include scenes for the restrooms, kitchen, front yard, and backyard. For a duplex, a view from the stairs will be great.
Now, your tool should be able to connect these scenes to make them into a tour. Basically, you need to be able to include hotspots that people can click and go to the other room.
For example, let’s say you are in the yard just outside the main entrance. Then you can place an icon on the entrance section that people can click to enter the house.
Recommended Real Estate Virtual Tour Creator For You ⚙️
All the features listed above are just the core features you would look for in your virtual tour software. Based on these requirements, we recommend you use a WordPress website and go for the WPVR tool.
WPVR is right now the no.1 virtual tour creator in WordPress and has all the features from above, plus more to create a perfect virtual tour for real estate sector. All you have to do is upload your 360 panoramic images, and this plugin will turn it into a 360 virtual tour.
Besides the core features, you will get additional features to make the tour even more engaging such as an interactive house floor map, a short introductory video, background music, mobile responsiveness, custom hotspot icons & navigation control, and many more.
3. How To Create A Real Estate Virtual Tour Easily
So far, you have learned how to capture 360 panoramas and know what to look for when choosing the right virtual tour plugin. Now, it’s time to create your property virtual tour.
Now, follow the steps below to craft your 3d real estate walkthrough.
1. Add Scenes to Your Virtual Tour
Upload your 360 images to WPVR by following the steps below:
i. Go to WordPress Dashboard > WP VR > Add New Tour.
You’ll be taken to the General Settings page of WPVR.
ii. Set a title for your virtual tour.
iii. Click on the Scenes tab.
Here, you can upload your 360 panoramas one by one, and each one will be considered one scene. But before you upload the images, follow the next two steps first.
iv. Set the first scene as default.
Click the Set as Default option and choose Yes. It means that this scene will be the 1st scene of the tour. (You can choose another scene as default when you upload more images)
v. Assign a Scene ID to your scene.
Each scene should contain a unique Scene ID.
vi. Click on the Upload button to upload a 360-degree image. You can manually upload an image or choose from your media folder.
Similarly, you can add more scenes by clicking on the “+” icon on top and then uploading images for them.
Here, I’ve added 4 scenes with different panoramic images.
After uploading, each scene will have a thumbnail of it under the Scene Upload section.
vii. Click on the Preview button.
You’ll see a live preview of your virtual tour in the Tour Preview section on the right side.
You can add up to 5 scenes on each virtual tour on the free plugin. (With WPVR Pro, you can add Unlimited Scenes on a virtual tour.)
Your scenes are uploaded, but now, you can only view the 1st scene. To be able to view the others, you need to add hotspots that people can click to go to other scenes.
2. Connect Your Scenes Into A Virtual Walkthrough Using Hotspots
Suppose you uploaded 4 scenes. Now, we will see how you can add the option for visitors to move between multiple scenes of your real estate virtual tour.
i. While on Scene 1, Click on the hotspots tab
ii. Here, set a unique hotspot ID.
iii. Change the hotspot type to Scene
iv. On the preview on the right, click on the spot you want to place the hotspot.
When you click, some coordinates will appear called ‘Pitch’ and ‘Yaw.’
Click on the “arrow-down” button to its right. It will add the coordinate values in the respective fields on the left.
v. Add a short tooltip as on-hover content for this hotspot.
For example, if that hotspot leads to “Master Bedroom,” add it as on-hover text so that people know where they are going next.
vi. Under Select Target Scene from List, choose the Scene ID where you want your viewers to go by clicking on this hotspot.
Repeat the same for the rest of the scenes and you will have a complete real estate virtual tour ready. Now, people will be able to move from one scene to another.
**To add hotspots to other scenes, go to the scenes Tab and click on the scene window from the top to view its settings. Set this scene as default and click on preview. Then go to the Hotspots tab and add hotspots to that scene. After you have added hotspots to all the scenes, return to the 1st scene and set it as default.
3. Add Information to Your Tour
Now, your tour is set. Next, you can make this tour more interesting and engaging by adding more information.
i. Again, go to the scene in question, then go to the Hotspots tab.
ii. Here, choose the Scene type as “Info.”
iii. Then collect the Pitch and Yaw from the Preview to place the hotspot.
iv. Under the Scene Type, add content.
The On-Hover Content will be displayed when someone hovers over the hotspot icon.
The On-click Content will be displayed on a pop-up within the virtual tour when someone clicks on the hotspot icon.
In the On-Click Content, you will be able to add content using a WYSIWYG editor to show text, image, video, GIF, or audio.
You may even add shortcodes of booking forms or lead forms.
You can set images, videos, and GIF files here.
And on the URL field, you can add a URL of any website so that clicking on the hotspot will rather take them to that website. So, you could take them to more listings of the same category of houses in the desired location.
You can add up to 5 hotspots on each scene. With WPVR Pro, you can add Unlimited Hotspots to each scene.
4. Set Up The Basic Settings and Control Buttons
Go to the General tab.
Here you’ll find two options are enabled by default:
Tour Autoload
Basic Control Buttons
Keep the Tour Autoload option enabled to automatically load the virtual tour once you land on the web page that contains the virtual tour.
Enabling the Basic Controls will display a few basic navigation control buttons, ‘fullscreen,’ ‘zoom-in,’ and ‘zoom-out’ on the virtual tour.
Once this is done, Publish the tour, and it will be ready. You can then embed it on any web page or post it on your website.
Here’s what this tour looks like.
But this is just a basic tour. Time to make it even better by using WPVR Pro.
Customize Your Tour into An Engaging Virtual Walkthrough
To carry out the next few customizations, you will need WPVR Pro. Here is how you can upgrade to WPVR Pro. Activate WPVR Pro and then follow the steps below.
1. Add Scene Title and Author Information on Each Scene
Go to the Scenes tab. Now, you’ll find these options:
Title: You can give the name of the scene.
Author: State who created it. You may use the company name here if you want
Author URL: You can add a link to your website or social profile which people can visit by clicking on the Author URL.
2. Customize The Hotspot Icons of Your Real Estate Virtual Tour
Go to a Hotspot tab under a scene.
Here you’ll find these options:
Hotspot Custom Icon
Hotspot Custom Icon Color
Hotspot Animation
> Hotspot Custom Icon:
Using this option, you can set custom icons for your hotspots.
Just click on the dropdown option, and you’ll find 900+ custom icons you can choose from.
> Hotspot Custom Icon Color
This option allows you to set a custom color for your hotspot icons.
You can add custom colors from RGB, HSL, and Hex mode.
Hotspot Animation:
By turning this option On, there will be smooth and slow flickering animation on your hotspots.
3. Display A Scene Gallery on Your Virtual Tour
Since you have created this virtual tour with multiple scenes, you can enable the scene gallery option where all the scenes will be shown as a thumbnail.
Go to the General section then click on the Advanced Controls tab. You’ll find an option here named Scene Gallery.
Turn it on, and a new option named ‘Scene Titles on Gallery‘ will appear. This option will show your scene titles at the top of each scene thumbnail in the scene gallery. You’ll be turning all the options On as well.
4. Add Background Music on Your Property Virtual Tour
You can also add soothing background music to your entire virtual tour to make it enjoyable. While on the Advanced Controls tab, enable the Tour Background Music option.
These new options will appear:
Autoplay: Turning on the Autoplay option will automatically start playing the background music.
Loop: Turning on the Loop option will play the background music on a loop.
Upload or Set Audio Link: With the Upload or Set Audio Link field, you can either set an audio link here or upload the audio file manually or from your media server.
5. Add your Real Estate Company Logo and Description
Adding your company logo on this virtual tour will show authority and let your clients learn a little more about your company and service.
Here, you’ll find these two options:
Upload Company Logo: This will allow you to upload a company logo to be shown on the top right corner of your virtual tour.
Company Details: You can add a small but informative description of your company here. Once your viewers click on your logo, this description will appear.
6. Add A Home Button To The Virtual Tour
WPVR allows you to add a home button on your real estate virtual tour that will take your viewers to the default scene by clicking on it.
To add this button, go to General > Control Buttons.
Find the Home option and turn it On. You can also customize its icon and icon color.
7. Add Contact Forms On Your Tour
One of the most important elements you can add to your real estate virtual tour is a contact form.
Suppose a potential buyer just had a look around your tour and is now interested in the property. Now, he’ll try to contact you to learn more about this property and arrange a visitation.
You can allow him to contact you instantly by keeping a contact form on this virtual tour. For this, you will need to install the WPVR Fluent Forms Add-on and the FluentForms plugin on your site.
You will get the Add-on for free when you get WPVR Pro.
Once you’ve created a suitable form for this purpose, you can easily integrate this form into your real estate virtual tour by following the steps below:
i. Create a form in Fluent Forms.
ii. Go to the Scenes section and add a new hotspot.
iii. Select the Hotspot-Type as Fluent Forms.
iv. From the Select Your Form section, choose your desired form.
v.Publish or Update the virtual tour.
vi. Now, the form hotspot will appear on the tour preview.
Click on the hotspot, and the form will pop up on the tour.
So now, your potential clients can contact you immediately when they’re experiencing the tour.
8. Add a house floor plan to your virtual tour
Having floor maps of virtual tours of houses will make the experience more meaningful and interactive. Once you are satisfied with your tour, view it on your website.
This is how your commercial real estate virtual tour looks like after you’ve applied all the customizations.
You can realize it’s way more engaging than the basic real estate virtual tour.
Pricing Of WPVR to Create A Real Estate Virtual Tour
When you calculate real estate virtual tour pricing, you will be surprised that it’s not as high as you would expect.
If you use WPVR, the software will cost you as low as $79.99.
Initially, the equipment may seem expensive if you go for the DSLR or the drone approach. But using your phone would mean it would cost less than $200.
But think of the long-term benefit. Your equipment cost will be one-time, and the software cost will be a yearly cost. But your tours will be created on a monthly basis, and you will be able to earn back thousands of dollars through successful home sales.
So, if you think about it, you won’t be spending too much, but the earning potential is huge.
Conclusion
Today, you’ve learned the importance of creating real estate virtual tours to stay ahead of the competition and attract more buyers. Using tools ensures your virtual tours include all crucial elements to make them memorable and effective.
Your main goal is to create tours that captivate visitors and drive sales. Start building your next virtual tour today and gain a competitive edge in the market.
Additionally, consider investing in VR stocks and exploring free real estate WordPress plugins to enhance your business further.
WPVR stands out as one of the best virtual tour software options available. By following this guide and leveraging WPVR, you’ll elevate your real estate business and close more deals.
Now, go ahead and transform your property listings with stunning virtual tours
Creating a virtual tour for real estate involves capturing 360-degree images of your property, and using virtual tour software to stitch these images together. It also adds interactive elements like hotspots and descriptions.
Which 3D real estate camera should you use?
For high-quality virtual tours, invest in a good 3D real estate camera. Popular choices include the Ricoh Theta Z1, Insta360 ONE X, and Matterport Pro2. These cameras offer excellent image quality and ease of use, making your virtual tour creation process smoother.
How can you create an engaging 3D real estate walkthrough?
To create an engaging 3D real estate walkthrough, focus on capturing detailed and high-quality 360-degree images. Use virtual tour software to add interactive elements like hotspots, floor plans, and descriptions.
How do real estate video tours differ from virtual tours?
Real estate video tours are pre-recorded videos showcasing a property, often with a guided narration. In contrast, virtual tours are interactive and allow you to navigate through the property at your own pace. It also provides a more immersive experience
Why should you use virtual tours of homes for sale?
Using virtual tours for homes for sale helps you reach a broader audience, including remote buyers. They provide a comprehensive view of the property. It allows potential buyers to explore every detail. Virtual tours also help you stand out from competitors and can lead to faster sales by offering an innovative and convenient way to view properties.
What if your next home buyer could fall in love with a property without ever stepping foot inside?
Nowadays buyers are overwhelmed by the time-consuming process of visiting numerous properties. Successful realtors now rely on VR tours to tackle this, significantly boosting their closing rates.
– Virtual tour listings earn 87% more pageviews than house listings without tours.
– 54% of buyers avoid property listings without virtual tours.
Modern virtual house tours come with many advanced elements such as tooltips, contact forms, embedded videos, and so on. This takes user engagement to a whole new level and viewers tend to trust you more.
According to a survey, 63% of potential home buyers considered placing bids without even visiting the house thanks to a detailed virtual tour.
Today, you will learn why virtual tours work and how you can create virtual tours of properties to start closing more deals.
So, let’s begin.
What is a Virtual House Tour
A virtual house tour is an online experience where you can explore properties through immersive 360-degree views. It allows you to virtually explore each room and space.
It also provides a realistic sense of the property’s layout and features. This innovative tool is convenient for prospective buyers or renters who want to preview homes without physically visiting them.
By offering detailed visuals and interactive capabilities, virtual house tours simplify the house-hunting process, saving time and effort.
Overall, virtual house tours revolutionize the way people search for and experience potential homes. It also makes the process more convenient and efficient.
How Virtual House Tours Can Ensure More Closed Deals
Maybe you still use images or videos of the properties when listing them on their websites. But, regular images can’t accurately represent a room’s lighting, ambiance, and surroundings of the property.
On the other hand, sure you can add a video walkthrough of your house. But that doesn’t feel like a real tour. It still leaves a lot of doubts in mind.
And even if the videos and images are great, people still need to give you a call to find out minor details about the house such as the flooring material, the roof details, etc.
That is why most buyers look at tons of properties, and you handle several visitations before finally finding a successful client. A virtual tour can change that.
You can easily implement a virtual walkthrough to get the best experience. Now I am going to tell you how a virtual house tour can provide it. So let’s get started-
With a 360-degree view and full control, you can explore every inch of the virtual house at your own pace, unlike videos that limit what you see. This interactive format gives you the freedom to look around as you please. It provides more engaging and insightful virtual reality house tours.
Today’s virtual tours are designed to provide detailed property information online without the need for a phone call. Imagine clicking on hotspots in the virtual house’s rooms to learn about dimensions or materials. You can even watch a short explainer video during the 3D house tours to understand important details about the home, just like you would ask over the phone.
Adding soothing background music enhances the online house tour’s ambiance, making you feel welcomed and immersed in the experience. Interactive buttons can guide you to additional images or videos of features like the swimming pool, giving you a deeper perspective.
For your convenience, there’s a button to submit bids or schedule appointments right from the virtual home tour. This seamless integration helps you take the next steps efficiently.
By the end of your 3D virtual home tours, you’ll have a realistic sense of the property, and most of your questions will be answered. When you reach out, you’ll be well-prepared and confident about potentially making this virtual house your home.
Both The Realtor And The Buyer Will Be Benefitted
As you saw, a virtual house tour can give the best experience to the buyer. But it is more than what you think. It gives both of you extra benefits.
Benefits of a Realtor
Benefits of a Buyer
1. Significant Market Exposure
The more buyers visit your virtual house tour listing, the more clients you attract to your agency.
Plus, when you sell a house with such a great display, your client is more likely to share his/her experience with many others, who may then consider working with you to find homes for themselves.
1. Detailed with More Research Time
Virtual reality home tours give buyers the freedom to get a look at the complete property more closely and help them inspect it thoroughly.
Also, since it’s available online, a buyer will get more time to look at it in his/her own free time. There is no rush compared to when taking a live visitation.
2. Draw Long Distance Clients
Virtual tours on your website can open the door to attract buyers even from far away. Most buyers are reluctant to travel a long way because they fear getting disappointed with the visit. A virtual tour will save them time and money to inspect a house, and they may consider buying from you even if they are from a distance.
2. Comfortable Experience
Since the tour gives more control to the buyer, they will find it more comfortable to take a tour while resting on a chair or maybe a couch.
And if he/she has a VR box, they can get the live tour while at home.
Then there are all those engaging elements in the tour that will make them love the experience compared to watching images or videos.
3. Increase Website Traffic
Once you start to reach more clients via the virtual house tours on your website, maybe via Ads or social media, your website traffic will start to increase because now, Google recognizes engaging content and ranks them faster.
3. A Better Way to Make a Decision
Normally, the process of buying a house can be quite stressful at times. Browsing through several properties, visiting the place, having a meeting with you, processing paperwork, and so much more. So people often get confused about which homes to discuss further.
Since the virtual tour answers most of the questions, a buyer is more comfortable moving forward with the process rather than staying in a dilemma between multiple houses.
Tips for High-Quality 360 Images for a Virtual House Tour
You must have seen various property listing websites. They sell vacant properties and focus on showing the best prices to customers.
These websites are filled up with images of individual property or a house. But the rooms are not highlighted or shown properly in most cases.
To properly showcase a virtual tour, you will have to take images from each room’s vantage point. This results in having too many images do nothing but confuse the potential buyer.
On the other hand, a virtual house tour doesn’t cause any issues like this. You can take a good-quality image of each room and put it into the virtual tour easily.
1. Proper & Clean Decoration
As I mentioned earlier, virtual tours will highlight empty spaces and extraordinary features. But too much of an empty house can look dull.
Add enough furniture to make the virtual luxury home tour. But avoid adding unnecessary items inside a house tour which can make the space seem untidy.
2. Set Up Appropriate Lighting
Take the 360 panorama image in bright and appropriate lighting. The rooms will look dull if you take the photos in dim lighting or at night time.
Not only dullness, but less lighting can also make a room appear smaller or congested than it is. Raise curtains and switch on the necessary lights to increase the intensity of the room.
3. Keep The Image Location In Mind
Try to take the image from a perspective where a person will be standing. This varies from room to room.
But placing yourself in the precise center of the room is the best approach. The whole room with windows and roofs is covered when each room tour image is taken from the center.
So when your clients take the tour, they’ll feel like they’re standing right in the middle of the room.
4. Display Exceptional Features & Outdoors
Always show off the exceptional features inside virtual house tours. Make different tours indoors and outdoors to make your customers understand how big the house is with front and backyards.
Let’s say a listed house has a pavilion or a swimming pool in the backyard. Make sure to highlight these exceptional features in the virtual house tour.
5. Optimize the Photos
Don’t forget to check the images of the rooms before adding them to a tour. Check each image if they are good enough for creating a virtual tour. You can use 360 cameras to capture good images.
On top of that, you will need to take high-caliber images for your virtual house tour. As a matter of fact, you can even use an iPhone for great panorama images.
You can even use an iPhone or an Android app for your mobile. You’ll be able to take great images and optimize your photos without any prior experience at all.
How To Use A Virtual House Tour in Your WordPress Site
There are many virtual tour software available in the market. But one of the best Virtual Tour tools available is WPVR. It has both a Free and a Pro Version available.
WPVR is one of the most user-friendly virtual tour builders available. You can convert a 360 panoramic image into a virtual house tour within a few minutes.
It lets you optimize virtual tours for both smartphones and desktops. Make the tour load time and transitions fitting for the clients.
Also, the WPVR Pro Version will help you make a comprehensive virtual house tour with all the necessary elements you need.
Must-Have Features of a Virtual House Tour
Here are the features that will help you to create an engaging Virtual House Tours:
Hotspots
The first and foremost thing is to add hotspots to your virtual house tour. Hotspots are usually used to pinpoint an element with details, change scenes, or add a product/contact form to a tour.
Imagine, you have cabinets in a house for different use. You’ll be able to give details of each cabinet with images or videos using hotspots in a virtual tour.
Gyroscope
Increase the comfort of your potential buyers by offering a virtual house tour on smartphones.
With the Gyroscope Feature enabled, your clients can check out the house through smartphones whenever they want.
Scene Gallery
Each house has its own uniqueness with multiple rooms. With the Scene Gallery feature, add the individual room scenes into a single virtual house tour.
Your clients will enjoy the 360 tours of each room distinctly. Scene Gallery feature displays all the rooms in a gallery section.
Your clients don’t have to look here and there to go from one room to another. They can switch to any scene from the gallery within seconds.
Compass
Many house buyers prefer the north view of a house whereas many like the east view. They can determine the side of a window or door in a room using the virtual house’s compass feature.
Company Information
Your clients need to know about your agency and real estate company before making any purchasing decision.
With this feature, showcase your company logo as well as give a brief description of your company.
Explainer Videos
Explainer Video is the video that your clients can enjoy when they’re taking the house tour.
This feature will let you add a video inside the tour. You can explain the unique attributes of a house and what your clients will gain by purchasing that particular house and all the details you want.
So your users will be able to take the tour and watch the video at the same time.
You can also add tour background music, zoom controls, and many other attributes to a virtual house tour.
Conclusion
To close more deals with an engaging virtual house tour, You should utilize its immersive capabilities to showcase your properties.
By allowing viewers to explore each room from multiple angles, interact with embedded content like videos and informational hotspots, and even experience the ambiance through background music.
They offer convenience and flexibility. It also enables buyers to view properties remotely at any time. This saves time and attracts more serious prospects.
Ultimately, It can lead to quicker sales cycles, higher conversion rates, and a more satisfying experience for both buyers and sellers. And by using tools like WPVR, you can easily understand how to create a virtual tour of a house and start attracting more clients.
1. How can virtual house tours benefit me as a buyer?
Virtual house tours allow you to explore properties in detail from the comfort of your home. You can guide through each room, look at features closely, and get a realistic feel for the property’s layout and ambiance. This saves you time and helps you narrow down your choices efficiently.
2. Are virtual house tours as effective as physical visits?
Yes, virtual tours are designed to provide a comprehensive viewing experience. They offer interactive features like informational hotspots and embedded videos that enhance understanding. While physical visits provide a hands-on experience, virtual tours can significantly reduce the number of properties you need to visit.
3. How do virtual house tours help sellers close deals faster?
Virtual tours increase buyer engagement and confidence by providing a detailed, immersive experience. They allow sellers to showcase their properties 24/7 to a global audience, attracting serious buyers who are more likely to make informed decisions and submit offers quickly.
4. Can virtual house tours replace traditional showings entirely?
While virtual tours offer a convenient initial viewing experience, many buyers may still prefer physical inspections before making a final decision. However, virtual tours can significantly reduce the need for multiple showings, saving time and effort for both sellers and buyers.
5. What features should I look for in a virtual tour to maximize effectiveness?
Look for tours that offer high-quality 360-degree images, interactive elements like hotspots for detailed information, compatibility with mobile devices, and easy sharing options. These features enhance user experience and increase the probability of closing deals efficiently.
It’s that time of the year when people have started planning for short vacations and traveling. And if you own a hotel, you must grab their attention for more bookings.
People usually browse available hotels in their planned destinations before heading out. But stale images and even video tours have become quite common nowadays and don’t always impress possible customers.
So what can you do differently? Use an interactive hotel virtual tour. Did you know that prospects browse 5 to 10 times longer on websites with virtual tours?
The longer a prospect stays on your website, the more the chance he/she will book a room in your hotel (if it’s within their budget).
In this article, you will learn why you should use a virtual reality hotel and how you can easily create a hotel virtual tour where the buyer can book a room directly from within the tour.
So let’s begin.
Why A Hotel Virtual Tour Is The Perfect Solution for More Bookings
A hotel virtual tour gives the prospect a clear view of what they can expect in real life and increases their confidence in your hotel.
According to Virtual360NY, over 50% of adults prefer viewing virtual tours when researching hotels and resorts.
In fact, according to a survey from 3D Tours Dubai, a quality virtual tour can increase online bookings, during peak season, by up to 85%!
And why not? A virtual tour can make it easier for your prospects to choose the right hotel.
The prospect will get a clear idea of exactly how the rooms are organized and what other facilities they might get when staying at your Hotel. This is often not so realistic via images.
A virtual hotel tour will give the prospect the control to navigate around the hotel and view available rooms. This extra control will make them feel special, and they will find it more comfortable with making a decision.
You will be able to exclusively highlight the main feature of a room in a luxury hotel virtual tour. For instance, let’s say your hotel room offers a private pool, and you added a virtual tour of the room along with the pool. The client will remotely experience exactly how amazing that is.
Plus, you may include tooltips that they can click to get a written description. In the case of the pool, you can mention if you allow a mix of warm and cool water, and you can even mention the capacity.
And most importantly, you can have your prospect attempt to book a room while on the virtual tour.
There are countless reasons why a virtual tour makes it easier to connect with the prospect. But the most important of them all is that you will give the prospect full control. You can also use some WordPress booking plugins to enhance your functionality as well.
How to Create A Hotel Virtual Tour on Your WordPress Site
Following is an example of an interactive hotel room virtual tour created using WPVR.
You can see there are icons that you can click to get more details about the service you get, and you can navigate a whole 360 view to get a good idea of how the room is organized.
Plus, there is a booking form for you to book the room right away. You can see how engaging this is. In the next few steps, you will learn exactly how you can create a similar tour using WPVR.
Once you know how to create a scene for a hotel room, you can then go ahead and create a complete hotel tour by adding more scenes of the rooms, hallways, swimming pools, and other facilities of the hotel.
In the following steps, I will walk you through everything you need to know to create a VR hotel tour on your WordPress website.
So let’s get started
1. Preparing Proper 360 Degree Images
First, you should consider taking good quality 360-degree hotel pictures. You can use a good DSLR camera or even an iPhone to take pictures of your hotel.
A good picture will always make sure that what you’re trying to show is reaching the customer. Don’t lag on the basics. Let’s check out a quick guide on creating our virtual tour of a hotel room.
2. Consider Using A Single Image for Hotel Rooms
One tactic you can consider following is to use a single 360 image for each of your hotel rooms, angled from the center.
You might have seen in the past that people used multiple images of a room from different angles, which resulted in a lower conversion rate.
This is mainly because the room may look different from different positions. Rather it is wise to give a 360 view from the center of the room.
However, if you are offering a honeymoon suite or royal suit with more than one room, then you can consider including one scene from each room. You can also add multiple scenes for your virtual tour If you want.
3. Install and Activate WPVR on Your WordPress Site
Now, go ahead and activate WPVR on your WordPress site. (It’s free)
Go to the WordPress Dashboard and hover to plugins.
Click “Add New”.
Search for WPVR. Once you find it, install and activate it. (You may also download and upload the plugin directly from the WP VR page in the WordPress repository,)
Next, get WPVR Pro and activate it.
You will also need the WPVR Fluent Forms Addon.
**The free plugin will let you create a simple virtual tour, but you will need WPVR Pro if you want to make it more engaging and meaningful. **The WPVR Fluent Forms Addon is used to embed booking forms within a hotspot. You will learn more about it later in this article.
4. Basic Configuration of WPVR
Once you have WPVR on your site, there are a few things you need to configure in the General Settings.
Disable WordPress Large Image Handler on WP VR: Since you’re showing off your hotel rooms, you need good-quality images. Good-quality images tend to be large files. This option lets the large images keep their quality and stop WordPress from compressing them.
Enable Mobile Media Resizer This option will let your 360 images get optimized for smaller screen sizes, especially for mobile and smartphone users.
Front-End Notice for Mobile Visitors You can give custom notices to mobile users about flipping their phones for a better experience.
5. Create The Hotel Virtual Tour Scene
Now let’s focus on creating a virtual hotel 360-room tour with the WPVR plugin.
On your Dashboard menus, hover on WPVR and click on Add New Tour.
It will take you to the new tour creation page.
Here, first, give a title to your tour.
Next, enable the Auto Rotation feature.
Set the rotation speed to a slow velocity (-5 is a good value) so that your tour doesn’t rotate too fast.
Now, move to the Scenes tab and upload a 360 image of your hotel room.
Then provide the Scene ID, scroll down, and click on Preview.
This will convert the 360 panoramic images into a virtual tour and give you a preview of how it looks on the right side.
Here, you can see the basic controls appear on the left side of the top left corner of the tour preview. You can also see that since I added a title to the image, the title has also appeared in the tour preview.
Then click on the Publish button above the preview and the tour will be saved.
So far, what you have created is easily doable with the free version of WPVR.
Now, let’s add more features to this virtual tour to make it more engaging, and the features we will be using next are the reason why you need WPVR Pro.
6. Use Advanced Control Options
In the Generals Menu, if you go to the Advanced Controls Tab, you will find several Pro features that can increase your conversion via this virtual tour.
You should use the following features for your Hotel room tour:
Gyroscope: Enabling this will let your prospects experience an improved experience on their smartphones.
Compass: This option will view a compass on tour, which will help the viewers to understand the direction.
Background Music: The Tour’s Background music is a crucial feature that can make the tour more attractive. You can either add a personalized recording or simply add soothing music on tour.
Add Company Information: Your hotel branding is necessary for marketing and advertising. Add your hotel’s logo and details to this section.
Explainer Video: You can also use the explainer video feature to add a short introductory video of yourself, which the prospect can view if they want to.
You can then go to the Control Options tab and use custom icons for the control buttons in the bottom left corner of your screen.
7. Use Hotspots for Improved Engagements
Hotspots are the best feature of WPVR. This is what will make your tour from a basic 360 panorama to an interactive virtual tour.
In the example tour you saw above, you will notice a few blue icons that you can hover over or click to get more details. Those are what we call ‘hotspots’ in WPVR.
It’s an icon that you can use to create engagement with the buyer by providing information on click/hover, showing images or videos on click/hover, adding music, and even offering the booking form.
Let’s see how you can use them.
First, go to the Hotspot Menu just below the Scenes Menu.
Now, there are 4 types of hotspots. Let’s know about them real quick.
Info Type: Info-type hotspot allows you to view information either by clicking or on hover (i.e., a tooltip). You can also display images, videos, or gifs (which you can include using basic HTML). We will be using hotpots of this type.
Scene Type: This type of hotspot will let you connect two scenes. So, if you have two rooms, you can include a Scene Type hotspot to allow the visitor to click and move between the two rooms. In a hotel room tour, we will not use this unless it’s a two-room suite. But for a complete hotel virtual tour, this will be very useful to allow visitors to move between different locations in the tour.
Fluent Forms integration: This is a great feature. The way you add a booking form to WPVR is by creating a form using Fluent Forms. Once you have a form ready, you can then assign that form to a Fluent Forms type hotspot. Then, a visitor can click on it to get the booking form right within the tour. You will get this option when you have the WPVR Fluent Forms Addon. We will be using this type of hotspot to place a booking form within the tour.
WooCommerce Product integration: This hotspot is used to link WooCommerce Products to the icon, which visitors can click to purchase products while on tour. We will not be using this type of hotspot in a hotel room virtual tour. But this can be used in the complete hotel virtual tour, around the bar area, or maybe a souvenir shop where you take orders.
Now that you know the hotspot types, let us learn how you can add a hotspot meaningfully.
While on the hotspot menu, initially, a blank hotspot is available to be set up.
Here, include a hotspot ID. Then on the tour preview, click where you want to place the hotspot icon.
Then below the preview, you will see some coordinates updating. Click on the button beside the coordinates, and you will see the Pitch and Yaw values updating on the left side.
Then, assign the hotspot type and input the required details.
For example, let’s say you set a hotspot on the pillows of the bed. Now, choose the hotspot type as Info Type, then below, on the on-hover field, input the text “Soft cotton pillows.”
What this will do is this will view the hotspot icon on top of the pillow, and upon hovering, it will display the text “Soft cotton pillows.”
Now that the hotspot is in place, you can update the tour, and on the preview, you can see where the hotspot is placed.
But you will notice the custom icon you used is not visible in the preview. That is something you have to view in the front end. Here’s how you can place the tour in a post and page to view them.
Use that to get a preview of how it has turned out so far. Here’s an example view:
To add a second hotspot in the same scene, simply click on the Plus icon ‘+’ above, and options to configure a second hotspot will appear.
Now that you know how to add hotspots let us go ahead and add the booking form.
8. Add A Booking Form In Your Hotel Room Tour
Before you can assign a form, you need to create one in FluentForms.
In Fluent Forms, you will find a beautiful room booking form that you can use on the go. Or you may create one from scratch.
Once you have the form ready, go back to the WPVR tour you created and add a hotspot just like you did earlier. But, this time, choose the hotspot type as Fluent Forms.
Once you do, you will get all your available forms on a dropdown view.
Simply select your desired booking form and then add a text in the ‘on hover content’ field that says “Click To Book This Room Now” so that people can hover over it and know that they can book this room by clicking there.
Once you have the form up, update the tour, and the changes will be saved. And that’s it. Your Hotel room tour is ready. You can directly embed it on the main room listing page, where people browse to view available rooms.
You can also include a preview image of the tour, which will be visible upon embedding it on a page so that people can click on it to enter the tour.
So, you can either create a separate hotel room tour for each of your rooms and use them on your room listing page, or you can add more scenes of different rooms and other facilities of the whole hotel and turn this into a complete interactive tour.
That’s it. You now know how easy it is to create a hotel virtual tour in WordPress.
Hotel Virtual Tours Examples
Now, I am going to tell you about hotel virtual tour examples that showcase the best use of hotel virtual reality in the hospitality industry.
01. Hard Rock Hotel
The Hard Rock Hotel Maldives offers an exceptional example of a hotel virtual tour. This immersive VR experience allows potential guests to explore the stunning overwater villas, vibrant dining areas, and serene beaches of the resort.
The virtual hotel tour highlights luxurious amenities such as the Rock Spa, fitness center, and various recreational activities, providing a comprehensive view of what guests can expect.
With interactive 360-degree views and detailed room descriptions, the Hard Rock Hotel Maldives’ virtual tour effectively captures the essence of the property. it entices visitors with a realistic preview that can significantly boost booking interest.
02. The Langham
The Langham offers an exquisite hotel virtual tour that showcases its elegance and luxury. Through this immersive virtual experience, potential guests can explore the opulent rooms and suites, grand ballrooms, and fine dining establishments of The Langham.
The virtual hotel tour highlights key amenities such as the Chuan Spa, fitness center, and indoor pool, providing a detailed look at the upscale services available.
With 360-degree views and interactive features, Langham’s virtual tour allows guests to get a realistic feel of the property. It helps to make it easier to visualize their stay and encourage bookings.
03. Sheraton Grand
The Sheraton Grand provides an impressive virtual tour highlighting its luxurious offerings and sophisticated ambiance.
This immersive virtual experience allows potential guests to explore the luxury rooms and suites, state-of-the-art conference facilities, and beautiful dining areas.
The virtual hotel tour showcases key amenities like the wellness spa, modern fitness center, and rooftop pool, giving a comprehensive view of the hotel’s features.
With interactive views and detailed descriptions, its virtual tour effectively captures the essence of the property, attracting visitors with a realistic preview and helping to get more bookings.
Conclusion
Creating a hotel virtual tour is an effective way to attract more bookings and showcase your property to potential guests. By offering an immersive and interactive experience, you can highlight the unique features and amenities of your hotel, giving guests a realistic preview of what to expect.
Start by choosing a high-quality 360-degree camera and software that suits your needs. Plan the tour carefully, focusing on areas that guests are most interested in, such as rooms, dining areas, and recreational facilities.
Ensure the lighting is perfect and the spaces are tidy and welcoming. Once you’ve captured the footage, use editing tools to enhance the visuals and add informative annotations.
By providing a captivating virtual experience, you can engage potential guests, build trust, and ultimately increase your bookings. You can easily create your hotel virtual tour with WPVR.
How can I make my virtual tour more engaging for visitors?
To make your virtual tour more engaging, include interactive hotspots with detailed information, images, and videos. Adding background music and a personalized welcome message can also enhance the experience.
What equipment do I need to create a high-quality virtual tour?
You will need a good 360-degree camera to capture panoramic images of your hotel rooms and facilities. Consider using a DSLR camera or even a high-quality smartphone camera or app to take these pictures.
How can I ensure my virtual tour is mobile-friendly?
Make sure to enable the Mobile Media Resizer option in the WPVR settings. This ensures your 360 images are optimized for smaller screens. In addition, it provides a seamless experience for mobile users.
Can I update my virtual tour with new images or information?
Yes, you can easily update your virtual tour by uploading new images and adding or modifying hotspots with updated information. It ensures your tour remains current and engaging.
How can I track the effectiveness of my virtual tour in increasing bookings?
Use analytics tools to monitor visitor behavior on your virtual tour. Track metrics such as time spent on the tour, interaction with hotspots, and conversion rates to measure its effectiveness in driving bookings.
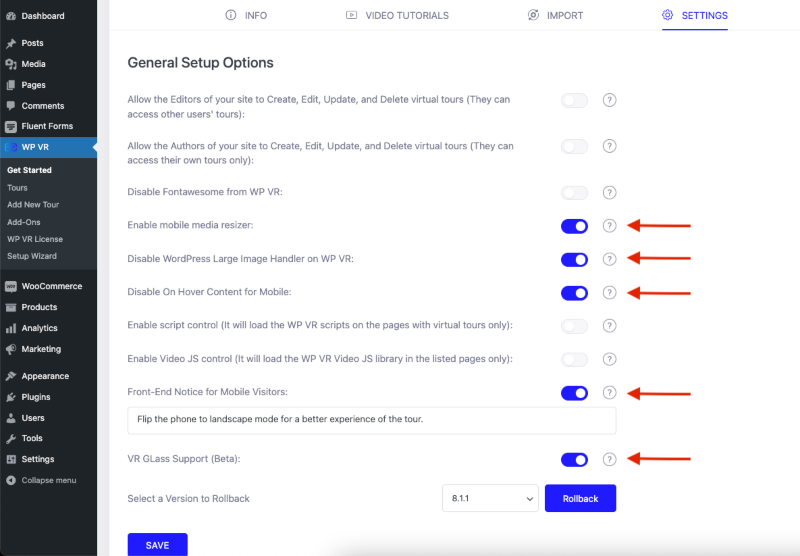
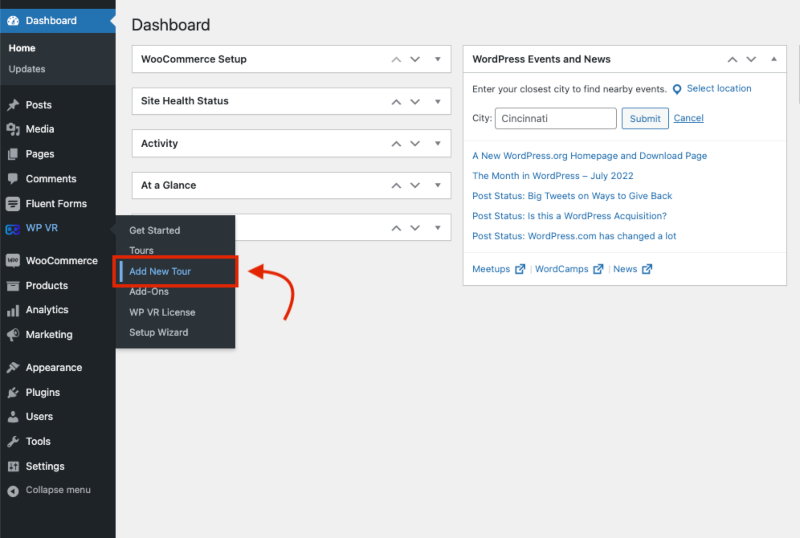
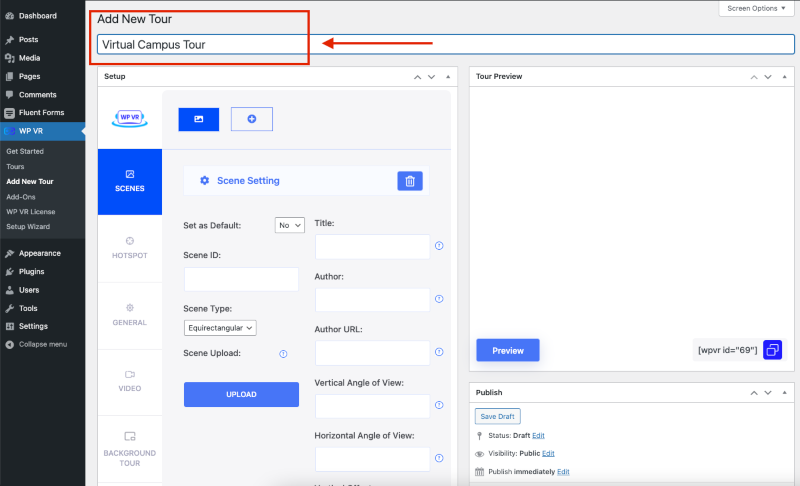
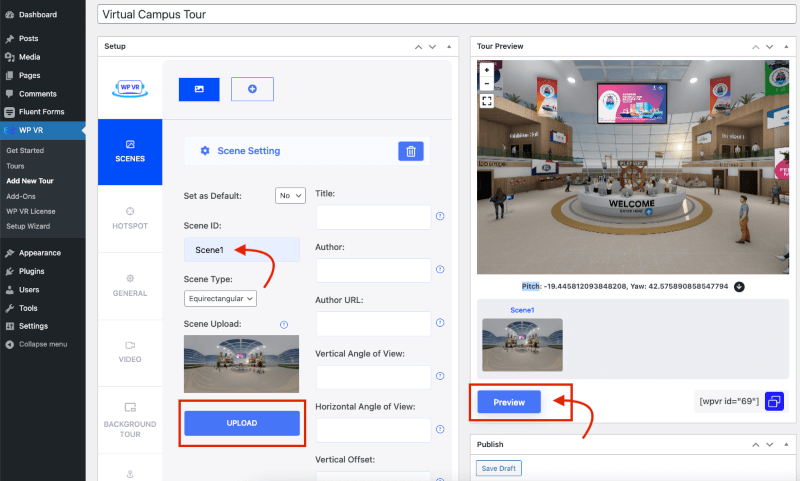
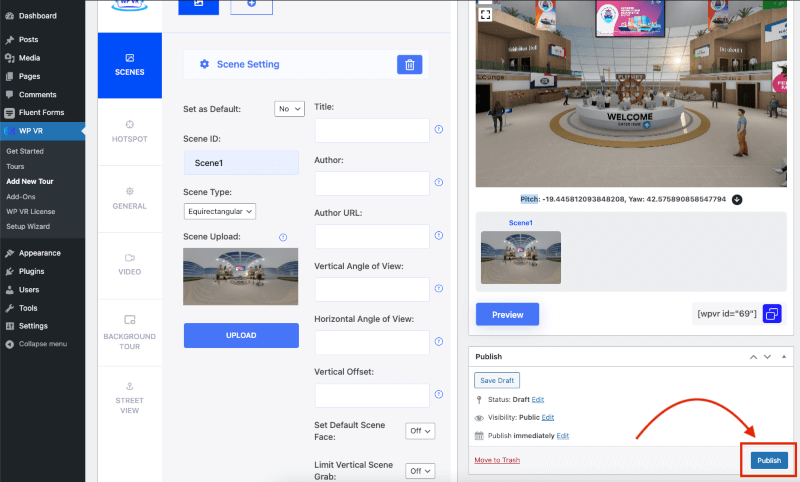
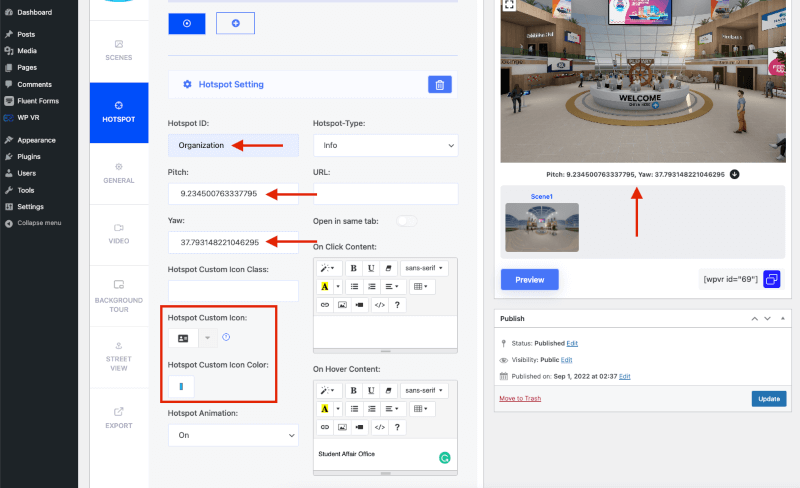
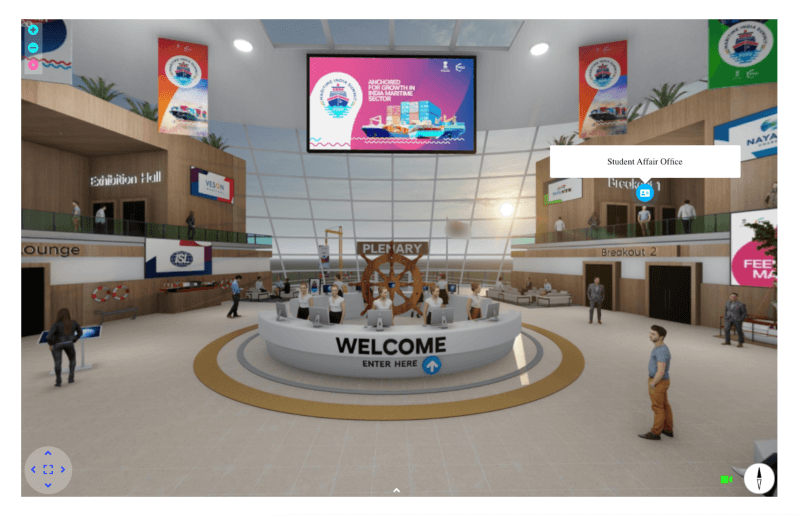

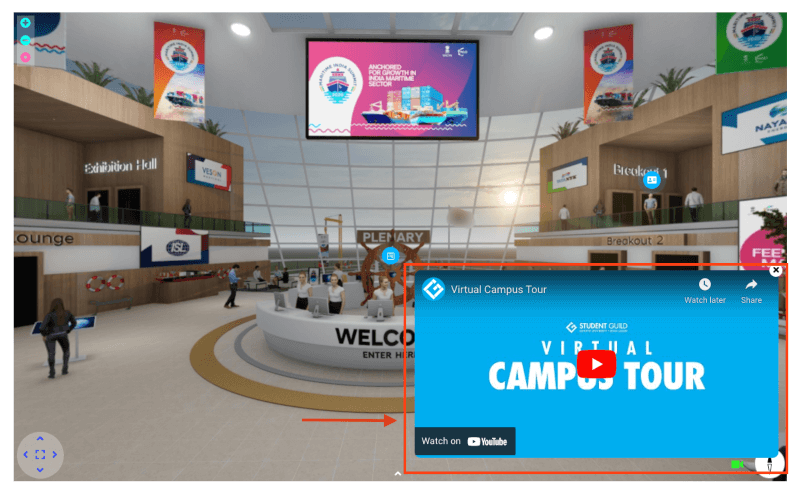
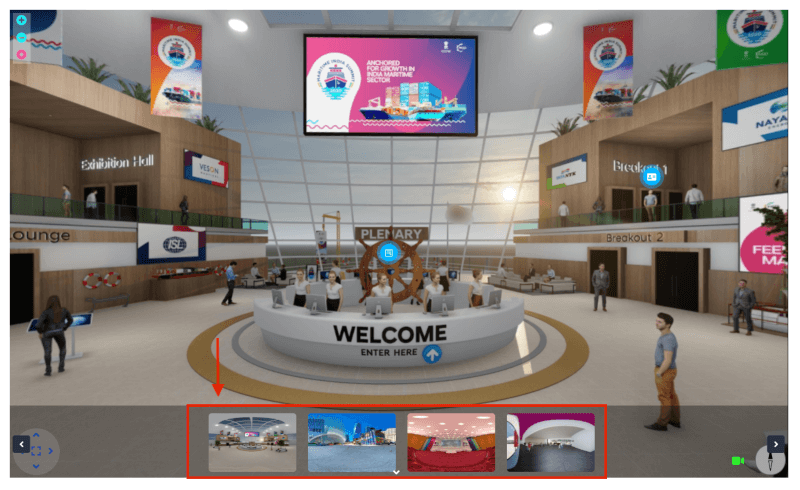
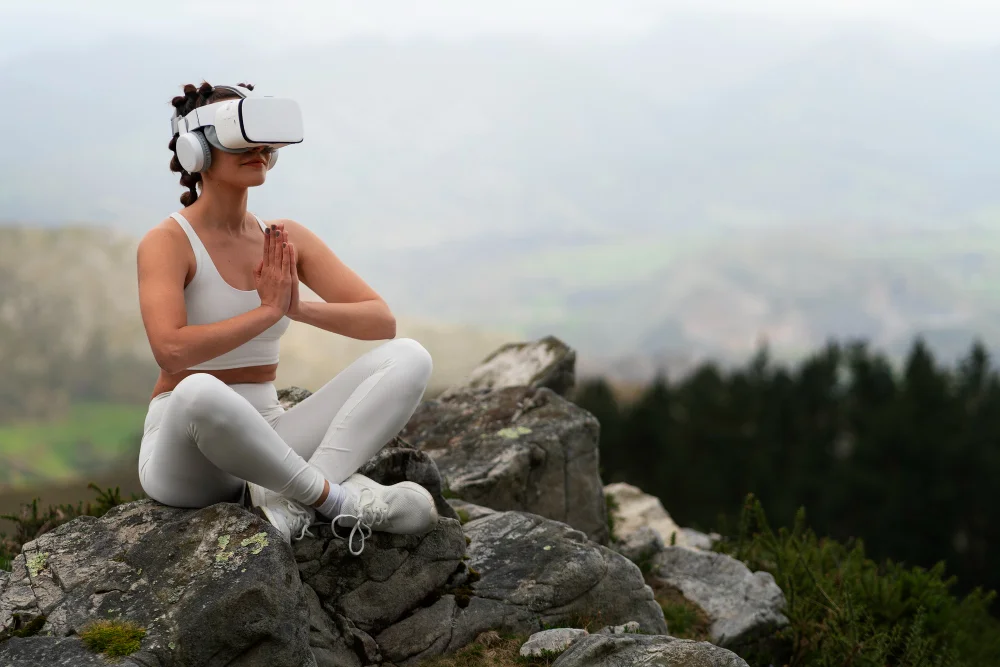


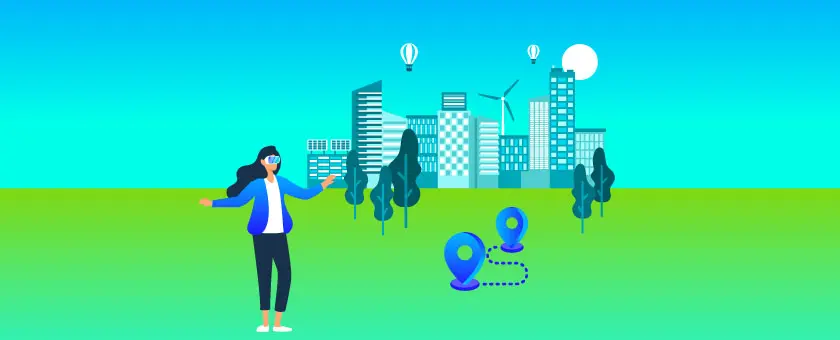
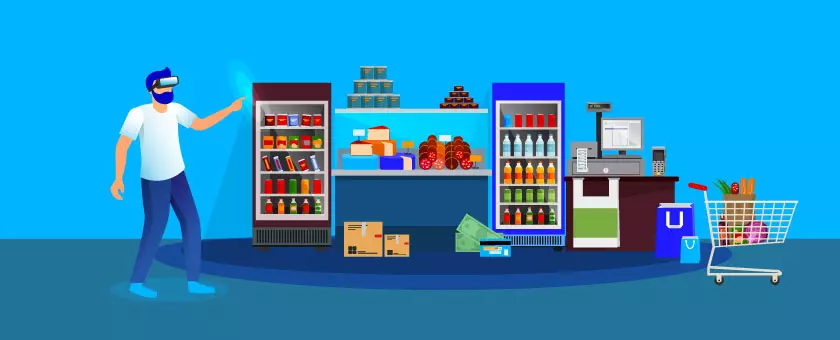
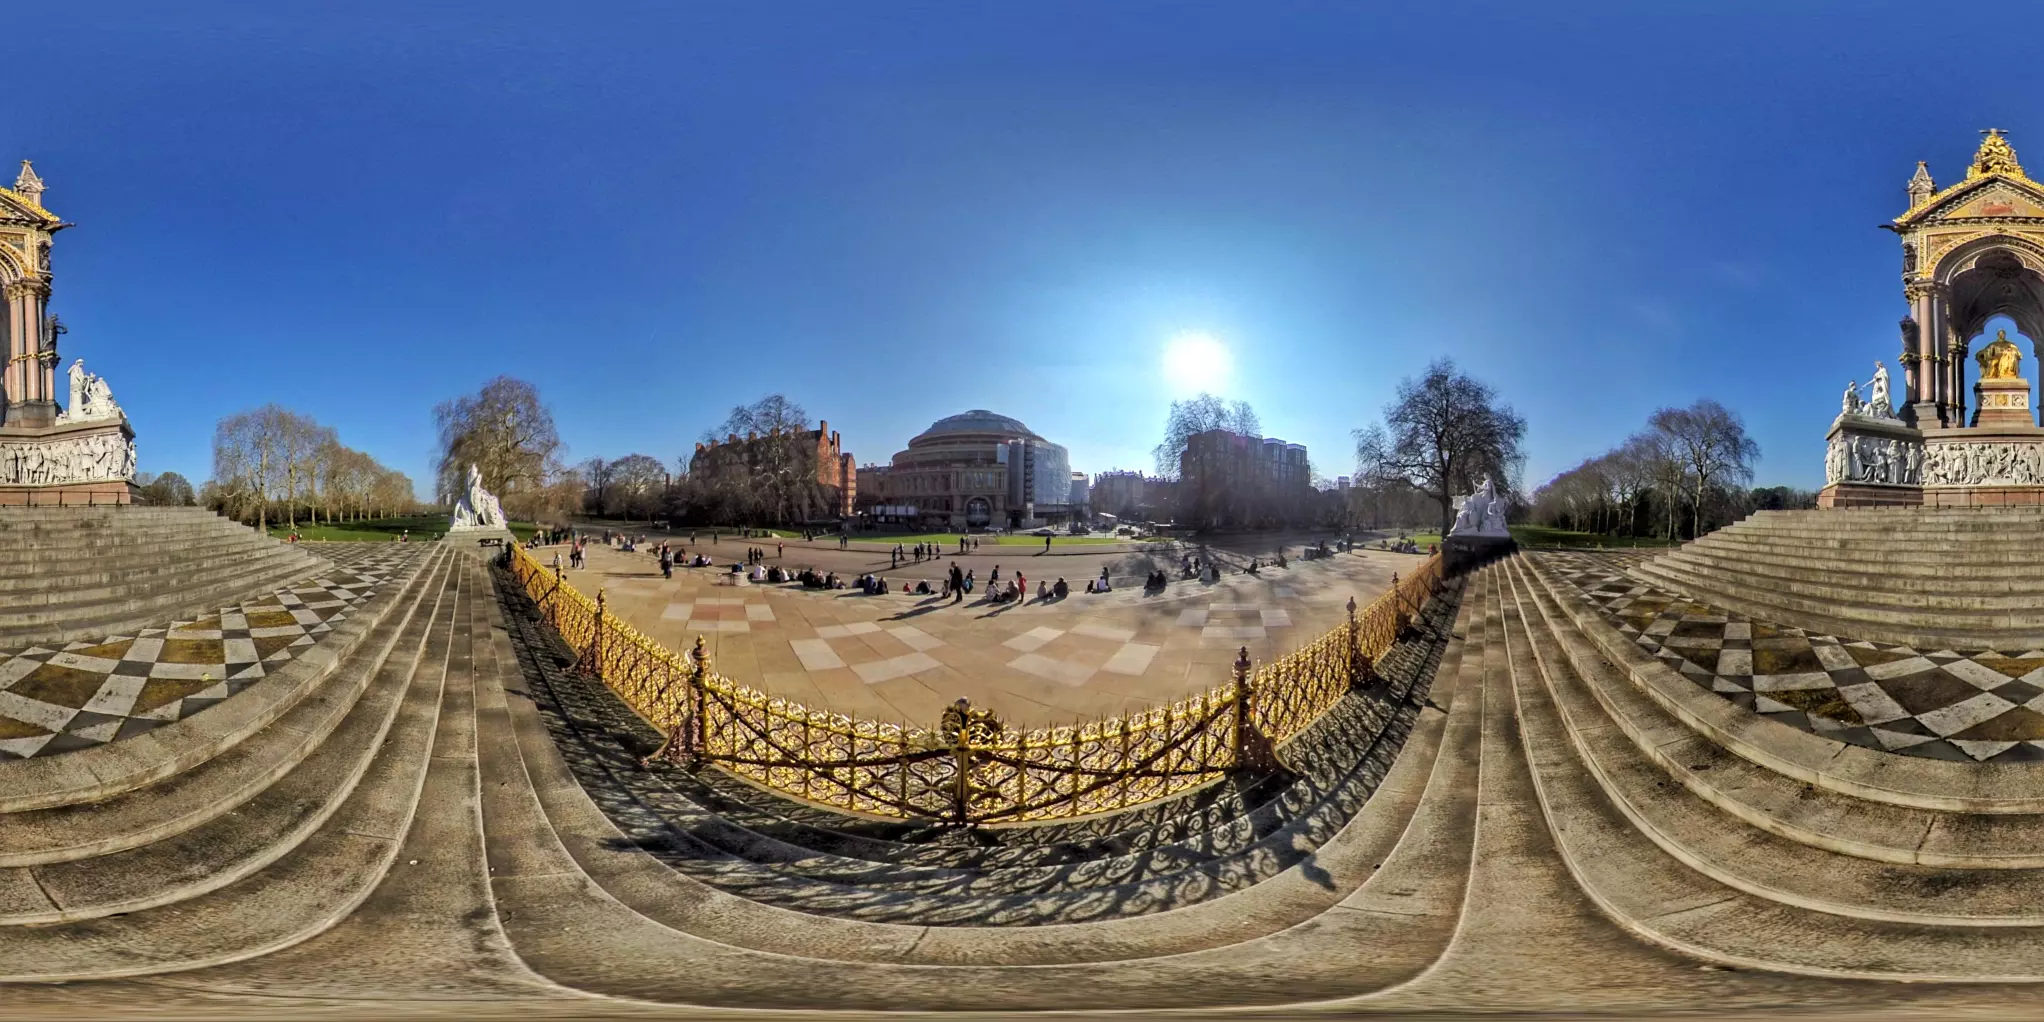
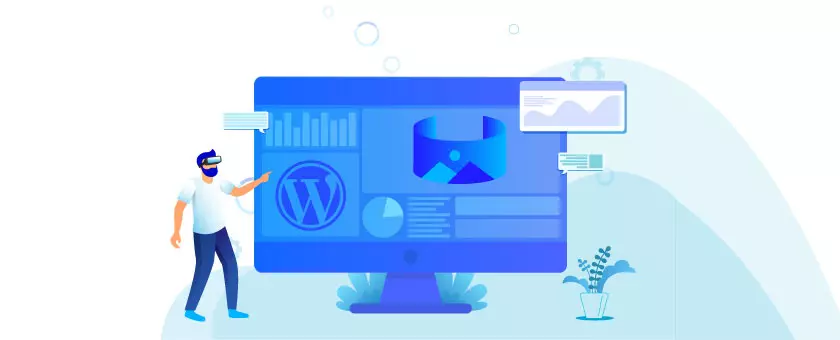
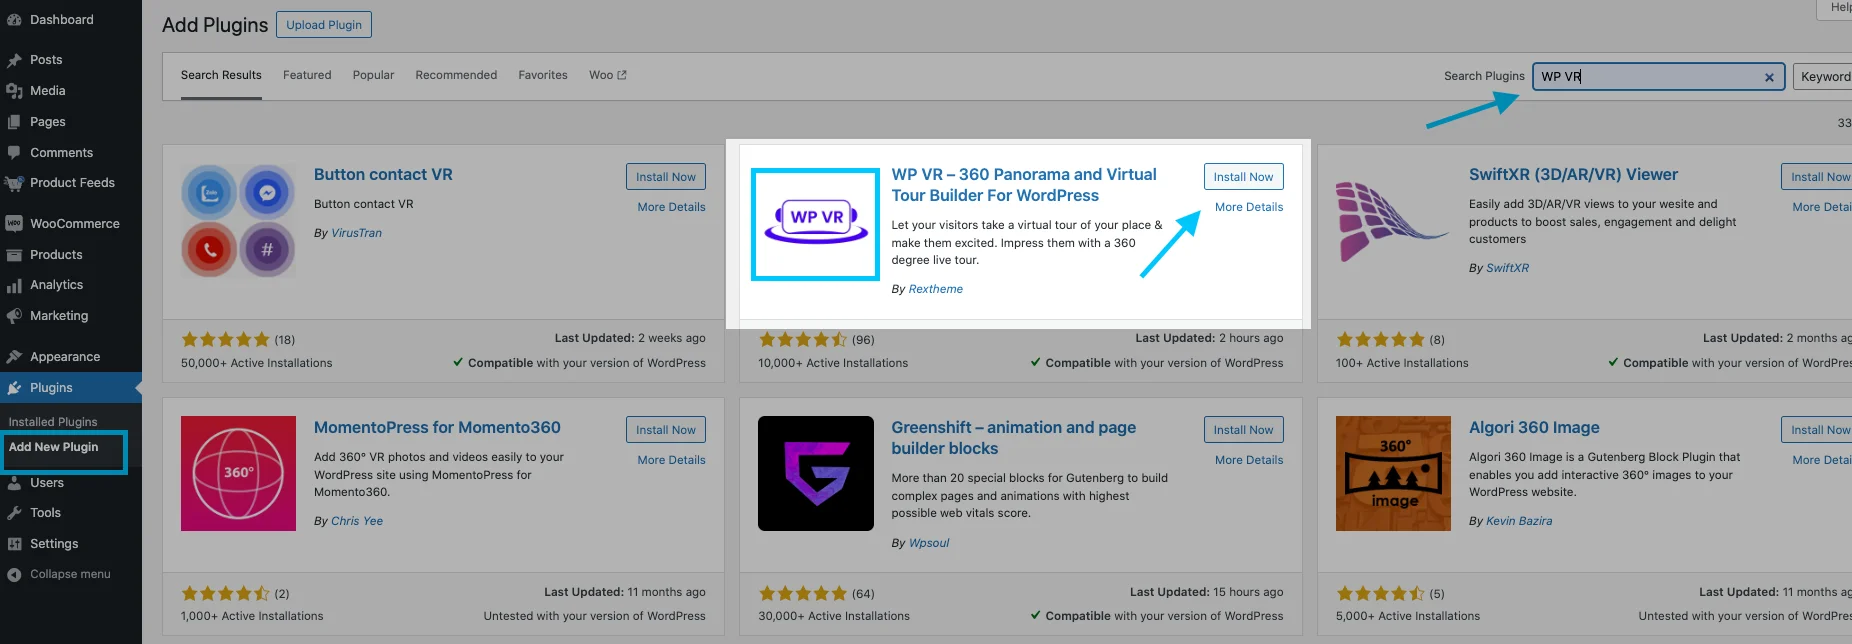
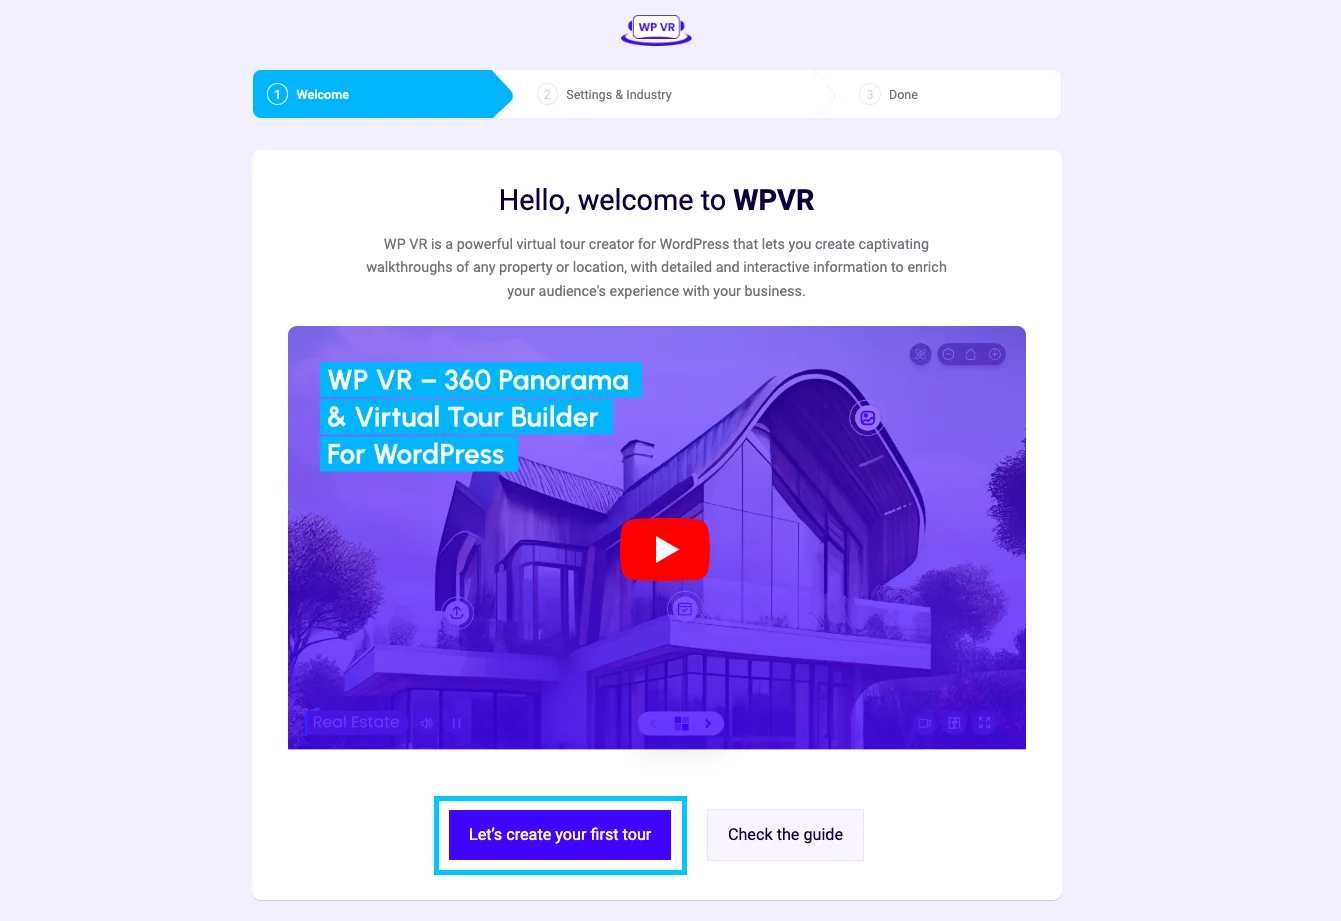
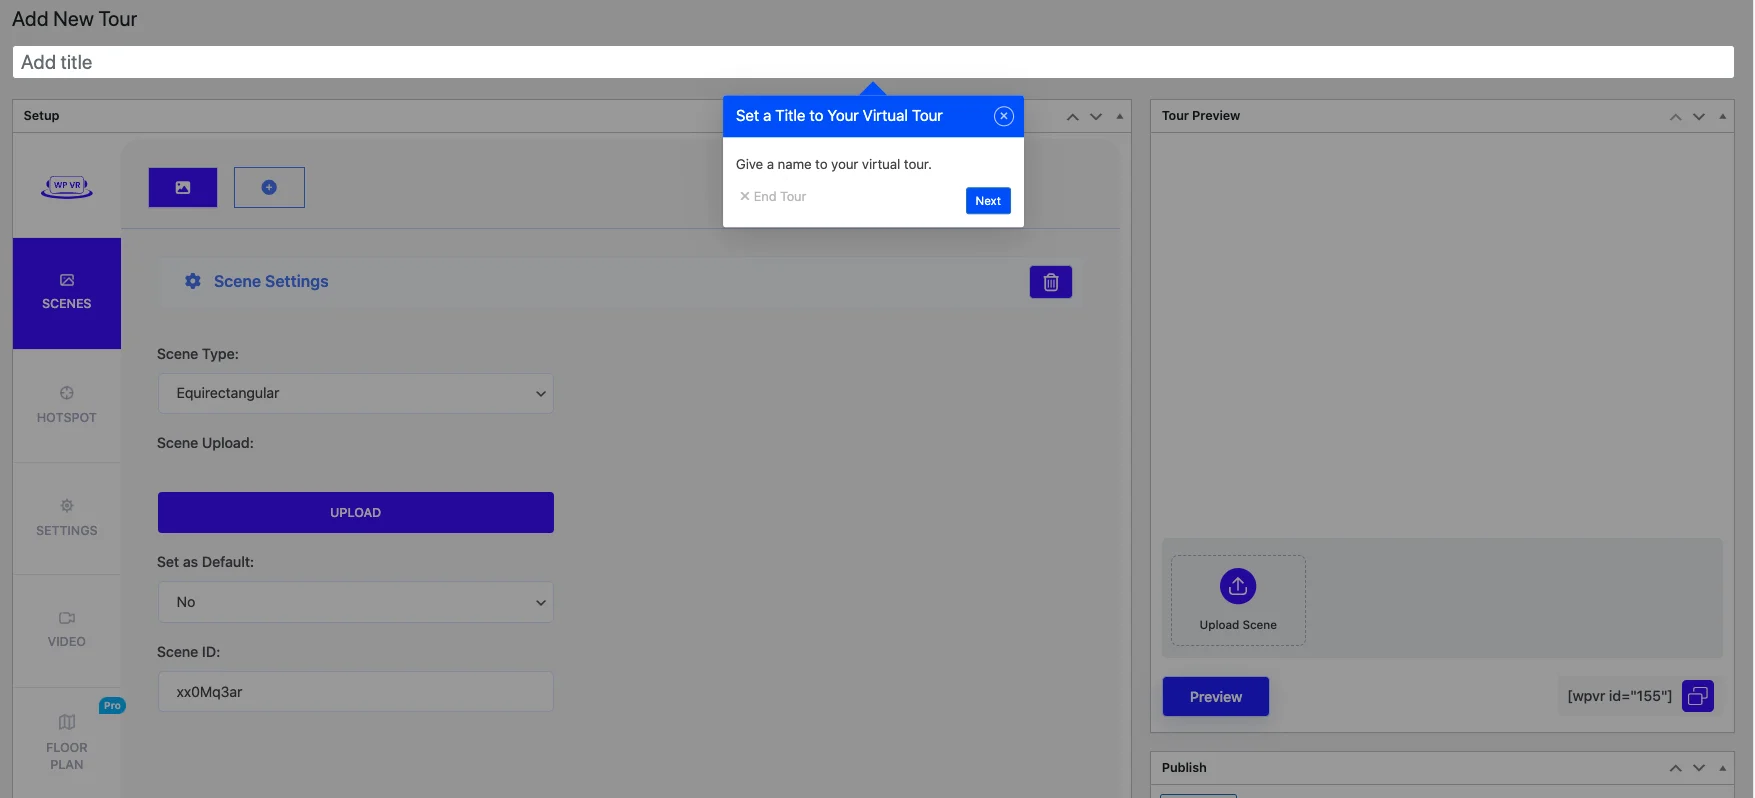

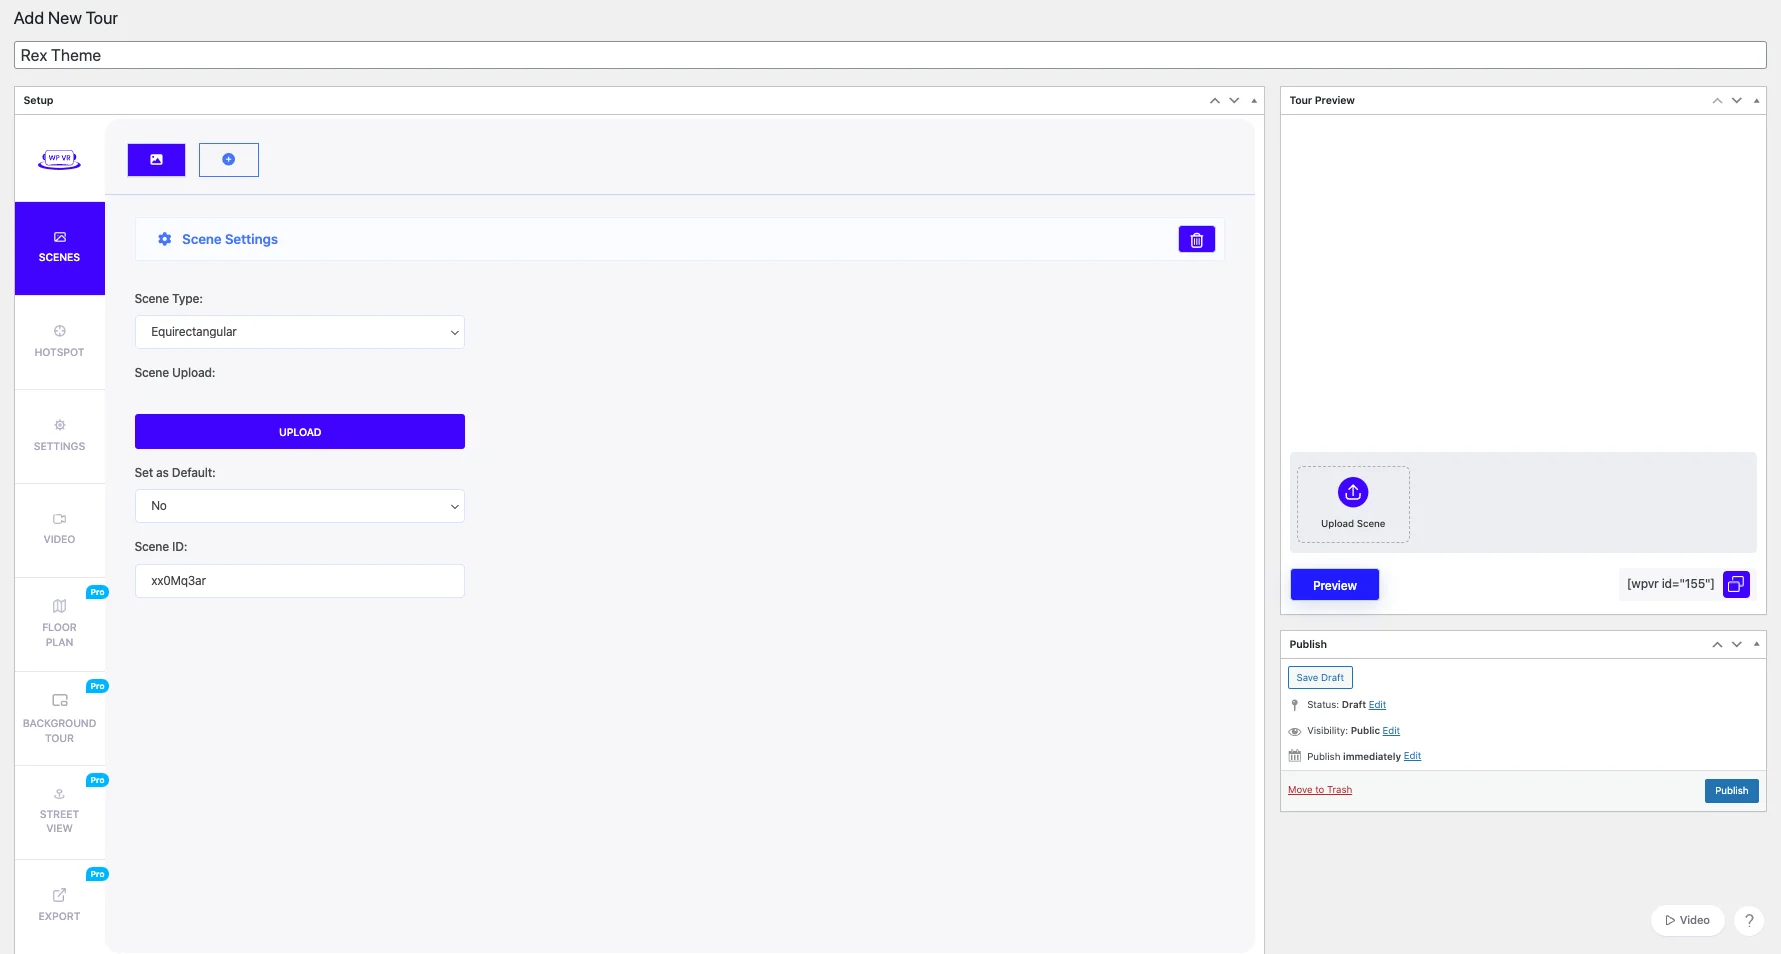
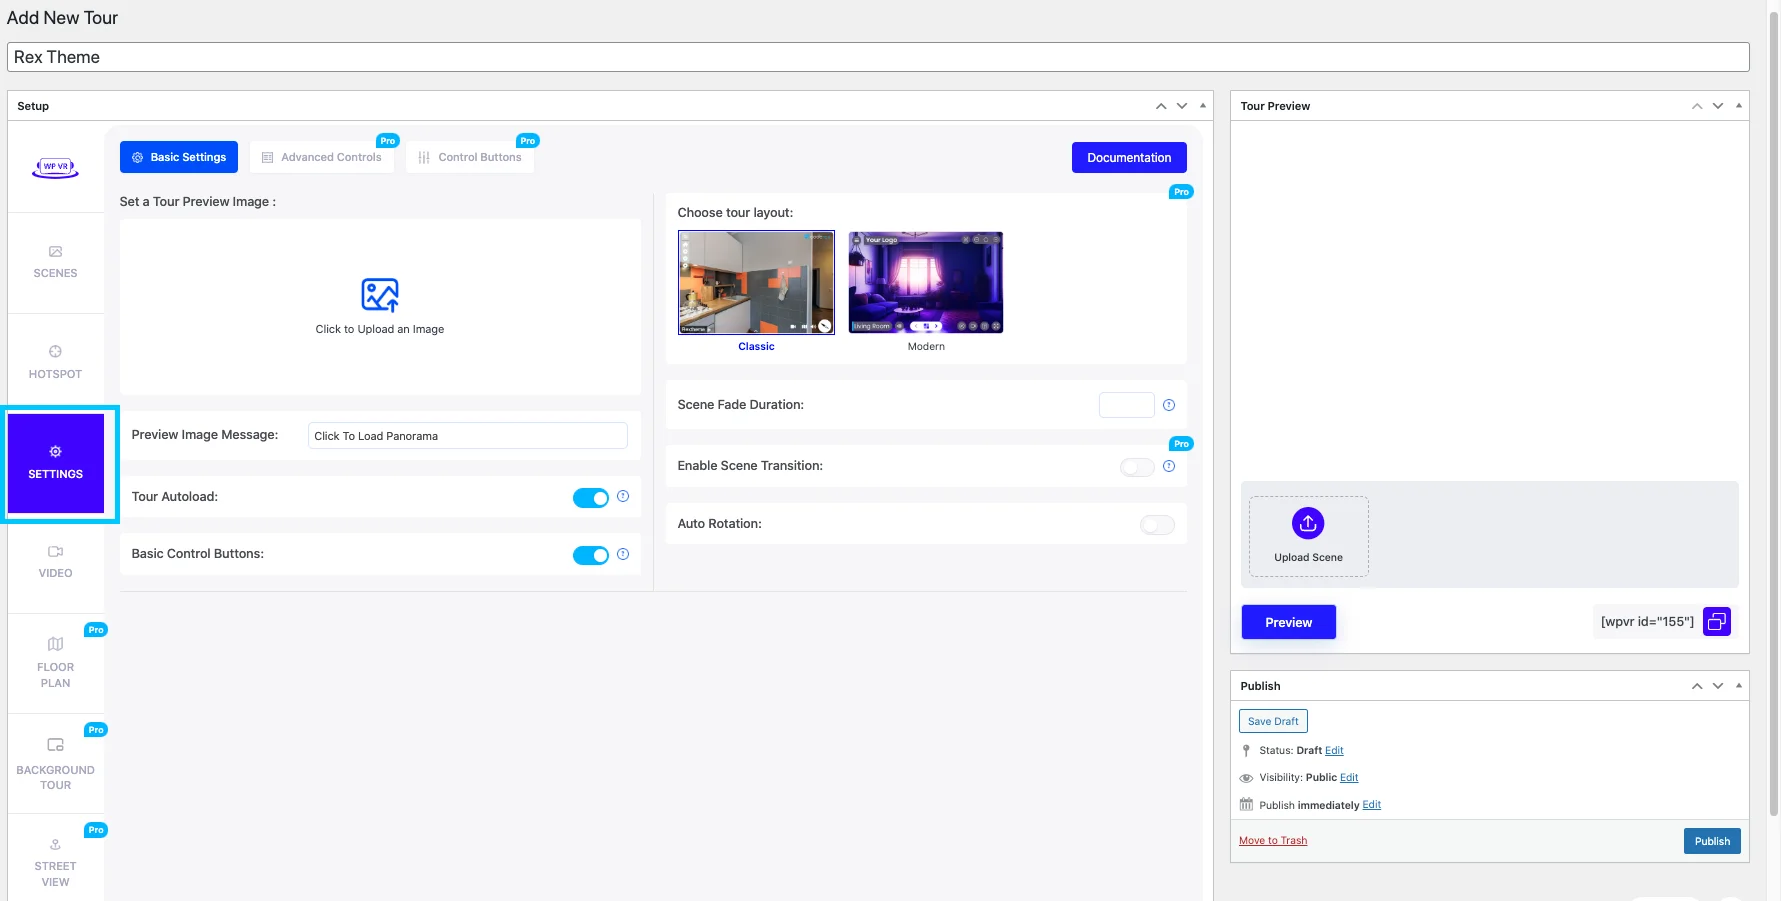
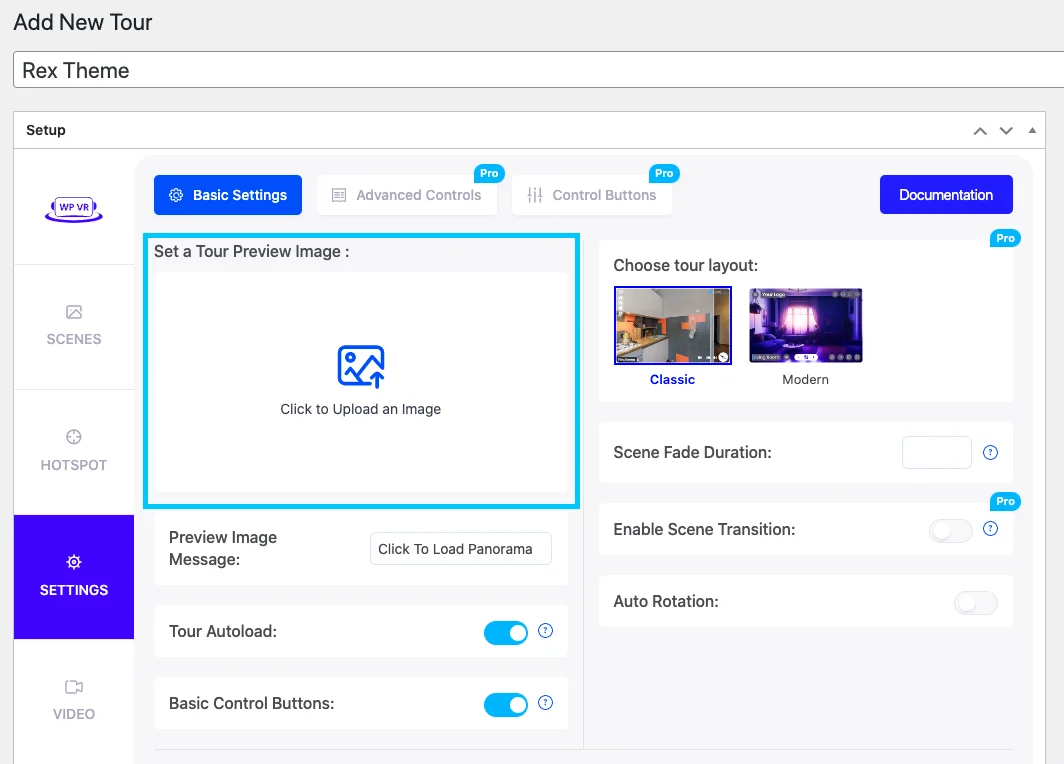
![How To Create A Virtual Tour In Easy Steps- A Complete Guide [2025] 1](https://staging-rextheme.kinsta.cloud/wp-content/uploads/2019/09/WPVR-Setting-.webp)
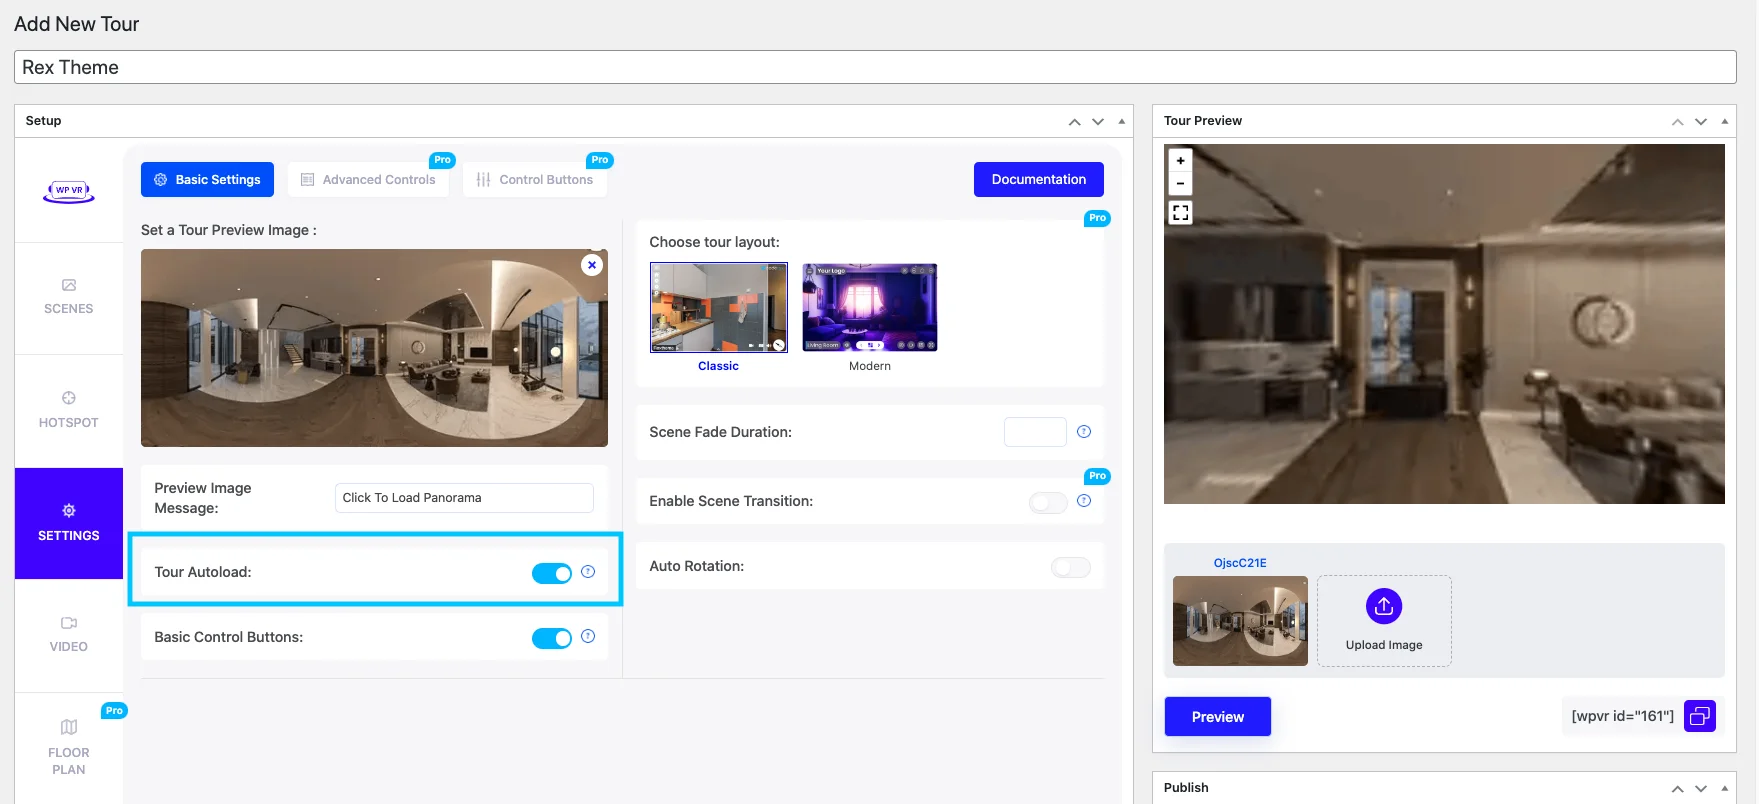
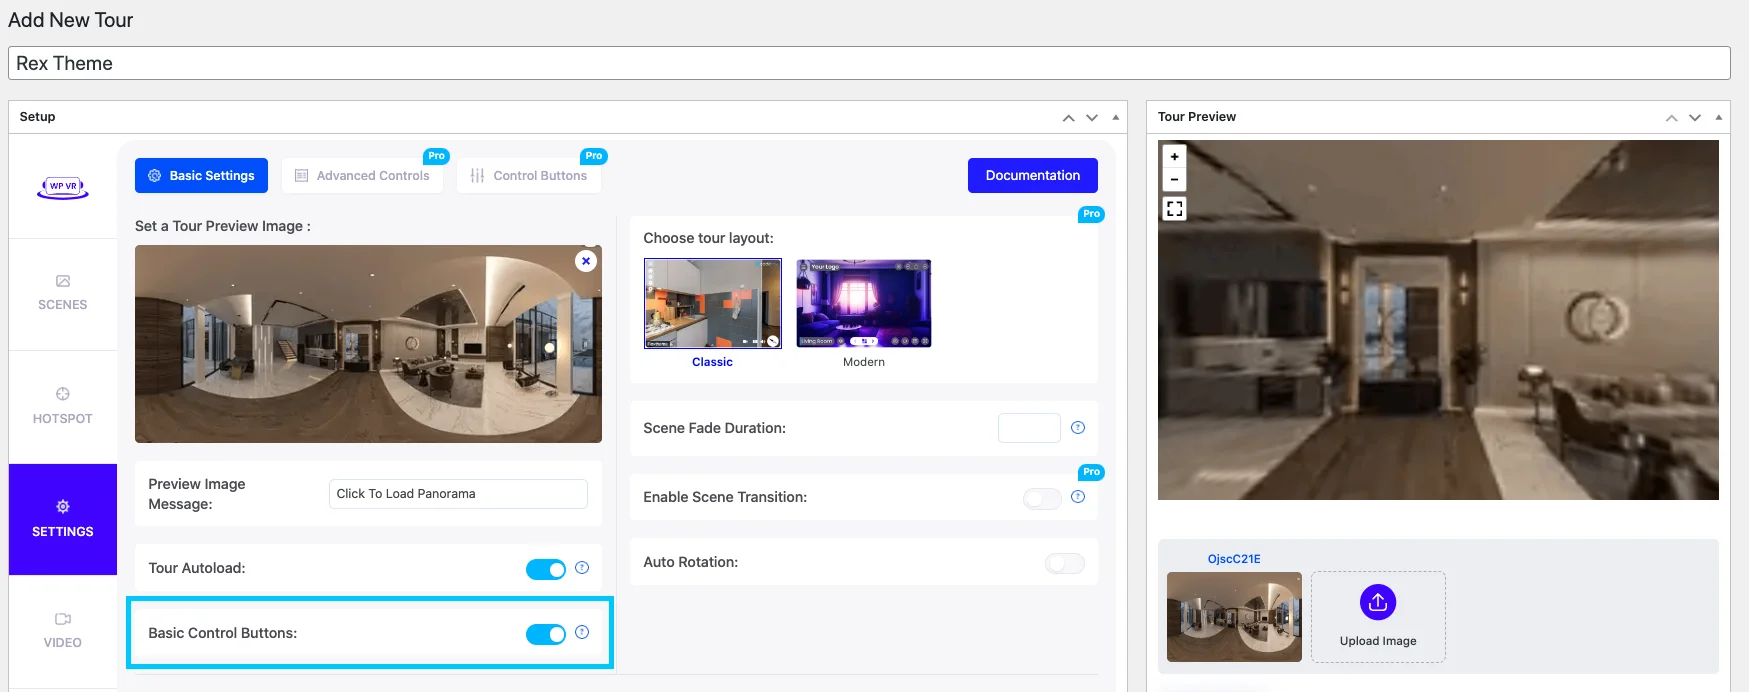

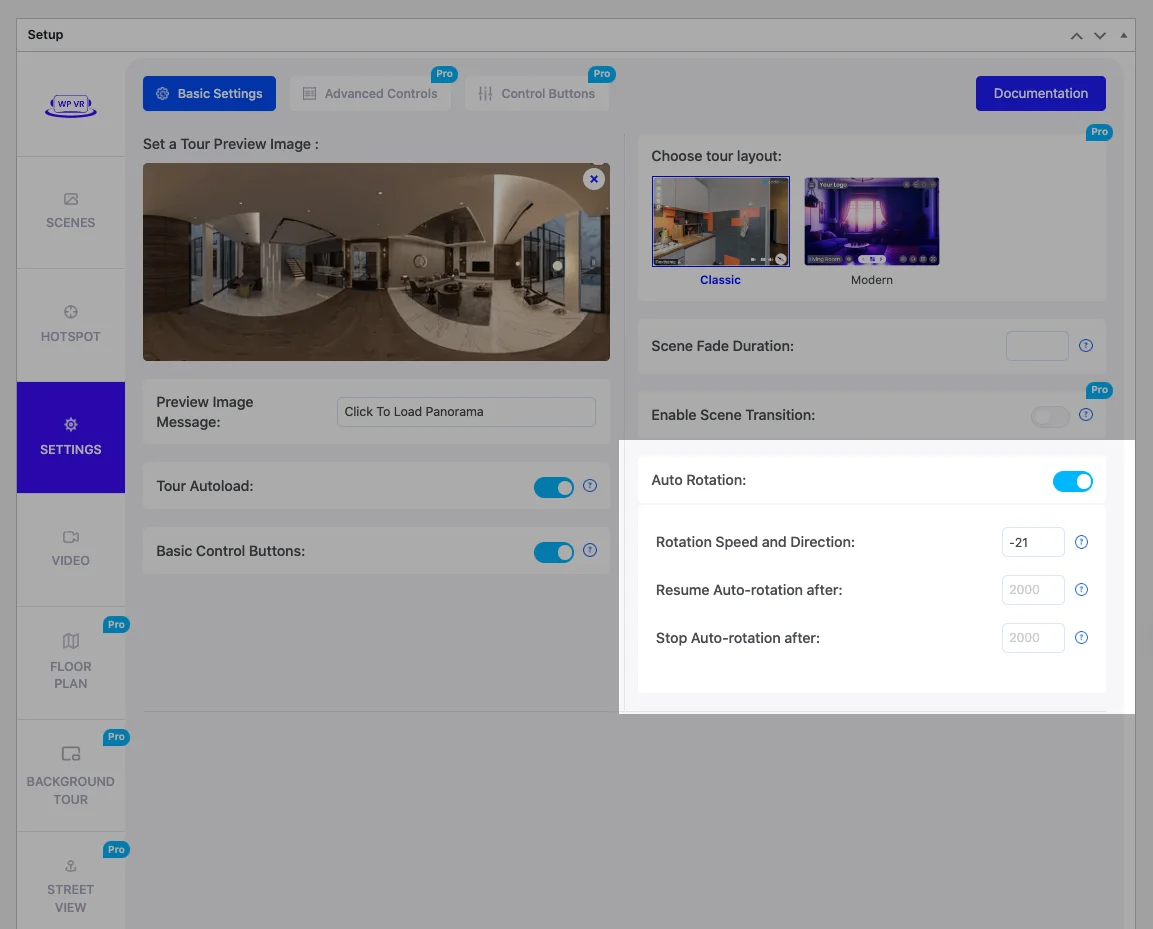
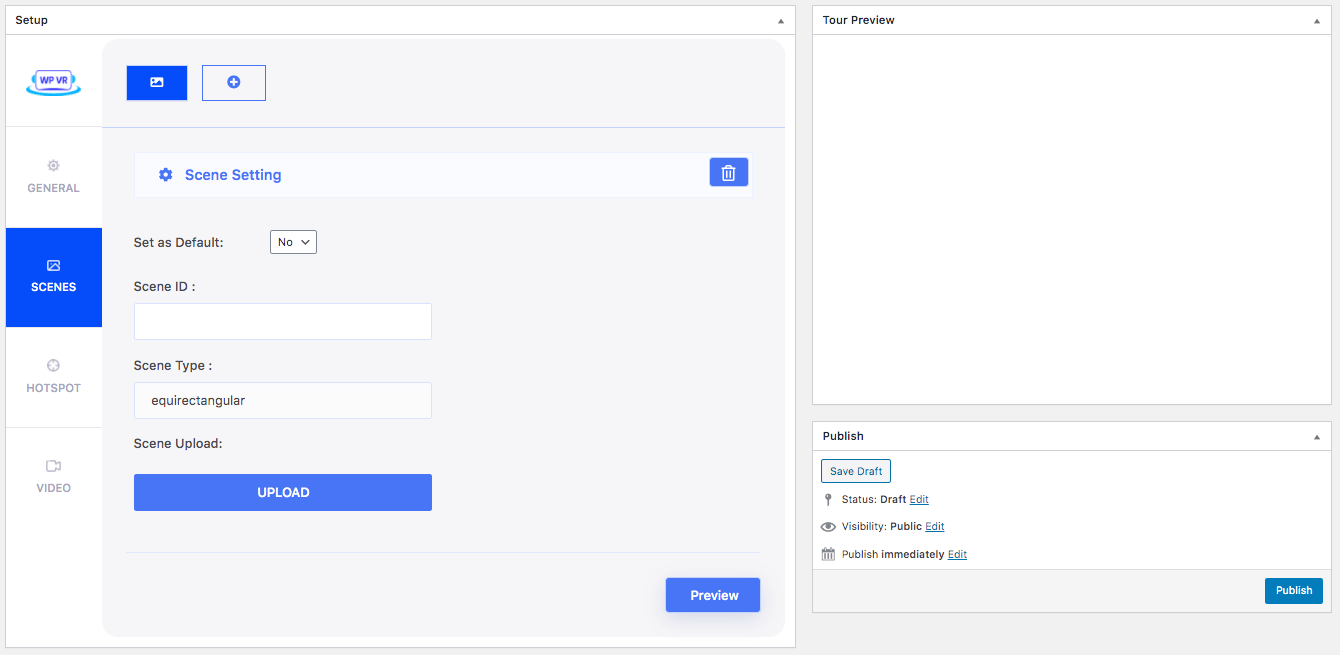
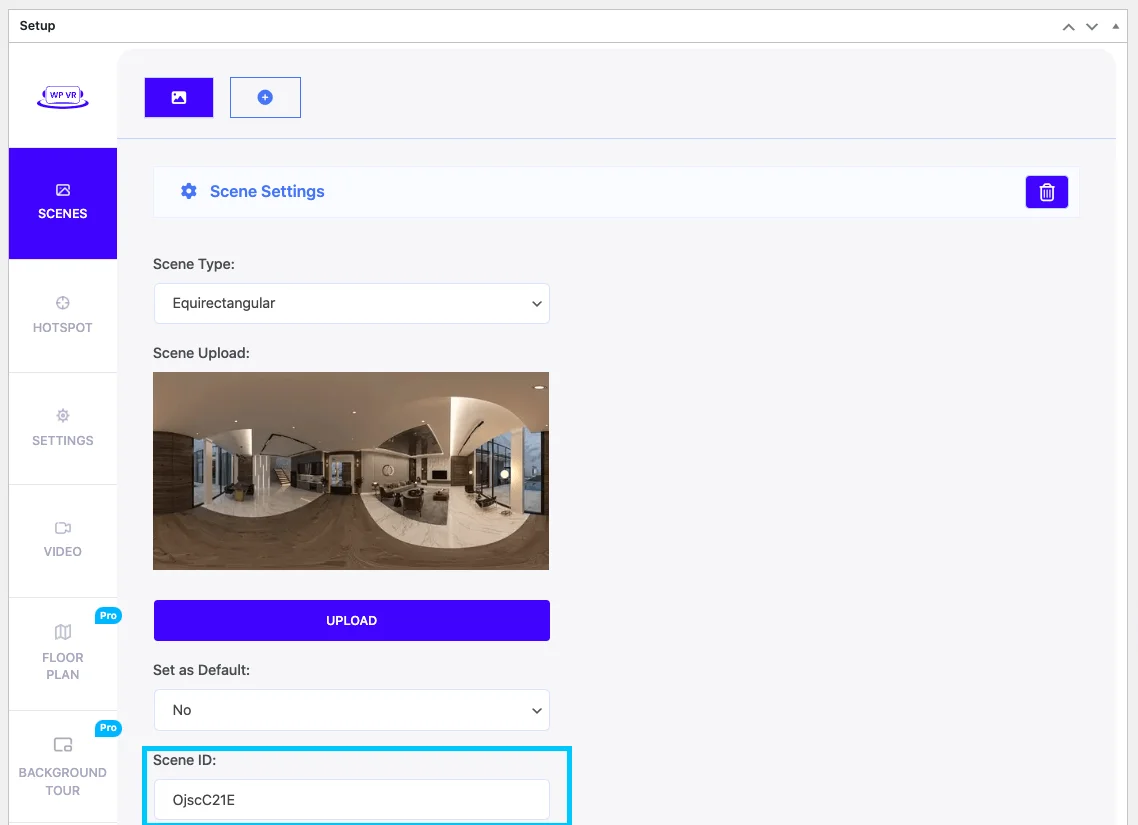
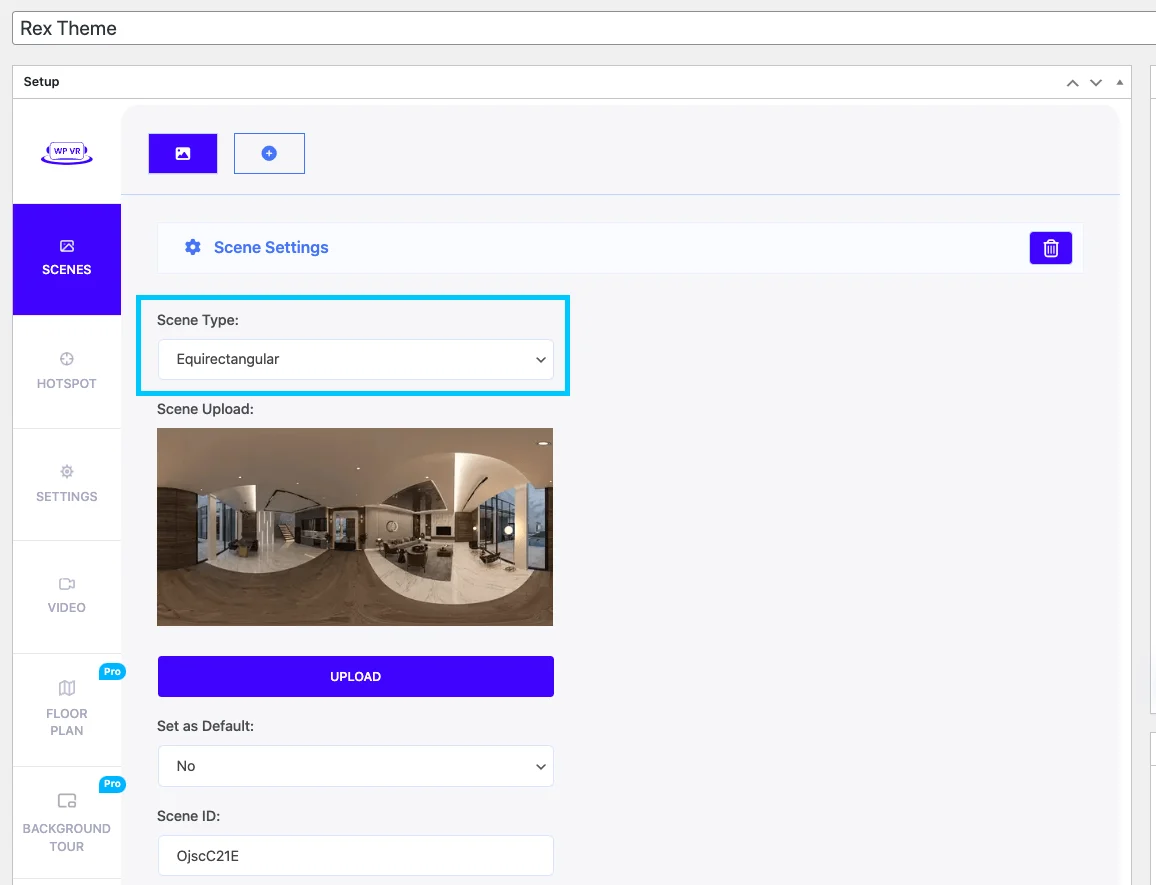

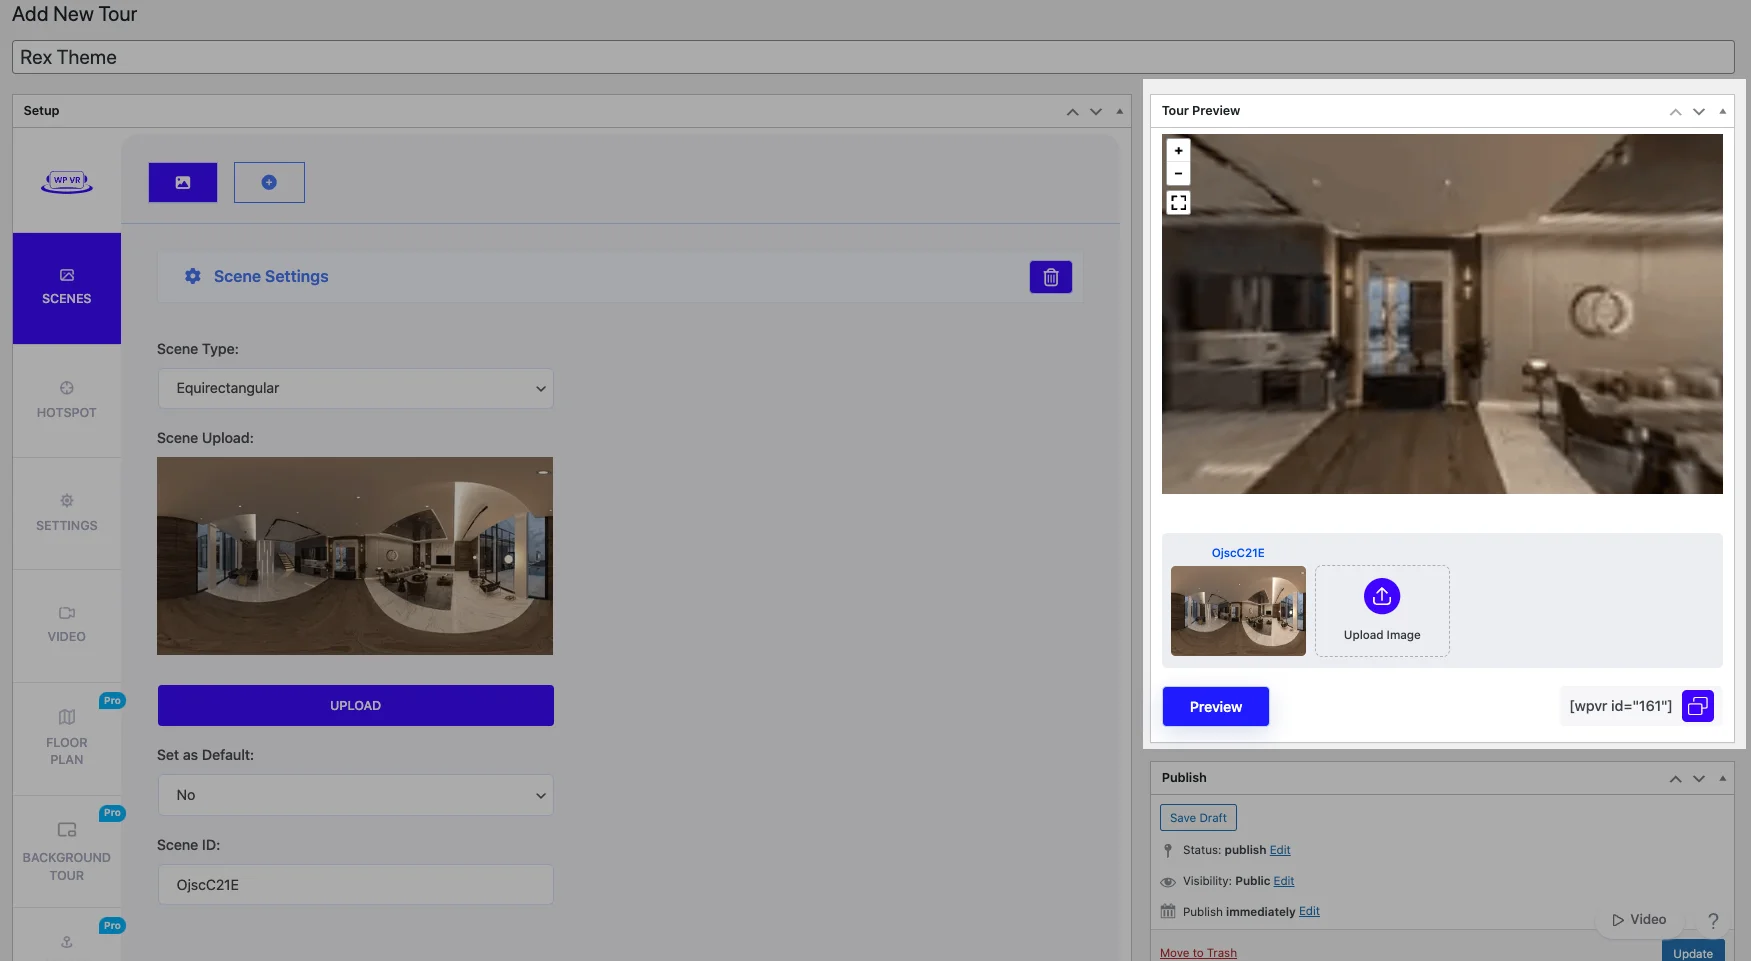
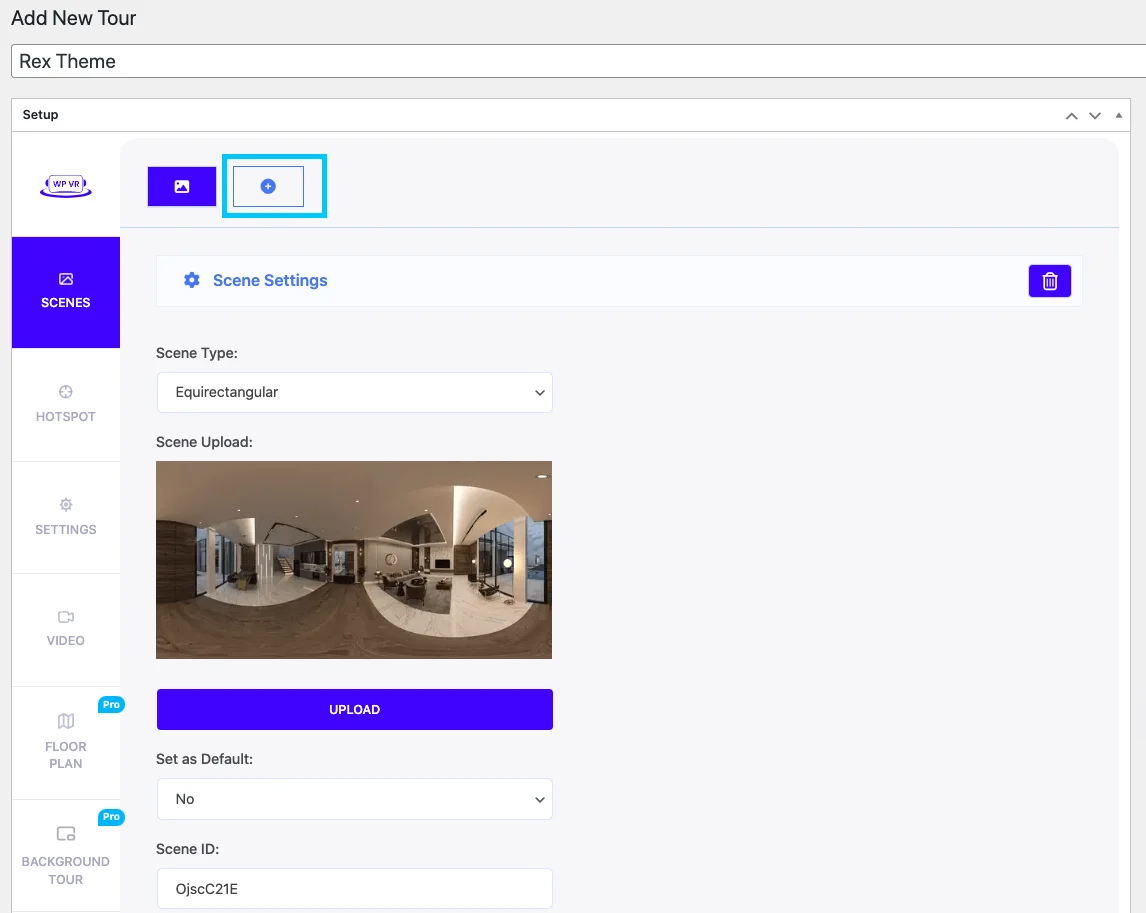
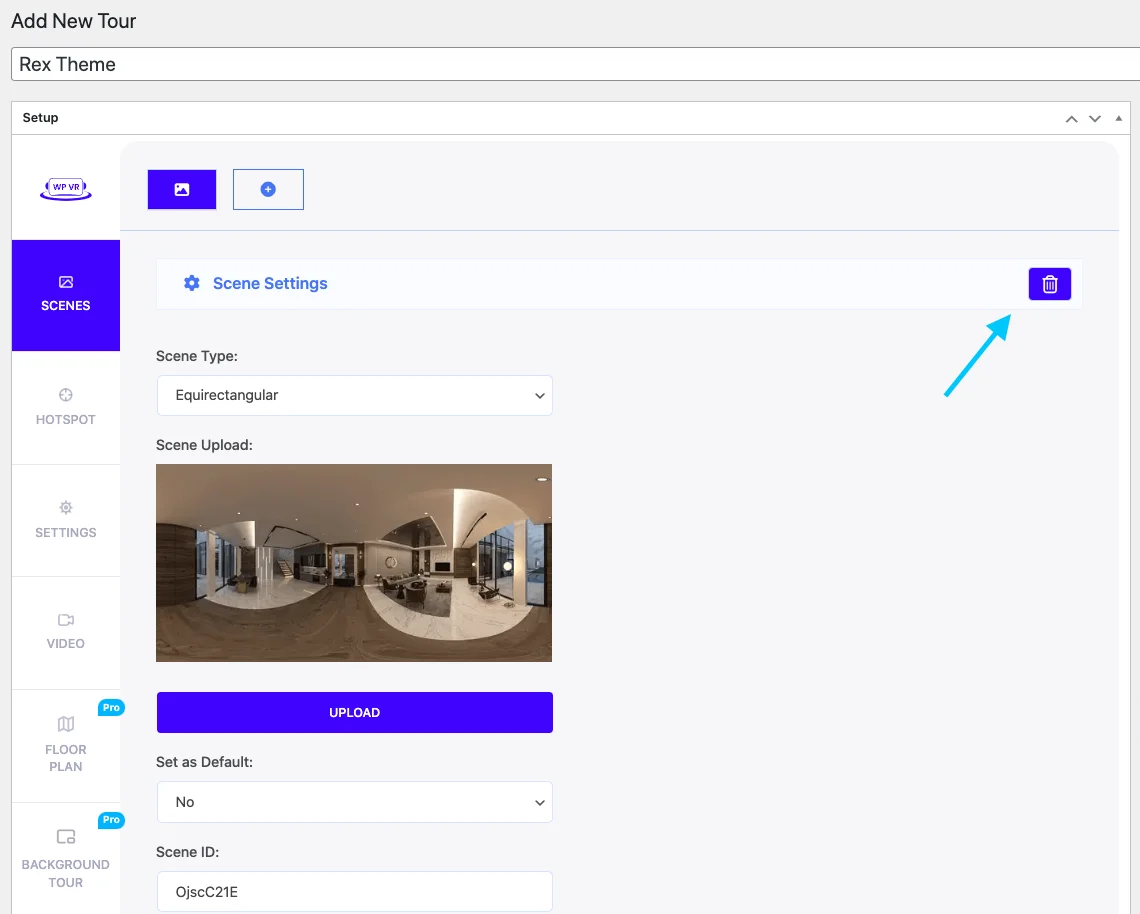
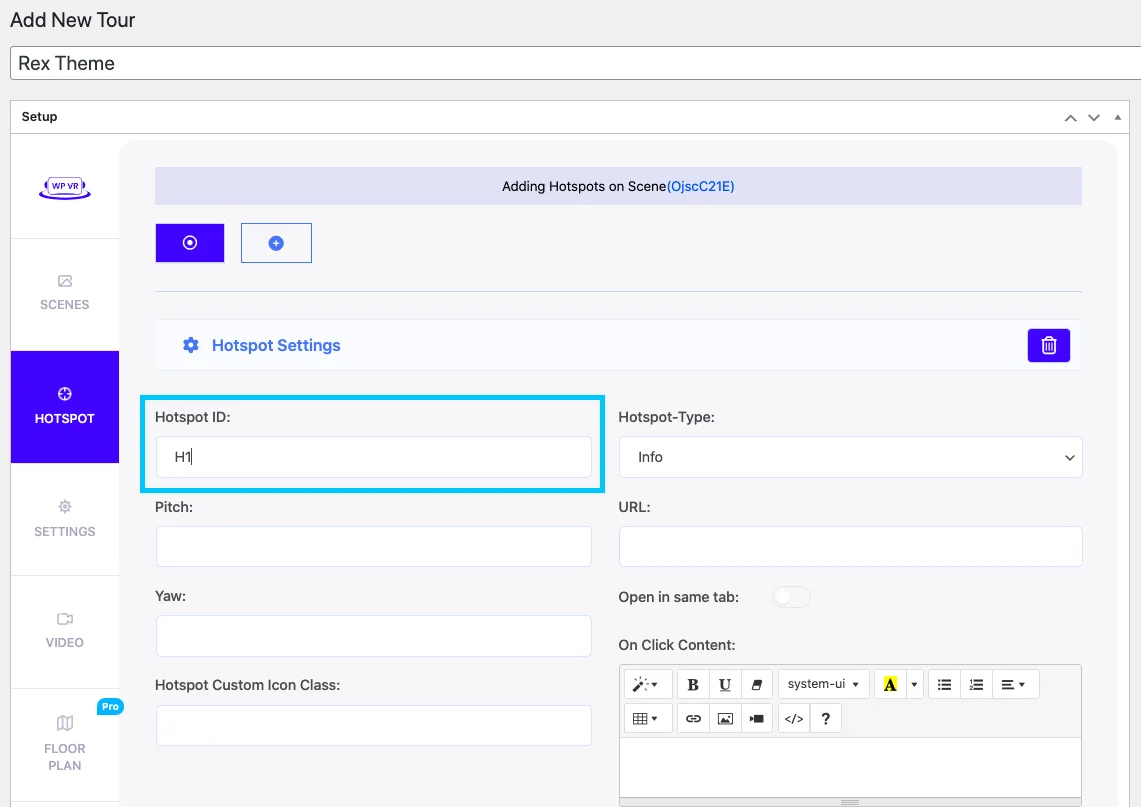
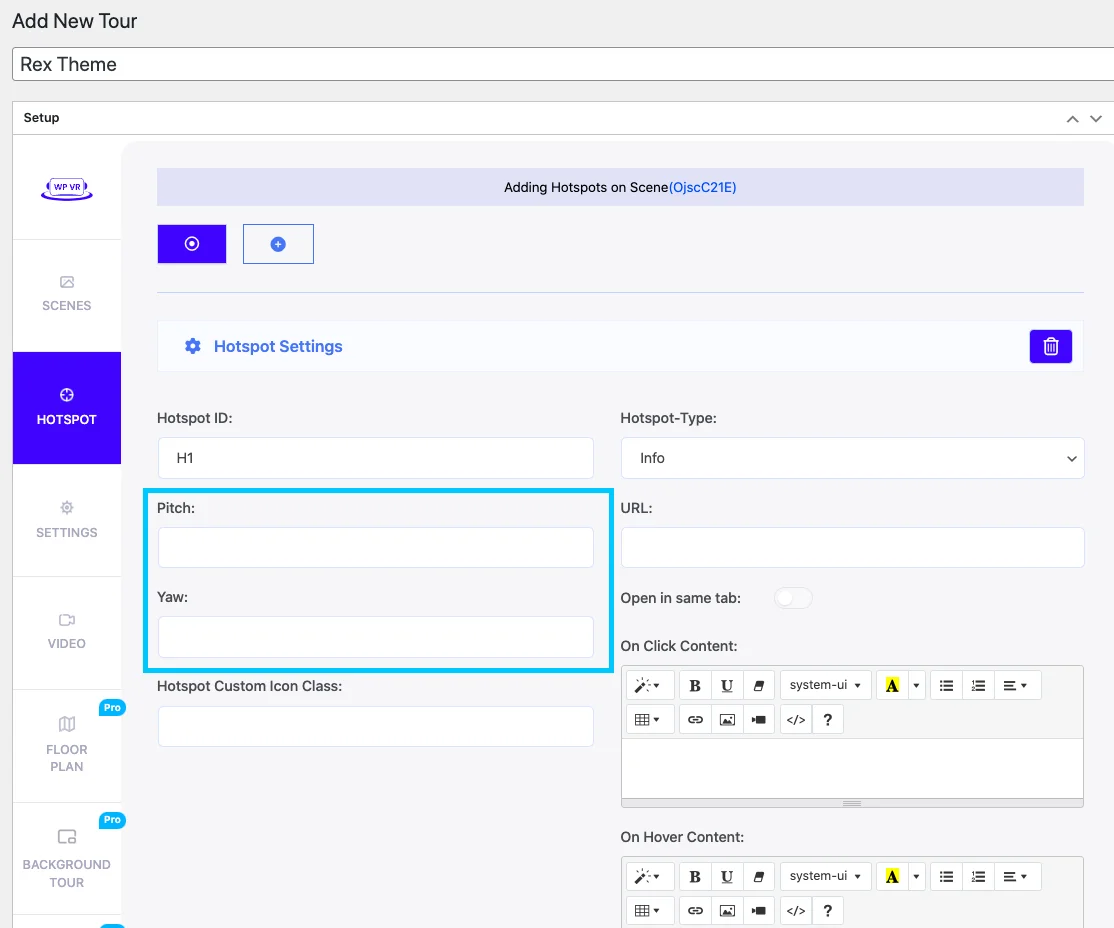
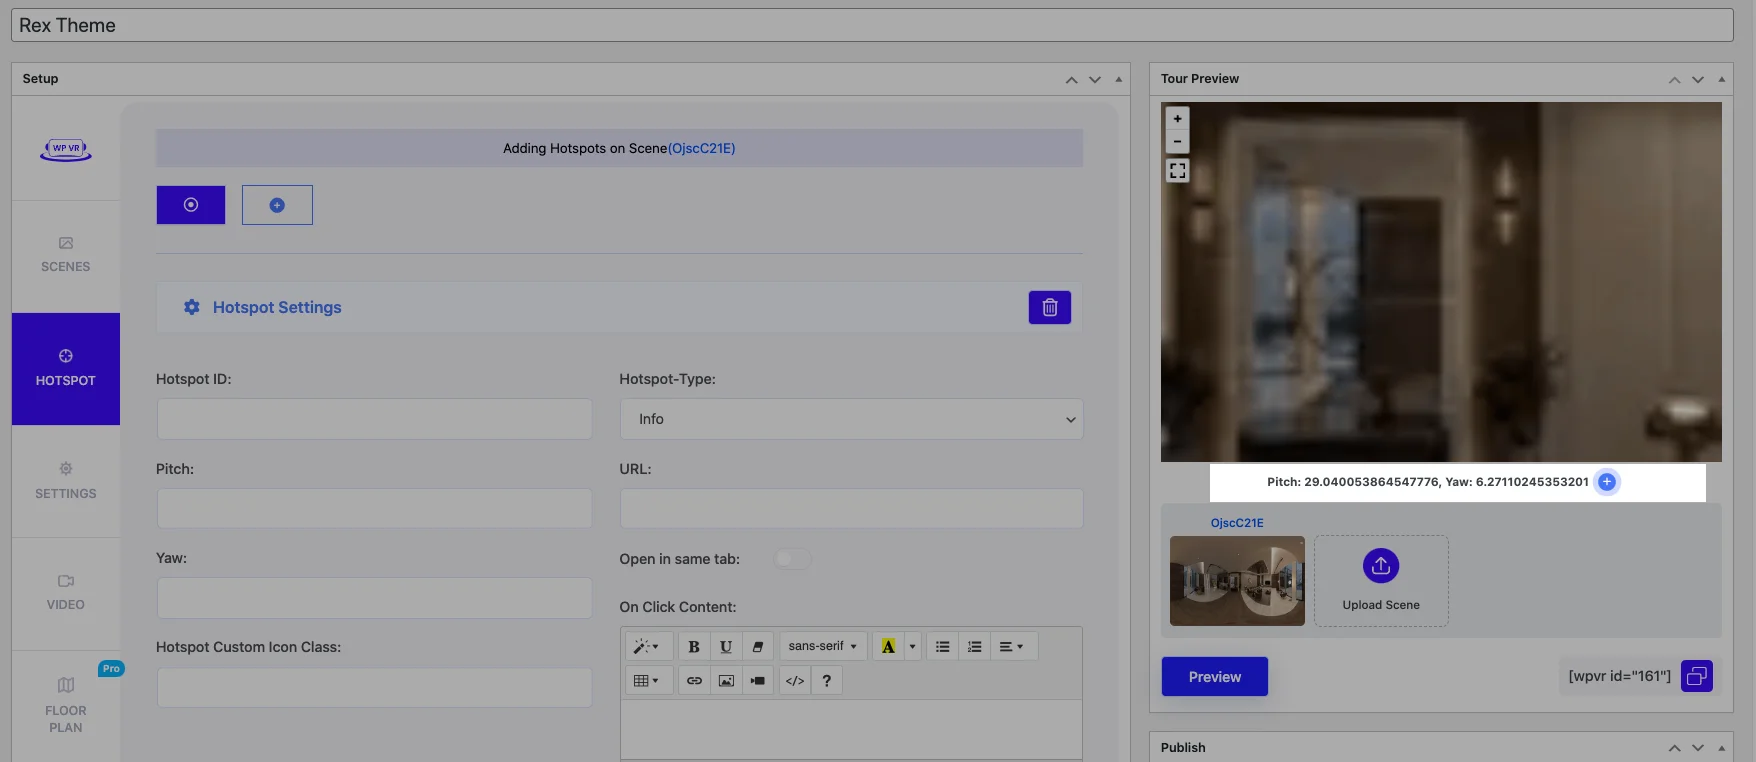
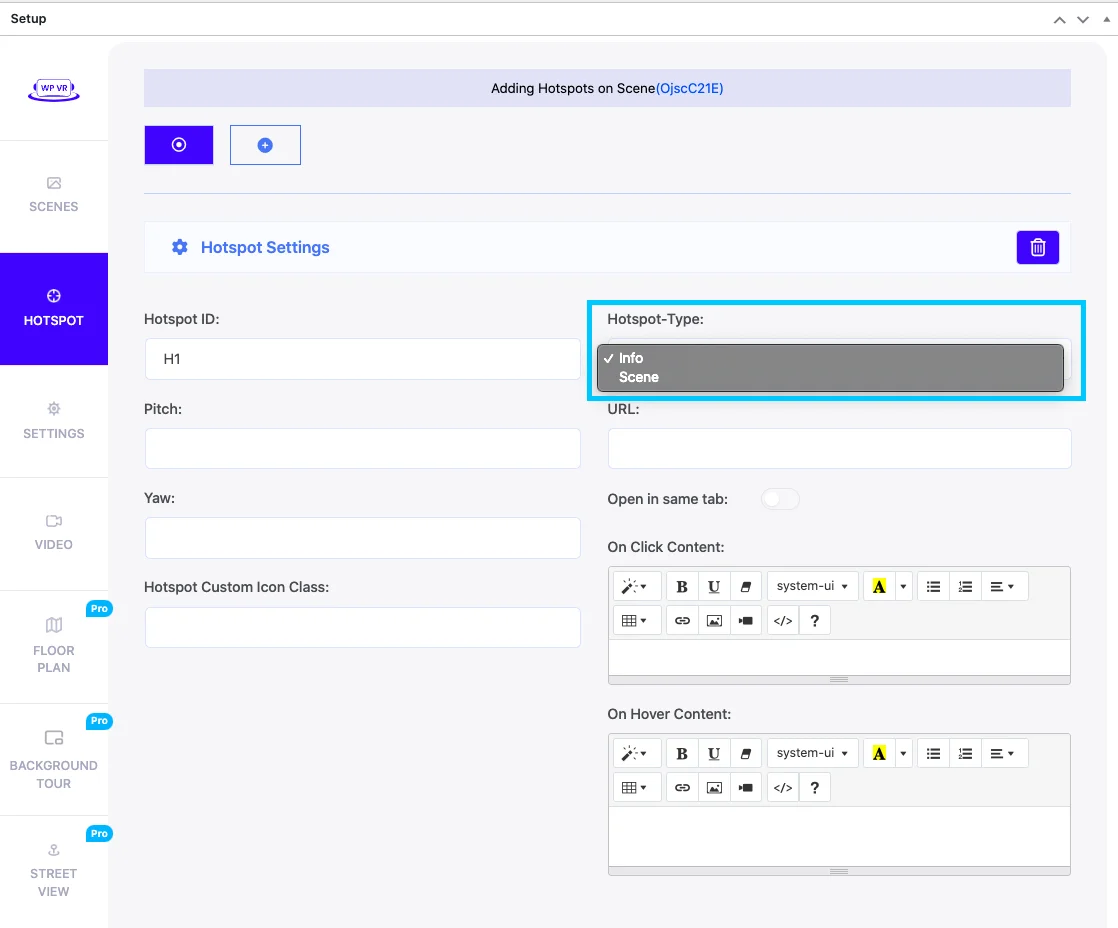
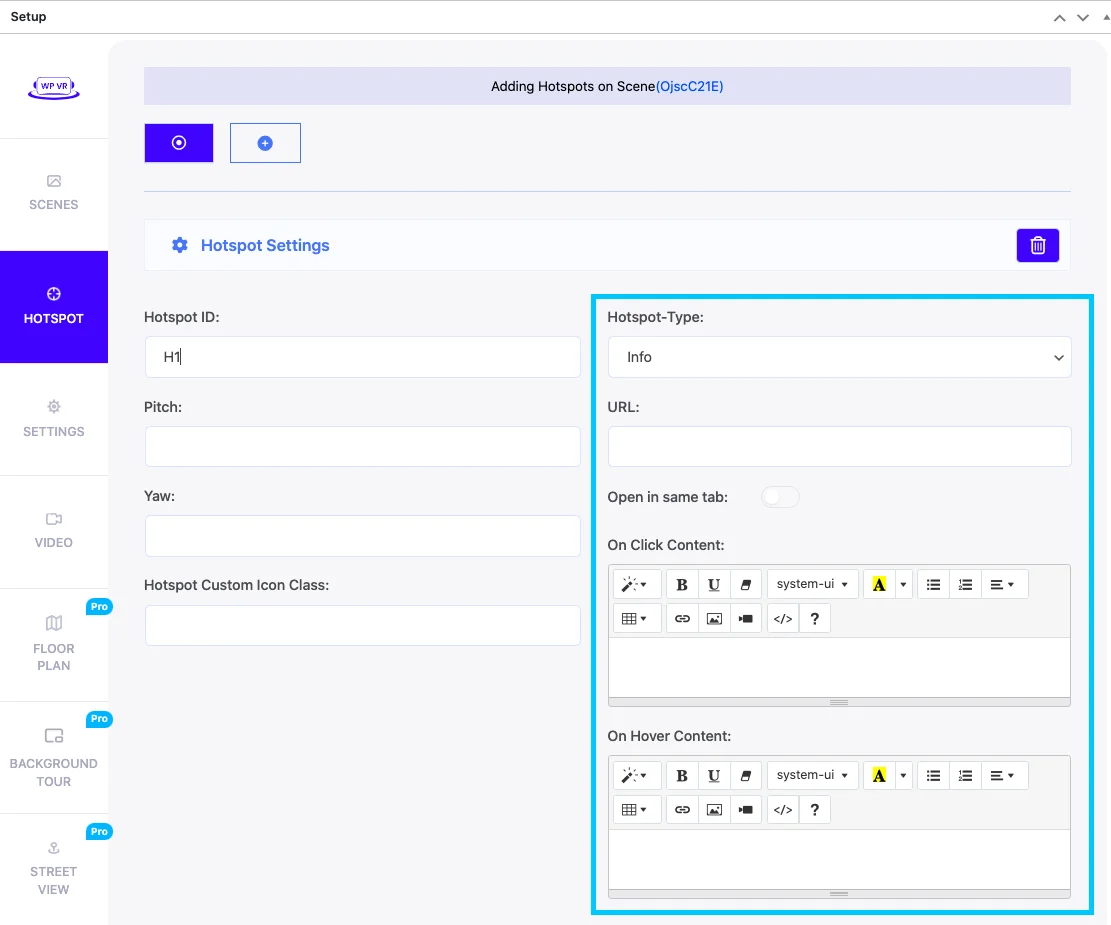
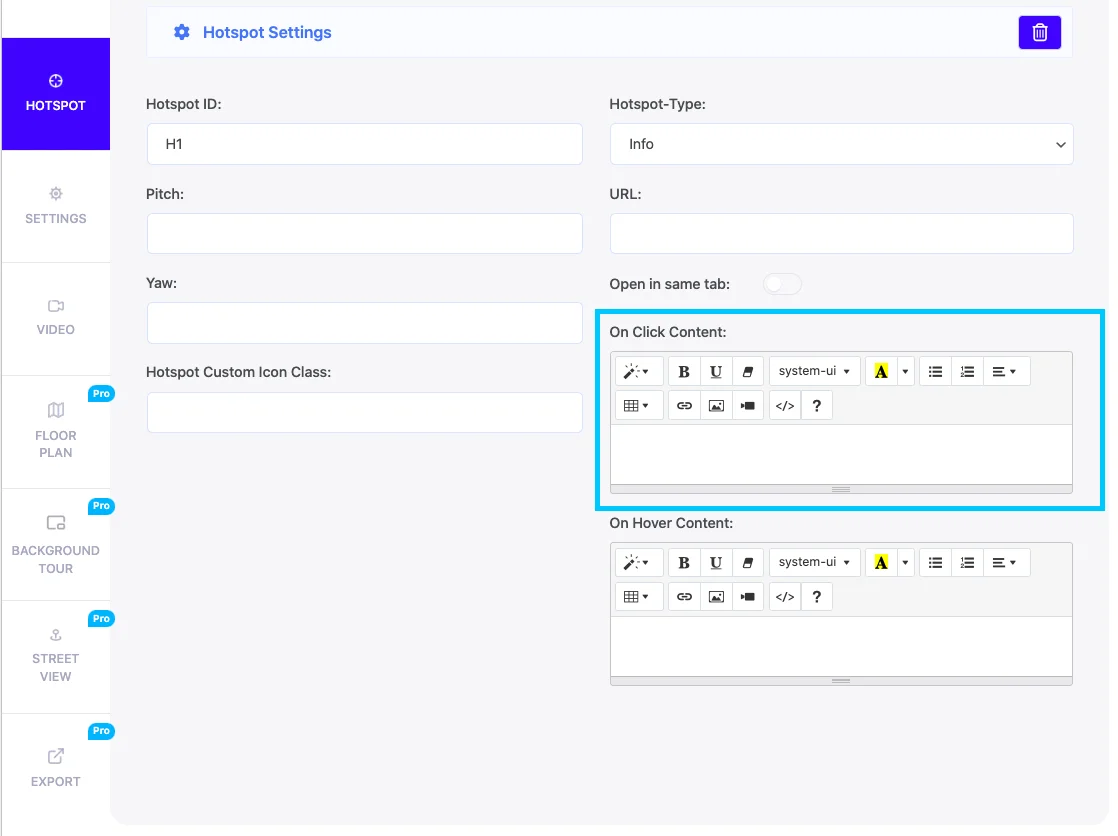
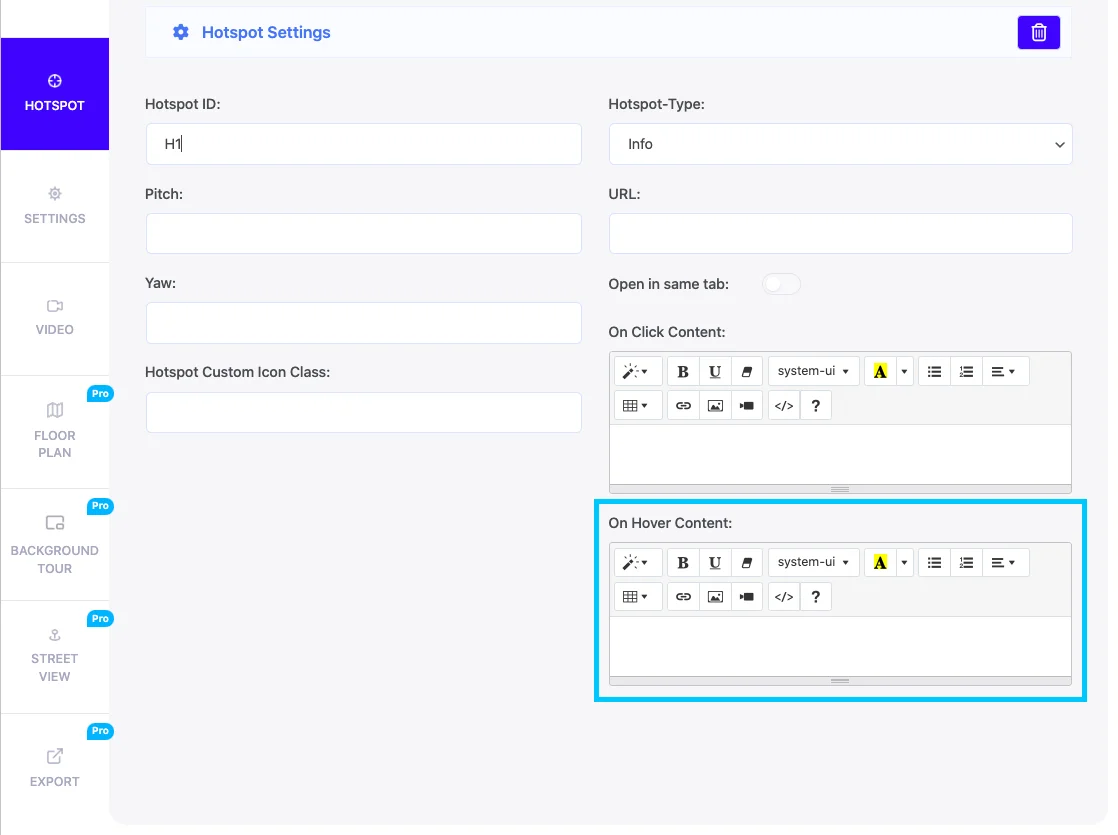
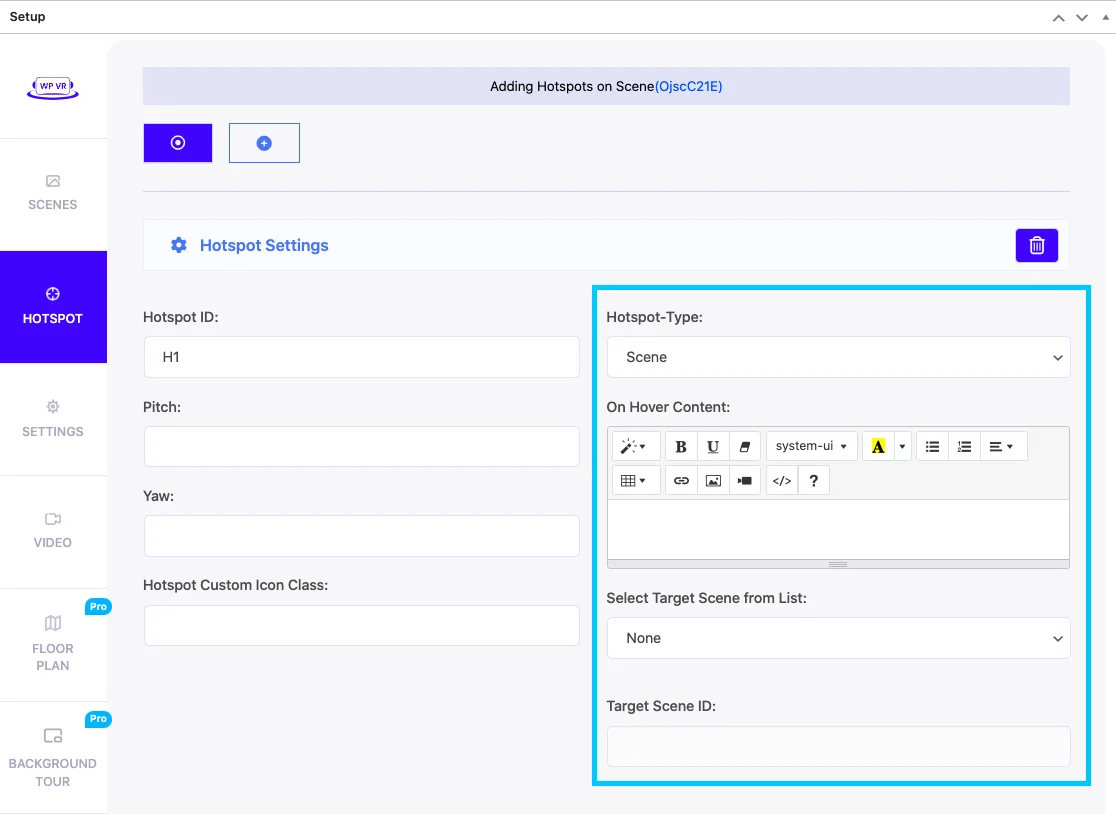
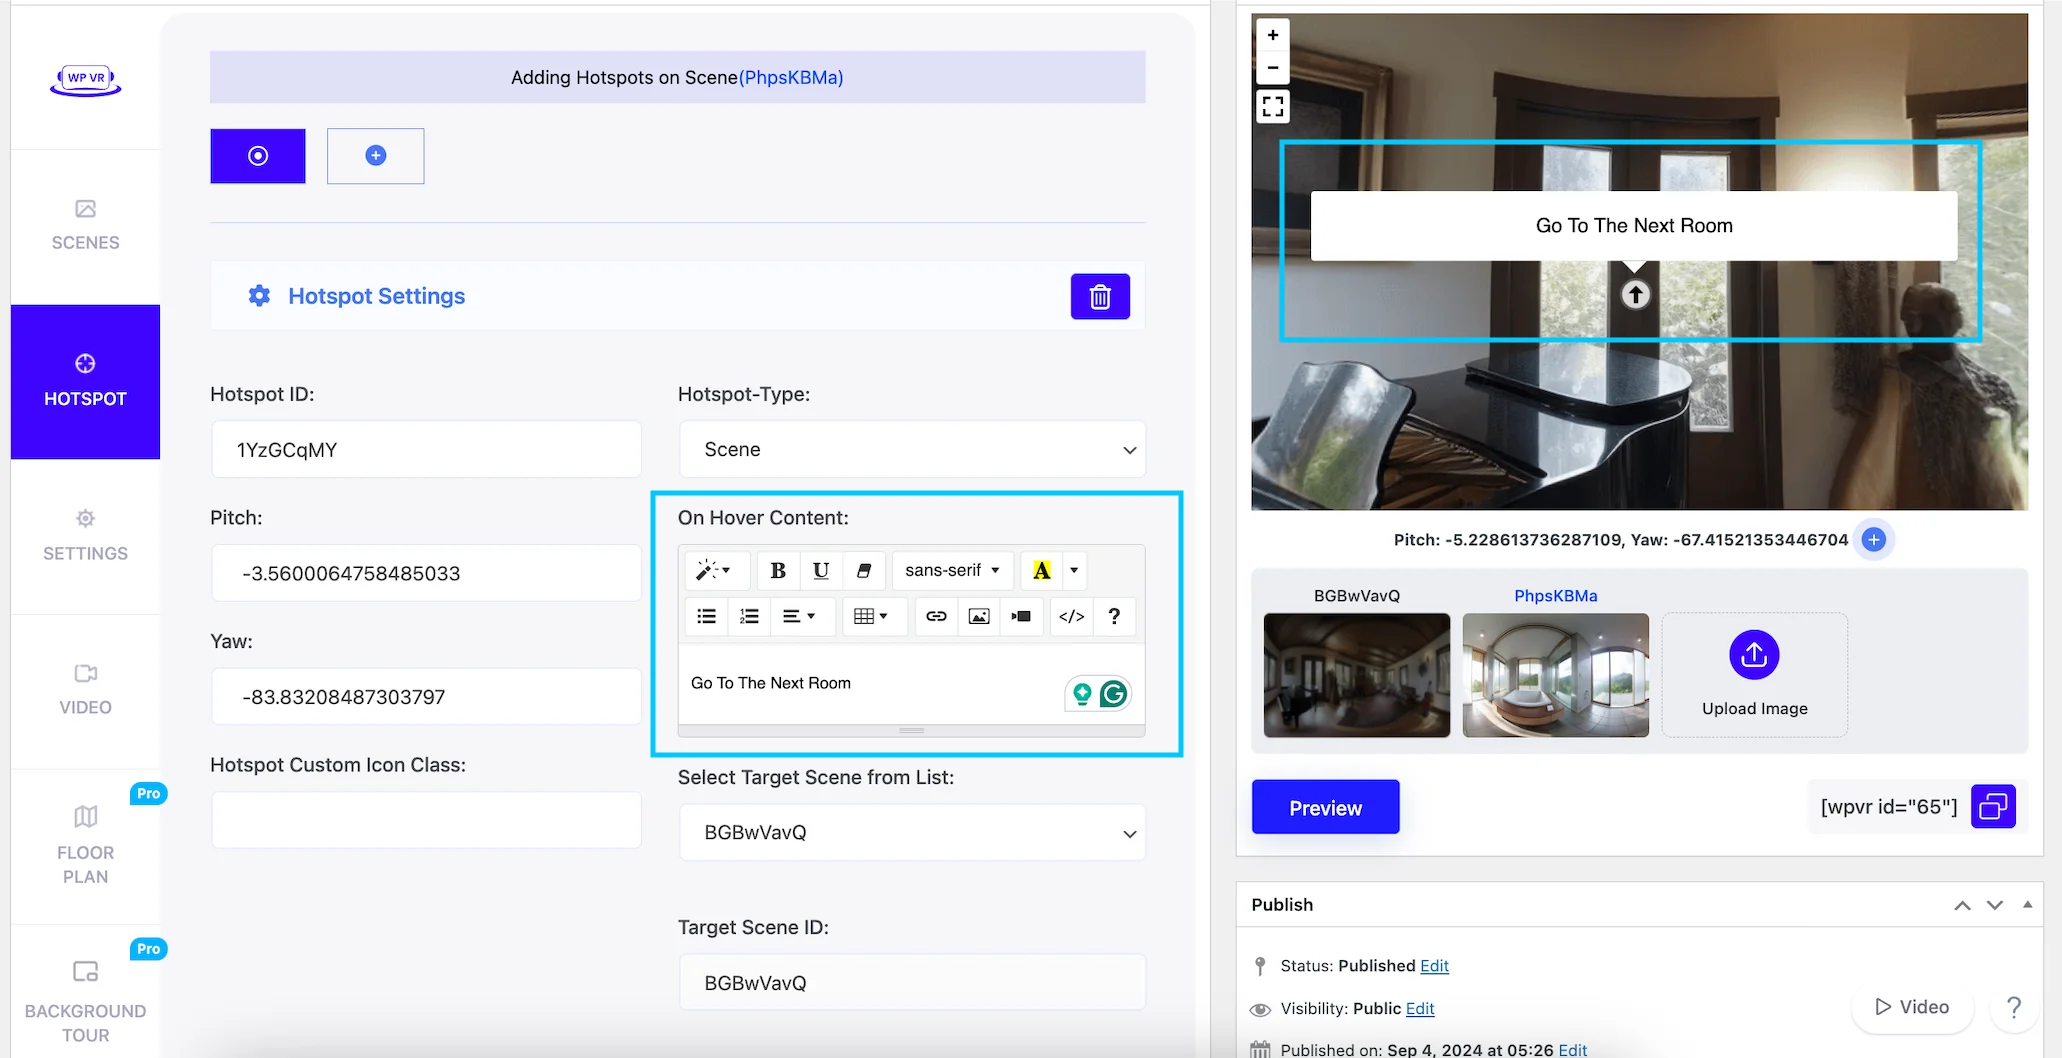


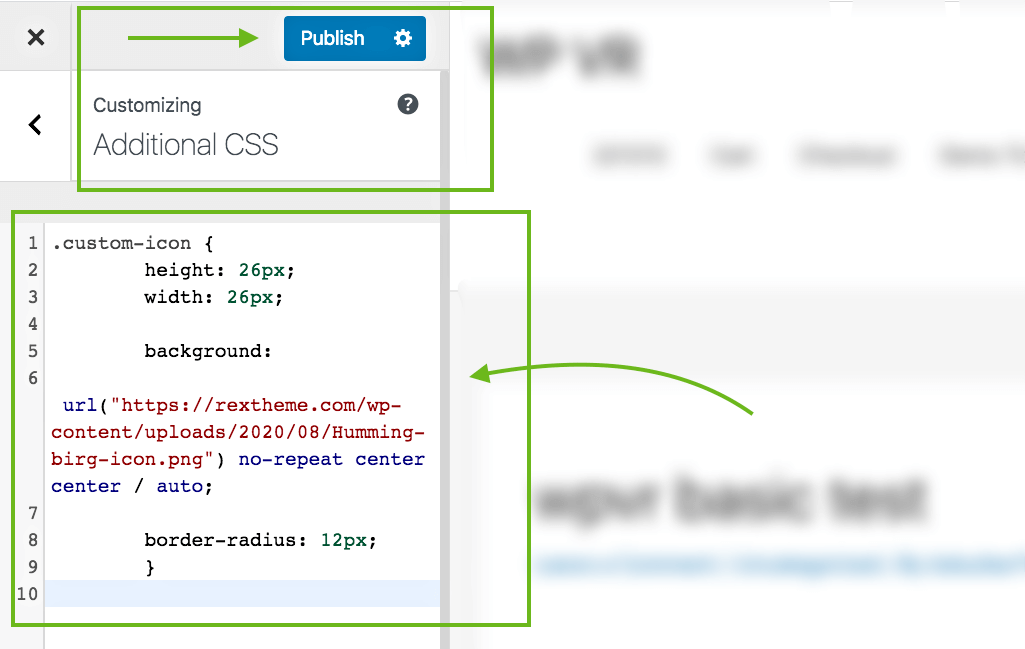

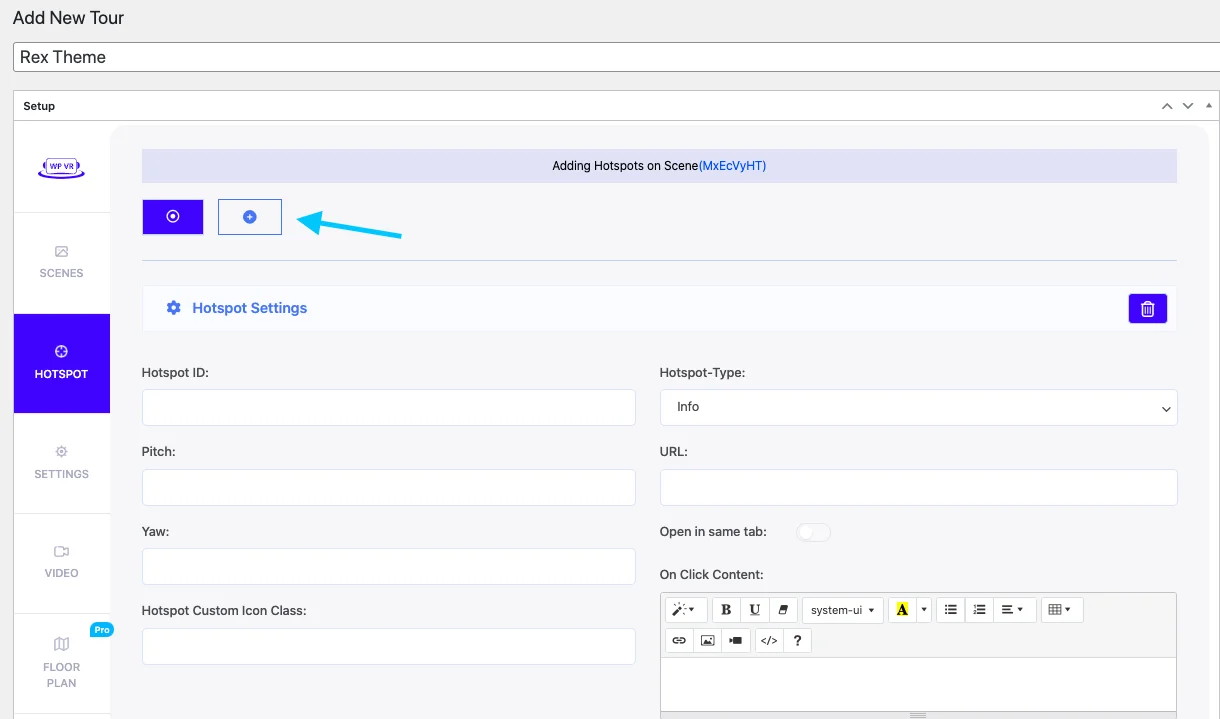
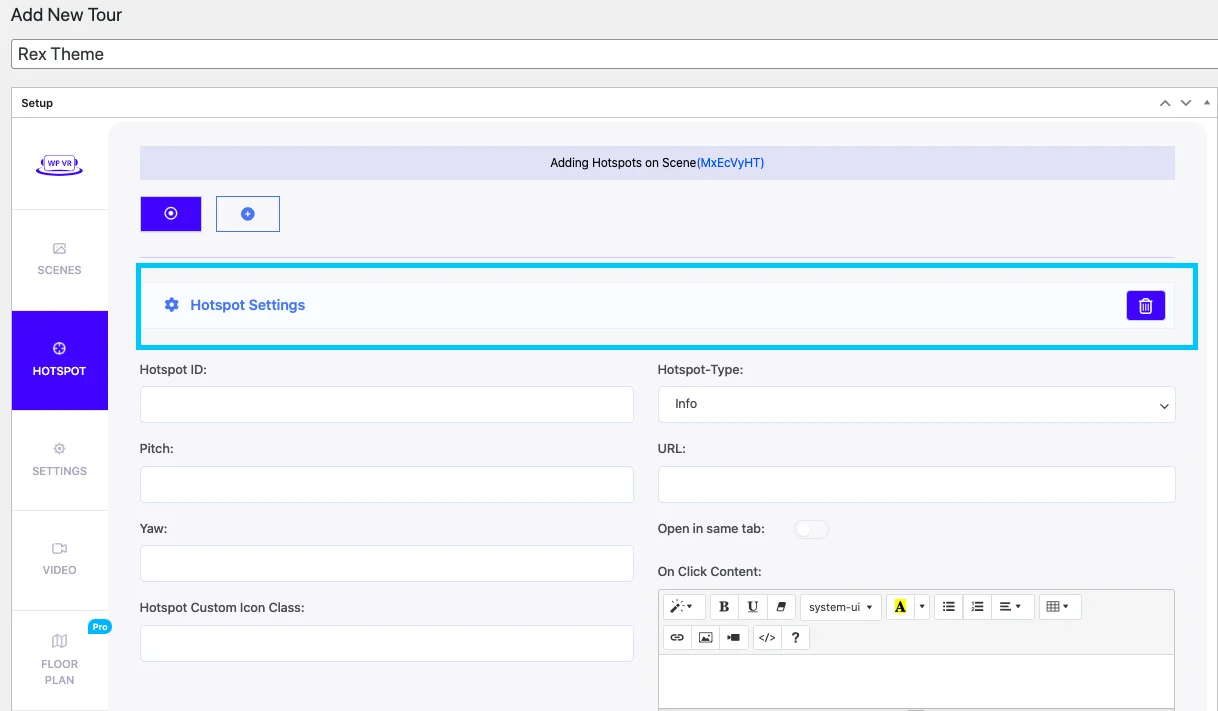

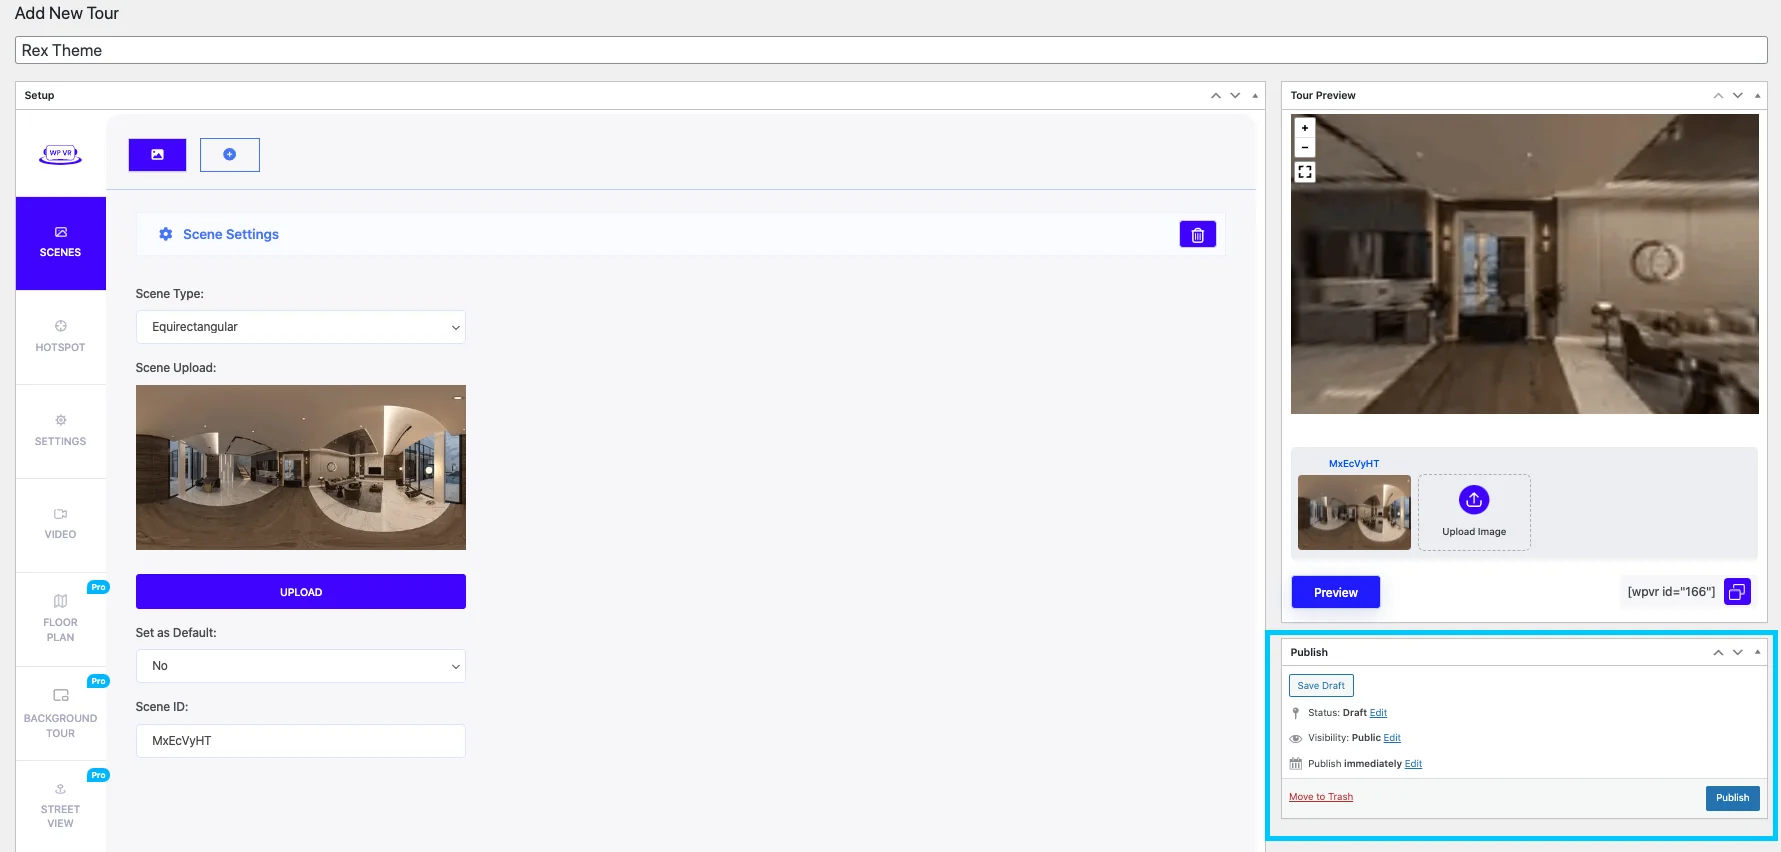
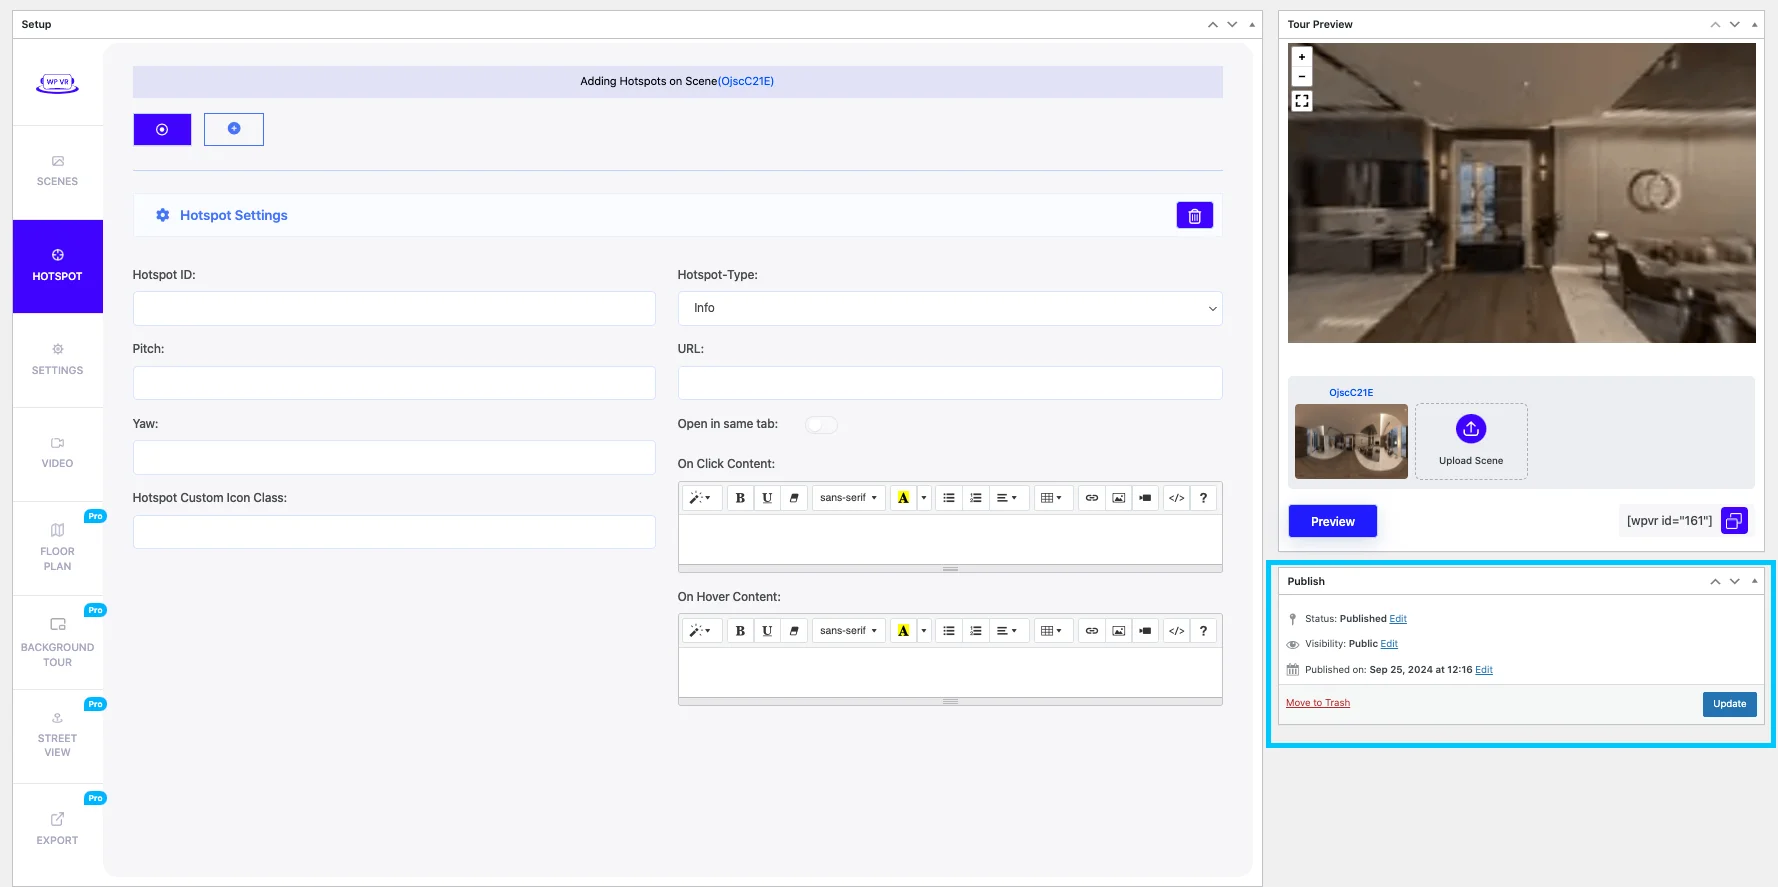
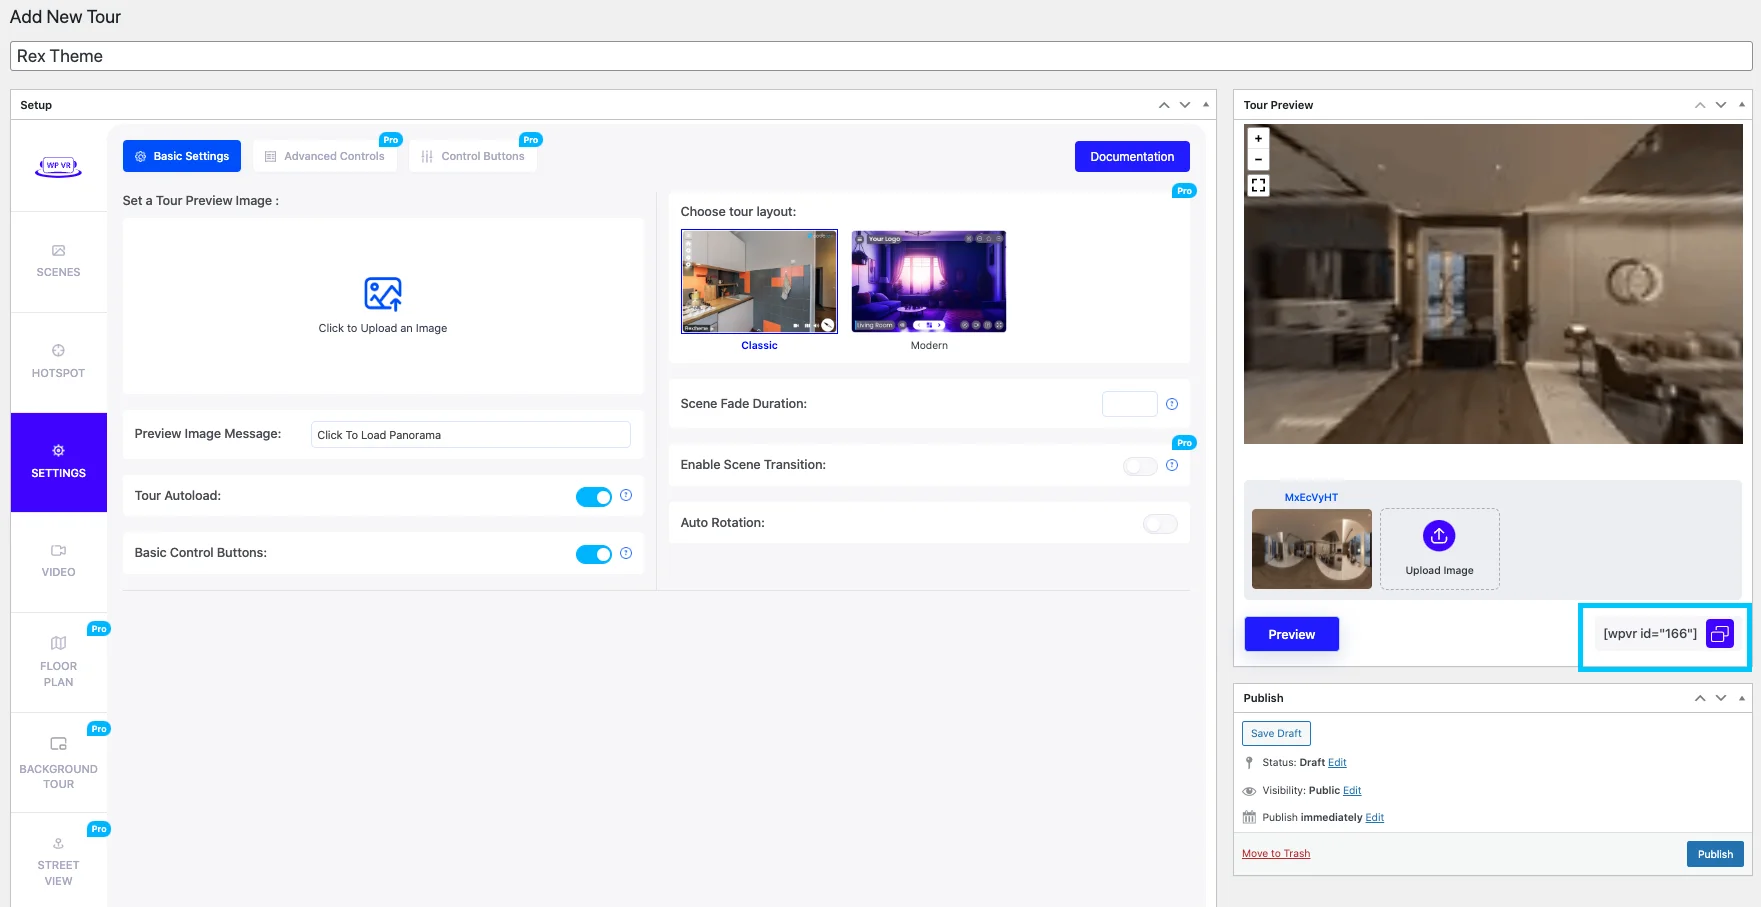
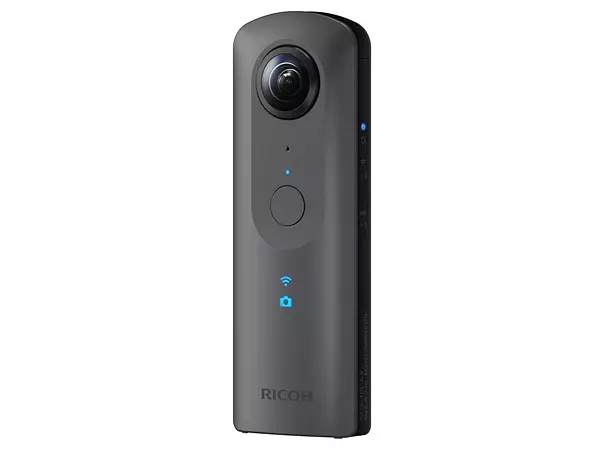
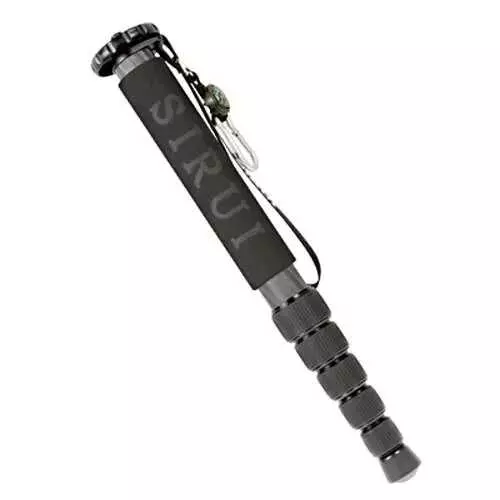
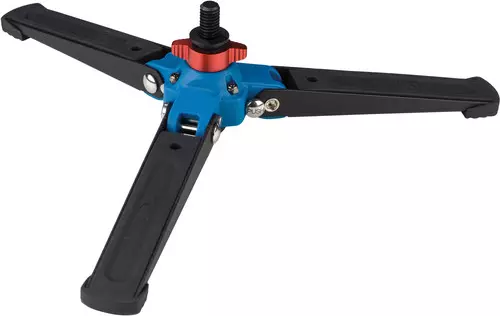
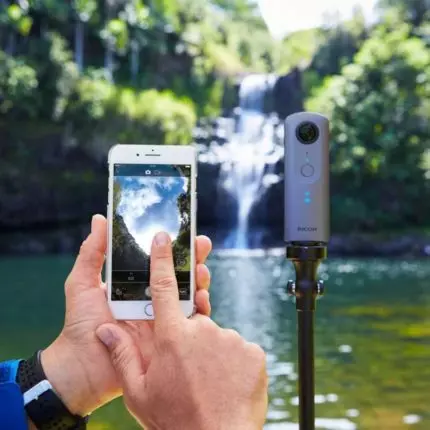


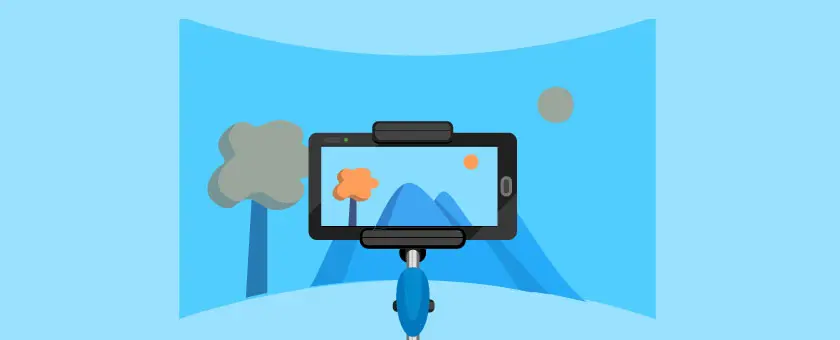

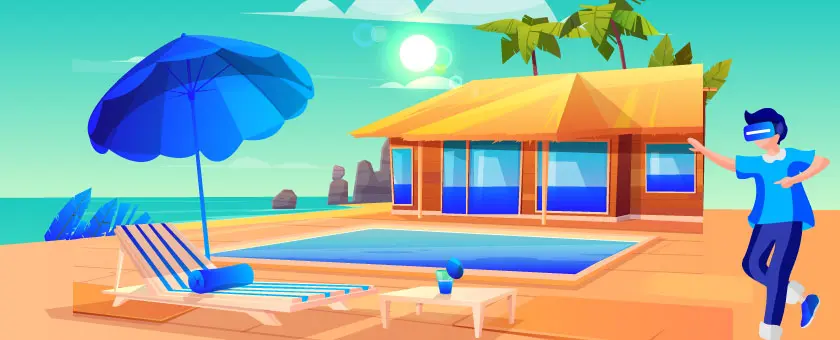

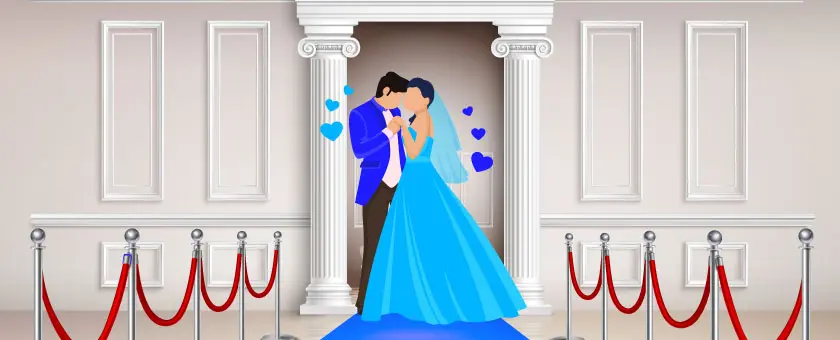
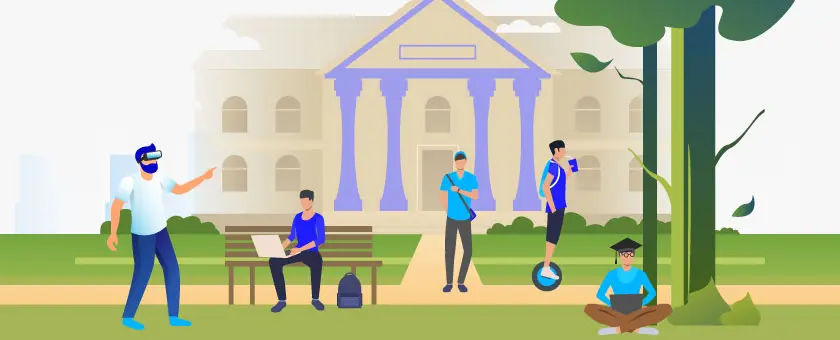

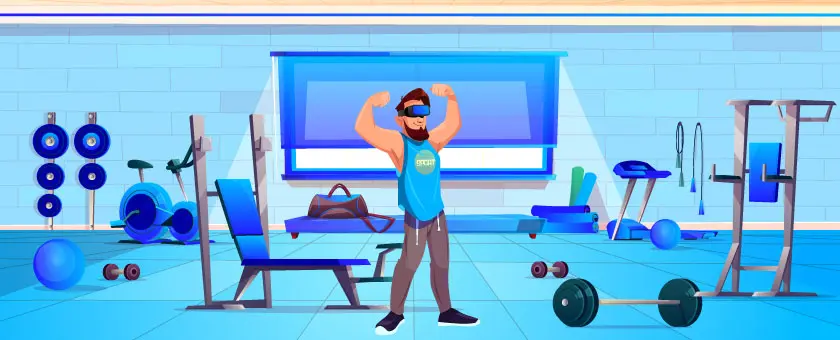

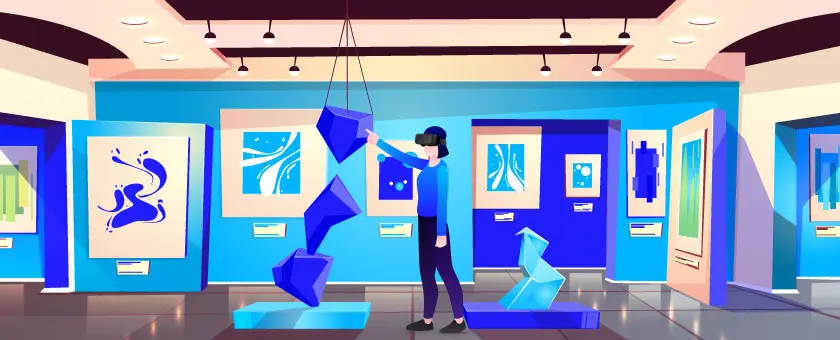

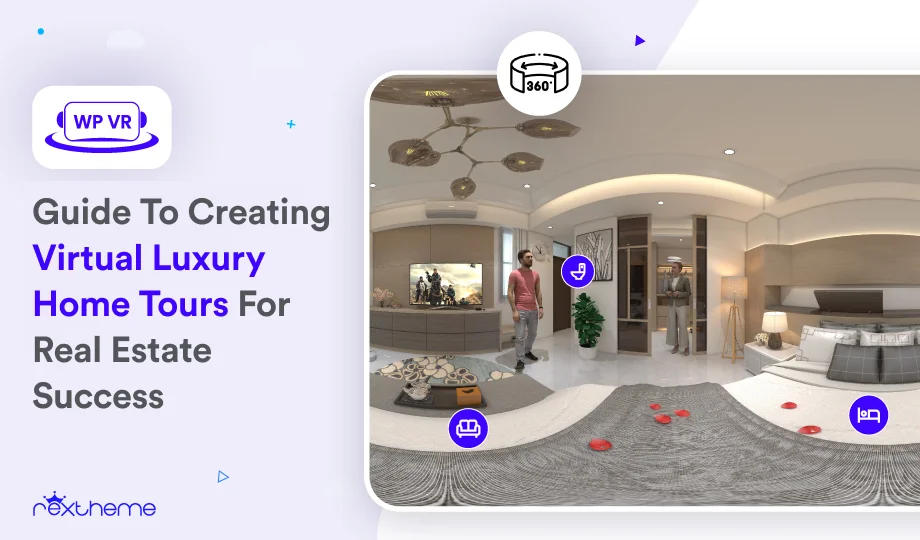
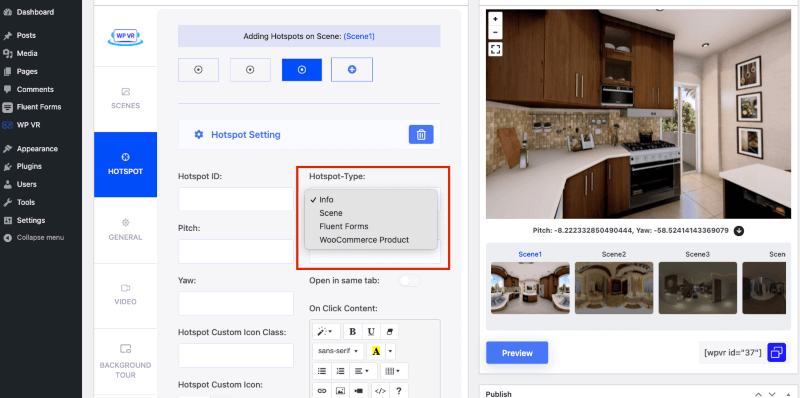

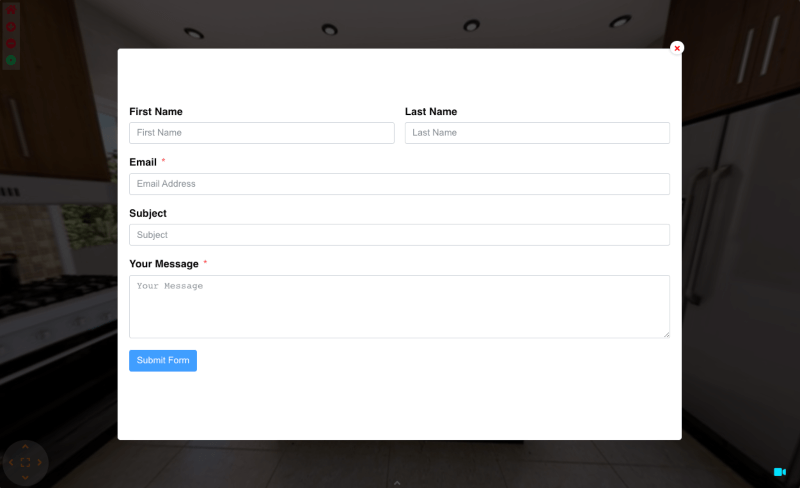
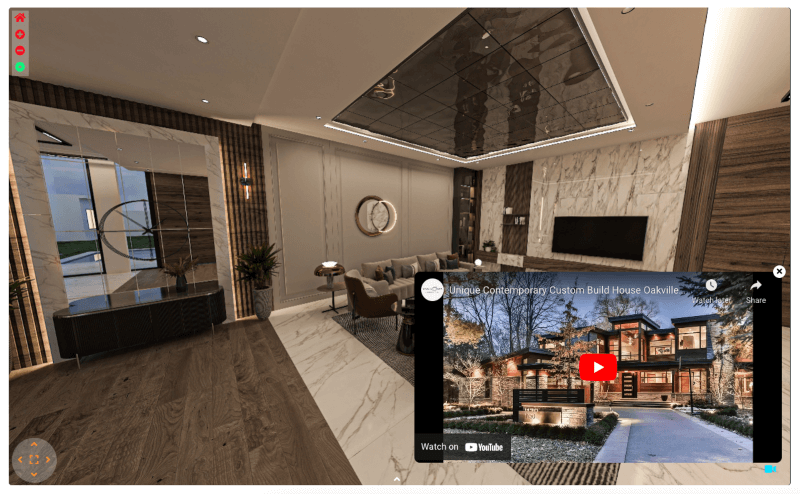

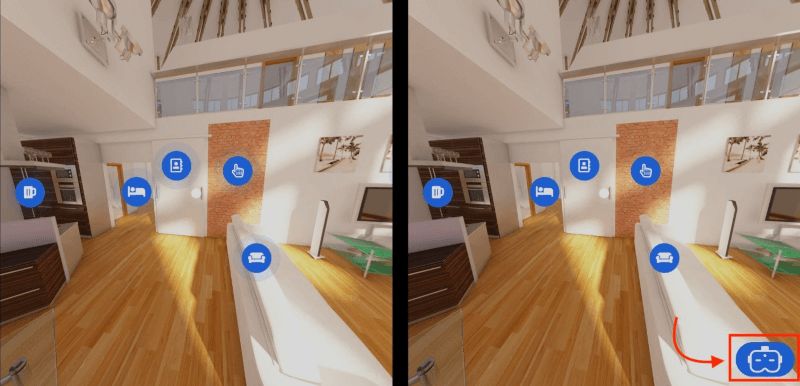
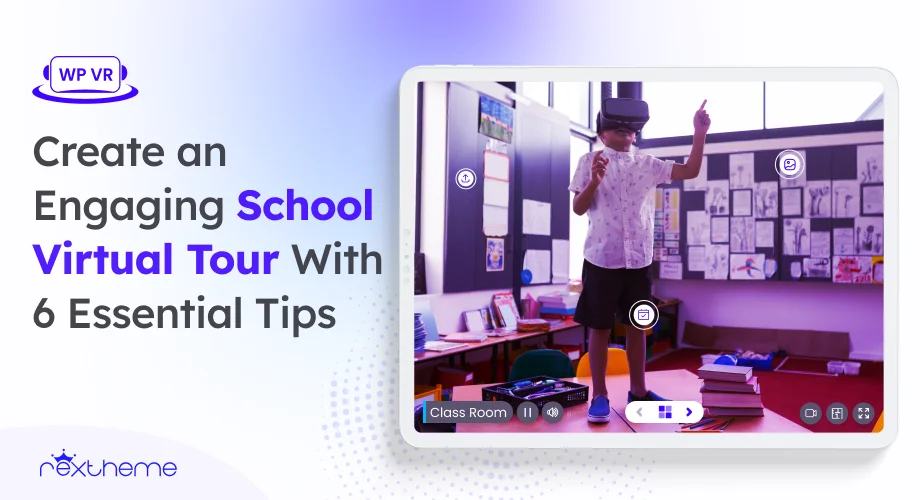
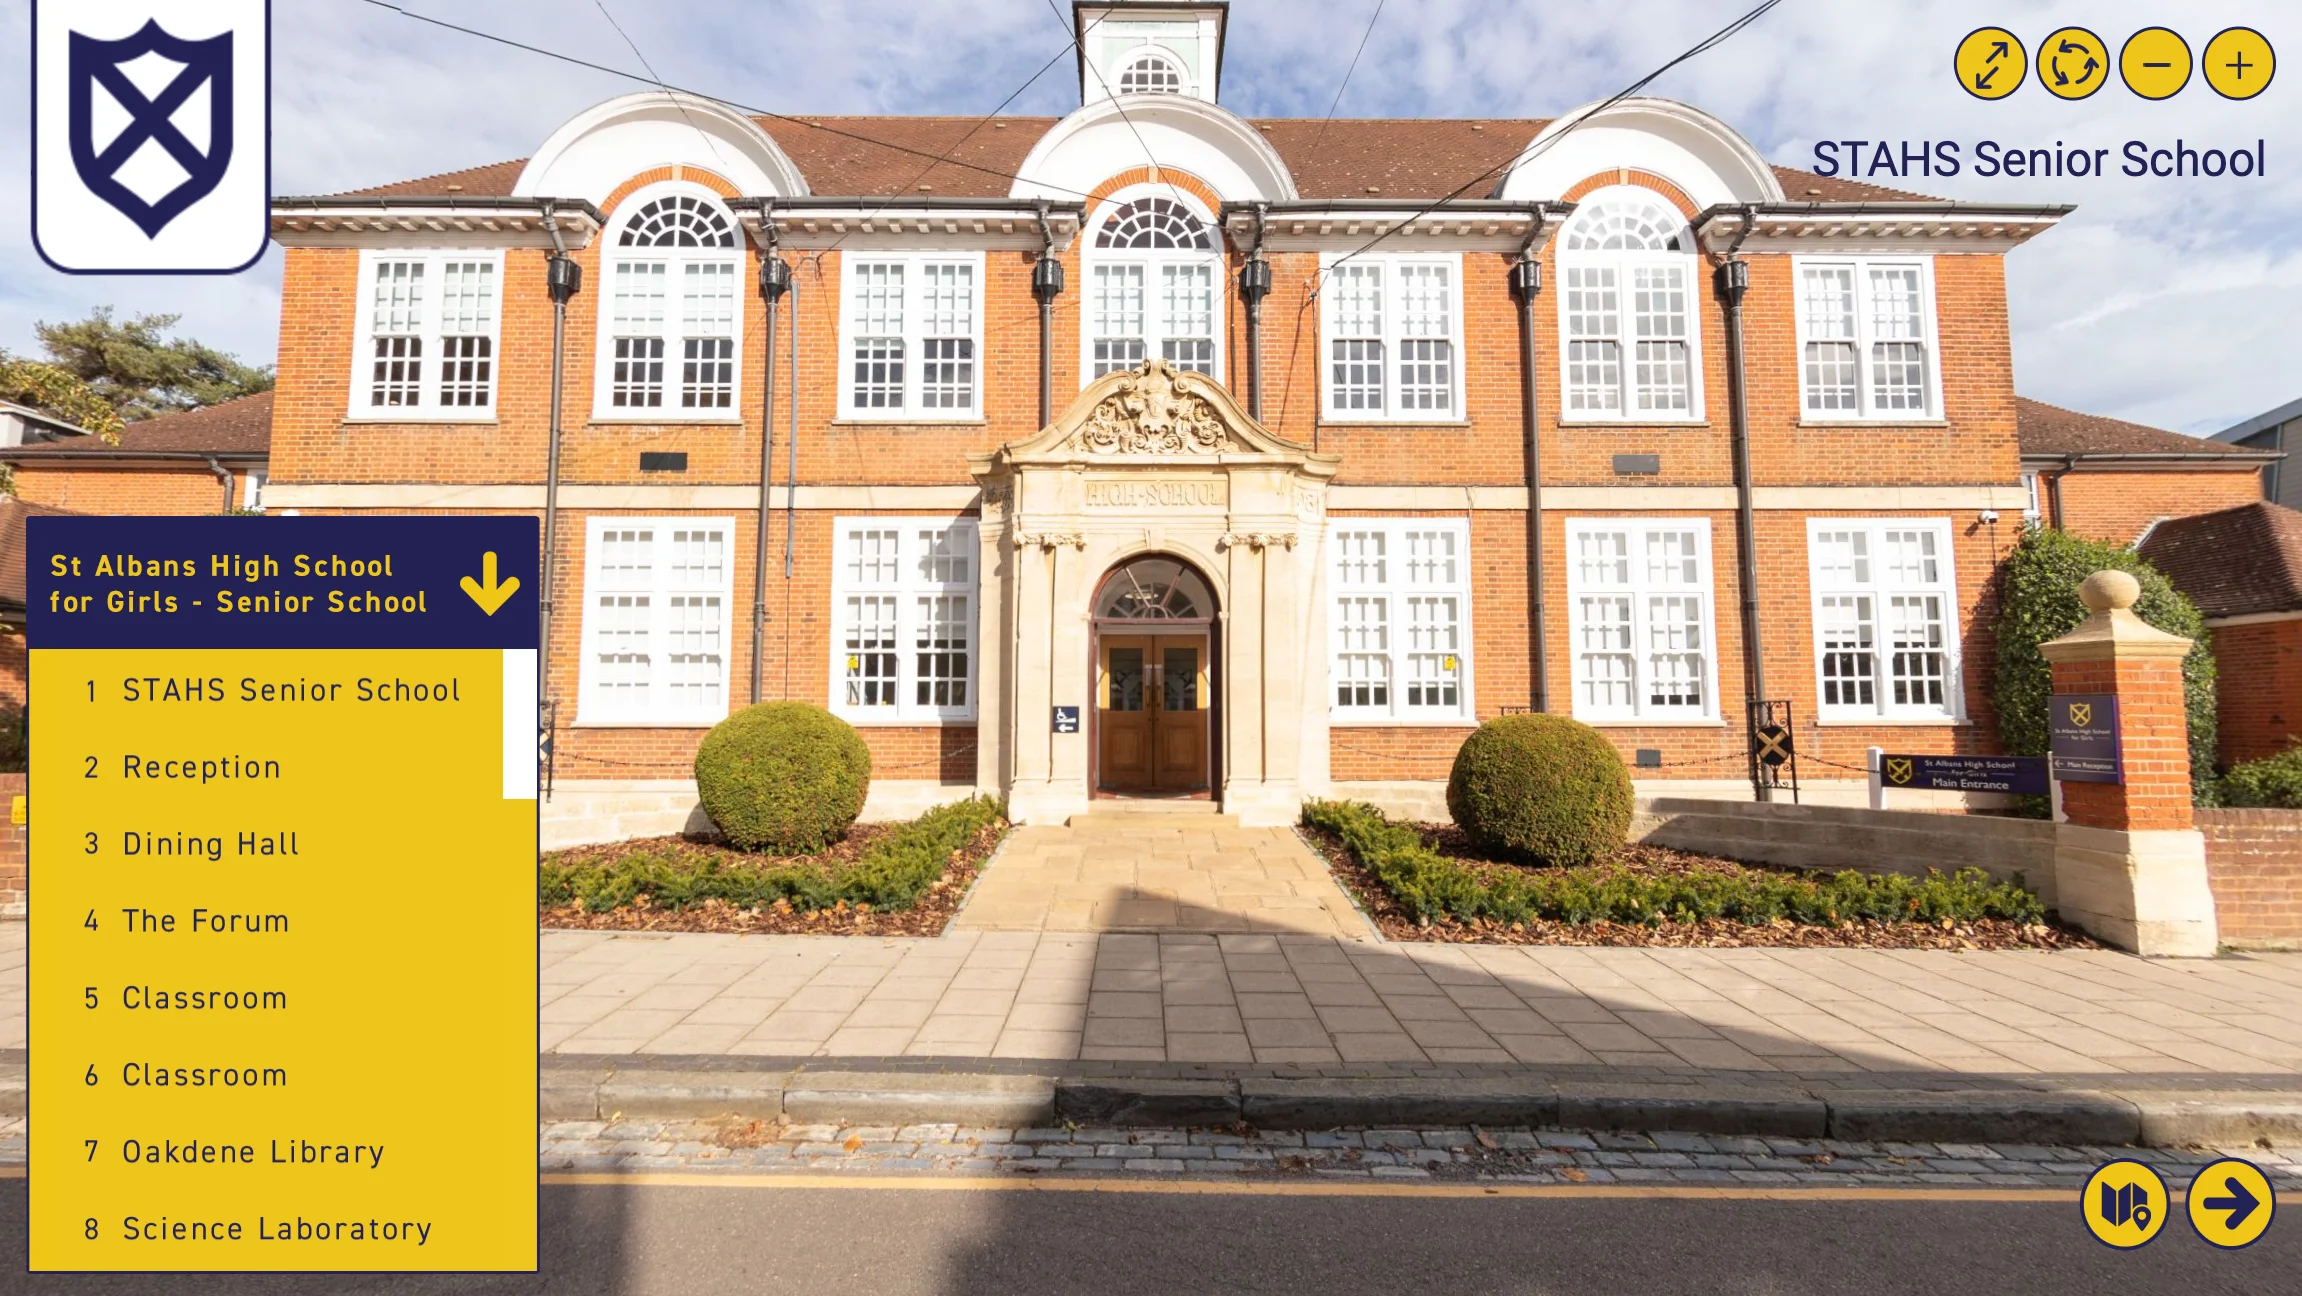
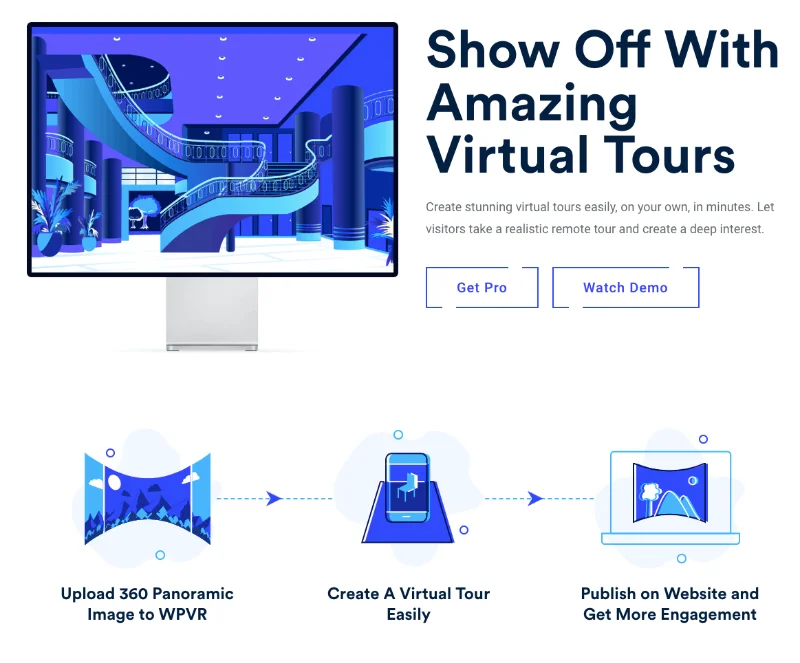

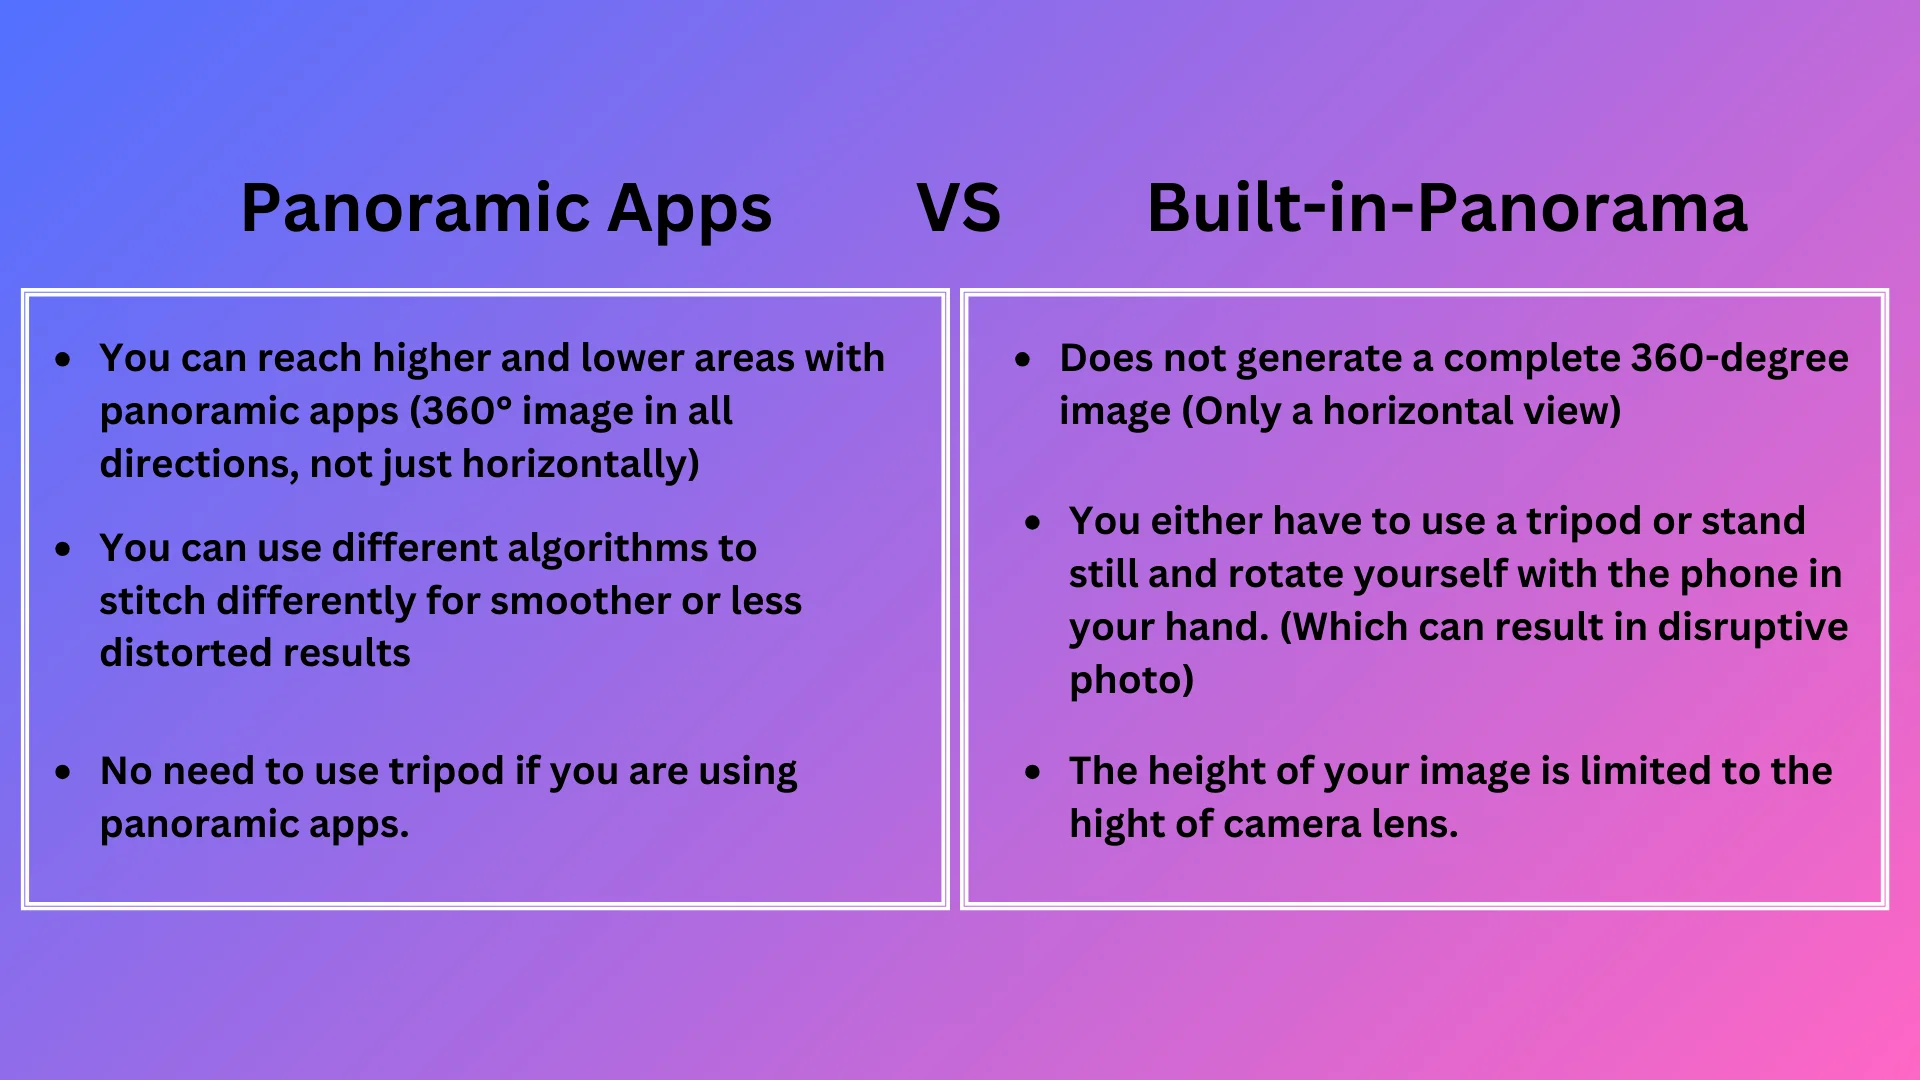
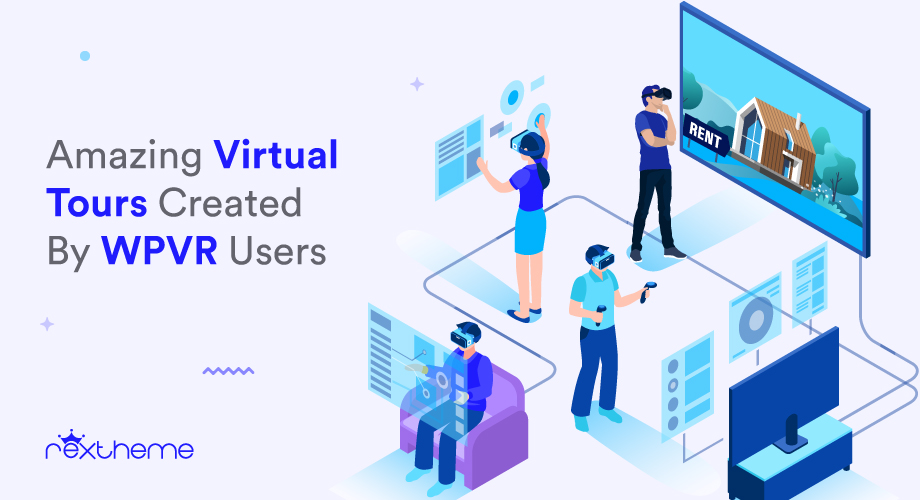


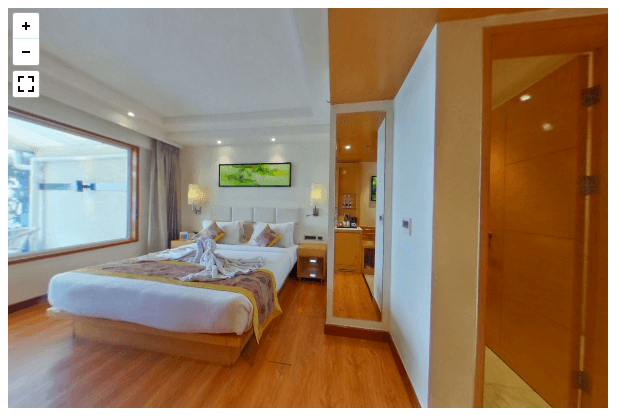
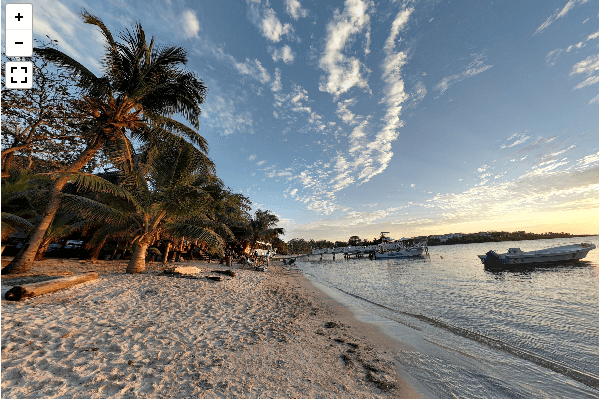


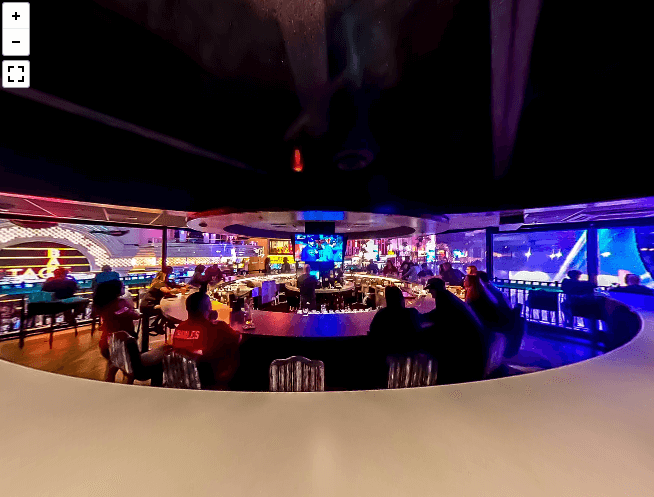
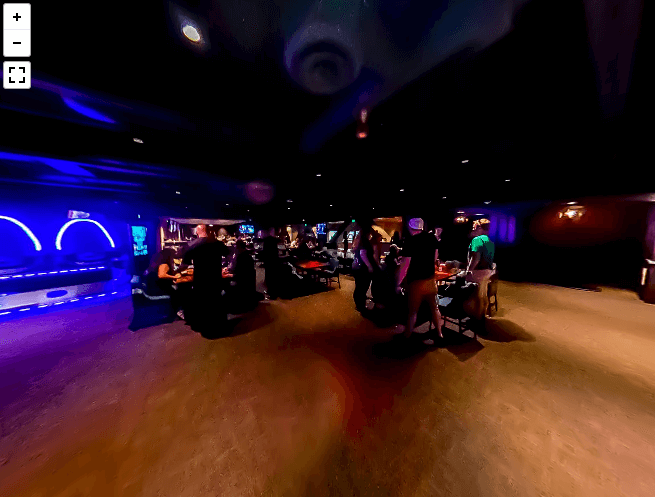
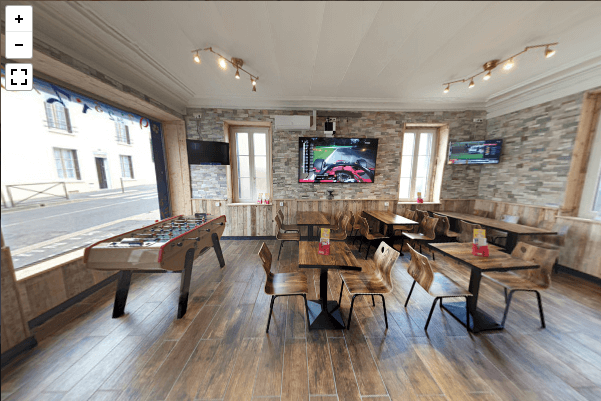
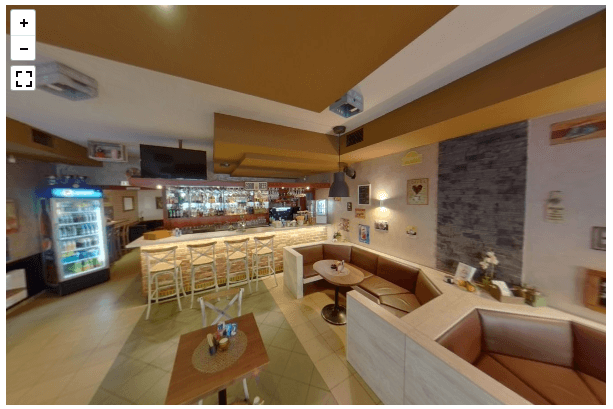
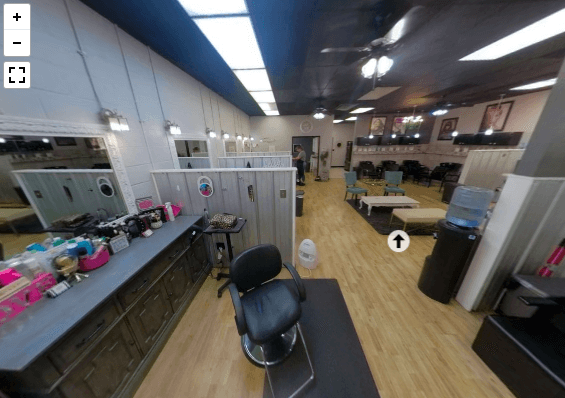

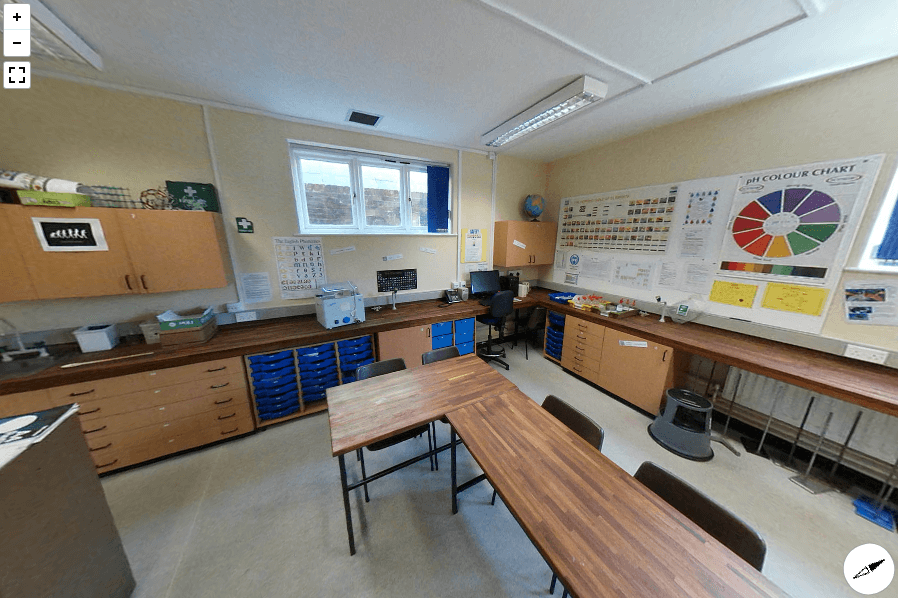
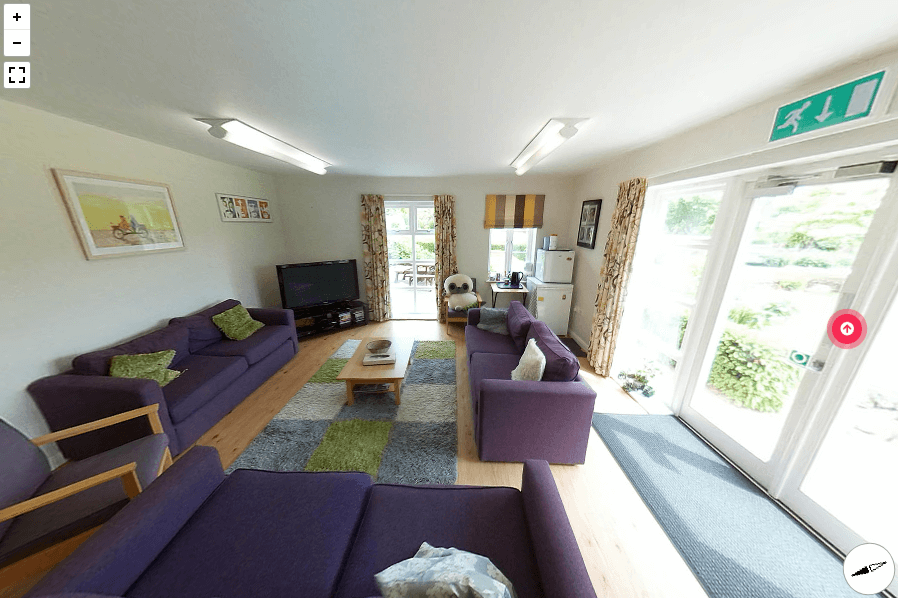
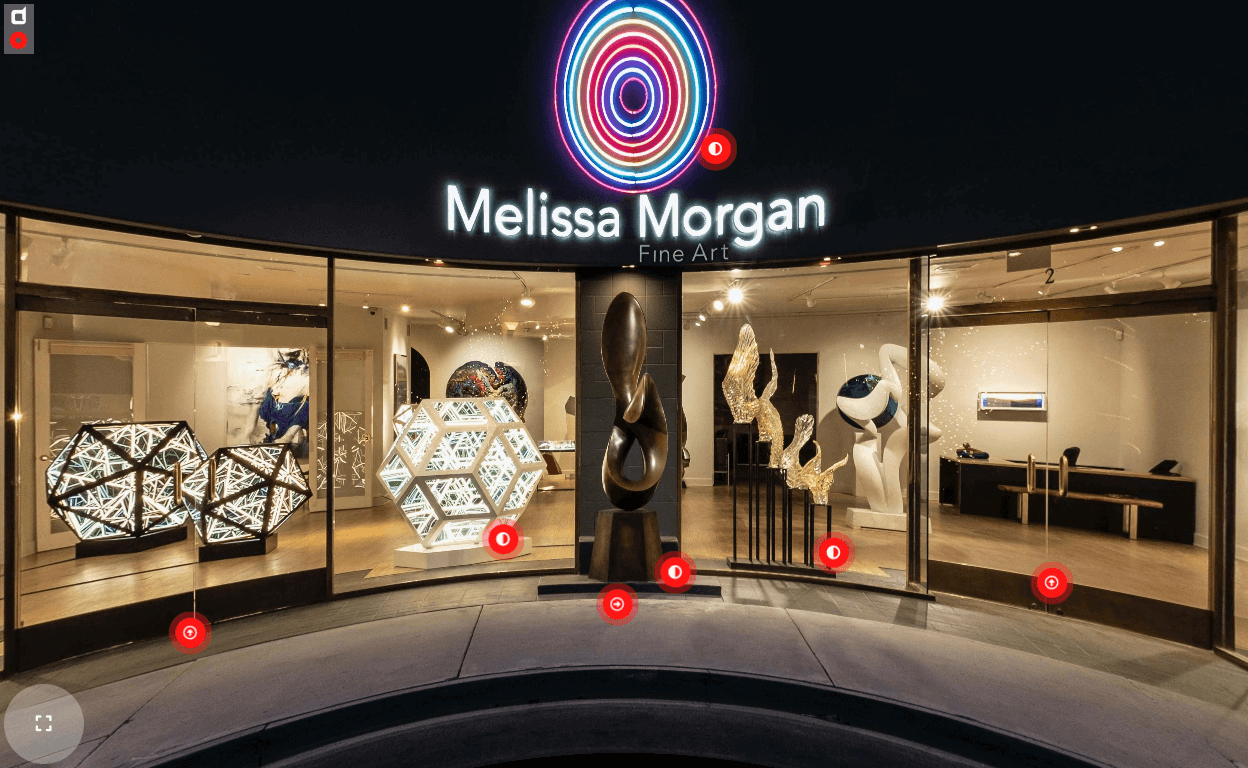
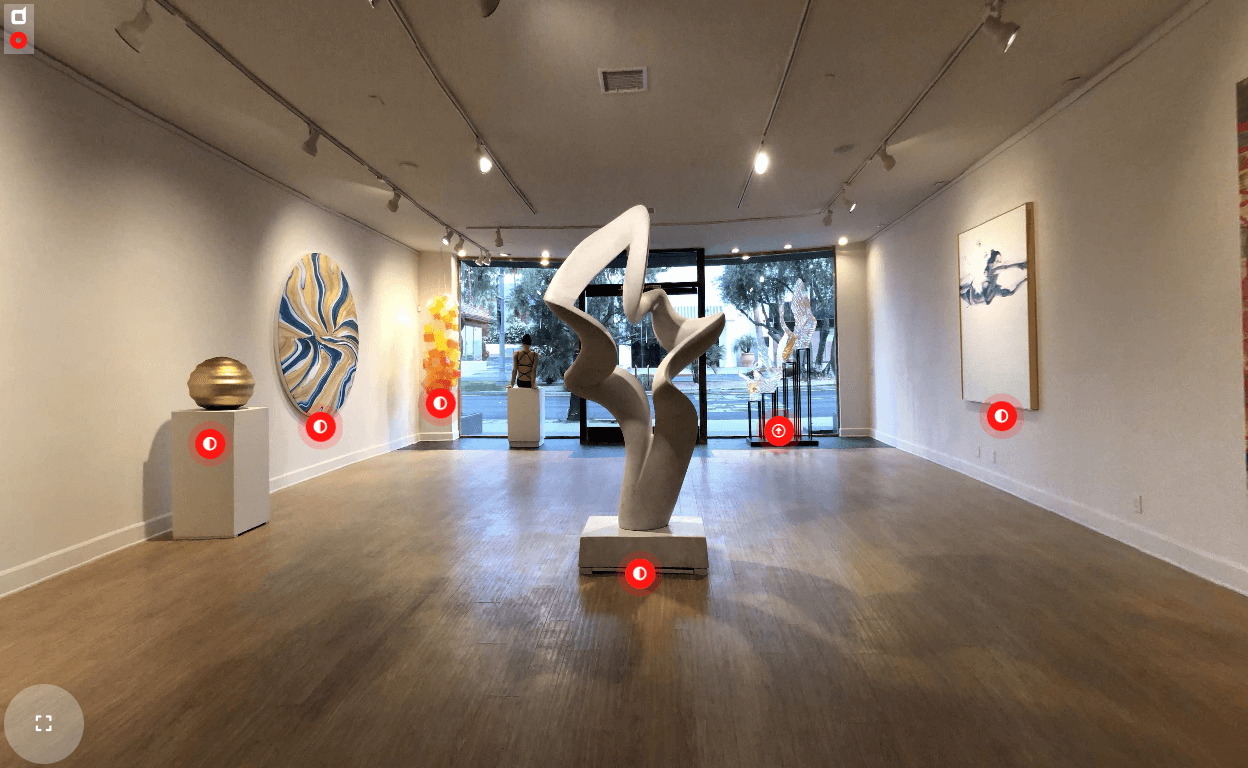
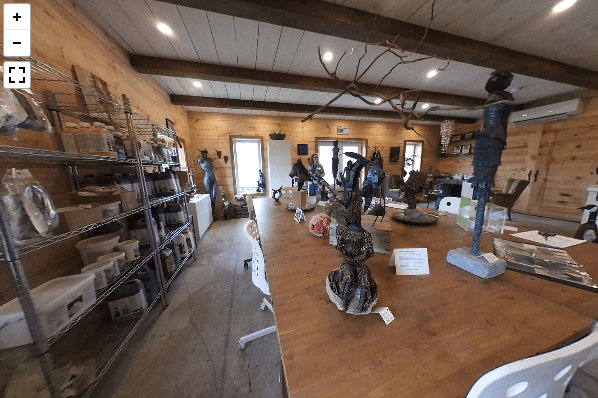

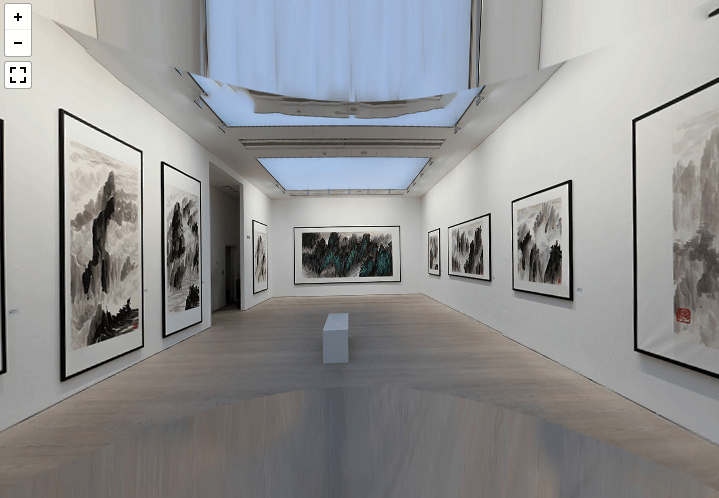

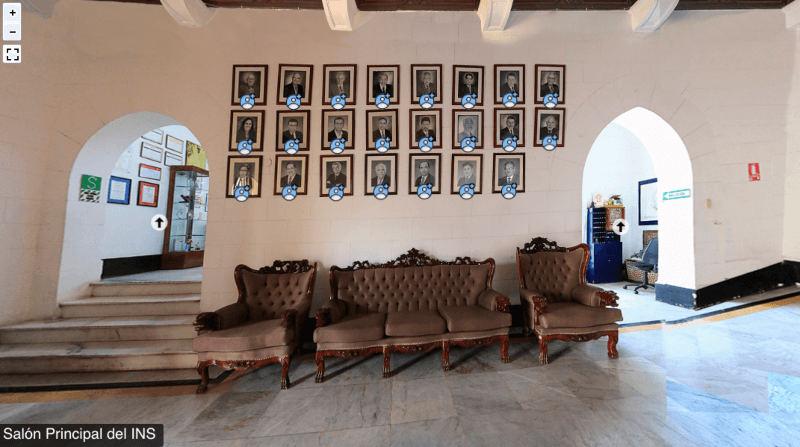
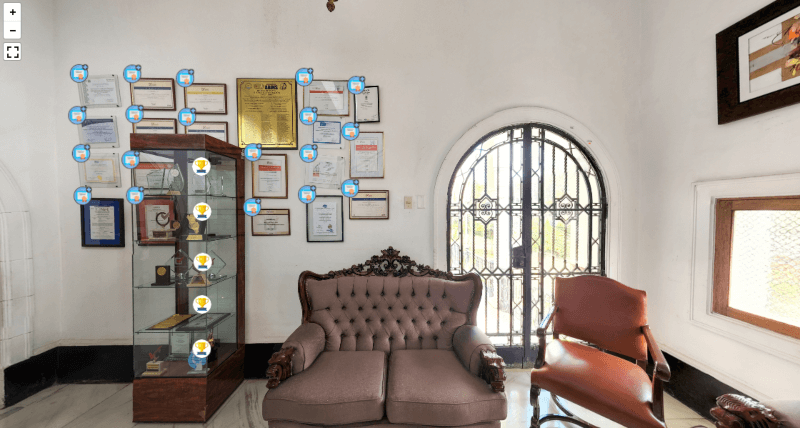

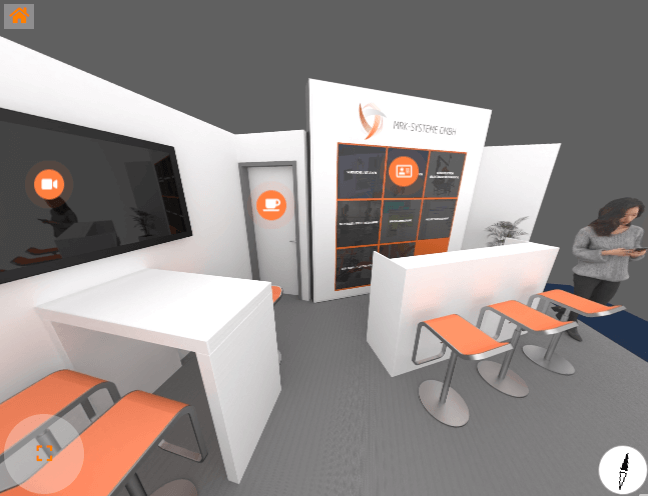
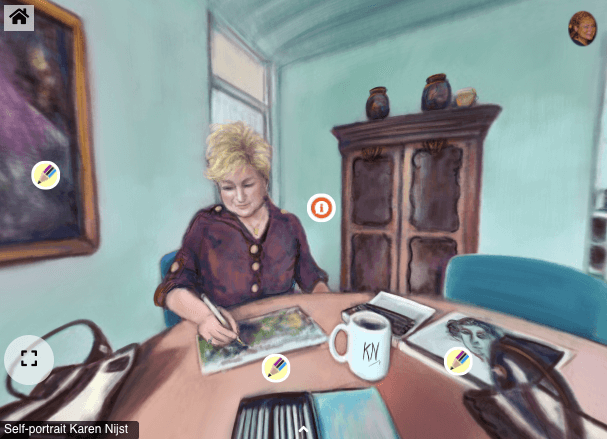
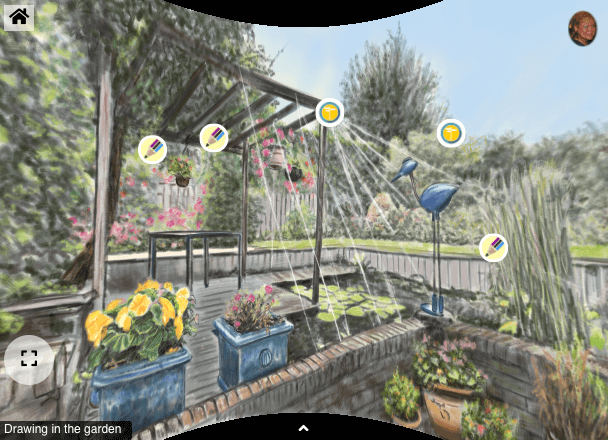
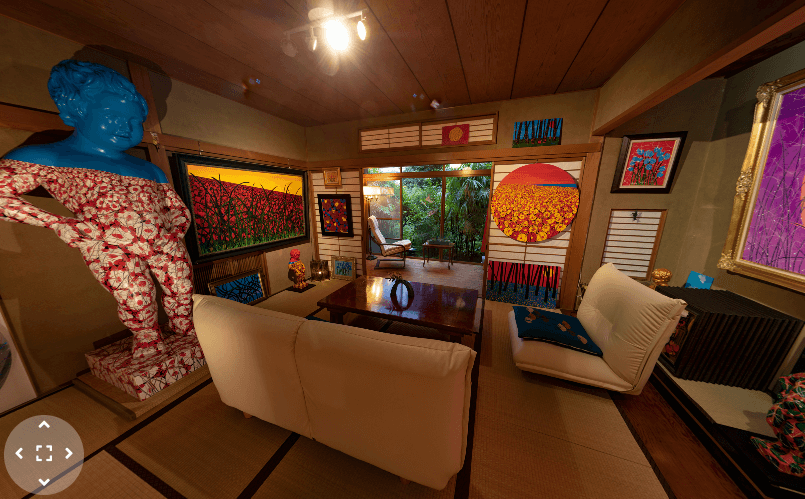
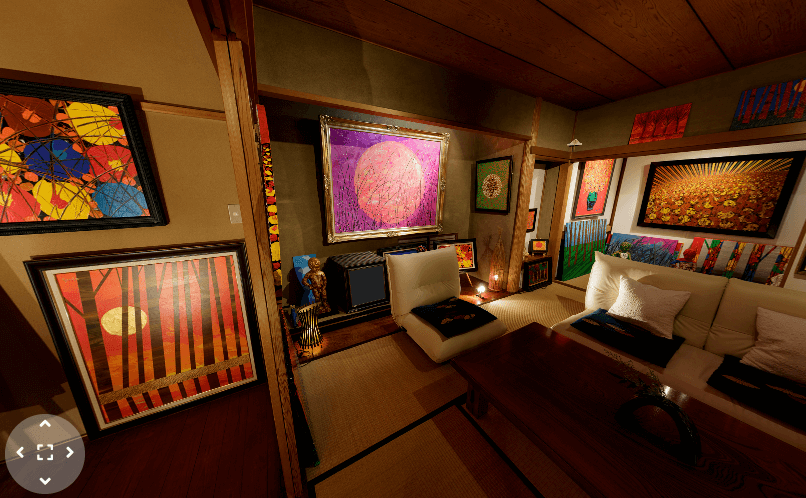
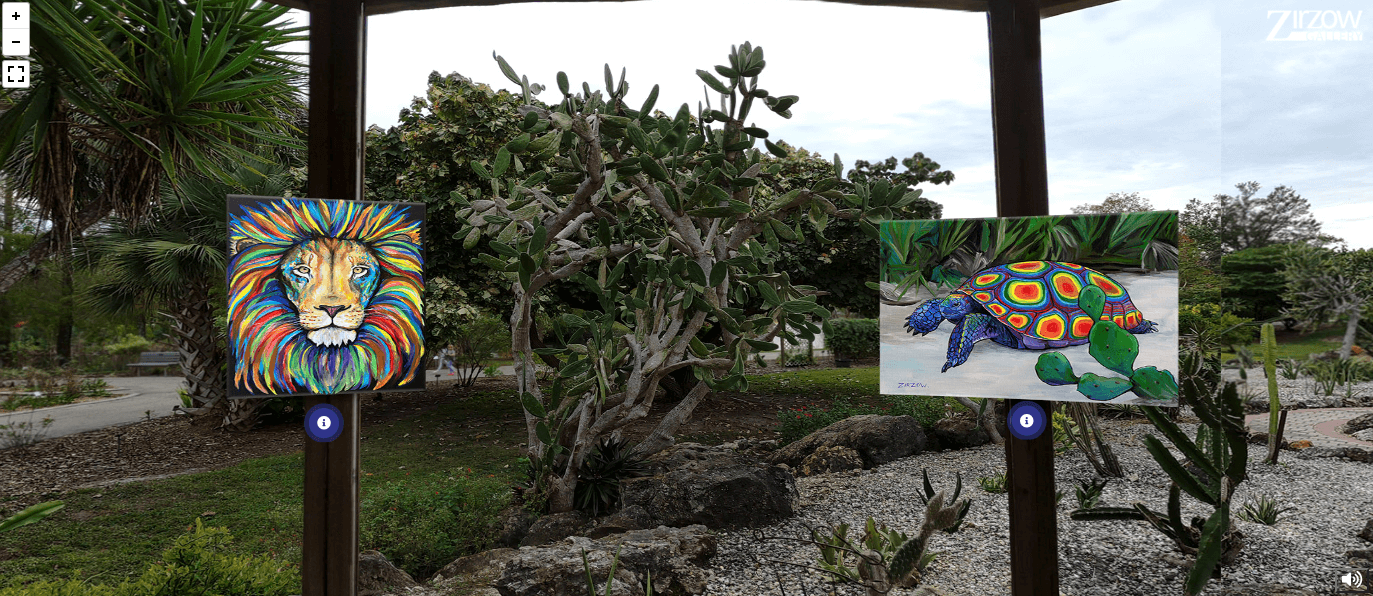
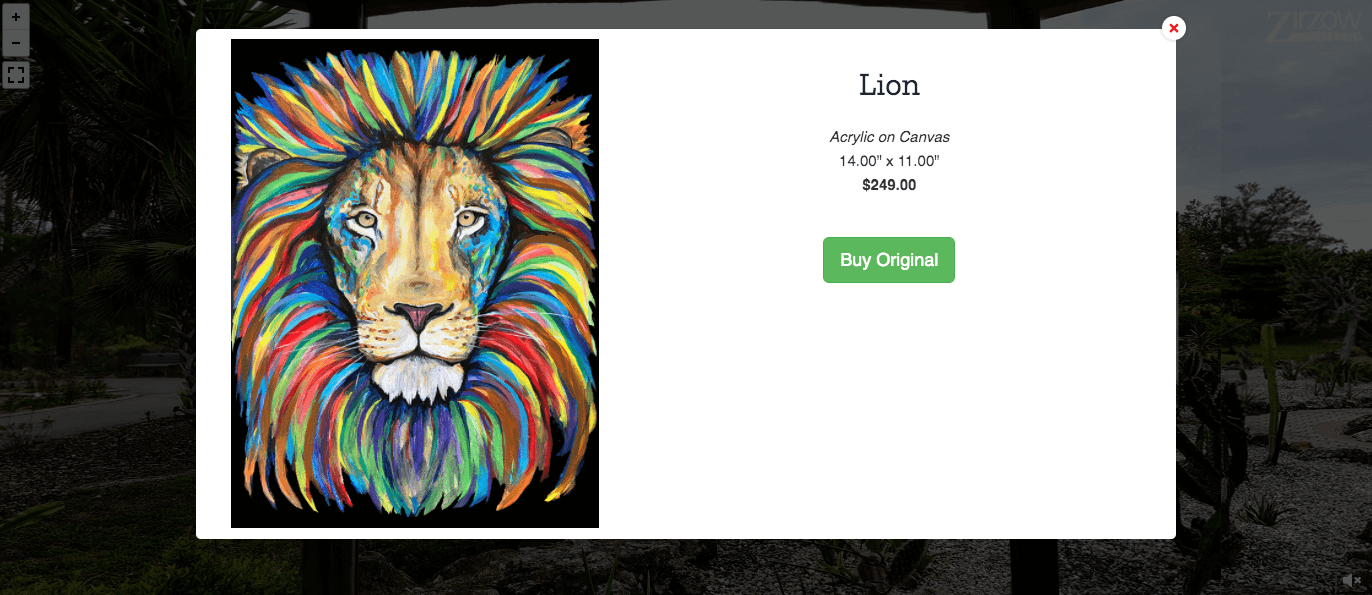

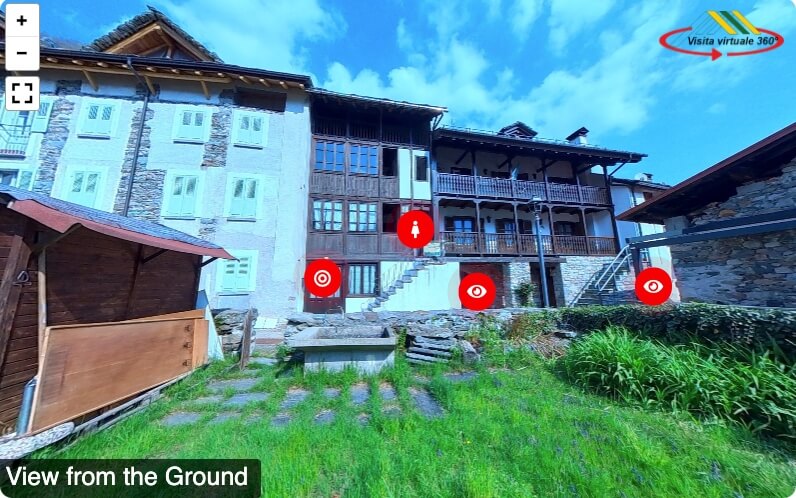
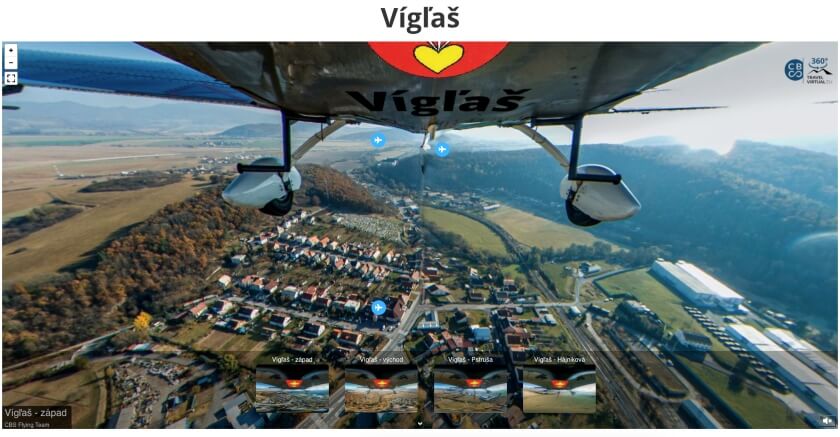


![Amazing WPVR Virtual Tours Created By Users [2024] 2](https://staging-rextheme.kinsta.cloud/wp-content/uploads/2022/08/Screen-Shot-2022-08-12-at-10.42.32-AM-1.png)