‘Art’ is always among the most appreciated element in the creative industry. However, the recent pandemic (COVID-19 crisis) has changed how people cherish art galleries.
According to Artsy, the art gallery business went down by 22% since the start of the pandemic due to a decline in visitors.
However, this also means they saw a rise in auctions and painting sales ONLINE.
If you are an artist or own an art gallery, then it’s crucial that you start investing more in the online realm as soon as possible.
Sure, you can run an eCommerce site with all your paintings there, but that is not the best option.
Remember, buying and selling art are more influenced by emotions than the price. The more you can connect with the viewer, the higher the chance of a good bid.
That’s where a virtual art gallery comes in.
A virtual art gallery will help you create a real-life impression for buyers even when they are sitting at home and double your chances of selling more paintings in the process.
And learning how to sell art online will make it really easy for you.
In this article, you will learn:
- Why you must use a virtual art gallery and how it can grow your revenue?
- How you can easily create such a tour in WordPress, on your own?
- The best way to make the virtual tour more engaging.
And eventually, you will be able to trigger more responses from interested buyers.
So let’s begin.
What is An Ideal Virtual (VR) Art Gallery Tour?
A virtual art gallery tour is basically a 360 virtual tour where you let viewers take a closer look at your paintings or art without a live visit.
The tour will allow buyers to zoom into the images, get extra details on the arts, and maybe, get an option to bid to purchase. As you can tell, this will intrigue art lovers and give them a real-life experience remotely.
The Biggest Benefits Of Using A Virtual Art Gallery
As an artist, there is no better way to blend in with technological advancement than working with VR. If you do some research, you will see that almost all creative sectors are slowly embracing Augmented Reality or Virtual Reality.
Whether you are a painter, photographer, sculptor, or a vivid creative artist, you can easily get into the limelight with your virtual art gallery online.
In fact, it will help you connect more with the prospects and help you get more recognition.
Let us look at some of the main benefits you can enjoy using a virtual tour of your art gallery on your website.
- An Emotional Connection Without Fail
- A virtual tour means the visitor will have full control over the navigation – the prospect will get to move around the gallery on their own and find their favorite piece of art.
- You can further increase the engagement by adding tool tooltips beside your arts, which viewers can click or hover to get more details on them.
- Overall, it will be a personalized experience and the visitor will surely remember it in the near future.
- A virtual tour means the visitor will have full control over the navigation – the prospect will get to move around the gallery on their own and find their favorite piece of art.
- A Comfortable Visit At A Suitable Time
- Since the tour is available online, there is no restriction on the time of visit. So a viewer will get to visit whenever he/she is free and will be able to spend more time choosing the best art.
- Plus, there will be no distraction – no crowd or annoying noises of any kind. This means every viewer will be able to view the best pieces of arts and observe their quality and appreciate the beauty as long as they want, without others standing around them.
- Art is often difficult to read without proper concentration and while in the virtual tour, the viewer will be able to focus in complete silence and give full attention to the art. Thus, a greater chance of emotional connection.
- Since the tour is available online, there is no restriction on the time of visit. So a viewer will get to visit whenever he/she is free and will be able to spend more time choosing the best art.
- Educational And Entertaining At The Same time
- Modern virtual tours always have ways to make the tour more valuable. You can provide details on the arts using a video, audio, or written text, where you can explain the meaning of the art or the history behind the idea.
- Buyers always love emotional stories. So if you can provide a good story behind your art, you can attract more buyers that may want to purchase just because of the depth of the story this art holds.
- Modern virtual tours always have ways to make the tour more valuable. You can provide details on the arts using a video, audio, or written text, where you can explain the meaning of the art or the history behind the idea.
- A Proven Business Solution
- It’s obvious that your art gallery is not just for promotion or recognition, you also have a business goal. It could be a service you provide, paintings you sell, or products you want to auction out. A physical gallery always has its limitations. A virtual tour will enhance the possibilities of reaching more prospects.
- You can get great international reach with a planned launch online. If you embrace proper product launch strategies, you can expect to get a great number of visitors right from the get-go. Maybe you can host a limited-time auction of antiques or collectibles or simply want to put your paintings up for sale. Or, you could showcase your talents and expect service inquiries for custom art. Simply create a virtual tour with a contact form for the right purpose and get the best bids from prospects all over the world.
- It’s obvious that your art gallery is not just for promotion or recognition, you also have a business goal. It could be a service you provide, paintings you sell, or products you want to auction out. A physical gallery always has its limitations. A virtual tour will enhance the possibilities of reaching more prospects.
- No Time Limitations
- One of the barriers to a live art gallery or art museum is there is a limited time you can keep your doors open. Plus, while people are there, you are always on the run talking to different visitors at different times. So time management is quite hectic. You can overcome these via a virtual art gallery tour.
- A prospect may not have time to visit when you are open. But, he can surely hop onto your website and take a tour whenever he is free. People who are passionate about art will love to get a visit and this tour will ensure they will not miss out on your fabulous art due to lack of time.
- Plus, an engaging virtual tour will mean you won’t need to personally guide them on the art. Proper use of audio and custom text will keep the visitors engaged and guided, while you can wait for them to reach out when they are ready to get in touch.
- One of the barriers to a live art gallery or art museum is there is a limited time you can keep your doors open. Plus, while people are there, you are always on the run talking to different visitors at different times. So time management is quite hectic. You can overcome these via a virtual art gallery tour.
If you own antiques, you can create a virtual art museum tour to show off your antiques, and get greater value for any items you want to put up for auctions.
How To Create A Virtual Art Gallery Tour Easily on Your WordPress Site
When you think of a virtual tour, it may sound like it’s complicated. But guess what, creating a virtual art gallery tour is rather quite easy, especially in WordPress.
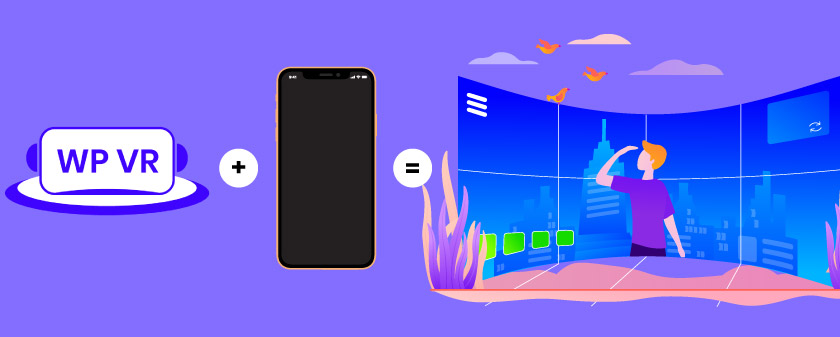
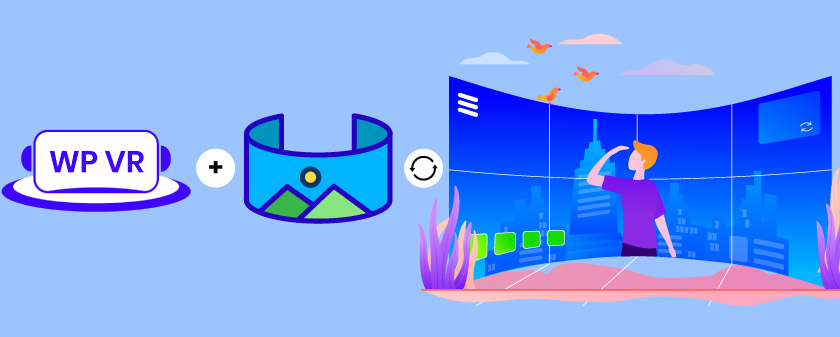
You will find a few VR tools in WordPress that makes it super easy to create virtual tours. And among them, the best one out there is WP VR.
WP VR is a virtual tour builder that has every feature you need to create a complete virtual art gallery that is engaging and can help to convert more prospects effectively. The plugin will make it easy for you to create virtual tours which will allow your prospects to get a 360 panoramic view of your art gallery and get a sense of how it looks in actuality.
Step 1 – Take Finest 360 Photos of Your Art Gallery
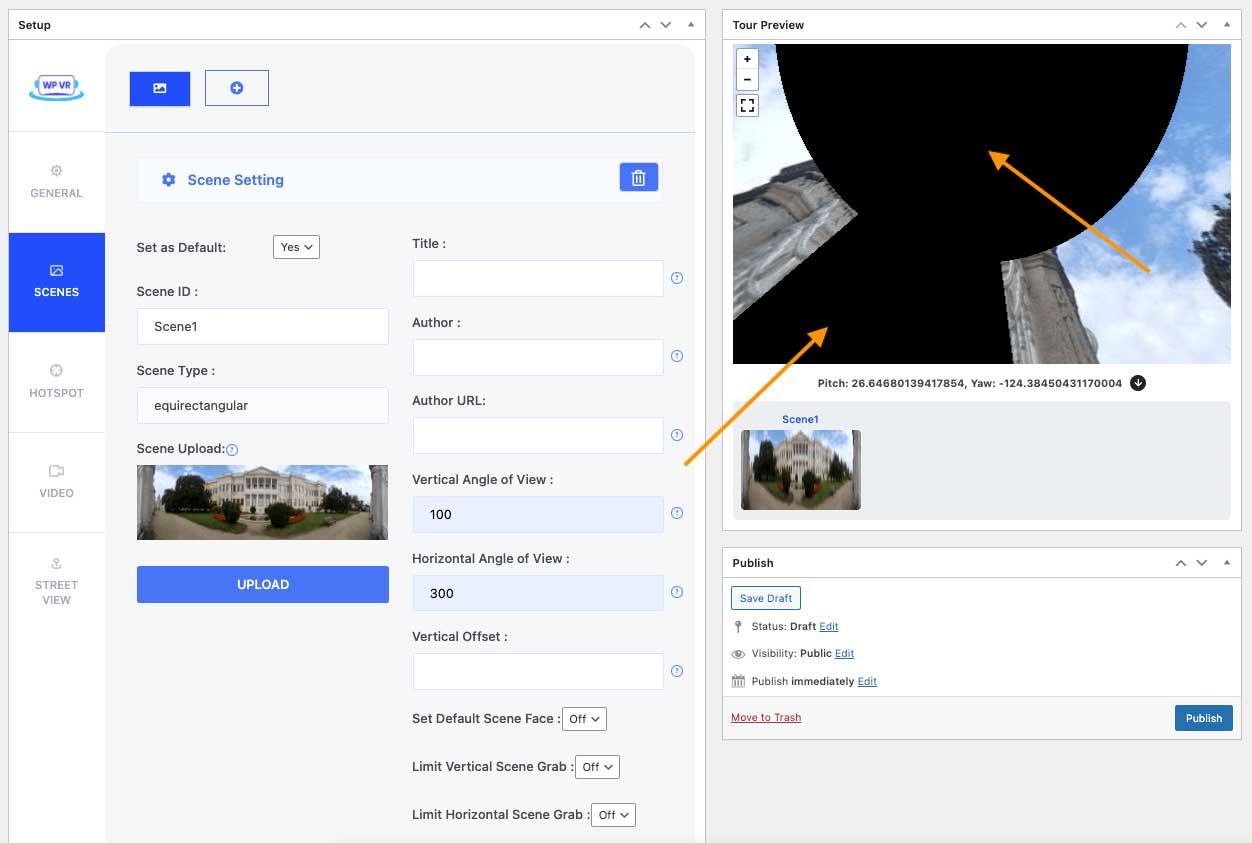
WPVR requires you to provide 360 images of the location you want to turn into a virtual tour. So it is important for you to take high-quality panoramic images of your art gallery from the center of different areas.
You can take pictures using a DSLR Camera and then use a stitching app to turn them into 360 panoramic images. Or you can take 360 images using an iPhone which can be directly turned into a virtual tour via WVPR.
The quality is super important since these will be viewed by art enthusiasts all over the world.
Step 2 – Install & Activate WP VR
The first important step is to install and activate WP VR into your WordPress Dashboard.
- Go to Plugins & Search for WP VR.
- Install & Activate the plugin once you’ve located it. Or download the free version of WP VR from the WordPress repository.
- Next, Upgrade to the premium version of WP VR
Here’s some further guidance if you face trouble installing the WP VR plugin.
Note: You can build a complete virtual tour with the free version. But with the premium version, you can make the tour more delightful.
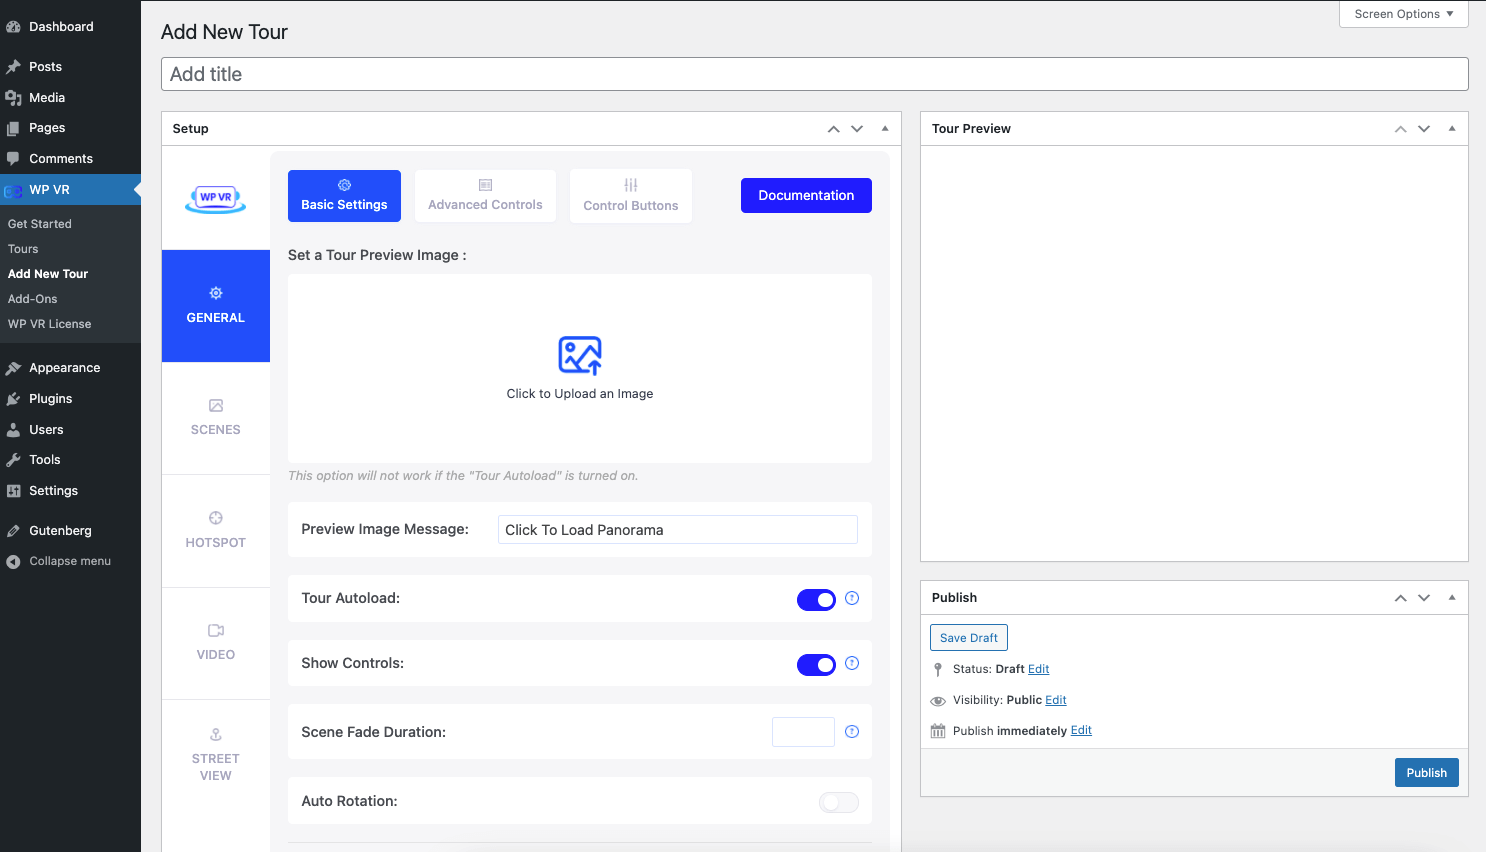
Step 3 – Create a Virtual Tour
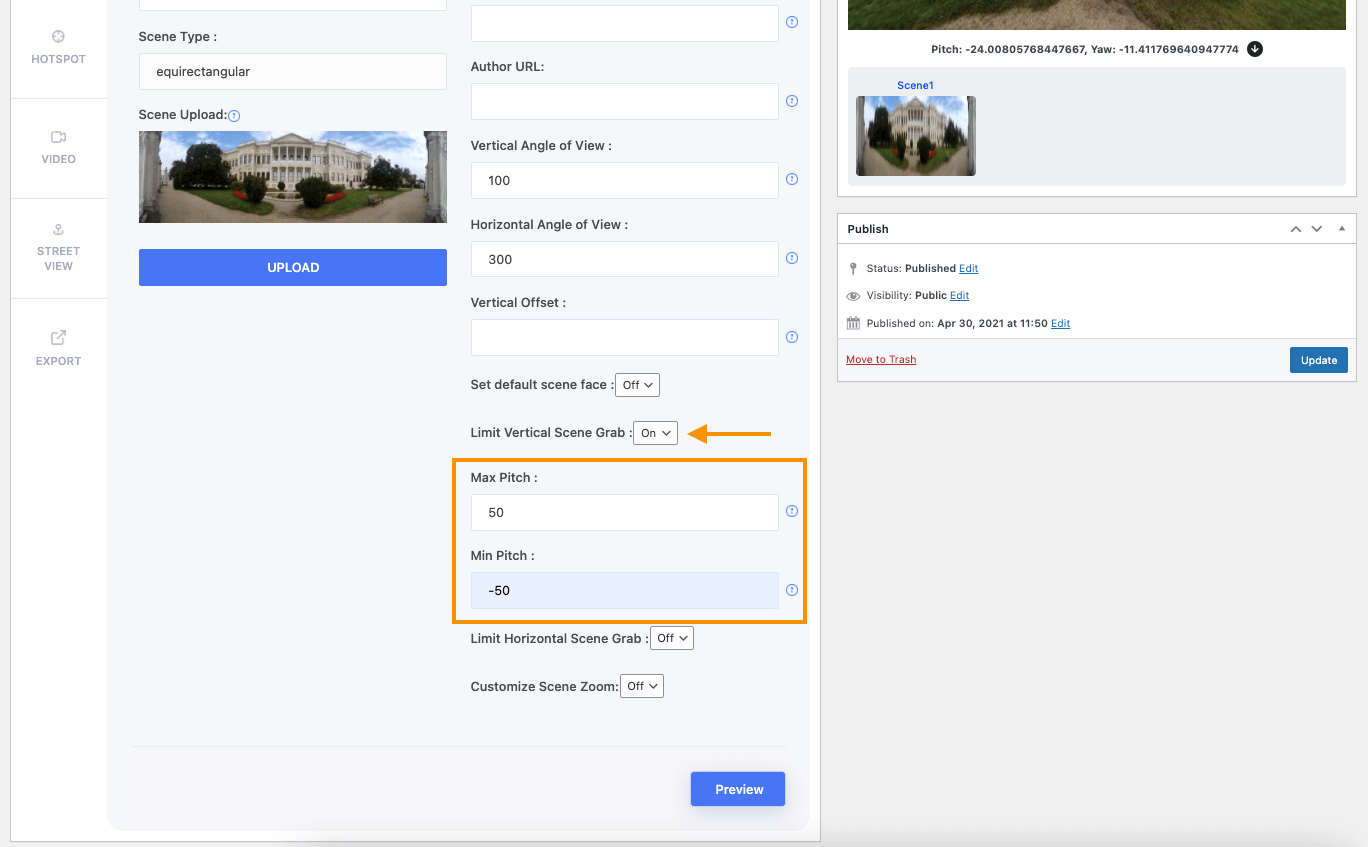
After installing the plugin, go to the WP VR General Settings.
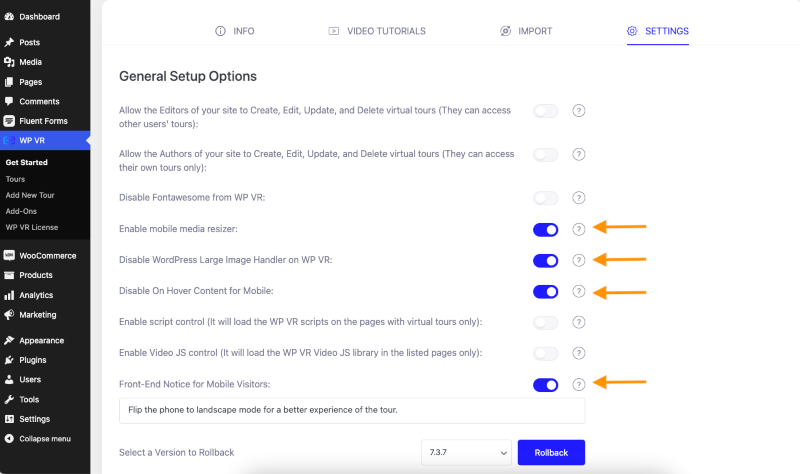
- Disable WordPress Large Image Handler on WP VR – this will keep the image quality intact for a better tour experience.
- Enable Mobile Media Resizer – it will resize the tour for mobile and smartphone devices.
- Disable On Hover Content For Mobile – this will remove the confusion between on-click and on-hover content from smartphones.
- Front-End Notice for Mobile Visitors – it’s a great option where you can notify smartphone users with a pre-written notice.
Afterward, hover over the WP VR & Click Add New Tour.
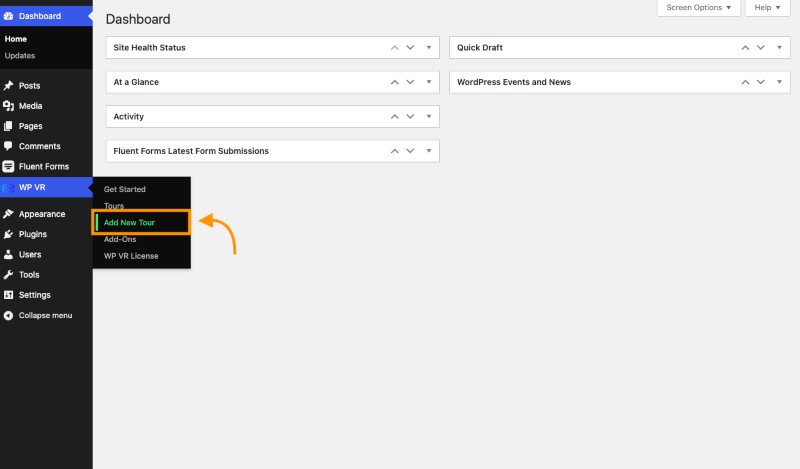
After adding a tour, Add a title to the tour.
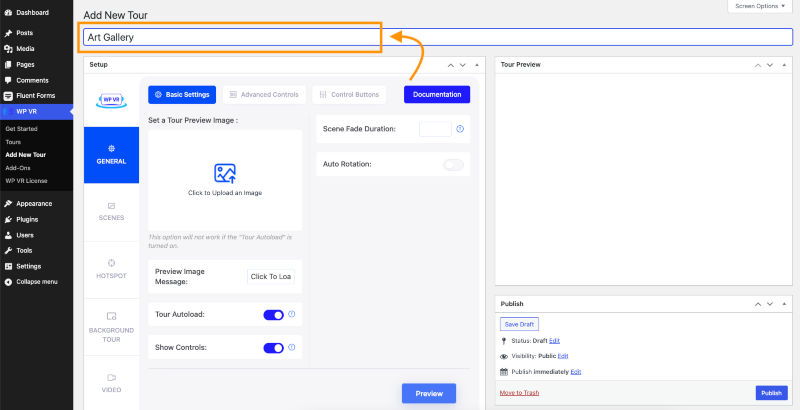
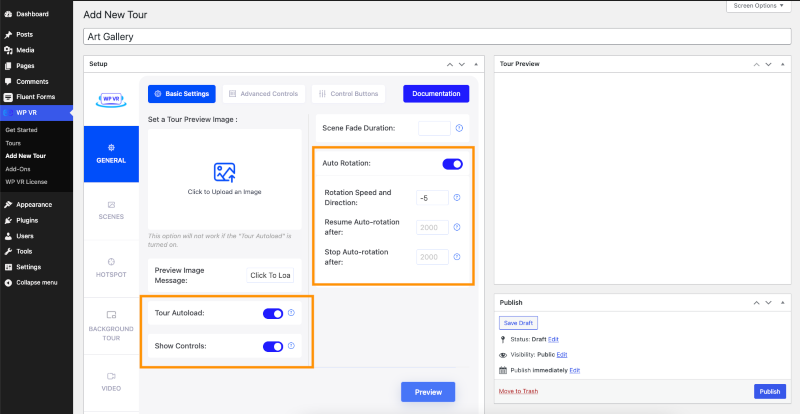
- Enable Tour Autoload & Controls option.
- Also, enable the Auto Rotation for the tour. And keep the auto rotation slow so that the doesn’t load too fast.
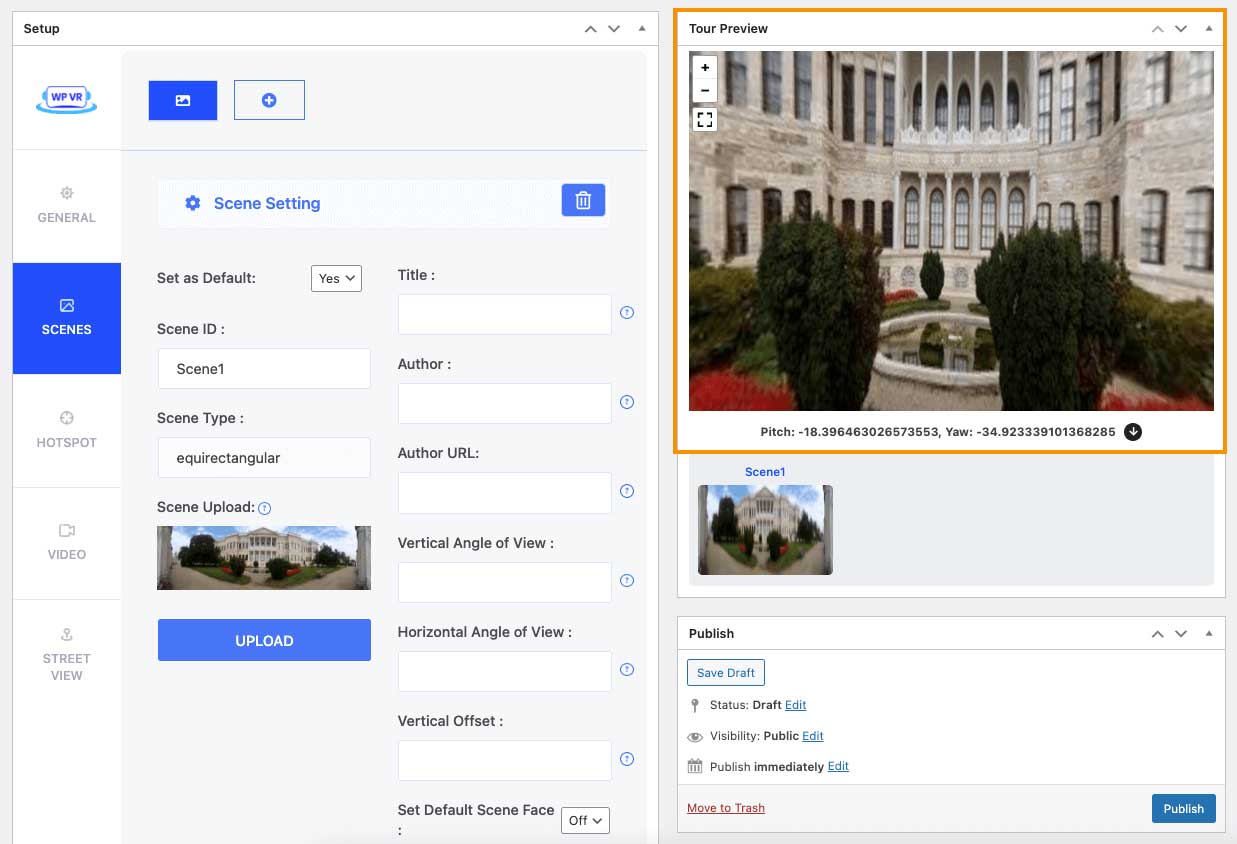
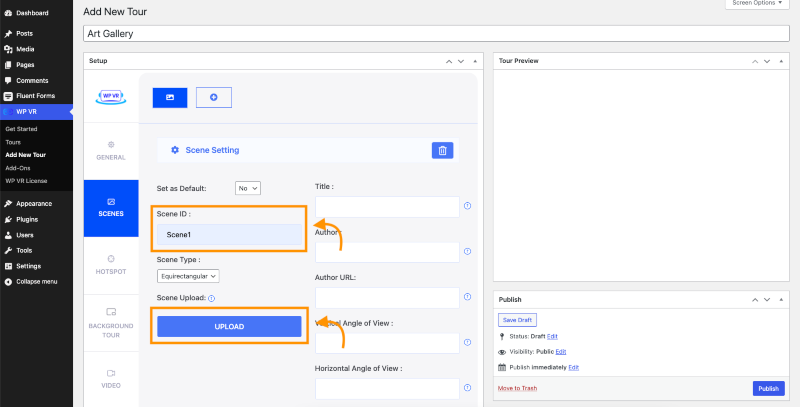
Step 4 – Upload a Scene
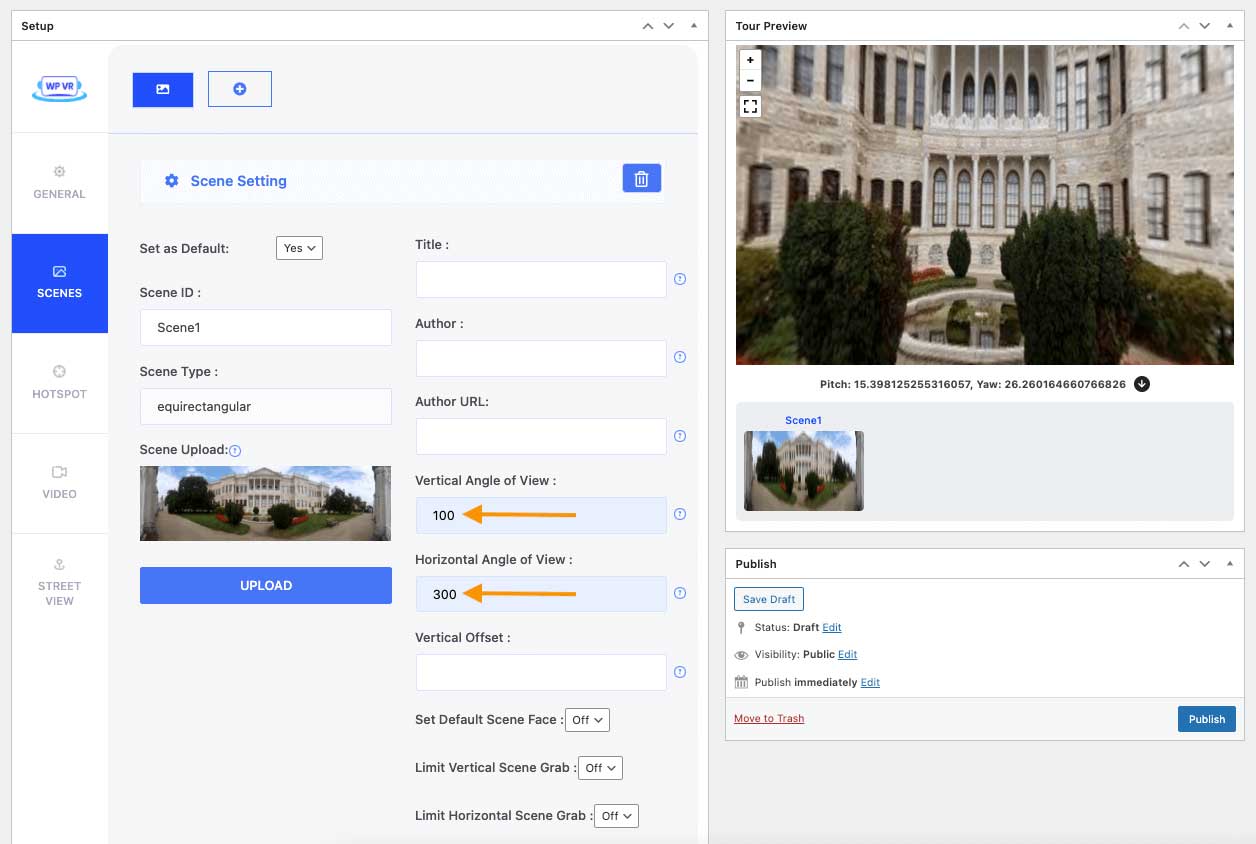
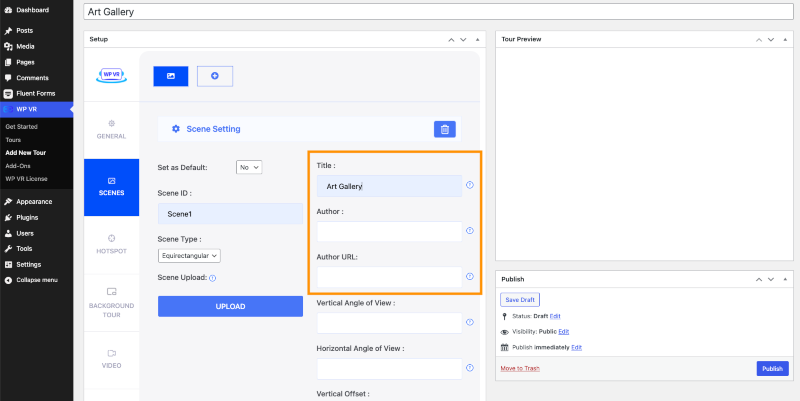
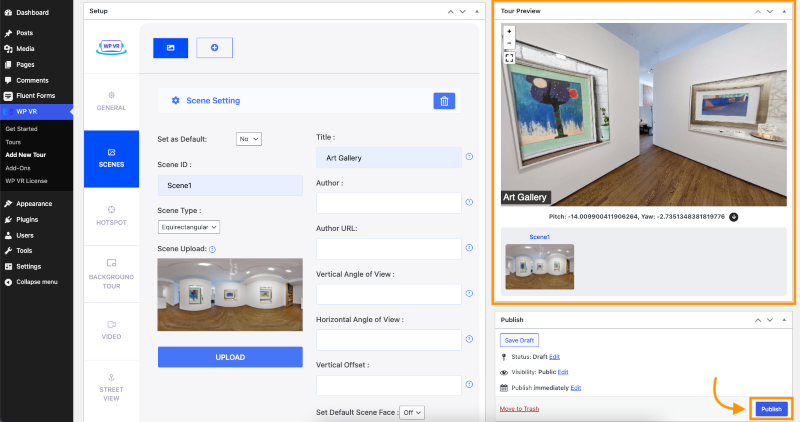
The next important task is to upload a scene. Go to the Scenes menu, provide a Scene ID, and click on Upload.
Give the necessary information with the scene as well. If your art has a title, a dedicated author, and a portfolio of the author, you can add that information accordingly.
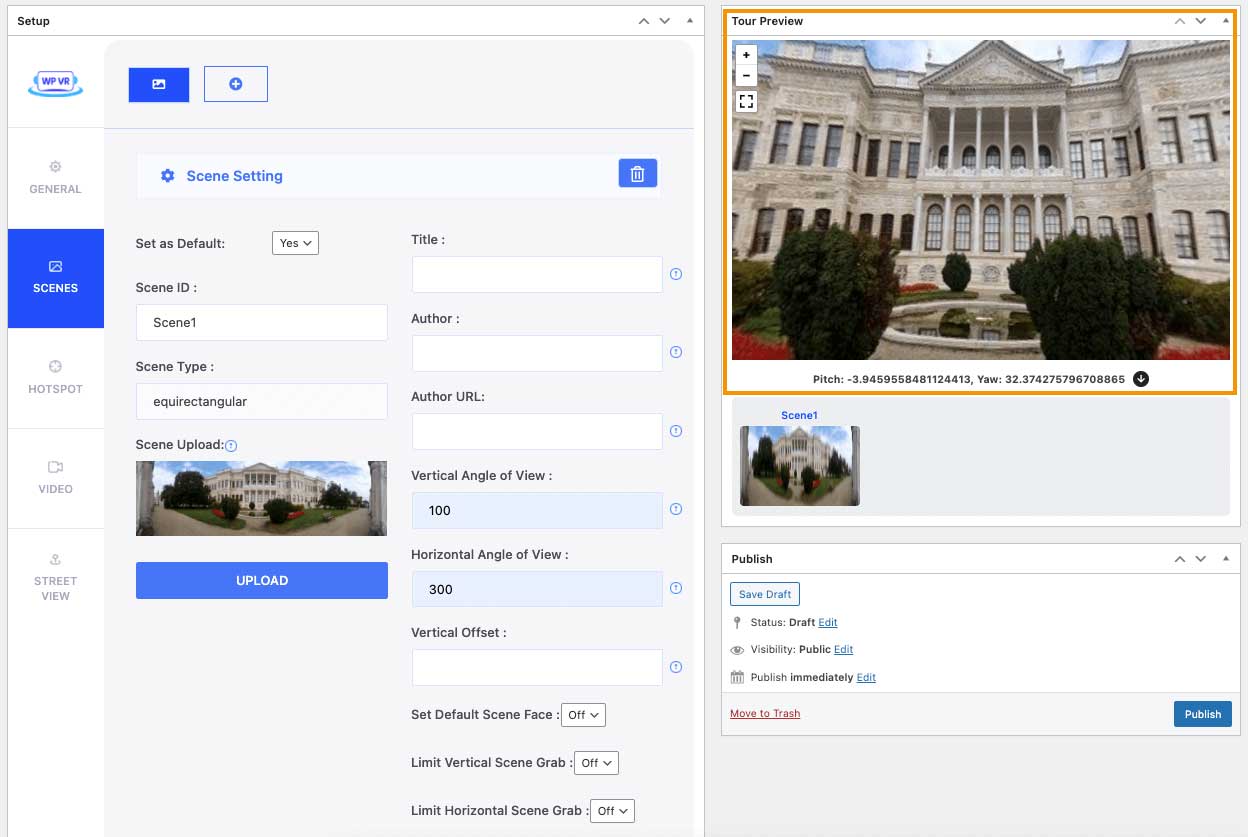
After you’ve uploaded the scene and added the necessary information, click on Preview,
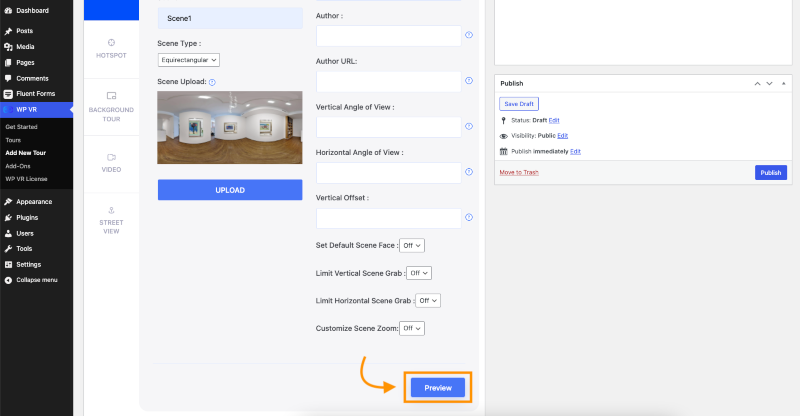
Afterward, you’ll be able to see a Tour Preview on the top right corner of your tour.
If the tour looks okay to you then click publish & your tour will be saved.
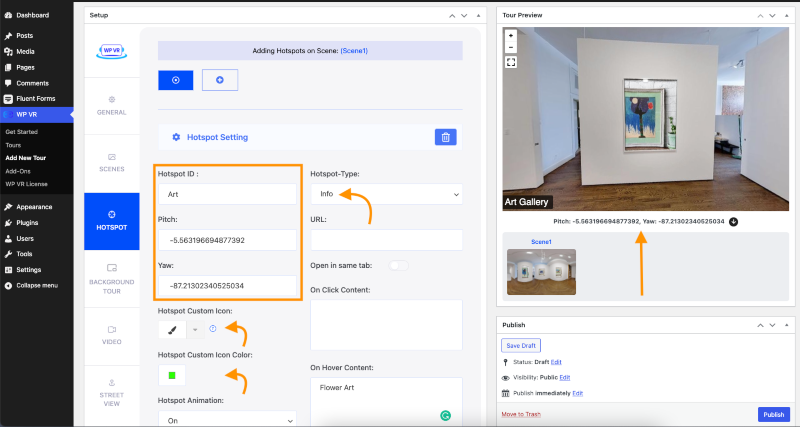
Step 5: Add Hotspots to Increase User Engagement
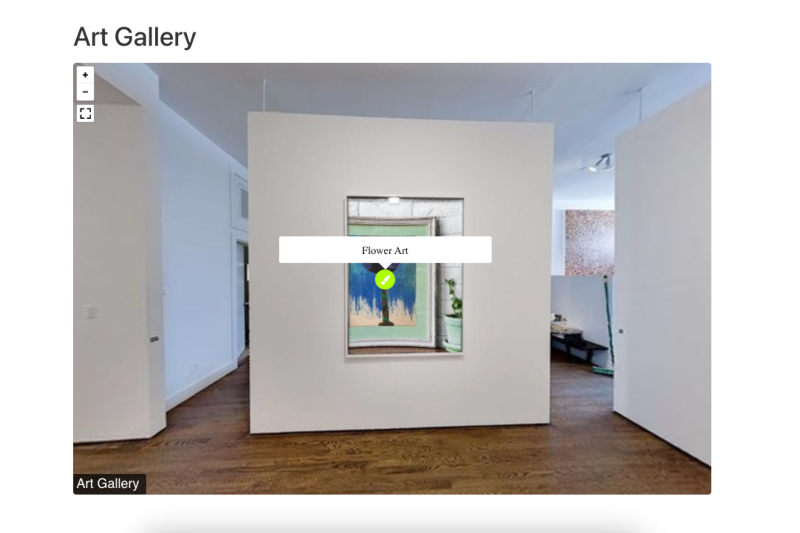
Hotspots are specifically created to make a tour more engaging and interesting. In this case, you can pinpoint an art and add basic details of the art.
How to Add a Hotspot:
- Just below the Scenes menu, go to the hotspot menu.
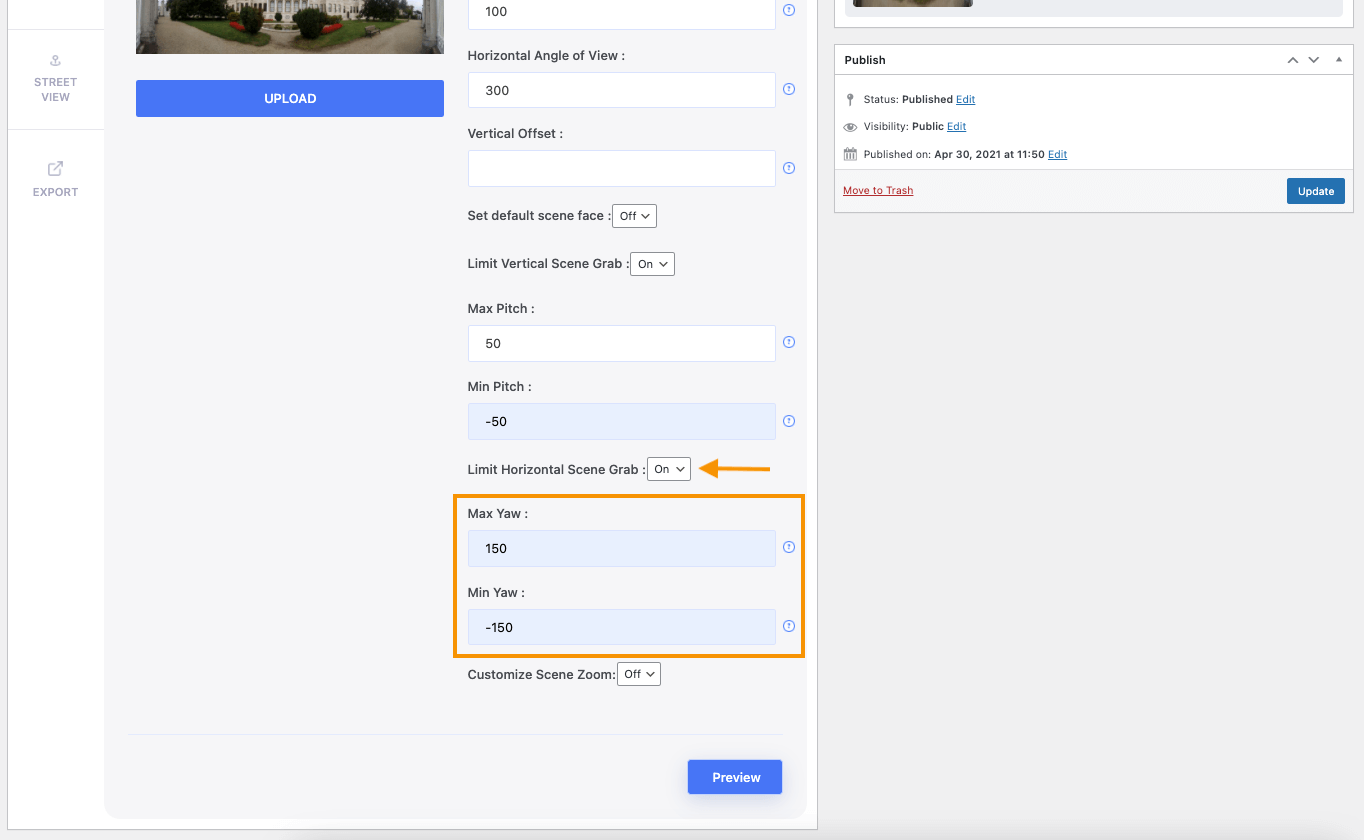
- Click on a place on the virtual tour where you want to add a hotspot and some coordinates will appear under the Tour Preview section.
- Select the coordinates of Pitch & Yaw. Simply click on the down arrow icon and it’ll be set automatically.
- Provide a unique Hotspot ID.
- Select the type of hotspot you want to have. For now, we’re creating an Info-type Hotspot.
- If you want, you can give a custom icon and color for the Hotspot.
- Add an On Hover Content where you can display text, images, gifs, and even video files.
After you’ve filled in all the necessary fields, you’ll need to update the tour from the bottom right corner of the Tour Preview.
Let’s check the hotspot directly from the website.
There are four types of Hotspots available for the free & premium versions collectively.
Info-Type Hotspots: The Info-type hotspots allow you to display art information, related images, videos, and combinations of all these on a hotspot.
Click here to learn more about Info-type hotspots.
Scene Type Hotspots: You can capture panorama images of your different rooms or halls and connect them using this hotspot.
Your guest can use these to move between all the locations inside your virtual art gallery tour.
Click here to learn more about Scene-type hotspots.
Fluent Form Hotspots: The Fluent Forms Addon is included with the premium version of WPVR. You can set contact forms or submission forms inside your virtual tours using this.
**I’ll tell you more about this later in this guide. So, keep on reading.
WooCommerce Product Hotspots: If you’re using WooCommerce and selling your arts or paintings through it, you can set the products on your hotspots.
Viewers can add them to their cart while roaming inside the virtual art gallery. This one is also available as a premium add-on.
Learn how to sell your arts using a virtual tour.
Step 6 – Advanced Controls & Control Buttons
You’ve created an awesome virtual art gallery tour for your visitors.
Now, what can we do next?
Let me tell you: making your tour better and more captivating using Advanced Controls and Control Buttons.
Advanced Controls

The important set of features that you can enable to make the tour engaging are:
i. Gyroscope Control
A large number of your viewers will choose to view your art gallery virtual tour from mobile devices.
And you can really impress these viewers if you provide an interactive experience.
Enabling the gyroscope support on your VR gallery will make it respond to their movement and hook them with surprise.
ii. Scene Gallery
Your virtual art gallery will surely have multiple panorama images.
To give your viewers an idea of how large your gallery is, turn on the Scene Gallery option.
It’ll make it easier for your viewers to navigate inside the VR gallery as well.
iii. Tour Background Music
Enhance the experience of your viewers by adding background music.
A soothing background audio that matches the arts or paintings in your gallery will only complement the entire experience.
iv. Explainer Video
An explainer video is a helpful option for your viewers that can make their journey easier and provide some additional information as well.
It will guide your viewers on how to experience the tour, what they can expect in it and a heads up on some of the most interesting pieces of art they’ll experience in it.
Furthermore, you can enable or disable all these Control Buttons, based on how much control you want to give to your viewers.

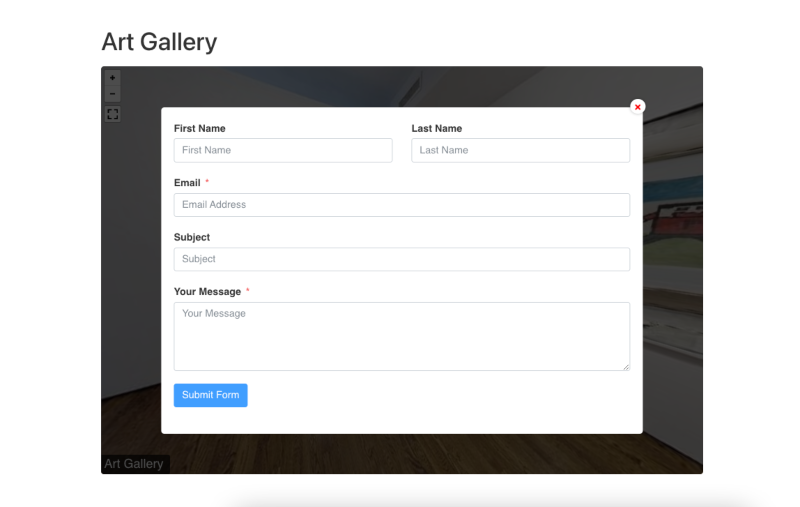
Bonus Step – Let Your Viewers Easily Contact You
Once you have impressed your visitors with virtual art gallery tours, why leave the chance to connect with them and lead it to something more potential?
With the WPVR Fluent Forms Add-on, you can easily set contact forms inside your virtual art gallery.
You can add them in each scene, so they can choose to contact you any time, especially if one of your artifacts or paintings has got their attention.
This is something that’ll take you one step ahead of your competitors.

Here is what a form will look like inside the tour.
Author’s Notes
Last year, the number of sales of art and artifacts was 13.3 Billion U.S dollars. So this is a great sign that you too should start using a virtual art gallery to increase your audience engagements and hopefully, grow your business.
So go ahead and create a virtual art gallery for your website using WPVR.
Take help from the latest technology and get the recognition you deserve.