Categories
Guide Virtual Reality

8 Important Benefits Of Virtual Reality In Tourism Businesses [2025]

Running a travel & tourism business can be quite exciting. You will regularly deal with new faces and try to help them get the best traveling experiences.

However, the main challenge here is the competition. The tourism industry is quite competitive, and you have to find smart ways to attract potential clients for your tourism packages.

Sure, you can put up images and videos of the locations you cover on your website or social media to attract a few potential clients.

However, there are better ways. And one of the options that work best is virtual reality in tourism.

The fact is, for some people, a tour during their vacation is the most part of the year. They plan for it for months and research every possible option. At this point, if you can hook them with something unique that is both affordable and attractive, they are more likely to take your service.

Likewise, VR has more important benefits in the tourism industry.

In this post, I’ll share 8 powerful ways VR can elevate your travel business.

After reading this article, you will get a clear answer to your question:
How could a travel and tourism company utilize virtual reality to enhance their business?

So, let’s begin.

What is VR Tourism?

The concept of VR Tourism is to give people a glimpse of an actual tour in a realistic virtual environment.

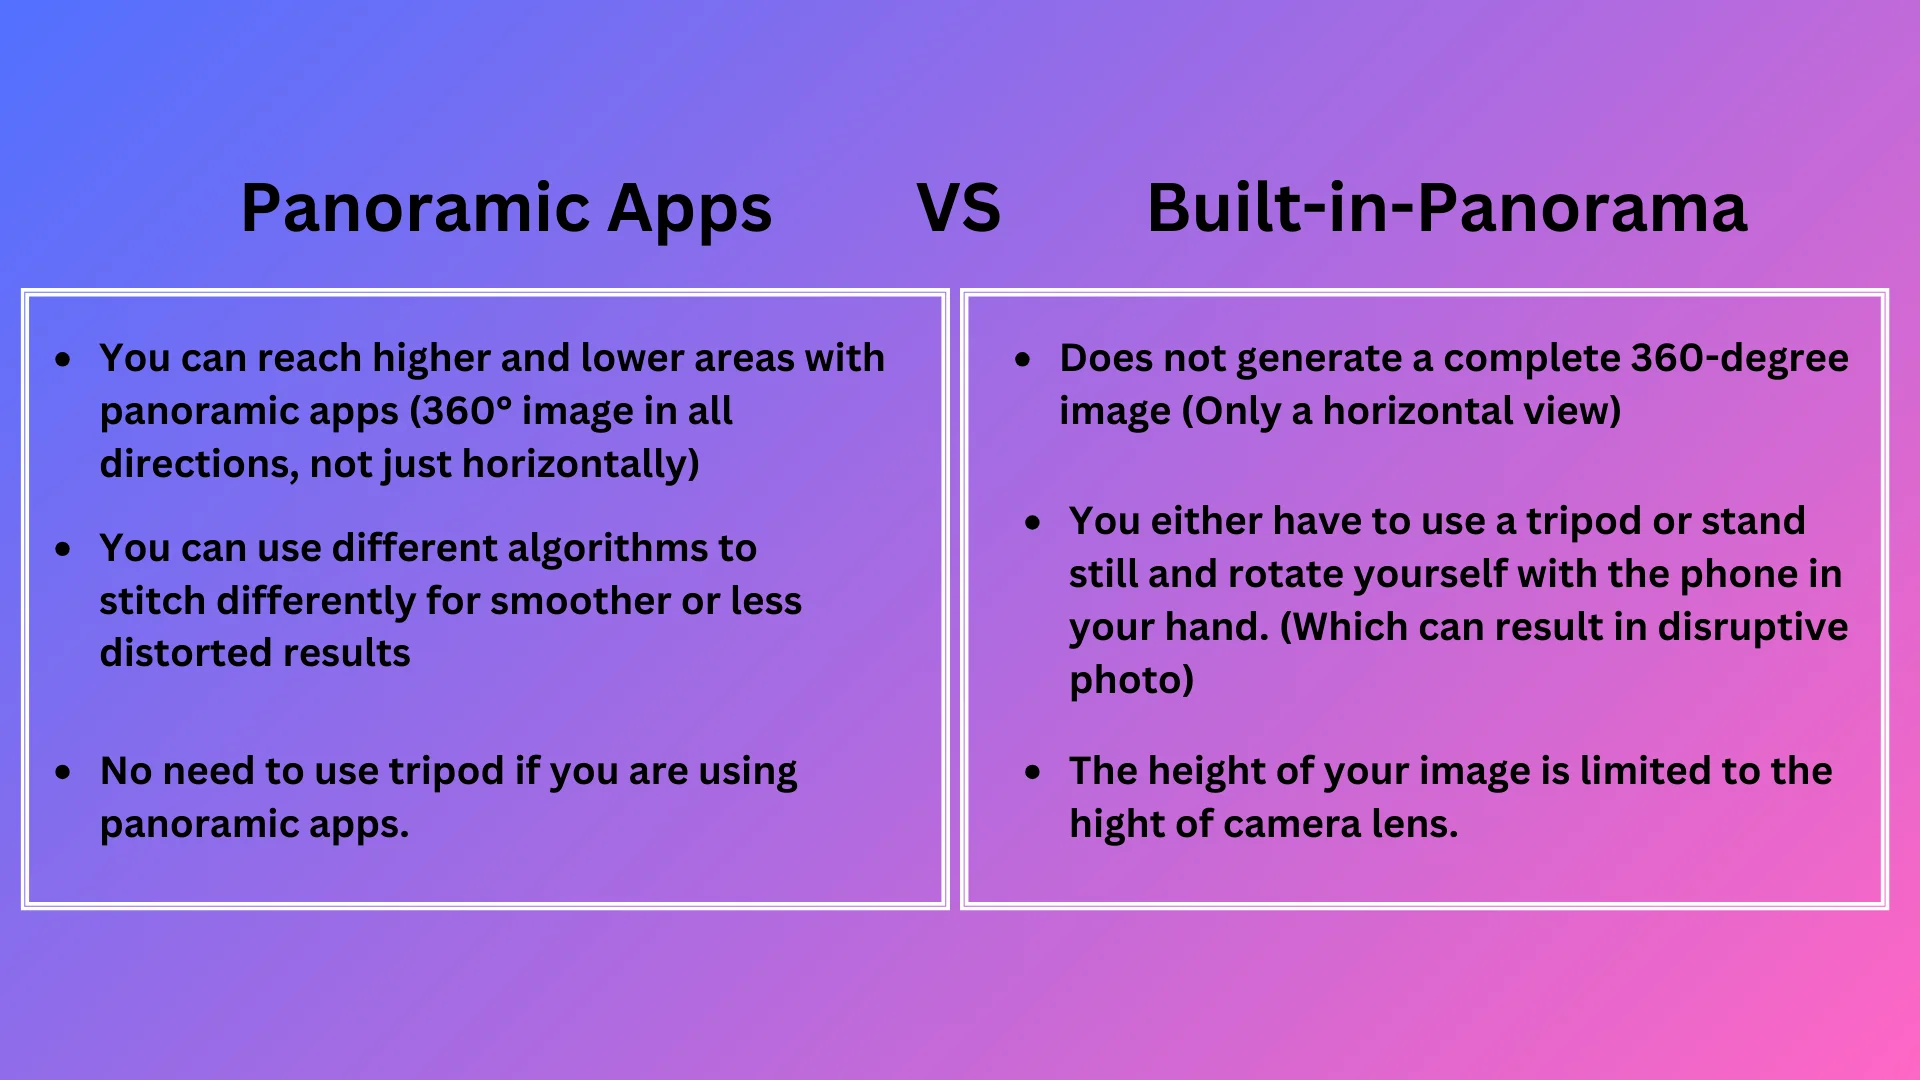
Basically, you capture 360 panoramic images of the locations you cover in your tourism packages and turn them into virtual tours.

Vr tourism

You can then place them on your website for potential clients to visit. Many clients will get hooked thanks to the realistic feeling they get and will be more curious to visit in person.

So basically, virtual tourism can be a great tool to convert prospects into clients in a unique way that’s more engaging and attractive than your competitors.

8 Reasons To Use Virtual Reality In Tourism Business

The way you use VR will vary depending on the packages you offer.

For example, you could offer a package where you take  Kilimanjaro Hiking Tour with a group of people via caravan and visit multiple locations in a span of 3 to 5 days. So the package may include the key tourist spots, hotels/resorts to reside at, food & other facilities, and a certified travel guide.

In this case, you could create a virtual tour that will include at least 1 scene from each of the tourist spots, a scene of the entrance of the resort, and the room where the travelers will lodge.

Then, you may connect each of these scenes so that people can explore all of them in the virtual environment before deciding to book this package with you.

Plus, you may even have the trainer record an introductory video which you can use along with your.

**Make sure to include tooltips and additional details in the VR tours so that people stay excited.

Another package could be a visit to a single resort.

In this case, you could have a virtual tour of the resort for people to browse through where they will be visiting.

Here are the key benefits of virtual Reality in tourism and the reasons why you should invest in having such virtual tours on your website.

1. Get Increased Bookings

As mentioned above, virtual reality tourism will get people curious about the places you offer in your tourism packages.

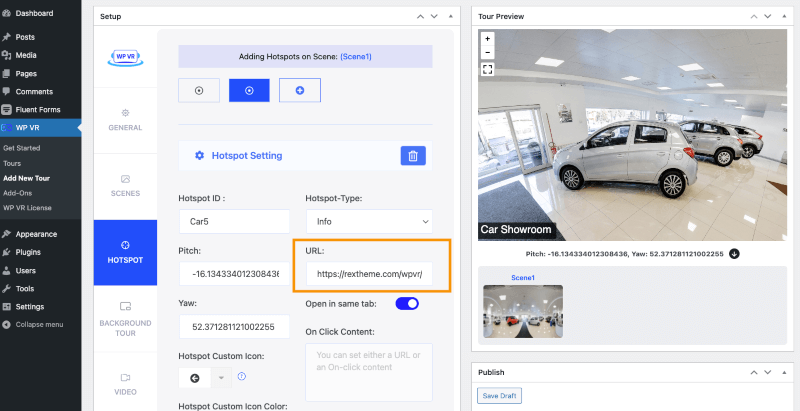
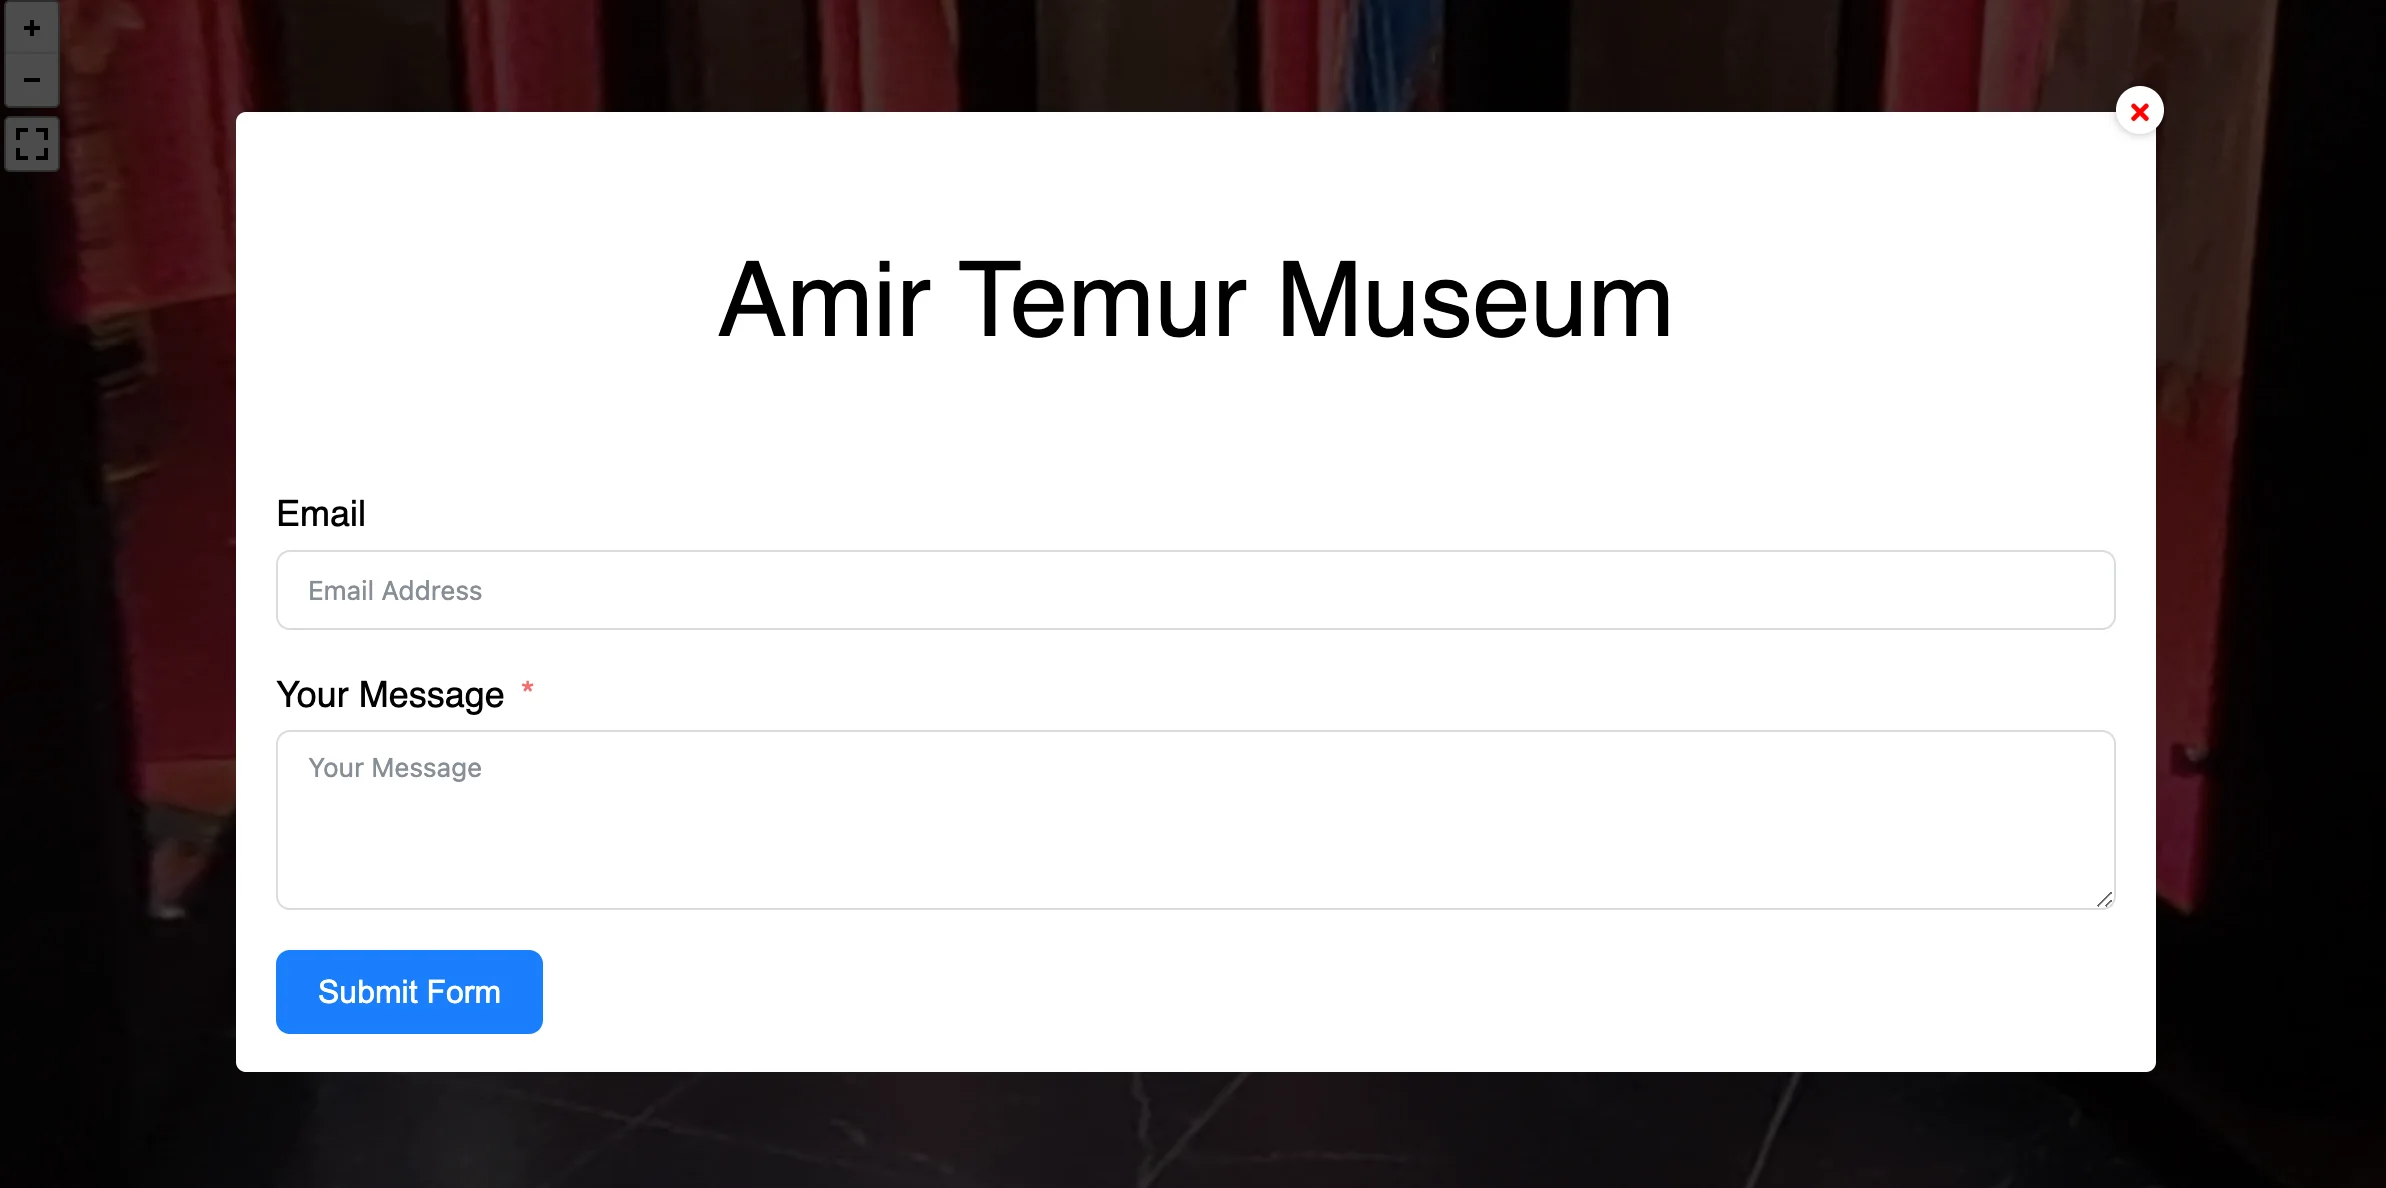
If you include a booking form or a contact form in the virtual tour, chances are many will end up booking a package while taking this tour.

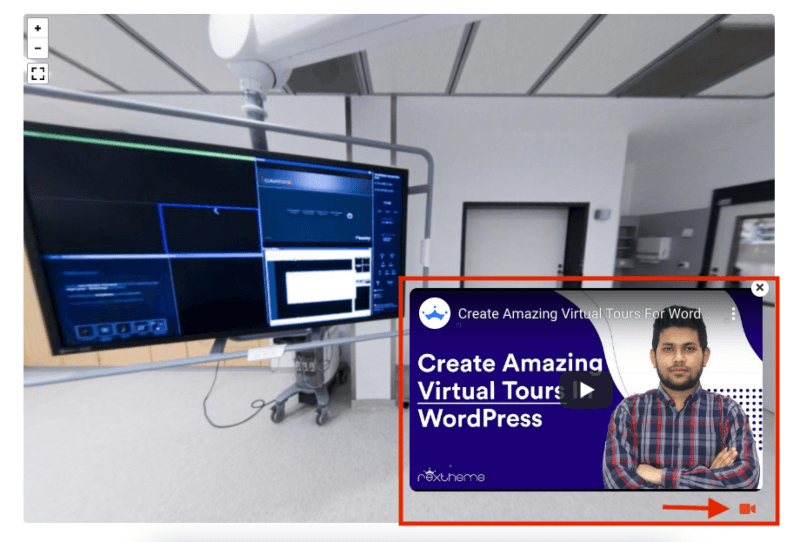
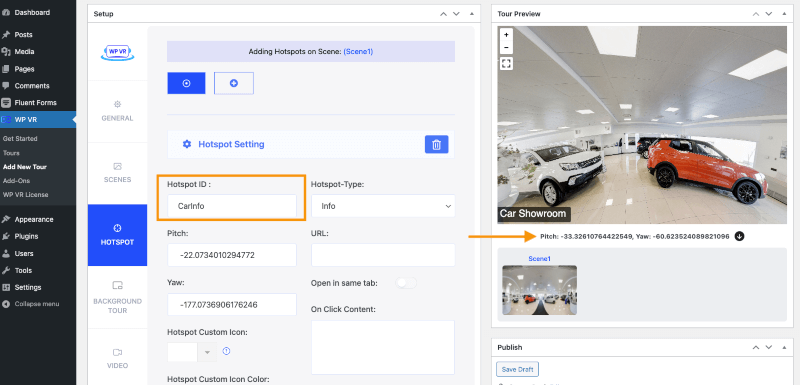
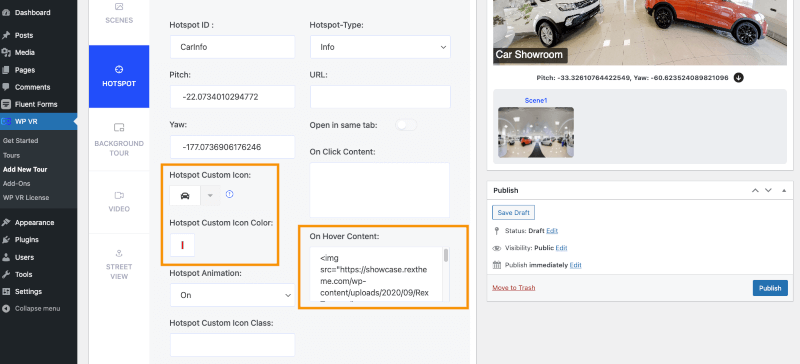
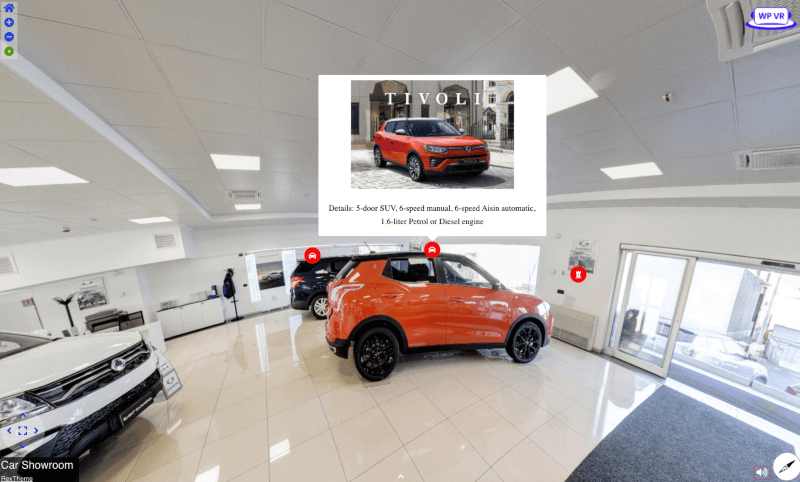
Of course, just a basic 360 environment is not enough. You need to include crucial elements such as relevant tooltips to share knowledge on specific locations or items, engaging click-to-view content such as videos or gifs, background music, and even a mini video to invite them in.

If your package only includes a hotel tour, then you can create a virtual tour of a hotel by highlighting the main areas of focus – the central public space, the rooms, the swimming pool (if any), the canteen, the bar (if any), etc. Overall, you should include all the areas that a visitor may find attractive.

Simply place the tour on the package landing page, and you will see how it will deliver a lot more results than a video.

The main reason why a virtual tour can get more results is the freedom of control and the engaging elements in the tour. People love to have more control when researching and this will definitely help convince them to book a package with you.

Read this guide if you are looking for ideas to increase your hotel bookings.

2. Time-Saving and Cost-Effective

A couple of concerns many people have is

  • they think it will get too expensive and
  • they feel it may take up too much time to create a virtual tour.
Time saving

However, virtual reality in tourism is not as expensive as you think.

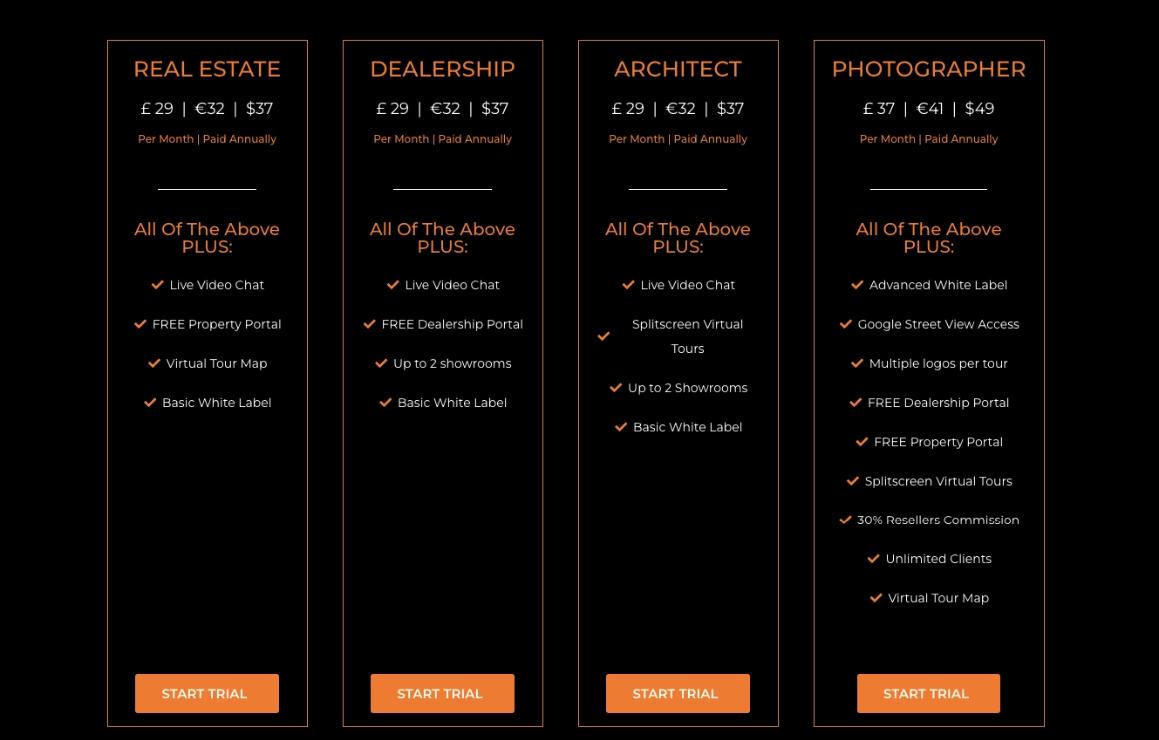
It is possible to create a tour for less than $100 spent a year. And the best part is that if you have the right tool, it won’t take more than 10 to 15 minutes to craft a complete virtual tour.

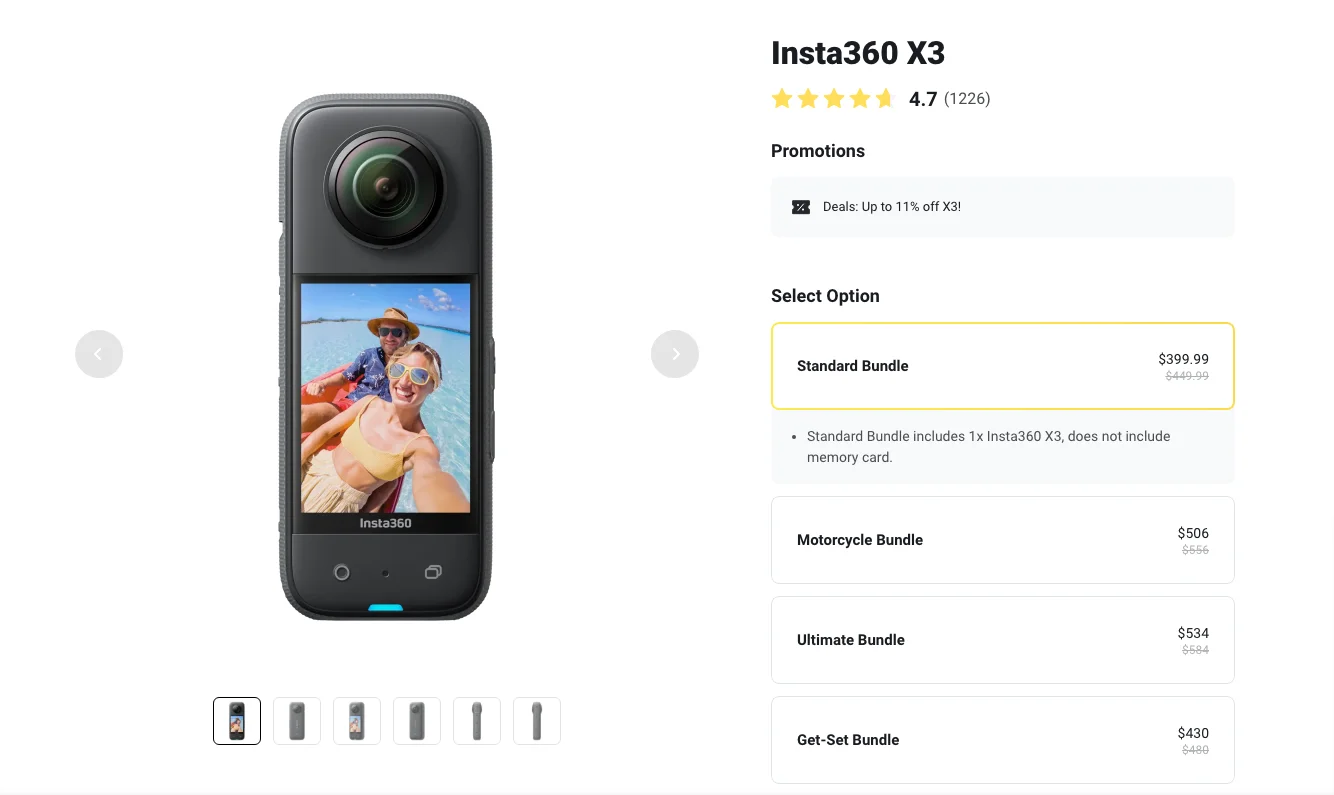
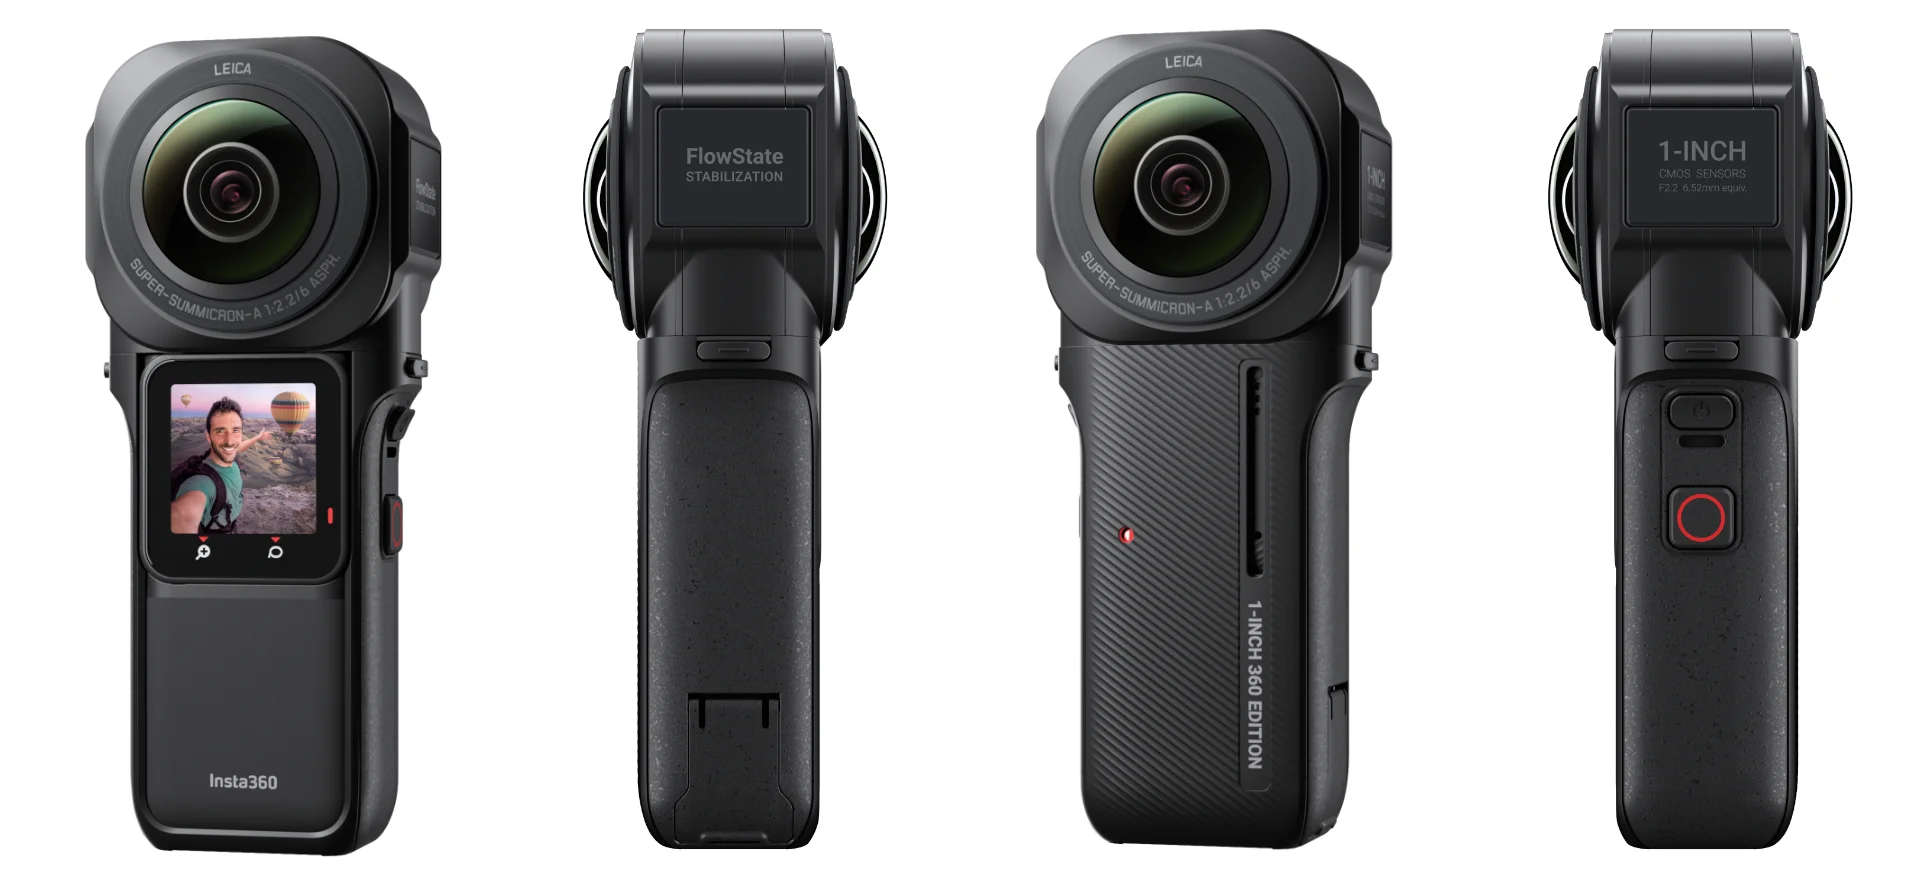
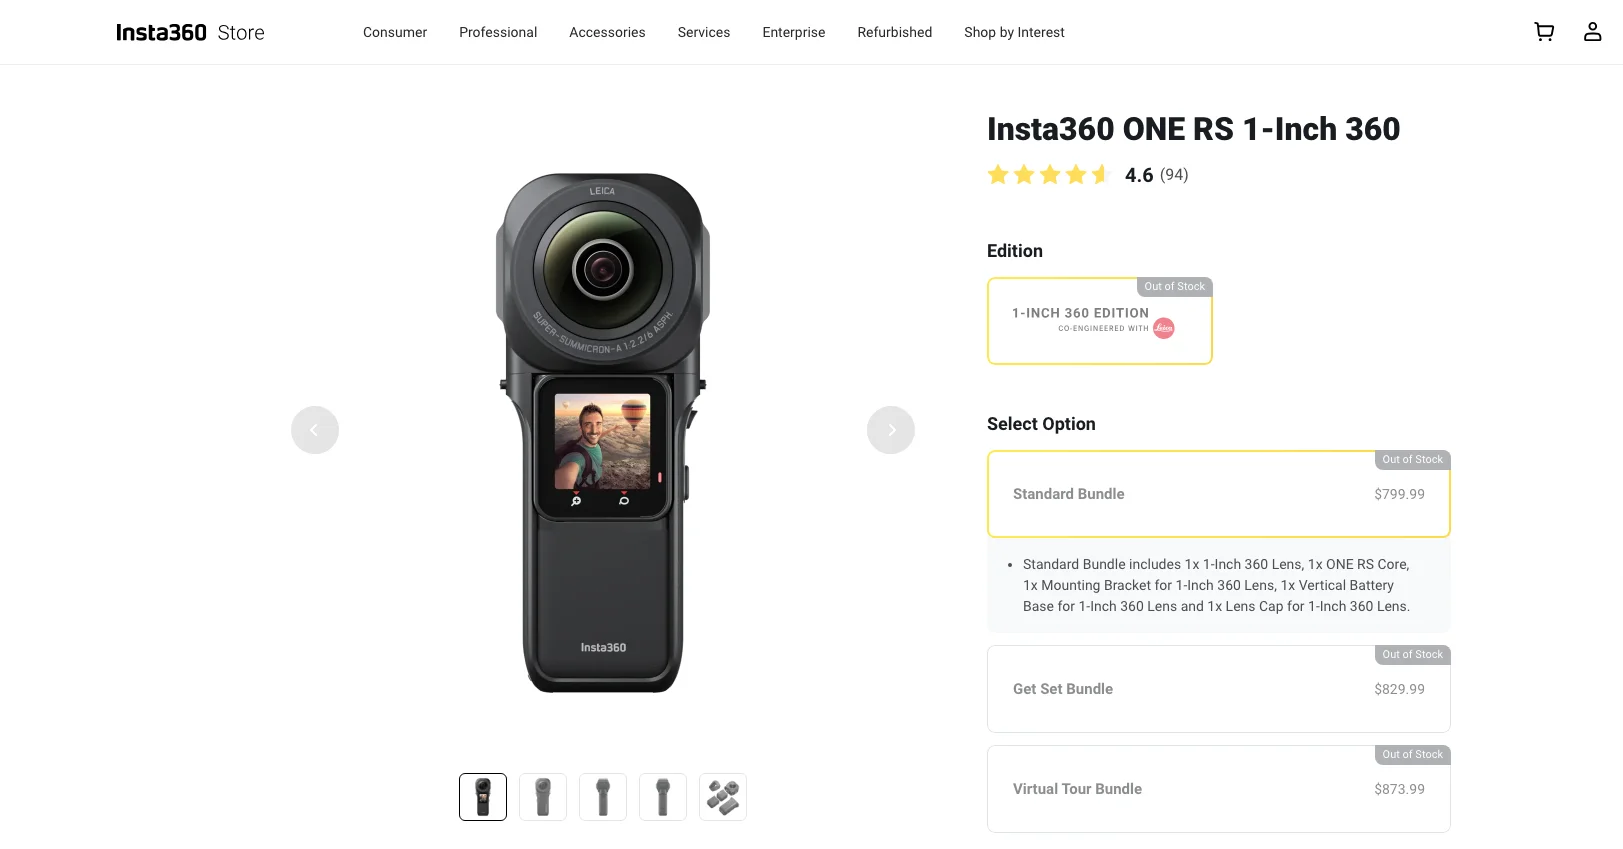
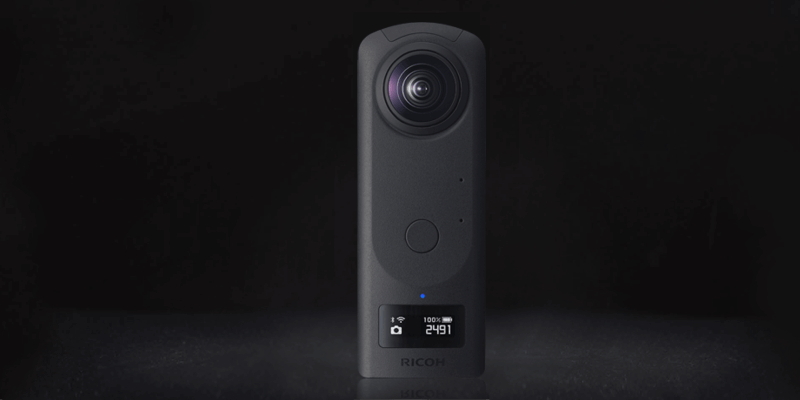
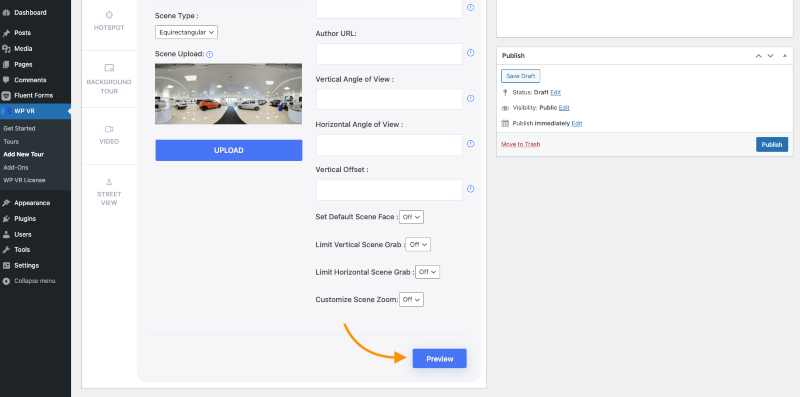
All you need is a digital 360 camera to capture panoramic images and a reliable virtual tour creator to turn these images into a virtual tour.

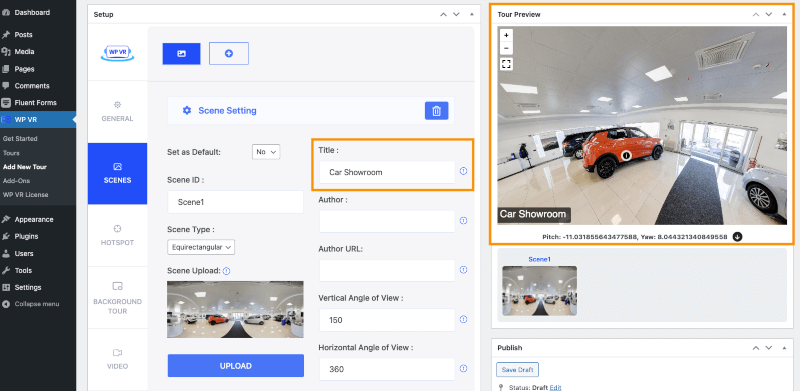
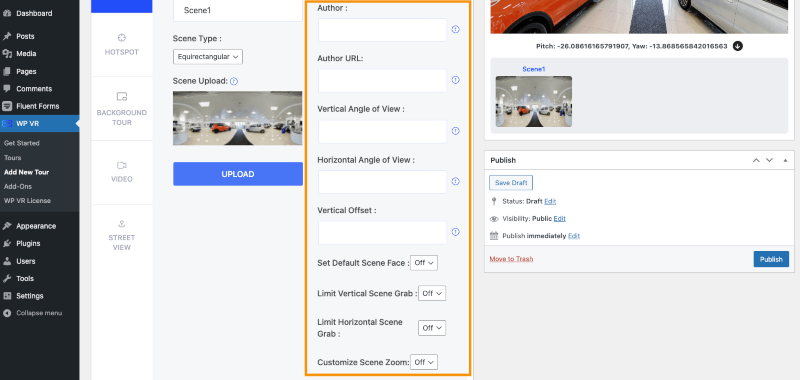
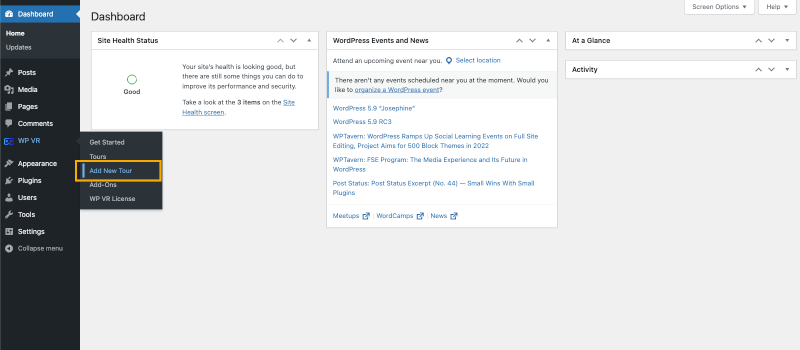
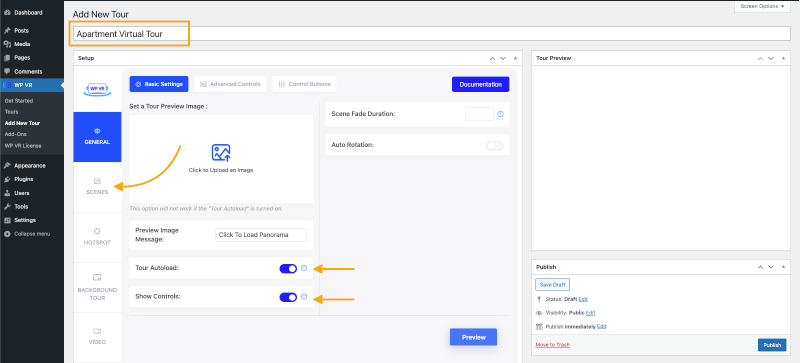
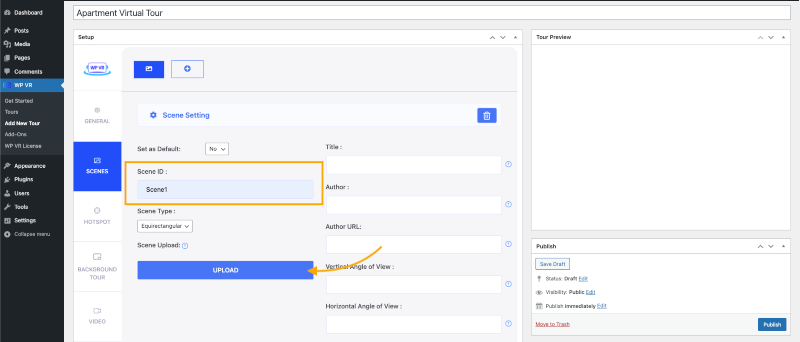
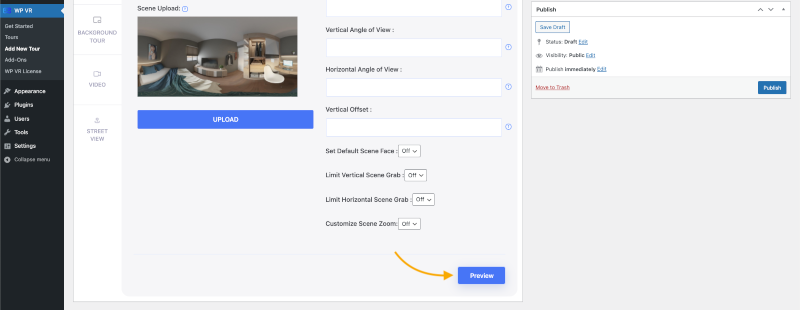
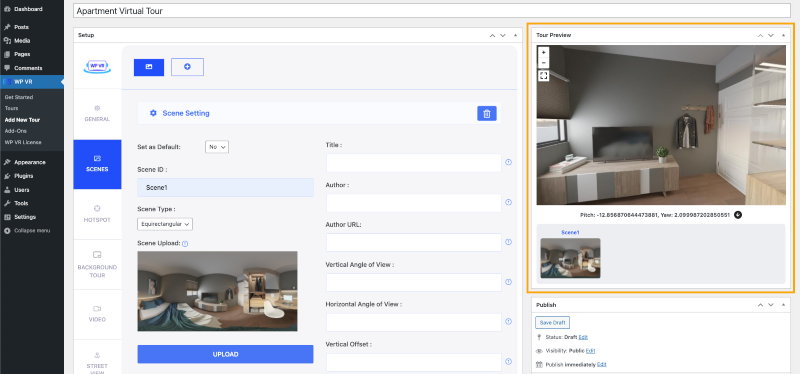
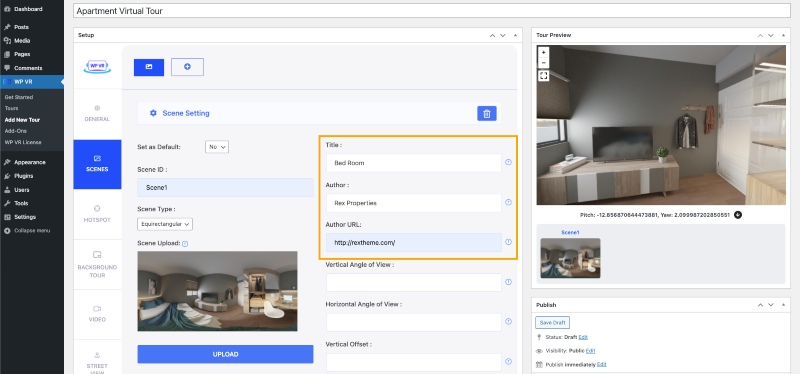
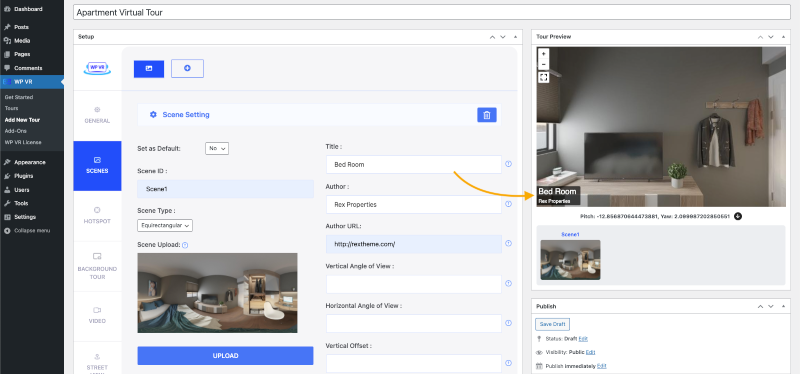
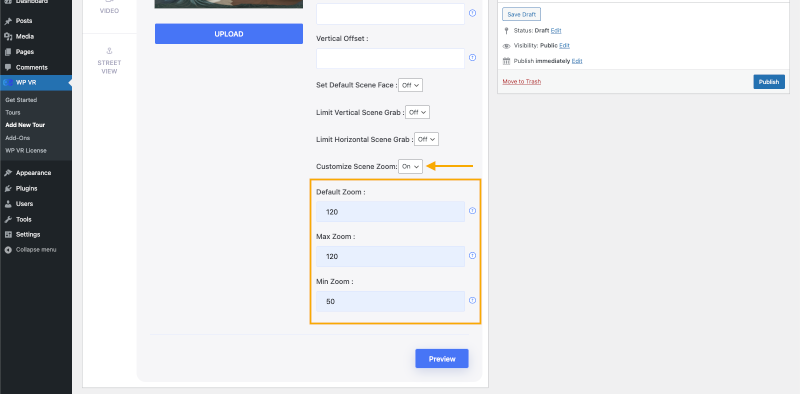
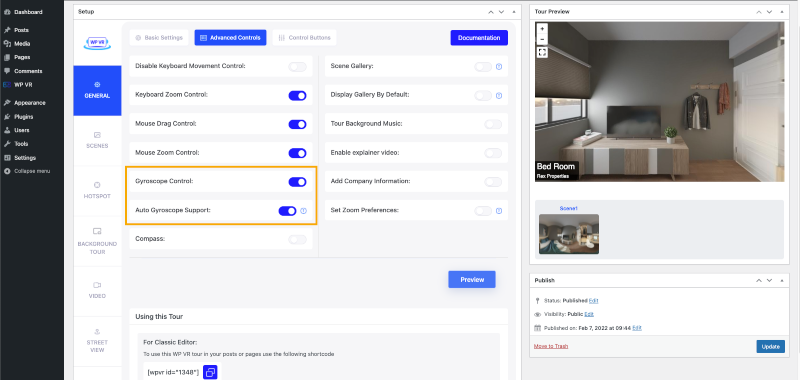
We recommend you use WPVR to create the virtual tour.

3. Improved Marketing Results

Using virtual tourism as part of your marketing plan can help you achieve a higher “time spent on page” and low “bounce rate.”

These are crucial because, as the concept goes, the longer a person spends time on your website, the higher the chances of him placing an order or making some commitment.

So, you can actively use virtual reality in tourism and achieve these higher marketing metrics, which will eventually lead to higher conversion rates and more packages sold.

4. Significant Competitive Advantage

Virtual reality is not so popular in the tourism industry simply due to the lack of knowledge on how much it can deliver.

So, if you start using it now, you will be one step ahead of your competitors. You will have a higher chance of getting customers excited about your tourism offers, provided that you are not overcharging and are advocating for high-quality services.

Moreover, it shows your commitment to providing the best possible experience for your customers. It’s a clear message that you’re investing in technology to make their journey more engaging, informative, and enjoyable. This level of dedication can earn you trust and loyalty. Additionally, offering seamless travel services, such as reliable airport taxis, can further enhance the overall customer experience, ensuring convenience from the start of their journey.

5. Make It Easier For Clients To Make A Decision

Virtual tours offer a fast lane to decision-making when it comes to booking accommodations or travel experiences.

In the traditional booking process, travelers often find themselves sifting through brochures, photos, and descriptions, trying to piece together potential destinations they will enjoy. This process can sometimes be frustrating.

Virtual tours will give them a visual understanding of how the environment is, what they can expect in the surroundings, and how aligned it is to serve their traveling purpose, such as peace, adventure, modernness, rural tranquility, etc.

Images & videos may not always be satisfactory as they are often manipulated to make the locations look better than they actually are. A virtual tour will nullify the possibility of false promotion regarding understanding the surroundings.

Hence, it is the best way to help prospects make a decision on which travel package they want.

6. Elevate Client Education and Cultural Awareness

When travelers understand more about a destination’s culture and history, their experience becomes much richer. Imagine a virtual tour of Kyoto’s ancient temples, complete with clickable spots that explain the history behind each shrine or ceremony. This gives your clients an authentic preview of what to expect.

You can break it down with:

  • Interactive Highlights: Add clickable points that explain local traditions, like food etiquette or seasonal festivals.
  • Storytelling: Incorporate short narrated clips about local legends or historical events that are unique to the destination.

This approach helps travelers feel more prepared and excited. You’re helping them make better choices, and they’ll feel more connected to the experience once they arrive.

7. Advance Staff Training and Skill Development

Training your staff to be more knowledgeable and confident improves customer satisfaction. Virtual tours can play a major role here.

Take this scenario: You run a tour company that specializes in historical landmarks. Instead of relying solely on training manuals, you create a virtual tour of each site with key facts, trivia, and storytelling prompts embedded in the tour.

Here’s how this can help:

  • Guided Practice: Staff can explore these virtual tours repeatedly until they’re confident in explaining each site to travelers.
  • On-Demand Training: New hires or part-time staff can train at their own pace, reducing the need for in-person sessions.
  • Better Engagement: A more visual and hands-on approach keeps employees interested in learning compared to reading static documents.

Ultimately, you’re creating a more professional and knowledgeable team, which helps you deliver a better experience to your clients.

8. Offer Travel-Like Experiences for Non-Travelers

Not everyone can hop on a plane and travel to far-off destinations. Virtual tours can offer these individuals an experience that feels close to real travel without leaving home.

Picture a family curious about visiting Greece but unable to travel due to health or financial limitations. You provide a virtual tour of Athens that explores landmarks like the Acropolis with detailed, 360-degree views.

This approach benefits you and your audience:

  • Accessibility: Anyone can experience new places, expanding your potential customer base beyond just travelers.
  • Increased Interest: Some may feel inspired to book a trip once their situation changes, simply because they already feel connected to the destination.
  • Educational Use: Schools or institutions may also use these tours as part of their curriculum, giving you new partnership opportunities.

With these virtual experiences, you’re broadening horizons for those who can’t physically travel while still fostering a desire to explore more.

Examples Of Virtual Reality Tourism

Virtual reality tourism has already proven its value in creating more engaging and informative travel experiences.

To show how this works in practice, let’s explore a few real-world examples where businesses have used VR for tourism to improve their services and attract more customers.

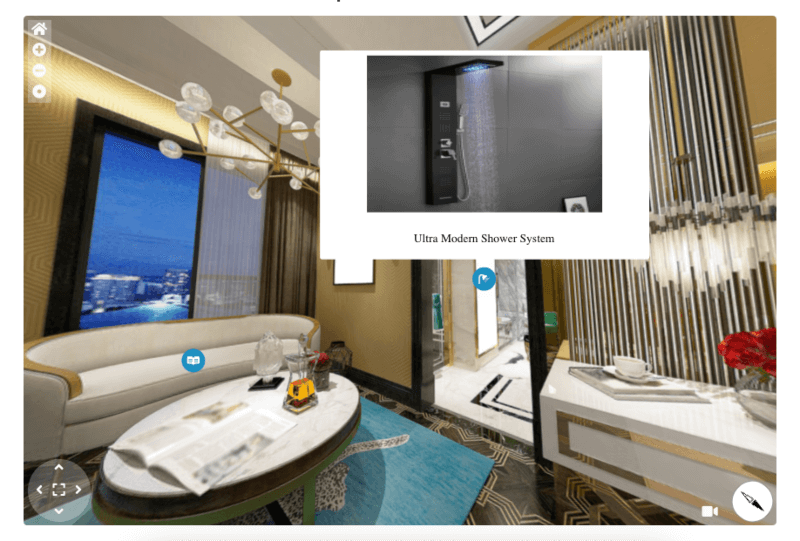
Virtual Tour of a Hotel

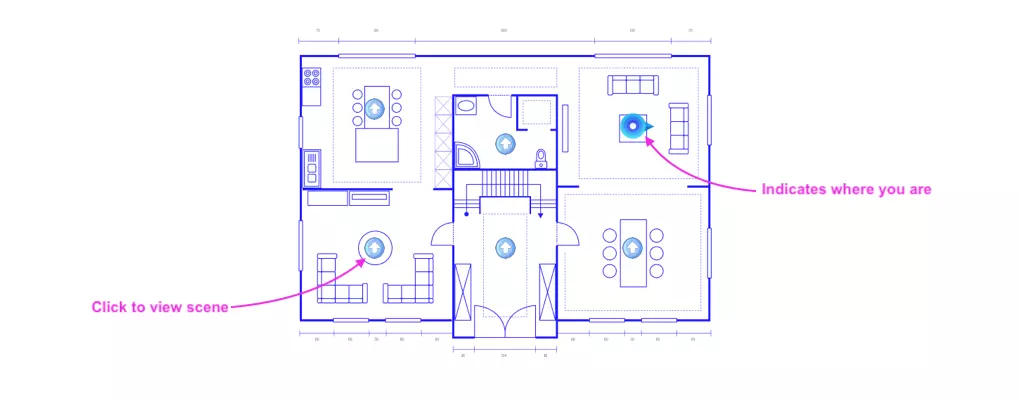
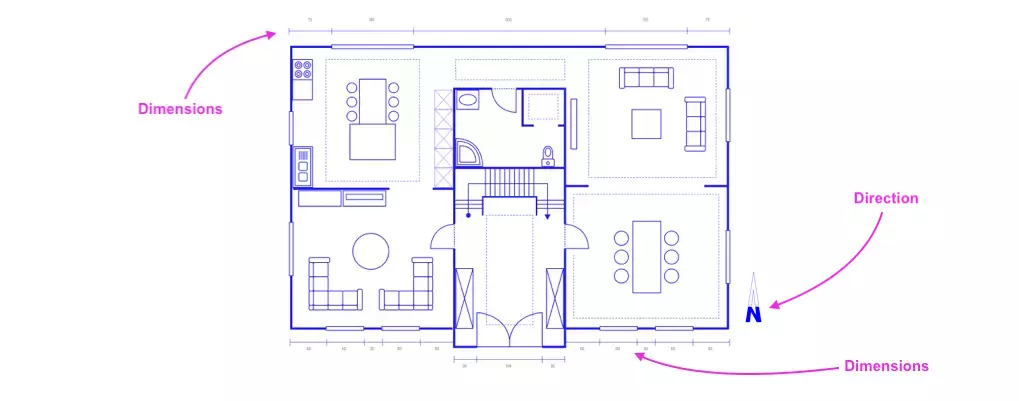
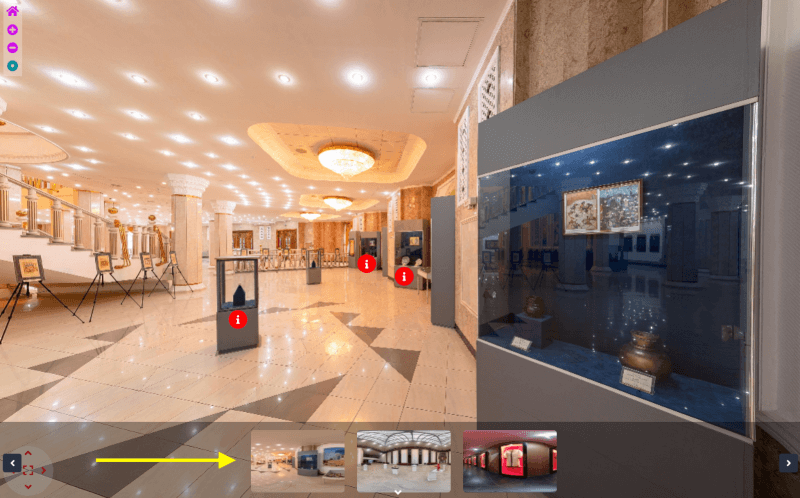
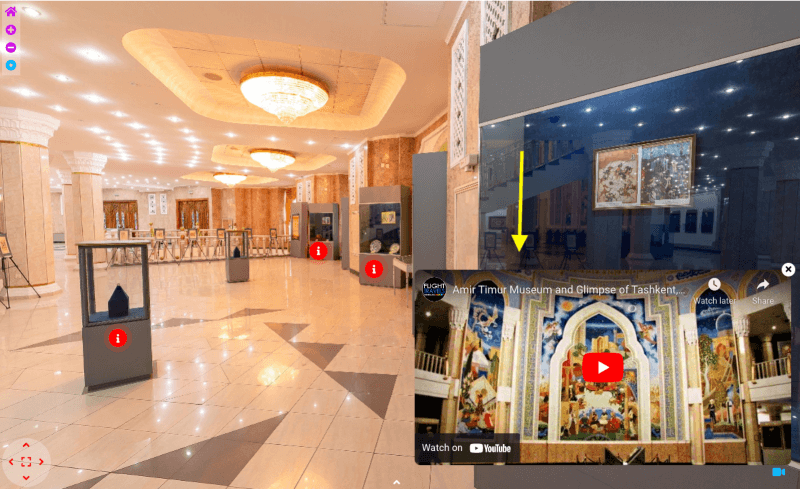
Here’s an example of a virtual tour of a hotel with interactive hotspots to let the audience know what they are offering in a room.

This lets the audience have a better look at the available rooms and choose from the best ones for them to book.

I’ve created this tour using the WordPress plugin WPVR.

360 Video Tour Atlantis Dubai

This Virtual 360 Tour Atlantis Dubai shows almost every unique feature that clients can see and explore before they even step there.

Hamilton Island 360 VR Tourism

In this virtual 360 video, you can easily explore everything from stepping onto the island to experiencing underwater adventures.

Final Thoughts

If you are in the travel and tourism business, then this is a great opportunity to stay ahead of the competition. Using virtual reality in tourism businesses is yet to get popular, and the sooner you start investing in it, the better your chances to become the go-to solution for offering the best tourism packages.

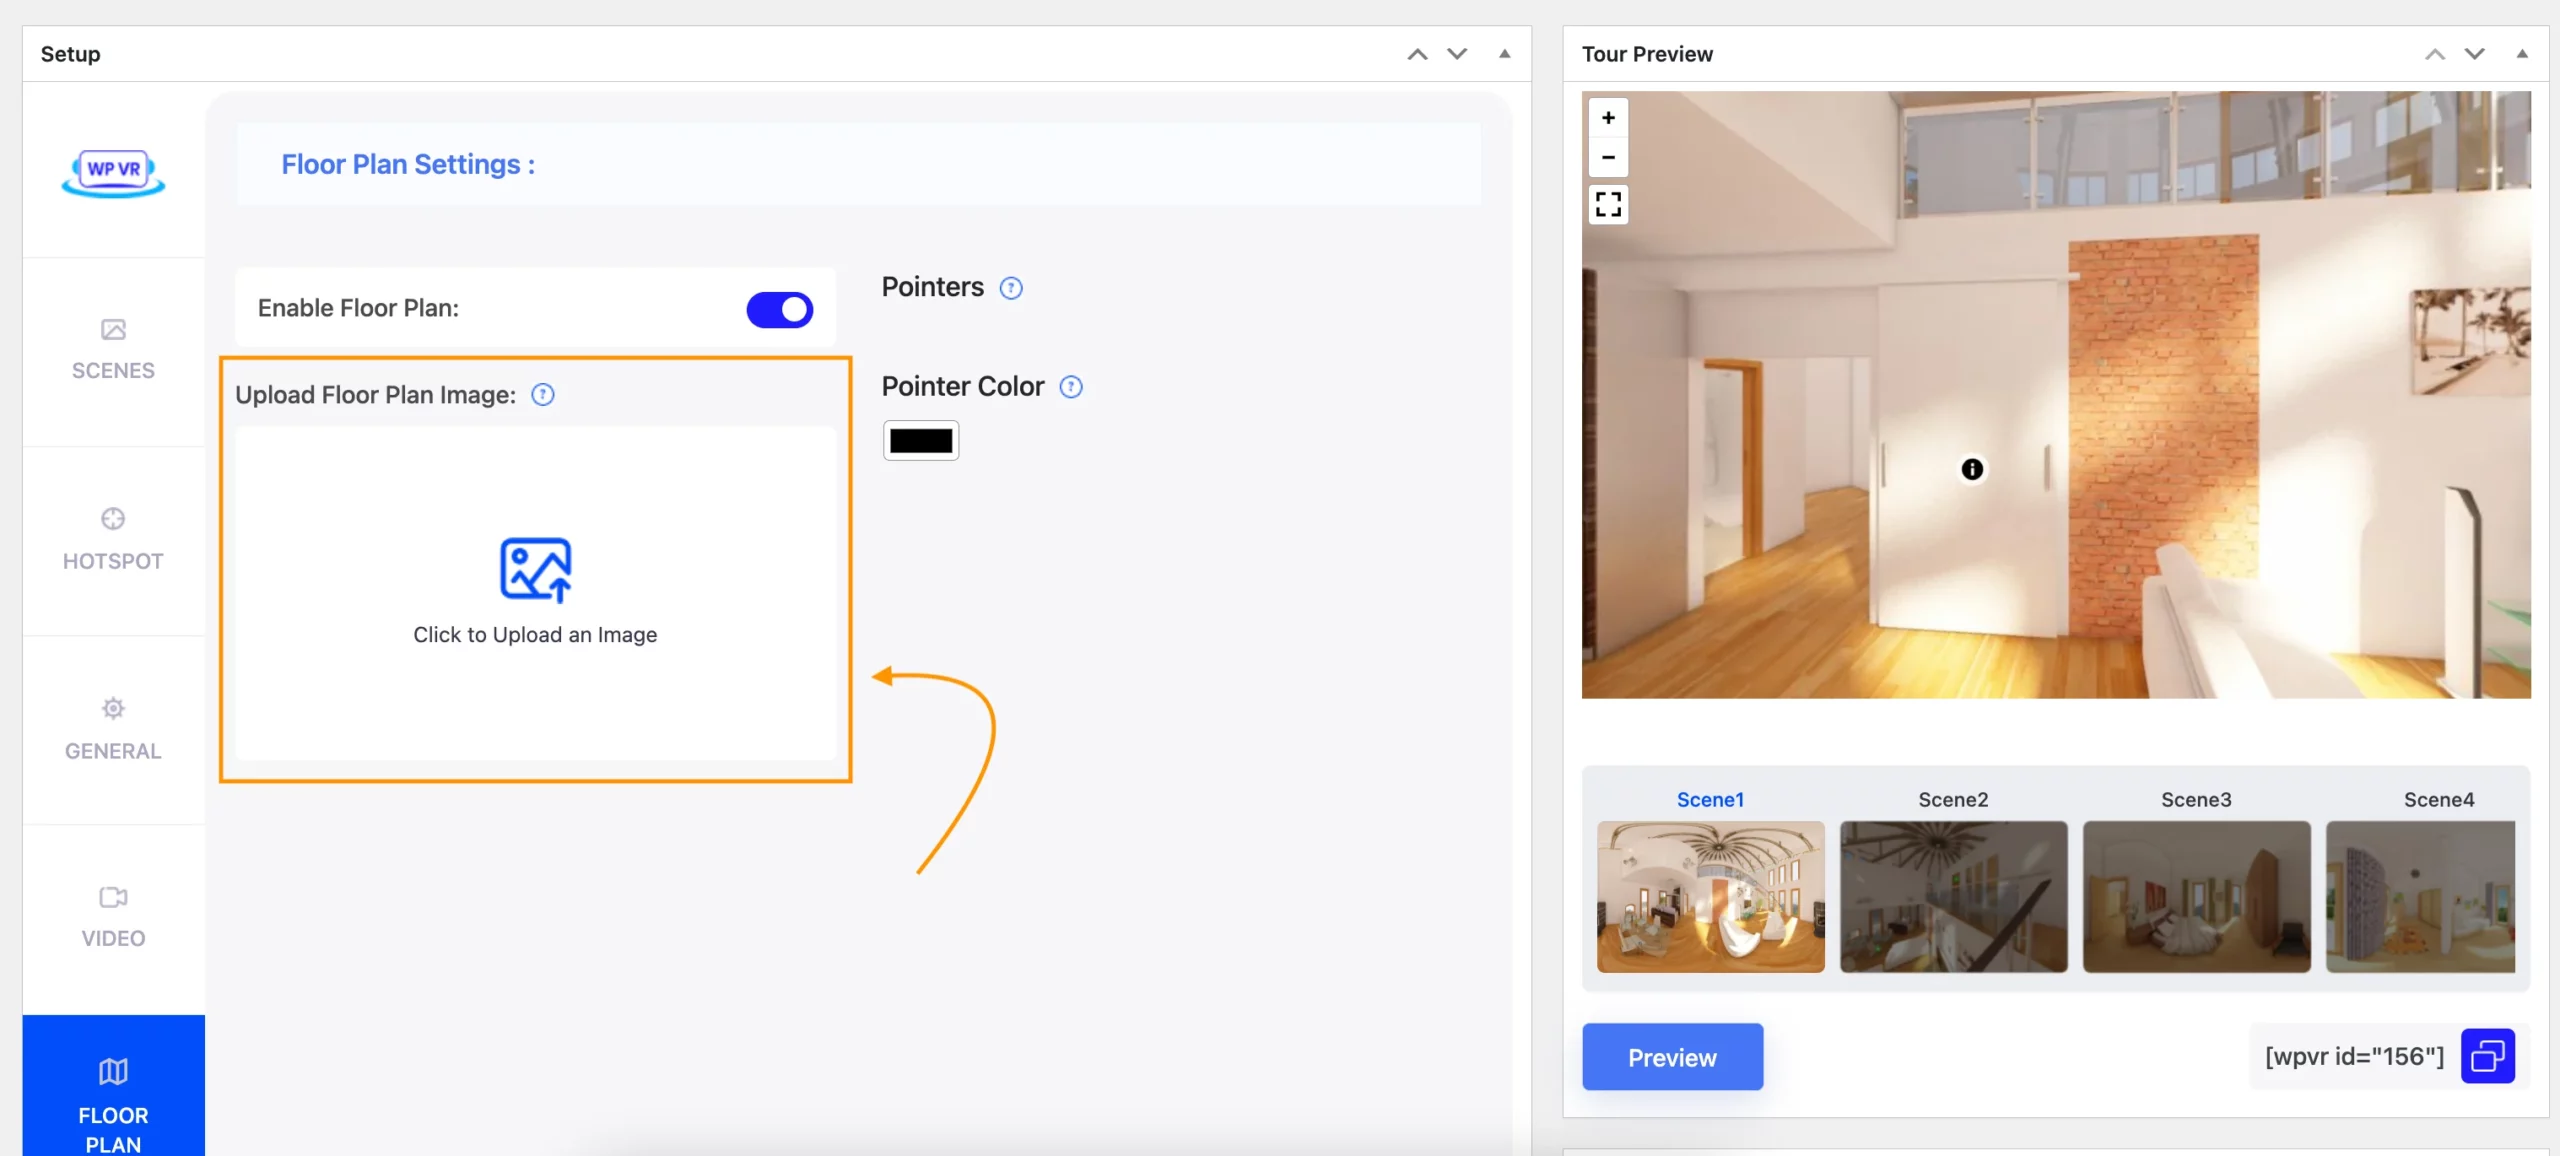
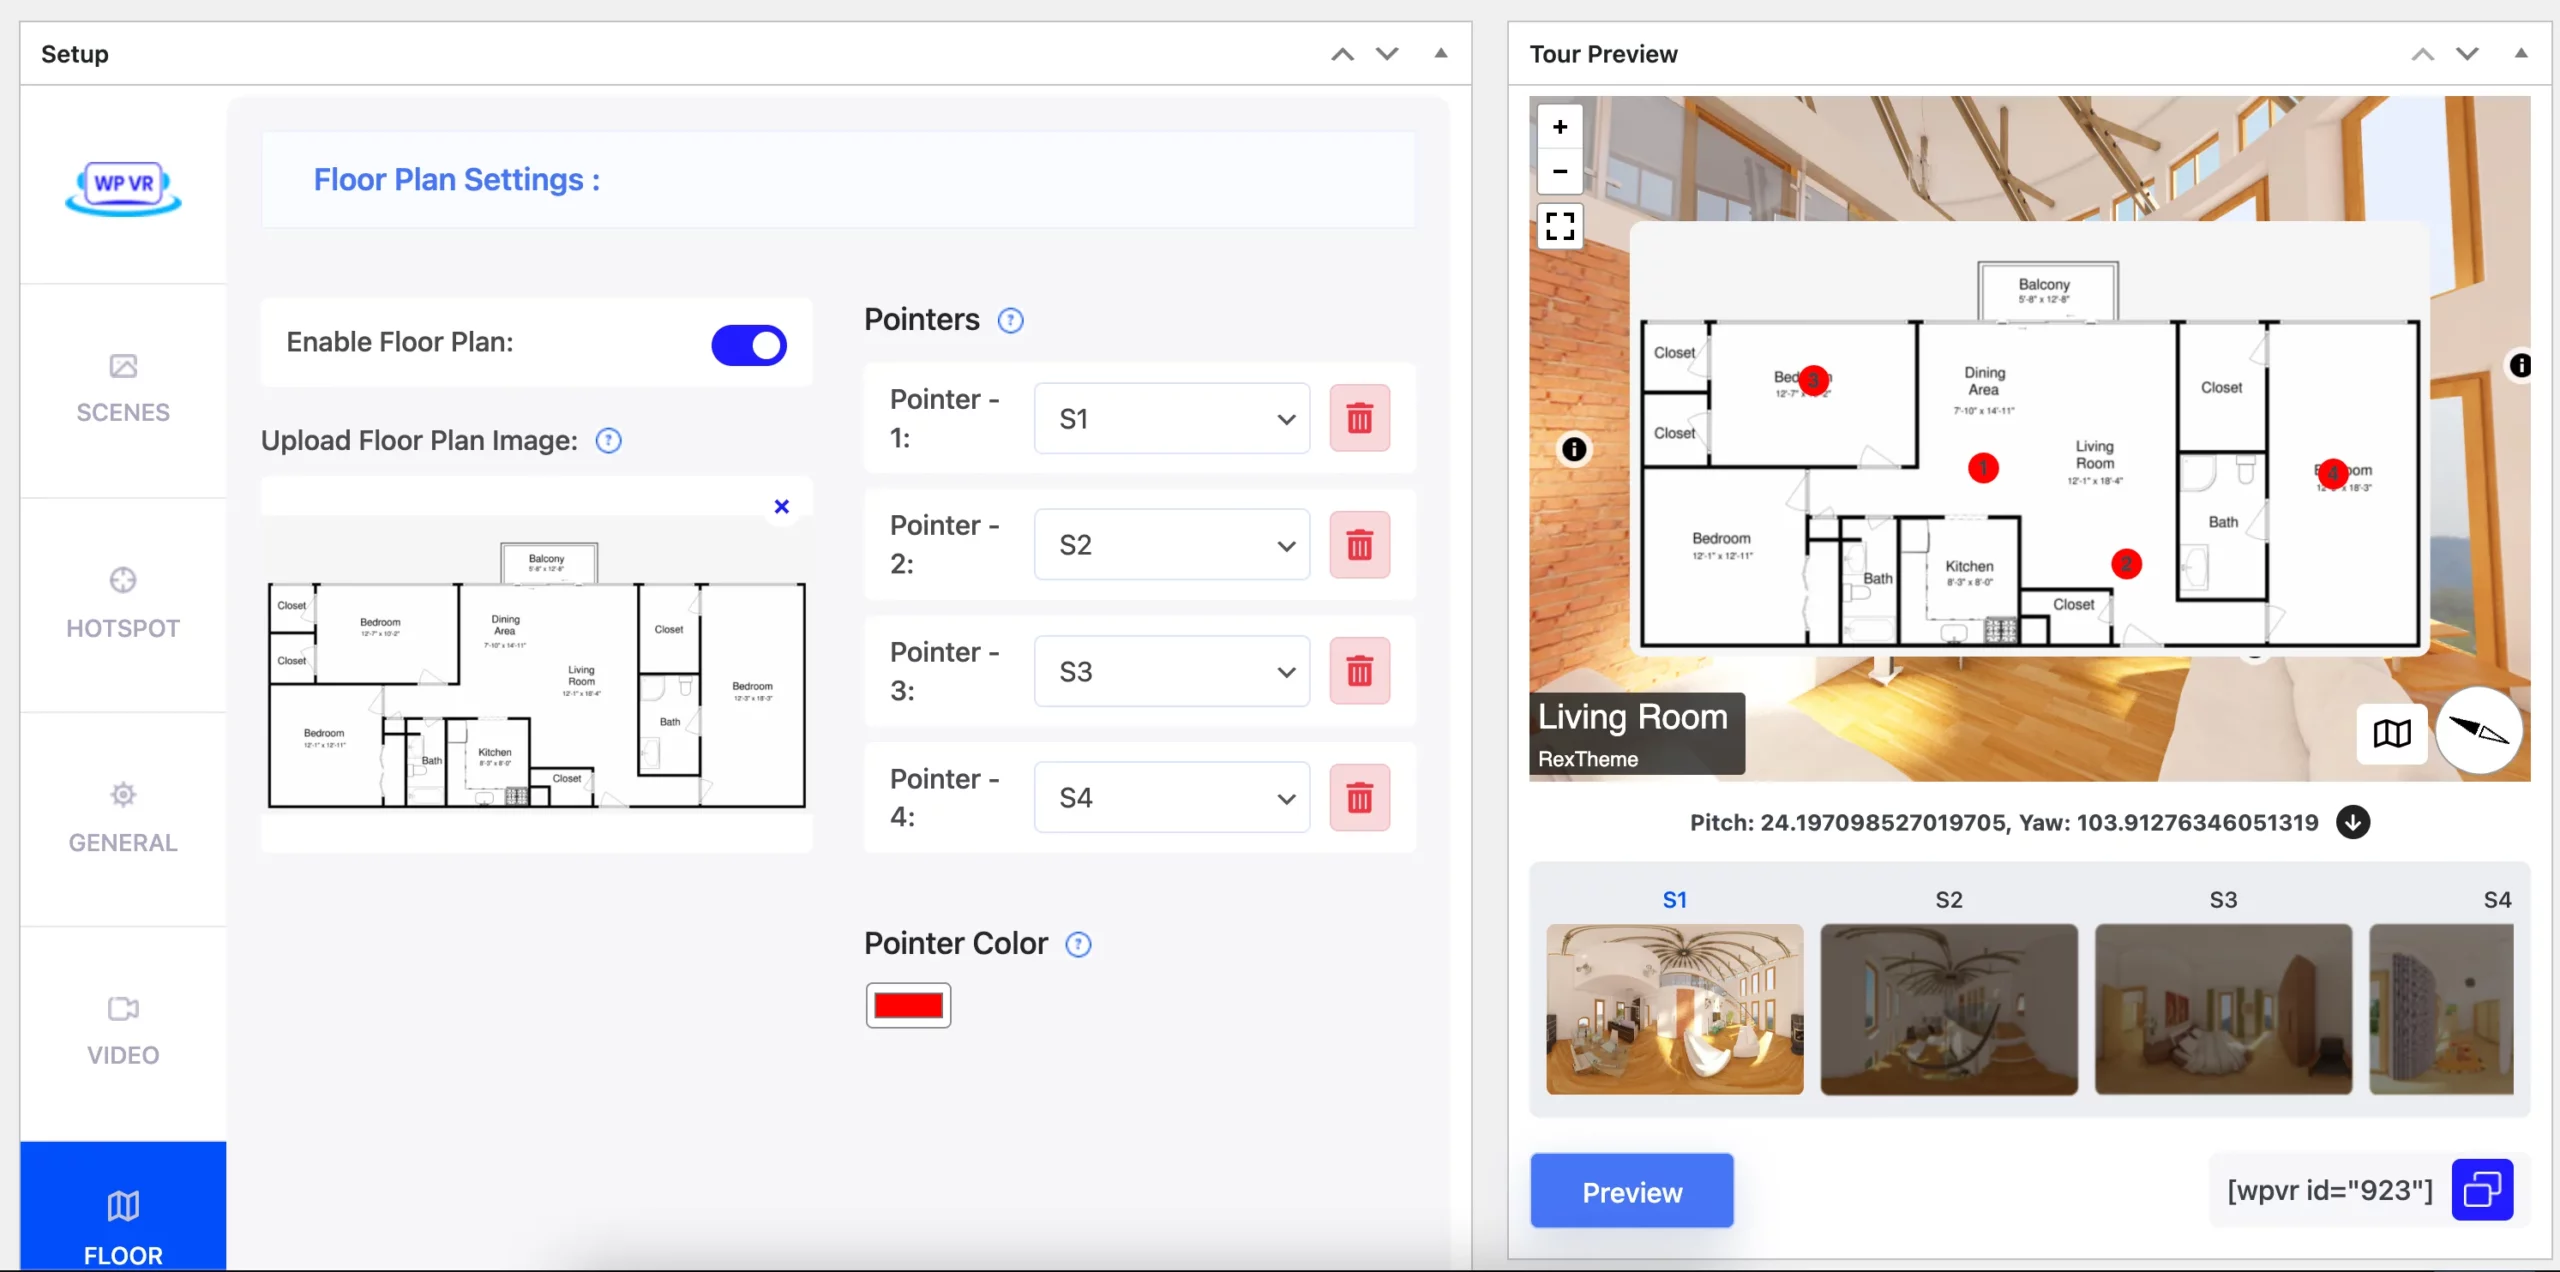
You can easily create virtual tours in WordPress thanks to the plugin WPVR.

WPVR is currently the #1 virtual tour plugin in WordPress, which has every feature you need to create engaging virtual tours without any complications.

If your website is created using WordPress, then you must try using WPVR. You will amazed at how simple yet effective this plugin is to help you grow your business using virtual reality.

FAQs

1. How does technology improve the travel experience?

VR tourism allows people to explore destinations from home, helping them make better travel decisions.

2. Can businesses benefit from interactive travel previews?

Virtual reality tourism helps businesses attract more customers by offering immersive previews of destinations.

3. Is there a cost-effective way to showcase destinations online?

Virtual tourism provides an affordable solution for hotels and agencies to offer interactive experiences.

4. How can travelers explore places before booking?

With virtual reality in tourism, travelers can take virtual tours to see accommodations and attractions in detail.

5. Does VR change how people plan vacations?

VR tourism makes trip planning easier by offering realistic previews of destinations, reducing uncertainty.
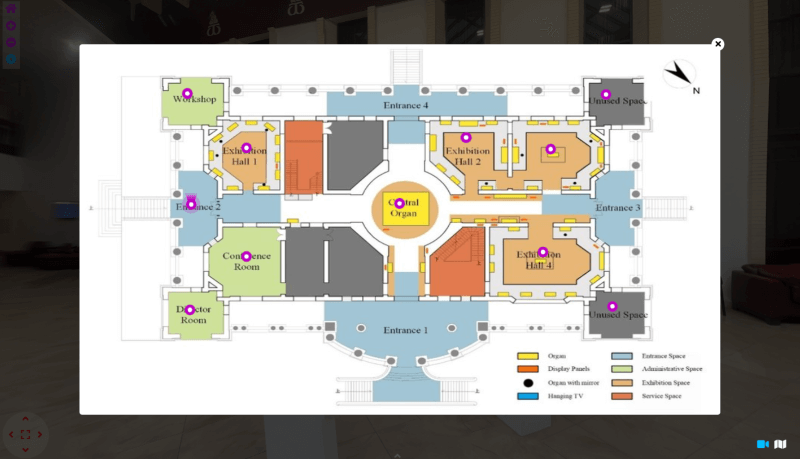
Categories
Guide Virtual Reality

Top 3 Panoramic Camera Apps for Your iPhone

Panoramic pictures are super popular right now in the area of photography & VR.

Panoramic photography is way easier with an iPhone.

And the best part is, you don’t need any other fancy equipment to try it out with your iPhone.

Even though your iPhone is equipped with a built-in panoramic camera, it can be quite challenging to use on its own to capture high-quality panoramic images, which is why using an iPhone panorama app can make a big difference.

With panoramic apps, you can take panoramic photos right on your iPhone without even having to move it around.

You don’t have to buy a tripod or expensive pieces of equipment either!

You can also use a panoramic camera app for Android if you are an Android user.

But in this article, we’ll look at 3 of the best panoramic camera apps for iPhone

Also at the end of the blog, I provide you guidelines on how you can create virtual tours easily with your panoramic photos and revisit virtually.

So let’s get started.

Why Use A Panoramic Camera App Instead Of iPhone’s Built-in Panoramic Camera?

The built-in panoramic camera that the iPhone comes with has a lot of limitations and it becomes way more challenging if you want to take panoramic photos.

Here are side-by-side comparisons:

Panoramic Apps VS Built-in-Panorama

If you want to take panoramic pictures, there are a bunch of apps that can help you do that.

If you look at the iTunes store, you’ll see a whole bunch of different app icons to choose from. Some are free, some you pay for once, and some you pay for extra features while using the app—so you can even find a free 360 camera app for iPhone if you’re looking to save on costs.

I have well researched most of the apps and chose 3 apps that can easily solve the issues that you will face using the in-built panorama of your iPhone.

Advantages of Using a Panoramic Camera App

Let’s have a look at some advantages you’ll have by using a panoramic camera app:

  • You’ll capture more of the scene in a single shot.
  • Panoramic camera apps will give you high-resolution images with impressive detail.
  • They’ll provide you with an experience with no visible stitching marks in the final panoramic image.
  • These panoramic camera apps are easy to use and require no professional photography skills.

Overall, a good panoramic camera app will save you from manual flaws and help you capture high-resolution panoramic photos with your iPhone quite easily.

Then, you can use them to show off a location or your property on Facebook or even via virtual tours on your website.

Top 3 Panoramic Camera Apps for iPhone

Here are three apps that I’ve chosen to provide in-depth information on quality & features to help you get 360 panoramic photos using an iPhone with the help of a 360 camera app for iPhone:

1. DMD Panorama

DMD Panorama is a pretty neat app and better than the iPhone’s panorama feature in many ways.

You can take full 360-degree panoramas with this app (both horizontal and vertical angles), which is awesome.

It uses the gyro and compass in your iPhone to help make sure your panorama turns out great.

So, if you want to take some great quality panoramic photos, this app is worth checking out!

Key Features of DMD Panorama:

  • Works with the front camera of the iPhone for panoramic selfies
  • Take panoramas with 3 different Exposure settings
  • Up to 100MP panoramas
  • The ultra-wide lens on the newest phones captures panoramas with floors and ceilings

Notes : In DMD panaroma app, selfie panorama mode unlocks after you capture and save 10 regular panoramas.

Feedback From DMD Panorama User’s:

I have read all the reviews of DMD panorama users that I got and summed up their feedback here below:

Panoramic Camera App for iPhone - DMD Panorama

Average User Rating: 4.4 stars out of 5.

App Link: DMD Panorama.

2. Panorama 360

Panorama 360 is a powerful panoramic app that will allow you to capture 360-degree panoramic photos with your iPhone easily.

The app offers a range of editing tools and filters to enhance your photos.

Key Features of Panorama 360:

  • Capture panoramas blazing fast
  • View your iPhone camera app panoramas in the 360-degree viewer
  • Embed panoramas in your website or blog
  • HD+ capture

Feedback from Panorama 360 App Users:

Well, there are much fewer 1st hand reviews I got on this app than the DMD panorama app.

I have jotted down the positives and also the negatives below:

Panoramic Camera App for iPhone - Panorama 360

Average User Rating: 4.2 stars out of 5.

App Link: Panorama 360 for iPhone.

3. Bimostitch

With Bimostitch, You can combine different photos to make one big panoramic image that looks perfect.

Now to mention that this is not a 360 panorama capturing app but a panorama stitching app. But I had to keep this on the list because this stitching is a very important aspect of 360 panorama images and in iPhone, this is one of the best apps you can find for that.

It won’t take up much space on your device and the panoramas will be super clear. You can make panoramas on the go, like when you’re on a trip, and you don’t need to be connected to the internet.

Bimostitch Panorama Stitcher has been downloaded 570 thousand times.

You don’t even need any fancy equipment or sensors to use this app. Whether you’re a pro or just starting, this app is perfect for making great panoramic photos.

Key Features of Bimostitch:

  • Stitch High-resolution, single-row, multi-row, vertical, horizontal, 360° panoramas.
  • Stitch many (2 to 200+) overlapping photos into impressive wide-view panoramas.
  • Compress large panoramas to save space on your device.
  • Video-to-panorama for converting videos of panning motion into panoramas
  • View source images in panorama while in preview mode

Feedback From Bimostitch User’s:

Though it’s not an image-capturing app but rather a stitching app, I got the highest positive reviews on this app. I summed up the positive reviews in 4 points.

In regards to negative reviews, I only got 1. Take a look:

Panoramic Camera App for iPhone - Bimostitch

Average User Rating: 4.6 out of 5.

App Link: Bimostitch

If you want a seamless way to capture high-quality 360 panoramic photos on your iPhone, a 360 camera app is a great choice. If you need more advanced features, explore custom iOS app development services to create a tailored solution for your specific needs.

Creative Ways To Use Panorama Images

Panorama images aren’t just stunning—they’re incredibly versatile. Here are some creative, actionable ways to use them:

1. Create Virtual Tours for Websites

Transform your panorama images into immersive virtual tours. If you’re a realtor, use them to showcase properties. As a resort owner, highlight your rooms, amenities, or scenic views. Tools like WP VR or Kuula can help you upload your panoramic shots and turn them into interactive experiences that visitors can explore from any device.

2. Design Eye-Catching Social Media Posts

Panoramic images stand out on platforms like Facebook and Instagram. You can upload them as scrollable photos or use third-party tools to convert them into engaging videos or carousels. Think of it as a way to grab your audience’s attention while telling a story.

3. Use Panoramas in Presentations

If you’re preparing a pitch or a creative presentation, panoramic images can serve as impactful visuals. For example, a tourism business could embed panoramic views of destinations into their slides to wow the audience.

4. Personalize Travel Albums

Want your travel photos to feel more immersive? Use panorama shots to capture breathtaking landscapes or cityscapes. Instead of flipping through flat photos, you’ll feel like you’re revisiting the entire scene. Print them as fold-out albums or large wall posters for an extra wow factor.

5. Create 3D-Printed Keepsakes

Panoramas can be converted into unique 3D models or keepsakes. Some services let you use panoramic shots to create printed snow globes, crystal engravings, or even 3D postcards.

6. Plan and Share Home Renovations

If you’re remodeling, take panoramic photos of each room before and after. Share these with your contractor to ensure they understand your vision or use them to inspire others when you post your home transformation online.

7. Capture Before-and-After Shots

If you’re in a creative field like landscaping, architecture, or event planning, panoramic photos are perfect for showing transformations. A side-by-side comparison of panoramic shots can be a compelling way to market your services.

By thinking outside the box, you can turn your panoramic photos into more than just pretty pictures—they become tools for storytelling, marketing, and memory-making.

Get a complete guide on how you can create a virtual tour using the iPhone Panorama picture that you took using one of the suggested plugins,

Wrapping Up

Each of these panoramic camera apps has its unique features and benefits.

Whether you’re looking for a user-friendly interface or powerful stitching tools, there is an app on this list that will meet your needs and could be considered the best 360 camera app for iPhone for capturing stunning panoramic shots.

So why wait?

Download one of these apps today and start capturing stunning panoramic photos with your iPhone.

Keep in mind that while these apps are great for capturing panoramic photos, the quality of the photos will also depend on the camera quality of your iPhone.

It’s recommended to use the latest iPhone models for best results.

Categories
Guide Virtual Reality

What Are The Best 360 Panoramic Cameras You Can Buy [2024]

In 2024, visually consumed information will be highly accepted as people want to know it all without investing a much longer time.

Whether you are a traveler, resort owner, or realtor,

your consumer list won’t be satisfied if your site provides images or videos with a conventional 2D camera.

For a proper virtual tour of a home, place, or resort with a photo-first model, you need to use a high-quality 360 camera.

With that kept in mind, here’s my top-picked suggestion list of 360 cameras for 2024.

Let’s get started.

Consideration Points Before Purchasing A 360 Panoramic Camera

Key Factors of 360 Panoramic Cameras you can buy

Before going to the list, go through these key factors you need to focus on while buying a 360 camera.

1. Dynamic Range Ability:

Capturing the full 360 angle of the scene is highly important in 360 photography.

Without a high dynamic range in the camera you are using, you will fail terribly in terms of the sharpness of your product.

2. Lens Quality:

In terms of lens, You should go for a single-lens mode camera.

A 4k single-lens mode camera would be the best as you will need very little editing time to give finishing to your images.

3. Easy & fast workflow :

You need to pick up a camera that speeds up the entire action cam workflow, from stabilizing, reframing, and editing to transferring files with an easy user interface.

4. Battery Life:

You must not want any overheating and crash issues with your camera.

Since panoramic cameras are power-hungry, choose one with a long battery life.

You should consider cameras with removable batteries or the ability to charge via USB, so you can keep the camera charged on the go.

5. Durability:

If you plan to take your panoramic camera on outdoor adventures or use it in harsh environments, look for models that are built to withstand the elements.

Weather sealing, rugged construction, and shock resistance are the features that you should consider.

6. Aligned with your need :

There are many amazing 360 cameras but every camera has its own unique value.

Some are really good at night mode, while others can tolerate the hot weather of sunny days.

Now considering all these, let’s have a look at the best 5 Panoramic cameras for you.

Best 360 Cameras For Capturing 360 Panoramic Images in 2024

As panoramic photography gains in popularity, more and more manufacturers are producing panoramic cameras that cater to this niche market.

So I’ve gathered the top five 360 panoramic cameras in the market right now, along with their standout features, pros, cons, and best use cases.

1. INSTA 360 X3

Insta 360 X3

The Insta360 X3 is an updated version of the Insta 360 X2 with improved HDR for better quality in difficult lighting.

It has 50% faster wifi transfer compared to X2.

You can easily mount the camera, and record any bouncy action with proper stabilization.

With this virtual tour camera, you can quickly share to social media in a few clicks without losing video quality.

Specs :

  • Sensor Size 1/2″
  • Battery Capacity 1800mAh
  • 360° Video 5.7K
  • 360° Active HDR Yes
  • 360° Photo 72MP
  • Single-Lens Mode 4K30fps
  • Screen Size 2.29″
  • Waterproof 10m (33ft)
  • FlowState Stabilization + 360° Horizon Lock Yes

Buy It If :

  • You want to edit on your mobile as it has photo format INSP, that can be exported via mobile app or desktop Studio.
  • You want to charge your battery in 90min(5V/3A)
  • You want a high dynamic range.

Don’t Buy It If :

  • Your operating temperature isn’t between -4°F to 104°F (-20℃ to 40℃).

Pricing

Insta360X3 pricing

2. INSTA360 ONE RS 1-Inch

Insta360 One 1-inch


The advantage of buying the Insta360 One RS 1-inch edition is that it has more impressive features than smaller sensor cameras.

With Leica co-engineered lenses, dual one-inch sensors, and 6K 360-degree recording capabilities, it delivers superior image quality and can provide you with low-light performance.

Specs :

  • Aperture F2.2
  • Focal Length 6.52mm
  • Photo Resolution 6528×3264 (2:1)
  • Dimensions (W x H x D) 53.2×129.3×49.5mm
  • Max Video Bitrate 120Mbps
  • ISO Range Photo: 100-3200, Video: 100-3200
  • Audio Modes Wind Reduction & Stereo
  • White Balance 2000K-10000K

Buy It If :

  • You have limited filming experience as Insta360 ONE RS 1-Inch easy to use right out of the box. The camera setup process is quick and intuitive.
  • You want to connect the camera to the smartphone app.
  • You want the app-to-camera connection to be stable and uninterrupted.
  • If you want to connect it with multiple devices (watch, AirPods). As the connection remains strong.

Don’t Buy It If You :

  • You want to format in mobile as RAW files of this device require software on PC/Mac to export.

Pricing

Insta360 one RS 1 inch

3. RICOH THETA Z1

Ricoh Theta Z1 Review Panoramic Camera

The Ricoh Theta Z1 is your premium choice for immersive 360-degree photography.

With its high-end features, it delivers detailed and captivating images, perfect for capturing your surroundings in stunning clarity.

Specs :

  • Image Sensor Size 1 inch (x2)
  • Image Sensor Effective Pixels Approx. 20M (x2)
  • File Size (still images) RAW: 7296 x 3648, JPEG: 6720 x 3360
  • Lens F2.1, 3.5, 5.6
  • OLED Panel 0.93 inch Organic light emitting display Panel, 128 x 36 dots
  • Usage temperature range 0°C – 40°C
  • Dimensions 48mm (W) x 132.5mm (H) x 29.7mm (24mm *7) (D)
  • Shutter speed Still image: (AUTO) 1/25000 sec. to 1/8 sec.

Buy It If :

  • You want to capture incredibly detailed images with excellent color accuracy and dynamic range as it has dual 1-inch CMOS sensors.
  • You want advanced image processing capabilities.
  • You want a large storage capacity.

Don’t Buy It If :

  • You require a huge amount of video recording as it has limited video recording capabilities.
  • You want longer battery life.

Pricing

Ricoh Theta Z1

4. QOOCAM 3

Qoocam 3

QooCam 3, is a 360-degree camera with two ultra-wide fisheye lenses that capture 5.7K photos and videos in all directions simultaneously.

With the “invisible” selfie stick, you can remove the footage by the camera’s algorithm.

Specs

Qoocam 3 specs
  • Aperture F1.6
  • Exposure Compensation ±2EV
  • White Balance Auto, 2500K-8000K
  • Maximum Resolution of Photos 62MP (11136×5568)
  • Video Bitrate 120Mbps
  • Water and Dust Resistant IP68 Waterproof
  • Audio output AAC (16 bit/Quadraphonic/48 KHz)

Buy It If :

  • You want an easy-to-use camera
  • You want a compact and travel-friendly camera.
  • You want a well-built and weather-resistant camera.

Don’t Buy :

  • Down on resolution and some features from its predecessor.
  • Built-in JPEG processing is only so-so, with the need to use DNG to get the best out of the camera

Pricing

Qoocam 3

5. PANOX V2

panox V2

PanoX V2 stands out for its exceptional performance, especially in capturing high-resolution still photos.

Its intuitive interface makes it a pleasure to carry and operate in the field.

And will allow you to focus on capturing stunning images without worrying about the fragility of the equipment.

Specs

  • 360°Video 5.7K@30FPS
  • 360° Photo 72MP
  • Sensors 1/2” CMOS
  • HDR Photo   12K
  • Photo  Format JPG+DNG
  • Live Streaming  4K 360° YouTube &Facebook
  • Timelapse. 5.7K 360°

Buy It If :

  • You want higher density and higher resolution as it has 8K 5 FPS mode
  • You want a built-in GPS.
  • You want to just drag the files right into the desktop uploader without other processing as it has on device stitching of 360s.
  • You don’t want to buy an adapter as it has a standard tripod camera mount.

Don’t Buy It :

  • If you want high sharpness, the UI on the camera feels a bit less polished
  • If you want fast GPS tracking, acquiring GPS satellites can take a bit of time.

Pricing

Panox V2

Comparison of The Best 360 Degree Cameras

Now that you know all the details about each of the best 360 cameras, let us look at a few comparison tables to understand which one is ideal for you to choose and which 360 cameras are affordable.

Video & Image Resolution

360 Cameras360 Video Resolution360 Image Resolution
Insta360 X3⬩ 5.7K: 5760×2880@30/25/24fps
⬩ 4K: 3840×1920@60/50/30/25/24fps
⬩ 3K: 3008×1504@100fps
72MP (11968×5984)
18MP (5952×2976)
Insta360 One 1-inch⬩ 5888×2944@30fps
⬩ 6144×3072@25/24fps
⬩ 3840×1920@30/25/24fps
⬩ 3040×1520@50fps
6528×3264 (2:1)
Ricoh Theta Z1 ⬩3840×1920 (30fps 4K)14 Megapixels
Kandao QooCam 3⬩ 8K Video (30fps)
⬩ 4K Video (120fps)
29.4 Megapixels
PANOX V2⬩ 5760 x 2880  (30fps).
⬩ 360 Degree 4K (60fps).
⬩ VR180 Degree 3D
18 Megapixels

Audio, Mounting & Durability

360 CamerasAudioMountingWaterproof
Insta360 X3⬩ 48 kHz, 16bits, AAC
⬩ Directional audio for vlogging.
⬩ Wind noise reduction & stereo quality sound.
Invisible Selfie StickYes, 10m (33ft)
Insta360 One 1-inch⬩ 4 Mic 360 Degree Audio.
⬩Wind Reduction
⬩ Stereo
Flip-out Mounting FeetYes, 10m (33ft)
Ricoh Theta V⬩ 4 microphones to record 360 degrees of spatial audio.
⬩ Option to use an additional external microphone.
Stands, Sticks, &
Smartphone holders (Optional extra)
No
Kandao QooCam 3⬩ 4 MEMS 48KHz Microphones.
⬩ 3.5mm Mic Port for external professional Mic.
Third-party stands
and sticks
No
Panox V2⬩ 4 MEMS 48KHz Microphones.Tripod SocketWith Case (Up To 30m)

Control Options & Pricing

360 CamerasMobile AppTouchscreenVoice CommandPrice
Insta360 X3YesYes14 Voice Commands$399
Insta360 One 1-inchYesYes4 Voice Commands$429.99
Ricoh Theta Z1YesYesOnly for Image Capture$376.95
Kandao QooCam 3YesYesNo$559.99
Panox V2YesNoNo$399

You can now compare different features and aspects of these 5 cameras and decide which one matches your requirements best.

How You Can Make Money with 360 Panoramic Cameras – Industry Use Cases

Let’s have a look at how panoramic cameras are being used and can be used in different industries to make you money.

1. Real Estate

If you’re a real estate agent, you can use 360 panoramic cameras to create virtual tours of your properties, providing a 360-degree view of the property to potential buyers.

This will help to increase engagement with your clients and provide them with a more immersive viewing experience.

Pair your camera with WPVR to easily create immersive virtual tours and integrate them directly into your website.

Here’s an example of how it will look,

2. Travel and Tourism

If you work in a travel company, you can use these 360 panoramic cameras to capture immersive footage of destinations where you operate and create virtual tours.

It allows your potential customers to explore a location before booking a trip.

They can explore rooms just like the one below,

3. Education and Training

You can use 360 panoramic cameras for education or to train employees or students by creating immersive training videos.

For example, medical students can get familiar with real-life challenges & learn how to act using 360-degree footage of surgeries.

4. Museums and Exhibitions

You can create interactive exhibits and virtual museum tours using 360 panoramic cameras and make your exhibitions open to your online viewers.

5. Automotive Industry

If you own a car dealership, you can use 360 panoramic cameras to create a virtual car showroom to showcase the interior and exterior of your vehicles.

They may check car details like this,

6. Architecture and Design

If you’re an architect or designer, 360 panoramic cameras will help you create immersive visualizations of your projects.

It allows your clients to have a better idea of the space before it’s built or designed.

7. Photography & Videography

360 panoramic cameras will let you capture unique perspectives and create stunning visuals.

Their compact size and portability make them a great option for your on-the-go shoots.

8. Event Planning

In the event planning business, you can use 360 panoramic cameras to capture your events from multiple angles, providing a more comprehensive view of the event and a dynamic showcase.

Also, utilizing 360 panoramic cameras to capture your events from multiple angles not only provides a more comprehensive view but also enhances the invitation-making process by offering dynamic visual content for the invitation maker app.

For those looking to elevate their event documentation further, hiring professional event photographers can add a layer of professionalism and creativity to your visuals.

It’ll make your job easier to impress your potential clients with your previous work.

9. Construction and Real Estate Development

If you have a construction business, you can utilize 360 panoramic cameras to create virtual site visits and track construction progress.

It’ll let your stakeholders monitor the progress of the project remotely.

10. Sports and Action

You can use 360 panoramic cameras to capture your extreme sports and outdoor activities in high-quality footage.

This will be useful for athletes like you looking to document their experiences.

11. Film and Entertainment

If you’re in the entertainment industry, you can use these panoramic cameras to capture live events, such as concerts and festivals, to capture 360-degree footage for your online audiences.

12. Security and Surveillance

In the case of monitoring large crowds or events, 360-degree footage can provide a comprehensive view of the area being monitored.

Wrapping Up

In summary, the Insta360 One X3 offers the best image stabilization and editing capabilities, making it a great choice for those who want to capture smooth, professional-looking footage.

The Kandao QooCam 8K is the best choice for those prioritizing image quality, as it offers the highest resolution and dynamic range.

The Ricoh Theta Z1 is a great option for those who want advanced features like live streaming and remote control.

The Insta 360 ONE RS 1-Inch offers amazing photo quality even in low light so it’s great for using in all weathers.

Lastly, PanoX V2 is great for its exceptional performance, especially in capturing high-resolution photos.

No matter which camera you choose, a 360 panoramic camera can open up creative possibilities for photographers and videographers.

Whether you’re looking to capture immersive footage of your travels or create virtual tours of real estate properties, these cameras can help you easily achieve your vision.


If you want to use a reliable virtual tour creator that is reliable, cost-effective, and has a high-quality interactive floor plan feature, then WPVR would be a great choice.

Try using WPVR today and start making virtual tours that are more optimized for converting clients.

FAQs

Are 360 panoramic cameras difficult to use for beginners?

  • Not necessarily. While they may have a learning curve, many models offer user-friendly interfaces and intuitive controls to simplify the shooting process.

Can I use a 360 panoramic camera for everyday photography?

  • Yes, 360 panoramic cameras are universal tools that can capture a wide range of scenes, from everyday moments to epic landscapes. It enhances your photography experience.

Are 360 panoramic cameras only suitable for professional photographers?

  • No, they’re for everyone. Whether you’re a professional photographer, an enthusiast, or just someone who loves capturing memories. A 360 panoramic camera can elevate your photography game.

Do 360 panoramic cameras require special editing software?

  • While some advanced editing software can enhance your images, many panoramic cameras come with built-in editing features. It helps to make it easy to edit and share your photos directly from the camera.

Can I use a 360 panoramic camera for live streaming?

  • Yes, some models, like the GoPro MAX and Ricoh Theta Z1, offer live-streaming capabilities. It allows you to share immersive experiences in real-time with your audience.
Categories
Guide Real Estate Virtual Reality WP VR

How to Prepare Engaging Virtual House Tour to Close More Deals [2025]

What if your next home buyer could fall in love with a property without ever stepping foot inside?

Nowadays buyers are overwhelmed by the time-consuming process of visiting numerous properties. Successful realtors now rely on VR tours to tackle this, significantly boosting their closing rates.

– Virtual tour listings earn 87% more pageviews than house listings without tours.

54% of buyers avoid property listings without virtual tours.

Modern virtual house tours come with many advanced elements such as tooltips, contact forms, embedded videos, and so on. This takes user engagement to a whole new level and viewers tend to trust you more.

According to a survey, 63% of potential home buyers considered placing bids without even visiting the house thanks to a detailed virtual tour.

Today, you will learn why virtual tours work and how you can create virtual tours of properties to start closing more deals.

So, let’s begin.

What is a Virtual House Tour

A virtual house tour is an online experience where you can explore properties through immersive 360-degree views. It allows you to virtually explore each room and space.

It also provides a realistic sense of the property’s layout and features. This innovative tool is convenient for prospective buyers or renters who want to preview homes without physically visiting them.

Virtual house tour

By offering detailed visuals and interactive capabilities, virtual house tours simplify the house-hunting process, saving time and effort.

Overall, virtual house tours revolutionize the way people search for and experience potential homes. It also makes the process more convenient and efficient.

How Virtual House Tours Can Ensure More Closed Deals

Maybe you still use images or videos of the properties when listing them on their websites. But, regular images can’t accurately represent a room’s lighting, ambiance, and surroundings of the property.

On the other hand, sure you can add a video walkthrough of your house. But that doesn’t feel like a real tour. It still leaves a lot of doubts in mind.

And even if the videos and images are great, people still need to give you a call to find out minor details about the house such as the flooring material, the roof details, etc.

virtual property tour

That is why most buyers look at tons of properties, and you handle several visitations before finally finding a successful client. A virtual tour can change that.

You can easily implement a virtual walkthrough to get the best experience. Now I am going to tell you how a virtual house tour can provide it. So let’s get started-

  • With a 360-degree view and full control, you can explore every inch of the virtual house at your own pace, unlike videos that limit what you see. This interactive format gives you the freedom to look around as you please. It provides more engaging and insightful virtual reality house tours.
  • Today’s virtual tours are designed to provide detailed property information online without the need for a phone call. Imagine clicking on hotspots in the virtual house’s rooms to learn about dimensions or materials. You can even watch a short explainer video during the 3D house tours to understand important details about the home, just like you would ask over the phone.
  • Adding soothing background music enhances the online house tour’s ambiance, making you feel welcomed and immersed in the experience. Interactive buttons can guide you to additional images or videos of features like the swimming pool, giving you a deeper perspective.
  • For your convenience, there’s a button to submit bids or schedule appointments right from the virtual home tour. This seamless integration helps you take the next steps efficiently.
  • By the end of your 3D virtual home tours, you’ll have a realistic sense of the property, and most of your questions will be answered. When you reach out, you’ll be well-prepared and confident about potentially making this virtual house your home.

Both The Realtor And The Buyer Will Be Benefitted

As you saw, a virtual house tour can give the best experience to the buyer. But it is more than what you think. It gives both of you extra benefits.

Benefits of a RealtorBenefits of a Buyer
1. Significant Market Exposure

The more buyers visit your virtual house tour listing, the more clients you attract to your agency.

Plus, when you sell a house with such a great display, your client is more likely to share his/her experience with many others, who may then consider working with you to find homes for themselves.
1. Detailed with More Research Time

Virtual reality home tours give buyers the freedom to get a look at the complete property more closely and help them inspect it thoroughly.

Also, since it’s available online, a buyer will get more time to look at it in his/her own free time. There is no rush compared to when taking a live visitation.
2. Draw Long Distance Clients

Virtual tours on your website can open the door to attract buyers even from far away. Most buyers are reluctant to travel a long way because they fear getting disappointed with the visit. A virtual tour will save them time and money to inspect a house, and they may consider buying from you even if they are from a distance.

2. Comfortable Experience

Since the tour gives more control to the buyer, they will find it more comfortable to take a tour while resting on a chair or maybe a couch.

And if he/she has a VR box, they can get the live tour while at home.

Then there are all those engaging elements in the tour that will make them love the experience compared to watching images or videos.
3. Increase Website Traffic

Once you start to reach more clients via the virtual house tours on your website, maybe via Ads or social media, your website traffic will start to increase because now, Google recognizes engaging content and ranks them faster.


3. A Better Way to Make a Decision

Normally, the process of buying a house can be quite stressful at times. Browsing through several properties, visiting the place, having a meeting with you, processing paperwork, and so much more. So people often get confused about which homes to discuss further.

Since the virtual tour answers most of the questions, a buyer is more comfortable moving forward with the process rather than staying in a dilemma between multiple houses.

Tips for High-Quality 360 Images for a Virtual House Tour

You must have seen various property listing websites. They sell vacant properties and focus on showing the best prices to customers.

These websites are filled up with images of individual property or a house. But the rooms are not highlighted or shown properly in most cases.

To properly showcase a virtual tour, you will have to take images from each room’s vantage point. This results in having too many images do nothing but confuse the potential buyer.

On the other hand, a virtual house tour doesn’t cause any issues like this. You can take a good-quality image of each room and put it into the virtual tour easily.

360 Images - Virtual House Tour

1. Proper & Clean Decoration

As I mentioned earlier, virtual tours will highlight empty spaces and extraordinary features. But too much of an empty house can look dull.

Add enough furniture to make the virtual luxury home tour. But avoid adding unnecessary items inside a house tour which can make the space seem untidy.

2. Set Up Appropriate Lighting

Take the 360 panorama image in bright and appropriate lighting. The rooms will look dull if you take the photos in dim lighting or at night time.

Not only dullness, but less lighting can also make a room appear smaller or congested than it is. Raise curtains and switch on the necessary lights to increase the intensity of the room.

3. Keep The Image Location In Mind

Try to take the image from a perspective where a person will be standing. This varies from room to room.

But placing yourself in the precise center of the room is the best approach. The whole room with windows and roofs is covered when each room tour image is taken from the center.

So when your clients take the tour, they’ll feel like they’re standing right in the middle of the room.

4. Display Exceptional Features & Outdoors

Always show off the exceptional features inside virtual house tours. Make different tours indoors and outdoors to make your customers understand how big the house is with front and backyards.

Let’s say a listed house has a pavilion or a swimming pool in the backyard. Make sure to highlight these exceptional features in the virtual house tour.

5. Optimize the Photos

Don’t forget to check the images of the rooms before adding them to a tour. Check each image if they are good enough for creating a virtual tour. You can use 360 cameras to capture good images.

On top of that, you will need to take high-caliber images for your virtual house tour. As a matter of fact, you can even use an iPhone for great panorama images.

You can even use an iPhone or an Android app for your mobile. You’ll be able to take great images and optimize your photos without any prior experience at all.

How To Use A Virtual House Tour in Your WordPress Site

There are many virtual tour software available in the market. But one of the best Virtual Tour tools available is WPVR. It has both a Free and a Pro Version available.

WPVR is one of the most user-friendly virtual tour builders available. You can convert a 360 panoramic image into a virtual house tour within a few minutes.

It lets you optimize virtual tours for both smartphones and desktops. Make the tour load time and transitions fitting for the clients.

Also, the WPVR Pro Version will help you make a comprehensive virtual house tour with all the necessary elements you need.

Must-Have Features of a Virtual House Tour

Here are the features that will help you to create an engaging Virtual House Tours:

Hotspots

Hotspots - Virtual House Tour

The first and foremost thing is to add hotspots to your virtual house tour. Hotspots are usually used to pinpoint an element with details, change scenes, or add a product/contact form to a tour.

Imagine, you have cabinets in a house for different use. You’ll be able to give details of each cabinet with images or videos using hotspots in a virtual tour.

Gyroscope

Increase the comfort of your potential buyers by offering a virtual house tour on smartphones.

With the Gyroscope Feature enabled, your clients can check out the house through smartphones whenever they want.

Scene Gallery

Scene Gallery - Virtual House Tour

Each house has its own uniqueness with multiple rooms. With the Scene Gallery feature, add the individual room scenes into a single virtual house tour.

Your clients will enjoy the 360 tours of each room distinctly. Scene Gallery feature displays all the rooms in a gallery section.

Your clients don’t have to look here and there to go from one room to another. They can switch to any scene from the gallery within seconds.

Compass

Compass - Virtual House Tour

Many house buyers prefer the north view of a house whereas many like the east view. They can determine the side of a window or door in a room using the virtual house’s compass feature.

Company Information

Your clients need to know about your agency and real estate company before making any purchasing decision.

With this feature, showcase your company logo as well as give a brief description of your company.

Explainer Videos

Explainer Video - Virtual House Tour

Explainer Video is the video that your clients can enjoy when they’re taking the house tour.

This feature will let you add a video inside the tour. You can explain the unique attributes of a house and what your clients will gain by purchasing that particular house and all the details you want.

So your users will be able to take the tour and watch the video at the same time.

You can also add tour background music, zoom controls, and many other attributes to a virtual house tour.

Conclusion

To close more deals with an engaging virtual house tour, You should utilize its immersive capabilities to showcase your properties.

By allowing viewers to explore each room from multiple angles, interact with embedded content like videos and informational hotspots, and even experience the ambiance through background music.

They offer convenience and flexibility. It also enables buyers to view properties remotely at any time. This saves time and attracts more serious prospects.

Ultimately, It can lead to quicker sales cycles, higher conversion rates, and a more satisfying experience for both buyers and sellers. And by using tools like WPVR, you can easily understand how to create a virtual tour of a house and start attracting more clients.

FAQs

1. How can virtual house tours benefit me as a buyer?

Virtual house tours allow you to explore properties in detail from the comfort of your home. You can guide through each room, look at features closely, and get a realistic feel for the property’s layout and ambiance. This saves you time and helps you narrow down your choices efficiently.

2. Are virtual house tours as effective as physical visits?

Yes, virtual tours are designed to provide a comprehensive viewing experience. They offer interactive features like informational hotspots and embedded videos that enhance understanding. While physical visits provide a hands-on experience, virtual tours can significantly reduce the number of properties you need to visit.

3. How do virtual house tours help sellers close deals faster?

Virtual tours increase buyer engagement and confidence by providing a detailed, immersive experience. They allow sellers to showcase their properties 24/7 to a global audience, attracting serious buyers who are more likely to make informed decisions and submit offers quickly.

4. Can virtual house tours replace traditional showings entirely?

While virtual tours offer a convenient initial viewing experience, many buyers may still prefer physical inspections before making a final decision. However, virtual tours can significantly reduce the need for multiple showings, saving time and effort for both sellers and buyers.

5. What features should I look for in a virtual tour to maximize effectiveness?

Look for tours that offer high-quality 360-degree images, interactive elements like hotspots for detailed information, compatibility with mobile devices, and easy sharing options. These features enhance user experience and increase the probability of closing deals efficiently.

Categories
Guide Virtual Reality WP VR

How To Create A Virtual Car Showroom – Virtual Reality (VR) In Automotive Industry [2024]

Large car brands such as BMW, Ford, Tesla, Audi, and many others are already using VR technology to promote their latest car models.

It is estimated that the automotive VR industry will see a 79% growth in annual revenue by 2026.

If you are a car dealer or own a car showroom, then you too should consider embracing VR technology to increase your chances of closing the deal.

If you have a WordPress site, then you will be glad to know that there is a reliable tool that will help you create your own virtual car showroom easily, without any high costs. (Learn about it later in this article.)

In this article, I will give you insights into virtual car showrooms and the step-by-step process of creating a VR Car showroom on your own in WordPress easily.

So let’s begin.

Why now is the right time for your business to consider a virtual car showroom?

COVID-19 accelerated the already popular tendency of purchasing expensive goods before seeing them.

2020 saw the debut of virtual car showrooms from Mercedes, BMW, Toyota, and Nissan.

Even if the pandemic slowed down, it’s clear that changes in buyer behavior have already changed a lot and increased the trust level in off-seen buying.

All calls to action (CTAs) that a car brand needs from “schedule a virtual appointment,” “set up a demonstration,” or direct customers to the checkout counter if they are ready to commit to a mission can be done with a virtual car showroom.

All you need to gather the right knowledge about an ideal interactive car showroom.

What Is An Ideal Interactive Virtual Car Showroom

A modern-day virtual car showroom is where you create an interactive tour with various views within your VR car showroom, and visitors will be able to move from one scene to another and navigate a 360-degree view.

With an interactive virtual car showroom, you can :

  • Develop an immersive virtual showroom with 360-degree panoramic views
  • Integrate interactive hotspots for additional information, videos, or audio
  • Create detailed 3D models of car interiors for each vehicle
  • Allow visitors to “enter” virtual car interiors with 360-degree views
  • Optimize for various VR headsets and devices
  • Incorporate gamification elements and analytics tracking
  • Consider e-commerce integration for car configuration and purchases

Here’s an example of what we are discussing here:

As you can see, this creates a user-friendly environment where the viewer will feel like he is taking a real tour.

Now, he could be sitting comfortably at home or, maybe, taking a coffee break at the office and visiting via a mobile phone or simply searching for his ideal car with his wife. The fact is, he will not be in a hurry and will be in a state of mind where he can choose a car with some real thought.

The tour will help highlight the main features of the car and allow him to picture how he can expect the car to be in real life. Thus, once he decides on a car, it will be a real decision to buy, not a dilemma of whether he wants a car or not.

So in a sense, the virtual car showroom tour is more of a passive sales pitch to attract real buyers.

Now, let us look at how you can create a virtual car showroom easily, on your WordPress site.

Step By Step Guide To Create A Virtual Car Showroom

When creating a virtual car showroom tour, it’s crucial to use a tool that is easy to use and does not hamper the quality of the environment.

In WordPress, you’ll find WPVR, is one of the easiest virtual tour builders out there.

Using this tool, you can turn a 360 panoramic image into a 360 virtual tour with just a few clicks.

In the next few steps, you will learn how you can use WPVR to create virtual car showroom tours on WordPress.

So let’s begin.

Step 1 – Get WPVR And Install & Activate It On Your WordPress Site

You will need to first install and activate WPVR free version from the WordPress repository.

Simply go to Dashboard > Plugins > Add New and search for WPVR. It should appear as the first option. Install and activate it.

Next, you need to get WPVR Pro.
The free version will let you create a simple virtual tour. The Pro plugin will let you add all the amazing elements to make the tour more engaging such as an explainer video, contact form support, hotspot icon customization, etc.

Once you have purchased WPVR Pro, install and activate it as well. Then activate your license key to get access to all of its premium features.

Step 2 – Configure WPVR For Best Output

Before creating your VR car showroom, configure WPVR for a better output in the General Setup Options.

VR Car Showroom - Advanced Settings

Make sure the following options are enabled:

  • Mobile Menu Resizer:
    This will ensure your virtual tour is optimized for mobile devices.
  • Disable WordPress Large Image Handler on WP VR:
    WordPress normally compresses image files. Enabling this option will mean when you will upload 360 images, they will not be compressed, thus maintaining a high quality of the tour.
  • Disable On Hover Content for Mobile:
    This option is useful because there is no option to hover on mobile devices. So it’s rather wise to disable it.
  • Front End Notice for Mobile Users:
    A notice to ask viewers to rotate the mobile to landscape view will help to improve their experience.

Step 3 – Create The First Scene Of Your Virtual Car Showroom Tour

Now, in less than a few minutes, we’ll make a simple virtual car showroom tour.

Hover on the WP VR menu in your WordPress Dashboard and select Add New Tour.

Create a new Virtual Car Showroom

You will be taken on a new tour and initially, you will be in the Basic Settings tab on the General menu.

Creating virtual car showroom
  • Add a Title to your virtual tour.
  • Enable the Auto Rotation & keep the speed slow. We recommend keeping it to -5.
  • Add a Preview image. This will act as a placeholder when you place the tour on a page. People can click on it to access the tour.

You can create a custom image to use as a preview image where you can include a cool image of your showroom and add a CTA text saying “Take a virtual tour and be amazed by your favorite cars” or something along that line.

Step 4 – Upload Your 360 Image And Create A Scene

Scenes are the part where the images will be uploaded.

  • Select the Scenes option.
  • Create a distinct Scene ID (Without any special characters and spaces).
  • Select the first panorama image of your flat by clicking the Upload button under the Scene Upload area.
Upload image of VR Auto
  • After the image has finished uploading, scroll down and click on the Preview button.
Preview of VR Car Showroom
Type caption (optional)
  • You’ll see a live preview of the tour in the Tour Preview section. You can move around this basic tour and use basic controls.
  • Give a Title of the image to showcase the name and Update.
Title for VR car showroom
Type caption (optional)

That’s it. See, how easy it was to create the virtual tour?

Let’s add more features and control options to make this a complete virtual car showroom tour. Here are the details:

Advanced Controls

Go to General > Advanced Control tab and enable these features:

  • Scene Gallery: Scene Gallery will let you keep an inside image of a car in the picture gallery.
  • Gyroscope: Gyroscope Feature will let you load the car showroom on Mobile.
  • Explainer Video: With the Explainer video, you can add explained details of the car.
  • Add Company Info: Time for the branding of your organization. Company info is very important while showcasing the car.
  • Tour Background Music: Tour Background Music will help with the engagement of clients.

Control Buttons

Now, Go to the Control Buttons tab.

Keep all the options enabled in this section. Go through the Navigational Features to understand how the control buttons will work for your own VR Car Showroom.

Extra Tips:

  • Author and Author URL fields are necessary when there are dedicated authors for images.
  • Default Scene Face will set a default scene for every tour.
  • With Customize Scene Zoom, you’ll receive three new options that let you adjust the zoom level to your preference. This Customize Scene Zoom will help you with the details.
  • You can now add additional panorama images to this VR Car Showroom tour by adding more scenes and different parameters.
Advanced Setting - VR Automotive Showroom
Type caption (optional)

Step 4 – Use Hotspots – Connect Panorama Images with Hotspots to Display Additional Information

Since you’re building a Car Showroom tour, it’s time for you to show the cars and their details. Let’s work with one car for now. To add a hotspot you’ll need to go to the hotspot section and add one.

  • Give an ID for the Hotspot. Note: The ID should be one word without any special characters.
  • Add Pitch & Yaw from the section of the panorama where you want to place the hotspot.
Information inside car showroom virtual tour
Type caption (optional)
  • Now scroll down, then you can add a custom icon. And on hover content write what you want to display when your clients hover on the hotspot. The best part is you can add images, and gif files as well.
Custom hotspot - VR Auto
Type caption (optional)

Let’s add another hotspot and see how it looks on the frontend:

Detailed information - VR Car
Type caption (optional)

Tip: I’ve added engine details in the hotspot as well. If you want to showcase the car features individually, you can do it this way.

You can even showcase the inside image of a car by moving from one scene to another. For this, you’ll need to use the Scene Type Hotspot.

You can also add a URL link to a Car’s product page from where the client can directly purchase the car.

Link to Car details
Type caption (optional)

Now, you’ve created a complete VR car showroom. And the next move would be to impress your customer with your presentation or answers and close the deal.

Yes, you still need to put in some effort to close the deal, but you can see how a virtual tour can reduce the amount of effort you would normally need to invest in convincing the buyer who just walked into your showroom to view cars.

Follow this simple guide to easily add contact forms inside virtual tours.

Some Components You Should Include In Your VR Car Showroom

Components of VR Automotive Showroom

Now, that you have understood the process,

let’s go through the components you should include in your VR car showroom.

  • Car description
    This may include the base price, real-life photos of the car in use, promo video, model no., details on design (interior & exterior), engine type, performance, comfort, safety, specifications, etc.
  • Client Experience Video
    You may include a testimonial video of a real buyer who used the car and was satisfied
  • Introductory Explainer Video With Recommendations
    You could include an explainer video to invite your buyer in and recommend some of your cars for various cases, such as suggesting a certain Sports car for more speed or another car for a better luxury interior, or you can even suggest the newest model in your showroom.
  • Include Showroom Address And Directions
    You can include your company information, contact numbers, and a link to directions for your showroom within the virtual tour.
  • Booking form for test drive or appointment
    As mentioned earlier, you can allow the prospect to book a time for a test drive, an online meeting, or even a meeting in person.

How Can A VR Car Showroom Help To Increase Car Sales

VR Car Showroom - Increase Car Sales

So far, you already learned how to create a VR car showroom.

Let’s discuss the reasons why you must consider using one.

1. Create A Meaningful Experience For Potential Buyers

Any brand new car looks awesome in photographs. But then why does a buyer reject cars when visiting in person?

Yes, the price may be a factor to think about at times, and that is something you can’t avoid. But there is more to it than just the price.

The fact is, when a person thinks of buying a car, he tries to imagine himself with the car, either sitting inside or standing by it.

An image can always mislead the prospect into imagining something more than what it is. But, a virtual tour will give him a more realistic idea of how the car actually looks. And an interior tour will help him decide if he is ready for a test drive or if the interior is not cozy enough for him.

Plus, for high-end buyers, the virtual tour will help them judge if the car goes with their profile.

2. Provide Relevant Details Than Can Drive Decisions

When choosing a car, a person also wants to ensure it has the right features and specifications.

For example, if someone is looking to purchase a Super Car, he will surely want to know about its engine, zero to hundred calculation, horsepower, etc.

You can include them as hotspots that prospects can click or hover to read. You can also include audio explaining its features. An even more engaging approach would be to include a click-to-view promo video on your cars.

If you can provide the right details along with the virtual tour, it will make it a lot easier to trigger a temporary decision from the buyer.

Also, a custom automotive software development can be integrated with car OS, these interactive elements can reshape even more towards the unique selling points of each vehicle, enhancing user engagement and driving informed purchase decisions. Additionally, software development analytics tools can analyze interactions and provide valuable insights into buyer preferences and behavior. This data helps to improve user engagement and purchase decisions.

3. Give A Complete Car Showroom Experience

You can take the experience one step further by allowing the prospect to book a test drive or a direct call with you or even allow him/her to submit questions for you to answer later.

All you have to do is to add a booking form or contact form within your tour, where the buyer can choose a suitable schedule or simply submit questions that you can later answer via email or phone call.

This will give you the added benefit of having a list of leads that are genuinely interested in buying a car that’s in your showroom.

At the end of this guide, I will explain how you can easily set up contact forms in your virtual car showroom to allow potential customers to reach you easily.

Additionally, consider adding a total loss calculator to your virtual showroom. This will enable prospects to get an estimate of their potential insurance payout or trade-in value directly on your site, enhancing transparency and trust.

Exploring partnerships with junkyards in Hawaii could further enhance the virtual showroom experience by providing users access to a wider range of parts and salvage vehicles, smoothly integrated with the virtual environment to offer comprehensive solutions for both buyers and sellers.

Conclusion

The VR automotive industry is quite on the boom and you can tag along by using virtual tours for your car showroom (if you haven’t already).

The amount of engagements you can make with a virtual car showroom tour is immense compared to a normal website. Plus, as you saw, it is so easy and affordable to create a virtual car showroom tour.

So it’s high time for you to start using VR technology to drive more sales.

This could be a game-changer in helping you attract more potential buyers and increase your car sales.

Categories
Virtual Reality WP VR

How To Create A VR Museum Tour To Increase Live Visitors [2025]

What if your museum could attract visitors from all over the world—without them even stepping inside first?

Let’s be real: getting foot traffic isn’t easy. Locals might stop by, but how do you turn your museum into a must-visit destination for travelers from other cities (or even countries)?

Simple: a VR Museum Tour.

Imagine someone in Paris, Tokyo, or New York stumbles upon your virtual museum tour. They explore your best exhibits, get immersed in fascinating stories, and suddenly, they’re obsessed. Next thing you know, they’re planning a trip just to see it in real life.

And the best part? You don’t need to digitize everything!

Just highlight your most captivating collections, add rich storytelling, and let the power of VR do the heavy lifting.

Ready to make history irresistible? Let’s dive into how you can create a VR museum tour in WordPress—easily and effectively.

Why Use VR Museum Tours?

A virtual museum will let your visitors go around and explore the museum just like they would in person while sitting comfortably at home.

More importantly, it comes with several significant benefits, such as :

i. Help Attract More Visitors From All Over The World

If you are someone related to public museums, you must know public museums act as a great attraction for tourists, which generates museum revenue and boosts the local economy.

Some museums even charge higher fees for foreign visitors as an additional income source.

If you are someone related to universities or large organizations, you must want to attract international students and culture-loving local students, or charity farms.

Whichever purpose you may have, you would definitely want to attract more visitors.

This is where virtual reality plays a big part.

If you create a Virtual Reality Museum of your original one, it will help attract people from all over the world.

And, if you can promote it actively, you will start seeing more and more prospects inquiring about a visit.

ii. Get Tickets Booked Online

You could easily integrate an online ticketing system into your virtual museum so that visitors can get tickets while taking the tour.

This means, that as soon as someone gets interested in your museum, they will be able to collect tickets and start planning their schedule to visit.

It will avoid too much confusion and make long-distance visitors more comfortable to travel & explore the full collection in person.

iii. Educate About Local History And Culture

It is important that people know about their history. Yes, people do learn a bit from school. But, it’s even better if they can get a visualized experience.

So, if you are willing to spread more knowledge about your local cultural history, creating a virtual tour would be great.

You may create a custom environment with historical figures and monuments in the tour, along with tooltips and click-to-view text or video to learn more about each character/item.

This will be super useful for students to learn with more interest, and help keep the locals well-informed about their own history.

**You can even create a premium VR museum experience where people may pay a small amount to get access to the complete museum in VR rather than partial access to some of the collections.

iv. A Great Medium To Preserve History Online

You never know how long you can preserve the actual historical items or monuments.

Books may whither away or museums may shut down. But, if you create a VR museum, that piece of history will remain online as long as you have your website.

So, this is a great way to preserve history.

v. Tie It Up With Premium Packages In Universities or Virtual Learning Schools

Some universities are creating custom virtual museums (with no physical local) that cover almost any historical items, characters, or events. This, they may offer as part of their paid packets.

Make Online Ticketing System For Virtual Museums

Similarly, education is now very popular online. Certain virtual schools may include access to a VR museum on certain subscription levels.

**You can also create a detailed online virtual museum and sell it to educational institutions on a subscription basis. This will allow universities to educate their students more effectively while you have a good source of income.

As you saw, you will get benefit if you create a virtual museum.

Now, let’s learn how you can create a VR museum for your WordPress site step by step.

How To Create A VR Museum That Will Hook More Visitors

Let’s kick things off with the most important piece of the puzzle: the visual experience.

1. Use High Quality 360 Panorama Image For Your Museum Virtual Tour

To create a virtual tour of your museum, you first need the right equipment to capture 360 panoramic images of the areas you want to include in this online tour.

2. Use A Reliable VR Tool

Once you have your images ready, you need to use a reliable virtual tour creator. You may use WPVR to convert and connect your panoramas into a virtual tour.

3. Embed This Tour On Your Website, Preferably On The Home Page.

Once your tour is ready, you may easily embed it on any page either using a shortcode or using an Elementor widget/Gutenberg block/other supported page builders.)

4. Make the VR Museum More Attractive & Engaging

The main challenge here is to ensure people spend more time on the tour to build up their interest.
At this point, you may use the following features:

i. Tooltips With Basic Details About The Character/Item

Image Hotspot In vr Museum Tour

Use Click-to-view text/video to get detailed historical knowledge.

You can add tooltips containing on-click and on-hover content inside the virtual tour for your visitors to check the history details of a particular piece of art.

Then again, video content is more interactive for your audience to learn something in detail. Add YouTube & Vimeo videos to the hotspot of your virtual tour.

Video Hotspot In Museum Virtual Tour

ii. Connect All Scenes Into a Journey For People To Visit Around

With Scene Galleries like this, your visitors will be able to move from one scene to another with a click. They don’t need to switch tabs or do a bunch of stuff to go to another section of the museum.

And, not only that, but you can also add titles to each Scene to let your audience know where they are.

Scene Gallery For Online Virtual Museum

iii. Use An Introductory Mini-video To Invite People To Visit Your Museum

You can not only add videos to specific tooltips but also set a mini explainer video globally in your virtual tour for the visitors.

In the video, you may describe what the whole museum is about, the sections it has, and what historical era and its features have been introduced.

Explainer video in Virtual Museum Tour

iv. Add A Floor Plan Of Your Museum For Easier Navigation

Include a floor plan of your museum to indicate the areas available compared to the areas visitors have access to in this VR Museum.

Usually, museums are built in large areas with a lot of units. So, while taking a virtual tour of a museum, your visitors might get confused about how they are going to go forward.

So adding a floor plan will help them go to a section of a museum in less time. By using specific pointers in a Virtual Floor Plan, visitors will be able to click and go to a section instantly.

Floor Plan In Museum Virtual Tour

5. Share Your Virtual Tour With The World

Now that your virtual tour is ready, it’s time to actively promote the page where you embedded the tour. Share that page on social media, VR groups, and other such platforms.

You may even consider running paid Ads to bring in more potential traffic. Since your tour is detailed and well-groomed, you may use proper copy to convince people to take the virtual tour. In the virtual tour, you may add CTAs from time to time and an enhanced ticketing system to allow people to order tickets online.

This will not only attract locals but also be a prime tourist choice for foreigners who visit neighboring areas.

**You may also consider collaborating with a few local and international influencers to spread the word and share your virtual tour. This will help attract a lot more audience than you would normally get. Since they have loyal fans, many will surely try out the virtual tour and, down the line, visit your museum.

And that’s about a virtual museum guide. This way you can easily create and use a virtual museum tour in WordPress to get more visitors and grow your online presence.

More Enhancement Opportunities

If you’d like to enhance the experience of your virtual museum tours more, then you can add these extra enhancements that will make your virtual tours more attractive to your users.

Add Inquiry Forms Inside The Virtual Museum Tours

WPVR allows you to include forms in the tour which you can use to collect inquiries for tickets.

Use Fluent Forms in Virtual Museum Tours

VR Headset Support For Immersive Museum Tour Experience

VR Headset Support will let your visitors experience a virtual tour from a realistic visual standpoint.

Your viewers will be able to move around from one scene to another easily, wearing VR headsets as if they are moving inside the museum itself.

This will benefit people who might not otherwise be able to attend museums due to inconveniences.

Sell From Your Museum Virtual Tour’s Gift Shop

You can also add a scene of your museum’s gift shop and sell souvenirs directly from the museum virtual tour.

Some museums offer Auctions, so you may add the sellable antiques as products and directly let sellers buy them from the Museum Virtual Tour.

What Challenges Do Museums Face With VR?

Now you know how powerful a VR tour can be, but it’s important to understand the challenges you may encounter when creating one for your museum.

These challenges are real, but with the right approach, they’re definitely manageable.

  • Cost: Creating a high-quality VR tour isn’t cheap. Between purchasing equipment and hiring experts, it can be expensive. You’ll need to plan your budget carefully to avoid surprises.
  • Technical Setup: Even with all the tools available, setting up a VR experience requires a bit of technical know-how. You might need some help with the back-end process to get everything running smoothly.
  • Time-Consuming: Capturing 360 images and editing them takes time. It’s not something you can throw together quickly, so be prepared for a bit of a time commitment.
  • User Experience: Not everyone is familiar with VR technology. You’ll need to consider how easy it is for your visitors to navigate the virtual tour and ensure the experience is engaging.

Understanding these challenges up front can help you plan better and set realistic expectations. While there are some hurdles, the rewards of attracting more visitors to your museum are well worth the effort.

Author’s Note

Virtual Museum Tours will be mainstream in the next few years. Visitors will demand them to interact with famous collections in ways that aren’t feasible in physical spaces.

Virtual tours, however, need to be immersive. You must take into account all the mentioned features to design an experience for your visitors that is genuinely engaging.

You must develop interactive user content for your visitors to provide the best online virtual museum tour they can experience.

Frequently Asked Questions (FAQs)

What features should a VR museum tour have to attract live visitors?

An effective VR museum tour should be highly immersive and visually stunning, providing a realistic and engaging representation of the museum. It should also offer interactive elements, such as audio guides, informative popups, and the ability to zoom in on specific exhibits. Including behind-the-scenes footage or interviews with curators can add depth and intrigue.

Do I need expensive equipment to create a VR museum tour?

No, you can start with a 360-degree camera and basic VR software. High-end setups help, but they’re not mandatory.

Can visitors access the VR tour without a VR headset?

Yes, most VR tours work on desktops, tablets, and smartphones without requiring a headset.

How long does it take to create a VR museum tour?

It depends on the size of your museum, but with the right tools, you can create a basic tour in a few days.

Will a VR tour replace in-person visits?

No, it enhances interest. A well-made VR tour makes people want to visit and see the full experience in person.

Categories
Guide Real Estate Virtual Reality

How to Take A Panoramic Photo with Drones – Guide To Aerial Panorama [2024]

360 panoramic images have changed how people see photography in several businesses. You can easily present properties or various locations in the form of 360 virtual tours thanks to panoramic images.

However, it’s 2024, and now you can take 360 photography to a whole new level. And it’s all thanks to the invention of drones!

That’s right! Drones have grown in popularity over the past few years, and now, you will find several drones that come with high-quality cameras that are perfect for capturing 360 panoramic photos from the air.

If you are part of businesses such as real estate, hotels, resorts, education institutes, etc., then you can get a huge advantage when using aerial photography.

For instance, homes with aerial panorama photos sell 68% faster.

Today, you’ll learn how to take a panoramic photo using a drone, easily capturing stunning wide-angle views.

So let’s begin.

How To Take A Panoramic Photo Using Drones

Drones give you an extra edge in 360 aerial photography because you will be able to capture a panoramic photo that’s more versatile and unique than ever, unlike a regular camera.

For instance, you will be able to take aerial shots and shots from a distance you could never take on your own using a regular 360 camera.

There are three main steps to capturing a 360 panoramic image during a drone shoot:

  1. Choosing a reliable drone with the right 360 camera and lens.
  2. Preparing to capture a 360 panoramic photo using your drone.
  3. Capturing an amazing 360 panorama using your drone.

Let us look at each of them one by one.

1. Choosing A Reliable Drone with The Right 360 Camera & Lens

Since this is about taking panoramic photos, the first thing you need to invest in is a drone suitable to take high-quality 360 panoramic images.

This means you will need to ensure the drone you choose has a proper fish-eye lens along with a stable, high-resolution camera.

Let us look at a couple of drones that you may consider buying for this.

i. DJI Phantom 4 Pro V2.0

DJI Phantom 4 Pro V2 Review - Panoramic Photo with Drone

The DJI Phantom 4 Pro V2.0 is one of the best drones for capturing 360-degree panoramic photos.

It has a 20-megapixel camera with a 1-inch CMOS sensor and a mechanical shutter that can shoot 4K video at 60 frames per second.

It comes with a 3-axis gimbal that provides stability during flight and ensures smooth footage.

Specifications of DJI Phantom 4 Pro V2.0:

  • Camera: 20-megapixel camera with a 1-inch CMOS sensor.
  • Video resolution: 4K at 60 frames per second.
  • Gimbal: 3-axis gimbal.
  • Flight time: Up to 30 minutes.
  • Max speed: 45 mph.
  • Max range: 4.3 miles.
  • Weight: 3.04 pounds.

Pros & Cons of DJI Phantom 4 Pro V2.0:

Pros:

  • High-quality camera with a large sensor and mechanical shutter.
  • The 3-axis gimbal provides stability during flight.
  • Long flight time and range.
  • Obstacle avoidance sensors for added safety.
  • Advanced flight modes for easier panoramic photography.

Cons:

  • It is expensive compared to other drones.
  • The heavy and bulky design may not be as portable as other options.
  • Limited battery life.

Industry Use Cases of DJI Phantom 4 Pro V2.0:

If you are a professional photographer or videographer and require high-quality panoramic images for commercial use, then The DJI Phantom 4 Pro V2.0 is an excellent choice.

For example, if you are a real estate agent, this will be a great drone for you to capture an aerial panoramic photo of your properties which you can include in your virtual tour to create a unique perspective.

ii. DJI Mavic Air 2

DJI Mavic Air 2 Review - Panoramic Photo with Drone

The DJI Mavic Air 2 is another great option for capturing 360-degree panoramic images.

It has a 48-megapixel camera with a 1/2-inch CMOS sensor and can shoot 4K video at 60 frames per second.

It also has a 3-axis gimbal for stability during flight and can fly for up to 34 minutes on a single charge.

Specifications of DJI Mavic Air 2:

  • Camera: 48-megapixel camera with a 1/2-inch CMOS sensor.
  • Video resolution: 4K at 60 frames per second.
  • Gimbal: 3-axis gimbal.
  • Flight time: Up to 34 minutes.
  • Max speed: 42.5 mph.
  • Max range: 6.2 miles.
  • Weight: 1.25 pounds.

Pros & Cons of DJI Mavic Air 2:

Pros:

  • High-quality camera with a large sensor.
  • Lightweight and portable design.
  • Long flight time and range.
  • Advanced obstacle avoidance sensors for added safety.
  • Intelligent flight modes for easier panoramic photography.

Cons:

  • Gimbal may not be as stable as other options.
  • Limited camera control compared to more advanced drones.
  • No mechanical shutter.

Industry Use Cases of DJI Mavic Air 2:

If aerial photography is your hobby and you like to capture stunning 360 panoramic images for your personal collection, then The DJI Mavic Air 2 is an excellent option.

It’s easier to operate and has just the right features required for aerial photography.

It’s also a great option for travel bloggers and social media influencers who want to capture aerial panorama photos and videos on the go.

2. Preparing to Capture A 360 Panoramic Image Using Your Drone

Preparing to Capture A 360 Panoramic Image - Panoramic Photo with Drone

Before you are able to capture a proper 360 panorama, you have to consider a few preparations.

i. Configure Your Drone for Panoramic Photography

The first thing to do is to ensure your drone is well-prepared for panoramic photography.

Make sure that the drone’s batteries are fully charged and the propellers are in good condition.

Additionally, you should ensure that the camera is correctly mounted on the drone and is set up for panoramic photography.

Set it up to capture images in RAW format, which will allow you to make adjustments to the exposure and color later during post-processing. Also, enable the manual mode for the camera for consistent exposure.

ii. Observe The Lighting Conditions & Weather Conditions

Lighting is a crucial aspect when capturing any photos. Hence, you need to keep an eye on the weather conditions and observe if the lighting is correct to be able to capture colorful, attractive panoramic images.

Most photographers prefer to conduct their photography session during the golden hour, which is the first hour after sunrise and the last hour before sunset when the light is soft and warm.

You should avoid your aerial photography session during windy conditions to avoid disruptions or at times when the sunlight is too bright to avoid unwanted flares.

iii. Identify A Spot with Fewer Obstructions to Fly Your Drone

You need to keep in mind that your drone will have a few automatic functions that will not allow you to move it to a place with obstructions.

Hence, you need to find a spot where you are sure you can fly and land your drone.

This is where you will navigate your drone to for landing once the photography session is done.

So this spot should be a place with no trees or wires within a 3-meter radius.

If you don’t want to be captured within the photo, then this spot should be a bit away from your main focus location.

iv. Use Flight Planning Software for Efficiency

You can use one of the two apps which is suitable for you:

1. Pix4Dcapture

Pix4Dcapture allows you to design precise flight paths, ensuring consistent and high-quality panoramic photos. It provides valuable data on altitude, speed, and direction, giving you greater control over your drone’s movements.

With Pix4Dcapture, you can automate your drone’s flight, making it easier to capture detailed and accurate panorama images for your virtual tours.

2. AirMap

AirMap provides real-time airspace information and tools to design precise flight paths, ensuring safe and effective panoramic photography. It offers insights into altitude, speed, and no-fly zones, giving you greater control over your drone’s movements.

With AirMap, you can plan your drone’s flight to capture stunning panorama images, making your virtual tours more engaging and professional.

These are flight planning software designed for drones and help you with valuable data such as altitude, drone spend, and direction so that you can have more control over your drone while capturing a photo.

3. Capturing An Amazing 360 Panorama with Your Drone

Capturing Amazing 360 Panorama - Panoramic Photo with Drone

Now that you are ready to start your photo session let’s learn how you can proceed to capture the panoramic image.

i. Identifying the Sweet Spot for Capturing Your Panoramas

Next, it’s time to decide on a location where you want to fly your drone and capture the image.

To find the sweet spot, fly the drone above and around your desired location and find an angle where you find the scene that meets your photogenic requirements.

It’s best you can find a view where your main element gets the highest focus while still capturing a few surrounding elements to add some extra attraction.

Plus, the opposite direction should have something very interesting.

For example, if you are taking a 360 photo of your resort, then your resort should be the center of attention, while you can still have the mountains behind the resorts within the capture on a small scale.

And on the other side, there could be a view of the nearby beach.

Once you find such an angle, mark the spot.

ii. Capture your 360 photo

While the drone is on the spot, let it remain still for a few seconds for the camera focus to fully stabilize.

Once you are happy with the output, capture the image three times.

Check the images after capture and see if this is the view you were looking for.

The drone controller screen should let you get a 360 view of your panorama to understand if it meets your requirements.

If you are satisfied, then there you go. You have just captured 360 panoramas using the best drone for pictures.

iii. Take More Images From Other Angles

As satisfying as it may be, you shouldn’t stop. You should be determined to find the best possible view rather than settling for just one.

Move your drone around again to find more suitable angles and positions and capture a few more aerial panoramic images.

We recommend you capture at least 3 such panoramas before choosing to stop.

iv. Landing Your Drone

If you have flown the drone from a location with no obstacles, then most drones have a single-click option to return to the initial position and land.

But if you move around your drone in too many angles from there, there could be obstacles in the path of the drone from the initial flight position, and then you have to navigate it back to the landing place or to another suitable landing spot manually.

  • Avoid trying to land the drone on your palm. Many find it daring, but it could be risky.
  • If you notice it is windy at the moment around the landing area, then you should move away from that place before attempting to land the drone. You do not want the wind to cause an accident.
  • Make sure there are no birds or other animals around the area you are landing the drone.

v. Post-processing Your Images

Since you captured your images in RAW, you may edit them using Adobe Photoshop and adjust the color balance, brightness, and exposure before exporting them in a suitable image format.

You may then upload it on a VR tool to observe and decide if any more changes are required.

In case you captured this image to create a virtual tour that you want to embed on your WordPress site, then you may use the plugin WPVR. It is right now the no. 1 virtual tour software in WordPress.

You can simply upload your 360 panoramic images in just a few clicks and get a ready virtual tour in less than 5 minutes.

Advantages of Using Drones for Aerial Panorama Photography

Advantages Of Using Drones -  Panoramic Photo with Drone

You have just learned how you can capture a 360-panoramic photo using a drone.

But if you are still having doubts about why this is the best option, let us look at some of the core benefits you will get when using drones.

1. Access to Difficult Locations

You can use drones to capture images from high altitudes, over water bodies, or in areas that are difficult to reach.

With a drone, you can easily capture panoramic images of landscapes, cityscapes, or even inaccessible natural wonders like waterfalls or canyons.

2. High-Quality Images

Drones are equipped with high-quality cameras that can capture high-resolution images.

On top of that, drones with advanced features like 3-axis gimbals and mechanical shutters can ensure that images are stable and free from blur.

3. Time-Saving

Capturing panoramic images manually is a time-consuming process, involving multiple shots taken at different angles and then stitched together in post-processing.

With the best drone for pictures, you can capture panoramic images quickly and efficiently, saving time and effort.

Drones can capture multiple images at different angles in a single flight, making the process of capturing panoramic images faster and more convenient.

4. Unique Perspective

Drones can provide a unique perspective that is not possible with traditional photography techniques.

You can capture panoramic images from high altitudes, providing a bird’s eye view of the environment.

This perspective can provide viewers with a unique and breathtaking view of landscapes and cityscapes.

5. Cost-Effective

Drones are a cost-effective option compared to traditional photography methods.

They can capture high-quality images at a fraction of the cost of traditional aerial photography methods like helicopters or planes.

Top 3 Tools to Create a Virtual Tour with Drone Panoramic Photos

Creating a stunning virtual tour with drone panorama photos requires the right tools. Here are the top three tools that will help you maximize the potential of your panoramic shots:

1. WPVR

WPVR - Panoramic Photo with Drone

WPVR is one of the best tools to create a virtual tour with drone panoramic photos. This WordPress plugin allows you to effortlessly transform your drone panorama shots into immersive virtual tours.

You can also upload high-resolution panoramic images, customize navigation hotspots, and add interactive elements to enhance the viewer experience.

Its user-friendly interface ensures that even beginners can create professional-quality virtual tours quickly. Ideal for real estate, tourism, and other industries, WPVR helps you engagingly showcase properties and locations.

By leveraging the ability of drone panoramic photography, WPVR makes it easy to captivate your audience with stunning virtual tours.

Pricing:

  • Free Plan: free in WordPress Repository.
  • Starter Annual Plan: $79.99 per annual for 1 site.
  • Pro Annual Plan: $169.99 per annual for 10 sites.
  • Agency Annual Plan: $269.99 per annual for unlimited sites.
WPVR Pricing - Panoramic Photo with Drone

2. Koala

Koala - Panoramic Photo with Drone

Koala is a cutting-edge virtual tour software that allows you to create stunning VR experiences using drone-captured footage. You can easily transform aerial photos and videos into immersive virtual tours, providing viewers with a unique and engaging perspective.

This software supports high-resolution imagery and offers intuitive tools for stitching, editing, and customizing your tours. Ideal for real estate, tourism, and event planning, It enhances the presentation of properties and locations, making them more appealing to potential clients.

Its user-friendly interface ensures that even beginners can create professional-quality VR tours, maximizing the impact of your drone photography effortlessly.

Pricing:

  • Basic Annual Plan: free with limited functionality.
  • Pro Annual Plan: $65 per annual for 3 tours.
  • Unlimited Annual Plan: $450 per annual for unlimited tours.
Koala Pricing - Panoramic Photo with Drone

3. My360tours

My 360 Tours - Panoramic Photo with Drone

My360tours is a top tool for creating virtual tours with drone panoramic photos. This platform allows you to turn your high-resolution panoramic images into immersive virtual experiences with ease.

It offers intuitive features for uploading, editing, and customizing your drone panorama shots, making the process straightforward even for beginners.

You can add interactive elements such as hotspots, info points, and navigation tools to enhance viewer engagement. Perfect for real estate, hospitality, and tourism industries, My360tours helps you showcase properties and locations in a captivating way.

By utilizing the capability of drone panoramic photography, My360tours enables you to create professional and engaging virtual tours that leave a lasting impression.

Pricing:

  • Real Estate Annual Plan: $37 per month (billed annually)
  • Dealership Annual Plan: $37 per month (billed annually)
  • Architect Annual Plan: $37 per month (billed annually)
  • Photographer Annual Plan: $49 per month (billed annually)
My 360 Tours - Panoramic Photo with Drone

Conclusion

To summarize, capturing 360 panoramic photos using drones is a revolutionary approach that can significantly enhance your photography capabilities.

Drones offer unique perspectives, high-quality images, and access to challenging locations, making them an ideal choice for real estate, hospitality, and education businesses.

They save you time and effort, provide breathtaking views, and are a cost-effective alternative to traditional methods. By following the steps outlined in this guide, you can master aerial panoramic photography and elevate your visual content.

Once you’ve captured these stunning images, you can easily create a virtual tour using the WPVR plugin. WPVR simplifies the process, allowing you to upload and integrate your 360 panoramic images into a virtual tour on your WordPress site in just a few clicks.

** FAQs **

1. What kind of weather conditions should you avoid when flying your drone?

  • When flying your drone, avoid strong winds, heavy rain, and extreme temperatures. These conditions can interfere with the drone’s stability and performance, potentially causing crashes or damage. Instead, opt for calm, clear days with moderate temperatures to ensure the best flying and photography experience.

2. How can you ensure your drone’s battery lasts longer during a photo session?

  • To ensure your drone’s battery lasts longer, fully charge it before your session and bring spare batteries. Avoid aggressive tricks and high-speed flights, as these can drain the battery quickly. Additionally, monitor your battery level regularly and plan your flight path to make efficient use of power. It ensures you have enough battery to safely return and land.

3. What should you do if your drone loses signal while capturing photos?

  • If your drone loses signal, stay calm. Most modern drones have a “Return to Home” feature that automatically brings the drone back to its takeoff point. Ensure this feature is enabled before flying. If the drone doesn’t return automatically, try moving to a higher or clearer location to re-establish the connection.

4. How can you enhance the quality of your drone photos in post-processing?

  • Enhance your drone photos by using editing software like Adobe Photoshop or Lightroom. Adjust the exposure, contrast, and saturation to make the images pop. Also, fix any distortions or stitching errors in panoramic shots. Shooting in RAW format gives you more flexibility in post-processing. It allows for better adjustments and higher-quality final images.

5. What precautions should you take when flying your drone in populated areas?

  • When flying in populated areas, always follow local regulations and avoid restricted zones. Maintain a safe distance from people, buildings, and vehicles to prevent accidents. Fly at a lower altitude to minimize risks, and always keep your drone within your line of sight. Additionally, inform any nearby individuals of your drone activity to ensure their awareness and cooperation.
Categories
Guide Real Estate Virtual Reality WP VR

How to Create Apartment Virtual Tour In WordPress To Rent & Sell Faster [2024]

Even though regular promotions using apartment photos and videos are still there, the way virtual tours can represent an interactive model of your apartments, traditional still images can’t.

And it’s obvious!

Virtual tours show off your apartment features without having an in-person visit.

It saves you wasted hours, cost, and hassle that you go through while showing your low potential home buyers an in-person visit.

So, whether you’re a real estate agent, realtor, property investor, or marketing manager, this guide is for you!

In this guide, I will give you a good insight into increasing conversion and a proper step-by-step guide to creating an apartment virtual tour (and no, it is not just a video tour).

So let’s dive into it.

Do You Really Need to Use Virtual Apartment Tours for Your Real Estate Business?

The answer is Yes. You need to use a virtual apartment tour.

92% of the interested buyers prefer to research on the internet first, then decide to reach out to an agent.

There are just too many competitors out there and buyers won’t think twice to move to another site if they don’t find your website appealing.

Besides, basic images and videos of properties have already become so common nowadays that people no longer find them amusing.

What Is a Virtual Apartment Tour?

Just imagine,

after all the hard work and investment you have put into building and developing your website,

your prospects are leaving your site without giving you a real chance.

Pretty frustrating, right?

So what can you do differently?

The best option now is to make an instant impression. And the most unique way to do so now is to use a virtual tour.

Instead of going to a place, a virtual tour can bring that place to you.

And people love this experience.

The longer you can keep your prospects hooked, the higher the chance they will consider reaching out to you for a deal.

So, having virtual tours is definitely the go-to solution for you.

You will find several such tools which include WPVR, Matterport, Kuula, Klapty, and many more.

The easiest of them are WPVR (for WordPress), and Klapty (though a bit expensive)

Before we look into how you can create one, let us learn what exactly a virtual apartment tour is and observe a few examples to understand why you need VR apartments on your website.

An Ideal Apartment Virtual Tour

Here is an example of a typical 360-degree apartment virtual tour:

As you can see, you have full control to view in all directions, move from one room to another easily, check out the information given inside hotspots, & use the control buttons for easier navigation.

This is an ingenious way to make your prospects get hooked right on the spot. In this guide, I will show you how you can create a virtual apartment tour on a WordPress site using WPVR.

Create an Apartment Virtual Tour in Minutes(Not Hours)

How to Do A Virtual Apartment Tour

By creating a complete virtual tour your visitors can get an overall idea of how your offered apartment looks in real life.

Simply upload a 360 panorama image, and the plugin will help you transform it into a realistic virtual tour. ( And you don’t have to wait too long for it)

So, Get rid of describing your apartment features again and again over the phone and in messages.

Simply for the steps below and you can create an apartment virtual tour in minutes.

Step 1 – Install and Activate The Virtual Tour Builder Plugin

  • Go to your WordPress dashboard and click on the Plugins tab.
  • Click on Add New
  • On the search bar, insert WPVR and choose to Install and then Activate WPVR.

Install and activate it on your site, and Activate the License Key.

Now you’ll have all the premium features to create a robust virtual tour of your apartments.

If you need any help, follow this short guide to set up WPVR on your website.

Step 2 – Create A Basic Virtual Apartment Tour Really Quick

Now, we’ll create a simple virtual apartment tour in under 5 minutes.

From your WordPress Dashboard,

  • Hover on WP VR, and click on the Add New Tour option.
Create New Virtual Apartment Tour

Now, you’re in the tour settings tab.

  • Set a Title for your virtual tour.
  • Make sure that the Tour Autoload option is enabled.
    • This will automatically load your virtual apartment tour.
  • Ensure that the Basic Controls option is enabled.
    • This will enable the Zoom in, Zoom Out, and Fullscreen control buttons in your apartment virtual tour.
Create New Apartment Virtual Tour
  • Click on the Scenes section.
  • Set a unique Scene ID (Without any special characters and spaces).
  • Click on the Upload button under the Scene Upload field, and choose the first panorama image of your apartment that want to use.
Upload Scene - VR Apartment Tour
  • Scroll down and click on the Preview button.
Preview 3D Virtual Apartment Tour
  • You’ll see a live preview of the tour in the Tour Preview section. Here, you can move around to see the basic tour and use basic controls.
Preview of Modern Apartment Virtual Tour

That’s it.

As you can see, it was really easy to create a basic virtual tour.

Let’s move on to the next step.

Step 3 – Apply Useful Options To Your Scene

Now, we’ll use the advanced options of WPVR in the scene you’ve just created, to give your viewers better control of the apartment virtual tour.

Let’s keep editing the tour:

  • On the Title field, set a suitable name for this panorama.
    • For example, if the image is of the kitchen, set it as ‘Kitchen’ or ‘Kitchen – 90 SQF’.

Tip: Use this field to give your viewers a heads up on where they are in the apartment.

  • The Author field can take your viewer to any link. You can use this field as you desire.
    • You can use terms like ‘Learn more about this Kitchen’ or ‘Made By Rex Properties’.
  • In the Author URL, you can set any URL of your company website or page.
Set Title and Details to Luxury Apartment Virtual Tour
  • Remember, this URL will be activated when a viewer clicks on the Author title. So, make it relevant to that field’s text.
  • Scroll down and click on the Preview button again.

You’ll see the Title, Author, and Author URL fields working now.

3D Virtual Tour Title and Info in Preview
  • Now, scroll down and turn on the Customize Scene Zoom option.

You’ll get 3 new options that will allow you to set any zoom settings you want.

Zoom Settings - 360 Degree Apartments Tour

The Zoom values range from 50 to 120.50 is the most zoomed in, and 120 is the most zoomed out.

Default Zoom will be applied every time your viewers load this scene.

The Max Zoom and Min values will define how much your viewer can zoom in or zoom out in the tour.

Apply any zoom setting that you prefer. It’s up to you.

Now, if you preview and look at the live preview, you’ll see that all your advanced scene settings have been applied.

You can apply some other options as well:

1. Default Scene Face

Set a point in the panorama image, which you want it to load from.

2. Vertical and Horizontal Angle of View

When you’re using partial panoramas or panoramas taken with your mobile phone, the images are not full 360 degrees. You can use it to adjust those images.

3. Limit Vertical and Horizontal Scene Grab

For partial or mobile panoramas, you can set a custom value within which you want your viewers to explore.

Now, keep adding more panorama images by adding more scenes in this tour. You can use an unlimited number of images until you’ve covered every corner of your apartment.

Apply different settings to each individual Scene or the same settings for all the Scenes. Whichever you prefer.

Now, let’s enable the advanced features and make turn it into a professional virtual apartment tour.

Follow the next step.

Step 4 – Use Advanced Features – To Turn It Into A Professional Virtual Tour

First, click on the Publish button to save your progress.

Now, under the General section, click on the Advanced Controls tab.

  • Turn on these 3 options:
    • Keyboard Zoom Control, Mouse Drag Control, Mouse Zoom Control.

1. Keyboard Zoom Control: It allows your viewer to zoom in and out on the virtual tour using the plus(+) and minus(-) buttons of the keyboard.

2. Mouse Drag Control: It allows your viewer to drag and move the view of the panorama image.

3. Mouse Zoom Control: It lets your viewers zoom in and out on the panorama image using the mouse wheel.

In short, these 3 options enable smooth control on your virtual tour.

Smooth Control on Virtual Apartment Tour
  • Turn on the Gyroscope Control option.
    • When viewing from a mobile device, the Gyroscope will respond to the movement of the device. It gives great realistic control of the virtual tour to your viewers.
  • To make it even better, enable Auto Gyroscope Support.

It will turn on the Gyroscope support on smartphones by default.

Gyroscope Support - Virtual Tour Mobile Device
  • Turn on the Compass feature. It will display a live compass inside the virtual tour and help the viewers understand which directions they’re looking at.
Compass on Virtual Apartment Tour
  • Turn on the Scene Gallery option.
    • When you have multiple panorama images, it will show a slider gallery where your clients can see a preview of every panorama image in your apartment. They can also choose to visit a specific scene directly from the gallery.
  • Turn on the Scene Title on Scene Gallery option – to make your clients understand which part of the apartment the scene will take them.
360 Degree Panorama Gallery

Now, how about adding some interesting features to your apartment virtual tour?

Let’s add them right away.

  • Set Background music to your virtual tour using the Tour Background Music option.
    • Let your clients experience soothing audio the entire time they’re on your tour.

  • Set an explainer video using the Enable Explainer Video option.
    • Definitely, you want to give your clients more information about the apartment you’re showing them.
    • You can record a video explaining details of the apartment and set it here.
      Whenever your clients want to explore more, they can click it and learn about the apartment directly from you.

Background Audio on 3D Apartment Virtual Tour

Now, it’s time for your own branding.

Tell them who created this virtual tour by showing your logo and description.

Set your company logo and a description using the Add Company Information option.

 Your Logo and Information - Virtual Tour

Step 5 – Set Control Buttons – Easy Navigation for Your Client

To make the tour easier to navigate, you can turn on the control buttons.

These are the controls you can turn on:

  • Move Up.
  • Move Down.
  • Move Left.
  • Move Right.
  • Zoom In.
  • Zoom Out.
  • Full Screen.
  • Gyroscope.
  • Home Button.
Control Buttons on Apartment Virtual Tour

On top of that, you can set a different icon and color for each of these buttons.

Step 6 – Use Hotspots – Connect Panorama Images & Show Additional Info

Once you’ve set up one panorama image, you can now upload more and connect them.

Remember to keep the sequence between your images.

For example, if your tour starts from the entrance of your apartment, the next one should lead to the living room or the bedroom that is right beside the living room.

And if your viewer is leaving that bedroom, it should take them back to the living room.

The sequence of the images must reassablence the apartment in real life.

You have to use the Scene-type hotspots to connect the scenes.

Here is a small guide to connecting panorama images in your virtual apartment tour.

On top of that, you can use the Info-type hotspots to show in-depth details about the apartment.

The content you can set in the hotspots:

  • Images.
  • Texts.
  • Videos (YouTube, Vimeo, & Self-hosted).
  • GIFs.
  • URLs (Open on a new tab or the same tab).
  • Buttons.
  • Combination of everything above.
Hotspot To Show Information - Virtual Tour

You can set these to both on-hover and on-click actions of the hotspots.

To add more content and customize the hotspots, follow this guide.

Bonus Tips To Make A Luxury Apartment Virtual Tour Stand Out From Your Competitors

If you’ve made it this far in this guide, then great job!

In this section, I have something for you that’ll pay off your patience.

Suppose you’ve followed all the steps in this guide to make the perfect apartment virtual tour.

Now, all you need to do is make the viewer contact you and start the process of conversion.

Here’s how,

Inside every panorama scene of your tour set a hotspot that will contain a contact form or email submission form.

You can go one step further by adding a different contact form in every scene.

Example:

  • In the Kitchen scene, invite them to drop their email – to learn more about the water supply & gas stove setup options.
  • In the Entrance or outdoor scenes, ask them to give you their contact – to learn about the lawn diameters and neighboring community rules.

The easiest way to generate more leads would be to keep the form as minimal as possible. Just asking them to type in their name, email address, and the best time to call back would be great.

But, you can also add a couple of questions to qualify them for your case such as their budget, expected time to rent, etc.

And this, you can easily set up using WPVR.

The Benefits of Using this Latest Trend: Convert Prospects Into Potential Buyers

Today there are several creative ways to handle prospects that help to boost conversion.

And one of the proven ways now is to use virtual tours on your website.

Webpages with virtual tours receive 5-10 times longer views.

Here’s how it works.

  1. Get prospects to visit your website.
  2. Hook them with engaging apartment virtual tours they can’t ignore.
  3. Give them a glimpse of exactly what they will get in real life.
  4. Get them interested and pre-qualified while on the tour.
  5. Make the prospects book a time for you to call back.

Advantages of Using Virtual Tour:

  • The user will not have to worry about traveling to get a live view of the apartment.
  • An apartment virtual tour with navigation control means prospects are not bound to a fixed view. They can view and move around however they want. This will gain more trust.
  • People will already get to make a temporary decision on the apartment of their choice.
  • You can include more details on the apartment within the tour, which you would normally explain via phone.
  • And most importantly, you can have the buyers fill out a form to get a call back right on the virtual apartment tour.

You can create an engaging apartment virtual tour without any complications using the right tool. And we mentioned and demonstrated WPVR here. You can easily go with it.

Conclusion 

As you can see, a virtual tour is the next best thing to a live visit. And it is also a key option to stand out among your competitors.

Plus, as you saw, creating apartment virtual tours is relatively easy and quite affordable. So it’s high time you, too should, start using virtual tours to sell or rent more apartments easily.

Keep your prospects hooked and convert them into buyers with the latest trend that works.

If you own a WordPress site, then go ahead and start using WPVR and start closing more deals.

Categories
WordPress WP VR

12 Benefits of Virtual Field Trips Every Educator Should Know [2025]

Field trips sound great—until you start planning one.

The cost, the paperwork, the permission slips that never come back, and the constant worry of losing a student in a crowd. By the time the trip actually happens, you’re too exhausted to enjoy it.

Now, imagine taking your students to the Great Wall of China or deep into the Amazon rainforest—without the hassle, the cost, or the stress. That’s exactly what virtual field trips offer.

For many students, real-world exploration isn’t always possible. Travel costs, logistics, and other barriers can make traditional field trips difficult to pull off.

Virtual field trips remove those obstacles, making it easy to expose your students to new places, ideas, and experiences—all from the classroom. Plus, they make teaching more interactive, engaging, and, let’s be honest, a lot less stressful for you.

Let’s dive into the biggest benefits of virtual field trips in your lessons.

What are virtual field trips?

First, let’s learn what virtual field trips actually are.

Virtual field trips basically let you take your students to places they might never visit in real life, all from the classroom. Instead of physically traveling, you use technology—videos, live streams, interactive maps, or VR—to explore museums, historical sites, national parks, or even space.

virtual field trip

For example, if you’re teaching a history lesson on ancient Egypt, you can take your students on a virtual tour of the pyramids. They can explore hidden chambers, see ancient carvings up close, and listen to expert explanations—all without leaving their seats.

It makes learning more interactive and engaging while removing the limitations of cost and travel.

How do virtual field trips work?

Setting up a virtual field trip is simple. You only need a device with internet access and a reliable platform. Here’s how it works:

i. Choose a topic:

Decide what subject or location you want to explore. It could be a historical site, a science lab, or a cultural experience.

ii. Select a platform:

Websites like Google Earth, National Geographic, or museum archives offer free and paid virtual field trips. Some are interactive, while others are guided videos.

iii. Prepare your students:

Set expectations and provide context before the trip. You can introduce key points, ask guiding questions, or assign tasks to keep them engaged.

iv. Experience the trip:

Depending on the format, students can watch, explore, or even interact with experts through live Q&A sessions.

v. Discuss and review:

After the trip, encourage students to share their observations, complete an activity, or reflect on what they learned.

With these simple steps, you can turn any lesson into an immersive learning experience without the hassle of planning a physical trip.

Why Should Educators Use Virtual Field Trips In The Classroom?

Not just mere words, let me show you some proven data from research.com that indicates how effective field trips are

in terms of increasing your student’s knowledge base.

Research data of positive impact of virtual field trip

Source

See how good student feels as they are rating “virtual field trips” really high :

Percentag of student survey who are rating virtual field trip high.

Source

Not only about feeling amazing, most of the students learn more properly when the process goes with the term “ Learn with fun”

The neurologist Judy Willis demonstrated how enjoyable experiences increase the levels of dopamine and endorphins in our brains.

Dopamine, known as the “feel-good hormone,” can make learning feel pleasurable and rewarding.

These hormones play a crucial role in effective learning.

Now I am going to going to explain the benefits in five categories :

Benefits of virtual field tour

Learning Benefits of Virtual Field Trips

Let’s go through 3 learning benefits of virtual field trips now:

1. Self-perception of learning

Virtual Field Trips are full of learning potential.

Even though virtual field trips can’t take your students to different places physically, they can make learning more engaging and hands-on.

When done well, virtual field trips can make students feel like they are there, teach them new things, and get them excited about the topic.

Virtual field trips allow students to customize and adjust the experience to fit their personal needs and preferred way of learning. For example, students can often pause the virtual activities or go through them at their own speed. Virtual fields can help students solve math problems by providing interactive, context-based experiences and simplifying abstract concepts into understandable, real-life situations

You can read this research paper on the learning impact of VFT to get a deeper knowledge of how impactful learning VFT can bring to your classroom.

2. Helpful in K-12 education

After looking at many different research studies, scientists at the University of Sao Paulo found proof that virtual field trips can help teach students from kindergarten through 12th grade.

They found multiple studies where using virtual reality headsets for virtual education trips helped students learn better.

The researchers found educational VR provided significant benefits beyond just engagement. It led to improved skills-based learning outcomes as well as better knowledge recall and comprehension compared to non-VR settings.

3. Exposure to Experts

With pre-recorded virtual field trips, your students have discussions and interviews with subject matter experts.

Exposer to experts

Source

Students are often excited to have the opportunity to talk directly with the explorer.

If you can manage video conferencing on your field trip with platforms like Skype or social media channels, your students can post their queries and receive real-time responses from the experts.

Virtual field tour idea for science background

Source

Here the benefit of virtual field trips for students is that it’s a small step towards active learning. 

Your students can see a place with their own eyes and ask questions to an expert who has been there and experienced it. 

Your students are far more likely to remember a topic when they can find the opportunity to engage, participate, and experience it themselves.

Engagement Benefits of Virtual Field Trips

We know what you are thinking!- My students will only look at a screen, where and how engagement between your students will come?

Here’s your answers :

4. Engage Student’s Senses More

Instead of just listening to a teacher talk, virtual trips can allow your students to see realistic visuals, hear sounds, and even interact using hand motions or controllers.

For example, on a virtual trip to the rainforest, students might see vivid 360-degree videos of the dense foliage and bright colors.

They could hear the sounds of birds squawking and monkeys howling.

5. Embodied Interaction Increases Student Engagement

The researchers discovered that being able to interact and experience things is extremely important for keeping students engaged. This kind of interaction is called embodied interaction.

When students can use multiple senses and truly interact with the learning material, they tend to be more excited about and involved in their learning process.

We all know how boring it can be to just sit and listen to a lecture without any way to participate meaningfully.

Accessibility Benefits of Virtual Field Trips

Virtual field tours break down barriers and below I listed down some accessibility opportunities that Virtual Field Trip open up :

6. Students with mobility restrictions

Virtual field trips allow students who have difficulty moving around or traveling to still experience going on a field trip.

They can join from wherever they are without needing to physically go to a new place. This is a great benefit of virtual field trips for students who are always on the go.

7. Students who are immunocompromised

For students whose bodies have a hard time fighting off illnesses, virtual trips are safer and easier than physical ones.

You can avoid risking your differently able students getting exposed to germs or catching something by traveling.

8. Students can access it from anywhere

No matter where your student lives or what their situation is, they can take part in a virtual field trip.

As long as they have a computer or device with internet, they can virtually go on a trip from their home, school, hospital, or anywhere else.

So, VFT is a great way to get fewer empty seats in your classrooms.

Collaboration Benefits of Virtual Field Trips

Virtual field trips share a sense of community collaboration. Now let’s go through some collaboration benefits of VFT :

9. Expanding Geographically

Virtual field trips allow your students and you to explore places and connect with people from all around the world, without having to travel there physically.

They can virtually visit museums, historical sites, national parks, and even other countries or cities that would normally be too far away or too expensive to go to in real life.

This expands the learning experience beyond the local geography and community, opening up opportunities to learn about diverse cultures, environments, and perspectives from a much broader geographic scope.

10. Share And Adapt the same virtual resources

Virtual engagement and remote collaboration can indeed help you to facilitate a spaced, interleaved, and practice-oriented approach to deep learning. Your students can share virtual resources among themselves which will increase their soft skills of collaboration and teamwork.

Financial Benefits of Virtual Field Trips

11. Cost Effectiveness

Virtual engagements obviously eliminate the need for travel, which is a big bang savings.

This is one of the big benefits of virtual field trips for teachers.

Also, you can play role a in saving the environment by reducing carbon emissions from flights and road transportation of physical field trips.

VFGs can potentially cut off some of the issues that physical field trips can create.

Traditional field trips principally those of an international nature have several disadvantages.

Because of the costs often many students cannot afford to participate.

Also, There may be gendered issues, cultural and language barriers, logistical issues, security issues, and problems in creating accurate risk assessments without prior visits by staff (Ternan, Charlkley, & Elmes, 1999).

Last But Not Least Benefits of Virtual Field Trips

12. Simplifying Teacher Experience

For teachers like you, organizing a traditional in-person field trip can be very complicated and stressful.

You need to plan transportation, lunches, chaperones, and permission slips, and juggle their regular teaching schedule around the trip day.

With virtual field trips, these kinds of hassles go away. You don’t have to worry about buses, packing meals, or finding enough parent volunteers.

You can schedule the virtual trip anytime that works best for their class schedule.

You can offer more to students while putting in less effort.

Create Virtual Field Trips by Your Own

To create a virtual field trip for your students, First research well for the type of content your students are mostly attracted to.

Then start making your virtual trips.

Here are a few things you’ll need:

First, you’ll need cameras to capture 360-degree photos or video footage of the places you want to virtually visit.

Next, you’ll need software that allows you to stitch those 360 photos/videos together into an immersive virtual tour experience.

WPVR offers an easy-to-use interface that allows you to create virtual tours rapidly, even if you don’t have any prior experience or expertise.

You can put together a basic virtual tour in under 5 minutes!

WPVR- Best virtual tour  tool.

If you need assistance, WPVR provides helpful resources like YouTube videos & documentation for setting up and using it properly.

Become an Innovative Education Leader

With virtual field trips, you can provide your students with something better than dull regular classes.

Also, in this fast-paced growing world,

you need to take some extra steps to teach our students more than traditional teachers do.

To research well and pick the content idea,

you can go through the Discovery Education portal.

Then just plan your trip and use a reliable tool to help you make your virtual field trips.

FAQs

1. What is the advantage of the field method?

The field method allows direct experience, real-world context, increased motivation and engagement, skill development, and interdisciplinary learning by conducting research or observations in authentic settings.

2. What are some virtual field trip examples?

Examples include exploring the Louvre Museum, touring NASA’s space stations, visiting the Great Wall of China, and diving into marine life with the Monterey Bay Aquarium.

3. Do virtual field trips cost money?

Some are free, like Google Earth tours, while others, like live expert-led sessions, may require a fee.

4. What do I need for a virtual field trip?

You only need an internet-connected device, a reliable platform, and a structured plan to keep students engaged.

5. How do virtual field trips benefit students?

They provide access to real-world learning experiences without travel costs, making lessons more interactive and engaging.

Categories
Guide Real Estate Virtual Reality WP VR

How to Use Real Estate Floor Plans in Virtual Tours [2024]

When selling houses, you will see that one of the major reasons your buyers may reject a house is due to the way the property was planned or built.

For many clients, it’s important that they are able to find a home that will resemble their desired house plan.

As a result, if you are using virtual tours to showcase properties, you should consider including real estate floor plans in the tours.

It will not only make a tour more interesting but also help eliminate any confusion about the architecture of the house. Plus, you will get a few additional benefits that will help you impress clients even more.

Today, you will learn how to add a floor map to your virtual tour to enhance the overall experience of your visitors.

In this article, you will learn,

  • The key benefits of using house plans with virtual tours,
  • how to embed a real estate floor plan into your property virtual tour,
  • examples of great floor plans with virtual tours.

Let’s get started.

Benefits of Using Real Estate Floor Plans With Virtual Tours

Virtual floor plans nowadays will provide potential buyers with an immersive and interactive experience to explore properties and gain a deeper understanding of their layouts. And if you can combine your virtual tours with floor plans, it will take the experience to the next level.

Following are some of the key benefits of using real estate floor plans with virtual tours.

1. Clear Property Plan & Layout For Better Decision-Making

The main benefit of using real estate floor plans is to ensure buyers get a clear idea about the layout of the house.

Normally, when you have images or a video, you are only looking at the house from a certain angle and can’t really imagine how it may be in reality.

When it comes to a virtual tour, yes, you get a near-perfect idea about the scene you see. But again, you can’t accurately guess the directions and the layouts of how each scene is connected to the other in real life.

A floor plan solves this problem. While taking the tour, if a person can get a glance at the interactive floor plan and understand where he is in the house, it will make it much easier for buyers to decide if this is what they are looking for.

Clear Property Plan & Layout For Better Decision-Making

For example, a family considering a property can better visualize if the bedrooms are located close to each other or apart, the kitchen is conveniently situated, and there’s a logical separation between private and communal spaces.

Hence, it will help buyers make decisions more confidently. And you are less likely to get a deal rejected due to the layout of the house.

2. Maps Out The Important Spots In Your Virtual Tour

In the floor map, you may name the rooms and areas available in the tour. You may leave pointers to indicate the spots from where visitors will be observing the view.

You may also contrast color the areas that you want the visitors to visit, i.e., the specialty of the property.

This could be maybe the dining room, or maybe the swimming pool area, or even the balcony to get a soothing view outside. This approach will work really well for furnished homes or luxury homes.

How to Use Real Estate Floor Plans in Virtual Tours [2024] 1

So, basically, you may use this as another way to connect with potential buyers.

3. Makes Navigation Easier With Click To View Scene

Modern floor maps in virtual tours allow you to add hotspots on the map, which people can click to visit that scene directly.

Makes Navigation Easier With Click To View Scene

This helps to attract buyers who are more concerned about specific rooms in the house.

For example, many want to make sure they get a spacious kitchen before all else. Hence, you may allow them to visit the kitchen just by clicking on the map.

4. Avoid Misunderstandings With Room Dimensions & Directions

A virtual does create a very realistic environment for the buyer, but it still doesn’t answer a few important questions the buyers may have.

Add dimensions and directions of the house

For example, a buyer may wonder about the dimensions or measurements of the rooms.

That is something you can cover in the real estate floor plan. You may easily add the measurements of each side of the rooms/scenes on the map, thus removing such confusion.

The directions could be another piece of information that you can include on the floor plan.

5. Define the Authenticity Of Your Listings

The use of real estate floor plans in your virtual tours will act as a psychological trigger and help you gain authority.

Having The floor maps will create a sense of authenticity. People will believe that you are more trustworthy with the listings as you even have access to the floor plans.

This will make it easier for people to choose you over your competitors.

Pro Tip: You can collect the floor plan from the owner or have someone inspect the house and prepare one for you. Do not use fake floor plans. It will rather make you lose potential clients.

How To Embed Real Estate Floor Plans To Your Virtual Tours

The ability to add a real estate floor plan to your virtual tour will really depend on what tool you are using to create your virtual tours.

Some tools have this feature built-in, while for others, you may need to customize it into the tours or compromise and use a floor map as an image below the virtual tours on a web page.

We highly recommend you choose a virtual tour software that has an interactive floor plan feature that allows you to connect the map to the virtual tour via hotspots and indicates the location of the currently viewed scene on the map.

In WordPress, you will find WPVR, which allows you to create and embed high-quality virtual tours on your website, along with interactive floor plans.

Here’s how you can craft a virtual tour along with a real estate floor plan using WPVR.

1. Create A Virtual Tour Using WPVR

First, you need to upload 360 panoramic images, which WPVR will convert into a virtual environment.

Next, connect the scenes to each other to make it into a complete tour of the house.

And finally, customize the tour with more details such as company information, tooltips, additional details on the house, and booking forms.

~ Here’s a simple guide to creating a Real Estate Virtual Tour To Increase Property Sales ~

2. Enable & Upload The Real Estate Floor Plan

Once you have the tour ready, it’s time to add the virtual tour house plans.

First, go to WPVR settings and enable the floor plan feature.

Enable floor plan

Next, upload the real estate floor map.

Upload a floor plan image

Then, set up hotspots and connect them to the associated scenes in the tour.

Add hotspots and Pointers in Floor plans

Here’s a video guide in case you need more help,

3. Embed Your Virtual Tour On The Website

Now that you have your floor plan virtual tour ready, you may easily embed it on any page on your website using shortcodes or widgets in one of the supported page builders.

For example, if you use Elementor, you may use the WPVR widget from Elementor to place the tour on a page, which you may link on your listing page for the associated house for sale.

~Here’s how you can easily embed a WPVR virtual tour anywhere on your WordPress site.

Examples Of Floor Plans With Virtual Tours

1. Interactive Floor Plan by WPVR

Following is an example of a virtual tour with a real estate floor plan that was created using WPVR. Go through the tour and explore how amazing this virtual tour is and how engaging this interactive floor map is.

2. Property Map Showcase by Zillow

You’ve surely heard of Zillow. Here’s how they present the floor maps with virtual tours.

Zillow Virtual Floor Plan

3. Basic House Plans With Virtual Tours by Panoee

Panoee Floor Plan

4. 3D Floor Plan Virtual Tour by WayneHomes (created using Matterport)

Matterport Floor plan

This one is a bit unique (and expensive). It’s the dollhouse effect by Matterport, which is probably not something most realtors would go for unless it’s for a very expensive luxury house.

Conclusion

As you can see, you get so many benefits from using real estate floor plans along with your virtual tours, and it is super easy to embed.

So go ahead and start using virtual tours with floor plans and convince more potential buyers to consider making a purchase decision.


If you want to use a reliable virtual tour creator that is reliable, cost-effective, and has a high-quality interactive floor plan feature, then WPVR would be a great choice.

Try using WPVR today and start making virtual tours that are more optimized for converting clients.

** FAQs **

Can virtual floor plans really enhance my property listings?

  • Yes, integrating virtual floor plans can greatly enhance your property listings. It provides potential buyers with clear insights into the layout and structure of the house.

Will adding floor plans to my virtual tours require a lot of technical expertise?

  • Not at all, with user-friendly tools like WPVR, embedding floor plans into your virtual tours is simple, even for those without technical skills.

Are virtual floor plans compatible with different devices for easy viewing?

  • Yes, virtual floor plans are optimized for seamless viewing across various devices. It ensures accessibility and engagement for all potential buyers.

How can virtual floor plans help me stand out from other realtors?

  • By incorporating virtual floor plans into your listings, you demonstrate attention to detail and professionalism. It helps you to set yourself apart as a realtor who goes the extra mile to assist buyers.

Can virtual floor plans really make a difference in attracting potential buyers?

  • Indeed, real estate virtual floor plans provide buyers with a comprehensive understanding of the property layout. It increases their confidence and likelihood of making a purchase decision.
Categories
Guide Virtual Reality

Guide to Panoramic Photography – How To Shoot Panorama Photos Efficiently [2024]

“Content is King,” as stated by Bill Gates, is quite true today. Most businesses nowadays rely on online presence and digital marketing.

You will find so many unique ways businesses are trying to use content to stay ahead of the competition. And one such unique content is “Panorama.”

A panoramic image is a processed form of photography that gives you a wide and expansive view of a location. You can then convert it into a 360 virtual tour quite easily.

Virtual tours are right now one of the most interactive forms of content in the real estate, hotel, and travel industry to increase sales.

However, panoramic photography can be quite challenging. You have to consider the lighting, the right equipment, and the proper angle of view to capture a high-quality panorama.

In this guide, you will learn how to shoot panorama photos in the right way, with the best possible captures.

After reading this article, you will learn:

  • The equipment needed for panoramic photography.
  • Proper shooting techniques to capture panoramas.
  • Ways to optimize capturing 360 panoramic images.

And eventually, you will be able to capture high-quality panoramas that you can use to create the best virtual tours.

So let’s begin.

Step By Step Guide To Panoramic Photography

Taking panoramic images will need you to follow three main steps:

  1. Collect the required equipment for efficient panoramic photography.
  2. Use the right shooting techniques to capture images for the panorama.
  3. Stich the captured images into a 360 panoramic image.

Let us look at each of them one by one.

Step 1 – Collecting The Required Equipment For Efficient Panoramic Photography

The first step to capturing panoramic images is to choose the right equipment.

Following are the tools you need to collect before you can proceed to capture your panoramic images.

1. High-Resolution Camera With A Wide-angle Lens

If you want to capture a high-quality panoramic image, you will need to choose a high-resolution camera and a wide-angle/fish-eye lens for the 360 effects.

Ideally, a camera with at least 24 megapixels and a wide-angle lens with a focal length of 35mm or less will serve your purpose.

The idea is to combine the camera and the lens to help you capture the full grandeur of a scene (which is not possible with a traditional lens).

  • The camera’s high resolution will ensure all the details are captured to the last detail.
  • The fish-eye lens will create a concave effect to help capture a 360 view.

Tips On Using Your Camera & Lens Properly

  • Set your camera to manual mode.
  • Use a decent shutter speed – 1/10th or 1/20th is ideal during the day.
  • Set the aperture to about F11 and ISO to around 640 or more during the day.
  • Set manual white balance to 4000 Kelvin

**Remember, these settings are suggested based on ideal photogenic lighting conditions. You may have to toggle the white balance and ISO a bit to get the best output.

Best Cameras To Consider For Panoramic Photo Shooting
Best Wide-angle Lenses For Panoramic Photography

2. A Tripod For Stable Photography

You’ll need a stable tripod for panoramic photography to avoid noise and jitters caused by camera shakes.

Plus, you will be able to raise or tone down the height of the camera easily, to capture at just the right angle for the best panoramic view.

Tips On Using A Tripod Properly

  • Try to keep the tripod on an even surface.
  • Adjust the height and angle of the tripod for your desired composition.
  • Notice the bubble of the tripod. If it’s in the center, it means the tripod is standing straight.
Best Tripods for Panoramic Photography

3. Remote Shutter Release

The remote shutter release will allow you to trigger the camera without physically touching it. This will remove the possibility of camera shakes.

Best Remote Shutter Releases

3. Automated Pano Head/Nodal Head For Controlled Photoshoot

Since you need to cover every angle of a view, you must maintain a fixed rotation angle. An automated pano head will help you maintain that angle.

You may set the amount of angle you want the camera to rotate after every shot (and set a timer to define how soon the camera will rotate next).

This will help you capture all angles of a 360 view without any manual effort.

Best Automated Pano Heads for Panoramic Photography

5. Leveling Tools

In case your tripod doesn’t; have a leveling tool attached, you may buy one. They are useful to ensure your tripod is on level, i.e., standing straight against gravity.

There are mainly 2 types of leveling tools

  • Bubble levels
  • Electronic levels.

Bubble levels are the most common ones used.

Best Leveling Tools for Panoramic Photography

Step 2 – Use The Right Shooting Techniques For The Best Panoramic Photography

Once you have all your equipment ready, it’s time to capture panoramas.

1. Choosing the Right Spot

The first step in capturing a great panorama is finding the right spot.

You may want to take a panoramic image of your office interior. Or you may want to take an exclusive panorama just outside your resort to capture your resort and the environment around it.

The spot to place your camera and other equipment will vary. The spot you choose will determine the quality of your image, and using an AI image enhancer can further improve sharpness and clarity in every detail of the captured scene.

  • Interior photoshoot
    In the case of interior photography, the best location is always the center. However, you have to work on maintaining a constant light balance throughout. For example, if there are windows on one side, find a way to block the sunlight from coming through. You do not want half of your image to be bright and half of your image to be dark.
  • Exterior photography
    When taking external panoramas, you should find a wide-open view where the elements around are not too close, and you get a soothing view of what you want to capture. You may stand in the spot and crouch a bit to judge if the angle is right before placing your equipment there.

2. Set Up The Tripod And The Panohead

Once you have decided on the spot, place the tripod in the middle and adjust the bubble level to the center. Also, adjust the height of the tripod to the height you found suitable when observing the view prior.

Next, set the pano head and adjust the pano head to rotate to an angle of 60 degrees after every shot. This will help to capture 6 photos horizontally.

Best Practice: Avoid using the center column of the tripod as it may cause instability. Instead, use the tripod’s legs to adjust the camera’s height.

Once these are set up, attach the camera to the pano head.

3. Configure Camera Settings

As mentioned above, if you capture the image during the day, set the following configurations:

  • Camera Mode: Manual
  • Shutter speed – 1/10th or 1/20th
  • Aperture: F11
  • ISO: 640
  • Manual white balance: 4000 Kelvin

If the weather is not too bright or too cloudy, these settings will help to get the best possible panoramic quality.

Before you start the shooting session, rotate the camera manually and check if you are satisfied with the lighting and angles. Make changes to the settings if required as per your observation.

Always use manual mode when capturing professional photos. It will give you more control over the image quality.

And finally, attach the remote shutter release to the camera.

4. Capturing Your Panoramic Photo

Once the setup is ready, go ahead and initiate the photoshoot.

Most automated pano heads come with a remote. So you may set it up and initiate the capture from afar.

You could either stand behind the photo view or go sit in your car to avoid getting caught up in the image.

First, initiate the shutter release once and then initiate the pano head rotation using their remotes respectively.

Every time the pano head rotates, clip the shutter release ones.

Once you have covered a 360 angle horizontally, stop the rotation. Since it’s a fish-eye lens, it already covers 180 degrees vertically. However, it will still keep the top and bottom ends missing around the center.

So, you need to manually move the camera view up to 90 degrees and down 90 degrees to capture 2 photos.

Now, you have a total of 8 images from all angles on the shooting spot.

Your photo session is complete for this spot. You may then follow the steps you followed in this section to capture images for more spots that you have in mind.

Once you are ready with your images, it’s time to stitch them into 360 panoramas.

Step 3 – Stitching Images Into Panorama Photos

Stitching images for panoramas is not a manual process. You simply need to use good stitching software, and it will be done in just a few clicks.

1. Good Photo Stitching Software To Choose From

There are several software options available for stitching your panoramic shots.

Some of the most popular ones include:

Each of these software has unique features, but they all follow a similar stitching process.

2. Step-by-Step Stitching Process

The stitching process involves aligning and merging multiple overlapping shots to create a single panoramic image.

Here’s a standard process to stitch your panoramas:

Step 1: Import your images into the stitching software.

Step 2: Identify the order of the images and which ones are the upper and downward views.

Step 3: The software will automatically align the images using control points or features in the images.

Step 3: The images will then be merged into a seamless panoramic image.

Step 4: Adjust the cropping and straighten the image if necessary.

Step 5: Generate the final stitched panorama.

Now, your panorama is ready. But there’s more work.

3. Optimizing The Stitched Panorama

You will notice that the stitched image will have a few issues, such as low brightness, dull color balance, or some blurry areas. You may edit the image to improve these issues.

Tip 1: Adjust the exposure and color to ensure the final image looks natural and has balanced colors.

Tip 2: Improve blurred areas with custom sharpening.

Tip 3: Adjust the image tilt if necessary.

Caution: Avoid over-editing the image as it can result in an unnatural and over-processed final image.

Once ready, export the image, and that’s it. You now have a complete 360 panoramic image that you captured and generated.

Tips for Advanced Panoramic Photography

1. Use A Polarizing Filter

A polarizing filter will help you capture more vibrant and natural-looking images.

It reduces glare and reflections on water and other reflective surfaces. Plus, it can improve color saturation and contrast.

Practical Use: Screw it onto the front of your lens and adjust it until you achieve the desired effect.

Best Practice: Use a circular polarizing filter, as it is more effective than linear polarizers with autofocus cameras.

Also, try to position yourself at an angle to the sun when using the filter to get the best results.

2. Be Mindful Of Exposure Changes

While you’re capturing panoramic photos, the exposure can change from one shot to the next, especially if you are shooting during the golden hour or other times of changing lights.

After the 6 photos are captured, if you notice unsatisfactory exposure at a certain angle, capture from that angle again after adjusting the white balance and ISO to get a better shot.

Best Practice: Shoot during times of consistent light, such as midday or overcast days.

Use exposure bracketing, which takes multiple shots at different exposures, to ensure you capture the perfect exposure.

3. Avoid Moving Objects

Any moving object will ruin a panoramic photo by creating a ghosting or blurring effect.

So, before you start capturing, make sure there are no moving objects, at least around the scenery that you want, with the utmost quality in your panorama.

If there are trees around, avoid holding the photo session during windy weather.

Best Practice: In the case of external photography, shoot during times of low activity, such as early morning or late evening.

Tip: Use a fast shutter speed to freeze motion.

4. Experiment with Different Perspectives

Don’t be afraid to experiment with different perspectives when shooting panoramas.

Try shooting from high vantage points or low angles to add interest to your images.

Tips: Use a drone, if possible, to shoot from a high vantage point.

Alternatively, try shooting from a low angle by placing your camera on the ground or using a tripod with adjustable legs.

Best practice: Use leading lines, such as a road or path, to create depth and interest in your images.

Turning Your Panoramic Images Into A 360 Virtual Tour

Once you have your panoramic images, you may use them by creating a virtual tour for your business.

And it’s actually quite easy. In WordPress, you will find a plugin called WPVR, which lets you create stunning virtual tours in just a few clicks.

All you have to do is upload your 360 images, and the plugin will turn it into a realistic, interactive virtual tour. And then, you will be able to customize it and make it more engaging using tooltips, images, and videos, and even connect multiple views through a click-to-move button.

On top of these, you may use a lead form to collect leads, include your company information, add an explainer video, include a floor map, and even set it to be viewed using a VR Box.

This means your hard work in capturing panoramic images will pay off, as you will then have amazing virtual tours to stay ahead of your competition online.

Final Thoughts

If you have the right tools, you can capture 360 panoramic images without many complications.

The quality of the outcome may be a bit shaky at the beginning, but as you gain experience, it will all become super easy.

And once you are good at panoramic photography, you may go ahead and create your own virtual tours. or offer panoramic photography services to other businesses that may want to use virtual tours.

So go ahead and get your camera equipment ready. start capturing high-quality panoramas now.

P.S. If you own a drone, then you can avoid these steps and do aerial photography instead to capture high-quality 360 panoramic images. Here’s a complete guide.

Categories
Guide Virtual Reality

Best 5 Panoramic Camera App for Android to Capture 360-Degree Images [2024]

Since you’re interested in Panorama images, you know how the popularity of panoramic photography increased among smartphone users in recent years.

However, you also know that traditional Android smartphone cameras have limitations in capturing high-quality panoramic images.

But don’t worry! There are some perfect panoramic camera app for Android in the market that offer a range of features to capture immersive 360-degree photos.

This article will discuss the top 5 panoramic camera apps available for your Android smartphone.

Once you go through this, you can choose the most suitable panoramic camera app for Android for you.

Let’s dive in.

Not an android user? Do you use iPhone? Here’s are some of the best panoramic camera apps for iPhones

Features to Look for in a Panoramic Camera App for Android

First, let’s have a look at the features or options a good panoramic camera app for Android should have.

You need to consider these features that contribute to the quality of 360-degree images.

Here are some of the features to look for:

i. Image Resolution:

Higher-resolution images provide more details and clarity, resulting in better-quality panoramic photos.

ii. Stitching Accuracy:

A good panoramic camera app should be able to stitch together multiple images accurately, without any visible seams or distortions.

iii. Ease of Use:

A user-friendly interface and straightforward navigation can make it easier to capture panoramic images on your Android device.

Top 5 Panoramic Camera Apps for Android

You’ll find many panoramic camera app for Android on the Google Play Store.

Here are the top 5 apps, along with their unique features and capabilities:

1. Panorama 360:

Panorama 360 is a popular panoramic camera app that will allow you to capture 360-degree images with your Android devices.

Panoramic Camera App for Android - Panorama 360

It allows you to capture 360-degree photos in high resolution and even supports VR viewing.

The app features a user-friendly interface, high-resolution image capture, and an auto-stitching feature for seamless panoramic images.

It also offers social sharing options, allowing users to share their panoramic photos directly from the app or send them via email.

The app comes with a variety of editing tools and filters to enhance your photos.

You can easily share your panoramic photos on social media platforms.

Features of Panorama 360 Android App:

  • 360-degree photos.
  • High-resolution photos.
  • VR viewing support.
  • Editing tools and filters.
  • Social media sharing.

Pros & Cons of Panorama 360 Android App:

Pros:

  • Easy to use.
  • Good image quality.
  • Variety of editing tools.

Cons:

  • Limited free version.
  • Some features require in-app purchases.

Average User Rating: 3.7 out of 5

App Reviews: 108k

App Downloads: 10M+

App Link: Panorama 360.

2. Cardboard Camera

Cardboard Camera is a panoramic camera app developed by Google.

Panoramic Camera App for Android - Cardboard Camera

It allows you to capture 360-degree photos and view them in VR with a Google Cardboard device.

The app features high-quality image capture, an auto-stitching feature for seamless panoramic images, and a virtual reality mode for viewing photos in 3D.

It also allows you to add sound to your photos for a more immersive experience.

With Cardboard Camera, you can easily share your panoramic photos with friends and family.

Features of Cardboard Camera:

  • 360-degree photos.
  • VR viewing with Google Cardboard.
  • Sound capture.
  • Sharing options.

Pros & Cons of Cardboard Camera:

Pros:

  • Good image quality.
  • User-friendly interface.
  • VR viewing support.

Cons:

  • Limited editing options.
  • Requires Google Cardboard for VR viewing.

Average User Rating: 4.4 out of 5

App Reviews: 162k

App Downloads: 10M+

App Link: Cardboard Camera.

3. Insta360

Panoramic Camera App for Android - Insta360

The Insta 360 camera is a cutting-edge panoramic camera designed to capture immersive 360-degree photos and videos. With its advanced features and intuitive interface, it allows you to create stunning panoramic content with ease.

Whether for personal use or professional projects, the Insta360 camera offers unparalleled versatility and quality, making it a must-have app for capturing life’s moments from every angle.

Features of Insta360 Panorama Camera:

  • Easy 360-degree photo capture.
  • Real-time preview and editing capabilities.
  • Advanced stitching algorithms for high-quality panoramic images.
  • Integration with social media platforms for easy sharing.
  • Additional features such as filters, effects, and virtual reality (VR) support.

Pros & Cons of Insta360 Panorama Camera:

Pros:

  1. Easy 360-degree photo capture for immersive experiences.
  2. Real-time preview and editing features enhance user experience.
  3. Integration with social media platforms simplifies sharing.

Cons:

  • Require significant storage space for high-resolution images.
  • Some advanced features may be locked behind in-app purchases.
  • Compatibility with certain Android devices may vary.

Average User Rating: 4.2 out of 5

App Reviews: 20.8k

App Downloads: 1M+

App Link: Insta360

4. Wide Camera – Panorama 360 HD

The Wide Camera – Panorama 360 HD is a powerful panoramic camera app for your Android device.

Panoramic Camera App for Android -Wide Camera Panorama 360 HD

It allows users to take 360-degree photos and offers a variety of features for editing and sharing them.

The app uses advanced algorithms to stitch together multiple images into a seamless panoramic view, resulting in high-quality images that capture the entire scene.

Features of Wide Camera – Panorama 360 HD:

  • High-resolution panoramic images.
  • Real-time capture and preview.
  • Automatic image stitching.
  • Advanced photo editing tools.
  • VR viewing support.
  • Social media sharing.
  • Live wallpaper creation.

Pros & Cons of Wide Camera – Panorama 360 HD:

Pros:

  • High-quality panoramic images.
  • Real-time capture and preview.
  • Wide range of editing tools.
  • Supports VR viewing.
  • Live wallpaper creation.
  • No ads.

Cons:

  • Some features require in-app purchases.
  • Limited free version.
  • Large file sizes may take up significant device storage.

Average User Rating: 3.5 out of 5

App Reviews: 1.17k

App Downloads: 500k+

App Link: Wide Camera – Panorama 360 HD.

5. Photaf Panorama by Bengigi

Photaf Panorama is a pretty good 360 camera app for Android that comes with a gyro sensor to guide you when taking 360 panoramas.

Panoramic Camera App for Android- Photaf Panorama by Bengigi

This panoramic photography app is well suited to capture 360 photos on the go as its sensor will indicate which angle to take pictures from next. If you are able to stay stable while capturing the images, then the app will automatically stitch the captured images into a 360-degree panorama.

You can even transfer your photos to your phone or desktop and use them to create virtual tours.

Features of Photaf Panorama:

  • Guided 360 image capture
  • Gyro sensor for compass & direction
  • Automatic Image Stitching
  • 360 Panorama creation
  • HD Panoramas (in Pro)

Pros & Cons of Google Street View:

Pros:

  • Guided photography to avoid flaws
  • Fast panorama generation
  • Access to their own featured photo library
  • 360 image capture for free

Cons:

  • Limited editing options.
  • Complicated UI
  • Sometimes errors in stitching

Average User Rating: 3.6 out of 5

App Reviews: 68.8k

App Downloads: 5M+

App Link: Photaf Panorama

How to Take Better Panoramic Photos

Capturing high-quality panoramic photos can be a challenging task, even with the best panoramic camera app.

Here are some tips to help you take better panoramic photos:

Choose A Good Location:

Look for a location with a scenic view or an interesting subject.

The more interesting the location, the better the panoramic photo will be.

Keep Your Camera Steady:

Avoid moving your camera while capturing the images for the panoramic photo.

This can result in blurred images or visible seams in the final photo.

Overlap Your Shots:

Make sure to overlap your shots by around 30% to ensure accurate stitching of the images.

Use Tripod & Gimbal:

Using a tripod can help keep your camera steady and make it easier to capture accurate shots for your panoramic photo.

Using Gimbal will keep your 360 images and videos super steady if you’re taking the shot by hand.

Use the right settings:

Adjust the settings on your panoramic camera app to ensure you capture high-quality images.

This includes adjusting the exposure, focus, and white balance settings.

Wrapping Up:

These were the top five panoramic camera apps for your Android device.

Each of these apps comes with its own unique features, pros, and cons.

Whether you’re looking for high-resolution photos, VR viewing support, or 3D effects, there’s an app on this list that will suit your needs.

Download these apps, experiment with their features, and capture stunning panoramic photos on your Android device. You can go through our next guide If you don’t know how to take a panoramic photo with drones.

** FAQs **

How do I know if my Android phone supports panoramic photography?

  • Most modern Android smartphones come with built-in panoramic photography features. Check your camera app for panorama mode. If unavailable, download panoramic camera apps from the Google Play Store.

Can I use panoramic camera apps on older Android devices?

  • Yes, you can use them on older devices if they meet minimum requirements. However, older models may face slower processing speeds or feature limitations compared to newer ones.

Are there specific techniques for capturing better panoramic photos?

  • Yes, techniques like selecting stable locations, keeping the camera steady, overlapping shots, and using tripods or gimbals can enhance stability and quality in panoramic photography.

Do panoramic camera apps require a lot of storage space on my Android device?

  • Panoramic camera apps may consume storage space, especially with high-resolution images or video recordings. Regularly delete old files or consider cloud storage options for managing space.

Can I use panoramic photos taken with these apps for professional purposes?

  • Yes, you can utilize panoramic photos professionally in real estate, travel websites, or virtual tours. It ensures high-quality representation and accuracy in depicting subjects or locations

Not satisfied with the quality of 360 images via Androids or iPhones? Then why not explore some of the best digital 360 cameras? It may turn out to be less hard work and better results. Here’s a list of the best 360 cameras out there.