You must know that the USA is the second-largest e-commerce market.
This means e-commerce within the USA is full of challenges! Such as :
Low population density, large distances, slow delivery, excess sales taxes, and more!
One smart way to remove these kinds of obstacles and tap into new audiences- is to start selling on Top marketplaces.
As you are a Woocommerce store owners, you must be looking for top platforms in USA to sell your Woocommerce products.
In this article, I will show you 8 options for your- WooCommerce stores with statistics and their current market demand so that you can choose the right one for you.
so, let’s get started.
7 Top Marketplaces In USA To Promote WooCommerce Products Easily
Following are 7 global online marketplaces where you can promote your products and expect to get great results real quickly.
First, let’s see how many visits these marketplaces get per month.
Let’s go through this list of online marketplaces in the USA one by one:
1. Amazon
Amazon Marketplace USA
From a seller’s perspective, Amazon Marketplace USA is a smart way to get international market reach. Even on the Standard listings, you can expect a large number of sales. For consultants, a consulting invoice receipt template ensures smooth and professional billing.
In 2023, the net sales of Amazon were close to 574.78U.S. dollars!
Plus, Amazon comes with great assistive approaches such as handling its shipping, offering Fulfillment by Amazon, and initiating a strict fraud protection system.
This means your store viewers won’t be able to sell ripped-off products at a ridiculous price – products have to be real and sellers should pass the Amazon background check.
But one of the best advantages you get from a marketing perspective is Amazon has tons of Affiliate promoters. Bloggers, eCommerce sites, and several Ad Firms regularly promote products from Amazon as affiliates to get some commission.
According to DigitalGYD – Amazon Associates has the highest market share of affiliate networks at 44.68%, with over 90,777 companies currently using the program.
Let’s go through some data insights that will help you to choose the right platform :
This large number indicates that your products are most likely to get sold but yes, you have to pay more fees.
The Top Categories And Topics That Rank High on Amazon
Social Traffic of Amazon
Suggestion You Need To Take To Sell via Amazon
As you saw the most-selling categories are video game consoles, accessories, Programming, and developer software, Computers, electronics, and mostly technological staff.
So if your niche is relatable to these categories, You can go for Amazon.
In the social traffic of the Amazon section, you can see that most traffic is on YouTube, which means you need to add affiliate marketing to your marketing strategy to achieve success.
2. eBay
eBay Marketplace USA
Suppose you have a jewelry business and you are searching for a marketplace to sell jewelry online, in that case, eBay is the best option to show your products to the maximum number of people.
Apart from high traffic, one special aspect of eBay is its auction.
You can list products for auction on eBay with a minimum price so that buyers can bid and you get to earn the highest amount possible on your products.
Plus, their Promoted Listings can display your products to the right audience, much better than most other marketplaces, making it a good value for money.
And like Amazon, eBay is also considered by most sellers that want to sell internationally.
The Top Categories And Topics That Rank High On eBay
Social Traffic On eBay
Suggestion To Sell via eBay
As you can see the audience’s highest interest is educational. If your niche is relatable to it you can go for eBay.
You can also consider selling on eBay MIP which increases your business success to a great extent.
For those inspired by eBay’s success and looking to venture into the e-commerce space, understanding how to create an online marketplace like eBay from scratch could be the next big step in realizing your business dreams.
3. Walmart
Walmart Marketplace USA
Walmart’s eCommerce business in USA is streamlining faster every year and last year, their net sales went over642.64 billion.
Walmart makes it super easy for buyers to choose and get products delivered. They offer 2-day free shipping which helps to drive more conversion.
Plus, since Walmart has at least one store in every community, almost every knows the company and trusts them with its website products. And they do make sure to take necessary measures to ensure that the products sold in their marketplace are of high quality.
You will need a pre-approval to be able to list your products on Walmart. You must have fast fulfillment capabilities, a diverse range of products, and competitive selling prices. So not all WooCommerce stores can qualify to list their products on Walmart.
Another reason the Walmart Marketplace USA is famous is its fast and reliable customer support. So your potential buyers will not doubt you and will remain loyal to Walmart, ensuring more sales for a while.
Having your products listed on such a reliable marketplace is always an advantage in terms of sales.
The Top Categories And Topics That Rank High On Walmart
The Social Traffic Data On Walmart
Suggestion To Sell via Walmart
Suggestion To Sell via Walmart As you can see Walmart’s audience’s highest interest is in video game consoles and accessories. if your niche is relatable to it, you can choose Walmart as our online marketplace.
4. Target Plus
Target Plus – One of the best premium US marketplaces
Target Plus is a third-party seller platform run by the American retail company, Target which has become a premium marketplace in USA for trending and seasonal products.
And they are among the top marketplaces that deliver only in the US states.
One specialty of Target is its focus on product promotion based on current trends. They have people who handle the changes so that buyers always get products that are related to a recent trend, season, occasion, or even location of the buyers.
This increases the chances of conversion and if you have trending products, you too will get the exposure.
Another advantage of Target Plus is its large pool of local buyers. Certain buyers are so satisfied with its quality delivery that they always consider Target Plus first, before going to other online shops.
The Top Categories And Topics That Rank High On Target
The Social Traffic Data On Target Plus
Suggestion to Sell via Target Plus
As you can see the target Audience’s interests are mostly in Banking credit and finance. If your niche is relatable to that you can choose Target Plus.
5. Wayfair
Wayfair online marketplace
If you’re targeting household goods, Wayfair is a marketplace in USA with highly relevant potential buyers.
The Top Categories And Topics That Rank High On Wayfair
The Social Traffic Data On Wayfair
Suggestions To Sell via Wayfair
If you supply or sell household goods, then Wayfair is one of the best places to rely on due to the relevant potential buyers, and the low-cost promotion modules.
Their detailed analytics provide you with quality customer demand data that may help you make decisions on re-stocking or stocking new products.
Plus, if you are a retailer and your products sell well, they may even offer to purchase your products and sell themselves as a supplier.
6. Overstock
Overstock USA
Overstock is well-trusted by its buyers when it comes to quality home decor at an affordable price. The website is serious about user experience and makes sure to remove any listed product that buyers report to be faulty, it even has records of banning sellers for false promotion.
Meanwhile, it has tons of loyal buyers who are solely interested in home decor products. So if you are part of that industry, then this site can be more beneficial than even Amazon or eBay.
Overstock is a brilliant USA marketplace to promote home decor products having a wide variety of options for its users. This means that if you sell products that fall under the ‘Home Decor’ category, then Overstock can help you get more sales.
The Top Categories And Topics That Rank High On Overstock
The Social Traffic Data On Overstock
Suggestions To Sell via Overstock
Overstock is a brilliant marketplace to promote home decor products having a wide variety of options for its users.
This means that if you sell products that fall under the ‘Home Decor’ category, then Overstock can help you get more sales.
7. Bonanza
Bonanza marketplace
Bonanza is one of the best online USA marketplaces that most sellers often call an alternative to eBay.
It is well-known for quality clothing products. However, to sellers, the Bonanza marketplace is rather popular due to generating more sales real quickly.
There is a reason why Bonanza is called an alternative to eBay. It’s due to higher odds of selling. Compared to eBay, Bonanza has a 1300: 1 buyer-to-seller ratio (whereas on eBay, it’s 10: 1).
One of the main reasons for this higher ratio is that Bonanza only accepts sellers based out of the USA and have a physical location. So, this is not your typical online marketplace. Bonanza wants to make sure both its buyers and sellers are happy, so, it is strict about listing products from local suppliers only, and likewise, it is strict about selling to local buyers only.
The Top Categories And Topics That Rank High On Bonanza
The Social Traffic Data On Bonanza
Suggestion To Sell via Bonanza
As you can see, the audience’s interest in this site is firstly computers and electronics. Secondly, fashion and apparel. If your niche is relatable to these, you can choose Bonanza as your online marketplace.
How To List WooCommerce Products On Large Marketplaces
Since you use WooCommerce, you have the advantage of using its Addons.
To generate an accurate product feed for any list of online marketplaces in the USA, you can go for a reliable plugin called Product Feed Manager for WooCommerce (PFM).
It goes beyond just providing pre-made feed templates, Such as :
With it, you can supplement your product data with additional details.
You can map out your product categories to Google’s category structure.
You can offer advanced filtering capabilities to generate feeds with specific products.
Enables the creation of customized feeds for merchants without existing templates.
Not only that you can automate your product feed generation process with this plugin.
Any modifications made to product data can be scheduled for automatic updates to the product feed, eliminating the need for manual intervention.
It allows you to create various types of feed files tailored to your merchant’s requirements.
After selecting your merchant, you can choose the desired feed type to generate, including:
XML Product Feed
CSV Product Feed
TEXT Product Feed
TSV Product Feed
RSS Product Feed
To get all things done easily, you can go through our documentation and video tutorials for clear understanding.
Einpacken
As you saw in the statistics above, these marketplaces have a huge audience and can generate more sales in no time. Plus, each of them has its specialty, which you can take advantage of. You can also visit UK online marketplaces to get an idea of other countries in terms of selling WooCommerce products.
So go ahead and choose the top marketplaces in USA that best suit you and start getting more sales!
FAQ 1: Why should I consider selling my WooCommerce products on marketplaces?
– Selling your WooCommerce products on popular online marketplaces can offer several advantages, such as increased visibility, access to a wider customer base, and streamlined selling processes. Marketplaces often have established trust and brand recognition, which can help boost your sales and reach more potential buyers.
FAQ 2: What are some of the top marketplaces in the USA for selling WooCommerce products?
– Some of the top marketplaces in the USA for selling WooCommerce products include Amazon, eBay, Etsy, and Walmart Marketplace. These platforms offer user-friendly interfaces, robust selling tools, and integration options that can make it easier to list and manage your WooCommerce products.
FAQ 3: How can I start selling on a marketplace in USA?
– To start selling on a marketplace in USA, sign up as a seller on platforms like Amazon or Walmart and list your products.
FAQ 4: What are the fees for selling on a marketplace in USA?
– Fees vary, but most Ecommerce marketplaces in USA charge a combination of listing fees, transaction fees, and subscription costs.
FAQ 5: Is a marketplace in USA suitable for international sellers?
– Yes, many marketplaces in USA, such as eBay and Amazon, support international sellers with global shipping options.
Wenn Sie einen WooCommerce-Shop besitzen, müssen Sie sich bei der Werbung für Ihre Produkte etwas mehr Mühe geben.
Eine Möglichkeit, wie die meisten WooCommerce-Geschäfte Erfolg haben, ist die Werbung für ihre Produkte über Google Shopping.
As a WooCommerce store owner, you can get numerous opportunities to showcase your products with Google Shopping ads.
But, there is a big issue that most store owners face.
To upload product feed files properly in the format that Google suggests.
This article will guide you through the steps of building a Woocommerce Google shopping product feed with WooCommerce with 6 simple steps(VERY EASY)
Now, I am here using a plugin Product Feed Manager For WooCommerce, and going to show you how you can generate a Woocommerce Google shopping product feed with JUST A FEW CLICKS.
Tool zum Generieren von WooCommerce Google-Produkt-Feed
First, you need to make sure that the Product Feed Manager For WooCommerce is installed and activated.
Jetzt können Sie damit fortfahren, den WooCommerce Google-Produkt-Feed effizient zu generieren.
6 Easy Steps To Generate WooCommerce Google Product Feed
Um einen genauen WooCommerce Google Product Feed zu erstellen, müssen Sie die folgenden 10 einfachen Schritte befolgen:
Sie können verschiedene Filter verwenden, um die Produkte auszuwählen, die Sie in Ihren Feed aufnehmen möchten.
Sie können auch verschiedene Einstellungsoptionen je nach Ihren Vorlieben konfigurieren.
Schritt 5 - Erzeugen der Produktzufuhr
Sobald die gesamte Konfiguration eingerichtet ist, scrollen Sie zur oberen rechten Seite und veröffentlichen Sie den Feed.
Daraufhin wird der Ladebalken für die Futtermittelerzeugung angezeigt.
Sobald der Ladevorgang abgeschlossen ist, ist Ihr Futter fertig.
Now, you will be able to view the feed, copy the feed link, and download the feed.
Schritt 6 - Hochladen WooCommerce Google Product Feed für die Förderung
Sie können nun den generierten Produkt-Feed herunterladen und in Ihr Google Merchant Center hochladen.
Wenn Sie Ihren WooCommerce-Shop mithilfe unseres Plugins automatisch mit Google Shopping synchronisiert haben, können Sie die Daten direkt über die Option "An Google senden" senden.
Under this option, you can set your schedule according to your own will, either Weekly, Monthly, or Hourly basis. Once you select the schedule, click on the Green button Send To Google.
Und das war's. Der Feed wird an Google gesendet und regelmäßig gemäß Ihrem festgelegten Zeitplan aktualisiert.
Falls Sie nicht wissen, wie Sie Ihren WooCommerce-Shop mit Google automatisch synchronisieren können, indem Sie Product Feed Manager For WooCommerce verwenden, lesen Sie diesen Artikel.
Generate WooCommerce Google Product Feed with Product Feed Manager
It can be difficult to get enough traffic on your website and it takes time for your site to get popular.
So nowadays, it is best to promote your products on large online marketplaces such as Google Shopping, Amazon, eBay, etc.
These platforms regularly get millions of visitors, and people are already purchasing products through these platforms.
Today we will learn about selling your products on eBay MIP.
eBay is currently one of the largest online marketplaces in the world, being the third most popular in the USA.
The eBay MIP is the Merchant Integration Platform (MIP) a feed-based selling platform for small businesses and enterprise merchants.
If you own a small business or if you are an enterprise seller, you can start selling on eBay MIP.
Here, you will get a complete guide on how to generate an eBay MIP product feed to sell your WooCommerce Products on eBay
Am Ende dieses Leitfadens werden Sie in der Lage sein
set up proper product feed of your WooCommerce store, in the most optimized way, for eBay MIP,
generate accurate and performance-driven product feed in minutes to upload and increase sales through eBay Merchant Integration Platform and eBay Seller Central.
So, if you promote on eBay, you can get a lot of visitors to your store.
Last year, One of the most highly visited shopping sites was eBay, with roughly 1.2 billion visits.
I’ve elaborated on some more benefits below :
Huge Daily Traffic
According to Similarweb analysis, in the last 6 months, eBay.com had over 632.8 million visits.
This means, around 4.56 million visitors per day!!
With over 132 million users, it is ideal to promote your WooCommerce products on eBay.
The eBay App
With 66 million regular users, the eBay app is one of the most used mobile apps for online shopping.
Through the eBay app,
6.72% of all Android users, all over the world, make regular purchases.
In the USA alone, 34.9% of all mobile users tend to use the eBay app.
This means 1 out of every 3 mobile users in the USA uses the eBay app.
As you can see, eBay is huge and it’s a marketplace you should explore if you wish to compete for higher sales.
eBay has two platforms with different facilities and perks of their own.
eBay Merchant Integration Platform
eBay Seller Central
Let us look into generating accurate product feeds for each of the platforms below.
Guide To Product Feed For eBay Merchant Integration Platform
eBay Merchant Integration Platform (MIP) is an easy-to-use platform that is ideal for small and medium businesses or enterprises.
It is an eBay platform to upload and organize your products, in order to handle product viewing and marketing across targetted locations and audiences.
Once you log in to your eBay account, you may access one of the 11 eBay MIP sites, depending on your preferred locality and language.
eBay MIP Channels (Sites)
Once you enter your desired eBay MIP site, you will find out all the instructions required to set up a channel for your business and implement proper strategies with your products.
It will allow you to upload your product feed to promote your online store products through this platform.
Setting Up Product Feed For eBay MIP In The Most Optimized Way
When you upload your products, eBay will look for some specific data.
Now, eBay suggests several feed types.
To upload products on eBay, the ideal feed type is the Combined Feed Type. The rest of the feed types are used for situational purposes.
Let us look at the data you must include on your feed, along with examples, for each data so that you know the most optimized way to generate the product feed for the eBay Merchant Integration Platform.
You may submit the product feed in CSV or XML format. We recommend using the CSV format, as the XML format for eBay MIP is very complicated compared to most other merchants.
A product feed (in CSV format) of a single product for eBay MIP usually looks like this:
You can see how a single product is normally listed whereas a variable product is listed with its variations, identified through a Variation Group ID.
Now, eBay MIP requires the following attribute values for each of your products.
Below is a more detailed explanation with examples of how each of these attributes should be assigned on your eBay MIP product feed for maximum output.
You will get samples of eBay MIP product feed later on in this article after I go over detailed instructions on the attributes and some tips.
Let’s look into the details to understand what values you should assign to each attribute.
Product Attributes Explained
Product SKU
Attribut
SKU
Beispiel
SK-01X
The SKU is a unique value assigned to every product to identify them separately from the rest of the products.
Every product, including variants, should have a unique SKU.
Localized For
Attribut
Localized For
Beispiel
en_US
This attribute indicates the language your feed is presented in, and the country it will be sold.
Since eBay MIP is in limited countries, here are the accepted values:
en_US
en_GB
de_DE
fr_FR
es_ES
en_CA
en_AU
de_AT
it_IT
ru_RU
en_IN
Variation Group ID
Attribut
Variation Group ID
Beispiel
SK-01GX
For a variable product, each variant is submitted as a separate product. So a unique Variation Group ID is set which indicates that a group of variants are of the same product.
All the variants of the same product must include the same Variation Group ID.
Variation Specific Name
Attribut
Variation Specific Name 1
Beispiel
Farbe
In the case of a variable product, you need to specify the Variation Specific Name to indicate what attributes the product has variants for, for example, Color or Size.
You can add up to 5 variation factors and include the attribute columns Variation Specific Name 1, Variation Specific Name 2, and so on, till Variation Specific Name 5.
For example, if a product has variations for both Color and Size, then you will need to add an attribute column for Variation Specific Name 1 with the value Color, and another column for Variation Specific Name 2 with the value Size.
Variation Specific Value
Attribut
Variation Specific Value 1
Beispiel
Sky Blue
In the case of a variable product, use a Variation Specific Value to define the variation of a product in reference to the Variation Specific Name.
You can add up to 5 variation factor values and include the attribute columns Variation Specific Value 1, Variation Specific Value 2 and so on, till Variation Specific Value 5 (depending on the number of Variation Specific Names you provided).
For example, if a product has variations for Color and Size, then you will need to add an attribute column for Variation Specific Value 1 with the color value such as ‘Sky Blue’, and another column for Variation Specific Value 2 with the size value such as ‘XL’.
**For each variation value, a separate row of the product data has to be included.
Produkt-Titel
Attribut
Titel
Beispiel
Long Sleeved T-shirt
It is the name of the product to be displayed. It is limited to 80 characters.
If you want, you can add one of its distinguishing features or variants (in the case of a variable product) to the title. For example, Leather High Trainers or Red Velvet Skirt.
Produktbeschreibung
Attribut
Produktbeschreibung
Beispiel
Dies ist ein rotes T-Shirt. Es wurde nur zu Testzwecken erstellt.
Add a proper description of the product you are selling. Make sure to highlight all the major features, it may have, that will attract buyers.
Make sure any details you provide here are accurate. You may also include multiple paragraphs to make it more readable.
Brand Name
Attribut
Marke
Beispiel
Rex Designs
This attribute defines the brand name of a product. If you are selling retail goods, then you may provide the original brand name of the product. If you are the manufacturer yourself, then you may include your company name as the brand name.
The product brand is not mandatory to submit, but we recommend you use it to appear more credible to prospects.
Custom Attribute Name
Attribut
Attribute Name 1
Beispiel
Collar Type
This attribute is used to add extra custom features or details for a product.
Let’s say, you sell shirts and they may have different types of collars. So you may add a column with the attribute ‘Attribute Name1‘ and the value ‘Collar Type’.
You can add up to 30 custom attribute names and include the columns Attribute Name 1, Attribute Name 2 and so on, till Attribute Name 30.
For example, for a product, if you wish to include two features, Collar Type and Hemline, then you will need to add an attribute column for Attribute Name 1 with the value Collar Type, and another column for Attribute Name 2 with the value Hemline.
Custom Attribute Value
Attribut
Attribute Value 1
Beispiel
Collar Type
Use this attribute to define the value of a custom Attribute Name that you included for a product.
You can add up to 30 custom attribute values and include the attribute columns Attribute Value 1, Attribute Value 2 and so on, till Attribute Value 30 (depending on the number of Attribute Values you provided).
For example, for a product, if you included two custom attribute names, Collar Type and Hemline, then you will need to add an attribute column for Attribute Value 1 with the collar type value such as ‘Classic Spread’, and another column for Attribute Value 2 with the hemline type value such as ‘Curved’.
Produkt-Zustand
Attribut
Condition
Beispiel
NEW
Use this attribute to indicate the current condition of the product.
These are the accepted values for the condition:
NEW
NEW_OTHER
NEW_WITH_DEFECTS
MANUFACTURER_REFURBISHED
SELLER_REFURBISHED
USED_EXCELLENT
USED_VERY_GOOD
USED_GOOD
USED_ACCEPTABLE
FOR_PARTS_OR_NOT_WORKING
Condition Description
Attribut
Condition Description
Beispiel
6 months used, but on top condition
This attribute is used to provide extra information regarding the condition of a product.
Even if it is not mandatory to use, we recommend you use it if you are selling any product that is Used or Refurbished.
Dimensions & Weight
In the case of some of your products, you might wish to provide certain measurements for dimensions or weight.
For example, if you are selling luggage, then people would like to know the dimensions and weight.
In these cases, you can either provide the data in the Product Description or submit these values through appropriate attributes.
The latter is ideal for better results on eBay.
Here are the attributes:
Measurement System
Attribut
Measurement System
Beispiel
ENGLISH
If your product or package has any particular measurements or weight that you wish to include in the feed, then you should include this attribute to define the unit and measurement value types.
It has two accepted values:
ENGLISH
METRIC
Here is a chart to understand METRIC and ENGLISH measurement values.
eBay suggests using
lb (pounds) and in (inches) for the English measurement system
kg (kilograms) and cm (centimeters) for Metric measurement system
**Make sure to include this Measurement System attribute to the feed if you wish to use the next few attributes, Length, Width, Height, Weight Major & Weight Minor.
If this attribute value is empty/missing, then the rest of the measurement and weight attributes will be ignored by eBay.
Dimensions
You may include any of the 3 dimensions, Length, Width, and Height as attributes for the dimensions of a product.
Länge
Attribut
Länge
Beispiel
10 cm
Use this attribute to define the dimension of the longest side of a product or package.
Breite
Attribut
Breite
Beispiel
5 cm
Use this attribute to define the dimension of the shortest side of a product or package.
Höhe
Attribut
Höhe
Beispiel
15 cm
Use this attribute to define the dimension of the height (top to bottom) of a product or package.
Gewicht
To specify the weight of a product, you need to include two attributes, weight major and Weight Minor.
Let us look at how it works.
Weight Major
Attribut
Weight Major
Beispiel
11
Let’s say you have a product with a weight of 11lbs 5oz. Then you will need to provide the high whole number value of the weight; in this case 11.
Weight Minor
Attribut
Weight Minor
Beispiel
5
Let’s say you have a product with a weight of 11lbs 5oz. Then you will need to provide the low whole number value of the weight; in this case 5.
Product Image
Attribut
Picture URL 1
Beispiel
https://www.yourwebsite.com/productimage.png
The Picture URL is the link to the image(s) for a product.
You can add up to 24 product images and include the attribute columns Picture URL 1, Picture URL 2 and so on, till Picture URL 24.
You must include at least one product image for every product you include in the feed.
In the case of variable products, you may include an attribute column for Group Picture URL which is used to provide a picture of each of its variants together, to display it in a unique manner on eBay.
For example, if you have a t-shirt with 3 color variants, and each of them has a unique Picture URL, you may include three of them together in Group Picture URL by separating them with a ‘|’ (pipe symbol) and no spaces; similar to the example in the table above.
Include this attribute value only on the 1st product of the variants.
This attribute is entirely optional.
Channel ID
Attribut
Channel ID
Beispiel
EBAY_DE
eBay lists products based on several channels it has for different countries.
The Channel ID is a unique identifier of the eBay MIP channel where you wish your products to appear on.
If you wish to sell on only one channel, then you may leave this column blank.
For multiple channels, you need to add a product multiple times and set the Channel IDs for your desired channels.
For example, if you sell in both the USA and the UK, then you will need to add the same products twice in two rows. For one, assign the Channel ID value as EBAY_US, and assign the Channel ID value as EBAY_UK for the other.
Then eBay will display the products on your desired eBay MIP channels.
Here is a list of the accepted Channel IDs for eBay MIP:
EBAY_US
EBAY_UK
EBAY_DE
EBAY_FR
EBAY_ES
EBAY_CA
EBAY_AU
EBAY_AT
EBAY_IT
EBAY_RU
EBAY_IN
EBAY_Motors
Produkt-Kategorie
Attribut
Produkt-Kategorie
Beispiel
11442
eBay MIP has a category list of its own which you need to use to categorize your products on eBay. You must set this attribute according to their required taxonomy in order to get your submitted product feed approved.
They have a Category Lookup Tool where you can search for relevant category threads and collect the Category ID which you have to provide as the value.
For example, if you are selling a book in the UK, which is an educational language coursebook, then on eBay Mip, it will fall under the category – GBooks, Comics & Magazines > Textbooks Education & Reference > Language Courses.
You can collect its ID from the eBay Category Lookup Tool. In this case, the Product Category value is 11442.
Business Policies
You have to set up a few important business policies when selling on eBay.
However, if you have certain products for which you need to assign unique policies, then you may submit the attributes Shipping Policy, Payment Policy, or Return Policy, whichever is required.
The rest of the products will follow the default business policies that you submitted on eBay when creating the account.
Here are the attributes for separate business policies:
Shipping Policy
Attribut
Shipping Policy
Beispiel
shipping
Payment Policy
Attribut
Payment Policy
Beispiel
payment
Return Policy
Attribut
Return Policy
Beispiel
return
**These business policies have to be created by you on eBay. There you will be able to collect the respective policy IDs from your eBay account preferences and use them as the values when creating the product feed.
Quantity Available
Attribut
Total Ship To Home Quantity
Beispiel
10
This attribute indicates the total quantity available for a product.
Product Price
Attribut
List Price
Beispiel
20
This is the price of the product to be displayed when listed on eBay channels.
The currency will be automatically assigned based on the Channel(s) you are listing your products.
Max Quantity Per Buyer
Attribut
Max Quantity Per Buyer
Beispiel
20
You might wish to restrict the number of certain products that a prospect can order. In that case, you may use this attribute so that a prospect won’t be able to order more than this many of the products within 10 days.
Here’s an example.
Let’s say you sell Hand-made Fancy Gift Cards. Now, let’s assume you have a rule of investing around 3 hours per day for a single customer and can create a maximum of 20 cards in 10 days for a particular customer.
Then you may add an attribute column ‘Max Quantity Per Buyer’ and assign the value ‘20’ so that a customer cannot order more than 20 cards within a span of 10 days.
Old Price (Strike-Through)
Attribut
Strike Through Price
Beispiel
25
This attribute is there to help you create more attraction to prospects by adding a price that will be stricken through, to indicate that the current price is a discounted price.
Let’s say you are running a promotion to sell a Purse at $20, whereas the original price was $25.
Then you can set this attribute value as 25 to display that the old price was $25.
Here’s an example of how it looks on an eBay product listing:
**You may use this feature even when you are not running a promotion. You can post the original price as the List Price, and then assign a higher value as a strikethrough price. But we strongly advise you to use it only when you really run a promotion.
VAT Percentage
Attribut
VATPercent
Beispiel
10
This attribute is used to state the Value Added Tax percentage of the sale price. This is only necessary for the EU countries, though not mandatory.
eBay MIP Product Feed Sample(s)
Now that you know what details you require to generate a Product Feed for eBay MIP, now let us look at a sample to understand the structure.
eBay MIP accepts XML or CSV format to submit product feed. However, the recommended format is CSV.
Now, manually adding products to the product feed file is time-consuming when you have a lot of products in your store.
Rather you can use a tool to generate product feed quickly and without much effort.
For a WooCommerce store, you may use the plugin, Product Feed Manager For WooCommerce with which, you can generate an accurate product feed for eBay MIP in just a few clicks.
Once you have the product feed file, you can now upload it to your eBay Merchant Integration Platform, and your products will be listed on your desired eBay Channels.
Now, you have learned all about eBay MIP Product Feed.
You can have a look at this guide to learn about eBay Seller Central. You can use either of the eBay platforms to increase sales in your store. Take care.
Google Shopping is one of the best ways to drive new traffic and generate Woocomerce sales simultaneously.
According to a Google survey, 49% of shoppers search on Google to discover a new product.
However, simply listing your products on Google Shopping is not enough to ensure your Google Shopping campaign’s success.
You can increase your relevance, ranking, and visibility by categorizing your products according to the Google Product Category.
Your products may not appear in relevant search results without proper categorization. Which will result in lost sales and frustration.
Here we have gathered some proven Google Product Category optimization tactics that you can implement for the best results. After reading this article, know about-
Why it is essential to use Google Product Category
How to categorize your products according to Google Product Category
How to optimize Google Product Category for the best results
By the end of the blog, you can use Google Product Category to boost your sales on Google Shopping.
So, let’s dive in.
Why Categorization with Google Product Category Matters
When you submit your product data to Google Merchant Center, you must select the most appropriate Google Product Category for each product.
Categorizing your products with Google Product Category is essential for below reasons:
Improved Visibility on Google Shopping Your products will appear in the right search results If you categorize them accurately. This will lead to improved visibility and higher click-through rates.
For example, suppose you sell running shoes on your website and categorize them correctly under “Apparel & Accessories > Shoes > Athletic Shoes > Running Shoes.”
In that case, your products will appear when someone searches for “running shoes” on Google Shopping, increasing your visibility and chances of making a sale.
The enhanced user experience when searching Often it hampers user experience if you do not categorize your products properly. Product categorization helps users find what they’re looking for more easily. and, thus, improves user experience.
For instance, suppose you sell furniture on your website and categorize your products under “Home & Garden > Furniture > Sofas.”
In that case, users searching for sofas will find your products easily, leading to a better user experience and higher chances of conversion.
But sometimes, our thinking pattern differs from that of our customers. To ensure a great UX, it’s advised to run online card sorting tests – a type of user research.
Complying with Google’s policies Google has strict policies about the use of Google Product Category. By categorizing your products accurately, you ensure that you comply with Google’s policies, reducing the risk of your product feed being rejected or your account being suspended.
For example, if you sell clothing on your website and categorize them under “Apparel & Accessories > Clothing,” you comply with Google’s policies.
In contrast, if you categorize them under “Electronics,” Google may consider it a policy violation and reject your product feed.
Now you know the benefits of categorization. Let’s find out how to categorize your products properly.
How To Categorize Products with Google Product Category?
Like optimizing other data in your product feed, such as title, color, and description, you need to select the most suitable option from Google product category taxonomy to deliver the most relevant results to your potential customers.
For example, if you sell running shoes and categorize them as simply “Shoes”instead of“Shoes > Athletic Shoes > Running Shoes,” your products may not appear in relevant search results for customers looking specifically for running shoes, resulting in fewer clicks and potentially lower sales.
Categorizing your products with Google Product Category is a simple process. You can do it manually or use a tool to automate the process.
Let’s look at both the categorization processes:
Manual Categorization
To manually categorize your products according to Google Product Category, follow these steps:
Now, Google auto-categorizes your products if you leave the google_product_category attribute blank. But it’s better to assign categories of your choices rather than leave it to Google’s algorithm.
You can use a SaaS like Channable or an affordable WordPress plugin to easily implement the product categorization process.
When you create your Google Shopping Feed with the plugin, you’ll see the google_product_category attribute on the feed creation page.
Beschriftung (optional)
As you can see, a default category mapper is already assigned; you just need to configure the category map. To do this, click on the “Configure Category Mapping” page, which will take you to the configuration page.
Beschriftung (optional)
Map your WooCommerce product categories according to Google Product Category.
Step -2: Map WooCommerce Product Categories
In the category mapping configuration page, you just need to type the category, and you will get suggestions for the most relative Google Category.
For example, if you type ‘Music,’ you’ll see the relevant category suggestions.
Beschriftung (optional)
Now, you just need to choose the right path for your product category, and you’re done!
Beschriftung (optional)
By using this category mapping system, you can reduce the risk of product disapproval in your Merchant Center.
Tips to Set Google Product Category List for Increasing Sales
Tip 1 : Use the most specific category possible
When categorizing your products, use the most specific category possible. It helps to ensure that your products appear in relevant search results and increase the chances of a sale.
For example, if you sell women’s shoes, **instead of categorizing them as “shoes.” Use a more specific category,” women’s athletic shoes” or “women’s high heels.”
Tip 2: Understand the Difference Between Product Type and Google Product Category
The product type attribute organizes bidding and reporting in your Google Ads Shopping campaigns.
On the other hand, Google Product Category is used by Google to ensure that your ad is displayed alongside relevant search results.
The main objective of Google Shopping is to showcase your ads to the right audience as frequently as possible. Both the Product Type and Google Product Category help achieve this goal.
Tip 3: Emphasize Localized Category
Pay attention to localized categories to categorize products with Google Product Category.
Let’s say; you’re selling electronics in the United States and Japan, and you find that the categories for electronic products are named differently in each country.
Thus, you can improve the visibility in local search results and increase your chances of attracting potential customers. Therefore, emphasizing local categories helps maximize your sales and revenue potential in different regions.
Tip 4: Check If The Category Is Related To Any Google Shopping Policy
Properly categorizing your products with Google Product Category is essential for better visibility and sales. It also plays a crucial role in ensuring your products comply with Google Shopping policies.
Let’s Say; You sell products related to alcohol; you must use the correct category (Food, Beverages & Tobacco > Beverages > Alcoholic Beverages) to meet the strict policy requirements.
Similarly, if you sell subscriptions, gift cards, or mobile devices with a contract or installment plan, you must use the appropriate category to ensure your products comply with Google’s policies.
Therefore, checking if your product category applies to any Google Shopping policy is essential to avoid disapproval or account suspension.
Tip 5: Optimize your product titles and descriptions
Optimize your product titles and descriptions with relevant keywords to improve the visibility of your products on Google Shopping. Include the category name in your title and description.
Tip 6: Keep up-to-date product data
Regularly updating your product data can also improve your visibility on Google Shopping. Ensure to update your product category data whenever product or inventory changes occur.
Tip 7: Maintain a clear product category hierarchy
Maintaining a clear and well-structured product category hierarchy is essential for your business if you deal with a large number of products. A well-organized category hierarchy can help your customers find products easily, improving their overall shopping experience.
Optimize Your Google Product Category with Product Feed Manager
When trying to get more sales on Google Shopping, using the right tools makes a big difference. Putting your products in the correct Google product categories helps customers find them easily.
But, doing this manually takes a lot of time and effort, especially if you have many products.
Using a tool like a product feed manager that can automatically map your product categories to Google’s categories saves your time and ensures accuracy. This not only helps customers discover your products but also follows Google’s rules to avoid issues.
One of its standout features is the Advanced Category Mapping capability, which allows you to easily map your WooCommerce product categories to their proper Google product categories.
To Sum Up
Categorizing your products with Google Product Category is essential for any eCommerce store wanting to boost Google Shopping sales.
By categorizing your products correctly, you are providing Google with important information about your products, which can lead to increased visibility, traffic, and sales.
Use the tips mentioned above to leverage the Google Product Category and boost your sales on Google Shopping.
Frequently Asked Question(FAQs)
FAQ 1: What are Google Product Categories and why are they important for WooCommerce stores?
-Google Product Categories are predefined categories that help Google better understand what types of products you sell in your WooCommerce store. Properly assigning these categories to your products can significantly improve their visibility in Google Shopping listings, leading to more qualified traffic and higher conversion rates.
FAQ 2: How do I optimize Google Product Categories for my WooCommerce store?
-To optimize Google Product Categories, you’ll need to first map your existing product categories to the appropriate Google Product Categories. This can be done manually or by using a plugin/extension. Next, ensure that your product titles, descriptions, and other details align with the assigned categories. Also, regularly review and update your categories as your product offerings change or expand.
The online jewelry industry has seen impressive growth in recent years and is estimated to be valued at $19.88 billion by 2024.
So, if you sell jewelry online then you probably realize how competitive the industry has become. And besides trying several sales tactics to increase conversion, you have to look for ways to reach more potential buyers.
And one of the best ways to do this is to promote on a large & popular online marketplace for jewelry. For example, Overstock is a well-known online marketplace where people regularly order jewelry online.
So, you need to know about the best place to sell jewelry online and if you have your products listed there, you too can get great exposure and more sales.
Today, I will show you 6 online marketplaces where you can list your jewelry products and expect to reach more potential clients than you normally can in your WooCommerce store.
So, let’s begin.
Top 6 Marketplaces To Sell Jewelry Online And Increase Sales
Below, I have compiled some of the best USA marketplaces where you can list your jewelry and start seeing a real difference in your sales figures. Let’s check them out.
1. eBay – Effortless Selling Jewelry Online
With over 159 million active buyers, eBay offers plenty of product-promoting opportunities. As the largest auction site, it helps you list your jewelry quickly and get good value for unique items.
Traffic & Engagement Stat’2024
Source- https://www.similarweb.com/
Why Should You Sell Jewelry via eBay
Besides being the third largest store in the world, eBay also has a reputation for being the 2nd best place to sell jewelry.
The eBay MIP marketplace and the auction center make this a unique and preferred place to shop from.
Walmart Marketplace is one of the fastest-growing online marketplaces for household products in the USA, with over 120 million active users. However, it has also got a new-found fame in the jewelry industry with a lot of local vendors listing products on their online marketplace.
Since Walmart handles the delivery itself, it’s a brilliant place to list your products and get more sales.
About 6.5% of Walmart’s listings consist of jewelry items, but they seem to see a lot of orders. This means that there is less competition but more possibility of conversion.
Hence, if you offer a good price, people will love to purchase your jewelry items.
Apart from a user-friendly marketplace, Walmart offers free 2-day shipping, which helps to attract more buyers easily.
Highlights of Selling Jewelry On Walmart
To sell on Walmart, you must include a GTIN for each of your products
Walmart goes by the “Customer is priority” module and has strict no-question return and shipping policies.
As a seller, it’s wise to take advantage of its own delivery system, saving you the hassle of handling shipping.
Since Walmart is locally popular in every state, people will trust to purchase your products from their site, more than via your own WooCommerce store.
Listing products on Walmart is free. Plus, there are no monthly fees.
Walmart charges a specific 6-15% referral fee for each sale depending on how expensive your product is.
3. Facebook Marketplace – Best Place to Sell Jewelry
Facebook is the leading social platform in the world today, and likewise, its online marketplace makes it easy for businesses to expose their products to tons of Facebook users.
Why Should You Sell Jewelry via Facebook Marketplace
A few years back, besides the shop page, Facebook introduced its own online marketplace where online store owners can list their products to drive potential buyers to their site.
The way it works is, that once you list your jewelry items on the Facebook marketplace, these appear on the search results for people who search for specific jewelry that matches your products. At the same time, you may run Ads for each of your jewelry locally and share your personalized flyer templates to reach even more potential buyers. Also, you can consider a few flyer design online tools to create visually appealing materials that enhance your jewelry marketing efforts.
Recently, Facebook Live has become more popular for connecting with jewelry lovers and providing them with an interactive shopping experience.
There are no fees for listing products on the Facebook Marketplace.
At the current demand level (2024) for jewelry, it will cost you $0.26 – $0.30 per click or $1.01 – $3.00 per 1,000 impressions.
4. Bonanza – A great online marketplace for jewelry
Bonanza is an emerging marketplace in jewelry eCommerce. Most buyers use the Bonanza App to shop online via their mobile phones. And this marketplace is quite popular for selling jewelry.
Bonanza comes with a seller-centric nature to help local sellers have a platform of their own. And WooCommerce store owners like yourself can take advantage of this.
The marketplace has this special feature called the Bonanza booth that allows you to create a complete store within the Bonanza marketplace. So you will be able to design your own booth and highlight the products you want. Buyers will be able to visit this personalized shop of yours when purchasing via Bonanza.
Bonanza has a significant representation of jewelry on the market, including artisan jewelry, fashion jewelry, and diamond jewelry.
Bonanza is strict about local product listings, giving you the edge over the international competition.
Buyers in Bonanza love discounts, hence if you run discount campaigns, you are more like to get more sales.
The Bonanza booth will help you rank as a shop within Bonanza if you have on-demand products listed.
Costing of Promoting On Bonanza
There are monthly fees or listing fees.
For products worth below $500, you are entitled to pay a fee of 3.5% per sale
In the case of products worth $500 or above, you are entitled to pay a fee of 1.5% per sale.
5. Etsy – Best Online Marketplace for Jewelry
Etsy is the go-to online marketplace for selling handmade or vintage jewelry products. With around 500 million active users, Etsy is ideal for promoting your jewelry products.
When listing jewelry on Etsy, you’re simply promoting products in front of a massive audience of interested buyers. With a proper listing, you can always expect many sales here.
On top of that, Etsy is a high-ranked platform and its listings have better visibility on search engines. It even has a built-in ads platform. So, if you list your jewelry items with appealing pictures and optimized keywords, it’ll help to reach even more potential buyers.
Besides, Etsy has a super easy dashboard to handle product listing, inventory tracking, and monitoring the exposure. Also, you can try out strategies like appealing pictures, optimized keywords, and seamless Etsy Integrations, so your jewelry items can reach an even broader audience, maximizing your potential sales.
Currently, there are over 40 million pieces of jewelry listed on Etsy, making it a prime marketplace that consumers look at when thinking of purchasing jewelry.
Prices are quite competitive, and if you can give a lucrative offer, then people will buy your products more.
Esty product’s SEO rank drop on Google will not happen if you provide a compelling title and product description.
Cost Of Promoting On Etsy
Setting up an account on Etsy is free, however, you have to sign up for a plan depending on your needs.
Standard: Good for starting a business. There are no monthly fees on it.
Plus: Good for expanding business. It has a $10 monthly charge.
Apart from the account plans, there are a few small fees for listing and selling products:
To upload a single product listing, you will have to pay $0.20, with 4-month validity.
There is a 6.5% fee for every sale you make.
If you run offside Ads via Etsy, then there is a 15% Ads fee when you make a sale via Ads.
6. Overstock for selling Jewelry online
With over 30 million active users, overstock is one of the most popular online marketplaces in the USA for fashion products, jewelry, and home decor.
Promoting on Overstock lets you connect with millions of unique and potential buyers every month. Most of the buyers at Overstock are housewives, and homemakers, thus increasing the chances of selling jewelry.
The marketplace has made a name for itself for eliminating fraudulent products – only real manufacturers are allowed to sell via their marketplace.
Here, renewing inventory is easier. It also offers fulfillment through shipping.
If you are in the USA, then selling jewelry via Overstock is a no-brainer.
Highlights of Selling Jewelry Online via Overstock
Overstock is a great auction site for expensive products.
Fine jewelry and classic jewelry are top sellers in the jewelry section of Overstock.
Buyers at Overstock seek offers on diamonds, gold, and handmade items. So discount campaigns will work really well in this marketplace.
Overstock provides its own fulfillment service, saving you from worrying about logistics.
Costing of Promoting On Overstock
The following costs apply when listing products on Overstock:
Listing costs on Overstocks may vary between $0.10 to $3.15.
You may subscribe at $6.95 per month to add up to 25 listings with no extra listing fees.
Following are the commissions you pay when you sell via this marketplace:
For products under $25, you are entitled to pay a 3% commission per sale. For products with higher prices, it will vary depending on your store’s reputation. You will be informed of your possible fees after you submit an application to sell via their platform.
You may pay $1 to display bold text and $5 for highlighted background for your products
A featured auction will cost $13.17 for a single product.
Start Listing Your WooCommerce Products On Large Marketplaces Without Any Hassle
So far, you’ve learned about the places where you can sell jewelry online and get more sales.
Now the question comes “How you can sell ?”
As a WooCommerce store owner,
The first step to selling on these marketplaces is to start listing. it could be quite time-consuming to manage listings on multiple marketplaces while still managing your own WooCommerce store.
You can start from zero and create perfect product feeds in as low as 3 simple steps!
Select Your Preferred Merchant
Configure Product Data For Your Feed
Generate Feed by clicking The Publish Button.
And that’s it. It’s That Easy! You can watch this video to list your products with the Product feed manager.
And then, all you have to worry about is delivering your products when you receive your orders and updating your WooCommerce stock. Later, can generate the lists again with the new stocks with a few clicks and update your feed in your marketplaces.
Above these are the online marketplaces where to sell jewelry and can have great profit.
Einpacken
Selling jewelry online via global online marketplaces is the key to establishing a successful online presence in jewelry eCommerce, especially if you are a startup or a medium-level business.
So, besides applying all the sales tactics and conversion optimization strategies, start promoting on large online marketplaces to get more sales.
Reach more potential buyers with the best online marketplace for jewelry and grow your WooCommerce sales easily.
FAQs
1. What are the top online marketplaces to sell handmade jewelry?
Etsy, Amazon Handmade, and eBay are leading jewelry marketplaces for handmade products.
2. How can I optimize my WooCommerce store for selling jewelry online?
Use SEO keywords, high-quality images, and plugins like Mail Mint to improve sales.
3. Is it better to sell jewelry on a marketplace or my WooCommerce store?
A jewelry marketplace offers exposure, but WooCommerce provides better branding control.
4. What fees should I expect when selling jewelry on these marketplaces?
Expect fees like 6.5% on Etsy, 15% on Amazon Handmade, and around 12.9% on eBay.
5. How do I drive traffic from a marketplace to my WooCommerce store?
Use packaging inserts, social media, and email campaigns to promote your WooCommerce store.
If you own a WooCommerce store in Germany and want to significantly increase your sales, then you should consider listing your products on idealo.de.
Idealo is one of Europe’s leading price comparison sites that is operating in six countries, including Austria, France, Germany, Italy, Spain, and the UK.
With 18 million visitors per month, idealo is the fourth largest e-commerce website in Germany.
Moreover, its extensive range of categories attracts buyers of all types. No matter what industry you are in or what products you sell, you will find relevant buyers.
Now, to promote your products on Idealo, it is crucial to submit your product data in the right format. Idealo has its own CSV format that you need to follow to upload products.
Simply create an Idealo feed with the right attributes and upload your products to the marketplace. And soon enough, you will start getting more potential buyers visiting your site.
In this guide, you will learn how you can start promoting on Idealo and get step-by-step instructions on generating your WooCommerce product feed to upload products on Idealo real quick.
Fangen wir also an.
The Right Attributes & Product Feed Specification For Idealo
Certain product data are a must when submitting your products for listing on Idealo feed.
Here’s the list of all the required attributes of Idealo:
Product Unique ID (sku)
Product Title (title)
Price (price)
Delivery Time (deliveryTime)
Delivery Costs (deliveryCosts_*)
Product URL (url)
EANS (eans)
HANS (hans)
Brand Name (brand)
Image URL (imageUrls)
Product Colour (colour)
Product Size (size)
Base Price (basePrice)
Checkout (checkout)
Fulfillment Type (fulfillmentType)
Checkout Limit (checkoutLimitPerPeriod)
There are more attributes you can include to increase your chances of converting prospects. Here is a guide on all attributes that you may submit to Idealo:
However, filling out the CSV manually can be quite hectic.
The good news is, you will find a reliable plugin, Product Feed Manager for WooCommerce, which you can use to generate a product feed in the right format in just a few minutes.
The plugin has a pre-made template for the Idealo feed. This means it will only take you a few clicks to generate a working product feed that you can upload to Idealo, without spending much time learning about Idealo’s feed format.
Let us look at how you can generate a product feed using this plugin.
How To Generate Idealo CSV Product Feed In WooCommerce
Then, follow the step-by-step instructions below to successfully generate an Idealo product feed.
Step 1 – Import Idealo Template For Feed Generation
1. On your dashboard, click on Product Feed and then click on Add New Feed option.
Sie gelangen dann zur Seite für die Erstellung des Feeds.
Here, on the top, you will get an option to give a name to your feed.
2. Click on the Feed Merchant field and type in Idealo.
Once you select it, the Idealo feed template will be loaded and you will be able to view all the required attributes for your products.
Step 2 – Feed Settings and Feed Filter (Optional)
Now, you can see three buttons under the Feed Title text box,
Fehlerbehebung
Produkt-Filter
Settings.
1. If you are having any issues generating the feed or get confused at any point, click on the Troubleshoot button and it will take you to the list of actions or guides you can follow to be able to generate a proper Idealo feed.
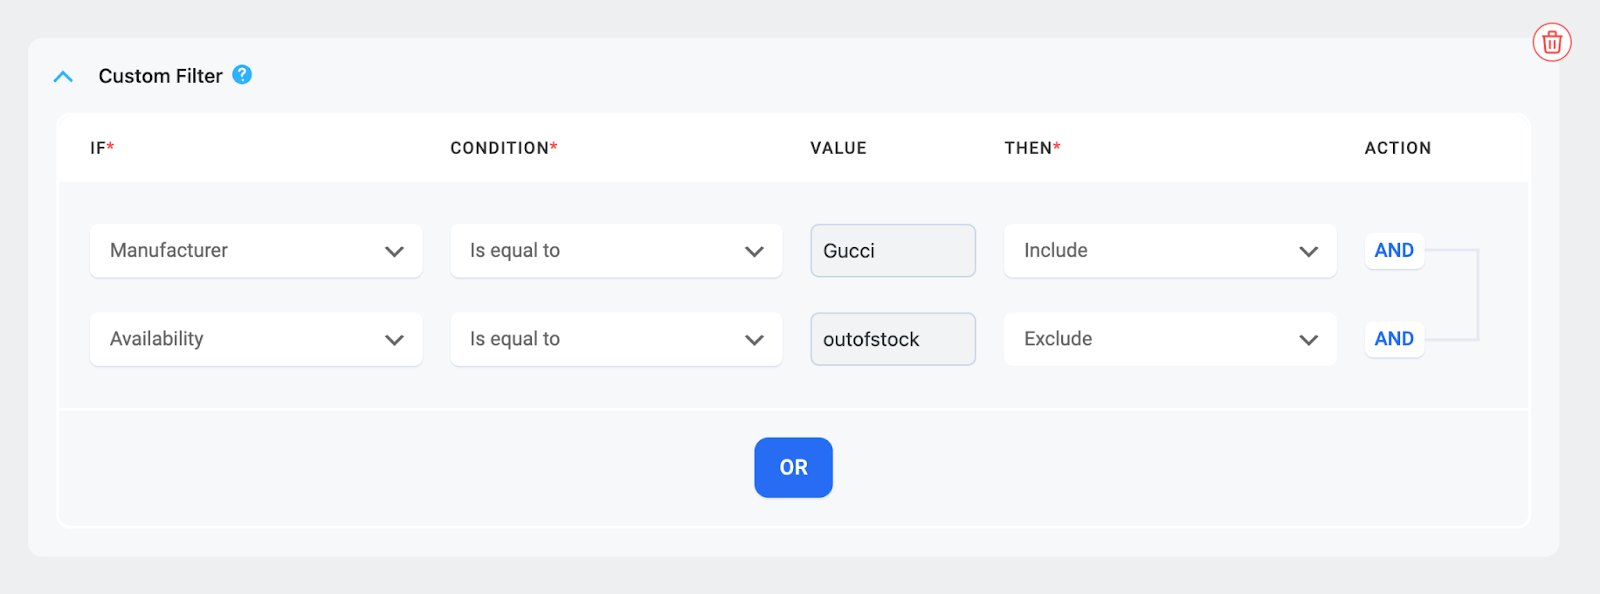
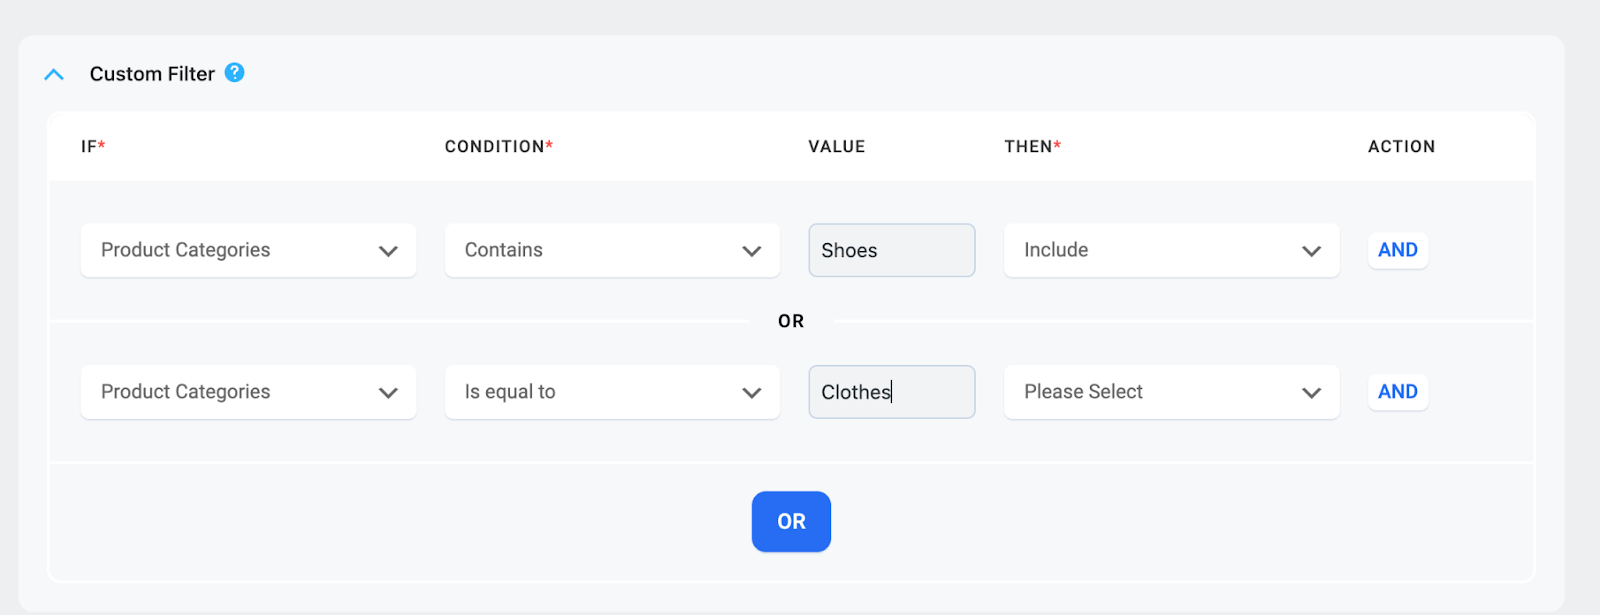
2. If you want to use any type of filter to exclude or include specific or a group of products to your feed, then click on the Product Filter button.
Here, you will get the following options:
All Featured Items
Custom Filter
Category Filter
Tag Filter
Product Filter (Pro)
Learn more about the filter options here.
3. If you need to use more advanced elements of the feed, then click on Settings and use whichever options you may require.
Normally, you do not need to make any changes to the settings, so you can simply move on to Step 3.
Step 3 – Configure Attributes On The Idealo Feed Template
Next, it’s time to configure the feed attributes.
Most of the attributes will already be configured. You simply need to map a few of them.
Marke
Delivery time
Kasse
Checkout Limit
EAN
Delivery Costs
Payment Costs
1.Delivery Time (deliveryTime)
– This is the expected time when the product/ goods will be received by the customer. You need to enter precise information on how long it may take to ship the product/ goods.
– Unclear entries such as “ready for shipment”, “presumably” are disallowed.
Beispiel:
1-3 working days
2. Delivery Costs (deliveryCosts_)
– You will have to enter at least one delivery cost. – If no fees apply, transmit “0.00”. Each payment method requires its own column! You will have to provide the delivery costs for the cheapest method in EUR.
– This is the GTIN / EAN for the offer. EANs are important for product recognition and to find the offer. EAN/GTIN can be retrieved directly from the manufacturer.
4. HANS (hans)
HANS is the list of manufacturer article numbers. It is important for automated product recognition and for finding the offer in the Idealo search result.
Beispiel:
DMC-AB101C-D
5. Brand (brand)
– If your product contains one single brand for all the products, then you can simply use the static value option to set the Brand info, and this Brand name will be added to all the products. – Or, if you have the brand name saved in a custom field within products, you may search for the field name in the value field. – However, we recommend using the Brand Plugin which will allow you to add brand names to your products similar to attributes, and you can assign that in the value field easily.
Btw, if you have a separate brand as an eCommerce store, don’t forget to use a logo maker and share a professional logo as well.
6. Colour (colour)
This indicates the colour of your product.
Beispiel:
blue
7. Size (size)
This indicates the size of the product.
Beispiel:
Groß
8. Base Price (basePrice)
This is the price per unit.
Beispiel:
1.99 $ / 100g
9. Checkout (checkout)
This attribute defines whether an offer is available for direct purchase. Use “true”, “ja” or “1” if this is true.
10. Fulfillment Type (fulfillmentType)
This is the fulfillment type for this offer.
Beispiel:
Parcel_Service
Allowed Values:
Allowed values: “Parcel_Service” or “Paketdienst”; “Freight_Forwarder” or “Spedition”; “Download”; “Letter” or “Briefversand”. The customer is required to provide a telephone number if “Freight_Forwarder” or “Spedition” is used in order to agree on a delivery date if applicable.
11. Checkout Limit Per Period (checkoutLimitPerPeriod)
This is the maximum number of offers that can be purchased via direct purchase per day.
Idealo ensures that it does not sell more offers than the number that was provided. Without this value the offer will remain in the direct purchase until it is deleted or the clearance is revoked. idealo recommends setting this field for all direct purchase offers in the interest of the customers and merchats. The transferred limit corresponds to the number of sales per day (0-24)
Step 4 – Publish The Feed And List Products In The Idealo Marketplace
1.Once the attributes are all set, scroll up and click on Publish and the feed will be generated.
2. Once the feed is generated, now you can download the feed. You will see a new View/ Download option under the publish button, click on the Download button and the feed will be downloaded.
That’s it. You have created your required product feed. The next thing to do is upload your products to Idealo.
Generate Idealo Feed with Product Feed Manager
As you saw above, how easily you can generate an Idealo product feed using Product Feed Manager for WooCommerce.
If you’re running a WooCommerce store and looking to expand your reach to new customers, check out the Product Feed Manager plugin.
With just a few clicks, you can generate flawless feeds tailored for popular marketplaces like Idealo.
To enhance your product listings and boost visibility, our plugin offers powerful features like category mapping, custom fields, product filters, and Google Auto-sync.
Our plugin supports the generation of multiple feed file types to cater to different marketplace needs, including:
XML Product Feeds
CSV Product Feeds
TEXT Product Feeds
TSV Product Feeds
RSS Product Feeds
WooCommerce lacks certain essential fields like Brand, GTIN, UPC, age group, and Gender. Our plugin bridges this gap by smoothly integrating these advanced custom fields, ensuring your product listings are comprehensive and appealing to your potential customers.
Schlussfolgerung
Idealo is an excellent platform to expose your business to a vast customer base. You can attract potential customers, but it’s up to you to capitalize on that opportunity once they arrive at your website.
Maintaining up-to-date pricing and product feed information on Idealo is crucial for maximizing the success of your online store.
Idealo operates on a Cost-Per-Click (CPC) model, similar to paid marketing on search engines like Google or Bing.
So, It’s high time you should take advantage of the Idealo marketplace and start getting more sales on your WooCommerce store.
Frequently Asked Question(FAQs)
FAQ1: What information should be included in my WooCommerce product feed for Idealo?
– When creating your WooCommerce product feed for Idealo, make sure to include essential information such as product titles, descriptions, images, prices, stock availability, and any relevant product attributes or specifications.
FAQ2: Why should I list my WooCommerce product feed on Idealo?
-Listing your WooCommerce product feed on Idealo can provide several benefits, including increased traffic to your online store, improved sales and revenue, and exposure to a large customer base actively searching for the best deals.
In WooCommerce, it can be quite confusing when it comes to setting the tax rates for your products.
You might feel overwhelmed and frustrated while setting your wooCommerce tax rates
This article is a clear and simple walk-through on how you can handle our wooCommerce tax rates in the best way possible.
Keep reading to get a clear idea of:
how to manually add WooCommerce tax rates,
how to configure all the tax options in WooCommerce,
how to automate your tax rates,
and eventually, have a running WooCommerce store with the right taxations.
So, Let’s begin.
Complete Guide To Handle WooCommerce Tax Rates Easily
When you add a product to your WooCommerce store, you can choose whether to include the applicable tax with the price.
Let’s say, you’re selling a T-shirt for 80$. And, the tax rate for your country is 10%.
You need to add an additional 8$ to the original price of the t-shirt. So, the total price of the T-shirt will be $88.
If you include the applicable tax, it will show $88 on the product page.
But, if you don’t include the applicable tax on the product page, customers will see 80$ on the product page and 88$ on the cart page.
WooCommerce automatically calculates the tax rate and shows the total price correctly.
But you need to add your own tax rates so that WooCommerce can configure them.
Now, there are two ways to manage your tax rates in WooCommerce:
Manually configure the WooCommerce Tax settings.
Use plugins to configure WooCommerce Tax rates.
Let’s see how you can do both configurations one by one.
How To Manually Configure WooCommerce Tax Rates Settings
Setting up taxes in Woocommerce manually is often complicated, especially if you operate from multiple countries.
You initially need to enable “WooCommerce tax rates” from the settings and then add the rates for each country. If you only sell locally, then you need to add a single tax rate only.
Follow the steps below to configure your WooCommerce tax rates in the right way.
Step 1 – Enable WooCommerce Tax Rates
To enable WooCommerce tax rates,
Login to your WordPress dashboard.
Go to WooCommerce > Settings
On the General tab, tick the Enable taxes and tax calculations checkbox.
Enable WooCommerce Tax Rates
Step 2 – Setting up the Tax Rates for your store
Once you enable the tax option, you’ll see a new tab in WooCommerce > Settings called Tax. Go to the “Tax” tab.
Here, you will get several options that you need to configure according to your business needs.
2.1 Prices Entered With Tax
You may choose if you want to add products with prices inclusive or exclusive of taxes. Hence you will get the following two options:
Yes, I will enter prices inclusive of tax If you choose this, then when adding products, you need to enter a price that has the tax amount added to it.
No, I will enter prices exclusive of tax Choose this if you want to add products with their original prices and want WooCommerce to calculate taxes based on the tax rates you provide. (You will learn how to provide tax rates later on in this article.)
2.2 Calculate Tax Based On
Regardless of how choose to input prices, WooCommerce will still calculate the taxes during checkout. Here you will get to choose which location WooCommerce will consider when calculating the tax amount.
So you will get the following options:
Customer shipping address Taxes will be calculated based on the shipping country of the customers.
Customer billing address Taxes will be calculated based on the billing country of the customers.
Shop base address Taxes will be calculated based on your business location.
2.3 Shipping Tax Class
This is where you’ll select the shipping tax class.
In the first option, the shipping tax is calculated based on the items in the cart. That means, when a customer adds a product with a different tax rate, the shipping tax will also be charged at that rate.
The other three options are the default tax classes of WooCommerce. In these tax classes, you can specify different tax rates.
Choose your preferred tax option from the drop-down.
Let’s say, you’ve applied a 5% standard tax rate.
Now, when you choose the Standard option, 5% will be applied to your shipping fees.
2.4 Rounding Tax At Subtotal
When you enable this – for having more than one tax for a single order, the value will be rounded at the checkout page rather than showing different taxes in different lines.
So, I’ll recommend you leave this unchecked.
2.5 Additional Tax Classes
The standard tax rate is the default tax rate for most products.
Let’s say, you want to add different tax rates for the products that qualify for a certain condition.
In this case, you’ll need to use the additional tax class
Using this field, you can insert the additional tax classes of your site.
You see, here we have added the Reduced rate and zero rate in the Additional tax classes.
You can also create a new tax class and assign different tax rates there.
2.6 Display Prices in the Shop
This means when you enter the price of your products, it will include the tax or exclude the tax.
2.7 Price Display Suffix
In this field, you’ll put the text that you want to display as a suffix to your tax value
For example, you can add a suffix incl of tax.
2.8 Display Tax Totals
Here, you’ll select how you want to display tax totals at the checkout.
Itemized – If you have more than one product on the cart, then each product will show its own tax separately.
As a single total – If you have 6 products in the cart, then WooCommerce will calculate the total tax of each of the products and the tax value will be displayed as a single value.
You know different states or countries have different taxes.
In WooCommerce, you can add standard tax rates based on the location.
Follow the steps below to add standard tax rates:
First, click on Insert row. When you do that, a new row will be inserted.
In the first column, you see the Country code. Here you’ll select the country code. If you don’t know the country code, you can click on the Country code and get the Wikipedia page where all the country codes are listed.
In the State code column, you can add a tax rate for a specific state of the country you selected.
For the Post code, if all the postcodes are applicable to the same tax rate then put a * on the column. You can also add multiple postcodes in different ranges and separate them with a semicolon.
In the City, insert the cities where the tax applies.
You’ll apply the tax percentage in the Rate column.
Next, enter the Tax name that you want to display at the checkout or cart page.
Assign Priority toeach tax rate.
The Compound option specifies whether the additional charge is based solely on product prices or on product prices plus regular sales tax.
If you enable the Shipping option, then the selected tax percentage will be applied to the shipping fees.
Now, it’s time to test if the tax rates are properly working.
Here, you can see I’ve added different tax rates for California state in the US.
Let’s check on the cart page if the tax is applied or not.
Here, for the shipping address CA, a 2% tax rate is applied.
Now, if we don’t select the state, the tax selected for the US will be applied.
Let’s check that on the cart page –
Here, for a different state in the United States, a 10% tax is applied.
Similarly, you can add the other tax classes.
b. Reduced Rate
c. Zero Rate
Delete Tax Rates
To delete individual tax rules:
Navigate to the tax settings by going to WooCommerce > Settings > Tax sections (Standard, Reduced Rate, Zero Rate).
Identify the incorrect tax rule lines and click on them to select and highlight them in yellow.
Choose the “Remove Selected Rows” option to delete the highlighted tax rules.
Don’t forget to save the changes after making deletions.
To delete all tax rates at once:
Go to the System Status section by navigating to WooCommerce > System Status > Tools.
Look for the option labeled “Delete all WooCommerce tax rates” and select it.
This will remove all tax rates configured in your WooCommerce store simultaneously.
Remember to save the changes after using this bulk deletion option.
How To Manage WooCommerce Tax Rates Using Plugins
As you saw, setting up your WooCommerce Tax Rates is actually not as complicated as it seems. However, there is a better way to make it even easier.
There are several amazing plugins out there that you may use to manage WooCommerce tax rates efficiently. Let us look at a few plugins that can make your life easier when managing taxes:
1. TaxJar
TaxJar is specialized in automatic sales tax calculations. This plugin not only helps you calculate what taxes to collect from different users, but it also helps you automatically file sales tax in states where you owe taxes, which is extremely useful if your store is located in the United States.
With TaxJar you don’t need to manually upload tax rates. Tax rates are already calculated and organized with its’ AI-driven tax categorization, that can help you to managing the taxes of your store.
First, it connects to your shopping cart or marketplace and collects data from there.
Next, it gathers and downloads that information.
Lastly, it compiles it into reports easy to file sales tax in the state in you have your sales tax.
Features of TaxJar –
Seamless integration with e-commerce & ERP platforms.
This plugin performs real-time tax calculations regardless of where your customers are located.
Quaderno transactions and invoices are compliant with ever-changing local tax rules for WooCommerce sellers, including US sales tax, EU VAT, and Canadian GST.
Quaderno also enables you to send tax-compliant documents.
It also facilitates advance tax filing. Quaderno sends email notifications automatically by attaching invoices.
Its super easy dashboard helps you manage all the revenue sources efficiently.
Features of Quaderno WooCommerce tax automation plugin –
Now that you know how you can configure your WooCommerce tax rates, go ahead and set up taxes in your WooCommerce store. Whether you do it manually or use a tax plugin, it is important to ensure you are adding the tax rates and inputting product prices accurately.
If you need help with any other aspects of WooCommerce, you may find a suitable guide here:
In addition to setting up WooCommerce tax rates, businesses should also consider other tax regulations, such as BIK on company cars, to ensure comprehensive tax compliance and effective financial management.
If you faced any difficulties when managing taxes or if you have used any tax plugins, share your experience with us in the comments below.
Ever tried to list your WooCommerce products on Google Shopping, but it was disapproved due to a Missing Unique Identifier? Not just Google, this is also frequently faced in several other online marketplaces such as Facebook Marketplace, Etsy, Rakuten, etc. But what does it mean?
Mit Unique Identifier bezeichnen die meisten Marktplätze eine GTIN oder MPN.
Eine GTIN oder MPN ist ein spezieller Code, der dazu beiträgt, dass Sie auf beliebten Marktplätzen die richtigen potenziellen Käufer erreichen. Außerdem können sie sicherstellen, dass Sie rechtmäßige Produkte verkaufen.
Oft werden Ihre Produkte nicht aufgeführt, wenn Sie sie nicht einreichen können.
In diesem Artikel erhalten Sie eine bessere Vorstellung davon, was GTIN und MPN sind.
And, you will learn how you can add the respective GTINs and MPNs to your WooCommerce productseasily (since you don’t have the option to add them in the default WooCommerce UI).
Fangen wir also an.
Was ist GTIN?
Eine GTIN oder Global Trade Item Number ist ein weltweit eindeutiger Produktidentifikator, der zur Identifizierung von Handelswaren verwendet wird.
Dabei handelt es sich um eine Reihe von Nummern, anhand derer festgestellt werden kann, ob das Erzeugnis tatsächlich gehandelt wird, und die in den einzelnen Ländern unterschiedlich heißen können.
Je nachdem, in welchem Land Ihr Unternehmen ansässig ist, müssen Sie den richtigen GTIN-Wert angeben, wenn Sie Ihre Produkte bei Google oder einem der großen Marktplätze einreichen.
Google akzeptiert die folgenden Arten von Unique Identifiers als GTIN:
Eindeutiger Bezeichner
GTIN Typ
Standort
Produkttyp
Anzahl der Ziffern
UPC - Universeller Produktcode
GTIN-12 (konvertiert 8-stellige UPC-E-Codes in 12-stellige Codes)
Nord-Amerika
Alle Produkte
12
EAN - Europäische Artikelnummer
GTIN-13
Europa
Alle Produkte
13
JAN - Japanische Artikelnummer
GTIN-13
Japan
Alle Produkte
8 oder 13
ISBN - Internationale Standardbuchnummer
GTIN-13 (ISBN-10 in ISBN-13 umwandeln)
Global
Bücher und veröffentlichte Produkte
13
ITF-14 - Interleaved 2 von 5
GTIN-14
Global
Mehrfachpackungen
13
Akzeptierte GTINs bei Google Shopping
Normally, these marketplaces can verify the GTIN from trade sources and determine if the product is being traded legally. If the GTIN is a fake one, most marketplaces can detect it and may unlist your product from its promotion list.
At the same time, when you upload your products, the GTIN helps you to understand the type of product you are selling, and may use it to present your products to the relevant audience even if the product name or description you provided isn’t entirely accurate.
In gewissem Sinne wird diese eindeutige Kennung Ihnen also helfen, mehr Verkäufe zu erzielen oder Sie zu stoppen.
**Geben Sie für kein Produkt eine falsche GTIN an. Bei einer falschen GTIN besteht die Gefahr, dass Ihr Produkt bei der falschen Zielgruppe angezeigt wird.
Wie können Sie die GTIN des Produkts finden?
Der einfachste Weg, die GTIN zu erfahren, ist die Überprüfung der Produktverpackung.
Wie Sie oben sehen können, können Sie die GTIN direkt unter dem Produkt-Barcode ermitteln.
You can always ask the supplier to provide you with a written list of products along with their respective GTIN.
If you want to know more about it, read this guide to learn how to get GTIN for your products.
Was ist MPN?
Die MPN (Manufacturer Part Number, Hersteller-Teilenummer) ist eine Nummer, mit der Sie zwischen Artikeln desselben Herstellers unterscheiden können. Auch Produkte, die in einer Fabrik oder einer Produktionsstätte hergestellt werden, haben eine MPN.
On the other hand, custom products or homemade products may not include an MPN.
Many marketplaces require you to submit an MPN along with the GTIN.
But a few marketplaces, such as Facebook Commerce, allow you to submit an MPN as an alternative to GTIN (when you don’t have one).
Eine legitime MPN ermöglicht es den Marktplätzen, den registrierten Hersteller zu identifizieren, was bis zu einem gewissen Grad beim Ranking Ihrer Produktanzeigen hilft.
Wie können Sie die MPN des Produkts finden?
Bei den meisten Produkten ist die MPN unten auf dem Produkt selbst aufgedruckt. Wenn Sie sie nicht finden, können Sie sie beim Hersteller oder beim Lieferanten erfragen. Die MPNs können auch in den Produktkatalogen der Hersteller zu finden sein.
Apart from that, marketplaces such as Google aren’t too strict about MPNs. They often accept the product SKU in your site as the MPN and consider it as a unique identifier, but there are more reasons to include MPN.
Warum müssen Sie GTIN und MPN in Ihre WooCommerce Produkte einschließen?
Es ist ganz einfach, Sie brauchen die GTIN und die MPN, damit:
Sie haben einen Nachweis über rechtmäßig gehandelte Produkte.
Sie erfüllen die Voraussetzungen, um Produkte auf Google Shopping, Facebook Marketplace, Etsy, Idealo und anderen großen Marktplätzen anzubieten.
SERPs und soziale Marktplätze können Ihre Produkte leichter vergleichen und potenziellen Käufern als Teil der richtigen relevanten Produktliste anzeigen.
Es wird einfacher, Produktdaten abzurufen und eine falsche Produktkategorisierung zu vermeiden.
Google does accept custom-made products or homemade products without a GTIN.
But you do have to include the attribute ‘Identifier Exists’ with the value ‘No’ for these products in your product feed. Although this does limit the reach you may get from Google Shopping Ads.
How To Include GTIN And MPN In A WooCommerce Product?
Normalerweise bietet WooCommerce Ihnen nicht die Möglichkeit, Ihren Produkten eine eindeutige Kennung hinzuzufügen.
Sie müssen benutzerdefinierte Felder hinzufügen, indem Sie entweder ein benutzerdefiniertes Feld-Plugin oder benutzerdefinierten Code zu Ihren Produktdetails hinzufügen, wo Sie GTIN und MPN für jedes Produkt speichern können.
Es gibt jedoch einige Plugins, die Sie verwenden können, um diese Felder einfach und ohne manuelle Arbeit hinzuzufügen.
Heute lernen Sie ein Plugin kennen, das Ihnen nicht nur hilft, diese Felder ohne benutzerdefinierten Code hinzuzufügen, sondern das Ihnen auch dabei hilft, Ihre WooCommerce-Produkte auf die beliebtesten Online-Marktplätze hochzuladen.
Produkt-Feed-Manager für WooCommerce (PFM)
Product Feed Manager für WooCommerce ist ein zuverlässiges Plugin, das Ihnen hilft, Produkt-Feed für Ihre WooCommerce-Produkte zu generieren, so dass Sie hochladen oder auflisten können sie auf große Marktplätze wie Google Shopping, Facebook Marketplace, etc, leicht.
Eine besondere Funktion dieses Plugins ist die Möglichkeit, spezielle Felder für eindeutige Identifikatoren in Ihren WooCommerce-Produktdetails hinzuzufügen.
Wie Sie oben sehen können, erhalten Sie für ein einfaches Produkt alle Felder im Menü WPFM Custom Fields unter Produktdaten.
Bei variablen Produkten werden diese Felder für jede Variante angezeigt.
Sie können das Plugin erwerben und dann dieser Anleitung folgen, um diese Felder zu aktivieren:
Sobald Sie sie aktiviert haben, können Sie die GTINs Ihrer Produkte nacheinander in Ihrem WooCommerce-Shop eingeben.
Diese Felder werden in Ihre strukturierten Daten aufgenommen, die Google (oder andere Marktplätze) beim Crawlen der Website zum Zeitpunkt des Abrufs der Produktdetails anzeigen können.
Außerdem können Sie sie bei Bedarf zusammen mit Ihren Produkten exportieren.
PFM not only solves your requirement to add WooCommerce GTIN and MPN, but it also helps you generate an accurate product feed for your desired marketplace in just a few clicks.
Wie Sie sehen können, ist dieses Plugin optimiert, um Ihnen zu helfen, Ihre Produkte auf großen Marktplätzen zu bewerben und Ihren Umsatz zu steigern. Es verfügt über alle Funktionen, die Sie benötigen, um sicherzustellen, dass Sie einen akkuraten Produkt-Feed haben, und die GTIN- und MPN-Felder sind Teil der nützlichen Funktionen, die es enthält.
Einpacken
Eindeutige Produktkennungen sind einer der Schlüsselaspekte eines Produkt-Feeds, und ohne sie können Ihre Produktreichweite und die Konversion auf dem Marktplatz beeinträchtigt werden.
So, these are must-have data that you must include in your WooCommerce products.
Holen Sie sich Product Feed Manager für WooCommerce jetzt und fügen Sie die GTIN und MPN-Werte, während die genaue Produkt-Feed wirklich schnell.
Start Optimizing your product data and list your product on Google Shopping, Facebook Marketplace, and other large marketplaces, to get more sales and boost your revenue.
So, for a WooCommerce store owner, TikTok can be a gem of a marketplace to sell products on.
That’s why, we’ve brought something amazing for you guys.
Introducing TikTok Feeds in Product Feed Manager For WooCommerce.
Let’s have a look at how that works.
Using TikTok Product Feeds For WooCommerce
Unlike creating any product feeds, all it takes is just 3 clicks to generate the feed.
Check out the following step by step tutorial,
Schritt 1
First, Go to Product Feed Manager For WooCommerce and click “Add New Feed”
Schritt 2
Once you do that, you’ll find the TikTok Catalog in the Feed Merchant Option. From there Select “TikTok Catalog”.
Schritt 3
Once you click on it, you’ll get the Pre made template loaded, and if you want, you can add custom attributes and filter the products however you want.
After you’re done just hit “Publish”.
Now you’re ready to promote your products via TikTok Ads!
Why Use TikTok Product Feed For Promoting Products
Well, if your target audience is young millennials and GenZ, then there isn’t a better option to promote your products other than TikTok.
Obviously, Instagram and YouTube are great options, but TikTok will give you more exposure and better visibility among youngsters.
But it isn’t limited to young audiences only, TikTok is actually said to be popular with middle-aged people as well, which is amazing for all B2C business owners.
How To Use TikTok Catalog For Promoting Products
Instead of creating long-form videos for your products, it’s easier on TikTok to create short-form videos within just 15-30 seconds and create brand awareness. And most of them are vertically created videos with smartphones.
So, it becomes far easier for you to start promoting products right away.
Also, user-generated content (UGC) thrives on the TikTok platform.
And it’s very easy to get attention with authentic product reviews from real customers since almost everyone owns a smartphone nowadays.
If you have a good number of customers already, you can offer a giveaway or create a challenge on TikTok where your users can review your products and you select a winner to giveaway a special prize.
This will increase the chances of your products being viral and trending and ultimately increase your revenue.
Source: www.freepik.com
Schlussfolgerung
So, don’t wait up.
Go ahead and start promoting your WooCommerce products on TikTok Ads today!
Das Online-Shopping hat in den letzten zehn Jahren stark zugenommen. Über 85% der Menschen weltweit bevorzugen den Online-Einkauf gegenüber dem Besuch physischer Geschäfte (laut alphr.com).
Many WooCommerce stores are doing exceptionally well and have achieved three times more sales than they used to about a few years ago.
Wussten Sie, dass Sie auch Ihren Ladenumsatz in kürzester Zeit verdreifachen können?
Aber was ist das Geheimnis?
Nun, der Schlüssel ist ... Wenn Sie Ihren Produkt-Feedauf die richtige Art und Weise erstellen und über Google Shopping Ads und Facebook Dynamic Ads bewerben, können Sie Ihre Verkäufe sofort ansteigen sehen.
Lassen Sie mich das erklären.
Google und Facebook haben das größte Publikum. Die Werbung auf ihren Händlerplattformen kann Ihre Verkäufe im Handumdrehen ankurbeln, WENN SIE GERECHT sind.
Today, you will get a complete step-by-step guide on how to generate your WooCommerce Product Feed in the most optimized way and skyrocket your store performance.
Am Ende dieses Leitfadens werden Sie in der Lage sein
Set up proper WooCommerce product feed in the most optimized way for Google Shopping and Facebook Dynamic Ads
Generieren Sie in Minutenschnelle genaue und leistungsgerechte Produktzuführung
Laden Sie den Feed auf Ihre gewünschte Plattform hoch und sehen Sie, wie Ihre Verkäufe steigen
Sobald Sie ein Konto haben, müssen Sie Ihren WooCommerce-Produkt-Feed hochladen, um über Google zu werben. Google hat jedoch einige Feed-Spezifikationen, die Sie befolgen müssen. Lassen Sie uns das also genauer untersuchen.
Wie man den WooCommerce Google-Produkt-Feed am besten einrichtet
Wenn Sie Ihre Produkte hochladen, sucht Google nach einigen spezifischen Daten.
Lassen Sie uns untersuchen, welche Daten Sie in Ihren Feed aufnehmen müssen, und ich werde Ihnen Beispiele für die einzelnen Daten geben, damit Sie wissen, wie der WooCommerce Google-Produkt-Feed am besten generiert werden kann.
Ein richtiger Google-Produkt-Feed (im XML-Format) eines einzelnen Produkts sieht normalerweise wie folgt aus:
<rss xmlns:g="http://base.google.com/ns/1.0" version="2.0" >
    <channel>
    <title> The name of the feed file </title>
    <link> Your website link </link>
    <description> Description of the content </description>
    <item>
        Product data attributes
    </item>
    </channel>
</rss>
**Here the item tag ( <item> </item> ) encapsulates the data of a product. For multiple products, you simply add more item tags and the product data within, and the rest remains the same.
Nun enthalten die Produktdaten eine Menge Informationen, die Sie den jeweiligen Attribut-Tags innerhalb des Artikel-Tags zuordnen müssen.
Für Google Shopping Ads werden die folgenden Daten für jedes Ihrer Produkte benötigt:
Produkt-ID
Produkt-Titel
Produktbeschreibung
Produkt-Link/URL
Produkt-Kategorie
Google-Produktkategorie
Produkt-Bild-URL
Verfügbarkeit der Bestände
Regulärer Preis
Produkt-Zustand
Hersteller/Markenname
GTIN (Global Trade Item Number)
MPN (Hersteller-Teilenummer)
Kennung
Inhalt für Erwachsene
Multipack
Bündel
Material
Altersgruppe
Farbe
Geschlecht
Größe
Muster
Objektgruppen-ID
Einige dieser Attribute hängen vom Produkttyp und seinen Varianten ab. Nachstehend finden Sie eine ausführlichere Erklärung mit Beispielen, wie jede dieser Daten in Ihrem Speicher für eine maximale Ausgabe aussehen sollte.
Jedes Attribut ist im folgenden Format auf dem Feed enthalten:
<g: Attribute name > Attribute Data </g: Attribute name >
Sie erhalten einen Link zu einer Beispielprodukt-Feed-Datei später in diesem Artikel, nachdem ich die detaillierten Anweisungen zu den Attributen und einige Tipps durchgegangen bin.
Schauen wir uns die Details an, um zu verstehen, wie Sie diese Daten einschließen sollten, welches Format die Feed-Datei hat und welche Daten aufgrund der Produkte in Ihrem WooCommerce-Shop ein- bzw. ausgeschlossen werden sollten.
Produkt-ID
Attribut
id
Beispielwert
671
Struktur der Futtermittel
<g:id>671</g:id>
It is a unique identifier for your product in your store. On WooCommerce, you should see the ID when you browse the product list.
Sie können jedoch auch die Produkt-SKU als Produkt-ID verwenden.
Produkt-Titel
Attribut
Titel
Beispielwert
T-Shirt mit rotem Logo Rex
Struktur der Futtermittel
<g:title> <![CDATA[ Red Logo Rex T-shirt ]]> </g:title>
Es ist der Name des anzuzeigenden Produkts. Auf WooCommerce sollten Sie den Titel des Produkts sehen, wenn Sie die Produktliste durchsuchen.
When you set the product title, do specify any special feature, such as its color and the brand name, along with the product. This will create more attraction for buyers.
However, you are not allowed to use any other promotional touch to the tile (for example, adding “free shipping” or “discounted price” or using all caps).
In the case of variable products, include the brand name in the title. Rather than including just ‘any’ feature to the main title, mention the feature that makes it a variant of the product.
For example, if a product is a Logo Rex T-shirt and has variations of Red and Blue, then on your Google Product Feed, one variation should be named “Logo Rex T-shirt – Red” and the other one “Logo Rex T-shirt – Blue”.
So, the feed data view will look like this individually:
<g:title>
    <![CDATA[ Logo Rex T-shirt - Red ]]>
</g:title>
<g:title>
    <![CDATA[ Logo Rex T-shirt - Blue ]]>
</g:title>
Produktbeschreibung
Attribut
Beschreibung
Beispielwert
Dies ist ein rotes T-Shirt. Es wurde nur zu Testzwecken erstellt.
Struktur der Futtermittel
<g:description> <![CDATA[ This is a Red T-shirt. It was created for testing purposes only. ]]> </g:description>
Fügen Sie eine korrekte Beschreibung des von Ihnen verkauften Produkts hinzu. Stellen Sie sicher, dass Sie alle wichtigen Merkmale hervorheben, die es haben kann, um Käufer anzuziehen.
Wenn Sie ein Produkt bearbeiten, können Sie seine Kachel, den Link und die Beschreibung wie in der Abbildung unten gezeigt einstellen:
Even though you should mention the exclusive features and benefits of the description, you are not allowed to use any extensive promotional touch in the description (for example, adding “free shipping” or “discounted price” or using all caps to highlight a certain point).
Außerdem sollten Sie keine Links zu einer anderen Webseite einfügen oder die Produkte mit denen der Konkurrenz vergleichen.
Dies ist der Link zu Ihrer Produktseite. Wenn Sie ein Produkt bearbeiten, sehen Sie den Permalink direkt unter dem Titel-Feld. Das ist die URL zu Ihrem Produkt.
When people find your product on Google, clicking on that Ad will take the potential buyer to the link you provide here.
Am besten ist es, den Produkttitel auf dem Link anzugeben, doch viele ziehen es vor, stattdessen die Produktkennung zu verwenden, und einige verwenden beide.
Außerdem müssen Sie sicherstellen, dass Ihre Website-Domäne verifiziert ist und mit "http" oder "https" beginnt.
This is the product type or category that you set on your store. When editing a product on WooCommerce, on the right side, you will have the option to set a Category.
This attribute is optional, but we recommend you use it to create a better visualization for viewers.
Google has a category list of its own, which you need to use to categorize your products on Google Shopping. You must set this attribute according to their required taxonomy in order to get your Google Product Feed approved.
Daher können Sie entweder Ihre WooCommerce-Shop-Kategorien entsprechend einstellen oder Ihre eigenen Kategorien mit Hilfe eines Plugins bei der Erstellung des Produkt-Feeds den Google-Kategorien zuordnen lassen.
Dies wird der Link zum Hauptbild Ihres Produktes sein. Wenn Sie ein Produkt bearbeiten, scrollen Sie auf der rechten Seite nach unten, und Sie sollten die Möglichkeit finden, ein Produktbild hinzuzufügen.
Welches Bild Sie auch immer hier verwenden, Sie müssen die URL zu diesem Bild für das Attribut "image_link" angeben.
Sie sollten ein überzeugendes Bild des Produkts ohne Werbetext oder Wasserzeichen bereitstellen. Vermeiden Sie auch die Verwendung von Platzhalterbildern.
Denken Sie daran, dass dieses Image der wichtigste Faktor ist, um mehr Kunden zu gewinnen. Die meisten Menschen werden Ihr Produkt nur dann bemerken, wenn ihnen gefällt, was sie sehen. Stellen Sie also sicher, dass Sie ein klares Bild mit hoher Qualität liefern.
Lagerstatus/Verfügbarkeit
Attribut
Verfügbarkeit
Beispielwert
vorrätig
Struktur der Futtermittel
<g:availability>in_stock</g:availability>
Dies bedeutet, dass das Produkt noch vorrätig oder ausverkauft ist. Blättern Sie auf der Produktbearbeitungsseite nach unten zum Abschnitt mit den Produktdaten. Wählen Sie Inventar und Sie sollten die Möglichkeit erhalten, den Lagerstatus zu setzen.
This value will be added under the attribute “availability” when generating a Google product feed. Google accepts the values “in_stock”, “out_of_stock”, or “preorder.”
WooCommerce gibt Ihnen standardmäßig die Optionen "auf Lager" und "nicht auf Lager". Für die Option "Vorbestellung" müssen Sie zusätzliches Coding oder ein anderes Plugin verwenden.
Tipp: Sie denken vielleicht darüber nach, warum Sie Produkte hinzufügen sollten, die "vergriffen" sind. Nun, manchmal kann man die "out of stock"-Option als psychologische Taktik einsetzen.
Hier ist ein Beispiel: Nehmen wir an, Sie haben ein T-Shirt mit 2 Varianten, Rot und Schwarz, und sagen wir, die schwarzen sind ausverkauft.
Wenn sich die Interessenten die Produkte ansehen, werden sie sehen, dass es zwei ähnliche Produkte gibt und eine Variante ausverkauft ist.
Das könnte bedeuten, dass dieses T-Shirt ziemlich beliebt ist. Daher wird es bestimmte Interessenten dazu verleiten, über den Kauf des Roten nachzudenken.
Regulärer Preis
Attribut
Preis
Beispielwert
26.53 USD
Struktur der Futtermittel
<g:price>26.53 USD</g:price>
Dies ist der Preis des Produkts (in der Regel vor Steuern). Blättern Sie auf der Produktbearbeitungsseite nach unten zum Abschnitt mit den Produktdaten. Auf der Registerkarte Allgemein erhalten Sie die Möglichkeit, den regulären Preis festzulegen.
This value will be added under the attribute “price” when generating a WooCommerce Google product feed.
Make sure you are inputting the accurate price, with the ISO currency code as the suffix.
Bitte beachten Sie, dass der Preis nicht "0" sein kann. (Der Preis "0" ist nur für mobile Geräte akzeptabel, die auf vertraglicher Basis verkauft werden).
Wenn Ihre Produkte für die USA oder Kanada bestimmt sind, dann erheben Sie keine Steuern auf den Preis. Für jedes andere Land müssen Sie die Mehrwertsteuer oder die GST oder eine andere regionale Steuer hinzufügen.
Produkt-Zustand
Attribut
Bedingung
Beispielwert
Neu
Struktur der Futtermittel
<g:condition> <![CDATA[ New ]]> </g:condition>
Verwenden Sie dieses Attribut, um zu kennzeichnen, ob Ihr Produkt brandneu oder überholt ist. Sie können die Werte "neu", "überholt" oder "gebraucht" zur Definition des Zustandes verwenden.
WooCommerce hat kein Feld, um den Zustand des Produkts zu definieren, daher müssen Sie es selbst zum Produkt-Feed hinzufügen.
Der Product Feed Manager For WooCommerce bietet Ihnen jedoch die Möglichkeit, das Feld für die Produktbedingungen für alle Produkte hinzuzufügen.
Hersteller/Markenname
Attribut
Marke
Beispielwert
RexTest
Struktur der Futtermittel
<g:brand> <![CDATA[ RexTest ]]> </g:brand>
It is mandatory to provide the manufacturer/brand name in order to add a product to Google Shopping. Ideally, you should also mention the brand name on the product tile.
Aber WooCommerce enthält kein "Marken"-Feld für Ihre Produkte. Daher können Sie für jedes Produkt ein benutzerdefiniertes Feld erstellen oder ein Plugin verwenden, um das Markenfeld zu jedem Produkt in Ihrem WooCommerce-Shop hinzuzufügen.
However, movies, books, or musical records don’t require you to include a brand name. In that case, you can keep the brand section empty.
GTIN (Global Trade Item Number)
Attribut
gtin
Beispielwert
123465465464
Struktur der Futtermittel
<g:gtin> <![CDATA[ 123465465464 ]]> </g:gtin>
Um Produkte über Google Shopping Ads zu bewerben, müssen Hersteller aus den USA oder Kanada, die eine GTIN-Zertifizierung haben, die GTIN-Nummer für jedes Produkt auf Ihrem Google Product Feed angeben.
Für andere Hersteller
in Nordamerika, stellen Sie UPC
in Europa, EAN zur Verfügung stellen
in Japan, stellen Sie JAN
Für ein Buch müssen Sie jedoch stattdessen die ISBN angeben, und für Multipacks müssen Sie die ITF-14 angeben.
MPN (Hersteller-Teilenummer)
Attribut
MPN
Beispielwert
Rex0011Test
Struktur der Futtermittel
<g: MPN> <![CDATA[ Rex0011Test ]]> </g: MPN>
Falls ein Produkt keine GTIN (oder UPC, EAN, JAN) hat, müssen Sie stattdessen die MPN angeben.
You may also use the product SKU as the value of its MPN when you do not have both GTIN or MPN (provided that you didn’t use the SKU as its product id).
Now, WooCommerce doesn’t provide fields for Brand, GTIN, or MPN by default. Hence, you need to input custom fields for every product manually.
However, I use the Product Feed Manager For the WooCommerce plugin whichincludes those fields on every product, as shown below:
Ich muss nur die richtigen Daten eingeben und sie als Werte der erforderlichen Attribute verwenden, wenn ich meinen WooCommerce-Produkt-Feed generiere.
Kennung vorhanden
Attribut
Bezeichner_existiert
Beispielwert
nein
Struktur der Futtermittel
<g:identifier_exists>no</g:identifier_exists>
Sie haben bereits gelernt, dass die Angabe von GTIN oder MPN obligatorisch ist. Einige Produkte haben jedoch weder eine GTIN noch eine MPN.
Einige Produkte werden zum Beispiel nur lokal hergestellt und enthalten keine GTIN oder MPN.
In diesem Fall müssen Sie das Attribut "identifier_exists" verwenden und den Wert "no" zuweisen.
Inhalt für Erwachsene
Attribut
Erwachsene
Beispielwert
ja
Struktur der Futtermittel
<g:adult>yes</g:adult>
Sie haben vielleicht einige erotische oder erwachsene Produkte. Es ist völlig in Ordnung, sie bei Google Shopping zu bewerben, solange Sie sie als Erwachseneninhalt kennzeichnen. Wenn Sie ein Produkt aus der Erwachsenenbranche einreichen, müssen Sie das Attribut "adult" verwenden und den Wert "yes" zuweisen.
Wenn Sie ein Geschäft betreiben, das vollständig in der Erotikbranche angesiedelt ist, z.B. ein lizenziertes Erotikgeschäft, dann benötigen Sie keine Attribute. Sie sollten lieber zu den Einstellungen Ihres Google Merchant Centers gehen und die Option wählen, die besagt, dass Ihr Unternehmen Produkte für Erwachsene liefert.
Multipack
Attribut
Multipack
Beispielwert
8
Struktur der Futtermittel
<g:multipack>8</g:multipack>
Ein Multipack ist, wenn Sie eine Gruppe von mehreren identischen Produkten als eine Einheit verkaufen, z.B. 8 Stifte zusammen.
This attribute is required for promotion in certain locations such as Australia, Brazil, Czechia, France, Germany, Italy, Japan, Netherlands, Spain, Switzerland, the UK, and the US.
You must include this attribute and assign its value to the number of products you assembled into a multipack.
Wenn das Multipack von seinem eigentlichen Hersteller und nicht von Ihnen zusammengestellt wird, brauchen Sie dieses Attribut nicht anzugeben.
Tipp: Versuchen Sie, Multipacks in Ihrem Geschäft mit einem kleinen Rabatt anzubieten.
Wenn z.B. 1 Stift 10 Dollar kostet und Sie ein Multipack für 8 Stifte festlegen, dann versuchen Sie, statt 80 Dollar einen Rabatt zu geben und vielleicht 70 oder 75 Dollar zu verlangen. Dieser kleine Rabatt wird mehr Attraktivität schaffen.
Bündel
Attribut
is_bundle
Beispiel
ja
Feed-Daten
<g:is_bundle>yes</g:is_bundle>
Ein Bundle ist, wenn Sie mehrere Produkte nehmen und sie als ein einziges Paket verkaufen. In der Regel sind alle Produkte in einem Bündel in gewisser Weise miteinander verbunden und können auch ohne das Bündel einzeln verkauft werden.
Hier fungiert ein Produkt als Hauptprodukt, die übrigen sind Unterprodukte, die in einem Paket angeboten werden.
Sie können z.B. ein Produktpaket erstellen, das eine Kamera, eine Speicherkarte und eine Tragetasche enthält. Hier ist die Kamera das Hauptprodukt, während die Speicherkarte und die Tragetasche verwandte Unterprodukte in einem Bündel sind.
Für die Förderung von Bundles in Australien, Brasilien, Tschechien, Frankreich, Deutschland, Italien, Japan, den Niederlanden, Spanien, der Schweiz, dem Vereinigten Königreich und den USA müssen Sie dieses Attribut verwenden und ihm den Wert "ja" oder "wahr" zuweisen.
Material
Attribut
Material
Beispiel
Leder
Feed-Daten
<g:material>Leather</g:material>
Falls Sie ein Produkt hochladen möchten, dessen Material ein bemerkenswertes Merkmal ist, können Sie dieses Attribut verwenden. Sie müssen gültige Materialnamen verwenden.
Falls das Produkt aus mehreren Materialien hergestellt wurde, nennen Sie alle Materialien, wobei Sie diese mit "/" voneinander trennen. Zum Beispiel Baumwolle/Leder/Polyester.
**For promoting Apparel & Accessories in Brazil, France, Germany, Japan, the UK, and the US, you need to provide more attributes, including age group, color, gender, and size. For variable products, you must include an extra attribute called item_group_id. So let’s learn more about them.
Altersgruppe
Attribut
Alter_Gruppe
Beispielwert
Kinder
Struktur der Futtermittel
<g:age_group>kids</g:age_group>
(Dieses Feld ist nur erforderlich, wenn Ihr Produkt unter die Kategorie Kleidung und Accessoires oder deren Unterkategorie fällt)
Sie müssen zuordnen, für welche Altersgruppe dieses Produkt bestimmt ist.
Google wird die folgenden Werte akzeptieren:
Neugeborenes
Kleinkind
Kleinkind
Kinder
Erwachsene
In the case of variable products, assign a separate age group for each variant.
Farbe
Attribut
Farbe
Beispielwert
Tango-Rot
Struktur der Futtermittel
<g:color>Tango Red</g:color>
(Dieses Feld ist nur erforderlich, wenn Ihr Produkt unter die Kategorie Kleidung und Accessoires oder deren Unterkategorie fällt).
Sie müssen die Farbe des Produkts beschreiben (aber keine Farbcodes oder Einzelbuchstaben).
Wenn es mehrere Farben gibt, erwähnen Sie alle Farben und trennen Sie diese mit einem "/". Zum Beispiel Rot/Blau/Grün.
For variable products, assign a separate color for each variant and add it to the product title.
Tipp: Es ist nicht notwendig, dass Sie eine allgemeine Farbe angeben müssen. Sie können eher einprägsame Farbnamen wie "Tango Red" statt nur "Red" verwenden, was für Käufer attraktiver ist.
Geschlecht
Attribut
Geschlecht
Beispielwert
männlich
Struktur der Futtermittel
<g:gender>male</g:gender>
(Dieses Feld ist nur erforderlich, wenn Ihr Produkt unter die Kategorie Kleidung und Accessoires oder deren Unterkategorie fällt).
Beim Verkauf von Bekleidung sollten Sie angeben, für welches Geschlecht das Produkt bestimmt ist.
Google akzeptiert die folgenden Geschlechter:
männlich
weiblich
Unisex
Größe
Attribut
Größe
Beispielwert
XL
Struktur der Futtermittel
<g:size>XL</g:size>
(Dieses Feld ist nur erforderlich, wenn Ihr Produkt unter die Kategorie Kleidung und Accessoires oder deren Unterkategorie fällt).
Sie müssen dem Produkt einen entsprechenden Größenwert zuordnen.
For example, “XL” to define extra-large, or “15/32 slim” to define a 15-inch neck size, 32 inches sleeves, and a slim fit.
Für ein Produkt in Freegröße sollten Sie den Wert "Einheitsgröße", "OS", "Einheitsgröße für alle", "OSFA", "Einheitsgröße für die meisten" oder "OSFM" zuweisen.
Bei variablen Produkten weisen Sie für jede Variante eine eigene Größe zu, die Sie auch dem Titel des Produkts hinzufügen können.
Tipp: Halten Sie eine Maßtabelle auf Ihrer Website bereit, um die hier genannten Größen zu definieren.
Wenn Sie beispielsweise die Größe als XL zugewiesen haben, erläutern Sie in der Tabelle die Höhe, Breite, Brustgröße usw. in Zoll oder cm, um Ihren Kunden eine Möglichkeit zu geben, zu überprüfen, ob diese Größe die richtige Passform ist.
Verschiedene Länder haben unterschiedliche Maße für die gleichen Größencodes, daher wird dies hilfreich sein.
Muster
Attribut
Muster
Beispielwert
gestreift
Struktur der Futtermittel
<g:pattern>Striped</g:pattern>
This field is only applicable to variable products. If you have different pattern designs for the same product, then you need to mention separate patterns for each variant using this attribute.
Objektgruppen-ID
Attribut
item_gruppen_id
Beispielwert
AB12345
Struktur der Futtermittel
<g:item_group_id>AB12345</g:item_group_id>
Bei variablen Produkten, wenn die Abweichungen aufgrund einer der folgenden Ursachen auftreten:
Bei variablen Produkten, wenn die Abweichungen aufgrund einer der folgenden Ursachen auftreten:
Farbe
Größe
Muster
Material
Altersgruppe
Geschlecht
dann müssen Sie das Attribut "item_group_id" verwenden.
Alle Varianten desselben variablen Produkts haben die gleiche Artikelgruppen-ID. Dies zeigt an, dass es sich um Varianten eines einzigen Produkts handelt. Sie müssen also eine eindeutige Gruppen-ID für jedes variable Produkt wählen.
Google Produkt-Feeds Beispiele
Da Sie nun wissen, welche Details Sie benötigen, um Ihren WooCommerce-Produkt-Feed für Google zu generieren, lassen Sie uns nun einige Beispiele betrachten, um die Struktur zu verstehen.
Google akzeptiert verschiedene Dateiformate von Produkt-Feeds, die hochgeladen werden können. Das empfohlene Format ist jedoch XML.
2. WooCommerce Produkt-Feed für dynamische Facebook-Werbung
Facebook ist das größte soziale Medium und derzeit eine wichtige Plattform zum Hochladen und Bewerben von Produkten für Ihr Unternehmen.
Wenn Sie auf Facebook blättern, finden Sie oft gesponserte Beiträge, wie unten dargestellt:
Wie Sie sehen, gibt es die Schaltfläche "Jetzt einkaufen", und es gibt Pfeile, mit denen Sie innerhalb einer Galerie von Produkten für dasselbe Unternehmen streichen können.
Dies ist eine intelligente Art und Weise, für Ihre Produkte zu werben.
Als Besitzer eines Woocommerce-Geschäfts ist es ideal, Ihre Produkte über Facebook zu verkaufen, da Sie ein größeres Publikum erreichen.
Wenn Sie bestimmte Richtlinien befolgen, können auch Sie von der Verwendung dynamischer Facebook-Werbung profitieren und den ROI Ihres Geschäfts steigern.
Wie man den WooCommerce Facebook-Produkt-Feed am besten einrichtet
Facebook hat einige Richtlinien für die Produkt-Feed-Spezifikationen, die Sie befolgen müssen, damit Ihre Produkte für Facebook Dynamic Ads zugelassen werden.
Let’s take a look at the necessary data that you must submit for your product to be promoted on Facebook.
Some of these attributes depend on the product type and its variants. Below is a more detailed explanation with examples of how each of these attributes should be assigned on your Facebook product feed for maximum output.
You will get samples of Facebook product feeds later on in this article after I go over detailed instructions on the attributes and some tips.
Schauen wir uns die Details an, um zu verstehen, welche Werte Sie jedem Attribut zuweisen sollten und welche auf der Grundlage der Produkte in Ihrem WooCommerce-Shop ein- bzw. ausschließen sollten.
Produkt-ID
Attribut
id
Beispielwert
671
Es ist ein eindeutiger Identifikator für Ihr Produkt in Ihrem Geschäft. Auf WooCommerce sollten Sie die ID sehen, wenn Sie die Produktliste durchsuchen.
Es wird empfohlen, die vorhandene SKU des Produkts als ID zu verwenden, da diese immer eindeutig ist.
Wenn mehrere Produkte die gleichen IDs haben, wird nur das erste Produkt auf der Liste berücksichtigt. Der Rest wird ignoriert. Stellen Sie also sicher, dass jedes Produkt eine eindeutige ID hat.
Produkt-Titel
Attribut
Titel
Beispielwert
T-Shirt mit rotem Logo Rex
Es ist der Name des anzuzeigenden Produkts. Auf WooCommerce sollten Sie den Produkttitel sehen, wenn Sie die Produktliste durchsuchen.
Wenn Sie den Produkttitel festlegen, geben Sie neben dem Produkt auch besondere Merkmale wie die Farbe und den Markennamen an. Dies wird die Aufmerksamkeit der Käufer auf sich ziehen.
However, you are not allowed to use any other promotional touch to the tile (for example adding “free shipping” or “discounted price” or using all caps).
In case of variable products include the brand name to the title. Rather than including just any feature in the main title, mention the feature that makes it a variant of the product.
For example, if a product is a Logo Rex T-shirt and has variations of Red and Blue, then one variation should be named “Logo Rex T-shirt – Red” and the other one “Logo Rex T-shirt – Blue”.
In der CSV-Datei werden sie also unterschiedliche Werte für den Titel haben:
id
Titel
872
Logo Rex T-Shirt - Rot
873
Logo Rex T-Shirt - Blau
Verfügbarkeit der Bestände
Attribut
Verfügbarkeit
Beispielwert
vorrätig
Dies bedeutet, dass das Produkt noch vorrätig oder ausverkauft ist. Blättern Sie auf der Produktbearbeitungsseite nach unten zum Abschnitt mit den Produktdaten. Wählen Sie Inventar und Sie sollten die Möglichkeit erhalten, den Lagerstatus zu setzen.
This value will be added under the attribute “availability” when generating WooCommerce Facebook product feed for Facebook Dynamic Ads.
Facebook accepts the following values:
in stock – when the product is ready for immediate shipping
out of stock – when the product is not available in stock
Vorbestellung - kann im Voraus für die künftige Wiederauffüllung der Bestände bestellen
available for order – if the product is available, but will require a couple of weeks for shipping
eingestellt - wenn das Produkt nicht mehr hergestellt wird
WooCommerce will give you the options “in stock” and “out of stock” by default.
For the rest of the values, you will need to use extra coding or another plugin.
Tipp: Wussten Sie, dass das Hinzufügen von Produkten, die "nicht vorrätig" sind, eine großartige psychologische Taktik sein kann?
Hier ist ein Beispiel: Nehmen wir an, Sie haben ein T-Shirt mit 2 Varianten, Rot und Schwarz, und sagen wir, die schwarzen sind ausverkauft.
Wenn sich die Interessenten die Produkte ansehen, werden sie sehen, dass es zwei ähnliche Produkte gibt und eine Variante ausverkauft ist.
Das könnte bedeuten, dass dieses T-Shirt ziemlich beliebt ist. Daher wird es bestimmte Interessenten dazu verleiten, über den Kauf des Roten nachzudenken.
Produkt-Zustand
Attribut
Bedingung
Beispielwert
neu
Verwenden Sie dieses Attribut, um zu kennzeichnen, ob Ihr Produkt brandneu oder überholt ist. Sie können die Werte "neu", "überholt" oder "gebraucht" zur Definition des Zustandes verwenden.
WooCommerce hat kein Feld, um den Zustand des Produkts zu definieren, daher müssen Sie es selbst zum Produkt-Feed hinzufügen.
However, the Product Feed Manager For WooCommerce will have the option for you to add the product condition field for all products.
Produktbeschreibung
Attribut
Beschreibung
Beispielwert
Dies ist ein rotes T-Shirt. Es wurde nur zu Testzwecken erstellt.
Fügen Sie eine korrekte Beschreibung des von Ihnen verkauften Produkts hinzu. Stellen Sie sicher, dass Sie alle wichtigen Merkmale hervorheben, die es haben kann, um Käufer anzuziehen.
When you edit a product, you get to set its title, link, and description as shown in the picture below:
You should mention the exclusive features and benefits of the description.
However, you are not allowed to use any extensive promotional touch in the description (for example adding “free shipping” or “discounted price” or using all caps to highlight a certain point).
Außerdem sollten Sie keine Links zu einer anderen Webseite einfügen oder die Produkte mit denen der Konkurrenz vergleichen.
Produkt-Bild-URL
Attribut
image_link
Beispielwert
https://www.yourwebsite.com/redtee394.png/
Dies wird der Link zum Hauptbild Ihres Produktes sein. Wenn Sie ein Produkt bearbeiten, scrollen Sie auf der rechten Seite nach unten, und Sie sollten die Möglichkeit finden, ein Produktbild hinzuzufügen.
Welches Bild Sie auch immer hier verwenden, Sie müssen die URL zu diesem Bild für das Attribut "image_link" angeben.
Denken Sie daran, dass dieses Image der wichtigste Faktor ist, um mehr Kunden zu gewinnen. Die meisten Menschen werden Ihr Produkt nur dann bemerken, wenn ihnen gefällt, was sie sehen. Stellen Sie also sicher, dass Sie ein klares Bild mit hoher Qualität liefern.
It’s best if the image is a clear picture of the product without any promotional text watermark, or any placeholder image (although I am using one just for test purposes).
Sie müssen jedoch die richtige Bildauflösung beibehalten.
If you use a square image for carousel ads, then the dimensions should be 600×600 px.
For Dynamic Ads with a single image, you need a minimum resolution of 1200×630 px with a minimum aspect ratio of 4 : 5 and a maximum aspect ratio of 1: 91: 1.
Alles, was außerhalb der genannten maximalen Seitenverhältnisse liegt, wird ausgeschnitten.
Produkt-URL
Attribut
Link
Beispielwert
https://www.yourwebsite.com/red-logo-rex-t-shirt/
Dies ist der Link zu Ihrer Produktseite. Wenn Sie ein Produkt bearbeiten, sehen Sie den Permalink direkt unter dem Titel-Feld. Das ist die URL zu Ihrem Produkt.
Am besten ist es, den Produkttitel auf dem Link anzugeben, doch viele ziehen es vor, stattdessen die Produktkennung zu verwenden, und einige verwenden beide.
Außerdem müssen Sie sicherstellen, dass Ihre Website-Domäne verifiziert ist und mit http oder https beginnt.
Regulärer Preis
Attribut
Preis
Beispielwert
26.53 USD
Dies ist der Preis des anzuzeigenden Produkts. Blättern Sie auf der Produktbearbeitungsseite nach unten zum Abschnitt mit den Produktdaten. Auf der Registerkarte Allgemein erhalten Sie die Möglichkeit, den regulären Preis festzulegen.
This value will be added under the attribute “price” when generating a product feed for Facebook.
Bitte beachten Sie, dass der Preis nicht "0" sein kann und jedes Produkt mit "0" oder keinem Preiswert zur Ablehnung von dynamischen Facebook-Werbung führt.
Make sure you are inputting the accurate price with the ISO currency code as the suffix.
Hersteller/Marke
Attribut
Marke
Beispielwert
RexTest
Falls ein Produkt keine GTIN hat, ist es zwingend erforderlich, den Hersteller/Markennamen anzugeben, um das Produkt auf Facebook hinzuzufügen.
If the product falls under the Daily Deals Inventory, then you must also include MPN alongside brand.
Aber WooCommerce enthält kein "Marken"-Feld für Ihre Produkte. Daher können Sie für jedes Produkt ein benutzerdefiniertes Feld erstellen oder ein Plugin verwenden, um das Markenfeld zu jedem Produkt in Ihrem WooCommerce-Shop hinzuzufügen.
Google-Produktkategorie
Attribut
google_produkt_kategorie
Beispielwert
Kleidung und Accessoires > Bekleidung
Facebook verwendet die gleiche Taxonomie und Kategorieangaben wie Google. Um Ihre Produkte zu kategorisieren, müssen Sie daher dieses Attribut gemäß der Google-Taxonomie festlegen, damit Ihr WooCommerce-Facebook-Produkt-Feed genehmigt werden kann.
Für einen Hersteller in den USA oder Kanada, der GTIN-zertifiziert ist, ist es notwendig, die GTIN-Nummer für jedes Produkt auf Ihrem Facebook-Produkt-Feed anzugeben.
Alternatively, you can also use UPC, EAN, JAN, or ISBN in place of GTIN if you are from a different location.
MPN (Hersteller-Teilenummer)
Attribut
mpn
Beispielwert
Rex0011Test
Falls ein Produkt keine GTIN (oder UPC, EAN, JAN, ISBN) hat, müssen Sie stattdessen die MPN angeben. Es ist eine eindeutige Hersteller-ID für ein Produkt, das keine GTIN hat.
Wenn Sie bei Produkten, die sich im Bestand des Tagesgeschäfts befinden, einen Markennamen angeben, dann ist es auch zwingend erforderlich, die MPN anzugeben.
Now, WooCommerce doesn’t provide fields for Brand, GTIN, or MPN by default. Hence, you need to input custom fields for every product manually.
However, I use the Product Feed Manager For the WooCommerce plugin includes those fields on every product, as shown below:
Ich muss nur die richtigen Daten eingeben und sie als Werte der erforderlichen Attribute verwenden, wenn ich den Facebook-Produkt-Feed generiere.
Größe
Attribut
Größe
Beispielwert
Groß
Dieses Feld ist nur für variable Produkte mit Größenvarianten erforderlich.
You may use words such as Small, Medium, or Large, or you may use numbers such as 20, 25, etc, whichever is appropriate to define the size of a product.
Tipps: Sie sollten auf Ihrer Website eine Maßtabelle führen, um die von Ihnen genannten Größen für Ihre Produkte zu definieren.
Wenn Sie beispielsweise die Größe als Large zugewiesen haben, erläutern Sie in der Tabelle die Höhe, Breite, Brustgröße usw. in Zoll oder cm, um Ihren Kunden eine Möglichkeit zu geben, zu überprüfen, ob diese Größe die richtige Passform ist.
Verschiedene Länder haben unterschiedliche Maße für die gleichen Größencodes, daher wird dies hilfreich sein.
Farbe
Attribut
Farbe
Beispielwert
Tango-Rot
Dieses Feld ist nur für variable Produkte mit Farbvarianten erforderlich.
Sie müssen die Farbe des Produkts beschreiben (aber keine Farbcodes oder Einzelbuchstaben).
Wenn es mehrere Farben gibt, erwähnen Sie alle Farben und trennen Sie diese mit einem "/". Zum Beispiel Rot/Blau/Grün.
In the case of variable products, assign a separate color for each variant and add it to the product title.
Tipp: Sie können die Farbe auf kreative Weise beschreiben, anstatt einfach allgemeine Farben zu verwenden. So können Sie beispielsweise eher eingängige Farbnamen wie "Tango Red" statt nur "Red" verwenden, was für Käufer attraktiver ist.
Geschlecht
Attribut
Geschlecht
Beispielwert
Unisex
Sie müssen angeben, für welches Geschlecht das Produkt bestimmt ist.
Facebook akzeptiert die folgenden Geschlechter:
männlich
weiblich
Unisex
Muster
Attribut
Muster
Beispielwert
Flanell
Dieses Feld ist nur für variable Produkte mit Mustervarianten erforderlich. Verwenden Sie Eigennamen für Muster wie "Gestreift", "Flanell" usw.
Begrenztes Sonderangebot
Attribut
Angebot_Preis
Beispielwert
9.99 USD
Dies ist eine einzigartige Option, die Sie nur bei Facebook Dynamic Ads erhalten.
You can set a product to be on a special discounted price for certain hours every day (during the offer period), or in other words, the product will be under the Daily Deals Inventory.
Tipp: Manchmal kann ein einziger Tagesrabatt auf bestimmte beliebte Produkte in Ihrem Geschäft Ihren Umsatz steigern.
Wenn Sie zum Beispiel eine Uhr in Ihrem Geschäft haben, bei der die Leute mehr als andere Produkte kaufen, können Sie ein überraschendes Ein-Tages-Sonderangebot machen. Dies könnte Ihre Verkäufe an diesem Tag verdoppeln und mehr Aufmerksamkeit von zukünftigen Interessenten erregen.
Fügen Sie einfach das Attribut "offer_price" in Ihren WooCommerce Facebook-Produkt-Feed ein und legen Sie einen ermäßigten Preis als Wert fest, um den angebotenen Sonderpreis zu definieren (einschließlich eines geeigneten ISO-Währungscodes als Suffix). Der Angebotspreis muss mindestens 15 % unter dem regulären Preis liegen, sonst wird er von Facebook abgelehnt.
Begrenztes Sonderangebot Dauer
Attribut
Angebot_Preis_Erfolgsdatum
Beispielwert
2018-06-01T12:00-0300/2018-12-01T00:00-0300
If you want to give a special offer for a product under the Daily Deals Inventory on Facebook, then along with “offer_price”, you must also add this attribute to specify the start and end date, with time, for the special offer.
Mention the start date and hours of the offer, then use a slash, and then mention the end date and hours of the offer.
Tipp: Vor großen Festivals, internationalen Anlässen oder Feiertagen kann es manchmal sinnvoll sein, Sonderangebote für bestimmte Produkte zu machen, um den Verkauf zu fördern.
Zum Beispiel können Sie eine Woche vor Weihnachten ein spezielles Rabattangebot für Weihnachtshüte einführen. Dies wird Ihre Verkäufe definitiv ankurbeln.
Facebook Produkt-Feed-Beispiele
Da Sie nun wissen, welche Details Sie benötigen, um Ihren WooCommerce-Produkt-Feed für Facebook Dynamics zu generieren, lassen Sie uns nun einige Beispiele betrachten, um die Struktur zu verstehen.
Facebook accepts several file formats of product feeds to be uploaded. However, the recommended format is CSV.
These feeds can easily be generated using the plugin, Product Feed Manager For WooCommerce. Once you have the product feed file, you can now manually upload it to your Facebook Business Account.
Jetzt haben Sie alles über den WooCommerce Google Product Feed und den WooCommerce Facebook Product Feed erfahren.
Lassen Sie mich Ihnen also eine richtige Anleitung zu dem Tool geben, mit dem ich WooCommerce-Produkt-Feeds einfach und in wenigen Sekunden erstellen kann.
Wie man WooCommerce-Produkt-Feeds einfach mit dem richtigen Werkzeug erzeugt
Product Feed Manager For WooCommerce ist ein Plugin, mit dem Sie ganz einfach Produkt-Feed ohne Programmierkenntnisse oder fortgeschrittene technologische Kenntnisse generieren können.
Warum dieses Plugin verwenden?
Es gibt mehrere Gründe, warum Product Feed Manager For WooCommerce eine ideale Wahl ist, um Ihnen bei der Erstellung von Feeds zu helfen:
Das manuelle Hochladen von Produkten dauert Stunden. Dieses Plugin erzeugt innerhalb von Sekunden einen Feed.
Das Plugin verfügt über eine saubere und einfache Schnittstelle mit entsprechender Dokumentation. Daher ist die Anwendung und das Erlernen der Software einfach.
Erzeugen Sie fehlerfreie Feeds, egal wie viele Produkte Sie haben.
Mit den Filteroptionen können Sie Feeds nur für die von Ihnen benötigten Produkte erzeugen.
It provides a Google Category Mapping option that saves us from changing the categories on our WooCommerce store.
Es ermöglicht Ihnen die automatische Synchronisierung mit dem Google Shopping Center, d.h. Ihr WooCommerce-Produkt-Feed wird automatisch an Google gesendet, ohne dass Sie ihn manuell hochladen müssen.
Es wird mit einer vorgefertigten Liste aller erforderlichen Attribute von Google und Facebook geliefert, so dass Sie keine Attribute manuell hinzufügen müssen.
Add certain custom fields such as GTIN, MPN, Brand, and UPC to your products, which are not available by default on WooCommerce.
Ein sehr aktives und nützliches Unterstützungsteam hilft Ihnen bei eventuellen Verwirrungen.
Lassen Sie uns jetzt durchgehen, wie Sie leicht Produkt-Feed mit Product Feed Manager für WooCommerce generieren können.
How to get a Product Feed Manager For WooCommerce?
Product Feed Manager For WooCommerce hat eine kostenlose Version, die Sie verwenden können, um seine grundlegenden Funktionen zu testen und seine Schnittstelle zu verstehen.
Aber es wird empfohlen, die Pro-Version zu kaufen, da sie mit verfeinerten Funktionen ausgestattet ist.
Installieren und aktivieren Sie das Plugin auf Ihrem WordPress-Dashboard, und Sie sollten so etwas sehen:
Jetzt sind Sie bereit, Produkt-Feeds zu erzeugen.
Wie WooCommerce Produkt-Feed mit Produkt-Feed-Manager zu generieren?
Product Feed Manager für WooCommerce ist so einfach zu bedienen.
1. Klicken Sie einfach auf "Neuen Feed hinzufügen" und Sie werden die Seite "Neuen Produkt-Feed hinzufügen" sehen:
2. Oben haben Sie die Möglichkeit, dem Feed einen Titel zu geben.
Geben Sie zunächst einen Titel für die Feed-Datei ein. Dann können Sie festlegen, welche Produkte in Ihren Feed aufgenommen werden sollen.
3. Direkt unter dem Titel sehen Sie eine Option zur Auswahl Ihres bevorzugten Händlers. Klicken Sie einfach auf die Dropdown-Schaltfläche Händler füttern und wählen Sie Ihren bevorzugten Händler aus der Dropdown-Liste aus oder suchen Sie in der Dropdown-Box.
Wählen Sie Ihren bevorzugten Händler aus und alle erforderlichen Attribute werden unten geladen.
Produkt-Filter
With the Product Feed Manager for the WooCommerce plugin, you will have the option to choose which products to include in your feed.
Um die Optionen zu sehen, klicken Sie einfach auf die Schaltfläche Produktfilter.
Wenn Sie auf die Schaltfläche Produktfilter klicken, wird die Produktfilter-Schublade auf der rechten Seite des Fensters eingeblendet.
Hier sehen Sie, dass die Option "Alle veröffentlichten Produkte" standardmäßig ausgewählt ist - diese Option umfasst jedes einzelne Produkt in Ihrem WooCommerce-Shop.
Wenn Sie möchten, können Sie auch andere Filteroptionen verwenden. Klicken Sie auf das Dropdown-Menü, und Sie werden einige Filteroptionen in der Dropdown-Liste sehen:
Sie können wählen
Alle vorgestellten Produkte - veröffentlicht nur die vorgestellten Produkte
Kategoriefilter - Produkte über Kategorien auswählen
Product Filter – use this custom filter to set a conditional filter
Tag Filter – choose a product using tags
Sehen Sie sich dieses Video an, um zu sehen, wie erstaunlich die Filteroptionen sind. Sie können ganz einfach die Produkte auswählen, die Sie in Ihren Produkt-Feed aufnehmen oder aus diesem ausschließen möchten.
Automatische Aktualisierung planen
Um einen Zeitplan für den Abruf festzulegen, klicken Sie zunächst auf die Schaltfläche Produkteinstellungen.
Wenn Sie auf die Schaltfläche " Produkteinstellungen" klicken, wird die Schublade "Produkteinstellungen" auf der rechten Seite des Fensters eingeblendet
Hier finden Sie oben in den Einstellungsoptionen die Option Auto-Generate Your Feed.
Sie können die geplante Aktualisierung auf täglich, stündlich oder wöchentlich einstellen.
Danach haben Sie die Möglichkeit, Variationen von Produkten einzuschließen oder auszuschließen und bei gruppierten Produkten die übergeordneten Produkte einzuschließen.
WPML-Unterstützung
Wenn Sie WPML verwenden, um verschiedene Sprachversionen Ihrer Produkte einzustellen, finden Sie hier einen WPML-Abschnitt.
You can have a look at this doc for a better understanding of how you can generate a feed with WPML:
Um einen Feed zu erstellen, müssen Sie zunächst Ihren bevorzugten Händler auswählen.
Wählen Sie für Google Product Feed den Händlertyp "Google Shopping". Wählen Sie für Facebook Product Feed den Händlertyp "Facebook".
Nach der Auswahl wird die Seite aktualisiert, und die erforderlichen Attribute werden automatisch angezeigt.
Hier befinden sich die Attribute auf der linken Seite, und die Werte der Attribute werden in der Spalte Zugewiesene Werte festgelegt.
Wählen Sie den Typ als Attribut und wählen Sie dann den Wert, den dieses Attribut in Ihrem WooCommerce-Shop haben wird.
Wenn Sie der Meinung sind, dass ein Attribut fehlt, können Sie es durch Drücken der Schaltfläche "NEUES ATTRIBUTE HINZUFÜGEN" hinzufügen.
Auf dieser Seite finden Sie einige sprachbezogene Optionen, wenn Sie WPML verwenden.
You can have a look at this doc for a better understanding of how you can generate a feed with WPML translation.
WooCommerce-Produkt-Feed generieren
Sobald der Feed konfiguriert ist, können Sie nun auf "Veröffentlichen" auf der rechten Seite klicken und Sie sehen einen Ladebalken.
Once this is complete, the “Publish” button will change to an “Update” button and you will get the feed link or feed download button right below the “Update button.”
Then you can set your product data feed to be updated automatically using the “Auto-Generate Your Feed” feature. So you won’t need to manually update your feed everytime you add new products or update any product individually.
Now you can download this feed and upload it to your desired merchant shop and watch your store sales get a boom.
Kategorie-Zuordnung
Wie ich bereits erwähnt habe, bietet dieses Plugin Optionen für die Zuordnung von Kategorien. Schauen Sie sich dieses Video an, um zu sehen, wie Sie die Kategoriezuordnungsfunktion einfach nutzen können:
Automatische Synchronisierung mit dem Google-Einkaufszentrum
Eine der besten Funktionen, die Product Feed Manager For WooCommerce bietet, ist, dass Sie Ihren WooCommerce-Produkt-Feed direkt mit dem Google Shopping Center automatisch synchronisieren können.
You can schedule the auto-sync to take place either hourly, weekly, or monthly. This means that every change you make to your products of the product feed. They will automatically be updated on your Google Shopping Center. You do not have to download and upload the feed every time.
Es ist immer wichtig, die besten verfügbaren Wege zu lernen und umzusetzen, um Ihren ROI zu erhöhen.
Product Feed Manager For WooCommerce is a powerful tool that you can use to achieve the goal of tripling your store performance, along with other marketing campaigns.
Machen Sie also weiter und beginnen Sie Ihre Reise zum Erfolg!
Fühlen Sie sich frei, Kommentare zu hinterlassen, wenn Sie Verwirrung oder Vorschläge haben.
Frequently Asked Question
What is a Product Feed?
A product feed is basically a file (could be CSV, XML, RSS, etc.) containing comprehensive data about products, including titles, images, descriptions, prices, categories, availability, quantities, and other relevant attributes or data.
By providing your customers with accurate and engaging product information in various marketplaces, a well-structured product feed will help with informed purchasing decisions and targeted advertising campaigns.
What are the Benefits of Using Product Feeds For WooCommerce?
Here are some of the significant benefits of using product feeds for your business,
Get more visibility for your products by listing them on popular marketplaces and comparison shopping engines. This opens up your business to a much larger customer base who may have never discovered your store otherwise.
Product feed management tools help ensure the product information you provide stays consistent and accurate across all platforms. No more worrying about errors that could leave customers feeling misled or dissatisfied.
Updating product details like pricing and availability with product feeds. Make any changes once, and they’ll automatically sync across every channel where your feed is distributed.
What criteria should I consider before selecting a Product Feed Management tool that suits my business?
Before you invest in a Product Feed Management tool you should check whether the tool has these or not,
WooCommerce compatibility
Easy-to-use interface
Customizable feed attributes
Automated Feed Updates
Performance analytics and reporting
Product Feed Manager For WooCommerce has all these – Check it out
How do Product Data Feeds work?
Once you create product feeds for your preferred marketplace, you can upload and promote them on those marketplaces to increase your sales without any effort. If you change anything in your WooCommerce store, and they’ll automatically sync across every channel where your feed is distributed.
Let me ask you a quick question. If you’re a WooCommerce seller in the UK, what’s one of the biggest challenges you face when trying to grow your sales?
Chances are, you’re already aware of how competitive the e-commerce world is.
With 62.1 million e-commerce users in the UK expected by 2025, standing out among thousands of online stores is no easy feat.
But here’s the good news: You don’t have to go it alone. The power of online marketplaces can help you promote your WooCommerce products and boost your sales in ways that you might not have thought of.
Wondering how to tap into these opportunities?
In this guide, I’ll walk you through the 9 best UK online marketplaces that can help skyrocket your business. Plus, I’ll share expert strategies to help you make the most of each platform and increase your sales effectively.
Ready to take your WooCommerce store to the next level?
Let’s dive in!
Why Sell on Online Marketplaces?
For any new business or a small e-commerce website, now it’s quite difficult to reach more people any time soon, even if there is a high popularity for online shopping.
87% of UK consumers shop online, with 55% of them placing orders at least once a week.
This is where UK online marketplaces play a big role.
These marketplaces usually have tons of buyers who regularly visit the sites and place orders.
But the main reason why you should value their audience is because you can list your WooCommerce products in these popular online marketplaces.
Some of these are great for any product, and some of them will give you extra results for certain types of products.
I will discuss all of these below.
Top 9 UK Online Marketplaces to Promote Your WooCommerce Products
Following are 9 UK online marketplaces that have statistically proven to generate the highest sales for most other e-commerce businesses.
1. Amazon UK
With millions of daily visitors, Amazon UK is a marketplace where potential buyers are already searching for items similar to what you offer.
According to cybercrew, 86% of people in UK shop at Amazon.
Amazon provides free shipping for many products. Their tagline is “Spend less. smile more”
and it’s totally TRUE!
If you list your products on Amazon UK, you can get a significant boost without spending a fortune.
When To Promote on Amazon UK
Youshould promote your WooCommerce products on Amazon UK when your goal is to expand your customer reach and your business has been around for a while.
Amazon charges quite high to list your products there.
You will definitely get good results if you list your products there, but it may not be a good ROI if you are a startup.
So, the only time you may list your products there as a startup is when you have a good amount of budget available.
The monthly fee for promoting on Amazon is $39.99. Plus, every sale you make has a commission fee of $0.99.
Another important consideration is the niche you are selling.
People rely on Amazon UK, especially in these niches electronics, health & beauty, Home and Kitchen, Books, Sports – DIY, etc.
While products in other categories also sell quite well, most of Amazon’s customer base are consumers of products in these categories.
So you will get more benefits if you are selling products in those niches. For those interested in exploring the online trading sphere, checking out a maverick trading review could provide valuable insights.”
Create a seller account on Amazon UK. Provide your business information, set up shipping options, and choose a product category.
List your products in the appropriate categories on Amazon UK. Make sure your listings are informative and go with Amazon’s guidelines.
Choose your shipping and fulfillment options.
If you want, you can also take advantage of Amazon’s advertising options.
2. eBay UK
With over 132 million active buyers, eBay offers you almost the same benefits as Amazon.
The main attraction of eBay is the auction and “BUY IT NOW” listings, which sets it apart.
The auction allows you to sell any product, even second-hand ones, fast and often, on a higher profit margin.
If a product is in high demand but rare, it may even sell at 2 to 3 times higher prices.
eBay UK also has “Promoted Listings,” which allows you to highlight your products at the top of search results to the right audience and ensure maximum visibility.
You may even observe the performance of your products on the eBay analytics dashboard to understand what changes you may require to improve your product data.
When To Promote on eBay UK
eBay serves almost all product category niches, so there’s no specific category to highlight.
For any niche you are selling on, you can take advantage of different types of listings on eBay and get fast exposure.
However, the different types of listings come with different selling fees.
So choose the one that suits you the most. (Most people simply go for the AUCTION.)
How To Promote on eBay UK
To sell on eBay,
You need to create a seller account and set up your store.
Next, you have to upload your product listing with high-quality images and competitive pricing.
Then You need to optimize your product listing to get the best results regularly.
You may also consider selling on eBay MIP which gives you better visibility and control over how your products are exposed
3. Etsy UK
Etsy UK is the go-to marketplace for personalized, creative, and artistic products.
If your WooCommerce store offers HANDMADE OR UNIQUE ITEMS, Etsy is the best option FOR YOU.
Here, you are promoting products only to consumers that you know are interested. This will increase conversion rates and help you increase sales really quickly.
One of the biggest advantages of Etsy is that this marketplace has a collaborative community to connect sellers with buyers.
As a WooCommerce store owner, being part of this community can help you build brand loyalty, gain feedback, and engage with customers who share your passion for unique products.
Moreover, Etsy makes it quite easy to list products, track inventory, and monitor exposure with its interactive dashboard.
When To Promote on Etsy UK
As mentioned above, Etsy will be the best option if you want to sell handcrafted and unique items.
Plus, if you are running a small business, Etsy will open up great opportunities for you because they are flexible with their fees.
How To Promote on Etsy UK
Selling on Etsy is pretty simple. You can make single listings or set up a whole store.
First, you need to answer some basic questions related to your products.
Then, you’ll create an Etsy account, build your shop, set up payment info, and manage your listings.
4. Google Shopping
Google is the number one search engine in the UK and offers you a powerful advantage for product promotion.
Basically, when people search for products on Google, they get some product suggestions on top of the search results.
All you need to do here is to make sure you have submitted the correct data about your products to Google Shopping. They will verify and match every detail you submit with your website before exposing them to potential buyers.
How To Promote on Google Shopping
First, you will need a Google Merchant Account, which you need to configure properly.
Next, you need to submit your product data in their required format along with the attributes they have requested (depending on the product category).
If all the data is correct, your products will be listed immediately.
If there are any errors, you will be able to see the reasons in the Google Merchant Center.
5. Zalando
Zalando is one of Europe’s largest online fashion and lifestyle marketplaces.
Zalando offers an intuitive shopping experience, making it easy for customers to explore and discover new products.
Moreover, you can access all your analytics and business insights through a powerful platform tool called zDirect.
When To Promote on Zalando
If your WooCommerce store specializes in fashion, accessories, or lifestyle products, then you can take advantage of a massive customer base who are interested in your niche.
Also, you might need to consider the promotion cost for selling on Zalando. The selling fee on Zalando has 2 categories:
Selling Commission
Fixed monthly charges
The commission depends on the product type and the price of the product. It usually ranges between 5% and 25%.
How To Promote on Zalando
To sell on Zalando, you need to join their partner program.
You must register your business on the platform. Then, you can decide the product range and prices.
Zalando can also handle payment processing and customer service. Plus, with additional fees, you can use Zalando Fulfillment Services and other marketing options.
6. OnBuy
OnBuy is the fastest-growing online marketplace in the UK right now.
Since it’s new, OnBuy offers a typically lower fee structure compared to most UK marketplaces. Also, it covers a wide range of product categories, from electronics and fashion to home and garden.
So, you can easily find a suitable category for their offerings and take advantage of its diverse customer base.
When To Promote on OnBuy
The most popular categories of OnBuy are – Electronic, entertainment, home furniture, household, gardening, care, fitness, etc.
So, if you are selling products in one of these niches, OnBuy should be among your go-to marketplaces.
The fee is 5% for consumer electronics and 9% for everything else.
And there are no listing fees. So it is perfect for startups to explore.
How To Promote on OnBuy
To promote OnBuy, you need to first sign up as a seller on OnBuy and provide the necessary business details. Next, you have to create your product listings.
Once you are a seller, you can use OnBuy’s promotional tools like deals, discounts, and bundle offers to make your listings more attractive.
7. Fruugo
Fruugo is a UK-based marketplace that currently has sellers from all over Europe.
One of the best aspects of Fruugo is that it translates product data depending on the location of the buyer. So it’s much easier for buyers to understand if they want to purchase.
As a seller, you will get a dedicated account manager to help you list products and plan proper advertisements.
This personalized approach is why many large businesses consider Fruugo as their go-to online marketing place for the UK.
When To Promote on Fruugo
Consider promoting your WooCommerce products on Fruugo when you clearly understand your target audience.
You have to make sure you identify the correct category for each of your products because Fruugo’s display algorithms will display products to buyers based on category.
If you provide offers during peak shopping seasons, holidays, or special events, Fruugo would be great as its traffic goes up by over 60% during such events.
How To Promote on Fruugo
To start selling on Fruugo, you need to follow some requirements of the marketplace.
You need to provide your company information, contact information, fulfillment capabilities, product information, and other technical information.
For product listing, Fruggo has some specific requirements.
All your products must have GTIN, product image background, and up-to-date product information.
8. Wayfair UK
Wayfair UK is a leading online marketplace dedicated to home goods, offering a wide range of furniture, decor, and other home essentials.
If your WooCommerce store specializes in FURNITURE, HOME DECOR, OR HOUSEHOLD GOODS, Wayfair is the ideal platform for you.
Wayfair connects sellers with millions of customers actively searching for home-related products. By listing your products on Wayfair, you tap into a highly targeted market, increasing the likelihood of higher sales and visibility. The platform provides robust marketing tools that help showcase your products to the right audience.
One of the major perks of selling on Wayfair is its user-friendly interface, which allows you to easily manage listings, track inventory, and adjust your products as needed.
When To Promote on Wayfair UK
Wayfair UK is the best marketplace for WooCommerce store owners in the home goods, furniture, and decor industries. If you have products related to improving living spaces, this platform is a great fit.
How To Promote on Wayfair UK
To sell on Wayfair, you’ll need to,
Create a seller account and list your products.
After registration, you’ll set up your store, manage your inventory, and make use of Wayfair’s marketing tools to boost visibility and sales.
9. ASOS UK
ASOS UK is a popular online fashion marketplace known for trendy clothing, accessories, and footwear.
If your WooCommerce store offers CLOTHING, SHOES, OR ACCESSORIES, ASOS is an excellent choice to expand your brand’s reach.
ASOS attracts millions of fashion-forward shoppers, providing a fantastic opportunity to promote your products to a large audience. It offers a seamless shopping experience with personalized recommendations, making it easier for buyers to discover your products. Additionally, ASOS’ strong brand presence can increase your credibility and sales.
For WooCommerce store owners in the fashion niche, ASOS also simplifies the process of listing and managing products, ensuring your items get maximum exposure.
When To Promote on ASOS UK
ASOS UK is perfect for WooCommerce store owners in the fashion, footwear, and accessories categories. If your business focuses on trendy, stylish products, ASOS is the marketplace for you.
How To Promote on ASOS UK
Selling on ASOS is simple.
First, you’ll need to sign up as a seller,
Then upload your products and start managing your inventory.
ASOS also provides helpful tools to track sales and improve your product listings.
How To List Your WooCommerce Products on UK Marketplaces Easily
Now you have a good idea of where to promote your WooCommerce products.
But you also need to learn how to list your products on these UK marketplaces without spending hours manually compiling product data or spending a fortune by hiring people.
Manually listing products is quite challenging if you have a large number of products.
Since you use WooCommerce, you can use different tools to make the process much easier.
And to promote your WooCommerce products on UK marketplaces,
You will find a reliable plugin that will help you generate product data in the right format for most UK online marketplaces in just a few clicks.
This plugin has pre-built templates so that you can generate the feed for almost any online selling sites UK and list your products real quickly. So you should check it out.
Now, it’s time you start looking into your options & budget and decide which marketplace you want to embrace.
The main focus here should be a balance between how much you may earn and how much you may have to spend. Only then you will get a high ROI.
So, which UK marketplaces do you think you will list your products on?
Share it with us in the comments below.
Zum Wohl.
Frequently ask question(FAQs)
FAQ1: What is the most used online marketplace in the UK?
Amazon is generally considered the most used UK marketplace online. It has a dominant market share and is widely popular among British consumers for its vast product selection, competitive pricing, and convenient delivery options. Other significant online marketplaces in the UK include eBay, Etsy, and Wayfair, but Amazon maintains a clear lead in terms of user base and sales volume.
FAQ2: How can I promote my products on UK selling sites?
Promoting on UK selling sites involves optimizing product listings, utilizing paid ads, and leveraging customer reviews to boost visibility and attract more buyers.
FAQ3: What are the best UK selling websites for WooCommerce store owners?
Some of the top UK selling websites for WooCommerce stores include Amazon UK, eBay UK, and Etsy UK, offering massive visibility and sales potential.
FAQ4: How do I choose the right UK selling sites for my products?
To select the best UK selling sites, consider your niche, product type, and target audience. Popular platforms like ASOS and Wayfair UK are great for specific categories.
FAQ5: What is the difference between UK marketplace and a direct online store?
A UK marketplace offers a platform where multiple sellers can list products, whereas a direct store allows you to manage everything independently, like with your WooCommerce setup.
When it comes to promoting your WooCommerce products on online marketplaces, we understand the challenges you face.
You probably find it difficult to list products manually or may face product disapproval on the merchant site.
The whole WooCommerce product promotion process can be complex and leave you frustrated.
But don’t worry anymore!
Today, We are thrilled to announce a major transformation of our Product Feed Manager for WooCommerce plugin, designed to revolutionize your marketplace promotion.
Over the past few months, we have listened to your suggestions, feedback, and pain points. Based on that we made a solution that will make your feed generation simpler and more efficient than ever before.
The improved version of the plugin will ensure:
Seamless Feed Mapping
Enhanced Product Filtering
Faster Feed Processing
Let’s dive into the key enhancements you can expect from the latest version of our Product Feed Manager:
Improvement 1: Seamless Feed Mapping In 3 Simple Clicks
Feed mapping is the major part of the product listing. Because this is where you select the attribute values you want to display in your feed.
You might have tried different plugins where you need to go through sequential steps for feed generation.
We wanted to reduce this confusion and make the feed creation easier. When you open the Add New Feed tab, you will see this page –
With our new user interface, configuring your product feed is now just a few clicks away.
By selecting your desired merchant, you’ll automatically gain access to all the required attributes.
For example, if you select Google Shopping, you’ll see the listed attributes below –
Now, you don’t need to worry about where to configure the attribute values. As you see, almost everything is pre-configured.
But, if you want to make any changes you can do selecting the action button.
Once you’re done configuring the feed, you can just publish it.
We’ve eliminated all the unnecessary additional steps. It ensures a streamlined experience where you’re always in control.
Improvement 2: Enhanced Product Filtering For Better Feed Optimization
You can now take full control of your feed with our advanced product filtering capabilities.
In this version, we’ve introduced AND/OR conditions in custom filtering, allowing you to filter your products even more effectively.
You can set up conditions and decide if all the conditions apply together or any of will be applicable in the feed.
Let’s say, you want to include only the ‘Gucci’’ branded products.
So, you’ll set this condition –
But a product (id =28) is out of stock, so you want to exclude it.
So, you’ll put another condition if product availability is out of stock exclude.
Now, this two condition goes together, so you’ll keep it under AND condition.
But if there’s a situation where you have to select any of the condition, you’ll choose OR.
Now, imagine a different scenario.
Suppose,have to go for either ‘Clothes’ category or ‘Shoes’ category.
Then you’ll put OR between these two conditions.
See, that’s how easily you can filter your products and get the maximum results out of it.
Improvement 3: Faster Feed Processing For Hassel-Free Feed Management
We’ve listened to your concerns and taken action to ensure seamless feed processing.
You will now no longer face feed processing stuck issues or data loss, especially when dealing with a large number of products.
With the implementation of the action scheduler, you can now generate error-free feeds faster than ever before.
Now there will be no frustrating delays and only efficient, hassle-free feed processing.
What’s Next?
This update is definitely one of the biggest upgrades, but it’s not the last! We have some exciting features lined up for you in the upcoming weeks….
Table Rate WooCommerce Shipping Support
Display Google Analytics in the feed
Facebook API
So, are you ready to take your WooCommerce product promotion to new heights?
Try out the all-new Product Feed Manager for WooCommerce and experience the difference it can make in your online selling journey.

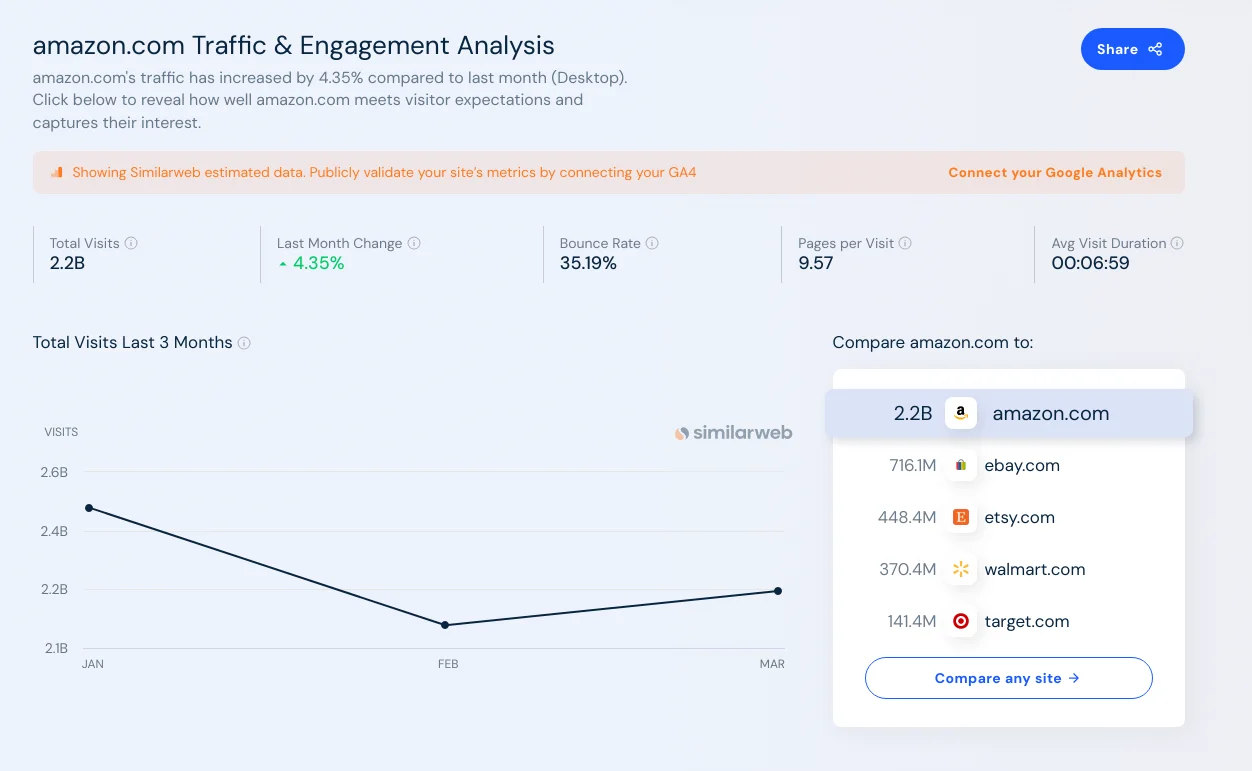
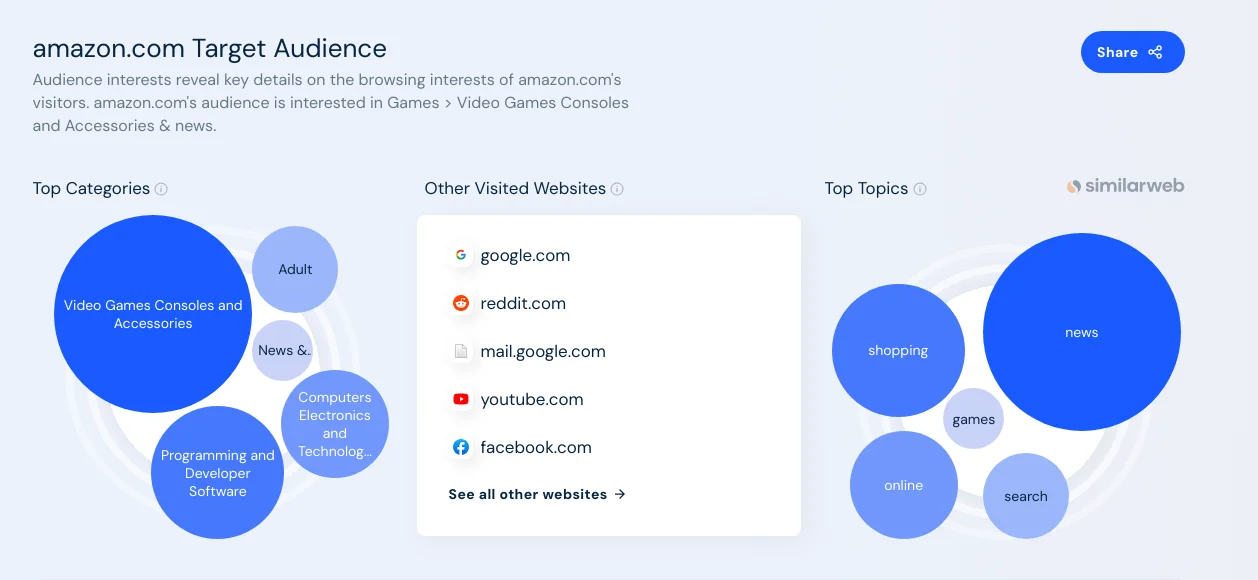
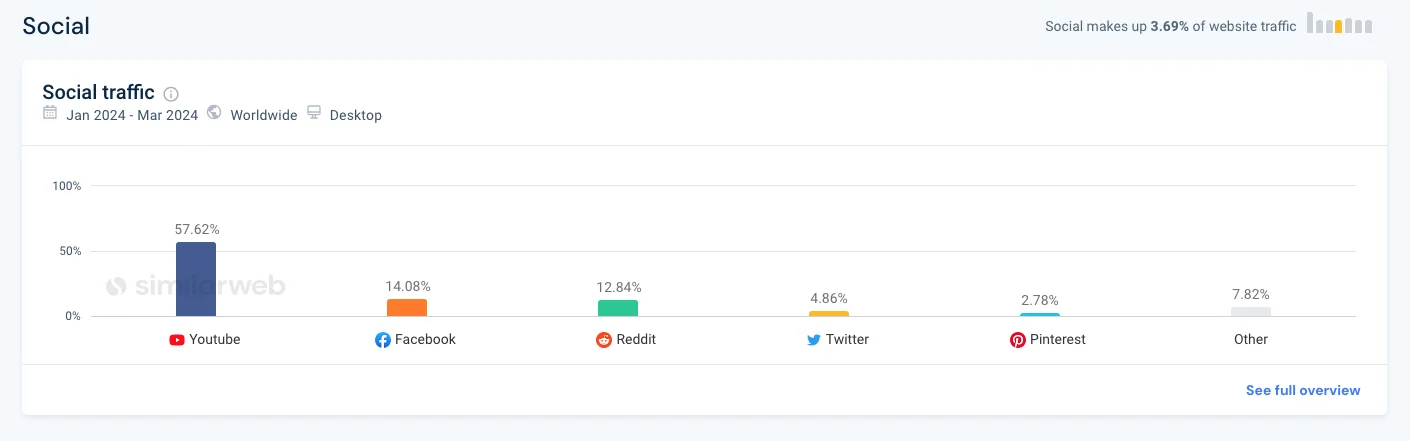

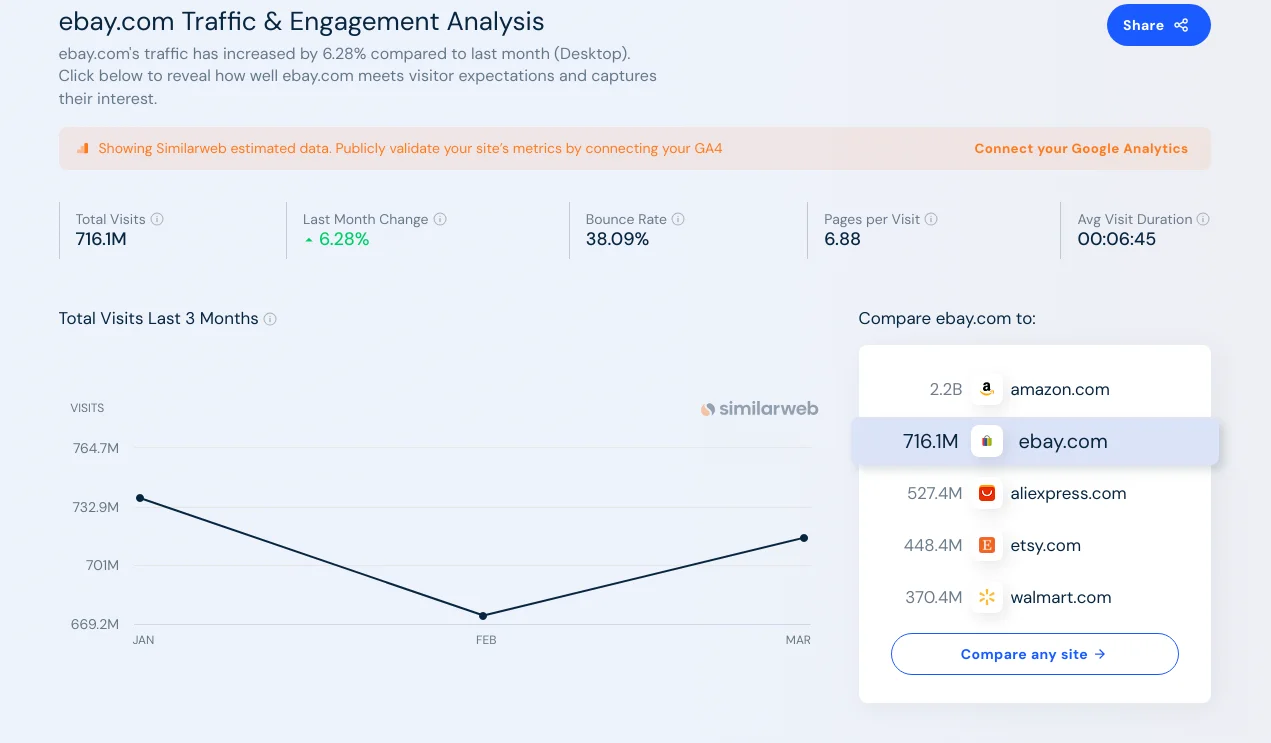
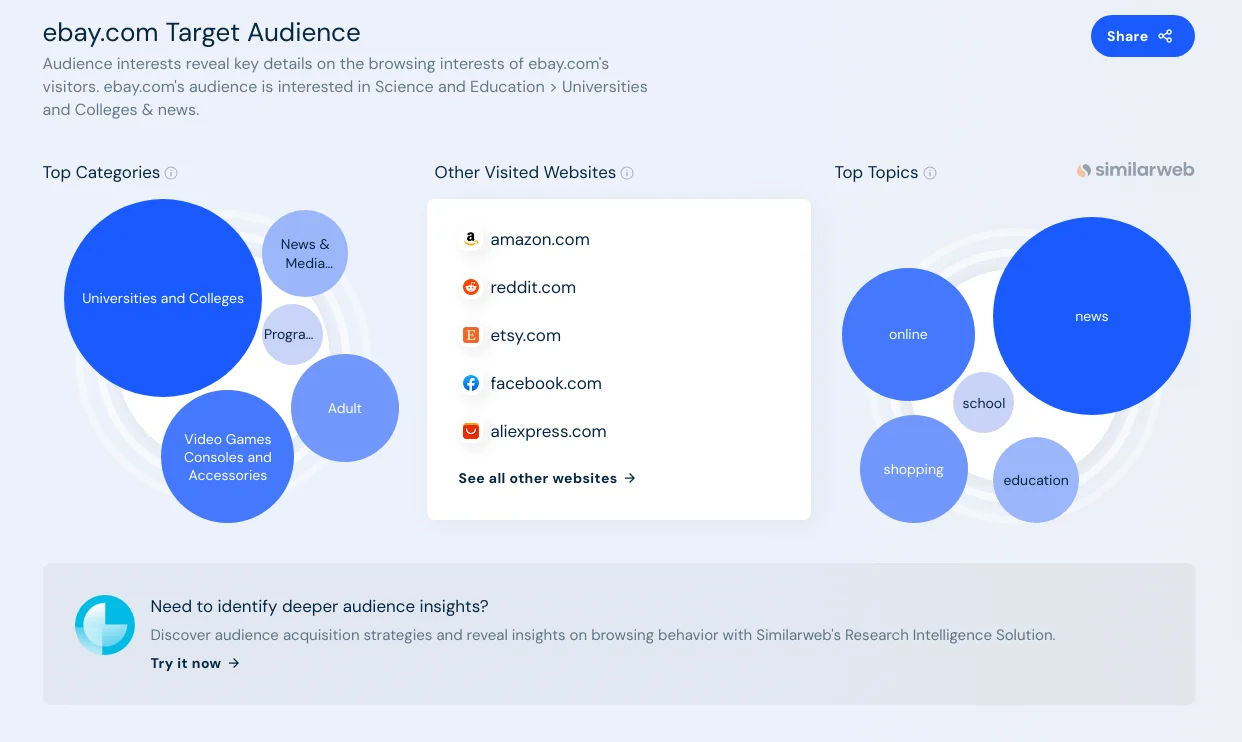
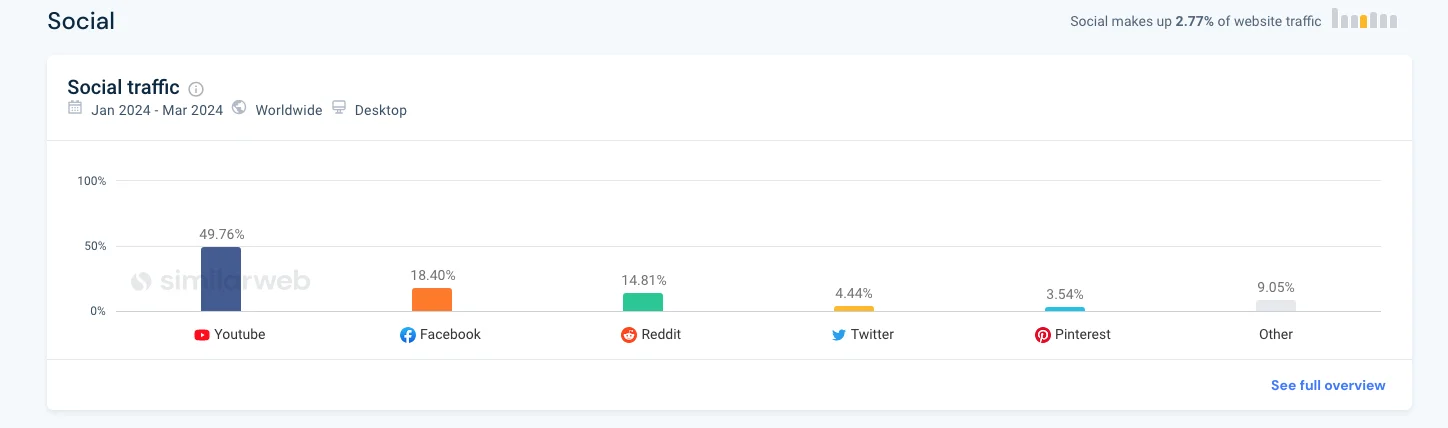


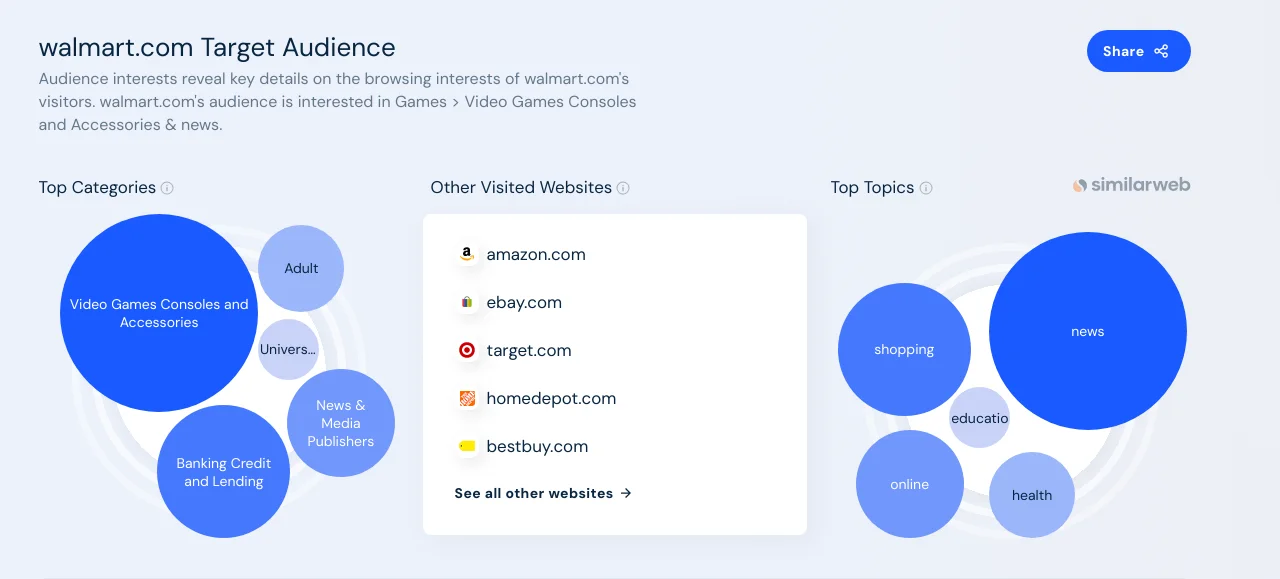
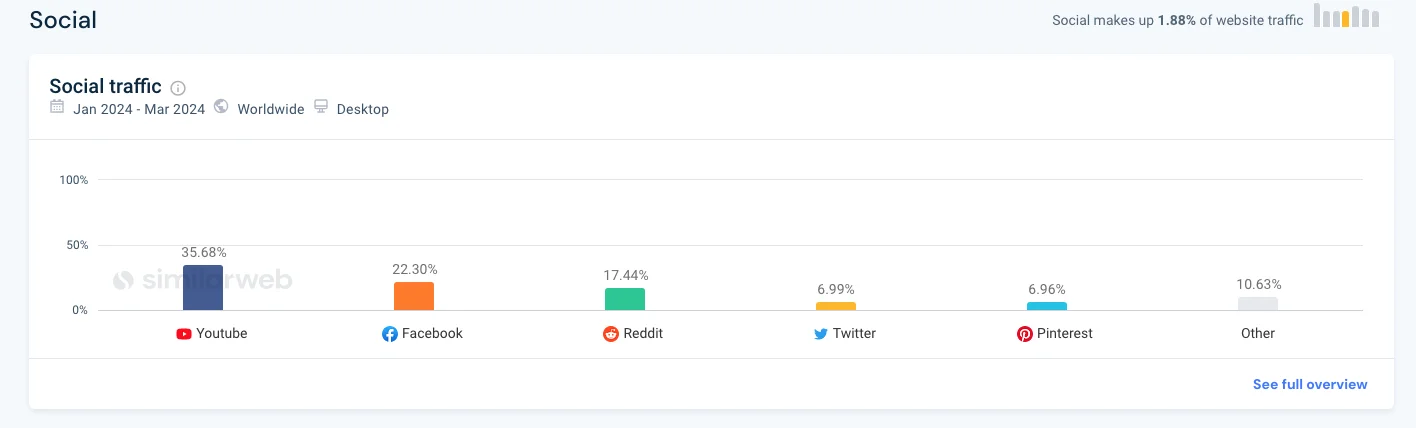

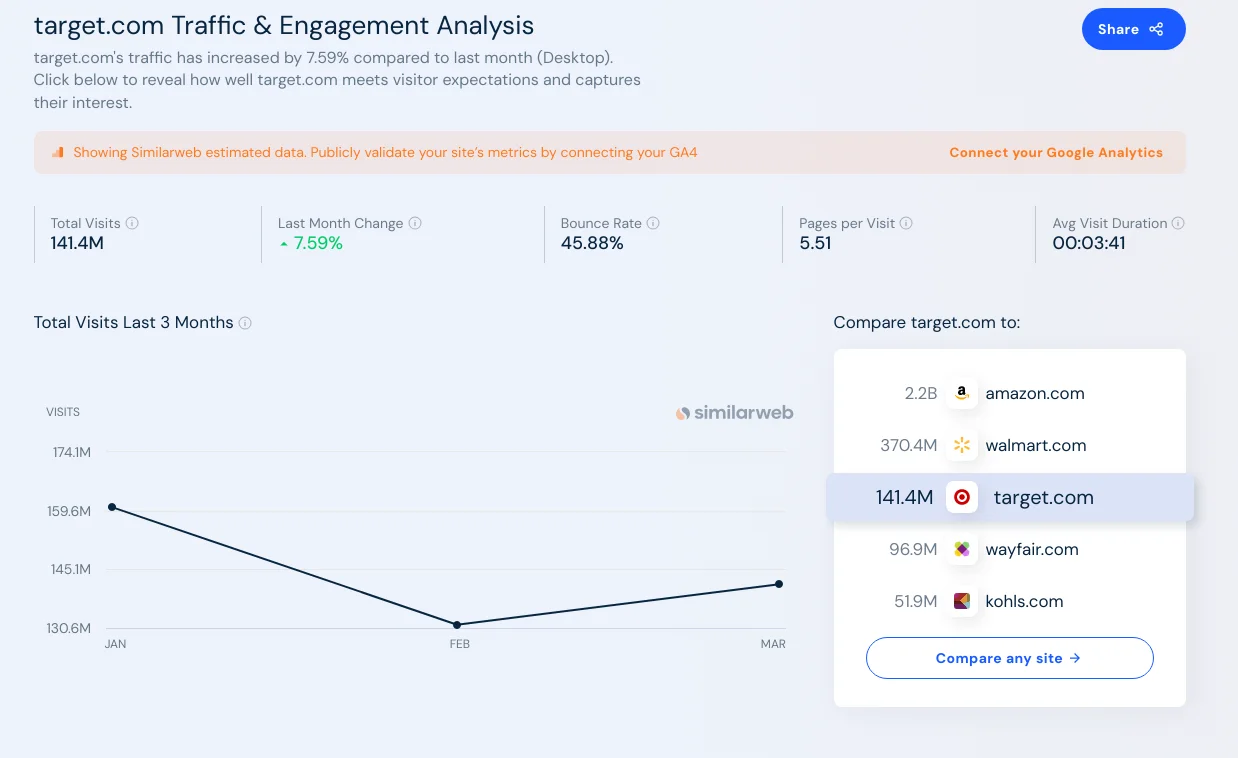
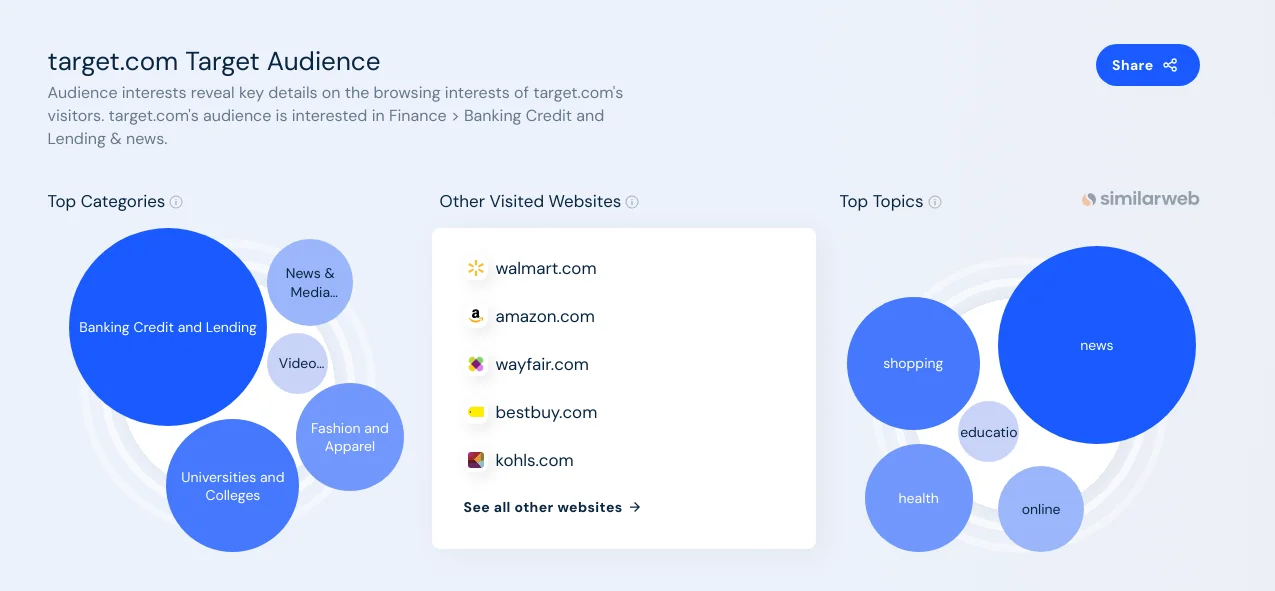
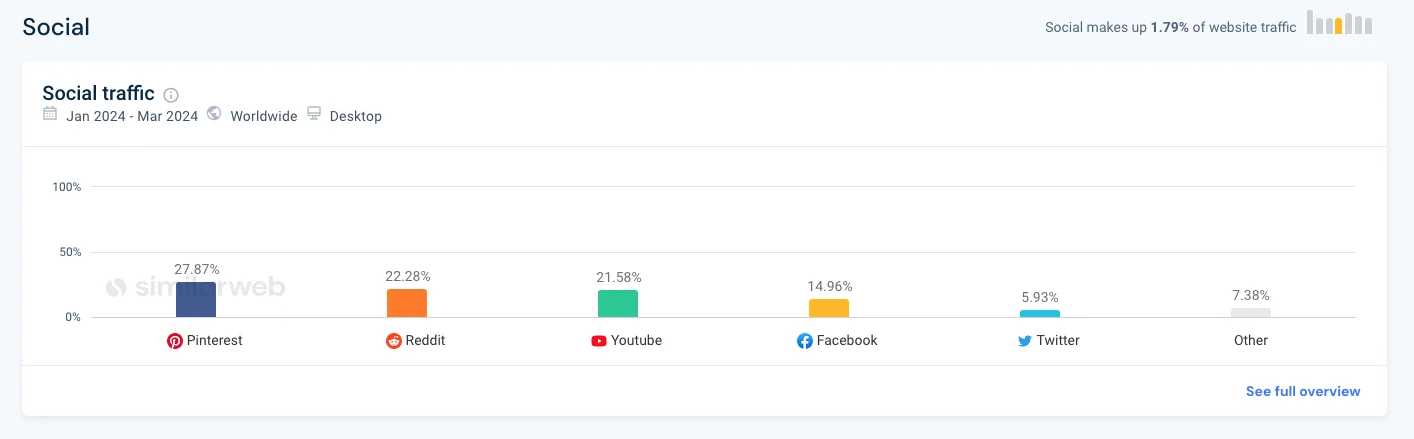


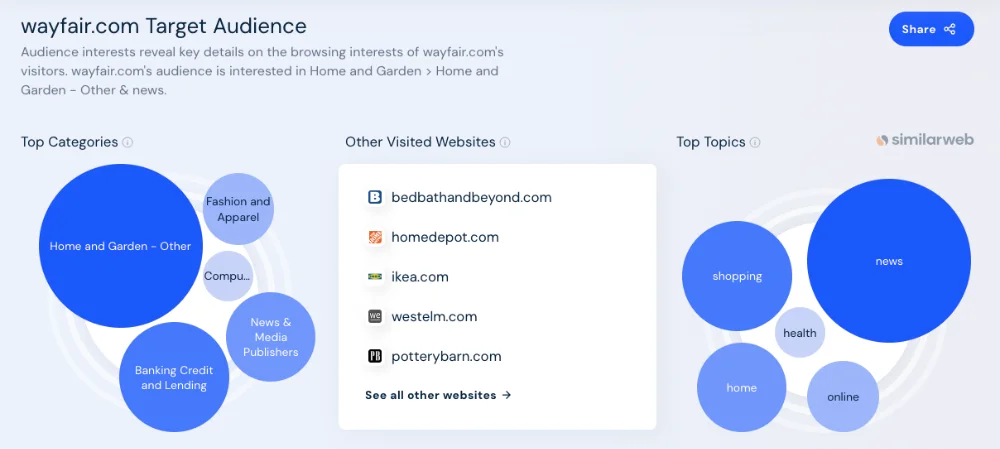


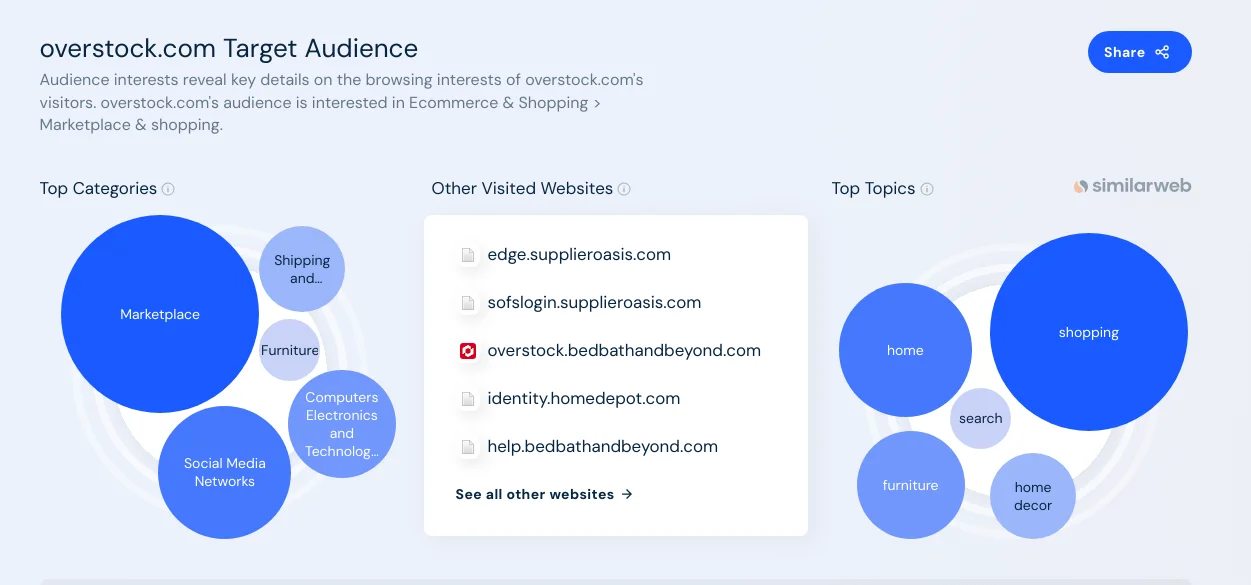
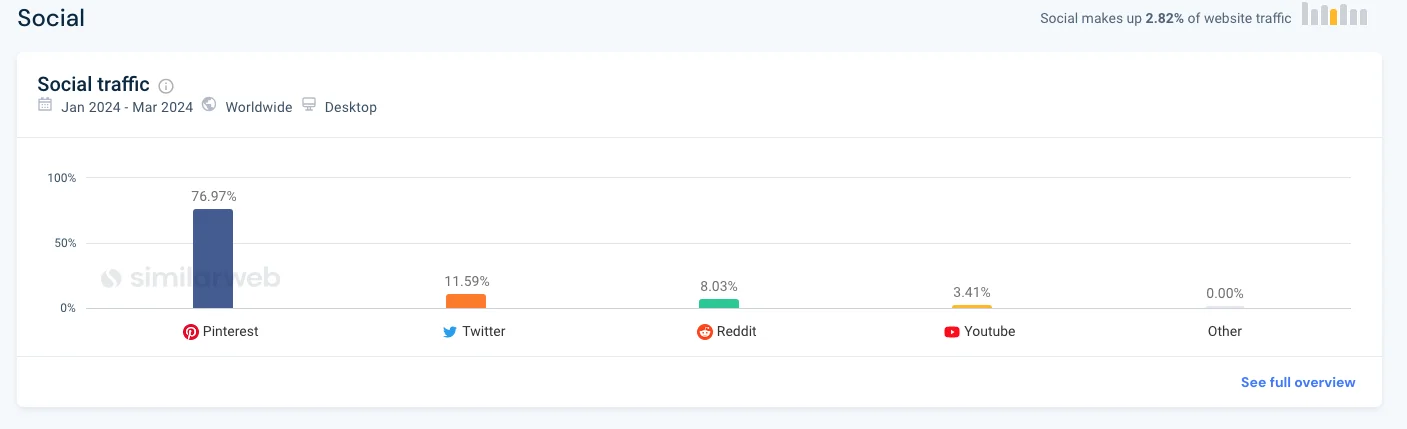

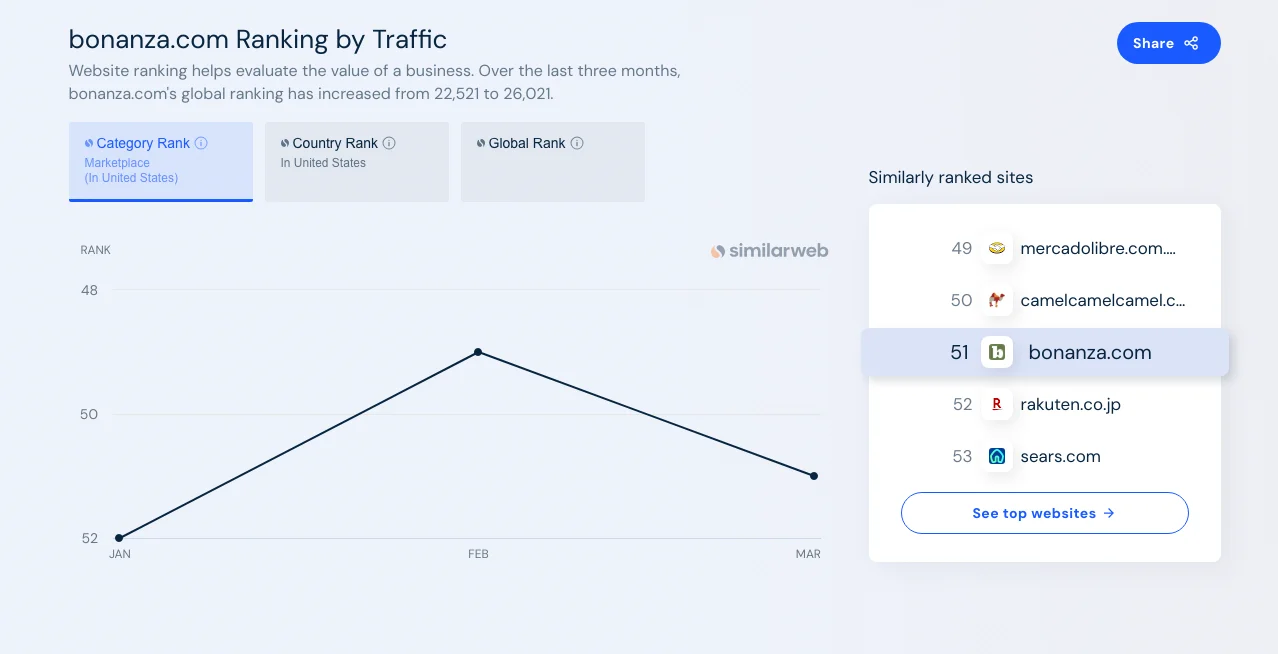
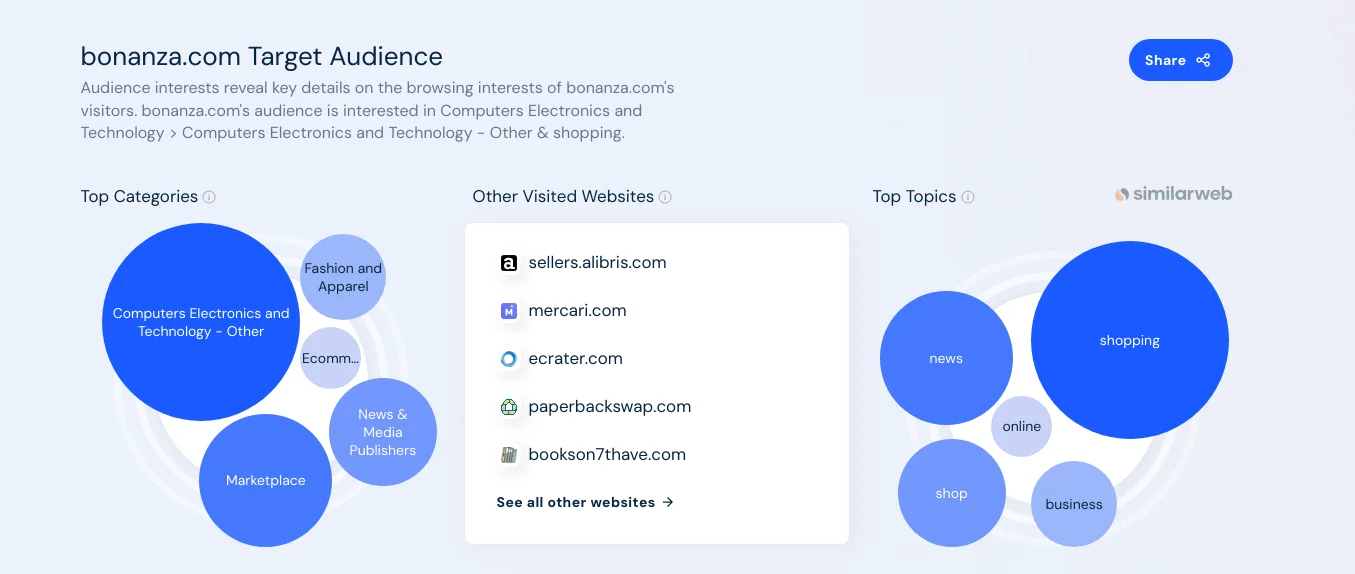
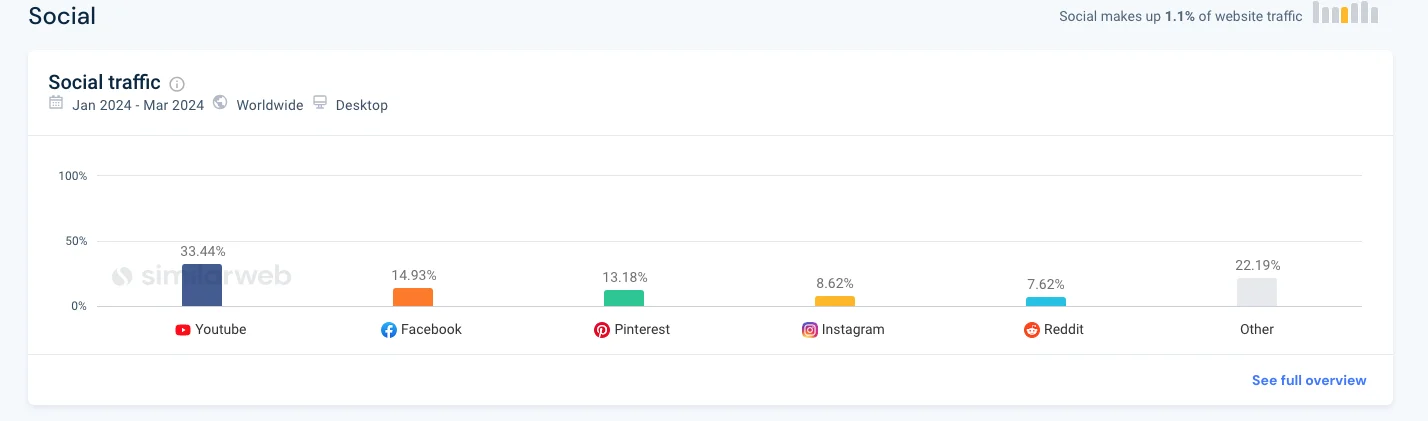
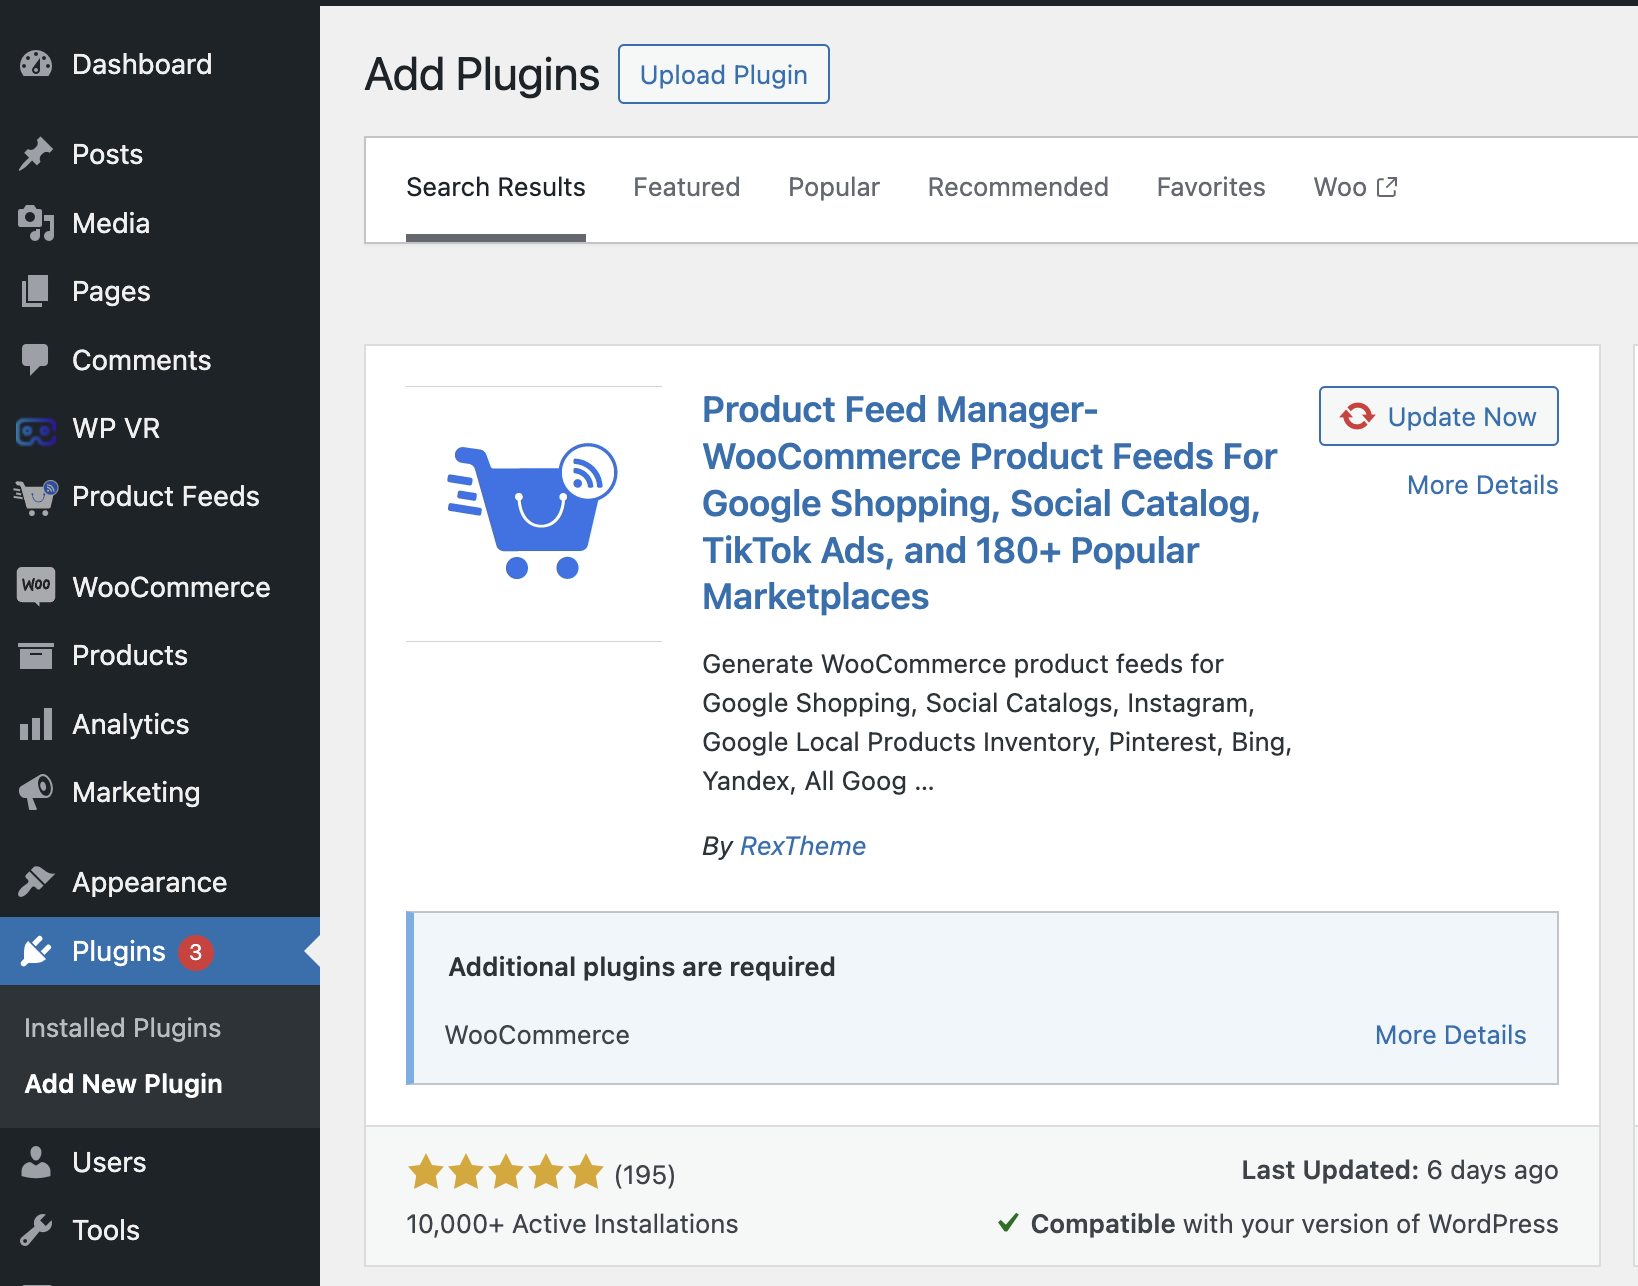
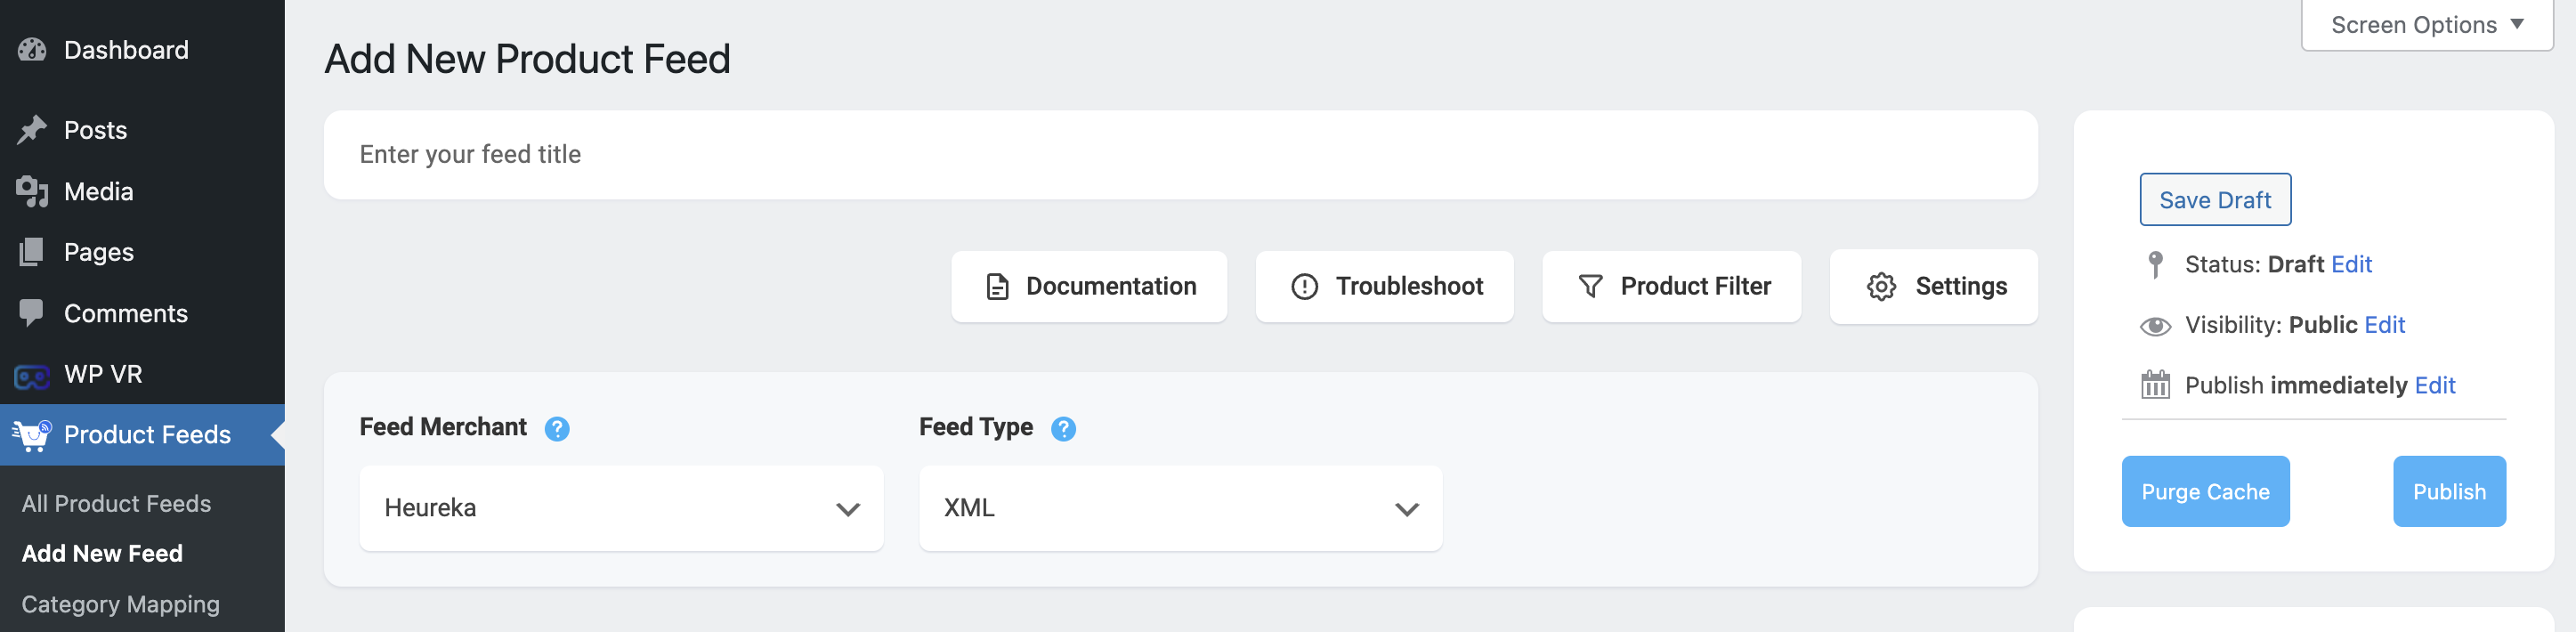
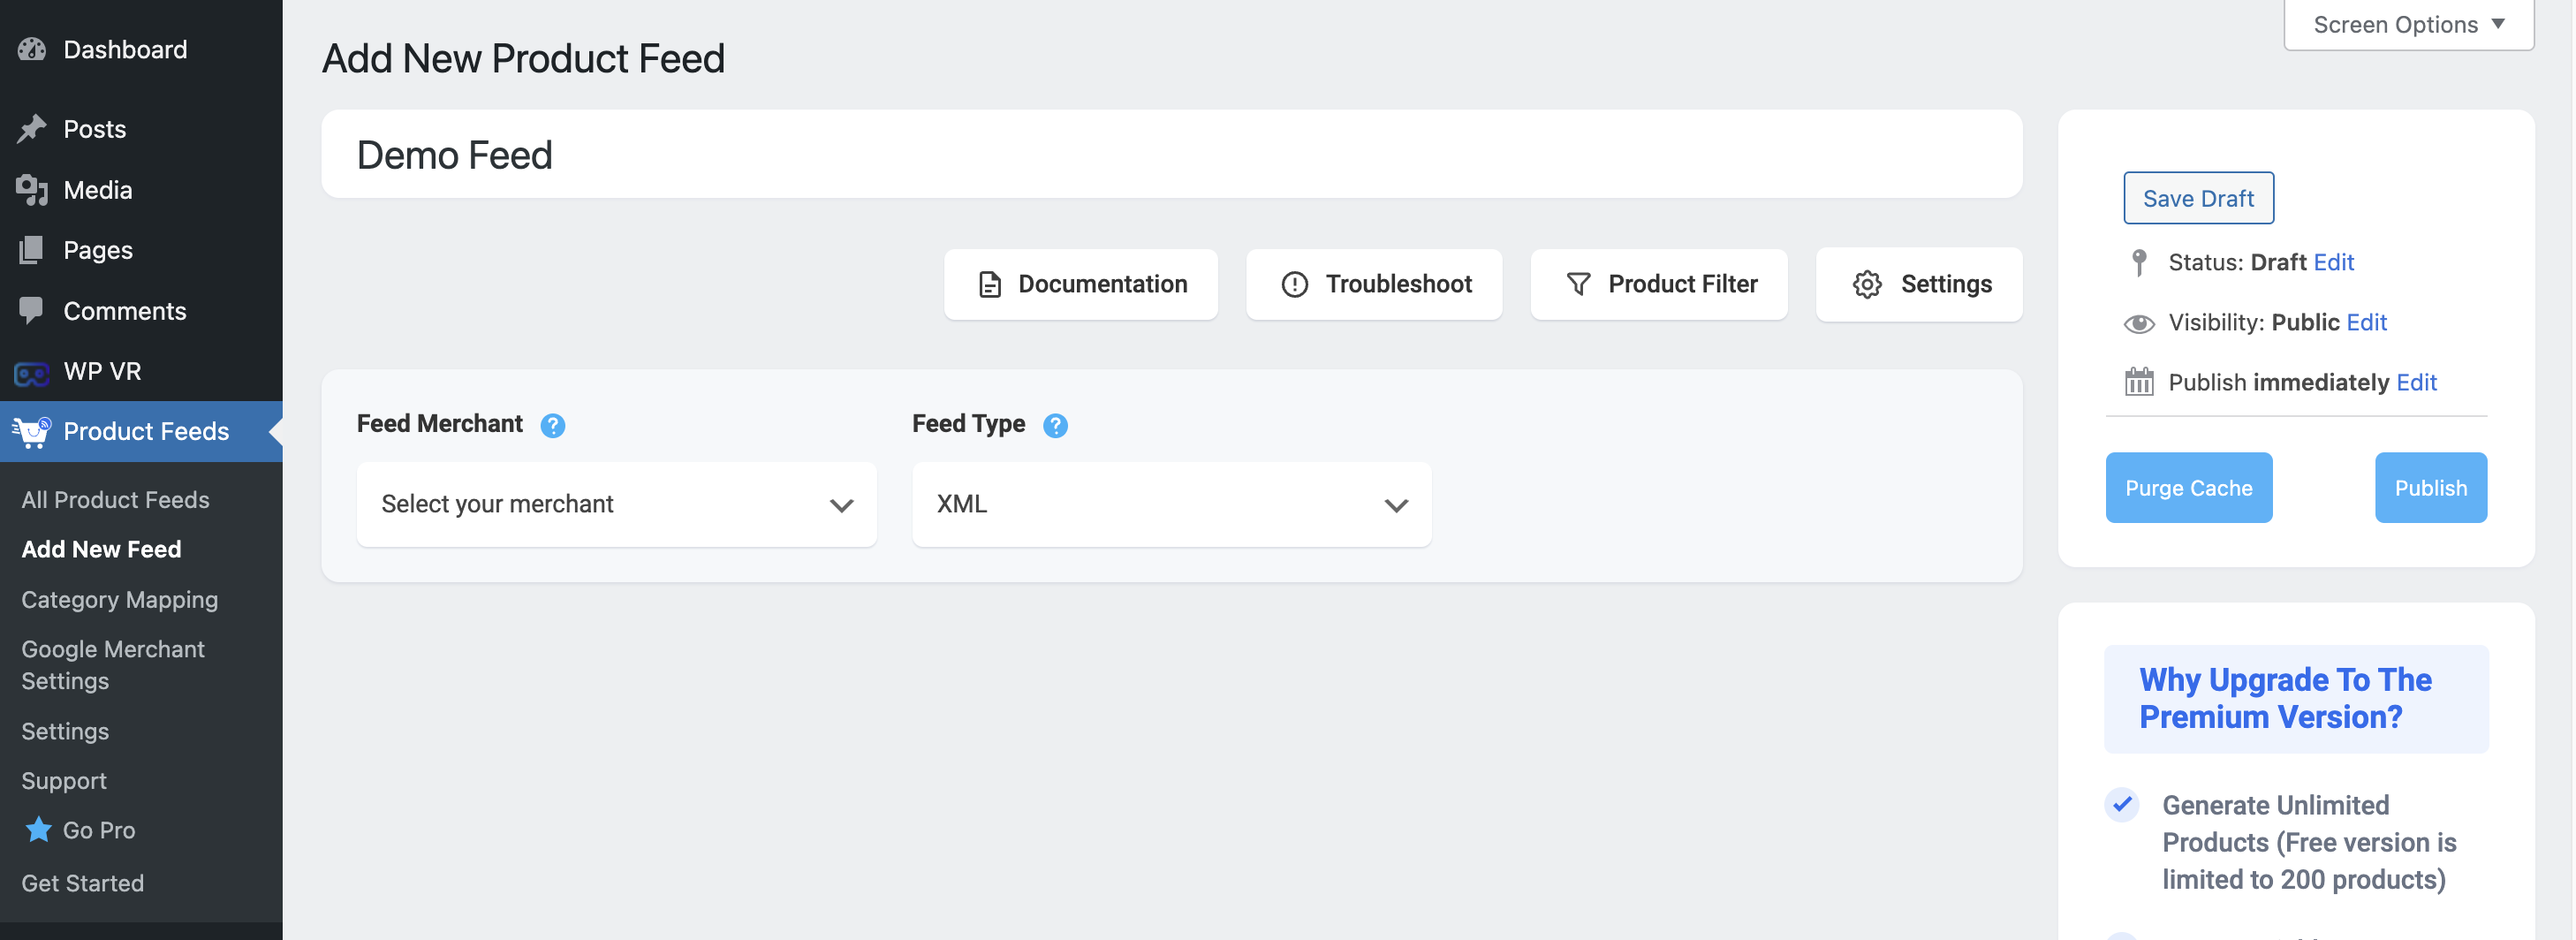
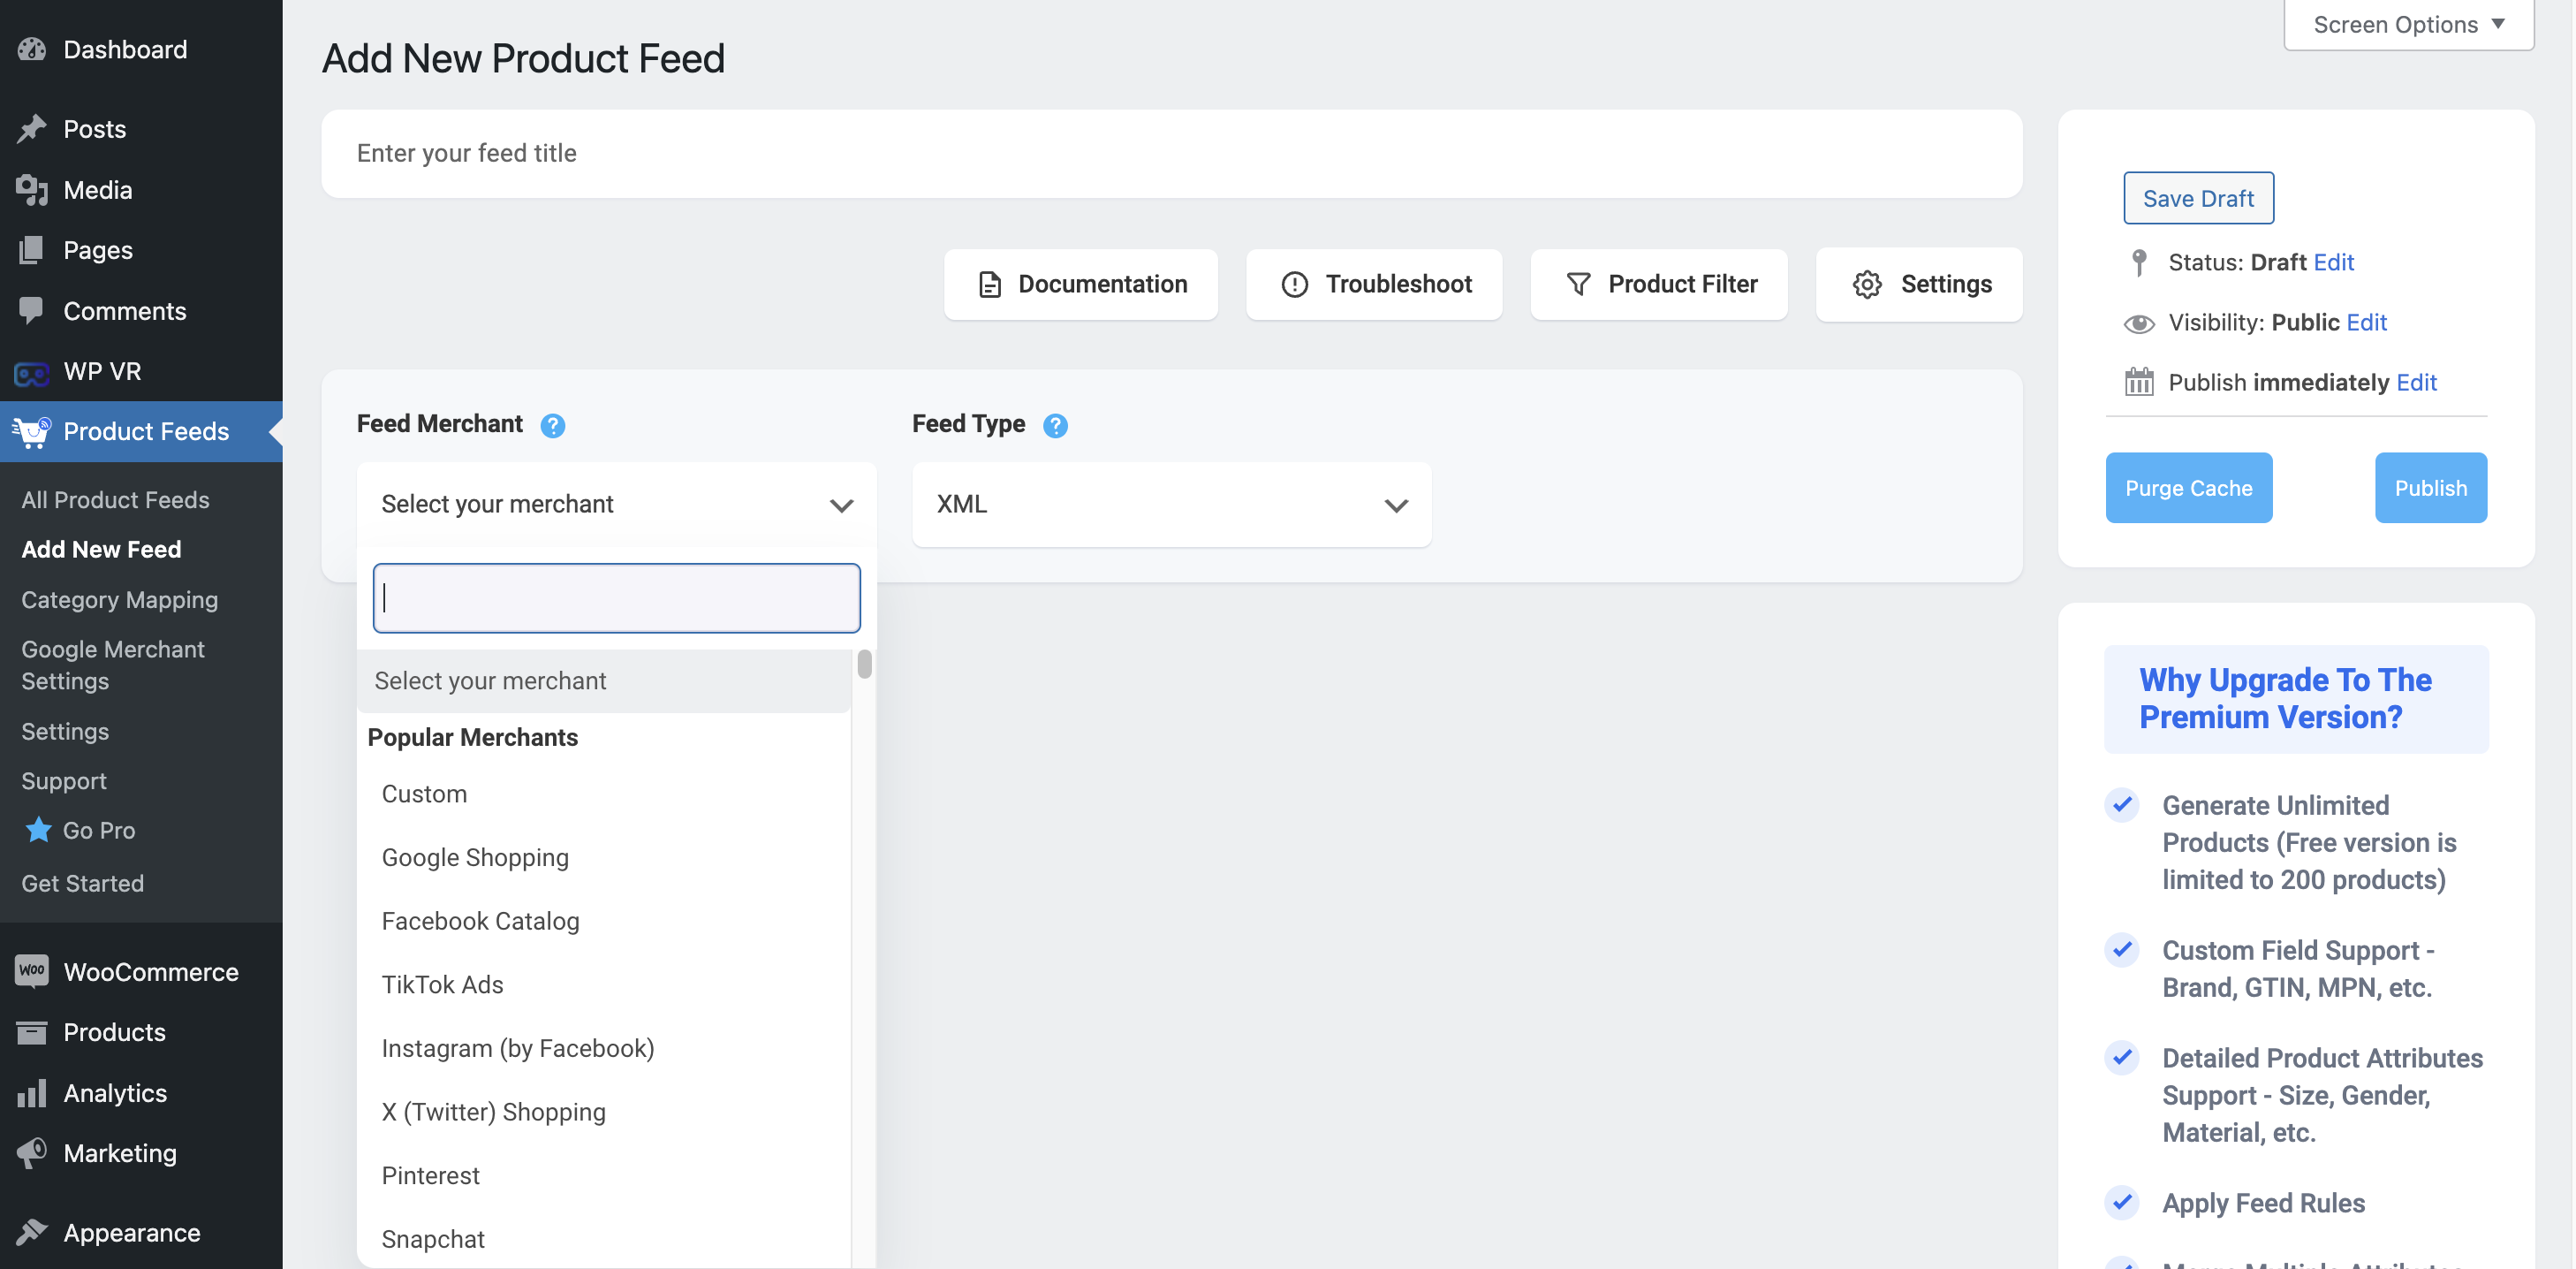


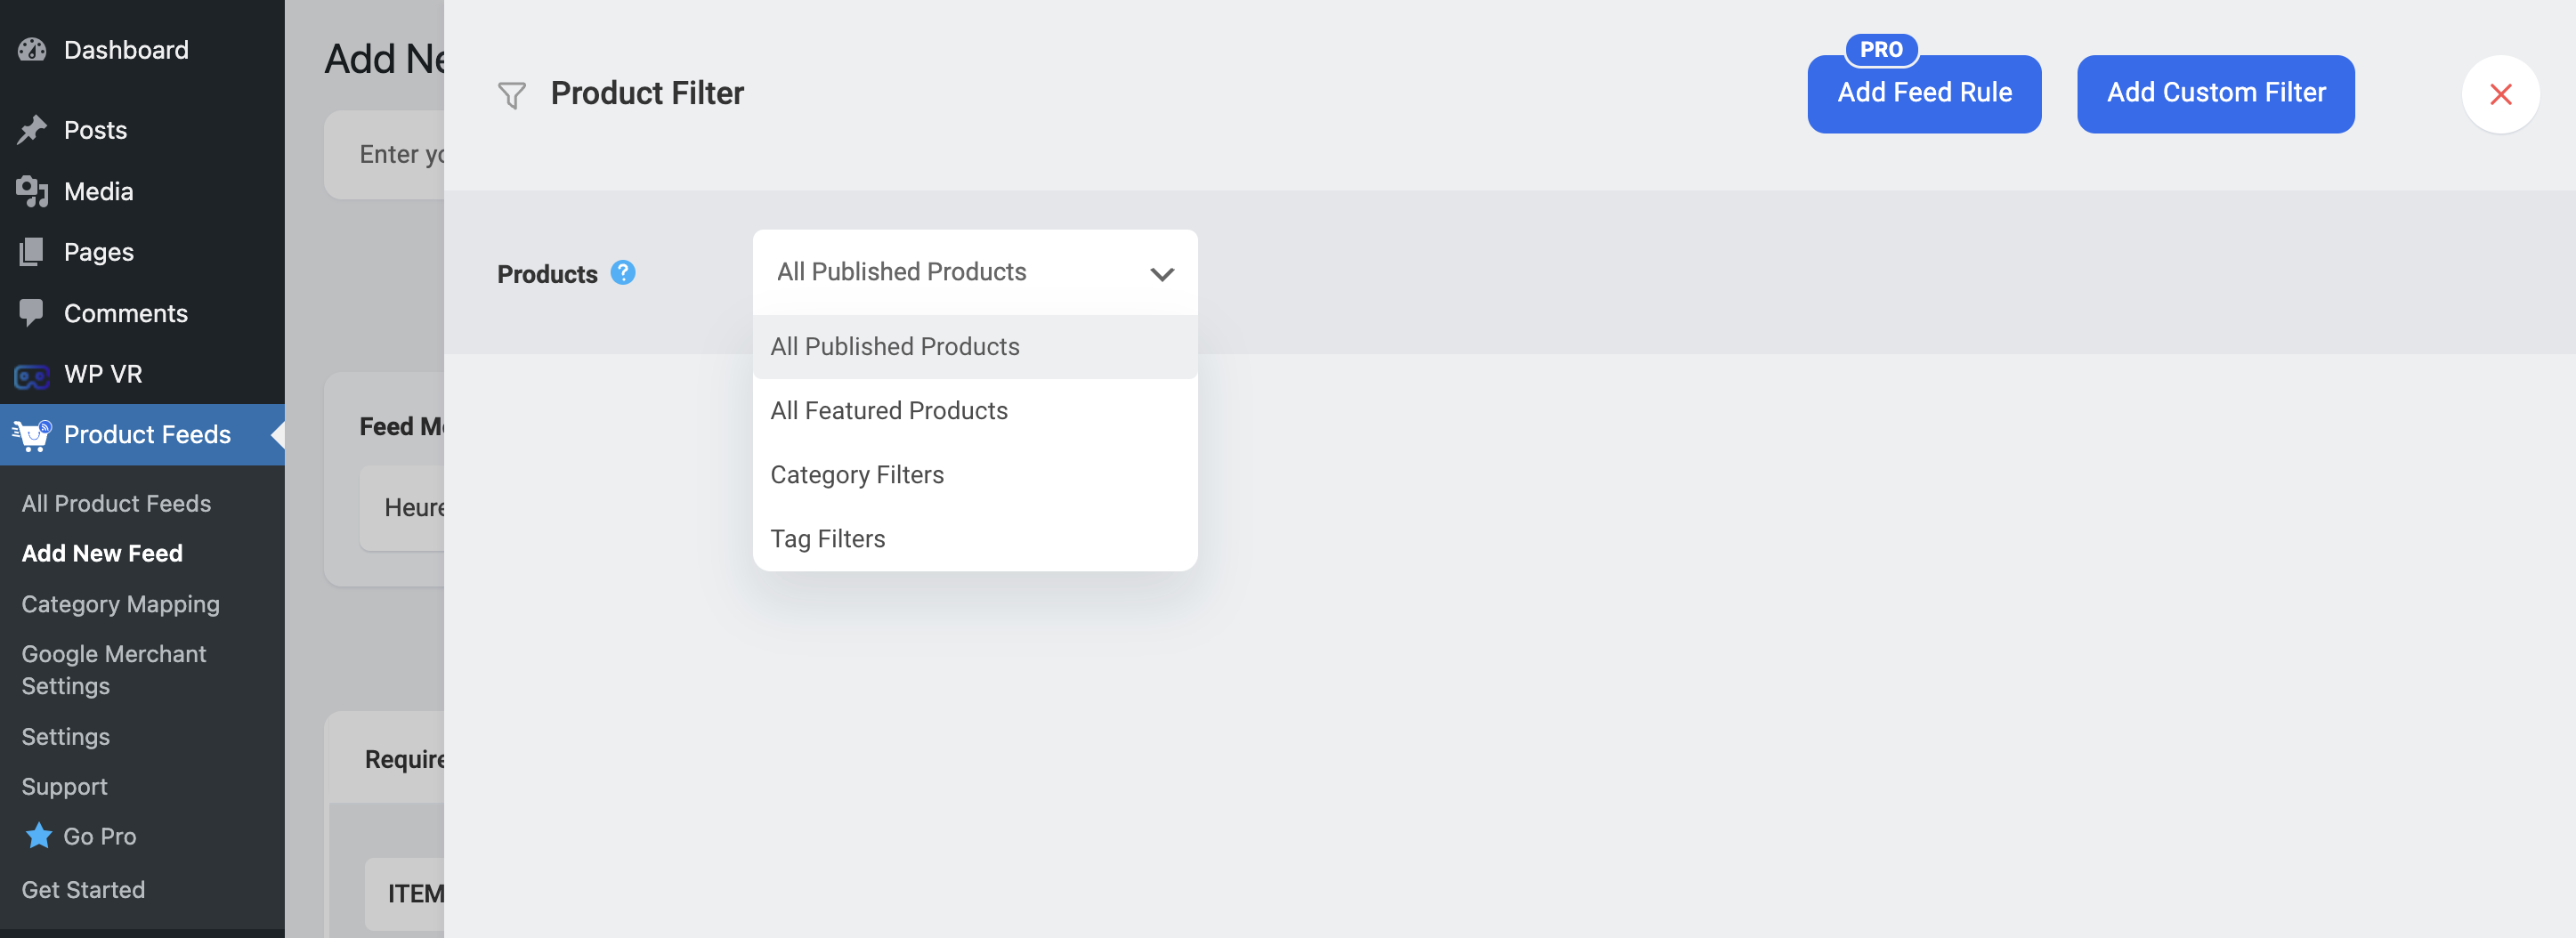
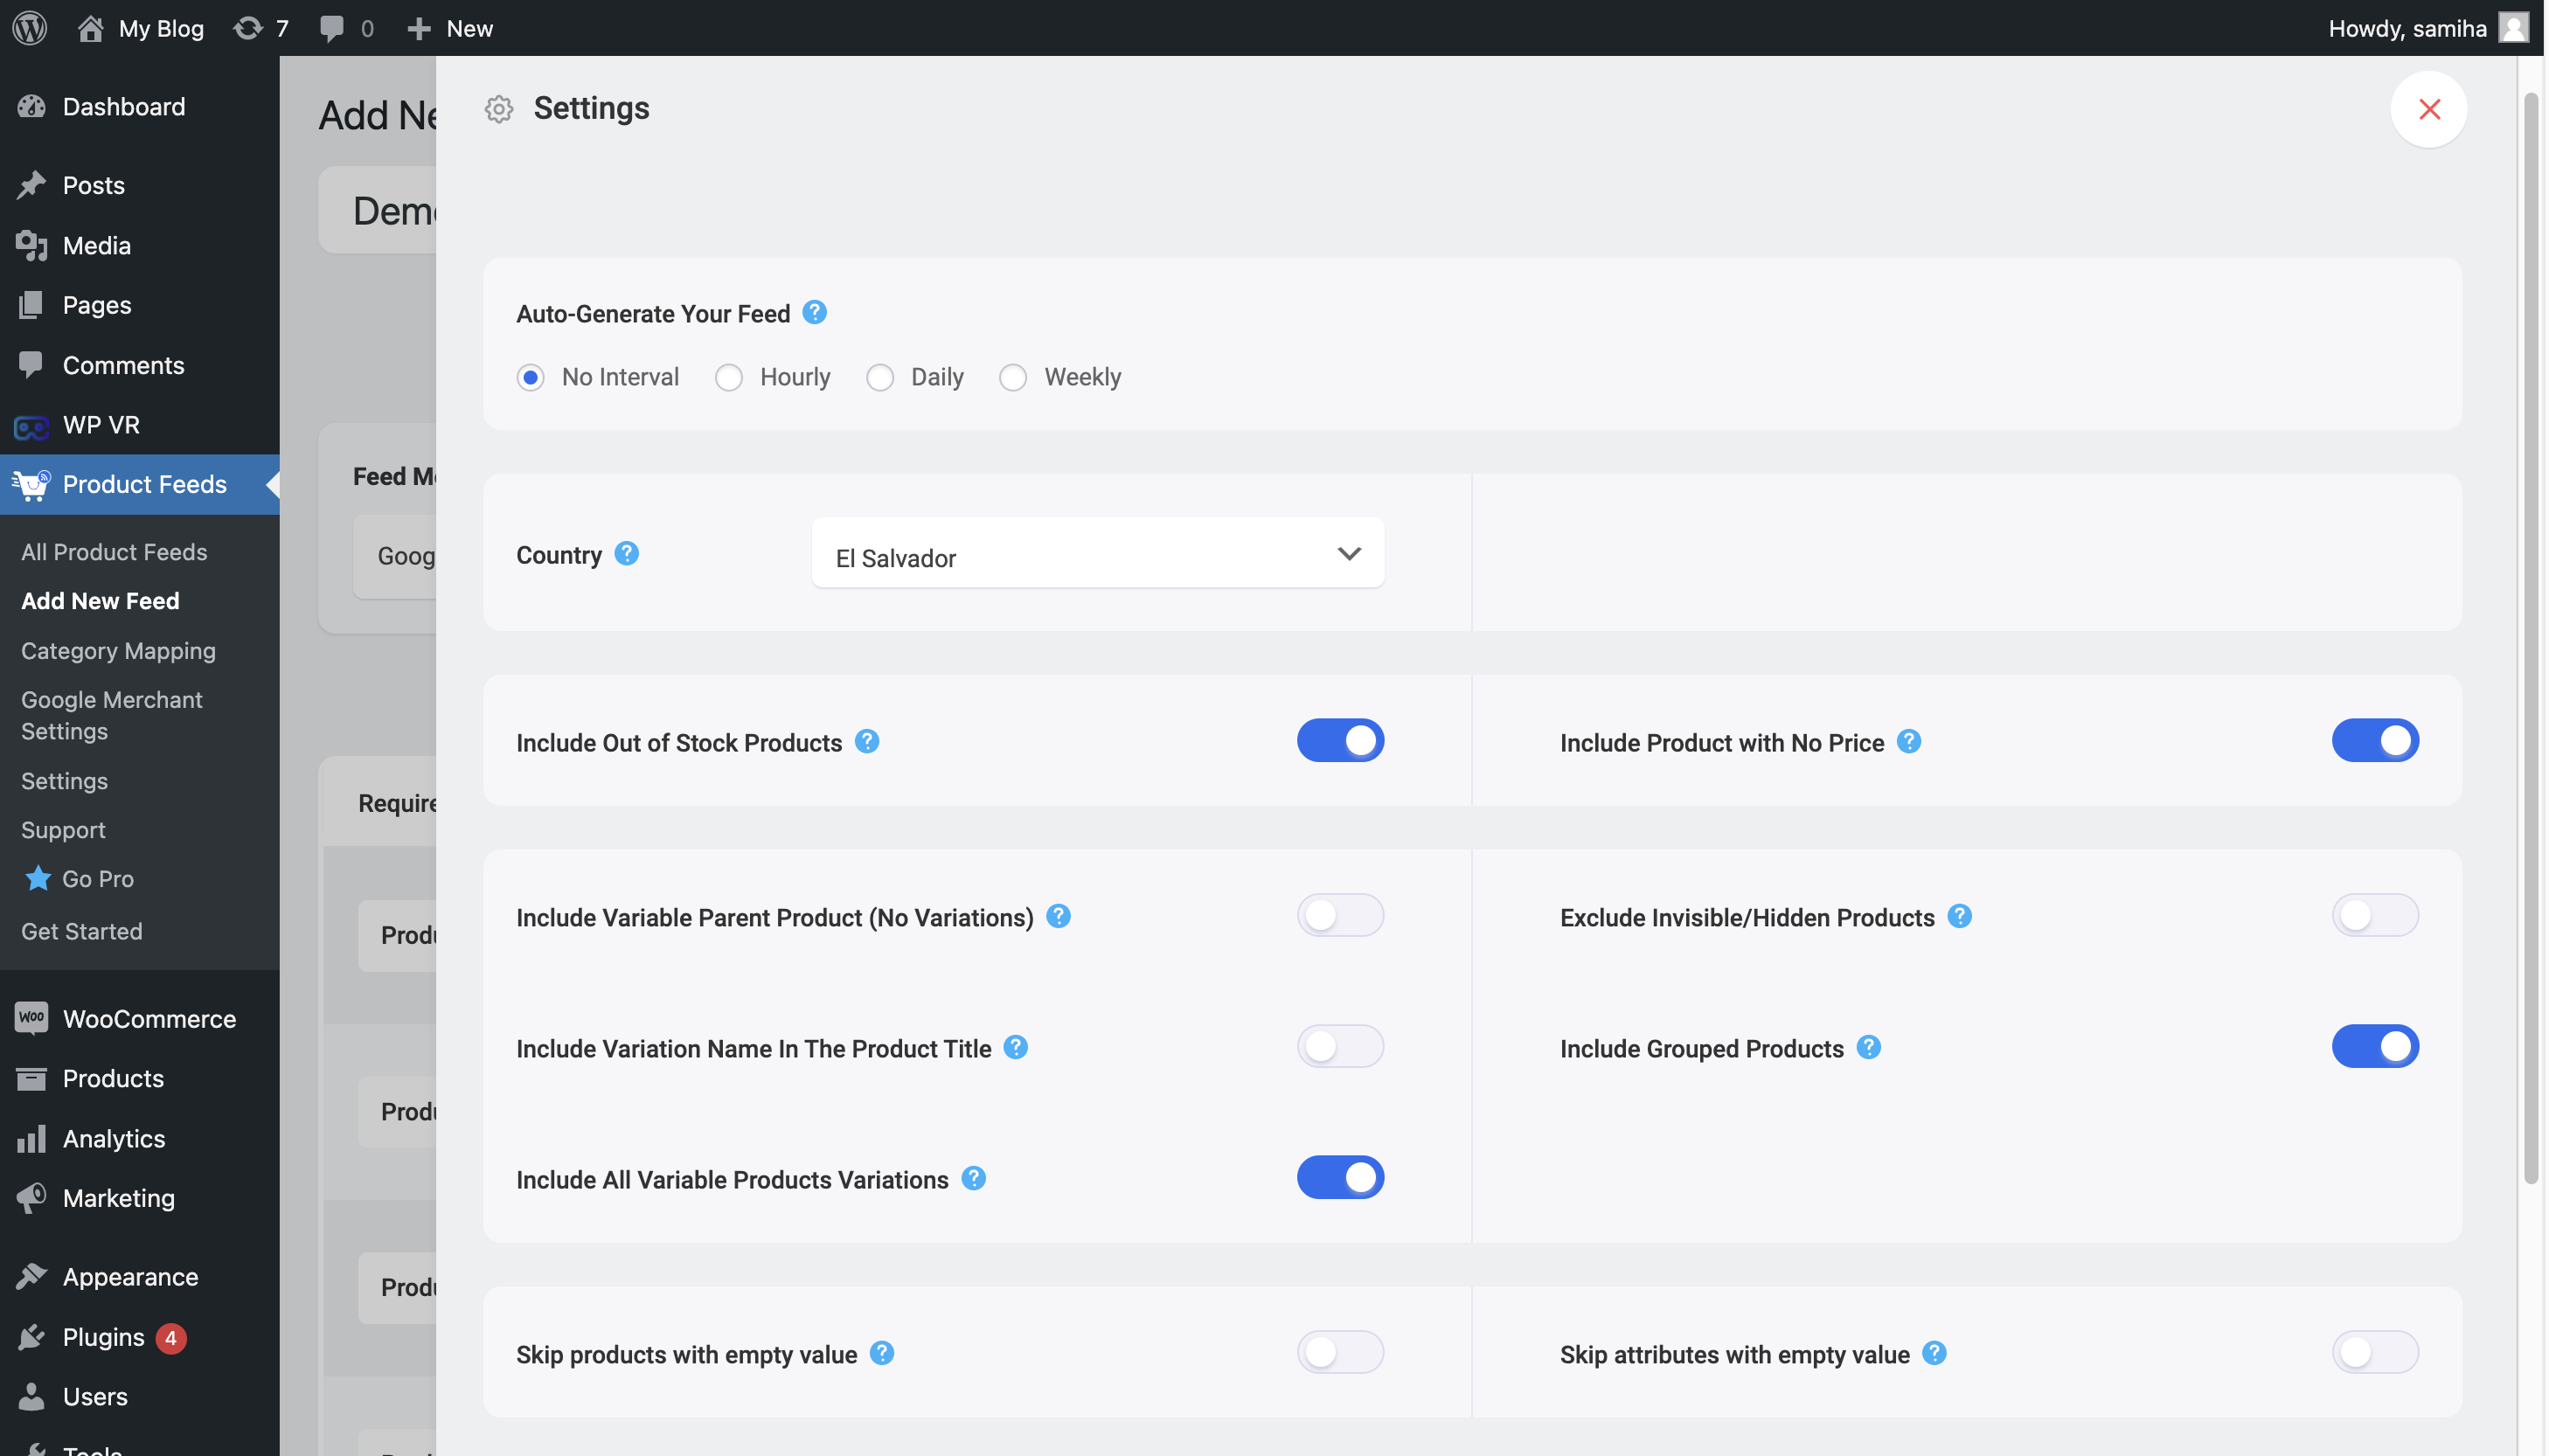
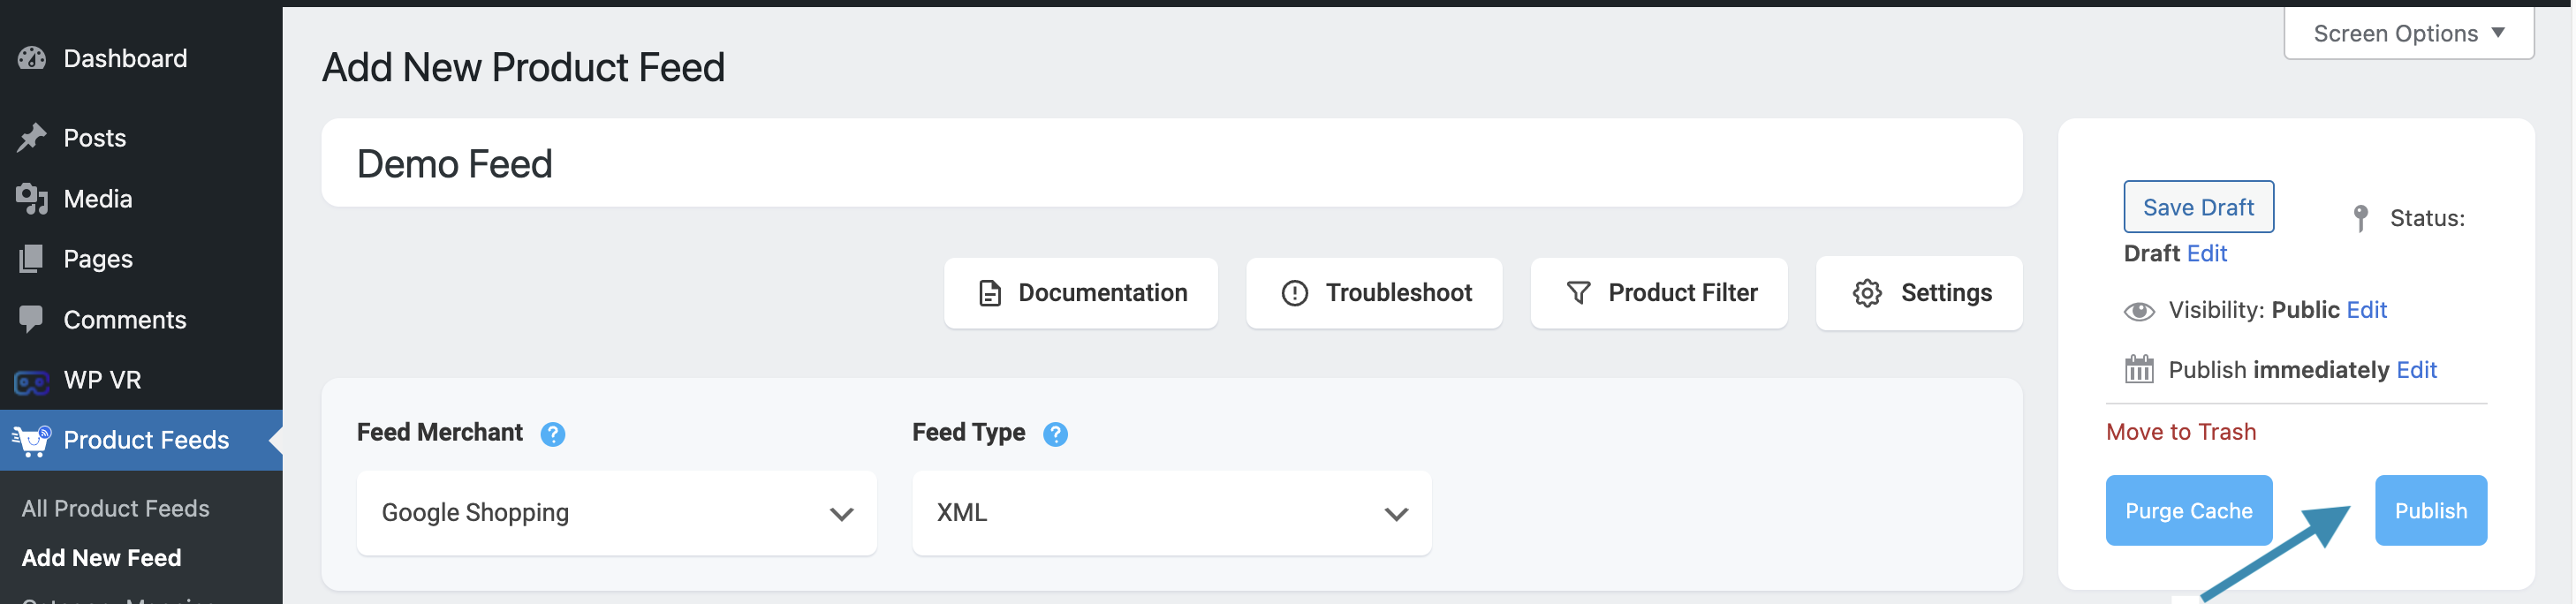
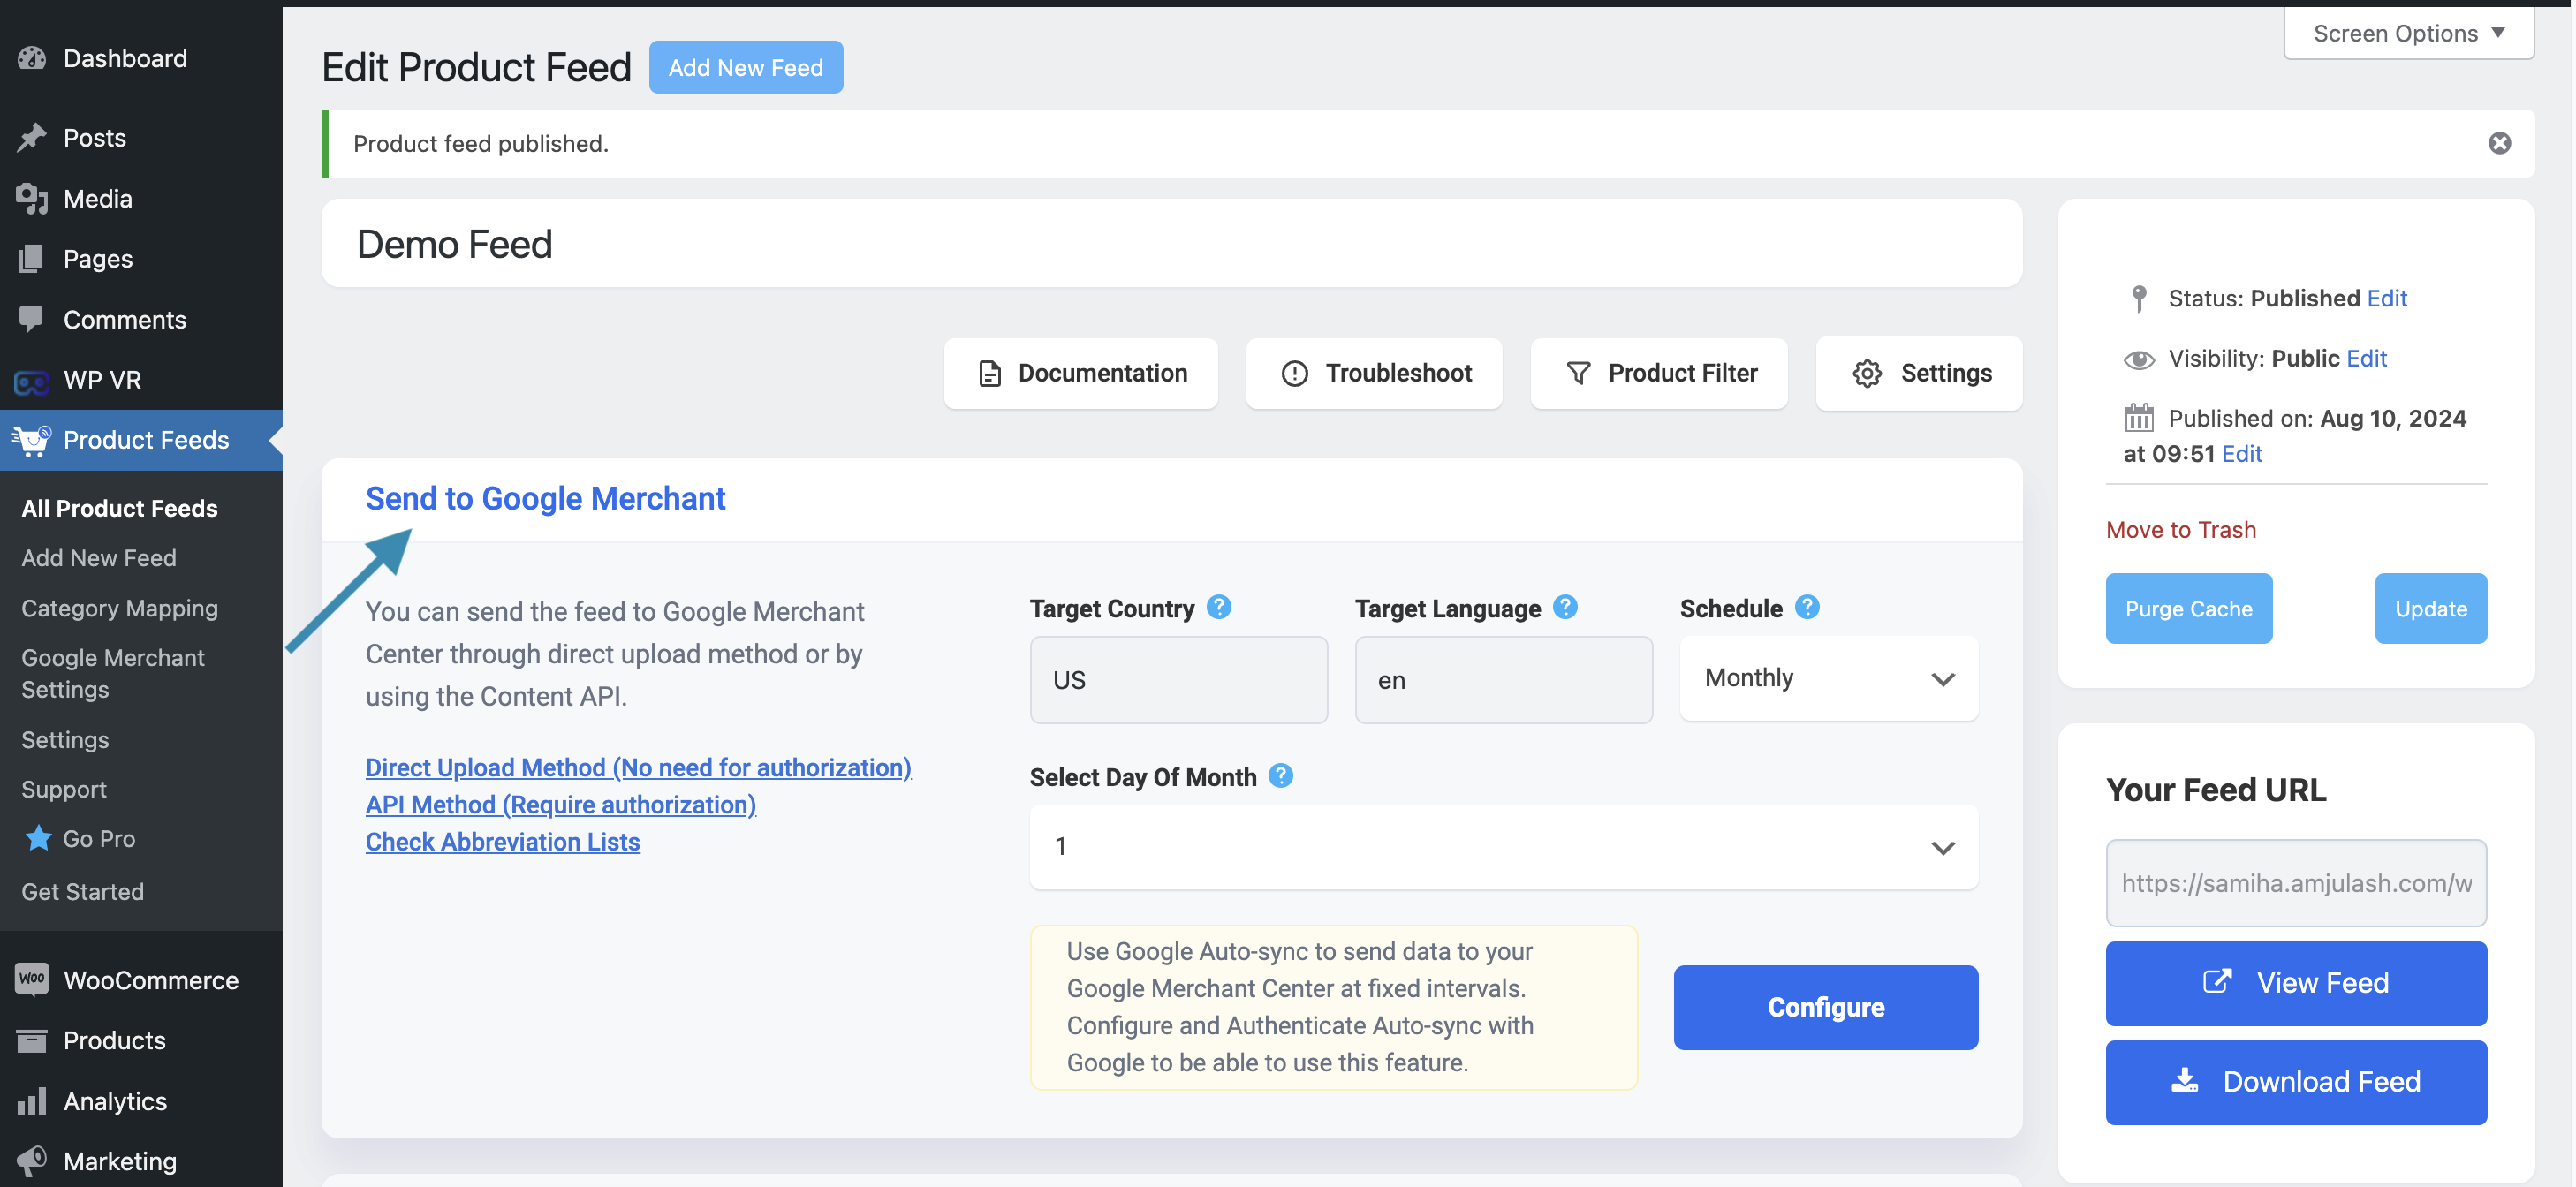
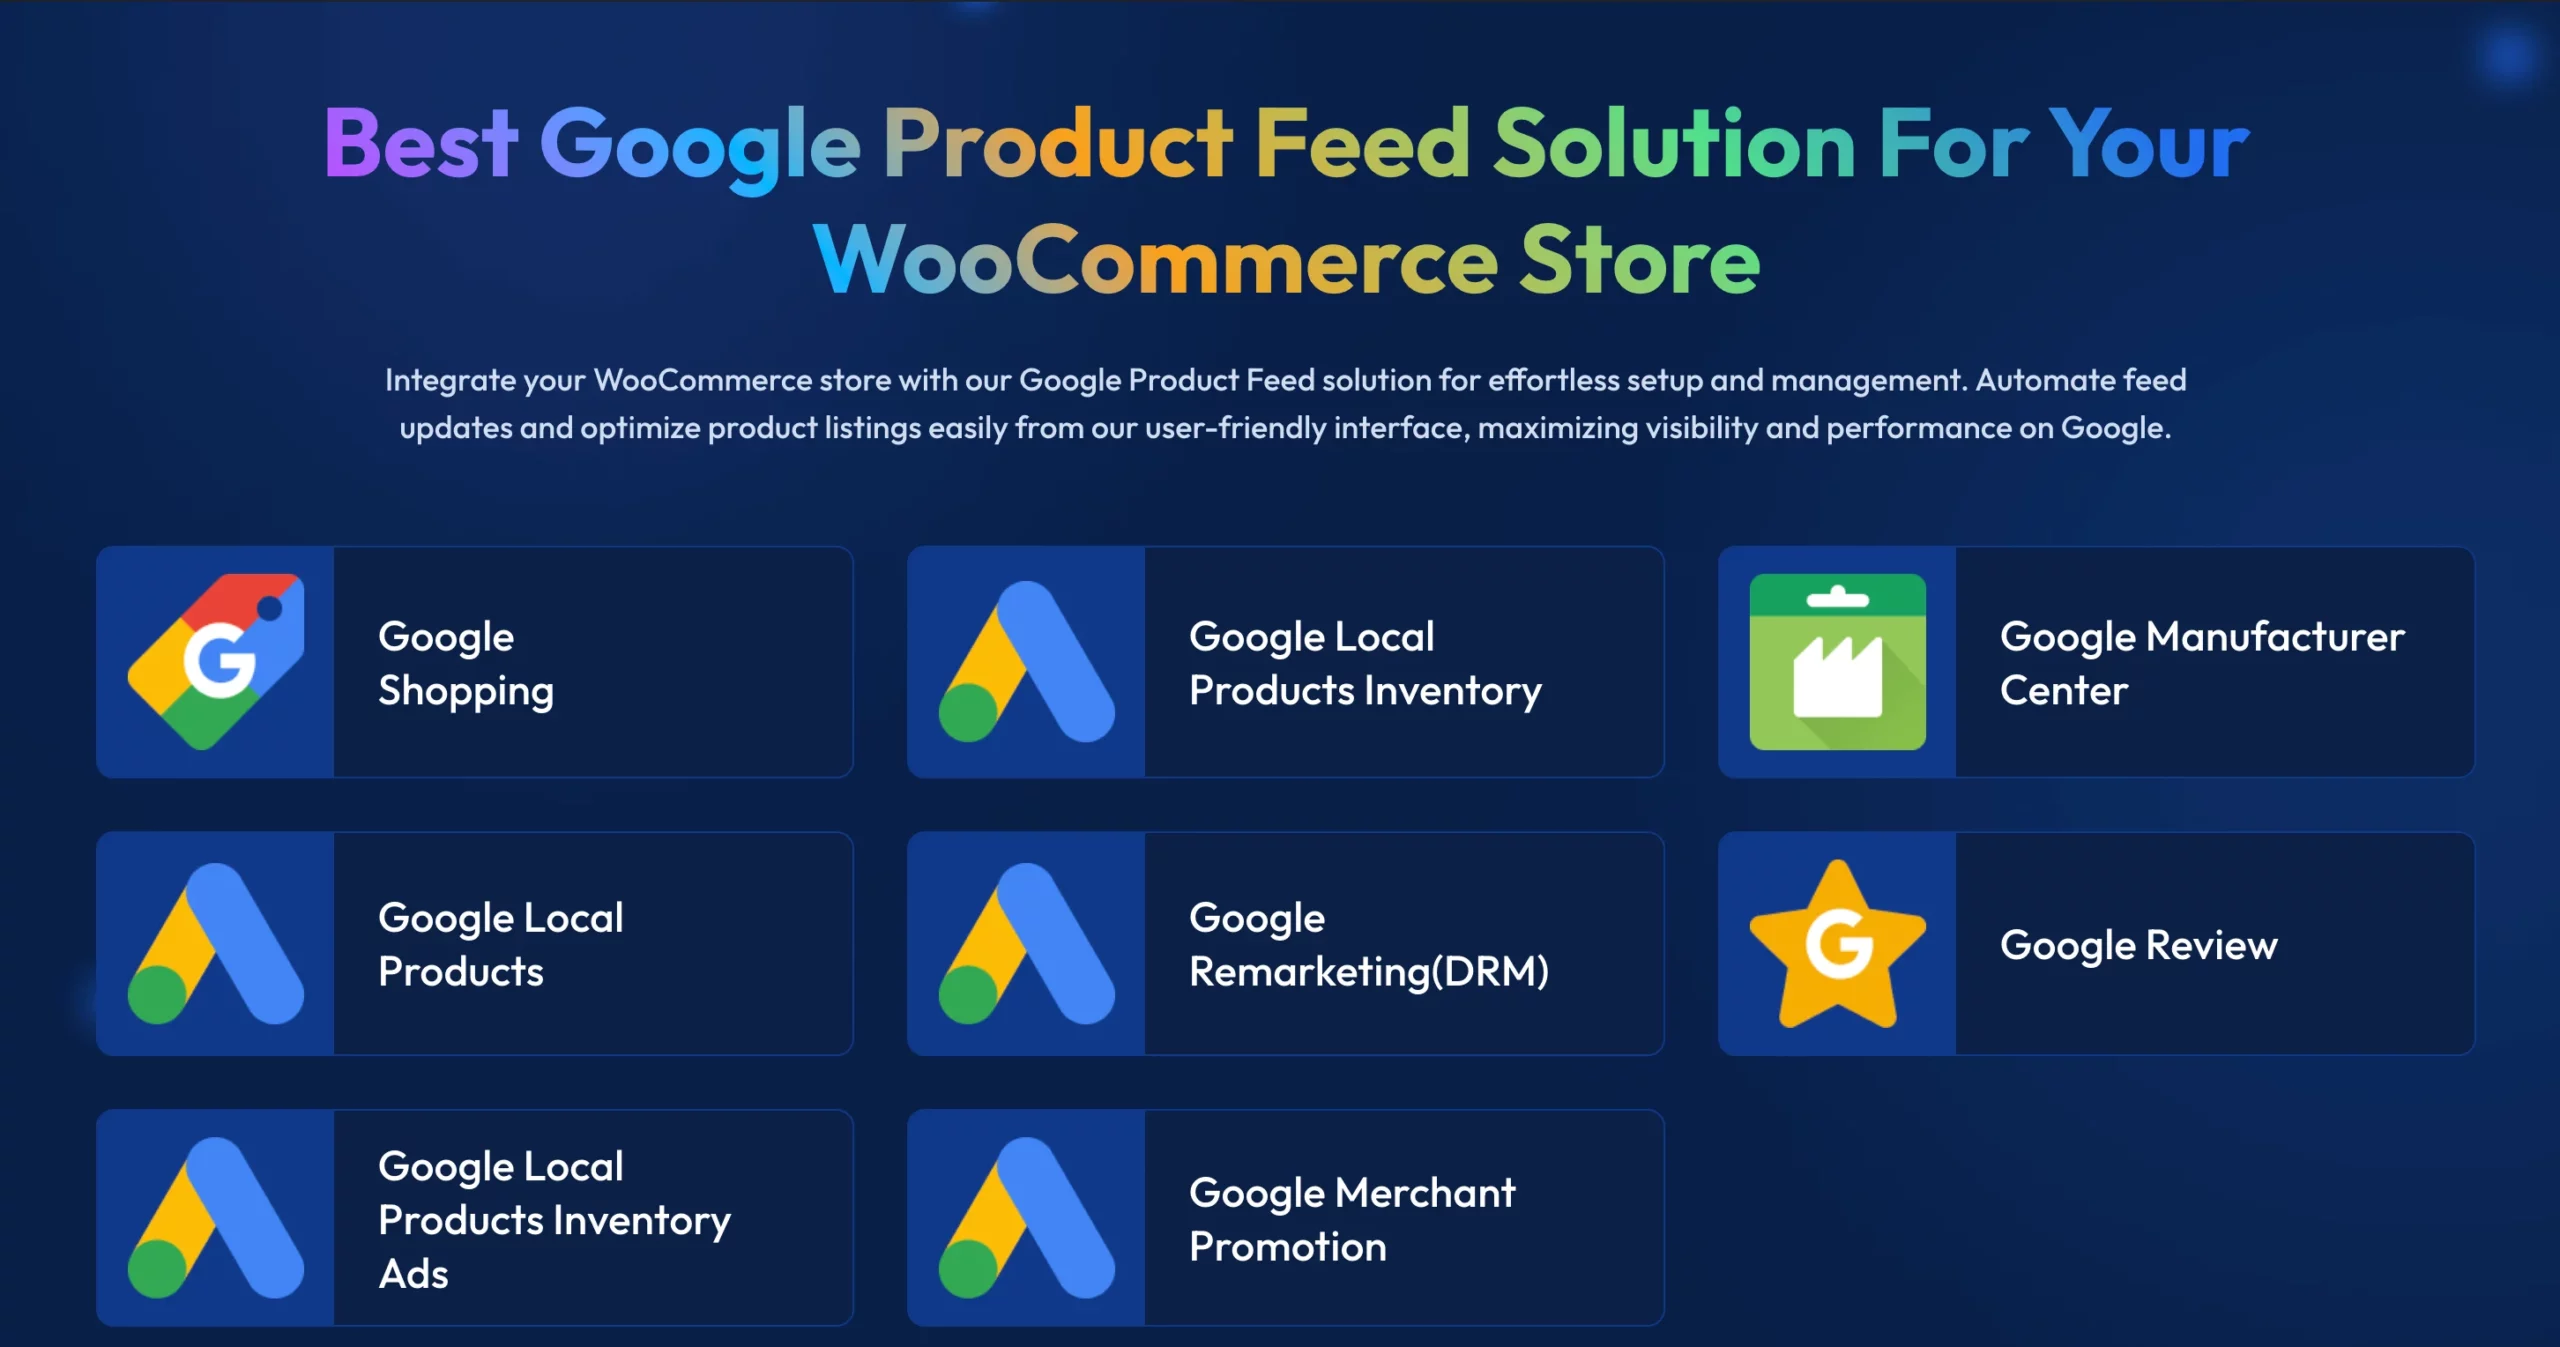
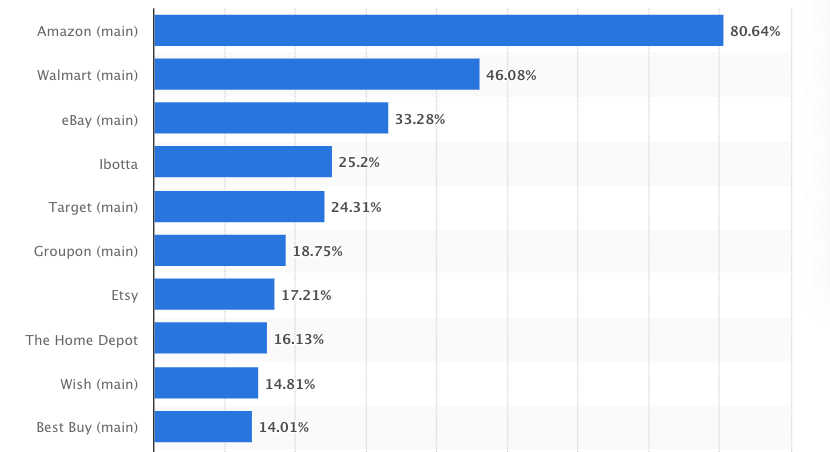
![Generate eBay MIP Product Feed [A Complete Guide] 3](https://staging-rextheme.kinsta.cloud/wp-content/uploads/2024/05/Lark20240905-155216.gif)
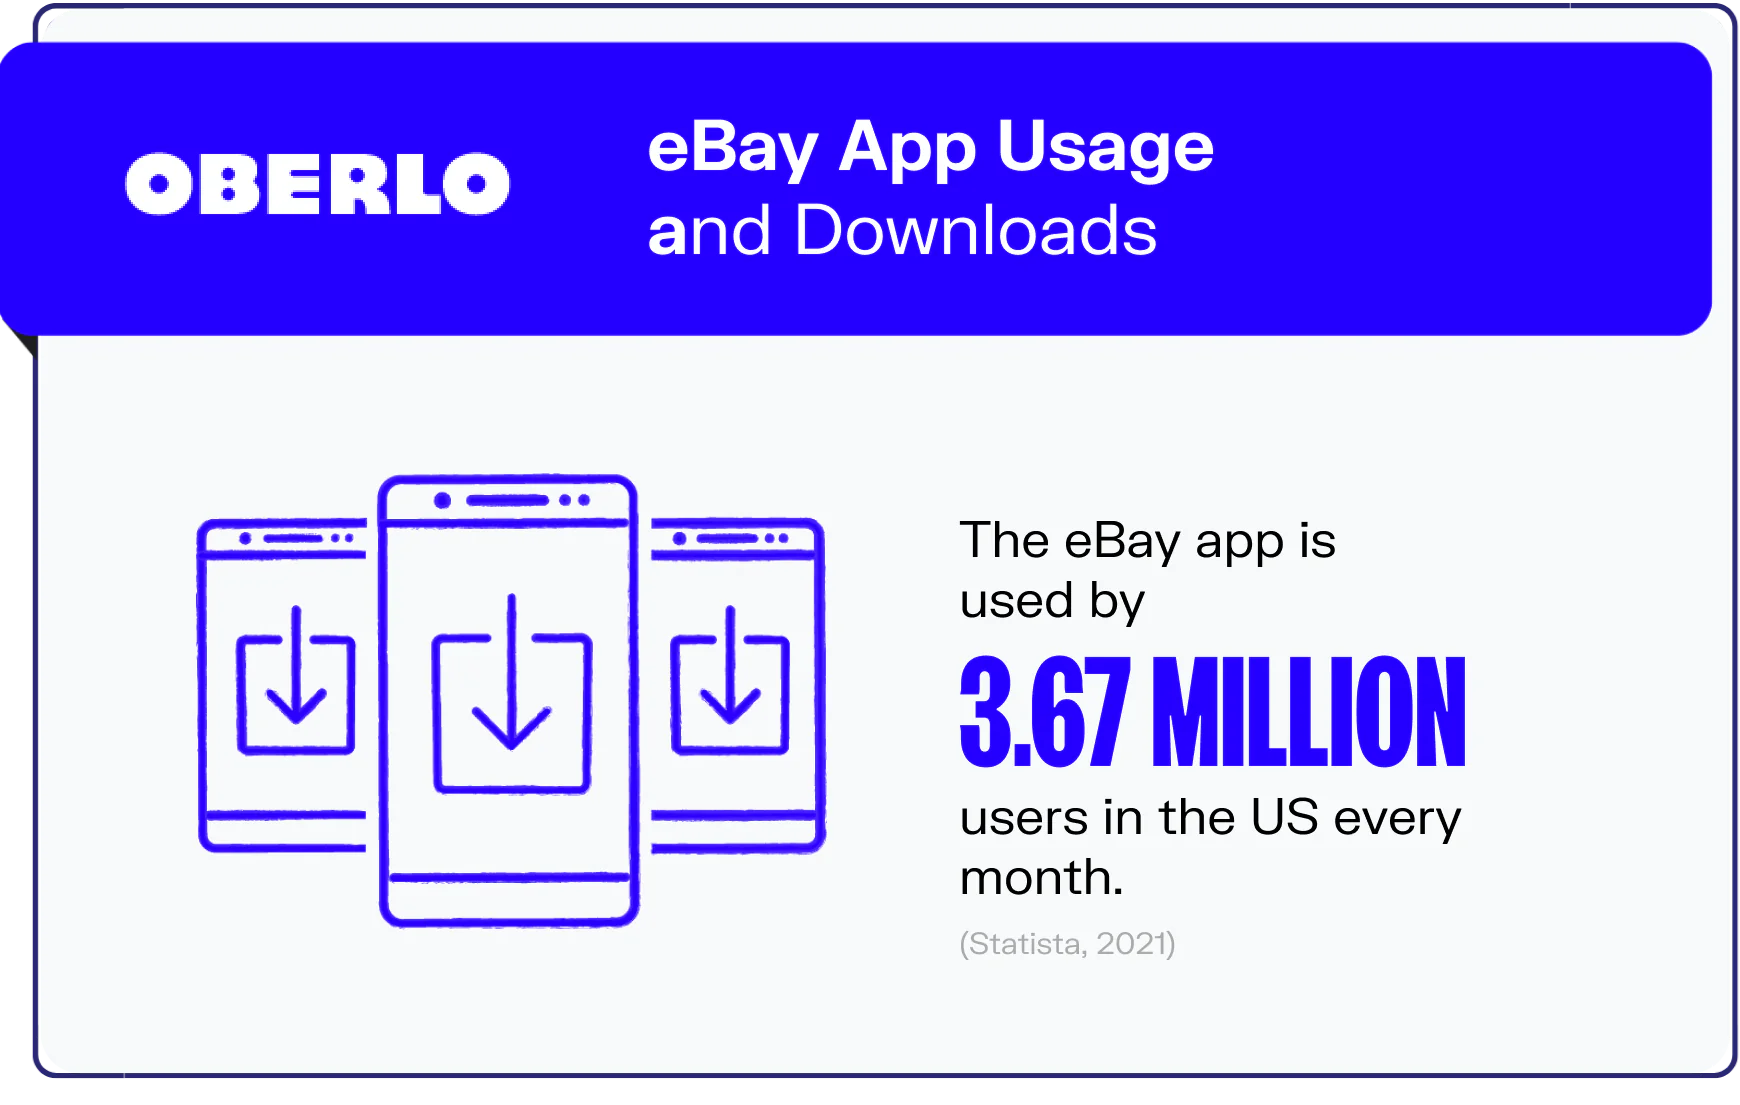
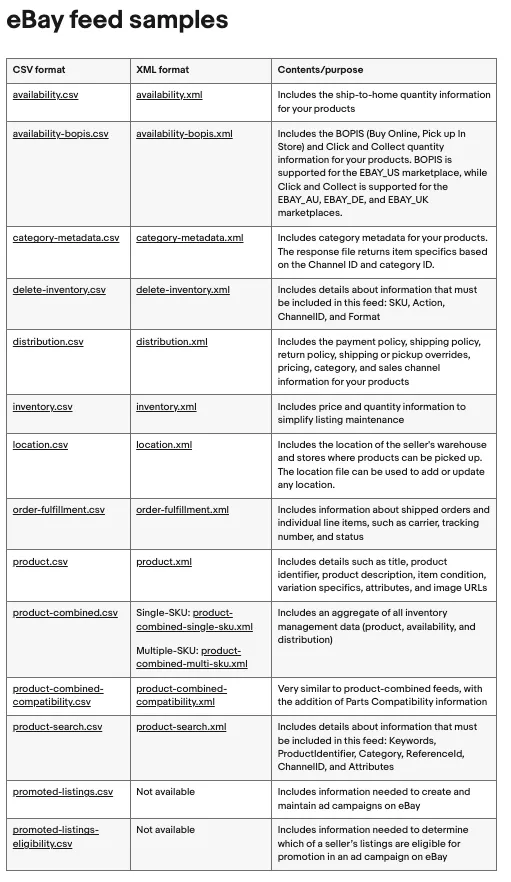


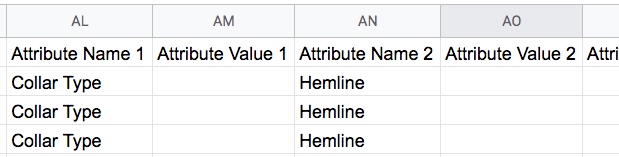

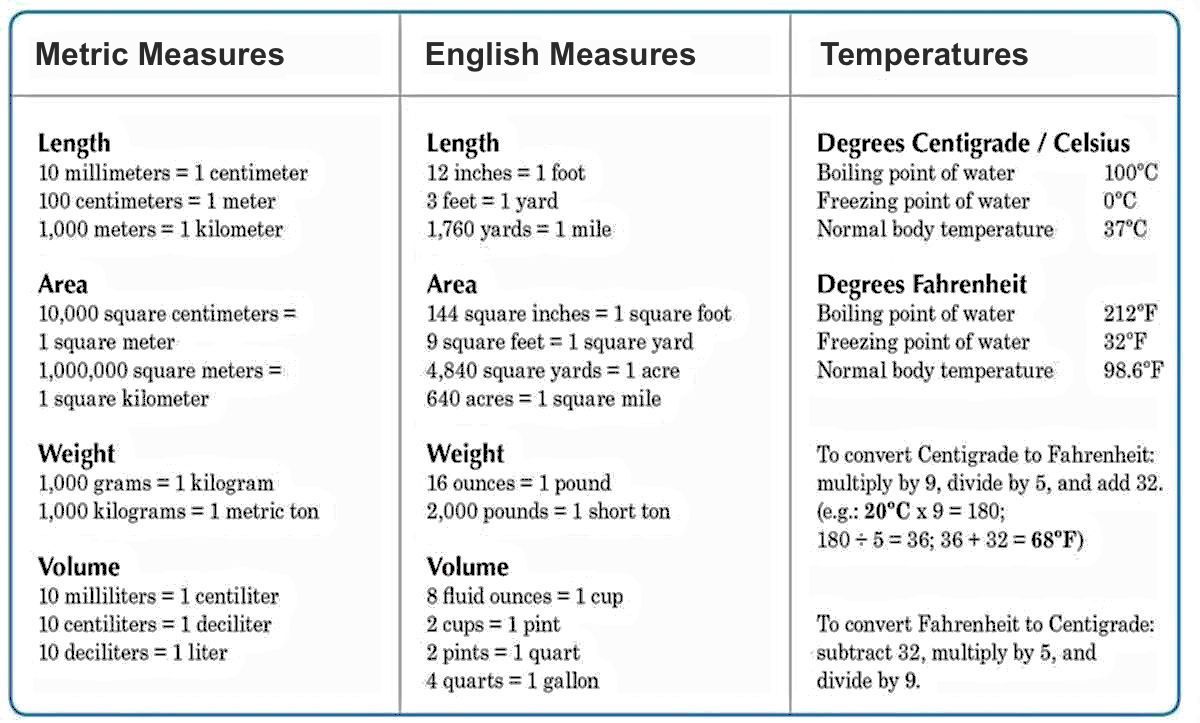
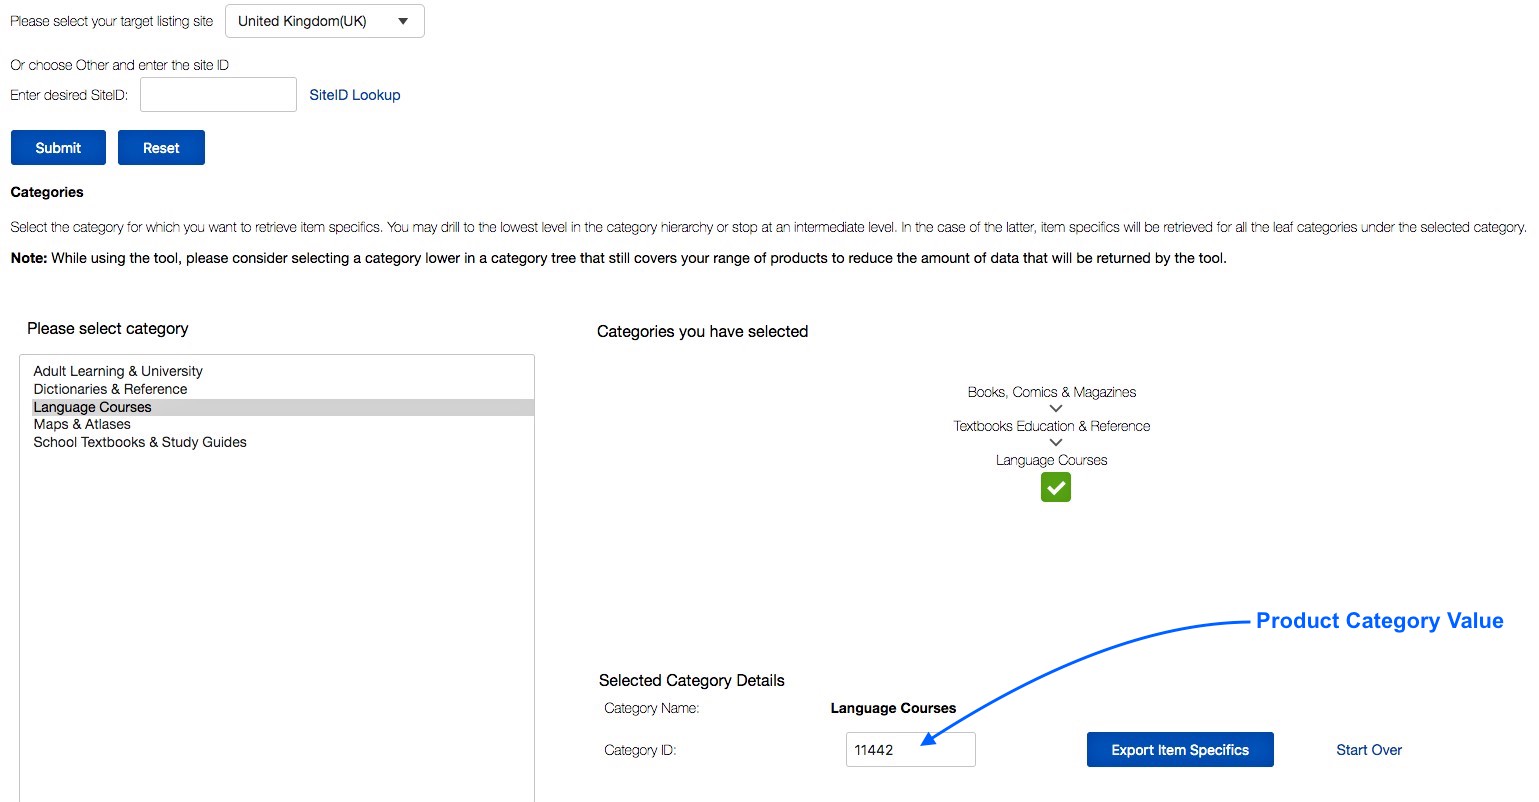
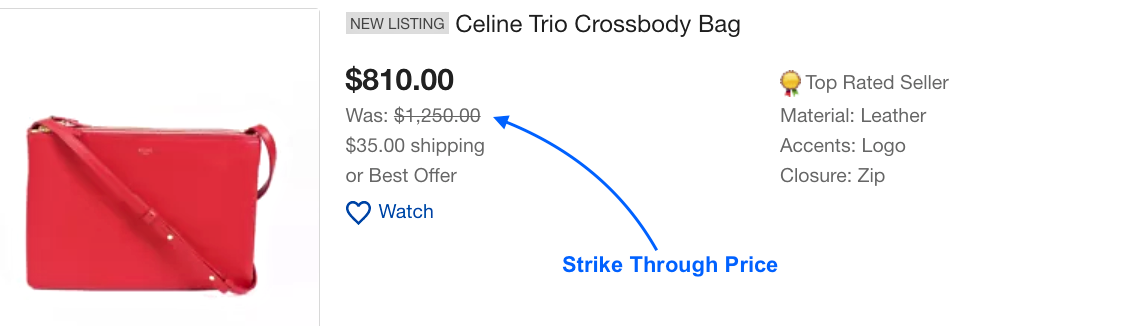
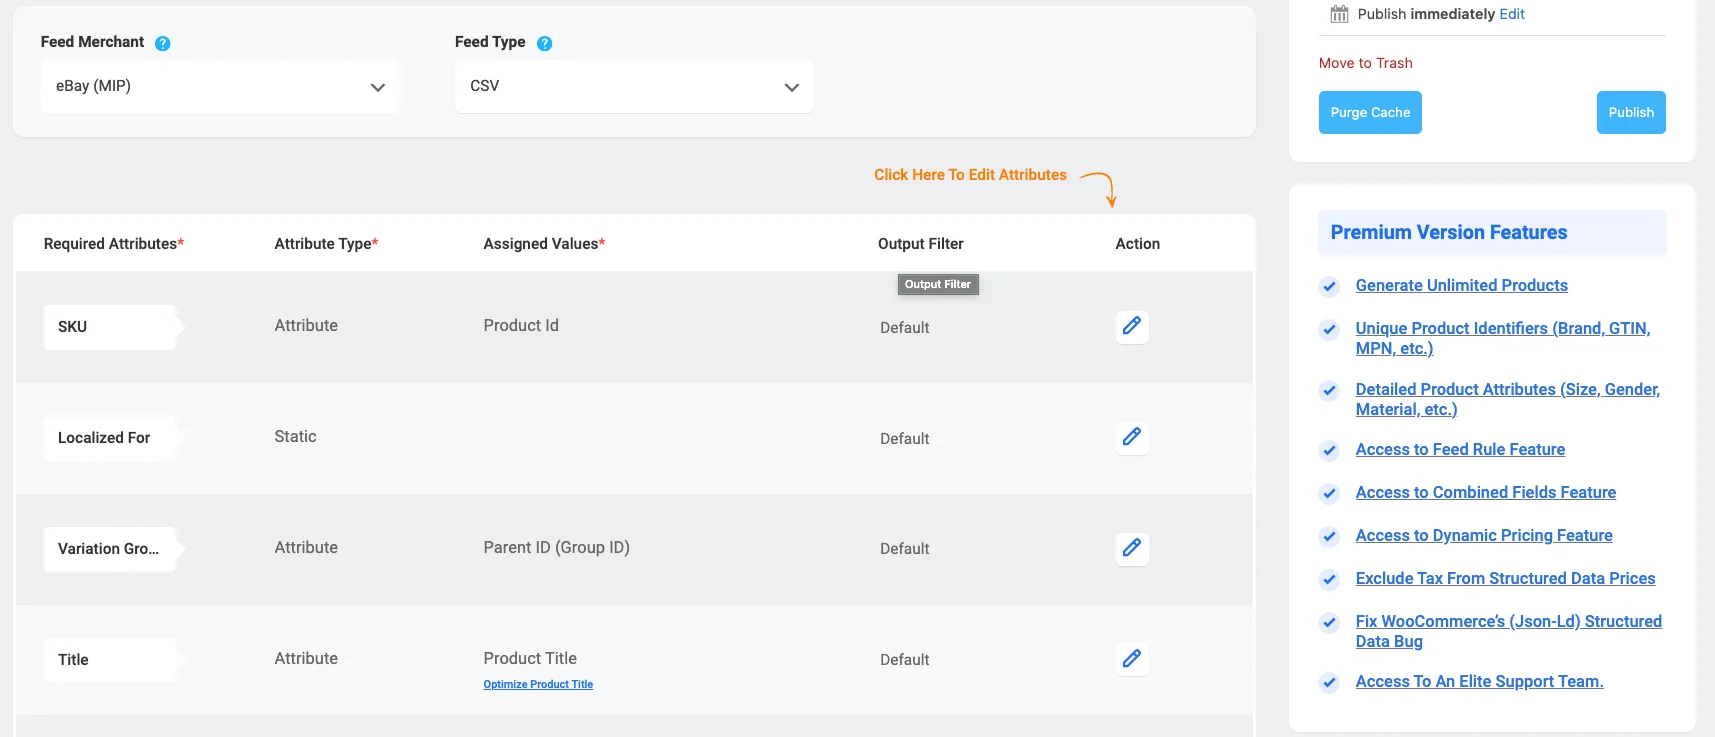

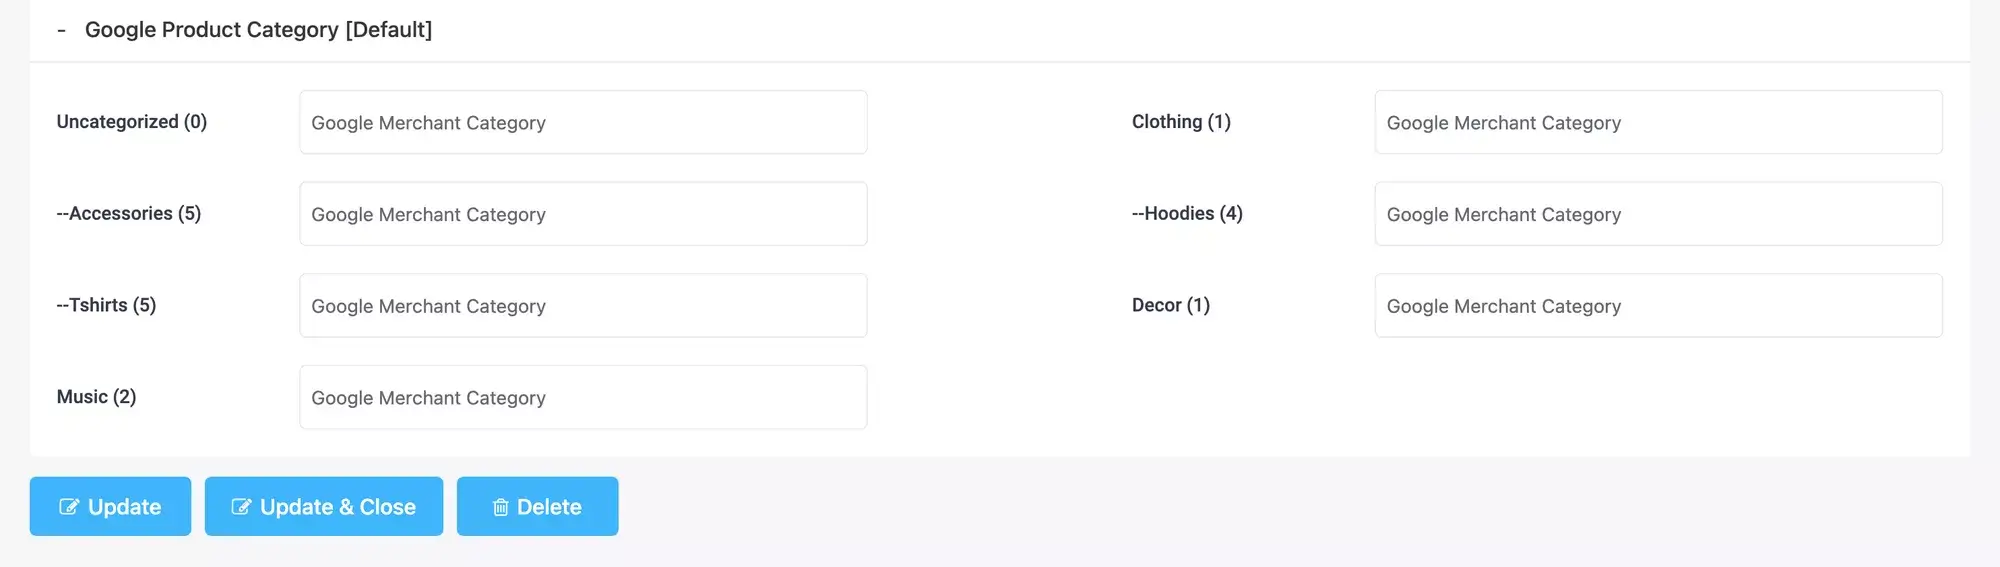
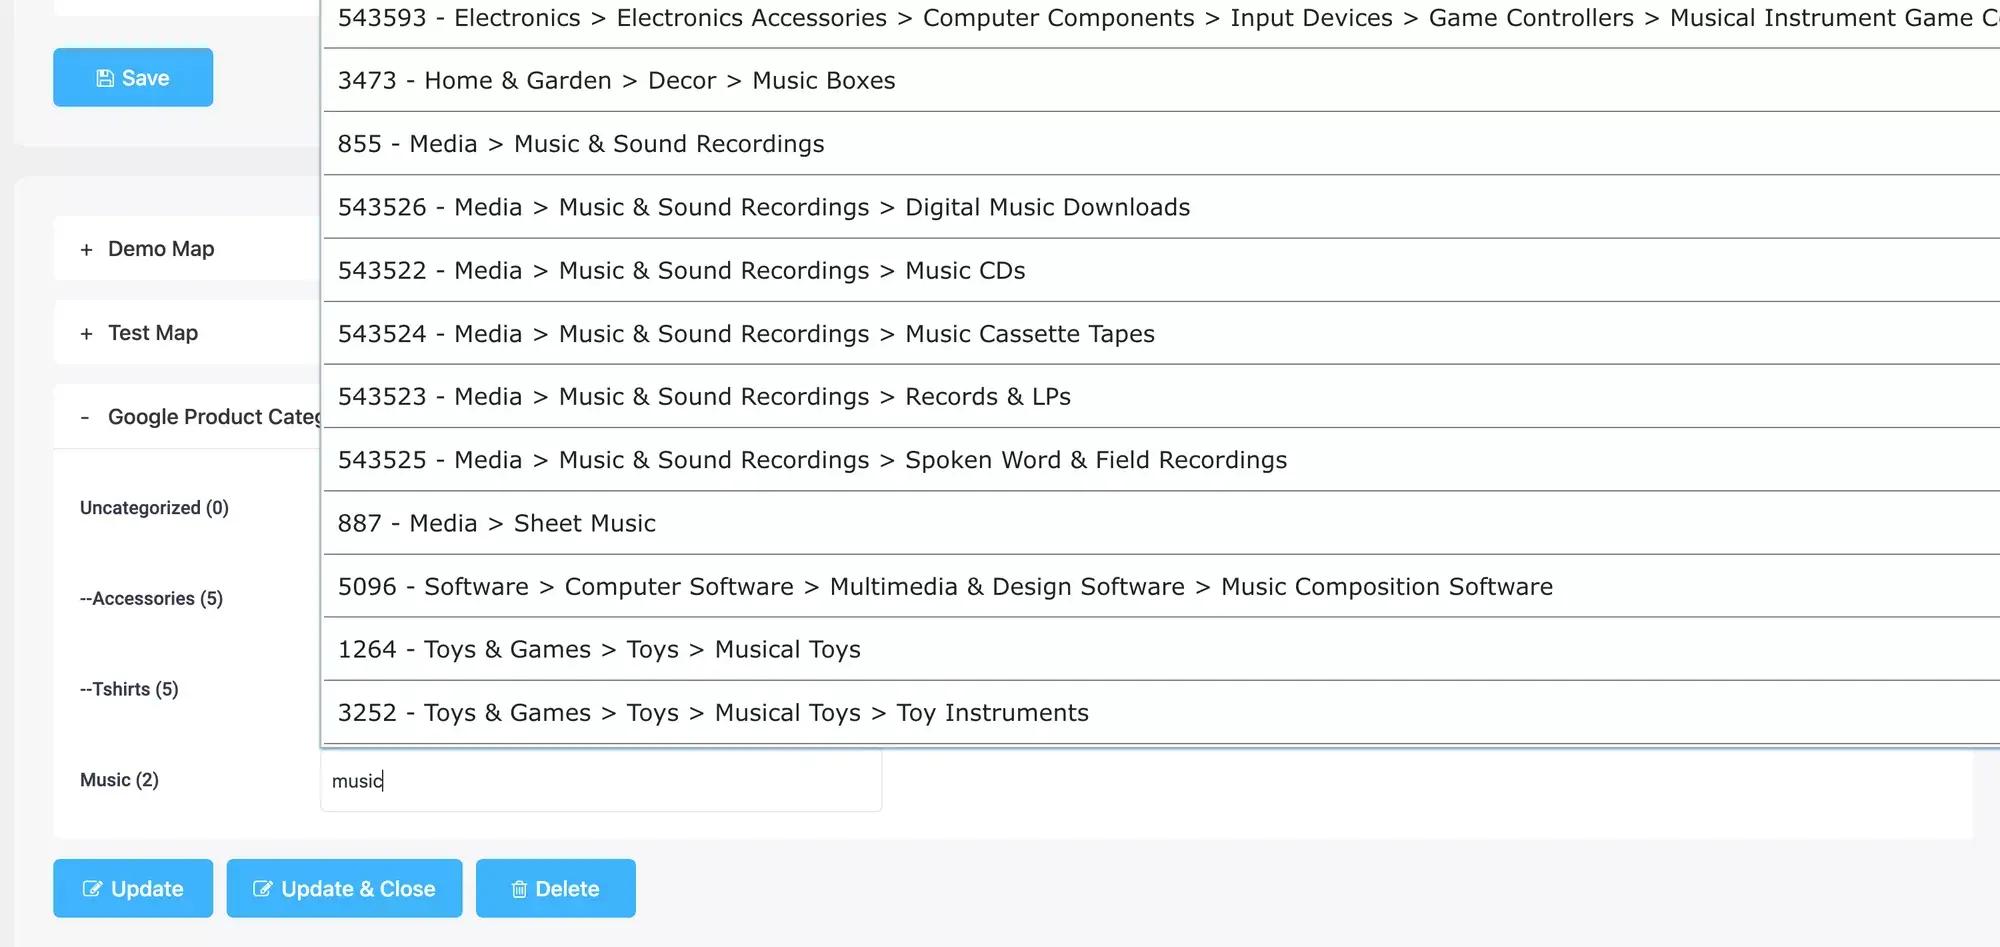
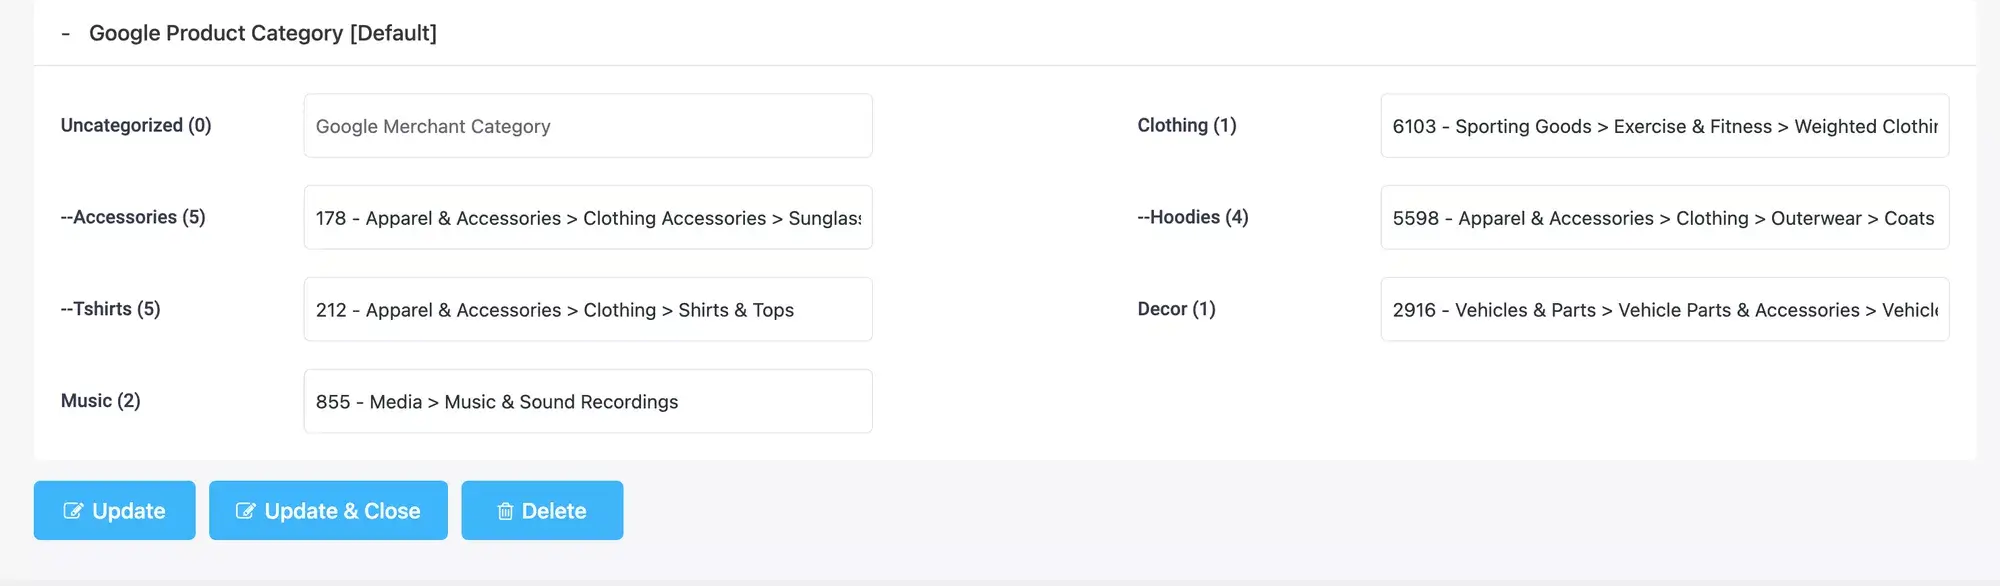


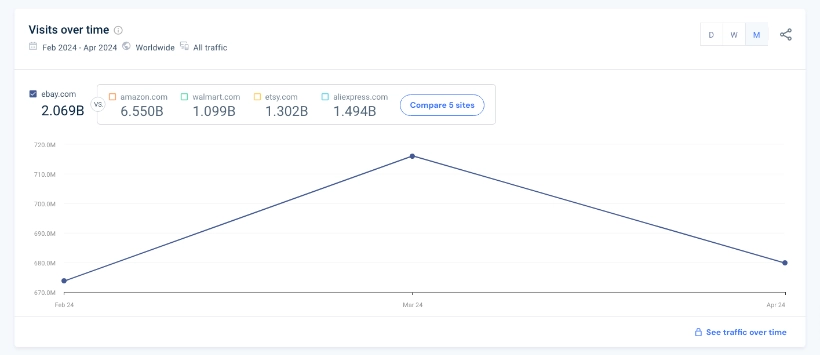
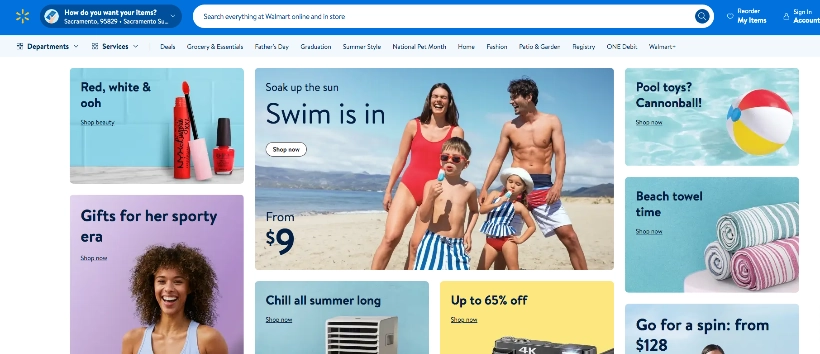
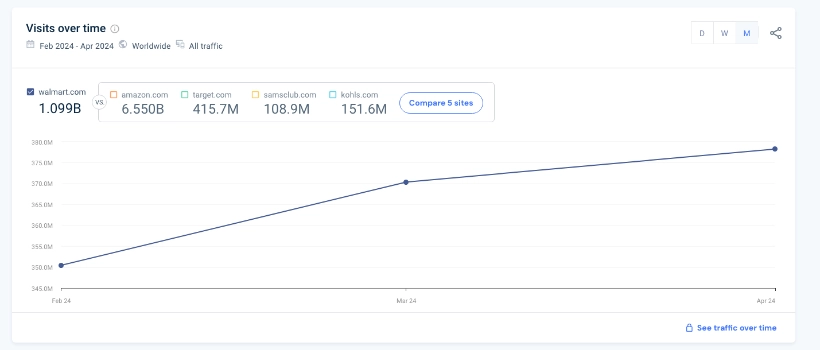
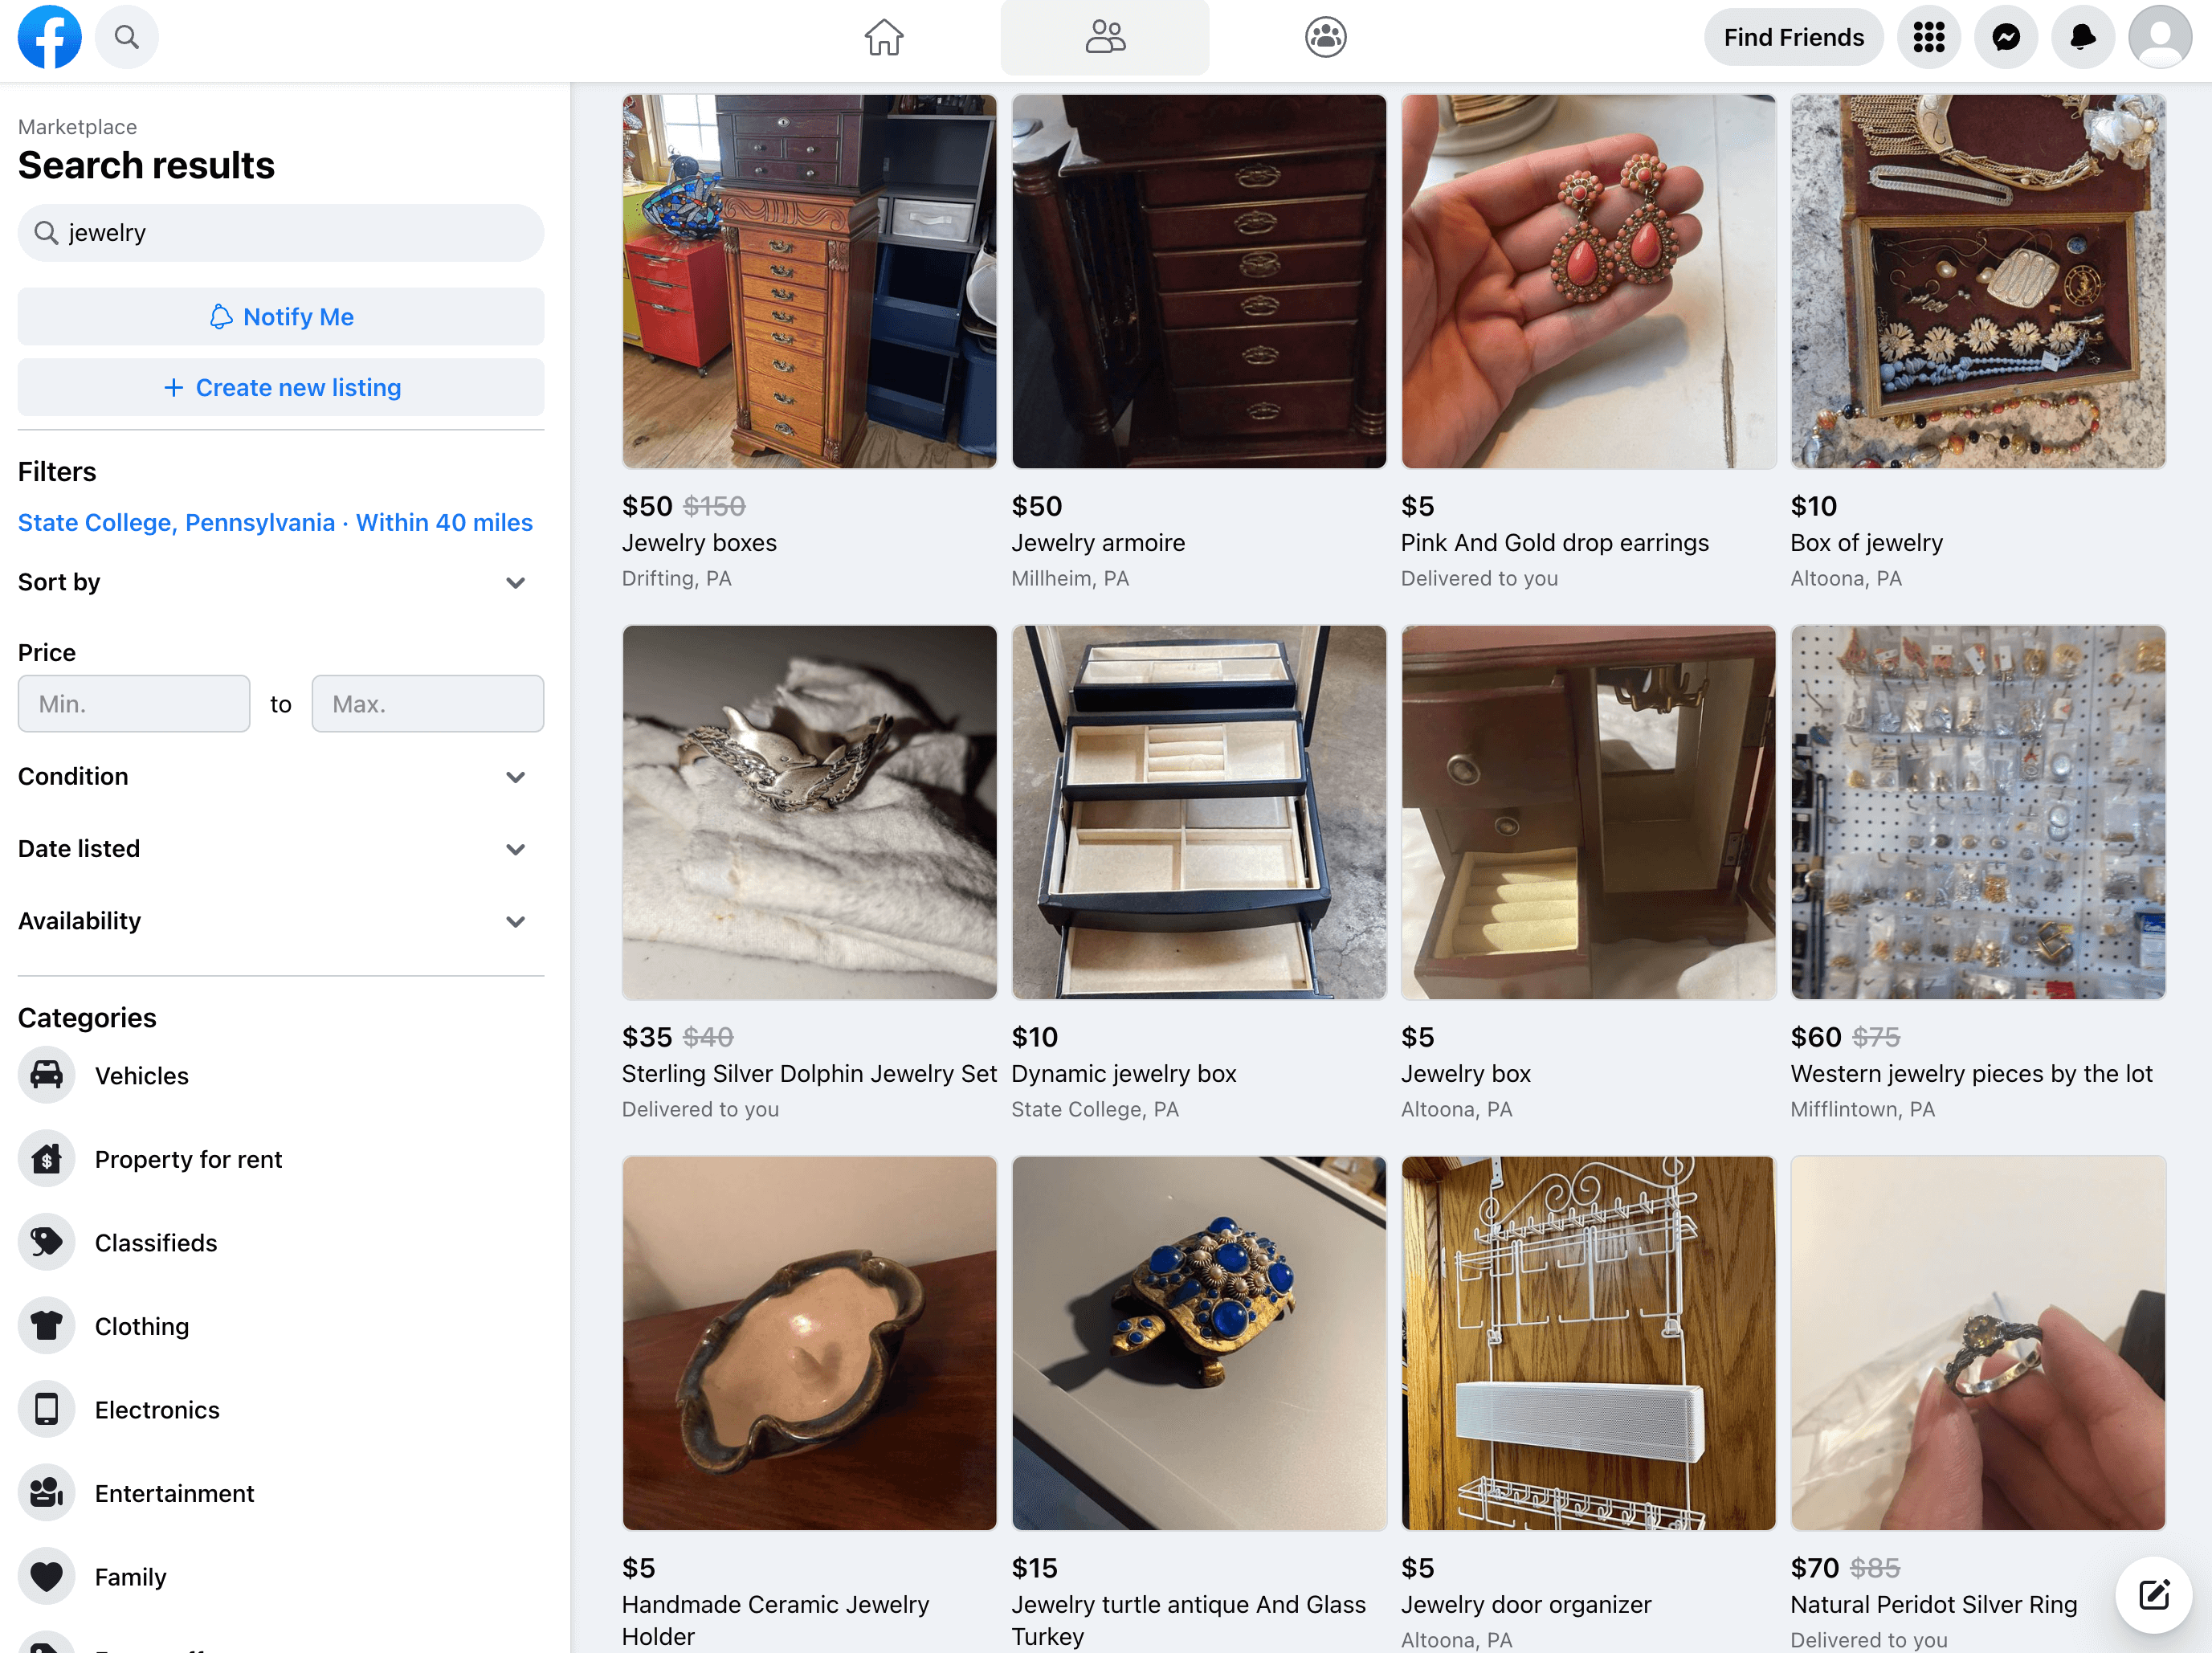
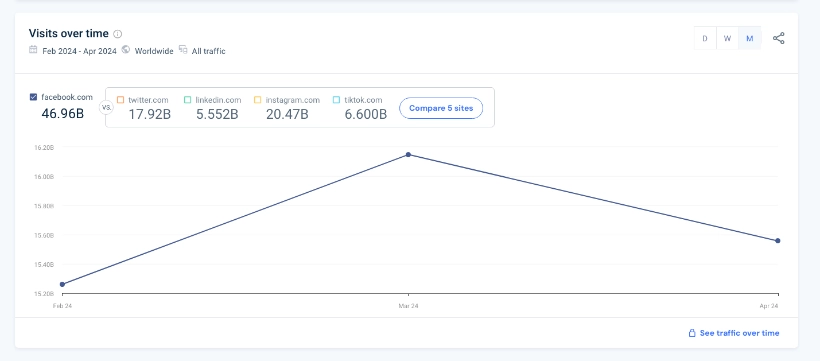
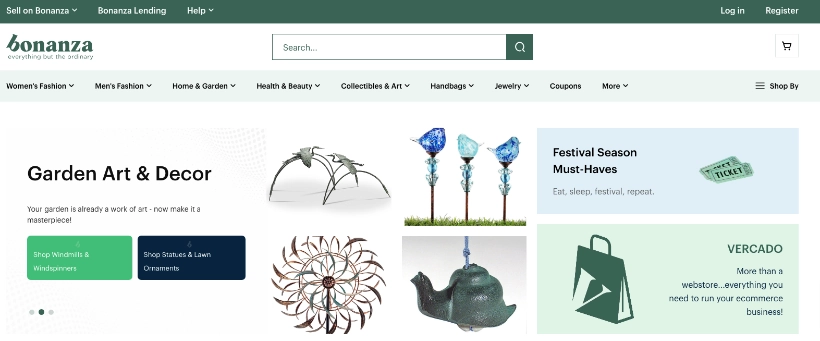
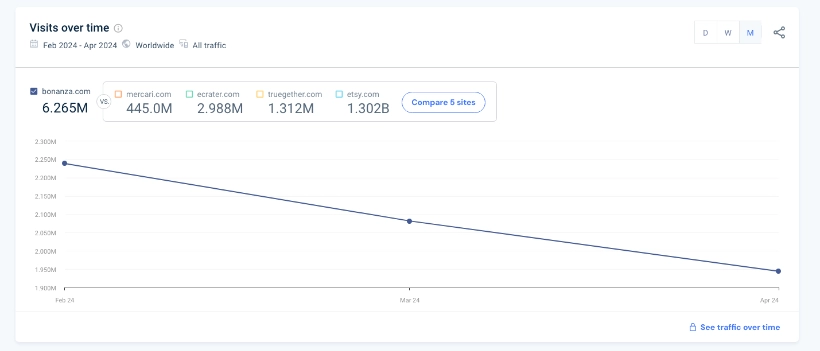
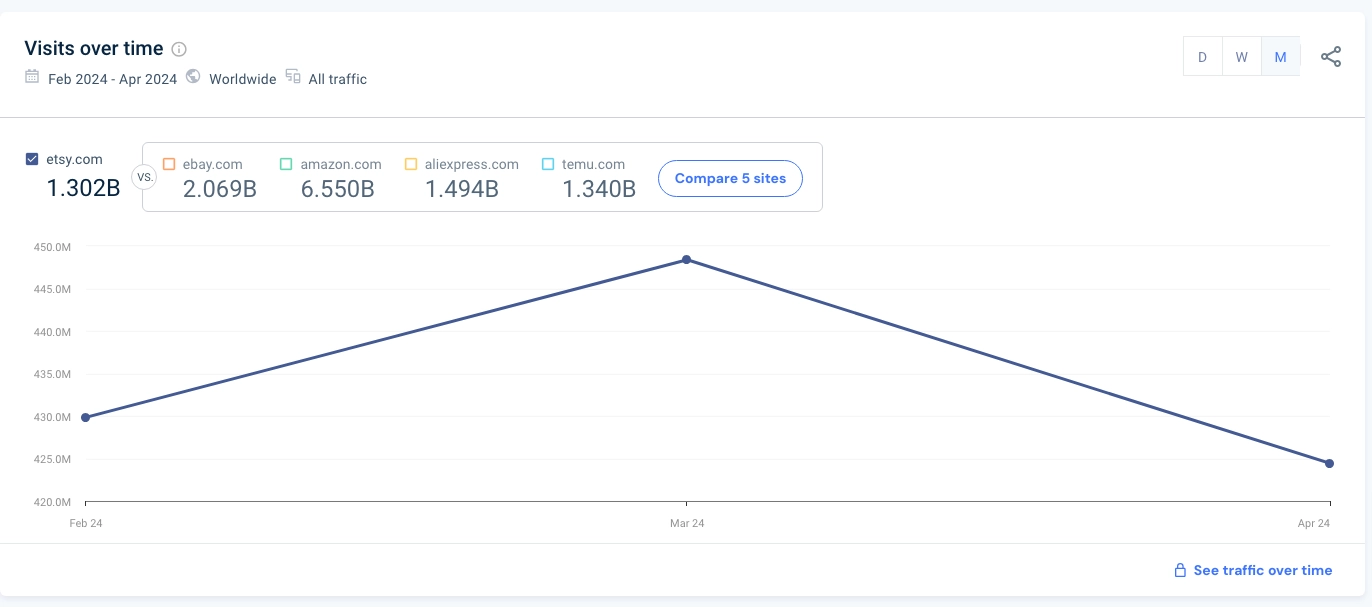
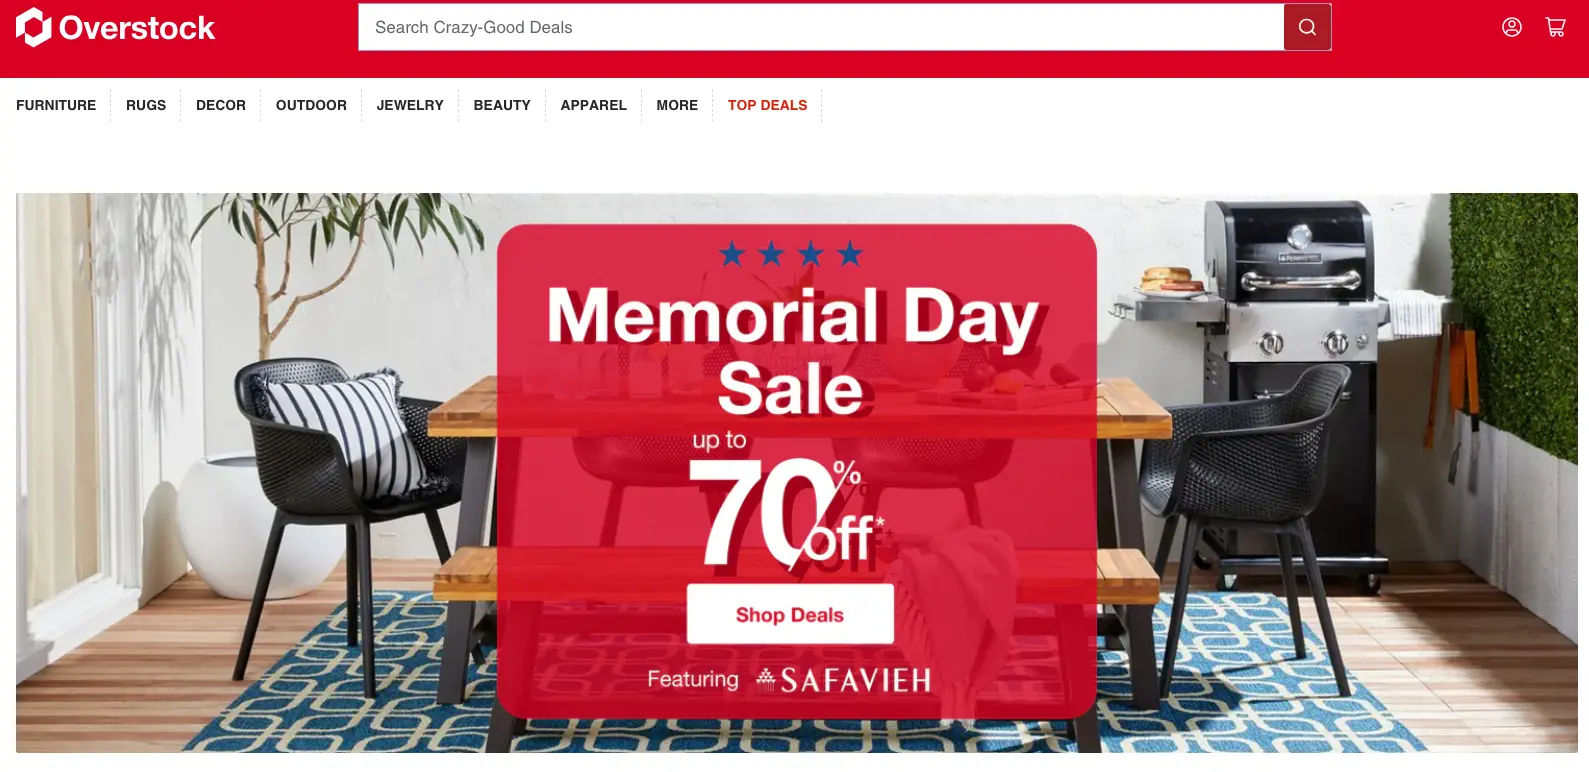
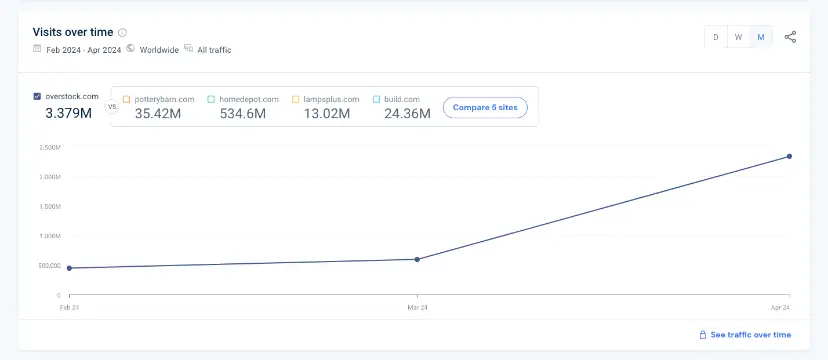
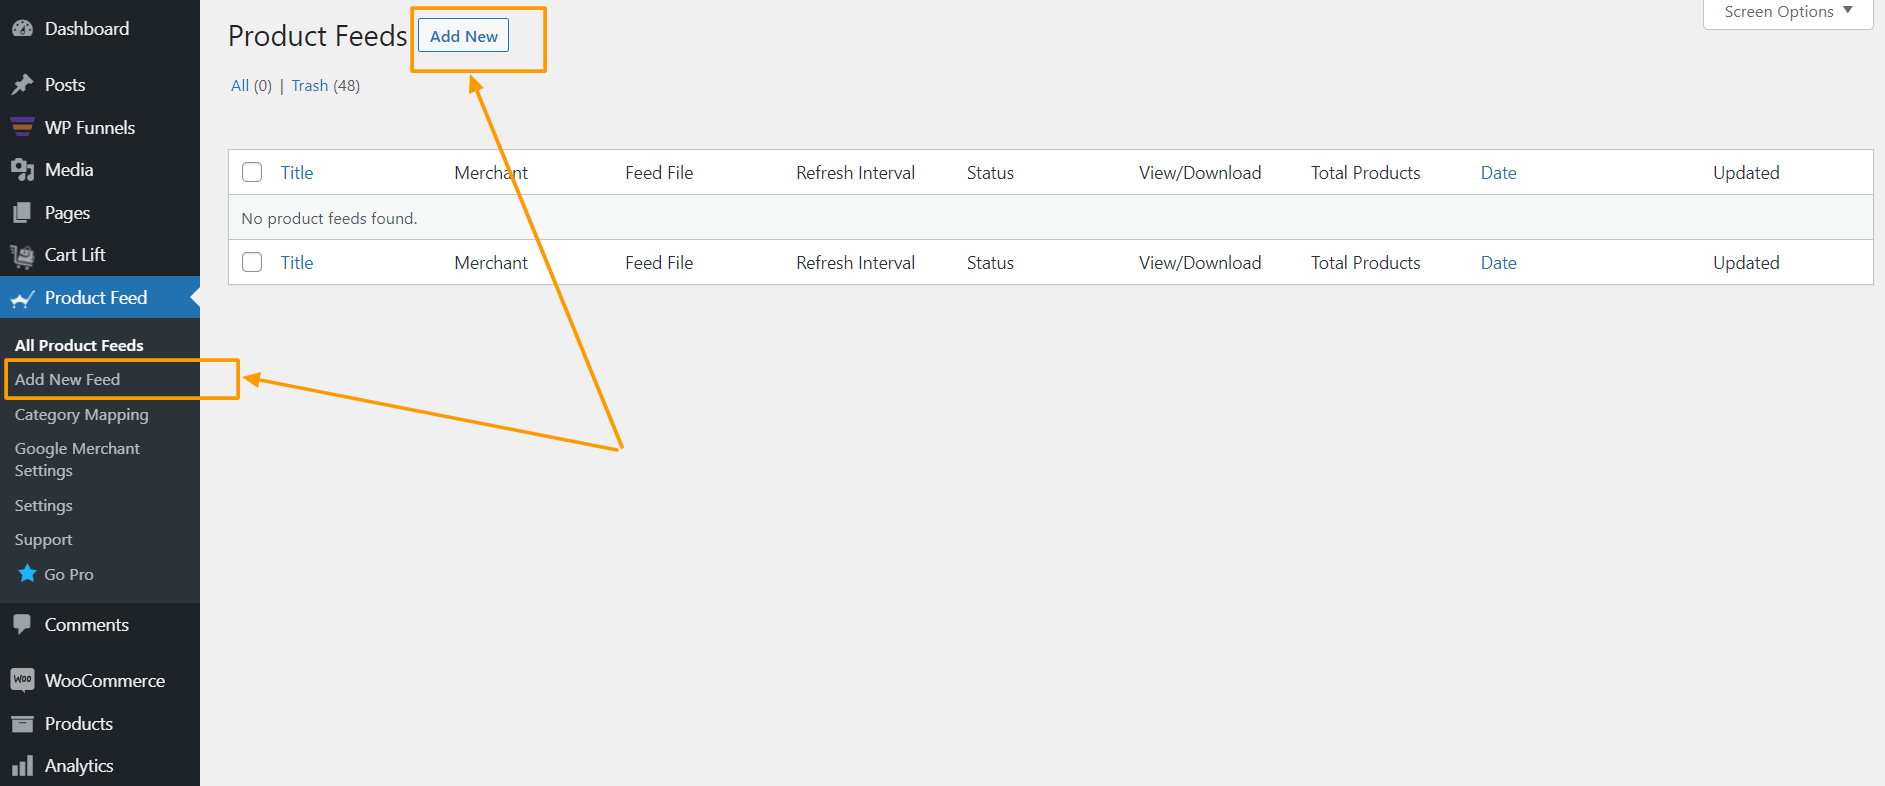
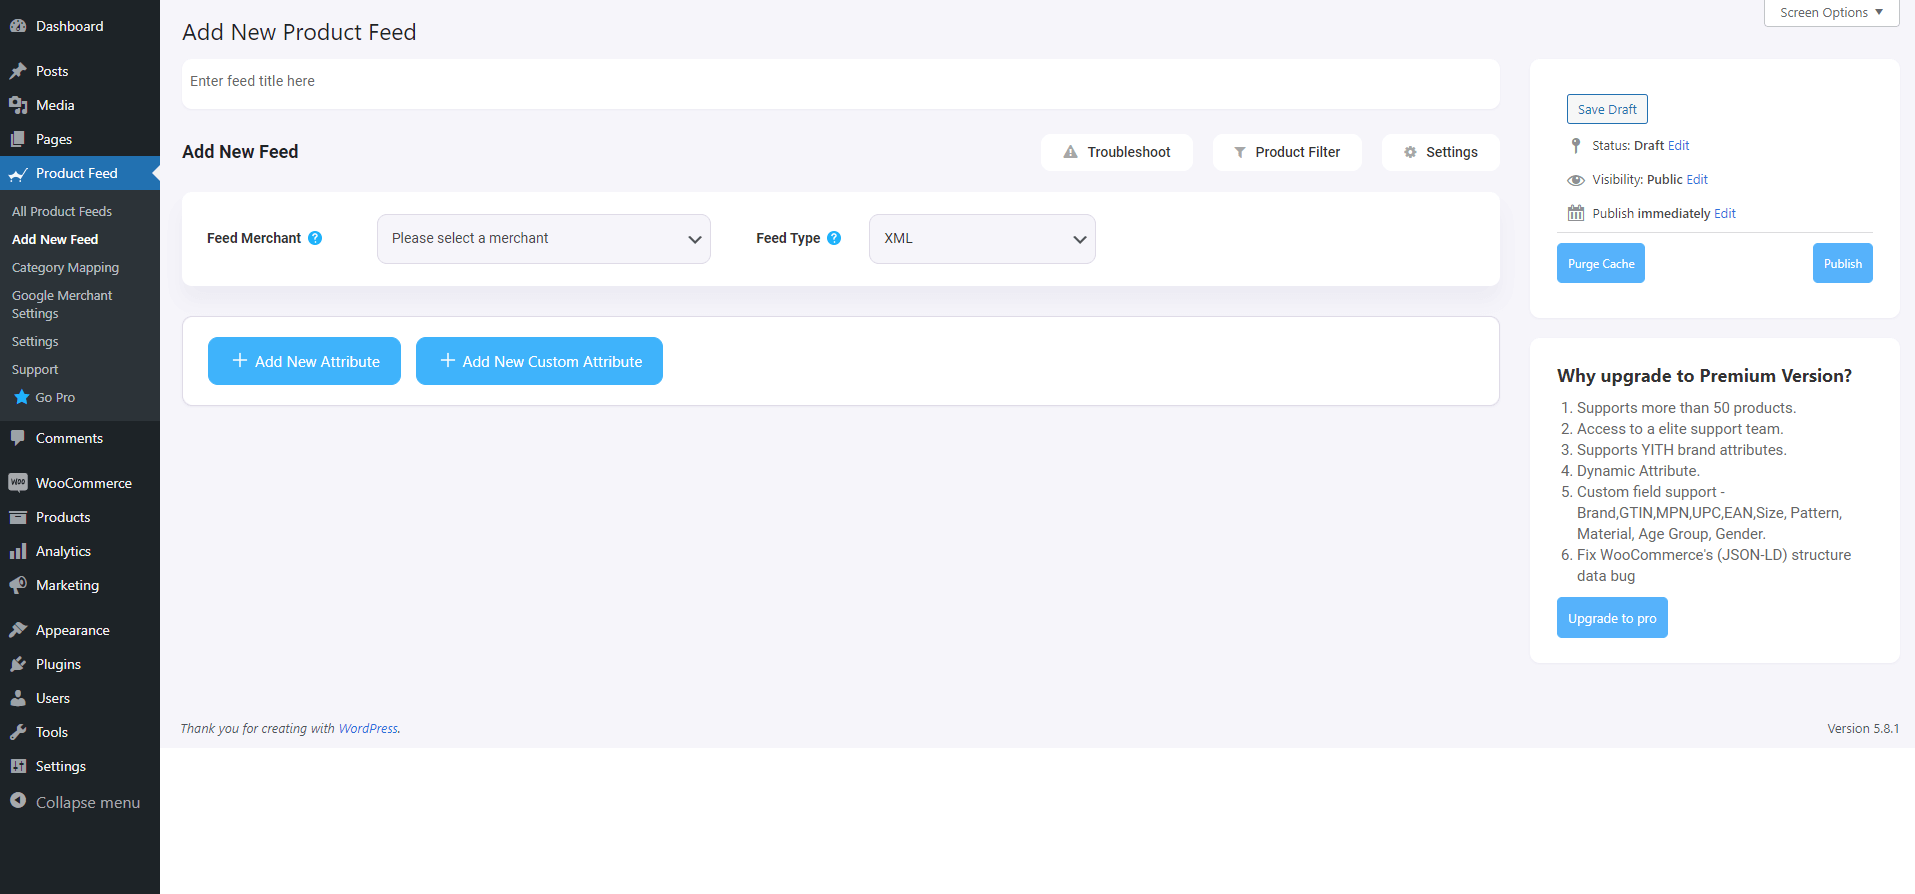


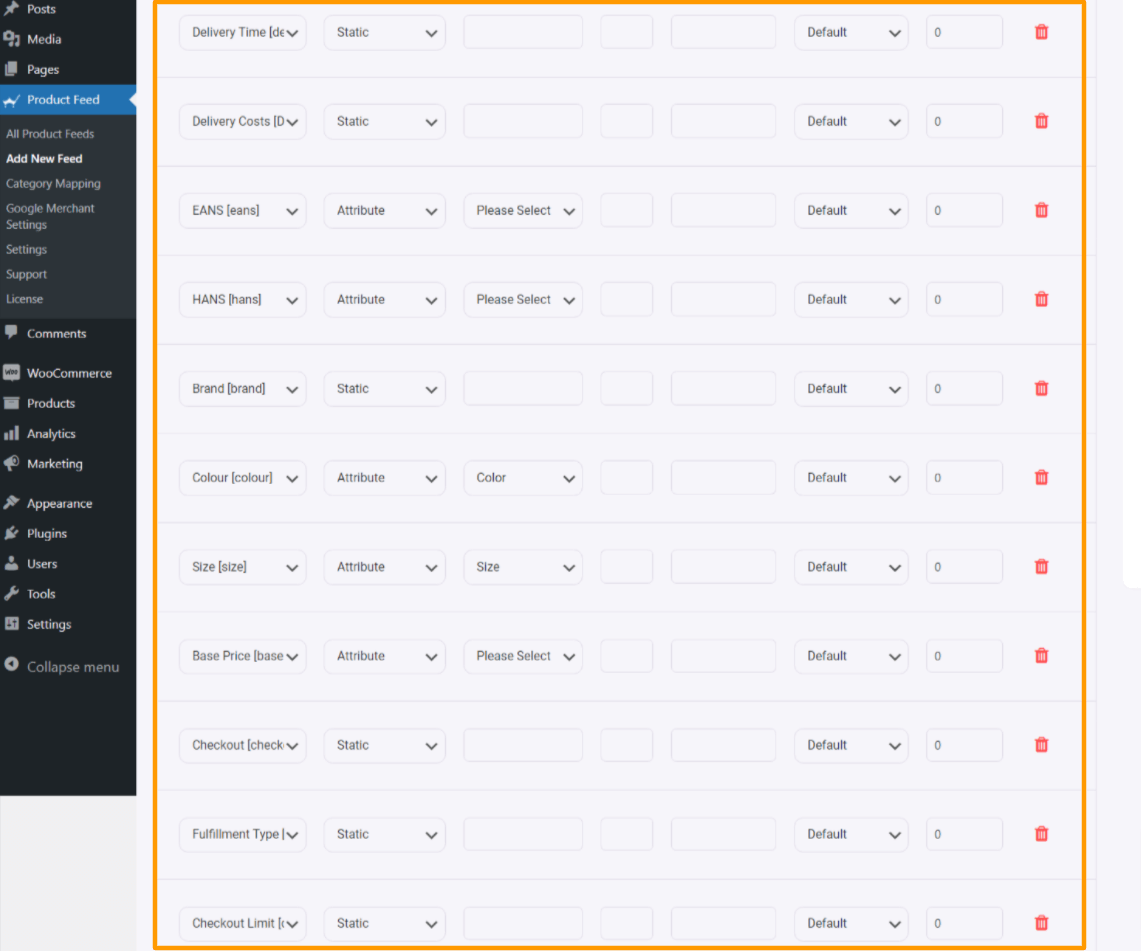
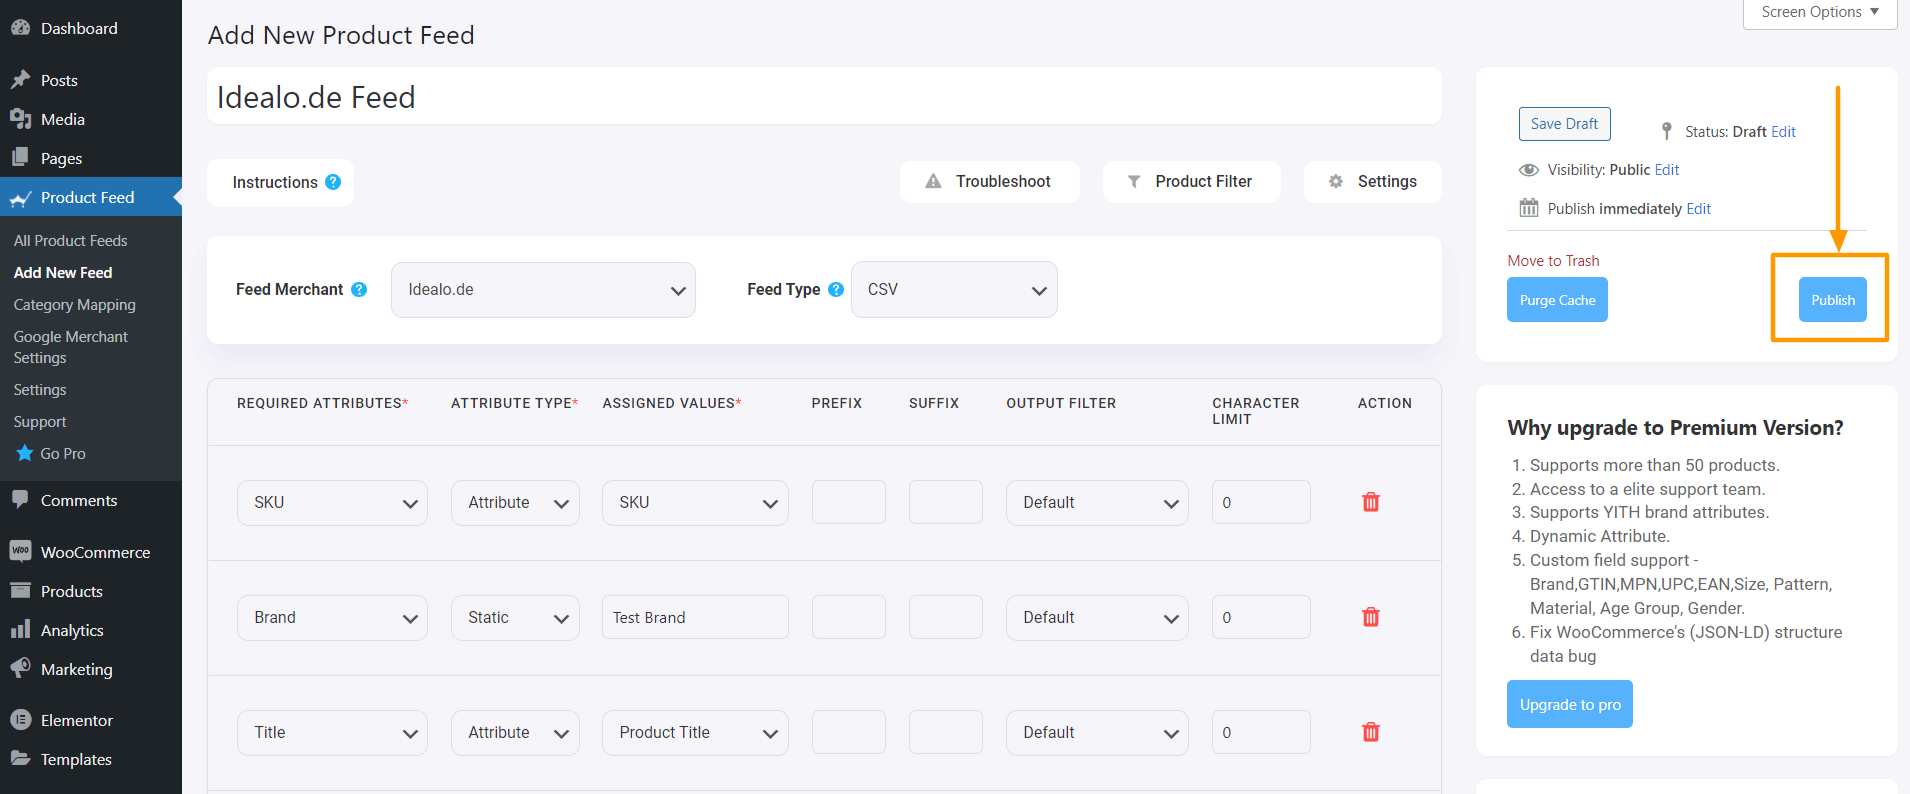
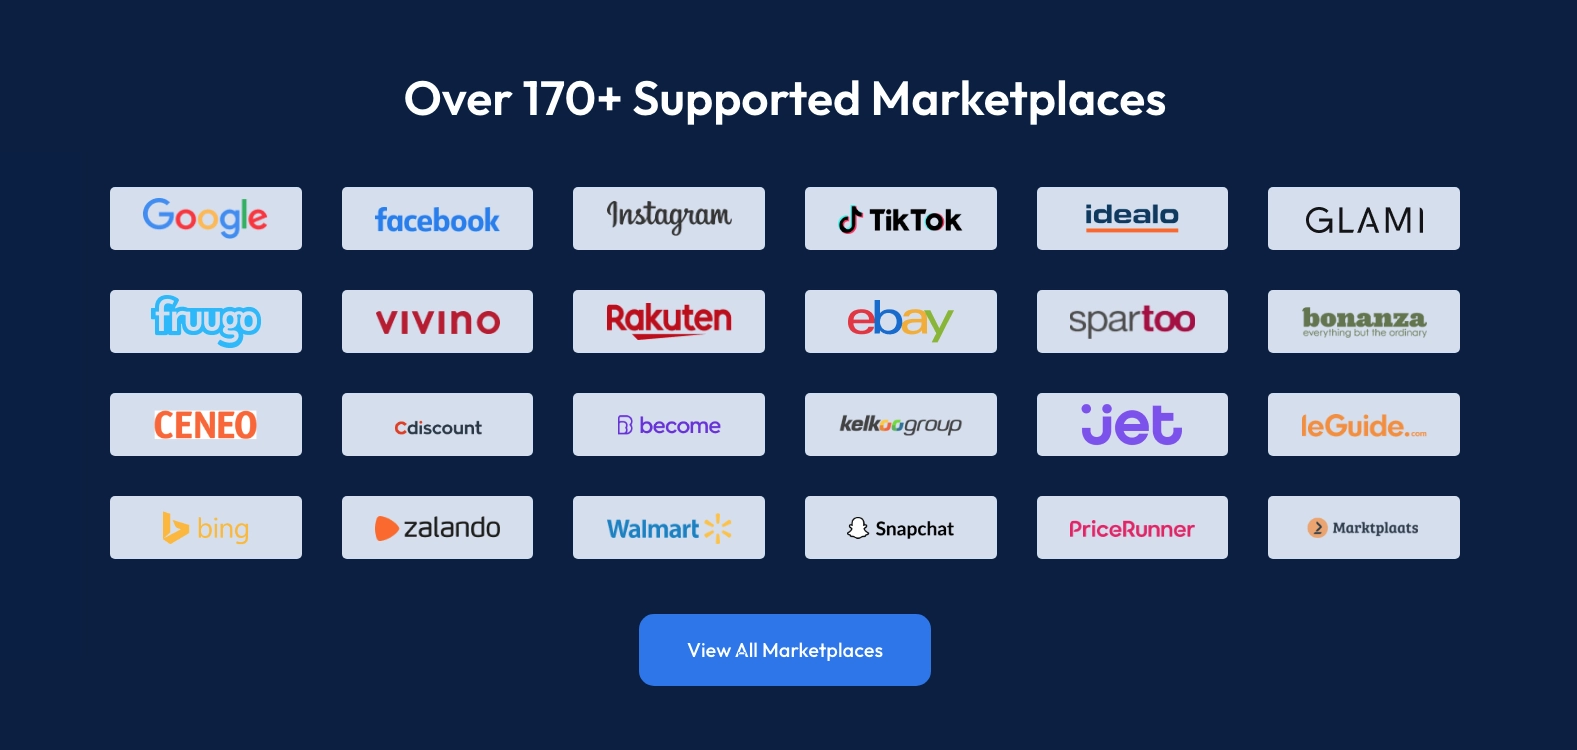
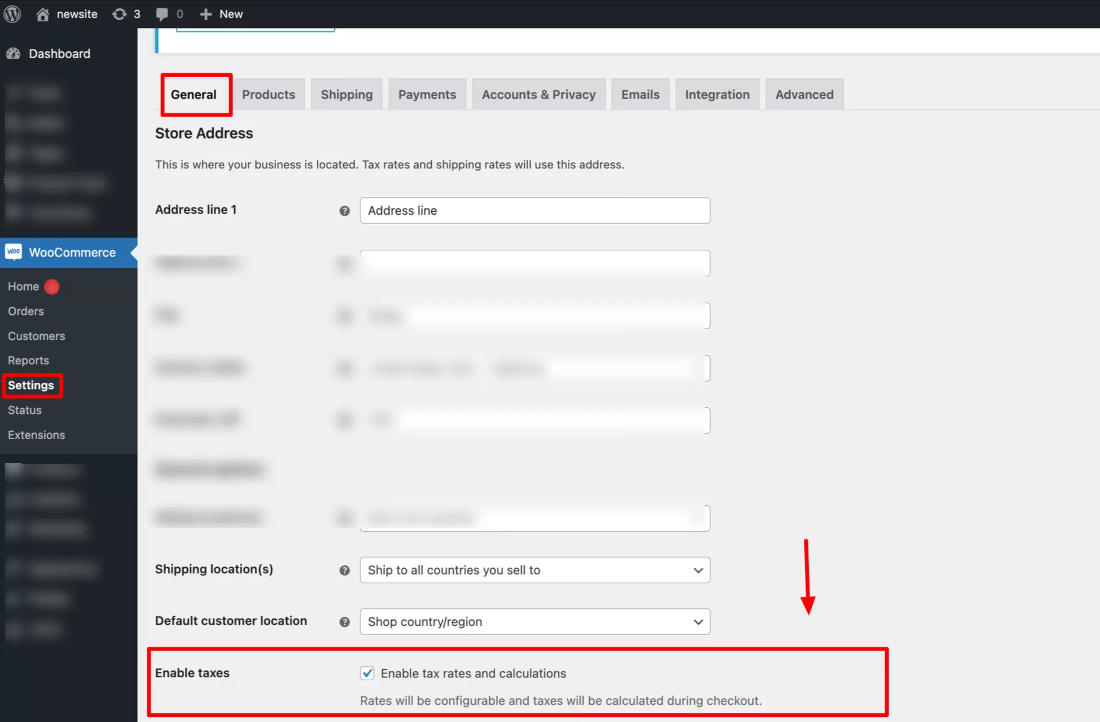
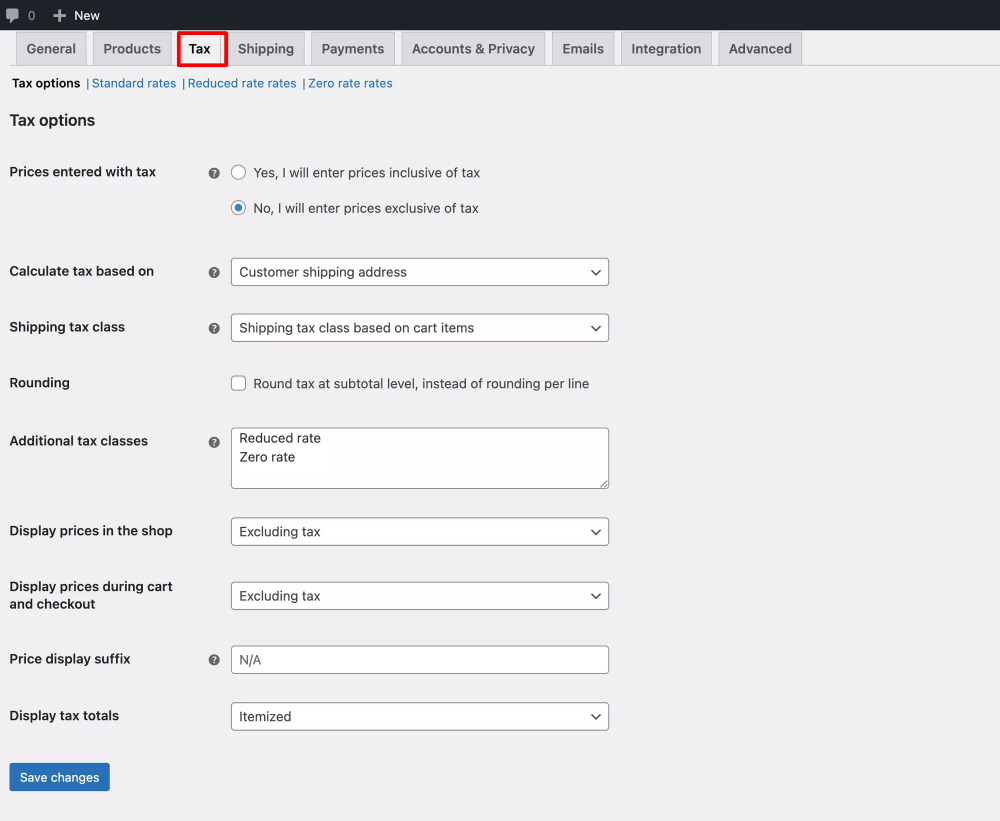

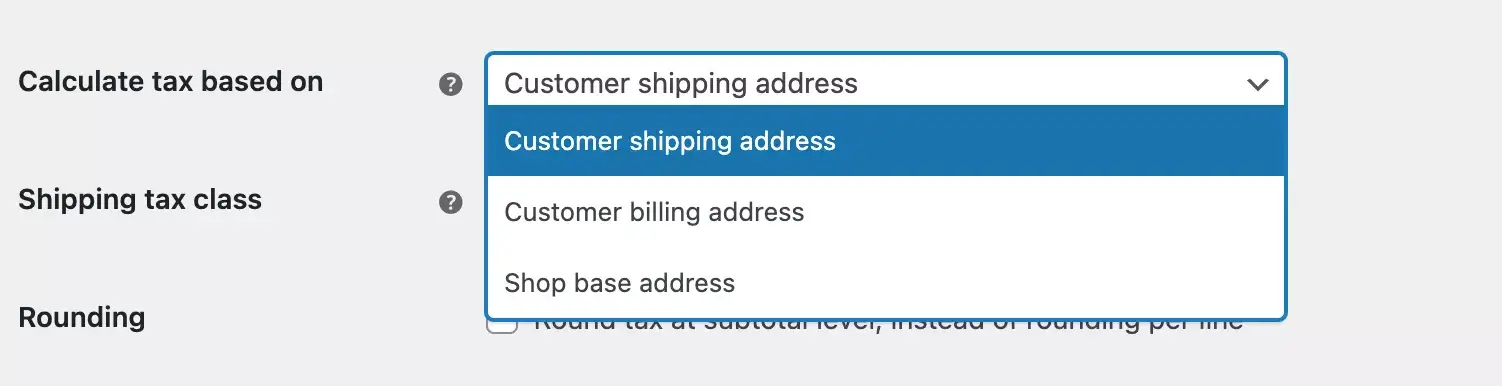


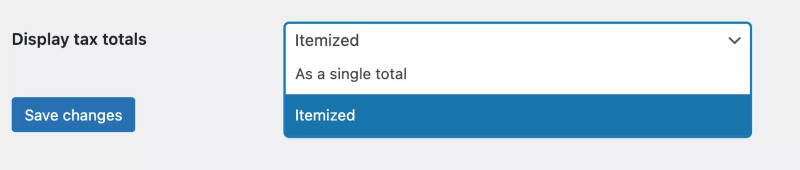

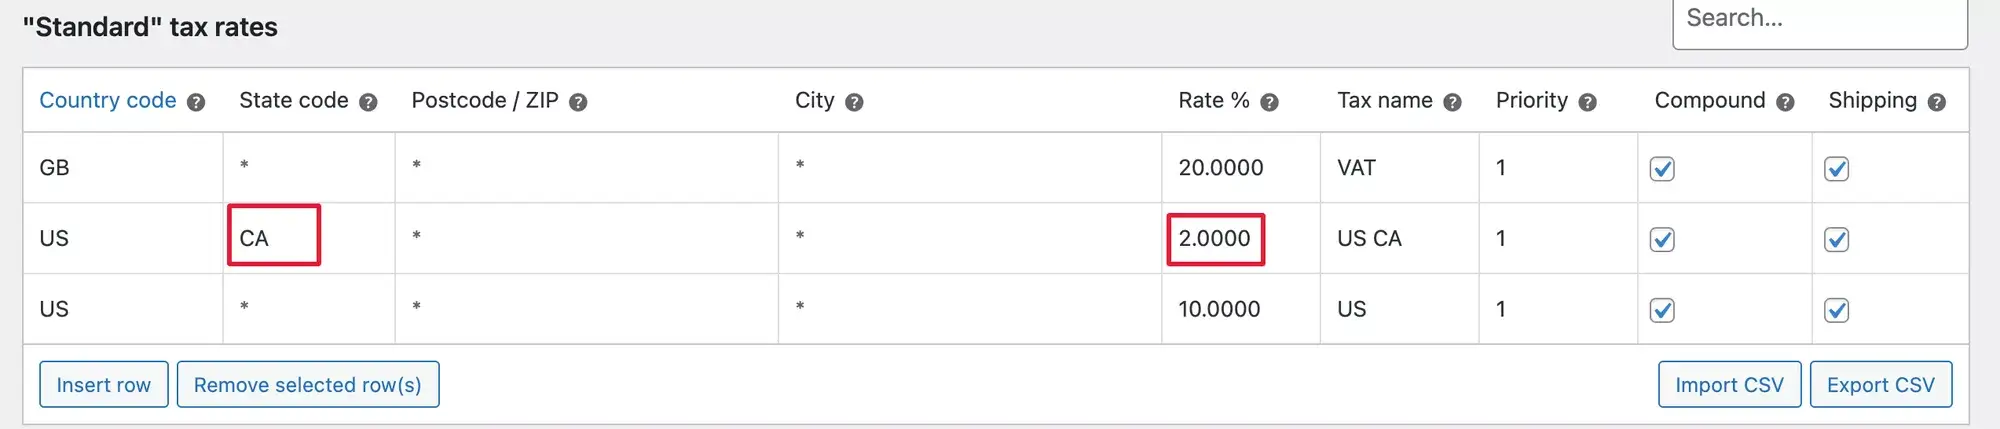
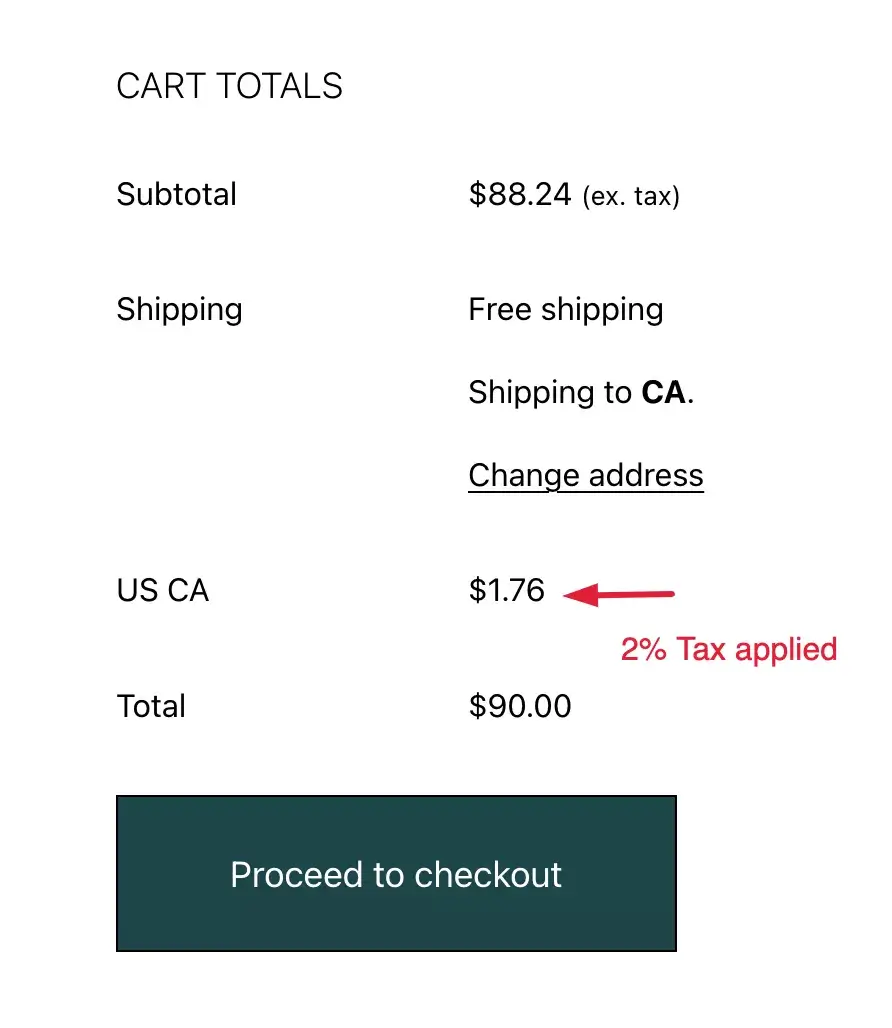
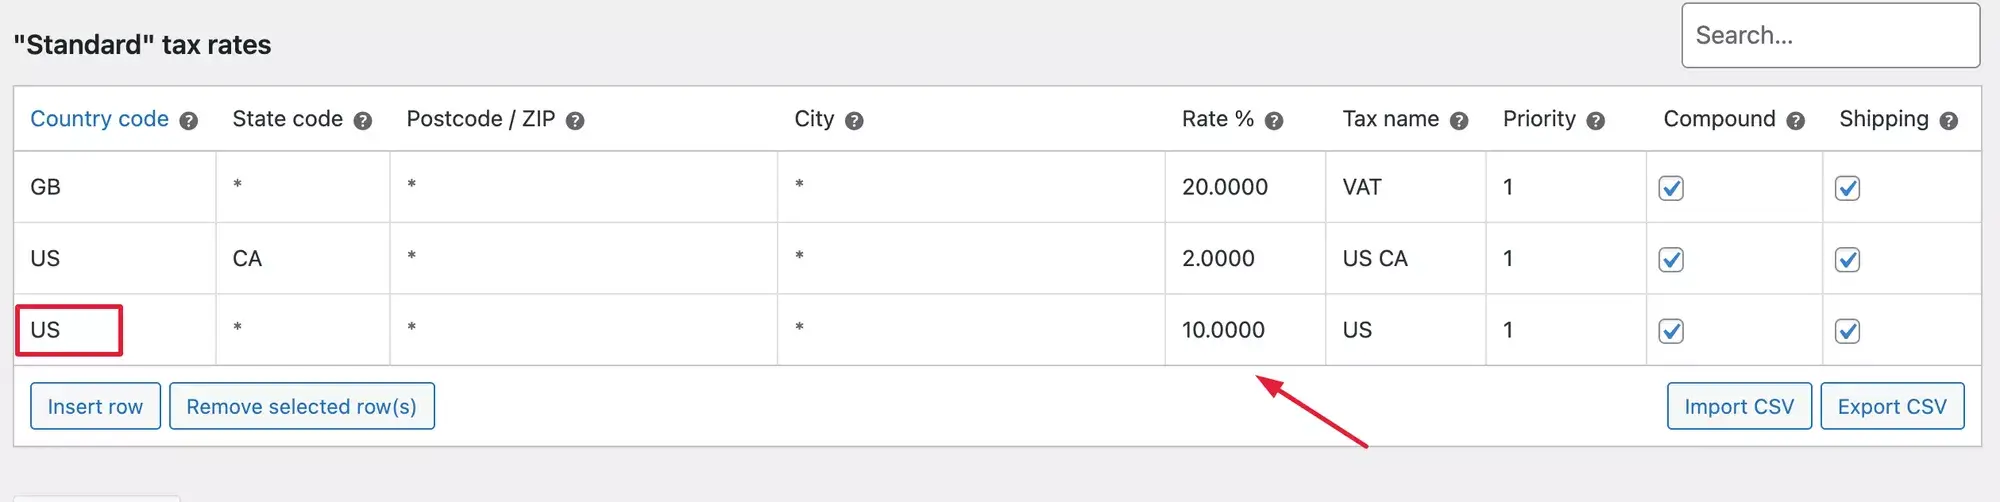
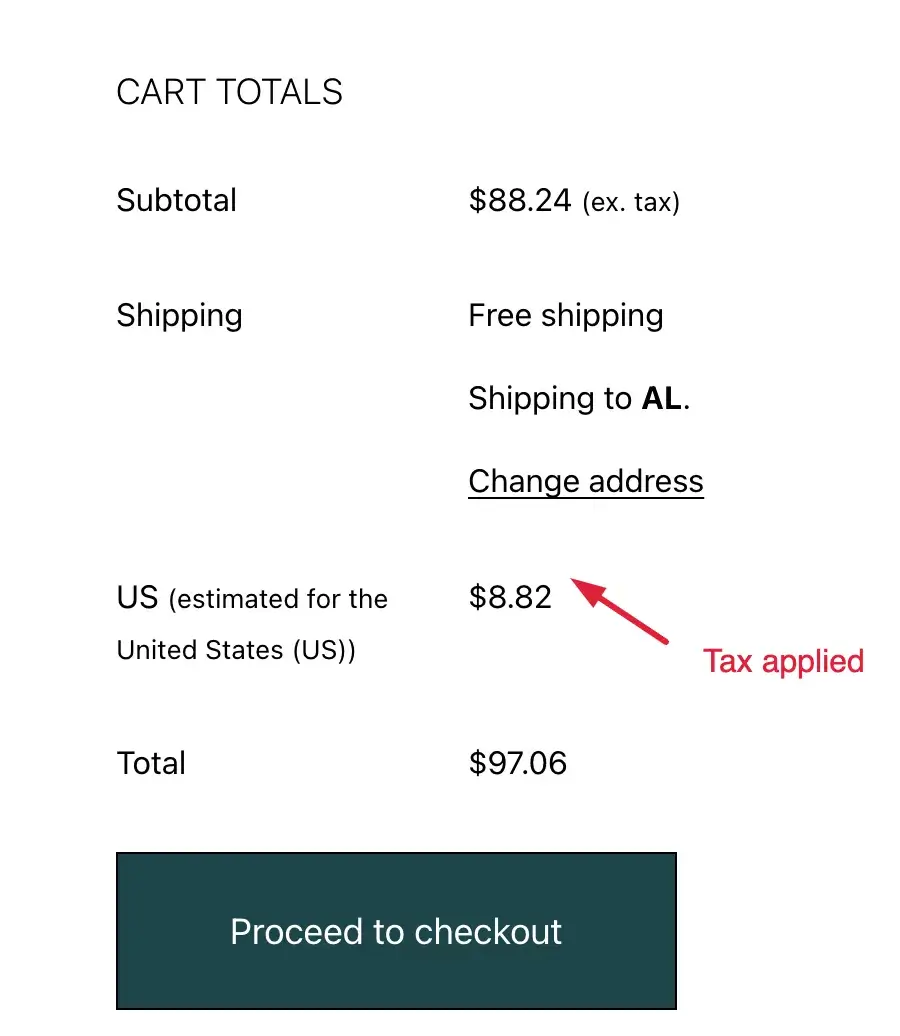


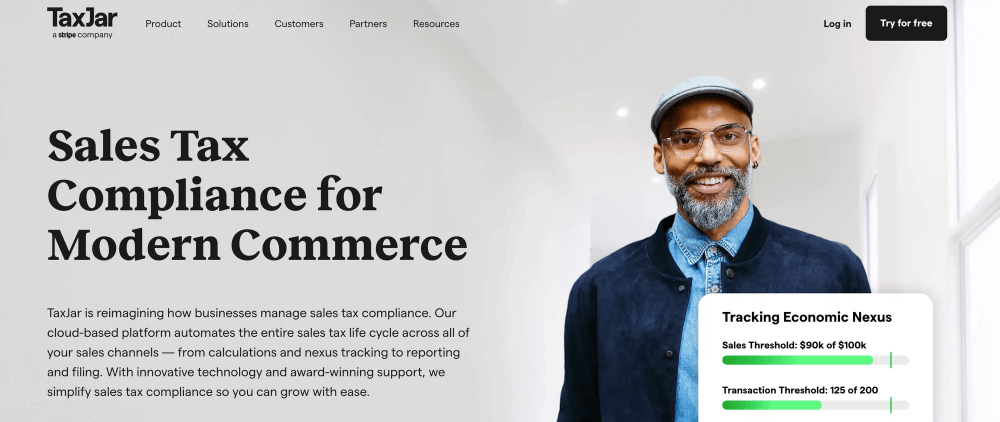
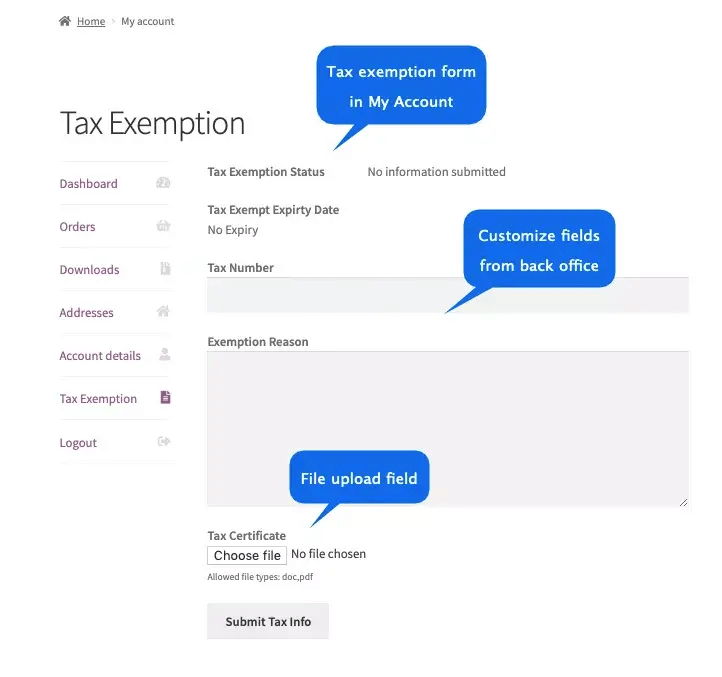
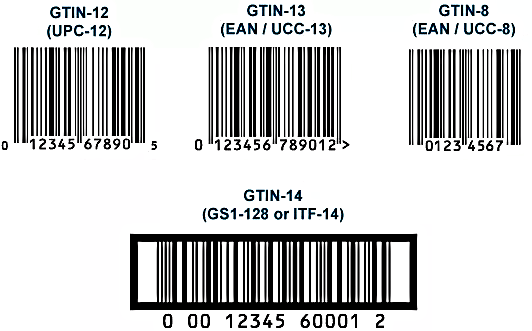


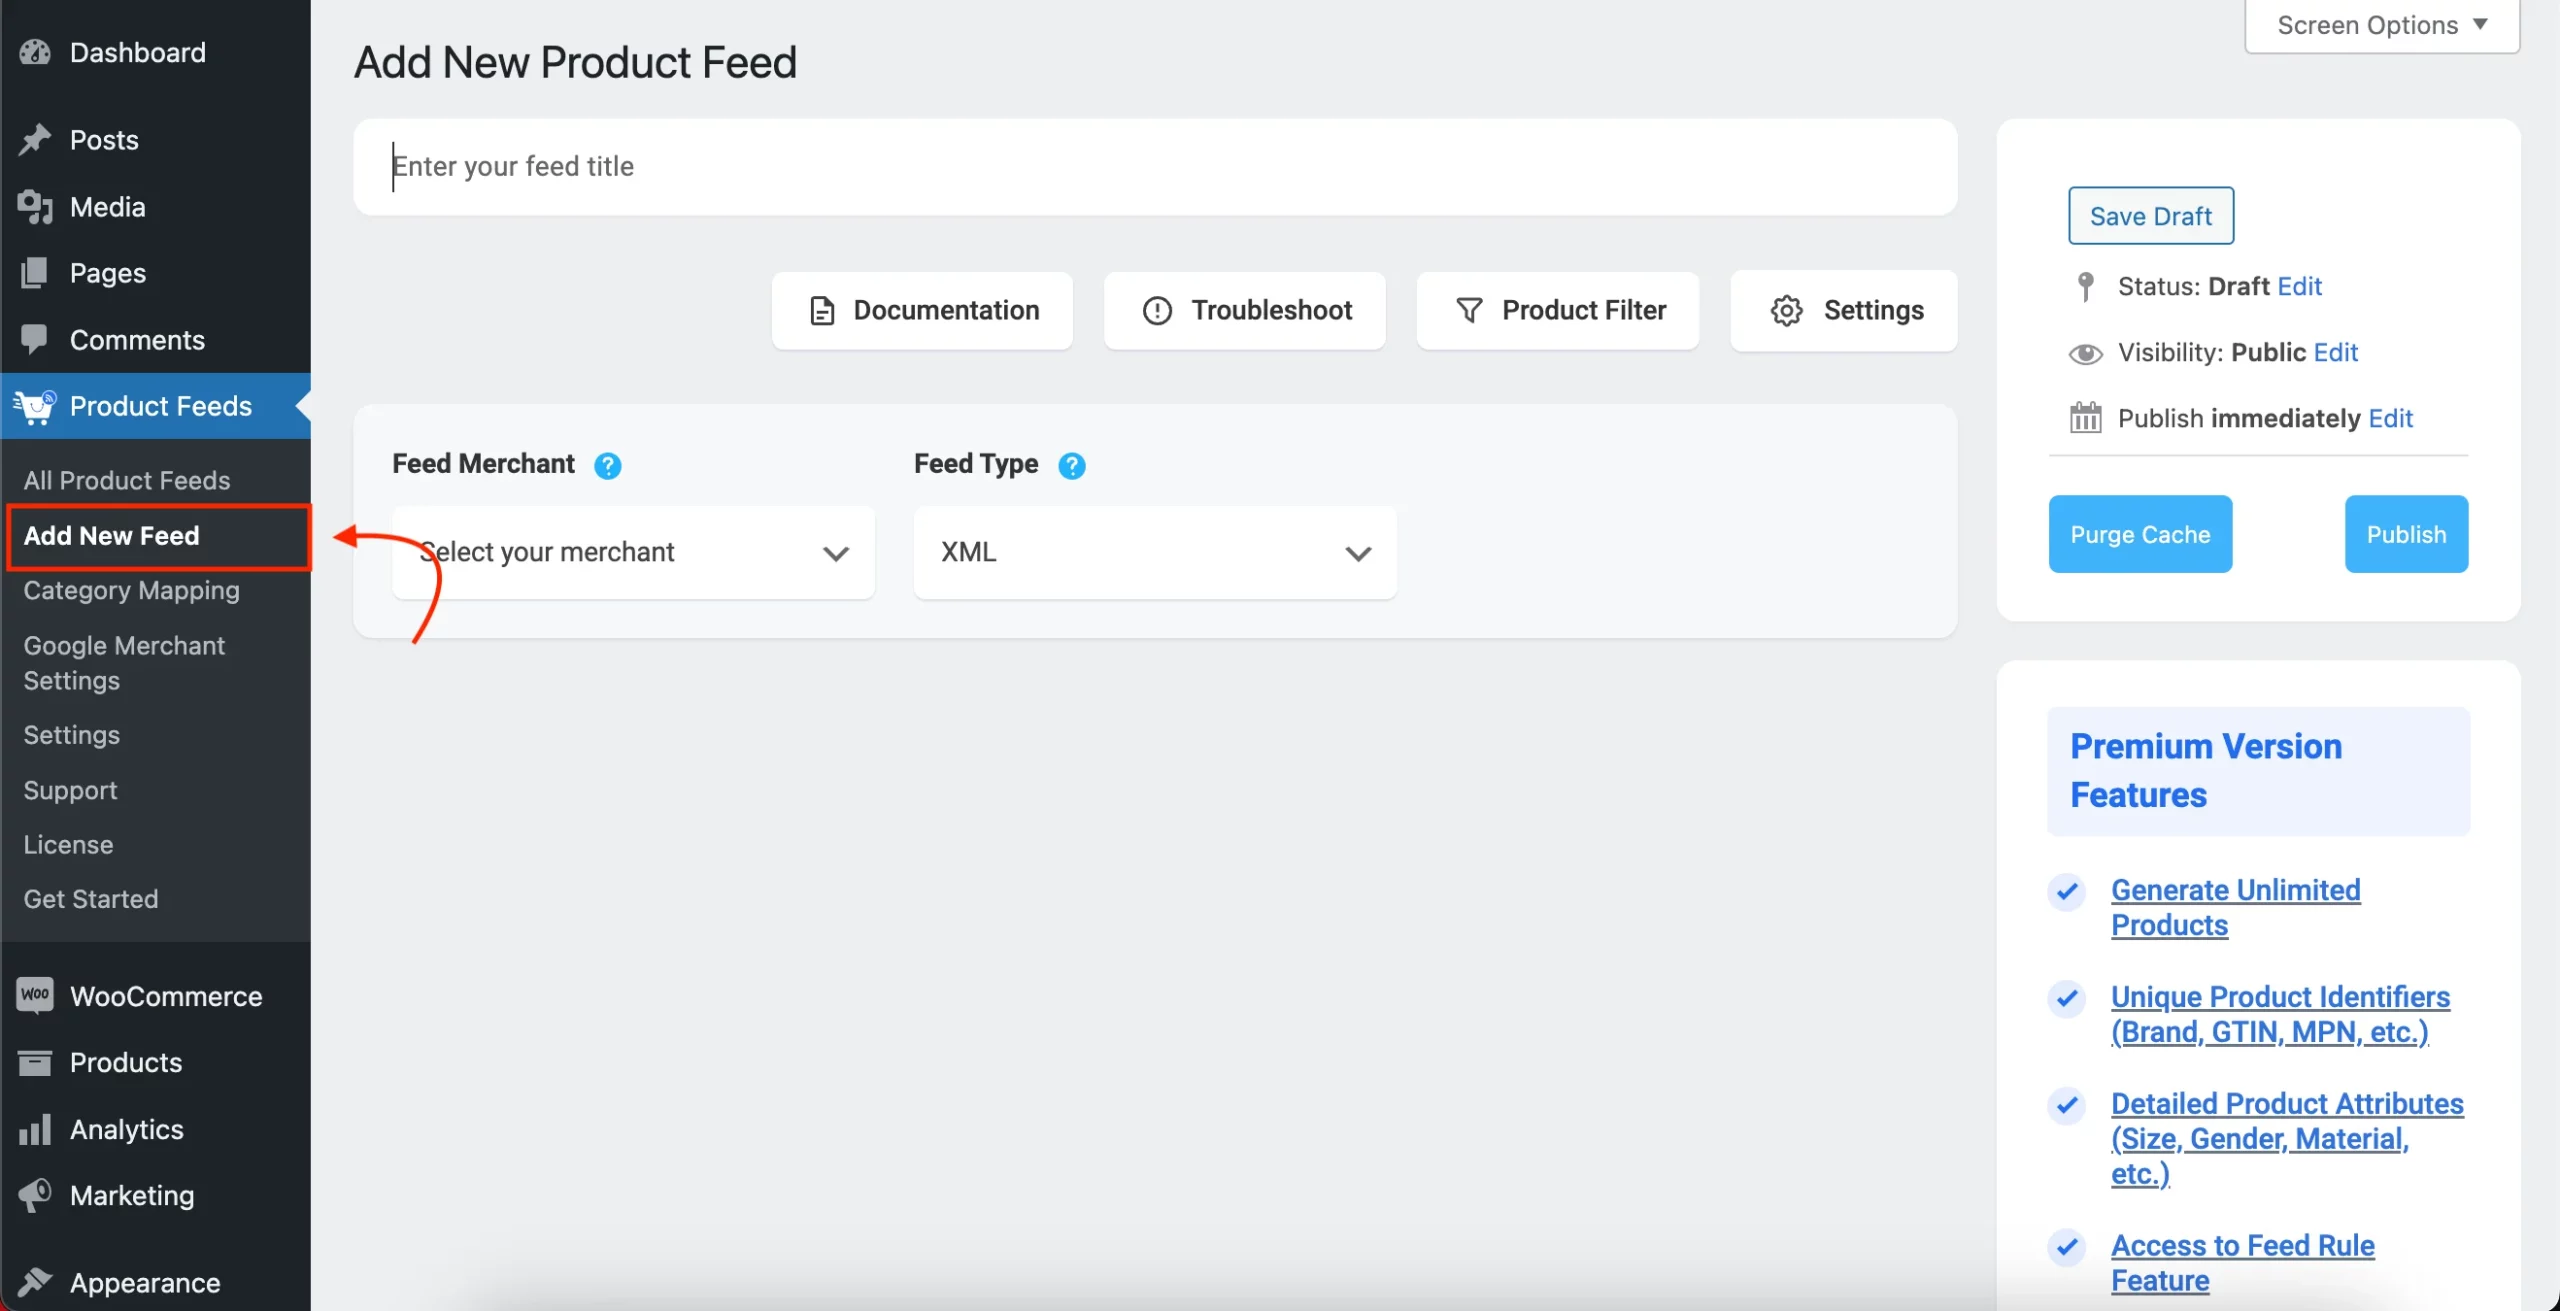
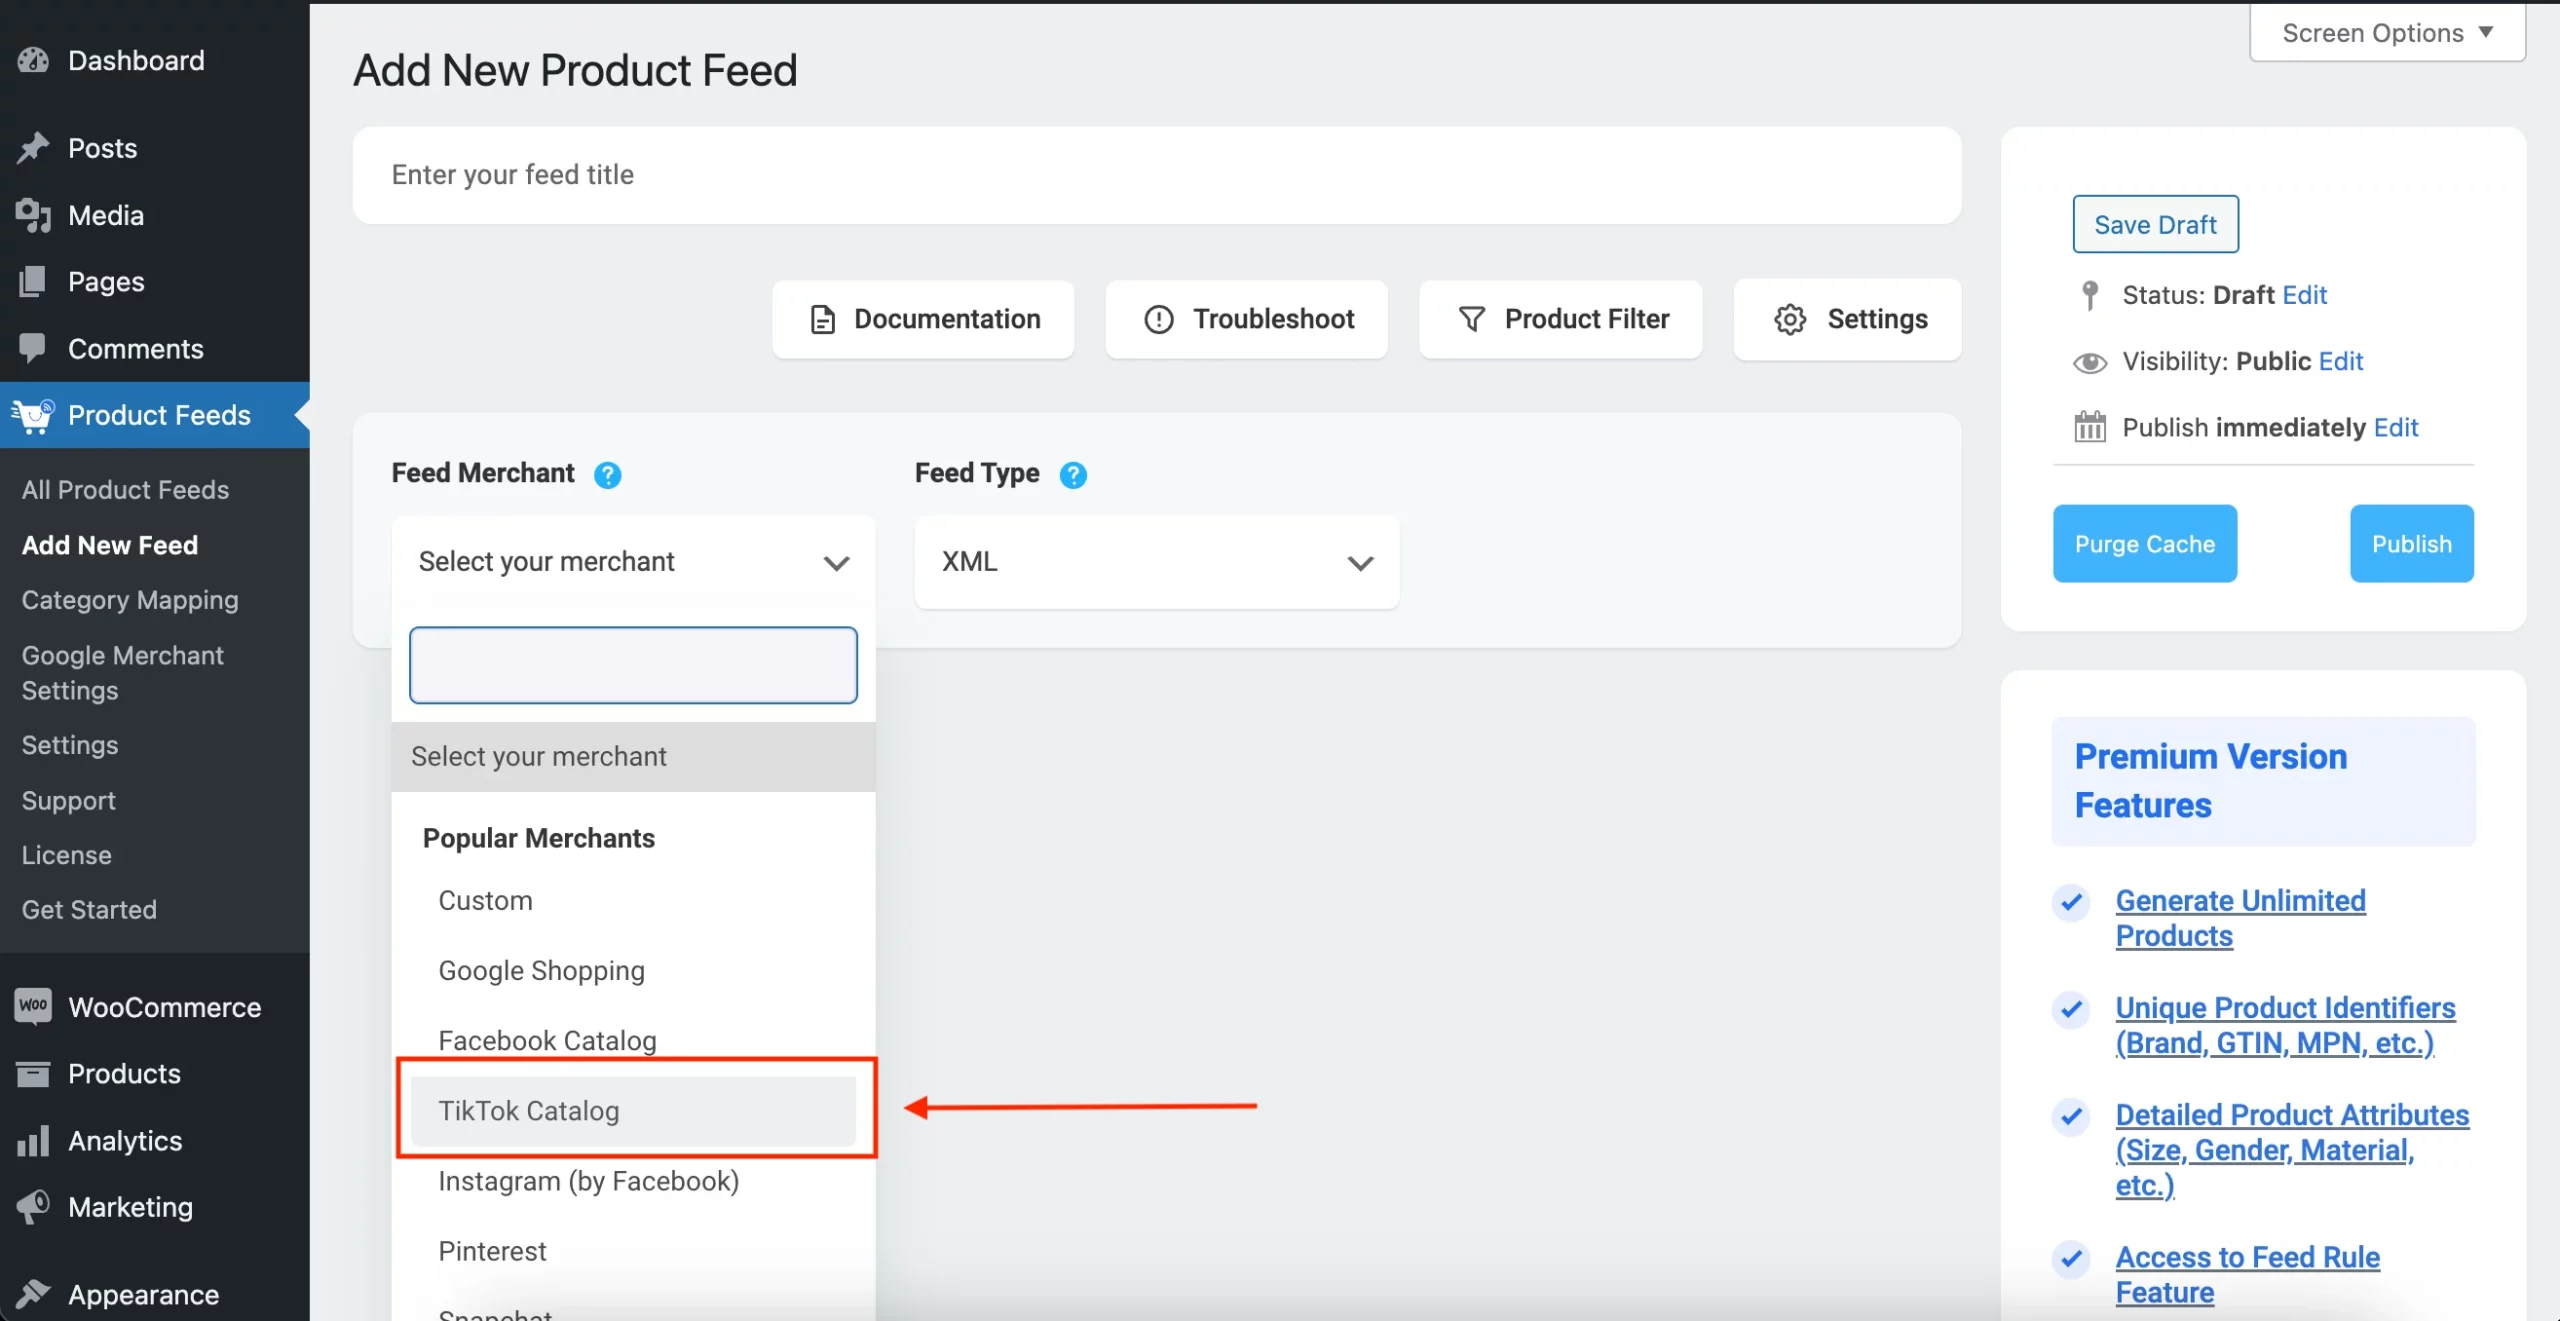
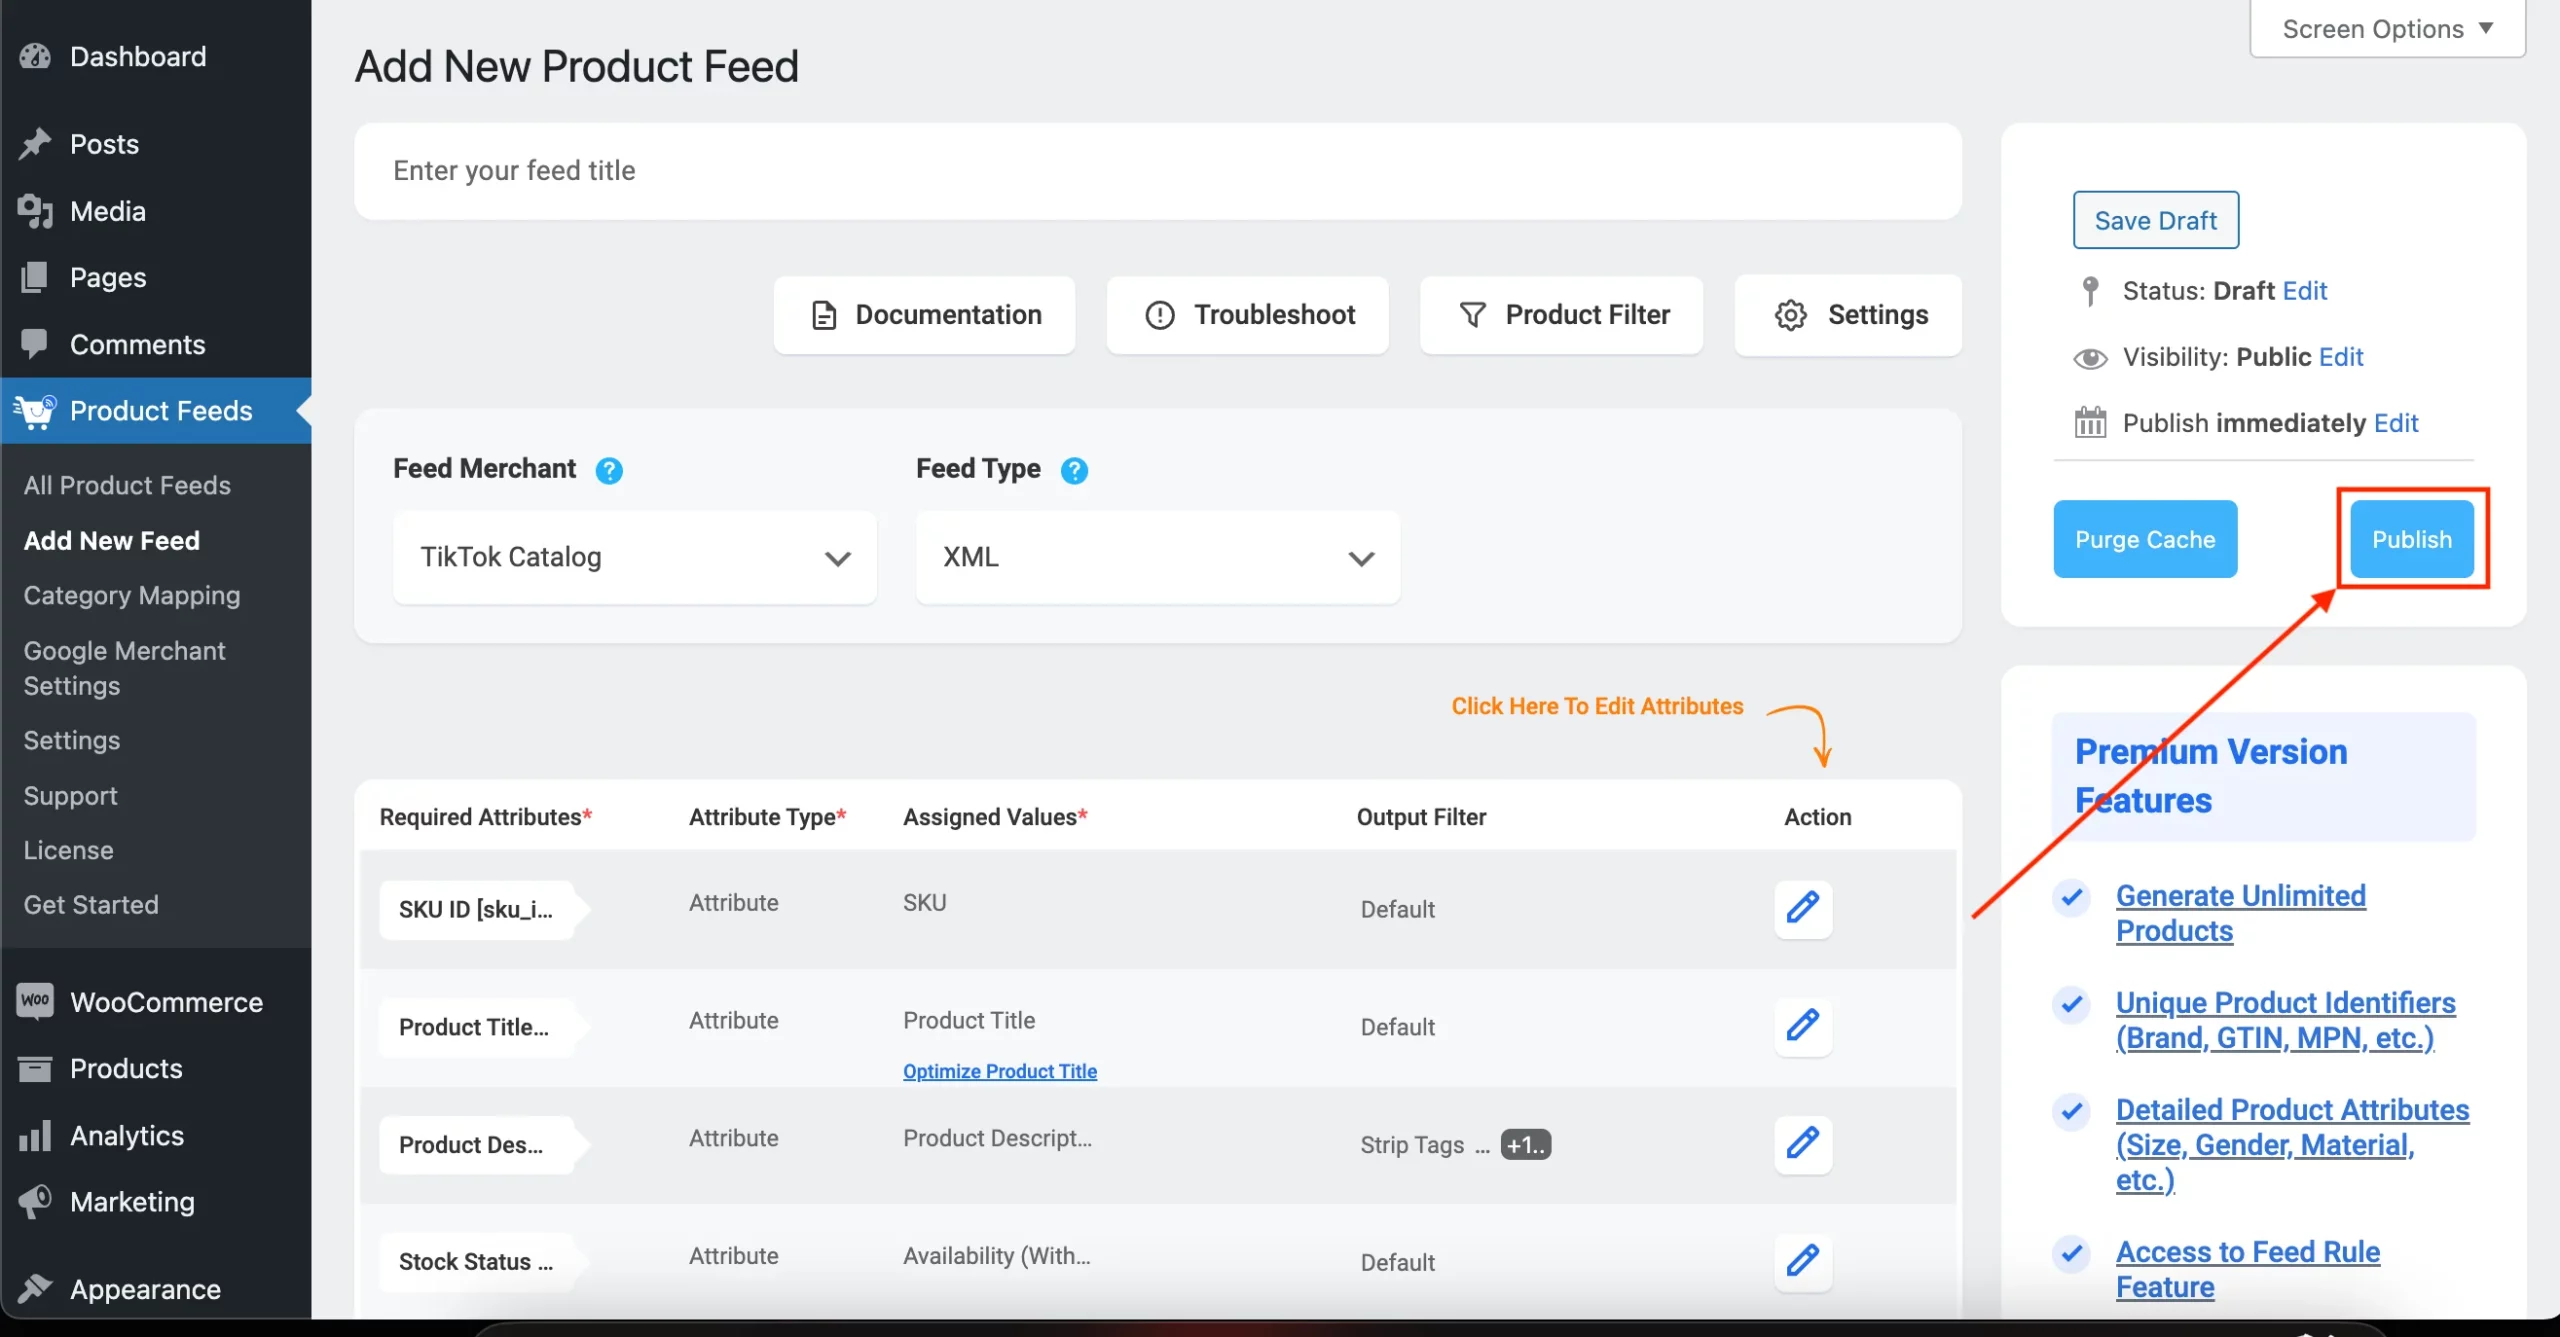
![Introducing TikTok Feeds For WooCommerce Products To Boost Sales! [2024] 4](https://staging-rextheme.kinsta.cloud/wp-content/uploads/2024/04/Use-user-generated-content-in-TikTok-scaled.webp)


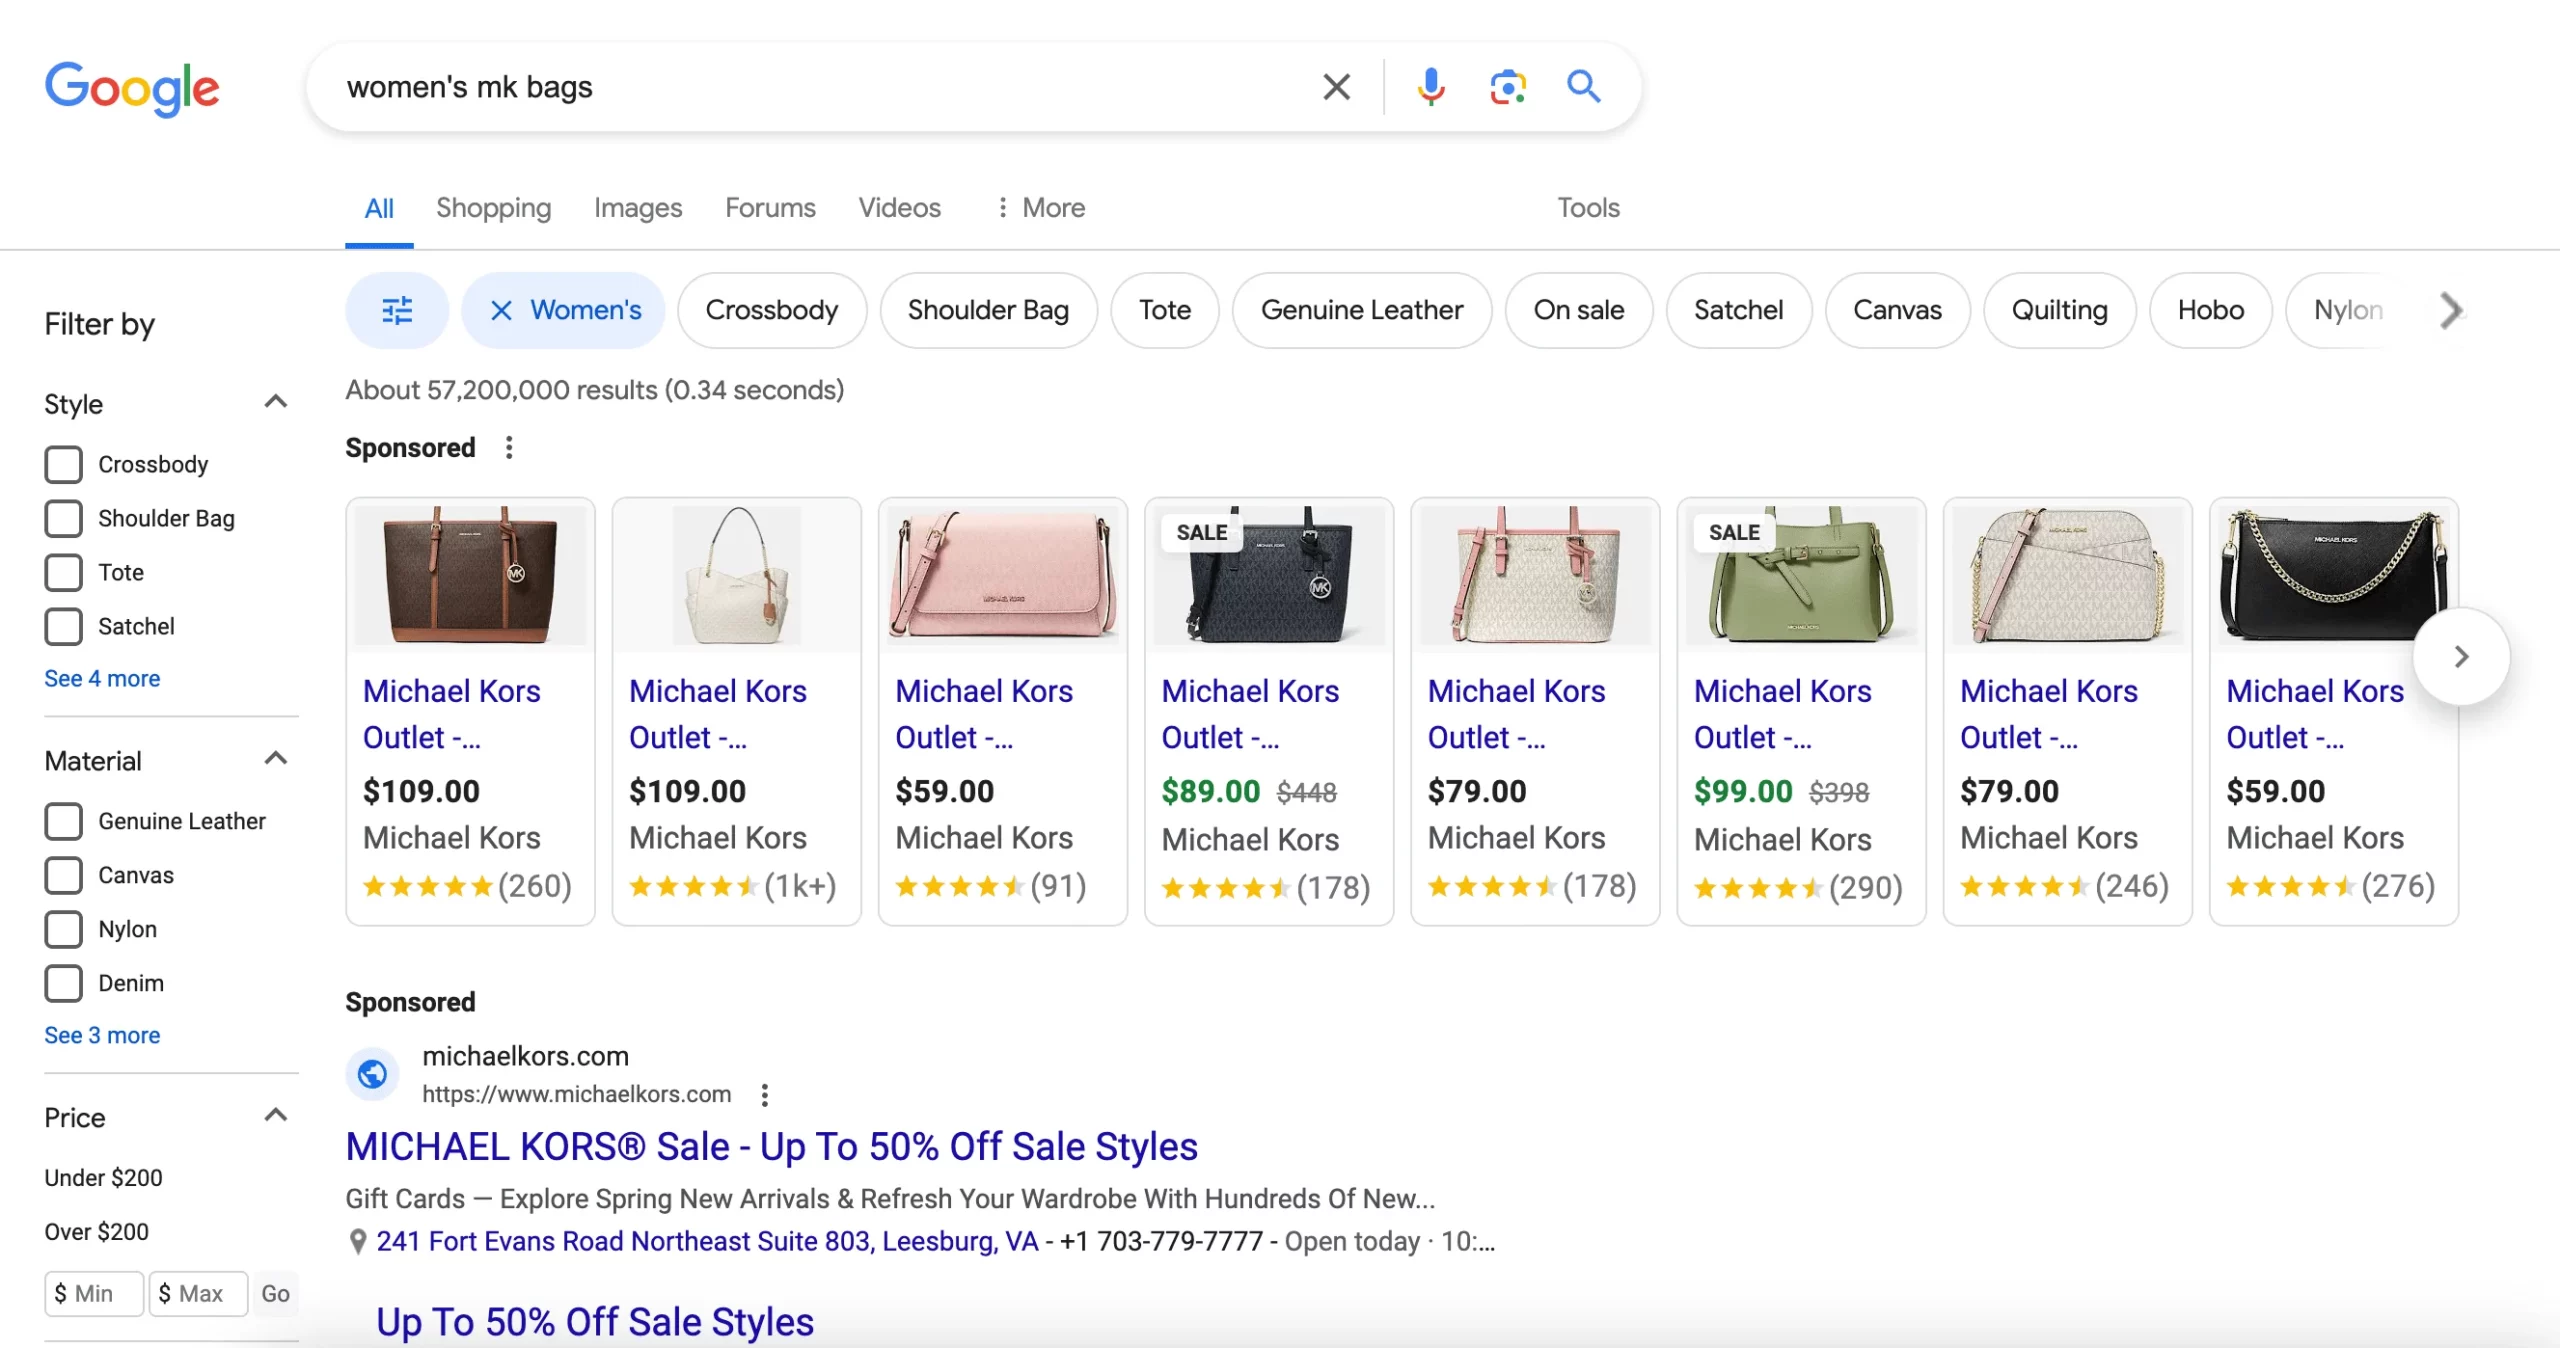
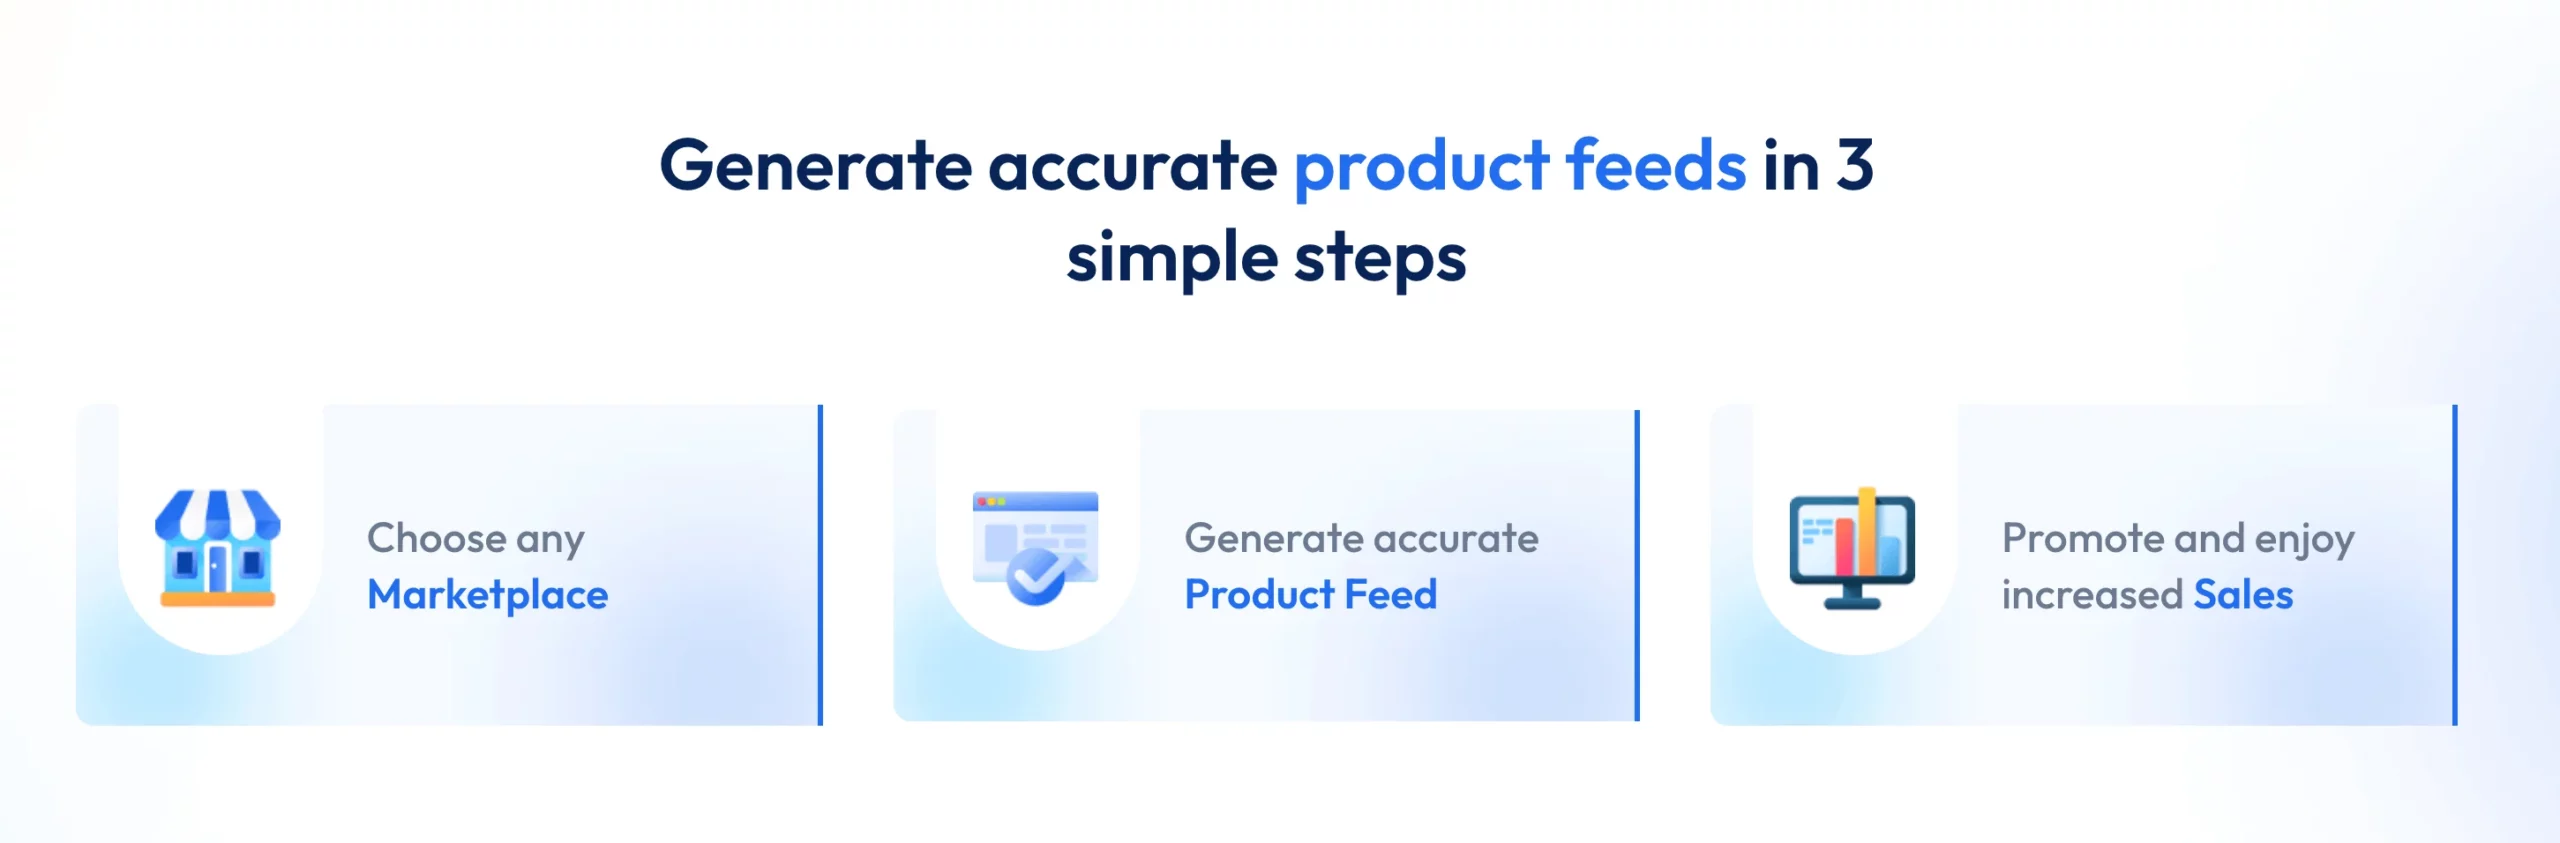


![Complete Guide To WooCommerce Product Feed - Google Shopping & Facebook [2024] 5](https://staging-rextheme.kinsta.cloud/wp-content/uploads/2019/05/005-Product-Category.png)
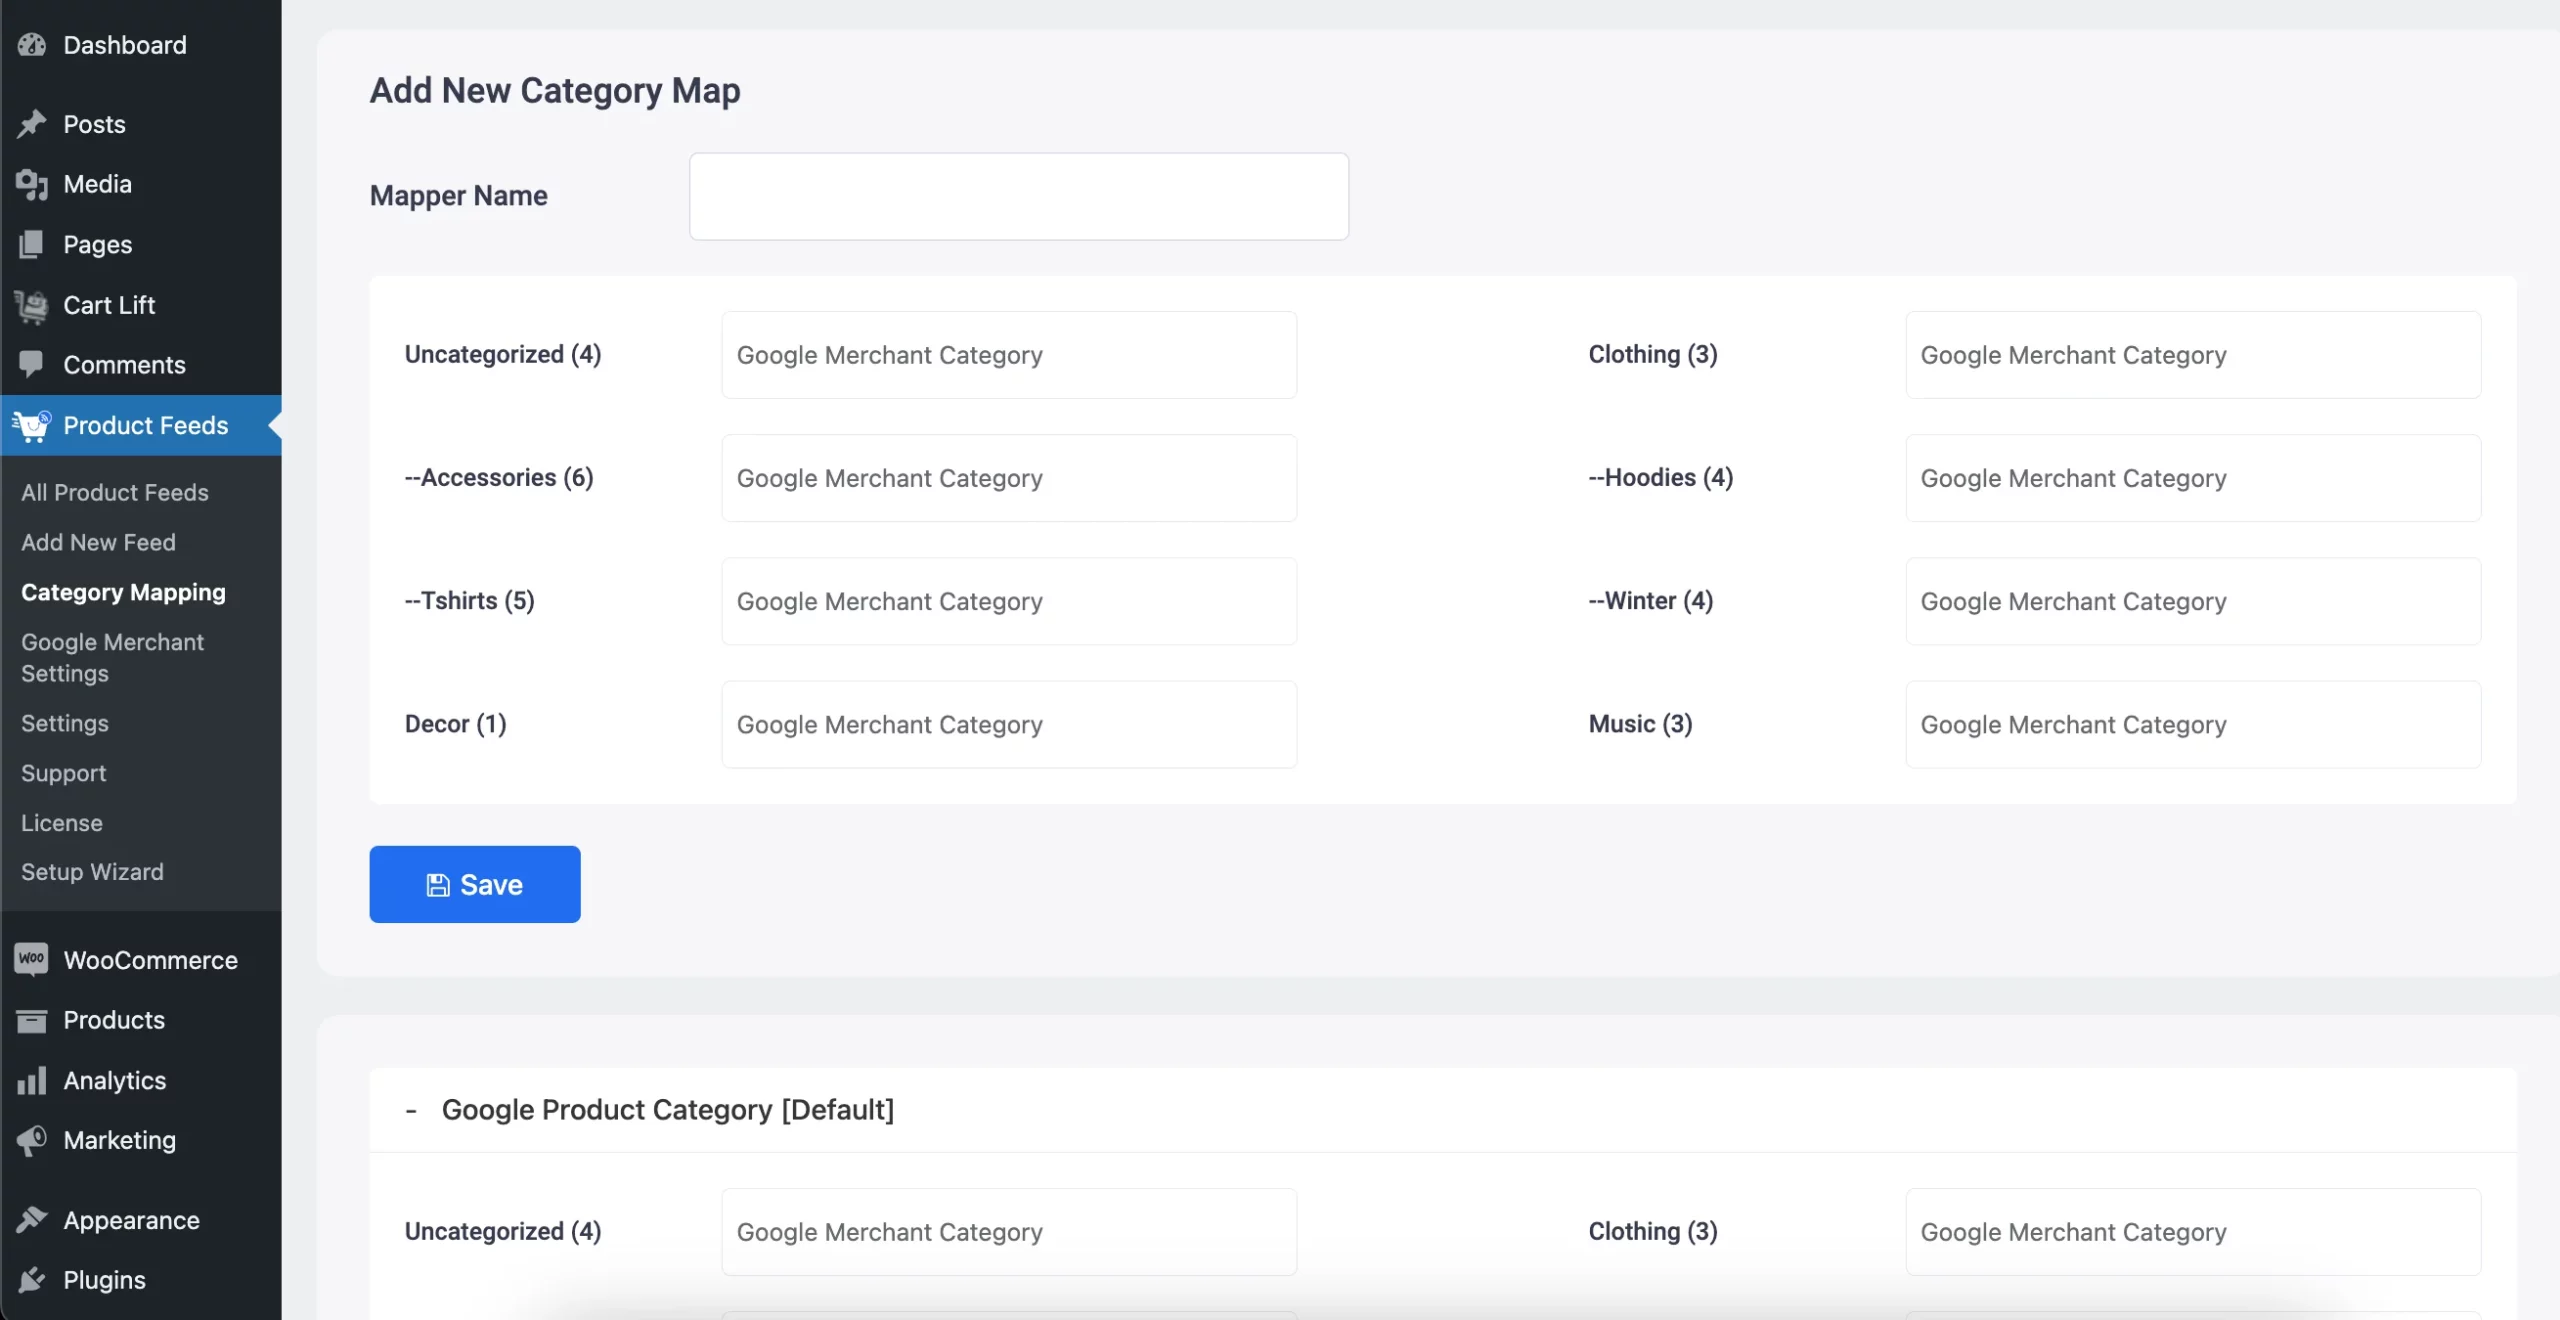

![Complete Guide To WooCommerce Product Feed - Google Shopping & Facebook [2024] 6](https://staging-rextheme.kinsta.cloud/wp-content/uploads/2019/05/007-G-Product-Image-URL.png)
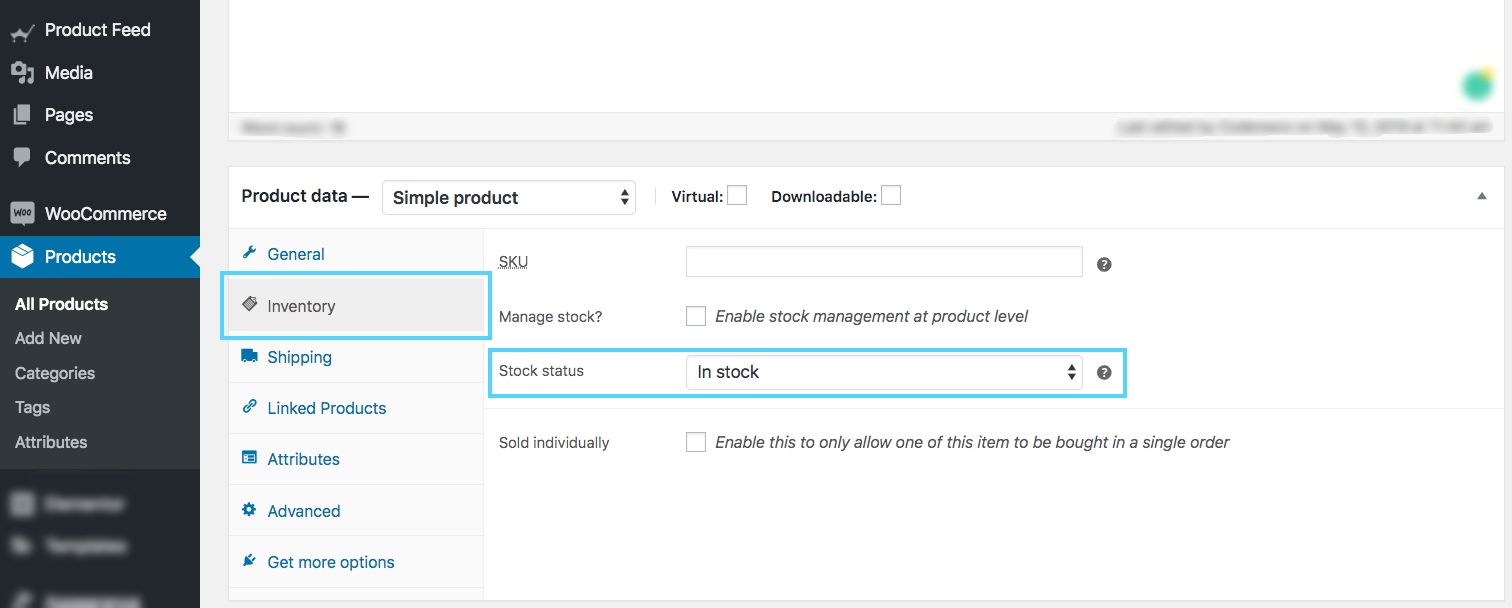

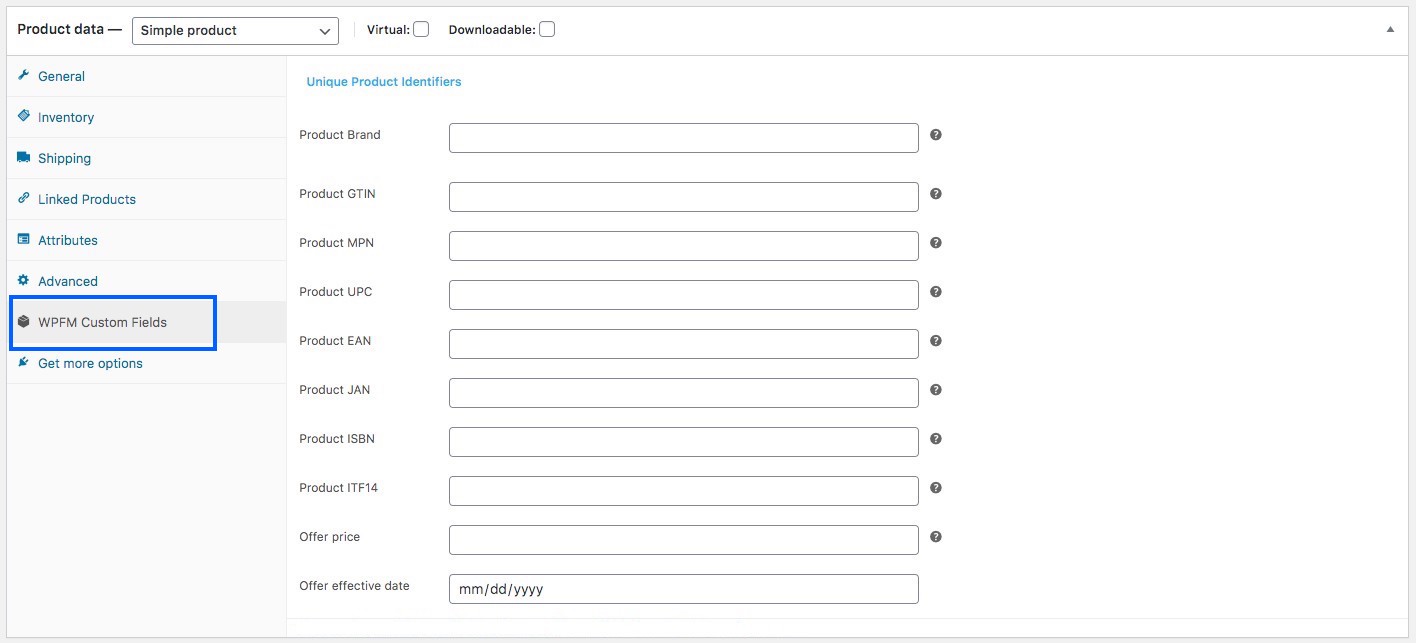

![Complete Guide To WooCommerce Product Feed - Google Shopping & Facebook [2024] 7](https://staging-rextheme.kinsta.cloud/wp-content/uploads/2019/05/Facebook-feed-CSV.png)
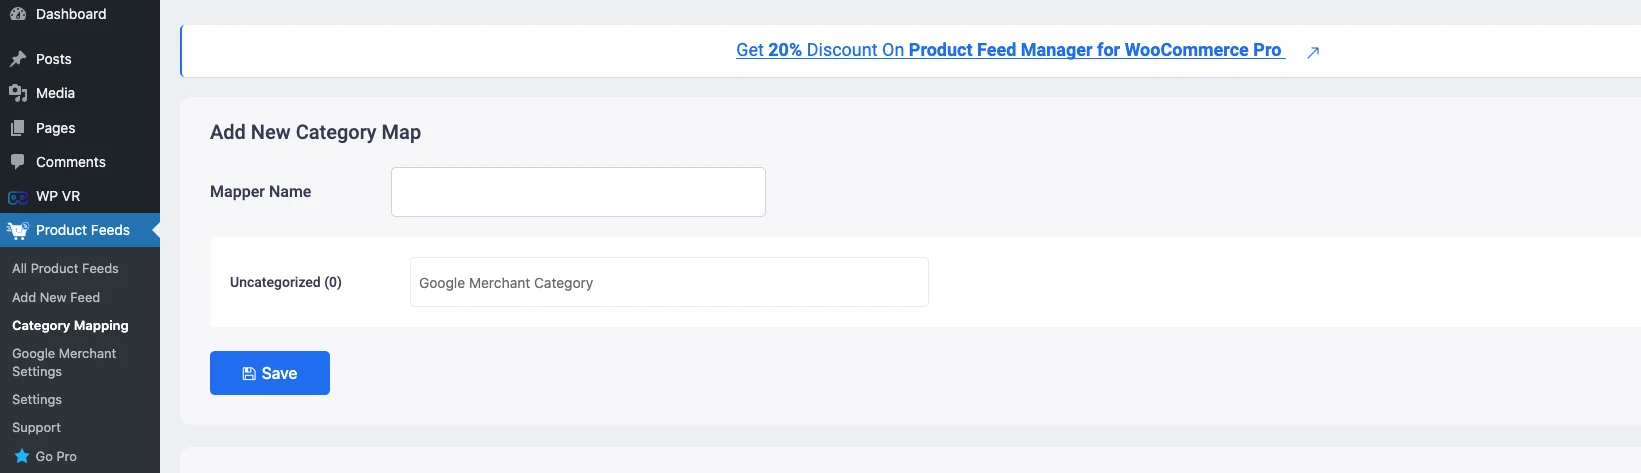


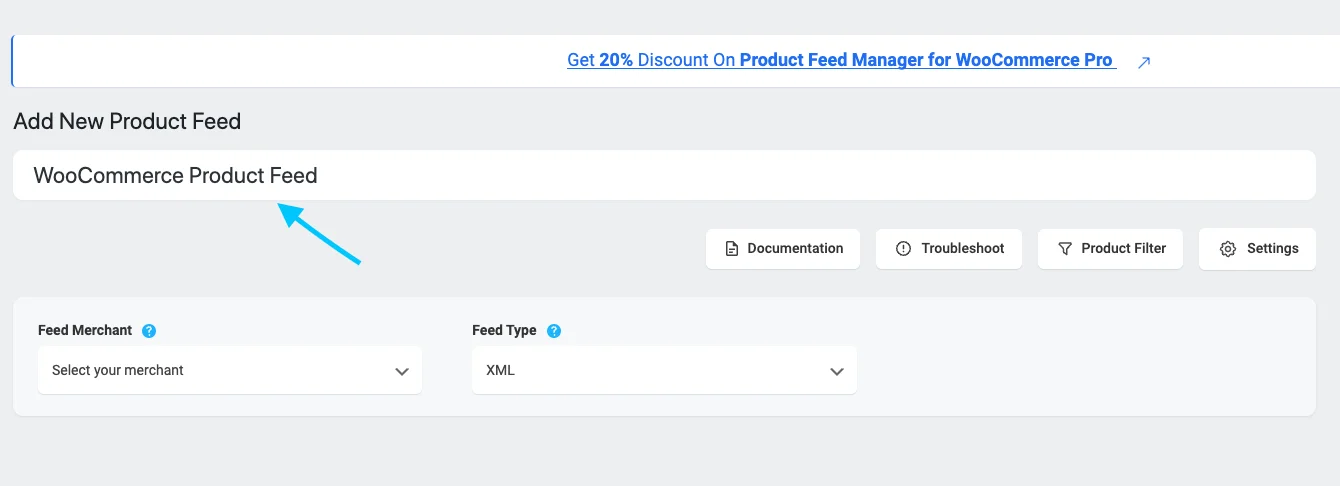

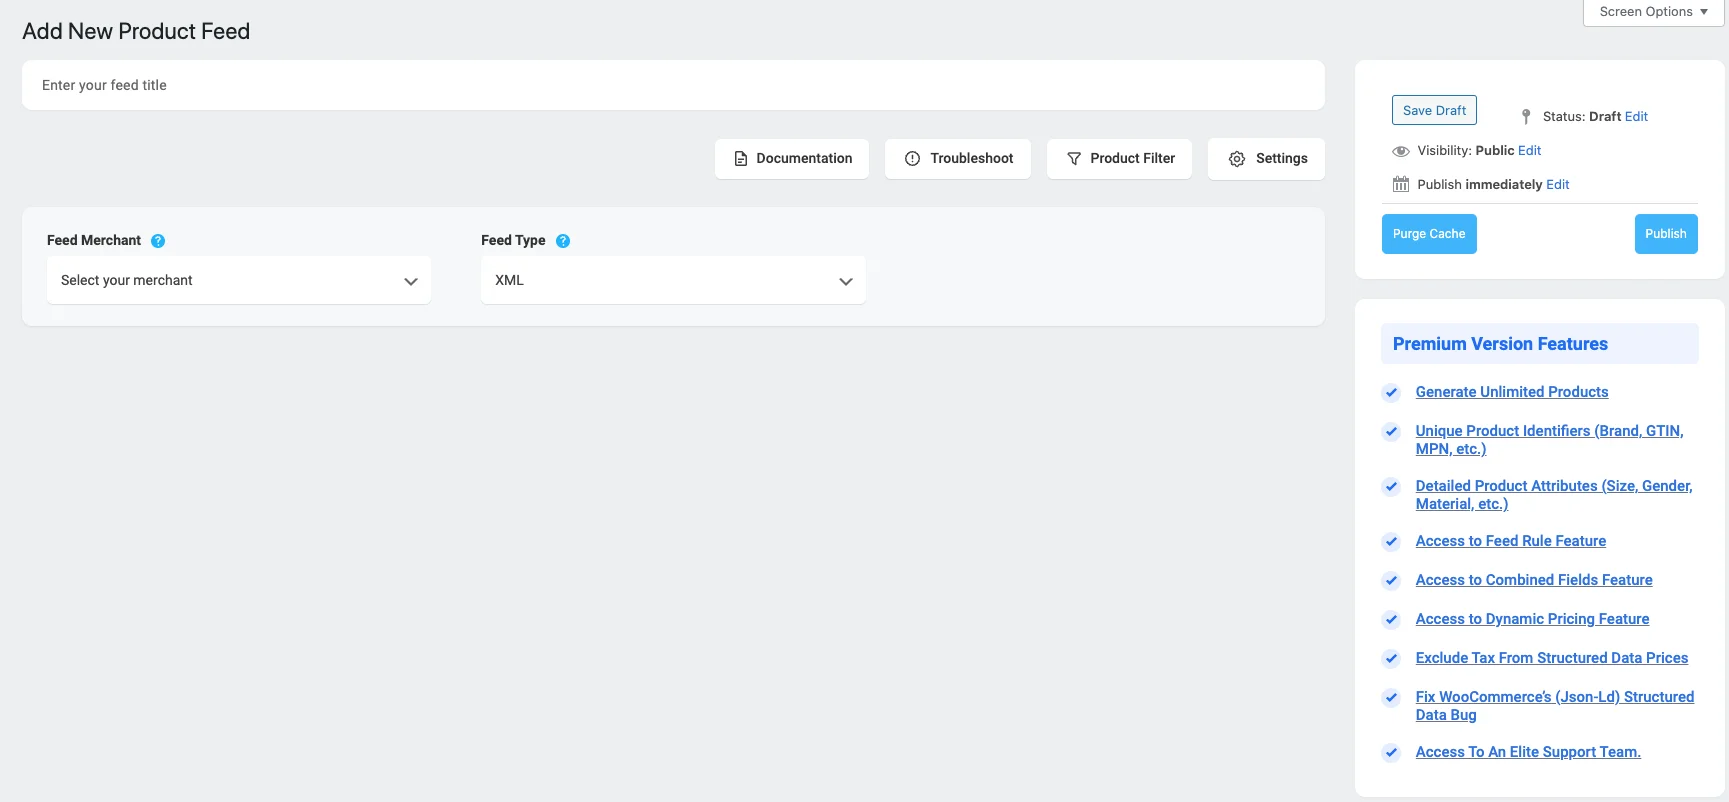
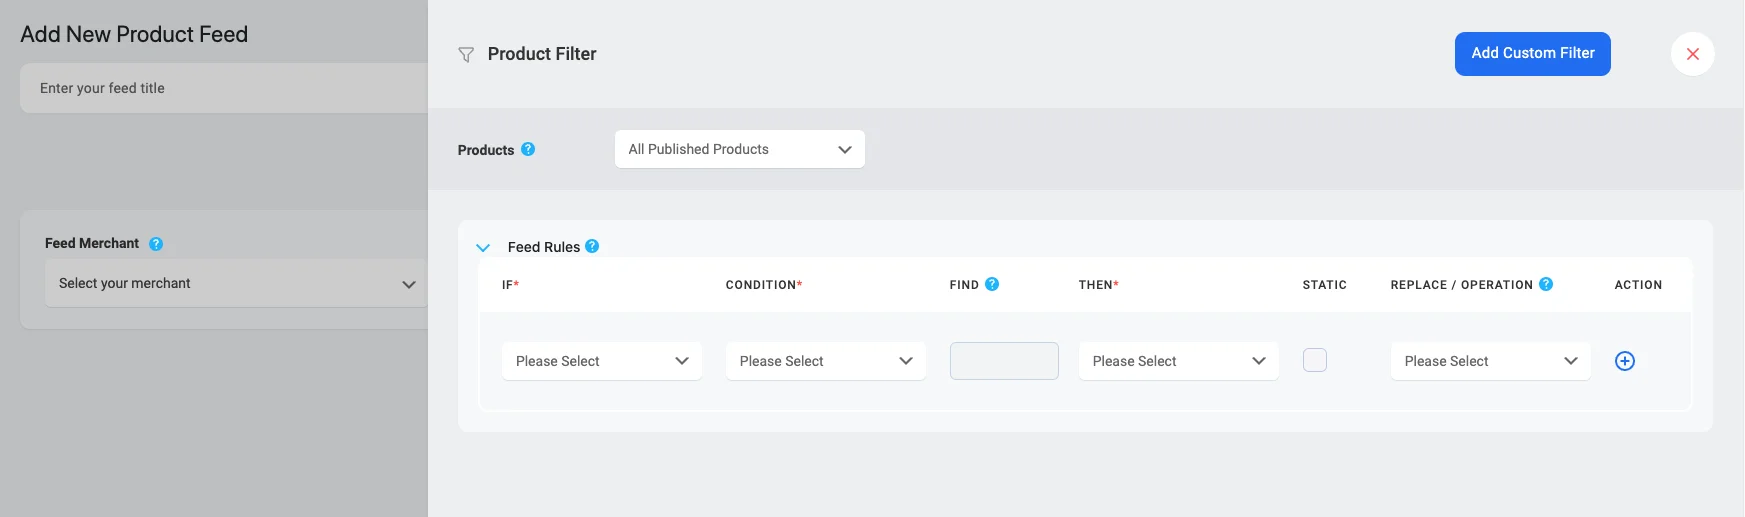

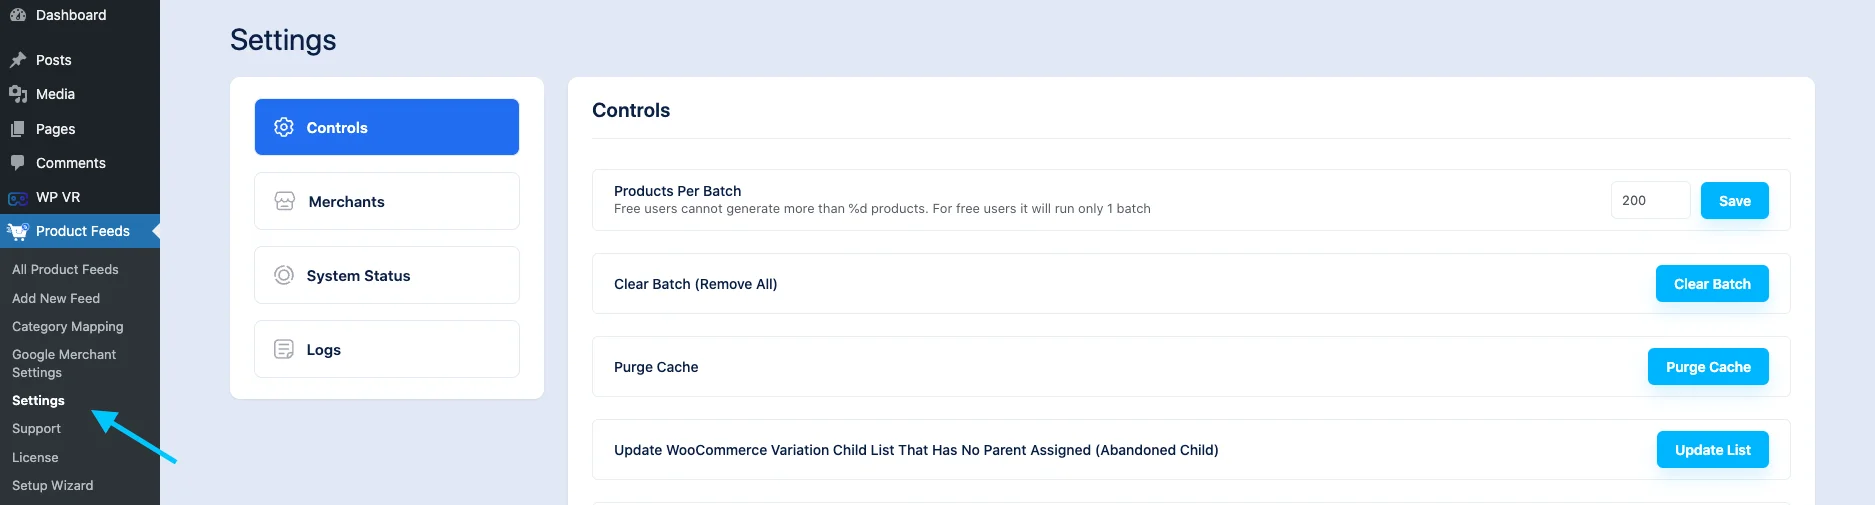
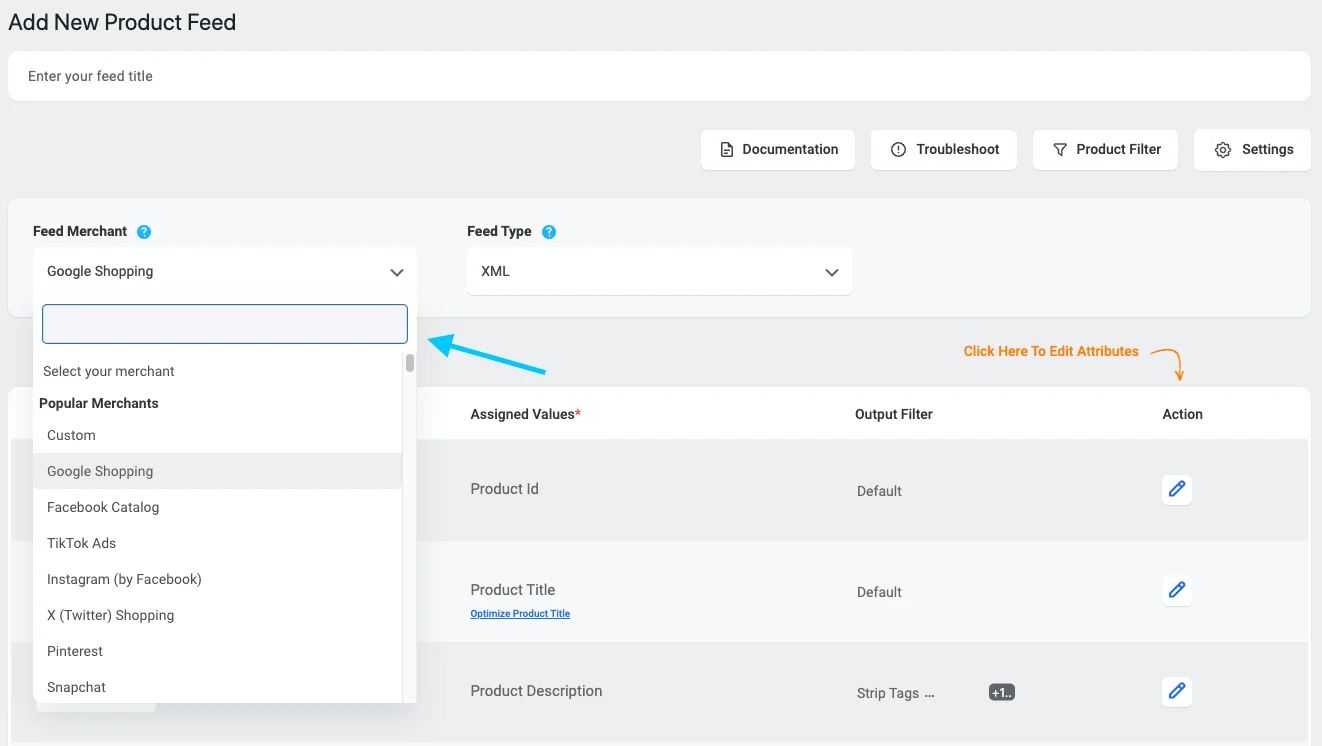
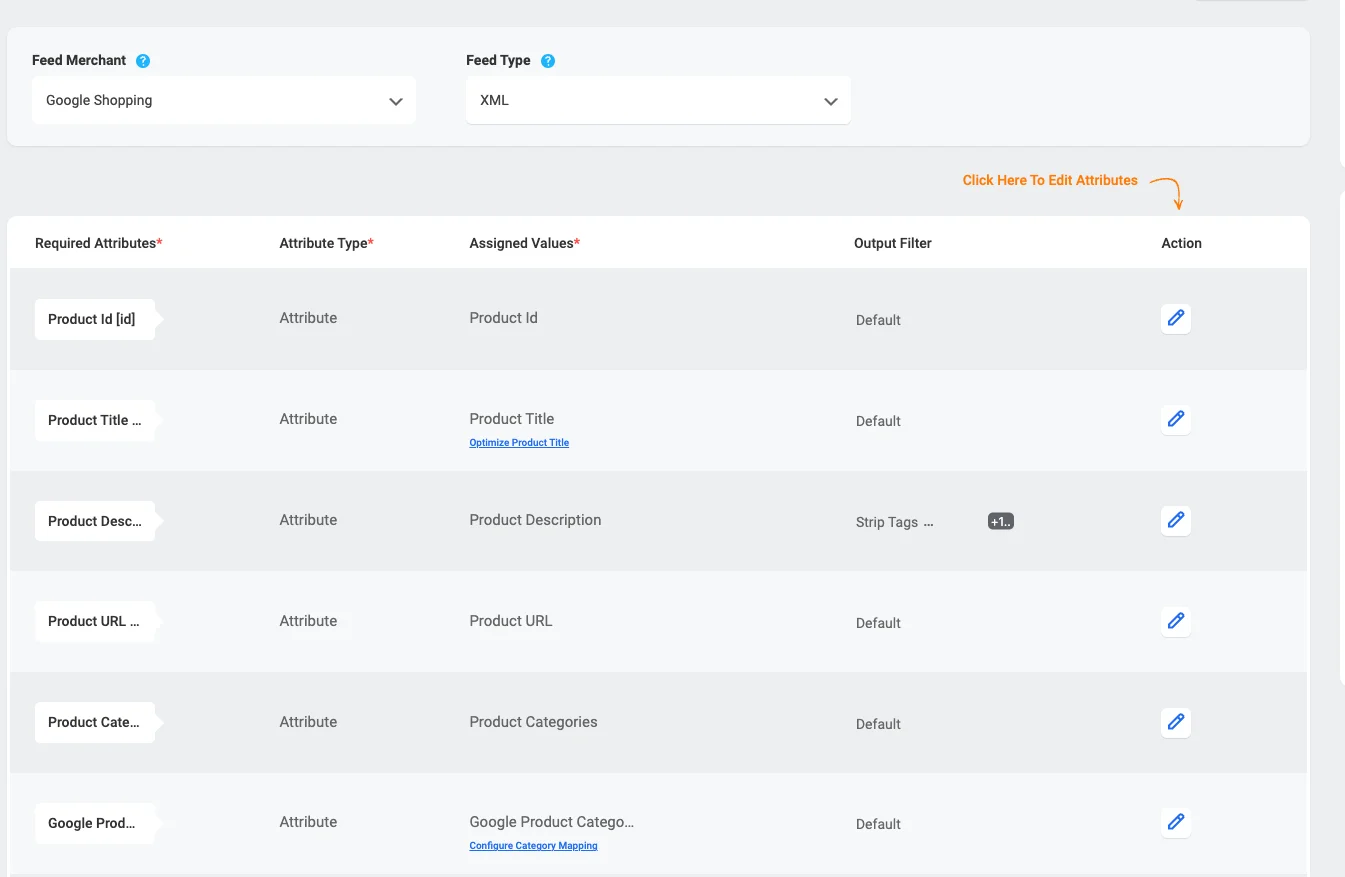
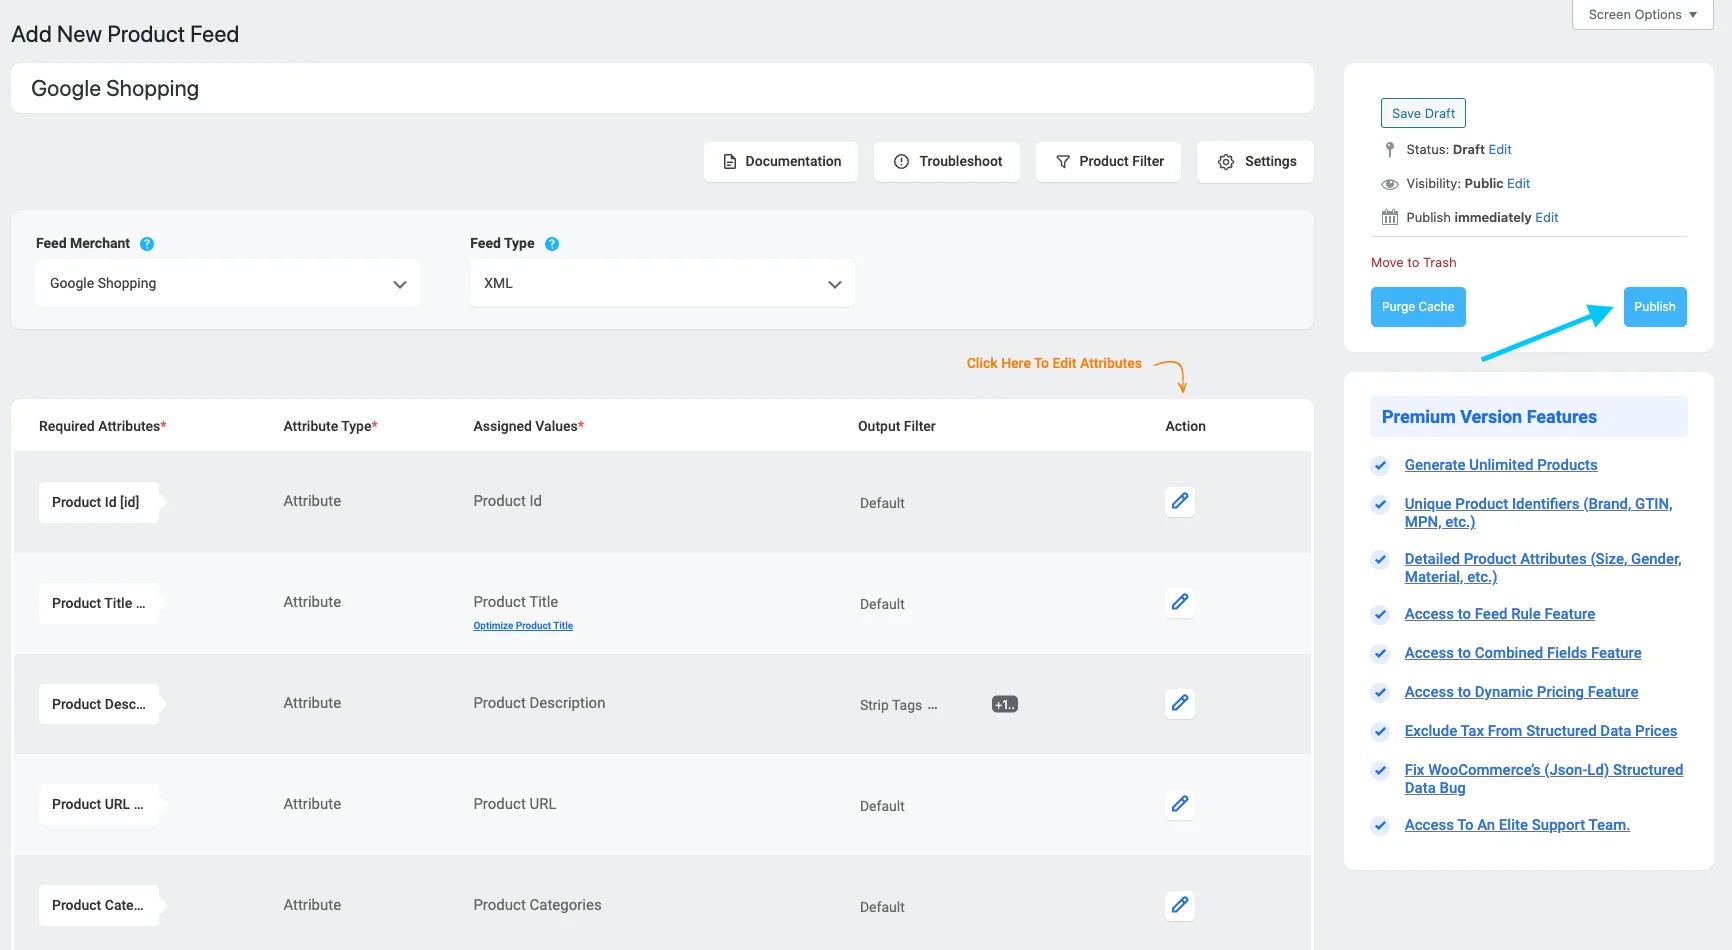
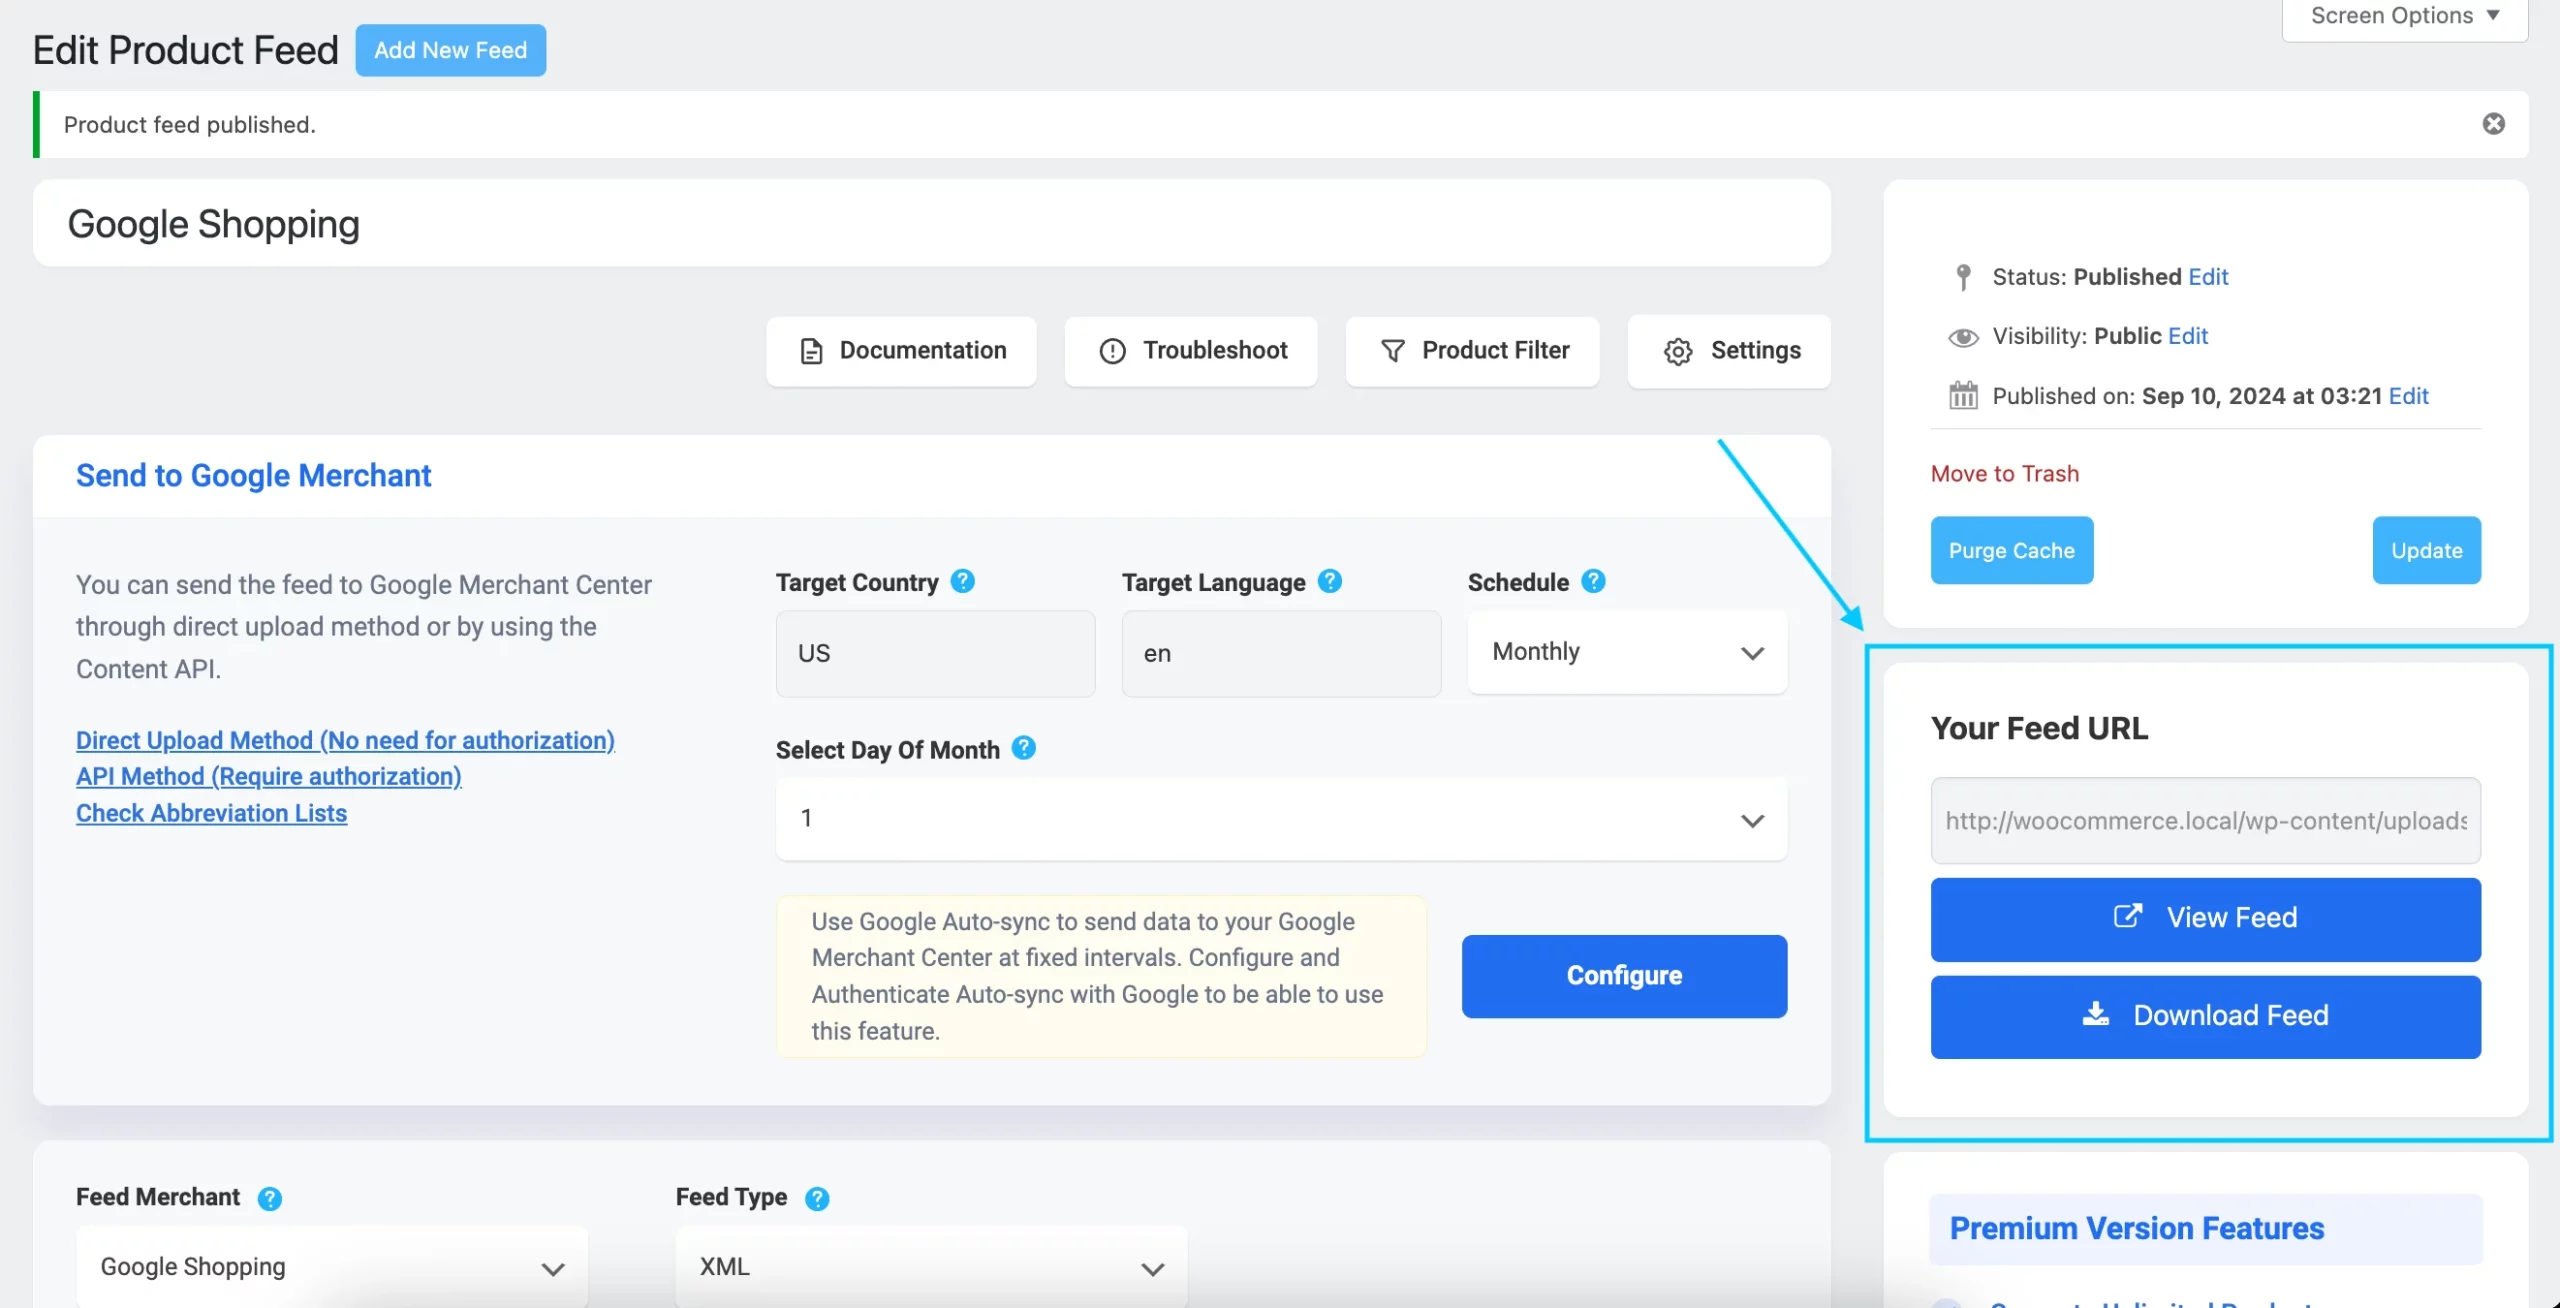
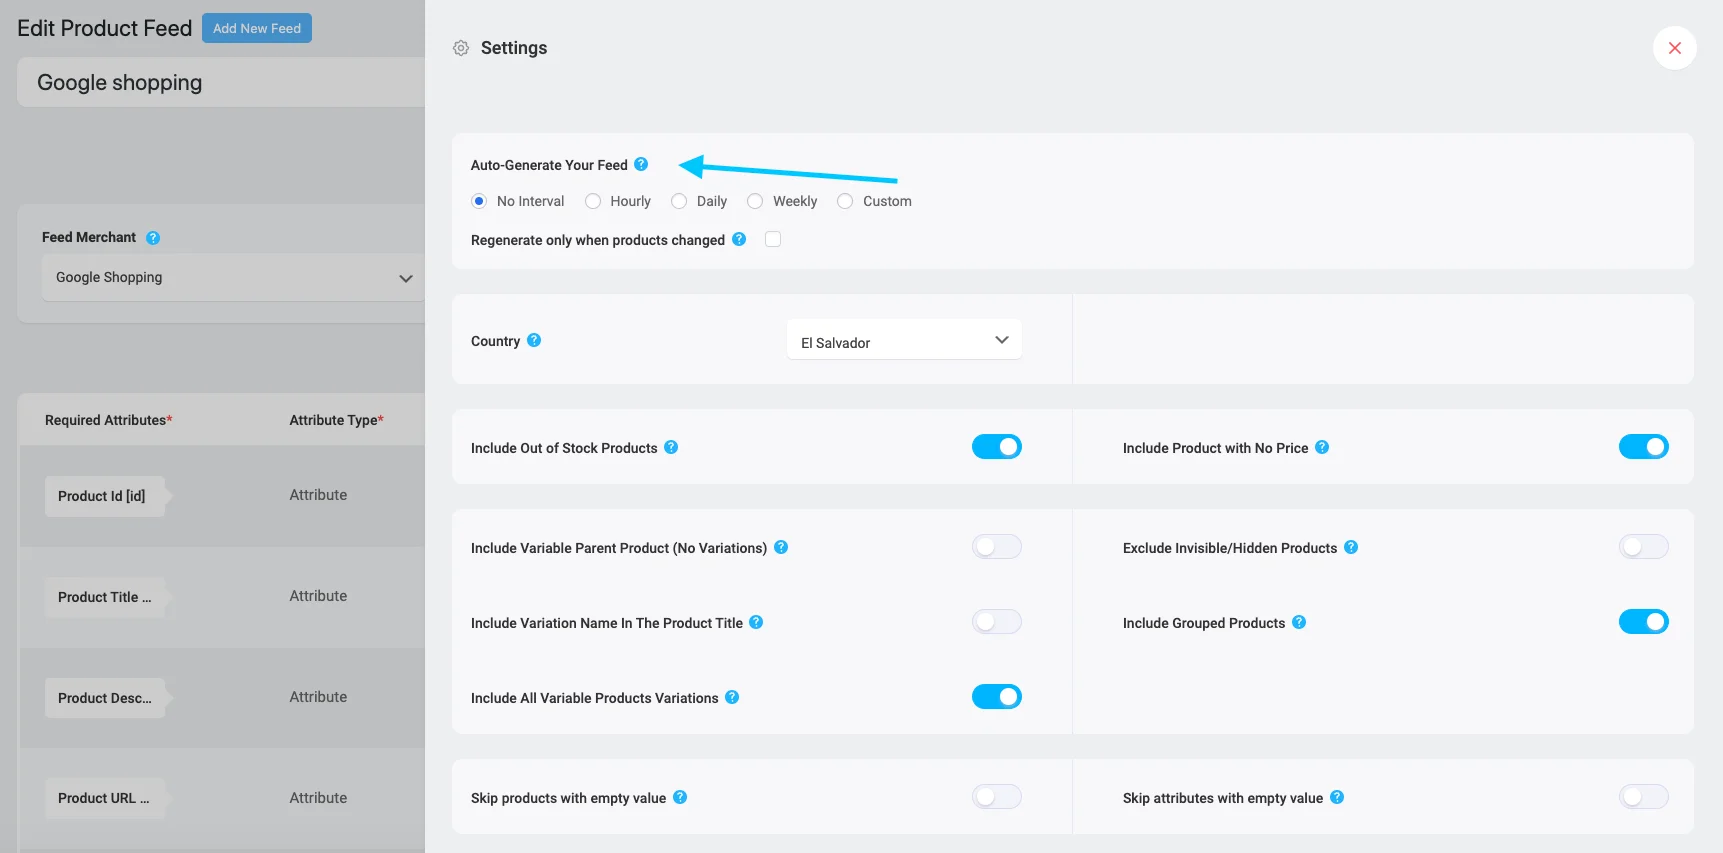

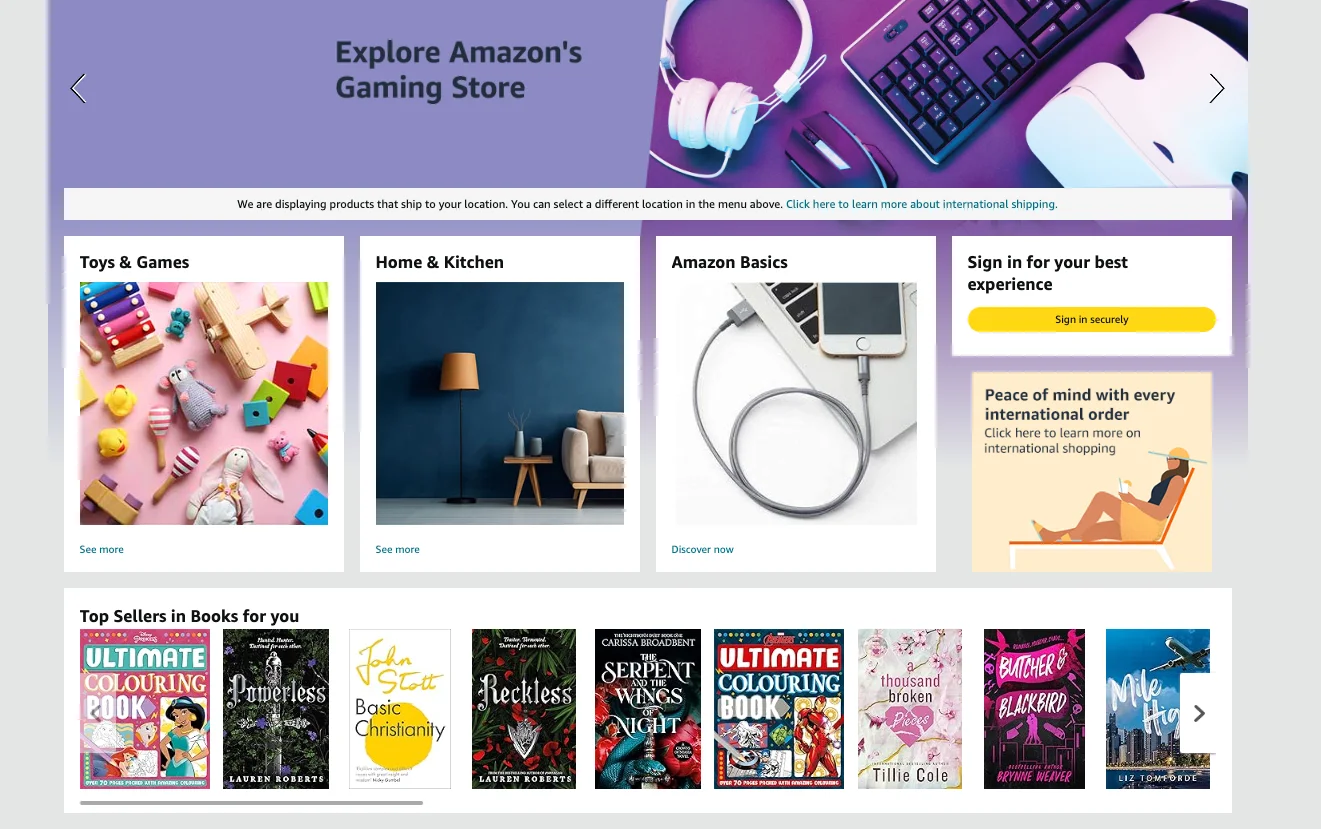

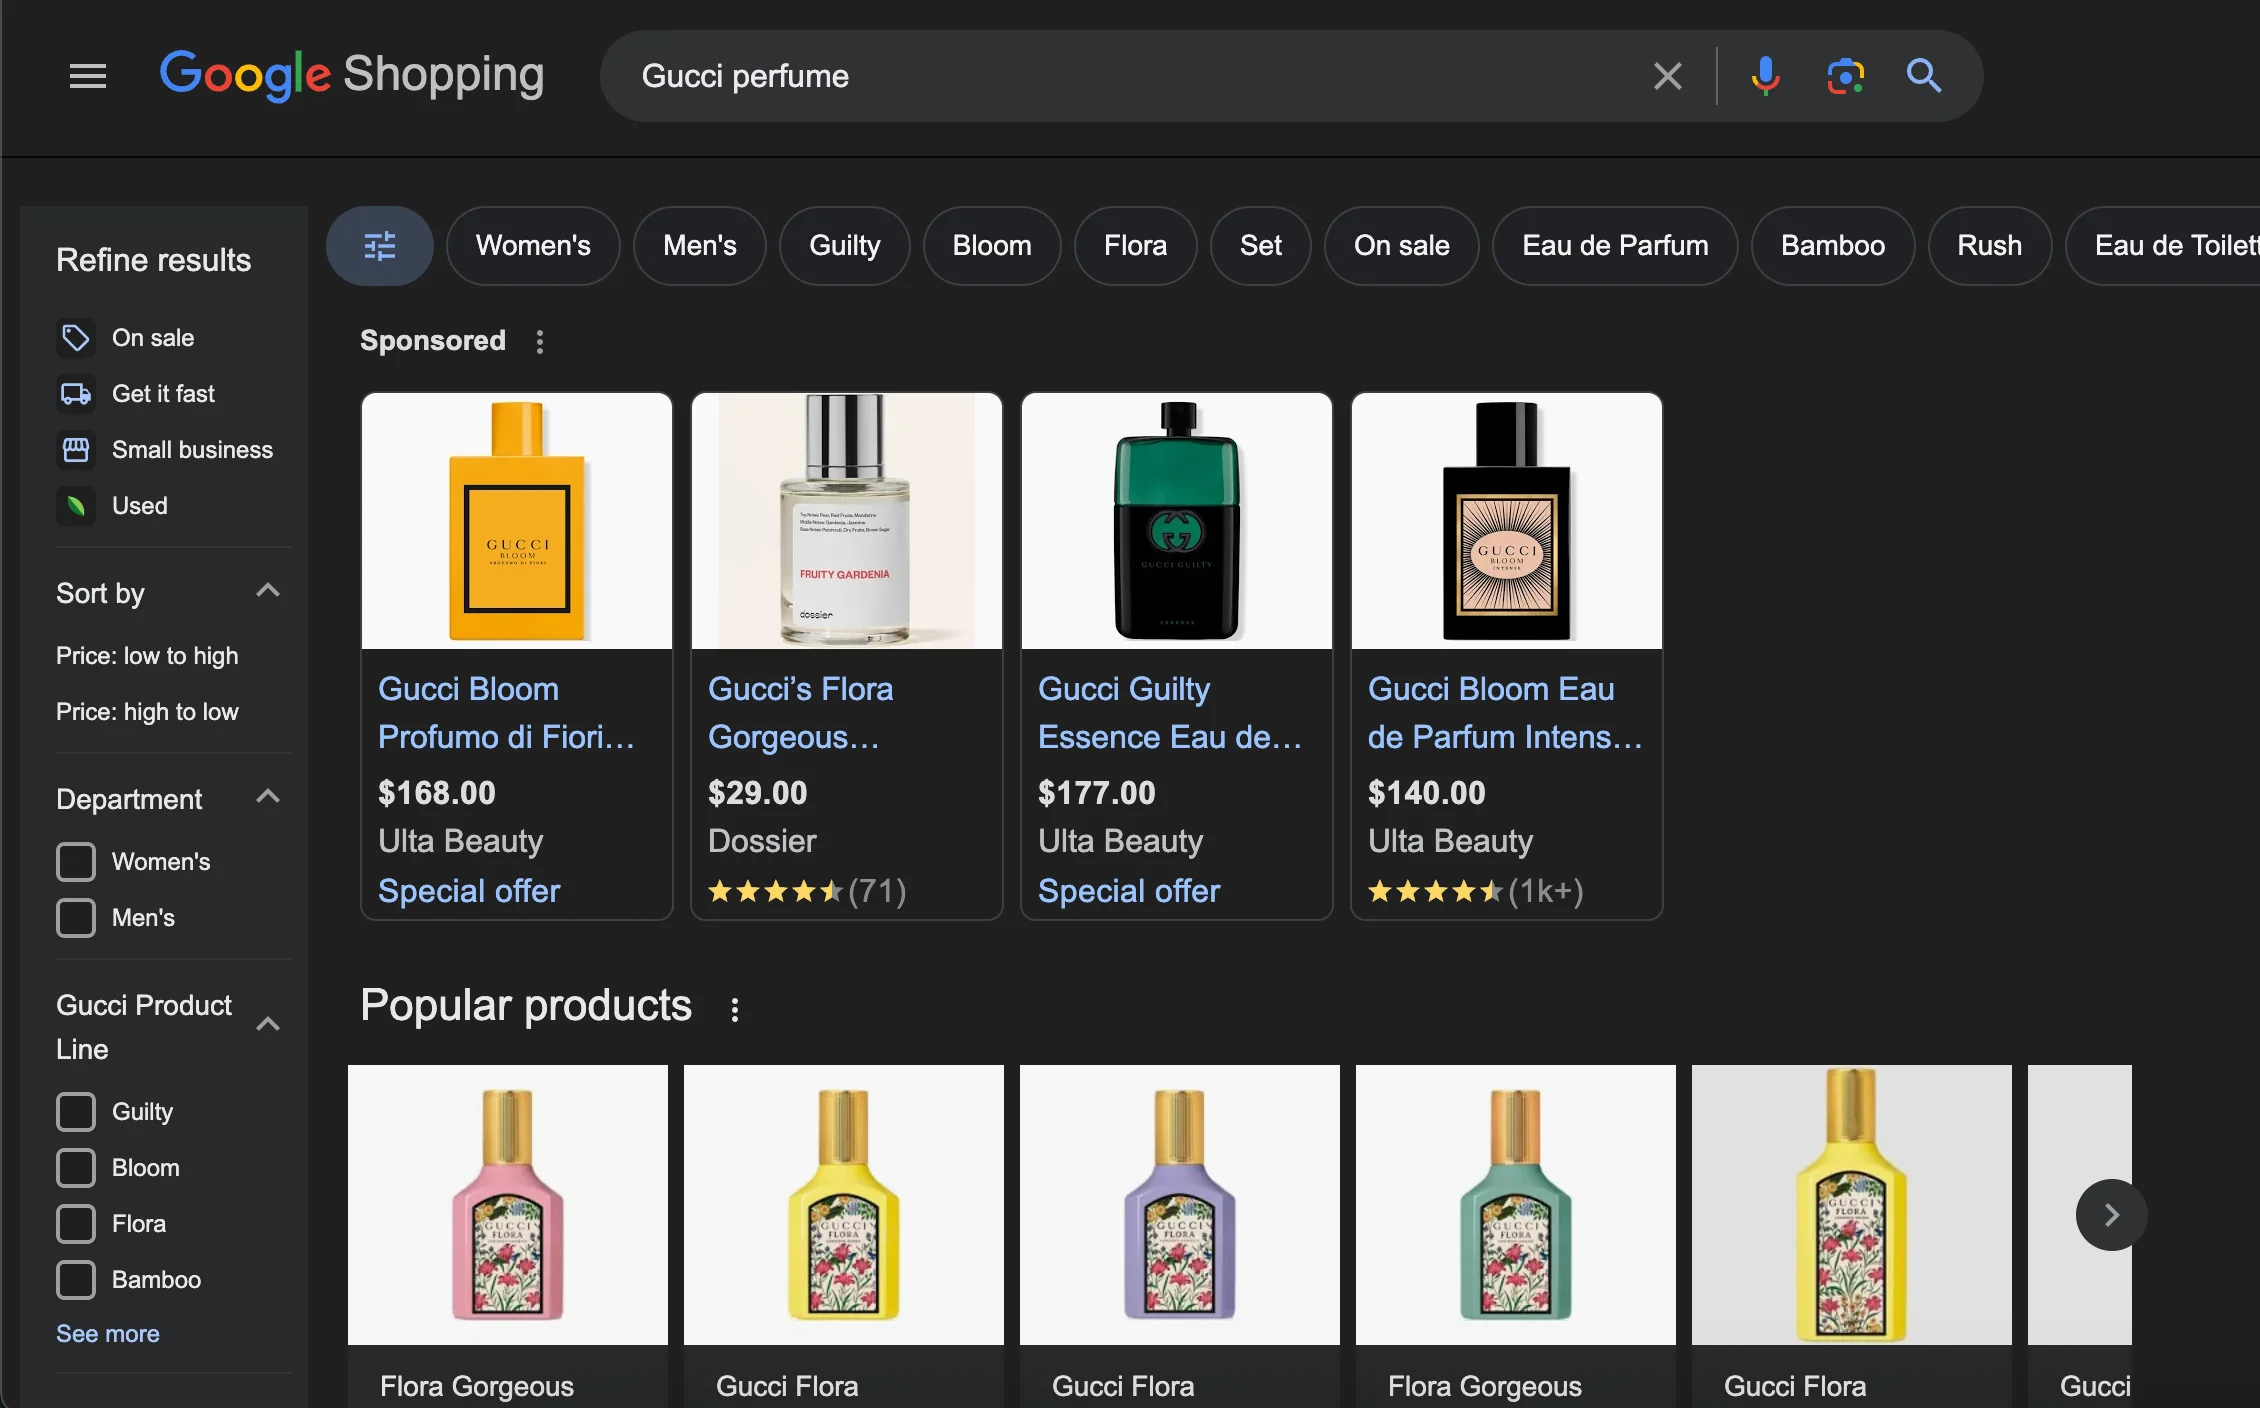
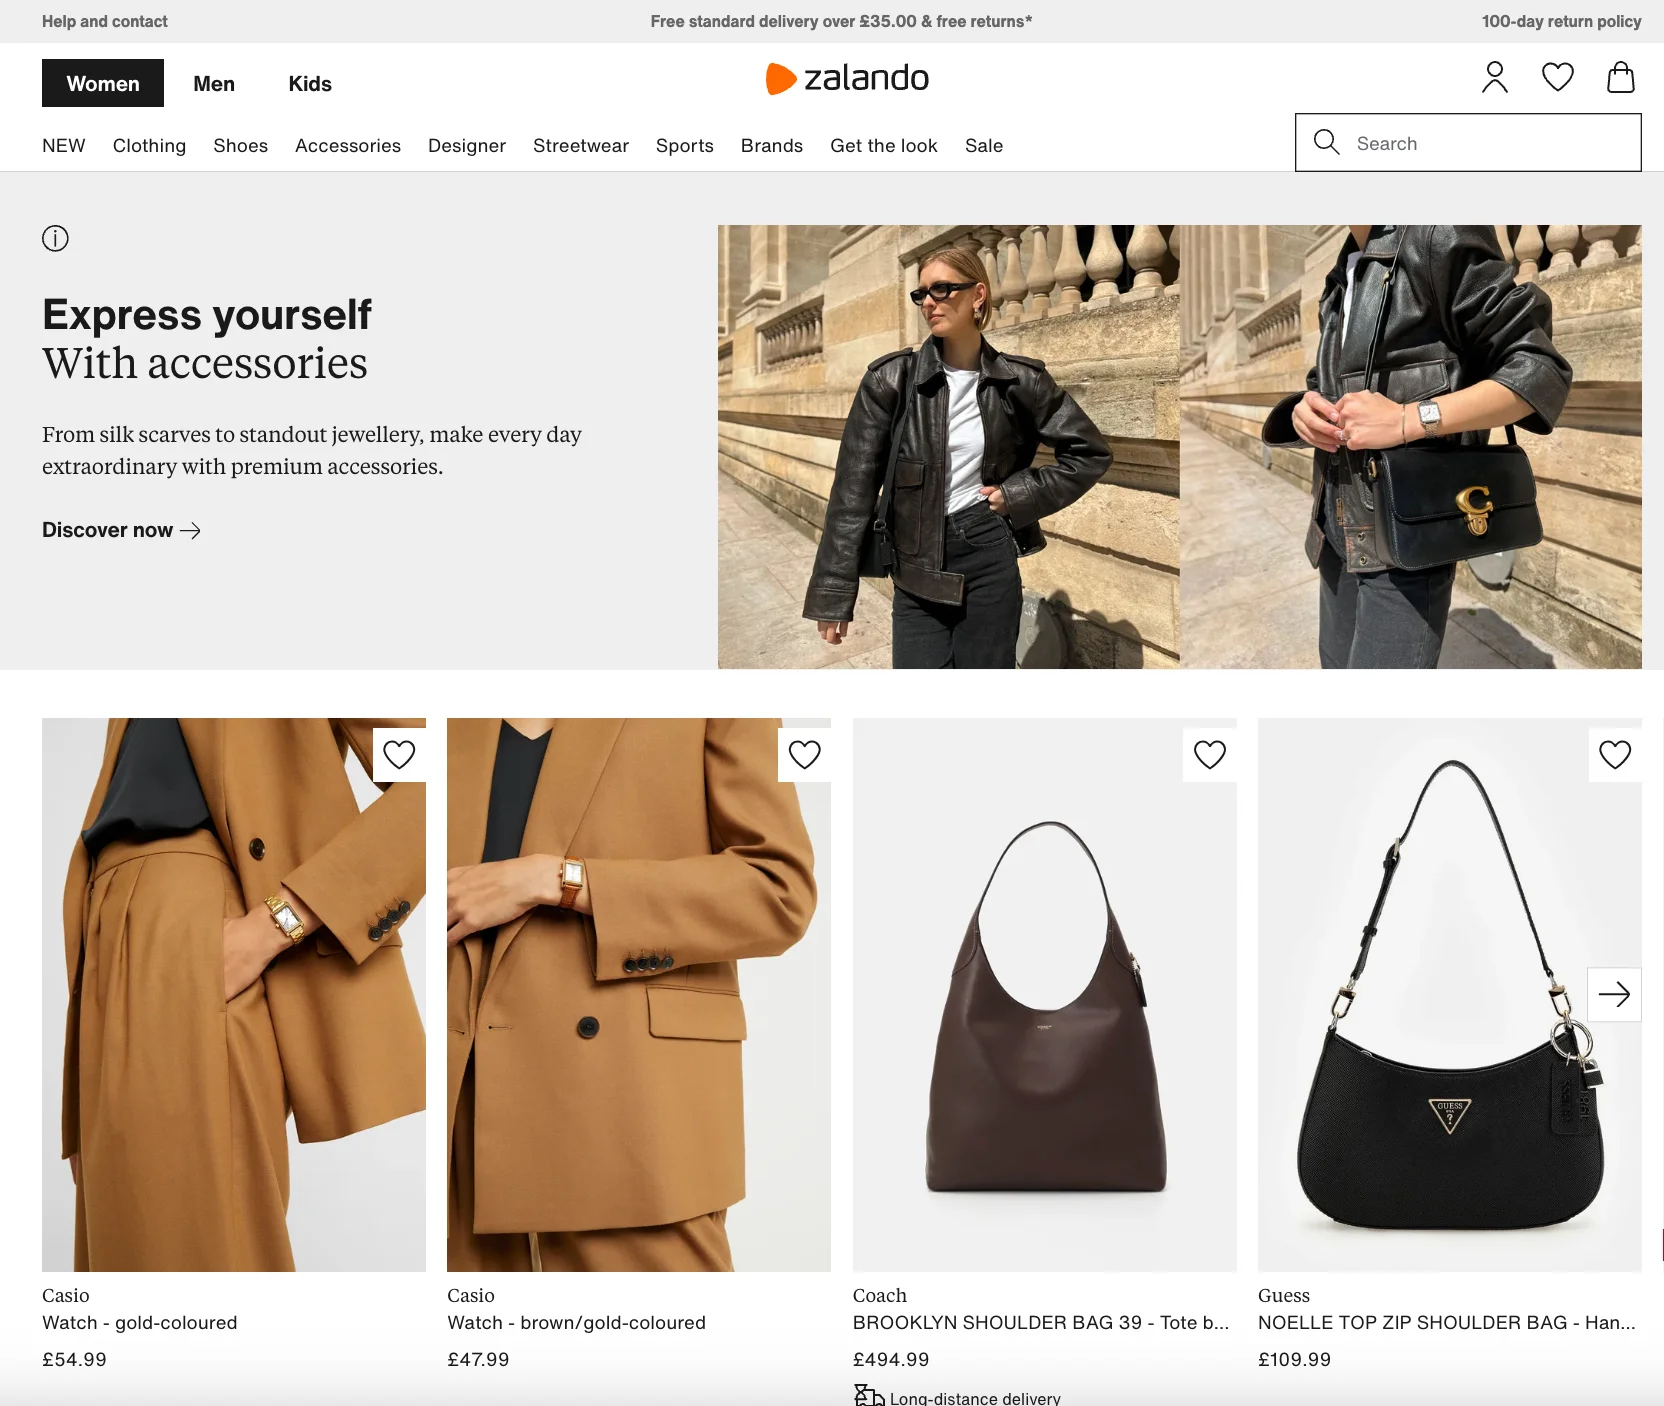

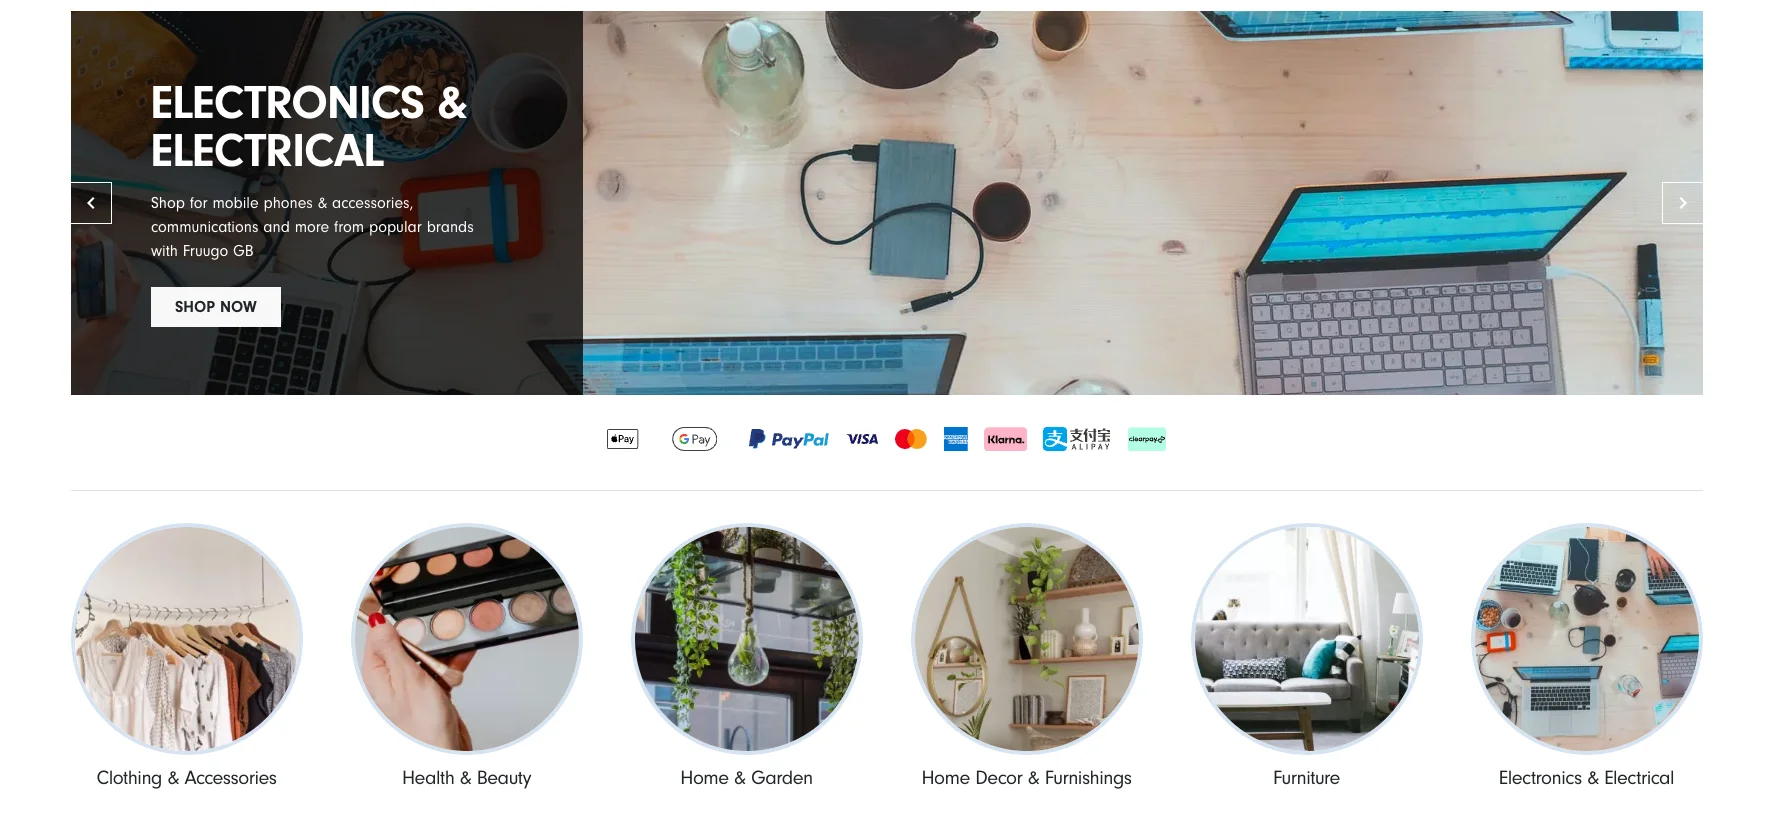
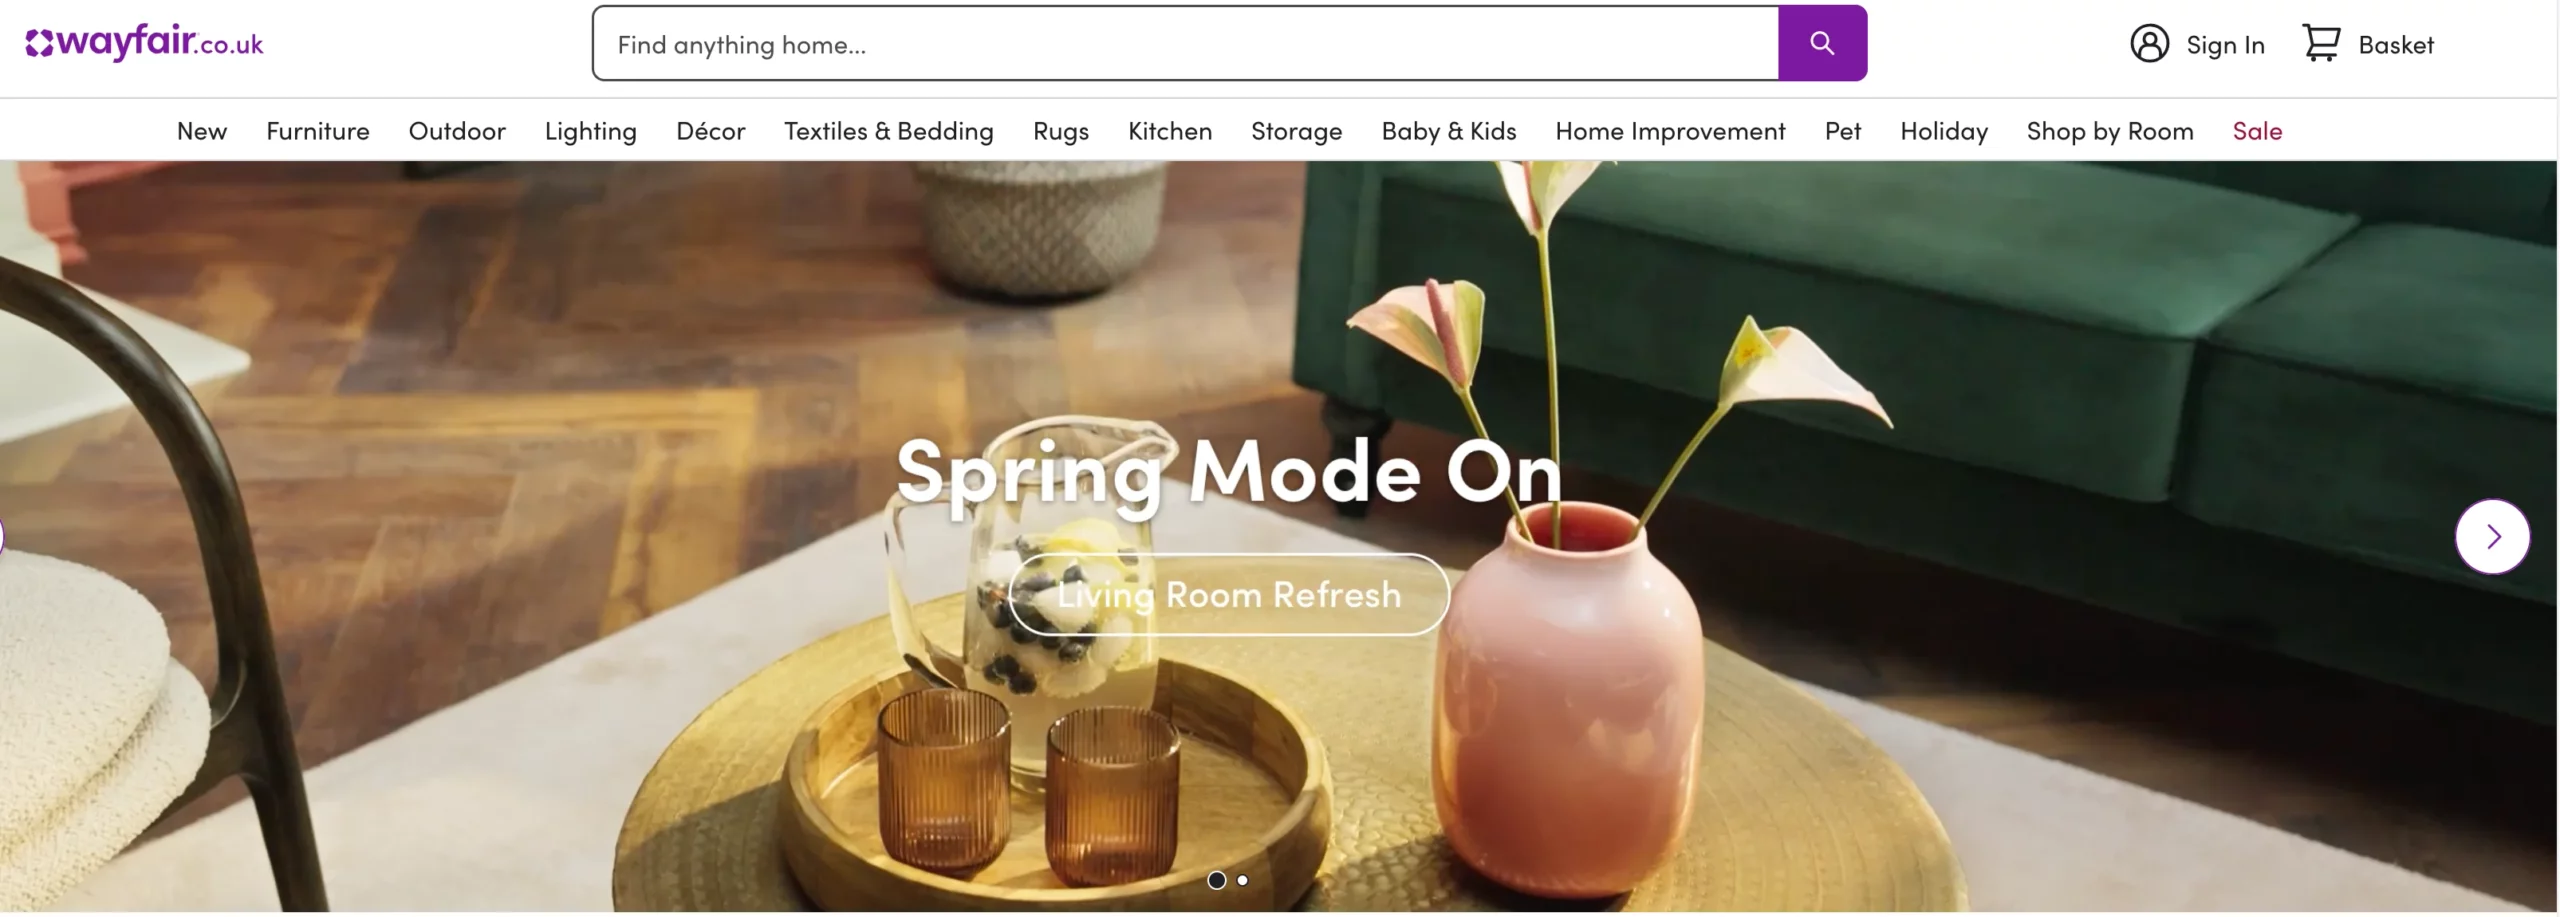
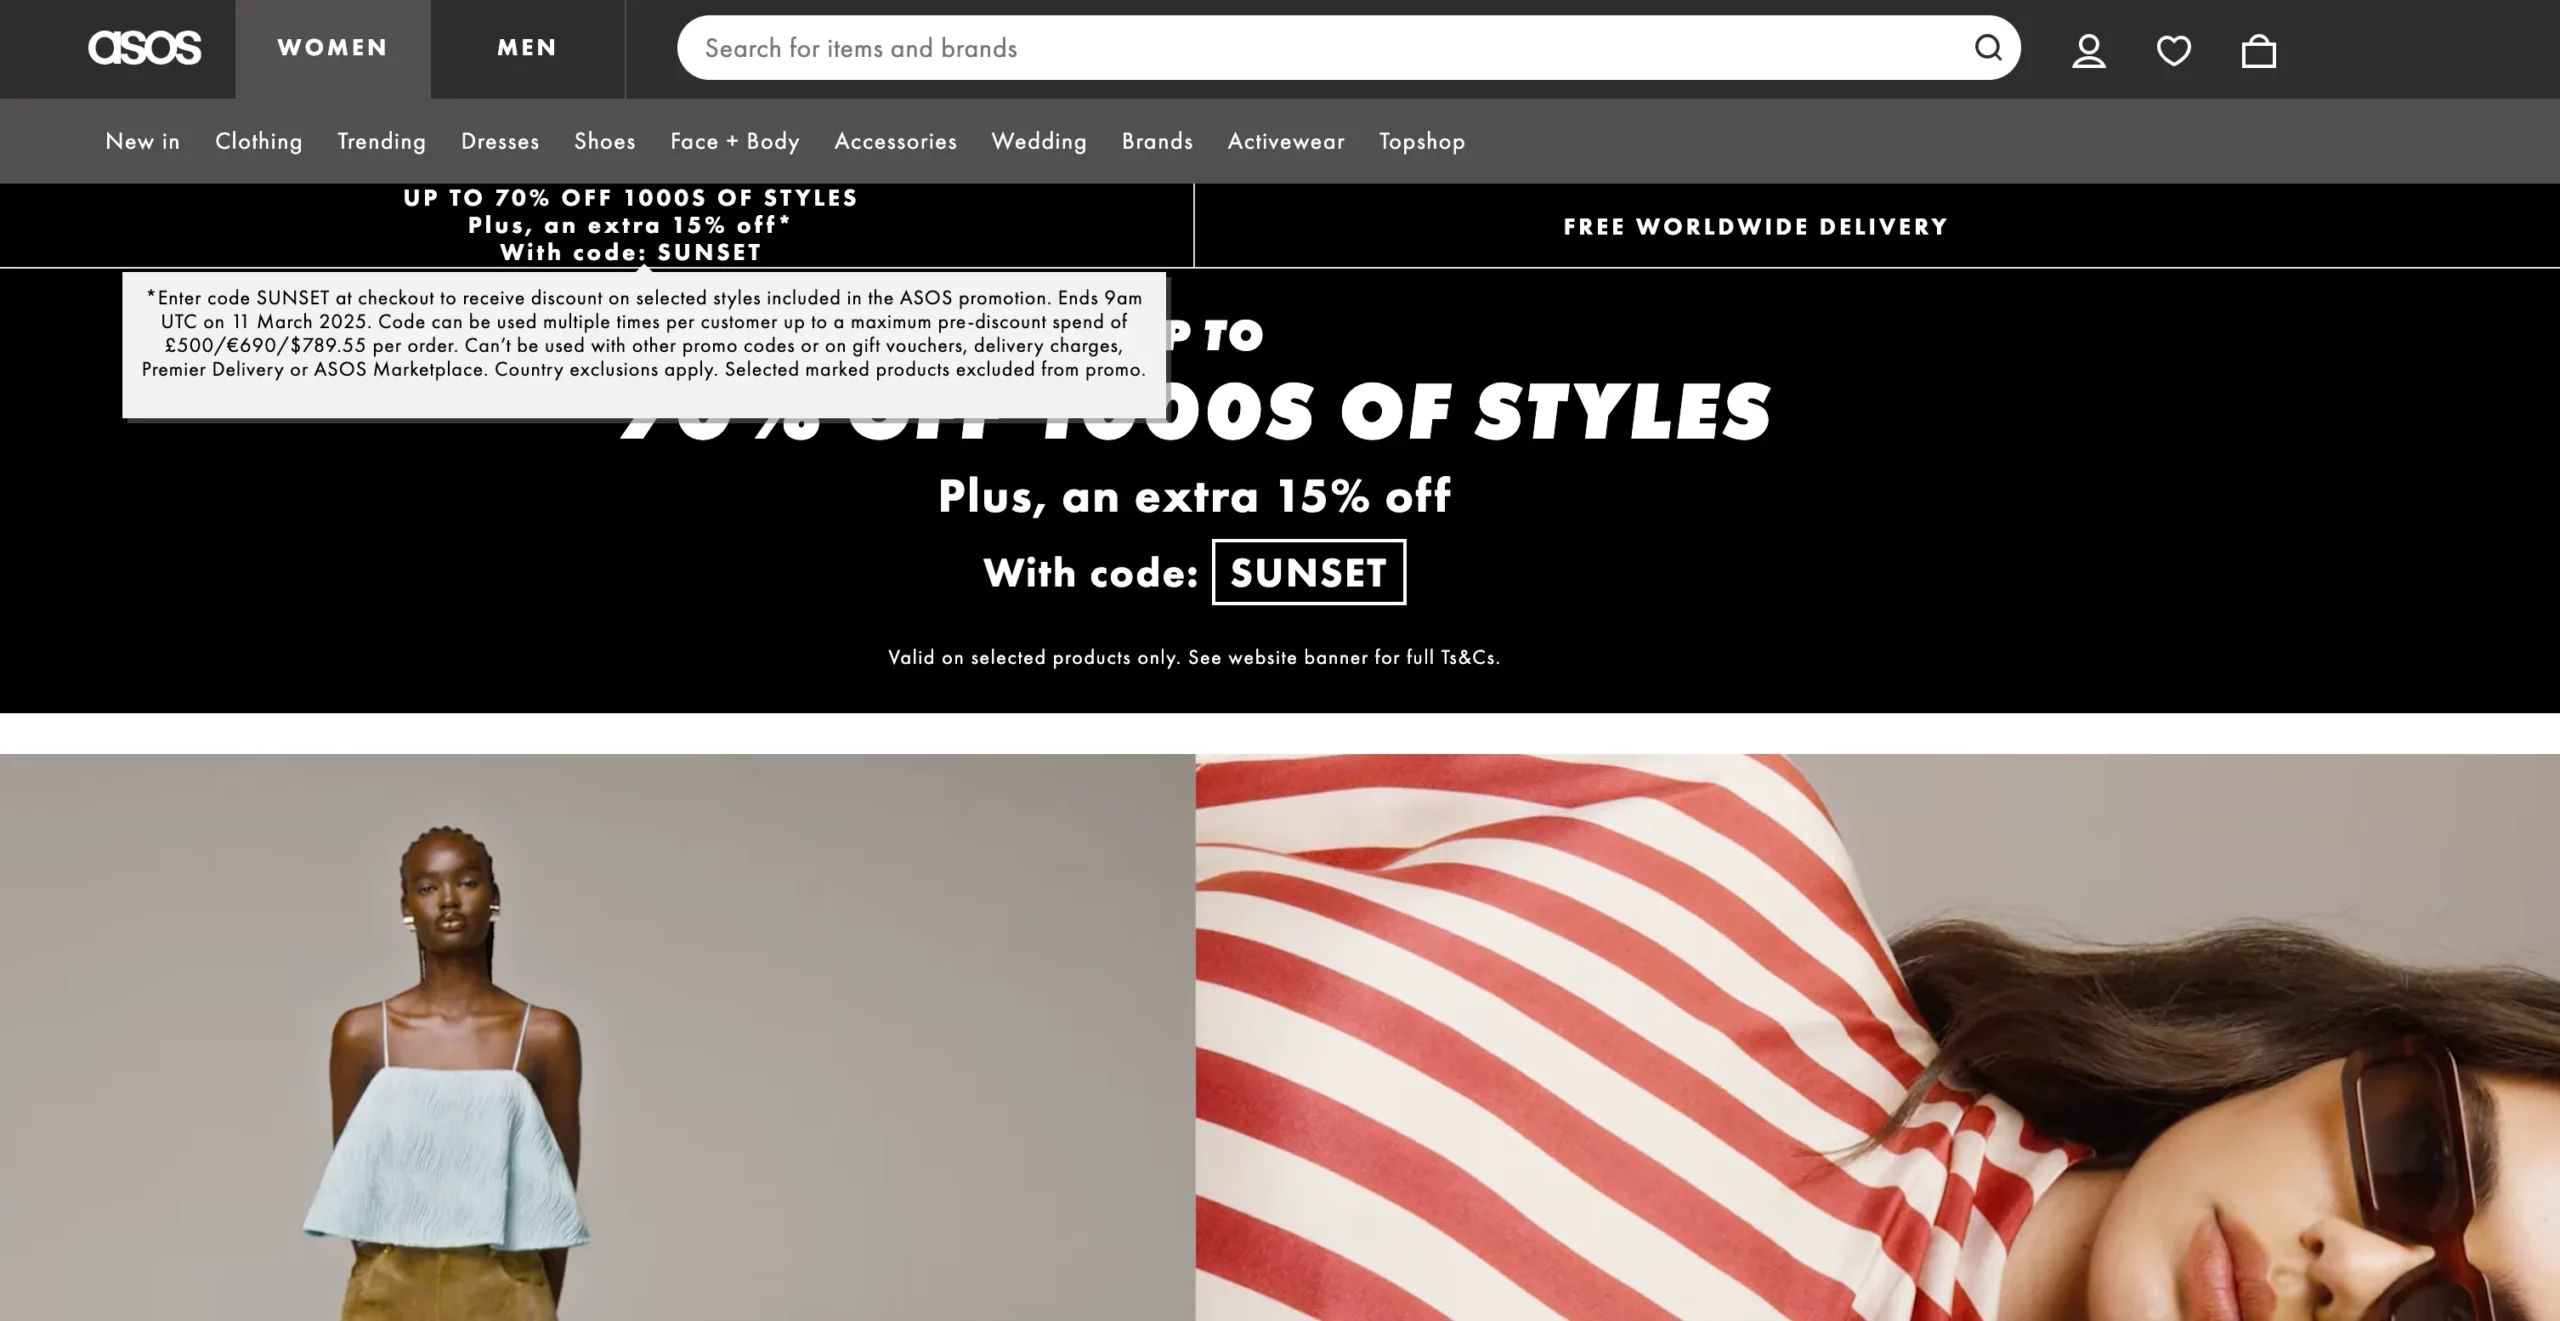
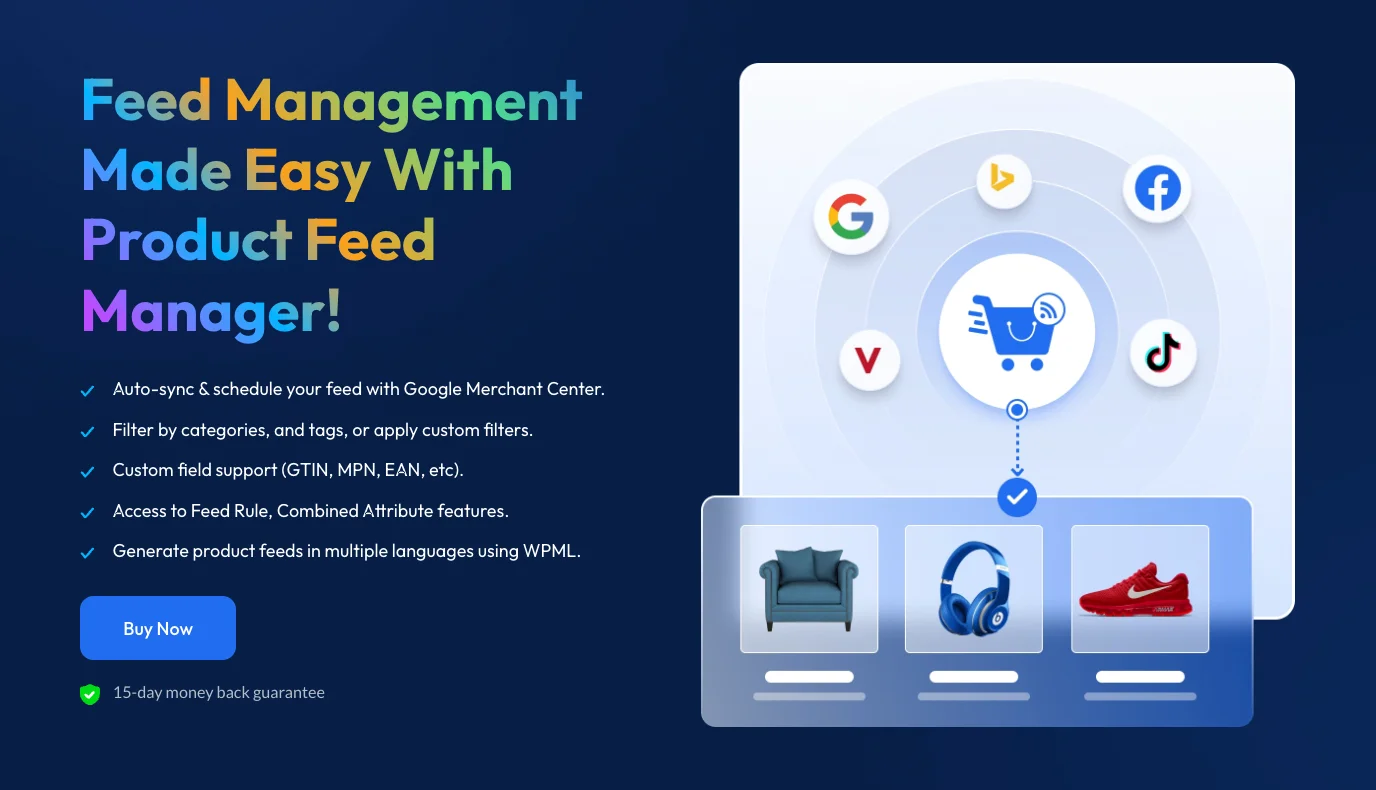

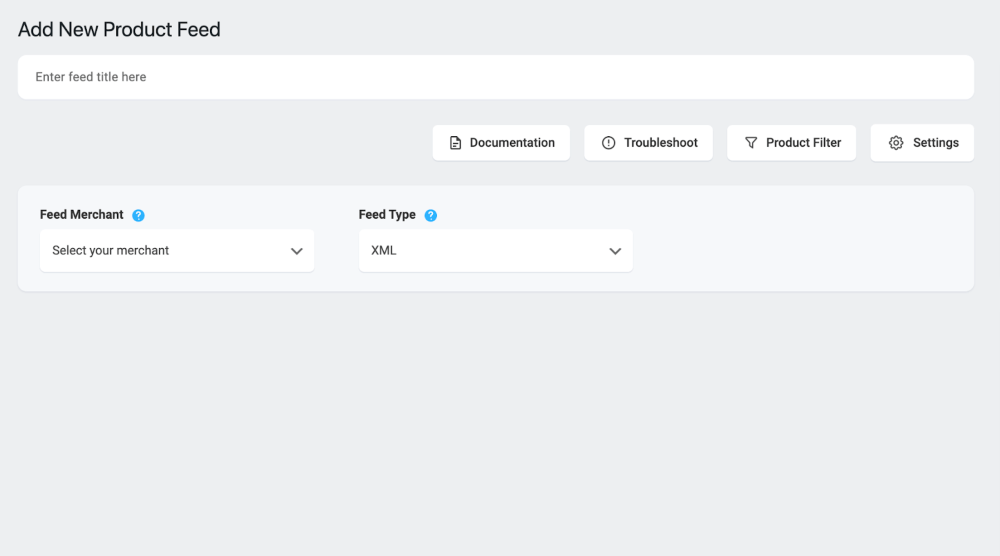
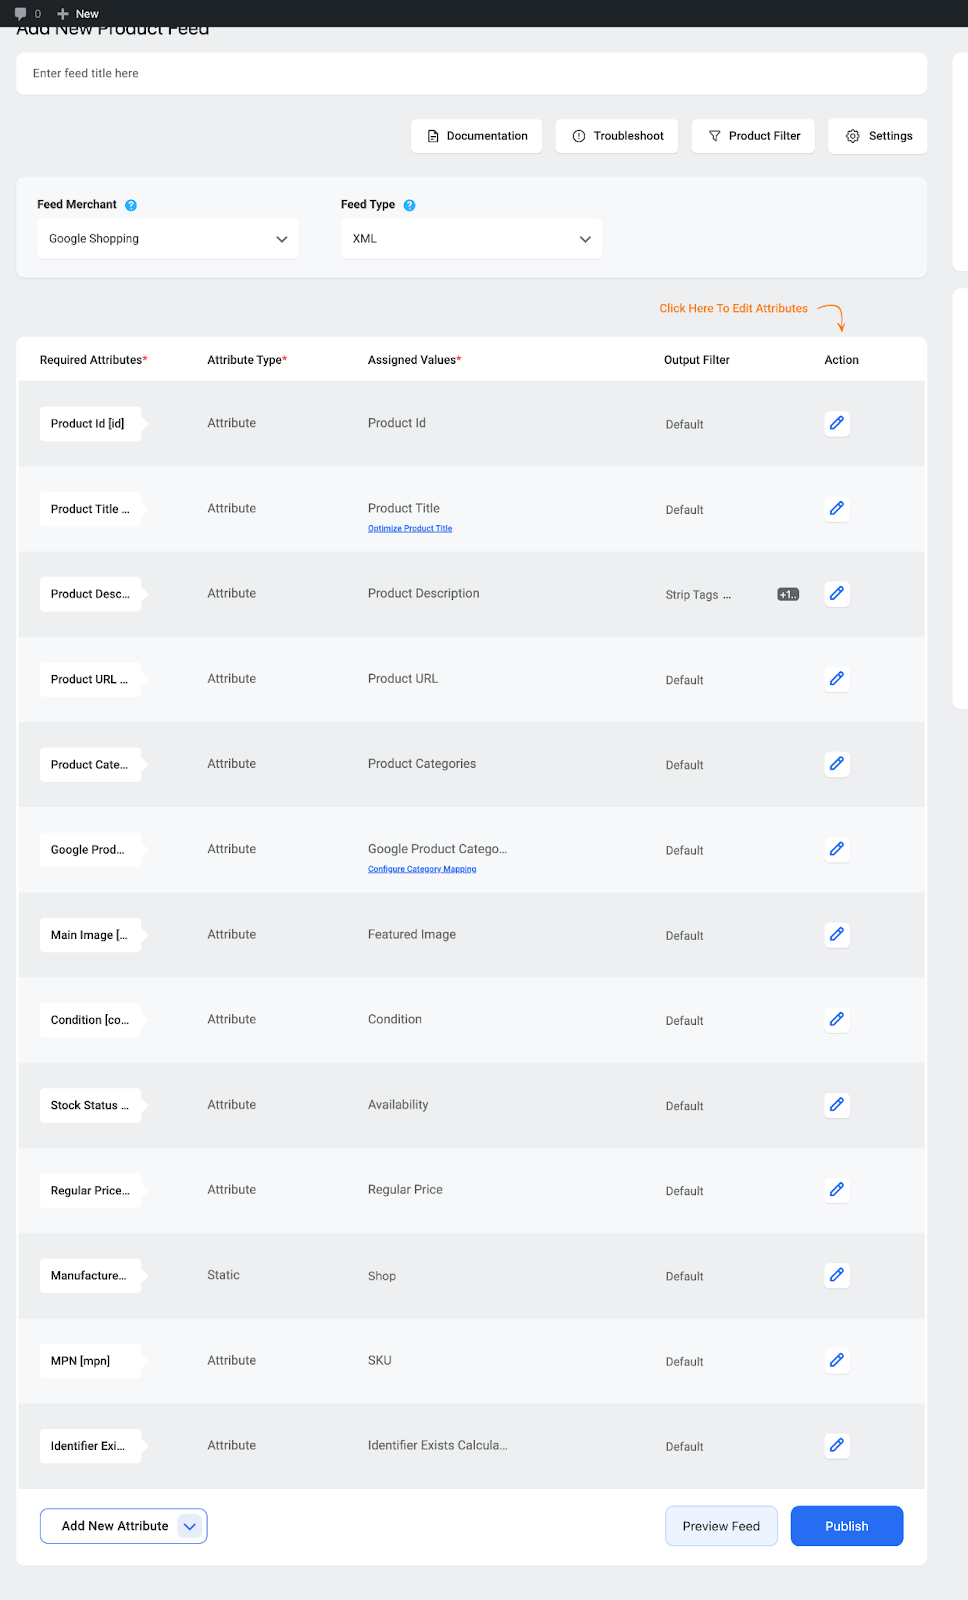


![Big Update! The Revamped Product Feed Manager is Here! [ Simplified Mapping, Advanced Controls, Faster Feed Generation & More] 8](https://lh4.googleusercontent.com/pqtnxud3Qiig3gHSACEOFCHJsKswVNnlL1ibvPSh64uVBA3EG24zWcDrj6tetYo602FM3GBSiRdYwITRjlVwDts8YxZtMfE0coc8iMlNmJR-x4jbmGPoFxf2VGGKPPk2ImwN15vGQ9Nlh-l6RXeOYnw)