Categories
Guide Product Feed Manager For WooCommerce Social Media

Facebook For WooCommerce – Transfer Your Products to The Best Social Marketplace [2024]

As a WooCommerce store owner, establishing a market presence is one of the most challenging aspects that you may face. If you own a newly rising online store, then it can take quite some time to become popular.

At this point, selling products only in the WooCommerce store is surely not enough. So you can try other Strategies & Facebook marketplace is one of the effective methods to sell your products easily.

Accodrding to current data, Facebook Marketplace has over 1.2 billion monthly active buyers.

In this article, I will discuss why you must promote your WooCommerce products in the Facebook Marketplace. You can also know how to easily generate and upload your store products to the marketplace in just a few clicks.

So let’s begin.

Why Should You Rely on Facebook for WooCommerce Product Promotion?

Facebook Marketplace has grown to assist digital stores in promoting their products to a greater audience and it is one of the best social marketplaces in the world. Its super-friendly business features can highlight your brand efficiently.

The Facebook business suit allows you to manage your business profile and Facebook page & shop around the Facebook community easily. So, you can leverage the marketplace to drive traffic and potential buyers into your WooCommerce store quite smoothly.

This social marketplace allows buyers to search for products, and if your product matches their intent, it will be available for the buyer to choose from.

Suppose a buyer is looking to purchase a musical instrument. He can simply go to Facebook Marketplace and search for the desired instrument.

Search in Marketplace - Facebook for WooCommerce

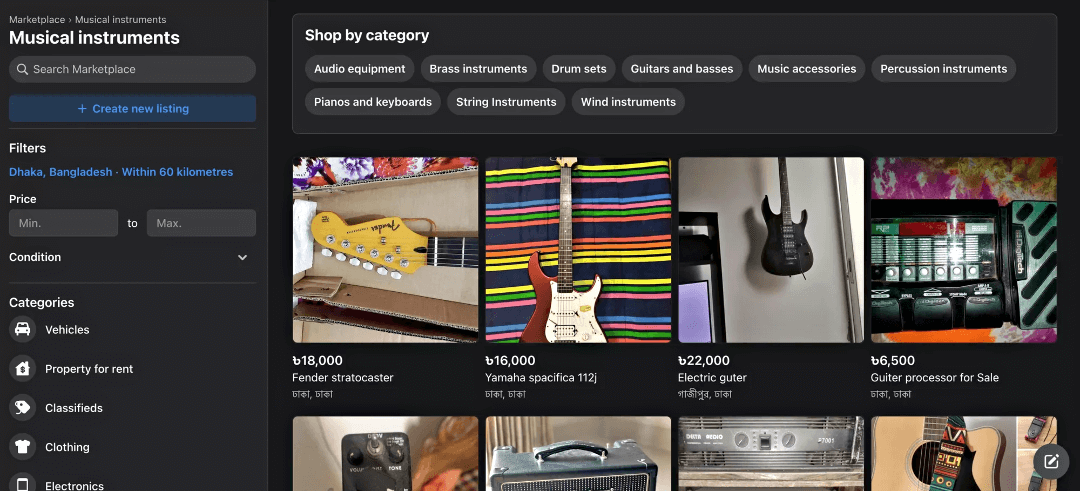
If the buyer clicks on the product, you can set it up to take the buyer to your Facebook shop page or your website.

The main difference between selling products only on a Facebook page and selling products from your WooCommerce to the Facebook marketplace is that you will get more trust from the people.

A buyer tends to order more from a business with its Brand value than buying from a private seller on Facebook. So having an up-and-running website is crucial if you want to stay in the eCommerce business for a long time.

In the next section, I will explain what you should have before creating a Facebook catalog as it is an important part of the process.

Necessary Things Before Creating a Facebook Catalog

Facebook for Woocommerce

Now I am going to explain necessary things that you need to prepare before creating a perfect Facebook catalog.

1. Website:

  • Ensure you have a functional and professional website where your products are listed. This is essential as your product catalog will link directly to your website.
  • How to Do It: Set up a website with a user-friendly design and clear product listings. Make sure the site is secure and optimized for mobile devices.

2. Accurate Product Information:

  • Gather detailed and precise information about each product, including titles, descriptions, images, prices, and stock levels.
  • How to Do It: Use a spreadsheet or a product information management system to organize and maintain accurate product data. Regularly update this information to reflect any changes.

3. Facebook Commerce Manager:

  • This is the tool where you will create and manage your catalog. It integrates with your Business Manager to provide a centralized location for your product data.
  • How to Do It: Log into your Facebook Business Manager, navigate to Commerce Manager, and follow the steps to set up your catalog.

4. Product Feed:

  • A product feed is a file that contains all the information about your products in a format that Facebook can read. This feed is uploaded to your catalog.
  • How to Do It: Create a WooCommerce product feed in CSV, TSV, or XML format. Include all necessary fields such as product ID, title, description, image URL, price, and availability. Validate the feed to ensure it meets Facebook’s requirements.

5. Facebook Tracking Pixel:

  • The Facebook Pixel is a piece of code that tracks actions on your website, such as views, adds to cart, and purchases. This data is crucial for dynamic ads and audience targeting.
  • How to Do It: Install the Facebook Pixel on your website by copying the pixel code from Facebook and adding it to your website’s header. Verify that it’s working correctly using Facebook’s Pixel Helper tool.

6. Facebook Page:

  • A Facebook Page is necessary to represent your business on Facebook and connect your catalog to your audience.
  • How to Do It: Create a Facebook Page if you don’t already have one. Fill out all relevant information, including business details, profile picture, cover photo, and contact information.

7. E-commerce Platform Integration:

  • If you use an e-commerce platform. you can easily connect WooCommerce to the Facebook marketplace. This Facebook WooCommerce integration simplifies the catalog creation process.
  • How to Do It: Follow the integration guides provided by Facebook and your e-commerce platform to sync your product data automatically.

8. Compliance with Policies:

  • Ensure your products and business practices comply with Facebook’s commerce policies to avoid disapproval or restrictions.
  • How to Do It: Review Facebook’s commerce policies and advertising guidelines, and make sure all your product listings meet these standards.

9. High-Quality Product Images:

  • Use clear, high-resolution images to showcase your products effectively. Good images can significantly enhance the appeal of your ads.
  • How to Do It: Ensure images are at least 500×500 pixels, well-lit, and showcase the product. Avoid cluttered backgrounds.

10. Accurate and Functional Product URLs:

  • Make sure each product URL in your feed correctly links to the specific product page on your website.
  • How to Do It: Test all URLs to ensure they lead to the right product pages. Correct any broken or incorrect links.

11. Inventory Management System:

  • Keep your inventory data up-to-date to avoid advertising out-of-stock products, which can frustrate customers. How to Do It: Use an inventory to sync stock levels with your product feed management system. Update the feed regularly to reflect the current stock.

12. Consistent Pricing:

  • Ensure all prices in your catalog match the currency and pricing strategy for your target market.
  • How to Do It: Verify that prices in your product feed are accurate and consistent with those displayed on your website.

13. Permissions and Roles:

  • Assign the right roles and permissions to team members to manage the catalog efficiently without compromising security.
  • How to Do It: In Business Manager, assign roles such as admin, editor, or analyst to relevant team members. Control access based on their responsibilities.

14. Customer Support Readiness:

  • Be prepared to handle customer inquiries and support requests that may arise from your product listings.
  • How to Do It: Set up a system for managing customer messages and comments on your Facebook Page. Train your team to respond promptly and effectively.

15. Analytics Setup:

  • Set up analytics tools to track the performance of your catalog and ads, helping you make data-driven decisions.
  • How to Do It: Use Facebook Analytics and other tools like Google Analytics to monitor key metrics such as click-through rates, conversions, and sales.

By following these steps, you’ll be well-prepared to create a Facebook Catalog that enhances your advertising efforts and helps you connect with potential customers more effectively.

Having said all that, you still have to upload your product data to the Facebook marketplace.

Now, manually adding products from WooCommerce to your Facebook marketplace can be quite frustrating. But there is an easy way to upload all of your products into Facebook for WooCommerce in just a few clicks.

Product Feed Manager for WooCommerce – Facebook Product Feed Generator

Product Feed Manager for WooCommerce (PFM) is an extension specialized for WooCommerce store owners who want to promote their products in other online marketplaces, including the Facebook Marketplace.

This tool will let you generate a product feed file in the right Facebook Catalog format with just a few clicks. Then, you can simply upload it to your Facebook for WooCommerce in the commerce center to list all of your products in the Facebook Marketplace in just a few minutes.

Now, yes, you will get some Facebook for WooCommerce plugins in WordPress that do a similar function, and some may even have more active installations.

But, what makes PFM unique is its super simple UI. You can start using the plugin and generate a Facebook Catalog feed with as low as 4 clicks. And if you have certain customized data in your store, you will still need as little as 3 minutes to configure and generate a perfect Facebook product feed.

Since you are running an eCommerce shop, you do not have a lot of time on your hands. The faster you can start promoting your products, the sooner you make money. That is why this tool is designed to save you time by uploading products on Facebook for the WooCommerce store.

You do not need to learn about the Facebook Catalog feed structure or format, and you do not need to spend hours configuring the feed generation. The plugin will lead you to achieve it real quickly.

Now, let’s take a look at how you can generate a product feed with all your WooCommerce products to upload to the Facebook Marketplace.

How to Quickly Generate Your Facebook Product Feed with WooCommerce Products

First, make sure you have the Product Feed Manager for WooCommerce installed and activated in your WooCommerce store.

Then, follow the two steps below to generate a Facebook product feed with your WooCommerce products.

Step 1 – Create A Product Feed

Once the plugin is activated, on your dashboard menus, you will find the option Product feed.

Hover on it and click on ‘Add New Feed’, and it will take you to the following page:

Add New Feed - Facebook for WooCommerce

Here, first set a feed title.

Then choose the Feed Merchant as Facebook.

Select Feed Merchant -  Facebook for WooCommerce

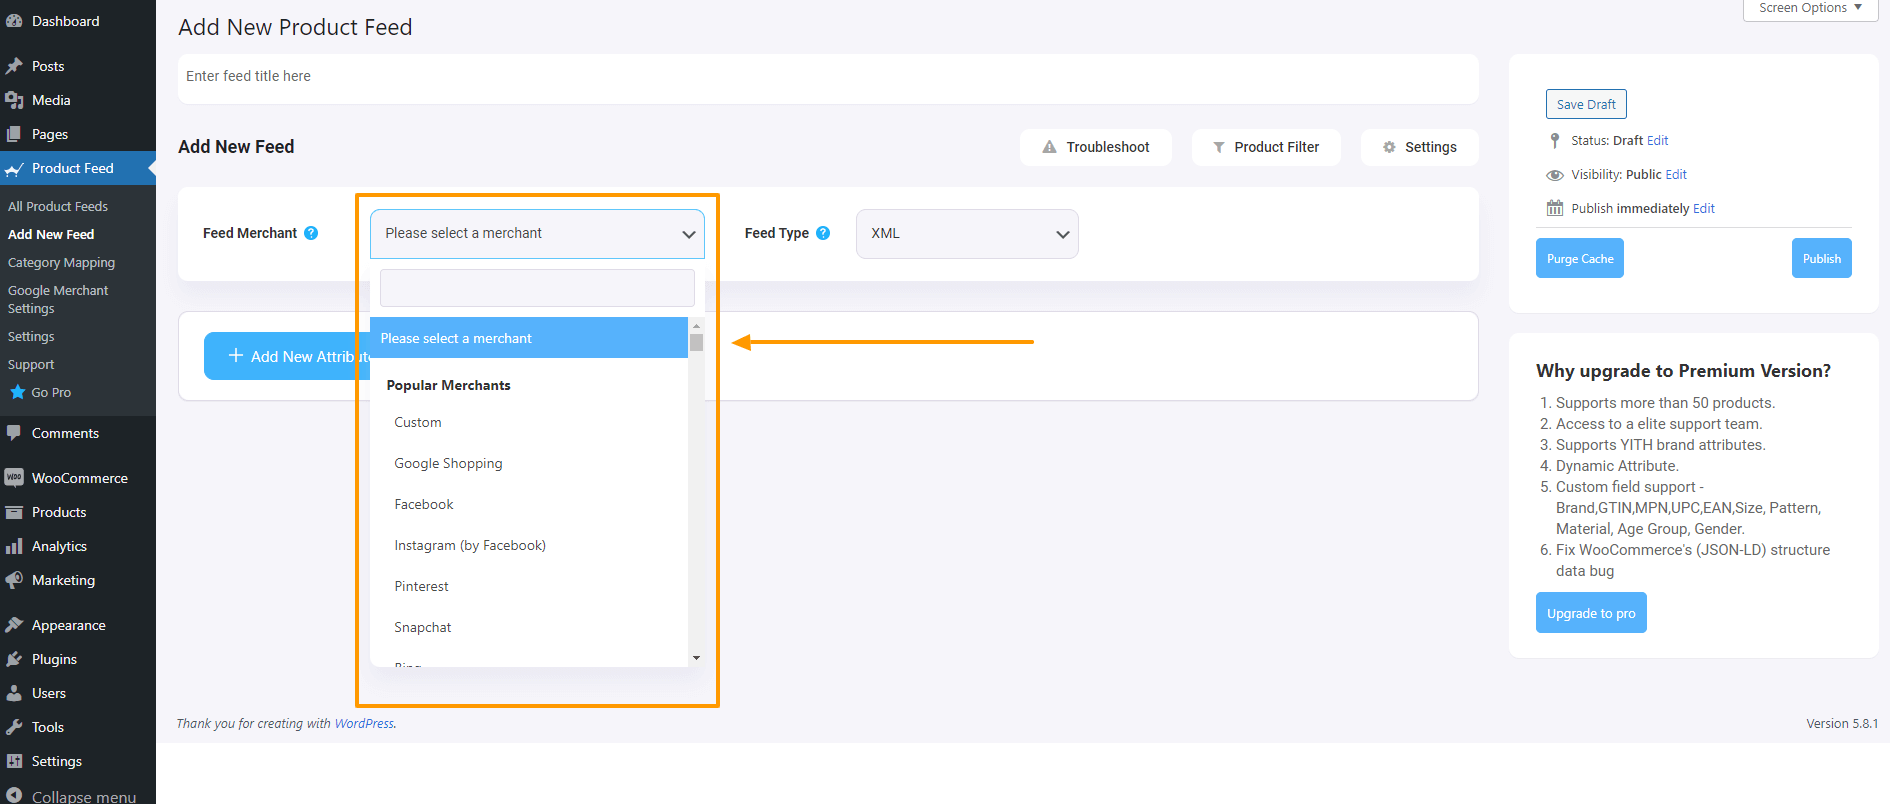
It will then load all the fields that will be included in your product feed for each of your products.

product feed generator - Facebook for WooCommerce

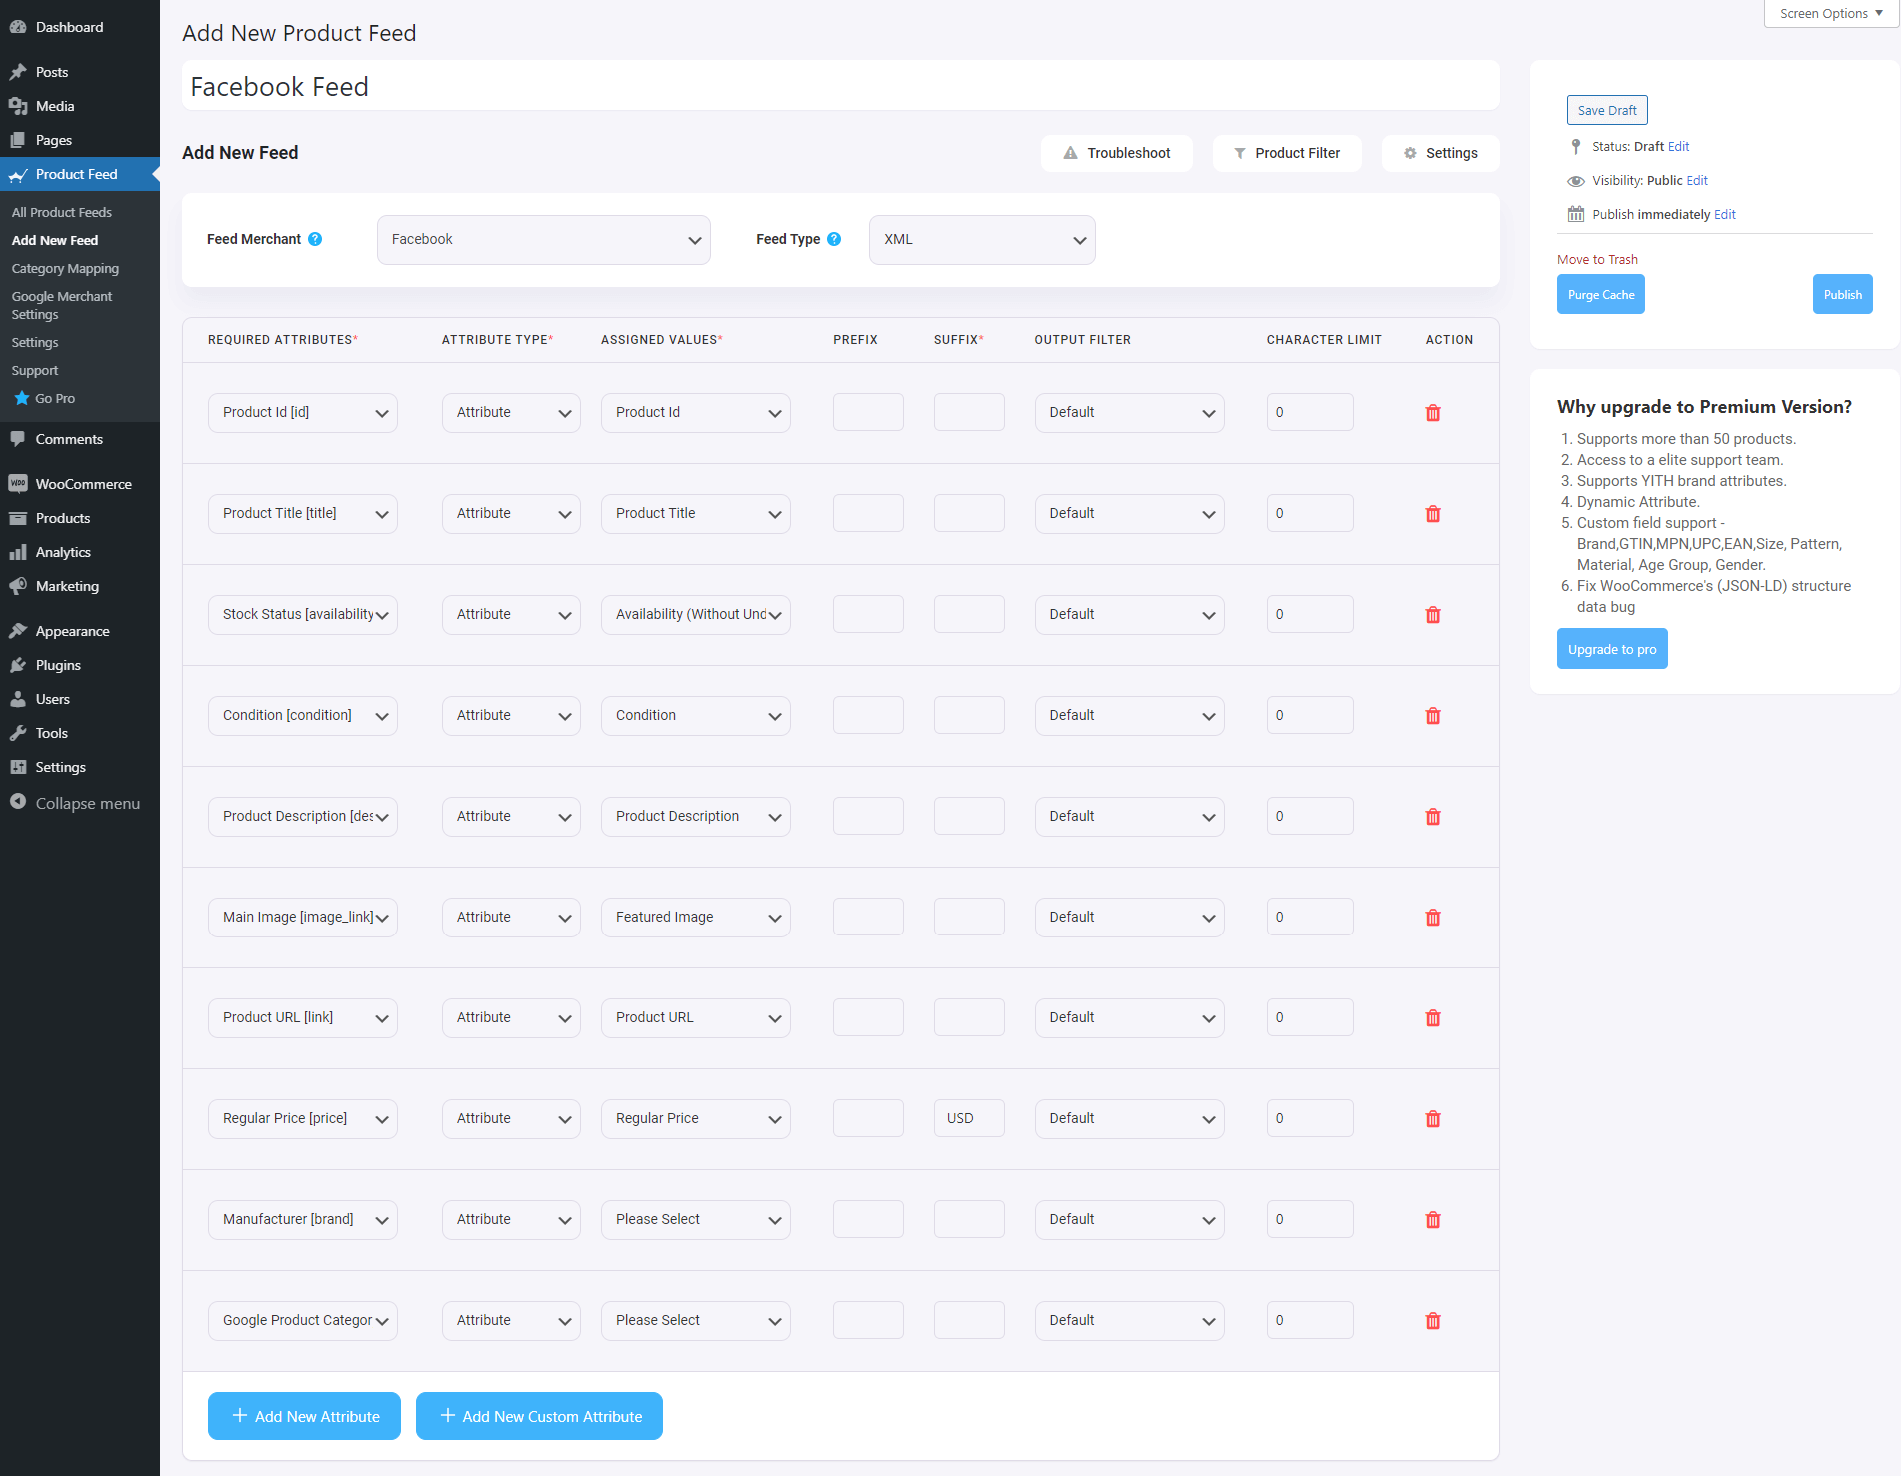
Step 2 – Configure Your Facebook Product Feed

You will notice that almost everything is already configured. All you have to do is assign the right values for the Manufacturer/Brand, and the Google Product Category

Configure required attributes -  Facebook for WooCommerce

– Assigning The Manufacturer/Brand:

This should be the Brand name of the product you are selling. If you are the manufacturer, you can set the type as Static and input your company name here.

If you have different brand names for different products, you will have to save the value in a custom field or product attribute and then use that value here.

**You can also use a brand plugin, which will make it easier to assign and use brand names.

– Configuring the Google Product Category:

Facebook Marketplace has its own set of categories (that match Google) that, most often, don’t match the categories in your store. But you do not have to change it in your store. You can simply use the category mapping feature to set up the mapping and use it as the value here.

You can further customize the feed if you need to use Product filters, a few basic feed settings, auto-update intervals, and feed rules. Normally, they are already configured in an optimized way for the Facebook Marketplace.

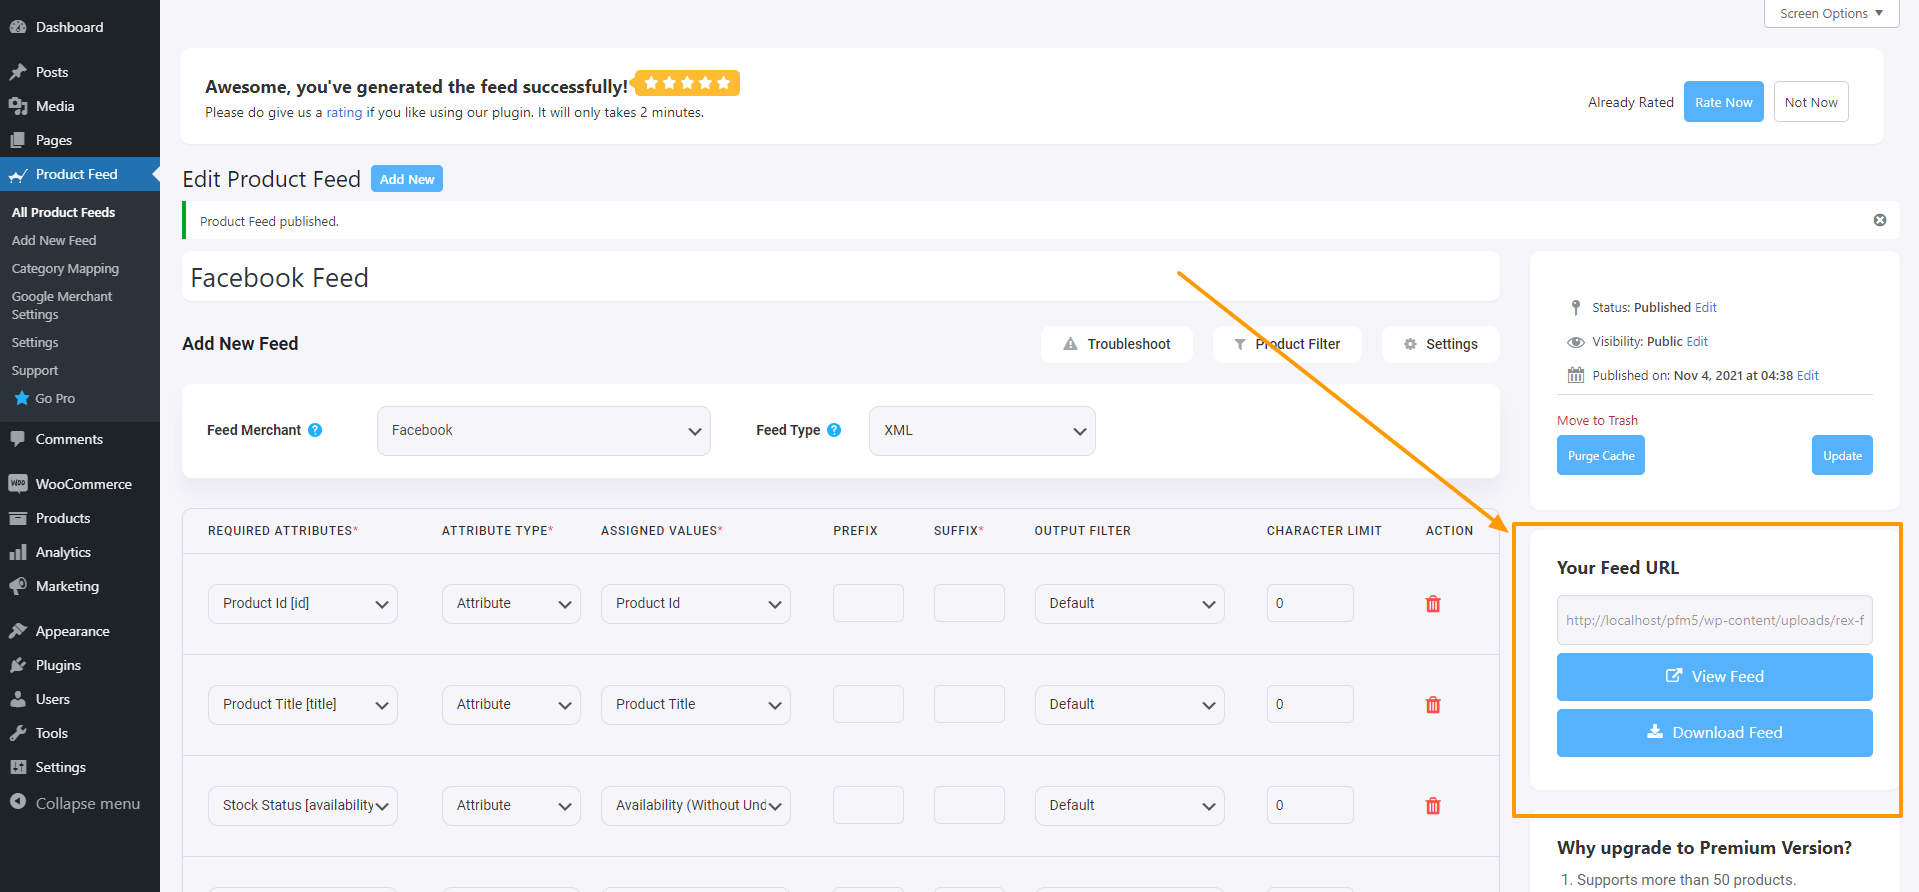
Once you have configured the feed, simply click on the Publish button on the right, and the feed will be generated in seconds.

And that’s it. You have successfully generated a product feed for the Facebook Marketplace. You will be able to collect the feed link or download the feed file from the right side.

product feed generated -  Facebook for WooCommerce

How to Upload Your Product Feed to Facebook Commerce Manager

Once you have generated the product feed, it’s time to get your WooCommerce products on the Facebook marketplace.

Before you do, it’s always best to create a Facebook business page if you want to leverage more exposure from Facebook for WooCommerce. You may read this guide to create a Facebook business page if you do not have one already.

Simply follow the steps below.

Step 1 – Create A Catalog

  1. Login to your Facebook account and access the Facebook Commerce Manager.
  2. Select your preferred way to sell your products on Facebook. Here, select the ‘Create a Catalog’ option. Then click on ‘Get Started.’
Commerce manager catalog -  Facebook for WooCommerce
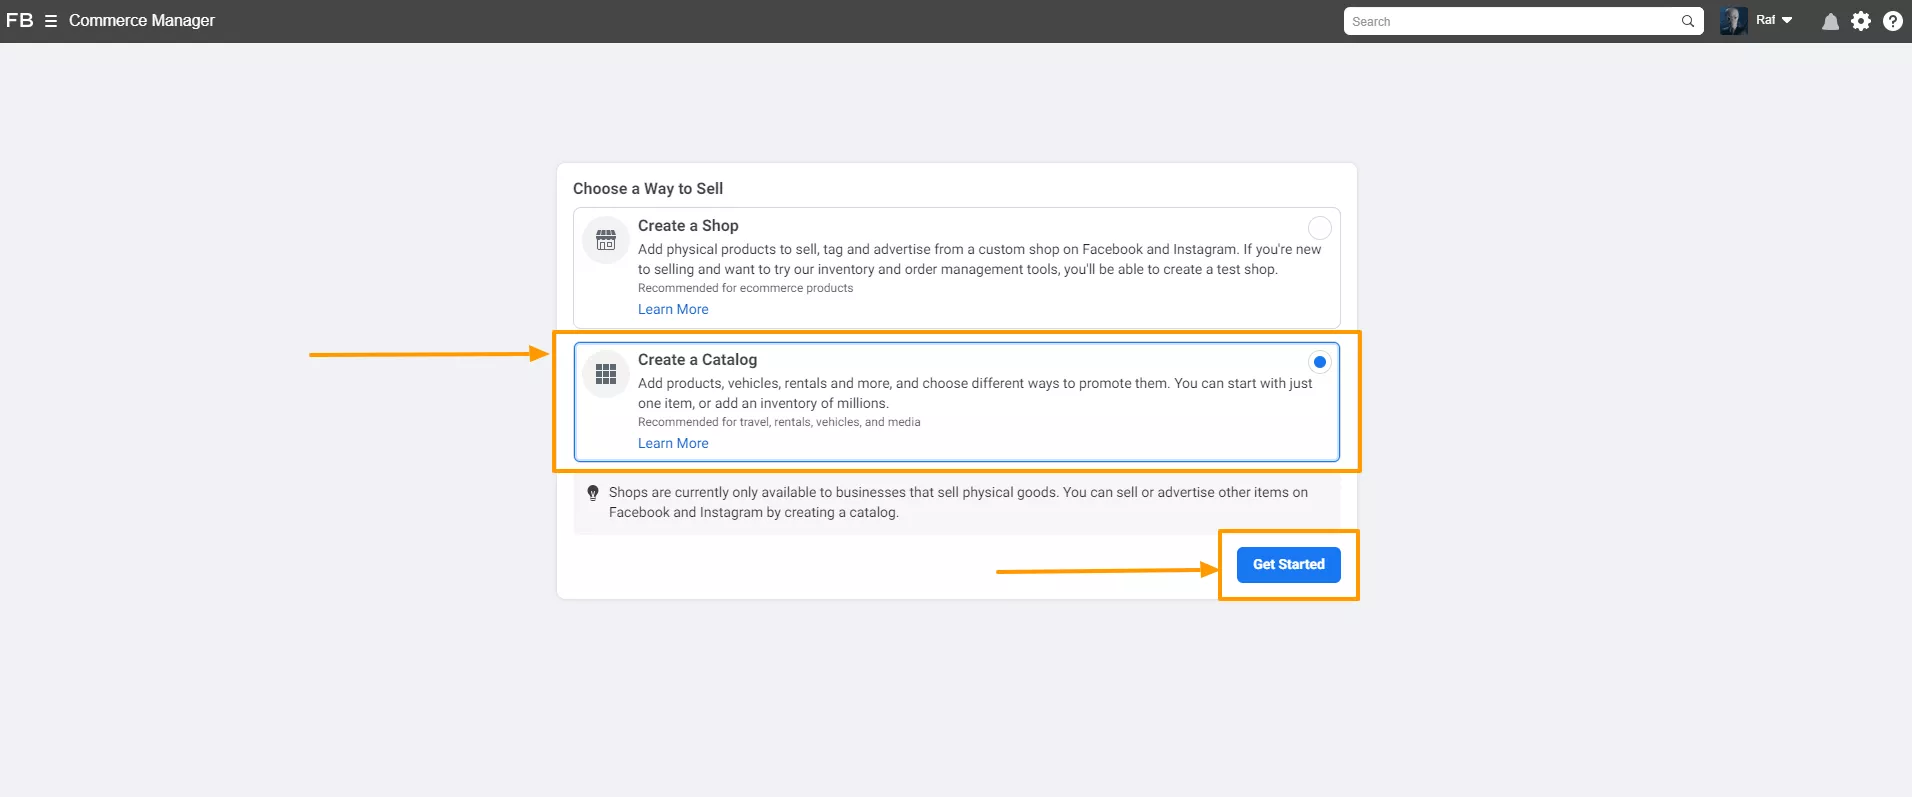
  1. Now, choose your catalog type.
Select your catalog type -  Facebook for WooCommerce
  1. Next, Select Upload Product Info and click on the ‘Create’ button.
Create Catalog -  Facebook for WooCommerce
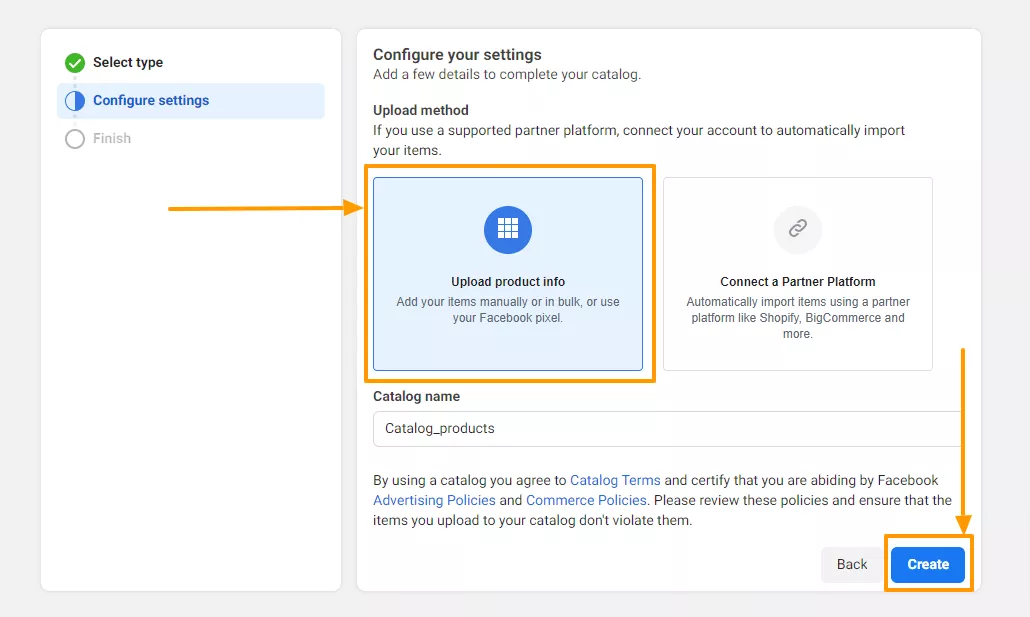
  1. Then click on finish, and it will redirect you to your Facebook Commerce Manager Dashboard.

Step 2 – Upload Your Product Feed to The Facebook Marketplace

Now that you have the Catalog prepared, you are ready to upload your products on the Facebook marketplace for your WooCommerce store.

  1. On your Commerce Manager menus, you will see a new menu called Catalog. Click on it, and then click on Data Sources.
  2. Then select Data Feed.
  3. Here, you will get three options – File Upload, Scheduled Feed, and Google Sheets. Choose Scheduled Feed.
  4. Then you will get the option to provide the link to the feed file. Earlier, when you generated the feed in your WooCommerce store, it gave you a feed link. Copy that link and paste it here.
  5. Now, choose a suitable time for the schedule fetch and click on Next.
  6. And finally, give a name to your catalog feed, choose the currency for your store, and click on Upload.

And that’s it. Your feed will be uploaded in a few minutes to the Facebook Marketplace, which you will be able to view in the Items menu under Catalog.

Key Benefits of Setting up Facebook Catalogs for WooCommerce

Now I will tell you some key benefits of setting up your Facebook catalog for WooCommerce so that you can be inspired more.

  1. Easy Integration: You can easily integrate WooCommerce with Facebook. It allows for automatic syncing of product information. It also saves you time and reduces manual data entry errors by automatically updating your Facebook Catalog whenever changes are made in WooCommerce.
  2. Enhanced Product Visibility: Products in your catalog can be featured across various Facebook and Instagram placements. It helps you to increase exposure and potential reach to millions of customers on these platforms.
  3. Dynamic Ads: Dynamic ads use your catalog to show personalized products to customers based on their behavior and interactions. It boosts your conversion rates by targeting buyers with products they’ve shown interest in, leading to higher ROI.
  4. Improved Shopping Experience: Customers can find and browse products directly from your Facebook and Instagram. It provides an easy shopping experience, reducing friction and making it easier for them to purchase.
  5. Automated Inventory Management: Syncing your WooCommerce store with Facebook ensures real-time inventory updates. It prevents advertising out-of-stock products, reducing customer frustration and potential lost sales.
  6. Advanced Analytics: Track performance metrics of your products and ads through Facebook’s detailed analytics tools. It enables data-driven decisions to make optimized product listings and advertising strategies.
  7. Multi-Channel Sales: Extend your sales channels by listing products on both your WooCommerce site and Facebook/Instagram. It helps to diversify revenue streams and reaches a broader audience.
  8. Easy Product Management: You can easily manage product listings, descriptions, prices, and inventory from a single platform. It simplifies catalog management, saving time and effort.
  9. Retargeting Opportunities: Using data from the Facebook Pixel helps to recapture your potential lost sales and increases conversion rates.
  10. Cost-Effective Advertising: Dynamic ads and personalized targeting are often more cost-effective than traditional advertising. It maximizes your budget efficiency by focusing on high-intent users.
  11. Enhanced Customer Insights: Gaining valuable insights can help you tailor marketing strategies and product offerings to better meet your customer needs.
  12. Increased Engagement: Engaging product posts and ads can attract likes, comments, and shares. It boosts your brand visibility and engagement on social media platforms.

By setting up Facebook Catalogs for WooCommerce, you can significantly enhance your e-commerce operations, improve customer experiences, and drive more sales through advanced targeting and easy integration.

Conclusion

In conclusion, Facebook Marketplace for your WooCommerce store can significantly enhance your product visibility and boost sales.

Following the steps outlined, you can easily transfer your products to Facebook. It allows you to reach a broader audience and simplify your sales process.

The integration offers numerous benefits, including dynamic ads, automated inventory management, and advanced analytics, all of which contribute to more efficiency & effectiveness.

For an effortless transfer process, use the Product Feed Manager to simply generate and upload your WooCommerce products to Facebook Marketplace with ease.

** FAQs **

How can I increase the visibility of my WooCommerce products on Facebook Marketplace?

  • To increase visibility, ensure your product titles and descriptions are clear and keyword-rich. Engage with your audience through your Facebook business page and use targeted ads to reach potential buyers. Additionally, leveraging Facebook’s algorithm by frequently updating your product listings can keep your store relevant and visible.

What should I do if my product feed fails to upload correctly?

  • If your product feed fails to upload, double-check the feed link and ensure it is formatted correctly. Also, verify that all mandatory fields, such as product titles and categories, are filled out. If issues persist, consider reaching out to support both WooCommerce and Facebook Commerce Manager for assistance.

How often should I update my product feed on Facebook?

  • It’s beneficial to update your product feed regularly, ideally daily, to reflect any changes in inventory, pricing, or new product additions. This keeps your listings accurate and up-to-date, improving customer trust and satisfaction.

Can I customize my product feed to match Facebook’s requirements?

  • Yes, you can customize your product feed using the Product Feed Manager for WooCommerce. Map your WooCommerce categories to Facebook’s, assign brand names, and adjust other attributes to ensure compatibility. This customization helps in displaying your products correctly on Facebook Marketplace.

How can I measure the success of my product listings on Facebook Marketplace?

  • You can measure success by tracking key metrics such as click-through rates, conversion rates, and sales figures through Facebook Commerce Manager. Additionally, utilize Facebook Insights to monitor engagement and adjust your strategy based on performance data to continually improve your listings.
Categories
Guide Social Media

How To Revive Old Post To Increase Blog Traffic [2024]

Social Media Marketing Strategy
Revive Old Post To Increase Blog Traffic

If you already have a blog site for a while, then you probably have a lot of articles posted. Think about the amount of money and resources you have spent on so many good contents in the past that are now lost in your website’s archives.

New visitors to your website hardly ever go to very old posts. You might have posted amazing guides, infographics, or knowledgeable articles on topics that are still valuable.

But they are probably getting forgotten since you didn’t update them, or just because you have so much more content posted afterward.

Here’s the thing. Your old posts can still be refined and valuable. You may start re-sharing your old posts via social media and get an amazing response.

To do this you need to

Now let us learn how to do all these in the best way possible, step-by-step.

Identify Potential Old Blog Posts

Identify Potential To Revive Old Post

Follow the steps below to identify the most potential old blogs.

Step1 – Find Old Posts With Good Keywords

  1. Check back through your archives and round up all of your old blog posts (that are no longer getting traffic).
  2. Separate the ones that are evergreen, i.e., knowledgeable for everyone. For example, listicles of a few best plugins, or guide to content marketing, and similar posts.
  3. You can use special tools to detect any old posts on your blog. For example, one such tool is Website SEO Checker by Sitechecker.
  4. Now, list their keywords on a document and use an SEO tool to find out which keywords among them are currently ranking high on SERPs. (This is because, you will be reviving them not just for Social Media, but also for normal SERPs.) You may use good tools such as Ahref or SEM Rush.
  5. Rearrange the blog topics and URLs on a document, based on the highest performing keyword to the lowest reasonably performing keyword.

    **Not all of your old posts had good keywords, and some of the keywords used back then are no longer usable.

You can immediately consider the top ten blogs with good keywords for reviving.

Step 2 – Separate Old Posts Based On Collaboration Opportunity

Once you separate the blogs that are in the top ten in terms of keyword popularity, the next is to identify potential blogs based on collaboration opportunities from the remaining blogs.

From these blogs, you will separate the ones where you have some opportunity to collaborate for better results.

By collaboration opportunity, I mean getting backlinks.

Let me explain.

Let’s say you have written a blog on “10 Best WooCommerce plugins in WordPress”. You can surely update it with the latest best plugins to start getting traction again.  

However, you can do something even better.

You can reach out to some of the latest good WooCommerce plugins, and offer them a collaboration.

You can offer a company to include their plugin(s) on this list with a “do follow” link to their product page, while they will also give you a “do follow” link to your product(s) on one of their articles.

“The best way to build up the online visibility of your business or website is by building relationships with your industry peers. Links will naturally occur as a result of these partnerships.”

Donald Chan, founder of MarTech Wise
Revive Old Post for Collaboration Opportunity

Now, many will say “backlink exchange” can be penalized by Google. But not if you do it smartly, especially when these premium links offer a solid ROI, enhancing your site’s value without direct link exchanges. Remember, quality always prevails over quantity in such strategies.

You will be penalized if they give a backlink to the same article of yours, on which you gave a backlink to them, i.e., a direct link exchange.

Let me explain with an example.

Suppose you have a post, Article 1. And another site has a post, Article 2.

Now, let’s say you gave them a backlink for their post, Article 2, on your post, Article 1. And they in return gave you a backlink for your post, Article 1, on their post, Article 2.

This is a direct backlink exchange and will, most likely, be penalized by Google.

However, if it’s not a direct exchange, there is no penalty for it.

Let’s say you have a post, Listicle 1, and a product page, Product 1. And another site has a post, Listicle 2, and a product page, Product 2.

So you can include their page, Product 2, on your post, Listicle 1. And in return, they can include your page, Product 1, on their post, Listicle 2.

Here, there is no direct exchange of links, and is a good collaboration.

So go ahead and separate the blogs with a potential collaboration opportunity.

**Even if you do not do a direct link exchange, frequent exchange of links with the same site is also seen as direct promotion and disliked by Google. So try not to exchange more than 2 links with the same site in a month. 

**Also many do collaborations with affiliate links. Keep in mind, Google can trace affiliate links and often penalizes sites with too many affiliate links in them. So do not create any posts with too many affiliate links in them.

Step 3 – Find Old Blog Posts Based On Potential Main Content

Now, for the remaining blogs, you need to identify potential blogs based on lucrative content.

  1. Open each blog and give a quick read.
  2. Find out if there is more opportunity with this article by improving keywords and content.

    First, check if it is possible to re-write it for a similar keyword that performs above average. In this case, you can be creative and think of a couple of relevant keywords yourself and then check if they rank higher on SERPs, compared to their current keyword.

    You can also directly get suggestions from SEO tools. For example, Ahref gives you more keyword ideas that are ranking high for any keyword term you analyze. So you may choose one from there if it sounds relevant to your content.
  3. It’s also best to choose articles among these that will need the least amount of research when re-writing, i.e., you can write about it on your own, without much help from other similar contents or SERP research.

From here, choose around 5 articles that seem potential to rewrite into good content.

So now, you will have around 15 to 20 blogs on your hand that you can work on to revive.

**I am assuming you have many articles, but it’s also okay if you have fewer. Just follow the steps here. The number of blogs is not too important unless you have more than 20 old blogs to revive.

Re-work On The Selected Potential Blogs

Re-work on Potential Old Blogs

In order to revive old posts, you have to make changes to the posts.

Some people simply start sharing the old posts on social media or via e-mail and expect that this social traffic will add value to the post. But that is totally wrong.

SERPs do not rank contents that are not up-to-date. Even if you get a sudden surge of traffic through social media, Google will still crawl and compare your post with old crawling data. And if the content has no change, then the post will still be ranked low.

  • First of all, Google values referrals and new backlinks.
  • Second, Google wants to present the latest data that are still valuable, to its audience. So along with backlinks, Google also values updates.
  • Third, Google values organic traffic over click-through/referred traffic from another site or social site.

So it is a must that you put some effort into revamping your old posts.

Here are a few things you can do to get better results out of each post.

The old featured image you used is probably no longer trendy in terms of design.

Create a new featured image with improved design.

Changing the featured image with the latest trendy design will give you the following advantages:

  • This will be an update that SERPs will see as a major change.
  • A newer design will be more engaging with readers.
  • The post will be more attractive on social media (if you do not create a separate image for social media).

2. Work on Improving Post Permalinks (URLs)

With time, the trend for setting a permalink has also improved.

Here are a few things to do:

  1. Check and remove any counting numbers or years from the permalink.

    For example, let’s say you have a post with the permalink:

    https://www.yourwebsite.com/10-best-checkout-plugins-2011

    Here, “10” is a counting number so remove it. This will allow you to add more than ten plugins to the post if you want to, thus removing the limit.

    Also “2011” indicates which year this is for. Remove it so that you can rework on the post every year with improved data. Thus carrying the post value along the way.

    No need to make new posts for the same topic every year.
  2. Nowadays, we prefer that the shorter a permalink, the better. So, remove any extra text on the permalink that is not necessary to indicate what this post is about and that is not part of the keyword.

    For example, let’s say you have a post with the keywords, “SEO tactics” and permalink:

    https://www.yourwebsite.com/the-best-seo-tactics-that-you-never-knew

    Here, at first “the” is not necessary. Any post with “the” at the beginning, do not include it on the permalink.

    The “that-you-never-knew” part was simply a hook, used to attract readers, in the title. It is not necessary on the permalink.

    So you may keep the “best-seo-tactics” portion. You can also remove the “best” from the link if you want and it won’t have any effect as long as the keyword is available on the permalink. But it’s best to keep one or two words along with the keyword to make more sense.

    Also, you may exclude any helping words or unnecessary prepositions in the link. For example, instead of “best-plugins-in-wordpress”, you may remove “in” and set the permalink to “best-plugins-wordpress”.
  3. Any changes you make to the permalink will mean that it will be considered as a new post by SERPs, which is a bit bad since it will lose all the value it had in the past. So it is best to use a 301 redirection from the old link to the new one.

3. Update the Content with the Latest Data

Update the content

Since this post was lost, there is a possibility that the data in this post could be back-dated or obsolete.

So here’s what you should do to improve the content:

  1. Separate all headings within the post. Search on Google with each heading and find out the current data available. Read a few articles and collect important points.
  2. Compare the data on those articles with yours and find out
    • What data you have, that has changed over the years, i.e. back-dated data.
       
    • Any information you have, that is good but missing from the other popular posts.
    • Any new ideas that you haven’t used in your post.
  3. Use these data to create a more refined, updated content based on each section. While improving, keep in mind, you are not updating this post for your sake only; your post must be helpful to whoever reads it.

Once the content is updated with the latest data, you can be sure to get more attention from SERPs.

The structure of content matters a lot these days. People no longer like to read essays or long descriptive paragraphs.

Even if you improve your content data, if you do not restructure it, it will result in a higher bounce rate, i.e., people will leave your blog without reading most of the content.

According to SERPs, a higher bounce rate is considered as an indication that the content is either not useful, or not attractive to readers, hence bad content.

Here are a few suggestions on what you should do.

● A Small Introductory Summary

Make the introduction short but precise on what this is about, and what people will be learning from it. You can use a small section stating what they will learn after reading this article. Here’s an example:

Introductory summary

You may create bullet points to give a summary of the things viewers will learn. This part will help the reader to understand if they will find what they were looking for. You might take the help of an AI-powered chat PDF to streamline the summarization process, and quickly extract key insights and takeaways from the document.

● Table Of Content

Include a table of contents to allow readers to jump to different sections in the post.

Here’s an example of how an attractive blog may look at the beginning. You can see the summary of what a reader will learn, followed by the table of contents to jump to different sections.

Table of contents

The “table of contents” is necessary because, sometimes, a reader does not wish to read the whole post; he/she is probably looking for something specific, which is a small part of your article.

So a table of content will help the reader understand and read what he/she needs.

● Engaging Blog Structures

Apply more engaging structures such as numbered bullet points, tables, and columns. Rather than reading paragraphs, people find it easier to read bullet points.

So, create a proper mix of paragraphs and bullet points throughout the post for a better connection with readers. For example, here is a portion of an article regarding US online shops for clothing.

Good Structure To Revive Old Post
A good structure to follow to revive old post

You can see that it has a heading, a numbered sub-heading, a small paragraph, and bullet points to explain a few details.

This is an ideal structure that readers find more attractive.

● Use Tables Or Columns

Use tables and columns when listing a lot of points for a topic, or when creating comparisons. Here is an example of using tables.

Example of Table
Using tables to provide data.

● More Media Throughout

Use More Media ThroughOut. Images and videos are always more engaging than plain text. So it’s best to use more images and videos.

On top of that, you can always convert some images to video online to make them more engaging.

For every heading section, you may use an image to represent that section.

You can check out this post for learning how to create better videos for your business.

If you have a summary video of the whole post, you may include that right after the introduction or the table of contents.

Here’s an example:

Video example
Here’s how we used a video to increase engagements in the blog above.

The idea is, to try to include a media for every 300 words written. This will keep the reader more engaged. So, an article with 1200 words, technically, should have a minimum of 4-5 images.

Any section of a post that is very long, you can input one image at the beginning and one image in the middle, to avoid boring the readers.

● Avoid using dull images

 Often people take a few image elements from online, place them on a colored background, and then use that as a section image, which is a terrible thing to do.

People lose interest just because of these images.

Here’s an example:

Poor image
An example of poor image choice

This article talks about things to look at when hiring a web designer. However, the images are like the one above. You can see that there are image elements in the middle, and a green background; an image that piques no interest.

Plus, you may notice another error. The image is placed above the section heading. It should rather be placed below the section heading.

Here’s an example of how it should be:

Good Image
A Section from an article about virtual tours for real estate.

This is a section out of an article that talks about the advantages of using a virtual tour on a website for realtors.

You can clearly see the heading of the section, followed by an image that is relevant to the section, and not at all boring.

**It is not necessary for the images to be so graphical, but at least it should be relevant to the section and not completely blunt. Maybe use color gradients or at least use images that won’t repel readers.

You can also include infographics or PowerPoint slides to present statistics on the topic. to present statistics on the topic. In a later article, we will learn about the creation and implementation of infographics.

Start Re-Sharing Your Content For Traffic

Re-Sharing Your Content

Once you are ready with the new and improved content, it’s time to start working on getting traffic on it again.

So here are the steps you should follow.

1. Change the Post Date As Appropriate

Sometimes, after you have completely revamped a blog post, you may change the publish date to a recent date.

This is often a good idea for blogs that didn’t perform well for a very long time, or never performed well in the past at all.

In this case, SERPs will completely ignore any old crawling data and consider this as a new post.

So, in this case, take the following actions:

  • make a change to the permalink of the post,
  • then set a 301 redirection from the old link to the new one,
  • and follow up by changing the publish date to a recent one.

This way, in most cases, Google will still consider any old crawling value the post had in the old permalink and will consider the updated post as new content.

2. Share On Social Media To Kick-start traffic

Revive old post and share on social media

Now that you are ready with your content with a complete makeover, it’s time to start applying Social Media Marketing.

  1. First one all, follow the Effective Tactics To Optimize Social Share For Bloggers. In this way, your social shares with result in more engagements.
  2. Then follow the Tactics to Automate Social Sharing. There you will get useful social automation tactics to follow, and you will learn about a reliable social automation tool, Social Booster.
  3. Set schedules for the blogs to be shared at the right hours using the social automation tool.
  4. Reach out to influencers to make social shares.
  5. Reach out to any sites for whom you gave links, for social shares.
  6. If you have any collaboration plan then inform them right away and finalize the deal.
  7. Boost the post if it’s evergreen content.
  8. About 2-3 days after your social share, e-mail it out to your subscribers.
  9. Post a summary video of the blog on Youtube and put the post link in the video description.
  10. One week after sharing on social media, share the Youtube video on social media and add the post link in the caption.
  11. Schedule automated retweets (on Twitter) of the post after every week, for 3 weeks.
  12. Make sure to reply actively to any comments.

And that’s it. Follow this procedure for every post you revive. Within a couple of months, your old posts will start getting good organic traffic, as a result of your patience and hard work.

Final Thoughts

Social Media Marketing is a broad topic, and one of its parts is to revive old posts and share them on social media.

If all the steps mentioned here are followed properly, then you can easily rely on social media to help you revive old posts with good traffic.

In the next guide, we will discuss how to create videos, which you can share on social media to get the highest reach and engagements.

Categories
Guide Social Media

How To Implement Social Media Automation For Blogging Success [2024]

Guide To Social Media Marketing — Strategies Part 3
Use Social Media Automation For Successful Blogging

Once you complete working on any content, it’s best to start working on the next content as soon as possible to make the most out of your content plan.

Sharing your newly published blogs on social media may take some time as you have to post them on several social media accounts.

Plus, it’s quite tiring to manually log in and post on every social site, every time you wish to share your content.

So, to reduce this hassle, you should start implementing Social Media Automation.

Social media automation is one of the latest trends to follow in order to increase the efficiency and effectiveness of blogging.

You can focus more on creating content and spend less time making social posts, while still getting a high social reach.

After reading this article, you will learn about

  • Why use social media automation?
  • Actionable tactics to automate social sharing
  • Guide to a reliable social automation tool for WordPress

 So let’s get started.

Why Use Social Media Automation?

Why Use Social Media Automation

As a blogger, a social media automation tool will help you share blogs on social channels without having to log in to every social site.

The is idea is to stop wasting time manually logging in and posting on social media for every content you produce.

Rather use a social media automation tool that is easy to use and efficient.

There are several tools out there that will allow you to share your published content on all of your social channels with just a single click. Some of these tools might slow up your device for that you can always use defragmentation to free up more space for smooth usage.

The advantages of using a social media automation tool are

  • No need to take the hassle of copying and pasting the captions, while logging in to various social channels. It will all be done from one place without any complications.
  • You won’t have to keep track of where you posted and where you did not. The tool will keep track of it.
  • You no longer have to waste time logging in and manually posting on every social channel. Simply share from one place with a single click. Then you can move on to your next tasks such as researching for new content or analyzing past content performances.

Eventually, you will be producing more content and still get social traffic without any complications.

Actionable Tactics To Automate Social Sharing 

Now, let us look at a few actional tactics that you can use to get the most out of social media automation.

i. Use A Reliable Tool To Make Instant Shares

Reliable tool to make instant share

One perk of social media automation is to share your blog content on social media as soon as you publish it.

Let’s say you have a content plan to write two long articles in a week. Now, to maintain quality, you will already be using a lot of time in researching for useful data, and constructing a proper structure, let alone creating content properly.

Once you publish the article, if you are moderately active on social media, then chances are you have accounts in over 4 social channels.

Now, it sure takes some time to manually access and post the article and set the caption over and over again.

You would rather prefer to start working on the next article.

In this case, you may use a reliable social automation tool that is integrated with your social channels. You can simply set the caption once and with just a click, your published post will be shared on social media.

You will find great tools such as SocialBee, Buffer, Hubspot, or Hootsuite to help you with social media automation.

However, if you have a WordPress site, then you should try using Social Booster.

It’s a social automation plugin for sharing WordPress content (pages, blogs, images, video, products, etc) on multiple social sites at the same time.

The best part about this plugin is that it will allow you to instantly share your published post directly from the post edit page.

You don’t even need to leave your article’s edit page. Just Publish, scroll down to the plugin options, and share on your social media with a single click. 

You can also use social automation tools to schedule posts to be shared on specific hours and days, which is very handy. We will be discussing tactics regarding this matter within this article.

**I will give a guide about Social Booster later on in this article.

Another effective method you can follow is reviving old blog posts. You can revamp old blog posts that are no longer performing, and schedule shares (resharing) on your social media for great results. We will discuss this matter in detail in a later article.

ii. Schedule Social Shares On The Most Productive Hours

The performance of content shared on social media depends a lot on the day and the hour you share it.

It is important to consider the audience you are trying to reach and the channel you are sharing on. For a thorough understanding of these dynamics, reviewing a detailed social media report can provide valuable insights.

For example, according to Sproutsocial, the best time to share posts on Facebook is 11:00 A.M. to 01:00 P.M., Wednesday.

SproutSocial report
SproutSocial report on best times to post on Facebook

There are more data for other social channels such as Instagram, Twitter, and LinkedIn and people on different social channels have different times when they are more active.

Other than the basic active hours when you should post, you can also choose the hours based on what type of audience you are trying to reach, whether businesses or consumers.

If you are trying to reach businesses, then you have to consider that businessmen are mostly busy and hardly browse during working hours, except for a few specific times.

For example, as per Hootsuite’s report, people in businesses are more active on LinkedIn

  • during the early hours between 07:45 A.M. to 10:45 A.M. 
  • on lunch breaks such as at around 12:45 P.M. 
  • during the end of the shift at about 05:45 P.M.

Moreover, they are more active on Wednesdays and Thursdays (since the rest of the days are usually packed with more work).

Reaching consumers will work best at slightly different hours.

According to a survey report from CoSchedule, consumers are more active on Twitter in the morning between 08:00 A.M. to 10:00 A.M., at noon i.e. 12:00 P.M., and late on the day between 07:00 P.M. to 09:00 P.M.

We will be discussing more with the exact best hours to post for every social channel at a later article.

You will find many such reports available online, and they will mostly be similar with slight differences in hours. You may consider following these timings as they have proven to work for many.

So, every content you wish to share, use a social media automation tool to schedule the post for your social media marketing. Set the schedules according to the best day and hours as per various social channels, mentioned in these statistics.

You may use Social Booster to schedule any WordPress content to be shared on your social channels at your desired time and day.

You won’t have to manually post on social media even if you have published the content a lot sooner than the best hours.

In fact, it will allow you to schedule the post for sharing at your preferred time on your preferred social channel, right from the post edit page or from the plugin dashboard.

iii. Schedule Consecutive Post Shares For Promotional Campaigns

Often it is necessary to share the same post multiple times in a span of a few days for maximum results.

Yes, you can manually re-share or retweet on social sites like Facebook or Twitter. However, that will require you to log in and manually share the post for each social channel.

Rather, use your social media automation tool to schedule the articles to be shared on the social channels, on a few consecutive days at the best hours.

Let me explain why you should share your post on consecutive days.

Let’s say, as an example, during Black Friday, you may create a post to display your latest discount plans for your prospects.

Now, there are tons of others that are sharing similar discount posts on the occasion of the event. Within a few hours of sharing your post, it will no longer be visible on people’s timelines.

But, it is most likely that you are running a discount campaign for about a couple of days to a week. So it is necessary that people see your shared post more frequently.

The best option here is to schedule consecutive post shares for a span of a few days.

You may use an automation tool to schedule your discount post to be shared on your social channels every day (on the most active hours) until the number of days you wish to run your discount campaign. 

That way, your article will appear as a new post every day on the timelines of your followers. 

Tip:
Some social channels see this as spamming if you share the same post for too many days. So we advise you to share such consecutive posts with a day’s gap in between every post. So in a span of 5 days, you may share it on the 1st day, 3rd day, and 5th day.

The schedule share option of the plugin, Social Booster, will allow you to create multiple schedules for the same post, which you can keep track of via the content calendar on the plugin dashboard.

Now, throughout this article, I mentioned Social Booster. Let me give you a short overview and guide on this social media automation plugin for WordPress.

Using A Tool For Social Media Automation

Social media management could be a great hustle if you don’t have the right tools.

However, Social Champ would be a great choice if you are looking for an affordable social media management tool.

Providing you with a handful of excellent automation features, it has got some unique and impressively defined features on the basis of which a business can manage its social profiles.

From the bulk uploading of content to the scheduling of the posts, Social Champ supports various personas like startups, SMBs, and agencies with the best automation features.

You can bring all the major social media profiles (Facebook, Instagram, LinkedIn, YouTube, Google My Business, Pinterest) to one dashboard and can connect them all together for future postings.

It lets you edit and create the posts instantly with the available built-in platforms of Canva, Crello, Pixelied, and Wave videos.

How fun and easy it is to manage all the social profiles of your business in one place with Social Champ!

Click here to get started with Social Champ.

Final Thoughts

One of the latest trends in Social Media Marketing is implementing social media automation when sharing blogs on social channels.

The schedule feature is specifically useful as it takes time and effort to remember and share your post on various social media manually. Rather, set schedules, and the post will be shared on the social media channels automatically. 

I suggest you try using Social Booster and hopefully you will see higher results soon.

In the next article, we will discuss how you can revive your old blog posts and increase website traffic.

Categories
Guide Social Media

How To Optimize A Social Media Post To Promote Your Blogs Effectively [2024]

Guide To Social Media Marketing — Strategies Part 2
Optimize A Social Media Post To Promote Your Blogs Effectively

If you run a blog, then you have a community of readers and other bloggers around it.

They definitely love to read your blogs and articles, however, most of them will not visit your blog too often unless they get a trigger.

Yes, you might have an e-mail list where you can send updates on new content. However, that is limited to those who subscribed.

The social media world is limitless.

Besides conducting SEO and other basic marketing tactics, it is important to promote your blog posts and content on social media.

Few good reasons to promote blog posts on social media:

  • Almost everyone uses social channels such as Facebook, Twitter, etc. And there are millions of such users that are interested in any particular same niche.
  • In social media, there is the advantage of notifications. If you follow a blogger, let’s say on Twitter, then you will get notifications every time that person tweets or retweets i.e. makes a new post. So, no extra effort is required.
  • Most social channels allow you to boost your posts in the form of Ads or Ad posts to reach more people who never heard of you, thus generating new followers. (We will learn more about these in a later article.)

Now, even if you create great content and share them on social media, the most difficult part is to make people click on the post and visit your website.

In this article, you will learn effective actions to take to make a proper social media post for blog posts and other content.

After reading this article, you will be able to:

  • Share your blogging content on social media in the most optimized way.
  • Learn the do’s and don’ts when making a social media post.
  • Get more people to click on your social posts and visit your blog.

So let’s get started.

1. Use A Specialized Social Media Post Image

Social Media Post Image

The image is the first content that catches a person’s attention when browsing through social media. Without a proper image, a social media post becomes just a wasted effort.

Most people tend to use the basic featured image of the original website content as the social media post image. However, that is often not the best idea.

When you create a featured image for your content on your website, you create it to match your website’s outlook and theme.

However, to get attention on social media, you have to create an image that connects with the viewer.

Let us look at an example.

Here’s the featured image of one of our blogs, which is an article to learn about the advantages of using Kelko and a guide to the Kelkoo marketplace.

Now, if I share it on our Facebook page and choose to boost this post, then this post will not perform too well. This Image is not at all ideal to use for a social media post.

Here’s why.

Boosting a post on Facebook means your post will appear in the timelines of several people that look like an ordinary post.

However, people nowadays know that there are tons of advertisements that appear on their timelines. So people tend to avoid any posts that they do not find interesting or useful at first glance.

The Kelkoo image simply looks like an advertisement image which, people will assume, may cost money without benefit. So, people will not click on the shared post or, in most cases, even bother to read the captions and title.

Here’s an example of an image that does work.

This is the image we created for social sharing for one of our articles, a Guide To WooCommerce Product Feed.

Here are the reasons why this image helped to increase the number of engagements for this post:

  • It clearly states what this post is about in a short sentence on the image.
  • It has contrasting colors that help to grab attention.
  • The illustrations on the right side give an idea about what niche it is related to.

You can use a small amount of text on the image to create a better connection with the audience.

Most importantly, the image does not look like an advertisement, rather, it looks like a helpful post for the relevant audience.

2. Choose A Caption That Connects With the Readers

A Caption That Connects With Readers

When you create any blog post or content, it is obviously intended to help people with information or help them solve certain problems.

Your caption should reflect your intentions and possible benefits for viewers. So, here’s what you should do. 

Use the caption to inform people of

  • The value they will get from your content.
  • What the content is about.

It’s best if you can keep the caption within 3 sentences.

People usually screen through a timeline post for around 2-5 seconds. So a short caption is the best way to grab more attention.


If you are not an expert at writing an intentional caption in a short sentence, then you may consider using an AI sentence generator. Just provide the AI sentence generator with a topic, and it will provide you with a unique and compelling sentence caption.

Long captions often discourage viewers. People would rather scroll down the timeline, than stop at a post that has a long caption.

Here’re a couple of examples:

Example 1

WPFM Guide caption
WooCoomerce Product Feed Guide

Example 2

VT guide caption
Guide To Create a Virtual Tour

The captions in these posts-

  • Is within three sentences.
  • States the benefits of the main topic.
  • States what the viewers will be reading about.

It is important that you talk directly with the viewers through the caption.

You may make your captions read more naturally by converting them from sound to text.

Here’s an example of a bad caption:

“WooCommerce is a great tool to create an eCommerce website. It has several features to set up the shop such as cart options, organized products, proper shipping information, and many more. Here is an article that can help to learn more about WooCommerce.”

This caption is not at all good because:

  • It is not directly communicating with the reader.
  • More informative, hence boring for social engagements.
  • It is more like a paragraph rather than 3 short sentences.

So it will perform less than average on social media.

3. Use Hashtags Wisely

HashTag #

If you look at the above examples, there are a number of hashtags mentioned below the caption text.

Hashtags allow you to indicate which relevant topics this post falls under.

People searching for any terms, related to the hashtags, will find your post in the search results.

Plus, it also acts as a category that people can click to find more posts (by others) shared under the same hashtag.

Choosing a hashtag depends on the –

  • Keywords you wish to rank for on social search results.
  • Hashtags search group you want your post to be a part of.
  • Frequency of a hashtag’s use on social media.

For example, if you wrote a blog post on online marketing tactics, you may use the hashtag ‘#onlinemarketing’ when sharing on social media. You can check the frequency of a hashtag on social media using hashtag analytics tools.

  • This hashtag has a good search volume.
  • People will search for the term ‘online marketing’ on social sites which is relevant to this hashtag.
  • Anyone clicking on this hashtag will find your post in the search results.

Many don’t know why hashtags are used and often use wrong, valueless hashtags.

For example, in the case of the blog post about a virtual tour guide, if I wanted, I could add a hashtag called “#virtualtourmayhem” when sharing it on social media.

But why would I?

This would not add any value to the post because,

  • Sure enough, nobody will search for “virtual tour mayhem” or “#virtualtourmayhem”.
  • Also, since this term was never used as a hashtag before, there is no chance that someone will click on it to find the post.

Only use hashtags that are actually used by others and are relevant to the search terms of your ideal target audience. Moreover, hashtags must be used precisely by businesses that choose to do marketing on social media. For example, if you sell jewelry, your hashtag should be #weddingring or #engagementring. But if you sell sports equipment, your hashtag should be #sportswear or #fitnessroutine

**One trick is to search for the hashtag term on the search bar of the desired social channel. The number of results with the same hashtag will indicate how much this tag was used.

If it’s used more often, it’s better to use it on your social media post as well. (Some sites such as Twitter and LinkedIn give suggestions on popular hashtags when you start typing the hashtag keyword.)

For example, if I search for #vr on Twitter, I will get results that include people that have #vr on their profile description, and a list of tweets that have a caption that includes #vr. This is an indication that the hashtag #vr is a good one to use on a social media post.

4. Use Custom Title & Description For More Social Engagements

Custom Title & Description

Naturally, when you share blog content on social media, it uses the title and meta description of the original content on your site, as the social media post title and description.

However, it is better to set a different Title or Description on social media for more engagements.

Setting A Suitable Title

If you have a lengthy blog title, then you may use a shorter title for social media.

Let us look at an example:

We have an article with a Title –

Best Marketplaces To Sell Clothes Online In The USA That You Did Not Know [2020]

Now, though this title is fine for our website, it is very long, and most social channels won’t be able to display the full name, resulting in a view like this:

“Best Marketplaces To Sell Clothes Online In Th….”

**In the case of Facebook, the title will take two lines, and exclude the description which is also very important.

This reduces viewer impressions.

So for sharing on social media, I would rather use the Title:

Best Marketplaces To Sell Clothes Online In the USA [2020]

This will be visible on any social media channels in full and won’t take too long for viewers to read.

Sometimes, it’s wise to use a completely different Title for sharing on social media than the title of the original content on your site.

For example, let us say you wrote an informative blog with the title:

“Psychology on Blogging For Marketing [2020]”

This Title will do pretty well on SERPs but not on social media.

So in this case, you can use a different name on social media such as:

“How To Understand Reader’s Mind – Marketing Blog Guide”

You might say this heading will also work on SERPs, so why not use this as the main Blog title? Well, that’s because the original content title really depends on the keywords you wish to rank for on SERPs.

In the case of a Title on social media, the title has an extra purpose of creating an instant engagement. |People searching on SERPs will look into the top-ranking results that appear when relevant keywords are searched.

In the case of social media, the Tile has multiple purposes:

  • We will be more focused on engaging with prospects on their timelines or news feed.

    Anyone following your social page will find your blog’s social media posts while scrolling through their timelines or news feed. Depending on its image, title and description, he/she will decide whether to click on it or not. An interesting title will definitely help.
  • If possible, we will optimize it for social search results, but it is not mandatory.

    Most social media search engines provide post results that have the keywords in the caption or the hashtags. The title is the third priority. So it is not mandatory, but you may try to optimize it for social search results.

There are a few Instagram plugins for WordPress that can help you with that.

Social Media Post Description

The description is also an important thing to look at.

The meta description we set for any post is optimized for SERPs. However, the description section for a social media post is usually very small and, similar to the title, is used to create instant engagement.

Hence, you may use a shorter, engaging description when making a social media post for an article.

This can be easily done using the right tools.

On WordPress, if you use an SEO plugin such as Yoast or Rank Math, you will be able to assign a separate image, title, and description for Facebook and Twitter, for any particular blog post, from the post edit page.

For example, on Rank Math, you can edit a post’s social snippet.

Social Preview

Social Snippet preview

Edit Title, Description & Image

Social snippet post edit

However, this is limited to Facebook and Twitter only. For all other social sites, it’s best to use a tool that allows Open Graph Post customization, i.e., you can edit the title, description, and image of a post for social posting on any social channel.

**It is best to automate the whole process of social media marketing. We will learn more about social automation in a later article.

Final Thoughts

All the tactics mentioned in this article are proven and effective for maximum results.

It’s high time you start optimizing social media posts for any content you create on your blog site, and take advantage of the immense audience you can get through social media. Hence streamlining customer communication or communication with the audience is extremely important. 

These are all simple tactics, but they matter a lot more than you think.

With time, you will get used to these, and combined with all other strategies that we will cover, you will be able to see positive results with social media marketing in no time.

In the next article, we will discuss one of the latest tactics to follow, social automation.

After reading the next article, you will learn

  • Why use social media automation?
  • Actionable tactics to automate social sharing
  • Guide to a reliable social automation tool for WordPress

Read the next article now:

Categories
Social Media

How To Optimize Your Page On Social Media Platforms For Effective Blogging [2024]

Guide To Social Media Marketing — Strategies Part 1
Optimize Your Page On Social Media Platforms For Effective Blogging

Similar to creating a website, you have put in some research and early effort when using a social media page on popular social media platforms.

There are a lot of things you need to consider and it’s best to apply a few smart tactics for the best outcome.

So let us look at a step by step guide on optimizing your social pages for blogging, to get the best results on various social media platforms.

The tactics mentioned in this article are proven to be most effective.

Did you know, on Facebook, having no brand name on the Page Name can be more effective? Find out how as you read the article.

Whether you are creating a new social media page, or you already have one, you should take help from this article to learn what you need to work on.

By the end of this article, you will be able to follow actionable steps in setting up social pages that are optimized for blogging and reaching your goals.

So let’s dive into it.

Step 1 – Decide Your Purpose And Initial Plan

Purpose On Social Media Platforms

First of all, you have to decide your purpose with a social page on any social network.

So, if you are willing to create/use a Facebook Page, Twitter Profile, LinkedIn Page, or any of the popular social media platforms, for sharing your blogs, then first you must decide what you wish to achieve from there.

For example, when we first decided to open a Facebook page for RexTheme, we wanted to create a social community for our users to communicate with us and discuss our plugins.

The ideal reason for a blogger or content writer to embrace Social Media Marketing is to get more traffic from the right audience.

There could be other goals such as affiliate sales, reaching more people to convey a message, giving updates, brand promotion, product promotion and many more.

Blogging is useful to get authority and audience for most intents and purposes. Any business can benefit from having a blog section on their website (even eCommerce sites or real estate sites). And having a presence in the social media increases the results.

Based on your purpose, make a plan for the 1st two weeks on

  • what type of contents to share
  • how many contents to share

Let us look at an example. Let’s say, you have a blog about Cars & Driving.

So you may decide that in the 1st two weeks you will share informative articles or infographics on topics such as various parts of a car, ideal safety measures when driving and so on. To refine your content creation strategy, you can take more inspiration from the AI writer by Picsart, exploring creative approaches and innovative styles to enhance your messaging.

And you may decide that you will share 2 contents per week (i.e. 4 articles in the 1st two weeks).

At this point, it is not necessary to select the content topics or which days of the week to share your content.

Step 2 – Set A Keyword Optimized Page Name

Keyword Optimized Page Name

Based on your purpose, the next trick is to choose a Page name that will help people find your page more easily.

You might think that you can simply use your business or website name as the Page name, however, that is not always the best thing to do.

On a few popular social platforms such as Facebook, it is best to choose a page name based on your ideal keywords rather than the brand name.

Let me explain why.

Here’s a fact, when you set up your website, you also add a meta description to it which is displayed on SERPs as the tagline. This helps people to understand what the website is about.

RexTheme SERP
RexTheme on Google Search

However, there is no such feature on Facebook when you search for a page.

Sure, when setting up a page on Facebook, you will get the option to provide an extra description of the page and a Page story. But no tagline is viewed for the page in the search results of Facebook.

RexTheme on fb search

As you can see in the image, the pages’ search results on Facebook will only show the page profile picture and the Page name.

Another fact is, Facebook still ranks pages with keywords in their names, in the search results (unlike SERPs such as Google).

So in this case, you need to take a smart, alternative step.

Rather than directly using your brand name as the page name, use a phrase that lets viewers know what to expect from this page. And then maybe add the brand name at the end.

So basically, the idea is to optimize the page name with keywords for search results.

Let us look at an example.

Let’s say I own a blogging site called Games101Blast and I write about the best games out there. Then I will probably choose a page name as follows:

Top Video Games News – Games101Blast

You can see, the phrase “Top Video Games News” explains what viewers will find on this page, and the brand name is at the end.

Plus, the keywords/search terms for the audience of this blog are probably “Top Video Games” or “Video Games” or “Video Games News”. And the page name has all of them in it, making it more ideal to be found on social search results.

Some pages place the brand name first and then the keyword-optimized phrase, which also works just fine.

Some pages don’t even use the brand name; just a phrase to highlight the page’s expertise, optimzed with keywords, does the trick.

When you research users, you will see that most people use search terms of “what they are looking for” rather than “a company name”.

For example, in most cases, a person looking to buy t-shirts will probably search “Printed t-shirt” or “buy t-shirts in USA” rather than a brand name (unless he is indeed looking for a specific brand).

And naturally, the pages that have relevant keywords in the page names, appear first in the search results.

FB Search - t-shirt USA

As you can see in the image, when I searched with the term “buy t-shirts in USA” on the location Los Angeles, California, the following pages came up:

  • Hiking T-shirts & Hoodies
  • Tshirt Store Online
  • Change The Word T-shirts

If you see the second result, the page name is “Tshirt Store Online”. They sell various t-shirts through online orders, as the Page name suggests.

However, the business name of this page is actually “King Shirt Store”.

They simply decided not to include the business name on their Facebook page name at all. And they are getting amazing results on local Facebook search results.

**Social sites such as Twitter, however, has the tagline available in search results, where you will be able to view the account description.

RexTheme on twit search

In this case, you may choose to use the company name as the profile name.

Step 3 – Don’t Use A Featured Image Without Proper Intent

Connect through Featured Image

Keep in mind, in the social media world, people are more obsessed with visual content.

At first glance, people will judge your social media page on three things:

  • Page Name
  • Cover/Featured Image
  • Profile Picture

We have already discussed the optimization tactics regarding the Page Name.

The next big thing to focus on is the page’s cover photo or featured image.

Use a meaningful cover photo or featured image that is relevant and interesting to your expected audience. For that, you may try out popular photo editing tools.

For example, if you run a blog site about food, you should use a featured image that includes images of a few tasty meals and the logo on the middle or right side.

Make sure that you’re keeping the topic intensively relevant while preparing these cover images or logo design.

Food Blogger On Facebook
Here’s how Food Bloggers of Canada has set the featured image for their Facebook Page.

For the profile picture, you may use your company logo, however, make sure you resize it to the proper image ratio so that your logo will be in the center. Most social sites display a circular center portion of the profile picture (as you can see in the image above).

So, while in the process of logo design for your company, make sure that you have multiple ratios and sizes of the logo.

Step 4 – Highlight Benefits In Page Story, Not Boring History   

Page Story

On all the social media networks, you will find the option to give a short description (About). This paragraph should be small, about 3 sentences, to tell readers what the page does or is specialized in.

However, pages such as Facebook or Tumblr have an added option to create a page story; or on LinkedIn, you have the option to present an overview of the business.

While writing the page story or overview, most people talk about their history — when they started, why they started and so on.

But do you really believe that readers are on your social page to learn about your history? No.

People will go to your social media page only if they think that you have what they are looking for.

They will expect to read your new content or watch your latest videos and other good posts, relevant to their interests.

Likewise, when your ideal audience reads your page description, they should be able to understand that they are in the right place.

You have to make it clear that you understand their requirements and that they will be satisfied with what they find here.

Let me give you an example.

Let’s say I am a blogger who writes about WordPress.

Here are two possible Page stories I may write for my Facebook page.

Example 1:

Since 2000, I have been crazy about WordPress and is learning since. So far I have created over 500 websites and helped to optimize SEO for over 1000 websites.

With all my knowledge and power, I am now writing articles to teach WordPress. Every week I write 2 articles that are helpful to learn WordPress.

Hopefully, I will be able to help people understand WordPress deeply.

Example 2:

WordPress is amazing. You have no idea that you can do so much with WordPress. Well, I am here to help you learn.

You can make a website fully customized while using plugins and themes that make the task easier. Plus the CMS is so easy to use, you will be surprised how fast you can learn.

And guess what, I am here to make it faster. Let me be your guide or buddy, and help you with regular details on WordPress so that you can be an expert in no time.

If you compare the two,

  • See that Example 1 is all about me while Example 2 is about what I can do for “You”.
  • That particular word “You” is very useful and makes readers feel personalized.
  • In Example 2, I am expressing excitement about WordPress which connects with the reader.
  • In both examples, I made it clear that my articles are intended to teach people using WordPress, except, Example 1 sounds generic for everyone, while Example 2 sounds personal for the current reader.

So a personalized page story or page overview such as Example 2 will connect with more people and create more authority.

A social wall allows you to display your valuable branded social media content alongside authentic user-generated content. This helps you build a strong and long-lasting impression on your site visitors while keeping them updated.

Once this is done, you are almost ready with your page.

To streamline the process businesses often use popular social media automation tool. There are still a few more things to do before you start sharing content.

Step 5 – Final Preparations To Get Going

Finishing Touch

Here’s something new that you can apply.

Once you open a page or have re-designed your page for a new social sharing plan, you can make a short post on your social channels, informing people that something exciting is on the way.

Let’s say, you have plans to share content about VR technology in the near future, and you have decided to write on a few topics explaining different types of VRs, examples of VRs, and the future of VR.

Then you can write create a social post similar to the following:

“Hey everyone, guess what, very soon I will be sharing interesting contents about VR. 

I have found some amazing details about different forms of VRs that you might wish to check out.

Plus I will share more articles about VR implementations, examples, and future expectations on a weekly basis. So stay tuned!!”

Now, obviously, you are pretty serious about blogging and so, it is wise to make a bit of early investment through boosting the page.

You may boost your pages on Facebook, Twitter, Instagram, and other social media platforms for a few days (4 days recommended).

Next, you may boost the post you made early, for a couple of days.

While these are happening, you can focus on choosing topics to write one, organizing a content calendar, writing blogs on the new topics, and posting your articles on your website.

And eventually, when ready, it’s time to share your articles on social media.

Final Thoughts 

The steps in this article are proven to be effective and we advise you to follow these whether you are opening a new social page, or trying to improve your old social pages for social media marketing.

In the next article, you will learn about tactics to follow when sharing a post on your social media platforms for the best results.

After reading the next article, you will be able to

  • share your blogging contents on social media in the most optimized way,
  • learn the do’s and don’ts when making a social media post,
  • get more people to click on your social posts and visit your blog.

Read the next article now: