Nowadays people are more comfortable buying from home than visiting a store directly. But, just like some products sell more online, there are products that people prefer buying in person.
For example, suppose you are selling products such as home decor, electronics, kitchen appliances, etc. In that case, your buyers may not wish to purchase them online based on mere images and descriptions, even if you have a well-organized WooCommerce store.
What if you could combine them both? What if you could create an online store, where people can get a similar experience that they would get on a live visit, while still being able to order products? Guess what, it’s possible. Simply create an online virtual store.
An Online Virtual Store will help you make the shopping experience more realistic for your buyers by letting them tour your shop and, view and order products right from within the virtual store.
Today, you will learn how you can turn your WooCommerce store into a 360 virtual store, and why you should use it actively.
So let’s begin.
What is an Online Virtual Store?
An online virtual store is a digital shopping experience that simulates a physical retail environment. Customers can virtually tour the store, view products in a realistic setting, and make purchases directly within the virtual space.
This immersive approach combines the convenience of online shopping with the interactive experience of an in-person visit.
you can enhance your online presence, attract customers seeking virtual shopping experiences, and drive sales in a dynamic virtual environment.
Why Online Virtual Stores Are Valuable
Two out of every three people recognize and enjoy virtual tours. And if you can use virtual tours in the right way, then your WooCommerce sales may significantly go up.
Following are some of the reasons why you and your buyers will love using an online virtual store:
Save a Generous Amount Of Time: With virtual store tours, customers can browse your products from anywhere, saving them the time and hassle of traveling to a physical store.
Never Run Out of Supplies: Virtual store tours ensure that customers always have access to your products, regardless of physical inventory levels, reducing the risk of stockouts.
Make Holiday Sales Easier: During busy holiday seasons, virtual store tours provide a convenient and stress-free shopping experience. It helps to accommodate increased demand and ensure customers find what they need.
Enhance Virtual Shopping Experience: Virtual store tours offer an immersive and interactive shopping experience. It allows customers to explore products in a realistic virtual environment.
Increase Reach and Accessibility: By offering virtual store tours, you can reach a broader audience of customers who may not have easy access to physical stores, expanding your market reach.
Easy Online Shopping: Virtual store tours simplify the online shopping process by providing a visual and interactive platform for customers to browse and purchase products seamlessly.
Now let’s see online virtual tours from a different perspective in the next section.
How Different Businesses Can Utilize Online Virtual StoreTours
Virtual Tours in WooCommerce Sites include the products that a buyer can purchase directly from the store. Your customers can explore your virtual store, and easily add any product they like into their carts from within the tour.
And then, once they are ready, they can simply visit the checkout page and complete the purchase in just a few seconds.
So, when you allow your customers to shop in a virtual store, you’re allowing them to shop from the comfort of their home – thus increasing the possibility to sell more.
Let’s take a closer look at a few businesses where virtual store tours have a lot of potential.
Virtual Retail & Wholesale Stores
Virtual Store Tours can be a must-have method for both retail and wholesale businesses.
Rather than showing a few products in a small shop, you can create a whole virtual store with a larger space where you can show all your products in a broader view.
Virtual Store Tour will let your customers shop without any inconvenience and give them a personalized purchasing experience.
As a retailer, you can expect people to order from you more frequently, and then handling the delivery is quite easy since you can deliver directly from your warehouse.
Virtual Book Stores
Buying new books has always been quite difficult from a physical store. You can not always realize what type of books you want or what books are available.
A virtual bookstore may solve this problem. Simply create separate views for separate genres. It allows your buyers to move to the area with their desired genres in a few clicks.
Plus, the added control in your tour will allow you to view some unique descriptions of the book by hovering over it. Then you can allow clicking to view and order it.
Books can satisfy the heart’s hunger. But it’s not always possible to go to a store, check different genres, and find a suitable book. This is a great way to represent your WooCommerce store when selling books.
Virtual Fashion & Lifestyle Stores
Fashion and Lifestyle stores usually contain makeup, clothing, and other fashion accessories. And a virtual store may be the most effective for businesses in these industries.
Famous brands like Ralph Lauren and Sephora are already utilizing virtual tours to showcase their available products.
Just imagine how amazed and delighted your customers will be when they get an immersive experience while shopping for their luxury comfort item through a virtual tour on a WooCommerce website.
So if you are selling clothing products or luxury items, then you should definitely consider preparing an online virtual store for your business.
How to Create an Online Virtual Store: Step-By-Step Guide
There are several no-code app builder tools to create Virtual Tours. But you can easily create a virtual virtual virtual tour with the WPVR tool.
Here’s a step-by-step guide to how to create a virtual store tour for your WooCommerce Site. So let’s get started.
1. Install & Activate WPVR Plugin
At first, you’ll need to install the free version of the WPVR Plugin. For this,
Go to your WordPress Dashboard -> Plugins -> Add New
Search for WPVR and the plugin will come up in the search results
Once you’ve upgraded and activated your license, install WooCommerce following the same steps as before and activate it.
2. Get the most out of your WPVR Plugin
Following the installation and activation of the plugin, a WPVR section will appear. Go to the WPVR and select General Settings from there.
Mobile Menu Resizer: This feature ensures that your virtual tour is compatible with smartphones and that the tour size is adjusted to fit your phone’s screen.
Disable WordPress Large Image Handler: By default, WordPress reduces image files. When you enable this option, 360 images will not be compressed when uploaded, preserving the tour’s good quality.
Disable On-Hover Content for Mobile: Smartphones do not have the ability to hover, therefore this feature disables the on-hover content for them.
Notice to Mobile Users on the Front End: Set customizable notices for your customers when they are experiencing the tour using a smartphone with this feature.
VR Glass Support: Use VR Glass to experience virtual tours in a realistic manner.
Then, Hover over WPVR and Select Add New Tour.
Now, move on and give a title of the tour,
3. Create Your First Scene of 360 Online Virtual Store
you’re in the Scenes Tab now.
Provide a Scene ID. Make sure you don’t give any special character or space inside the Scene ID
Then click upload to add a 360 panoramic image to your virtual tour.
After you’ve uploaded the scene, click on Preview to load the tour on the backend,
You’ll then see a Tour Preview has appeared on the screen.
Give a Title that you want to display at the front end.
If the Tour Preview seems okay to you, click Publish and your tour will be ready.
And you’re all done creating your first virtual store tour!
4. Advanced Controls
Now, let’s move on to the WPVR Pro controls. The first one is Advanced Controls from the Generals Tab.
Here are some exceptional features you should have in your online Virtual Store other than the usual settings,
Gyroscope Control: If you want your customers to shop using smartphones, Gyroscope control is a must-feature for you. This feature helps you to optimize the whole virtual tour for smartphones so that your users can enjoy the tour from wherever they want.
Scene Gallery: Your store must have various types of products and aisles in one store. Showcase all the aisles in different scenes. Once you have multiple Scenes in a Virtual tour and enable the advanced Scene Gallery option, your customers will be able to move from one Scene to another in one click via the Scene Gallery. Now your customers will be able to jump from one scene to another from the scene gallery.
Add Company Information: Provide brief descriptions of your store brand or company and also add the logo so that your customers know about your online store.
5. Control Buttons
Next, move on to the Control Buttons. Leave the options enabled if you want to have that specific control feature in your virtual tour.
6. Add WooCommerce Product
Now, it’s time for you to add WooCommerce Products to your virtual store. With WPVR, there’s an option for you to integrate WooCommerce products as hotspots.
Point to the product that you want to add as a WooCommerce product and some coordinates of that product will appear as Pitch & Yaw. Copy-Paste those coordinates in the dedicated fields.
Preview & if the tour seems okay in the preview then publish it.
Note: The Custom Icon & Color won’tappear on the tour preview. You’ll only be able to see that from the Frontend
When the customer clicks on it, the product appears and they can add the product to their cart directly.
This is how a virtual retail store can be set up on a WooCommerce site. You can now carry on to making your entire store virtual.
Virtual Reality Shopping Platforms
Now, I’m going to explain how you can transform your WooCommerce site into an engaging online virtual store, providing your customers with an immersive and interactive shopping experience. Here are some virtual reality shopping platforms that help you to make a virtual store online.
WPVR: Provides easy integration with WordPress websites. It also offers a user-friendly interface for creating virtual stores with customizable environments and product displays.
Obsess: Delivers an immersive 360-degree virtual shopping experience, featuring personalized virtual stores that reflect brand identity and interactive product displays for enhanced engagement.
ByondXR: Enables the creation of immersive and interactive 3D virtual stores. It provides easy integration with existing e-commerce platforms and offers customizable environments tailored to brand identity.
3D Cloud by Marxent: Revolutionizes the virtual shopping experience with lifelike 3D environments. It also provides real-time synchronization of product data & inventory and intuitive tools for designing personalized virtual stores.
V-commerce by Matterport: Integrates Matterport’s 3D technology for virtual shopping environments. It also offers interactive product showcases, detailed product information, and a seamless transition from physical to virtual spaces.
Spatial: Offers collaborative virtual shopping experiences for multiple users. It helps to integrate 3D models and augmented reality for product visualization, and provides remote virtual showrooms and product demonstrations.
Glimpse Group: Provides innovative virtual reality solutions for immersive shopping experiences. It features advanced visualization tools, interactive product displays, and integration with various e-commerce platforms.
Holition: Offers cutting-edge augmented reality and virtual reality technologies for retail. It includes interactive product demonstrations, virtual try-on experiences, and customizable virtual stores tailored to brand requirements.
Inspace XR: Specializes in creating virtual showrooms and retail spaces with spatial design features. It integrates virtual reality for immersive product exploration and offers realistic and customizable virtual environments for brand representation.
Emperia: It is a virtual reality shopping platform with personalized virtual stores. It helps to integrate with e-commerce platforms for smooth shopping experiences and provides customizable product displays and interactive features for enhanced engagement.
Conclusion
In conclusion, transforming your WooCommerce site into an online virtual store is a strategic move to elevate your brand presence.
By offering a virtual store tour, you provide an engaging and immersive shopping experience that seems to be a live visit, regardless of your store’s size.
This approach enhances the virtual shopping experience, encourages increased purchases, and adds a touch of luxury to your online virtual storefront.
Adopting virtual shopping with WPVR indicates your WooCommerce site and creates a beautiful virtual product showroom.
So, take advantage of virtual store platforms to create organized 360 Virtual Tours, turning your plain WooCommerce site into a dynamic and memorable destination for customers.
How can I create an online virtual store using WooCommerce?
To create a virtual store with WooCommerce, start by installing plugins like WPVR, which provide tools for building immersive virtual store tours and product showcases directly on your website. These plugins offer intuitive interfaces and step-by-step guides to help you set up your virtual store effortlessly.
What are the advantages of virtual store tours for my WooCommerce site?
Virtual store tours enhance the shopping experience by allowing customers to explore products in a lifelike virtual environment. It boosts engagement and encourages more purchases. They also differentiate your WooCommerce site, making it more memorable and appealing to visitors, ultimately increasing sales and brand recognition.
Can I personalize virtual store tours for my WooCommerce products?
Yes, virtual store tours can be customized to showcase your unique WooCommerce products. It enables you to highlight special features, promotions, and discounts. You can easily create tailored virtual experiences that resonate with your target audience and drive conversions.
How do virtual store tours improve the virtual shopping experience on my WooCommerce site?
Virtual store tours provide a more interactive and engaging shopping experience, increasing customer satisfaction and trust in your brand. By offering a realistic preview of your products, virtual tours help reduce uncertainty and hesitation, leading to higher conversion rates and repeat purchases.
Are virtual store tours compatible with mobile devices for my WooCommerce site?
Yes, virtual store tours created with plugins are fully responsive and compatible with mobile devices. It ensures that customers can enjoy an easy shopping experience across all platforms. This accessibility allows you to reach a broader audience and maximize the impact of your virtual store on your WooCommerce site.
Even though regular promotions using apartment photos and videos are still there, the way virtual tours can represent an interactive model of your apartments, traditional still images can’t.
And it’s obvious!
Virtual tours show off your apartment features without having an in-person visit.
It saves you wasted hours, cost, and hassle that you go through while showing your low potential home buyers an in-person visit.
So, whether you’re a real estate agent, realtor, property investor, or marketing manager, this guide is for you!
In this guide, I will give you a good insight into increasing conversion and a proper step-by-step guide to creating an apartment virtual tour (and no, it is not just a video tour).
So let’s dive into it.
Do You Really Need to Use Virtual Apartment Tours for Your Real Estate Business?
The answer is Yes. You need to use a virtual apartment tour.
There are just too many competitors out there and buyers won’t think twice to move to another site if they don’t find your website appealing.
Besides, basic images and videos of properties have already become so common nowadays that people no longer find them amusing.
Just imagine,
after all the hard work and investment you have put into building and developing your website,
your prospects are leaving your site without giving you a real chance.
Pretty frustrating, right?
So what can you do differently?
The best option now is to make an instant impression. And the most unique way to do so now is to use a virtual tour.
Instead of going to a place, a virtual tour can bring that place to you.
And people love this experience.
The longer you can keep your prospects hooked, the higher the chance they will consider reaching out to you for a deal.
So, having virtual tours is definitely the go-to solution for you.
You will find several such tools which include WPVR, Matterport, Kuula, Klapty, and many more.
The easiest of them are WPVR (for WordPress), and Klapty (though a bit expensive)
Before we look into how you can create one, let us learn what exactly a virtual apartment tour is and observe a few examples to understand why you need VR apartments on your website.
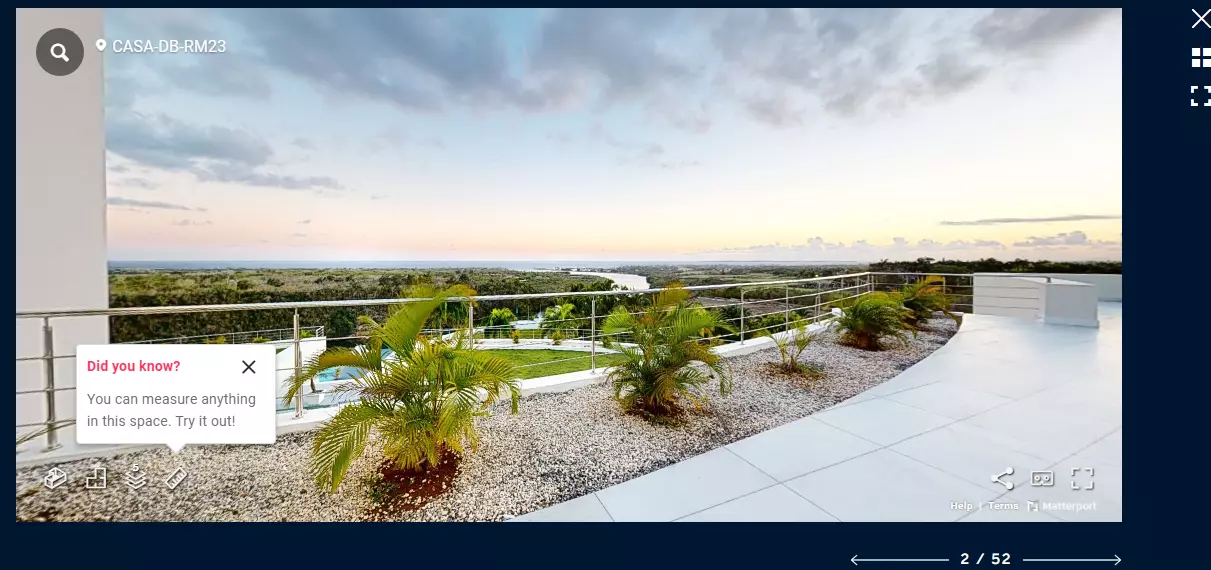
An Ideal Apartment Virtual Tour
Here is an example of a typical 360-degree apartment virtual tour:
As you can see, you have full control to view in all directions, move from one room to another easily, check out the information given inside hotspots, & use the control buttons for easier navigation.
This is an ingenious way to make your prospects get hooked right on the spot. In this guide, I will show you how you can create a virtual apartment tour on a WordPress site using WPVR.
Create an Apartment Virtual Tour in Minutes(Not Hours)
By creating a complete virtual tour your visitors can get an overall idea of how your offered apartment looks in real life.
Simply upload a 360 panorama image, and the plugin will help you transform it into a realistic virtual tour. ( And you don’t have to wait too long for it)
So, Get rid of describing your apartment features again and again over the phone and in messages.
Simply for the steps below and you can create an apartment virtual tour in minutes.
Step 1 – Install and Activate The Virtual Tour Builder Plugin
Go to your WordPress dashboard and click on the Plugins tab.
Click on Add New
On the search bar, insert WPVR and choose to Install and then Activate WPVR.
Now, if you preview and look at the live preview, you’ll see that all your advanced scene settings have been applied.
You can apply some other options as well:
1. Default Scene Face
Set a point in the panorama image, which you want it to load from.
2. Vertical and Horizontal Angle of View
When you’re using partial panoramas or panoramas taken with your mobile phone, the images are not full 360 degrees. You can use it to adjust those images.
3. Limit Vertical and Horizontal Scene Grab
For partial or mobile panoramas, you can set a custom value within which you want your viewers to explore.
Now, keep adding more panorama images by adding more scenes in this tour. You can use an unlimited number of images until you’ve covered every corner of your apartment.
Apply different settings to each individual Scene or the same settings for all the Scenes. Whichever you prefer.
Now, let’s enable the advanced features and make turn it into a professional virtual apartment tour.
Follow the next step.
Step 4 – Use Advanced Features – To Turn It Into A Professional Virtual Tour
First, click on the Publish button to save your progress.
Now, under the General section, click on the Advanced Controls tab.
When viewing from a mobile device, the Gyroscope will respond to the movement of the device. It gives great realistic control of the virtual tour to your viewers.
To make it even better, enable Auto Gyroscope Support.
Turn on the Compass feature. It will display a live compass inside the virtual tour and help the viewers understand which directions they’re looking at.
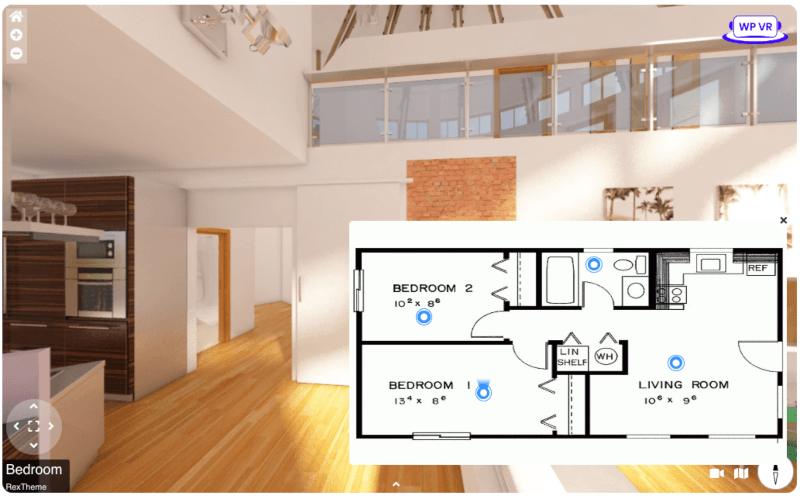
Turn on the Scene Gallery option.
When you have multiple panorama images, it will show a slider gallery where your clients can see a preview of every panorama image in your apartment. They can also choose to visit a specific scene directly from the gallery.
Turn on the Scene Title on Scene Gallery option – to make your clients understand which part of the apartment the scene will take them.
Now, how about adding some interesting features to your apartment virtual tour?
Definitely, you want to give your clients more information about the apartment you’re showing them.
You can record a video explaining details of the apartment and set it here. Whenever your clients want to explore more, they can click it and learn about the apartment directly from you.
Step 6 – Use Hotspots – Connect Panorama Images & Show Additional Info
Once you’ve set up one panorama image, you can now upload more and connect them.
Remember to keep the sequence between your images.
For example, if your tour starts from the entrance of your apartment, the next one should lead to the living room or the bedroom that is right beside the living room.
And if your viewer is leaving that bedroom, it should take them back to the living room.
The sequence of the images must reassablence the apartment in real life.
You have to use the Scene-type hotspots to connect the scenes.
Bonus Tips To Make A Luxury Apartment Virtual Tour Stand Out From Your Competitors
If you’ve made it this far in this guide, then great job!
In this section, I have something for you that’ll pay off your patience.
Suppose you’ve followed all the steps in this guide to make the perfect apartment virtual tour.
Now, all you need to do is make the viewer contact you and start the process of conversion.
Here’s how,
Inside every panorama scene of your tour set a hotspot that will contain a contact form or email submission form.
You can go one step further by adding a different contact form in every scene.
Example:
In the Kitchen scene, invite them to drop their email – to learn more about the water supply & gas stove setup options.
In the Entrance or outdoor scenes, ask them to give you their contact – to learn about the lawn diameters and neighboring community rules.
The easiest way to generate more leads would be to keep the form as minimal as possible. Just asking them to type in their name, email address, and the best time to call back would be great.
But, you can also add a couple of questions to qualify them for your case such as their budget, expected time to rent, etc.
And this, you can easily set up using WPVR.
The Benefits of Using this Latest Trend: Convert Prospects Into Potential Buyers
Today there are several creative ways to handle prospects that help to boost conversion.
And one of the proven ways now is to use virtual tours on your website.
Hook them with engaging apartment virtual tours they can’t ignore.
Give them a glimpse of exactly what they will get in real life.
Get them interested and pre-qualified while on the tour.
Make the prospects book a time for you to call back.
Advantages of Using Virtual Tour:
The user will not have to worry about traveling to get a live view of the apartment.
An apartment virtual tour with navigation control means prospects are not bound to a fixed view. They can view and move around however they want. This will gain more trust.
People will already get to make a temporary decision on the apartment of their choice.
You can include more details on the apartment within the tour, which you would normally explain via phone.
And most importantly, you can have the buyers fill out a form to get a call back right on the virtual apartment tour.
You can create an engaging apartment virtual tour without any complications using the right tool. And we mentioned and demonstrated WPVR here. You can easily go with it.
Conclusion
As you can see, a virtual tour is the next best thing to a live visit. And it is also a key option to stand out among your competitors.
Plus, as you saw, creating apartment virtual tours is relatively easy and quite affordable. So it’s high time you, too should, start using virtual tours to sell or rent more apartments easily.
Keep your prospects hooked and convert them into buyers with the latest trend that works.
If you own a WordPress site, then go ahead and start using WPVR and start closing more deals.
The latest innovations include Machine Learning, Artificial Intelligence, Virtual Reality, Blockchain, the Internet of Things, and many more.
Among these breakthroughs, Virtual Reality is reshaping how we interact with the digital world, bridging the gap between imagination and reality.
Currently, around 171 million people use VR globally in some form.
Today I will discuss 5 most popular types of virtual reality that are really out of the box.
Let’s get started.
What Is Virtual Reality?
Virtual Reality refers to creating a realistic experience that does not exist in reality.
It is a virtual experience that you can observe, listen to, and interact with, but cannot touch.
Sounding complex?
Let me explain it a bit deeper.
For example, in a remote virtual tour, you will feel like you are actually taking a tour of that place.
However, in reality, you are sitting at your home and taking an amazing virtual tour through your computer, while still getting to look around the place as if you are physically there.
Over the years, people have developed many forms of virtual reality that they are using for innovative purposes. Some popular virtual reality examples include virtual medical training, virtual skills practice, games, virtual tours of homes or hotels, and many more.
Industries such as real estate, hotels, amusement parks, research facilities, army officials, motor companies, machine development companies, and many more industries have started using some forms of virtual reality to attain greater results in their business and purposes.
For example, Porche has introduced the types of VR experience,
that allow their users to take a ride in the latest car virtually, mainly to experience the car’s finesse, luxurious interior, the technology used, and customization visualization.
And you can too!
5 Different Types of Virtual Reality
To find the right type of virtual reality that matches your needs, You need to know the best ones among all the VR types.
Among tons of VR formats, pick one among these 5 innovative virtual reality types.
Non-immersive Virtual Reality.
Fully Immersive Virtual Reality.
Semi-Immersive Virtual Reality.
Augmented Reality.
Collaborative VR.
Now let’s learn in-depth one by one:
1. Non-immersive Virtual Reality
Non-immersive virtual reality is a virtual experience through a desktop. You can control characters or activities within the software.
You can also find a powerpack laptop for virtual machines and work on the go.
Since more and more people appreciate mobility, manufacturers create powerful systems in compact bodies.
For example, when you play video games such as World of WarCraft, you can control characters within the game that have their own animations and attributes.
(Interestingly, over the years, several science conferences have been held within the World of Warcraft ‘world’. Utilizing the platform instead of a traditional web conferencing system while creating an innovative experience for members. This, of course, has its benefits compared to traditional means.)
Technically, you are dealing with a virtual world, but you are not the center of attention in the game.
All actions or features interact with the characters within.
All basic forms of gaming devices, such as PlayStation, Xbox, Computer, other video game consoles, and even input devices such as mouse keyboards, etc, provide you with a non-immersive virtual reality experience.
The US Defence Force suggested that strategic games may help to develop the planning and strategic expertise of the US Army back in 2017. This has been put in effective use since the Summer of 2018.
2. Fully Immersive Virtual Reality
Contrary to non-immersive virtual reality, fully immersive virtual technology ensures that you have a realistic experience within the virtual world.
It’ll give you a sense of being present in that virtual world, and everything is happening to you for real.
This is an expensive form of virtual reality that involves helmets, gloves, and body connectors with sense detectors.
These are connected to a powerful computer. Your movements, reactions, and even a blink of an eye are detected and projected within the virtual world.
You will feel like you are within the virtual world physically.
One example could be a Virtual Shooter gaming zone where you will be equipped with the gears in a small room and you will be viewing a virtual world through the helmet where you are facing other shooters trying to kill you.
You will move your arms and body to run, jump, crouch, shoot, throw, and many more within the game.
A new concept of virtual medical training is being looked at to train neurosurgeons to avoid disasters during risky brain operations.
Another potential fully immersive virtual reality that’s becoming popular nowadays is transforming the education sector.
Many more such concepts are coming to life and hopefully will result in making our lives better.
Fully immersive virtual reality is costly and not so widely created yet.
3. Semi-immersive Virtual Reality
A Semi immersive virtual reality is a mixture of non-immersive and fully immersive virtual reality.
This can be in the form of a 3D space or virtual environment where you can move about on your own, either through a computer screen or a VR box/headset.
So all activities within the virtual world are concentrated toward you.
However, you have no real physical movements other than your visual experience.
On a computer, you can use the mouse to move about the virtual space, and on mobile devices, you can touch and swipe to move about the place.
Most semi-immersive virtual environments support Gyroscope, which means the virtual space will be fixed on your phone based on the vertical axis, and you have to literally move your phone about in different directions to view the virtual environment in those directions.
Swiping will not work.
The ones that are connected to VR boxes are more interactive since they are also a form of Gyroscope, but without you using your hands.
When you wear a VR box/headset, you will only be able to see the virtual environment and not your real world, even from the corner of your eye. Thus creating a realistic experience.
Semi-immersive virtual reality is the most cost-effective and commonly used among all forms of virtual reality after non-immersive VR. It’s especially used for training and educational purposes.
It can be used to provide students with immersive, interactive educational experiences like exploration of historical events, and distant planets, and even scouting oceans from the classroom. Ultimately helping teachers to teach more engagingly and realistically rather than sticking to theoretical explanations only.
A virtual tour is the most popular semi immersive virtual reality that most businesses are embracing today.
They can be both device-based and web-based. Overall, they provide an interactive virtual experience.
It is mostly used in businesses such as real estate websites, hotels, local bars or pubs, universities, schools, and many more businesses that rely on highlighting and promoting their locations.
4. Augmented Reality
Augmented Reality is when a certain entity or device seems to be present in reality but is actually not.
Rather than putting you into a virtual world, a virtual entity is placed in the real world through any device.
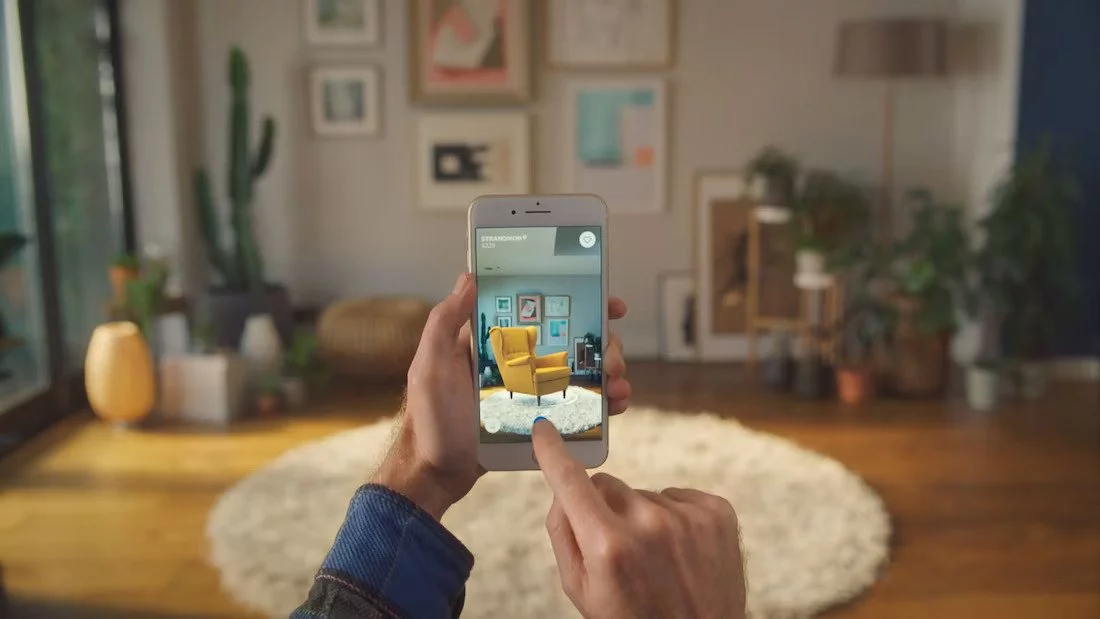
For example, through your mobile screen, you can view your room and probably place a cartoon character in the corner. You will be able to see the character through your mobile screen and not in reality.
For example, a person willing to buy a table will be able to place the table in his room through his phone display.
This will let him understand if this table is suitable and looks good in his room or if he has to choose another design.
Augmented reality often is argued to be a unique form of technology rather than VR. There are also a few technology consulting services that often assist in implementing augmented reality solutions effectively.
But its ability to place entities virtually often puts it within the VR category.
5. Collaborative VR
This is a form of a virtual world where different people from various locations can come into contact within a virtual environment, usually in the form of 3D or projected characters.
For example, Unity game development has also embraced the concept of virtual collaboration, much like the video game called PUBG (Players Unknown Battle-Ground), where tons of players come into existence as individual virtual characters that they can control. Similarly, the integration of hybrid casual elements in virtual reality games is becoming increasingly popular, offering a unique blend of simplicity and engagement.
Much like the transformative impact of igaming development in its sector, VR technologies are paving the way for innovative experiences across various domains.
Here they can interact with each other through microphones, headsets, and chatting.
Recently people are getting used to virtual meeting rooms to conduct business meetings remotely, or for conducting virtual debate competitions.
For those interested in enhancing their virtual collaboration, learning how to conduct virtual meetings effectively is crucial, offering a blend of convenience and efficiency in today’s digital landscape. Exploring AR VR development services can significantly enhance these virtual experiences, the main goal of this form of VR is to create collaboration between people. As virtual reality continues to improve over time, the advancement of translation for VR will pave the way for immersive multilingual experiences.
The Perfect Tool to Make Virtual Tour
Now think and choose what type of virtual reality you want to experience. I know what you are thinking.
How can you make a virtual tour right?
Making a virtual tour can sound too complex. But by using WPVR, you can do it very easily with just 3 steps!
First, take 360° panorama images, and then :
Connect these Panorama Scenes
Use Scene-type Hotspots so all the 360-degree images join together
Show information in the virtual tours using info hotspots and hit publish!
And that’s it, you’ve created your desired virtual tour!
And you can share your virtual tour on social media very easily.
Using WPVR you can easily share your 360-degree virtual tours on your desired Social Media Platforms like
Facebook,
LinkedIn,
Twitter,
Email, and
Reddit.
not just that you can generate a QR Code automatically for your virtual tour and send it anywhere, and you too can view or show your virtual tour without any web page!
You also don’t have to worry about how to do plugin installation and activation process, As we have created 82 pieces of documentation from installation to all the minor Major setting step by step.
As you can see, these are the most popular types of VR available out there. With time, the quality of virtual reality is getting better and better.
More and more businesses are implementing different forms of virtual reality, mostly virtual tours, and virtual meeting rooms, to improve their engagement with their prospects and business module.
If you haven’t looked into it yet, I suggest you start thinking about using virtual reality to stay on par with this advanced world.
FAQs
1. What are the main types of virtual reality?
The main types include non-immersive, semi-immersive, fully immersive, augmented reality (AR), and collaborative VR.
2. What is the difference between AR and VR?
AR overlays digital elements in the real world, while VR creates a fully immersive, computer-generated environment.
3. How is semi-immersive VR used?
Semi-immersive VR is often used in training simulations, like flight or medical training, to blend digital and physical interaction.
4. What industries benefit from collaborative VR?
Collaborative VR enhances industries like education, architecture, and business by enabling virtual teamwork and shared spaces.
5. Why is fully immersive VR significant?
Fully immersive VR offers complete engagement with a virtual environment, ideal for gaming, therapy, and advanced simulations.
It’s particularly excellent when you need to list products that come in different variations like size or color. But, getting these variable products right can be a bit tricky at first.
Today, I will give you a complete guide on how you can add WooCommerce variable products.
After reading this guide, you’ll able to:
Add products to your store accurately and without wasting time
Create product variations for your variable products efficiently
Optimize your store’s product data to increase sales
Get actionable tips to improve your variable product page to increase your conversion rate
Let’s get your products set up properly and make your store work harder for you.
Understanding WooCommerce Variable Product
You might have a few products that have multiple variations. For example, let’s say you are selling a t-shirt in 3 different colors. In this case, the t-shirt is a variable product, and each colored version of the t-shirt is a variant.
In WooCommerce, when you add products, you may choose the product type as “Variable product” and then add variants easily.
Once you add a variable product to your WooCommerce, the product page will look like this:
As you can see, you may click on the dropdown menu to select a variant of the product.
Next, you will be able to customize the product page in many ways, such as using suitable plugins, applying a WooCommerce theme, or by customizing the page’s design on your own.
For example, you can use a plugin, Variation Swatches for WooCommerce, to display the variants in the form of swatches.
As you can see, you may click on the dropdown menu to select a variant of the product.
Now, let me give you a step-by-step guide on adding and optimizing variable products to your WooCommerce store.
So let’s get started.
Step-by-step Guide On Adding And Optimizing A WooCommerce Variable Product
Once you follow the steps below, you will be able to add variable products to your WooCommerce store easily. And later, you will get actionable tips that you can use to achieve a higher conversion rate real quickly.
Step 1 – Create Variable Product Attributes
The first step to properly adding a WooCommerce variable product is to create a variation product attribute and assign its variants.
A variation product attribute is basically the factor by which a product may vary. For example, if a product has 3 color variants, then ‘Color’ is a Variation Product Attribute, and each color is a variant.
So let us learn how to create one.
1. On your dashboard, go to Products > Attributes.
Here, you will see the option to create variation attributes.
2. Input a name and slug for the attribute in their respective fields. For example, you can name it ‘Color’ and assign the slug, ‘color.’
Then click on the ‘Add attribute‘ button below.
You will see that the attribute is added on the right side.
Here, I have added a variable product attributes called Color.
3. On the right side of the attribute, under the Terms, you will see an option called Configure Terms. Click on it.
It will take you to the page where you can add variants.
4. Input a variant name and slug in their respective fields, and add a description to it if you want to.
For example, you can name it ‘Blue,’ and assign the slug ‘blue.’
5. Then click on the Add New Color button below. You will see that the variant is added on the right side.
You can add more variants here. I have added two more, Green and Red.
It will take you to the page where you can add variants.
So far, you have a variation product attribute, and it’s corresponding variants. You can repeat the whole step to add more variations of product attributes and their variants.
These will be used to set up variations when adding variable products to your WooCommerce store.
Step 2 – Add A New Product
The next step is to add a product and set it up as a variable product.
1. On your Dashboard, go to Products > Add New.
It will take you to a blank product edit page to input the necessary data for the product.
Here, you will need to add a few product data; make sure the data is optimized.
As you read on, I will give you relative examples to help you understand how you can optimize the data.
2. Add a Product Name and Description.
Try to avoid using too many marketing schemes on the Product name, but do include the unique features that may make it stand out. And, in some cases, you may include the variant term on the name as well.
For example,
You may use: Super Heroes T-shirt – Red/Blue/Green
But do not use: Red T-shirt – Buy 3 Get 1 Free
In the description, try to explain all the product features so people may learn what to expect when purchasing the product.
If you have size variants, then it is best to include a size chart in the description as well.
Make sure to highlight all the advantages and special features of the product here.
3. On the right side, you will get the option to assign Product Categories.
Here, you may choose a suitable category that already exists or create a new category for this product.
Putting the product within a relevant category is important because people will often search for products based on categories in your store.
4. Add images to your product.
On the right side, you will get the option to add a Product image. Click on Set product image to upload an image.
This is the main image of the product. A person usually notices this image first when viewing the product page.
For the main image, it’s best to use an image that is a collection of all the variations in a single picture, so that people know that they have options.
**You will be able to add images based on variants, which I will show you later.
Make sure the image is clear and matches the product you are selling. Avoid using fake images or enhanced images that look way better than the actual product.
Remember. You are here to do business on a long-term basis. Deceiving people may result in them not buying from you again. The more original you are, the more people will be your regular buyers.
Below the Product Image section, you will be able to add more images in the Gallery.
Try adding multiple images from different angles of the product to showcase it properly.
These are the basic data of the product that you need to add. However, there are more options available such as Short Description and Tags. I will give you tips on how you can optimize them later in this article.
Step 3 – Configure The Product As A Variable Product
Once you have inputted the basic details, you need to configure this product into a variable product.
1. Below, you can see the Product Data Section.
You will see that on the Product data field, it is set as a Simple product.
2. Click on Simple Product and change it to Variable Product.
You will see that the menus below will change.
Here, by default, you will get 7 main menus on the left side (and there may be more depending on other plugins you use).
3. First, configure the General menu.
Here you will get two options:
Tax Status – Here, you can choose if the product is taxable, or if the tax applies to the shipping cost only, or select the option ‘None’ if the product is not taxable.
Tax Class – If you mark a product as ‘taxable,’ then you will need to choose a Tax Class, from the ones created when setting up WooCommerce.
4. Next, configure the Inventory menu.
Here you will get three options:
SKU – This is the parent SKU of the product. Even if you assign this, you will still need to assign unique SKUs to product variants (which I will show you in a bit).
Manage Stock – If you enable this, you will be able to
specify the available quantity of your product,
choose if you allow backorders or not, and
set a threshold to be notified if the stock is low. **For variable products, it’s best to manage stock within each variant rather than here.
Sold Individually – You can enable this if you accept only 1 item per order for this product.
5. Now, move on to the Shipping menu.
Here, you can assign the Weight and Dimensions of the product, which may affect the shipping cost.
And if you have created a Shipping class when setting up WooCommerce, you can assign that here if it applies.
6. Then comes the Linked Products menu.
Here you can assign products for Upsell or Cross-sell for this product.
Here’s a guide on how to use them effectively.
It’s best to assign similar products that are better and more expensive, as upsell. They will be displayed as suggested products on the product page.
For example – if it’s a Leather Jacket, then you can suggest more leather jackets that are better in quality and more expensive.
You may also assign products that are related to this product, as cross-sell. They will be suggested to the buyer in the cart.
For example – if it’s a Shirt, you can suggest suitable Jeans to go with it.
I will explain the Attributes menu, and the Variations menu in the next Step as these hold the main options to set up a WooCommerce variable product. For now, let’s take a look at the Advanced menu.
7. Go to the Advanced menu.
Here, you can leave a note for the buyer during purchase and enable reviewing by buyers.
Step 4 – Add Variation Attributes To The Product
You have set up all the basic data in the last two steps. Now, you will learn to create variants for your product.
1. Go to the Attributes menus
2. You can see there is an option that says Custom product attribute. Click on it.
You will be able to select from the variation product attribute(s) that you created in Step 1 of this guide.
I have created three more along with ‘color,’ so you can see four options in the image above.
3. Choose the one you want to use to create product variation for this product and click on Add.
For example, let’s say you want to create color variants for this product. Then choose Color.
You can see, the Color attribute has been assigned.
4. Under values, if you click on the field, you will get the option to choose from the variants you created for this Attribute.
If you think all the variants apply to this product, you may click on Select All, and all the color variants will be added.
You can see that I have decided to add all the variants, Blue, Green, and Red, that I created in Step 1.
**On the right side, you can see there is an Add New button. If you need to add a color that is only applicable to this product, but you won’t need to use it for any other products, you can click on it to add it here.
5. Next, checkmark on the ‘Used for variations‘ option.
This will allow you to create variants of this product, using the variant terms you assigned. Once this is done, click on Save Attributes below.
You have successfully assigned a variation product attribute to this product.
You can repeat the process in Step 4 up until here to add more variation product attributes.
Bonus conditional steps –
The variation product attribute(s) that you learned to create in Step 1 is used globally. Any product you create, you can assign those attributes to them.
However, there may be a case where you have a product with variants that do not resemble any other products in your store.
For example, let’s say you decided to sell a unique jacket with variants based on the closure — one having a zip-closure and the other having a button closure. In this case, it is less likely that there will be more products having similar variants.
Here, what you can do is, rather than creating a global variation product attribute, you can directly create custom variation attributes just for this product.
Here’s how.
i. In the Attributes menu, instead of choosing a variation product attribute, choose Custom Product Attribute and click on Add.
It will add a blank Attribute below.
ii. Here, name the attribute and assign values in the form ‘Variant1|Variant2’.
iii. And checkmark the Used for Variations option.
iv.Then click on Save Attributes.
Next, it’s time to generate product variants based on the attribute variants you added.
Step 5 – Generate Product Variations
Now that your attributes have been added to your product, it’s time to generate product variations.
1. Go to the Variations menu.
2. Here, click on Add variation, and select, ‘Create variations from all attributes‘.
3. Then click on Go, and WooCommerce will ask for your confirmation. Once you confirm, variants of this product will be added.
**If you marked multiple attributes for variants in Step 4, then WooCommerce will generate every possible combination between the variants here.
For example, if you used a Size attribute with 3 variant terms and a Color attribute with 3 variant terms, then a total of 9 Product variants will be generated.
You can then remove the ones you don’t need.
Step 6 – Configure Each Variant Properly
Now, you have to configure each of the generated variants and input proper data.
1. Click on a variant, and it will expand.
2. First, assign a unique value as its SKU.
3. Next, input the Price and Stock Status for this product.
If you have a promotion running, you can include a Sale Price.
You can assign the Stock status as ‘In stock’, ‘Out of stock,’ or ‘On Backorder.’
4. Upload a suitable Image dedicated to this variant.
This will mean that this image will be viewed if someone selects this variant on the product page.
Make sure to include a good image here.
6. Add a Description and assign a Tax class if applicable.
Even if you have added a description earlier, it is still a great idea to add a short description within each variant.
When a person chooses this variant, he/she will get a description dedicated to this variant. So you will have a chance to highlight the uniqueness of this particular variation of the product.
And, if you want, you can enable a Tax class just for this variant; you can change the value from ‘Same as parent’ to one of the classes you created when setting up WooCommerce.
7. You can also assign Weight, Dimensions, and a Shipping class to this variant.
8. Just below the image, you will see a few options. Choose the ones that apply to your requirements.
You will get the following options:
Enabled – If you uncheck this option, this variant will not appear as a choice on the product page.
Downloadable – If your product is has a downloadable file required along with the product, then checkmark this option.
**When you mark a product as Downloadable, you will get additional options — attach the file, add a link to the file, assign a download limit, or assign an expiry date as download time.
Virtual – If you mark your product as Virtual, it means that this product cannot be shipped because it is an online product.
**When you mark a product as Virtual, you will see the fields for Weight, Dimensions, and Shipping Class will no longer be visible.
Manage Stock – If you want to manage stock for every variant, then you can enable this option.
**If you enable Manage Stock, the stock status field will no longer be visible. Instead, you will get the option to input the quantity available and indicate if you allow backorder or not.
It is best to manage stock based on each variant because there are times when a certain variant may be sold out earlier. Managing it at a product level and not the variant level may result in you answering many inquiries about the variant that is not available.
9. Now click on Save Changes below. Then repeat all the tasks in Step 6 for every variant you generated for this product.
10. Scroll up and on the top right side, click on Publish, and the product will be published.
That’s it. You have successfully created a WooCommerce variable product.
How To Optimize Product Data To Increase Sales
Now, I will give you some tips on optimizing the product data, which will help you to increase your conversion rate.
Most people will give you advice such as ‘Use optimized images that highlight your product’, or ‘Optimize SEO in your product description’, and so on. Now, it’s true that all those are important.
But here, I will provide you with some unique ideas that might give you the edge in increasing your sales even further.
i. Choose A Feature Specific Product Name With ‘Smart Adjectives’
When choosing the product name, you have to keep in mind that this will be the first thing people will notice after the image.
The name should be decided in such a way so that people can instantly know what it is and its most special feature. Plus, you need to use adjectives to describe the product smartly.
For example, let’s say you are selling a t-shirt with a Super Heroes theme.
So its best feature is Super Heroes. You can set a name as ‘Super Heroes T-shirt.’
Next, you have to understand the purpose of this product.
The t-shirt is an element of style, so you would probably want to use the adjective, Stylish. However, you have to consider the fact that the word ‘Stylish’ will probably have less influence on most men. You might want to use an adjective that’s gender friendly.
In this case, you can consider the fact that ‘Super Heroes’ brings excitement or amazement among people.
So, the adjective ‘Exciting’ or ‘Amazing’ could be a great fit. And if it’s a new design, then pointing it out is also helpful.
So you may name it ‘The Amazing New Super Heroes T-shirt.’
If it’s a rare t-shirt, you can go with ‘The Rare Collection – Super Heroes T-shirt’.
If the Super Heroes theme is popular, you might wish to go with ‘The Trending Super Heroes T-shirt’.
The three names suggested above are just examples. However, it is not mandatory to use adjectives on all product names in the same category.
For example – if it’s a single color t-shirt with not exclusive design, then you might be better off naming it ‘Comfortable Plain T-shirt.’ (The word, comfortable is almost always relative when it comes to clothing products.)
If the product has variants, you may mention the variant terms in the product name when someone selects a particular variant.
For example, let’s say you have 3 color variants for the Super Heroes T-shirt, being Blue, Green, and Red. Then, when a person chooses the Blue color for this t-shirt, you could display the name ‘The Trending Super Heroes T-shirt – Blue.’
**In WooCommerce, this cannot be done by default. So you have to use some custom coding to achieve it.
You may also choose to mention all the variation terms in the product name.
For example, you could name it ‘The Trending Super Heroes T-shirt In Blue, Green Or Red’.
Though this may not be as attractive as individual variant names, it is still effective in letting people know of the available choices.
Also, try to avoid using marketing schemes in the Product name.
For example, avoid using product names such as ‘Super Heroes T-shirt – Buy 3 Get 1 Free’.
For such matters, try mentioning such offers in the Product image, in the Description, or use a Short Description. But do not use it in the title as it will confuse people about what the product is.
ii. Make The Product Description Worth Their While
When a person reads a product description, it means that the person is interested in the product, but wants to confirm if it has the features he/she needs. And it is your task to grab this opportunity and make the prospect realize that this is the product he/she was looking for.
Most people do not value the product description as much. They simply mention the product features, and that’s it. But believe me, a product description can be a big push towards making a purchase decision.
Here’s a format I recommend that you follow. Create a description in the following order:
What benefit will the person get with this product? -Write a short paragraph explaining the main benefits or results people will get if they purchase this product.
For example, let’s say you are selling a pair of Earphones with good sound quality. So the paragraph could be something like this:
“Get the exclusive XYZ Earphones and get into a different world when listening to the music. This earphone is specially designed to enhance the music quality so that you feel every beat of the music, along with the soothing feeling flowing through your ears. Enjoy every bit of music on the go!!”
The main features of the product in a benefit-specific way -In this section, use bullet points to mention the features, while stating the benefits where possible.
For example, in the case of the XYZ Earphones, it could be something like this:
Long wire for better portability – Cable Size: 2.5m
Easy to fit in the ears with a suitable In-ear style.
Enhanced base control for the maximum music experience
2:1 surround system for a realistic music experience
Compatible with almost all devices – 3.5mm jack
As you can see, I have mentioned the features and stated one benefit for each, all in bullet points.
Why a person should buy this product over other similar ones
Here, you can use a paragraph to mention the unique reason why people should buy this product. And you can mention here if it has any variants.
Also, if the product comes with something extra, you can mention it here. (However, if it’s a promotional item, you should rather mention that in the 1st paragraph.)
For example:
“What makes XYZ Earphones better than others is that it comes with an Ultra base control technology, which makes sure no noise spikes are experienced to hurt your ear. Rather, you will be able to enjoy smooth music at all times.
The XYZ Earphones come with a pouch to carry it at all times.
Plus, you can choose from three stylish colors, Blue, Green, or Red, to be your ears’ companion.”
A call to action -Finally, mention what people will get in the order and use a call to action.
For example:
“When you order, you will get:
1 x XYZ Earphones
1 x Earphone pouch
Buy XYZ Earphones now and start listening to awesome music.”
Now, this format is only my suggestion, but it works.
Often swapping the third paragraph with the 1st may be a good idea. In the case of some products that are too simple, it’s best if you do not use the third paragraph; rather, combine that with the 1st paragraph.
iii. Use A Short Description
I have mentioned earlier that the main Description either comes below the basic product details or with a tab to click and view.
So, you may rather use the Short Description feature in WooCommerce, which appears just below the title on the product page.
When you edit a product, go to the screen options and enable the Product Short Description option, and it will appear just below the Product Data section.
Here, explain within 3 lines, the product’s main features that people are looking for.
This will help people to realize first hand that it is the right product for them.
iv. Update the slug according to the main product name
When you use adjectives and variant terms in the Product name, publishing it also adds them to the slug or product link.
However, it’s best to use a simple URL slug, rather than a long one.
For example, in the case of the Super Heroes T-shirt, when you name it ‘The Trending Super Heroes T-shirt’, you will see that the slug will be something like this:
You can see the product slug is ‘the-trending-super-heroes-t-shirt’
To make it simple, change it to a ‘super-heroes-t-shirt’.
You can assign a slug when creating a product. Simply go to the screen options and enable the Slug option. A Slug section will appear just below the Product Data section. There, you can input the slug you want.
Or, after publishing the product, you can go to Dashboard > Products > All Products. There look for the product and quickly edit it. Here, you will get the option to input your desired slug.
v. Try managing stock based on each variant
In WooCommerce, you have the option to manage stock, i.e., the quantity of your products, and backorder service.
When editing a variable product, you can either do it in the Inventory tab in the product data section or within each variant.
It’s best to use the manage stock option within each variant rather than the one in Inventory. This will allow you to control how many of each variant is available. In case one variant is sold out, you can mention that in your store.
Here, if you control quantities from the Inventory tab, buyers will not know if a particular variant is available.
Let us look at an example.
Suppose you are selling a pair of running shoes that vary based on the sizes, 36, 37, 38, and 39.
You have a total of 4 for each variant, which is a total of 16 shoes.
Let’s say the size 37 is sold out.
Heres’ what will happen if you manage stock in the Inventory tab:
On the product page, when a person will choose the size 37, it will still indicate that it is available.
Since you are using the Inventory tab, it counts the total number of products. So, after 4 shoes in size 37 is sold, the inventory will count that 12 more shoes are remaining. Hence, it will mark it as ‘In Stock,’ no matter what variant a prospect may choose.
Here’s how using Stock Management within a variant will help:
Since the size 37 is sold out, choosing it on the product page will indicate that it is out of stock. Choosing any other variant will display the available individual quantity of each of the variants.
Apart from these 5 tips above, do remember that it is still very important to apply SEO optimization on the Product description. And it’s best to use optimized images that highlight the best features of the product.
I’ll repeat another important tip. Please refrain from using fake images to sell your products.First, many people use images of a product and then deliver replicas that do not look identical. They do not meet the feature requirements that were claimed in the description. For example, If you are saying it’s an original Jersey, then it should be original. You can’t just send a replica.Second, do not edit your product images to such extent that it looks way better than it actually is, or looks different from the actual product. For example, do not turn a purple dress into a pink dress. Stating that ‘Color will slightly vary from real life’ doesn’t justify such high difference.
How To Customize The Product Page To Increase Engagements
Sure, optimizing product data is very important. But it is also equally important to optimize the product page.
And you can get an extra edge with variable products, and there are more scopes of customization.
Here are a few tips on customizing the product page that is currently working really well for many.
i. Customize your product page to be simple and less congested
Look for a WooCommerce product page template that is not too congested, and makes it easy for a prospect to take a decision on the product.
Many people use templates where too many details are presented right in the first view, which may confuse buyers.
You can display product variants in the form of button swatches. For example, you can use colored swatches to present color variants, or image swatches to let people choose variants.
It’s a great way to grab the attention of buyers and create curiosity to choose a variant.
Here’s an example of the use of color swatches to display product variants.
One way to ensure the conversion is to make a buyer purchase as soon as he/she is interested in a product.
So, what you can do is you can make it so that a person can complete the purchase instantly. You may achieve this using the plugin Buy Now For WooCommerce.
It’s a simple plugin where a buyer can click on the Buy Now button, and the checkout page will appear as a pop-up so that the buyer can make the payment instantly and get done with the purchase without having to leave the page.
Running a WooCommerce store can be hectic if you do not organize your shop properly. Hence, it is best to learn the proper steps and actions to take when adding products, especially variable products.
Hopefully, if you follow the steps in this guide, you will be able to run a successful WooCommerce store with no difficulties whatsoever. When it comes to selling variable products, the tips will come in handy for you.
Though there are so many more to learn about WooCommerce, it’s best to learn one step at a time. Learning to add variable products in an optimized way is definitely an important step that you covered in this guide.
Also, here is a list of guides you can use to learn WooCommerce in detail. Take your time and learn to set up a proper WooCommerce store so that you can achieve a high conversion rate and increased ROI in the near future.
** FAQs **
How do I manage stock for each product variant?
To manage stock for each variant, go to the “Variations” menu under the “Product Data” section. Click on a variant to expand it, and you will see the option to input the stock quantity. This allows you to specify how many units of each variant you have available. It ensures accurate stock management for each variant separately.
Can I add unique descriptions for each product variant?
Yes, you can add unique descriptions for each variant. When you expand a variant in the “Variations” menu, you’ll find a field to add a description specific to that variant. This helps highlight the unique features and benefits of each variant. It provides more detailed information to your customers.
How do I set different prices for each variant?
To set different prices for each variant, go to the “Variations” menu. Expand a variant, and you will see fields to input the regular price and sale price (if applicable). This allows you to price each variation according to its features or market demand.
How can I add images for each product variant?
You can add specific images for each variant by expanding a variant in the “Variations” menu and uploading an image in the designated field. This ensures that when a customer selects a variant, the corresponding image is displayed. It provides a visual representation of the chosen option.
What should I do if I want to add a unique attribute just for one product?
If you need to add a unique attribute for a single product, you can create a custom attribute directly in the “Attributes” menu of the product. Select “Custom Product Attribute” and click “Add.” Then, name the attribute and input the values separated by a vertical bar (|). Check the “Used for variations” option and save it. This allows you to create product-specific attributes without affecting other products in your store.
If you own a WooCommerce store, you need to put in some extra effort when promoting your products.
One way most WooCommerce stores find success is by promoting their products through Google Shopping.
As a WooCommerce store owner, you can get numerous opportunities to showcase your products with Google Shopping ads.
But, there is a big issue that most store owners face.
To upload product feed files properly in the format that Google suggests.
This article will guide you through the steps of building a Woocommerce Google shopping product feed with WooCommerce with 6 simple steps(VERY EASY)
Now, I am here using a plugin Product Feed Manager For WooCommerce, and going to show you how you can generate a Woocommerce Google shopping product feed with JUST A FEW CLICKS.
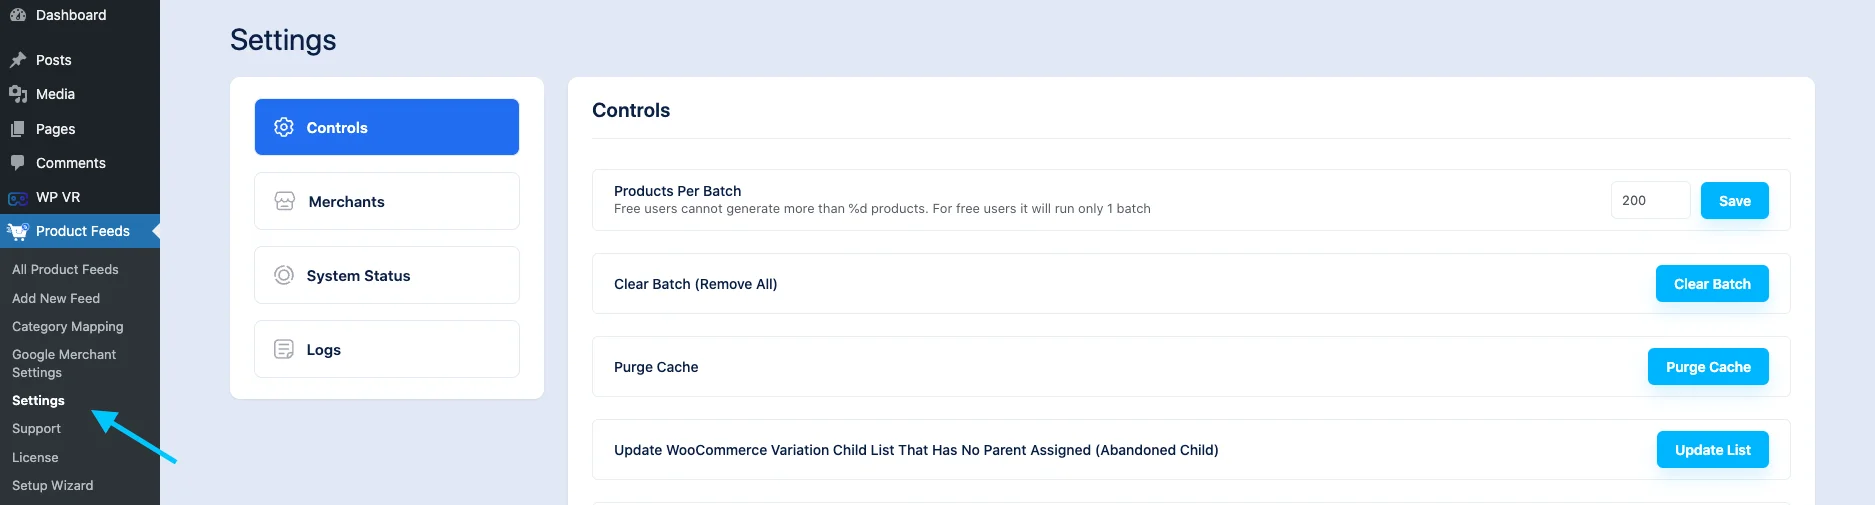
Tool To Generate WooCommerce Google Product Feed
First, you need to make sure that the Product Feed Manager For WooCommerce is installed and activated.
Now, you can proceed to generate WooCommerce Google product feed efficiently.
6 Easy Steps To Generate WooCommerce Google Product Feed
To be able to generate an accurate WooCommerce Google Product Feed, you have to follow the 10 simple steps below:
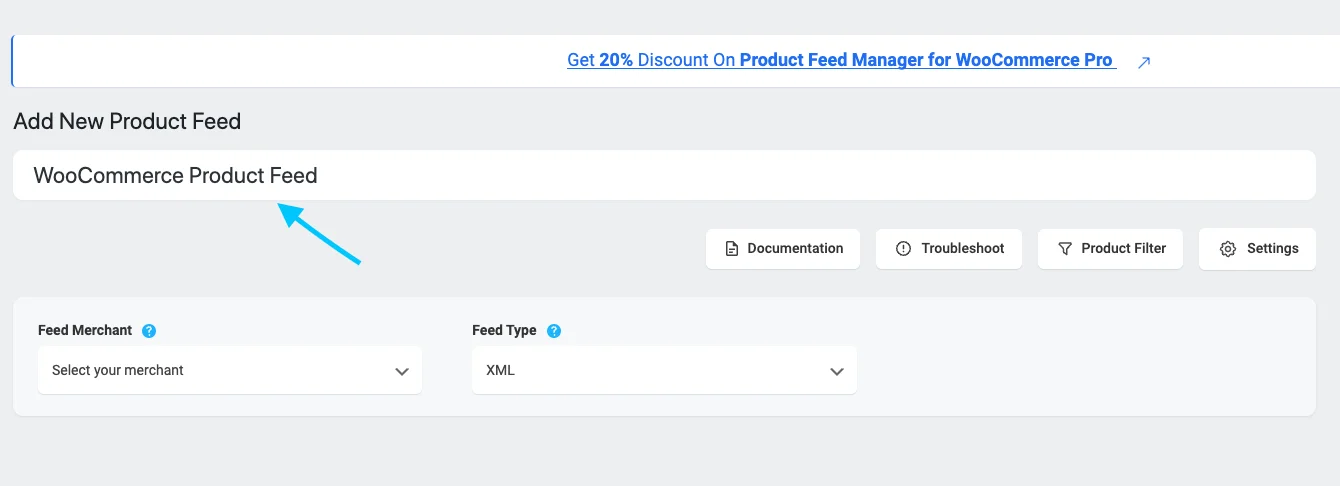
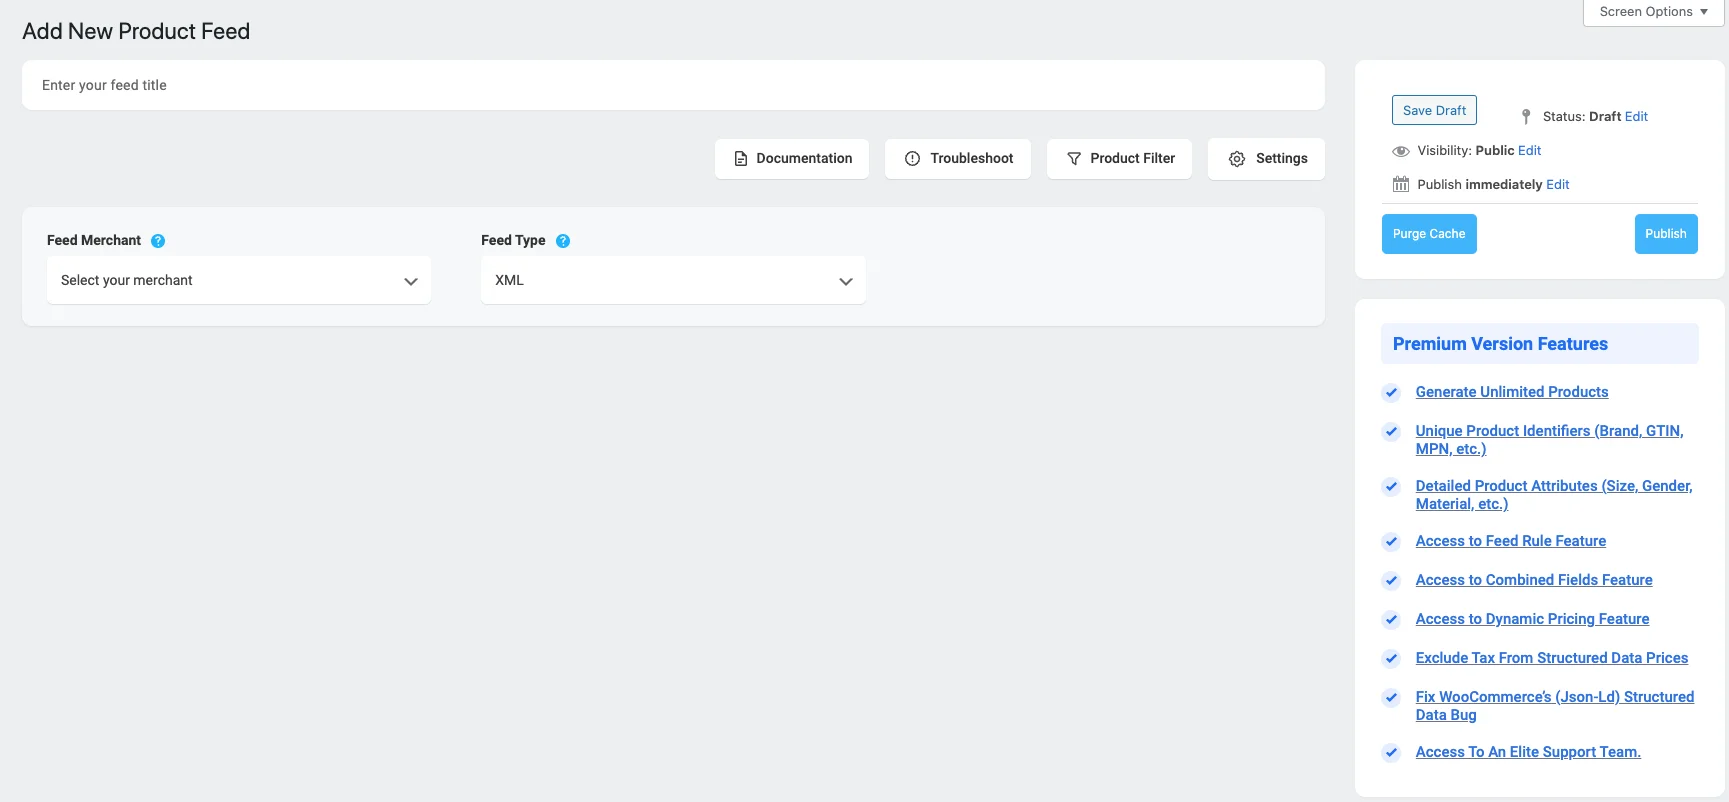
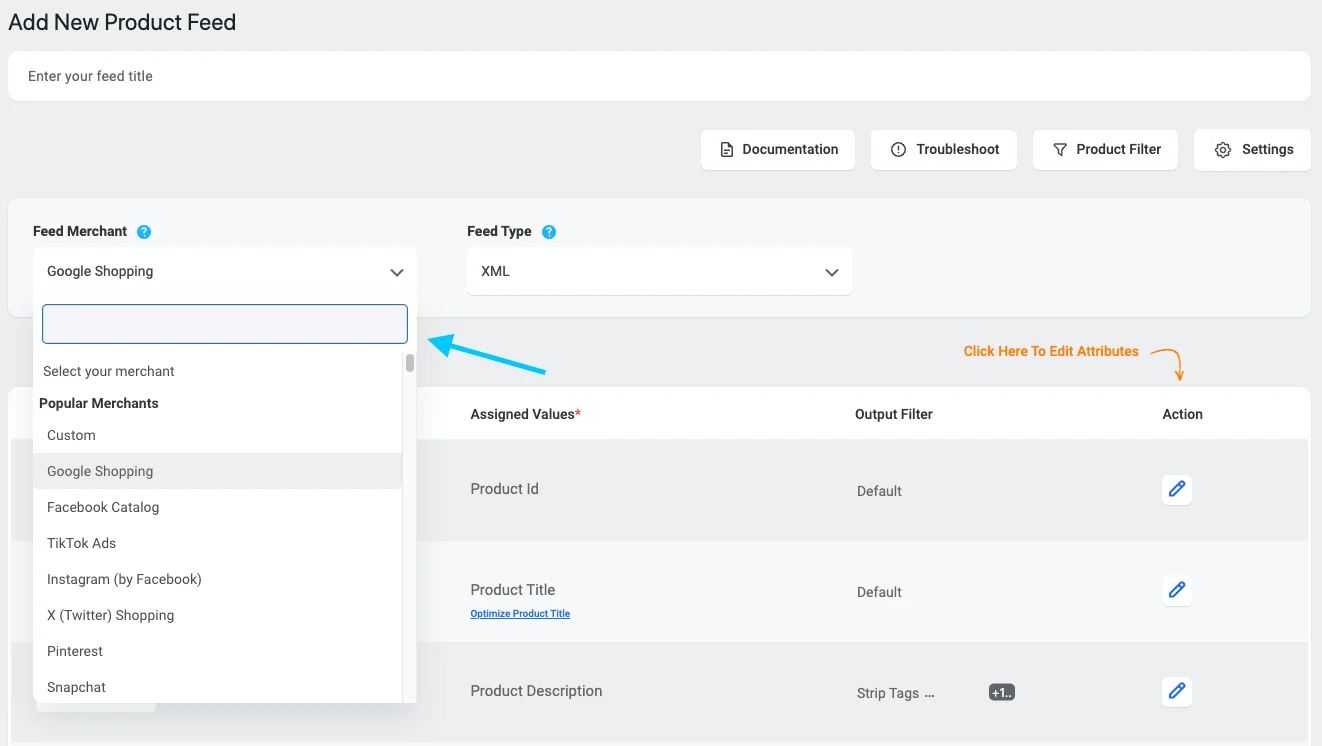
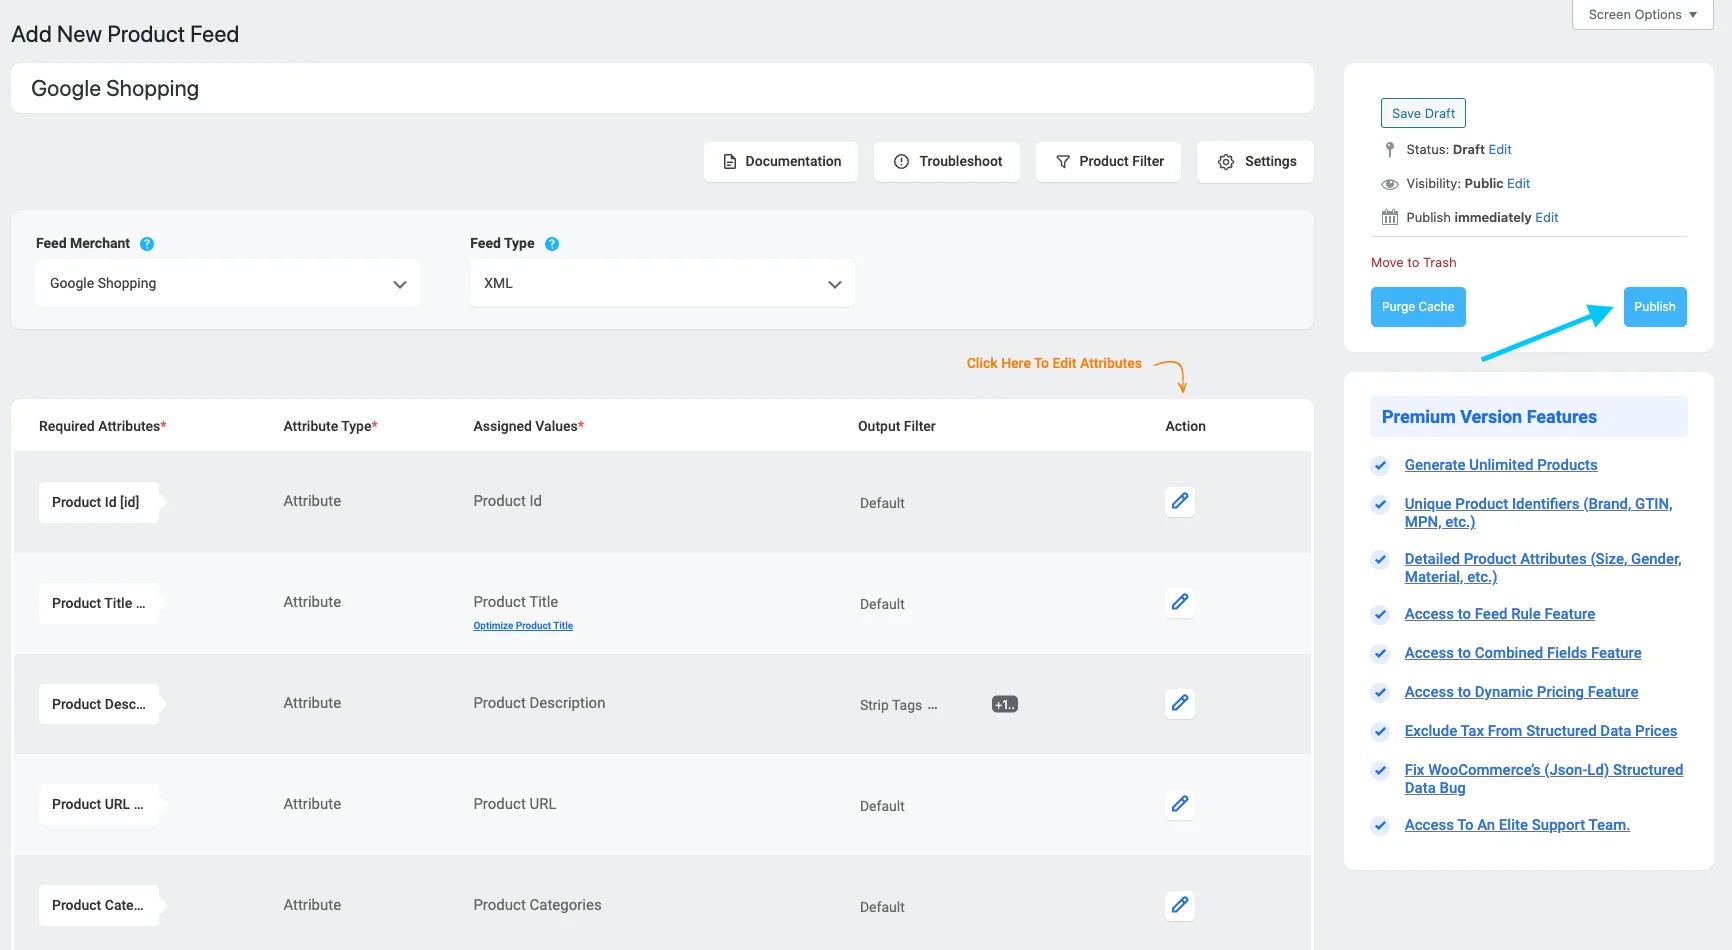
From the drop-down select the merchant where you want to list your products. Here, you will select Google Shopping.
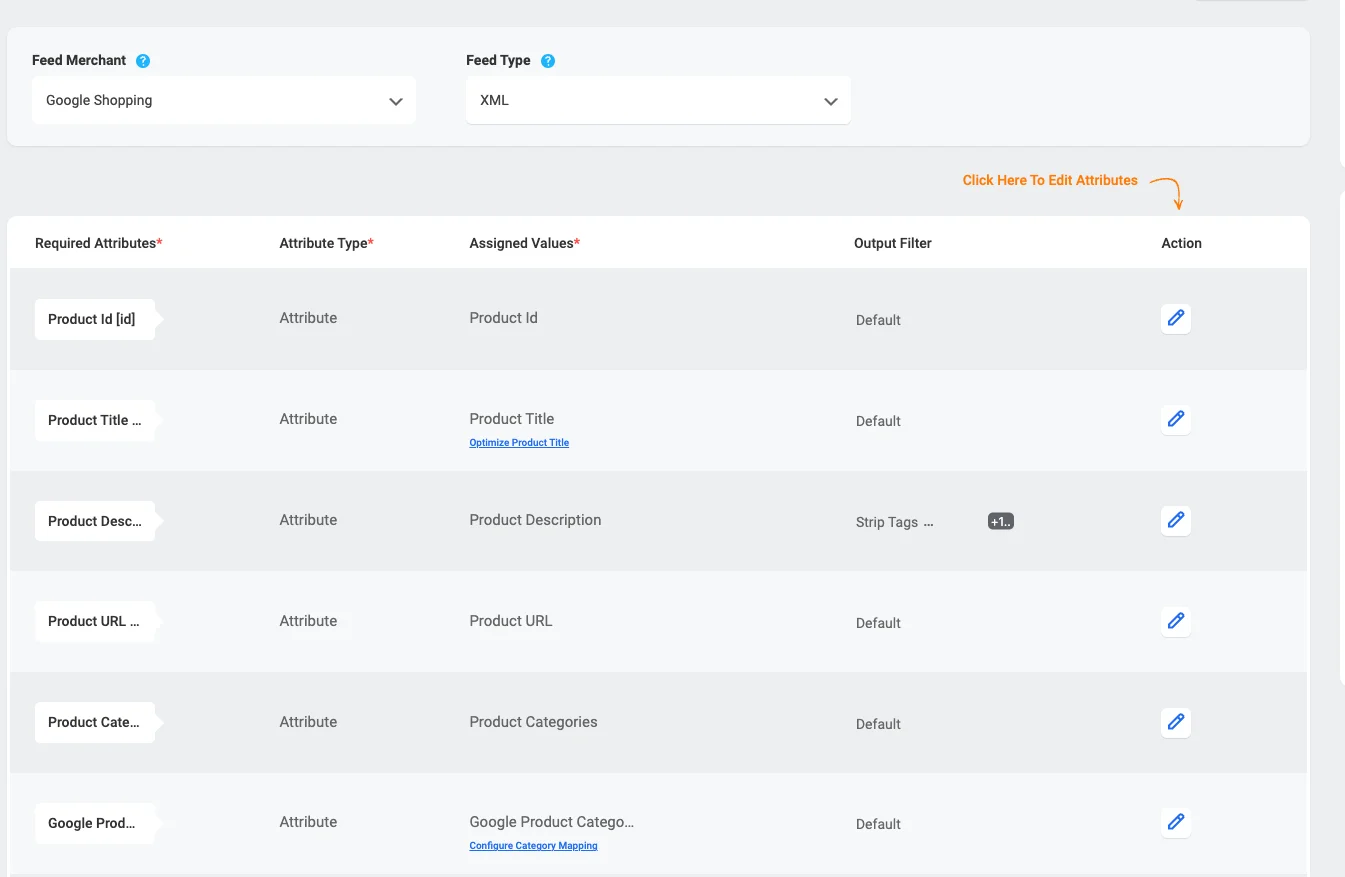
Once you select Google Shopping, you’ll see all the required Google Shopping feed attributes listed on the page.
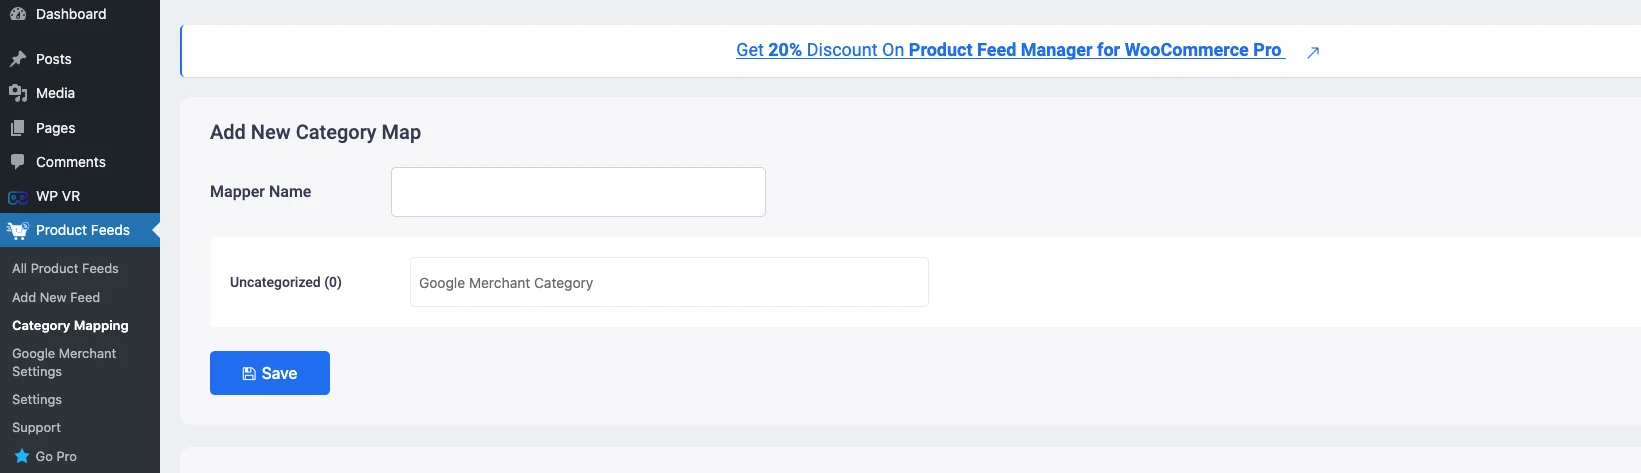
Step 3 – Configure The Unmapped Attributes
In the feed creation page, you will see almost all the attributes have their values set accordingly.
As you can see here for the Manufacturer (brand)the values are set as static.
but for Google Product Categories, the values are not set.
You need to map the right values for these attributes.
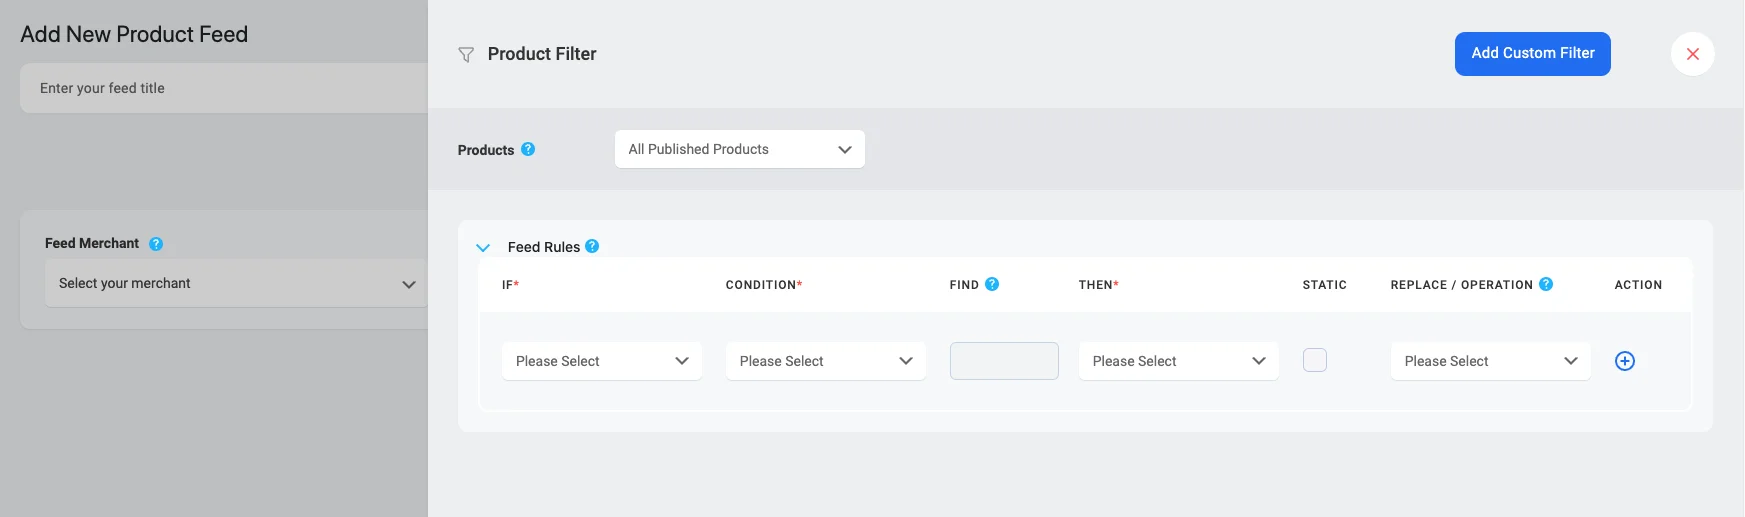
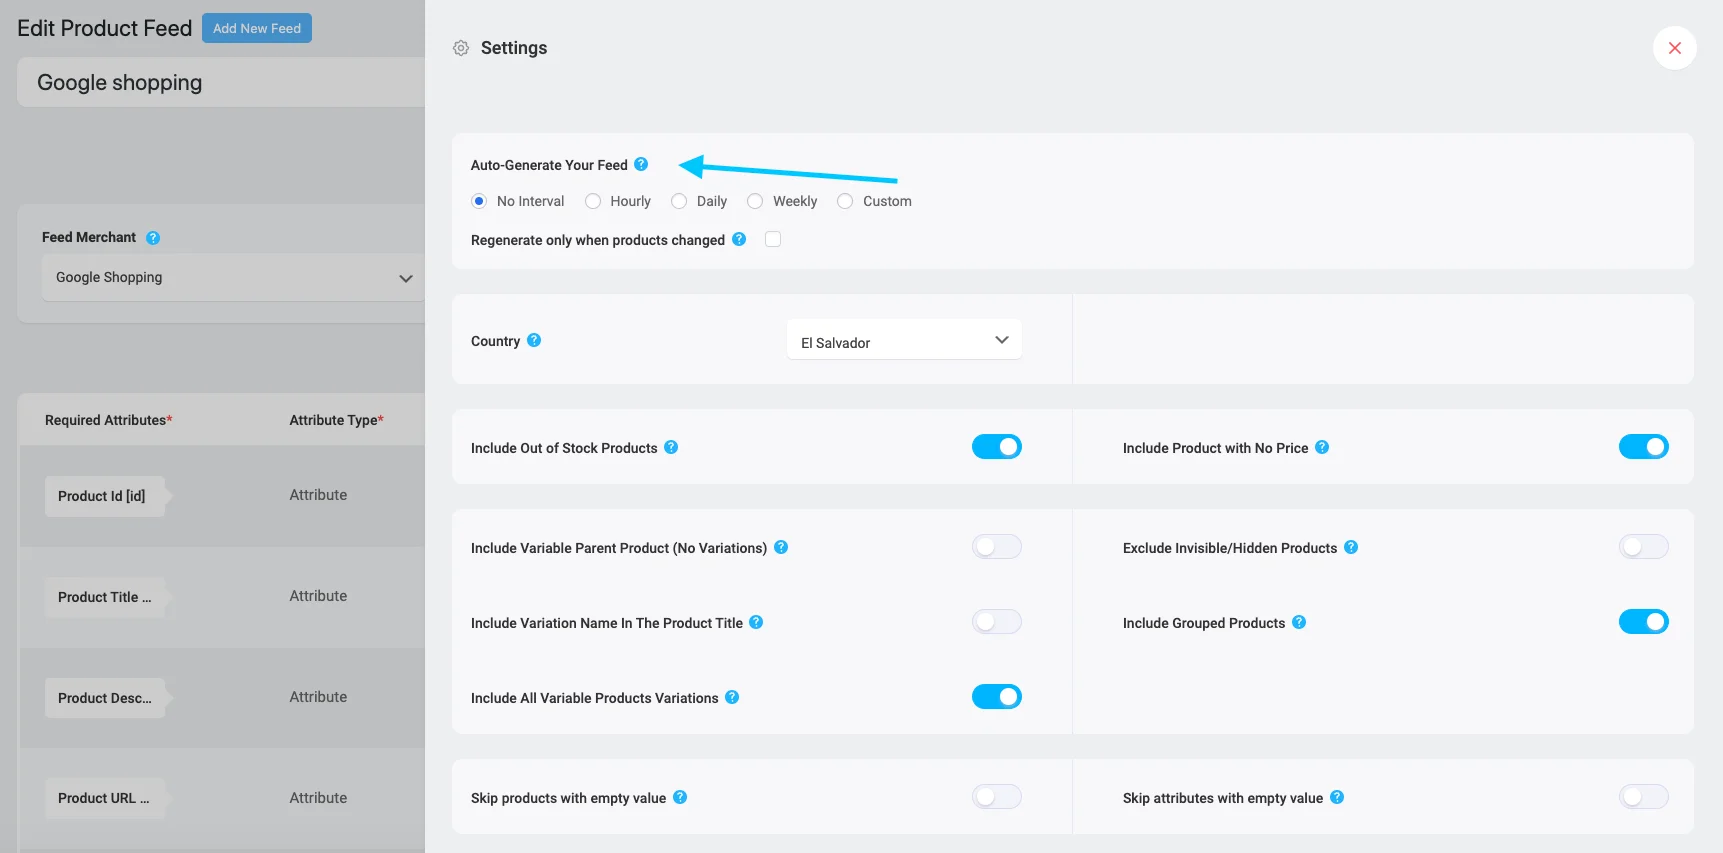
Step 4 – Configure Filter & Settings Option
You can use different filters to select which products you want to include in your feed.
You can also configure different settings options based on your preferences.
Step 5 – Generate The Product Feed
Once all the configuration is in place, scroll to the top right side and publish the feed.
Then the feed generation loading bar will appear.
Once the loading is done, your feed will be ready.
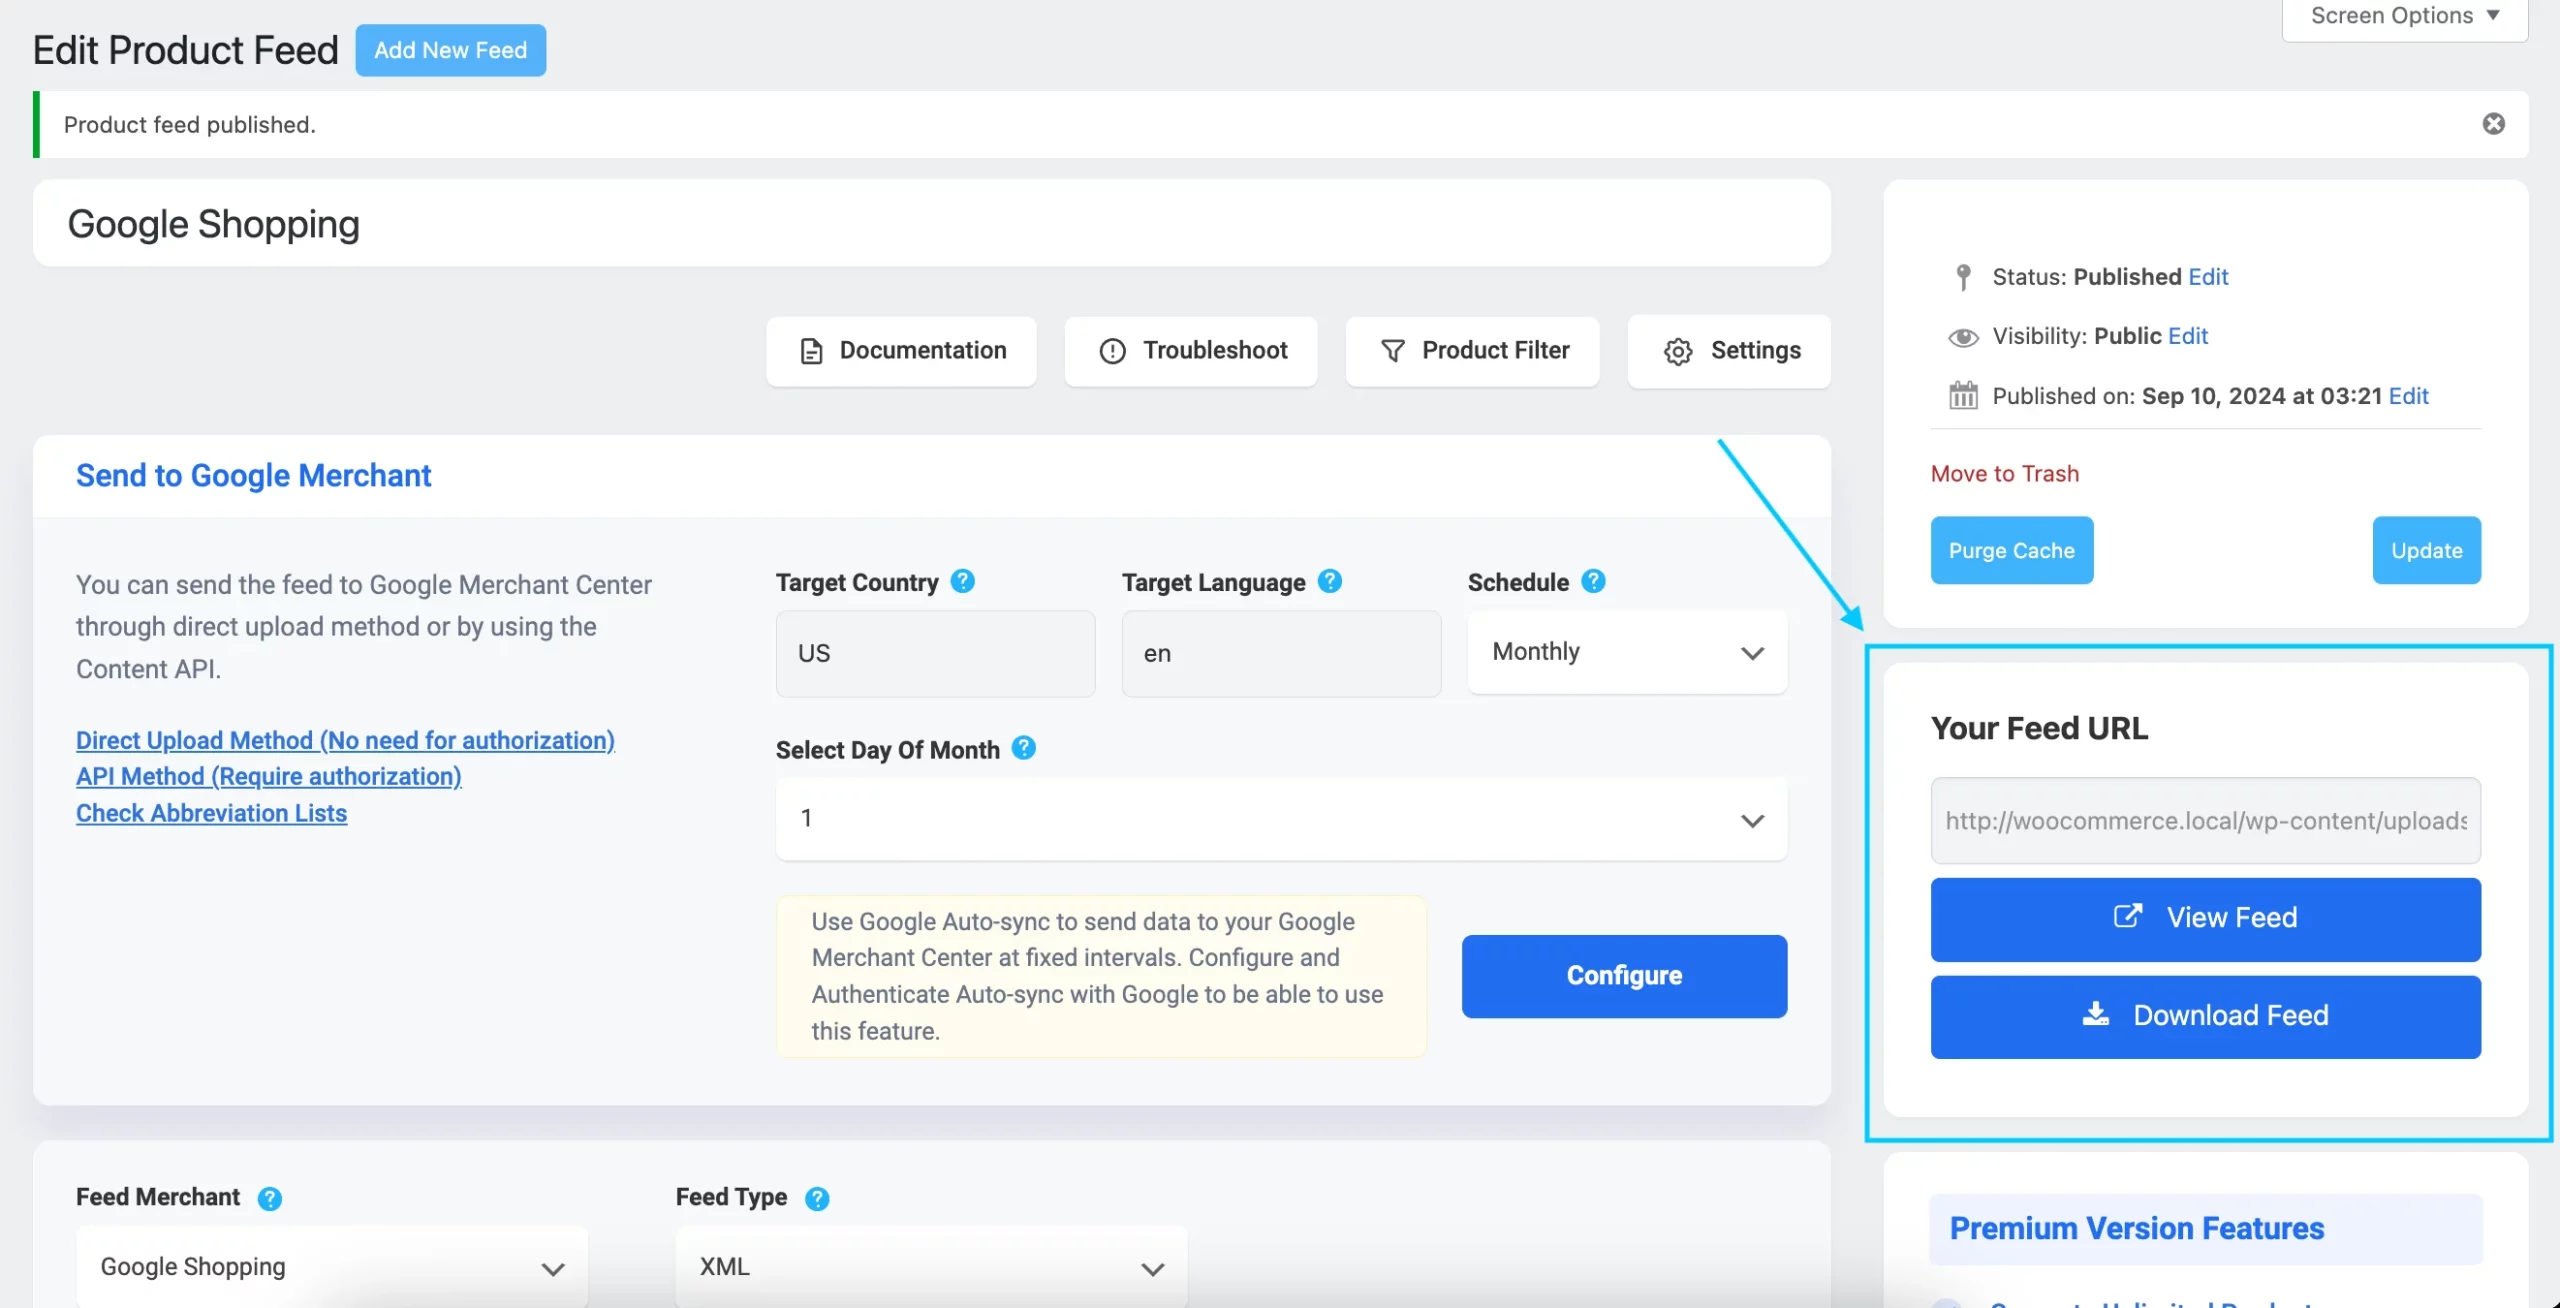
Now, you will be able to view the feed, copy the feed link, and download the feed.
Step 6 – Upload WooCommerce Google Product Feed For Promotion
You can now download the generated product feed and upload it to your Google Merchant Center.
If you have auto-synced your WooCommerce store to Google Shopping using our plugin, then you can directly send it from the ‘Send to Google’ option.
Under this option, you can set your schedule according to your own will, either Weekly, Monthly, or Hourly basis. Once you select the schedule, click on the Green button Send To Google.
And that’s it, the feed will be sent to Google and regularly updated as per your set schedule.
In case you do not know how to auto-sync your WooCommerce store with Google using Product Feed Manager For WooCommerce, read this article.
Generate WooCommerce Google Product Feed with Product Feed Manager
It can be difficult to get enough traffic on your website and it takes time for your site to get popular.
So nowadays, it is best to promote your products on large online marketplaces such as Google Shopping, Amazon, eBay, etc.
These platforms regularly get millions of visitors, and people are already purchasing products through these platforms.
Today we will learn about selling your products on eBay MIP.
eBay is currently one of the largest online marketplaces in the world, being the third most popular in the USA.
The eBay MIP is the Merchant Integration Platform (MIP) a feed-based selling platform for small businesses and enterprise merchants.
If you own a small business or if you are an enterprise seller, you can start selling on eBay MIP.
Here, you will get a complete guide on how to generate an eBay MIP product feed to sell your WooCommerce Products on eBay
By the end of this guide, you will be able to
set up proper product feed of your WooCommerce store, in the most optimized way, for eBay MIP,
generate accurate and performance-driven product feed in minutes to upload and increase sales through eBay Merchant Integration Platform and eBay Seller Central.
So, if you promote on eBay, you can get a lot of visitors to your store.
Last year, One of the most highly visited shopping sites was eBay, with roughly 1.2 billion visits.
I’ve elaborated on some more benefits below :
Huge Daily Traffic
According to Similarweb analysis, in the last 6 months, eBay.com had over 632.8 million visits.
This means, around 4.56 million visitors per day!!
With over 132 million users, it is ideal to promote your WooCommerce products on eBay.
The eBay App
With 66 million regular users, the eBay app is one of the most used mobile apps for online shopping.
Through the eBay app,
6.72% of all Android users, all over the world, make regular purchases.
In the USA alone, 34.9% of all mobile users tend to use the eBay app.
This means 1 out of every 3 mobile users in the USA uses the eBay app.
As you can see, eBay is huge and it’s a marketplace you should explore if you wish to compete for higher sales.
eBay has two platforms with different facilities and perks of their own.
eBay Merchant Integration Platform
eBay Seller Central
Let us look into generating accurate product feeds for each of the platforms below.
Guide To Product Feed For eBay Merchant Integration Platform
eBay Merchant Integration Platform (MIP) is an easy-to-use platform that is ideal for small and medium businesses or enterprises.
It is an eBay platform to upload and organize your products, in order to handle product viewing and marketing across targetted locations and audiences.
Once you log in to your eBay account, you may access one of the 11 eBay MIP sites, depending on your preferred locality and language.
eBay MIP Channels (Sites)
Once you enter your desired eBay MIP site, you will find out all the instructions required to set up a channel for your business and implement proper strategies with your products.
It will allow you to upload your product feed to promote your online store products through this platform.
Setting Up Product Feed For eBay MIP In The Most Optimized Way
When you upload your products, eBay will look for some specific data.
Now, eBay suggests several feed types.
To upload products on eBay, the ideal feed type is the Combined Feed Type. The rest of the feed types are used for situational purposes.
Let us look at the data you must include on your feed, along with examples, for each data so that you know the most optimized way to generate the product feed for the eBay Merchant Integration Platform.
You may submit the product feed in CSV or XML format. We recommend using the CSV format, as the XML format for eBay MIP is very complicated compared to most other merchants.
A product feed (in CSV format) of a single product for eBay MIP usually looks like this:
You can see how a single product is normally listed whereas a variable product is listed with its variations, identified through a Variation Group ID.
Now, eBay MIP requires the following attribute values for each of your products.
Below is a more detailed explanation with examples of how each of these attributes should be assigned on your eBay MIP product feed for maximum output.
You will get samples of eBay MIP product feed later on in this article after I go over detailed instructions on the attributes and some tips.
Let’s look into the details to understand what values you should assign to each attribute.
Product Attributes Explained
Product SKU
Attribute
SKU
Example
SK-01X
The SKU is a unique value assigned to every product to identify them separately from the rest of the products.
Every product, including variants, should have a unique SKU.
Localized For
Attribute
Localized For
Example
en_US
This attribute indicates the language your feed is presented in, and the country it will be sold.
Since eBay MIP is in limited countries, here are the accepted values:
en_US
en_GB
de_DE
fr_FR
es_ES
en_CA
en_AU
de_AT
it_IT
ru_RU
en_IN
Variation Group ID
Attribute
Variation Group ID
Example
SK-01GX
For a variable product, each variant is submitted as a separate product. So a unique Variation Group ID is set which indicates that a group of variants are of the same product.
All the variants of the same product must include the same Variation Group ID.
Variation Specific Name
Attribute
Variation Specific Name 1
Example
Color
In the case of a variable product, you need to specify the Variation Specific Name to indicate what attributes the product has variants for, for example, Color or Size.
You can add up to 5 variation factors and include the attribute columns Variation Specific Name 1, Variation Specific Name 2, and so on, till Variation Specific Name 5.
For example, if a product has variations for both Color and Size, then you will need to add an attribute column for Variation Specific Name 1 with the value Color, and another column for Variation Specific Name 2 with the value Size.
Variation Specific Value
Attribute
Variation Specific Value 1
Example
Sky Blue
In the case of a variable product, use a Variation Specific Value to define the variation of a product in reference to the Variation Specific Name.
You can add up to 5 variation factor values and include the attribute columns Variation Specific Value 1, Variation Specific Value 2 and so on, till Variation Specific Value 5 (depending on the number of Variation Specific Names you provided).
For example, if a product has variations for Color and Size, then you will need to add an attribute column for Variation Specific Value 1 with the color value such as ‘Sky Blue’, and another column for Variation Specific Value 2 with the size value such as ‘XL’.
**For each variation value, a separate row of the product data has to be included.
Product Title
Attribute
Title
Example
Long Sleeved T-shirt
It is the name of the product to be displayed. It is limited to 80 characters.
If you want, you can add one of its distinguishing features or variants (in the case of a variable product) to the title. For example, Leather High Trainers or Red Velvet Skirt.
Product Description
Attribute
Product Description
Example
This is a Red T-shirt. It was created for testing purposes only.
Add a proper description of the product you are selling. Make sure to highlight all the major features, it may have, that will attract buyers.
Make sure any details you provide here are accurate. You may also include multiple paragraphs to make it more readable.
Brand Name
Attribute
Brand
Example
Rex Designs
This attribute defines the brand name of a product. If you are selling retail goods, then you may provide the original brand name of the product. If you are the manufacturer yourself, then you may include your company name as the brand name.
The product brand is not mandatory to submit, but we recommend you use it to appear more credible to prospects.
Custom Attribute Name
Attribute
Attribute Name 1
Example
Collar Type
This attribute is used to add extra custom features or details for a product.
Let’s say, you sell shirts and they may have different types of collars. So you may add a column with the attribute ‘Attribute Name1‘ and the value ‘Collar Type’.
You can add up to 30 custom attribute names and include the columns Attribute Name 1, Attribute Name 2 and so on, till Attribute Name 30.
For example, for a product, if you wish to include two features, Collar Type and Hemline, then you will need to add an attribute column for Attribute Name 1 with the value Collar Type, and another column for Attribute Name 2 with the value Hemline.
Custom Attribute Value
Attribute
Attribute Value 1
Example
Collar Type
Use this attribute to define the value of a custom Attribute Name that you included for a product.
You can add up to 30 custom attribute values and include the attribute columns Attribute Value 1, Attribute Value 2 and so on, till Attribute Value 30 (depending on the number of Attribute Values you provided).
For example, for a product, if you included two custom attribute names, Collar Type and Hemline, then you will need to add an attribute column for Attribute Value 1 with the collar type value such as ‘Classic Spread’, and another column for Attribute Value 2 with the hemline type value such as ‘Curved’.
Product Condition
Attribute
Condition
Example
NEW
Use this attribute to indicate the current condition of the product.
These are the accepted values for the condition:
NEW
NEW_OTHER
NEW_WITH_DEFECTS
MANUFACTURER_REFURBISHED
SELLER_REFURBISHED
USED_EXCELLENT
USED_VERY_GOOD
USED_GOOD
USED_ACCEPTABLE
FOR_PARTS_OR_NOT_WORKING
Condition Description
Attribute
Condition Description
Example
6 months used, but on top condition
This attribute is used to provide extra information regarding the condition of a product.
Even if it is not mandatory to use, we recommend you use it if you are selling any product that is Used or Refurbished.
Dimensions & Weight
In the case of some of your products, you might wish to provide certain measurements for dimensions or weight.
For example, if you are selling luggage, then people would like to know the dimensions and weight.
In these cases, you can either provide the data in the Product Description or submit these values through appropriate attributes.
The latter is ideal for better results on eBay.
Here are the attributes:
Measurement System
Attribute
Measurement System
Example
ENGLISH
If your product or package has any particular measurements or weight that you wish to include in the feed, then you should include this attribute to define the unit and measurement value types.
It has two accepted values:
ENGLISH
METRIC
Here is a chart to understand METRIC and ENGLISH measurement values.
eBay suggests using
lb (pounds) and in (inches) for the English measurement system
kg (kilograms) and cm (centimeters) for Metric measurement system
**Make sure to include this Measurement System attribute to the feed if you wish to use the next few attributes, Length, Width, Height, Weight Major & Weight Minor.
If this attribute value is empty/missing, then the rest of the measurement and weight attributes will be ignored by eBay.
Dimensions
You may include any of the 3 dimensions, Length, Width, and Height as attributes for the dimensions of a product.
Length
Attribute
Length
Example
10 cm
Use this attribute to define the dimension of the longest side of a product or package.
Width
Attribute
Width
Example
5 cm
Use this attribute to define the dimension of the shortest side of a product or package.
Height
Attribute
Height
Example
15 cm
Use this attribute to define the dimension of the height (top to bottom) of a product or package.
Weight
To specify the weight of a product, you need to include two attributes, weight major and Weight Minor.
Let us look at how it works.
Weight Major
Attribute
Weight Major
Example
11
Let’s say you have a product with a weight of 11lbs 5oz. Then you will need to provide the high whole number value of the weight; in this case 11.
Weight Minor
Attribute
Weight Minor
Example
5
Let’s say you have a product with a weight of 11lbs 5oz. Then you will need to provide the low whole number value of the weight; in this case 5.
Product Image
Attribute
Picture URL 1
Example
https://www.yourwebsite.com/productimage.png
The Picture URL is the link to the image(s) for a product.
You can add up to 24 product images and include the attribute columns Picture URL 1, Picture URL 2 and so on, till Picture URL 24.
You must include at least one product image for every product you include in the feed.
In the case of variable products, you may include an attribute column for Group Picture URL which is used to provide a picture of each of its variants together, to display it in a unique manner on eBay.
For example, if you have a t-shirt with 3 color variants, and each of them has a unique Picture URL, you may include three of them together in Group Picture URL by separating them with a ‘|’ (pipe symbol) and no spaces; similar to the example in the table above.
Include this attribute value only on the 1st product of the variants.
This attribute is entirely optional.
Channel ID
Attribute
Channel ID
Example
EBAY_DE
eBay lists products based on several channels it has for different countries.
The Channel ID is a unique identifier of the eBay MIP channel where you wish your products to appear on.
If you wish to sell on only one channel, then you may leave this column blank.
For multiple channels, you need to add a product multiple times and set the Channel IDs for your desired channels.
For example, if you sell in both the USA and the UK, then you will need to add the same products twice in two rows. For one, assign the Channel ID value as EBAY_US, and assign the Channel ID value as EBAY_UK for the other.
Then eBay will display the products on your desired eBay MIP channels.
Here is a list of the accepted Channel IDs for eBay MIP:
EBAY_US
EBAY_UK
EBAY_DE
EBAY_FR
EBAY_ES
EBAY_CA
EBAY_AU
EBAY_AT
EBAY_IT
EBAY_RU
EBAY_IN
EBAY_Motors
Product Category
Attribute
Product Category
Example
11442
eBay MIP has a category list of its own which you need to use to categorize your products on eBay. You must set this attribute according to their required taxonomy in order to get your submitted product feed approved.
They have a Category Lookup Tool where you can search for relevant category threads and collect the Category ID which you have to provide as the value.
For example, if you are selling a book in the UK, which is an educational language coursebook, then on eBay Mip, it will fall under the category – GBooks, Comics & Magazines > Textbooks Education & Reference > Language Courses.
You can collect its ID from the eBay Category Lookup Tool. In this case, the Product Category value is 11442.
Business Policies
You have to set up a few important business policies when selling on eBay.
However, if you have certain products for which you need to assign unique policies, then you may submit the attributes Shipping Policy, Payment Policy, or Return Policy, whichever is required.
The rest of the products will follow the default business policies that you submitted on eBay when creating the account.
Here are the attributes for separate business policies:
Shipping Policy
Attribute
Shipping Policy
Example
shipping
Payment Policy
Attribute
Payment Policy
Example
payment
Return Policy
Attribute
Return Policy
Example
return
**These business policies have to be created by you on eBay. There you will be able to collect the respective policy IDs from your eBay account preferences and use them as the values when creating the product feed.
Quantity Available
Attribute
Total Ship To Home Quantity
Example
10
This attribute indicates the total quantity available for a product.
Product Price
Attribute
List Price
Example
20
This is the price of the product to be displayed when listed on eBay channels.
The currency will be automatically assigned based on the Channel(s) you are listing your products.
Max Quantity Per Buyer
Attribute
Max Quantity Per Buyer
Example
20
You might wish to restrict the number of certain products that a prospect can order. In that case, you may use this attribute so that a prospect won’t be able to order more than this many of the products within 10 days.
Here’s an example.
Let’s say you sell Hand-made Fancy Gift Cards. Now, let’s assume you have a rule of investing around 3 hours per day for a single customer and can create a maximum of 20 cards in 10 days for a particular customer.
Then you may add an attribute column ‘Max Quantity Per Buyer’ and assign the value ‘20’ so that a customer cannot order more than 20 cards within a span of 10 days.
Old Price (Strike-Through)
Attribute
Strike Through Price
Example
25
This attribute is there to help you create more attraction to prospects by adding a price that will be stricken through, to indicate that the current price is a discounted price.
Let’s say you are running a promotion to sell a Purse at $20, whereas the original price was $25.
Then you can set this attribute value as 25 to display that the old price was $25.
Here’s an example of how it looks on an eBay product listing:
**You may use this feature even when you are not running a promotion. You can post the original price as the List Price, and then assign a higher value as a strikethrough price. But we strongly advise you to use it only when you really run a promotion.
VAT Percentage
Attribute
VATPercent
Example
10
This attribute is used to state the Value Added Tax percentage of the sale price. This is only necessary for the EU countries, though not mandatory.
eBay MIP Product Feed Sample(s)
Now that you know what details you require to generate a Product Feed for eBay MIP, now let us look at a sample to understand the structure.
eBay MIP accepts XML or CSV format to submit product feed. However, the recommended format is CSV.
Now, manually adding products to the product feed file is time-consuming when you have a lot of products in your store.
Rather you can use a tool to generate product feed quickly and without much effort.
For a WooCommerce store, you may use the plugin, Product Feed Manager For WooCommerce with which, you can generate an accurate product feed for eBay MIP in just a few clicks.
Once you have the product feed file, you can now upload it to your eBay Merchant Integration Platform, and your products will be listed on your desired eBay Channels.
Now, you have learned all about eBay MIP Product Feed.
You can have a look at this guide to learn about eBay Seller Central. You can use either of the eBay platforms to increase sales in your store. Take care.
Ever tried to list your WooCommerce products on Google Shopping, but it was disapproved due to a Missing Unique Identifier? Not just Google, this is also frequently faced in several other online marketplaces such as Facebook Marketplace, Etsy, Rakuten, etc. But what does it mean?
By Unique Identifier, what most marketplaces refer to is a GTIN or MPN.
A GTIN or MPN is a special code that helps in getting more reach to the right potential buyers in popular marketplaces. Plus, they may also ensure that you are selling legitimate products.
Often your products may not be listed if you can’t submit them.
In this article, you get a better idea of what GTIN and MPN are.
And, you will learn how you can add the respective GTINs and MPNs to your WooCommerce productseasily (since you don’t have the option to add them in the default WooCommerce UI).
So let’s begin.
What Is GTIN?
A GTIN or Global Trade Item Number is a worldwide unique product identifier used to identify trade items.
These are a set of numbers that can be used to identify if the product is genuinely traded, and they may be called different names in different countries.
Depending on which country your business is based, you must include the right GTIN value when submitting your products to Google or any large marketplaces.
Google accepts the following types of Unique Identifiers as GTIN:
Unique Identifier
GTIN Type
Location
Product Type
No. of Digits
UPC – Universal Product Code
GTIN-12 (convert 8-digit UPC-E codes to 12-digit codes)
North America
All Products
12
EAN – European Article Number
GTIN-13
Europe
All Products
13
JAN – Japanese Article Number
GTIN-13
Japan
All Products
8 or 13
ISBN – International Standard Book Number
GTIN-13 (convert ISBN-10 to ISBN-13)
Global
Books & Published products
13
ITF-14 – Interleaved 2 of 5
GTIN-14
Global
Multipacks
13
Accepted GTINs by Google Shopping
Normally, these marketplaces can verify the GTIN from trade sources and determine if the product is being traded legally. If the GTIN is a fake one, most marketplaces can detect it and may unlist your product from its promotion list.
At the same time, when you upload your products, the GTIN helps you to understand the type of product you are selling, and may use it to present your products to the relevant audience even if the product name or description you provided isn’t entirely accurate.
So in a sense, this unique identifier will help you get more sales or stop you.
**Do not include a wrong GTIN for any product. A wrong GTIN will risk displaying your product to the wrong target audience.
How Can You Find The Product GTIN?
Checking the product packaging is the simplest way to obtain the GTIN.
As you can see above, you can determine the GTIN just below the product barcode.
You can always ask the supplier to provide you with a written list of products along with their respective GTIN.
If you want to know more about it, read this guide to learn how to get GTIN for your products.
What Is MPN?
The MPN, or Manufacturer Part Number, is a number that allows you to distinguish between items from the same manufacturer. Even product produced in a factory or production house has an MPN.
On the other hand, custom products or homemade products may not include an MPN.
Many marketplaces require you to submit an MPN along with the GTIN.
But a few marketplaces, such as Facebook Commerce, allow you to submit an MPN as an alternative to GTIN (when you don’t have one).
A legitimate MPN will allow the marketplaces to identify the registered manufacturer, which will help to some extent with the process of ranking your product ads.
How Can You Find The Product MPN?
Most products have the MPN printed at the bottom of the product itself. If you do not find it, you may ask for it from the manufacturer or the supplier. The MPNs may also be found in the product catalogs of the manufacturer.
Apart from that, marketplaces such as Google aren’t too strict about MPNs. They often accept the product SKU in your site as the MPN and consider it as a unique identifier, but there are more reasons to include MPN.
Why You Must Include GTIN And MPN In Your WooCommerce Products?
It’s straightforward, you need to have GTIN and MPN so that:
You have proof of legitimately traded products.
You meet the requirements to list products on Google Shopping, Facebook Marketplace, Etsy, Idealo, and other large marketplaces.
SERPs and Social Marketplaces can find it easier to compare and display your products as part of the correct relevant product list to potential buyers.
It gets easier to fetch product data and avoid wrong product categorization.
Google does accept custom-made products or homemade products without a GTIN.
But you do have to include the attribute ‘Identifier Exists’ with the value ‘No’ for these products in your product feed. Although this does limit the reach you may get from Google Shopping Ads.
How To Include GTIN And MPN In A WooCommerce Product?
Normally, WooCommerce doesn’t give you the option to add a unique identifier to your products.
You have to add custom fields either by using a custom field plugin or custom code to your product details where you can store GTIN and MPN for every product.
However, there are a few plugins that you can use to easily add these fields without any manual work.
Today, you learn of a plugin that will not only help you to add these fields without any custom code but will also help you get ready to upload your WooCommerce products to the most popular online marketplaces.
Product Feed Manager For WooCommerce (PFM)
Product Feed Manager for WooCommerce is a reliable plugin that will help you generate product feed for your WooCommerce products so that you can upload or list them to large marketplaces such as Google Shopping, Facebook Marketplace, etc, easily.
One special feature this plugin includes is the ability to add dedicated fields for Unique identifiers in your WooCommerce Product details.
As you can see above, for a Simple product, you will get all the fields in the WPFM Custom Fields menu under Product data.
For Variable products, these fields will appear for each variant.
You can get the plugin and then follow this guide to enable these fields:
Once you enable them, you can then input your product GTINs one by one in your WooCommerce store.
These fields will be included in your Structured data for Google (or other marketplaces) to view when crawling the site at the time of fetching product details.
Plus, you will also be able to export them with your products when needed.
PFM not only solves your requirement to add WooCommerce GTIN and MPN, but it also helps you generate an accurate product feed for your desired marketplace in just a few clicks.
As you can see, this plugin is optimized to help you promote your products to large marketplaces and increase your sales. It comes with all the features needed to make sure you have an accurate product feed and the GTIN & MPN fields are part of all the useful features it holds.
Wrapping Up
Unique Product Identifiers are one of the key aspects of a product feed and without them, your product reach and marketplace conversion may be hampered.
So, these are must-have data that you must include in your WooCommerce products.
Get Product Feed Manager for WooCommerce now and add the GTIN and MPN values, while generating accurate product feed real quick.
Start Optimizing your product data and list your product on Google Shopping, Facebook Marketplace, and other large marketplaces, to get more sales and boost your revenue.
Like people require oxygen, To be a successful real estate agent you need leads.
And it’s true – without a steady process of generating qualified leads,
it’s nearly impossible to scale up your real estate business.
We know you nod in agreement,
That’s why you’re reading the countless ‘how-to generate leads’ articles
-all promising the secret to generating a never-ending supply of leads.
To save you time from digging into 100 resources,
we have rounded up 14 proven tips on
“how to generate real estate leads” and
will shower you with lots of “want to know/buy your home” calls!
Keep reading!
Table of Contents
Why Applying the Right Strategies is Crucial for Real Estate Leads
Before diving into the tips and tactics,
Let you know why it is important to pick the right strategies.
Implementing the right lead-generation strategies is not just about finding any leads,
it’s about targeting the right prospects, maximizing your return on investment, and
building a sustainable pipeline of high-quality leads.
Here are the benefits of picking the right strategies for your real estate growth :
Receive More Website Traffic: When you implement the right mix of lead gen tactics, you’re able to draw more qualified prospects to your real estate website.
Reduced Costs: Using lots of lead generation tactics often leads to wasted time and resources. But strategic, data-driven methods allow you to maximize your return on investment.
Reduce Your Site’s Bounce Rate: Irrelevant or untargeted leads are more likely to click away from your website quickly.
Increased Closing Rates: Strategic lead generation helps you focus on the prospects who are truly ready to buy.
How to Generate Real Estate Leads – 14 Tried-and-True Methods
From receiving more website traffic to increasing sales,
these proven 14 tips will help you generate leads faster :
14. Optimize your SEO for local leads
As a real estate agent, your bread and butter comes from local leads – after all,
your expertise and network are rooted in your community.
So, when it comes to your digital marketing strategy,
optimizing your SEO for local search is an absolute must.
Real estate lead generation tools like keyword planners and
local SEO services can greatly
enhance your visibility without significant costs.
Let’s dive into a few key tactics to help you get found by the right local prospects :
Create Content Based on Local News Stories or Events: By creating content that taps into the latest news, trends, or happenings in your market, you position yourself as a trusted, in-the-know resource in front of your potential leads
Hone in on Local Keywords: To attract local leads, you need to laser-focus on location-specific search terms.
Use Location Pages or a Location-Specific “About Us” Page: In this way, you can more real estate to showcase your community expertise, highlight local listings, and make it crystal clear to search engines (and prospective clients) that you’re the go-to agent in that local.
13. Optimize your landing pages for conversions
Only focusing on local leads will limit your lead-generation process.
It can dive deep into the metrics that matter most like –
High click-through rates, low bounce rates, conversion rates, and more.
This is how you can optimize your landing page for conversion :
Make your visitor think, “Wow, this page speaks to me!”- Craft captivating headlines that grab your audience’s attention and communicate your unique value proposition.
Don’t make them wait for “what’s next.”- Create compelling copy that addresses your audience’s pain points and highlights the benefits of your offer. Keep it concise, engaging, and focused.
Attractive Design – Visually appealing layouts that guide visitors toward your desired action. Remove any clutter or distractions that could dilute your message and conversion potential.
Conversion Monitoring- Alwaysmeasure key metrics like click-through rates, bounce rates, and conversion rates.
12. Network with home professionals
Networking is the cheapest way to get real estate leads and
can create a foundation for referral-based leads which often come without any upfront cost.
You can start building your network even before obtaining your real estate license.
Here are some key professionals you should look to connect with:
Mortgage Lenders: Having a reliable lender in your network can speed up the pre-approval process for your buyers and ensure they avoid predatory lenders.
Home Inspectors: Building a relationship with home inspectors can help you secure quick turnaround times for your clients, especially in competitive markets.
Appraisers: Like home inspectors, having a connection with appraisers can help you get faster service for your buyers and sellers.
Attorneys: Attorneys can be a valuable lead source, especially those working with clients going through divorce or other life events that may necessitate real estate transactions.
Financial Planners: Financial planners often have clients looking to invest in real estate, so being the go-to agent for these professionals can lead to new opportunities.
Property Managers: Referring your investor clients to reliable property managers can strengthen your relationships and lead to more business.
REO Asset Managers: Building connections with REO asset managers at banks can provide a steady stream of foreclosed properties to sell.
Builders and Contractors: Even if you don’t represent builders directly, having relationships with local construction professionals can help you serve your land-buying clients or receive referrals.
11. Contact clients on their birthdays and other events
As a real estate agent, maintaining strong client relationships is key to generating referrals and repeat business.
Contacting clients on special occasions is an effective and cheapest way to get real estate leads.
Birthdays, in particular, are often a happy time for your clients.
They want to surround themselves with people who put them in a good mood – and
you can be one of those people.
Giving each of your top clients a personalized birthday call is one of the easiest,
most thoughtful gestures you can make.
Even if you’re not the sentimental type,
setting aside time for these calls in a consistent, efficient manner can pay huge dividends.
Go through your list of best clients and make sure to give each one a call on their special day.
As a real estate agent, hosting a webinar is one of the greatest real estate lead-generation tools to
position yourself as an expert and attract qualified leads.
Here’s how you can go about hosting an impactful real estate webinar:
Choose a Relevant, Valuable Topic: Think about the pain points, questions, or trends that your potential clients are most interested in to make valuable content.
Promote the Webinar Across Multiple Channels: Once you’ve got your topic nailed down, start promoting the webinar across your website, email list, social media platforms, and any other relevant channels.
Use Webinar Software for a Polished Presentation: Tools like Zoom, GoToWebinar, or WebEx make it easy to host a professional-looking webinar complete with screen sharing, Q&A sessions, and audience engagement features.
Deliver Genuinely Helpful Content: Share insights, tips, and actionable advice that position you as a trusted resource.
07. Create interesting, helpful content for your blogs
Not only can your real estate blogs and articles benefit your clients,
but they also keep you in the forefront of potential clients’ eyes as a real estate authority.
This is another method for how to get leads in real estate for free.
06. Make It Easy To Contact You
If a consumer likes what you are offering,
you need to make it as simple as possible for them to contact you.
Including a contact form would be the most appropriate way to do it.
05. Segment and score leads with marketing automation software
The power of marketing automation can be a total game-changer for real estate agents looking to
because they often include specific fields that capture customer behavior, demographics, and other information.
04. Create Facebook Ads to Generate Quality Leads
Facebook ads are another essential tool in the modern real estate agent’s toolkit.
With laser-targeted reach, diverse ad formats, and robust performance tracking, Facebook enables you to connect with your ideal audience and convert them into high-quality leads.
So, employ targeted Facebook ads, which can be both the cheapest way to get real estate leads and a method to use real estate lead generation tools effectively.
Diverse Ad Formats: From eye-catching image and video ads to lead generation forms and dynamic creative, Facebook offers a range of ad formats to capture attention and drive results. You can get creative with your messaging and visuals to make a lasting impression.
Retargeting Opportunities: Facebook’s pixel tracking enables you to retarget ads to users who have already engaged with your content or website. This keeps you top-of-mind and increases the chances of converting them into leads or clients.
Detailed Performance Insights: The Facebook Ads Manager platform provides robust reporting and analytics, allowing you to track key metrics like impressions, clicks, conversions, and cost-per-lead. This data empowers you to continuously optimize your campaigns for better results.
03. Optimize social media pages and post regularly
Social media is a powerful tool for real estate agents like you to boost your brand,
attract new clients, and find quality leads.
Using LinkedIn helps you to connect with business clients and share expertise. By optimizing your profiles with keywords and location tags, you can improve visibility.
Engaging with followers on platforms like Instagram and Twitter and sharing helpful content r local in your local market.
Joining online communities can also help you build relationships and find new leads.
Collaborating with influencers such as Instagram influencers can expand their reach and credibility.
With WPVR’s easy-to-use interface, You can easily create virtual tours without any technical knowledge.
You can make a basic virtual tour in just five minutes!
Because with WPVR, you can build a comprehensive virtual tour of any property or area.
Here are the steps :
Utilize 360° panorama photographs to construct scenes that include various rooms, corners, or locations.
Make a connection between these panoramic scenes.
To connect all of the 360-degree photos, use scene-type hotspots.
Press “Publish” to display information utilizing info hotspots in virtual tours!
You’ve just finished creating a virtual tour!
With this virtual tour, your viewers may navigate about as if it is an actual tour! In the free edition,
you can link up to five scenes and add five hotspots to each scene on a virtual tour.
You can also create a comprehensive floor plan for your house, business, showroom, or any other location with ease.
Realtors and real estate agencies love using real estate floor plans, and
you can use them to add some flair to your real estate tours.
To construct 360 panorama scenes :
Upload the floor plan to WPVR
Place pointers for each scene on the floor map
And then connect the pointers to the scenes. And that’s it!
You can also :
Include A Gallery To View All Available Scenes
Cover Every Inch Of The Property For An Interactive Tour
To Get More Real Estate Leads Through Your Virtual Tour with your site here are a few more techniques :
Add direct CTA – Add a CTA button that will directly take your site visitor to your virtual tour. In this way, you can get even the busiest/ uninterest lead.
Market your virtual tour – Market your virtual tour on social platforms to maximize your reach.
WordPress restriction – Often time WordPress automatically lowers the quality of panorama images through compression. A high-quality 360-degree panorama photograph typically has a resolution of 3000 x 1500 pixels.
With WPVR, you can choose to remove this limitation, making it simple to post panorama photos with a width of more than 3000 pixels. WPVR allows you to generate virtual tours from any high-quality panorama photograph, including jpeg, png, and web.
Not just that, with WPVR you can add a direct CTA button to your site that will take your viewers directly to the virtual tour.
Also, with WP VR you can easily share your virtual tours on different Social Media Platforms:
FAQ 1: How does community involvement factor into real estate lead gen?
Getting involved locally through sponsorships, volunteering, hosting events, and partnering with businesses can help raise your profile and connect you with potential clients in your market.
FAQ 2: What online lead gen advice is recommended?
To generate leads online easily most impactful way is to add a virtual tour. As seeing the tour you can gain trust and also save your valuable hours this one is highly recommended.
A constant concern of hoteliers all over the world- “How to increase hotel bookings?” “Are the booking strategies right?” or “How to increase hotel occupancy in low season?”
Let’s break it down together. The solution involves a few strategic moves:
Choosing the right booking channels,
Implementing effective tactics to boost bookings,
Optimally using these channels for maximum impact.
In an industry flooded with options, it’s not unusual for hotels to miss out on deals, especially during slower periods. If you’re not actively seeking ways to enhance your bookings, you might see a dip in occupancy and revenue.
The secret to standing out? Implementing the right strategies with precision and care.
In this blog, I have shared 10 practical ways of increasing hotel bookings to boost sales like never before.
So, let’s get started!
Table of Contents
Why Direct Bookings Are the Real Deal?
Before diving into the main topic – how to increase hotel bookings, let’s first learn about direct bookings. Direct bookings are basically the reservations made directly with your hotel, without using any third-party platforms.
Here’s why embracing direct bookings is beneficial for boosting your profit and sales:
Cut Down Commission Costs: When guests book directly with you, you eliminate the need to pay commission fees to third-party booking platforms. More of the profit stays in your pocket.
Increase Guest Loyalty: Direct interactions pave the way for building stronger relationships with your guests. When they book directly, you have the opportunity to personalize their experience, increasing the likelihood they’ll come back or recommend your hotel to others.
Control Over the Booking Experience: Managing the booking process yourself means you can control guest experiences from the start. You ensure that they get accurate information and a seamless booking process, which can lead to higher satisfaction rates.
Access to More Guest Data: Direct bookings give you valuable insights into your guests’ preferences and behaviors. Use this data to tailor your marketing strategies and improve your services, ultimately leading to more tailored experiences and increased guest satisfaction.
Quicker Adjustments to Offers: With direct control over your bookings, you can quickly implement promotions or adjust pricing based on demand, season, or special events, helping you stay competitive and responsive in the market.
In the next section, I’ll also be discussing ‘how to get direct bookings’ which can really boost your hotel’s profits and sales. It gives you more control and helps you build better relationships with your guests.
How to Increase Hotel Bookings- 10 Proven Ways That Work
Focusing on optimizing direct bookings through your website is a great starting point if you’re looking to increase your hotel bookings. Let’s explore 10 effective strategies that can help your hotel attract more guests directly.
1. Optimizing Your Hotel’s Website for Search Engine
Just the mere presence of a website won’t do much for your sheer ambitions of making more bookings. Your hotel website needs to have good visibility, good user experience, and trustworthiness, which will ultimately drive higher traffic, conversions, and revenue.
Your website has to be seen, liked, and used for the sake of making money for your business.
And there are some ways that you need to believe in religiously.
a) SEO
SEO (search engine optimization) enhances your hotel website’s visibility on search engines like Google. By incorporating relevant keywords, optimizing title tags and meta descriptions, and building backlinks, you improve your site’s ranking. This includes focusing on both regular and local SEO to ensure your hotel appears prominently in search results.
Ultimately, effective SEO strategies make it easier for potential guests to discover and book your hotel online.
b) Content Marketing
Having a collection of blogs on your hotel website is crucial for improving SEO, as it educates prospective guests about the area, and showcases your unique guest experience. Regularly updating the blog builds a backlog of posts, keeping visitors engaged and providing content for social media and email marketing.
c) Website’s Ease-of-Use
The ease of use of your hotel’s website directly impacts the user experience. A complicated or frustrating website layout can deter visitors and lead to abandoned bookings. By prioritizing ease of use, you create a positive impression, build trust with potential guests, and increase the likelihood of conversion, ultimately driving more bookings and revenue for your hotel.
d) Mobile-Friendliness
Ensuring your hotel website is mobile-friendly is crucial because over 50% of potential guests browse websites using their mobile devices. A mobile-responsive layout, fonts, and images are essential for a seamless browsing experience. Check your website’s loading time, navigation, call-to-action placement, and content optimization to ensure a smooth mobile experience for guests.
2. Having a Simple & Smooth Booking system
Implementing a simple and smooth booking system on your hotel website is essential for increasing bookings. With an average bounce rate of 47%, a complicated booking process can deter potential guests. Simplify the process to a 2-step action, where users enter check-in/check-out dates, select room type, and make payment.
Collect basic information in Step 1 and redirect to a payment page with multiple options in Step 2. Avoid email verification by allowing sign-ups via Google or Facebook. Immediately confirm booking and payment details to guests.
By streamlining the booking process, your website can convert more browsers into actual guests, which will boost bookings significantly.
3. Virtual Showcase of Your Properties
Virtual showcases of hotel rooms can significantly increase hotel bookings by providing potential guests with a realistic and immersive preview of the accommodations. Through virtual tours, 360-degree photos, or interactive videos, guests can explore rooms, amenities, and facilities from the comfort of their own homes. Having this can naturally enhance the understanding of the space, and build trust in the hotel’s offerings.
But you need to do it right, or else that would be a baseless investment. With the right software and tools, you can easily make a virtual tour or panorama image of your hotel’s rooms.
WPVR is one virtual tour-creating software in WordPress. You simply upload 360 panoramic images, and this plugin will turn it into an exclusive virtual tour. You can trust the creation process while saving your sweat for implementing all the other strategies.
4. Run Marketing Campaigns – Seasonal and Off-season
Local events like festivals, concerts, and conferences are drawing travelers, offering accommodation operators opportunities to boost occupancy. Maximize these events by adding them to your marketing calendar, creating special packages, promoting them on your website, and discussing them on social media.
Seasonal marketing campaigns tailored to specific guest segments can effectively increase hotel bookings.
A good example of how this could look like-
Summer Vacation Campaign:
Target Audience: Families with children
Offer: Family-friendly packages with activities such as pool parties, beach outings, and children’s entertainment.
Promotion: Special discounts on extended stays or complimentary meals for kids.
Content: Social media posts featuring fun summer activities and vibrant images of families enjoying their vacation at the hotel.
Also, you can say that effective off-season marketing campaigns are crucial in learning how to increase hotel occupancy in low season.
5. Email Marketing to Outreach & Retarget
Email marketing can be a powerful tool for hotels to channel communication and personalized offers. This is a good way of building relationships with past guests on a regular basis. But you have to put your mind and soul into reaching out, or your emails will be left unopened- meaning no possibility of sales.
To do it right,
Segment your email campaigns tailored to your guest’s interests and demographics.
Implement pre-arrival communication to promote add-on services, enhance the overall guest experience, and encourage bookings.
Reconnect with website visitors who did not book, reminding them of the hotel and enticing them to complete the booking process, which is retargeting.
Effectively engage recipients with visually appealing and mobile-optimized emails
6. Expand your Reach Everywhere- Tourism websites, Online Travel Agencies
When it comes to sales, leave no space for your competitors. And the only best way to ensure that is by being present everywhere. To maximize visibility and attract guests, ensure your hotel is listed on multiple online travel agencies. OTAs offer broad reach and high search engine rankings, increasing discovery opportunities for potential guests.
To establish an impressive presence,
Provide comprehensive information, including accommodation options, facilities, rates, and contact details
Encouraging positive guest reviews to enhance credibility and boost bookings.
Capitalize on tourism websites’ traffic by featuring your hotel prominently with compelling photos and unique features.
Explore collaboration opportunities with local tourism boards and businesses for cross-promotion, which might further increase bookings for all parties involved.
Here is an example of how Waterfront Hotel did an amazing job at showcasing its properties on TripAdvisor.
Hotel Waterfront listed on TripAdvisor
7. Establish a Social Media Presence
Establishing an impressive presence on social media platforms like Facebook, Instagram, and Twitter is essential for increasing hotel bookings, especially considering that almost one-third of travelers seek vacation ideas on social media.
But obviously, any social media marketing won’t work, unless you do it strategically.
Share relatable content to humanize your brand
Leverage user-generated content, such as photos and reviews from previous guests, to build trust and credibility in your brand.
Encourage guests to leave reviews on social media or popular review websites like TripAdvisor to further enhance your hotel’s reputation and attract more bookings.
Beyond regular updates and promotions, employ storytelling techniques to engage your target audience by sharing behind-the-scenes stories of hotel management, staff, or amenities
8. Personalize the Customer Experience
Guest satisfaction and loyalty come when they feel cared for, and the only way to do it is by personalizing services. By leveraging guest data and preferences, hotels can offer tailored services, discounts, and offers that enhance guest satisfaction.
There are ways more than one that you can do so-
– For instance, maintaining detailed information such as birthdays, anniversaries, and special preferences in a guest management system enables hotels to send personalized messages and provide unique experiences during guests’ stays. This personalized approach fosters stronger relationships with guests, encouraging repeat bookings and positive word-of-mouth referrals.
– You might as well utilize a concise form to gather guest preferences upon booking. Based on this information, the hotel offers relevant experience packages and complimentary amenities, such as champagne for guests celebrating special occasions.
This personalized touch not only delights guests but also sets the hotel apart, creating memorable experiences that drive customer loyalty and increase direct bookings.
9. Digital Advertising
Digital advertising can be a powerful tool by leveraging social media platforms and creating a sense of urgency for travelers. Firstly, utilizing social media advertising allows hotels to dominate search results and drive traffic to their websites. But these platforms can do a lot more than that. Like-
Integrating a booking engine with social media pages enables fans to book directly, streamlining the booking process and encouraging conversions.
Employing messaging on the hotel website that creates a sense of urgency can further boost bookings.
Strategies such as flash sales or limited-time offers can be effective in driving traffic and increasing conversion rates. These promotions can be promoted via email campaigns or prominently displayed on the website with a unique discount code.
By leveraging digital advertising tactics that create a sense of urgency, hotels can effectively fill occupancy quickly and drive direct bookings.
10. Incorporate CTAs and Pop-ups
A lot of visitors explore hotel websites to browse through images, learn about amenities, and understand policies. But sometimes they are not consciously browsing, and they lose directions. This is when leveraging compelling CTAs (Call-to-Actions) and strategically timed pop-ups on your website can be highly effective. But some key ideas to note when putting your CTAs-
Utilizing attention-grabbing CTAs and pop-ups that can alert them to special offers or lower rates, encouraging direct bookings.
By making your homepage pop-up noticeable and providing incentives for direct bookings, you can significantly boost your conversion rates. However, it’s crucial to ensure that these CTAs and pop-ups are not intrusive and don’t disrupt the booking process. Visitors should have the option to easily skip or close them if they choose.
While it can be challenging to alter traveler behavior, implementing well-designed CTAs and pop-ups can effectively encourage visitors to return to your website and consider booking directly.
Final Remarks
Lastly, don’t just go for shiny objects, have patience with whatever strategies you come up with, refine, and then optimize. Always keep measuring. Measure the open rates of emails, and subscription rates, if the CTAs are really working. Keep learning and try different options. The results will often surprise you. When it comes to getting direct bookings, don’t follow your instincts, they don’t always work. Analyze the data you get and base your decisions on it.
As hotel managers, keeping up with travelers’ modern needs and coming up with strategies to meet those should be your top priority. When you meet their needs, sales will follow you through anyway.
And if you are looking for software that can help you create virtual tours for your hotel website, WPVR can do beyond magic.
For any software advice or strategies, you are always free to ask for help through comments or our support system.
Because asking for help is smart!
FAQs
1. What Are Some Direct Booking Examples?
Direct booking examples include guests making reservations directly through a hotel’s website, contacting the hotel via phone, or sending booking inquiries through email. These methods allow guests to interact directly with the hotel without involving third-party platforms like online travel agencies (OTAs) such as Booking.com or Expedia.
2. How Can WPVR Help in Increasing Hotel Bookings?
WPVR, a virtual reality plugin for WordPress, can enhance hotel bookings by offering immersive experiences to potential guests. Through virtual tours, guests can explore hotel facilities and rooms in detail, increasing their confidence in booking. This technology provides a more engaging and realistic preview, effectively showcasing the hotel’s offerings and encouraging guests to make reservations.
3. What are the Drawbacks of Online Travel Agencies?
Online travel agencies (OTAs) offer convenience but come with notable drawbacks for hotels. High commission rates eat into profit margins, while limited control over branding and customer data poses challenges. Managing inventory across multiple platforms can lead to overbookings or underbookings. Overall, these do not guarantee your business profit and more bookings.
The E-Commerce industry is getting more and more competitive every day, almost to a point where you’d expect that you’ll require a huge early investment to start your own online business.
Did you know you could actually start an online business with any product of your own whatsoever?
In fact, you can run an online shop without any inventory to begin with!
But how?
Well, that’s exactly what we will discuss in this article.
Today, you will learn how to start an online store without inventory and without any overwhelming investments.
Whether you are a fresh graduate or a struggling individual looking to establish a business of your own, this guide will help you take your first step toward your ambition.
So, let’s dive in.
Table of Contents
TL;DR – Steps To Start An Online Store Without Inventory
1. Use one of the following business strategies:
i. Print On Demand Merchandise
ii. Affiliate Marketing
iii. Sell Digital Products
iv. Embrace Dropshipping
v. Sell Subscription Boxes
vi. Sell Handmade or Custom Products
vii. Leverage White Labeling
viii. Host An Online Marketplace
ix. Become A Consultant Or A Coach
x. Compile A Price Comparison Site
2. Learn to create a budget-friendly eCommerce store
3. Promote your products using various proven tactics.
How To Start An Online Store Without Inventory – Tips & Strategies
The first step to starting an online business is to decide on what product or service you will sell.
Normally, you may think of creating unique products and establishing a brand to manufacture and supply them to the market. Or, you may look to purchase supplies for certain types of products that you would want to sell in your online store.
But, if you do not have a large capital for investment, this will not be possible.
However, the good news is, that you still can run an online business.
Following are a few business strategies where you do not need to stock up on supplies and make a huge investment upfront. These strategies are modeled to help your business grow as the number of your customers grows.
We will discuss these strategies while giving you some directions on how to start. So, let’s begin.
1. Print on Demand (POD) Merchandise
If you are a creative person then you can put your creativity on the table and start a business based on that.
Print-on-demand (POD) is a brilliant way to showcase your creativity without worrying about inventory.
There are several online POD services like Printful and Printify, where you simply can upload your designs and offer them as customized merchandise such as t-shirts, mugs, phone cases, and more
The best part is these platforms will handle the printing, shipping, and fulfillment. All you need to do is invest in promoting your unique designs to get more interested customers to place orders.
For example, you could design custom pajamas, or, let’s say you create personalized folder designs for offices using a renounced POD service provider. And then promote them online to get orders placed, which you can do by promoting through your social channels, listing sites, or even via a website of your own.
It’s not limited to clothing or merchandise only. Another big opportunity would be to offer custom-branded designs for various organizations. For example, you could create personalized folder layouts and offer to deliver branded designs for them to various companies. This, if done, right, will give you a chance to earn more through B2B sales, who usually order in bulk, meaning you could earn more from every buyer.
We will discuss ways to promote your online products later in this article.
2. Affiliate Marketing
While POD requires artistic creativity, you could rather go for affiliate marketing, which will require you to be good at digital marketing.
Basically, several online businesses have affiliate programs where you get a handsome commission to help them get customers. So, your focus here will be to drive potential traffic to their website. Whenever a prospect converts, you get your commission.
You may join affiliate programs offered by companies like Amazon Associates, ShareASale, ClickBank, etc., which will permit you to list and promote their products on your website or social media channels. You may also become affiliate partners with companies that actively help them with promotion as an influencer.
For example, you could run a YouTube channel dedicated to reviewing WordPress plugins, where you may demonstrate how a plugin works, its pros and cons, and its key benefits. In the process, you could include your affiliate link for that plugin in the video description so that people can click to get the plugin. Any conversions through this link will mean you will get a commission.
If done right, affiliate marketing has the potential to help you earn thousands of dollars every month.
The little investment you will need is on learning digital marketing, creating the creatives and promotional materials, and maybe purchasing equipment to record videos.
How To Find A Product To Sell As An Affiliate Marketer?
While at the beginning, every affiliate program will seem attractive, it is important that you understand the importance of establishing a long-term affiliate business.
So, you first need to decide on a specific niche you want to focus on as an affiliate marketer. This will help you build up an audience for a targeted niche (whether it is followers, community members, etc.) meaning, your recommendations will resonate with your target audience and increase the possibility of conversions.
By specific, I want to clarify that it’s not too specific as to a single product type (such as t-shirts only). Rather go for a specific niche that has diversified options such as Clothing brands (which will cover all types of clothes various clothing brands produce). This will help you stay relevant to your audience while promoting various types of products.
Once you decide on a niche, you may simply search for companies that serve in that niche and have affiliate programs. Then simply sign up as an affiliate partner, pick out unique products that you want to promote, and start advocating for them in your marketing channels.
So frankly put, if you decide on the niche, then you can easily find products to sell as an affiliate marketer.
3. Sell Digital Products
If getting “inventory” is your concern, then why not create a digital product of your own?
While starting an online business, you can also consider creating and selling digital assets such as e-books, courses, software, graphics, stock photos, etc., online.
However, it’s not easy to create digital assets as the market is very competitive. But if you can think of something unique and better than most existing options, then this can be a great way to make a fortune.
We have seen countless people leaving their jobs and becoming course creators in their fields of expertise to make a fortune.
So this is indeed a great opportunity if done right.
How To Create A Product To Sell Digitally?
Initially, start by deciding on what type of digital product you want to create. This will depend on your current set of skills and industry knowledge.
For example, if you want to create courses, you need to find out what topic or skill you have expertise in that you can teach others. Or, what type of software are you confident with creating?
Once it is decided, then you need to use the necessary tools to bring this into reality.
So, for courses, you will need a course builder such as LearnDash or TutorLMS, which will allow you to host courses on your website. Or, you may adhere to online platforms such as Coursiv or Teachable where you can host and sell courses without having a website of your own.
For eBooks, you will need a tool that will allow you to convert your written book into an eBook, such as Visme.
To create graphics, you may use Canva, Figma, or other graphic tools. Or if you are a photographer, you may take high-quality pictures. Once you have your images ready, you may upload them on platforms such as Shutterstock, Alamy, Envato Elements, Dreamstine, etc., to sell them online (by paying a small percentage of the earnings to these platforms).
So, if you have your digital product decided, you need the right tools to prepare it and start promoting it. After that, utilize various marketing strategies like social media marketing, email marketing, and influencer marketing. Don’t forget to include your e-business card in your promotional materials to allow potential customers to connect with you easily.
4. Embrace Dropshipping
Dropshipping was once considered the most popular business model for online entrepreneurs with no extensive capital at hand.
Though a little less popular nowadays due to a saturated market, it can still be very profitable with the right digital marketing efforts.
How it works is you partner with wholesalers or manufacturers who store and ship products directly to customers. Through a pitch deck creator, you can set up a partner meeting to introduce your business to them. You essentially act as the middleman, handling marketing and sales while your supplier takes care of inventory management and fulfillment.
Where To Source Products To Sell via Dropshipping?
You may look to use platforms such as Oberlo, Sprocket, Dropship Central, etc., where you will be able to source products and automate the dropshipping process. You may do the same through Amazon and eBay.
5. Sell Subscription Boxes
This is a unique approach that you can embrace if you are good at networking.
What you do is combine multiple products from different suppliers into bundles or curated boxes and actively promote them on your website, social channels, etc. Upon conversion, you get a healthy commission from all the suppliers involved.
You need to partner with various vendors who have complementary products to one another. You can create unique subscription boxes tailored to specific interests or themes, such as beauty, fitness, or gourmet food.
The best part is, that you can assemble these boxes on demand, i.e., when orders are placed. This means that if you are good at building relationships with suppliers and partnering up with them to allow you to sell such bundles, you will be able to run your own online business without any inventory.
6. Sell Handmade or Custom Products
Here’s another scope for exploring your creative side. If you have creative skills in art, crafting, or woodwork in real life, then you can easily run a business on your own following an on-demand delivery process.
Basically, you can craft certain products on your own, and use them as a reference as to what you can do for people. Create products on your website or social media while mentioning in detail that you can either make something similar or any custom work the people may request.
Initially, do some market research to see what others are charging for the work, and do analysis on the average material costs when creating your work. Then offer a suitable pricing that covers your expenses and pays you enough for your time & energy, though not higher than others in the market.
There are several online marketplaces such as Etsy or Amazon, that are quite popular for selling such craftworks and services. If you don’t have a website, you may start your business there.
Over time, you may work on creating a social community (maybe a Facebook group), and eventually build a website dedicated to your products and services.
This approach literally depends on your skills and uniqueness – no overwhelming investment in terms of money, and no inventory required.
If you can deliver quality work, you will easily get good reviews and build lasting relationships with customers.
7. Become A Consultant/Coach/Trainer
Earlier, we discussed creating your own digital product. Similarly, you may consider becoming a consultant or a coach in your area of expertise.
For example, if you are a great artist, you may look to become an Art Trainer to teach people how to enhance their creativity and deliver high-quality artwork. Similarly, if you have vast experience in managing business expenses, you can become a financial consultant for businesses. If you are great with fitness training, then you can go for a certification and become a Fitness Trainer.
Everything is possible here. Any skill that you are an expert in, you can become an authoritative person for that, and get people to pay you to teach them.
The difficulty is establishing credibility so that you start getting clients. But, let’ me share a method that works quite well in such businesses.
How To Get More Clients For My Coaching Business?
It’s a step-by-step process :
Gain Credibility And Testimonials
Initially, if you are just starting the journey, people won’t trust you enough to invest in your services. Hence, you first need to work on becoming credible. The best way to do this is by offering your service for free to a handful of people. Consider launching mentorship programs to build real relationships, gather valuable feedback, and showcase the impact of your service. Help these individuals become good at the skills that they have mastered. In return, ask for data and testimonials (with consent to use them for your marketing purposes). If you are able to help these people genuinely, you will easily be able to get useful data to define success, and direct testimonials to prove your credibility.
2. Collect leads
Once you have data and positive reviews, your next task is lead generation. You can prepare an ebook sharing some part of your training for free. Or, you can host a free live workshop to demonstrate real-life experience of your actual training program. On the process, collect people’s names, email addresses, and if possible, additional details such as phone numbers, area of interest, goal with the skills learned, etc. You can also use lead generation tools like MariaDB replication to automate data collection and reach more potential customers.
3. Run A Sales Campaign
Craft a sales funnel to convert these leads into paying clients. An easy way is to run email nurturing campaigns after they opt-in, and then lead them to a funnel where you make a special offer on your services. This has to be a full-fledged funnel journey including steps and email workflows. (Here’s a guide to help you out.)
You have more ways to promote your services. If done right, you will be entering a million-dollar industry.
8. Host An Online Marketplace
Just like other online shops where you can list your products, you may consider creating an online marketplace of your own.
Basically, you will create an eCommerce platform where your main task will be to maintain the website and drive relevant traffic, while other vendors will agree to list their products on your site. Here, you will have to handle the payment process, and in some cases fulfillment (which you can easily handle by partnering with a delivery company).
Here, you may charge a small fee (around 3-5% of the price) on every order successfully delivered.
This strategy will take time to flourish as you need to invest in SEO & advertising efforts to slowly get your online marketplace popular. You may start by building an audience locally before thinking of going international.
So, while this is a long-term business scope with significant efforts involved, you can consider going for this business without having any products of your own – no inventory required.
9. Compile A Price Comparison Site
Similar to an online marketplace, you can create a price comparison site.
The concept is completely the same except that, here, the payment and fulfillment will be handled by the vendors themselves from their own websites.
All they will do is they will list your products on your website. The website will have similar products from various vendors so that customers will be able to compare and decide which one they want to order.
You will drive potential traffic. People interested will click on the product and will be directed to the vendor’s website to complete the purchase.
In this case, you can follow a business module of either a certain fee based on CTR or a small monthly subscription fee based on the number of products listed.
However, this will again, take time to grow as you need to work on building up traffic volume. This means, initially, your fees have to be very minimal.
You can obviously explore additional income strategies such as collecting fees for exclusive advertising or a fee to be added to the featured section on your home page, etc.
10. Leverage White Labeling
There are several companies that offer their products on white label, mostly software. Here, there is a small early investment involved as you have to purchase the software initially.
But then, you can improve the tool and create a brand of your own to offer services or re-sell the product under your brand without any exclusive investment in research & development.
The concept here is that you don’t need to build unique products from scratch; improvise on what’s available and start a business of your own with no restrictions.
Of course, the hard work here would be marketing and promotions. That’s where you need to focus most of your efforts.
How To Setup An Online Store Easily?
Once you’ve decided on the products or services you want to offer, setting up an online store is relatively straightforward.
First, you need to decide where you want to host your online store. There are 3 ways:
Create An Online Shop On Social Media
Sell via An Existing Online Marketplace
Build A Website Of Your Own
Let us quickly look at the steps to set up your store on each case.
1. Steps To Create an Online Shop on Social Media
Following are the steps you may follow to start an online shop via social media. This is not the ultimate way, but it is one of the proven ways to get started.
Step 1: Choose the Platform
Decide which social media platform suits your business best depending on the strategy you selected.
Almost all of them are possible on Facebook through a business page or a group. And it has it’s own marketplace which you can leverage for eCommerce.
Instagram, Pinterest, and TikTok are also great options for eCommerce strategies such as POD or Custom Products.
Overall, you need to do thorough research on what type of audience is more likely to purchase your products and which social channel(s) they usually hang out in.
Step 2: Set Up Your Business Account
Create a business account if you haven’t already. This often involves providing business information and linking it to your personal account.
Step 3: Create Your Shop
Most social media platforms offer built-in tools for setting up a shop. Follow the platform’s instructions to create your shop, including adding products, descriptions, and prices.
Step 4: Customize Your Shop
Personalize your shop by adding branding elements such as your logo, banner images, and product photos.
Step 5: Promote Your Shop
Utilize social media marketing techniques to attract customers to your shop. This may include creating engaging content, running ads, and collaborating with influencers.
When you’re running an online business, you need to take advantage of every chance to get people engaged with your brand digitally. One of the easiest and most impactful things you can do is put some extra effort into your social media game. Make sure your social media channels are poppin’ with eye-catching images and videos that’ll grab people’s attention immediately.
When it comes to advertising or promoting, you need to go where your audience is hanging out. If your crowd is there on Instagram but barely uses Twitter, you’ll get way more attention for your business by focusing your ad spend on Instagram.
It’s all about finding the right platform where your people are actively scrolling and engaging.
Example Scenario
Let’s look at an example. Suppose you choose to become an affiliate marketer for online software. The option here would be to first establish a presence on YouTube and then transition the audience into a Facebook Group where you can get more engagement and conversions if you are able to refer to good products.
So, you will need a YouTube channel, a Facebook Business page, and a Facebook Group. You can then be creative with your approach. Maybe you can offer lead magnets to collect leads and add email marketing to your tactic. You may even have a website for the same purpose, getting you more customers from different sources.
2. Sell via an Existing Online Marketplace
This one is more applicable for strategies such as POD, Digital Products, Subscription Boxes, Custom Products, and White Labelling.
It’s pretty straightforward. You list down what products you offer on marketplaces where your relevant audience usually shops and gets orders directly from the platform. Your job is to deliver in due time once the orders are placed.
Following are the basic steps to take this route.
Step 1: Choose the Marketplace
Research different online marketplaces to find out the ones where your products may sell more.
Don’t just be tempted by the fact that a lot of similar products are listed in a marketplace. Look for marketplaces where similar products have a lot of orders placed or reviews given. This is a good sign that you will get the right audience in this marketplace.
For example, Bonanza is renounced for selling clothing products and you will see at a glance that it has a lot of clothing products listed, many of which have be reviewed several times. This is perfect if you are selling POD t-shirts.
Step 2: Register as a Seller
Create a seller account on the chosen marketplace. This typically involves providing business information and verifying your identity.
Step 3: List Your Products
Use the marketplace’s tools to list your products, including detailed descriptions, prices, and images.
Or you will find several other tools that will help you with the listing. For example, suppose you choose to sell on a marketplace while also having a website of your own via WooCommerce. In this case, first, upload your products on WooCommerce. There, you will get plugins such as Product Feed Manager For WooCommerce from RexTheme that will help you generate product feeds that are in the right format for various online marketplaces of your choice. Once you have the feed, you can simply upload it to the respective marketplace in just a few clicks.
Step 4: Manage Your Listings
Keep your product listings up to date, manage inventory, and respond to customer inquiries promptly.
Step 5: Optimize for Sales
Use SEO techniques and optimize your product listings to improve visibility and attract more customers.
SEO can be a real rabbit hole if you let it. But if you’re just getting started, here are a few key things to keep in mind :
First up, you need to get into the mindset of your customer. Think about how your target audience actually talks about your products and what kinds of questions they’re trying to get answered.
Next, is on-page content. I’m talking product titles, descriptions, images, blogs. You need to craft your content using the same natural language your customers use when they’re searching for that kind of stuff. Answer their questions right there on the page.
Don’t forget about those meta tags! The title tags are like the headlines for search engines.
The key with all of this is just thinking like a customer. Use the words they use, and answer the questions they’re asking. Do that, and you’ll be well on your way to optimizing that SEO even from scratch.
3. Build a Website of Your Own
This one is the one you would want to go for if you have a long-term online business in mind.
Following are a few basic steps to get started.
Step 1: Choose An eCommerce Platform
Select an e-commerce platform such as Shopify, WooCommerce (for WordPress), or BigCommerce to build your online store.
Step 2: Set Up Your Store
Let’s assume you want to use WooCommerce for your website.
In that case, you will need to get a domain and hosting for WordPress. And then you may get the plugin WooCommerce.
Once that is done, you may then set up your store such as adding business details, choosing a suitable Theme (such as WoodMart), designing the online shop, and preparing for the overall customer experience.
Step 3: Add Your Products
In WooCommerce, you may easily add products either via a CSV file or manually.
Since it’s your own website, you will have full freedom on what details you want to add, what images you want to add, and what categories you want to create.
But do keep in mind, the pricing has to be lucrative, and the content should respect SEO requirements to rank naturally.
Step 4: Set Up Payment and Shipping
Configure payment gateways and shipping options to enable customers to make purchases and receive their orders.
Start with the right pieces in place – internet acquiring, payment gateways, e-payment operators, and aggregators.
The payment service should work seamlessly with popular card systems like Mastercard, Visa, Apple Pay, and Google Pay.
If your business is global, making sure you can handle multiple currencies and international transactions is an absolute must.
But it’s not just about the payment tech. The whole journey involves actually building out your website from the ground up and integrating that payment system in a way that fits your specific business and customer needs perfectly.
And through it all, you’ve got to be crossing on the legal side of things, making sure the tech is bulletproof, and creating an experience that keeps your customers happy.
Step 5: Optimize The Store For Conversion & Increased AOV
Enhancing your WooCommerce store for better conversion rates and increased Average Order Value (AOV) can be achieved with the right mix of tools and tactics:
Checkout Optimization Tools: Consider using plugins like OptinMonster that can help capture exciting visitors with targeted messages to reduce cart abandonment.
Order Bumps and Upsells: For order bumps and one click upsells, WPFunnels and CartFlows offer easy integration to add complementary product offers in the checkout flow.
Discount Strategies: Utilize Dynamic Discounts for WooCommerce to implement flexible discounting strategies that can increase AOV through volume-based discounts, special offers, and loyalty rewards.
Conversion Rate Optimization (CRO) Tools: Use Google Analytics for deep insights into user behavior and Hotjar for heatmaps and user feedback to understand and improve the user experience. A/B testing can be conducted with tools like Optimizely to test different elements of your store for conversion optimization.
Step 6: Launch & Promote Your Store
With your store ready, it’s time to launch and promote it across various channels:
SEO Optimization: Ensure your website is optimized for search engines with relevant keywords, meta descriptions, and high-quality content to improve visibility. Additionally, consider link building outreach, which involves reaching out to other websites to secure backlinks and drive more traffic to your site.
Advertising: Invest in targeted ads on platforms like Google AdWords and social media to drive traffic to your store.
Social Media Promotions: Utilize social media platforms to engage with your audience, showcase your products, and drive sales through organic and paid promotions.
Email Marketing: Develop an email marketing strategy to nurture leads, announce promotions, and keep your audience engaged with your brand.
By implementing these tactics, you can increase traffic to your newly launched store and boost sales effectively.
Regardless of which option you choose, make sure to prioritize customer service, marketing, and ongoing optimization to ensure the success of your online store. Consider investing in tools to help with this, such as an email automation platform, customer experience software, social media scheduling tool, etc.”
Must-Use Tactics To Maximize Your Sales?
So far, you have learned how to launch an online shop without inventory. You have learned popular strategies, ways to start your online store, and how to optimize sales growth based on the type of store you create.
Now, let us look at some of the tactics you must use no matter what product you sell or what type of online store you create. Also, we will suggest some tools to help you out.
Let’s dive deeper into these essential tactics for maximizing your online sales, complete with tool recommendations to enhance each strategy:
1. Content Marketing: Creating engaging and valuable content is key to attracting and engaging your target audience. Whether it’s through blog posts, videos, or podcasts, high-quality content can significantly boost your online visibility and authority.
Tools: Use Ahrefs or SEMrush for comprehensive keyword research and SEO strategies. Clearscope is excellent for content optimization, ensuring your content is both relevant and ranks well on search engines.
2. Social Media Marketing: Social media platforms offer a vast arena for building brand awareness and connecting with potential customers. Each platform serves different audience segments, so tailor your strategy accordingly.
3. Email Marketing: An effective email marketing strategy can help you build and nurture relationships with your subscribers, turning leads into loyal customers through personalized campaigns and newsletters.
Tools:Mail Mint, Mailchimp, and Constant Contact offer user-friendly interfaces for campaign management, while Drip provides advanced automation features tailored for e-commerce.
4. Influencer Marketing: Partnering with influencers can amplify your brand’s reach and credibility. Influencers with a loyal following in your niche can drive awareness and sales in an authentic way.
Tools:Upfluence and BuzzSumo are great for identifying influencers with high engagement rates. Grin offers end-to-end influencer management capabilities.
5. Paid Advertising: Paid ads are a direct method to drive targeted traffic to your store. Effective use of Google Ads, Facebook Ads, and other platforms can yield a significant return on investment.
Tools:Google Ads Editor and Facebook Ads Manager facilitate campaign creation and optimization. simplifies cross-platform ad management and testing.
6. Sales Funnels: Optimizing your sales funnel with strategic order bumps and upsells can significantly increase your average order value (AOV) and customer lifetime value (CLV).
Tools:WPFunnels offers an intuitive platform for building sales funnels. CartFlows also provides comprehensive tools for creating, managing, and optimizing funnels to improve conversion rates.
7. Quality Online Support: Providing excellent customer support is crucial for building trust and loyalty. A responsive support system can resolve issues promptly, enhancing customer satisfaction and retention.
Tools: Consider using Zendesk for a robust support ticket system or Intercom for integrated chat and email support. These platforms help ensure your customers receive timely and helpful assistance, fostering positive relationships and trust in your brand.
Implementing these tactics with the right tools can significantly enhance your online store’s performance, driving sales and fostering long-term customer relationships.
Time To Step Into Entrepreneurship
So when you’re doing business online, you need to do a whole lot of work to make sure to not end up failing.
Not having to store and manage products yourself definitely has some appealing advantages. It saves you money on storage costs, and shipping to professionals, and limits those operational costs.
But that also increases a lot more deep work as there is no human interaction & it becomes way harder to reach your customer, knowing their buyer persona & more.
To save more cost and make the process easy for you, make sure to use funnel tools like WPFunnels to create a funnel way more easily and Product Feed Manager to generate and optimize your feed or over 170 online marketplaces.
Online shopping has been on the rise over the past decade. Over 85% of people worldwide prefer online shopping over visiting physical stores (according to alphr.com).
Many WooCommerce stores are doing exceptionally well and have achieved three times more sales than they used to about a few years ago.
Did you know that you could easily triple your store sales in no time as well?
But what’s the secret?
Well, the key is … If you generate your Product Feed in the right way and promote through Google Shopping Ads and Facebook Dynamic Ads, you may see your sales go up right away.
Let me explain.
Google and Facebook hold the largest audience. Promoting on their merchant platforms can boost your sales in no time IF PROPERLY DONE.
Today, you will get a complete step-by-step guide on how to generate your WooCommerce Product Feed in the most optimized way and skyrocket your store performance.
By the end of this guide, you will be able to
Set up proper WooCommerce product feed in the most optimized way for Google Shopping and Facebook Dynamic Ads
Generate accurate and performance-driven product feed in minutes
Upload the feed on your desired platform and see your sales go up
Once you have an account, you will need to upload your WooCommerce Product Feed in order to promote through Google. However, Google has a few feed specifications that you need to follow. So let us look into it in more detail.
How To Set Up WooCommerce Google Product Feed In The Most Optimized Way
When you upload your products, Google will look for some specific data.
Let us look into what data you must include on your feed and I will give you examples for each data so that you know the most optimized way to generate the WooCommerce Google product feed.
A proper Google product feed (in XML format) of a single product usually looks like the following:
<rss xmlns:g="http://base.google.com/ns/1.0" version="2.0" >
    <channel>
    <title> The name of the feed file </title>
    <link> Your website link </link>
    <description> Description of the content </description>
    <item>
        Product data attributes
    </item>
    </channel>
</rss>
**Here the item tag ( <item> </item> ) encapsulates the data of a product. For multiple products, you simply add more item tags and the product data within, and the rest remains the same.
Now, the product data includes a lot of information that you need to assign to their respective attribute tags within the item tag.
Google Shopping Ads require the following data for each of your products:
Product ID
Product Title
Product Description
Product Link/URL
Product Category
Google Product Category
Product Image URL
Stock Availability
Regular Price
Product Condition
Manufacturer/Brand Name
GTIN (Global Trade Item Number)
MPN (Manufacturer Part Number)
Identifier
Adult Content
Multipack
Bundle
Material
Age Group
Color
Gender
Size
Pattern
Item Group ID
Some of these attributes depend on the product type and its variants. Below is a more detailed explanation with examples of how each of these data should be on your store for the maximum output.
Each attribute is included in the following format on the feed:
<g: Attribute name > Attribute Data </g: Attribute name >
You will get a sample product feed file link later on in this article after I go over detailed instructions on the attributes and some tips.
Let’s look into the details to understand how you should include these data, the format on the feed file, and which ones to include/exclude based on the products on your WooCommerce Store.
Product ID
Attribute
id
Example Value
671
Feed Structure
<g:id>671</g:id>
It is a unique identifier for your product in your store. On WooCommerce, you should see the ID when you browse the product list.
However, you may also use the product SKU as the product ID.
Product Title
Attribute
title
Example Value
Red Logo Rex T-shirt
Feed Structure
<g:title> <![CDATA[ Red Logo Rex T-shirt ]]> </g:title>
It is the name of the product to be displayed. On WooCommerce, you should see the Product’s Title when you browse the product list.
When you set the product title, do specify any special feature, such as its color and the brand name, along with the product. This will create more attraction for buyers.
However, you are not allowed to use any other promotional touch to the tile (for example, adding “free shipping” or “discounted price” or using all caps).
In the case of variable products, include the brand name in the title. Rather than including just ‘any’ feature to the main title, mention the feature that makes it a variant of the product.
For example, if a product is a Logo Rex T-shirt and has variations of Red and Blue, then on your Google Product Feed, one variation should be named “Logo Rex T-shirt – Red” and the other one “Logo Rex T-shirt – Blue”.
So, the feed data view will look like this individually:
<g:title>
    <![CDATA[ Logo Rex T-shirt - Red ]]>
</g:title>
<g:title>
    <![CDATA[ Logo Rex T-shirt - Blue ]]>
</g:title>
Product Description
Attribute
description
Example Value
This is a Red T-shirt. It was created for testing purposes only.
Feed Structure
<g:description> <![CDATA[ This is a Red T-shirt. It was created for testing purposes only. ]]> </g:description>
Add a proper description of the product you are selling. Make sure to highlight all the major features it may have, that will attract buyers.
When you edit a product, you get to set its tile, link, and description as shown in the picture below:
Even though you should mention the exclusive features and benefits of the description, you are not allowed to use any extensive promotional touch in the description (for example, adding “free shipping” or “discounted price” or using all caps to highlight a certain point).
Also, you shouldn’t include any links to a different webpage or compare the products to any competitors.
This is the product type or category that you set on your store. When editing a product on WooCommerce, on the right side, you will have the option to set a Category.
This attribute is optional, but we recommend you use it to create a better visualization for viewers.
Google has a category list of its own, which you need to use to categorize your products on Google Shopping. You must set this attribute according to their required taxonomy in order to get your Google Product Feed approved.
Hence, you can either set your WooCommerce store categories accordingly or have your own categories mapped to Google’s using a plugin when generating product feed.
This will be the link to the main image of your product. When editing a product, on the right side, scroll down and you should find the option to add a Product image.
Whichever image you use here, you need to provide the URL to that image for the “image_link” attribute.
You should provide a compelling picture of the product without any promotional text or watermark. Also, avoid using any placeholder image.
Remember, this image is the most important factor to get more customers. Most people will notice your product only if they like what they see. So make sure to provide a clear picture with high quality.
Stock Status/Availability
Attribute
availability
Example Value
in_stock
Feed Structure
<g:availability>in_stock</g:availability>
This will signify if the product is still in stock, or all sold out. On the product edit page, scroll down to the product data section. Choose Inventory and you should get the option to set the Stock Status.
This value will be added under the attribute “availability” when generating a Google product feed. Google accepts the values “in_stock”, “out_of_stock”, or “preorder.”
WooCommerce will give you the options “in stock” and “out of stock” by default. For the “preorder” option, you will need to use extra coding or another plugin.
Tip: You might think, why you should add products that are “out of stock.” Well, sometimes you can use the “out of stock” option as a psychological tactic.
Here’s an example: Let’s say you have a T-shirt with 2 variations, Red and Black and let’s say the black ones are sold out.
Now, when prospects will view the products, they will see that there are two similar products, and one variation is sold out.
This could mean that this t-shirt is pretty popular. Hence, it will tempt certain prospects to think about buying the Red one.
Regular Price
Attribute
price
Example Value
26.53 USD
Feed Structure
<g:price>26.53 USD</g:price>
This is the price of the product (usually before taxes). On the product edit page, scroll down to the product data section. On the General tab, you will get the option to set the Regular Price.
This value will be added under the attribute “price” when generating a WooCommerce Google product feed.
Make sure you are inputting the accurate price, with the ISO currency code as the suffix.
Please note that the price cannot be “0”. (The price “0” is only acceptable for mobile devices sold on a contractual basis.)
Also, if your products are for the US or Canada, then do not add any tax to the price. For any other country, make sure to add VAT or GST or whichever regional tax that may apply.
Product Condition
Attribute
condition
Example Value
New
Feed Structure
<g:condition> <![CDATA[ New ]]> </g:condition>
Use this attribute to signify if your product is brand new or refurbished. You can use the values “new”, “refurbished” or “used” to define the condition.
WooCommerce doesn’t have any field to define the condition of the product, hence you have to add it on your own to the product feed.
However, Product Feed Manager For WooCommerce will have the option for you to add the product condition field for all products.
Manufacturer/Brand Name
Attribute
brand
Example Value
RexTest
Feed Structure
<g:brand> <![CDATA[ RexTest ]]> </g:brand>
It is mandatory to provide the manufacturer/brand name in order to add a product to Google Shopping. Ideally, you should also mention the brand name on the product tile.
But WooCommerce doesn’t include a “brand” field for your products. Hence, you can create a custom field for every product or use a plugin to add the brand field to every product on your WooCommerce store.
However, movies, books, or musical records don’t require you to include a brand name. In that case, you can keep the brand section empty.
GTIN (Global Trade Item Number)
Attribute
gtin
Example value
123465465464
Feed structure
<g:gtin> <![CDATA[ 123465465464 ]]> </g:gtin>
In order to promote products through Google Shopping Ads, manufacturers from the US or Canada that are GTIN certified must provide the GTIN number for every product on your Google Product Feed.
For other manufacturers
in North America, provide UPC
in Europe, provide EAN
in Japan, provide JAN
However, for a book, you need to provide ISBN instead, and for multipacks, you need to provide the ITF-14.
MPN (Manufacturer Part Number)
Attribute
MPN
Example value
Rex0011Test
Feed structure
<g: MPN> <![CDATA[ Rex0011Test ]]> </g: MPN>
In case a product does not have a GTIN (or UPC, EAN, JAN), then you need to provide the MPN instead.
You may also use the product SKU as the value of its MPN when you do not have both GTIN or MPN (provided that you didn’t use the SKU as its product id).
Now, WooCommerce doesn’t provide fields for Brand, GTIN, or MPN by default. Hence, you need to input custom fields for every product manually.
However, I use the Product Feed Manager For the WooCommerce plugin whichincludes those fields on every product, as shown below:
I’ll just have to input the correct data and use them as values of the required attributes when generating my WooCommerce Product feed.
Identifier Exists
Attribute
identifier_exists
Example Value
no
Feed Structure
<g:identifier_exists>no</g:identifier_exists>
You already learned earlier that providing either GTIN or MPN is mandatory. However, some products don’t have a GTIN or MPN.
For example, some products are just locally produced and don’t incorporate a GTIN or MPN.
In this case, you have to use the “identifier_exists” attribute and assign the value “no”.
Adult Content
Attribute
adult
Example Value
yes
Feed Structure
<g:adult>yes</g:adult>
You might have some erotic or adult products. It’s totally fine to promote them on Google Shopping as long as you label them as adult content. When submitting a product that’s in the adult industry, you need to use the “adult” attribute and assign the value “yes”.
In case you run a business that is completely in the adult industry, for example, a licensed erotic shop, then you do not need any attributes. You should rather go to your Google Merchant Center settings, and select the option that says that your business delivers adult products.
Multipack
Attribute
multipack
Example Value
8
Feed Structure
<g:multipack>8</g:multipack>
A multipack is when you sell a group of several identical products as a single unit; for example, 8 pens together.
This attribute is required for promotion in certain locations such as Australia, Brazil, Czechia, France, Germany, Italy, Japan, Netherlands, Spain, Switzerland, the UK, and the US.
You must include this attribute and assign its value to the number of products you assembled into a multipack.
If the multipack is assembled by its actual manufacturer, and not you, then you do not need to include this attribute.
Tip: Try to include multipacks on your store with a small amount of discount.
For example, if 1 pen cost 10 dollars, and you set a multipack for 8 pens, then rather than charging 80 dollars, try to give a discount and charge 70 or 75 dollars maybe. This little discount will create more attraction.
Bundle
Attribute
is_bundle
Example
yes
Feed Data
<g:is_bundle>yes</g:is_bundle>
A bundle is when you take multiple products and sell them as one single package. Usually, all the products in a bundle are somewhat related and can be sold individually without the bundle.
Here, one product acts as the main product, and the rest are sub-products offered in a bundle.
For example, you can create a product bundle that includes a camera, a memory card, and a carry bag. Here, the camera is the main product, while the memory card and the carry bag are related sub-products in a bundle.
For promoting bundles in Australia, Brazil, Czechia, France, Germany, Italy, Japan, Netherlands, Spain, Switzerland, the UK, and the US, you must use this attribute and assign its value as “yes” or “true”.
Material
Attribute
material
Example
Leather
Feed Data
<g:material>Leather</g:material>
In case you wish to upload a product whose material is a notable feature, then you may use this attribute. You need to use valid material names.
In case the product is made using multiple materials, mention all the materials while separating them with “/” between them. For example, cotton/leather/polyester.
**For promoting Apparel & Accessories in Brazil, France, Germany, Japan, the UK, and the US, you need to provide more attributes, including age group, color, gender, and size. For variable products, you must include an extra attribute called item_group_id. So let’s learn more about them.
Age Group
Attribute
age_group
Example Value
kids
Feed Structure
<g:age_group>kids</g:age_group>
(This field is required only if your product falls under the Apparel & Accessories category or its sub-category)
You have to assign which age group this product is for.
Google will accept the following values:
newborn
infant
toddler
kids
adult
In the case of variable products, assign a separate age group for each variant.
Color
Attribute
color
Example Value
Tango Red
Feed Structure
<g:color>Tango Red</g:color>
(This field is required only if your product falls under the Apparel & Accessories category or its sub-category).
You need to describe the color of the product (but not color codes or single letters).
If there are multiple colors, mention all the colors while separating them with a “/”. For example, Red/Blue/Green.
For variable products, assign a separate color for each variant and add it to the product title.
Tip: It is not necessary that you have to give a generic color. You can rather use catchy color names such as “Tango Red” instead of just “Red”, which is more appealing to buyers.
Gender
Attribute
gender
Example Value
male
Feed Structure
<g:gender>male</g:gender>
(This field is required only if your product falls under the Apparel & Accessories category or its sub-category).
When selling apparel, you should identify which particular gender the product is for.
Google will accept the following genders:
male
female
unisex
Size
Attribute
size
Example Value
XL
Feed Structure
<g:size>XL</g:size>
(This field is required only if your product falls under the Apparel & Accessories category or its sub-category).
You have to assign an appropriate size value for the product.
For example, “XL” to define extra-large, or “15/32 slim” to define a 15-inch neck size, 32 inches sleeves, and a slim fit.
For a free-size product, you should assign the value “one size”, “OS”, “one size fits all”, “OSFA”, “one size fits most”, or “OSFM.”
In case of variable products, assign a separate size for each variant and you may also add it to the title of the product.
Tip: Keep a measurement table on your site to define the sizes you mentioned here.
For example, if you assigned the size as XL, then on the table explain the height, width, chest size, etc. in inches or cms, to give your customers a way to check if that size is the right fit.
Different countries have different measurements for the same size codes, hence this will be helpful.
Pattern
Attribute
pattern
Example Value
striped
Feed Structure
<g:pattern>Striped</g:pattern>
This field is only applicable to variable products. If you have different pattern designs for the same product, then you need to mention separate patterns for each variant using this attribute.
Item Group ID
Attribute
item_group_id
Example Value
AB12345
Feed Structure
<g:item_group_id>AB12345</g:item_group_id>
For variable products, if the variations occur due to any of the following:
For variable products, if the variations occur due to any of the following:
color
size
pattern
material
age group
gender
then you must use the “item_group_id” attribute.
All the variants of the same variable product will have the same Item Group ID. This will indicate that they are variants of a single product. So, you need to choose a unique Group ID for each variable product.
Google Product Feed Samples
Now that you know what details you require to generate your WooCommerce Product Feed for Google, now let us look at some samples to understand the structure.
Google accepts several file formats of product feed to be uploaded. However, the recommended format is XML.
● Google Product Category ● GTIN (Global Trade Item Number) ● MPN (Manufacturer Part Number) ● Size ● Color ● Gender ● Pattern ● Special Limited Offer ● Special Limited Offer Duration
Some of these attributes depend on the product type and its variants. Below is a more detailed explanation with examples of how each of these attributes should be assigned on your Facebook product feed for maximum output.
You will get samples of Facebook product feeds later on in this article after I go over detailed instructions on the attributes and some tips.
Let’s look into the details to understand what values you should assign to each attribute, and which ones to include/exclude based on the products on your WooCommerce Store.
Product ID
Attribute
id
Example Value
671
It is a unique identifier for your product on your store. On WooCommerce, you should see the ID when you browse the product list.
It is advised to use the existing SKU of the product as ID since that is always unique.
If multiple products have the same IDs, only the first one on the list will be considered. The rest will be ignored. So make sure each product has a unique ID.
Product Title
Attribute
title
Example Value
Red Logo Rex T-shirt
It is the name of the product to be displayed. On WooCommerce, you should see the product title when you browse the product list.
When you set the product title, specify any special feature such as its color, and the brand name, along with the product. This will grab the attention of the buyers.
However, you are not allowed to use any other promotional touch to the tile (for example adding “free shipping” or “discounted price” or using all caps).
In case of variable products include the brand name to the title. Rather than including just any feature in the main title, mention the feature that makes it a variant of the product.
For example, if a product is a Logo Rex T-shirt and has variations of Red and Blue, then one variation should be named “Logo Rex T-shirt – Red” and the other one “Logo Rex T-shirt – Blue”.
So on the CSV file, they will have different values for the title:
id
title
872
Logo Rex T-shirt – Red
873
Logo Rex T-shirt – Blue
Stock Availability
Attribute
availability
Example Value
in stock
This will signify if the product is still in stock, or all sold out. On the product edit page, scroll down to the product data section. Choose Inventory and you should get the option to set the Stock Status.
This value will be added under the attribute “availability” when generating WooCommerce Facebook product feed for Facebook Dynamic Ads.
Facebook accepts the following values:
in stock – when the product is ready for immediate shipping
out of stock – when the product is not available in stock
preorder – can order in advance for future restock
available for order – if the product is available, but will require a couple of weeks for shipping
discontinued – if the product is discontinued
WooCommerce will give you the options “in stock” and “out of stock” by default.
For the rest of the values, you will need to use extra coding or another plugin.
Tip: Did you know that adding products that are “out of stock” can be a great psychological tactic?
Here’s an example: Let’s say you have a T-shirt with 2 variations, Red and Black and let’s say the black ones are sold out.
Now, when prospects will view the products, they will see that there are two similar products, and one variation is sold out.
This could mean that this t-shirt is pretty popular. Hence, it will tempt certain prospects to think about buying the Red one.
Product Condition
Attribute
condition
Example Value
new
Use this attribute to signify if your product is brand new or refurbished. You can use the values “new”, “refurbished” or “used” to define the condition.
WooCommerce doesn’t have any field to define the condition of the product, hence you have to add it on your own to the product feed.
However, the Product Feed Manager For WooCommerce will have the option for you to add the product condition field for all products.
Product Description
Attribute
description
Example value
This is a Red T-shirt. It was created for testing purposes only.
Add a proper description of the product you are selling. Make sure to highlight all the major features it may have, that will attract buyers.
When you edit a product, you get to set its title, link, and description as shown in the picture below:
You should mention the exclusive features and benefits of the description.
However, you are not allowed to use any extensive promotional touch in the description (for example adding “free shipping” or “discounted price” or using all caps to highlight a certain point).
Also, you shouldn’t include any links to a different webpage or compare the products to any competitors.
Product Image URL
Attribute
image_link
Example Value
https://www.yourwebsite.com/redtee394.png/
This will be the link to the main image of your product. When editing a product, on the right side, scroll down and you should find the option to add a Product image.
Whichever image you use here, you need to provide the URL to that image for the “image_link” attribute.
Remember, this image is the most important factor to get more customers. Most people will notice your product only if they like what they see. So make sure to provide a clear picture with high quality.
It’s best if the image is a clear picture of the product without any promotional text watermark, or any placeholder image (although I am using one just for test purposes).
However, you need to maintain proper image resolution.
If you use a square image for carousel ads, then the dimensions should be 600×600 px.
For Dynamic Ads with a single image, you need a minimum resolution of 1200×630 px with a minimum aspect ratio of 4 : 5 and a maximum aspect ratio of 1: 91: 1.
Anything outside the mentioned maximum aspect ratios will be cropped out.
Product URL
Attribute
link
Example Value
https://www.yourwebsite.com/red-logo-rex-t-shirt/
This is the link to your product page. When editing a product, you will see the Permalink just below the Title box. That is the URL to your product.
It’s best to include the product title on the link, however many prefer to use the product Id instead, and some use both.
Also, You must make sure your website domain is verified and starts with http or https.
Regular Price
Attribute
price
Example Value
26.53 USD
This is the price of the product to be displayed. On the product edit page, scroll down to the product data section. On the General tab, you will get the option to set the Regular Price.
This value will be added under the attribute “price” when generating a product feed for Facebook.
Please note that the price cannot be “0” and any product with “0” or no price value will result in rejection from Facebook Dynamic Ads.
Make sure you are inputting the accurate price with the ISO currency code as the suffix.
Manufacturer/Brand
Attribute
brand
Example Value
RexTest
In case a product doesn’t have a GTIN, then it is mandatory to provide the manufacturer/brand name in order to add that product on Facebook.
If the product falls under the Daily Deals Inventory, then you must also include MPN alongside brand.
But WooCommerce doesn’t include a “brand” field for your products. Hence, you can create a custom field for every product or use a plugin to add the brand field to every product on your WooCommerce store.
Google Product Category
Attribute
google_product_category
Example Value
Apparel & Accessories > Clothing
Facebook uses the same taxonomy and category specifications that Google uses. Hence, to categorize your products, you must set this attribute according to Google’s taxonomy, for your WooCommerce Facebook Product Feed to be approved.
For a manufacturer in the US or Canada, that is GTIN certified, it is necessary to provide the GTIN number for every product on your Facebook Product Feed.
Alternatively, you can also use UPC, EAN, JAN, or ISBN in place of GTIN if you are from a different location.
MPN (Manufacturer Part Number)
Attribute
mpn
Example Value
Rex0011Test
In case a product does not have a GTIN (or UPC, EAN, JAN, ISBN), then you need to provide the MPN instead. It is a unique manufacturer ID for a product that doesn’t have a GTIN.
For products that are under the Daily Deals Inventory, if you provide a Brand name, then it is also mandatory to include MPN.
Now, WooCommerce doesn’t provide fields for Brand, GTIN, or MPN by default. Hence, you need to input custom fields for every product manually.
However, I use the Product Feed Manager For the WooCommerce plugin includes those fields on every product, as shown below:
I’ll just have to input the correct data and use them as values of the required attributes when generating Facebook Product feed.
Size
Attribute
size
Example Value
Large
This field is required only for variable products with size variants.
You may use words such as Small, Medium, or Large, or you may use numbers such as 20, 25, etc, whichever is appropriate to define the size of a product.
Tips: You should keep a measurement table on your site to define the sizes you mentioned for your products.
For example, if you assigned the size as Large, then on the table explain the height, width, chest size, etc. in inches or cms, to give your customers a way to check if that size is the right fit.
Different countries have different measurements for the same size codes, hence this will be helpful.
Color
Attribute
color
Example Value
Tango Red
This field is required only for variable products with color variants.
You need to describe the color of the product (but not color codes or single letters).
If there are multiple colors, mention all the colors while separating them with a “/”. For example, Red/Blue/Green.
In the case of variable products, assign a separate color for each variant and add it to the product title.
Tip: You may use a creative way to describe the color, rather than simply using generic colors. For example, you can rather use catchy color names such as “Tango Red” instead of just “Red”, which is more appealing to buyers.
Gender
Attribute
gender
Example Value
unisex
You need to mention which gender the product is for.
Facebook will accept the following genders:
male
female
unisex
Pattern
Attribute
pattern
Example Value
Flannel
This field is required only for variable products with pattern variants. Use proper pattern names such as “Striped”, “Flannel”, etc.
Special Limited Offer
Attribute
offer_price
Example Value
9.99 USD
This is a unique option you get only on Facebook Dynamic Ads.
You can set a product to be on a special discounted price for certain hours every day (during the offer period), or in other words, the product will be under the Daily Deals Inventory.
Tip: Sometimes a single day discount on certain popular products on your store can boost your sales.
For example, if you have a watch on your store, that people are buying more than other products, you can give a surprise single day special discount offer. This may double your sales on that day and grab more attention from future prospects.
Simply include the “offer_price” attribute to your WooCommerce Facebook product feed and set a discounted price as it’s value to define the special price offered (including a proper ISO currency code as the suffix.). The offer price must be at least 15% less than the regular price, or else Facebook will reject it.
Special Limited Offer Duration
Attribute
offer_price_effective_date
Example Value
2018-06-01T12:00-0300/2018-12-01T00:00-0300
If you want to give a special offer for a product under the Daily Deals Inventory on Facebook, then along with “offer_price”, you must also add this attribute to specify the start and end date, with time, for the special offer.
Mention the start date and hours of the offer, then use a slash, and then mention the end date and hours of the offer.
Tip: Before any major festivals, international occasions or holidays, sometimes, giving special offers on certain relative products can boost your sales.
For example, a week before Christmas, you may implement a special discounted offer on Christmas Hats. This will definitely boost your sales.
Facebook Product Feed Samples
Now that you know what details you require to generate your WooCommerce Product Feed for Facebook Dynamics, now let us look at some samples to understand the structure.
Facebook accepts several file formats of product feeds to be uploaded. However, the recommended format is CSV.
These feeds can easily be generated using the plugin, Product Feed Manager For WooCommerce. Once you have the product feed file, you can now manually upload it to your Facebook Business Account.
Now, you have learned all about WooCommerce Google Product Feed and WooCommerce Facebook Product Feed.
So, let me give you a proper guide on the tool that I use to generate WooCommerce product feed easily, in a few seconds.
How To Generate WooCommerce Product Feed Easily Using The Right Tool
Product Feed Manager For WooCommerce is a plugin with which you can easily generate product feed without any coding skills or any advanced technological expertise.
Why use this plugin?
There are several reasons, why Product Feed Manager For WooCommerce is an ideal choice to help you generate feed:
Manually uploading products takes hours. This plugin will generate feed within seconds.
The plugin has a clean and easy interface with proper documentation. Thus, easy to use and learn.
Generate flawless feeds no matter how many products you have.
Filter options allow you to generate feed only for the products you require.
It provides a Google Category Mapping option that saves us from changing the categories on our WooCommerce store.
It allows you to auto-sync with Google Shopping Center, i.e., your WooCommerce product feed will automatically be sent to Google, without you having to manually upload it.
It comes with a pre-built list of all the required attributes of Google and Facebook, hence you do not need to manually add attributes.
Add certain custom fields such as GTIN, MPN, Brand, and UPC to your products, which are not available by default on WooCommerce.
A very active and useful support team helps you out with any confusion you may have.
Now let’s go through how you can easily generate product feed using Product Feed Manager For WooCommerce.
How to get a Product Feed Manager For WooCommerce?
Product Feed Manager For WooCommerce has a free version that you can use to test out its basic features and understand its interface.
But it’s recommended to get the pro version since it comes with more refined features.
Install and activate the plugin on your WordPress dashboard and you should see something like this:
Now you are ready to generate product feed.
How to Generate WooCommerce Product Feed using Product Feed Manager?
Product Feed Manager For WooCommerce is so easy to use.
1. Simply click on “Add New Feed” and you shall see the Add New Product Feed page:
2. On top, you will get the option to add a title to the feed.
First, give a title to the feed file. Then, you can set which products to include in your feed.
3. Just under the title, you will see an option to select your preferred merchant. Simply click on the Feed Merchant dropdown button and select your preferred merchant from the dropdown or you can search in the dropdown box.
Select your preferred merchant and all the required attributes will be loaded below.
Product Filter
With the Product Feed Manager for the WooCommerce plugin, you will have the option to choose which products to include in your feed.
To see the options, simply click on the Product Filter button.
Once you click on the Product Filter button, the Product Filter drawer will slide in from the right side of the window.
Here, you will see that the “All Published Products” option is selected by default – this option will include each and every product on your WooCommerce store.
If you want, then you can use other filter options. Click on the dropdown, and you will see some filter options in the dropdown list:
You can choose
All Featured Products – only publish the featured products
Category Filter – choose products using categories
Product Filter – use this custom filter to set a conditional filter
Tag Filter – choose a product using tags
Watch this video to see how amazing the filter options of are. You can easily choose the products you want to include or exclude from your product feed.
Schedule Auto-update
To set a schedule fetch time, click on the Product Settings button first.
Once you click on the Product Settings button, the Product Settings drawer will slide in from the right side of the window
Here, on the top of the Settings options, you will find an option Auto-Generate Your Feed.
You can set the scheduled update to be daily, hourly, or weekly.
After that, you will get the options to either include or exclude variation products, and whether to include parent products in case of the grouped products.
WPML Support
If you use WPML to set different language versions of your products, you will find a WPML section here.
You can have a look at this doc for a better understanding of how you can generate a feed with WPML:
To generate a feed, at first, you need to select your preferred merchant.
For Google Product Feed, select Merchant Type “Google Shopping“. For Facebook Product Feed, select Merchant Type “Facebook.”
Once you select, you will see the page refresh and the required attributes will automatically appear.
Now, here, the Attributes are on the left, and the values of the attributes are set under the Assigned Values column.
Choose the Type as Attribute and then select the Value this attribute will hold from your WooCommerce store.
If you think any Attribute is missing, you can add it by pressing the button “ADD NEW ATTRIBUTE.”
In this page, you will find some language-related options if you are using WPML.
You can have a look at this doc for a better understanding of how you can generate a feed with WPML translation.
Generate WooCommerce Product Feed
Once the feed is configured, you can now click on “Publish” on the right side and you will see a loading bar.
Once this is complete, the “Publish” button will change to an “Update” button and you will get the feed link or feed download button right below the “Update button.”
Then you can set your product data feed to be updated automatically using the “Auto-Generate Your Feed” feature. So you won’t need to manually update your feed everytime you add new products or update any product individually.
Now you can download this feed and upload it to your desired merchant shop and watch your store sales get a boom.
Category Mapping
Now, as I mentioned earlier, this plugin offers category mapping options. Check out this video to see how to use its category mapping feature easily:
Auto-sync With Google Shopping Center
One of the best features that Product Feed Manager For WooCommerce offers is that you can auto-sync your WooCommerce product feed directly to Google Shopping Center.
You can schedule the auto-sync to take place either hourly, weekly, or monthly. This means that every change you make to your products of the product feed. They will automatically be updated on your Google Shopping Center. You do not have to download and upload the feed every time.
It is always important to learn and implement the best ways available out there, to increase your ROI.
Product Feed Manager For WooCommerce is a powerful tool that you can use to achieve the goal of tripling your store performance, along with other marketing campaigns.
Hence, go ahead and start your journey towards success!!
Feel free to leave comments if you have any confusion or suggestions.
Frequently Asked Question
What is a Product Feed?
A product feed is basically a file (could be CSV, XML, RSS, etc.) containing comprehensive data about products, including titles, images, descriptions, prices, categories, availability, quantities, and other relevant attributes or data.
By providing your customers with accurate and engaging product information in various marketplaces, a well-structured product feed will help with informed purchasing decisions and targeted advertising campaigns.
What are the Benefits of Using Product Feeds For WooCommerce?
Here are some of the significant benefits of using product feeds for your business,
Get more visibility for your products by listing them on popular marketplaces and comparison shopping engines. This opens up your business to a much larger customer base who may have never discovered your store otherwise.
Product feed management tools help ensure the product information you provide stays consistent and accurate across all platforms. No more worrying about errors that could leave customers feeling misled or dissatisfied.
Updating product details like pricing and availability with product feeds. Make any changes once, and they’ll automatically sync across every channel where your feed is distributed.
What criteria should I consider before selecting a Product Feed Management tool that suits my business?
Before you invest in a Product Feed Management tool you should check whether the tool has these or not,
WooCommerce compatibility
Easy-to-use interface
Customizable feed attributes
Automated Feed Updates
Performance analytics and reporting
Product Feed Manager For WooCommerce has all these – Check it out
How do Product Data Feeds work?
Once you create product feeds for your preferred marketplace, you can upload and promote them on those marketplaces to increase your sales without any effort. If you change anything in your WooCommerce store, and they’ll automatically sync across every channel where your feed is distributed.
Imagine you are browsing through your favorite real estate app, looking for your dream home. You come across a stunning property, and with just a few clicks, you find yourself immersed in a virtual tour that feels almost as good as being there in person.
This experience, once a rare novelty, has now become a game-changer in the real estate industry, thanks to the incredible technological advances.
But, this also has a flip side. As a realtor, while you can make property shopping more accessible and convenient, it can also raise the bar on what people expect when viewing properties online. For example, many now assume they will get a chatbot in the tours for live communications.
Hence, as a real estate agent, you have to find ways to create a personalized property walkthrough that will make the experience more engaging and help you stand out.
And guess what, the VR industry is going to grow to a whole new level. Very soon, you will be able to use advanced VR technology through artificial intelligence (AI) and next-level augmented reality (AR), just to name a couple.
In this article, we will look at what benefits you get today using virtual tours in the real estate industry and what you can expect in the future.
So let’s begin.
What Are Virtual Walkthroughs?
Have you ever been on a guided tour of an area, where a considerate guide takes you through different parts of a place while explaining its context and importance? Now, imagine experiencing this without having to leave the comfort of your couch, through a virtual walkthrough.
A virtual walkthrough has now become a core part of the real estate industry because today, we are living in an era where showing, rather than telling, has become the norm. After all, let’s face it, who among us hasn’t been captivated by the beautiful homes showcased on popular HGTV shows?
Virtual walkthroughs are a sequence of panoramic images or videos meticulously stitched together to create a visual experience similar to a realistic visit. In real estate, they add a new level of depth that images alone cannot provide.
Home seekers can explore the property with more control, and get an authentic feel for the layout of the house even without a live visit to the location.
And to capture these panoramic emails, you will need to use specialized 360 degree cameras that can record every aspect of a property or space. The footage is then edited and stitched together to create a seamless and immersive experience for the viewer.
You may then use it in your real estate app or website for potential buyers to access and get an experience they will not forget.
In addition to real estate, virtual walkthroughs are also used in other industries, such as hospitality and retail, travel & tourism, education, the automotive industry, etc.
For example, hotel virtual walkthroughs are often used to give potential guests a glimpse of facilities, including guest rooms, common areas, and amenities. Retail stores use virtual walkthroughs to showcase their products and services, allowing customers to browse and explore their offerings without having to physically visit the store.
However, showcasing the location cannot be its only purpose. You will find several creative ways that people are using to make the VR experience more meaningful and engaging. AI development in real estate is revolutionizing the way we interact with virtual property tours, making them not only more engaging but also incredibly insightful for prospective buyers.
AI has helped develop algorithms to grow virtual reality technology to a more near-perfect immersion that was deemed impossible in the past. There are also AI tools that can generate AI Presentations with creative slides for presentation of a product or service and help in showcasing and marketing presenting. Today, you will find virtual tours with 99.99% realistic experience along with touch-sensitive experience via advanced VR glasses. More such technologies are on the way.
Benefits of Using A Virtual Property Walkthrough
A virtual walkthrough is surely an advanced technology that you would want to use in real estate marketing campaigns.
Here are a few benefits of virtual tours to offer a realistic online property walkthrough for real estate agents, buyers, and sellers.
1. Saves time for potential buyers
Suppose a person is looking to buy a house. In the traditional way, he would have to set aside an entire weekend to browse through potential properties online and then visit them in person to get a good idea if they are the right match for his dream house.
A virtual walkthrough will change this. The buyer will be able to get a realistic idea of how the property is planned out and understand what to expect in the real home. So, he will no longer need to visit the home due to confusion.
He will be able to browse multiple properties and get an in-depth understanding of if this is something he should explore. So, the buyer will only need to book a visit to the homes that he is almost certain he will buy.
Thus, it will home buyers time and allow them to make an informed decision online. At the same time, it will save you time because you will get fewer visitation requests from clients that are not interested. Most visitors will already have made up their minds to get the property and will meet you to finalize their decision real quickly before going into negotiations.
But it doesn’t stop there. If you’re working with a developer and have some customizations in mind, there’s no need for endless back-and-forth. They can present proposed plans through these virtual tours and make necessary adjustments according to your taste.
2. Cost-effective real estate agents and sellers
Normally, you need to spend a lot of time and money when arranging live visits and hosting open houses.
However, having a virtual real estate tour will help you meet more potential buyers and avoid getting bookings through buyers who are less likely to purchase a house.
In fact, you can use a virtual tour to collect more qualified leads by providing detailed information within tours to address the most common major concerns. This will help connect with potential buyers more effectively and increase your chances of getting a higher success rate when selling real estate.
3. Increased lead generation
The immersive and interactive experience in 3D tours will help to captivate potential buyers and encourage them to spend more time engaging with the property. This realistic engagement will help you get more inquiries from potential clients, unlike your competitors who simply have images and videos.
If you are able to tie it up with a lead form, you will be able to get direct leads through inquiries from potential buyers. It’s simple. When a person finds your listed property attractive, he would definitely want a visit or have some questions in mind. So, you should make it easy for them to contact you.
Simply include a contact form or a booking form within the virtual tour. You can also set up a real estate texting service to make communication even faster and more convenient. Since buyers will be able to contact you immediately in just a few clicks, it will help you avoid losing leads who would probably add your property to their notebook to contact later.
The best part, these leads will be qualified because they have already seen the price range and got a live virtual tour. So you will have a higher chance of closing a deal. Alternatively, AI embedded in most of the best email extractor mechanisms will allow you to collect accurate and spam-free contacts that they can use for lead nurturing.
4. Direct Connection Through Engaging Interactions
The latest virtual tour creators offer special features to allow you to add engaging elements such as tooltips and on-click content to provide additional information. Plus, you will be able to add background images, introductory videos, custom hotspot icons, and many more.
The fact is, people will feel they are exploring a house and getting information from a tour guide in this virtual environment. Hence, your virtual walkthrough will create a direct connection with potential home buyers and increase your chances of closing a deal successfully.
5. Realistic immersive experience for buyers
Virtual tours enable buyers to navigate through a property, room by room, and even floor by floor, getting a true feel for the layout, size, and features of the space. They can zoom in and out, rotate, and pan, allowing them to examine the property from all angles and get a deeper understanding of its design and architecture.
And if a person takes the virtual tour through a VR glass, it will make this experience more immersive and close to reality. Buyers who are shopping for a property remotely will gain a clearer sense of the property’s characteristics than they would from static images or videos alone and also they can get help from the chatbot. This experience is something buyers will find more engaging and useful when making online home buying decisions.
The Future of Real Estate Virtual Walkthroughs
While the VR industry is already quite impressive, things will only get better.
Some advancement in VR is being worked on as we speak so that you will be able to create even more realistic virtual tours with automation and holographic control that you probably couldn’t imagine even a few years back.
Let us look at some of these emerging technologies that you can expect in the VR industry.
1. AI Customized Virtual Tours
Sophisticated companies like Zillow are already harnessing the potential of artificial intelligence (AI) to create immersive listing experiences on their platforms, a recent example being their “Listing Showcase”.
In these showcases, instead of static images, users get to navigate interactive high-resolution scrolling hero images organized by rooms. The generative AI system, trained on large language models (LLMs) and large data sets, by understanding buyer preferences, selects the suitable hero image that mainly characterizes the property across different platforms. This kind of application highlights the importance of LLM data analytics in leveraging AI models effectively for enhanced user experiences.
Interactive floor plans by Zillow give shoppers an in-person perspective of properties for sale or rent.
Moreover, Zillow uses machine learning to create dynamic floor plans for any listing, serving as a detailed digital guide to the properties. These AI-generated 3D walkthrough house plans provide an enriched perspective of a house’s structural flow, something that is limited to traditional images. Intelligence gleaned by AI assists users in narrowing down their searches to homes they genuinely love.
Similar to Zillow, several private technological firms have already started working on AI integration with VR to craft a fully automated virtual tour generation just from images provided.
For example, you will expect in the future that, simply after you upload your panoramic images of all the rooms of a house, the virtual tour creator will automatically place them in order and add walkthrough buttons for people to start taking a tour immediately. You won’t have to manually indicate where to click to go to the next room.
Plus, you will also see conversational virtual tour software where the tool will ask a few questions, and based on your answers, the tour will include custom audio per scene, special tooltips on specific scenes, and lead form prompts after certain intervals.
These are still a work in progress. But AI will definitely make it easier for realtors to use virtual walkthroughs actively and get more clients.
One other significant breakthrough is the use of AI tools like ChatGPT in designing real estate virtual tours. These tools can generate custom descriptions of each property, based on its unique features, providing comprehensive information about surrounding areas. The content generated is tailored according to viewers’ specific interests and preferences, enhancing the overall browsing experience. And then, you may present these details to OpenAI’s MidJourney Image AI to generate panoramas.
With continuous advancements in AI technology, the future holds even more enchanting possibilities for customized virtual tours tailored to individual visitor needs.
In the near future, AI might be used to design personal virtual tours, considering each viewer’s distinct preferences and needs. Each property or location recommendation will be based on a thorough AI analysis of visitor behavior. This will ensure that content and presentation will be personalized according to each person’s profile, interests, goals, and mood.
AI advancements could also help real estate agents analyze the popularity and efficiency of different virtual tours. It can provide insights into which features are catching the viewers’ attention the most, or which aspects of the property are generating more interest.
2. Immersive VR walkthroughs
Immersive VR house tours have gained popularity in recent years. It provides a modern, innovative way to showcase realtor listings.
Through a combination of VR and 3D rendering, potential buyers or renters get to experience an astounding sense of realism.
For 3D rendering, users can almost feel the textures of walls, identify the play of natural light through windows, and sense the ambiance of a space. VR then wraps these visuals into a 360-degree experience that invites users to “inhabit” the rendered spaces digitally.
Several real estate firms, such as Sotheby’s and Capote House, are leading the way in employing these technologies. Clients can now use the 3D view option to explore luxury homes or experience the Virtual Reality Tour (VR) using a compatible mobile device, such as an iPhone or Android phone, coupled with a VR headset.
Goldman Sachs projects that the VR and augmented reality market in real estate will reach up to $80 billion by 2025. It’s also predicted that there will be around 300,000 active users of VR and augmented reality technology in the real estate field.
In the upcoming future, VR technology will facilitate millions of virtual property visits. Just by wearing the VR headset, users can experience a three-dimensional immersive property walkthrough.
3. Virtual Tours + Augmented Reality
Augmented Reality (AR) has been a game-changer in many industries, and real estate is no exception.
By adding digital interactivity to the physical world, AR provides an immersive and engaging experiences. With AR-enabled devices such as smartphones or smart glasses, viewing realtor listings and 3D tours become both instructive and entertaining encounters.
For example, imagine touring a science museum where exhibits spring to life with animations, detailed explanations, and interactive elements.
Another distinct feature of real estate is virtual staging. AR, when combined with VR, can assist buyers in visualizing how different furniture arrangements and décor choices would transform the space. This could be particularly beneficial for those in search of a property to renovate or considering a fixer-upper.
IKEA, in 2017, launched an AR application allowing prospective buyers to virtually furnish apartments using items from their massive online catalog. This 3D walkthrough app offers users a nearly authentic experience of how chosen objects would interact within the designated space, all before making any purchase commitments.
In industries closely linked with real estate, such as construction and interior design, AR is making a significant impact. Contractors and designers now have the ability to share realistic images with detailed information.
With financial investments in physical marketing and staging, real estate agencies can lean into AR and VR technologies for a more cost-effective approach. Using tech for home staging also allows clients to check out properties from anywhere in the world where they have internet access.
Companies such as Sotheby’s International Realty Affiliates, for example, have stepped up their game by launching an AR app named ‘Curate’. This app allows users to design their future homes and browse through home furnishing options, all within an immersive AR experience.
Looking ahead, we may witness the emergence of interactive VR maps seamlessly integrated with AR. WPVR recently added an interactive map that allows users to explore floor plans while viewing a virtual tour.
When you place the map in your tour, your audience will get an icon in the bottom right corner to click and view it. This added layer of detail could prove invaluable to clients hoping to get a detailed understanding of the property.
4. Virtual Commerce
As we look into the future of real estate virtual tours, we should consider the potential advancements and use cases virtual commerce technology (V-commerce) will bring to the real estate industry.
Integration with AI A potential growth avenue for V-commerce in real estate lies in using artificial intelligence. Imagine AI algorithms suggesting furniture styles and décor options based on the user’s expressed preferences or past choices while going through the VR tour. This would facilitate a more personalized viewing experience, leading to higher levels of engagement and customer satisfaction.
Seamless shopping experience within the virtual tour Another exciting possibility is enhanced V-commerce integration that enables homebuyers to purchase furniture and decor items directly within the VR environment. It could even extend beyond visual changes, allowing for structural modifications and renovations to be modeled and priced in the tour itself.
Real-time collaborations Virtual tours could become collaborative platforms where multiple stakeholders – buyers, sellers, interior designers, architects, and contractors – collectively ‘walk’ through a property, making modifications synchronized in real-time. This shared virtual space could redefine collaborative decision-making in real estate.
Blockchain technology in transactions Secure, transparent transactions within the VR environment can be realized using blockchain technology. This can build trust with buyers who wish to finalize or make immediate purchases.
VR Showrooms & Galleries Real estate agencies could partner with furniture brands and interior designers to create virtual showrooms or galleries within a VR tour. These partnerships could establish a new revenue stream for agencies and deliver an immersive shopping experience without users leaving the tour.
Challenges and Limitations to Creating Immersive, Personalized Virtual Tours
Creating immersive and personalized virtual tours is an exciting possibility that technology has made available to us. However, like any other technology, it is not without its challenges and limitations.
Let’s explore the current limitations of virtual tour personalization and the challenges that you, developers, and users may face when trying to create an immersive experience.
1. Cost and hardware limitations
One of the significant challenges in creating immersive, personalized virtual tours is the cost and limitations of hardware technology. High-end VR hardware and custom-built VR experiences can be expensive, requiring significant investment in equipment and software.
Also, the development of hardware technology is crucial to the success of mixed reality. Hardware restrictions such as a small field of view, bulky headsets, and limits on computational power can impact the user experience.
This challenge can be a significant obstacle for individuals or businesses looking to create immersive virtual tours, as it may be really expensive for some budgets.
Moreover, the cost of hiring a team of programmers and designers to build unique VR experiences can also be a barrier to entry.
2. Accurate real-time object tracking
Continuously and precisely detecting, locating, and maintaining the position of objects within the VR environment in real-time to enhance the overall Mixed Reality (MR) experience is a challenge.
Achieving accurate, real-time object tracking can significantly impact the level of immersion and interactivity, allowing users to experience a seamless blend of virtual and real-world elements.
However, this task remains difficult due to technical limitations, including varying lighting conditions, occlusions, and computational constraints.
3. Ensuring data privacy and security
Ensuring data privacy and security is a crucial challenge in creating immersive, personalized virtual tours. As tour creators capture and share images or videos of various environments, there is an increased risk of exposing sensitive or personal information.
This information could be exploited by malicious actors for purposes like identity theft, fraud, or harassment. Additionally, Augmented Reality (AR) and Virtual Reality (VR) devices collect extensive biometric data, which can identify individuals and reveal additional insights, enhancing user experiences but also exacerbating privacy concerns.
To gain users’ trust and promote widespread adoption of Mixed Reality (MR) technologies, it is essential to implement effective privacy safeguards, secure data processing, security measures such as encryption, and passkeys for authentication and protect user identities and information from potential breaches, similar to how secure transactions are ensured when you buy bitcoin with debit card.
4. Current AI limitations in understanding specific contexts
AI has shown remarkable progress in processing vast amounts of data and recognizing patterns, allowing for enhanced personalization of property recommendations.
However, it often lacks the broader contextual understanding and common sense reasoning that humans possess. This limitation can lead to inaccuracies or misinterpretations in virtual tours, hindering the overall immersive experience for users.
Solving this problem means making sure that AI algorithms can understand situations and think more effectively. This way, we can provide a virtual tour that’s always interesting and matches what users want and like.
Will Virtual Tours Completely Replace Physical Home Viewing?
No, virtual tours will not replace physical home viewing. Virtual tours offer numerous benefits and conveniences, allowing users to narrow down their options and potentially even finalize property purchases without leaving their current location.
Despite the advanced technology, virtual tours cannot yet fully replicate the feel of a property that can be experienced during a physical inspection.
This unique sensory experience is a significant factor in deciding to buy a home. It adds to a complete understanding and liking of the property.
However, due to the constant progress in PropTech, it’s likely that virtual tours will keep improving, becoming even more engaging and impactful in the coming years. This might lead to more buyers feeling confident in making home purchase decisions solely based on virtual tours.
This change could greatly simplify the buying process, leading to quicker closings and increased efficiency in the real estate market.
Conclusion
The use of a virtual property walkthrough seems super engaging today, but VR will continue to advance, and change the future of online home buying for the better.
While virtual tours may not completely replace physical viewings, they bring impressive advantages. These include helping narrow down property options, enabling purchases from out-of-state, and providing immersive experiences that rival in-person visits.
As a real estate agent, you can embrace these innovative technologies and tools to stay ahead in the market and ensure the best possible home shopping experience for your clients.
Special thanks to Agnes A. Gaddis for her helpful contributions to this article.
Contributing Author Bio: Agnes A. Gaddis is a specialist writer for real estate SAAS companies. She is a contributing writer for Credit.com, Rentals, GetResponse, and Inman News. She’s a big fan of caramel coffee and mystery novels. Get in touch with her on Twitter @Alanagaddis or visit her website.
You were not leaving your cart just like that, right?
Enter your email below to save your shopping cart for later. And, who knows, maybe we will even send you a sweet discount code.

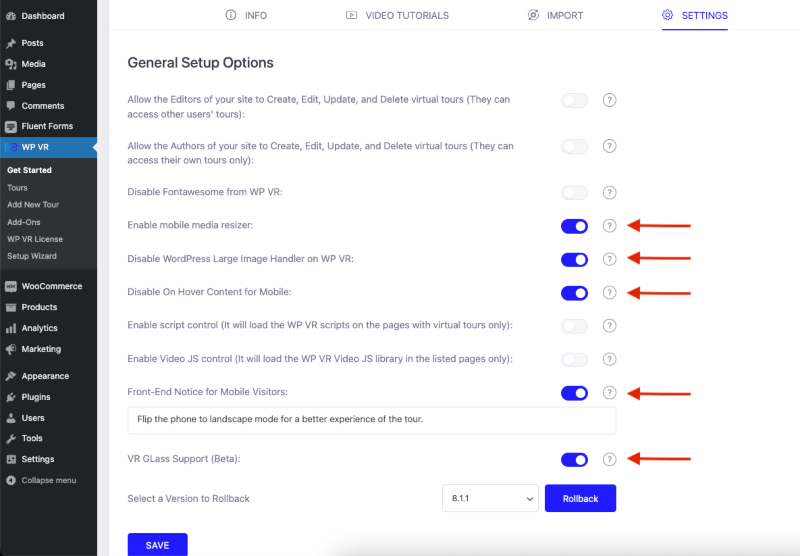
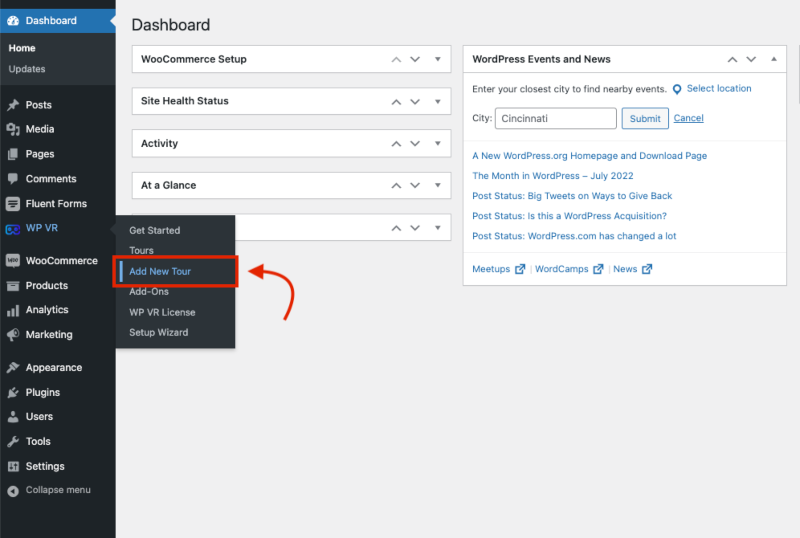
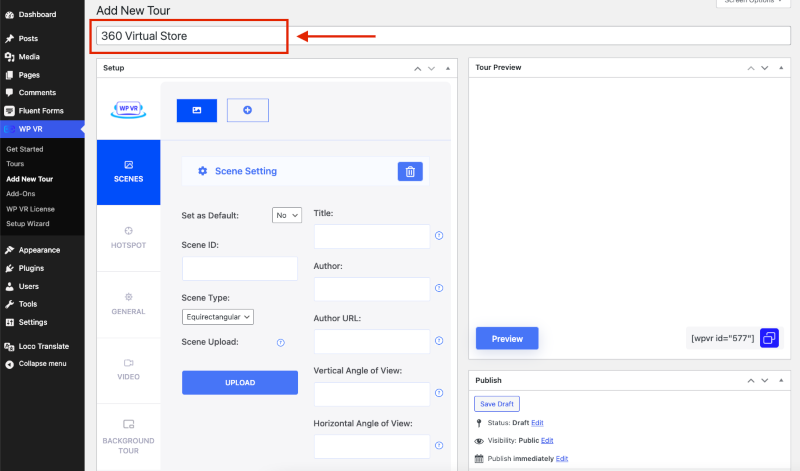
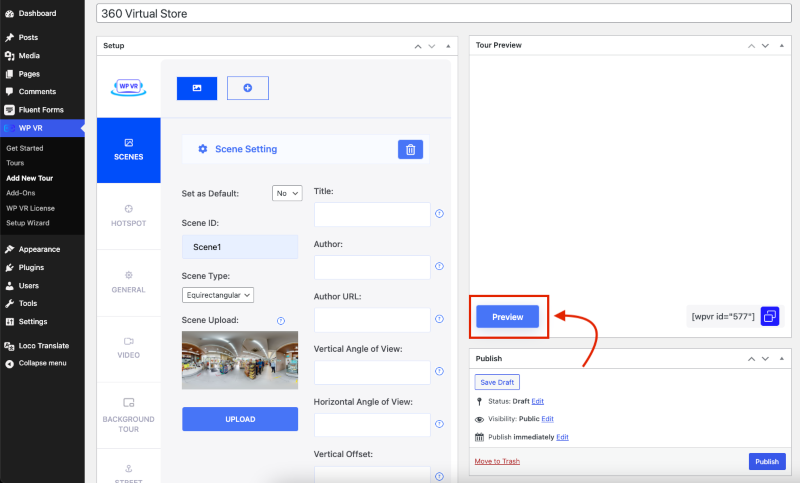

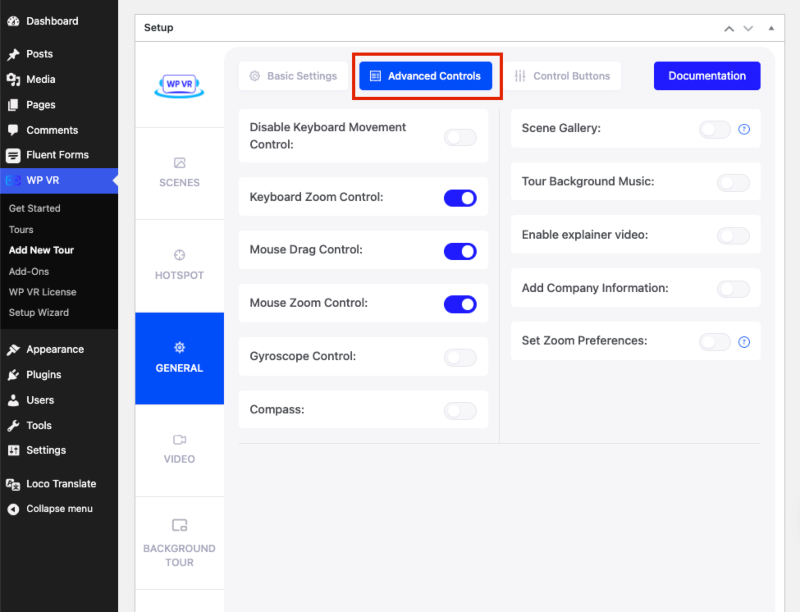
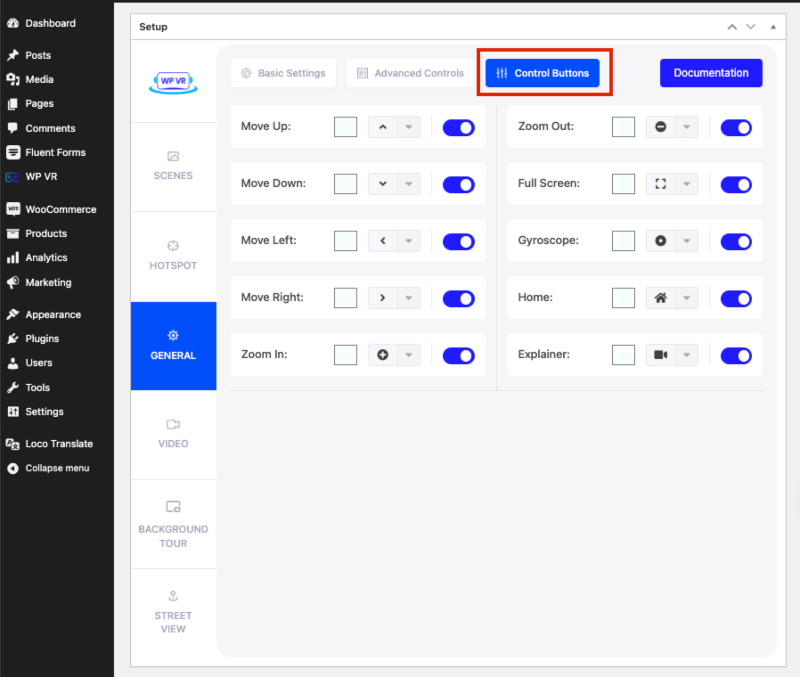
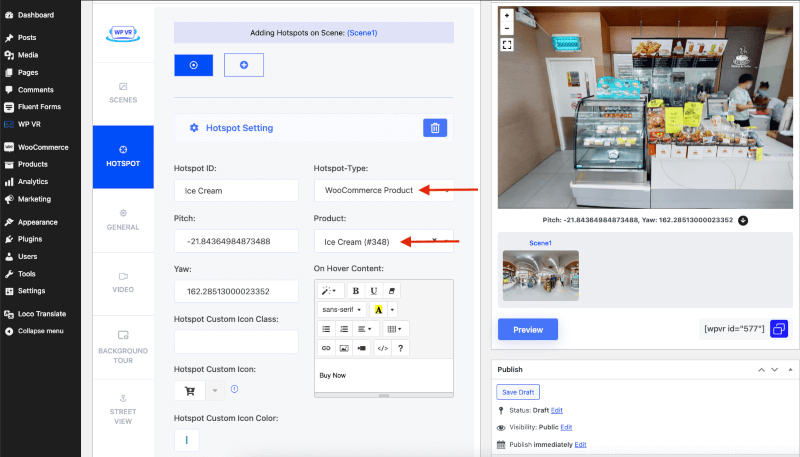
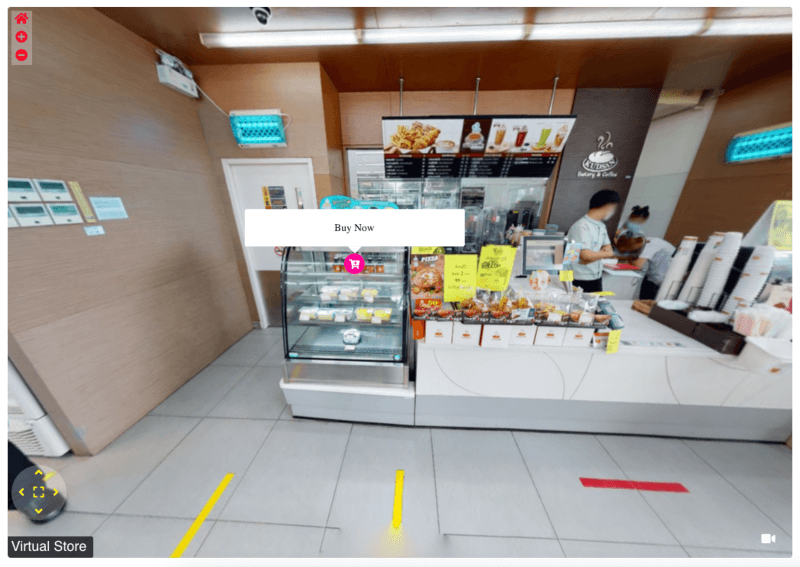
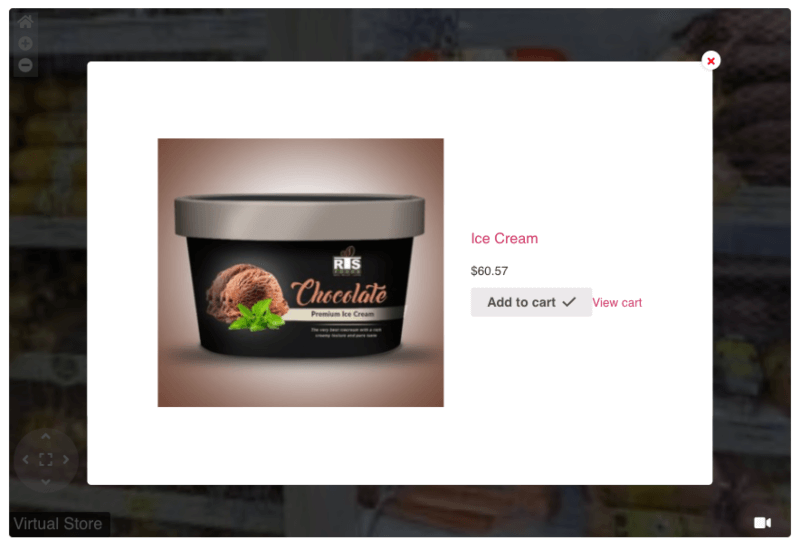


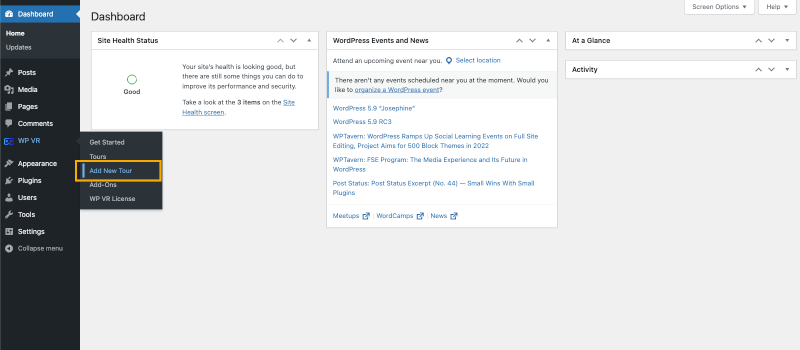
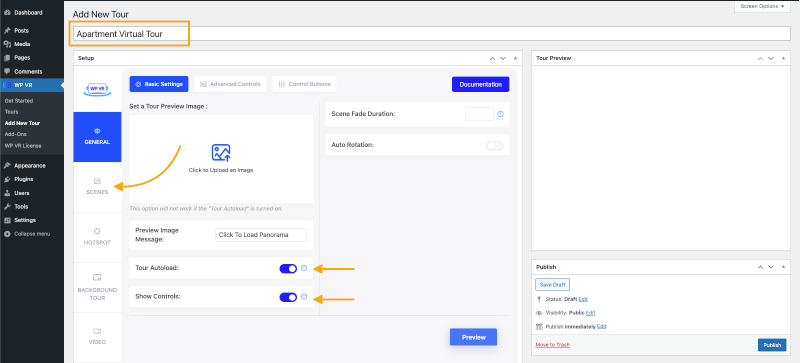
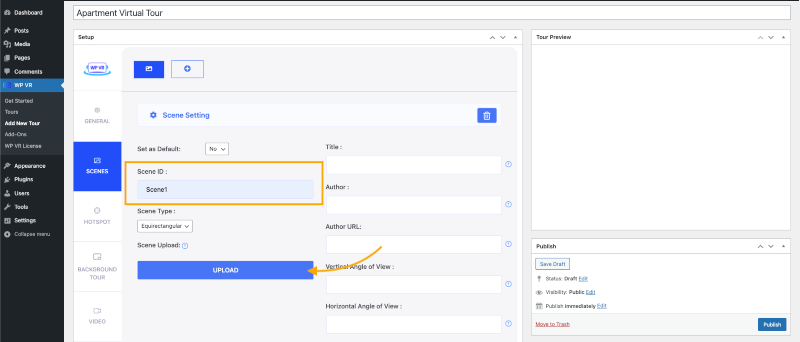
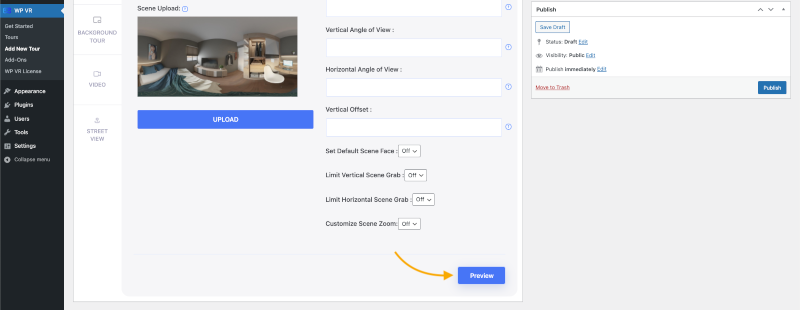
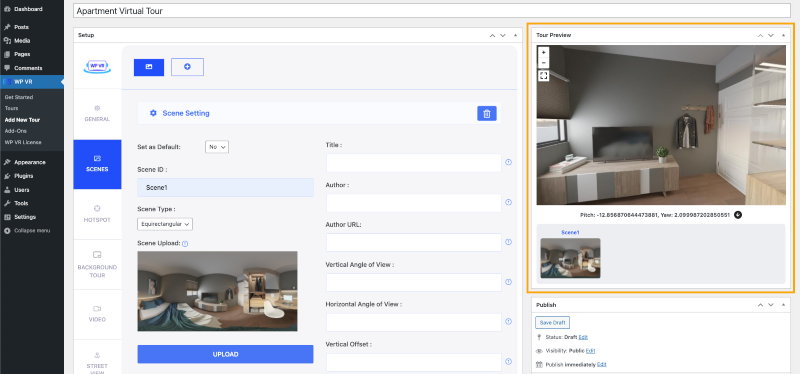
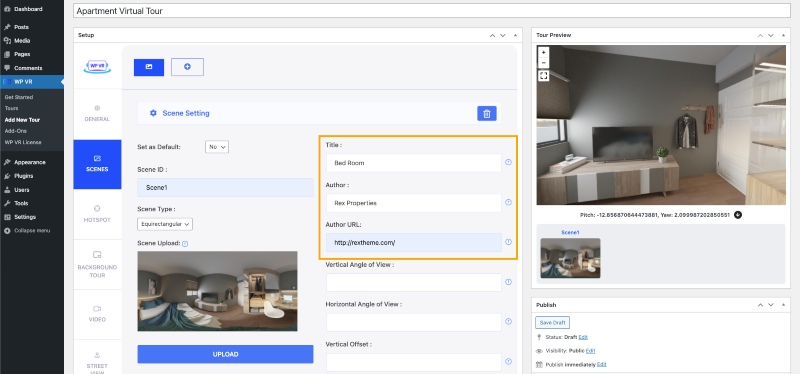
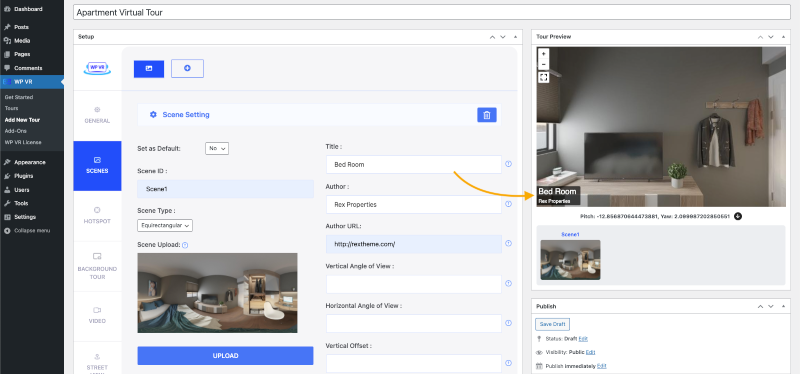
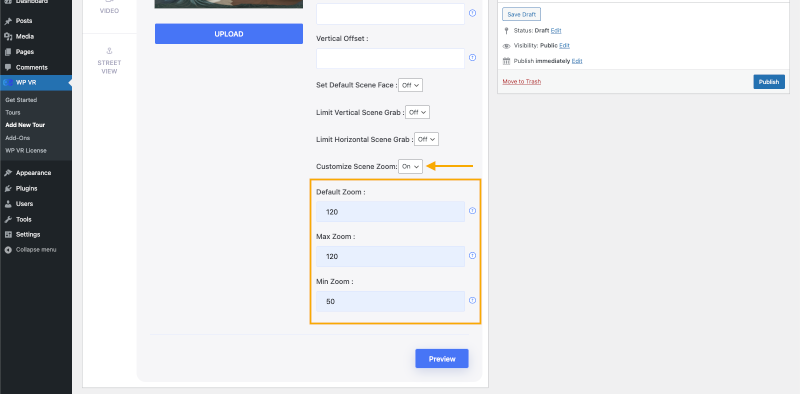

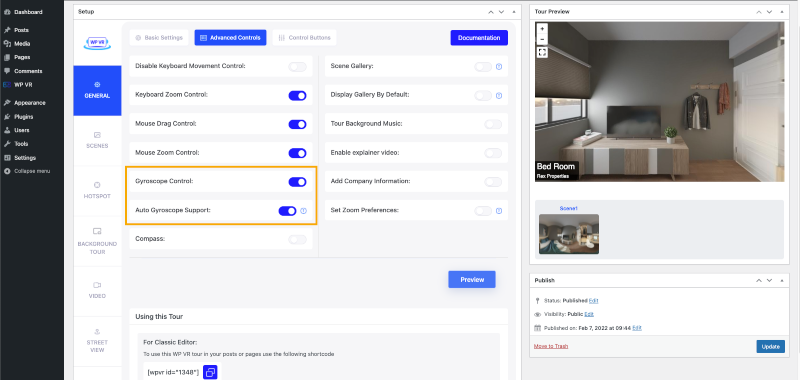
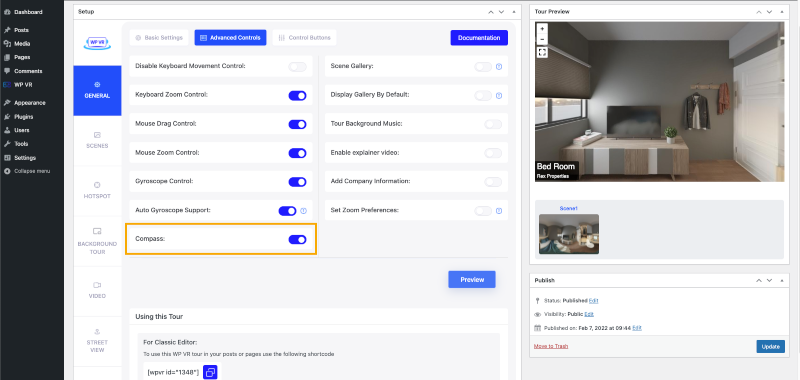
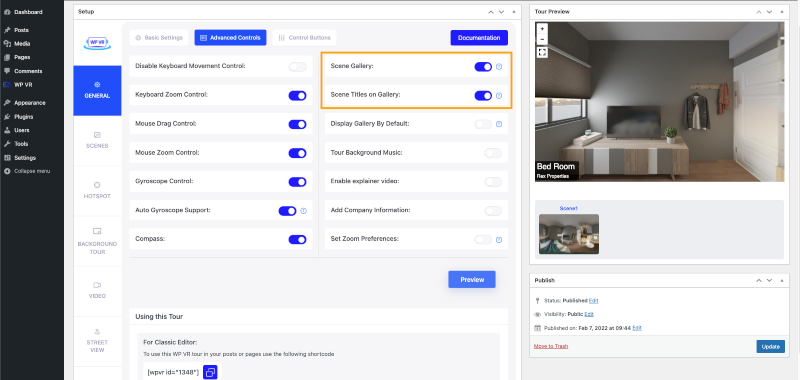
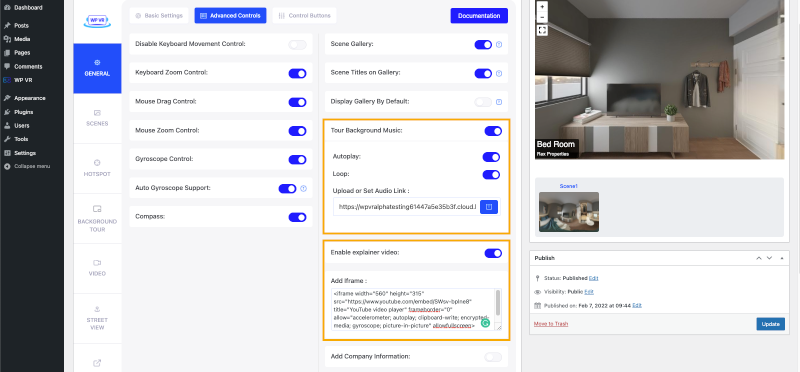


![5 Types Of Virtual Reality – Get The Perfect VR Solution [2025] 1](https://staging-rextheme.kinsta.cloud/wp-content/uploads/2023/09/Add-New-Virtual-Tour-WPVR.webp)
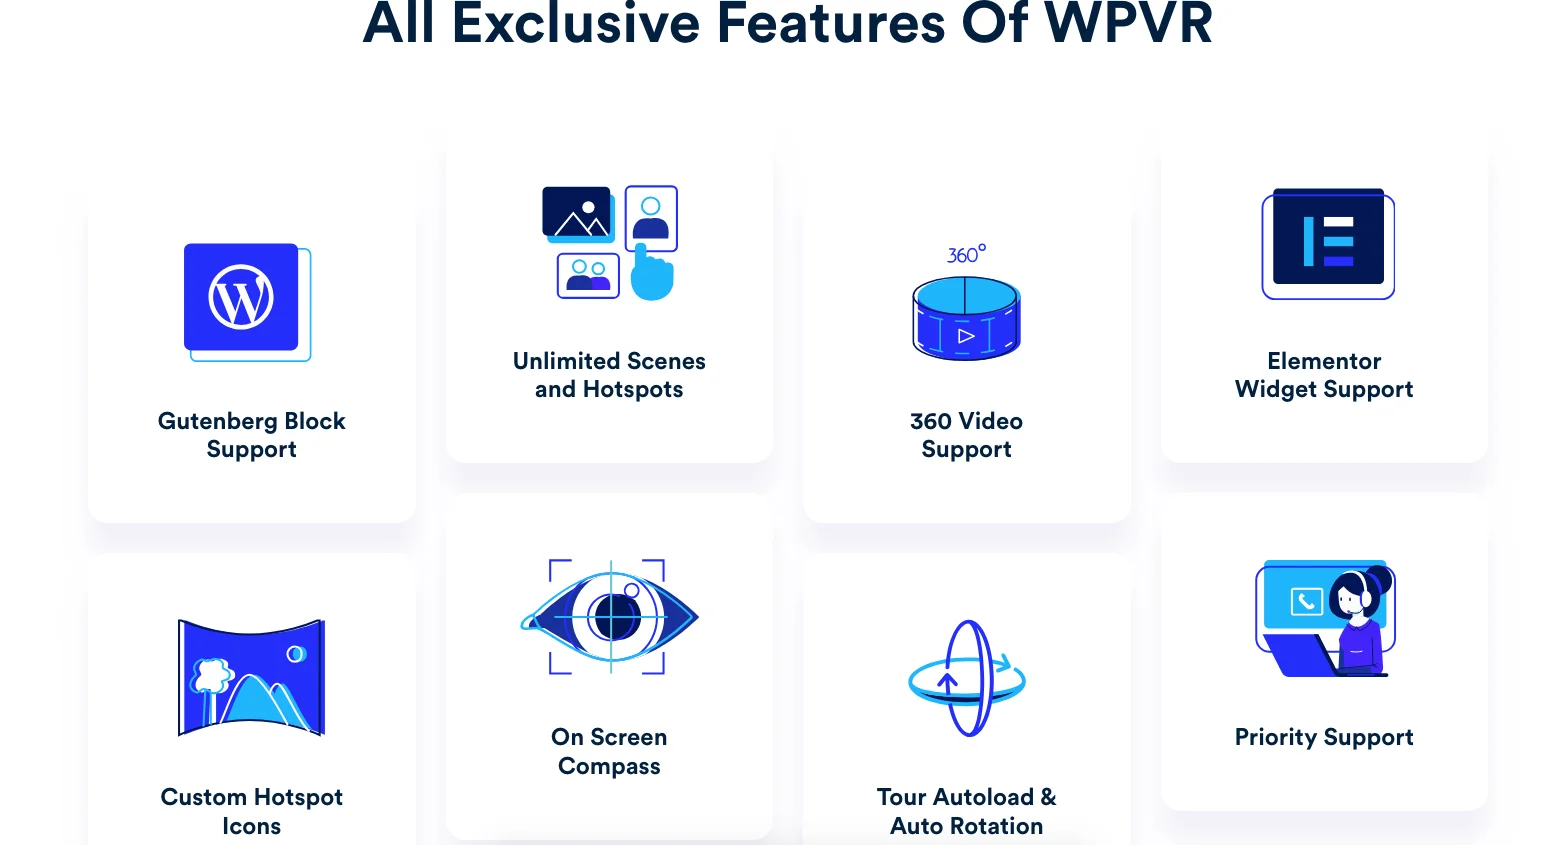
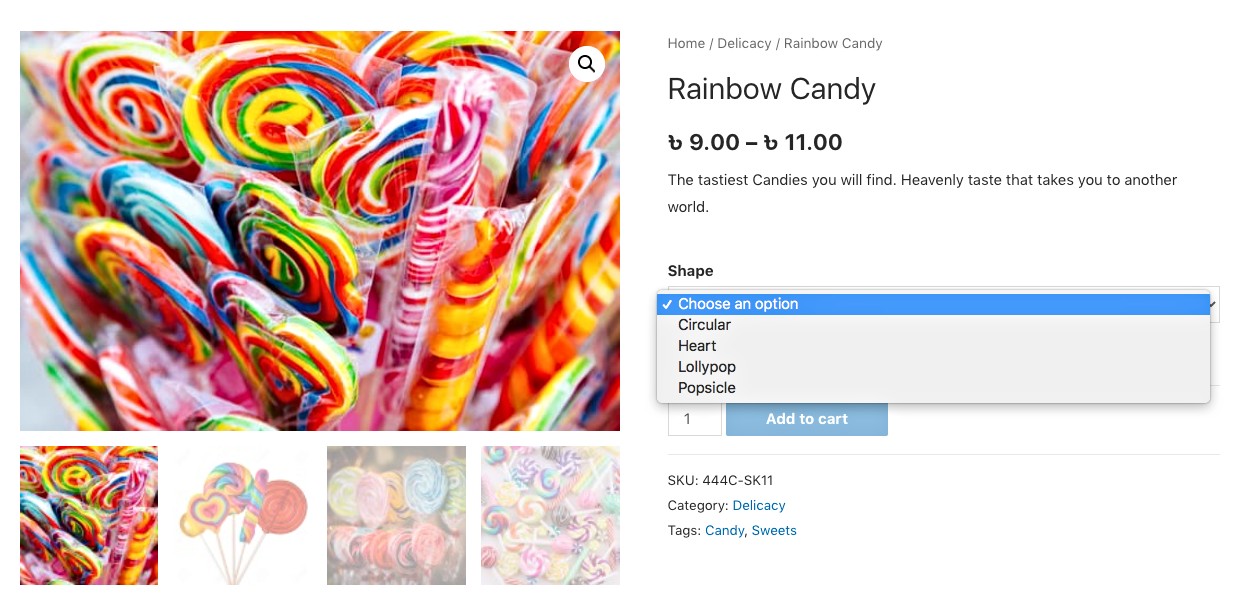

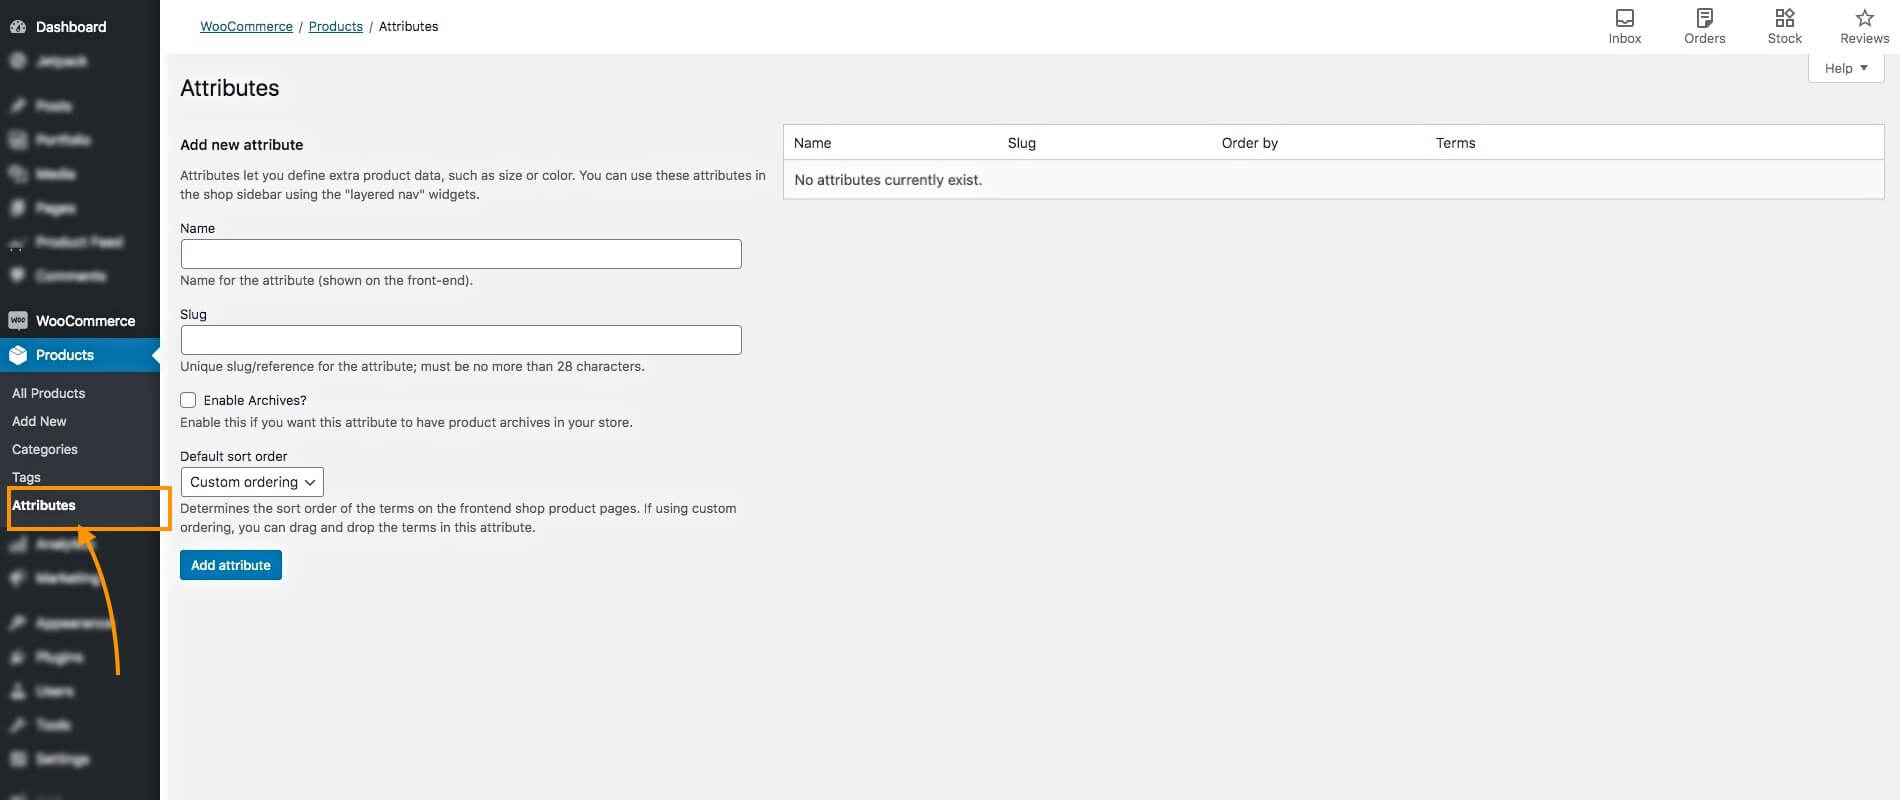
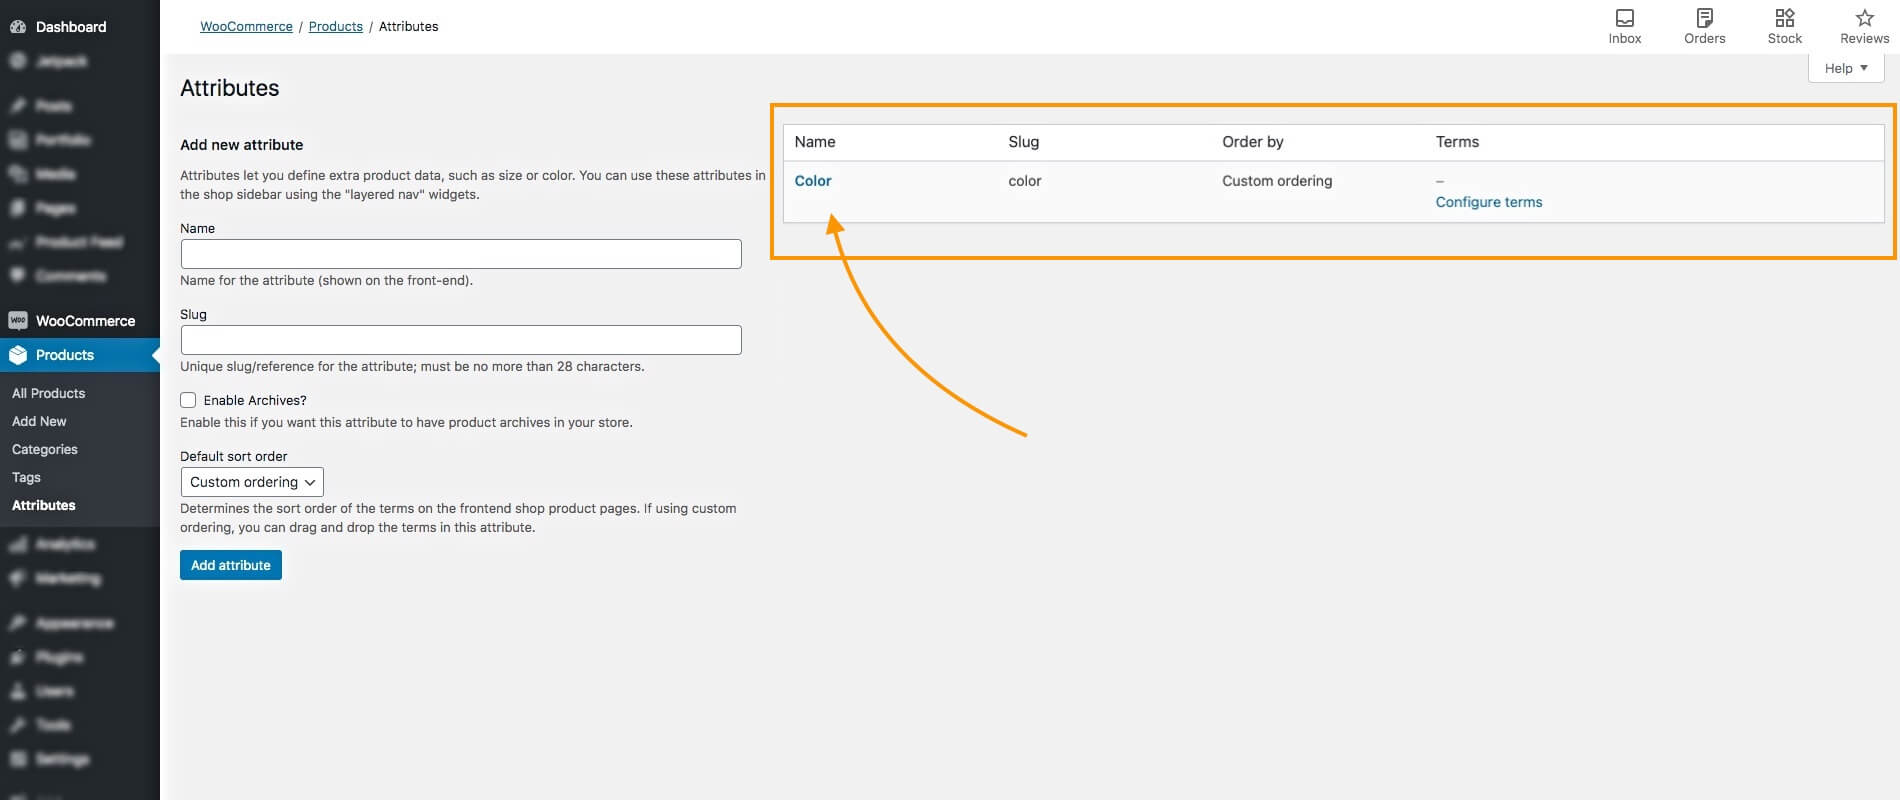
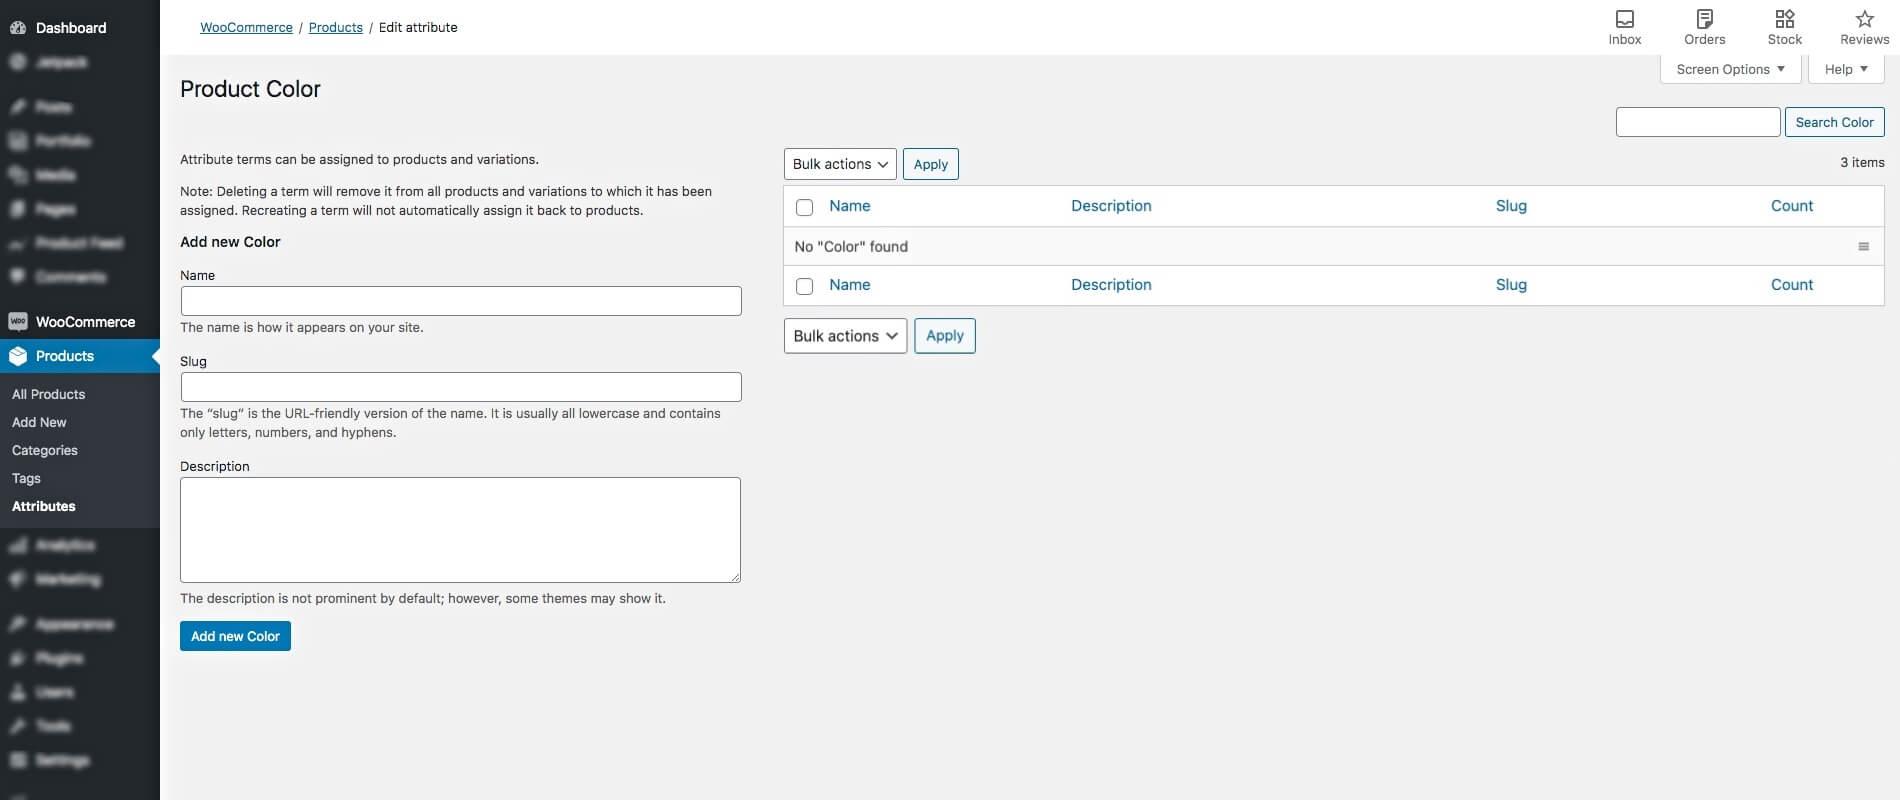
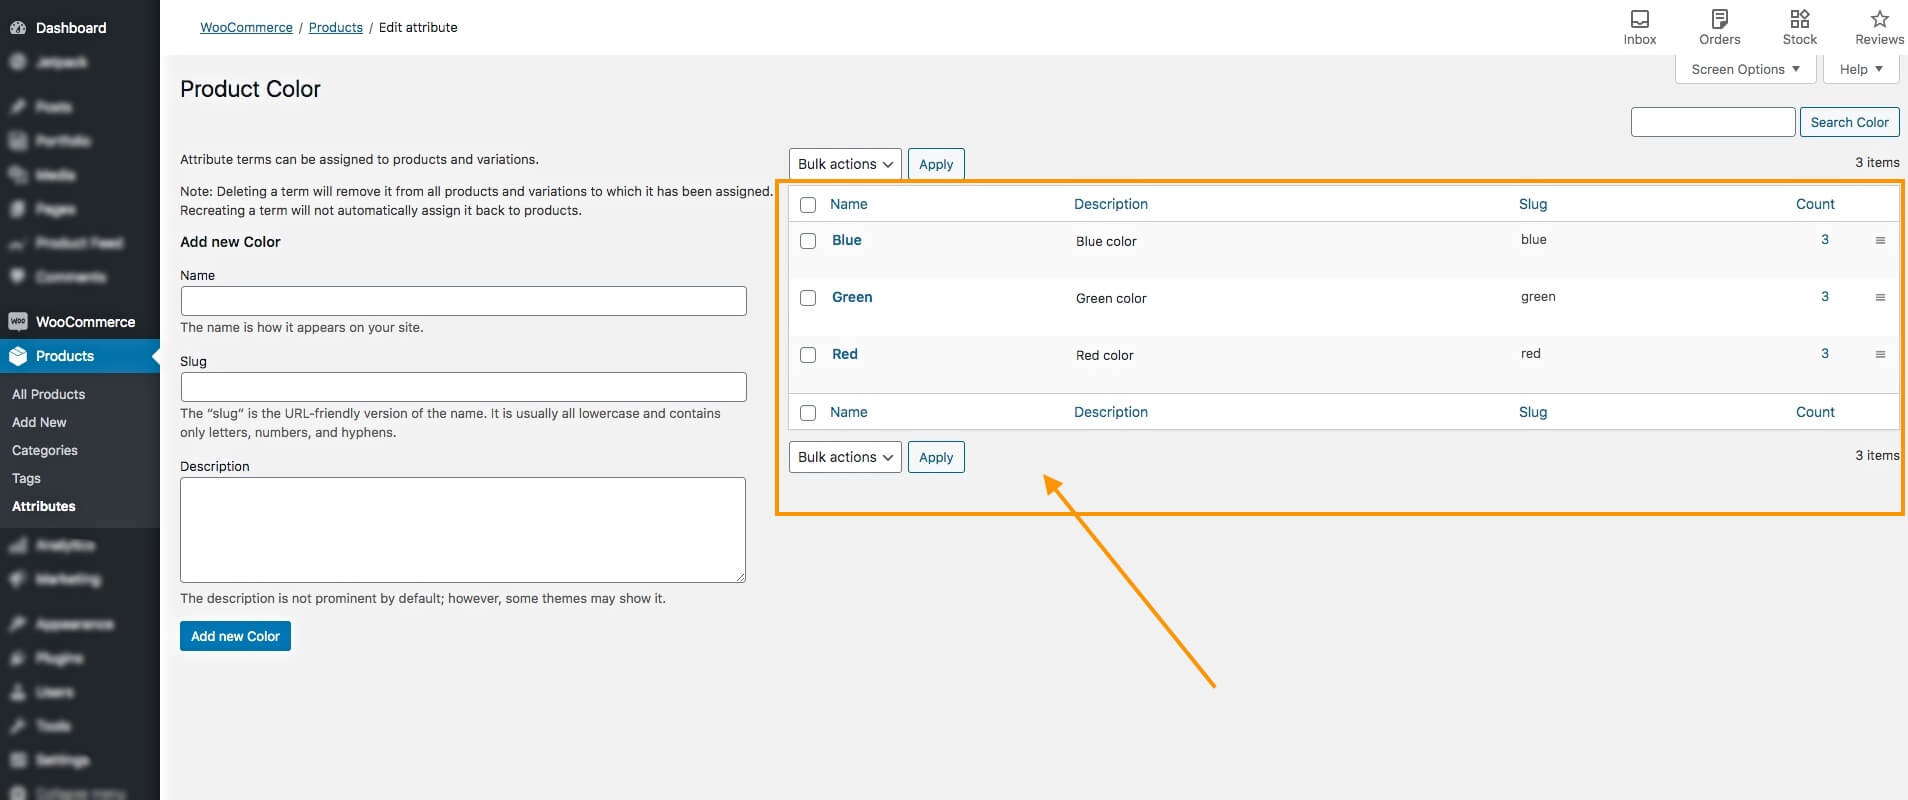

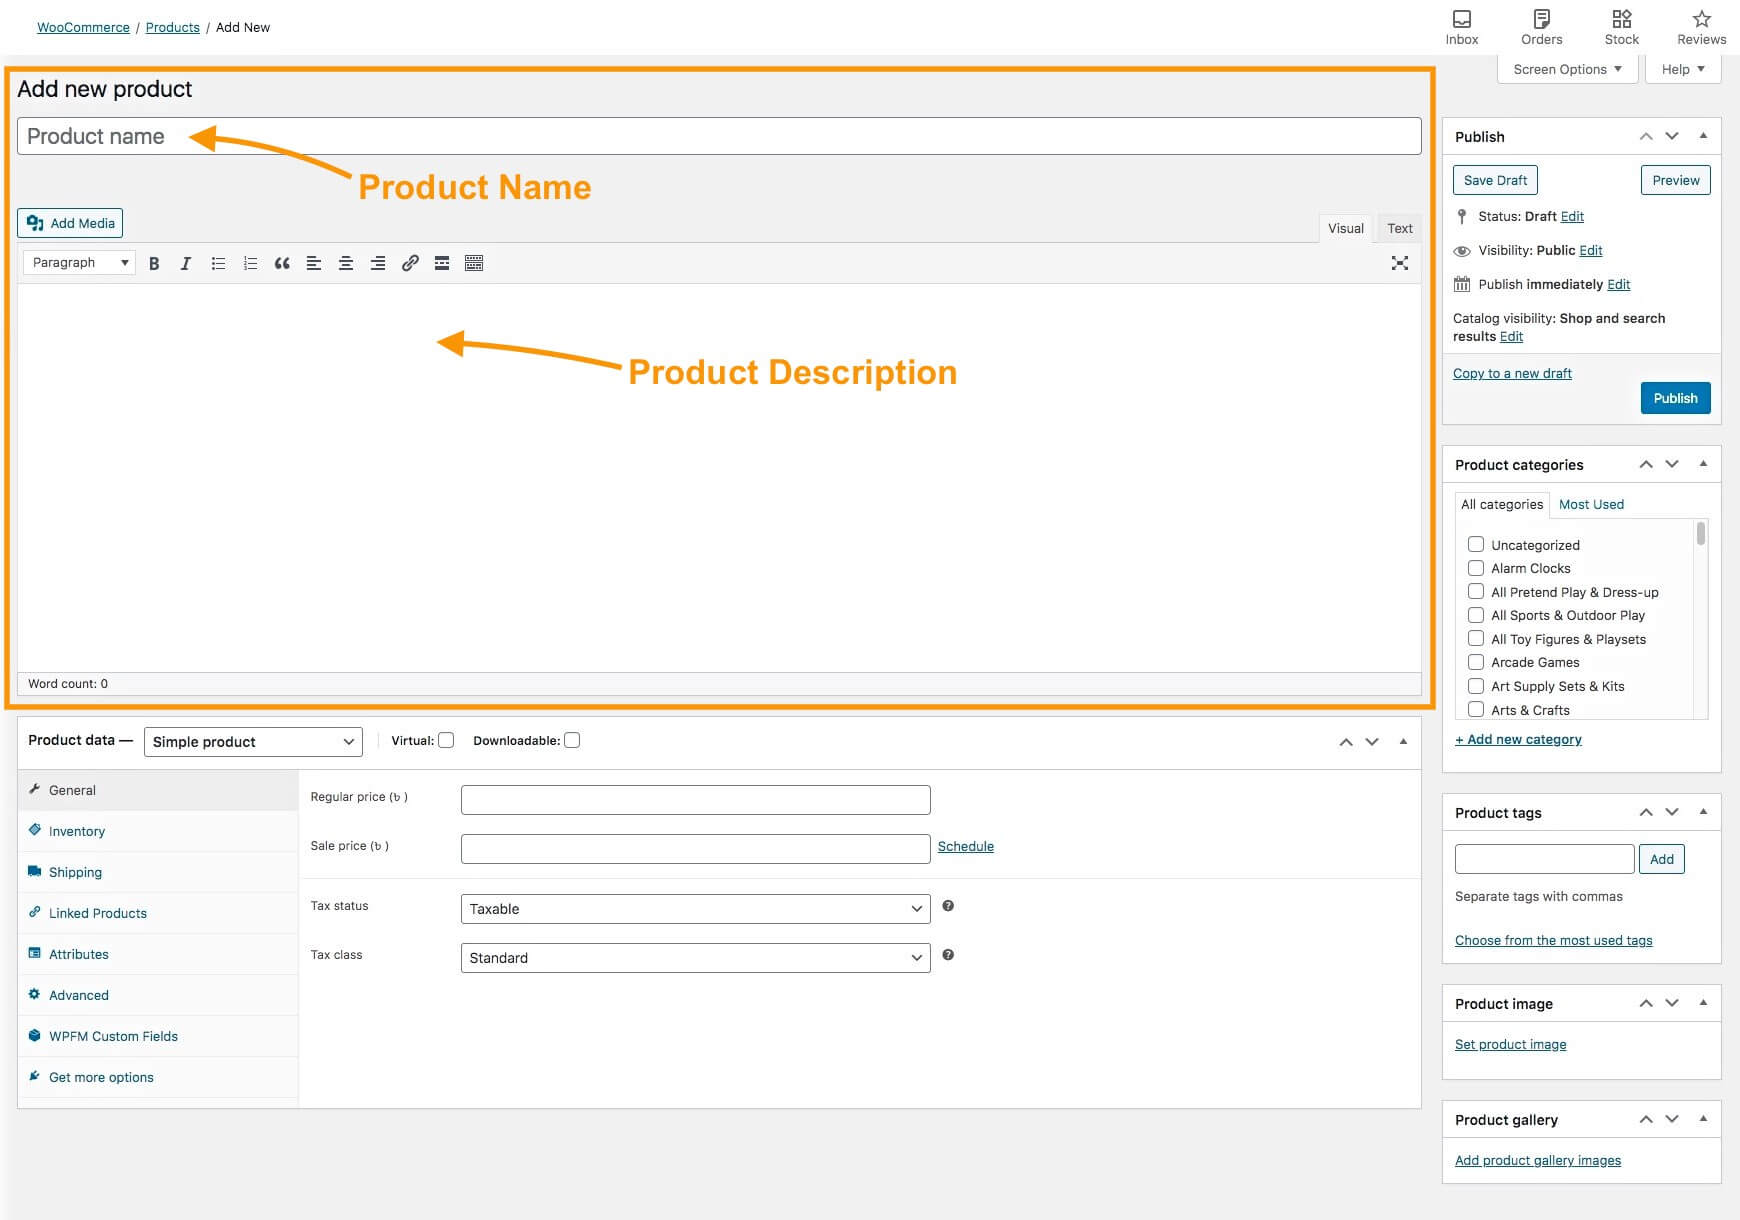


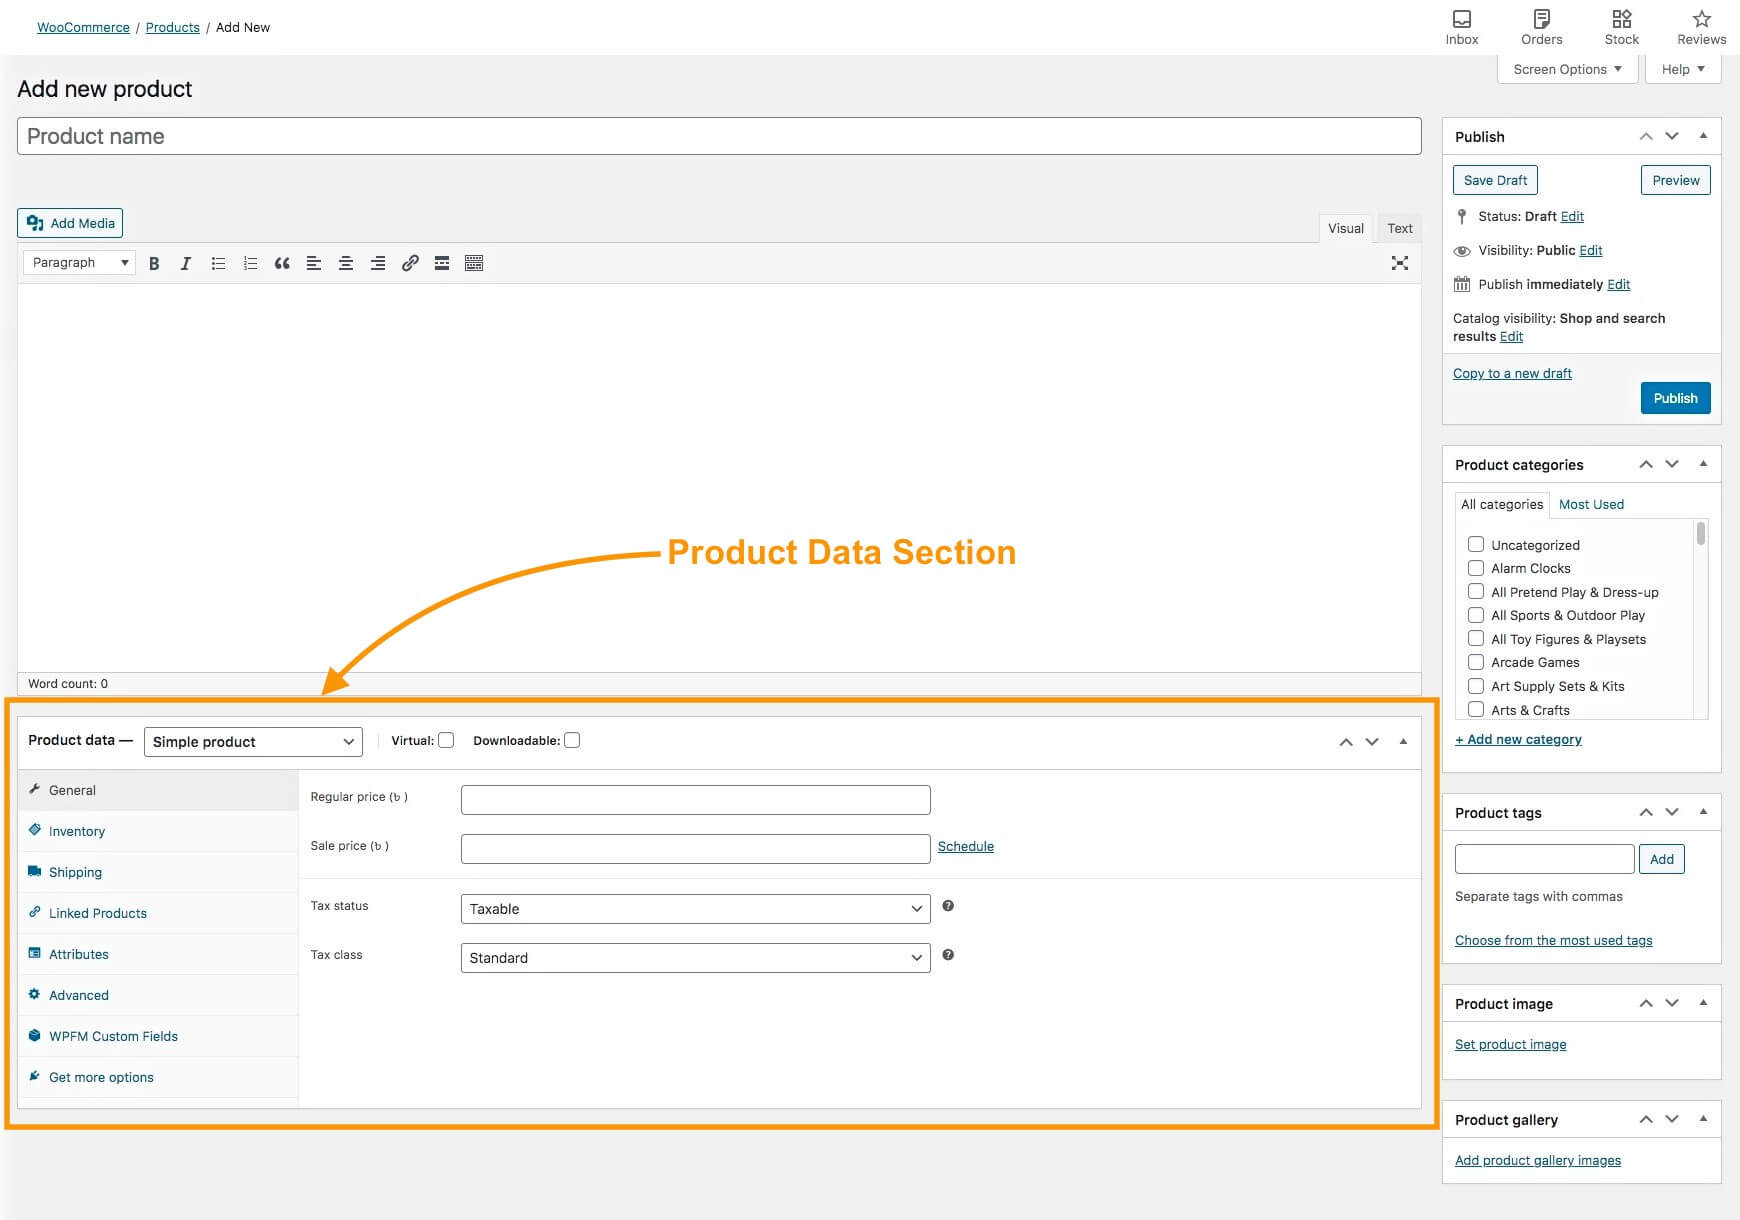
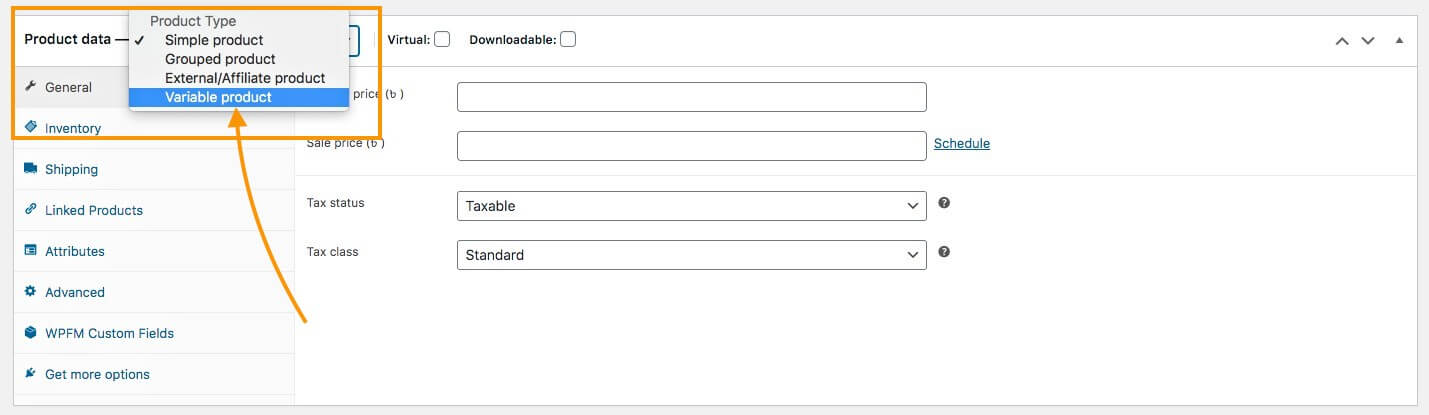

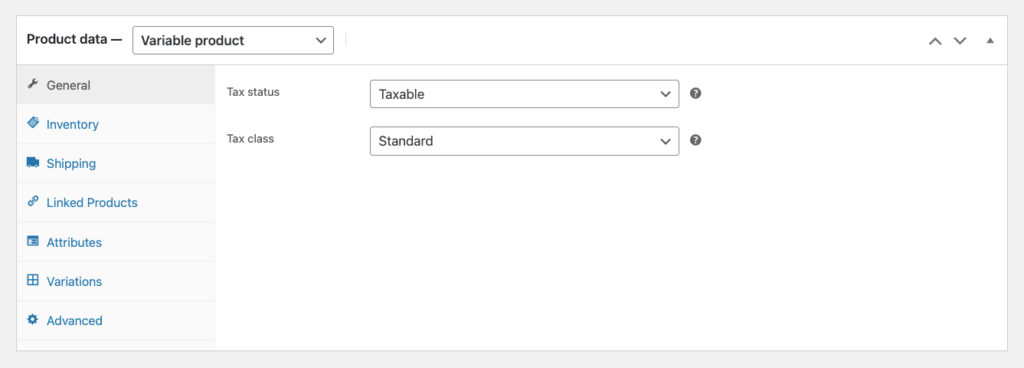


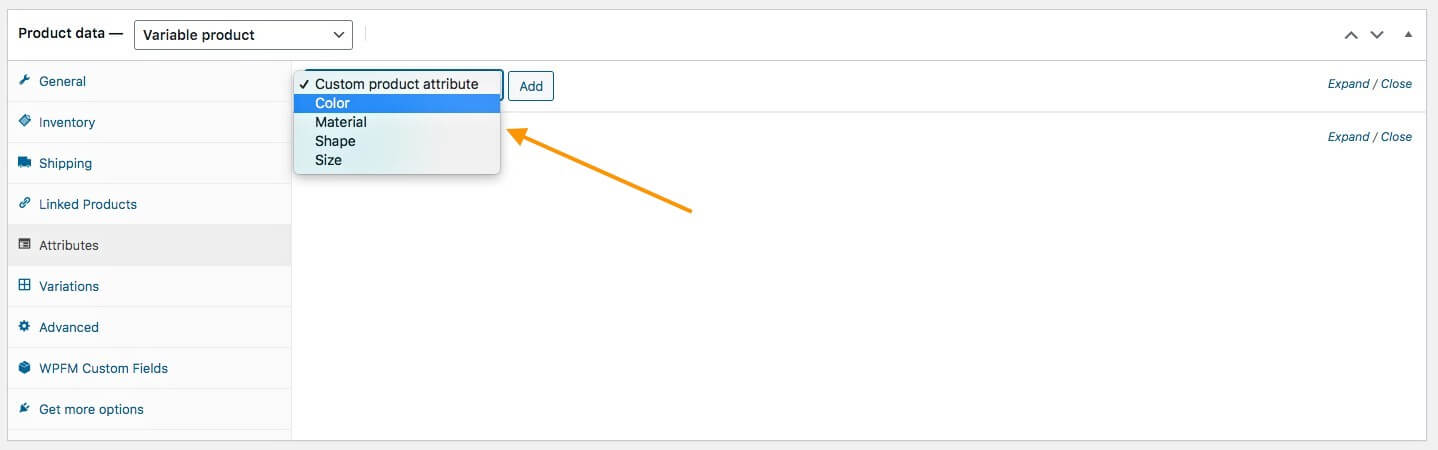
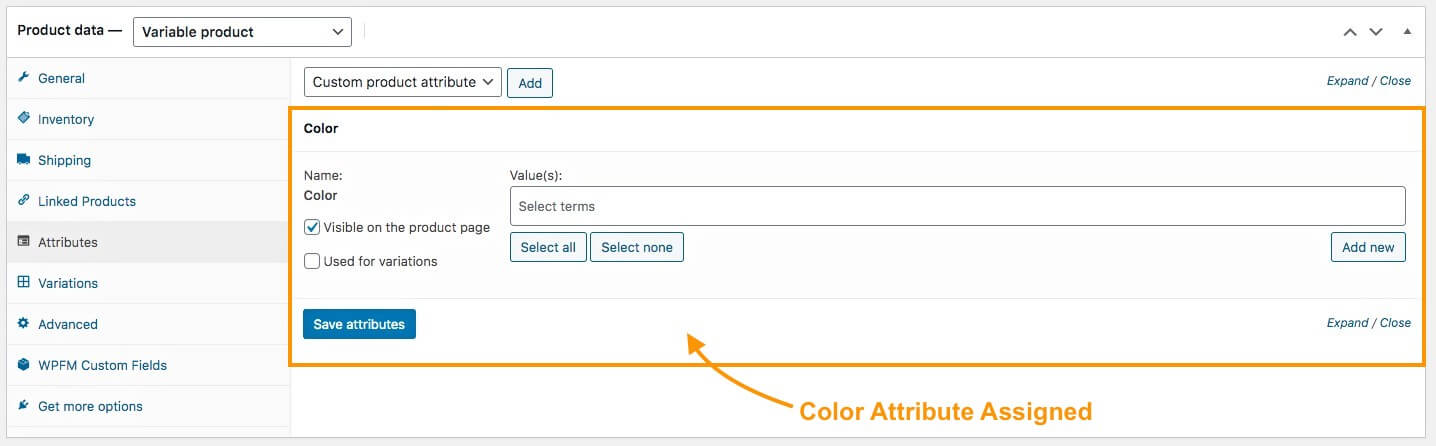
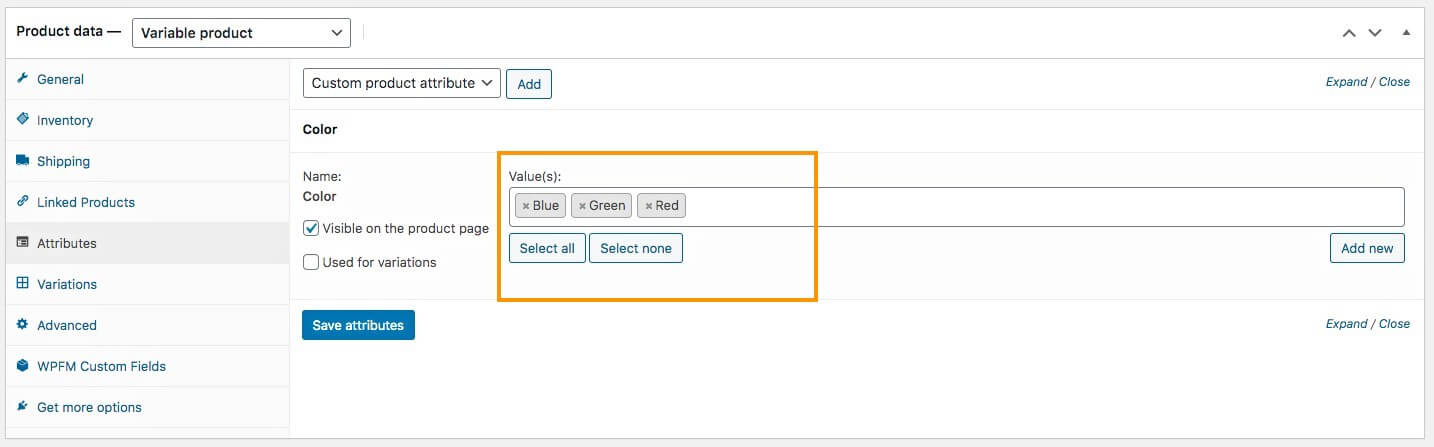
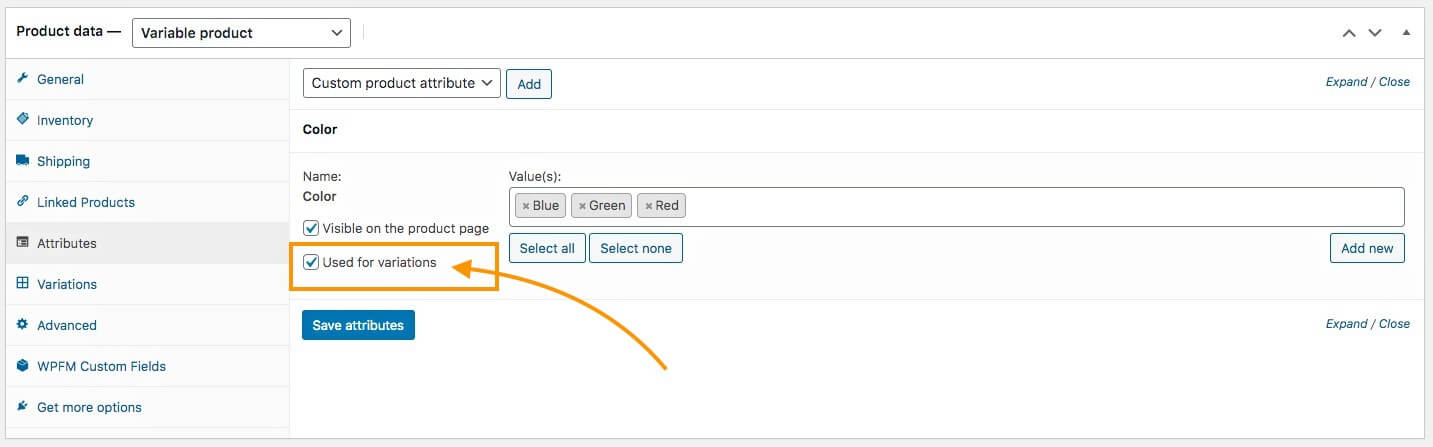
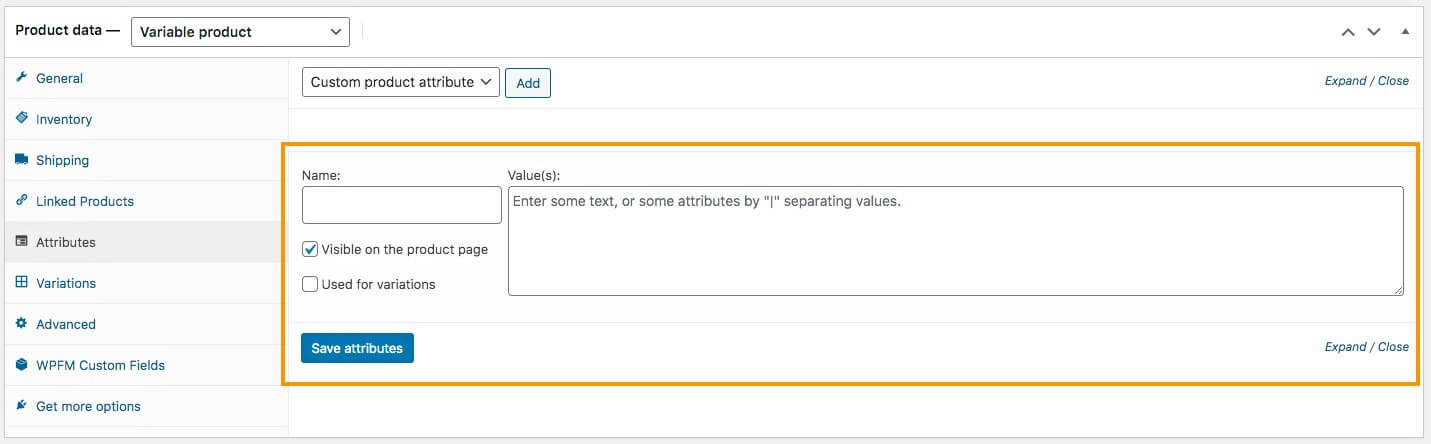
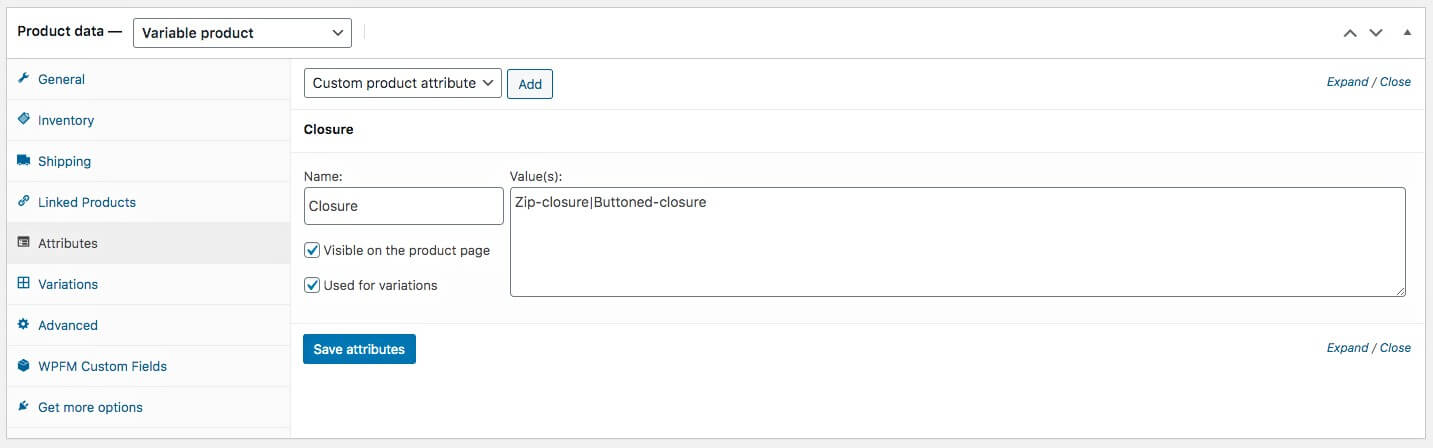
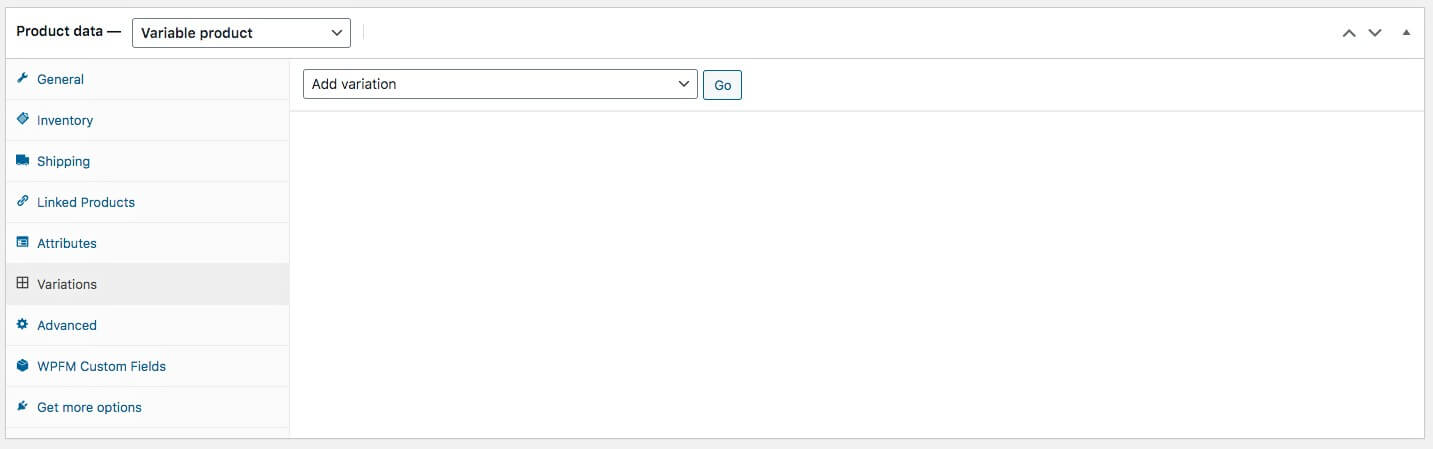
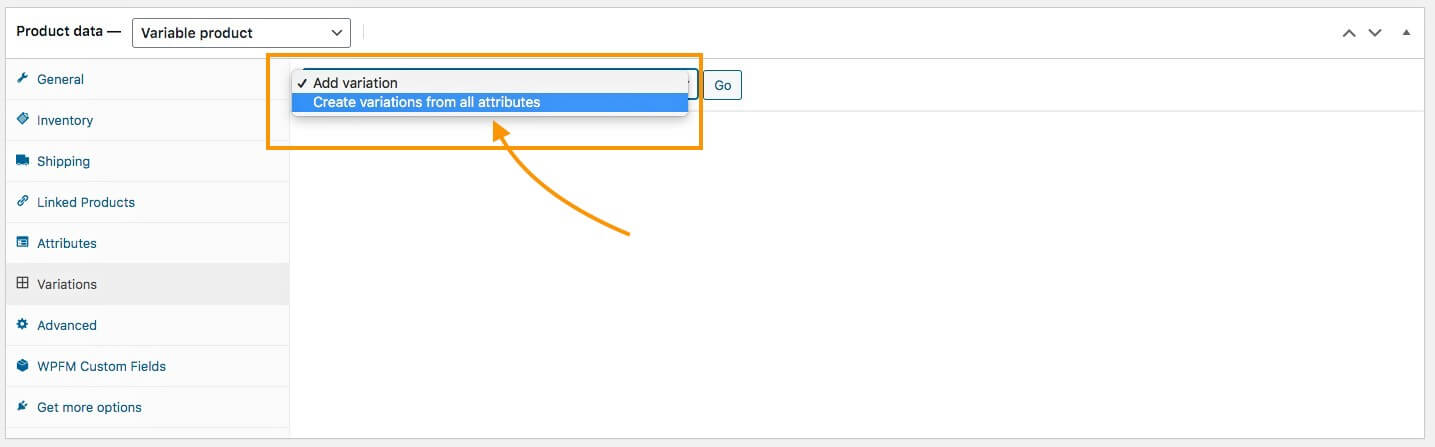
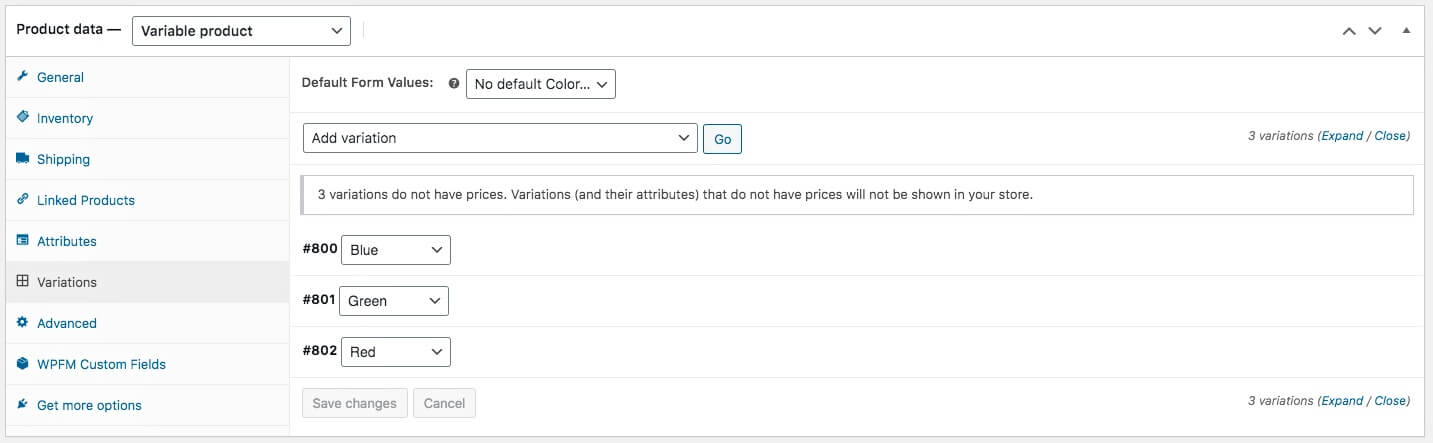
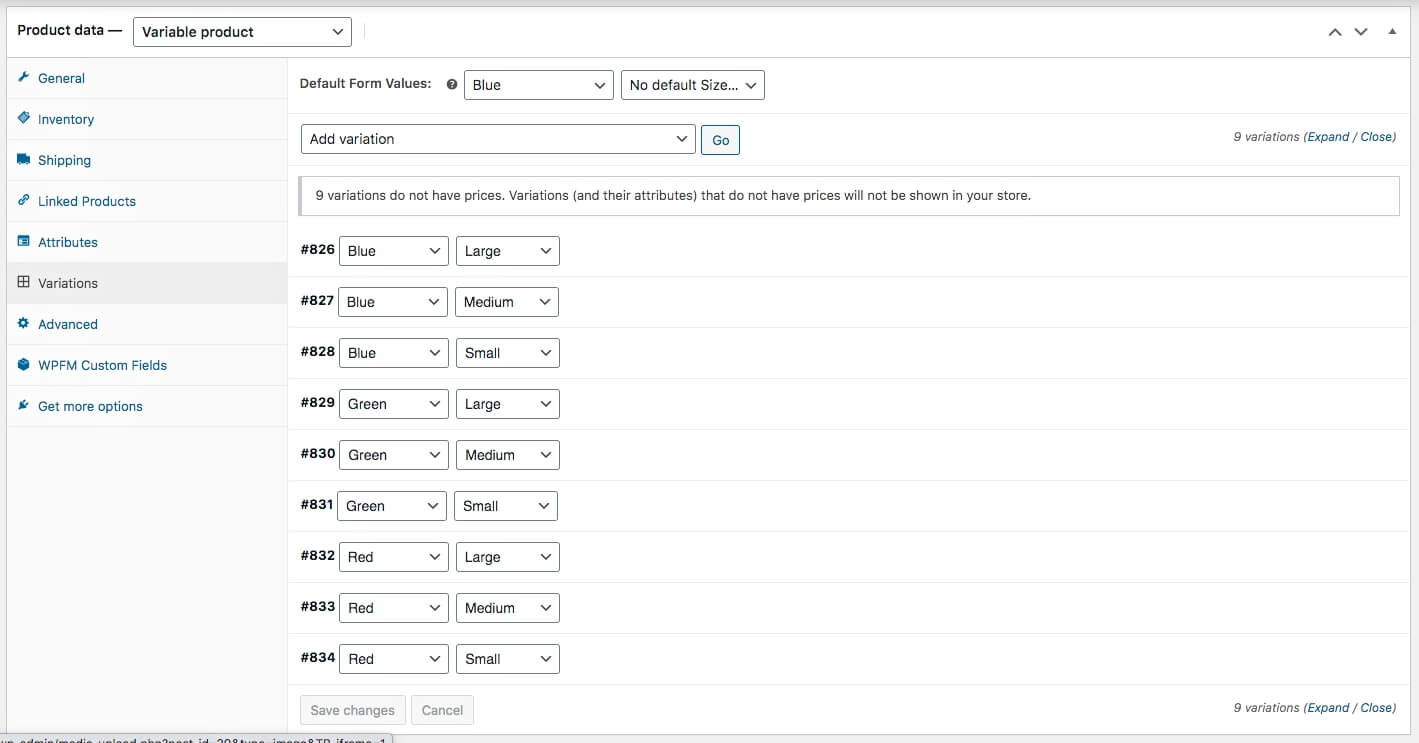

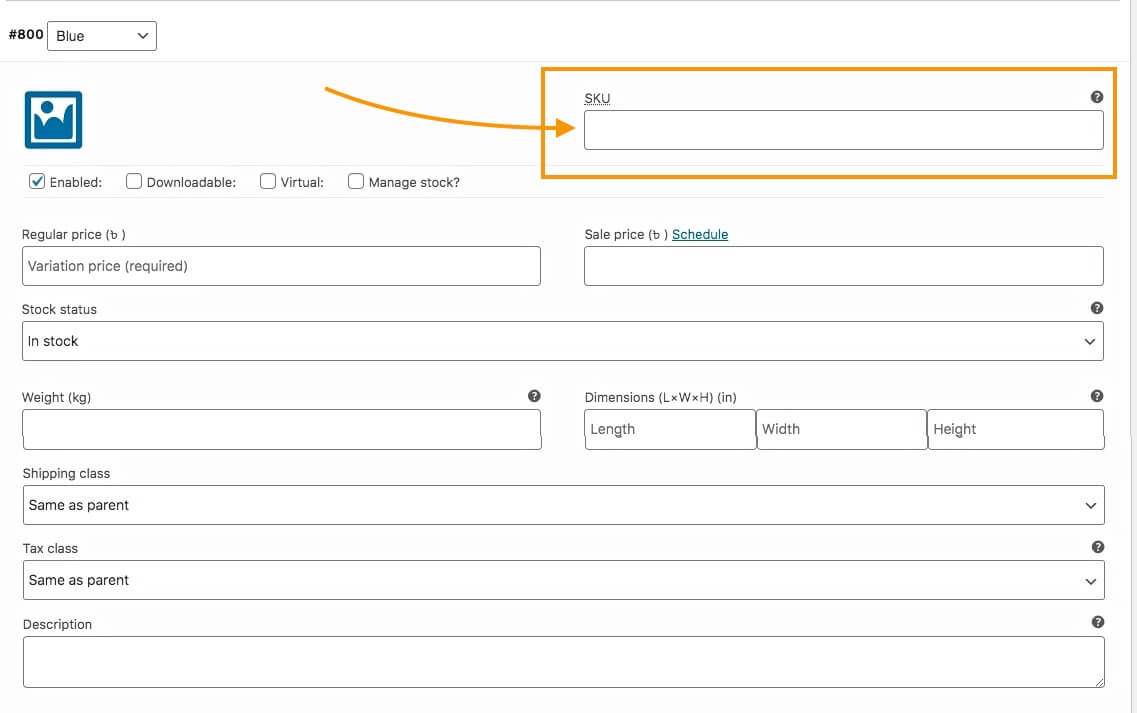
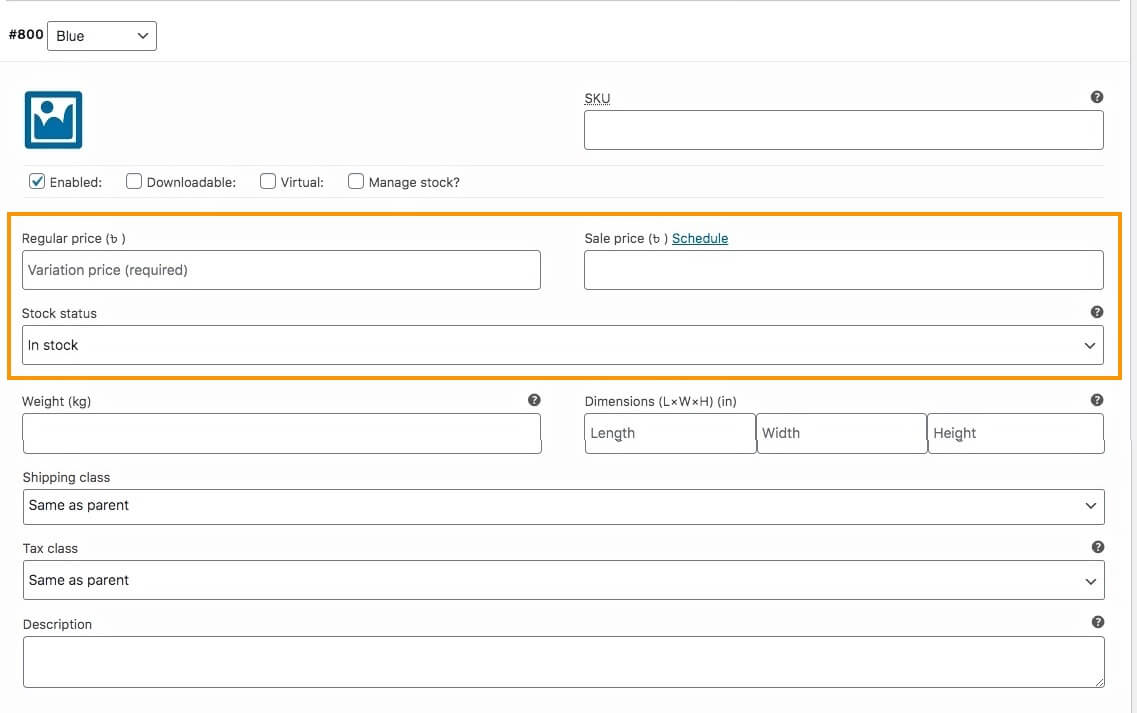
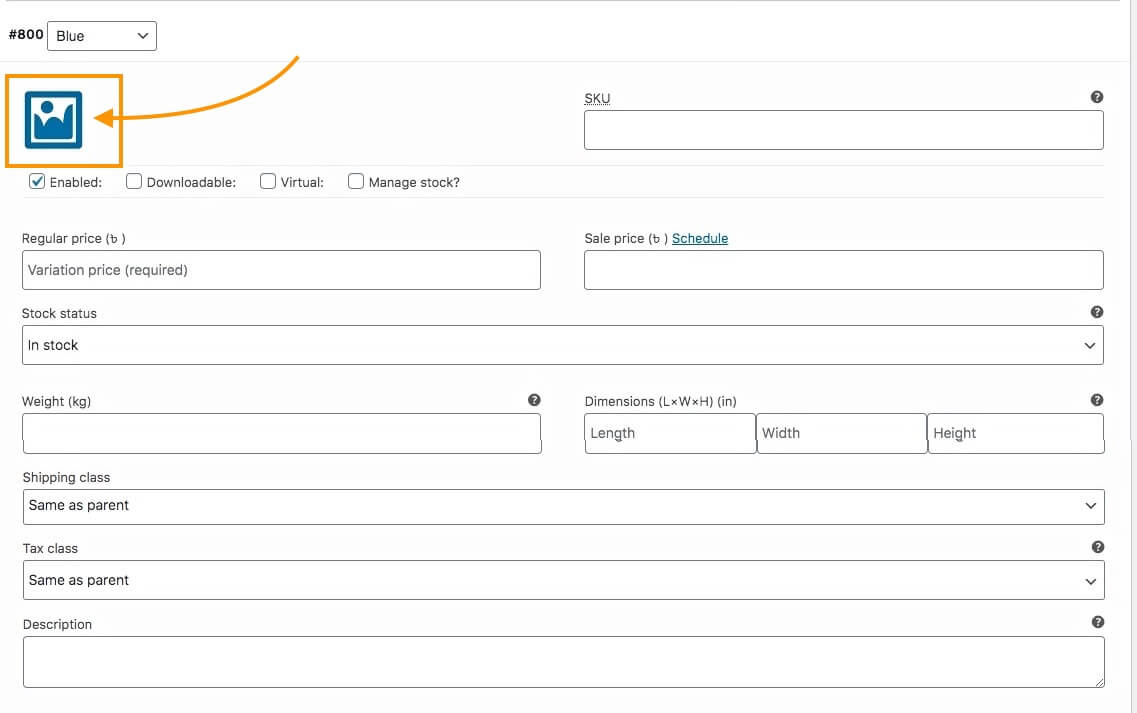

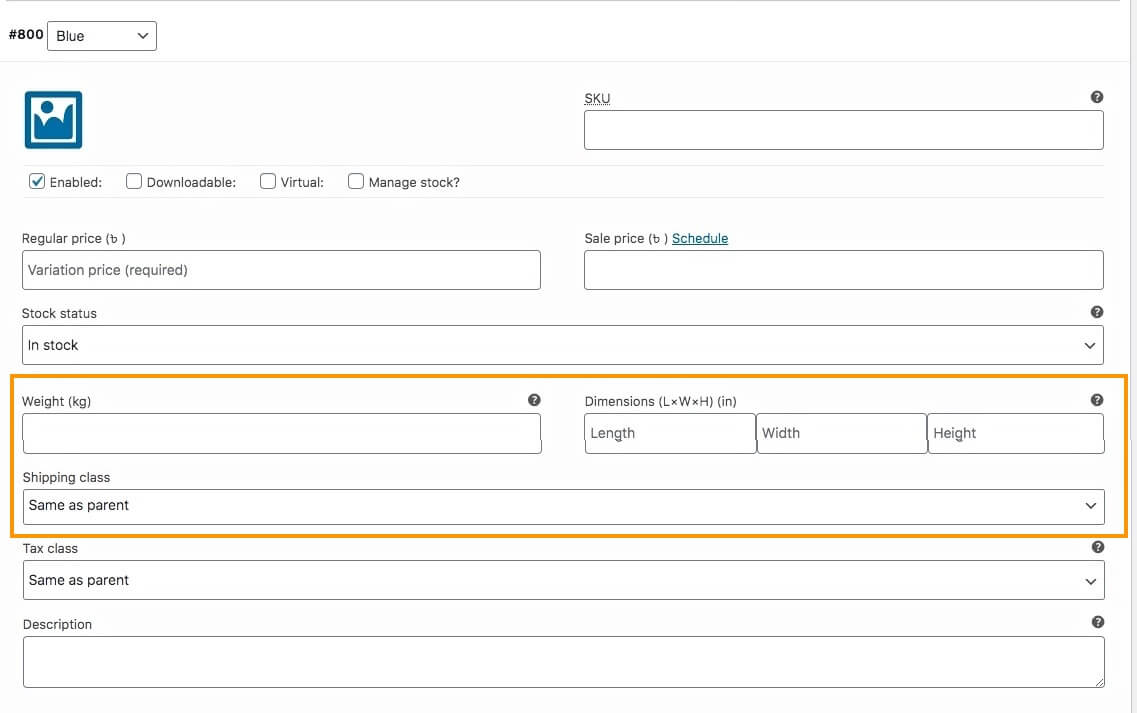

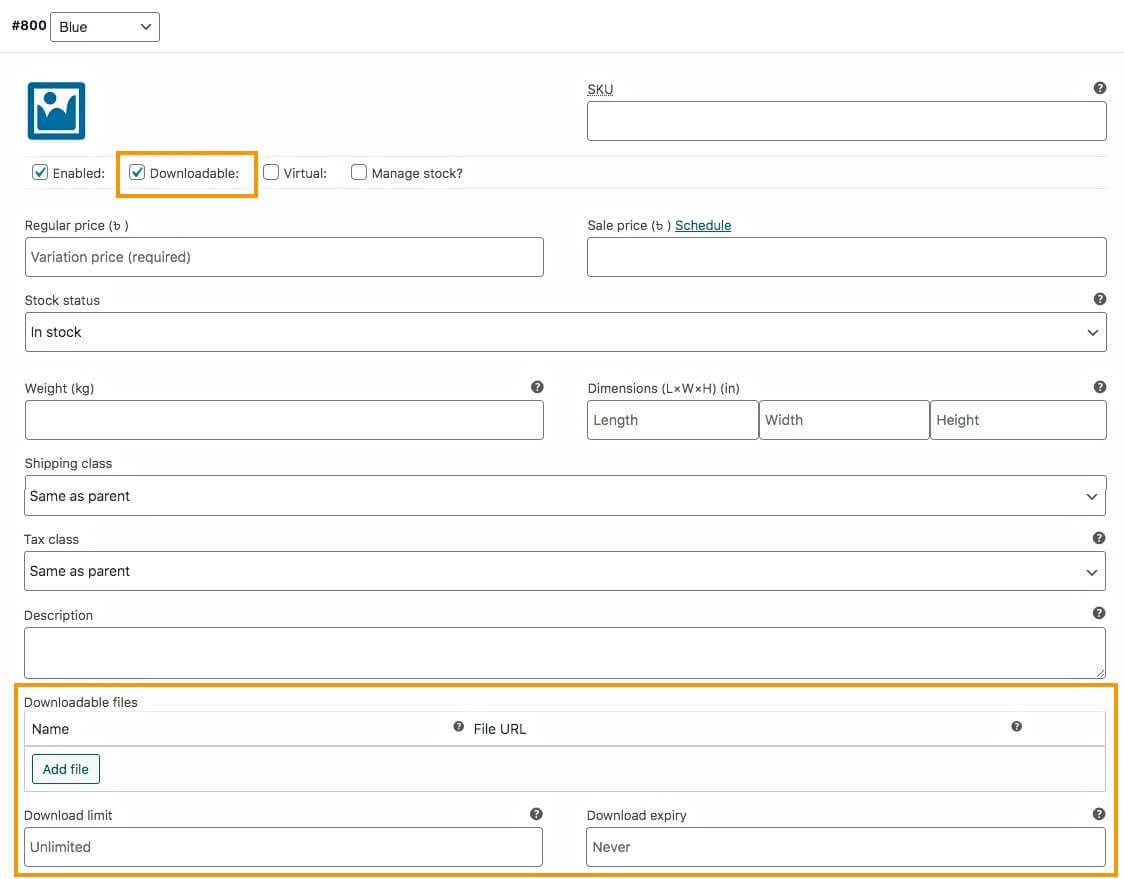
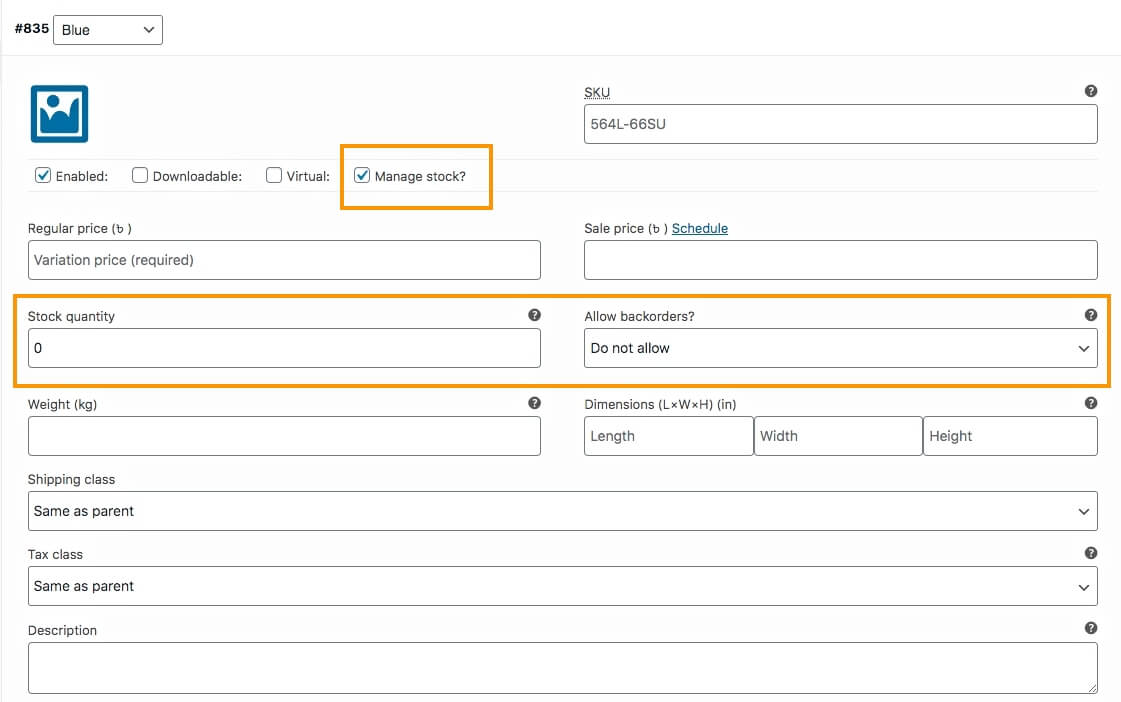
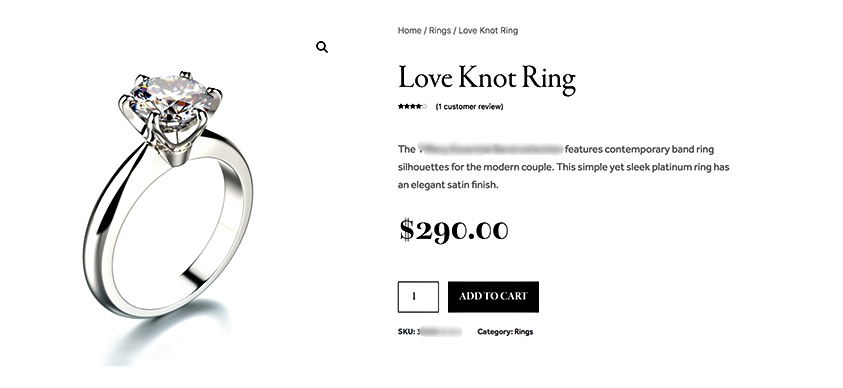


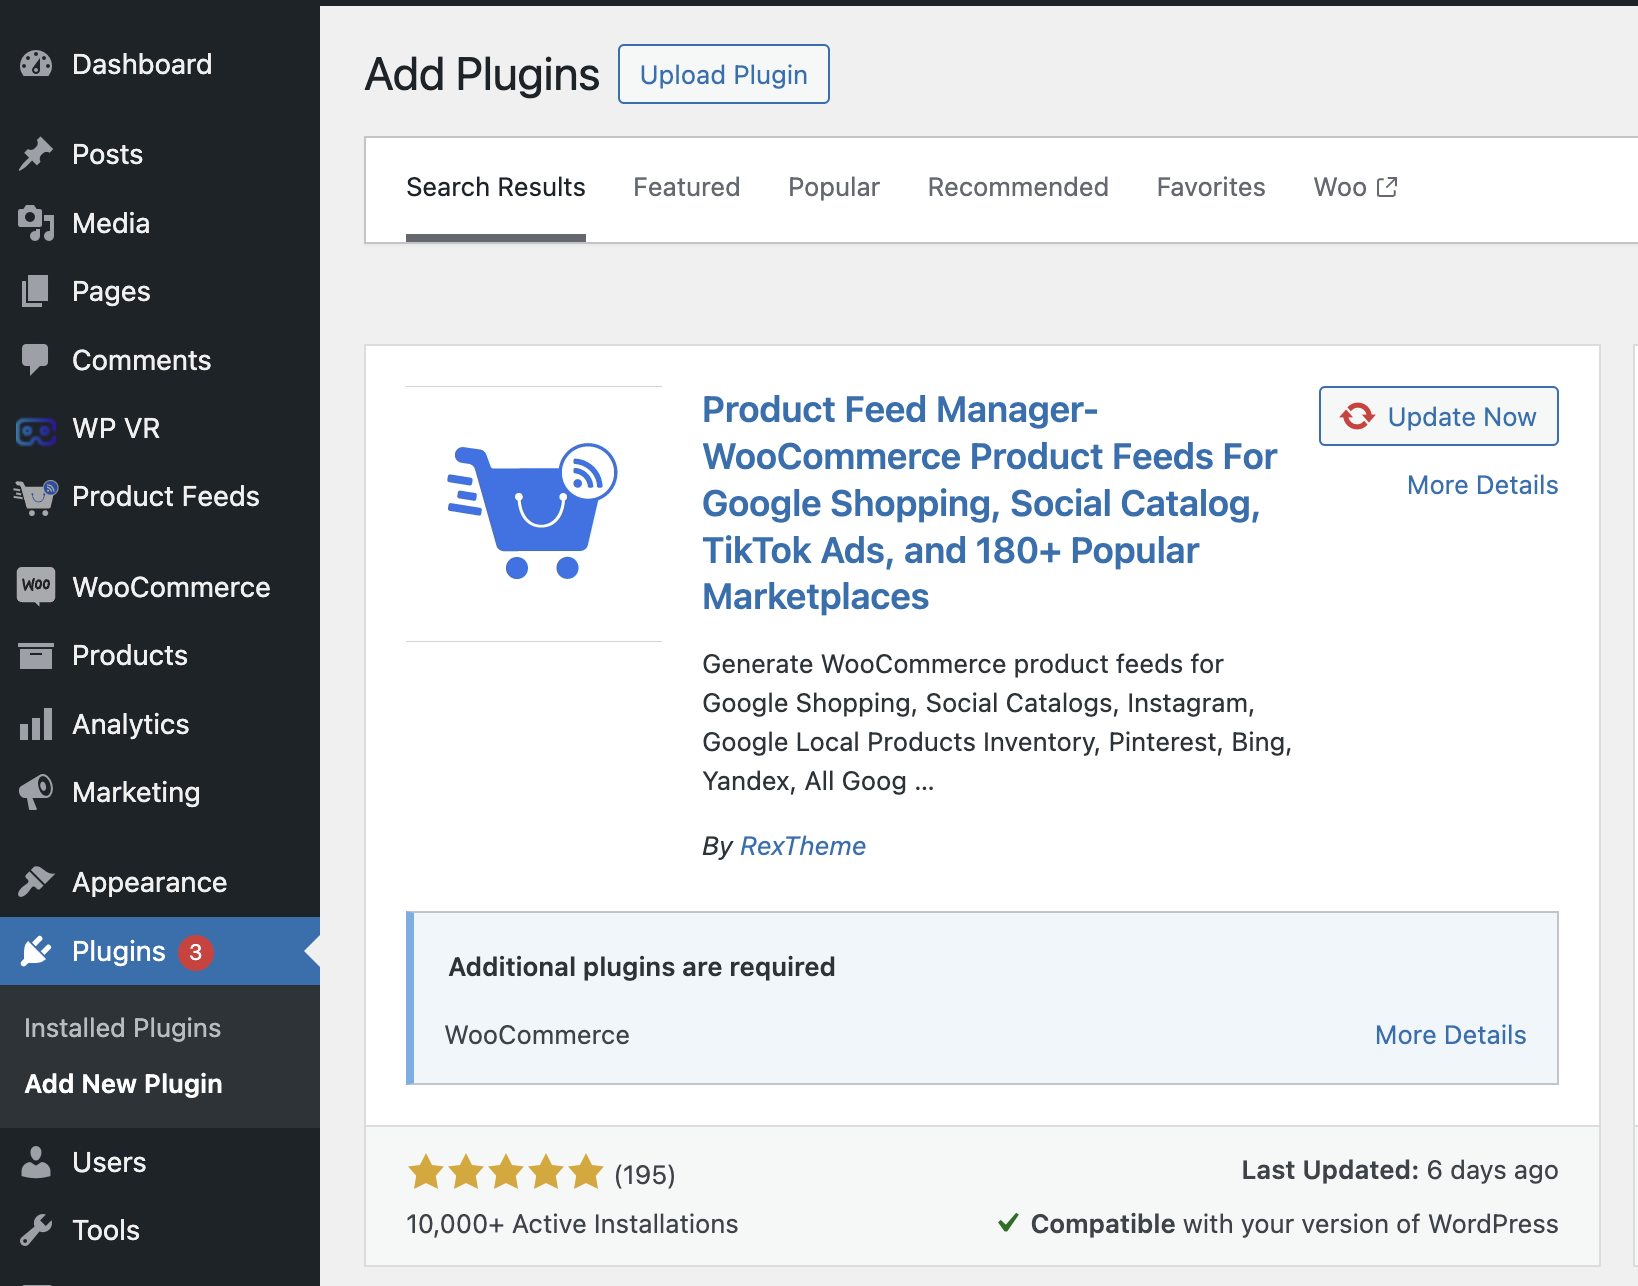
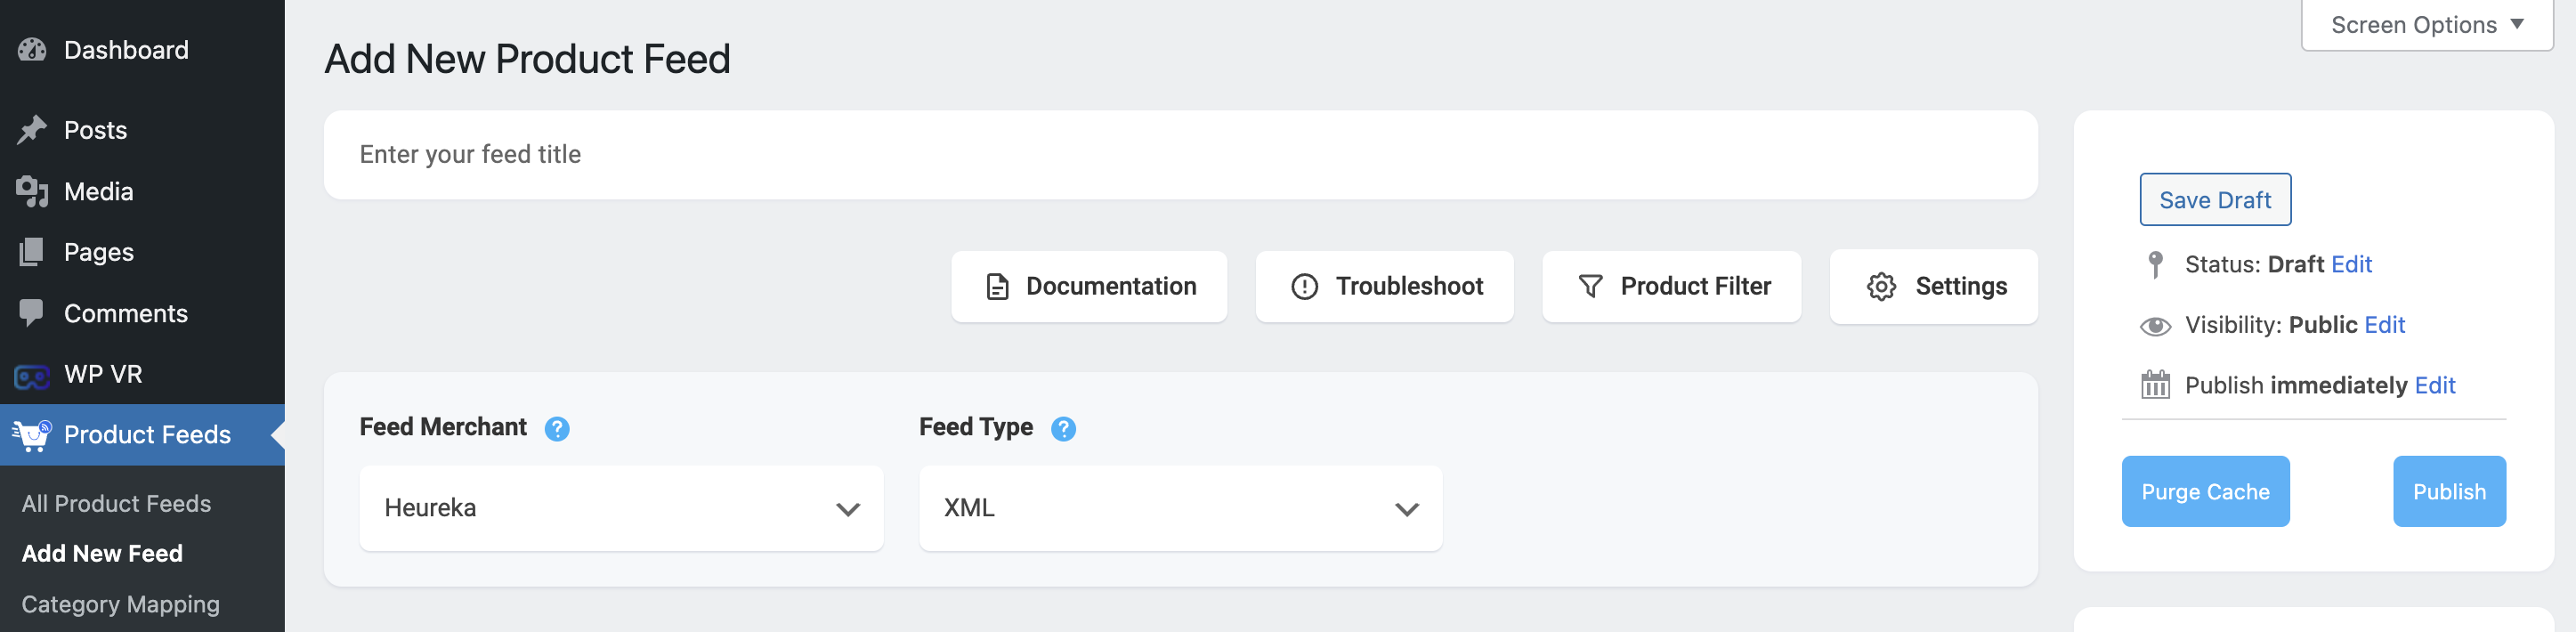
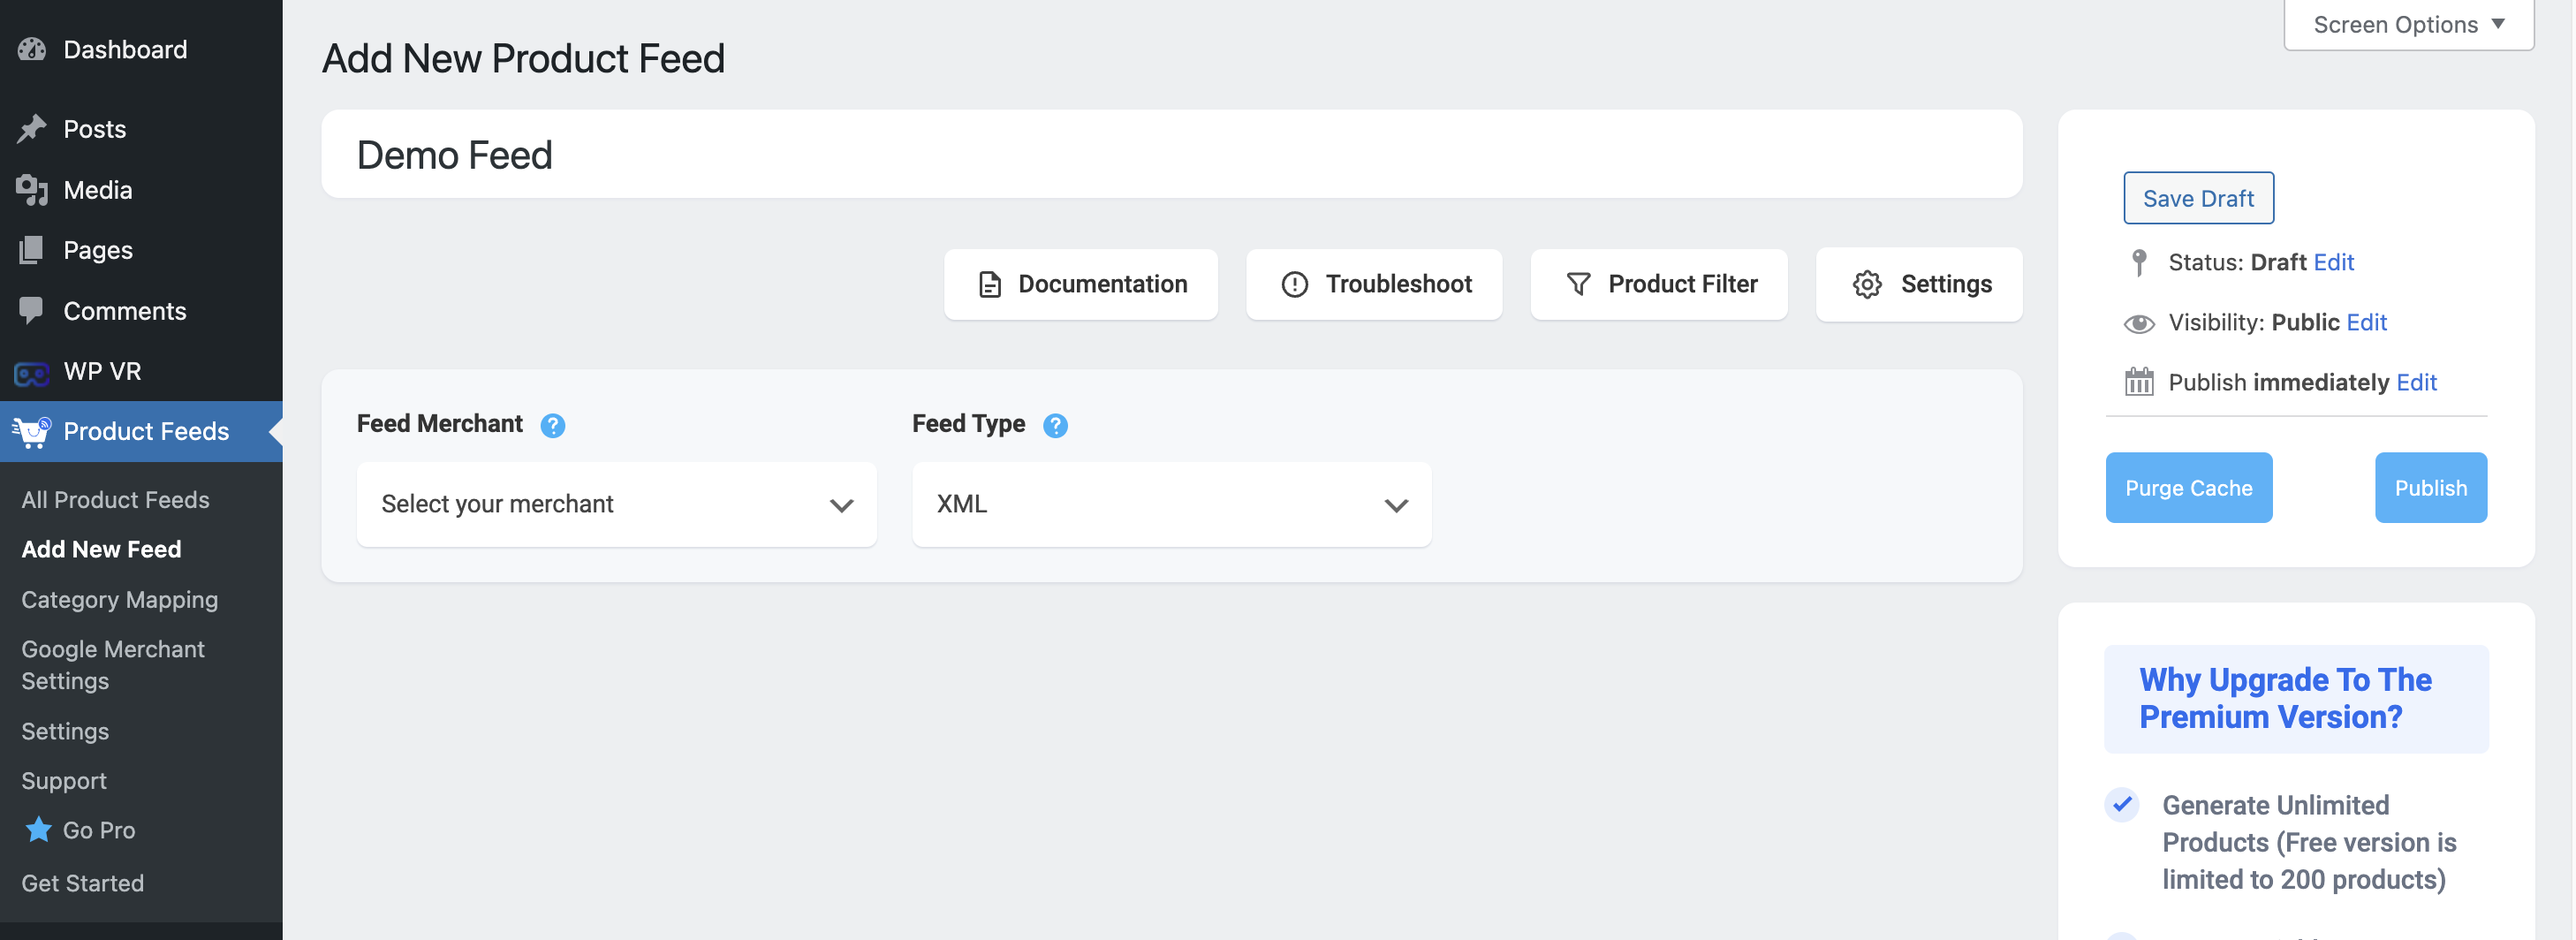
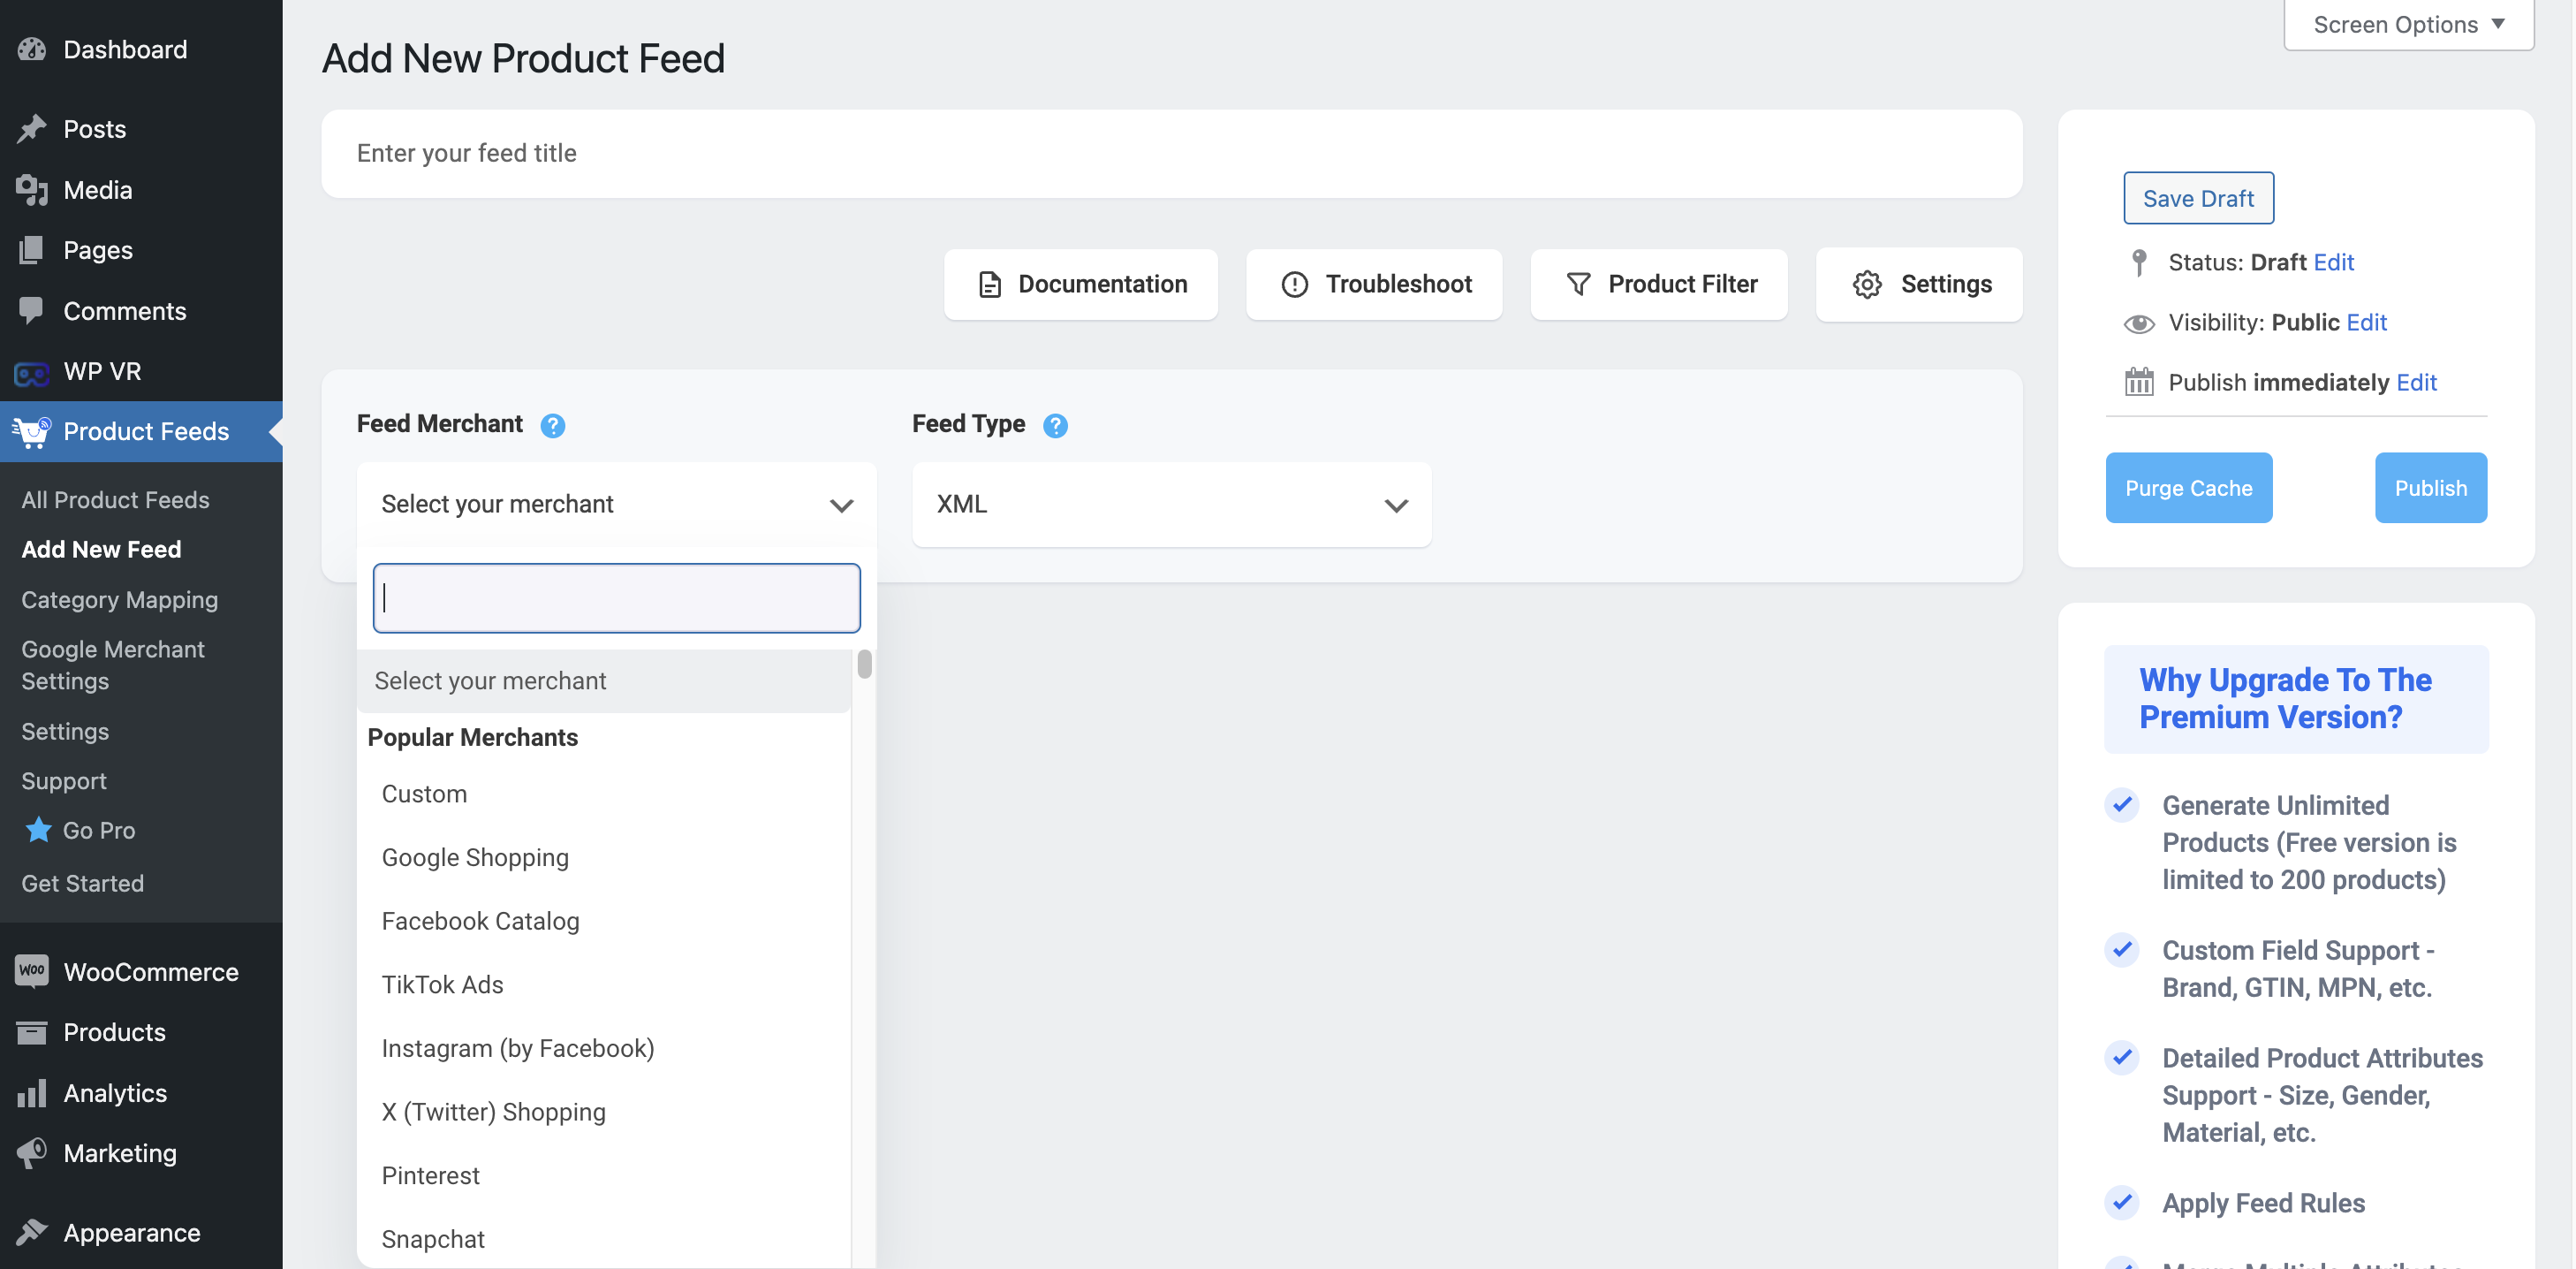


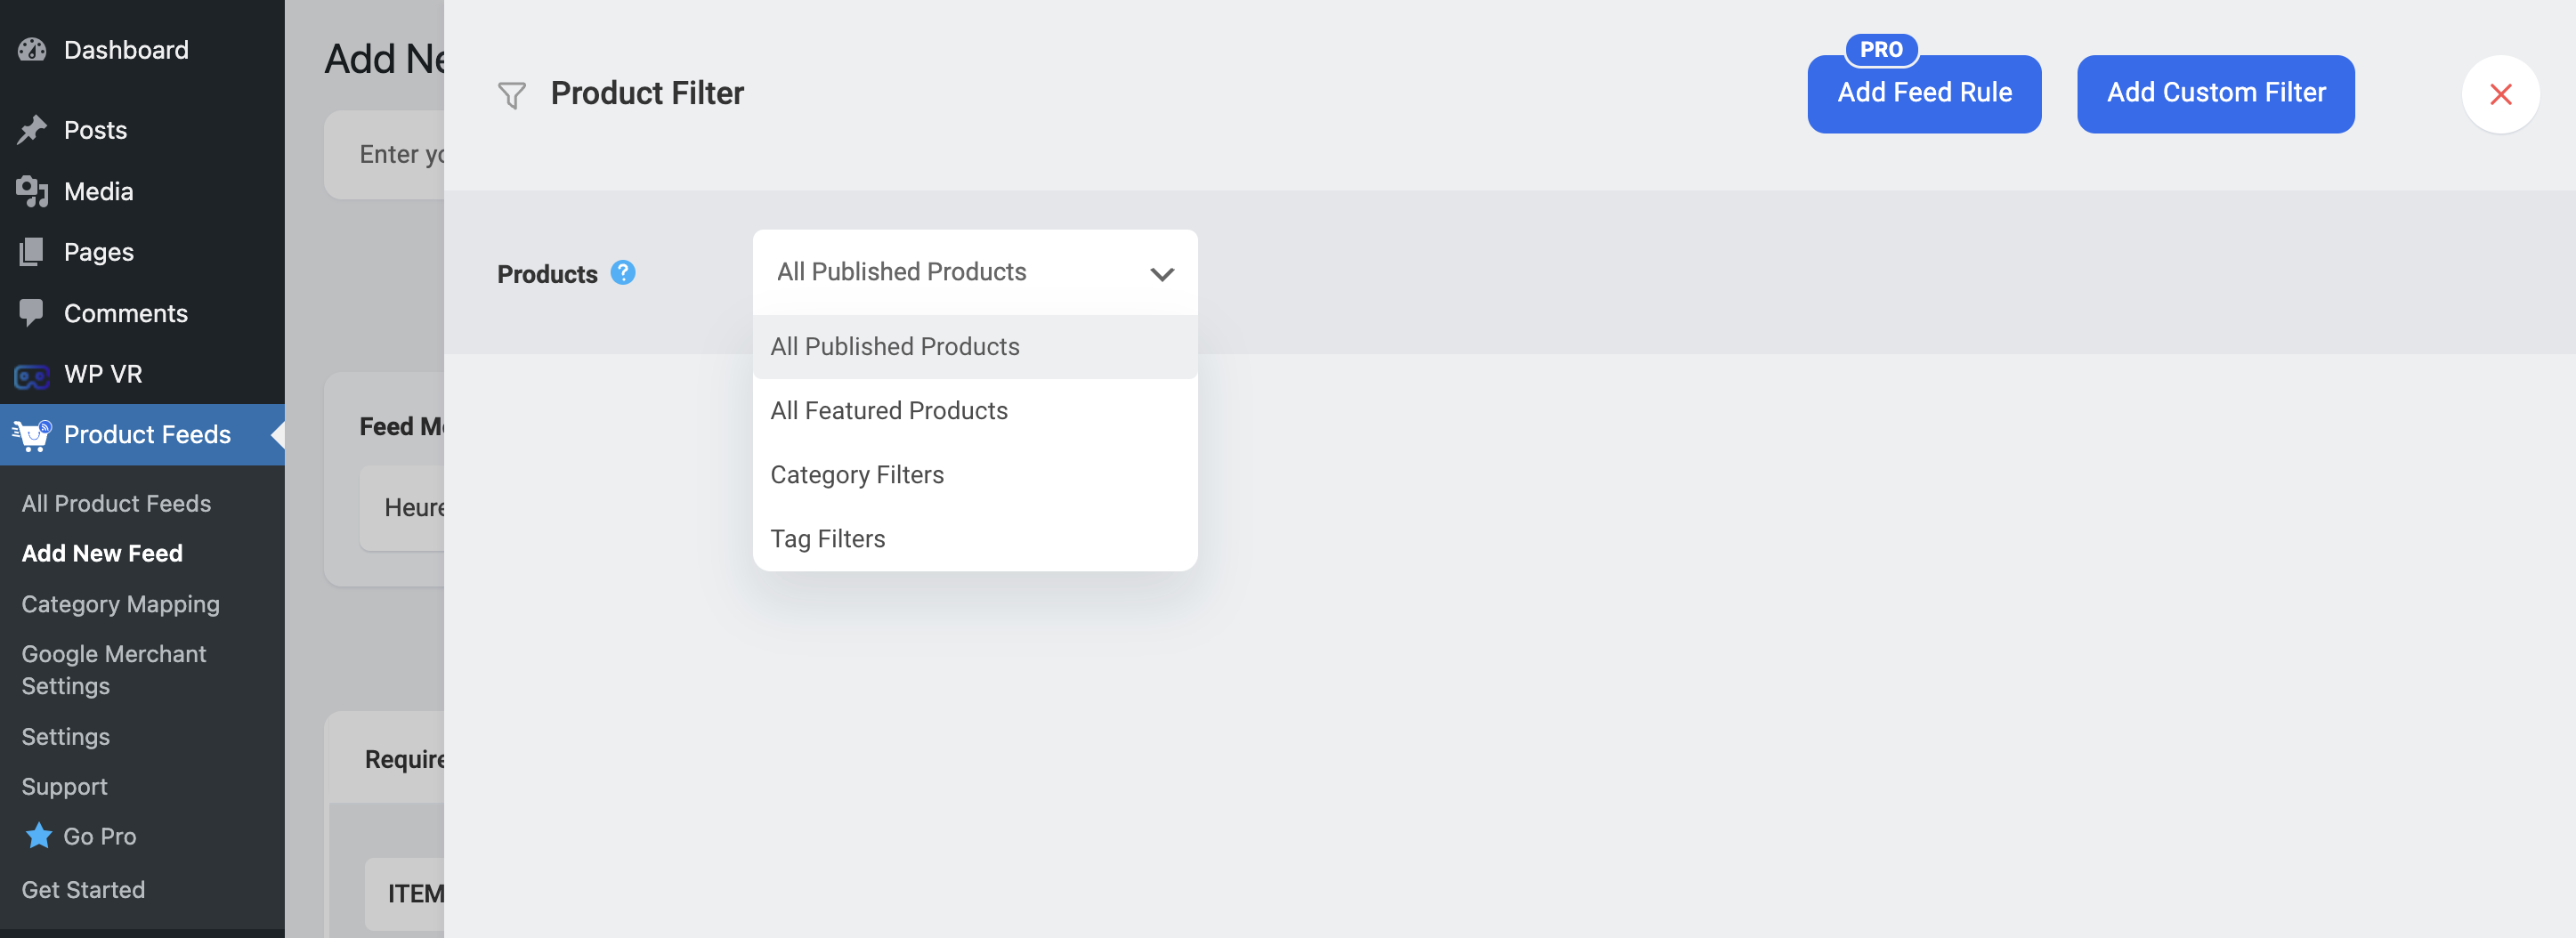
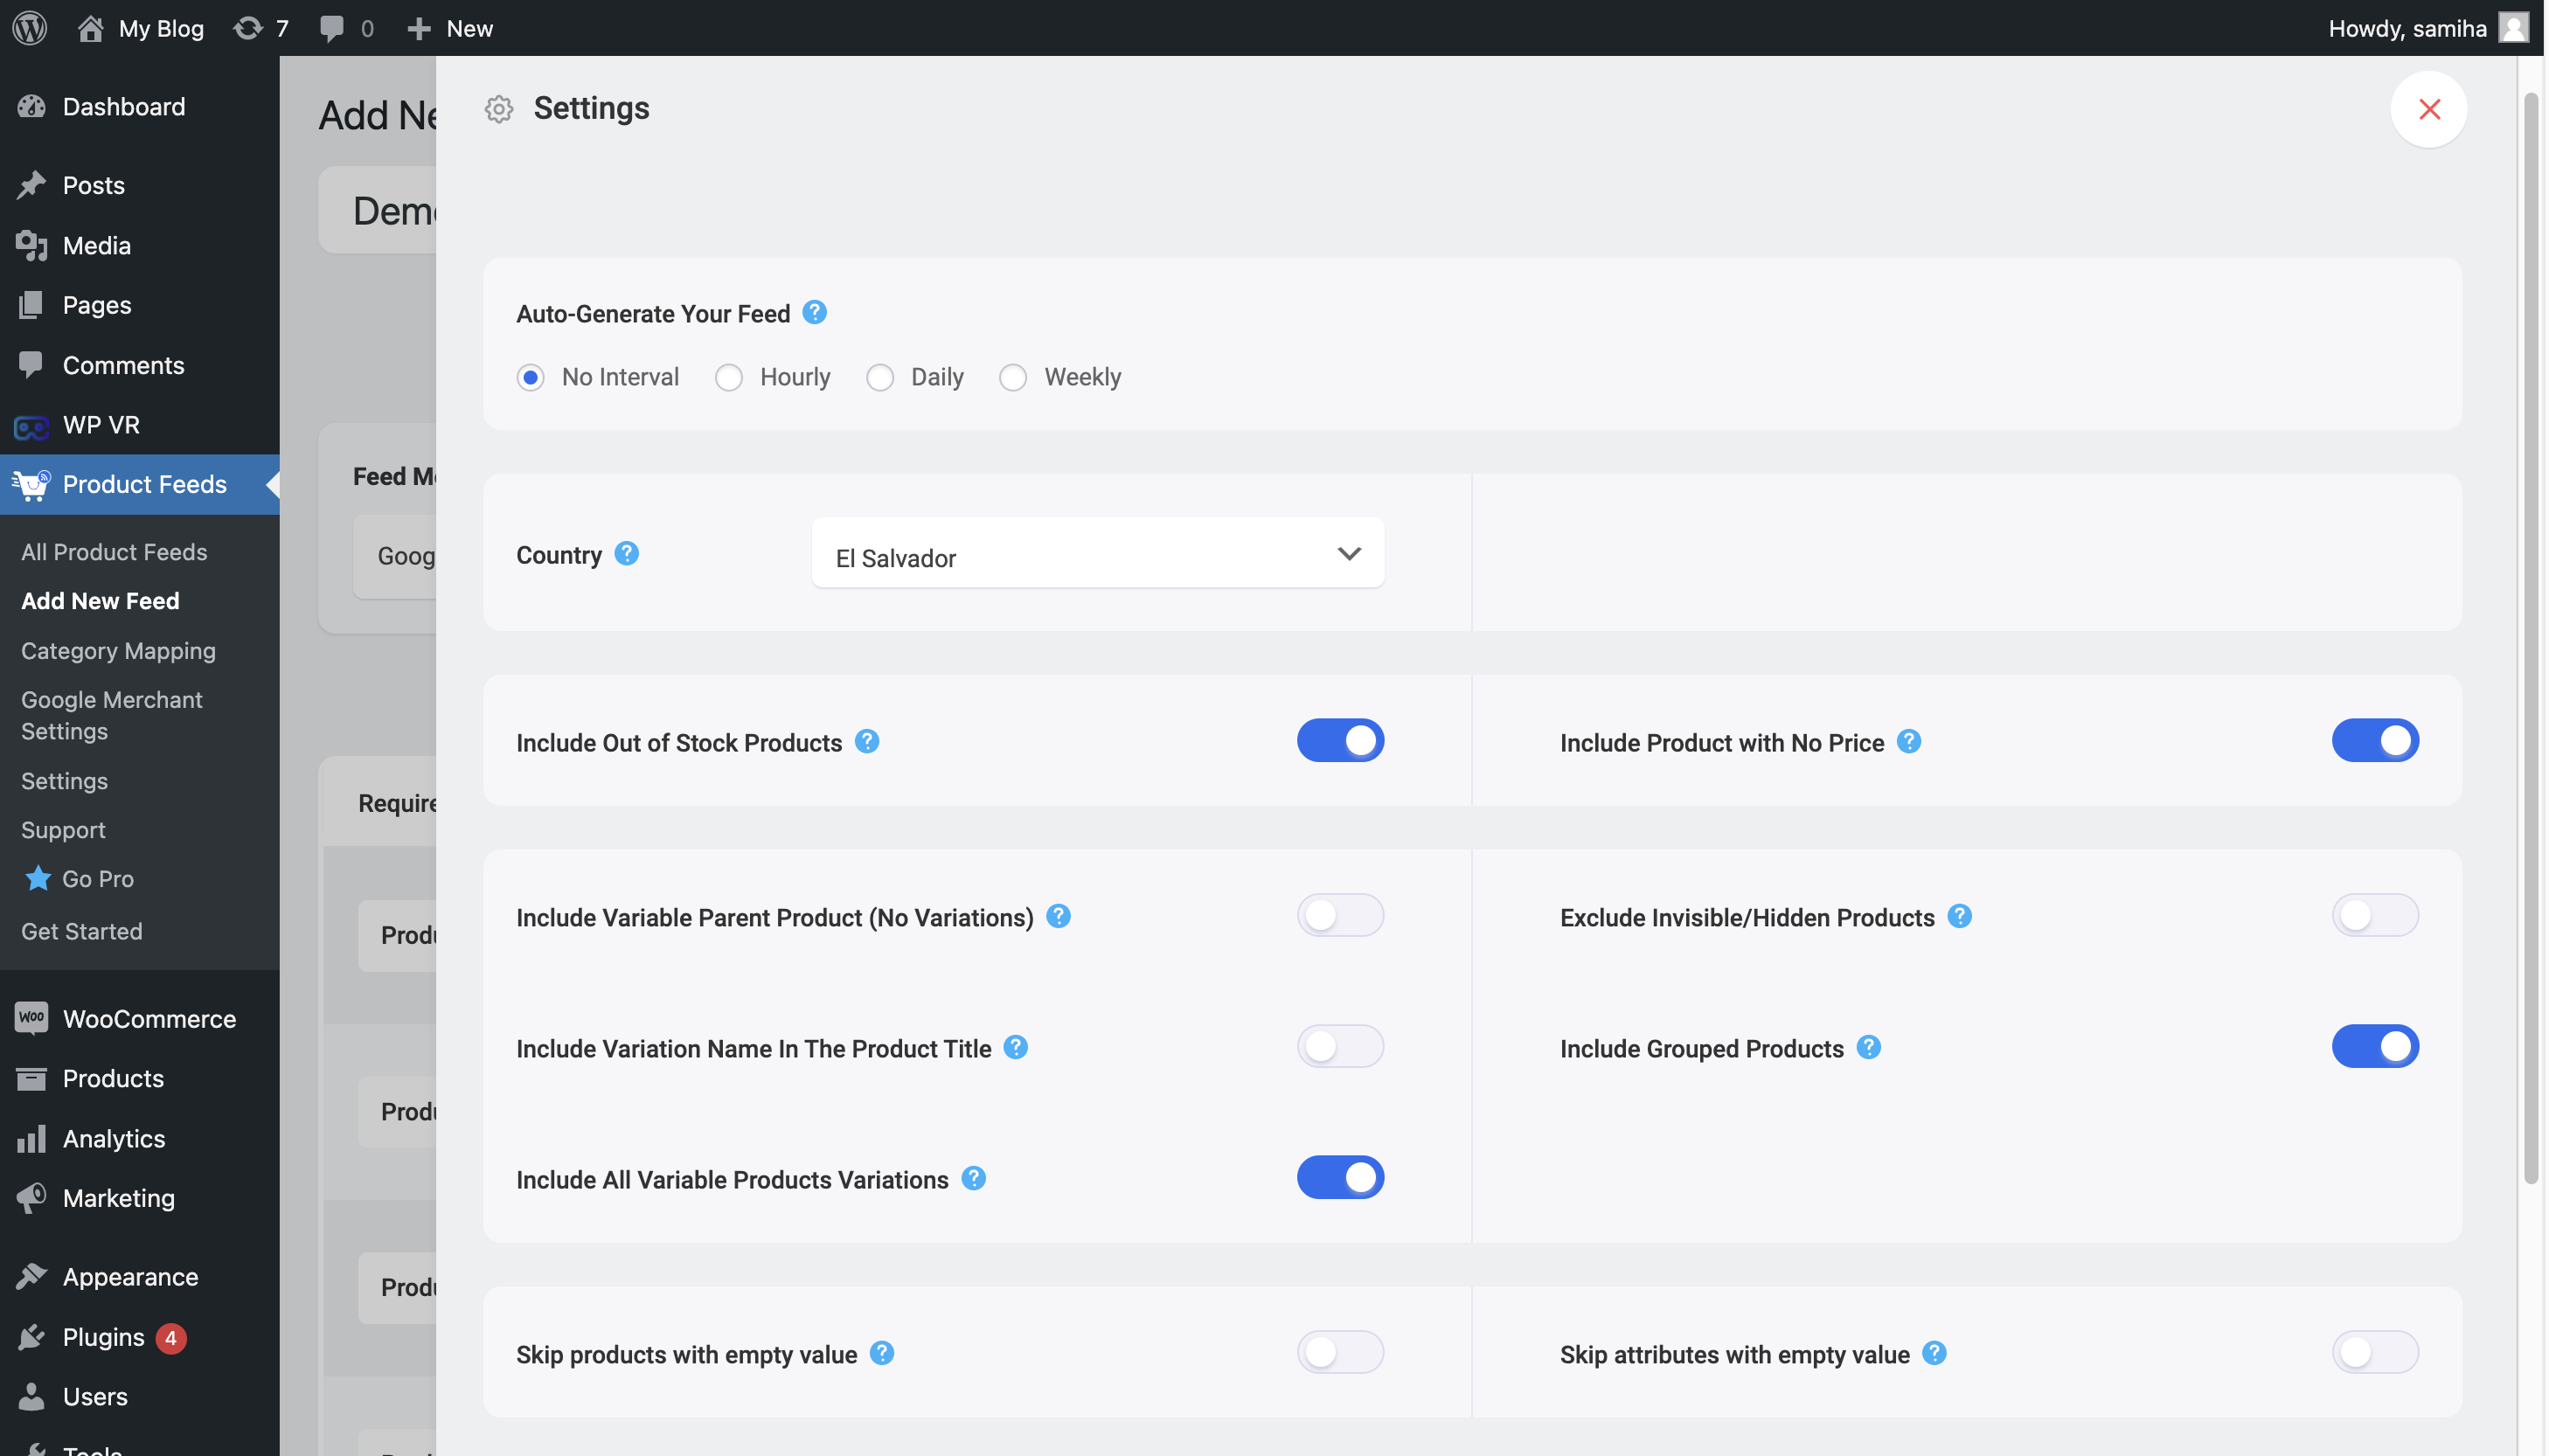
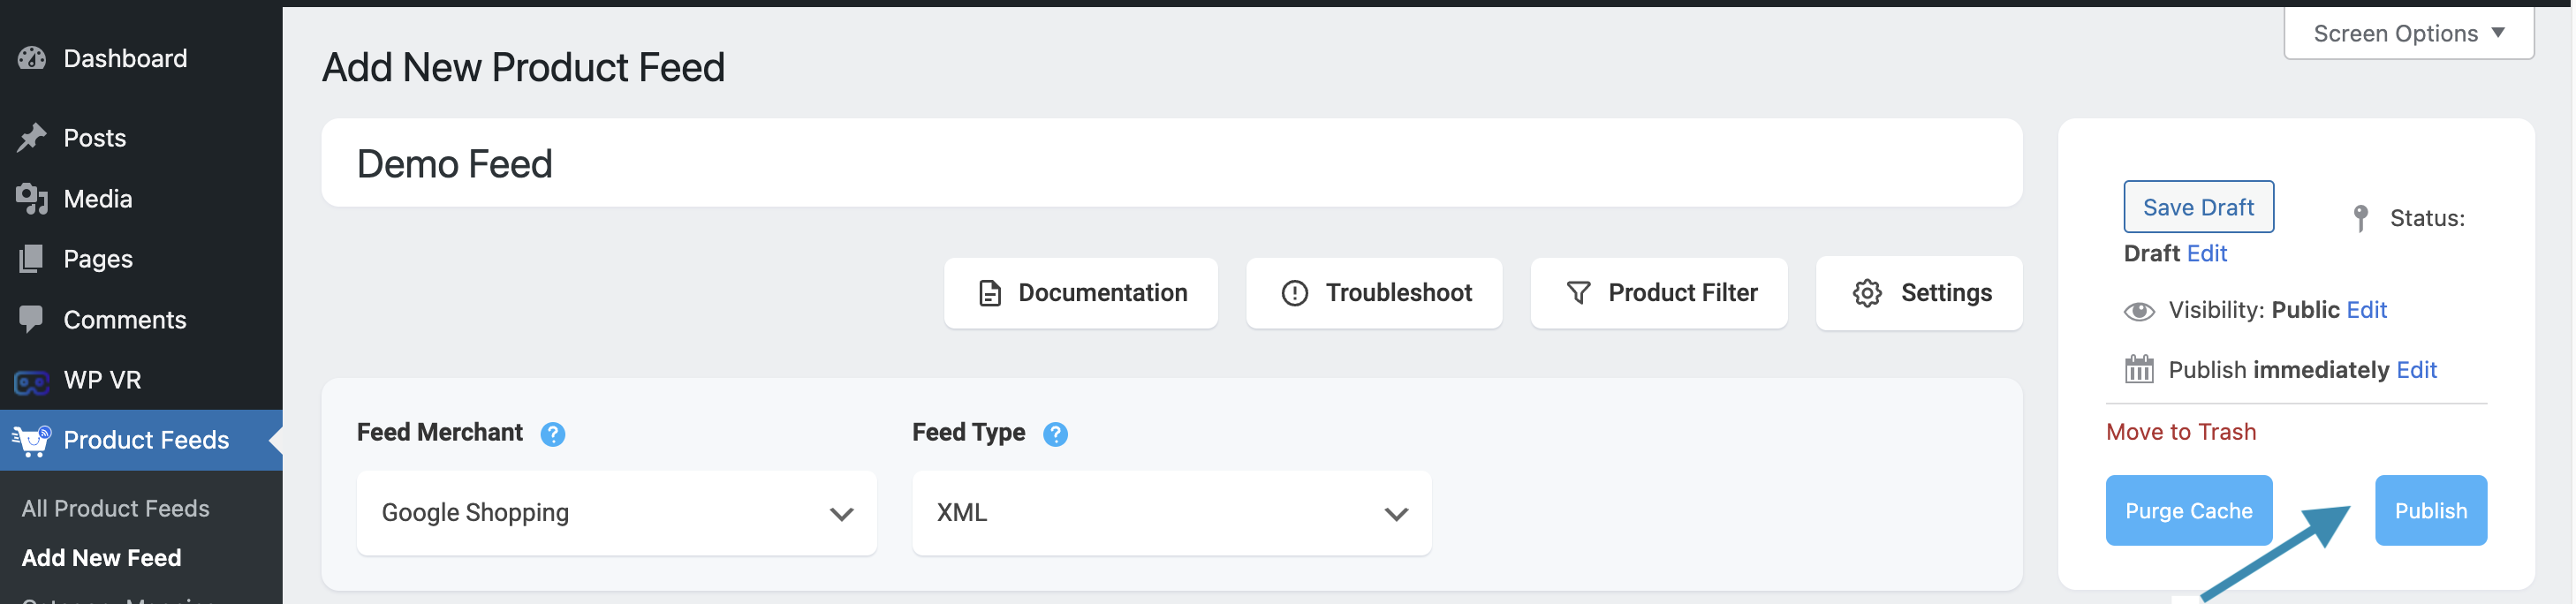
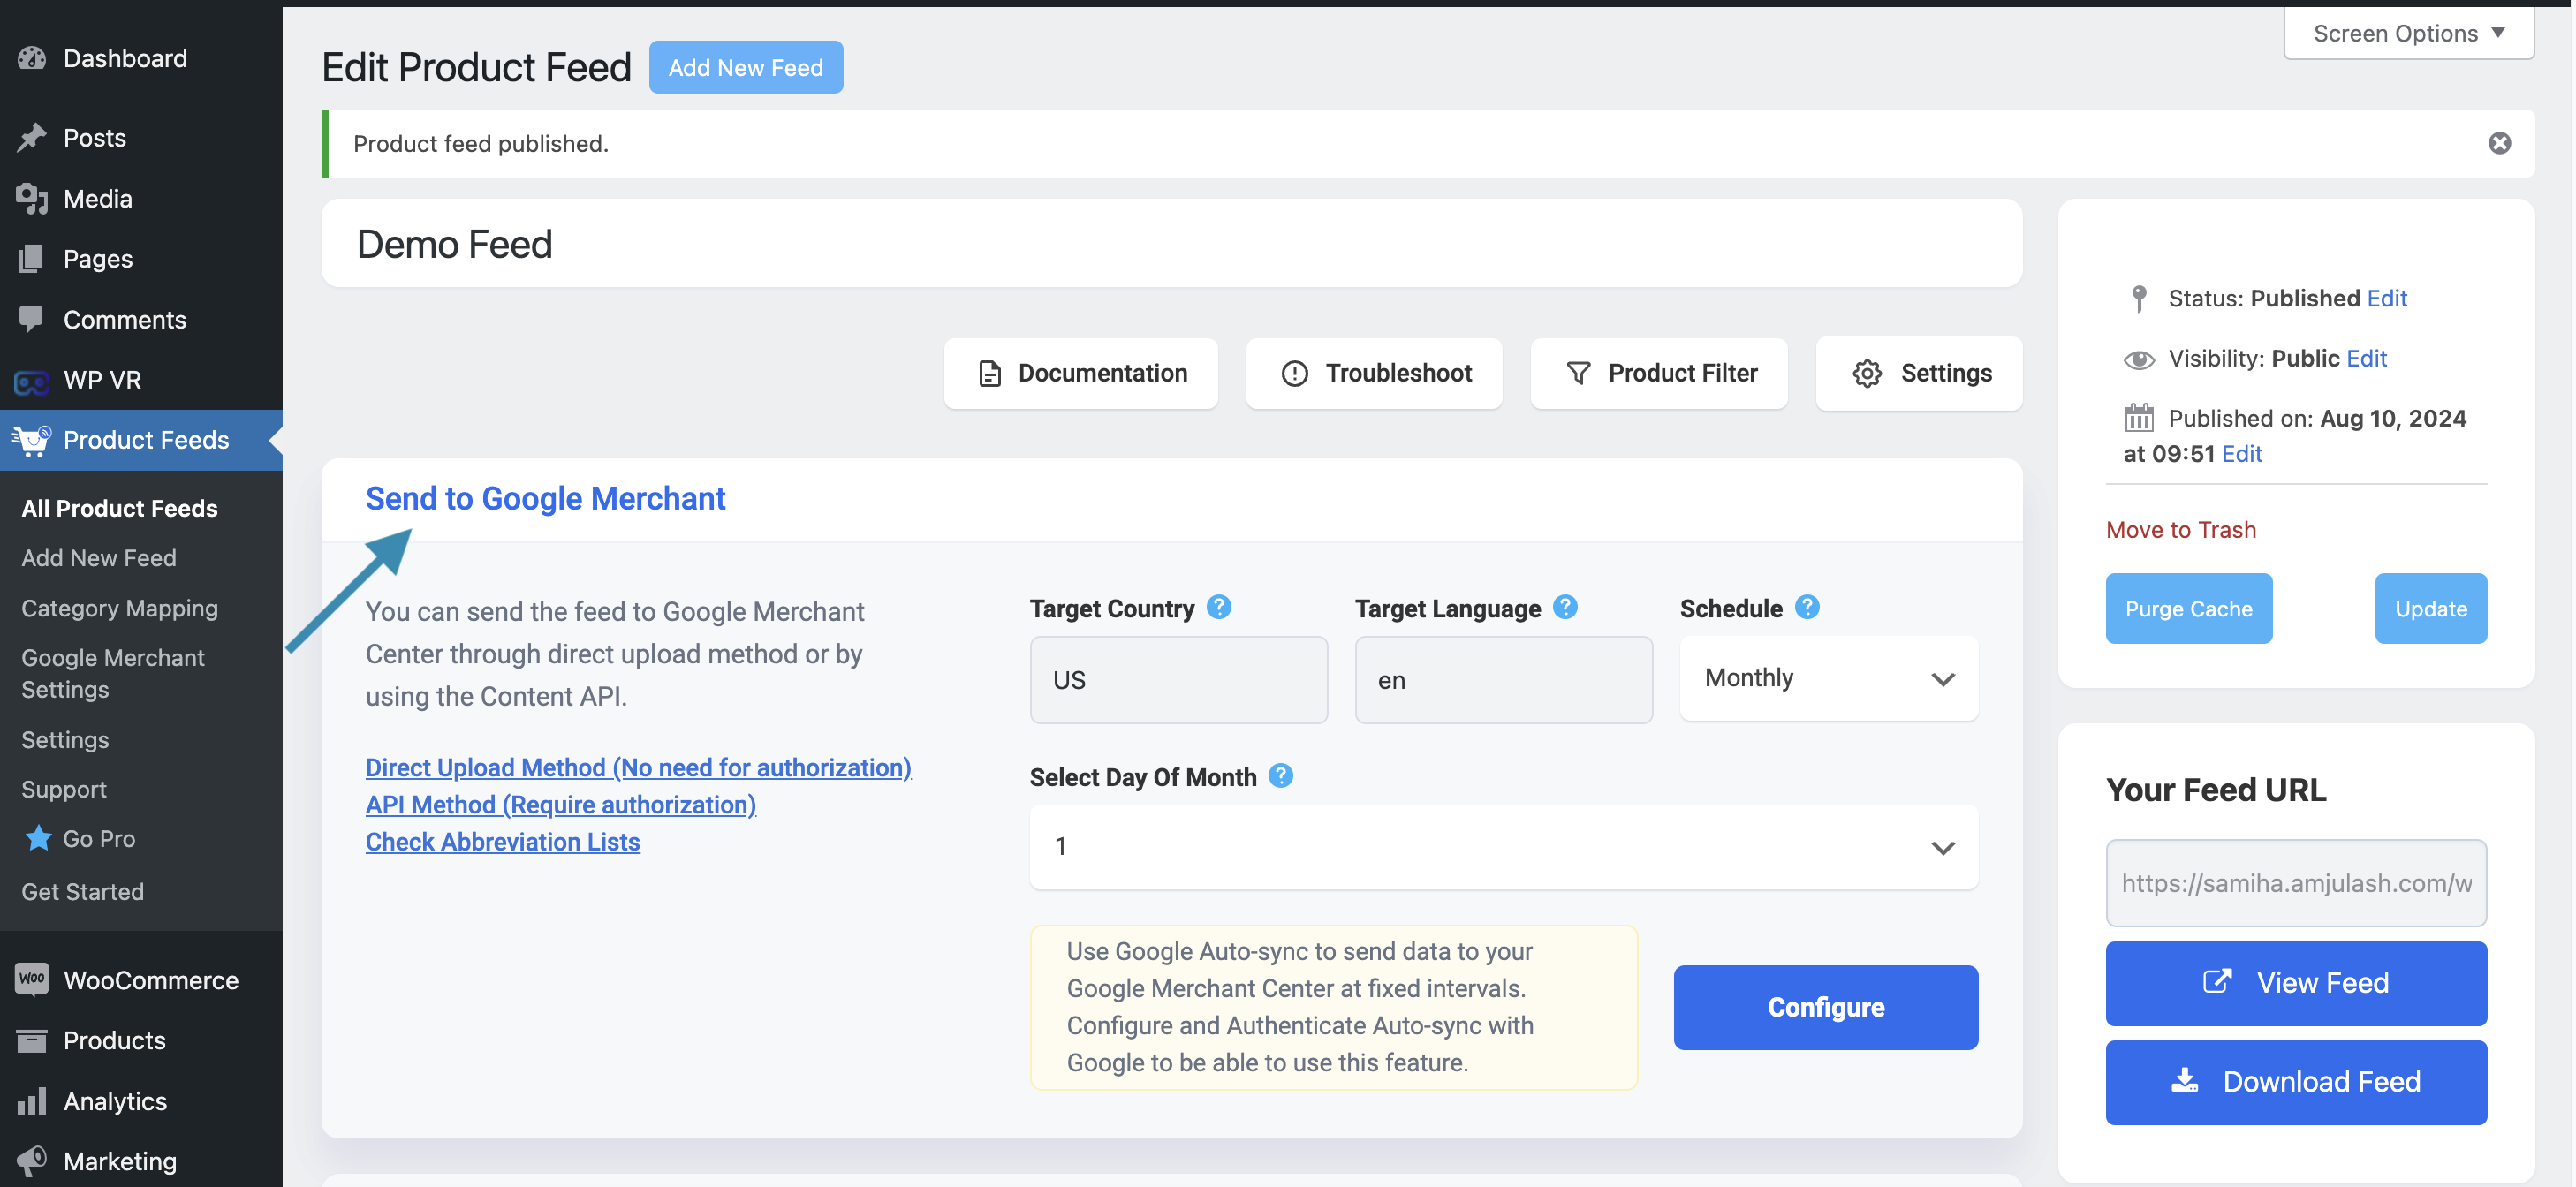
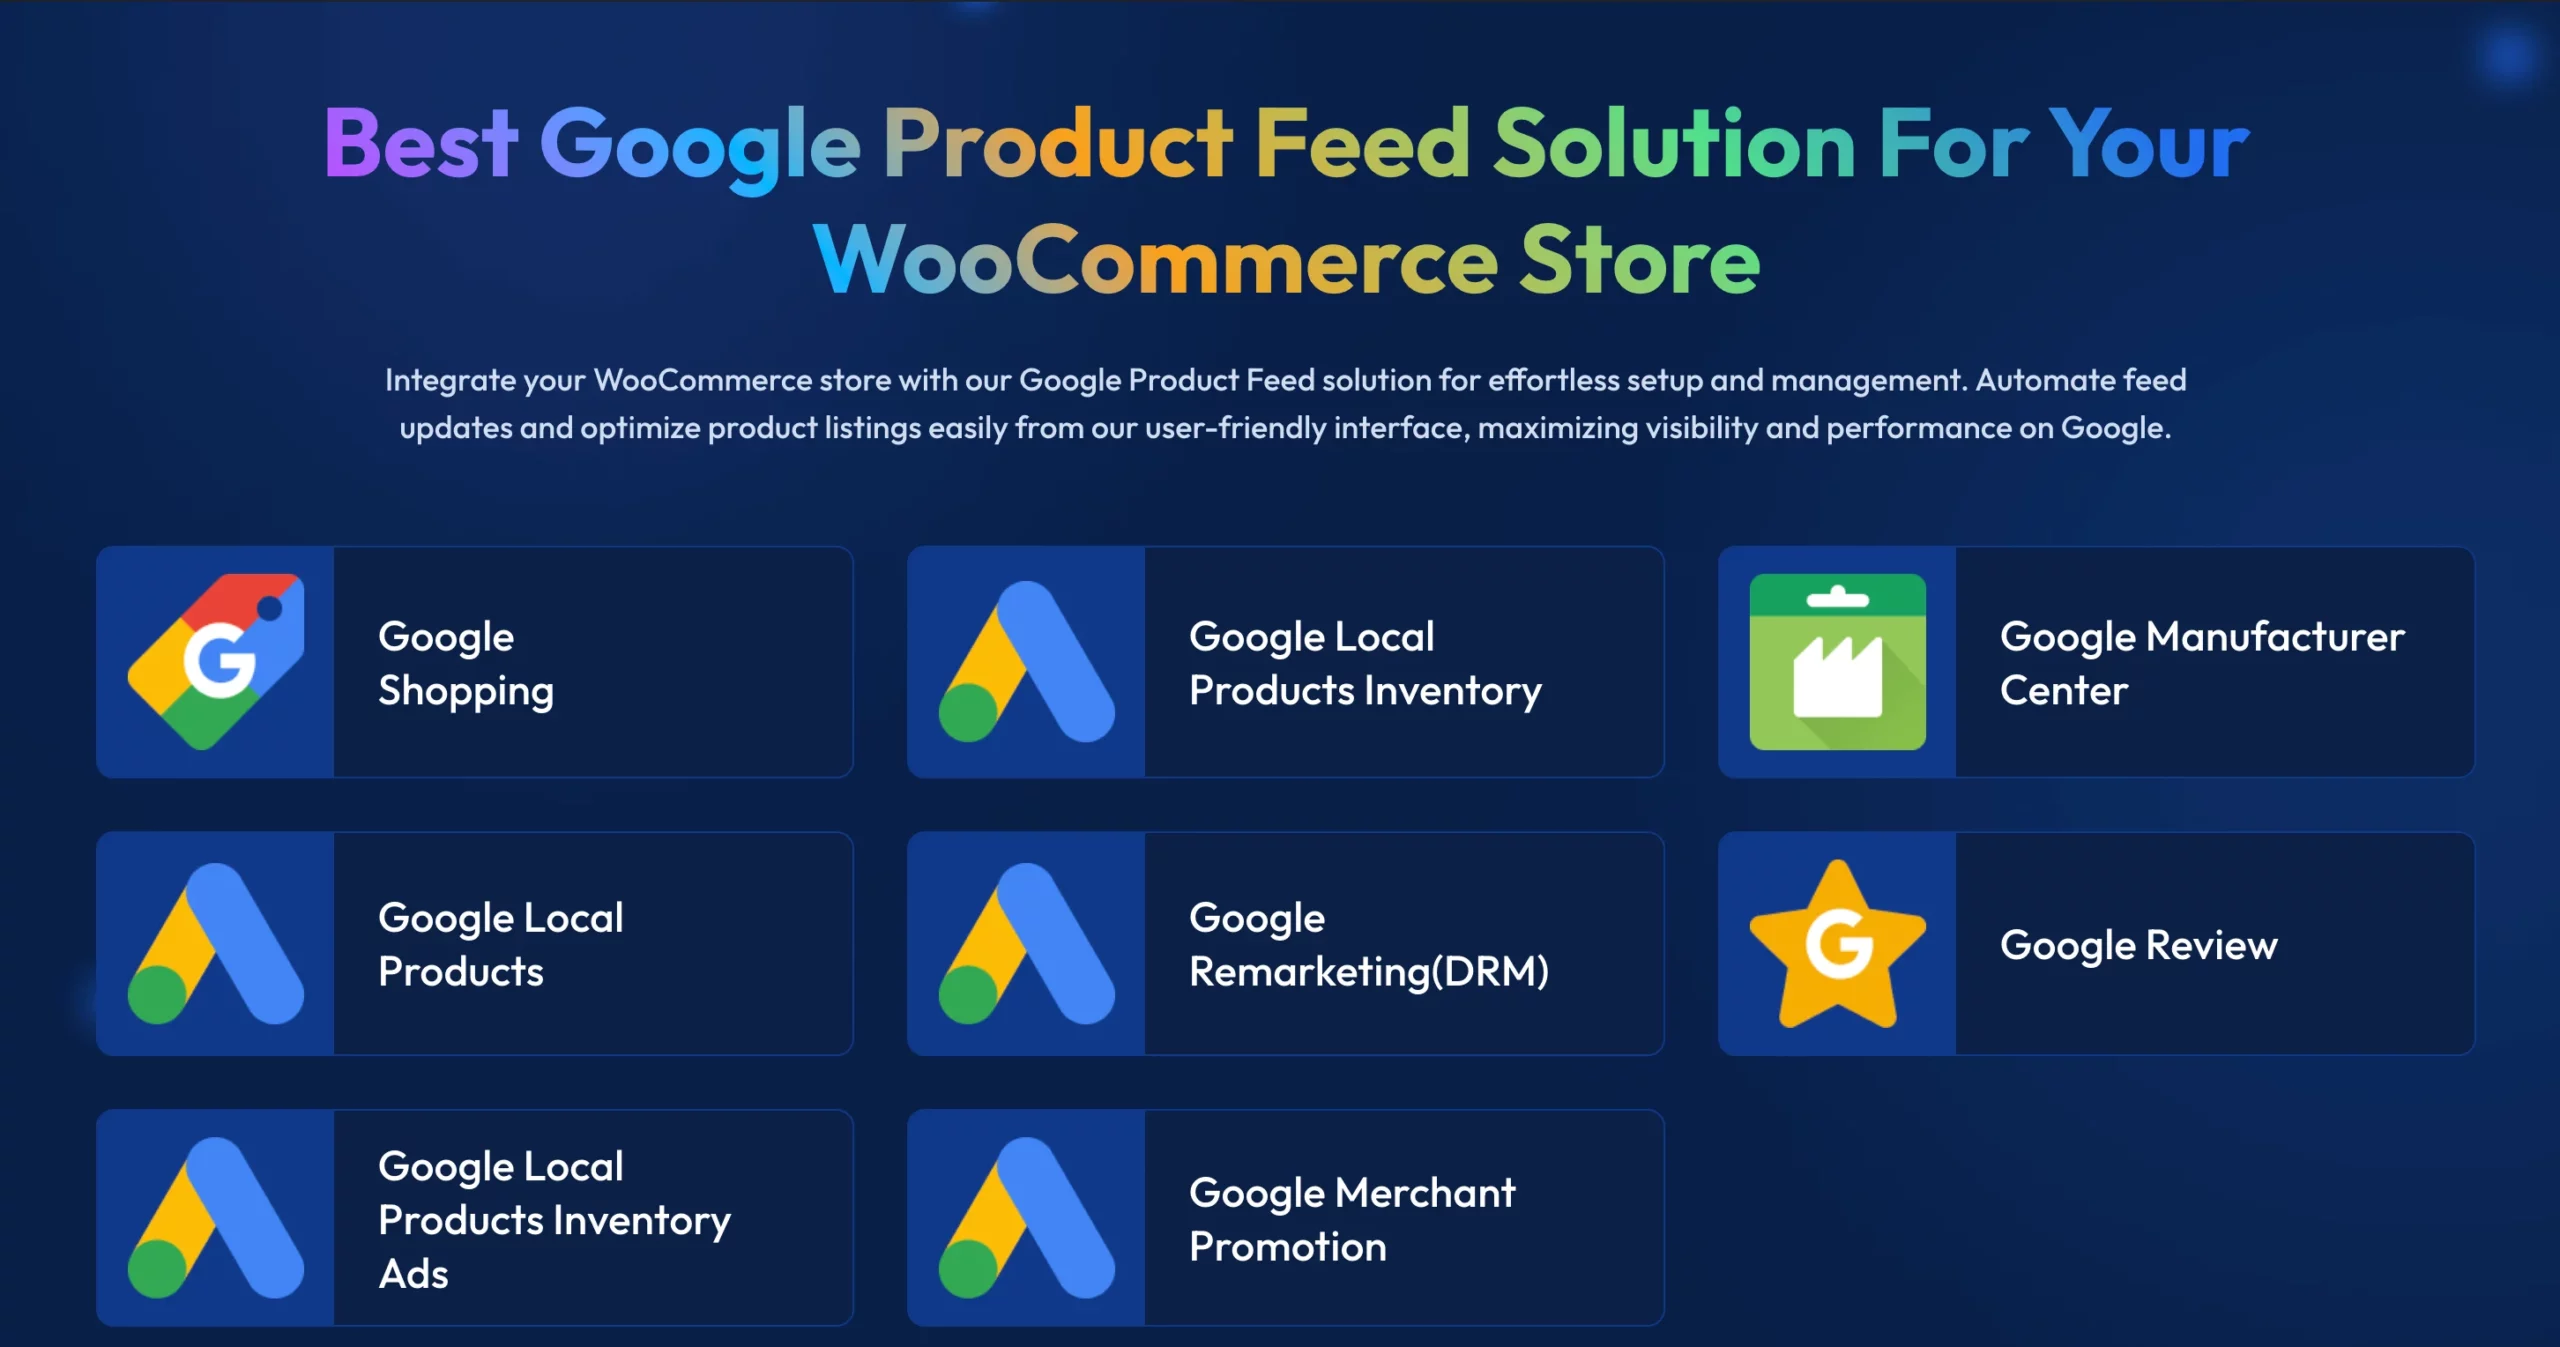
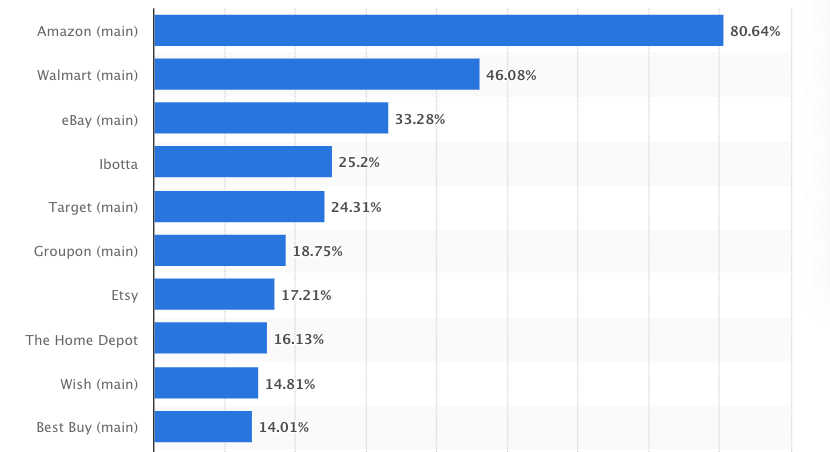
![Generate eBay MIP Product Feed [A Complete Guide] 2](https://staging-rextheme.kinsta.cloud/wp-content/uploads/2024/05/Lark20240905-155216.gif)
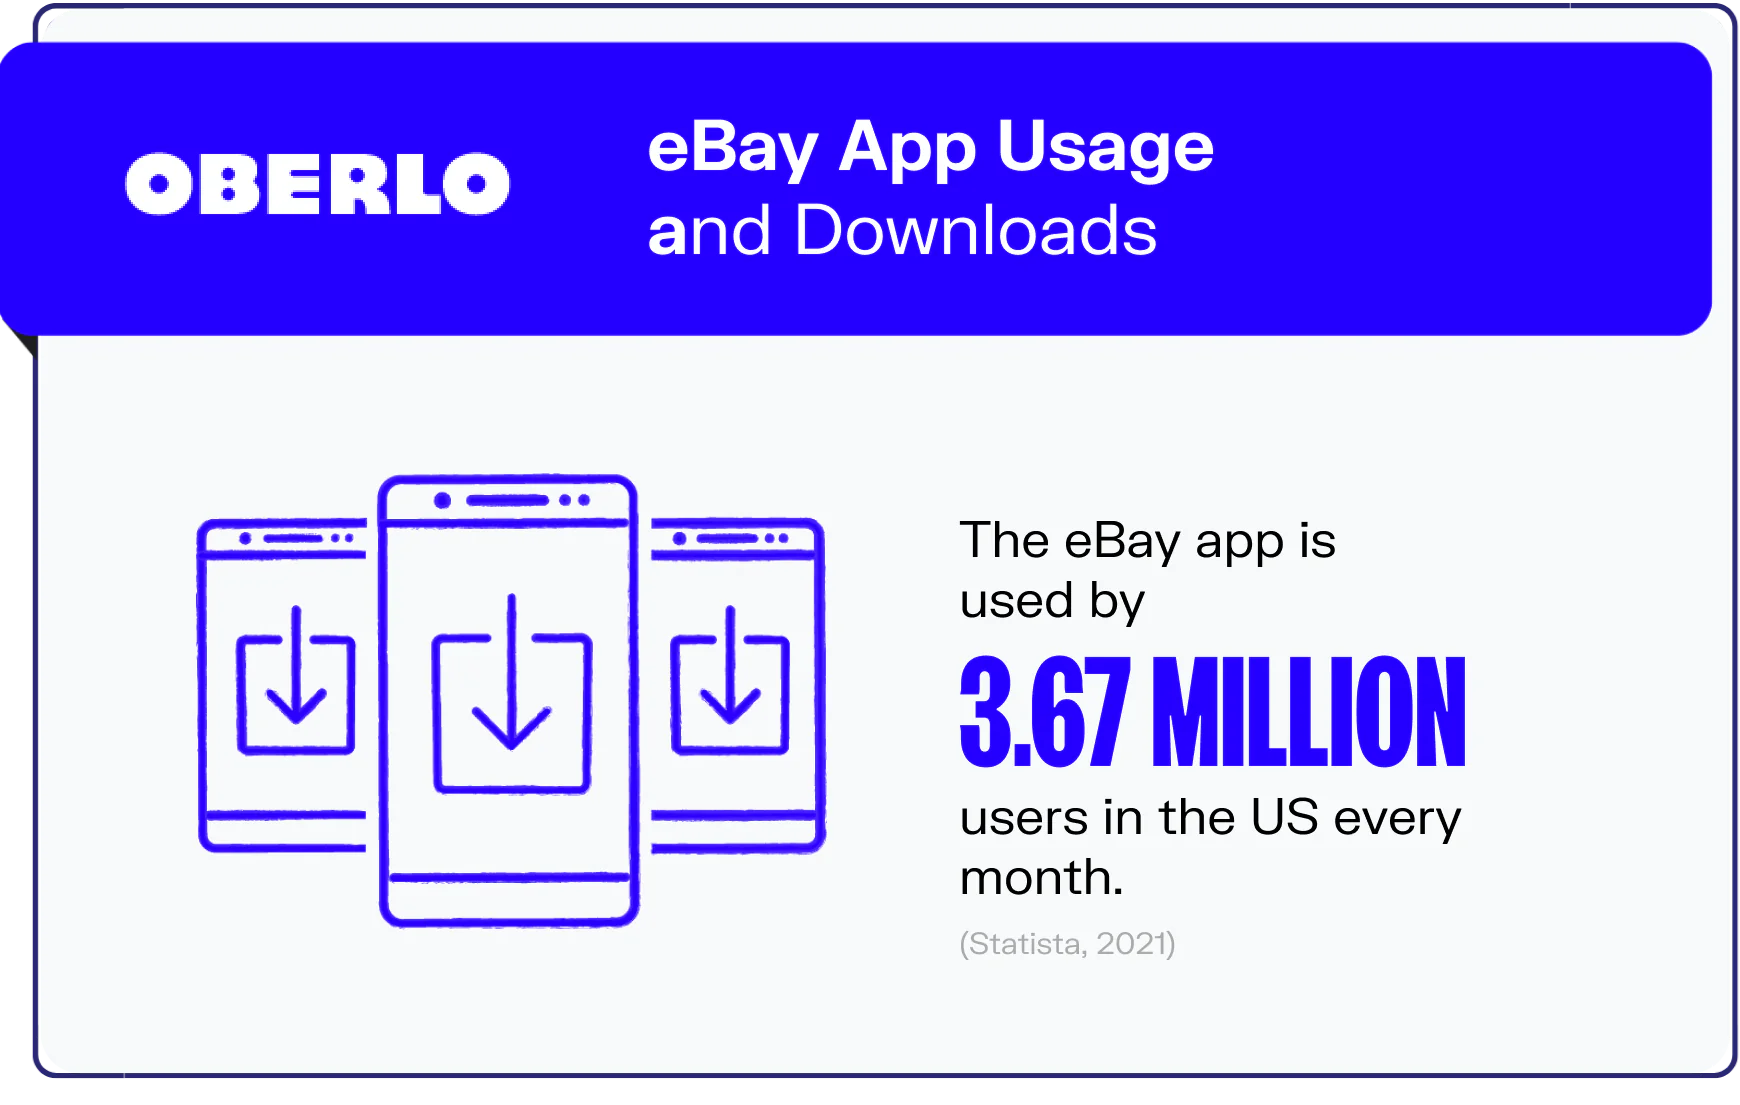
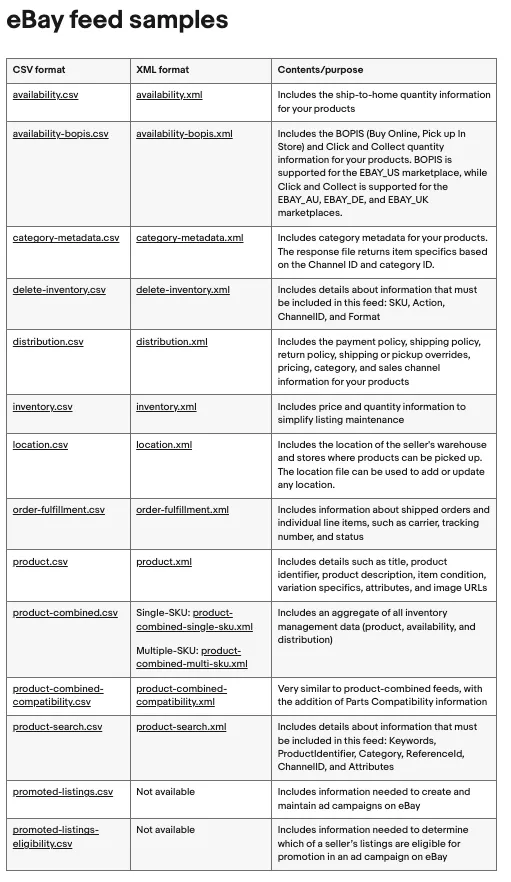


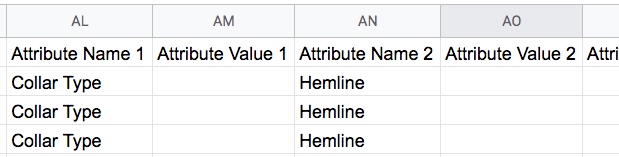

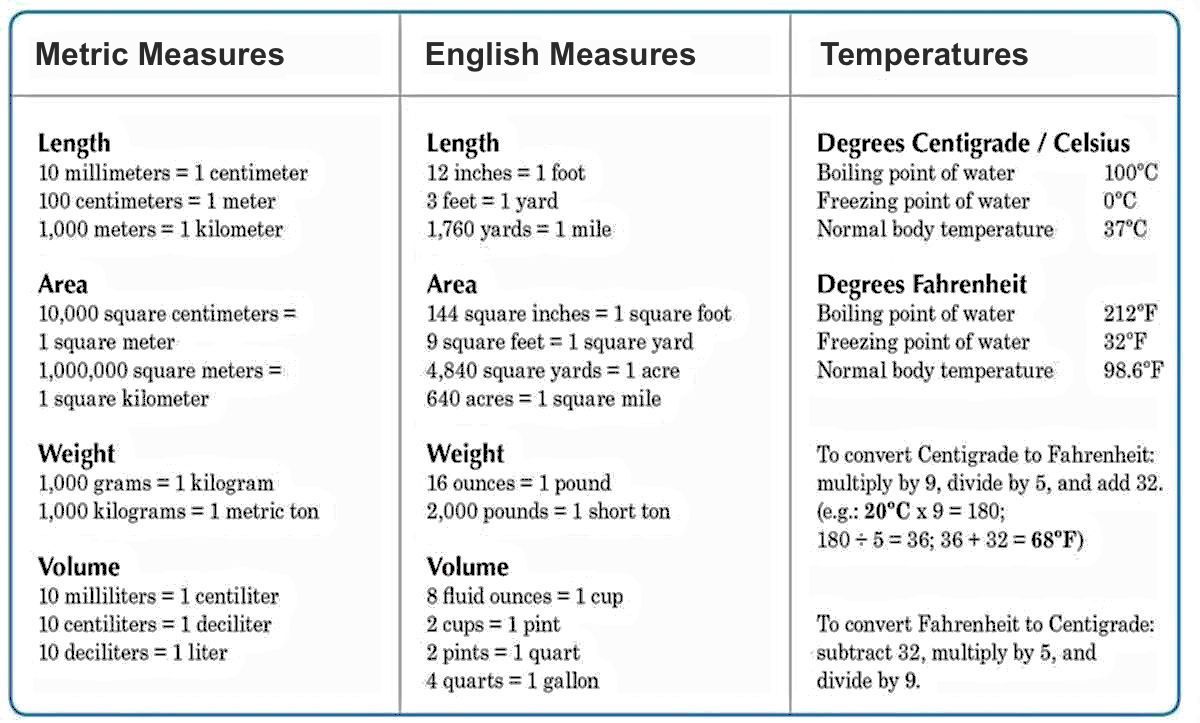
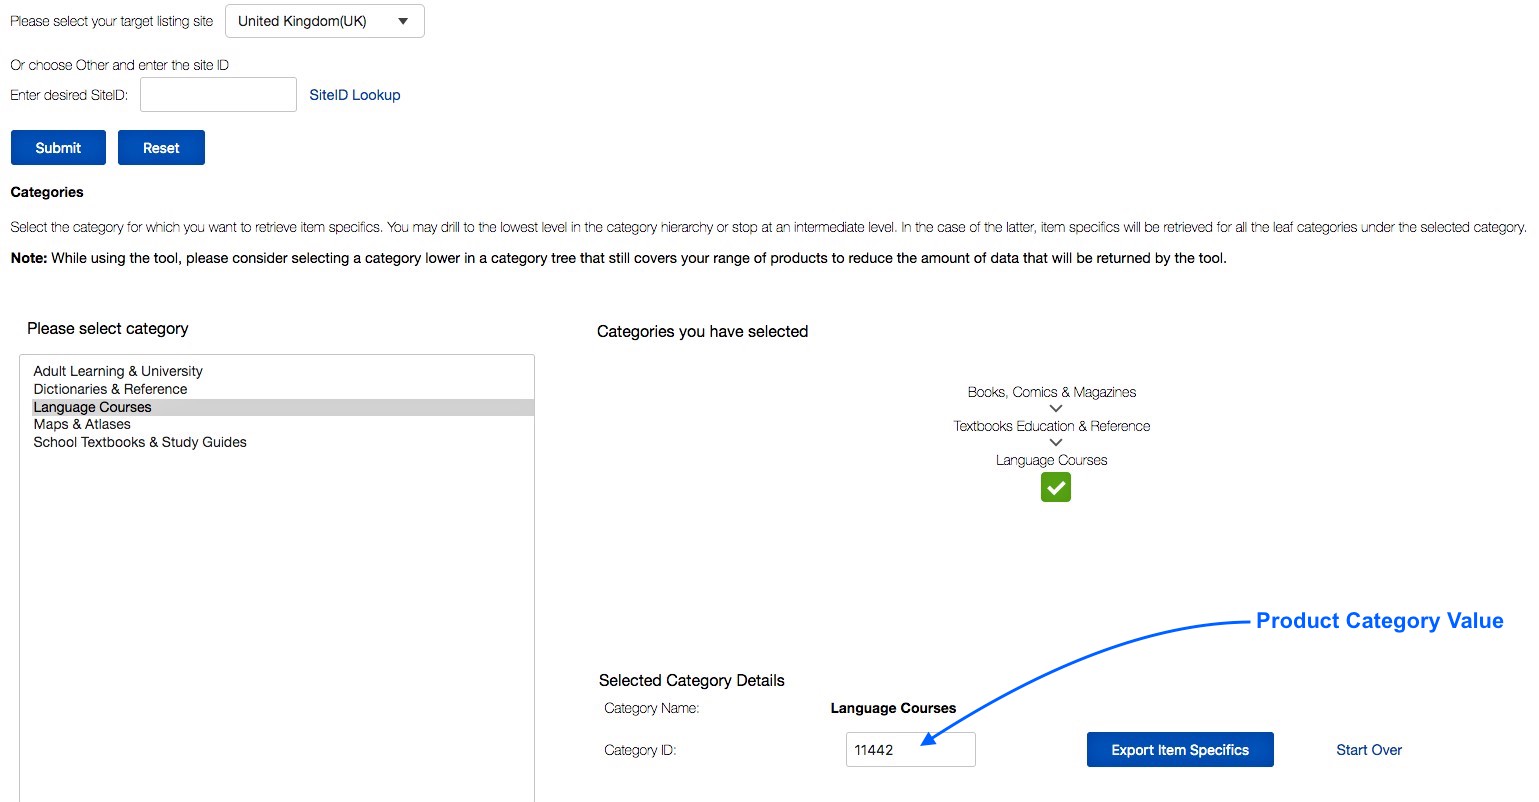
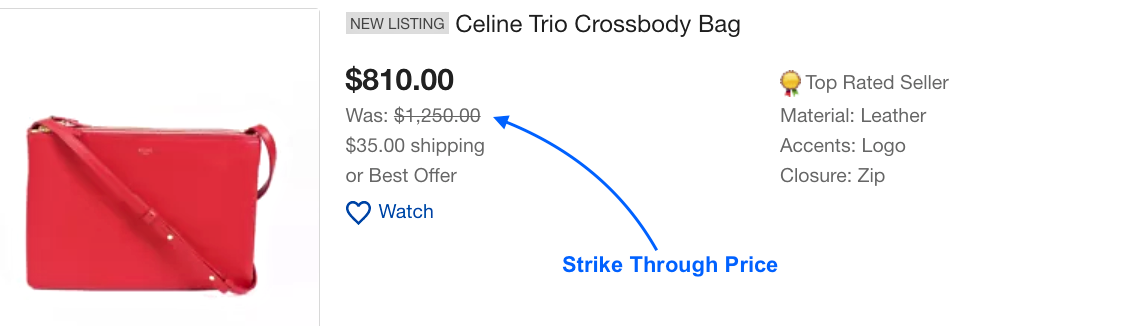
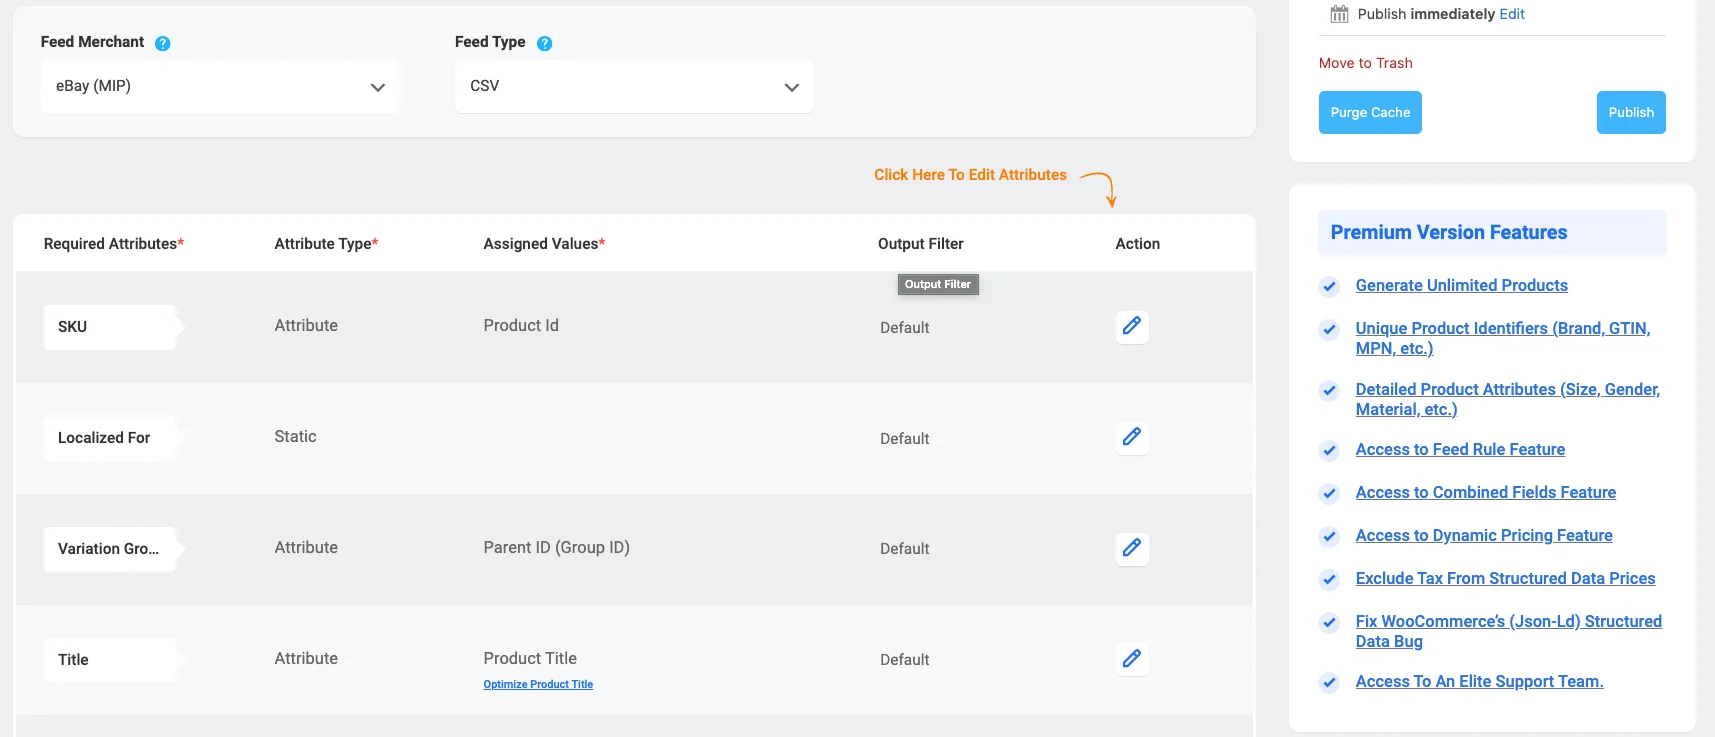
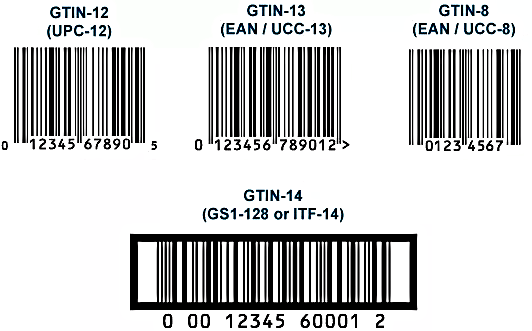


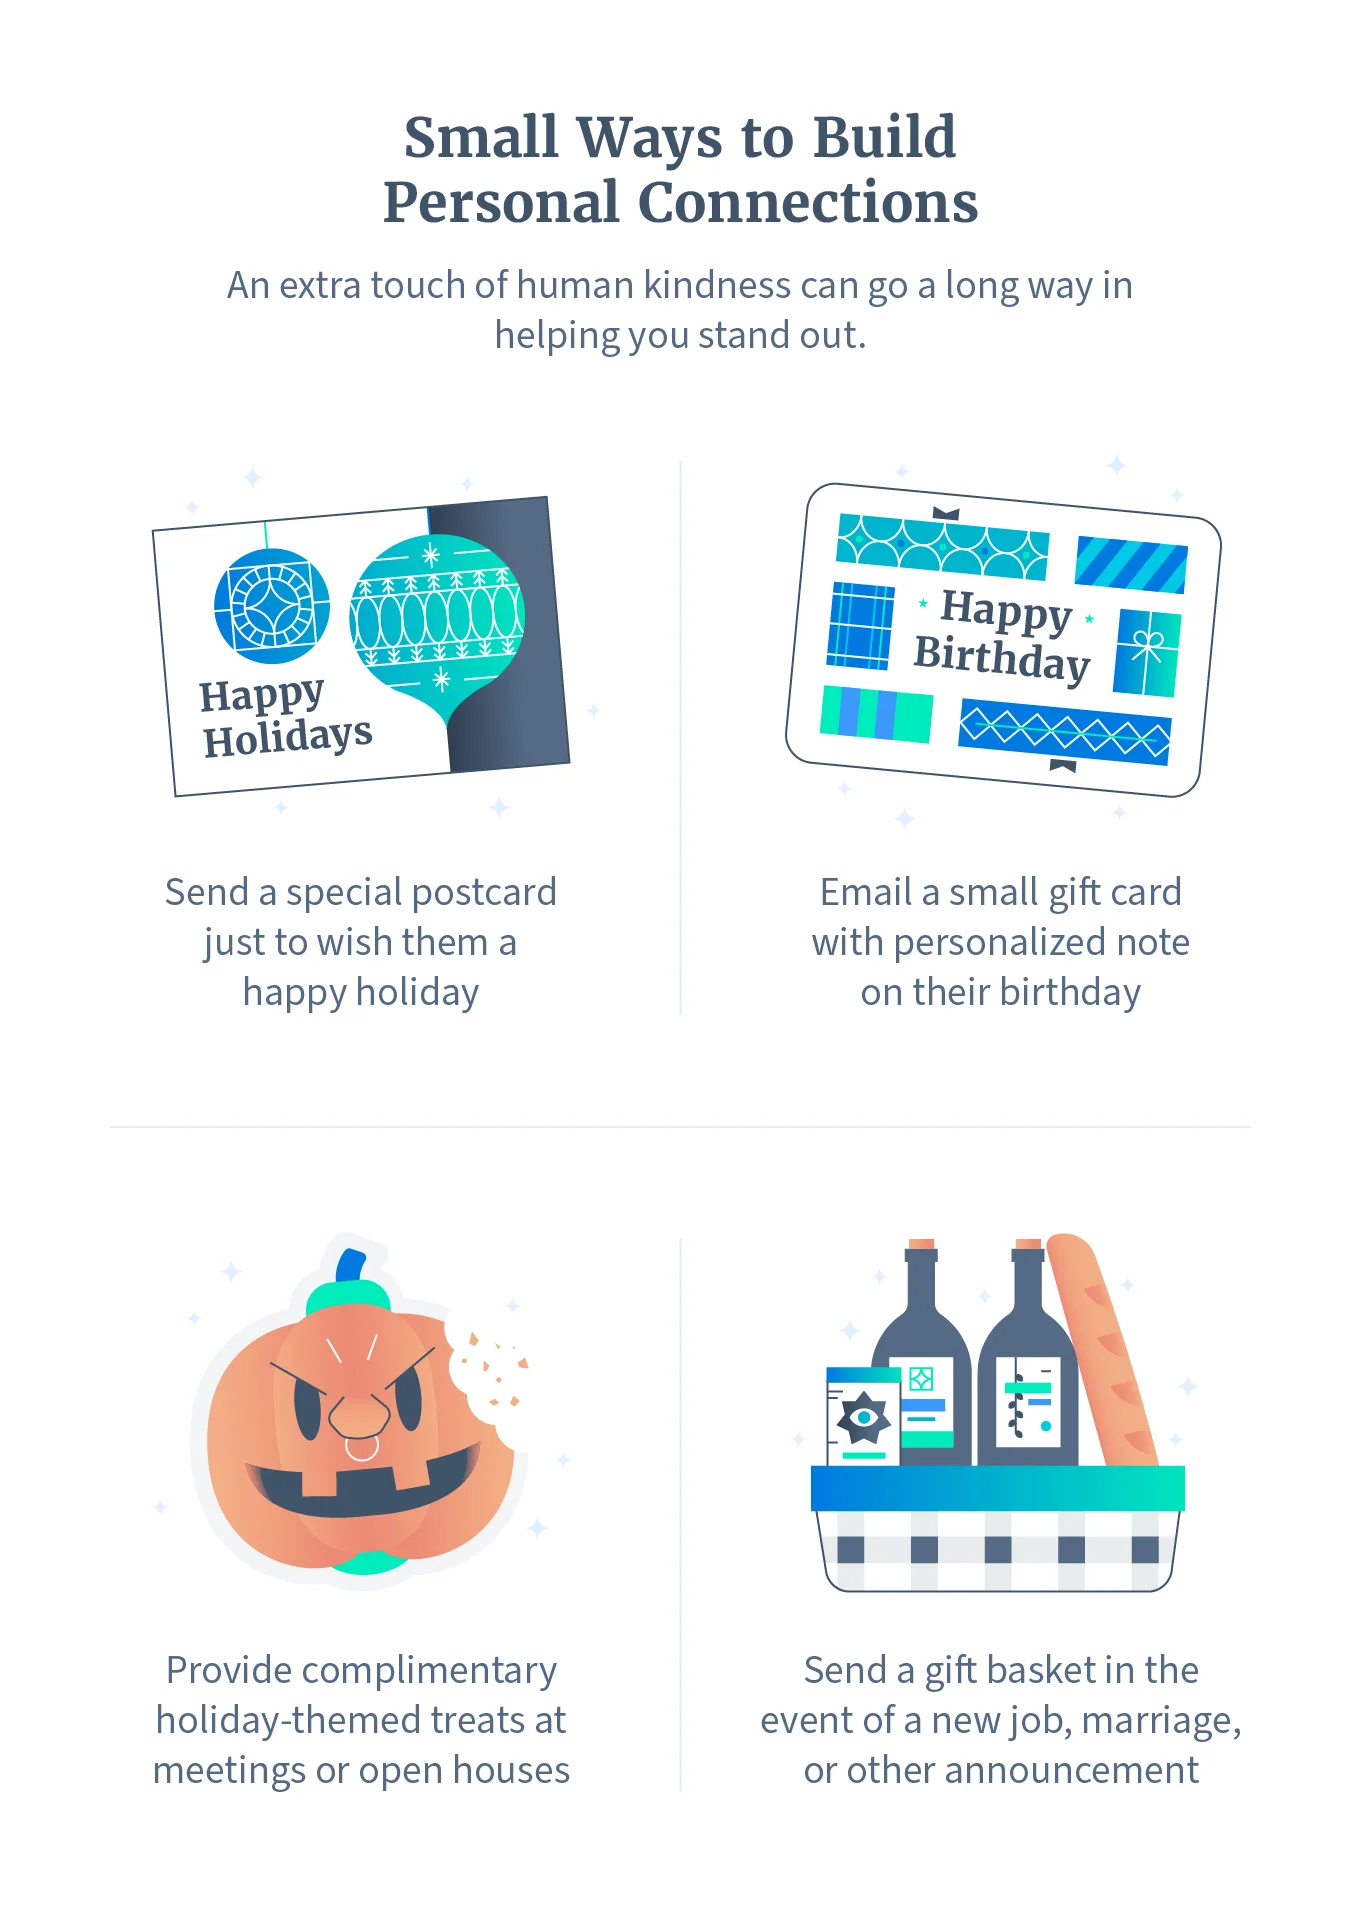
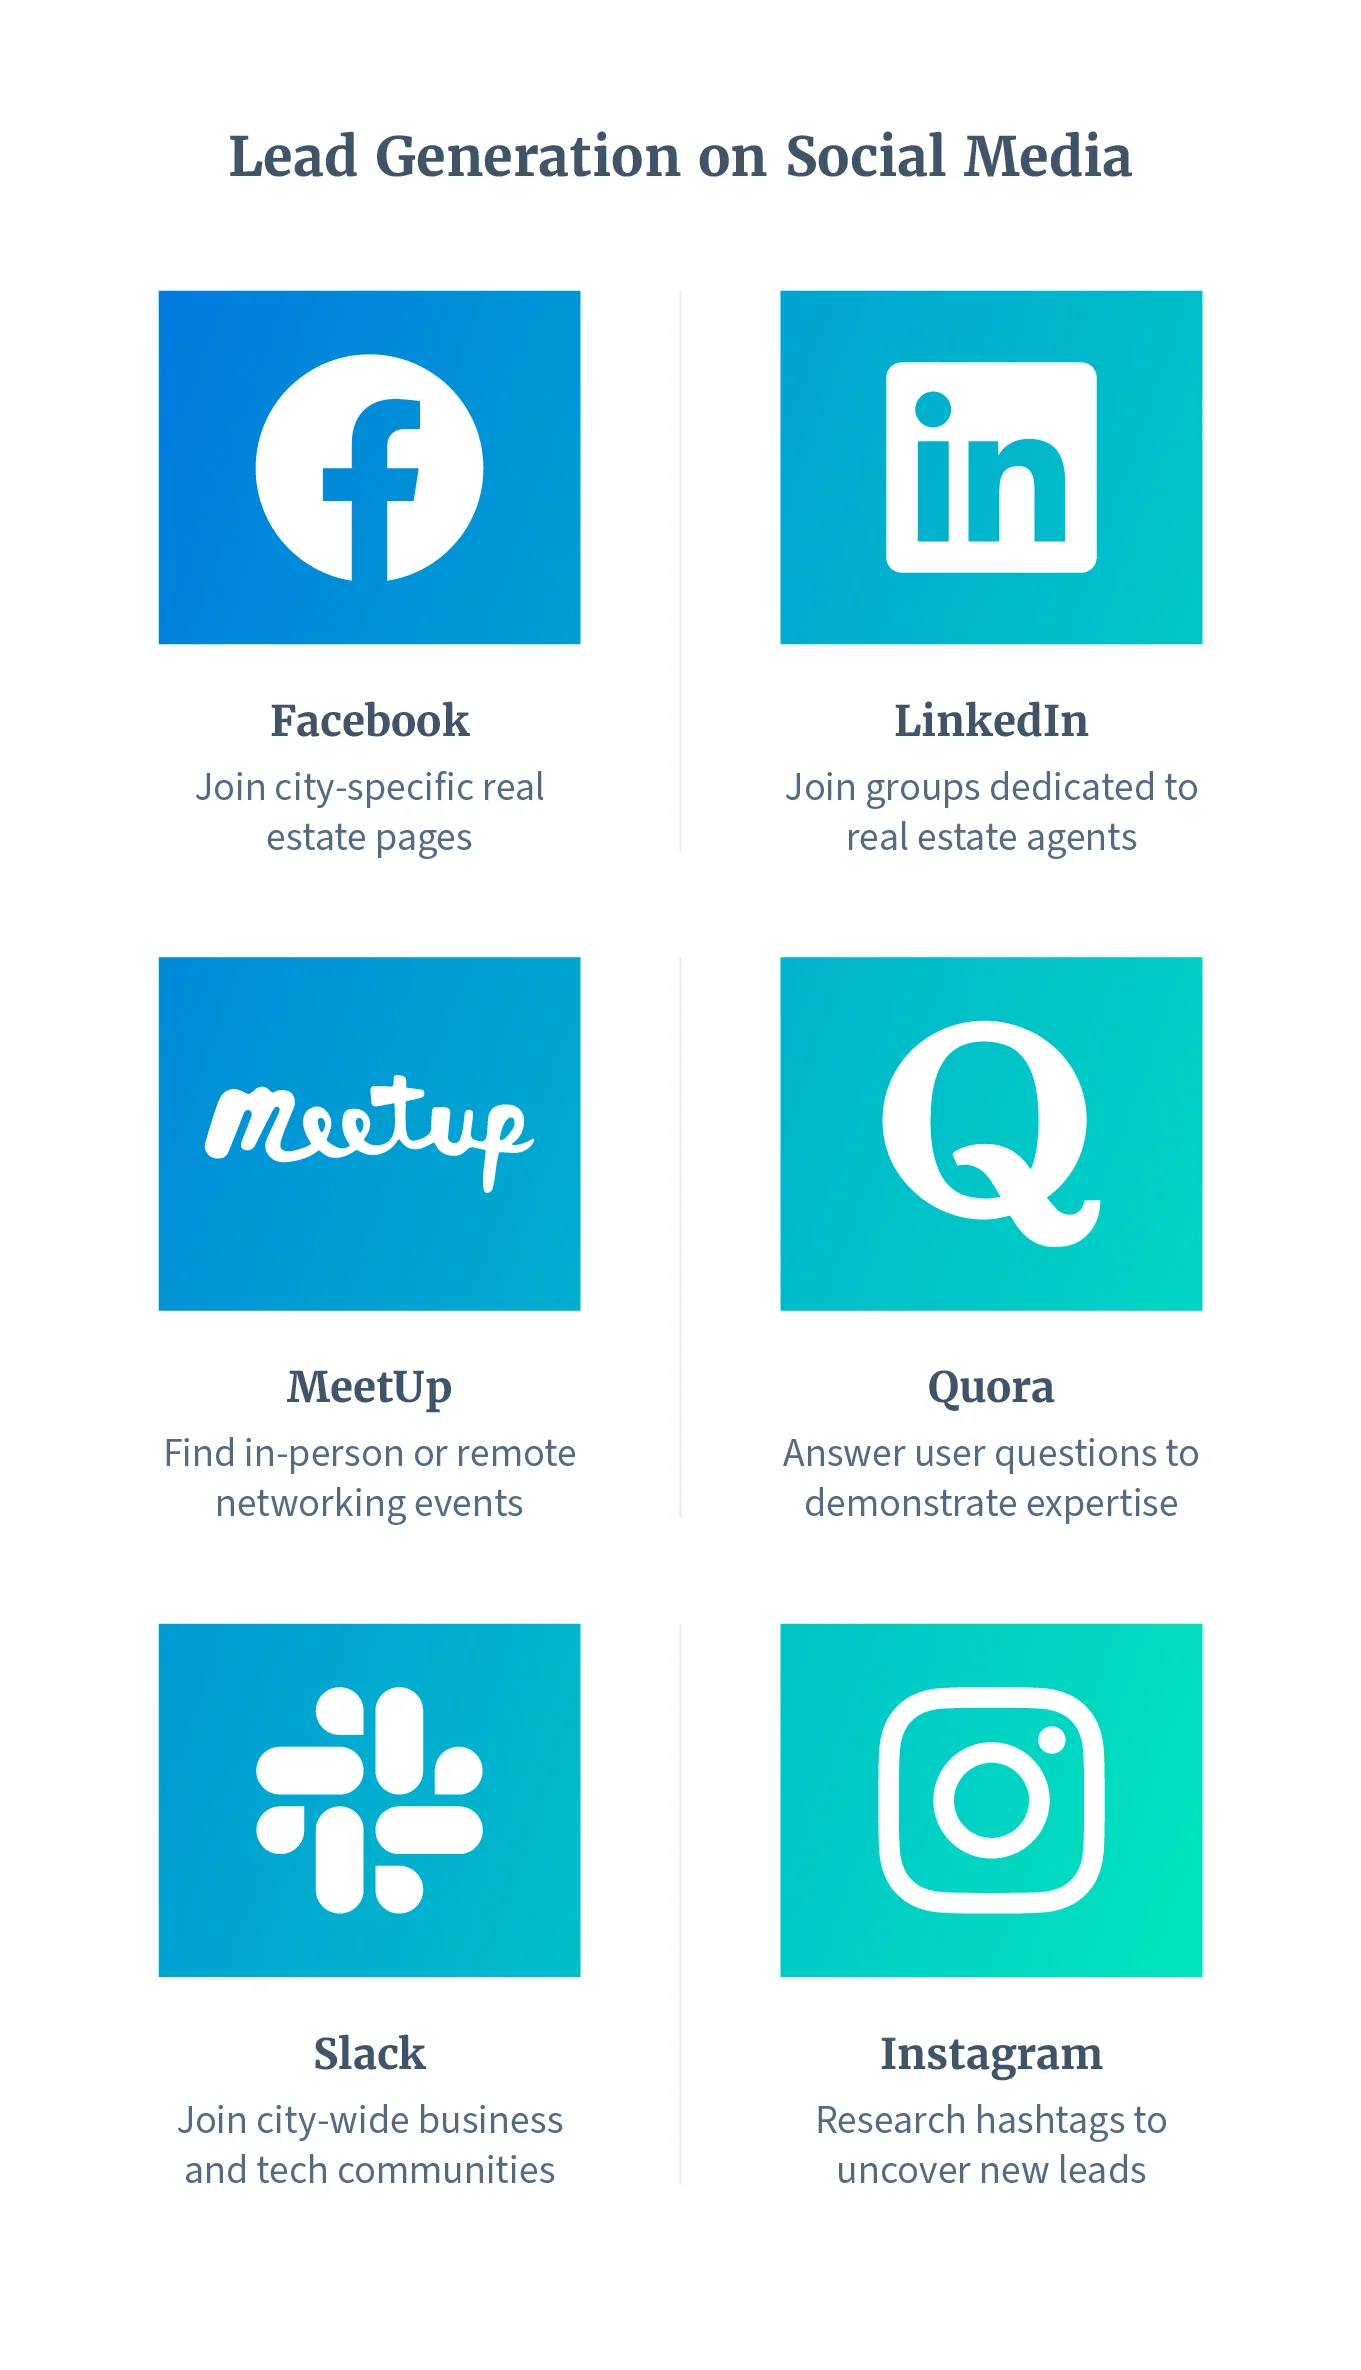
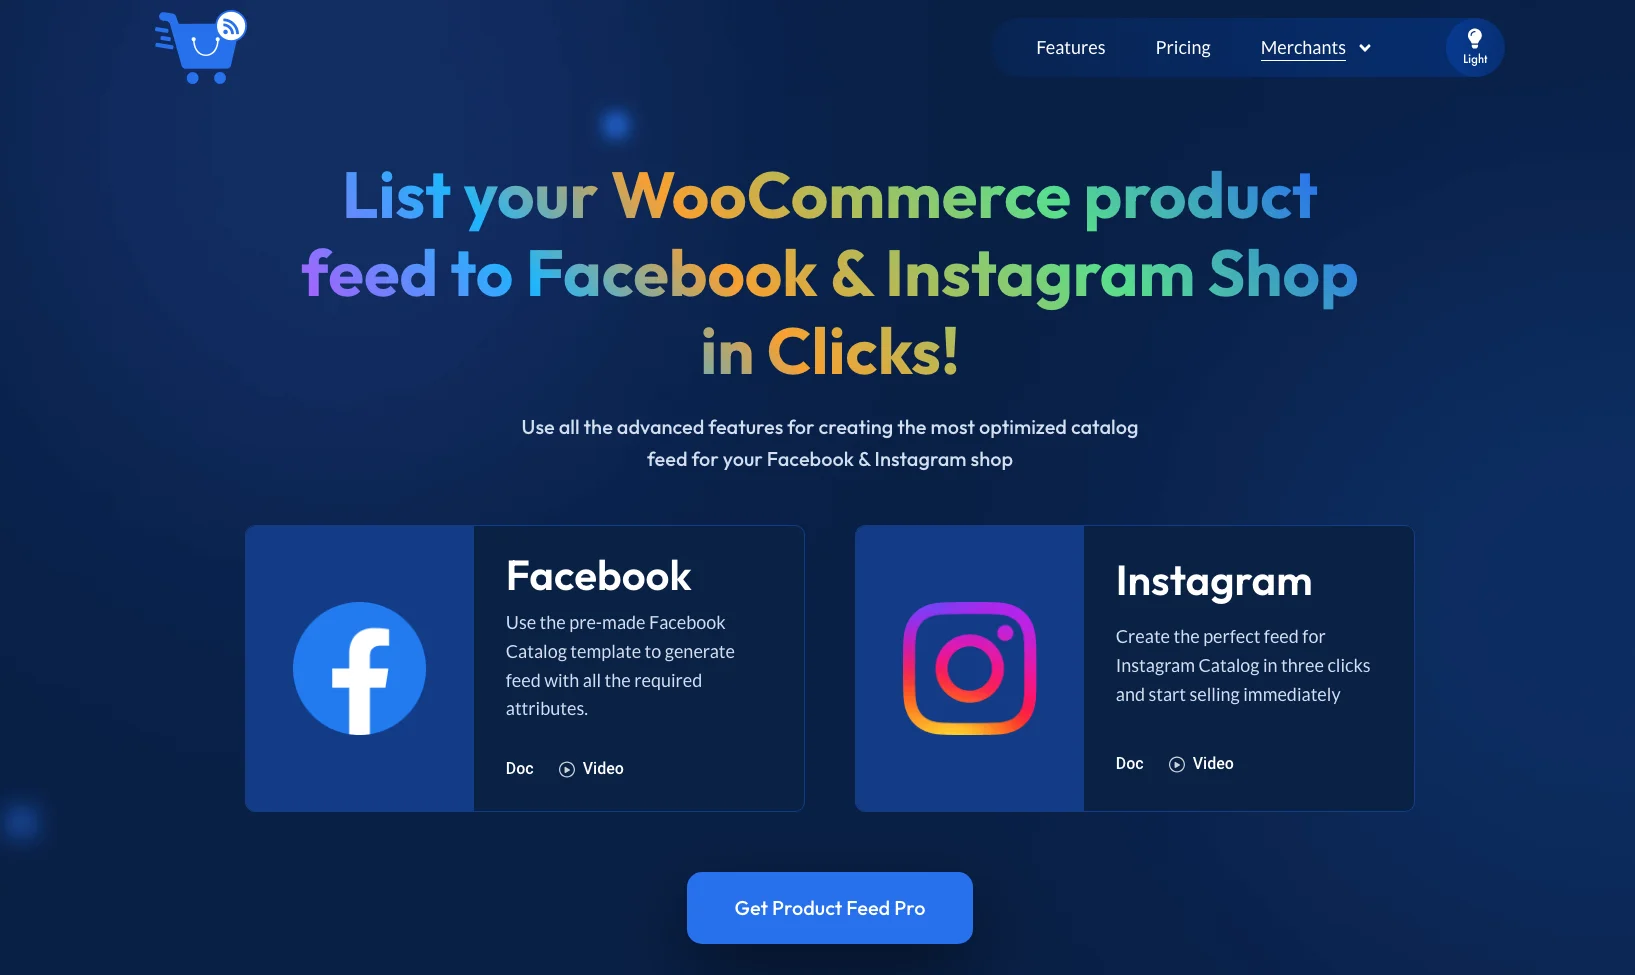

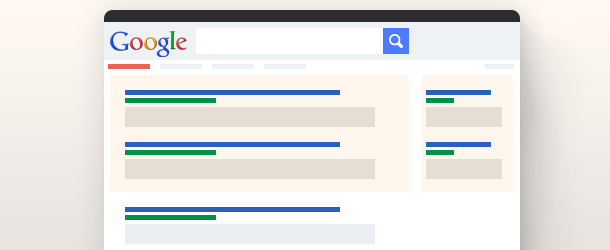

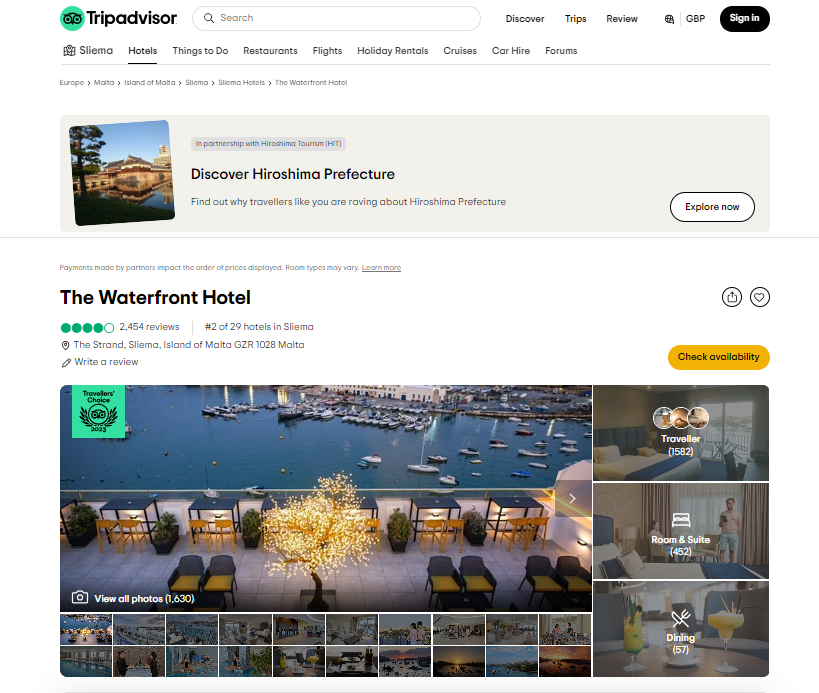


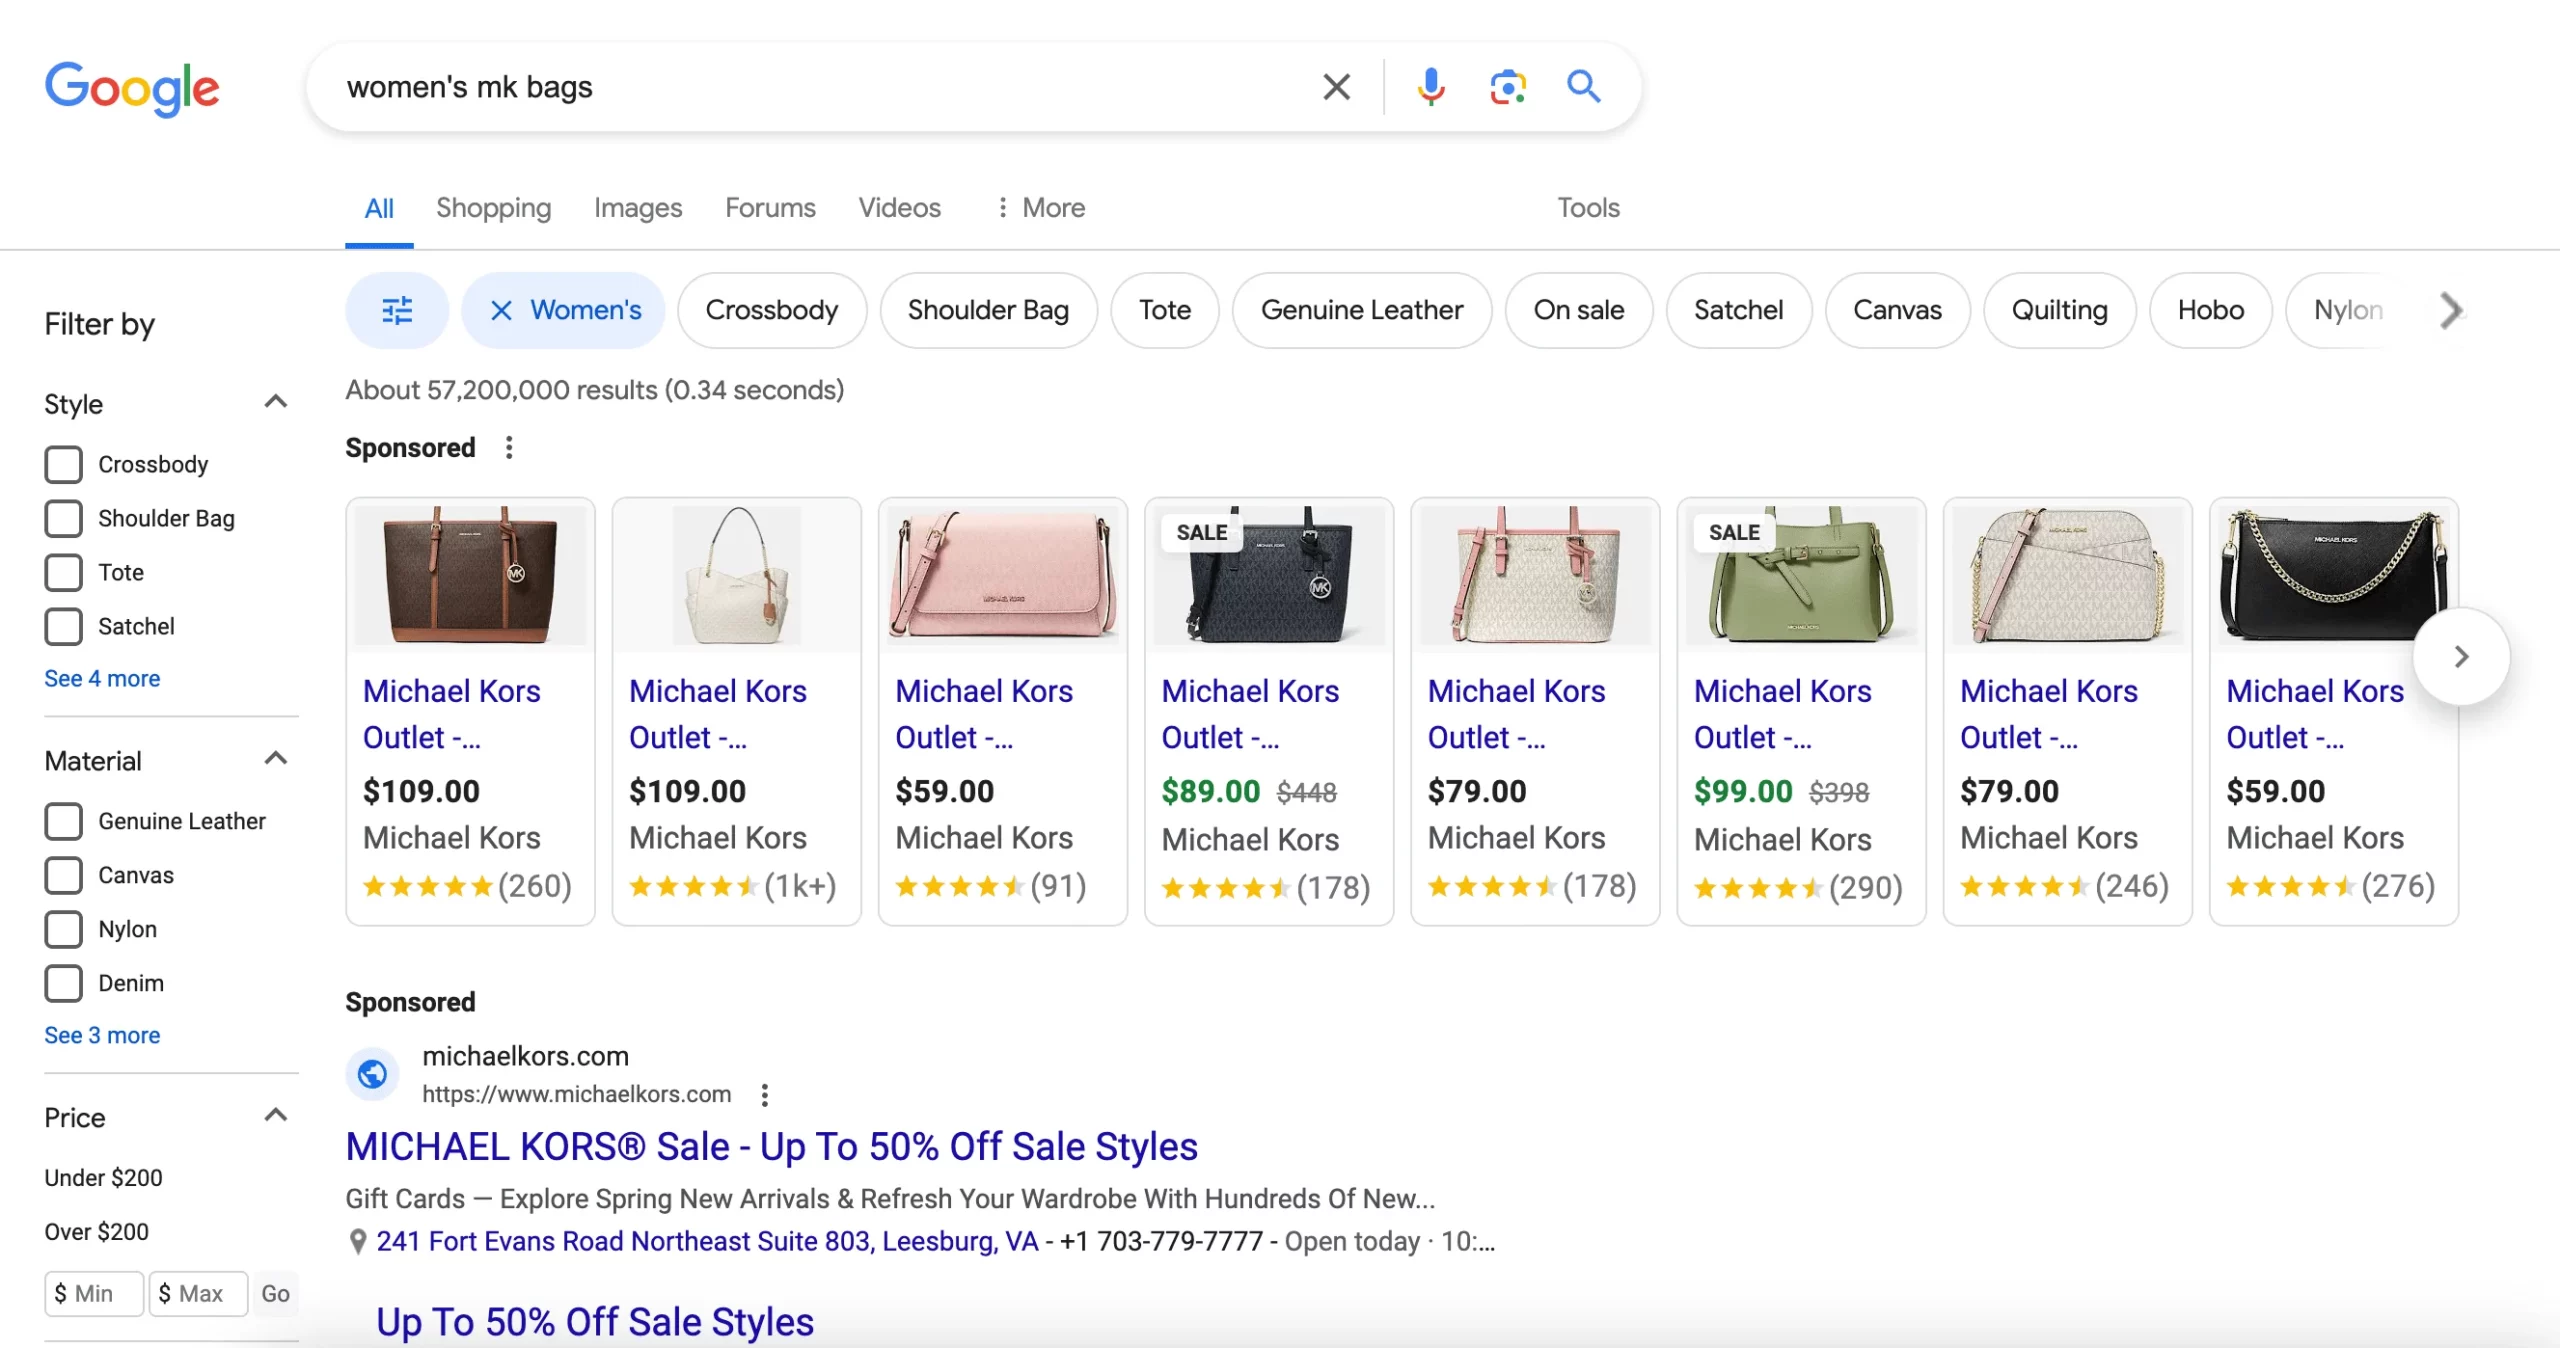
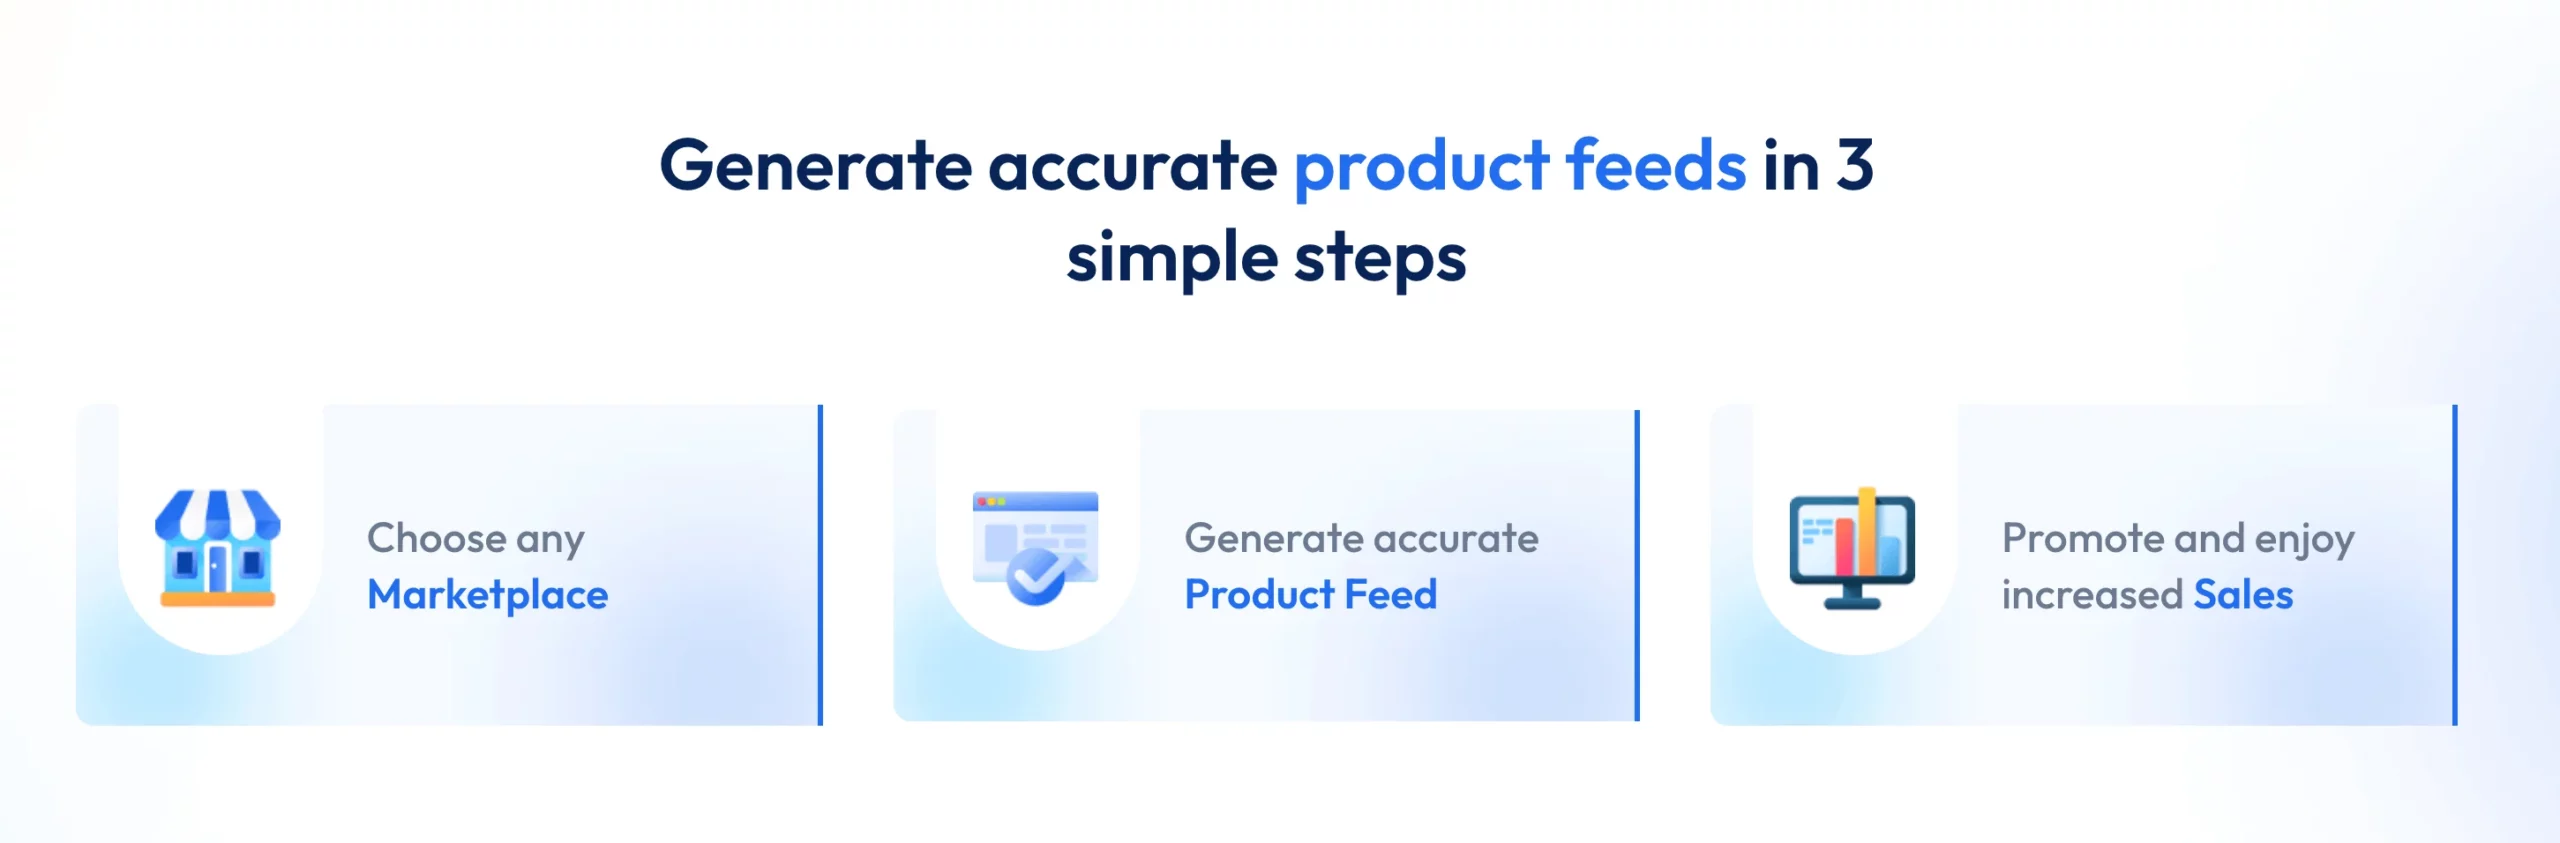
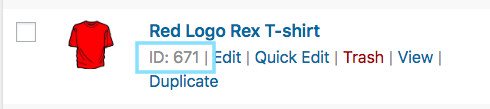


![Complete Guide To WooCommerce Product Feed - Google Shopping & Facebook [2024] 4](https://staging-rextheme.kinsta.cloud/wp-content/uploads/2019/05/005-Product-Category.png)
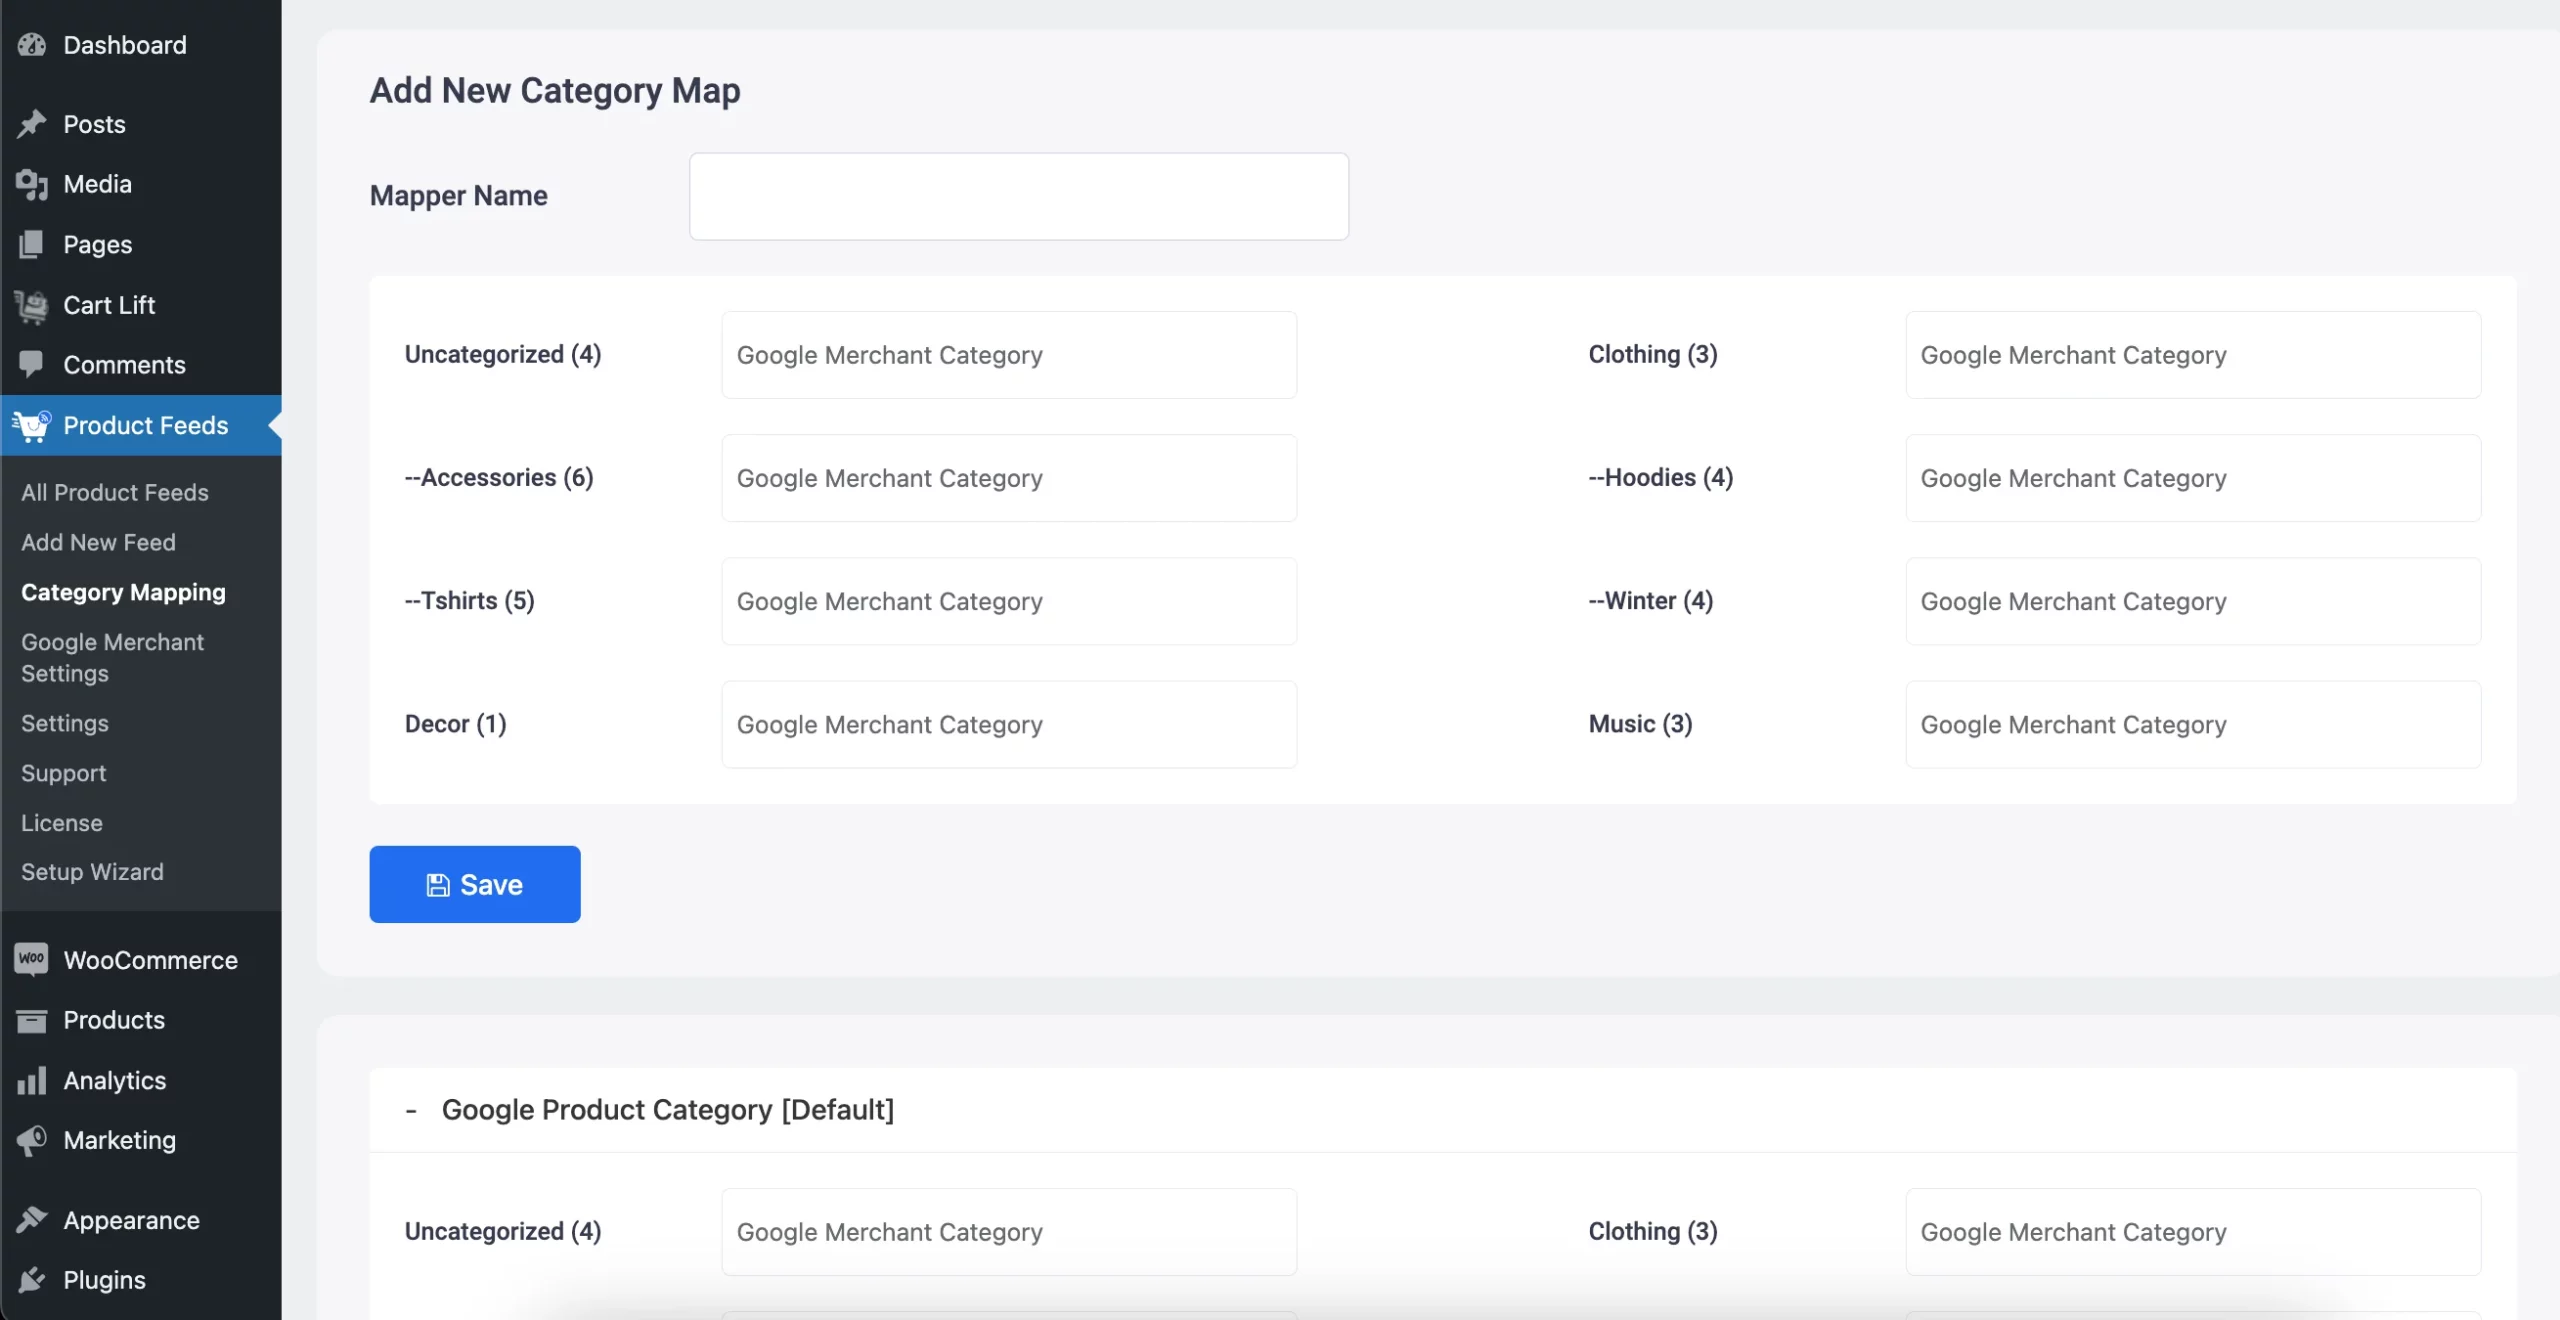

![Complete Guide To WooCommerce Product Feed - Google Shopping & Facebook [2024] 5](https://staging-rextheme.kinsta.cloud/wp-content/uploads/2019/05/007-G-Product-Image-URL.png)
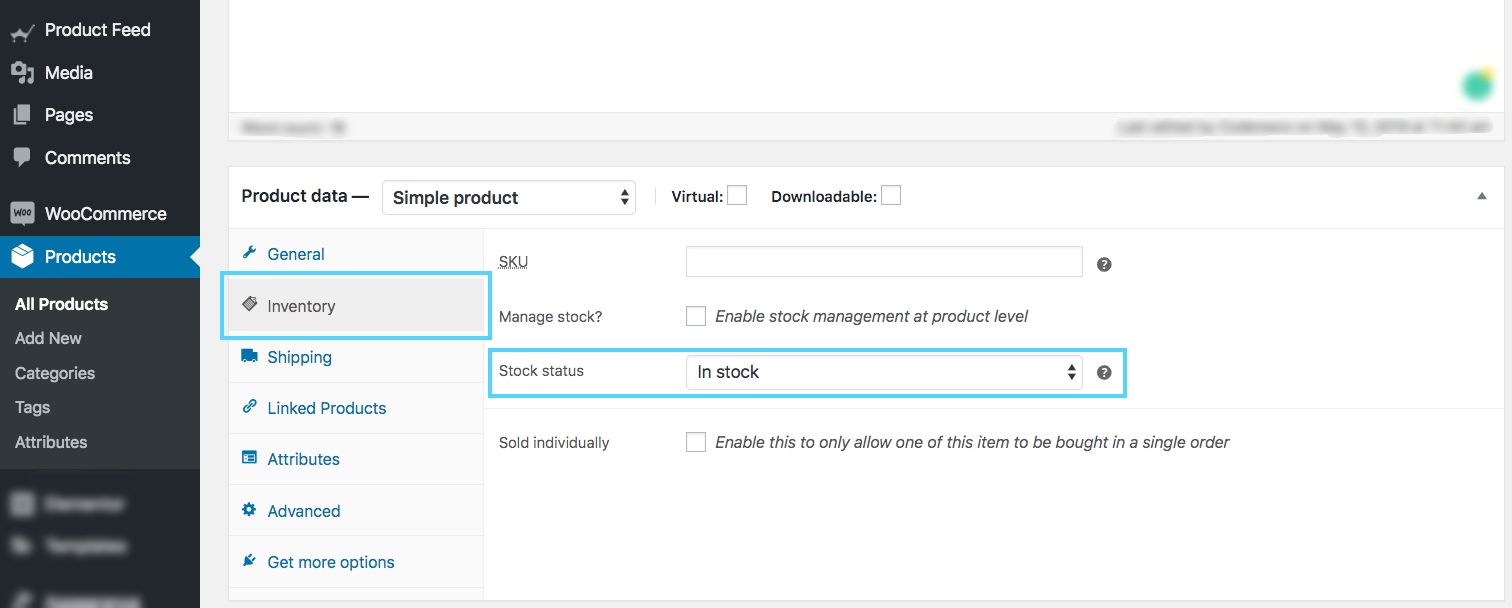

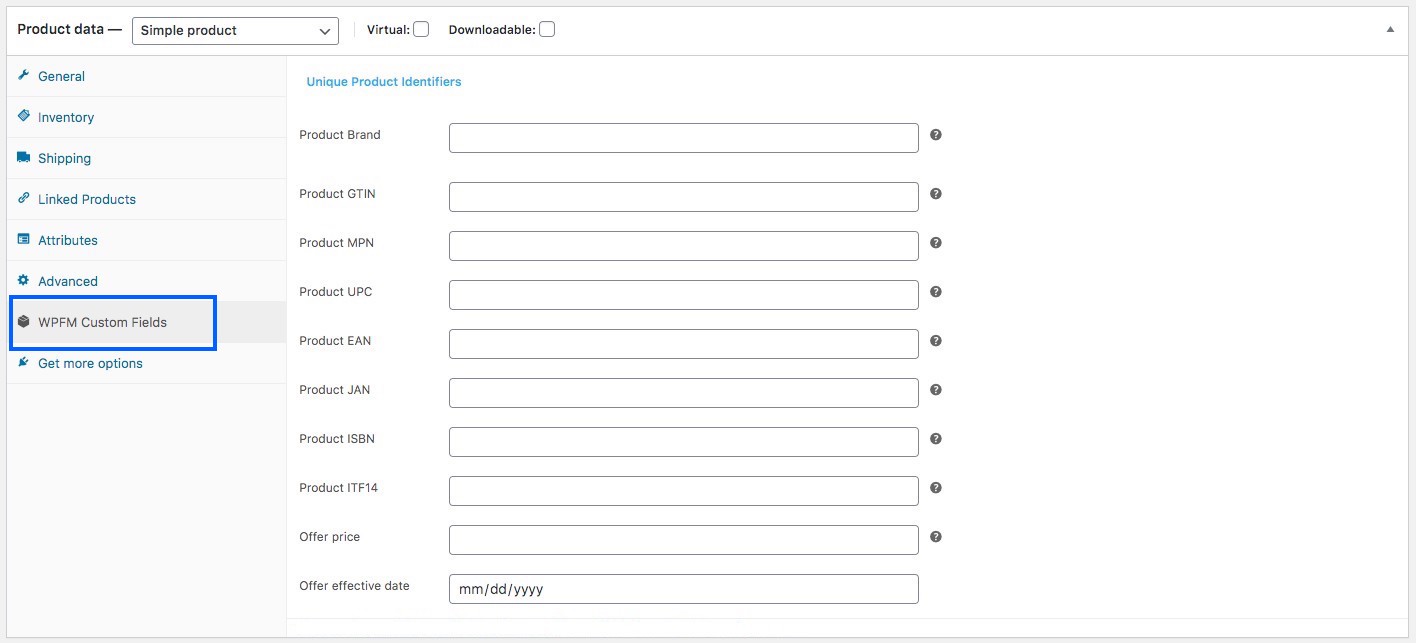

![Complete Guide To WooCommerce Product Feed - Google Shopping & Facebook [2024] 6](https://staging-rextheme.kinsta.cloud/wp-content/uploads/2019/05/Facebook-feed-CSV.png)