Erhalten Sie nützliche Leitfäden zu mehreren wichtigen Faktoren für eine erfolgreiche Website. Erhalten Sie verwertbare Tipps und richtige Schritt-für-Schritt-Anleitungen.
Amidst all the features of Woocommerce, the custom product attribute is the most simple yet effective one.
If you have various products with different features, you must learn how to create custom product attributes.
With custom product attributes you can get rid of disorganized listings, ineffective searches, and unclear descriptions that make it difficult for your customers to navigate your site
Unlike global product attributes, a custom attribute is used to define a feature of a specific product; it does not apply to most other products.
Heute erhalten Sie eine Schritt-für-Schritt-Anleitung, wie Sie benutzerdefinierte Produktattribute zu Ihrem WooCommerce Produkte leicht hinzufügen können.
Fangen wir also an.
Wie man ein benutzerdefiniertes Produktattribut für WooCommerce erstellt und verwendet
A custom product attribute has to be created while adding/editing a product, from within the Product Data section.
Wenn Sie die nachstehenden Schritte befolgen, können Sie benutzerdefinierte Produktattribute problemlos verwenden.
Step 1 – Add a New Product or Edit an Existing Item
Gehen Sie in der linken Menüleiste auf "Produkte". Sie können entweder einen neuen Artikel hinzufügen oder einen vorhandenen Artikel bearbeiten.
1. Bearbeiten oder erstellen Sie ein Produkt und scrollen Sie nach unten zum Abschnitt Produktdaten.
Here, choose the product type (for example Simple product or Variable Product).
Now, fill out the basic required data in the General, Inventory, Shipping, and Linked Products menus.
Step 2 – Add the Custom Product Attribute
Go to the Attributes menu.
Here, you can see there is a dropdown menu that says Custom product attribute and an ‘Add’ button beside it.
Klicken Sie auf die Schaltfläche "Hinzufügen".
Step 3 – Complete the Custom Product Attribute Details
You will see that a custom attribute section has been created.
The ‘Name’ field refers to the Attribute name, and the ‘Value(s)’ field refers to the Attribute terms.
Fill out the required values as per your requirements.
Let’s say I am selling a T-shirt that has both Long sleeves and short sleeves. So let’s name it ‘Sleeves’.
Für den/die "Wert(e)" müssen Sie Werte mit einem "|"-Trennzeichen hinzufügen. Fügen wir also die Begriffe "Lang|Kurz" hinzu.
Und auf der linken Seite sehen Sie die Option "Sichtbar auf der Produktseite". Diese ist standardmäßig markiert, was bedeutet, dass dieser Attributbegriff auf der Produktseite angezeigt wird.
Wenn es sich um ein variables Produkt handelt, möchten Sie diese Attributbegriffe vielleicht für die Erstellung von Varianten verwenden. In diesem Fall können Sie das Kontrollkästchen "Für Varianten verwendet" aktivieren (direkt über der Schaltfläche "Attribut speichern") und später auf der Registerkarte "Varianten" auf der linken Seite Varianten erstellen.
Then click on the “Save” attribute button and this attribute will be saved for this product.
Je nach Thema wird dieses Attribut also auf der Produktseite angezeigt.
Wann sollten Sie benutzerdefinierte Produktattribute verwenden?
Wie bereits erwähnt, kann ein benutzerdefiniertes Produktattribut erstellt werden, wenn Sie ein Produkt im Bereich Produktdaten bearbeiten oder hinzufügen.
Sie sollten das benutzerdefinierte Produktattribut verwenden, wenn Sie ein Merkmal für ein Produkt definieren wollen, das nur für dieses Produkt gilt.
For example,
if you are selling ‘Organic Tea’ in bulk, you might want to sell them in packs of 10 Sachets, 20 Sachets, and 50 Sachets per order. However, this sort of custom order package might not apply to other products in your WooCommerce store.
Here’s another example :
In this case, you should use a custom product attribute to define this feature, and possibly use it for WooCommerce product variations.
So you should create and use custom product attributes when you want to define a feature that applies to a particular product only.
This will save you time from creating a global attribute separately and help optimize the use of server resources.
If you are planning to promote on Google Shopping, you should be aware of this following fact :
Google Shopping requires additional product attributes for items in a few industry-based categories:
Größe
Farbe
Muster
Material
Age group
Geschlecht
WooCommerce doesn’t have default fields for these attributes.
However, Product Feed Manager allows you to add custom fields to your WooCommerce products to include this important information for Google Shopping.
You can go through this video tutorial to learn more :
Schlussfolgerung
As you can see, using a custom product attribute is often more convenient, and hopefully, this guide was easy to follow.
Teilen Sie uns Ihre Meinung zu diesem Leitfaden in den unten stehenden Kommentaren mit.
As a resort or luxury hotel owner, you are committed to providing your guests with a top-notch experience.
However, the problem is how you can build trust that your resort won’t give a money-wasting experience to your visitors.
One great approach to convince your clients is a virtual tour of your resort.
A resort virtual tour will allow you to connect with potential clients by giving them a realistic, immersive experience. It will eventually help to amaze guests into booking it for their next trip or event.
Today, I will discuss how you can use a virtual tour to showcase your resort online.
Through this article, you will learn:
How you can organize a complete virtual tour of your resort or luxury hotel.
The right tools to create a compelling virtual tour.
How to make your virtual tour more interactive and optimized for bookings.
Eventually, you will have an edge over your local competitors online.
Fangen wir also an.
How Virtual Tours Influence More Online Bookings
In 2024, people are becoming enthusiastic about traveling. And many tend to look for resorts to experience amazing elite service.
As digitalization becomes stronger, more and more people are getting comfortable booking resorts directly from websites.
So, it is crucial for you to make it super easy and exciting for your potential guests to book or reserve your resort.
Sure, high-quality pictures or high-definition videos are a great way to present your exquisite hotel.
A virtual tour here can make a huge difference in people’s decisions.
Your potential clients may get a unique personalized experience.
Also, they can get more eager to visit your resort just by looking at all the magnificent decor and top-notch services you offer.
Let’s go through a few resorts that are using virtual tours to show their resort online :
Resort virtual tour of Tranquility Bay Resort
This project involved creating an immersive virtual tour for Tranquility Bay Resort, designed to portray its luxurious amenities, stunning location, and spectacular views.
The tour features:
Over 80 interactive 360° scenes
A central aerial 360° image with custom navigation
Optimization for fast loading across all devices and browsers
Custom branding aligned with the resort’s existing site
“Micro tours” for specific areas (e.g. 3-bed beach house)
Another great example of using a resort virtual tour is Parrot Key Resort.
In this project, Parrot Key Resort :
Features over 70 interactive 360° scenes that showcase the resort’s best features.
Designed to be responsive across devices and includes a content management system for easy updates.
Implemented Custom features like extractable scenes, information pop-ups, and photo galleries.
The design of the tour was branded to match the resort’s aesthetic, and Google display banner ads were created to drive client interest.
You can do the same and make your resort a prime choice during trips.
With the interactive and immersive experience, your guests can get a feel for the resort’s environment and plan their itinerary before arrival.
This level of engagement and personalized experience can build trust among your targeted travelers.
And they will be more likely to book a villa at your resort directly from your website.
Planning & Crafting Your Resort Virtual Tour
By now you must understand the advantages of using a resort virtual tour.
Now let’s look at how you can plan one for your website.
1. Capture 360-degree Resort Room Images
First, you will need a good 360 camera to capture panoramic images of your resort.
In this case, it’s best to choose a high-quality camera so that you don’t miss out on any single detail.
Once you have the camera, you can get a gizmo or a tripod (or maybe a drone) and capture 360 panoramic images of your resort facilities.
In case you are uncomfortable with taking pictures on your own, you may hire professional photographers to do it for you.
Quality is a key factor here because we are talking about a resort here, not a random local hotel.
Sometimes WordPress can automatically compress and reduce the panorama image quality.
A good 360 panorama image usually comes with a very high resolution that can easily go over 3000×1500 pixels.
This comes with the option to disable this restriction so that you can easily upload panorama images that can be more than 3000 pixels in width.
2. Use A Virtual Tour Creator That’s Easy To Use & of High Quality
Once you have the 360 images of all of your villas or sports of your resort ready, you may go ahead and upload them to a reliable virtual tour creator to craft stunning virtual tours.
There are several tools out there. It’s important to choose one that has all the features that can make your virtual tour more immersive.
If you have a WordPress site, then you may use WPVR, which is the no. 1 VR plugin out there, and perfect to showcase your virtual resort tour online.
With WPVR, you can give your viewers unrestricted virtual exploration.
Your audience can explore your virtual tours however they want with the easiest navigation buttons with a mouse, keyboards, or VR headsets.
Using WPVR you can go for a luxurious button color and the button icon aligns with your brand identity.
3. Create Virtual Tours For Each of Your Facilities
Since it’s a luxury hotel, you likely have a lot of facilities available for your customers.
And a single virtual tour of the whole hotel will be quite difficult for your clients to browse through in full.
It may often confuse people and drive away potential clients.
In this case, create separate virtual tours for specific room types along with the bedroom and bathroom, plus the added facilities such as a private pool or jacuzzi.
Then, create more tours for each of your grand luxurious halls, garden, game zone, fitness center, food cuisines, or maybe the casino (if you have one).
Then, create a central landing page to highlight all your facilities and allow clients to visit the facilities they are interested in.
Having separate tours for each will help clients only to visit what they are looking for and not waste their time.
Watch this video to learn how you can add a scene to each of your separate tours.
You can also use a QR code generator to make it easy for guests to access specific virtual tours instantly.
In fact, you can have a separate landing page for each of your facilities which will allow you to rank higher on SERPs for your potential clients.
How To Optimize Your Resort Virtual Tour For More Engagements
Creating your resort virtual tours is just half the task. Making them more engaging and resourceful is the main challenge here.
Rather than giving a playing 360 environment to browse through, include a few elements to it to make it feel more realistic and personalized.
The hotspots are like small icons that visitors can click to get more information, such as:
Texts.
Images.
Promotional Banners.
Videos.
Room details.
GIFs, etc.
In your tour, you may level these information bubbles on top of specific items or resources to give more details to your clients.
For example, if there is a rooftop pool for members only, then you can add a hotspot at the ergonomic desk by the pool to give details on becoming a member, along with a video of how enjoyable it is to relax in the rooftop pool.
This is a great way to personalize with potential clients.
With WPVR, You can enjoy full access to an HTML Editor and WYSIWYG interface for crafting hotspot content.
This platform offers a vast library of over 900 customizable icons for your hotspots.
You can further personalize these icons by adjusting their colors and adding optional ripple animations.
Watch this video to learn easily how you can interactive virtual tour of your resort.
2. Communicate Through An Explainer Video
The hotspot option sounds great, but what if you could communicate directly with your prospects when they visit the tour?
That’s exactly what an explainer video will allow you to do.
An explainer video on a virtual tour is a small video screen on the right corner of the tour which visitors can play while taking the tour.
Suppose, Your resort has 3 types of villas. One is a mud house, one with a swimming pool, and the other has a jacuzzi.
Only with pictures and description, it can be confusing what type of villa has more facilities.
But with a guided explainer video your clients can fully understand all the facilities each type of villa has.
In this way, you can also reduce the amount of resort or hotel booking cancellations.
To add an explainer video, You have to pick a VR tool like WPVR that has the feature of adding an explainer video.
Worried about how you will create an explainer video? Watch this video to understand the process clearly.
So that you can leave an introductory video or explain your facilities in detail via a well-planned video.
This could act as an elevator sales pitch to convince the client to book your resort.
3. Villa Bookings Within The Resort Virtual Tours
Let’s say a prospect browsed your Premium Room with a private pool. What now?
Does he have to go to an external page to confirm the booking, or maybe call you?
No need! Let your clients place bookings while experiencing the virtual tour.
This will help to increase your number of hotel bookings as the prospect will have no chance of getting distracted from his decision.
4. Guide Your Clients With An Interactive Floor Plan
In case you do choose to include a central virtual tour that leads to various facilities, you may include a floor plan of your hotel or resort to help the visitor navigate through the tour.
This will help the clients to get accustomed to your luxury hotel even before visiting it in person.
Plus, it will act as an added element to get the prospect more excited about the tour.
5. Offer A Realistic Experience With VR Headsets
Apart from taking a realistic tour on a desktop or a mobile, you may also allow your clients to get a complete VR experience via VR headsets.
People who love virtual reality often enjoy direct virtual tours.
If your resort is well-decorated, it will help pique the interest of such clients.
Naturally, they are excited to travel and visit beautiful places. If your resort is well-decorated, it will help pique the interest of such clients.
It will not only make the experience near-perfect to reality, but it will leave a long-term good impression on your quality.
6. Share Your Resort Virtual Tour on Social Media
Virtual tours provide an effective “hook” for initiating and maintaining social media interactions with your audience.
Increase engagement with the brand
Generate user-generated content
Drive Conversations About Your Tour and Business
Gather valuable feedback for future improvements
See below how the tranquility of Bay Beach Resort shares its virtual tour on its social media :
They use the power of interactive, immersive content in digital marketing.
And the result came up as below :
Up to 15x more user engagement compared to traditional methods
Improved customer research and decision-making process
Increased return on investment through higher online hotel bookings and engagement
So, you can start using this digital marketing strategy using a virtual tour.
Make sure you use industry-specific hashtags when posting tour-related content
Encourage audience participation by asking them to share personal experiences related to showcased spaces
If you are using WPVR, then you can easily share your resort virtual tour on your social media platforms.
7. Optimize Your 360-Degree Luxury Hotel Virtual Tour For Smartphones
Since this is the age of smartphones, it’s evident that you should make your virtual hotel tour optimized for smartphones.
Responsive Tour:
In most VR plugins, you will find a way to make the tour responsive for mobile devices with a Mobile Media Resizer and make the tour smoother and more enjoyable.
Gyroscope Support:
Gyroscope will let your visitors enjoy the virtual tour by moving their smartphone devices around just like they would have to move on a live visit.
Overall, if you can make the experience hassle-free and attractive at the same time.
8. Use QR Code
Your clients can explore rooms, check out features, and get a real feel for the space – all just from your site in an easy way.
Using QR code generators is super convenient for your clients. They just have to scan the code and they’re in!
Using A Virtual Tour Creator You Can Rely On – WPVR
Now that you know how you can start using luxury hotel virtual tours and attract more clients, a crucial part of your whole plan will be choosing the right tool.
In WordPress, the best plugin to help you create the stunning virtual tours you want is WPVR.
It is the only WordPress plugin that comes with all the amazing features that help to increase engagement in your virtual tour while being reasonable in price.
If you are from the Czech Republic and Slovakia, then Heureka. cz and Heureka. sk is the perfect marketplace to market your Woocommerce products.
Because Heureka regularly showcases deals, discounts, and promotional offers, serving a dual purpose to the targeted customer using separate websites for each country.
It helps consumers find the best value while providing retailers like you with an effective marketing tool to attract potential buyers.
Heureka incorporates customer reviews and ratings. With positive reviews and ratings, you can attract more potential clients.
So, if you are a WooCommerce store owner willing to sell on Heureka’s websites, in this article,
Here, I’ll talk about:
1. Why it’s good to sell your products on Heureka
2. Mandatory and other optional Product Attributes To Include In The XML Feed
3. How easily you can create an XML feed for Heureka using the right plugin (ONLY 7 STEPS)
I’ll explain everything in a simple way, whether you’re new to Heureka or already using it.
By reading this, you’ll learn how to show your products to more people and thus sell more.
But first, let’s know the reasons for choosing the Heureka marketplace to sell your products
Reasons To Sell on Heureka
Heureka provides a platform to showcase your products to a wide audience from the start.
Not many marketplaces provide these benefits. You have to wait longer to get wide audiences in other marketplaces.
This platform is user-friendly and allows sellers like you to manage their stores with ease.
It supports multiple payment options, so you can offer diversified payment options to your customers.
Heureka’s partnerships with major companies like Google help drive traffic to your store. The platform prioritizes security, using encryption to protect customer data.
So, Heureka can be a great way to expand your online business and increase your sales.
Mandatory Product Attributes To Include In The XML Feed
Following are the required product attributes that you must submit for every product you want to promote on the Heureka marketplaces.
ITEM_ID
Example Format: <ITEM_ID>3252</ITEM_ID>
This is the unique product id.
PRODUCTNAME
Example Format: <PRODUCTNAME>Adidas Superstar 2 W EUR 36</PRODUCTNAME</PRODUCTNAME>
Use a product title that defines exactly what the product is, along with its most notable features such as color, size, etc.
For different types of products, you are recommended to include different types of information in the product title.
Product name structures guide per category: – Web View – PDF View
DESCRIPTION
Example Format: <DESCRIPTION>V rámci kolekce Originals uvádí adidas sportovní obuv The Superstar, která je již od svého vzniku jedničkou mezi obuví. Jejím poznávacím znamením je mimo jiné detaily designové zakončení špičky. Díky kvalitnímu materiálu a trendy vzhledu, podtrženého logy Adidas uvnitř boty i na ní, bude hvězdou vašeho botníku.</DESCRIPTION>
Provide a description of the product with real data.
Do not include any HTML tags or shortcodes in the description.
URL
Example Format: <URL>https://www.yourdomain.cz/adidas-superstar-2-w7ref?eur-36</URL>
Submit a valid URL of the product on your WooCommerce store.
For variable products, each variant should have its unique URL.
Make sure the link has no spaces or diacritics.
IMGURL
Example Format: <IMGURL>https://www.yourdomain.cz/adidas-superstar-2-36-img-1.jpg</IMGURL>
Use the link to the main product image for this attribute.
For product variants, you may use the featured image for each variant respectively.
Make sure the link has no spaces or diacritics.
PRICE_VAT
Example Format: <PRICE_VAT>36</PRICE_VAT>
Submit the price that is a total of all the fees, except shipping, such as the base price + tax + extra packing charges, etc.
No need to include the currency.
MANUFACTURER
Example Format: <MANUFACTURER>Adidas</MANUFACTURER>
If the product is manufactured by a renounced Brand, then you have to include the brand name in the product name as well as under this attribute.
CATEGORYTEXT
Example Format: <CATEGORYTEXT>Oblečení a móda | Obuv | Dámská obuv</CATEGORYTEXT>
Heureka has its own category list, and you need to submit which category each of your products may fall under.
**You will find category lists in your required language on the knowledge page for your respective country.
P.S. You may use category mapping in our suggested plugin to submit the right category as per Heureka’s requirements without changing the actual categories in your WooCommerce store. **I’ll explain how later in this guide.
DELIVERY_DATE
Example Format: <DELIVERY_DATE>0</DELIVERY_DATE>
Use this attribute to indicate how soon the product is available for shipping, i.e., if it is in stock.
If you have the product in stock, then use the value as 0. Else, mention the number of days after which the product will be in stock.
*Do not submit any product that is only available on request.
ITEMGROUP_ID
Example Format: <ITEMGROUP_ID>3251</ITEMGROUP_ID>
For the variants of a variable product, submit a common item group ID to indicate that they are variants of the same product.
These are the necessary attributes. If you include these data in your product feed, you can then submit it to your merchant account.
Other Optional Product Attributes You May Submit
You may include a few more additional attributes to the product data to increase product presence and conversion.
PRODUCT
Example Format: <PRODUCT>didas Superstar 2 W EUR 36 – novinka</PRODUCT>
You may submit this attribute to indicate some extra product benefits.
Following accepted information you may include:
Extended warranty
x year warranty on engine, parts..
“to your door” delivery surcharge/ convenience fee
Extension of warranty/post-warranty service
Free maintenance
Extended return policy
Only in-person pick up
Gift-wrapping and other services regarding the product
PARAM (For Variations)
Example Format: <PARAM> <PARAM_NAME>size</PARAM_NAME> <VAL>41</VAL> </PARAM>
For variable products, you may submit extra parameters by which the product varies under the attribute group, PARAM. For example, if a product varies by size, then you have to submit the size values as a separate attribute.
For multiple variation terms, you may submit this attribute multiple times.
You may also use it to submit additional product attributes such as material, pattern, etc. (For material, you may submit a percentage as well – PARAM_PERCENTAGE).
IMGURL_ALTERNATIVE
Example Format: <IMGURL_ALTERNATIVE>https://www.yourdomain.cz/adidas-superstar-2-36-img-1.jpg</IMGURL_ALTERNATIVE>
You may submit additional product images by submitting this attribute multiple times.
DELIVERY
Example Format: <DELIVERY> <DELIVERY_ID>CESKA_POSTA</DELIVERY_ID> <DELIVERY_PRICE>120</DELIVERY_PRICE> <DELIVERY_PRICE_COD>120</DELIVERY_PRICE_COD> </DELIVERY>
If you use multiple delivery services, then submit this attribute group multiple times to Indicate the delivery price and the service that will be used for the products
Use the Delivery Price COD only when you also accept cash on delivery. Else, just the Delivery Id and Delivery Price is enough.
If you have the EAN of the product available, it’s recommended to submit it as well.
ISBN
Example Format: <ISBN>9978-0-123456-47-2</ISBN>
For books, you may submit the ISBN number.
VIDEO_URL
Example Format: <VIDEO_URL>https://youtu.be/gG4gtcTHb_Y</VIDEO_URL>
If you have a product review video on Youtube, you may submit the link to the video using this attribute.
HEUREKA_CPC
Example Format: <HEUREKA_CPC>50</HEUREKA_CPC>
If you want to get a special feature on Heureka, then you may bid for a higher position by submitting the highest you are willing to spend as CPC (i.e., cost per click). The higher the bid, the higher are your chances to be featured in more popular sections.
The highest you can bid is 100 CZK.
If you want to use this, make sure to use it only on your most popular products. Otherwise, it’s not worthed.
ACCESSORY
Example Format: <ACCESSORY>show laces</ACCESSORY>
If the product comes with some additional accessories, then you may mention them under this attribute, separating each item with a comma.
GIFT
Example Format: <GIFT>Adidas Badge</GIFT>
You may also mention a gift that you may provide along with the product.
If you give away multiple gifts for a product, then submit this attribute multiple times to mention each gift separately.
Example XML Feed In The Right Format
Now that you know about the required and optional attributes you can include in the XML feed, take a look at the format in which products are added to the XML feed.
The following is an example of two variants of a variable product.
<?xml version="1.0" encoding="utf-8"?>
<SHOP>
     <SHOPITEM>
         <ITEM_ID>3252</ITEM_ID>
         <PRODUCTNAME>Adidas Superstar 2 W EUR 36</PRODUCTNAME>
         <DESCRIPTION>V rámci kolekce Originals uvádí adidas sportovní obuv The Superstar,
            která je již od svého vzniku jedničkou mezi obuví. Jejím poznávacím znamením je
            mimo jiné detaily designové zakončení špičky. Díky kvalitnímu materiálu a trendy
            vzhledu, podtrženého logy Adidas uvnitř boty i na ní, bude hvězdou vašeho botníku
         </DESCRIPTION>
         <URL>https://www.yourdomain.cz/adidas-superstar-2-w7ref?eur-36</URL>
         <IMGURL>https://www.yourdomain.cz/adidas-superstar-2-36-img-1.jpg</IMGURL>
         <PRICE_VAT>36</PRICE_VAT>
         <MANUFACTURER>Adidas</MANUFACTURER>
         <CATEGORYTEXT>Oblečení a móda | Obuv | Dámská obuv</CATEGORYTEXT>
         <DELIVERY_DATE>0</DELIVERY_DATE>
         <DELIVERY>
            <DELIVERY_ID>CESKA_POSTA</DELIVERY_ID>
            <DELIVERY_PRICE>120</DELIVERY_PRICE>
         </DELIVERY>
         <ITEMGROUP_ID>3251</ITEMGROUP_ID>
         </SHOPITEM>
         <SHOPITEM>
         <ITEM_ID>3253</ITEM_ID>
         <PRODUCTNAME>Adidas Superstar 2 W EUR 37</PRODUCTNAME>
         <DESCRIPTION>V rámci kolekce Originals uvádí adidas sportovní obuv The Superstar,
            která je již od svého vzniku jedničkou mezi obuví. Jejím poznávacím znamením je
            mimo jiné detaily designové zakončení špičky. Díky kvalitnímu materiálu a trendy
            vzhledu, podtrženého logy Adidas uvnitř boty i na ní, bude hvězdou vašeho botníku
         </DESCRIPTION>
         <URL>https://www.yourdomain.cz/adidas-superstar-2-w7ref?eur-37</URL>
         <IMGURL>https://www.yourdomain.cz/adidas-superstar-2-37-img-1.jpg</IMGURL>
         <PRICE_VAT>36</PRICE_VAT>
         <MANUFACTURER>Adidas</MANUFACTURER>
         <CATEGORYTEXT>Oblečení a móda | Obuv | Dámská obuv</CATEGORYTEXT>
         <DELIVERY_DATE>0</DELIVERY_DATE>
         <DELIVERY>
            <DELIVERY_ID>CESKA_POSTA</DELIVERY_ID>
            <DELIVERY_PRICE>120</DELIVERY_PRICE>
         </DELIVERY>
         <ITEMGROUP_ID>3251</ITEMGROUP_ID>
     </SHOPITEM>
     <SHOPITEM>
     ...
     </SHOPITEM>
</SHOP>
7 Steps To Generate Heuraka XML Feed With Your WooCommerce Products
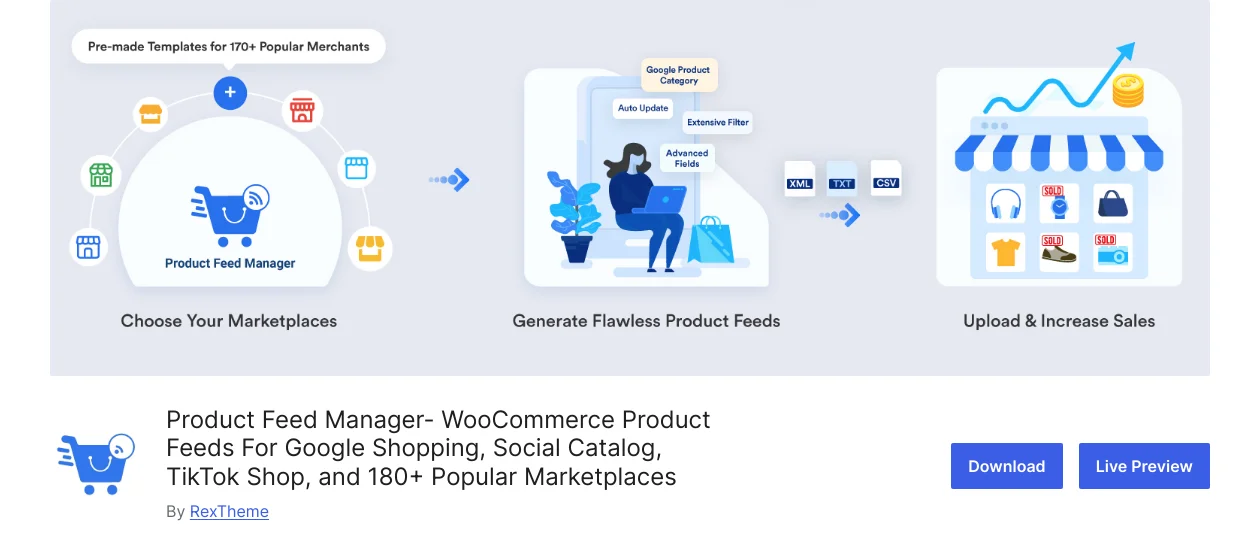
In WooCommerce, you will find an easy-to-use plugin, Product Feed Manager for WooCommerce, with which you can generate an XML feed in just a few clicks.
This is because the plugin has a pre-built template for Heureka with the right XML format and product attributes.
Follow this step-by-step guide and use the plugin to generate the required product feed.
Step 1 – Install And Activate Product Feed Manager For WooCommerce
Go to your Dashboard. Then hover on Plugins and click on the Add New button.
Type “Product Feed Manager” in the search box, and you will find the plugin. Click on Install.
Once installed, Activate the plugin.
You will find a new menu called ‘Product Feeds’ among your dashboard menus.
Step 2 – Import Heureka Template For Feed Generation
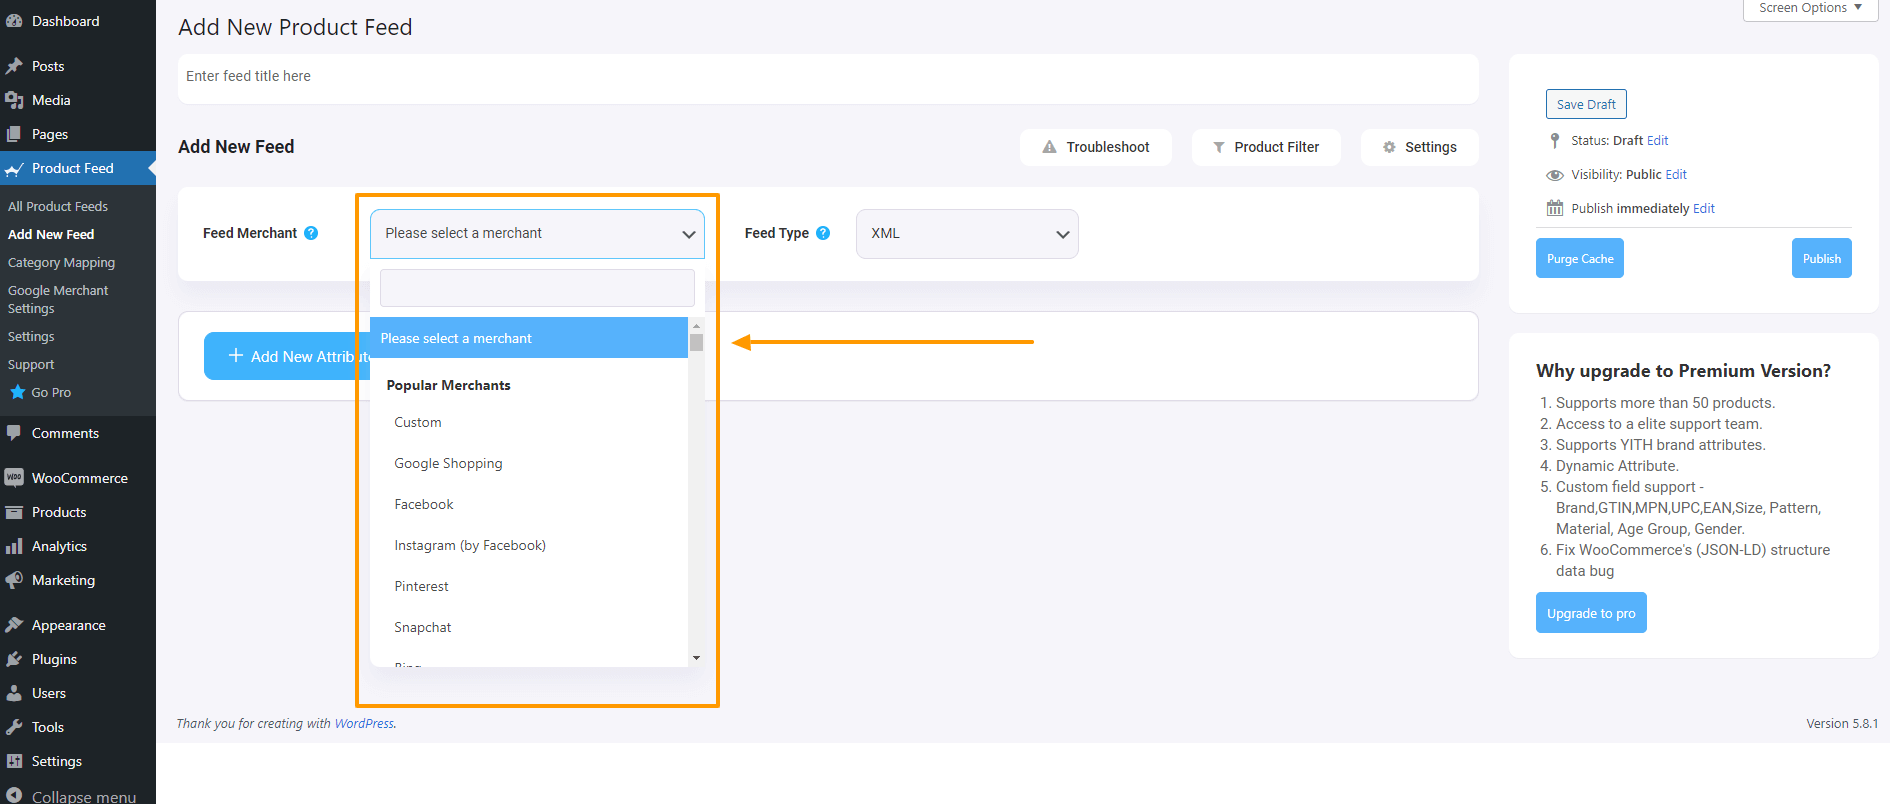
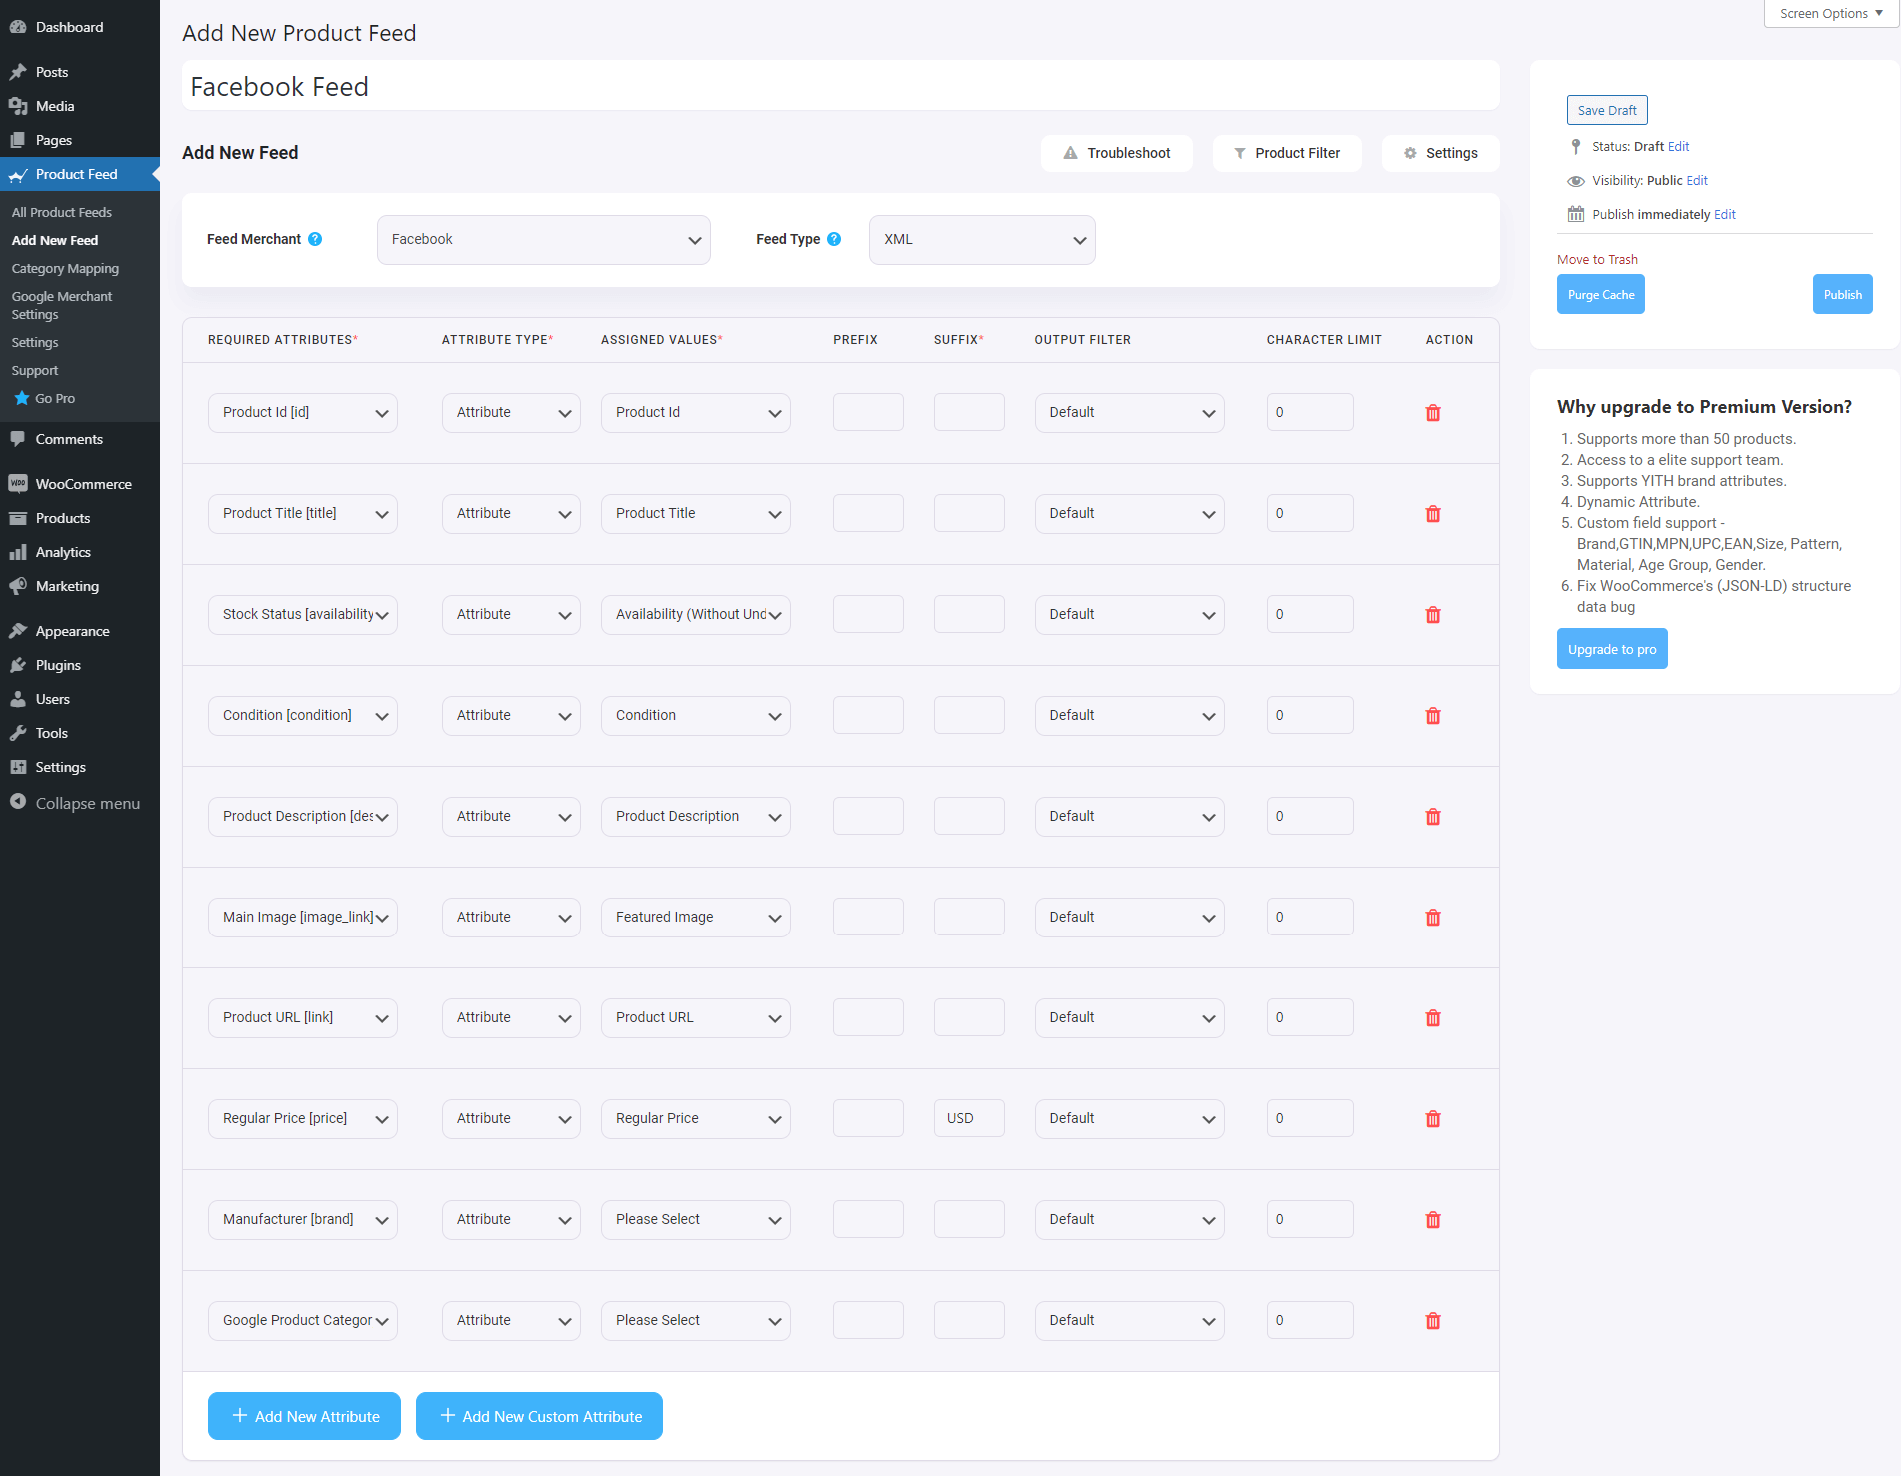
1. On your dashboard, click on Product Feed and then click on Add New Feed option.
It will take you to the feed creation page
Here, on the top you will get an option to give a name to your feed, you can skip it too.
2. Click on the Feed Merchant Dropdown and you will get the list of all the supported merchants.
You can scroll down this merchant dropdown list or you can type Heureka in the search box, and you will get both Heureka and Heureka (availability).
If you select Heureka (availability), in this way all the required attributes of Heureka will be loaded below.
If you select Heureka, in this way all the required attributes of Heureka will be loaded below.
Step 3 – Create A New Product Feed
Now, you can see three buttons under the Feed Title text box, Troubleshoot, Product Filter, and Settings.
1. If you are having any issues generating feed, click on this Troubleshoot button, it will take you to the Troubleshoot page, which could be helpful for you.
2. If you want to use any filter or condition, you can click on the Product Filter option, and a drawer will slide in from the right side of the window, and there you will get the following filters:
You can select any filter option and use them as per your need and click on the Close button when done.
3. Now, to schedule your feed or to choose which type of products will be included in your feed, click on the Settings button, and you will get a list of options to exclude or include products.
Change the options as per your need and click on the Close button when done.
Step 4 – Use The Heureka XML Feed Template
1. If you look at the Feed Merchant dropdown button, there you will get another dropdown “Feed Type”, you can click here to set the type of this feed.
You can set different types of feeds depending on what types of feeds this merchant supports or what types of feeds this Product Feed Manager has the support for.
For Fruugo, CSV will be selected by default.
2. Now, in the attributes section, you will see that all the attributes are under the Required Attributes column, and their values are set according to the attributes under the Assigned Values column.
You can change any values to any attributes, simply click on the value dropdown, and select your preferred value.
All the required attributes will appear below. Now, most of the attributes will already be configured but notice that some of these attributes are unassigned.
Step 5 – Assign The Right Values To Unassigned Attributes
Most of the attributes are already configured. You need to assign values for the unassigned attributes.
You will need to assign values for the following:
Manufacturer– If you are the sole manufacturer of all of your products, you can set the type as Static and input your company name as the value. If you have different brand names for different products, you will have to save the value in a custom field or product attribute and then use that value here. **You may try using Perfect Brands for WooCommerce to assign the brand names more easily.
Category Text– To assign the category text, you will need to use category mapping, which will be done in the next step. For now, leave it as it is.
Delivery date- If all of your products are in stock, then mark this attribute to static and assign the value as 0.
If some products are subject to be in stock in a few days, then the value has to be saved in a field within the product and use that field value here.
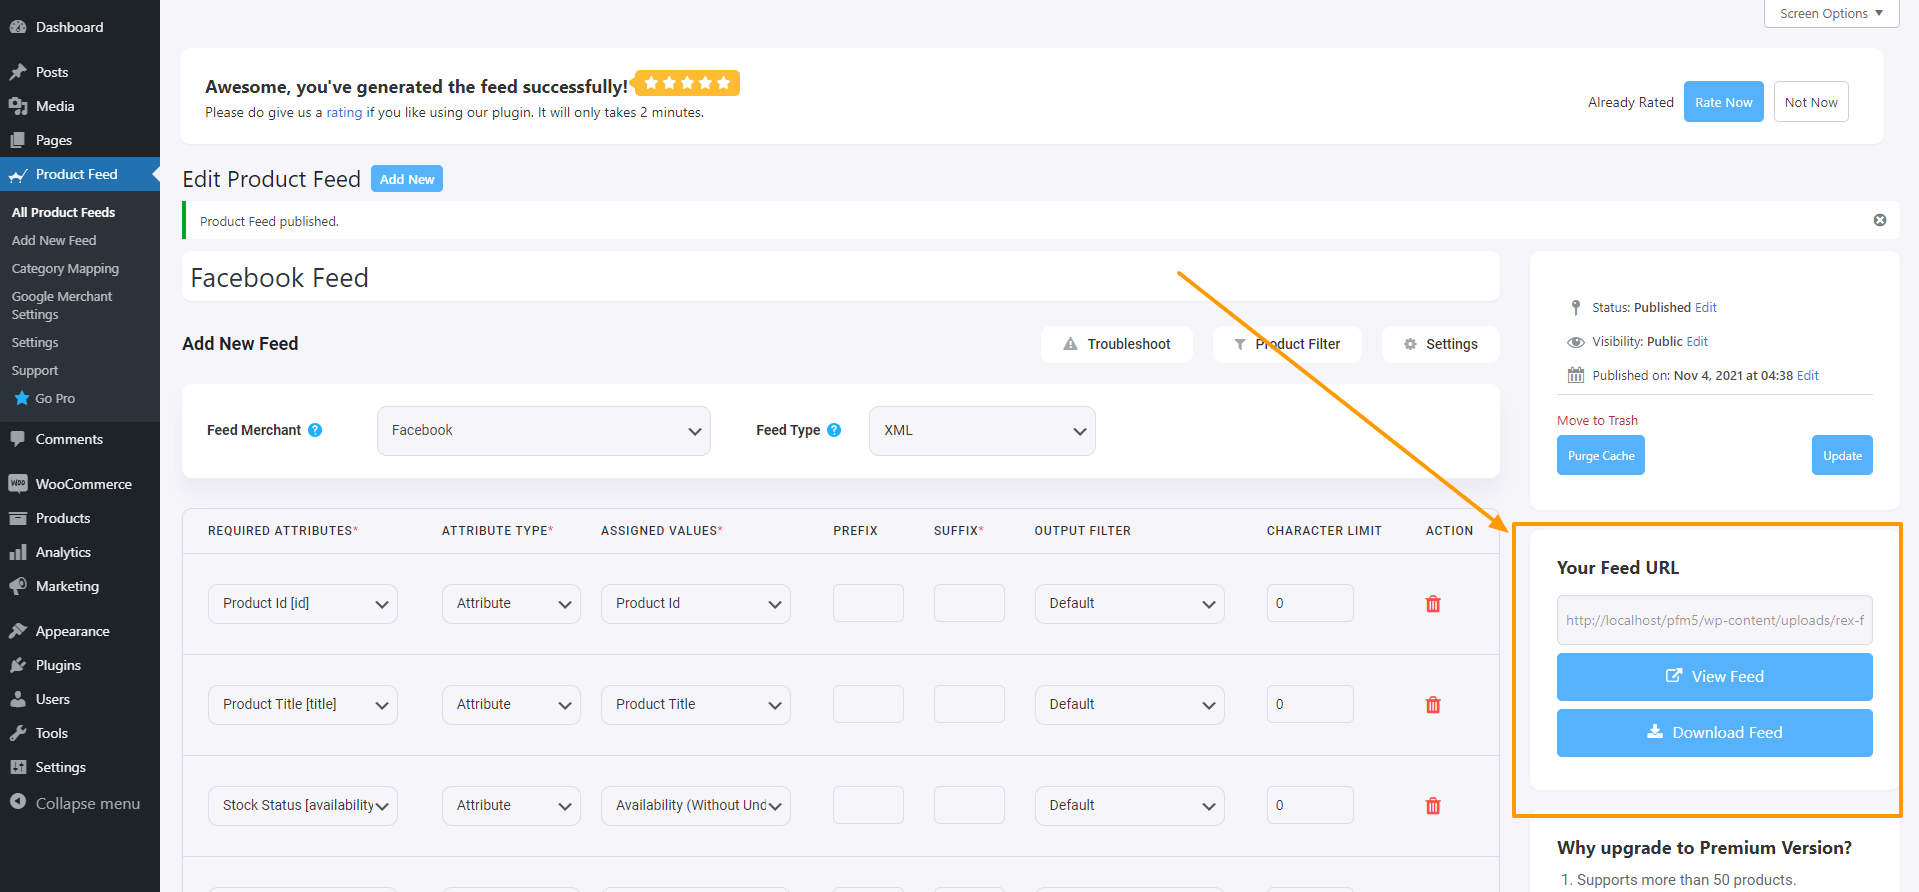
Next, scroll up and Publish the feed.
Once the feed is published, it’s time to use Category Mapping.
Step 6 – Use Category Mapping Using The Accepted Heureka Category List
To use category mapping, first, you will need the category list supported by Heureka.
On your Dashboard menus, under Product Feed, click on Category Mapping. You will be taken to the category mapping page.
Here, all the categories in your store will be listed.
Give a name on the Mapper Name field.
Next, for every category listed here, find a relevant/appropriate category from Heureka’s category list. Then copy the category’s full name and paste it in the field beside the respective category.
Scroll down and click on the Save button, and your mapper will be saved.
Step 7 – Update & Generate Your Accurate XML Feed
Go to Dashboard > Product Feed > All Product Feeds, and edit the feed you were creating.
Once it loads, on the right side, click on the Purge Cache button.
Next, scroll down to the Feed Configuration section and click on the value field for the Category Text attribute.
At the very bottom of the value list, you will find the category map you created. Select it.
Now, scroll up and click on Update.
That’s it. You have created your required product feed. The next thing to do is upload your products to Heureka.
Schlussfolgerung
If you are a local online shop owner in the Czech Republic or Slovakia, then it’s high time you start promoting your WooCommerce products on Heureka and take advantage of its huge audience.
You can go for Product Feed Manager for WooCommerce to generate the XML feed in minutes and start boosting your sales. Go ahead and start selling on Heureka.
Setting up Woocommerce might feel difficult at first, Maybe that’s the reason you are looking for an easy beginner-friendly guide to follow and apply.
This beginner’s guide on how to setup WooCommerce covers the entire process from start to finish with VERY EASY STEPS(also I make sure none of the steps miss out)
I will cover all the basic settings you need to configure (with images) when you install WooCommerce for the first time before adding your products.
Fangen wir also an.
Why Use WooCommerce?
Investing too much right from the start would probably increase your startup expenses.
So, in the beginning, it’s best to start by keeping expenses to a minimum level.
You won’t be locked into any subscription fees or contracts to use the core WooCommerce plugin because it’s free.
Also, The hosting fees for a WordPress site are quite affordable and you can choose according to your needs.
That is why it has been the leading eCommerce platform for a while now.
With over 25% of all eCommerce businesses in the world using WooCommerce.
These businesses are using Woocommerce because it is very much beneficial.
I am going to discuss 4 benefits of Woocommerce here :
Let’s go deeper one by one :
Cost-effective
As explained above, The only cost you need to cover is hosting & domain fees.
The hosting cost depends on the hosting plan you choose. If you have generic shared web hosting, you can get hosting at as low as $3 a month.
The only drawback of this low-budget plan is that it has fewer resources.
You can choose any of the web hosting services as per your needs. For example, Bluehost stands out for its reliability and affordability. With various web hosting offers by Bluehost, you can find plans that fit your needs while staying within your budget.
Flexible With Customization
You may easily customize your whole online store, whether it is the Shop Page, Product Page, or even the Checkout page. If you need more specialized skills, you can hire a WooCommerce developer to tailor your site to your specific needs. P.S. You will find a plugin for almost any custom changes you may want in your store.
Makes Marketing Products Easy
The product page, shop page, and product data are all well-organized and programmed for SERP ranking, you can easily customize the pages using a theme or page builder.
Use-Friendly Even For Beginners
One of the strong suites of WooCommerce is its ease of use. As you read along, you will find out that WooCommerce doesn’t take too much effort to set up.
Now, let us look at how you can set up WooCommerce for the first time and configure the basic settings.
Get Started With WooCommerce
Follow the steps below to install and configure your WooCommerce store for the first time.
Step 1 – Install & Activate WooCommerce
There are 3 ways you can activate Woocommerce :
Here, I am going to pick the last option & explain it in detail.
If you have a running WordPress website, you can easily install WooCommerce from within your WordPress dashboard.
So first,
Go to Dashboard > Plugins and click on Add New
Then, on the search bar, write the keyword WooCommerce. You’ll see the plugin in the first search result.
Beschriftung (optional)
Click on Install Now and wait for a few seconds. Once it’s ready, click on the Activate button.
Beschriftung (optional)
Step 2 – The WooCommerce Setup Wizard
When you activate the plugin, it will show you a Run the Setup Wizard.
Click the Run the Setup Wizard button. If you accidentally hit the Skip setup button, you can still run it from Help → Setup Wizard.
Here’s how you should go through it.
On the first page of the setup wizard, you will need to input your location and business address. Fill them up and click on Continue.
Beschriftung (optional)
Once you click on Continue, you’ll see a pop-up that says, “Build a better WooCommerce.“
Beschriftung (optional)
**These are data that help WooCommerce to learn a few non-sensitive data on how you use WooCommerce so that they can come up with better improvements in the future. So you may choose “Yes, count me in!” Or you may choose not to allow it. It’s totally up to you.
Next, you will be asked which industry your business is a part of. You may choose one of the options there or choose Other and define your own industry. Then click on Continue.
Beschriftung (optional)
Now, you will be asked what type of products you sell.
For products that you have to deliver physically, choose Physical products.
If you sell downloadable products, choose Downloads.
To sell subscription-type products with recurring fees, you may choose Subscriptions.
Beschriftung (optional)
Then click on Continue and it will ask a couple of business-related questions. Answer and click on Continue.
Beschriftung (optional)
Right after these, you will be referred to install a few free WooCommerce plugins that they recommend. We recommend unchecking this option.
P.S. As a beginner, so many extra plugins may be too overwhelming for you. It’s best to go step-by-step. So we recommend not to get these plugins now. We will create more guides to help you choose the right plugins later on when the time comes.
Finally, you will be asked to install a theme that’s more suitable for WooCommerce. We recommend StoreFront as it is built by the creators of WooCommerce and is fully compatible.
**Later, you may consider going for better premium themes that allow more customization options, such as WoodMart, Bloksy, Porto, etc., to improve buyers’ experience.
Beschriftung (optional)
Step 3 – Configure The WooCommerce General Settings
You now have access to WooCommerce. But before adding products or setting up other necessary elements, you first need to configure a few basic settings.
Go to WooCommerce > Settings, and you will see several tabs to configure. For now, we will focus on the General, Products, and Accounts & Privacy tabs.
Initially, you will be on the General Tab. Here, first, Input your Store Address (if you haven’t during the Setup Wizard).
Beschriftung (optional)
Next, configure where you want to sell your products.
Beschriftung (optional)
You will get the following options:
Selling Location This will let you define the country where people will be able to view and purchase your products.
Shipping Location Here, you will define where you ship your products to in case you sell physical products.
Default Custom Location This option will let you geolocate a customer and automatically input the address on the checkout page. If you choose an option here, it will install a plugin that you need to configure for geolocation tracking. For now, let’s not use this option.
Next, choose if you want to enable Tax rates and calculations. You will need this option but for now, let’s leave it unchecked. At a later guide, we will teach you when to enable this and what to do next.
Beschriftung (optional)
Right after the tax option, you have options related to coupons.
Select “Enable the use of coupon codes” if you plan to run discount promotions via coupons in the near future.
The next option, “Calculate coupon discounts sequentially,” is not so commonly used as people usually do not allow a stack of discounts via multiple coupons in the same order.
And finally, you have the currency options, where you define the currency and other useful settings for price.
Beschriftung (optional)
Once the data are ready, make sure to save them.
Step 4 – Configure Basic Product Settings
Go to the Products tab. You will see there are a few important settings that need to be configured before you proceed with adding products.
For now, we will look into the General and Inventory settings. The other options you see there are pre-configured and don’t require much change.
Let’s configure each of them 1-by-1.
1. Products > General
In the general product settings, you will get the following options:
Shop Pages:
Shop Page To choose which page should be considered the shop page. You may leave it as is for now.
Add to cart behavior
Enable “Redirect to the cart page after successful addition “if you want the buyer to be re-directed to the cart page after adding a product to the cart.
“Enable AJAX add to cart buttons on archives” option will allow you to show the “Add to cart” button for products on archive pages as well.
Placeholder image Here, you may input an image URL or the image ID you want as the placeholder image for products for which you did not upload an image.
Measurements:
Weight unit
Dimensions unit
These values are useful, especially for shipping purposes.
Reviews:
Enable Reviews
Here, first, you may Enable product reviews and ensure that the person is a verified owner, as in, the review was left by someone who has an account.
Product Ratings
You may also allow star ratings on the product page.
2. Products > Inventory
Here, you will get important options to configure how you want to manage your product stocks and other inventory-related aspects.
Enabling it will mean you will mention the quantity of the products you have available, and WooCommerce will keep count every time a product is sold until it gets out of stock, i.e., buyers won’t be able to place orders anymore.
The following are the options:
Manage stock
If you check “Enable stock management,” then it means you are willing to input product quantities.
Hold stock (minutes)
Here, you can define a time, in minutes, to hold stock for an unpaid order. So, let’s say someone tried to purchase a product, but the card declined. So this product will be held for the time you define here before someone else can buy it instead.
Notifications
The “Enable low stock notifications” option means if you have fewer units of a product remaining, you will get an admin notification email to inform you about it.
The “Enable out of stock notifications” is similar except you get an email notification when all units of the product are sold out.
Notification recipient(s)
Email address where you want to receive notifications.
Low stock threshold
Mention what number is considered as low stock.
Out of stock threshold
Mention what number is considered out of stock.
Out of stock visibility
Enabling “Hide out of stock items from the catalog” means people will see this product on the shop page but won’t be able to order.
Stock display format
You choose if you want to show the quantity of the product on your product page or not, or only show it when stock is low.
Step – 5 – Accounts & Privacy Settings
Account and privacy settings are important because you want your customers to be able to create accounts where they can track the products they ordered, change the delivery address, etc.
Also, ensure your WooCommerce store is secure, especially for email protection. Missing DMARC records can expose you to email spoofing or phishing risks, so setting them up is crucial for protection.
Plug, you may choose various checkout settings such as allowing guest checkout, create account during checkout, etc.
Beschriftung (optional)
Here you will get several self-explanatory options.
Guest checkout You will get a couple of options to define if you would accept an order without an order or allow the user to log in while on that page.
Account Creation Under this, you will get a few options for controlling the account creation of prospects, such as creating an account during checkout, auto-generating the username and password during checkout, and so on.
Account eraser requests Here, you may define if you want the buyer to have control over his data.
Personal data removal Allow users to remove their personal data.
Privacy policy You may provide privacy policy details during registration and checkout.
Personal data retention Here you can define how long you want to retain one’s personal data.
Und das war's.
Make sure to Save the changes you made and you are ready for the next step of running your eCommerce business.
The Next Step
So far, you have seen how easily you managed to configure your WooCommerce store.
Keep learning and start selling on this popular place.
Frequently Asked Question(FAQ)
What is the easiest way to create a Woocommerce site?
The easiest way to create a WooCommerce site is:
Choose a hosting provider that supports WordPress.
Go through this blog on “How to Install Woocommerce” and set up.
Select and install a WooCommerce-compatible theme.
Install the free WooCommerce plugin from the WordPress plugin directory.
Run the WooCommerce setup wizard to configure basic store settings.
Add your products and customize your store design.
Many hosting providers offer one-click WordPress and WooCommerce installations to simplify the process further. You can also find one with low hosting fees.
How long will it take me on average to be an expert on Woocommerce?
Becoming an expert in WooCommerce can take varying amounts of time depending on your background and dedication.
On average:
Basic proficiency: 1-3 months of regular use and learning
Intermediate level: 6-12 months of active development and problem-solving
Expert level: 1-2 years of consistent work with WooCommerce, including customization, troubleshooting, and keeping up with updates
Continuous learning is key, as WooCommerce trends evolve regularly
What are some tips for beginners to effectively use Woocommerce?
Here are some tips for beginners to effectively use WooCommerce:
Test your checkout process regularly to ensure a smooth customer experience
Start with a good WooCommerce-optimized theme to ensure compatibility
Take time to properly set up your store’s basic settings (payment, shipping, taxes)
Learn to use product categories and tags for better organization
Optimize your product images and descriptions for SEO
Install only necessary plugins to avoid slowing down your site
Regularly update WooCommerce, WordPress, and all plugins
Use WooCommerce’s built-in analytics to track your store’s performance
Familiarize yourself with WooCommerce shortcodes for easy customization
The skincare market is expanding faster than any other sector of the beauty industry.
The skincare market is expected to reach $177 billion by 2025.
Selling online is highly competitive now.
As a Woocommerce seller in the skincare industry, you must constantly look for new and innovative ideas to connect with your customers, especially when selling online.
Otherwise, your skincare business can be lost and termed as “JUST LIKE OTHER SKINCARE BRANDS”
But there are tons of marketing methods that you might feel overwhelmed and confused about picking the right ones that will highlight your skincare brand differently.
That’s why in this blog, I’ve rounded up 9 unique skincare marketing strategies that are highly impactful in attracting skincare lovers to your store.
However, taking some unique marketing approach to increase sales by building an individual brand mark is something you should aim for.
So, below I’m presenting unique skincare promotion ideas that can help you stay ahead of your competition in the skincare market and persuade more potential prospects.
1. Influence Marketing With Unique Themetic Campaign
I will start with an example of how running a campaign with influencers can gain success.
LULA Beauty is a cruelty-free, clean skincare company developed by women.
This company has established a devoted following in just its first year of operation and gained praise from trade journals like WWD, Allure, and Well + Good.
The interesting fact is that influencer marketing is LULA’s sole online consumer outreach tactic, and it worked!
Why?
Unlike other common influence marketing approaches, Lula promoted their philosophy, “less is more”.
They make sure to get the limelight among the vastly influenced skincare marketing community that has been crowded with other skin care companies advertising.
This is one fine example of how a unique strategy worked like magic to highlight a brand from others.
Not just LuLa Beauty, but many more skincare brands are adopting this strategy and gaining success.
For instance,
Fenty Skin, Rihanna’s skincare line, employs a multi-platform marketing strategy.
This brand went through YouTube influencer partnerships with popular celebrities.
Just like Lula and Fenty, you can apply this unique strategy TOO!
You must make sure to target the right group of influencers.
Examine if they fit with your brand if they target your appropriate audiences, and have a record of achieving the required engagement.
You have an opportunity to reach out to your buyers with exciting news, thus increasing your brand awareness, and boosting your skincare marketing strategy.
2. The One-Week Campaign Strategy
The “One-week Campaign” strategy is one of the special skincare promotion ideas where you plan to run a unique discount campaign for a week every month.
For example, next month, in the second week, you could run a special campaign for organic products.
So, for people who prefer organic skincare solutions, you may offer them discounts and lucrative bundle offers during this week.
Again, the month after, plan for another campaign, let’s say the “No More Wrinkles” week, where you will give discounts on products that are specialized in reducing wrinkles.
This skincare marketing tactic works well. It will give you two specific advantages:
Your buyers will be curious about what offers you may come up with next month and are more likely to visit your website every month.
When they visit, many may not find a certain week’s campaign suitable for them, but they may still browse through other products you have and end up purchasing.
3. Adding Suggestions To Make Your Customer Feel Connected
With this strategy, you can build up the trust level of your customers and create a chain of communication in between.
Adding suggestions or Q&A related to skincare or form on your website will make your consumers feel like you are an expert in this field and make sure their investment brings them benefits.
This will increase their trust level and willingness to buy from you.
See below how ESTEE LAUDER & Paula’s Choice applied this strategy :
When browsing through your shop, buyers are specific about what they want when it comes to skincare products as it is a sensitive matter.
However, some of these products are easier to sell than others. And you can do that by adding a few persuasive tags to a few products that are more likely to sell skincare products with the right push.
Following are some of the ways you can do this.
>> The ‘Stock Ending Soon’ Trigger
When browsing through products, people often tend to be reluctant with products that are a bit more expensive than others, even if they are good.
For example, if someone is looking to purchase an exfoliator for oily skin, let’s say you have the “Dual Action Exfoliator by Lifeline” available in your store.
However, it costs $65, which is $20-$30 more than most common exfoliators.
But this is a product had has proven to be one of the best out there when it comes to exfoliators.
In this case, a small push is required to make them take a decision.
You may add a tag that says “Stock Ending Soon” to this product on the shop page. And genuinely, display that a low number of this product is available (even if you have a lot of it available in reality).
This will make the buyer think quickly. If she is willing to spend a bit more for high quality, then they may decide to take it right away, rather than missing out on it when stock runs out.
>> The “% Off” Tag
Discounts are a common skincare marketing tactic used by online stores, and you too may run discounts on several products occasionally.
However, this can be made more apparent with a discount tag on the product right on the shop page.
Let’s say you are giving a 15% discount on the “Revitalift Face Serum by L’Oreal Paris.”
So all you have to do is add a tag on top of the product stating “15% Off.”
And that’s it. People looking for face serums will notice it and may end up purchasing it due to the discount.
>> Highlight “New” products
Well, maybe you are not offering any discounts yet or don’t have enough data to highlight a best-selling product.
You can still grab buyers’ attention with your new products. This involves leaning on more than just your product packaging design; it’s about a holistic and creative approach to skincare marketing.
Simply add the tag, “New” to them. So when people make a relevant search or simply browse through your shop, they will notice these products.
This is a great way to get a few instant sales for new products.
You may also consider creating a separate category for new products only, which will let curious buyers browse through the new items. It will even make it easier for you to run discount campaigns for new products.
**Other tactics with Tags such as “Bestselling” or “Most Popular” are quite commonly used, and you too should use them.
5. Sell Skincare Products On Large Online Marketplaces
If you are a start-up or a small-medium business, then promoting your products on online multi-vendor marketplaces is inevitable.
The idea is, that an online marketplace already has a set number of loyal buyers with huge traffic daily.
If you list your WooCommerce products there, then this will surely drive a lot of sales if done right.
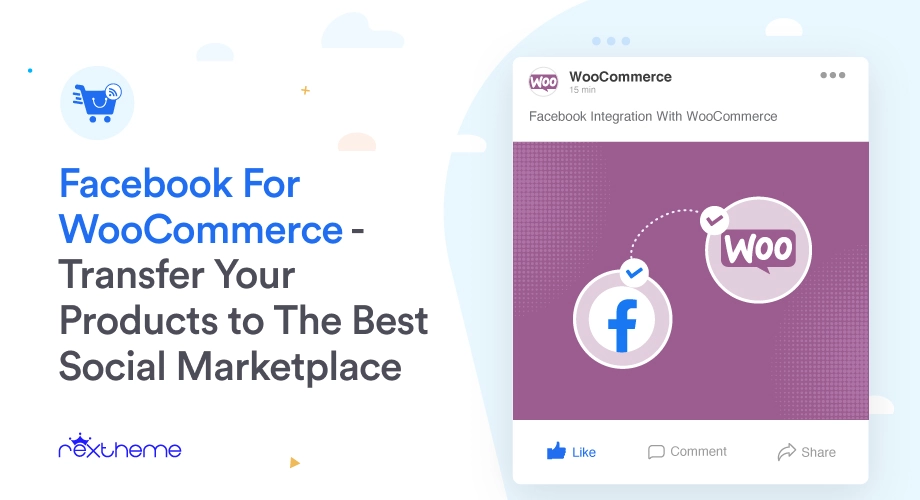
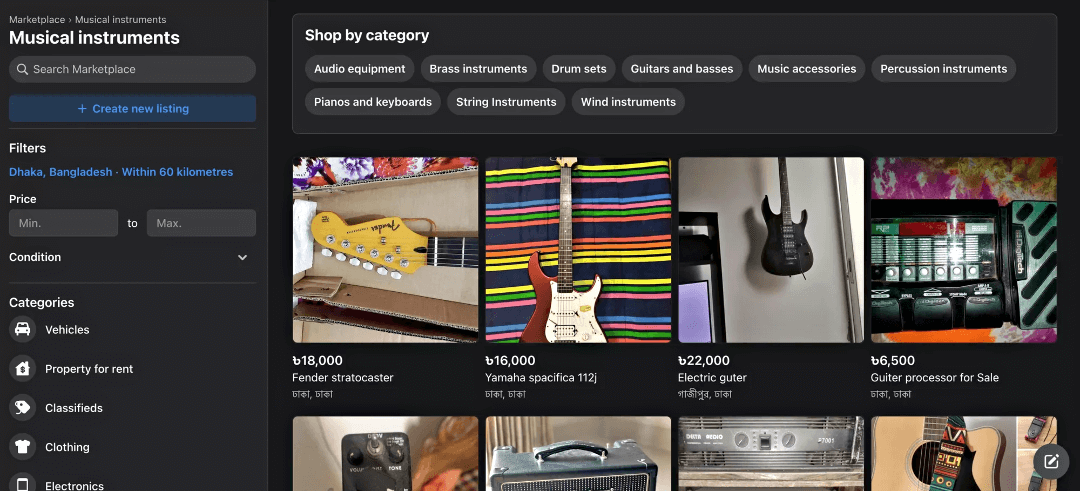
Platforms like Google Shopping, Facebook, eBay MIP, etc are extremely popular and almost every WooCommerce store owner should consider promoting there.
However, to list your products on these marketplaces you need to submit your product data in specific formats that are difficult to create manually.
However, since it’s a WooCommerce store, you will be glad to know that there is a simpler solution.
This plugin makes product listing seamless by letting you generate feed accurately for your desired marketplaces in just a few clicks. Once you have the feed ready, you may submit the feed link in the marketplaces, and your products will be listed there in minutes.
You can post on your Facebook, Instagram, or TikTok on notable days like Mother’s Day, Women’s Day, or calendar-marked days that align with your skincare line.
In terms of posting on Social media, always keep in mind that your targeted individual is scrolling through their social feed and there are thousands of posts they are seeing. You have to put some scroll-stopping details to trigger your targeted consumer’s buyer intent.
Don’t be scared of including some humor in your social media posts. Memes, humorous videos, polls, and captions with pop culture references can help your business stand out and become memorable.
7. Product bundling in skincare
Product bundling strategy can be particularly effective in skincare because many products are designed to work together in a routine.
Bundles can help introduce your customers to new products they might not have tried otherwise, potentially leading to repeat purchases of individual items in the future.
Take, for example, a facial serum. On its own, it’s an effective product for targeting specific skin concerns.
But bundle it with a jade roller and a silk pillowcase, and you’ve created a luxurious nighttime skincare ritual that’s not just effective, but also indulgent and appealing to customers seeking a spa-like experience at home.
This bundle combines the benefits of the serum’s active ingredients with the soothing, de-puffing effects of jade rolling and the gentleness of a silk pillowcase on delicate facial skin.
Your targeted potential customer will love to take this bundling and as a result, your sales will double.
8. Offer Category-Based Discounts
Offering different types of discounts for different categories is a proven skincare marketing strategy that will generate more sales.
Though it is difficult to categorize skincare products even further, it’s quite easy. Most people categorize skincare products with skin types, expected output, or the use of the product.
For example, the brand LifeLine has its products distributed in categories that include
Fine Lines & Wrinkles
Acne Scarring
Elasticity Loss
Sun Damage
You can see buyers can easily relate to these categories to meet their needs.
Categorizing based on face type (Sensitive, Dry, Oily, etc) is also very popular.
If you have skincare products from multiple brands in your store, then this is even more effective.
Once you have them categorized, now it’s time to plan discount campaigns for categories when it is most effective.
For example, during summer vacation, products that cure or prevent damage from sunlight will be popular. You may run discount campaigns for these products at that time to attract more buyers to your store during the vacation.
Again, during winter, people with dry skin have a hard time. So any skincare products that help with protection or curing dry skin will be in high demand. Again, this is an opportunity for you to run discounts during the winter to stay ahead of the competition.
9. Make Your Buyers Exciting In Referring To Their Friends
This is a special skincare marketing strategy where you offer a gift to any buyer who refers a friend to purchase your product.
For example, you may provide a 25% discount code to a buyer that she can pass on to a friend. And if her friend purchases a product from your store while using that code, then she will get a $15 discount on the purchase she makes.
This can be easily promoted on your landing page, and you may send a referral email to anyone who makes the first purchase, with this offer.
This may not sound that big a tactic, but imagine if you managed to reach someone who has a good number of followers on her social media. One shout-out from her can get you tons of new sales.
She will probably benefit quite a lot from it, but you will be able to reach more people in a shorter time.
Einpacken
These are only a few unique and effective strategies that you need to consider for skincare marketing online. But you too can look for creative ways to bolster your sales.
Sure, improving your product titles, description copy, and images matter a lot. But people won’t always pay attention to them unless you grab their attention.
A business can’t grow just by relying on prospect needs. You often have to make the buyer want your product over others.
Hence, you must start using these tactics as soon as possible.
So go ahead and start promoting your skincare products in the best way possible and climb your way up the skincare marketing competition.
If you own an online store in Europe to sell fashion products, then you can easily boost your sales by promoting on a popular online marketplace – Glami.
With over 47 million monthly visitors, and 450,000+ orders generated per month, the Glami marketplace is surely a platform you can rely on.
Now, to promote your products on Glami, it is crucial to submit your product data in the right format. Glami has its own format for XML feed to upload your products to their marketplace.
The good news is, if you run a WooCommerce store, then you can generate this product feed in just a few clicks.
In this guide, you will learn about the required product data you need to include in the Glami XML feed, and about a reliable plugin that will help you generate the product feed in a matter of minutes.
So, let’s begin.
What is Glami XML Feed?
An XML feed is a structured data format that allows you to share information between different systems. It uses tags to define data elements, making it easy for computers to understand and process.
In e-commerce, XML feeds are used to share product details like descriptions, prices, and images with various platforms.
A Glami XML Feed, also known as a Glami product feed, is designed specifically for the Glami fashion search engine. It includes your product titles, descriptions, prices, categories, images, and availability.
By using an XML feed generator or a tool for WooCommerce product feed, you can easily create a Glami feed. This also ensures your products are accurately represented and easily found by shoppers.
Requirements to Join Glami to Promote WooCommerce Products
To start selling on Glami, you must meet the following requirements:
Ensure that you have a valid e-commerce store that is SSL-certified.
Prepare a proper XML Feed in the format that they accept (explained later in this article).
And that’s it. After that, you will be notified in two business days if your products were uploaded successfully or if there is an error.
Once your products are approved and published, you will start getting more traffic in no time.
FYI: Glami has a flexible CPC module. It ensures that the products with higher costs have higher CPC, whereas products with lower costs will have less CPC charged.
Also, certain product categories can have seasonal changes in CPC; for example, Summer products will have a lower CPC during the winter and a higher CPC in the summer.
Now that you know the requirements, let me guide you on generating its product XML feed.
XML Feed Structure to Upload Products on Glami
Normally, the feed structure is as follows:
<?xml version="1.0" encoding="utf-8"?>
<SHOP>
	<SHOPITEM>
            ---PRODUCT ATTRIBUTES AND DATA HERE---
	</SHOPITEM>
	<SHOPITEM>
            ---PRODUCT ATTRIBUTES AND DATA HERE---
	</SHOPITEM>
</SHOP>
**Each product is considered a SHOPITEM in the feed.
If you have a WooCommerce store, you do not need to worry about creating this format on your own. You can simply use the plugin, Product Feed Manager for WooCommerce, to generate this feed in just a few clicks.
Now, let us look at a list of the required product attributes that you must include for every product. Later, I will show you an example XML feed with product data and guide you on how you can generate this feed real quickly.
Required Product Attributes for Glami Feed
The following are the mandatory attributes you need to submit for each product.
ITEM_ID
PRODUCTNAME
DESCRIPTION
URL
IMGURL
PRICE_VAT
MANUFACTURER
CATEGORYTEXT
SIZE
DELIVERY_DATE
ITEMGROUP_ID
Read details about each of these attributes below
Attribut
Format With Example
ITEM_ID
This is the unique ID of a product. In WooCommerce, you may use the Product ID or the SKU as the value for this attribute.
<ITEM_ID>1031</ITEM_ID>
PRODUCTNAME
This is the title of the product. You may use your product title from WooCommerce as its value.
It is recommended to add features to the title such as gender, material, color, or other notable features that may define your product (except the size). *This will also help to rank products in your own store.
Do not add any promotional terms to the product name, such as ‘free delivery’ or ‘discount,’ etc.
<PRODUCTNAME>Pullover Hoodie For Men – Red</PRODUCTNAME>
DESCRIPTION
You may include a short product description explaining more about the product features.
Do not provide any false information about the product.
Submit the description in the correct language of your local Glami marketplace. For example, if you are selling in Czechia, then the description must be in the Czech language.
<DESCRIPTION><![CDATA[ This hoodie has a branded logo on front and a half-zip closure ]]></DESCRIPTION>
URL
This is the link to the product page on your website.
This is the link to the main image of the product.
You must submit a real image of the product. It should not have any graphics, enhancements, watermarks, or promotional texts.
Also, there should not be any other objects visible in the image – it should just be the product with a light background.
The image must be at least 500 px in width.
If it’s a product variant, then the image should match the exact variant. For example, if a t-shirt varies in colors, Red and Blue, then the Red variant should include the image of the Red t-shirt, and the Blue variant should include the image of the Blue t-shirt.
**You will find category lists in your required language on the knowledge page for your respective country.
P.S. You may use category mapping in our suggested plugin to submit the right category as per Glami’s requirements without changing the actual categories in your WooCommerce store. **I’ll explain how later in this guide.
This attribute actually indicates how soon the product is available for shipping, i.e., if it is in stock.
If you have the product in stock, then use the value as 0. Else, mention the number of days after which the product will be in stock.
*Do not submit any product that is only available on request.
<DELIVERY_DATE>0</DELIVERY_DATE>
ITEMGROUP_ID
For a variable product, every variant should be submitted as a separate shop item, but they all should have a common item group ID to indicate that they are variants of the same product.
<ITEMGROUP_ID>1030</ITEMGROUP_ID>
Optional Product Attributes You Can Include in The Feed
You can also submit a few additional attributes for better performance.
URL_SIZE: If you have a variable product that varies with size, then you can include this attribute and submit the product link with the size selected by default.
IMGURL_ALTERNATIVE: You can submit additional images of your product using this attribute. Submit this attribute multiple times to include multiple additional images.
MATERIAL: You have the option to submit the material and the percentage of material used in the product. Its format is similar to the Size and the Param attribute but has an additional Percentage tag.
SIZE_SYSTEM: If you use a size system other than EU or International, you can submit this attribute to indicate which size system you use. – Supported size systems.
DELIVERY: You can add additional delivery information for a product if you deliver that particular product using a postal service other than your default delivery method. You need to include the delivery ID, the delivery price, and the delivery price COD.
EAN: If you have the product EAN, you can submit it via this attribute.
Format:

<EAN>1234567890123</EAN>
More Relevant Parameters: You can also submit additional parameters or features of your products to make them more relevant. For example, if you have a costume for Halloween, you can submit a parameter for ‘occasion’ with the value ‘Halloween.’ Each parameter you submit will be a separate product feature it will rank for in the marketplace. Here are a few more examples:
Here’s a sample feed structure with the mandatory attributes and example data.
<?xml version="1.0" encoding="utf-8"?>
<SHOP>
	<SHOPITEM>
		<ITEM_ID>1031</ITEM_ID>
		<PRODUCTNAME>Pullover Hoodie For Men - Red</PRODUCTNAME>
		<DESCRIPTION><![CDATA[ This hoodie has a branded logo on front and a half-zip closure ]]></DESCRIPTION>
		<URL>https://www.yourdomain.cz/products/pullover-hoodie-1</URL>
		<IMGURL>http://images.example.com/adidas-superstar-ii-2015.jpg</IMGURL>
		<PRICE_VAT>29.99</PRICE_VAT>
		<MANUFACTURER>Adidas</MANUFACTURER>
		<CATEGORYTEXT>Glami.eco | Men's sustainable clothing and shoes | Men's sustainable clothing</CATEGORYTEXT>
		<PARAM>
		<PARAM_NAME>size</PARAM_NAME>
		<VAL>41</VAL>
		</PARAM>
		<DELIVERY_DATE>0</DELIVERY_DATE>
		<PARAM_NAME>colour</PARAM_NAME>
		<VAL>blue</VAL>
		</PARAM>
		<PARAM_NAME>style</PARAM_NAME>
		<VAL>lifestyle</VAL>
		</PARAM>
		<ITEMGROUP_ID>1030</ITEMGROUP_ID>
	</SHOPITEM>
</SHOP>
Now that you have a good idea of the required product data you need to submit on Glami let us look at how you can generate an XML feed of your WooCommerce products in just a few clicks.
7 Steps to Generate Glami Product Feed in Your WooCommerce Store
In WooCommerce, you will find an efficient tool, Product Feed Manager for WooCommerce, to generate an XML feed for all of your products in just a few clicks.
The plugin has a pre-built template with the required product data for Glami in the right format.
This guide will give you step-by-step instructions on using the plugin and generating the required feed real quickly.
Step 1 – Install & Activate Product Feed Manager
1. Go to your Dashboard. Here, go to Plugins and click on the Add New button
2. Type “Product Feed Manager” in the search box, and you will find the plugin Product Feed Manager for WooCommerce.
3. Click on the Install Now button and then Activate the plugin.
Once you activate the plugin, you will find the Product feed menu on your dashboard menus.
Step 2 – Import GlamiTemplate for Feed Generation
1. On your dashboard, click on Product Feed and then click on Add New Feed option.
It will take you to the feed creation page
Here, on the top, you will get an option to give a name to your feed, you can skip it too.
2. Click on the Feed Merchant Dropdown and you will get the list of all the supported merchants.
You can scroll down this merchant dropdown list or you can type Glami in the search box, and you will get the Glami option in the list.
Select Glami and all the required attributes of Glami will be loaded below.
Step 3 – Create A New Product Feed
Now, you can see three buttons under the Feed Title text box, Troubleshoot, Product Filter, and Settings.
1. If you are having any issues generating feed, click on this Troubleshoot button, it will take you to the Troubleshoot page, which could be helpful for you.
2. If you want to use any filter or condition, you can click on the Product Filter option, and a drawer will slide in from the right side of the window, and there you will get the following filters:
All Featured Items
Custom Filter
Category Filter
Tag Filter
Product Filter (Pro)
You can select any filter option and use them as per your need and click on the Close button when done.
3. Now, to schedule your feed or to choose which type of products will be included in your feed, click on the Settings button, and you will get a list of options to exclude or include products.
Change the options as per your need and click on the Close button when done.
Step 4 – Use The Glami XML Feed Template
1. If you look at the Feed Merchant dropdown button, there you will get another dropdown “Feed Type”, you can click here to set the type of this feed. You can set different types of feeds depending on what types of feeds this merchant supports or what types of feeds this Product Feed Manager has the support for.
For Favi, XML will be selected by default.
2. Now, in the attributes section, you will see that all the attributes are under the Required Attributes column, and their values are set according to the attributes under the Assigned Values column.
You can change any values to any attributes, simply click on the value dropdown, and select your preferred value.
All the required attributes will appear below. Now, most of the attributes will already be configured but notice that some of these attributes are unassigned.
Step 5 – Assign The Right Values To Unassigned Attributes.
1. You will simply need to assign values for the following:
Manufacturer: If you are the sole manufacturer of all of your products, you can set the type as Static and input your company name as the value. If you have different brand names for different products, you will have to save the value in a custom field or product attribute and then use that value here. **You can try using Perfect Brands for WooCommerce to assign the brand names more easily.
Category Text: To assign the category text, you will need to use category mapping, which will be done in the next step. For now, leave it as it is.
Size value: You can see the attribute ‘size’ is added as a parameter. For the value, you have to assign the field name or the attribute name in which you saved the size.
2. Next, scroll up and Publish the feed.
Once the feed is published, it’s time to use Category Mapping.
Step 6 – Use Category Mapping Using The Accepted Glami Category List
To use category mapping, first, you will need the category list supported by Glami.
1. On your Dashboard menus, under Product Feed, click on Category Mapping. You will be taken to the category mapping page.
Here, all the categories in your store will be listed.
2. Give a name on the Mapper Name field.
3. Next, for every category listed here, find a relevant/appropriate category from Glami’s category list. Then copy the category’s full name and paste it in the field beside the respective category.
4. Scroll down and click on the Save button, and your mapper will be saved.
Step 7 – Update & Generate Your Accurate XML Feed
1. Go to Dashboard > Product Feed > All Product Feeds, and edit the feed you were creating.
2. Once it loads, on the right side, click on the Purge Cache button.
3. Then, scroll down to the Feed Configuration section and click on the value field for the Category Text attribute.
4. At the very bottom of the value list, you will find the category map you created. Select it.
5. Now, scroll up and click on Update.
That’s it. You have created your required product feed. The next thing to do is implement Glami Pixel and upload your fashion products to the Glami marketplace.
Simply check the requirements to promote on Glami and get your products uploaded on their huge marketplace to start getting more sales.
Schlussfolgerung
Generating a Glami XML feed for WooCommerce is important for effectively selling your fashion products on the Glami platform.
By ensuring your product titles, descriptions, prices, categories, images, and availability are accurately represented, you can significantly boost your visibility and sales.
Using an XML feed generator for WordPress simplifies this process, making it easy to create and manage your Glami product feed.
So, optimizing your WooCommerce store with a well-structured Glami XML feed can enhance your presence on the Glami fashion search engine, attracting more customers and driving sales. You can easily generate your Glami XML feed with a product feed manager.
How do I create a Glami product feed for my WooCommerce store?
To create a Glami product feed for your WooCommerce store, use an XML feed generator plugin like PFM. It simplifies the process by automatically generating the required Glami XML feed with your product details, including titles, descriptions, prices, and images.
Why should I use a Glami XML feed?
Using a Glami XML feed helps you showcase your fashion products on the Glami platform, increasing your visibility and attracting more customers. It ensures your listings are accurate and up-to-date, improving your chances of making sales.
What information should I include in my Glami feed?
Your Glami feed should include product titles, descriptions, prices, categories, images, and availability. This ensures that your listings are comprehensive and attractive to potential buyers on the Glami platform.
Can I update my Glami XML feed automatically?
Yes, you can set up automatic updates for your Glami XML feed using an XML feed generator plugin for WordPress. This ensures your product information is always current, helping you maintain accurate listings and avoid any potential issues with outdated data.
How do I optimize my Glami product feed?
To optimize your Glami product feed, make sure your product titles are clear and include relevant keywords. Use high-quality images and provide detailed descriptions. Regularly update your Glami feed to keep your listings fresh and competitive. By doing so, you increase your chances of attracting more customers and boosting sales.
Selling products from your WooCommerce store can be challenging, but promoting on popular online marketplaces can significantly boost your sales.
One of the most reliable online marketplaces to promote your products on is Fruugo. If you run a WooCommerce store, you should also consider selling on the Fruugo marketplace.
According to AIMGroup, revenue at online marketplace Fruugo has been doubled andEBITDA rose more than 6x from £1.3 million to £8.1 million in 2022.
In this guide, I will discuss how you can prepare your WooCommerce product data to start selling on Fruugo without any hassle.
Fangen wir also an.
What is Fruugo Marketplace?
Fruugo Marketplace is a global online platform that connects buyers and sellers from various countries, enabling cross-border shopping.
As a Fruugo seller, you can list your products on this marketplace to reach a broader audience. The platform supports multiple currencies and languages, making it accessible to international shoppers.
It operates on a commission-based model, where sellers pay a fee for each sale made through the platform.
With features like automated feed updates and country-specific platforms, It offers an easy selling experience for your business looking to expand its global reach.
Which countries are supported by Fruugo?
Fruugo supports customers in 46 countries, enabling global shopping and selling opportunities. These countries include:
What are the benefits of selling on Fruugo Marketplace?
Selling on Fruugo Marketplace offers numerous benefits:
Global Reach: Fruugo provides access to customers from 46 countries, significantly expanding your market and allowing you to reach a diverse international audience.
Multi-currency Support: It supports multiple currencies, making transactions easier for international buyers and enhancing their shopping experience.
Ease of Integration: With plugins like Product Feed Manager, integrating your WooCommerce store with Fruugo is straightforward. This simplifies product listing and management, saving you time and effort.
Increased Sales Potential: By tapping into Fruugo’s established customer base and marketing efforts, you can boost your sales and grow your business more effectively.
Automated Updates: Fruugo offers automated feed updates and real-time inventory management. This reduces manual workload and minimizes errors. It also ensures your product information is always accurate and up-to-date.
These benefits make Fruugo Marketplace an excellent platform for expanding your eCommerce business and reaching a global audience.
How to Generate Fruugo Product Feed for WooCommerce
To create a Fruugo product feed for WooCommerce, you’ll need to follow specific steps to ensure your product information is formatted correctly for integration with the Fruugo platform.
Let’s walk through the process together.
1. Getting Started As A Seller On Fruugo
The first thing to do is to register as a Seller on the Fruugo Marketplace. You simply need to fill out a registration form to start selling on Fruugo.
Now, there is no upfront fee to register as a seller. Fruugo will only take a small commission when you make a sale.
Fruugo will charge 15% of the shopper’s basket value (excluding VAT). And 2.35% of the transaction value will be deducted as the transaction processing fee.
So basically, you can take advantage of the huge audience and only pay a small commission when you make money.
Frankly speaking, this is a small fee compared to the huge amount of sales that you can expect from this marketplace.
2. Required Data To Upload Products On Fruugo
To upload your WooCommerce products on the Fruugo marketplace, you first need to generate a product feed with the right product data.
The best option is to generate a CSV feed with the required product attributes and upload your products directly or via one of Fruugo’s integration partners.
Let us look at the mandatory product attributes that you need to include in the product feed.
Required Product Attributes For Fruugo Feed
Product ID (ProductId)
This is the same as the WooCommerce product ID.
It is ideal for the Product ID to be unique for every product and its variants for variable products.
SKU Id (SkuId)
You may use the product SKU from your WooCommerce store for this attribute.
It is ideal for the SKU to be unique for every product and its variants for variable products.
GTINs – EAN / UPC (EAN)
Depending on where your products are manufactured from, you should have a unique global identifier such as GTIN, UPC, EAN, UCC, etc.
You need to submit this identifier value for every product and every variant of a variable product.
**You don’t normally have any default field to add this value in the product data section. So, your options are to add a custom field for each product and save the value there or add it as a product attribute to the product – the latter won’t work for variable products.
(P.S. we will later discuss how you can get that custom field easily without using codes).
Brand (Brand)
This will either be the manufacturer name or the brand name of the product.
Again, there is no default field in WooCommerce for Brand. But you can easily assign it to every product using a product attribute, a custom field, or using a WooCommerce Brand plugin.
Category (Category)
Fruugo has its own set of categories that you need to map your products into.
However, you do not need to change your WooCommerce categories to achieve this. We will learn about a tool later on in this article with which you can set up proper category mapping when generating product feed.
Image URL 1 (Imageurl1)
Use the link to the main image or the featured image of your WooCommerce product for this attribute.
Make sure this image is at least 400px x 400px in size and is an original image of the product with a white background. No texts, watermarks, or placeholders should be there.
Stock Status (StockStatus)
This should indicate if your product is available in your store or not.
Accepted values:
INSTOCK – When the product is in stock.
OUTOFSTOCK – When the product is currently out of stock but may re-stocked soon.
NOTAVAILABLE – When the product won’t be sold anymore and needs to be removed from the marketplace.
**Submitting the available quantity is not mandatory, but if you want to include that, then use the “StockQuantity” attribute instead.
Product Title (Title)
You may use your WooCommerce Product Title/Name for this attribute.
It is recommended to include the brand name in the product title. But do not include any promotional text, attribute names, or pricing info to the title.
Description (Description)
Describe your product briefly and try to highlight the best features of the product.
You may simply use your product description in your WooCommerce store for this attribute as long as there are no external links, emails, or contact details leading to the exit of the page.
Normal Price (NormalPriceWithVAT or NormalPriceWithoutVAT)
You may submit the current price of your products on your WooCommerce store, either with VAT or without VAT.
If your product prices are VAT inclusive, then submit the attribute header NormalPriceWithVAT.
If your product prices are exclusive of VAT, then use the attribute header, NormalPriceWithoutVAT
Submit any one of these attribute headers depending on your website’s price.
VAT Rate (VATRate)
For EU-based retailers, you have to submit the VAT rate in your country.
Do not include the % symbol; just submit the numerical value of the rate.
If no VAT is applicable in your country of sale (which is common for non-EU retailers), then use the value 0 for this attribute.
Now, let us look at how you can generate a product feed that includes these mandatory attributes for all of your WooCommerce products.
3. Generate Fruugo Product Feed with Your WooCommerce Products
In WooCommerce, you will find a reliable plugin called Product Feed Manager for WooCommerce with which you can generate a CSV feed for all of your products in just a few clicks.
Once you have the plugin, follow the steps below and see how easily you can generate a CSV feed with the right product attributes real quick.
Step 1 – Import Fruugo Template For Feed Generation
1. On your dashboard, click on Product Feed and then click on Add New Feed option.
It will take you to the feed creation page
Here, on the top, you will get an option to give a name to your feed, you can skip it too.
2. Click on the Feed Merchant Dropdown and you will get the list of all the supported merchants.
You can scroll down this merchant dropdown list or you can type Fruugo in the search box, and you will get the Fruugo option in the list.
Select Fruugo and all the required attributes of Fruugo will be loaded below.
Step 2 – Create A New Product Feed
Now, you can see three buttons under the Feed Title text box, Troubleshoot, Product Filter, and Settings.
1. If you are having any issues generating feed, click on this Troubleshoot button, it will take you to the Troubleshoot page, which could be helpful for you.
2. If you want to use any filter or condition, you can click on the Product Filter option, and a drawer will slide in from the right side of the window, and there you will get the following filters:
All Featured Items
Custom Filter
Category Filter
Tag Filter
Product Filter (Pro)
You can select any filter option and use them as per your need and click on the Close button when done.
3. Now, to schedule your feed or to choose which type of products will be included in your feed, click on the Settings button, and you will get a list of options to exclude or include products.
Change the options as per your need and click on the Close button when done.
Step 3 – Use The Fruugo CSV Feed Template
1. If you look at the Feed Merchant dropdown button, there you will get another dropdown “Feed Type”, you can click here to set the type of this feed. You can set different types of feeds depending on what types of feeds this merchant supports or what types of feeds this Product Feed Manager has the support for.
For Fruugo, CSV will be selected by default.
2. Now, in the attributes section, you will see that all the attributes are under the Required Attributes column, and their values are set according to the attributes under the Assigned Values column.
You can change any values to any attributes, simply click on the value dropdown, and select your preferred value.
All the required attributes will appear below. Now, most of the attributes will already be configured but notice that some of these attributes are unassigned.
Step 4 – Assign The Right Values to Unassigned Attributes
1. You will need to assign values for the following:
Though almost all of them will be configured by default, you will need to assign the correct values for the following:
GTINs: On the value field, choose the value of the custom field or attribute name that you used to assign the GTIN to your WooCommerce store products.
**With Product Feed Manager for WooCommerce, you will get a set of custom fields added to your products and product variants, which you can use to assign unique identifiers.
Brand: On the value field, choose the value of the custom field or attribute name that you used to assign the Brand to the products.
**You can try using Perfect Brands for WooCommerce to assign brands easily and use that as the value here.
Category: Since you need to assign each product to Fruugo’s dedicated categories, you need to use category mapping if you do not want to change your WooCommerce store’s current categories.
**With Product Feed Manager for WooCommerce, you will get the category mapping feature that will allow you to achieve this easily. For now, keep this attribute unassigned, configure the rest, and Publish the feed. Then follow this guide to use category mapping easily.
VAT Rate: On the value field, choose the custom field value you used to assign the VAT rate to your products.
For the Price, be sure to use the right attribute depending on how the prices are set up in your WooCommerce store.
Step 5 – Publish The Feed And Upload to Fruugo
1. Scroll up and click on the Publish button and the feed will be generated.
2. Setup category mapping and update your feed configuration with your mapped data. (See the previous step to understanding what to do here.)
3. Update your feed with all the default attributes assigned. Then you will be able to download your feed.
And that’s it. You can then go ahead and upload your products on the Fruugo marketplace and start getting more sales.
Schlussfolgerung
Generating a Fruugo product feed for WooCommerce is crucial for selling on this global marketplace. It involves formatting your WooCommerce product data to meet Fruugo’s requirements.
To simplify this process, consider using a product feed manager plugin for WooCommerce. These tools automate feed generation, update product information, and synchronize inventory easily.
By leveraging this tool, you can save time, maintain listing accuracy, and enhance visibility on Fruugo. This strategic approach not only improves efficiency but also increases sales potential.
If you are aiming to expand your market reach and effectively manage your Fruugo listings, utilizing a product feed manager is highly recommended.
To begin selling on Fruugo, you need to create a seller account on their platform. Once registered, you can list your products directly from your WooCommerce store using the PFM plugin. Ensure your product feed meets Fruugo’s specifications for easy integration.
What are Fruugo’s feed specifications?
Fruugo requires specific product feed formats, including details like Global Trade Item Numbers (GTINs) for each product. Using automated feed generators tailored for WooCommerce helps ensure your listings are compliant and optimized for visibility.
Can I sell internationally on Fruugo?
Yes, Fruugo operates in 46 countries. It allows you to reach a global audience through their marketplace. Utilize WooCommerce’s store categories to categorize your products effectively for different regions.
How safe is selling on Fruugo?
Fruugo is a trusted online marketplace with positive reviews from both sellers and shoppers. They provide secure transactions and a user-friendly platform for conducting international trade.
How does Fruugo benefit shoppers?
Fruugo offers shoppers the comfort of comparing prices from various sellers across different countries. This allows them to make informed purchasing decisions based on product availability and competitive pricing.
Running an eCommerce business may seem hectic, but today, eCommerce is the most booming industry out there.
According to a global report, the e-commerce industry has seen over $5.8 trillion worth of sales in 2023 globally and is expected to grow to over $8 trillion by the end of 2027.
Now, despite generating so much revenue and sales, most consumers go online to compare the prices of products. And 87% of these consumers end up making online purchases sooner or later.
Thousands of people still go to compare prices through several price comparison sites such as Pricespy, Pricerunner, Pricechecker, etc.
Thus it is ideal for any online store to list its products on popular price comparison sites. Pricespy is currently the most popular price comparison site in Europe.
This means, that if you run an online store and deliver products in major countries in Europe, then you must list your products on Pricespy to increase sales.
What is Pricespy?
Pricespy is a popular price comparison website that helps you find the best deals on a wide range of products. It allows you to compare prices from various retailers across different categories such as electronics, appliances, and more.
As a shopper, Pricespy enables you to make informed purchasing decisions by presenting comprehensive price information and product reviews in one place.
For sellers, listing products on Pricespy increases visibility and attracts price-sensitive customers looking for competitive deals.
It is a valuable tool for both consumers seeking the best prices and businesses aiming to reach a broader audience, especially in the competitive UK online marketplaces.
How does Pricespy work?
Pricespy works by aggregating product information and prices from various online retailers into a centralized platform. Here’s how it operates:
Data Collection: Pricespy gathers product details, prices, and availability from participating retailers like you.
Comparison: It compiles this information into a searchable database. It allows you to compare prices and features across different products and brands.
User Interface: Customers can easily navigate through categories, view product reviews, and filter results based on their preferences.
Seller Participation: You can list its products on Pricespy to increase visibility and attract customers looking for competitive deals.
Decision-Making: Customers benefit from comprehensive price transparency and unbiased product reviews. It enables them to make informed purchasing decisions.
Pricespy’s platform facilitates a convenient and efficient way for consumers to find the best deals online while providing you with a valuable tool to enhance your market reach and sales potential.
Why You Should List Your Products on Pricespy?
Pricespy is currently the most trusted price comparison site around Europe with over 14 million regular users.
Let’s look at the reasons why Pricespy is ideal for you to list your products.
When you list your products, they will be sorted into various categories.
When a consumer will search for a product, they will get a list of the best deals for that particular product.
If you are offering a good price and an overall good deal compared to others, your product will appear among the suggestions that the visitors will see.
Let’s say the consumer chooses your product. Click on it will redirect the consumer to the product page on your site, where he/she can complete the purchase.
Now, this sounds similar to most other such sites, however, Pricespy has a few perks that outweigh others.
i. Displays Honest Deals
Other listing sites such as Google Shopping or Facebook Ads have packages where paying higher can increase views. Pricespy has no such policy.
When a consumer searches for a product, he/she will get a genuine list of the best deals for that product from the lowest price to the highest.
So if you are offering a good deal, you will surely make money.
ii. Offers Price Prediction Graphs
Pricespy offers a unique service to consumers with a Price Prediction Graph. They have an artificial intelligence tool of their own called USP, which compares price changes in the past and the current market, and predicts what a product price might change into.
This can be used by consumers to decide when to purchase a product, and at the same time, it can be used by sellers to decide when to release good discount deals.
For example, if you see that the price of a product will fall next month, you can decide to give a discount offer beforehand to increase your sales as much as possible, before the fall in the market price.
In this way, even if a consumer sees that the price will fall later, your discount might tempt them to make an immediate purchase.
If the market price falls later, your current production cost will make it difficult to get a good profit at that time. So selling more of your products earlier will be more beneficial for your shop.
iii. Affordable Collaboration
Along with the above advantages you get, the cost of posting in Pricespy is absolutely nothing. They have a fair Cost Per Click (CPC) payment policy depending on the click volume. So if you are not getting results here, you will not have to pay.
They do have a paid feature, ‘Featured Shop’, however, it’s not what it sounds like. You might think a featured shop will probably be highlighted uniquely or will be displayed at the top of the list. But that’s not the case here.
In Pricespy, it will allow you to display your logo in the listing results rather than the name only, it will allow you to add a biography, and it will also add a ‘Cheapest on PriceSpy’ tag if your deal is cheapest for a certain product.
Apart from that, it gives you an analytics board to keep track of your product performance and changes the fees into a fixed Cost Per Click amount regardless of the click volume. These are the two features why most people sign up for the featured shop.
Your advantage here is that others cannot get too many special preferences just by paying extra. If you are offering good deals, you will get the value you deserve on the listing.
2. Huge Reach
Pricespy currently operates in 7 different European regions with their respective local domains (in local languages).
It originated in Sweden as Prisjakt and has expanded to the above regions, while already gaining people’s favor locally and globally.
Most English-speaking people in any of these regions prefer using Pricespy UK rather than using the local sites. However, that’s not where it ends. Pricespy UK is also used by people overseas who wish to order products from the UK.
The site has regular users from the USA, Australia, India, Canada, Germany, Italy, Netherlands, and many other countries. So, if you sell products globally, this site is a sure way to reach ideal prospects.
3. High Regular Traffic
There is a reason why Pricespy decided to have local sites for the above-mentioned regions. It’s due to the huge traffic the site gets regularly.
Being the #1 price comparison site, Pricespy gets tons of regular visitors every day and results in tons of sales.
Here’s a chart (compiled using Ahref and Alexa) that will give you an idea of the number of visitors Pricespy gets in each of their regions:
Land
Ahref Traffic Analysis
Alexa Rank & Stats
UK & Ireland
Global: 131,914 /month Local: 839982 /month
Rank: #54,920 1:22 Daily Time on Site
Neuseeland
Global: 251,216 /month Local: 251,216 /month
Rank: #82,216 2:04 Daily Time on Site
Schweden
Global: 2,807,643 /month Local: 2,807,643 /month
Rank: #14,723 1:48 Daily Time on Site
Norwegen
Global: 835,560 /month Local: 830,664 /month
Rank: #31,802 1:25 Daily Time on Site
Finnland
Global: 80,406 /month Local: 279,935 /month
Rank: #243,912 0:51 Daily Time on Site
Dänemark
Global: 14,191 /month Local: 14,069 /month
Rank: #601,266 1:42 Daily Time on Site
Frankreich
Global: 636,256 /month Local: 627,249 /month
Rank: #98,963 2:04 Daily Time on Site
**Daily time on site means the average time spent by every visitor per day.
As you can see, each of these sites has a high number of monthly visitors. This is a plus sign for you if you list your products on these sites.
Also, notice that visitors to all of these sites spend more than 1 minute (on average) daily. This is considered highly engaging. Any site with a daily time above 45 seconds is considered a quality and well-preferred site.
All these are proof that people regularly buy products through the help of this website which is earning revenue for many online stores.
4. Trusted Overseas
Here’s another great advantage of listing your products on Pricespy. Other than huge local visitors, Pricespy is also used by people overseas, who wish to order products from the UK.
Here are stats of the number of visitors Pricespy gets from a few overseas countries.
Land
Traffic Volume
USA
63,828 /month
Australien
2,019 /month
Indien
1,036 /month
Kanada
886 /month
Deutschland
854 /month
Italien
588 /month
Niederlande
502 /month
This is promising for any online store that delivers globally. Hence you have an opportunity to expand.
5. Engaging Mobile App
Pricespy launched its mobile app which helped increase its usage even further.
The app comes in 7 different languages:
English
Danish
Finnish
French
Norwegian
Bokmål
Swedish
This is a great advantage because more than half the online consumers prefer using mobile apps to make purchases. Hence, this will increase the possibility of you getting more sales.
Currently, the app is regularly used by over 5 million Android users and tons of Apple users as well.
Now that you know all the advantages you can get just by listing your products in Pricespy, let us look at how you can start listing your products here.
How to List Your Products on Pricespy Accurately
First of all, keep in mind, that Pricespy will not list any non-branded products. So, for any products you submit here, you must submit a brand name.
For in-house products, they too need to have a brand name, possibly under your company name. Now, in order to list your products on Pricespy, you will need the following.
Signing Up As A Retailer On Pricespy
Signing up is completely free. The idea is to make sure that even very small shops can benefit from the site along with large stores.
However, there is a certain set of requirements that needs to be met. In this guide, I will elaborate on how you can get registered on Pricespy UK.
It’s a simple process. To get registered on their UK platform you will need to meet the following requirements:
You must sell at least one product within the categories of PriceSpy.
The website must be in English (language).
Products prices on your site must be in GBP (currency).
You must be able to take online orders via your website (or email).
The company policy should comply with all laws and regulations; nothing illegal is allowed.
You must submit your Company number or VAT number to Pricespy
After you register, if your shop is a British legal entity, then it will be listed with a UK flag next to its name.
And, if you own a non-EU company, then you must either be VAT registered in the EU countries where you wish to sell your products or be registered via the EU-service “VAT Mini One Stop Shop” (VAT MOSS). See details on Non-Union VAT MOSS here.
Here’s a copy of the Registration form:
Simply fill out the form with all the required details.
The field ‘URL to product feed is where you can put the link to the price list you create for your products. If you don’t have that ready yet, you can leave it blank for now.
The shop category is important. Pricespy lets you choose from the following shop categories:
Various
Audio & Video
Beauty & Health
Camera & Photo
Computers & Accessories
Fashion & Accessories
Gamer Zone
Games & Consoles
Home & Garden
Phones & GPS
Sports & Outdoors
White Goods & Household Appliances
If you sell products from different niches in one shop, then you can choose ‘Various’. However, if you sell products within a single niche, then it’s best to choose one of the other categories.
This is because consumers have the option to get notifications and updates on Shopping categories. Choosing ‘Various’ reduces your shop’s visibility in any individual category.
Once you register, your application will be reviewed and you will get a confirmation e-mail with instructions for using Pricespy.
After that, the next step is to submit the Price List of your products.
How to Generate And Upload an Accurate Product Price List on Pricespy?
When you create your product price list, you will need to include a few specific data.
Let us look into what data you must include on your price list and I will give you examples for each data so that you know the most optimized way to generate it.
Pricespy accepts either a Text format with tab delimiters or an XML format, although they prefer you to submit the Text format.
*I will provide you with a sample feed template to understand how the data should be submitted for your products
Now, Pricespy requires the following attribute values for each of your products to be included in the price list:
Mandatory Attributes
Product ID / Article Number
Product Name
Produkt-Kategorie
Produkt-URL
Product Price
Condition / Product Format
Availability
Brand / Manufacturer
Recommended (but optional) Attributes
Product Image links
MPN / Manufacturer SKU
EAN-13 / GTIN-13
Shipping Fees
Total Price
Produktbeschreibung
Stock Status
Colour or pattern
Gender and audience
Größe des Produkts
Multi-pack or bundle
Now, you must include all the data listed under the Mandatory Attributes. The recommended attributes are strongly advised to be used for better results in the listings.
Below is a more detailed explanation with examples of how each of these attributes should be assigned on your Pricespy price list for the maximum output.
After learning about the attributes in detail, you will get a sample of a Pricespy price list to get a clear idea. Now, let’s get into the details to understand what values you should assign to each attribute.
Product Attributes Explained
For each of the attributes, Pricespy has its own set of instructions that you need to follow.
Here I will give you examples and tips on how to make sure the data is not rejected and are optimized for better results.
Produkt-ID
Attribut
Product ID or Article Number **Here you can either submit Product ID or Article Number
Beispiel
241
This is a unique value for each product, to identify it in your store. It is limited to 36 characters.
For this, you can either use the value of the Product ID or the SKU of the product in your store.
**SKU is also unique for each product and can be used for the same purpose.
Product Name
Attribut
Product name
Beispiel
RFL White Electronic Blender
It is the name of the product to be displayed. When you set the product title, make sure it includes the product title, along with the model name/number.
Also, specify any special feature such as its color, material, model year, etc on the title if possible, especially for variations of the certain product.
If there is a separate brand name that people may recognize your product by, that is different from the manufacturer name you submitted, then you must include the brand name in the Product name.
For example, if you submit the Manufacturer as Today Electronics, but the brand name of the product is RFL, then include RFL in the product name (as shown in the example in the table).
Certain products may have different pack sizes (such as perfume, shampoo, and food). In this case, you need to specify the volume or weight in the product name.
If it is bundled or multiple packs of products, this should also be stated in the product name.
These tips are important to follow to get better chances of being relevant to a user’s search term, thus more chance of being listed when searched for.
Produkt-Kategorie
Attribut
Kategorie
Beispiel
Kitchen Appliances > Electronics For Kitchen
This is the category of the product. You must include the full category including sub-categories, in a tree structure.
The categories you submit should be based on the product type and not brand or any other aspects such as sales category, color, trademark, etc.
Pricespy will only accept the submission of one category, so you cannot submit multiple categories for the same product.
In this case, I suggest you use certain category mapping tools to ensure the right category tree is assigned.
**Browse through Pricespy and find out how other products, similar to yours, are categorized, and try to assign similar categories to your products when mapping.
This is the link to your product page. If the product page doesn’t have a URL of its own, you can use the URL for the category page.
If there are parameters in the product URL to differentiate between variants of a product such as color or size, the parameter must be included in the link; do not just give the URL of the basic product page.
**Do not include any UTM tracking code in the URL. For UTM tracking, submit a separate attribute called UTM, with the value of the UTM code.
Product Price
Attribut
Price or Price (without VAT) **Here you can either submit Price or Price (without VAT)
Beispiel
Example: 85.09 GBP
This is the price of the product to be displayed when listed, excluding shipping fees. I suggest you submit the price with VAT.
If you submit the price without VAT included, then rather use the attribute name Price (without VAT) to specify this to Pricespy.
The price you submit should match the price shown on your product page, and the currency should be GBP for the UK market.
Condition / Product Format
Attribut
Condition or Product Format **Here you can either submit Condition or Product Format
Beispiel
Demo
Use this attribute to indicate the current condition of the product or the format of the product.
These are the accepted values for the condition:
New – to indicate that is a brand new product and intact
Demo – to indicate that this is a preview of the product.
Used – to indicate that the product was refurbished or unpacked
Download – to indicate that this is a digital product to be downloaded
If all the products in your price list it in new condition and are physical products, then you can avoid submitting this attribute at all.
Availability
Attribut
Availability
Beispiel
Can not be ordered
Use this attribute to indicate if a product is currently available for shipping, if a certain product in the price list cannot be ordered immediately, or if it doesn’t accept home delivery.
These are the accepted conditional values for availability:
Available – to indicate that the product is in stock and can be ordered
Can not be ordered – to indicate that it is not available for ordering at the time being
Pickup – to indicate that this product has to be physically collected; no home delivery
Brand / Manufacturer
Attribut
Manufacturer
Beispiel
RexSupplies
It is mandatory to provide the brand/manufacturer to add products on Pricespy. Ideally, you should also mention the brand name on the product title.
In case you are a renounced manufacturer but are selling products with another brand, then you probably want to represent your company name as the Manufacturer’s name.
In that case, you must include the product brand name in the Product name. Certain products may be accepted without submitting this attribute.
These include
Movies
Books
Music Records
Other than these 3 types of products, any other products with missing brands or incorrectly defined brands will not be indexed or listed.
Product Image links
Attribut
Image links
Beispiel
https://www.yourwebsite.com/productimage.png
You may submit 1 or more image links for the product. The first link will be considered the primary image in case you submit multiple links.
Make sure the image has no watermarks brand seals, or any such marks on it. It’s advised to use high-resolution images of the product with a white background.
Also, the image should match various details that you include on the Product Name such as the color or the size.
For example, if the name of a product is White Blender, then the image should also include a Blender that is White color.
Pricespy will list your products even if you do not submit image links, however, we strongly advise you to provide at least 1 image link for better results in the listing.
MPN / Manufacturer SKU
Attribut
MPN or manufacturer SKU **Here you can either submit MPND or manufacturer SKU
Beispiel
PH0011
Here you need to provide the product MPN code of your products.
In case you do not have an MPN, you may use the SKU as the value (provided that you did not use the SKU as the Product ID.
It is not mandatory to include this attribute, but it is highly recommended to help with faster, more accurate indexing.
**MPN for each product is unique.
EAN-13 / GTIN-13
Attribut
EAN-13 or GTIN-13 **Here you can either submit EAN-13 or GTIN-13
Beispiel
4129179234125
A product that is manufactured in Europe usually has an EAN. Similarly, a product manufactured in the US or Canada comes with a GTIN.
If you have the EAN-13 or GTIN-13 barcodes for your products, then you may submit them through this attribute.
This is optional data to provide, but submitting it helps with an accurate listing.
Shipping Fees
Attribut
Shipping
Beispiel
5 GBP
You can submit the shipping fees for your products.
The shipping fee may vary depending on the product, so it is not necessary that you have to assign a fixed shipping fee.
Total Price
Attribut
Total Price (with VAT) or Total Price (without VAT) **Here you can either submit the Total Price (with VAT) or the Total Price (without VAT)
Beispiel
Example: 90.09 GBP
Rather than submitting a separate shipping fee, you can choose to submit a total price which is basically, the shipping fees added to the product price.
If you wish to submit the Total Price including VAT then use the attribute Total Price (with VAT).
If you wish to submit the Total Price excluding the VAT, then use the attribute Total Price (without VAT).
**You can either submit a shipping fee or the total price. If you submit both, Pricespy will keep the Shipping and exclude the Total Price attribute.
Produktbeschreibung
Attribut
Product description
Beispiel
This blender is super efficient and takes up less electricity than others.
You can add a short description of the product you are selling. Try to highlight all the major features it may have included in any features that you did not include in the Product Name.
This is optional data you may submit; we advise you to submit it to attract more prospects.
Stock Status
Attribut
Stock status
Beispiel
Vorrätig
This attribute indicates the stock status of the products in the shop. It is not mandatory to submit this attribute, but it helps to enhance the search results on the listing.
The stock status value you submit is conditional. It must be relative to the value you submitted under Availability. The following are the accepted values for the stock status:
In stock: To indicate that the product is available and can be delivered to the customer within six business days.
Out of stock: To indicate that the product is out of stock in the shop.
Incoming [date]: To indicate that the product is not in stock at the moment, but is expected to be available on the given date
Pre-order [date]: To indicate that the product is not released yet, but it will be released on the given date and can be pre-ordered from your website
You can use ‘In stock’ only when you submit Availability as ‘Available’.
Use ‘Out of stock’, ‘Incoming [date]’ or Pre-order [date] when you submit Availability as ‘Can not be ordered’
Do not submit a Stock Status if you submit Availability as ‘Pickup’.
**If you do choose to submit the stock status, then make sure it matches the instructions above. Incorrect submission of the Stock Status for any product will result in Pricespy hiding that product from the listing.
Color or Pattern
Attribut
Color or pattern
Beispiel
Stripped Marble Green/White
For certain types of products such as Apparel & Accessories, it is more logical to specify the color or pattern since buyers look into these aspects when buying such products.
Submit the actual color or pattern assigned by the manufacturer if possible.
As you can see, the example in the table, Stripped Marble Green/White is not a generic color or pattern; it was assigned by the manufacturer.
Gender and Audience
Attribut
Gender and audience
Beispiel
Unisex
Certain products are made for people of a specific gender or age group. For example, a skirt for women or a toy for children.
In such cases, you may submit the target gender or audience for the product. You may use the following values:
Women – if the product is for an adult lady
Men – if the product is for an adult man
Unisex – to indicate the product is usable by any gender
Girl – if it is for a teenage girl
Boy – if it is for a teenage boy
Child – to indicate that the product is for children
This attribute is optional. You only need to submit it if you did not include the value of the Product name.
Größe des Produkts
Attribut
Größe
Beispiel
UK12
For certain products such as shoes or T-shirts, a buyer will always look into the size. So you can submit the size of the product using this attribute.
Make sure to indicate the size type such as EU45 or US11 or UK12, to understand which size type the buyers are dealing with.
For example, you can submit the size as UK12, and if the buyer is from the US, then he/she can convert it from the UK to the US size and decide if this is the right size to buy.
If you have a product with multiple sizes available, you may submit all of them with a ‘/’ in between for example EU45 /E42 / EU40.
Multi-pack or bundle
Attribut
Multi-pack or bundle
Beispiel
Bündel
If you wish to submit a bundle or multi-pack offer from within your shop, and not the actual product manufacturer, you can use this attribute.
For example, let’s say you have the products Shampoo, Hair Conditioner, and Hair Serum. In your shop, you created a bundle with these items. You can submit that bundle as a product in Pricespy. In that case, you need to include this attribute and set the value as ‘Bundle’.
You can use the following values:
No: Indicate that the product is not a multi-pack or bundle created by your shop (or you may keep it blank).
Multi-pack: If you submit a multi-pack offer created by your shop.
Bundle: If you submit a bundle offer created within your shop.
Although this seems beneficial, I advise you not to submit your own created bundles or multi-packs to Pricespy as it may confuse buyers. You can avoid using this attribute by adding “bundle by (your shop name)” to the product names of the bundles you submit. For example, “Shampoo Combo bundle by RexSupplies”.
That’s it. By following the instructions above when including data in the price list, you can expect successful approval by Pricespy and optimization for better results in the listing.
Sample Price List of A Product for Pricespy
Here’s a sample of a price list for a single product in text format (with the mandatory attributes included),
One advantage you have with Pricespy is that, unlike most other listing sites, if you submit extra attributes, that are not among the ones mentioned above, they are not entirely ignored.
After pre-scanning, if any such values are traced that are not part of the expected attributes, Pricespy initiates review by a live agent, i.e., manual review.
How to Generate The Price List for Pricespy Easily?
Now comes the question, how will you generate the price list?
Manually creating it will take hours of your time, in case you have over 50 products. In that case, you can look for product feed generation tools to help you out.
The plugin has the template of Pricespy already created. All you need to do is assign the target values and the plugin will generate the price list in minutes.
I mentioned earlier that to create categories, you will need category mapping. This plugin already has this feature.
Before generating the price list, simply set the category mapping. Then when you generate the price list, assign the category mapper you created as the value for the Category.
You can first test out the free version of the plugin. Once you generate the price list, log in to your Pricespy account.
On the Merchant Dashboard, you will find the Products tab. Here, choose Add Products and then click on the option called Feed file. There you will be able to upload the price list.
Schlussfolgerung
Using more options to promote your online products is wise if you want maximum sales. Pricespy is one of the few price comparison sites that consistently brings good results for online shops.
To excel in sales, it’s high time you start listing your products on Pricespy, provided you offer competitive deals and don’t overcharge.
It’s essential to create accurate and optimized product feeds to upload your products without any hassle. And for listing your eCommerce products on Pricespy, you need a plugin to simplify the process.
A product feed manager for WooCommerce can help you upload and optimize all your products effortlessly. So go ahead with it to save your valuable time on listing
To start selling on Pricespy, create a seller account on their platform. Then, use a product feed manager plugin to upload your WooCommerce product feed. Make sure your products are competitively priced for better visibility.
What are the benefits of using Pricespy?
Pricespy helps you attract more customers by allowing them to compare prices across different retailers. This increased visibility can lead to higher sales, especially if you offer competitive pricing.
How can I optimize my product listings on Pricespy?
Use a product feed manager to ensure your product data is accurate and up-to-date. Regularly update your prices and product information to stay competitive and improve your chances of appearing in search results.
Is it necessary to use a product feed manager?
Yes, using a product feed manager simplifies the process of uploading and managing your products on Pricespy. It ensures your listings are optimized and helps maintain accurate, current product data.
Can I list bundle offers on Pricespy?
Yes, you can list bundle offers on Pricespy. Label them clearly by adding “bundle by (your shop name)” to the product names. This helps avoid confusion and ensures buyers know they are purchasing a bundle created by your shop.
Trovaprezzi is one of the largest marketplaces in Italy to sell electronics online.
To promote your products on this marketplace, you simply need to submit your product feed in the right format, along with the necessary attributes for listing.
Currently, this marketplace gets an average of over 15.4 million visits per month, and it’s high time you too start selling on Trovaprezzi to boost your revenue.
In this guide, you will learn about the mandatory attributes, i.e., the product data you need to submit to list your products on Trovaprezzi
Plus, you will get a step-by-step guide to generate a Trovaprezzi product feed from your WooCommerce store in just a few clicks, using a simple and easy-to-use plugin.
Fangen wir also an.
What is The Trovaprezzi Marketplace?
Trovaprezzi is a top Italian price comparison marketplace that can help you find the best deals on products ranging from electronics to fashion and home goods.
If you’re a retailer, listing your products on Trovaprezzi can boost your visibility and sales by reaching a broader, price-conscious audience.
This platform enables a competitive shopping environment, benefiting you as a consumer looking for great prices or as a seller aiming to expand your market presence.
Therefore, Utilizing Trovaprezzi can be a strategic move to enhance your shopping or selling experience in the Italian market.
Benefits of Selling on Trovaprezzi Marketplace
Now let me explain the effective benefits of selling on Trovaprezzi Marketplace:
Increased Visibility: Listing on the Trovaprezzi marketplace boosts your product’s visibility among price-conscious Italian shoppers.
WooCommerce Integration: By integrating your WooCommerce product feed with Trovaprezzi using product feed management software, you can simplify the process.
Optimized Listings: Product feed optimization ensures your listings are accurate, appealing, and competitive.
Higher Conversion Rates: Effective product data feed management can lead to higher conversion rates and increased sales.
Market Expansion: Selling on Trovaprezzi helps you reach a broader audience and expand your presence in the Italian market.
Mandatory Product Data for Feed Prodotto Trovaprezzi
Following are the mandatory attributes you need to submit for each of your products to list them on the Trovaprezzi marketplace.
Name: It is the name of the product, along with the model name. Do not include any promotional tag lines or phrases.
Code: You need to submit a unique product ID as the code. You can use the product IDs or the product SKU in your WooCommerce store for this attribute.
Description: In the description, you have to discuss the use and features of the product. You can also mention the compatibility, specifications, and variation details along with the product description.
You can use HTML tags to structure the description properly.
I advise you not to be too promotional as they tend to bring fewer results in this marketplace.
Categories: Include the entire category tree, from the parent category to the last child category, that a product can fall under.
You can use a comma (“,”) or semicolon (“;”) as the separator between the categories.
Image: Include a link to the main image of the product.
Make sure the image over-edited.
Avoid including watermarks, slogans, or promotional phrases in the image.
You must submit at least one image for each of your products to be listed on Trovaprezzi.
Link: This is the link to the product on your site.
Original Price: This is the base price of the product.
Do not include the currency along with the price. Normally people run discount campaigns when promoting Trovarprezzi. The original price still needs to be submitted so that Trovaprezzi can show the users the original price on which they are getting the discount.
Preis: If you are running discounts on your products, then submit the discounted price using this attribute. However, if you are not running a discount, then submit this attribute with the same value as the Original Price.
Do not include the currency along with the price.
Shipping Cost: Trovaprezzi is very strict about accuracy and needs you to submit an accurate shipping cost for the products that you are availing on your site. For example, let’s say you have an Air Cooler, that you are selling at a free shipping cost. So the Shipping Cost for this will be 0. Now, let’s say you are delivering an Air Conditioner at a shipping cost of 10 GBP, then you need to submit this attribute for the Air Conditioner with the value of 10.
Do not include the currency along with the cost.
Brand: If you are the main manufacturer, then use your company name as the brand name. However, if you sell various products from different providers, then include the actual brand name using this attribute.
EAN Code: EAN is a unique identifier that exists for all original manufactured products. You have to submit an accurate EAN code for all products you include in the product feed.
Part Number: The Part Number also referred to as MPN, is provided by the manufacturer of most electronic goods. If you have the original MPN of your products, then include them here, or you can use your product SKU instead.
Weight: You have to submit the weight of the products you are listing on Trovaprezzi. The weight is measured in kg. So do not submit any unit; just input the numerical value in terms of kg.
Stock: This is the number of a certain product you have available in stock.
Example Feed Prodotto Trovaprezzi
Here is an example of how a general product feed for Trovaprezzi looks like with two product offers:
So far, you have learned about all the product attributes that you need to submit on Trovaprezzi. Now, let us learn how you can generate a WooCommerce product feed for Trovaprezzi.
7 Steps to Generate Feed Prodotto Trovaprezzi Using PFM
PFM is right now the most stable and easy-to-use plugin that you can use to generate a product feed for Trovaprezzi real quickly.
Additionally, the plugin comes with a pre-build template which you can use to generate an optimized product feed in just a few clicks.
You can also add UTM parameters to track your feed’s performance effectively. Now, let me show you how easily you can generate a Trovaprezzi product feed in minutes by following these 7 simple steps.
Step 1 – Install And Activate Product Feed Manager for WooCommerce
Whichever way you save it, you can use that value for the Brand attribute.
5. Submit the Product Ean Code and Part Number
For the EAN Code, since it has to be unique for each product, you must save it in a custom field within your product. You can use the custom fields provided by our plugin (which is a Pro feature), or you can add a custom field of your own to store the value.
For the Part Number, you can use the SKU, or if you have actual MPNs stored for your products, you can use them through custom fields.
6. Assign A Product Weight
In WooCommerce, you will be able to assign a weight to every product. Then use it in the feed by choosing Weight as the value for the attribute.
7. Decide on available stock
Since you need to submit the available product quantity in stock for each product, you have to manage stock in your WooCommerce store, which will be included in the feed.
Step 6 – Publish & View Your XML Feed
1. Scroll up and click on Update.
A progress bar will appear to show that the feed is being generated.
2. Once updated, you will get a notification “Product Feed Updated” and also you will get the option to view or download the feed.
Step 7 – Submit Your Feed on Trovaprezzi And Start Getting More Sales
Now that you have the feed ready, you can log in to your Trovaprezzi merchant account and submit your product feed. Once listed, you will start getting more traction soon.
Schlussfolgerung
In conclusion, utilizing a product feed manager simplifies the process of generating and optimizing your Trovaprezzi product feed.
These tools automate feed creation, update product information dynamically, and simplify the synchronization of inventory.
By using a product feed manager, you can ensure that your listings on Trovaprezzi are accurate, up-to-date, and attractive to potential buyers, thereby enhancing your visibility and sales opportunities on this popular Italian price comparison platform.
If you are looking to maximize your presence on Trovaprezzi, utilizing a product feed manager is a highly recommended solution.
To start selling on Trovaprezzi, you need to create a seller account on their platform. Once registered, you can integrate your products from WooCommerce using tools. Ensure your product feed meets Trovaprezzi’s requirements for easy integration.
What are the benefits of using a product feed manager?
Using a product feed manager simplifies the process of managing your Trovaprezzi listings. It automates feed generation, updates product information in real time, and helps optimize your listings for better visibility and sales.
Can I customize my product listings on Trovaprezzi?
Yes, you can customize your product listings on Trovaprezzi through your WooCommerce store. Use features to adjust product details, pricing, and availability directly from your WooCommerce dashboard.
How often should I update my Trovaprezzi product feed?
It’s recommended to update your Trovaprezzi product feed regularly, especially when there are changes in product information or inventory. Use PFM to automate these updates to ensure your listings are always accurate and up-to-date.
Is selling on Trovaprezzi safe and reliable?
Yes, Trovaprezzi is a reputable platform known for its secure transactions and reliable service. They provide a trusted marketplace environment for both sellers and buyers, ensuring a safe experience for all parties involved.
If your target customers are new wine buyers and you are promoting in a marketplace that targets years-old wine buyers, chances are you will get low sales.
To attract new wine buyers you should promote your wines in a popular online wine marketplace called Vivino.
With over 5 million visits per month(mostly new buyers) in 2024 – Vivino is definitely a marketplace that will help you generate a huge amount of profit by selling wine.
If you run a WooCommerce store to sell wine online, then you can easily generate a Vivino product feed in just a few clicks, using the right tool.
I’ve explained how you can generate a Vivino XML feed in just a few clicks with details so that you can understand and implement better.
Fangen wir also an.
Guide To Generate Vivino Product Feed
Let us look at all the required data and the process to generate the Vivino product feed, real quick, using the right tool.
Instructions Feed Specification For Vivino Product Data
When creating a new feed for Vivino, you will need to include a few specific data in the right format.
Normally, the feed structure is as follows:
<vivino-product-list>
	<product>
		---PRODUCT ATTRIBUTES AND DATA HERE---
	</product>
</vivino-product-list>
Now, let us look at a list of the required product attributes that you should include on your product feed, and I will provide an example for each attribute so you understand how to include the product data.
Later, I will show you an example of the complete structure of the XML feed and guide you on how you can generate the feed fast.
Required Product Attributes To Submit to Vivino
The following are mandatory attributes that you must submit for every wine you want to list on Vivino.
Attribut
Instructions
Beispiel
Product Name
Format: <product-name>…</product-name>
This field is required.
Use the product name in the format: [Producer] + [Wine name and appellation] + [Vintage] + [Wine Color]
**If it’s not White or Rosé wines, then you can avoid including the wine color. **If it’s a non-vintage wine, then use NV in place of Vintage.
<product-name>Famille Perrin Côtes du Rhône 2014 Rosé</product-name>
Price
Format: <price>…</price>
This field is required.
This should be the final price of the wine after all discounts.
**For non-US/Candian sellers, you must include taxes in the price. **Do not include the currency.
Accepted values for this attribute are ‘True’ and ‘False’.
**True indicates that the discount will be applicable only if a certain quantity is purchased. **False indicates that the discount is applicable for all bottles.
<quantity-is-minimum>False</quantity-is-minimum>
Bottle Size
Format: <bottle_size>…</bottle_size>
This field is required.
The bottle size indicates the size or volume of the wine bottles you are selling.
**Vivino only accepts the following bottle volumes: – 375ml – 500ml (for fortified and dessert wines) – 750ml – 1000ml – 1500ml
<bottle_size>750ml</bottle_size>
Bottle Quantity
Format: <bottle_quantity>…</bottle_quantity>
This field is required.
This is the number of bottles you are offering at the given price.
To submit the extra attributes, you normally need to submit them by cascading them within the Extra tags.
Take a look at the example feed structure below to see what a Vivino XML feed looks like with all the mandatory attributes and a few recommended extra attributes.
Example Feed Structure For Vivino
Here’s a sample Vivino feed structure that you can follow to create a Vivino feed:
<vivino-product-list>
	<product>
		<product-name>Apothic Winemaker's Blend Red California 2013</product-name>
		<price>7.45</price>
		<quantity-is-minimum>false</quantity-is-minimum>
		<bottle_size>750 ml</bottle_size>
		<bottle_quantity>1</bottle_quantity>
		<link>http://www.wayback-wines.com/california/wine-12345.html</link>
		<inventory-count>20</inventory-count>
		<product-id>1125</product-id>
		<extras>
			<producer>Apothic</producer>
			<wine-name>Winemaker's Blend Red</wine-name>
			<appellation>California</appellation>
			<vintage>2013</vintage>
			<country>United States</country>
			<color>Red</color>
			<upc>0123456789001</upc>
			<varietal>70% Merlot, 25% Cabernet Sauvignon, 5% Malbec</varietal>
			<alcohol>13.4%</alcohol>
			<description>This is a great wine from Apothic with good value.</description>
			<ageing>12 months in oak and 12 months in bottle</ageing>
			<image>http://www.wayback-wines.com/wp-content/uploads/img/2535550.jpg</image>
		</extras>
	</product>
</vivino-product-list>
Now that you know the attributes to include in the feed, let us look at how you can generate Vivino XML feed easily using a WordPress plugin.
7 Steps To Generate Vivino Product Feed In Your WooCommerce Wineshop
Creating an XML feed manually for all of your products is no longer required as there are several tools out there that you can use to easily generate a product feed for Vivino.
In this guide, I will show you how you can generate a product feed for Vivino wine selling using Product Feed Manager for WooCommerce which is one of the easiest plugins to use and has a pre-built template to help you generate Vivino XML feed in just a few clicks.
Follow these 7 quick steps below to use the plugin easily and generate Vivino product feed real accurately.
Step 1 – Install And Activate Product Feed Manager For WooCommerce
3. Install and Activate it. Once activated, you will find the menu Product feed on your dashboard.
Step 2 – Import Vivno Template For Feed Generation
1. On your dashboard, click on Product Feed and then click on Add New Feed option.
Sie gelangen dann zur Seite für die Erstellung des Feeds.
Here, on the top you will get an option to give a name to your feed, you can skip giving your feed a name if you want.
Click on the Feed Merchant Dropdown and you will get the list of all the supported merchants.
2. You can scroll down this merchant dropdown list or you can type Vivino in the search box, and you will get the Vivino option in the list.
Select Vivino, and all the required attributes of Vivino will be loaded below.
Step 3 – Feed Configuration Options
Now, you can see four buttons under the Feed Title text box, Documentation, Troubleshoot, Product Filter, and Settings.
1. Clicking on the Documentation button will take you to the Product Feed Manager documentation section. Here you will get all the necessary docs that you can use to create a feed successfully.
2. If you are having any issues generating feed, click on this Troubleshoot button, it will take you to the Troubleshoot page, it could be helpful for you.
3. If you want to use any filter or condition, you can click on the Product Filter option, and a drawer will slide in from the right side of the window, and there you will get the following filters:
All Featured Items
Custom Filter
Category Filter
Tag Filter
Product Filter (Pro)
Product Rule Feature (Pro)
You can select any filter option and use them as per your need and click on the Close button when done.
4. Now, to schedule your feed or to choose which type of products will be included in your feed, click on the Settings button, and you will get a list of options to exclude or include products.
Step 4 – Use The Vivino XML Feed Template
1. If you look at the Feed Merchant dropdown button, there you will get another dropdown Feed Type, you can click here to set the type of this feed. You can set different types of feeds depending on what types of feeds this merchant supports or what types of feeds this Product Feed Manager has the support for.
For Vivino, keep the Feed Type as XML.
2. Now, in the attributes section, you will see that all the attributes are under the Required Attributes column, and their values are set according to the attributes under the Assigned Values column.
You can change any values to any attributes, simply click on the value dropdown, and select your preferred value.
All the required attributes will appear below. Now, most of the attributes will already be configured but notice that some of these attributes are unassigned.
Step 5 – Assign The Right Values To Unassigned Attributes
You will need to assign values for the following:
Quantity is minimum
Bottles size
Bottles quantity
1.Quantity is minimum
Assign the value as True if the price you submitted is a discounted price and will be applicable only if a certain quantity is purchased.
Assign the value as False if the price you submitted is applicable for any number of bottles purchased.
2.Bottles size
Input an accepted bootle size for each product.
3.Bottles quantity
The bottles quantity mainly indicates the number of bottles you are offering at the given price. So assign a value to it.
Step 6 – Publish & View Your Vivino XML Feed
1. Once you are done with the attribute, click on the Publish button on the bottom or Scroll to the top and click on Publish button.
A progress bar will appear to show that the feed is being generated.
2. Once updated, you will get a notification saying Product Feed Updated, and you will get the option to view or download the feed.
Step 6 – Submit Your Feed On Vivino And Boost Your Wine Sales
Now that you have the feed ready, you can log in to your Vivino merchant account and submit your product feed. Once listed, you will start getting more traction soon.
Schlussfolgerung
As you saw above, this is how easily you can generate a product feed for Vivino using Product Feed Manager for WooCommerce.
Initially, test out the free version of the plugin or take a live preview.
Once you are sure the plugin does what is claimed, you can go ahead and think about upgrading to Pro.
Promoting via Vivino is the best decision most wine shops have ever taken. It’s about time you should also sell wine online through this trusted marketplace, and boost your revenue.
Unlike other marketplaces, you don’t need to update again and again.
This marketplace updates itself, so you can get sales without much effort also without investing in advertising.
If you want to promote your products on the Bonanza marketplace, you need to make sure you submit your Bonanza feed in the right format.
Bonanza has its own set of required product data that you need to include in the product feed, which you need to prepare in a CSV format.
In this guide, you will get a good understanding of
why you should sell on Bonanza,
what product data you need for your products to be accepted on Bonanza, and
how you can generate an accurate product feed quickly.
Fangen wir also an.
1. Why Sell On Bonanza?
Bonanza has already built up a reputation for helping WooCommerce stores increase their revenue.
This is possible mainly due to a high buyer-to-seller ratio, seemingly 1300: 1.
This means there are a lot more active users than the number of sellers in the marketplace, that’s why the Bonanza selling platform can be a good choice for you.
There are more reasons. Such as :
Bonanza provides sellers like you with a “Seller Stats Dashboard”.
This stats dashboard offers sellers comprehensive data on item views and revenue.
The dashboard also highlights TurboTraffic activity.
So, you can visualize its impact on your store’s performance at a glance.
You can choose from advertising rates of 9%, 13%, 19%, or 30%, with higher rates resulting in increased buyer traffic from platforms like Google Shopping and other sources.
And the best part is, there are no upfront or monthly fees to register on Bonanza!
Don’t make these mistakes
Bonanza makes sure all its sellers are selling genuine products.
They run several checks for example :
products with images that are not real, edited, enhanced, or vague are rejected immediately.
2. If a Seller has a bad reputation, then there is no chance of registration.
3. If your online store is spammy with too many Ads, your products won’t be accepted unless you fix it.
Make sure you don’t make these mistakes.
Now that you know why it’s beneficial to sell on Bonanza, let us look at how you can prepare a product feed in the right format to list your products on this marketplace.
2. The Right Product Data To Upload WooCommerce Products On Bonanza
Since Bonanza wants to maintain quality, you are required to submit the following product data for each of your products.
**The ones marked in Green color are required attributes and the ones marked in Grey are optional attributes.
Product ID (id)
You can use the WooCommerce Product ID or the SKU for this attribute.
Product Name (title)
Use the product Title in your WooCommerce store and if possible, include extra traits such as color, size, gender, Brand name, etc to the title.
For variable products, it’s recommended to include the variation term to the tile for each variant.
Product Price (price)
Use the current price of the product on your site, i.e., if you have a sale running, then submit the sale price, else submit the regular price.
Do not include the currency for the price.
Category (category)
You need to submit the exact category path or category Id your product falls under as per Bonanza’s category list.
You can easily do that by using a category mapping feature when generating product feed. I will show you how later on in this article.
Product Description (description)
Use a benefit-rich description. You may choose to use the WooCommerce product description or the short description, whichever suits you better.
You may submit 3 additional images for every product.
Shipping Type (shipping type) – optional
Indicate the shipping cost type for your products using this attribute.
Accepted values are:
flat-rate
calculated
kostenlos
Shipping Price (shipping_price) – optional
If you include a shipping type as “flat-rate”, then indicate the shipping price here.
Shipping Service (shipping_service) – optional
Indicate the shipping service you use to deliver your products.
shipping_lbs – optional
If your shipping type is “calculated,” then you may specify the weight of your package in pounds using this attribute.
Do not include the unit of measurement in the value.
shipping_oz – optional
If the shipping type is “calculated,” specify the weight of your package in ounces using whole numbers only.
shipping_carrier – optional
If the shipping type is “calculated,” specify the carrier such as “ups”, “usps”, or “fedex”.
shipping_package – optional
If the shipping type is “calculated,” use this field to specify the packaging type such as “envelope”, “normal”, “large”, or “very large”.
worldwide_shipping_type – optional
If you ship outside the USA, then indicate the shipping cost type for your products using this attribute.
Accepted values:
flat-rate
calculated
kostenlos
worldwide_shipping_price – optional
If you include a worldwide shipping type as “flat-rate”, then indicate the international shipping price here.
worldwide_shipping_carrier – optional
For sellers located in the US that wish to offer “calculated” shipping to worldwide addresses, use this attribute to specify the shipping carrier.
Accepted values are:
usps
ups
fedex
Now that you know about the required product attributes and optional attributes you can submit to upload your products on Bonanza, let us learn how you can generate a CSV feed for Bonanza easily.
3. How To Generate WooCommerce Product Feed For Bonanza Marketplace
In WooCommerce, you will find a reliable plugin called Product Feed Manager For WooCommerce with which you can generate a CSV feed for all of your products in just a few clicks.
Watch the video below to generate a Bonanza CSV feed in just a few minutes.
As you just saw, it’s really easy to create a product feed.
The next thing to do is set up your Bonanza Booth and upload your clothing products to the Bonanza marketplace to start getting more sales.
Schlussfolgerung
As you saw above, this is how easily you can generate Bonanza product feed using Product Feed Manager for WooCommerce.
Initially, check out the plugin easily with the live preview option.
Once you are sure the plugin does what is required, you can go ahead and think about upgrading to Pro.
It’s high time you take advantage of the Bonanza marketplace and start getting more sales.
As a WooCommerce store owner, establishing a market presence is one of the most challenging aspects that you may face. If you own a newly rising online store, then it can take quite some time to become popular.
At this point, selling products only in the WooCommerce store is surely not enough. So you can try other Strategies & Facebook marketplace is one of the effective methods to sell your products easily.
In this article, I will discuss why you must promote your WooCommerce products in the Facebook Marketplace. You can also know how to easily generate and upload your store products to the marketplace in just a few clicks.
Fangen wir also an.
Why Should You Rely on Facebook for WooCommerce Product Promotion?
Facebook Marketplace has grown to assist digital stores in promoting their products to a greater audience and it is one of the best social marketplaces in the world. Its super-friendly business features can highlight your brand efficiently.
The Facebook business suit allows you to manage your business profile and Facebook page & shop around the Facebook community easily. So, you can leverage the marketplace to drive traffic and potential buyers into your WooCommerce store quite smoothly.
This social marketplace allows buyers to search for products, and if your product matches their intent, it will be available for the buyer to choose from.
Suppose a buyer is looking to purchase a musical instrument. He can simply go to Facebook Marketplace and search for the desired instrument.
If the buyer clicks on the product, you can set it up to take the buyer to your Facebook shop page or your website.
The main difference between selling products only on a Facebook page and selling products from your WooCommerce to the Facebook marketplace is that you will get more trust from the people.
A buyer tends to order more from a business with its Brand value than buying from a private seller on Facebook. So having an up-and-running website is crucial if you want to stay in the eCommerce business for a long time.
In the next section, I will explain what you should have before creating a Facebook catalog as it is an important part of the process.
Necessary Things Before Creating a Facebook Catalog
Now I am going to explain necessary things that you need to prepare before creating a perfect Facebook catalog.
1. Website:
Ensure you have a functional and professional website where your products are listed. This is essential as your product catalog will link directly to your website.
How to Do It: Set up a website with a user-friendly design and clear product listings. Make sure the site is secure and optimized for mobile devices.
2. Accurate Product Information:
Gather detailed and precise information about each product, including titles, descriptions, images, prices, and stock levels.
How to Do It: Use a spreadsheet or a product information management system to organize and maintain accurate product data. Regularly update this information to reflect any changes.
3. Facebook Commerce Manager:
This is the tool where you will create and manage your catalog. It integrates with your Business Manager to provide a centralized location for your product data.
How to Do It: Log into your Facebook Business Manager, navigate to Commerce Manager, and follow the steps to set up your catalog.
4. Product Feed:
A product feed is a file that contains all the information about your products in a format that Facebook can read. This feed is uploaded to your catalog.
How to Do It: Create a WooCommerce product feed in CSV, TSV, or XML format. Include all necessary fields such as product ID, title, description, image URL, price, and availability. Validate the feed to ensure it meets Facebook’s requirements.
5. Facebook Tracking Pixel:
The Facebook Pixel is a piece of code that tracks actions on your website, such as views, adds to cart, and purchases. This data is crucial for dynamic ads and audience targeting.
How to Do It: Install the Facebook Pixel on your website by copying the pixel code from Facebook and adding it to your website’s header. Verify that it’s working correctly using Facebook’s Pixel Helper tool.
6. Facebook Page:
A Facebook Page is necessary to represent your business on Facebook and connect your catalog to your audience.
How to Do It: Create a Facebook Page if you don’t already have one. Fill out all relevant information, including business details, profile picture, cover photo, and contact information.
7. E-commerce Platform Integration:
If you use an e-commerce platform. you can easily connect WooCommerce to the Facebook marketplace. This Facebook WooCommerce integration simplifies the catalog creation process.
How to Do It: Follow the integration guides provided by Facebook and your e-commerce platform to sync your product data automatically.
8. Compliance with Policies:
Ensure your products and business practices comply with Facebook’s commerce policies to avoid disapproval or restrictions.
How to Do It: Review Facebook’s commerce policies and advertising guidelines, and make sure all your product listings meet these standards.
9. High-Quality Product Images:
Use clear, high-resolution images to showcase your products effectively. Good images can significantly enhance the appeal of your ads.
How to Do It: Ensure images are at least 500×500 pixels, well-lit, and showcase the product. Avoid cluttered backgrounds.
10. Accurate and Functional Product URLs:
Make sure each product URL in your feed correctly links to the specific product page on your website.
How to Do It: Test all URLs to ensure they lead to the right product pages. Correct any broken or incorrect links.
11. Inventory Management System:
Keep your inventory data up-to-date to avoid advertising out-of-stock products, which can frustrate customers. How to Do It: Use an inventory to sync stock levels with your product feed management system. Update the feed regularly to reflect the current stock.
12. Consistent Pricing:
Ensure all prices in your catalog match the currency and pricing strategy for your target market.
How to Do It: Verify that prices in your product feed are accurate and consistent with those displayed on your website.
13. Permissions and Roles:
Assign the right roles and permissions to team members to manage the catalog efficiently without compromising security.
How to Do It: In Business Manager, assign roles such as admin, editor, or analyst to relevant team members. Control access based on their responsibilities.
14. Customer Support Readiness:
Be prepared to handle customer inquiries and support requests that may arise from your product listings.
How to Do It: Set up a system for managing customer messages and comments on your Facebook Page. Train your team to respond promptly and effectively.
15. Analytics Setup:
Set up analytics tools to track the performance of your catalog and ads, helping you make data-driven decisions.
How to Do It: Use Facebook Analytics and other tools like Google Analytics to monitor key metrics such as click-through rates, conversions, and sales.
By following these steps, you’ll be well-prepared to create a Facebook Catalog that enhances your advertising efforts and helps you connect with potential customers more effectively.
Having said all that, you still have to upload your product data to the Facebook marketplace.
Now, manually adding products from WooCommerce to your Facebook marketplace can be quite frustrating. But there is an easy way to upload all of your products into Facebook for WooCommerce in just a few clicks.
Product Feed Manager for WooCommerce – Facebook Product Feed Generator
This tool will let you generate a product feed file in the right Facebook Catalog format with just a few clicks. Then, you can simply upload it to your Facebook for WooCommerce in the commerce center to list all of your products in the Facebook Marketplace in just a few minutes.
Now, yes, you will get some Facebook for WooCommerce plugins in WordPress that do a similar function, and some may even have more active installations.
But, what makes PFM unique is its super simple UI. You can start using the plugin and generate a Facebook Catalog feed with as low as 4 clicks. And if you have certain customized data in your store, you will still need as little as 3 minutes to configure and generate a perfect Facebook product feed.
Since you are running an eCommerce shop, you do not have a lot of time on your hands. The faster you can start promoting your products, the sooner you make money. That is why this tool is designed to save you time by uploading products on Facebook for the WooCommerce store.
You do not need to learn about the Facebook Catalog feed structure or format, and you do not need to spend hours configuring the feed generation. The plugin will lead you to achieve it real quickly.
Now, let’s take a look at how you can generate a product feed with all your WooCommerce products to upload to the Facebook Marketplace.
How to Quickly Generate Your Facebook Product Feed with WooCommerce Products
First, make sure you have the Product Feed Manager for WooCommerce installed and activated in your WooCommerce store.
Then, follow the two steps below to generate a Facebook product feed with your WooCommerce products.
Step 1 – Create A Product Feed
Once the plugin is activated, on your dashboard menus, you will find the option Product feed.
Hover on it and click on ‘Add New Feed’, and it will take you to the following page:
Here, first set a feed title.
Then choose the Feed Merchant as Facebook.
It will then load all the fields that will be included in your product feed for each of your products.
Step 2 – Configure Your Facebook Product Feed
You will notice that almost everything is already configured. All you have to do is assign the right values for the Manufacturer/Brand, and the Google Product Category
– Assigning The Manufacturer/Brand:
This should be the Brand name of the product you are selling. If you are the manufacturer, you can set the type as Static and input your company name here.
If you have different brand names for different products, you will have to save the value in a custom field or product attribute and then use that value here.
**You can also use a brand plugin, which will make it easier to assign and use brand names.
– Configuring the Google Product Category:
Facebook Marketplace has its own set of categories (that match Google) that, most often, don’t match the categories in your store. But you do not have to change it in your store. You can simply use the category mapping feature to set up the mapping and use it as the value here.
You can further customize the feed if you need to use Product filters, a few basic feed settings, auto-update intervals, and feed rules. Normally, they are already configured in an optimized way for the Facebook Marketplace.
Once you have configured the feed, simply click on the Publish button on the right, and the feed will be generated in seconds.
And that’s it. You have successfully generated a product feed for the Facebook Marketplace. You will be able to collect the feed link or download the feed file from the right side.
How to Upload Your Product Feed to Facebook Commerce Manager
Once you have generated the product feed, it’s time to get your WooCommerce products on the Facebook marketplace.
Before you do, it’s always best to create a Facebook business page if you want to leverage more exposure from Facebook for WooCommerce. You may read this guide to create a Facebook business page if you do not have one already.
Simply follow the steps below.
Step 1 – Create A Catalog
Login to your Facebook account and access the Facebook Commerce Manager.
Select your preferred way to sell your products on Facebook. Here, select the ‘Create a Catalog’ option. Then click on ‘Get Started.’
Now, choose your catalog type.
Next, Select Upload Product Info and click on the ‘Create’ button.
Then click on finish, and it will redirect you to your Facebook Commerce Manager Dashboard.
Step 2 – Upload Your Product Feed to The Facebook Marketplace
Now that you have the Catalog prepared, you are ready to upload your products on the Facebook marketplace for your WooCommerce store.
On your Commerce Manager menus, you will see a new menu called Catalog. Click on it, and then click on Data Sources.
Then select Data Feed.
Here, you will get three options – File Upload, Scheduled Feed, and Google Sheets. Choose Scheduled Feed.
Then you will get the option to provide the link to the feed file. Earlier, when you generated the feed in your WooCommerce store, it gave you a feed link. Copy that link and paste it here.
Now, choose a suitable time for the schedule fetch and click on Next.
And finally, give a name to your catalog feed, choose the currency for your store, and click on Upload.
And that’s it. Your feed will be uploaded in a few minutes to the Facebook Marketplace, which you will be able to view in the Items menu under Catalog.
Key Benefits of Setting up Facebook Catalogs for WooCommerce
Now I will tell you some key benefits of setting up your Facebook catalog for WooCommerce so that you can be inspired more.
Easy Integration: You can easily integrate WooCommerce with Facebook. It allows for automatic syncing of product information. It also saves you time and reduces manual data entry errors by automatically updating your Facebook Catalog whenever changes are made in WooCommerce.
Enhanced Product Visibility: Products in your catalog can be featured across various Facebook and Instagram placements. It helps you to increase exposure and potential reach to millions of customers on these platforms.
Dynamic Ads: Dynamic ads use your catalog to show personalized products to customers based on their behavior and interactions. It boosts your conversion rates by targeting buyers with products they’ve shown interest in, leading to higher ROI.
Improved Shopping Experience: Customers can find and browse products directly from your Facebook and Instagram. It provides an easy shopping experience, reducing friction and making it easier for them to purchase.
Automated Inventory Management: Syncing your WooCommerce store with Facebook ensures real-time inventory updates. It prevents advertising out-of-stock products, reducing customer frustration and potential lost sales.
Advanced Analytics: Track performance metrics of your products and ads through Facebook’s detailed analytics tools. It enables data-driven decisions to make optimized product listings and advertising strategies.
Multi-Channel Sales: Extend your sales channels by listing products on both your WooCommerce site and Facebook/Instagram. It helps to diversify revenue streams and reaches a broader audience.
Easy Product Management: You can easily manage product listings, descriptions, prices, and inventory from a single platform. It simplifies catalog management, saving time and effort.
Retargeting Opportunities: Using data from the Facebook Pixel helps to recapture your potential lost sales and increases conversion rates.
Cost-Effective Advertising: Dynamic ads and personalized targeting are often more cost-effective than traditional advertising. It maximizes your budget efficiency by focusing on high-intent users.
Enhanced Customer Insights: Gaining valuable insights can help you tailor marketing strategies and product offerings to better meet your customer needs.
Increased Engagement: Engaging product posts and ads can attract likes, comments, and shares. It boosts your brand visibility and engagement on social media platforms.
By setting up Facebook Catalogs for WooCommerce, you can significantly enhance your e-commerce operations, improve customer experiences, and drive more sales through advanced targeting and easy integration.
Schlussfolgerung
In conclusion, Facebook Marketplace for your WooCommerce store can significantly enhance your product visibility and boost sales.
Following the steps outlined, you can easily transfer your products to Facebook. It allows you to reach a broader audience and simplify your sales process.
The integration offers numerous benefits, including dynamic ads, automated inventory management, and advanced analytics, all of which contribute to more efficiency & effectiveness.
For an effortless transfer process, use the Product Feed Manager to simply generate and upload your WooCommerce products to Facebook Marketplace with ease.
How can I increase the visibility of my WooCommerce products on Facebook Marketplace?
To increase visibility, ensure your product titles and descriptions are clear and keyword-rich. Engage with your audience through your Facebook business page and use targeted ads to reach potential buyers. Additionally, leveraging Facebook’s algorithm by frequently updating your product listings can keep your store relevant and visible.
What should I do if my product feed fails to upload correctly?
If your product feed fails to upload, double-check the feed link and ensure it is formatted correctly. Also, verify that all mandatory fields, such as product titles and categories, are filled out. If issues persist, consider reaching out to support both WooCommerce and Facebook Commerce Manager for assistance.
How often should I update my product feed on Facebook?
It’s beneficial to update your product feed regularly, ideally daily, to reflect any changes in inventory, pricing, or new product additions. This keeps your listings accurate and up-to-date, improving customer trust and satisfaction.
Can I customize my product feed to match Facebook’s requirements?
Yes, you can customize your product feed using the Product Feed Manager for WooCommerce. Map your WooCommerce categories to Facebook’s, assign brand names, and adjust other attributes to ensure compatibility. This customization helps in displaying your products correctly on Facebook Marketplace.
How can I measure the success of my product listings on Facebook Marketplace?
You can measure success by tracking key metrics such as click-through rates, conversion rates, and sales figures through Facebook Commerce Manager. Additionally, utilize Facebook Insights to monitor engagement and adjust your strategy based on performance data to continually improve your listings.
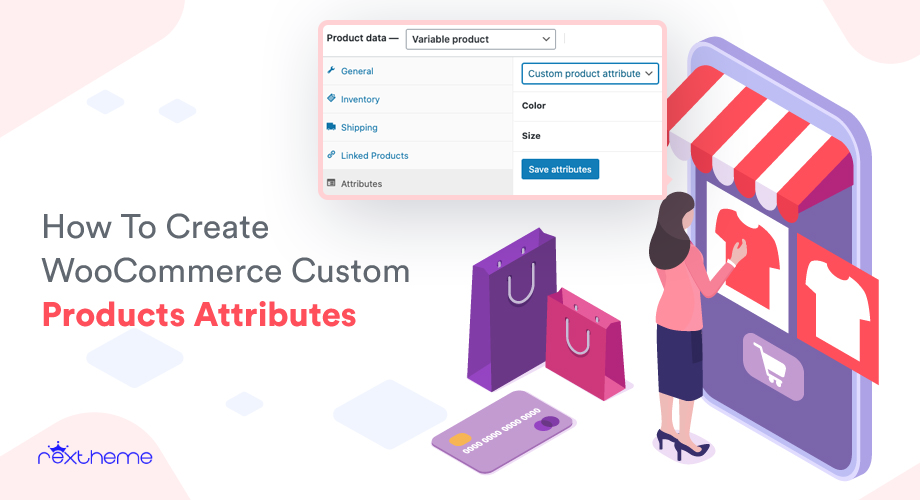
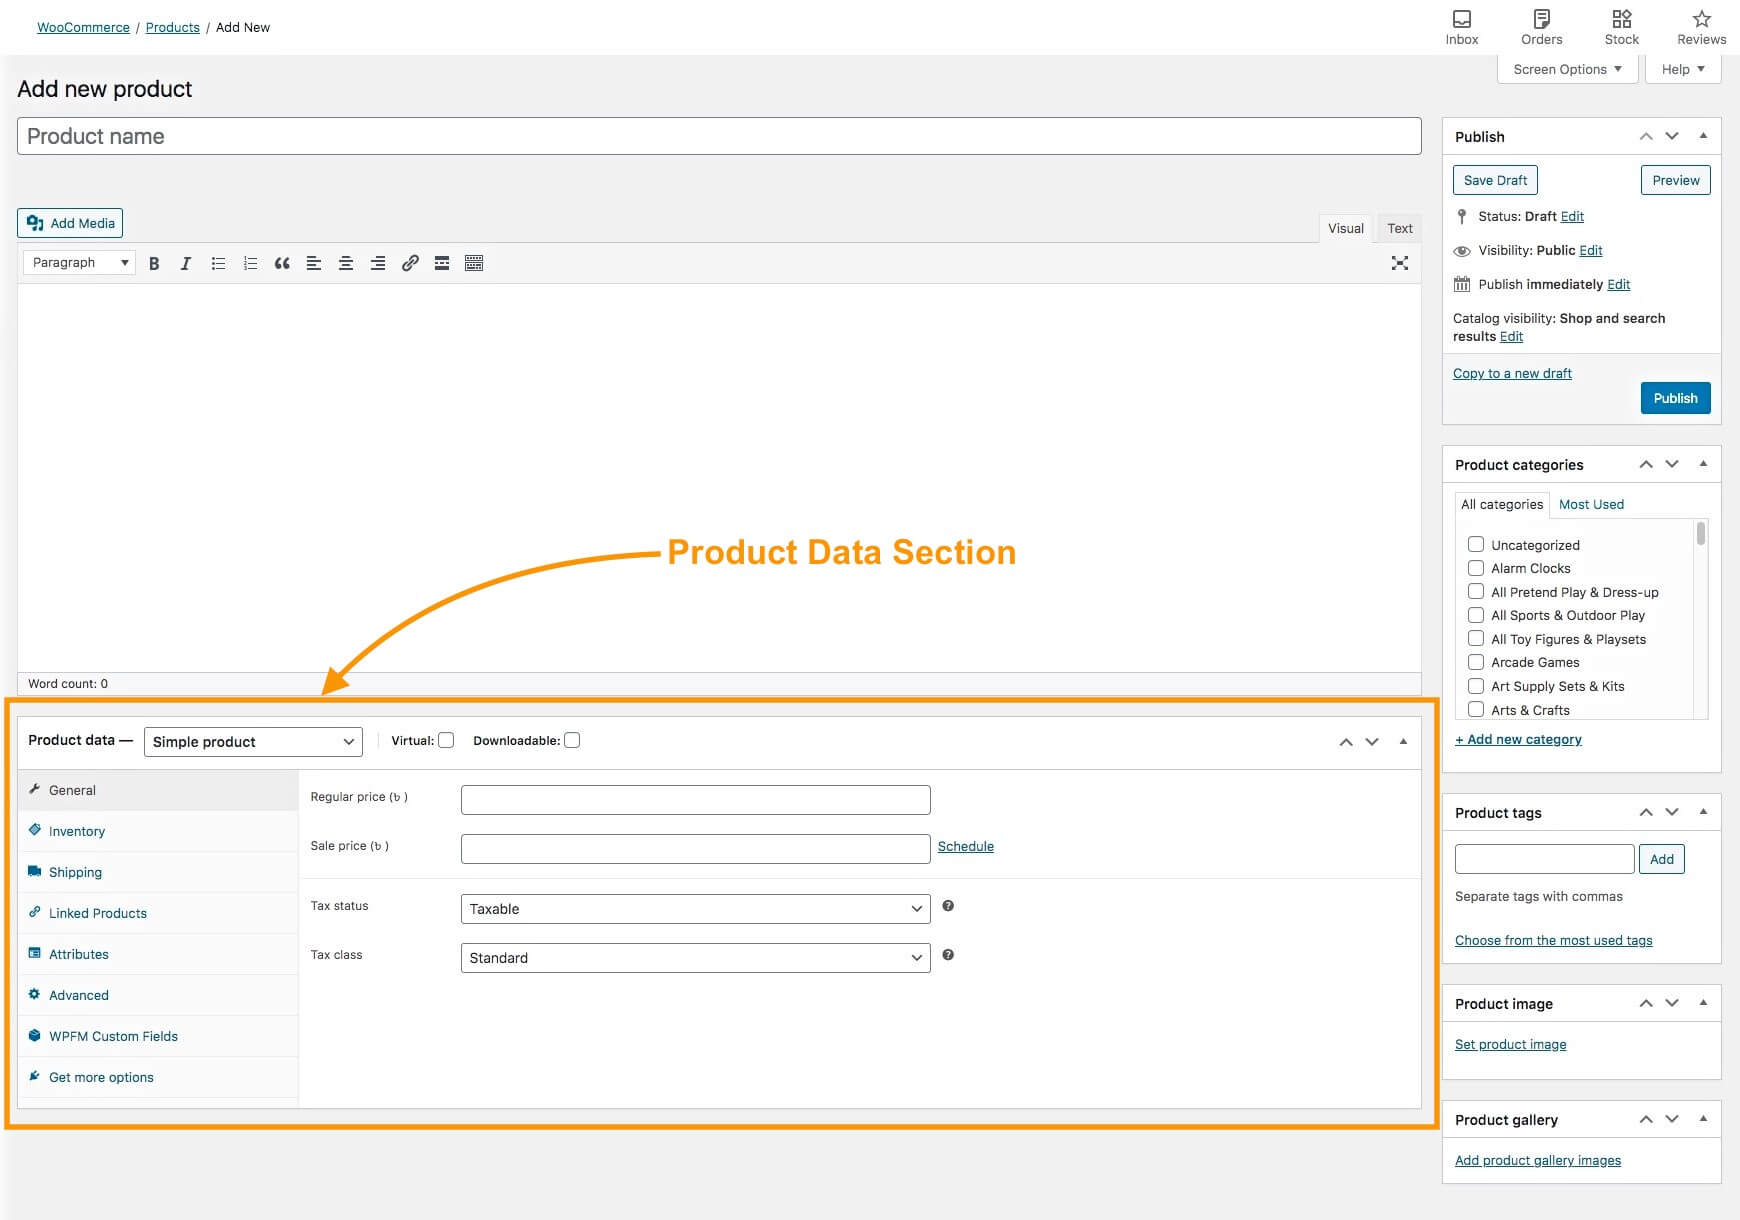
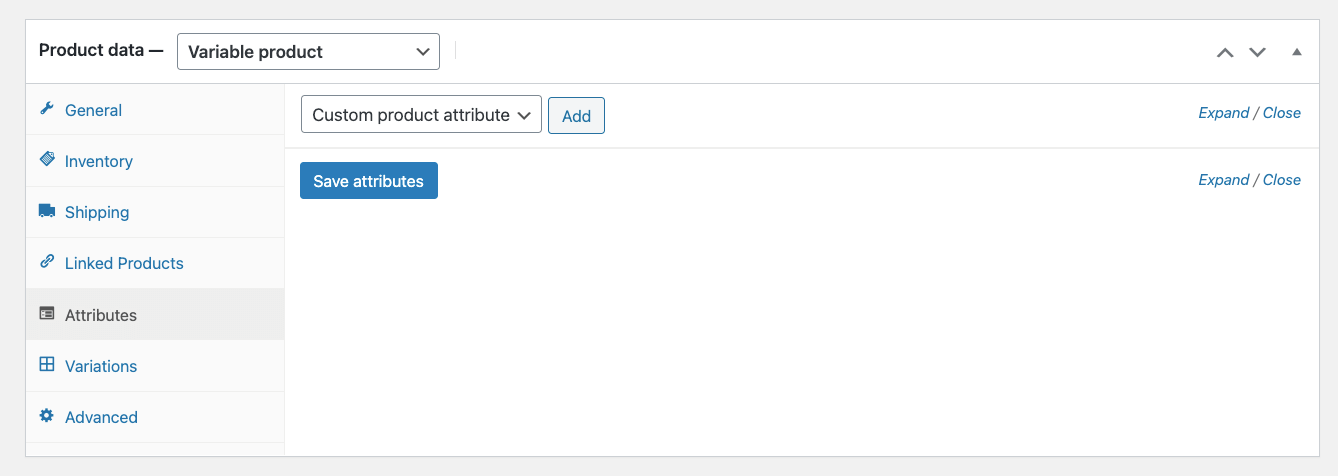
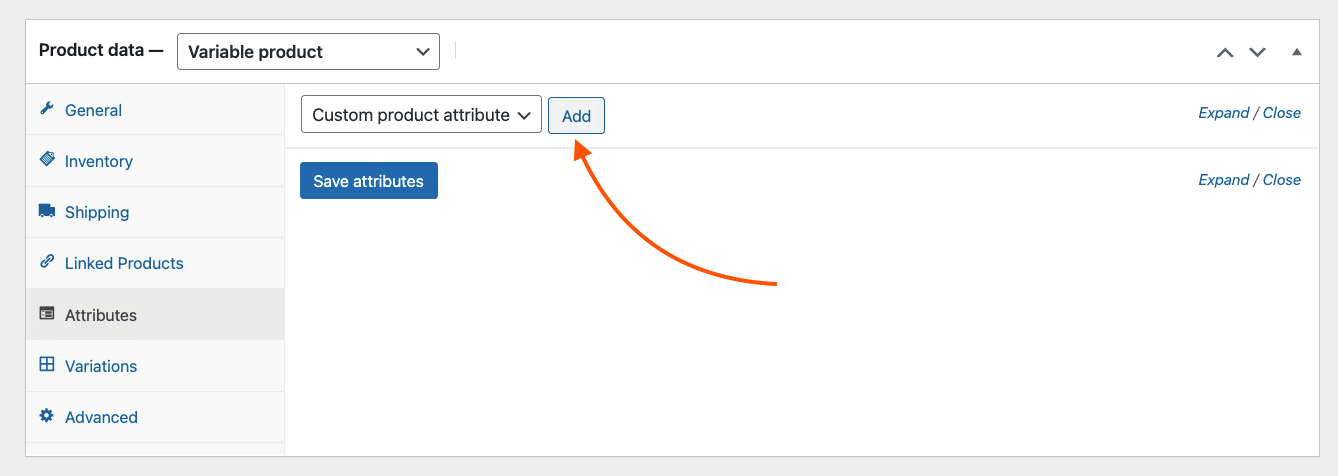

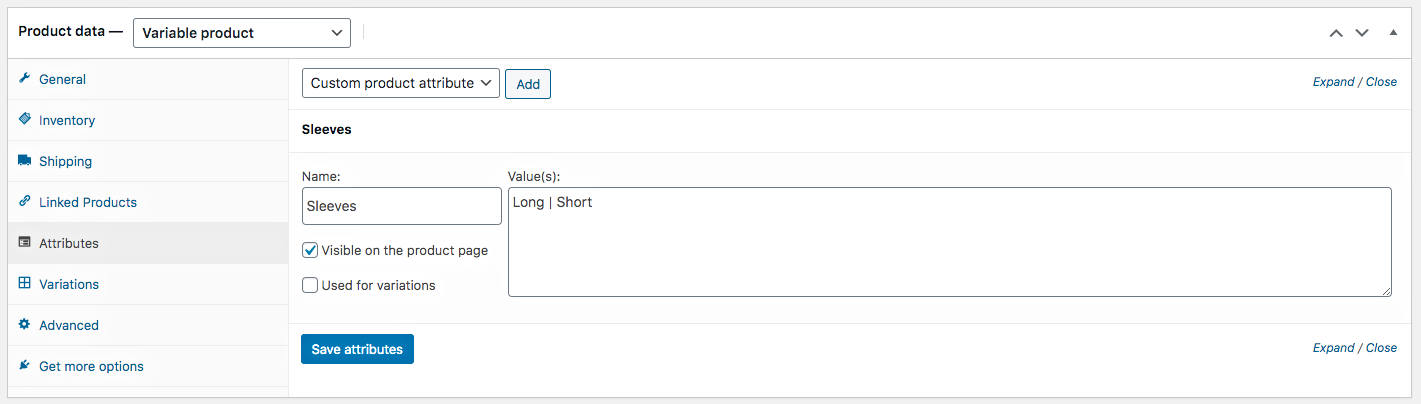


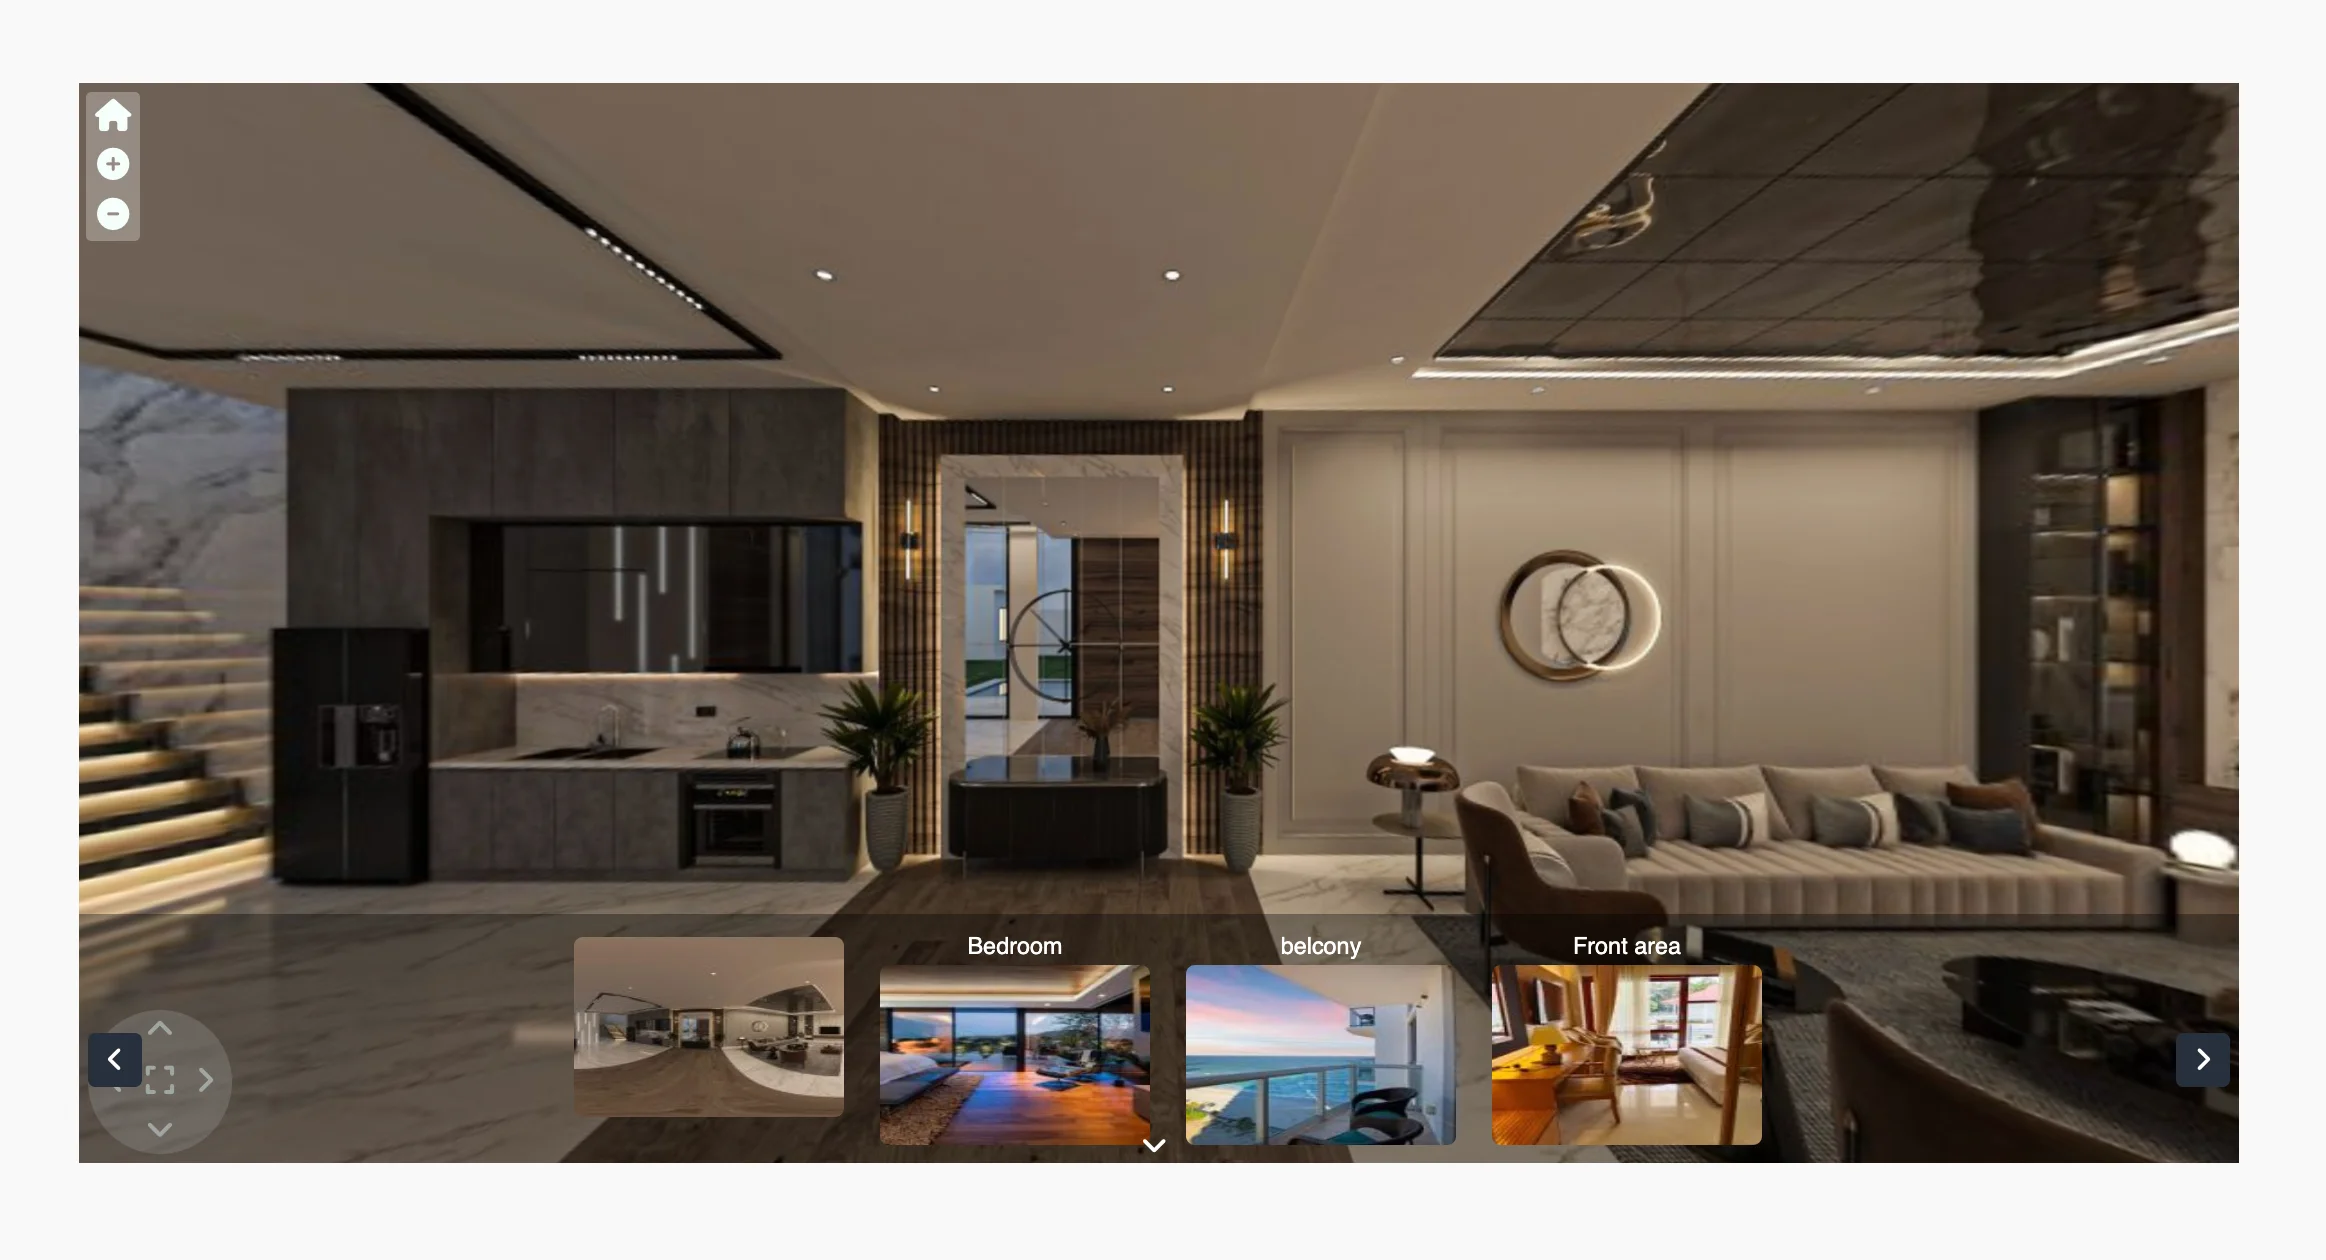

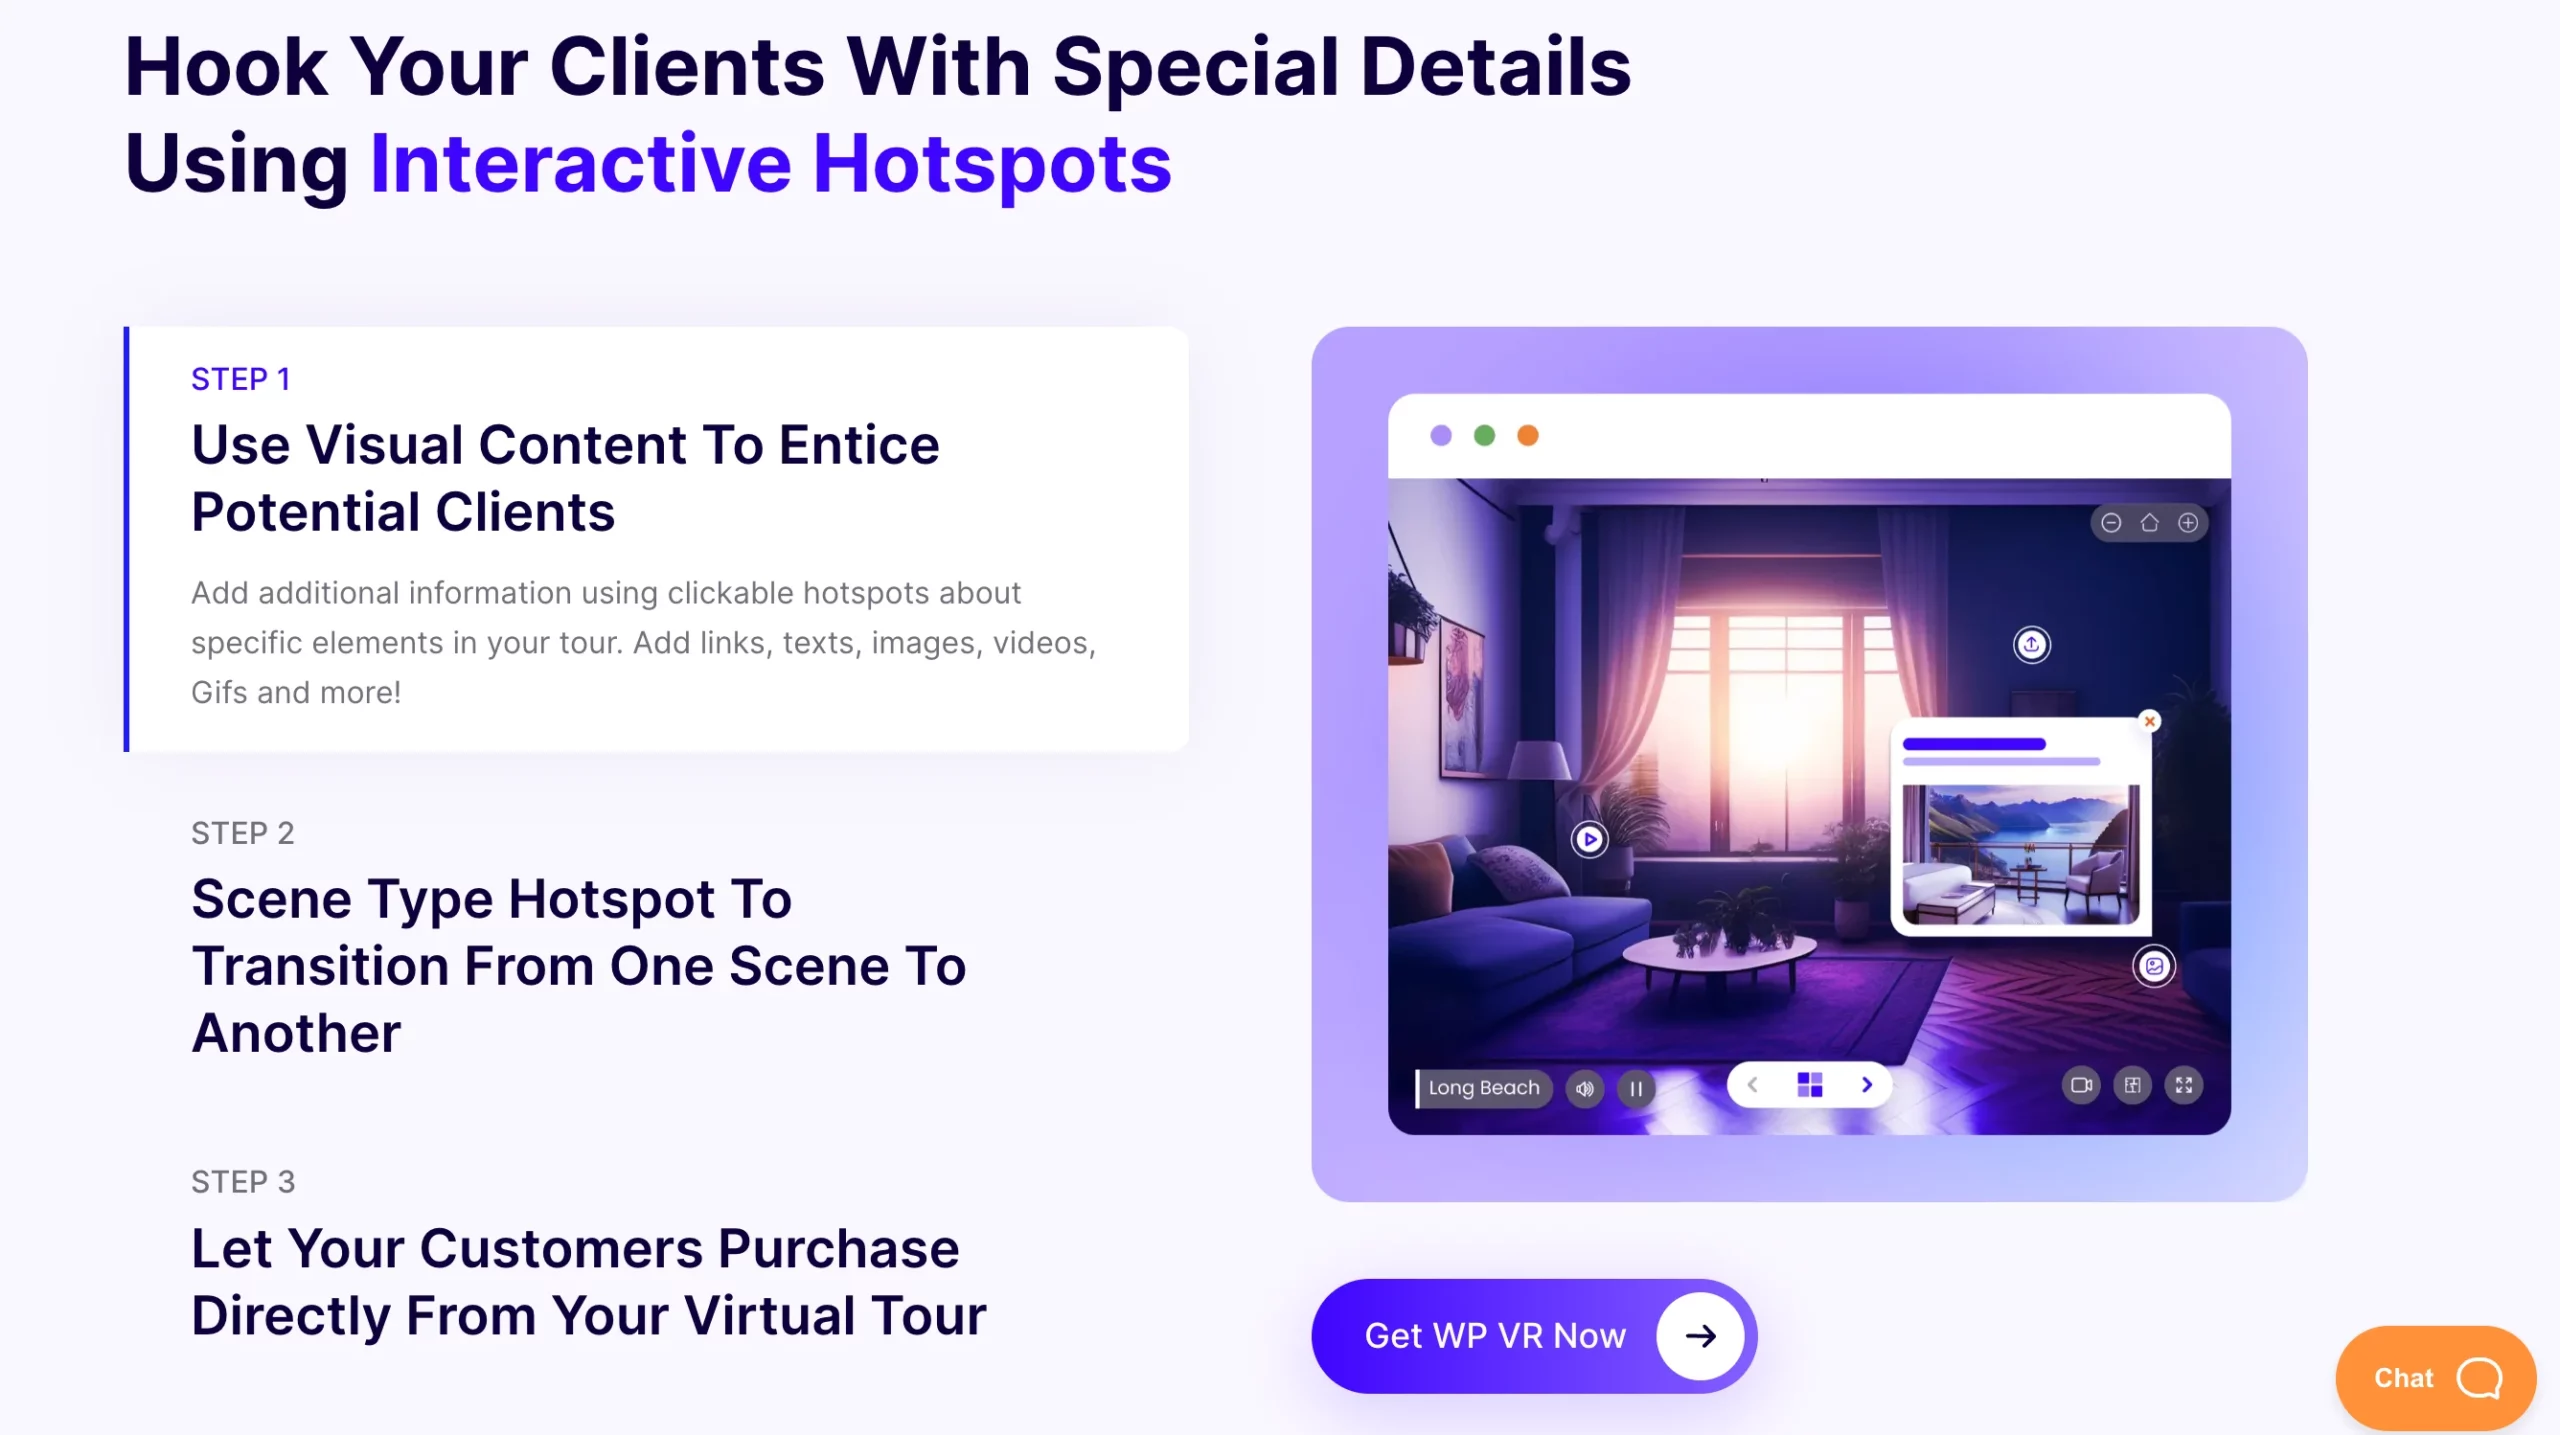
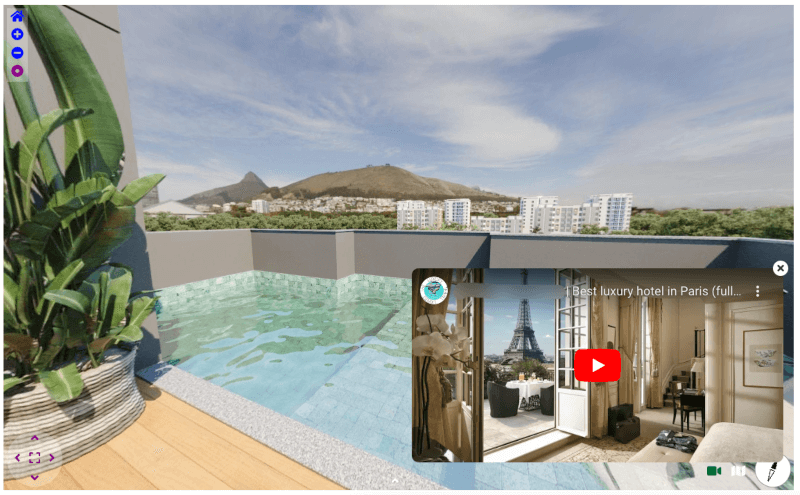

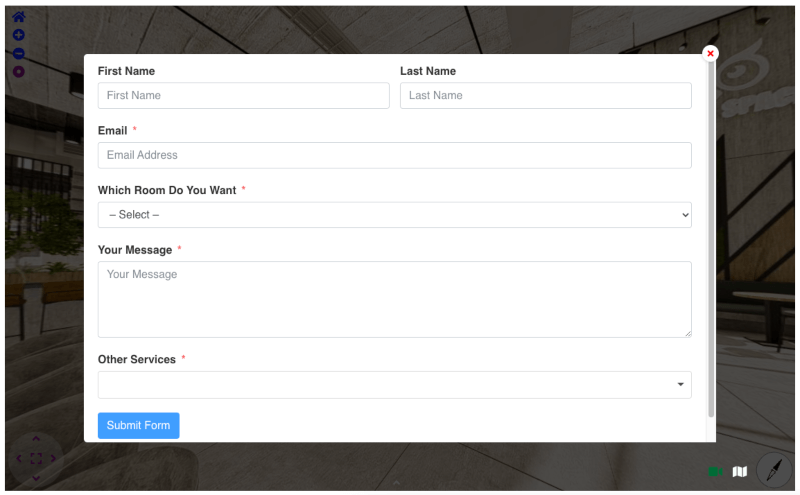
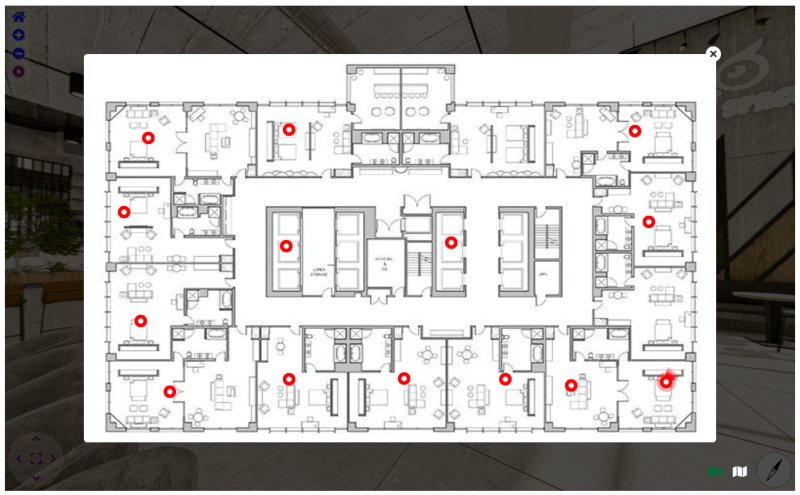

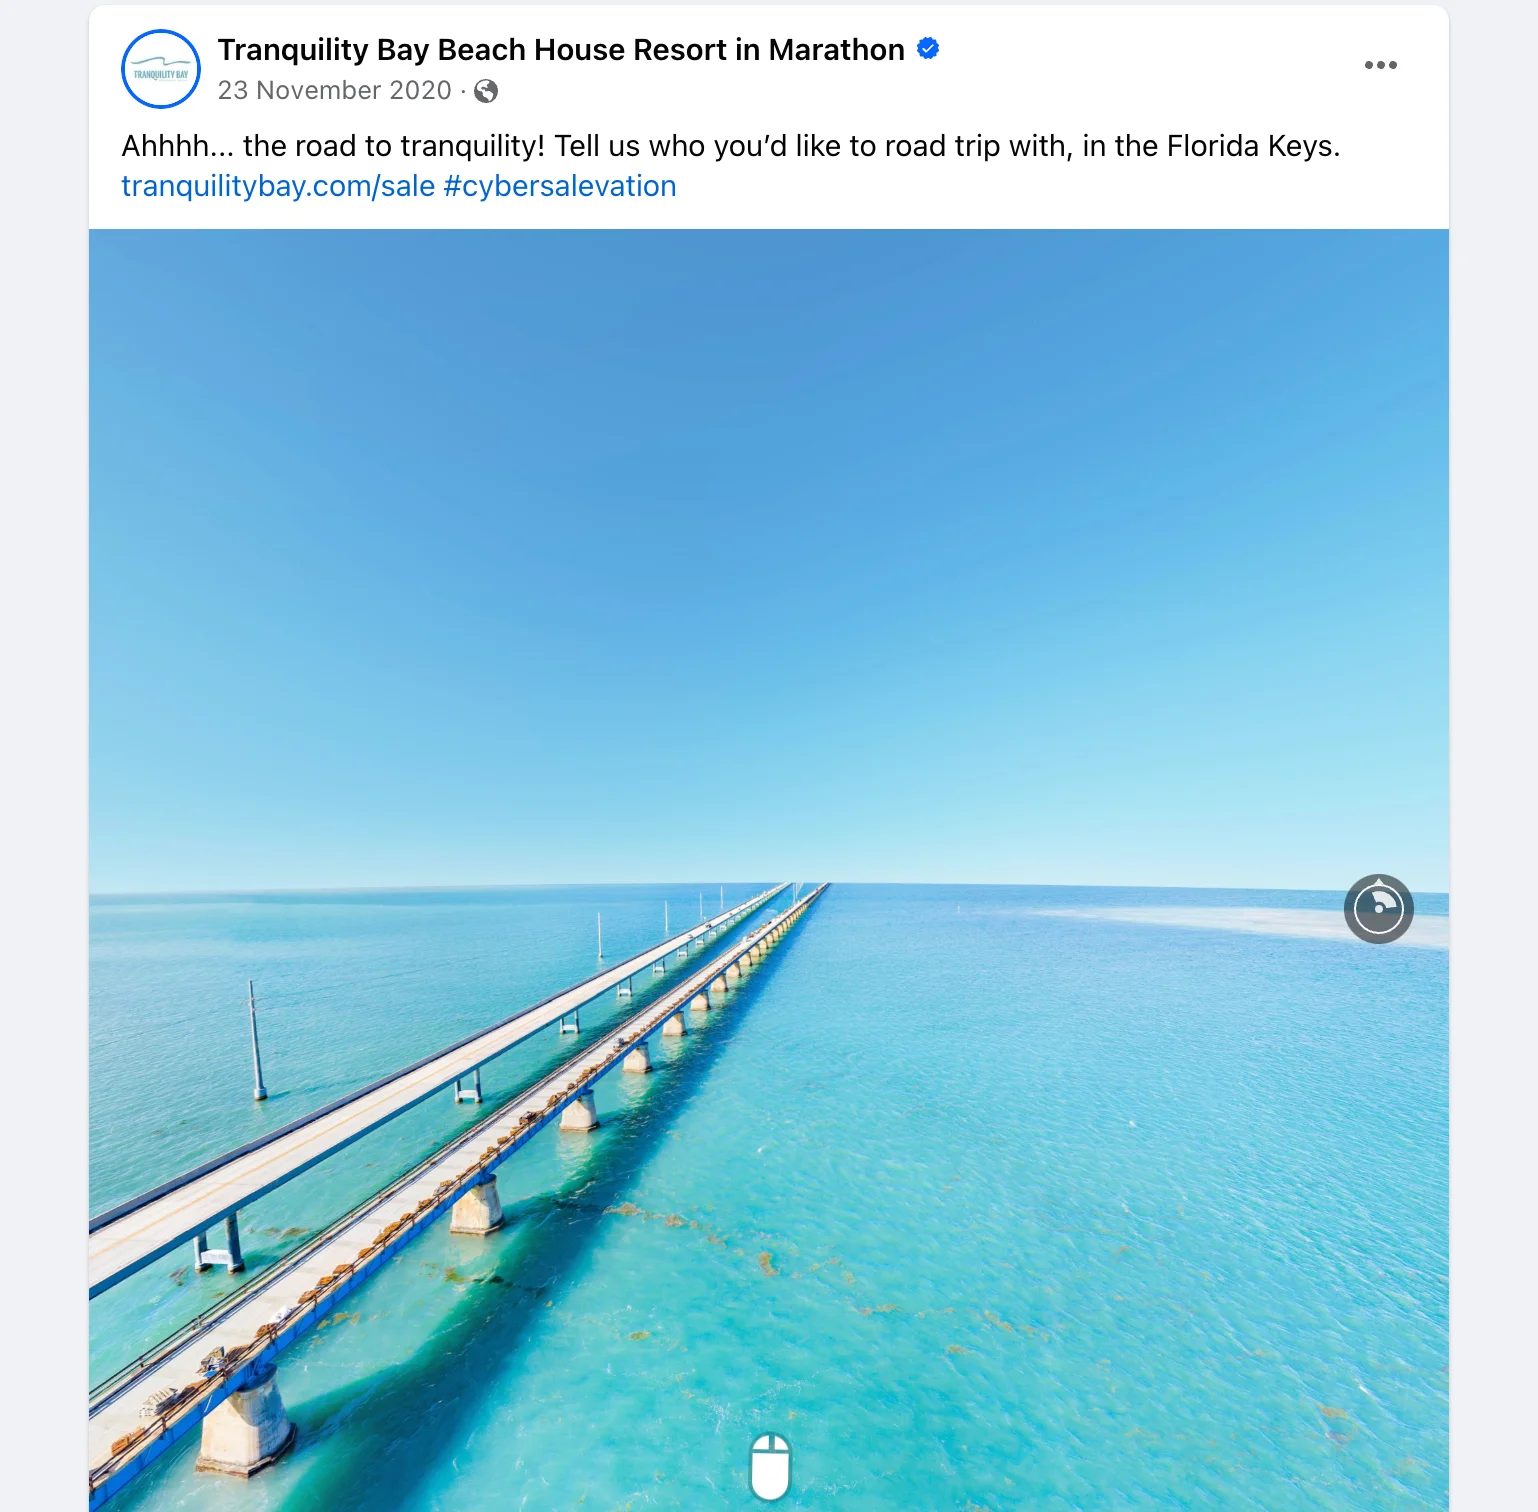
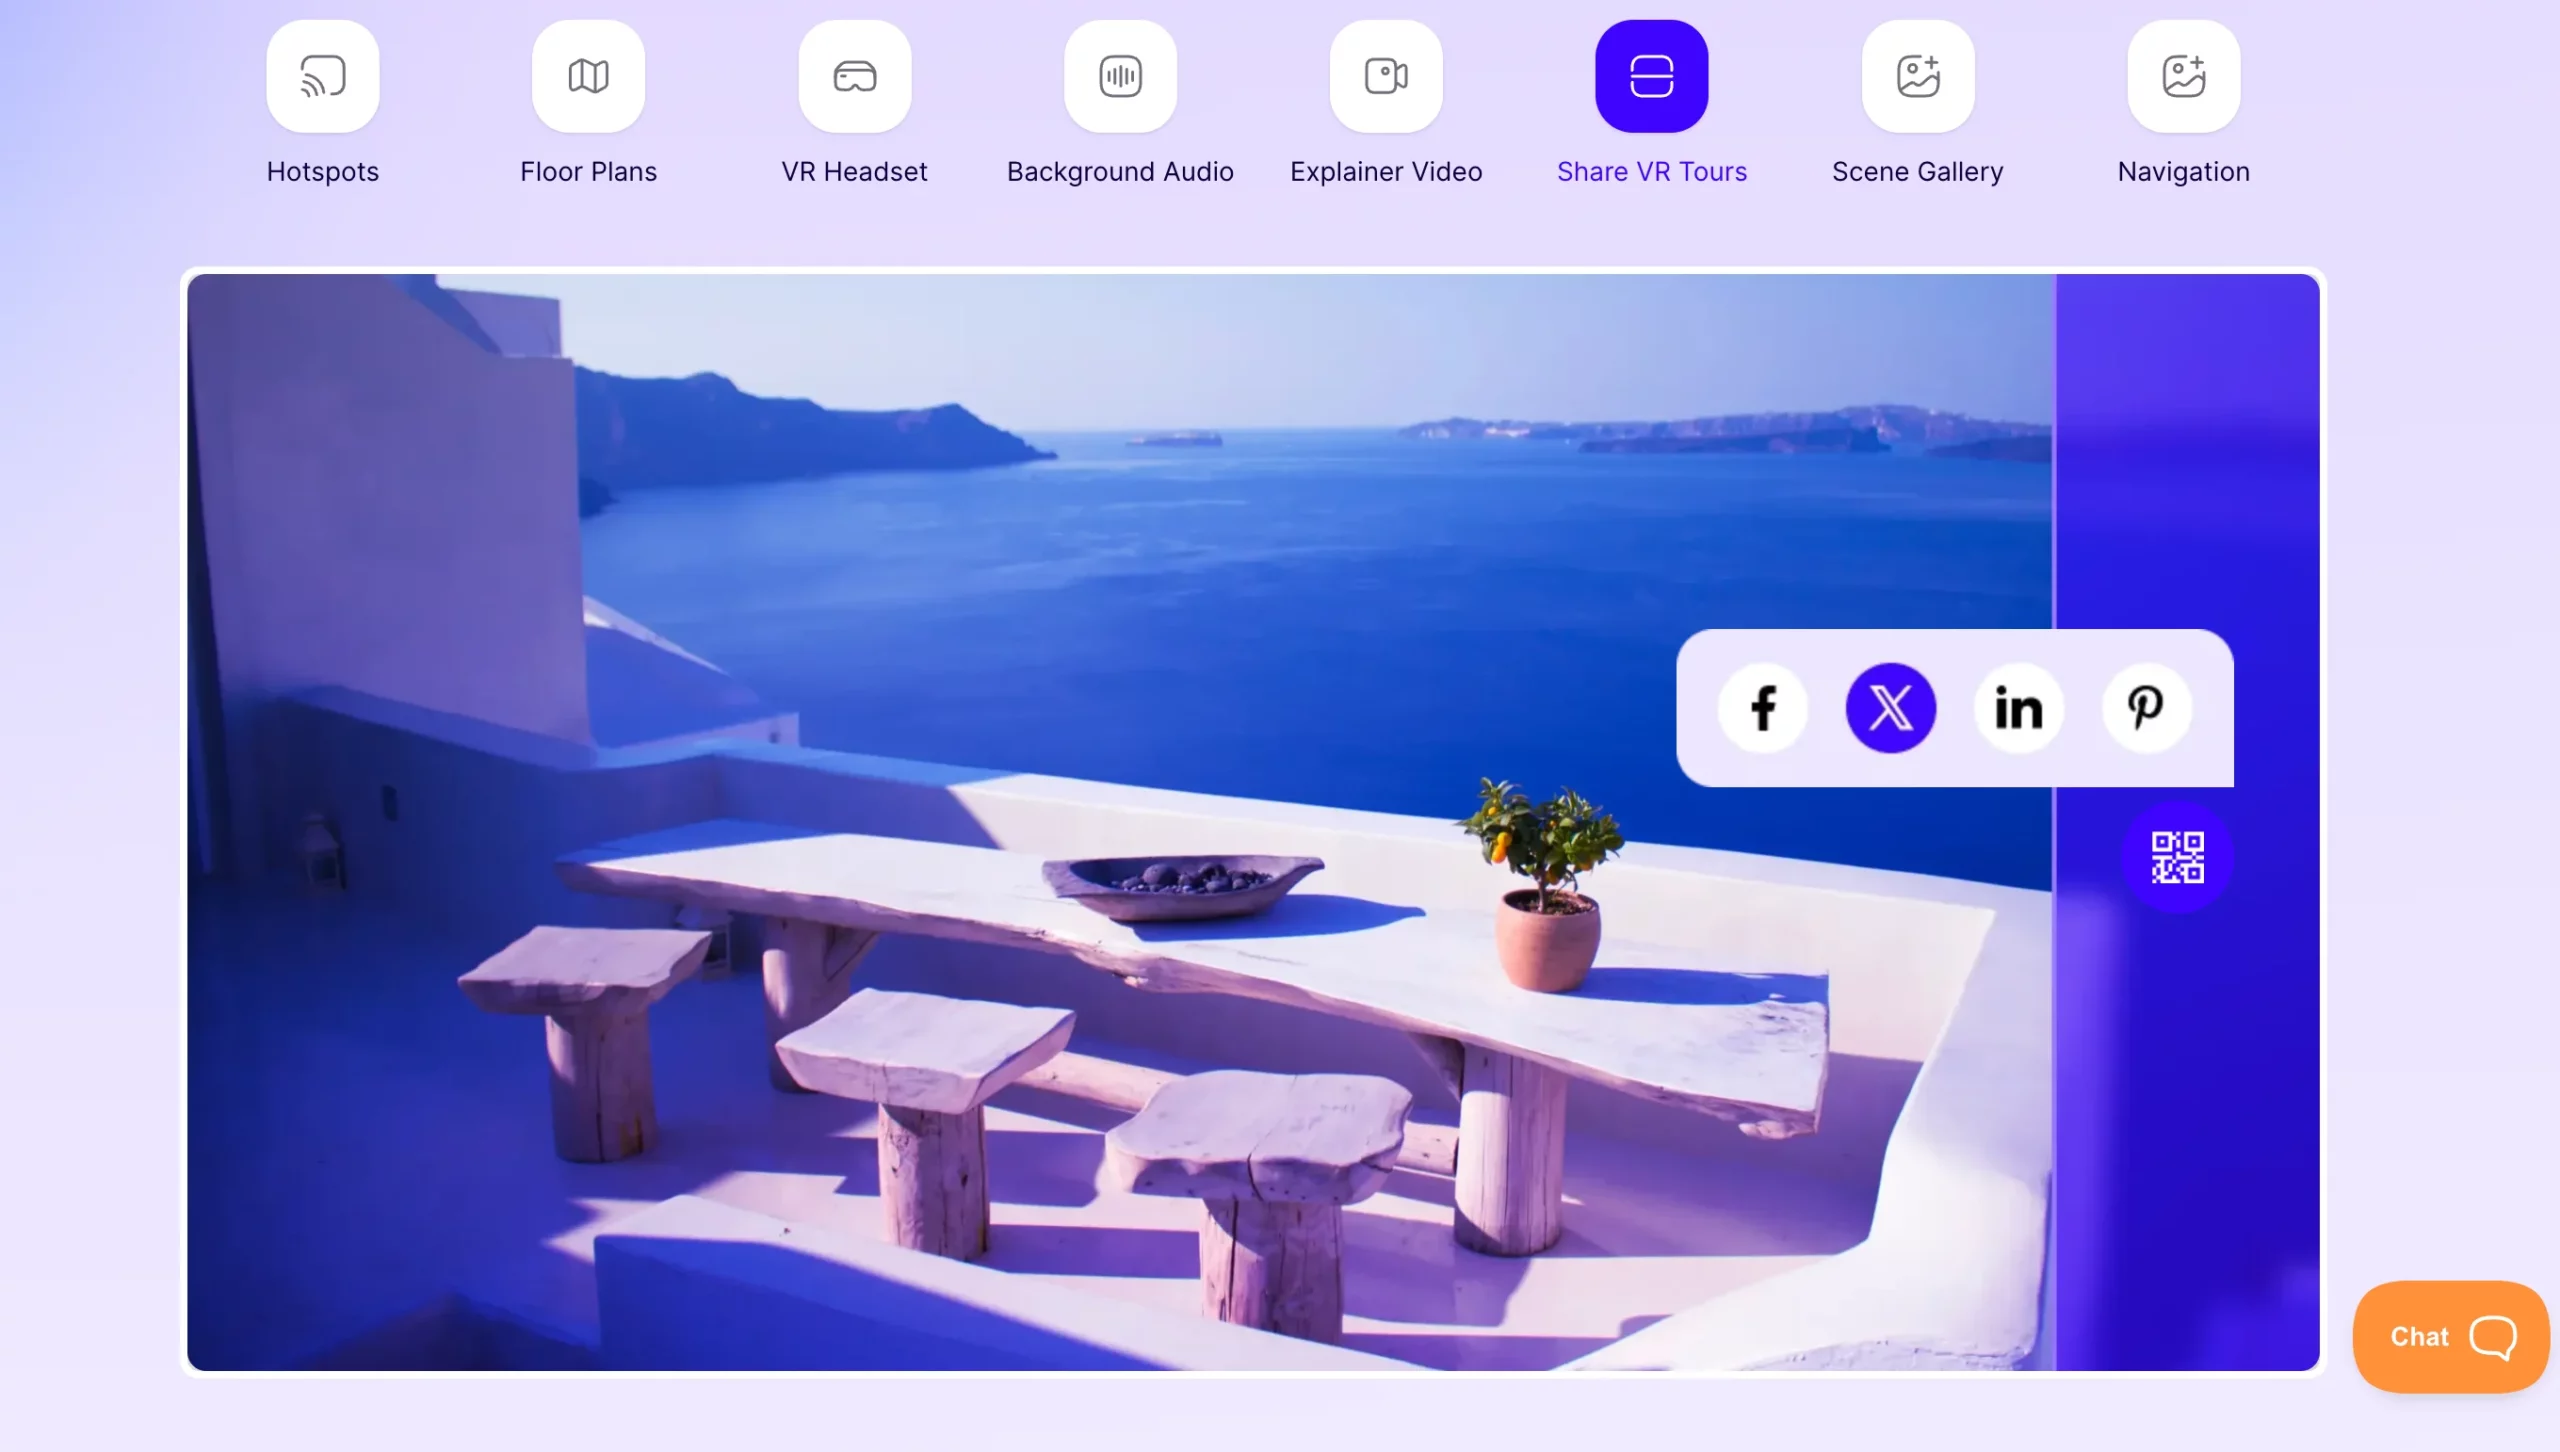
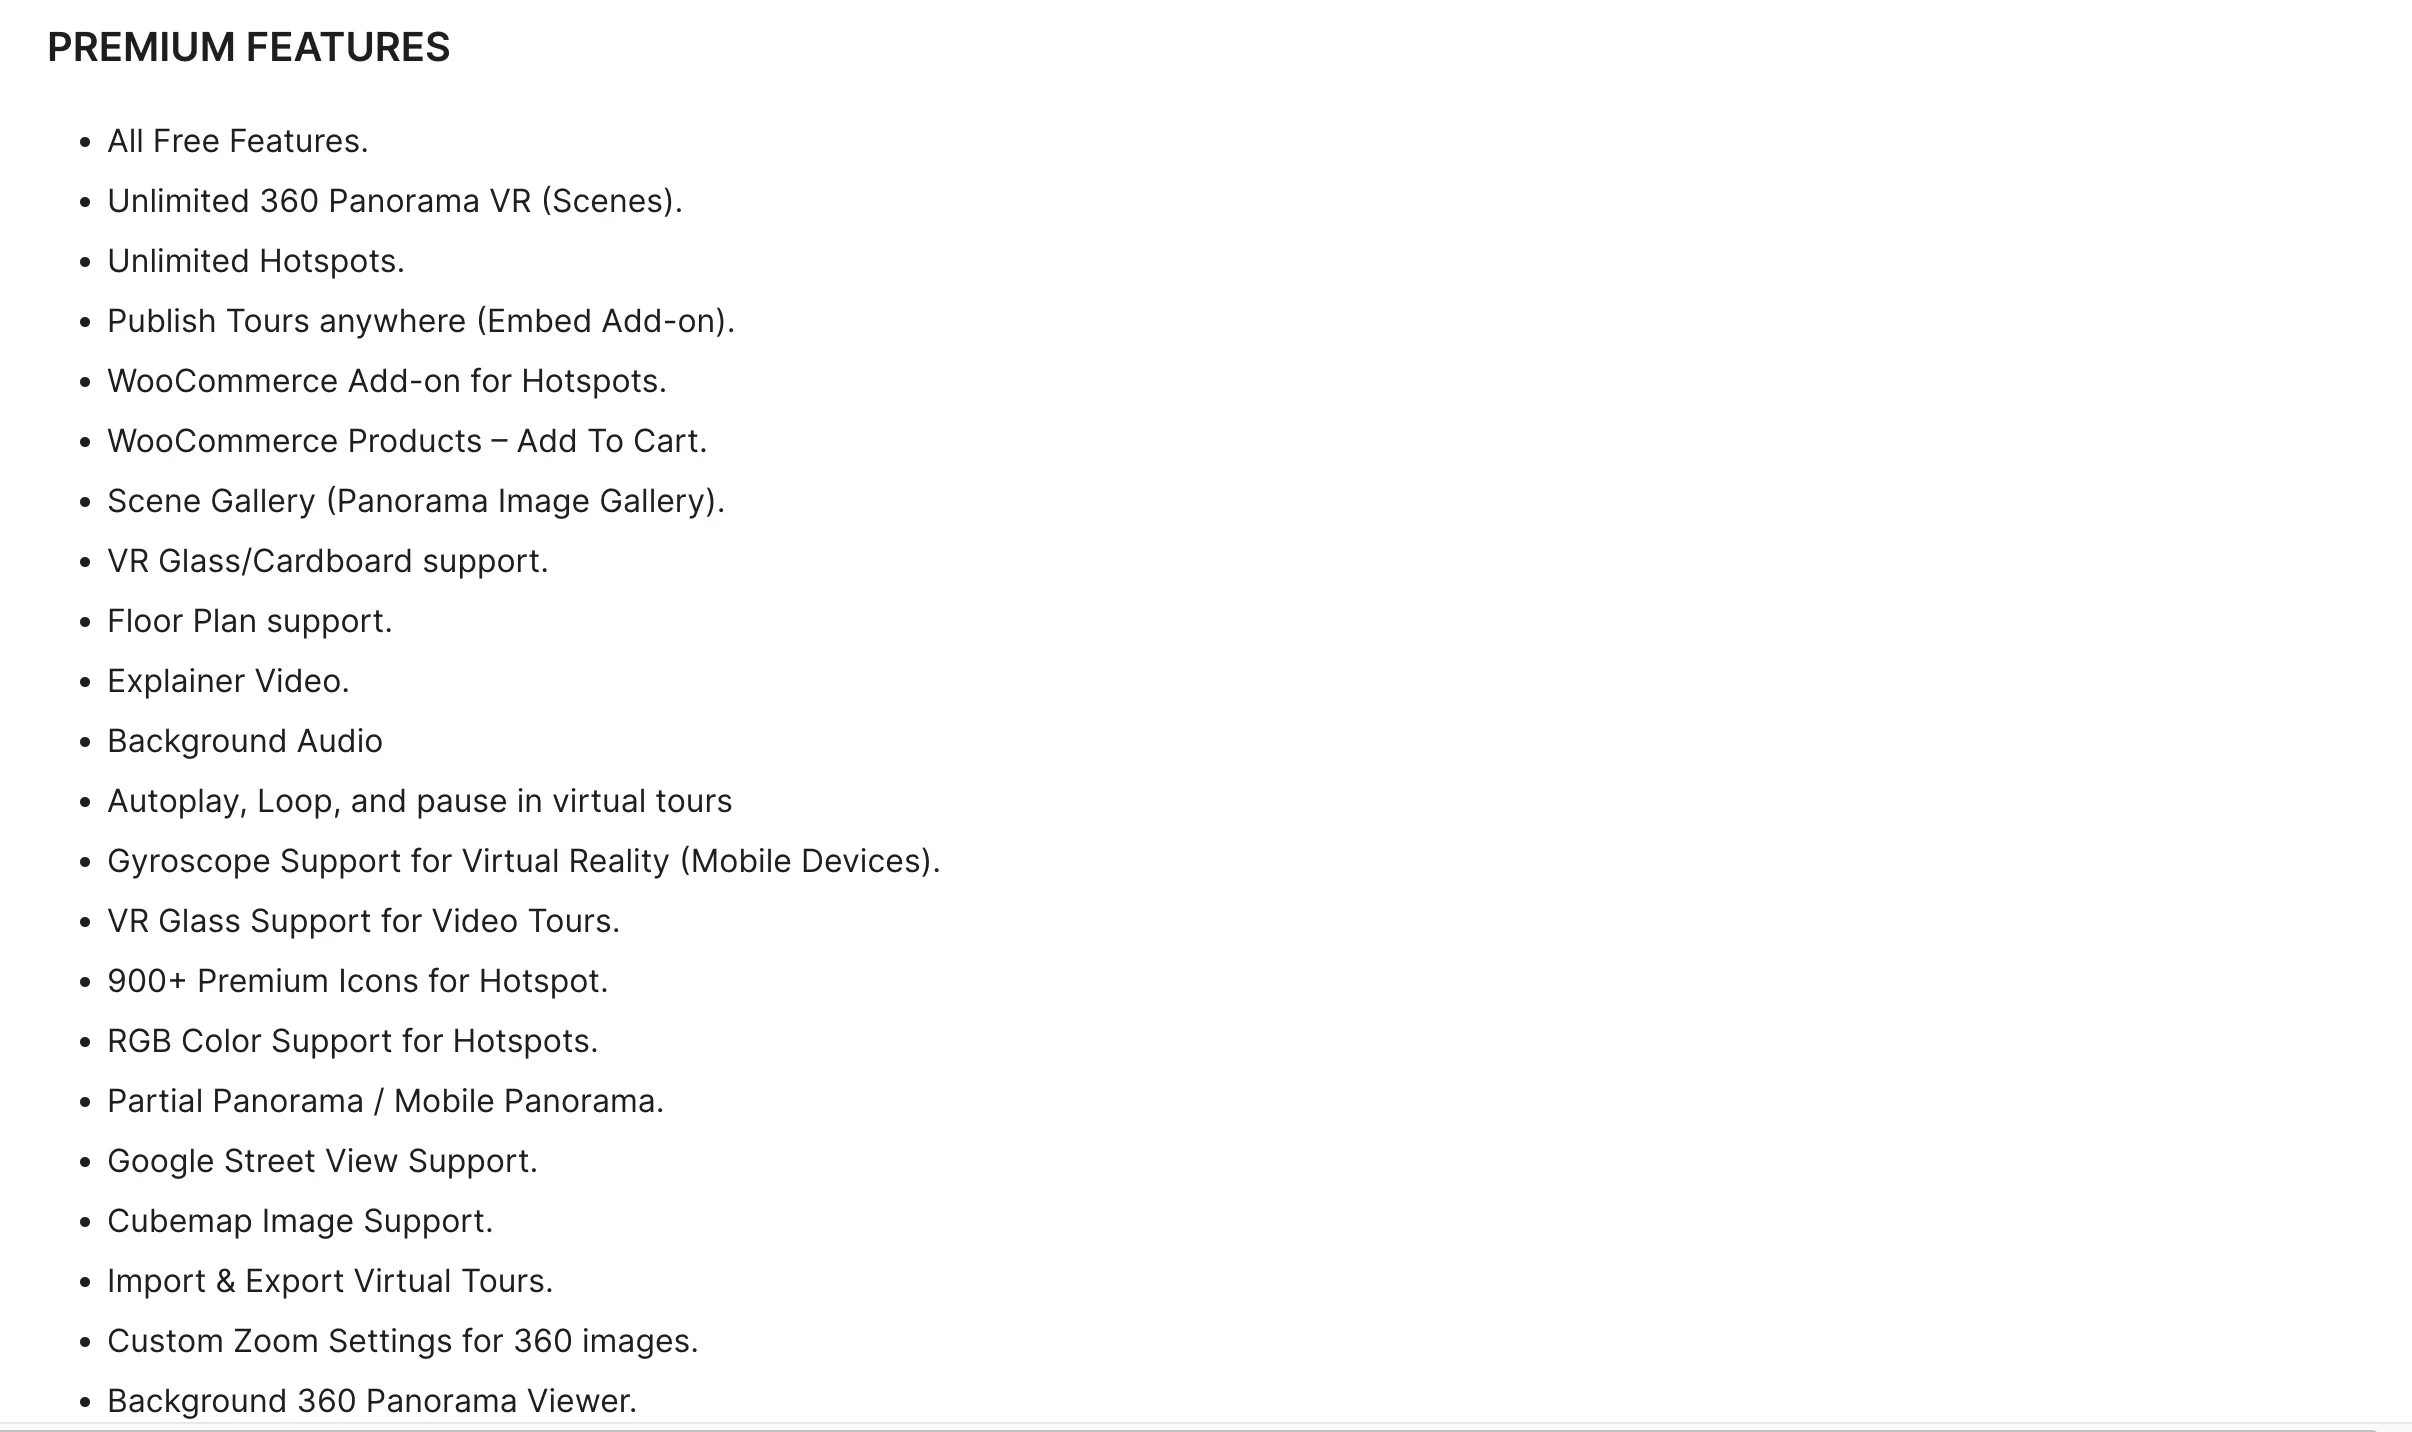
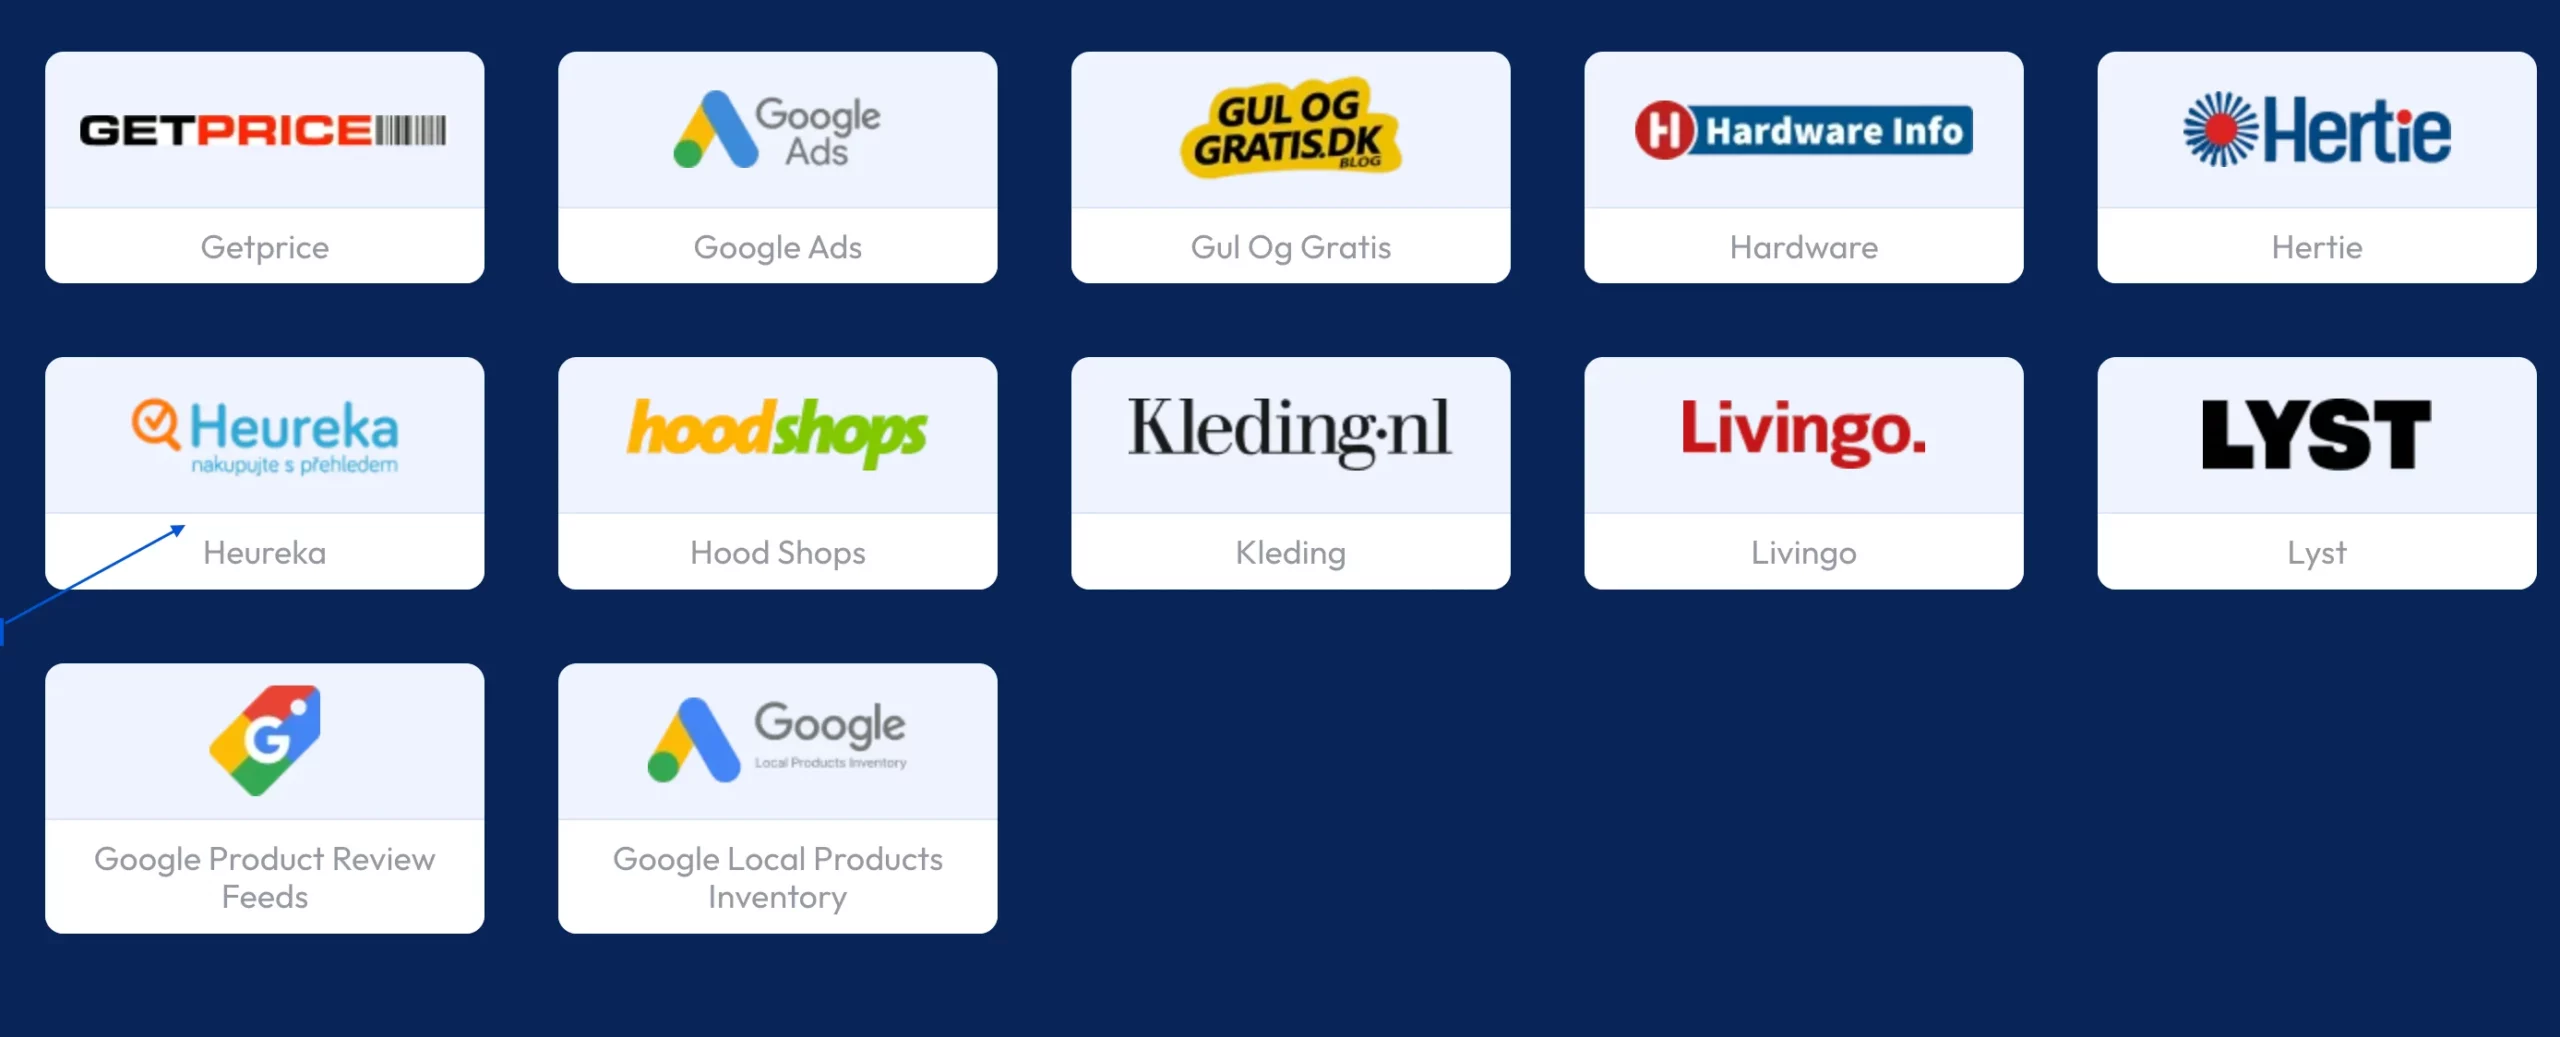
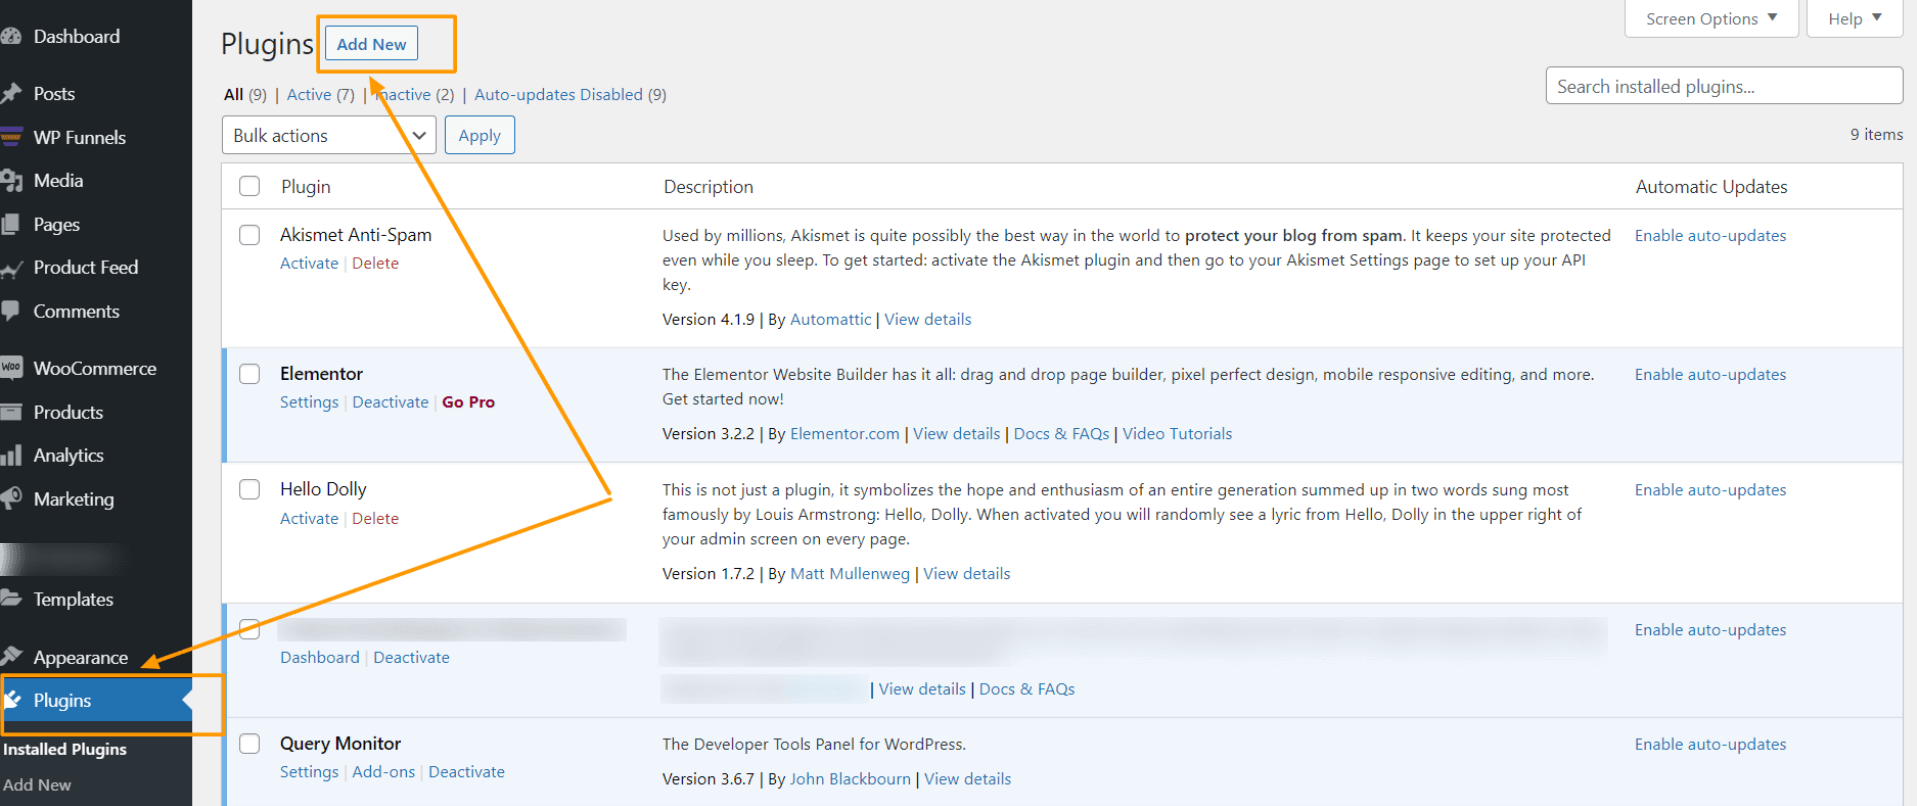
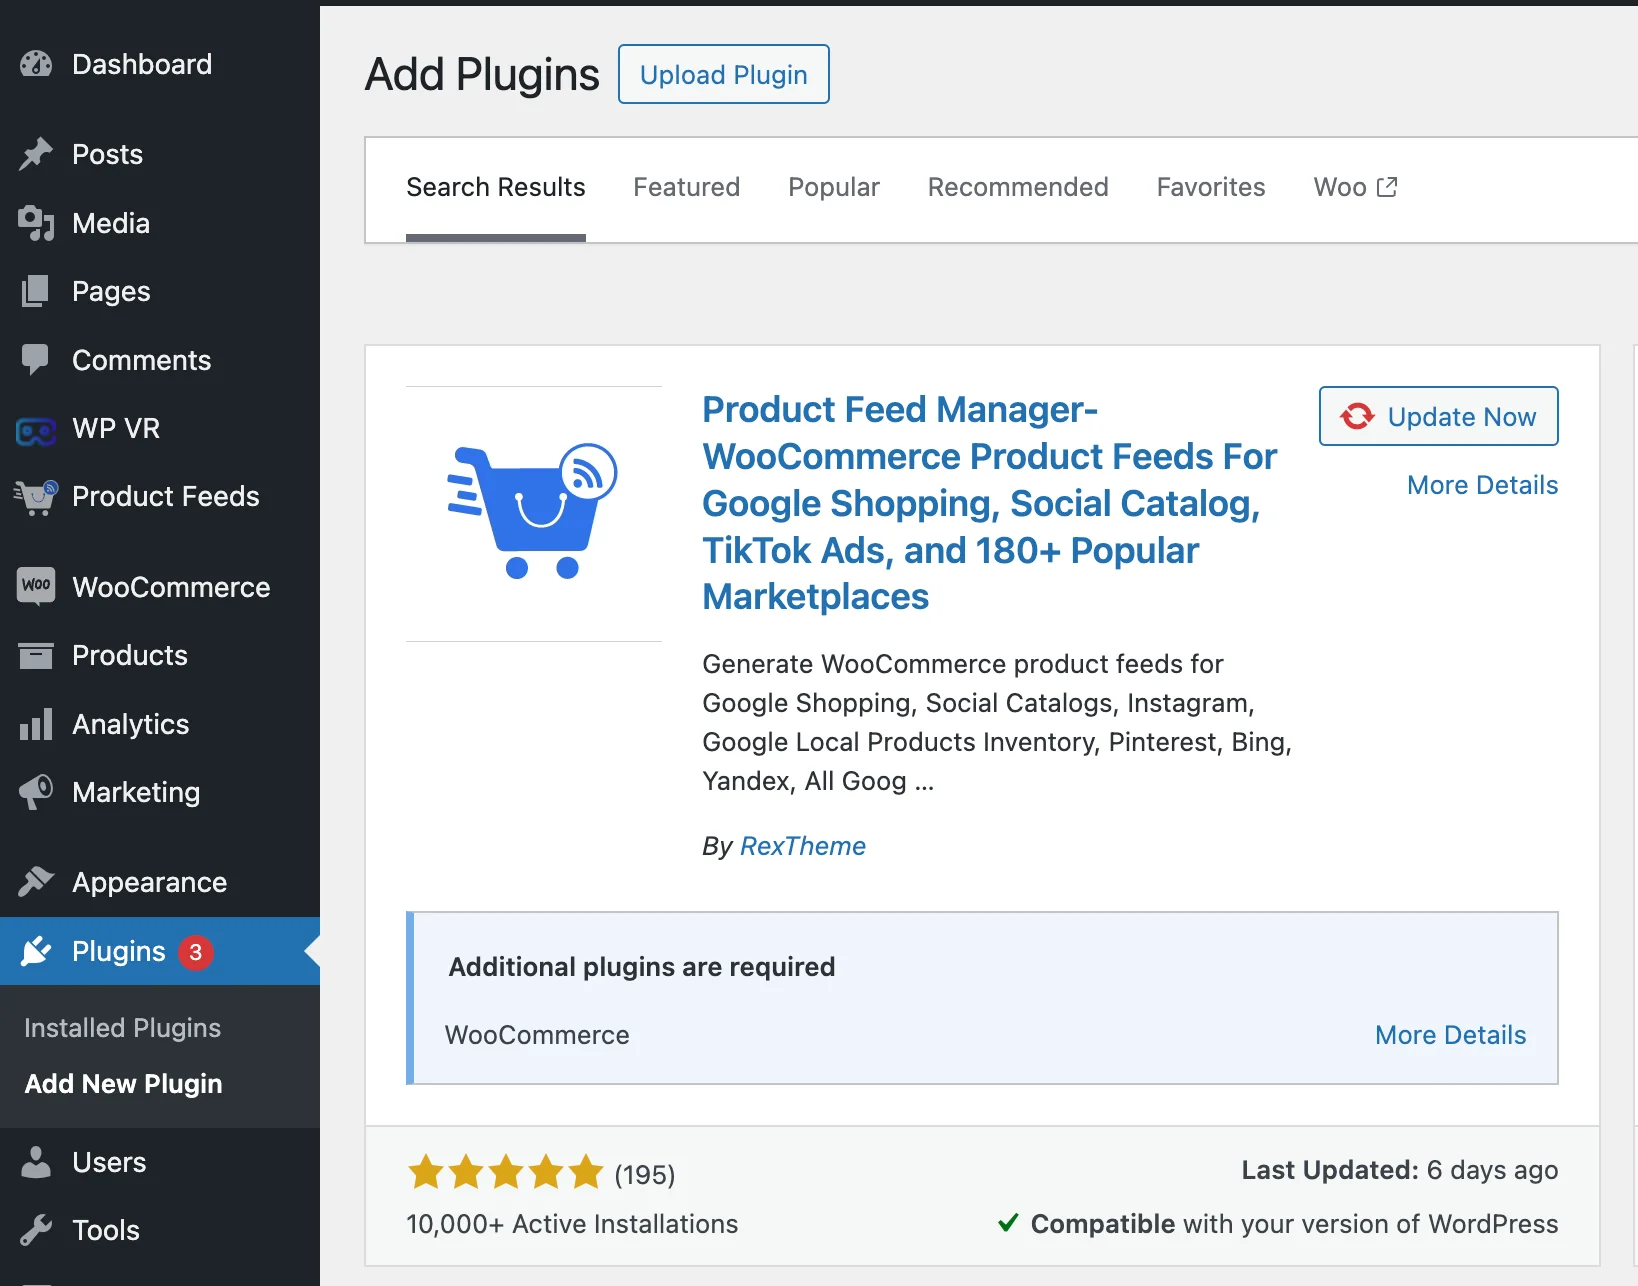
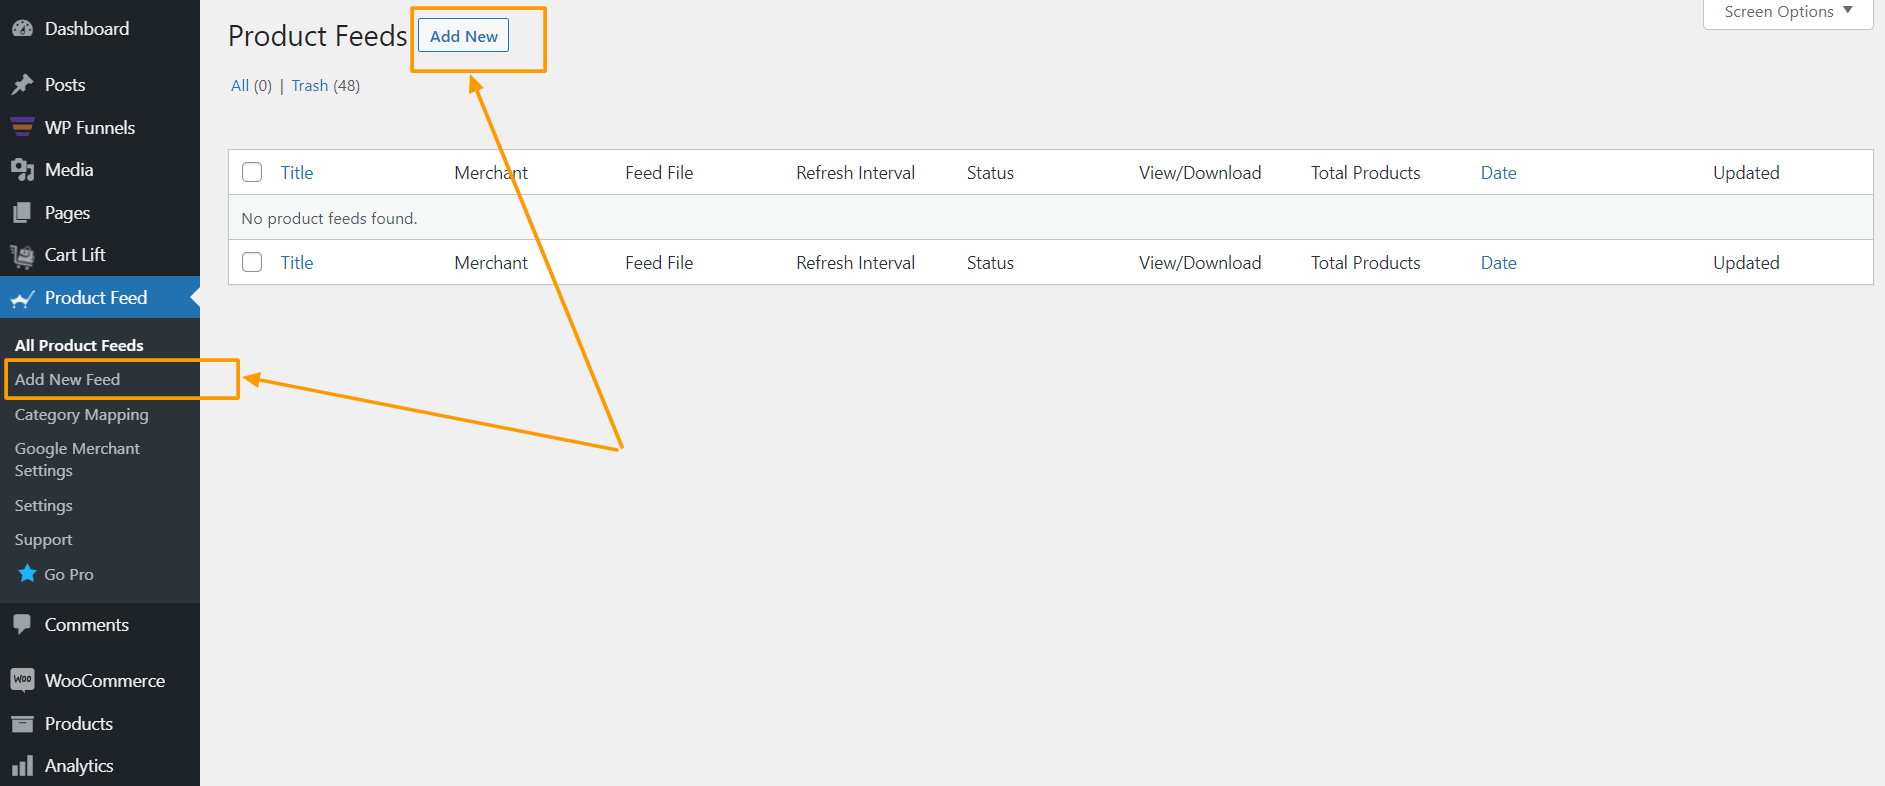


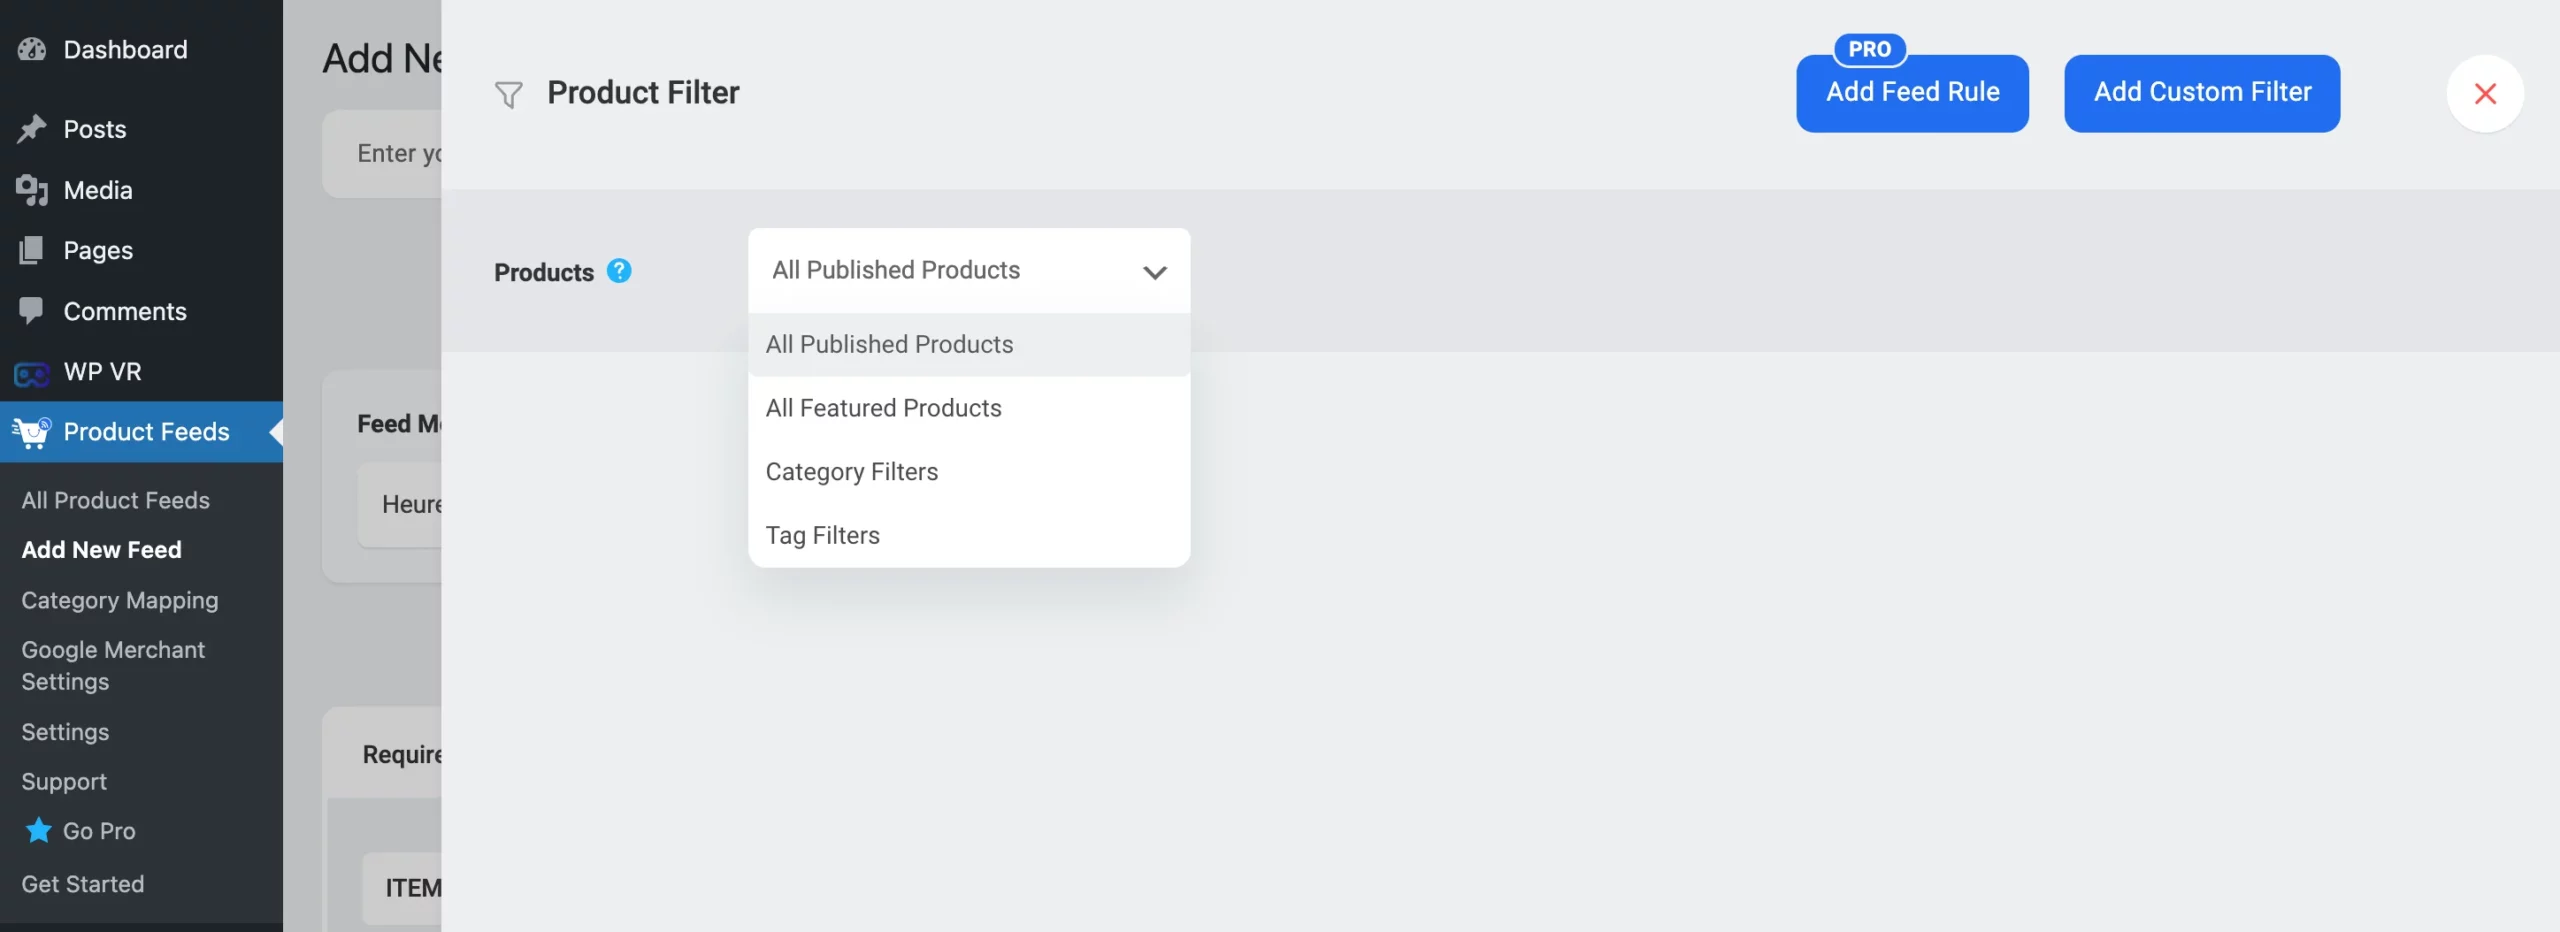
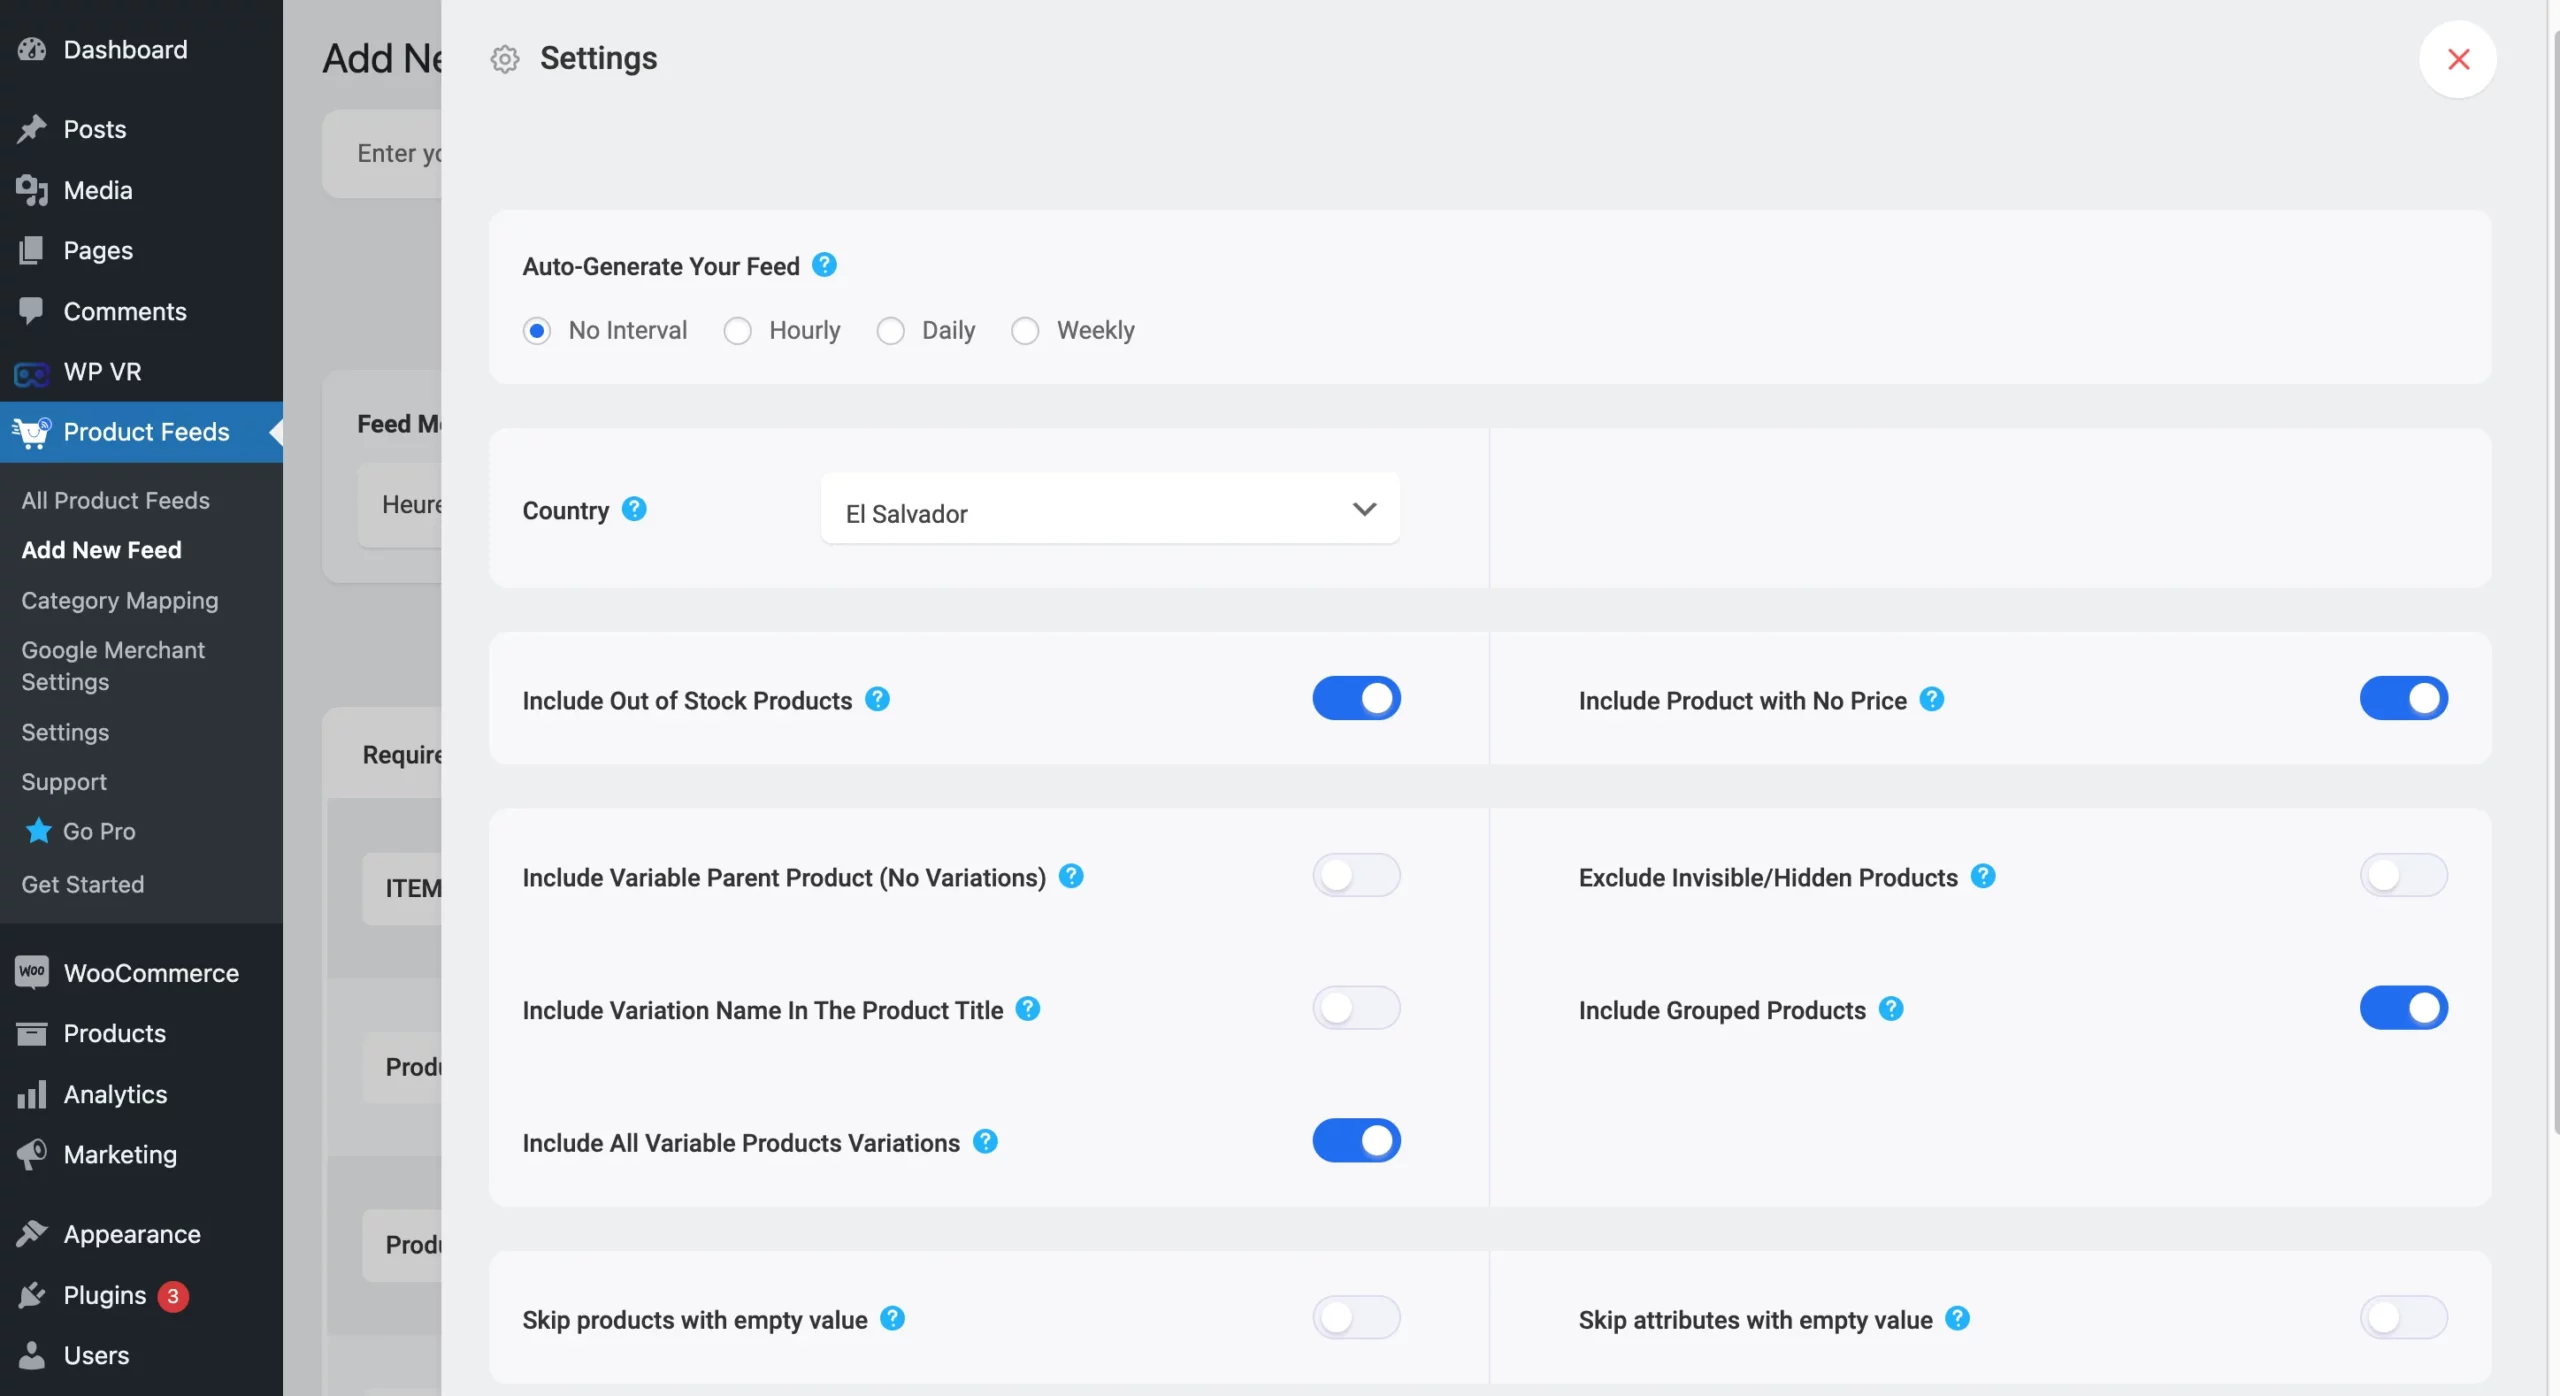
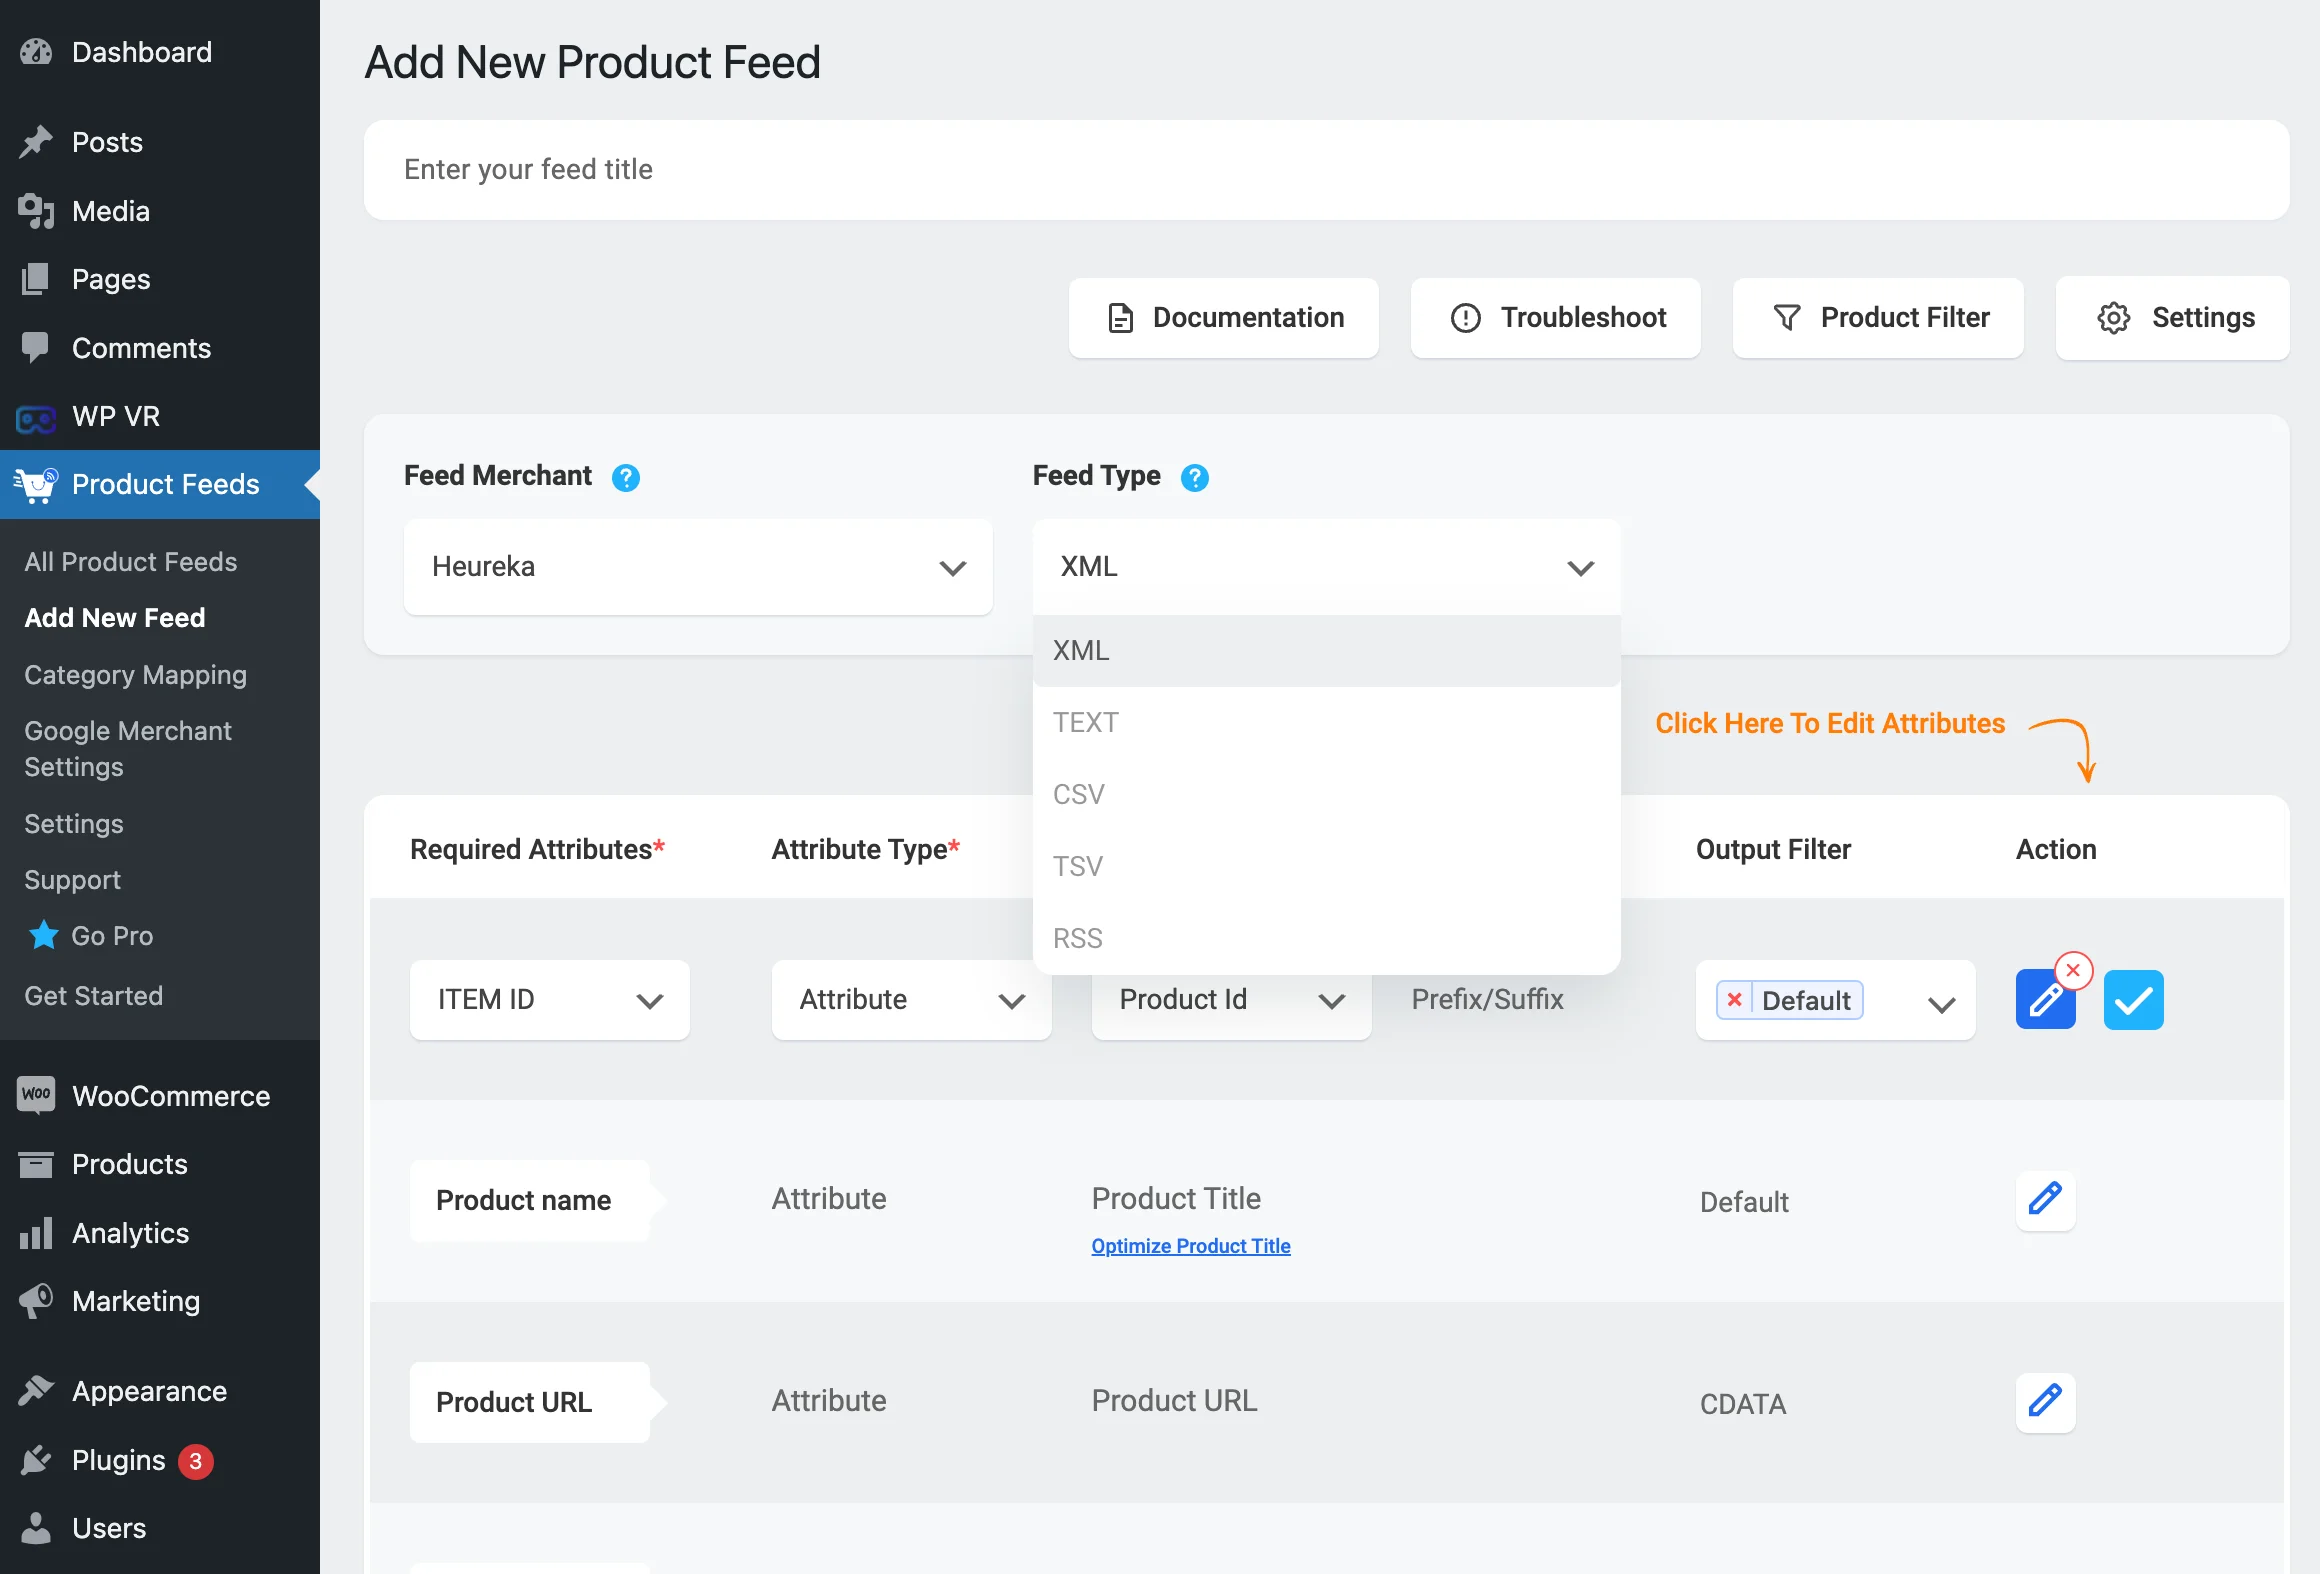


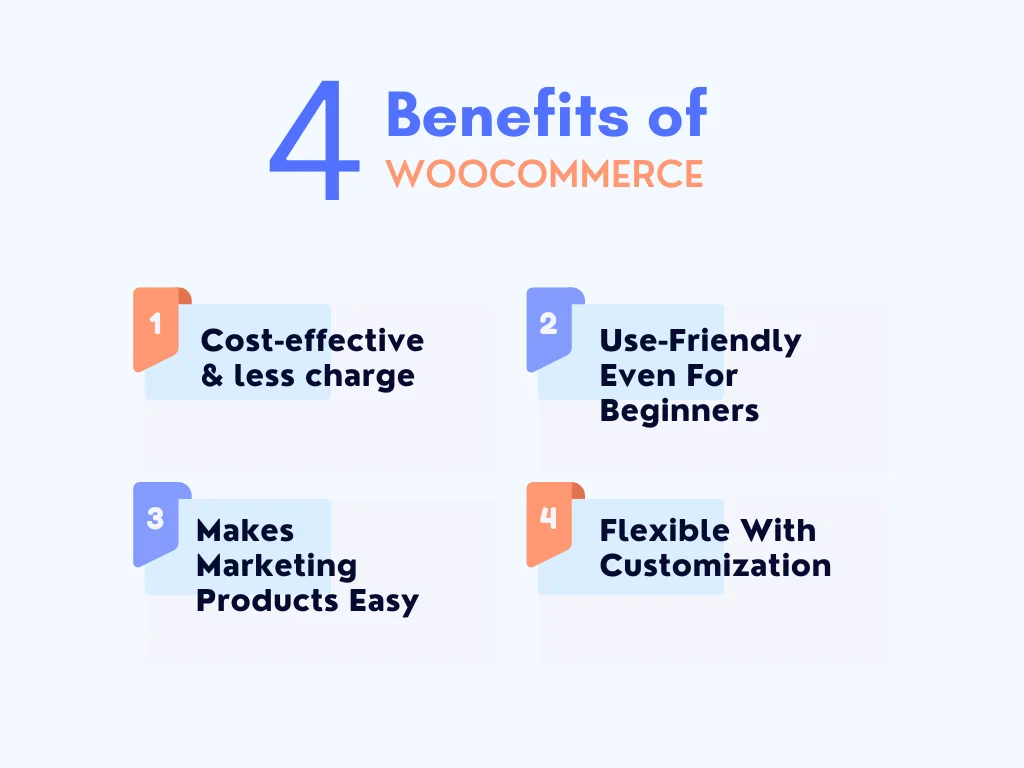
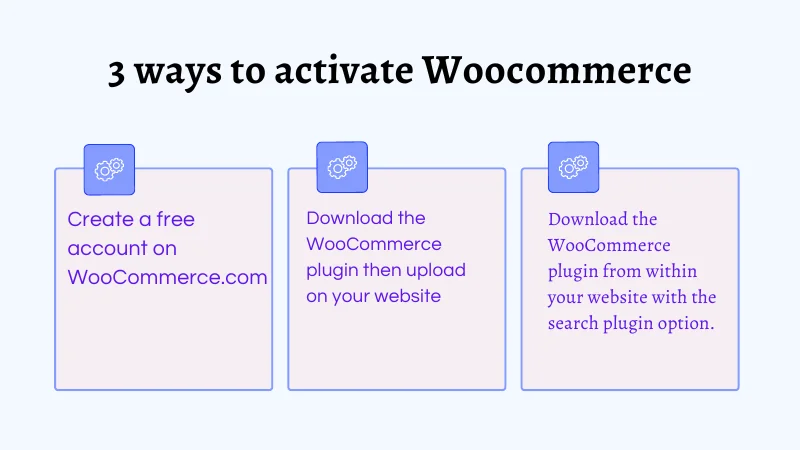

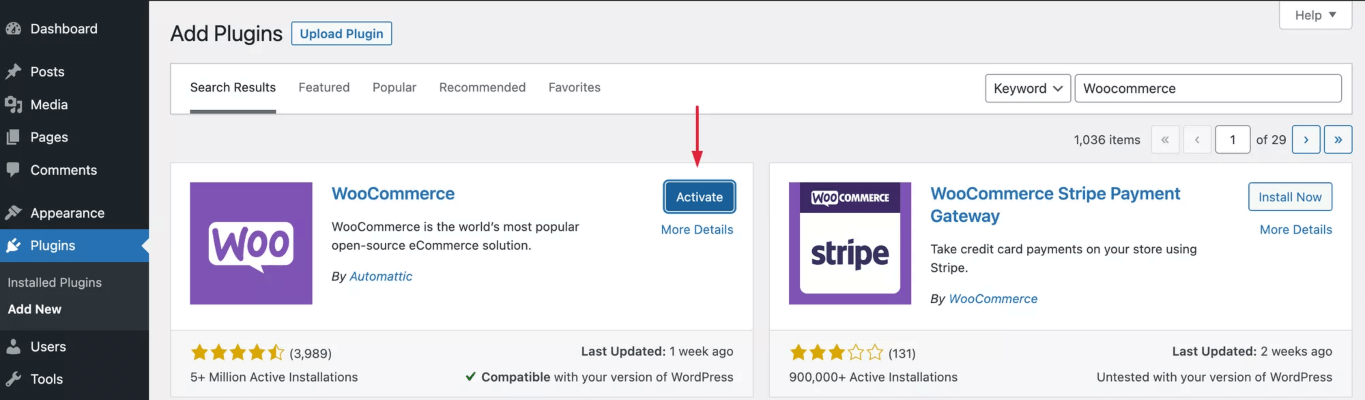
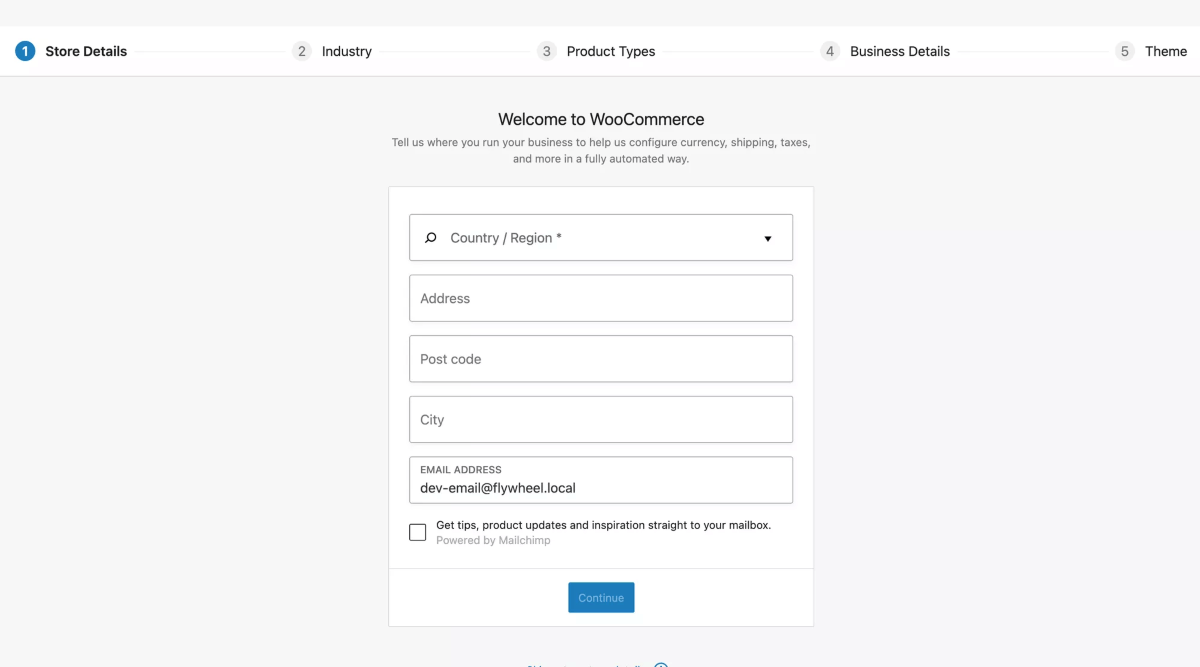
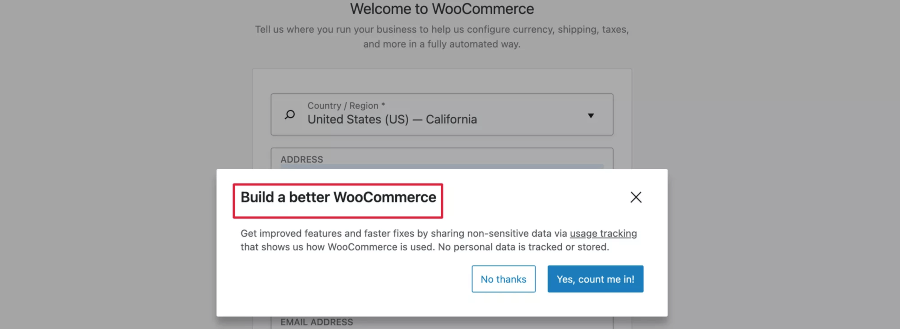
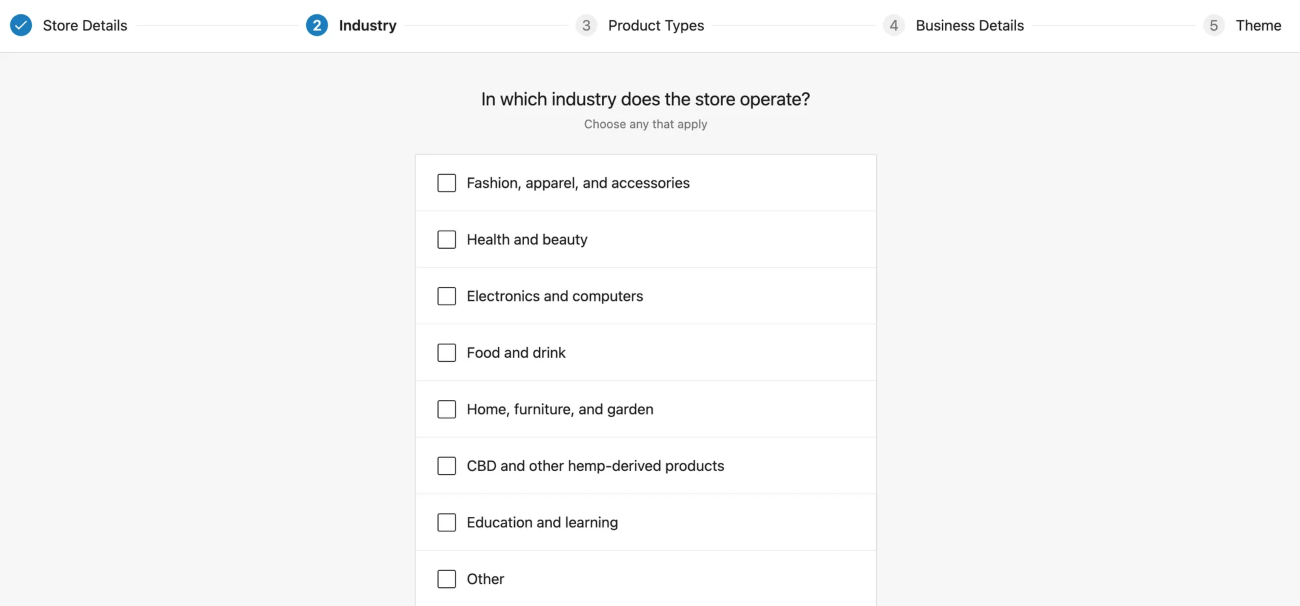
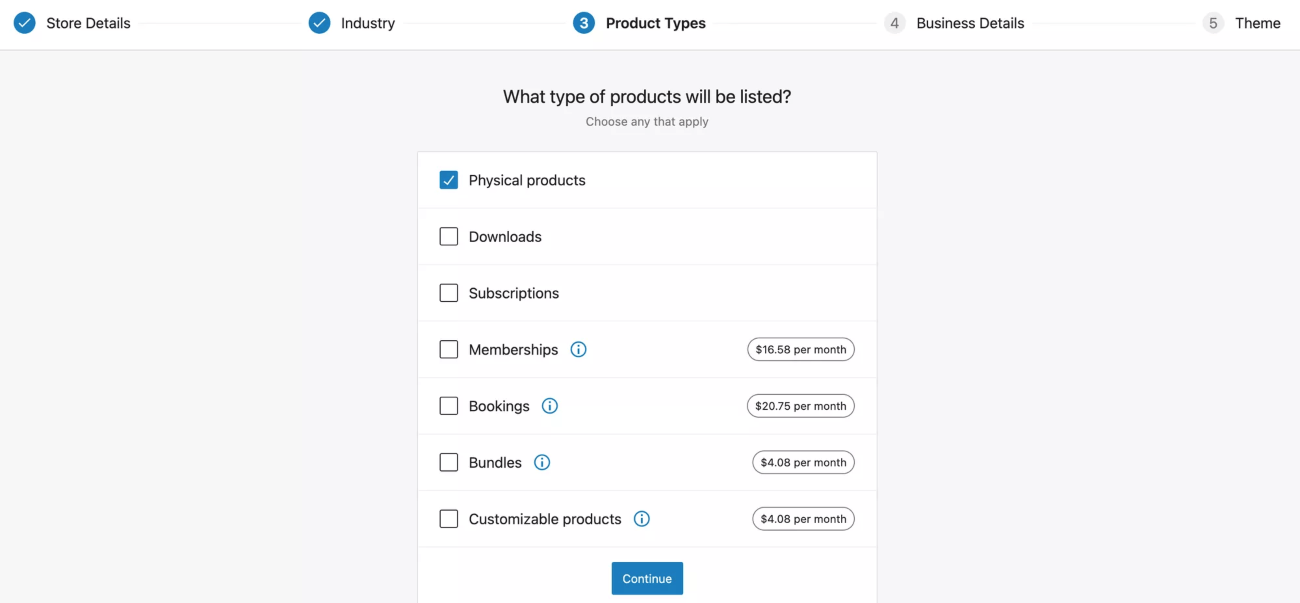
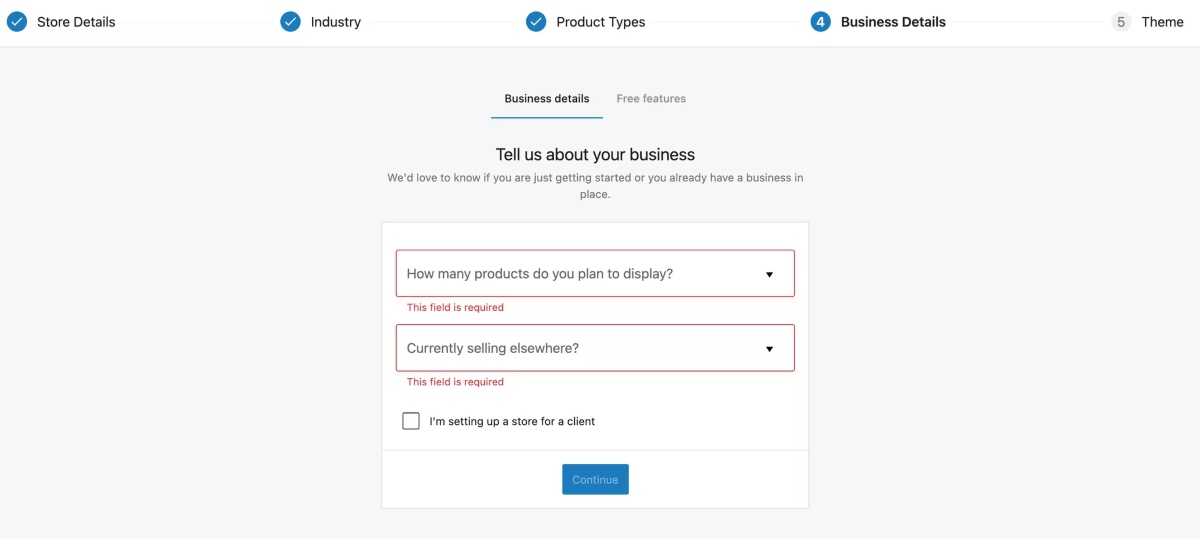
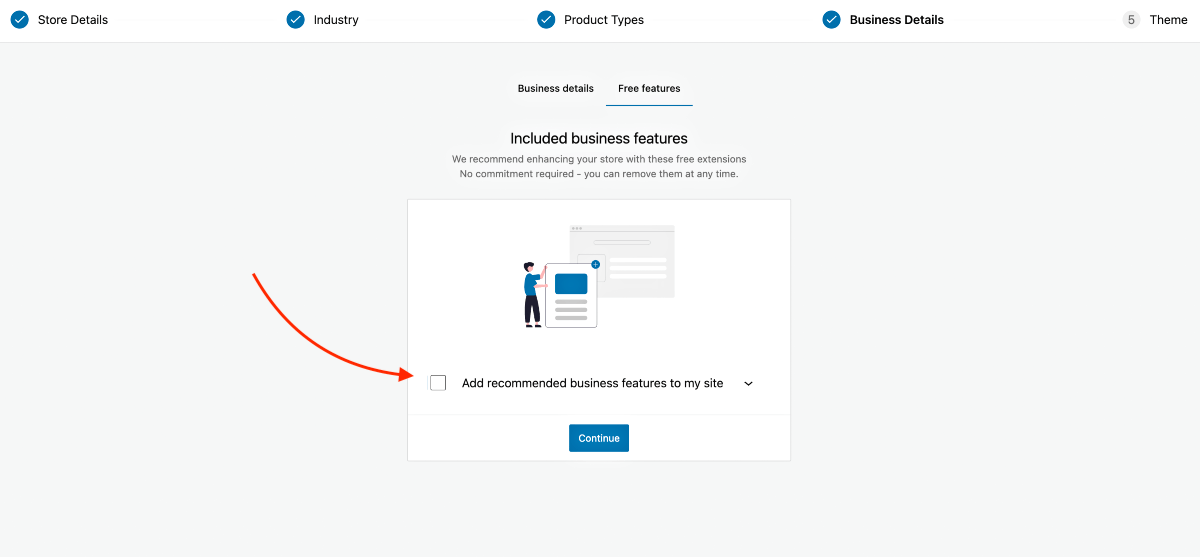
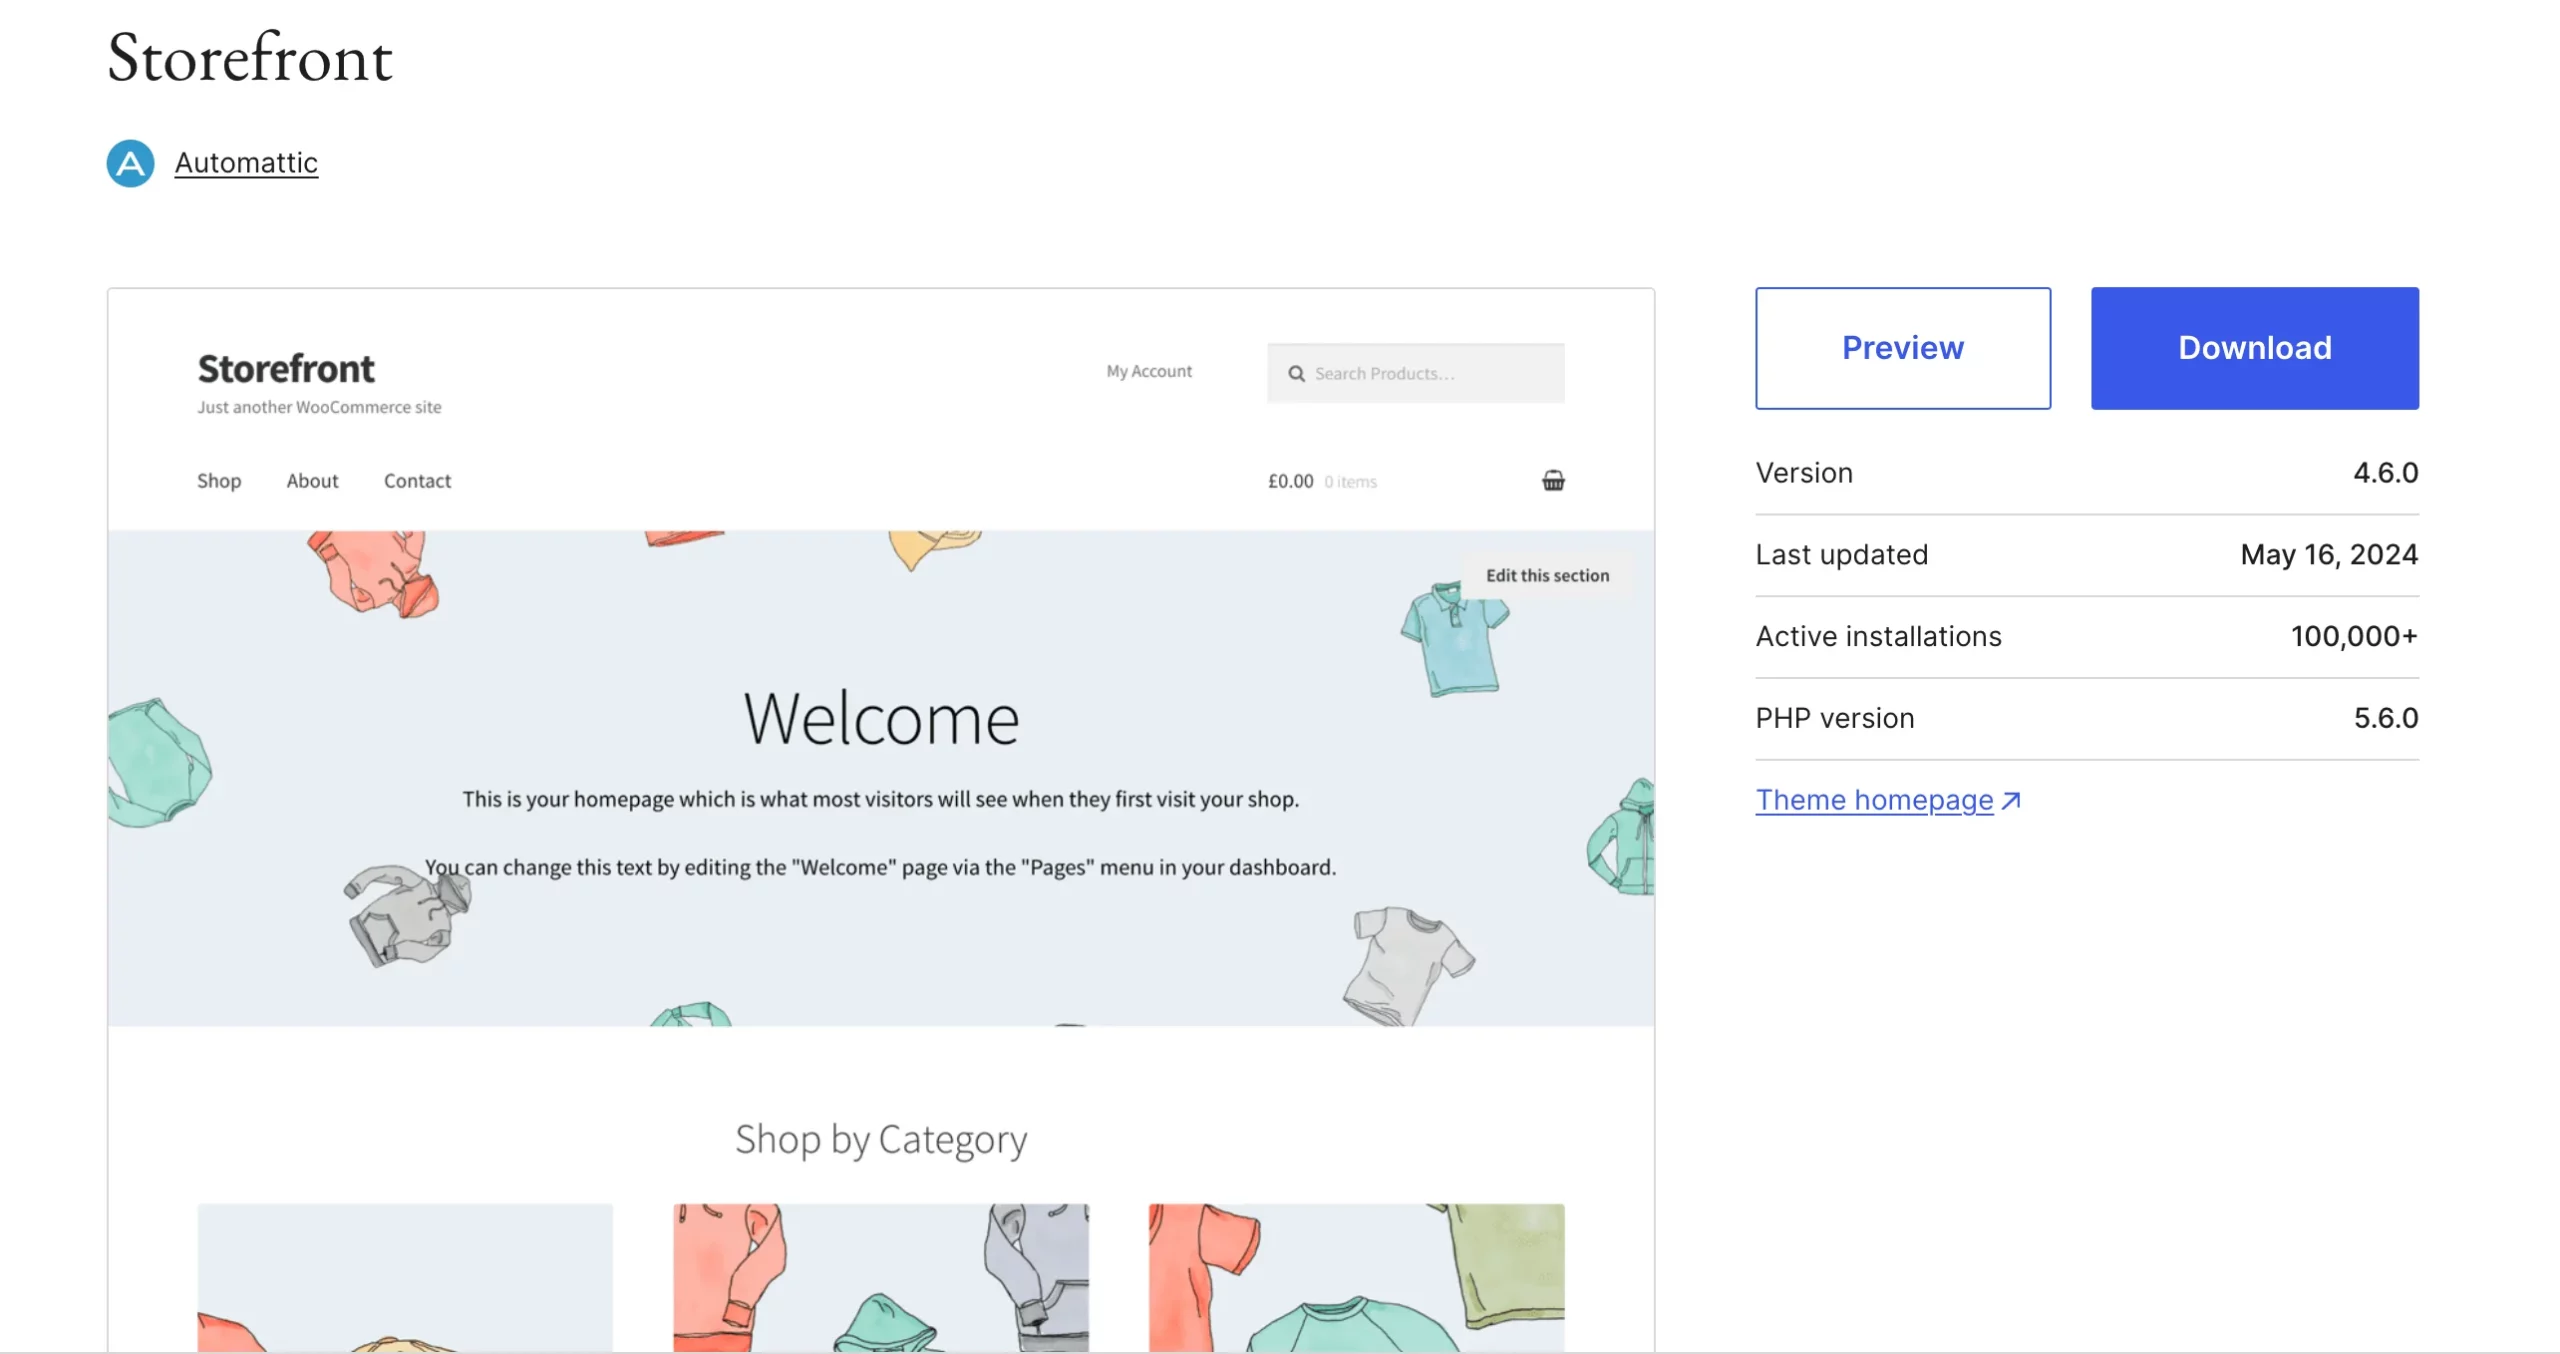
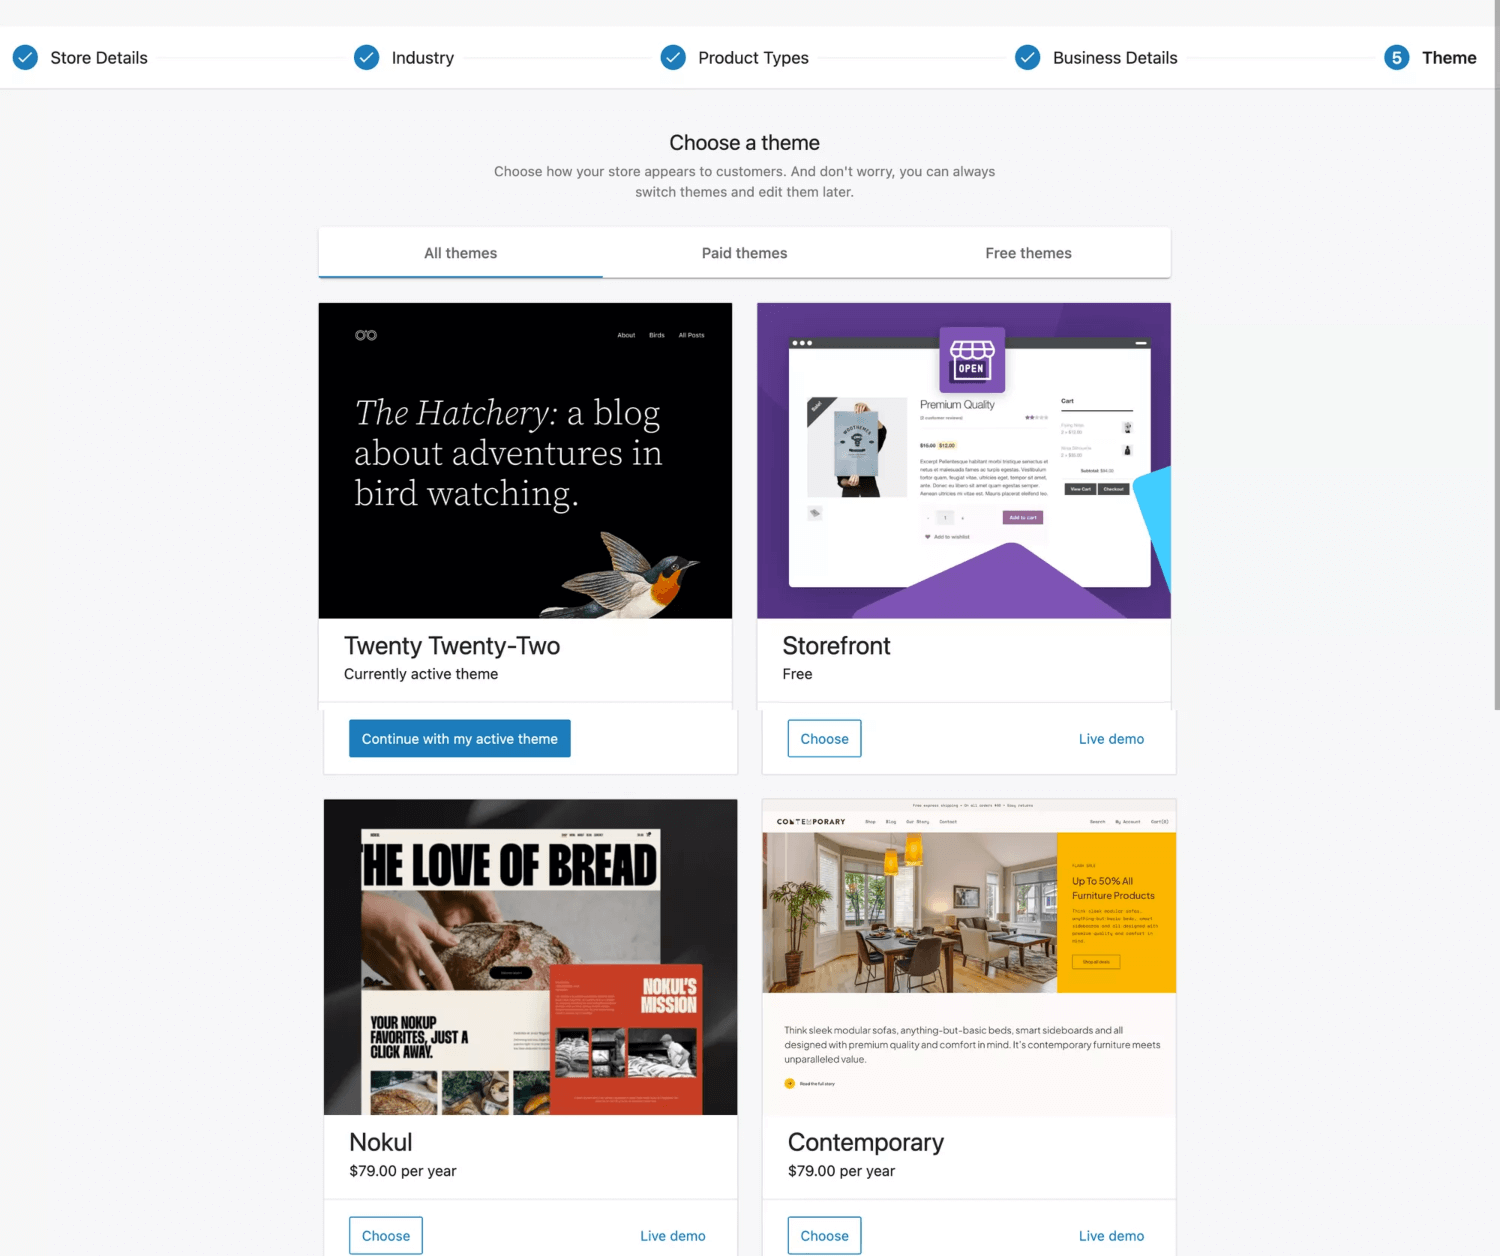


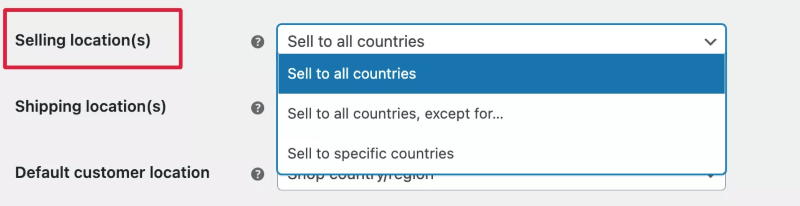
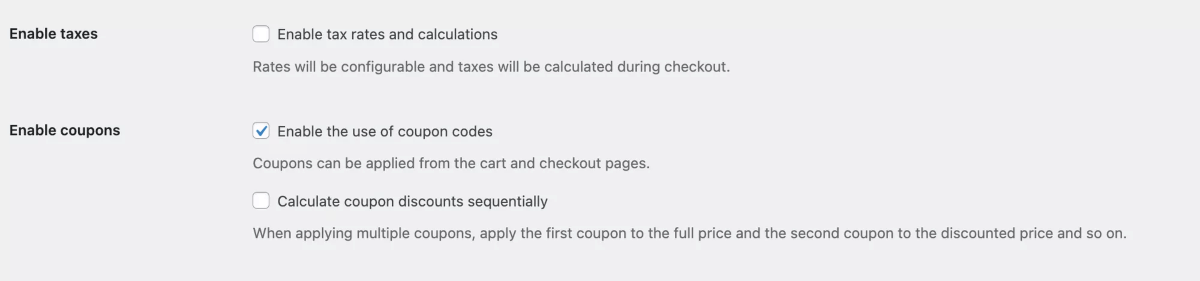
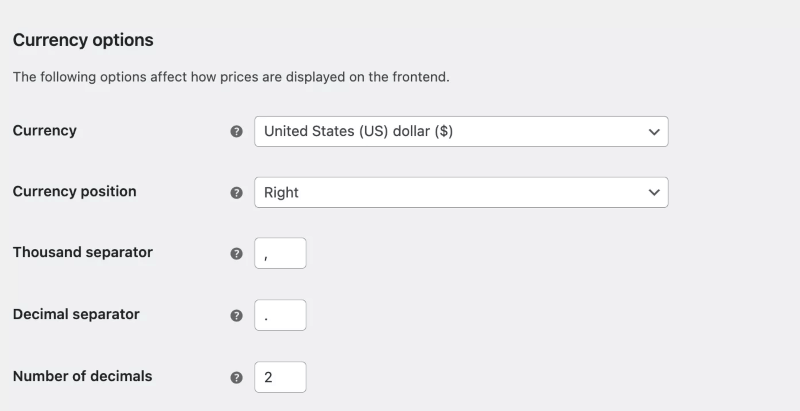
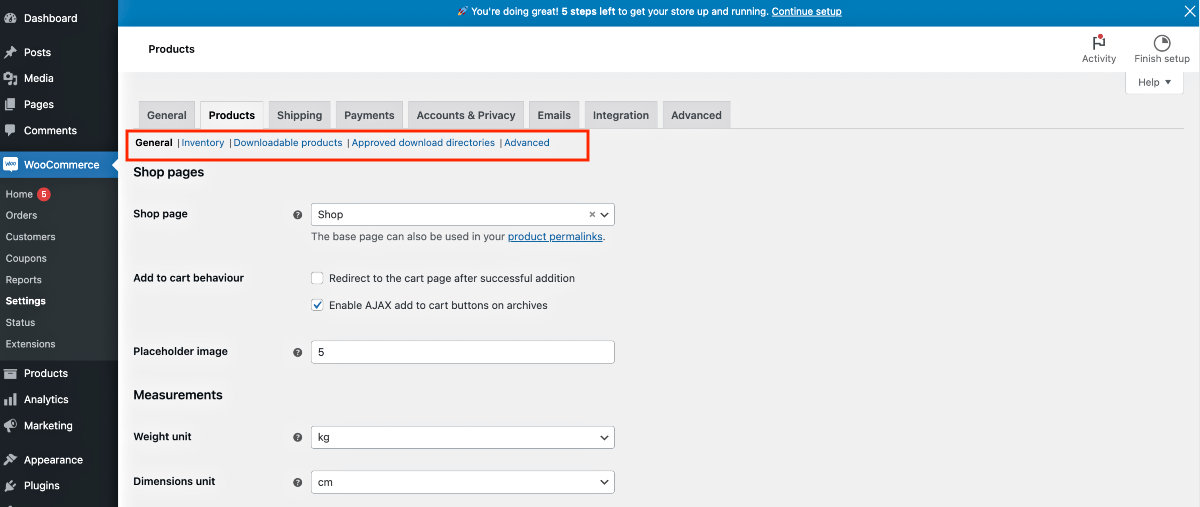
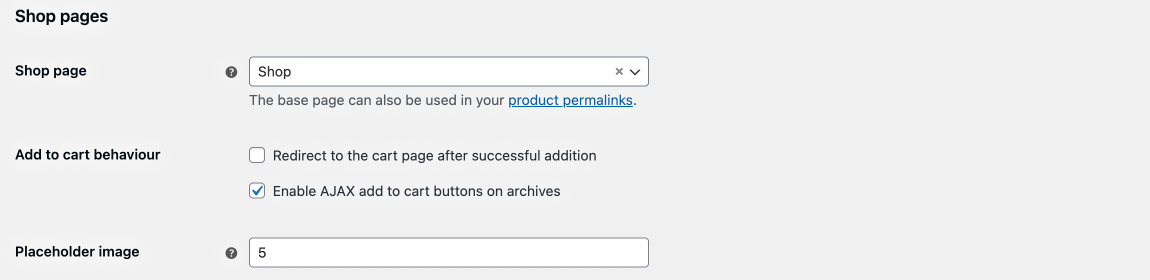


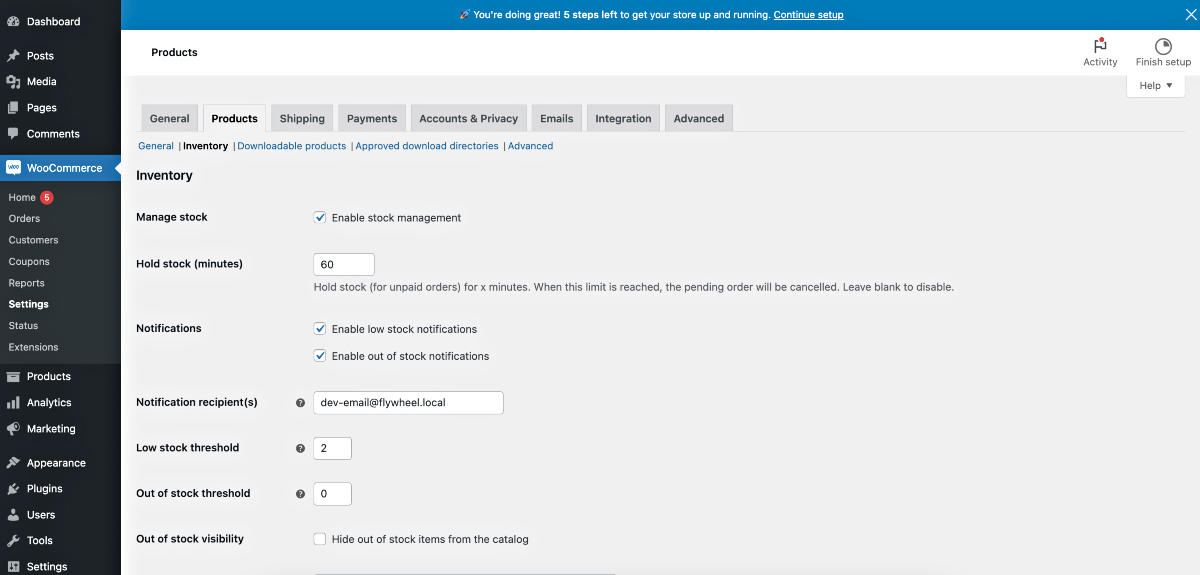
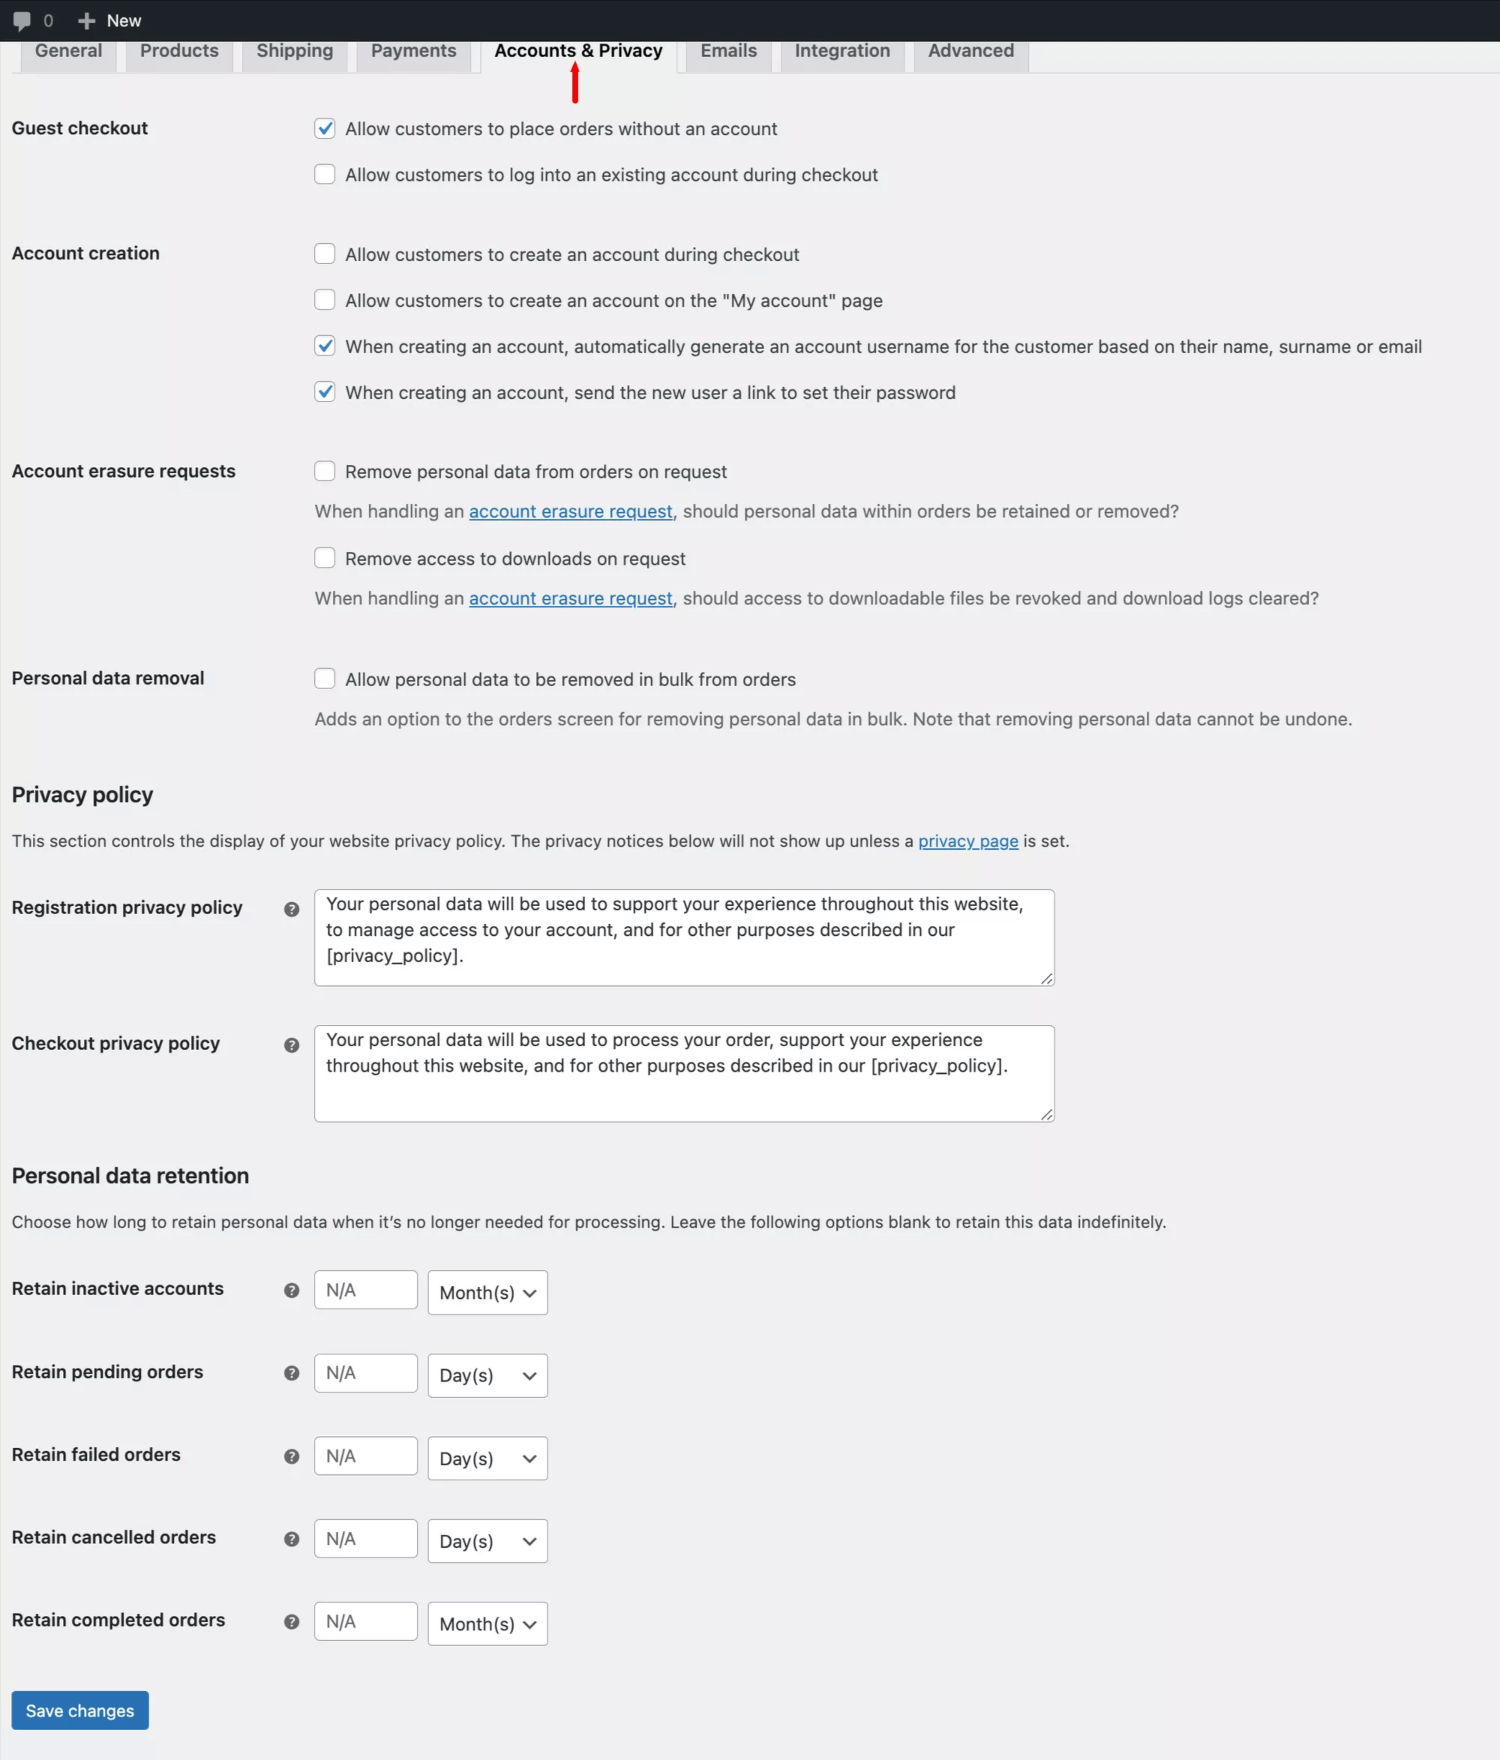


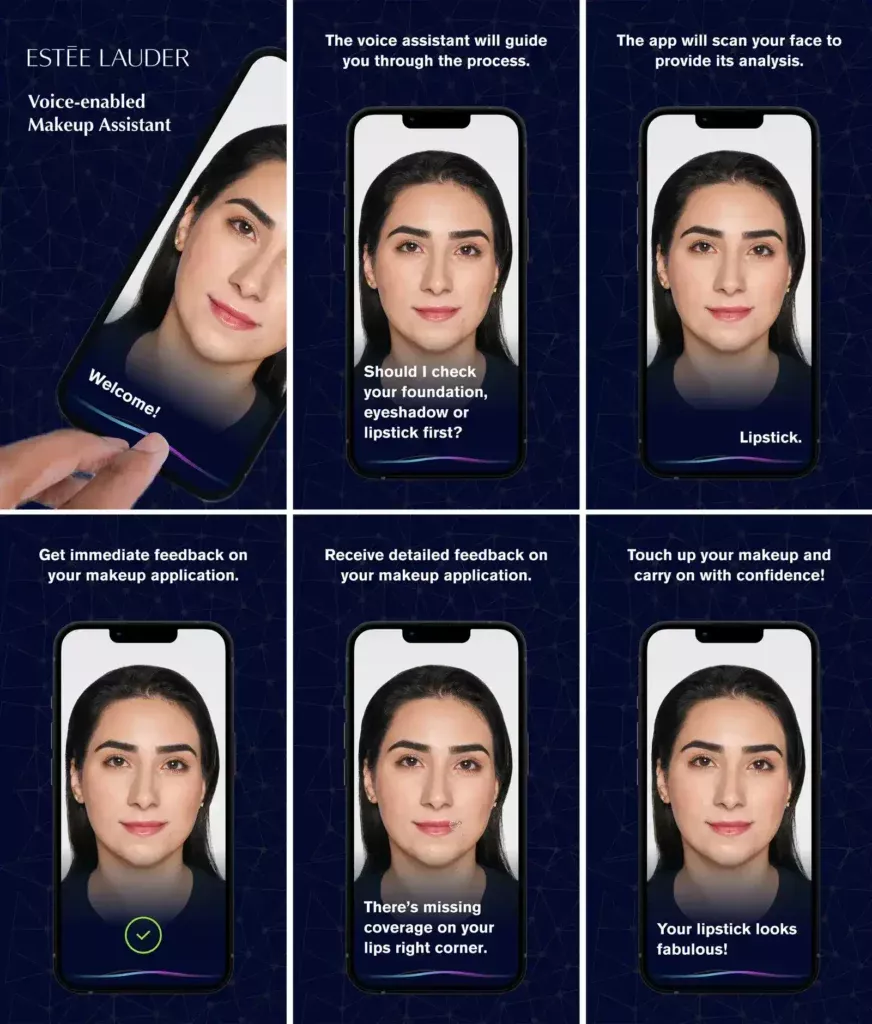
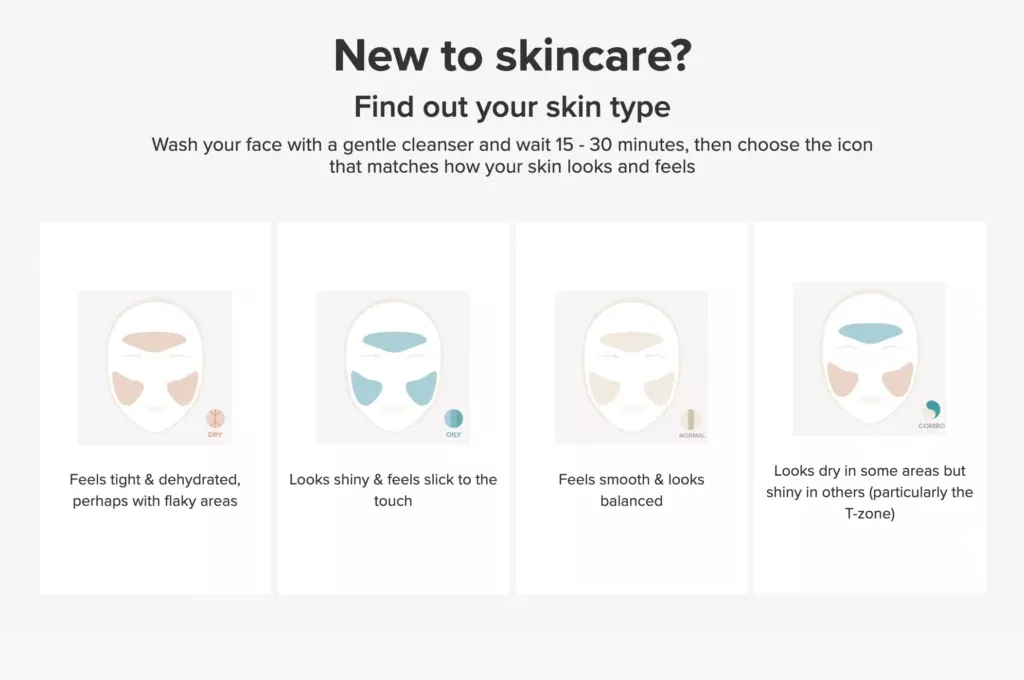


![How to Generate Glami XML Feed to Sell Fashion Products for WooCommerce [2024] 5](https://staging-rextheme.kinsta.cloud/wp-content/uploads/2024/06/01.-Glami-XML-Feed.webp)
![How to Generate Glami XML Feed to Sell Fashion Products for WooCommerce [2024] 6](https://staging-rextheme.kinsta.cloud/wp-content/uploads/2024/06/01.-Glami-XML-Feeds.webp)


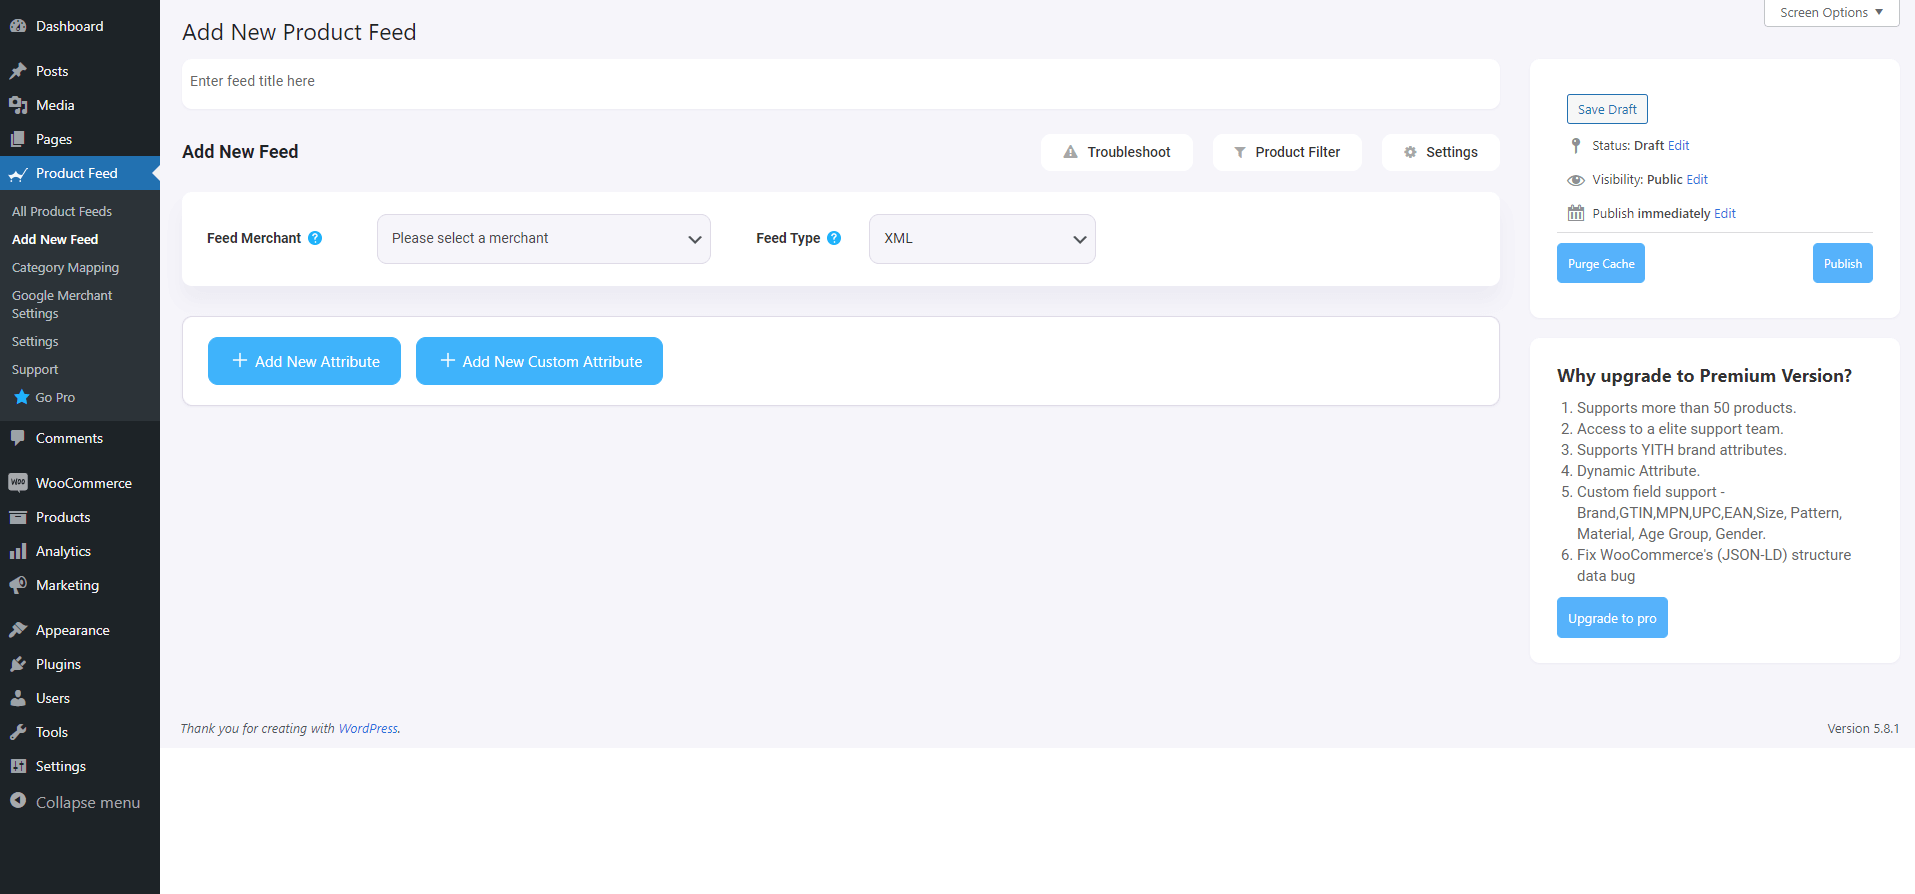
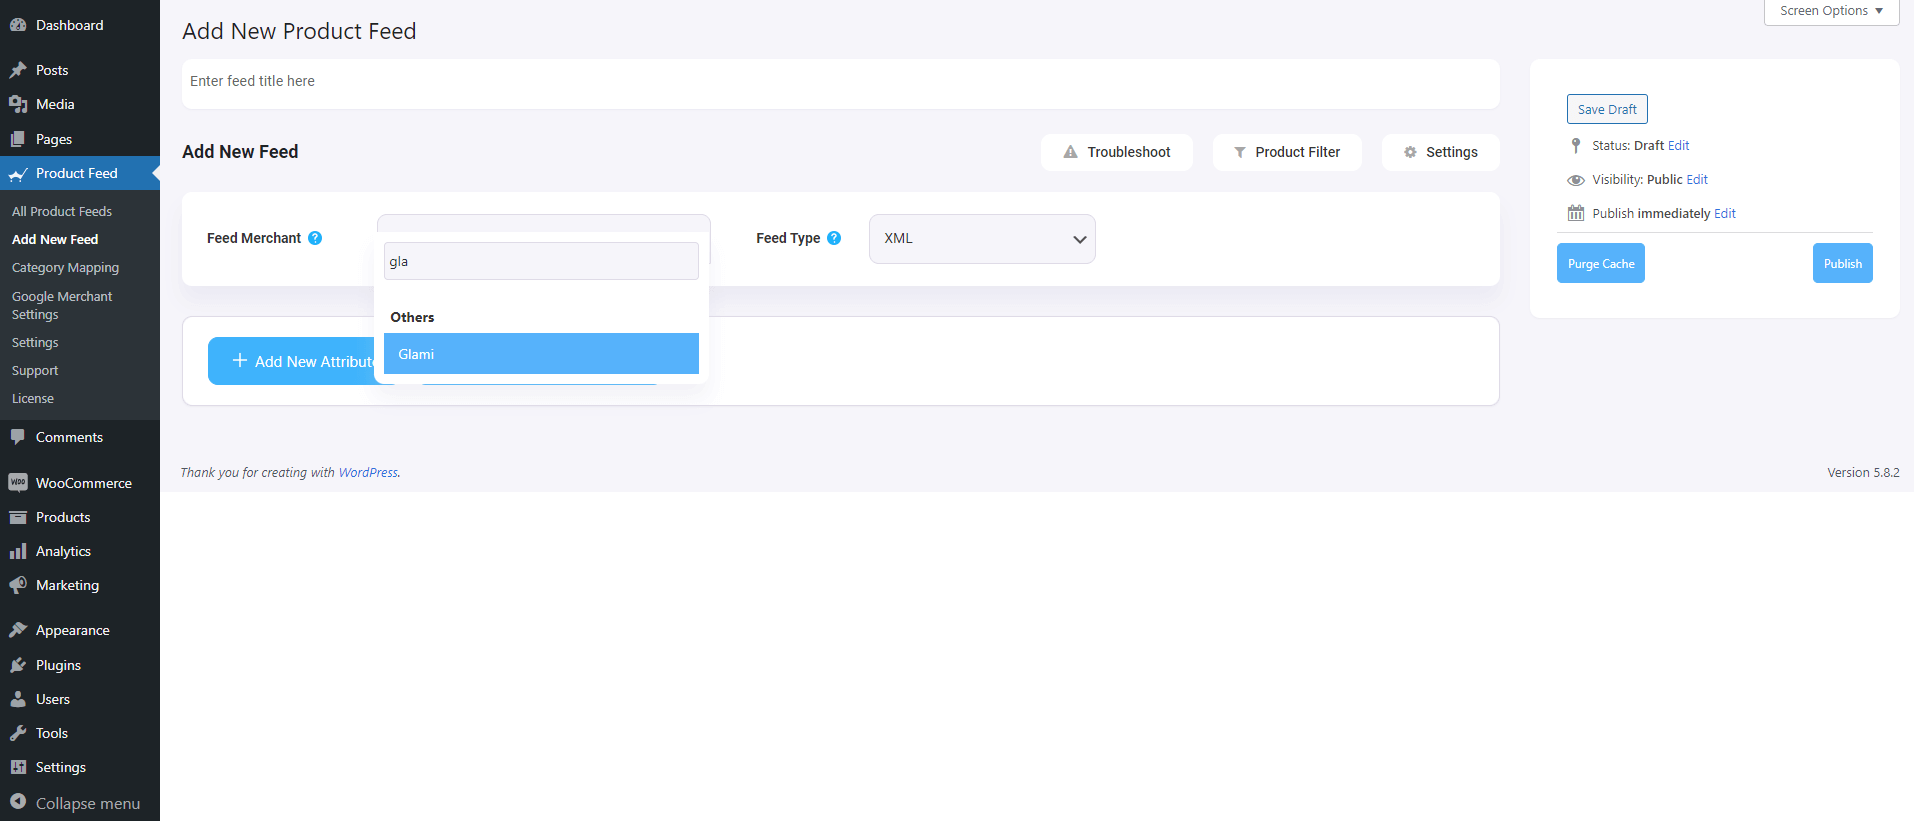

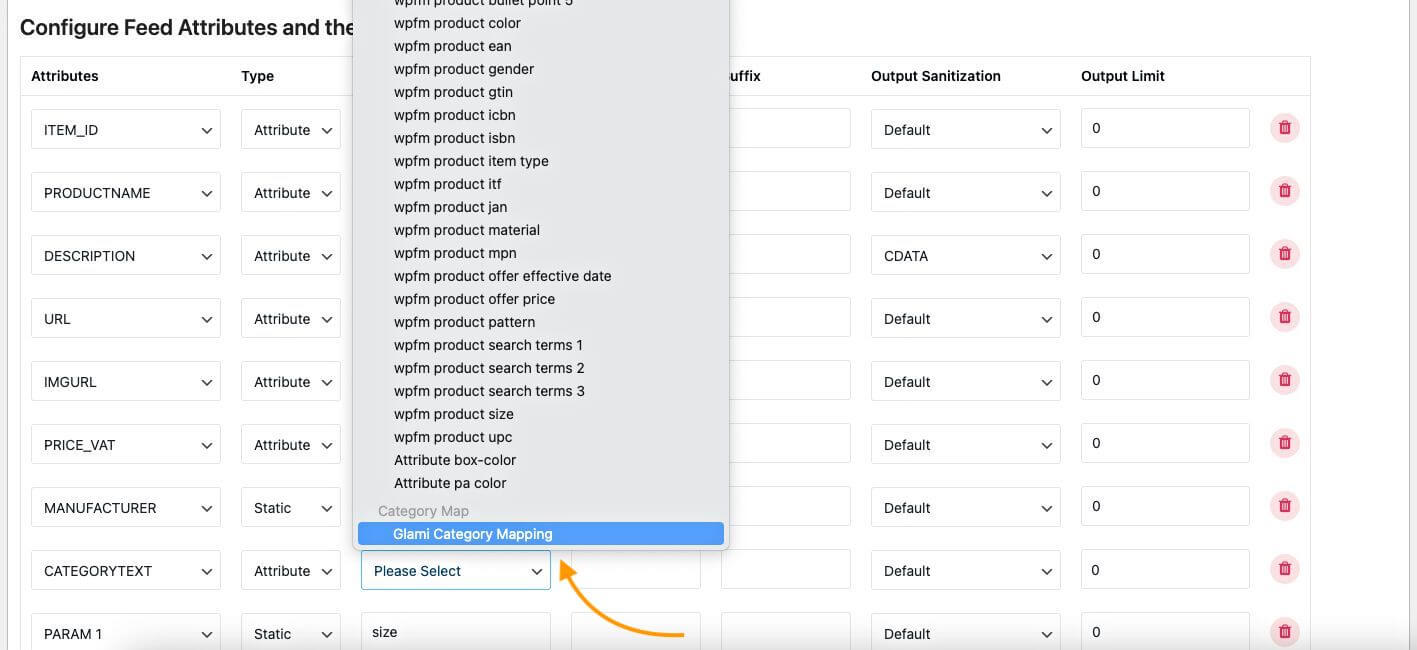
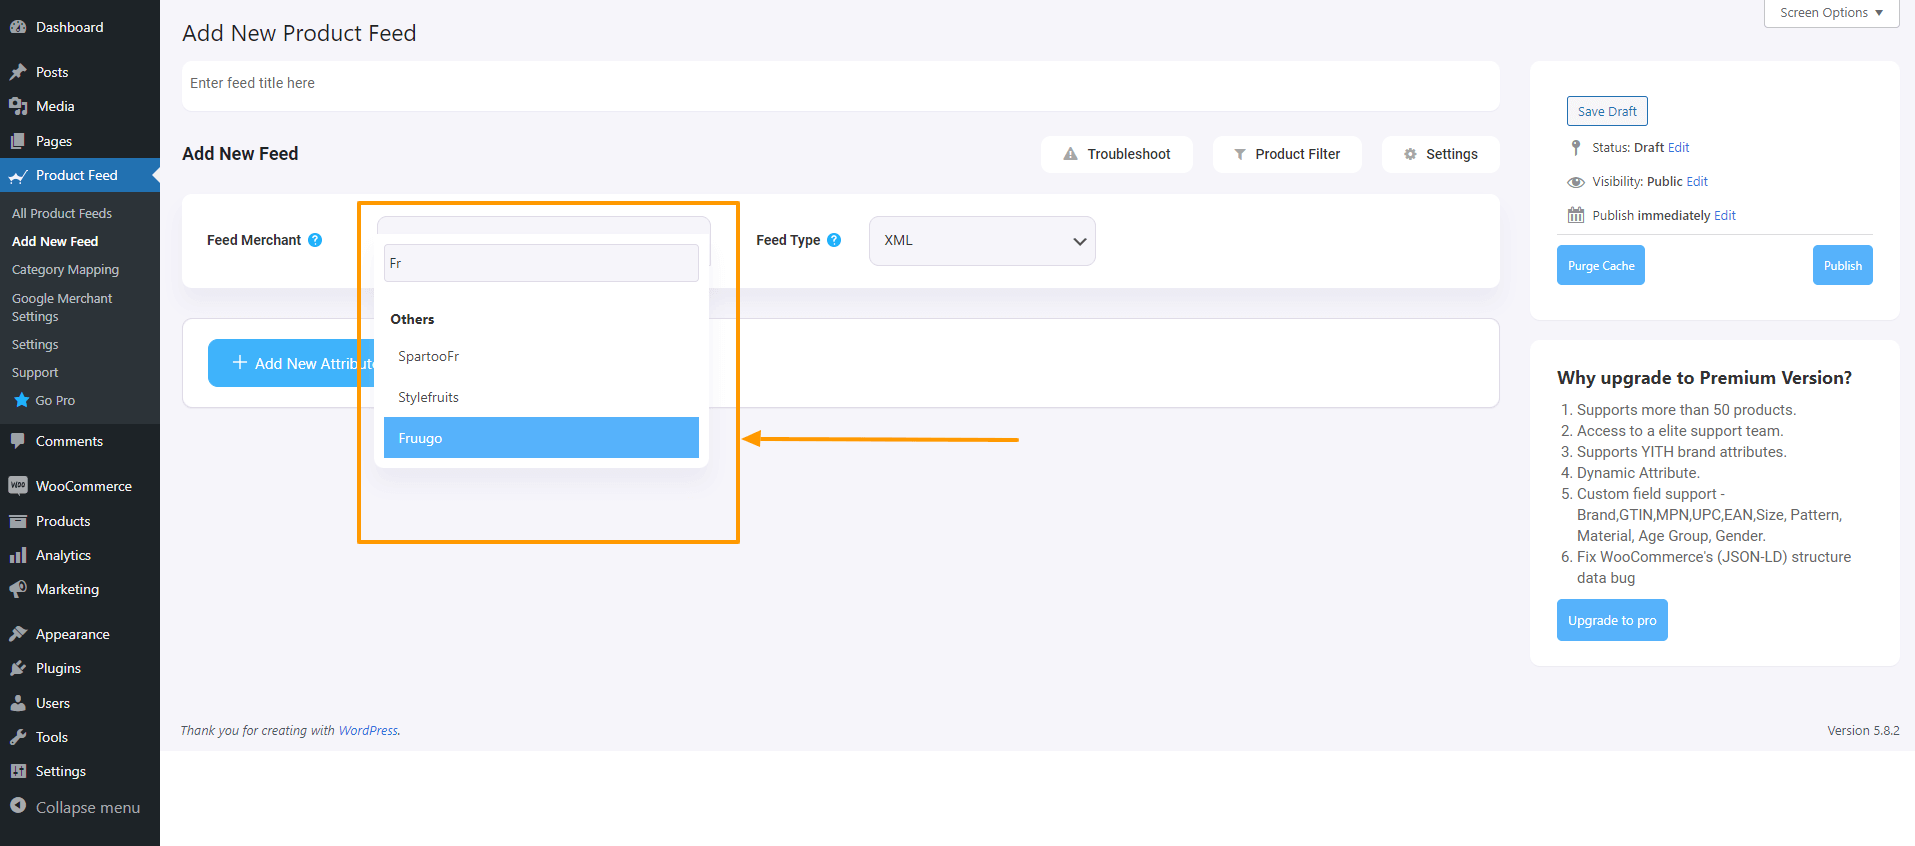
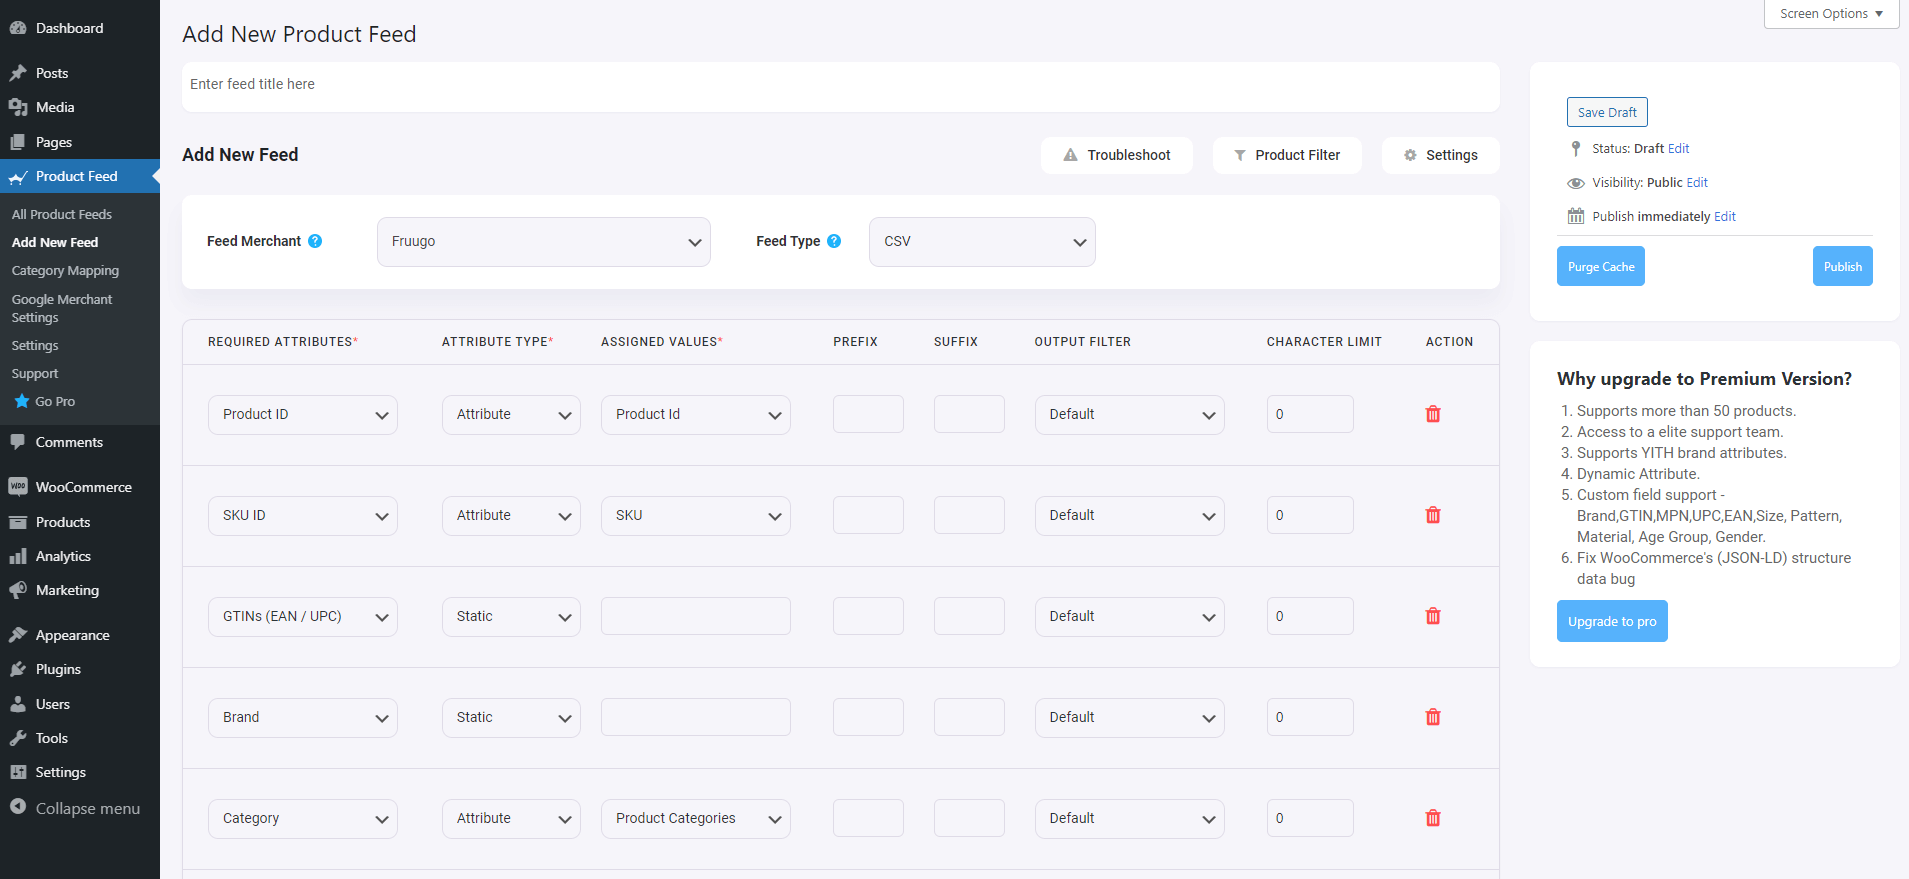


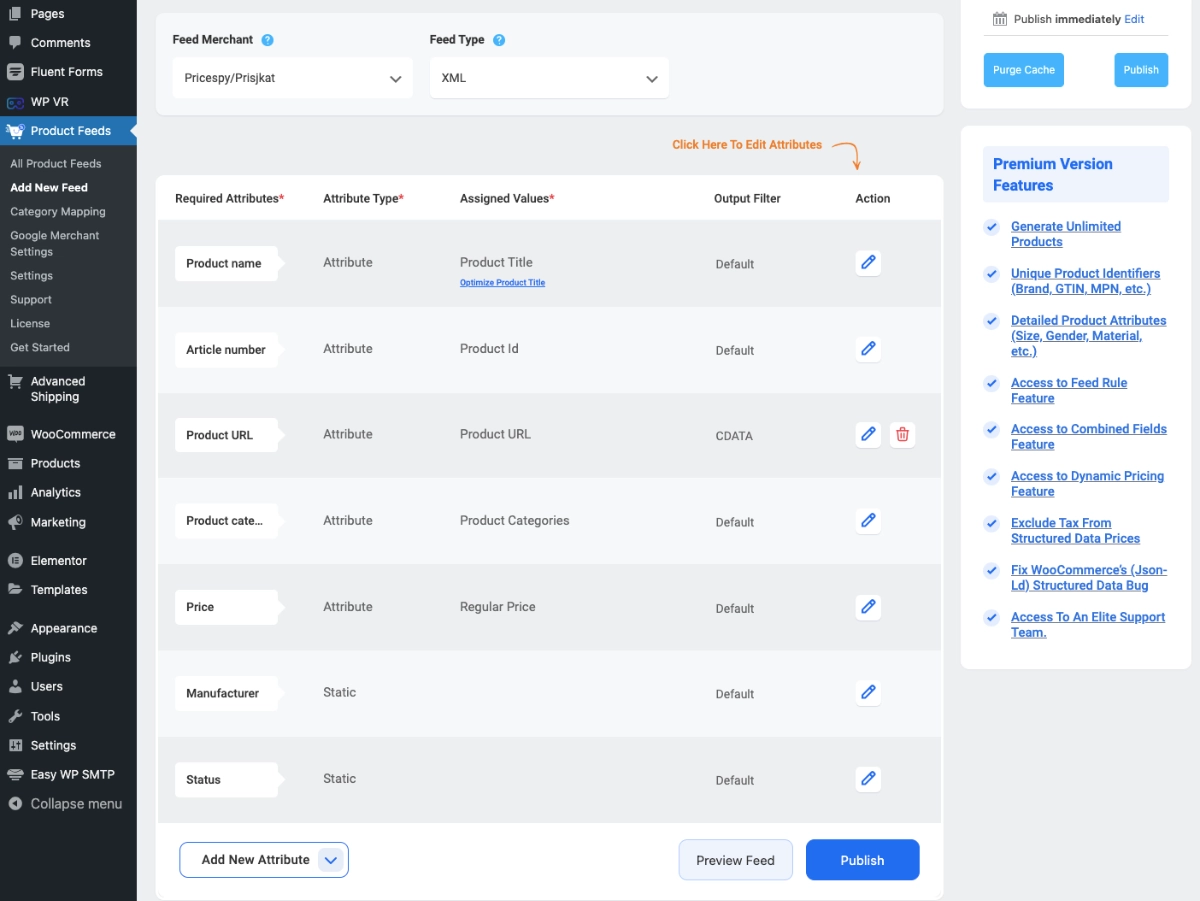
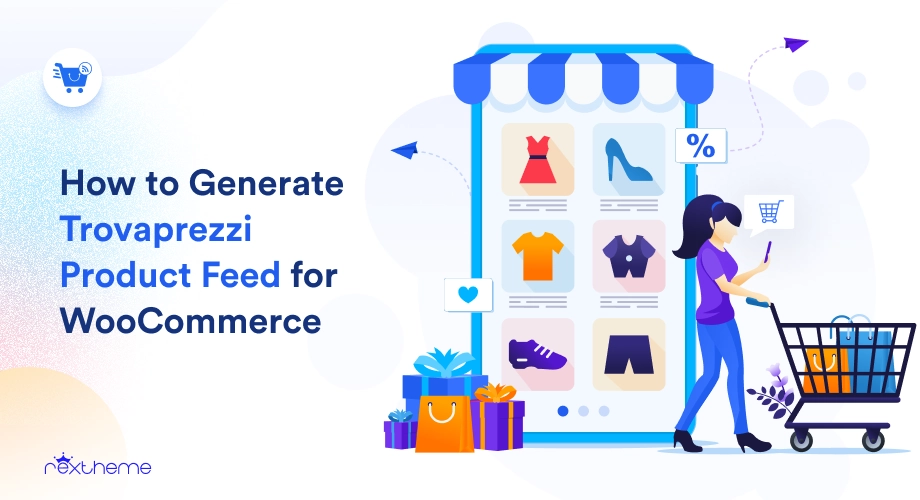
![How to Generate Trovaprezzi Product Feed for WooCommerce [2024] 7](https://staging-rextheme.kinsta.cloud/wp-content/uploads/2024/06/01.-Trovaprezzi-product-feed-.webp)


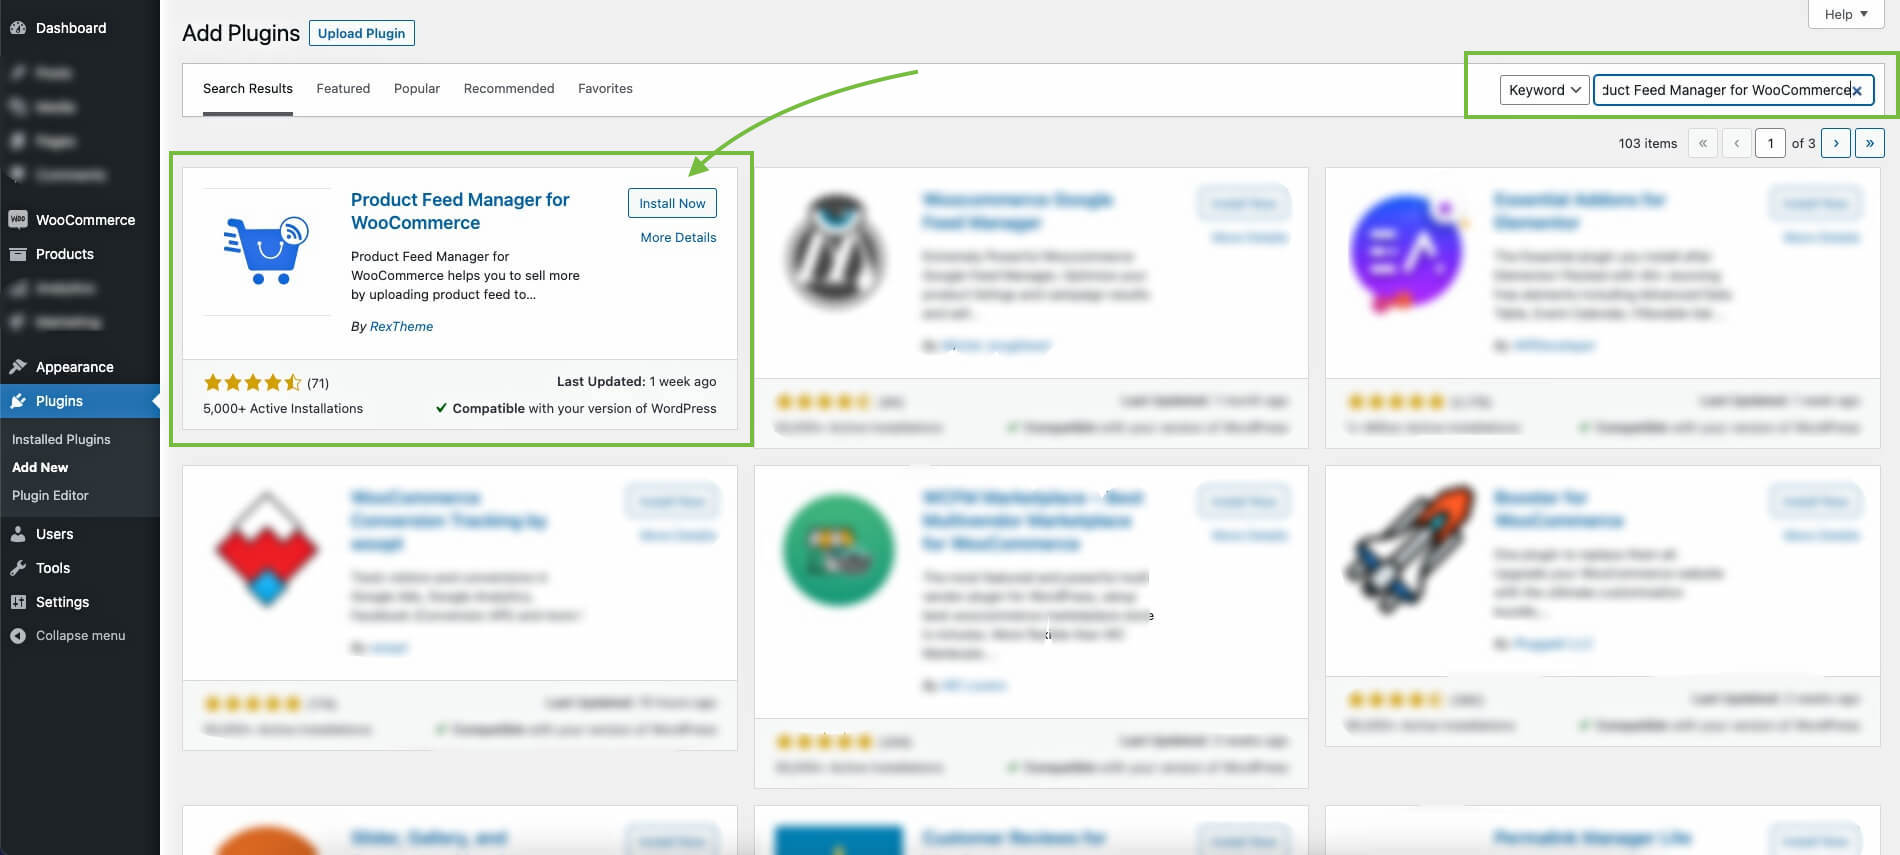
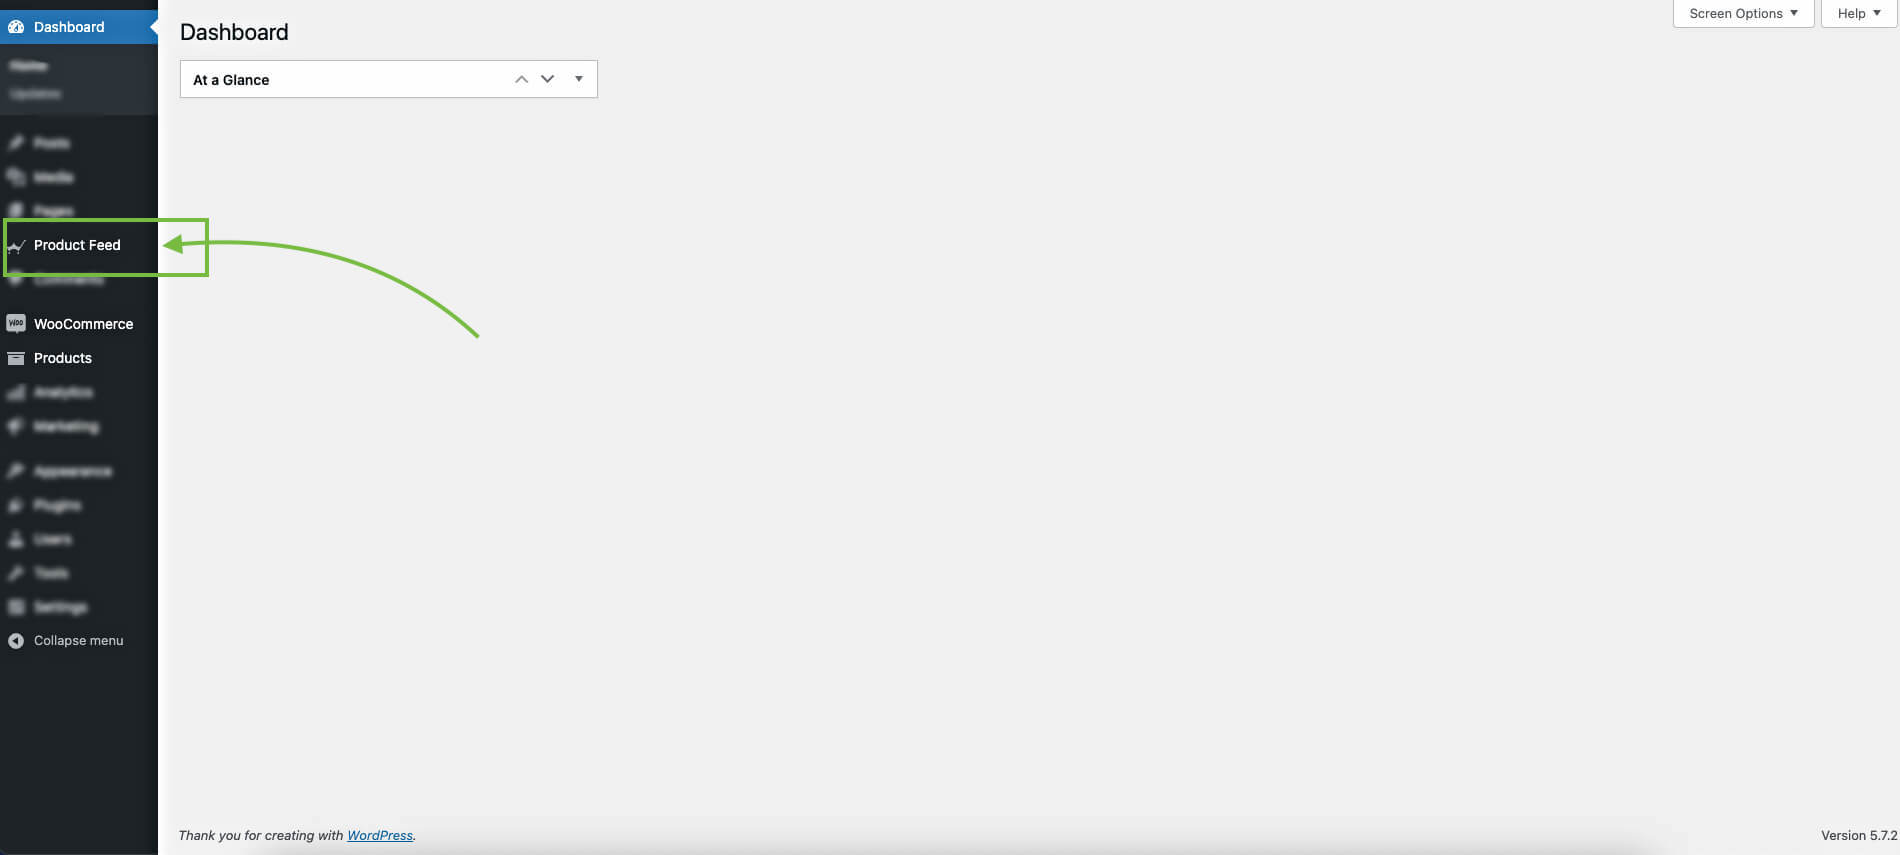
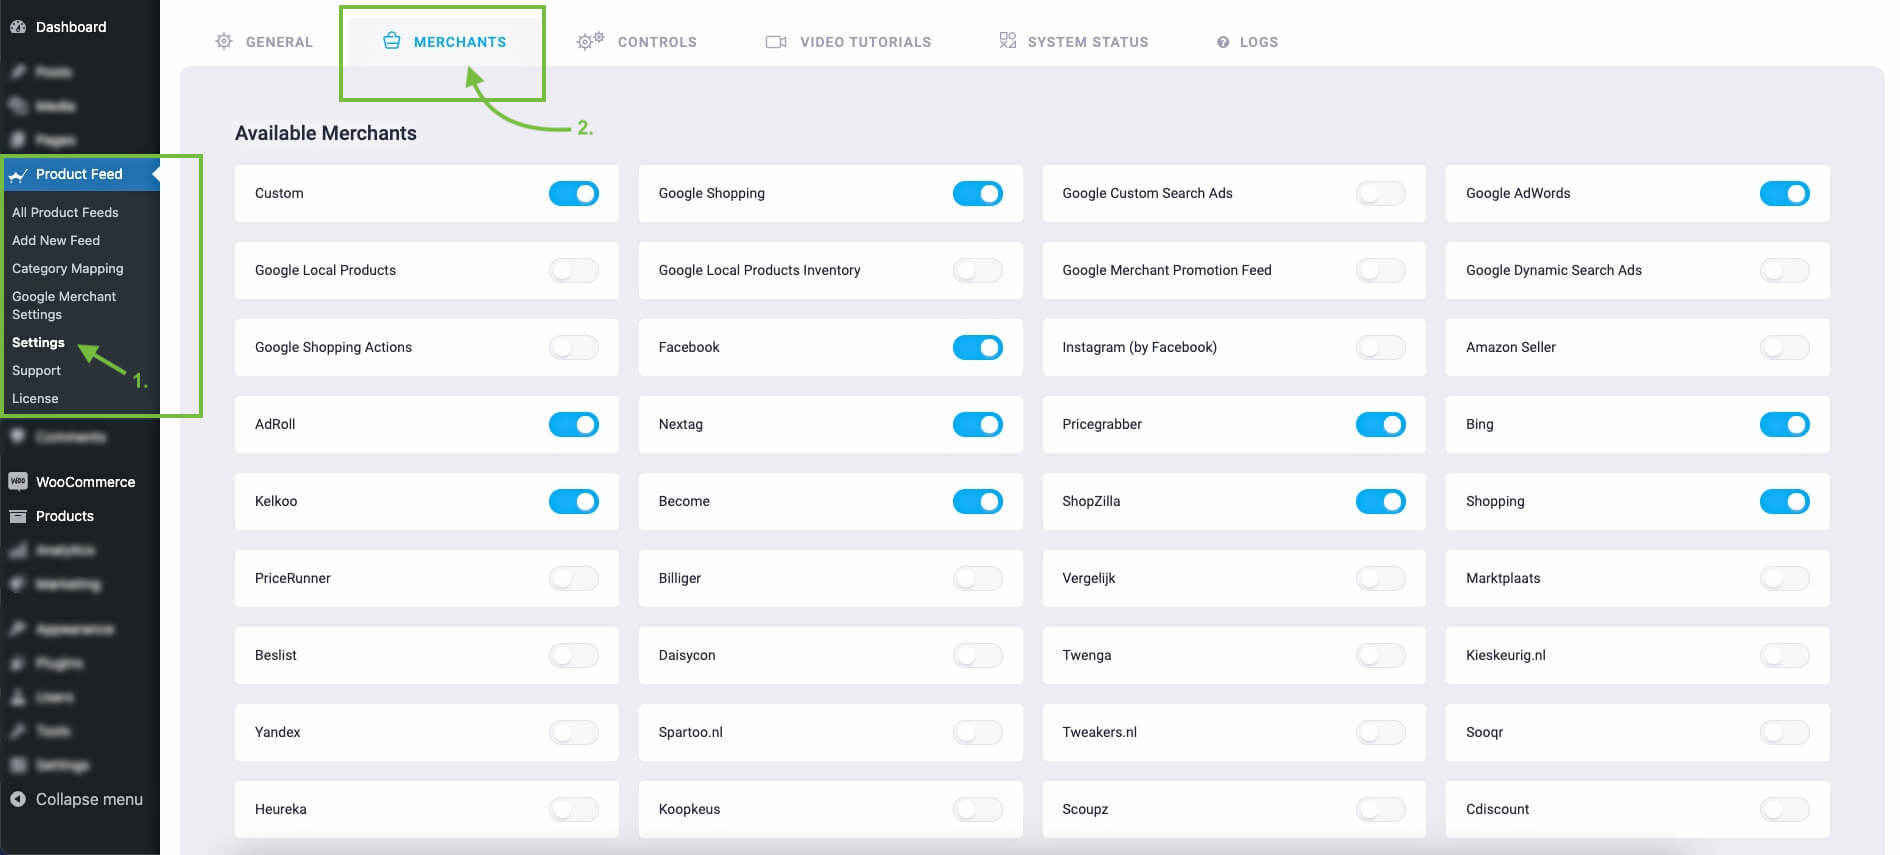
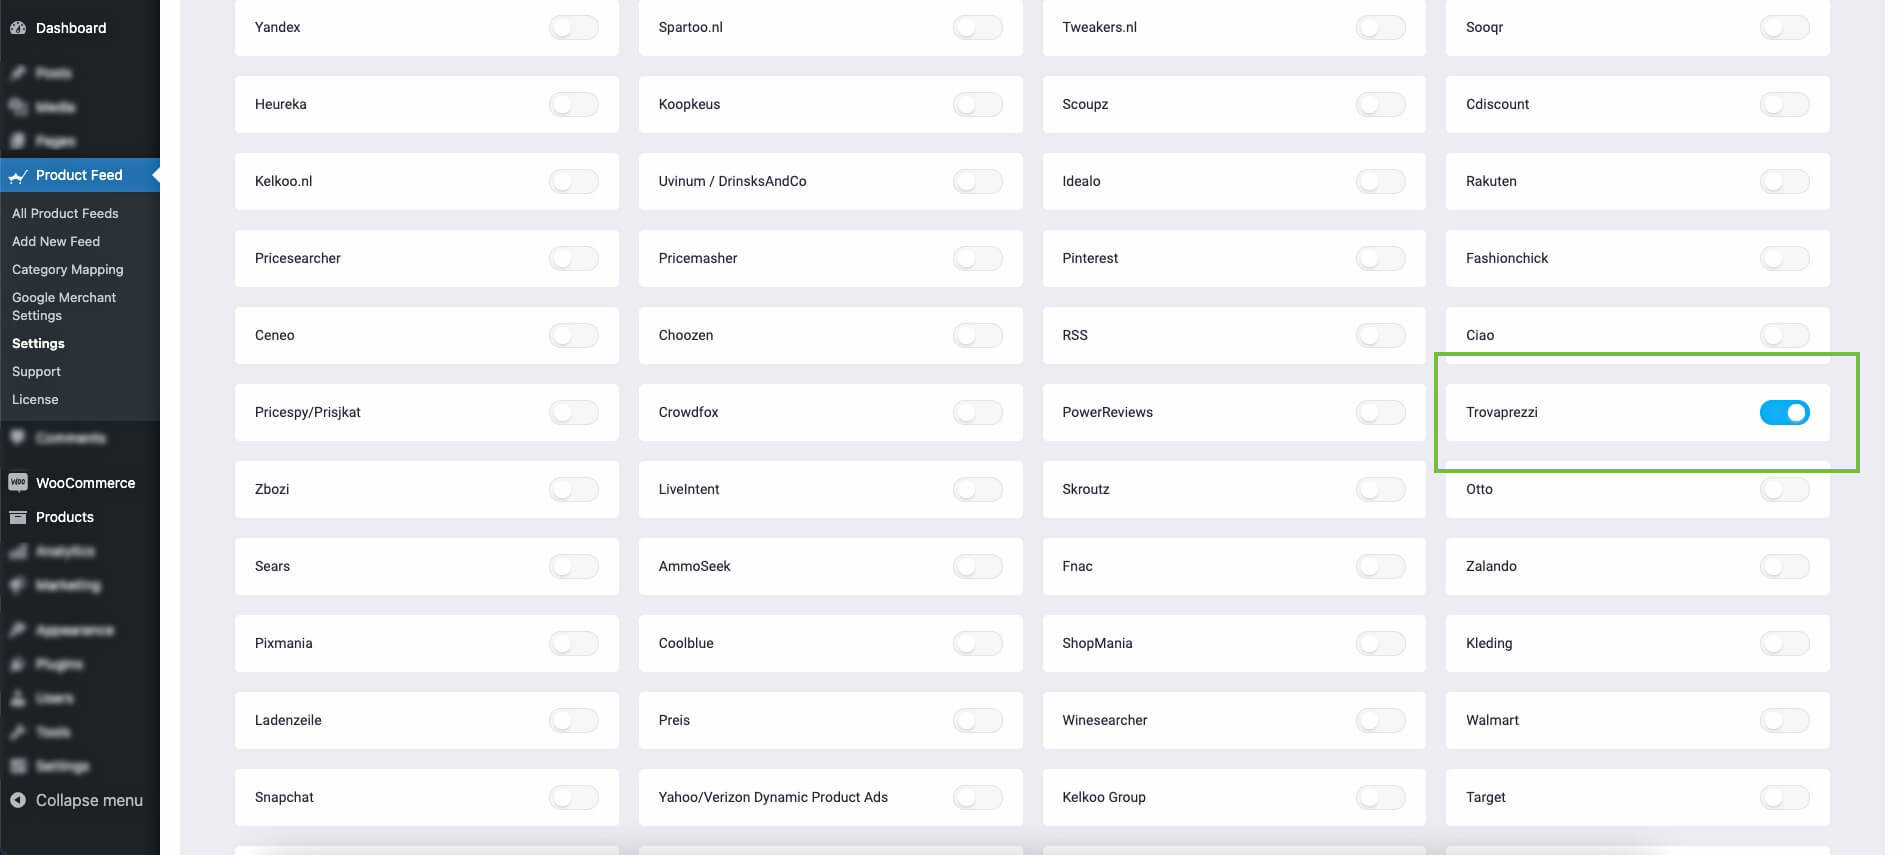

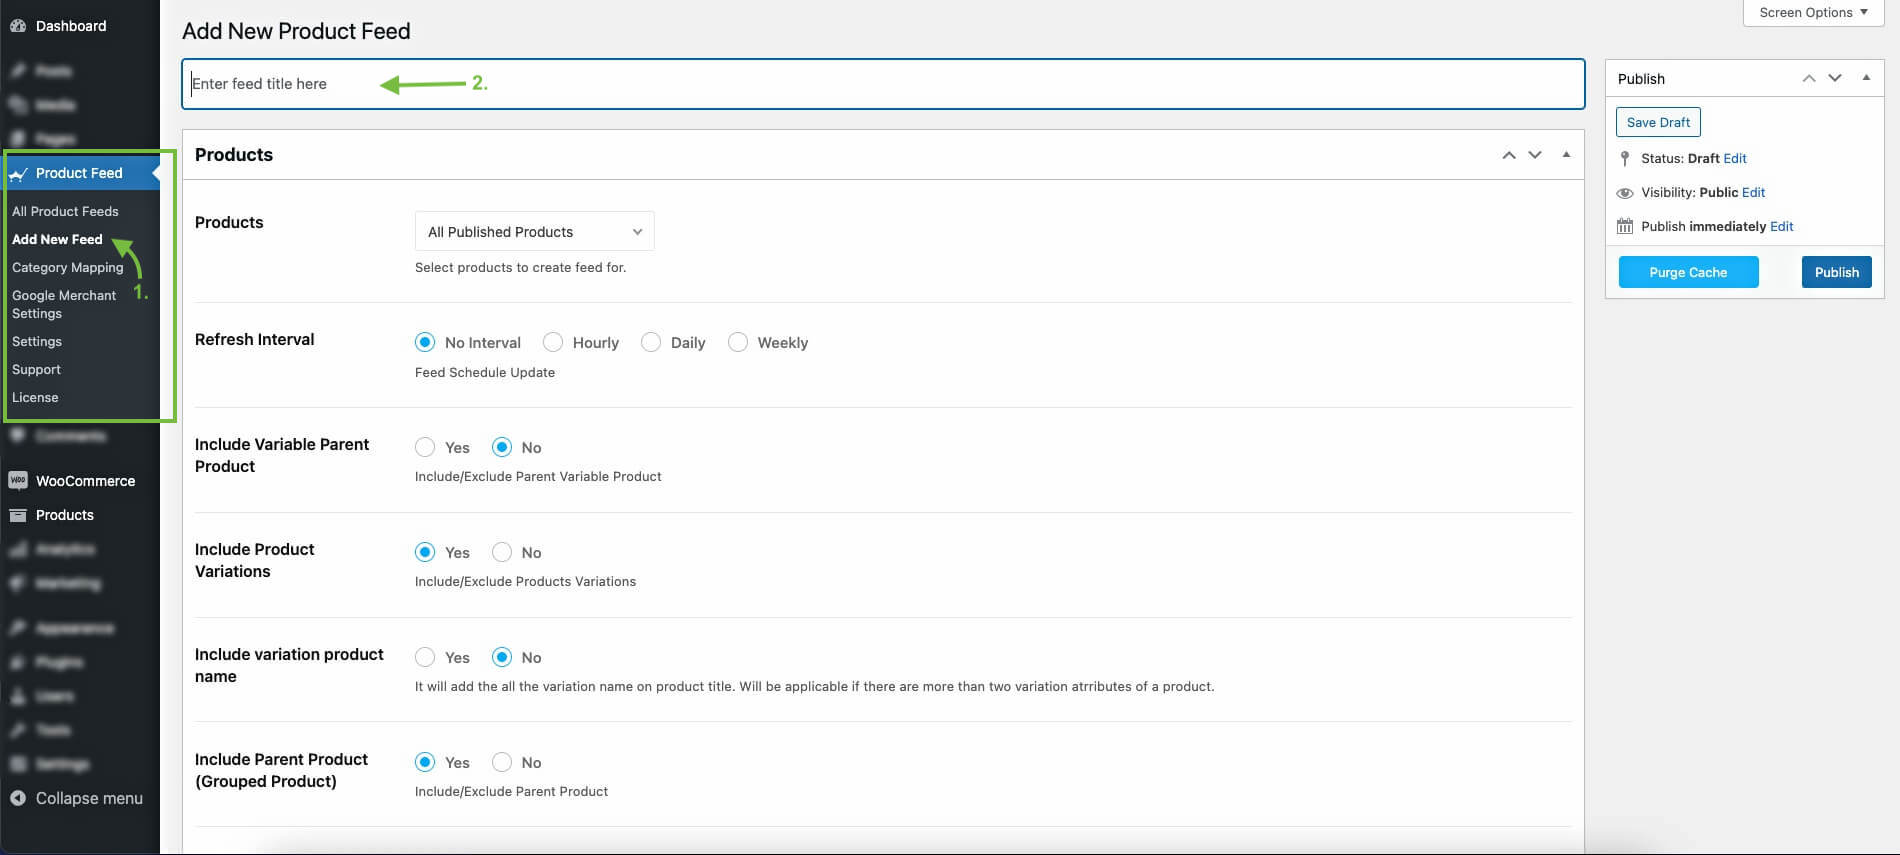

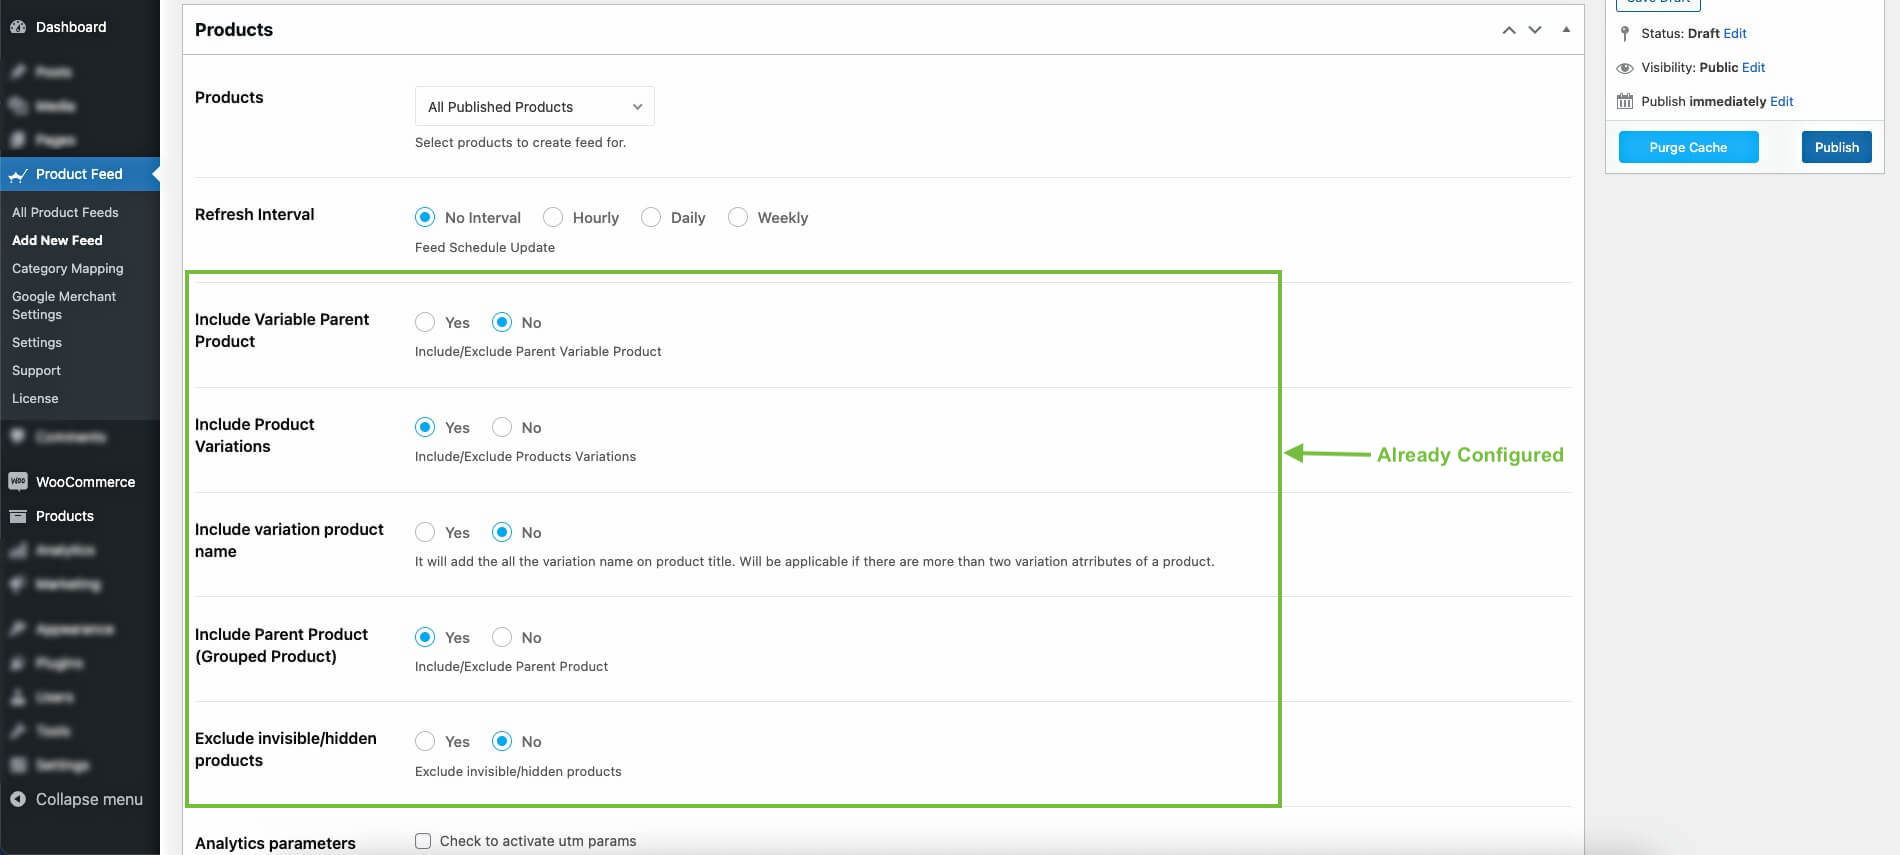
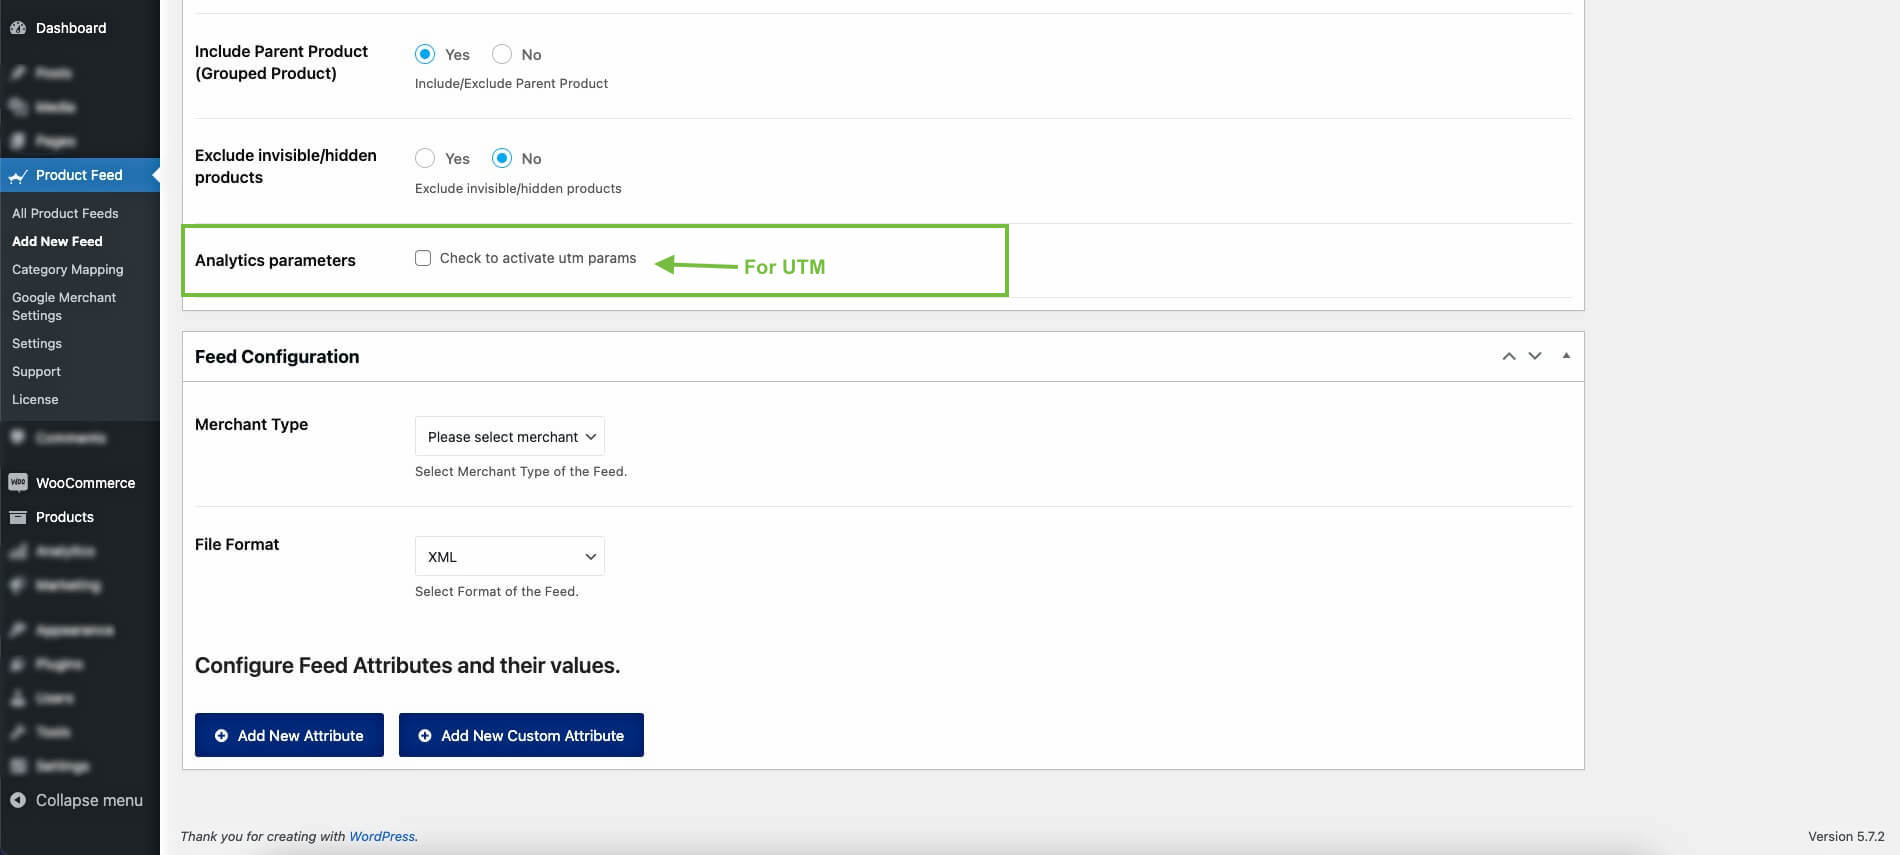
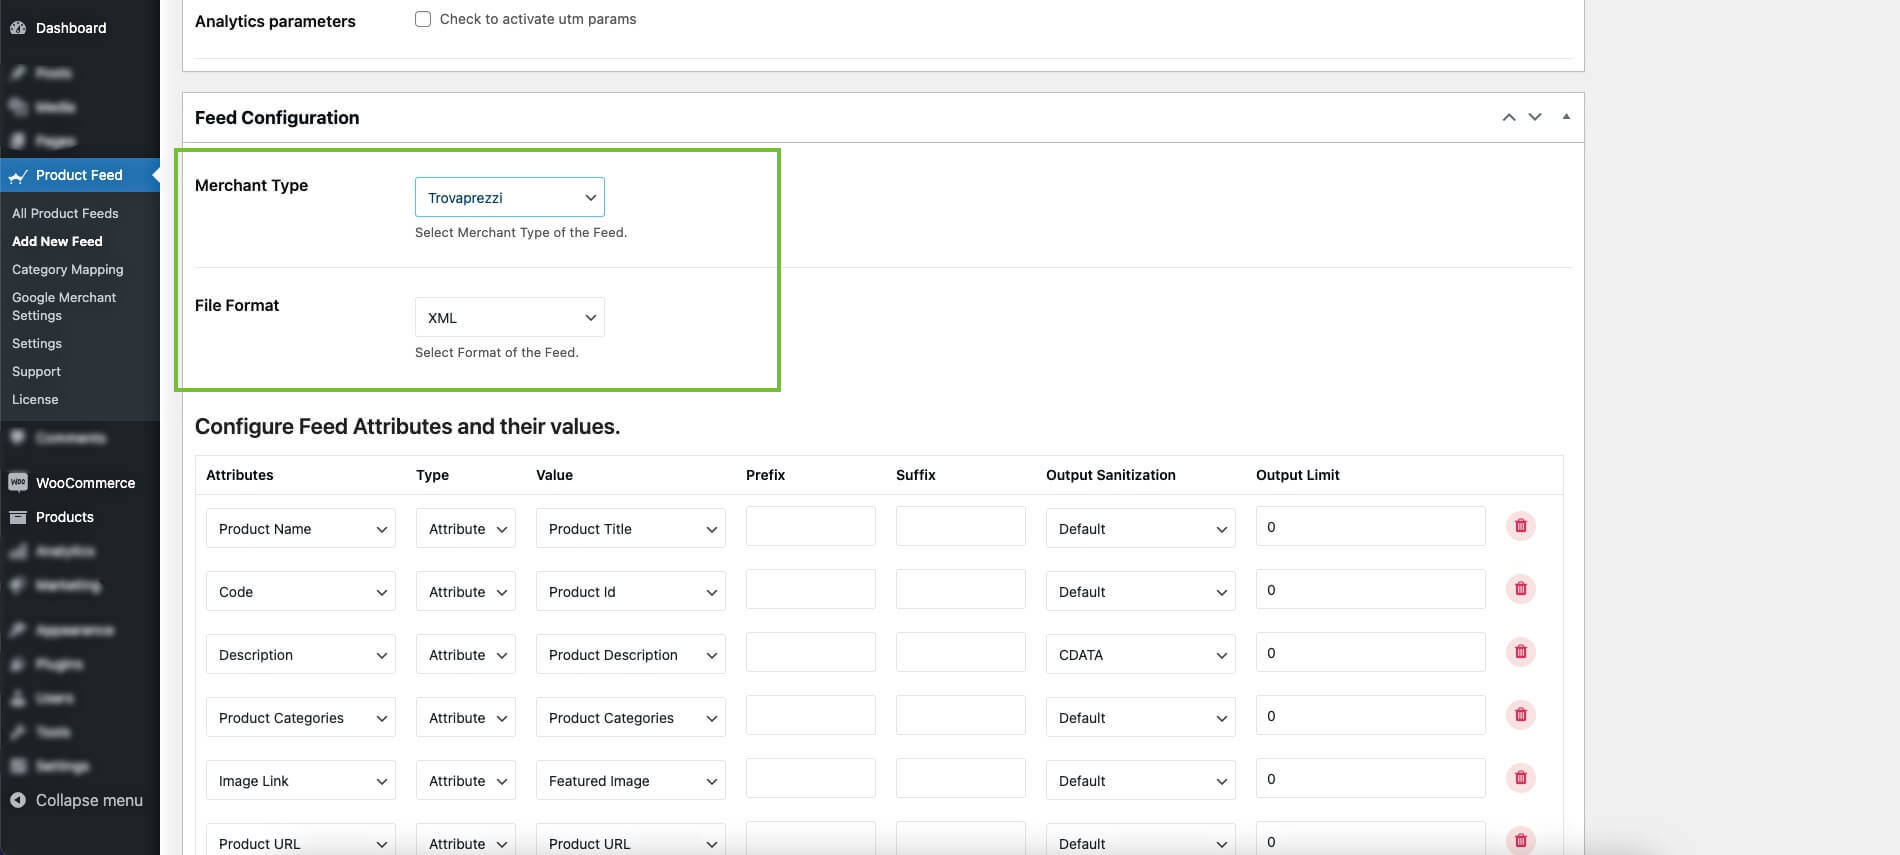


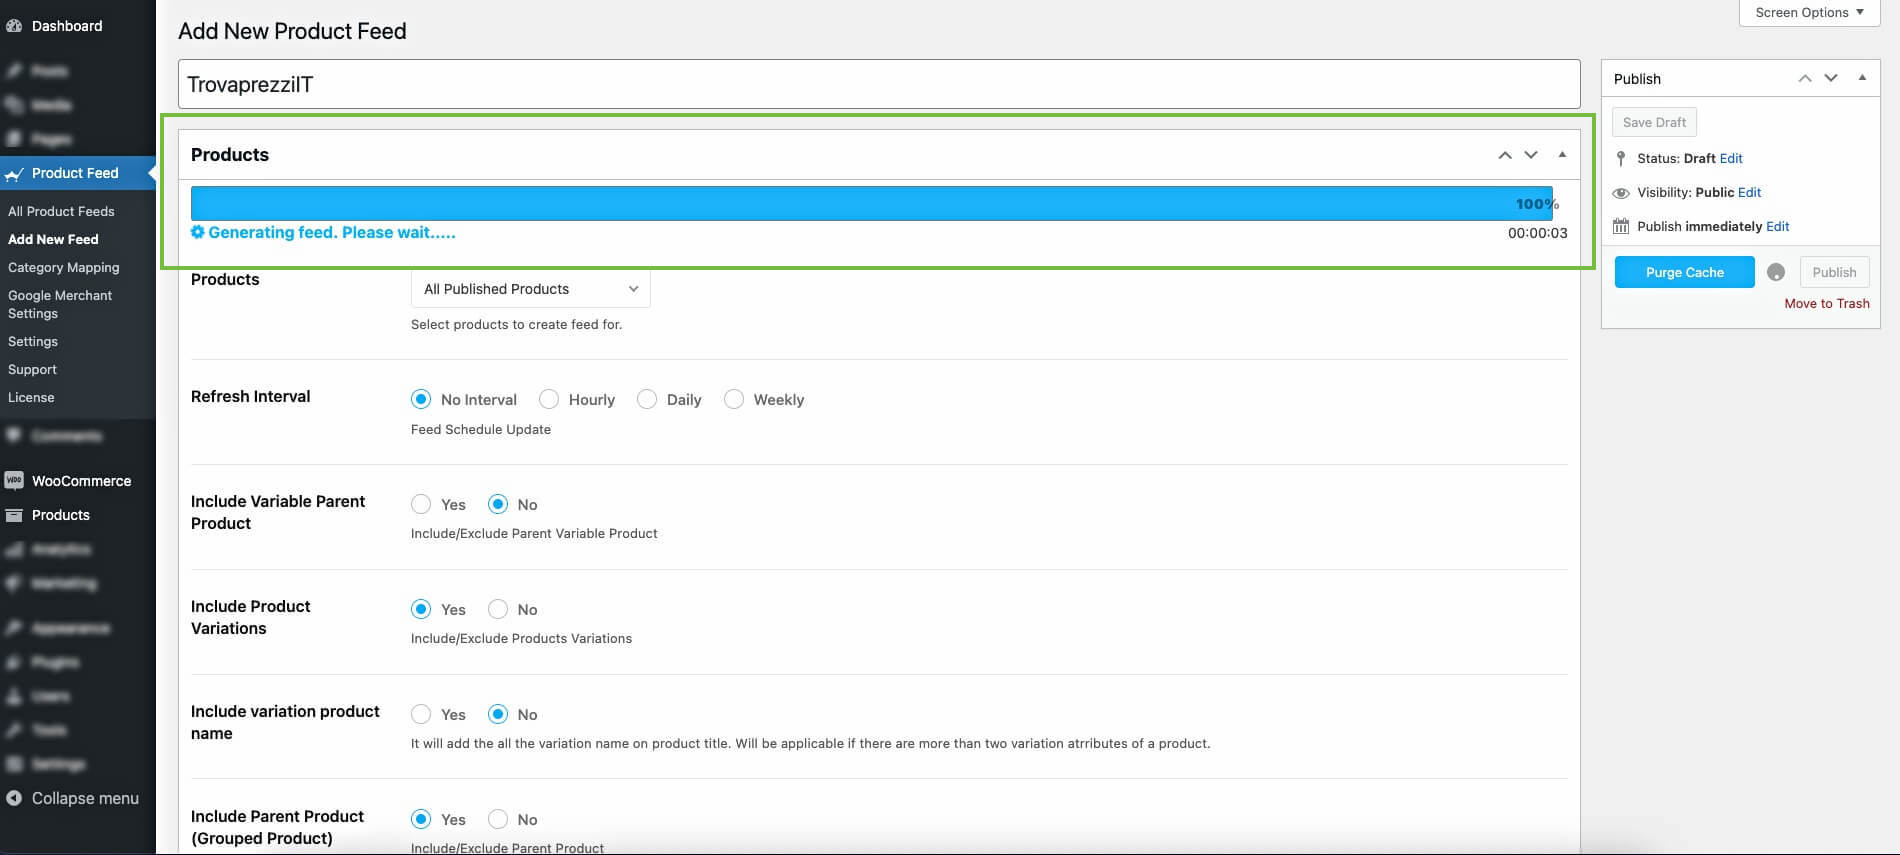
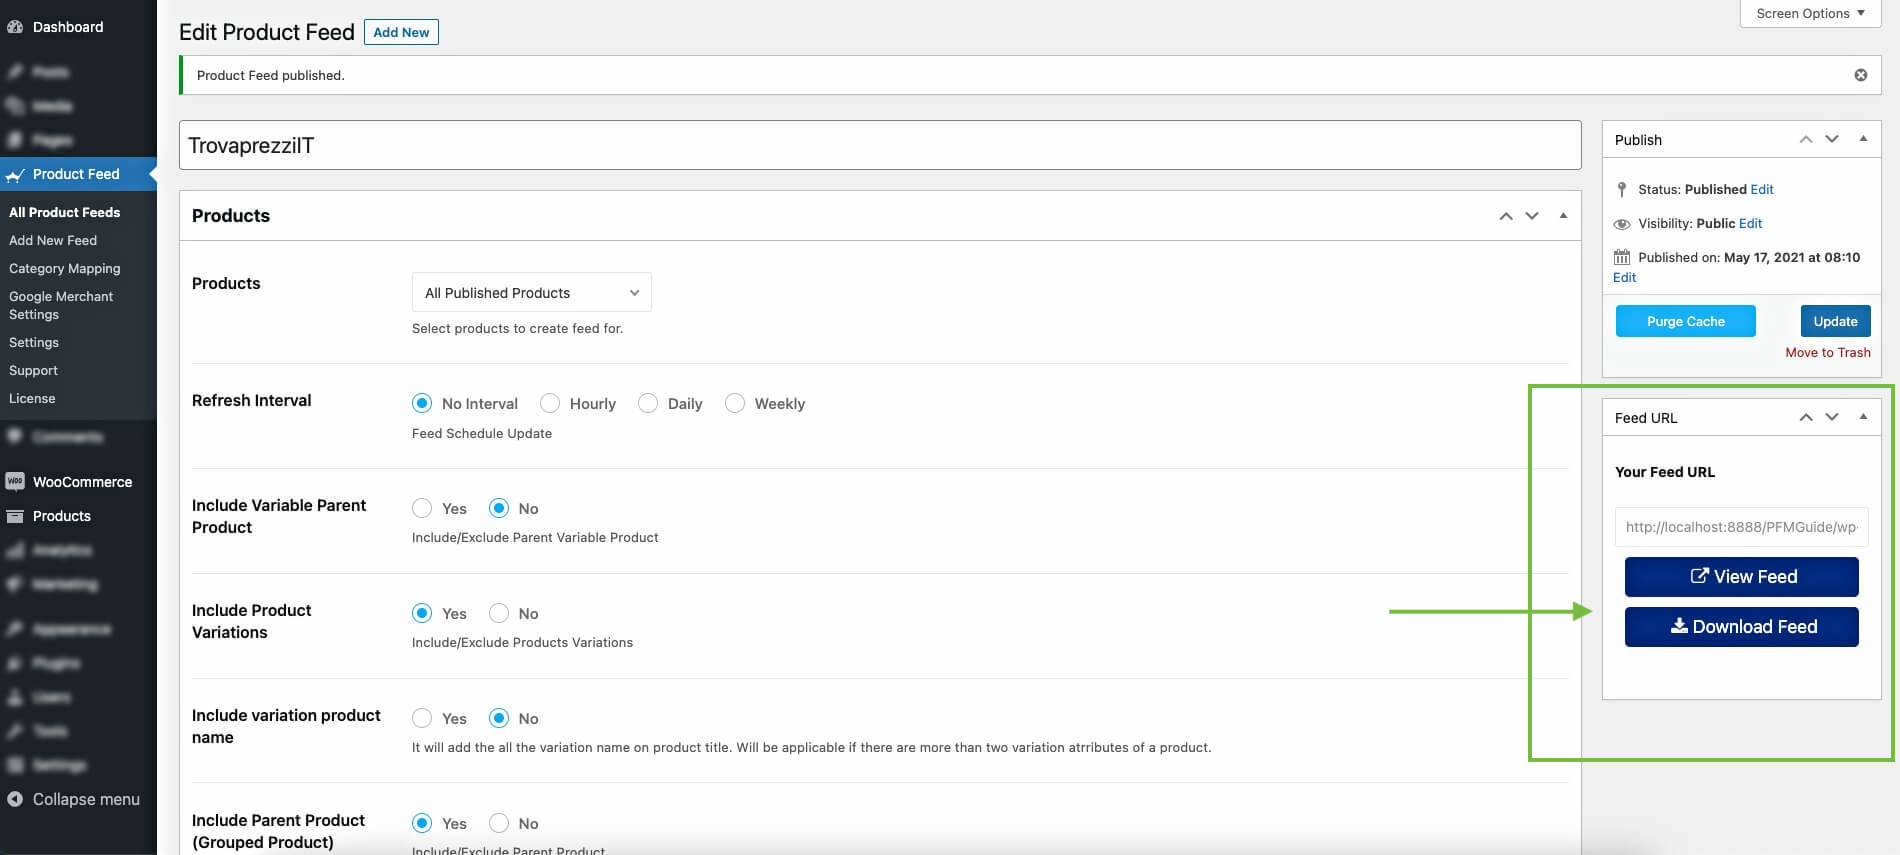
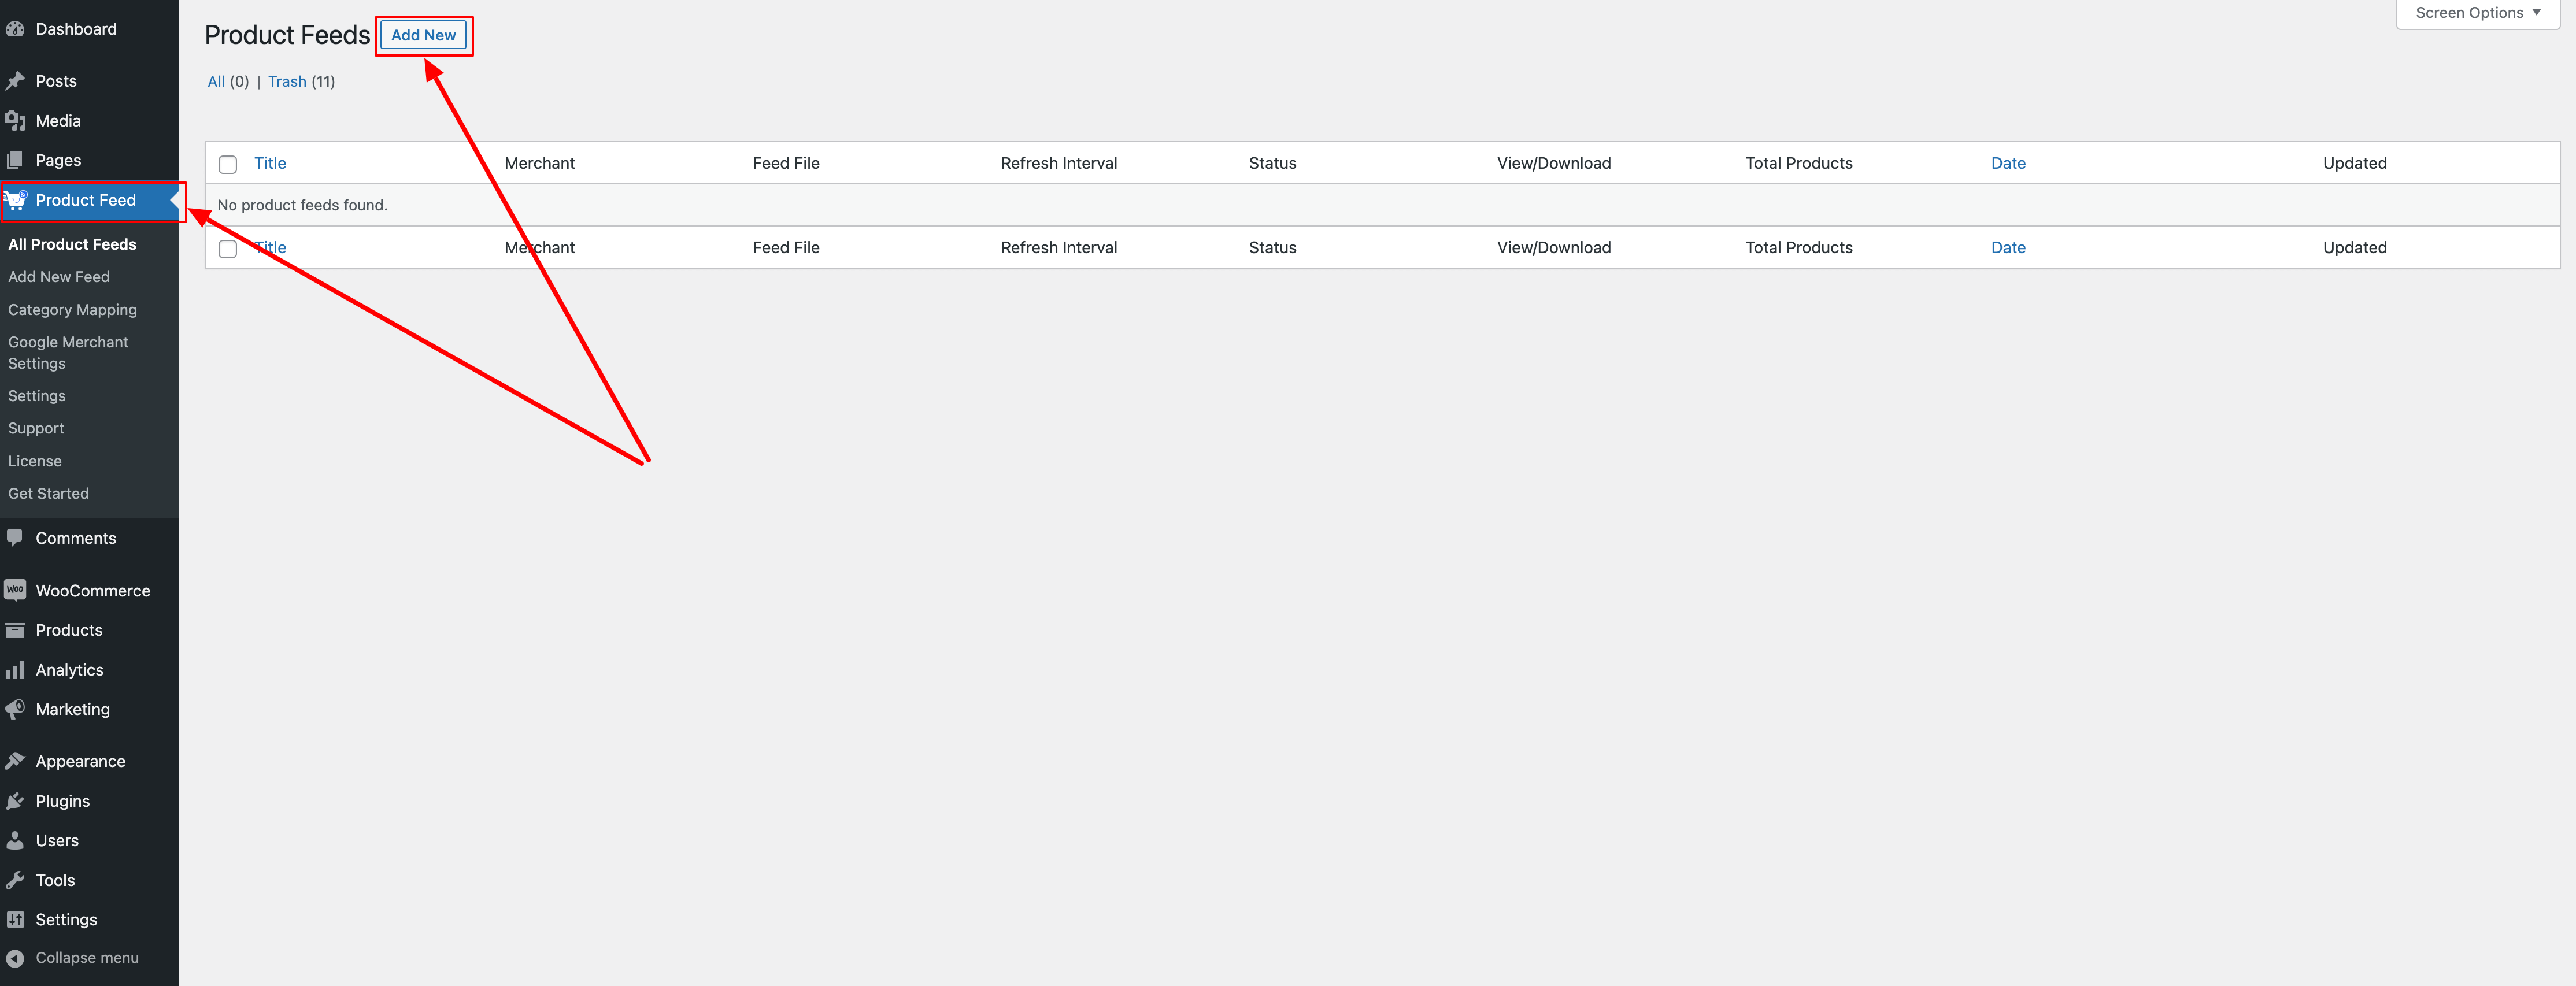
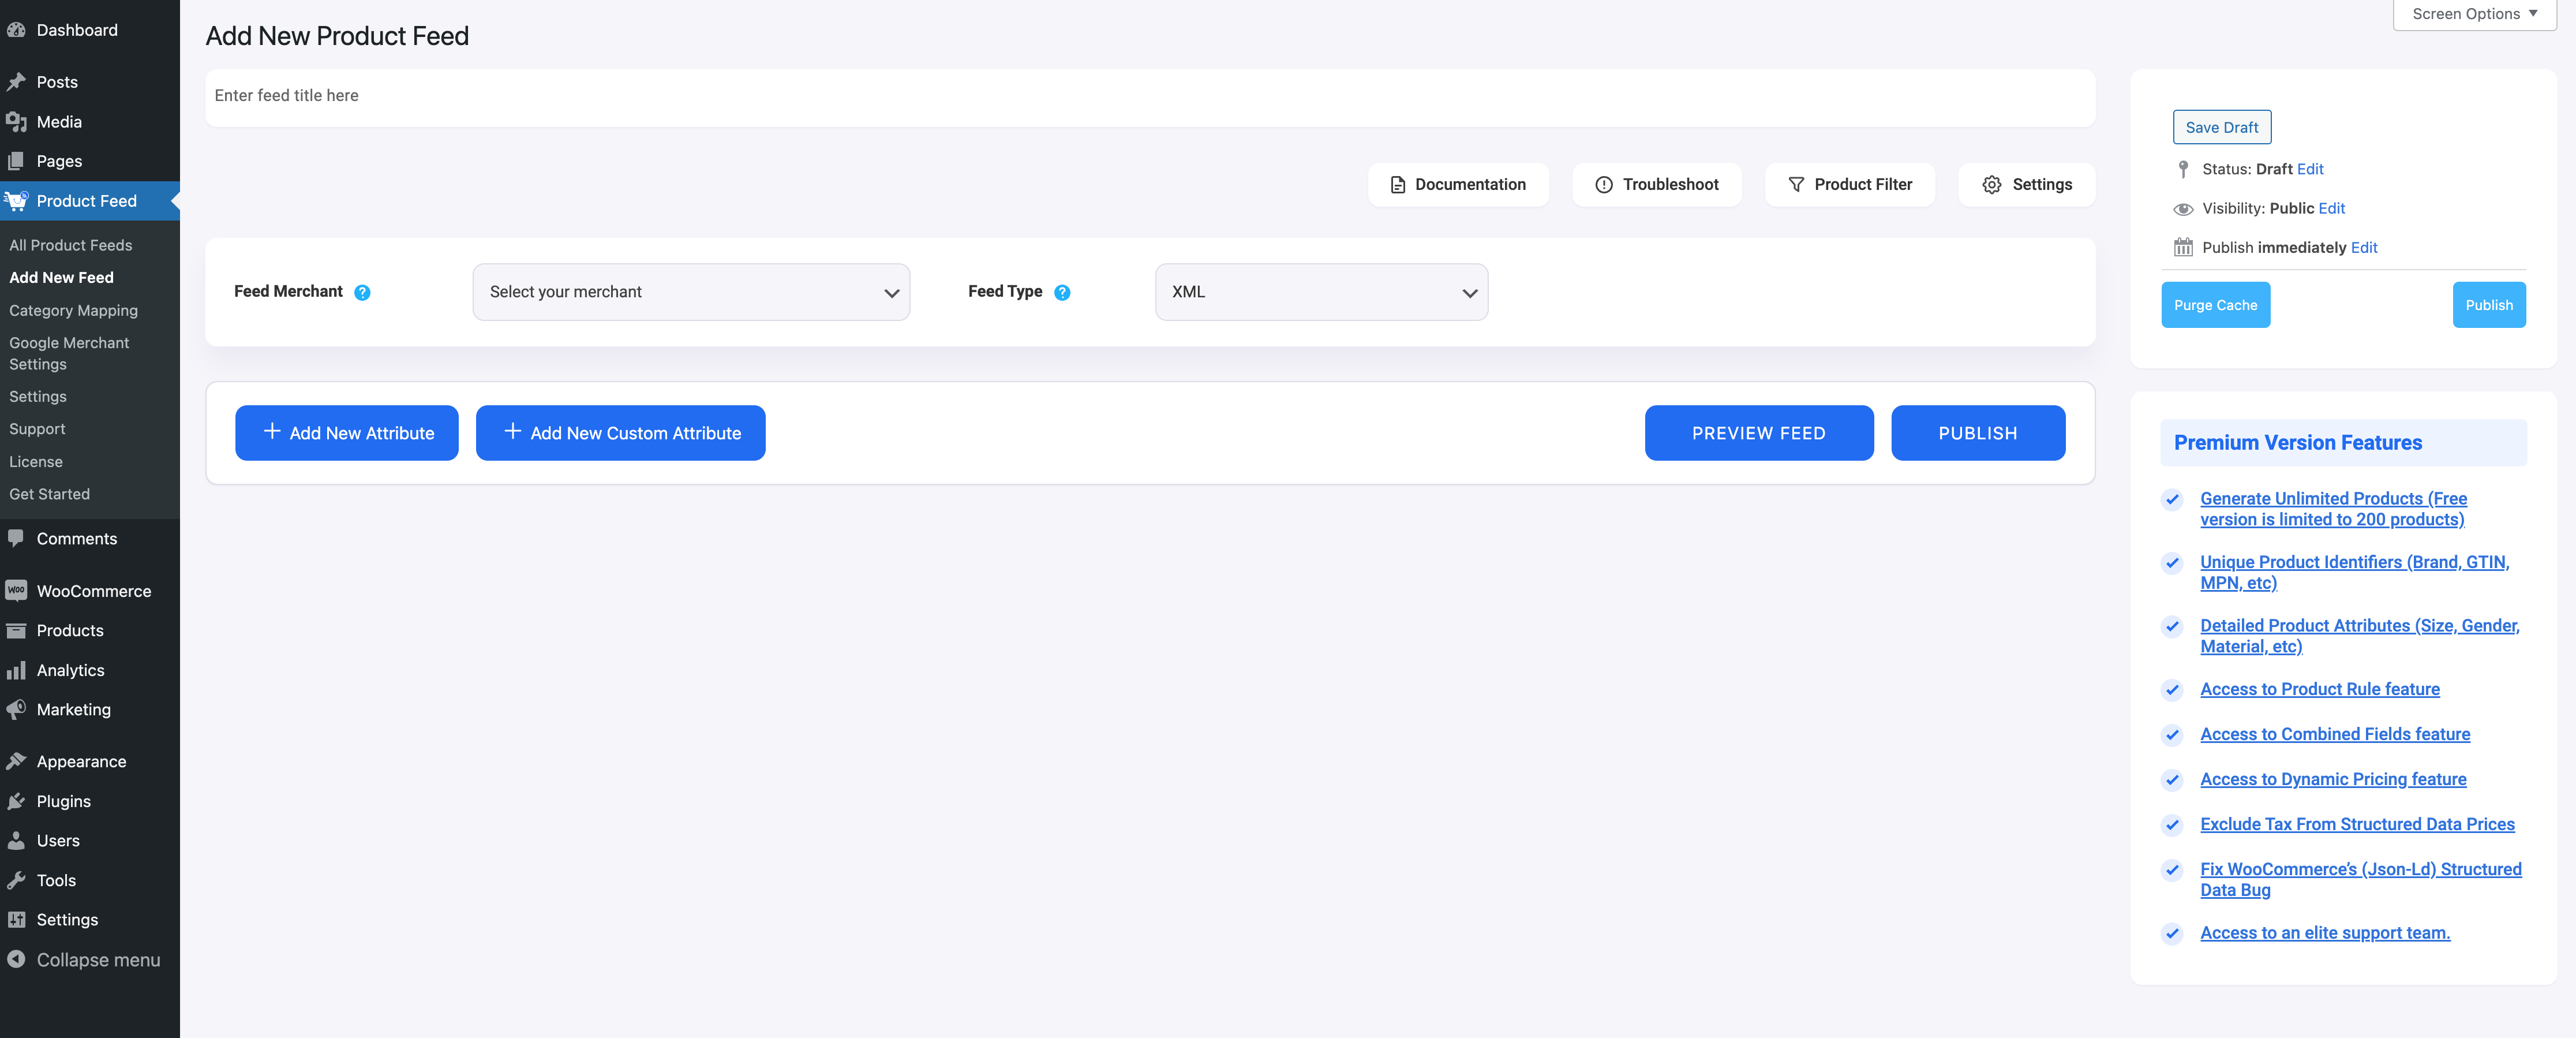
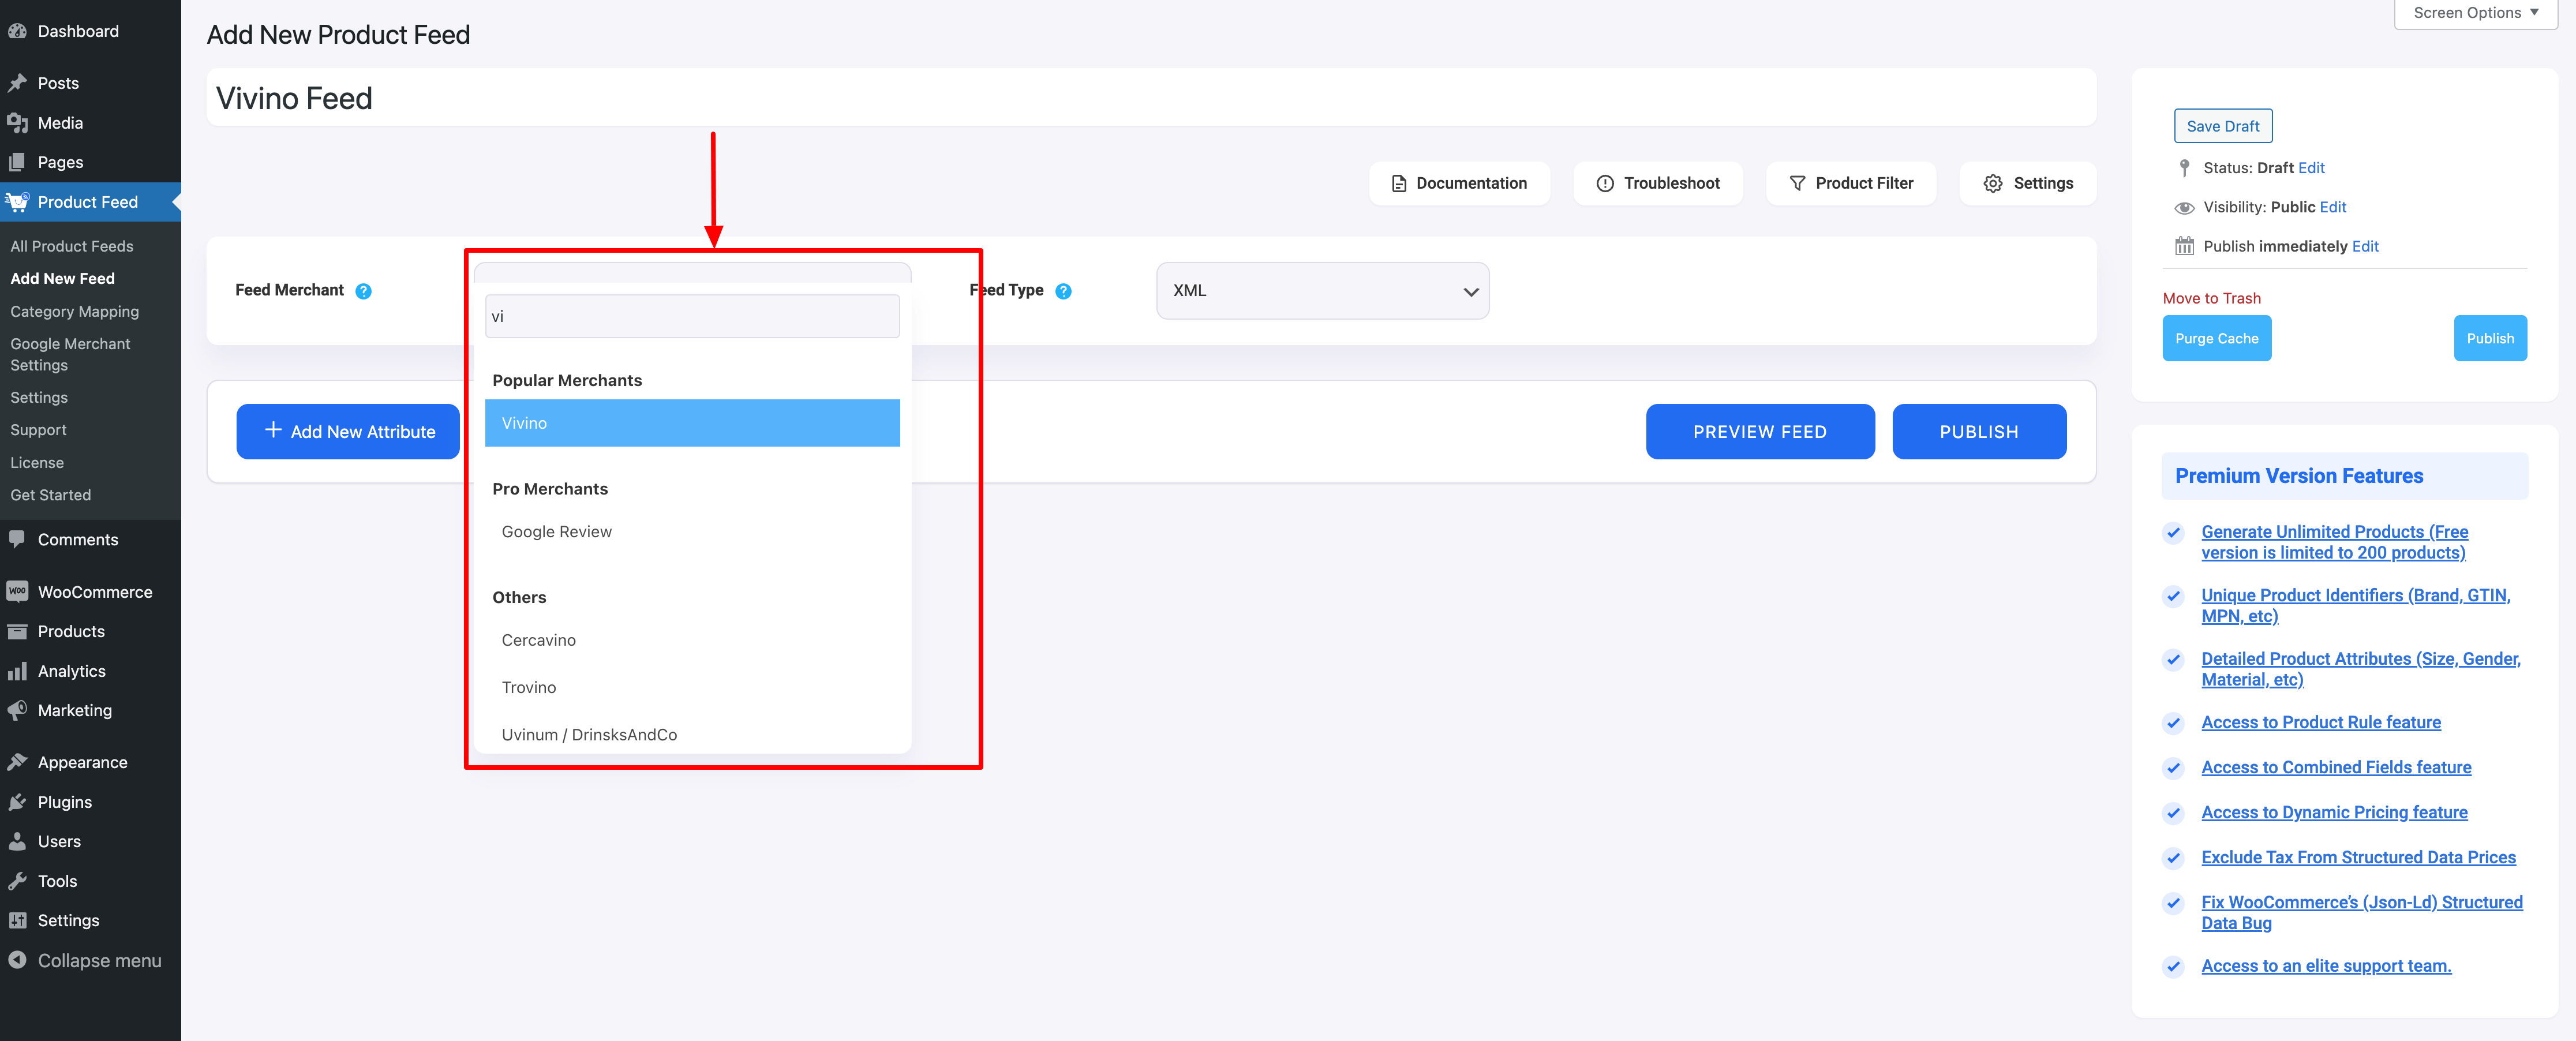
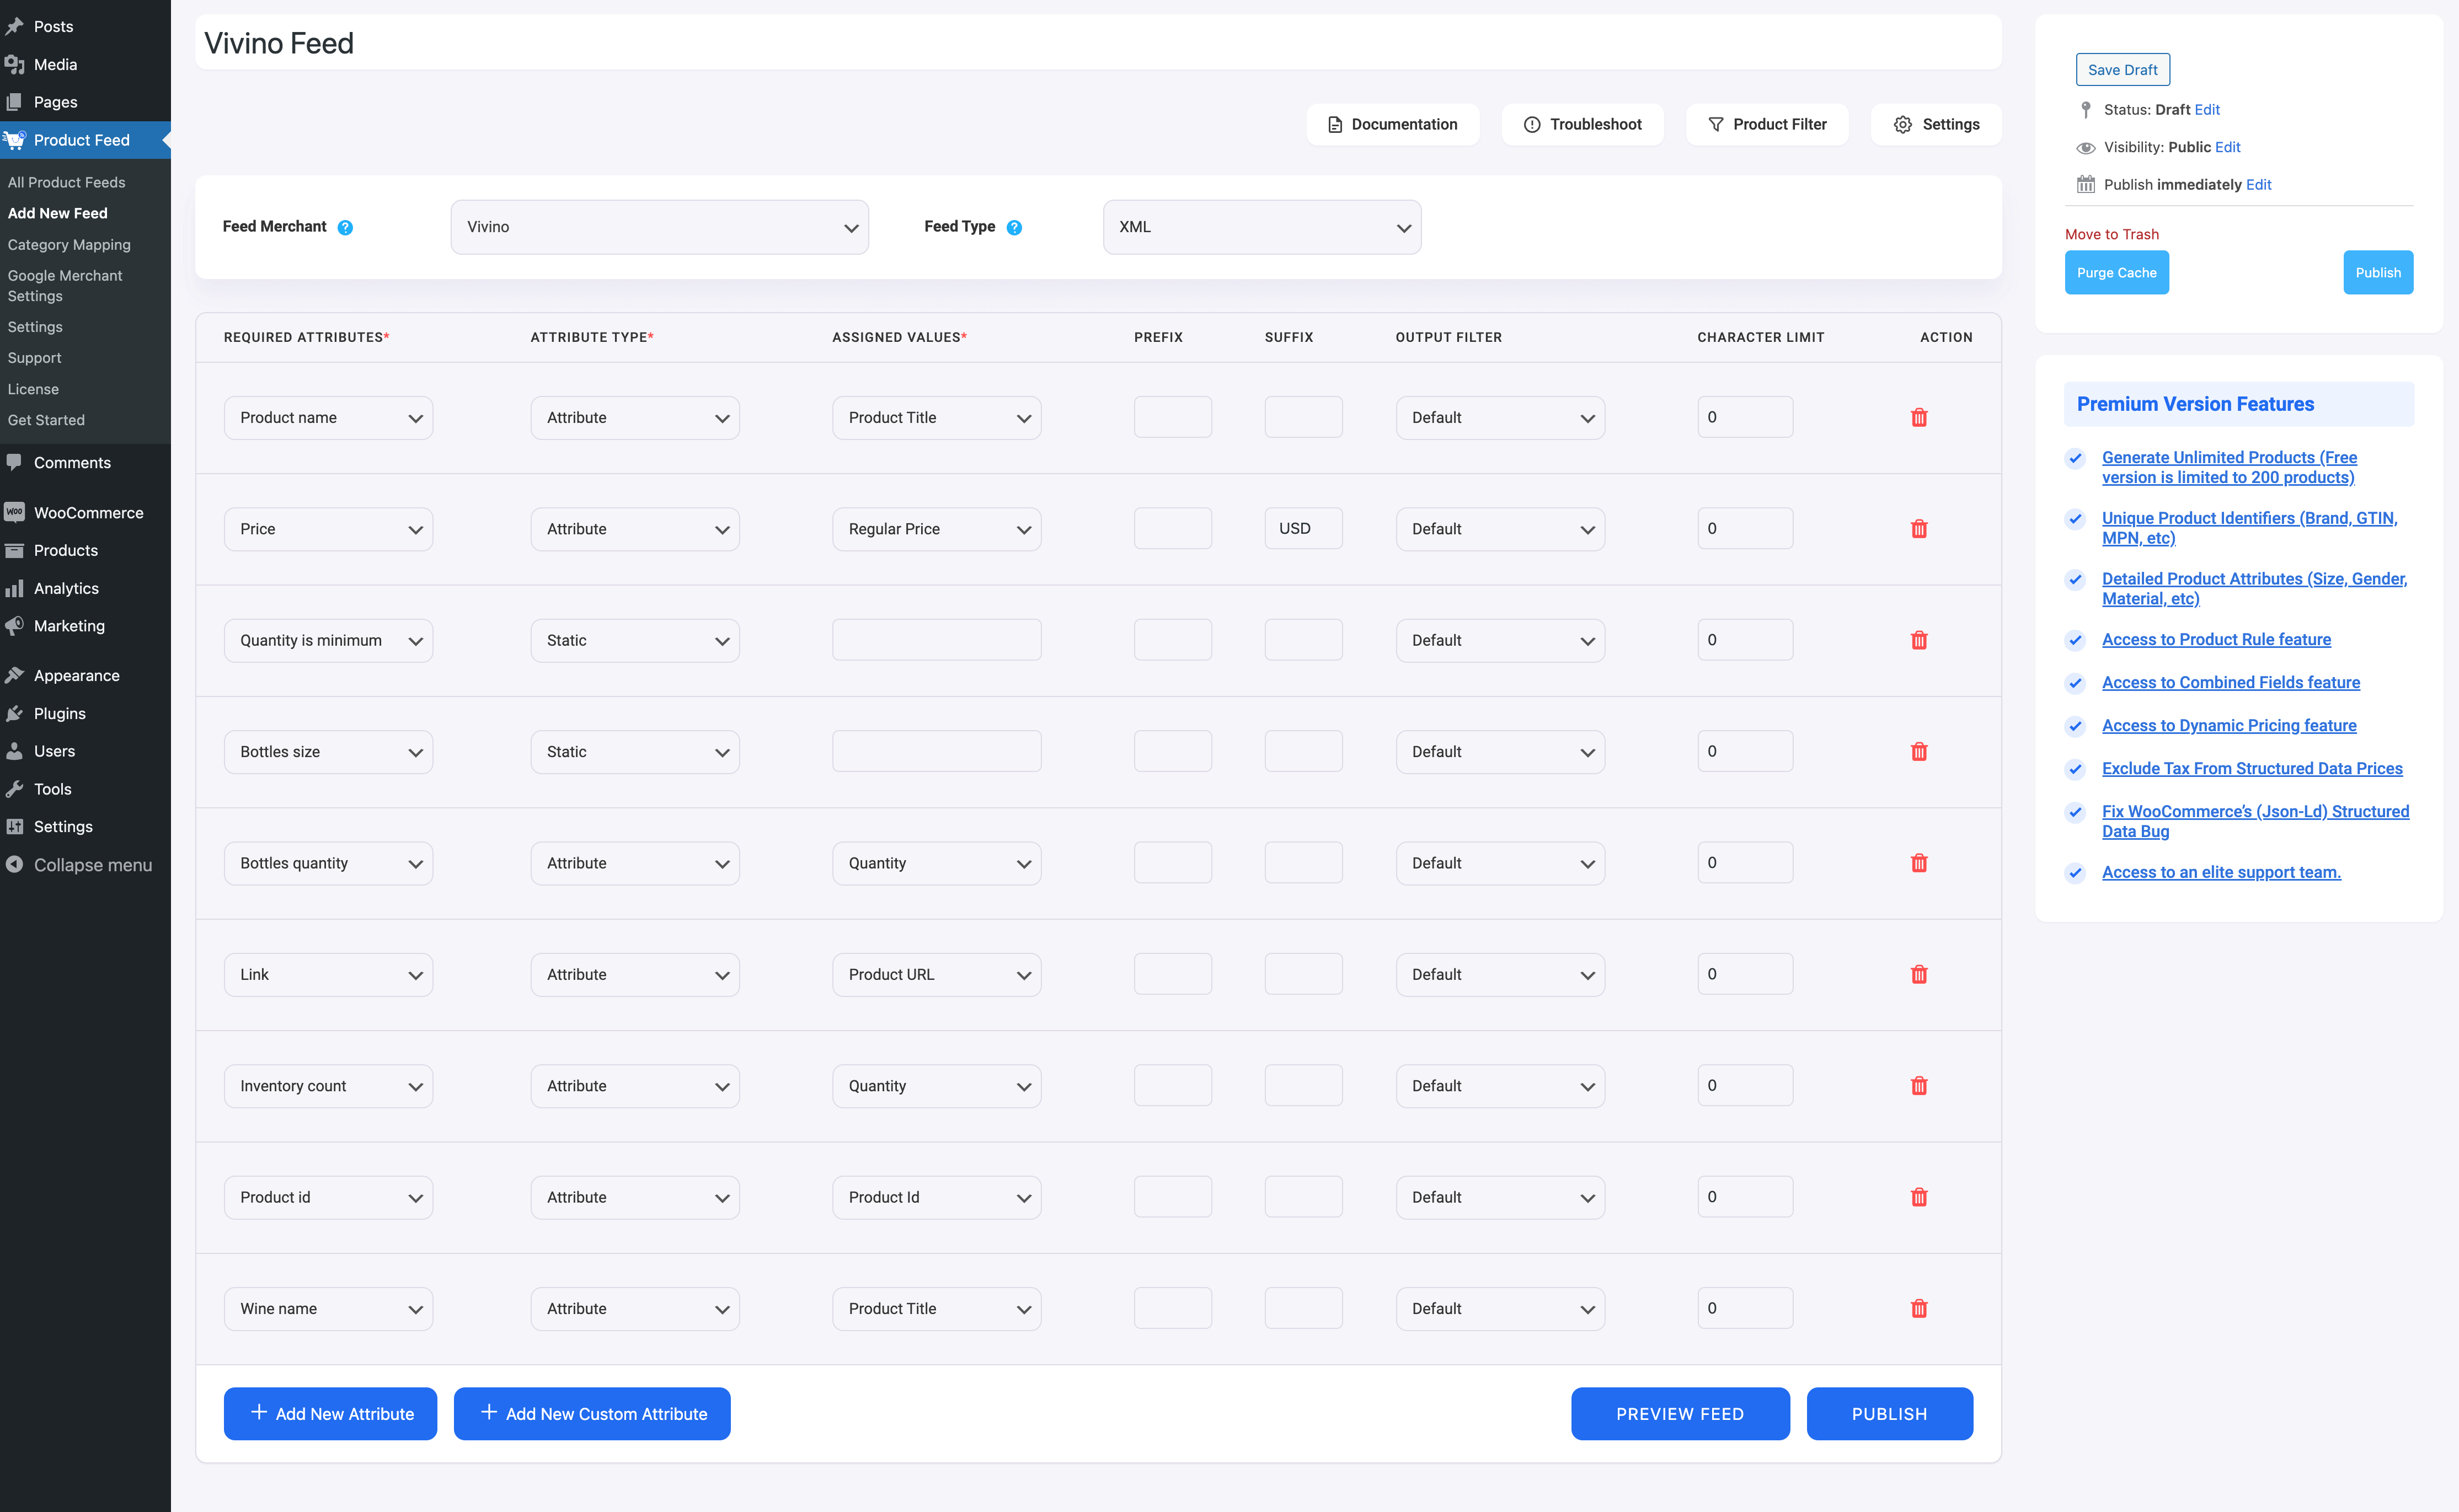
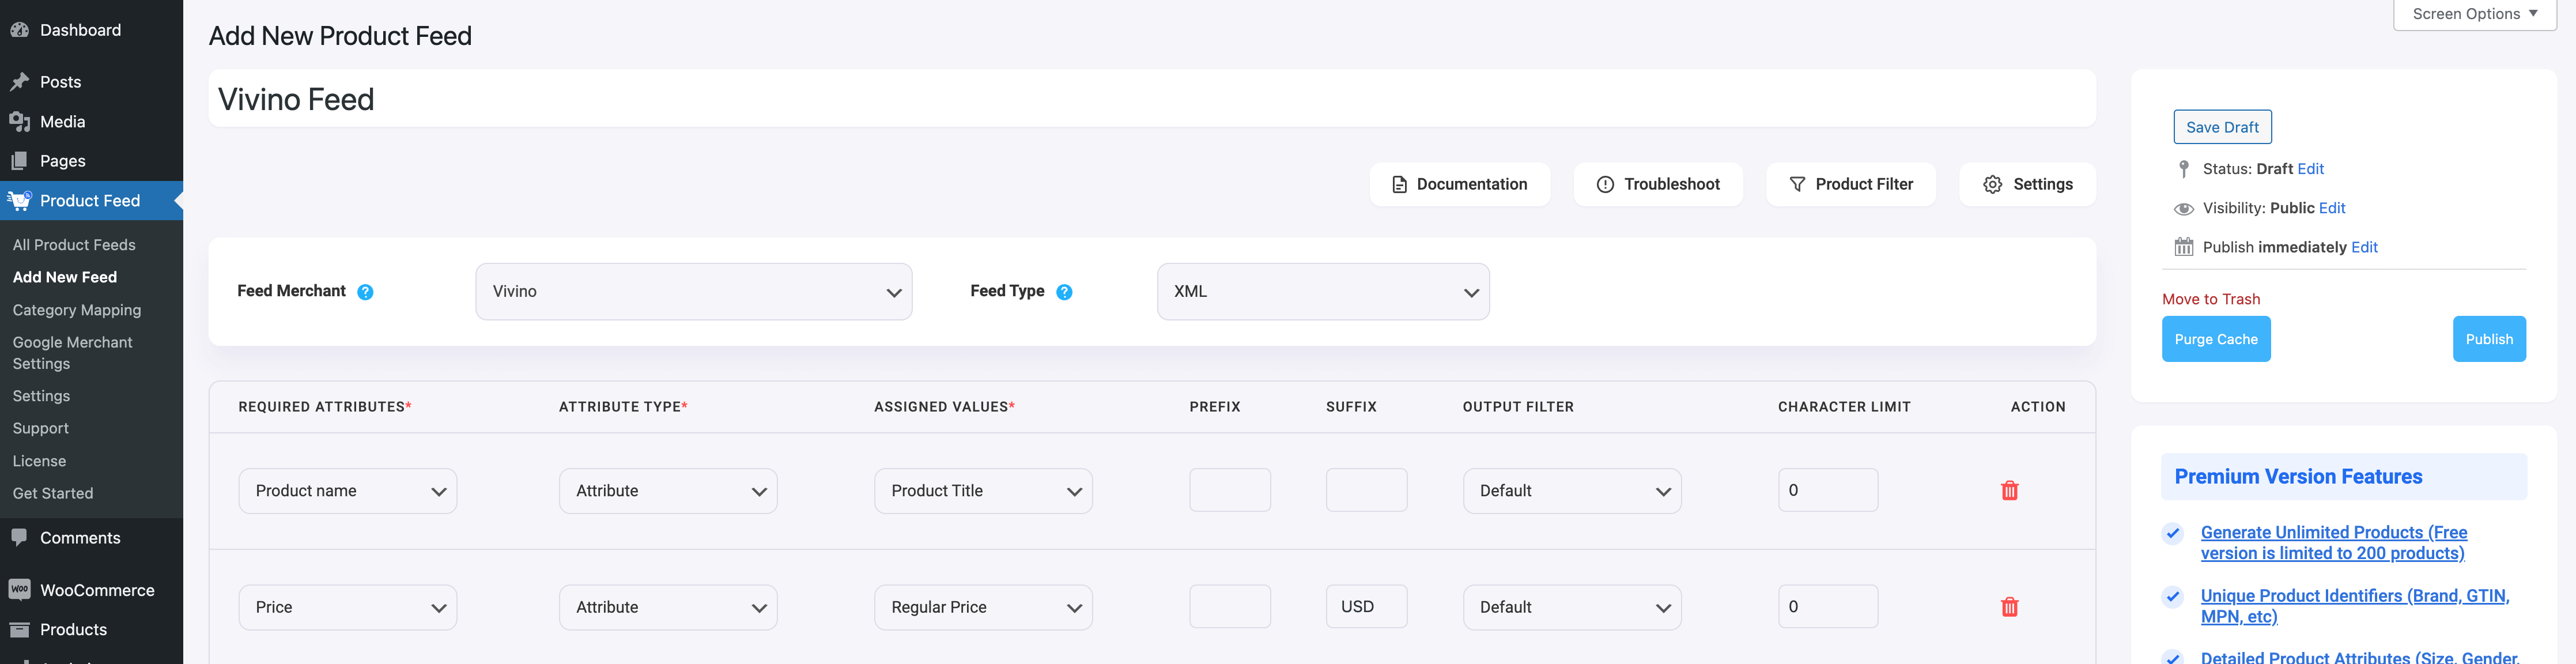


![Quick Guide To Generate Vivino Product Feed - WooCommerce [2024] 8](https://staging-rextheme.kinsta.cloud/wp-content/uploads/2022/06/Publish-Vivino-Feed.png)