Erhalten Sie nützliche Leitfäden zu mehreren wichtigen Faktoren für eine erfolgreiche Website. Erhalten Sie verwertbare Tipps und richtige Schritt-für-Schritt-Anleitungen.
Choosing a college is one of the most important decisions a student will make. It’s not just about academics—it’s about finding a place that feels right, offers great facilities, and has a campus students can’t wait to call home.
If you manage a college or are responsible for showcasing its appeal, having a virtual campus tour on your website isn’t just an option—it’s essential.
Why?
Because most students and parents begin their college search online. An engaging online campus tour can be the difference between someone scrolling past your site and a family deciding your college is worth exploring further.
In this article, I’ll show you how to create a virtual campus tour that grabs attention and builds excitement. You’ll learn:
Why a virtual tour is a must-have for your college website
How to create one step-by-step
Tips to optimize it for maximum impact
By the end, you’ll have everything you need to attract local and international students—and get them to picture themselves walking your campus.
Let’s dive in.
What is a Virtual Campus Tour?
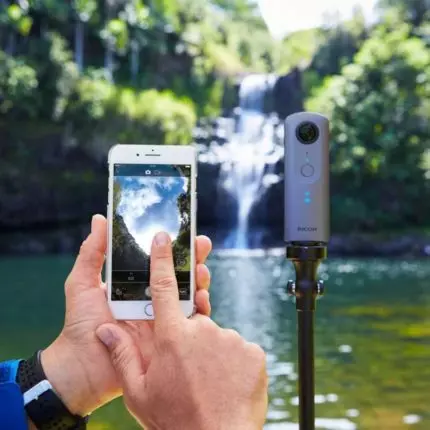
A virtual campus tour is an online experience that lets students and parents explore your college from wherever they are. It’s like walking through your campus, but instead of being there in person, they navigate it through photos, videos, or 360-degree views on your website.
For example, imagine a student looking for a college with modern science labs and vibrant student areas. With a virtual campus tour, they can click through high-quality 360-degree views of your biology or chemistry faculty buildings, lecture halls, dorms, and recreational spaces.
They get a feel for what it’s like to study and live on campus, all from the comfort of their home.
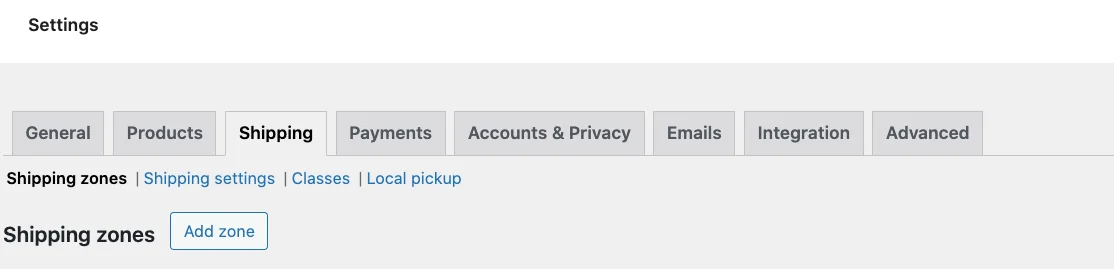
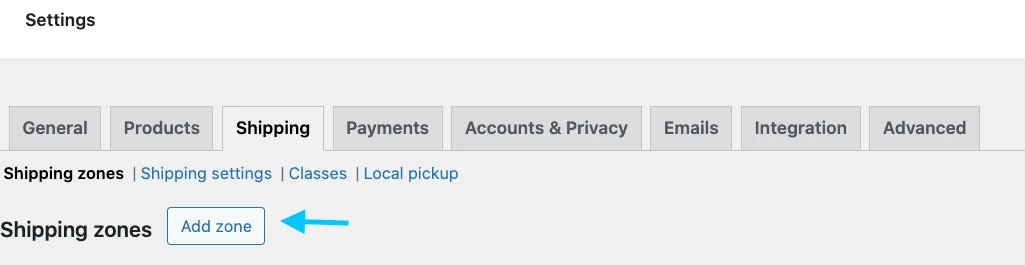
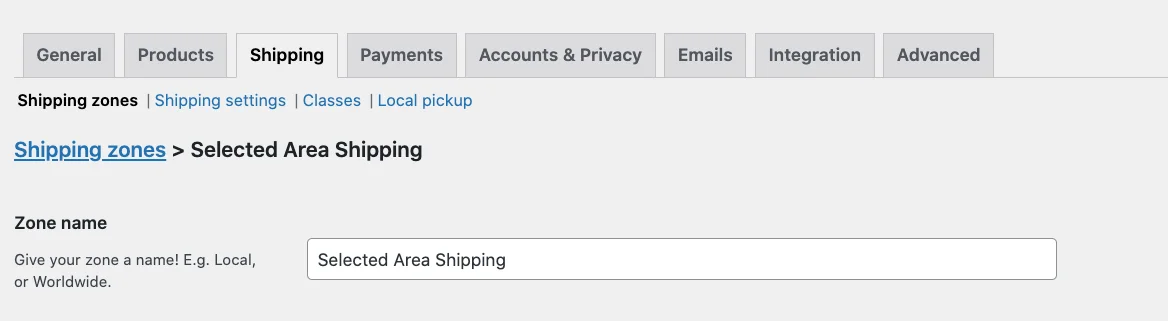
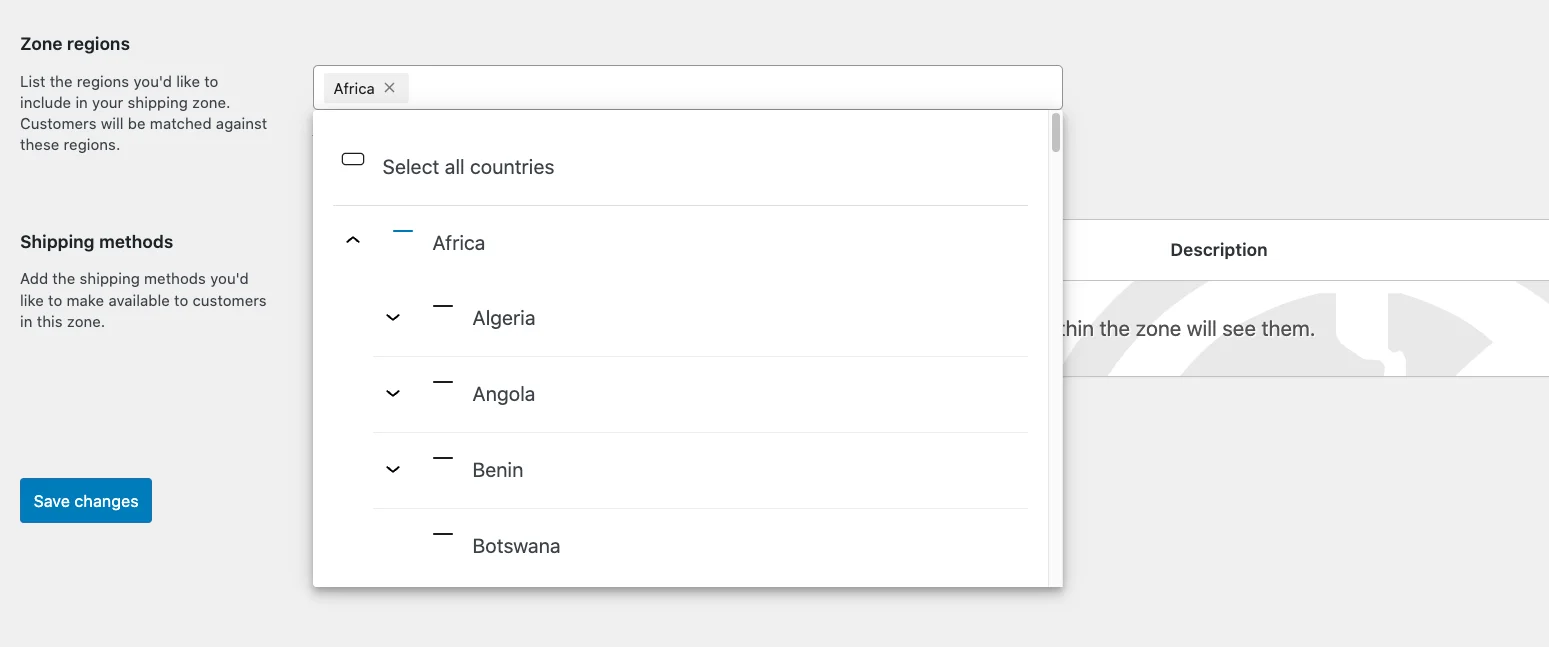
Why Do You Need To Have A Virtual Campus Tour?
A virtual campus tour will let your prospective students get a glimpse of how the campus is in reality.
Through this virtual campus visit, you will have a chance to show off all the best areas of your college, including hallways, college rooms, faculty areas, dormitories, classrooms, labs, etc.
And if you can make it more engaging with additional information in the tour, it may help connect with them even more.
Let us look at some key reasons you must have a virtual campus tour.
1. Have An Engaging Strategy To Attract New Students
A virtual tour is probably the most engaging piece of content that you could have to connect with potential students.
While having the right subjects and faculties are essential, the campus is just as important.
If you have an attractive virtual college tour in place, most students would want to spend more time finding out about your college.
You could also add contact forms within the tour so that students can easily inquire for more information while taking the tour – a perfect way to connect with them on the go.
In the process, you could get more inquiries and have a chance to register more new students.
2. Attract Both Local And International Students
Local students can take a college tour directly. But if you do admit international students, they aren’t lucky enough to get a tour before taking admission.
Hence, they need to either observe images & video tours, or you could entice them more effectively with a VR campus tour.
A near-realistic tour will help remove any doubts about your college campus and may influence international students to put you on their priority lists.
The same can be said about distant local students, who can travel to the college, but the virtual tour would make it much easier to attract them while they are researching your college.
3. Impress The Students With Your High-Standards
Your virtual tour should show off how well-built your campus is and that it is of the highest standards.
They want a campus they can be proud of. Similarly to that for students quality education is another major factor they can be proud of, and writing help for university students from experts is necessary.
Similarly, Images and videos can hardly do that. But, a quality virtual campus tour can be the best way to present the high standards to the students.
4. Captivate The Parents With Quality and Well-being
Parents are more interested in finding out if the college campus is safe and well-groomed for the upbringing of their children in the next few years.
You have to demonstrate the safety measures, culture, quality, and innovation within the tour.
To do so, you may add additional information on every important aspect of the tour, such as the lab facilities, sports & fitness areas, club facilities, surveillance for security, etc.
5. Highlight The Key Features Of Your College
As mentioned before, the college virtual tour allows you to showcase the best areas & facilities of your college.
For example, some students want dedicated sports fields, while some parents may want to observe if a good library is available. In the case of international students, vr tours of the dorms would be a huge plus.
Requirements To Create A Virtual College Tour
When creating a VR college tour, you need to do the following:
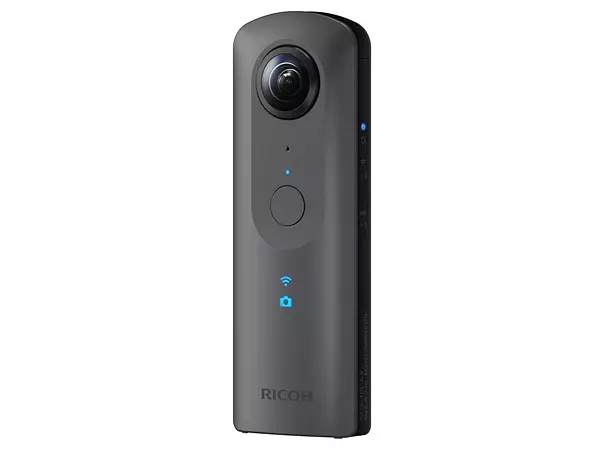
Take Aerial 360 Photos For Larger Attractions Of Your College To highlight larger areas, such as the football field or the birds-eye view of the whole campus, you could take 360 photos using a drone. ~ Here is a guide on how you can capture 360 photos using drone.
Use A Virtual Tour Creator To Craft An Engaging Virtual Campus Tour Choose a reliable virtual tour creator to build a virtual tour and make it engaging with more details.
We recommend you use a WordPress website and use WPVR, which is a brilliant VR tour creator.
Once you have a basic tour in place, you may then use WPVR Pro to add more engaging elements such as a college map, introductory video etc.
Place Your Virtual Tour On The Website Create a separate page to host the virtual tour. You may also add it to the home page of your college.
Encourage More Students To Take A Tour Add pop-ups and CTAs on your home page and other website pages to take a tour. You may also do the same via social posts.
Now, let us look at how you can craft a virtual campus tour using the tool we recommended, WPVR.
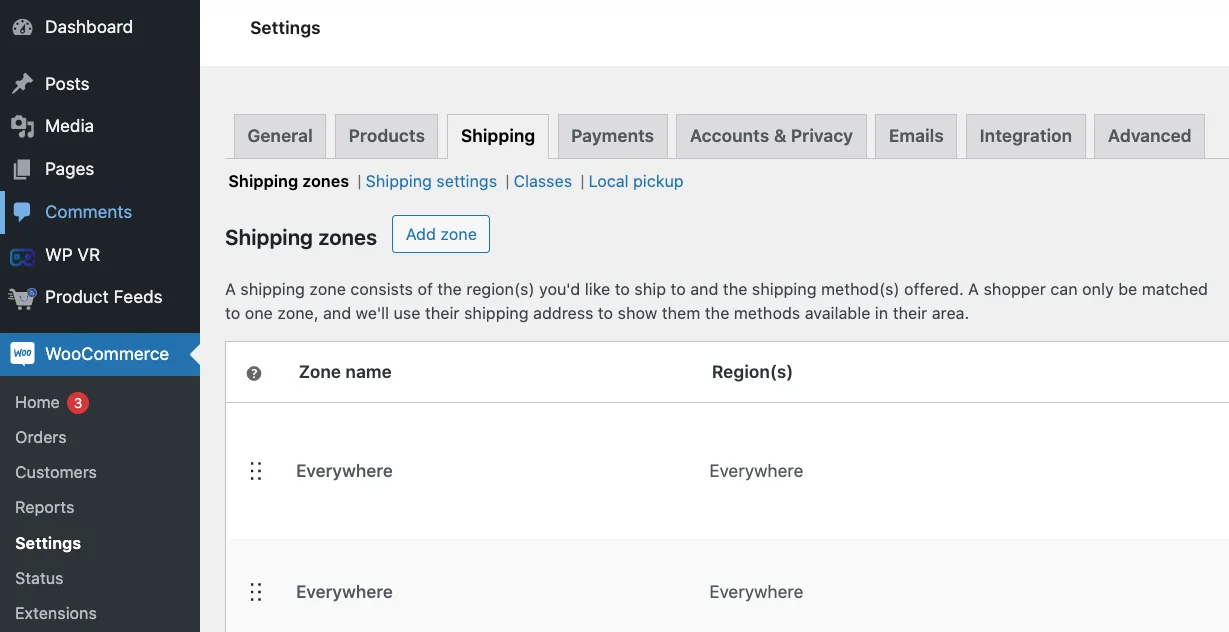
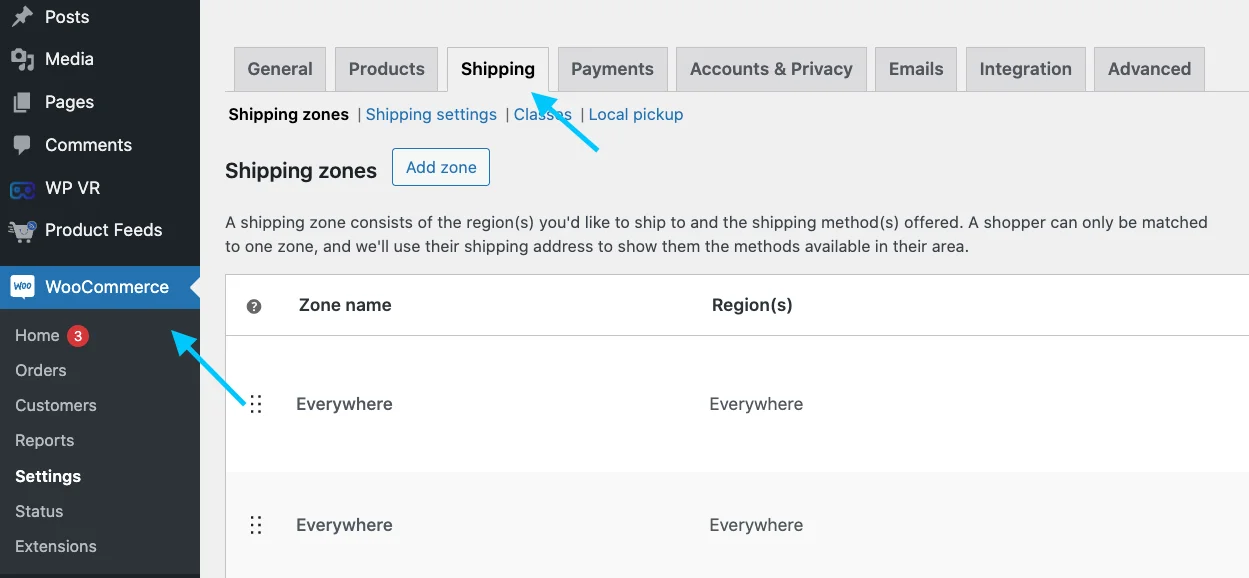
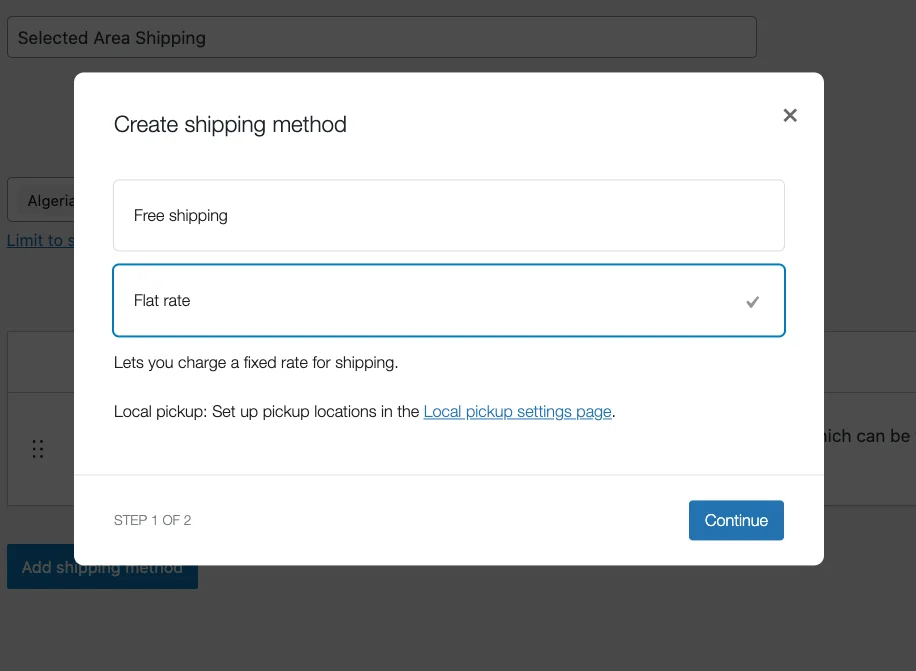
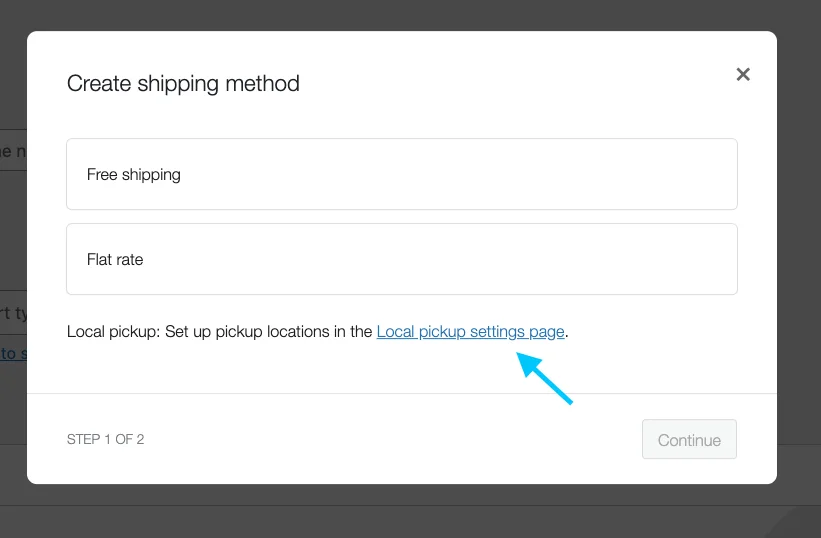
How To Create Virtual Campus Tours For Your College Using WPVR
First, install and activate WPVR in your WordPress Dashboard. Here’s how
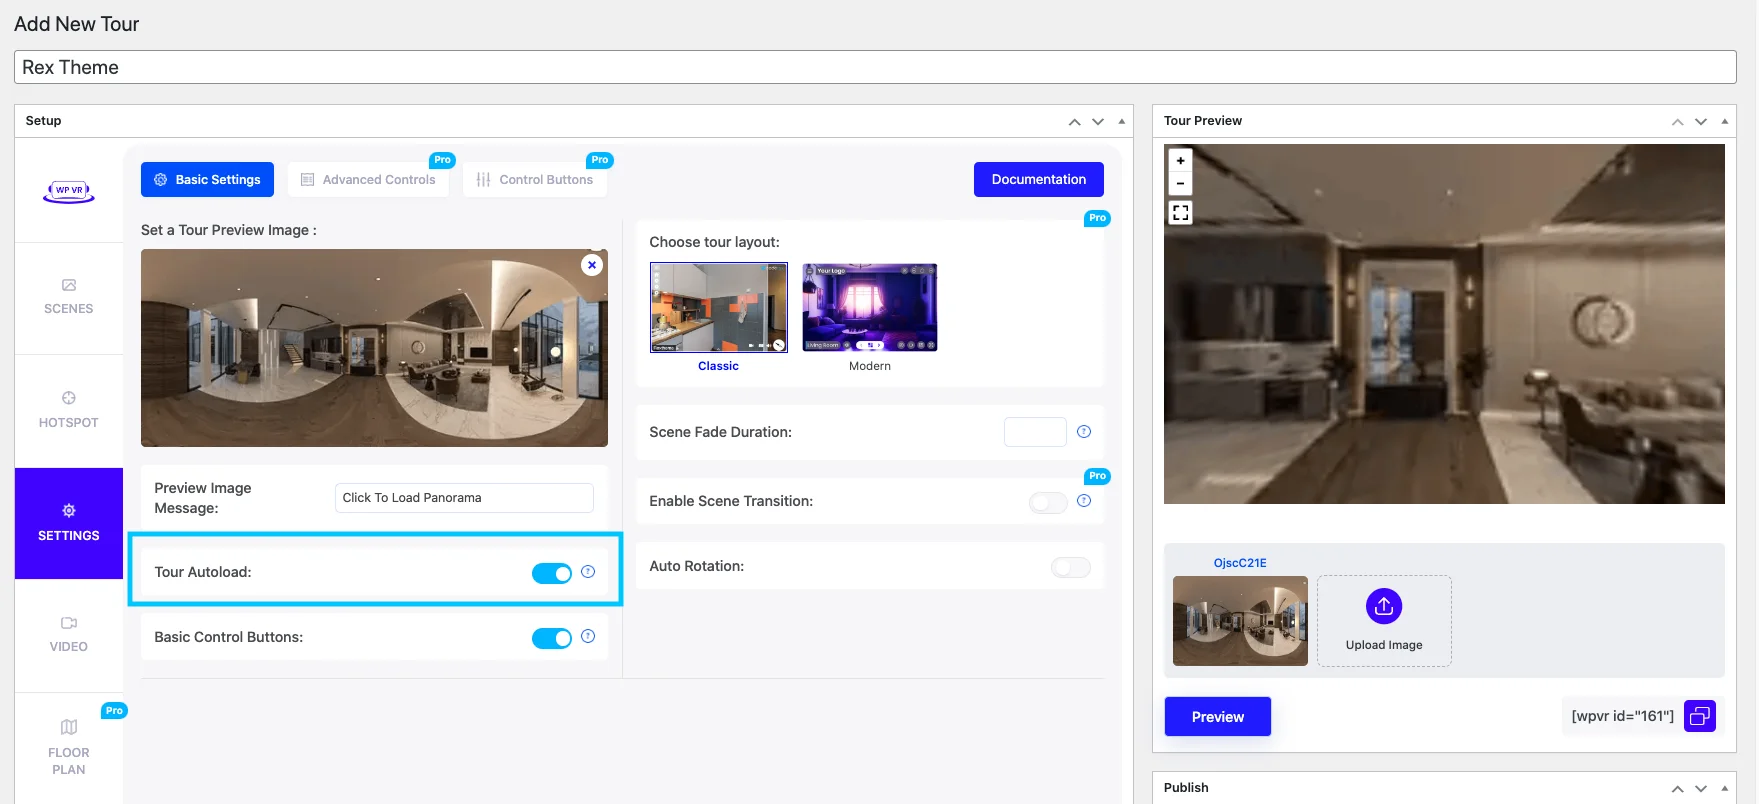
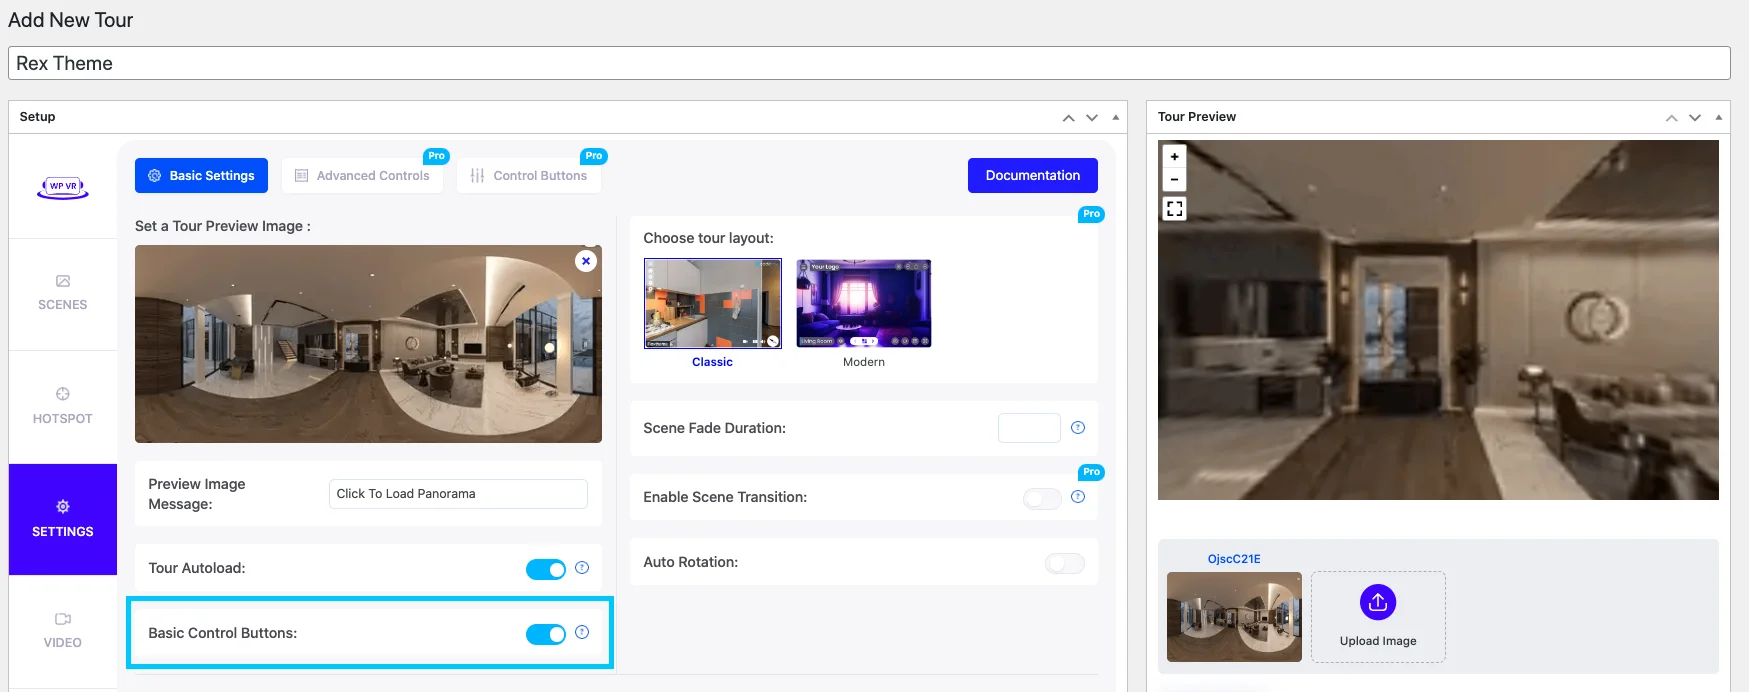
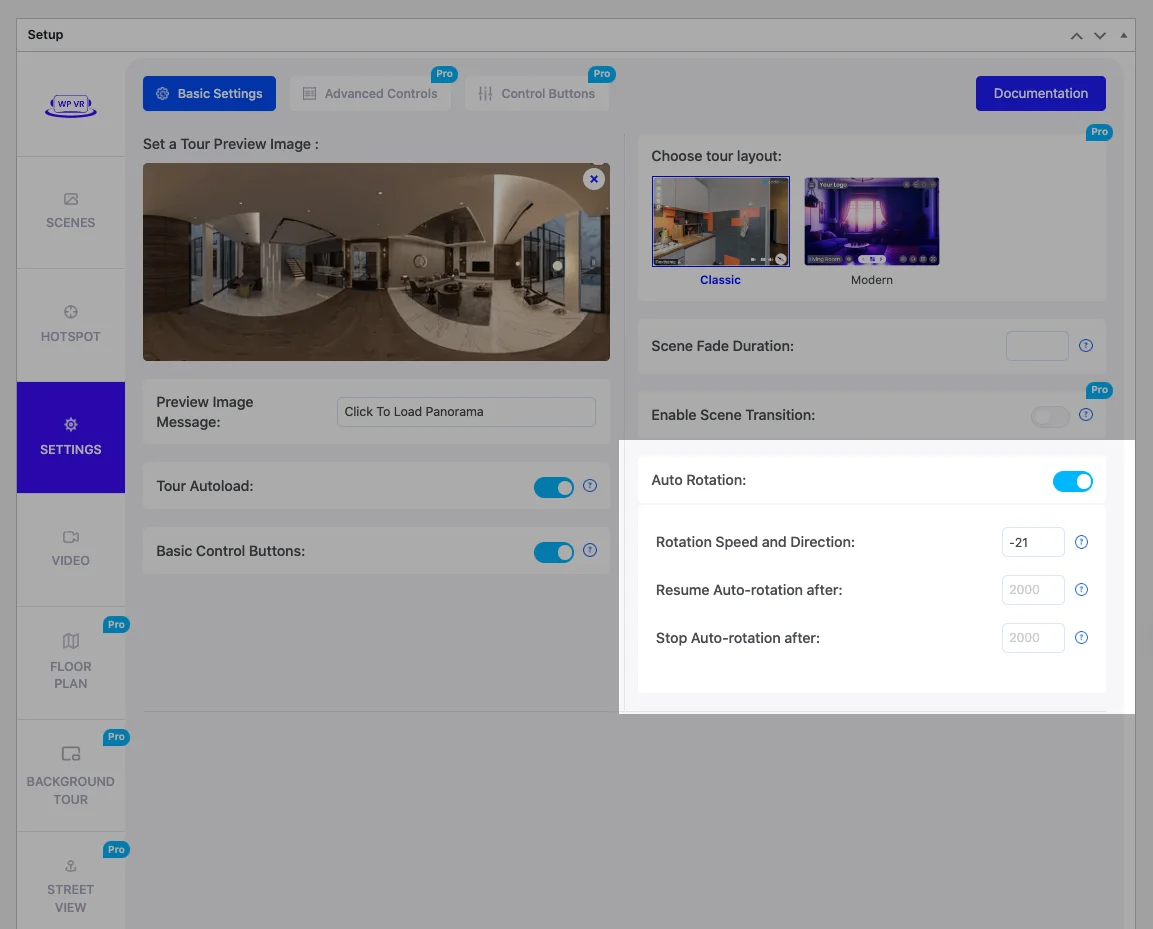
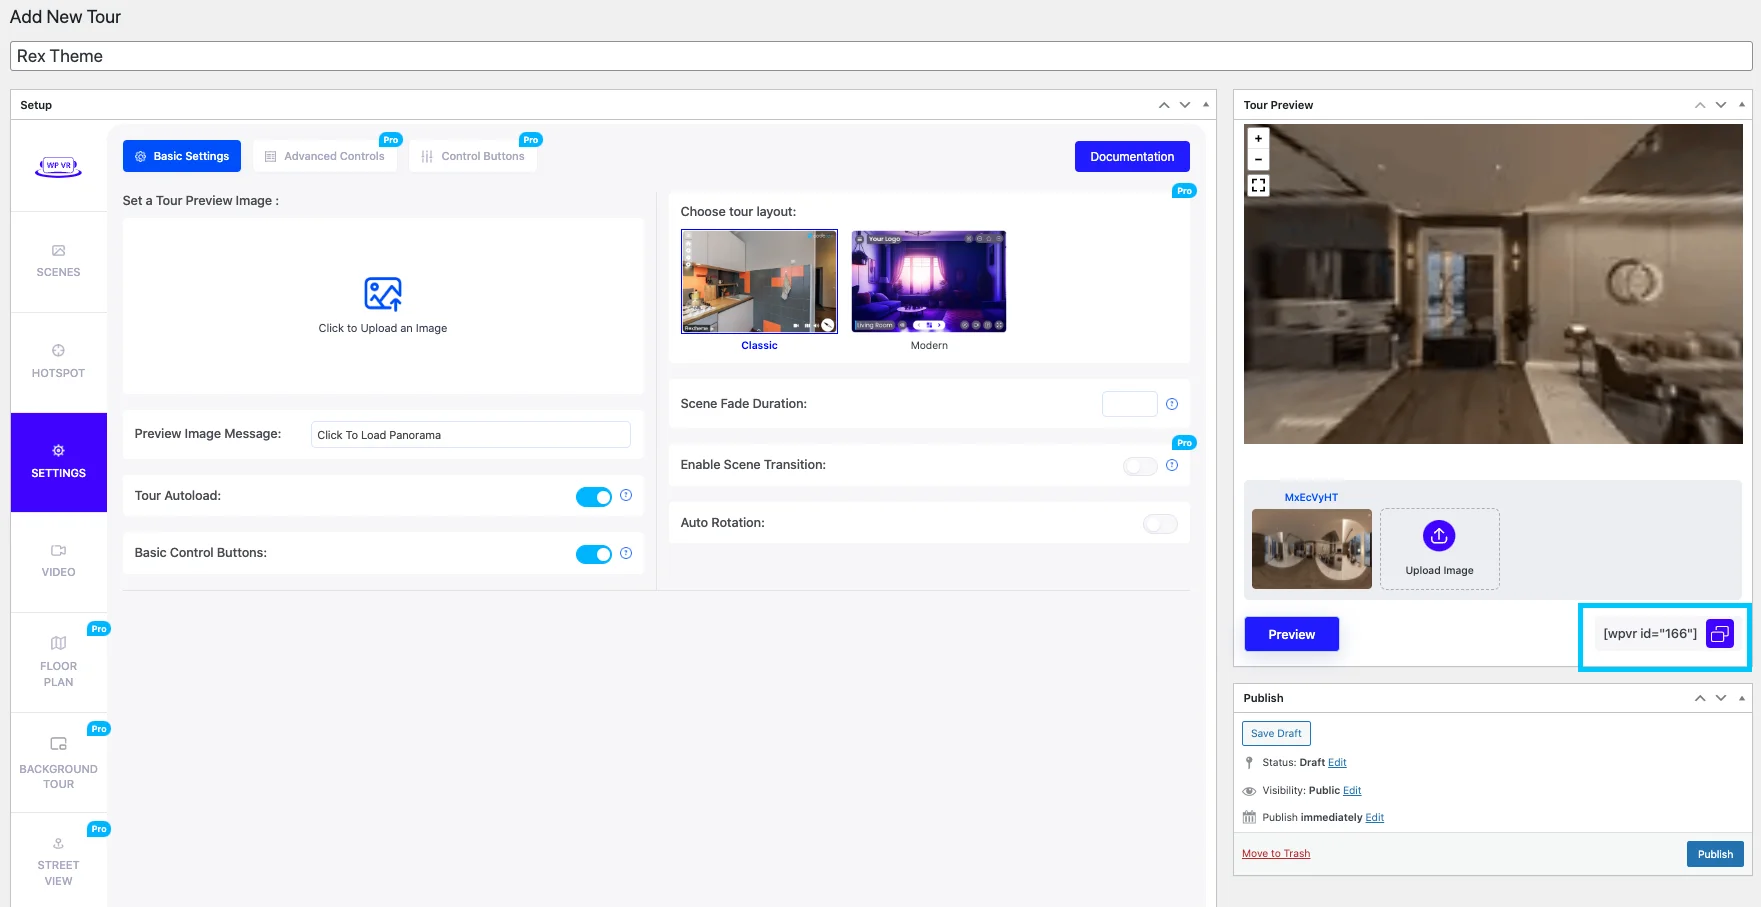
Go to WPVR Get Started Page & configure the basic Settings
Here are the options that you may enable so that your Virtual Tour is flawless.
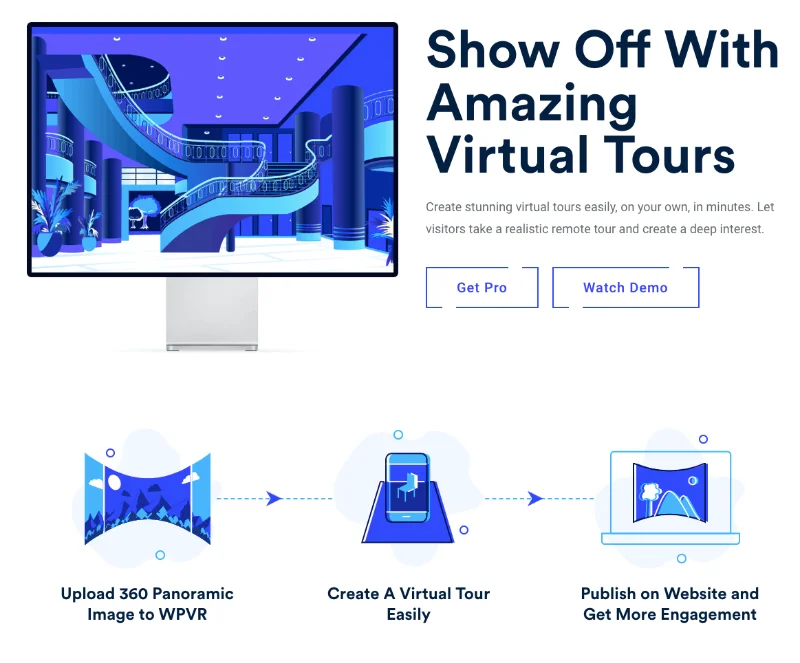
1. Create Your First Virtual Campus Tour Scene
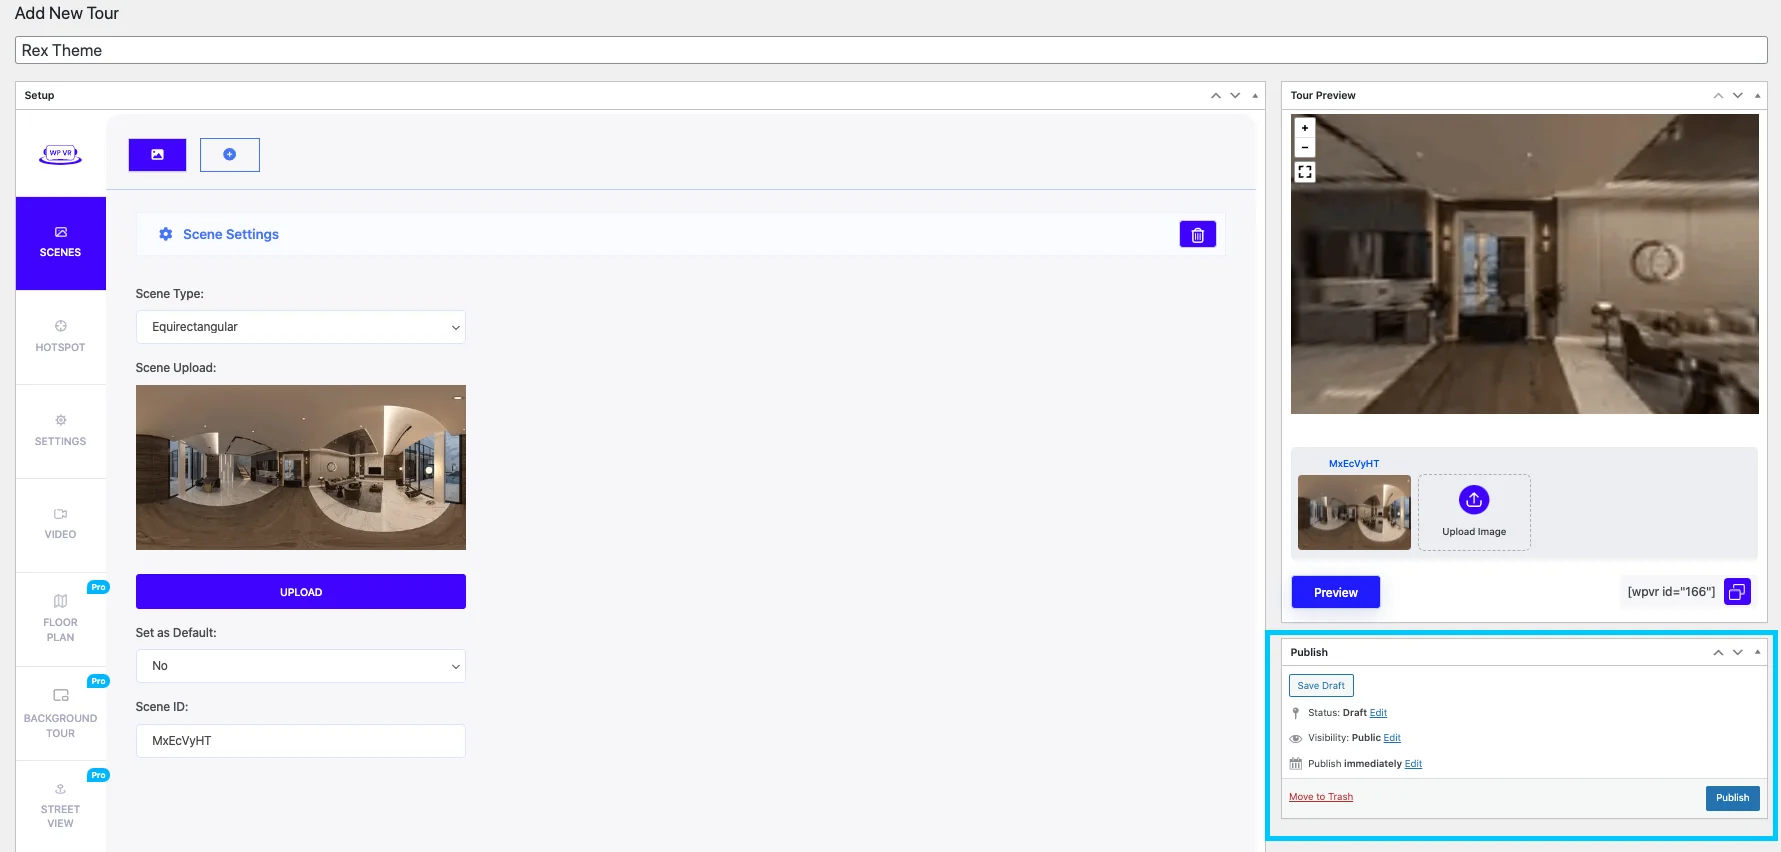
At first, Add a New Tour,
Now, Add the title of the tour,
Then,
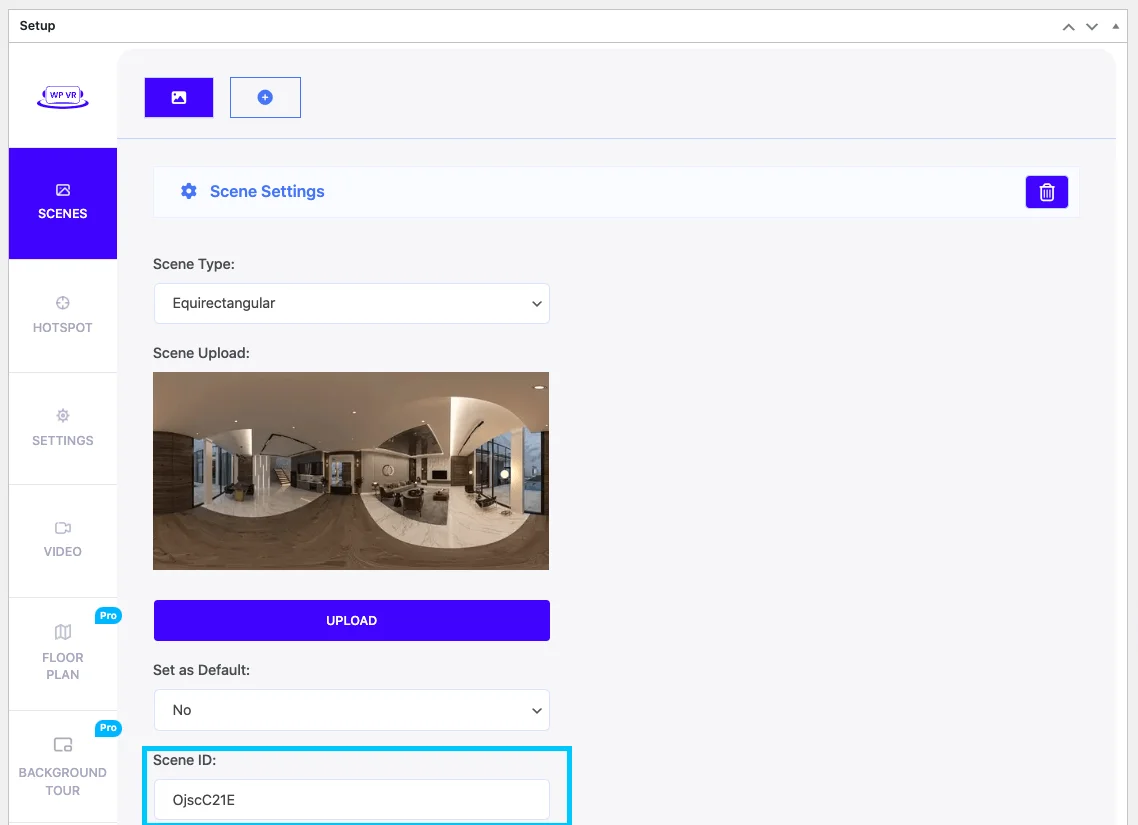
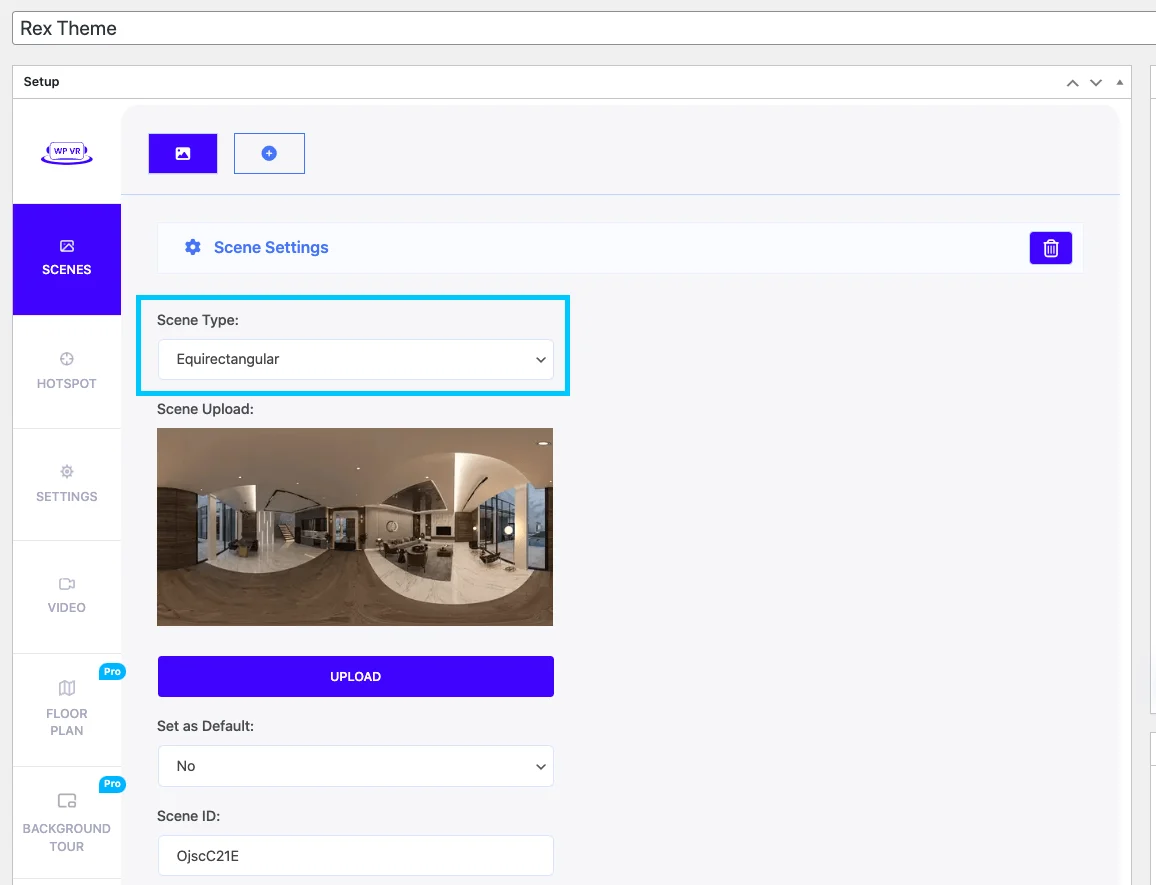
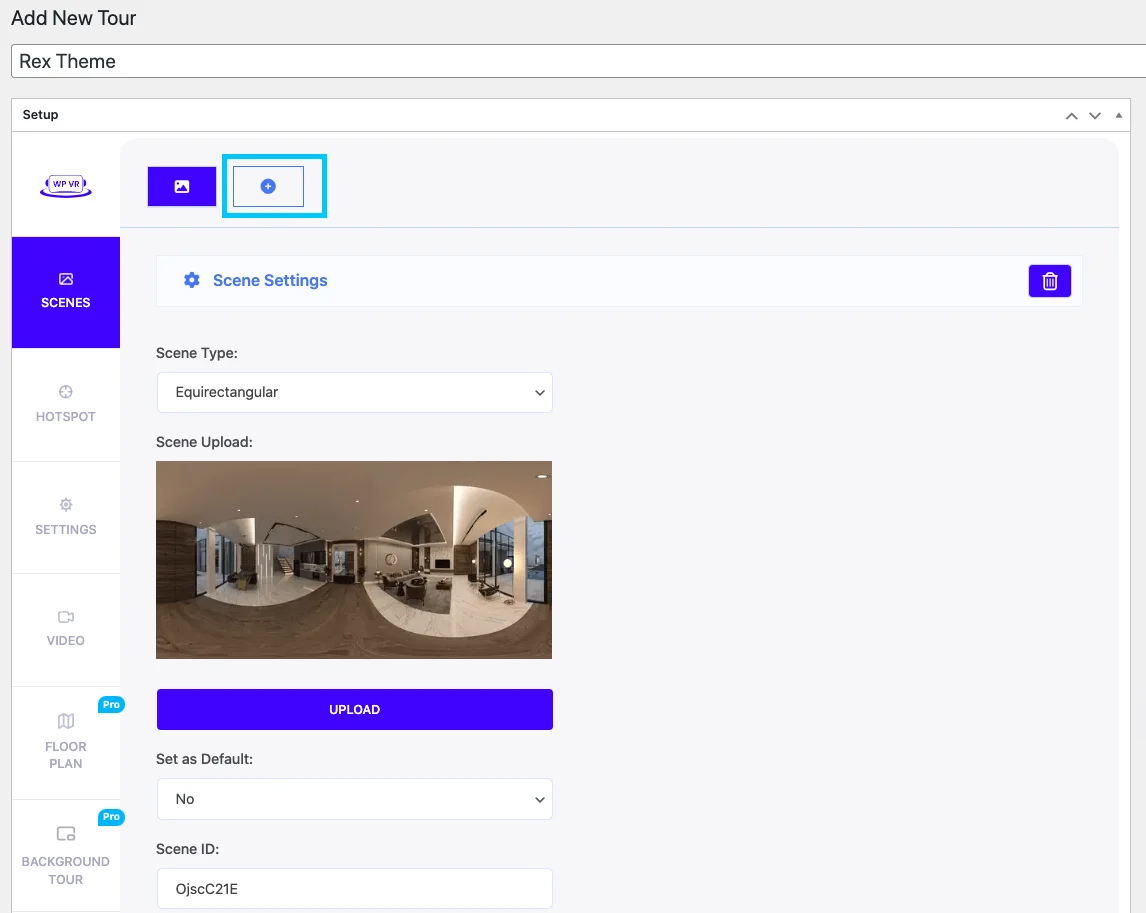
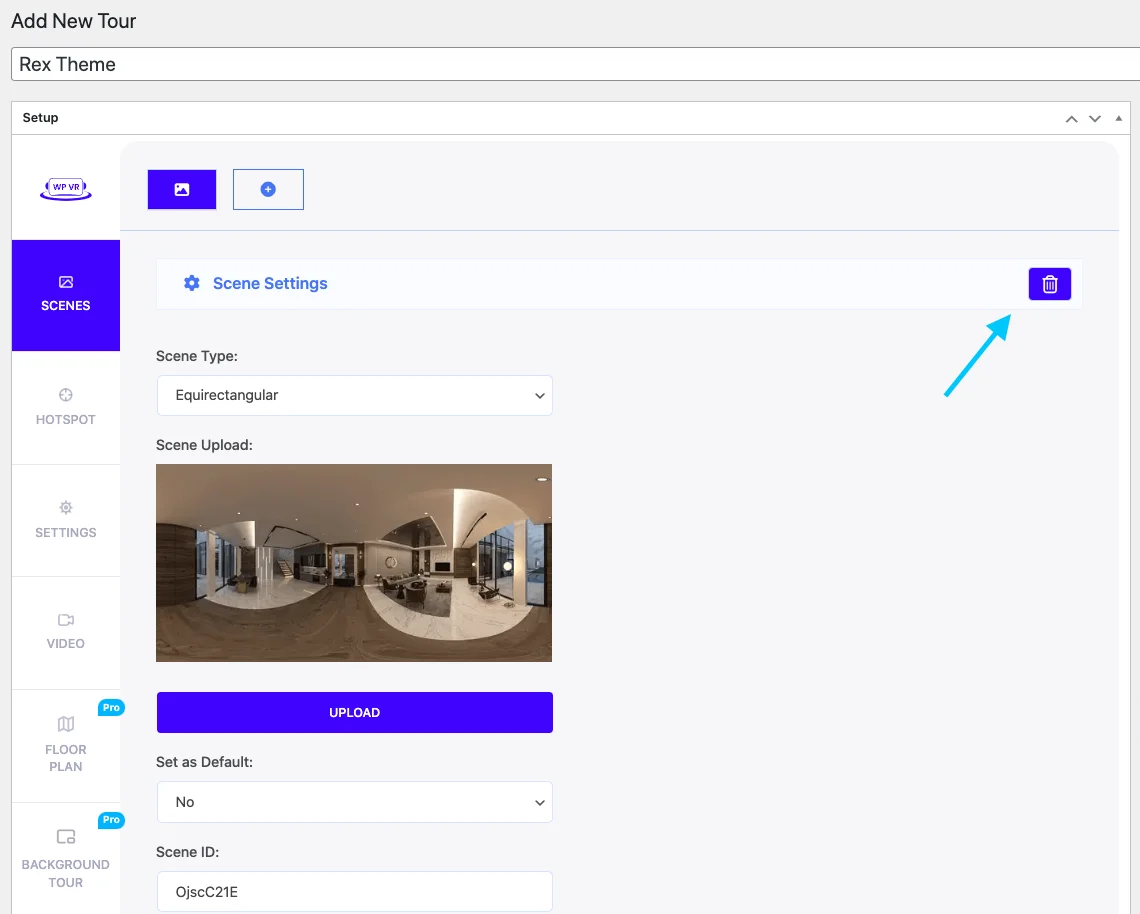
Click on Upload to add a Scene
Provide a Scene ID
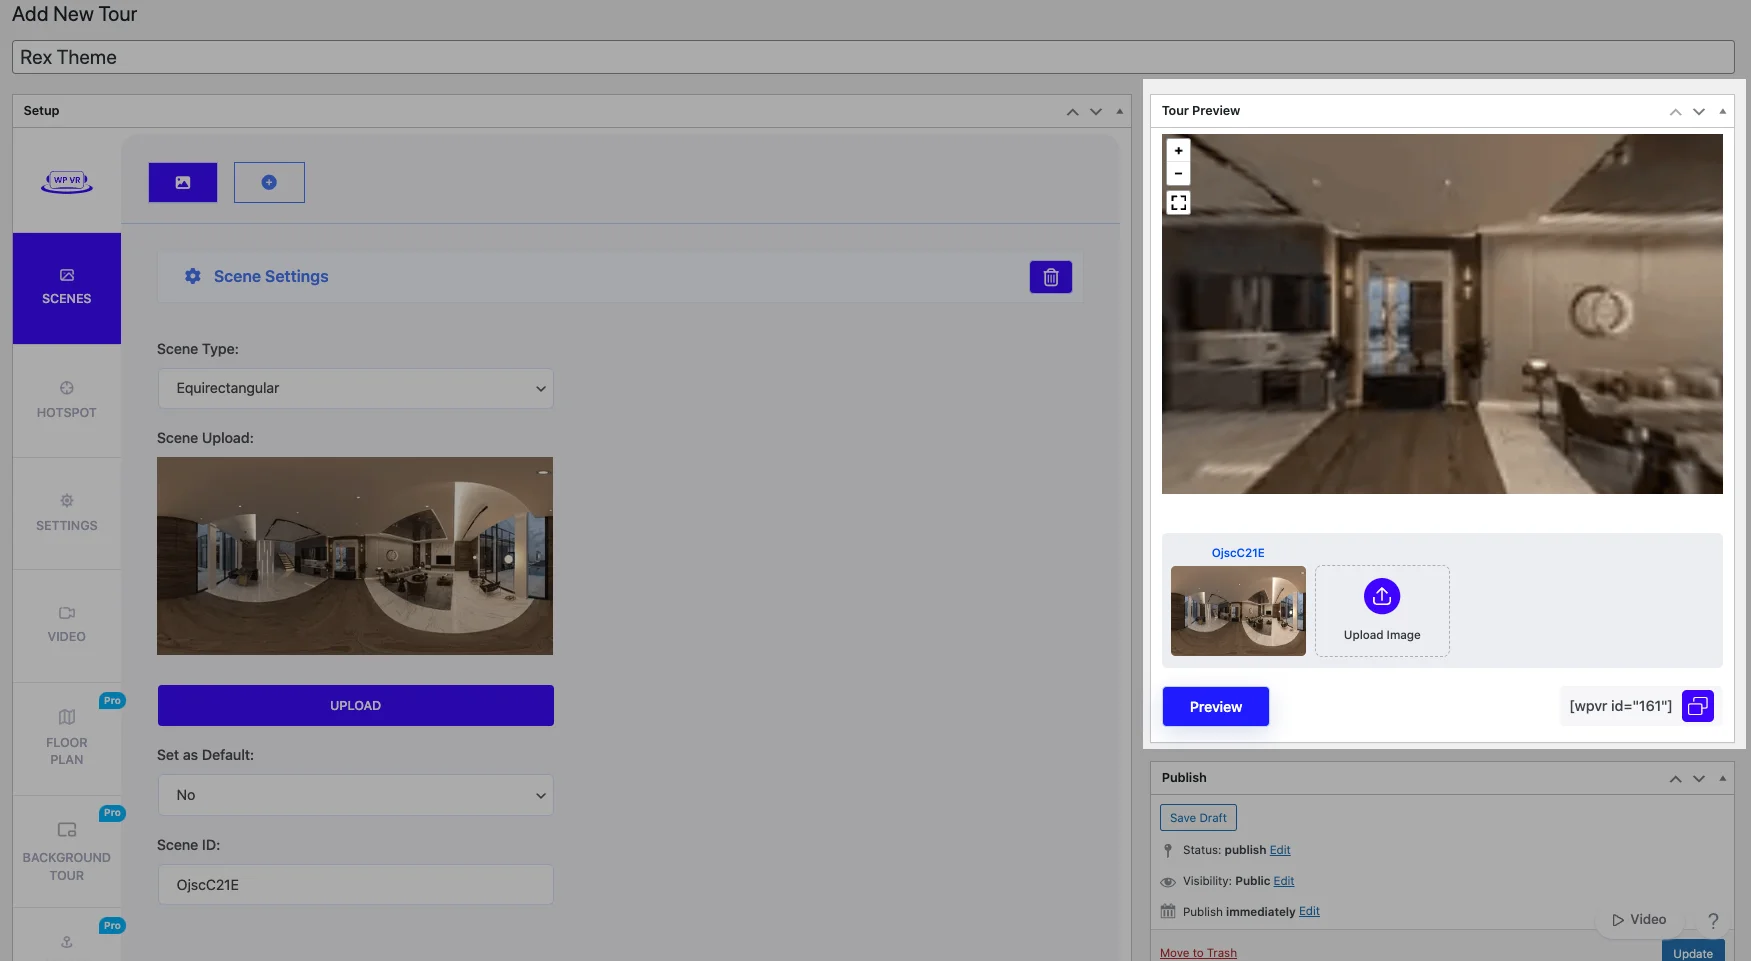
Click Preview to check how the virtual campus tour will look
If you like how the tour looks, then click on Publish.
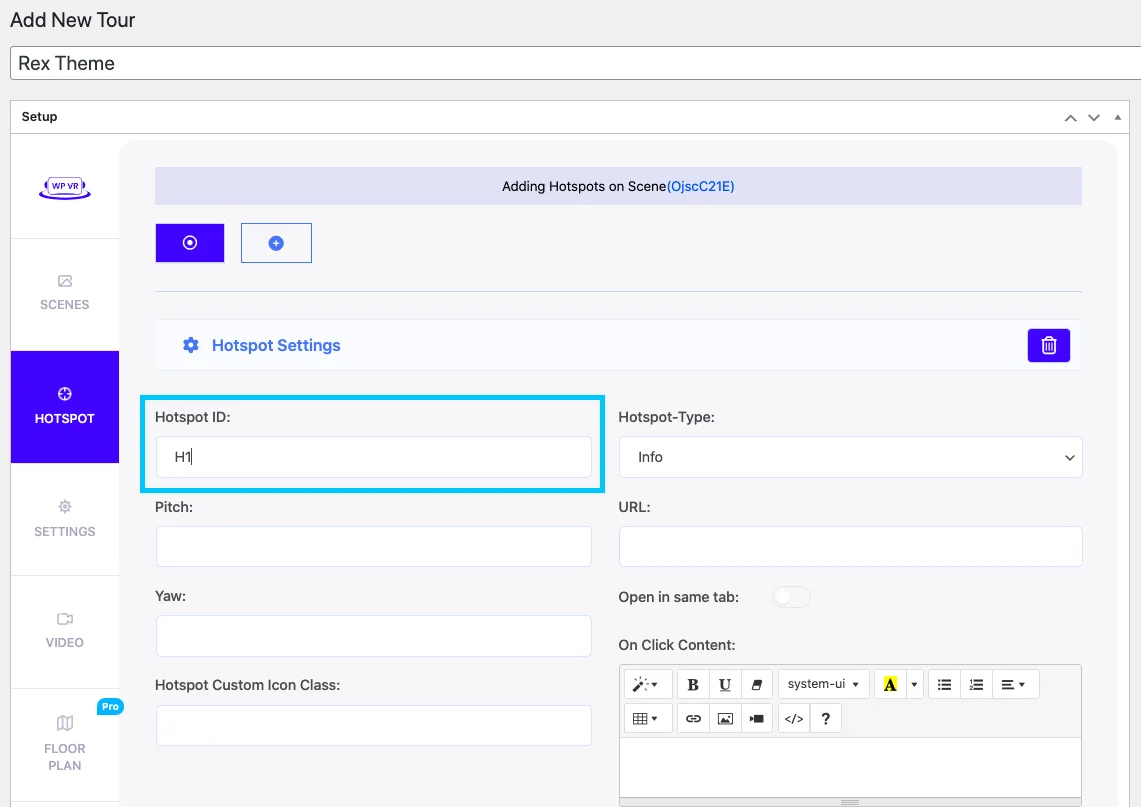
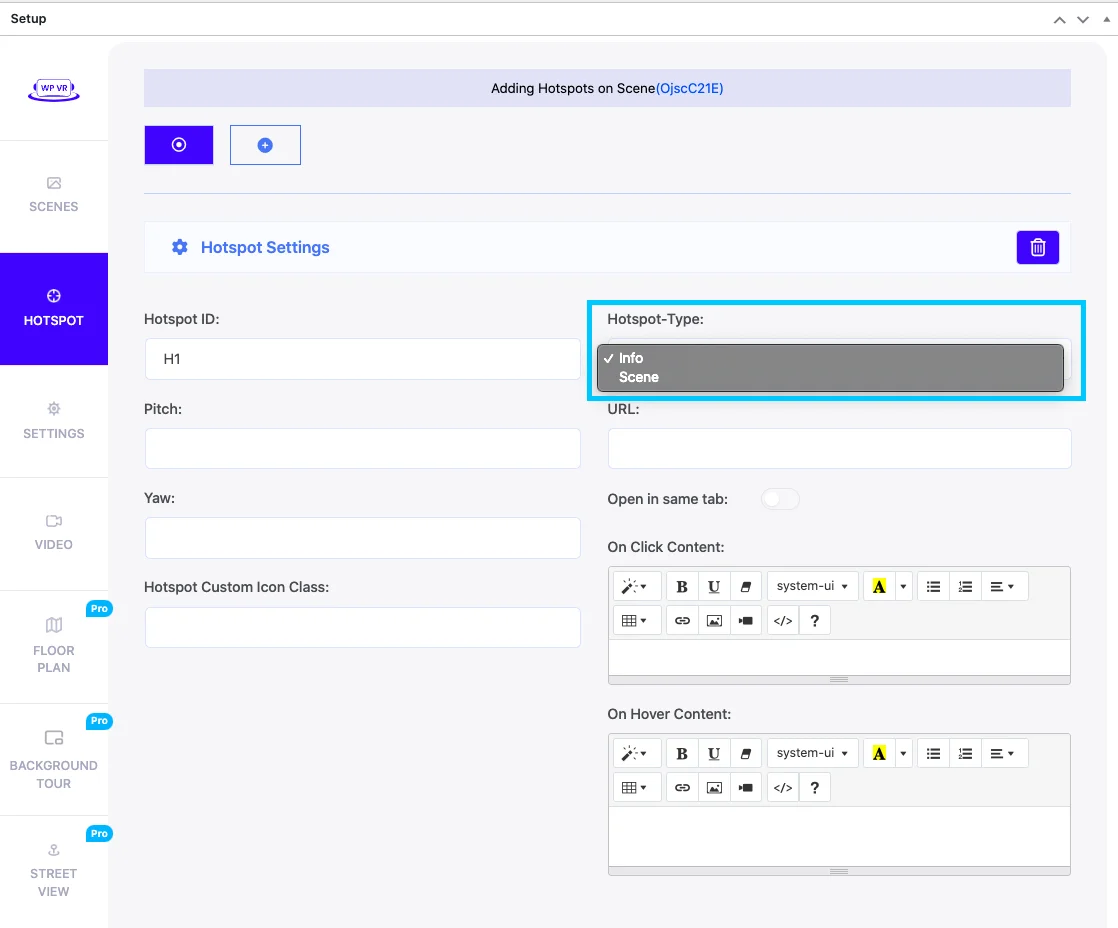
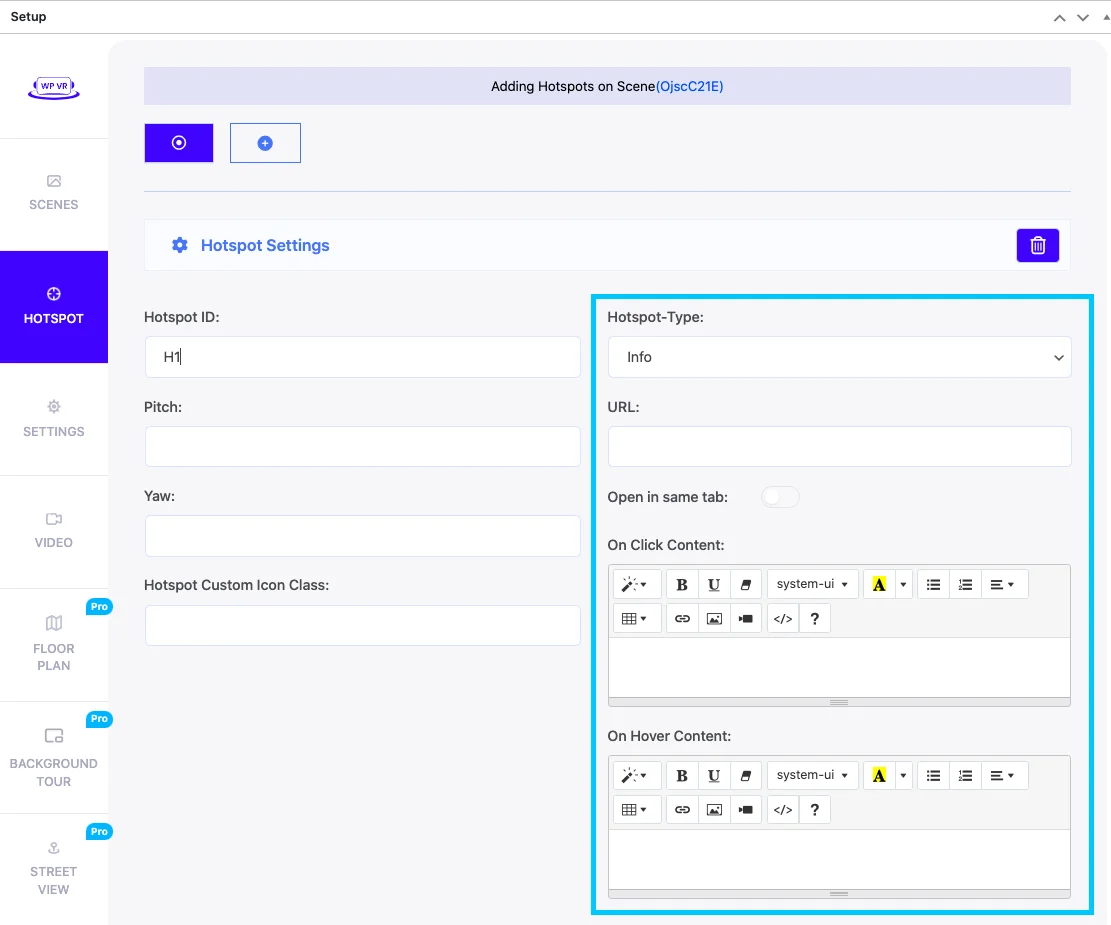
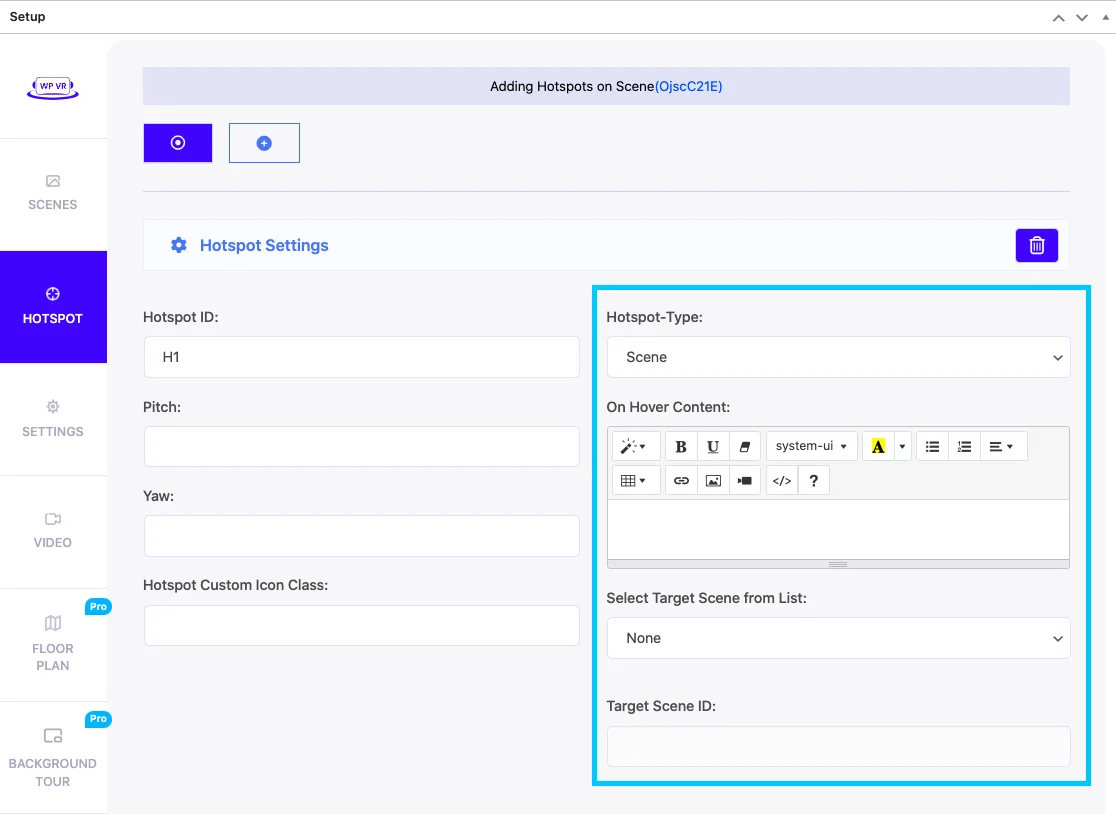
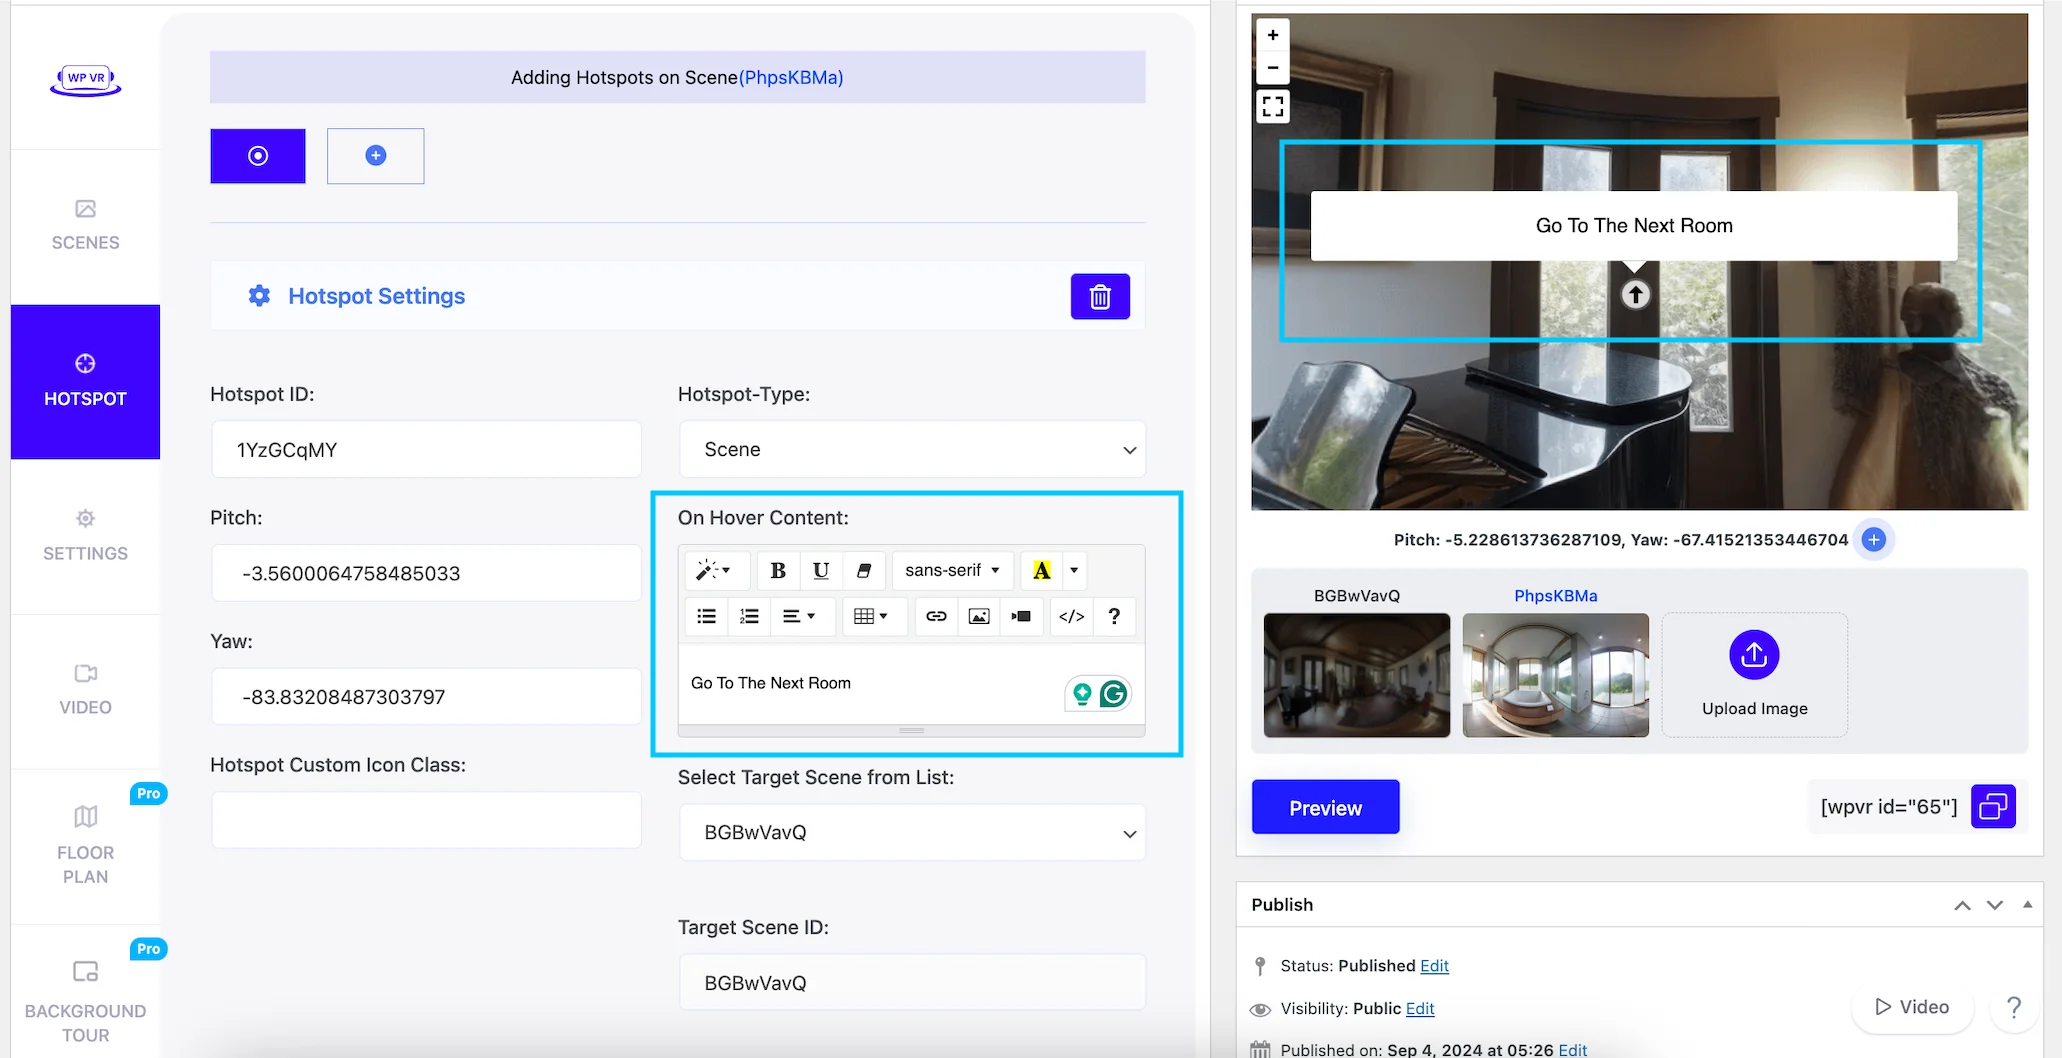
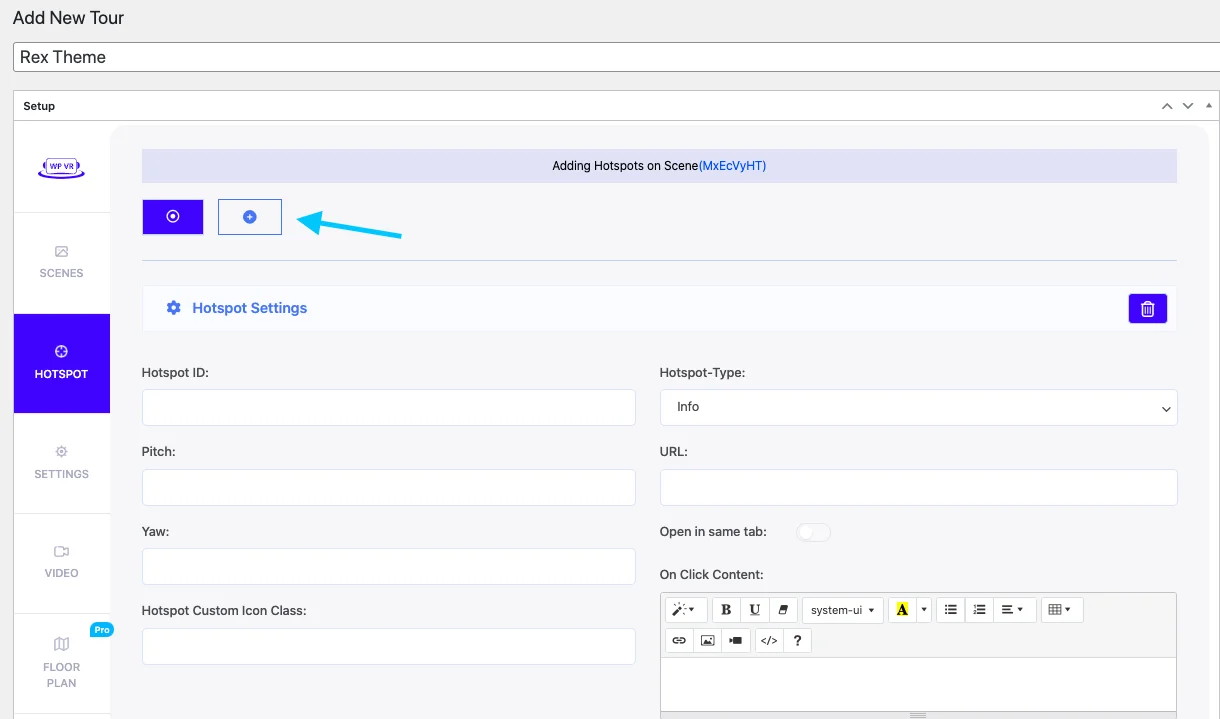
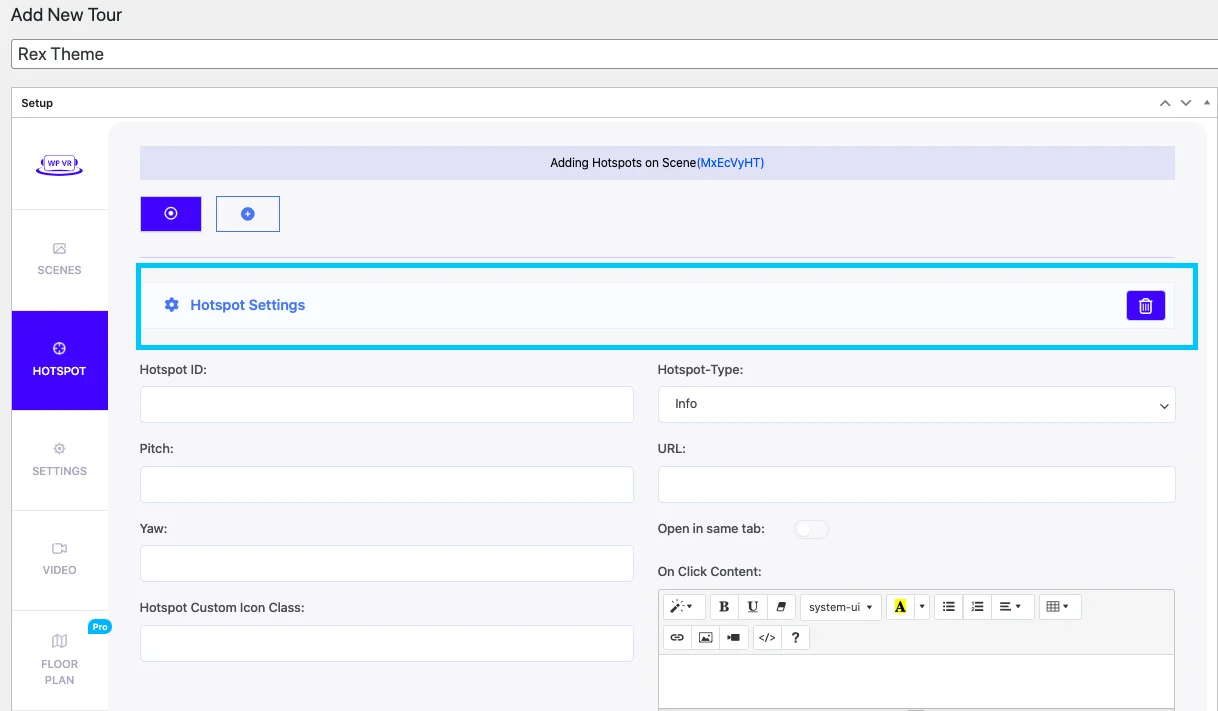
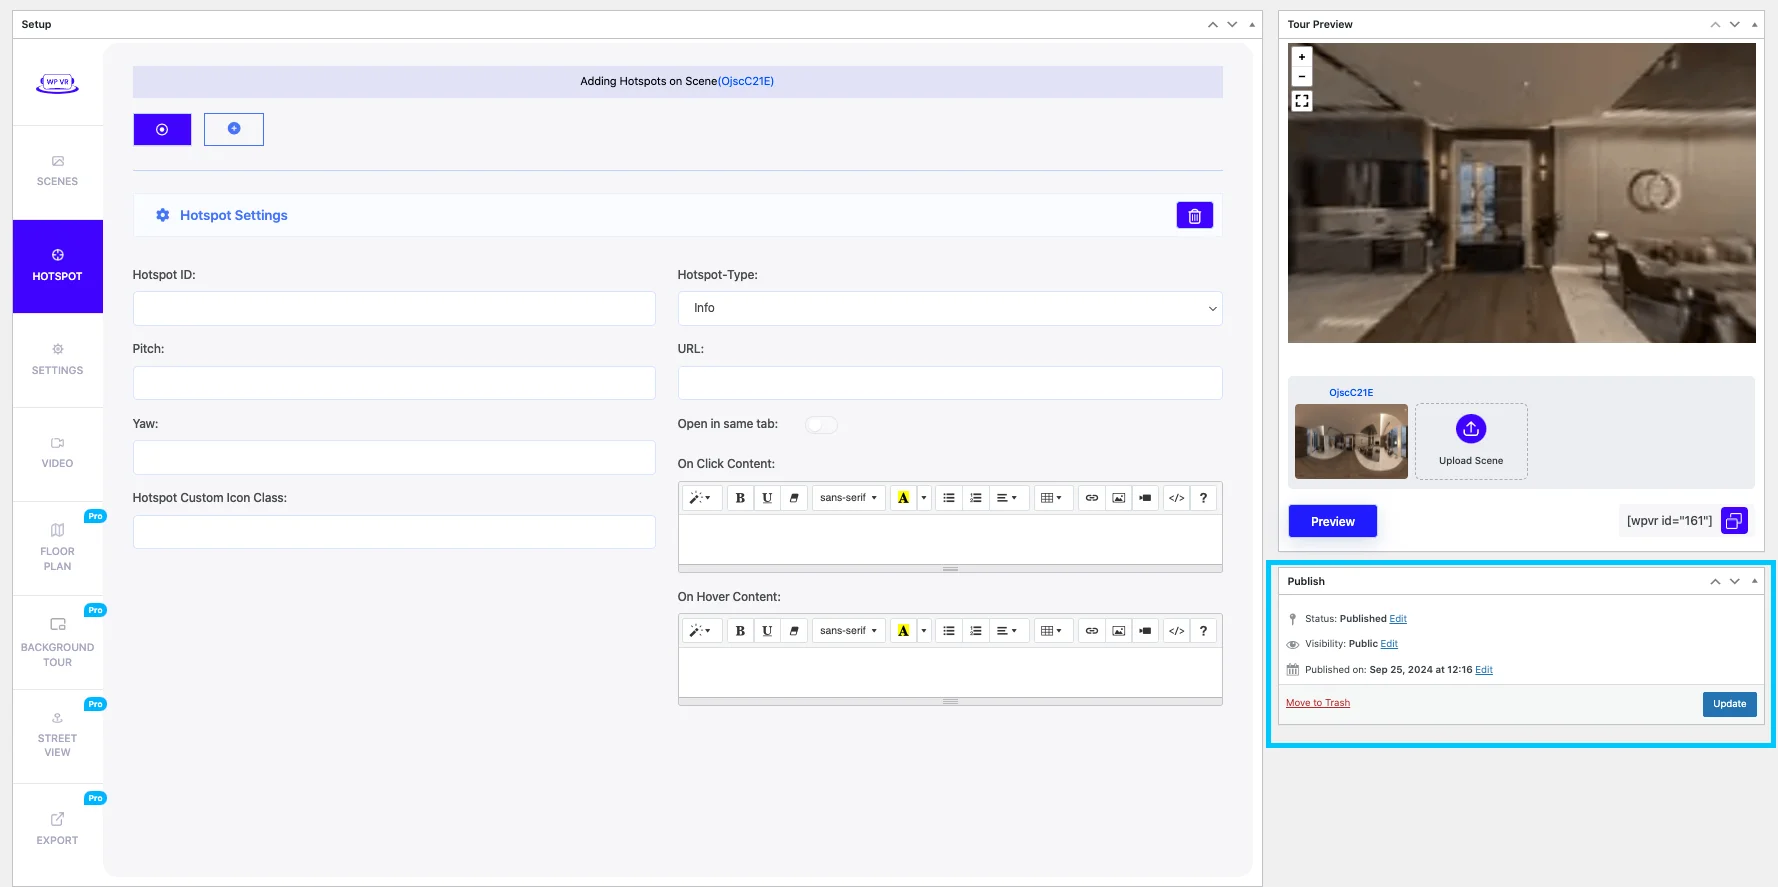
2. Add Engaging Hotspots To Add Interactive Content
Hotspots are different pointers that give information about something from a virtual tour. It can be texts, images, videos, and other media files.
Here’s how you can add a hotspot to a Virtual Tour,
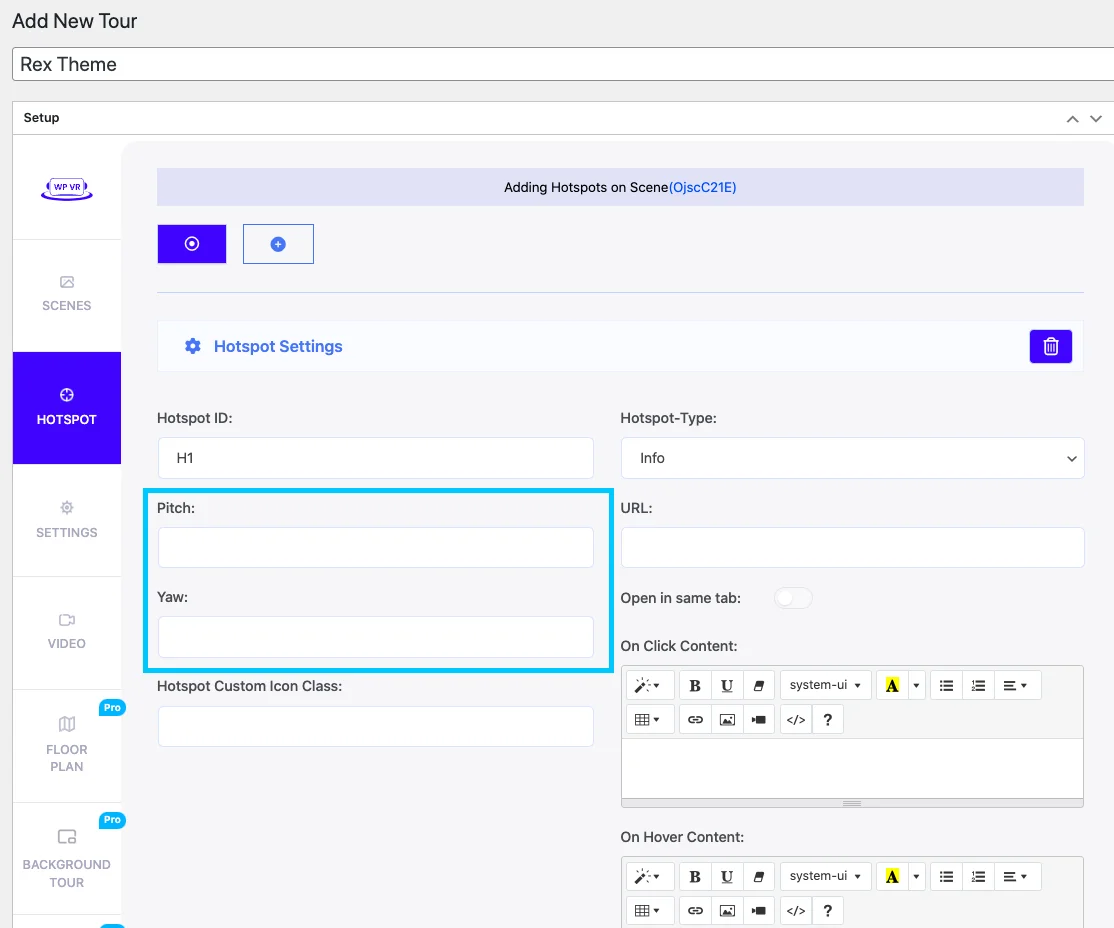
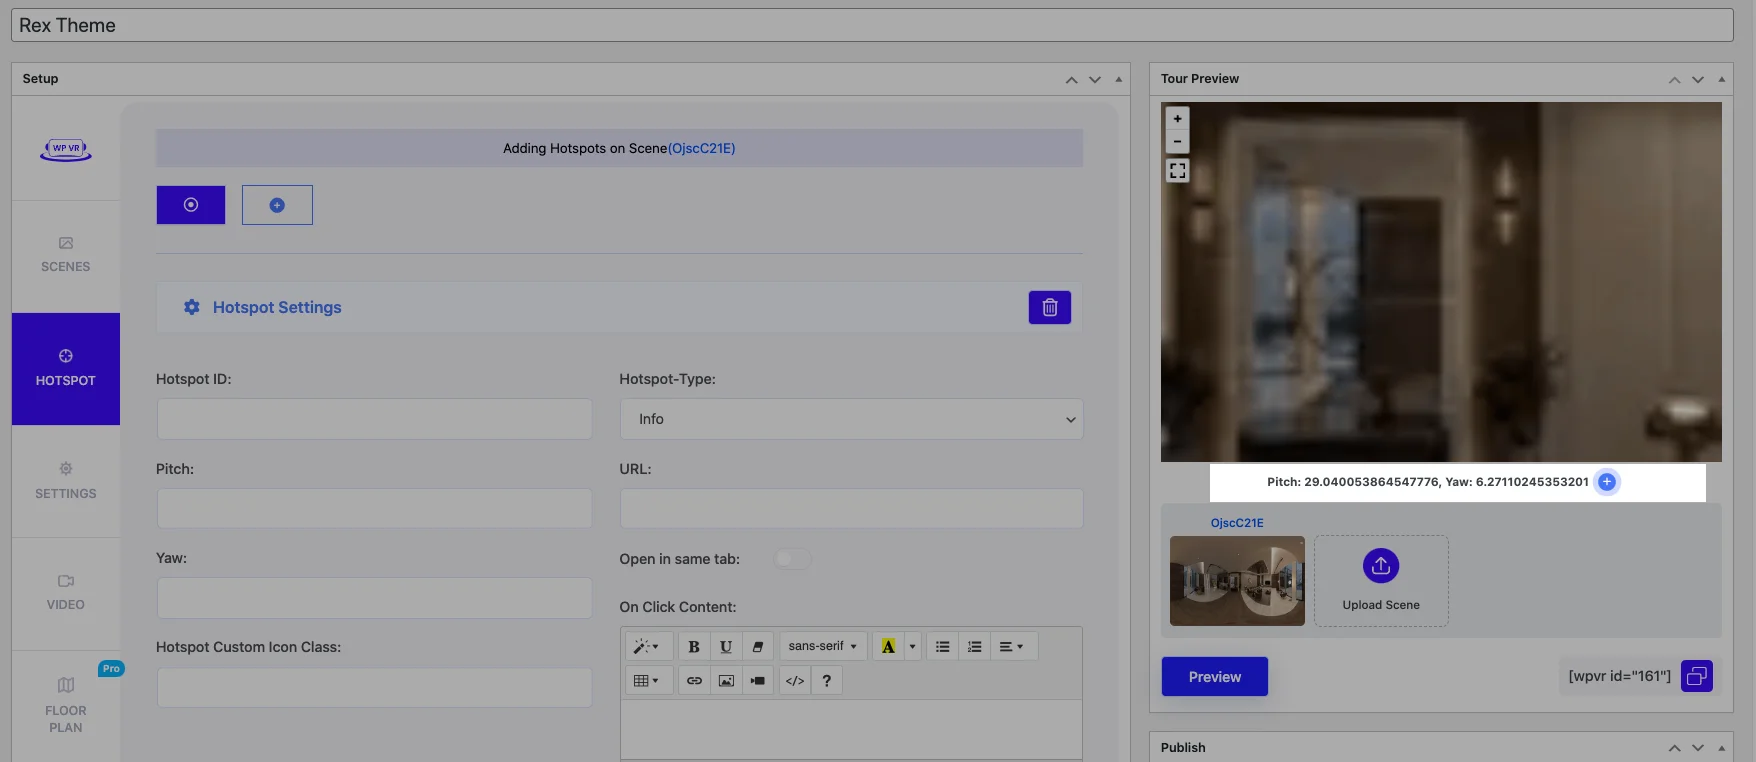
Click on the spot you want to add a hotspot on. You will notice the values of Pitch & Yaw appear below the tour preview. Then click on the arrow icon to assign these coordinates to place the hotspot there.
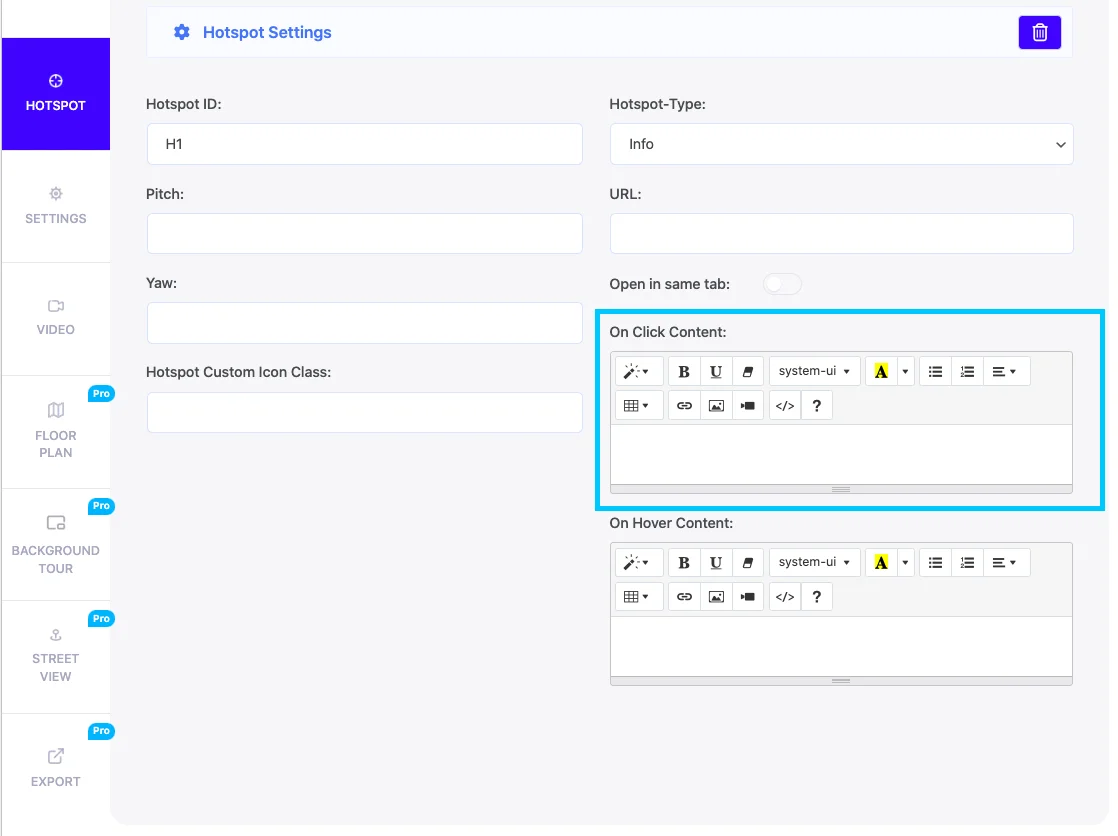
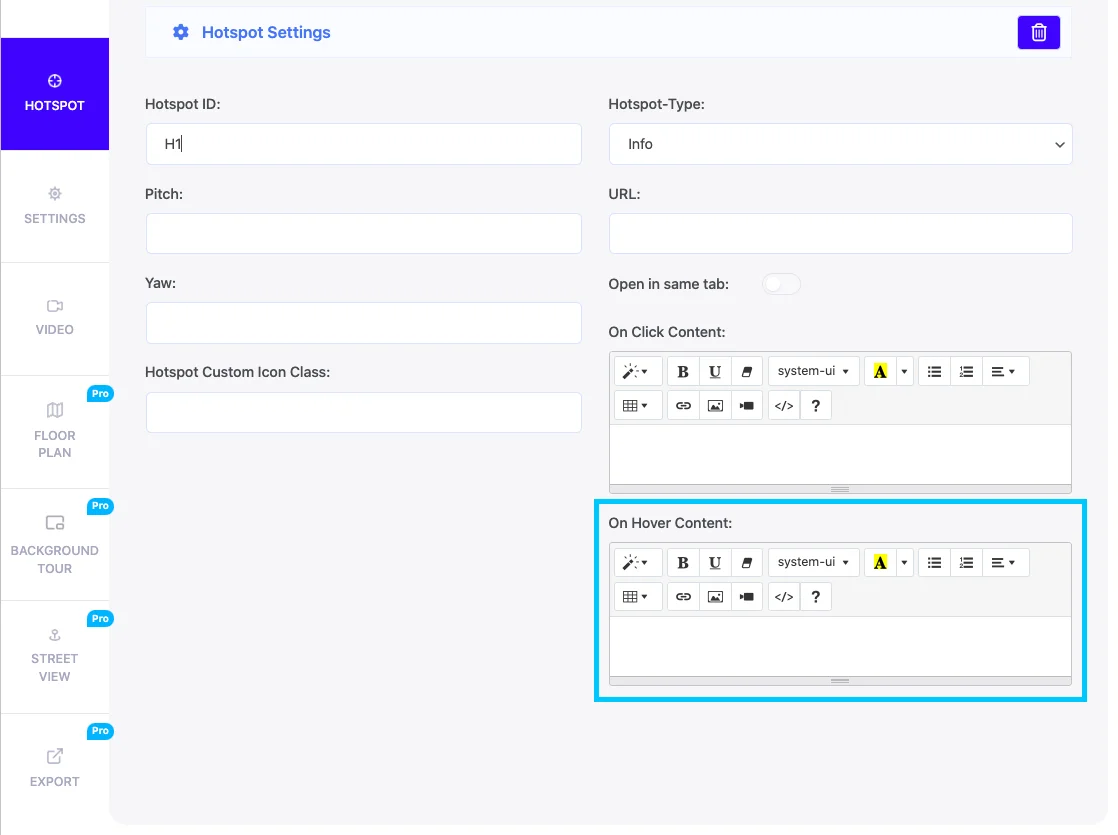
You may add some On-Hover Content and On-Click Content in the hotspots
There’s a Hotspot Custom Icon and a Custom Color Option to show the hotspot in a more interactive manner.
Once you’ve added the hotspot, Preview the tour to see if the hotspot is in the right place. If it is, then update the tour.
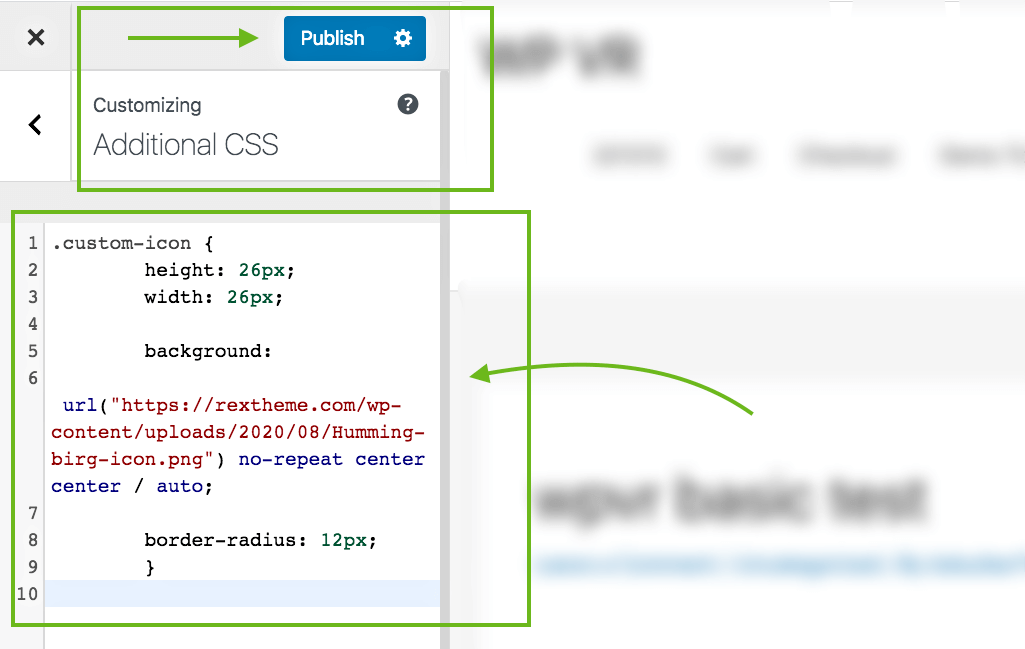
*Note that the Hotspot Custom Icon & Hotspot Custom Icon Color will not be visible in the backend. You’ll need to place the tour on a page and preview it to get a glimpse of how it looks.
3. Use Advanced Features For Connecting With Students
There are many advanced features in the WPVR Pro Version that will let you add more interactional elements in a Virtual Tour in order to connect with your students more.
i. Contact Form For Student Query
Your students might have different questions about college facilities or maybe the application process. So why not add a contact form within the Virtual Tour?
With WPVR Fluent Forms Addon, you can now add Contact Forms in the hotspots. In fact you may add multiple forms inside a virtual tour.
Here’s how it looks in a virtual tour,
ii. Add Explainer Video
The Explainer Video feature will let you add an introductory video inside of the Virtual Tour. Your prospective students can play the video and take the tour at the same time.
Use this feature to showcase College’s history, present opportunities, and all the other exceptional trademarks.
iii. Scene Gallery To Show All Campus Grounds
You may add multiple Scenes in a Virtual Tour and show them in a gallery.
Take 360 panorama images of all the spaces of your college covering the sports grounds, study halls, dormitory, and canteens, then add them as scenes in your Virtual Campus Tour.
Your prospective students can move from one scene to another using the Scene Gallery option.
Und das war's.
4. Embed Your VR College Tour On Your Website
The next thing to do is to embed your tour on your website.
You may use the virtual tour shortcode or use blocks/widgets to place it.
However, creating a virtual campus tour is more than just uploading pictures and videos. To make it effective, you need to focus on providing a meaningful experience that reflects your campus’s best features.
Best Practices to Create a Virtual Campus Tour
Let’s go over some best practices to ensure your virtual campus tour stands out.
Use high-quality visuals: Include clear, professional 360-degree photos and videos of key areas like lecture halls, dorms, libraries, and recreational spaces. Make sure everything looks inviting and well-lit.
Keep navigation simple: Design your virtual tour with an easy-to-use interface. Ensure visitors can click or tap to move through different areas without any confusion.
Add engaging descriptions: Include short, detailed descriptions for every location. Highlight what makes each area special, such as modern equipment in labs or unique study spaces.
Incorporate student stories: Use audio clips or captions to share student experiences and testimonials. Hearing from current students makes the tour feel more relatable.
Make it mobile-friendly: Ensure the tour works smoothly on smartphones and tablets, as many visitors will use their mobile devices to explore your campus.
Include calls to action: Add buttons or links that encourage viewers to schedule a physical visit, request more information, or start the application process.
Update regularly: Keep your tour current by adding new features, renovated spaces, or updated visuals. An outdated tour can leave a negative impression.
When you apply these practices, your virtual campus tour becomes an engaging and effective tool for reaching prospective students. It’s all about making the experience as informative and user-friendly as possible.
Schlussbemerkungen
As you saw, it’s super easy to create and embed a virtual campus tour on your website.
Having an online college tour that is engaging and revealing about your college standards and best campus facilities could be a game changer to grow your educational institution significantly.
So go ahead and get WPVR now. Create your own campus tour now and start admitting more students.
Zum Wohl.
FAQs
1. How can virtual tours help colleges attract more students?
A virtual campus tour gives students a real feel for the college without visiting in person, making it easier for them to decide.
2. What makes a virtual reality campus tour project successful?
High-quality visuals, smooth navigation, and accurate details about the campus are essential for creating an engaging experience.
3. Are virtual campus tours mobile-friendly?
Yes, a well-designed virtual campus tour is accessible on smartphones, ensuring students can explore from anywhere.
4. Can a virtual campus tour project include interactive features?
Interactive elements like clickable maps and student testimonials make tours more engaging and informative.
5. Do virtual campus tours require advanced equipment to create?
With the right tools, like 360-degree cameras and software, you can create an impressive tour without needing costly gear.
Running a travel & tourism business can be quite exciting. You will regularly deal with new faces and try to help them get the best traveling experiences.
However, the main challenge here is the competition. The tourism industry is quite competitive, and you have to find smart ways to attract potential clients for your tourism packages.
Sure, you can put up images and videos of the locations you cover on your website or social media to attract a few potential clients.
However, there are better ways. And one of the options that work best is virtual reality in tourism.
The fact is, for some people, a tour during their vacation is the most part of the year. They plan for it for months and research every possible option. At this point, if you can hook them with something unique that is both affordable and attractive, they are more likely to take your service.
Likewise, VR has more important benefits in the tourism industry.
In this post, I’ll share 8 powerful ways VR can elevate your travel business.
After reading this article, you will get a clear answer to your question: How could a travel and tourism company utilize virtual reality to enhance their business?
So, let’s begin.
What is VR Tourism?
The concept of VR Tourism is to give people a glimpse of an actual tour in a realistic virtual environment.
Basically, you capture 360 panoramic images of the locations you cover in your tourism packages and turn them into virtual tours.
You can then place them on your website for potential clients to visit. Many clients will get hooked thanks to the realistic feeling they get and will be more curious to visit in person.
So basically, virtual tourism can be a great tool to convert prospects into clients in a unique way that’s more engaging and attractive than your competitors.
8 Reasons To Use Virtual Reality In Tourism Business
The way you use VR will vary depending on the packages you offer.
For example, you could offer a package where you take Kilimanjaro Hiking Tour with a group of people via caravan and visit multiple locations in a span of 3 to 5 days. So the package may include the key tourist spots, hotels/resorts to reside at, food & other facilities, and a certified travel guide.
In this case, you could create a virtual tour that will include at least 1 scene from each of the tourist spots, a scene of the entrance of the resort, and the room where the travelers will lodge.
Then, you may connect each of these scenes so that people can explore all of them in the virtual environment before deciding to book this package with you.
Plus, you may even have the trainer record an introductory video which you can use along with your.
**Make sure to include tooltips and additional details in the VR tours so that people stay excited.
Another package could be a visit to a single resort.
In this case, you could have a virtual tour of the resort for people to browse through where they will be visiting.
Here are the key benefits of virtual Reality in tourism and the reasons why you should invest in having such virtual tours on your website.
1. Get Increased Bookings
As mentioned above, virtual reality tourism will get people curious about the places you offer in your tourism packages.
If you include a booking form or a contact form in the virtual tour, chances are many will end up booking a package while taking this tour.
Of course, just a basic 360 environment is not enough. You need to include crucial elements such as relevant tooltips to share knowledge on specific locations or items, engaging click-to-view content such as videos or gifs, background music, and even a mini video to invite them in.
If your package only includes a hotel tour, then you can create a virtual tour of a hotel by highlighting the main areas of focus – the central public space, the rooms, the swimming pool (if any), the canteen, the bar (if any), etc. Overall, you should include all the areas that a visitor may find attractive.
Simply place the tour on the package landing page, and you will see how it will deliver a lot more results than a video.
The main reason why a virtual tour can get more results is the freedom of control and the engaging elements in the tour. People love to have more control when researching and this will definitely help convince them to book a package with you.
Read this guide if you are looking for ideas to increase your hotel bookings.
2. Time-Saving and Cost-Effective
A couple of concerns many people have is
they think it will get too expensive and
they feel it may take up too much time to create a virtual tour.
However, virtual reality in tourism is not as expensive as you think.
It is possible to create a tour for less than $100 spent a year. And the best part is that if you have the right tool, it won’t take more than 10 to 15 minutes to craft a complete virtual tour.
All you need is a digital 360 camera to capture panoramic images and a reliable virtual tour creator to turn these images into a virtual tour.
Using virtual tourism as part of your marketing plan can help you achieve a higher “time spent on page” and low “bounce rate.”
These are crucial because, as the concept goes, the longer a person spends time on your website, the higher the chances of him placing an order or making some commitment.
So, you can actively use virtual reality in tourism and achieve these higher marketing metrics, which will eventually lead to higher conversion rates and more packages sold.
4. Significant Competitive Advantage
Virtual reality is not so popular in the tourism industry simply due to the lack of knowledge on how much it can deliver.
So, if you start using it now, you will be one step ahead of your competitors. You will have a higher chance of getting customers excited about your tourism offers, provided that you are not overcharging and are advocating for high-quality services.
Moreover, it shows your commitment to providing the best possible experience for your customers. It’s a clear message that you’re investing in technology to make their journey more engaging, informative, and enjoyable. This level of dedication can earn you trust and loyalty. Additionally, offering seamless travel services, such as reliable airport taxis, can further enhance the overall customer experience, ensuring convenience from the start of their journey.
5. Make It Easier For Clients To Make A Decision
Virtual tours offer a fast lane to decision-making when it comes to booking accommodations or travel experiences.
In the traditional booking process, travelers often find themselves sifting through brochures, photos, and descriptions, trying to piece together potential destinations they will enjoy. This process can sometimes be frustrating.
Virtual tours will give them a visual understanding of how the environment is, what they can expect in the surroundings, and how aligned it is to serve their traveling purpose, such as peace, adventure, modernness, rural tranquility, etc.
Images & videos may not always be satisfactory as they are often manipulated to make the locations look better than they actually are. A virtual tour will nullify the possibility of false promotion regarding understanding the surroundings.
Hence, it is the best way to help prospects make a decision on which travel package they want.
6. Elevate Client Education and Cultural Awareness
When travelers understand more about a destination’s culture and history, their experience becomes much richer. Imagine a virtual tour of Kyoto’s ancient temples, complete with clickable spots that explain the history behind each shrine or ceremony. This gives your clients an authentic preview of what to expect.
You can break it down with:
Interactive Highlights: Add clickable points that explain local traditions, like food etiquette or seasonal festivals.
Storytelling: Incorporate short narrated clips about local legends or historical events that are unique to the destination.
This approach helps travelers feel more prepared and excited. You’re helping them make better choices, and they’ll feel more connected to the experience once they arrive.
7. Advance Staff Training and Skill Development
Training your staff to be more knowledgeable and confident improves customer satisfaction. Virtual tours can play a major role here.
Take this scenario: You run a tour company that specializes in historical landmarks. Instead of relying solely on training manuals, you create a virtual tour of each site with key facts, trivia, and storytelling prompts embedded in the tour.
Here’s how this can help:
Guided Practice: Staff can explore these virtual tours repeatedly until they’re confident in explaining each site to travelers.
On-Demand Training: New hires or part-time staff can train at their own pace, reducing the need for in-person sessions.
Better Engagement: A more visual and hands-on approach keeps employees interested in learning compared to reading static documents.
Ultimately, you’re creating a more professional and knowledgeable team, which helps you deliver a better experience to your clients.
8. Offer Travel-Like Experiences for Non-Travelers
Not everyone can hop on a plane and travel to far-off destinations. Virtual tours can offer these individuals an experience that feels close to real travel without leaving home.
Picture a family curious about visiting Greece but unable to travel due to health or financial limitations. You provide a virtual tour of Athens that explores landmarks like the Acropolis with detailed, 360-degree views.
This approach benefits you and your audience:
Accessibility: Anyone can experience new places, expanding your potential customer base beyond just travelers.
Increased Interest: Some may feel inspired to book a trip once their situation changes, simply because they already feel connected to the destination.
Educational Use: Schools or institutions may also use these tours as part of their curriculum, giving you new partnership opportunities.
With these virtual experiences, you’re broadening horizons for those who can’t physically travel while still fostering a desire to explore more.
Examples Of Virtual Reality Tourism
Virtual reality tourism has already proven its value in creating more engaging and informative travel experiences.
To show how this works in practice, let’s explore a few real-world examples where businesses have used VR for tourism to improve their services and attract more customers.
Virtual Tour of a Hotel
Here’s an example of a virtual tour of a hotel with interactive hotspots to let the audience know what they are offering in a room.
This lets the audience have a better look at the available rooms and choose from the best ones for them to book.
This Virtual 360 Tour Atlantis Dubai shows almost every unique feature that clients can see and explore before they even step there.
Hamilton Island 360 VR Tourism
In this virtual 360 video, you can easily explore everything from stepping onto the island to experiencing underwater adventures.
Schlussbemerkungen
If you are in the travel and tourism business, then this is a great opportunity to stay ahead of the competition. Using virtual reality in tourism businesses is yet to get popular, and the sooner you start investing in it, the better your chances to become the go-to solution for offering the best tourism packages.
You can easily create virtual tours in WordPress thanks to the plugin WPVR.
WPVR is currently the #1 virtual tour plugin in WordPress, which has every feature you need to create engaging virtual tours without any complications.
If your website is created using WordPress, then you must try using WPVR. You will amazed at how simple yet effective this plugin is to help you grow your business using virtual reality.
Ever since COVID-19, a lot of things have changed. Most buyers nowadays prefer to purchase online rather than visit the store. The pandemic has taught people how easy it is to order online while they are free at home.
If you own a showroom of any sort, then it’s highly recommended that you too should start selling via your own website and social media.
But it’s as easy as it sounds.
You see, each and every industry is now more competitive than ever. So it is crucial for you to find unique ways to attract more buyers.
Introducing ‘Virtual Showroom’
While others have been struggling to find potential clients, a few businesses have turned their store into a 24hrs sales hub using virtual showrooms. It has proven to generate more sales than usual.
People are able to visit their stores remotely, anytime they want, and order products while sitting comfortablely at home.
People love virtual showrooms and 2 out of 3 prospects want more businesses to use VR.
In this article, you will get a good idea of what a virtual showroom tour includes, and how you can use it in your business.
So let’s take a look.
What Is A Virtual Showroom Tour?
A virtual showroom gives your potential customers a chance to visit your store and get a realistic experience, even if he is sitting at home, traveling to a distant country, or on break time during work.
The fact is, it creates a virtual experience of what your store is in real life, which the audience finds more engaging. While on the tour, they can look at the products and decide to purchase one just like they would on a live visit, except, they won’t have to speak with anyone, stand in a line for checkout, or walk with a crowd while shopping.
This creates a sense of personal satisfaction and your prospect will be more comfortable shopping whenever they are free. They won’t have to find time from their busy day to visit your store.
Plus, this is a unique experience for the buyer. Rather than browsing through a boring page with product listings, they will get an interactive tour on a 3D view, and move around of their own free will. This will help to emotionally connect with them and they will find it exciting to shop in such a unique environment.
How Does a Virtual Showroom Work?
A virtual showroom works just like a physical store, except your customers don’t have to visit in person. Instead, they can explore your showroom from their phone, tablet, or computer.
Here’s how it works:
360° Store View: Your store is captured using high-quality images or 3D rendering to create a realistic, interactive tour. Customers can move around, zoom in on products, and explore different sections of your showroom.
Clickable Product Information: Each product can have interactive tags that display details like price, specifications, and availability. Customers can check the information without needing assistance.
Direct Purchase Options: A virtual showroom isn’t just for browsing. You can link products directly to your online store so customers can add items to their cart and complete purchases instantly.
Live Assistance: Some virtual showrooms offer live chat or video call options. This lets customers ask questions, get recommendations, or request real-time assistance while browsing.
VR and AR Support: If you want to go a step further, you can allow customers to use virtual reality (VR) headsets for a more immersive experience. Augmented reality (AR) features can also let them see how products fit in their space before buying.
With these features, your virtual showroom makes shopping easier, more engaging, and more convenient for your customers.
Now, let’s see which businesses can benefit from using virtual showroom tours.
Businesses That Can Benefit From Using Virtual Showrooms
Plenty of businesses are utilizing the idea of online showroom tours at this moment. Let us look at some of the niches that can benefit from it.
Virtual Fashion Showroom
It’s predicted that this year there’s going to be an uptake of tech usage in the Fashion Sector.
And many modern designers have embraced virtual reality as one of the ways to promote their pieces.
If you own a fashion store, then a VR tour can have a huge impact on exposing your designs and collection. This will rather feel like an exhibition where they can purchase the products they want.
Benefits of a Virtual Fashion Showroom Tour
Virtual Fashion Showroom tour offers many opportunities to showcase fashion products to clients in an immersive way and you can benefit from it more than just getting visitors.
1. Detailed Feature Description
In the virtual tour, you may add an option to view details of each clothing along with images and videos. This will keep them hooked on the tour and allow them to take buying decisions on the go.
2. Smartphone-Friendly Virtual Shopping
Most people shop using smartphones, which is even better when using virtual showrooms. Viewing a tour on a mobile on a gyroscope mode will allow the buyer to move and look through just like he would do in the store in person, thus making the journey more exciting.
3. Instant Order Of The Product
You may also include a way to order the product right from the virtual tour, or at least give a CTA that will take the buyers to the product sales page.
This will increase the possibility of increasing sales.
4. Real View Of The Clothing – More Reliable
Normally, images on the website are edited and many often enhance the clothes to look much better than it really is. This creates a trust issue among buyers who are often reluctant to order expensive dresses due to a fear of anomaly.
A virtual tour will have the dresses highlighted just like you would in your real store, thus giving an idea of how it looks in real life. This will help to make buyers trust your product’s authenticity.
5. Get More Inquiries
If you can put together a good virtual fashion showroom, then you can expect to get more inquiries about your products. In fact, you can include a contact form in the tour to allow potential buyers to reach you before ordering a dress. This will help in selling more expensive dresses.
Virtual Furniture Showroom
Furnitures are difficult to shop online due to the need for virtual observation. Hence, traditional eCommerce sites struggle to sell more furniture directly from the website. Most people view the products and then visit the store to find out more.
However, recently, it has been proven that virtual showrooms can be used to increase furniture sales online. For example, IKEA has its own Virtual Reality Showroom which has resulted in a spike in online sales.
Let us look at some of the benefits of selling furniture online.
Benefits of a Virtual Furniture Showroom
The furniture industry is pretty competitive since large brands such as IKEA and Pottery Barn have already won over several loyal buyers.
But using sensible virtual showrooms can attract a few back here.
1. A Visualized Attractive To Sell Furniture
The best option to make the furniture virtual tour more attractive is rather than creating a tour of the actual showroom, you may furnish a small house with the furniture and create a virtual tour of that place.
This will give the buyers a clear idea of how the furniture will look in a real house, thus helping to take a buying decision.
2. Highlight Furniture Details With A Virtual Tour
In the tour, you can include small icons to hover and get further details on the furniture you are selling.
For example, you can let the audience know about the color, wood materials, size, etc. You may even add extra promo videos of your most expensive products to make the experience even better.
3. Connect With Prospects Personally
In the tour, you may include a small promo video that the visitor can view while taking the tour so that you can pitch your products personally and may even inform them of a promotion you are running.
You can do the same with pre-recorded background audio.
This will allow you to connect directly with the buyers on a personal level and the buyers will feel you value them.
Virtual Kitchen Showroom
Visiting kitchen showrooms is an exciting adventure for most women that handle a family with responsibility. And a virtual kitchen showroom can get you more potential buyers than you would normally expect. Let us look at why.
Benefits of a Virtual Kitchen Showroom
A virtual kitchen showroom will not only let you personally connect with potential buyers, but it will also make it easier for buyers to make time and take a visit. Hence, it comes with great benefits.
1. The Ideal Choice Of A Responsible Housewife
Most housewives are busy maintaining a healthy family and even if they want to, they may not get time to visit your showroom. So they resort to buying online from an eCommerce site.
However, since it’s time-consuming to find what you need on an eCommerce site, many even avoid that. A virtual kitchen showroom can change that.
If you can create a virtual tour of your showroom, then housewives can take a tour and get a realistic experience. This will let them shop around just like they would in your real store, and will keep them excited to purchase more products – a win-win for both of you.
2. A Better Way Of Highlighting Kitchen Appliances
Try and provide more details about your products within the virtual tour. Let’s say, you may include an icon that buyers can hover over to get details such as material, special features, color, etc. And then you can set it up so that clicking on it will load a CTA to purchase the product.
This will let you highlight the specialty of your products to potential buyers.
3. Show Different Kitchen Showcases
Again, rather than simply making a virtual tour of your shop, you can decorate multiple kitchens with different appliances and then create virtual tours for each of them.
This will give the buyers a clear idea of how the products look in real life.
The Most Affordable Virtual Showroom Software
As amazing as virtual showroom sounds, you might be in a dilemma about how you can create one.
In fact, due to the high technological impact it has, you may even think it’s expensive.
But that’s not true. You can get amazing virtual tour software out there that is both affordable and of high quality.
The real concern here is how you can make it more engaging.
An Ideal Virtual Showroom Software Should Have The Following
Navigation features with zooming options.
Full-Screen Feature
Gyroscope Feature for Smartphone Users
On Click / On Hover content information
On Click “Add to Cart” Product
If you use a WordPress site, then the good news is, that you will find just the right tool to create stunning virtual showrooms – WPVR
WPVR is the #1 virtual tour builder in WordPress that will allow you to create 30 virtual tours easily. And it has all the features needed to make the tour more engaging.
In the following guide, you’ll learn how to create a digital showroom in a captivating way.
Then you can move on and build a specific one for your own industry.
How To Create A Virtual Showroom: Step by Step Guide
Now that you understand the benefits of a virtual showroom and know about the most affordable virtual showroom software, it’s time to create one for your business.
Setting up a virtual showroom might seem complex, but with the right approach, you can build an engaging and interactive experience for your customers.
Follow this step-by-step guide to get started.
Step 1 – Take Good Quality Images of Your Store
Taking better quality images of your showroom is a must-do task before creating a virtual tour. To capture the product details of your store, you can use a nice DSLR camera or even an iPhone.
A good tour with a clear 360 panoramic image will always ensure that the buyer sees what you’re trying to demonstrate.
Step 2 – Install & Activate WPVR
The first thing is for you to move ahead and install & activate WPVR on your WordPress Website (It’s Free!)
WPVR should be installed and activated on your WordPress site.
Hover over Plugins in the WordPress Dashboard.
Choose “Add New.”
Look for WPVR. Install and activate it once you’ve found it. (Alternatively, you can download and install the plugin directly from the WPVR page on wordpress.org)
Note: The Free Plugin will allow you to create a great tour. But with the pro plugin features you can make the tour more captivating.
Step 3 – Create A Virtual Showroom
Let’s get started with creating a virtual showroom for your website,
From your WordPress Dashboard, hover to the WP VR Plugin and Select “Add New Tour”.
Add a Title to your Tour in the annotated section.
Then configure the basic settings which are Tour Autoload, Show Controls, Auto Rotation, etc.
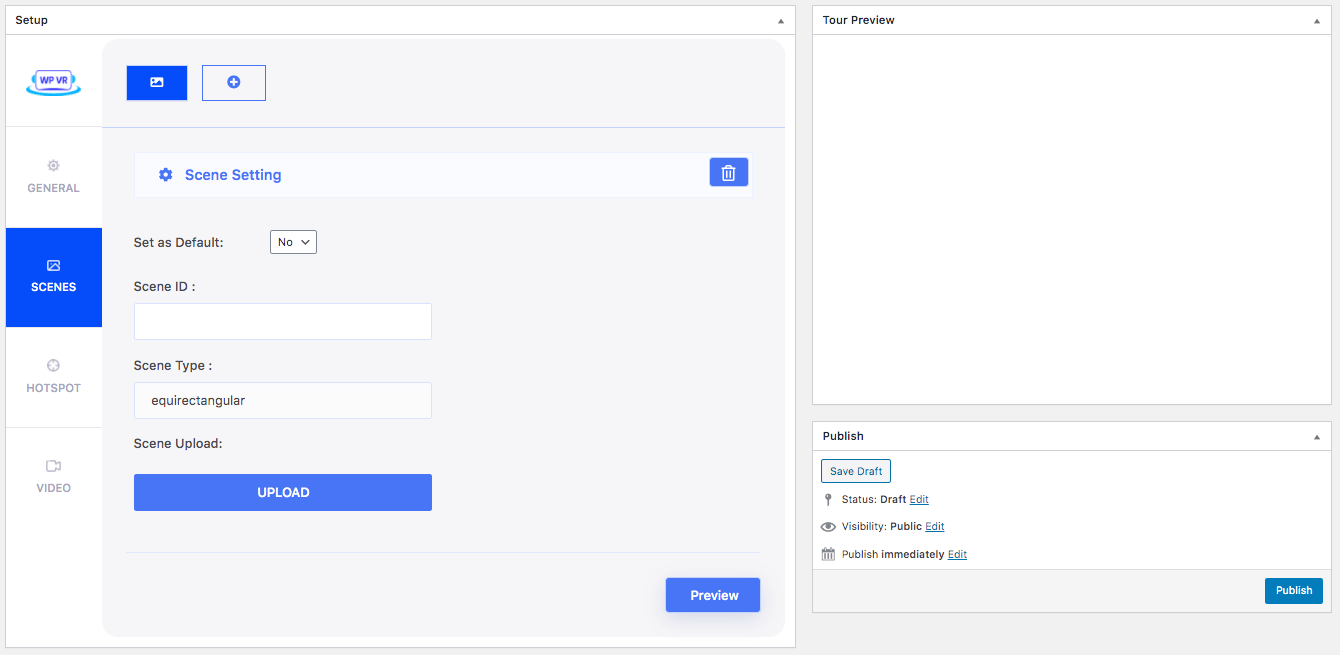
Now, the step is to upload a scene from the Scenes Tab,
Provide a Scene ID and Click on Upload
Note: Don’t use any space or special characters in the Scene ID.
Upload the scene you want and hit Preview. You’ll then find a Tour Preview on the Upper Right of the Dashboard. Provide a Title and extra information about the image if needed.
Once you’ve updated all the necessary details, Publish the tour,
Step 4 – Use Advanced Controls & Control Buttons
The Pro version of WP VR Plugin has two exclusive control features. One is Advanced Controls & the other is Control Buttons.
You should use these features within the Advanced Controls,
Gyroscope This feature will provide your clients with an enhanced smartphone experience of your Virtual Showroom tour.
Your clients will be able to thoroughly experience the tour from your virtual showroom tour.
Scene Gallery Add pictures of different sections of your showroom and display them with this feature.
Your virtual showroom might have different sections with different products. WP VR lets you add different scenes in a single tour. Your clients will be able to flip between sections from the scene gallery when you add them as separate scenes.
Tour Background Music Enabling this option will allow your clients to have a pleasant journey while they’re shopping from your showroom.
Add Company Information Your brand is your identity. Display your brand logo and showroom information with this feature.
Zoom Preferences Set necessary zoom preferences to help your prospects determine product quality. So your clients can zoom in and out when needed.
And, there’s another option to edit Control Buttons. Enable the options you need accordingly.
Step 5 – Refine The Tour With Hotspots
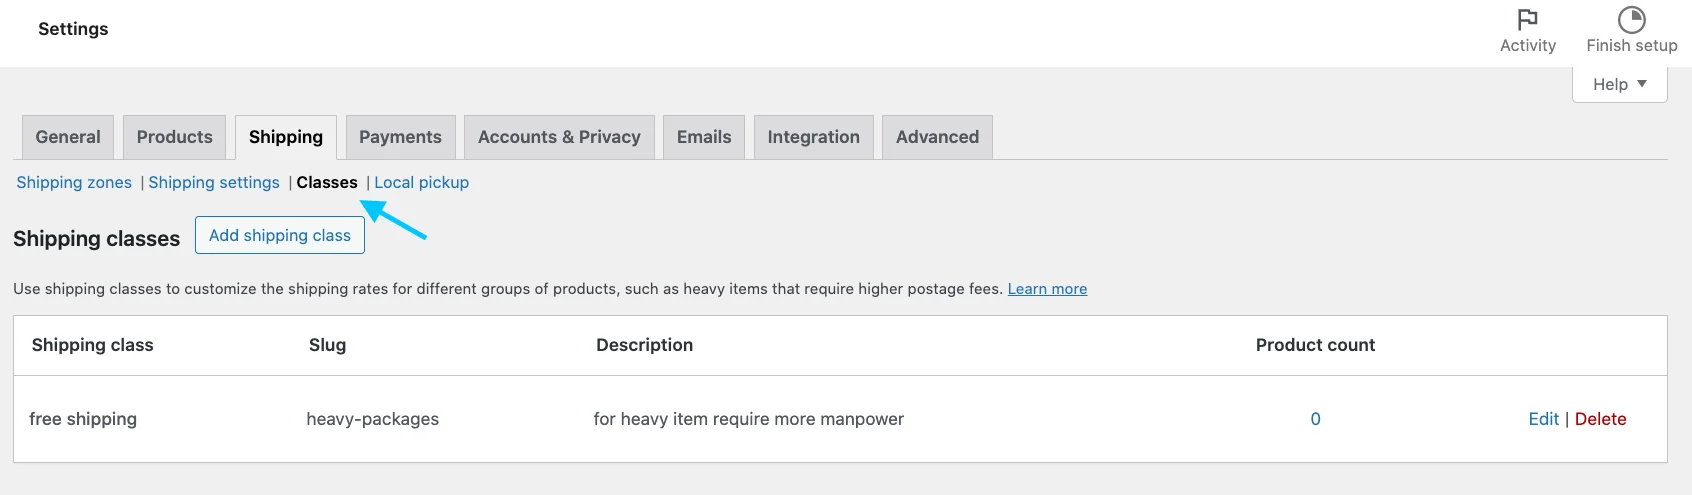
Hotspots are the most iconic feature of WPVR. Make your virtual showroom tour immersive with Hotspot Feature.
How to Add Hotspots:
Go to the Hotspot Menu from the Menu Section. You’ll find it just under the Scenes Menu.
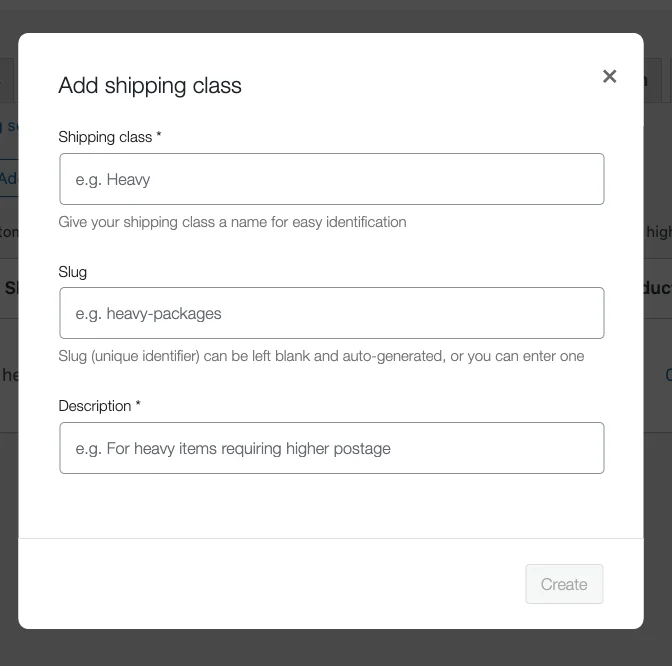
Add One and Provide a Hotspot ID. Hotspot ID refers to giving a unique name of the point you want to identify.
Then you’ll find four types of Hotspots.
Info Type:
You may view details by clicking or hovering over an info-type hotspot. You can even add images or gifs inside the hotspots. – Learn More about Info Type Hotspot.
Scene Type:
Let’s say you have multiple images of your showroom. If you’d love to display both ladies’ and gents’ dress sections and want to move from one section to another, the scene type hotspot is perfect for that purpose. – Learn More about Scene Type Hotspot.
Fluent Forms:
Fluent Forms help with Form Submission. If you’d like to get customer reviews about any product or want your customers to contact you for product info, use this addon. – Learn More about Fluent Forms Addon
WooCommerce Product:
This hotspot is best for a Virtual Showroom Tour. The user can directly click on a product and then proceed to add the product to the cart. – Learn More about WooCommerce Addon
Let’s Add an Info Type Hotspot to our Scene.
Let’s say, you want to add information that the trial room is there.
Provide a hotspot ID here.
Then, on the tour preview, Pin the hotspot icon to the desired location.
Then you’ll notice some values updated underneath the preview. When you click the button next to the Pitch & Yaw, the values on the left side will update.
Afterward, update the scene, and you’ll find an icon that has appeared on the tour. But you can only see the custom icon after you embed the tour onto a page or a post.
Beschriftung (optional)
Step 6 – How to Add a WooCommerce Product
A great thing about WooCommerce Addon is your prospects can directly shop from your virtual tour.
Before adding a product to your virtual tour, make sure you have the product enlisted in your WooCommerce store. At first, you’ll have to specify the Hotspot as “WooCommerce Product”.
Add a hotspot. Provide an ID
Find what product you want to enlist.
Select Pitch & Yaw
Then Add the Product, Hotspot Custom Icon & Color, and On Hover Content.
Try to keep your On Hover Content that speaks action. Keep the content like “Buy Now” or “Add Dress to Cart Right Away”.
Once you’ve completed setting up the WooCommerce Product. The modifications will be stored once you update the tour.
Frontend Preview
Let’s have a look at the frontend preview of WooCommerce Addon. This window appears when you click on the Hotspot.
Let’s add the Product to the cart and see what happens.
And to make sure that the product has been added to the cart, let’s redirect to the “View Cart”
And that’s it. Your Product has been added to the cart.
That concludes the discussion. Now, step up your game and impress your prospects by building an amazing virtual showroom tour. With perfect virtual reality showroom tours, make your prospects fall in love with your brand.
Best Practices for a Virtual Showroom to Boost Revenue
A virtual showroom should do more than just display products. It needs to create an experience that keeps visitors engaged and encourages them to buy. Here are the best practices to make your virtual showroom more effective:
Keep the Layout Clean and Organized – A cluttered showroom can overwhelm visitors. Arrange products logically, categorize them clearly, and remove unnecessary elements that distract from the shopping experience.
Ensure Fast Loading Speed – Slow-loading pages can cause visitors to leave. Optimize image sizes, use a reliable hosting service, and minimize unnecessary scripts to keep everything running smoothly.
Make It Easy to Navigate – Visitors should be able to find what they need without effort. Use intuitive controls, provide a visible menu, and ensure users can move between sections without confusion.
Highlight Best-Selling and Featured Products – Draw attention to popular items by placing them in key areas. A dedicated section for best-sellers, new arrivals, or exclusive products can help increase sales.
Keep the Buying Process Simple – If purchasing requires too many steps, customers may lose interest. Reduce unnecessary form fields, offer guest checkout options, and allow multiple payment methods.
Optimize for All Devices – Many users browse from mobile devices, so the showroom must work seamlessly on different screen sizes. Test it on desktops, tablets, and smartphones to ensure a smooth experience.
Provide Live Support – Customers may have questions while exploring. A chatbox, live video consultation, or even a chatbot for quick FAQs can help keep them engaged and move them closer to a purchase.
Regularly Update Content – Stale content makes a showroom look outdated. Refresh product images, update descriptions, and rotate featured products to keep it dynamic and engaging.
A virtual showroom should make shopping effortless. When everything works smoothly, customers are more likely to stay, explore, and buy. Now, let’s wrap things up.
Summary
Virtual Showrooms will improve your sales along with lowering the cost of the physical showroom. Your business will almost certainly reach a greater audience if you choose the virtual approach.
It doesn’t matter if you own a furniture showroom or a fashion house. Your ultimate goal should be to provide the best service to your potential clients.
And a virtual showroom tour might just be the game-changer you were looking for.
So, go ahead and create your own virtual showroom tour.
Ever wonder why some marketplaces explode with buyers and sellers while others feel like a ghost town?
Spoiler: it’s not luck—it’s strategy.
The truth is, that most marketplace businesses don’t fail because of a bad idea. They fail because they jump in without a plan—no clear way to attract users, generate revenue, or scale efficiently.
And before they know it, they’re stuck with an expensive, time-consuming project that just isn’t working.
That’s why having a solid marketplace strategy is non-negotiable. You need a game plan for getting sellers on board, keeping buyers engaged, and making sure your platform actually makes money.
In this guide, I’ll break down 10 actionable steps to help you build a marketplace that doesn’t just survive—but thrives.
Let’s get into it.
What is the Marketplace Strategy?
A marketplace strategy is basically your game plan for building, running, and growing an online marketplace.
It’s not just about setting up a platform and waiting for buyers and sellers to show up. It’s about knowing how to attract the right users, keep them engaged, and ensure transactions happen smoothly.
Think about it this way: if you’re launching a marketplace for handmade crafts, you need to decide how to bring in both artisans and buyers. You’ll need a system for listing products, managing payments, and handling customer service. Without a clear strategy, you might get a few initial users, but scaling will be a challenge.
A well-planned marketplace strategy covers key areas like:
business model selection,
pricing,
customer acquisition,
and seller management.
It ensures that your platform doesn’t just exist—it grows, stays competitive, and keeps users coming back.
Why Does Having a Marketplace Strategy Matter?
Launching a marketplace without a strategy is like throwing a party without invitations—you might get a few random visitors, but it won’t turn into a real success. Without a structured plan, you’ll struggle to attract buyers and sellers, manage operations, and scale profitably.
Here’s why a solid marketplace strategy is non-negotiable:
Competition is fierce – New marketplaces pop up every day, and standing out isn’t as easy as just launching a website. If you don’t have a clear approach to growth, you’ll get lost in the crowd.
Customers are more demanding than ever – Buyers expect fast delivery, personalized recommendations, and a seamless checkout process. If your marketplace can’t keep up, they’ll leave for one that can.
AI and automation are changing the rules – Businesses that use AI for pricing, product recommendations, and customer support are moving ahead fast. If you’re still relying on manual processes, you’re already behind.
Marketing isn’t just about ads anymore – Data-driven marketing helps you target the right audience, but without a strategy, you’ll waste money on ads that don’t convert.
Scaling too fast can backfire – If your operations can’t handle rapid growth, you’ll face logistical nightmares, poor user experience, and a flood of negative reviews.
Now, let’s see what are key benefits of having a proper marketplace strategy in place for your business.
Key Benefits of a Marketplace Strategy
With a solid strategy in place, you’ll see immediate and long-term benefits that help you grow and succeed in today’s competitive world.
Here’s how having a clear plan pays off:
Stronger customer acquisition and retention – A well-thought-out strategy helps you understand your target customers better. You’ll not only attract more of them, but you’ll also keep them coming back with offers and services they actually want.
Efficient resource allocation and business growth – A clear plan ensures you use your resources effectively. You’ll spend less time and money on tactics that don’t work and more on what actually drives growth.
Better monetization and revenue generation – With a clear strategy, you’ll spot more revenue opportunities, whether it’s through subscription models, transaction fees, or value-added services.
Enhanced customer trust and brand positioning – Customers trust businesses that have a clear purpose and vision. A solid strategy helps you position your marketplace as a reliable, well-organized brand, building trust from the start.
Competitive edge through data-driven decision-making – A good strategy relies on data, not guesswork. By using insights from customer behavior and trends, you can make smarter decisions that give you a leg up on the competition.
Now that we’ve covered the foundation of why a marketplace strategy is crucial, let’s dive into the actionable steps you can take to build and refine your own.
10 Actionable Steps to Build a Marketplace Strategy
These steps will guide you through the essentials of creating a marketplace that’s ready to scale and succeed.
1. Define Your Marketplace Vision
To start building your marketplace, you first need to define what kind of marketplace you’re creating. Are you focusing on
B2B (business-to-business),
B2C (business-to-consumer),
or P2P (peer-to-peer)?
This will shape how you approach everything from user acquisition to revenue generation.
2. Identify Your Target Audience & Their Needs
This step is about understanding who you’re serving. A marketplace succeeds when it solves real problems for its users. That means you need to know their pain points, demands, and behaviors before launching.
Start by researching your potential buyers and sellers. Look at competitor marketplaces, industry reports, and customer reviews to see what people are struggling with. Social media, forums, and surveys can also give you direct insights into what your audience needs.
Focusing on a niche can make it easier to stand out. Instead of trying to serve everyone, target a specific group with clear needs. A well-defined niche helps build a loyal customer base and makes marketing more effective.
General marketplaces compete with giants like Amazon, but niche marketplaces—like ones for handmade crafts or eco-friendly products—can attract dedicated users looking for something specific.
3. Choose the Right Marketplace Revenue Model
Now that you know your marketplace type and who you’re serving, it’s time to figure out how you’ll generate revenue. Your business model needs to make sense for both you and your users—otherwise, you’ll struggle to grow.
Let’s break down the most common revenue models, their real-world applications, and the pros and cons of each.
i. Commission Model
With the commission model, your marketplace takes a percentage of every sale made on the platform. This is one of the most popular approaches because it aligns your success with that of your sellers. If they make money, so do you.
Think about platforms like Airbnb or Upwork. When a guest books a stay or a client hires a freelancer, the marketplace takes a small cut from each transaction. This way, sellers don’t pay anything upfront—they only pay when they make a sale.
✅ Pros:
No upfront cost for sellers, making it easier to attract them.
Scales well since revenue grows with transaction volume.
Encourages quality service—sellers only pay when they succeed.
❌ Cons:
If transactions are low, so is your revenue.
Some sellers may try to avoid paying by taking transactions off-platform.
Setting the right commission percentage can be tricky—too high, and sellers leave; too low, and you struggle to profit.
ii. Subscription Model
A subscription model charges users a recurring fee—monthly, quarterly, or yearly—to access your marketplace or premium features. This creates a steady income stream regardless of transaction volume.
LinkedIn Premium and Amazon Prime follow this approach. LinkedIn charges job seekers and recruiters for enhanced features, while Amazon Prime members pay for benefits like free shipping and exclusive discounts.
✅ Pros:
Predictable, consistent revenue stream.
Encourages user retention since people want to get value from their membership.
Works well for niche or high-value marketplaces.
❌ Cons:
Harder to convince new users to sign up, especially if they don’t see immediate value.
You need strong marketing and engagement strategies to keep subscribers from canceling.
Users may expect premium features, which require ongoing investment.
iii. Listing Fee Model
With this model, sellers pay a fixed fee to list their products or services on your marketplace, regardless of whether they make a sale.
eBay and Craigslist have used listing fees in certain categories. If you want to post a job opening on a job board or sell a high-value product, you might need to pay a one-time fee to get listed.
✅ Pros:
Generates revenue upfront, even before transactions happen.
Works well for marketplaces with high seller demand (e.g., real estate, recruitment platforms).
Keeps listings relevant—sellers won’t spam the platform with low-quality offers if they have to pay.
❌ Cons:
Can discourage sellers, especially new ones who aren’t sure if they’ll make a sale.
Revenue isn’t tied to sales, so your marketplace might profit while sellers struggle.
Less effective for marketplaces that rely on high transaction volume.
iv. Hybrid Model
A hybrid model mixes different revenue strategies. You might charge a small listing fee plus a commission on sales or offer a free version with premium subscription upgrades.
Etsy combines a listing fee with a commission per sale, making it affordable for sellers while ensuring the marketplace earns revenue from successful transactions.
✅ Pros:
Creates multiple revenue streams, making your marketplace more financially stable.
Gives sellers flexibility—some might prefer paying upfront, while others are okay with commissions.
Can be customized to fit your marketplace’s needs.
❌ Cons:
More complex to set up and manage.
If not balanced properly, it could frustrate sellers.
Requires continuous testing to see which combination works best.
Which Model Should You Choose? The best revenue model depends on your marketplace type, audience, and goals. If your platform relies on high transaction volume, a commission model might work best. If you offer exclusive value, a subscription model could be a great fit. You can also mix and match based on what makes sense for your users. The key is to test and adapt as you grow.
4. Make Your Marketplace Easy to Manage and Scale
Once you’ve decided on a revenue model, your marketplace needs to run smoothly—even as it grows. If things get messy, buyers and sellers will leave.
Start with organized product listings. Make sure everything is easy to find with
clear categories,
filters,
and search options.
If buyers struggle to find what they need, they won’t stick around.
Next, order fulfillment and shipping need to be reliable. If sellers handle shipping, set clear guidelines to avoid delays. If your marketplace manages fulfillment, ensure quick deliveries and easy returns. Bad shipping experiences hurt trust and reduce repeat purchases.
Payments should be secure and hassle-free. Use trusted payment gateways and support multiple payment options so transactions go smoothly. If payments fail or seem unsafe, both buyers and sellers may stop using your platform.
To keep things running efficiently, automate as much as possible.AI-powered tools can help with customer support, pricing adjustments, and inventory tracking.
This reduces manual work and ensures your marketplace can handle more users without extra effort.
5. Keep Buyers and Sellers Coming Back
Now that you’ve established a solid foundation, keeping your marketplace vibrant is key.
A marketplace only works if both buyers and sellers stay active.
If there aren’t enough sellers, buyers won’t find what they need. If there aren’t enough buyers, sellers won’t stick around.
Keeping this balance is key.
To attract high-quality sellers, show them why your platform is worth their time. Offer lower fees, strong marketing support, or access to a specific audience. Highlight seller success stories to build trust and encourage more vendors to join.
For buyers, a great shopping experience keeps them coming back. Offer loyalty programs, personalized recommendations, and exclusive deals to encourage repeat purchases. If buyers feel valued, they’re more likely to stay.
Monitor key metrics like product availability, order volume, and buyer activity. If one side of the marketplace is struggling, adjust your strategy—whether that’s recruiting more sellers or running promotions to attract buyers.
6. Get More Customers from Multiple Channels
Once your marketplace is running smoothly, you need a steady stream of new buyers and sellers. Relying on a single source won’t be enough—different people discover list of online marketplaces in different ways. A multi-channel approach brings in more users and keeps your business growing.
i. SEO & Content Marketing
Ranking high on search engines helps people find your marketplace when they need it. Optimize your category pages, product listings, and blog content with relevant keywords.
High-quality guides, case studies, and tutorials can also attract organic traffic. The easier it is for users to find your platform on Google, the more marketplace Sales and sign-ups you’ll get.
ii. Social Media & Influencer Marketing
Social platforms help spread the word about your marketplace. Regular posts, short videos, and user-generated content keep your audience engaged.
Influencers and industry experts can introduce your marketplace to their followers.
Focus on platforms where your target audience spends time, whether that’s Instagram, TikTok, LinkedIn, or Facebook.
iii. Paid Advertising & Retargeting
Paid ads bring in users quickly. Google Ads work well for people actively searching for products, while Facebook and Instagram ads help with brand awareness.
Retargeting ads remind past visitors to return, increasing conversions. Running ads with clear offers, discounts, or benefits makes them more effective.
iv. Email Marketing & Community Engagement
Email keeps your marketplace top of mind. Send newsletters with new products, special deals, or trending items. Personalized recommendations based on past activity improve click-through rates.
An engaged community also helps—forums, live Q&A sessions, and interactive polls make users feel connected to your platform.
7. Make Your Marketplace Safe, Easy, and Reliable
Getting users to sign up is only half the battle. If your marketplace feels confusing or untrustworthy, they won’t stick around. A smooth, secure, and user-friendly platform keeps people coming back.
i. Make Navigation Simple
Nobody likes a confusing website. Buyers should find what they need in seconds, and sellers should manage their listings without hassle. A clear menu, smart search filters, and a clean layout make your marketplace easy to use.
ii. Speed Up the Checkout Process
Slow or complicated checkouts lead to abandoned carts. Keep forms short, support multiple payment methods, and remove unnecessary steps. A frictionless checkout means more completed purchases.
iii. Build Trust with Security
People won’t buy or sell if they feel unsafe. Use secure payment gateways, encrypt sensitive data, and prevent fraud. Clearly display trust badges and policies so users feel protected.
iv. Use Reviews to Boost Confidence
Buyers rely on reviews to make decisions. Allow verified buyers to leave honest feedback and highlight top-rated sellers. This keeps the marketplace fair and helps users shop with confidence.
v. Offer Quick and Helpful Support
When users run into issues, they should get help fast. Provide live chat, email support, or an easy-to-use help center. A well-organized FAQ section can also solve common problems without users needing to reach out.
A smooth and secure marketplace isn’t just good for users—it directly impacts your growth. When people trust your platform, they spend more and recommend it to others.
8. Keep Users Coming Back with Rewards and Freebies
A marketplace isn’t just about transactions—it’s about keeping people engaged. If buyers and sellers stay active, your platform grows naturally.
i. Use Rewards to Encourage Activity
Everyone loves perks. Offer discounts, cashback, or points-based rewards to keep buyers coming back. Sellers can also get incentives, like free listing upgrades for consistent sales.
ii. Referral Programs Bring in More Users
Word of mouth is powerful. Give users a reason to invite friends by offering referral bonuses—like a discount for both the referrer and the new user. This grows your marketplace at a lower cost.
iii. Let Users Try Before They Commit
Free trials and special offers remove hesitation. Let sellers list a few items for free or give buyers their first purchase discount. Once they see the value, they’re more likely to continue using your platform.
iv. Build a Community, Not Just a Marketplace
A strong community makes users feel connected. Features like discussion forums, expert Q&As, and live events keep people engaged beyond just buying and selling. When users feel involved, they stick around longer.
9. Use Data to Improve Your Marketplace
Every action on your marketplace—searches, purchases, clicks—tells a story. Tracking and analyzing this data helps you make smarter decisions, improve the user experience, and boost sales.
i. Track User Behavior to Find What Works
Analytics tools show where users drop off, which products get the most views, and how buyers interact with your platform. Heatmaps, session recordings, and conversion tracking highlight areas that need improvement.
ii. Test and Adjust for Better Results
Small changes can make a big difference. A/B testing lets you compare different layouts, pricing strategies, or checkout processes to see what drives more sales. If a small tweak increases conversions, it’s worth rolling out across your marketplace.
iii. Use Data to Improve Personalization
People expect relevant recommendations. By analyzing shopping habits and past interactions, you can suggest products that match their interests. A personalized experience keeps buyers engaged and increases sales.
Data is one of your biggest assets. Using it wisely means better decision-making, improved user experience, and steady marketplace growth.
10. Grow Your Marketplace Beyond Borders
Once your marketplace is running smoothly, expanding to international markets can open up new opportunities. But global scaling comes with challenges, and you need to prepare for them.
i. Make Your Product Listings Ready for Global Buyers
Different regions have different shopping habits. Optimize product feeds with localized descriptions, correct currencies, and relevant keywords. Ensuring accurate translations helps users feel comfortable making purchases.
ii. Offer the Right Payment Methods
Not all countries use the same payment options. Supporting local payment gateways—like Alipay for China or Klarna for Europe—removes barriers for international buyers. Flexible pricing and multi-currency support also improve the shopping experience.
iii. Stay Compliant with Local Laws
Every country has its own tax rules, shipping regulations, and data privacy laws. Researching these requirements early prevents legal issues later. Partnering with local logistics providers also ensures smooth delivery and better customer satisfaction.
Expanding globally isn’t just about selling to more people—it’s about adapting to new markets. A well-planned approach makes it easier to grow without running into unnecessary obstacles.
How Does A Feed Management ToolLead to Marketplace Growth?
Expanding into new markets means managing product listings across multiple platforms. Keeping everything updated manually is time-consuming and prone to errors.
It supports over 180+ marketplaces, allowing you to optimize, automate, and synchronize your product listings from a single dashboard.
i. Accurate Product Data Across All Platforms
PFM ensures that product details—pricing, stock levels, and descriptions—stay consistent and up to date across every marketplace, reducing errors and mismatched information.
ii. Easier Multi-Marketplace Expansion
PFM automatically adjusts your product feeds to meet each marketplace’s requirements, making expansion simpler.
iii. Better Product Visibility
PFM automates keyword placement, category mapping, and structured data formatting to improve discoverability and drive more sales.
Schlussbemerkungen
So, scaling a marketplace requires a structured approach. From choosing the right revenue model to optimizing operations and expanding globally, every step plays a role in long-term success.
Without a clear strategy, it’s easy to run into inefficiencies that slow growth.
Automating product feed management simplifies many of these challenges. PFM helps you keep listings accurate, expand to multiple marketplaces, and improve product visibility—all from a single platform. If you’re looking to streamline operations and scale faster-
Shopping cart abandonment is a major reason, why most e-commerce sites lose tons of prospects.
According to Baymard, the average abandoned cart rate is 70.19% throughout all industries.
As you can see, this is a serious issue and it’s best to take steps to cut down the chances of any abandoned cart situation.
Das sind die guten Nachrichten.
Today, I have analyzed the major reasons why shopping cart abandonment happens. There are some reasons you often ignore, such as some facts in the refund policy.
Ich habe auch erörtert, wie man diese unerwünschten Szenarien vermeiden kann.
Nach der Lektüre dieses Artikels werden Sie Folgendes erfahren
Unexpected reasons why you face shopping cart abandonment
How to avoid abandoned cart issues?
Warum Sie sich ernsthaft mit diesem Thema befassen sollten
Also lasst uns loslegen.
What is Shopping Cart Abandonment?
Shopping cart abandonment happens when someone visits your WooCommerce store and adds products to their cart but doesn’t complete the purchase. It’s a missed sale that leaves money on the table.
Think about this: You’ve found a great deal on a product. You add it to your cart, maybe even browse a bit more. But then something distracts you. Maybe you get confused about shipping fees or decide to compare prices on another site. Before you know it, you’ve closed the tab and completely forgotten about the cart.
That’s exactly what shopping cart abandonment looks like for your store. And it’s not rare—most online stores experience this regularly.
However, the first step to fixing it is understanding why it happens.
Key Reasons Behind Shopping Cart Abandonment
Nach vielen Recherchen habe ich herausgefunden, dass die Hauptgründe, warum Sie mit verlassenen Warenkörben konfrontiert werden können, ziemlich einfach sind. Sie sind:
Fehlende Zahlungsmöglichkeiten
Keine oder schlechte Rückgabe-/Rückerstattungsrichtlinien
Zusätzliche versteckte Kosten
Komplizierter oder mangelhafter Checkout-Prozess
Slower Page Load Speed
No Security Symbol
Yes, these may sound like small possibilities and are often ignored, but it is the reality; these simple issues lead to the largest number of abandoned carts.
Let’s look at why shopping cart abandonment happens so that you can effectively work on to reduce cart abandonment.
1. Fehlende Zahlungsmöglichkeiten
Sobald ein potenzieller Kunde alle Konvertierungsschritte durchlaufen hat und zur Kasse gegangen ist, ist es Zeit für die Bezahlung.
Das bedeutet, dass der Interessent wirklich interessiert und zum Kauf bereit ist.
However, there is still a chance of an abandoned cart when choosing payment options.
Viele Interessenten neigen dazu, ihr Interesse aufgrund der verfügbaren Zahlungsoptionen oder -methoden zu ändern.
Ja, das hört sich weit hergeholt an, aber es ist wirklich so!!
59% of customers abandon their carts because their preferred payment option was not offered on the site.
Bei all den verschiedenen Zahlungsmöglichkeiten und -methoden, die heute zur Verfügung stehen, besteht immer die Möglichkeit, dass Sie eine bestimmte Option nicht anbieten, die einige Interessenten vielleicht erwarten.
Die meisten Websites bieten Optionen wie Nachnahme, Kreditkartenzahlung (Visa/Masters) und Zahlung per Paypal an.
Was ist, wenn eine Person mit einer Geschenkkarte bezahlen möchte? Viele Websites akzeptieren sie nicht. Ich habe sogar Websites gesehen, die nicht einmal Zahlungen per Debitkarte akzeptieren; nur CC-Zahlungen werden akzeptiert.
This can often cause prospects to have an instant denial of interest and just abandon the cart without a second thought.
There is nothing more frustrating than losing a prospect right at the last moment, and that too is for a reason not related to the product.
2. Keine oder unzureichende Rückgabe-/Rückerstattungsrichtlinien
One thing that is almost as frustrating as the woocommerce abandoned cart itself is a refund.
Nehmen wir an, eine Person hat online ein Telefon gekauft. Nachdem er es jedoch erhalten und einen Tag lang benutzt hat, stellt er fest, dass der Akku des Telefons ein Problem hat und sehr schnell leer ist.
Dies ist ein ernstes Problem und bei elektronischen Geräten durchaus möglich. Die nächste zu erwartende Maßnahme ist eine Rückgabe oder Erstattung.
Aus diesem Grund informieren sich die meisten Käufer immer über die Rückgabe- und Erstattungsbedingungen einer Website, wenn sie zum ersten Mal ein Produkt kaufen.
Wenn Sie keine Rückgabe- und Erstattungsrichtlinien haben, ist das ein großes Warnsignal, und wenn Sie zwar eine haben, diese aber für potenzielle Kunden nicht praktikabel ist, wird das den Kunden ebenfalls abschrecken.
Most people wish to read the refund policy after they have found some products they like and probably added to the cart. But if they can’t find the refund policy or are not happy with the terms in the policy, they will simply leave your WordPress website.
So the bottom line is that the return & refund policy is a must for any online store.
Why Your Store Needs A Proper Return & Refund Policy
Let’s look at the following statistics:
63% of online buyers won’t consider buying from an online shop if there is no return policy.
Almost 30% of all the orders on online shopping get returned, but they get returned for a good reason.
96% der Käufer würden wieder bei einem Online-Shop kaufen, wenn dieser einmal eine einfache Rückgabe unterstützt hat.
3. Zusätzliche versteckte Kosten
Zusätzliche versteckte Kosten entstehen vor allem aufgrund von 2 Dingen:
Steuern
Versand-/Lieferkosten
Fast jeder Online-Käufer hat ein festes Budget im Kopf, wenn er online einkauft, und vieles hängt von diesem Budget ab, wenn er entscheidet, welche Produkte er kaufen möchte.
Stellen Sie sich eine Interessentin vor, die Make-up-Zubehör kaufen möchte. Auch wenn sie vielleicht Markenpräferenzen hat, so hat sie doch auch ein Budget, das sie nicht überschreiten möchte.
Nehmen wir an, sie hat einige Produkte gefunden, die ihr gefallen, hat sie in den Warenkorb gelegt und ist bereit für die Kasse.
Once she goes to the checkout page, all of a sudden, she sees this huge extra cost for taxes and shipping/delivery fees that add up to surpass her budget.
Zu diesem Zeitpunkt hat sie nur 3 Möglichkeiten:
das Budget erhöhen
einige Produkte durchstreichen
oder lassen Sie den Wagen stehen
In den meisten Fällen wird die dritte Option gewählt. Gründe:
Das ist leichter, als sich dem Druck einer Entscheidung auszusetzen.
Der Interessent denkt vielleicht, dass er später kaufen wird, wenn er mehr Geld zur Verfügung hat, und vergisst es dann schließlich.
Die Kunden könnten dies als unfair empfinden und auf der Suche nach besseren Preisen zu anderen Online-Shops wechseln.
4. Komplizierter oder mangelhafter Checkout-Prozess
According to a survey run by Bayard, 22% of online buyers said that they abandoned a cart because the checkout process was confusing or complicated.
Nun, 9 % klingt wenig, aber das sind die Interessenten, die am ehesten konvertieren. Sie haben jeden Schritt der Umwandlung durchlaufen und erst aufgehört, als sie sich mit dem letzten Prozess unwohl fühlten.
Dies sind die Gründe, warum die Kaufabwicklung für die Nutzer kompliziert wird:
The long and confusing checkout process
Creating distractions with ads and banners.
No place to enter discount coupons.
Erstellen eines detaillierten Kontos während der Kaufabwicklung
Warenkorb kann nicht bearbeitet werden
Keine Kontaktinformationen an der Kasse
Fehlen von Links zu Ihrer Politik
Here’s an example. Let’s say a person is willing to purchase a custom hoodie from your store. Once he goes to the checkout, if he sees that there are about 4 to 5 steps to purchasing just 1 hoodie, he will probably decide to do it later and end up forgetting about it.
Similarly, let’s say a person is on the checkout page. Now, if you initiate a lot of Ads or product suggestions, and by any chance, he finds one interesting, he will rather like to click on that.
Now you might think this is good that he might buy another product. But here’s the fact. Many people who will go into those Ads, will eventually get busy and decide to purchase later. And some will never come back.
Sie können auf der Warenkorb-Seite Produktvorschläge machen. Achten Sie jedoch darauf, dass keine Produktvorschläge oder Anzeigen erscheinen, wenn sich ein Kunde im Bezahlvorgang befindet. Eine kleine Ablenkung kann die Wahrscheinlichkeit eines abgebrochenen Einkaufs erhöhen.
5. Slower Page Load Speed
If your store’s pages take too long to load, prospects might lose patience and leave before they even get a chance to check out. Fast load speeds are critical to keeping your customers engaged, especially during checkout.
Imagine this: a customer has added a few items to their cart and is ready to make the purchase. But when they click on the checkout page, it takes several seconds—or even longer—for the page to load. They start wondering if the site is legit, or if there’s an issue with the checkout system. Frustration sets in, and instead of sticking around to wait, they simply leave.
In fact, studies show that 40% of users will abandon a website if it takes more than 3 seconds to load.
A slow website is not only annoying, but it’s also a major reason for shopping cart abandonment. Make sure your pages load quickly to avoid losing potential customers during these critical moments.
6. No Security Symbol
Nowadays, security is top of mind for online shoppers. If your WooCommerce store doesn’t show any signs that it’s secure—like SSL certificates or a security symbol—shoppers might hesitate to enter their personal and payment information.
Let’s say a customer has reached the checkout page, ready to buy. But when they look for that reassuring “padlock” symbol or see the HTTPS prefix in the URL, it’s nowhere to be found. They might start questioning whether it’s safe to enter sensitive information.
Without a clear security symbol, you risk turning away customers who aren’t willing to take the risk. Displaying an SSL certificate and other security markers can build trust and encourage customers to go through with their purchase.
6 Actionable Strategies To Avoid Shopping Cart Abandonment
Taking steps to prevent shopping cart abandonment means you’re staying ahead of the game.
You’ve seen how easily things like slow pages, hidden costs, or tricky checkouts can make someone leave. But by focusing on the right strategies, you’re showing your customers that their experience matters just as much as the products they’re buying.
Let’s look at how you can avoid those abandoned carts and create a smoother path to checkout.
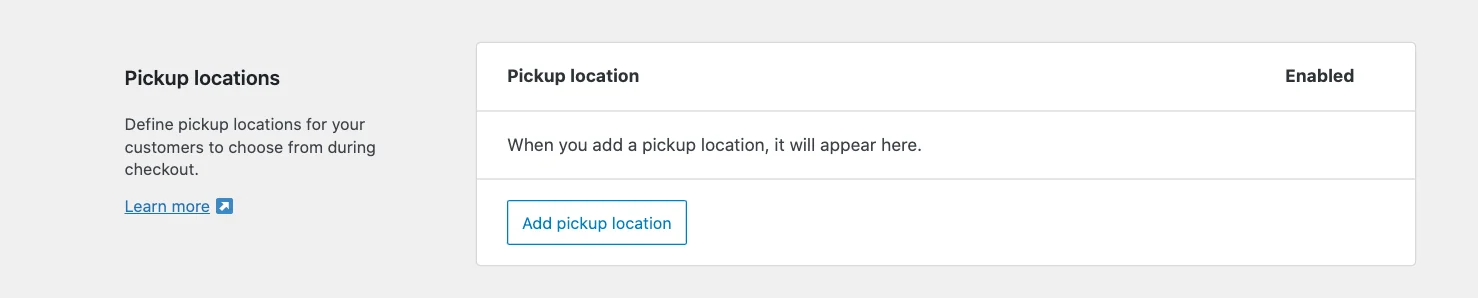
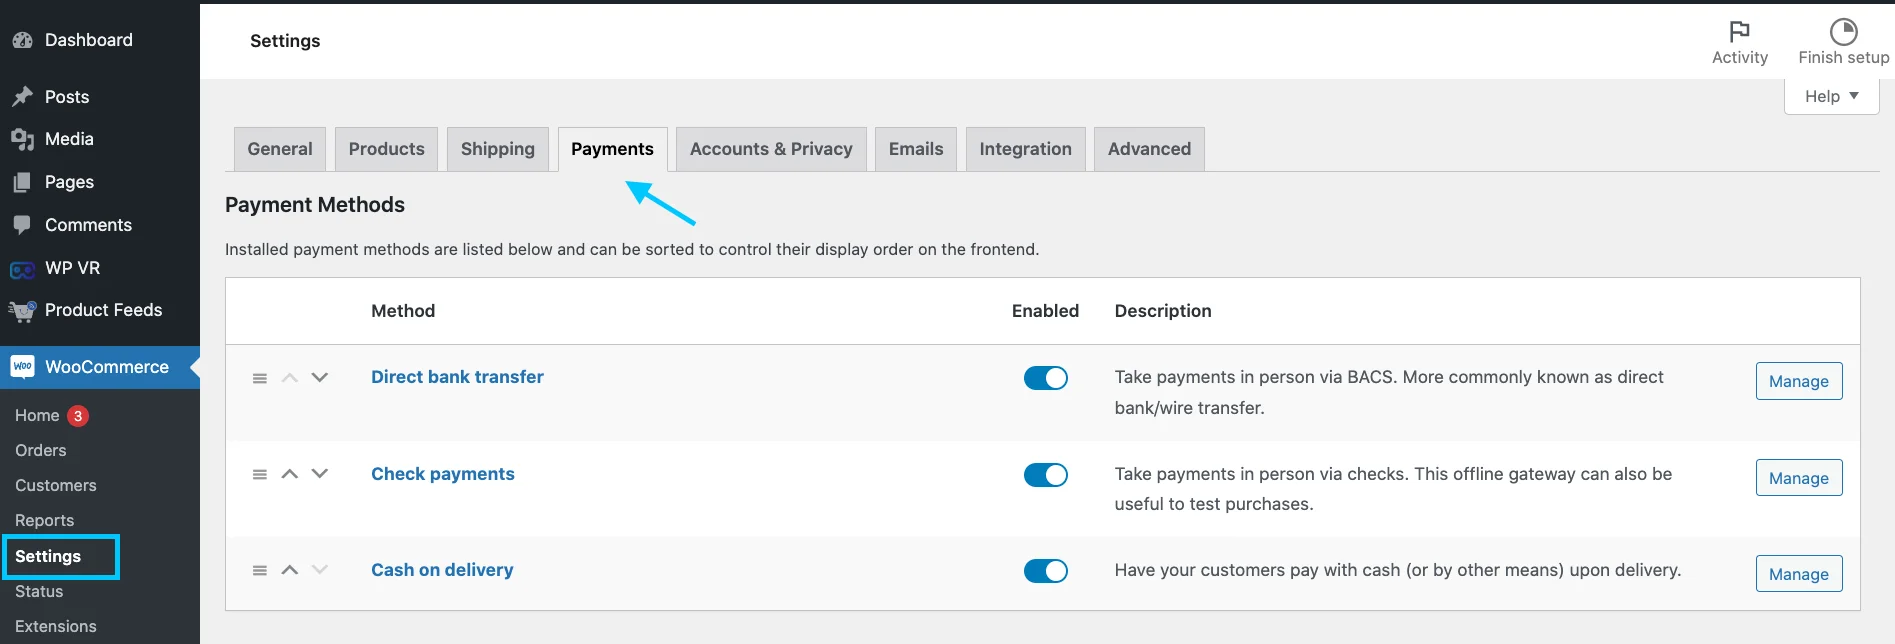
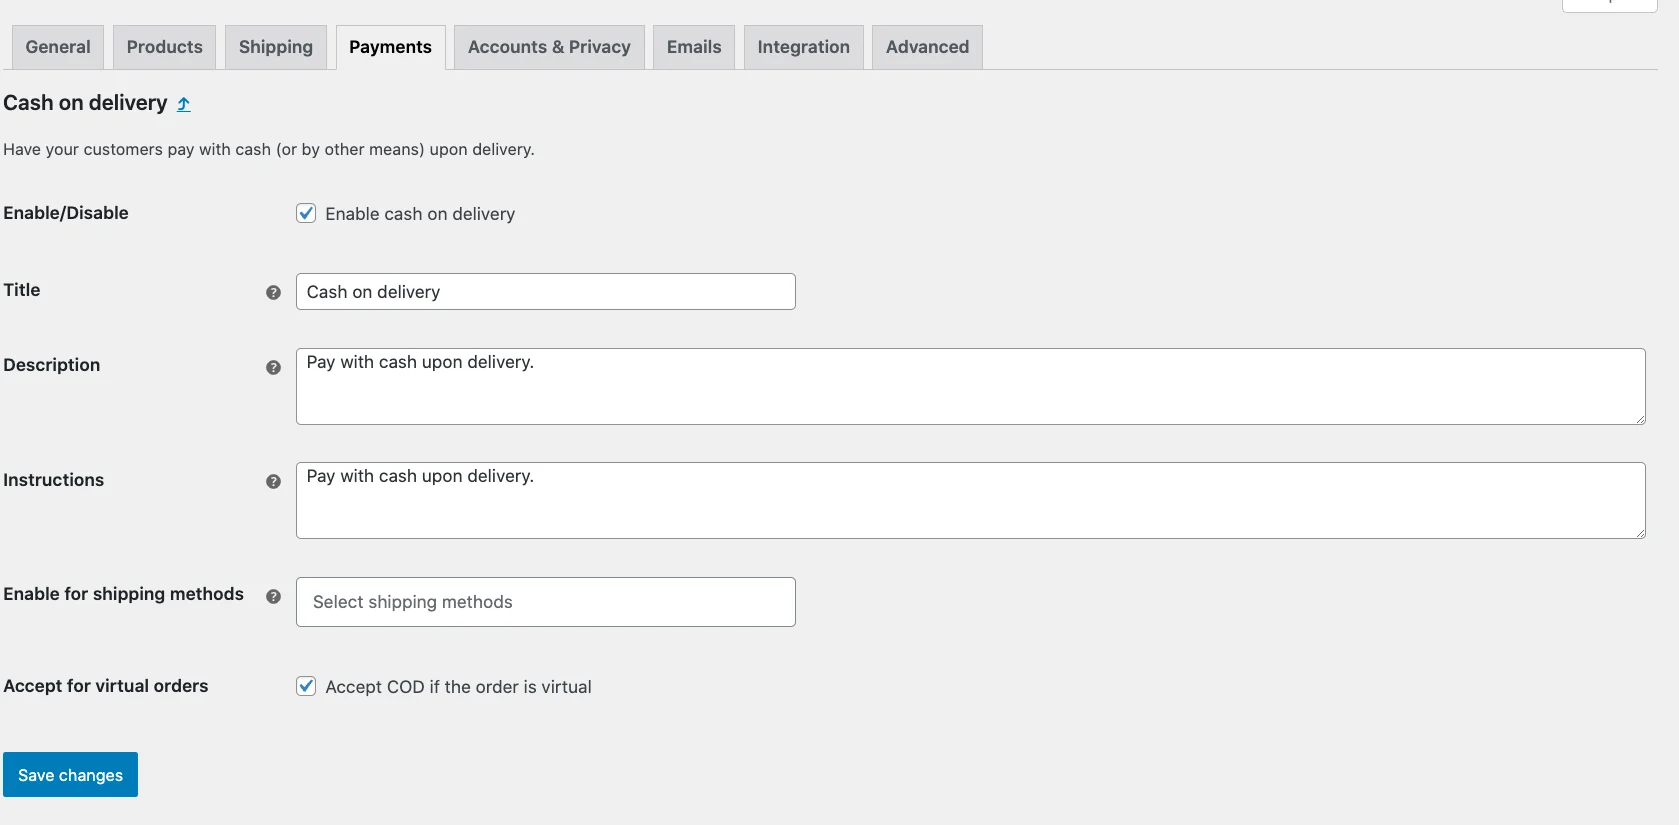
1. Offer Multiple Payment Options
Zunächst einmal müssen Sie die gängigen Zahlungsarten akzeptieren:
Nachnahme (für lokale Verkäufe)
Zahlungen mit Kreditkarte (Visa/Masters)
Paypal
Um mehr potenzielle Kunden zufrieden zu stellen, müssen Sie jetzt mehr Zahlungsmöglichkeiten einführen. Schauen wir uns einige von ihnen an.
i. Debitkarten-Zahlungen
Whether it’s a Visa, Masters, or any card processing network assigned, as long as the debit card is allowing payments via your required currency, it should be accepted, even if the person is from abroad.
ii. Geschenkkarten-Zahlungen
A gift card, also known as a gift voucher or a gift token, is a prepaid stored-value card and is usually issued by a bank or a retailer.
Let’s say a person got a gift card as a present and is looking for a place to spend it. If you accept gift cards, then your shop might be the place to spend it.
Außerdem haben Sie damit einen Vorteil gegenüber Ihren Mitbewerbern, da die meisten von ihnen keine Geschenkkarten als Zahlungsmittel akzeptieren.
iii. Teilzahlungen zulassen
‘Partial payments’ means when you allow a customer to place an order by paying a portion of the bill, and the rest to be paid during delivery.
Auf diese Weise ist die Wahrscheinlichkeit einer Stornierung geringer und es werden Interessenten angezogen, die nur wenige Vertrauensprobleme haben.
iv. Zahlung in Raten
Wenn Sie teure Produkte haben, können Sie Ihren Kunden die Möglichkeit geben, in Raten zu zahlen.
Sie können den Interessenten bei der Übergabe eine Art Vertrag unterschreiben lassen, um sich abzusichern, und ihm erlauben, den Gesamtbetrag über einen bestimmten Zeitraum zu tilgen.
IMEI is one of the forms of payment via installment that most electronic sellers allow nowadays, where a person purchases a product using a credit card, and an ACH is set up for the customer to be charged every month for an agreed number of months.
Sie können Ihren potenziellen Kunden auch die Möglichkeit geben, ähnliche Verträge über ihre Debitkarte abzuschließen, um diejenigen anzusprechen, die keine Kreditkarte besitzen oder diese nicht benutzen wollen.
v. Gesplittete Zahlung zulassen
During the holiday season, many banks and companies reward their users and employees with gift cards. This is also the time when people look forward to purchasing expensive gift items.
For example, if a prospect has a gift card worth $50 and he comes across a toaster in your store worth $80, he is unable to pay it with the gift card alone.
But if you allow him to split the payment and pay the rest of the $30 with his debit card, he will be happy to pay for the toaster.
vi. Akzeptieren Sie Zahlungen über andere Zahlungs-Gateways
If you’re running an online store, you should keep all the popular and standard payment gateways for your prospects. It is one of the great strategies of abandoned cart recovery that you can implement as the solution for woocommerce shopping cart abandonment.
Other than PayPal, two other payment gateways to consider for WooCommerce are Braintree and Stripe
Bei WooCommerce können Sie einige wirklich großartige Plugins für die Einrichtung eines Zahlungs-Gateways verwenden.
Denken Sie daran, dass "Finanzen und Zahlungen" eine sensible Angelegenheit sind. Die Menschen zahlen lieber mit ihrer bevorzugten Zahlungsmethode oder -option.
2. Create Clear and Customer-Friendly Return Policies
Let’s start with statistics on why there should be a clear and buyer friendly return policy in your store.
63% of online buyers won’t consider buying from an online shop if there is no return policy.
So, first of all, you must have a Return & Refund Policy if you wish to run a successful WoocComme store.
In der Police müssen Sie genaue Anweisungen darüber geben, was zu tun ist, wenn ein Kunde eine Rückgabe oder Erstattung beantragen möchte.
Tips on writing a proper Return & Refund Policy
You must clearly state the terms that make a prospect eligible for a refund. And mention the time it will take to process the refund policy. Look at the example below.
Diese sind Teil der Erstattungspolitik von RexTheme.
It is clearly stated when a person is eligible to apply for a refund and within what time they have to request a refund.
You need to include an action plan, i.e. what will be done by you when – A delivered product has defects – A wrong product is delivered – No product (s) delivered at all – Correct product delivered but does not match product details
You should also state the different action plans you may have for different product types. For example, underwear cannot be returned, but if it is defective, you have to offer a refund. Again, a phone can be returned and the prospect may be offered an exchange, repair (via warranty), or a refund. (More about this a bit later.)
Give your customers enough time to ask for a refund. It is ideal to give customers at least a week to report a return or refund request. Most large companies rather allow a 14-day return & refund policy. This is because it is not always possible to notice an issue with any product quickly. For example, an issue with lipstick can be spotted immediately but issues with a phone require a few days to notice.
Schreiben Sie eine Richtlinie, die Ihr Unternehmen widerspiegelt. Seien Sie nicht faul und kopieren Sie sie einfach von einer anderen eCommerce-Website. Die Richtlinie sollte sich ausschließlich auf Ihre Produkte und Ihre Zielkunden beziehen.
Hier sind einige Strategien, die Sie anwenden können, um die Rückgabe- und Erstattungspolitik für Sie praktikabler zu gestalten.
Intelligente Alternativen zur Erstattung
In einigen Fällen haben Sie die Möglichkeit, die Erstattung zu vermeiden. Sie können die folgenden Alternativen ausprobieren:
Offer a store credit of the same amount if a prospect has a genuine refund request. This way, the prospect will have to spend the amount on your store. However, this idea is more applicable to customers who purchase regularly, or if you have a popular online store with membership facilities.
You can keep an exchange/replacement option. An exchange/replacement option is more applicable if the reason for the refund request is a ‘damaged product’. This is a better solution for electronics, which usually cost more than clothes and apparel, and people will be more than happy to accept a replacement.
Rückgabe- und Erstattungsrichtlinien je nach Produkttyp
Hier sind einige Ideen, die Sie bei der Ausarbeitung Ihrer Rückgabe- und Erstattungsrichtlinien auf der Grundlage von Produkttypen umsetzen können.
i. Erstattungspolitik für Lebensmittelprodukte
Wenn Sie Lebensmittel verkaufen, dann wissen Sie, dass Lebensmittel verderblich sind oder verfaulen. Daher müssen Sie eine andere Politik für Lebensmittel haben.
Hier ist, was Unique Pretzels sagt über ihre Rückgabebedingungen:
Verderbliche Lebensmittel können nicht zurückgegeben werden. Alle Artikel in unserem Online-Shop werden nicht zurückgenommen, es sei denn, sie sind defekt.
Wenn das Produkt defekt, beschädigt oder verunreinigt ist, können Sie sich mit uns in Verbindung setzen und innerhalb von 14 Tagen nach Erhalt der Sendung die Rückgabe Ihres Kaufs gegen Erstattung oder Umtausch beantragen.
Diese Politik ist präzise. Ein Kunde kann sie nur zurückgeben, wenn das Produkt einen Mangel aufweist. Und der Kunde hat gut zwei Wochen Zeit, eine Erstattung oder einen Umtausch zu beantragen.
Lassen Sie uns ein Beispiel nehmen. Nehmen wir an, ein Kunde hat eine Packung Pralinen bestellt. Als er die Lieferung erhielt, waren die Pralinen zerbrochen oder innen geschmolzen. Gemäß der oben genannten Richtlinie hat er Anspruch auf eine Rückerstattung, sofern er innerhalb von 14 Tagen eine Rückerstattung beantragt.
Usually, the process is, that the customer has to send images proving the defection, and if proven correct, the request for a refund will be granted.
ii. Refund Policy on Electronics
Elektronische Produkte sind häufig Gegenstand von Rückgabe oder Umtausch.
If you are selling electronics online and a customer buys a cellphone from your store & discovers that the battery is not providing sufficient backup, then the customer should be offered a solution via repair. replacement, or refund.
Walmart gives customers a long period of 15-30 days to demand a return. According to their refund policy:
Elektronik, einschließlich, aber nicht beschränkt auf Computer, Camcorder, digitale Musikplayer und GPS-Geräte, muss innerhalb von 15 Tagen gegen Quittung zurückgegeben werden.
As long as the receipt is there and a notable issue is reported, after inspection (i.e. checking that the actual sold product was returned, which can be checked through product GTIN or MPN, and no extra damage was inflicted by the customer), return and refund may be accepted.
You can allow your prospects a similar return policy. You may also offer options such as repair, replacement, or store credit.
iii. Refund Policy On Clothes & Apparel
Clothes and apparel usually receive the highest amount of refund/return requests. According to SmallBizTreds, 75% of all the returned products online are products under the category ‘clothing and apparel’.
Sie können eine taktische Umtauschpolitik für Kleidung zulassen, um Rückzahlungen zu vermeiden.
Nehmen wir an, eine Person hat ein Kleid für seine Frau gekauft. Nach Erhalt des Kleides stellt er jedoch fest, dass es nicht die richtige Größe hat. In diesem Fall können Sie ihm einen Umtausch gegen eine passende Größe ermöglichen.
Beachten Sie, dass in diesem Beispiel das Kleid keinen Mangel aufwies und der Kunde zum Zeitpunkt des Kaufs wusste, welche Größe er kaufte. Warum also den Umtausch trotzdem zulassen?
This is just a strategy to avoid refunds when there is a defect. If your policy states an exchange, then you can simply allow the customer to return the defective product and send a copy of the same product that is not defective. Thus avoiding refund.
Sie müssen jedoch erwähnen, dass ein "präferenzbedingter Umtausch" nur einmal zulässig sein sollte. Nur defekte Waren können mehrfach zurückgegeben werden.
Bei Bekleidung sollten Sie jedoch eine Rückgabe und Erstattung nur dann zulassen, wenn ein Mangel oder ein falsches Produkt geliefert wurde.
Make Additional Policy For the Holiday Season
In der Ferienzeit werden Sie mehr Aufträge und mehr Verkäufe erhalten. Das hat aber auch einige Nachteile.
The delivery system will be packed up during this time. With more sales, there will also be more refund requests. Plus, missed delivery time will be a major headache. So the question is how you can avoid abandoned carts during the holiday season.
Imagine a man purchasing gifts for everyone in his family and two of the gifts were wrong deliveries. He will be furious and will surely want a refund.
Sie müssen sich also auf den Ferienrummel vorbereiten. Hier sind einige Tipps:
Verlängern Sie die Antragsfrist für Rücksendungen: Verlängern Sie von Mitte Dezember bis Anfang Januar die Frist für Rückgabe- und Umtauschanträge. Wenn sie bisher 14 Tage betrug, sollte sie für Bestellungen, die innerhalb dieses Zeitraums eingehen, auf 22 Tage verlängert werden.
Versenden Sie kostenlose Produkte: Wenn ein potenzieller Kunde eine falsche Lieferung erhält, bieten Sie ihm ein zusätzliches Guthaben an und schicken Sie ihm nach der Stoßzeit ein kleines Geschenk zu.
Erwähnen Sie mögliche Verzögerungen: Erwähnen Sie in Ihrer Police, dass sich die Lieferung aufgrund von Eile um ein paar Tage verzögern kann.
Wenn Sie transparent sind, werden Sie für potenzielle Kunden glaubwürdiger sein.
Nutzen Sie all diese Ideen und erstellen Sie eine überzeugende Rückerstattungspolitik. Achten Sie darauf, dass der Link auch im Warenkorb und auf der Kassenseite enthalten ist.
Auf den Produktseiten können Sie erwähnen, dass Sie eine Geld-zurück-Garantie anbieten, falls das Produkt nicht den Anforderungen entspricht. So gewinnen Sie mehr Vertrauen und verringern die Wahrscheinlichkeit eines abgebrochenen Einkaufs.
3. Be Transparent About Costs Upfront
Since hidden costs can be one of the prominent reasons for shopping cart abandonment, let’s directly go through how you can be transparent about the costs to your customers.
Hier erfahren Sie, wie Sie die versteckten Kosten aus der Welt schaffen können.
Empfohlene Schritte:
i. Show the delivery fee on the product page
Geben Sie auf der Produktseite die Lieferkosten unterhalb des Produktpreises an.
Wenn es sich um einen internationalen Kunden handelt, sollten Sie ein Plugin verwenden, das mit Hilfe von Geolocation Tracing die Versandkosten anhand des Standorts des Kunden anzeigt.
Sie können einen Rechner für den internationalen Versand einbinden, in dem die Kunden ihr bevorzugtes Lieferland auswählen können, um die Versandkosten zu ermitteln.
Oder Sie können einfach einen Produktpreis mit erhöhtem Wert festlegen und kostenlosen Versand anbieten.
Wenn ein Käufer ein Produkt für ein Fest oder einen wichtigen Anlass bestellt, ist das Lieferdatum das wichtigste Anliegen.
Das Datum kann sich in der Realität unter vielen Umständen verzögern, aber Sie können das mögliche Lieferdatum des Produkts schätzen.
ii. Show the Delivery Date On The Cart
Wenn ein Käufer ein Produkt für ein Fest oder einen wichtigen Anlass bestellt, ist das Lieferdatum das wichtigste Anliegen.
Das Datum kann sich in der Realität unter vielen Umständen verzögern, aber Sie können das mögliche Lieferdatum des Produkts schätzen.
iii. Preis inklusive Steuer anzeigen
Ab sofort können Sie oft den Standort eines Interessenten ermitteln und den Steuerbetrag berechnen, der auf das Produkt aufgeschlagen wird. Zeigen Sie diesen Betrag an, wenn ein Kunde ein Produkt betrachtet.
If a buyer sees a price including the tax on the product page, he or she will be able to make accurate budget decisions and are less likely to abandon the cart.
So macht es NordStorm:
Here, you can see the actual price of the product, the shipping fee (Free shipping in this case), the tax amount, and the total bill to be paid, thus making it easier for the prospect to manage his budget.
iv. Show Shipping costs on Product Pages
Wenn einem Interessenten ein Produkt gefällt und der Preis im Rahmen seines Budgets liegt, wird er sich als Nächstes nach den Versandkosten erkundigen.
Je nach Standort des Kunden können die Versandkosten sehr niedrig oder höher als der eigentliche Produktpreis sein, insbesondere beim internationalen Versand.
Daher ist es am besten, die Versandkosten auf der Produktseite anzugeben.
v. Kostenaufschlüsselung auf dem Warenkorb anzeigen
Es ist immer eine gute Idee, eine Kostenaufstellung für die Produkte in Ihrem Warenkorb zu führen.
Wie Sie bereits am Beispiel von NordStorm gesehen haben, können Sie alle Kosten für den Kauf von Produkten aufschlüsseln und einen Gesamtpreis ermitteln.
Hier ist ein weiteres Beispiel, die Warenkorb-Seite von LookHuman:
Hier ist ein weiteres Beispiel, die Warenkorb-Seite von LookHuman:
Sie können einige Tools verwenden, um die genauen Versandkosten für ein Produkt zu berechnen.
Hier sind einige Tipps, wie Sie die Versandkosten senken können.
Tips Regarding Shipping –
i. Kostenloser Versand anbieten
Eine der wirksamsten Methoden, Ihre Käufer zu überzeugen, besteht darin, ihnen einen kostenlosen Versand anzubieten.
Dies ist ein lukratives Geschäft, das auf lokaler Ebene sehr gut funktioniert.
Sehen Sie, wie AliExpress das macht.
Sehen Sie, wie AliExpress das macht.
Sie können auch einen kostenlosen Versand in einige bestimmte Länder anbieten, wenn Sie weltweit liefern. Weisen Sie auf der Grundlage der Geolocation die Nachricht "Kostenloser Versand" zu, die nur für Kunden angezeigt wird, die in den von Ihnen bevorzugten Ländern kaufen.
You can also offer surprise-free shipping in the cart or on the checkout page. This means you will show the shipping cost on the product page, but when the customer goes to the cart or checkout page, he will get a surprise with free shipping.
This will make him feel like it’s a special offer and will reduce the chance of shopping cart abandonment.
ii. Expresszustellung anbieten
Wenn jemand ein Produkt im Internet bestellt, möchte er es so schnell wie möglich erhalten. Deshalb wird der Begriff "Same Day Delivery" immer beliebter.
Wenn ein Interessent Ihr Produkt mit ähnlichen Produkten Ihrer Konkurrenten vergleicht, ist manchmal der einzige Unterschied, der ihn dazu bringt, sich für Ihr Produkt zu entscheiden, die Expresslieferung.
**Express delivery costs more so you should mention it, calculate the price, and show the cost of express delivery.
Wenn der Kunde es wirklich eilig hat, wird er für die zusätzlichen Kosten aufkommen.
iii. Behalten Sie eine Seite mit Versandrichtlinien
You should not confuse a shipping policy page with a privacy policy page.
Die Seite mit den Versandrichtlinien sollte alle Einzelheiten über den Versand enthalten.
Dies sind Dinge, die Ihre Seite mit den Versandrichtlinien enthalten sollte:
Verschiedene Versandarten, die Sie anbieten (Normal- und Expressversand) und deren Preise.
Versandmedium (wie FedEx, USMail, etc.)
Akzeptierte Lieferorte
Informationen zum internationalen Versand
Lokale Versandinformationen
Informationen zum Versand von Massengütern/Großhandel
Wie werden die Versandgebühren bezahlt?
Gebühren für die Rückgabe/Erstattung von Produkten
Versandbedingungen für verlorene/vermisste Produkte
Versandbedingungen bei verspäteter Lieferung
Versandbedingungen für stornierte Bestellungen
Product and Location restrictions (If any)
Hier ist ein Beispiel für eine ausgezeichnete Versandpolitik von BulletProof.
iv. Create a Tax Policy
Now, this is probably a new term for you. You won’t usually see the tax policy page on most eCommerce sites.
Die Höhe der Steuer auf ein Produkt hängt davon ab:
Die Art des Produkts.
If the buyer is shipping it locally or internationally.
In den USA haben einige wenige Bundesstaaten eine Recyclingsteuer auf Kunststoffprodukte erhoben, die je nach Bundesstaat unterschiedlich hoch ist. Und wenn Sie international versenden, erheben die verschiedenen Länder auf die meisten importierten Produkte unterschiedliche Steuern.
Sie können also eine separate Seite für die Steuerpolitik erstellen oder eine einzige Seite für die Versand- und Steuerpolitik erstellen.
4. Simplify Your Checkout Process
A short simple checkout process genuinely helps in reducing the chance of shopping cart abandonment.
Es gibt eine Reihe von Dingen, die Sie tun können, um den Checkout-Prozess zu verbessern.
i. Keep The Process Short & Simple
Versuchen Sie, den Bestellvorgang in so wenigen Schritten wie möglich abzuschließen.
Some websites insist that a customer should open an account, verify it, and then place an order. This is often very annoying as it takes a lot more time to complete than what a customer would expect.
Sie können also Folgendes tun.
Nehmen Sie nur die Informationen auf, die Sie wirklich für eine vollständige Bestellung benötigen. Behalten Sie also 4 Felder: Name, E-Mail, Adresse und Telefonnummer.
Schließen Sie dann den Zahlungsvorgang ab.
Sobald Sie fertig sind, erstellen Sie automatisch ein Konto und vermerken auf der Seite, dass ein Konto erstellt und eine E-Mail zur Festlegung des Passworts versandt wurde.
Sie können ein Kontrollkästchen mit der Aufschrift "Senden Sie mir in Zukunft interessante Angebote für ähnliche Produkte" einrichten, so dass eine Person ihr Passwort auch dann nicht zurücksetzen muss, wenn sie es in nächster Zeit nicht ändert.
Dadurch erhalten Sie die Erlaubnis, sich in Zukunft mit ihnen in Verbindung zu setzen, und früher oder später werden sie ihr Konto ordnungsgemäß einrichten.
ii. Gast-Checkout zulassen
Es kann sein, dass ein Käufer kein Konto eröffnen möchte, sondern nur einen einmaligen Kauf tätigen will, weil er entweder beschäftigt ist oder aus Sicherheitsgründen.
You can allow a “Guest Checkout” where the prospect will just provide the phone number, name, and address. Then proceed with the payment process.
Sie können nach dem Zahlungsvorgang eine Werbebotschaft anzeigen, die einen Rabattgutschein für eine Neuanmeldung anbietet, um die Person zu ermutigen, in Zukunft ein Konto zu eröffnen.
Denken Sie daran, dass Sie Ihren potenziellen Kunden zur Eröffnung eines Kontos ermutigen, aber niemals dazu zwingen sollten.
iii. Apply One Page-Checkout
Sie können auch strategisch vorgehen und eine einseitige Einkaufswagen- und Kassenseite verwenden, so dass ein Interessent seine ausgewählten Produktdetails sehen und den Kassiervorgang in einem Schritt abschließen kann.
Wenn er bereits ein Konto erstellt hat, können Sie alle Felder für Kundendaten automatisch ausfüllen und ihm erlauben, sie bei Bedarf zu bearbeiten. Ist dies nicht der Fall, lassen Sie ihn die Felder einfach ausfüllen und später automatisch ein Konto erstellen.
Here are some of the fields you should include in a one-page checkout:
Name des Kunden
E-Mail
Rufnummer
Warenkorb-Details (die er bearbeiten kann)
Zahlungsmöglichkeiten
Lieferadresse und -methode
Schaltfläche "Einkaufswagen speichern" (bei Anklicken E-Mail und Name angeben)
"Schaltfläche "Mehr einkaufen
Links to your policy pages
Nowadays, most large companies use One-Page Checkout to minimize WooCommerce cart abandonment.
5. Optimize Page Load Speed for Faster Navigation
Slow-loading websites are one of the primary reasons users abandon their carts. If your website takes too long to load, customers lose patience and leave without completing their purchase. Optimizing your page load speed ensures a seamless shopping experience, making it more likely that customers will follow through with their orders.
Here’s how you can optimize your page load speed with actionable strategies:
i. Minimize Image Sizes
High-resolution images can take a significant amount of time to load, especially on mobile devices. Compress your images to smaller sizes without compromising quality.
WordPress plugins like Smush or ShortPixel for automated compression.
Also, consider using modern formats like WebP instead of older formats like PNG or JPEG.
ii. Enable Browser Caching
Browser caching stores static resources, like images and stylesheets, on the user’s device. This reduces the need to reload these resources each time the user visits your site.
Set up caching using plugins like WP Super Cache or W3 Total Cache if you’re using WordPress.
For non-WordPress sites, configure caching through server settings or CDN providers like Cloudflare.
iii. Use a Content Delivery Network (CDN)
A CDN improves page speed by distributing your website’s resources across multiple servers worldwide. When a user accesses your site, they download resources from the server closest to their location. Popular CDNs include:
Cloudflare
Akamai
Amazon CloudFront
iv. Optimize Code (CSS, JavaScript, and HTML)
Bloated code can slow down your website. Minify your CSS, JavaScript, and HTML files to reduce file sizes and improve load times.
Use online tools like Minify Code for quick fixes.
Install plugins like Autoptimize to automate this process for WordPress sites.
Additionally, remove unused code and reduce the number of scripts running on your site.
v. Optimize Your Hosting Environment
Your web hosting provider plays a crucial role in page load speed. Ensure that your hosting plan can handle the traffic your website receives.
For WooCommerce sites, use hosting providers optimized for eCommerce, like SiteGround or Kinsta.
Upgrade to a VPS or dedicated server if your current shared hosting plan is causing slowdowns.
vi. Reduce HTTP Requests
Every time a user loads your site, their browser sends HTTP requests for various resources. Too many requests can slow things down. Reduce these requests by:
Combining CSS and JavaScript files.
Limiting the number of plugins you use.
Using CSS sprites for icons and small images.
By focusing on page load speed, you ensure your customers enjoy a smooth and frustration-free shopping experience, reducing the likelihood of shopping cart abandonment. The faster your site, the happier your customers.
6. Build Trust with Security Badges and SSL Certificates
If visitors don’t feel secure while browsing your site or entering their personal information, they’ll leave without making a purchase.
By showcasing security measures like SSL certificates and trust badges, you can reassure potential customers that their data is safe, building credibility and boosting conversions.
Beschriftung (optional)
Here’s how you can effectively build trust with security badges and SSL certificates:
i. Install and Display an SSL Certificate
An SSL (Secure Socket Layer) certificate encrypts the data exchanged between your website and users, ensuring that sensitive information like credit card details and passwords remain secure.
Activate HTTPS: Transition your site from HTTP to HTTPS. Most browsers mark HTTP sites as “Not Secure,” which deters users.
Obtain SSL certificates from trusted providers like Let’s Encrypt (free) or premium services like DigiCert.
Check for SSL configuration errors using tools like SSL Labs’ SSL Test.
ii. Highlight Trust Badges on Your Website
Trust badges are visual indicators that signal your site is secure and trustworthy. Place them prominently on:
Checkout pages: Reassure users that their payment information is safe.
Homepage or footer: Reinforce trust throughout their browsing experience.
Verified seller certifications (e.g., TrustedSite or Better Business Bureau).
iii. Enable Two-Factor Authentication (2FA)
Adding an extra layer of security like two-factor authentication reassures users that their accounts are protected from unauthorized access.
Use WordPress plugins like Wordfence or Google Authenticator to implement 2FA.
Encourage users to activate this feature for their accounts.
iv. Display Privacy Policies Clearly
Transparency builds trust. Create a privacy policy that explains how you collect, use, and store customer data.
Write in clear, simple language, avoiding legal jargon.
Place a link to the privacy policy in the footer, checkout page, and account creation page.
Tools like Termly or PrivacyPolicies.com can help you generate a professional policy.
v. Add a Security Seal to Your Site
Displaying a security seal from a trusted provider increases buyer confidence. Services like Norton Secure, McAfee Secure, or Trustwave offer seals after verifying your site’s security.
By combining these strategies, you create a safe and secure shopping environment that builds trust with your customers.
Bolus Strategies to Prevent Shopping Cart Abandonment
Now that you’ve implemented core strategies, it’s time to take things further. Adding a few extra tactics can address specific scenarios where visitors might leave without completing their purchase.
These strategies complement what you’ve already done, giving you more ways to connect with potential customers.
i. Use Retargeting for Cart Abandoners
Even with the best optimizations, some visitors will leave their carts behind. Retargeting gives you a chance to bring them back. Use tools like Google Ads or Facebook Ads to create retargeting campaigns that remind these users about their incomplete purchases.
Show ads with images of the products they left behind.
Offer time-limited discounts to encourage them to act quickly.
Use dynamic ads to personalize the experience and make it feel relevant.
This strategy doesn’t just recover lost sales—it keeps your brand top of mind.
ii. Employ Social Proof
When people see others trust your business, they’re more likely to trust it too. Social proof builds confidence and makes your brand look credible.
Beschriftung (optional)
Display customer reviews on product pages.
Add user-generated content, like photos or testimonials, on your homepage.
Highlight statistics, such as “10,000+ happy customers” or “Rated 4.8/5.”
Plugins like TrustPulse or Judge.me can help automate this process. By showing real-world validation, you create a sense of reliability that influences buying decisions.
iii. Utilize Exit-Intent Pop-Ups
Visitors leaving your site don’t have to be a lost cause. Exit-intent pop-ups are a simple way to grab their attention before they go.
Offer a discount or free shipping to make them reconsider.
Share lead magnets like an eBook, checklist, or free trial to capture their email address.
Keep the pop-up design clean and the message short for maximum impact.
You can use tools like OptinMonster or Popup Maker to create effective exit-intent campaigns. These pop-ups are particularly useful for turning hesitant visitors into leads or customers.
By adding these extra strategies, you give your site an edge. Combined with the core methods, they create a more comprehensive approach to improving engagement and conversions.
Conclusion
Reducing the number of shopping cart abandonment in your store doesn’t require a lot of effort. But you do need to focus on the little things that you often ignore.
The idea is to work smart and adopt the right methods for optimizing your store. I have offered the solutions that I found more actionable and result-oriented. You can be more creative and look for a better solution.
Eventually, if you can tackle the problems mentioned in this article properly, then you will end up reducing shopping cart abandonment by over 20% which will be more feasible.
Cart Lift can solve your problem by automating cart recovery with personalized email campaigns and discount incentives. This easy integration with WooCommerce ensures a smooth and effective recovery process, boosting your conversions and revenue.
Send personalized follow-up emails with a reminder of their abandoned items. You can offer a small discount or free shipping in these emails can entice customers to return and complete their purchase.
How does mobile optimization help to reduce cart abandonment?
Make sure your WooCommerce store is mobile-friendly, as many shoppers use mobile devices. A smooth mobile experience can significantly lower the chances of shopping cart abandonment.
How can I improve my website’s loading speed?
To improve your website’s loading speed, optimize images, use a reliable hosting provider, and implement a content delivery network (CDN). Faster loading times enhance user experience and reduce cart abandonment.
Should I offer discounts to first-time buyers?
Yes, you should. You can offer discounts to first-time buyers who can incentivize them to complete their purchase. This not only helps reduce cart abandonment but also encourages new customers to try your products.
How can live chat support help reduce abandoned carts?
Implementing live chat support allows customers to get immediate help if they encounter issues during checkout. This instant assistance can resolve concerns quickly, reducing the likelihood of shopping cart abandonment.
Ever wished you could teleport? Well, creating a virtual tour is the next best thing—minus the sci-fi complications and potential teleportation mishaps.
Imagine giving people a full, immersive tour of your business, property, or event space without them having to leave their couch (or even change out of their pajamas).
With a virtual tour, your audience can explore every nook and cranny as if they were there in person—without you having to clean up first.
In this guide, I’ll walk you through everything you need to know: from the basics of virtual reality to capturing stunning 360° images and building a tour that wows.
Once you complete this guide, you won’t rely on anyone to create virtual tours.
You’ll know how to create a virtual tour completly on your own, at the lowest cost.
Fangen wir also an.
First, Let’s Clear The Confusion!
If you gather clear knowledge of the basic terms it will be easier for you to understand the process of virtual tour creation.
Now, most people get confused between Virtual Reality and Virtual Tours!
Here’s a clear definition :
Was ist Virtuelle Realität?
Virtual Reality is a computerized environment or projection that you can experience visually.
You can observe, listen to, and interact with this environment.
Now, there are many types of VR technologies. The 5 most popular ones are listed below :
Arten von virtueller Realität
Nicht-immersive virtuelle Realität Nicht-immersive virtuelle Realität bezieht sich auf eine computergestützte virtuelle Erfahrung, bei der Sie einige Charaktere oder Aktivitäten innerhalb der Software steuern können, aber die Umgebung nicht direkt mit Ihnen interagiert. Beispiel: Simulationsspiele wie God of War.
Fully immersive virtual reality A fully immersive virtual technology ensures that you have a realistic experience within the virtual world. This is an expensive form of virtual reality which involves helmets, gloves and body connectors with sense detectors, to transfer your every physical moments within the virtual world. Example: Virtual shooting game zone.
Semi-immersive virtuelle Realität Eine halb-immersive virtuelle Realität kann in Form eines 3D-Raums oder einer virtuellen Umgebung vorliegen, in der Sie sich entweder durch einen Computer mit Maus und Tastatur oder auf mobilen Geräten durch Berühren und Streichen bewegen können, um sich am Ort zu bewegen. Sie kontrollieren keinen Charakter, Sie kontrollieren die Sichtweise selbst. Einige VR-Headsets sind halb-immersiv. Die meisten halb-immersiven virtuellen Umgebungen unterstützen Gyroscope. Beispiel: Ein virtueller Rundgang.
Erweiterte virtuelle Realität Augmented Reality ist, wenn eine bestimmte Einheit oder ein Gerät in der Realität vorhanden zu sein scheint, es aber in Wirklichkeit nicht ist. Anstatt Sie in eine virtuelle Welt zu versetzen, wird ein virtuelles Wesen durch ein beliebiges Gerät in die reale Welt gebracht. Beispiel: Das Spiel Pokemon Go zeigt Pokemons über Ihr Telefon an.
Kollaborative virtuelle Realität Es handelt sich um eine Form der virtuellen Welt, in der verschiedene Personen von verschiedenen Orten innerhalb einer virtuellen Umgebung in Kontakt kommen können, normalerweise in Form von 3D oder projizierten Charakteren. Die Menschen können über Mikrofone, Headsets und Chats miteinander interagieren. Beispiel: Spiele wie PUBG (Unbekanntes Schlachtfeld für Spieler)
Businesses such as Real Estate, Hotels & Resorts, Restaurants, Universities, Schools & Colleges, Super shops, Antique shops, Art Galleries, Showrooms, Museums, etc can engage with more prospects using virtual tours.
Read along to learn about how businesses can benefit from virtual tours (your business might be one of them).
Along with VR technology many VR devices such as VR Headsets, Virtual Game Spaces, Virtual Simulation, and training devices, and many more devices are being created day by day. Similarly, in the tech industry, companies specializing in igaming software development can leverage virtual tours to showcase their cutting-edge solutions and engage potential clients effectively.
Since you have an idea about virtual reality and its different formats, I’ll move to our main objective today – virtual tours.
Was ist ein virtueller Rundgang?
A virtual tour is a form of semi-immersive (one of the types of virtual reality)VR technology that allows you to experience a certain location remotely.
Basically, represents a real place in a virtual platform. You will feel like as if you are there.
Usually, a virtual tour is created by transforming a 360 seamless panoramic image into a realistic Equirectangular 3D space.
You will be able to rotate the screen 360 degrees in all directions. Plus you will be able to move from one panoramic image to another.
There are other forms of panorama images used to create virtual tours such as Cube Map, Little Planet, or Fish Eye. But we will be discussing the most efficient one, the Equirectangular virtual tour.
In jüngster Zeit haben virtuelle Rundgänge aufgrund des hohen Engagementpotenzials mit Interessenten in mehreren Unternehmen große Beliebtheit erlangt.
The latest forms of virtual tours are more advanced and attractive. You will find a scene gallery, click-to-view information tags, background music, Gyroscope support, some even support VR boxes, and many more. Proper platform development can also significantly enhance these virtual tours.
Beim Lesen erfahren Sie, wie Sie selbst virtuelle Rundgänge erstellen können.
Schauen wir uns die Vorteile der Nutzung einer virtuellen Tour für die meisten Unternehmen an.
Advantages Of Using A Virtual Tour On Your Website
Nun sind virtuelle Rundgänge für Unternehmen, die darauf angewiesen sind, ihren Standort hervorzuheben, um Interessenten anzuziehen, von größerem Nutzen.
So, Real Estate Firms, Hotels, Museums, Universities, Schools and Colleges, Amusement Parks, Fancy Restaurants, and most other such businesses can use virtual tours to attract more potential prospects.
Ja, die Verwendung von qualitativ hochwertigen Bildern ist keine schlechte Idee, aber eine virtuelle Tour kann eine größere Verbindung zum Betrachter herstellen, da dieser sich während der Tour persönlich und engagiert fühlt.
Hier sind einige der Vorteile, die Sie für Ihr Unternehmen durch eine virtuelle Tour erwarten können.
1. Sofortiges Engagement
Die Nutzung einer virtuellen Tour ist noch sehr neu und die Besucher Ihrer Website werden sofort begeistert sein.
The fact is, people are already well-accustomed to looking at flat images or videos. A virtual tour will be something new and interesting to all viewers.
Der Hauptgrund, warum ein virtueller Rundgang effektiver ist, liegt darin, dass die Zuschauer die volle Kontrolle über den Rundgang haben.
Flache Bilder können nur ein phantasievolles Bild erzeugen, das möglicherweise nicht genau ist. Und Videos können nur unkontrolliert angeschaut werden. Wir müssen den Ort aus dem Blickwinkel des Kameramanns betrachten.
In a virtual tour, viewers can move and look around from any angle or direction. They can go from one scene to another easily and can take their time to inspect the location.
Once they take the tour, they will have a more accurate visual of the actual location.
Thus, even if someone is not willing to purchase a website visit, a virtual tour might grab his attention and possibly turn him into a potential buyer.
Realtors and hotel owners will benefit the most in this case, compared to most other businesses.
However, anything unique, that’s interesting and exciting, can always get you better results no matter what business you run.
2. Bessere Visualisierung von Perspektiven
Das Hauptkonzept eines virtuellen Rundgangs besteht darin, eine realistische Vorstellung von einem Ort zu vermitteln. Und fast jedes Unternehmen kann virtuelle Rundgänge nutzen, um den Interessenten ein besser informiertes Bild zu vermitteln.
Previously, the most advanced remote tours were video tours.
However, the problem with video tours is that you can only watch from the point of view or angle of the cameraman.
You have no way to inspect from another angle.
Wie ich bereits erwähnt habe, können flache Bilder auch ein fantasievolles Bild erzeugen, das möglicherweise nicht genau ist.
Hier ist also das Hauptproblem. Mit Hilfe von Videos oder Bildern können sich die Menschen in ihren Köpfen ein Bild machen, was eine gewisse Erwartungshaltung erzeugt, wie der Ort bei einem persönlichen Besuch aussehen wird.
Nun, wenn eine Person zu Besuch kommt, verliert sie fast sofort das Interesse, wenn es nicht ihrer Vorstellung entspricht.
A virtual tour rather creates a near-perfect visual of the place.
A person taking a virtual tour will develop an expectation that very much matches the place in reality.
Thus creating more potential prospects.
So whether it is a hotel, an amusement park, a school, or any form of business, a virtual tour can generate more potential prospects.
3. Helfen Sie den Interessenten, eine Entscheidung zu treffen
As you just read, a virtual tour gives a better visual of the location.
Almost every detail can be inspected through a virtual tour and the close resemblance to the actual location makes it a great instrument of choice.
Lassen Sie mich das erklären.
Let’s say you’re searching online for good restaurants in your area. You found three restaurants that have good reviews based on the taste of their food.
But which one you’ll choose to visit?
Let’s assume all three of these restaurants have virtual tours on their site. Once you take a virtual tour of each of them, you will be able to understand which one has the environment that you were looking for.
The decorations and the seating arrangements would be more clear and you could choose your preferred restaurant.
Auf einer Immobilienwebsite können die Besucher auf ähnliche Weise verschiedene Häuser an einem Ort besichtigen. So können sie diejenigen auswählen, die sie für geeignet halten.
Almost all businesses can use virtual tours to influence prospects’ choices.
4. Unnötige Besuche und Ablehnung vermeiden
Using a huge number of photos is a common practice for realtors.
However, no matter how many images you use, it’s not possible to have a clear idea of the property structure and planning.
You may see each individual room and each important location clearly but don’t know how the spots are connected and how to move around inside the property.
Plus the latest photo editors can even transform a dull place to look stunning.
There is a high possibility that most people, willing to visit the location, might end up being disappointed since they had better or lower expectations.
At the same time, if you are giving a live tour to people during every visit, then you will be wasting a lot of time and effort since there is a high rejection rate.
The main reason is, as I explained earlier, failure to meet expectations.
A virtual tour will allow viewers to carefully inspect the property and decide if it’s suitable for them.
As a result, calls to visit will mostly come from prospects who are already interested and satisfied with the location, i.e., more potential prospects and fewer rejections.
According to a report, using 360-degree virtual tours in the real estate industry will reduce the number of wasted viewings by 40%.
That’s a substantial amount of time and money you can save.
5. Technologischer Vorteil gegenüber der Konkurrenz
Even though virtual tour is a relatively new term for a lot of people, it already has become a key marketing strategy for industries like real estate, hospitality business, museums, etc.
However, almost every business has the scope to utilize virtual tours as a part of its marketing strategy.
Dies ist eigentlich ein Vorteil für Ihr Unternehmen, wenn Sie virtuelle Touren nicht in großem Umfang genutzt haben.
For example, if you own a super shop, you can create a virtual tour that will let visitors get a tour of the shop remotely.
They will be able to see the various sections and types of goods you have. Plus, they will notice how organized and clean your super shop is.
Many viewers might choose to take a visit after noticing a certain section on your super shop, expecting to meet the quality they require.
Other super shops that don’t have a virtual tour on their site will not get this added advantage to convert an online visitor to a live prospect.
Similarly, if you own a hotel, then a virtual tour will give you an added advantage over other hotels in your area.
People visiting your site will be able to get a virtual experience remotely, compared to other hotels that rely on just images and videos.
Wenn Ihr Hotel gut dekoriert und erschwinglich ist, werden die meisten Leute Ihr Hotel nach einem virtuellen Rundgang wahrscheinlich anderen vorziehen.
As you can see, every business can be ahead of its competitors through a virtual tour. You will achieve more trust from prospects, and gain a good reputation for reliability and up-to-date technology.
These are 5 major advantages that almost all businesses can enjoy despite the niche.
There could be more advantages such as being more cost-effective compared to creating virtual video tours (due to hiring expert camera crews), and more efficient and effective towards prospects.
Liste der Unternehmen, die von virtuellen Touren profitieren können
Immobilien
Hotels und Ferienanlagen
Restaurants
Kasinos
Kunstgalerie
Modehaus
Hochzeitsorte
Konferenz-Säle
Autohäuser
Aquarium-Läden
Antiquitätenläden
Einkaufszentren
Super-Shops
Filmtheater
Haus/Interieur-Dekorationen
Historische Orte
Reise/Tourismusindustrie
Fitness-Studio/Fitness-Zentren
Universitäten, Schulen und Hochschulen
Virtuelle Lernzentren
Forschungseinrichtungen
Produktionshaus
Geschäftsstelle
Virtuelle Spielzonen
Indoor-Spielzonen/-Clubs
Handwerks-/Möbelgeschäfte
Themen-/Musikpark
Flughäfen und Fluggesellschaften
Orchideen und Blumengärten
Natur-/Safariparks
Museen
Krankenhäuser
Später in diesem Artikel werden wir auch erfahren, wie jedes dieser Unternehmen die Vorteile der Nutzung virtueller Touren nutzen kann. Sie erhalten nischenspezifische Informationen darüber, wie Sie virtuelle Touren nutzen können, um mehr Interessenten zu gewinnen.
If your business is on this list, then you will find this guide very helpful. And if you haven’t used virtual tours yet, then it’s time you start thinking about using them.
How To Create a Virtual Tour
To use a virtual tour you need to create one. To create a virtual tour you need some materials and need to know the process.
Let’s start with materials :
Resources You Need To Create a Virtual Tour
To create a virtual tour you will need two specific things.
You can go for any type of virtual tour.
For this article, I am going to use an equirectangular type to create a virtual tour.
In the case of an Equirectangular virtual tour, the main elements are:
360 panoramic images, and
A Virtual Tour Creator Tool.
What Is A 360 Panoramic Image?
First, understand what a panoramic image is.
A panoramic image is different from the usual photographs.
They are usually very wide and the pictures are taken in different ways for different types of panoramic images.
Now, a 360-degree panoramic image takes a 360-degree angle of a place or thing.
Once processed using a virtual tour creator, it becomes an Equirectangular virtual tour.
Here is an example:
A 360-degree Panorama Image
Converted To A Basic Virtual Tour
Once you have seamless 360 panoramic images, you can now easily create amazing virtual tours using a virtual tour creator.
In the example above, I used WPVR which is currently the best virtual tour creator for WordPress.
Das Erstellen einer virtuellen Tour klingt nach einer schwierigen Aufgabe, aber in Wirklichkeit ist es ziemlich einfach, solange Sie das richtige Werkzeug verwenden.
**Vorsicht bei Produktionsfirmen. Viele werden behaupten, dass Videotouren virtuelle Touren sind, aber das stimmt nicht. Ja, es gibt virtuelle Videotouren, aber sie sind nicht ideal für eine vollständige Kontrolle und Inspektion. Außerdem sind sie in der Produktion teurer.
Es gibt viele Werkzeuge und Dienste, die Ihnen helfen können, Ihre 360-Panoramabilder in eine virtuelle Tour umzuwandeln.
However, today I will show you a step-by-step process on how to create a virtual tour for your WordPress site using the WPVR plugin.
With WPVR, you can easily learn how to make a virtual tour with the simplest steps.
There are more virtual tour plugins, but this one comes with an easy interface and quality output.
Here’s a step-by-step guide on how you can generate a quality virtual tour using WPVR easily, on your own.
Step-by-Step Guide To Create Virtual Tour Using WPVR
First, let’s look at how you can create a virtual tour using the free version. Then I will discuss some of its Pro features that you can use to make the virtual tour more attractive.
Um eine virtuelle 360°-Tour von Ihrem WordPress-Dashboard aus zu erstellen, folgen Sie 9 einfachen Schritten:
Gehen Sie zu Ihrem WordPress Dashboard > Plugin > Neu hinzufügen.
Wenn Sie nach WPVR suchen, finden Sie ein blaues Symbol des Plugins, wie in der Abbildung unten gezeigt:
Click on “Install” and after that “Activate” will appear. Click on the button of the plugin.
Once the plugin is activated, you will get this page :
Click on the “Let’s create your first tour” button.
you will see on your Dashboard that a new menu called “WP VR” has been added. And this page will appear :
Now give a title to your virtual tour. If you don’t want to give title now then just press the cross button.
Then, as you proceed a pop up of scene id will come up :
Schritt 2 - Erstellen einer virtuellen Tour
As you proceed, this dashboard will appear :
On the left side, you will see 8 tabs:
:
Allgemein
Szenen
Hotspot
Video
Floor plan
Background Tour
Street View
Export
Für einen virtuellen Rundgang müssen Sie die richtigen Einstellungen der ersten drei Registerkarten vornehmen.
Schritt 3 - Konfigurieren Sie die allgemeinen Einstellungen
Go to the General>Basic Settings tab and you will see the following options:
Set A Tour Preview Image:
When you keep Autoload option “Off”, there is a netted placeholder visible. However. you can replace that by uploading a Preview image.
Simply click on the “UPLOAD” button and add a media image. (You should use a flat image for this, rather than a 360 panoramic image)
Oder Sie können einen Link zu dem Bild angeben. (Stellen Sie sicher, dass Ihre Website SSL-zertifiziert ist, d.h. "https", dann sollte auch der Bildlink "https" haben).
Sobald Sie das Bild hochgeladen haben, erscheint über der Upload-Schaltfläche ein Miniaturbild.
Dies bedeutet, dass das Vorschaubild erfolgreich hochgeladen wurde.
Now once you Preview the tour (or view the tour on a live page), if the Autoload option is “Off”, you will see that this image is in place of the tour until you click on it.
And if the Autoload option is “On”, then this image will be there until the tour loads. And if not you need to click on the button preview.
Now, the tour preview image won’t appear on the tour, if you’ve turned on the Autoload option.
Tour Autoload:
If the autoload is turned on, the panorama you upload will load automatically. Otherwise, it will load on-click on the option “preview“
Basic Control Buttons:
Turning it “On” will view the on-screen control button, such as zoom in/out and full-screen mode.
Scene Fade Duration:
The scene fade duration can be added in milliseconds for the transition between two scenes.
Nach diesem Bild ist die Szenenüberblendungsdauer auf 1000 Millisekunden, d.h. 1 Sekunde, eingestellt. Daher wird es einen 1-Sekunden-Überblendungseffekt geben, um von einer Szene zur anderen zu gelangen.
Auto Rotation:
Turning it “On” will show three more fields for you to add an auto-rotation feature to your virtual tour.
Rotation Speed and Direction
These are to set the speed of auto rotation on your tour. We suggest you keep this speed within the range of -20 to 20, or else the rotation will probably be too fast.
A negative number will rotate the tour anti-clockwise and a positive number will make it rotate clockwise.
Resume Auto Rotation After
This lets you set a time, in milliseconds, so that if you stop the rotation, then after this amount of time, it will start rotating again.
According to the image above, it is set to 2000 milliseconds, i.e., 2 seconds.
Stop Auto Rotation After
This lets you set a time after which the tour will stop auto-rotating.
However, this will not work if you input the value on Auto Rotation Inactive Delay. According to the image above, it is set to 2000 milliseconds, i.e., 2 seconds.
These are all the options in the General settings. Configure the settings as you require
Schritt 4 - Einrichten von Szenen
Im Grunde ist jedes einzelne Panorama, das Sie in Ihren virtuellen Rundgang aufnehmen möchten, eine Szene. Gehen Sie auf die Registerkarte Szenen und Sie erhalten folgende Optionen:
Set as default:
If you select “Yes” then the current scene will be the default scene to be viewed at first when the virtual tour is loaded. (FYI: The first scene is considered the default scene naturally.
If you want another scene to be the default scene, then mark that scene as “Yes” for Set as default.
Scene ID:
Scene ID is the initialization of a scene. You need to assign a unique scene ID to every scene you wish to upload.
Mit dieser Szenen-ID können Sie später unter Hotspot eine Szene als Zielszene zuweisen, d.h. durch Klicken auf den Hotspot gelangen Sie zu dieser Szene. Einen Leitfaden dazu erhalten Sie unter der Rubrik "HotSpot".
Scene Type:
The scene type is set as ‘equirectangular’ by default. It means that it will view the Equirectangular format of the scene.
Scene Upload:
Here, click on the “UPLOAD” button and upload a 360-degree panoramic image to use it as your current scene.
Sobald Sie das Bild hochgeladen haben, erscheint über der Upload-Schaltfläche ein Miniaturbild.
Dies bedeutet, dass das Bild als das aktuelle Szenenbild hochgeladen wird.
FYI: Most mobile devices have restrictions on the resolution; they can support a maximum of 4096 px by 2048 px.
Hence, we suggest you use a panoramic image within these dimensions for the virtual tour to be responsive on all devices. (However, the plugin works with any resolution. You can upload high resolution images if you just want to view the tour on PC).
Preview:
Once you have uploaded the image, you can now click on the Preview button.
You will get a Tour Preview of the tour just beside the Scene Settings.
Jedes Mal, wenn Sie Änderungen an den Einstellungen vornehmen, können Sie auf die Schaltfläche Vorschau klicken, um zu sehen, welche Änderungen in der Vorschau der Tour wirksam werden.
**The Tour Preview has a scene gallery below. You can double-click on a thumbnail there to go to any scene in the tour preview.
Um eine zweite Szene hinzuzufügen, klicken Sie oben auf die Schaltfläche "+".
Und es wird eine neue leere Szene hinzugefügt.
Um zwischen den Szenen zu wechseln, klicken Sie auf die obigen Symbole. Die aktuell betrachtete Szene wird blau markiert.
To delete a scene, you can simply go to the scene, then click on the “Trash Bin” icon and the scene will be deleted.
Here are more fields that you get :
Title: Specifies the name or title of the panoramic scene.
Author: Identifies the creator or photographer of the panoramic image.
Author URL: Provides a link to the author’s website or portfolio.
Vertical Angle of View: Determines the vertical field of view for the panoramic scene.
Horizontal Angle of View: Sets the horizontal field of view for the panoramic scene.
Set accordingly the field as per your needs.
That’s it with the basics of Scene Settings.
Now, add Hotspots to make the tour more meaningful and engaging.
Schritt 5 - Hotspot effizient nutzen
Für eine aktive Szene können Sie mehrere Hotspots hinzufügen. Mit dieser Option können Sie jede Ihrer Szenen mit anderen Szenen verknüpfen.
Also, you can add images, links, or video information via this option.
While on a Scene, go to the HotSpot tab and you get the hotspots you added for that particular Scene.
To add a hotspot for another scene, first, go to the Scene tab, select the desired Scene, then go to the Hotspot tab to view its respective Hotspots.
For a hotspot of a scene, initially, you will get the following options:
HotSpot ID:
You have to provide a unique Hotspot ID for every hotspot you create in a scene.
Pitch And Yaw:
The Pitch and Yaw are the coordinates required to define the point where the Hotspot will be placed.
You will be able to collect these from the Preview Tour.
Previously you set up the scene and clicked on Preview. The Preview Tour will be still there.
Scrollen Sie zur Vorschau-Tour und klicken Sie auf den Punkt auf der Tour, an dem Sie den Hotspot platzieren möchten. Sie werden sehen, dass die Pitch- und Gier-Koordinaten unterhalb der Vorschau-Tour angezeigt werden.
Sie können Tonhöhe und Gieren kopieren und in die erforderlichen Felder eingeben.
Or, you can click on the arrow button (beside the Pitch and Yaw coordinates under the Tour preview) to automatically collect and place Pitch and Yaw values in the Pitch and Yaw fields for a Hotspot.
Once you are done setting up the hotspot, click on the Preview button, and a hotspot icon will appear in the current scene on the spot from where you collected the coordinates of the Pitch and Yaw.
HotSpot Type:
There are two types of hotspots available:
Info
Szene
It comes as “Info” by default and you will view these fields:
URL.
On Click Content.
On Hover Content.
URL:
Provide the URL of a website, so clicking on the hotspot will take you to that website on a new tab.
On Click Content:
Here you can add content to your hotspot so that clicking on the hotspot will display a pop-up window over the tour with the content you entered. There are options to add text, images, videos, gifs and more!
On Hover Content:
Here you can add content to your hotspot so that if you just hover your mouse on the hotspot, the content will appear. And similar to the on click content, you can add whatever type of content you want.
You can also add images using the <img src> tag or add a video using the <iframe> snippet of the video to display them when you hover the mouse on the hotspot.
Now, let’s look at the Scene type hotspot.
A scene-type hotspot is used to connect two scenes, i.e., clicking on the hotspot will transmit you to another scene (assigned here).
If you change the hotspot style to Scene, then you will view these fields:
On Hover Content.
Select Target Scene from the List.
Target Scene ID.
On Hover Content:
Here you can add content to your hotspot so that if you just hover your mouse on the hotspot, the content will appear. In the content, you’ll be able to add image [maybe of the scene that you’re guiding them to], videos, images etc.
Hier ist ein Beispiel:
You can also add images using the <img src> tag or add a video using the <iframe> snippet of the video to display them when you hover the mouse on the hotspot.
Select Target Scene and the ID from the List:
For every Scene you create, their Scene IDs get listed here for you to choose from. Whichever you choose will be the scene where the hotspot will take you. This field shows you the Id of the Scene that you selected from the Target Scene from the List.
The ID automatically gets loaded.
**When you choose a hotspot to be Scene type, the hotspot icon on the tour will change to a small Arrow.
Hotspot Custom Icon Class:
This field is there to allow you to implement customizations of the hotspot content.
Hier können Sie das Hotspot-Symbol anpassen. Sie können ein beliebiges Symbol Ihrer Wahl verwenden. Ich möchte Ihnen ein Beispiel nennen.
Um Ihr Hotspot-Symbol anzupassen, gehen Sie zu Ihrem Erscheinungsbild > Editor. Wählen Sie das Stylesheet Ihres aktuellen Themas, oder gehen Sie zu Darstellung > Anpassen > Zusätzliche CSS.
Erstellen Sie hier eine Klasse, und fügen Sie unter der Klasse Ihren CSS-Code im benutzerdefinierten Stil zur Anpassung hinzu. Klicken Sie auf Speichern. Zum Beispiel:
Here I set the class name as “custom-icon” but you can give any name you want. Then set the height and width of the image (ideally 26px by 26px for icons). Then provide the image URL. You can add a border radius if you want the icon to be circular.
So sieht meine aus:
Dann veröffentlichen.
Hotspot Custom Icon Class:
Now go to your tour and input the class name “custom-icon” on the “Hotspot custom icon class” field for the hotspot you wish this icon to apply on.
Then update the tour. This icon won’t show at the back end, but it will appear on the front-end.
Hence, embed the tour on a page and preview it to see the result.
Add More Hotspot As You Move On:
Um einen zweiten Hotspot hinzuzufügen, klicken Sie auf die Schaltfläche "+" oben und ein neuer leerer Hotspot wird hinzugefügt.
Um einen Hotspot zu entfernen, klicken Sie einfach auf das Papierkorbsymbol, und der Hotspot wird gelöscht.
Das war's, das ist alles, was man über die Einrichtung eines Hotspots vorerst wissen muss.
Hotspot Special Features In WPVR PRO
Now utilize Steps 3, 4, and 5 to add more scenes and set up a virtual tour.
You can also customize your icon with these options :
Hotspot Custom Background Color: This allows you to set a specific background color for hotspots in the panoramic scene.
Hotspot Custom Background Shape: This allows you to set specific background shapes for hotspot icons like circles, rectangles or hexagon.
Hotspot Custom Icon Color: Enables customization of the color of the icon used for hotspots in the panoramic view.
Hotspot Animation: Provides options to add visual effects or movements to hotspots, making them more noticeable or interactive. This icon won’t show at the back end, but it will appear on the front end.
Step 6 – Publish The Tour and Collect Tour ID
Once done, move to the next step.
Publish The Tour: Once you have successfully set the settings for General settings, Scene settings, and Hotspots settings, click on the Publish button on the top right side of the page.
Nach der Veröffentlichung ändert sich diese Schaltfläche in Aktualisieren.
Collect Tour ID: On the tour setting pages, you will see a box named Using This Tour where the shortcode and the Tour ID is provided. You will need the Tour ID to embed your virtual tour on the website.
You can also get the Tour ID from the tours section.
Alle von Ihnen erstellten Touren werden unter Dashboard > WPVR > Touren gespeichert.
You will see the list of the tours you have created. You can collect the Shortcode or tour ID.
Step 7 – Place The Virtual Tour On Your Website
Die Platzierung der virtuellen Tour auf Ihrer Website hängt vom verwendeten Seiteneditor ab.
Classic editor: For Classic Editor, copy and paste the shortcode of your virtual tour. You can add height, width, radius, or any designs you want within the shortcode.
Preview or Publish the page to find the virtual tour added.
Other page editors (such as Visual Composer):
For page builders such as Beaver Builder, Visual Composer, etc, you need to use an “HTML” block (such as Raw HTML block) and input the shortcode there.
Step 8 – Enjoy The Benefits Of Using A Virtual Tour
Now that you know how to create, set up, and present the virtual tour on your website. The next thing to do is to sit and see your audience getting excited, visitors becoming dedicated prospects, and prospects turning into customers.
As you can see, it is super easy to create a virtual tour for your WordPress site. Go ahead and start using virtual tours ASAP.
In a later section, I will discuss how many business niches can use and benefit from using virtual tours. You will definitely be able to relate.
Jedenfalls sind die meisten von uns heute nicht mehr mit Panoramabildern vertraut, da sie ohne einige wenige Geräte und Methoden nicht aufgenommen werden können. Und wie Sie im letzten Abschnitt gesehen haben, müssen Sie, um einen virtuellen Rundgang zu erstellen, ein nahtloses 360°-Panoramabild verwenden.
Nun wollen wir uns ansehen, wie Sie selbstständig 360-Panoramabilder aufnehmen können.
Capturing A Perfect 360 Panoramic Image
Sie können 360 Panoramabilder auf 3 Arten erfassen und erstellen:
Digital 360 Degree Cameras are the best for this case. They are easy to use, less hassle, and cost-effective.
Ich gebe Ihnen jedoch einen richtigen Leitfaden für alle 3 Methoden mit Vorschlägen für die erforderliche Ausrüstung sowie Tipps und Anleitungen zur erfolgreichen Erstellung von 360-Panoramabildern.
1. Using Digital 360 Degree Cameras
There are certain cameras available just for 360-degree photography. These are digital cameras that usually have multiple built-in Fisheye lenses that cover a complete 360 degrees in one go.
Hier werden wir eine kurze Anleitung zur Verwendung der Ricoh Theta V für die Aufnahme von nahtlosen 360°-Panoramabildern geben.
Schauen wir uns die benötigten Werkzeuge an.
Erforderliche Ausrüstung:
1. Ricoh Theta V
A Ricoh Theta V is a slim camera with two Fisheye lenses in opposite directions. Each lens captures a complete 180 degrees both horizontally and vertically.
Der Hauptvorteil dieser Kamera besteht darin, dass sie über eine Autostitching-Funktion verfügt, d.h. wenn Sie ein Foto aufnehmen, wird das Ergebnis automatisch ein 360°-Panoramabild sein. Sie müssen keine manuellen Stitching-Maßnahmen durchführen oder mehrere Bilder aufnehmen.
2. Einbeinstativ
Ein Einbeinstativ ist eine Kamera mit 1 ausziehbaren Bein, das in bestimmten Höhen fixiert werden kann. Da die Ricoh Theta einen kompletten 360-Grad-Bereich abdeckt, wäre ein Stativ mit seinen 3 Beinen hinderlich. Ein Einbeinstativ erscheint überhaupt nicht auf dem Bild.
Die App bietet Ihnen Funktionen zur Steuerung von Weißabgleich, ISO, Belichtungsreihen und Auslöser.
The main reason to use the app is to be able to take photos remotely. Since the 360 camera covers all directions in one go, you clicking manually would mean that you would be on the image.
Mit Hilfe der App können Sie die Geräte einrichten, in den nächsten Raum gehen und die App zur Aufnahme des Bildes verwenden.
Tipps und Hinweise zur Verwendung
Stellen Sie das Einbeinstativ auf das Stativ und befestigen Sie die Kamera daran. Platzieren Sie die Geräte an einem Punkt in der Nähe der Raummitte.
Schalten Sie das Einbeinstativ um, um die Kamera auf eine Höhe zu bringen, die der Augen- oder Schulterhöhe einer durchschnittlichen Person entspricht. Dadurch wird ein realistischerer Effekt bei der Erstellung eines virtuellen Rundgangs erzielt.
Schließen Sie die Telefonanwendung an die Kamera an, und schalten Sie den Live-View-Modus ein. Hier wird das Bild in einem 360-Äquirektangulär-Format angezeigt, um zu sehen, ob Sie alle Einstellungen korrekt vorgenommen haben und ob das Bild gut aussieht.
Tagsüber wird empfohlen, den ISO-Wert zwischen 200-400 zu halten, basierend auf dem Umgebungslicht. Nachts sollten Sie den ISO-Wert auf 100 oder darunter senken, um weniger Rauschen im Bild zu erhalten.
Aktivieren Sie die Option "Rauschunterdrückung" aus der Anwendung, um die Bildqualität zu verbessern.
Verlassen Sie den Raum und bereiten Sie sich auf die Aufnahme des Bildes vor.
Schalten Sie den Live-View-Modus "aus", da es zu einer Auslöseverzögerung kommen kann, wenn er "eingeschaltet" wird.
Nehmen Sie das Foto auf, das entweder in der Fotogalerie Ihres Telefons oder auf der Speicherkarte der Kamera gespeichert wird.
Das Gerät führt das Heften und Verarbeiten automatisch durch, so dass Sie keine zusätzliche harte Arbeit leisten müssen.
Das ist es! Sie haben nun ein nahtloses 360°-Panoramabild. Sie können dieses Bild auf WPVR hochladen und eine beeindruckende virtuelle Tour erstellen.
2. Using DSLR To Capture 360 Panoramic Images
DSLRs werden in der Regel für professionelle Fotografie verwendet und können qualitativ hochwertige Bilder aufnehmen. Es ist jedoch ziemlich schwierig, 360-Panoramabilder mit einer DSLR aufzunehmen.
Sie müssen mehrere Bilder aufnehmen, um vollständige 360 Grad in alle Richtungen abzudecken, und dann einige Bearbeitungen vornehmen, um ein richtiges 360°-Panoramabild zu erhalten.
Hier ist ein kurzer Leitfaden, der Ihnen helfen soll.
Erforderliche Ausrüstung:
1. Eine hochwertige DSLR-Körper
Use a DSLR body with high dpi that has a bracketing feature.
**Klammerung bezieht sich darauf, ein bestimmtes Foto mehrfach mit verschiedenen Belichtungen aufzunehmen und dann zu einem Foto mit ausgeglichener Belichtung zusammenzufügen.
A Panohead/Nodalhead is a piece of equipment to that you attach your camera to. You can then can set the camera to rotate at fixed horizontal angles using the Panohead rings. This will ensure you cover a complete 360 degrees horizontally, without overlapping.
If you are willing to capture images on an uneven or unbalanced ground location, then you may use a Ball head to balance your camera on a proper horizontal axis.
A tripod is a camera stand with 3 legs that are extendable and fixable to specific heights. It has a horizontal 360 spinnable top section, with a handle, on which the ball head or the Panohead (in case you don’t use a ball head) is attached.
Der Panohead-Ring hilft bei der Steuerung der Winkel, in denen Sie die Kamera drehen können.
Wählen Sie eine Tageszeit, zu der aus allen Richtungen geeignetes Licht zum Fotografieren vorhanden ist. Wenn Sie nachts fotografieren, stellen Sie sicher, dass Sie rundum die richtige Beleuchtung haben.
Stellen Sie die Geräte auf und stellen Sie sie in der Mitte des Raumes auf.
Schalten Sie das Stativ um, um die Kamera auf eine Höhe zu bringen, die der Augen- oder Schulterhöhe einer durchschnittlichen Person entspricht.
Umschalten der Kamera für beste Einstellungen. Hier sind meine Vorschläge für den Fall, dass genügend Tageslicht vorhanden ist:
Bringen Sie die Kamera in den vollständig manuellen Modus
Halten Sie eine vernünftige Verschlusszeit ein; 1/10 oder 1/20 ist ideal bei Tag
Setzen Sie Apparture auf etwa F11 und ISO auf etwa 640 oder mehr.
Manueller Weißabgleich auf 4000 Kelvin einstellen
Stellen Sie die Belichtungsreihen auf 3 Belichtungsstufen mit einer Differenz von 2 Stufen zwischen ihnen ein.
Wenden Sie einen automatischen Timer an, um diese Belichtungsreihenbilder zu erfassen, vielleicht innerhalb von 3-5 Sekunden.
FYI: Photography completely depends on the light, and these settings might not give the best output at different light exposures. Hence, you need to toggle settings based on the amount of light available.
Jetzt wird fotografiert.
Aufnahme der erforderlichen Bilder mit DSLR
Nun müssen Sie eine Anzahl von Fotos machen, die von der Breite Ihres Fisheye-Objektivs abhängt.
Nehmen wir ein Beispiel:
Wenn Sie ein Fisheye-Objektiv verwenden, das vertikal 90 Grad und horizontal 60 Grad abdeckt, dann müssen Sie Folgendes tun:
Stellen Sie Ihren Panohead so ein, dass er sich um 60 Grad dreht.
Machen Sie 6 Klammerfotos, indem Sie die Kamera nach jeder Aufnahme um 60 Grad drehen.
Stellen Sie die Kamera nach oben und machen Sie 2 Fotos, indem Sie die Kamera nach der 1. Aufnahme um 180 Grad drehen.
Stellen Sie die Kamera nach unten und machen Sie 2 Fotos, indem Sie die Kamera nach der 1. Aufnahme um 180 Grad drehen.
Trennen Sie das DSLR-Gehäuse vom Rest der Ausrüstung und machen Sie ein Handfoto von der Mitte des Raumes, in dem das Stativ zuvor aufgestellt war.
Nach diesem Beispiel haben Sie nun also 6 horizontale Fotos, zwei Deckenfotos und 3 Bodenfotos.
Die Fotos zusammenfügen
Nun, da Sie die benötigten Bilder haben, müssen Sie sie zu einem nahtlosen 360°-Panoramabild zusammenfügen.
Sobald Sie dies getan haben, müssen Sie sicherstellen, dass Sie Metadaten einfügen, um daraus ein vollständiges 360-Grad-Panorama zu erstellen. Sie können dazu das Werkzeug Xifer verwenden.
Dies ist jedoch nicht notwendig, um Metadaten zu haben, wenn Sie WPVR verwenden, da das Plugin keine Metadaten benötigt, um zu funktionieren.
Nach dem Zusammenfügen wird ein nahtloses 360°-Panoramabild erstellt. Sie können es dann auf WPVR hochladen, um es in eine virtuelle Tour umzuwandeln.
3. 360-Grad-Fotos mit Ihrem Smartphone
Selbst wenn Sie keine DSLR, Objektive oder spezielle 360er-Kameras besitzen, können Sie mit Ihrem Smartphone ein nahtloses 360er-Panoramabild aufnehmen.
Vier Schritte zur Aufnahme von 360-Panoramen mit dem Smartphone
Whether you use an Android device or an IOS device, the process is the same.
Schritt 1 - Herunterladen der App
The Google Street View app lets you easily take 360 photos with your Android smartphone. It is the most stable 360-degree photography app for smartphones to date.
The app will give you some welcome tips and then take you to the homepage. In the bottom-right corner, there is a camera option.
Wählen Sie die Kamera-Option, und es erscheint ein Menü. Um 360 Fotos zu machen, müssen Sie die dritte Option wählen.
Schritt 3 - Machen Sie die Bilder
Sie werden auf den Bildschirm der Kamera geführt und die App gibt Ihnen eine Anleitung für den Erfassungsvorgang. Halten Sie das Telefon in Ihrer Nähe, wählen Sie eine geeignete Position und stehen Sie still.
Sobald Sie auf die Schaltfläche "Start" klicken, erscheint in der Mitte Ihres Bildschirms ein Hohlkreis. Und einige orangefarbene Kreise werden anfangen, in verschiedene Richtungen zu erscheinen.
Move the phone, match the center circle with an orange circle, and click the snap button. That orange circle will turn blue/green and will disappear, while a photo is captured.
Another orange circle will appear in a different direction. Move the phone to the next orange circle to do the same. Keep doing it until all the orange spots are captured.
Die App ist so konzipiert, dass, nachdem Sie alle orangefarbenen Kreise aufgenommen haben, eine vollständige 360°-Ansicht erfasst wurde.
Danach führt Sie die App wieder auf die Homepage.
Schritt 4 - Bildausgabe
Zu diesem Zeitpunkt fügt die App bereits die Fotos zu einem 360°-Bild zusammen. Sie können den Fortschritt des Heftens auf einem Ladebalken sehen.
Nachdem das Zusammenfügen abgeschlossen ist, finden Sie das 360-Grad-Bild in Ihrer Fotogalerie gespeichert. Sie können dieses Foto dann auf WPVR hochladen und eine virtuelle Tour erstellen.
**Bitte beachten Sie, dass das neueste Update der Google Camera App einige wichtige Änderungen im Backend aufweist, wodurch es möglicherweise nicht mit vielen Android-Geräten kompatibel ist.
There you go, now you know what is virtual reality, what is a virtual tour, how to create a virtual tour, what a seamless 360 panoramic image is, and how to capture 360 panoramic images on your own.
Now, you can simply choose a method to take a 360 panoramic image, upload it on the virtual tour creator (WPVR) and present it on your website to engage with your audience with more authority and opportunity for conversion.
Wie Ihr Unternehmen von virtuellen Touren profitieren kann
Zuvor habe ich eine Reihe von Unternehmen aufgelistet, die von der Nutzung virtueller Touren auf ihren Websites profitieren können.
Wenn Ihr Unternehmen auf dieser Liste stand, dann wissen Sie bereits, dass virtuelle Rundgänge ideal für Ihr Unternehmen sind.
Every business can have a virtual tour on its website. However, some businesses can dramatically increase revenue by implementing a virtual tour on their site.
Lassen Sie uns nun die wichtigsten Vorteile einer virtuellen Tour auf Ihrer Website betrachten, wobei wir uns auf die wichtigsten Nischen konzentrieren.
Finden Sie heraus, wie sich eine virtuelle Tour positiv auf Ihr Unternehmen auswirken kann.
1. Immobilien
Menschen, die Immobilien-Websites besuchen, wollen meist innerhalb der nächsten 2-3 Monate Grundstücke oder Häuser kaufen. Das Hauptproblem ist jedoch die Unentschlossenheit.
Though prospects mostly look for houses in specific locations and within a suitable price range, they find it difficult to choose among multiple properties that match their requirements.
One of the reasons for this is that they are visualizing how the house looks based on flat images. They are not able to understand if the structure of the house is suitable for them since they are visualizing in their imagination.
Endergebnis? Sie neigen dazu, mehrere Objekte zu besichtigen, bevor sie sich für ein Objekt entscheiden, das ihren Vorstellungen und Bedürfnissen entspricht.
Hier verlieren Sie eine Menge Zeit, wenn Sie ihnen die Live-Tour geben, und Mühe, indem Sie sich an Interessenten wenden, die vielleicht am Ende bei anderen Maklern kaufen (ja, die Leute werden bei der Suche nach einem Haus mit mehreren Maklern sprechen).
A real estate virtual tour can ensure that the prospects you are dealing with are already interested to buy.
The visit is just for credibility. People will be able to remotely visit the place and explore.
Hence, they will call you for a visit, with the intent to buy.
Rather than taking several live tours of many properties, they will only wish to visit a few which they might end up purchasing, thanks to the remote virtual tour.
2. Hotel und Ferienanlagen
Tourists, travelers, or international businessmen tend to look for suitable hotels to lodge at when going to distant locations. So, it is natural for them to browse through the websites of hotels available at the location they are visiting.
You can take steps to attract as many prospects as possible through your website. A simple hotel or resort virtual tour can take you a long way.
Hier ist die Idee. Die Menschen suchen immer nach Hotels, die sowohl erschwinglich als auch komfortabel sind. Die meisten Menschen neigen dazu, bei der Auswahl durch Fotos von Räumen zu blättern. Warum ihnen nicht mit einer virtuellen Tour ein besseres Bild geben?
Create virtual tours for each room available for lodging and place them on your website. Try to add a virtual tour of your reception, hall room, bar, and dining area on your home page.
Diese werden vor allem für Ausländer eine große Attraktion darstellen. Eine qualitativ hochwertige virtuelle Tour bedeutet, dass die Leute die Qualität und Schönheit Ihres Hotels verstehen können und wahrscheinlich in Erwägung ziehen werden, sofort eine Reservierung anzufordern, anstatt sich nach weiteren Hotels umzusehen.
For Resorts, you should create a broad virtual tour, highlighting all of your special facilities such as swimming pools, beach areas, parks, ballrooms, spas, and other specialties besides the lodging and basic entertainment.
Virtual tours will definitely get prospects excited and influence more site visitors to convert into interested prospects.
3. Restaurants
Having a restaurant means a lot of competition since currently, it is among to top business niches.
People love to try out restaurants with good food, as well as well interior design.
Whether it’s a fancy restaurant or a classic restaurant, they have their own set of admirers.
Now, food quality is the most important thing. If you get good ratings about your food from customers, more people will probably take a visit soon.
However, the second most important aspect is the interior.
Nowadays, prospects tend to visit the websites of several restaurants before choosing to visit one.
There, they not only look at the menus but also look at the gallery of your restaurant photos to understand if it is a suitable place to visit.
A better way to catch their attention is by allowing them to take a virtual tour of your restaurant from home.
They will be able to see the seating arrangement, spaciousness, decoration, quality, and overall interior arrangement. This will inspire them to choose your restaurant over others.
Hier ist ein Beispiel:
Sagen wir, Sie sind ein Burgerladen. Eine Gruppe Jugendlicher ist bereit, in Ihrer Gegend Burger zu essen. Sie werden also die Websites mehrerer Burger-Buden in Ihrer Gegend besuchen, bevor sie sich für einen entscheiden.
Sie können sich durch einen virtuellen Rundgang davon abheben, indem Sie neben dem köstlichen Essen auch Ihre erstaunliche Innendekoration zeigen.
Through this remote tour, they might realize that the seating arrangements are comfortable and the decorations are great for taking selfies with friends.
Thus, they will end up visiting your place. Your next task is to impress them with the food.
For a fancy or theme-based restaurant, a virtual tour is more lucrative since you will be able to highlight your specialty to remote prospects on your website.
This will raise more awareness and influence more people to visit your restaurant.
4. Hochzeitsorte
Eine Hochzeit gehört zu den wichtigsten Meilensteinen, die ein Mensch im Leben erreicht. Und es ist ganz natürlich, dass sich jeder eine Hochzeitszeremonie wünscht wie kein anderer. Der Hochzeitsort spielt eine wichtige Rolle, um die Hochzeit zu einem unvergesslichen Ereignis zu machen.
Usually, fiances choose the wedding venue together. They tend to browse through the websites of several wedding venues and shortlist a few that they feel are perfect for their wedding.
A virtual tour can make your wedding venue the ideal one. Let the couple take a remote visit and experience how grand the venue is.
The venue entrance, the stage, the dining halls, the chandeliers, the photo session room, and all the specialties of your venue can be highlighted easily through a virtual tour.
Schicken Sie das Paar in eine Welt der Phantasie, damit sie ihren Gang durch den Veranstaltungsort und den Gang der Braut über den Teppich in Richtung des Pfarrers und ihres Verlobten spüren, die bereit sind zu heiraten; das Werfen des Blumenstraußes und die Trinksprüche von Freunden und Familie.
Diese kleine Reise innerhalb des Veranstaltungsortes wird ihnen helfen, ihre Zukunft zu planen und Ihren Veranstaltungsort als idealen Ort auszuwählen, der ihr Zusammensein in den kommenden Tagen prägen wird.
Eine virtuelle Tour auf Ihrer Website ist daher nur das Richtige.
5. Universitäten, Schulen und Hochschulen
Obwohl in vielen Universitäten, Schulen und Hochschulen neu eingeführt, haben viele von ihnen durch die Erstellung virtueller Rundgänge durch ihre Einrichtungen eine größere Reichweite für die Studenten erreicht.
Egal, ob Sie eine große oder eine kleine Einrichtung leiten, Studenten und ihre Eltern sind nach einer qualitativ hochwertigen Ausbildung eher um qualitativ hochwertige Wohnheime und attraktive Campusse besorgt.
While they visit your website to find out about the courses you offer, you can also present a virtual tour of your campus to give them a remote experience of being part of the institution.
Lassen Sie sie einen Spaziergang durch Ihre Fakultätsgebäude, Sporteinrichtungen, Wohnheime, Forschungslabors, Fitnesszentren usw. machen und verstehen Sie die Qualität, die Sie neben der Ausbildung bieten.
This is very important for international students. They will be moving to a new location, therefore, the quality environment and surroundings are among their main concerns and priorities.
Darüber hinaus wird der virtuelle Rundgang als Symbol der Glaubwürdigkeit fungieren und Ihre Fähigkeit unterstreichen, die Studierenden mit hoher Qualität in Ihren Räumlichkeiten unterzubringen.
6. Reise/Tourismusindustrie
Wenn Sie für Urlaubs- oder Reisepakete werben, dann hängen die Aussichten auf mehr Interessenten neben dem Preis auch sehr von den Orten ab, zu denen Sie sie bringen.
Die Menschen zögern oft, Reisepakete zu kaufen, da sie Zweifel an der Qualität ihrer Reise haben. Sie können ihr Vertrauen leicht gewinnen, indem Sie einen virtuellen Rundgang machen.
You can include virtual tours for several iconic locations that your travel package will cover. You may also highlight great tourist resorts or historic places that your travel package will take travelers to.
Die Idee besteht darin, den Zuschauern durch einen virtuellen Rundgang einen Einblick in die attraktiven Zonen zu geben, die die Tour aus der Ferne einschließt. Lassen Sie sie die erstaunlichen Orte, die sie besuchen können, unter voller Kontrolle inspizieren.
Dies wird nicht nur für mehr Aufregung sorgen, sondern auch die Zuschauer in interessierte Perspektiven beeinflussen.
7. Fitnessstudio / Fitnesscenter
Die Menschen neigen dazu, ein Fitnessstudio oder Fitnesscenter aufgrund der verschiedenen Arten von Geräten und Fitnessgeräten zu wählen, die dort zur Verfügung stehen. Außerdem hängt es auch von der Qualität der Ausrüstung ab.
Sie können virtuelle Touren nutzen, um online Leute anzuziehen und Glaubwürdigkeit für Ihr Fitnesscenter zu gewinnen. Erstellen Sie einen hochwertigen virtuellen Rundgang, der jeden Abschnitt Ihres Zentrums abdeckt. Und lassen Sie in jedem Abschnitt Klickblasen neben den Maschinen stehen, die Informationen über das Maschinenmodell und die Qualität geben.
At the same time, create short videos of the fitness trainer of the center, training and demonstrating the use of every piece of fitness equipment.
Leave a hotspot on each piece of fitness equipment available within the virtual tour, to be clicked to watch the relevant video.
Dadurch werden nicht nur die Geräte hervorgehoben, sondern auch die Fachkenntnisse des Fitnesstrainers demonstriert, wodurch mehr Menschen für Ihr Fitnesscenter begeistert werden.
8. Einkaufszentrum
Einkaufen gehört zu den Lieblingsbeschäftigungen der meisten Frauen und einiger Männer. Es ist jedoch oft schwierig, die richtigen Geschäfte in einem idealen Einkaufszentrum zu finden.
Es gibt Tonnen von Geschäften, die verschiedene Produkte und Dienstleistungen verkaufen. Obwohl jedes Einkaufszentrum auf jeder Etage eine Anfahrtsskizze zur Verfügung stellt, wird es oft schwierig, jedes gewünschte Geschäft nur durch die Interpretation der Karte zu finden.
For a large mall, people often run around in circles while messing up the directions. This is frustrating to customers and often limits them to purchase items.
Whether you are part of the ownership of a shopping mall or a shop owner at a mall, you could guide more prospects in the right direction through a virtual tour on your site.
On the virtual tour, a person will be able to follow directions as if in person and eventually reach their desired shops.
Since it’s a realistic visualization, the directions will be much easier to remember. Then when the prospect visits the mall, it will not take long to find his/her desired shop.
Als Ladenbesitzer könnte dies Ihnen helfen, mehr Kunden zu gewinnen und nicht potenzielle Kunden an die Konkurrenz zu verlieren.
People with the internet on their phones can access your website while in the mall, hence they won’t need to use the flat map, rather they can get a realistic guide on their mobile.
As you can see, it is beneficial to add a showroom virtual tour on the website of either the shopping mall or any particular shop, to provide better navigation for prospects.
9. Museen
People often love to visit museums due to the incredible historical display of various tools, items and reminisces of the past.
But the problem is, due to visual entertainment available on mobile phones or computers, most people do not try to seek out how great a visit to a museum might be.
Die meisten Museen sind mit einem Rückgang der Besucherzahlen im Laufe der Zeit konfrontiert. Dies kann jedoch durch die Verwendung von virtuellen Touren geändert werden.
Create a virtual tour for a certain section of your museum. Let’s assume this section contains items from World War II. Within the virtual tour, you can place clickable information bubbles for people to get historical information about any particular item.
Dies wird bei den Website-Besuchern ein gutes Interesse wecken. Der Schlüssel ist es, die Neugier der Besucher zu wecken, damit sie das Gefühl haben, dass sie andere Bereiche Ihres Museums besuchen müssen, um mehr zu erfahren.
You can also offer a paid virtual tour for the rest of the sections. This will allow people overseas to take a tour of your museum remotely.
Sie werden einen Anstieg der Besucherzahlen feststellen und auch Menschen aus Übersee Ihr Museum schätzen lassen.
10. Kunstgalerie
Zeichnen Sie und tragen Sie zur Ausstellung von Kunstgalerien bei? Oder haben Sie eine eigene Kunstgalerie?
Dann wissen Sie wahrscheinlich, wie begeistert die Menschen von der Kunst sind, wenn sie eine Kunstgalerie besuchen. Darüber hinaus neigen einige Sammler dazu, Kunstwerke mit großem Wert zu besuchen und oft zu kaufen.
Wenn es um das Online-Geschäft geht, werden Kunstgalerien jedoch oft unterschätzt. Warum nicht? Die meisten Kunstgalerien machen nicht viel aus ihrer Website.
Let me tell you why. It’s because owners tend to flood their websites with individual pictures of their art. With so much art to look at, how long will a person browse through the collection?
Eventually, people only check the first few and then leave if nothing amazes them among the early collection.
But this means that they are avoiding pictures that are in a later queue. It is possible that one of those photos could have been the one to connect with them.
This can be drastically changed with an art gallery virtual tour. Create a virtual tour of your gallery and let art enthusiasts take a remote tour. This will be similar to a live visit and viewers will be able to walk around the gallery while observing your artwork.
You can leave little click bubbles beside every piece of art so that viewers can click to view the piece of art as a pop-up image, or on a new tab.
Provide a unique ID for every piece of art so that prospects can order online or request a visit to view the piece of art.
That’s how effective a virtual tour can be. Go ahead and attract more prospects to buy your art online.
Bisher habe ich die Vorteile der Nutzung virtueller Touren in 10 verschiedenen Geschäftsnischen erläutert. Wenn Ihre Geschäftsnische nicht unter diesen 10 Unternehmen war, dann lassen Sie sich nicht enttäuschen.
Read the following article to learn about the benefits of virtual tours for all 32 niches mentioned in this article.
Schlussfolgerung
So, after reading this article, you should have a good knowledge of virtual reality, virtual tours and their benefits, and what you need to create virtual tours.
You have also learned how you can create a virtual tour and include it on your WordPress site using WPVR.
And you got a detailed guide on how to take 360 panoramic images on your own and use them to create virtual tours.
Schließlich diskutierten wir, wie verschiedene Unternehmen von virtuellen Touren profitieren können.
Nun sollten Sie in der Lage sein, Ihre eigenen virtuellen Touren ohne fachliche Unterstützung zu erstellen. Warum also noch mehr Zeit verschwenden?
Fangen Sie an, virtuelle Touren zu nutzen, um Ihr Unternehmen auf die nächste Ebene zu bringen. Nehmen Sie von Ihrer Website aus Kontakt mit Ihren Interessenten auf und sehen Sie, wie sie zu wertvollen Kunden werden.
Since Google is the number one search engine today, its shopping campaigns always bring the best results.
According to The Media Campaign, 46% of all product searches are made via Google.
If you own a WooCommerce store, then promoting your products on the Google Merchant Center will be a game-changer to drive more sales.
And for that, you need to create a product feed for Google Shopping and optimize it properly.
In this article, you will learn a few important Google Shopping Feed optimization tactics that you should embrace if you want successful results.
After reading this article you will learn
Why it is important to optimize Google product feed
Which product data should be optimized for the best results
How you can optimize these data to convert more buyers
And in the long run, you will be able to get more sales from Google Shopping campaigns and grow your business.
Fangen wir also an.
What is a Google Shopping Feed?
A Google Shopping feed is a file that contains all the details about the products you want to list on Google Shopping. This includes information like product titles, descriptions, prices, images, and other essential attributes.
Think of it as a structured file that acts as the bridge between your WooCommerce store and Google Merchant Center. Once you upload this feed, Google uses it to display your products in relevant search results or shopping ads.
For example, if you’re selling sneakers, the shopping feed ensures your products show up with accurate information when someone searches for “running shoes” or “comfortable sneakers.”
Why should you optimize your Google Shopping Feed?
To get the best results from Google Shopping, you need more than just uploading a product feed. Optimizing it ensures your products appear in front of the right audience and perform better.
Here’s why it’s important:
Increases product visibility: An optimized feed helps Google understand your product better, improving its chances of appearing in search results.
Attracts relevant customers: When your product data matches the customer’s search intent, it makes them more likely to click on your listing.
Improves ad performance: A detailed and accurate feed leads to higher-quality ads, which typically results in better click-through rates and conversions.
Reduces rejection issues: Google has strict guidelines for product feeds. Optimizing ensures you meet their standards, avoiding unnecessary rejections.
Simplifies management: A clean, optimized feed is easier to update and maintain over time, saving you effort in the long run.
Optimizing your Google Shopping feed is not an extra step but a crucial part of your product marketing strategy. It ensures your products are presented accurately and attractively to potential buyers.
Challenges Of Promoting Products via Google Shopping
As much as Google Shopping drives sales, there are a few challenges that you need to overcome to get the best outcome.
Your product feed data must meet Google’s feed structure Google Shopping has its own defined feed structure which you need to follow if you want to list products there. What most store finds difficult to do is to make sure they have met all the criteria explained in their product data specification. So you should create a product feed that meets all requirements.
Rejection of product feed by Google The biggest issue people face is that the data people submit are rejected by Google for one or more reasons. The most common reasons Google rejects are
mismatched data between the website’s schema, feed, and frontend view
missing required product data
dynamic pricing issue
wrong currency, and
variation product data mismatch.
Try to solve the above problems but if you still struggle then Google Consultants are experts who can come in handy for navigating Google’s requirements and optimizing your data for approval.
Products listed on Google Shopping but not getting results This is a blind spot for many online shops that sell via Google Shopping. Many believe that just listing products there should bring results. But the fact here is, that you need to optimize some of your product data to get better results. This may include the product title, images, category, offer prices, and even your website’s design.
**Submitting basic product data will not trigger potential buyers to purchase, you have to make sure to optimize the data so that the product Ads and listings will convince the prospect to make a buying decision.
Throughout this article, you will learn all the possible ways to optimize your Google shopping feed that will make your Google Shopping campaign successful.
6 Proven Google Shopping Feed Optimization Tips That Can Trigger More Sales
To learn how to optimize Google shopping feed, you can apply these 6 proven Google merchant center optimization techniques :
1. Optimized Product Title To Match Search Queries
The product title is a vital element that you can use to drive the right traffic.
It is a crucial element that is not only necessary to optimize your Google Shopping feed but also plays a key role in conversion rate optimization, helping you maximize sales and performance.
When your customer is looking for a product, the title is one of the first things the prospects will judge your product by.
You have to make the title meaningful in a way so that just by reading it, your targeted buyer feels like this is what he/she was looking for.
This will help to trigger more potential buyers to click on the Google Shopping Ads for your products that appear above the search results. In this simple way, you can do your Google shipping optimization.
The best way to optimize a product title is to add some extra elements to the title that will highlight its specialty or features.
For example, let’s say you are selling a cream in France called ‘Avène Tolérance Extrême Cream.’
Now, if you leave the name as is, only the buyers who are familiar with Avène or have researched the brand will recognize this product. Others may not click on the Shopping Ad with that title.
But, let’s consider naming it ‘Avène Tolérance Extrême – Moisturizer for Sensitive Skin, 50ml.’
This title specifies that
this cream is by Avène (i.e. the product brand)
it’s a Moisturizer (not a beauty cream)
it’s for Sensitive Skin (i.e. skin type), and
it is the ’50ml’ pack.
As you can see, this title will tell a buyer, who has zero knowledge about this product, if it is for her, i.e., a higher chance of a conversion.
Just like that, you can optimize the product title for any product by adding elements such as the product brand, color, size, capacity, quantity, special feature, model, who it’s for, or even its use case.
Here are a few more examples for different product types:
Books or Novels – Book Name + Genre + Author Name Example: The Da Vinci Code – Mystery Thriller by Dan Brown
Electronics – Product Brand + Product Name + Model + Special feature Example: OnePlus Nord N20 5G – 13 + 3 + 3 MP Camera, 64GB RAM
Clothing Products – Brand + Product Name + Color + Size + Material Example: Gant The Original T-Shirt – Red, XL, 100% Cotton
This approach is a proven tactic and easy to embrace.
Things to avoid when optimizing product titles:
Avoid Promotional terms on the title.
Don’t stuff keywords if it doesn’t fit
Don’t use all capital letters in a title.
Avoid special symbols.
2. Unique Image Optimization Tricks To Connect With Buyers
Once you list on Google Shopping, the product image plays a huge part in convincing buyers to choose your product among others.
Thus this plays a vital role in Google shopping ads optimization.
So you must make sure you use images that clearly show what the product is. This is especially important for products such as clothing and accessories, decoratives, tech products, toys, etc.
The most common advice photographers will give you is to take product images with a white background (or a contrasting background if your product is White).
This is the best approach if you want to clearly keep your buyers focused on your product.
When people search for products on Google, a lot of products are suggested in a single row.
So the idea of a distraction-free view of the product doesn’t really apply there unless the product has a catchy color combination.
Here are a couple of unique tactics you can follow that may help you stand out in Google merchant center optimization.
Use a shaded-white background The concept here is to use a gradient background with a mix of white and light grey to give a shaded feel at the back. This creates an unexpected classy impression of the product in the center.
Find the most uncommon color for your niche If you have competition in the market, you can do a quick search on Google with your product title and look at the suggested product Ads. See which background colors are commonly used. Then you can decide on an uncommon background color that may make your Ad stand out among most other product Ads. *It’s best to consult with a professional UX designer for this as they will be more expert in suggesting backgrounds that stand out. A user experience enhancements audit can also help identify the best visual choices for better ad performance and visibility.
Use contrast backgrounds Large brands such as Zara have embraced the concept of solid contrast background colors and it delivered great results. So it’s a proven approach you can choose to embrace as well.
Choose an angle that highlights the best feature(s) Often you have to be creative about how you take the picture. You will see that in modern-day eCommerce, most shoe brands take the approach of placing two shoes in two ways – one is laid on the ground and the other is kept upright. This is to try and show all views of the shoes.
If Possible, Use Square Images Since all Google Shopping Ads are displayed with square images, it’s best if you too could provide images in that size. In most shops, people tend to keep a longer height for the product images. What this will do is that Google will fit the image via the longest dimension, in this case, the height, making the image smaller in the process. A square image will maintain the right dimension ratio and view your product in the best possible size.
**If you use square images, you can also try using an image border to make your product stand out.
It’s best you make these changes in your WooCommerce store and then use those image links in the product feed data for Google for the best results.
For Product variations, make sure to have specific images for each variation rather than just a single image for all variants.
Things to avoid when optimizing product images:
Do not use unclear or blurry images
Avoid including product price in the images
Avoid using promotional words in the images (e.g. Special offer, 10% discount, etc)
Do not cluster the product background with unnecessary elements
3. Follow Google’s Category Hierarchy In Your Store To Optimize Google Shopping Feed
The product category is important to help buyers find a certain type of product they are looking for.
At the same time, Google also maintains a categorization of products to display your shopping ads to the right audience. This is one kind of Google shopping optimization you get for free.
Google doesn’t make it mandatory for you to submit a product category field, but it does look for the category in your store in order to place a product under its right search intent category.
So you must maintain proper categorization in your store.
It’s best to maintain your product category structure as per Google as most other marketplaces also follow the same category hierarchy.
You can get help from Google’s taxonomy list to optimize the categories on your website.
However, just maintaining the categories is not the only product feed optimization. You have to ensure you are assigning your product to the most relevant possible product category.
For example, if are selling a Baby Bathtub, then do not just assign it under the category ‘Baby & Toddler’ or the ‘Baby & Toddler > Baby Bathing’. It should rather go under the further child category ‘Baby & Toddler > Baby Bathing > Baby Bathtubs & Bath Seats.’
This will help you keep track of your products more efficiently and help Google display your products to the right audience.
Tips To Optimize Product Category
In WooCommerce, when choosing a child category, make sure to mark the parent category as well.
Even if you do not follow Google’s taxonomy, make sure to keep the categories meaningful. Google can relate to the meanings of your set categories.
Avoid using special characters in category names.
4. Try To Maintain Consistent Product Data Everywhere To Optimize Google Shopping Feed
It is important to make sure your buyers do not get confused with your products.
For example, if you have one title in your WooCommerce store and another title in your Google Shopping listings, it may cause some confusion – the buyer may initially get baffled and start looking for the description, or often, if they are in a hurry, they will simply close the tab and look for other options.
The same can be the same if you have a different meta title and schema which will alter your traditional search result Title and the title Google bot will find in the schema.
So the best practice is to try to keep all your product data same whereever it is listed to optimize google shopping feed better.
What to do if you have already added a lot of products without optimized data?
Yes, it can be hectic to change the titles, descriptions, images, or other product data for optimization for all the products that you have already added to your WooCommerce store.
If you have fewer products in-store, then it’s best to take the time and make the changes.
In case you have a lot of products, you can leave them as-is and start optimizing the data for all the new products that you will add in the future.
This will ensure that you will get the best sales results for your new products.
Over time, the old products will eventually be sold out and there will be a time when your store will have all products with optimized data.
Should you not optimize the product feed data for the old products?
One of the questions that may arise is if you keep the old product data unchanged, should you simply submit those data without optimizing them?
The answer is NO.
Even if you can’t take the time to optimize the product data in your store, you should at least optimize some elements of the product when adding them to the Google product feed – the product title and category.
This may not solve the confusion issue due to different content, but it will still trigger more buyers to at least visit your store.
Google normally does not reject your feed due to the title as long as the main Title keywords are included in your product title in the feed.
The category is important as it helps Google to properly display your products to the right audience.
Apart from this, you should also consider making sure all the required product data by Google is consistent in both your product schema and your product page.
This is important because Google will crawl your website before approving your product feed and may reject products if a mismatch exists for required attributes. And this point is highly important for Google merchant center optimization.
5. Include All Required Product Data In WooCommerce
The required product attributes that Google recommends are more than just for product feed.
If you make sure to include those data for your products properly, then it will also help you rank in terms of SEO. Also, it is highly important for Google shopping optimization.
Without including the required product data, google merchant center optimization is incomplete.
Following are the recommended attributes by Google that you should include for products in your WooCommerce store as well:
Produkt-ID
Produkt-Titel
Produktbeschreibung
Produkt-Link/URL
Produkt-Kategorie
Produkt-Bild-URL
Verfügbarkeit der Bestände
Regulärer Preis
Produkt-Zustand
Hersteller/Markenname
GTIN (Global Trade Item Number)
MPN (Hersteller-Teilenummer)
Specific product attributes
Material
Altersgruppe
Farbe
Geschlecht
Größe
Let’s dive deeper into some key attributes and how to optimize them.
i. Product ID Optimization
Your Product ID is a unique identifier that distinguishes each item in your store. It’s crucial for tracking and managing your product listings, especially when you have a large inventory.
Use simple, consistent formats (e.g., numeric IDs or SKU codes).
Avoid duplicating IDs, as this can cause errors in your Google Merchant Center feed.
ii. Product Description
A well-written product description not only helps with Google SEO but also convinces customers to click.
Keep it detailed but concise—highlight the key benefits and features.
Use bullet points for technical details and maintain a natural flow for readability.
Include keywords naturally without keyword stuffing.
iii. Product Price
Your product price should always reflect the actual cost customers will pay.
Ensure your prices are competitive for your industry.
Match the price displayed in your feed with the price on your product page—discrepancies can cause rejections in Google Merchant Center.
iv. Product Stock Availability
Accurate stock information is crucial for maintaining customer trust and ensuring your products qualify for ad campaigns.
Update your inventory regularly to prevent showing out-of-stock items.
Use labels like “In Stock” or “Out of Stock” in your product feed.
v. Managing Product Links
Each product should have a dedicated URL that leads directly to the product page.
Avoid redirecting links or using generic URLs.
Make your product links user-friendly by including descriptive terms (e.g., /products/blue-running-shoes).
vi. Product Category & Subcategory
Assigning the right category to your products ensures they appear in the relevant search results.
Use Google’s recommended category structure to map your products accurately.
Include subcategories when possible, as they provide better targeting for niche audiences.
vii. Using Correct GTIN & MPN
Google requires specific identifiers like GTIN (Global Trade Item Number) and MPN (Manufacturer Part Number) for products to improve search accuracy.
Add GTIN and MPN for each product, especially if they’re brand-specific or globally sold items.
viii. Add as Many Additional Product Images
Customers are more likely to convert when they can view a product from multiple angles.
Upload high-quality images that showcase your product’s features.
Include close-ups, variations (like colors or styles), and lifestyle shots for better engagement.
Optimize image file sizes to maintain page loading speeds.
Some of these are important for proper product Ads distribution, for example, the GTIN can help identify your product’s legitimacy and help Google to choose a more appropriate category.
Some of these data can also be used to trigger conversion on the product page. For example, the specific product attributes are things buyers look at when considering buying something for personal use, such as a Jacket. Plus, these attributes can also be used to create variations of the same product.
Now, some of the data here cannot be included in the default WooCommerce.
For example, there is no default product field for GTIN, MPN, or Brand. In this case, you may use different plugins to get the custom fields.
Note that, just using a custom field is not enough. The data saved there should be part of the product structured data or Schema Markup. Plus, in the case of variable products, these attributes have to be specific for each variant.
Following are a couple of tools you can consider looking at:
Product Feed Manager – For custom fields for GTIN, MPN, and Brand. It also has the feature to furnish the JSON-LD structured data for products.
Dynamic product views let you tailor how your products appear based on what shoppers are searching for. This means the product images, titles, and descriptions can adjust dynamically to match search terms, making your listings more relevant and appealing.
Here’s why this matters:
It helps improve your click-through rate since shoppers see exactly what they’re searching for.
It increases conversion rates by displaying product details that match buyer intent.
To get the best results, use relevant and descriptive keywords in your dynamic views. These keywords help Google understand your product better and show it in the right search results.
7. Include Shipping Information
The shipping details in your product feed play a big role in customer decisions and Google Shopping rankings. Shoppers want clarity on courier service costs and delivery times, so optimizing this information is essential.
Here’s how to make the most of your shipping details:
Offer free shipping: This can make your product more attractive and encourage more buyers to click and purchase.
Provide expedited shipping options: Fast delivery sets your product apart from competitors, especially for time-sensitive buyers.
Track your shipping performance: Monitor delivery times and product condition on arrival. Keeping shipping reliable and consistent helps build trust and customer satisfaction.
8. Use A Feed Generation Plugin For Accuracy
Now, despite putting enough effort into making your product data optimized for conversion, it is also important to generate the product feed in the right format and with the right product data.
In this regard, you can either partner up with a feed management SAAS tool such as Feed Army, or, you can rather consider going with a much more affordable WordPress plugin, Product Feed Manager for WooCommerce.
Produkt-Feed-Manager für WooCommerce (PFM)
Product Feed Manager is a simple and easy-to-use plugin that helps to generate product feed for several marketplaces (including Google Shopping) in the right format in just a few clicks.
The specialty of this plugin is its pre-built feed template, which you can set up in just a few minutes, even without any prior knowledge of Google product feed.
If you want to avoid getting your feed rejected due to a human error, you should consider using this plugin to list your products on Google Shopping easily.
PFM has all the tools required to optimize Google shopping feed :
The plugin comes with the combined field feature which can help with optimizing product titles for the Google shopping feed optimization.
Its category mapping feature will help to optimize the category in the feed data without changing your store’s original categories.
This plugin also comes with custom fields for GTIN, MPN, and Product Brand to help you set up your products in an optimized way before generating the feed.
Plus, its one-click JSON-LD structured data ensures data mismatch in the schema.
Once you map all the attributes with the correct product data, click on the publish button.
And, your feed will be ready to upload in the Google Merchant Centre. This way you can pull up Google merchant center optimization very easily.
Common Errors While Optimizing Google Shopping Feed
Even with the best intentions, it’s easy to make mistakes when optimizing your Google Shopping feed. These errors can hurt your product visibility and lead to missed opportunities. Here are some of the most common ones you should watch out for:
Leaving out critical product attributes: Forgetting to include fields like GTIN or product category can cause Google to disapprove your product listings. For instance, if you’re selling branded shoes and don’t add the correct GTIN, your listing might never reach the right audience.
Using vague or generic titles: Titles like “Stylish Shirt” don’t help shoppers or Google understand what you’re selling. Be specific: “Men’s Cotton Polo Shirt – Navy Blue, Size L” works much better.
Uploading low-quality product images: A blurry or poorly cropped image can deter shoppers. Always use high-resolution images that clearly display your product.
Incorrect pricing or availability: If your feed shows a different price or indicates “in stock” when your product is actually sold out, shoppers will lose trust, and Google might flag your listing.
Missing keywords in descriptions: A plain description without relevant search terms can prevent your product from showing up in searches. Use keywords naturally in a way that highlights your product’s benefits.
Skipping regular feed updates: Product details, like prices and stock levels, change frequently. Not keeping your feed updated can lead to outdated information being displayed, which frustrates shoppers.
Read our guide if you want to know more about the google feed errors.
Anmerkung des Autors
Since WooCommerce is your source of earning money, you need to invest some time to optimize your Google shopping feed and then go for promotions.
And when it comes to product promoting your products, listing products on Google Shopping is a must.
The tactics mentioned above are just 6 among many other ways you can do google merchant center optimization or even Google Shopping ads optimization.
If you haven’t already, start optimizing your product data and make your marketing efforts fruitful.
1. How often should you update your Google Shopping feed?
You should update your feed whenever product details like price, stock, or availability change. Regular updates keep your listings accurate and improve performance.
2. What happens if your product images are low quality?
Low-quality images can reduce clicks and conversions. Google might even disapprove your listings if images don’t meet their guidelines.
3. Why is GTIN important for your products?
GTIN helps Google identify and categorize your products accurately. Without it, your listings might not show up in relevant searches.
4. Can incorrect shipping details impact your feed?
Yes, inaccurate shipping info can confuse shoppers and lead to lower sales or negative reviews. Always double-check your shipping parameters.
5. Do product titles affect search visibility?
Absolutely. Clear, specific titles with relevant details improve your product’s chances of appearing in the right searches.
When guardians can’t visit your school in person, a virtual tour becomes their window into your world. And if you’re managing school admissions or marketing, you know that first digital impression can make or break a family’s decision to enroll.
But here’s the thing – putting together a virtual tour that actually engages viewers isn’t as straightforward as it seems. Many schools end up with tours that feel flat or fail to showcase what makes them special.
In this guide, I’ll share six practical tips to help you create a school virtual tour that captures attention and gives families a genuine feel for your school’s environment.
Let’s dive in and make your school virtual tour stand out.
What is a School Virtual Tour?
Before jumping into the tips, let’s quickly understand what you’re creating. A school virtual tour is simply a digital walkthrough of your campus that lets families explore your school from their devices. It’s more like an online open house – available 24/7.
Your virtual tour can be as basic as a photo gallery or as detailed as a 360-degree interactive experience. You can show off your classrooms, labs, library, playground, and other facilities that make your school unique. You can even add videos of teachers, students, and events to give viewers a better sense of your school life.
The best part is while you’re busy running the school, parents and students can check out your campus anytime, from anywhere. This makes it easier for families who live far away or have busy schedules to get a real feel for your school.
Why School Virtual Tour is Important?
School virtual tours basically help bridge the gap between you and prospective families, allowing them to “experience” your school before making the decision to enroll or even visit in person.
Here’s how a virtual school tour can work for everyone involved:
For Students
Allows students to see their future classrooms, labs, and common areas, helping them picture their daily life on campus.
Eases concerns about adjusting to a new environment by giving a clear sense of the school’s layout and atmosphere.
Highlights spaces where students can engage in extracurriculars, study, and socialize, making them feel more connected before they even arrive.
For Parents
Offers a detailed look at your school’s safety features, facilities, and resources to help parents feel confident in their choice.
Provides transparency around classroom quality, extracurricular options, and amenities, so parents understand the full value of what you offer.
Lets parents evaluate how well the school environment matches their expectations and values for their child’s education and growth.
For Teachers
Gives prospective teachers an inside look at classrooms, labs, and other facilities to understand the tools and resources available to them.
Showcases the culture of your school, helping teachers decide if it aligns with their professional goals and teaching style.
Highlights your commitment to a supportive work environment, which can attract enthusiastic educators who want to be part of your community.
So, you can say virtual school tours are invaluable for students, teachers, and parents alike. Now, let’s go straight into the tips to creating an engaging school virtual tour.
6 Essential Tips for creating an engaging school virtual tour
Creating an engaging and logical virtual tour for schools is about more than just showing off your school grounds. It’s about guiding viewers through an experience that feels as close to real life as possible, making them feel connected to your school from wherever they are.
1. Plan Your Tour Route Strategically:
To make your virtual school tour flow naturally, start with a well-planned route that guides viewers through your school step-by-step. Here’s a simple way to approach it:
Welcome Visitors at the Entrance: Begin at the main entrance or lobby to give a warm, inviting first impression. This is where your virtual tour should create an immediate sense of welcome and professionalism.
Show Core Learning Spaces: Guide viewers through key areas like classrooms, labs, and the library. These are essential parts of any school, and showing them early on establishes the focus on learning.
Highlight Unique Areas: If your school has specialized spaces, like an art studio or a tech lab, this is the time to showcase them. These areas can set your school apart, so give viewers an up-close look.
End with Social or Outdoor Spaces: Finish with areas where students socialize, like the cafeteria, gym, or outdoor spaces. These spots provide a sense of community and balance out the tour with something familiar and inviting.
When you build your school virtual tour with a clear, strategic route, viewers will have an experience that feels natural, engaging, and organized—just like a real visit.
2. Focus on High-Quality Visuals and Multimedia:
To keep viewers engaged and help them experience your school, it’s essential to use high-quality visuals and multimedia. Clear, vibrant images and videos make each area of your school feel real, giving your audience a true-to-life perspective.
Use High-Resolution Images and Videos: Start by capturing images and videos in high resolution. Each classroom, lab, and social area should be sharp and visually appealing. This clarity allows viewers to appreciate the details in each space, from desk arrangements to equipment.
Incorporate 360-Degree Views: If possible, add 360-degree views of larger spaces, like the gym or auditorium, to provide a more immersive experience. This allows viewers to look around as if they’re standing in the room, giving them control over what they see.
Add Narration or Background Music: Consider adding light background music or narration to guide viewers through the tour. A welcoming voiceover can provide context for each area while keeping viewers’ attention.
Highlight Key Features with Text Overlays: Use text overlays to point out specific features, like interactive boards in classrooms or safety features in labs. This provides extra information without overwhelming the viewer.
By focusing on high-quality visuals and engaging multimedia, you’re ensuring your virtual school tour is visually captivating and informative. This attention to detail makes it easy for viewers to picture themselves at your school, making a lasting impression.
3. Ensure User-Friendly Navigation:
Your school virtual tour should be easy to navigate, so viewers can explore your school without any confusion. Simple, user-friendly navigation lets them focus on the spaces and information rather than how to move around.
Create a Clear Menu or Map: Provide a menu or clickable map that allows viewers to jump to specific areas of interest, like the library, science labs, or outdoor facilities. This helps them find what they’re looking for right away, whether they want to explore the entire tour or just certain sections.
Use Intuitive Controls for Moving Around: Make sure the controls for moving through the tour are intuitive, with clear arrows or “next” buttons to guide viewers from one area to the next. This way, they can easily move forward, backtrack, or pause to take a closer look.
Include a Progress Indicator: A simple progress bar or indicator can show how far they’ve gone in the tour, helping them keep track and encouraging them to view the full experience. This adds a subtle guide without pushing them through too quickly.
Offer a Restart Option: Make it easy to start over with a “restart” button or option at the end, in case they want to go through it again or view sections they missed.
By keeping navigation straightforward and intuitive, you’re giving your viewers control and a smooth experience, which keeps them focused on your school and what it has to offer.
4. Promote Interactivity and Engagement:
To make your virtual school tour more engaging, it’s important to promote interactivity. Giving viewers the chance to actively participate will keep them interested and make the experience feel more personal.
Add Clickable Hotspots: Use clickable hotspots in each area of the tour that provide extra details. For example, clicking on a classroom might show information about the teacher-student ratio or the subjects taught in that room. This keeps viewers engaged and lets them learn more without interrupting the flow of the tour.
Include Virtual Q&A or Chat Features: If possible, add a Q&A section or live chat feature where viewers can ask questions as they go through the tour. This allows them to interact with a school representative or get immediate answers to any inquiries.
Offer Interactive 360° Views: Let viewers control what they see by incorporating interactive 360° views. This way, they can explore different angles of a room or space, making them feel like they’re truly in the environment.
Allow for Customizable Paths: If your virtual tour platform allows it, let viewers choose their own path. For instance, they could opt to visit certain areas first, like sports facilities, or focus on academic spaces. Giving them some control over their experience makes it feel more tailored and engaging.
By adding these interactive elements, you’re encouraging viewers to actively participate, making them more likely to stay engaged and remember your school when it’s time to make decisions.
5. Optimize for Seamless Integration and Sharing:
Making your virtual tour easy to share and integrate with other platforms is key to getting the most out of it. The easier it is for people to share, the more exposure your school will get, and the more likely it is that prospective students and parents will see it.
Ensure Easy Sharing on Social Media: Make sure your virtual school tour has clear options for sharing on social media platforms like Facebook, Twitter, and LinkedIn. Adding social share buttons at the end of the tour encourages visitors to share their experience with others, helping you reach a larger audience.
Embed Your Tour on Your Website: Embed the virtual tour on your school’s homepage or dedicated tour page. This allows prospective students and parents to easily access it whenever they visit your website. The more accessible it is, the more likely people will take the time to view it.
Provide a Shareable Link: For convenience, provide a direct link to the virtual tour that viewers can easily copy and share with others. This ensures the tour can be distributed via email or text, allowing people to share it directly with friends or family members who may be interested.
Integrate with Other Tools and Platforms: If you use CRM systems, email marketing tools, or other platforms, make sure your school virtual tour can be easily integrated with them. This will allow you to track engagement, follow up with viewers, or include the tour in your promotional materials.
By making your virtual tour easy to share and integrate with different platforms, you expand its reach and ensure that more people get the chance to see what your school has to offer.
6. Seek Feedback and Continuous Improve:
Once your virtual tour is live, it’s important to keep improving it. Feedback from users can provide valuable insights that help you make adjustments and ensure the tour stays relevant and effective.
Ask for Feedback from Users: After visitors complete the tour, encourage them to provide feedback. Keep it simple, like asking what they liked, what could be better, or if they encountered any issues during the tour. This helps you identify areas for improvement.
Analyze User Behavior: Track how people interact with the tour. Are they spending more time in certain areas? Do they skip some parts? Use this data to understand what works and what doesn’t, then adjust the tour to make it more engaging or easier to navigate.
Regularly Update the Tour Content: Make sure the content in the virtual tour stays up to date. If there are any changes in the school—like new facilities, programs, or staff—update the tour accordingly. This ensures that prospective students and parents always get an accurate representation of your school.
Test New Features or Improvements: If you add new features or make changes, test them with a small group of users first. See how they react and make any necessary tweaks before rolling out the updates to a wider audience.
By seeking continuous feedback and making regular improvements, you ensure that your virtual tour remains fresh, relevant, and effective in attracting potential students and parents.
Top 3 Tools to Create Interactive School Virtual Tour
Now, I’m going to share the top three school virtual tour app or tools to create interactive virtual reality. It ensures that you have the best options for different types of virtual reality at your fingertips.
1. WPVR
WPVR revolutionizes the process of creating immersive school virtual tours directly within the WordPress platform.
As someone interested in exploring school options, imagine having the ability to navigate through different classrooms, facilities, and campus grounds—all from the comfort of your own device.
With WPVR, you can do just that. For instance, a parent considering various schools for their child. By utilizing WPVR, you can take a virtual tour of each campus, gaining insights into the environment and facilities to make an informed decision.
It’s akin to attending an open house event but with the convenience of being accessible anytime, anywhere. WPVR helps you explore schools at your own pace, providing a dynamic and engaging experience that helps you visualize yourself and your family as part of the school community.
2. Cupix:
Cupix is a dynamic platform designed for creating magnetic 3D virtual tours, perfect for showcasing school campuses and facilities in stunning detail.
As someone eager to explore educational options, picture yourself navigating through realistic 3D renderings of classrooms, labs, and common areas—all from the convenience of your computer or mobile device.
With Cupix, you can easily evaluate different schools for your teacher, students, and parents. By utilizing Cupix, you can take immersive virtual tours of each campus, gaining valuable insights into the learning environment and amenities to make informed decisions.
It’s like stepping into the school itself but with the flexibility to explore at your own pace and convenience. Cupix helps you to experience schools in a whole new dimension, providing an engaging and interactive platform to visualize your family’s educational journey.
3. Matterport:
Matterport is a cutting-edge platform that revolutionizes the creation of immersive 3D virtual school tour, ideal for showcasing school campuses and facilities with unparalleled realism.
Imagine yourself navigating through lifelike 3D models of classrooms, libraries, and sports facilities, all from the comfort of your own device.
Picture yourself as a parent exploring various school options for your child. By leveraging Matterport, you can take virtual tours of each campus, gaining valuable insights into the learning environment and amenities to make informed decisions.
It’s like stepping into the school itself, but with the convenience of being accessible anytime, anywhere. Matterport allows you to explore schools in exquisite detail, providing a dynamic and interactive experience.
Conclusion:
In conclusion, the utilization of advanced virtual tour platforms such as WPVR, Cupix, and Matterport presents a transformative opportunity for educational institutions, prospective students, and parents alike.
A school virtual tour app or tools offers a dynamic and immersive way to explore school campuses and facilities, providing invaluable insights and experiences that transcend traditional methods of school evaluation.
Moreover, By harnessing the power of virtual reality technology, individuals can visualize themselves as part of the school community. It helps them to make informed decisions about their educational journey.
As the digital landscape continues to evolve, the adoption of virtual tour platforms appears as a vital component in shaping the future of education, fostering greater accessibility, engagement, and connectivity within the school environment.
**FAQ**
Is WPVR compatible with VR headsets for a more immersive experience?
Yes, WPVR virtual tours can be experienced with VR headsets. It provides users with a truly immersive and lifelike exploration of school campuses.
Are virtual tours compatible with mobile devices?
Most virtual tour platforms are optimized for mobile devices and it ensures easy exploration on smartphones and tablets.
Is it possible to embed virtual tours on our school’s website?
Certainly! Virtual tours can be easily embedded into your school’s website. It provides visitors with direct access to explore your campus digitally.
Can I edit or update my WPVR virtual tour after it’s been published?
Yes, WPVR allows you to edit and update virtual tours at any time, ensuring that your school’s digital showcase remains up-to-date and relevant.
Can I customize the virtual tour to match our school’s branding?
Yes, you can personalize virtual tours with your school’s logo, colors, and branding elements to maintain consistency with your institution’s identity.
The spooky October has arrived already – it’s time to prepare your online store for Halloween! But it won’t be just a treat for the buyers; retail sales for any Halloween store are also going to shoot for the sky.
It is the third most celebrated holiday in the United States. And the best part is, customers then go crazy looking for exciting deals.Last year, average consumers spent $108.24 on Halloween festivities.
So you must start working on getting your Halloween store ready and boost your sales significantly!
Now, let us look at how you can prepare your online shop for Halloween and maximize your revenue.
Fangen wir also an.
Here are the best marketing ideas for Halloween
6 Treats To Boost Your Halloween Sales
You can’t just apply any strategy in your store for Halloween and expect sales. You need to pick a strategy that is the right fit for you.
Here, in these 6 strategies, you will find applicable ideas to get your Halloween products stocked out fast!
1. Offer The Right Halloween Merch
Wenn Sie Einzelhändler sind, dann sollten Sie wissen, dass die beliebtesten Produkte, die zu Halloween verkauft werden, Kostüme, Süßigkeiten, Dekorationen und Grußkarten sind.
Customer’s approaches and buying mindsets during any seasonal events are different than usual buying intent.
For example, a vampire costume seems very unnecessary to shopping at the usual time but not in the Halloween season.
Before stocking your store with Halloween merchandise, you should have a solid knowledge of the buying factors that trigger buyers on Halloween.
To get customers limelight on you in the crowd, you need to know the latest Halloween trends.
According to Pinterest, the number of searches below has increased compared to last year during this Halloween season.
Most searches increased on makeup looks :
spooky makeup – 60% increase
Gentle vampire makeup ideas -475% increase
Gothic romance cosmetics- 710% increase
Makeup for goth boys- 290% increase
Ideas for zombie makeup -230% increase
The Crow composition (plus 275%) increase
Makeup on clowns appears – 1870% increase
Sakuna cosmetics – 1655% increase
People are searching for these ideas on Pinterest, which means they are going to search for the same type of products to get the latest Halloween vibe.
Mix & Match Halloween Products ToIncrease Revenue
You can also offer a Halloween-themed bundle and increase your AOV.
So, you need to stock up on the products that will help them to create a look and vibe that align with this year’s Halloween trend to get an insane sale.
2. Marketing As An Online Halloween Store
Even if you have amazing products, you must understand global Halloween trends and create a great Halloween theme on your website to give your buyers a spooky feel.
Neben dem Webdesign sollten Sie sich auch auf die Entwicklung spannender Marketingkampagnen konzentrieren, um mehr Aufmerksamkeit zu erregen und den Umsatz zu steigern.
Sie können zum Beispiel einen Facebook-Wettbewerb starten, der potenzielle Kunden auf Ihre Website führt. Vielleicht kaufen sie dann mehr Produkte. Sie können auch Mengenrabattaktionen für kleine Dekorationen durchführen.
Hier finden Sie weitere Marketingideen für WooCommerce-Halloween-Shops:
3. Build Dynamic Sales Funnels To Streamline Halloween Sales
As Halloween is near already, you should make every effort to boost your sales. And it’s high time you built your sales funnel to track your buyer’s journey & make them spend more than they intended.
Jedes Online-Geschäft wartet mit Angeboten und Deals auf. Das ist Ihre Chance, sich von Ihren Mitbewerbern abzuheben.
Dazu können Sie verschiedene Taktiken anwenden, um Ihre Kunden mit dynamischen Angeboten zu überraschen.
Sie können zum Beispiel Trichter für spezielle Produktkategorien innerhalb eines bestimmten Zeitraums zu Halloween erstellen.
Hier sind einige weitere Ideen, die Sie in Betracht ziehen könnten -
Legen Sie dynamische Angebote auf ihre Kaufsumme oder Produktmenge fest.
Bieten Sie spezielle Rabatte auf Basis der Benutzerrolle an.
Sell other relevant items with the Highest-sold products or Most popular products.
Oder führen Sie einfach einen Trichter im gesamten Lager ein, um Halloween-Sonderartikel zu jedem gekauften Produkt anzubieten.
Diese Angebote werden Ihre potenziellen Käufer ansprechen und den Umsatz sofort steigern.
Sie können alle diese Strategien mit WPFunnels, die die meisten einzigartigen Dynamic WooCommerce Funnel-Funktion für Ihr Geschäft mit Tonnen von Bedingungen hat zu implementieren.
Bringen Sie also Ihre dynamischen Trichter in Stellung, bevor Halloween kommt.
4. Customize Your Discounts For Halloween Season
Your potential customers are hunting for the best Halloween deals and discounts.
You can use a variety of inventive marketing strategies to increase sales and generate buzz around Halloween.
You can give your customers the option to receive a “Treat” discount on larger purchases or a “Trick” discount on selected items when they make a purchase.
To attract greater orders, you can create unique bundles such as “Halloween Party Packs” or “Buy One, Get One 50% Off” offers.
You can create a separate category of Halloween products and offer category-based discounts.
One-third of TikTok users reported that the website influenced their Halloween purchases the previous year. TikTok even released a tutorial on how to publicize the holiday on their platform.
This is the perfect moment to plan your TikTok or Instagram Halloween strategy if you have not already.
Influencer partnerships can help you promote products more widely but do not undervalue the importance of social media-worthy events, promotions, and shop displays.
6. Halloween Is For You Aswell
Vergessen Sie bei all dem nicht, dass Halloween auch für Sie ist. Und du verdienst eine tolle Belohnung.
Raten Sie mal, es gibt jede Menge Leckereien, die Sie genießen können. Mehrere Themes und Plugins bieten exklusive Halloween-Rabatte an. Sie können sich die besten Premium-Themes und Plugins zum niedrigsten Preis sichern.
Here’s where you can avail of amazing Halloween discounts on WordPress themes and plugins.
Beste WordPress Halloween-Angebote und Rabatte für Sie
Here you can find a complete list of the best Halloween deals and discounts for WordPress this year.
Machen Sie also dieses Halloween zu einem aufregenden Ereignis für sich.
Leverage The Best Marketplaces For A Greater Reach
Online-Marktplätze werden in dieser Halloween-Shopping-Saison schneller wachsen als der gesamte eCommerce.
Der Grund dafür ist, dass Millionen von Käufern diese Plattformen für den Online-Einkauf bevorzugen.
Wenn Sie den Umsatz Ihres WooCommerce-Halloween-Shops steigern möchten, sollten Sie sich ansehen, was auf diesen Marktplätzen beliebt ist, und ähnliche Produkte in Ihren Shop aufnehmen.
Werfen wir einen Blick auf die 3 wichtigsten Marktplätze, auf denen Sie Ihre Produkte zu Halloween anbieten können.
i. Google Shopping
Google Shopping ist derzeit die beste Plattform, um Produkte online zu bewerben.
Google ist die Nummer eins unter den Suchmaschinen, seine Kampagnen in der Ferienzeit bringen immer die besten Ergebnisse.
An diesem Halloween können Sie hier eine Verkaufskampagne durchführen und erwarten, dass Sie mehr Umsatz für Ihren WooCommerce-Shop erzielen.
Promoting on Facebook & Instagram is a great way to engage your potential buyers easily.
You can promote your products on Facebook and inform your customers through engaging Facebook posts and videos.
The super-friendly business features of Facebook & Instagram can highlight your brand efficiently on Halloween.
Instagram’s target audience is GenZ and millennials, and entertaining events like Halloween are highly trends on Instagram.
Instagram is not only for enjoyment but it also encourages people to follow and interact with your business.
By applying easy tactics like interactive Halloween vibe product videos, hashtags, and spooky product images you can attract a lot of targeted buyers and create instant hype for your online Halloween store.
These two marketplaces make millions of sales every week.
And you can take advantage of it by promoting products from your online store through these marketplaces during Halloween.
For that, you can use Product Feed Manager for WooCommerce to generate an accurate product feed in minutes. Eventually, you can easily promote it on your desired platforms.
iv. TikTok Ads
In the Halloween season, TikTok often triggers visitors for more unplanned and impulse purchases.
You can simply choose your creator and visit the creator marketplace of TikTok, collaborate, and get a huge increase in your sales.
But before that, you need to lay out your Halloween products on your TikTok business page properly.
For that, you can choose a product feed manager for WooCommerce to promote your WooCommerce products with TikTok ads.
Watch how easily with simple steps you can create the most accurate feed for Tiktok ads :
Anmerkung des Autors
Halloween ist eine der besten Gelegenheiten, den Umsatz Ihres Online-Shops zu steigern. Nutzen Sie alle Tipps und Artikel, die sich auf diesen Artikel beziehen, und Sie werden zweifellos Ihren Weg zu einer hohen Anzahl von Verkäufen verfolgen.
Machen Sie sich bereit, den gruseligsten Online-Halloween-Shop zu eröffnen.
Panoramic pictures are super popular right now in the area of photography & VR.
Panoramic photography is way easier with an iPhone.
And the best part is, you don’t need any other fancy equipment to try it out with your iPhone.
Even though your iPhone is equipped with a built-in panoramic camera, it can be quite challenging to use on its own to capture high-quality panoramic images, which is why using an iPhone panorama app can make a big difference.
With panoramic apps, you can take panoramic photos right on your iPhone without even having to move it around.
You don’t have to buy a tripod or expensive pieces of equipment either!
But in this article, we’ll look at 3 of the best panoramic camera apps for iPhone
Also at the end of the blog, I provide you guidelines on how you can create virtual tours easily with your panoramic photos and revisit virtually.
Fangen wir also an.
Why Use A Panoramic Camera App Instead Of iPhone’s Built-in Panoramic Camera?
The built-in panoramic camera that the iPhone comes with has a lot of limitations and it becomes way more challenging if you want to take panoramic photos.
Here are side-by-side comparisons:
If you want to take panoramic pictures, there are a bunch of apps that can help you do that.
If you look at the iTunes store, you’ll see a whole bunch of different app icons to choose from. Some are free, some you pay for once, and some you pay for extra features while using the app—so you can even find a free 360 camera app for iPhone if you’re looking to save on costs.
I have well researched most of the apps and chose 3 apps that can easily solve the issues that you will face using the in-built panorama of your iPhone.
Advantages of Using a Panoramic Camera App
Let’s have a look at some advantages you’ll have by using a panoramic camera app:
You’ll capture more of the scene in a single shot.
Panoramic camera apps will give you high-resolution images with impressive detail.
They’ll provide you with an experience with no visible stitching marks in the final panoramic image.
These panoramic camera apps are easy to use and require no professional photography skills.
Overall, a good panoramic camera app will save you from manual flaws and help you capture high-resolution panoramic photos with your iPhone quite easily.
Then, you can use them to show off a location or your property on Facebook or even via virtual tours on your website.
Top 3 Panoramic Camera Apps for iPhone
Here are three apps that I’ve chosen to provide in-depth information on quality & features to help you get 360 panoramic photos using an iPhone with the help of a 360 camera app for iPhone:
1. DMD Panorama
DMD Panorama is a pretty neat app and better than the iPhone’s panorama feature in many ways.
You can take full 360-degree panoramas with this app (both horizontal and vertical angles), which is awesome.
It uses the gyro and compass in your iPhone to help make sure your panorama turns out great.
So, if you want to take some great quality panoramic photos, this app is worth checking out!
Key Features of DMD Panorama:
Works with the front camera of the iPhone for panoramic selfies
Take panoramas with 3 different Exposure settings
Up to 100MP panoramas
The ultra-wide lens on the newest phones captures panoramas with floors and ceilings
Notes : In DMD panaroma app, selfie panorama mode unlocks after you capture and save 10 regular panoramas.
Feedback From DMD Panorama User’s:
I have read all the reviews of DMD panorama users that I got and summed up their feedback here below:
With Bimostitch, You can combine different photos to make one big panoramic image that looks perfect.
Now to mention that this is not a 360 panorama capturing app but a panorama stitching app. But I had to keep this on the list because this stitching is a very important aspect of 360 panorama images and in iPhone, this is one of the best apps you can find for that.
It won’t take up much space on your device and the panoramas will be super clear. You can make panoramas on the go, like when you’re on a trip, and you don’t need to be connected to the internet.
You don’t even need any fancy equipment or sensors to use this app. Whether you’re a pro or just starting, this app is perfect for making great panoramic photos.
Stitch many (2 to 200+) overlapping photos into impressive wide-view panoramas.
Compress large panoramas to save space on your device.
Video-to-panorama for converting videos of panning motion into panoramas
View source images in panorama while in preview mode
Feedback From Bimostitch User’s:
Though it’s not an image-capturing app but rather a stitching app, I got the highest positive reviews on this app. I summed up the positive reviews in 4 points.
In regards to negative reviews, I only got 1. Take a look:
If you want a seamless way to capture high-quality 360 panoramic photos on your iPhone, a 360 camera app is a great choice. If you need more advanced features, explore custom iOS app development services to create a tailored solution for your specific needs.
Creative Ways To Use Panorama Images
Panorama images aren’t just stunning—they’re incredibly versatile. Here are some creative, actionable ways to use them:
1. Create Virtual Tours for Websites
Transform your panorama images into immersive virtual tours. If you’re a realtor, use them to showcase properties. As a resort owner, highlight your rooms, amenities, or scenic views. Tools like WP VR or Kuula can help you upload your panoramic shots and turn them into interactive experiences that visitors can explore from any device.
2. Design Eye-Catching Social Media Posts
Panoramic images stand out on platforms like Facebook and Instagram. You can upload them as scrollable photos or use third-party tools to convert them into engaging videos or carousels. Think of it as a way to grab your audience’s attention while telling a story.
3. Use Panoramas in Presentations
If you’re preparing a pitch or a creative presentation, panoramic images can serve as impactful visuals. For example, a tourism business could embed panoramic views of destinations into their slides to wow the audience.
4. Personalize Travel Albums
Want your travel photos to feel more immersive? Use panorama shots to capture breathtaking landscapes or cityscapes. Instead of flipping through flat photos, you’ll feel like you’re revisiting the entire scene. Print them as fold-out albums or large wall posters for an extra wow factor.
5. Create 3D-Printed Keepsakes
Panoramas can be converted into unique 3D models or keepsakes. Some services let you use panoramic shots to create printed snow globes, crystal engravings, or even 3D postcards.
6. Plan and Share Home Renovations
If you’re remodeling, take panoramic photos of each room before and after. Share these with your contractor to ensure they understand your vision or use them to inspire others when you post your home transformation online.
7. Capture Before-and-After Shots
If you’re in a creative field like landscaping, architecture, or event planning, panoramic photos are perfect for showing transformations. A side-by-side comparison of panoramic shots can be a compelling way to market your services.
By thinking outside the box, you can turn your panoramic photos into more than just pretty pictures—they become tools for storytelling, marketing, and memory-making.
Get a complete guide on how you can create a virtual tour using the iPhone Panorama picture that you took using one of the suggested plugins,
Each of these panoramic camera apps has its unique features and benefits.
Whether you’re looking for a user-friendly interface or powerful stitching tools, there is an app on this list that will meet your needs and could be considered the best 360 camera app for iPhone for capturing stunning panoramic shots.
So why wait?
Download one of these apps today and start capturing stunning panoramic photos with your iPhone.
Keep in mind that while these apps are great for capturing panoramic photos, the quality of the photos will also depend on the camera quality of your iPhone.
It’s recommended to use the latest iPhone models for best results.
As a Woocommerce owner, you might often be scared that your potential customer will abandon their almost-buying cart.
One of the reasons for abandoning your cart may be unclear shipping methods and payment sections.
WooCommerce Shipping settings are often confusing because there are plenty of options in the WooCommerce Dashboard.
So, in this article, I focused on making things as simple as possible for you when setting up the WooCommerce Shipping.
I gave proper directions for every step and used several pictures to let you follow the steps with your dashboard [EASILY].
Follow all the steps properly and your WooCommerce shipping settings will be ready.
Fangen wir also an.
WooCommerce Shipping Setup (Basic Steps)
WooCommerce Shipping is a feature that allows you to control shipping options.
WooCommerce Shipping consists of basic three options. You can say these are the foundation-setting options that you must set.
Here are these 3 options :
Schiffsklasse
Versandzone
Versandart
I’ll go over them one by one :
Create WooCommerce Shipping Classes
In this section, you will learn how to create shipping classes :
Schritt 1
First, Go to WooCommerce > Settings > Shipping
You’ll see four options: Shipping Zones, Shipping Settings, Classes, and Local Pickup.
Notice the blue line under the panel, you will find the option “Classes“
Schritt 2
After clicking on AddShipping Classes, you will see a page as follows :
Sie müssen die folgenden Details eingeben:
Shipping Class: what kind of shipping approach do you want? For example: if you want free shipping, you must write free shipping. (This is mandatory).
Slug: A slug is created based on your shipping classes in your database. In most cases, you won’t need them unless you are working with several shipping classes. If you don’t provide a slug name, it will be created automatically.
Description: It is a good practice to provide a brief description of your shipping classes; the specific nature of products that put them under the same class, etc. This is completely optional.
Step 3
Once you provide the information, click on Save.
In my case, the shipping class looks like this:
Sie können so viele Versandklassen anlegen, wie Sie möchten.
Ihre Versandzone gibt an, in welche Regionen Sie Ihre Produkte versenden möchten.
You can set multiple shipping regions based on the name, country/province, postal codes, etc.
Sie können auch unterschiedliche Versandtarife für verschiedene Regionen auf der Grundlage der innerhalb dieser Option verfügbaren Versandmethoden festlegen.
P.S.: Wenn Sie Regionen festlegen, sehen nur Benutzer aus diesen Regionen Ihre Versandoptionen.
Now let’s learn how to create a new shipping zone :
Schritt 1
On your dashboard go to WooCommerce > Settings and on the page, click on Shipping
Schritt 2
Under Shipping, you will get 3 options. Click on the Shipping Zones option.
Schritt 3
As you can see, To create one, click on Add zone.
Schritt 4
In the first option, you will see the zone name. Fill the box accordingly.
When you select a zone region on the box, all the regions under that zone will be previewed in the list. You will be able to select multiple regions among them.
In my case, the box looks like this.
Klicken Sie auf Änderungen speichern, um Ihre neu erstellte Versandzone zu speichern.
You are done with creating a Shipping Zone.
Then you need to select “Add Shipping Method” to Free Shipping or Flat Rate.
Which I am now going to discuss elaborately on how you can set up shipping methods :
Set Up A WooCommerce Shipping Method [Manual]
So, There are 3 types of shipping methods you can go for :
i. Free Shipping
ii. Flat Shipping
iii. Local shipping
First I will guide you with free shipping.
Then I will give you an overview of the other two WooCommerce shipping methods.
So let’s go ahead :
i. Free Shipping Method
If you want to give your customers shipping free of charge then you need to set up a free shipping method.
So, now go to the WooCommerce settings option. Then select the button Shipping< Add Zone
As you scroll down you will see the option shipping methods on the left side :
On the right panel, you will see a blue button labeled “Add shipping Method”
As you click on the button this list will come up :
Here, you will see a 2 option. select Free Shipping and click on the Continue button.
This is what the Free shipping Settings look like:
As you can see, first you have to put a name on it and then fill out the requirements.
Sie müssen die folgenden Informationen eingeben:
1. Title:
This is the name of your shipping method. The name you set here is what users will see while checking out.
You can set the title from Free shipping to anything you want (for example, ‘No shipping fee’) but the method of shipment will remain the same.
2. Free shipping requirements :
You can either choose to give free shipping without any condition, or you can choose from 4 conditions to make free shipping applicable:
A valid free shipping coupon: The customer has to have a coupon to get free shipping
A minimum order amount: The customer has to order that’s worth a certain amount or more to get free shipping
A minimum order amount or a coupon: Customer can have either a free shipping coupon or a certain target amount worth of the order; any one of them will avail of free shipping
A minimum order amount AND a coupon: The customer needs to have a free shipping coupon and order a certain amount worth of order; both have to be achieved to avail of the free shipping option
Minimum order amount: In case you set the condition above to have a minimum order amount (i.e. you chose one of the last three options for “Free shipping requires“.
I will select the “No requirement” option.
Now, in the shipping method box, free shipping has been added. Now, look at the right side of the dashboard, you will find the option to edit.
Click on Edit and it will take you to the free shipping settings. Update any changes you want.
Your Free shipping method is set up.
The next shipping method is flat rate shipping :
ii. Flat Rate Shipping Method
Flat-rate shipping charges a fixed rate for shipping.
To set this method up, follow the steps below :
To access Flat Rate Settings, Go to WooCommerce > Settings > Shipping > Shipping Zones > Shipping method.
Then choose the option flat rate and click on the button Continue.
It will take you to the flat rate settings.
In the Flat Rate Settings, you have to enter your estimated cost, shipping class cost, and some other relevant information accordingly.
Terms you need to know :
Methode Titel: Dies ist der Name Ihrer Versandmethode. Der Name, den Sie hier einstellen, ist das, was Benutzer beim Auschecken sehen werden. Sie können den Titel von "Flat Rate" (Pauschale) bis zu allem, was Sie wünschen (z.B. "Pauschale Versandgebühr") einstellen, aber die Versandart bleibt dieselbe.
Steuerstatus: Wählen Sie, ob Versandprodukte steuerpflichtig sind oder nicht.
Kosten: Es sind die von Ihnen festgelegten Basiskosten, die sich als anfängliche Pauschalkosten summieren. Sie wird für alle Produkte berechnet, auch wenn sie nicht in eine bestimmte Klasse fallen.
Shipping Class Cost: Set an additional cost you want to imply on your products that fall under certain shipping classes. For example, I have set my shipping class cost to 5 for the class ‘Heavy’. Anyone who is buying an item that falls under the class ‘Heavy’, will be charged an additional $5, along with the flat rate cost.
No Shipping Class Cost: Set up your shipping rates for the products that fall under no specific classes. I set it up as 2. Anyone who is buying an item that falls into no shipping classes will get an extra charge of $2 along with the flat rate cost.
Calculation Type: When you have multiple shipping classes, you can choose the types of calculation you want to imply with your shipping classes cost. In the Flat rate method, you will have two ways to do that: Per Class & Per Order
After you fill up all box, click on the button “Create & Save“
Now let’s look at the Local pickup shipping method.
iii. Versandmethode für lokale Abholung
Go to Shipping zone> shipping method> add shipping method> local shipping
This is what the Local pickup Settings look like :
Now click on the option “Enable local pickup”.
Scroll down and tick on the label line “Add a price for customers who choose local pickup”.
By default, the local pickup shipping method is free. but if you can charge an extra fee for local pickup you can assign it here. Usually, store owners do not charge anything extra, but it is an option you can use.
Tax status: Here, you have the option to choose between Taxable or None.
It is by default assigned as Taxable, which means when using a local pickup, store base taxes will apply regardless of customer address.
This is the ideal choice for most store owners, however, you can choose not to charge for taxes and select Non-Taxable instead.
Now, scroll down and you will see the option to pick locations. On the left side, you will see the button “Add pickup location“
As you click, you see this page with these options :
Once these are inputted, click on the Save Changes button, and your Local pickup shipping method is set up.
How to Calculate Shipping Rates & fees
There are two calculation types available :
Pro Klasse
For any order that will include products in multiple classes, the shipping class cost for each of those classes will be added on top of the flat rates.
Also if the order includes products with no particular class, then the cost for no shipping class will be present as well.
For instance, let’s assume that I have another shipping class named ‘Light’ and I assigned a shipping class cost of $3 to it.
Now, let’s say a buyer ordered 4 products, out of which two products fall under the class ‘Heavy’, one product falls under the class ‘Light’ and another falls under the no shipping class.
Then the total shipping cost will include a $2 charge for no shipping class cost, a $5 charge for the shipping class cost of ‘Heavy’, and a $3 charge for the shipping class cost of ‘Light’, on top of the flat rate cost of $5. So the total shipping cost will add up to $15.
Pro Bestellung
In this case, for any orders that will include products from multiple classes, the shipping class cost that is the highest among these classes will be added on top of the flat rate cost. Suppose, I have another shipping class named ‘Light’ and I assigned a shipping class cost of $3 to it.
Now, let’s say a buyer ordered 4 products, out of which two products fall under the class ‘Heavy’, one product falls under the class ‘Light’ and another falls under the no shipping class.
Here, among the three, the highest shipping class cost is $5. Hence, only $5 will be added on top of the flat rate cost, the other two shipping class costs will be ignored. Therefore, the total shipping cost will add up to $10.
Once these are inputted, click on the Save changes button, and your Flat rate shipping method is set up.
Set Up Payment Methods
In the WordPress dashboard, navigate to and click on the Payments tab within the WooCommerce > Settings menu.
You can choose from these options :
Direct bank transfer: Take payments in person via BACS. More commonly known as direct bank/wire transfer.
Check payments: Take payments in person via checks. This offline gateway can also be useful to test purchases.
Cash on delivery: Have your customers pay with cash (or by other means) upon delivery.
Click on the button manage, you will get the settings page of any option :
As you can see here the setting page of cash on delivery. Fill up accordingly with your credentials. Clock on save changes. Your payment setup is done.
Set Up Weight-based Shipping [Additional]
Some might think configuring WooCommerce shipping based on weight would be a hard task.
When you know the RIGHT process, it’s very simple.
Let us walk you through all the steps.
How to Turn On WooCommerce weight-based shipping class
Jump to WooCommerce >> Settings >> Shipping and add a shipping class.
I will name this WooCommerce weight-based shipping class:
Now, in the same way, create other classes for other weight ranges.
Next, you have to assign the classes to the products according to their weight categories.
For example, I have a product that is under kg, so I would send it to under the Up to kg class.
Looks like a time-consuming task, right? You can also bulk assign WooCommerce weight-based shipping classes.
Go to All Products and filter your products according to your requirements. Select all of them and click the Quick Edit button.
On the Quick Edit window, assign the appropriate class and update.
Finally, you need to create or edit a flat shipping method. Go to your designated shipping zone and add/edit the flat rate method.
Scroll down the flat rate window, and you will find all the classes you created.
Finally, set your rates for every class.
Integrate shipping with An Advanced Shipping Plugin
As you see in WooCommerce, you might not get every option you need.
You can integrate a shipping plugin into your WooCommerce. I am showing you a plugin named “Advanced Shipping”
First, install and activate the plugin.
Now go to the Shipping zone > Shipping method>Advanced shipping.
And now see how easy it is now to set up your shipping process. You will get all the options under one panel.
You don’t have to go back and forth to different pages to set up separately.
Schlussbemerkungen
A well-defined shipping strategy can make your shipping process smooth.
In this guide, I provided a step-by-step guide for setting up shipping in WooCommerce.
I added how you can make the process easy with the Advanced shipping plugin.
By following the steps outlined and carefully considering your customer’s need, you can establish both a user-friendly and sale-focused shipping system.
Comment below any question you have on your mind! I’d love to answer and solve your queries.
Frequently Asked Questions (FAQs)
FAQ 1: Which of the following shipping methods is commonly available in WordPress?
-Common shipping methods available in WooCommerce include:
Flat Rate shipping
Kostenloser Versand
Abholung vor Ort
Table Rate Shipping (with plugin)
Live rates from carriers (with extensions)
FAQ 2: What are the shipping variations in WooCommerce?
– Configuring shipping in WooCommerce is a straightforward process that begins in the WooCommerce Settings under the Shipping tab.
Here, you’ll set up shipping zones, which are geographical areas you ship to, and add appropriate shipping methods for each zone.
These methods can include options like flat rate, free shipping, or local pickup. For each method, you’ll need to configure specific settings such as costs and conditions.
FAQ 3: How to offer multiple shipping options in WooCommerce?
– WooCommerce offers several shipping variations to help tailor the shipping process to your business model. Shipping zones allow you to define different rates for different geographical areas. Shipping classes help you group products with similar shipping requirements.
Various shipping methods provide different ways to calculate shipping costs. You can base shipping calculations on factors like weight, dimensions, or cart total.
In 2024, visually consumed information will be highly accepted as people want to know it all without investing a much longer time.
Whether you are a traveler, resort owner, or realtor,
your consumer list won’t be satisfied if your site provides images or videos with a conventional 2D camera.
For a proper virtual tour of a home, place, or resort with a photo-first model, you need to use a high-quality 360 camera.
With that kept in mind, here’s my top-picked suggestion list of 360 cameras for 2024.
Fangen wir an.
Consideration Points Before Purchasing A 360 Panoramic Camera
Before going to the list, go through these key factors you need to focus on while buying a 360 camera.
1. Dynamic Range Ability:
Capturing the full 360 angle of the scene is highly important in 360 photography.
Without a high dynamic range in the camera you are using, you will fail terribly in terms of the sharpness of your product.
2. Lens Quality:
In terms of lens, You should go for a single-lens mode camera.
A 4k single-lens mode camera would be the best as you will need very little editing time to give finishing to your images.
3. Easy & fast workflow :
You need to pick up a camera that speeds up the entire action cam workflow, from stabilizing, reframing, and editing to transferring files with an easy user interface.
4. Battery Life:
You must not want any overheating and crash issues with your camera.
Since panoramic cameras are power-hungry, choose one with a long battery life.
You should consider cameras with removable batteries or the ability to charge via USB, so you can keep the camera charged on the go.
5. Durability:
If you plan to take your panoramic camera on outdoor adventures or use it in harsh environments, look for models that are built to withstand the elements.
Weather sealing, rugged construction, and shock resistance are the features that you should consider.
6. Aligned with your need :
There are many amazing 360 cameras but every camera has its own unique value.
Some are really good at night mode, while others can tolerate the hot weather of sunny days.
Now considering all these, let’s have a look at the best 5 Panoramic cameras for you.
Best 360 Cameras For Capturing 360 Panoramic Images in 2024
As panoramic photography gains in popularity, more and more manufacturers are producing panoramic cameras that cater to this niche market.
So I’ve gathered the top five 360 panoramic cameras in the market right now, along with their standout features, pros, cons, and best use cases.
1. INSTA 360 X3
The Insta360 X3 is an updated version of the Insta 360 X2 with improved HDR for better quality in difficult lighting.
It has 50% faster wifi transfer compared to X2.
You can easily mount the camera, and record any bouncy action with proper stabilization.
With this virtual tour camera, you can quickly share to social media in a few clicks without losing video quality.
Specs :
Sensor Size 1/2″
Battery Capacity 1800mAh
360° Video 5.7K
360° Active HDR Yes
360° Photo 72MP
Single-Lens Mode 4K30fps
Screen Size 2.29″
Waterproof 10m (33ft)
FlowState Stabilization + 360° Horizon Lock Yes
Buy It If :
You want to edit on your mobile as it has photo format INSP, that can be exported via mobile app or desktop Studio.
You want to charge your battery in 90min(5V/3A)
You want a high dynamic range.
Don’t Buy It If :
Your operating temperature isn’t between -4°F to 104°F (-20℃ to 40℃).
Preisgestaltung
2. INSTA360 ONE RS 1-Inch
The advantage of buying the Insta360 One RS 1-inch edition is that it has more impressive features than smaller sensor cameras.
With Leica co-engineered lenses, dual one-inch sensors, and 6K 360-degree recording capabilities, it delivers superior image quality and can provide you with low-light performance.
Specs :
Aperture F2.2
Focal Length 6.52mm
Photo Resolution 6528×3264 (2:1)
Dimensions (W x H x D) 53.2×129.3×49.5mm
Max Video Bitrate 120Mbps
ISO Range Photo: 100-3200, Video: 100-3200
Audio Modes Wind Reduction & Stereo
White Balance 2000K-10000K
Buy It If :
You have limited filming experience as Insta360 ONE RS 1-Inch easy to use right out of the box. The camera setup process is quick and intuitive.
You want to connect the camera to the smartphone app.
You want the app-to-camera connection to be stable and uninterrupted.
If you want to connect it with multiple devices (watch, AirPods). As the connection remains strong.
Don’t Buy It If You :
You want to format in mobile as RAW files of this device require software on PC/Mac to export.
Preisgestaltung
3. RICOH THETA Z1
The Ricoh Theta Z1 is your premium choice for immersive 360-degree photography.
With its high-end features, it delivers detailed and captivating images, perfect for capturing your surroundings in stunning clarity.
Specs :
Image Sensor Size 1 inch (x2)
Image Sensor Effective Pixels Approx. 20M (x2)
File Size (still images) RAW: 7296 x 3648, JPEG: 6720 x 3360
Lens F2.1, 3.5, 5.6
OLED Panel 0.93 inch Organic light emitting display Panel, 128 x 36 dots
Usage temperature range 0°C – 40°C
Dimensions 48mm (W) x 132.5mm (H) x 29.7mm (24mm *7) (D)
Shutter speed Still image: (AUTO) 1/25000 sec. to 1/8 sec.
Buy It If :
You want to capture incredibly detailed images with excellent color accuracy and dynamic range as it has dual 1-inch CMOS sensors.
You want advanced image processing capabilities.
You want a large storage capacity.
Don’t Buy It If :
You require a huge amount of video recording as it has limited video recording capabilities.
You want longer battery life.
Preisgestaltung
4. QOOCAM 3
QooCam 3, is a 360-degree camera with two ultra-wide fisheye lenses that capture 5.7K photos and videos in all directions simultaneously.
With the “invisible” selfie stick, you can remove the footage by the camera’s algorithm.
Specs
Aperture F1.6
Exposure Compensation ±2EV
White Balance Auto, 2500K-8000K
Maximum Resolution of Photos 62MP (11136×5568)
Video Bitrate 120Mbps
Water and Dust Resistant IP68 Waterproof
Audio output AAC (16 bit/Quadraphonic/48 KHz)
Buy It If :
You want an easy-to-use camera
You want a compact and travel-friendly camera.
You want a well-built and weather-resistant camera.
Don’t Buy :
Down on resolution and some features from its predecessor.
Built-in JPEG processing is only so-so, with the need to use DNG to get the best out of the camera
Preisgestaltung
5. PANOX V2
PanoX V2 stands out for its exceptional performance, especially in capturing high-resolution still photos.
Its intuitive interface makes it a pleasure to carry and operate in the field.
And will allow you to focus on capturing stunning images without worrying about the fragility of the equipment.
Specs
360°Video 5.7K@30FPS
360° Photo 72MP
Sensors 1/2” CMOS
HDR Photo 12K
Photo Format JPG+DNG
Live Streaming 4K 360° YouTube &Facebook
Timelapse. 5.7K 360°
Buy It If :
You want higher density and higher resolution as it has 8K 5 FPS mode
You want a built-in GPS.
You want to just drag the files right into the desktop uploader without other processing as it has on device stitching of 360s.
You don’t want to buy an adapter as it has a standard tripod camera mount.
Don’t Buy It :
If you want high sharpness, the UI on the camera feels a bit less polished
If you want fast GPS tracking, acquiring GPS satellites can take a bit of time.
Preisgestaltung
Comparison of The Best 360 Degree Cameras
Now that you know all the details about each of the best 360 cameras, let us look at a few comparison tables to understand which one is ideal for you to choose and which 360 cameras are affordable.
⬩ 4 MEMS 48KHz Microphones. ⬩ 3.5mm Mic Port for external professional Mic.
Third-party stands and sticks
Nein
Panox V2
⬩ 4 MEMS 48KHz Microphones.
Tripod Socket
With Case (Up To 30m)
Control Options & Pricing
360 Cameras
Mobile App
Touchscreen
Voice Command
Preis
Insta360 X3
Ja
Ja
14 Voice Commands
$399
Insta360 One 1-inch
Ja
Ja
4 Voice Commands
$429.99
Ricoh Theta Z1
Ja
Ja
Only for Image Capture
$376.95
Kandao QooCam 3
Ja
Ja
Nein
$559.99
Panox V2
Ja
Nein
Nein
$399
You can now compare different features and aspects of these 5 cameras and decide which one matches your requirements best.
How You Can Make Money with 360 Panoramic Cameras – Industry Use Cases
Let’s have a look at how panoramic cameras are being used and can be used in different industries to make you money.
1. Immobilien
If you’re a real estate agent, you can use 360 panoramic cameras to create virtual tours of your properties, providing a 360-degree view of the property to potential buyers.
This will help to increase engagement with your clients and provide them with a more immersive viewing experience.
Pair your camera with WPVR to easily create immersive virtual tours and integrate them directly into your website.
Here’s an example of how it will look,
2. Travel and Tourism
If you work in a travel company, you can use these 360 panoramic cameras to capture immersive footage of destinations where you operate and create virtual tours.
It allows your potential customers to explore a location before booking a trip.
They can explore rooms just like the one below,
3. Education and Training
You can use 360 panoramic cameras for education or to train employees or students by creating immersive training videos.
For example, medical students can get familiar with real-life challenges & learn how to act using 360-degree footage of surgeries.
4. Museums and Exhibitions
You can create interactive exhibits and virtual museum tours using 360 panoramic cameras and make your exhibitions open to your online viewers.
5. Automotive Industry
If you own a car dealership, you can use 360 panoramic cameras to create a virtual car showroom to showcase the interior and exterior of your vehicles.
They may check car details like this,
6. Architecture and Design
If you’re an architect or designer, 360 panoramic cameras will help you create immersive visualizations of your projects.
It allows your clients to have a better idea of the space before it’s built or designed.
7. Photography & Videography
360 panoramic cameras will let you capture unique perspectives and create stunning visuals.
Their compact size and portability make them a great option for your on-the-go shoots.
8. Event Planning
In the event planning business, you can use 360 panoramic cameras to capture your events from multiple angles, providing a more comprehensive view of the event and a dynamic showcase.
Also, utilizing 360 panoramic cameras to capture your events from multiple angles not only provides a more comprehensive view but also enhances the invitation-making process by offering dynamic visual content for the invitation maker app.
For those looking to elevate their event documentation further, hiring professional event photographers can add a layer of professionalism and creativity to your visuals.
It’ll make your job easier to impress your potential clients with your previous work.
9. Construction and Real Estate Development
If you have a construction business, you can utilize 360 panoramic cameras to create virtual site visits and track construction progress.
It’ll let your stakeholders monitor the progress of the project remotely.
10. Sports and Action
You can use 360 panoramic cameras to capture your extreme sports and outdoor activities in high-quality footage.
This will be useful for athletes like you looking to document their experiences.
11. Film and Entertainment
If you’re in the entertainment industry, you can use these panoramic cameras to capture live events, such as concerts and festivals, to capture 360-degree footage for your online audiences.
12. Security and Surveillance
In the case of monitoring large crowds or events, 360-degree footage can provide a comprehensive view of the area being monitored.
Einpacken
In summary, the Insta360 One X3 offers the best image stabilization and editing capabilities, making it a great choice for those who want to capture smooth, professional-looking footage.
The Kandao QooCam 8K is the best choice for those prioritizing image quality, as it offers the highest resolution and dynamic range.
The Ricoh Theta Z1 is a great option for those who want advanced features like live streaming and remote control.
The Insta 360 ONE RS 1-Inch offers amazing photo quality even in low light so it’s great for using in all weathers.
Lastly, PanoX V2 is great for its exceptional performance, especially in capturing high-resolution photos.
No matter which camera you choose, a 360 panoramic camera can open up creative possibilities for photographers and videographers.
Whether you’re looking to capture immersive footage of your travels or create virtual tours of real estate properties, these cameras can help you easily achieve your vision.
If you want to use a reliable virtual tour creator that is reliable, cost-effective, and has a high-quality interactive floor plan feature, then WPVR would be a great choice.
Try using WPVR today and start making virtual tours that are more optimized for converting clients.
Are 360 panoramic cameras difficult to use for beginners?
Not necessarily. While they may have a learning curve, many models offer user-friendly interfaces and intuitive controls to simplify the shooting process.
Can I use a 360 panoramic camera for everyday photography?
Yes, 360 panoramic cameras are universal tools that can capture a wide range of scenes, from everyday moments to epic landscapes. It enhances your photography experience.
Are 360 panoramic cameras only suitable for professional photographers?
No, they’re for everyone. Whether you’re a professional photographer, an enthusiast, or just someone who loves capturing memories. A 360 panoramic camera can elevate your photography game.
Do 360 panoramic cameras require special editing software?
While some advanced editing software can enhance your images, many panoramic cameras come with built-in editing features. It helps to make it easy to edit and share your photos directly from the camera.
Can I use a 360 panoramic camera for live streaming?
Yes, some models, like the GoPro MAX and Ricoh Theta Z1, offer live-streaming capabilities. It allows you to share immersive experiences in real-time with your audience.
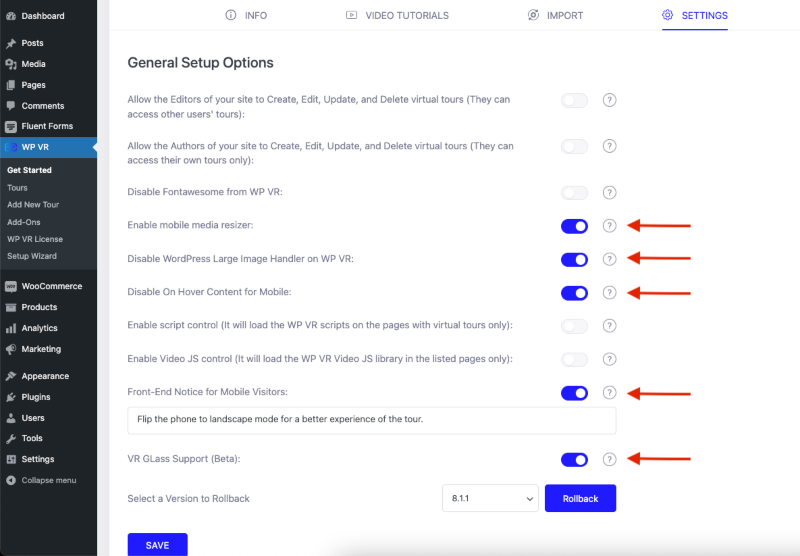
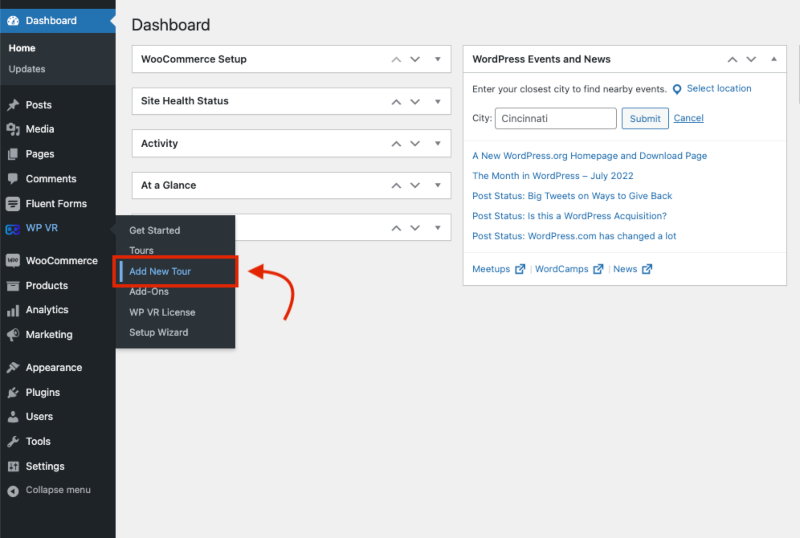
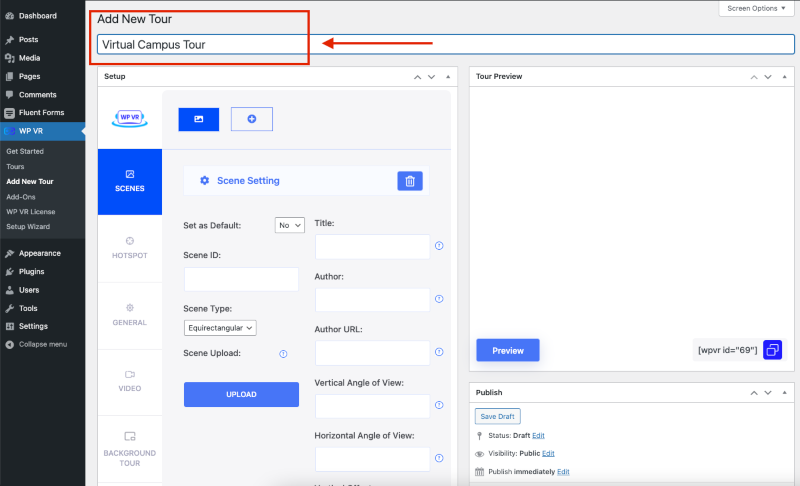
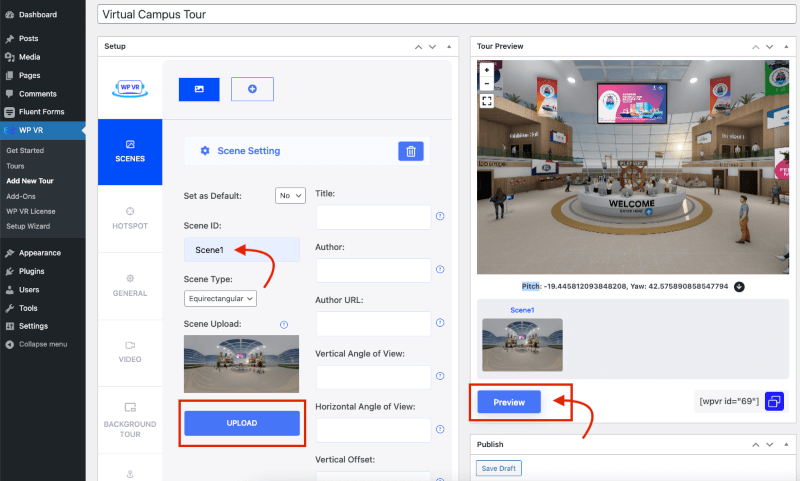
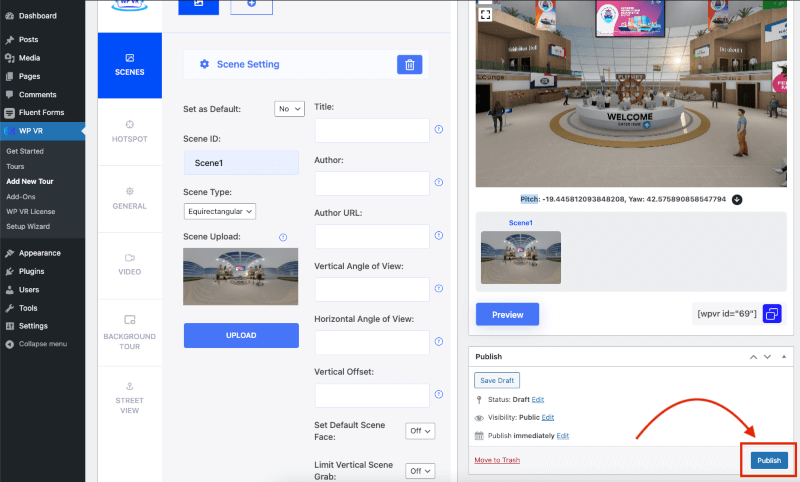
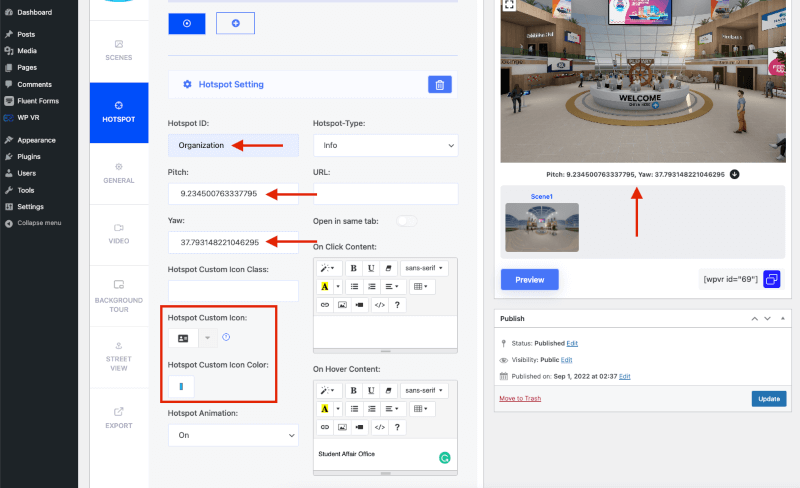
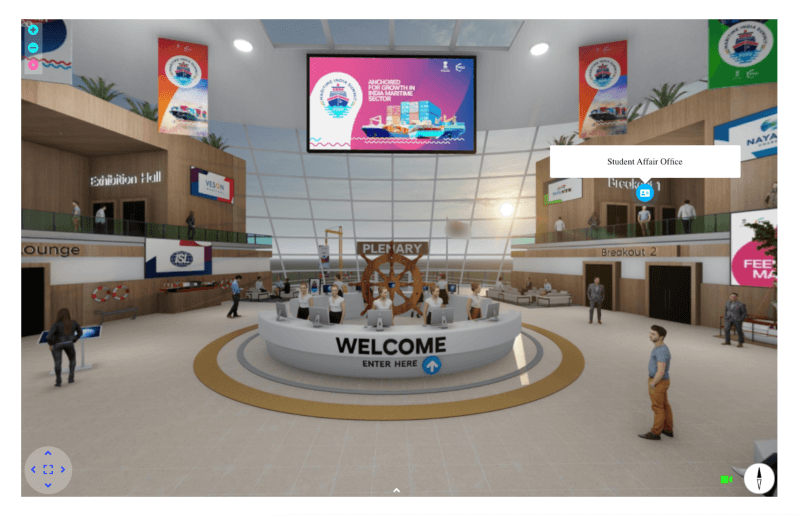

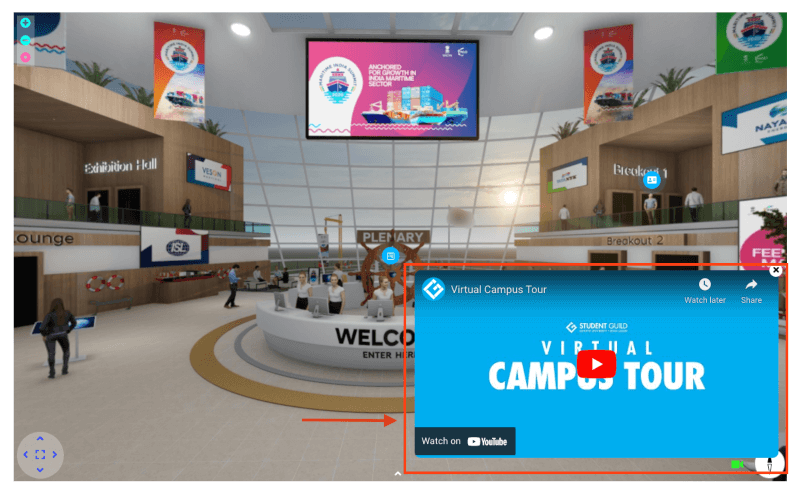
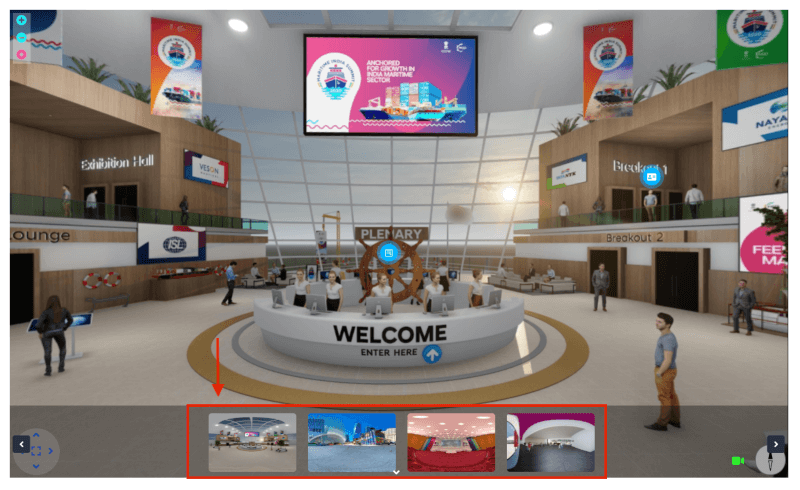


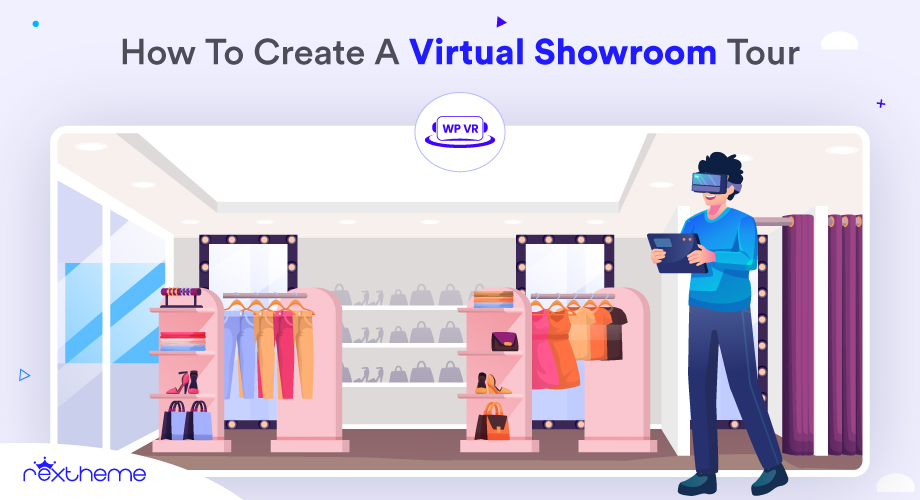
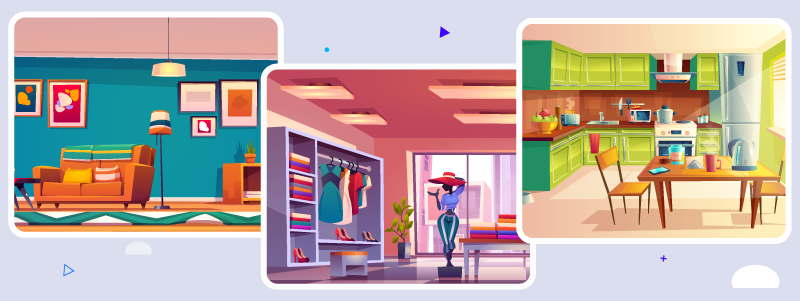
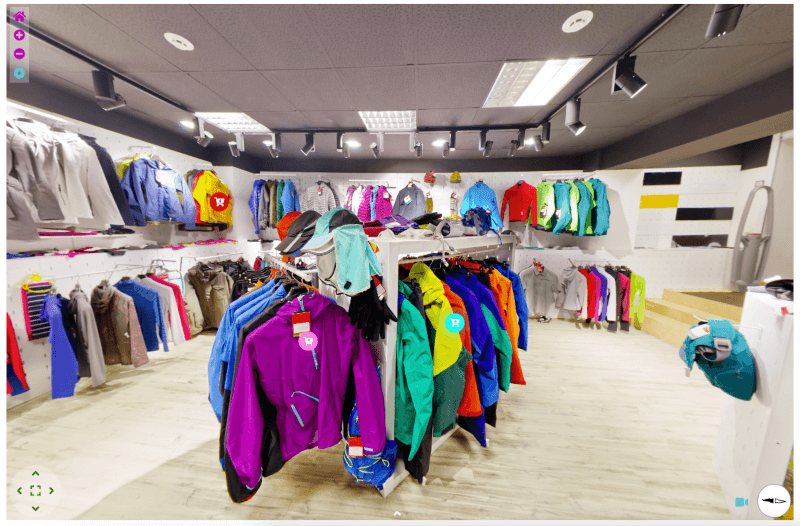
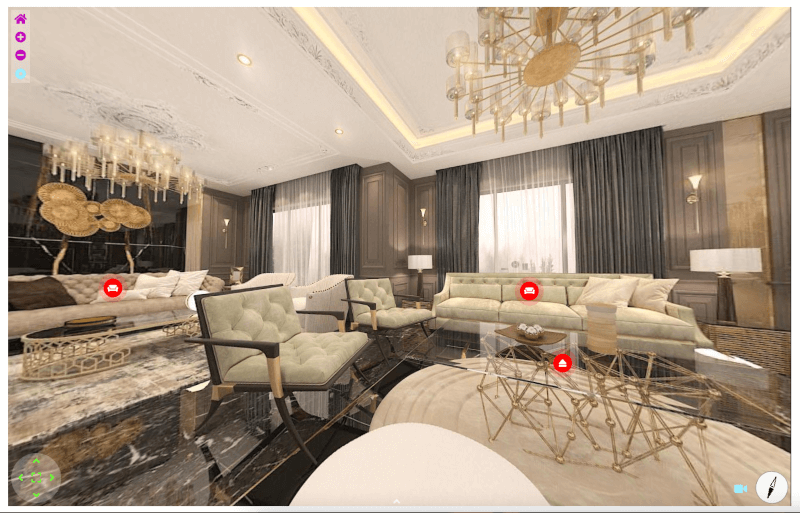
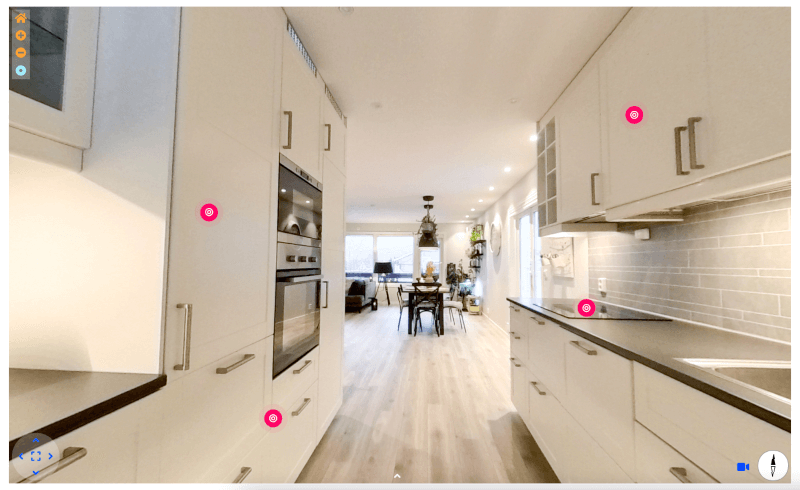
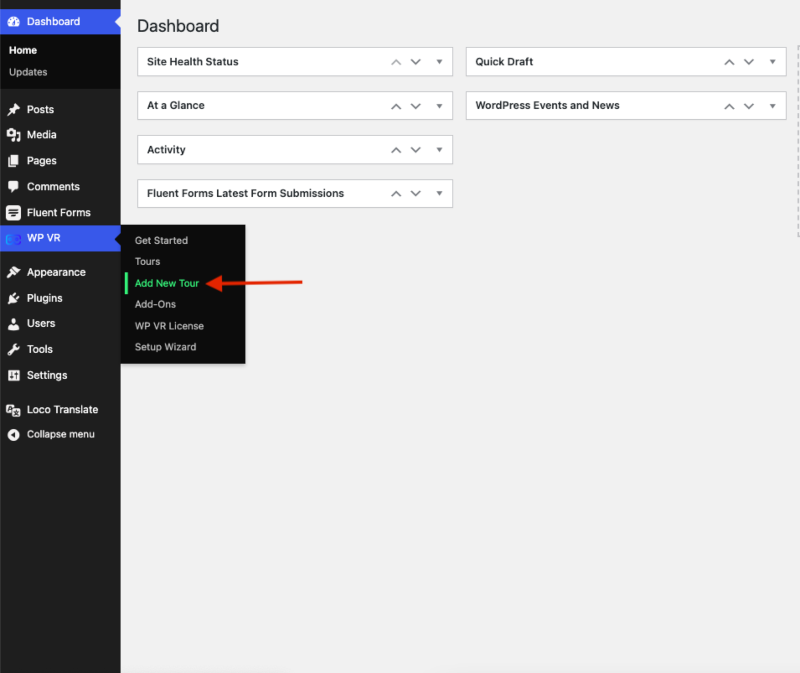

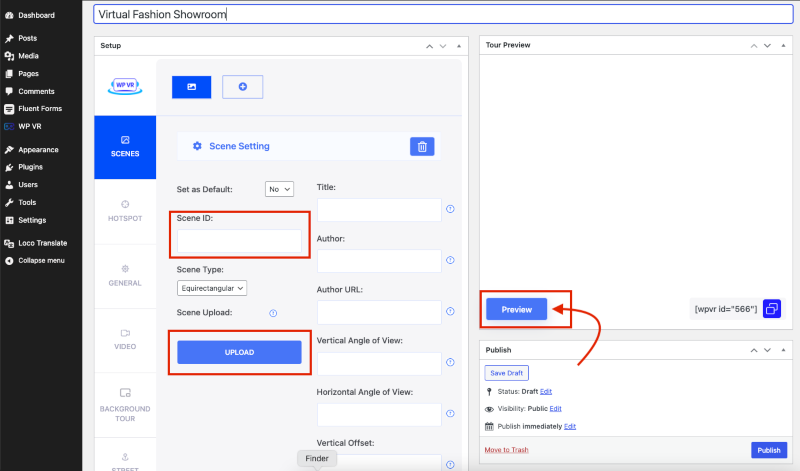
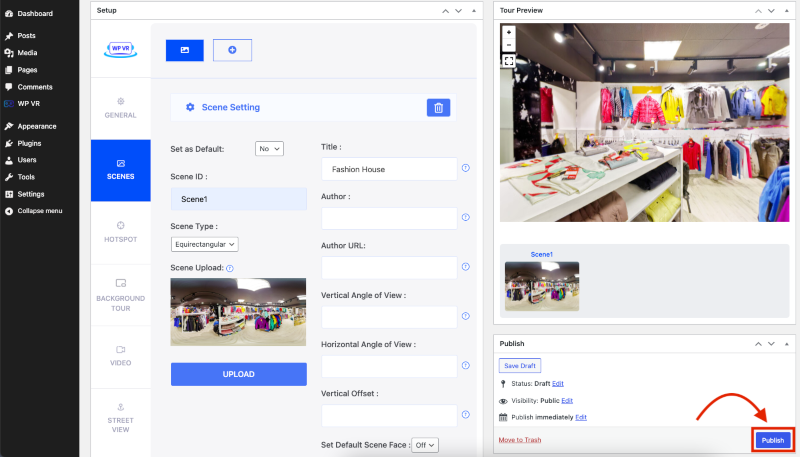

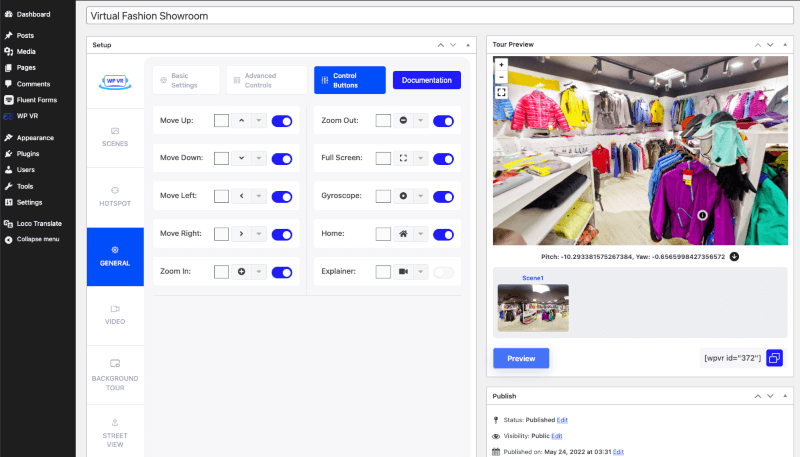
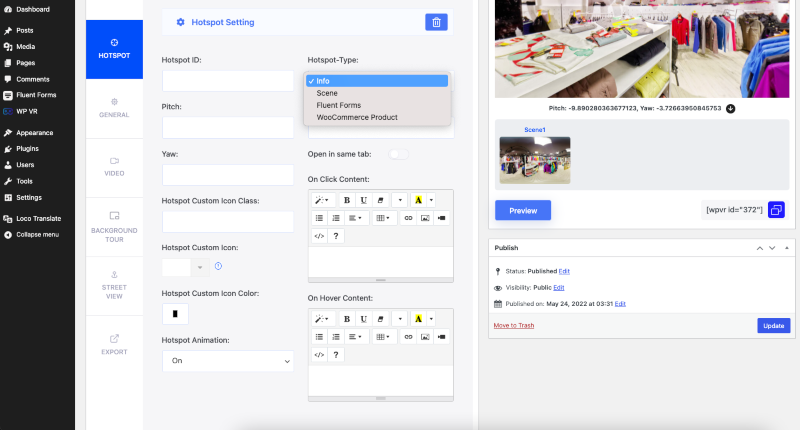
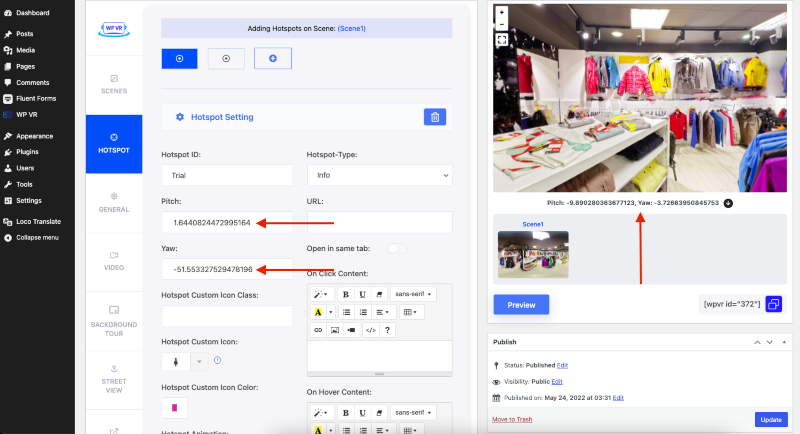

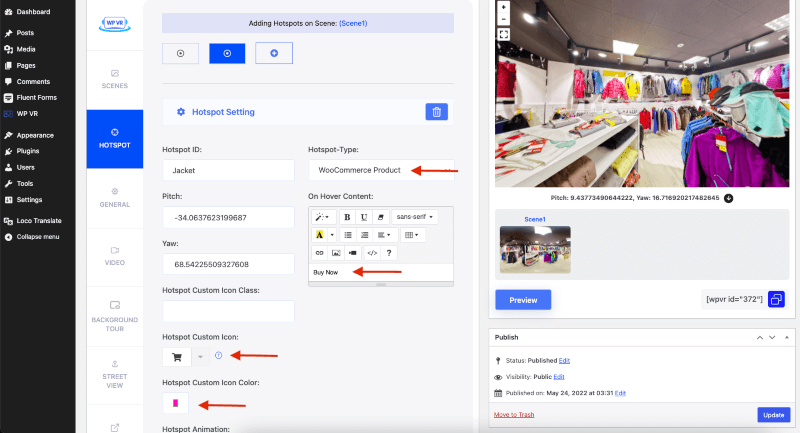
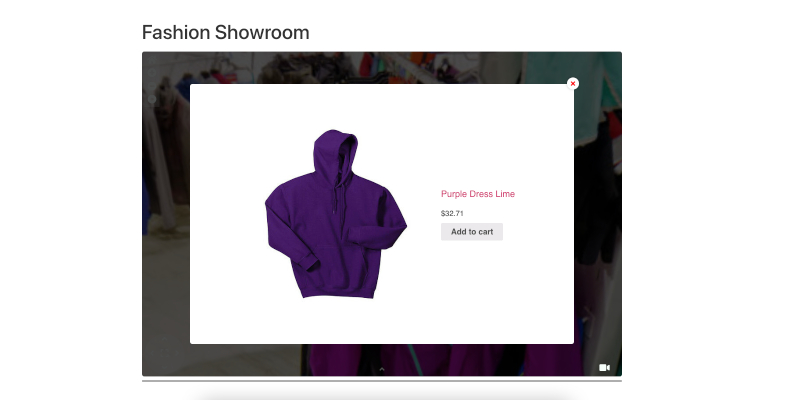

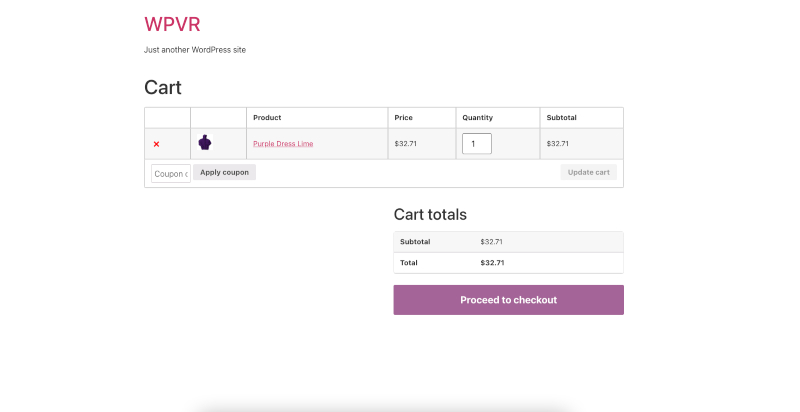

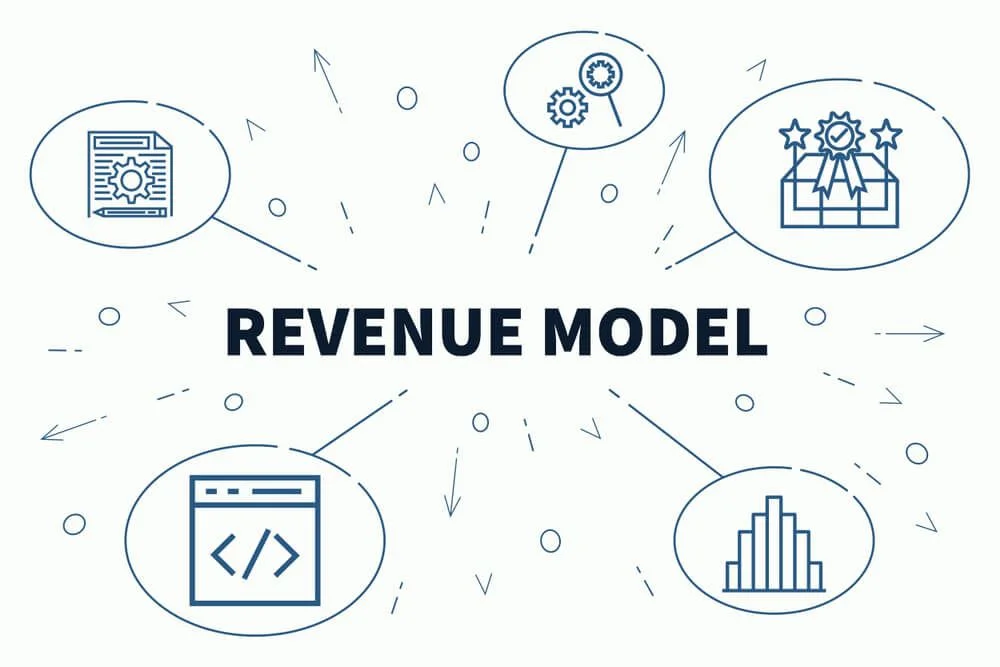


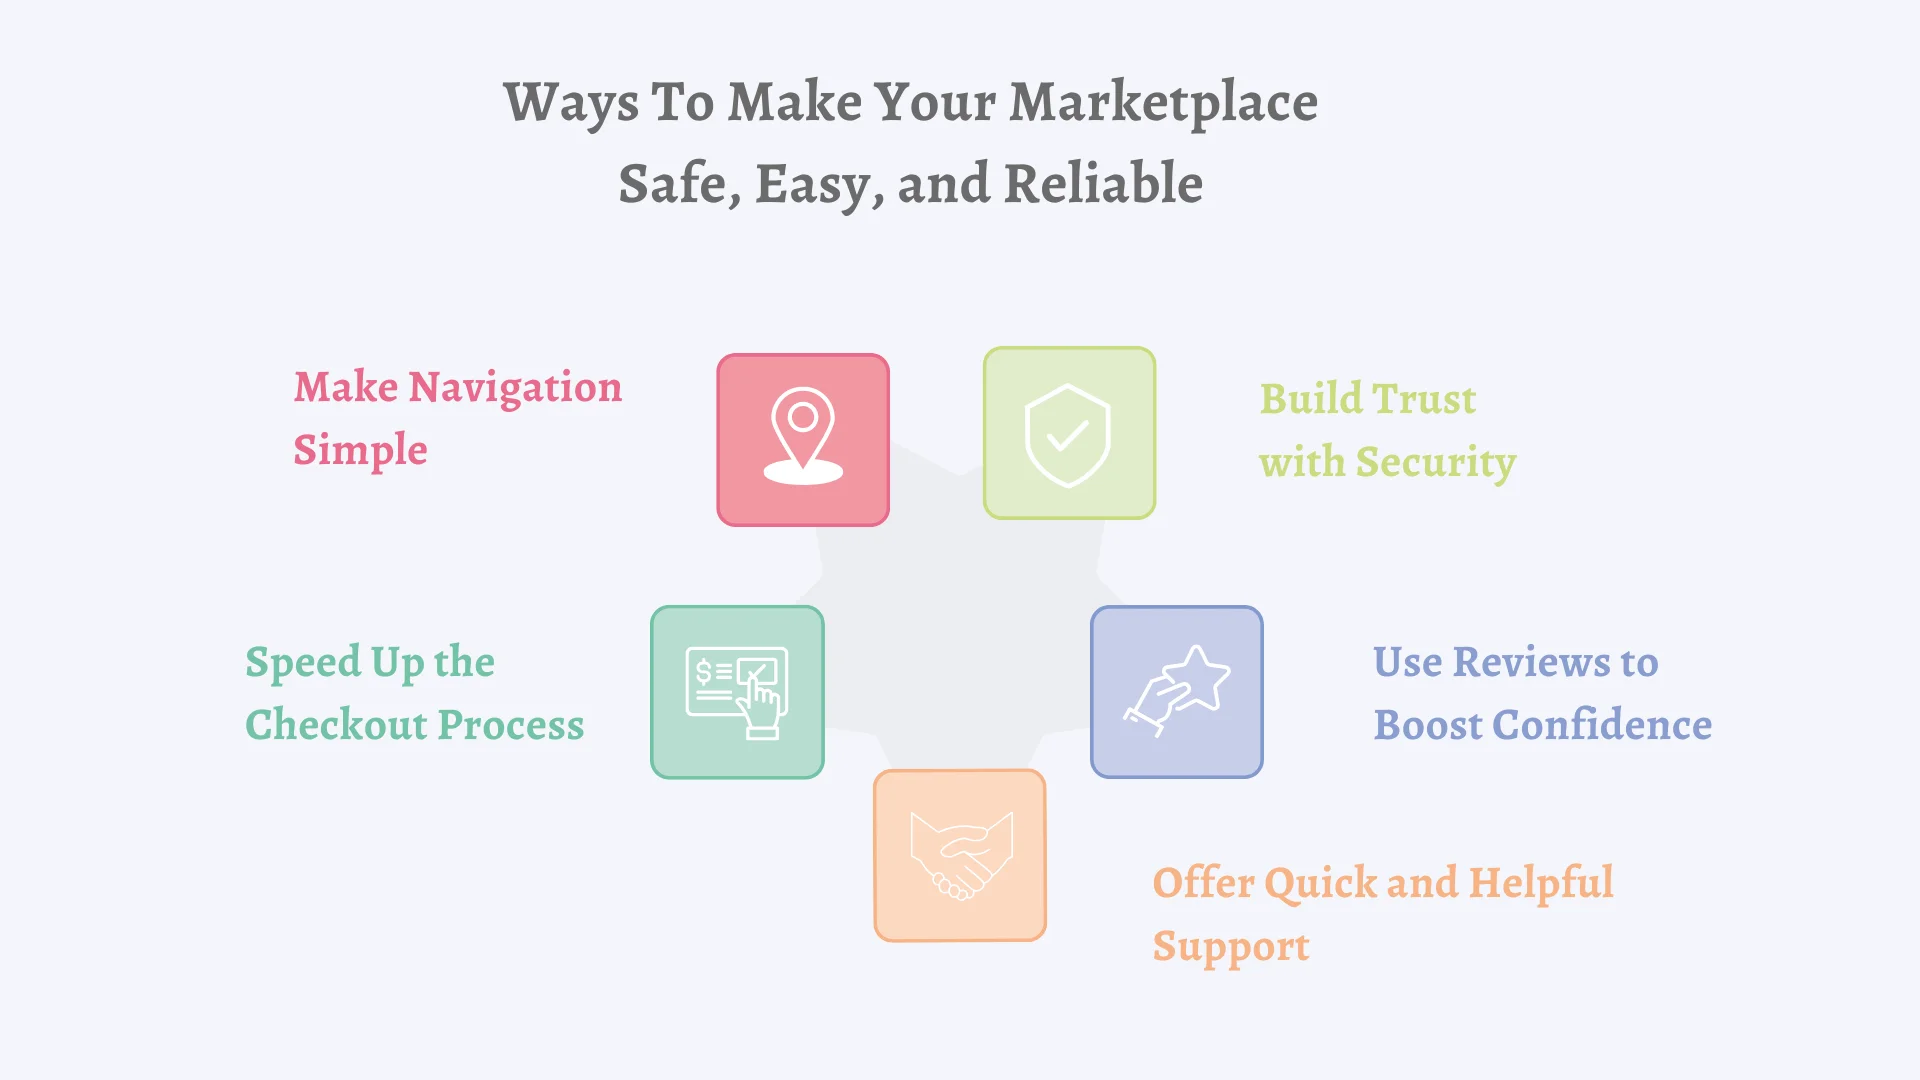


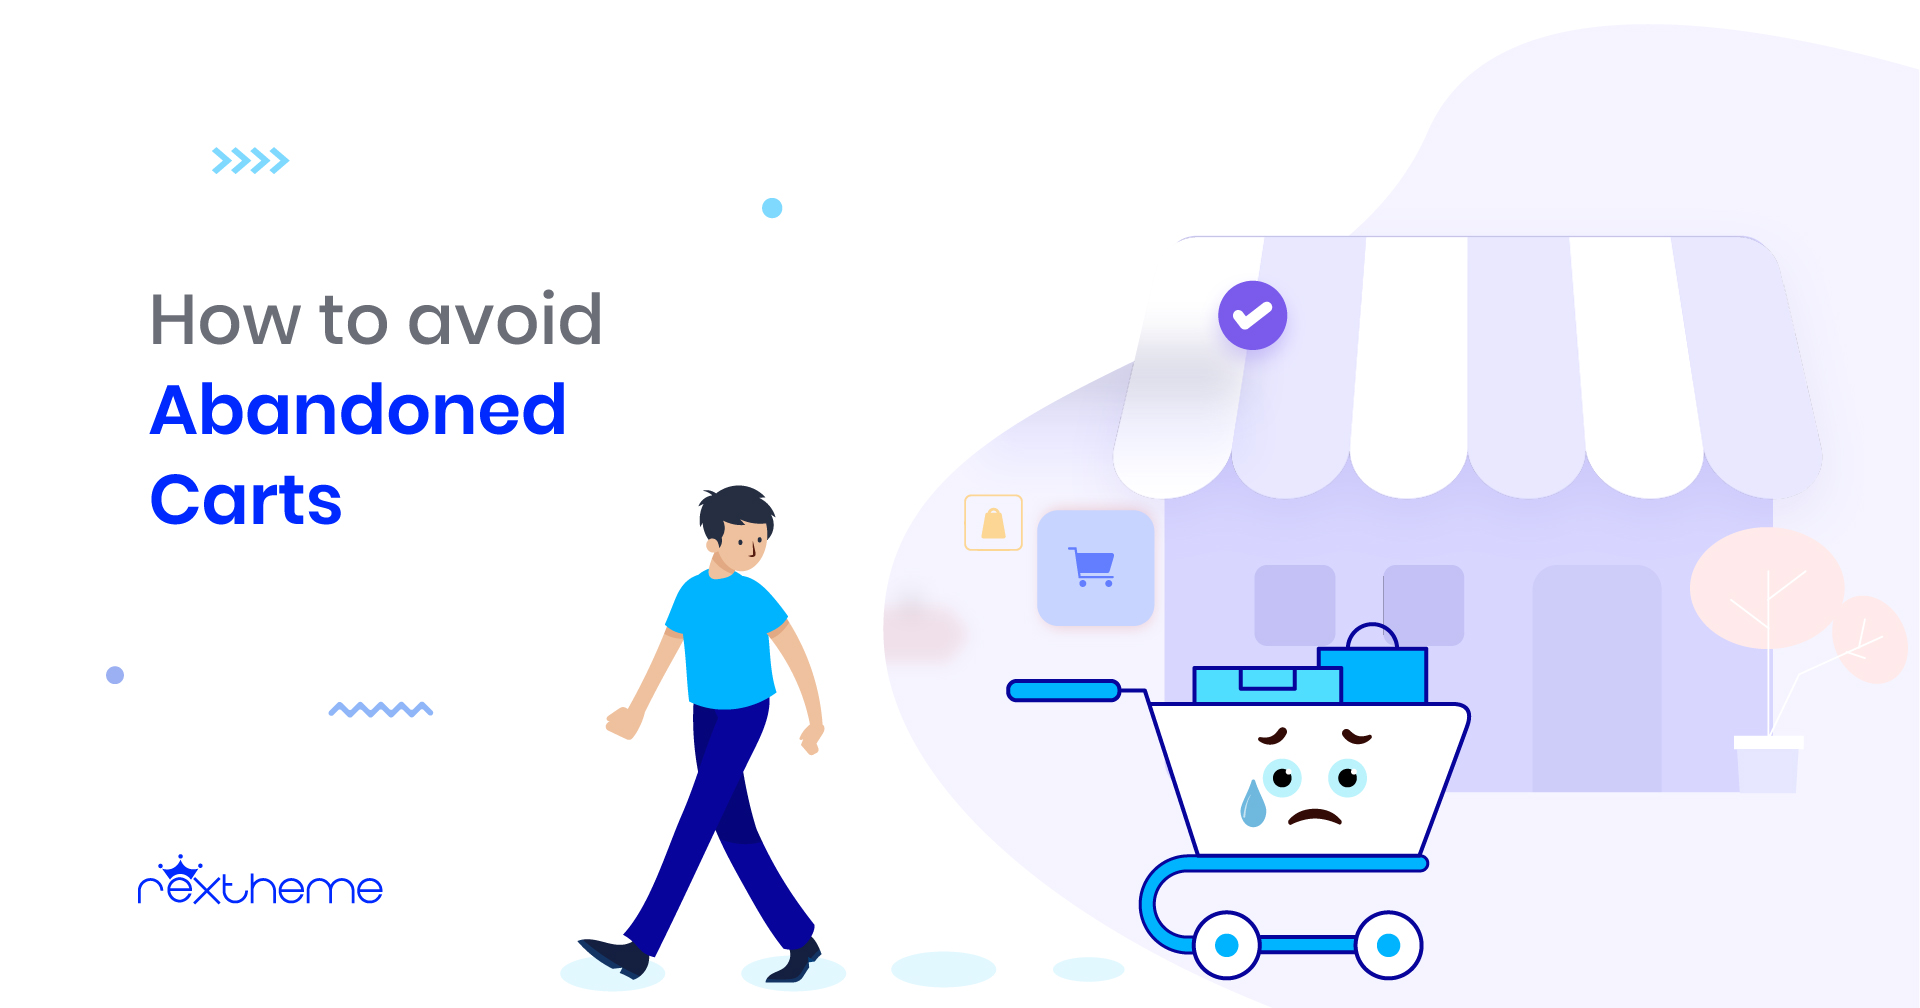


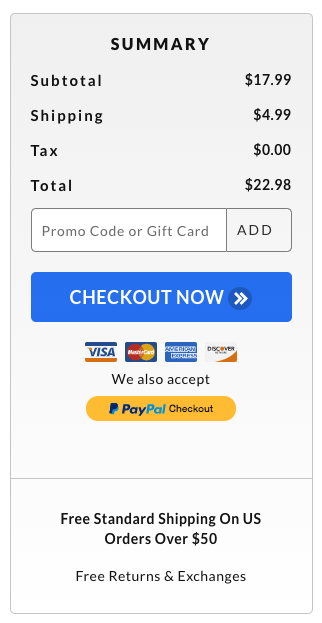

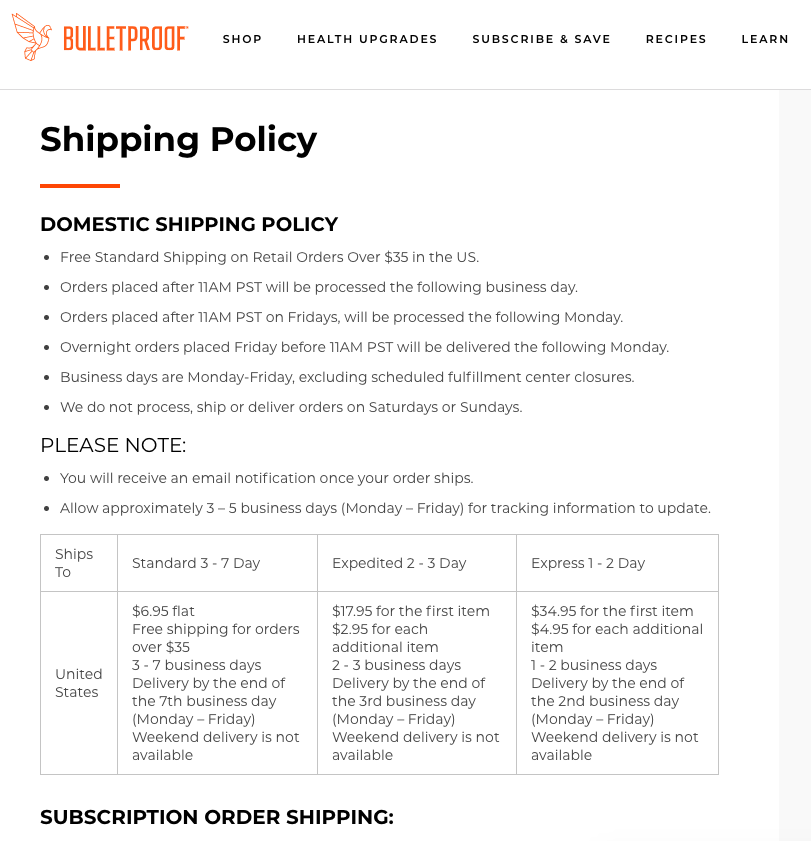

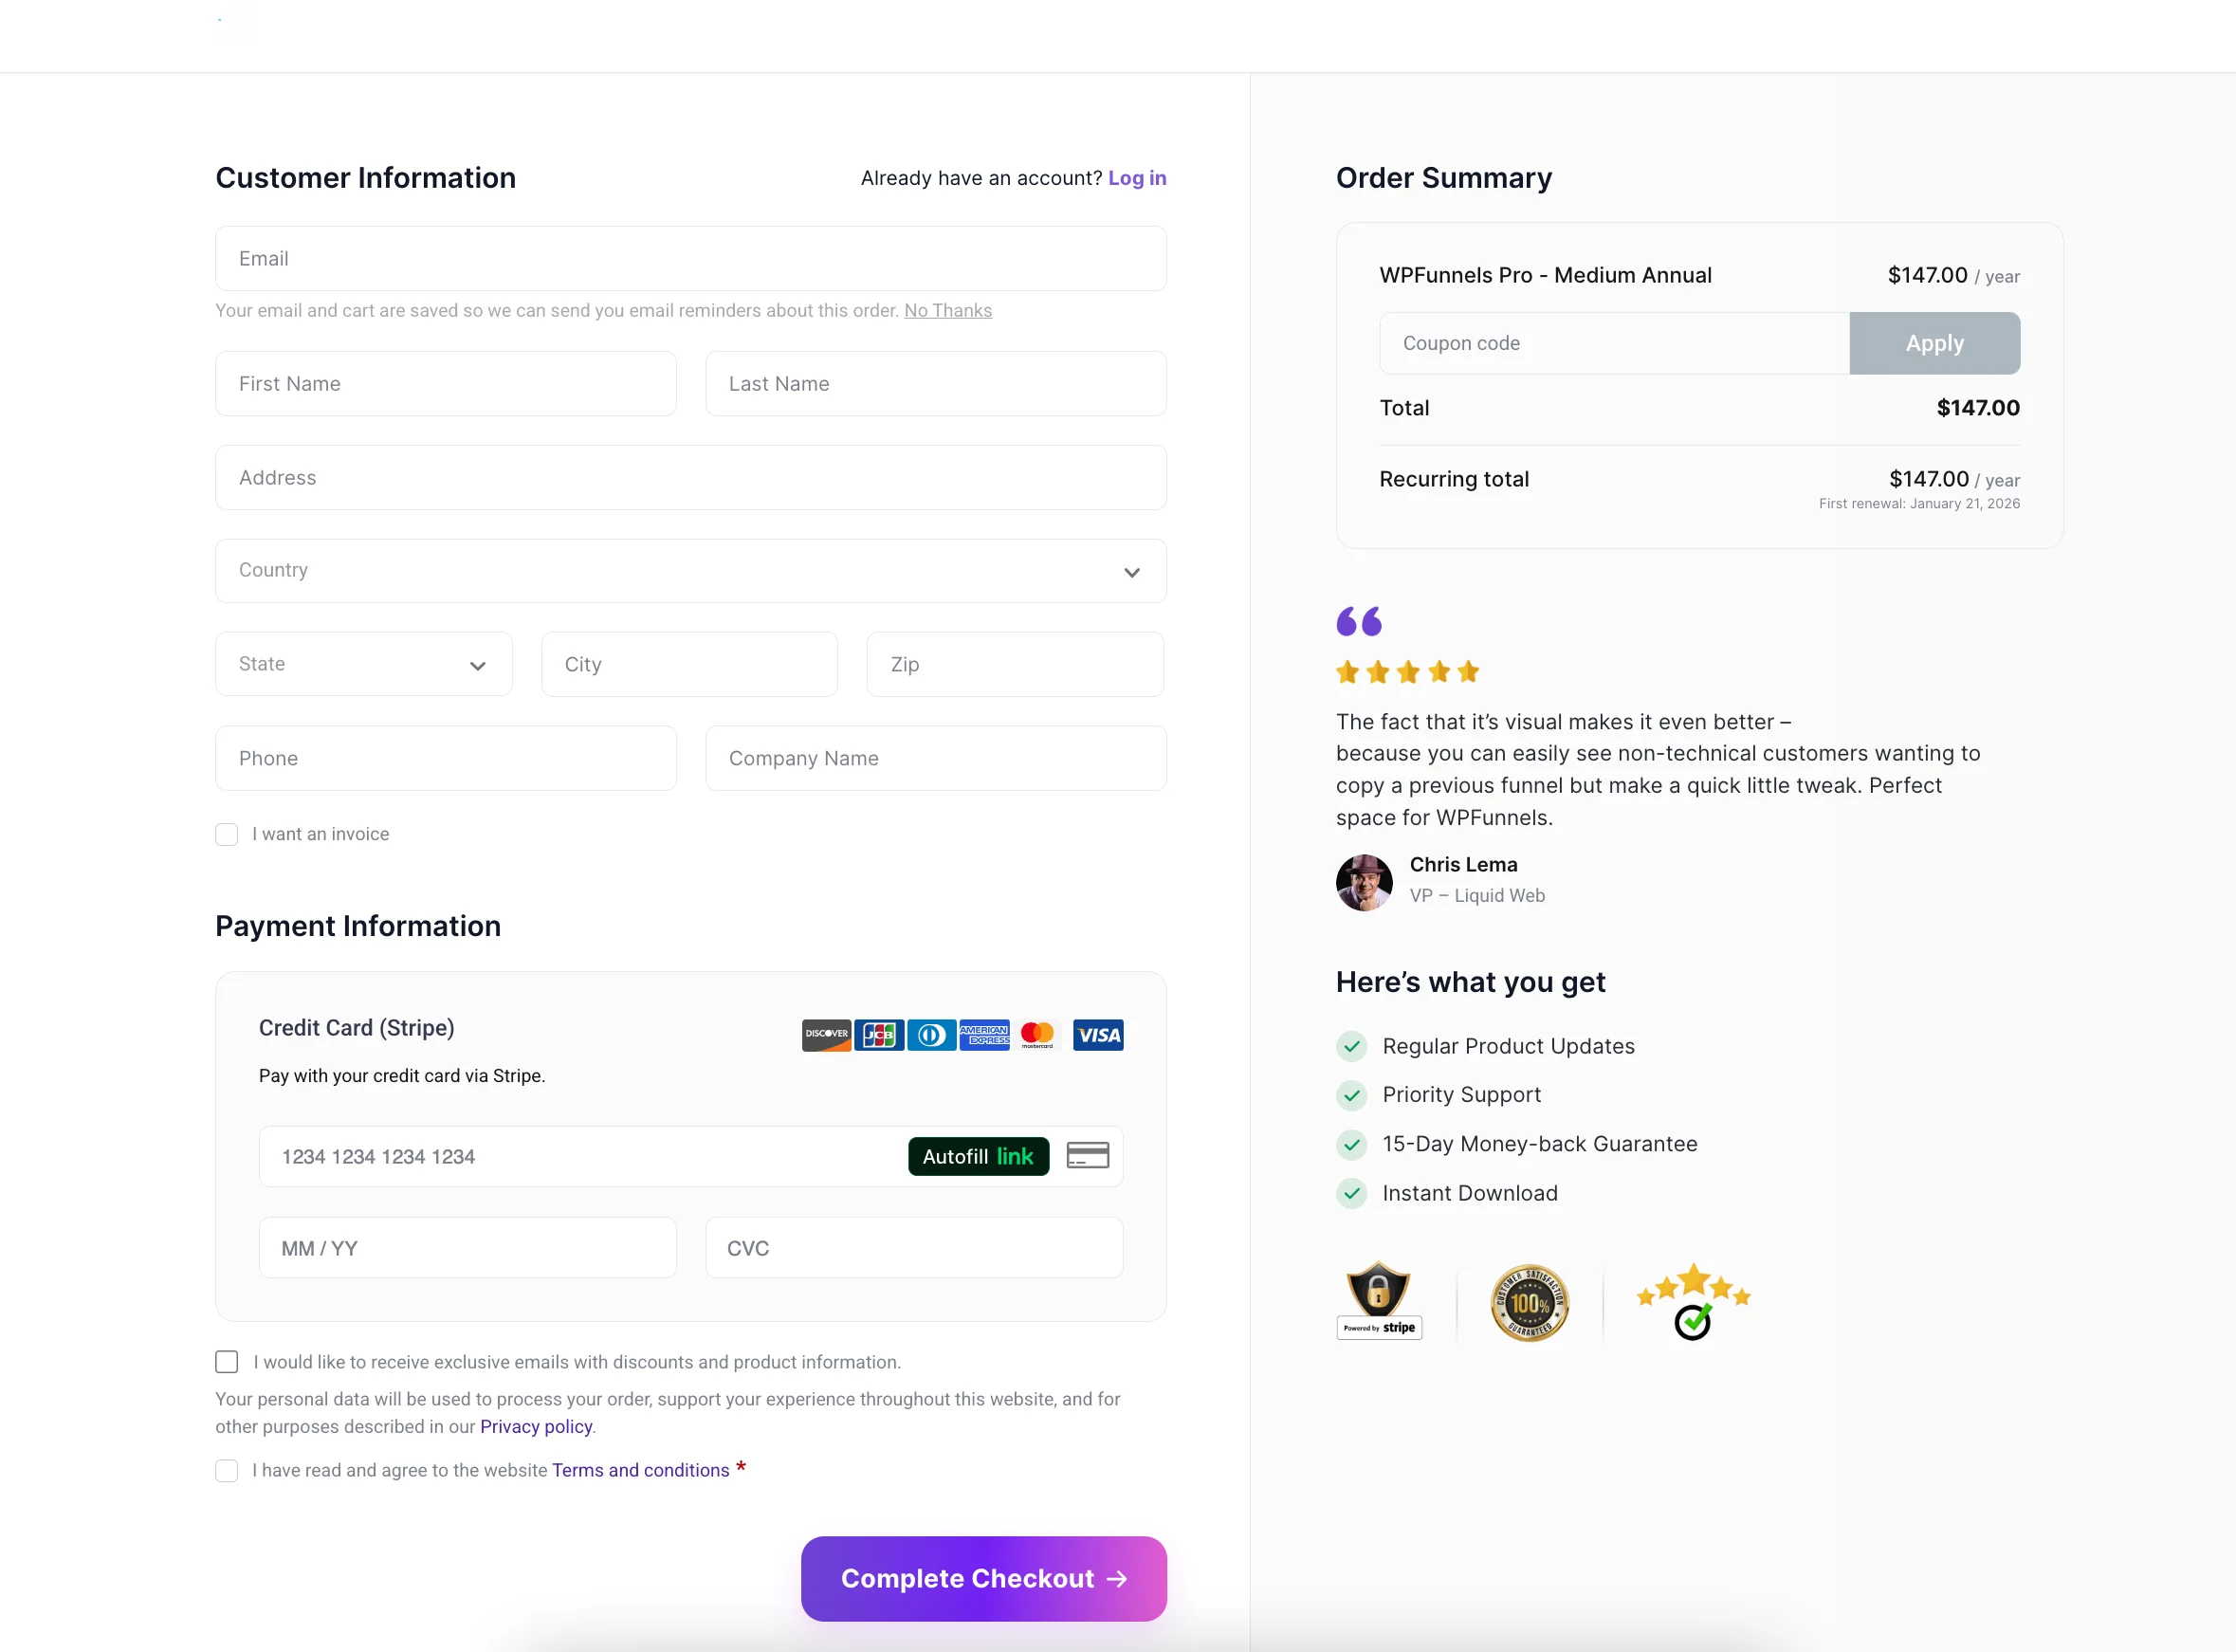


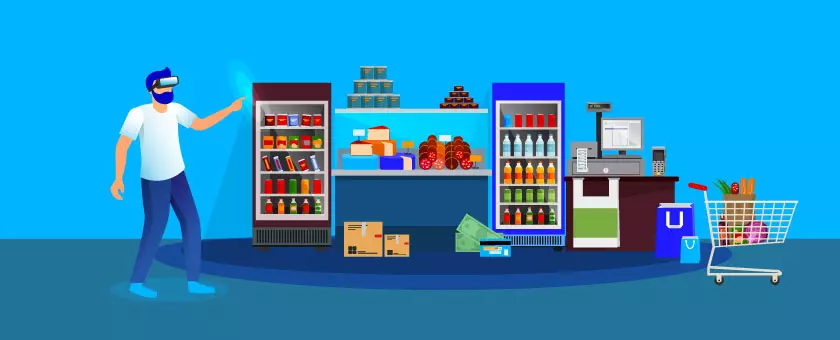
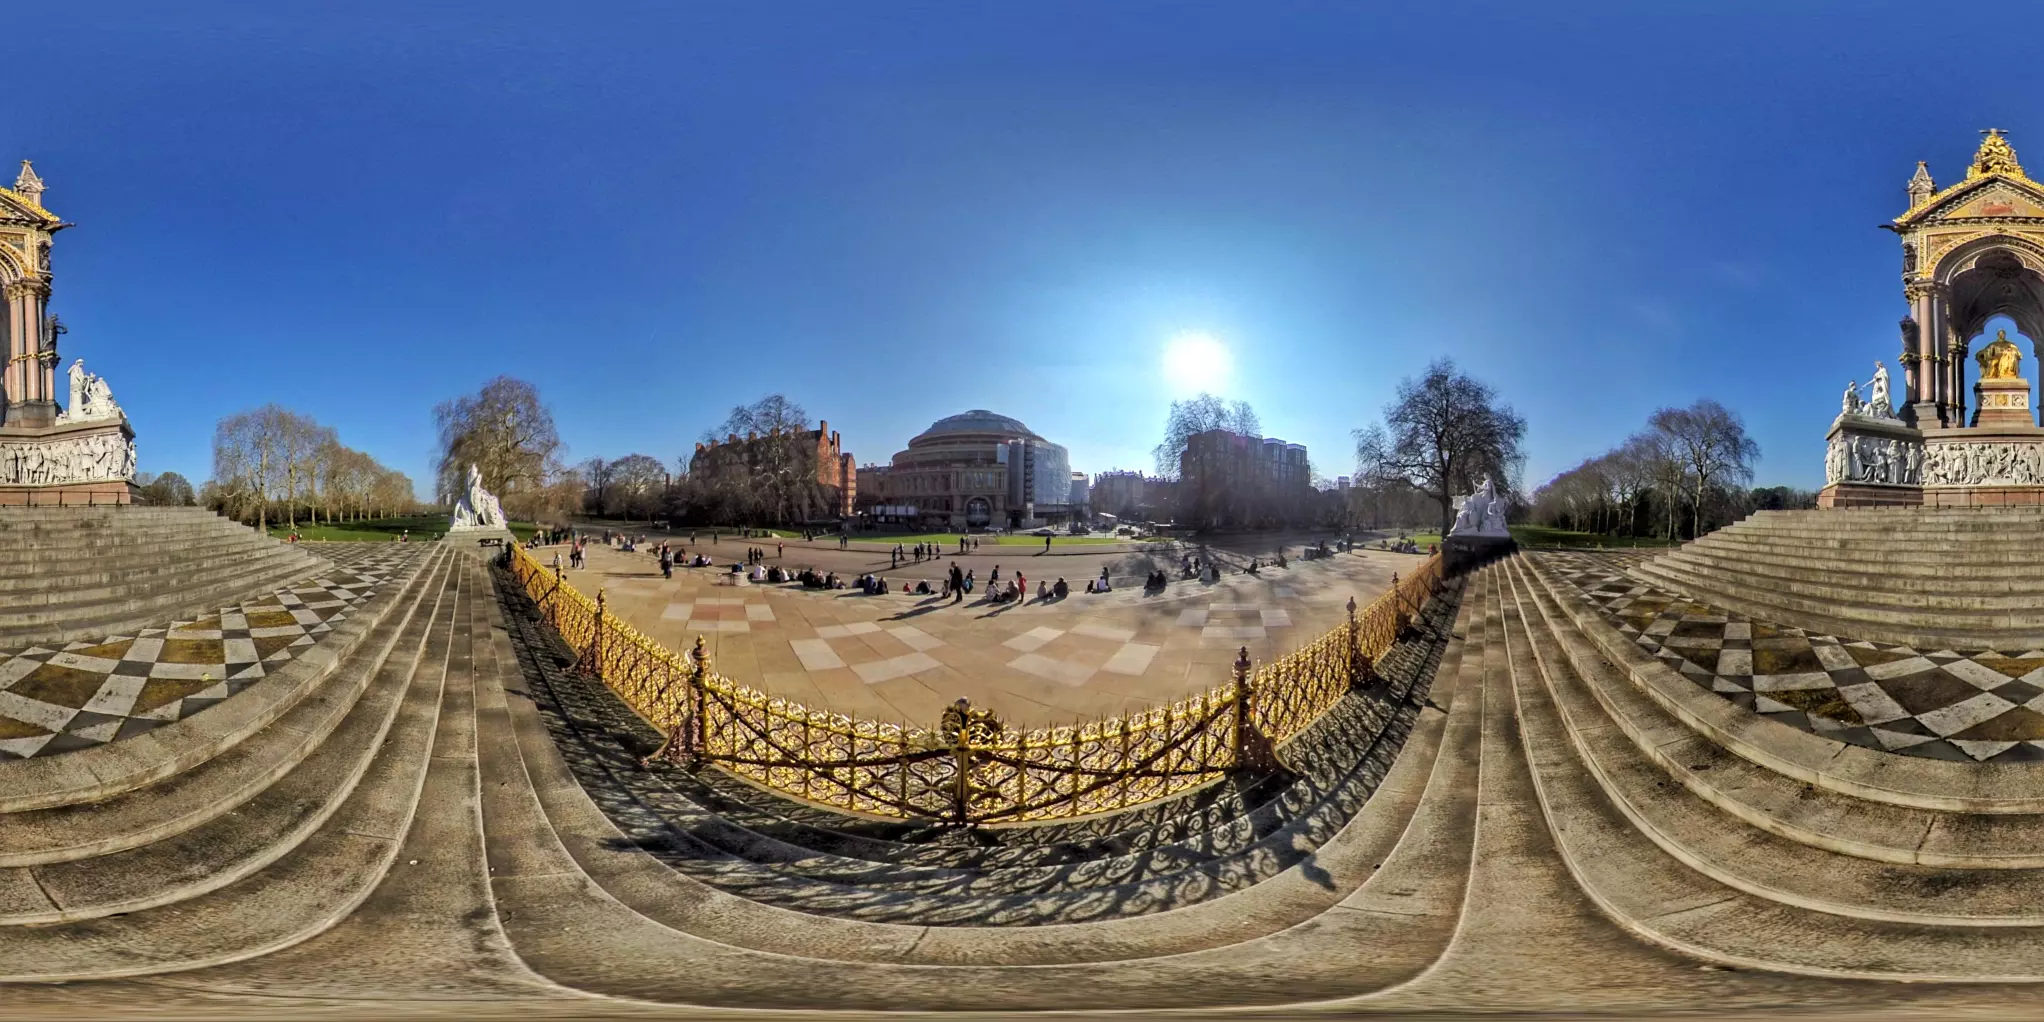

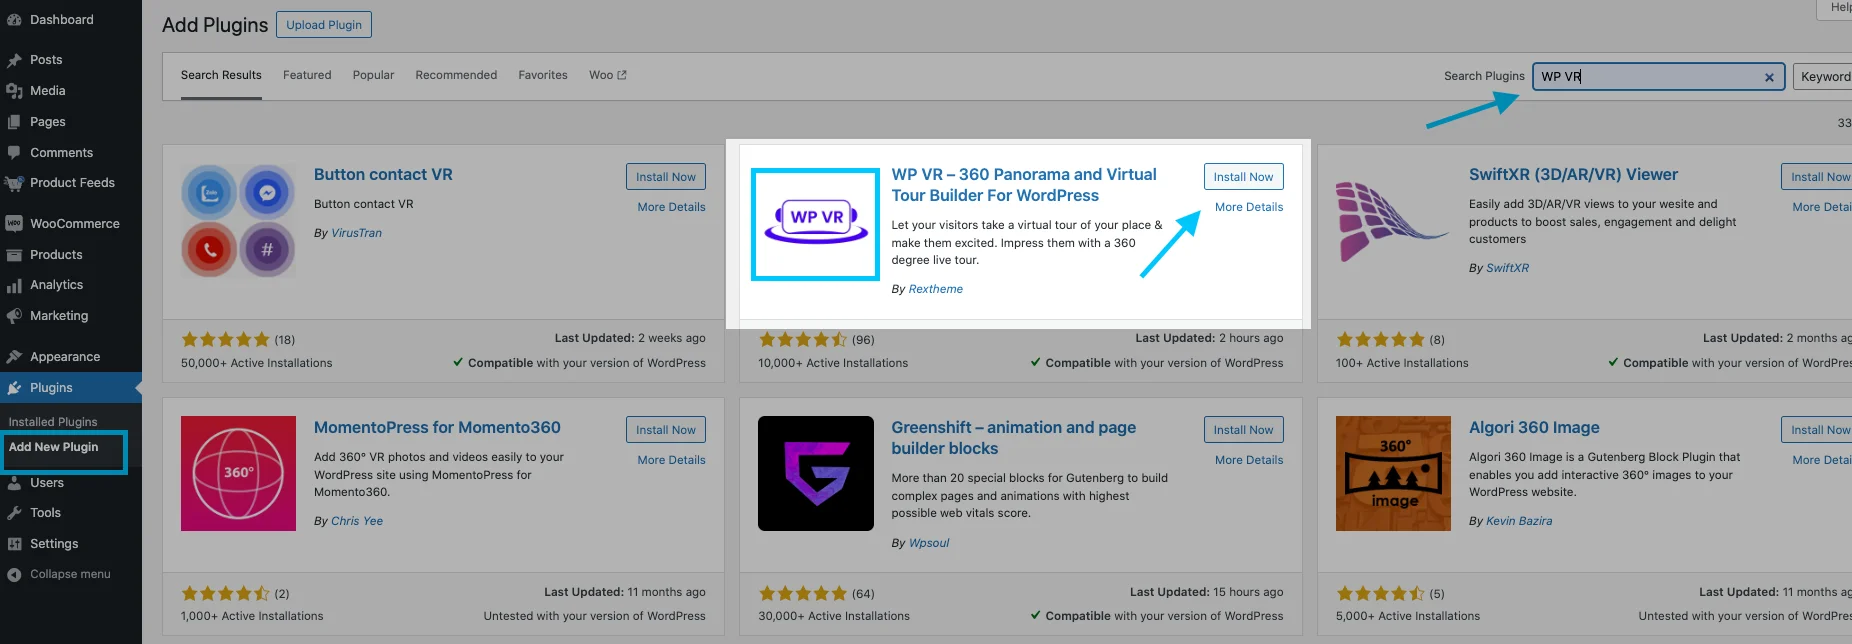
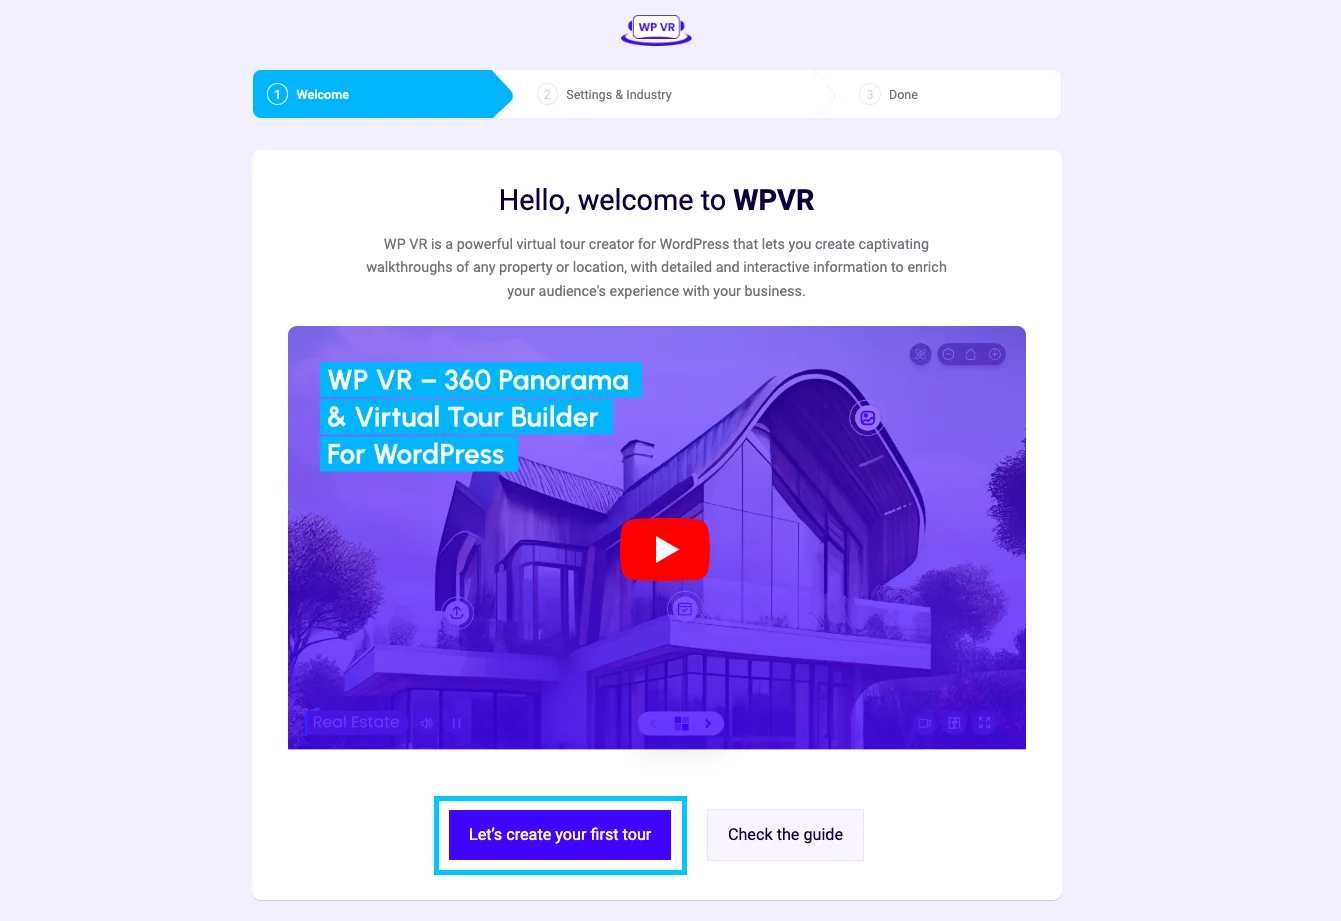
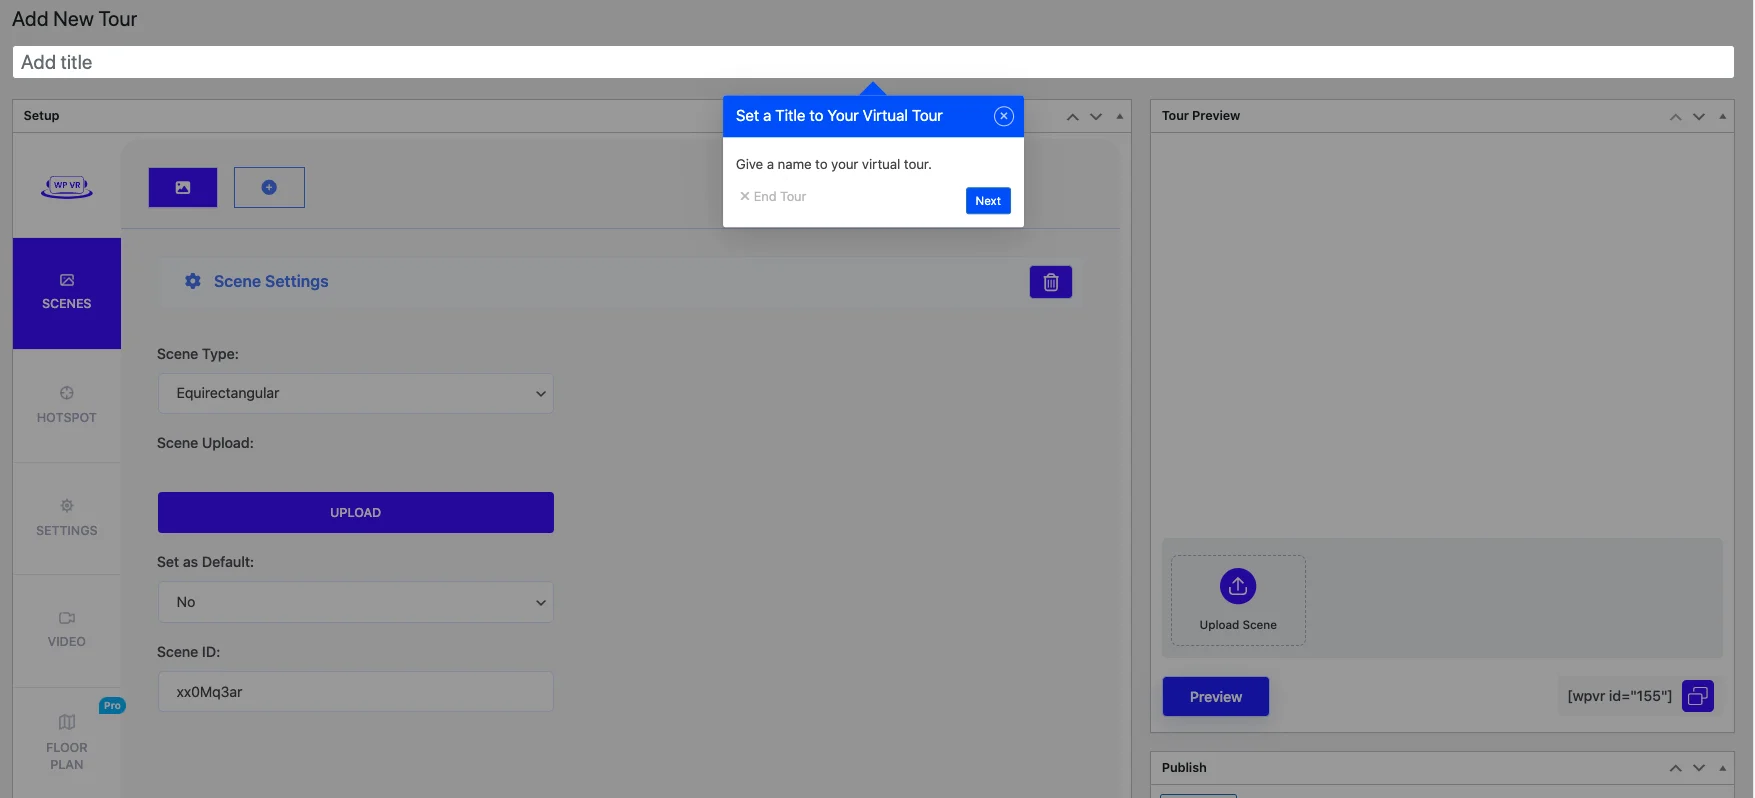

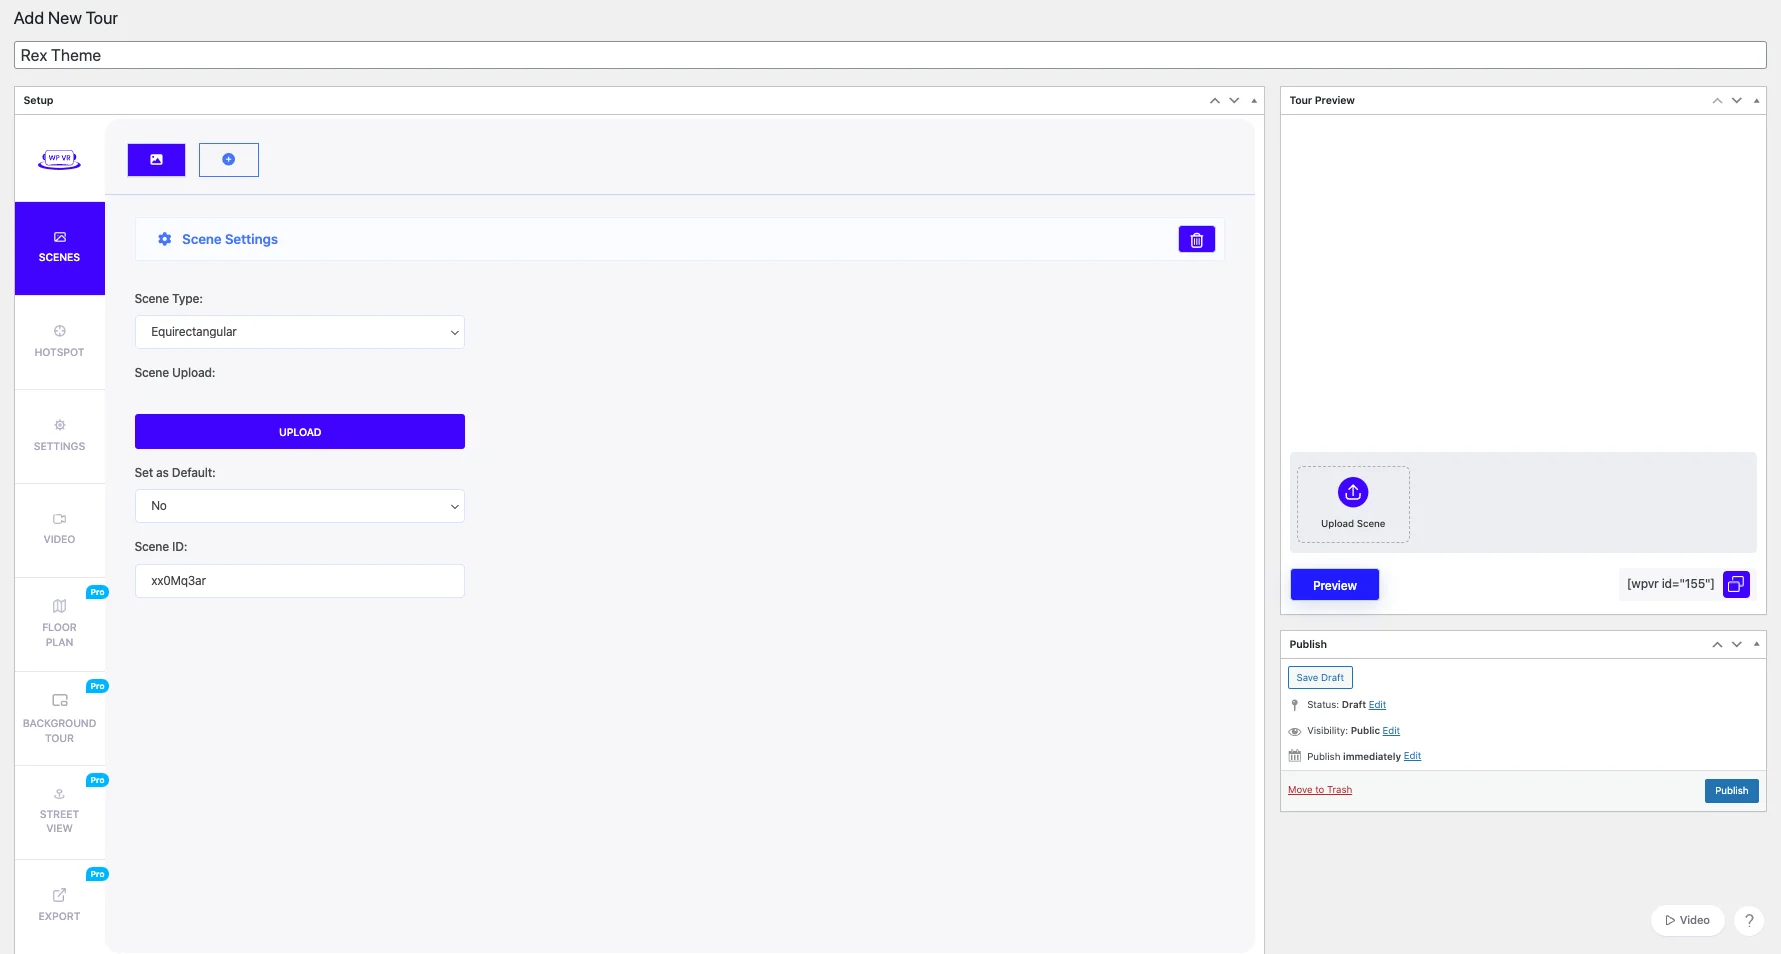
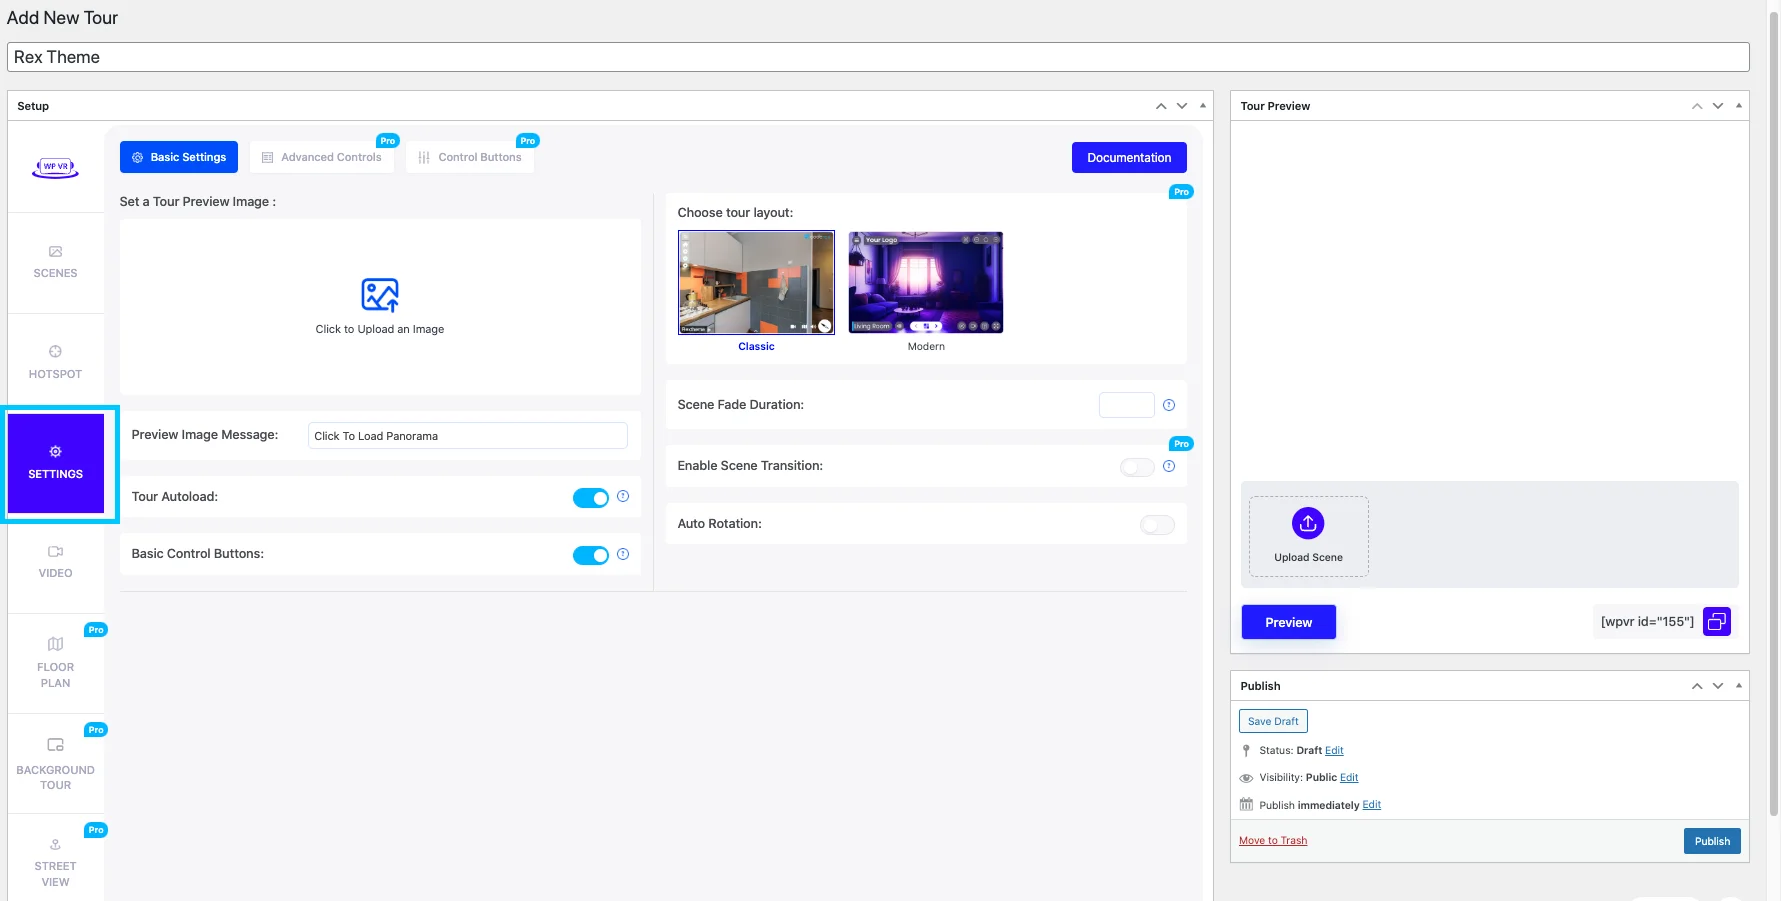
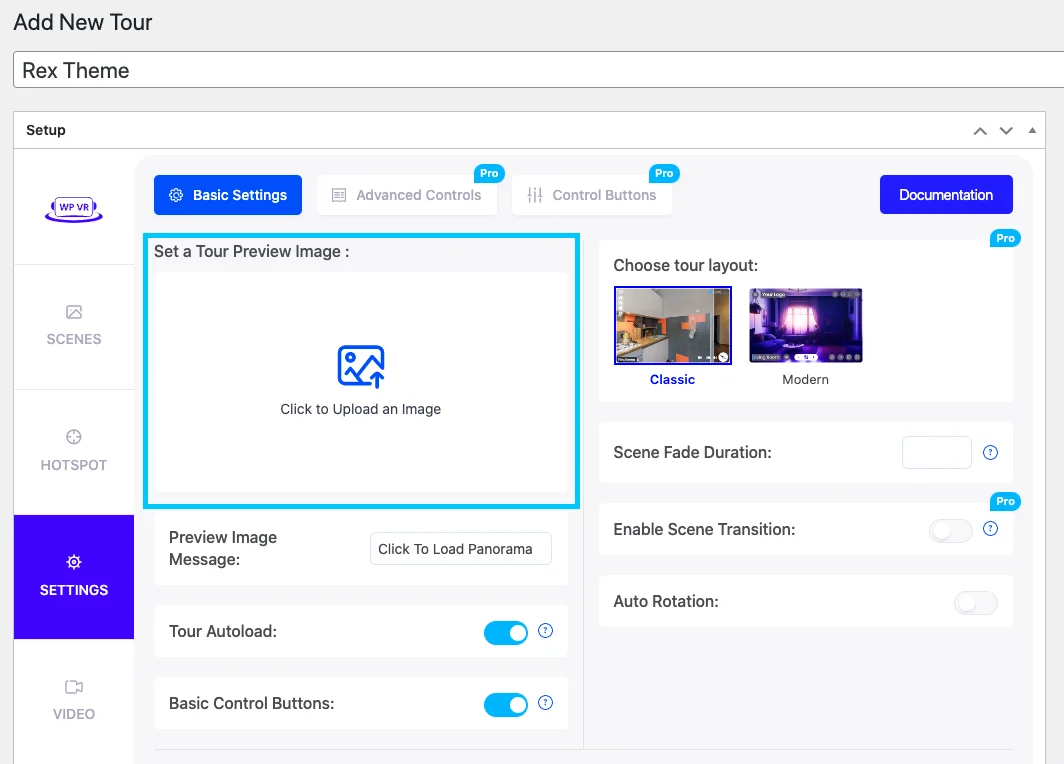
![How To Create A Virtual Tour In Easy Steps- A Complete Guide [2025] 1](https://staging-rextheme.kinsta.cloud/wp-content/uploads/2019/09/WPVR-Setting-.webp)