![8 Proven Product Title Optimization Tricks You Should Apply [2025] 1](https://staging-rextheme.kinsta.cloud/wp-content/uploads/2025/01/Product-Title-Optimization.webp)
Imagine this: You’re searching for a product online. You skim through the results, and suddenly, one listing grabs your attention. Why? Because the title speaks directly to what you’re looking for.
Now, flip the script. Your potential customers are doing the same thing—scrolling, scanning, and deciding in seconds. Will your product title stop them in their tracks? Or will they scroll past?
Here’s the reality: Your product title is your first sales pitch. Get it right, and you drive more clicks, higher conversions, and better rankings. Get it wrong, and well… you’re just another listing lost in the noise.
In fact, according to WakeUpData, optimizing product titles can result in a 47% increase in click-through rate (CTR).
That’s nearly half more potential buyers landing on your page—just by tweaking a few words.
But don’t worry—you don’t have to guess your way through this. In this guide, I’ll share 8 proven ways to craft product titles that attract, persuade, and sell.
Let’s dive in and start turning those scrolls into sales.
What Basically is Product Title Optimization?
Product title optimization is simply making your product title as clear, accurate, and compelling as possible. It’s about choosing the right words, placing them in the right order, and including relevant keywords to ensure your product gets noticed.
For example, let’s say you’re selling a leather jacket. Instead of just calling it “Leather Jacket,” you optimize the title to something like: “Men’s Brown Leather Jacket – Stylish, Warm, Perfect for Winter”. This title is more detailed, includes keywords like “men’s,” “brown,” and “winter,” and it gives shoppers a clear idea of what to expect.
Now that you have a clear understanding, let’s look at why optimizing your product title is essential to your e-commerce success.
Why is Product Title Optimization Necessary?
You’re probably wondering, “Why put so much effort into tweaking my product titles?” Here’s why it matters:
i. Higher Click-Through Rate (CTR):
When your product title is clear and specific, it grabs the attention of shoppers.
Let’s say you’re selling a camera. A title like “Digital Camera with 4K Video & 30x Zoom” is more likely to get clicked than just “Digital Camera.”
It gives customers the details they care about, increasing the chances they’ll click on your product. The result? More traffic to your store.
ii. Better Search Results:
When your title includes the right keywords, it helps search engines understand exactly what your product is.
For example, if someone is searching for a “waterproof smartwatch,” a title like “Men’s Waterproof Smartwatch – Fitness Tracking & Heart Rate Monitor” will be picked up by search engines and shown in the search results.
This means your product has a better chance of being seen by people who are specifically looking for what you’re selling.
iii. Clearer Customer Expectations:
Think about it—if you were looking for a leather sofa, would you prefer a title like “Sofa” or one like “Comfortable Leather Sofa – 3-Seater, Durable & Easy to Clean”?
The second one gives you a clear picture of what the product is, what it’s made of, and its key features. This helps customers quickly understand what they’re getting, so they feel more confident about their purchase.
iv. Builds Trust:
When your product title is specific and descriptive, customers trust it more. If a title clearly explains what a product does and why it’s useful, shoppers are more likely to believe it’s a quality item.
For example, a title like “Wireless Headphones with Noise Cancelling” tells customers exactly what to expect, making them feel more confident in clicking through to learn more.
This kind of clarity builds trust and encourages sales.
Let’s now dive into the prime section- the ultimate tactics that will drive you more sales.
8 wirksame Taktiken zur Optimierung von Produkttiteln für mehr Umsatz
Wenn eine Person online einkaufen möchte, kann sie auf verschiedene Weise nach einem Produkt suchen. Er kann über die Produktmarke, die Modellnummer oder sogar über eine der besten Eigenschaften des Produkts suchen.
Die Herausforderung besteht darin, herauszufinden, welche Suchbegriffe für eine bestimmte Art von Produkt am häufigsten verwendet werden.
Sie müssen vermeiden, zu viele Details anzugeben, damit Sie die wichtigsten Schlüsselwörter in den Produkttitel aufnehmen können.
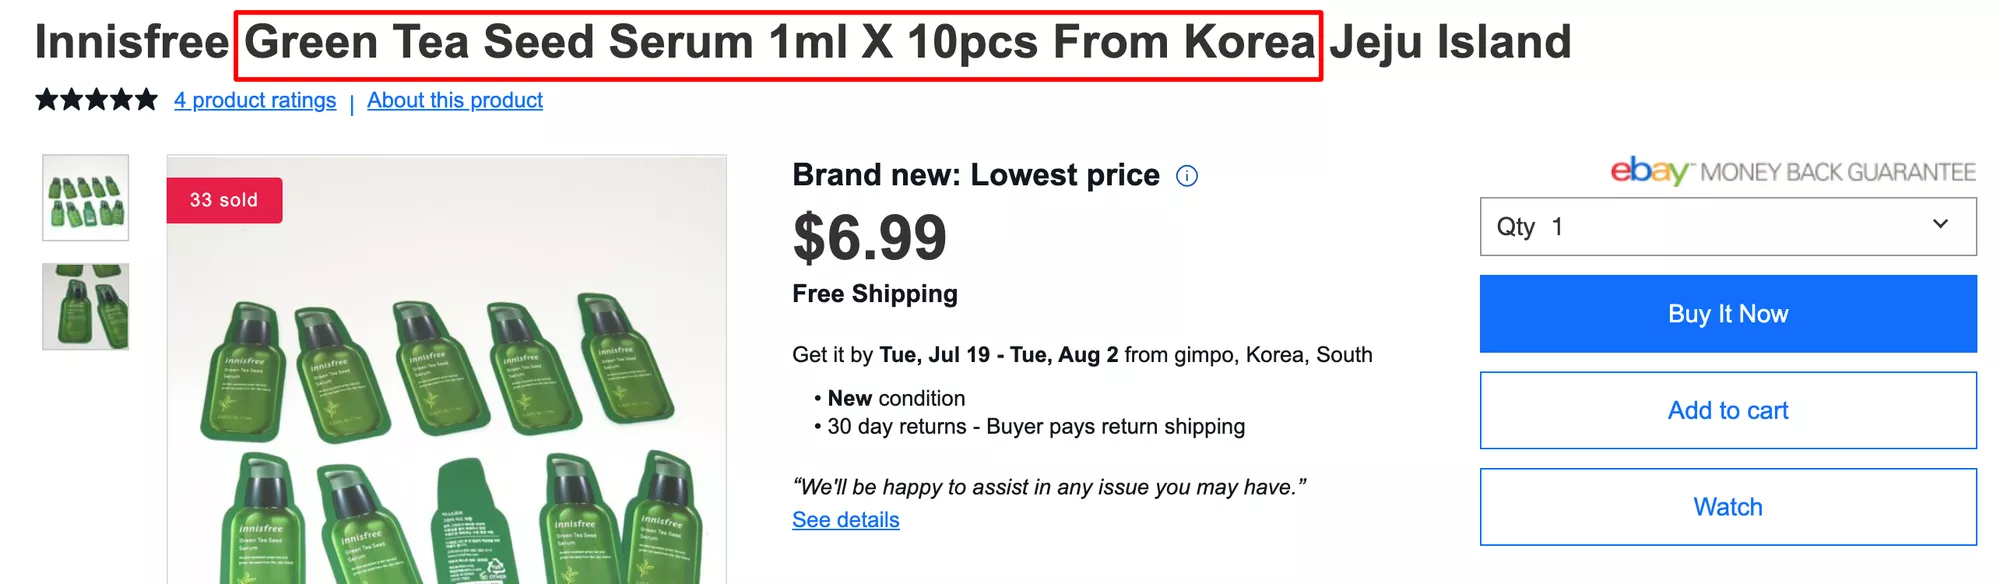
Die Seife Imperial Leather zum Beispiel ist bei vielen sehr beliebt, aber nicht jeder weiß, ob sie zu seinem Hauttyp passt. Bei der Verwendung von Seifen sind die Menschen in der Regel sehr besorgt über ihre Hauttypen. Anstatt das Produkt also als "Imperial Leather Soap Bar" zu bezeichnen, ist es besser, "Imperial Leather Soap for Sensitive Skin" zu verwenden.
Eine weitere Frage ist das Volumen der Suppe. Handelt es sich um eine 200g-Seife oder eine 100g-Suppe? Wenn ein Benutzer die Produktseite aufrufen muss, um das herauszufinden, ist das sehr zeitaufwändig. Sie können den Titel eher zu "Imperial Leather Soap for Sensitive Skin - 100g" verbessern.
1. Suche Optimieren Sie den Titel, um die CTR zu verbessern
Worte haben eine immense Überzeugungskraft. Nutzen Sie sie, um Ihr Zielpublikum zu ermutigen.
Stellen Sie sich vor, wie Ihre idealen Kunden Ihre Produkte definieren würden. Sie müssen herausfinden, wonach sie bei der Suche nach den Produkten suchen werden.
Als eCommerce-Verkäufer müssen Sie das Verhalten Ihrer Kunden kennen. Ermitteln Sie die wichtigsten Elemente, die die Kaufentscheidung der Kunden beeinflussen.
Überlegen Sie sich die folgenden Fragen, wenn Sie einen Titel entwerfen wollen.
- Für wen sind Ihre Produkte gedacht?
- In welchem Alter können sie sein?
- Wie sieht ihre Demografie aus?
- Welche Art von Worten würden sie schätzen?
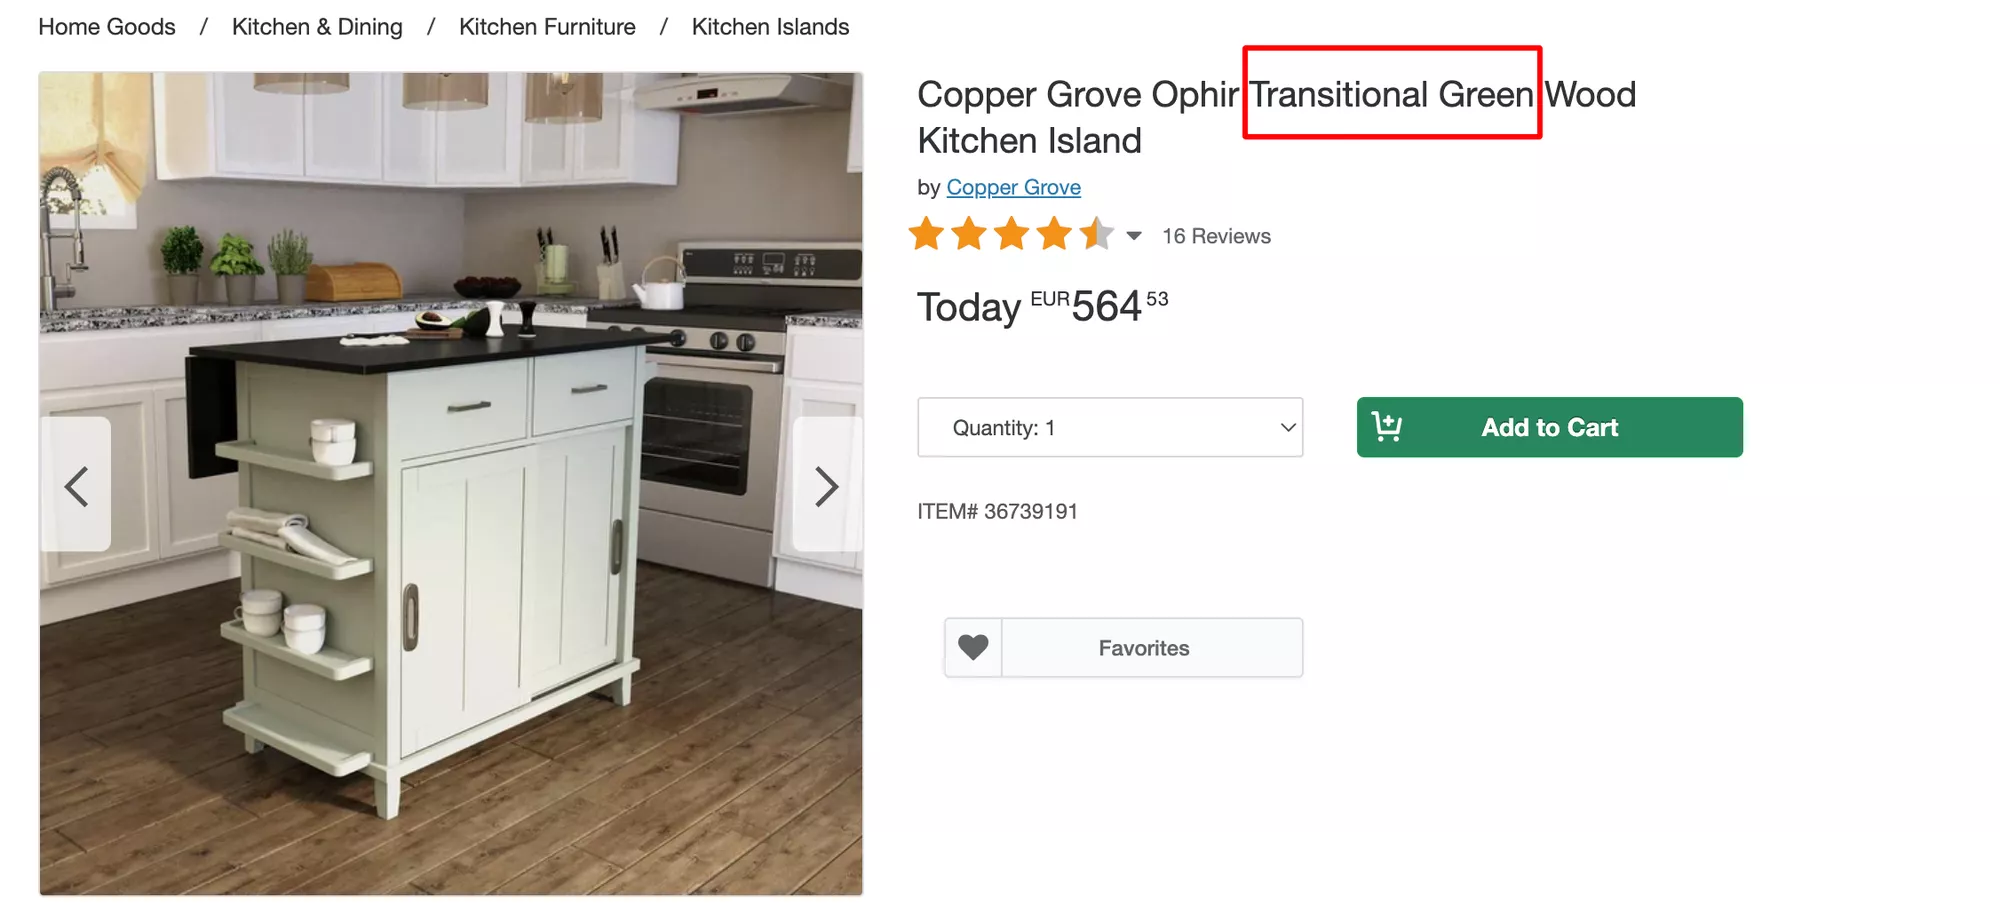
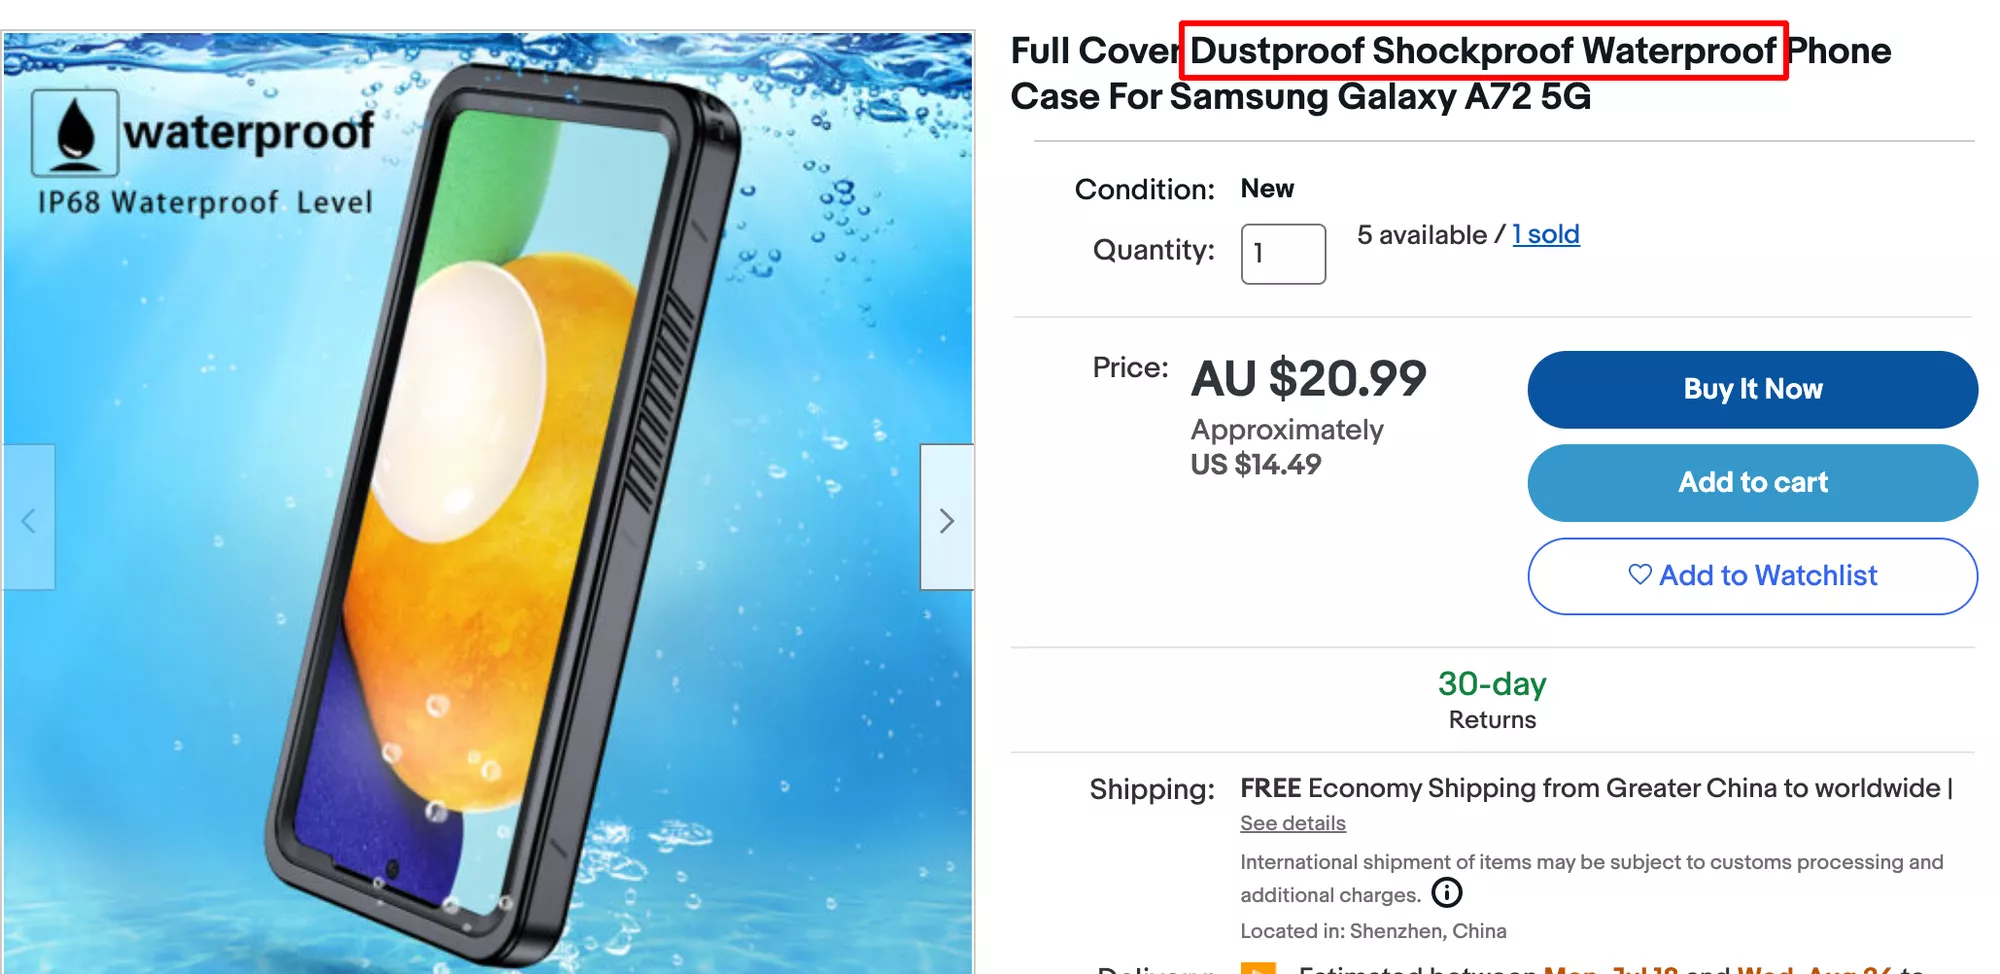
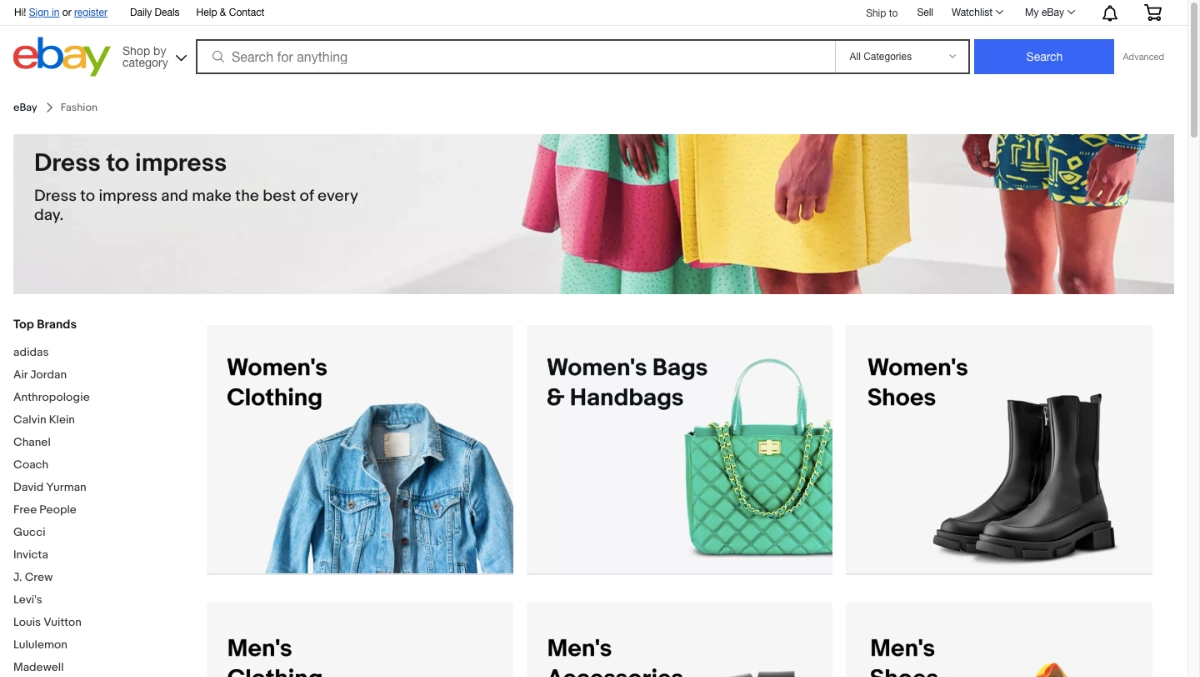
In diesem Bild enthalten die Produkttitel alle wichtigen Merkmale des Produkts. Dadurch werden die Suchanfragen der Kunden besser bedient.
Bei der Optimierung von Produkttiteln ist jedoch nichts festgelegt. Titel variieren je nach Branche und Nische.
Um also die besten Ergebnisse zu erzielen, müssen Sie Ihre Zielgruppe analysieren, um ihre Suchabsicht zu verstehen.
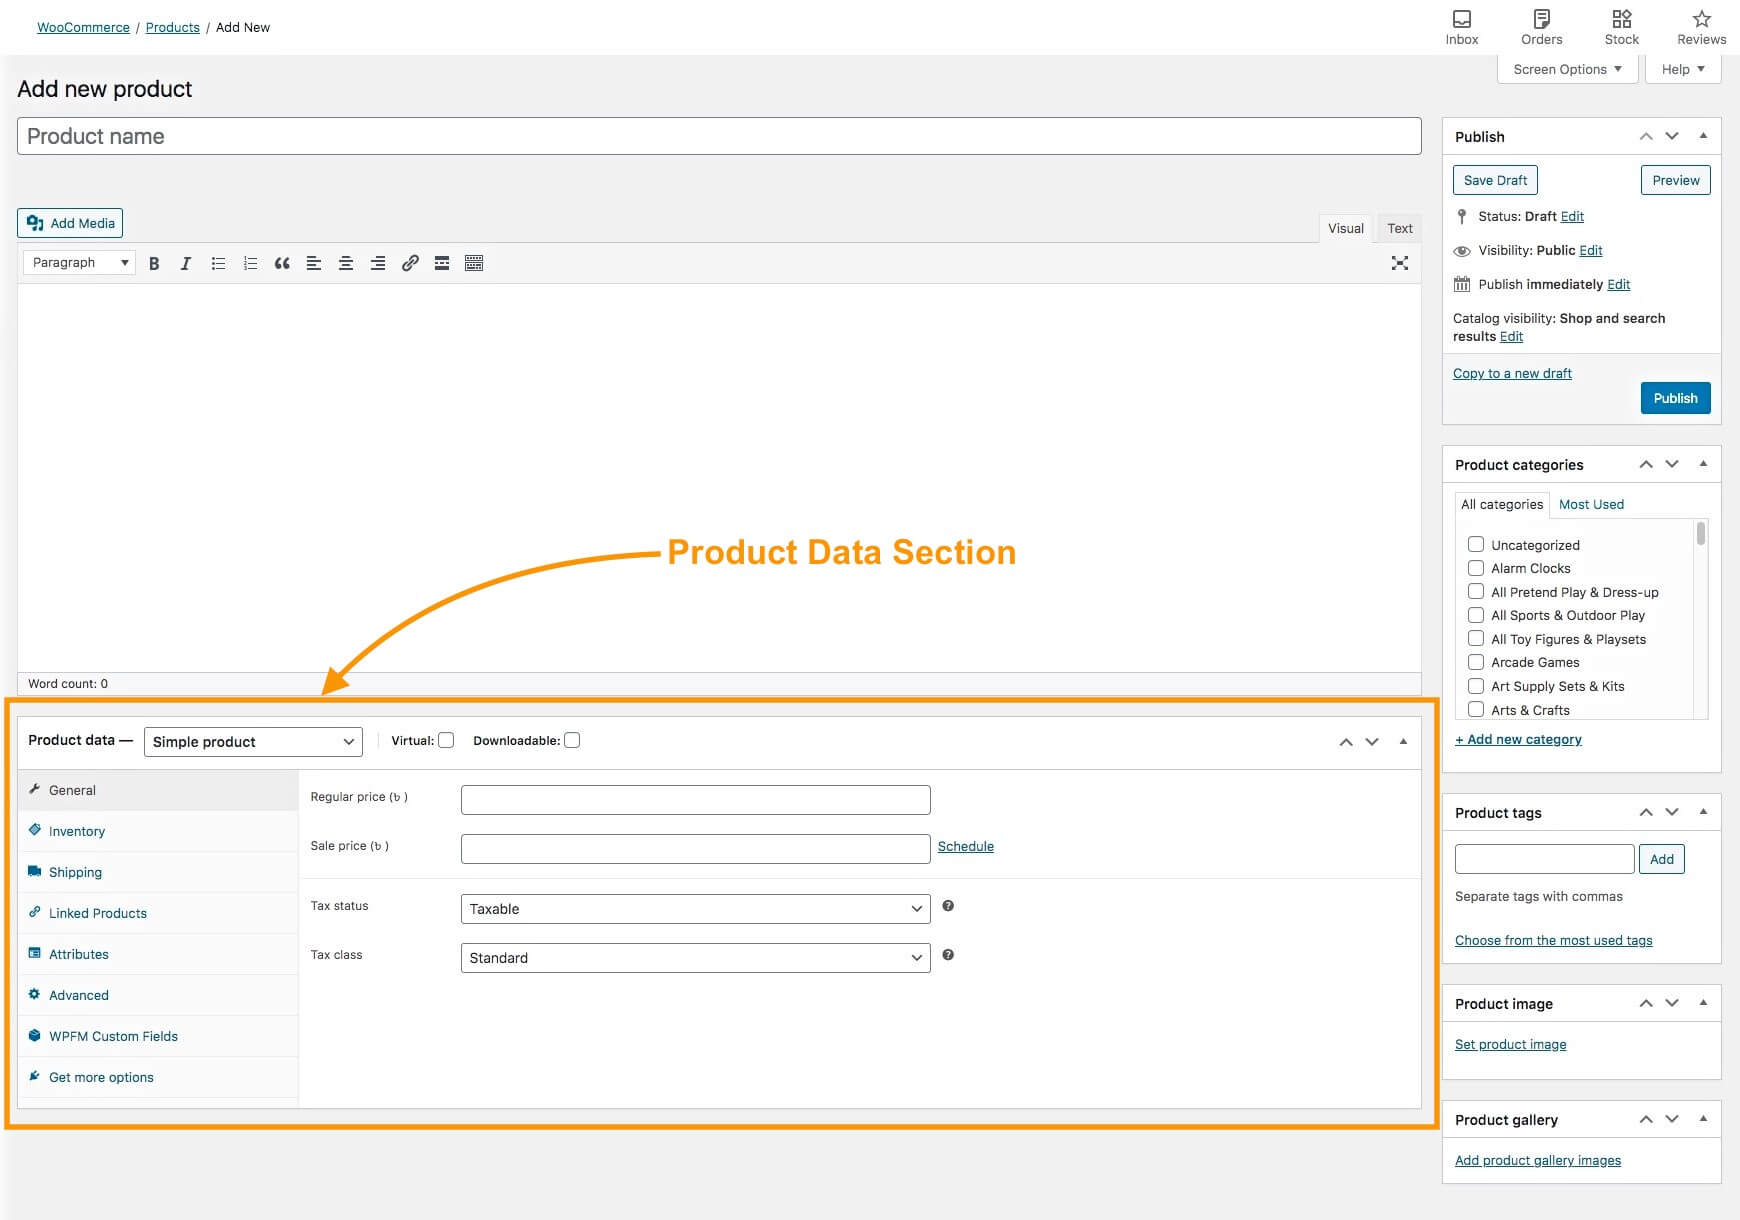
2. Produkttitel strukturieren, um die Traktion zu verbessern
Bei der Optimierung von Produkttiteln ist es wichtig, sie so zu strukturieren, dass die Aufmerksamkeit potenzieller Käufer geweckt wird. Da der Platz für Titel jedoch begrenzt ist, ist es entscheidend, die wichtigsten Informationen zu priorisieren und gezielte Schlüsselwörter sinnvoll einzusetzen.
Ein effektiver Ansatz besteht darin, mit den interessantesten Informationen und relevanten Schlüsselwörtern zu beginnen. Wenn es sich bei dem Produkt beispielsweise um einen Samsung-Fernseher handelt, beginnen Sie den Titel mit "Samsung TV", damit die Wahrscheinlichkeit steigt, dass er in den Suchergebnissen erscheint, wenn jemand nach dieser Marke sucht.
Ein weiterer wichtiger Aspekt ist die Länge des Titels. Je nach dem Gerät, das zum Durchsuchen verwendet wird, kann der Titel abgeschnitten werden. Daher ist es wichtig, die Informationen zu priorisieren und ein Format zu verwenden, das es ermöglicht, die wichtigsten Details zu sehen.
Es gibt jedoch kein einheitliches Konzept für die Strukturierung von Produkttiteln, aber Sie können einige Formeln befolgen (wie in den Beispielen gezeigt).
Product Title Examples
Hier habe ich ein paar Formeln aufgelistet, die Ihnen helfen sollen, die richtige für Sie zu finden.

3. Relevante Adjektive hervorheben, um Begehrlichkeit zu erzeugen
Beim Online-Shopping verlassen sich die Kunden stark auf die Produktbeschreibungen, um eine Vorstellung davon zu bekommen, was sie von einem Produkt erwarten können. Eine Möglichkeit, Ihr Produkt hervorzuheben, ist die Verwendung von sinnlichen Adjektiven in Ihren Produkttiteln.
Wenn Sie zum Beispiel Parfüm verkaufen, können beschreibende Adjektive wie "holzig", "blumig" oder "zitrusartig" den Käufern helfen, sich den Duft vorzustellen. Wenn Sie eine Jacke verkaufen, kann die Erwähnung der Eigenschaften "weich", "strukturiert" oder "leicht" den Käufern ein besseres Verständnis für das Produkt vermitteln.
Indem Sie Adjektive wie "schwarz", "lang", "mittel" oder "wasserfest" in Ihre Titel aufnehmen, können Sie Ihren Kunden helfen, ihre Suchergebnisse einzugrenzen und Ihr Produkt leichter zu finden.
Wenn Sie außerdem Adjektive einfügen, die angeben, für wen Ihr Produkt bestimmt ist, z. B. "für Männer", "für Frauen" oder "für Kinder", können Sie die Chancen, dass Ihr Produkt gesehen wird, weiter erhöhen.
Es ist jedoch wichtig, Adjektive auf natürliche und organische Weise zu verwenden und sie nicht zu oft zu benutzen.
Wenn Sie das richtige Gleichgewicht finden und relevante sensorische Adjektive einbeziehen, können Sie einen überzeugenderen Produkttitel erstellen, der bei Ihren Kunden Anklang findet und den Umsatz steigert.
4. Keyword-Optimierung, um in den Suchergebnissen hervorzustechen
Schlüsselwörter spielen eine entscheidende Rolle, wenn es darum geht, die Besucherzahlen zu steigern und die Sichtbarkeit Ihrer Produkte zu erhöhen. Indem Sie die richtigen Schlüsselwörter in Ihrem Produkttitel verwenden, können Sie sicherstellen, dass Ihre idealen Kunden Ihre Produkte leicht finden können.
Um eine erfolgreiche Keyword-Strategie zu entwickeln, müssen Sie jedoch eine gründliche Keyword-Recherche durchführen, um die relevantesten und umsatzstärksten Keywords für Ihre Produkte zu ermitteln.
Angenommen, Sie verkaufen Hautpflegeprodukte. Eines Ihrer Produkte ist eine "ölfreie Gesichtsmaske". Ihre Kunden können aber auch nach "Gesichtsmaske ohne Öl" suchen . Hier müssen Sie prüfen, welches Schlüsselwort ein hohes Suchvolumen hat.
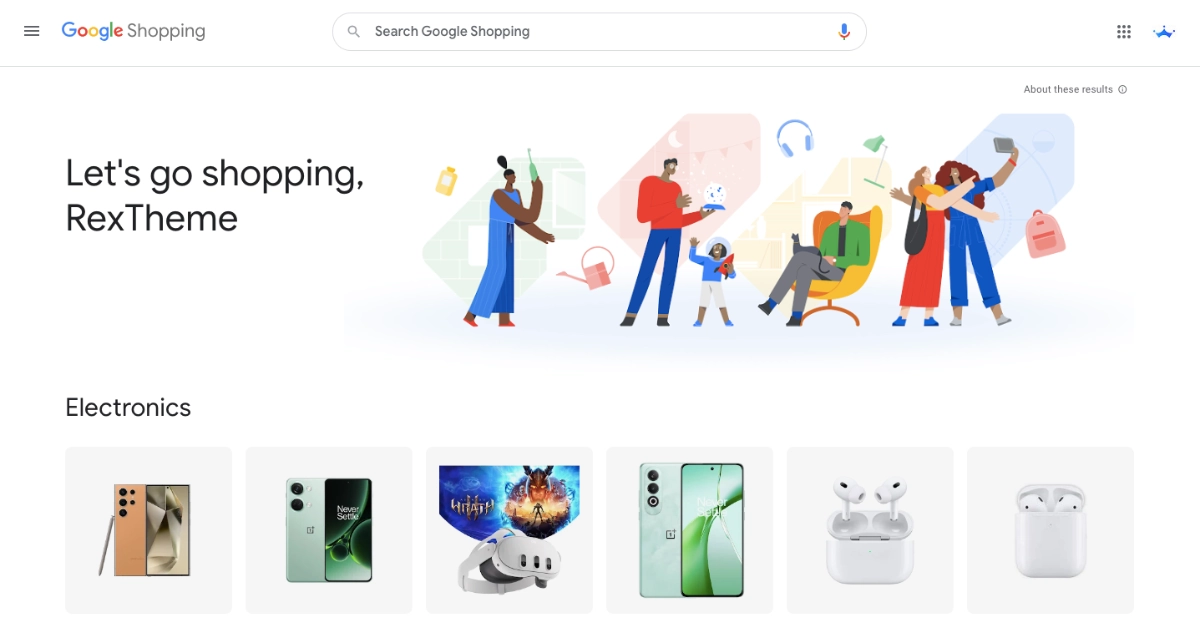
Pro-Tipp: Wenn Sie unsicher sind, wie Sie einen Produkttitel festlegen sollen, versuchen Sie es mit einer Suche bei Google Shopping. So erhalten Sie Ideen zu den Perspektiven der Suchbegriffe.
Also, optimizing your store for Local SEO can help your products appear in more relevant searches, driving higher conversions.
**Check out our guide on optimizing local SEO to improve your search visibility further.
5. Fügen Sie Ihren USP ein, um Ihren Produktwert zu präsentieren
Die Aufnahme Ihres Alleinstellungsmerkmals (Unique Selling Proposition, USP) in Ihren Produkttitel kann Ihnen helfen, Ihr Produkt von anderen auf dem Markt zu unterscheiden. Ein USP kann alles sein, was Ihr Produkt von der Konkurrenz abhebt und Ihren Kunden einen Grund gibt, Ihr Produkt anderen vorzuziehen.
Nehmen wir zum Beispiel an, Sie verkaufen ein Paar Laufschuhe. Ihr Alleinstellungsmerkmal könnte sein, dass die Schuhe aus umweltfreundlichen Materialien hergestellt sind. Ihr Produkttitel könnte "Umweltfreundliche Laufschuhe für Männer" lauten. Dieser Titel enthält Ihren USP und vermittelt den Kunden eine klare Vorstellung davon, was sie von dem Produkt erwarten können.
Ein weiteres Beispiel könnte ein High-End-Smartphone sein, das eine einzigartige Eigenschaft wie eine lange Akkulaufzeit hat. Ihr Produkttitel könnte "Premium-Smartphone mit langer Akkulaufzeit" lauten. Dieser Titel hebt die einzigartige Eigenschaft Ihres Produkts hervor und hebt es von anderen Smartphones auf dem Markt ab.
Denken Sie bei der Gestaltung Ihres Produkttitels darüber nach, was Ihr Produkt auszeichnet und einzigartig macht. Integrieren Sie Ihr Alleinstellungsmerkmal in den Titel, und zwar so, dass es prägnant und aufmerksamkeitsstark ist. So hebt sich Ihr Produkt von der Konkurrenz ab und zieht die Aufmerksamkeit potenzieller Kunden auf sich.
6. Entfernen Sie die vermeidbaren Faktoren für maximale Wirkung
Im Folgenden finden Sie einige Faktoren, die Sie bei der Optimierung Ihres Produkttitels vermeiden sollten:
Länge
Überschreiten Sie nicht die Länge Ihres Titels von mehr als 150 Zeichen. Sie müssen das vorgegebene Zeichenlimit voll ausschöpfen, indem Sie die gezielten Schlüsselwörter durchsetzen.
Die optimale Länge des Produkttitels im eCommerce liegt zwischen 55 und 70 Zeichen.
Getrennte Varianten
Die Käufer sollten in der Lage sein, zwischen Ihren Varianten zu unterscheiden. Machen Sie die Titel klar genug, um die Varianten zu identifizieren.
Angenommen, Sie verkaufen Kuchen in verschiedenen Variationen, dann achten Sie darauf, dass Sie Geschmack, Farbe und Größe in Ihre Produkttitel aufnehmen.
Werbetexte
Sie wollen Ihre potenziellen Kunden auf keinen Fall vergraulen. Werbetexte können genau das bewirken.
Fügen Sie also niemals etwas wie "Buy One Get One" oder "Flat Discount" in Ihren Produkttitel ein.
Grammatikalische Fehler
Jegliche Grammatik- oder Rechtschreibfehler lassen die Käufer denken, dass Sie Ihre Produkte nicht ernst nehmen. Bauen Sie kein unprofessionelles Image auf, nehmen Sie sich die Zeit und überprüfen Sie Ihre Grammatik.
7. Verbessern Sie Ihre Überschriften, um mehr zu konvertieren
Was ich mit der Auffrischungsphrase meine, ist, dass Sie Ihren Produkttitel einzigartig, auffällig und interessant gestalten.
Fragen Sie sich, welches "Extra" Sie anbieten, um die Käufer zum Kauf zu bewegen. Sie müssen Ihr besonderes Merkmal hinzufügen, um auf der Liste hervorzustechen.
Versuchen Sie, Ihren Titel einzigartig zu gestalten. Dies können Sie erreichen, indem Sie mehrere Schlüsselwörter verwenden.
Berücksichtigen Sie diese Faktoren, um den Titel einzigartig zu machen:
- Qualität der Sprache
- Format des Titels
- Personalisierte Botschaft für das Zielpublikum.
Angenommen, Sie verkaufen Hautpflegeprodukte, dann erwähnen Sie "authentisch" in der Produktbezeichnung. So werden sich Ihre Kunden keine Sorgen über die Echtheit des Produkts machen.
Ihre Kunden sollten wissen, dass sie von dem Produkt profitieren werden, wenn sie Ihren Produkttitel sehen.
8. Spionieren Sie Ihre Konkurrenten aus, um im Wettbewerb hervorzustechen
Das Ausspionieren Ihrer Konkurrenten ist ein wichtiger Bestandteil der Optimierung Ihrer Produkttitel. Durch die Analyse ihrer Produkttitel können Sie wertvolle Erkenntnisse darüber gewinnen, was in Ihrer Branche funktioniert und was nicht.
Hier sind einige Dinge, die Sie beim Ausspionieren Ihrer Konkurrenten beachten sollten:
- Auffällige Faktoren in ihren Produkttiteln: Suchen Sie nach Gemeinsamkeiten und Unterschieden in ihren Produkttiteln. Welche Schlüsselwörter verwenden sie? Welche Alleinstellungsmerkmale heben sie hervor? Diese Informationen können Ihnen helfen, Ihre eigenen Produkttitel zu verfeinern.
- Gezielte Schlüsselwörter: Ermitteln Sie die Schlüsselwörter, auf die Ihre Konkurrenten abzielen. So bekommen Sie ein Gefühl für die Sprache, die bei Ihrer Zielgruppe Anklang findet.
- Leichte Navigation: Bewerten Sie, wie einfach es für die Nutzer ist, auf den Websites Ihrer Konkurrenten zu finden, was sie suchen. Sind die Produkttitel klar und beschreibend? Werden Formatierungen (z. B. Aufzählungspunkte) verwendet, um die Informationen besser lesbar zu machen?
Indem Sie Ihre Konkurrenten genau beobachten, können Sie der Zeit voraus sein und Ihre Produkttitel kontinuierlich optimieren, um den Umsatz zu steigern.
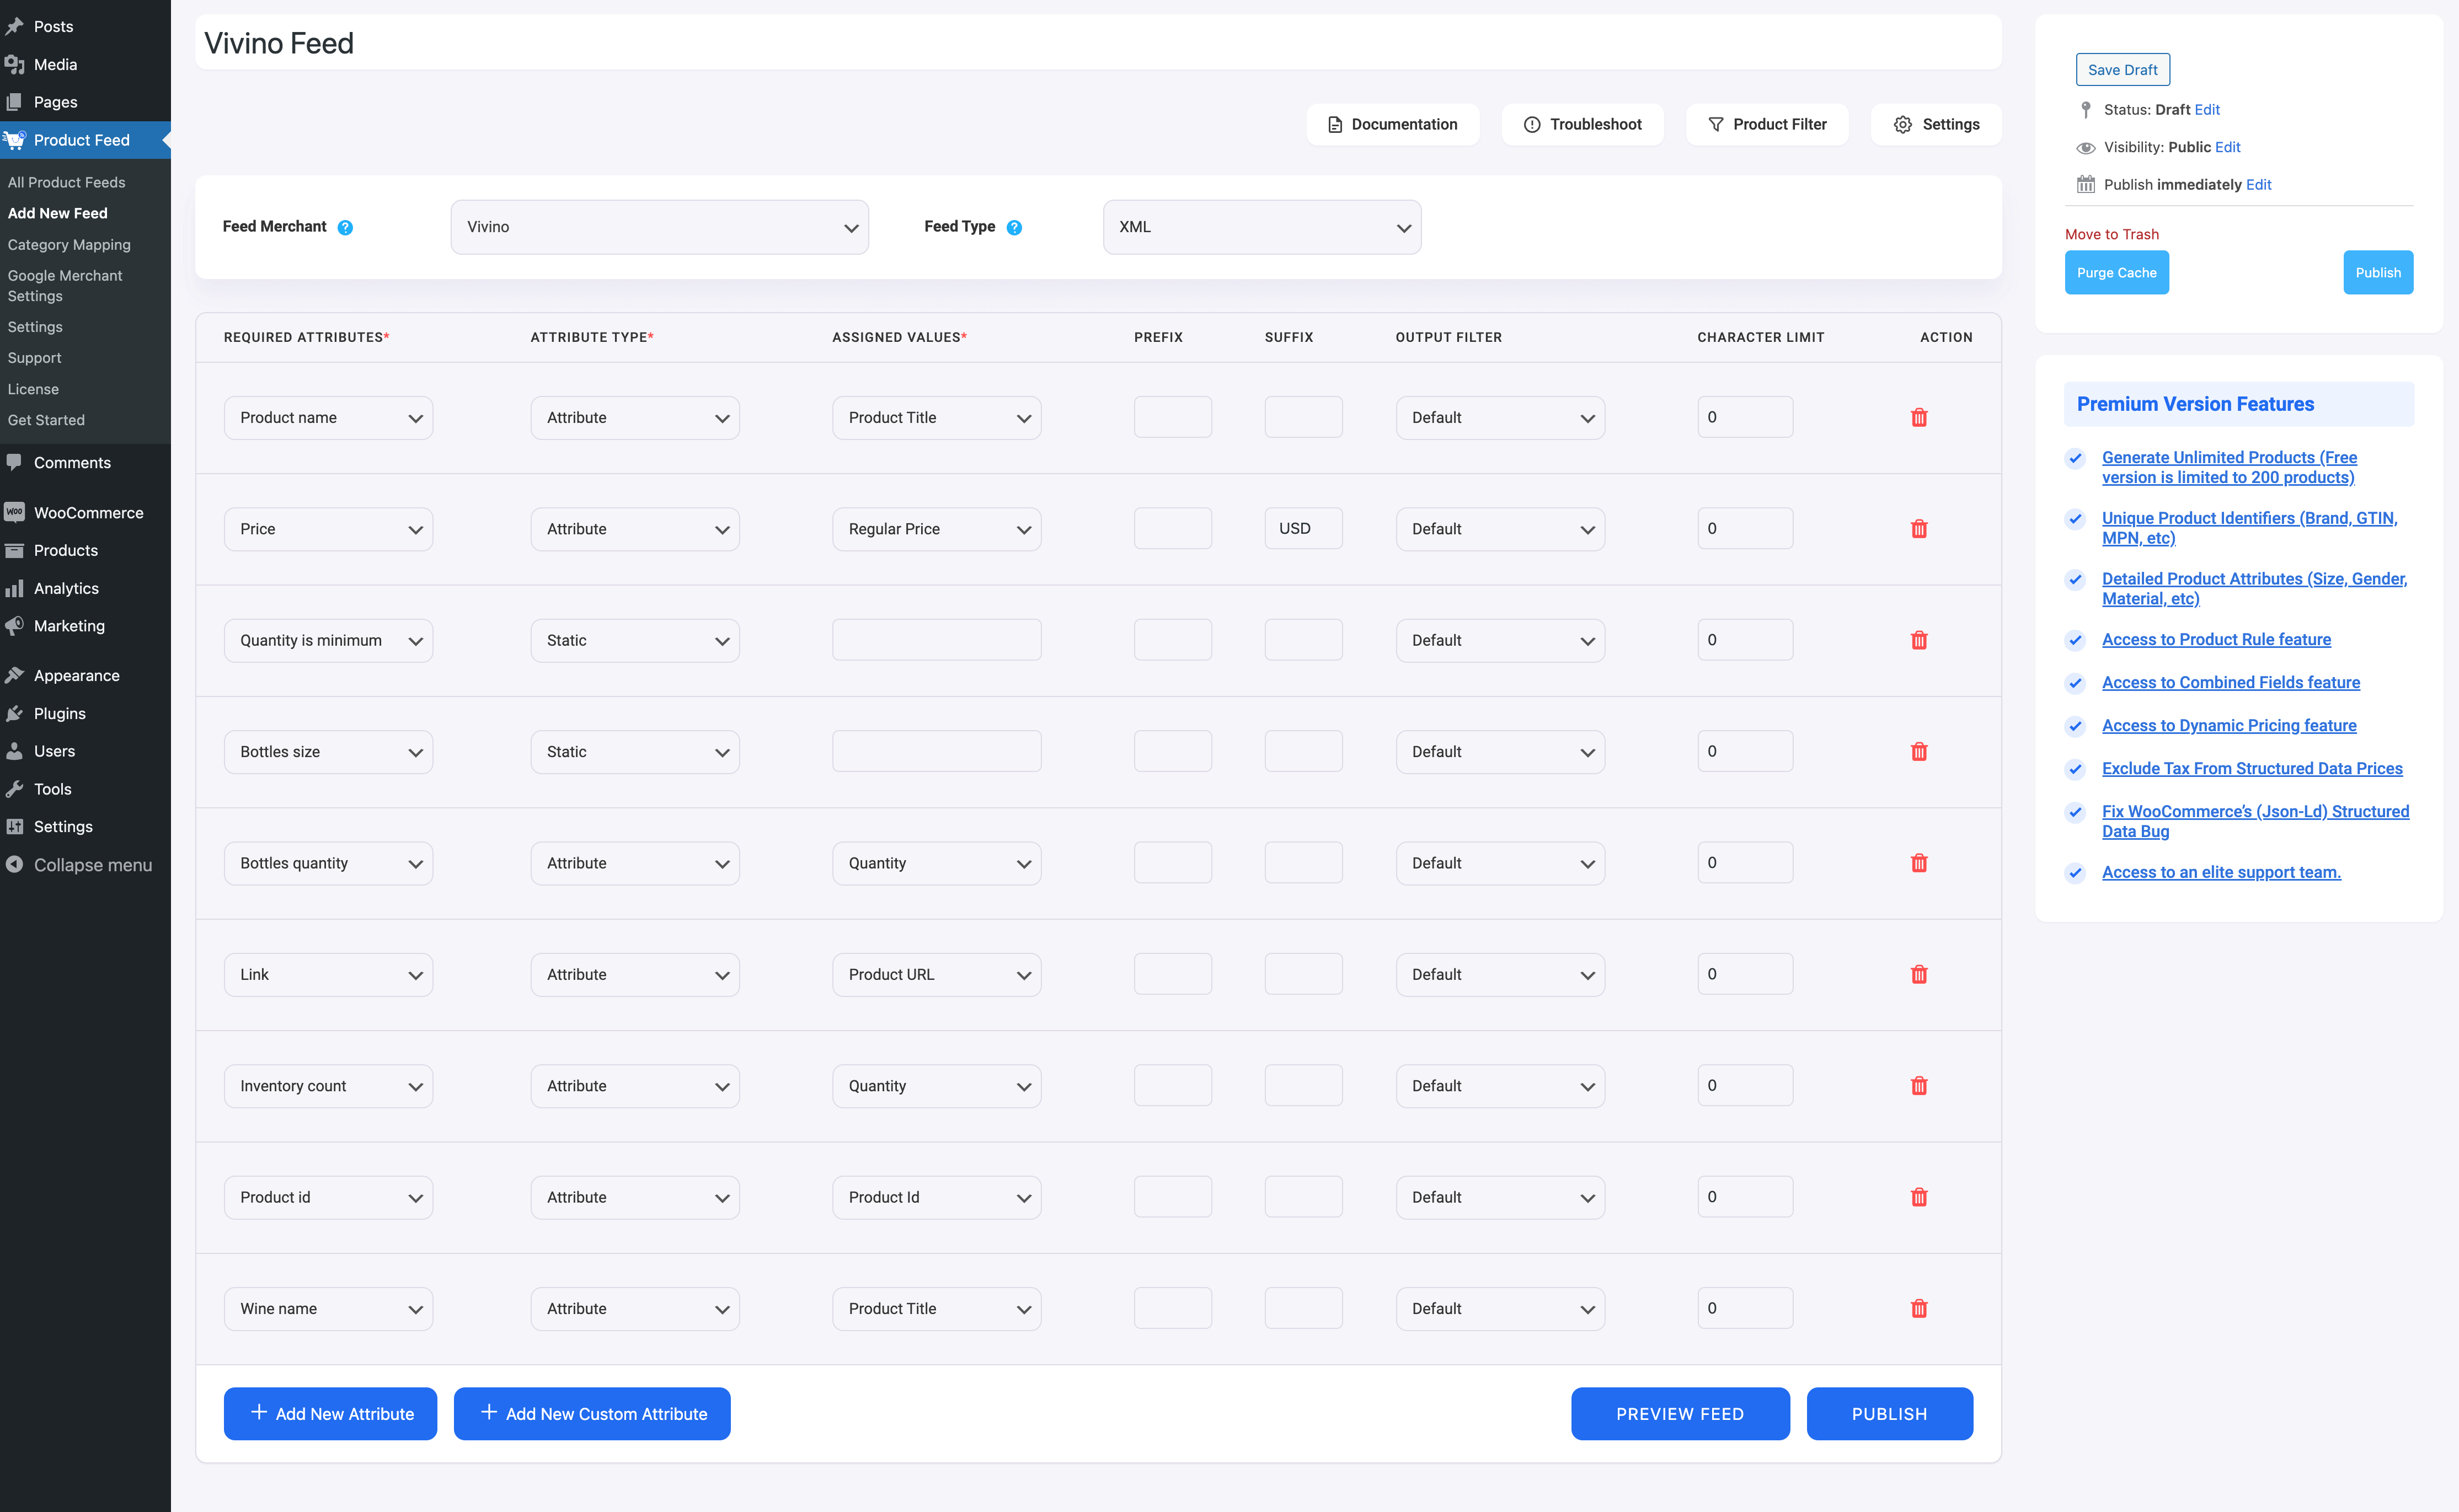
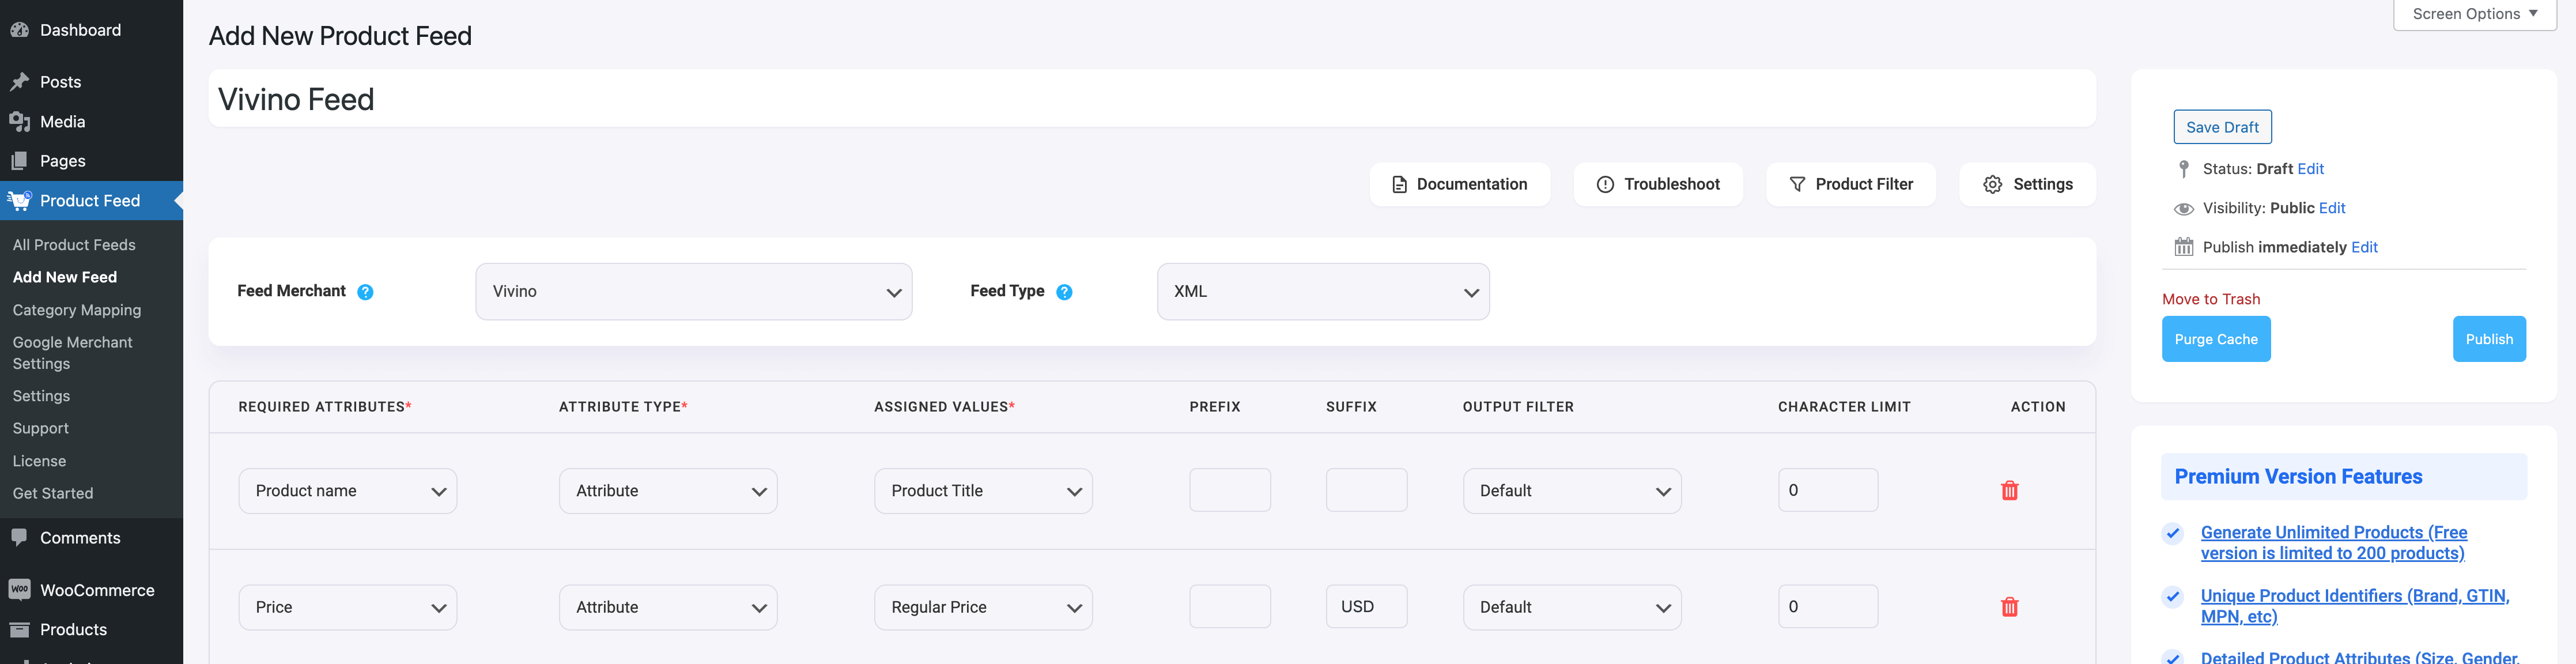
Wie Sie Ihr WooCommerce Produkt Feed Produkte Titel optimieren
Bisher haben Sie gelernt, wie Sie Ihren Produkttitel optimieren können, um Ihre Produkte für Ihr Publikum attraktiver zu machen und so eine höhere Konversion zu erreichen.
Wenn Sie jedoch mehr als 100 Produkte verkaufen, ist es ziemlich schwierig, Ihre Produkttitel auf einmal zu optimieren.
Aber es gibt einen Weg, wie Sie Ihre WooCommerce-Feed-Produkttitel bei der Erstellung des Produktfeeds ganz einfach optimieren können.
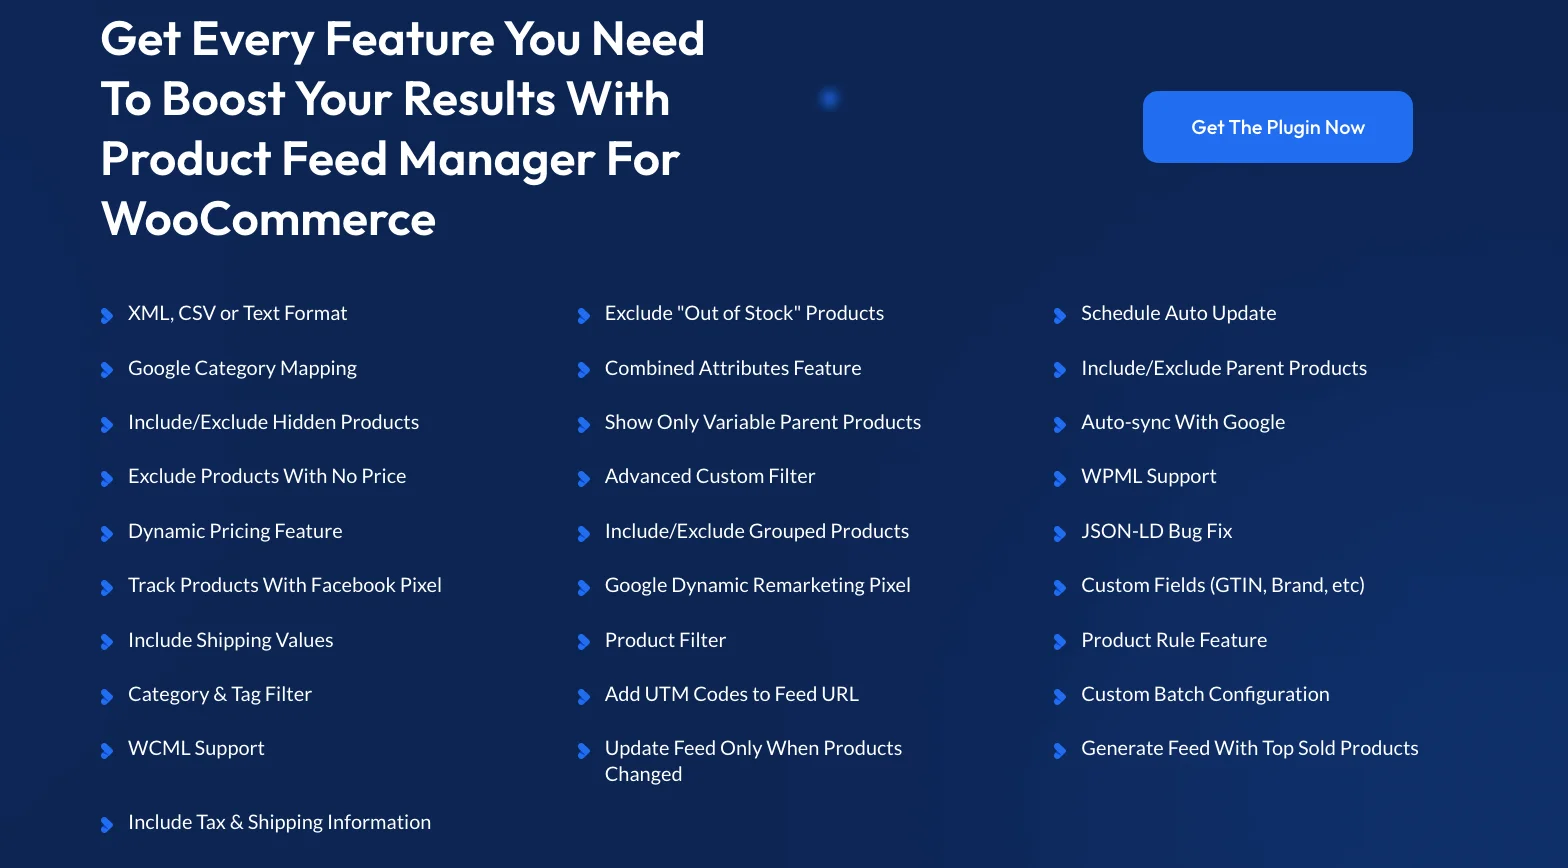
Sie können die Funktion Kombinierte Attribute des Product Feed Managers für das WooCommerce-Plugin verwenden.
Ich zeige Ihnen, wie einfach Sie Ihre WooCommerce-Produktfeed-Produkttitel optimieren können.
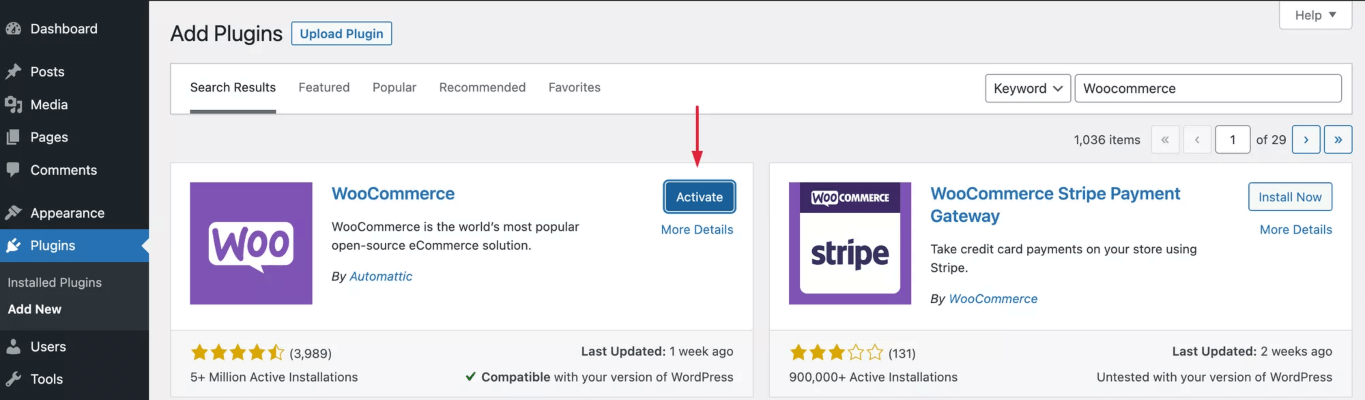
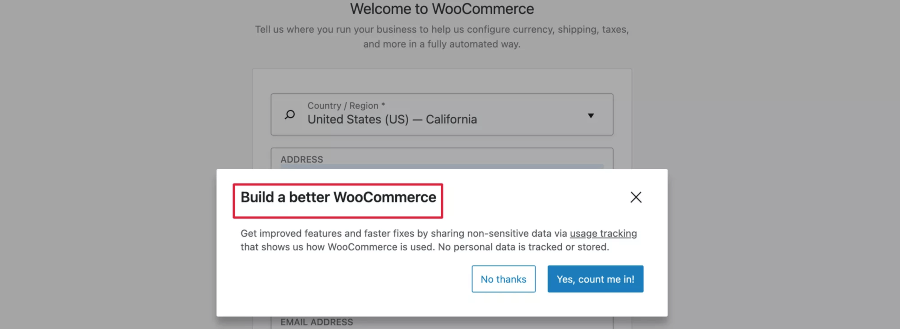
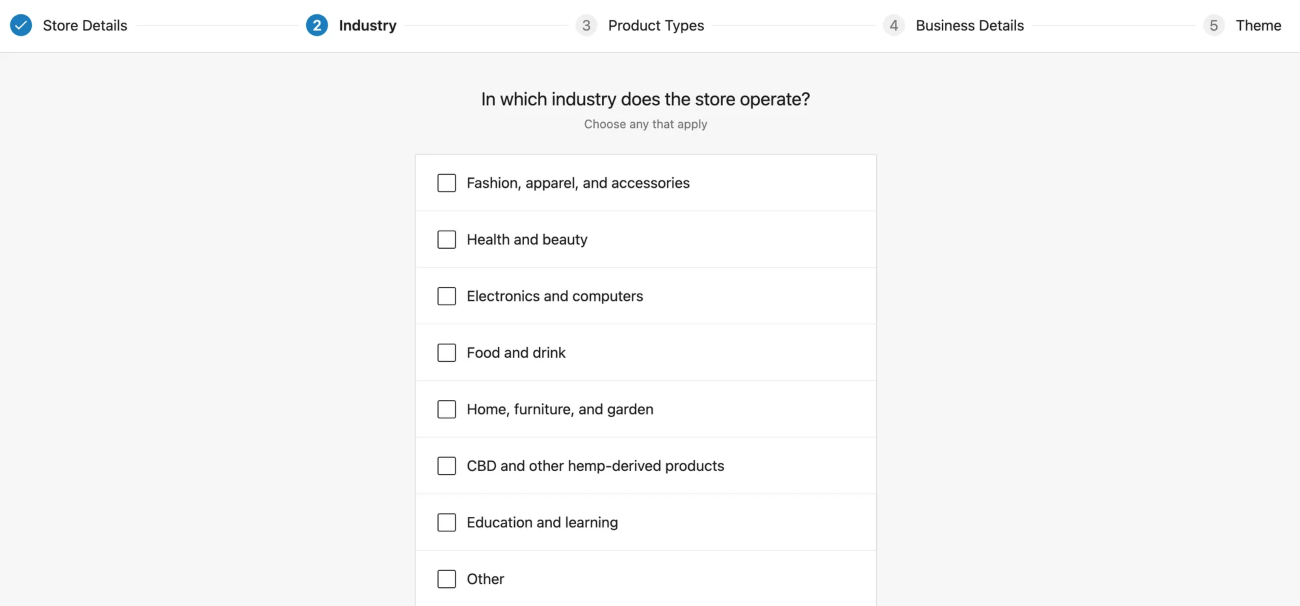
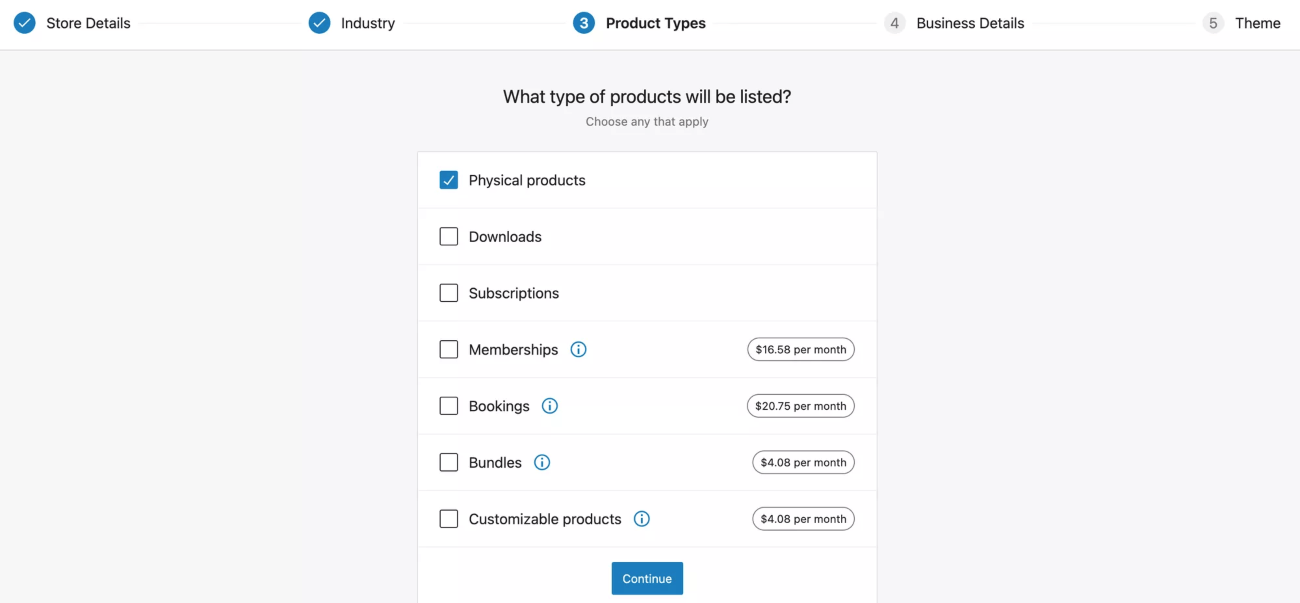
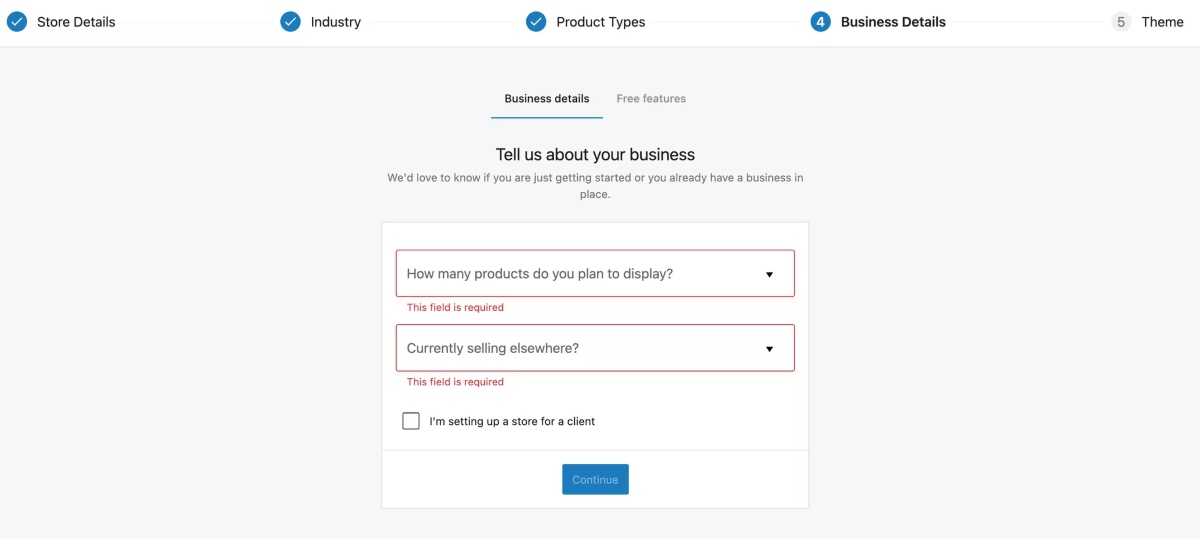
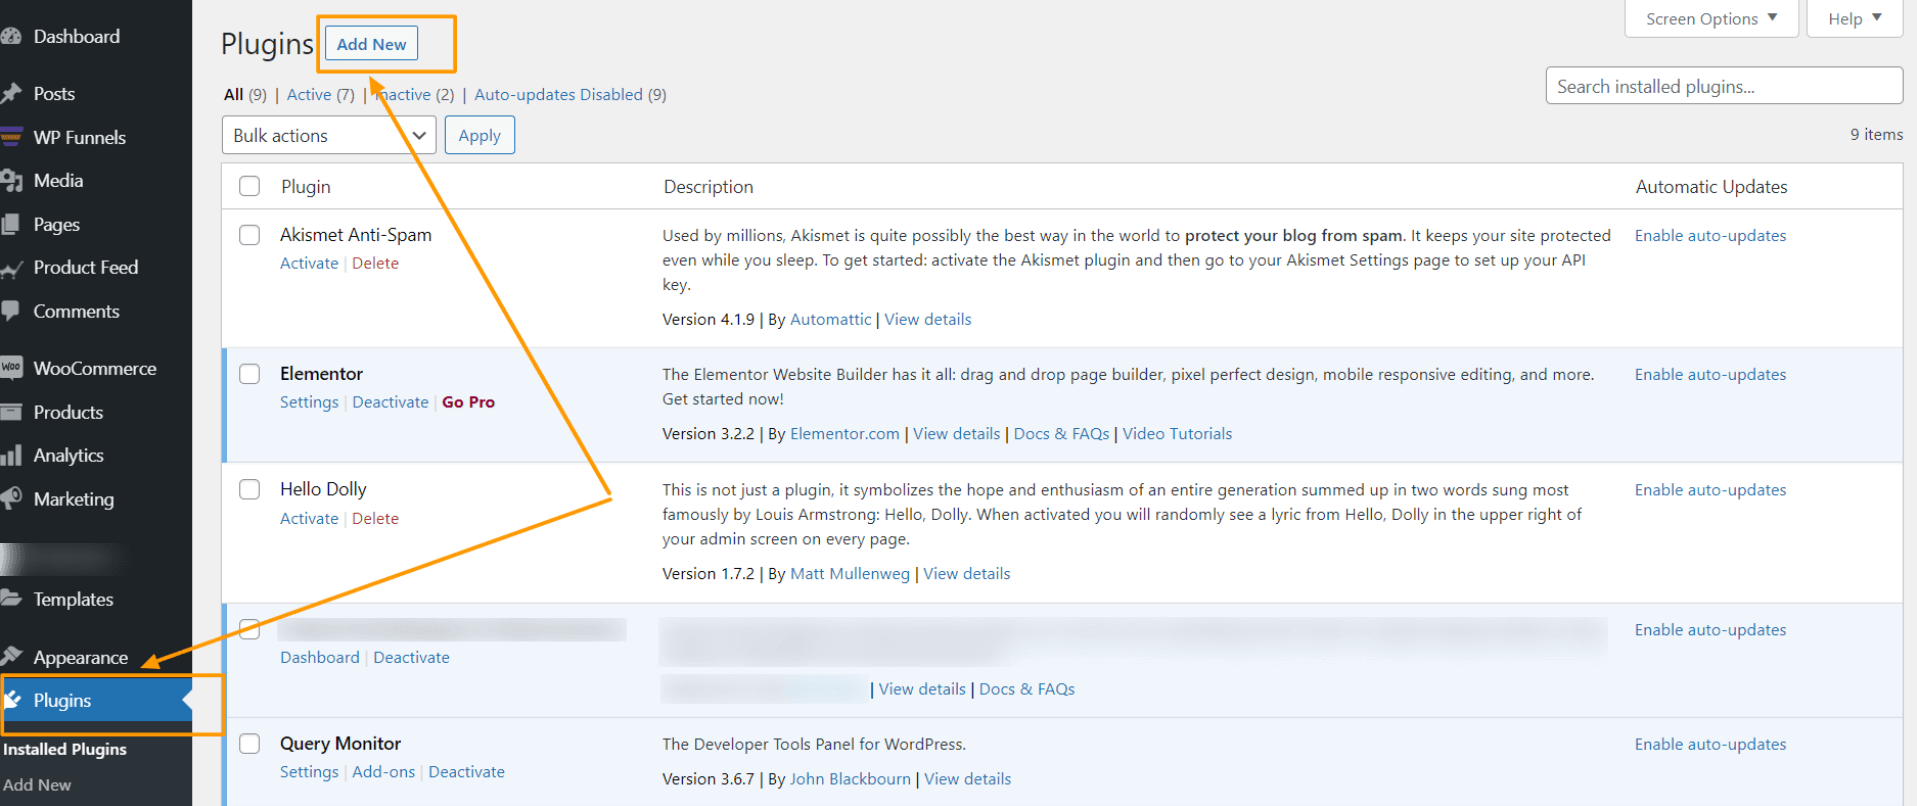
Schritt 1: Installieren Sie Product Feed Manager für WooCommerce Plugin auf Ihrer WordPress-Website
**Vergewissern Sie sich, dass Sie WooCommerce auf Ihrer Website installiert haben, bevor Sie das Plugin Product Feed Manager for WooCommerce installieren.
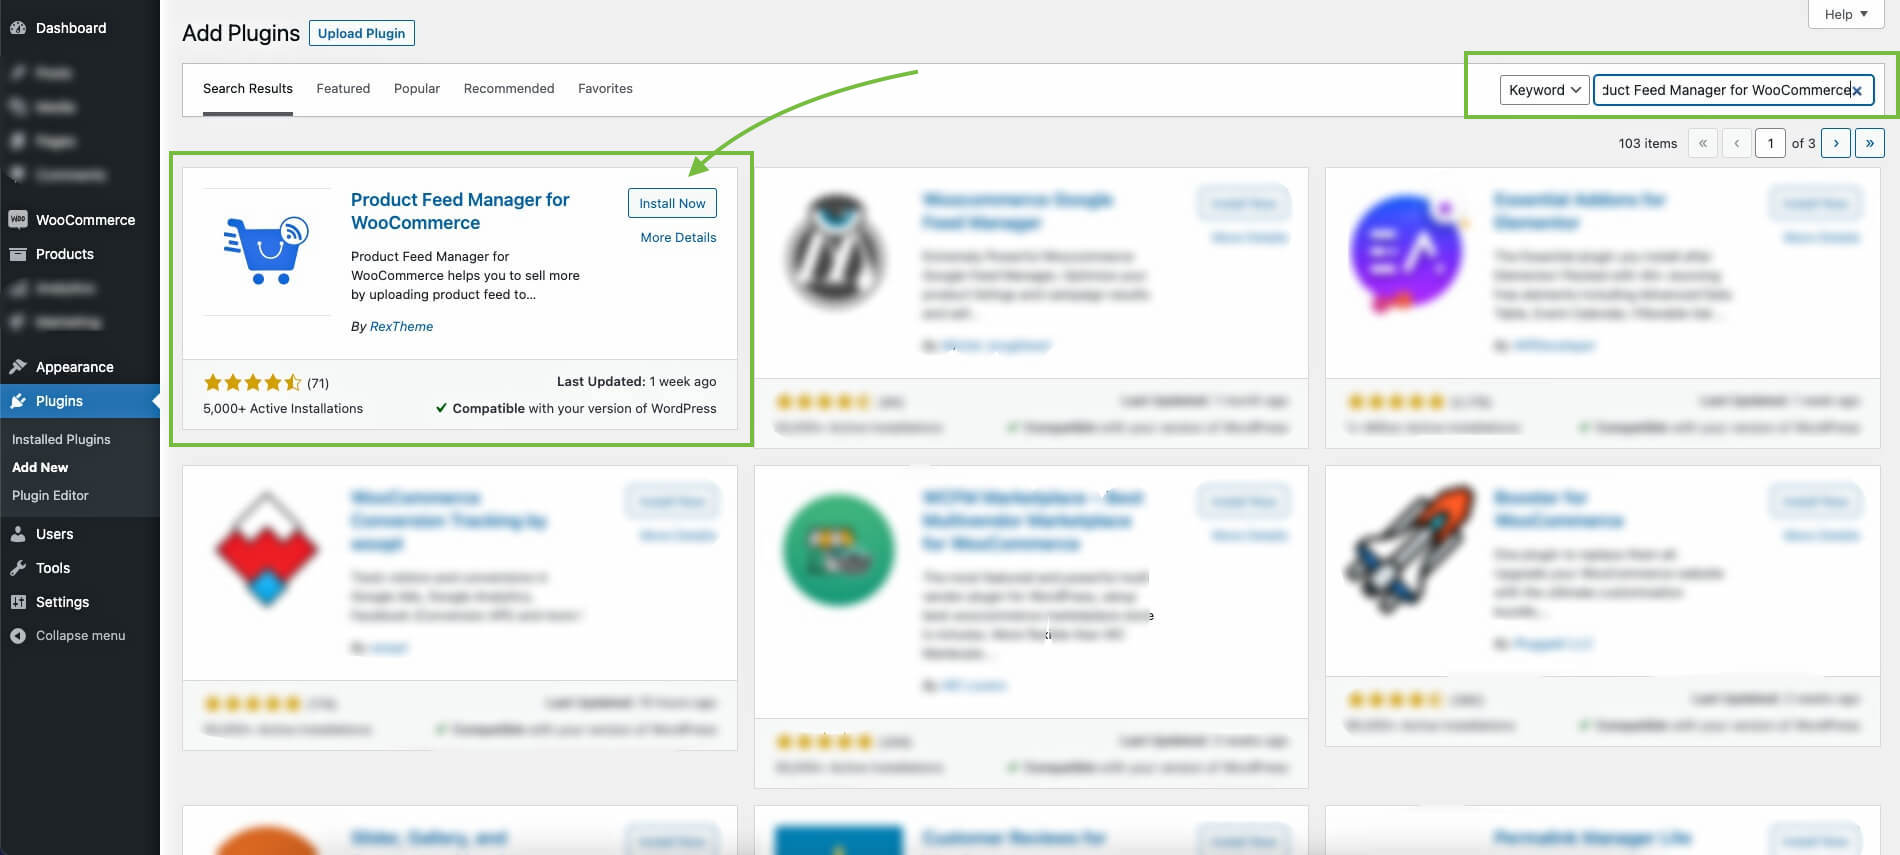
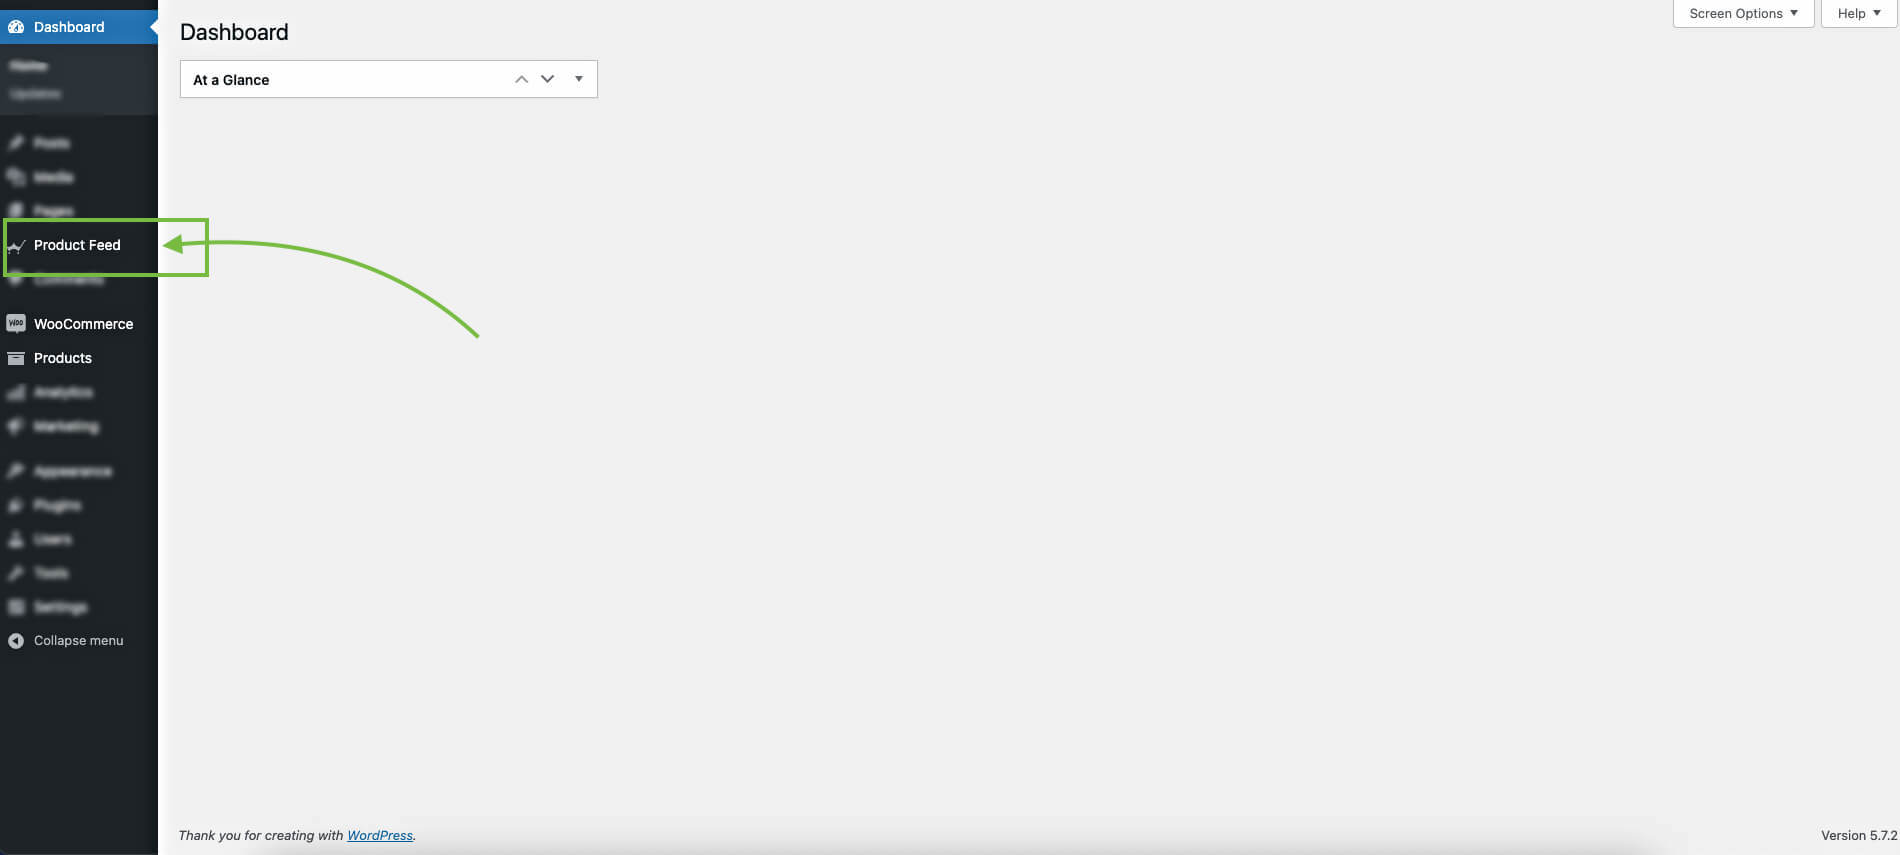
1. Gehen Sie zu Ihrem WordPress Dashboard und wählen Sie Plugins. Klicken Sie auf die Schaltfläche Neu hinzufügen.
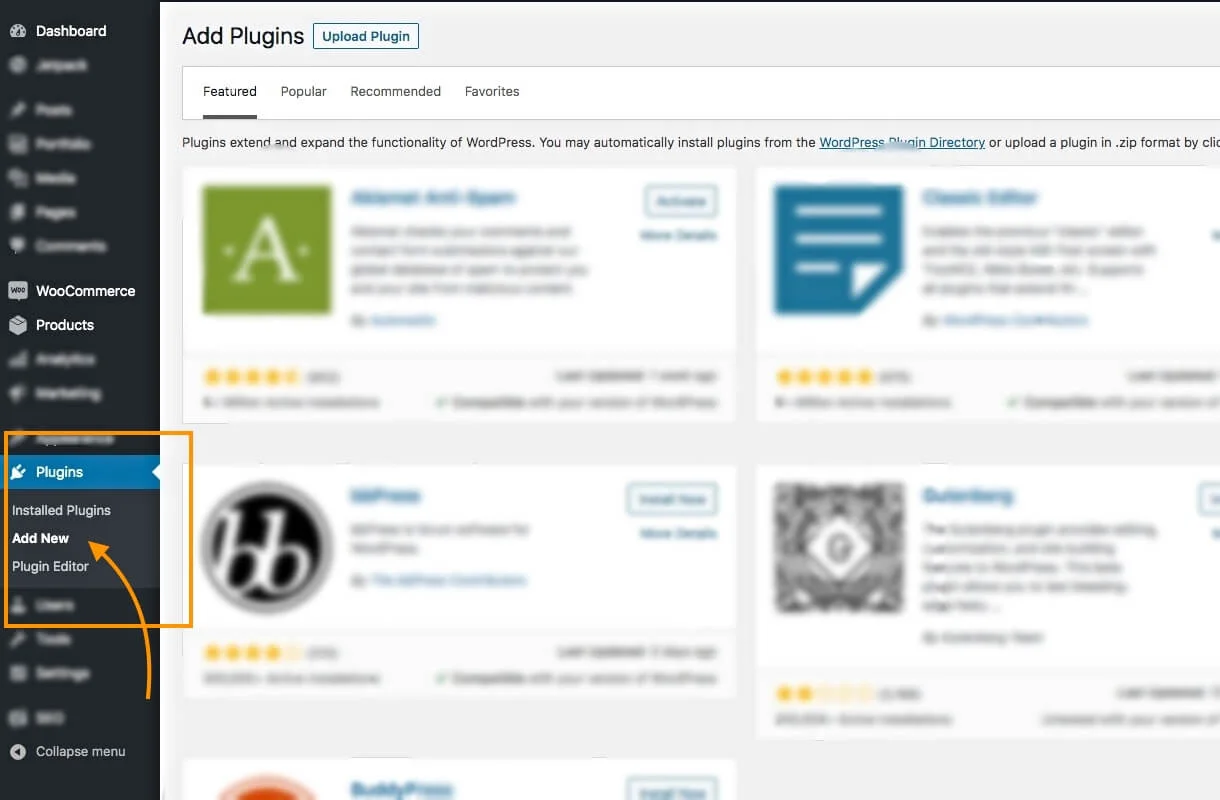
2. Suchen Sie im Feld Schlüsselwort nach "Product Feed Manager For WooCommerce", und das Plugin wird in den Suchergebnissen angezeigt.
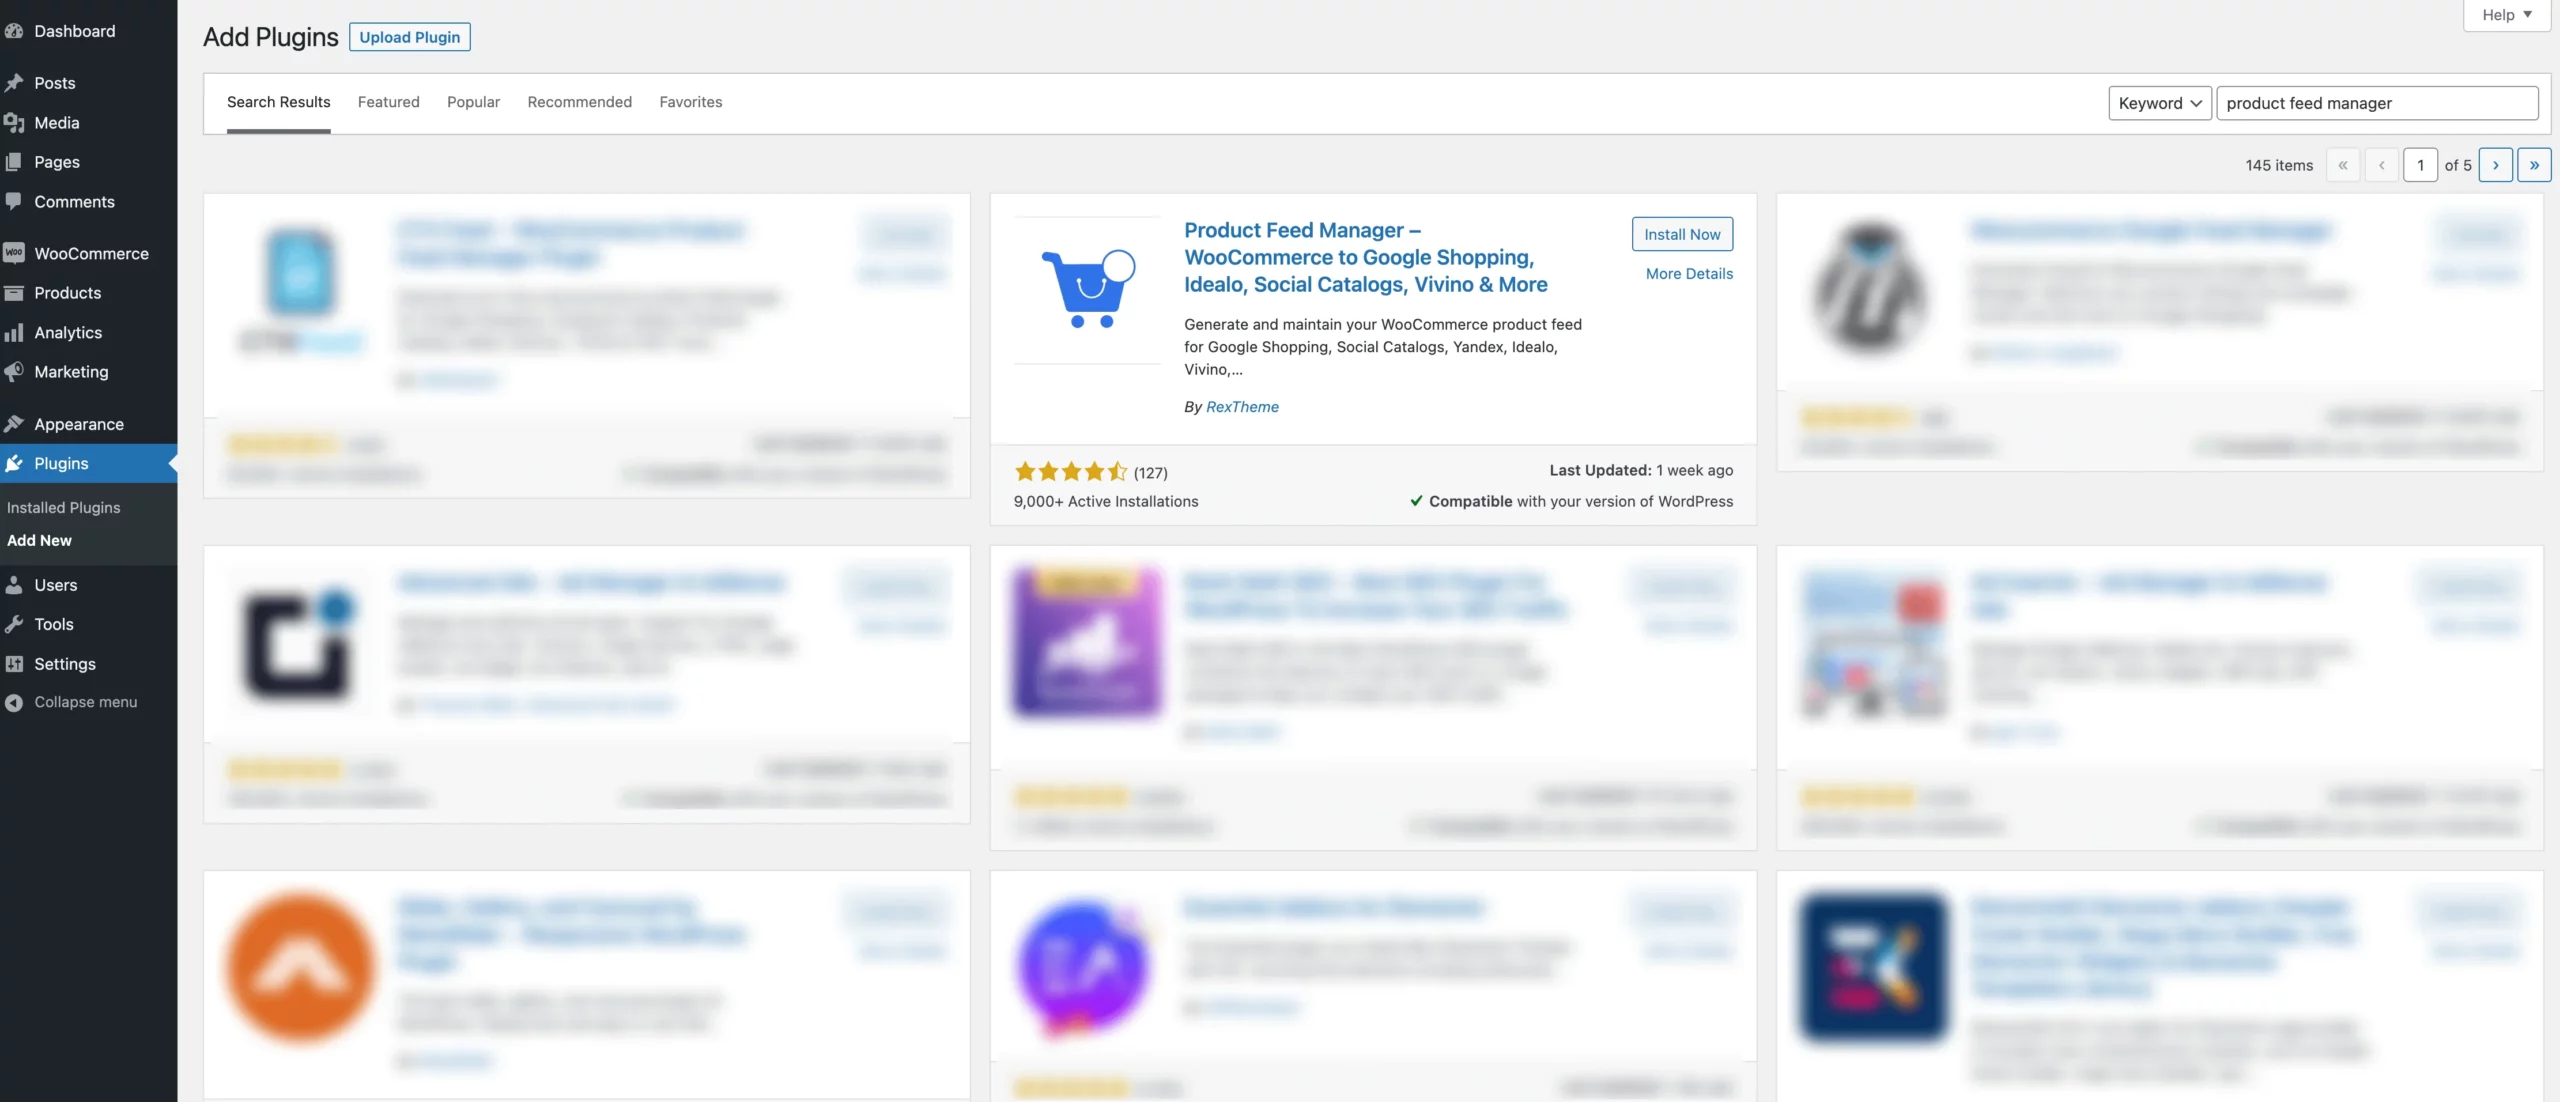
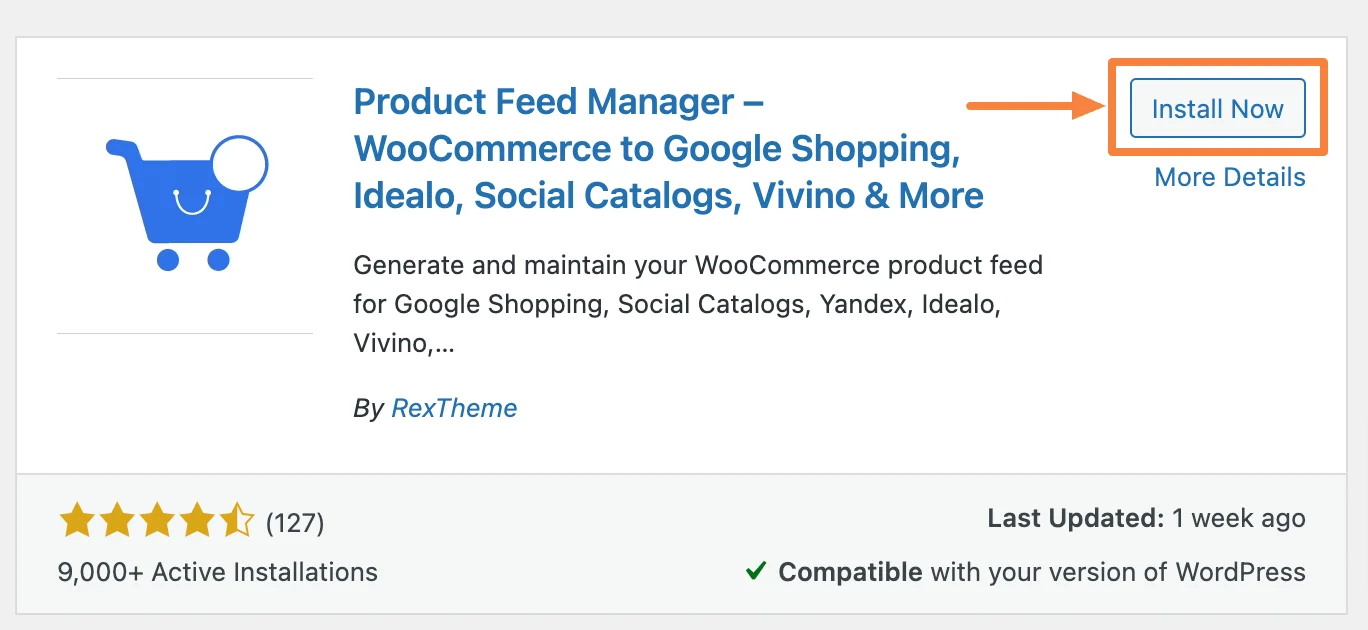
3. Klicken Sie auf die Schaltfläche Jetzt installieren.
Sobald das Plugin installiert ist, wird die Schaltfläche Aktivieren angezeigt.
4. Klicken Sie darauf, um das Plugin auf Ihrer Website zu aktivieren. Sobald das Plugin aktiviert ist, wird auf der linken Seite ein Produkt-Feed-Menü angezeigt.
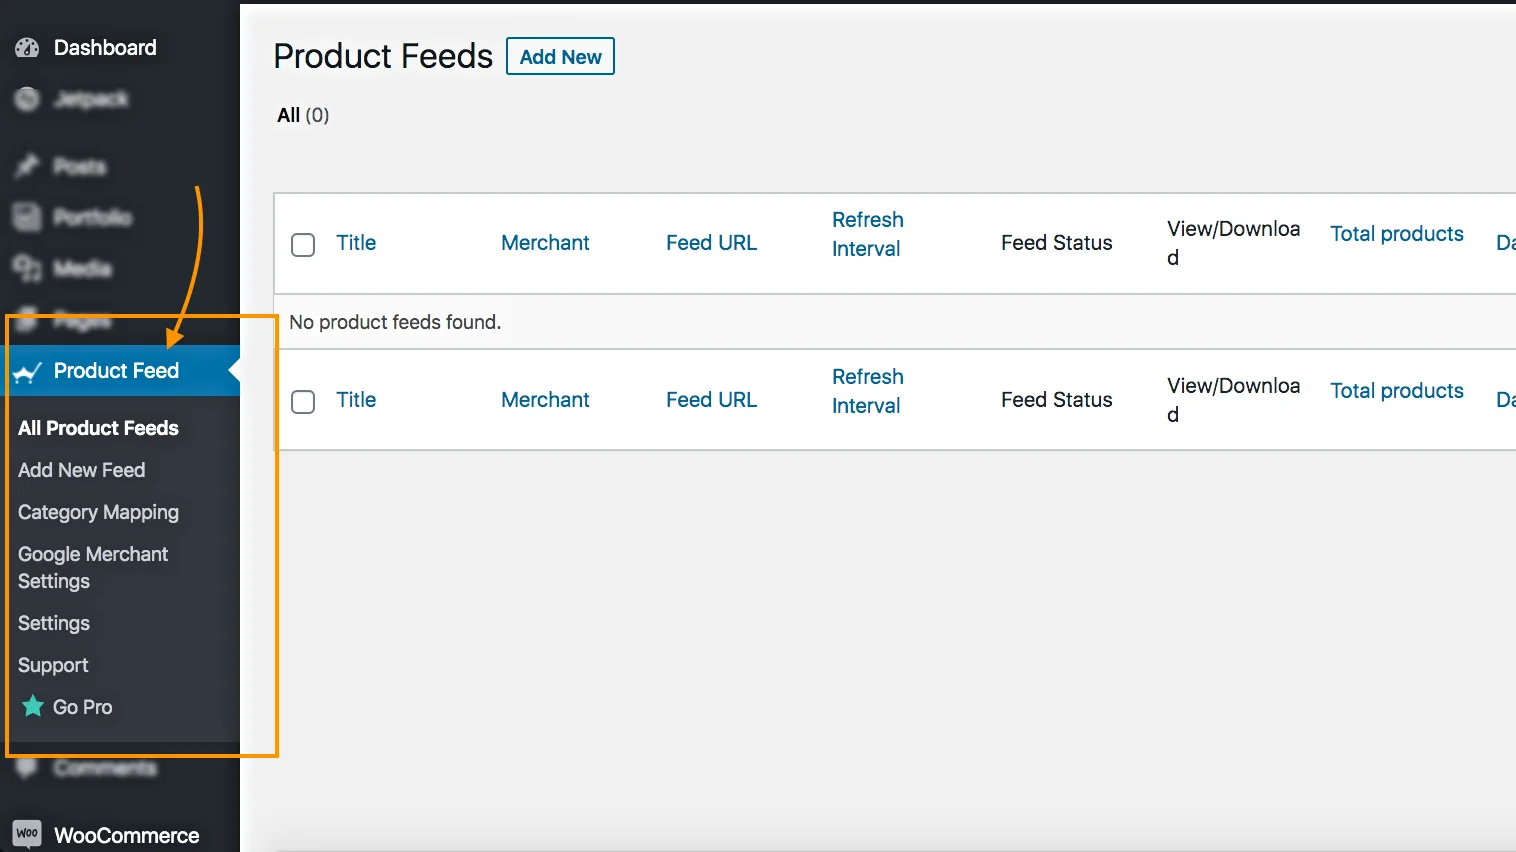
Das war's. Sie haben jetzt einen Product Feed Manager für WooCommerce auf Ihrer Website installiert.
Jetzt müssen Sie die Pro-Version des Plugins installieren, um die Funktion "Kombinierte Attribute" zur Optimierung Ihrer WooCommere-Feed-Produkttitel zu nutzen.
You can get the Product Feed Manager Pro version here:
https://staging-rextheme.kinsta.cloud/best-woocommerce-product-feed/
Hier ist eine Anleitung, die Sie befolgen können, um zu erfahren, wie Sie den Product Feed Manager für das WooCommerce Pro-Plugin installieren und aktivieren und wie Sie die Lizenz aktivieren: WIE INSTALLIEREN UND AKTIVIEREN PFM PRO
Wenn Sie das Plugin aus dem WordPress-Repository oder von der RexTheme-Website herunterladen, gehen Sie zu Dashboard > Plugins > Neu hinzufügen und sehen Sie oben links eine Schaltfläche "Hochladen". Klicken Sie auf diese Schaltfläche. Laden Sie dann die Plugin-Datei hoch, installieren und aktivieren Sie sie.
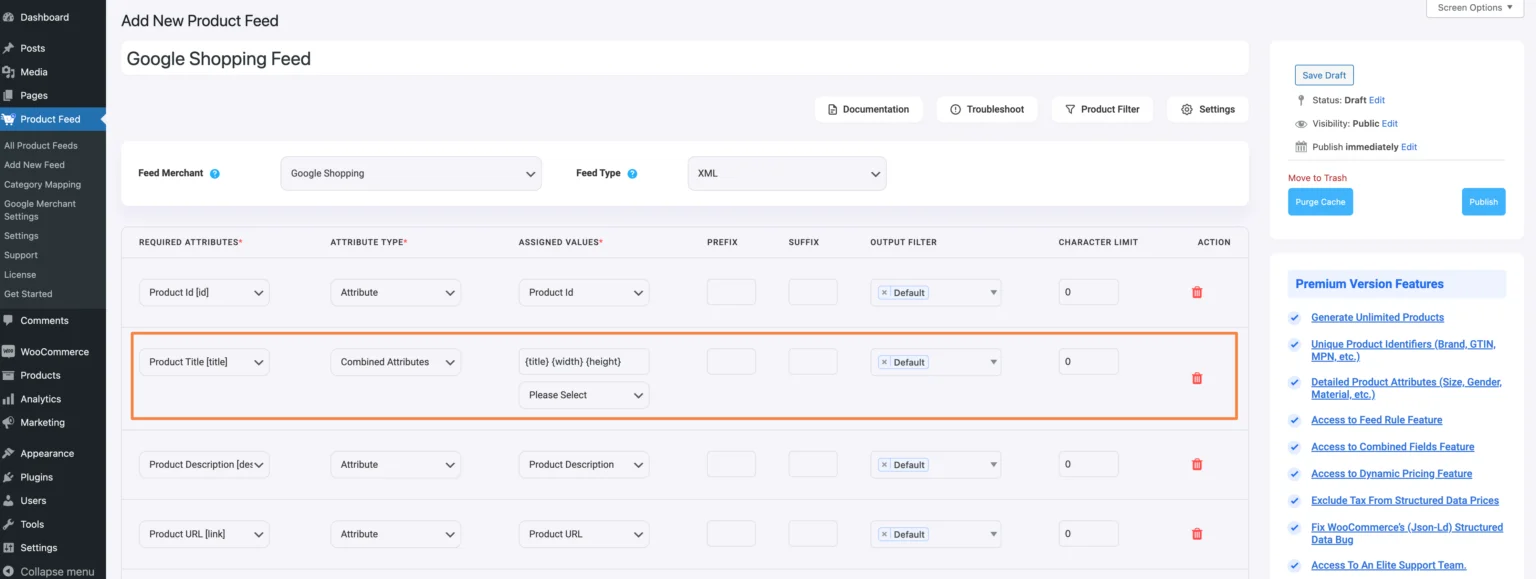
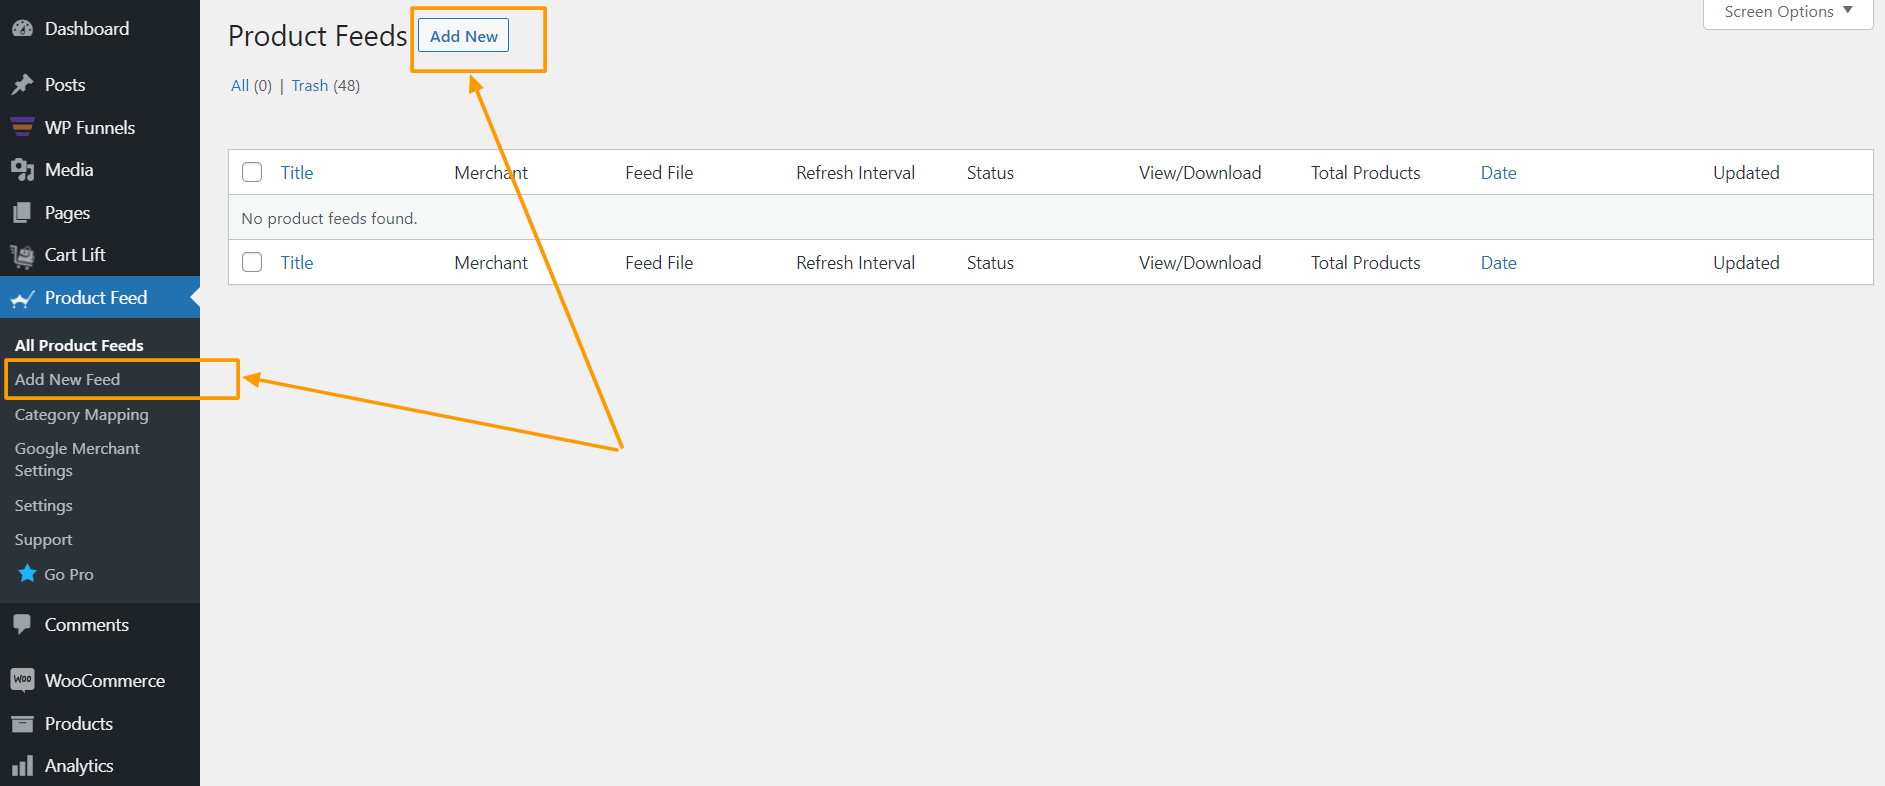
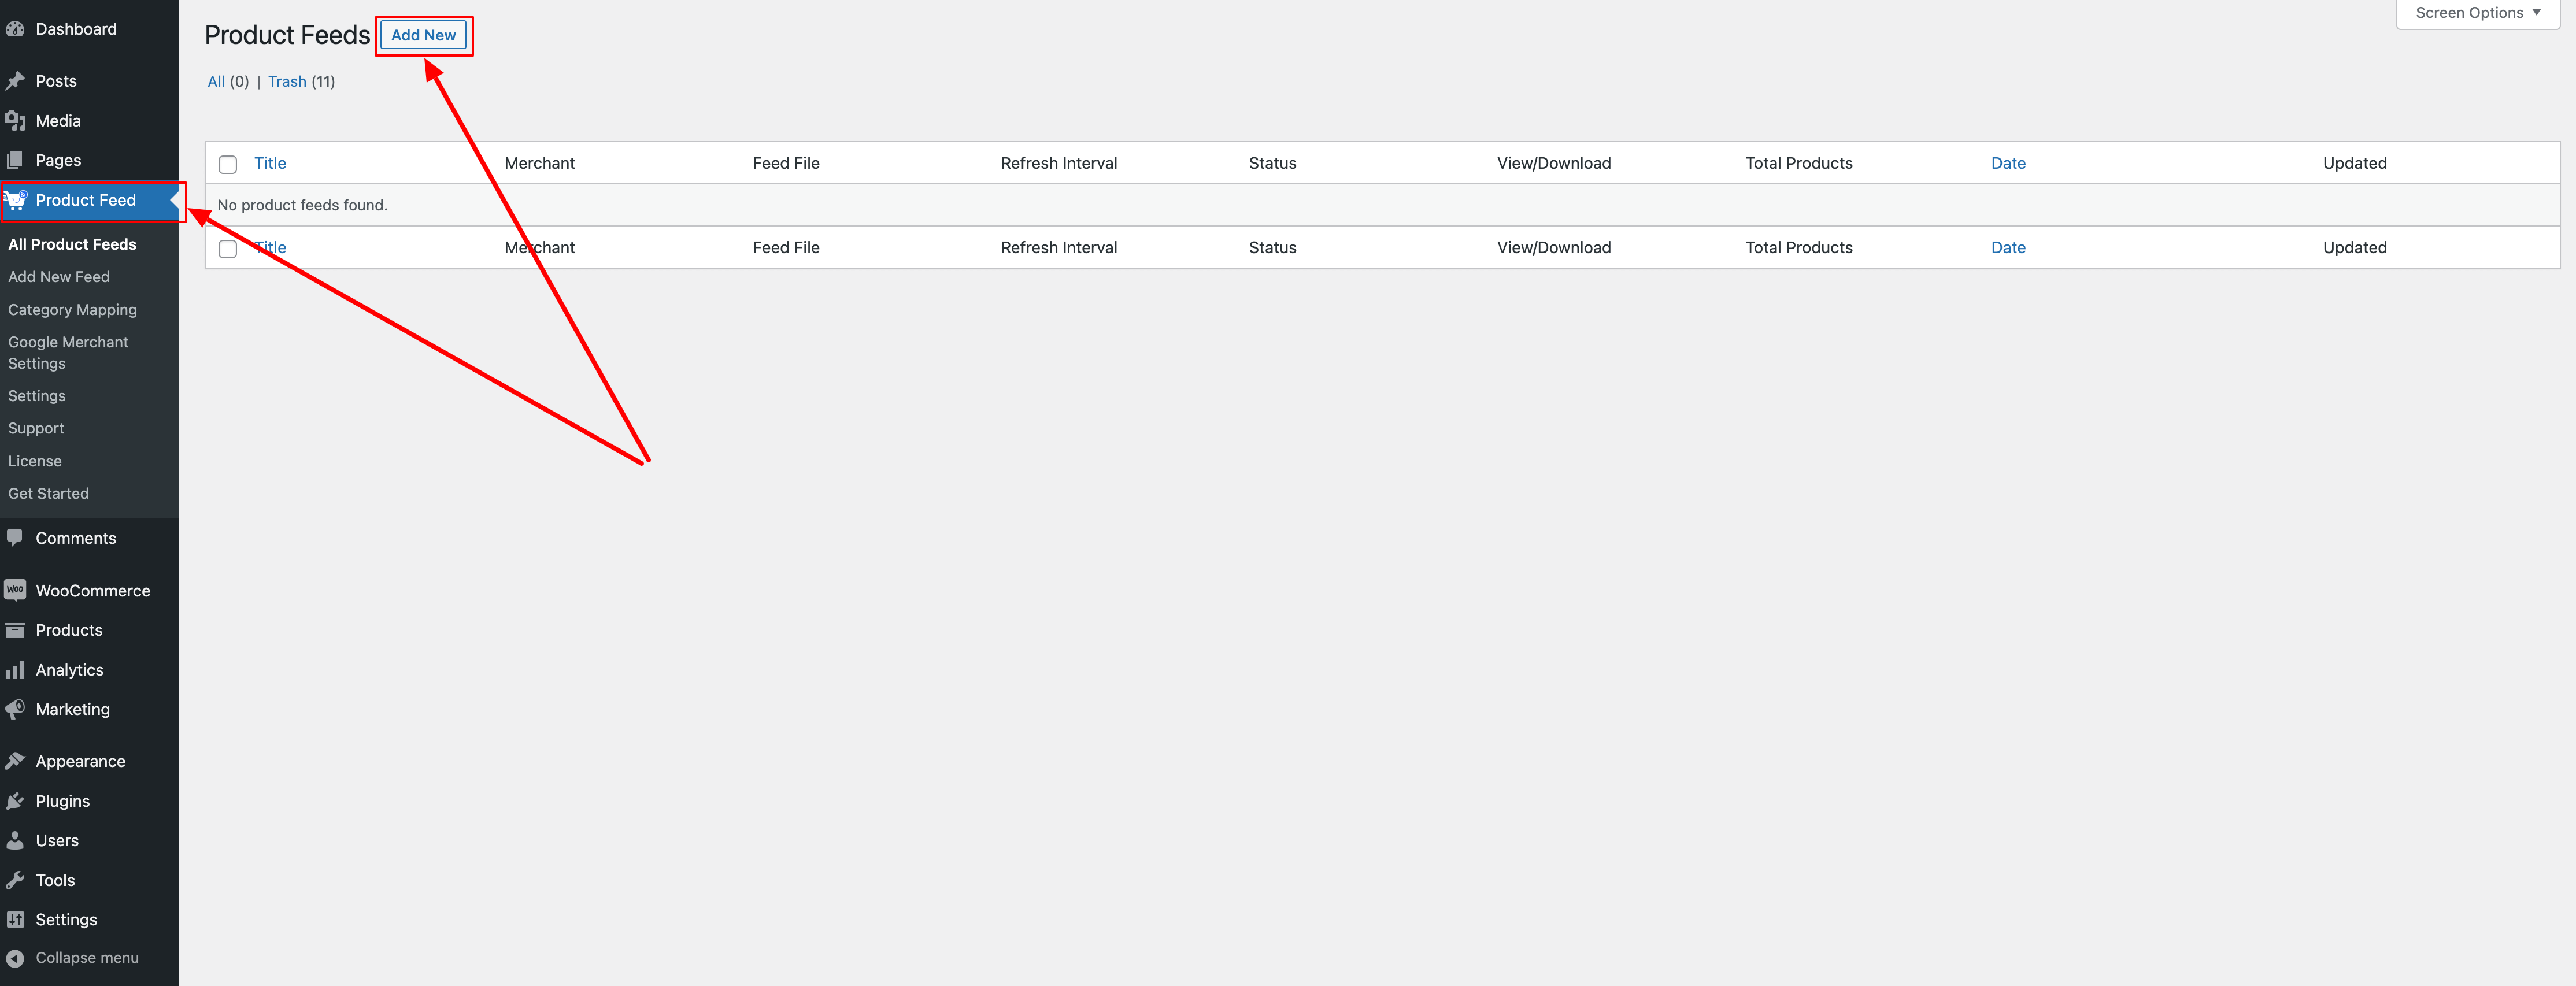
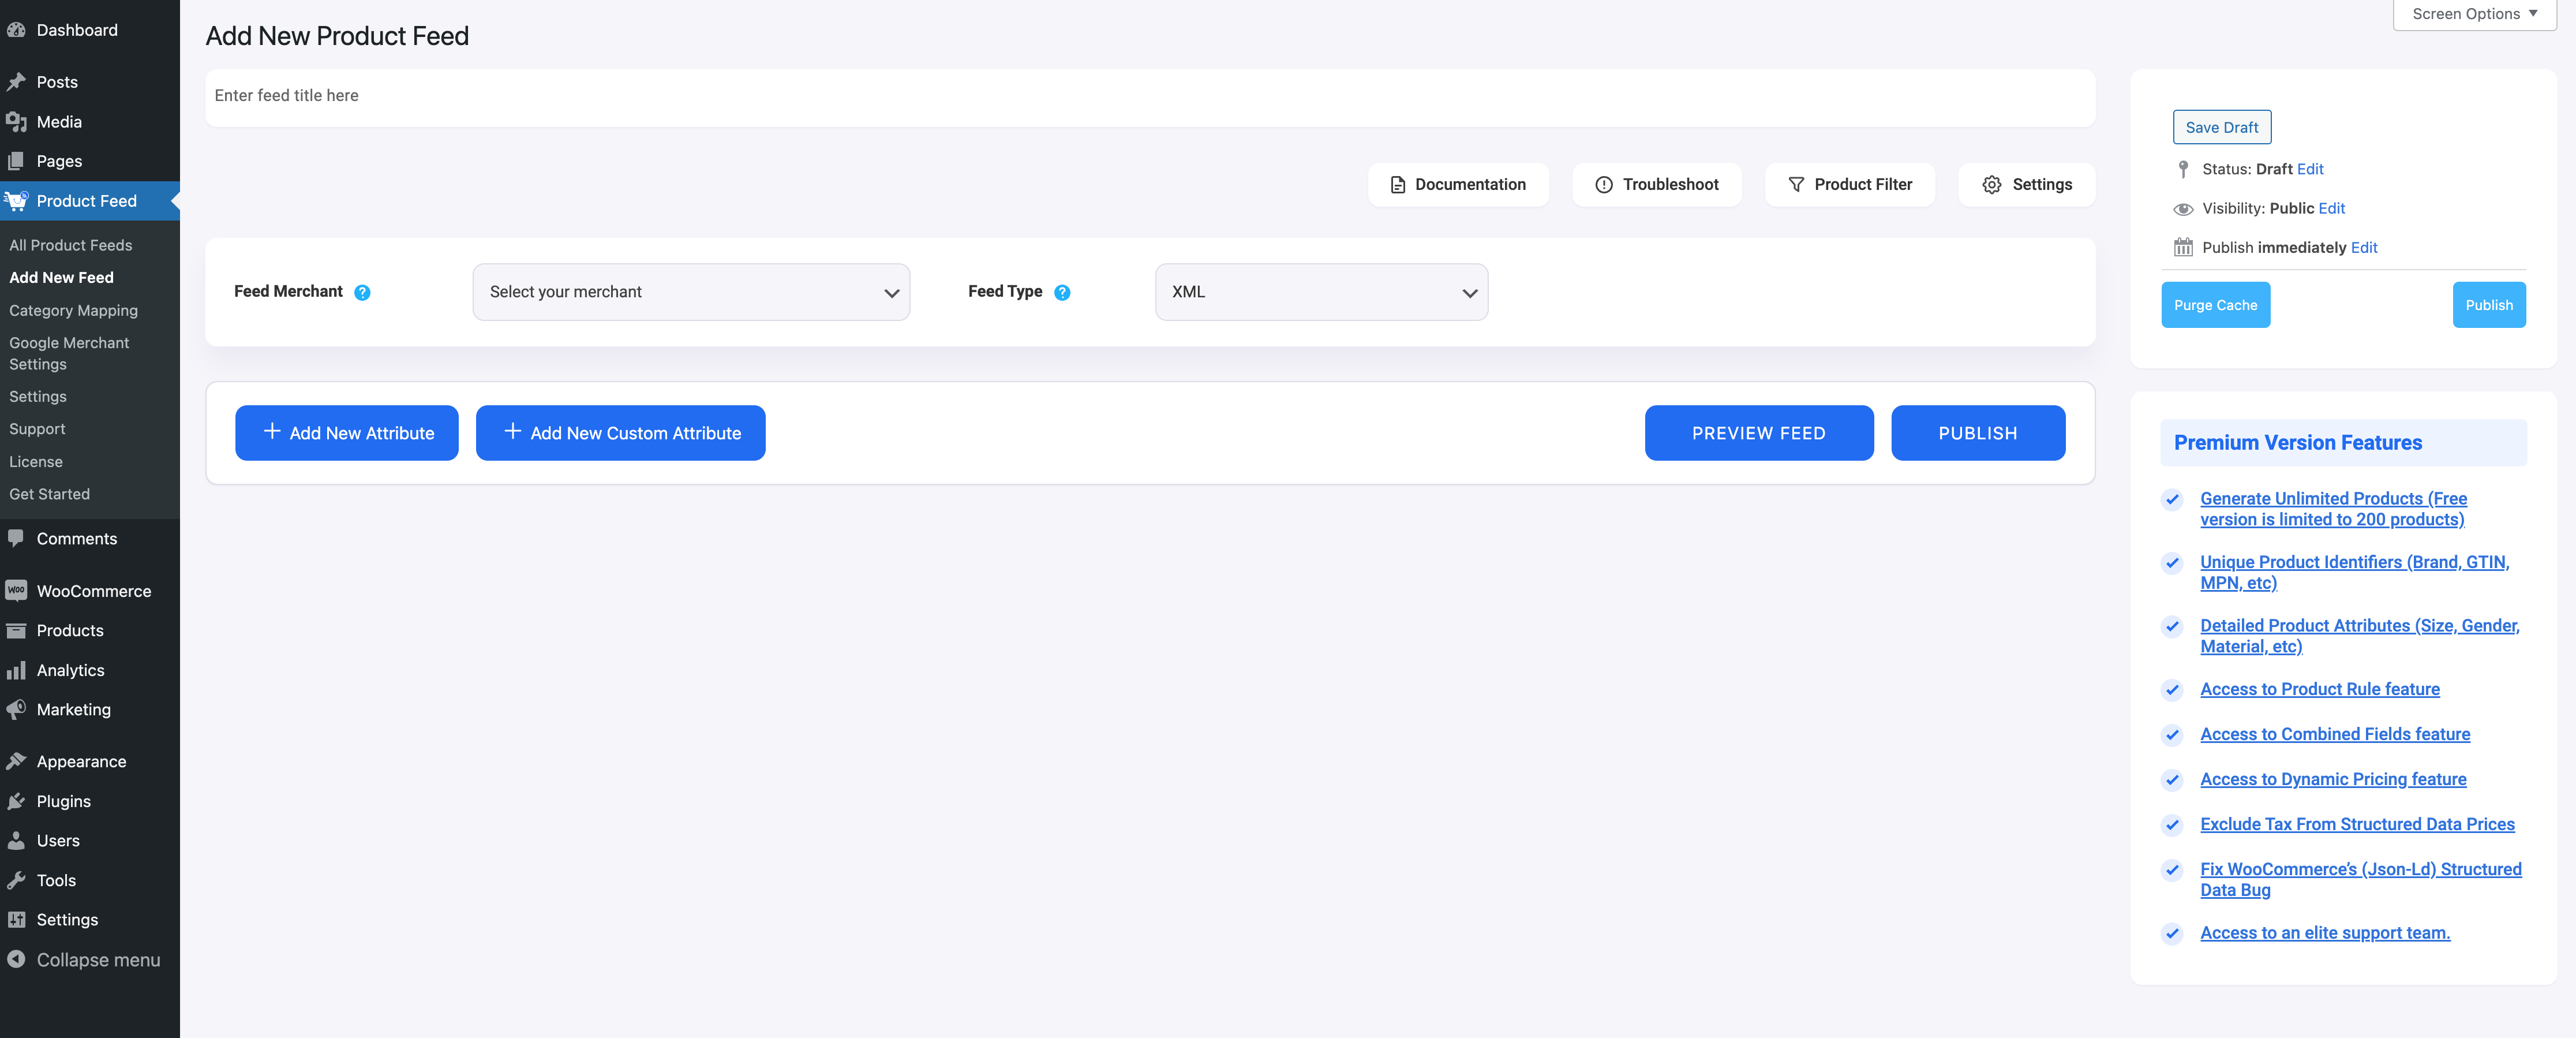
Schritt 2: Erstellen eines neuen Feeds
Gehen Sie zu Ihrem Produkt-Feed-Dashboard.
Klicken Sie auf die Schaltfläche Neuen Feed hinzufügen.
Sie gelangen dann zur Seite für die Erstellung des Feeds.
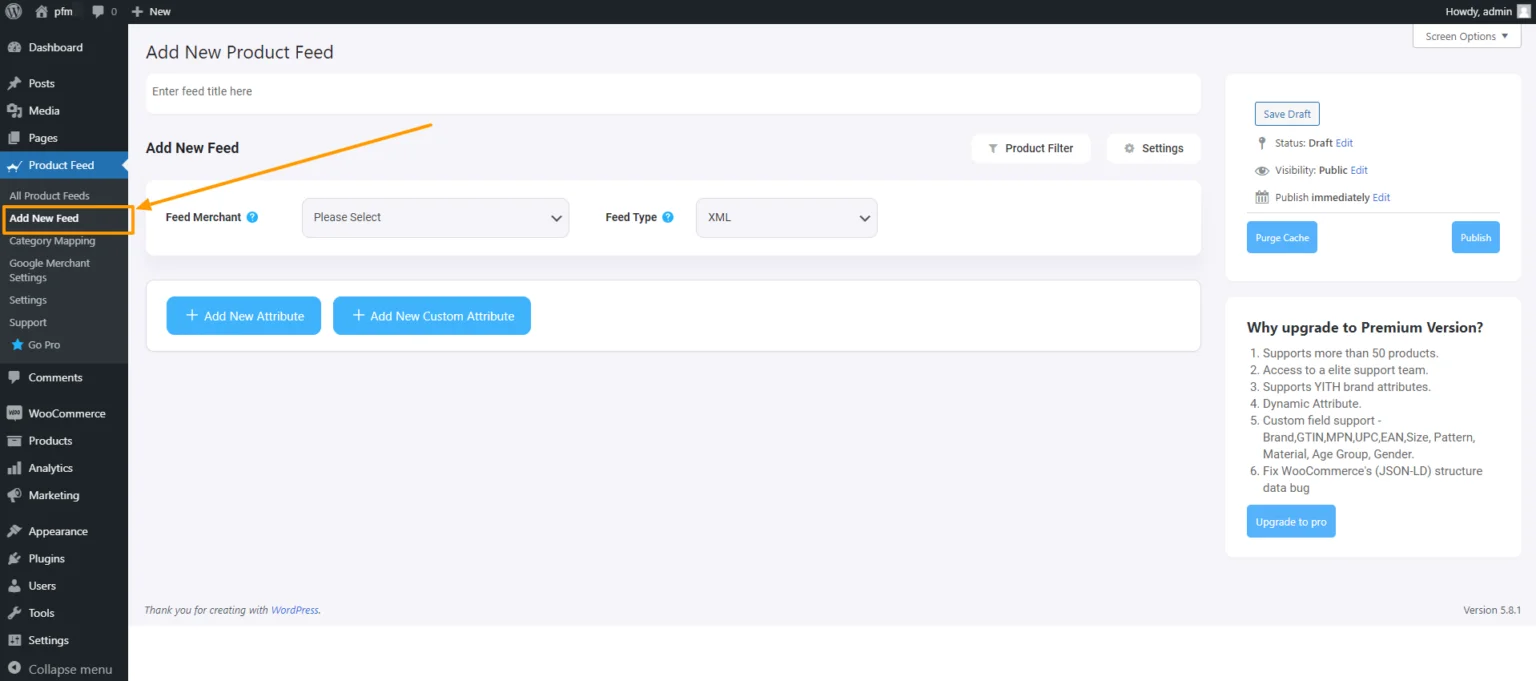
Also, hier,
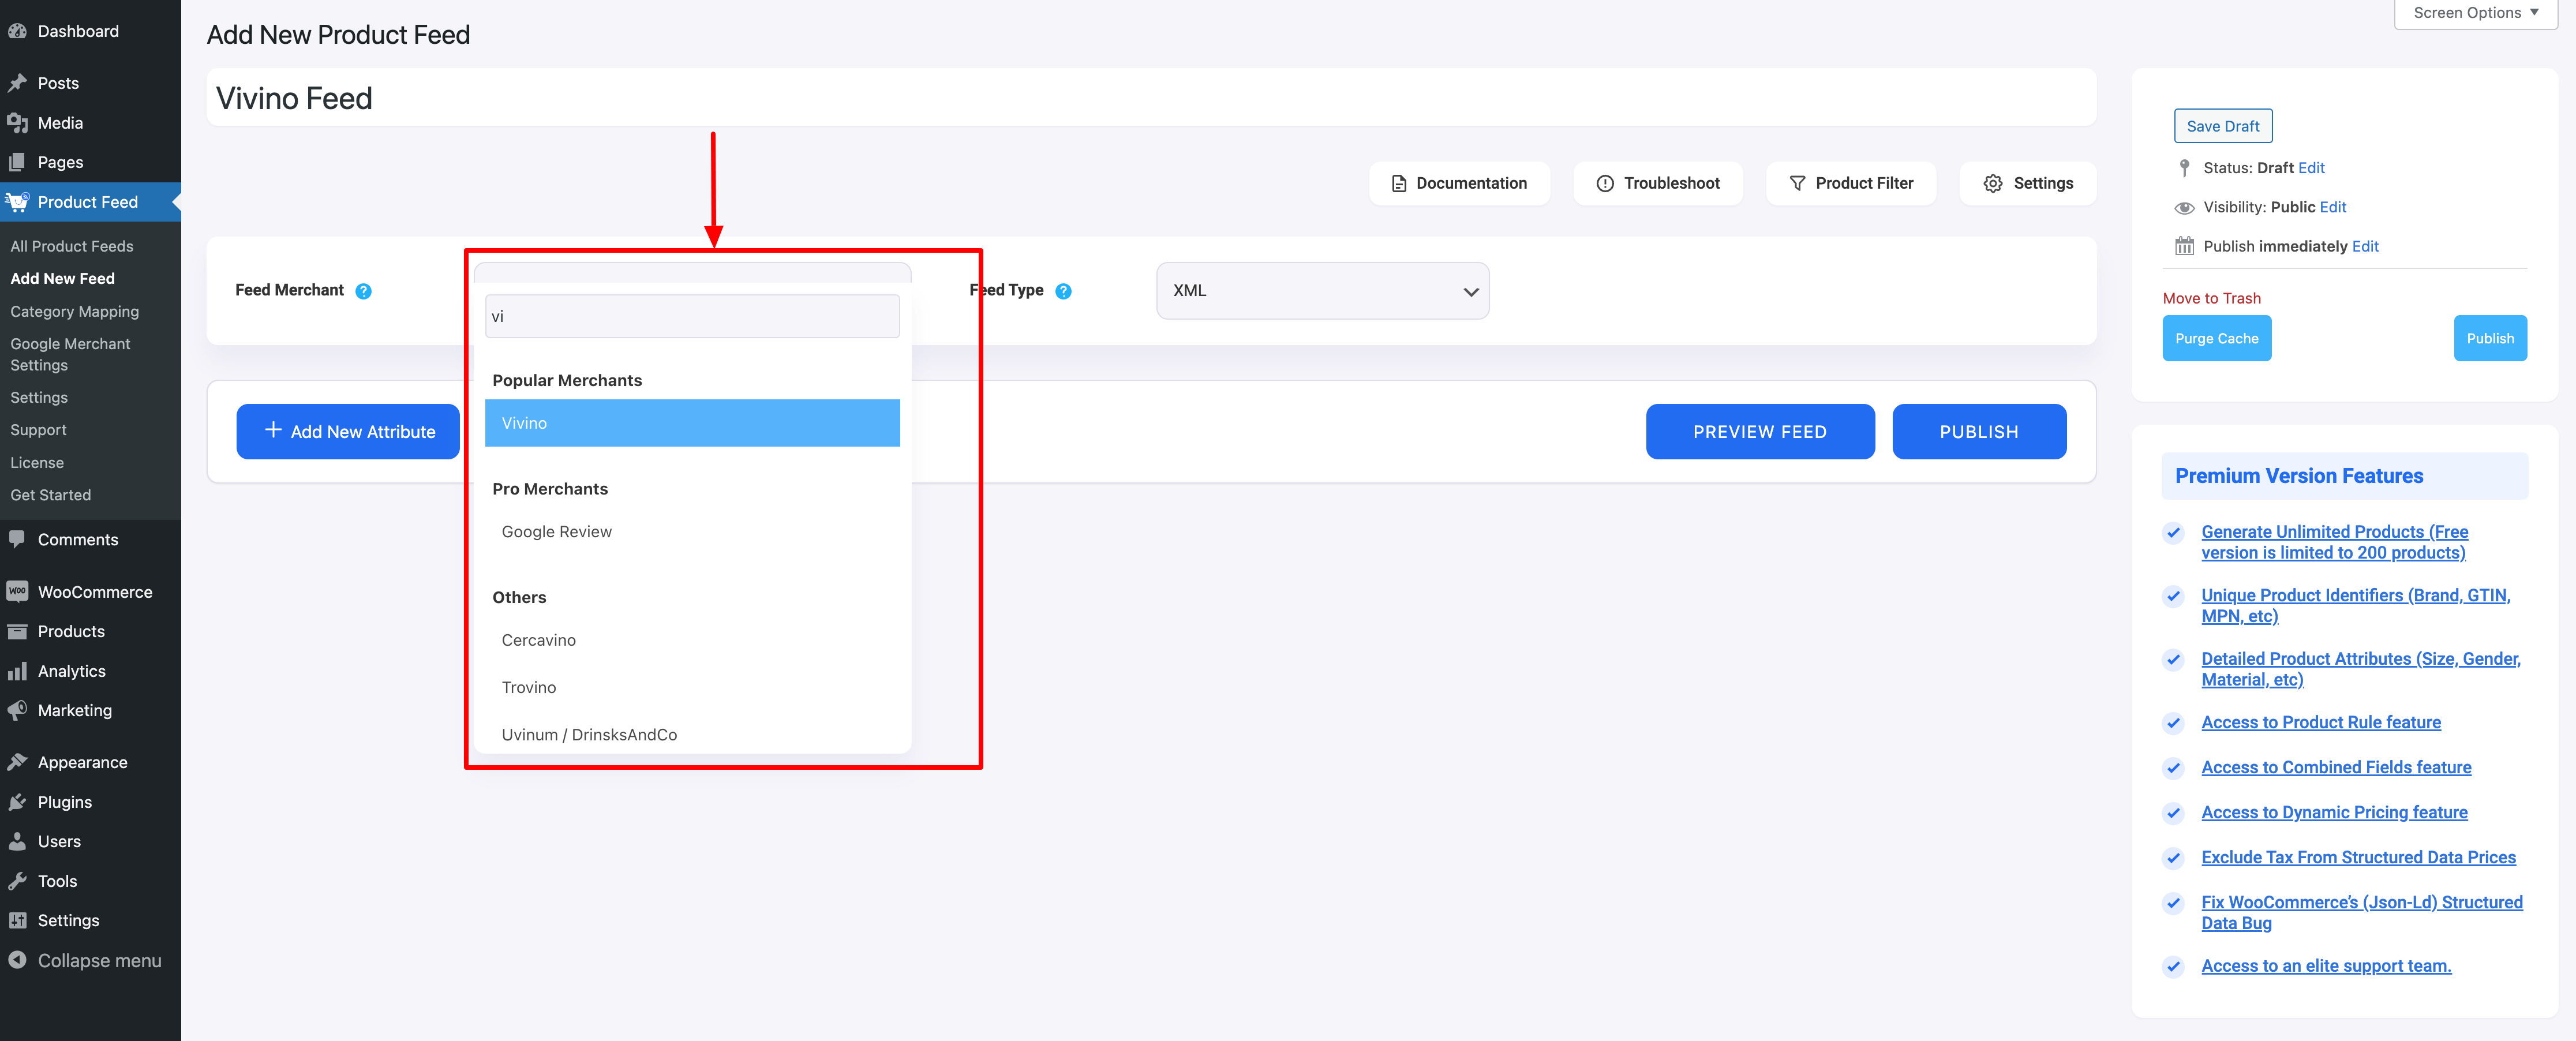
1. Oben haben Sie die Möglichkeit, dem Feed einen Titel zu geben. Geben Sie Ihrem Feed einen Namen.

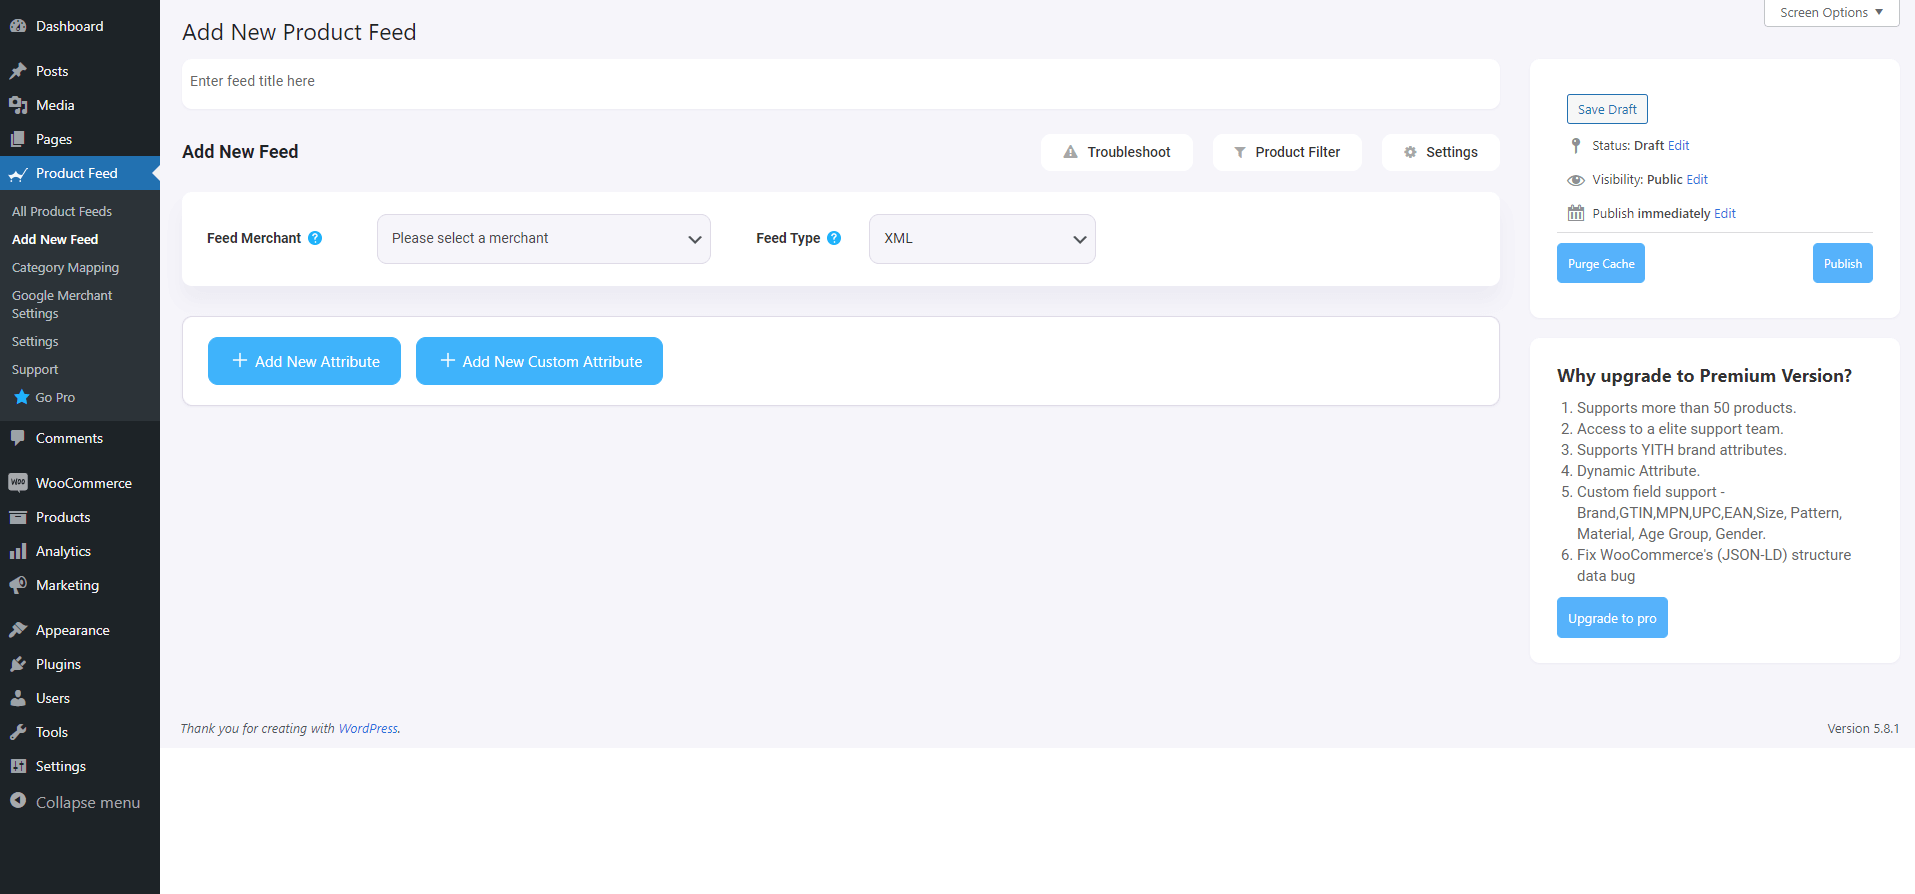
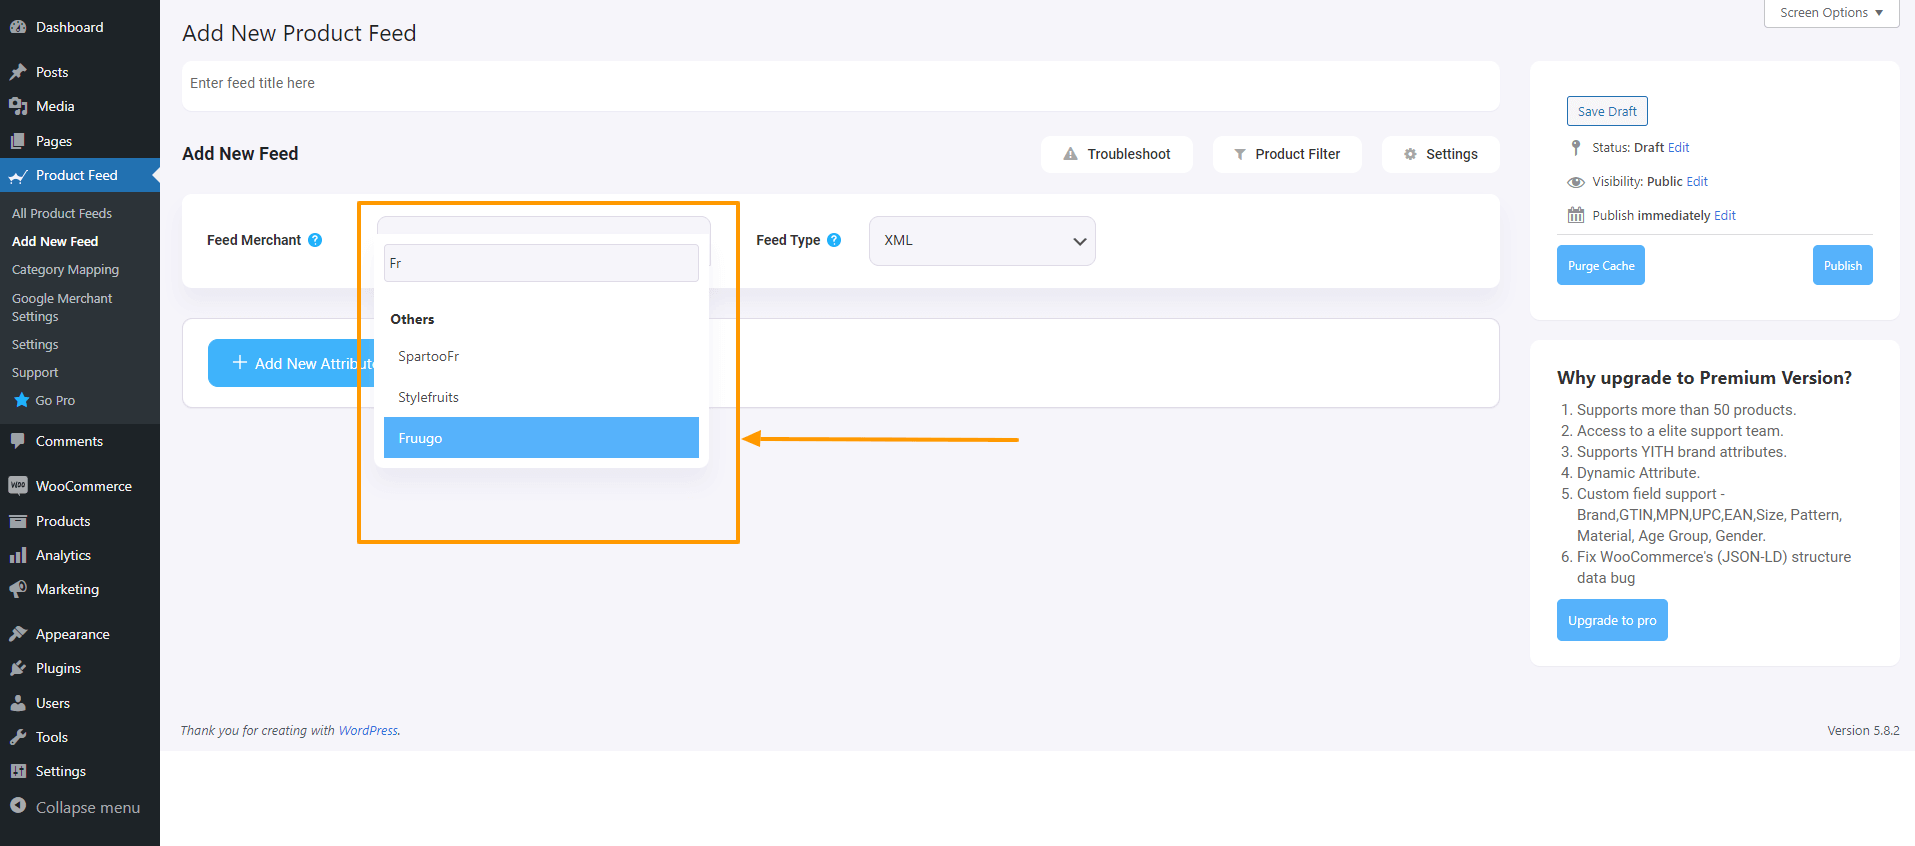
2. Direkt unter dem Titel sehen Sie eine Option zur Auswahl Ihres bevorzugten Händlers. Klicken Sie einfach auf die Dropdown-Schaltfläche Händler füttern und wählen Sie Ihren bevorzugten Händler aus der Dropdown-Liste aus oder suchen Sie in der Dropdown-Box.
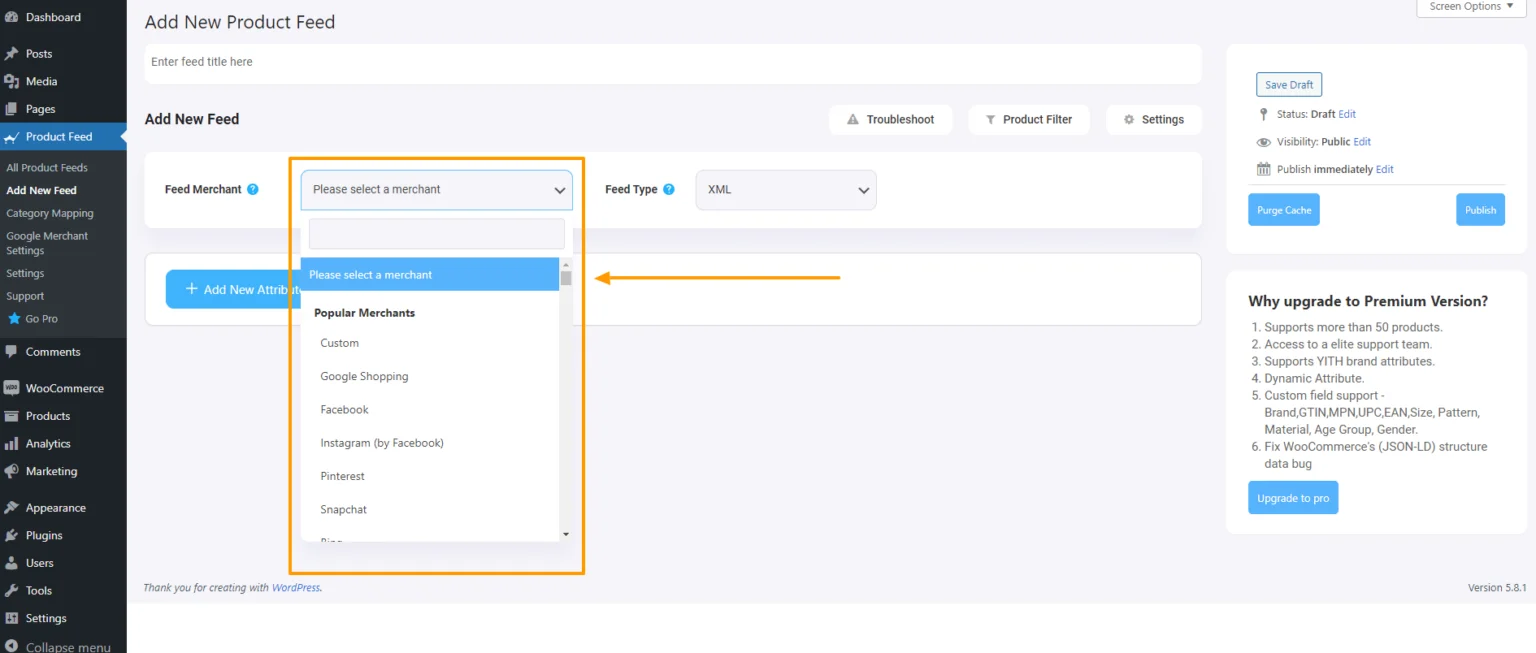
Wählen Sie Ihren bevorzugten Händler aus und alle erforderlichen Attribute werden unten geladen.
Wählen wir Google Shopping für diesen Feed aus.
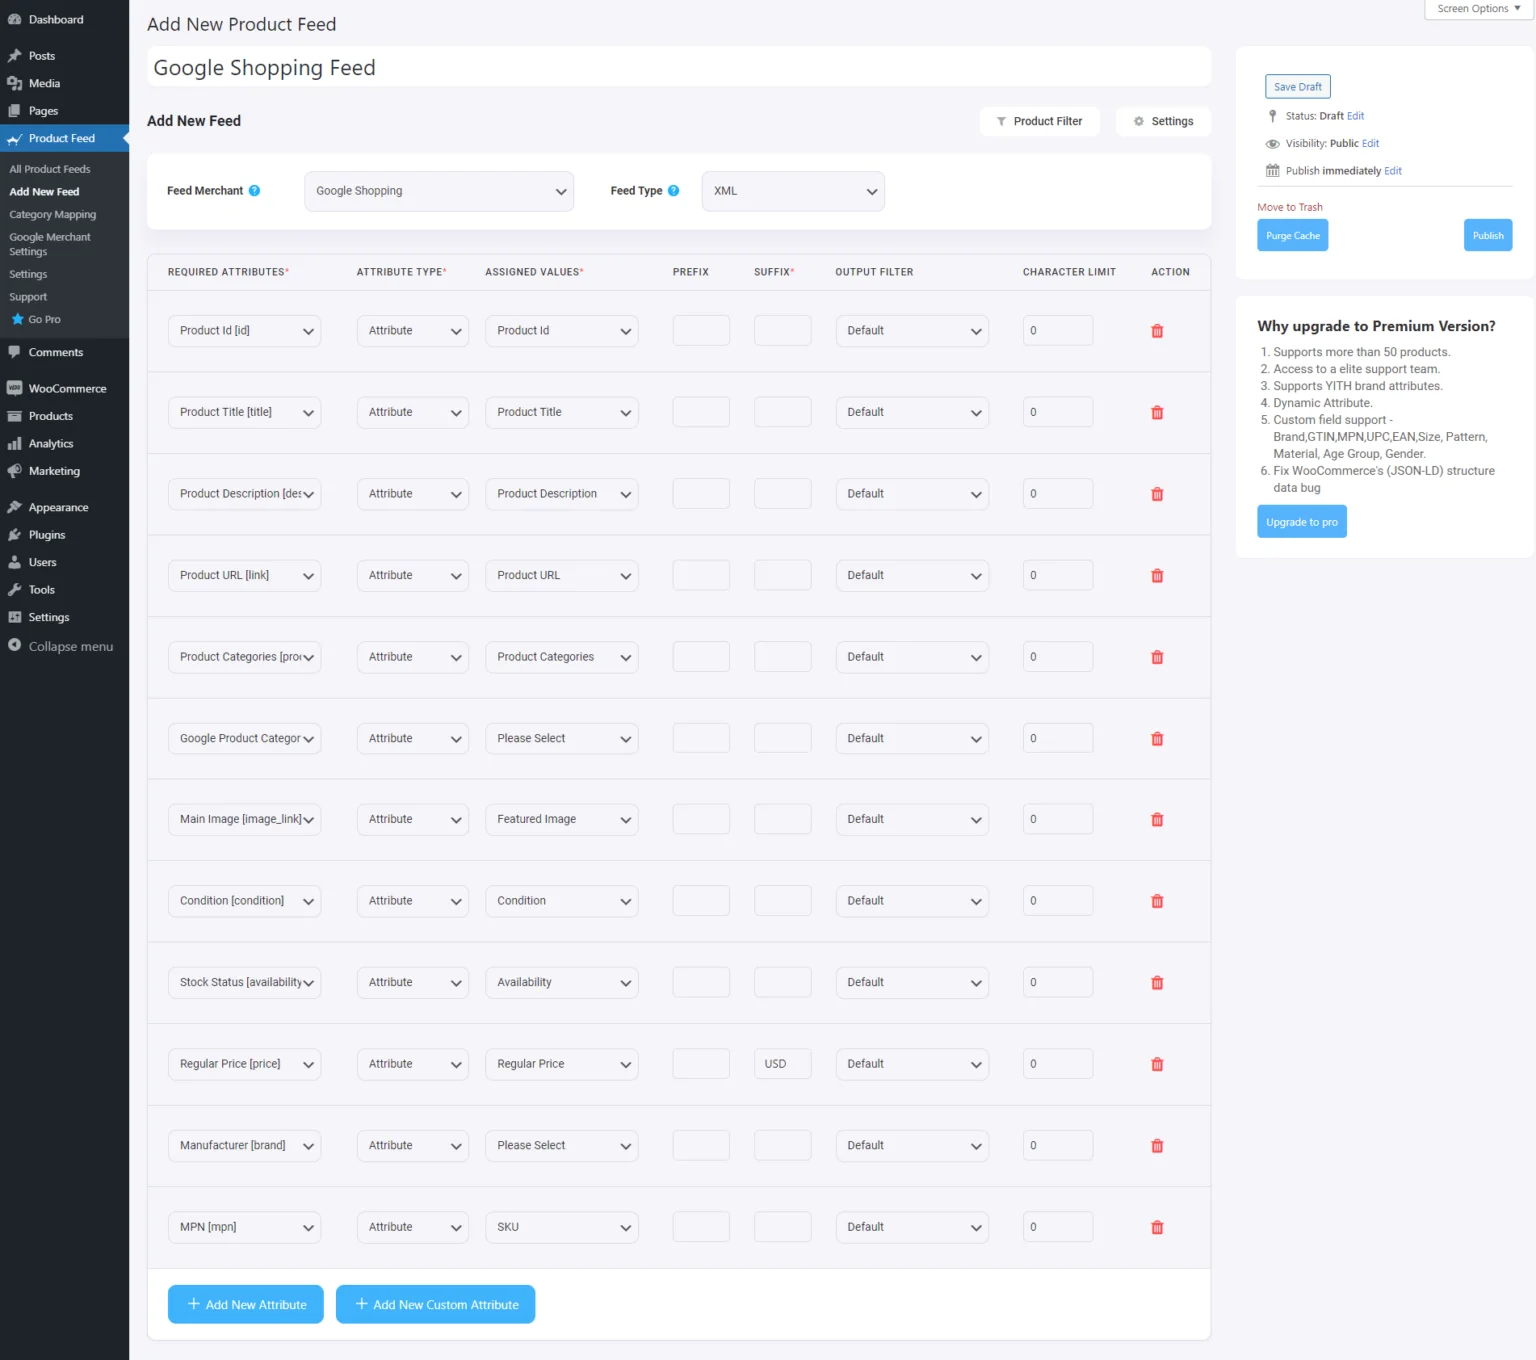
**Bitte beachten Sie, dass Google Shopping nur XML-Feeds akzeptiert, so dass Sie keine Option zur Auswahl des Dateiformats erhalten. Bei anderen Händlern können Sie jedoch ein Dateiformat neben der Option "Feed-Händler" auswählen.
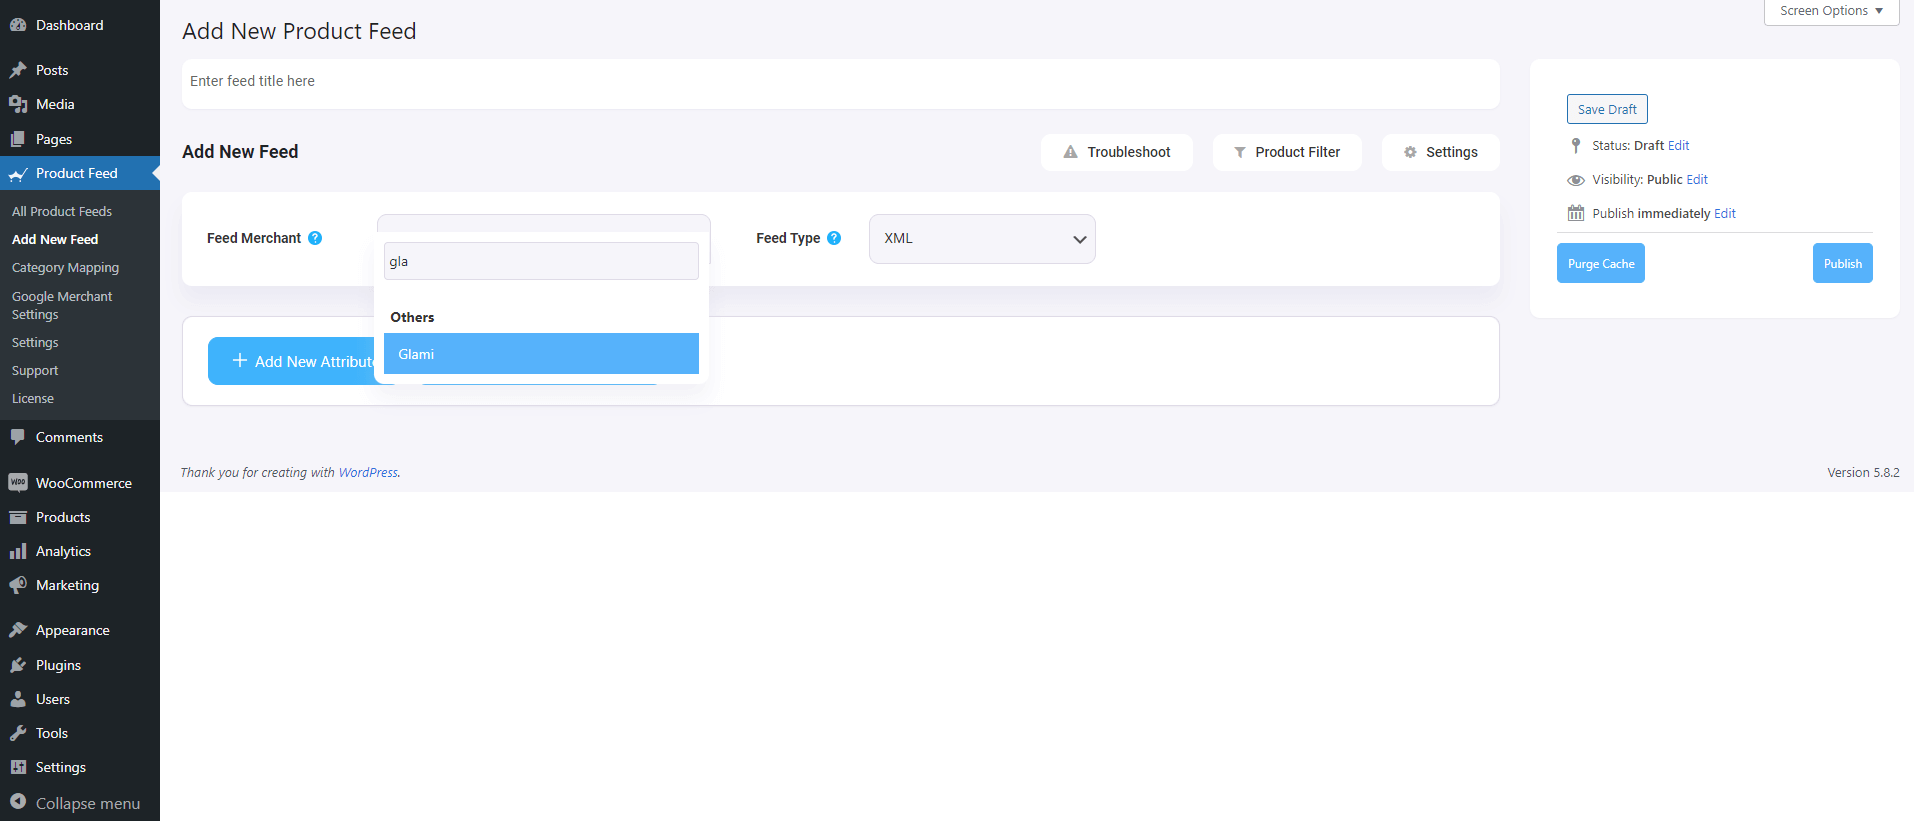
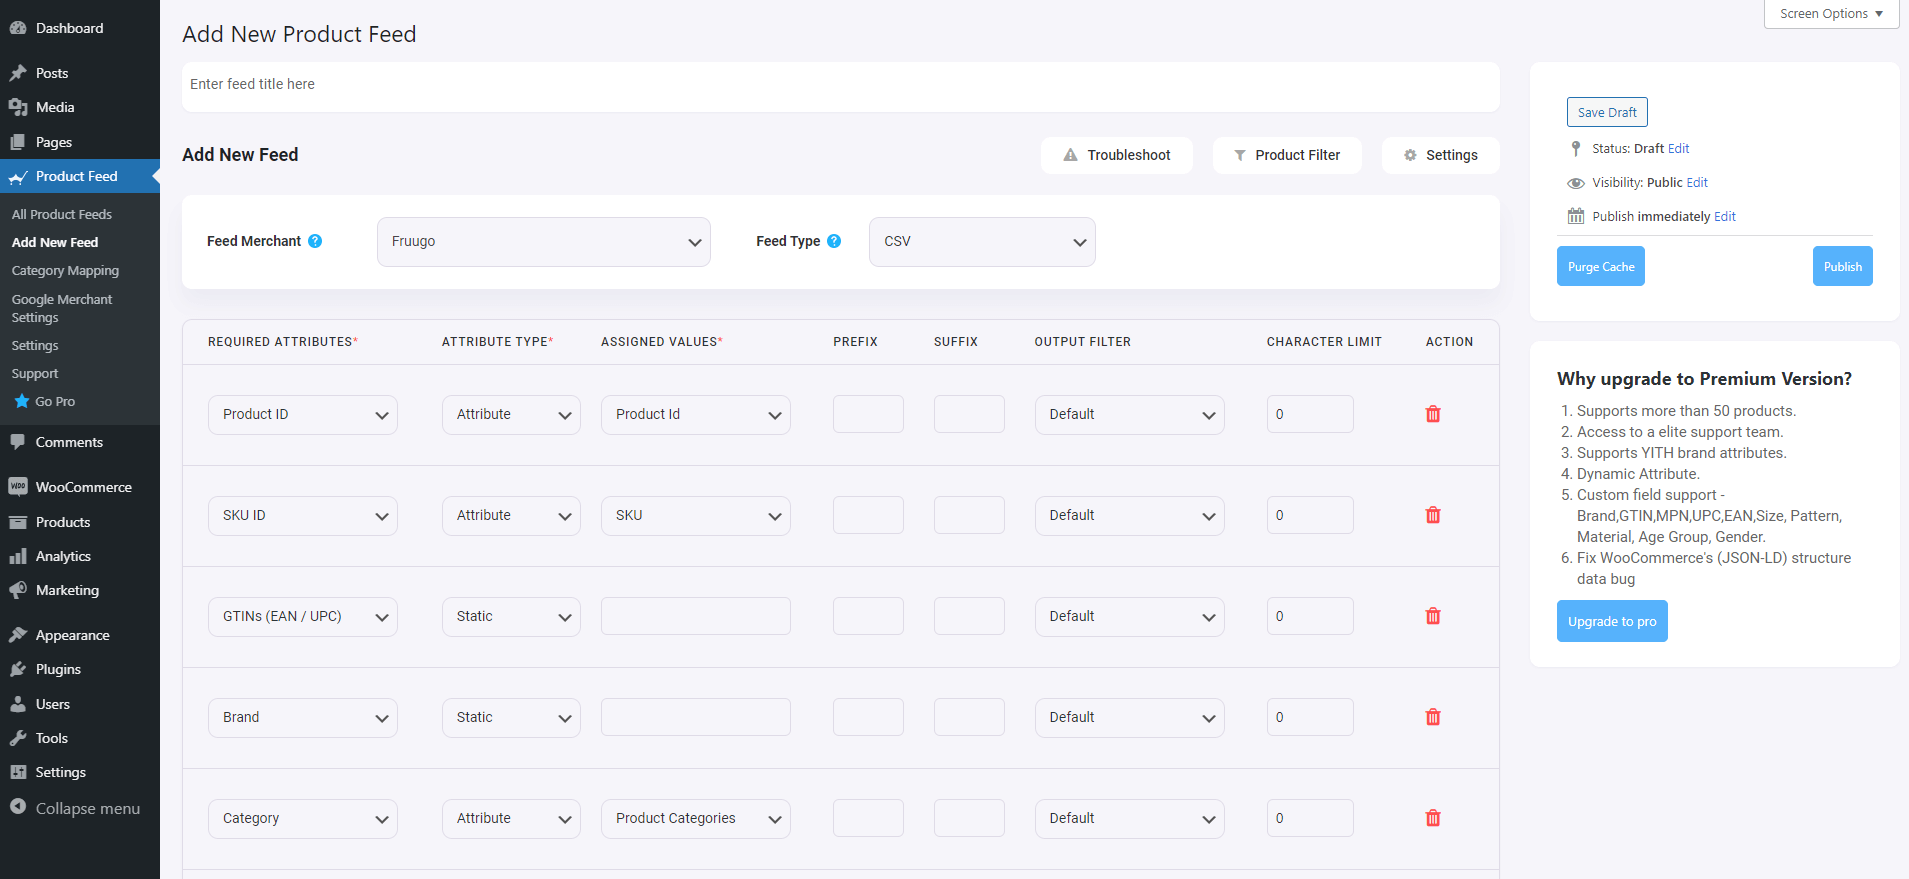
3. Hier können Sie Ihre Attribute zuordnen. Wenn Sie Google einen Wert für das Attribut "Hersteller" zuweisen, können Sie einen funktionierenden Feed für Sie erstellen.
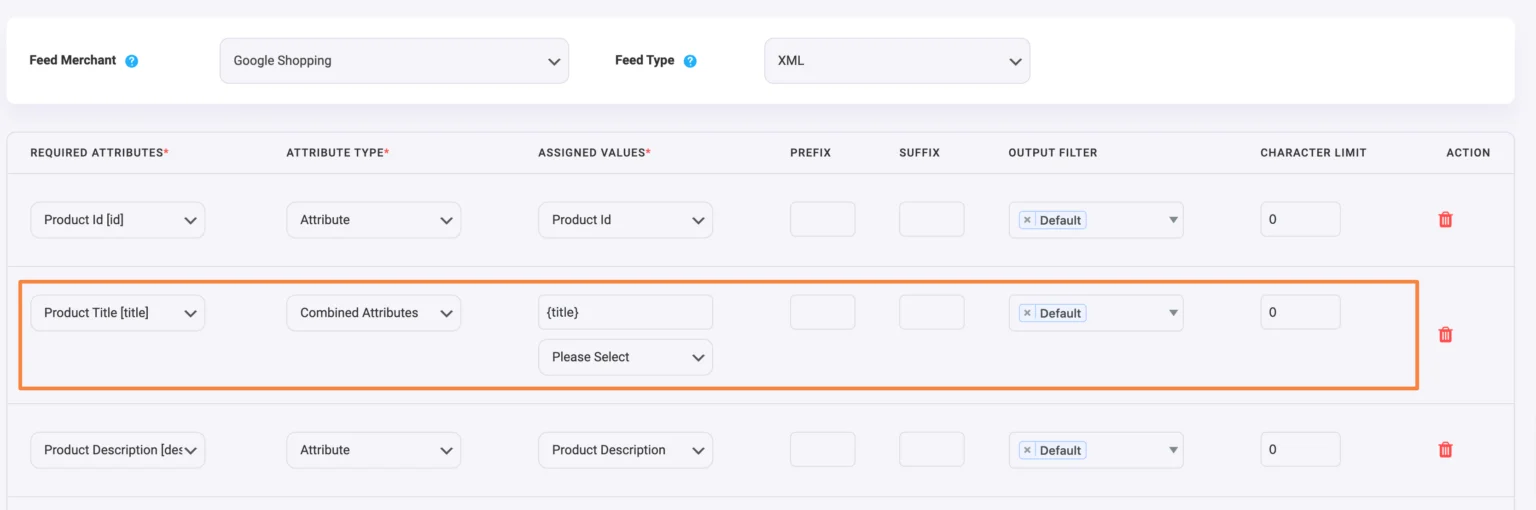
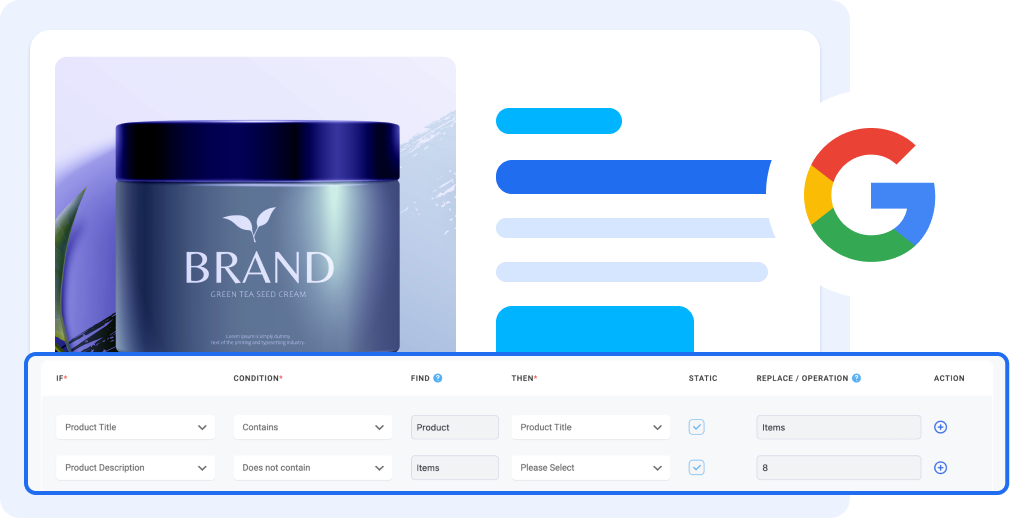
Schritt 3: Wenden Sie die Funktion "Kombinierte Attribute" an, um den Titel Ihrer Produkt-Feed-Produkte zu optimieren
Bevor ich Ihnen zeige, wie Sie die Funktion "Kombinierte Attribute" für Ihren Titel nutzen können, sollten Sie wissen, dass Sie diese Funktion für jedes Ihrer Feed-Attribute verwenden können.
Hier zeige ich Ihnen, wie Sie Ihre Produkttitel ganz einfach mit der Combined Attribute-Funktion des Plugins optimieren können.
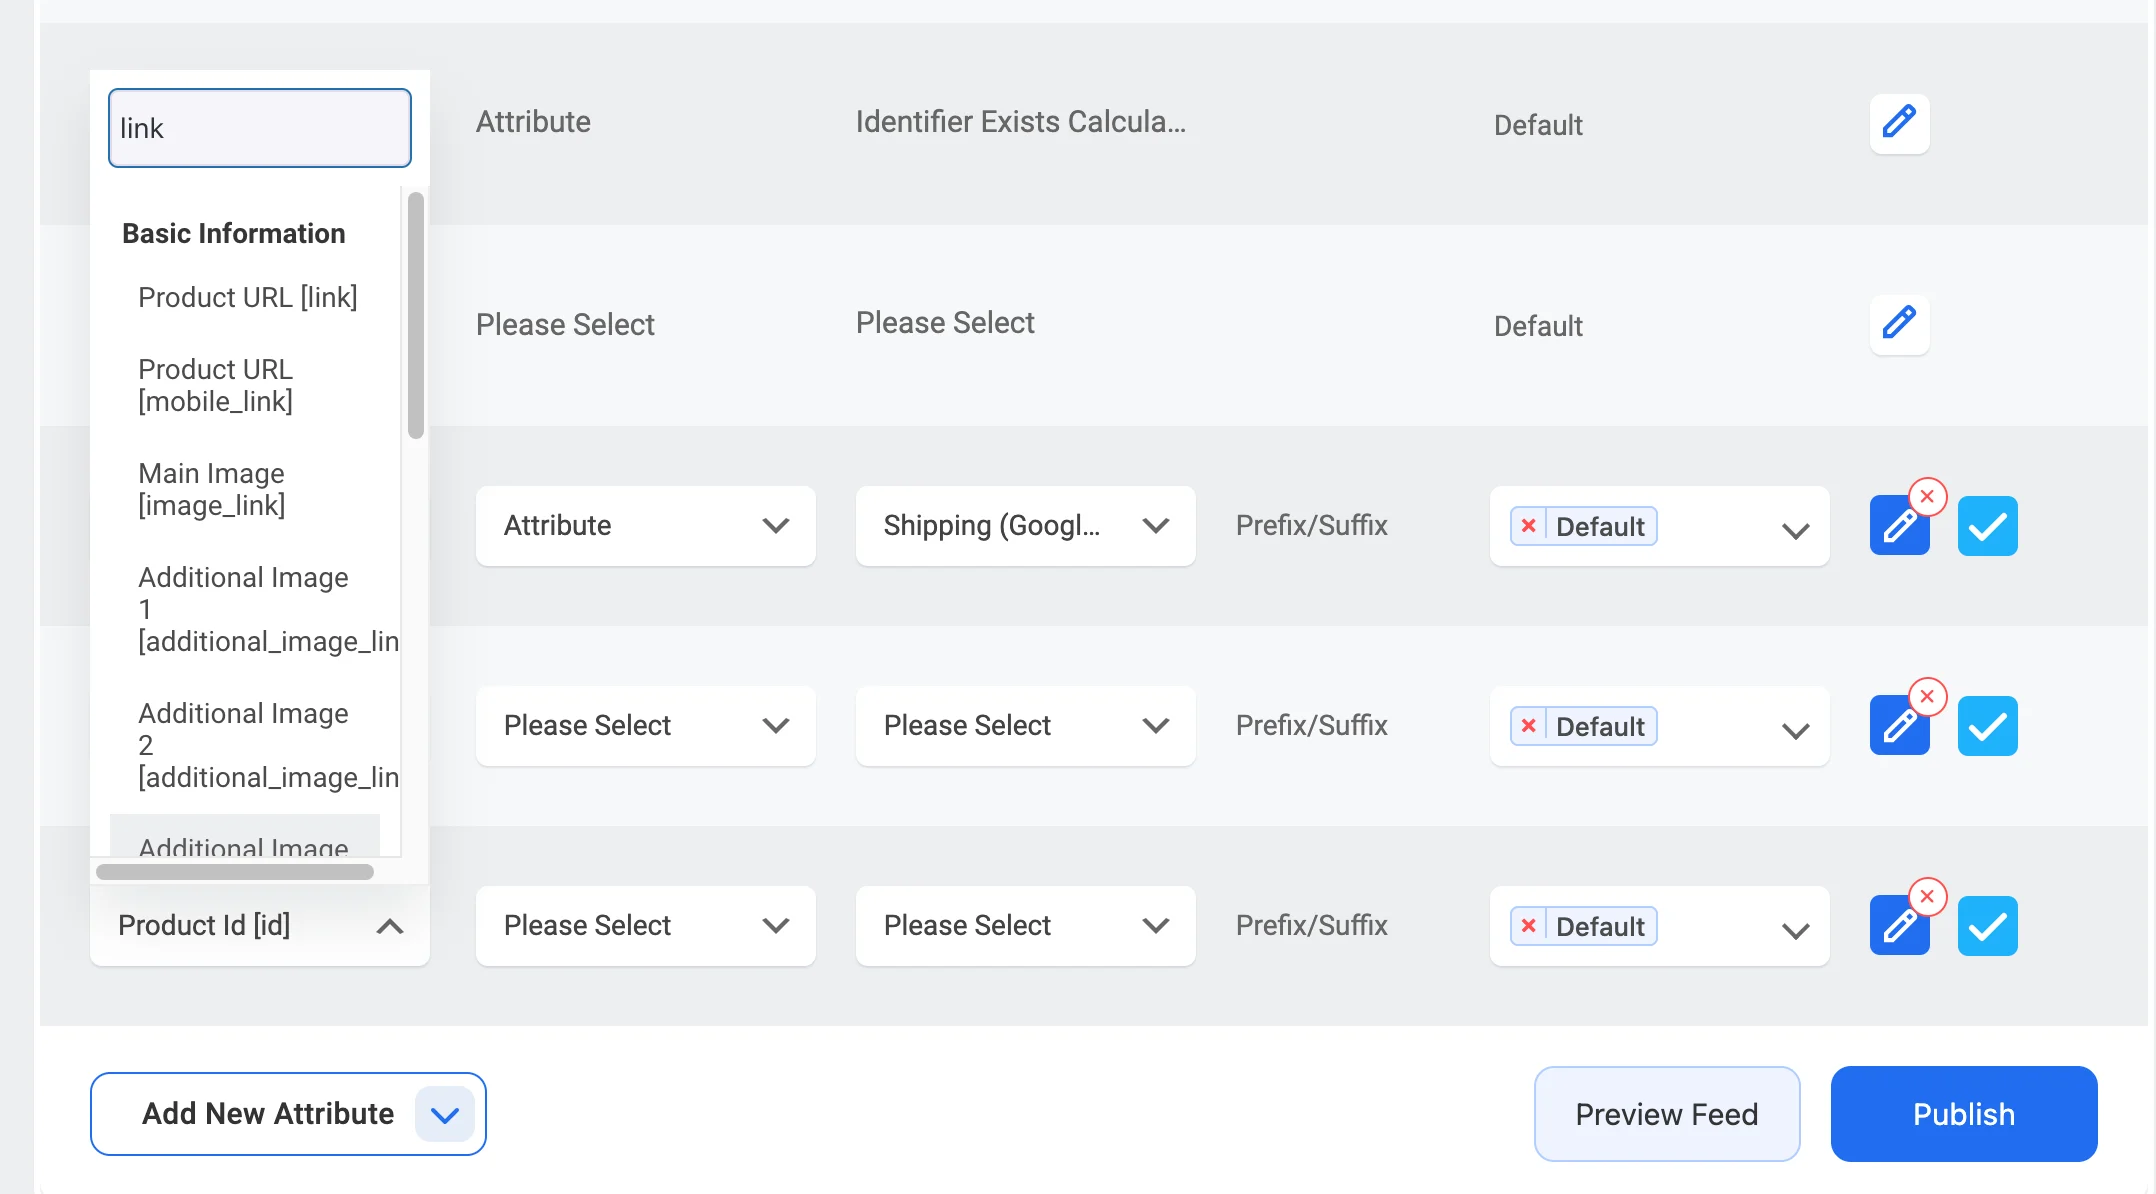
1. Klicken Sie auf die Dropdown-Liste Attributtyp des Attributs Produkttitel.
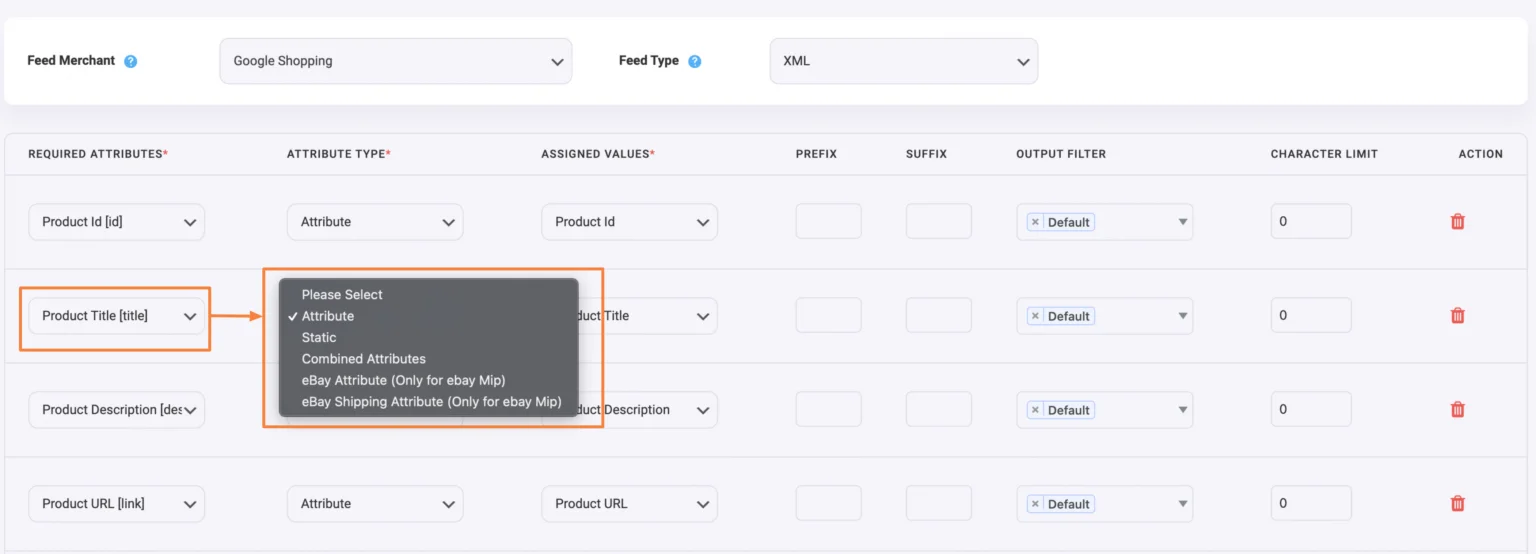
2. Wählen Sie Kombinierte Attribute aus dem Dropdown-Menü des Attributtyps. Sie werden sehen, dass sich die Struktur des Abschnitts für das Attribut "Produkttitel" geändert hat und ein neuer Textfeld-Editor erschienen ist, in dem die ID des Attributs bereits eingetragen ist.
3. Klicken Sie auf das Dropdown-Menü "Attributwerte". Hier sehen Sie alle Werte aufgelistet.
Sie können mehrere Werte aus diesem Dropdown-Menü auswählen, die dann in das Feld Kombinierte Attribute aufgenommen werden:
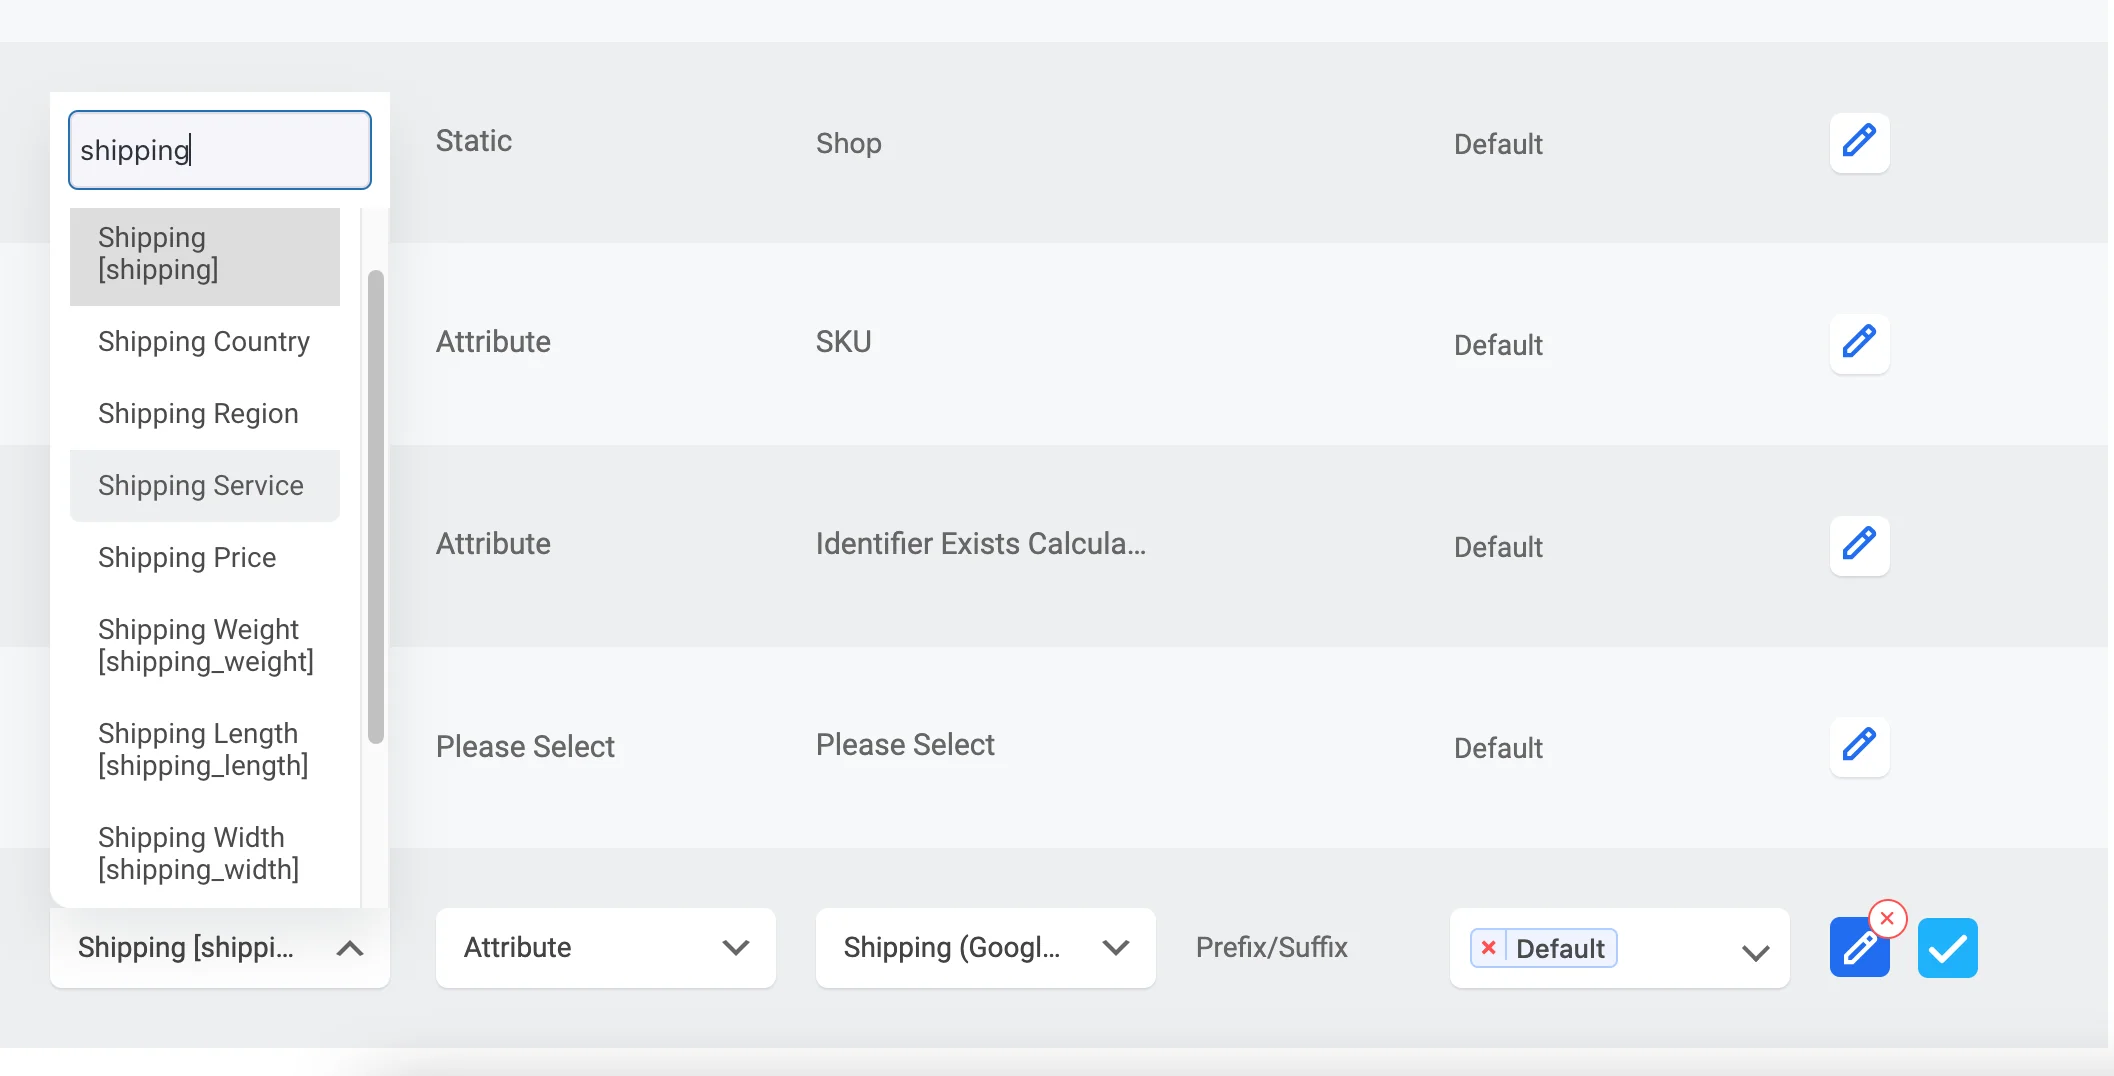
4. Hier können Sie auch beliebige Trennzeichen zwischen den IDs verwenden, wenn Sie möchten.
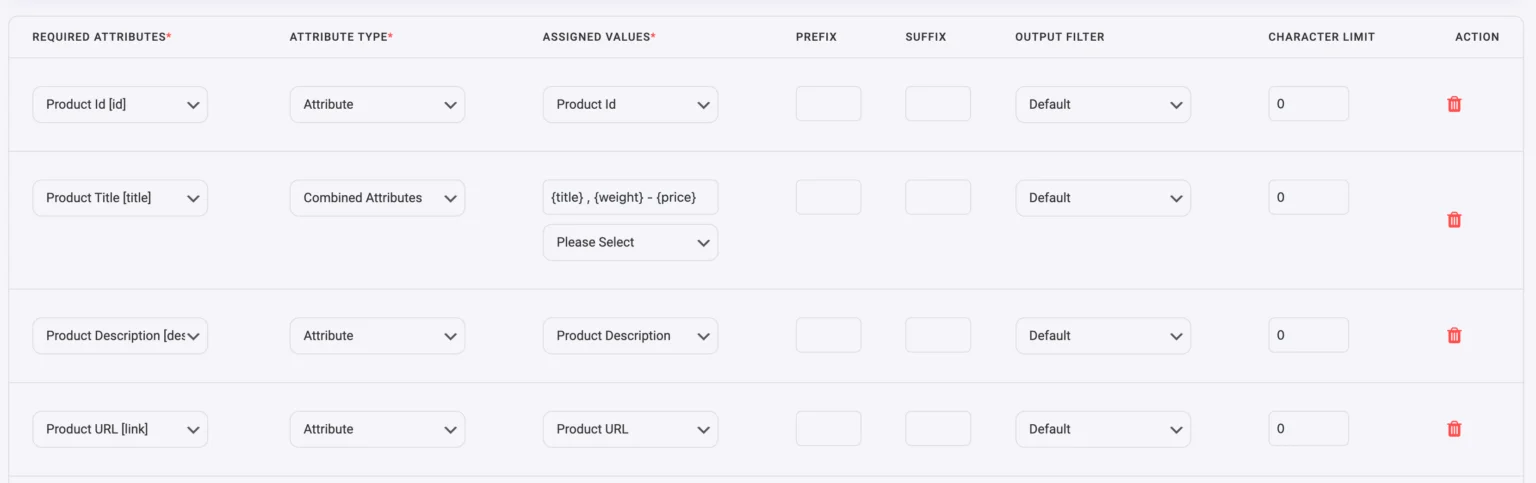
Sie können einen beliebigen Wert als Trennzeichen eingeben oder einfach ein beliebiges Trennzeichen aus der Dropdown-Liste auswählen. (Sie können auch einen beliebigen Text oder ein Symbol als Trennzeichen verwenden)
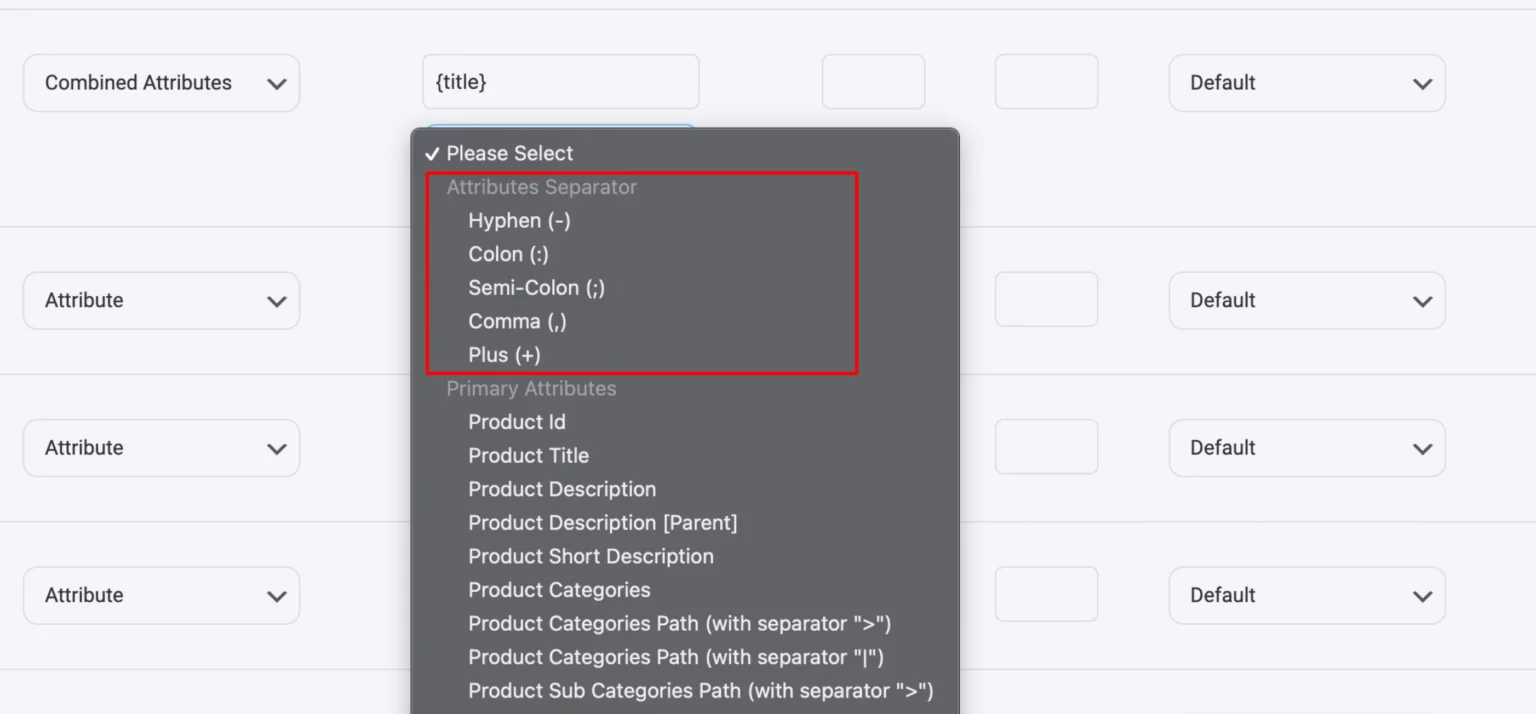
Sie können in diesem Feld manuell Attribut-IDs hinzufügen oder entfernen.
5. Wenn Sie mit der Zusammenführung fertig sind, klicken Sie einfach auf die Schaltfläche "Veröffentlichen" oder "Aktualisieren" und öffnen dann den Feed, um die Änderungen zu sehen.
Wenn Sie jedoch keine Änderungen sehen, sollten Sie den Cache Ihres Browsers leeren und den Cache aus dem Plugin löschen, dann sollten Sie die Änderungen sehen.
Schlussbemerkungen
Die Optimierung von Produkttiteln spielt eine wichtige Rolle im Konversionsprozess von eCommerce-Käufern. Sie legt den Grundstein dafür, dass Sie die Produktsuche dominieren und neue potenzielle Käufer anziehen können.
Es ist also höchste Zeit, dass Sie den Produkttiteln besondere Aufmerksamkeit schenken und diese Taktiken zur Optimierung der Produkttitel befolgen.
Der Produkttitel ist jedoch nicht das Einzige, was zu mehr eCommerce-Verkäufen führt. Sie müssen auch Ihren Produkt-Feed optimieren, um Ihre Produkte auf verschiedenen Marktplätzen zu bewerben.
Learn How to Generate WooCommerce Product Feed Optimized For Effective Promotion
FAQs
How can I optimize my WooCommerce product titles?
Focus on including relevant keywords, keeping the title clear and concise, and adhering to the platform’s title length restrictions for better visibility.
What are the common mistakes in product title optimization?
Avoid keyword stuffing, using unclear or overly generic terms, and ignoring the importance of formatting for better readability.
How does product title optimization impact SEO?
Optimizing titles helps search engines better understand your product, boosting your chances of appearing higher in search results, which can drive more traffic.
Does WooCommerce product title limit impact mobile shoppers?
Yes, long titles may truncate on mobile screens, making it harder for users to quickly understand the product details.
Should I use special characters in my product titles?
It’s best to avoid unnecessary special characters unless they directly enhance clarity or highlight key features of the product.
![The Ultimate SEO for WooCommerce Guide To Increase Traffic [2025] 2](https://staging-rextheme.kinsta.cloud/wp-content/uploads/2025/01/SEO-for-woocommerce.webp)


![How to Generate Glami XML Feed to Sell Fashion Products for WooCommerce [2024] 5](https://staging-rextheme.kinsta.cloud/wp-content/uploads/2024/06/01.-Glami-XML-Feed.webp)
![How to Generate Glami XML Feed to Sell Fashion Products for WooCommerce [2024] 6](https://staging-rextheme.kinsta.cloud/wp-content/uploads/2024/06/01.-Glami-XML-Feeds.webp)


![Quick Guide To Generate Vivino Product Feed - WooCommerce [2024] 7](https://staging-rextheme.kinsta.cloud/wp-content/uploads/2022/06/Publish-Vivino-Feed.png)