Categories
WP VR

New & Exciting Pricing Plans – WP VR [2020]

At RexTheme, creating a user-friendly product and improving it is a never-ending process.

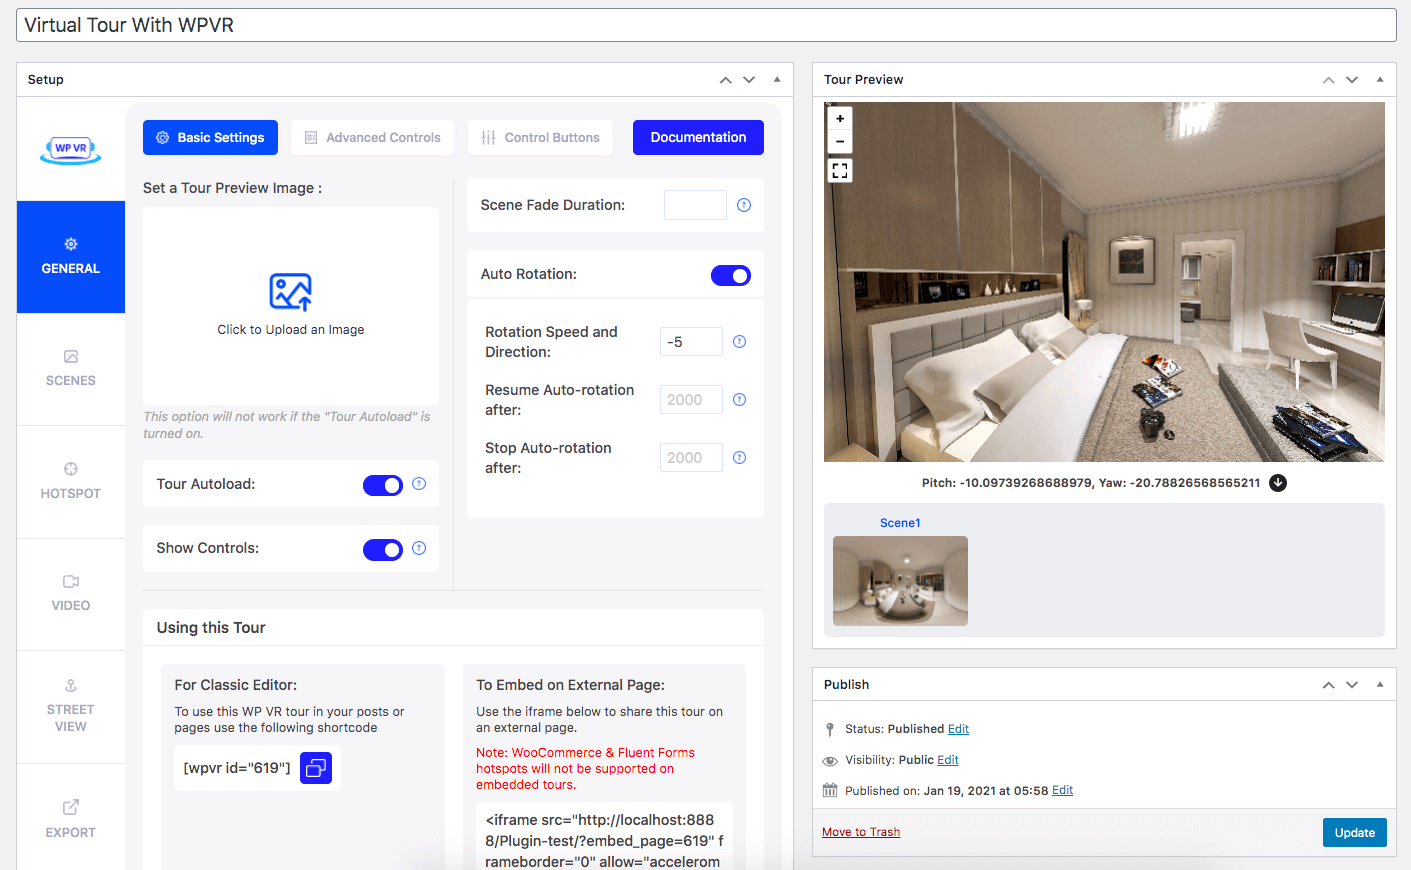
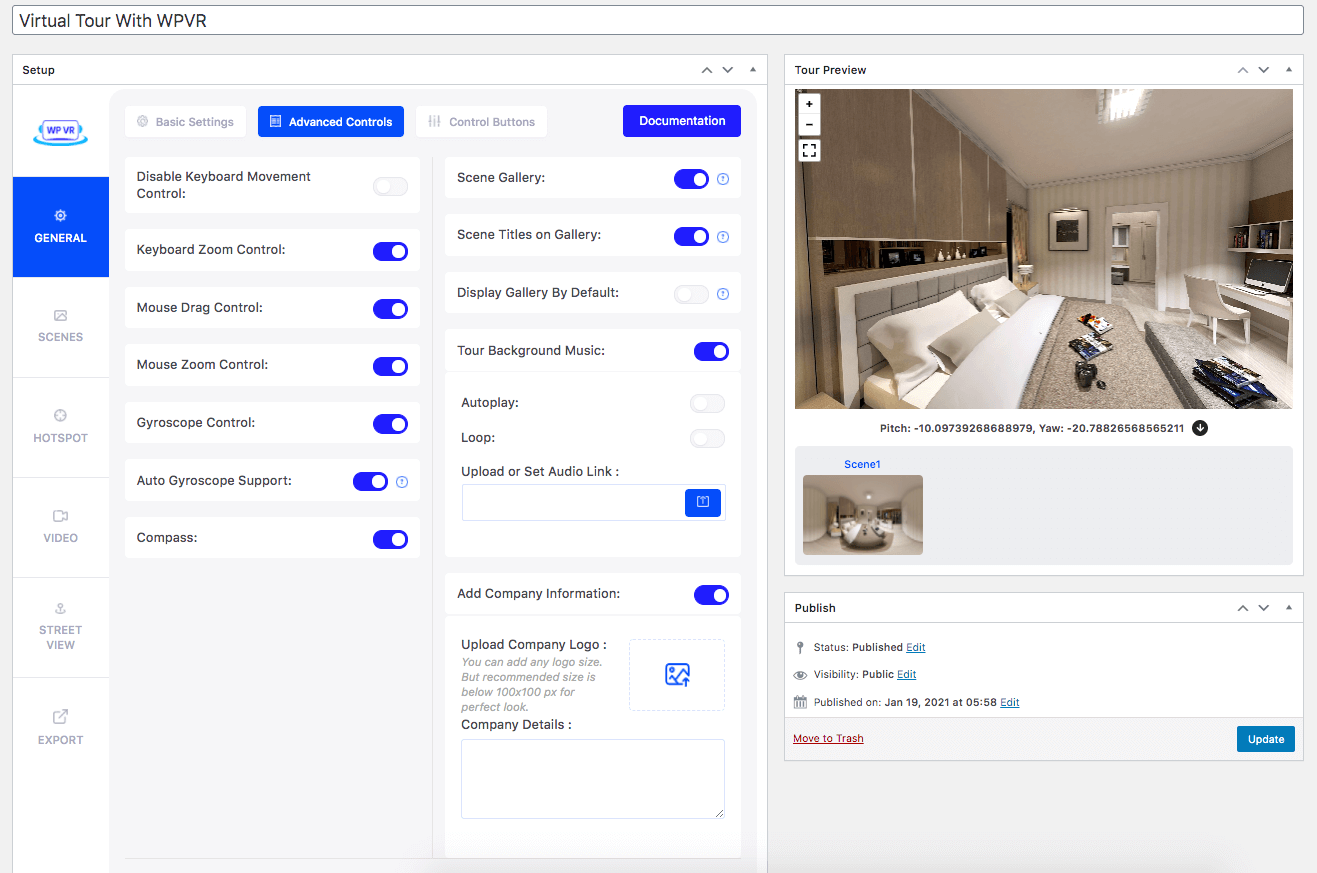
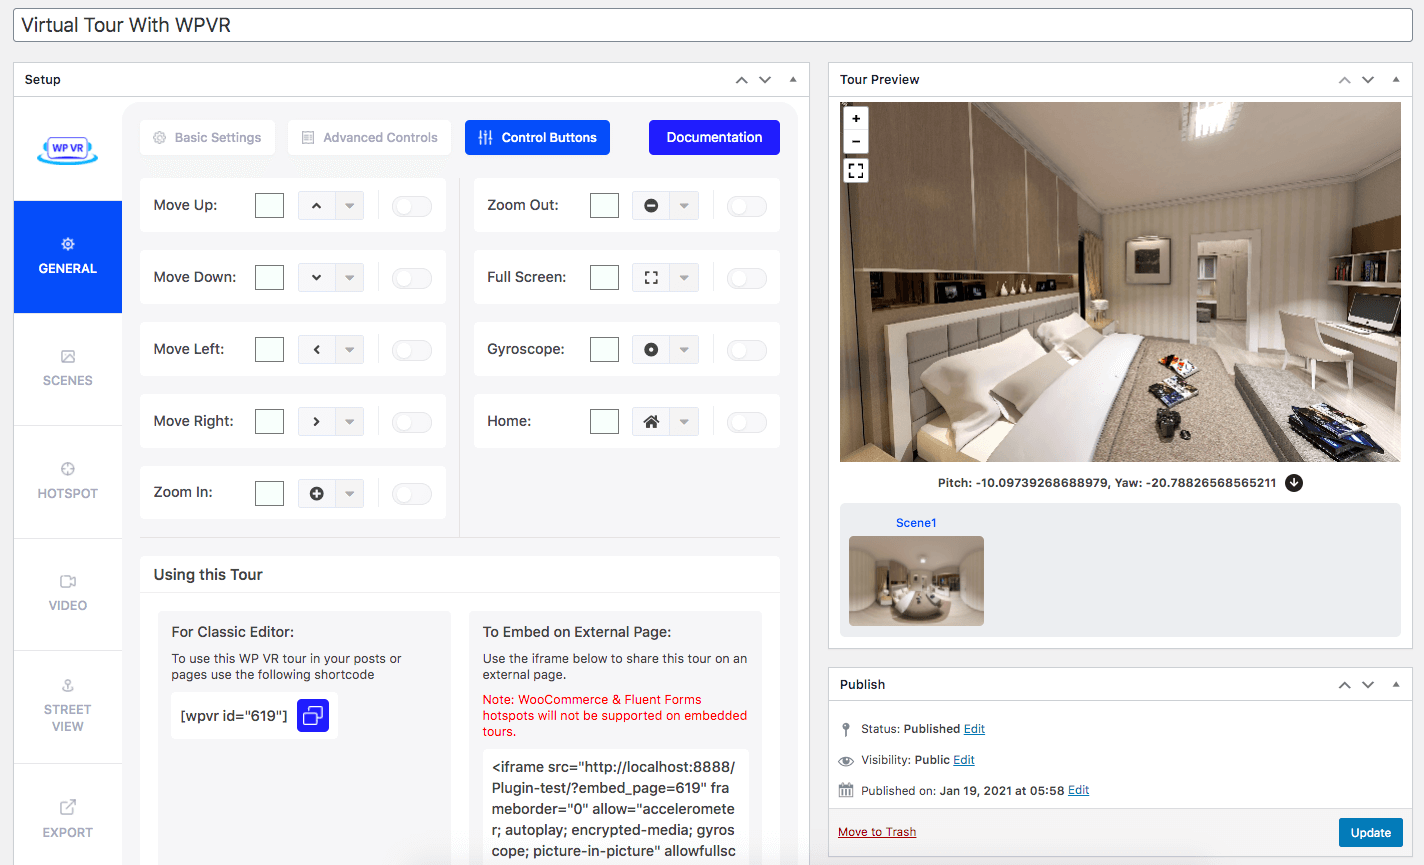
A couple of months ago, we took a challenge to ourselves and decided to make some huge changes to our virtual tour builder plugin, WP VR.

Our main objective was to:

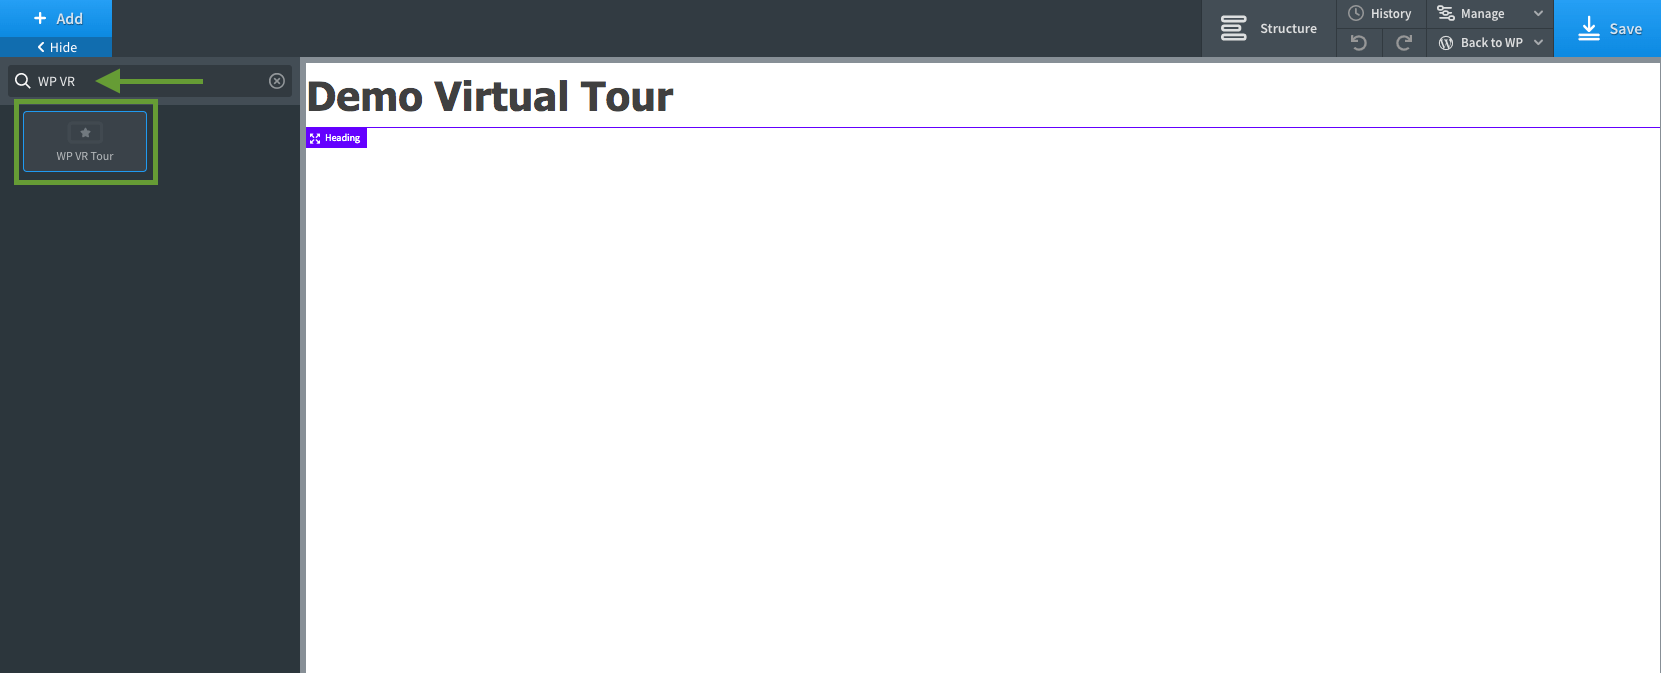
  • Change the interface of the plugin to make it more user-friendly.
  • Release some major features to increase its usability.

We’re really glad to tell you that, we successfully did it for you.

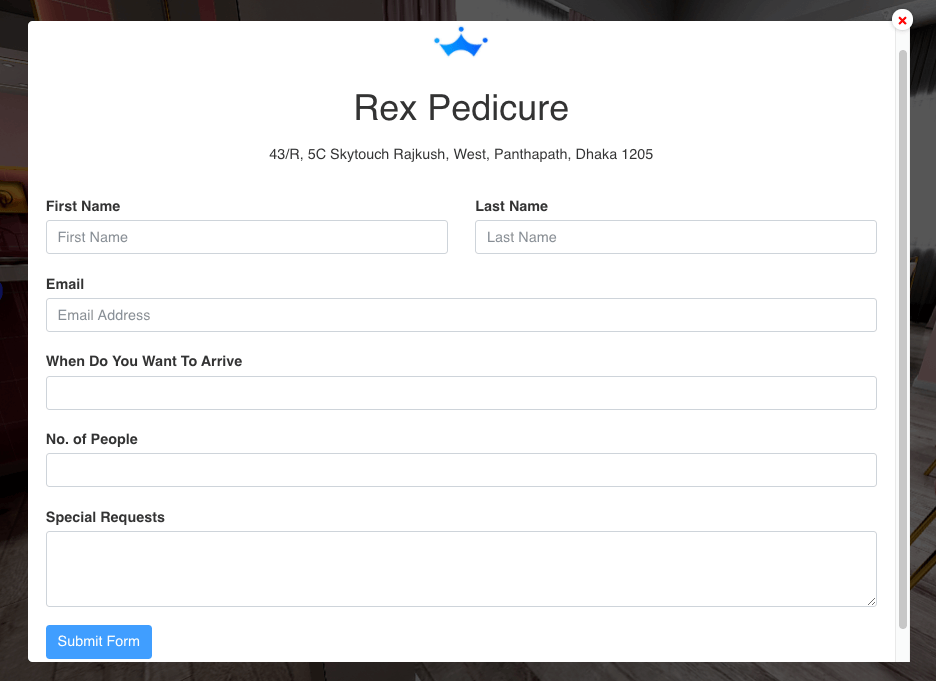
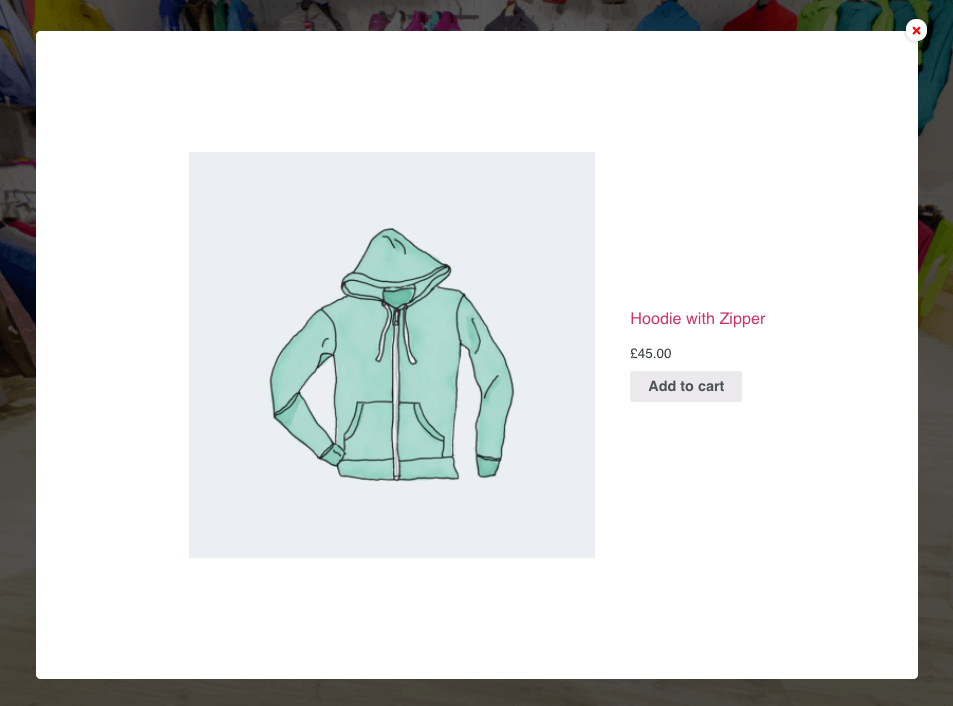
You can now create virtual tours more easily, and get a high rate of conversions with all the new exciting features such as Fluent Forms integration, WooCommerce integration, multi-site support, and many more.

Along with these updates, we have decided to review our pricing plans for WPVR Pro starting from 1st September 2020.

Updated Pricing Plans For WPVR

The following are the pricing plans that we decided to improve to:

PlanLicense TypePrice
Starter (Annual)1 site license$59.99/year
Pro (Annual)10 sites license$149.99/year
Agency (Annual)Unlimited sites$249.99/year
Starter (Lifetime)1 site license$249.99 one time fee
Pro (Lifetime)10 sites license$449.99 one time fee
Agency (Lifetime)Unlimited sites$649.99 one time fee
These pricing plans will be effective from 1st September 2020

Now, based on each plan, we have made some changes to what features you will get on each plan.

Click on the plans below to view all the features that you will get on each plan.

Annual Plans:

Lifetime Plans:

Exciting Features On WPVR Plans

Here are the feature list of each WPVR plans:

Annual Starter Plan –

Here are all the features you’ll get on the Annual Starter Plan:

  • Unlimited Scenes
  • Unlimited Hotspots
  • WooCommerce Integration
  • Fluent Forms Integration
  • Pay Annually
  • Priority support for 1 Year
  • Updates for 1 year

This plan is suitable for your personal use.

Annual Pro Plan –

Here are all the features you’ll get on the Annual Pro Plan:

  • Unlimited Scenes
  • Unlimited Hotspots
  • WooCommerce Integration
  • Fluent Forms Integration
  • Pay Annually
  • Priority Support For 1 Year
  • Updates For 1 Year

This plan is great for you if you own multiple sites and want to publish virtual tours on them.

Annual Agency Plan –

Here are all the features you’ll get on the Annual Agency Plan:

  • Unlimited Scenes
  • Unlimited Hotspots
  • WooCommerce Integration
  • Fluent Forms Integration
  • Embed to Non-WordPress site using iframe
  • VR Theme (Coming Soon)
  • All Future Extensions
  • Pay Annually
  • Priority support for 1 Year
  • Updates for 1 year

This plan is perfect for you if you’re an agency and you’ll be creating virtual tours for a lot of your clients.

Lifetime Starter Plan –

Here are all the features you’ll get on the Lifetime Starter Plan:

  • Unlimited Scenes
  • Unlimited Hotspots
  • Pay Only Once
  • WooCommerce Integration
  • Fluent Forms Integration
  • Lifetime Dedicated Support
  • Lifetime Updates

This plan is suitable for your personal use.

Lifetime Pro Plan –

Here are all the features you’ll get on the Lifetime Pro Plan:

  • Unlimited Scenes
  • Unlimited Hotspots
  • Pay Only Once
  • WooCommerce Integration
  • Fluent Forms Integration
  • Lifetime Dedicated Support
  • Lifetime Updates

This plan is great for you if you own multiple sites and want to publish virtual tours on them.

Lifetime Agency Plan –

Here are all the features you’ll get on the Lifetime Agency Plan:

  • Unlimited Scenes
  • Unlimited Hotspots
  • WooCommerce Integration
  • Fluent Forms Integration
  • Embed to Non-WordPress site using iframe
  • VR Theme (Coming Soon)
  • Pay Only Once
  • All Future Extensions
  • Lifetime Dedicated Support
  • Lifetime Updates

This plan is perfect for you if you’re an agency and you’ll be creating virtual tours for a lot of your clients.

As you can see, each plan has it’s own benefits.

We will be putting these pricing plans live effective from 1st September 2020.

Categories
Virtual Reality WP VR

What’s New With WP VR – Huge Updates [2020]

Over the past couple of months, we have worked really hard and now, WP VR is on the next level.

You can now create virtual tours more easily, and get high conversions with all the new exciting features.

For example, you can now integrate forms on a virtual tour so that people can submit inquiry forms, or you can embed a virtual tour on another non-WordPress site.

Let us look at all the latest exciting features that you can use with the new WP VR.

What’s New With WP VR?

  1. A Brand new look
  2. WPVR Oxygen Builder Element
  3. Multisite Support
  4. Fluent Forms Integration
  5. WooCommerce Integration
  6. Embed A Virtual Tour On A Non-WordPress Site

1. A Brand New Look

WPVR now has a brand new look on the interface that will let you create virtual tours more easily.

You will see that you can now take a preview tour on the right side while editing the tour on the left side.

Also, the General section is now segmented into 3 parts.

  • Basic Settings
    -This section simply includes the very basic features such as Auto Rotation, Preview image, scene fade duration, and show controls.
WP VR Basic Settings
  • Advanced Controls
    -This tab includes advanced features such as keyboard and mouse usage limit, Gyroscope support, Scene gallery display, include background music, and adding a company logo.
WPVR Advanced Controls
  • Control Buttons
    -Here, you will be able to enable custom icons for navigation and control buttons on the tour.
WP VR Control Buttons

Plus, we have updated video tutorials to help you out all the way.

Watch tutorial videos here: WPVR Complete Video Tutorials

2. WPVR Oxygen Builder Element

Do you like the new emerging Oxygen builder?

Well, now you will find a dedicated WP VR Element for Oxygen builder to embed virtual tours on any pages or posts you edit using Oxygen builder.

It’s really simple.

On the element area, search for WP VR, and you should find an element called WP VR Tour.

Simply choose the tour you want to embed, and assign your desired size. And that’s it. The tour will be embedded on that page/post.

WP VR Oxygen Element

Here’s a complete guide on how you can use this feature easily.

3. Multisite Support

WP VR now has full multisite support. This means, if you are the Network Admin of a multisite network, then you can now manage the plugin on your sub-domains or subdirectories from a single WordPress dashboard.

No need to install/activate WP VR on each sub-domains or subdirectories, individually anymore.

This is especially useful for certain site owners such as Realtors, who may have several sub-domains under the multisite paradigm.

So go ahead and manage WP VR on multisite with no barriers.

4. Fluent Forms Integration

You can now integrate forms, created using Fluent Forms, in your virtual tours.

This is a long-awaited feature that might just help you take your business to the next level.

For example, if you create a virtual tour for a car showroom, you can let people submit inquiry forms for each car.

It’s really simple.

i. Create a form using Fluent Forms

ii. While editing a virtual tour, create a hotspot at the point where you want people to click to submit a form.

iii. Choose the hotspot type as Fluent Forms.

iv. Then choose the form you created from a dropdown list in the hotspot settings.

v. Update and publish the tour on a page, and it’s ready to go.

Contact Form In Virtual Tour

Here’s a complete guide on how you can use this feature easily:

**This feature comes as an add-on if you purchase WPVR Pro.

5. WooCommerce Integration

If you have an online shop that you manage using, WooCommerce, then this is a big feature for you.

You can now allow visitors to Preview and add products to the cart, directly from within the virtual tour.

Let’s say you own a clothing shop and you have a virtual tour of it on your WooCommerce site. Then you can use product hotspots on the clothes on the tour so that people can click to preview the products and add them to the cart.

WooCommerce Products in Virtual Tour

And this feature is also very easy to use.

i. While editing a virtual tour, create a hotspot on the product which you want people to be able to order.

ii. Choose the hotspot type as WooCommerce Product.

iii. Then on the respective field, start typing the name of the product, and you will get suggestions for the available products in your store.

iv. Choose the appropriate product.v. Update and publish the tour on a page, and it’s ready to go.

Here’s a complete guide on how you can use this feature easily.

**This feature comes as an add-on if you purchase WP VR Pro.

6. Embed A Virtual Tour On A Non-WordPress Site

You can now create a virtual tour on your site, and then embed it on another non-WordPress site!!

Suppose you have a second website for which you do not use WordPress.

However, you want to use the same virtual tours there, that you have created on your WordPress website. You can now easily do that.

Simply publish the tour, and you will get an embed link (with iframe tags), which you can use on any other websites to embed the virtual tour there. It’s as simple as that.

**This feature comes as an add-on if you purchase WPVR Pro – Unlimited lifetime license.

Upcoming Features

With all these features already out there, you would think where we go from here. Well, we have several upcoming features planned.

  • Walking tour – you will move across the tour as if you were walking.
  • Floor plan – you can add a tour map where people can click to visit a scene
  • Cubemap virtual tour – a different form of a virtual tour that can be created with images that are not 360 panoramic images.

And many more are on the way.

Here’s our public roadmap for you to keep an eye on our development progress:

Final Thoughts

As you can see, the plugin is getting better and better, and with the current features, you will surely connect with the visitors and create more engagements.

So get WPVR Pro now enjoy all the features that can make your tour more attractive, and productive at the same time.

Categories
Update WP VR

Attract With Quality Virtual Tours – WPVR

WPVR is improving and is now better than ever.

As you know, WPVR allows you to create compelling virtual tours without any hassle. You simply need to provide 360 panoramic images and follow our guidelines, and you can create quality virtual tours in minutes. You do not need expert assistance.

Last time, we posted about a lot of features we added a couple of months ago. Read it here.

Recently we have added a few major Pro features to make your virtual tour creation experience even better.

Let us look at these new features.

What’s New in WPVR? 

 1. Scenes Gallery On Virtual Tours

Along with a satisfying virtual tour, you can now display a scenes’ gallery for better navigation of the tour.

Scene Gallery For Viewers:
Viewers will be able to see a small arrow at the bottom-center of the tour.

Demo Gallery

If they click on it, a gallery of all scenes will slide up.

Tour Gallery

There, viewers can double click on any scene and directly transit to that scene.

Till now, viewers could only go from one scene to another by clicking on hotspots. Now, they can go to any desired scenes directly from the gallery.

Simply enable the option ‘Show Scene Gallery‘ on the GENERAL tab.

Enable Scene Gallery

And the gallery will be available for viewers.

Scene Gallery On Tour Preview:
The gallery is also available at the back-end, below the tour preview, for you to be able to view and understand the order of the scenes on your tour.

Tour Preview Gallery

Thus making it more exciting to create and view the virtual tour.

2. Gyroscope On Mobile Devices

You can allow viewers using mobile devices, to get a gyroscope experience of the tour.

If enabled, while taking a tour on a mobile device, viewers will be able to see the icon to enable gyroscope mode.

WPVR Gyroscope On or Off

This will allow visitors to move their phones and get a view as if they are watching the place live.

Allow this feature by enabling ‘Gyroscope Control’ on the GENERAL tab.

Gyroscope enabled

Once enabled, the gyroscope icon will appear on the tour when viewed on mobile devices

3. Duplicate Tour 

Do you wish to add the same virtual tour twice on the same page?

Or do you wish to make a copy of the virtual tour, just to make little alterations and use it for some other purpose?

Simply create a duplicate of the tour.

Go to Dashboard > WPVR > Tours. Here you will find a list of all the tours you have created.

Find the tour you wish to duplicate and hover the mouse on it and you should see a Duplicate button.

Duplicate tour

Click on it and instantly a draft copy of the tour will be created with a new tour Id. You will be redirected to the tour setup page.

You can make any changes you want and publish the new tour to be able to use it.

4. Import/Export WPVR Tour 

WPVR now allows you to Import and Export tours on different sites that have WPVR Pro activated.

So if you have multiple sites, but you wish to view the same virtual tours on both the sites, then you can just export and import the tours between the websites; you do not need to recreate the entire tour again.

And it’s easy to use so, as well.

Exporting a tour:
Once you publish a tour, a new Export tab will appear on the tour edit page.

Export tab

Go to this tab and simply click on the Download button.

Export Download

Your tour will be downloaded in zip format.

Importing a tour: 
If you have exported a WPVR virtual tour, then you will be able to import it on any website that also has WPVR Pro installed and activated on it.

Go to Dashboard > WPVR > Getting Started. On the top right side, you will see that there is a tab called Import.

Import

Go to that tab. Here you will see a red-colored button. This is the import button.

Import button

Click on it and upload the tour that you downloaded earlier. Then click on submit. This will upload the tour on your site and redirect you to the tour edit page.

5. The ‘fullwidth’ Tag

There have been several improvements made on WPVR, when controlling the width and height of the tour, including allowing a percentage to control the size of the tour. We recently also introduced the implementation of tour radius.

The latest inclusion was the ‘fullwidth’ tag. For the tour width, instead of assigning a fixed size or a percentage, if you write ‘fullwidth’, this will ignore the container size and will make the tour appear on a full-width view of your web page.

Fullwidth quality virtual tours
As you can see, this tour is of full-width view on the web page.

Using the ‘fullwidth’ tag correctly:

On Gutenberg block editor, use the WPVR block and assign width as fullwidth.

Gutenberg fullwidth

On Elementor page builder, use WPVR widget and assign width as fullwidth.

Elementor fullwidth tag

And for Classic editor or any other page builders, apply the tour shortcode (on html blocks or editor for page builders). Edit the shortcode and add the width tag, with the value fullwidth, and add the height tag with any value you desire.

Classic Editor fullwidth

Then publish the page/post and let your viewers get a full-width view of your virtual tour.

Upcoming Features 

As you know, we have a lot of exciting features planned out and in the process of development.

>>Ground map – You will be able to create a map of the location you created a virtual tour of. And users will be able to click on pointers on the map to directly go to that particular scene of the tour. This will allow you to create a detailed tour of large locations and allow users to get a better navigation system.

>>Connect multiple tours – We are trying to implement a feature so that you can connect two different virtual tours, either by directly merging them or simply transiting from on to another through a hotspot.

>>Resize images for phones – Currently, the plugin only works with the 360 panoramic images provided by you. But if the resolution is too high (seemingly higher than 4096×2048), then the tour cannot be viewed on mobile devices. We are trying to integrate a resizing option so that the plugin can resize the images for mobile devices if required.

There are so many more features we wish to include and with time, they will all be available soon.

There is no limit to how much you can achieve using quality virtual tours on your site. Whether you wish to highlight real estate properties, museums, hotels, amusement parks, spa, campus or any other purpose, a virtual tour will certainly make it more credible and reliable.

Upgrade to pro to enjoy all exciting features and use quality virtual tours with no limitations.

Hence, go ahead and start using WPVR and create amazing virtual tours for your site visitors.

Categories
WP VR Update

What’s New With WPVR? Great Updates [2019]

It’s a wonder how fantastic WordPress is. You have a countless number of plugins that help you simplify all your efforts easily. WPVR is one of the few VR plugins that allow you to create a Virtual Tours on your WordPress website.

Since the start, WPVR managed to deliver with stable and quality output. And with time, the plugin developed into something amazing.

Now you can create a virtual tour, on your own, with tons of customization. That too, with a simple and user-friendly interface.

Let us look at some of the exciting features that WPVR incorporated since we launched our first stable version.

What’s New With WPVR?

1. GUTENBERG BLOCK SUPPORT

The time when this plugin was launched, WordPress was on the verge of upgrading to WordPress 5.0 with a major change. They made Gutenberg the default editor, replacing the Classic Editor.

Hence, WPVR was modified to provide Gutenberg block support.

You will get a separate block called “WP VR” under the common blocks.

Gutenberg block WPVR

You simply need to use the block and provide the tour id to the block.

Block Data Update

And your tour will be added to the post/page.

2. ELEMENTOR SUPPORT – WPVR WIDGET

For those of you, who love to use the Elementor page builder, you will now get a separate Widget to embed the virtual tours created using WPVR.

WPVR Elementor Widget

Simply drag-and-drop this widget to any section. Provide the widget with ID, height, and width; you will be able to see the virtual tour added.

Tour added through WPVR  Elementor Widget

Hence, customize your page and add a virtual tour wherever you want by directly using the Wpvr widget.

3. AUTO ROTATION

The plugin allows you to create an auto-rotation effect on your tour. Once you have created a tour, you can set it up so that, if not touched, the tour will rotate automatically.

You can control the auto rotation speed and direction, and you can set a timer for auto-rotation to start again when stopped by visitors.

4. COMPASS (PRO)

Sometimes it makes more sense to include a compass to your tour.

Compass on tour

Now you can display a small compass on the bottom right corner of the tour.

5. DEFAULT SCENE FACE (PRO)

You will be able to set the view that will appear first by default when the tour is loaded on the page.

Simply define the pitch and yaw of face you wish to show at first and that will be the face that will appear first when a tour is loaded on the page.

6. SCENE BOUNDARY (PRO)

This is one of the great features that let you have more control over the tour you create.

You can set horizontal or vertical boundaries to control how much a person can look left or right, and up and down.

7. ZOOM CONTROL (PRO)

You can even control how much a visitor can zoom in or out.

You can limit the max zoom in or max zoom out and you can set it up so that the tour is already zoomed in a bit when loaded.

8. HOTSPOT CUSTOM ICONS WITH COLOR CUSTOMIZATION (PRO)

This is a brilliant feature that allows you to make the tour more attractive.

You get to choose from 900+ font-awesome icons as your hotspot icons. This is ideal to make the tour more meaningful.

For example, you can set a person icon to indicate ‘walk this way’.

Hotspot with custom icon and color

On top of this, you can even change the color of these icons. The plugin gives you the color customizer option to choose the color you desire for your hotspot icons.

Hotspot custom icon color

9. TITLE AND AUTHOR (PRO)

For every scene, you can give a title the scene and give an author name.

Scene title

For example, let’s say you created a virtual tour for a house, and for the scene of the bedroom, you can add the title ‘Bed Room’.

10. 360 VIDEO SUPPORT

You can also embed 360 Degree Video tours, rather than creating a virtual tour using images.

Either provide a video link from Youtube or Vimeo or upload a 360 Degree Video and let visitors take a virtual video tour.

WHAT’S NEXT ON WPVR?

We are constantly trying to add more and more features while keeping it out of any sign of complications. The idea is for everyone to be able to create virtual tours easily and have full control over it. We are currently working on more exciting features.

UPCOMING FEATURES OF WPVR:

>>Google Cardboard Support: A VR box can really take a virtual tour to the next level. Hence, it only makes sense for us to integrate the virtual with a VR box so that visitors can get an enhanced feeling of reality.

>>Cubemap Virtual Tour: We are also planning to introduce a second type of virtual tour Cubemap. Currently, we have the Equirectangular virtual tour which requires a 360 panoramic image. The Cubemap will rather require 6 flat images of the same height and width. This will create a cube space for visitors to take a tour.

>>Background Tour Music: Often people use virtual tours to preview or showcase their location. A piece of delightful background music could only make it even better. Hence, we are working on a way for users to add music to a tour. Imagine visitors taking a tour while listening to soothing music and enjoying the tour.

These are a few of the many upcoming features that we have lined up for the future.

There is no limit to how much you can achieve using a quality virtual tour on your site. Whether you wish to highlight real estate properties, museums, hotel amusement parks, spa, campus or any other purpose, a virtual tour will certainly make it more credible and reliable.

Upgrade to pro to enjoy all exciting features and use virtual tours with no limitations.

Hence, go ahead and start using WPVR and create amazing virtual tours for your site visitors.

Categories
Update WP VR

[Update] WP VR is Gutenberg Compatible [2019]

We are happy to announce that WPVR is now completely Gutenberg compatible. This means, you can embed virtual tours on any web page, whether you use a Classic Editor or Gutenberg block editor.

Since November 2018, the latest virtual tour creator in WordPress has been released. WPVR, an exclusive WordPress virtual tour creator plugin, allows users to create amazing virtual tours using 360 Panoramic Images.

You simply need to upload a proper 360 degree panoramic images and this plugin will turn them into an amazing virtual tour, where you can move about, zoom in or out, and get information as if it is a real tour. 

Let me show you how you can embed a virtual tour using Gutenberg block editor.

How To Embed A WPVR Virtual Tour using Gutenberg 

Once you have created a virtual tour, collect the ID generated and go to the web page you wish to embed it on. 

This virtual tour creator automatically adds a WPVR block type under the common blocks of Gutenberg.

Gutenberg block WPVR

Go to a post or a page and click on add block icon (the + icon) and select block type as “WPVR”. And a block will be added as shown in the following image:

WPVR block added

Once Block is added, click on the Settings icon on the top-right corner of the page and select the Block menu for the toolbar of WPVR block.

WPVR block settings

Here, you can see you need to provide “id”, “Width” and “Height”.  Once you provide data in the field, the block will update the data.

WPVR block data inputted

Now, you can preview or publish the page and you will see that the virtual is embedded on your page.

Why Was It Important to Make WPVR Gutenberg Compatible?

WPVR is Gutenberg compatible

As you know, WordPress has integrated Gutenberg block editor as the default editor since the end of November 2018. And this virtual tour creator was not Gutenberg compatible at that time. 

Since the release, the uniqueness of the plugin got people hyped quickly, and the installations kept on increasing. But people using Gutenberg was having compatibility issues.

This is because this plugin was configured to generate shortcodes in order to embed the virtual tours on web pages.

When Gutenberg became the default editor, you could create virtual tours, everything would work properly at the back-end. But Gutenberg didn’t support the shortcode that the plugin generated, hence you would not be able to embed a virtual tour on any web page.

In January 2019, our developers made a long-awaited update. WPVR is now fully Gutenberg compatible and will work with both Classic Editor and Gutenberg block editor. You can now create and embed virtual tours on your webpage without any issues.

Conclusion

As you can see, it is so simple and easy to embed a virtual tour created by WPVR whether you use Gutenberg or Classic Editor.

It is time you start using this amazing virtual tour creator and connect with visitors. Start enjoying the benefits of using virtual tours on your website.