Categories
Guide Virtual Reality WP VR

How To Create A Virtual Tour In Easy Steps- A Complete Guide [2025]

Ever wished you could teleport? Well, creating a virtual tour is the next best thing—minus the sci-fi complications and potential teleportation mishaps.

Imagine giving people a full, immersive tour of your business, property, or event space without them having to leave their couch (or even change out of their pajamas).

With a virtual tour, your audience can explore every nook and cranny as if they were there in person—without you having to clean up first.

In this guide, I’ll walk you through everything you need to know: from the basics of virtual reality to capturing stunning 360° images and building a tour that wows.

Once you complete this guide, you won’t rely on anyone to create virtual tours.

You’ll know how to create a virtual tour completly on your own, at the lowest cost.

So let’s get started.

First, Let’s Clear The Confusion!

If you gather clear knowledge of the basic terms it will be easier for you to understand the process of virtual tour creation.

Now, most people get confused between Virtual Reality and Virtual Tours!

Here’s a clear definition :

What Is Virtual Reality?

Virtual Reality is a computerized environment or projection that you can experience visually.

You can observe, listen to, and interact with this environment.

What Is Virtual Reality

Now, there are many types of VR technologies. The 5 most popular ones are listed below :

Types of Virtual Reality

Non-immersive virtual reality
Non-immersive virtual reality refers to a computerized virtual experience where you can control some characters or activities within the software, but the environment is not directly interacting with you. Example: Simulation games such as God of War.
Fully immersive virtual reality
A fully immersive virtual technology ensures that you have a realistic experience within the virtual world. This is an expensive form of virtual reality which involves helmets, gloves and body connectors with sense detectors, to transfer your every physical moments within the virtual world. Example: Virtual shooting game zone.
Semi-immersive virtual reality
A semi-immersive virtual reality can be in the form of a 3D space or a virtual environment which you can move about on your own either through a computer using a mouse and keyboard, or on mobile devices by touching and swiping to move about the place. You do not control any character, you control the view on your own. Some VR headsets are semi-immersive. Most semi-immersive virtual environments support Gyroscope. Example: A Virtual Tour.
Augmented virtual reality
Augmented Reality is when a certain entity or device seems to be present in reality, but is actually not. Rather than putting you into a virtual world, a virtual entity is placed in the real world through any device. Example: The game Pokemon Go displays Pokemons through your phone.
Collaborative virtual reality
This is a form of virtual world where different people from various locations can come into contact within a virtual environment, usually in the form of 3D or projected characters. People can interact with each other through microphones, headsets and chatting. Example: Games such as PUBG (Players Unknown Battle Ground)

**To learn more about types of VR in detail click here.

Virtual Reality And Businesses

Over the years, virtual reality has increased its influence in tons of businesses to create better interactions with their customers.

By the year 2025, the total size of the global Virtual Reality market will be valued at more than 22 billion US dollars.

Businesses such as Real Estate, Hotels & Resorts, Restaurants, Universities, Schools & Colleges, Super shops, Antique shops, Art Galleries, Showrooms, Museums, etc can engage with more prospects using virtual tours.

Read along to learn about how businesses can benefit from virtual tours (your business might be one of them).

Along with VR technology many VR devices such as VR Headsets, Virtual Game Spaces, Virtual Simulation, and training devices, and many more devices are being created day by day. Similarly, in the tech industry, companies specializing in igaming software development can leverage virtual tours to showcase their cutting-edge solutions and engage potential clients effectively.

IDtechEx estimates that, in 2023, the revenue from only the VR headset sales will be more than $9 billion.

Since you have an idea about virtual reality and its different formats, I’ll move to our main objective today – virtual tours.

What Is A Virtual Tour?

A virtual tour is a form of semi-immersive (one of the types of virtual reality)VR technology that allows you to experience a certain location remotely.

Basically, represents a real place in a virtual platform. You will feel like as if you are there.

Virtual Tour Experience

Usually, a virtual tour is created by transforming a 360 seamless panoramic image into a realistic Equirectangular 3D space.

You will be able to rotate the screen 360 degrees in all directions. Plus you will be able to move from one panoramic image to another.

There are other forms of panorama images used to create virtual tours such as Cube Map, Little Planet, or Fish Eye. But we will be discussing the most efficient one, the Equirectangular virtual tour.

Recently, virtual tours gained huge popularity in several businesses due to the high engagement potential with prospects.

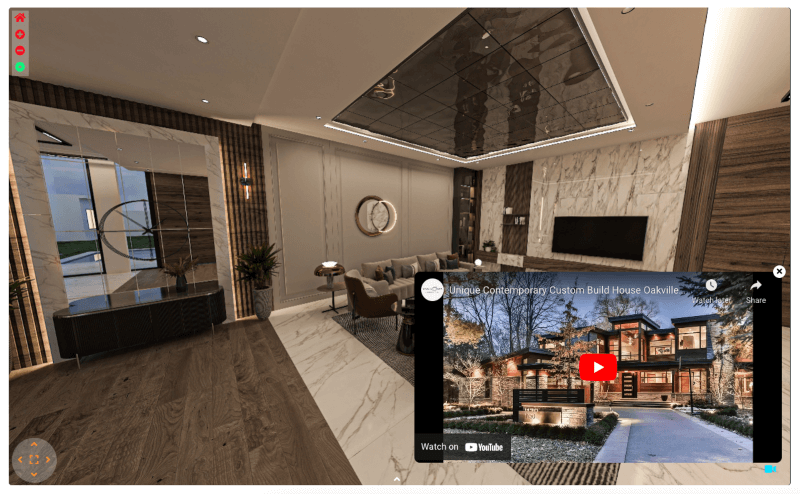
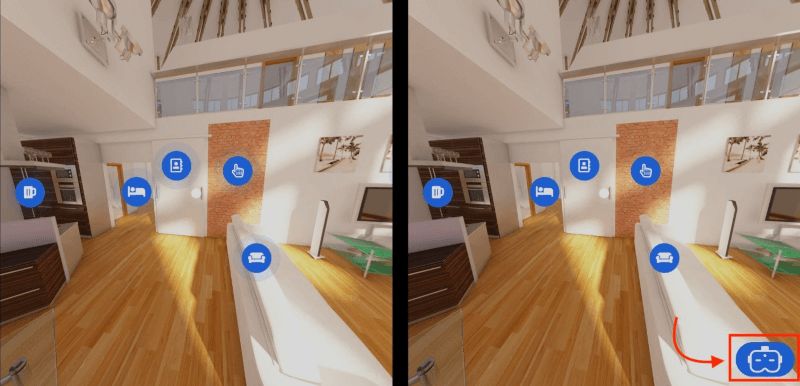
The latest forms of virtual tours are more advanced and attractive. You will find a scene gallery, click-to-view information tags, background music, Gyroscope support, some even support VR boxes, and many more. Proper platform development can also significantly enhance these virtual tours.

As you read along, you will learn how you can create virtual tours on your own.

Let us look at the advantages of using a virtual tour for most businesses.

Advantages Of Using A Virtual Tour On Your Website

Now, virtual tours are more beneficial to businesses that rely on highlighting their location to attract prospects.

So, Real Estate Firms, Hotels, Museums, Universities, Schools and Colleges, Amusement Parks, Fancy Restaurants, and most other such businesses can use virtual tours to attract more potential prospects.

Yes, using high-quality images is not a bad idea, but a virtual tour can have a greater connection with the viewer since they feel personalized and engaged as they take the tour.

Here are some of the benefits you can expect for your business using a virtual tour.

1. Instant Engagement

The use of a virtual tour is still very new and people visiting your site will be instantly hooked.

Engage with prospects through virtual tours

The fact is, people are already well-accustomed to looking at flat images or videos. A virtual tour will be something new and interesting to all viewers.

The main reason a virtual tour is more effective is because the viewers are in full control of the tour.

Flat images can only create an imaginative visual which might not be accurate. And videos can only be watched with no control. We have to watch the place from the angle of the cameraman.

In a virtual tour, viewers can move and look around from any angle or direction. They can go from one scene to another easily and can take their time to inspect the location.

Once they take the tour, they will have a more accurate visual of the actual location.

Thus, even if someone is not willing to purchase a website visit, a virtual tour might grab his attention and possibly turn him into a potential buyer.

Realtors and hotel owners will benefit the most in this case, compared to most other businesses.

However, anything unique, that’s interesting and exciting, can always get you better results no matter what business you run.

2. Give A Better Visual To Prospects

The main concept of a virtual tour is to give a realistic vision of a place. And almost any business can use virtual tours to give a more informed visual to the prospects.

Better visual using virtual tours

Previously, the most advanced remote tours were video tours.

However, the problem with video tours is that you can only watch from the point of view or angle of the cameraman.

You have no way to inspect from another angle.

Also, as I mentioned earlier, flat images can create an imaginative visual which might not be accurate.

So here’s the main issue. Through videos or images, people can visualize in their minds and this creates a certain assumptive expectation of how the place will look when visited in person.

Now, when a person visits, if it does not match his imagination, he will lose interest almost immediately.

A virtual tour rather creates a near-perfect visual of the place.

A person taking a virtual tour will develop an expectation that very much matches the place in reality.

Thus creating more potential prospects.

So whether it is a hotel, an amusement park, a school, or any form of business, a virtual tour can generate more potential prospects.

3. Help Prospects To Take A Decision

As you just read, a virtual tour gives a better visual of the location.

Almost every detail can be inspected through a virtual tour and the close resemblance to the actual location makes it a great instrument of choice.

Help home buyers make a decision easily

Let me explain.

Let’s say you’re searching online for good restaurants in your area. You found three restaurants that have good reviews based on the taste of their food.

But which one you’ll choose to visit?

Let’s assume all three of these restaurants have virtual tours on their site. Once you take a virtual tour of each of them, you will be able to understand which one has the environment that you were looking for.

The decorations and the seating arrangements would be more clear and you could choose your preferred restaurant.

Similarly, on a real estate website, people will be able to take tours of various houses in a location. This will let them choose the ones that they feel are suitable.

Almost all businesses can use virtual tours to influence prospects’ choices.

4. Avoid Unnecessary Visits And Rejection

Avoid Unnecessary Visits And Rejection

Using a huge number of photos is a common practice for realtors.

However, no matter how many images you use, it’s not possible to have a clear idea of the property structure and planning.

You may see each individual room and each important location clearly but don’t know how the spots are connected and how to move around inside the property.

Plus the latest photo editors can even transform a dull place to look stunning.

There is a high possibility that most people, willing to visit the location, might end up being disappointed since they had better or lower expectations.

At the same time, if you are giving a live tour to people during every visit, then you will be wasting a lot of time and effort since there is a high rejection rate.

The main reason is, as I explained earlier, failure to meet expectations.

A virtual tour will allow viewers to carefully inspect the property and decide if it’s suitable for them.

As a result, calls to visit will mostly come from prospects who are already interested and satisfied with the location, i.e., more potential prospects and fewer rejections.

According to a report, using 360-degree virtual tours in the real estate industry will reduce the number of wasted viewings by 40%.

That’s a substantial amount of time and money you can save.

5. Technological Advantage Over Competitors

Even though virtual tour is a relatively new term for a lot of people, it already has become a key marketing strategy for industries like real estate, hospitality business, museums, etc.

However, almost every business has the scope to utilize virtual tours as a part of its marketing strategy.

This is actually an advantage for your business if you have not used virtual tours on a large scale.

Technological Advantage of Virtual Tours

For example, if you own a super shop, you can create a virtual tour that will let visitors get a tour of the shop remotely.

They will be able to see the various sections and types of goods you have. Plus, they will notice how organized and clean your super shop is.

Many viewers might choose to take a visit after noticing a certain section on your super shop, expecting to meet the quality they require.

Other super shops that don’t have a virtual tour on their site will not get this added advantage to convert an online visitor to a live prospect.

Similarly, if you own a hotel, then a virtual tour will give you an added advantage over other hotels in your area.

People visiting your site will be able to get a virtual experience remotely, compared to other hotels that rely on just images and videos.

If your hotel is well-decorated and affordable, most people will probably prefer your hotel to others after taking a virtual tour.

As you can see, every business can be ahead of its competitors through a virtual tour. You will achieve more trust from prospects, and gain a good reputation for reliability and up-to-date technology.

These are 5 major advantages that almost all businesses can enjoy despite the niche.

There could be more advantages such as being more cost-effective compared to creating virtual video tours (due to hiring expert camera crews), and more efficient and effective towards prospects.

List Of Businesses That Can Benefit From Virtual Tours

  • Real Estate
  • Hotels & Resorts
  • Restaurants
  • Casinos
  • Art Gallery
  • Fashion House
  • Wedding Venues
  • Conference Halls
  • Car Showrooms
  • Aquarium Shops
  • Antique Shops
  • Shopping Malls
  • Super Shops
  • Movie Theatres
  • Home/Interior Decors
  • Historic Locations

  • Travel/Tourism Industry
  • Gym/Fitness Centers
  • Universities, Schools & Colleges
  • Virtual Learning Centers
  • Research Facilities
  • Production House
  • Corporate Office
  • Virtual Gaming Zones
  • Indoor Gaming Zones/Clubs
  • Handcraft/Furniture Shops
  • Theme/Amusement Park
  • Airports & Airlines
  • Orchids & Flower Gardens
  • Natural/Safari Parks
  • Museums
  • Hospitals

Later in this article, we will also learn how each of these businesses can take advantage of using virtual tours. You will get niche-specific information on how you can use virtual tours to get more prospects.

If your business is on this list, then you will find this guide very helpful. And if you haven’t used virtual tours yet, then it’s time you start thinking about using them.

How To Create a Virtual Tour

To use a virtual tour you need to create one. To create a virtual tour you need some materials and need to know the process.

Let’s start with materials :

Resources You Need To Create a Virtual Tour

To create a virtual tour you will need two specific things.

You can go for any type of virtual tour.

For this article, I am going to use an equirectangular type to create a virtual tour.

In the case of an Equirectangular virtual tour, the main elements are:

  • 360 panoramic images, and
  • A Virtual Tour Creator Tool.

What Is A 360 Panoramic Image?

First, understand what a panoramic image is.

A panoramic image is different from the usual photographs.

They are usually very wide and the pictures are taken in different ways for different types of panoramic images.

Now, a 360-degree panoramic image takes a 360-degree angle of a place or thing.

Once processed using a virtual tour creator, it becomes an Equirectangular virtual tour.

Here is an example:

A 360-degree Panorama Image

A 360-Degree Panorama Image

Converted To A Basic Virtual Tour

Once you have seamless 360 panoramic images, you can now easily create amazing virtual tours using a virtual tour creator.

In the example above, I used WPVR which is currently the best virtual tour creator for WordPress.

If you want to learn how to capture 360 degree photo using drones, read our detailed guide.

A Virtual Tour Creator – WPVR

Learn how to Create a virtual tour using the right tool

Creating a virtual tour sounds like a difficult task, but in reality, it is pretty simple as long as you are using the right tool.

**Careful with production companies. Many will claim that video tours are virtual tours, but that’s not true. Yes, there are virtual video tours, but they are not ideal for complete control and inspections. Plus they cost more to produce.

There are many tools and services that can help you convert your 360 panoramic images into a virtual tour.

However, today I will show you a step-by-step process on how to create a virtual tour for your WordPress site using the WPVR plugin.

WPVR

With WPVR, you can easily learn how to make a virtual tour with the simplest steps.

There are more virtual tour plugins, but this one comes with an easy interface and quality output.

Here’s a step-by-step guide on how you can generate a quality virtual tour using WPVR easily, on your own.

Step-by-Step Guide To Create Virtual Tour Using WPVR

You can get the free version of WPVR from the WordPress repository.

You can get the pro version from here :

Get the pro plugin: WPVR Pro

First, let’s look at how you can create a virtual tour using the free version. Then I will discuss some of its Pro features that you can use to make the virtual tour more attractive.

Now, let’s go through it step-by-step.

Step 1 – Install And Activate WPVR

Go to your WordPress Dashboard > Plugin > Add New.

Search for WPVR and you will find a blue icon of the plugin as shown in the image below:
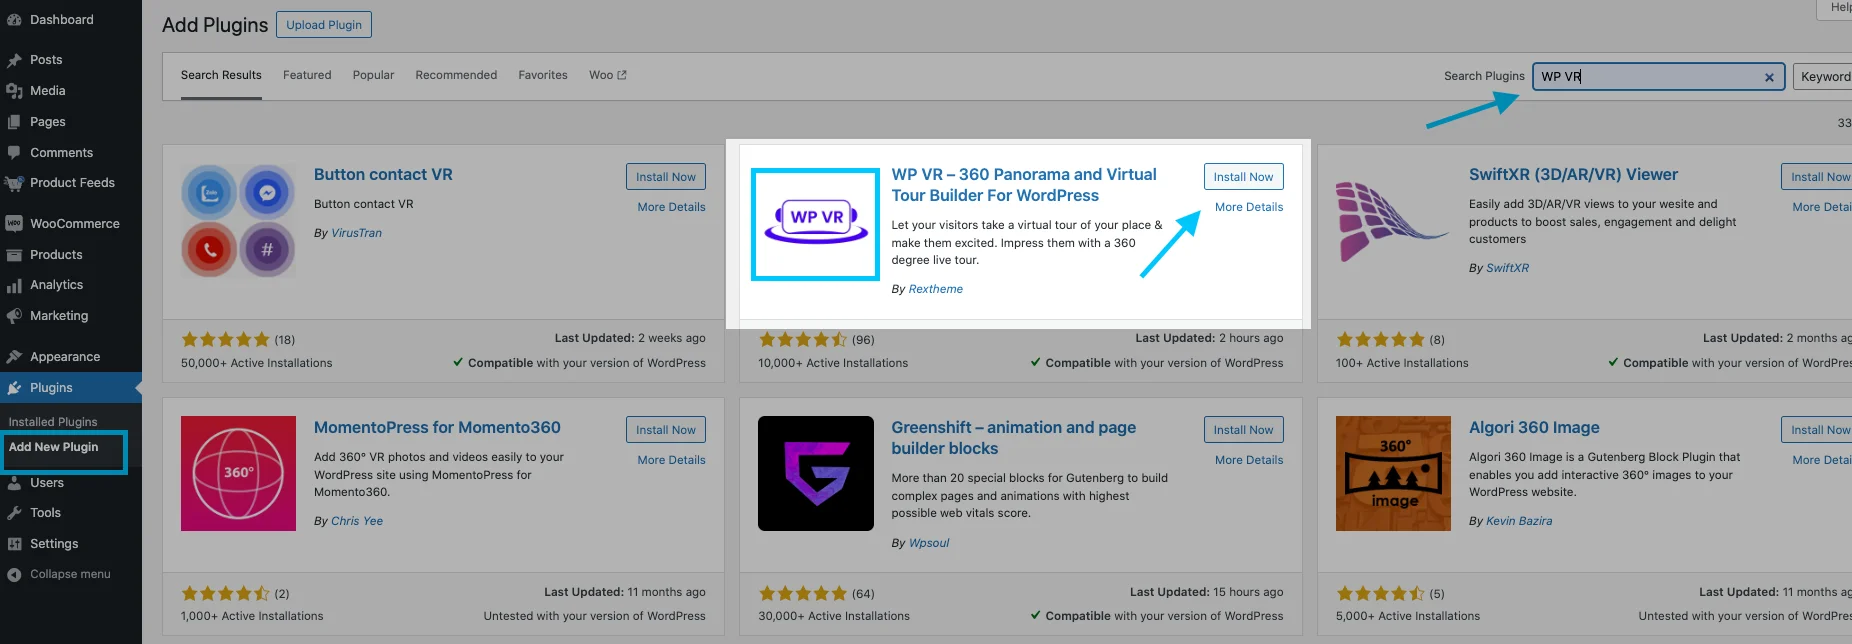
WPVR

Click on “Install” and after that “Activate” will appear. Click on the button of the plugin.

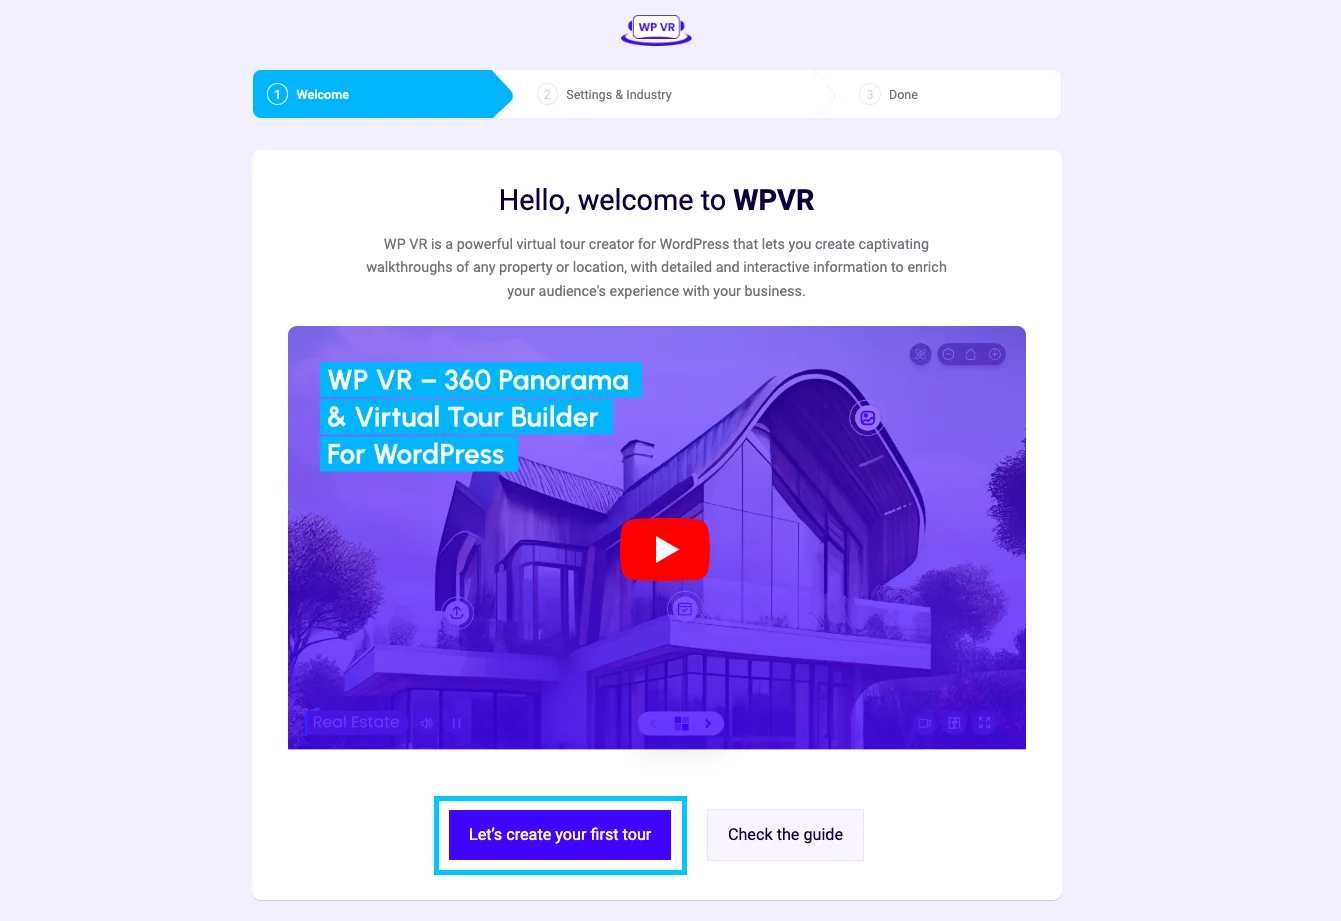
Once the plugin is activated, you will get this page :

WPVR setup process

Click on the “Let’s create your first tour” button.

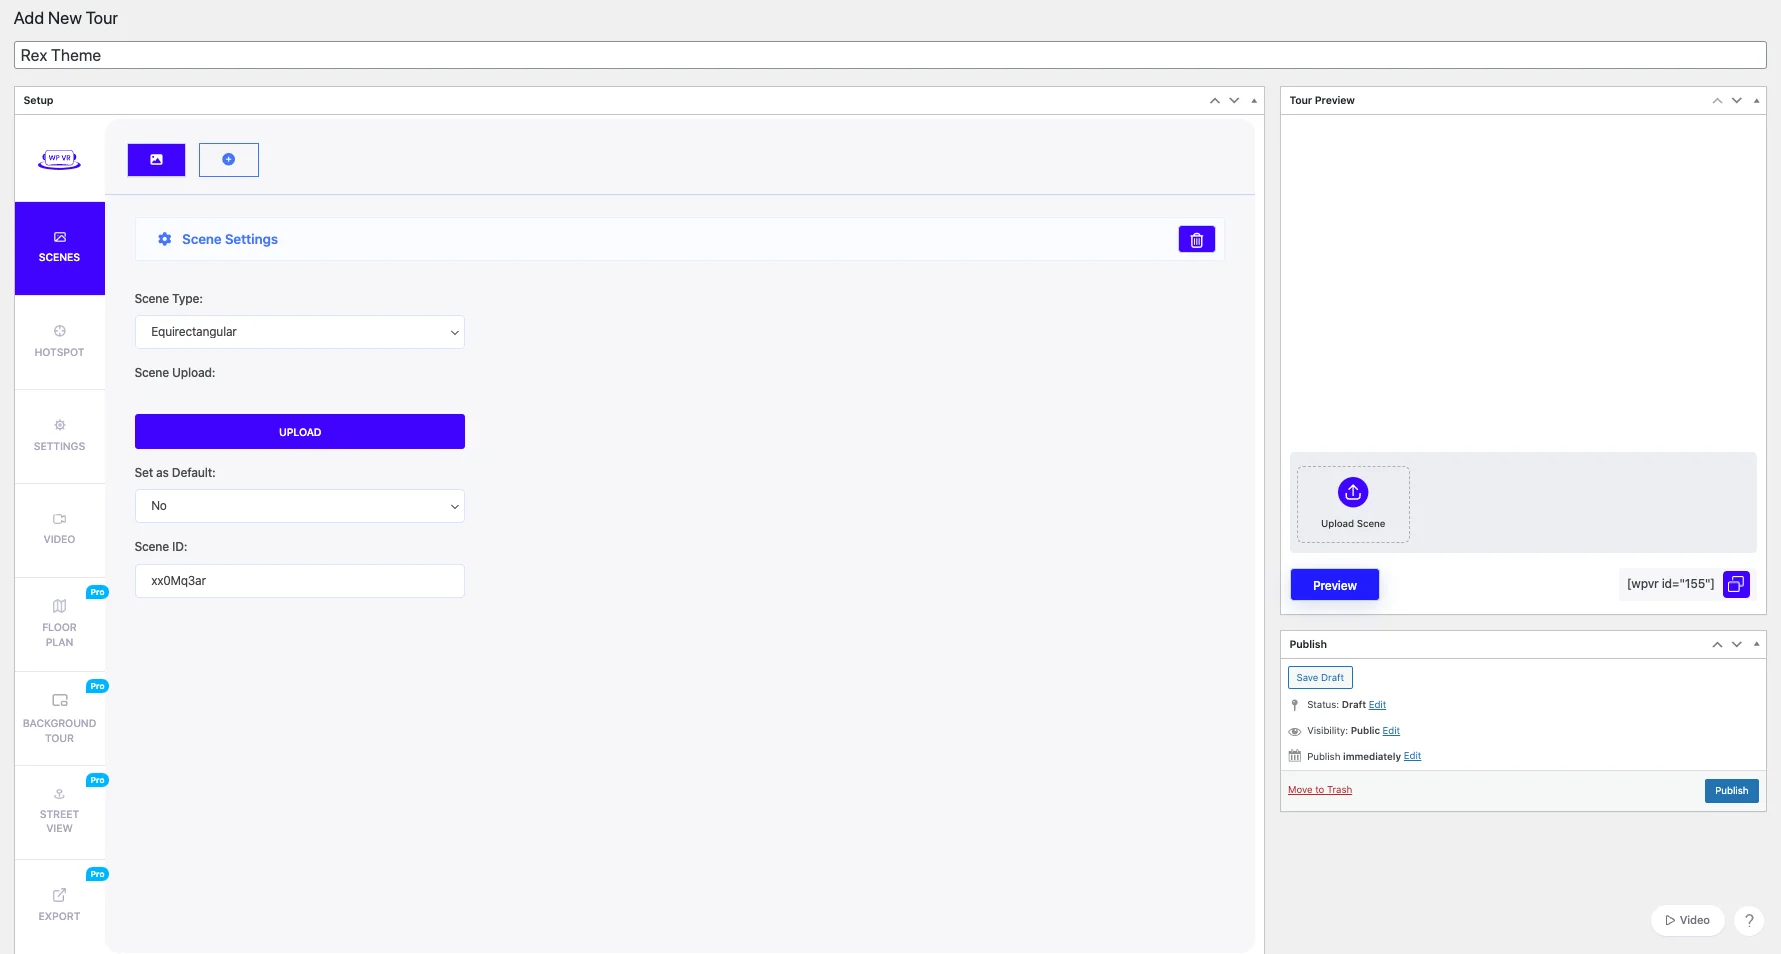
you will see on your Dashboard that a new menu called “WP VR” has been added. And this page will appear :
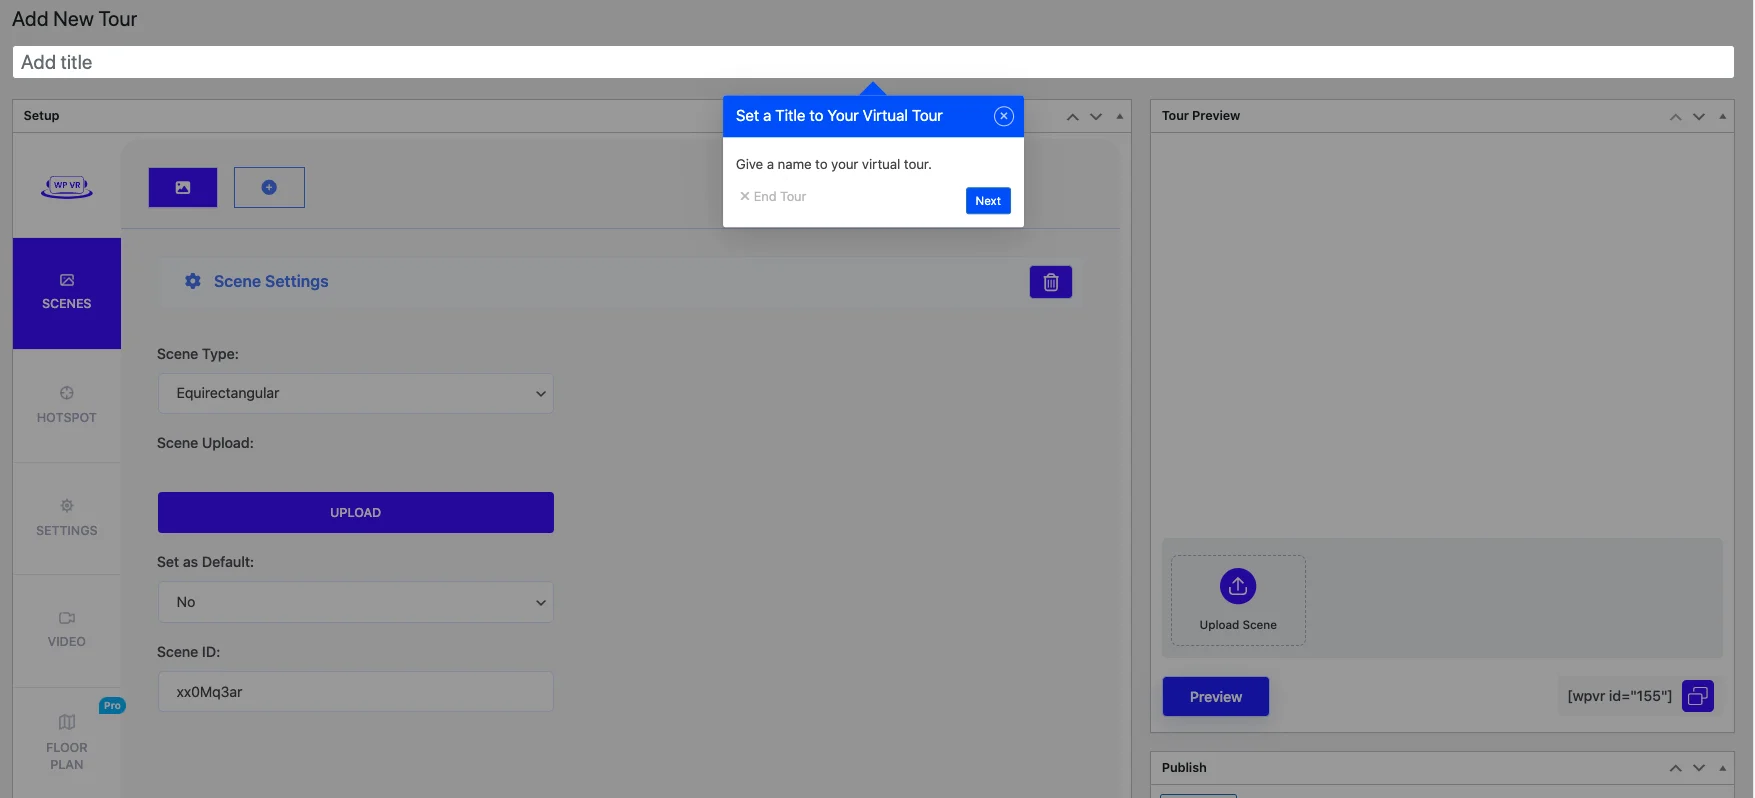
set up WPVR

Now give a title to your virtual tour. If you don’t want to give title now then just press the cross button.

Then, as you proceed a pop up of scene id will come up :

WP VR scene ID

Step 2 – Create A Virtual Tour

As you proceed, this dashboard will appear :

Dashboard of WP VR

On the left side, you will see 8 tabs:

:

  • General
  • Scenes
  • Hotspot
  • Video
  • Floor plan
  • Background Tour
  • Street View
  • Export

For a virtual tour, you will need to set the proper settings of the first three tabs.

Step 3 – Configure General Settings

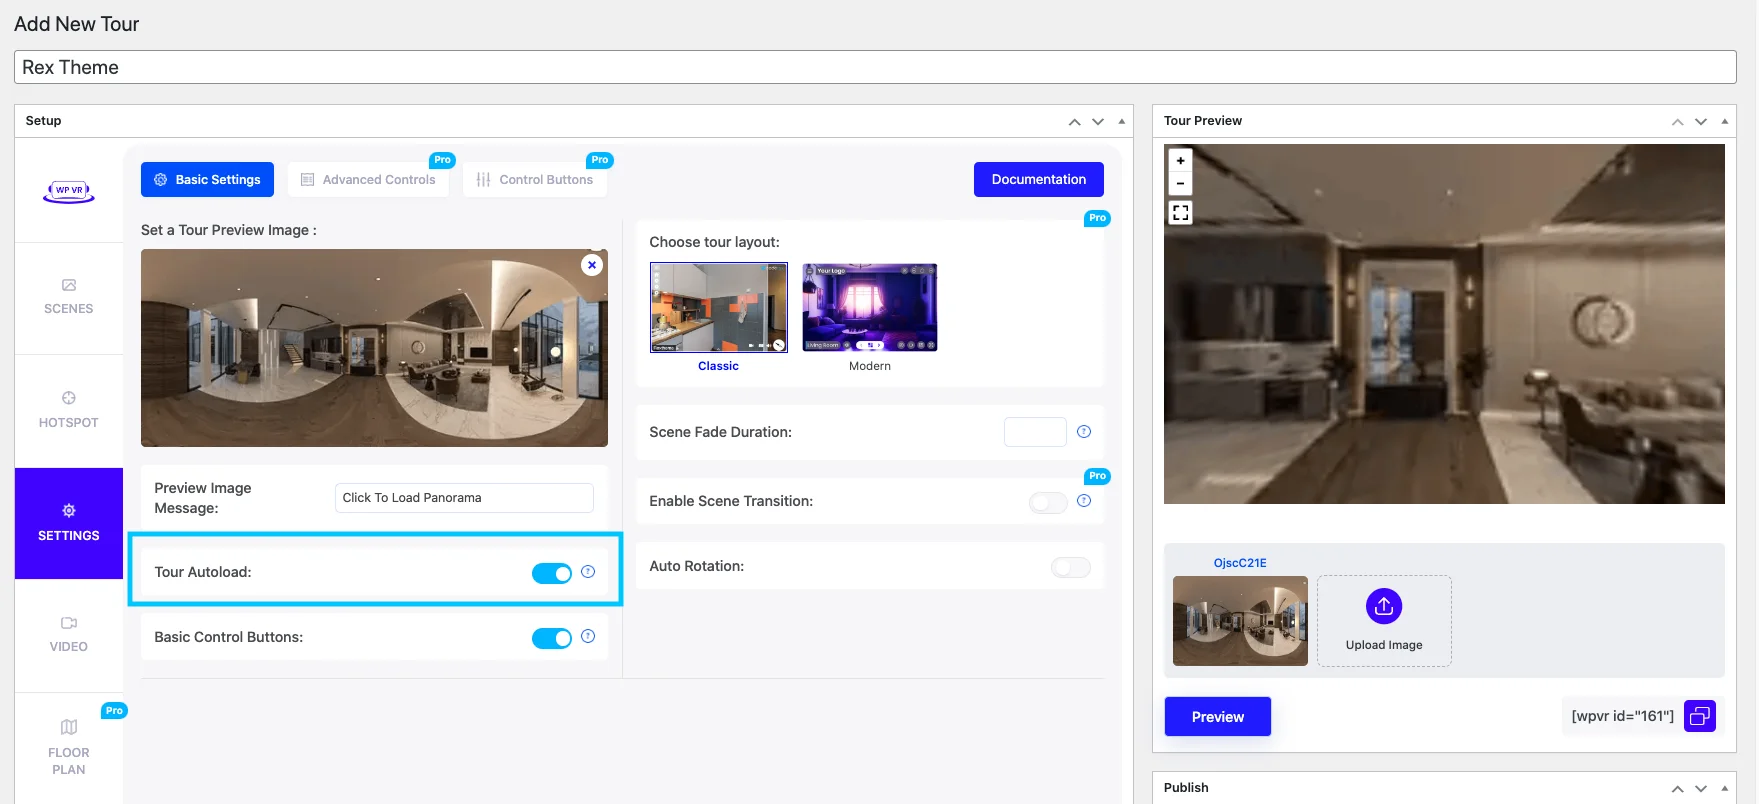
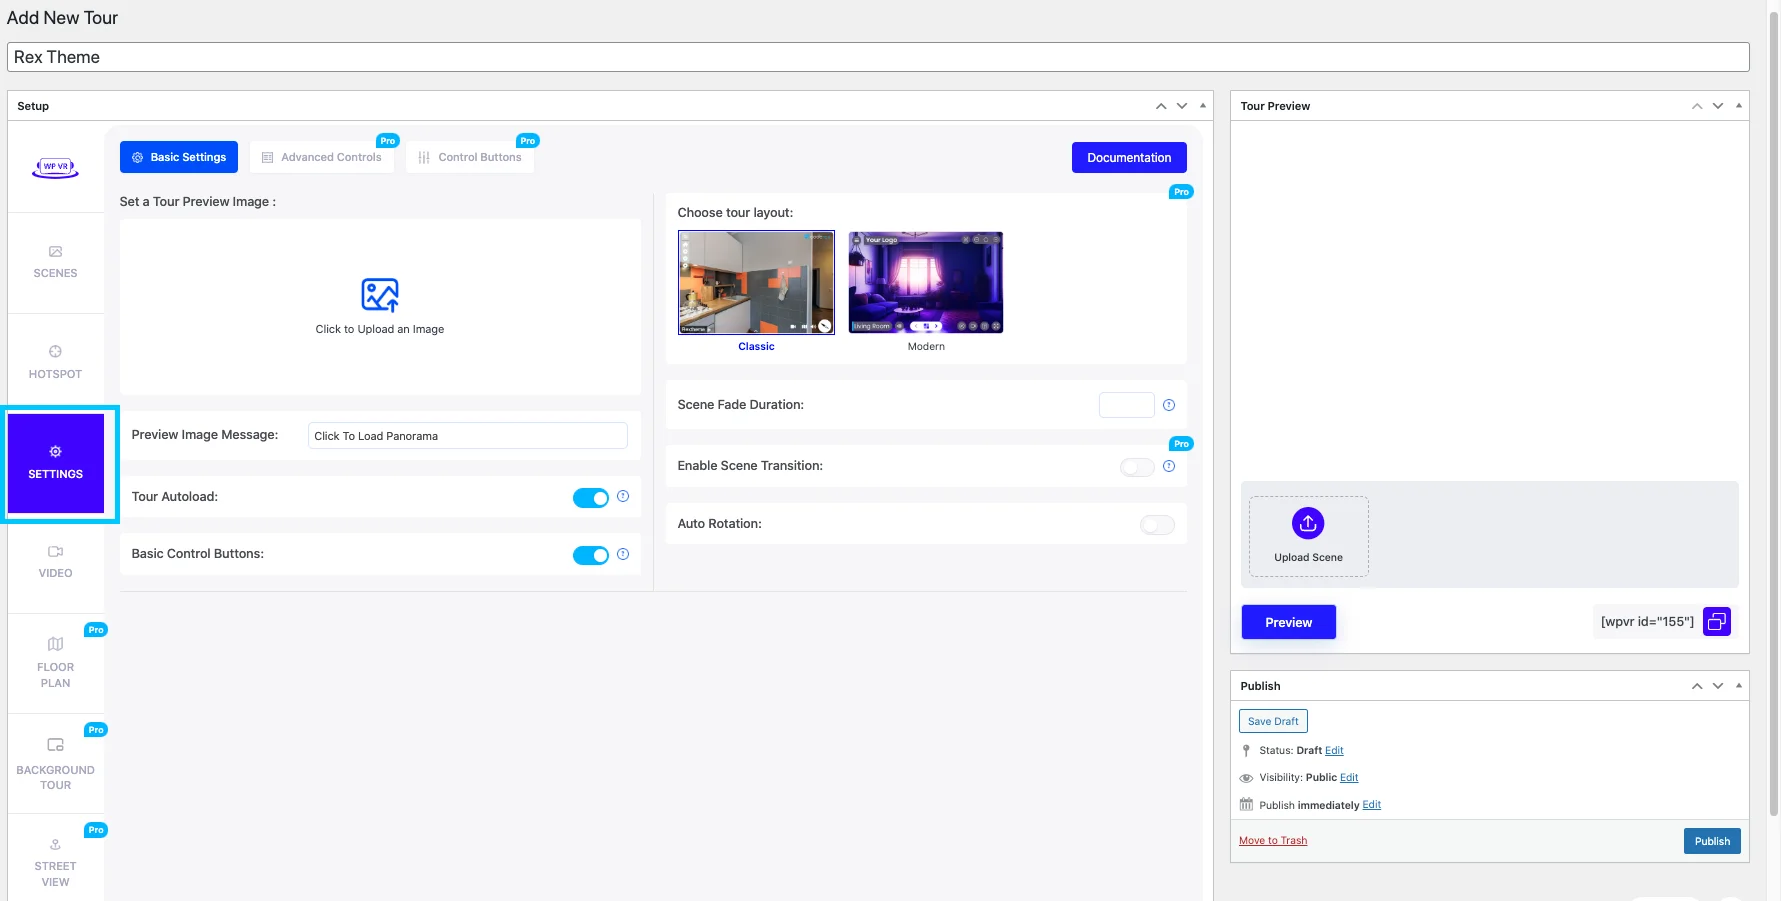
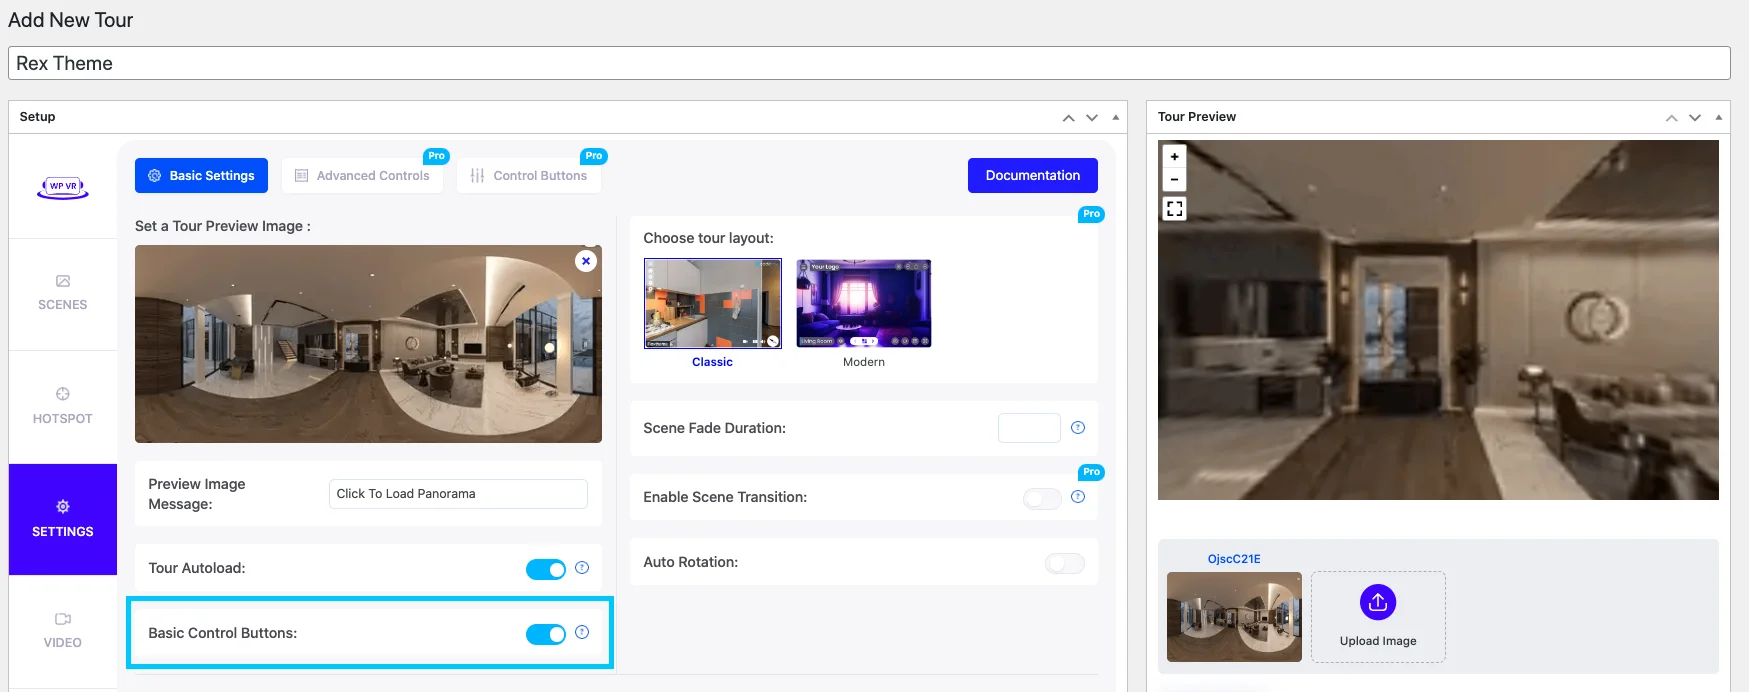
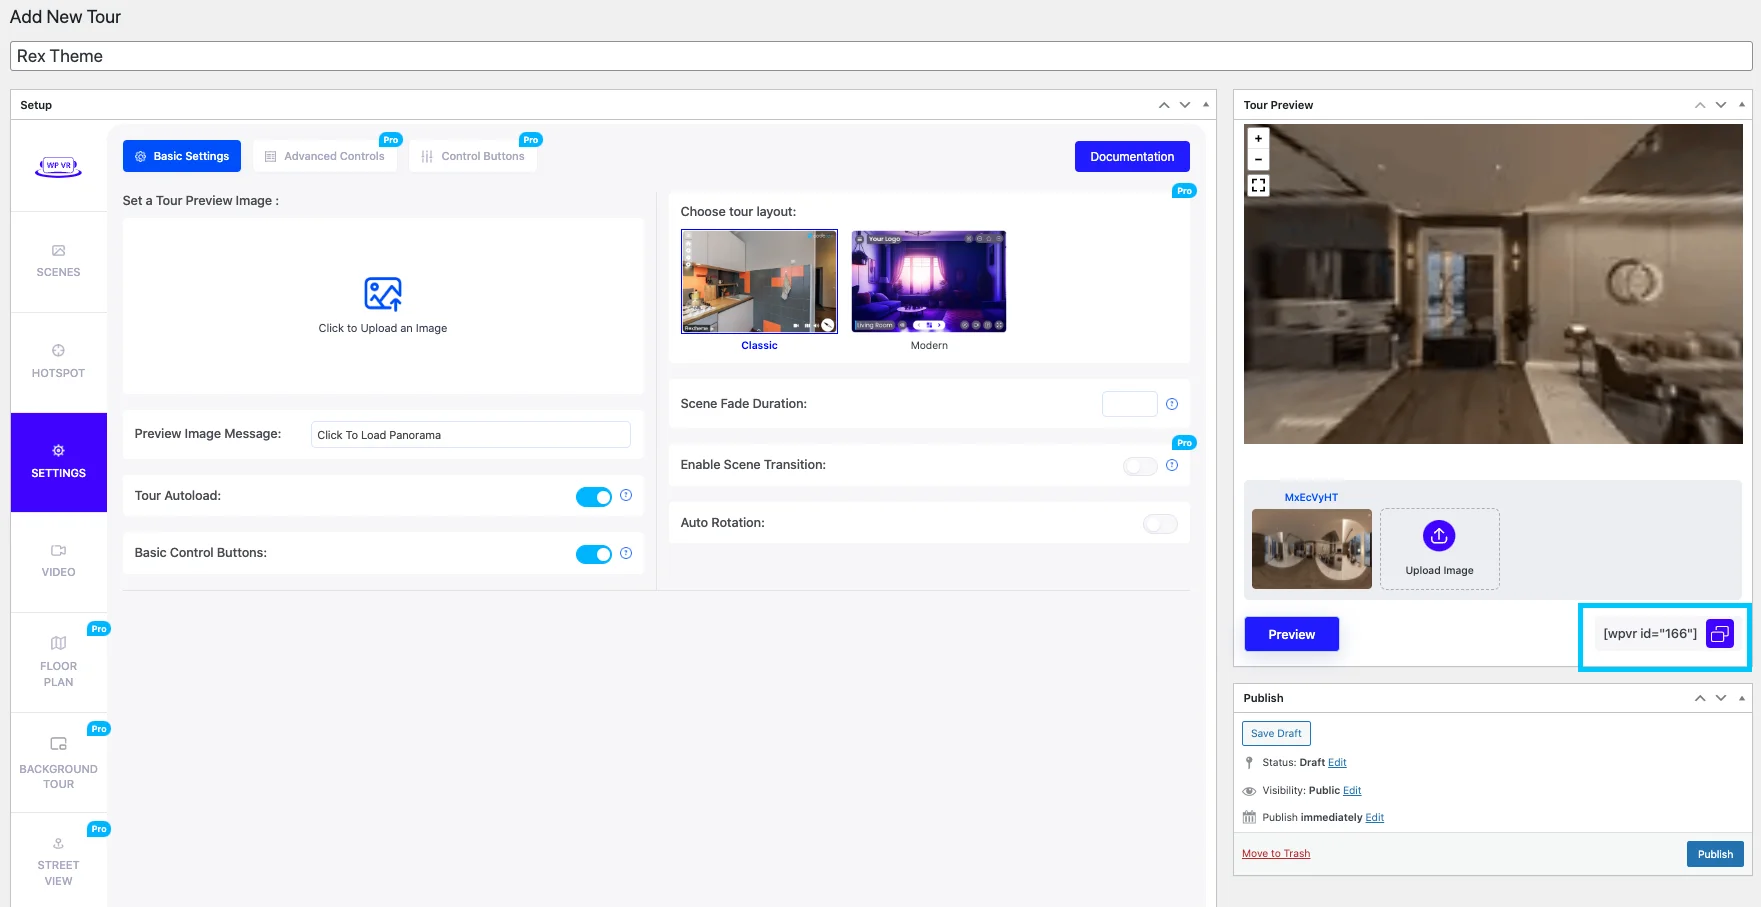
Go to the General > Basic Settings tab and you will see the following options:

Setting option of WP VR

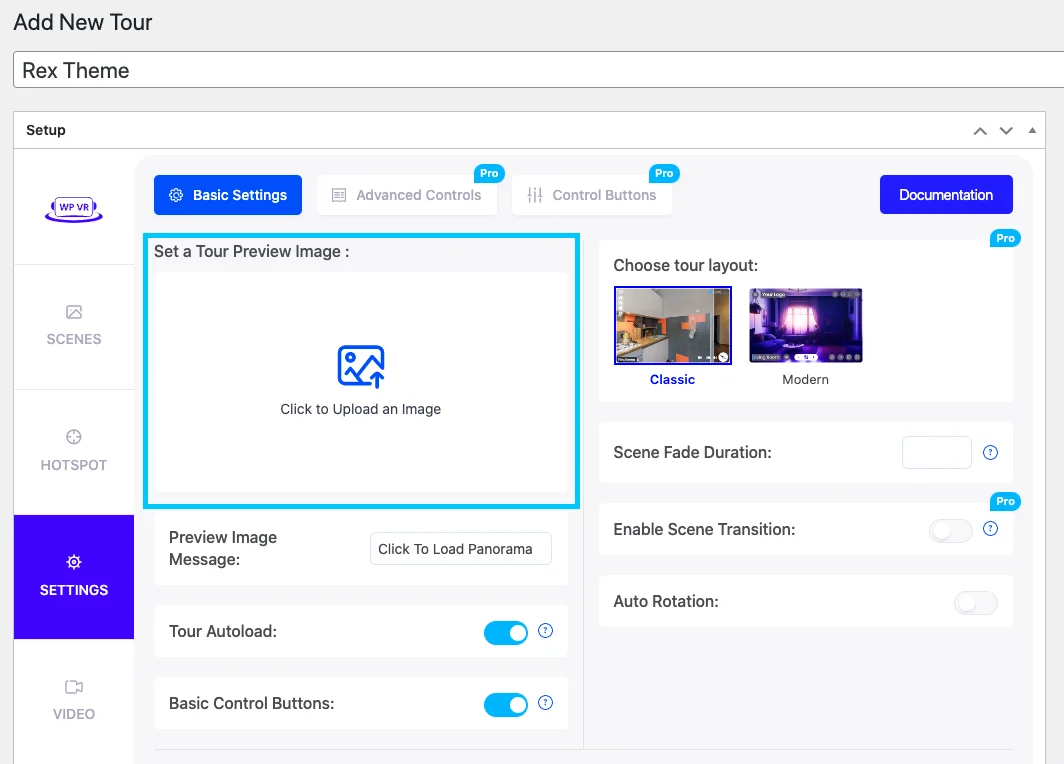
Set A Tour Preview Image:

When you keep Autoload option “Off”, there is a netted placeholder visible. However. you can replace that by uploading a Preview image.

Simply click on the “UPLOAD” button and add a media image. (You should use a flat image for this, rather than a 360 panoramic image)

Or you can provide a link to the image. (Make sure if your site is SSL certified i.e. “https”, then the image link should also have “https”.)

Set a preview image

Once you upload the image, a thumbnail will appear above the upload button.

This means the preview image was uploaded successfully.

Now once you Preview the tour (or view the tour on a live page), if the Autoload option is “Off”, you will see that this image is in place of the tour until you click on it.

And if the Autoload option is “On”, then this image will be there until the tour loads. And if not you need to click on the button preview.

How To Create A Virtual Tour In Easy Steps- A Complete Guide [2025] 1

Now, the tour preview image won’t appear on the tour, if you’ve turned on the Autoload option.

Tour Autoload:

If the autoload is turned on, the panorama you upload will load automatically. Otherwise, it will load on-click on the option “preview

WP VR

Basic Control Buttons:


Turning it “On” will view the on-screen control button, such as zoom in/out and full-screen mode.

button option

Scene Fade Duration:

The scene fade duration can be added in milliseconds for the transition between two scenes.

Setting option of preview

According to this image, the scene fade duration is set to 1000 milliseconds i.e. 1 second. Hence there will be a 1-second fading effect to transit from one scene to another.

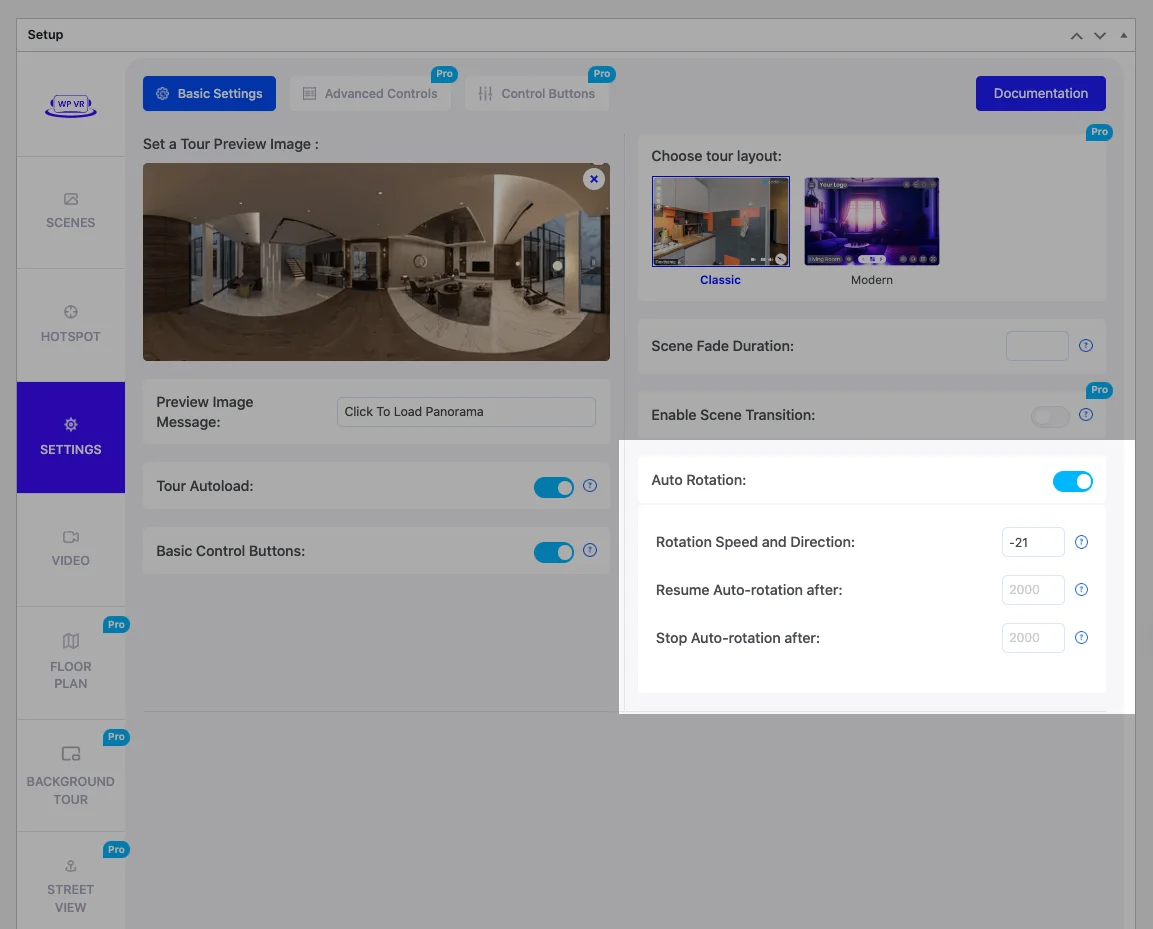
Auto Rotation:

Turning it “On” will show three more fields for you to add an auto-rotation feature to your virtual tour.

auto rotation

  • Rotation Speed and Direction

These are to set the speed of auto rotation on your tour. We suggest you keep this speed within the range of -20 to 20, or else the rotation will probably be too fast.

A negative number will rotate the tour anti-clockwise and a positive number will make it rotate clockwise.

  • Resume Auto Rotation After

This lets you set a time, in milliseconds, so that if you stop the rotation, then after this amount of time, it will start rotating again.

According to the image above, it is set to 2000 milliseconds, i.e., 2 seconds.

  • Stop Auto Rotation After

This lets you set a time after which the tour will stop auto-rotating.

However, this will not work if you input the value on Auto Rotation Inactive Delay. According to the image above, it is set to 2000 milliseconds, i.e., 2 seconds.

These are all the options in the General settings. Configure the settings as you require

Step 4 – Set Up Scenes

Basically, every single panorama you want to include in your Virtual tour is a scene. Go to the Scenes tab and you get the following options:
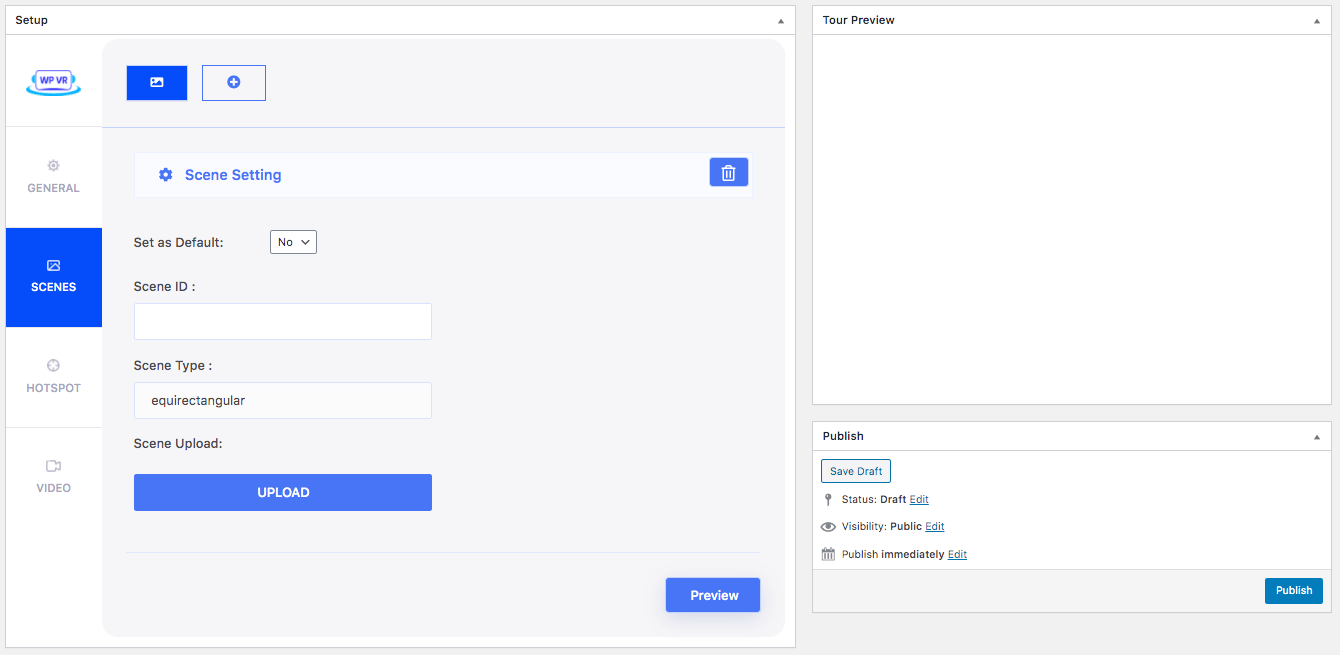
Scenes Section

Set as default:


If you select “Yes” then the current scene will be the default scene to be viewed at first when the virtual tour is loaded. (FYI: The first scene is considered the default scene naturally.

If you want another scene to be the default scene, then mark that scene as “Yes” for Set as default.

Scene ID:

Scene ID is the initialization of a scene. You need to assign a unique scene ID to every scene you wish to upload.
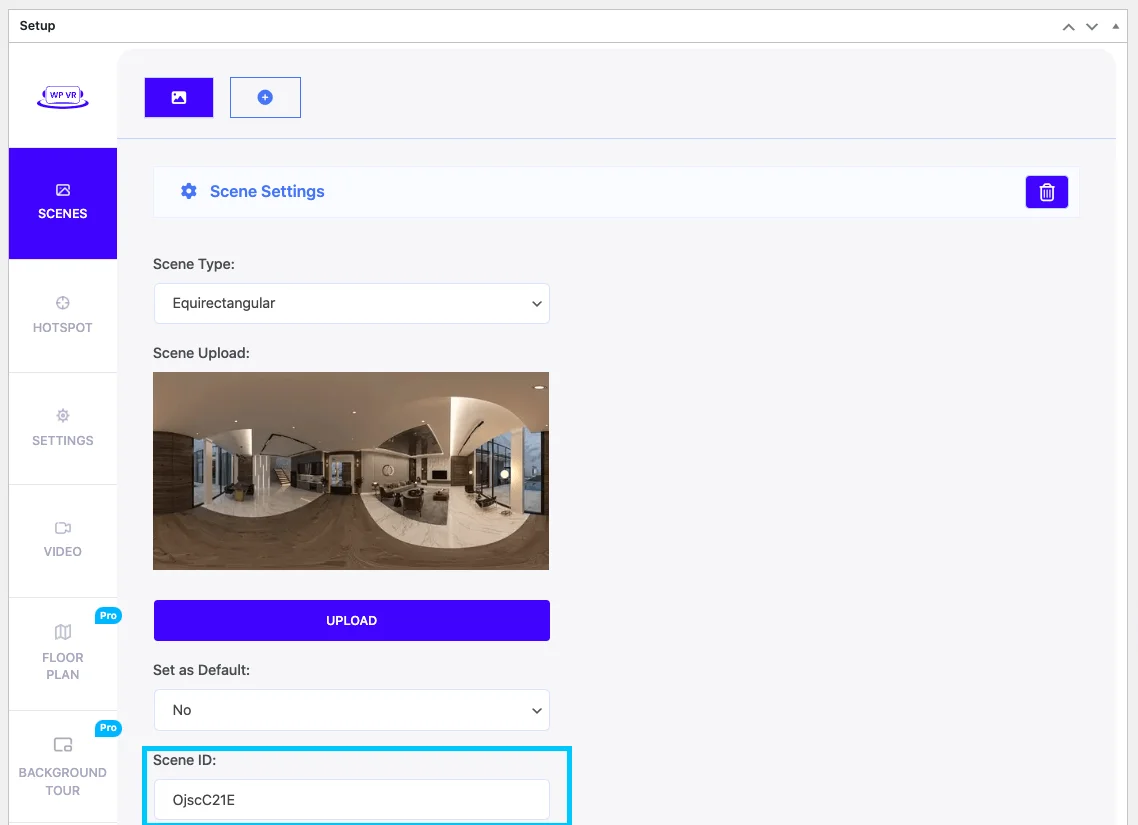
scene id

You can later use this Scene ID to assign a scene as the Target Scene under Hotspot, i.e. clicking on the hotspot will take you to this scene. You will get a guide to this under the “HotSpot” section. 

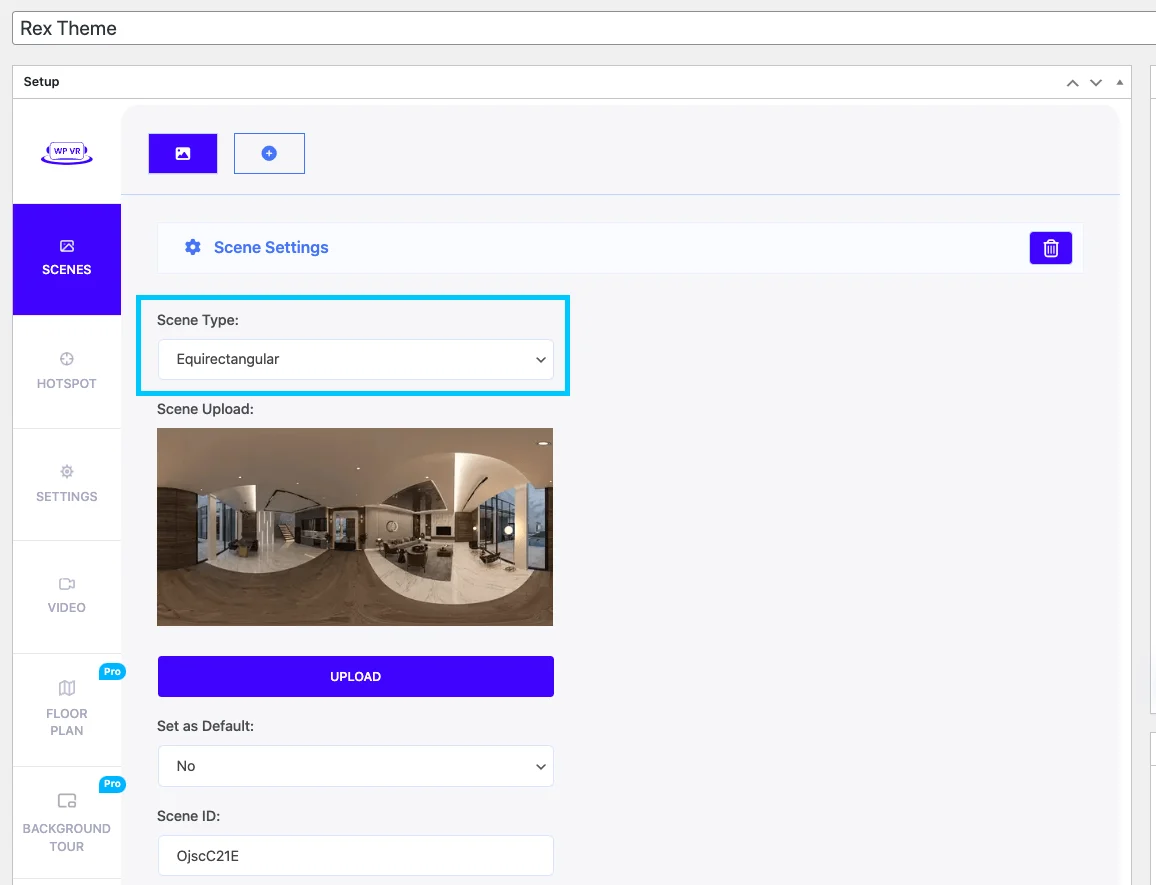
Scene Type:

The scene type is set as ‘equirectangular’ by default. It means that it will view the Equirectangular format of the scene.

scene type

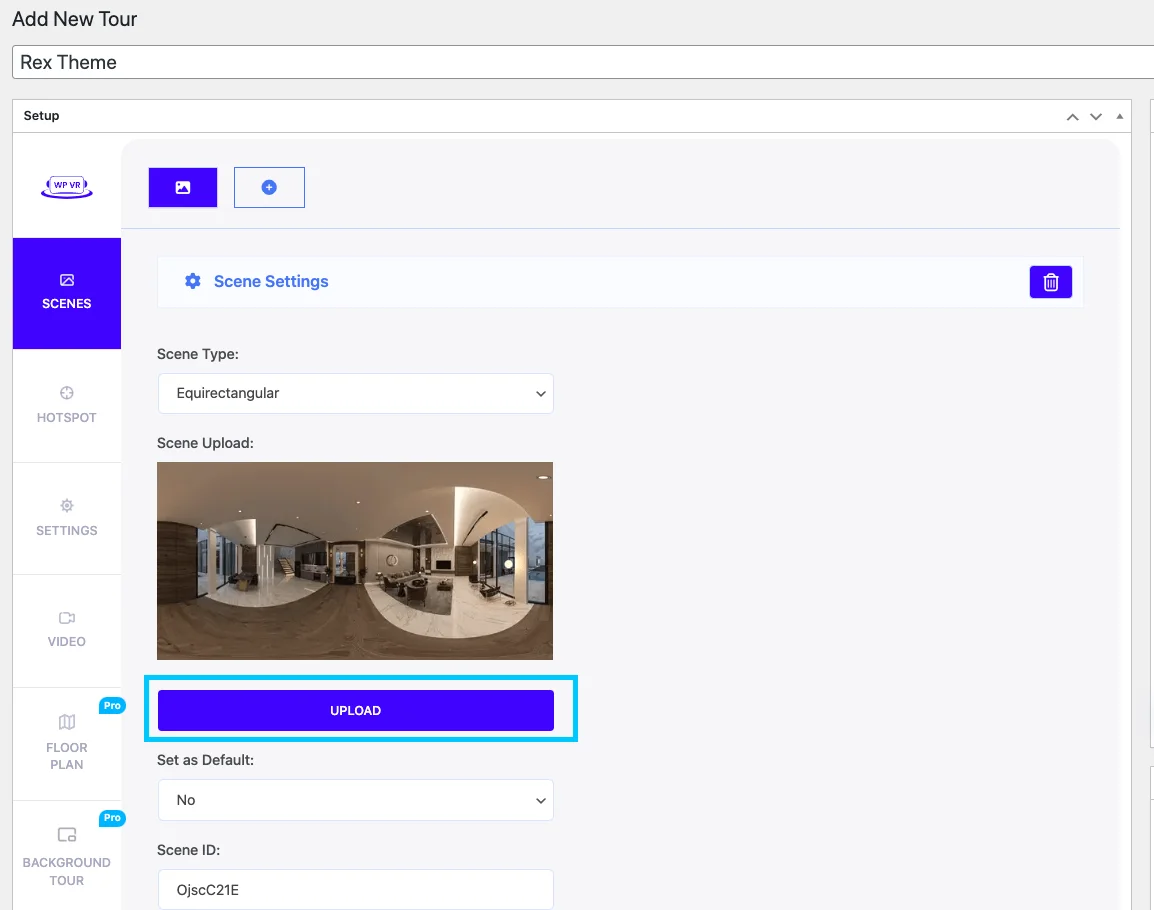
Scene Upload:

Here, click on the “UPLOAD” button and upload a 360-degree panoramic image to use it as your current scene.

Once you upload the image, a thumbnail will appear above the upload button.

Upload option

This will mean that the image is uploaded as the current scene image.

FYI: Most mobile devices have restrictions on the resolution; they can support a maximum of 4096 px by 2048 px.

Hence, we suggest you use a panoramic image within these dimensions for the virtual tour to be responsive on all devices. (However, the plugin works with any resolution. You can upload high resolution images if you just want to view the tour on PC).

Preview:

Once you have uploaded the image, you can now click on the Preview button.
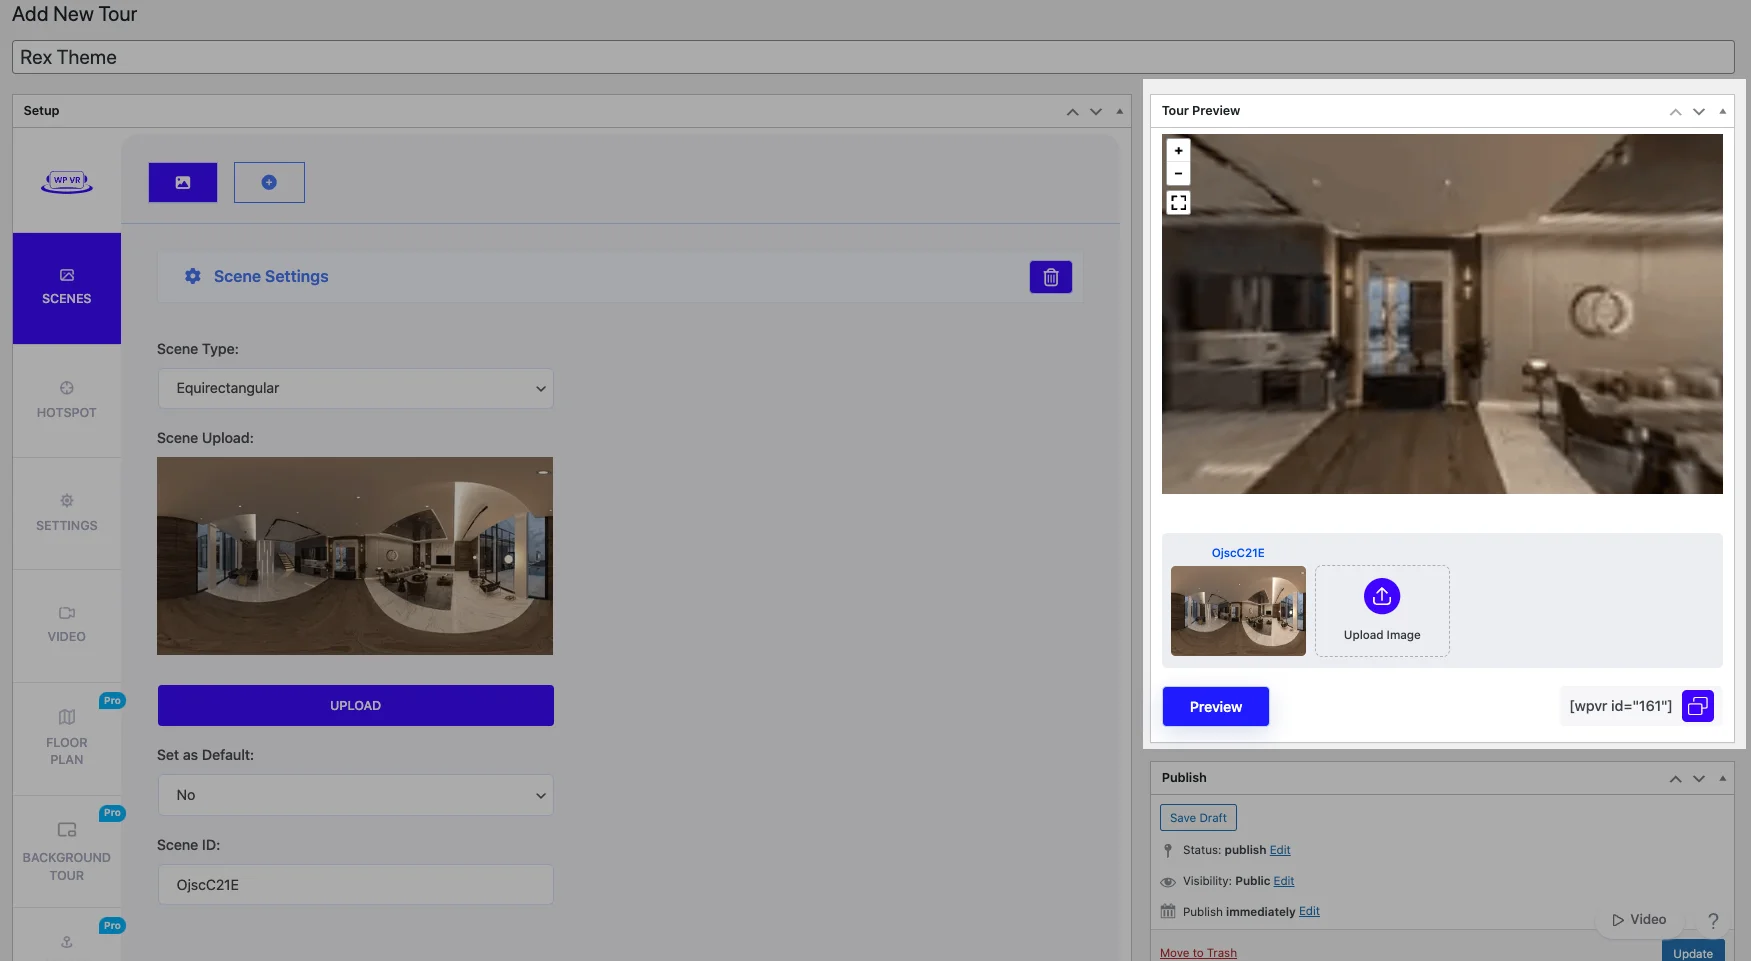
Scene preview option

You will get a Tour Preview of the tour just beside the Scene Settings.

Every time you make changes to any settings, you can click on the Preview button to see the changes taking effect on the tour preview.

**The Tour Preview has a scene gallery below. You can double-click on a thumbnail there to go to any scene in the tour preview.

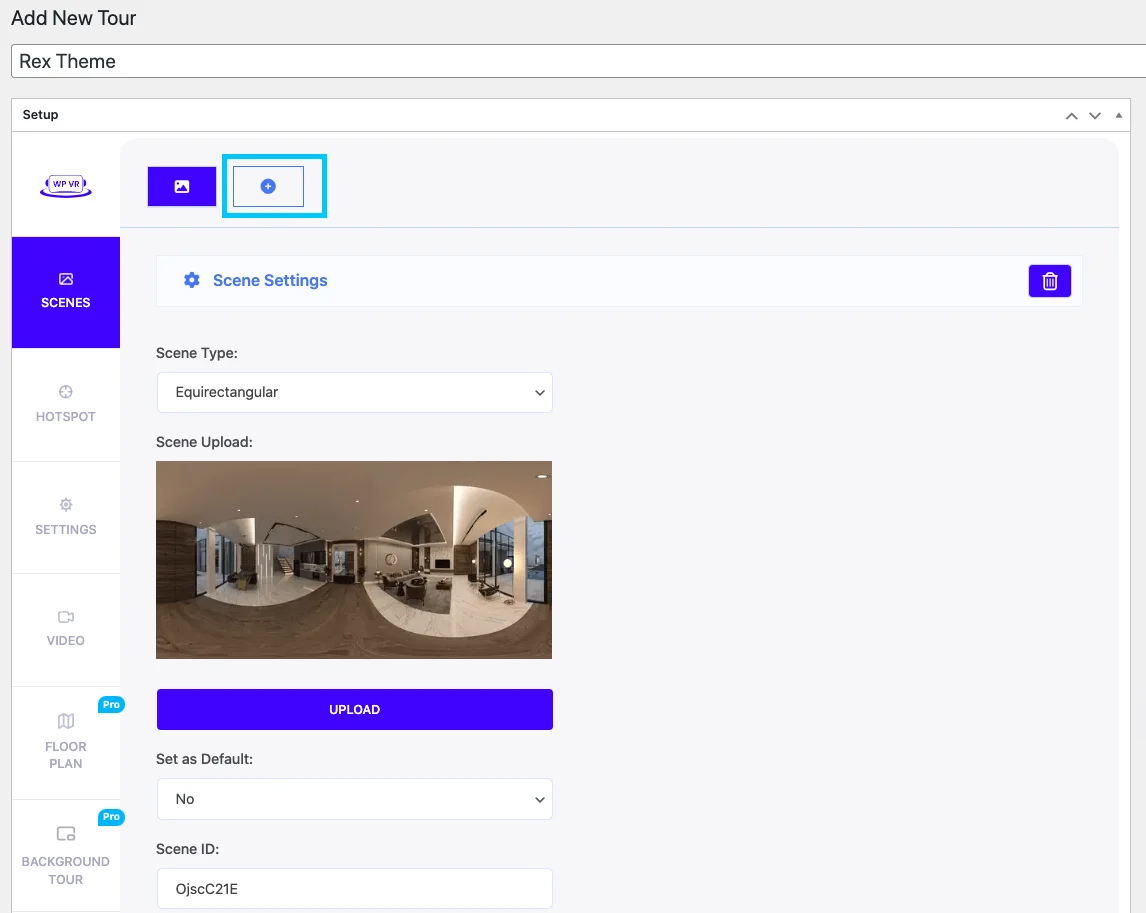
To add a second scene, on top, click on the “+” button.

Add scene

And a new blank scene will be added.

To switch between scenes, click on the icons above. The currently viewed scene will be marked blue.

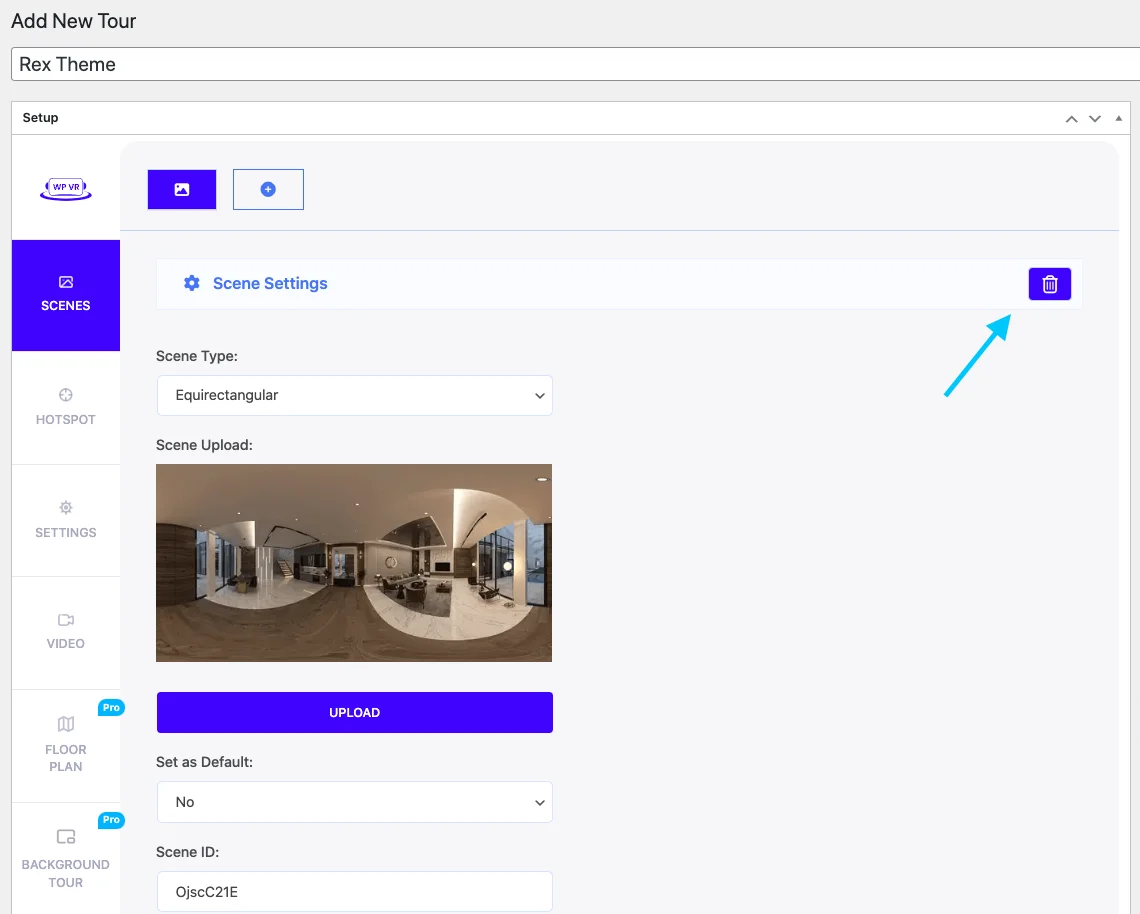
To delete a scene, you can simply go to the scene, then click on the “Trash Bin” icon and the scene will be deleted.

delete button in scene option

Here are more fields that you get :

  • Title: Specifies the name or title of the panoramic scene.
  • Author: Identifies the creator or photographer of the panoramic image.
  • Author URL: Provides a link to the author’s website or portfolio.
  • Vertical Angle of View: Determines the vertical field of view for the panoramic scene.
  • Horizontal Angle of View: Sets the horizontal field of view for the panoramic scene.

Set accordingly the field as per your needs.

That’s it with the basics of Scene Settings.

Now, add Hotspots to make the tour more meaningful and engaging.

Step 5 – Use Hotspot Efficiently 

For an active scene, you can add multiple hotspots. With this option, you can link any of your scenes with other scenes.

Also, you can add images, links, or video information via this option.

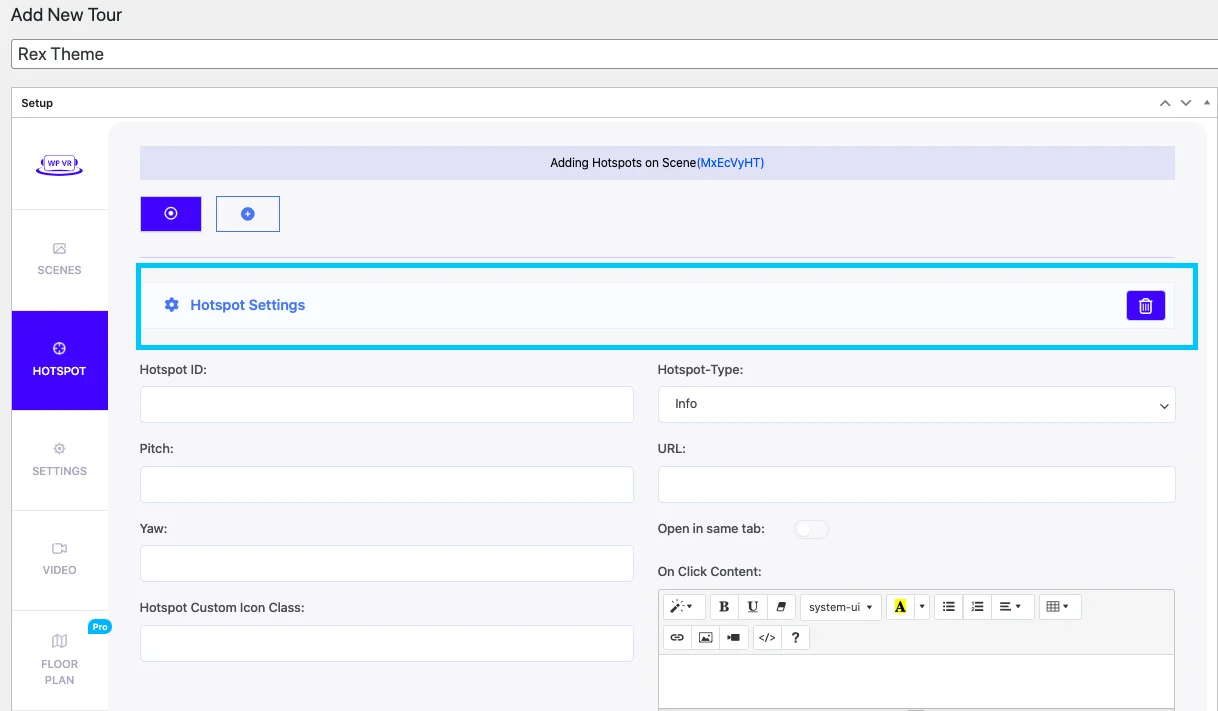
While on a Scene, go to the HotSpot tab and you get the hotspots you added for that particular Scene.

To add a hotspot for another scene, first, go to the Scene tab, select the desired Scene, then go to the Hotspot tab to view its respective Hotspots.

For a hotspot of a scene, initially, you will get the following options:

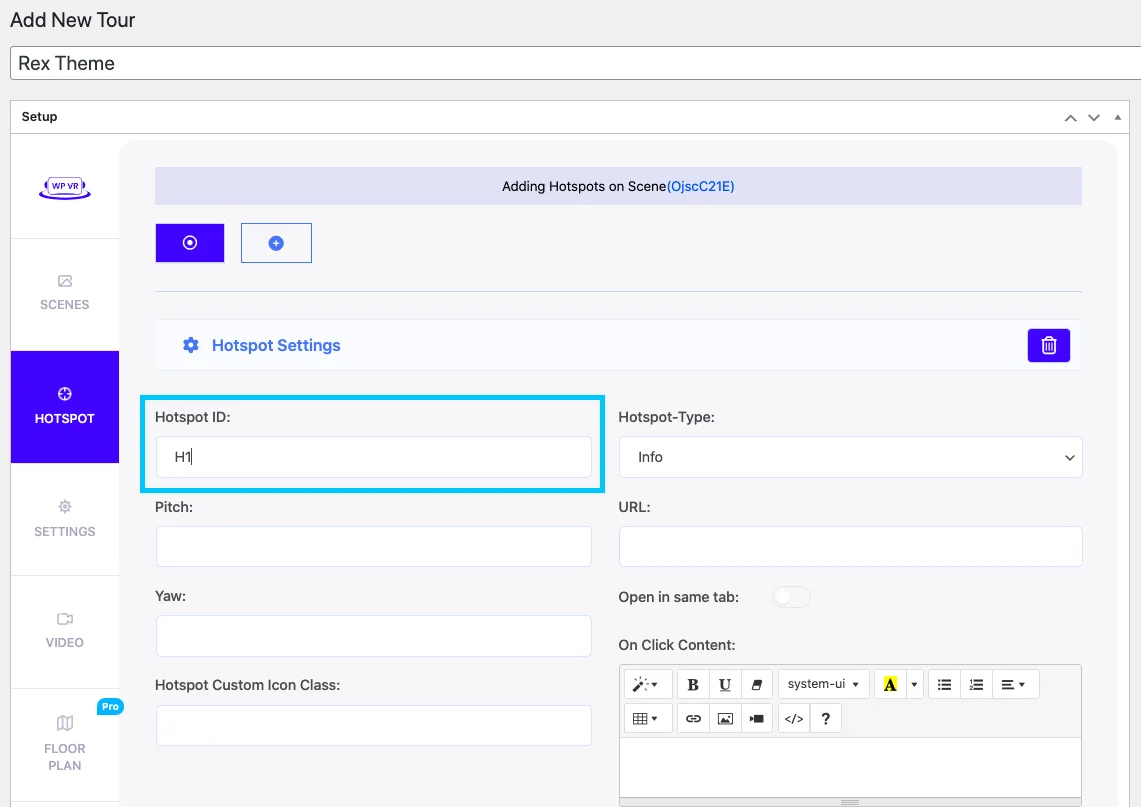
HotSpot ID:

You have to provide a unique Hotspot ID for every hotspot you create in a scene.

hostpot id

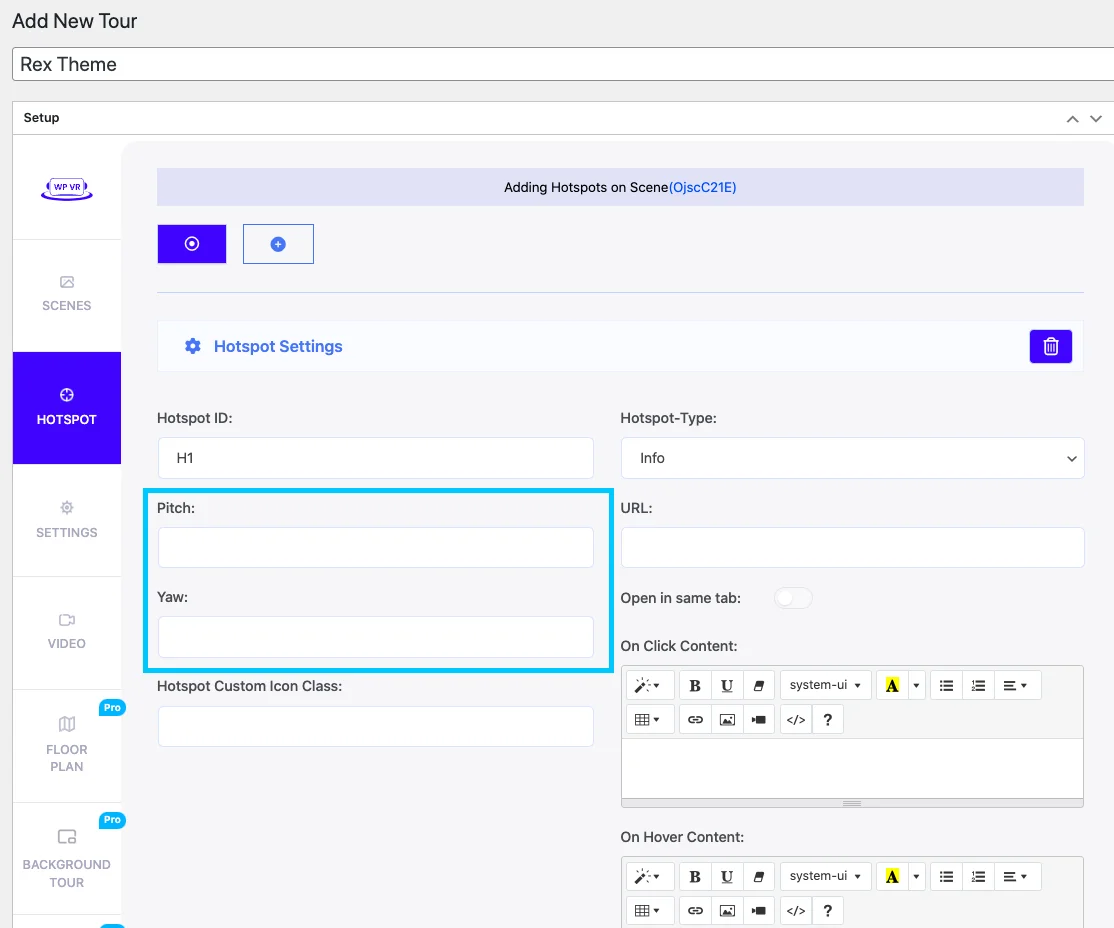
Pitch And Yaw:

The Pitch and Yaw are the coordinates required to define the point where the Hotspot will be placed.

pitch and yaw

You will be able to collect these from the Preview Tour.

Previously you set up the scene and clicked on Preview. The Preview Tour will be still there.

Scroll down to the Preview Tour and click on the point on the tour, where you want to place the Hotspot. You will see that the pitch and yaw coordinates will appear below the Preview Tour.

You can copy the Pitch and Yaw and input them in the required fields.

Or, you can click on the arrow button (beside the Pitch and Yaw coordinates under the Tour preview) to automatically collect and place Pitch and Yaw values in the Pitch and Yaw fields for a Hotspot.

Once you are done setting up the hotspot, click on the Preview button, and a hotspot icon will appear in the current scene on the spot from where you collected the coordinates of the Pitch and Yaw.
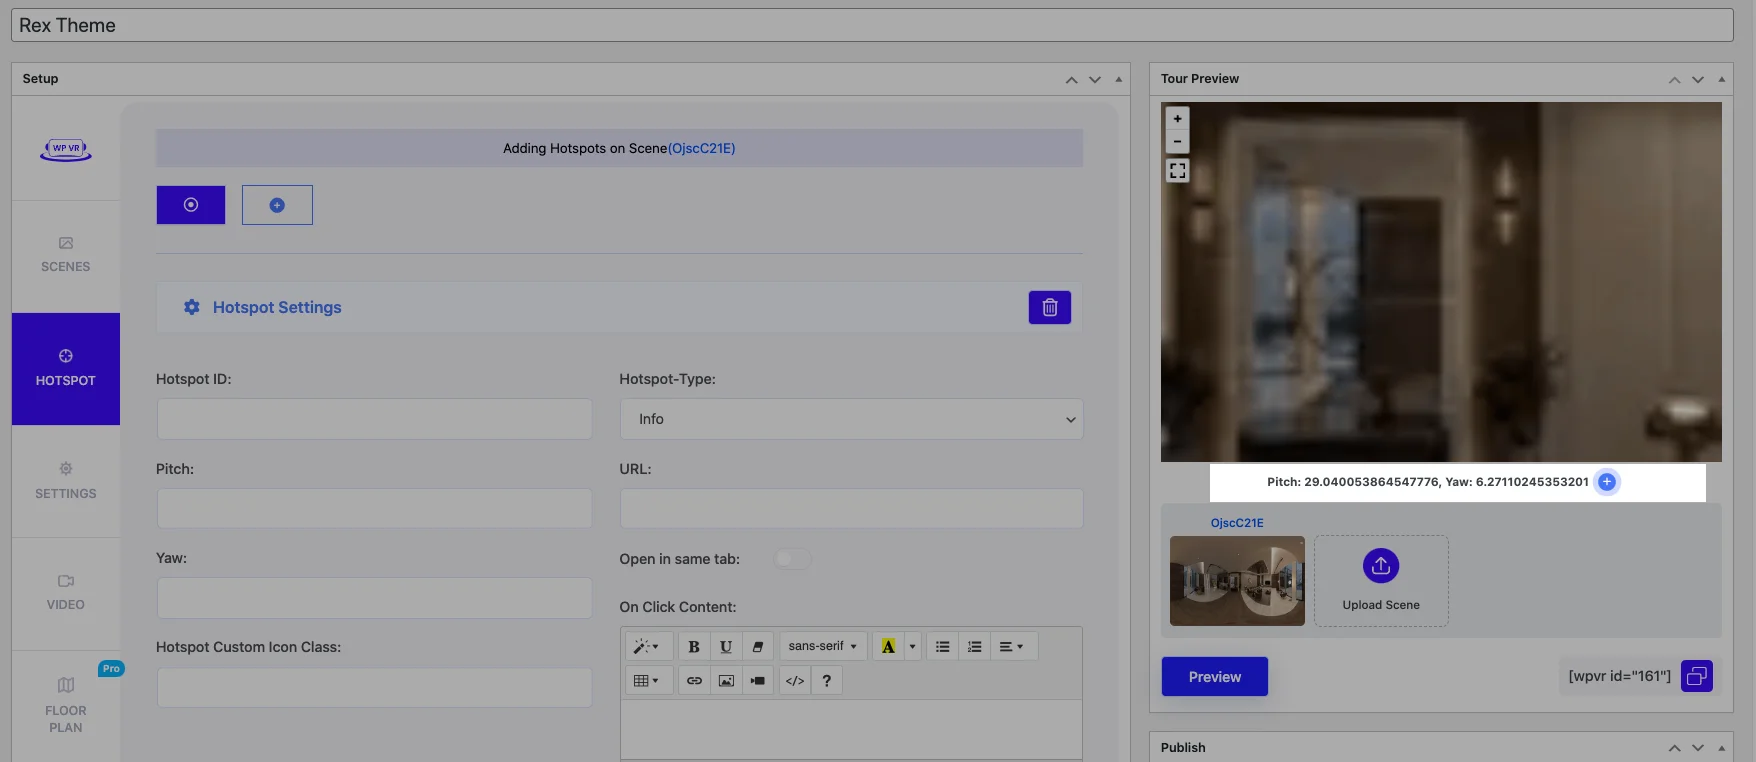
pitch and yaw

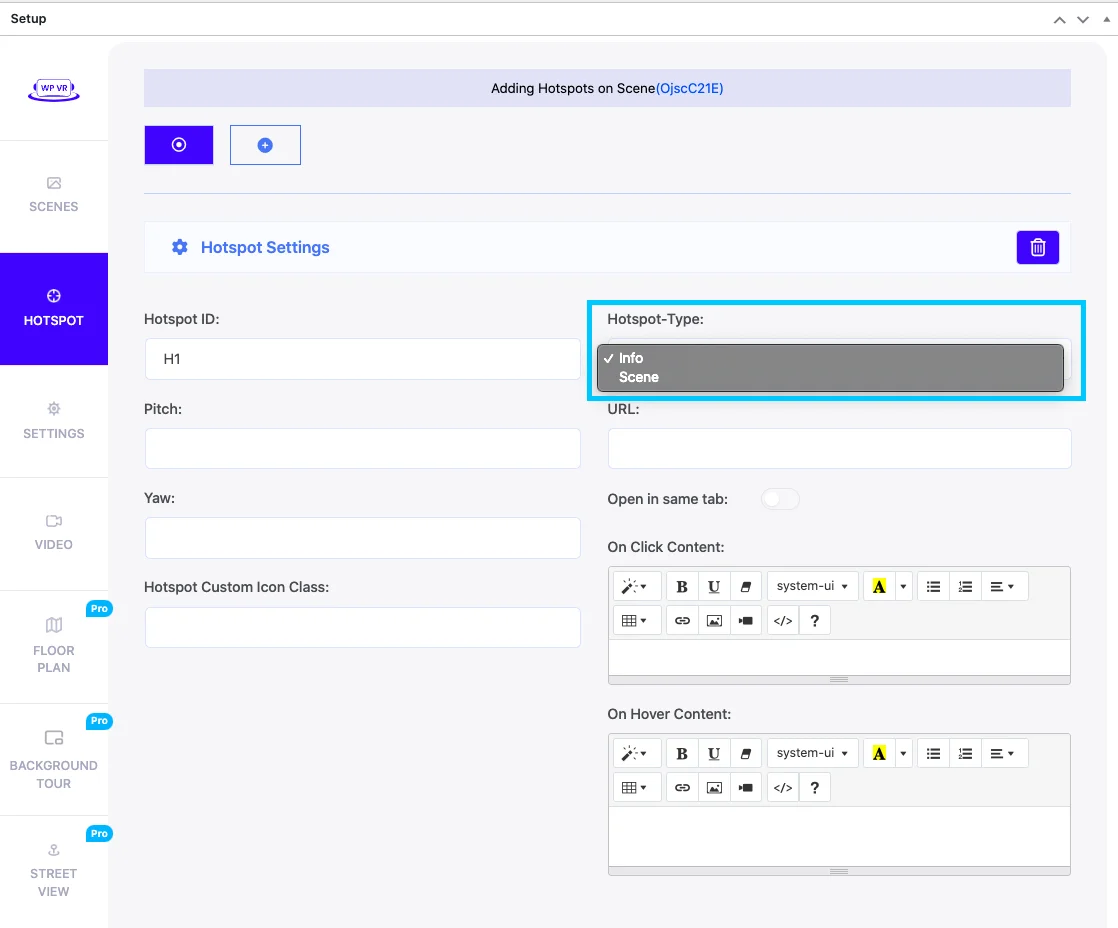
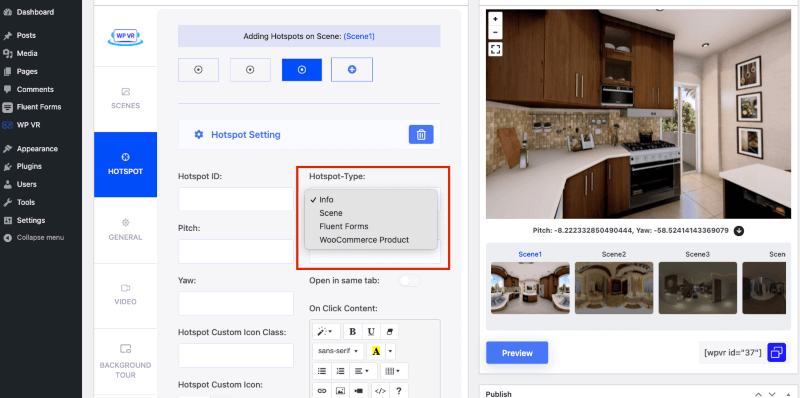
HotSpot Type:

There are two types of hotspots available:

  • Info
  • Scene
type of hotspot

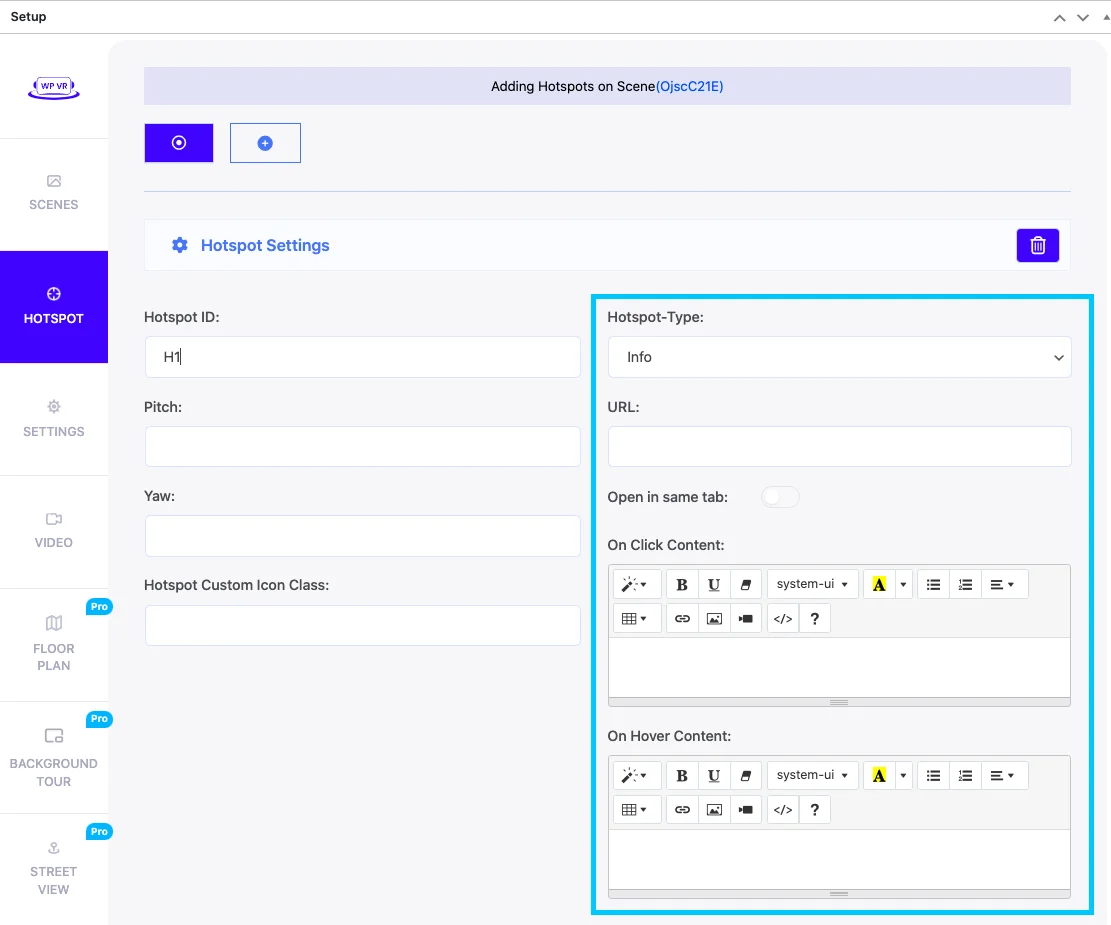
It comes as “Info” by default and you will view these fields:

  • URL.
  • On Click Content.
  • On Hover Content.
hotspot option

URL:

Provide the URL of a website, so clicking on the hotspot will take you to that website on a new tab. 

On Click Content:

Here you can add content to your hotspot so that clicking on the hotspot will display a pop-up window over the tour with the content you entered. There are options to add text, images, videos, gifs and more!
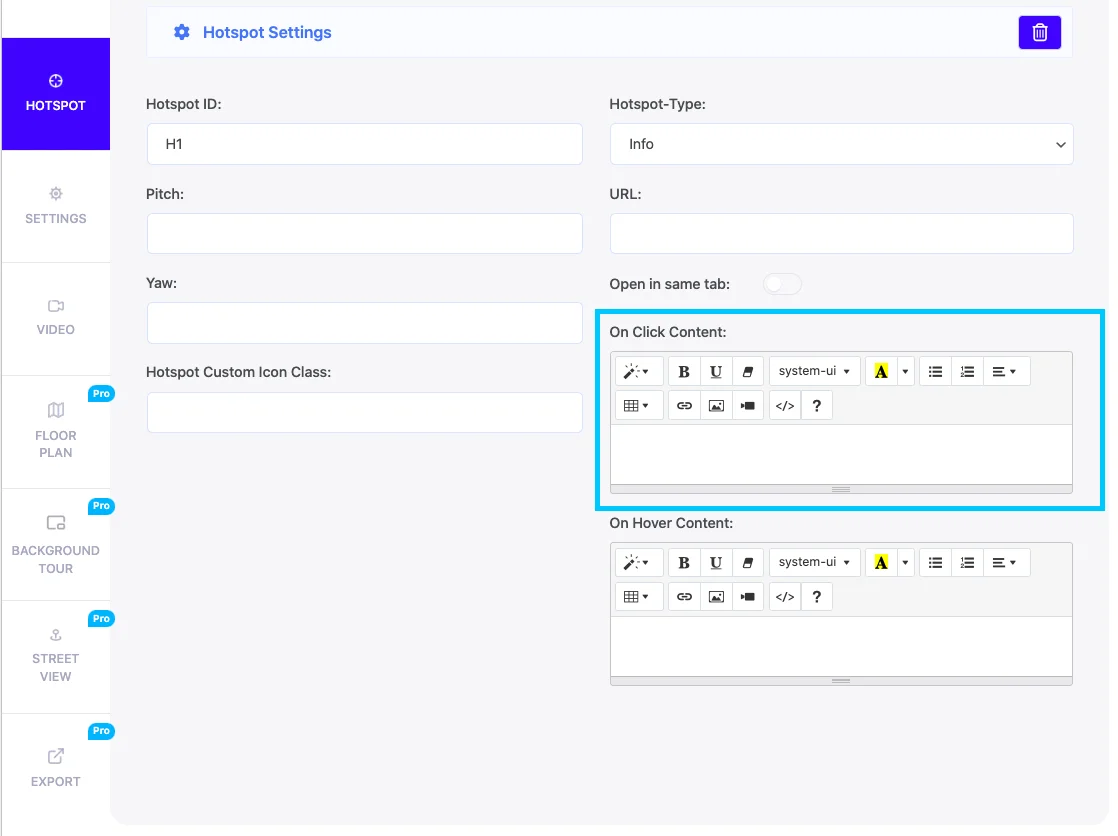
on click content

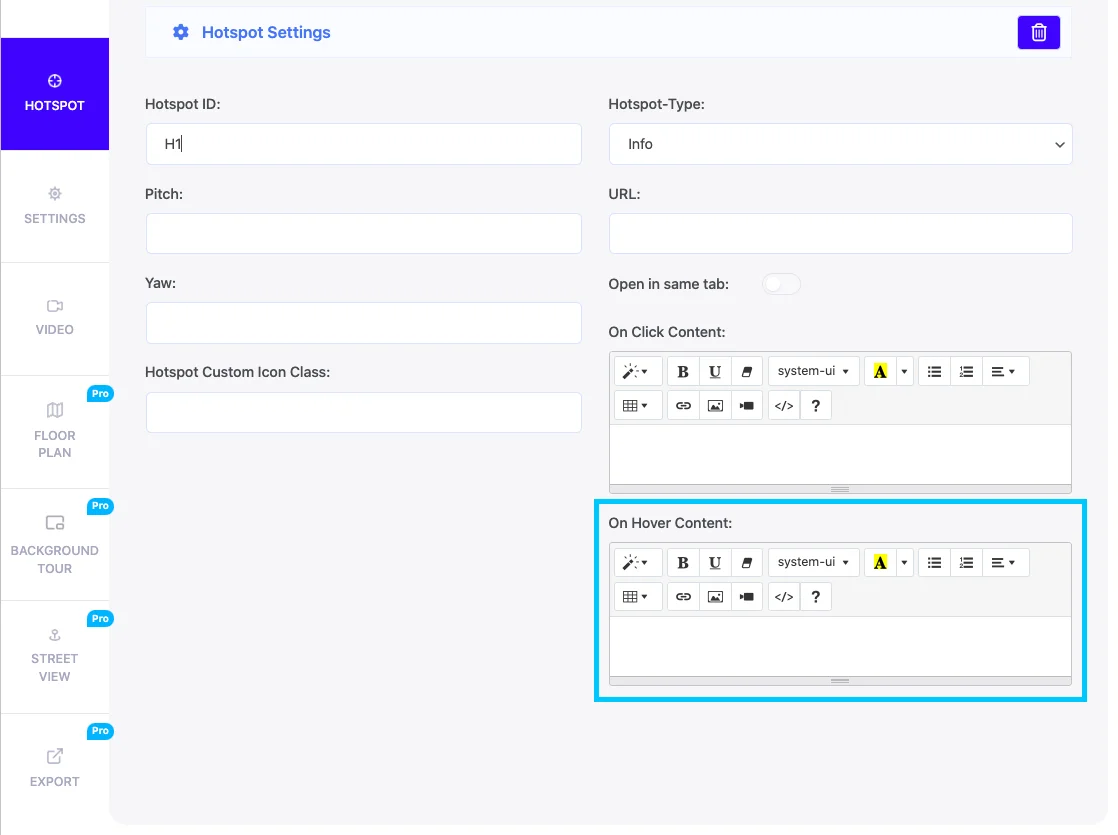
On Hover Content:

Here you can add content to your hotspot so that if you just hover your mouse on the hotspot, the content will appear. And similar to the on click content, you can add whatever type of content you want.

On hover content

You can also add images using the <img src> tag or add a video using the <iframe> snippet of the video to display them when you hover the mouse on the hotspot.

Now, let’s look at the Scene type hotspot.

A scene-type hotspot is used to connect two scenes, i.e., clicking on the hotspot will transmit you to another scene (assigned here).

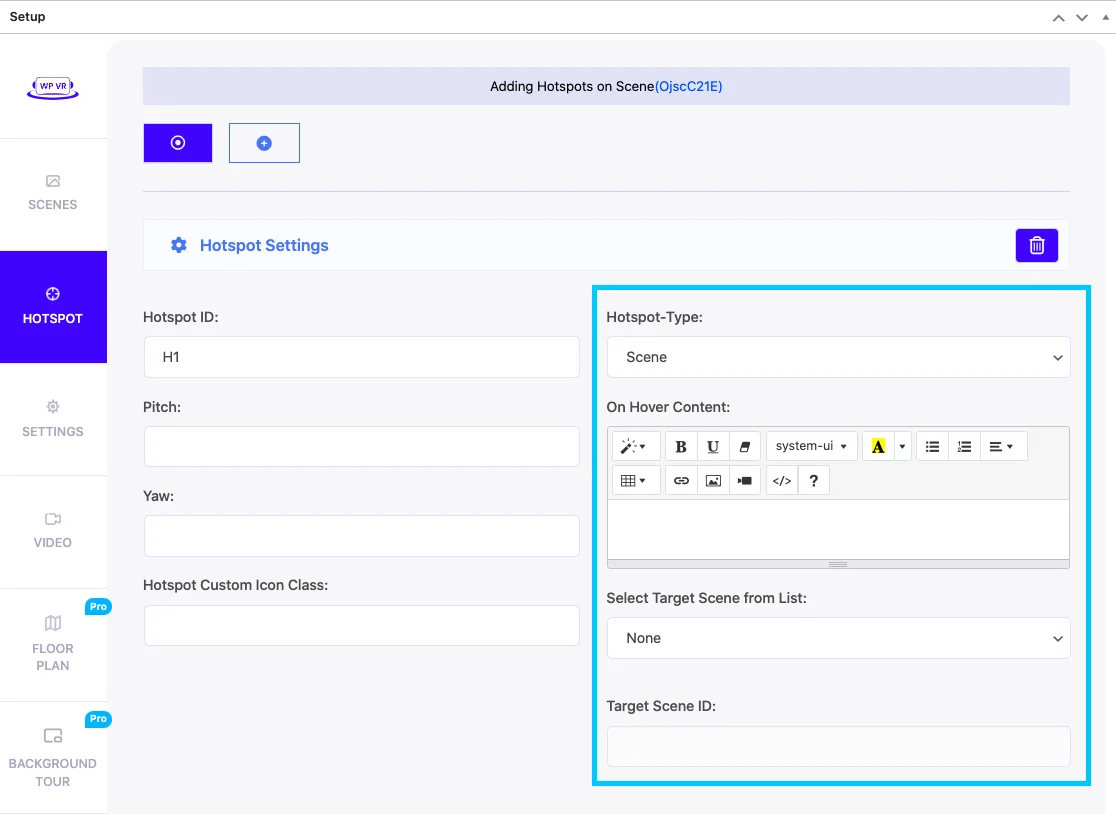
If you change the hotspot style to Scene, then you will view these fields:

  • On Hover Content.
  • Select Target Scene from the List.
  • Target Scene ID.
hotspot scene type

On Hover Content:

Here you can add content to your hotspot so that if you just hover your mouse on the hotspot, the content will appear. In the content, you’ll be able to add image [maybe of the scene that you’re guiding them to], videos, images etc.

Here’s an example:
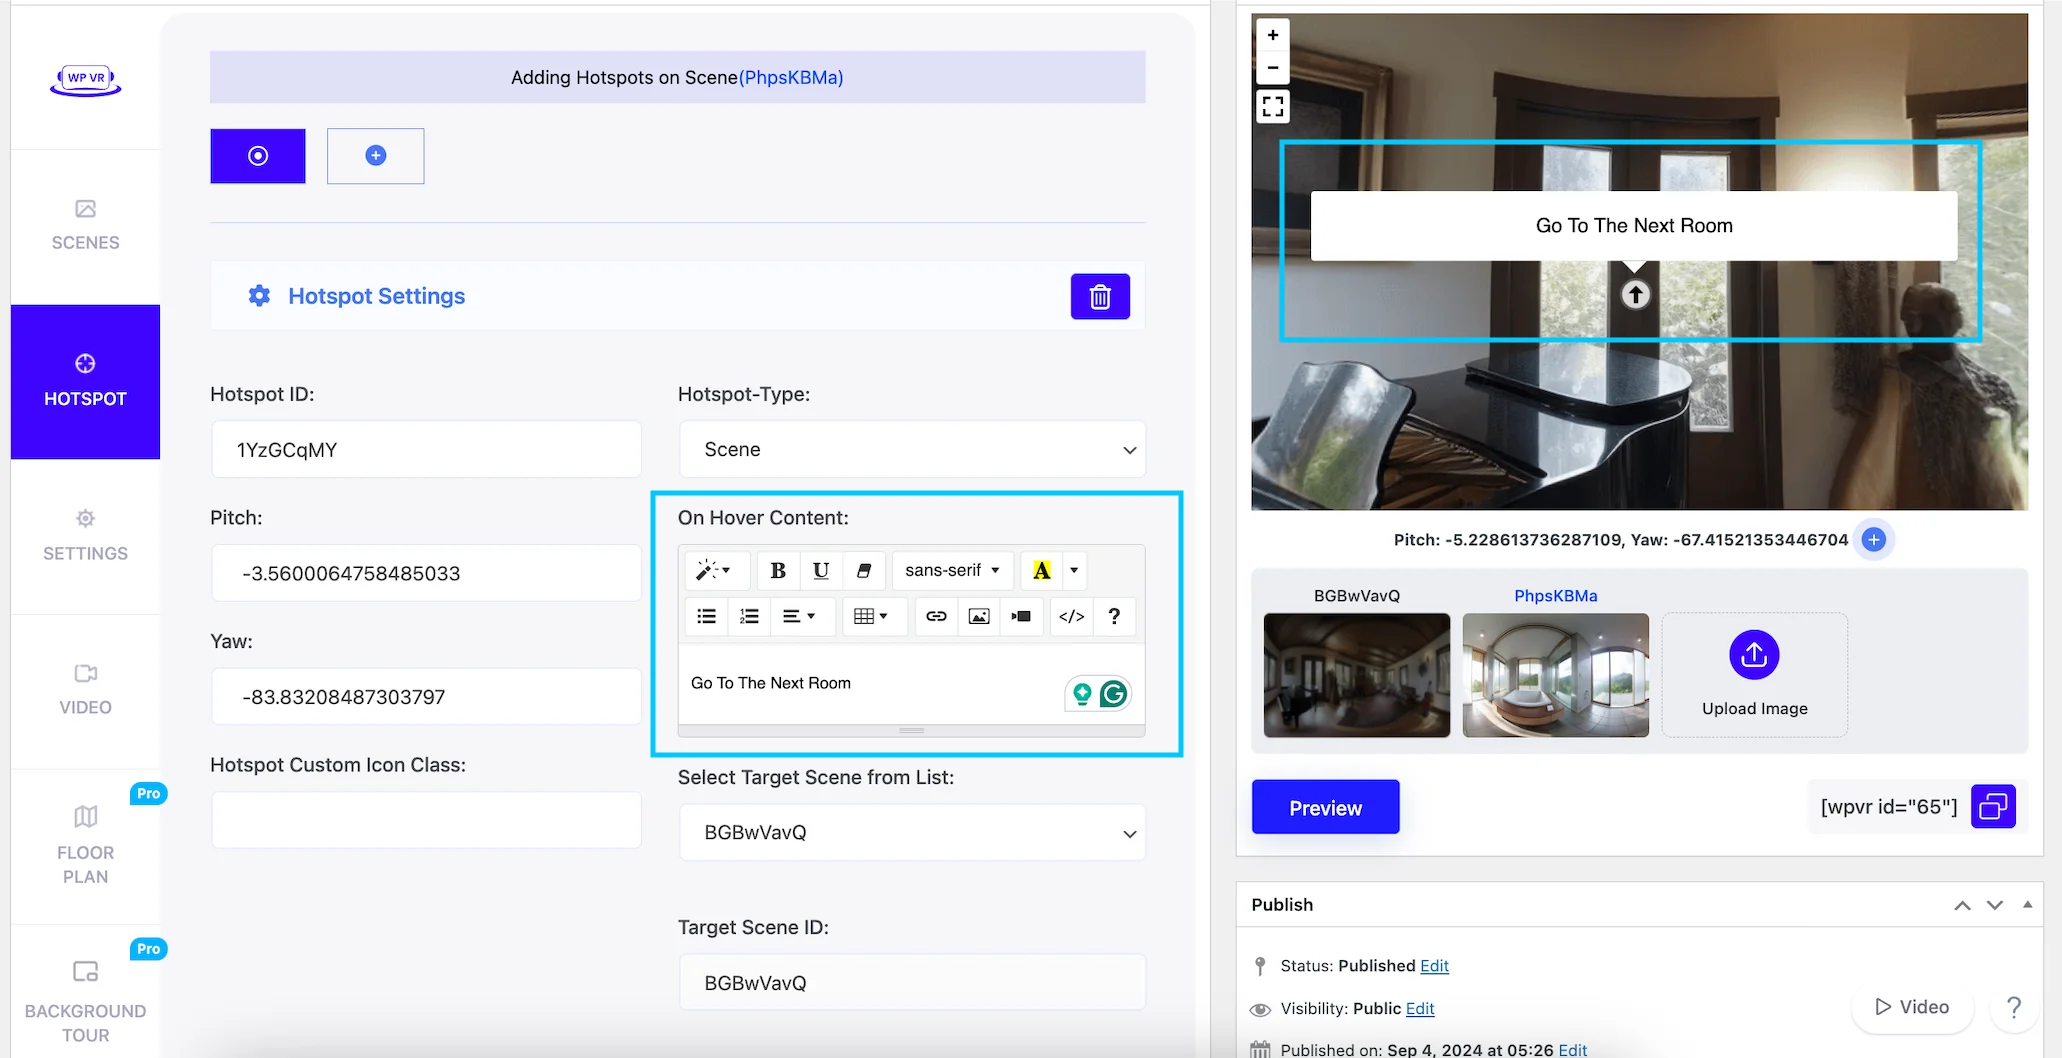
On Hover Content Scene Type

You can also add images using the <img src> tag or add a video using the <iframe> snippet of the video to display them when you hover the mouse on the hotspot.

Select Target Scene and the ID from the List:

For every Scene you create, their Scene IDs get listed here for you to choose from. Whichever you choose will be the scene where the hotspot will take you. This field shows you the Id of the Scene that you selected from the Target Scene from the List.

The ID automatically gets loaded.

Select Scene for Hotspot

**When you choose a hotspot to be Scene type, the hotspot icon on the tour will change to a small Arrow.

Hotspot Scene Type

Hotspot Custom Icon Class:

This field is there to allow you to implement customizations of the hotspot content.

Custom Hotspot Icon

Here you can apply customization to the hotspot icon. You may use any icon of your own choice. Let me give you an example.

To customize your hotspot icon, go to your Appearance > Editor. Choose the style sheet of your current theme, or you may go to Appearance > Customize > Additional CSS.

Here, create a class and under the class, add your custom style CSS code for customization. Click Save. For example:

.custom-icon { 
height: 26px; 
width: 26px; 
background: url("image url") no-repeat center center/auto; 
border-radius: 12px; 
}

Here I set the class name as “custom-icon” but you can give any name you want. Then set the height and width of the image (ideally 26px by 26px for icons). Then provide the image URL. You can add a border radius if you want the icon to be circular.

Here’s how my one looks:
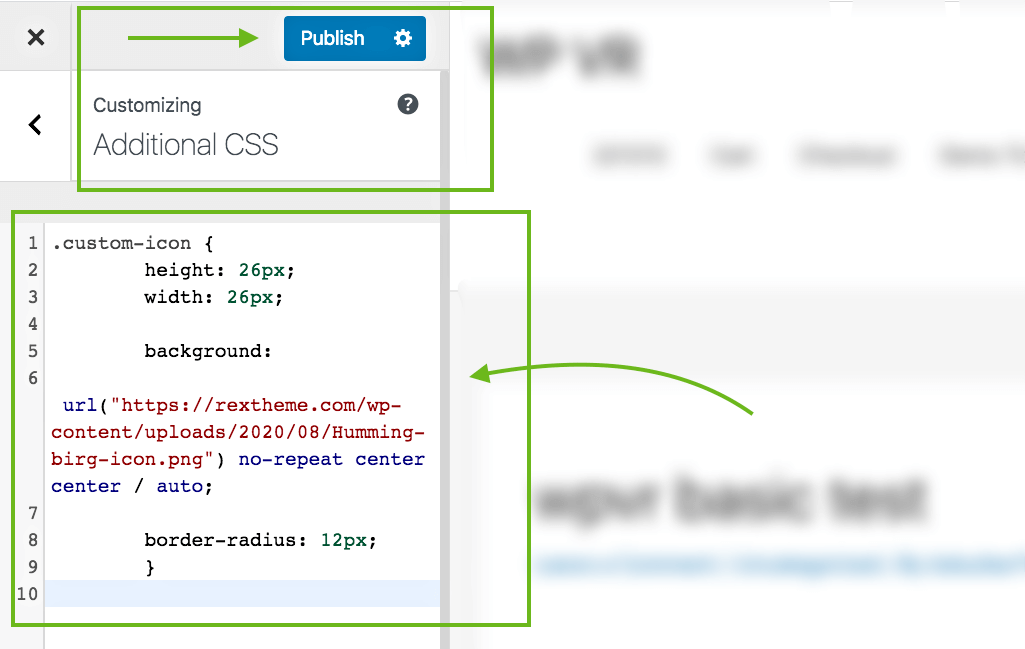
Paste code in Additional CSS

Then Publish.

Hotspot Custom Icon Class:

Now go to your tour and input the class name “custom-icon” on the “Hotspot custom icon class” field for the hotspot you wish this icon to apply on.

Icon class used

Then update the tour. This icon won’t show at the back end, but it will appear on the front-end.

Hence, embed the tour on a page and preview it to see the result.

Add More Hotspot As You Move On:

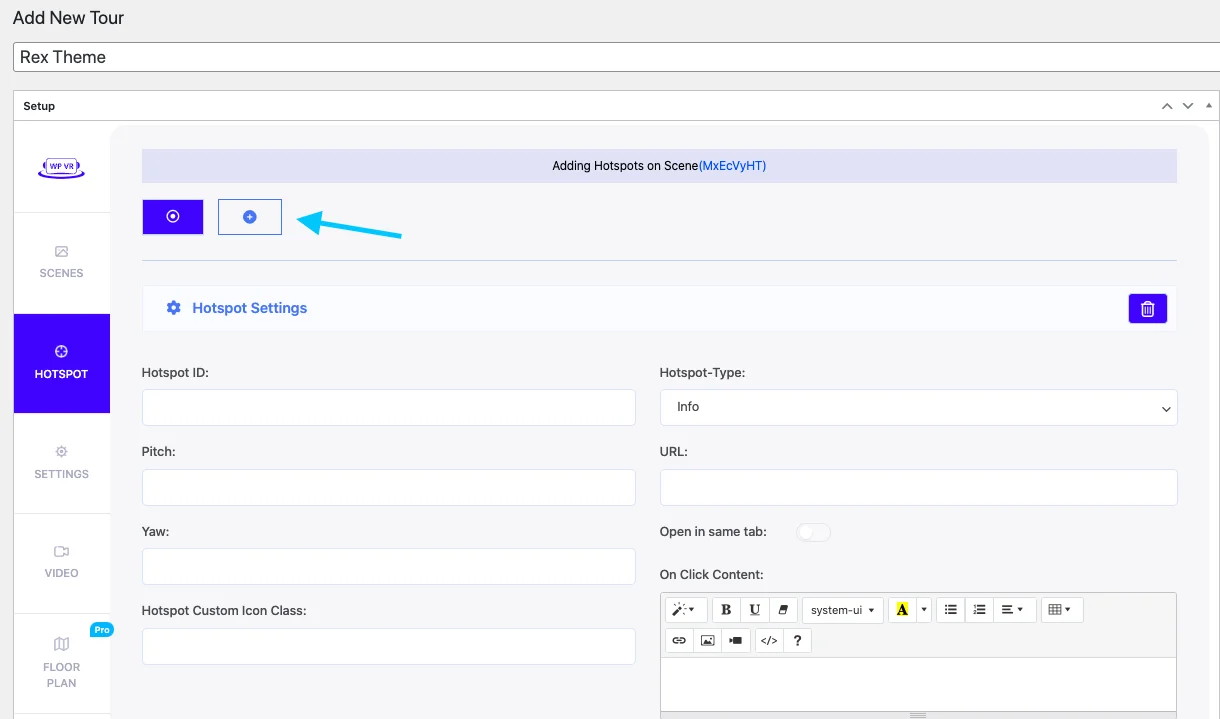
To add a second hotspot, click on the “+” button above and a new blank hotspot will be added.

add hostpot option

To remove a hotspot, simply click on the trash icon and the hotspot will be deleted.

hotspot delete option

That’s it, that’s all you need to know about setting up a hotspot for now.

Hotspot Special Features In WPVR PRO

Now utilize Steps 3, 4, and 5 to add more scenes and set up a virtual tour.

You can also customize your icon with these options :

  • Hotspot Custom Background Color: This allows you to set a specific background color for hotspots in the panoramic scene.
  • Hotspot Custom Background Shape: This allows you to set specific background shapes for hotspot icons like circles, rectangles or hexagon.
  • Hotspot Custom Icon Color: Enables customization of the color of the icon used for hotspots in the panoramic view.
  • Hotspot Animation: Provides options to add visual effects or movements to hotspots, making them more noticeable or interactive. This icon won’t show at the back end, but it will appear on the front end.
Hotspot Customization

Step 6 – Publish The Tour and Collect Tour ID

Once done, move to the next step.

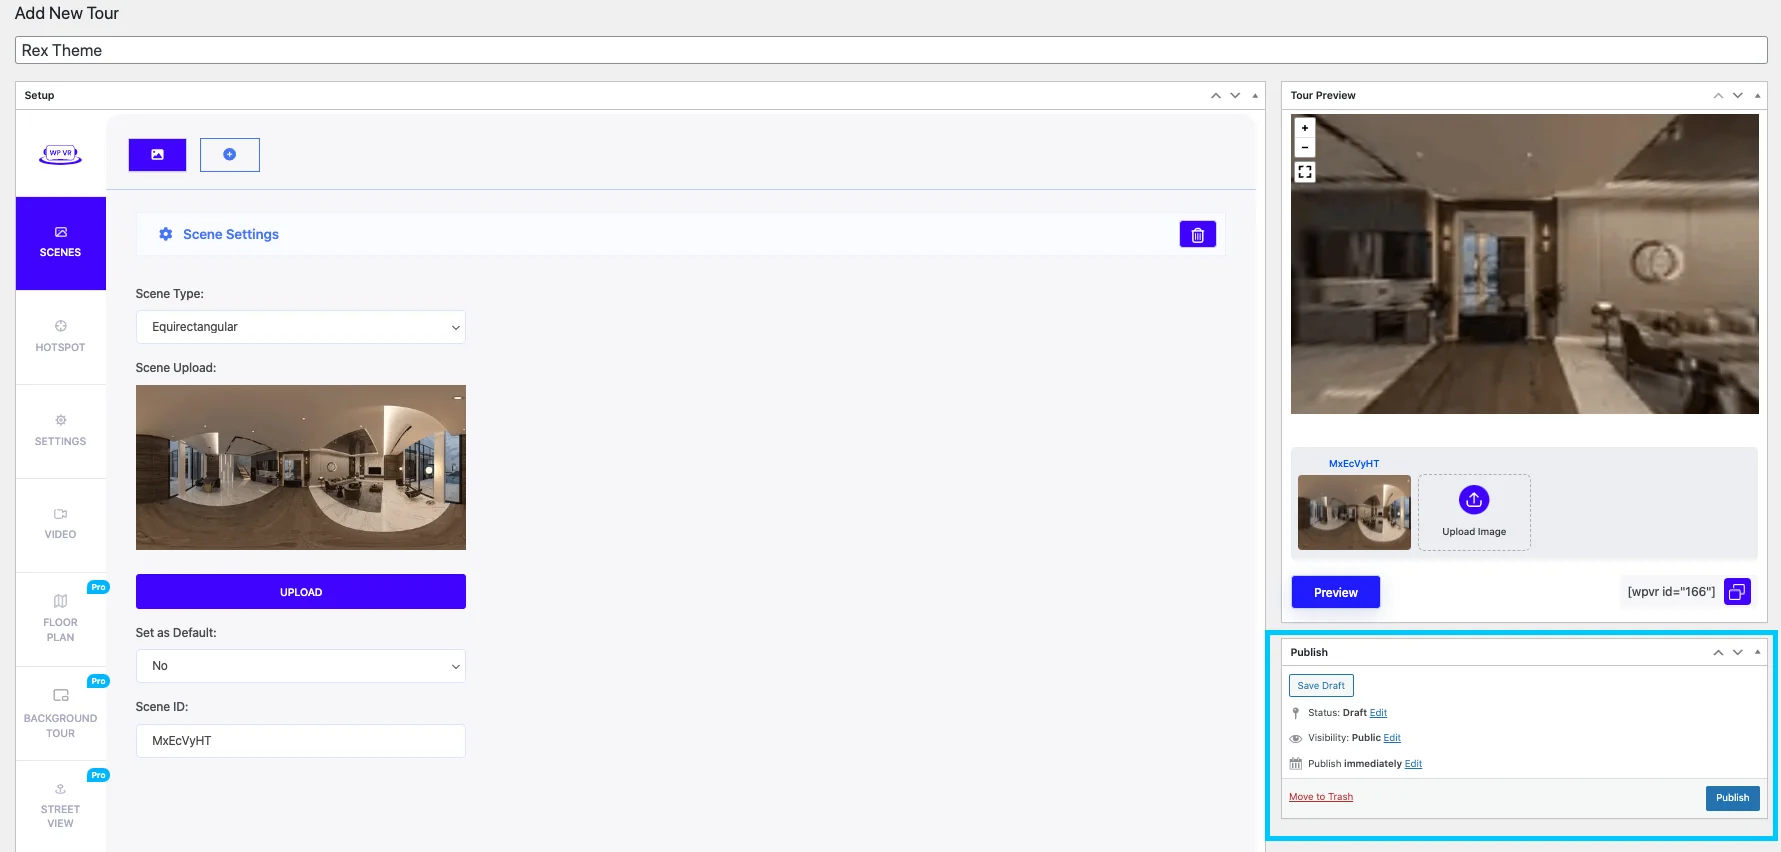
Publish The Tour:
Once you have successfully set the settings for General settings, Scene settings, and Hotspots settings, click on the Publish button on the top right side of the page.

publish option

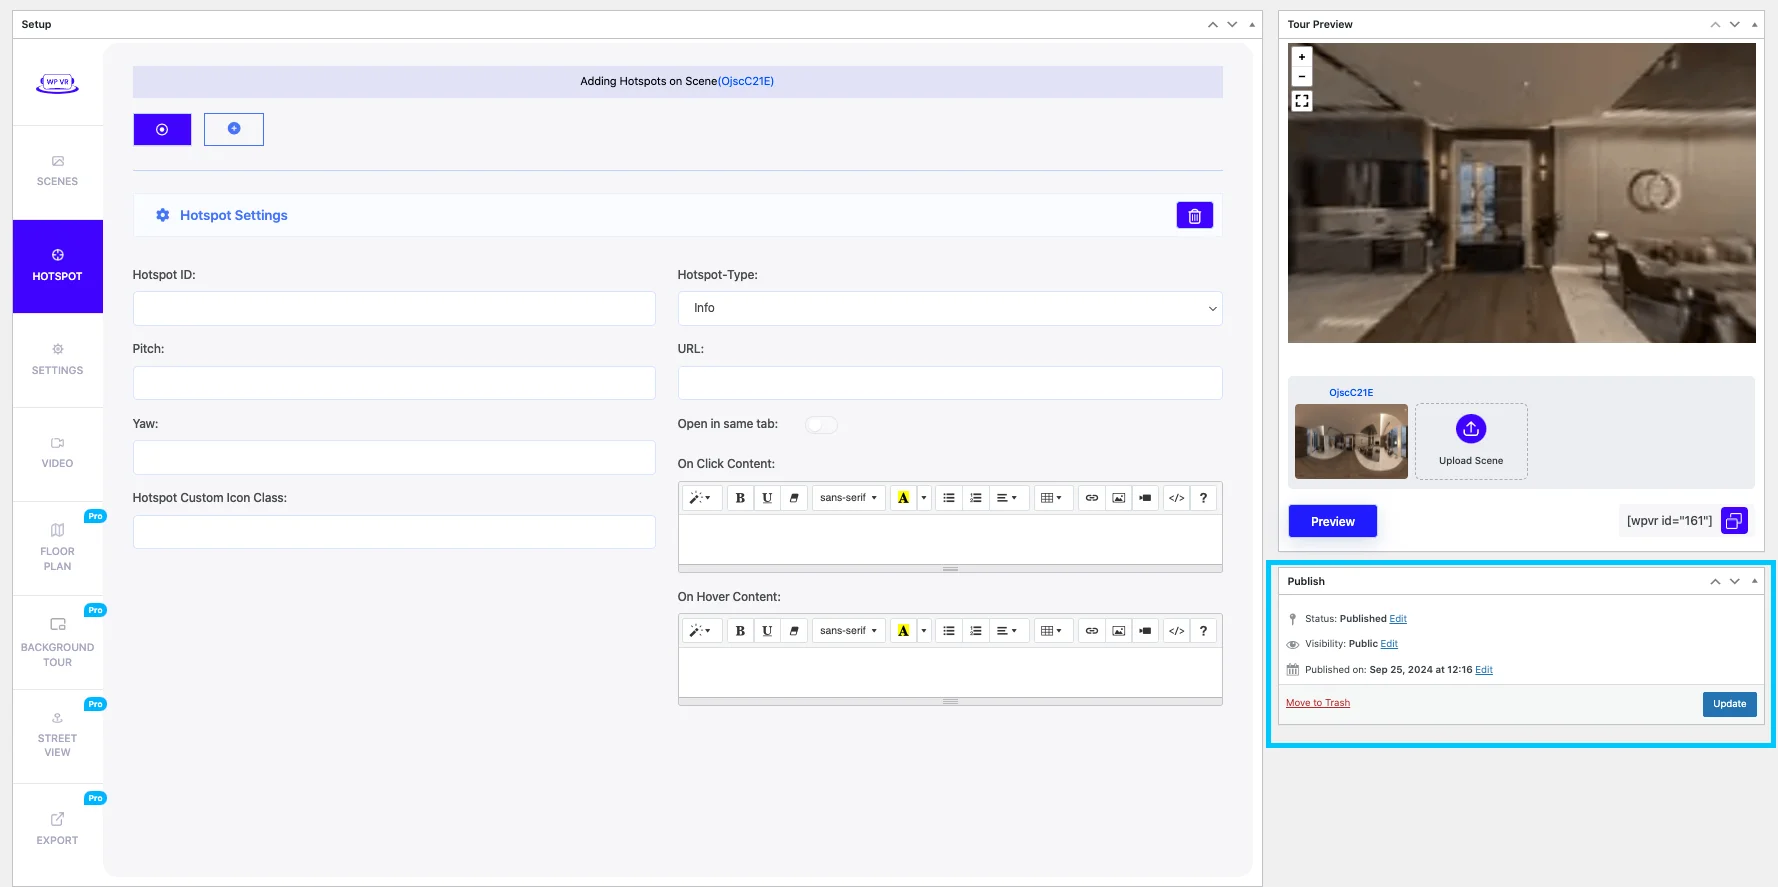
Once you publish, that button will change to Update.

update option

Collect Tour ID:
On the tour setting pages, you will see a box named Using This Tour where the shortcode and the Tour ID is provided. You will need the Tour ID to embed your virtual tour on the website.

Tour ID

You can also get the Tour ID from the tours section.

All the tours you have created will be stored under Dashboard > WPVR > Tours.

You will see the list of the tours you have created. You can collect the Shortcode or tour ID.

Step 7 – Place The Virtual Tour On Your Website

Placing the virtual tour on your website depends on the page editor you use.

  • Classic editor: For Classic Editor, copy and paste the shortcode of your virtual tour. You can add height, width, radius, or any designs you want within the shortcode.
[wpvr id = "Example ID" width = "600px" height = "400px"]

Preview or Publish the page to find the virtual tour added.

  • Other page editors (such as Visual Composer):

For page builders such as Beaver Builder, Visual Composer, etc, you need to use an “HTML” block (such as Raw HTML block) and input the shortcode there.

Step 8 – Enjoy The Benefits Of Using A Virtual Tour

Now that you know how to create, set up, and present the virtual tour on your website. The next thing to do is to sit and see your audience getting excited, visitors becoming dedicated prospects, and prospects turning into customers.

As you can see, it is super easy to create a virtual tour for your WordPress site. Go ahead and start using virtual tours ASAP.

In a later section, I will discuss how many business niches can use and benefit from using virtual tours. You will definitely be able to relate.

Anyways, now most of us are not familiar with panoramic images since they cannot be taken without a few equipment and methods. And as you saw in the last section, in order to create a virtual tour, you will need to use a Seamless 360 Panoramic Image.

Now, let us look at how you can capture 360 panoramic images on your own.

Capturing A Perfect 360 Panoramic Image

Capturing A Seamless 360 Panoramic Image 

You can capture and create 360 panoramic images in 3 ways:

  1. Using Digital 360 Degree Camera (Recommended)
  2. Using Standard DSLR
  3. Using A Smart Phone

Digital 360 Degree Cameras are the best for this case. They are easy to use, less hassle, and cost-effective.

However, I will give you a proper guide to follow all the 3 methods with suggestions on the equipment required, and tips and directions to successfully create 360 Panoramic Images.

1. Using Digital 360 Degree Cameras

There are certain cameras available just for 360-degree photography. These are digital cameras that usually have multiple built-in Fisheye lenses that cover a complete 360 degrees in one go.

Here is a list of some of the best 360 Degree Digital Cameras.

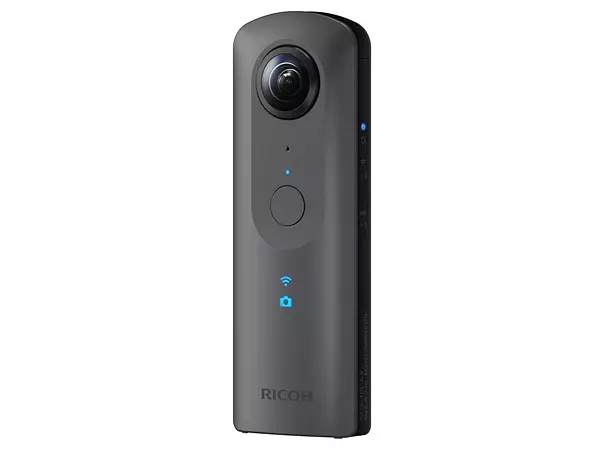
Here, we will give a brief guide on using the Ricoh Theta V to take seamless 360 panoramic images.

Let us look at the tools required.

Equipment Required:

1. Ricoh Theta V

Ricoh Theta V is a slim camera with two Fisheye lenses in opposite directions. Each lens captures a complete 180 degrees both horizontally and vertically.

The main advantage of this camera is that it has an auto-stitching function, i.e., once you take a photo, the output will automatically be a 360 panoramic image. You do not need to do any manual stitching or take multiple images.

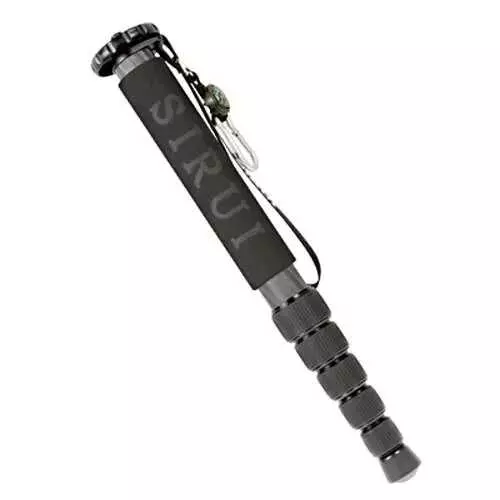
2. Monopod

A Monopod is a camera that has 1 extendable leg, fixable at specific heights. Since the Ricoh Theta covers a complete 360 degrees, a tripod would be obstructive with its 3 legs. A Monopod will not appear in the image at all.

Here’s a list of monopods you can check out.

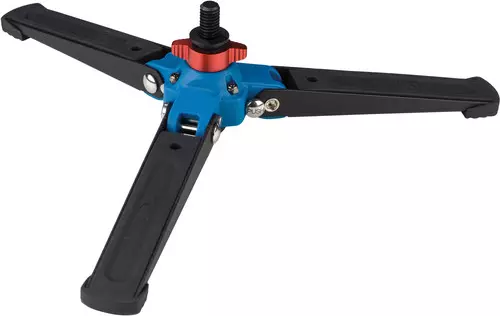
However, you will need a 3-leg locking base to be attached at the bottom for it to stand tall.

It is a small 3-legged stand that lays flat, while the Monopod is connected on top. Its 3 legs give the support required for the Monopod to stand.

3. Ricoh Theta V App

Whether you call it an advantage or not, you can control the Ricoh Theta capture using your smartphone through the Ricoh Theta V App.
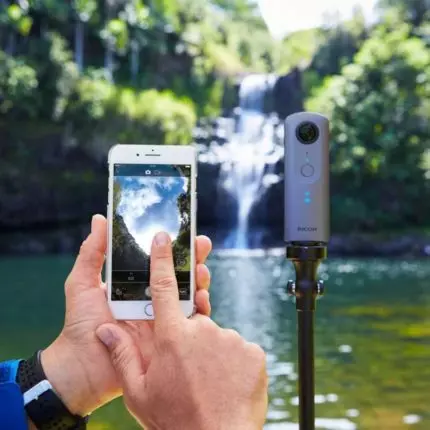
Ricoh Theta V App

Simply connect the camera to your phone through Bluetooth and then you can get the image preview on your phone through the Ricoh Theta V app. Hence, you can carefully analyze if you have placed the camera in the right spot for the best light and location exposure.

The app gives you features to control white balance, ISO, bracketing, and shutter timer.

The main reason to use the app is to be able to take photos remotely. Since the 360 camera covers all directions in one go, you clicking manually would mean that you would be on the image.

With the help of the app, you can set the devices up, go to the next room and use the app to capture the image.

Tips And Directions To Use

  1. Place the Monopod on the stand and attach the camera to it. Place the devices at a point near the center of the room.
  2. Toggle the Monopod to place the camera at a height similar to the height of an average person’s eyes or shoulder. This will create a more realistic effect when creating a virtual tour.
  3. Connect the phone app to the camera, and go on live view mode. Here, it will show the image in a 360 Equirectangular format, to see if you have adjusted all the settings correctly and if the image looks good.
  4. During the day, it is advised to keep the ISO between 200-400 based on the surrounding light. At night you should lower the ISO to 100 or below to get less noise in the image.
  5. Enable the “noise reduction” option from the app to improve image quality.
  6. Go outside the room and prepare to shoot the image.
  7. Turn the live view mode “off” since it can causes a shutter lag if turned “on”.
  8. Capture the photo which will be saved either on your phone’s photo gallery or in the memory card of the camera.

The device automatically does the stitching and processing so you do not have to do any extra hard work.

That’s it! You now have a seamless 360 panoramic image. You can upload this image to WPVR and create a stunning virtual tour.

2. Using DSLR To Capture 360 Panoramic Images

DSLRs are usually used for professional photography and can capture high-quality images. However, it is quite difficult to capture 360 panoramic images using a DSLR.

You will need to capture several images to cover complete 360 degrees in all directions, and then do some editing to achieve a proper 360 panoramic image.

Here’s a brief guide to help you out.

Equipment Required:

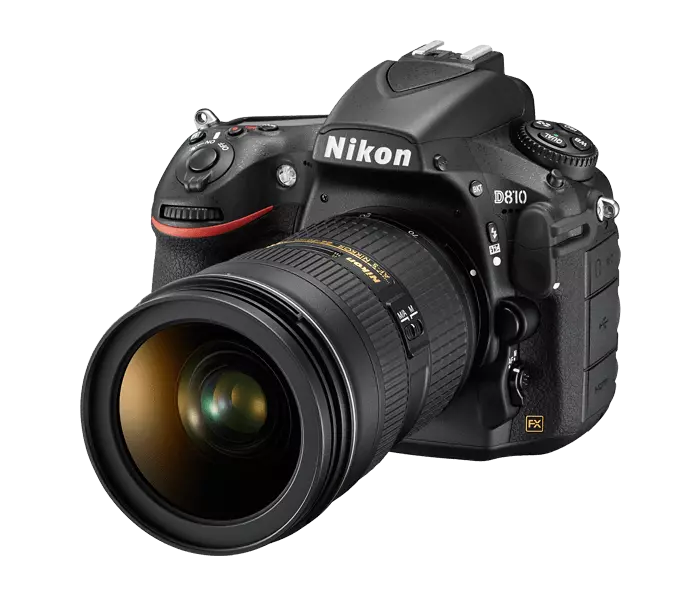
1. A Quality DSLR Body

Use a DSLR body with high dpi that has a bracketing feature.

**Bracketing refers to taking a certain photo multiple times at different exposures and then merging them together to form a photo with a balanced exposure.

You can take a look at Nikon D810Canon EOS 5d Mark IVSony Alpha A7R2, or Panasonic Lumix G6 when considering buying a DSLR body.

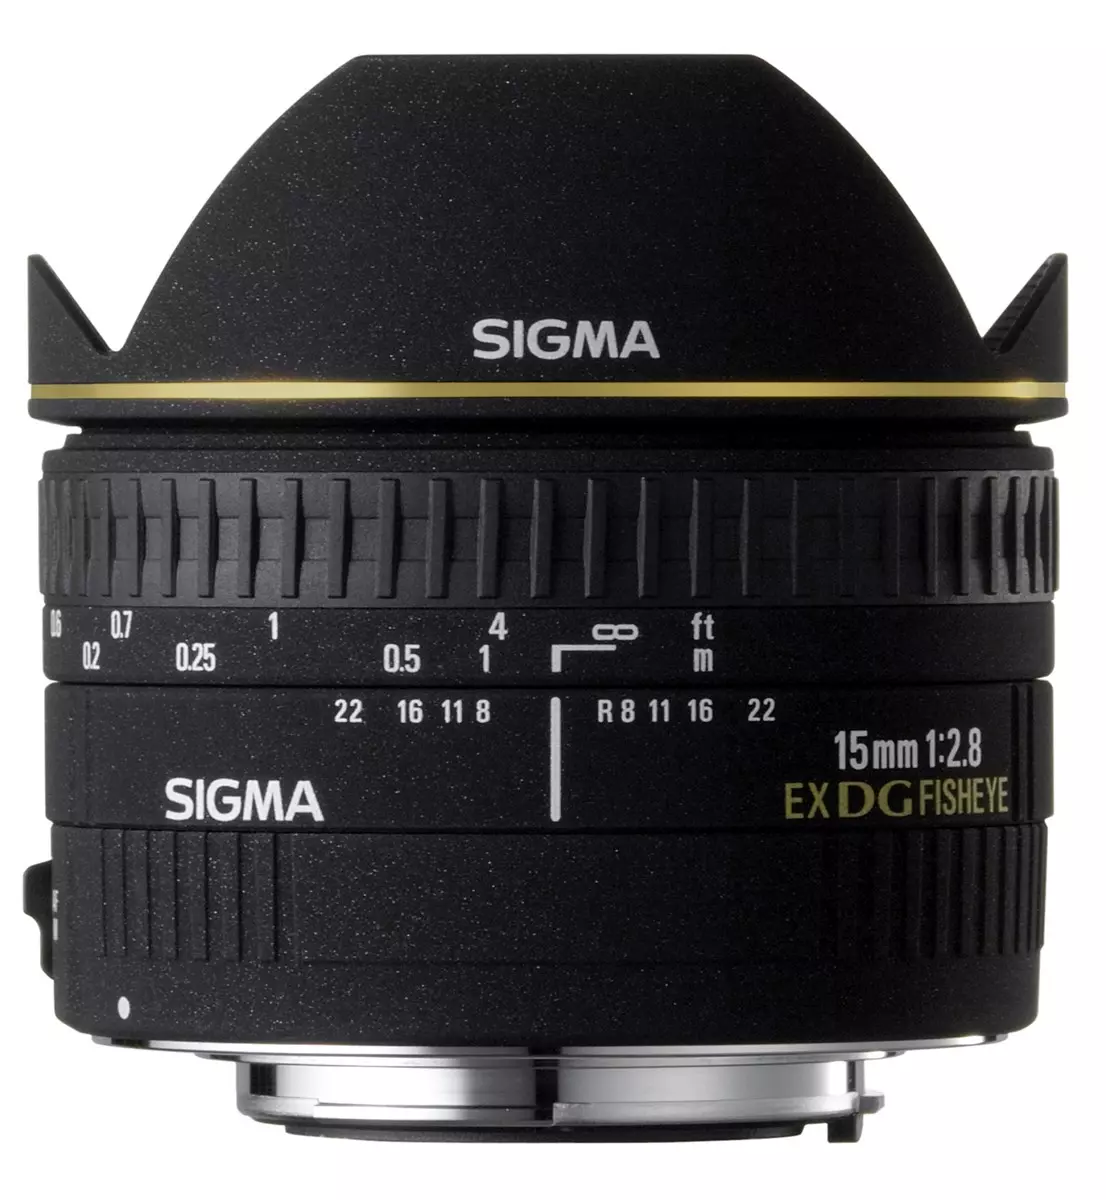
2. A Fisheye Lens

You will need a Fisheye lens to capture wider images, in order to complete the process with fewer photographs taken.

Here’s a list of Canon Fisheye lens you can take a look at.

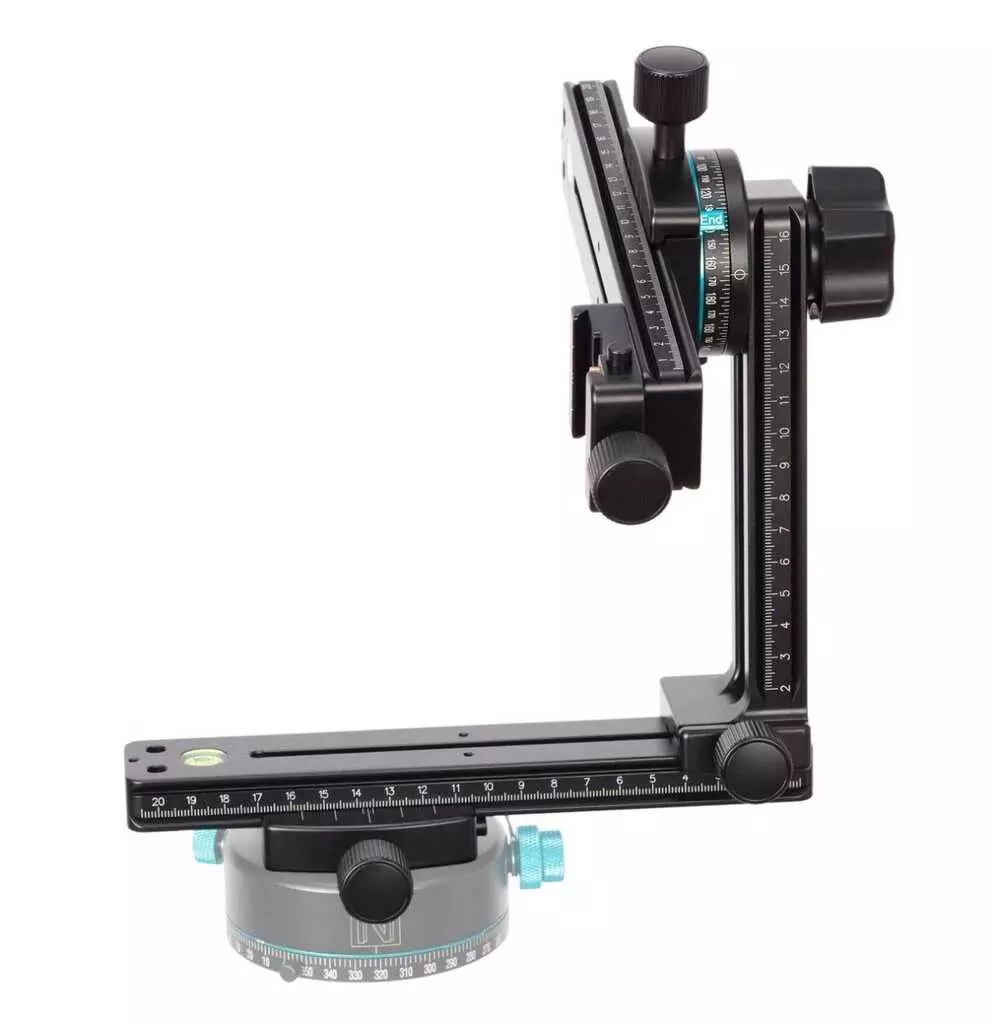
3. A Panohead

A Panohead/Nodalhead is a piece of equipment to that you attach your camera to. You can then can set the camera to rotate at fixed horizontal angles using the Panohead rings. This will ensure you cover a complete 360 degrees horizontally, without overlapping.

You can learn more about Panoheads here.

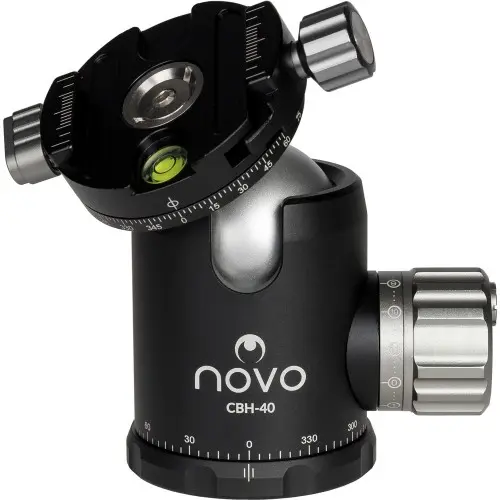
4. A Ball head (optional)

If you are willing to capture images on an uneven or unbalanced ground location, then you may use a Ball head to balance your camera on a proper horizontal axis.

Here’s a list of good ball heads you can look at.

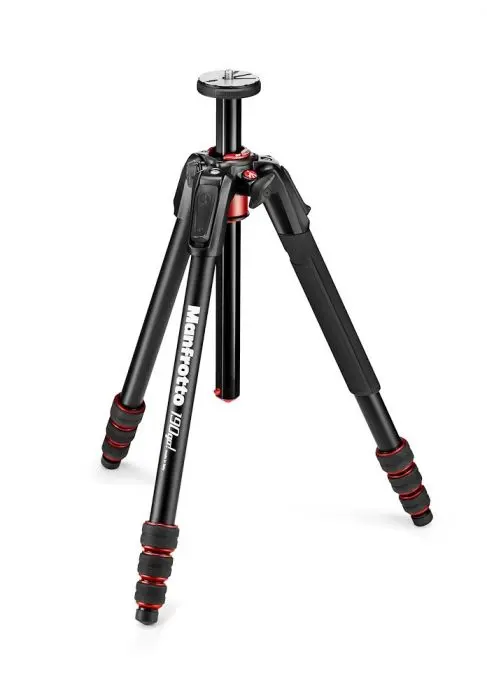
5. A Tripod

A tripod is a camera stand with 3 legs that are extendable and fixable to specific heights. It has a horizontal 360 spinnable top section, with a handle, on which the ball head or the Panohead (in case you don’t use a ball head) is attached.

The Panohead ring will help to control the angles you can spin the camera.

Here are some of the best tripods out there.

Tips And Directions To Use

  1. Chose a time of the day when there is suitable light from all directions to take photographs. If you’re shooting at night, make sure you have proper lighting all around.
  2. Set up the equipment and place it in the center of the room.
  3. Make sure to create a no Parallex point. Here’s a video to help you understand.
  4. Toggle the tripod to place the camera at a height similar to the height of an average person’s eyes or shoulder.
  5. Toggle camera for best settings. Here are my suggestions in case there is sufficient daylight:
    • Put the camera in full manual mode
    • Keep a decent shutter speed; 1/10th or 1/20th is ideal at daytime
    • Set apparture to about F11, and ISO to around 640 or more
    • Set manual white balance to 4000Kelvin
  6. Set bracketing to 3 exposure levels at a difference of 2 levels between them.
  7. Apply auto timer to capture these bracketing images, maybe within 3-5seconds.

FYI: Photography completely depends on the light, and these settings might not give the best output at different light exposures. Hence, you need to toggle settings based on the amount of light available.

Now to take pictures.

Capturing Necessary Images Using DSLR

Capturing Necessary Images Using DSLR

Now, you need to take a number of photographs depending on the width your Fisheye lens can cover.

Let’s take an example:

If you are using a Fisheye lens that cover 90 degrees vertically and 60 degrees horizontally, then here’s what you need to do:

  1. Set your Panohead to rotate 60 degrees.
  2. Take 6 bracketed photographs by rotating the camera to 60 degrees after each capture.
  3. Set the camera upwards and take 2 photographs by rotating the camera 180 degrees after the 1st shot.
  4. Set the camera downwards and take 2 photographs by rotating the camera 180 degrees after the 1st shot.
  5. Separate the DSLR body from rest of the equipment and take a handheld photo of the center of the room where the tripod was placed earlier.

So as per this example, you will now have 6 horizontal photos, two ceiling photos, and 3 ground photos.

Stitching The Photos

Stitching The Photos

Now that you have the required images, you have to stitch them into a seamless 360 panoramic image.

You can manually do it using Photoshop. Here’s a beginner’s tutorial.

Once you do it, you need to make sure you inject metadata to make it into a complete 360 degree panorama. You can use the tool Xifer to do it.

However, this is not necessary to have metadata when you use WPVR since the plugin does not need metadata to work.

You may also use tools such as PhotoMerge, PhotoStitcher, Stitcher V4, etc.

Once stitched, a seamless 360 panoramic image is created. You can then upload it to WPVR to convert it into a Virtual Tour.

3. 360-Degree Photos With Your Smartphone

360 Photo With Smartphone

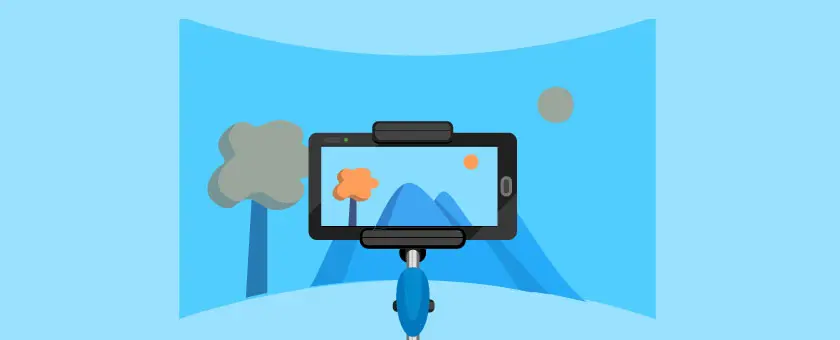
Even if you don’t have any DSLR, Lenses, or specialized 360 cameras, you can take a 360 seamless panorama picture with your smartphone.

Here’s a step-by-step guide to using a smartphone to take 360 panoramic images.

Four Steps Guide To Capture 360 Panoramas With Smartphone

Whether you use an Android device or an IOS device, the process is the same.

Step 1 – Download The App

The Google Street View app lets you easily take 360 photos with your Android smartphone. It is the most stable 360-degree photography app for smartphones to date.

Download the Google Street View For Android or Google Street View For IOS and the Google Camera app from the Playstore/Appstore.

Step 2 – Set Up The App

The app will give you some welcome tips and then take you to the homepage. In the bottom-right corner, there is a camera option. 

Choose the camera option, and a menu will appear. You have to choose the third option to take 360 photos.

Step 3 – Take The Pictures

You will be taken to the camera screen and the app will give you guidance for the capture process. Hold the phone close to you, choose a suitable position, and stand up still.

Once you click on the start button, you will have a hollow circle in the center of your screen. And some orange circles will start appearing in different directions.

Move the phone, match the center circle with an orange circle, and click the snap button. That orange circle will turn blue/green and will disappear, while a photo is captured.

Another orange circle will appear in a different direction. Move the phone to the next orange circle to do the same. Keep doing it until all the orange spots are captured.

The app is designed so that once you have snapped all the orange circles, a full 360 view was captured.

Once done, the app will take you to the homepage again.

Step 4 – Image Output

At this point, the app is already stitching the photos together to make a 360 image. You will be able to see the progress of stitching on a loading bar.

After stitching is complete, you will find the 360-degree image saved in your photo gallery. You can then use this photo to upload it on WPVR and create a virtual tour.

**Please note that the latest update of the Google Camera App has some major back-end changes, due to which it might not be compatible with many Android devices.

There you go, now you know what is virtual reality, what is a virtual tour, how to create a virtual tour, what a seamless 360 panoramic image is, and how to capture 360 panoramic images on your own.

Now, you can simply choose a method to take a 360 panoramic image, upload it on the virtual tour creator (WPVR) and present it on your website to engage with your audience with more authority and opportunity for conversion.

How Your Business Can Benefit From Virtual Tours

Previously, I have listed a number of businesses that can benefit from using virtual tours on their websites.

If your business was part of that list, then you already know that virtual tours are ideal for your business.

Around 67% of the people online want virtual tours to be implemented on more businesses.

Every business can have a virtual tour on its website. However, some businesses can dramatically increase revenue by implementing a virtual tour on their site.

Now let us look at the major benefits of using a virtual tour on your site, focusing on the major niches.

Find out how a virtual tour can positively impact your business.

1. Real Estate

VR for Real Estate

People visiting real estate sites are mostly looking to buy properties or houses within the next 2-3 months. However, the main issue is indecisiveness.

Though prospects mostly look for houses in specific locations and within a suitable price range, they find it difficult to choose among multiple properties that match their requirements.

One of the reasons for this is that they are visualizing how the house looks based on flat images. They are not able to understand if the structure of the house is suitable for them since they are visualizing in their imagination.

End result? They tend to physically visit several properties before choosing one that resembles their imagination and requirements.

Here, you are losing a lot of time while giving them the live tour, and effort by pitching to prospects who might end up buying from other realtors (yes, people will talk with several realtors when searching for a house).

A real estate virtual tour can ensure that the prospects you are dealing with are already interested to buy.

The visit is just for credibility. People will be able to remotely visit the place and explore.

They will be able to view the place from every angle and eventually develop a genuine interest in a property that suits their requirements.

Hence, they will call you for a visit, with the intent to buy.

Rather than taking several live tours of many properties, they will only wish to visit a few which they might end up purchasing, thanks to the remote virtual tour.

2. Hotel & Resorts

VR for Hotel & Resorts

Tourists, travelers, or international businessmen tend to look for suitable hotels to lodge at when going to distant locations. So, it is natural for them to browse through the websites of hotels available at the location they are visiting.

You can take steps to attract as many prospects as possible through your website. A simple hotel or resort virtual tour can take you a long way.

Here’s the idea. People always look for hotels that are both affordable and comfortable to stay at. Most people tend to browse through photos of rooms when choosing. Why not give them a better visual with a virtual tour?

Create virtual tours for each room available for lodging and place them on your website. Try to add a virtual tour of your reception, hall room, bar, and dining area on your home page.

These will act as big attractions, especially for foreigners. A quality virtual tour will mean that people will be able to understand the quality and beauty of your hotel, and will probably consider calling in for reservations immediately, rather than looking into more hotels.

For Resorts, you should create a broad virtual tour, highlighting all of your special facilities such as swimming pools, beach areas, parks, ballrooms, spas, and other specialties besides the lodging and basic entertainment.

Virtual tours will definitely get prospects excited and influence more site visitors to convert into interested prospects.

3. Restaurants

VR for Restaurants

Having a restaurant means a lot of competition since currently, it is among to top business niches. 

People love to try out restaurants with good food, as well as well interior design.

Whether it’s a fancy restaurant or a classic restaurant, they have their own set of admirers.

Now, food quality is the most important thing. If you get good ratings about your food from customers, more people will probably take a visit soon. 

However, the second most important aspect is the interior.

Nowadays, prospects tend to visit the websites of several restaurants before choosing to visit one.

There, they not only look at the menus but also look at the gallery of your restaurant photos to understand if it is a suitable place to visit.

A better way to catch their attention is by allowing them to take a virtual tour of your restaurant from home.

They will be able to see the seating arrangement, spaciousness, decoration, quality, and overall interior arrangement. This will inspire them to choose your restaurant over others.

Here’s an example:

Let’s say you are a burger joint. A group of teenagers is willing to eat burgers in your area. So they will visit the websites of several burger joints in your area before choosing one.

You can stand out by displaying your amazing interior decorations besides your delicious food, through a virtual tour.

Through this remote tour, they might realize that the seating arrangements are comfortable and the decorations are great for taking selfies with friends.

Thus, they will end up visiting your place. Your next task is to impress them with the food.

For a fancy or theme-based restaurant, a virtual tour is more lucrative since you will be able to highlight your specialty to remote prospects on your website.

This will raise more awareness and influence more people to visit your restaurant.

4. Wedding Venues

VR for Wedding Venues

A wedding is among the most important milestones that a person achieves in life. And it is natural for anyone to wish to have a wedding ceremony like no other. The wedding venue plays an important role in making the wedding a memorable one.

Usually, fiances choose the wedding venue together. They tend to browse through the websites of several wedding venues and shortlist a few that they feel are perfect for their wedding.

A virtual tour can make your wedding venue the ideal one. Let the couple take a remote visit and experience how grand the venue is.

The venue entrance, the stage, the dining halls, the chandeliers, the photo session room, and all the specialties of your venue can be highlighted easily through a virtual tour.

Send the couple into a world of imagination so that they can feel their walk in the venue, and the bride walking down the carpet towards the priest and her fiance, ready to get married; the tossing of the bouquet and toasts from friends and family.

This little journey within the venue will help them set their future and choose your venue to be the ideal venue that will mark their togetherness in days to come.

Hence, a virtual tour on your website is only the right thing to do.

5. Universities, Schools & Colleges

VR for Universities, Schools & Colleges

Though newly implemented in many, a lot of universities, schools, and colleges achieved greater student reach by creating virtual tours of their institutions.

Whether you run a large institution or a small one, students and their parents are more concerned about quality dorms and attractive campuses, after quality education.

While they visit your website to find out about the courses you offer, you can also present a virtual tour of your campus to give them a remote experience of being part of the institution.

Let them take a stroll around your faculty buildings, sports facilities, dorms, research labs, fitness centers, etc, and understand the quality you offer besides education.

This is very important for international students. They will be moving to a new location, therefore, the quality environment and surroundings are among their main concerns and priorities.

Plus, the virtual tour will act as a symbol of credibility, highlighting your ability to accommodate students with high quality, while within your premises.

6. Travel/Tourism Industry

VR in Travel and Tourism Industry

If you are promoting holiday or travel packages, then getting more prospects depends a lot on the locations you are taking them to, besides the price.

People are often reluctant to purchase travel packages since they have doubts about the quality of their journey. You may easily gain their trust by using a virtual tour.

You can include virtual tours for several iconic locations that your travel package will cover. You may also highlight great tourist resorts or historic places that your travel package will take travelers to.

The idea is to give viewers a glimpse of the attractive zones that the tour will include remotely through a virtual tour. Let them inspect, in full control, the amazing locations they will be able to visit.

This will not only create more excitement but also influence onlookers into interested prospects.

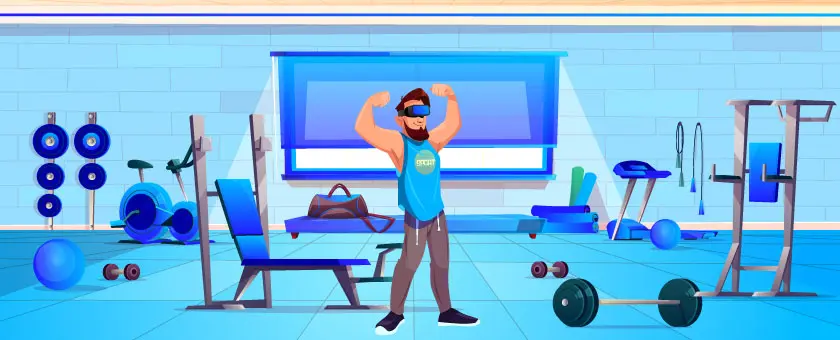
7. Gym / Fitness Centers

VR for Gym and Fitness Centers

People tend to choose a gym or fitness center based on the various types of equipment and fitness machines available there. Plus, it also depends on the quality of the Equipment.

You can use virtual tours to attract people online and gain credibility for your fitness center. Create a quality virtual tour, covering every section of your center. And on each section, leave click bubbles beside the machines which will give information about the machine model and quality.

At the same time, create short videos of the fitness trainer of the center, training and demonstrating the use of every piece of fitness equipment.

Leave a hotspot on each piece of fitness equipment available within the virtual tour, to be clicked to watch the relevant video.

This will not only highlight the equipment but also demonstrate the expertise of the fitness trainer, thus inspiring more people to join your fitness center.

8. Shopping Mall

VR for Shopping Mall

Shopping is among the favorite activities of most women and some men. However, it often gets difficult to find the right shops in an ideal shopping mall.

There are tons of shops selling various products and services. Although every shopping mall provides a directions map on every floor, it often gets difficult to look for any desired shop only by interpreting the map.

For a large mall, people often run around in circles while messing up the directions. This is frustrating to customers and often limits them to purchase items.

Whether you are part of the ownership of a shopping mall or a shop owner at a mall, you could guide more prospects in the right direction through a virtual tour on your site.

On the virtual tour, a person will be able to follow directions as if in person and eventually reach their desired shops.

Since it’s a realistic visualization, the directions will be much easier to remember. Then when the prospect visits the mall, it will not take long to find his/her desired shop.

As a shop owner, this could help you drive more customers and not lose potential ones to competitors.

People with the internet on their phones can access your website while in the mall, hence they won’t need to use the flat map, rather they can get a realistic guide on their mobile.

As you can see, it is beneficial to add a showroom virtual tour on the website of either the shopping mall or any particular shop, to provide better navigation for prospects.

9. Museums

VR for Museums

People often love to visit museums due to the incredible historical display of various tools, items and reminisces of the past.

But the problem is, due to visual entertainment available on mobile phones or computers, most people do not try to seek out how great a visit to a museum might be.

Most museums are facing a decline in visitors over time. However, this can be changed by using virtual tours.

Create a virtual tour for a certain section of your museum. Let’s assume this section contains items from World War II. Within the virtual tour, you can place clickable information bubbles for people to get historical information about any particular item.

This will create a good amount of interest among site visitors. The key is to create curiosity among viewers so that they feel like they need to visit other sections of your museum to learn more.  

You can also offer a paid virtual tour for the rest of the sections. This will allow people overseas to take a tour of your museum remotely.

You will see a rise in visitors and also let people from overseas appreciate your museum.

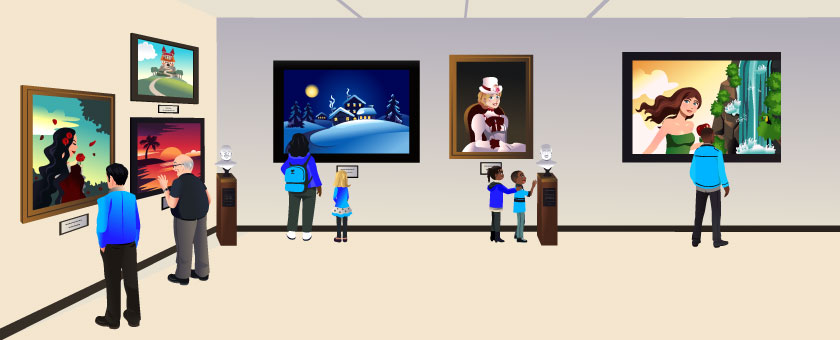
10. Art Gallery

VR for Art Gallery

Do you draw and contribute to exhibit art galleries? Or do you have an art gallery of your own?

Then you probably know how excited people are about art when they visit an art gallery. Not only that, several collectors tend to visit and often purchase works of art with great value. 

However, when it comes to online business, art galleries are often underrated. Why not? Most art galleries do not make much out of their website.

Let me tell you why. It’s because owners tend to flood their websites with individual pictures of their art. With so much art to look at, how long will a person browse through the collection?

Eventually, people only check the first few and then leave if nothing amazes them among the early collection.

But this means that they are avoiding pictures that are in a later queue. It is possible that one of those photos could have been the one to connect with them.

This can be drastically changed with an art gallery virtual tour. Create a virtual tour of your gallery and let art enthusiasts take a remote tour. This will be similar to a live visit and viewers will be able to walk around the gallery while observing your artwork.

You can leave little click bubbles beside every piece of art so that viewers can click to view the piece of art as a pop-up image, or on a new tab.

Provide a unique ID for every piece of art so that prospects can order online or request a visit to view the piece of art.

That’s how effective a virtual tour can be. Go ahead and attract more prospects to buy your art online.

So far, I’ve explained the benefits of using virtual tours in 10 different business niches. If your business niche was not among these 10 businesses, then don’t get disappointed.

Read the following article to learn about the benefits of virtual tours for all 32 niches mentioned in this article.

Conclusion

So, after reading this article, you should have a good knowledge of virtual reality, virtual tours and their benefits, and what you need to create virtual tours.

You have also learned how you can create a virtual tour and include it on your WordPress site using WPVR.

And you got a detailed guide on how to take 360 panoramic images on your own and use them to create virtual tours.

Finally, we discussed how different businesses can benefit from virtual tours.

Now, you should be able to create your own virtual tours without any expert assistance. Hence, why waste any more time?

Go ahead and start using virtual tours to take your business to the next level. Engage and connect with your prospects from your website, and see them turn into valuable customers.

FAQs

Can I create a virtual tour without expensive equipment?

Yes! You can use a smartphone with a 360° camera app or an affordable 360° camera to capture images.

How long does it take to set up a virtual tour?

It depends on complexity, but a basic tour can be created in a few hours using the right tools.

Do I need coding skills to build a virtual tour?

No, many platforms offer easy drag-and-drop options to set up and publish your virtual tour.

What types of businesses can benefit from virtual tours?

Real estate, hotels, museums, retail stores, and educational institutions all gain from immersive tours.

Can I embed a virtual tour on my website?

Yes! Most virtual tour platforms provide embed codes, making it easy to add them to any site.

Categories
Guide Product Feed Manager For WooCommerce WooCommerce

8 Best Google Shopping Feed Optimization Tips To Drive More Sales [2025]

Since Google is the number one search engine today, its shopping campaigns always bring the best results.

According to The Media Campaign, 46% of all product searches are made via Google.

If you own a WooCommerce store, then promoting your products on the Google Merchant Center will be a game-changer to drive more sales.

And for that, you need to create a product feed for Google Shopping and optimize it properly.

In this article, you will learn a few important Google Shopping Feed optimization tactics that you should embrace if you want successful results.

After reading this article you will learn

  • Why it is important to optimize Google product feed
  • Which product data should be optimized for the best results
  • How you can optimize these data to convert more buyers

And in the long run, you will be able to get more sales from Google Shopping campaigns and grow your business.

So let’s begin.

What is a Google Shopping Feed?

A Google Shopping feed is a file that contains all the details about the products you want to list on Google Shopping. This includes information like product titles, descriptions, prices, images, and other essential attributes.

google shopping feed

Think of it as a structured file that acts as the bridge between your WooCommerce store and Google Merchant Center. Once you upload this feed, Google uses it to display your products in relevant search results or shopping ads.

For example, if you’re selling sneakers, the shopping feed ensures your products show up with accurate information when someone searches for “running shoes” or “comfortable sneakers.”

Why should you optimize your Google Shopping Feed?

To get the best results from Google Shopping, you need more than just uploading a product feed. Optimizing it ensures your products appear in front of the right audience and perform better.

Here’s why it’s important:

  • Increases product visibility: An optimized feed helps Google understand your product better, improving its chances of appearing in search results.
  • Attracts relevant customers: When your product data matches the customer’s search intent, it makes them more likely to click on your listing.
  • Improves ad performance: A detailed and accurate feed leads to higher-quality ads, which typically results in better click-through rates and conversions.
  • Reduces rejection issues: Google has strict guidelines for product feeds. Optimizing ensures you meet their standards, avoiding unnecessary rejections.
  • Simplifies management: A clean, optimized feed is easier to update and maintain over time, saving you effort in the long run.

Optimizing your Google Shopping feed is not an extra step but a crucial part of your product marketing strategy. It ensures your products are presented accurately and attractively to potential buyers.

Challenges Of Promoting Products via Google Shopping

As much as Google Shopping drives sales, there are a few challenges that you need to overcome to get the best outcome.

  1. Your product feed data must meet Google’s feed structure
    Google Shopping has its own defined feed structure which you need to follow if you want to list products there. What most store finds difficult to do is to make sure they have met all the criteria explained in their product data specification. So you should create a product feed that meets all requirements.
  1. Rejection of product feed by Google
    The biggest issue people face is that the data people submit are rejected by Google for one or more reasons. The most common reasons Google rejects are
    • mismatched data between the website’s schema, feed, and frontend view
    • missing required product data
    • dynamic pricing issue
    • wrong currency, and
    • variation product data mismatch.

Try to solve the above problems but if you still struggle then Google Consultants are experts who can come in handy for navigating Google’s requirements and optimizing your data for approval.

  1. Products listed on Google Shopping but not getting results
    This is a blind spot for many online shops that sell via Google Shopping. Many believe that just listing products there should bring results. But the fact here is, that you need to optimize some of your product data to get better results. This may include the product title, images, category, offer prices, and even your website’s design.

    **Submitting basic product data will not trigger potential buyers to purchase, you have to make sure to optimize the data so that the product Ads and listings will convince the prospect to make a buying decision.

Throughout this article, you will learn all the possible ways to optimize your Google shopping feed that will make your Google Shopping campaign successful.

6 Proven Google Shopping Feed Optimization Tips That Can Trigger More Sales

To learn how to optimize Google shopping feed, you can apply these 6 proven Google merchant center optimization techniques :

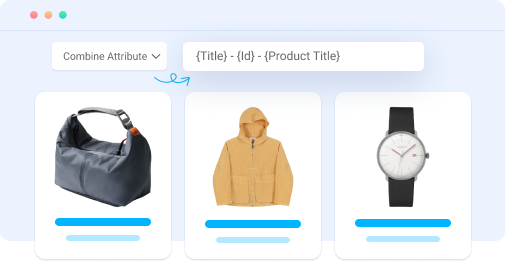
1. Optimized Product Title To Match Search Queries

The product title is a vital element that you can use to drive the right traffic.

It is a crucial element that is not only necessary to optimize your Google Shopping feed but also plays a key role in conversion rate optimization, helping you maximize sales and performance.

When your customer is looking for a product, the title is one of the first things the prospects will judge your product by.

You have to make the title meaningful in a way so that just by reading it, your targeted buyer feels like this is what he/she was looking for.

This will help to trigger more potential buyers to click on the Google Shopping Ads for your products that appear above the search results. In this simple way, you can do your Google shipping optimization.

The best way to optimize a product title is to add some extra elements to the title that will highlight its specialty or features.

product title Optimization

For example, let’s say you are selling a cream in France called ‘Avène Tolérance Extrême Cream.’

Now, if you leave the name as is, only the buyers who are familiar with Avène or have researched the brand will recognize this product. Others may not click on the Shopping Ad with that title.

But, let’s consider naming it ‘Avène Tolérance Extrême – Moisturizer for Sensitive Skin, 50ml.’

This title specifies that

  • this cream is by Avène (i.e. the product brand)
  • it’s a Moisturizer (not a beauty cream)
  • it’s for Sensitive Skin (i.e. skin type), and
  • it is the ’50ml’ pack.

As you can see, this title will tell a buyer, who has zero knowledge about this product, if it is for her, i.e., a higher chance of a conversion.

Just like that, you can optimize the product title for any product by adding elements such as the product brand, color, size, capacity, quantity, special feature, model, who it’s for, or even its use case.

Here are a few more examples for different product types:

  • Books or Novels – Book Name + Genre + Author Name
    Example: The Da Vinci Code – Mystery Thriller by Dan Brown
  • Electronics – Product Brand + Product Name + Model + Special feature
    Example: OnePlus Nord N20 5G – 13 + 3 + 3 MP Camera, 64GB RAM
  • Clothing Products – Brand + Product Name + Color + Size + Material
    Example: Gant The Original T-Shirt – Red, XL, 100% Cotton

This approach is a proven tactic and easy to embrace.

Things to avoid when optimizing product titles:

  • Avoid Promotional terms on the title.
  • Don’t stuff keywords if it doesn’t fit
  • Don’t use all capital letters in a title.
  • Avoid special symbols.

2. Unique Image Optimization Tricks To Connect With Buyers

Once you list on Google Shopping, the product image plays a huge part in convincing buyers to choose your product among others.

Thus this plays a vital role in Google shopping ads optimization.

So you must make sure you use images that clearly show what the product is. This is especially important for products such as clothing and accessories, decoratives, tech products, toys, etc.

The most common advice photographers will give you is to take product images with a white background (or a contrasting background if your product is White).

This is the best approach if you want to clearly keep your buyers focused on your product.

When people search for products on Google, a lot of products are suggested in a single row.

So the idea of a distraction-free view of the product doesn’t really apply there unless the product has a catchy color combination.

Image Optimization

Here are a couple of unique tactics you can follow that may help you stand out in Google merchant center optimization.

  • Use a shaded-white background
    The concept here is to use a gradient background with a mix of white and light grey to give a shaded feel at the back. This creates an unexpected classy impression of the product in the center.
  • Find the most uncommon color for your niche
    If you have competition in the market, you can do a quick search on Google with your product title and look at the suggested product Ads. See which background colors are commonly used. Then you can decide on an uncommon background color that may make your Ad stand out among most other product Ads.
    *It’s best to consult with a professional UX designer for this as they will be more expert in suggesting backgrounds that stand out. A user experience enhancements audit can also help identify the best visual choices for better ad performance and visibility.
  • Use contrast backgrounds
    Large brands such as Zara have embraced the concept of solid contrast background colors and it delivered great results. So it’s a proven approach you can choose to embrace as well.
  • Choose an angle that highlights the best feature(s)
    Often you have to be creative about how you take the picture. You will see that in modern-day eCommerce, most shoe brands take the approach of placing two shoes in two ways – one is laid on the ground and the other is kept upright. This is to try and show all views of the shoes.
  • If Possible, Use Square Images
    Since all Google Shopping Ads are displayed with square images, it’s best if you too could provide images in that size. In most shops, people tend to keep a longer height for the product images. What this will do is that Google will fit the image via the longest dimension, in this case, the height, making the image smaller in the process. A square image will maintain the right dimension ratio and view your product in the best possible size.

    **If you use square images, you can also try using an image border to make your product stand out.

It’s best you make these changes in your WooCommerce store and then use those image links in the product feed data for Google for the best results.

For Product variations, make sure to have specific images for each variation rather than just a single image for all variants.

Things to avoid when optimizing product images:

  • Do not use unclear or blurry images
  • Avoid including product price in the images
  • Avoid using promotional words in the images (e.g. Special offer, 10% discount, etc)
  • Do not cluster the product background with unnecessary elements

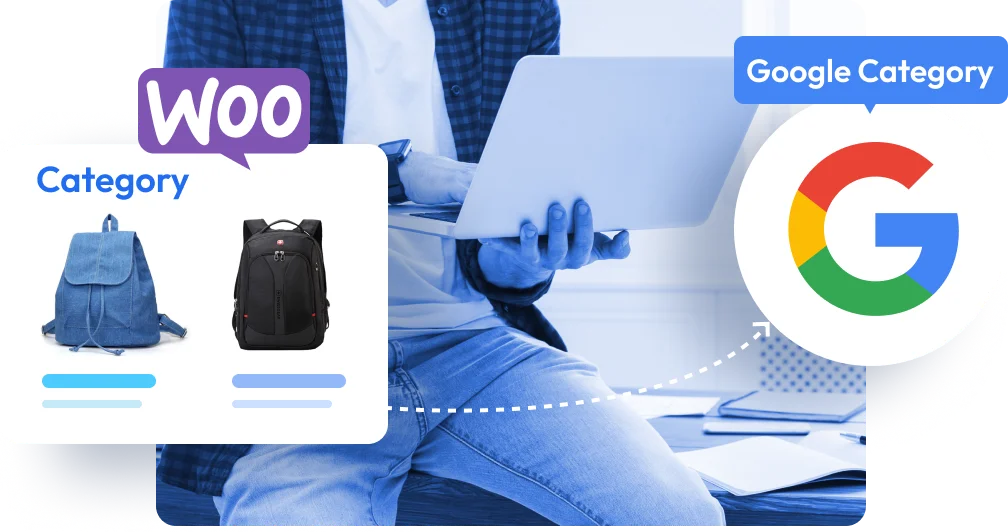
3. Follow Google’s Category Hierarchy In Your Store To Optimize Google Shopping Feed

The product category is important to help buyers find a certain type of product they are looking for.

At the same time, Google also maintains a categorization of products to display your shopping ads to the right audience. This is one kind of Google shopping optimization you get for free.

Google doesn’t make it mandatory for you to submit a product category field, but it does look for the category in your store in order to place a product under its right search intent category.

So you must maintain proper categorization in your store.

It’s best to maintain your product category structure as per Google as most other marketplaces also follow the same category hierarchy.

Google Category Mapping

You can get help from Google’s taxonomy list to optimize the categories on your website.

However, just maintaining the categories is not the only product feed optimization. You have to ensure you are assigning your product to the most relevant possible product category.

For example, if are selling a Baby Bathtub, then do not just assign it under the category ‘Baby & Toddler’ or the ‘Baby & Toddler > Baby Bathing’. It should rather go under the further child category ‘Baby & Toddler > Baby Bathing > Baby Bathtubs & Bath Seats.’

This will help you keep track of your products more efficiently and help Google display your products to the right audience.

Tips To Optimize Product Category

  • In WooCommerce, when choosing a child category, make sure to mark the parent category as well.
  • Even if you do not follow Google’s taxonomy, make sure to keep the categories meaningful. Google can relate to the meanings of your set categories.
  • Avoid using special characters in category names.

4. Try To Maintain Consistent Product Data Everywhere To Optimize Google Shopping Feed

It is important to make sure your buyers do not get confused with your products.

For example, if you have one title in your WooCommerce store and another title in your Google Shopping listings, it may cause some confusion – the buyer may initially get baffled and start looking for the description, or often, if they are in a hurry, they will simply close the tab and look for other options.

The same can be the same if you have a different meta title and schema which will alter your traditional search result Title and the title Google bot will find in the schema.

So the best practice is to try to keep all your product data same whereever it is listed to optimize google shopping feed better.

google shopping ads optimization

What to do if you have already added a lot of products without optimized data?

Yes, it can be hectic to change the titles, descriptions, images, or other product data for optimization for all the products that you have already added to your WooCommerce store.

If you have fewer products in-store, then it’s best to take the time and make the changes.

In case you have a lot of products, you can leave them as-is and start optimizing the data for all the new products that you will add in the future.

This will ensure that you will get the best sales results for your new products.

Over time, the old products will eventually be sold out and there will be a time when your store will have all products with optimized data.

Should you not optimize the product feed data for the old products?

One of the questions that may arise is if you keep the old product data unchanged, should you simply submit those data without optimizing them?

The answer is NO.

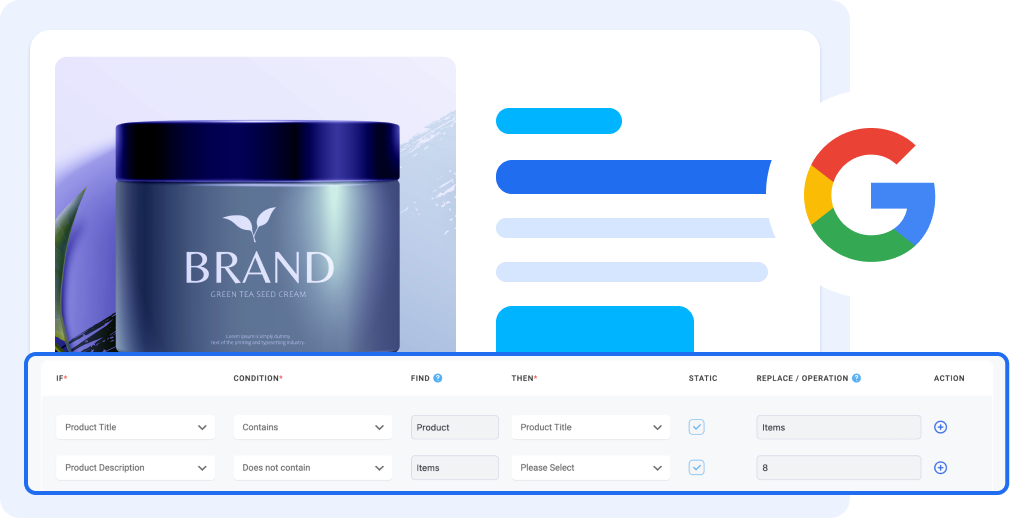
Even if you can’t take the time to optimize the product data in your store, you should at least optimize some elements of the product when adding them to the Google product feed – the product title and category.

This may not solve the confusion issue due to different content, but it will still trigger more buyers to at least visit your store.

  • Google normally does not reject your feed due to the title as long as the main Title keywords are included in your product title in the feed.
  • The category is important as it helps Google to properly display your products to the right audience.

Apart from this, you should also consider making sure all the required product data by Google is consistent in both your product schema and your product page.

This is important because Google will crawl your website before approving your product feed and may reject products if a mismatch exists for required attributes. And this point is highly important for Google merchant center optimization.

5. Include All Required Product Data In WooCommerce

The required product attributes that Google recommends are more than just for product feed.

If you make sure to include those data for your products properly, then it will also help you rank in terms of SEO. Also, it is highly important for Google shopping optimization.

Without including the required product data, google merchant center optimization is incomplete.

Following are the recommended attributes by Google that you should include for products in your WooCommerce store as well:

  • Product ID
  • Product Title
  • Product Description
  • Product Link/URL
  • Product Category
  • Product Image URL
  • Stock Availability
  • Regular Price
  • Product Condition
  • Manufacturer/Brand Name
  • GTIN (Global Trade Item Number)
  • MPN (Manufacturer Part Number)
  • Specific product attributes
    • Material
    • Age Group
    • Color
    • Gender
    • Size

Let’s dive deeper into some key attributes and how to optimize them.

i. Product ID Optimization

Your Product ID is a unique identifier that distinguishes each item in your store. It’s crucial for tracking and managing your product listings, especially when you have a large inventory.

  • Use simple, consistent formats (e.g., numeric IDs or SKU codes).
  • Avoid duplicating IDs, as this can cause errors in your Google Merchant Center feed.

ii. Product Description

A well-written product description not only helps with Google SEO but also convinces customers to click.

  • Keep it detailed but concise—highlight the key benefits and features.
  • Use bullet points for technical details and maintain a natural flow for readability.
  • Include keywords naturally without keyword stuffing.

iii. Product Price

Your product price should always reflect the actual cost customers will pay.

  • Ensure your prices are competitive for your industry.
  • Match the price displayed in your feed with the price on your product page—discrepancies can cause rejections in Google Merchant Center.

iv. Product Stock Availability

Accurate stock information is crucial for maintaining customer trust and ensuring your products qualify for ad campaigns.

  • Update your inventory regularly to prevent showing out-of-stock items.
  • Use labels like “In Stock” or “Out of Stock” in your product feed.

v. Managing Product Links

Each product should have a dedicated URL that leads directly to the product page.

  • Avoid redirecting links or using generic URLs.
  • Make your product links user-friendly by including descriptive terms (e.g., /products/blue-running-shoes).
manage product link

vi. Product Category & Subcategory

Assigning the right category to your products ensures they appear in the relevant search results.

  • Use Google’s recommended category structure to map your products accurately.
  • Include subcategories when possible, as they provide better targeting for niche audiences.

vii. Using Correct GTIN & MPN

Google requires specific identifiers like GTIN (Global Trade Item Number) and MPN (Manufacturer Part Number) for products to improve search accuracy.

  • Add GTIN and MPN for each product, especially if they’re brand-specific or globally sold items.

viii. Add as Many Additional Product Images

Customers are more likely to convert when they can view a product from multiple angles.

  • Upload high-quality images that showcase your product’s features.
  • Include close-ups, variations (like colors or styles), and lifestyle shots for better engagement.
  • Optimize image file sizes to maintain page loading speeds.

Some of these are important for proper product Ads distribution, for example, the GTIN can help identify your product’s legitimacy and help Google to choose a more appropriate category.

Some of these data can also be used to trigger conversion on the product page. For example, the specific product attributes are things buyers look at when considering buying something for personal use, such as a Jacket. Plus, these attributes can also be used to create variations of the same product.

Now, some of the data here cannot be included in the default WooCommerce.

For example, there is no default product field for GTIN, MPN, or Brand. In this case, you may use different plugins to get the custom fields.

Note that, just using a custom field is not enough. The data saved there should be part of the product structured data or Schema Markup. Plus, in the case of variable products, these attributes have to be specific for each variant.

Following are a couple of tools you can consider looking at:

6. Dynamic Display of Products

Dynamic product views let you tailor how your products appear based on what shoppers are searching for. This means the product images, titles, and descriptions can adjust dynamically to match search terms, making your listings more relevant and appealing.

Here’s why this matters:

  • It helps improve your click-through rate since shoppers see exactly what they’re searching for.
  • It increases conversion rates by displaying product details that match buyer intent.

To get the best results, use relevant and descriptive keywords in your dynamic views. These keywords help Google understand your product better and show it in the right search results.

7. Include Shipping Information

The shipping details in your product feed play a big role in customer decisions and Google Shopping rankings. Shoppers want clarity on courier service costs and delivery times, so optimizing this information is essential.

Shipping info

Here’s how to make the most of your shipping details:

  • Offer free shipping: This can make your product more attractive and encourage more buyers to click and purchase.
  • Provide expedited shipping options: Fast delivery sets your product apart from competitors, especially for time-sensitive buyers.
  • Track your shipping performance: Monitor delivery times and product condition on arrival. Keeping shipping reliable and consistent helps build trust and customer satisfaction.

8. Use A Feed Generation Plugin For Accuracy

Now, despite putting enough effort into making your product data optimized for conversion, it is also important to generate the product feed in the right format and with the right product data.

As per Google’s product data specification, you have to maintain a set XML format with all the required attributes as tags.

In this regard, you can either partner up with a feed management SAAS tool such as Feed Army, or, you can rather consider going with a much more affordable WordPress plugin, Product Feed Manager for WooCommerce.

Product Feed Manager For WooCommerce (PFM)

Product Feed Manager is a simple and easy-to-use plugin that helps to generate product feed for several marketplaces (including Google Shopping) in the right format in just a few clicks.

The specialty of this plugin is its pre-built feed template, which you can set up in just a few minutes, even without any prior knowledge of Google product feed.

If you want to avoid getting your feed rejected due to a human error, you should consider using this plugin to list your products on Google Shopping easily.

PFM has all the tools required to optimize Google shopping feed :

  • The plugin comes with the combined field feature which can help with optimizing product titles for the Google shopping feed optimization.
  • Its category mapping feature will help to optimize the category in the feed data without changing your store’s original categories.
  • This plugin also comes with custom fields for GTIN, MPN, and Product Brand to help you set up your products in an optimized way before generating the feed.
  • Plus, its one-click JSON-LD structured data ensures data mismatch in the schema.

Following is a glimpse of how you can generate a Google product feed using PFM:

On your PFM dashboard –

  1. Click on Add New Feed.
  2. Enter A feed title.
  3. Select Google from the merchant list.

Once you map all the attributes with the correct product data, click on the publish button.

And, your feed will be ready to upload in the Google Merchant Centre. This way you can pull up Google merchant center optimization very easily.

Create product feeds in 3 simple steps

Common Errors While Optimizing Google Shopping Feed

Even with the best intentions, it’s easy to make mistakes when optimizing your Google Shopping feed. These errors can hurt your product visibility and lead to missed opportunities. Here are some of the most common ones you should watch out for:

  • Leaving out critical product attributes: Forgetting to include fields like GTIN or product category can cause Google to disapprove your product listings. For instance, if you’re selling branded shoes and don’t add the correct GTIN, your listing might never reach the right audience.
  • Using vague or generic titles: Titles like “Stylish Shirt” don’t help shoppers or Google understand what you’re selling. Be specific: “Men’s Cotton Polo Shirt – Navy Blue, Size L” works much better.
  • Uploading low-quality product images: A blurry or poorly cropped image can deter shoppers. Always use high-resolution images that clearly display your product.
  • Incorrect pricing or availability: If your feed shows a different price or indicates “in stock” when your product is actually sold out, shoppers will lose trust, and Google might flag your listing.
  • Missing keywords in descriptions: A plain description without relevant search terms can prevent your product from showing up in searches. Use keywords naturally in a way that highlights your product’s benefits.
  • Skipping regular feed updates: Product details, like prices and stock levels, change frequently. Not keeping your feed updated can lead to outdated information being displayed, which frustrates shoppers.

Read our guide if you want to know more about the google feed errors.

Author’s Note

Since WooCommerce is your source of earning money, you need to invest some time to optimize your Google shopping feed and then go for promotions.

And when it comes to product promoting your products, listing products on Google Shopping is a must.

The tactics mentioned above are just 6 among many other ways you can do google merchant center optimization or even Google Shopping ads optimization.

If you haven’t already, start optimizing your product data and make your marketing efforts fruitful.

FAQs

1. How often should you update your Google Shopping feed?

You should update your feed whenever product details like price, stock, or availability change. Regular updates keep your listings accurate and improve performance.

2. What happens if your product images are low quality?

Low-quality images can reduce clicks and conversions. Google might even disapprove your listings if images don’t meet their guidelines.

3. Why is GTIN important for your products?

GTIN helps Google identify and categorize your products accurately. Without it, your listings might not show up in relevant searches.

4. Can incorrect shipping details impact your feed?

Yes, inaccurate shipping info can confuse shoppers and lead to lower sales or negative reviews. Always double-check your shipping parameters.

5. Do product titles affect search visibility?

Absolutely. Clear, specific titles with relevant details improve your product’s chances of appearing in the right searches.


Categories
Product Feed Manager For WooCommerce WooCommerce

WooCommerce Targeted Advertising: Reach Out To The Right Audience [2025]

Getting a lot of traffic but not enough sales? Chances are, you’re not reaching the right audience.

To increase your sales, you need more than just random marketing—you need targeted advertising.

In recent years, Targeted advertising has become increasingly important for WooCommerce store owners like you!

According to gitnux, 78.3% of US companies use targeted advertising to reach and engage with consumers.

I’ll explore these targeted advertising strategies here. They are:

  • Organic Targeted Advertising
  • Paid Targeted Advertising
  • Advance Strategy For enhanced result

By following these strategies, you can do your product promotion more effectively.

I will also give you tips on implementing those strategies properly.

So, let’s get started.

What is Targeted Advertising?

Targeted advertising is a focused way to show ads to people who are most likely to be interested in your products or services. Instead of displaying the same ad to everyone, it uses data to ensure that your message reaches the right audience.

Targeted advertising

Imagine you own an online store that sells fitness gear. Showing your ads to anyone who visits the internet would be random and ineffective. But with targeted advertising, you can specifically reach people who actively search for gym equipment, follow fitness influencers, or read articles about healthy lifestyles.

This way, your ad feels relevant to them, increasing the chances they’ll click and buy.

In the past, this concept worked in simpler ways. A cosmetics company might have placed ads in women’s magazines, knowing that was the primary audience.

Today, technology takes this to the next level by collecting user data like browsing history, search queries, and purchase behavior. This makes your ads feel personalized and timely, making your marketing efforts much more effective.

Now that you understand what targeted advertising is, let’s explore how it works step by step.

How does targeted advertising work?

Targeted advertising uses data to match your ads with the people most likely to respond. Here’s a simplified breakdown of how it works:

  1. Collecting data Every interaction online leaves behind a trail of data. From browsing behavior to purchase history, this data gives you insights into what your audience wants. For instance, if someone searches for “best running shoes,” they’re likely a fitness enthusiast looking for quality gear.
  2. Analyzing data After collecting this information, it’s time to make sense of it. You look for patterns—what are their interests? Do they prefer budget-friendly options, or do they lean toward premium products? These details help you understand how to speak directly to their needs.
  3. Segmenting your audience Not everyone is the same, so you segment your audience into smaller groups. Let’s say you’re selling fitness equipment. One group might include seasoned athletes, while another might be beginners just starting their fitness journey. Each group gets tailored messaging.
  4. Personalizing ads Once you have your segments, you create ads that feel personal and relevant. For example, an ad for an advanced fitness tracker might appeal to experienced athletes, while beginners might see ads for simple workout gear.
  5. Placing the ads Where your ads appear matters. They could show up on social media, in search engine results, or on websites your audience frequently visits. It’s all about meeting them where they are, at the perfect moment.
  6. Tracking and optimizing Once your ads are live, you monitor how they perform. Are they getting clicks? Are they leading to sales? If something isn’t working, you adjust. Maybe the headline needs tweaking, or the imagery could be more engaging. It’s a constant cycle of learning and refining.

For example, if someone buys a pair of hiking boots, they might start seeing ads for accessories like backpacks or water bottles. This approach keeps the ads relevant and adds value to their experience.

By following these steps, you’re not just showing ads; you’re connecting with the right people in a way that feels meaningful and helpful.

What Are the Types of Targeted Advertising?

When it comes to reaching the right audience, targeted advertising offers several approaches. Each type focuses on delivering ads tailored to specific preferences, behaviors, and needs. Here’s a closer look:

  • Interest-Based Targeting This type focuses on what people are passionate about. For example, if someone frequently reads blogs about fitness or watches workout videos, they’ll likely see ads for gym equipment or activewear.
  • Demographic Targeting This approach ensures that ads are relevant based on age, gender, income level, or even education. For instance, a college student might see ads for affordable gadgets, while a professional might see premium work tools.
  • Geographic Targeting Location plays a key role in this type. Businesses use it to show ads to people in specific cities, regions, or countries. For example, a local restaurant may target customers within a 10-mile radius with lunchtime promotions.
  • Behavioral Targeting Behavioral targeting focuses on users’ online activities, such as websites visited or items browsed. If you’ve added a product to your cart but didn’t check out, you might see ads reminding you to complete the purchase.
  • Programmatic Targeting This type uses automated systems to buy and place ads in real time. These systems analyze user data and decide the best ad placement for maximum effectiveness, ensuring your ad reaches the right person at the right moment.

By leveraging these types of targeted advertising, businesses can create campaigns that feel relevant and timely.

Up next, let’s explore how these approaches benefit both businesses and consumers.

What Are the Benefits of Targeted Advertising?

When done right, targeted advertising creates a win-win situation for businesses and customers. It ensures you reach the right people at the right time, while customers get ads that actually matter to them. Here’s how:

How Businesses Gain from Targeted Advertising

  • Efficient Spending: By targeting people who are most likely to buy, you avoid wasting money on uninterested audiences.
  • Higher Conversions: Showing ads to customers with a clear buying intent boosts your chances of making a sale.
  • Improved Loyalty: Relevant ads create a positive connection with your audience, encouraging repeat purchases.
  • Better ROI: The more focused your campaigns, the greater the return on every dollar spent.

Why It’s Better for Customers Too

  • Relevant Recommendations: Customers get ads for products they need or might enjoy, making their shopping experience easier.
  • Less Clutter: Instead of being overwhelmed with ads they don’t care about, they see tailored suggestions that matter.
  • Convenience: Ads often appear at the right time, helping customers find what they need without searching.
  • Personalized Experience: Relevant ads foster a sense of connection with brands that understand their preferences.

With all these targeted advertising benefits, it’s clear that targeted advertising has immense potential.

But as useful as it is, it comes with a responsibility to address a critical concern—Privacy.

Privacy Issues in Targeted Advertising

To make advertising effective, companies rely on data about your online behavior. While this helps in creating personalized experiences, it also opens the door to privacy concerns.

Imagine you’re searching for a new phone. After just one search, ads for phones, accessories, and even financing options follow you across every app and website. It feels like you’re being watched. That’s because companies use cookies and tracking tools to collect data about your activities—sometimes across multiple platforms.

Privacy Issues in Targeted Advertising

The Risks of Collecting Too Much Data

  • Data Breaches: The more data companies store, the bigger the risk of it being stolen in a breach. Personal information in the wrong hands can lead to identity theft or fraud.
  • Detailed Profiles Without Consent: Some tracking practices create detailed profiles of users without clear or informed consent, making people feel uneasy about how much is known about them.
  • Misuse of Ads: In some cases, targeted ads have been exploited for manipulative purposes, such as spreading misinformation or influencing political opinions.

Why People Are Concerned

Many users now prefer more transparency about how their data is collected and used. They want control over what information is shared and how it’s handled. This growing awareness has led to stricter regulations and increased demands for ethical advertising practices.

Targeted advertising offers undeniable advantages, but it’s equally important to ensure that it respects privacy. By finding the right balance, you can make advertising both effective and trustworthy.

2 Proven Targeted Advertising Strategies for WooCommerce

For targeted promotion of your WooCommerce products, you need to first select your strategy.

There are 2 proven strategies you can go for :

1. Organic targeted advertising and

2. Paid advertising

Why paid advertising?

You can not always reach your goal by only organic targeted advertising. That’s where you have to consider paid advertising.

Before going to paid targeted advertising, let’s put light on organic advertising.

1. Woocommerce Targeted Advertising For Organic Traffic

Suppose you own a WooCommerce store of outdoor sporting goods.

Your product range includes items such as camping gear, hiking equipment, and fishing accessories.

Besides having a strong online presence on your WooCommerce website, you need to place your products in front of your targeted audience who are actively searching for outdoor sports products on different marketplaces.

In this case, you must choose those online marketplaces that are popular for this kind of product, such as Amazon or eBay.

As these marketplaces have a dedicated customer base that actively seeks outdoor sports gear, you can choose them as ideal platforms to showcase and sell your products.

But remember that all marketplaces are not specialized or ideal for all types of your products.

When listing your products on different marketplaces, you must have to focus on proper execution.

So, when people search for your product types, they immediately appear in front of them.

Now, let’s focus on how to do that properly –

Strategies To Execute Organic Targeted Advertising Effectively

Here are some tips with targeted advertising examples for successfully enlisting your products on different marketplaces:

  • Research and choose the right marketplaces
    First, Identify marketplaces that align with your product categories and target audience. For example, if you sell handmade crafts, promoting your products on Etsy will be a good choice.
  • Create your product listing
    Once you have selected your marketplace, create your product list. Choose the product that you want to promote on the marketplace and create your desired product feed.
  • Optimize your product feed
    When listing, ensure that your product feed is accurate, up-to-date, and optimized for each marketplace’s specific requirements. Include relevant attributes such as product title, description, images, pricing, and availability.
  • Stay updated with marketplace policies
    Besides feed optimization, You should follow the policies, guidelines, and updates of the marketplaces you’re selling on. Compliance with marketplace rules is essential to maintain a strong presence and avoid penalties or account suspensions.

Drive stronger results with the proper tools

Now, after choosing your targeted marketplace next question that may arise in your mind is- how to implement this easily.

There are several tools that can help you list your WooCommerce products on different marketplaces.

One such reliable plugin is Product Feed Manager for WooCommerce.

180+ marketplaces of PFM

As It has 180+ pre-defined marketplace templates, you can easily create your product feed for your desired merchant.

And, coming to curating your listing, you can easily filter your products to create the perfect feed.

This way, you can promote your targeted products in your preferred online marketplaces.

Besides organic targeted advertising, you can consider paid advertising to promote products to the targeted audience.

Let’s find out how you can do that-

2. Woocommerce Targeted Advertising For Paid Traffic

When your organic product promotion comes into your mind, reaching your targeted audience may still be difficult for you. Here, paid advertising offers an additional level of control and precision in promoting your WooCommerce products to a targeted audience.

By investing in paid targeted advertising strategies, you can amplify your reach and drive targeted traffic to your store. Thus, you can increase your chances of converting potential customers into buyers.

Imagine you have a WooCommerce store specializing in fitness apparel and accessories.

For product promotion, you decide to run paid advertising campaigns on social media platforms like Facebook and Instagram.

Let’s discuss targeted advertising on Facebook. For that, you can do the following-

  • Set up custom audiences based on interests such as fitness, gym memberships, and active lifestyle
  • Then, ensure your ads are shown to individuals who are more likely to be interested in your products. For that, do as follows-
    – Create visually appealing ads featuring your latest workout gear
    – Offer a limited-time discount
    – Entice potential customers to click through and make a purchase on your WooCommerce store.

Let’s see two effective paid targeted advertising strategies for your WooCommerce store:

Facebook Advertising for Higher Reach

let’s say you run a WooCommerce store that sells handmade jewelry.

You have a new product line that you want to promote to your target audience on Facebook. With Facebook, You can create targeted campaigns easily that reach users who are interested in your handmade jewelry and fashion accessories.

To achieve this, let’s assume you already have a Facebook ad account. Here’s how you can effectively utilize Facebook-sponsored advertising in your jewelry store example:

  1. Define your targeted audience:
    • Set parameters based on demographics, interests, and behaviors. For instance, you can target individuals who have previously liked similar jewelry pages or have made purchases of handmade jewelry in the past.
  2. Create lookalike audiences:
    • Capitalize on your existing customer data to create lookalike audiences. This allows you to expand your reach and target potential customers who share similar characteristics and behaviors as your existing customer base.

Implementing Facebook Advertising Effectively

Now, let’s explore some strategies for implementing Facebook advertising effectively in your jewelry store:

  1. Choose your advertising objective:
    • Consider your business goals and select the most relevant advertising objective provided by Facebook. For example, if your aim is to boost sales, you can choose the objective of increasing conversions.
  2. Craft your ad:
    • Here, Opt for visually appealing ad formats, such as stunning images, captivating videos, or engaging carousels. Showcase your exquisite WooCommerce jewelry products in a way that grabs attention. Furthermore, craft ad copy that directly addresses the needs and aspirations of your target audience, highlighting the uniqueness and craftsmanship of your handmade jewelry.
  3. Launch and monitor your campaign:
    • Once your campaign is live, closely monitor its performance. Keep a close eye on key metrics like click-through rates, conversions, average revenue per user, and engagement. Make necessary adjustments to optimize your Facebook advertising campaigns continually. A/B testing different ad elements and targeting strategies can help you refine your approach and maximize results.

Following are the targeted advertising strategies for Facebook advertising.

But, What if you fail to achieve your goal with this approach?

Let’s explore dynamic remarketing as a solution for that.

Advance Targeted Advertising for Enhanced Results

To maximize your product promotion, you can integrate dynamic remarketing with Facebook advertising.

Let’s explore how the integration of dynamic remarketing and Facebook advertising can work together in your handmade jewelry store example:

  1. Set up dynamic remarketing with Google Ads:
    • Begin dynamic remarketing through Google Ads, following the steps mentioned earlier. Set up the remarketing tag on your WooCommerce store to track user behavior and create customized remarketing lists based on product views and cart abandonments.
  2. Create your dynamic product feed:
    • Then, Generate a product feed that includes all your handmade jewelry products along with relevant attributes, such as product names, captivating images, and prices. This feed will be used for both Facebook advertising and dynamic remarketing campaigns.
  3. Implement Facebook remarketing:
    • Now, Integrate your dynamic product feed with Facebook. This will allow you to synchronize your inventory and create Facebook remarketing campaigns. Also, enables you to target users who have shown interest in your handmade jewelry products.
  4. Set up targeted Facebook advertising campaigns:
    • As mentioned earlier in the previous section, you have to set targeted advertising on the Facebook platform. If you fail to achieve your goal through targeted advertising, go for dynamic marketing.
  5. Implement dynamic remarketing on Facebook:
    • Use the dynamic product feed created earlier to deliver personalized ads on Facebook. Showcase the exact handmade jewelry products that users have viewed or added to their carts, But didn’t complete their purchase. This can Increase the chances of your conversion.
      ****Don’t forget to Use compelling visuals and persuasive ad copy that resonate with your target audience’s needs and aspirations.
  6. Continuously monitor and optimize:
    • After running your targeted advertising, don’t forget to monitor the results. Regularly monitor the performance of your Facebook advertising and dynamic remarketing campaigns. Track key metrics like click-through rates, conversions, and engagement. Analyze the data to identify areas for improvement and make necessary adjustments to optimize your campaigns further.

This integrated approach enhances your overall targeted advertising efforts. Also, increase your product promotion reach and conversions.

Wrapping Up

Targeted advertising is an essential component of your WooCommerce marketing strategy.

After identifying your targeted audience, you can develop highly effective targeted advertising campaigns that resonate with your audience and drive conversions. For that, you have to promote your products in different marketplaces.

To effectively enlist your products into the product feed and do your targeted advertising, consider trying Product Feed Manager for your WooCommerce.

It has advanced features and an intuitive interface to help you create high-quality product feeds that are optimized for multiple advertising channels, including Google Shopping, Facebook, and more.

Start implementing these targeted advertising strategies in your WooCommerce store today.

And, enjoy the positive impact they can have on your business!

Frequently Asked Questions(FAQs)

How can I set up targeted advertising for my WooCommerce store?

Setting up targeted advertising for your WooCommerce store involves several key steps. First, choose an advertising platform that aligns with your goals, such as Facebook Ads or Google Ads. Next, install the necessary plugins or integrations to connect your store data with the chosen platform. Create custom audiences based on your store data, including past customers, site visitors, or specific product interests. Design ads that are tailored to these audiences, considering their preferences and behaviors. Set up proper tracking to measure the performance of your campaigns accurately.

What are some effective targeting options for WooCommerce stores?

WooCommerce stores have access to a variety of effective targeting options to reach the right audience. Retargeting past visitors or cart abandoners can help re-engage potential customers who have shown interest in your products.

How can targeted ads be beneficial for businesses?

Targeted ads help businesses focus on the right audience, reducing wasted ad spend and boosting sales effectively.

What makes targeted advertising better for customers?

Customers see ads that match their interests, making their online experience more relevant and enjoyable.

Is my privacy at risk with targeted advertising?

While targeted advertising relies on data, most companies use safeguards to protect personal information.

Categories
WooCommerce

Instagram Marketing Strategy: 10+ Handy Tips to Follow for 2025

You must already have noticed that Instagram has become a powerhouse for businesses to grow and drive serious sales.

And that’s why, with over two billion users browsing daily, Instagram is now the third-largest social network in the world and a must-have tool for businesses in 2025.

The blend of visual storytelling and interactive features has transformed it into a top-tier marketing tool.

However, as Instagram’s algorithm and trends continue to evolve, staying ahead requires a winning strategy to ensure your business sees consistent growth, engagement, and results.

In this blog, I’ll share 10+ actionable tips to refine your Instagram marketing strategy and keep your brand thriving.

So, let’s dive in.

What is Instagram marketing?

Instagram marketing means using Instagram to promote your business, connect with your audience, and drive actions like clicks, leads, or sales.

With its visual-first focus and features like Reels, Stories, and Shopping, it’s a powerful way to build your brand.

Around 83% of Instagram users say they discover new products and services on the platform, making it an essential part of any marketing plan.

Instagram statistics

How is Instagram Used for Marketing?

There are different ways to market on Instagram, and it all depends on your goals.

  • Organic content: Sharing regular posts, Stories, or Reels to keep your followers engaged.
  • Instagram ads: Using paid campaigns to target specific audiences and expand your reach.
  • Influencer marketing: Collaborate with influencers to promote your product to their audience.
  • Instagram Shop: Selling your products directly on Instagram with shoppable posts and collections.

Each approach works together to help you connect with your audience and grow your brand effectively.

Why Instagram Is a Must-Have Marketing Channel in 2025

Now that you understand how Instagram can be used for marketing, let’s see why it’s a must-have platform for your business in 2025.

  1. Attracting Younger Audiences: Instagram is extremely popular among younger users. In fact, more than 60% of users are aged 18-34, giving you the chance to connect with a vibrant, trend-conscious audience.
  2. Visual Storytelling: Instagram’s strength lies in its visual content. Features like photos, videos, Reels, and Stories allow you to tell your brand’s story in a creative and engaging way. You can use tools like Canva, Adobe, and Designwiz to create eye-catching visuals for Instagram, including a cleaning service flyer to promote your offers.
  3. Instagram Reels & Stories: Reels and Stories are gaining more attention and engagement, with users spending more time watching short-form videos. This feature is ideal for brands to share updates, promotions, and behind-the-scenes content.
  4. Instagram Shopping: With Instagram Shop, businesses can easily integrate their products directly into posts and stories. It lets customers browse and buy products without leaving the app, making the shopping experience simpler and more convenient.
  5. Shifting Marketing Trends: As trends move more towards visual-first marketing, Instagram stands at the forefront of this shift. Its unique mix of features, such as Stories, Reels, and Shopping, reshapes the way you can market and sell to your audience.

So, It’s clear that if you’re not already using Instagram marketing to its full potential, you’re missing out on an enormous opportunity to engage with potential customers and drive sales.

Now let’s move on to the main part!

Handy Tips for a Winning Instagram Marketing Strategy (10+)

With Instagram evolving rapidly, having a strategy is something you simply can’t overlook.

Here’s how you can set up your business with a proper Instagram marketing strategy.

Tip 1: Define Clear Instagram Marketing Goals [That’s Trendy]

Before you dive into creating content or running ads, clarify what you want to achieve.

Like, are you trying to grow your follower count by 15% in the next three months? Or are you focused on driving traffic to your online store?

Having specific, measurable goals like these helps you focus your efforts and track results effectively.

If you’re running an e-commerce store, your goal might be to increase product page clicks by 20% using Instagram Stories. For a service-based business, you might aim to book 10 new consultations per month through direct messages.

These objectives tie directly into broader business outcomes like increasing revenue or scaling operations, giving your Instagram efforts purpose.

Tip 2: Optimize Your Profile for 2025

Your Instagram profile is often the first impression your audience gets of your brand, so it needs to be clear, professional, and actionable.

Start by crafting a bio that explains who you are and what you offer. Include relevant keywords to make your profile searchable.

For example, a digital marketing agency might write, “Helping small businesses grow with data-driven strategies. DM us for a free audit.”

Here’s an example from a book marketing agency.

Instagram profile bio

Take advantage of Instagram’s latest features.

The clickable links in posts, for example, let you link directly to products, blog articles, or landing pages. This removes the friction of always directing people to “link in bio.” You can also use pinned posts to highlight important updates, like promotions or customer testimonials.

An example from soulshine.digital.

Instagram pinned posts

Finally, ensure your profile picture aligns with your brand—whether that’s a logo or a professional photo since a cohesive and polished profile encourages trust and draws in your target audience.

Tip 3: Share High-Quality & Engaging Content in Different Formats

Instagram thrives on variety, and so should your content strategy. Sticking to a single format limits your reach and engagement. Instead, explore different types of posts to keep your audience engaged:

i. Photos and Carousels:

Share a carousel post to showcase your products or services from different angles or in various use cases.

For instance, a furniture store could post a series featuring a sofa styled in different room settings to inspire buyers.

Let’s see an example from Nike.

ii. Reels:

Short, dynamic videos are Instagram’s most engaging format. Create Reels that align with trending topics or sounds while showcasing your product or service in action.

For example, a skincare brand might post a quick tutorial on applying their best-selling serum.

iii. Stories:

Use Stories for updates, polls, or behind-the-scenes content. These are perfect for engaging directly with followers in a casual and time-sensitive way.

For example, you could ask your audience to vote on your next product design or share a quick clip of your team prepping for an event.

Here’s how Glossier keeps its content fresh while staying consistent with its branding.

Instragram story

Tip 4: Post Consistently

Consistency is key to building a loyal audience. Create a posting schedule based on when your audience is most active, and stick to it.

For example, if you’ve noticed higher engagement on weekday evenings, plan your posts around those times.

A content calendar makes this easier. Map out themes for the week—product highlights, user testimonials, behind-the-scenes moments—and schedule them accordingly.

This approach ensures that your feed looks organized and your messaging stays cohesive. Over time, consistent posting establishes trust and keeps your followers coming back for more.

Tip 5: Leverage Trendy Reels for Maximum Reach

Reels are Instagram’s secret weapon for massive engagement. In 2025, they dominate the platform, with users spending most of their time scrolling through these short, snappy videos. To take advantage, focus on creating content that entertains, educates, or solves a quick problem for your audience.

Here’s how to do it:

  • Start with trending audio—Instagram even labels it for you in the music library.
  • Add captions that grab attention, like a bold statement or a quick “how-to” phrase.
  • Keep the videos between 10-15 seconds.
  • And make sure your visuals are sharp and vertical.

Reels thrive on relatability, so focus on content that aligns with your audience’s daily lives or challenges.

For instance, a skincare brand could show a “morning routine” using their products.

Let’s watch a reel from Cerave.

Tip 6: Use Instagram marketing Ads Strategically [Boost High Rated Posts]

Instagram marketing Ads are your go-to for amplifying reach. The beauty of ads is you can target exactly who you want to see your content—whether it’s potential customers in your niche or those who’ve already interacted with your brand.

Here’s the strategy:

Start with your best-performing posts and boost them. Instagram’s algorithm already sees these as valuable, and paid promotions push them further.

You can also explore formats like Stories ads for quick, swipe-up actions, carousel ads to showcase multiple products, or in-feed ads for a natural scroll experience.

For example, if you’re a fitness coach, you could run a carousel ad showing transformations, client testimonials, and a link to book a consultation.

Tip 7: Partner With Influencers and Brand Advocates

Influencers are still a game-changer in 2025, but the key is partnering with the right ones. Micro-influencers (10k–50k followers) often bring a more engaged audience, while macro-influencers can give you broader exposure. Either way, authenticity is non-negotiable.

Here’s how to do it:

  • Find aligned influencers: Choose influencers who genuinely reflect your brand values. For example, a sustainable clothing brand could collaborate with someone advocating eco-friendly living.
  • Set clear goals: Define specific campaign objectives, such as driving website clicks or boosting sales for a particular product.
  • Leverage brand advocates: Don’t limit yourself to influencers. Encourage satisfied customers to share reviews and tag your brand in their posts.
  • Share user-generated content: Show appreciation by resharing content from your advocates to build trust and foster community engagement.

Tip 8: Monitor Metrics and Analytics

You can’t grow what you don’t track. Analytics give you a clear picture of what’s working and what’s not, so you can fine-tune your strategy and get better results.

Here’s what to track:

  • Engagement rate (likes, comments, and shares) shows how your audience connects with your content.
  • Follower growth lets you see if your efforts are attracting the right people.
  • Website clicks and profile visits measure how effectively your posts and ads drive traffic to your site.
  • Use Instagram Insights to check these metrics regularly.

If you want deeper analysis, tools like Sprout Social or Hootsuite provide advanced tracking options.

For example, if you notice your Reels drive more website traffic than Stories, you know where to focus your energy.

Tip 9: Experiment With New Features

Instagram constantly updates its platform with new features that can elevate your strategy. Features like Instagram Shop, Broadcast Channels, and Collaborative Posts are designed to help you reach your audience in fresh ways.

For instance, Collaborative Posts let you co-create content with other creators or brands, merging your audiences for increased visibility. Broadcast Channels, on the other hand, allow you to communicate directly with your followers in an exclusive group.

Regularly testing and incorporating these tools ensures you stay ahead of trends and find new ways to engage your audience effectively.

Tip 10: Set Up Instagram Shopping (If Applicable)

If you run an online store, Instagram Shopping is a no-brainer. It turns your account into a virtual storefront where customers can browse and buy products directly. The convenience is hard to beat.

By tagging products in your posts or Stories, you make it easy for users to explore your catalog.

For example, if you’re launching a new product, you can showcase it in a post and tag it so users can click and purchase instantly.

It’s a simple way to combine content and commerce.

Tip 11: Utilize Instagram Live

Going live on Instagram is one of the most engaging ways to connect with your audience. Whether it’s a product demo, an AMA (ask me anything), or just sharing behind-the-scenes moments, Live allows for real-time interaction that strengthens your connection with followers.

Plan your sessions based on what your audience values.

For instance, if you’re a skincare brand, a live tutorial on applying your products could resonate. Answer questions, respond to comments, and make it feel like a two-way conversation. Plus, Lives are prioritized in the feed, ensuring higher visibility.

Tip 12: Never Miss Brand Mentions

As your account grows, brand mentions become an invaluable tool for building trust and credibility. Whether it’s a happy customer tagging your product or an influencer promoting your brand, these mentions are social proof you can’t afford to ignore.

Make it a habit to monitor your notifications for mentions. When you spot one, share it on your account to amplify the message.

For example, if a customer posts a photo of your product with a glowing review, repost it with a caption thanking them for their support.

Small gestures like this build community and trust.

Tip 13: Keep an Eye on the Competition

Keeping tabs on competitors isn’t about copying—it’s about staying informed. Knowing what others in your industry are doing helps you adapt your strategy and stay competitive.

For example, if you notice a competitor gaining traction with a certain Reel format or campaign, analyze why it’s working.

Then, think about how you can put your unique spin on it. Staying proactive ensures you’re always delivering relevant content that resonates with your audience.

Examples of Brands Nailing Instagram Marketing in 2025

Let’s see how some brands are nailing Instagram marketing in 2025. These Instagram marketing examples show what’s possible when you combine creativity with the right features.

i. ASOS:

You’ve probably seen ASOS on Reels. They’re not just posting trendy outfit transitions—they’re tagging products in their videos so you can shop while you watch. They also mix in behind-the-scenes content and use trending audio to keep things fresh and engaging. It’s a smart way to blend entertainment with shopping.

Here is a reel from ASOS.

ii. Starbucks:

Starbucks knows how to connect. They use Instagram Live to host Q&A sessions with baristas and share drink-making tutorials. These live sessions feel personal and build a stronger connection with their followers.

Plus, their Stories highlights are perfect for keeping seasonal drinks and promotions front and center.

_Starbucks_ instagram marketing example

iii. LEGO:

LEGO is all about collaboration. They team up with creators to share posts that showcase custom builds and play ideas. These Collaborative Posts grab attention while encouraging creativity.

Here’s an example from Lego

LEGO also takes full advantage of Instagram Shop, making it easy for you to buy directly from their feed.

Each of these brands is using Instagram features in ways that feel authentic to their style—and you can do the same by focusing on what makes your brand unique. Remember, It’s not about copying; it’s about finding what works for you and running with it.

Start Crafting Your Instagram Strategy Today

So, you’ve seen how brands are thriving on Instagram in 2025. Now it’s your turn to make those Instagram marketing strategies work for you. The best time to start crafting your Instagram marketing plan is right now because the earlier you take action, the sooner you’ll see your brand gaining momentum.

If you’re planning to use Instagram Shop, having a strong product catalog isn’t just a good idea—it’s essential. A well-organized product feed makes it easier for customers to find and buy from you directly on Instagram.

Consider using Product Feed Manager for WooCommerce which simplifies creating and managing product feeds, so you can focus on growing your shop without worrying about the technical side of things.

PFM tool

Start today, and set your brand up to stand out in 2025.

FAQs

1. How can brands use Instagram Reels effectively?

Instagram marketing examples show that short, engaging Reels with trending audio drive significant reach and engagement in 2025.

2. Why should small businesses invest in Instagram ads?

Instagram marketing helps small businesses reach specific audiences with affordable ad formats like Stories and carousel ads.

3. Are influencer partnerships effective for online stores?

Yes, many Instagram marketing examples highlight how micro-influencers boost trust and drive sales for online stores.

4. How does content scheduling improve results on Instagram?

A good Instagram marketing plan ensures consistent posting, helping you grow followers and maintain engagement over time.

5. Which features should brands prioritize on Instagram?

Instagram marketing in 2025 emphasizes using features like Reels, Instagram Live, and Shops to connect and convert audiences.

Categories
WooCommerce

11 BOGO Deals That Work: Proven Buy-One-Get-One Strategies

What if you could double the excitement for your customers while boosting your sales at the same time?

That’s how BOGO deals work delivering value in a way that feels almost too good to pass up.

In fact, studies show that BOGO offers are the third most popular promotion among shoppers, capable of increasing sales by an impressive 90%.

Whether you’re looking to move excess inventory, grow customer loyalty, or drive higher cart values, a well-crafted BOGO deal can do it all.

In this guide, I’ll share 11 innovative BOGO strategies that are designed to inspire, engage, and deliver results.

Let’s get started.

What Are BOGO Deals?

A BOGO deal is exactly what it sounds like: “Buy One, Get One” — it’s a promotion where you get something extra when you buy a product.

Let’s say you’re running a shoe store. You could offer a “Buy one pair of shoes, get the second one free” deal.

Pretty appealing, right?

BOGO deals are popular in marketing because they create a win-win situation for both you and your customers.

For example, if a customer buys a shirt, they might hesitate to buy a second one. But when you throw in a “Buy one, get one 50% off” offer, it gives them an extra reason to grab that second shirt.

BOGO Deals examples

The great thing about BOGO deals is that they can be customized to meet different business needs. You could offer a free gift with a purchase to introduce customers to a new product.

Or maybe you want to boost your sales, so you could give a discount on the second item to increase the order total. It all depends on what you’re trying to achieve.

Now I’ll explain why BOGO deals work wonders for your business.

Why Are BOGO Deals Effective?

BOGO deals work because they tap into how you think about value. When you see an offer that gives you something extra—like a free item or a discount on the next one—it feels like you’re getting more than what you paid for.

That sense of getting a good deal makes it hard to resist, especially when there’s a time limit.

But it’s not just about getting a quick sale. These deals give your customers a reason to shop with you again and again.

Here’s how BOGO deals can make a real difference:

i. Encouraging impulse purchases

Think back to the last time you saw a “Buy one, get one free” deal. You might have been walking through the store with no intention to buy, but when you saw “Buy one, get one free” on your favorite snacks, even if you didn’t plan to buy snacks, the deal made you grab them.

That’s how BOGO deals work—they get you to act on impulse.

11 BOGO Deals That Work: Proven Buy-One-Get-One Strategies 2

ii. Increasing average order value

BOGO deals often push your customers to spend a little more to qualify for the offer.

For example, if your deal is “Buy two, get one free” on a product like shampoo, customers are more likely to add an extra bottle to their cart to take advantage of the promotion.

This increases the overall value of the sale, benefiting both your customers and your store’s revenue.

iii. Clearing out old inventory

BOGO is also a smart way to pair slow-moving items with popular ones. If a new product is flying off the shelves, you can offer a free clearance item with each purchase.

iv. Building customer loyalty

When you offer deals that feel like a gift, it sticks with your customers. For instance, if you sell skincare products, offering an exclusive “Buy one moisturizer, get a serum free” deal for your loyal customers can make them feel appreciated.

So, BOGO deals aren’t just about making sales but about creating an experience that keeps people coming back for more.

Now that you understand why BOGO deals work so well, let’s dive into specific strategies you can use to boost your sales.

11 Proven BOGO Strategies to Grow Your Business

These tried-and-true approaches are effective & flexible enough to suit various types of businesses.

#1 Buy One, Get One Free (Classic BOGO)

This is the original BOGO deal—buy one product, and the second one is completely free. You’ve likely seen this offer everywhere because it’s simple and effective. It works best for products with high margins, where the “free” item doesn’t eat into your profits.

Think about this: You walk into a clothing store and see a sign that says, “Buy one t-shirt, get another free.”

Even if you weren’t planning to shop, it’s tempting, right?

Brands like Poundfun uses this tactic to clear inventory while encouraging customers to buy more. You can use this same approach to create buzz and boost sales without complicating your offer.

Buy One, Get One Free (Classic BOGO)

#2 Buy One, Get One 50% Off

If giving something away for free feels like too much, this is a smart alternative. Instead of a second free item, you offer it at a discount—usually 50% off. It’s just enough to feel like a deal but still helps you recover costs on the second product.

Imagine you’re shopping for shoes, and the store advertises, “Buy one pair, get the second 50% off.” That deal makes it easier to justify grabbing that second pair.

Famous Footwear has perfected this strategy, making it a go-to for shoppers looking to save while splurging a little.

#2 Buy One, Get One 50% Off

#3 Buy X, Get Y (BXGY)

Sometimes it makes sense to mix things up by offering a different item as the freebie. This works particularly well for products that complement each other. By bundling items this way, you can cross-promote categories and introduce customers to something new.

For example, let’s say you run a coffee shop. You could try “Buy a bag of coffee beans, get a free mug.

Your customers walk away with a complete experience, and you get a chance to show off products they might not have noticed otherwise.

Stores like Bath & Body Works often run mix-and-match bogo deals like “Buy 3, get 3 free” to drive up sales across their collections.

#3 Buy X, Get Y (BXGY)

#4 Buy One, Get a Free Gift

Everyone loves getting something extra, and free gifts are an excellent way to surprise and delight your customers. This strategy is especially useful if you want to introduce new products without risking inventory.

Picture this: A skincare brand offers a free travel-sized serum with every moisturizer. Not only are you more likely to try the serum, but you might fall in love with it and come back to buy the full size.

Estee Lauder often offers this by setting the minimum spent and offering free samples.

#4 Buy One, Get a Free Gift

#5 Buy One, Get Free Samples

Adding free samples to a purchase is a practical way to build trust while introducing your customers to new products. This strategy works especially well if you’re launching something new or want to encourage repeat purchases.

For example, if you sell skincare products, you might offer a free sample of a new serum with the purchase of a moisturizer. It gives customers a chance to try something new without any extra cost. .

Farm 2 Flour is a good example of this.

_#5 Buy One, Get Free Samples

#6 Buy Three, Get One Free

This strategy focuses on encouraging customers to buy in bulk. It’s particularly effective for consumable or frequently used items like food, beverages, or household supplies. Customers feel like they’re saving money in the long run, while you benefit from higher sales volume upfront.

For instance, a pet supply store might offer a deal like “Buy three bags of dog treats, get one free.” This incentivizes customers to stock up, ensuring they have enough on hand while feeling rewarded for buying more.

ETSY has used this approach effectively, targeting families who shop in larger quantities for home decoration.

#6 Buy Three, Get One Free

#7 BOGO for Limited Categories

Limiting BOGO deals to specific categories can help you clear out inventory or draw attention to seasonal items. This approach allows you to strategically boost sales for products that need extra promotion without impacting your entire catalog.

For example, a clothing store might run a promotion like, “Buy one sweater, get another sweater free,” as part of an end-of-season sale.

It’s a win-win: customers enjoy discounted items, and you free up space for next season’s collection.

#8 BOGO with a Minimum Purchase Requirement

Setting a minimum purchase requirement for a BOGO market is a smart way to increase the average order value. This ensures that while customers get a deal, they also spend more overall, boosting your revenue.

For instance, an online electronics store could offer, “Spend $100 and get a free phone charger.” Customers are motivated to add more to their cart to unlock the reward, which benefits your business by increasing the total purchase amount.

Neiman Marcus frequently uses this strategy. They set up a minimum spent and offer a free gift if a customer spends the amount.

#8 BOGO with a Minimum Purchase Requirement

#9 Buy One, Get a Discount on the Next Purchase

Encouraging customers to return is easier when they know they’re getting something valuable in their next purchase. Offering a discount on future purchases creates an incentive for repeat business while fostering brand loyalty.

For example, a bookstore could offer a deal like, “Buy any hardcover novel and get 20% off your next purchase.” Customers walk away feeling like they’ve saved money and have a reason to return.

#10 Conditional BOGO (e.g., Spend $X, Get a Free Product)

Conditional BOGO deals, such as “Spend $50 and get a free T-shirt,” not only provide value to customers but also encourage higher cart values. By setting a minimum purchase requirement, you can guide customers to add more items to their orders, increasing your average revenue per transaction.

A beauty brand might use this strategy by offering “Spend $75 and get a free makeup bag.”

This motivates shoppers to add a few extra items to their cart, knowing they’ll receive an extra product at no cost.

#11 BOGO for Loyalty Program Members

Offering exclusive BOGO deals to loyalty program members is a great way to make them feel valued while encouraging repeat purchases. These members-only deals create a sense of exclusivity, motivating others to join your loyalty program.

For example, a coffee shop could offer loyalty members a deal like “Buy one latte, get another free,” available only to those who’ve signed up for the program.

Best Practices for Running Successful BOGO Deals

After exploring various BOGO strategies, let’s focus on how you can make them work effectively for your business. A well-executed BOGO deal isn’t just about creating excitement; it’s about aligning the promotion with your goals and ensuring your customers find value in the offer. Here’s how you can do it:

  • Choose the right products: Start by selecting products that make financial sense for a BOGO offer. High-margin items work best, as they can offset the cost of the free item. Alternatively, use BOGO examples to move slow-moving inventory, clearing out your stock without compromising profitability.
  • Set clear terms: Misunderstandings can cost you sales and frustrate customers. Clearly outline what’s included in the deal, any restrictions, and how to redeem it. For example, if the offer applies to a specific collection or price range, make that obvious from the beginning.
  • Create urgency: Time-sensitive deals create a psychological push for customers to act quickly. Phrases like “Offer ends tonight” or “Limited stock available” encourage shoppers to grab the deal before it’s gone.

Now that you’ve structured your deal, it’s time to promote it where your audience is most active. To maximize your reach:

  • Email campaigns: Use your email list to target subscribers with engaging subject lines and clear CTAs. Highlight the value of the deal and create excitement.
  • Social media: Use eye-catching visuals and concise messaging to share your offer on platforms where your audience spends time. Share countdowns or updates to maintain engagement.
  • Paid ads: Consider running targeted ads to reach new customers. Use platforms like Google or Meta to refine your audience based on demographics or shopping behavior.

By following these steps, you’ll not only run a successful BOGO promotion but also build trust with your audience, ensuring they keep coming back for more.

Are BOGO Deals Right for Your Business?

As you refine your promotional strategies, it’s important to assess whether BOGO deals align with your business goals and customer behavior. These offers work best when they match your audience’s shopping habits and support your sales objectives.

For example, if you run a clothing boutique and need to clear out last season’s inventory before launching your spring collection, a BOGO deal can help you move items quickly while creating excitement around your brand.

Similarly, during the holiday season, a “Buy One, Get One Free” on gift sets can encourage bulk buying and attract customers looking for value-packed presents.

BOGO deals are also ideal for businesses with high-margin products, like beauty brands selling skincare bundles, or consumables, such as coffee shops offering a “Buy Two, Get One Free” deal on beans.

However, if you operate in a niche market with low-margin items, like handmade artisan crafts or limited-edition artwork, this approach might not work.

For instance, a jeweler selling custom-designed rings with tight profit margins might find BOGO deals unsustainable, as the production cost for each item is too high to absorb.

In these cases, discounts or loyalty programs might be a better fit.

How to Create “Buy One Get One Free” (BOGO) Deals

If you’ve decided BOGO deals are a fit for your store, creating them doesn’t have to be complicated. With Dynamic Discounts for WooCommerce, you can set up a “Buy One Get One Free” offer in just a few steps. This tool streamlines the process, making it easy to customize rules and conditions based on your products and customers’ needs.

To guide you through the setup, here’s a step-by-step video tutorial that shows how you can create a BOGO deal for your WooCommerce store:

Start Running BOGO Promotions Today

So, you can say BOGO promotions offer a straightforward way to attract customers, increase sales, and create excitement around your products.

When planned carefully, they can help you achieve various business goals, from clearing out old inventory to encouraging repeat purchases. These deals aren’t just about offering value—they also build trust and long-term relationships with your customers.

Start incorporating BOGO deals into your marketing strategy. With the right products, clear terms, and a solid promotional plan, you can make a big impact on your bottom line.

Whether it’s seasonal sales or a way to boost cart value, these promotions are versatile and effective tools for growth.

FAQs

1. Are BOGO deals suitable for all types of businesses?

BOGO deals work best for businesses with high-margin or consumable products. Low-margin businesses may struggle to make them profitable.

2. How long should a BOGO promotion run?

A short time frame, like a week or two, creates urgency and encourages quicker purchases.

3. Can I run BOGO deals during peak seasons?

Yes, they’re highly effective during peak seasons to boost sales and attract more customers.

4. Do BOGO deals work for service-based businesses?

Yes, you can offer BOGO deals for services like “Buy one session, get one free” to drive more bookings.

5. How can I measure the success of a BOGO promotion?

Track sales, average order value, and customer acquisition during the campaign period.

Categories
WooCommerce

Win Back Sales: Guide to Abandoned Cart Emails That Convert [2025]

Imagine this: a customer is browsing your online store, adds a few items to their cart, gets to the checkout page, and then—poof—disappears.

You’re left wondering, “What went wrong?” It’s not just you. Nearly 70% of online shopping carts are abandoned, leaving billions in potential revenue sitting on the table.

But here’s the silver lining: abandoned cart emails can help you win those customers back.

On average, abandoned cart recovery emails boast a 41.18% open rate, a 21% click-through rate, and an impressive 50% conversion rate.

That’s right: half of the people who open these emails end up completing their purchase.

So, in this guide, I’m breaking down 10 proven tips for creating abandoned cart emails that actually work.

Let’s turn those abandoned carts into conversions.

What Makes an Abandoned Cart Email Work?

Abandoned cart emails only work if they’re thoughtfully crafted. You need to address why someone left their cart behind and nudge them toward completing their purchase in a way that feels natural.

Let’s break this down, starting with why people abandon carts in the first place and how you can use that insight to create emails that deliver results.

The Psychology Behind Cart Abandonment

Think about the last time you added something to your cart but didn’t check out. Maybe unexpected shipping fees popped up, or you wanted to compare prices. Or perhaps life just got in the way, and you completely forgot about it.

Your customers do the same.

Studies show that high costs, distractions, or simply not being ready to commit are the biggest reasons people leave their carts behind. Addressing these issues directly in your email can make all the difference.

If shipping costs are a concern, highlight free shipping. If indecision is the problem, remind them why the product is a perfect fit for them.

The key is to meet their objections head-on.

Key Elements of High-Performing Abandoned Cart Emails

To win back customers, your emails need to check certain boxes. Here’s what separates good abandoned cart emails from the ones that get ignored:

i. Personalization:

Speak directly to your customer. Use their name in the subject line and reference the items they left behind. For example, “Still thinking about your cozy fleece hoodie?” feels personal and engaging.

ii. Strong Subject Lines:

Your subject line determines whether your email gets opened or trashed. Use something specific, like “Don’t let your new sneakers slip away,” to grab attention.

iii. High-Quality Visuals:

Show them what they’re missing. If a customer left a pair of sunglasses in their cart, include a crisp image of the exact pair. Seeing it again can rekindle their interest.

iv. Incentives:

Sometimes, a little push helps. Offering a 10% discount or free shipping can tip the scales. Include it prominently, like “Complete your purchase now and get free shipping—today only!”

v. Urgency:

Make it clear that time is running out. Phrases like “Your cart will be saved for 24 more hours” or including a countdown timer can create a sense of urgency.

vi. Clear CTA:

Don’t make them guess their next step. Use a button with clear text like “Return to Your Cart” or “Complete Your Order.” Make it bold, obvious, and easy to click.

When your emails combine these abandoned cart email best practices with a solid understanding of your customer’s mindset, you’re setting up your campaigns for success.

Now, let’s dive into some proven tips to make your abandoned cart emails stand out and recover those lost sales.

vii. Brand recognition:

An email marketing platform for franchises can help multi-location businesses keep consistent branding and messaging across all locations.

10 Outstanding Tips for Abandoned Cart Emails

Each of these tips along with some great abandoned cart email examples showcases a unique approach that works, and you can use them to craft emails that bring customers back to complete their purchases.

1. Personalized Reminder with Product Images

People respond better when they feel like the message was written just for them. Including their name in the subject line or opening line is a good start, but showing the exact items they left behind takes it a step further.

For example, imagine you’re shopping for sneakers and leave a pair of running shoes in your cart. Receiving an email that says, “Still thinking about these running shoes, Alex?” alongside a clean image of the sneakers reminds you of what you’re missing.

Beardbrand does this exceptionally well. Their cart reminder emails address users by name and display the abandoned items with product details and a simple “Reclaim My Cart” button.

Personalized Reminder with Product Images

2. Offer Attractive Discounts to Attract Customers

Sometimes all it takes is a small nudge to get someone to commit, and a discount can be just the push they need. Offering 10% off or a code for free shipping can reduce hesitation. But make sure that abandoned cart email subject lines are compelling enough.

For example, you could send an email saying, “Here’s 15% off to complete your order—use code SAVE15 at checkout.” Pairing the discount with a clear call-to-action like “Claim Your Discount Now” ensures they know exactly what to do next.

society6 uses this strategy effectively. Their cart abandonment emails often feature a time-limited discount, with bold visuals and an easy-to-click button that leads back to the cart.

Offer Attractive Discounts

3. Creating Urgency with Limited-Time Offers

Urgency works because people don’t want to miss out. Highlighting that the deal or the items in the cart won’t last long adds pressure to take action.

For example, a message like “Your cart will expire in 24 hours” creates a sense of urgency. Adding a countdown timer to visually reinforce the deadline works even better.

Joggy frequently uses this tactic with messages like this in their abandoned cart emails. It’s a straightforward way to create FOMO and nudge customers to make a decision quickly.

Creating Urgency with Limited-Time Offers

4. Add Reviews and Social Proof to Drive Mimetic Desire

Seeing positive feedback from other customers reassures shoppers that they’re making the right choice. Including reviews, ratings, or testimonials for the abandoned products in your email builds trust and confidence.

For instance, you could say, “Join 500+ happy customers who love this product!” and link to detailed reviews on your website.

Brands like Adidas use this approach effectively. Their emails feature customer quotes and product ratings which makes it easy for potential buyers to see why others love the products they’re considering.

Add Reviews and Social Proof to Drive Mimetic Desire

5. Re-engaging with a Free Shipping Offer

Sometimes, the extra cost of shipping is what stops someone from completing their purchase. Offering free shipping is an easy way to remove that barrier.

A message like “We’ve got you covered—enjoy free shipping on your order!” can be enough to bring them back. Adding a prominent button with a call-to-action like “Claim Free Shipping Today” keeps things clear and actionable.

For example, Danner’s cart abandonment emails often highlight free shipping as a perk, making it clear that there’s nothing extra to worry about.

Re-engaging with a Free Shipping Offer

6. Emotional Storytelling to Connect with Customers

Facts and discounts help, but sometimes you need to appeal to emotions. Sharing a relatable story can make your email memorable and build a stronger connection.

For instance, if you’re selling a cozy blanket, your email could describe a scenario like “Imagine curling up on the couch with your favorite book and this super-soft blanket—exactly what you need for the perfect evening.

Loftie does this very well.

Emotional Storytelling to Connect with Customers

7. Eye-Catching Visuals to Highlight Products

A well-designed email is more than just words. Clean, professional visuals make your abandoned products look even more desirable. High-quality images and appealing layouts can draw attention and drive clicks.

If you’re selling a coffee maker, for example, include a sleek image of the product alongside a headline like “Still Thinking About This?

Fiorucci is a perfect example. Their emails are visually stunning, with a focus on showcasing the product in the best possible light. Everything from the layout to the imagery feels polished and encourages you to click through for a closer look.

Eye-Catching Visuals to Highlight Products

8. Using Humor to Stand Out

Adding a touch of humor can make your email feel more personal and less sales-driven. A clever subject line or lighthearted tone grabs attention and helps your email stand out in a crowded inbox.

For instance, you could write something like, “Oops, did you forget something? Don’t worry, we saved it for you. It misses you already!” This playful approach makes your brand feel approachable and relatable.

Take AWAY as an example. Their cart abandonment emails are known for their cheeky humor which makes customers chuckle and creates a lasting impression.

Using Humor to Stand Out

9. Mobile-Optimized Emails for On-the-Go Shoppers

With so many people checking emails on their phones, making sure your emails look great on mobile is essential. A responsive design with touch-friendly buttons and easy-to-read text ensures customers can take action immediately, no matter where they are.

Imagine a shopper who abandoned their cart while commuting. An email with a clean design, a bold product image, and a clear “Complete My Purchase” button makes it easy for them to pick up where they left off.

Meow Meow Tweet does this really well. Their abandoned cart emails are mobile-friendly, with large images, clear CTAs, and text that adjusts perfectly to smaller screens. This makes shopping from a phone effortless.

Mobile-Optimized Emails for On-the-Go Shoppers

10. Multi-Step Email Sequences for Consistent Engagement

Not everyone comes back after one email, and that’s okay. A series of well-timed emails can gently remind them over time. Start with a simple nudge, then follow up with an incentive, and finally, add urgency to push them to act.

For example, your first email could say, “Still thinking it over?” A few days later, you might offer free shipping or a small discount. Then, finish with something like, “Last chance to grab your favorites before they’re gone!

Brands like Adidas often use this strategy. Their email sequences keep the messaging fresh and tailored to different points in the customer’s decision-making process.

How to Create Your Own Abandoned Cart Emails

Now that you’ve seen what works, it’s time to craft your own abandoned cart emails. This might seem overwhelming at first, but with the right tools and a clear plan, you can create a smooth process that brings results.

Let me introduce you to a powerful tool Cart Lift which is designed to make abandoned cart email campaigns effortless. It lets you set up email sequences tailored to your customers without needing advanced technical skills.

Once integrated with your store, Cart Lift tracks abandoned carts and sends automated emails based on your chosen schedule.

With Cart Lift, you can:

  • Quickly set up automated workflows.
  • Customize email content to match your branding.
  • Track performance and optimize for better results.

For a step-by-step guide, check out this video that walks you through using Cart Lift.

Wrap-Up

By now, it’s clear how abandoned cart emails play a critical role in recovering lost sales. They give you a second chance to connect with potential customers and turn their hesitation into action.

If you’re ready to optimize your process, tools like Cart Lift make it simple. With automation, customization, and performance tracking built in, it helps you recover more carts without extra effort.

FAQs

What is an abandoned cart email?

An abandoned cart email is a follow-up message sent to customers who leave items in their shopping cart without checking out. It gently reminds them to return and complete their purchase, often using incentives or personalized details.

Why are abandoned cart emails important?

They help recover lost revenue by addressing customer hesitations like cost or indecision. This strategy can boost conversion rates while keeping your brand fresh in the shopper’s mind.

How often should I send abandoned cart emails?

A series of 2–3 emails over 1–3 days works well. Begin with a friendly reminder, follow up with an incentive like a discount, and finish with urgency to drive action.

What should I include in an abandoned cart email?

Add the abandoned items, personalized details like their name, and a clear CTA. Include elements like discounts, product reviews, or urgency for better results.

Can I automate abandoned cart emails?

Yes, tools like Cart Lift and Mail Mint allow you to automate these emails. They help you set up timing, personalize content, and optimize campaigns for conversions.

Categories
Virtual Reality WP VR

Virtual Reality in Education: What’s The Future? [2025]

Students these days have pretty short attention spans due to advanced technologies and them being locked into smartphones.

As a teacher, you may be finding it difficult to keep their attention during a history or a biology lesson, with traditional methods not quite doing the trick.

Here’s where VR can play a vital role. You introduce this to your students and boom! The lesson comes to life right before their eyes.

Instead of just reading about history or science, students can immerse themselves directly into the experience.

VR makes them feel like they’re exploring the pyramids of Egypt —without leaving the classroom.

88% of students say they feel more involved in lessons that use VR.

It’s clear that VR isn’t just a passing trend—it’s reshaping the way we educate and preparing students for a future that’s interactive and exciting.

Let’s take a look at how virtual reality in education is transforming and making learning more exciting and interactive.

What is Virtual Reality Learning?

Virtual Reality (VR) in education is a technology that allows you to step into a fully immersive, digital world where you can interact with subjects in a way traditional learning can’t match.

Unlike regular classroom settings where you read about concepts or watch videos, VR puts you directly in the environment you’re learning about.

Virtual Reality Learning

Think about using a VR headset, like the Meta Quest, to experience something like a virtual field trip to the Egyptian pyramids or explore the ocean floor without leaving your seat.

Platforms like the Metaverse also make it possible to explore simulations of real-world environments and activities in ways that textbooks and lectures simply can’t offer. These are powerful virtual reality in education examples showcasing its transformative potential.

Let’s see how virtual reality works in classrooms.

How Does VR Work in Classrooms?

In a classroom, VR is powered by a combination of hardware and software.

The most essential hardware is the VR headset, like Meta Quest, which you wear to view the virtual environment.

You’ll also use controllers to interact with what’s in front of you—whether it’s picking up objects, navigating through a virtual space, or answering questions in a simulation.

The software, like Labster or other educational VR platforms, runs the simulations and lessons you’ll be immersed in.

These platforms offer interactive and hands-on learning experiences that you can engage with in real-time, making the subject matter more relatable and memorable.

Have a look at how Labster has shown the recrystallization process using virtual reality.

If you imagine a simple setup, the VR headset takes you into the digital world, and the controllers let you interact with it, all while being guided by educational apps designed for immersive learning.

So, It’s basically a setup that transforms how lessons are delivered, bringing subjects like science, history, or art to life.

Now that you have an idea of how VR works in the classroom, let’s look at the real benefits it brings to learning.

Major Benefits of Virtual Reality in Education

VR is changing how you experience education and making it more engaging, interactive, and accessible for everyone, making it one of the best AI learning resources out there.

Let’s see how-

i. Enhancing Learning Experiences

With VR, you can go on virtual field trips, train in STEM subjects, or even witness historical events, all without leaving the classroom.

Imagine exploring the British Museum virtually or walking through a World War I simulation.

These immersive experiences don’t just make lessons more interesting—they help improve your memory and understanding of the material.

By engaging all your senses, VR creates a stronger connection to what you’re learning, making it easier to remember and apply that knowledge in real-world situations. Such immersive learning experiences are excellent virtual reality in education examples.

ii. Developing Empathy and Cultural Awareness

One of the best ways VR transforms education is by allowing you to step into someone else’s shoes.

Simulations like “Walk a Mile in My Shoes” let you experience the world from a different perspective, whether it’s facing challenges others go through or understanding life in another culture.

A great example is the “Clouds Over Sidra” VR experience, which lets you see life through the eyes of a 12-year-old refugee girl living in a camp. Through VR, you get to see her world, experience her daily struggles, and understand the challenges she faces, all from her perspective.

These experiences help build empathy, allowing you to see the world in a more meaningful way and develop a deeper understanding of different people and situations. This highlights the impact of virtual reality on education when it comes to promoting empathy and global understanding.

iii. Encouraging Creativity and Collaboration

VR also opens up new ways to be creative. Tools like Tilt Brush allow you to create 3D artwork in a virtual space, which you can share and work on with classmates.

These tools promote creativity, problem-solving, and collaboration. Whether you’re designing an art project or building something for a group project, VR gives you the chance to work together in ways that you can’t match with traditional methods.

iv. Supporting Diverse Learning Needs

Another major benefit of VR is how it supports all kinds of learners. VR in education provides tools like immersive audiobooks for students with disabilities, making learning more accessible for everyone.

VR can also cater to different learning speeds and needs, allowing you to learn at your own pace.

vr for students with disabilities

This adaptability makes VR a powerful tool for creating a more inclusive and effective learning environment for everyone.

Challenges and Limitations of VR in Education

As exciting as VR is for education, there are some challenges and limitations that you need to consider-

I. Financial Barriers

The cost of using VR in the classroom can be a significant hurdle. Devices like VR headsets, which range from budget-friendly options to high-end models, can be expensive.

On top of that, schools often need to pay for software subscriptions and maintenance.

However, there are affordable options like Google Cardboard, which allows schools to offer a basic VR experience without breaking the bank.

Google cardboard
source- https://www.amazon.com/Cardboard-Topmaxions-Virtual-Reality-Compatible/dp/B01C2PA0KK/

By using more cost-effective solutions, you can still bring the benefits of VR into the classroom without going over budget.

II. Ethical and Safety Concerns

With new technology comes new concerns. VR can lead to increased screen time, and some students may experience motion sickness or eye strain. But the impact of virtual reality on education often outweighs these challenges with proper safeguards.

To ensure VR is safe, schools can set time limits on VR sessions and provide regular breaks to minimize the risks.

Also, making sure that VR content is age-appropriate and follows guidelines will help keep the experience safe and enjoyable for all students.

III. Accessibility Issues

Another challenge is that VR technology can be out of reach for schools in remote or underfunded areas. Not every school has the budget for high-quality VR equipment, which means some students might not get these opportunities.

Organizations like ClassVR are addressing this by offering grants and funding opportunities to support VR and AR implementation. These efforts are inspiring virtual reality in education examples for schools on a budget.

For a deeper understanding of how VR can transform learning, you might find this video insightful:

Implementation of VR in Schools

Now that we’ve explored the potential benefits and challenges of VR in education, let’s look at how schools can actually implement this technology to enhance learning experiences.

i. Creating Immersive Learning in the Classroom

With VR, students no longer have to rely on textbooks or static images to explore the world. Imagine a student sitting at their desk, but instead of reading about the Pyramids of Giza, they can virtually walk through them.

Or think about a student exploring a space station without ever leaving the classroom. This kind of immersive learning brings abstract concepts to life, showing how VR can transform everyday lessons into unforgettable experiences.

a. VR in Learning History

History feels more exciting to the students when you let them experience it firsthand. With VR, they can explore ancient Rome or witness revolutionary moments as if they’re there.

b. VR in Understanding Biology

Biology becomes easier to grasp when your students can see it in action. VR lets them follow blood cells through veins or watch organs function, helping them truly understand how the body works.

c. VR in Exploring Nature

Imagine walking through the Amazon Rainforest or observing extinct animals like the dodo. With VR, you connect your students with nature in ways that were never possible before.

d. VR in Oceanology

The ocean’s secrets come to life with VR. You can let your students explore coral reefs, swim alongside marine life, or virtually dive to shipwrecks, making marine science unforgettable.

e. VR in Space

Space feels closer when VR brings it to your classroom. Your students can explore Mars, visit the International Space Station, or observe galaxies, fueling their curiosity about the universe.

Creating Immersive Learning in the Classroom

ii. VR in Different Educational Stages

VR can benefit students at all levels of education, and it works differently depending on the stage.

Primary Education:

  • Gamified learning: VR can transform lessons into interactive games, making learning enjoyable for young students. For example, students could virtually explore a zoo or engage in fun math puzzles within a 3D environment.
  • Interactive lessons: Kids can learn about space by visiting the moon or interact with 3D models of animals they study in science class.
Primary learning

Secondary Education:

  • Medical simulations: Students studying anatomy or biology could virtually dissect a human body or explore complex systems like the circulatory or respiratory system in 3D.
  • Historical and geographical experiences: Virtual field trips allow students to visit landmarks around the world, or walk through historical events like WWII or the signing of the Declaration of Independence.
Secondary vr Education
Source- https://www.ixrlabs.com/blog/how-effective-is-virtual-reality-in-teaching-human-anatomy/

Higher Education:

  • Engineering simulations: Engineering students can design and test machinery in a virtual environment before building them in real life.
  • Paleontology explorations: Students studying paleontology could explore a virtual dig site, uncover fossils, and study them up close.
Higher vr education

In each of these stages, VR adapts to the subject matter, making learning both immersive and practical.

Preparing Educators

For VR to truly make an impact in the classroom, educators need to be prepared to use this technology. Professional development is essential to ensure that teachers know how to integrate VR into their lessons.

  • Training programs: Educators can take part in programs like ClassVR certification, which teaches them how to use VR effectively in the classroom.
  • Workshops and support: Many schools and institutions offer workshops or online courses to help teachers get comfortable with VR tools.

With the right training, educators can confidently use VR to enhance their teaching methods and provide students with the best possible learning experiences.

Virtual Field Trips: Expanding Horizons

After looking at how VR can transform classrooms and adapt to different stages of education, one of the most exciting applications is- virtual field trips.

They allow students to experience the world without ever leaving their desks, breaking down barriers of distance, cost, and accessibility.

What Are Virtual Field Trips?

Virtual field trips use VR technology to bring destinations directly to your classroom. Instead of planning costly and logistically challenging physical trips, students can explore far-off places or inaccessible environments through a VR headset.

These trips serve the same educational purpose as traditional field trips—broadening students’ knowledge and connecting lessons to real-world experiences—just without the hassle.

For example, students could virtually hike through the Amazon Rainforest to learn about biodiversity or tour the Louvre Museum to study famous art pieces.

The opportunities are nearly limitless, and all it takes is a VR setup to make these experiences possible.

Benefits of Virtual Field Trips

Virtual field trips offer many advantages that physical trips simply can’t match:

  • Accessibility: You can take students to places that are normally impossible to visit, like Antarctica, the International Space Station, or ancient ruins in remote locations. VR makes these experiences as close to reality as possible.
  • Cost Savings: Traditional field trips come with significant expenses for transportation, entry fees, and supervision. Virtual trips eliminate these costs while still providing the same level of engagement.
  • Environmental Impact: Virtual trips also teach students about sustainability. Instead of traveling to sensitive ecosystems like coral reefs or national parks, VR lets students explore these environments without contributing to their degradation.

By incorporating virtual field trips into lessons, you not only expand your students’ horizons but also make learning more accessible, affordable, and eco-friendly.

Future of VR in Education

You’ve seen how VR can transform the classroom, but the future holds even more exciting possibilities.

As VR continues to evolve, it’s set to play an even bigger role in how we teach and learn. Let’s take a look at what’s coming next.

A. Integration with Emerging Technologies

Imagine if your lessons could adapt to you. With VR and AI working together, that’s exactly what’s happening.

AI can track your progress and adjust the VR experience based on how quickly you’re learning.

If a topic feels tricky, VR can pause and provide extra explanations, just like a personal tutor. It adapts to different learning speeds and styles.

B. Promoting Virtual Education Globally

One of the most exciting things about VR is how it’s breaking down barriers to education. Schools in underserved areas are already using VR to offer lessons that they could never afford with traditional methods.

For example, imagine being able to take a field trip to the Louvre or visit a local factory for a hands-on lesson—all from your classroom.

Tools like WPVR make it even easier [And is an inexpensive option] to bring these experiences to life without draining your budget.

WPVR

With virtual tours and immersive content, schools can create global learning experiences for students anywhere in the world. Whether you’re teaching history or science, VR makes it possible to transport your students to places they’ve only dreamed of visiting.

C. Predicting the Next Decade

Looking ahead, the next decade promises even more exciting advancements for VR in education. Here’s a peek at some trends you can expect:

  • Mixed Reality (MR): This will combine virtual and augmented reality, blending the digital world with the physical one. Think about being able to interact with a 3D model of a cell right on your desk.
  • Tactile Feedback: In the future, VR gear will let you feel what you’re interacting with, whether it’s a virtual object or part of a simulation. It’s like being able to “touch” what’s in front of you.
  • Broader Adoption: As VR tech becomes more affordable, you’ll see it popping up in classrooms everywhere—making interactive, immersive learning accessible to more students than ever before.

The future of VR in education is looking bright, and it’s only going to get more engaging and accessible as time goes on.

Transforming Education with VR

As VR continues to grow in education, it’s clear that it’s changing how we learn. From virtual field trips to immersive lessons, it’s opening up new possibilities for students and teachers alike. Virtual learning is making subjects come alive, allowing you to explore places and concepts that would otherwise be out of reach.

Despite some challenges like costs and accessibility, VR is becoming more affordable and accessible. Schools are finding ways to bring this technology into classrooms, making it easier for more students to benefit.

With its increasing presence in education, VR is poised to reshape the classroom experience. It’s transforming the way we teach and learn, and it’s only going to keep growing.

The future of education is immersive, interactive, and right at your fingertips.

FAQs

1. How does VR improve student engagement in classrooms?

The benefits of virtual reality in education include increased student engagement by creating immersive experiences that are more interactive than traditional teaching methods.

2. What are some real-life uses of VR in schools?

Virtual reality in education examples include virtual field trips, historical reenactments, and science experiments in a safe and controlled environment.

3. Is VR technology accessible to all learners?

Yes, VR in education can accommodate diverse learning needs by offering customizable and inclusive experiences for different skill levels and abilities.

4. How does VR influence modern teaching methods?

The impact of virtual reality on education is evident in how it enables teachers to provide hands-on, experiential learning opportunities that traditional methods cannot.

5. Can VR enhance career-focused education?

The benefits of virtual reality in education also extend to career preparation by simulating real-world job environments, helping students develop practical skills.

Categories
WooCommerce

20+ Discount Code Ideas to Increase Sales for Your Online Store

Ever noticed how a great discount code can make you stop scrolling and hit “Add to Cart”? You’re not alone.

71% of shoppers jump ship to a competitor just because they offered a better deal.

That’s the power of a well-crafted discount code which grabs attention, drives sales, and keeps customers coming back.

But here’s the catch: not all discounts work the same. A random 10% off won’t cut it if it doesn’t speak to your audience or fit your goals.

The good news?

When you design your offers strategically, you can create urgency, reward loyalty, and turn browsers into buyers.

In this blog, I’ll share 20 creative discount code ideas to help you boost conversions and grow your online store.

So, let’s dive in.

Why Discount Codes Are Essential for eCommerce Growth

Discount codes are one of the most effective ways to boost your sales while keeping customers engaged with your brand.

Let’s see how discount code examples work to grow your business:

  • Attract first-time buyers: Offering a discount code to new customers can lower their hesitation to buy and bring them into your store.
  • Encourage repeat purchases: Exclusive codes for returning customers give them a reason to shop with you again.
  • Clear old inventory: End-of-season discounts or clearance sales help you move stock that’s taking up space.
  • Promote new products or collections: Launch discounts create buzz and drive attention to your latest offerings.
  • Boost average order value: Discounts like “Save $10 on orders over $50” encourage customers to add more to their cart.
  • Retain loyal customers: Personalized codes for birthdays or anniversaries make customers feel valued and connected to your brand.
  • Drive urgency with limited-time offers: Time-sensitive codes push customers to act fast, reducing cart abandonment and closing more sales.

So, that’s how discount code ideas help in growing your business. Now, I’ll discuss how to make these work ever better.

Best Practices for Using Discount Codes Effectively

Discount code ideas can drive serious results for your online store, but only if they’re used wisely. To truly maximize their potential, you need a plan that aligns with your goals and resonates with your customers.

By focusing on the below strategies, you’ll get better outcomes with every campaign.

i. Understand Your Target Audience

Tailoring your discount codes to your customers’ preferences is key to making them work.

  • Price Sensitive Audience: If your audience is price-sensitive, offer higher percentage discounts like “20% off your first order.” This can motivate them to make a purchase they might have skipped otherwise.
  • Old Customers: For loyal customers, consider exclusive rewards such as early access to sales or coupon code ideas like “VIP15” for a special discount. These incentives make them feel valued and appreciated.
  • Personalized Offers: Use customer data to create customized offers, such as discounts based on purchase history or specific product interests.

ii. Create a Sense of Urgency

A limited-time discount motivates customers to act quickly instead of leaving items in their carts.

  • Phrasing matters. Use terms like “Today Only” or “Expires Midnight” to make the offer feel immediate.
  • Highlight deadlines clearly on your website or promotional emails to ensure customers know when the offer ends.
  • Experiment with flash sales or countdown timers to push last-minute purchases.

iii. Measure and Optimize Campaigns

Tracking the success of your discount codes helps you understand what works and what doesn’t.

  • Use analytics tools to monitor key metrics like conversion rates, average order value, and retention rates for each campaign.
  • Test different types of discounts—percentage off, free shipping, or tiered discounts—to see which resonates most with your audience.
  • Continuously refine your campaigns based on performance data. If a certain code performs well, replicate that approach in future promotions.

That means, when you approach discount code name ideas with a clear strategy, you’ll see more consistent and impactful results for your store.

Now I’ll share the main ideas that you can use right away while generating discount codes.

20+ Discount Code Ideas to Drive Sales

When you’re looking to boost sales, discount codes are one of the most effective ways to grab attention and get people buying.

In this section, I’m sharing a variety of discount strategies you can use for different goals—from getting first-time buyers to increasing your average order value.

1. Discount Ideas for First-Time Buyers

First impressions always matter. Offering a discount on that first purchase helps new customers take the plunge and makes them feel good about choosing your store.

i. 10% Off Welcome Code:

Use something simple like “WELCOME10” to welcome first-time buyers with a small but attractive discount on their first order.

ii. Exclusive New Customer Offers:

Offer free shipping with a code like “FREESHIPFIRST” or give a free gift with a code like “GIFTFORYOU” to make the initial experience memorable.

Western Digital offers it this way-

Exclusive New Customer Offers

2. Ideas to Boost Repeat Purchases

Now that you’ve got their attention, keep those customers coming back with repeat purchase discounts. These ideas encourage loyalty and build long-term relationships.

i. Loyalty Discounts:

Reward your returning customers with a code like “THANKYOU15” for 15% off their next purchase. They’ll appreciate the recognition, and it keeps them coming back for more.

ii. Anniversary Codes:

Send a code like “HAPPYANNIV20” to customers on their purchase anniversary. It’s a nice personal touch that shows you value their loyalty.

Adidas provides a 15% discount upon signing up for their adiClub membership, which also includes free shipping and exclusive experiences.

Loyalty Discounts- Adidas

3. Seasonal or Holiday Discounts

Holiday shopping is big, and seasonal sales get customers in the mood to shop. Use discount code ideas that tie into the excitement of the season or a special holiday event.

i. Holiday Sale Codes:

Try using promo code ideas like “SUMMER20” for a summer sale or “WINTER20” for the colder months. People are more likely to shop when the discount matches the season.

ii. Festive Free Shipping:

Offering free shipping with a code like “FREESHIP” during major holidays like Halloween, Black Friday, or Christmas can drive sales. Try using “SPOOKYSHIP” for Halloween, “BLACKFRIDAYSHIP” for Black Friday, or “MERRYSHIP” for Christmas.

Govee offers up to 50% off during their Christmas sale, ending December 25, with no need for a coupon to avail of this discount.

Christmas sale- Govee

4. Discounts to Increase Average Order Value (AOV)

If your goal is to increase the amount customers spend, these discounts are a great way to nudge them toward buying more. They work best when you want to boost sales without needing to increase traffic.

i. Bundle Offers:

Encourage customers to buy more with a deal like “Buy 2 Get 1 Free” or “Save 20% on Orders Over $100.” This type of offer works well when you’re promoting related products.

For example, if you sell shoes, offer “Buy 1 pair of shock-absorbing sneakers, get the second pair free.

ii. Add-Ons Discounts:

Offer a small discount for customers who add related items to their order, like “10% off accessories when purchased with a laptop.” This strategy works well when customers are already buying something major and can be tempted to add complementary items.

iii. BOGO Offers:

Buy one, get one free offers like “Buy 1 shock-absorbing pair of sneakers and get another free” are perfect for products that customers tend to buy more than once, like clothing or accessories. It makes the deal feel too good to pass up and helps boost your overall order value.

BOGO offer

5. Promotions for Social Engagement

When you tap into your customers’ networks, you can see a real uptick in both sales and brand awareness. These promotions are most effective when you want to grow your customer base and increase social interaction.

i. Referral Codes:

Reward both the referrer and the new customer with a code like “REFER10” that gives a discount for both. This works best when you have a strong customer base willing to spread the word.

For example, “Refer a friend and you both get 10% off your next order.”

ii. Social Media Exclusive Deals:

Posting limited-use codes on platforms like Instagram or Facebook is a great way to drive traffic. These offers work best for engagement because they make followers feel like they’re part of an exclusive group.

For instance, use codes like “INSTAGRAM20” or “FBEXCLUSIVE15” for discounts only available on social media.

6. Clearance and Inventory Management Discounts

Clearance discounts work best when you need to move older stock or items that are overstocked. These promotions help create urgency, and customers love getting a great deal on items that are being discontinued.

i. End-of-Season Discounts:

Use codes like “CLEAROUT30” for end-of-season items you need to clear out.

For example, offer 30% off winter coats in the spring to make room for new inventory.

ii. Low Stock Alerts:

If you have products running low, using codes like “Only 5 left – Get 10% Off Now!” creates urgency and encourages quick purchases. This works best when you have popular items with limited availability, making customers feel like they need to act fast before the deal is gone.

The Fragrance Shop does it well.

Clearance and Inventory Management Discounts

7. Personalized and VIP Discounts

These discounts help you build loyalty and make your customers feel special. They work best when you want to reward your most loyal customers or create a more personalized shopping experience.

i. Birthday Discounts:

Offering something like “20% off your next purchase this month” for customers on their birthday is a great way to show appreciation. This works best when you have enough customer data to send them a birthday offer, making it feel personal.

ii. VIP Early Access Codes:

For your loyalty program members, giving early access to sales with codes like “VIPACCESS20” is a great incentive. This works well when you want to reward your most loyal customers and make them feel like VIPs before a big sale.

Let’s look at Steve Madden’s promo code ideas that they offer on users’ birthdays.

VIP Early Access Code

8. Gamified Discount Strategies

When you make discounts fun, you’re not just offering a deal—you’re giving customers an experience. Gamified discounts work best when you want to engage your audience and make shopping feel more interactive.

i. Spin the Wheel:

Add excitement by letting customers “win” a discount like “WIN20” for 20% off. This works well for increasing time spent on your site and making visitors more likely to convert.

For instance, place a spin-to-win widget on your homepage and let visitors try their luck.

ii. Mystery Discounts:

Keep the suspense alive with checkout offers like “Reveal Your Discount.” Customers might get anything from 10% to 50% off, creating a sense of surprise and urgency. This strategy works best during flash sales or holiday campaigns when people are already motivated to shop.

9. Recurring Discounts

Consistency is key when you want to drive regular traffic. Recurring discounts are ideal for creating habits and keeping customers coming back.

i. Hourly Deals:

For first-time visitors, offering an hour-long deal like “15% off if you purchase within the next hour” works wonders. It adds urgency and pushes quick decisions.

For example, when someone lands on your website, you can display a countdown timer with the offer.

ii. Weekly Discounts:

Run promotions on specific days to build anticipation, like “Flash Friday – 20% off sitewide every Friday.” This strategy works well if you want to drive consistent traffic on slower days.

iii. Monthly Discounts:

If hourly or weekly discounts feel too frequent, a monthly deal like “End of Month Special – Save 25%” can be just as effective. This works best for big-ticket items or seasonal stock updates.

10. Product Launch Discounts

New product launches are the perfect time to reward your loyal customers or attract new ones. These discounts work best when you want to generate excitement and early sales.

i. Early Bird Discounts:

Offer a significant discount during pre-launch, such as “Pre-Order Now and Save 30%.” This encourages people to commit early and builds buzz around your launch.

For example, if you’re introducing a new tech gadget, offer early adopters a special deal before the product officially hits the market.

ii. Launch Lifetime Discounts:

Provide a deal that feels too good to pass up, like “Lifetime Access for $199—Only During Launch Week.” This works especially well for digital products like courses or software. It creates urgency and guarantees sales upfront.

NET-A-PORTER encourages shoppers to buy through the official app by giving a 50% off coupon code, often used during new product launches to incentivize early purchases.

Product Launch Discounts

11. Product-Specific Discounts

Tailoring discounts to specific products or categories is a smart way to clear inventory or capitalize on seasonal trends.

i. Category-Based Discounts:

Target seasonal needs with offers like “Back-to-School Sale – Save 20% on all stationery.” This works best during high-demand times when customers are already looking for deals in that category.

ii. Discounts on Specific Product Lines:

Move old stock by offering discounts like “30% off all summer clothes this winter.” This strategy works well for off-season inventory, helping you make room for new arrivals.

How to Create Discount Codes in Your WooCommerce Store

Creating discount codes in WooCommerce can feel time-consuming, especially when you want them tailored to your sales goals.

But Dynamic Discount for WooCommerce makes it easier for you.

With this plugin, you can set up discounts that fit your strategy—whether it’s BOGO offers, cart-based discounts, or user-specific promotions.

Below I’m sharing a video tutorial that walks you through the setup step-by-step.

Final Thoughts

So you have seen discount code ideas are about more than just price cuts, they’re a way to drive sales, attract new customers, and build loyalty. By choosing the right strategy, you can make your offers more meaningful and relevant to your audience.

Whether you’re boosting AOV with BOGO deals, increasing engagement with social-exclusive promotions, or clearing out inventory with end-of-season discounts, there’s a strategy for every goal.

Start testing these strategies, track the results, and refine your approach to maximize your impact. When done right, discount code ideas can be a game-changer for your store’s success.

FAQs

1. What’s the best way to create effective promo code ideas?

Focus on simplicity and relevance. Use names like “SUMMER15” or “WELCOME10” that align with your campaign goals.

2. Can you share some creative discount code examples?

Try codes like “FREESHIP50” for free shipping or “BUNDLE20” for bundle offers to engage your audience effectively.

3. How do you choose discount code name ideas for seasonal sales?

Seasonal names work best, like “WINTER20” for winter sales or “BACK2SCHOOL” for school supplies.

4. Are gamified coupon code ideas effective?

Yes, codes from games like “SPIN10” for a spin-the-wheel discount make promotions more engaging for shoppers.

5. What are some must-try Discount Code Ideas for WooCommerce?

Use BOGO codes, social-exclusive codes like “INSTALOVE10,” or VIP codes for loyalty rewards to boost conversions.

Categories
WooCommerce

What is Exit Intent Popup? 6 Examples & Best Practices [2025]

You know that moment when a visitor is just about to leave your site? That’s your chance to turn things around.

Exit intent popups swoop in at the perfect time, using smart behavior tracking to deliver a message or offer right before they click away.

Here’s the kicker: studies show you can “save” 10 to 15 percent of those lost visitors with the right exit-intent strategy.

That’s not just a number—that’s real potential to recover sales, cut down on cart abandonment, and boost your conversions.

In this guide, I’ll walk you through what exit intent popups are, show you examples that work, and share actionable tips to get the most out of them.

Let’s get started.

What Is an Exit Intent Popup?

Exit intent popups are a powerful way to keep your visitors engaged when they’re about to leave your site. These popups basically work by tracking your cursor movements or other behavior patterns to detect when you’re heading for the exit button.

Right then, a message or offer appears, giving you a reason to stay or take action.

The goal is simple: stop potential losses.

Whether it’s offering a discount, capturing an email address, or collecting feedback, exit intent popups give you one last chance to connect before someone clicks away.

Why Are Exit Intent Popups Effective?

Now that you know what exit intent popups are, let’s talk about why they’re so effective and why you should seriously consider using them.

  • Prevent cart abandonment: If someone’s about to ditch their shopping cart, a popup offering free shipping or a discount can be just the nudge they need to finish checking out. It’s like saying, “Hey, don’t leave! Here’s a little something to make your day.
  • Capture leads for email campaigns: Exit popups are perfect for grabbing email addresses. You can offer something valuable—like a free guide or an exclusive deal—and grow your email list effortlessly. Leverage an SPF generator to ensure your emails reach your audience’s inbox and build trust with your subscribers
  • Re-engage visitors with targeted offers: These popups let you deliver personalized offers based on what someone’s been browsing. It’s a smart way to bring them back for that item they weren’t sure about.
  • Get valuable insights through surveys: Popups asking quick questions, like why someone’s leaving, can give you the answers you need to improve your site and keep visitors around longer. A survey platform can support these efforts seamlessly.
  • Offer exclusive deals to close the sale: A time-sensitive discount or bonus can create just the right sense of urgency to make someone act before they leave.

After seeing how they can prevent cart abandonment and capture leads, it’s clear these popups directly impact conversions.

How exit-intent popups increase conversions?

Let’s look at some numbers that show how effective they really are.

  • Shockbyte, a game server hosting company, used OptinMonster’s exit popups and more than doubled their sales conversions. That’s the kind of boost every business aims for.
  • Reliablesoft.net saw a staggering 300% increase in conversion rates with just one well-placed exit-intent popup. Sometimes, a single popup can make all the difference.
  • On average, companies targeting exit intent engage about 7% of their visitors. That might not seem huge, but when you think about how many people visit your site daily, it adds up to significant results over time.

The stats speak for themselves. Exit intent popups give you a practical way to stop losing potential customers and start turning more visitors into leads or paying customers.

6 Examples of Exit Intent Popups That Work

You’ve seen how exit-intent popups can increase conversions, but knowing how to apply them is key.

Let’s dive into six proven exit intent popup examples that not only grab attention but also drive real results.

Example 1: Discount Offers to Recover Abandoned Carts

Discount popups are a powerful way for you to win back visitors who are ready to leave without completing their purchase.

Imagine this: a customer is browsing your online store, adds a few items to their cart, but then hesitates at checkout. Instead of watching them leave, you show a popup offering a 10% discount or free shipping.

This little nudge could be the difference between an abandoned cart and a completed order.

Macy’s frequently uses exit-intent popups to offer discounts like “Sign up for 25% off your first purchase,” targeting visitors who might leave without buying.

Discount Offers to Recover Abandoned Carts

You can use Cart Lift to make this process easier. It lets you set up targeted discount offers that appear just as your visitor is about to leave.

Example 2: Limited-Time Offers

Creating urgency can push visitors to act faster. Limited-time exit-intent popups work by offering a deal that expires soon, like “Get 20% off if you check out in the next 10 minutes.”

These popups play on the fear of missing out, a psychological trigger that’s proven to drive conversions.

For example, seasonal sales or flash offers often use this strategy to boost last-minute sales. The ticking clock not only grabs attention but also motivates you to complete your purchase quickly.

Shein uses time-sensitive offers during seasonal sales. When visitors try to leave, they might see a popup saying, “This deal ends in 1 hour—get 20% off now!

Limited-Time Offers

Example 3: Content Upgrades for Lead Generation

Not everyone who visits your site is ready to buy right away, and that’s totally fine. You can still turn them into a lead by offering something valuable.

Picture this: someone is reading your blog about, say, improving productivity. Just as they’re about to leave, they see a popup that says, “Want our free checklist for boosting productivity? Enter your email to download it now!”

This kind of offer works because it feels helpful and relevant. You’re giving them something they actually care about while capturing their email. Now, you’ve got a lead you can nurture with more valuable content until they’re ready to convert.

HubSpot offers free resources like eBooks or templates. For instance, if you’re on a blog post, they might show a popup offering a related guide in exchange for your email. But they do it in a strategic way- instead of putting the popup at the middle of the blog they set it as a side downbar.

Content Upgrades for Lead Generation

Example 4: Feedback Collection Forms

Understanding why people leave your site is just as important as keeping them there.

Let’s say a visitor spends a few minutes on your product page but decides not to buy. Right before they go, a popup asks, What stopped you from completing your purchase?

This small question opens the door to valuable insights. Maybe they thought shipping costs were too high or they couldn’t find enough product information. By collecting this feedback, you’re showing them you care about their experience while also gathering data to improve your site. It’s a win for both sides.

Here’s an example that asks the audience if they can spare a few minutes to answer survey questions, that help understand user experience and areas for improvement.

Feedback Collection Forms
Source- https://getsitecontrol.com/p/06zxkyve

Example 5: Free Shipping or Add-Ons

We all know how much people dislike unexpected costs at checkout. That’s where a well-timed popup can make a difference.

Imagine this: your customer is about to leave because of the shipping fee. Suddenly, a popup appears saying, Add $10 more to your cart and get free shipping!

It’s a small nudge that not only encourages them to spend more but also makes them feel like they’re getting a better deal. Or you could offer something like, “Checkout now and get a free gift with your order.”

Quince offers free shipping to visitors through exit-intent popups. When a user shows intent to exit, a popup provides free shipping, incentivizing them to complete their purchase.

Example 6: Newsletter Signups

Just because someone isn’t ready to buy doesn’t mean you should lose them completely.

Let’s say a visitor is browsing your store, checking out your products, but decides to leave. Before they go, a popup appears with an offer like this: “Join our mailing list and get 10% off your first order!”

It’s easy for them to say yes—they get a discount just for signing up—and you get their contact information. Once they’re on your email list, you can stay in touch, share updates, and offer deals that eventually bring them back to make a purchase.

It’s a simple way to keep them connected to your brand.

HeyMaeve uses exit-intent popups to encourage newsletter signups. As visitors are about to leave, a popup offers a discount in exchange for signing up, effectively growing their email list.

Newsletter signup forms

However, designing an exit intent popup isn’t just about grabbing attention. It’s about giving your visitors a reason to stay or come back.

Best Practices for Designing Exit Intent Popups

Poorly designed popups can frustrate users and hurt your conversions, while well-crafted ones can turn hesitant visitors into leads or customers. A good design keeps things clear, relevant, and targeted to the visitor’s needs, ensuring they see value right away.

Let’s break down some essential tips to help you design popups that work seamlessly for different audiences and devices.

i. Make the Offer Clear and Valuable

The first thing your popup needs is a crystal-clear offer. Address the visitor’s needs directly and make it irresistible.

A phrase like “Wait! There’s an offer for you!” instantly grabs attention. Keep your message short but persuasive, focusing on why the visitor should act now. Overloading with information can be overwhelming, so stick to one strong offer that’s easy to understand.

ii. Use Different Popups for Different Audiences

Your visitors aren’t all the same, so your popups shouldn’t be either. Segment your audience and craft specific messages that resonate with each group.

For example, returning visitors might see a loyalty discount, while new visitors could get a first-time shopper deal. Tailoring your popups this way ensures you’re speaking to the right person at the right time.

iii. Optimize the Design for Mobile and Desktop

Your popup’s design needs to work flawlessly on all devices. A clunky mobile popup can drive users away instead of drawing them in. Make sure your exit popups are responsive and load quickly. A mobile-friendly design, like a small banner or slide-in, keeps the experience smooth and user-friendly without disrupting navigation.

iv. Set Timely and Relevant Triggers

Timing is everything with popups. Using triggers based on user behavior—like scrolling a certain percentage of the page or moving the cursor toward the close button—makes the popup feel more natural and less intrusive. This approach ensures your message reaches visitors when they’re most likely to act.

v. Add a Countdown Timer

Creating urgency is a proven way to nudge visitors toward action, and a countdown timer does this perfectly.

Whether it’s a limited-time discount or an exclusive offer, a ticking clock triggers FOMO (fear of missing out). It’s a subtle push that motivates visitors to act before they lose the deal.

vi. Test and Optimize Regularly

What works today might not work tomorrow, so it’s crucial to keep testing. A/B test different designs, offers, and messaging to see what gets the best response. By regularly analyzing performance and making adjustments, you can ensure your popups stay effective and relevant.

These best practices help you design exit intent popups that feel helpful, not intrusive, while boosting your conversions.

Final Thoughts

Exit intent popups are more than just another marketing tool—they’re a strategic way to keep your visitors engaged and turn potential losses into opportunities.

When designed with the right timing, clear messaging, and audience segmentation, they can significantly boost conversions and improve customer engagement.

Whether your goal is recovering abandoned carts, growing your email list, or offering irresistible deals, exit intent popups provide a practical solution to help you connect with your audience at critical moments.

FAQs

1. What is an Exit Intent Popup?

An Exit Intent Popup is a targeted message that appears when a user is about to leave your site. It helps capture attention and prevent exits.

2. How does an Exit Intent Popup work?

It tracks user behavior, like mouse movements, to detect when they’re leaving and displays a popup to re-engage them.

3. Why should I use Exit Intent Popups on my website?

Exit Intent Popups help recover abandoned carts, collect leads, and improve conversions by engaging visitors at the right moment.

4. Can an Exit Intent Popup increase sales?

Yes, offering discounts or limited-time deals through an Exit Intent Popup can nudge visitors to complete their purchases.

5. Are Exit Intent Popups mobile-friendly?

When designed correctly, Exit Intent Popups can work on mobile devices, ensuring you engage users across all platforms.

Categories
Real Estate Virtual Reality WP VR

Guide To Creating Virtual Luxury Home Tours For Real Estate Success [2025]

What if you could let potential buyers experience the elegance of a luxury home from anywhere, at any time?

Selling luxury homes is quite different than selling the usual homes. Aside from the expense, a luxury house has a lot to do with how well it is decorated, furnished, and architected.

As a realtor, you have to work on creative ways to highlight the best features of the luxury homes you sell, and at the same time, make them feel emotionally connected to the property.

The best way to do this is –to use virtual luxury home tours.

A virtual tour will ensure that your potential buyers will get a chance to explore this wonderful property in their own free time, even if they have a tight schedule.

In this article, I’ll discuss:

  • How luxury home virtual tours can help you close more deals?
  • How can you create a luxury home tour easily?
  • And why does this work?

And eventually, you will be able to target prospects easily and sell more properties.

So let’s begin.

Why Create Virtual Luxury Home Tours?

A virtual tour allows potential buyers to explore a property in a realistic way, helping them decide if it’s the right fit for them.

75% of Prospects Prefer Virtual Tours when taking a decision to purchase a house.

Here’s why you should consider offering virtual tours for luxury homes:

i. Showcase Unique Features:

Luxury homes come in all styles, and each buyer has different tastes.

For example: – One client may appreciate the industrial aesthetic with intricate mechanical structures. – Another might be drawn to antique statues and terracotta features.

A virtual tour allows you to highlight these distinctive features, making it easier for buyers to see if the property fits their preferences.

ii. Give Your Potential Buyers Full Control:

With a virtual tour, buyers can navigate the home as they wish, taking the time to explore the aspects that matter most to them.

iii. Enhanced Details To Make The Tour Engaging:

You can add interactive elements to the tour, like:

  • Tooltips explaining the history or significance of decorations.
  • Background audio to set the mood and create a more immersive experience.

By offering these personalized touches, you not only give clients a thorough look at the property, but you also increase the chances of scheduling an in-person visit.

How to Create A Compelling Virtual Luxury Home Tour

As you saw above, a virtual tour will give you an edge when it comes to selling luxury homes. But much like the house itself, you need to make sure you go out of your way to make the virtual tour the best virtual experience ever.

Creating a virtual tour is actually quite easy. All you need are 360 images of the location you want to highlight, and the right virtual tour builder.

If you use WordPress, then WPVR is currently the most affordable solution you will find to create virtual tours. Simply upload the 360 panoramic images and the tool will turn that into an amazing 3D virtual tour.

The plugin has everything you need to create stunning 3D Luxury Home Tours with advanced features such as hotspots, embedded explainer video, company contact info, etc.

Get WPVR Now!

Once you have the basic tour ready, now it’s time to optimize this tour for conversion.

Let us look at the ways you can improve your virtual tour.

1. Make The Virtual Luxury Home Tour More Interactive

Hotspots help to pinpoint an element inside a virtual tour with different Contents. Hotspots let you add contents inside of a Virtual Tour with specified coordinates.

There are four types of hotspots available in the WPVR.

Hotspot Types in Virtual Tour- WPVR

You can add different content like Text, Video, Images, GIFs, and so on. It’s possible to add all the content in one single hotspot as well.

Learn More About Hotspots

Also, there are options to customize the color and hotspot of the hotspot.

Here’s an example of how hotspot content looks,

Hotspot Content on Virtual Tours - WPVR

There’s another option which is the Scene-Type Hotspot. Multiple rooms in luxury homes can be uploaded as Scenes and displayed in one Virtual Tour.

Here’s what the Scene-Type Hotspot looks like,

2. Contact Forms To Let Your Clients Reach You

A contact form is crucial for your virtual tour so that you can allow interested buyers to get in touch with you without any hassle.

WPVR Pro has the Fluent Forms Addon that lets you add a Contact Form for the clients to contact you.
You can use this form to let your clients contact you for an appointment.

Learn How To Set Up A Contact Form

Contact Form in Virtual Tour - WPVR

3. Add An Engaging Explainer Video

Let’s say you have a video explaining what a particular house offers and what the exceptional qualities are.

You can easily add that explainer video to your dream home virtual tour. Your clients will be able to check out the video while taking the tour.

Explainer Video in Virtual Tour

Learn How To Add an Explainer Video In A Virtual Tour

4. Scene Gallery To Display All The Scenes In One Place

Scene Gallery offers a gallery where all the Scenes of a Virtual Tour are displayed in one place.

There are several rooms present in a luxury home virtual tour. So, with the help of the Scene Gallery, clients can easily move from one scene to another with a click.

Learn How To Set Up Scene Gallery

Here’s a look at the Scene Gallery View,

Scene Gallery in Virtual Tour

Other Ways To Make The Tour More Engaging

There are many other options to make your Virtual Tour of the Luxury Homes more interactive such as Compass, Gyroscope, etc.

1. Compass

Compass is an essential feature for house buyers. The compass feature lets the clients understand the room position inside a house.

While many people prefer the south side of a house, others might prefer the east side. So it’s a necessary feature for decision making.

2. Gyroscope

The Gyroscope is also a necessary feature. Enabling this lets your clients enjoy 3d tours of luxury homes with smartphones.

Learn More about Gyroscope Feature

3. VR Headset Support

Your potential clients with a VR headset or VR cardboard will be able to experience your luxury home virtual tour in a setting as if they’re already inside the house.

This will help them decide if they want to live in a house like the virtual tour showing them.

It’s also helpful in figuring out how spacious a place is or how they can decorate the house.

Learn about VR Headset Support

VR Headset Support For Virtual Tours

Ways to Optimize Your Website To Connect With The Right Clients

Now that you know how you can create an engaging luxury house tour, let us look at how you can effectively optimize your so that your high-end clients are hooked with the properties you have listed.

1. Add A Short Promo Video On The Home Page

This is a tactic that most realtors avoid because they don’t want to invest in a video that includes properties that may be sold soon.

The idea is, you can create a promo video, maybe of 2mins max, that will show a glimpse of various luxury vr properties that you have under you.

Here, you have to capture the view that will highlight the best features of the property, and also express its theme, i.e., what type of luxury home it is.

This can help to make buyers curious and take a look at your available luxury homes listings.

2. Make It Easier To Look For The Right Luxury Homes

Even if you know your luxury homes are quite expensive, some are way too expensive compared to others. So a price filter can be useful when a certain buyer has a fixed budget.

For example, if a prospect has a budget ranging from $3-5 million, then he should be able to view the available homes in that price range.

Again, some of the homes have a cultural or historical significance which you can easily identify as Modern, Contemporary, Mediterranean, Greek Revival, Victorian, etc.

So categorizing the homes under such titles can help buyers to find the right type of homes they are looking to purchase.

Then there are luxury homes that are available for renting as well. So you can have a single filter to separate the ones that are available for rent.

3. Include The Virtual Tour On The First Section Of The Property Page

Whenever someone enters the property page, he should be welcomed with an interactive virtual tour. This will lead to many of them taking the tour immediately and getting interested even before looking into further details.

It will also have a psychological impact as later on, every detail they find out will sound more exciting than they normally would.

4. Highlight The Best Details In The Product Description

Despite having a virtual tour available, you still need to work on highlighting the best features of the luxury home in question. So in the description, create sub-headings with the special features and mention the details on them along with images or short videos.

This extra effort can make a difference in how interested buyers will get while checking out the property.

5. Collect Leads & Inquiries On The Property Page

Many realtors make the mistake of taking the buyers to a separate form on another page to submit an inquiry or quotation. Rather, you may design the page in a way so that they have access to an inquiry form right on the property page, if possible, with an option to request a call from you.

This will increase your chances of speaking directly with your potential clients, and hopefully, booking a visit.

Final Thoughts

Managing luxury home sales may take some extra effort, but when it sells, it brings in a fortune.

And virtual luxury home tours can have a significant impact on converting more prospects into buyers if you have created one correctly. Make sure to keep things as fabulous as possible, and highlight all the best features of your luxury home in the virtual tour.

So go ahead and start using WPVR and increase your chances of selling more luxury homes.

FAQs

1. What are virtual luxury home tours?

Virtual luxury home tours are immersive online experiences that allow potential buyers to explore high-end properties remotely with interactive features.

2. Why are virtual tours important for selling luxury homes?

They let buyers view properties realistically and highlight unique features, increasing engagement and interest in scheduling a visit.

3. How can virtual tours boost property sales?

By offering 24/7 access and personalization, virtual tours attract more qualified leads and help buyers make faster decisions.By offering 24/7 access and personalization, virtual tours attract more qualified leads and help buyers make faster decisions.

4. What tools are needed for creating virtual luxury home tours?

You can use tools like WP VR to create professional, detailed, and engaging virtual tours for any property.

5. Can virtual tours be customized for luxury homes?

Yes, you can add tooltips, background music, and unique visuals to showcase specific details of luxury properties.

Categories
WooCommerce

8 Incredible Product Recommendation Examples To Engage Customers [2025]

Did you know nearly half of online shoppers buy things they didn’t plan to?

49% of consumers say they’ve purchased a product they didn’t intend to after receiving a personalized recommendation.

That’s the power of showing people exactly what they want, sometimes before they even know they want it.

Personalized product recommendations don’t just improve the shopping experience—they drive sales and keep customers coming back.

Big brands like Amazon and Netflix have mastered this, but here’s the good news: businesses of any size can use similar strategies to see great results.

In this blog, I’ll share eight incredible product recommendation examples and how you can use them to engage your customers and grow your business.

So, let’s go!

What Are Product Recommendations?

Product recommendations are basically personalized suggestions that help you show customers exactly what they’re looking for based on data like browsing habits, purchase history, or preferences that match similar shoppers.

For example, if a customer buys a smartphone, you might recommend a compatible phone case or a screen protector.

These recommendations save time for your customers by pointing them directly to products they’re most likely to buy.

Product recommendation - Best Buy

Personalization taps into a simple truth: people love feeling understood.

When you show recommendations that fit their interests, it’s more than just a suggestion—it’s a reason to shop with you again.

Now that you know what product recommendations are, let’s talk about why they’re so important for your business.

Why Are Product Recommendations Essential for Customer Engagement?

When you shop online, the options can be overwhelming. Product recommendations cut through the noise by showing your customers exactly what they need—or didn’t know they needed.

Here’s how product recommendations directly impact your store:

  • Make shopping easier: When you suggest products that match your customer’s needs, they don’t have to waste time hunting for them. In fact, 91% of shoppers say they prefer brands that personalize their shopping experience.
  • Help with decision-making: Too many choices can overwhelm shoppers. By showing them relevant suggestions—like alternatives to out-of-stock items—you’re guiding them to a quick, confident decision.
  • Increase order value: Recommendations like “Frequently Bought Together” or “Customers Also Bought” naturally encourage people to add more to their cart.
  • Strengthen Customer Loyalty: When your recommendations feel personalized, customers notice. It shows you understand their preferences, which helps build trust and keeps them coming back.
  • Keep customers coming back: Personalized suggestions—whether through follow-ups or on your site—can increase repeat purchases by 44%, according to Invesp.

Now that you understand how product recommendations can boost your customer engagement, it’s time to get practical.

8 Incredible Product Recommendation Examples to Try in 2025

Let’s look at some proven examples you can start using in your store.

1. Frequently Bought Together – Amazon

Amazon’s “Frequently Bought Together” feature suggests complementary items, like pairing a camera with a memory card or a laptop with a protective case.

FBT- Amazon

Why This Works:

By showing complementary products, it makes it easier for your customers to add more items to their carts. The result? Higher sales and more items per order.

Implementation Tips:

You can do this in your store too. When someone adds a product, suggest items that naturally go with it—like offering a phone case when a customer buys a smartphone. Tools and plugins can automate this process for you, so you don’t have to do it manually.

2. Top Rated Products – Walmart

Walmart features “Top Rated” products, particularly in categories like beauty or clothing, where customer ratings and reviews can be a deciding factor for a purchase.

Top rated product- Walmart

Why This Works:

Customers trust the opinions of others. When you feature top-rated products, it builds trust and helps people feel more confident in their purchasing decisions.

Implementation Tips:

You can feature your best-rated products on your homepage or product pages.

Make it easy for customers to find these popular items by using a “Top Rated” section or filter. Keep it updated to highlight the most recent high reviews.

3. Out of Stock Product Alternatives – Best Buy

Best Buy does this well by suggesting alternatives when a product you want is unavailable. If an item goes out of stock, they display similar products that match in style or price.

Out of stock alternatives- Best Buy

Why This Works:

This approach ensures that customers can still find something they like, preventing them from bouncing off your site. By offering alternatives, you increase the likelihood of a purchase, even when the original product isn’t available.

Implementation Tips:

When an item is out of stock, it automatically shows alternative products that are similar in features or price.

For example, if a customer is browsing a red dress that’s out of stock, you could display other red dresses or similar styles in different colors or sizes.

Alternatively, sites like Amazon show “similar items” or “customers also viewed” options when a product is unavailable. Implementing this on your site can keep customers engaged and help you retain sales.

4. Best Selling Products From The Store – ETSY

ETSY does this effectively by featuring its best-selling products prominently on its site. By making these products easy to find, they guide customers toward popular items that have already been vetted by others.

Bestsellers - ETSY

Why This Works:

People often trust the “wisdom of the crowd.” When you showcase top-selling products, you reassure customers that others have found them valuable, increasing their confidence in making a purchase.

Implementation Tips:

Create a dedicated section for best-selling products on your homepage or within your product categories.

For example, you could have a “Top Picks” section that shows your store’s best-sellers. Another option is to add a “Trending Now” section. This makes it easy for customers to find products they can trust and boosts the chance of a sale.

5. The New Arrivals On The Store- ASOS

ASOS does a great job in its product recommendation system by featuring its “Latest Arrivals” in the fashion space. This section highlights the latest products, encouraging customers to check out what’s new and trendy.

New Arrivals On The Store- ASOS

Why This Works:

New arrivals keep your store dynamic and exciting. Customers are more likely to return to see what’s new, and it gives them a reason to keep browsing your site regularly.

Implementation Tips:

Make sure to highlight new arrivals on your homepage or in category pages to grab attention.

For example, Shopify stores often have a “New Arrivals” banner or section at the top of their homepage to showcase the latest products.

You could also implement a similar layout where new products are grouped together in a visible, easily accessible part of your website. This keeps your store fresh and entices customers to check out new inventory regularly.

6. Popular Products That Are On Sale- Target

Target is a pro at this. They showcase popular products on sale, creating a sense of urgency that pushes customers to make faster decisions.

Popular Products That Are On Sale- Target

Why This Works:

When you combine discounts with products that people already love, you make it hard for customers to resist. They feel like they’re getting a great deal, which encourages immediate purchases.

Implementation Tips:

Showcase a dedicated section that highlights popular products currently on sale.

For example, during Christmas sales, you could feature discounted items like festive decorations, gift sets, and winter apparel under a “Top Deals” banner on your homepage.

7. Personalized Recommendations Based on Browsing History – Netflix

Netflix can be the best example of this since it recommends shows based on your past viewing habits. It’s all about making suggestions that feel like they were picked just for you.

Why This Works:

Personalized recommendations work because they align with what your customers have already shown interest in. By suggesting products tied to their browsing or purchase history, you eliminate guesswork for the customer and make their shopping experience smoother.

Implementation Tips:

Use tools that analyze browsing history to display personalized recommendations.

For instance, if a customer has been looking at sneakers, show them similar styles or related accessories like socks or shoe cleaners.

This approach not only increases engagement but also drives more sales by giving customers exactly what they’re looking for.

8. Product Suggestion on Checkout Pages – Petco

Petco offers related pet care items at checkout. For instance, if you’re purchasing a bag of dog food, they might suggest chew toys, treats, or dog food topper as last-minute add-ons.

Product Recommendations on Checkout Pages - Petco

Why This Works:

When customers are about to complete their purchase, relevant suggestions feel useful and encourage additional purchases, increasing your average order value (AOV).

Implementation Tips:

On your checkout page, suggest items that complement the products in the cart.

For example, if someone is buying running shoes, you could recommend a pair of socks or an anti-blister spray.

These small but practical add-ons can make the shopping experience more convenient and profitable for you

How to Implement Product Recommendations with Product Recommendation for WooCommerce

If you’re ready to boost sales and improve customer experience, Product Recommendation for WooCommerce makes it simple to put these 8 strategies into action.

Product recommendation for Woocommerce

And the best part is this tool is completely free to use. With its powerful features, you can easily showcase the right products to the right customers, right when they need them.

Here’s how it helps you:

Conclusion

So, it’s clear that driving more sales and keeping your customers engaged comes down to implementing smart product recommendation strategies.

Whether you’re highlighting top-rated products, suggesting alternatives for out-of-stock items, or personalizing recommendations based on browsing history, these approaches make your store more dynamic and customer-friendly.

Ready to take the next step? Product Recommendation for WooCommerce makes it easy to implement all these strategies effortlessly.

Start using it today to enhance your store and increase your sales.

FAQs

1. What are the best Product Recommendation Examples for online stores?

The best examples include personalized recommendations, top-sellers, discounted items, new arrivals, and alternatives for out-of-stock products.

2. How do Product Recommendation Examples help increase sales?

They guide customers toward relevant items, improve engagement, and encourage higher order values with tailored suggestions.

3. What tools can implement Product Recommendation Examples effectively?

Tools like Product Recommendation for WooCommerce make it easy to set up strategies like best-sellers and personalized suggestions.

4. Are Product Recommendation Examples suitable for small businesses?

Yes, they work for all store sizes by boosting customer experience and driving conversions with minimal setup.

5. Which Product Recommendation Examples work best for holiday sales?

Highlight discounted popular items, new arrivals, and gift bundles tailored to the holiday shopping season.

Categories
WooCommerce

14 Proven Product Bundling Examples to Boost AOV [2025]

What if you could get your customers to spend more and make them feel good about it? That’s exactly what product bundling does!

By thoughtfully grouping products together in a way that makes sense, you’re not only boosting sales, but also creating a better shopping experience.

Studies show that highly satisfied customers—those who feel like you’ve gone the extra mile—are 5% more likely to stick around, which can drive your sales up by as much as 25%.

In this post, I’ll share 14 proven product bundling examples, straight from brands that know how to do it right along with some best practices and common mistakes.

Let’s dive in.

What Is Product Bundling?

Product bundling is basically when you group two or more products together and sell them as a package.

This strategy works because your customers feel like they’re getting a deal which encourages them to spend more.

There are several ways to approach bundling:

  • Complementary bundles pair items that naturally go together, like a phone and a case.
  • Mix-and-match bundles give customers the freedom to choose their favorite items from a set selection, which is perfect for variety seekers.
  • Quantity-based bundles incentivize bulk purchases by offering discounts when buying more of the same or related products.

When creating bundles, you’ll generally use one of two types:

i. Pure bundling:

In pure bundling, products in the bundle aren’t sold separately. For example, a subscription box like Birchbox offers curated items only as part of the box. You can’t buy the individual products separately from the company.

Pure bundling- Birchbox

ii. Mixed bundling:

In mixed bundling, products in the bundle are available individually or as part of a package. For example, McDonald’s allows you to buy a burger, fries, or a drink individually, but also offers value meals that combine them at a discounted price.

Mixed bundling- McDonald's

Mixed bundling works well because it gives customers flexibility while still incentivizing the bundle.

Bundling vs. Upselling

But many people think product bundling and upselling are the same thing while they’re not. Here’s how they differ:

  1. Purpose: Bundling focuses on grouping multiple products together at a value-driven price. Upselling, on the other hand, encourages customers to upgrade to a higher-priced version of a product they’re already considering.
  2. Customer mindset: When bundling, your customers are thinking about getting more for less. With upselling, they’re weighing whether a premium option is worth the added cost.
  3. Product focus: Bundles combine different products into a single package, while upselling highlights one product and emphasizes its higher-end features or benefits.
  4. When to use: Use bundling when you want to move inventory, boost AOV, or create value for your customers. Use upselling when you want to encourage higher-margin purchases or showcase premium options.

Here’s the comparison between Bundling and Upselling in a table format:

AspectBundlingUpselling
PurposeGroups multiple products together at a value-driven priceEncourages customers to upgrade to a higher-priced version of a product they’re already considering
Customer MindsetThinking about getting more for lessWeighing if a premium option is worth the added cost
Product FocusCombines different products into a single packageHighlights one product and emphasizes its higher-end features or benefits
When to UseTo move inventory, boost AOV, or create valueTo encourage higher-margin purchases or showcase premium options

Now let’s go through some reasons why product bundling works like wonder.

Why Product Bundling Can Skyrocket AOV?

Product bundling usually works because it offers value to both your business and your customers. Here’s how it helps drive higher Average Order Value:

i. Encourages spending by creating perceived value: Bundling makes customers feel like they’re getting a deal.

For example, a $50 backpack paired with a $30 water bottle might sell as a bundle for $70. Customers see the $10 savings and are more likely to purchase both instead of just one item.

ii. Reduces decision fatigue: Bundles simplify the buying process by grouping related items together. Instead of deciding between several products, customers can choose a bundle that feels like a complete solution.

For instance, skincare brands often bundle cleansers, toners, and moisturizers that make it easier for customers to grab everything they need in one go.

iii. Moves inventory faster: If you have slower-selling products, bundling them with bestsellers gives those items a push.

For example, pairing last season’s phone case with a trending phone charger increases the likelihood of clearing excess stock.

iv. Improves visibility for lesser-known products: When you include new or niche items in bundles with popular products, customers discover them without hesitation.

A gaming console bundle that includes a newly launched game can introduce players to titles they might not have picked on their own.

So, whether it’s saving money, finding convenience, or getting introduced to new products, your customers win, and so does your bottom line.

Let’s enter the main section of this blog.

14 Proven Product Bundling Examples to Boost AOV

Different types of bundles work for different businesses, depending on your goals and what your customers value.

Let’s break down some of the best product bundle examples you can easily adapt to your business.

1. Pure Bundling for Slow-Moving Inventory

Pure bundling works best when you want to clear out products that aren’t selling on their own. Instead of letting slow-moving stock gather dust, you can pair these items with your bestsellers as an exclusive deal.

For example, Apple often includes accessories like AirPods when purchasing a MacBook or iPad during their annual student deal.

Pure Bundling for Slow-Moving Inventory- Apple

While AirPods are popular, this bundling strategy helps Apple move older or overstocked AirPods models that might not sell as quickly on their own, while providing customers with perceived added value.

2. “Mix-and-Match” Bundling for Variety Seekers

As I mentioned before, Mix-and-match bundling gives your customers the flexibility to pick exactly what they want from a selection of products.

For instance, NatureBox lets you personalize your snack box by selecting your preferred nutrition level and taste. You can pick your favorites, mix and match, and create a box full of snacks that suit your tastes.

“Mix-and-Match” Bundling for Variety Seekers- Naturebox

3. BOGO (Buy One Get One) Bundling

BOGO bundling works because it creates a sense of value while encouraging customers to buy more. Whether you offer the second product free or at a discount, this strategy is especially effective during seasonal sales or promotional periods.

For example, during back-to-school sales, shoe retailers like Payless often promote “Buy One Pair, Get the Second at 50% Off.” This motivates customers to grab an extra pair instead of stopping at just one. It’s a win-win: your customers save, and your sales grow.

BOGO bundling- Payless

You can also take BOGO offer a step further like this:

  • Offer a “Buy One, Get One Free” deal to create an even stronger value perception for customers.
  • Customize your promotion, like “Buy 3, Get 3 Free,” to encourage higher-volume purchases while maintaining flexibility for your business.

Watch the video below to see how you can set up BOGO bundling in your business easily.

4. Cross-Sell Bundles

Cross-sell bundles combine complementary products to offer customers a full solution, rather than just a single item. These bundles make it easier for customers to see the value in purchasing multiple products together.

You can see this cross-sell bundling example on Amazon by visiting a product page.

For instance, if you look up a tab on Amazon, you will typically see the cross-sell bundles displayed as complementary items that often include accessories like bags, keyboard cases, or stylus pens.

Cross-Sell Bundles- Amazon

5. Subscription Bundling for Recurring Revenue

Subscription bundling focuses on long-term customer retention by offering curated boxes that customers receive regularly. This works especially well for consumable products like food, beauty items, or pet supplies.

A notable example is CARSLOTH, which provides an all-inclusive car subscription service. For a flat monthly fee, subscribers receive a vehicle along with insurance, maintenance, and roadside assistance, eliminating the traditional hassles of car ownership.

Subscription Bundling- Carsloth

6. Seasonal Bundling to Match Customer Demand

Seasonal bundling is a smart way to align your offers with what customers need at specific times of the year. You can create holiday gift sets or themed bundles to cater to the demand for seasonal shopping.

Think about Starbucks‘ holiday bundles. Every winter, they sell gift-ready sets that include mugs, coffee beans, and holiday-flavored syrups. These bundles make gifting easier and feel exclusive because they’re only available for a limited time.

Seasonal Bundling - Sturbuck's

7. DIY (Build Your Own) Bundles

DIY bundles give your customers full control over what they buy, which makes the shopping experience feel personal and fun. Instead of offering fixed bundles, you let them choose the items they want to include, all for a discounted bundle price.

Brands like Mixbook let customers design their own photo book bundles, choosing layouts and add-ons to create something that fits their needs perfectly. This approach keeps customers engaged and increases their willingness to buy.

DIY (Build Your Own) Bundles- Mixbook

8. Discount Bundling for Cost-Conscious Shoppers

Everyone loves a good deal, and discount bundling gives your customers the feeling they’re saving while encouraging them to buy more. You offer a group of products at a lower total price than if they were purchased individually.

Retailers like Target often bundle everyday essentials, like shampoo and conditioners, at a discounted rate.

Discount Bundling for Cost-Conscious Shoppers- Target

9. Clearance Bundling to Clear Out Inventory

When you’ve got inventory that just isn’t moving, clearance bundling can help you turn it into revenue. Pair older or slow-selling items with popular ones to create an attractive package deal.

Take GetFPV, for instance. They make it easy for you to grab a bundle of compatible parts for their drone DIY kit. It’s a smart way to clear inventory while giving you everything you need for your next drone project.

Clearance Bundling- getfpv

10. Upsell Bundles to Drive High-Value Purchases

Upsell bundles are all about encouraging customers to spend more by including premium products alongside their main purchase. This allows them to get a better deal on something they might not have considered otherwise.

Take Koh, the cleaning products brand. At checkout, they make it hard to resist their upsell bundle, offering you a deal that lets you stock up on essentials while saving money.

Upsell Bundles - Koh

11. Gift Bundling for Special Occasions

Gift bundles make shopping easier for customers who are looking for presents but don’t know where to start. By curating products into gift-ready packages, you save them time and effort while increasing the appeal of your items.

Lifestyle brands like Bath & Body Works design holiday-themed bundles with Body Wash (10 fl oz), Body Lotion (8 fl oz) Fine Fragrance Mist (8 fl oz) and Hand Cream (1 fl oz) that customers love to give and receive.

Gift Bundling- Bath & Body Works

12. Gamify Bundling to Enhance Engagement

Gamifying your bundling strategy makes the shopping experience more exciting for your customers. You can introduce challenges, spending thresholds, or tiered rewards to encourage more engagement.

For instance, Starbucks uses its loyalty program to gamify purchases by offering bonus stars when customers reach specific spending goals, often by bundling coffee and snacks.

Gamify Bundling - Sturbucks

13. Limited-Edition Bundles to Create Urgency

Nothing motivates purchases like exclusivity. Limited-edition bundles create a sense of urgency because customers know they won’t be available forever. This strategy works especially well during product launches, collaborations, or seasonal events.

Here’s an example of a limited edition bundle from Pai Skincare.

Limited-Edition Bundles - Pai Skincare

14. Buy More Pay Less Bundles

Offer “Buy more pay less” bundles andencourage your customers to purchase in larger quantities by rewarding them with tiered discounts. The more they buy, the less they pay per item, which feels like a win-win.

For example: If they take 5 – they get 10% off, if they get 10 – they get 15% off. This way the more items they take, the less they have to pay.

Look at the example from Godiva

Buy More Pay Less Bundles- Godiva

Best Practices for Effective Product Bundling

To make your product bundles work, you need a clear plan that focuses on customer value and business goals. Each step in the process should help you create bundles that feel natural to your customers and deliver the results you’re looking for.

1. Define Clear Goals for Your Bundles

Start by figuring out why you’re creating a bundle. Are you trying to increase sales, clear out extra stock, or introduce new products? Knowing your goal helps you create bundles that make sense and deliver results.

For example, if you want to move older inventory, pair it with something popular to make it more attractive. If you’re aiming for bigger sales, consider adding premium items to encourage higher spending. Clear goals keep your bundles on track.

2. Use Data to Identify Bundle Opportunities

Your customer data can tell you a lot about what works. Look at what people buy together or the products they often add to their carts.

For instance, if customers usually grab a pair of headphones with a phone case, bundling them makes perfect sense. Or, during holidays, offering discounts on kitchenware sets might boost sales. Paying attention to customer habits helps you create bundles they’ll actually want.

3. Price Bundles to Show Clear Value

Bundle pricing should make it obvious that buying the bundle saves money. If the savings are clear, your customers are more likely to go for it.

Let’s say one product costs $30, but a bundle of three costs $75. Highlight the savings—“Save $15 with this bundle!” Clear pricing builds trust and makes the decision to buy easier for your customers.

4. Promote Bundles Where Customers Will See Them

Make sure your bundles show up in the right places. Add them to product pages, checkout pages, or even a dedicated bundle section on your site.

Think of how Amazon shows “frequently bought together” products right below an item you’re looking at. It’s easy to see and tempting to buy. You can also feature bundles at checkout as a quick way to encourage customers to add more items.

5. Use Tools to Make Bundling Easier

You don’t have to do everything manually. Tools like Dynamic Discount for WooCommerce can help you create and display bundles effortlessly.

Dynamic discount for WooCommerce

So, stick to these tips, and you’ll create bundles that customers love and that help you hit your business goals. Simple, effective, and easy to manage.

However, getting product bundling right isn’t just about creating combinations. It’s also about avoiding the pitfalls that can turn customers away.

Common Mistakes to Avoid in Product Bundling

Let’s cover some common mistakes to ensure your bundles work for both your business and your audience.

1. Ignoring Customer Preferences

If your bundles don’t match what your customers actually want, they won’t sell. It’s that simple. Always think about their needs and buying habits before creating a bundle.

For example, bundling winter boots with swimwear might make sense for clearing inventory but won’t appeal to most customers.

Instead, bundle products that go together naturally—like a laptop with a bag or a skincare set with complementary products. Pay attention to what your customers typically buy together, and you’ll have a winning combination.

Let’s see how HP offers it.

HP product bundling

2. Overcomplicating Bundle Choices

Too many options or overly complex bundles can confuse customers and drive them away. Keep it straightforward.

For instance, offering three or four simple bundle choices is much better than overwhelming customers with ten different configurations. When the decision is easy, customers are more likely to buy. Think of stores like Costco, which often feature clear, simple product bundles at unbeatable prices.

3. Not Highlighting the Savings

If customers can’t quickly see how much they’re saving, they’ll lose interest. Make the value crystal clear.

For example, instead of just listing the bundle price, say something like, “Save $20 when you buy this bundle.” Bold the savings on your product pages, emails, and ads. When the savings stand out, you’re giving customers a reason to feel good about their purchase.

By avoiding these mistakes, you’ll make your product bundles more appealing and easier for customers to choose. Simplicity and clarity are key to keeping them engaged and ready to buy.

Conclusion

You’ve seen how product bundling can transform the way your business sells. It’s not just about offering more products—it’s about creating combinations that make sense for your customers and increasing your average order value (AOV).

Bundling helps you move inventory, attract cost-conscious buyers, and deliver value that keeps customers coming back. Whether it’s seasonal bundles, upsells, or clearing old stock, the strategies we’ve covered are a great starting point.

Now’s the time to try these strategies, see how your customers respond, and grow your revenue.

FAQs

1. What is the benefit of combining products into a single offer?

Combining products into product bundles increases perceived value and encourages customers to purchase multiple items together, boosting overall sales.

2. How can I find inspiration for creating product offers?

Look at best product bundle examples from competitors or successful brands. These examples can help you design offers that align with your audience’s needs.

3. What strategies work best for pricing product bundles?

Review product bundle pricing examples to see how discounts or tiered pricing can drive more sales while maintaining profitability.

4. How can I attract customers to bundled offers?

Using a bundle sales promotion with time-limited discounts or exclusive deals can create urgency and excitement around your bundles.

5. Are there any real-world applications for bundling?

Yes, studying Product Bundling Examples from leading e-commerce brands can show how bundling complementary items boosts customer satisfaction and revenue.