Categories
Guide Virtual Reality WP VR

How To Create A Virtual Tour In Easy Steps- A Complete Guide [2025]

Ever wished you could teleport? Well, creating a virtual tour is the next best thing—minus the sci-fi complications and potential teleportation mishaps.

Imagine giving people a full, immersive tour of your business, property, or event space without them having to leave their couch (or even change out of their pajamas).

With a virtual tour, your audience can explore every nook and cranny as if they were there in person—without you having to clean up first.

In this guide, I’ll walk you through everything you need to know: from the basics of virtual reality to capturing stunning 360° images and building a tour that wows.

Once you complete this guide, you won’t rely on anyone to create virtual tours.

You’ll know how to create a virtual tour completly on your own, at the lowest cost.

So let’s get started.

First, Let’s Clear The Confusion!

If you gather clear knowledge of the basic terms it will be easier for you to understand the process of virtual tour creation.

Now, most people get confused between Virtual Reality and Virtual Tours!

Here’s a clear definition :

What Is Virtual Reality?

Virtual Reality is a computerized environment or projection that you can experience visually.

You can observe, listen to, and interact with this environment.

What Is Virtual Reality

Now, there are many types of VR technologies. The 5 most popular ones are listed below :

Types of Virtual Reality

Non-immersive virtual reality
Non-immersive virtual reality refers to a computerized virtual experience where you can control some characters or activities within the software, but the environment is not directly interacting with you. Example: Simulation games such as God of War.
Fully immersive virtual reality
A fully immersive virtual technology ensures that you have a realistic experience within the virtual world. This is an expensive form of virtual reality which involves helmets, gloves and body connectors with sense detectors, to transfer your every physical moments within the virtual world. Example: Virtual shooting game zone.
Semi-immersive virtual reality
A semi-immersive virtual reality can be in the form of a 3D space or a virtual environment which you can move about on your own either through a computer using a mouse and keyboard, or on mobile devices by touching and swiping to move about the place. You do not control any character, you control the view on your own. Some VR headsets are semi-immersive. Most semi-immersive virtual environments support Gyroscope. Example: A Virtual Tour.
Augmented virtual reality
Augmented Reality is when a certain entity or device seems to be present in reality, but is actually not. Rather than putting you into a virtual world, a virtual entity is placed in the real world through any device. Example: The game Pokemon Go displays Pokemons through your phone.
Collaborative virtual reality
This is a form of virtual world where different people from various locations can come into contact within a virtual environment, usually in the form of 3D or projected characters. People can interact with each other through microphones, headsets and chatting. Example: Games such as PUBG (Players Unknown Battle Ground)

**To learn more about types of VR in detail click here.

Virtual Reality And Businesses

Over the years, virtual reality has increased its influence in tons of businesses to create better interactions with their customers.

By the year 2025, the total size of the global Virtual Reality market will be valued at more than 22 billion US dollars.

Businesses such as Real Estate, Hotels & Resorts, Restaurants, Universities, Schools & Colleges, Super shops, Antique shops, Art Galleries, Showrooms, Museums, etc can engage with more prospects using virtual tours.

Read along to learn about how businesses can benefit from virtual tours (your business might be one of them).

Along with VR technology many VR devices such as VR Headsets, Virtual Game Spaces, Virtual Simulation, and training devices, and many more devices are being created day by day. Similarly, in the tech industry, companies specializing in igaming software development can leverage virtual tours to showcase their cutting-edge solutions and engage potential clients effectively.

IDtechEx estimates that, in 2023, the revenue from only the VR headset sales will be more than $9 billion.

Since you have an idea about virtual reality and its different formats, I’ll move to our main objective today – virtual tours.

What Is A Virtual Tour?

A virtual tour is a form of semi-immersive (one of the types of virtual reality)VR technology that allows you to experience a certain location remotely.

Basically, represents a real place in a virtual platform. You will feel like as if you are there.

Virtual Tour Experience

Usually, a virtual tour is created by transforming a 360 seamless panoramic image into a realistic Equirectangular 3D space.

You will be able to rotate the screen 360 degrees in all directions. Plus you will be able to move from one panoramic image to another.

There are other forms of panorama images used to create virtual tours such as Cube Map, Little Planet, or Fish Eye. But we will be discussing the most efficient one, the Equirectangular virtual tour.

Recently, virtual tours gained huge popularity in several businesses due to the high engagement potential with prospects.

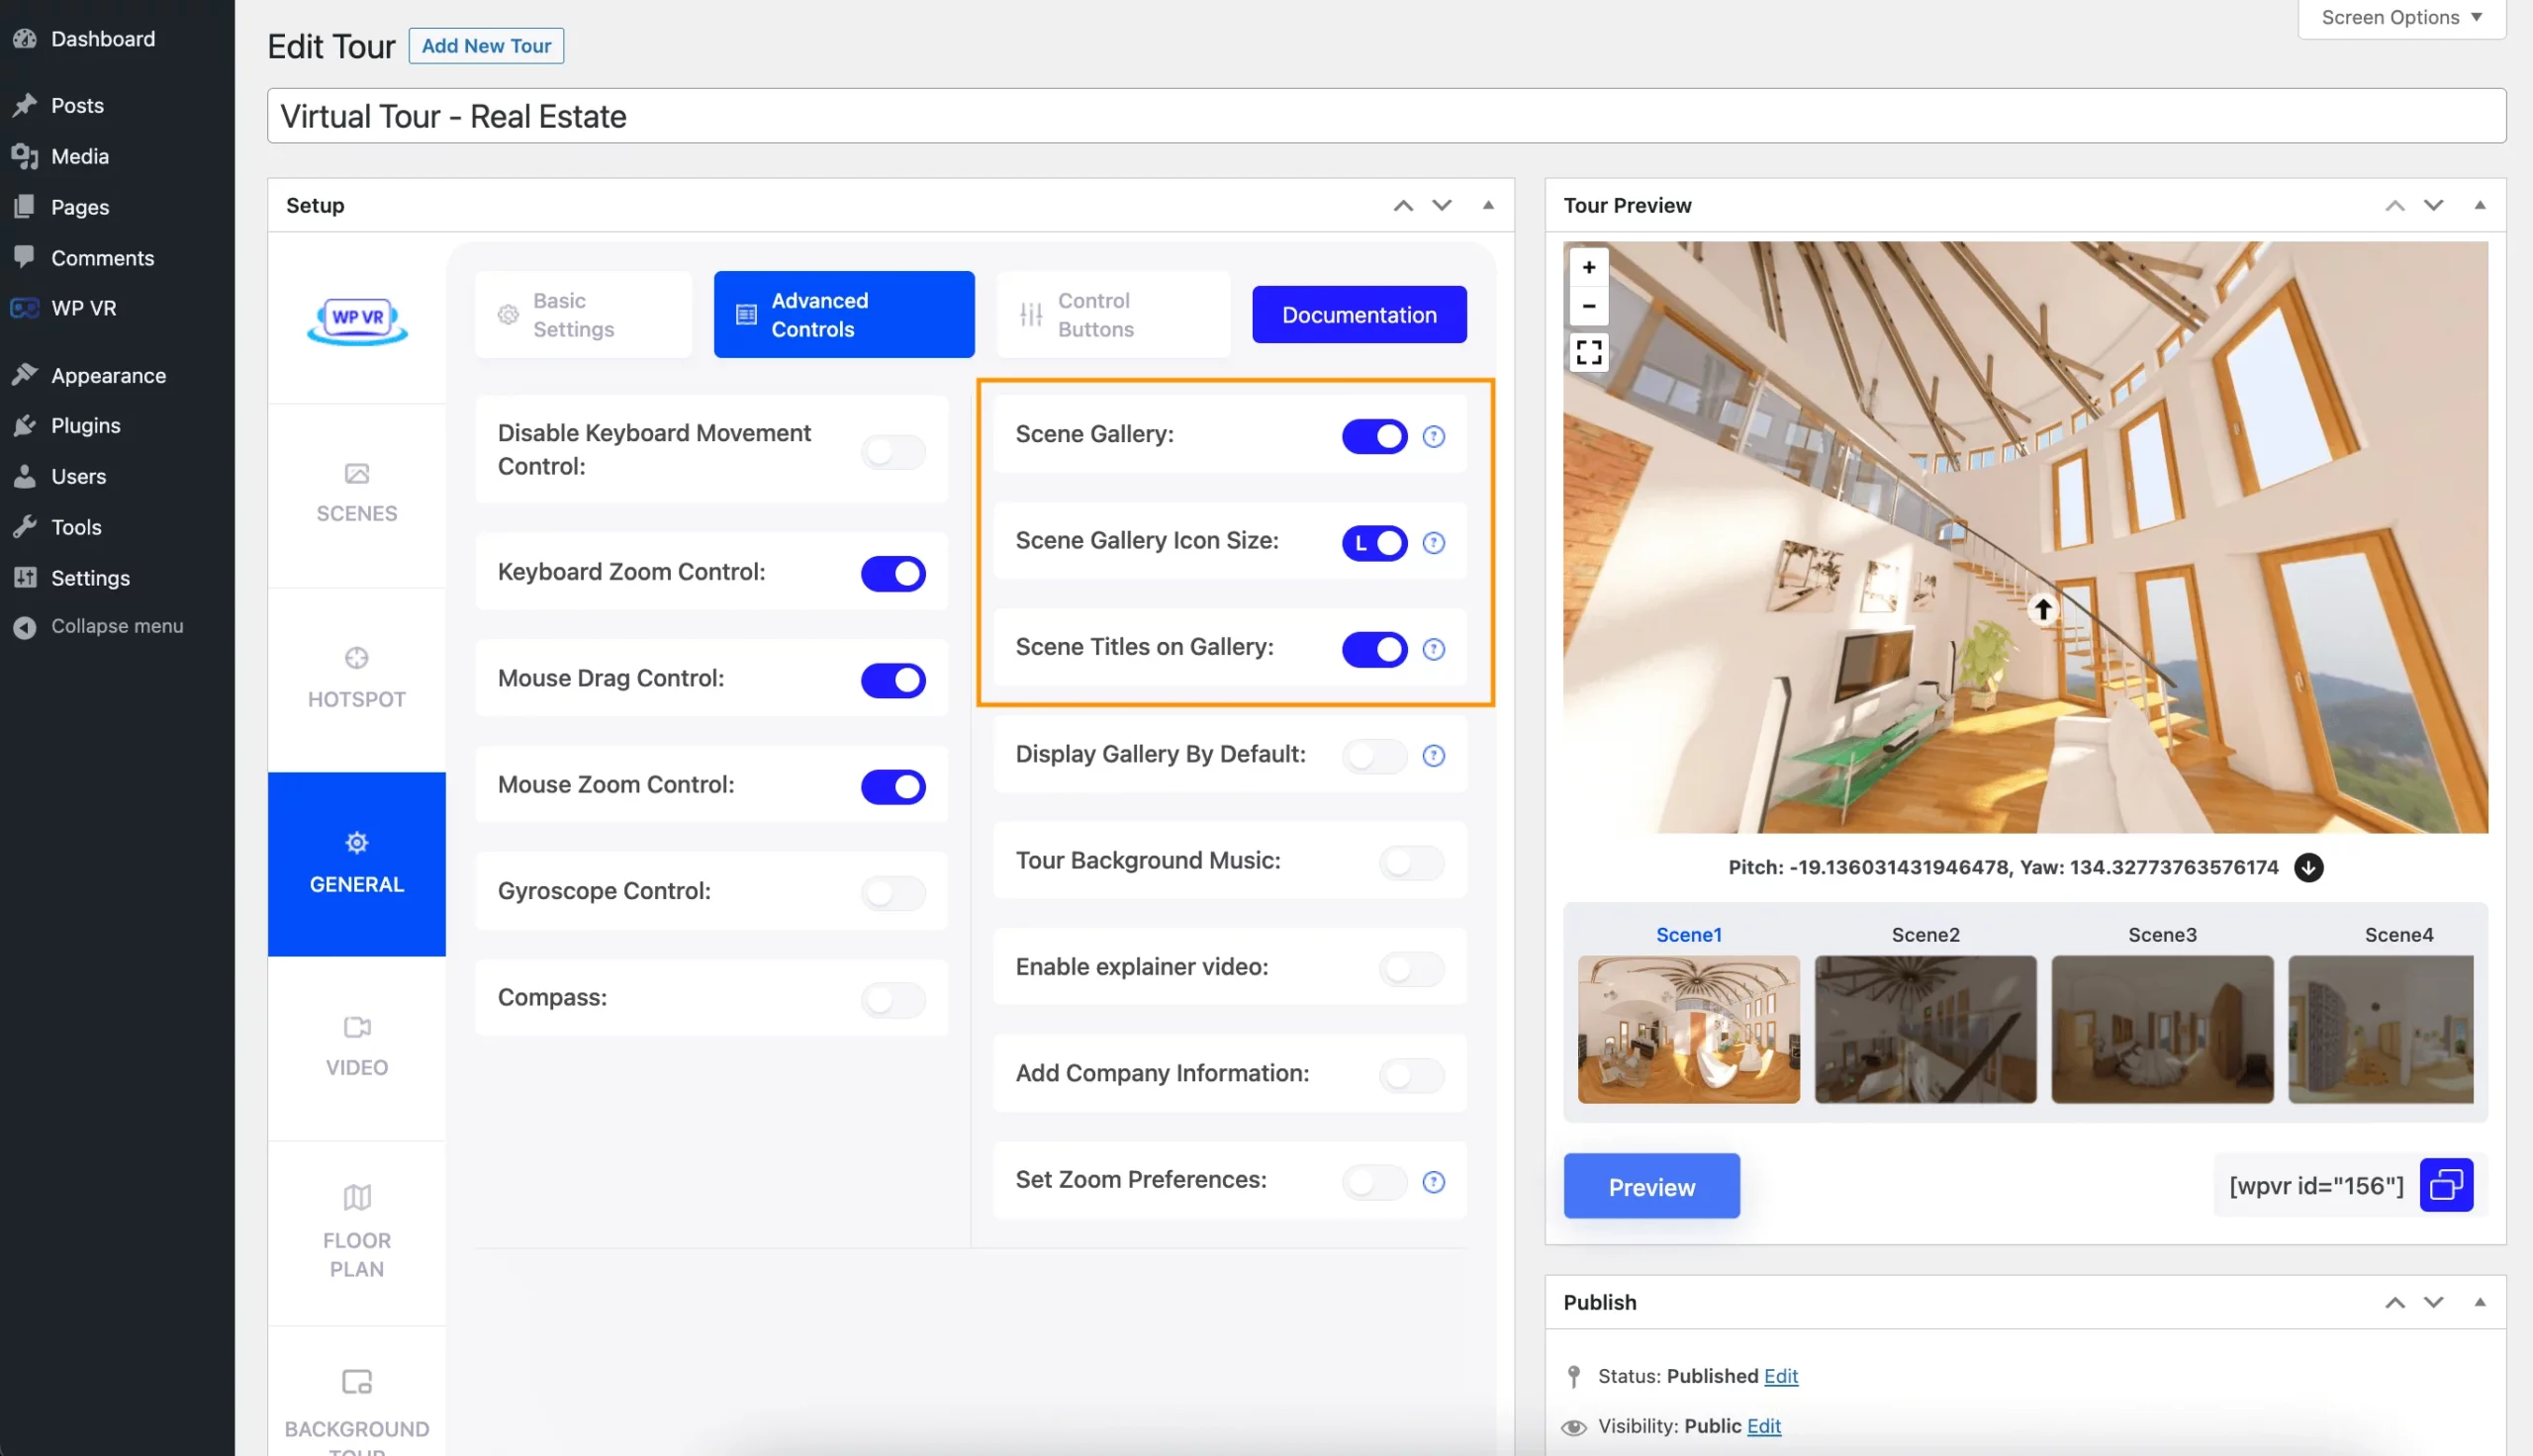
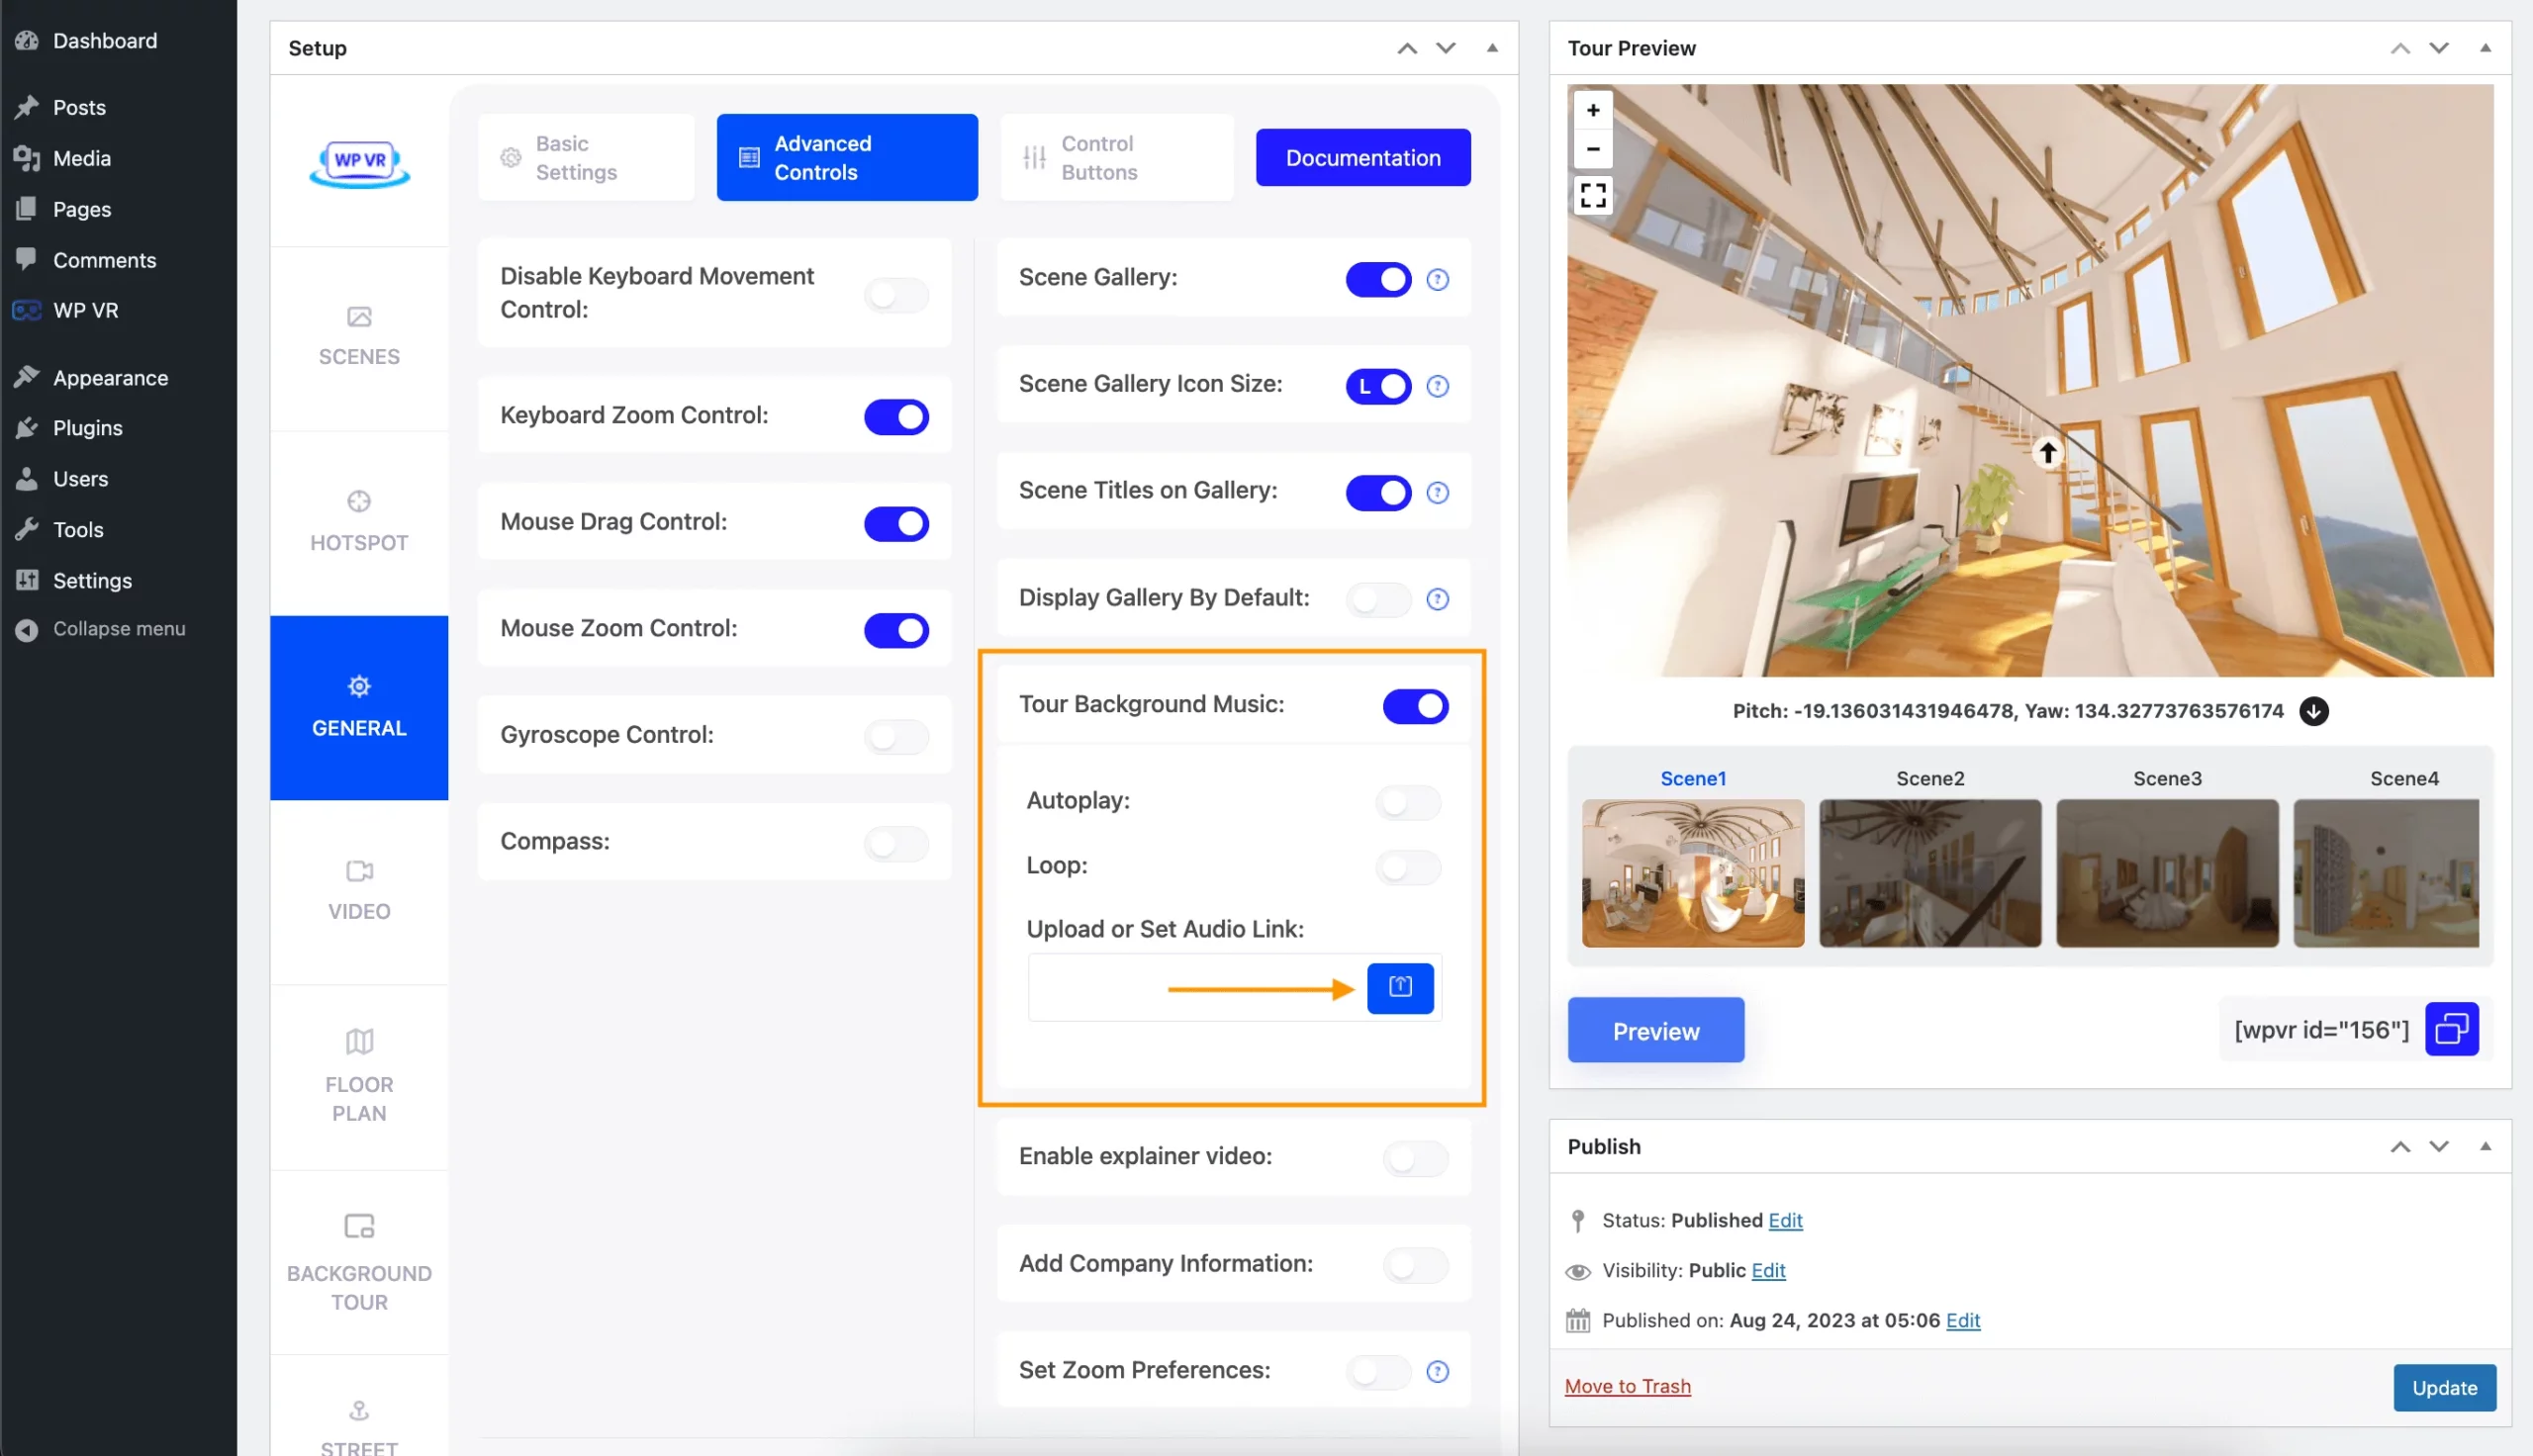
The latest forms of virtual tours are more advanced and attractive. You will find a scene gallery, click-to-view information tags, background music, Gyroscope support, some even support VR boxes, and many more. Proper platform development can also significantly enhance these virtual tours.

As you read along, you will learn how you can create virtual tours on your own.

Let us look at the advantages of using a virtual tour for most businesses.

Advantages Of Using A Virtual Tour On Your Website

Now, virtual tours are more beneficial to businesses that rely on highlighting their location to attract prospects.

So, Real Estate Firms, Hotels, Museums, Universities, Schools and Colleges, Amusement Parks, Fancy Restaurants, and most other such businesses can use virtual tours to attract more potential prospects.

Yes, using high-quality images is not a bad idea, but a virtual tour can have a greater connection with the viewer since they feel personalized and engaged as they take the tour.

Here are some of the benefits you can expect for your business using a virtual tour.

1. Instant Engagement

The use of a virtual tour is still very new and people visiting your site will be instantly hooked.

Engage with prospects through virtual tours

The fact is, people are already well-accustomed to looking at flat images or videos. A virtual tour will be something new and interesting to all viewers.

The main reason a virtual tour is more effective is because the viewers are in full control of the tour.

Flat images can only create an imaginative visual which might not be accurate. And videos can only be watched with no control. We have to watch the place from the angle of the cameraman.

In a virtual tour, viewers can move and look around from any angle or direction. They can go from one scene to another easily and can take their time to inspect the location.

Once they take the tour, they will have a more accurate visual of the actual location.

Thus, even if someone is not willing to purchase a website visit, a virtual tour might grab his attention and possibly turn him into a potential buyer.

Realtors and hotel owners will benefit the most in this case, compared to most other businesses.

However, anything unique, that’s interesting and exciting, can always get you better results no matter what business you run.

2. Give A Better Visual To Prospects

The main concept of a virtual tour is to give a realistic vision of a place. And almost any business can use virtual tours to give a more informed visual to the prospects.

Better visual using virtual tours

Previously, the most advanced remote tours were video tours.

However, the problem with video tours is that you can only watch from the point of view or angle of the cameraman.

You have no way to inspect from another angle.

Also, as I mentioned earlier, flat images can create an imaginative visual which might not be accurate.

So here’s the main issue. Through videos or images, people can visualize in their minds and this creates a certain assumptive expectation of how the place will look when visited in person.

Now, when a person visits, if it does not match his imagination, he will lose interest almost immediately.

A virtual tour rather creates a near-perfect visual of the place.

A person taking a virtual tour will develop an expectation that very much matches the place in reality.

Thus creating more potential prospects.

So whether it is a hotel, an amusement park, a school, or any form of business, a virtual tour can generate more potential prospects.

3. Help Prospects To Take A Decision

As you just read, a virtual tour gives a better visual of the location.

Almost every detail can be inspected through a virtual tour and the close resemblance to the actual location makes it a great instrument of choice.

Help home buyers make a decision easily

Let me explain.

Let’s say you’re searching online for good restaurants in your area. You found three restaurants that have good reviews based on the taste of their food.

But which one you’ll choose to visit?

Let’s assume all three of these restaurants have virtual tours on their site. Once you take a virtual tour of each of them, you will be able to understand which one has the environment that you were looking for.

The decorations and the seating arrangements would be more clear and you could choose your preferred restaurant.

Similarly, on a real estate website, people will be able to take tours of various houses in a location. This will let them choose the ones that they feel are suitable.

Almost all businesses can use virtual tours to influence prospects’ choices.

4. Avoid Unnecessary Visits And Rejection

Avoid Unnecessary Visits And Rejection

Using a huge number of photos is a common practice for realtors.

However, no matter how many images you use, it’s not possible to have a clear idea of the property structure and planning.

You may see each individual room and each important location clearly but don’t know how the spots are connected and how to move around inside the property.

Plus the latest photo editors can even transform a dull place to look stunning.

There is a high possibility that most people, willing to visit the location, might end up being disappointed since they had better or lower expectations.

At the same time, if you are giving a live tour to people during every visit, then you will be wasting a lot of time and effort since there is a high rejection rate.

The main reason is, as I explained earlier, failure to meet expectations.

A virtual tour will allow viewers to carefully inspect the property and decide if it’s suitable for them.

As a result, calls to visit will mostly come from prospects who are already interested and satisfied with the location, i.e., more potential prospects and fewer rejections.

According to a report, using 360-degree virtual tours in the real estate industry will reduce the number of wasted viewings by 40%.

That’s a substantial amount of time and money you can save.

5. Technological Advantage Over Competitors

Even though virtual tour is a relatively new term for a lot of people, it already has become a key marketing strategy for industries like real estate, hospitality business, museums, etc.

However, almost every business has the scope to utilize virtual tours as a part of its marketing strategy.

This is actually an advantage for your business if you have not used virtual tours on a large scale.

Technological Advantage of Virtual Tours

For example, if you own a super shop, you can create a virtual tour that will let visitors get a tour of the shop remotely.

They will be able to see the various sections and types of goods you have. Plus, they will notice how organized and clean your super shop is.

Many viewers might choose to take a visit after noticing a certain section on your super shop, expecting to meet the quality they require.

Other super shops that don’t have a virtual tour on their site will not get this added advantage to convert an online visitor to a live prospect.

Similarly, if you own a hotel, then a virtual tour will give you an added advantage over other hotels in your area.

People visiting your site will be able to get a virtual experience remotely, compared to other hotels that rely on just images and videos.

If your hotel is well-decorated and affordable, most people will probably prefer your hotel to others after taking a virtual tour.

As you can see, every business can be ahead of its competitors through a virtual tour. You will achieve more trust from prospects, and gain a good reputation for reliability and up-to-date technology.

These are 5 major advantages that almost all businesses can enjoy despite the niche.

There could be more advantages such as being more cost-effective compared to creating virtual video tours (due to hiring expert camera crews), and more efficient and effective towards prospects.

List Of Businesses That Can Benefit From Virtual Tours

  • Real Estate
  • Hotels & Resorts
  • Restaurants
  • Casinos
  • Art Gallery
  • Fashion House
  • Wedding Venues
  • Conference Halls
  • Car Showrooms
  • Aquarium Shops
  • Antique Shops
  • Shopping Malls
  • Super Shops
  • Movie Theatres
  • Home/Interior Decors
  • Historic Locations

  • Travel/Tourism Industry
  • Gym/Fitness Centers
  • Universities, Schools & Colleges
  • Virtual Learning Centers
  • Research Facilities
  • Production House
  • Corporate Office
  • Virtual Gaming Zones
  • Indoor Gaming Zones/Clubs
  • Handcraft/Furniture Shops
  • Theme/Amusement Park
  • Airports & Airlines
  • Orchids & Flower Gardens
  • Natural/Safari Parks
  • Museums
  • Hospitals

Later in this article, we will also learn how each of these businesses can take advantage of using virtual tours. You will get niche-specific information on how you can use virtual tours to get more prospects.

If your business is on this list, then you will find this guide very helpful. And if you haven’t used virtual tours yet, then it’s time you start thinking about using them.

How To Create a Virtual Tour

To use a virtual tour you need to create one. To create a virtual tour you need some materials and need to know the process.

Let’s start with materials :

Resources You Need To Create a Virtual Tour

To create a virtual tour you will need two specific things.

You can go for any type of virtual tour.

For this article, I am going to use an equirectangular type to create a virtual tour.

In the case of an Equirectangular virtual tour, the main elements are:

  • 360 panoramic images, and
  • A Virtual Tour Creator Tool.

What Is A 360 Panoramic Image?

First, understand what a panoramic image is.

A panoramic image is different from the usual photographs.

They are usually very wide and the pictures are taken in different ways for different types of panoramic images.

Now, a 360-degree panoramic image takes a 360-degree angle of a place or thing.

Once processed using a virtual tour creator, it becomes an Equirectangular virtual tour.

Here is an example:

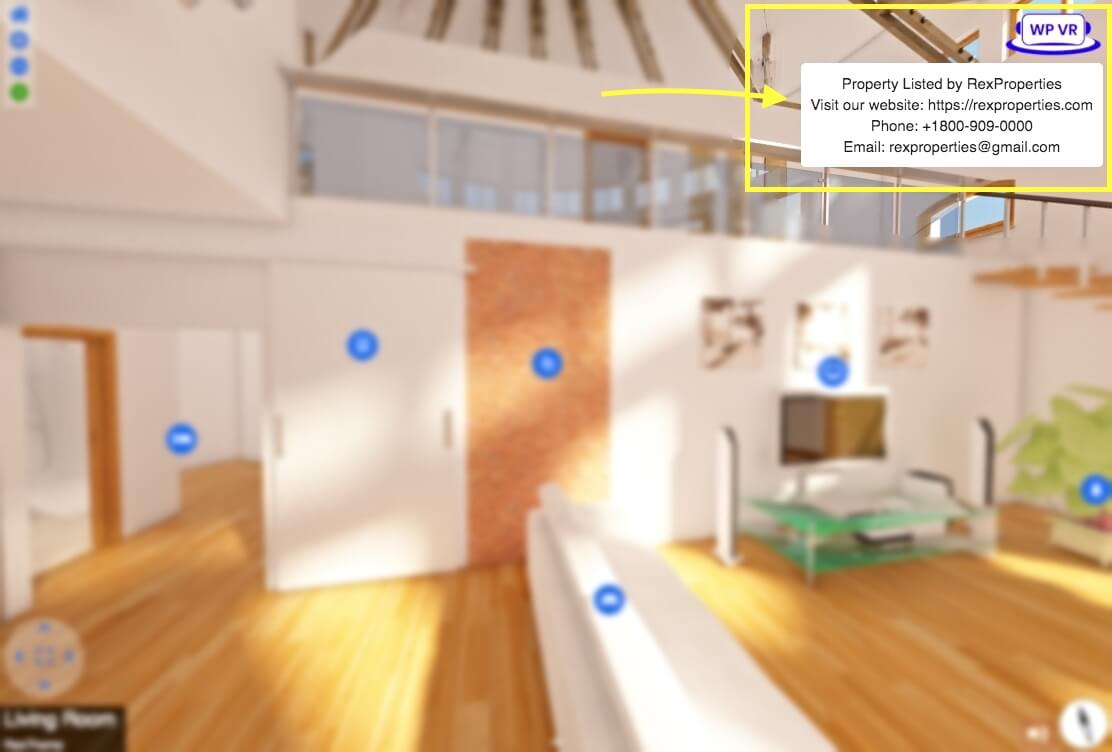
A 360-degree Panorama Image

A 360-Degree Panorama Image

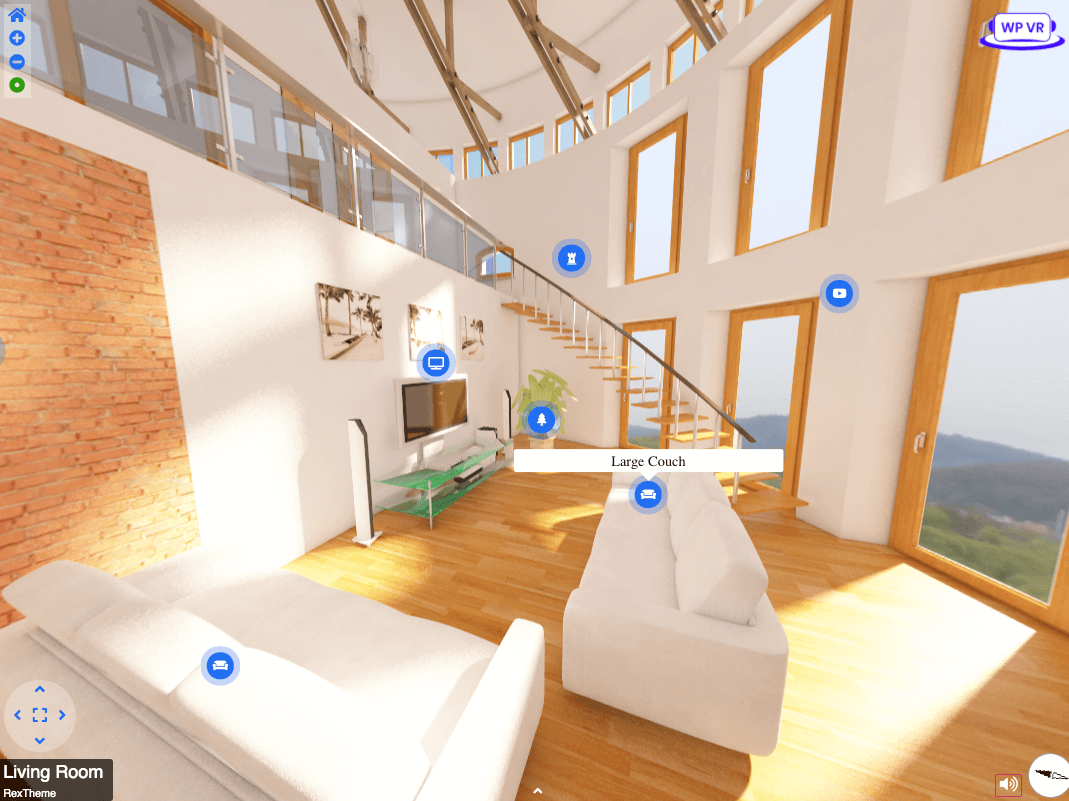
Converted To A Basic Virtual Tour

Once you have seamless 360 panoramic images, you can now easily create amazing virtual tours using a virtual tour creator.

In the example above, I used WPVR which is currently the best virtual tour creator for WordPress.

If you want to learn how to capture 360 degree photo using drones, read our detailed guide.

A Virtual Tour Creator – WPVR

Learn how to Create a virtual tour using the right tool

Creating a virtual tour sounds like a difficult task, but in reality, it is pretty simple as long as you are using the right tool.

**Careful with production companies. Many will claim that video tours are virtual tours, but that’s not true. Yes, there are virtual video tours, but they are not ideal for complete control and inspections. Plus they cost more to produce.

There are many tools and services that can help you convert your 360 panoramic images into a virtual tour.

However, today I will show you a step-by-step process on how to create a virtual tour for your WordPress site using the WPVR plugin.

WPVR

With WPVR, you can easily learn how to make a virtual tour with the simplest steps.

There are more virtual tour plugins, but this one comes with an easy interface and quality output.

Here’s a step-by-step guide on how you can generate a quality virtual tour using WPVR easily, on your own.

Step-by-Step Guide To Create Virtual Tour Using WPVR

You can get the free version of WPVR from the WordPress repository.

You can get the pro version from here :

Get the pro plugin: WPVR Pro

First, let’s look at how you can create a virtual tour using the free version. Then I will discuss some of its Pro features that you can use to make the virtual tour more attractive.

Now, let’s go through it step-by-step.

Step 1 – Install And Activate WPVR

Go to your WordPress Dashboard > Plugin > Add New.

Search for WPVR and you will find a blue icon of the plugin as shown in the image below:
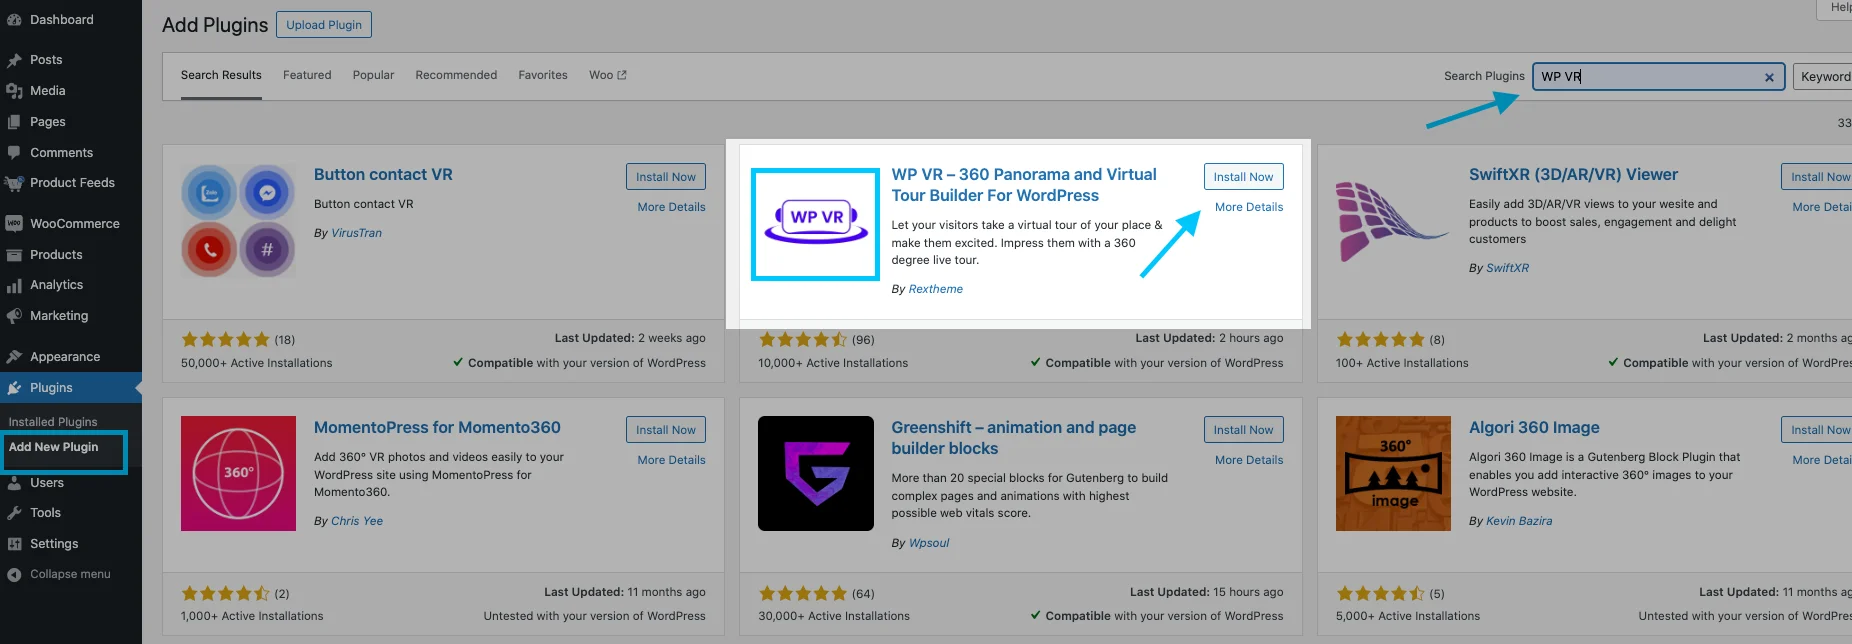
WPVR

Click on “Install” and after that “Activate” will appear. Click on the button of the plugin.

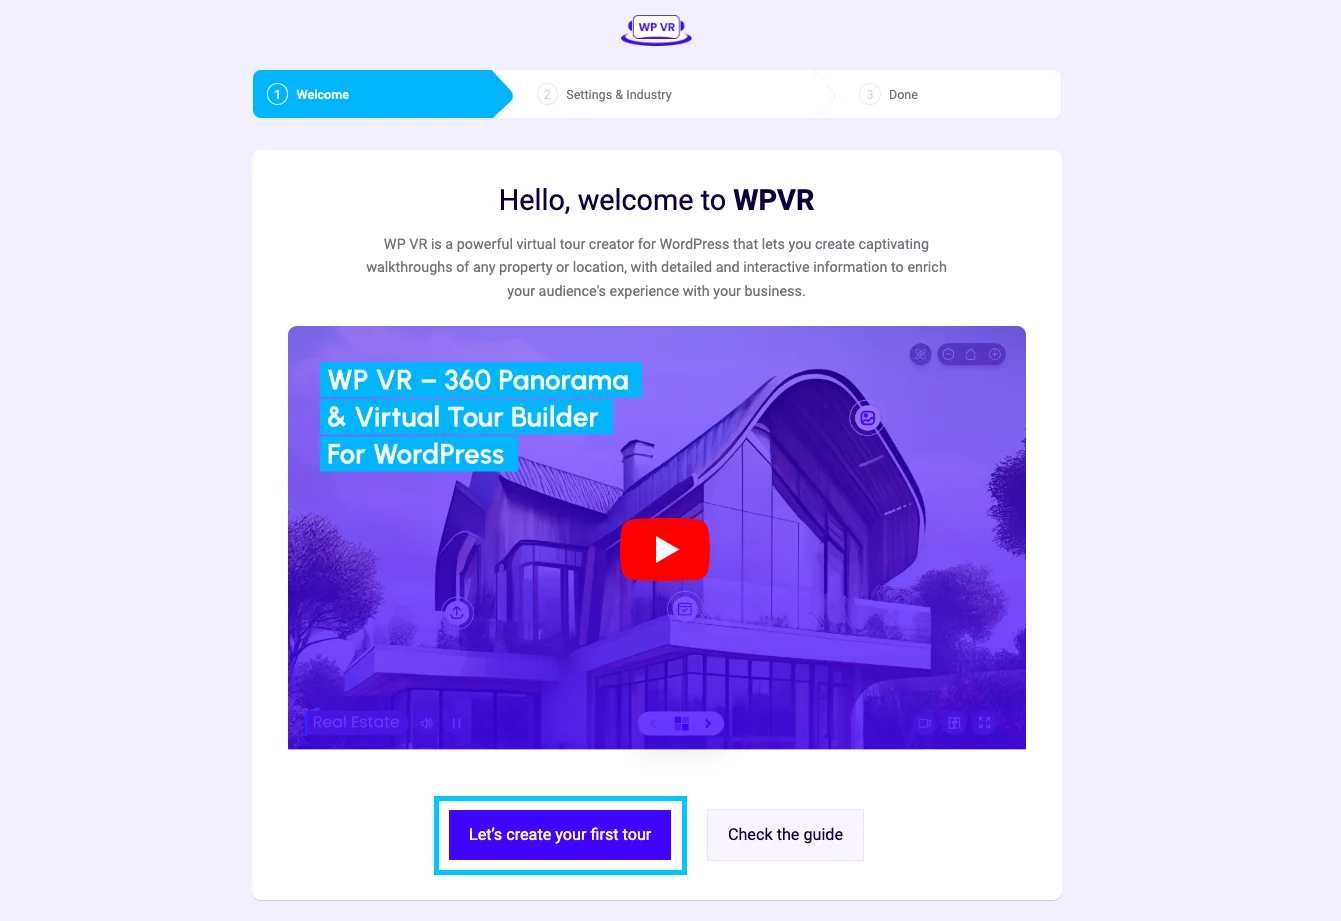
Once the plugin is activated, you will get this page :

WPVR setup process

Click on the “Let’s create your first tour” button.

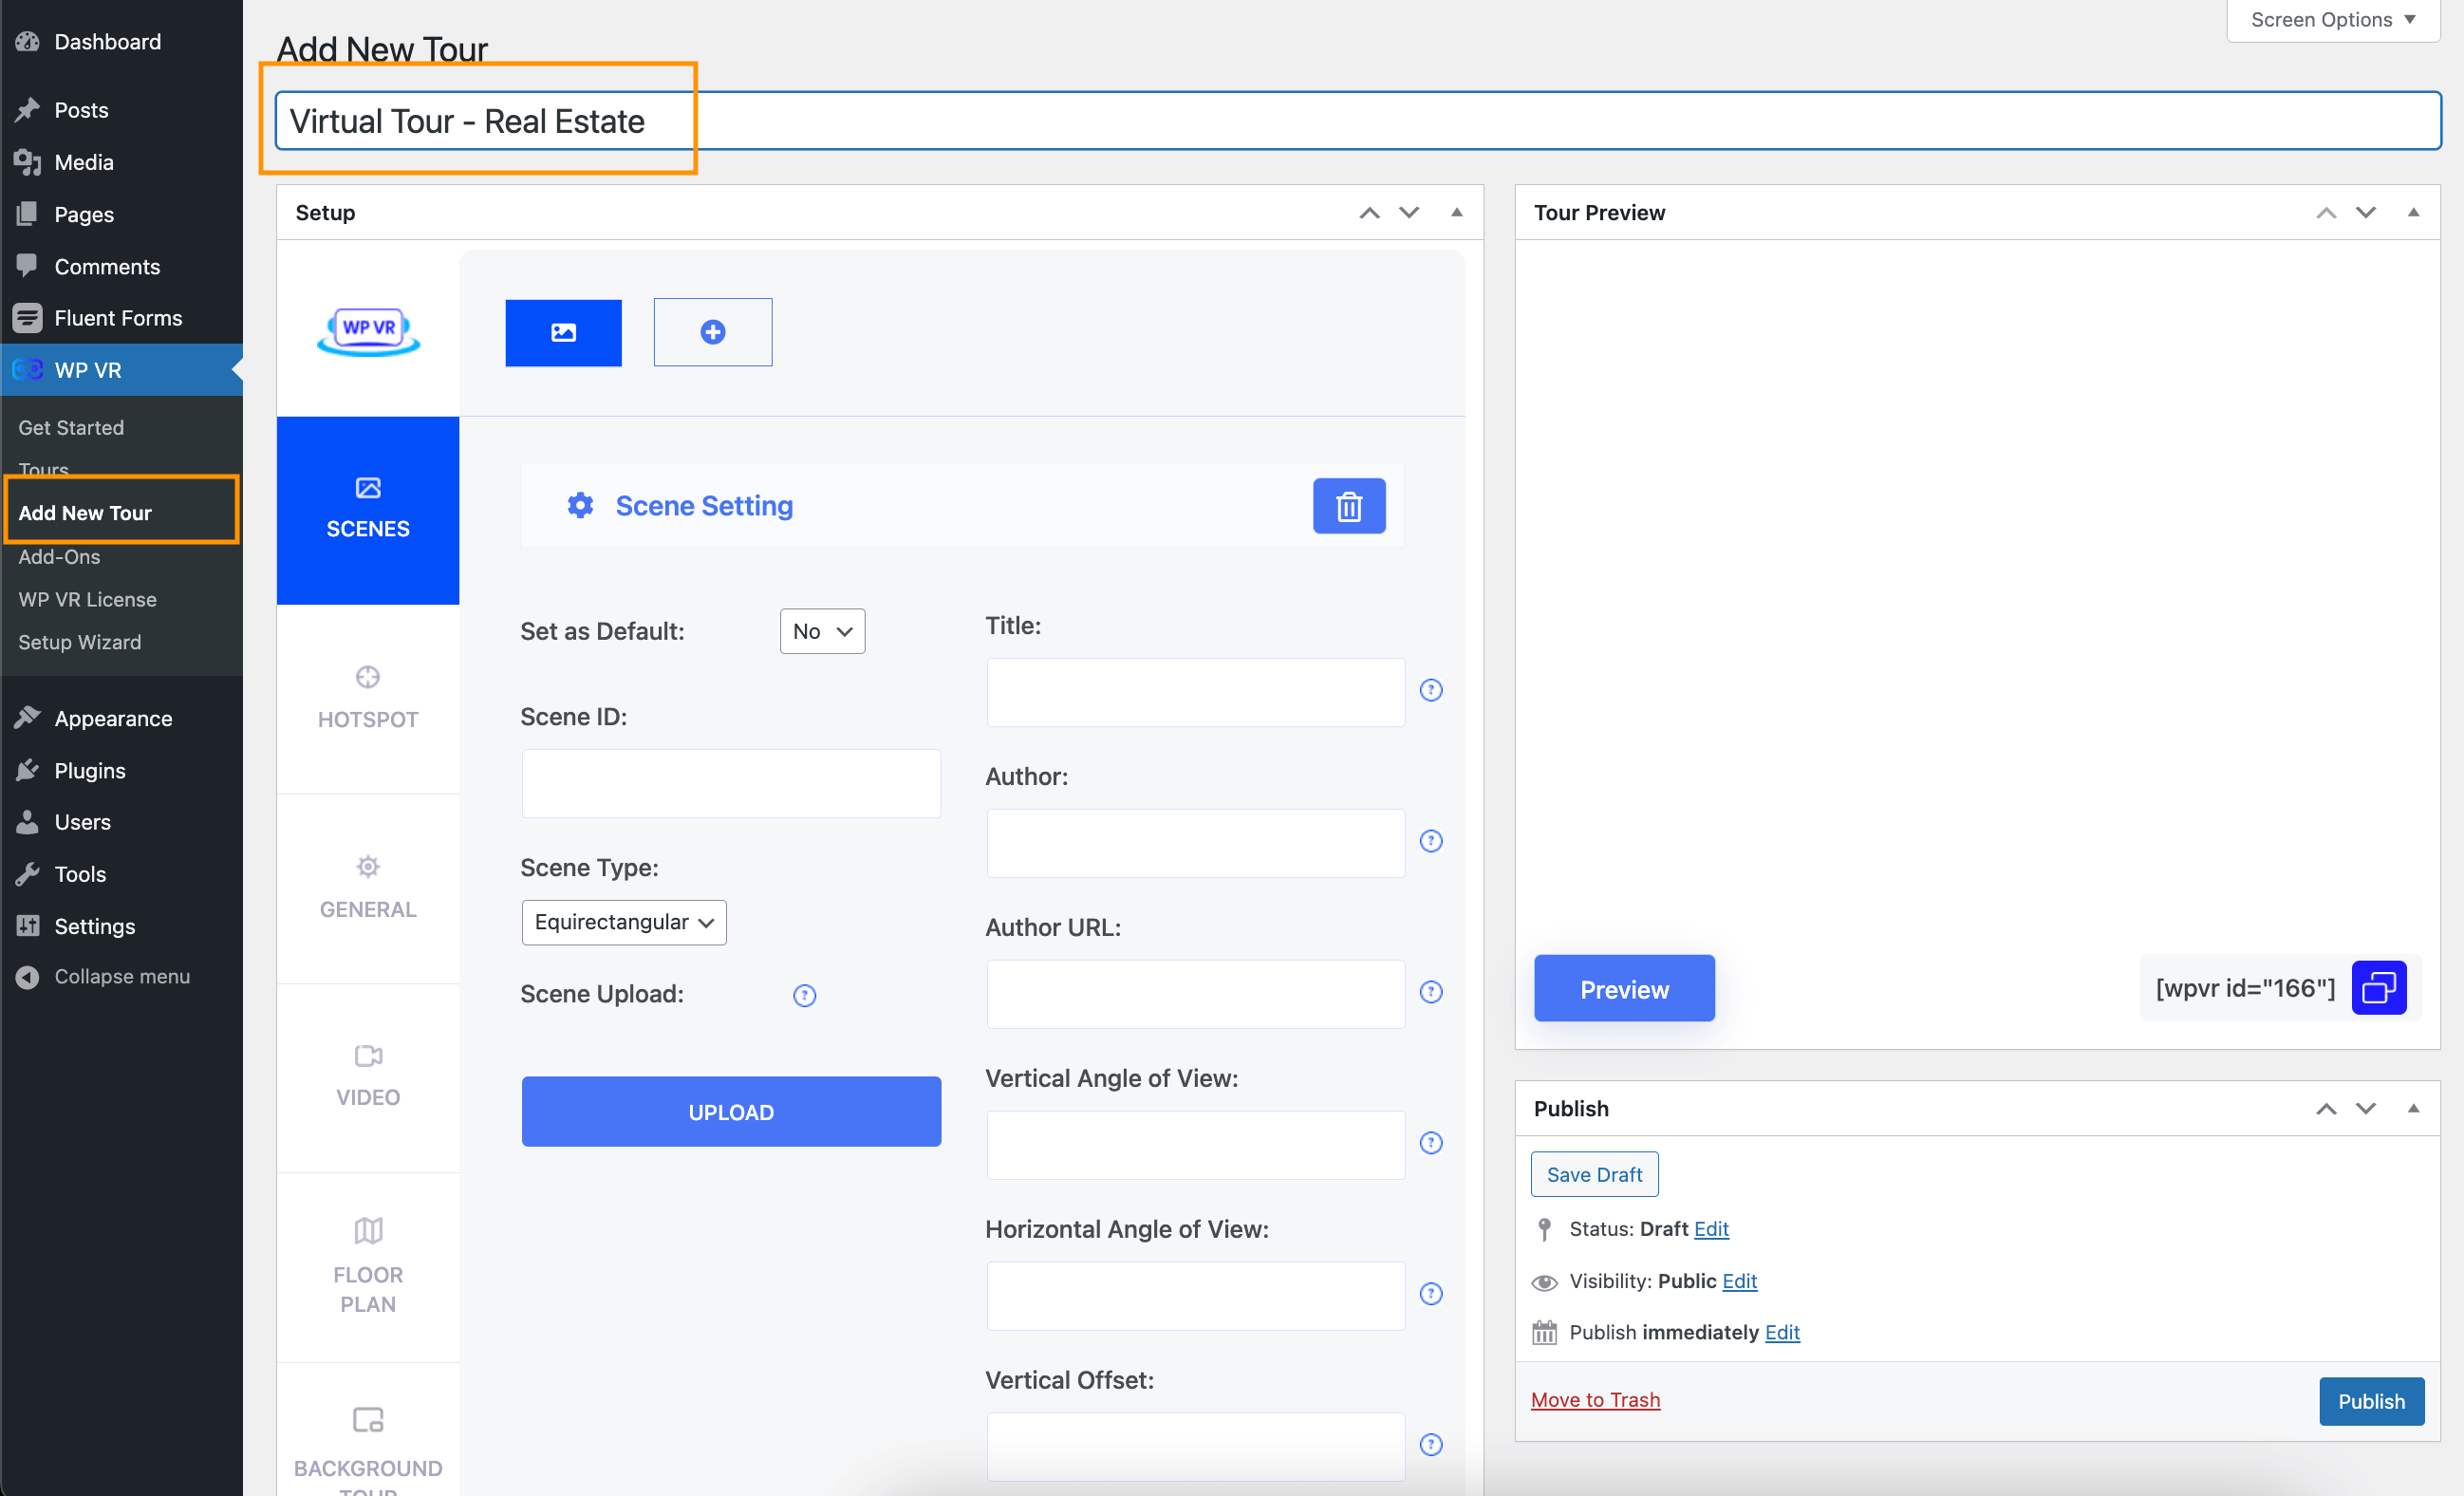
you will see on your Dashboard that a new menu called “WP VR” has been added. And this page will appear :
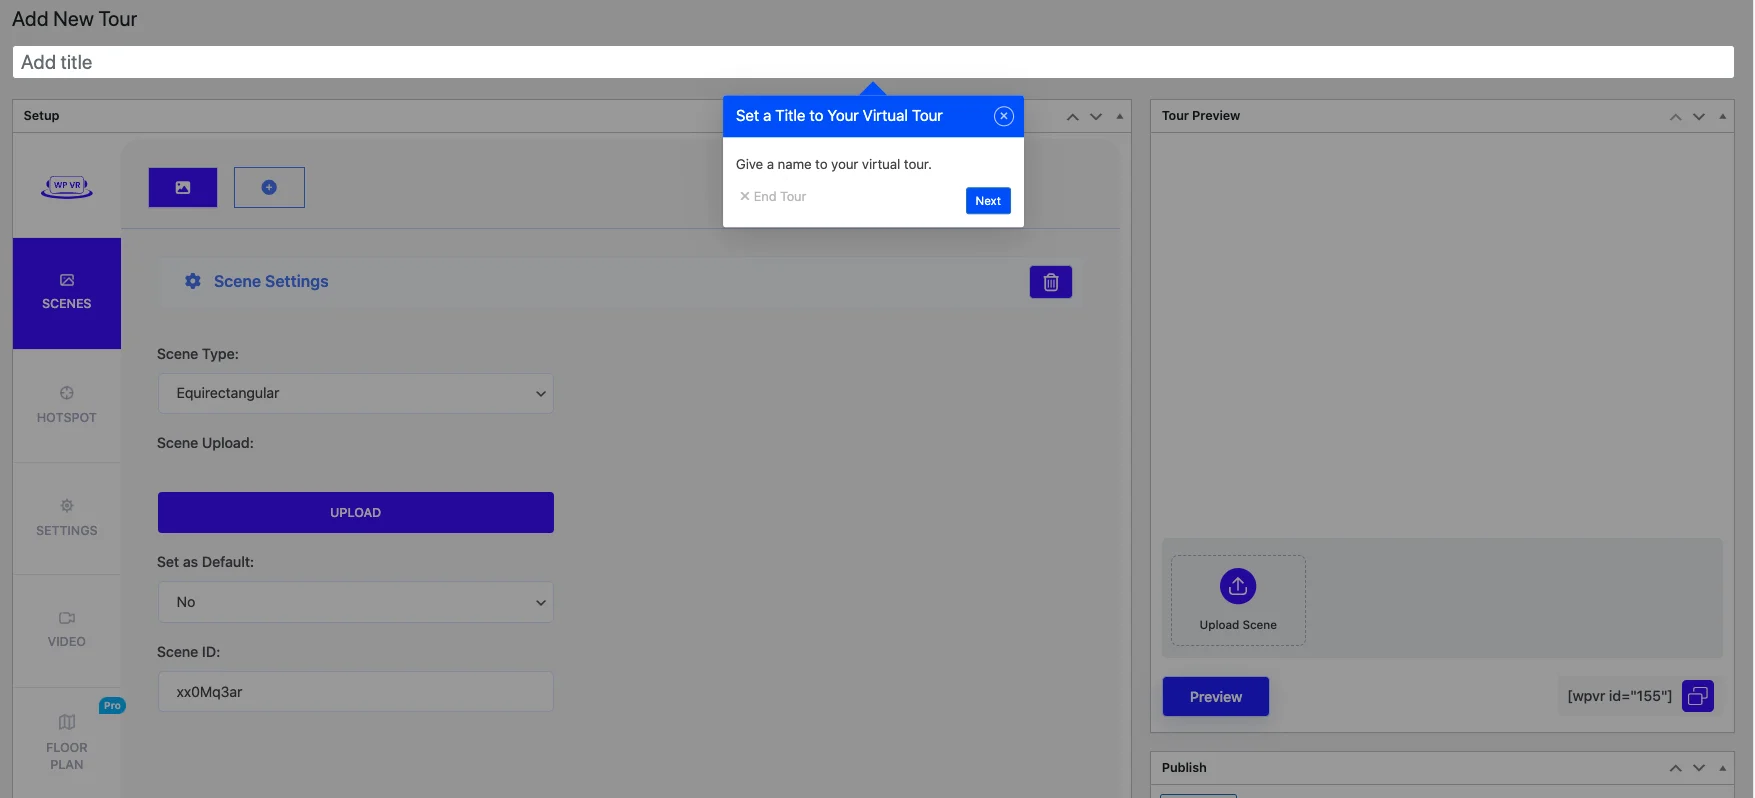
set up WPVR

Now give a title to your virtual tour. If you don’t want to give title now then just press the cross button.

Then, as you proceed a pop up of scene id will come up :

WP VR scene ID

Step 2 – Create A Virtual Tour

As you proceed, this dashboard will appear :

Dashboard of WP VR

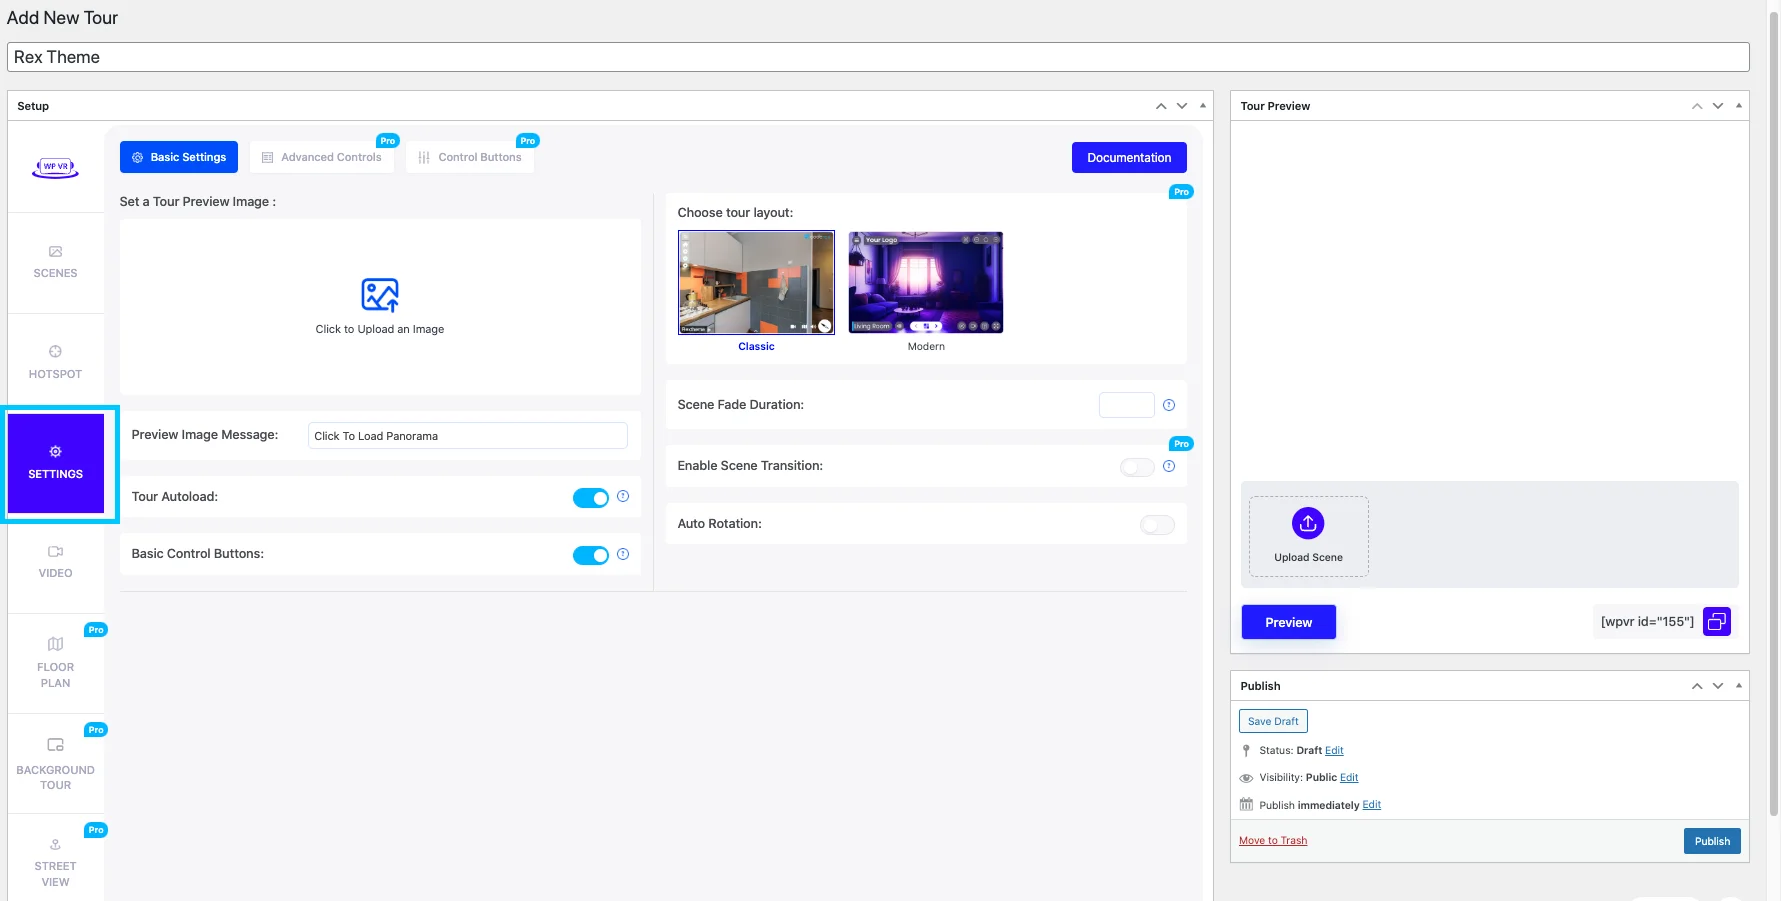
On the left side, you will see 8 tabs:

:

  • General
  • Scenes
  • Hotspot
  • Video
  • Floor plan
  • Background Tour
  • Street View
  • Export

For a virtual tour, you will need to set the proper settings of the first three tabs.

Step 3 – Configure General Settings

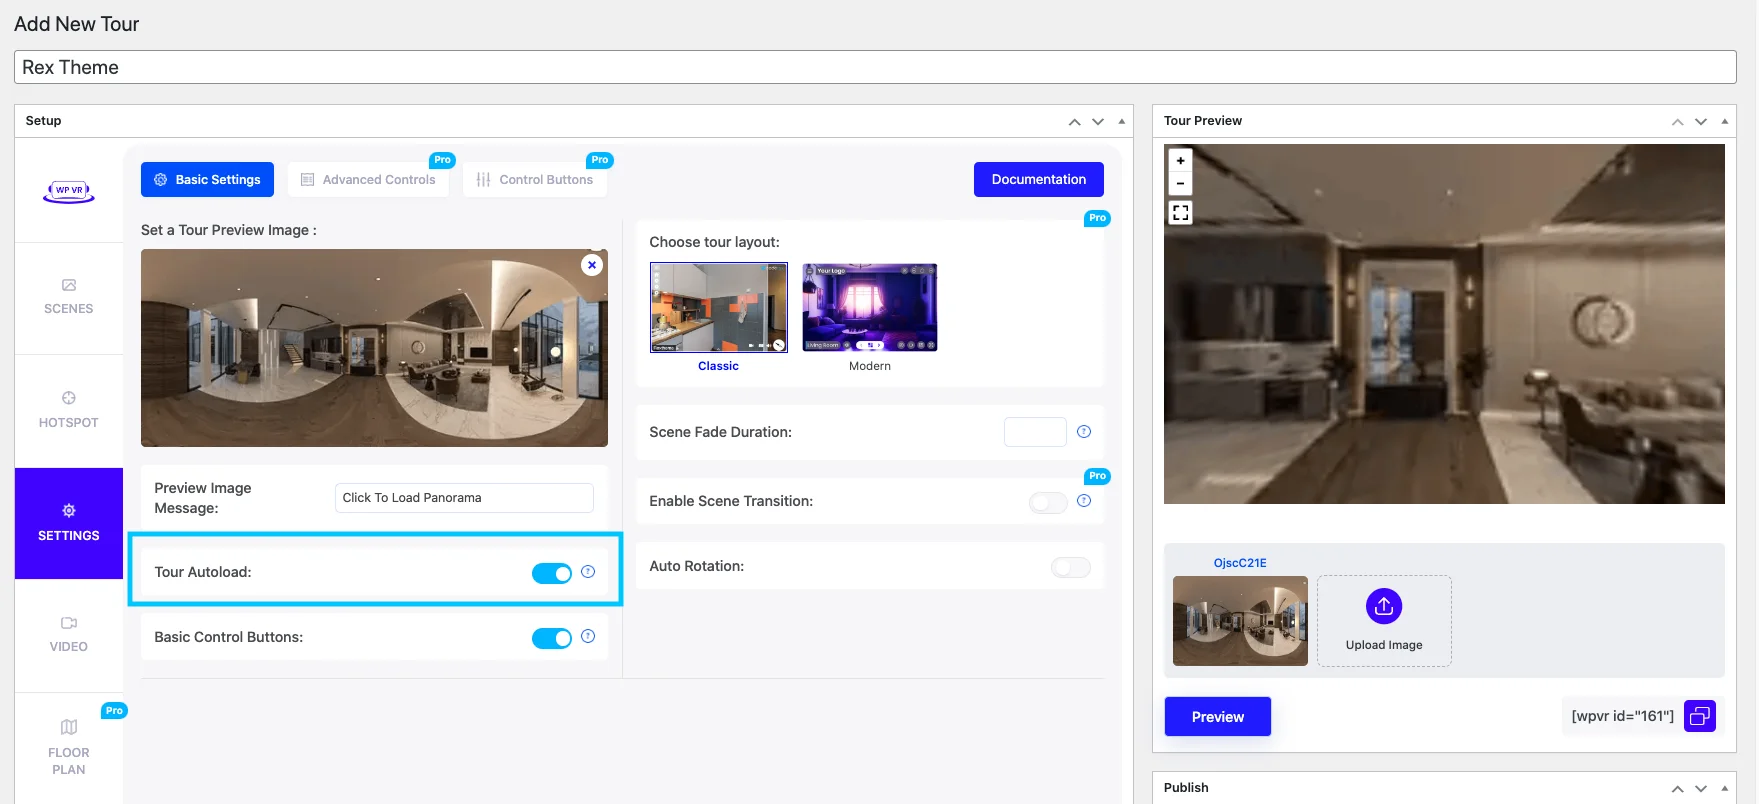
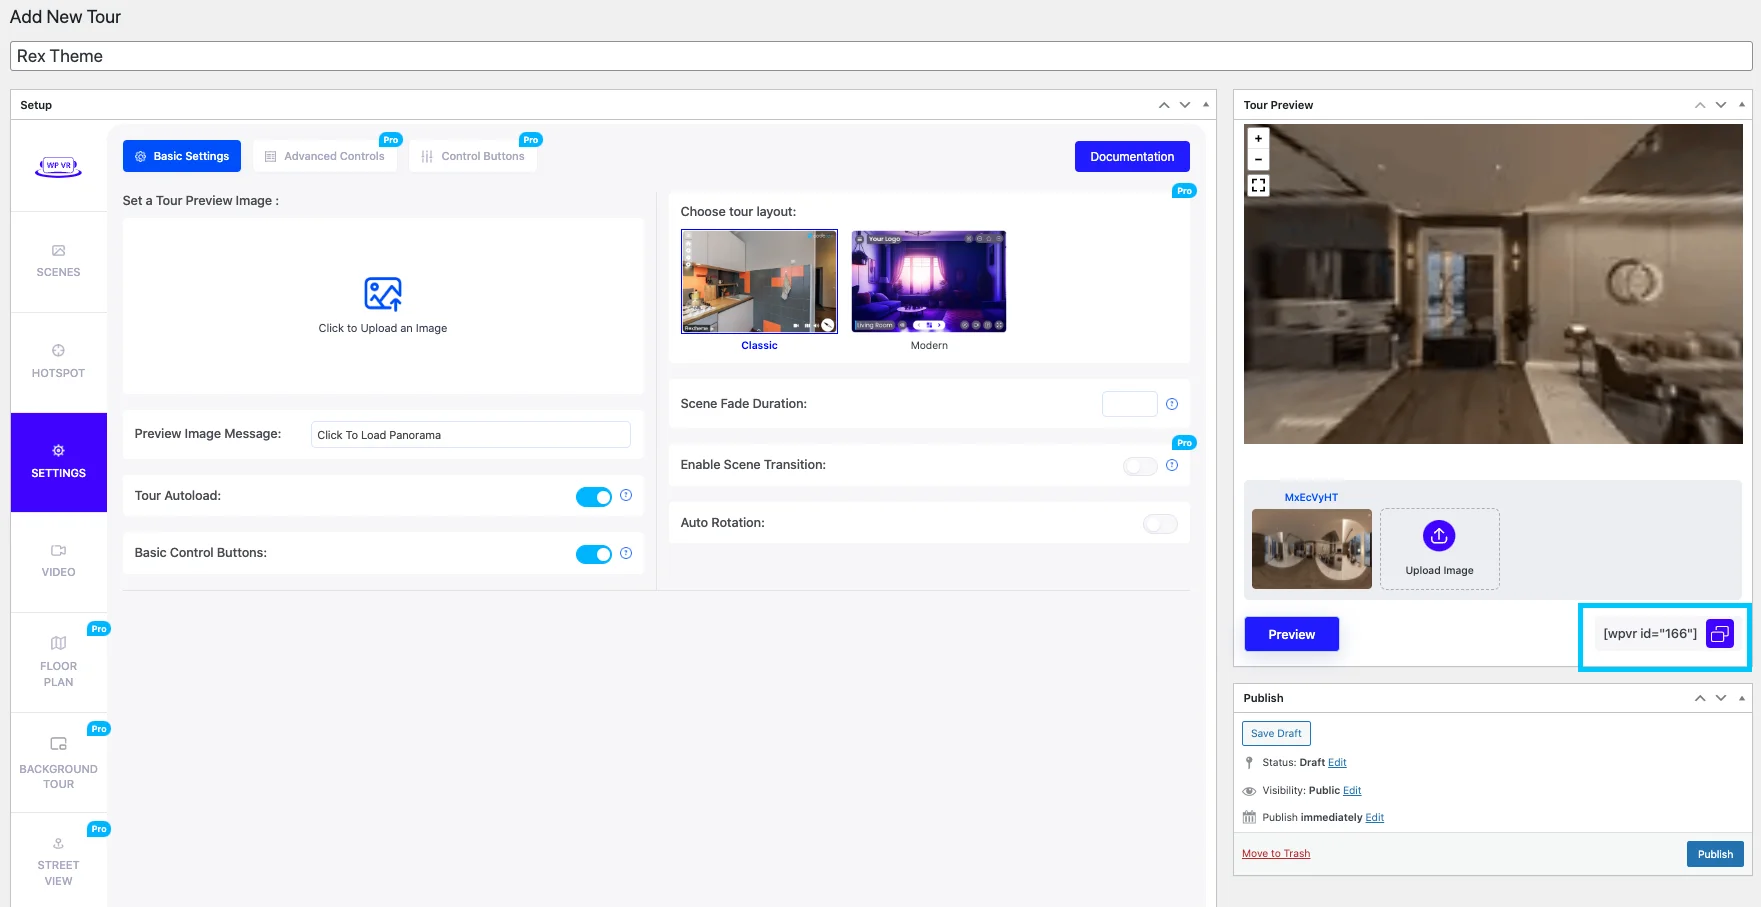
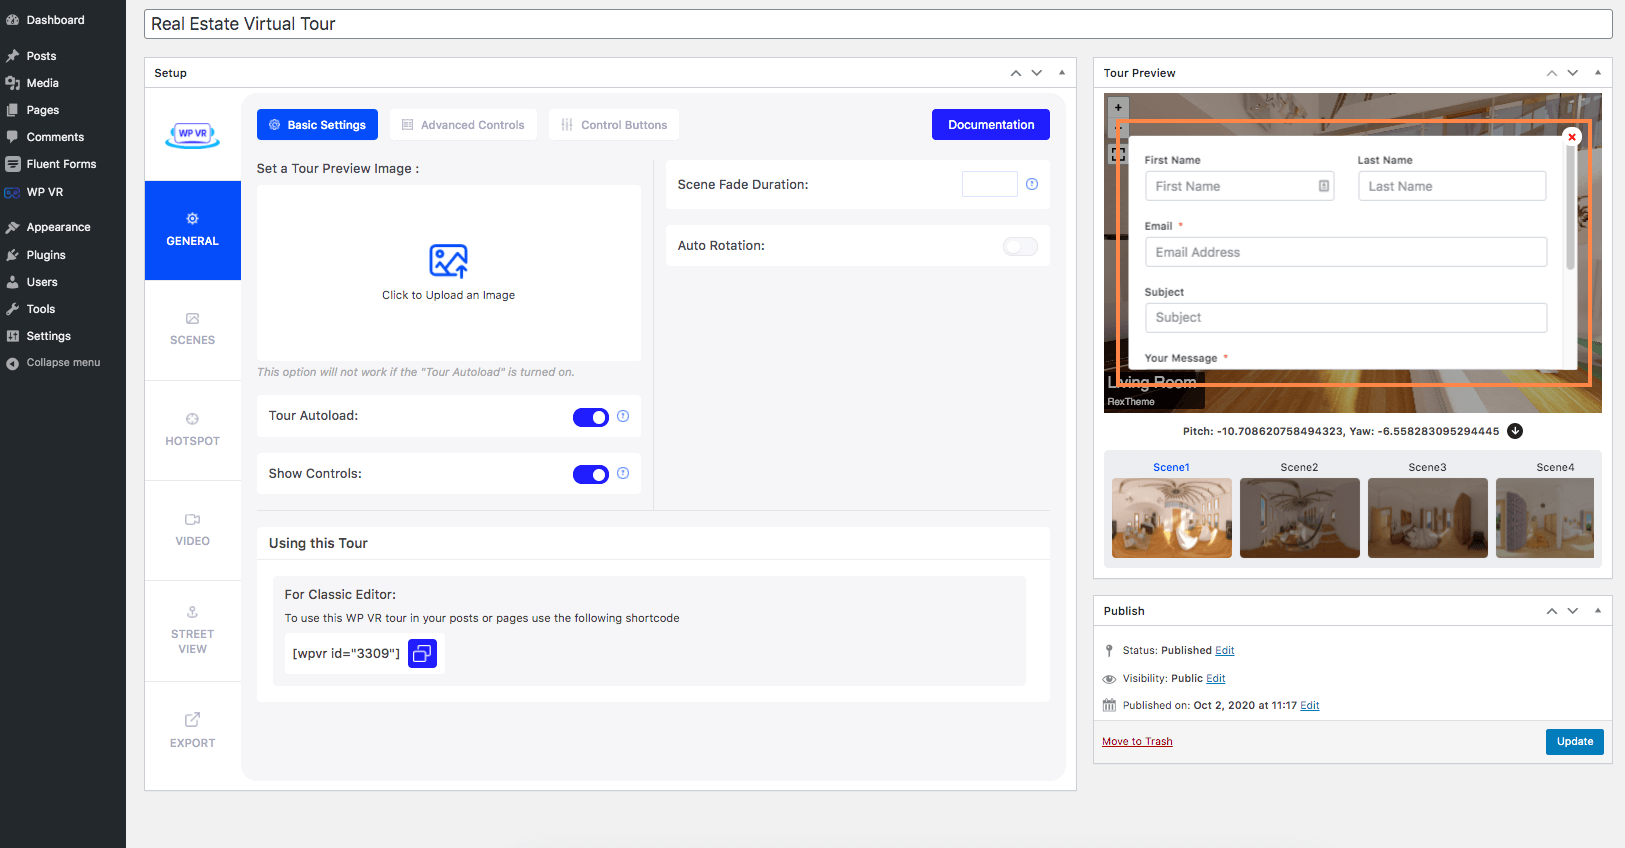
Go to the General > Basic Settings tab and you will see the following options:

Setting option of WP VR

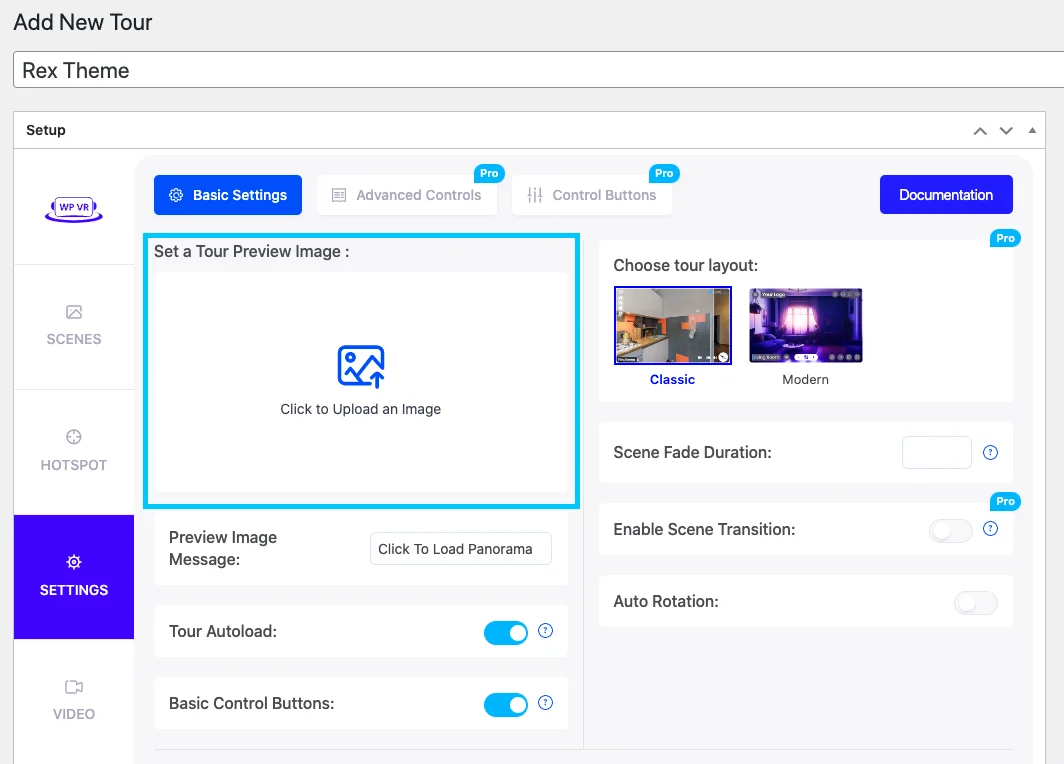
Set A Tour Preview Image:

When you keep Autoload option “Off”, there is a netted placeholder visible. However. you can replace that by uploading a Preview image.

Simply click on the “UPLOAD” button and add a media image. (You should use a flat image for this, rather than a 360 panoramic image)

Or you can provide a link to the image. (Make sure if your site is SSL certified i.e. “https”, then the image link should also have “https”.)

Set a preview image

Once you upload the image, a thumbnail will appear above the upload button.

This means the preview image was uploaded successfully.

Now once you Preview the tour (or view the tour on a live page), if the Autoload option is “Off”, you will see that this image is in place of the tour until you click on it.

And if the Autoload option is “On”, then this image will be there until the tour loads. And if not you need to click on the button preview.

How To Create A Virtual Tour In Easy Steps- A Complete Guide [2025] 1

Now, the tour preview image won’t appear on the tour, if you’ve turned on the Autoload option.

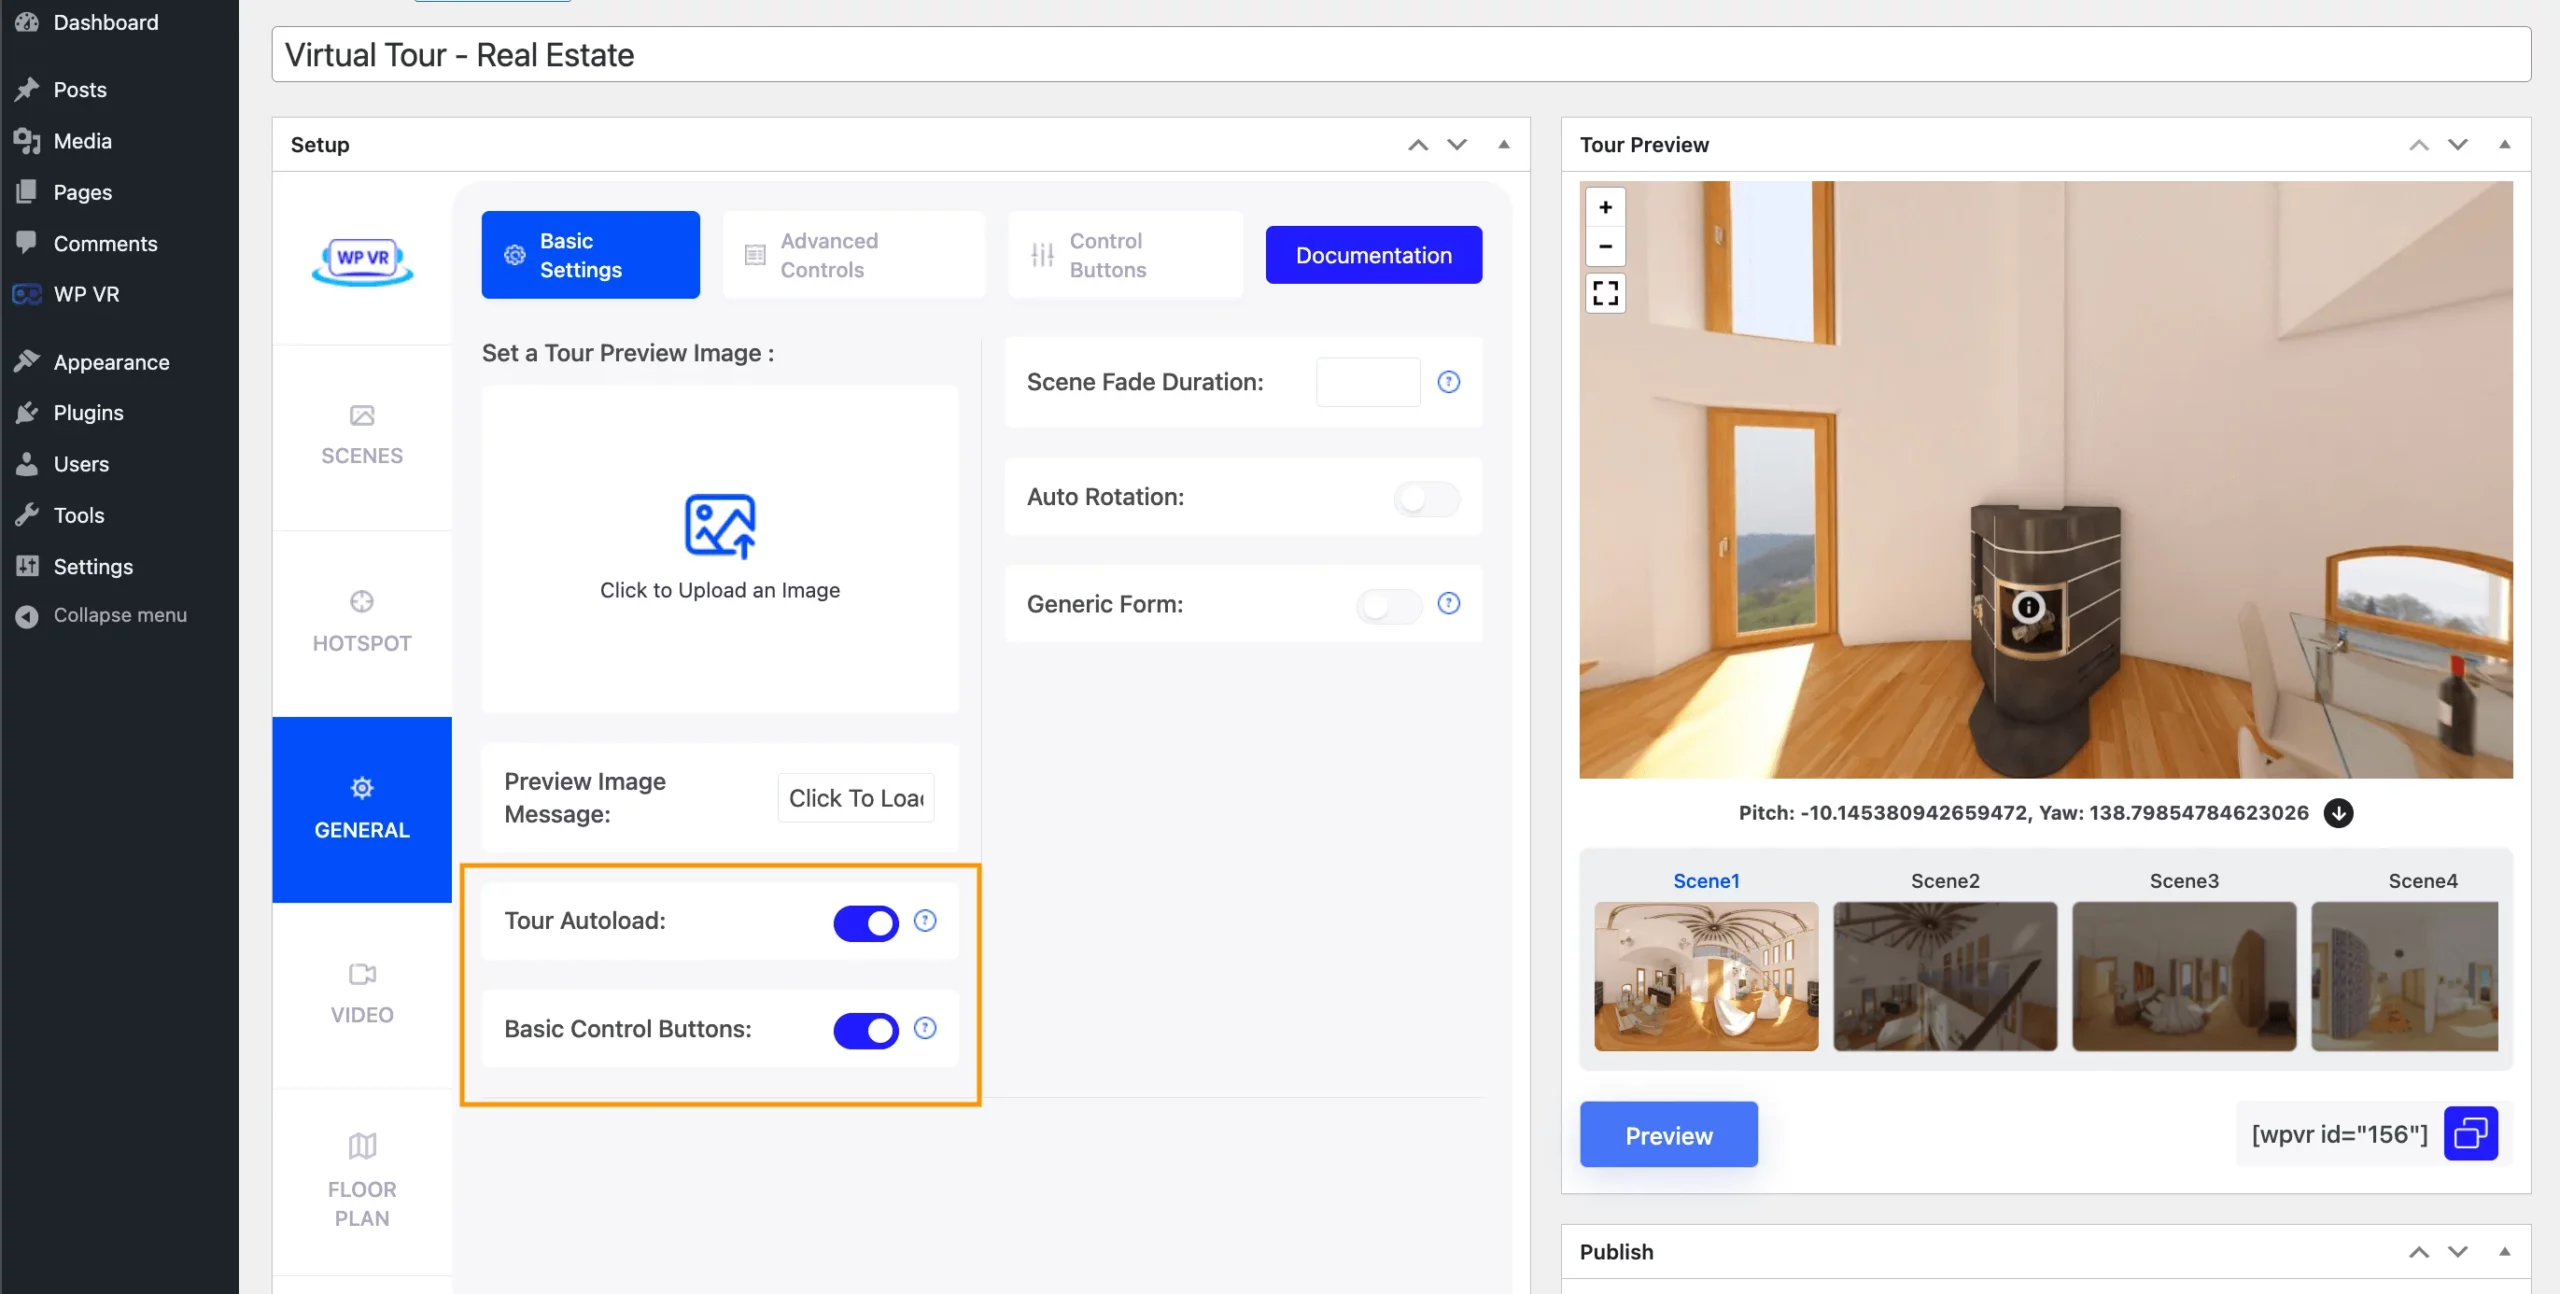
Tour Autoload:

If the autoload is turned on, the panorama you upload will load automatically. Otherwise, it will load on-click on the option “preview

WP VR

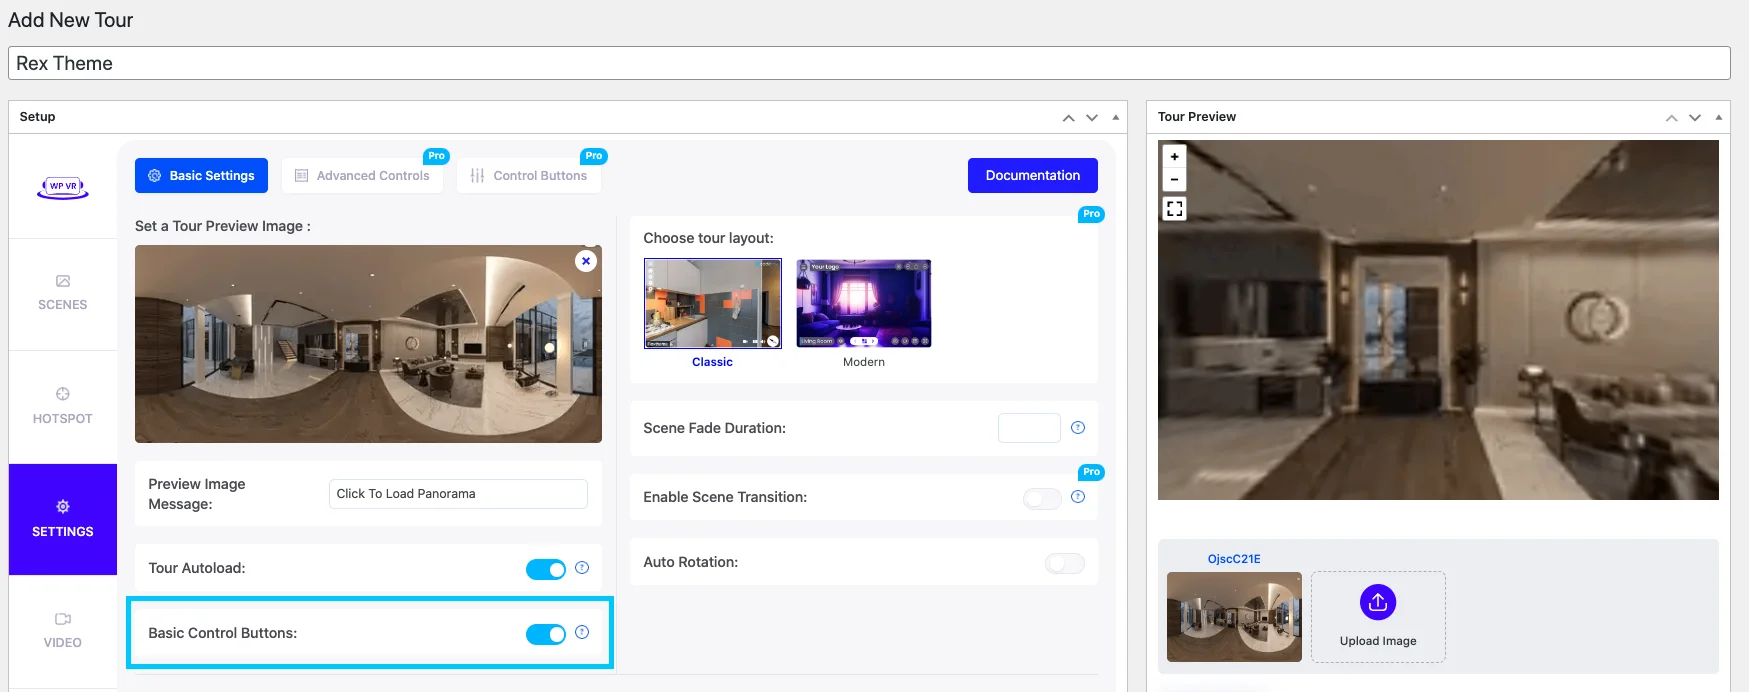
Basic Control Buttons:


Turning it “On” will view the on-screen control button, such as zoom in/out and full-screen mode.

button option

Scene Fade Duration:

The scene fade duration can be added in milliseconds for the transition between two scenes.

Setting option of preview

According to this image, the scene fade duration is set to 1000 milliseconds i.e. 1 second. Hence there will be a 1-second fading effect to transit from one scene to another.

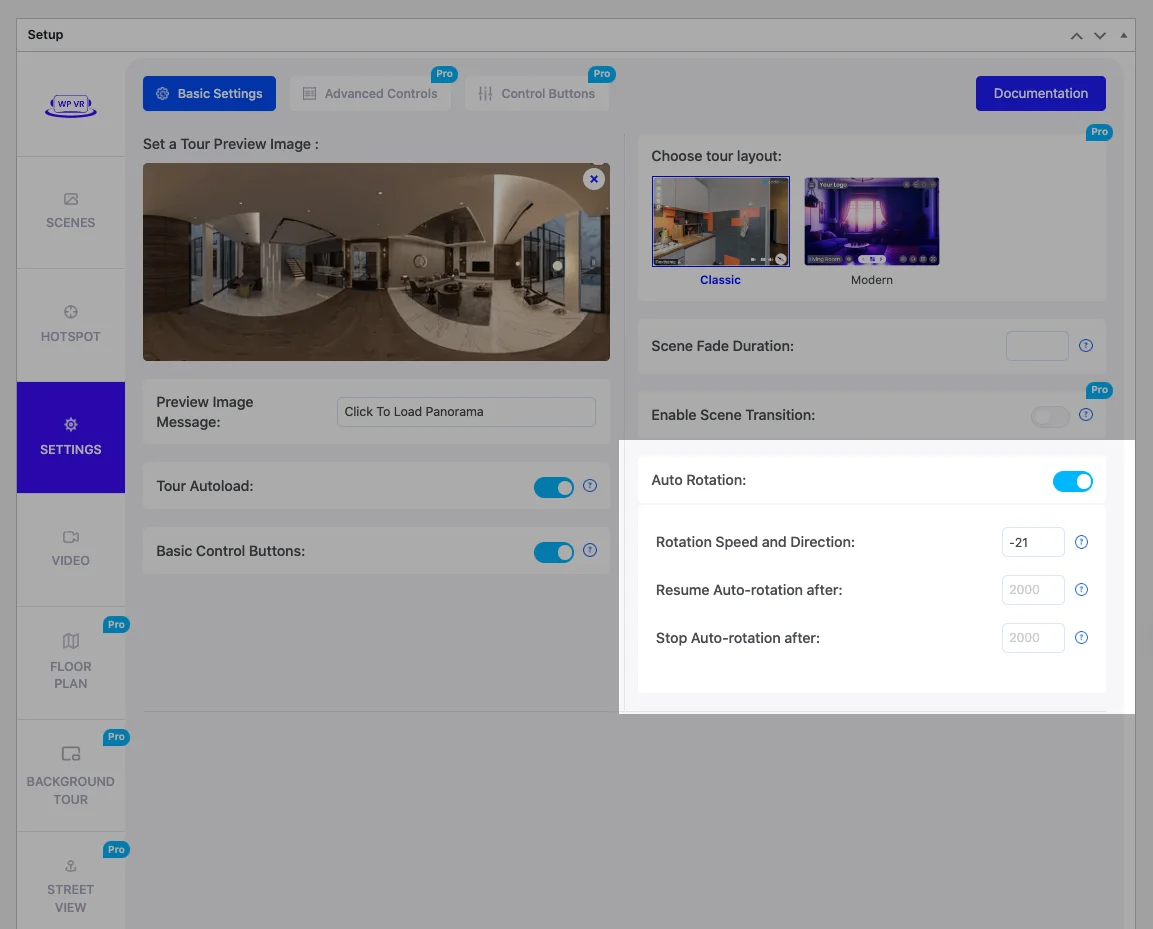
Auto Rotation:

Turning it “On” will show three more fields for you to add an auto-rotation feature to your virtual tour.

auto rotation

  • Rotation Speed and Direction

These are to set the speed of auto rotation on your tour. We suggest you keep this speed within the range of -20 to 20, or else the rotation will probably be too fast.

A negative number will rotate the tour anti-clockwise and a positive number will make it rotate clockwise.

  • Resume Auto Rotation After

This lets you set a time, in milliseconds, so that if you stop the rotation, then after this amount of time, it will start rotating again.

According to the image above, it is set to 2000 milliseconds, i.e., 2 seconds.

  • Stop Auto Rotation After

This lets you set a time after which the tour will stop auto-rotating.

However, this will not work if you input the value on Auto Rotation Inactive Delay. According to the image above, it is set to 2000 milliseconds, i.e., 2 seconds.

These are all the options in the General settings. Configure the settings as you require

Step 4 – Set Up Scenes

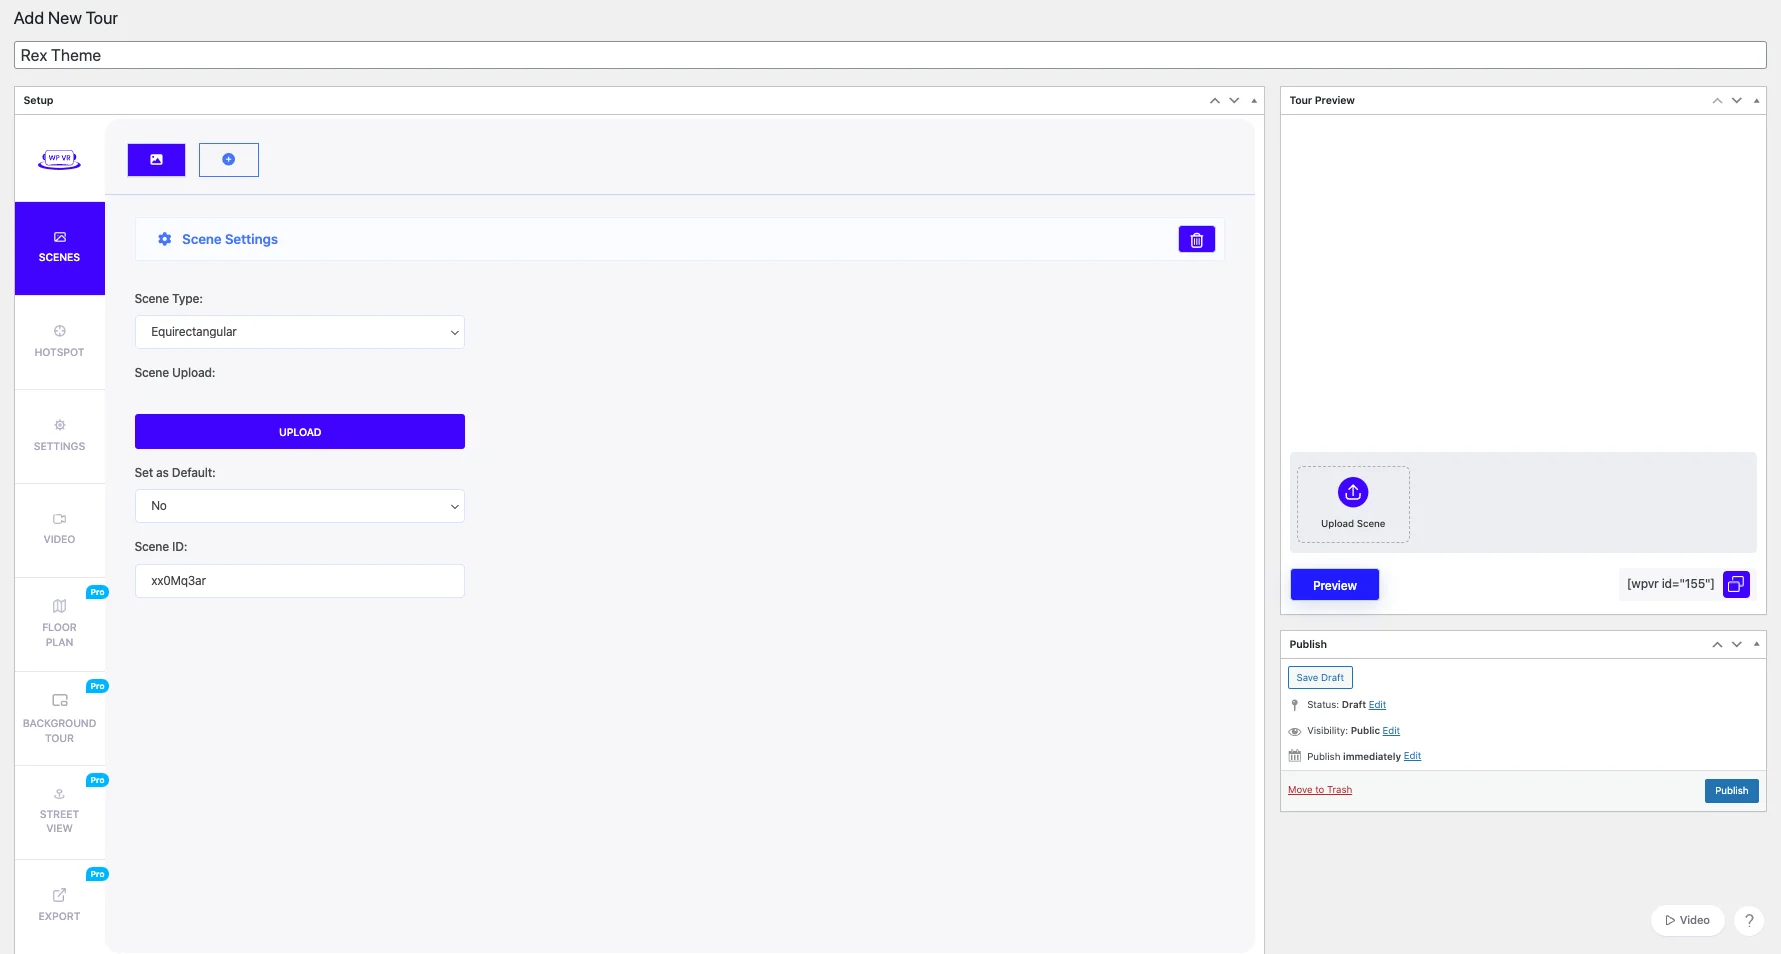
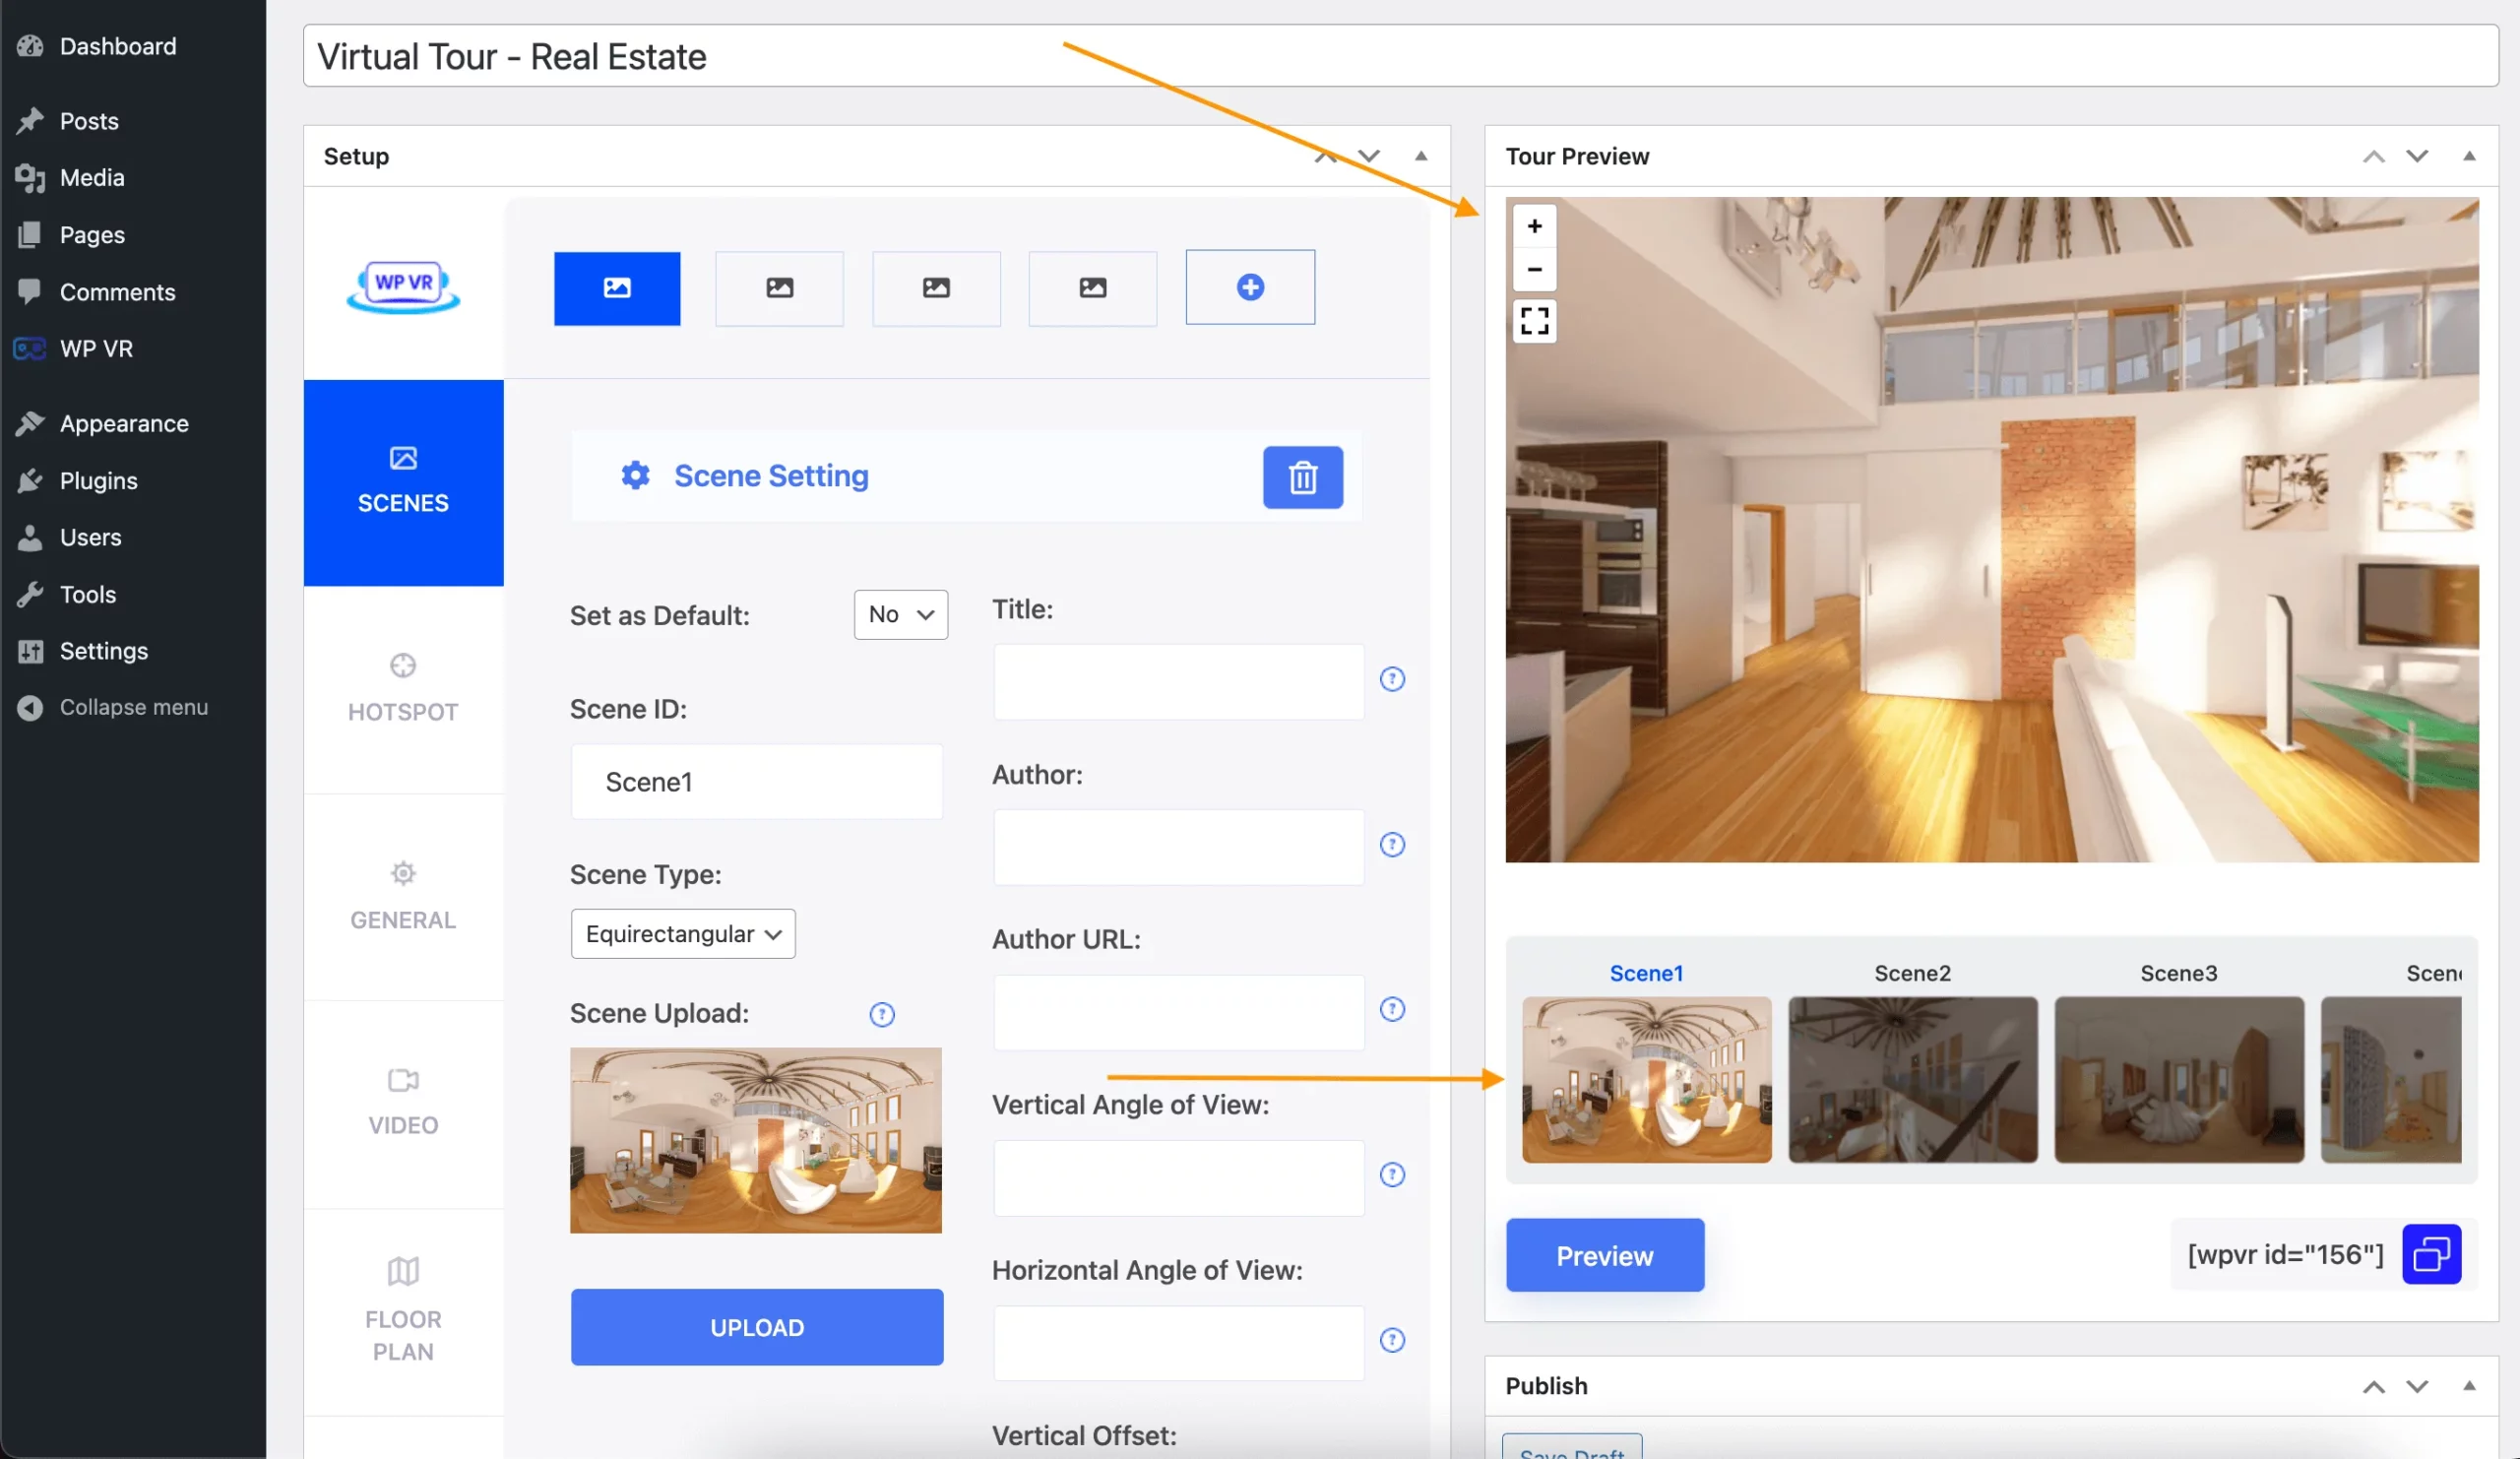
Basically, every single panorama you want to include in your Virtual tour is a scene. Go to the Scenes tab and you get the following options:
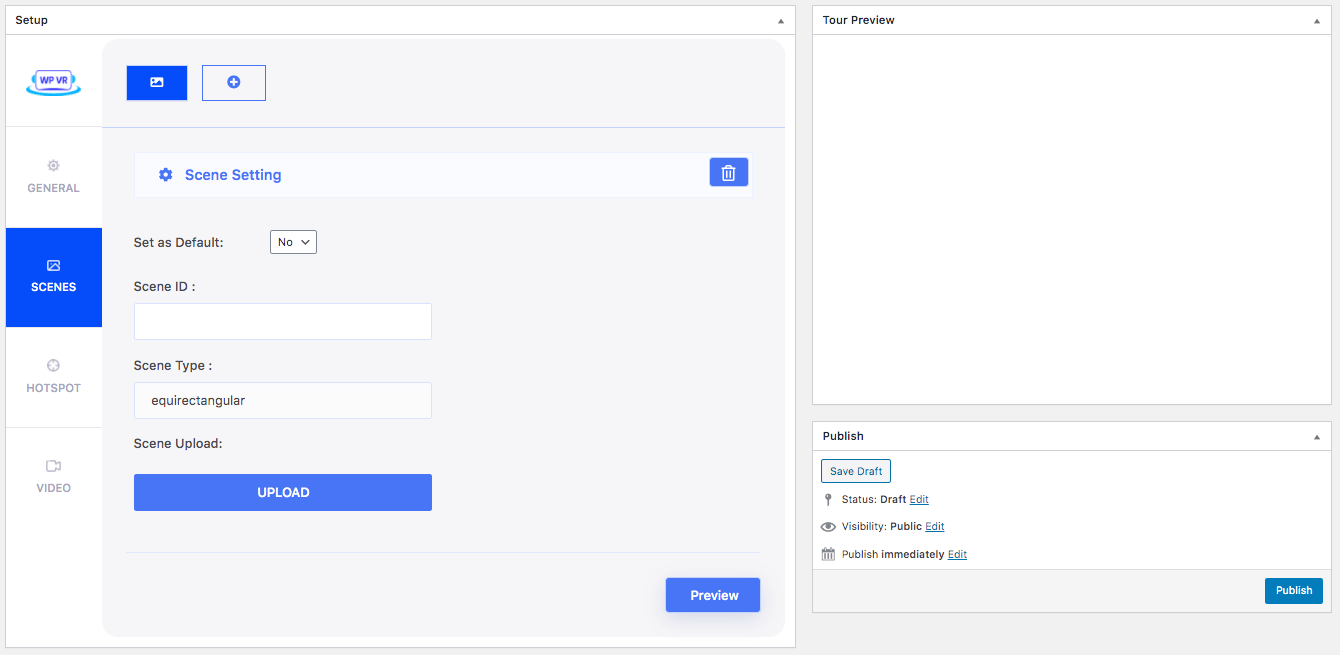
Scenes Section

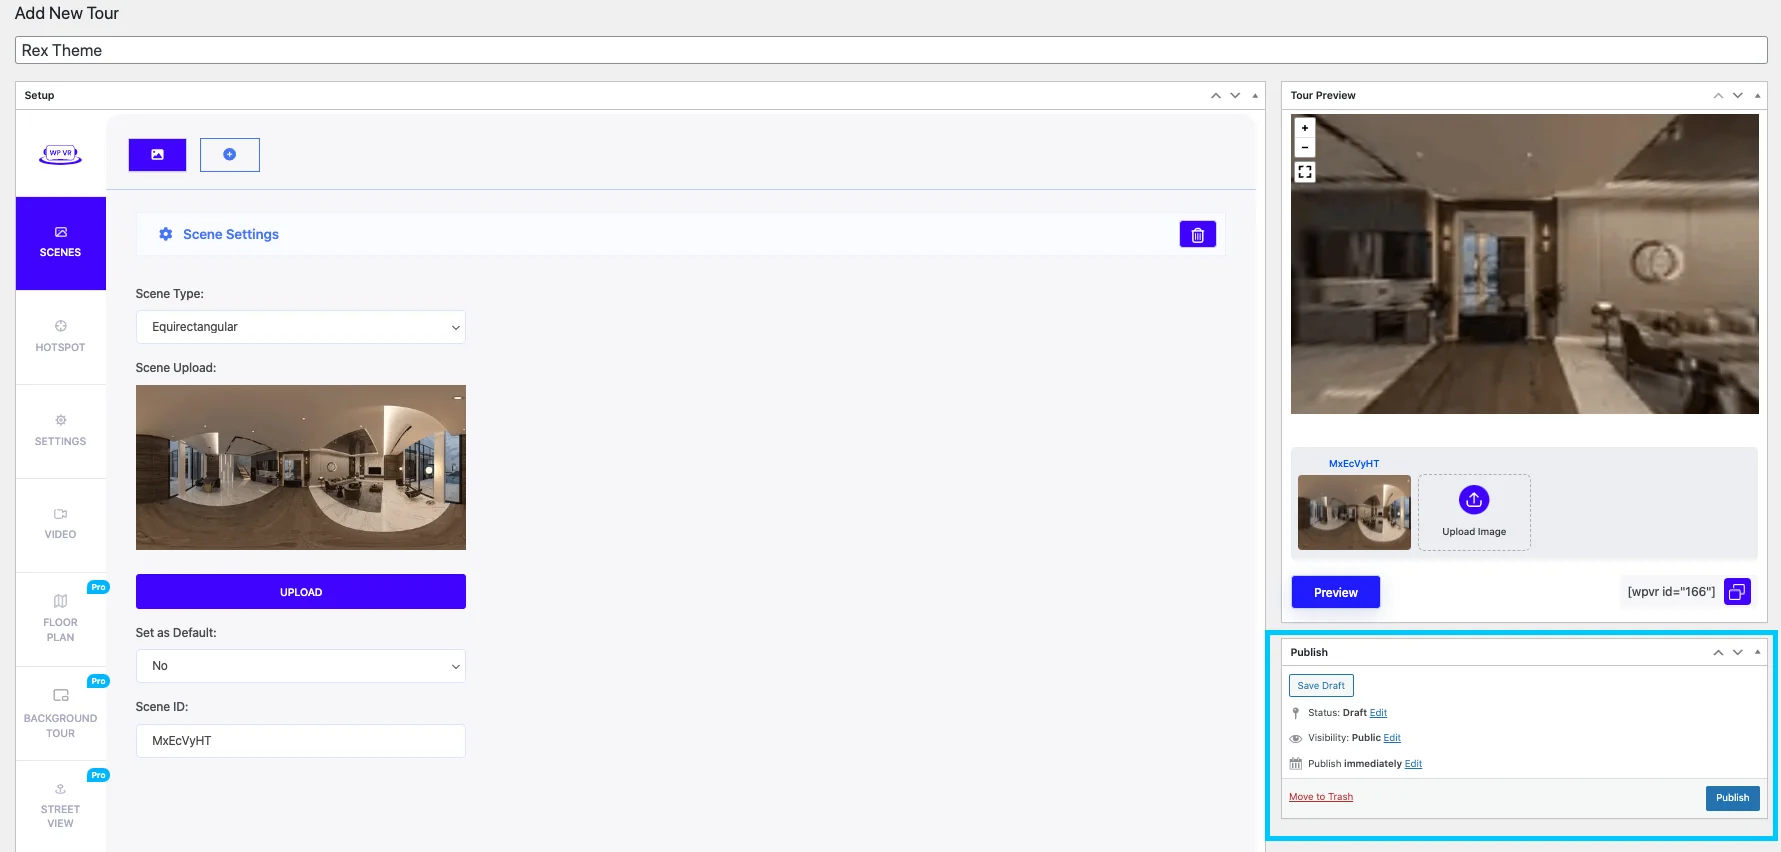
Set as default:


If you select “Yes” then the current scene will be the default scene to be viewed at first when the virtual tour is loaded. (FYI: The first scene is considered the default scene naturally.

If you want another scene to be the default scene, then mark that scene as “Yes” for Set as default.

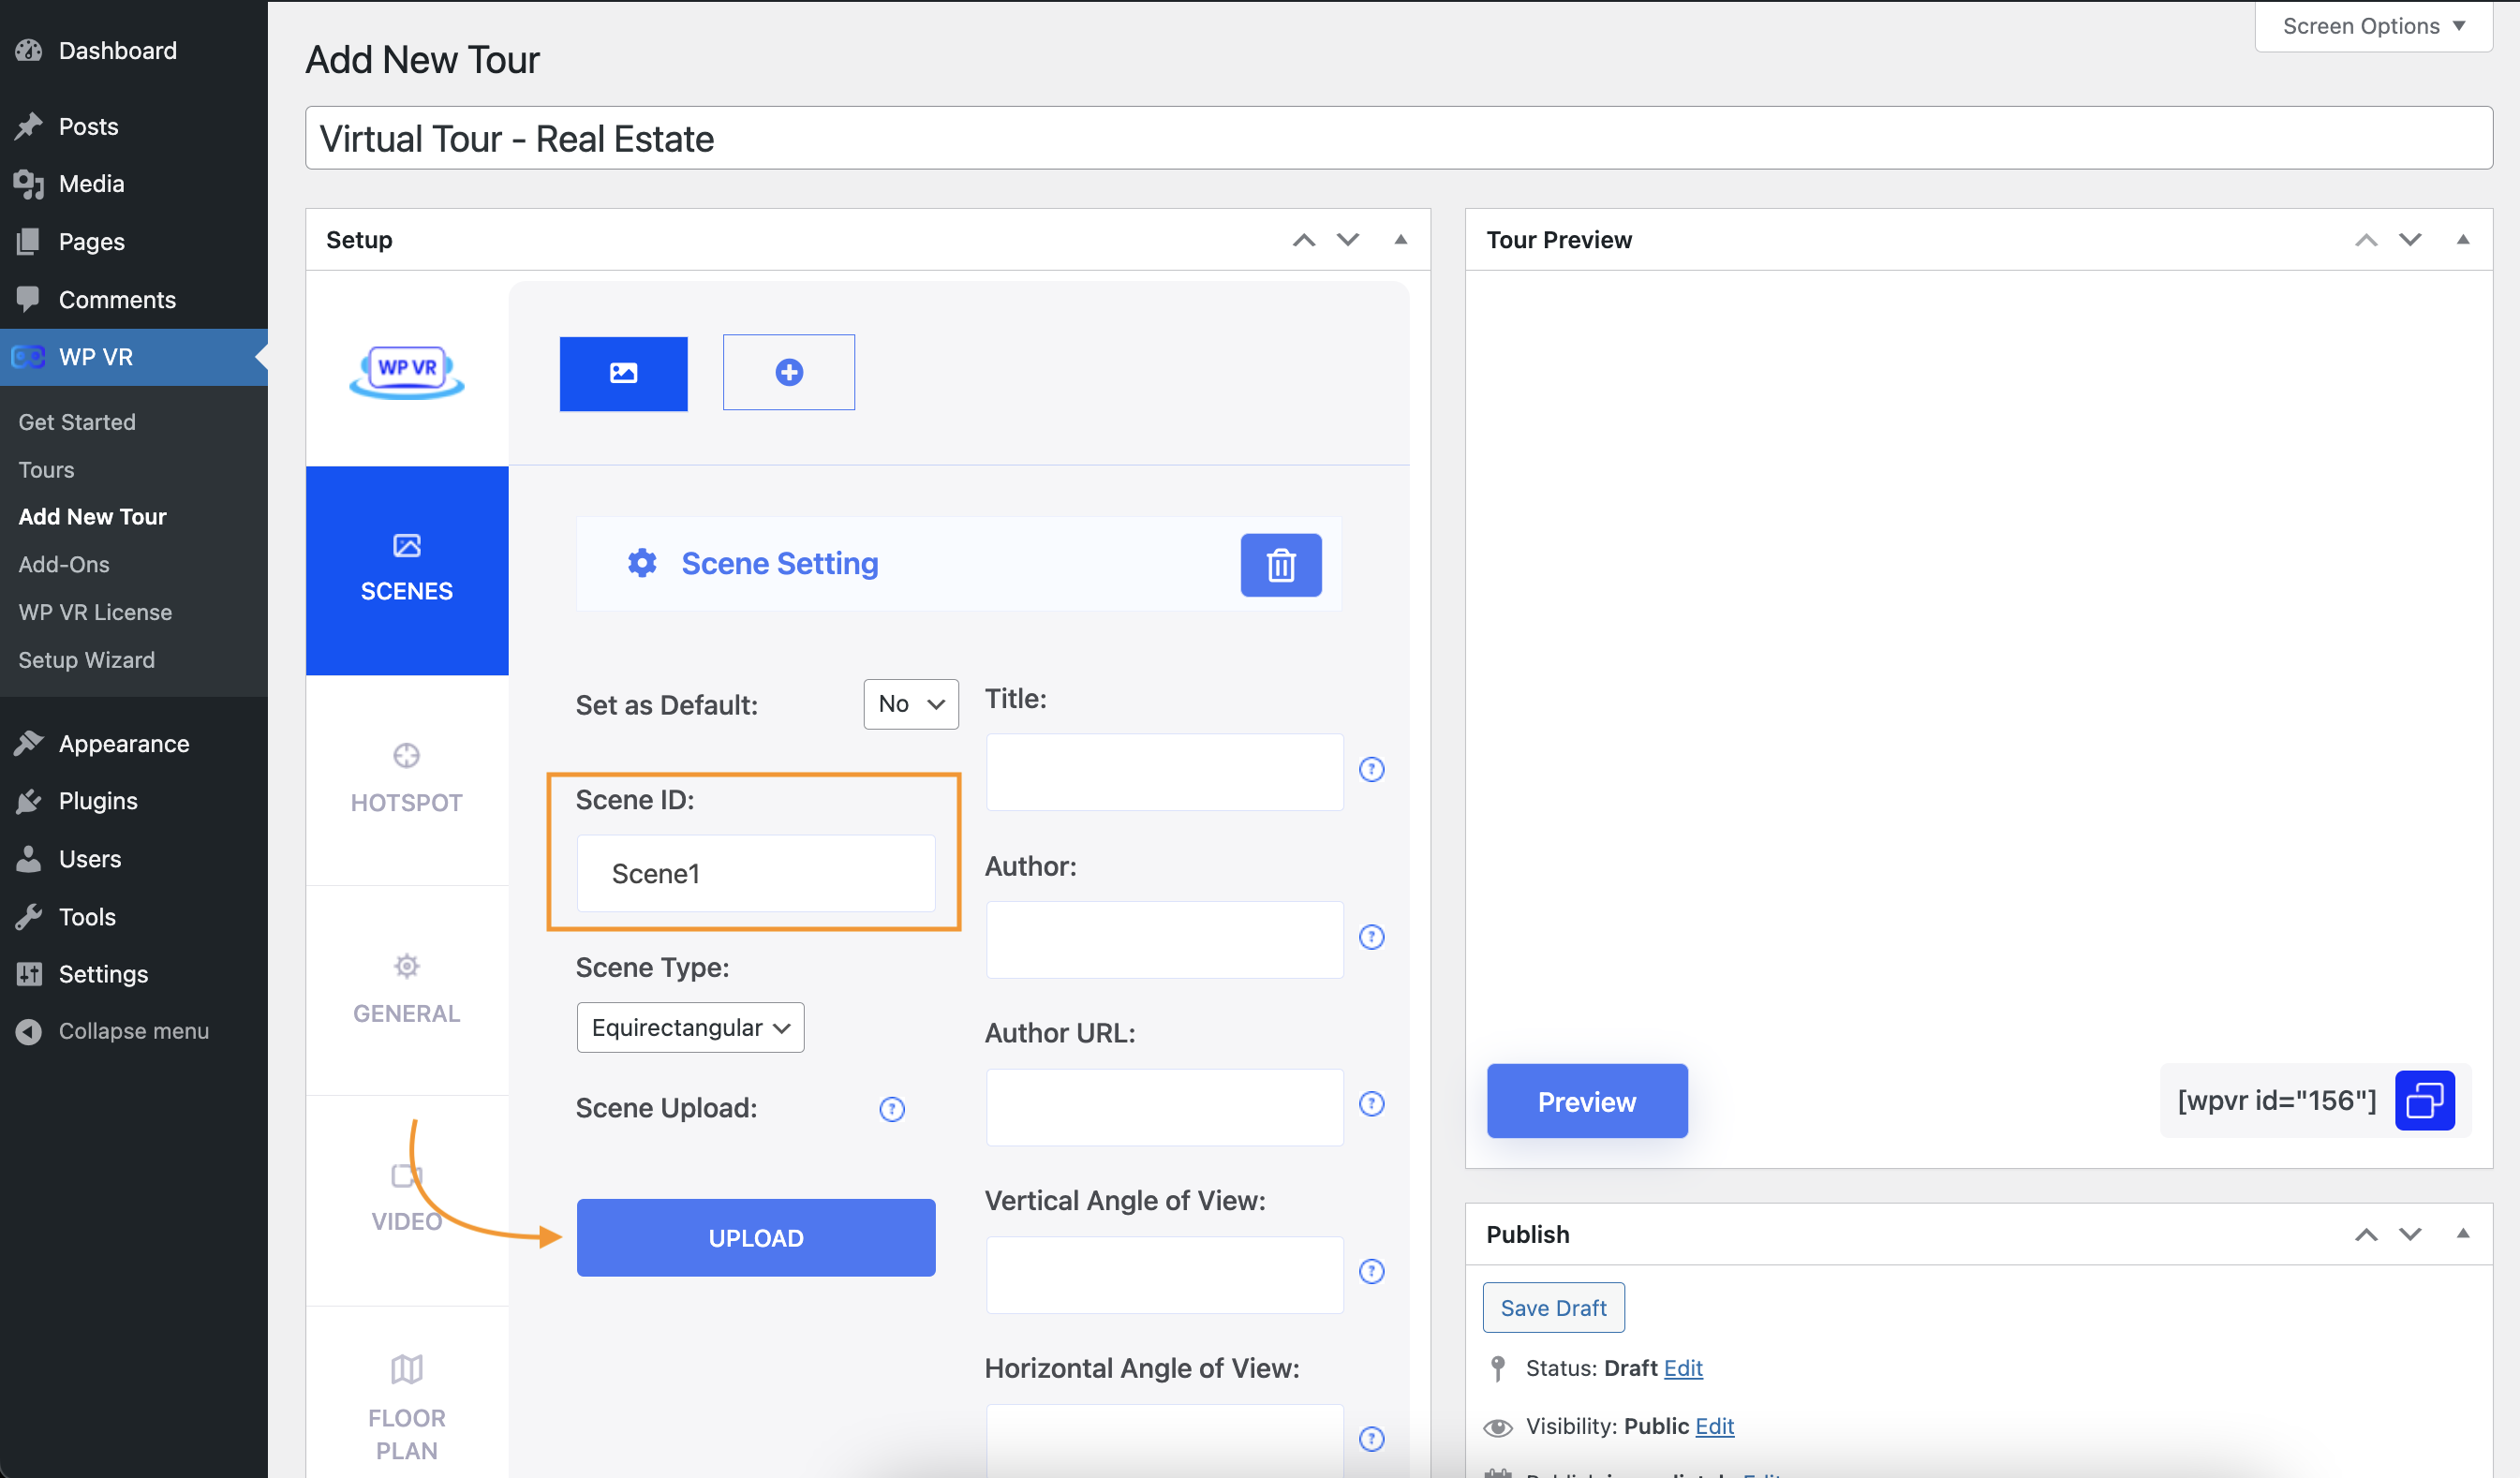
Scene ID:

Scene ID is the initialization of a scene. You need to assign a unique scene ID to every scene you wish to upload.
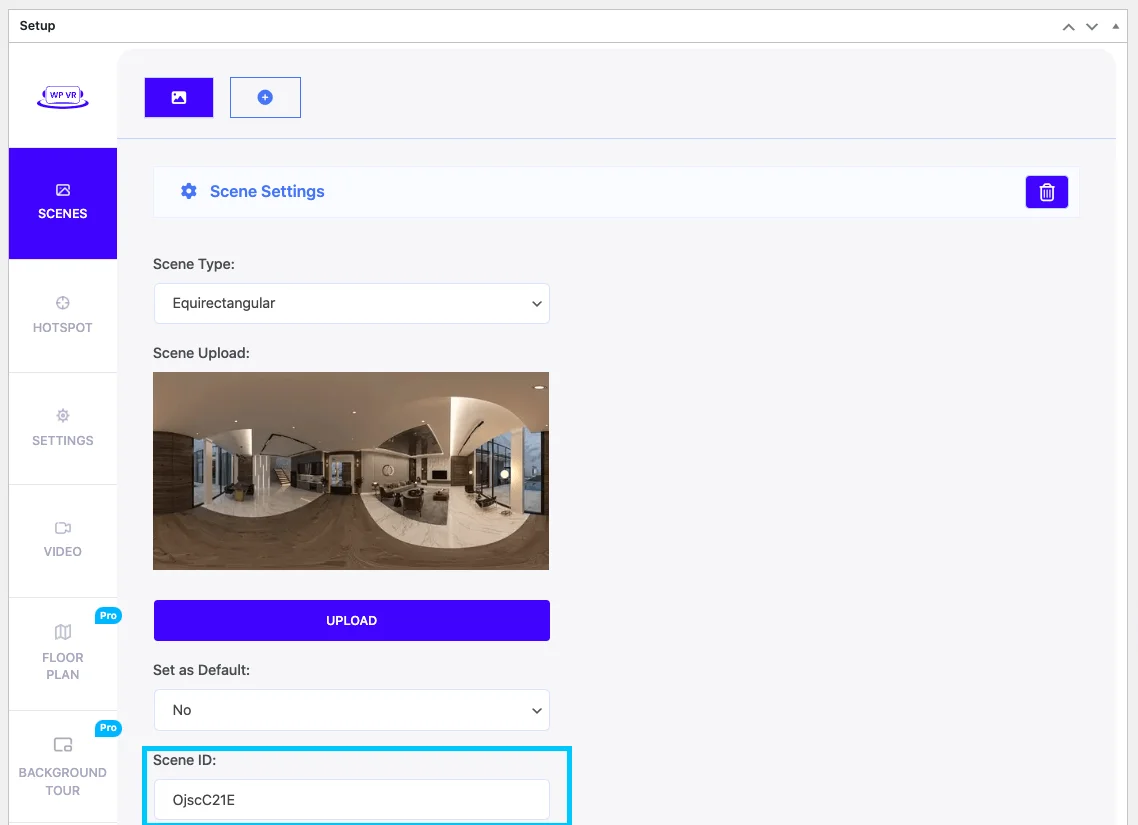
scene id

You can later use this Scene ID to assign a scene as the Target Scene under Hotspot, i.e. clicking on the hotspot will take you to this scene. You will get a guide to this under the “HotSpot” section. 

Scene Type:

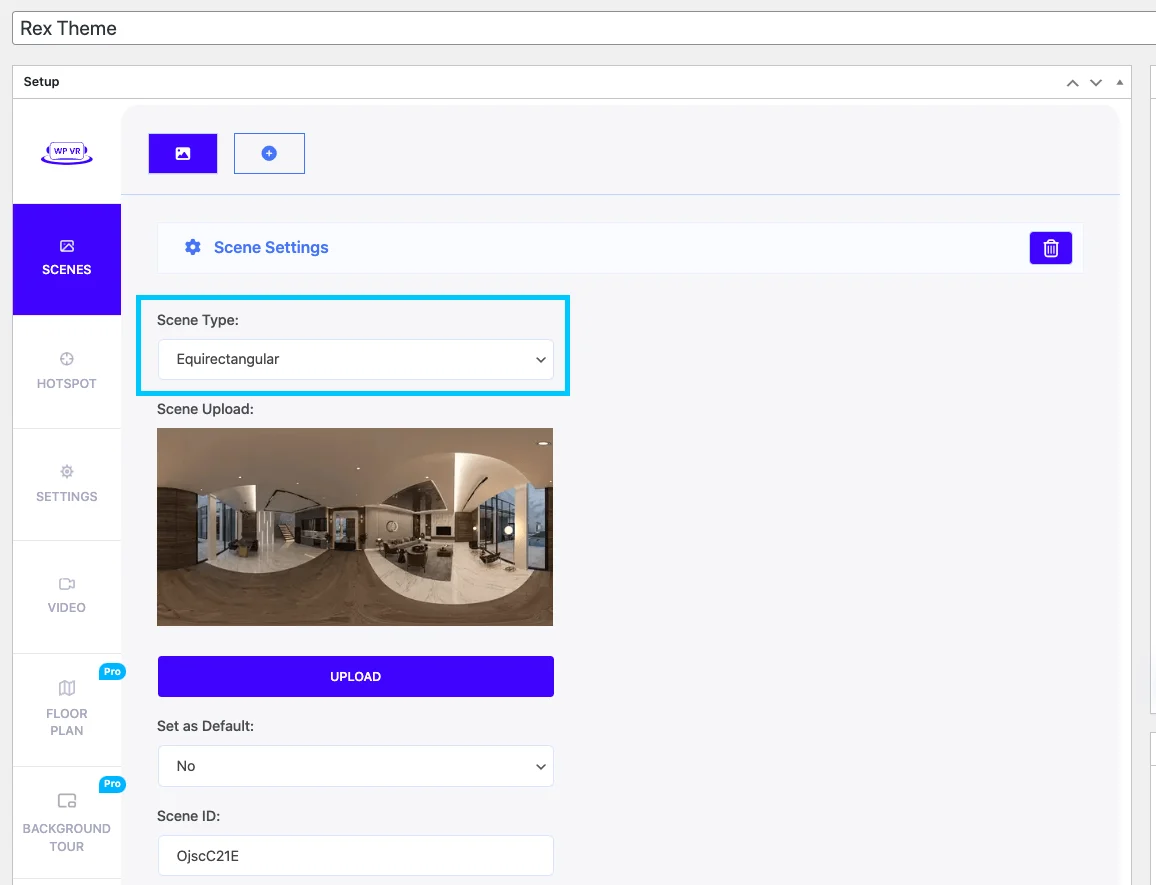
The scene type is set as ‘equirectangular’ by default. It means that it will view the Equirectangular format of the scene.

scene type

Scene Upload:

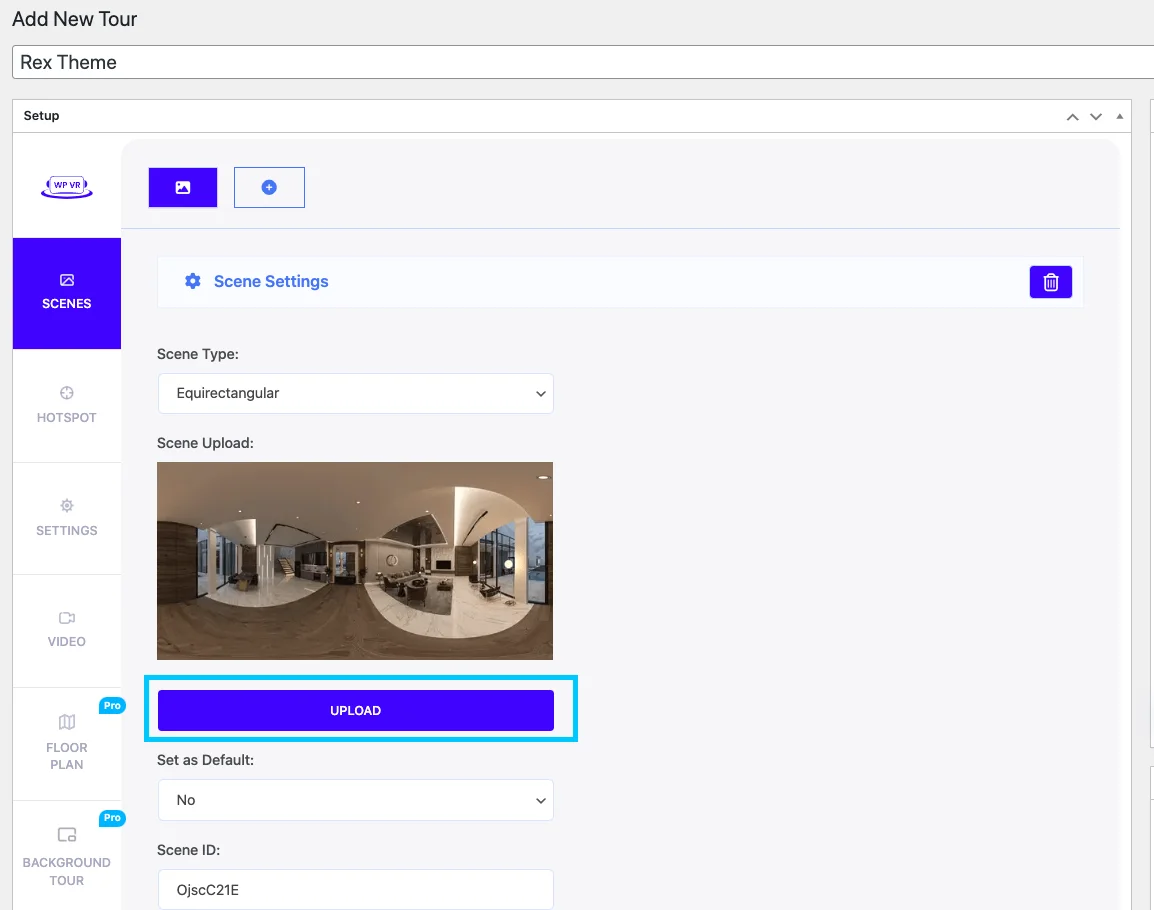
Here, click on the “UPLOAD” button and upload a 360-degree panoramic image to use it as your current scene.

Once you upload the image, a thumbnail will appear above the upload button.

Upload option

This will mean that the image is uploaded as the current scene image.

FYI: Most mobile devices have restrictions on the resolution; they can support a maximum of 4096 px by 2048 px.

Hence, we suggest you use a panoramic image within these dimensions for the virtual tour to be responsive on all devices. (However, the plugin works with any resolution. You can upload high resolution images if you just want to view the tour on PC).

Preview:

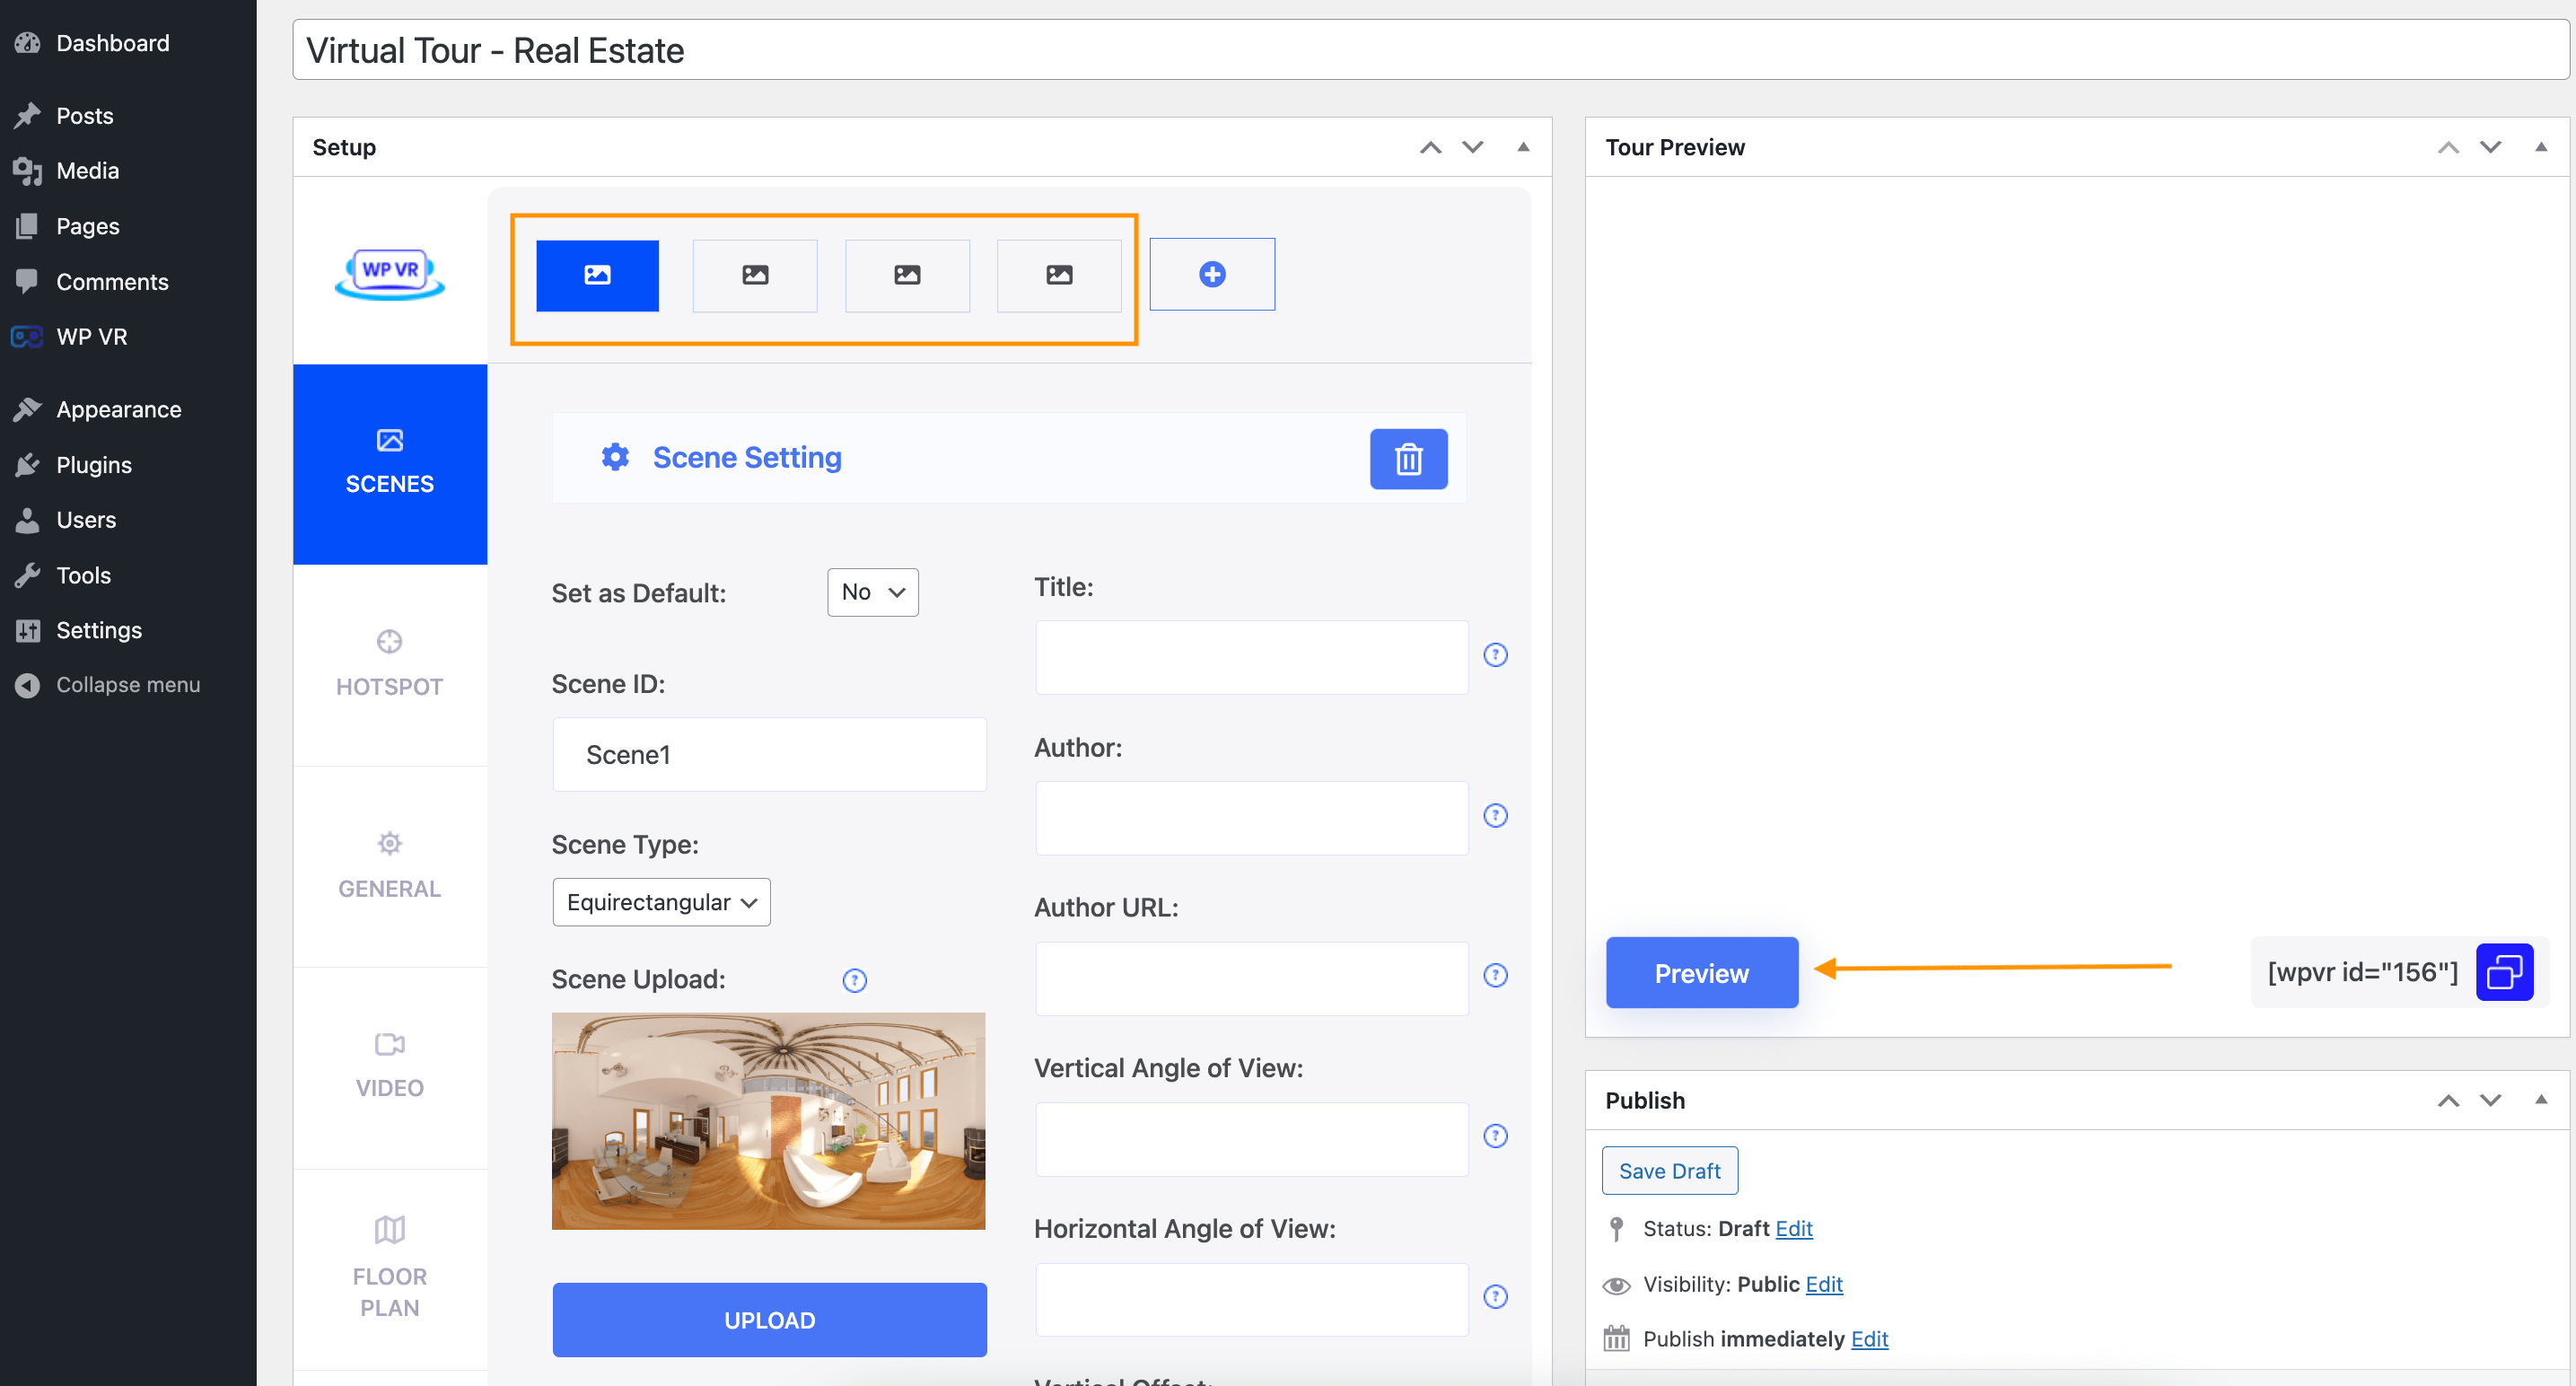
Once you have uploaded the image, you can now click on the Preview button.
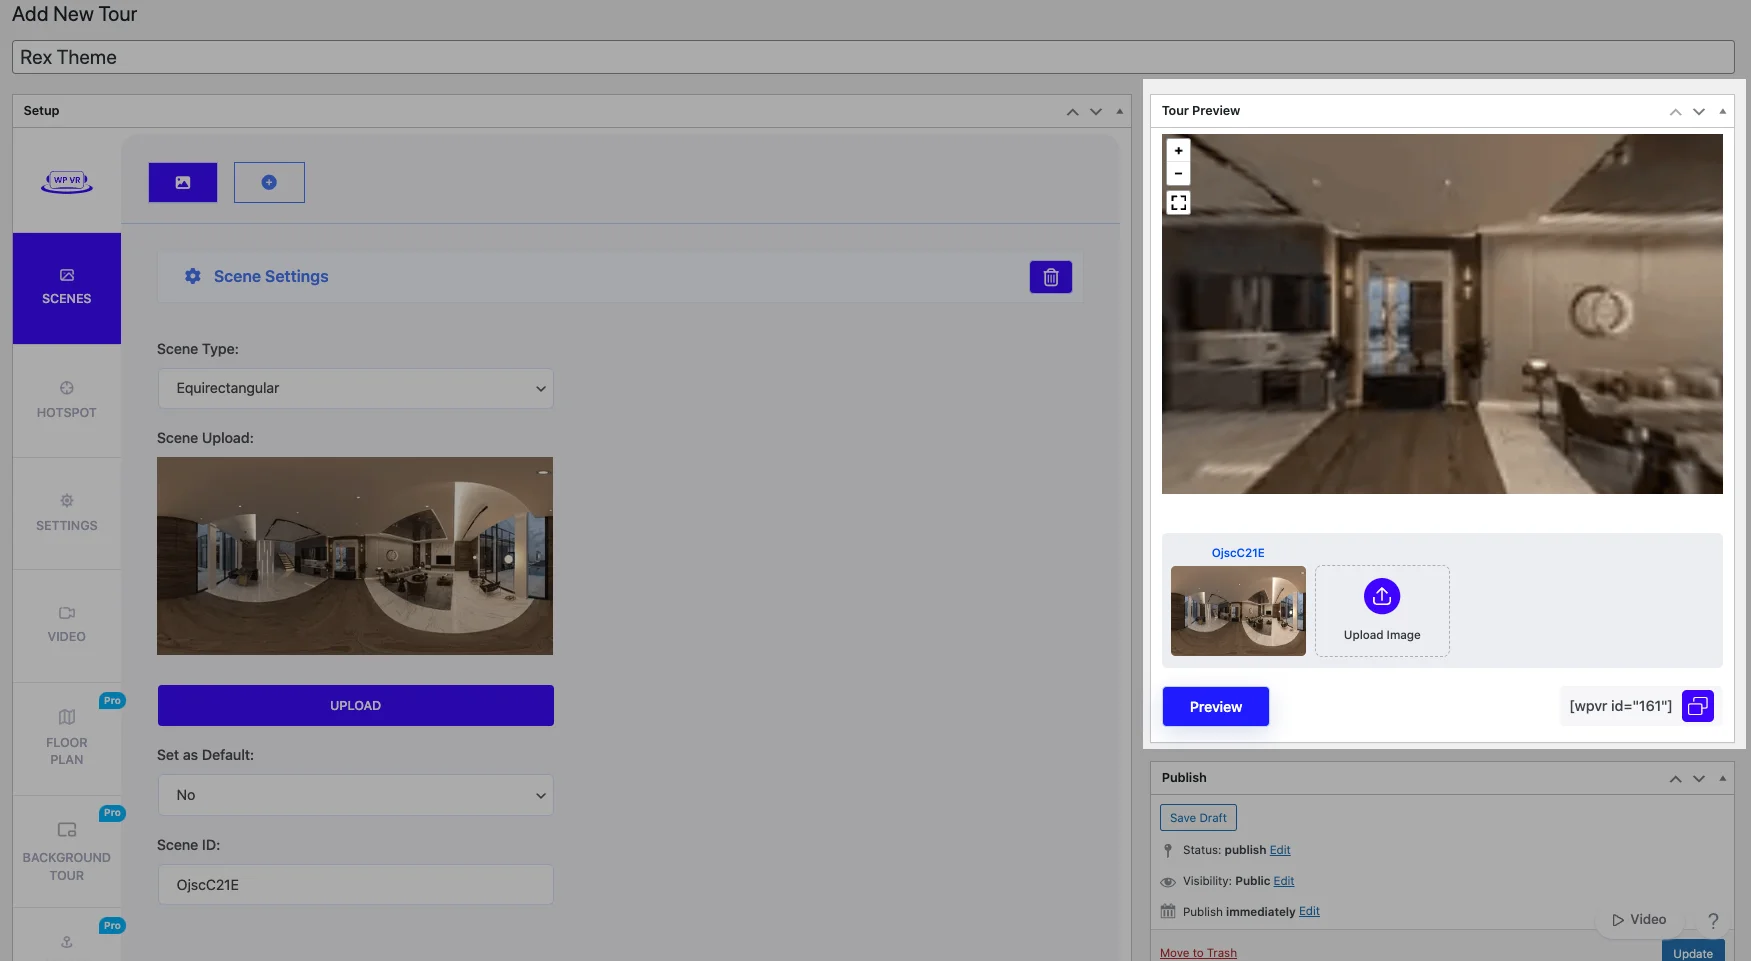
Scene preview option

You will get a Tour Preview of the tour just beside the Scene Settings.

Every time you make changes to any settings, you can click on the Preview button to see the changes taking effect on the tour preview.

**The Tour Preview has a scene gallery below. You can double-click on a thumbnail there to go to any scene in the tour preview.

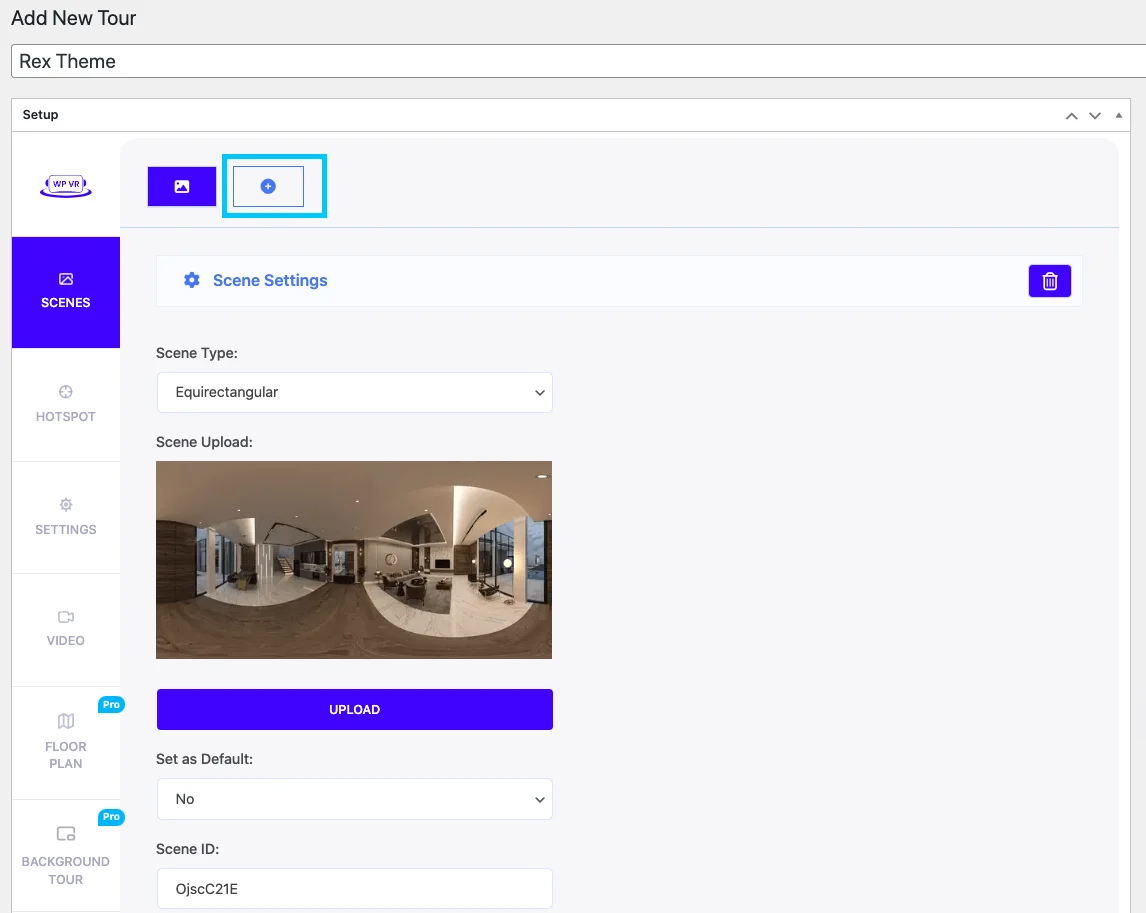
To add a second scene, on top, click on the “+” button.

Add scene

And a new blank scene will be added.

To switch between scenes, click on the icons above. The currently viewed scene will be marked blue.

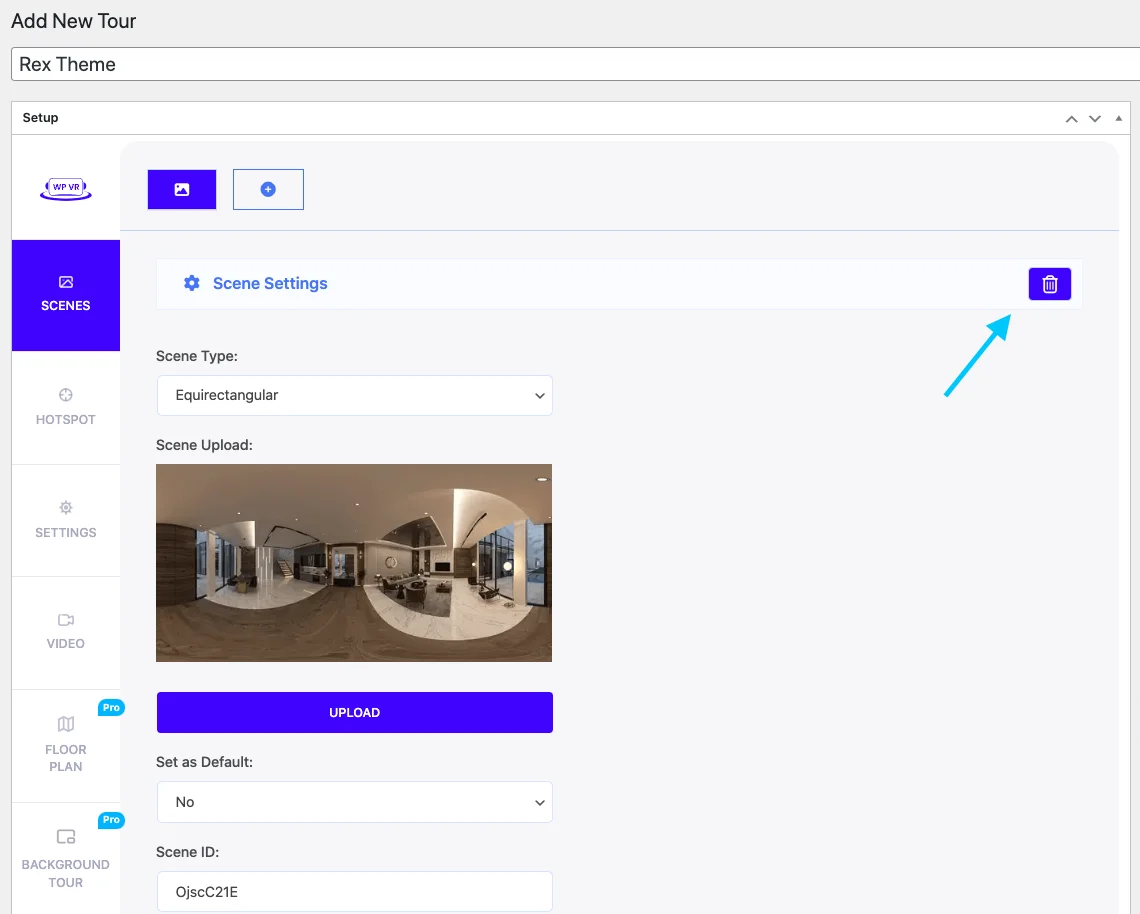
To delete a scene, you can simply go to the scene, then click on the “Trash Bin” icon and the scene will be deleted.

delete button in scene option

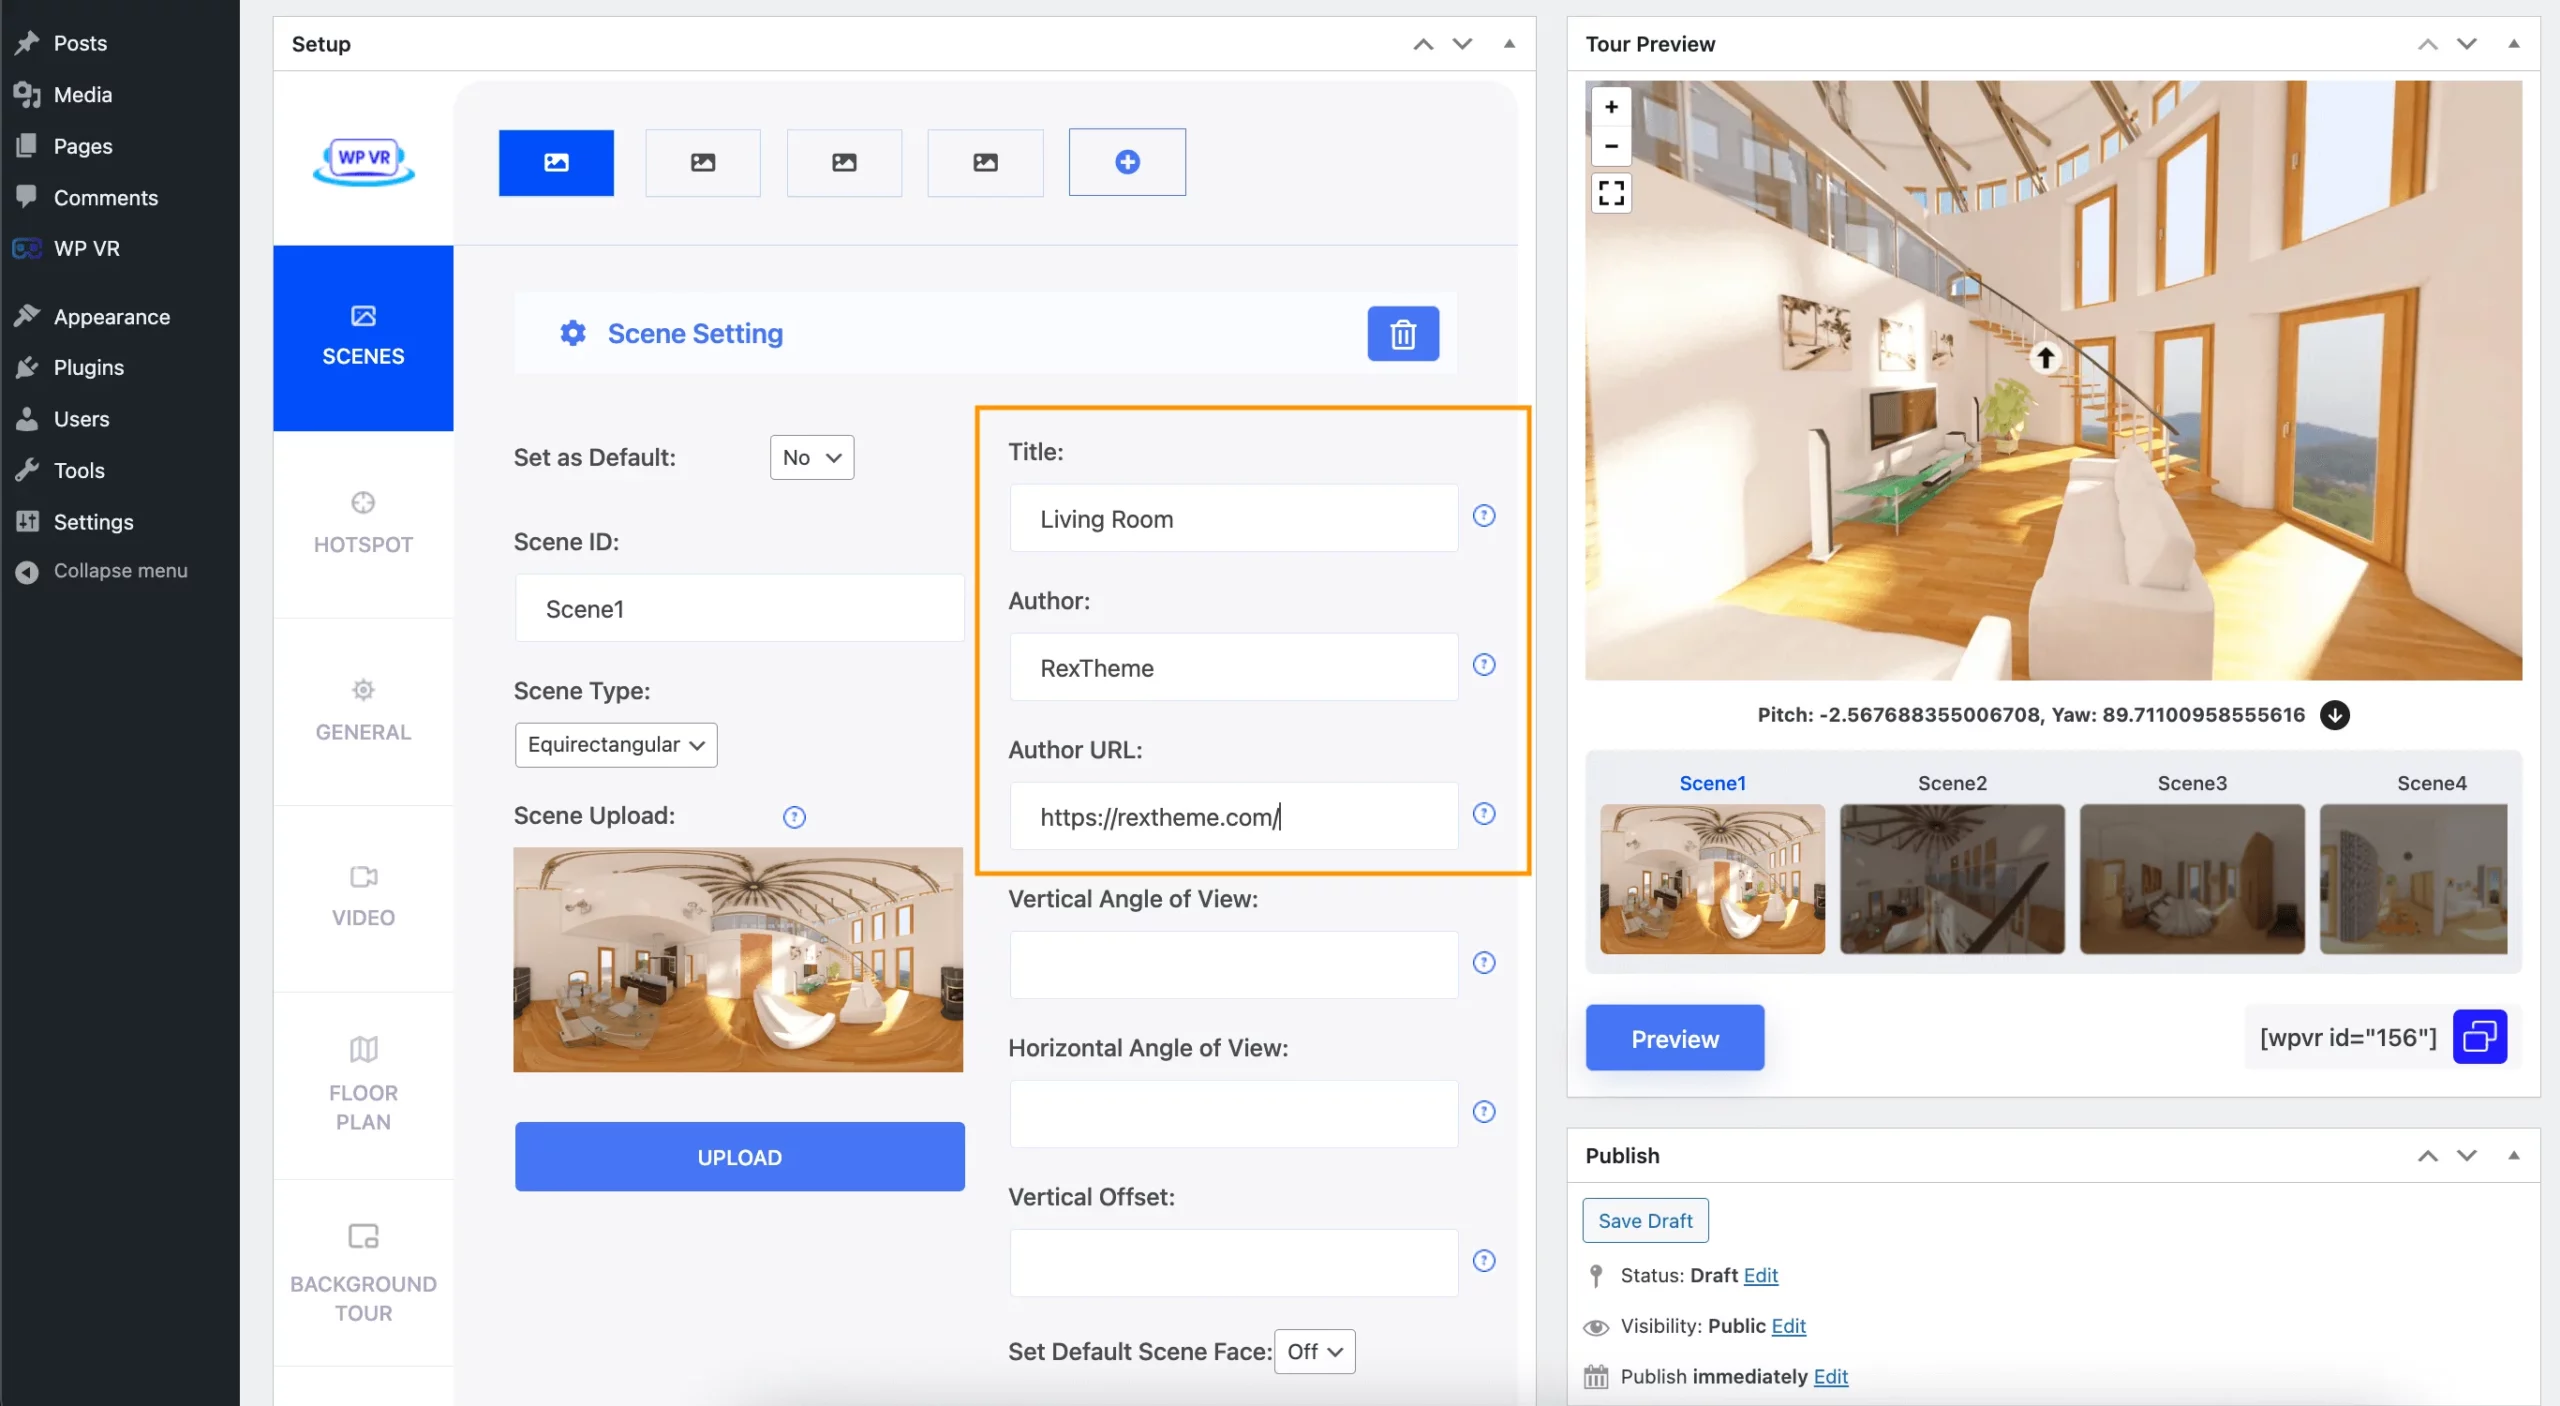
Here are more fields that you get :

  • Title: Specifies the name or title of the panoramic scene.
  • Author: Identifies the creator or photographer of the panoramic image.
  • Author URL: Provides a link to the author’s website or portfolio.
  • Vertical Angle of View: Determines the vertical field of view for the panoramic scene.
  • Horizontal Angle of View: Sets the horizontal field of view for the panoramic scene.

Set accordingly the field as per your needs.

That’s it with the basics of Scene Settings.

Now, add Hotspots to make the tour more meaningful and engaging.

Step 5 – Use Hotspot Efficiently 

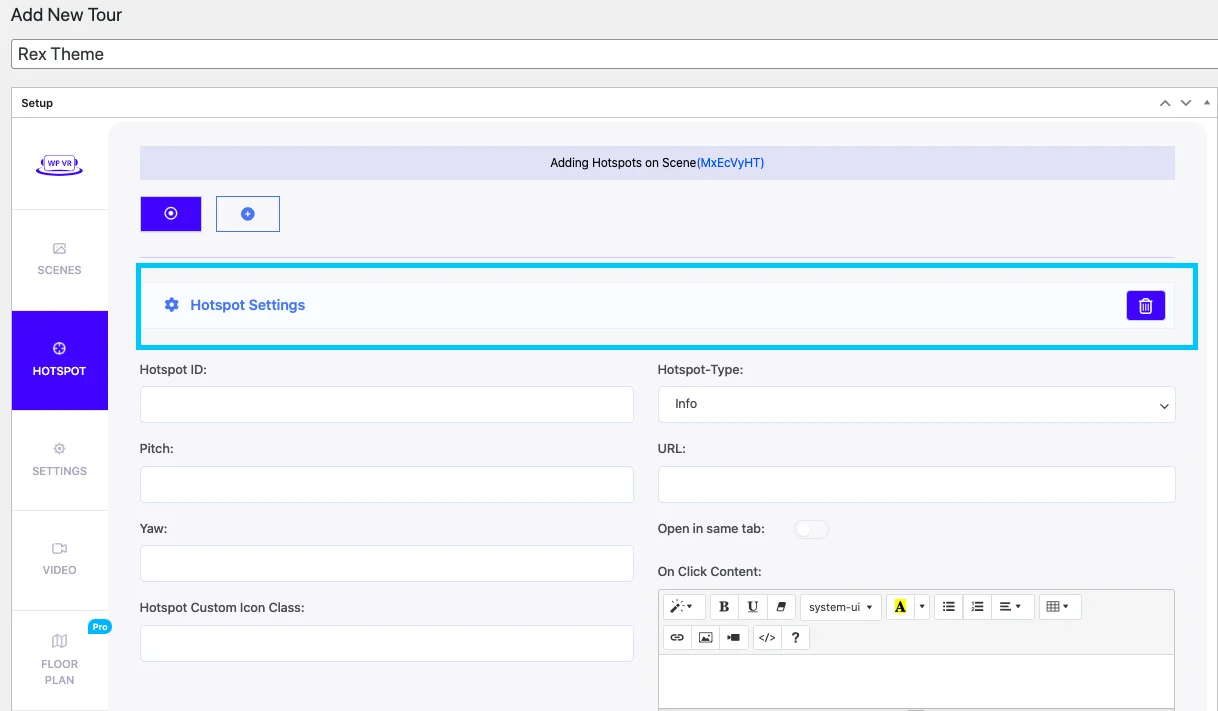
For an active scene, you can add multiple hotspots. With this option, you can link any of your scenes with other scenes.

Also, you can add images, links, or video information via this option.

While on a Scene, go to the HotSpot tab and you get the hotspots you added for that particular Scene.

To add a hotspot for another scene, first, go to the Scene tab, select the desired Scene, then go to the Hotspot tab to view its respective Hotspots.

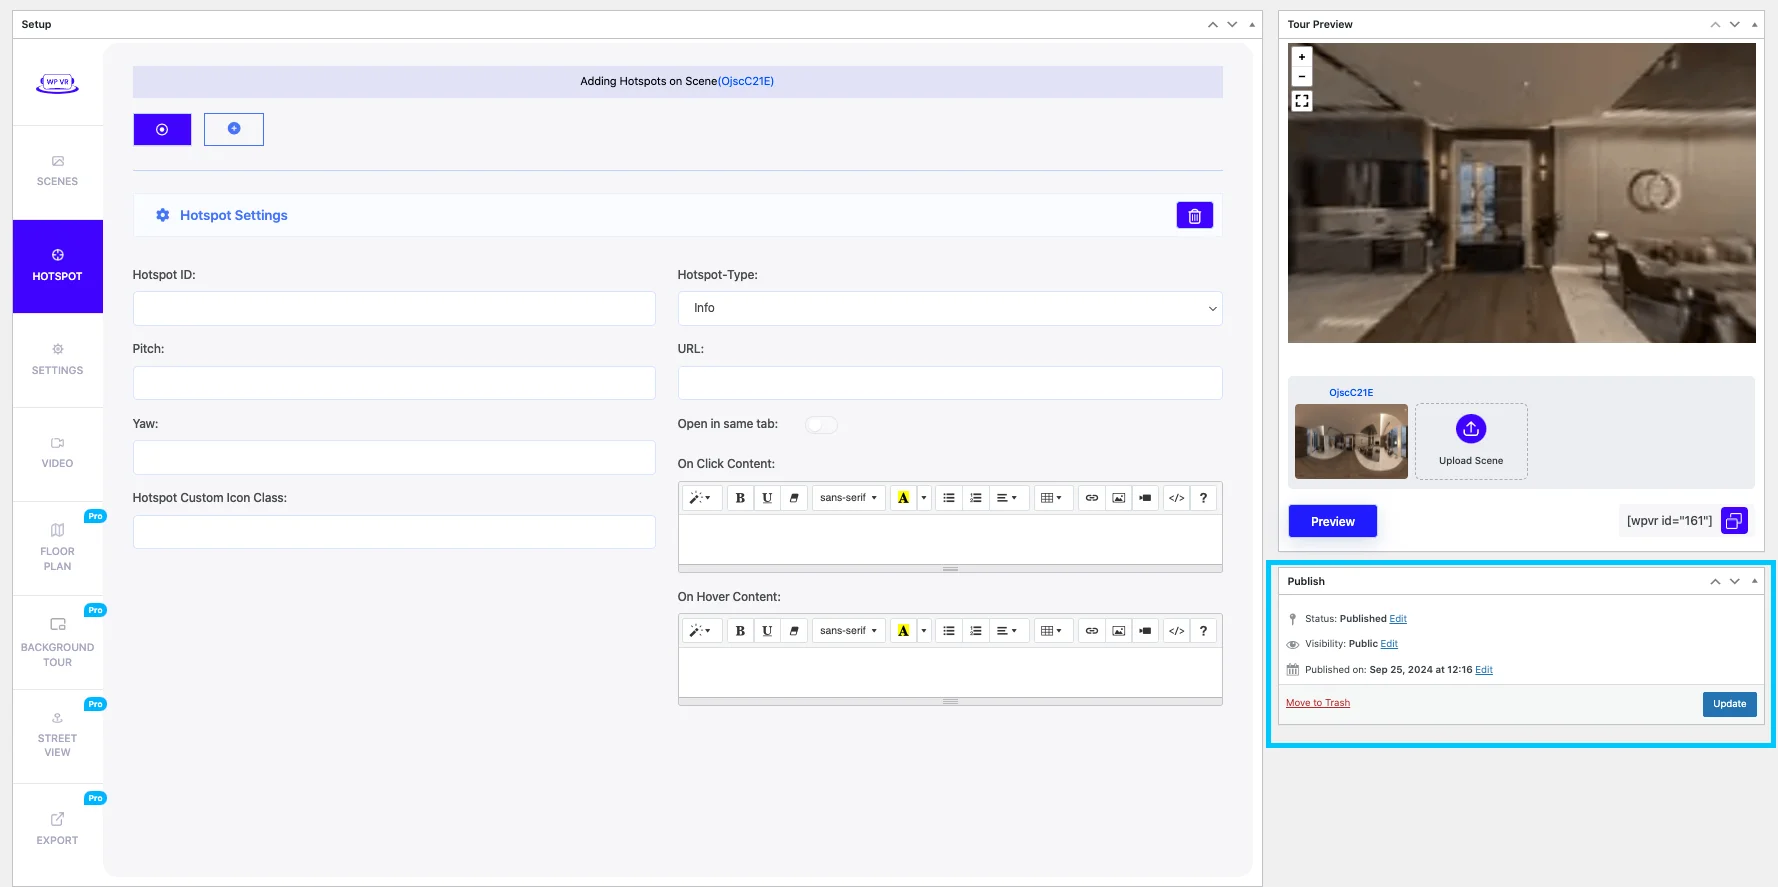
For a hotspot of a scene, initially, you will get the following options:

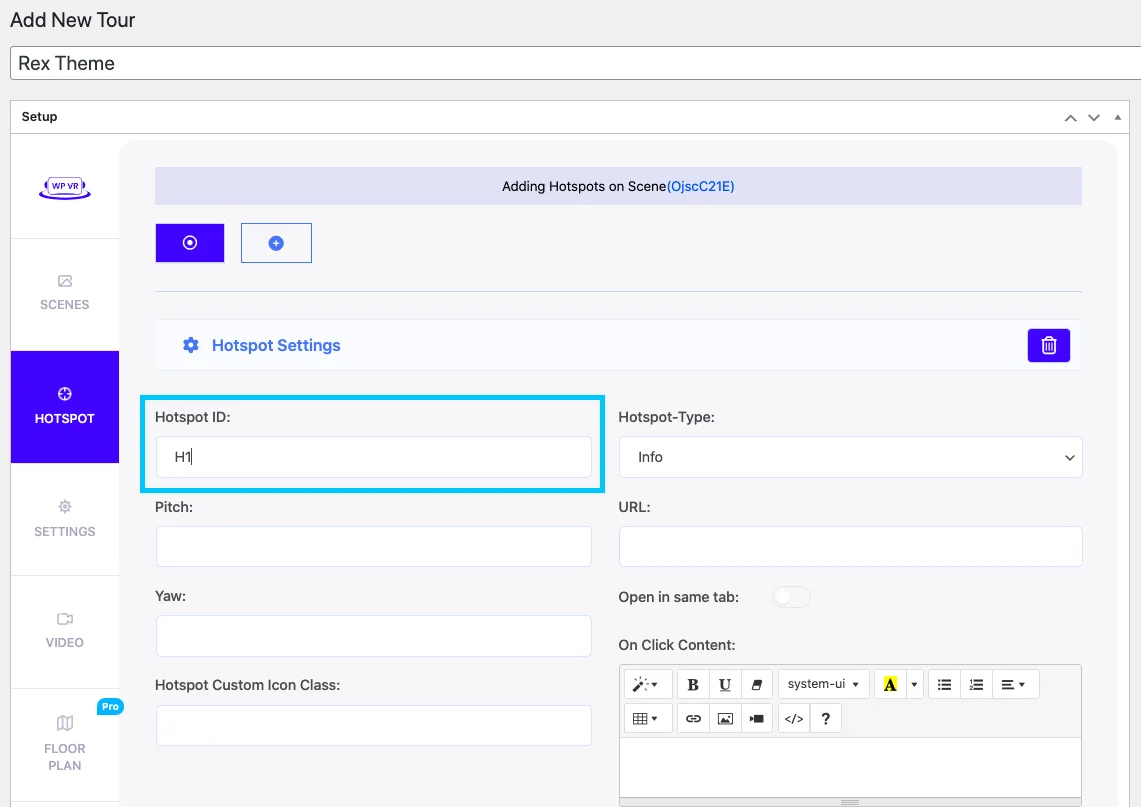
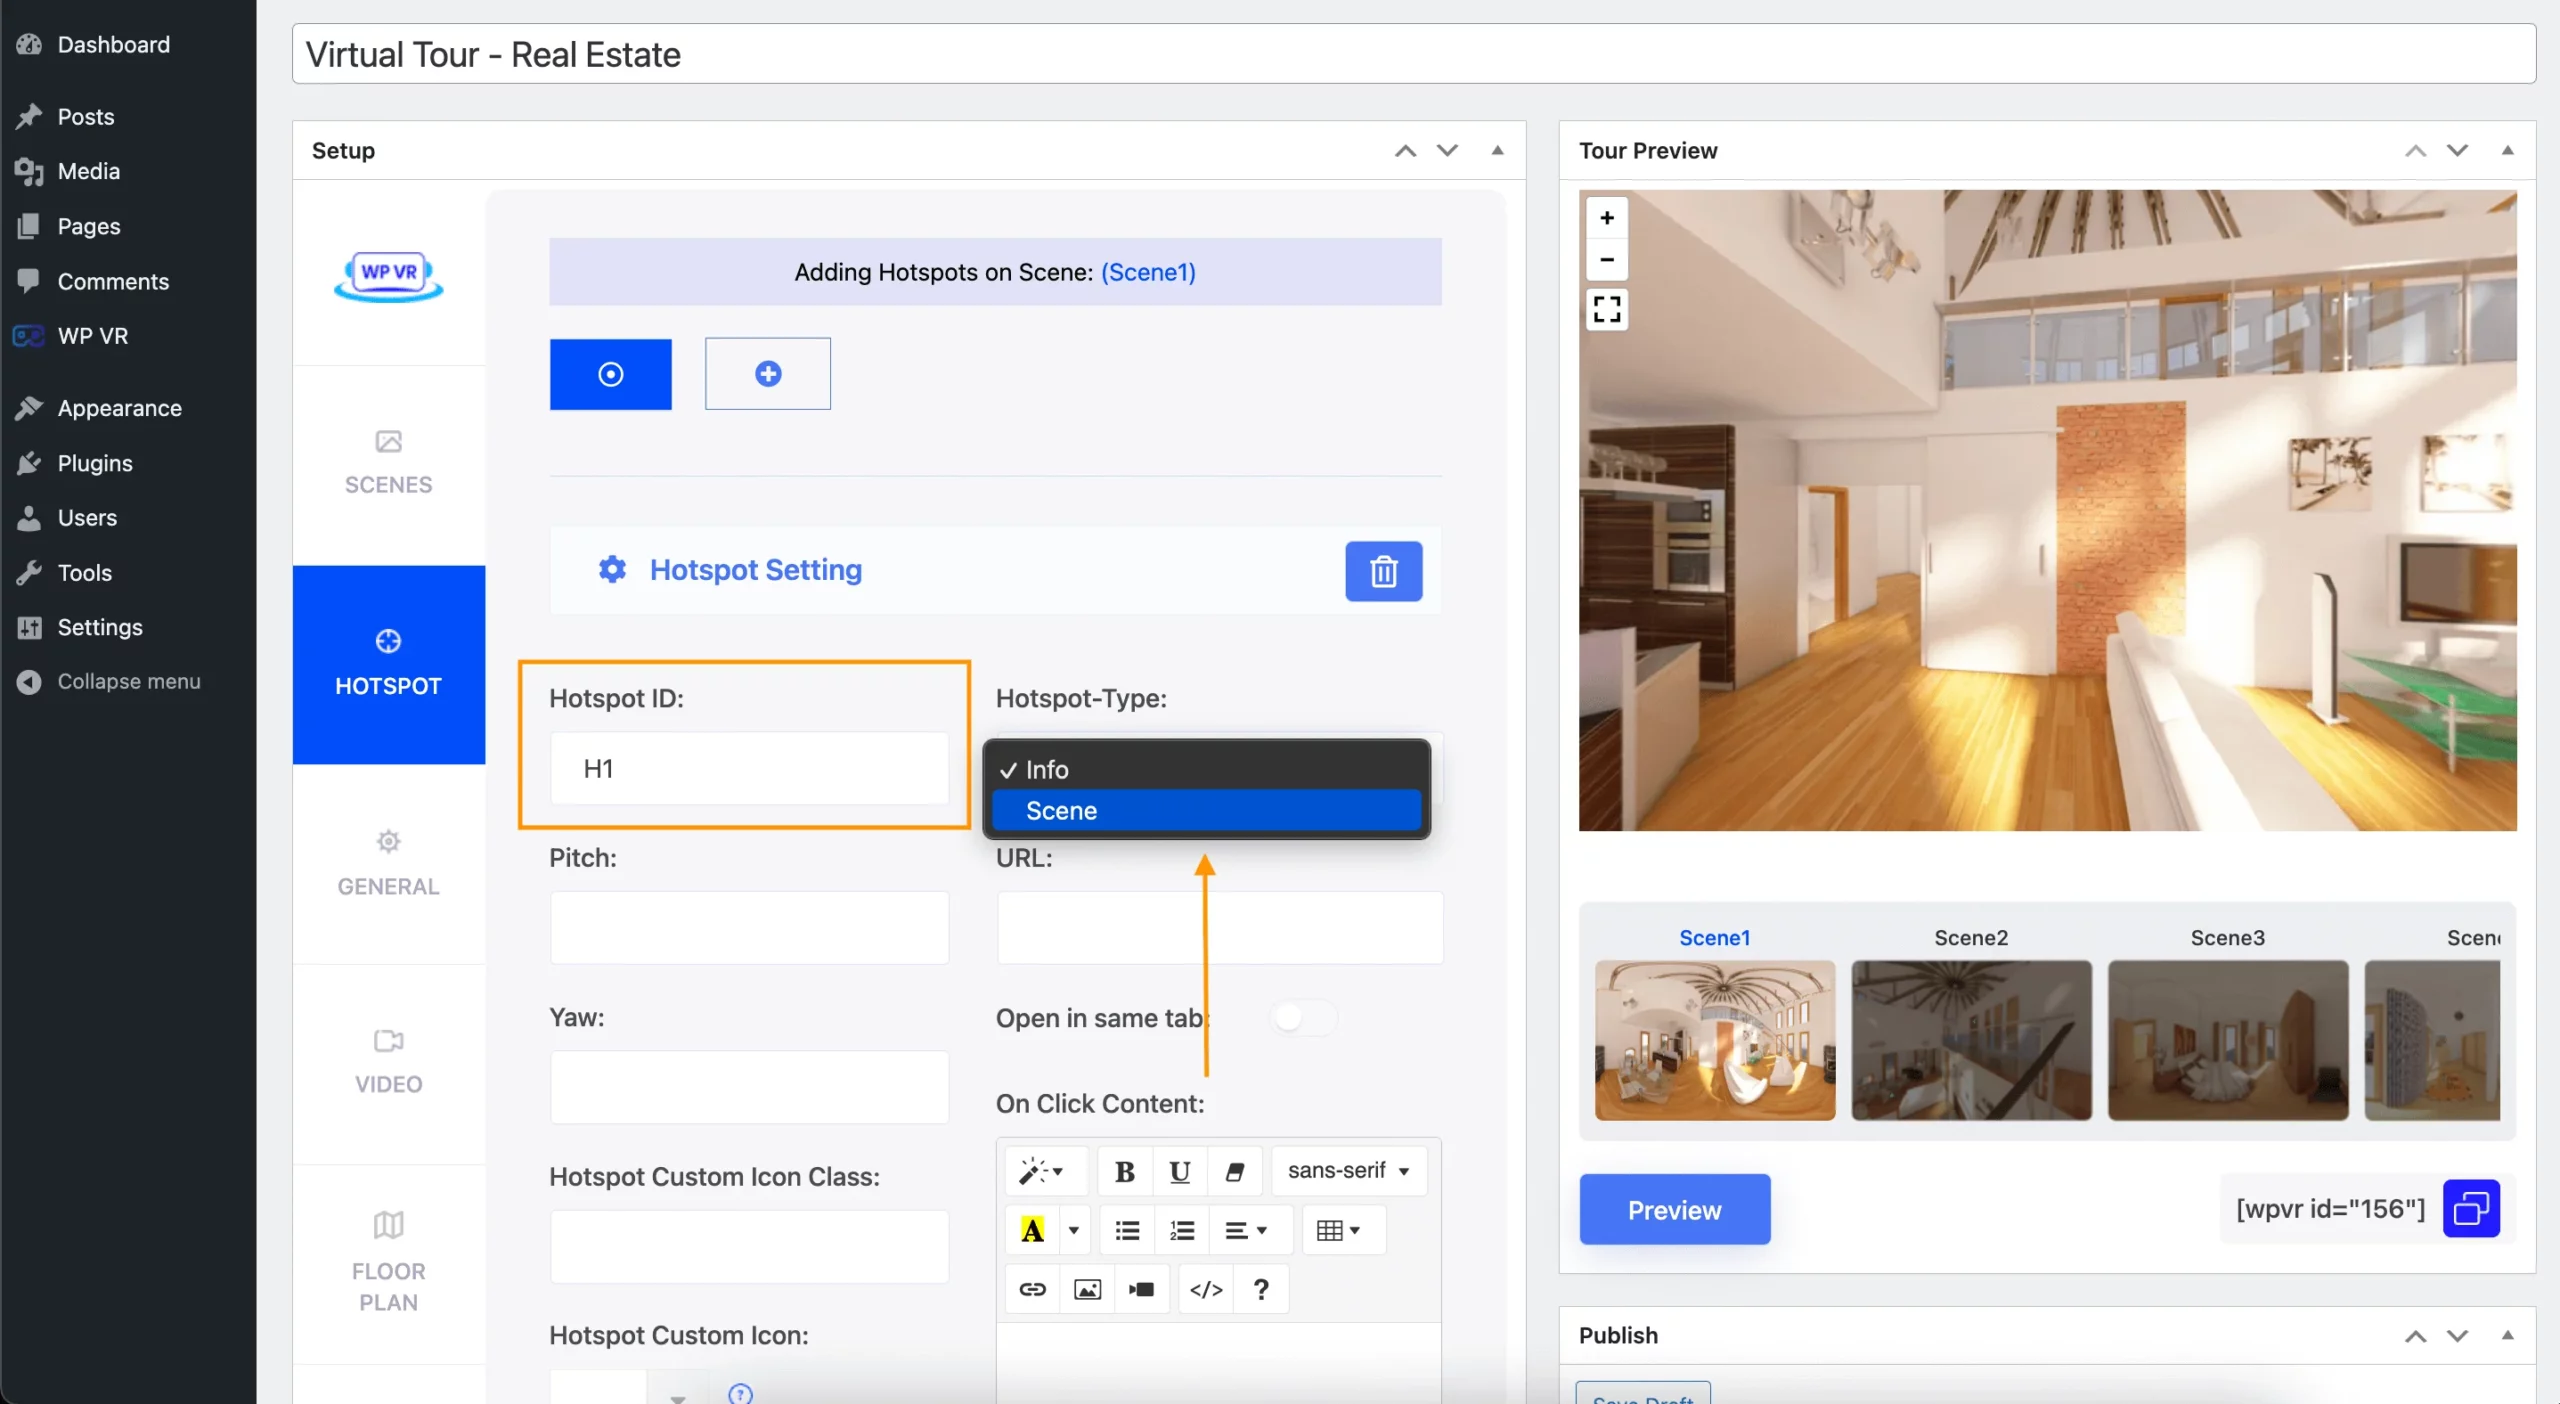
HotSpot ID:

You have to provide a unique Hotspot ID for every hotspot you create in a scene.

hostpot id

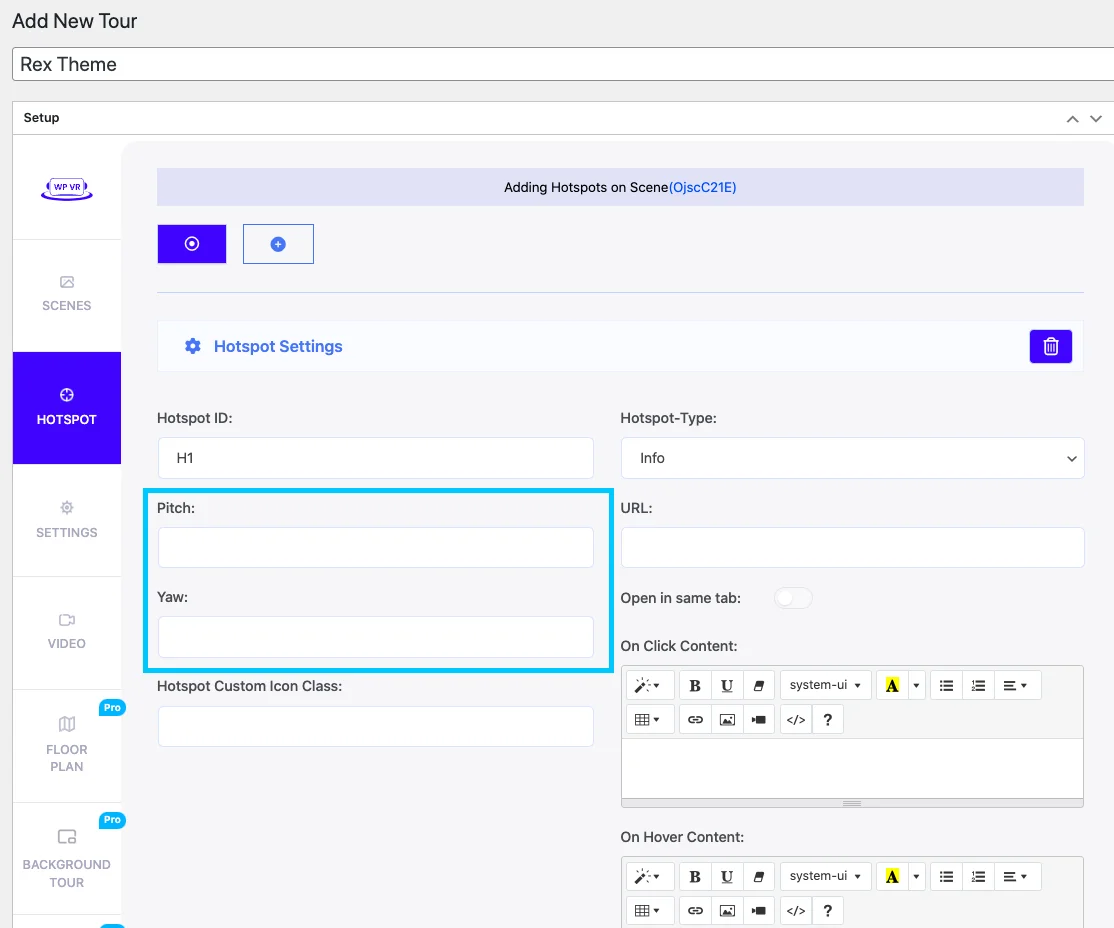
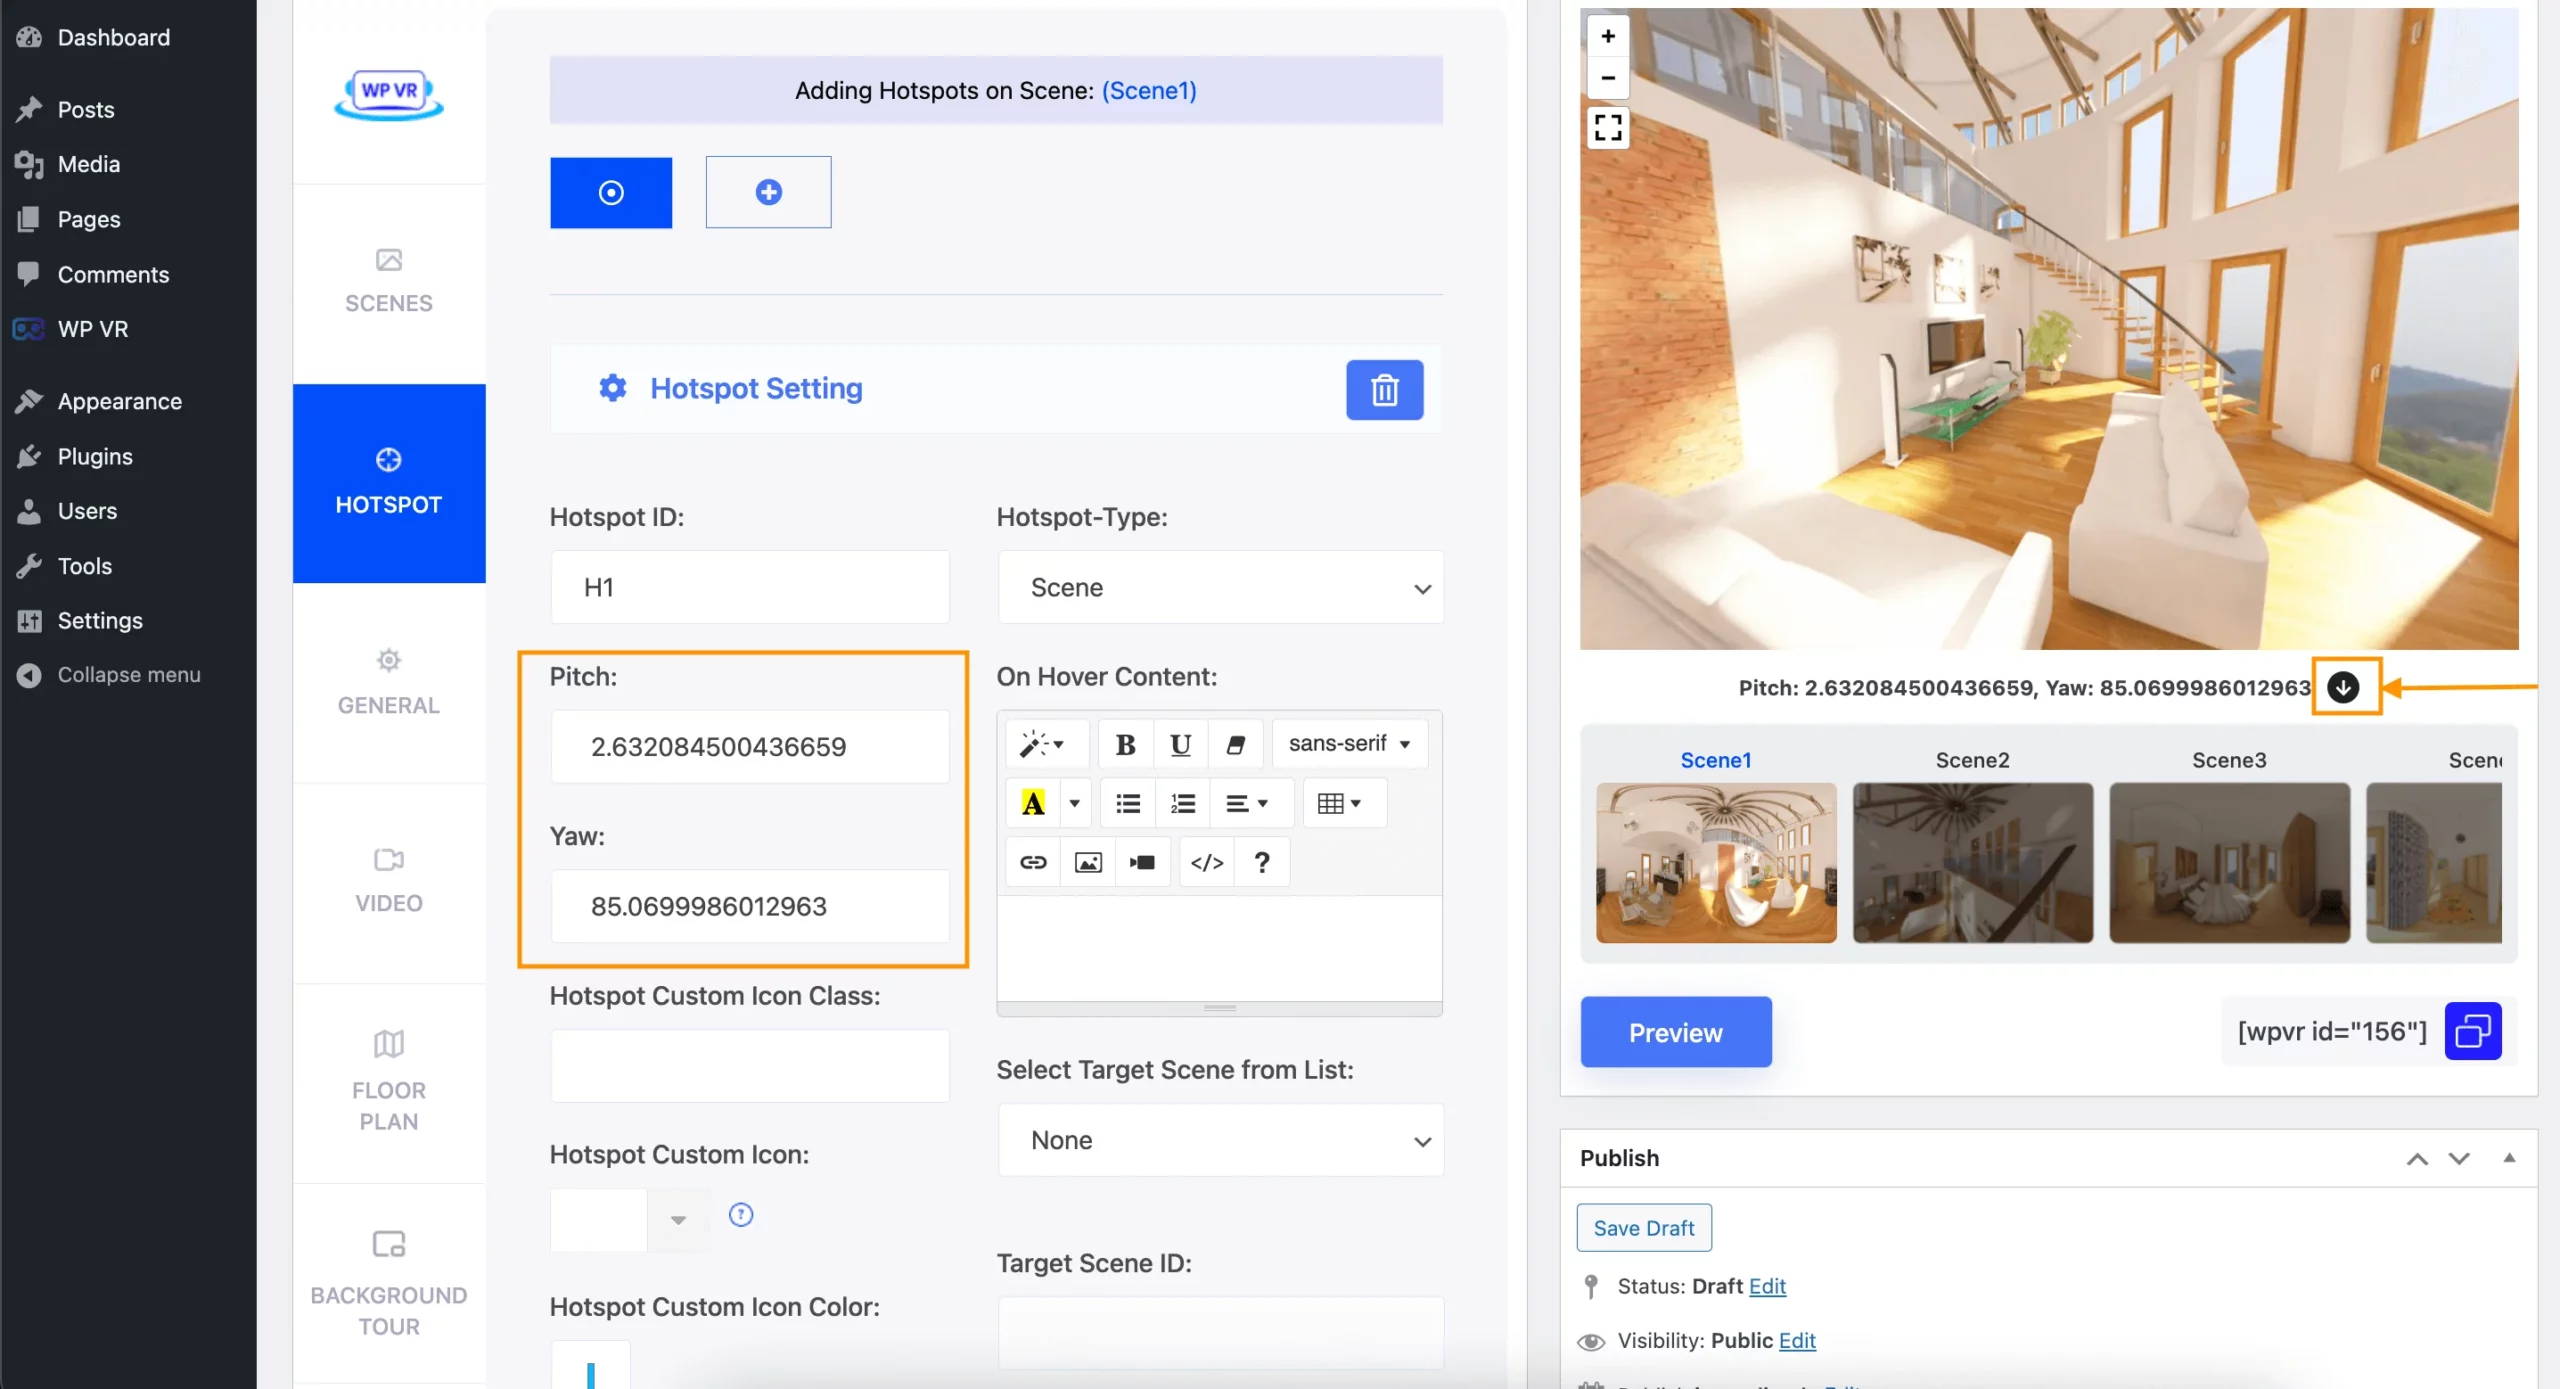
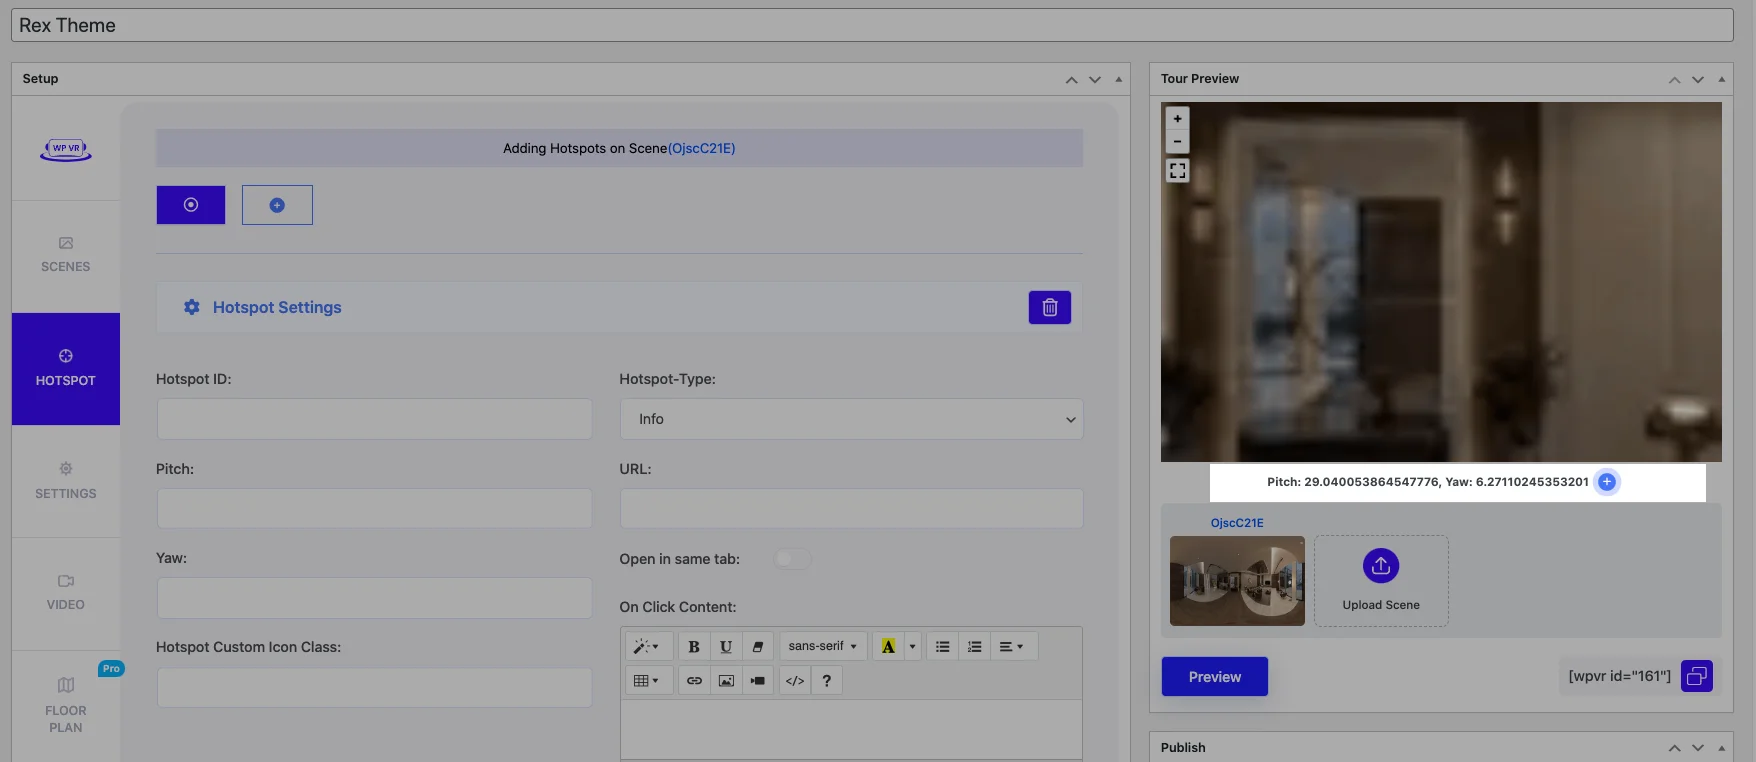
Pitch And Yaw:

The Pitch and Yaw are the coordinates required to define the point where the Hotspot will be placed.

pitch and yaw

You will be able to collect these from the Preview Tour.

Previously you set up the scene and clicked on Preview. The Preview Tour will be still there.

Scroll down to the Preview Tour and click on the point on the tour, where you want to place the Hotspot. You will see that the pitch and yaw coordinates will appear below the Preview Tour.

You can copy the Pitch and Yaw and input them in the required fields.

Or, you can click on the arrow button (beside the Pitch and Yaw coordinates under the Tour preview) to automatically collect and place Pitch and Yaw values in the Pitch and Yaw fields for a Hotspot.

Once you are done setting up the hotspot, click on the Preview button, and a hotspot icon will appear in the current scene on the spot from where you collected the coordinates of the Pitch and Yaw.
pitch and yaw

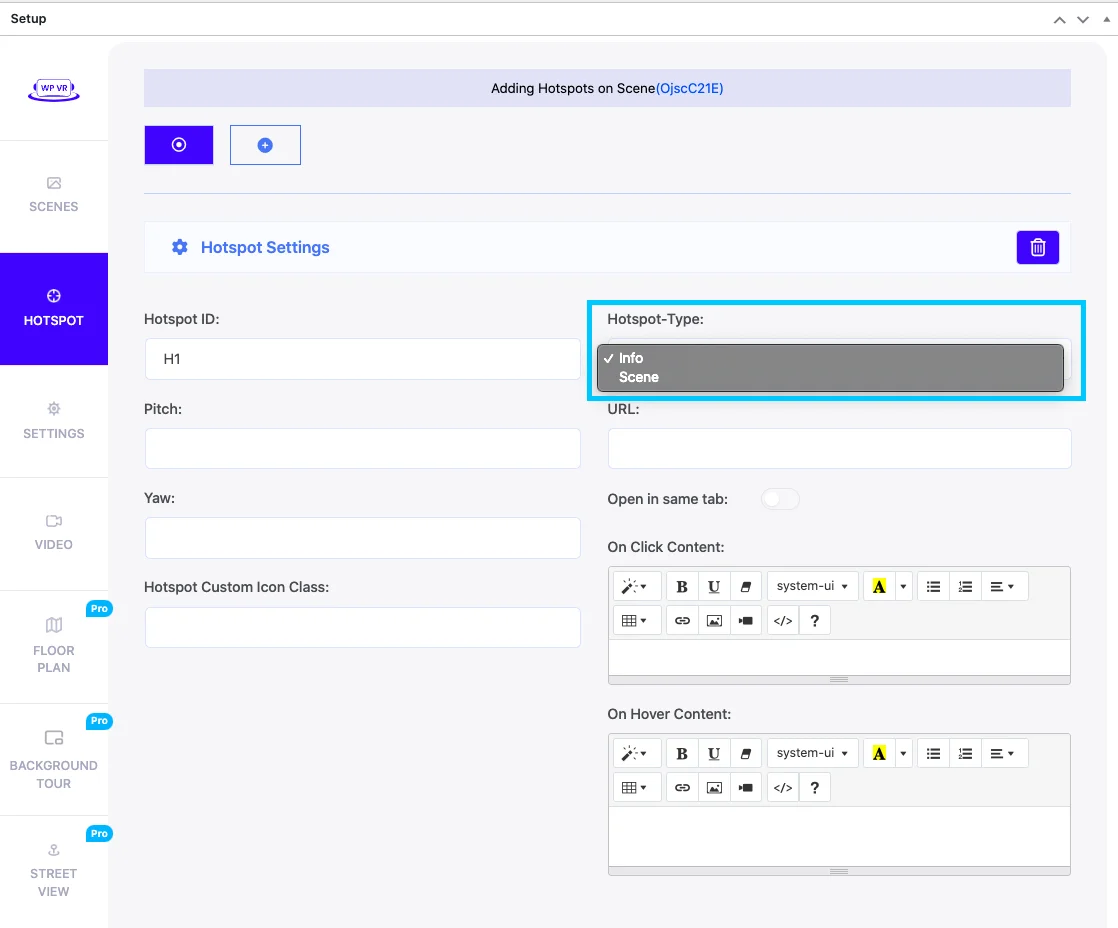
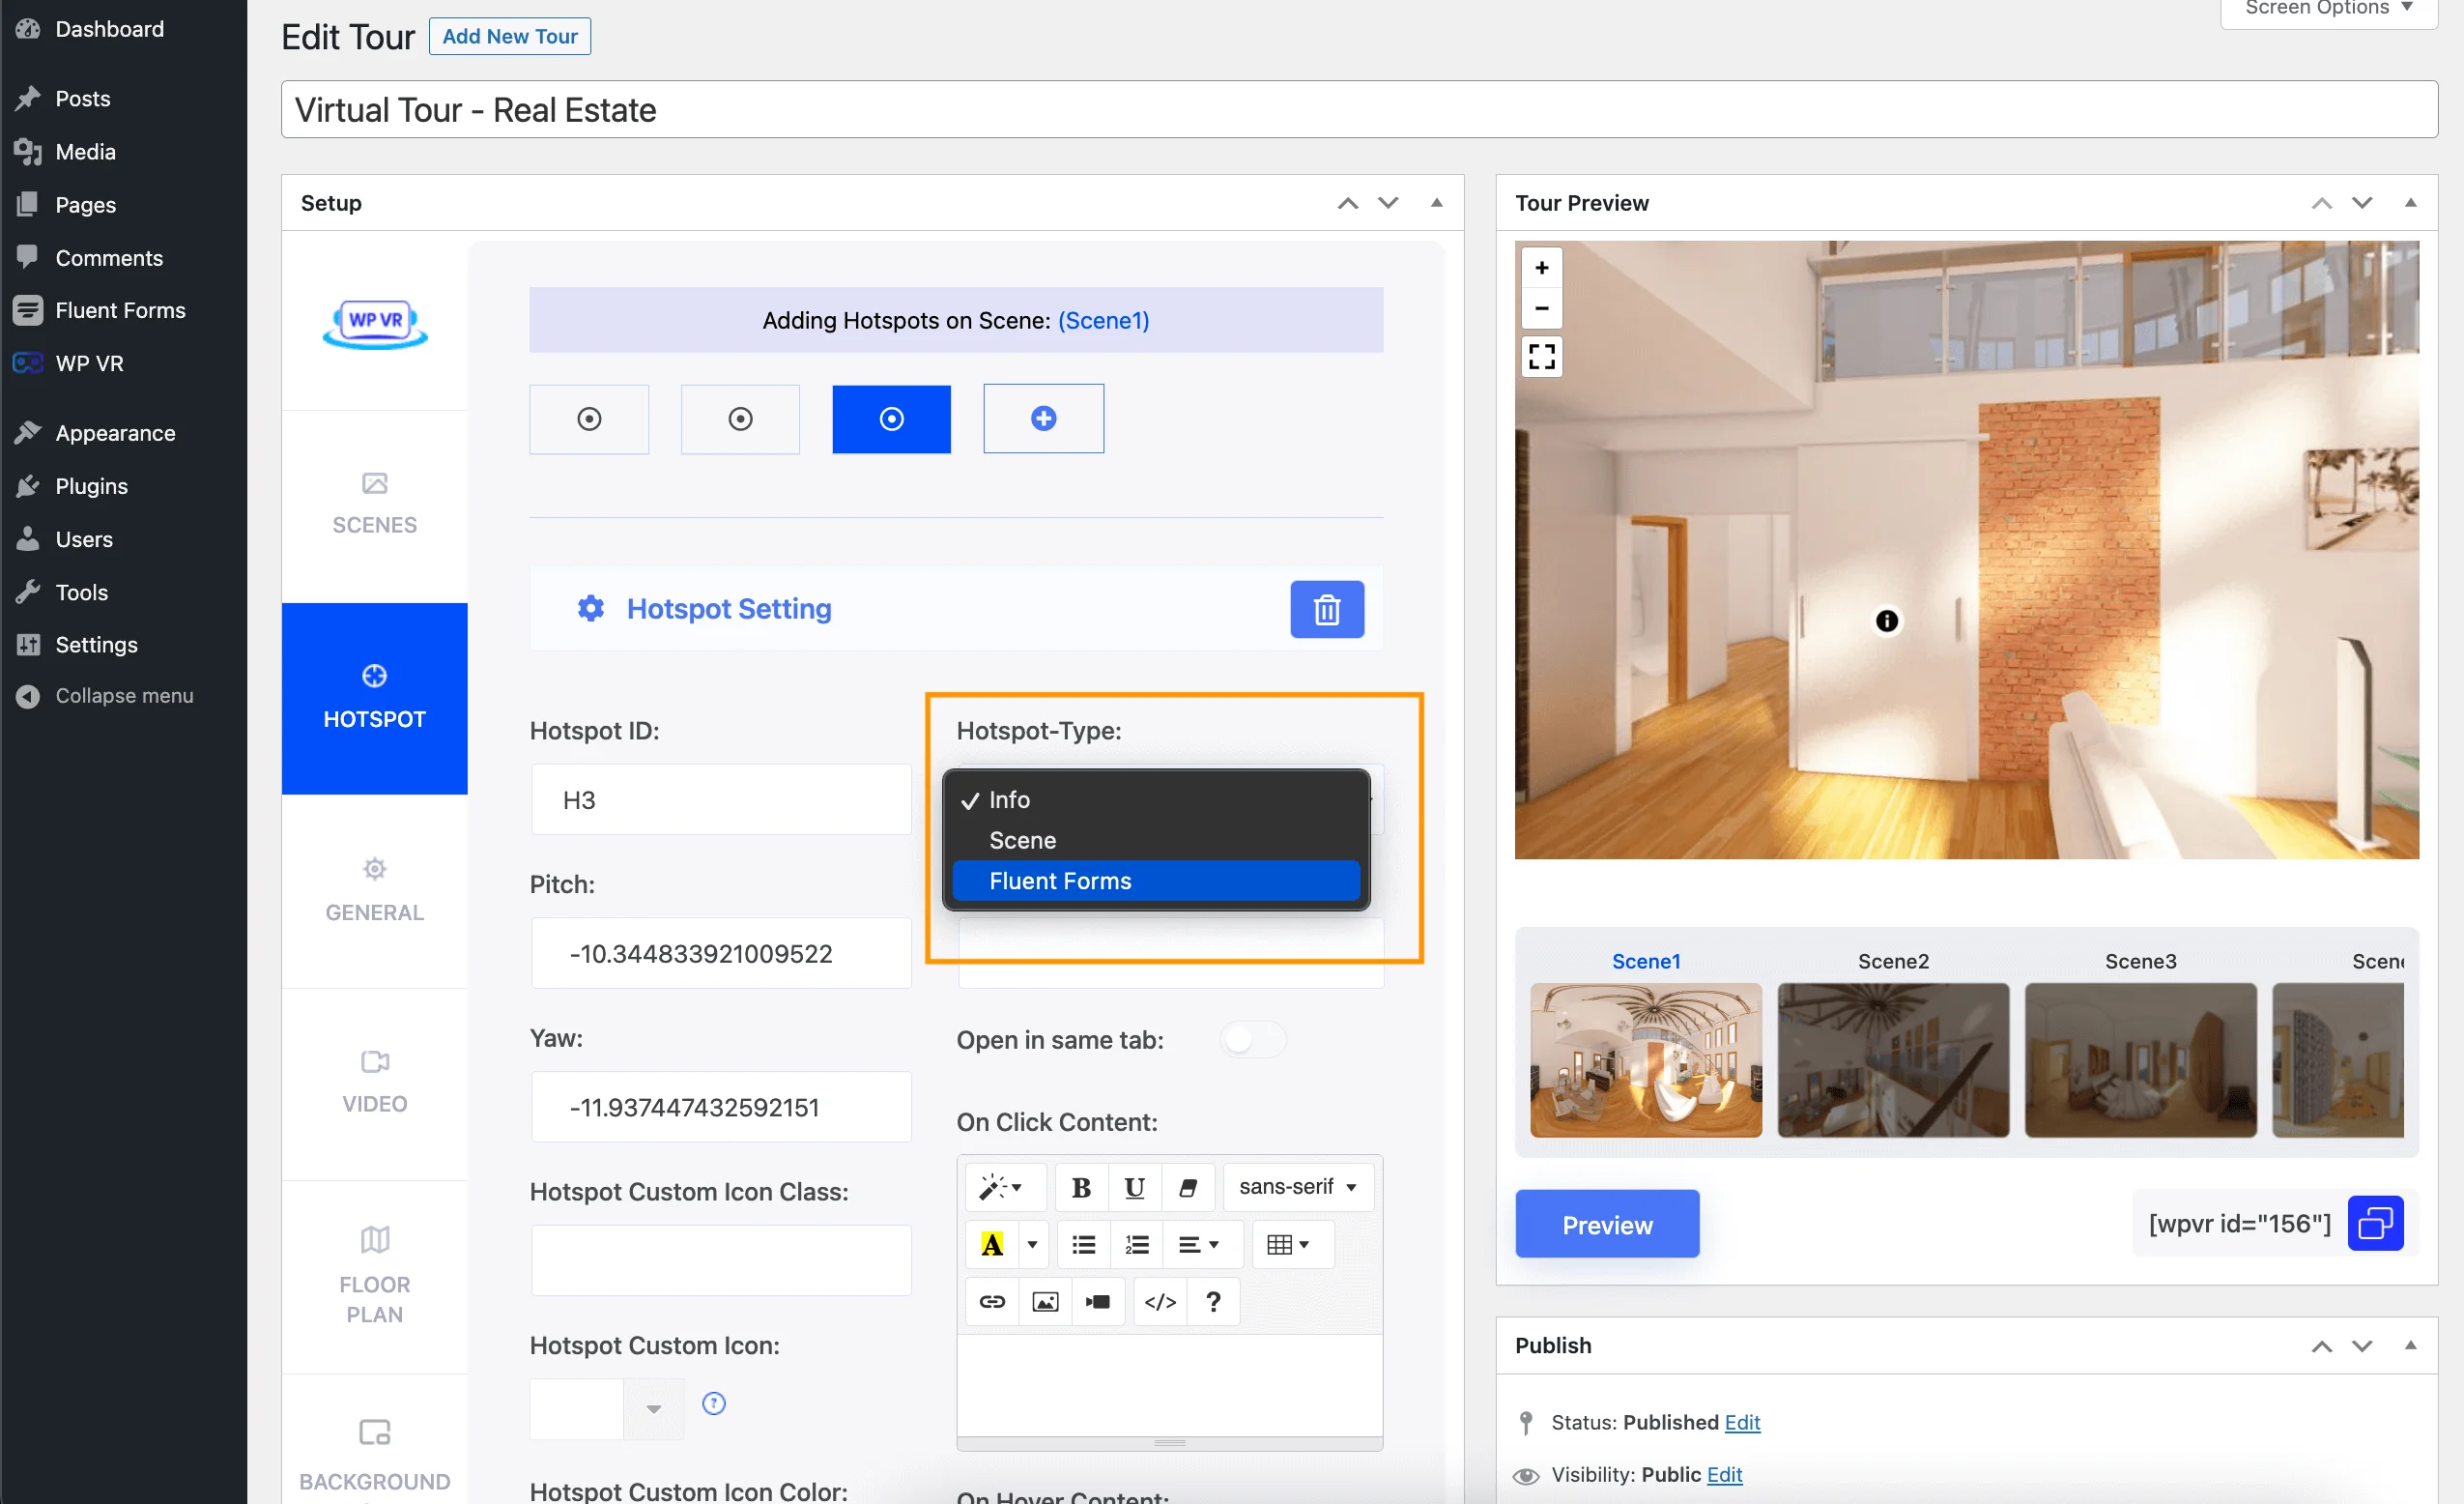
HotSpot Type:

There are two types of hotspots available:

  • Info
  • Scene
type of hotspot

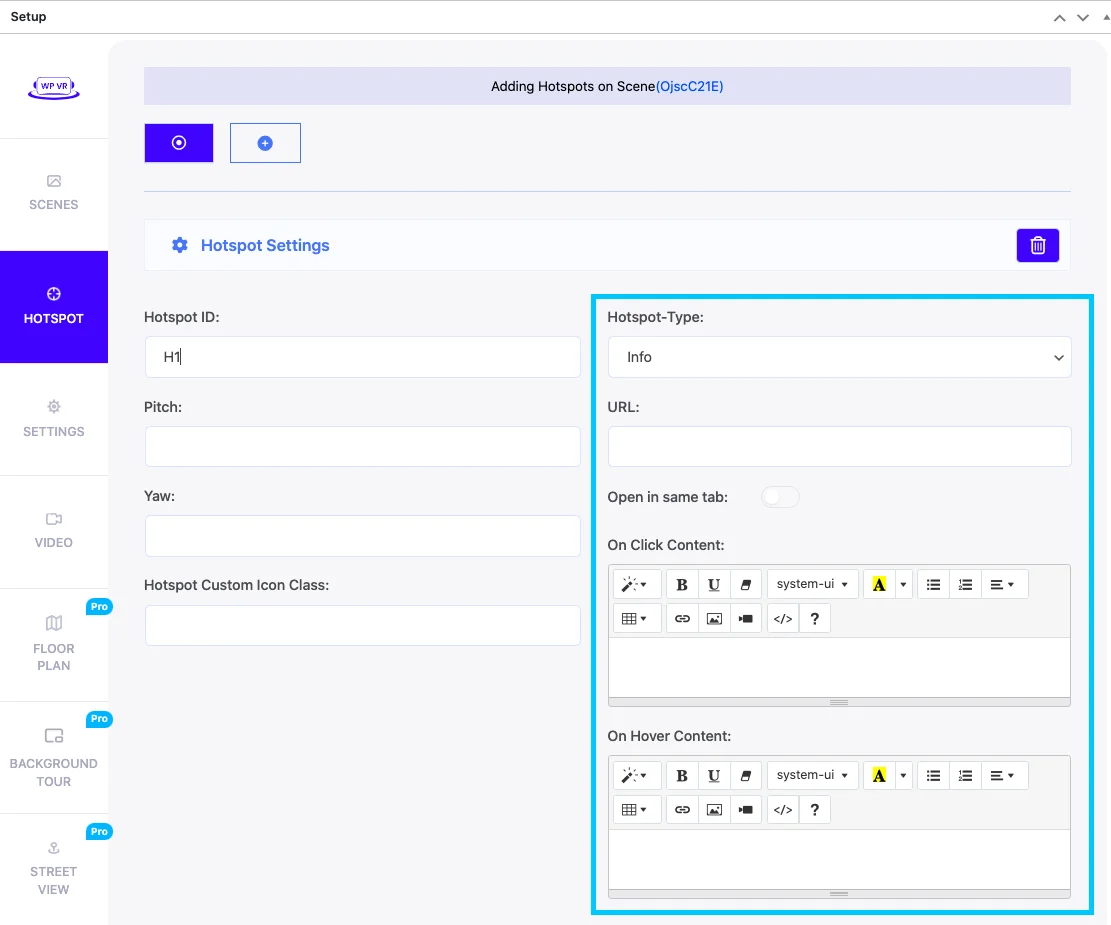
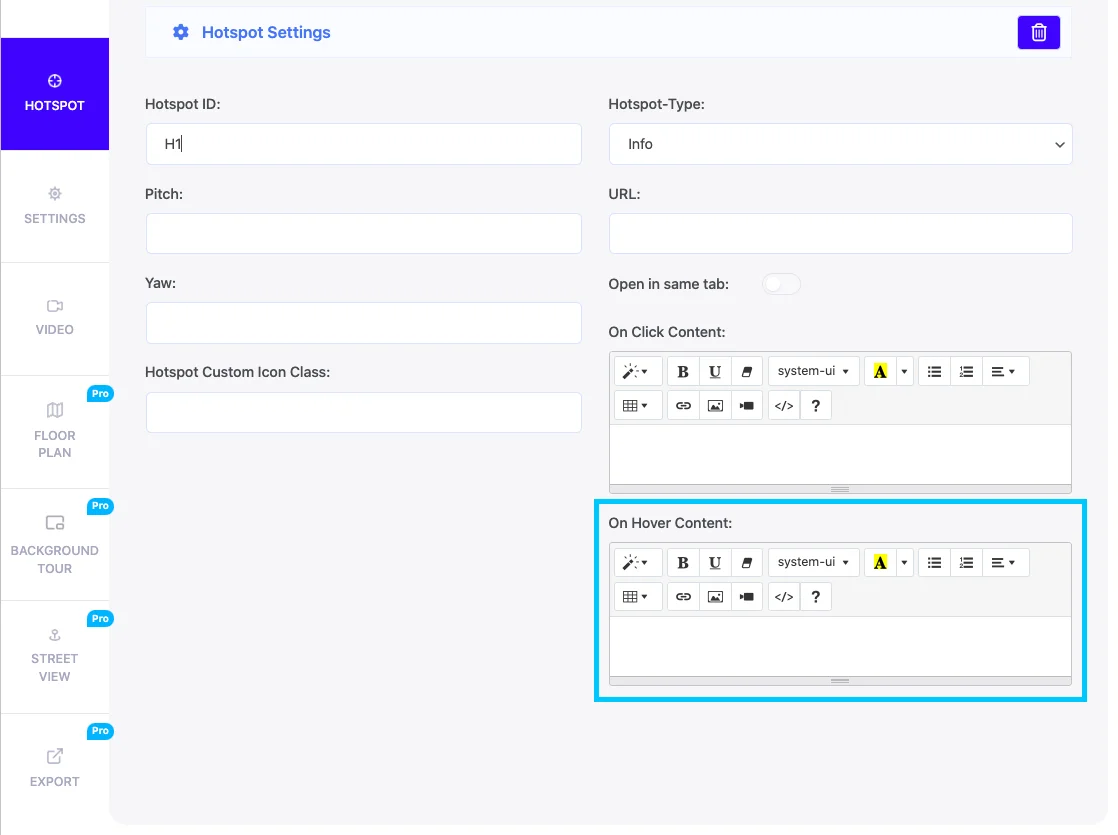
It comes as “Info” by default and you will view these fields:

  • URL.
  • On Click Content.
  • On Hover Content.
hotspot option

URL:

Provide the URL of a website, so clicking on the hotspot will take you to that website on a new tab. 

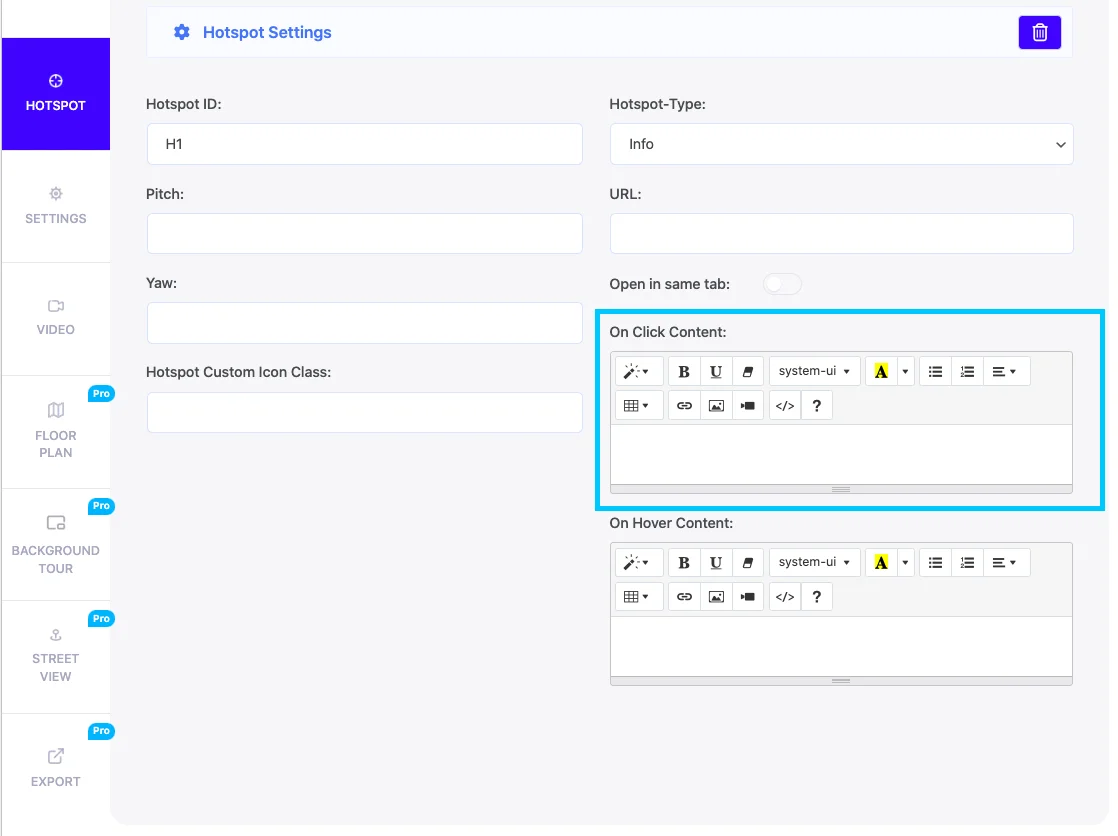
On Click Content:

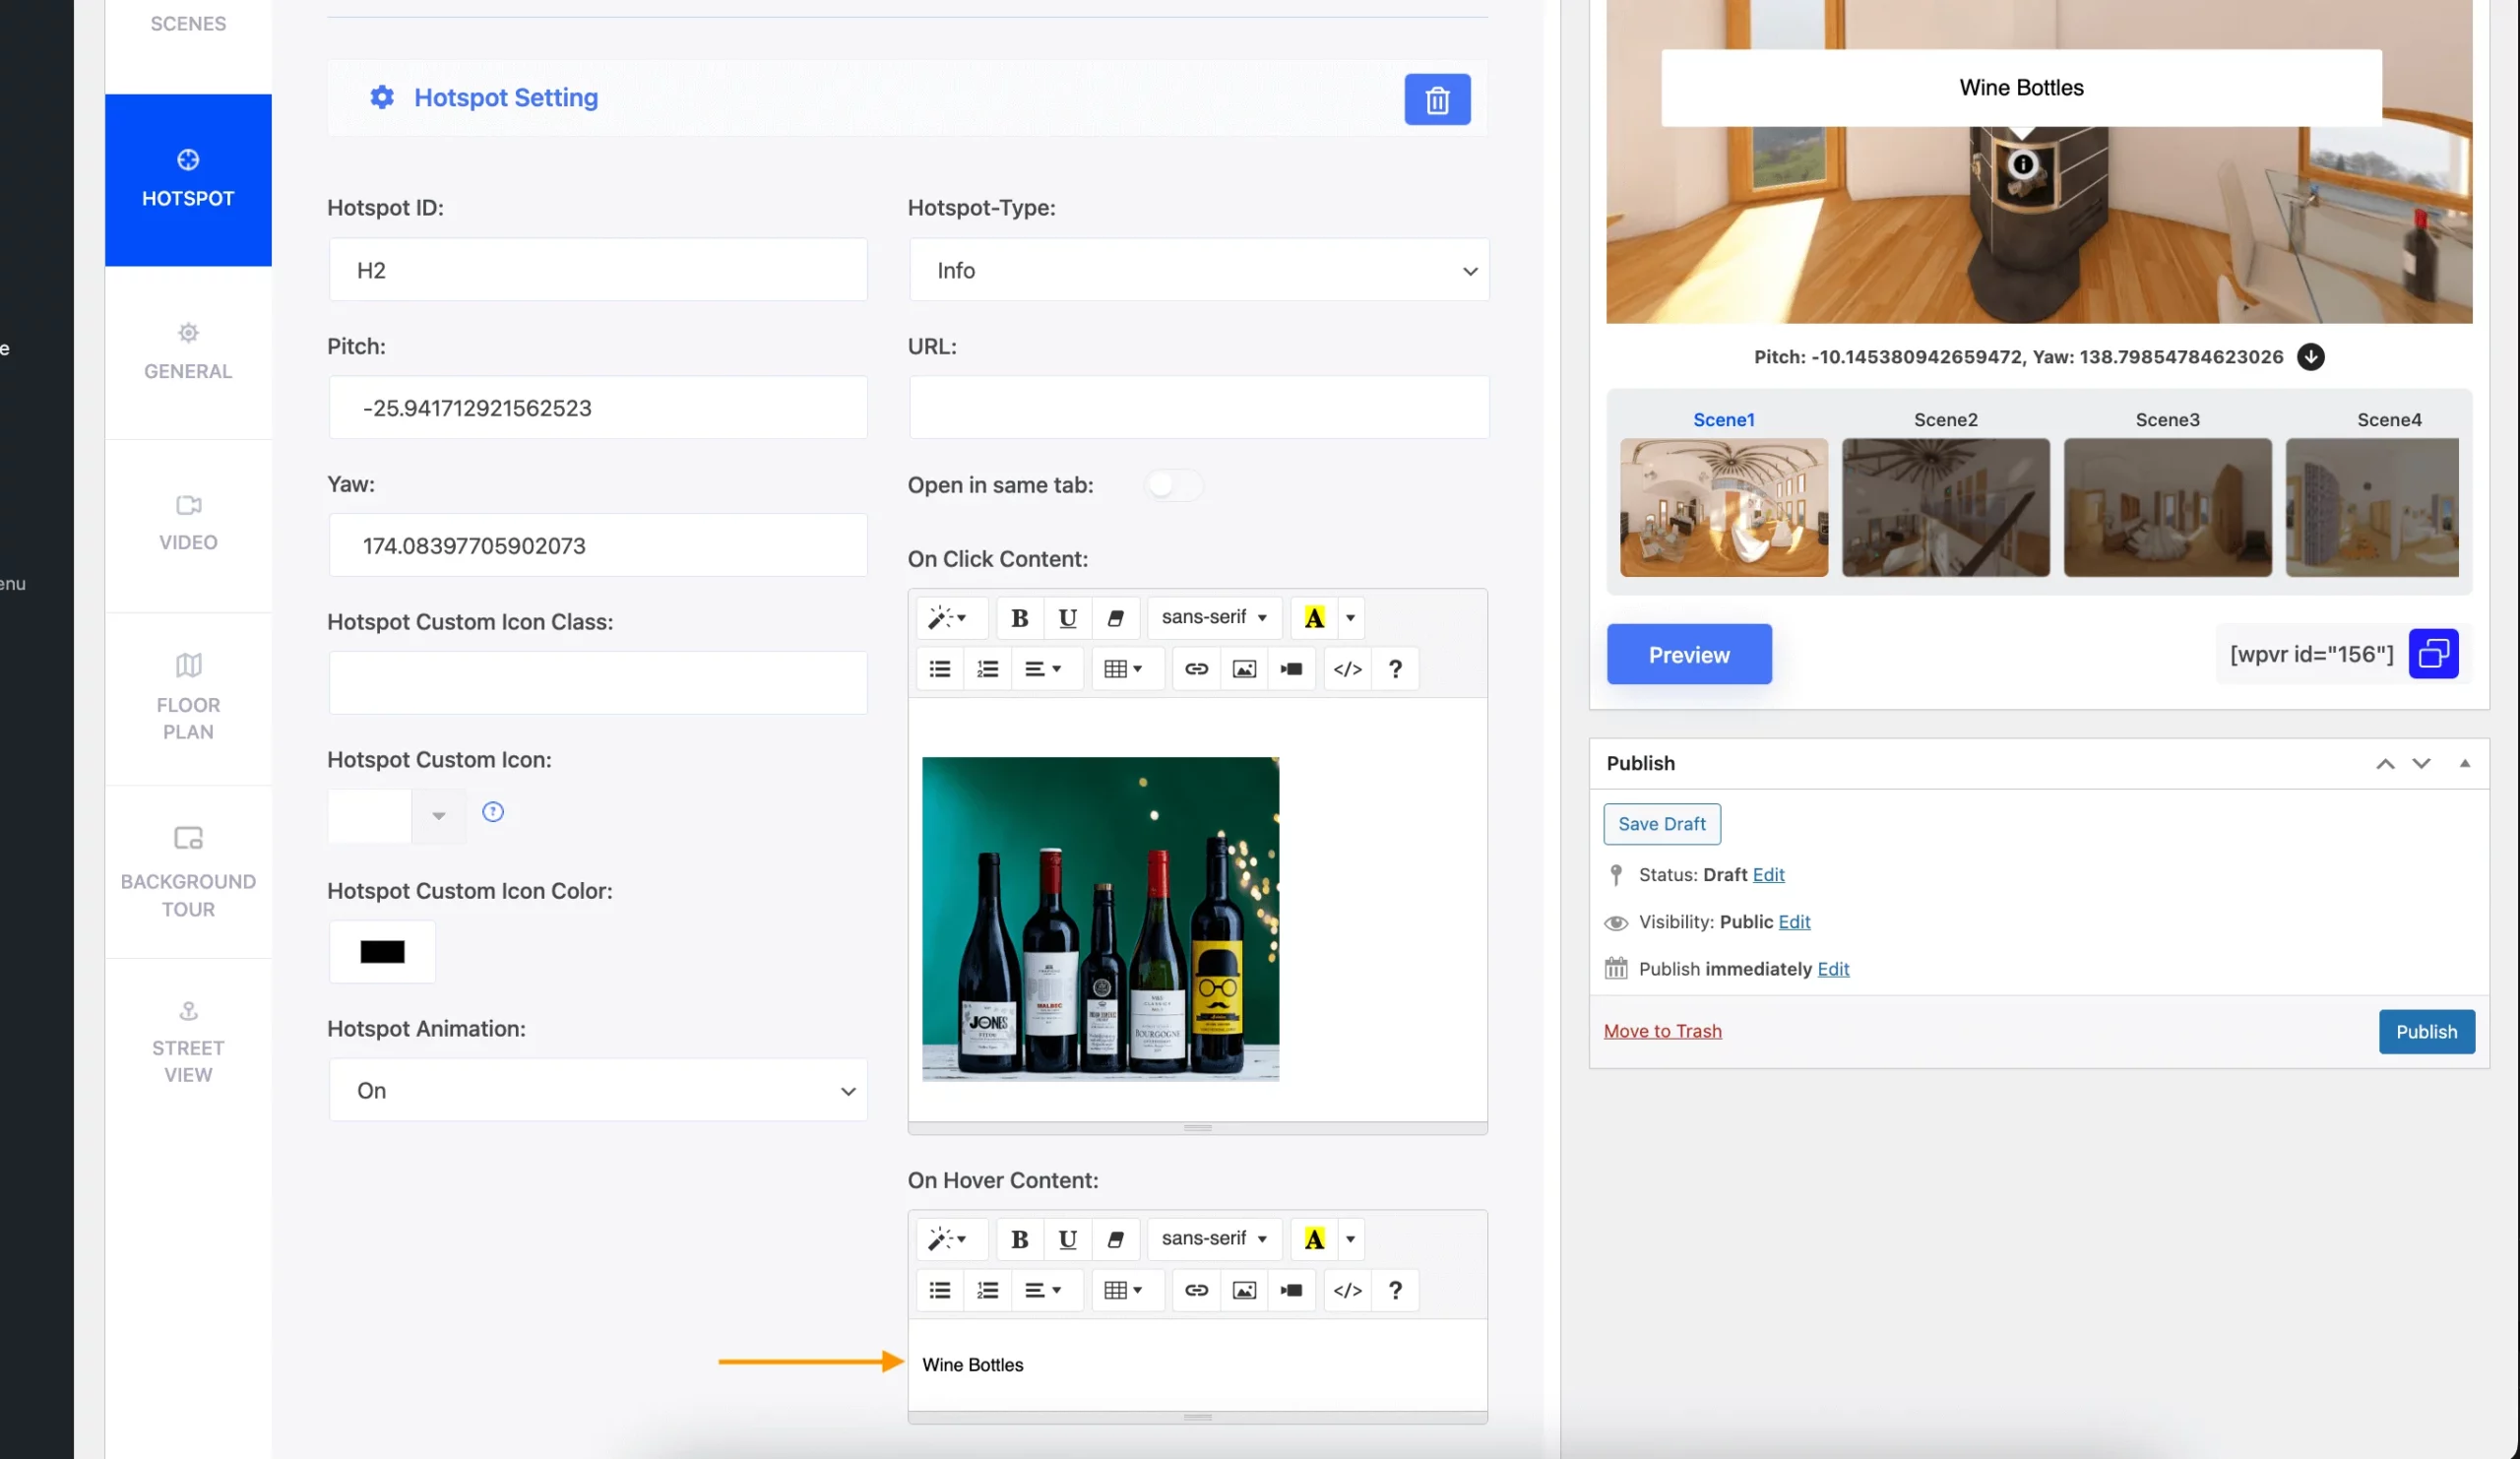
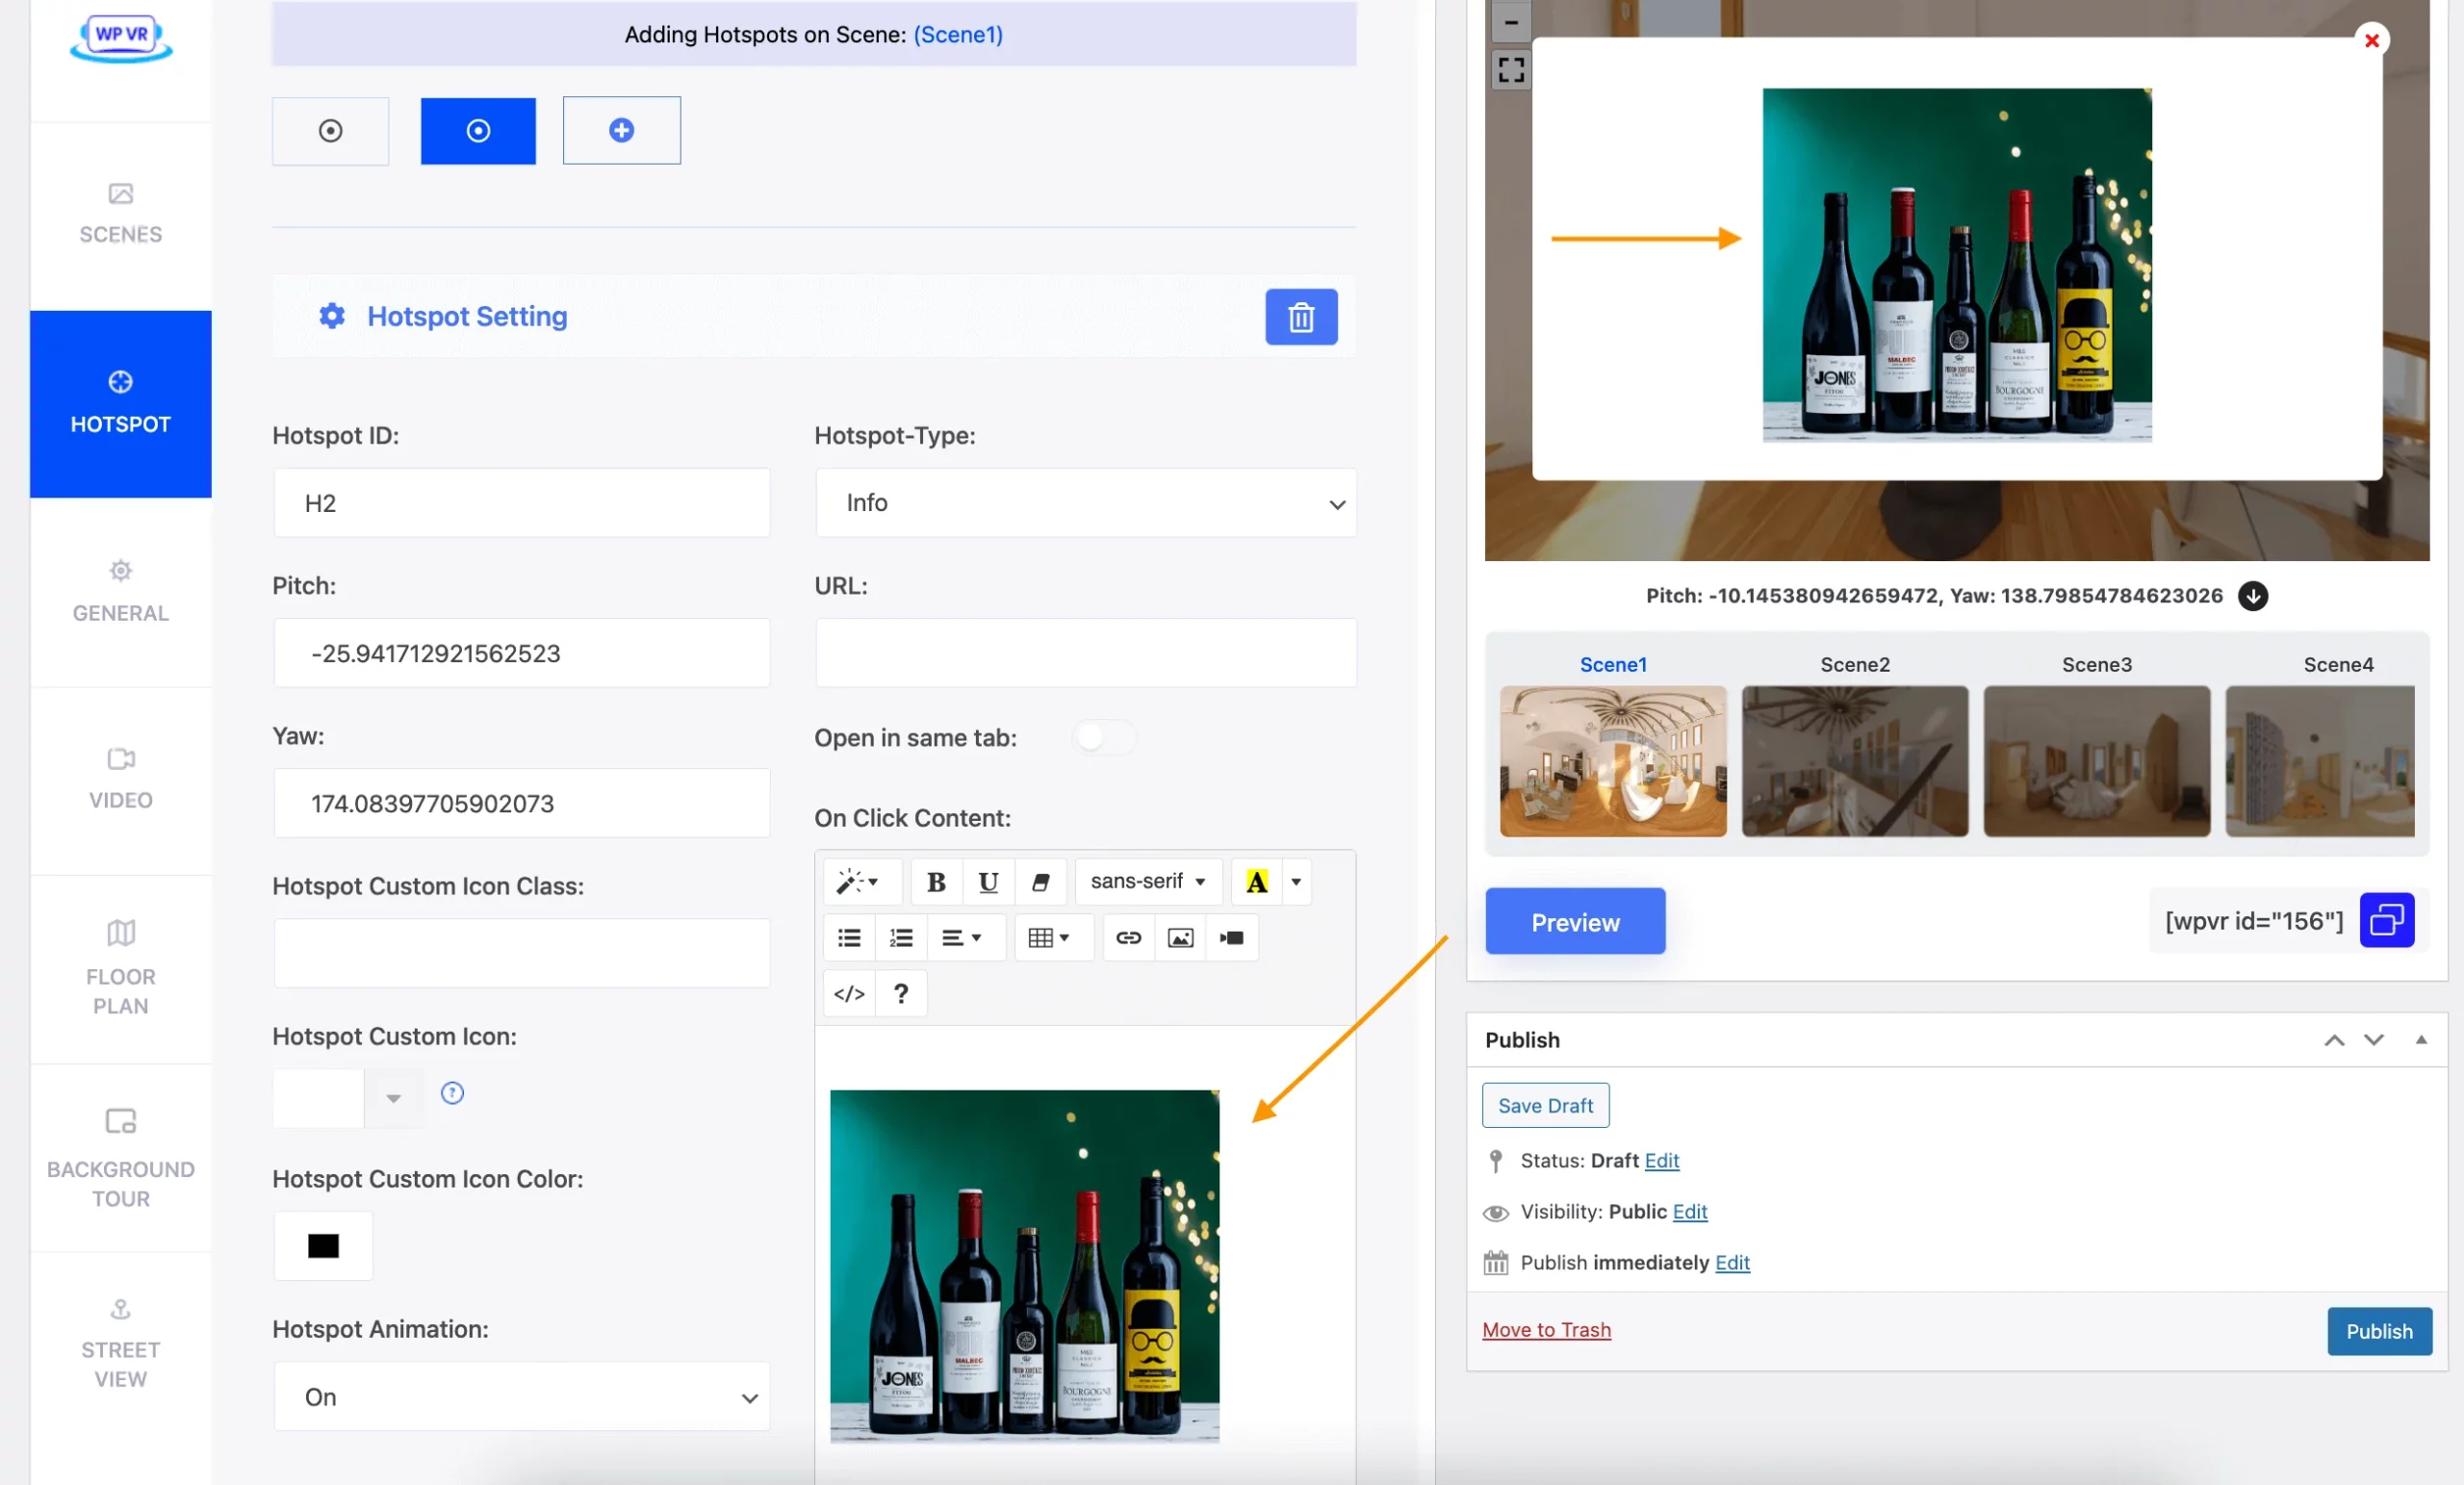
Here you can add content to your hotspot so that clicking on the hotspot will display a pop-up window over the tour with the content you entered. There are options to add text, images, videos, gifs and more!
on click content

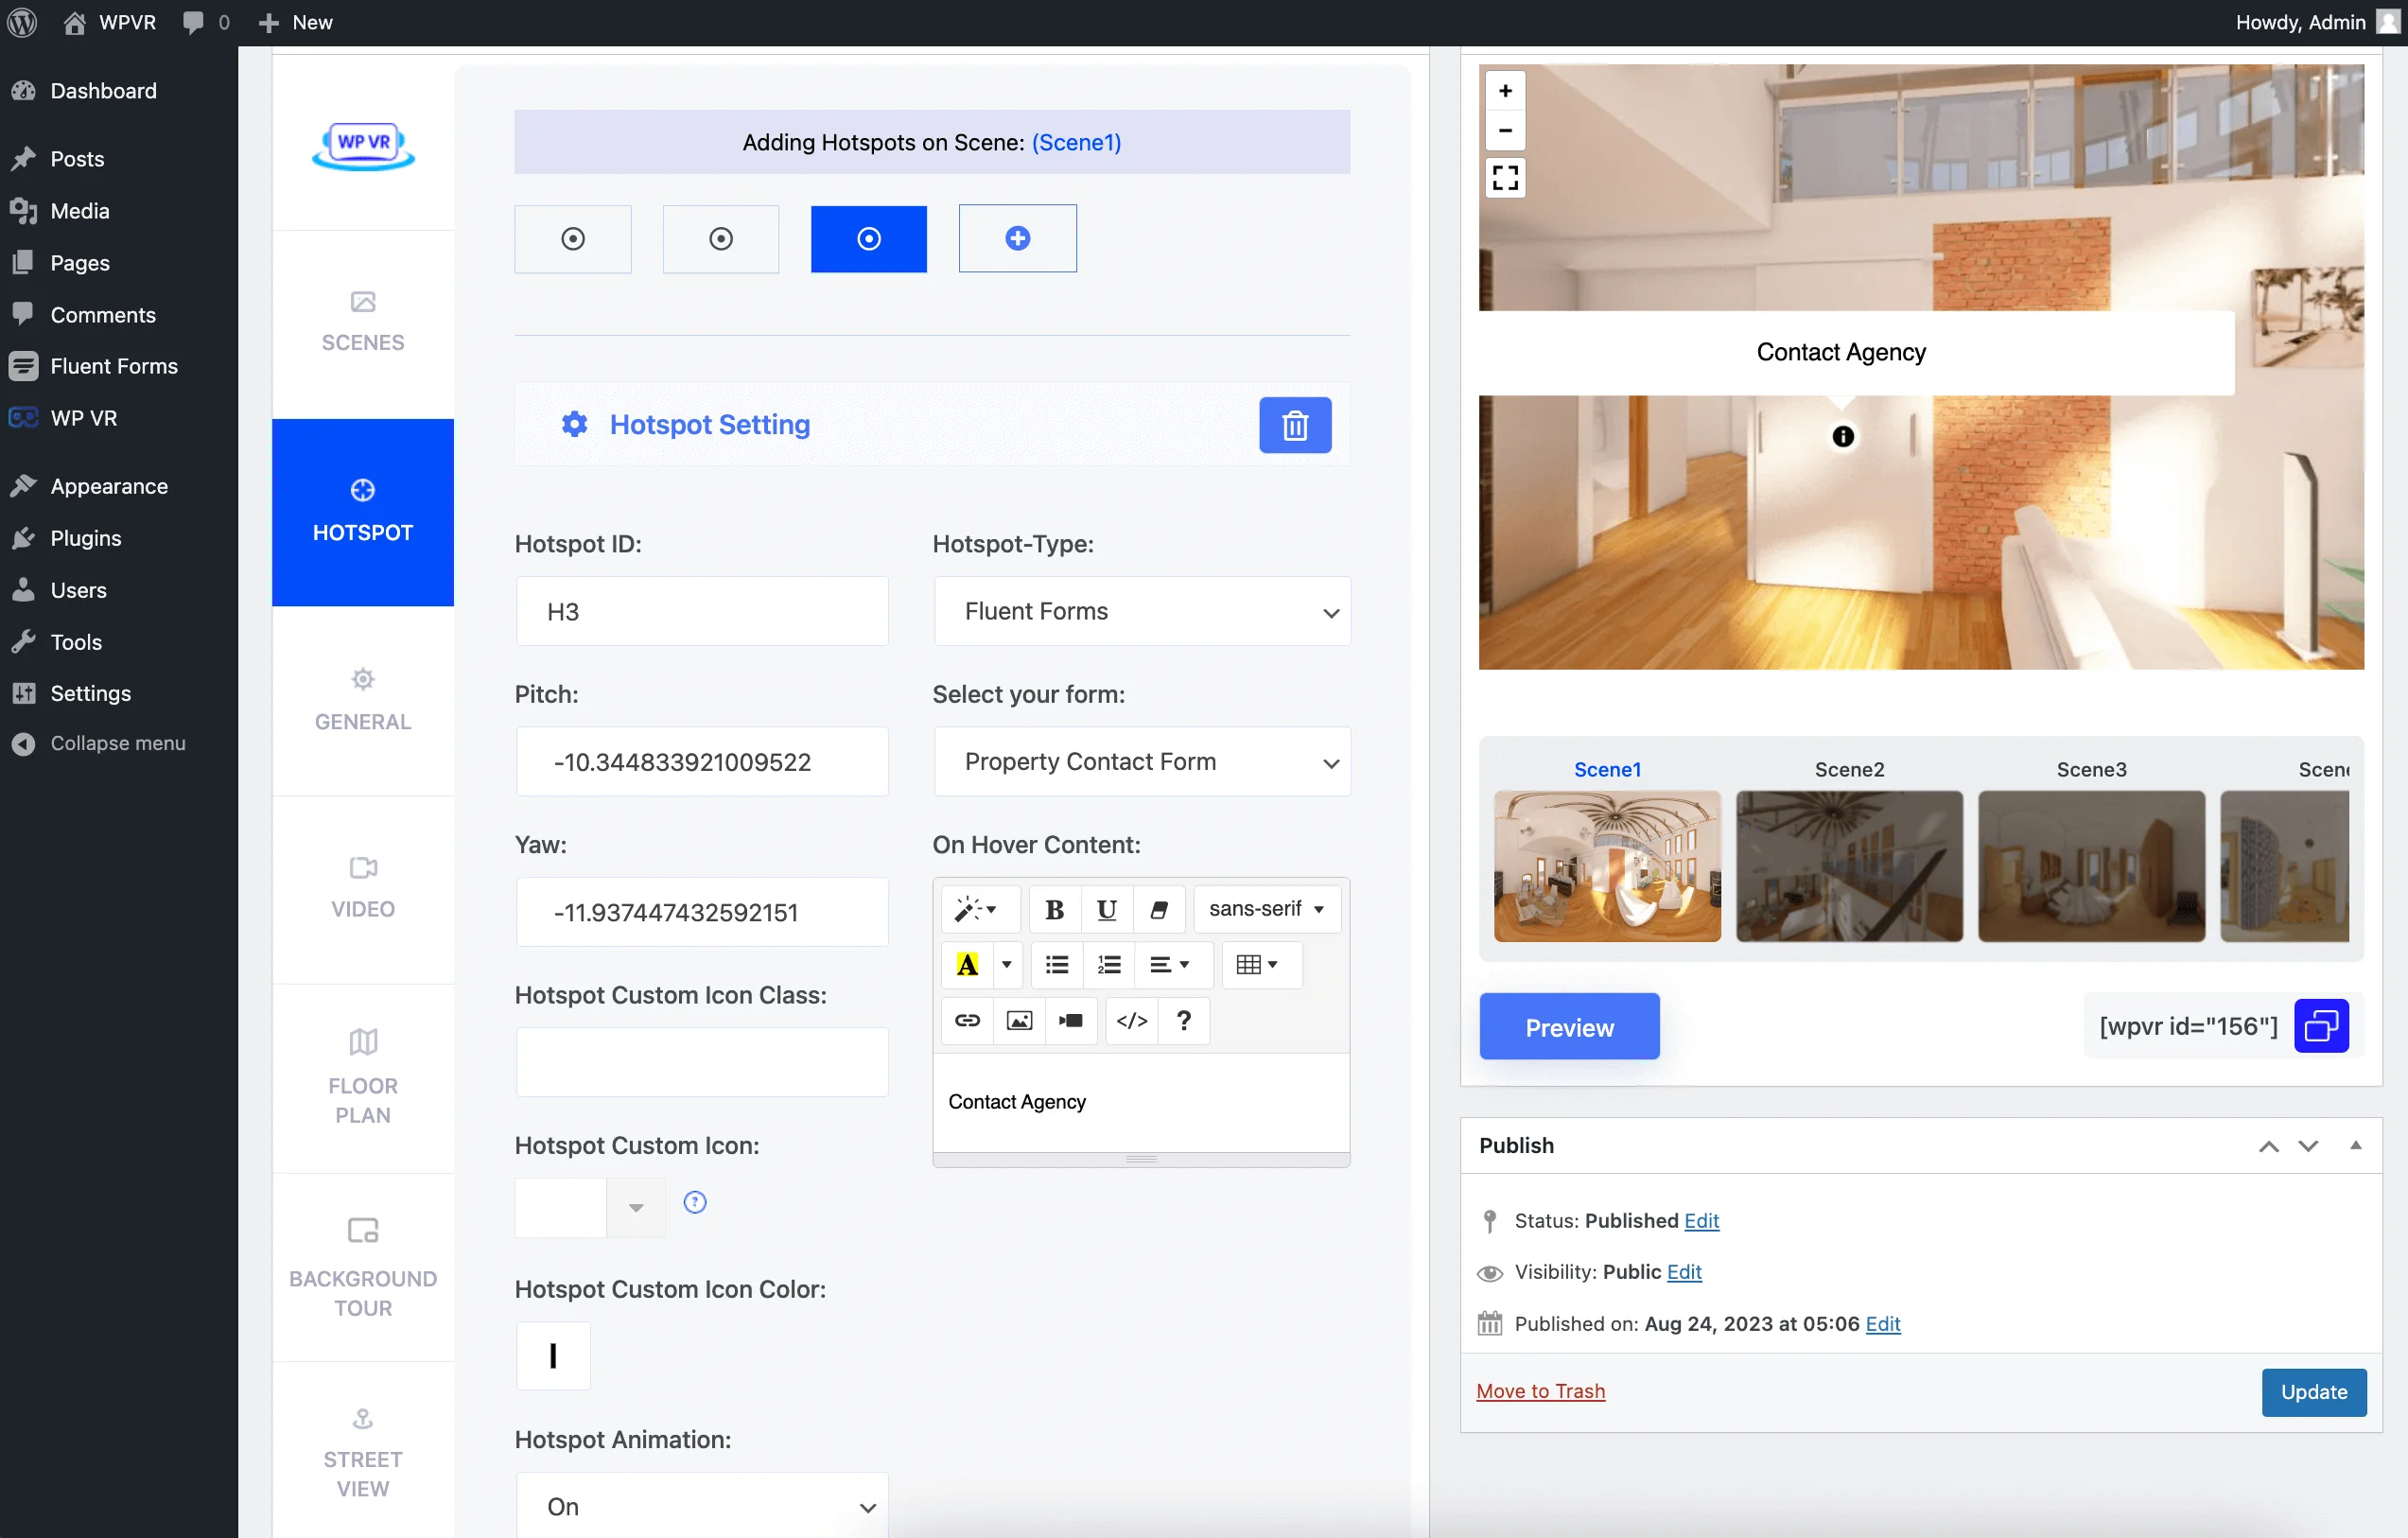
On Hover Content:

Here you can add content to your hotspot so that if you just hover your mouse on the hotspot, the content will appear. And similar to the on click content, you can add whatever type of content you want.

On hover content

You can also add images using the <img src> tag or add a video using the <iframe> snippet of the video to display them when you hover the mouse on the hotspot.

Now, let’s look at the Scene type hotspot.

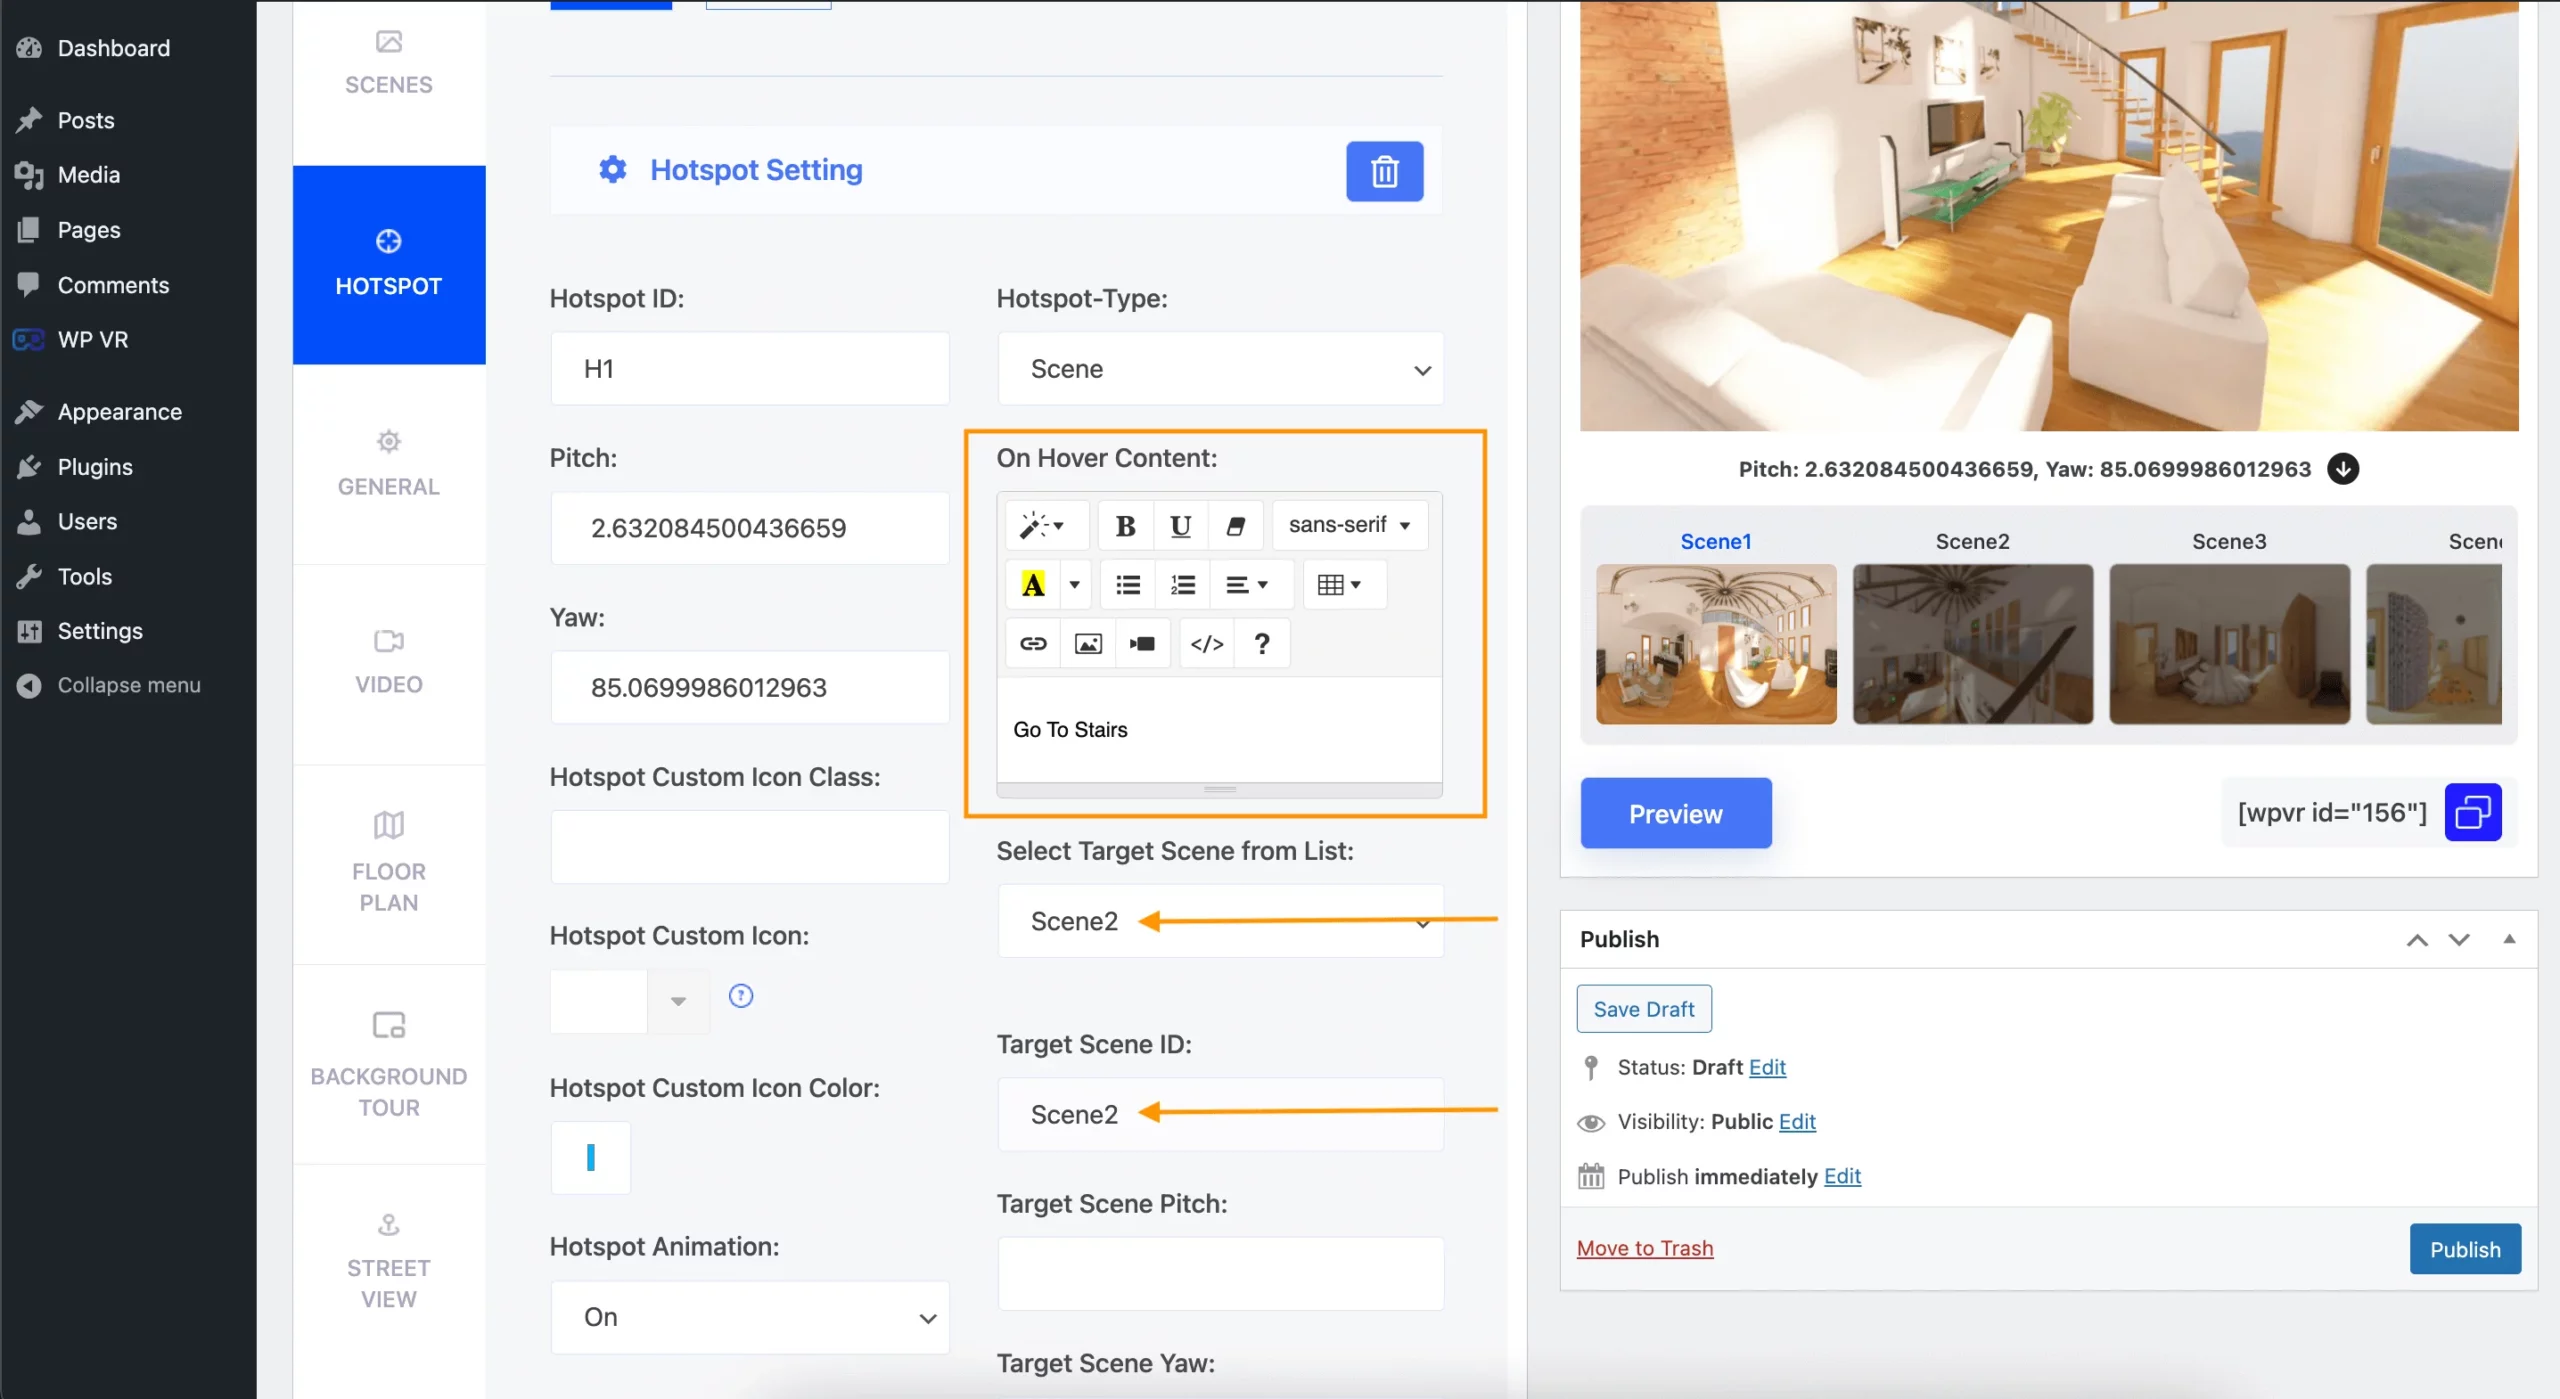
A scene-type hotspot is used to connect two scenes, i.e., clicking on the hotspot will transmit you to another scene (assigned here).

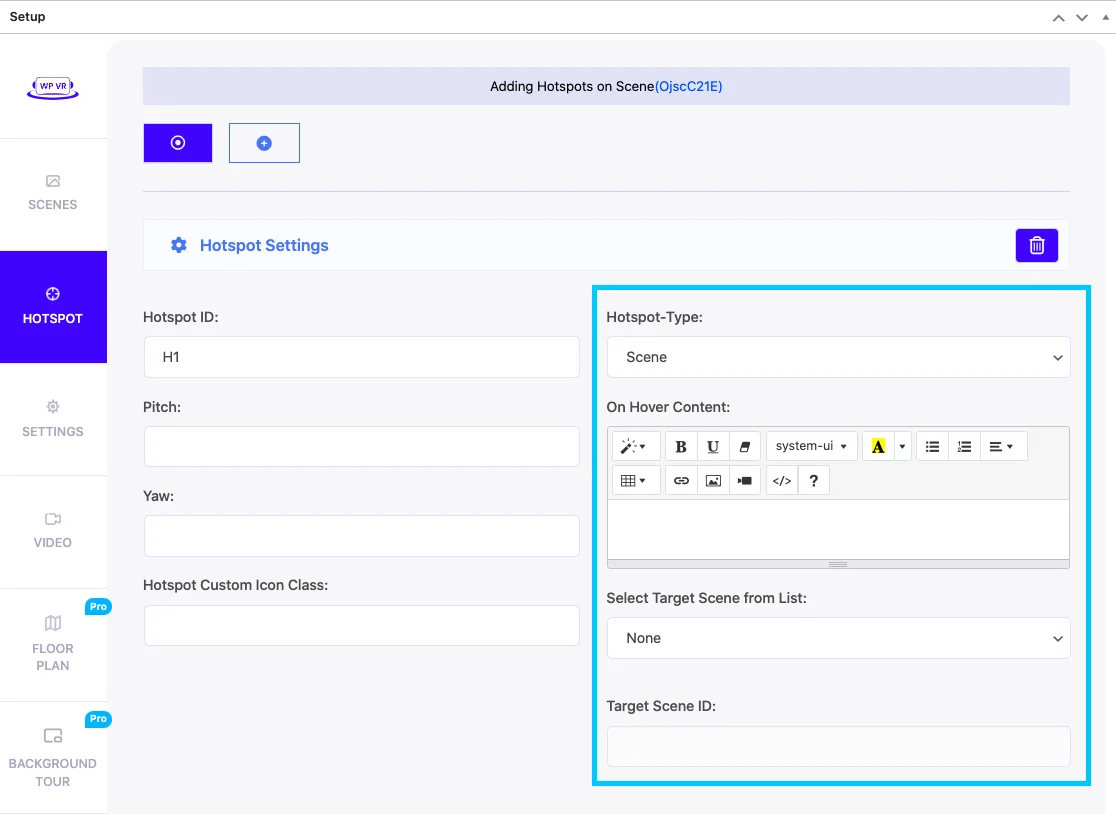
If you change the hotspot style to Scene, then you will view these fields:

  • On Hover Content.
  • Select Target Scene from the List.
  • Target Scene ID.
hotspot scene type

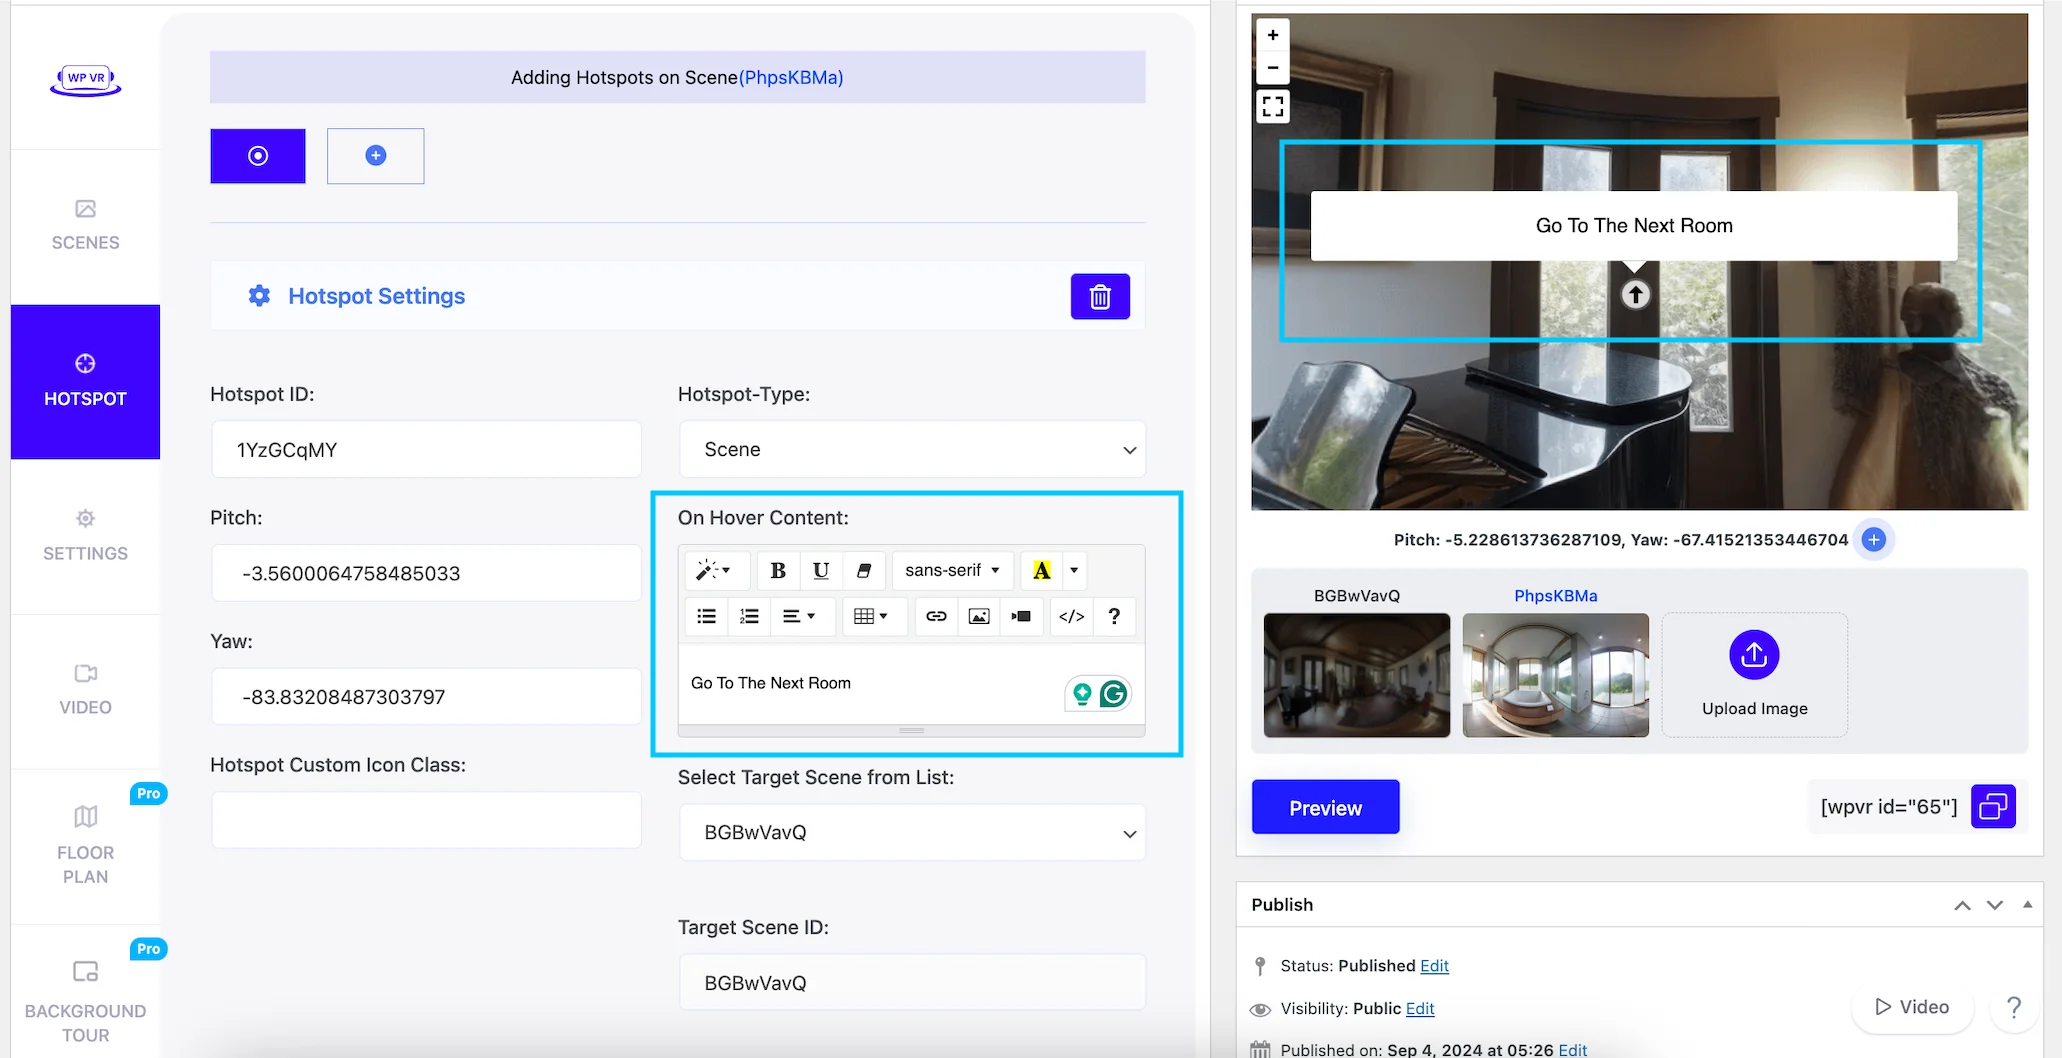
On Hover Content:

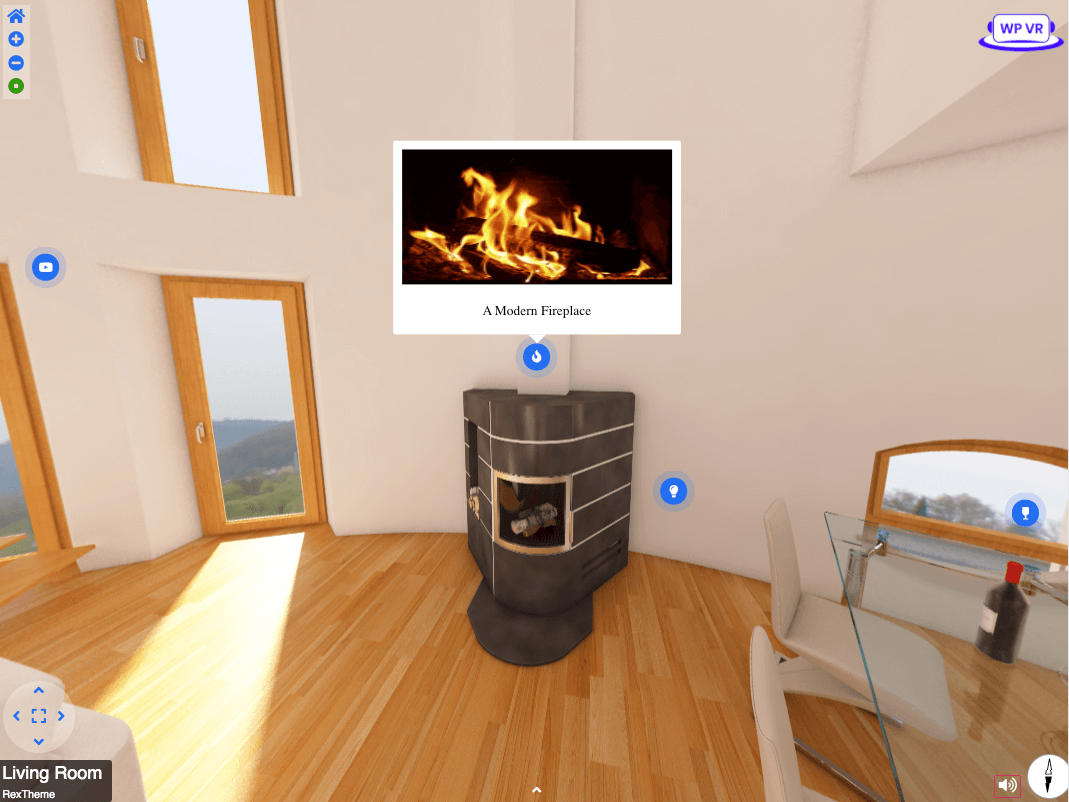
Here you can add content to your hotspot so that if you just hover your mouse on the hotspot, the content will appear. In the content, you’ll be able to add image [maybe of the scene that you’re guiding them to], videos, images etc.

Here’s an example:
On Hover Content Scene Type

You can also add images using the <img src> tag or add a video using the <iframe> snippet of the video to display them when you hover the mouse on the hotspot.

Select Target Scene and the ID from the List:

For every Scene you create, their Scene IDs get listed here for you to choose from. Whichever you choose will be the scene where the hotspot will take you. This field shows you the Id of the Scene that you selected from the Target Scene from the List.

The ID automatically gets loaded.

Select Scene for Hotspot

**When you choose a hotspot to be Scene type, the hotspot icon on the tour will change to a small Arrow.

Hotspot Scene Type

Hotspot Custom Icon Class:

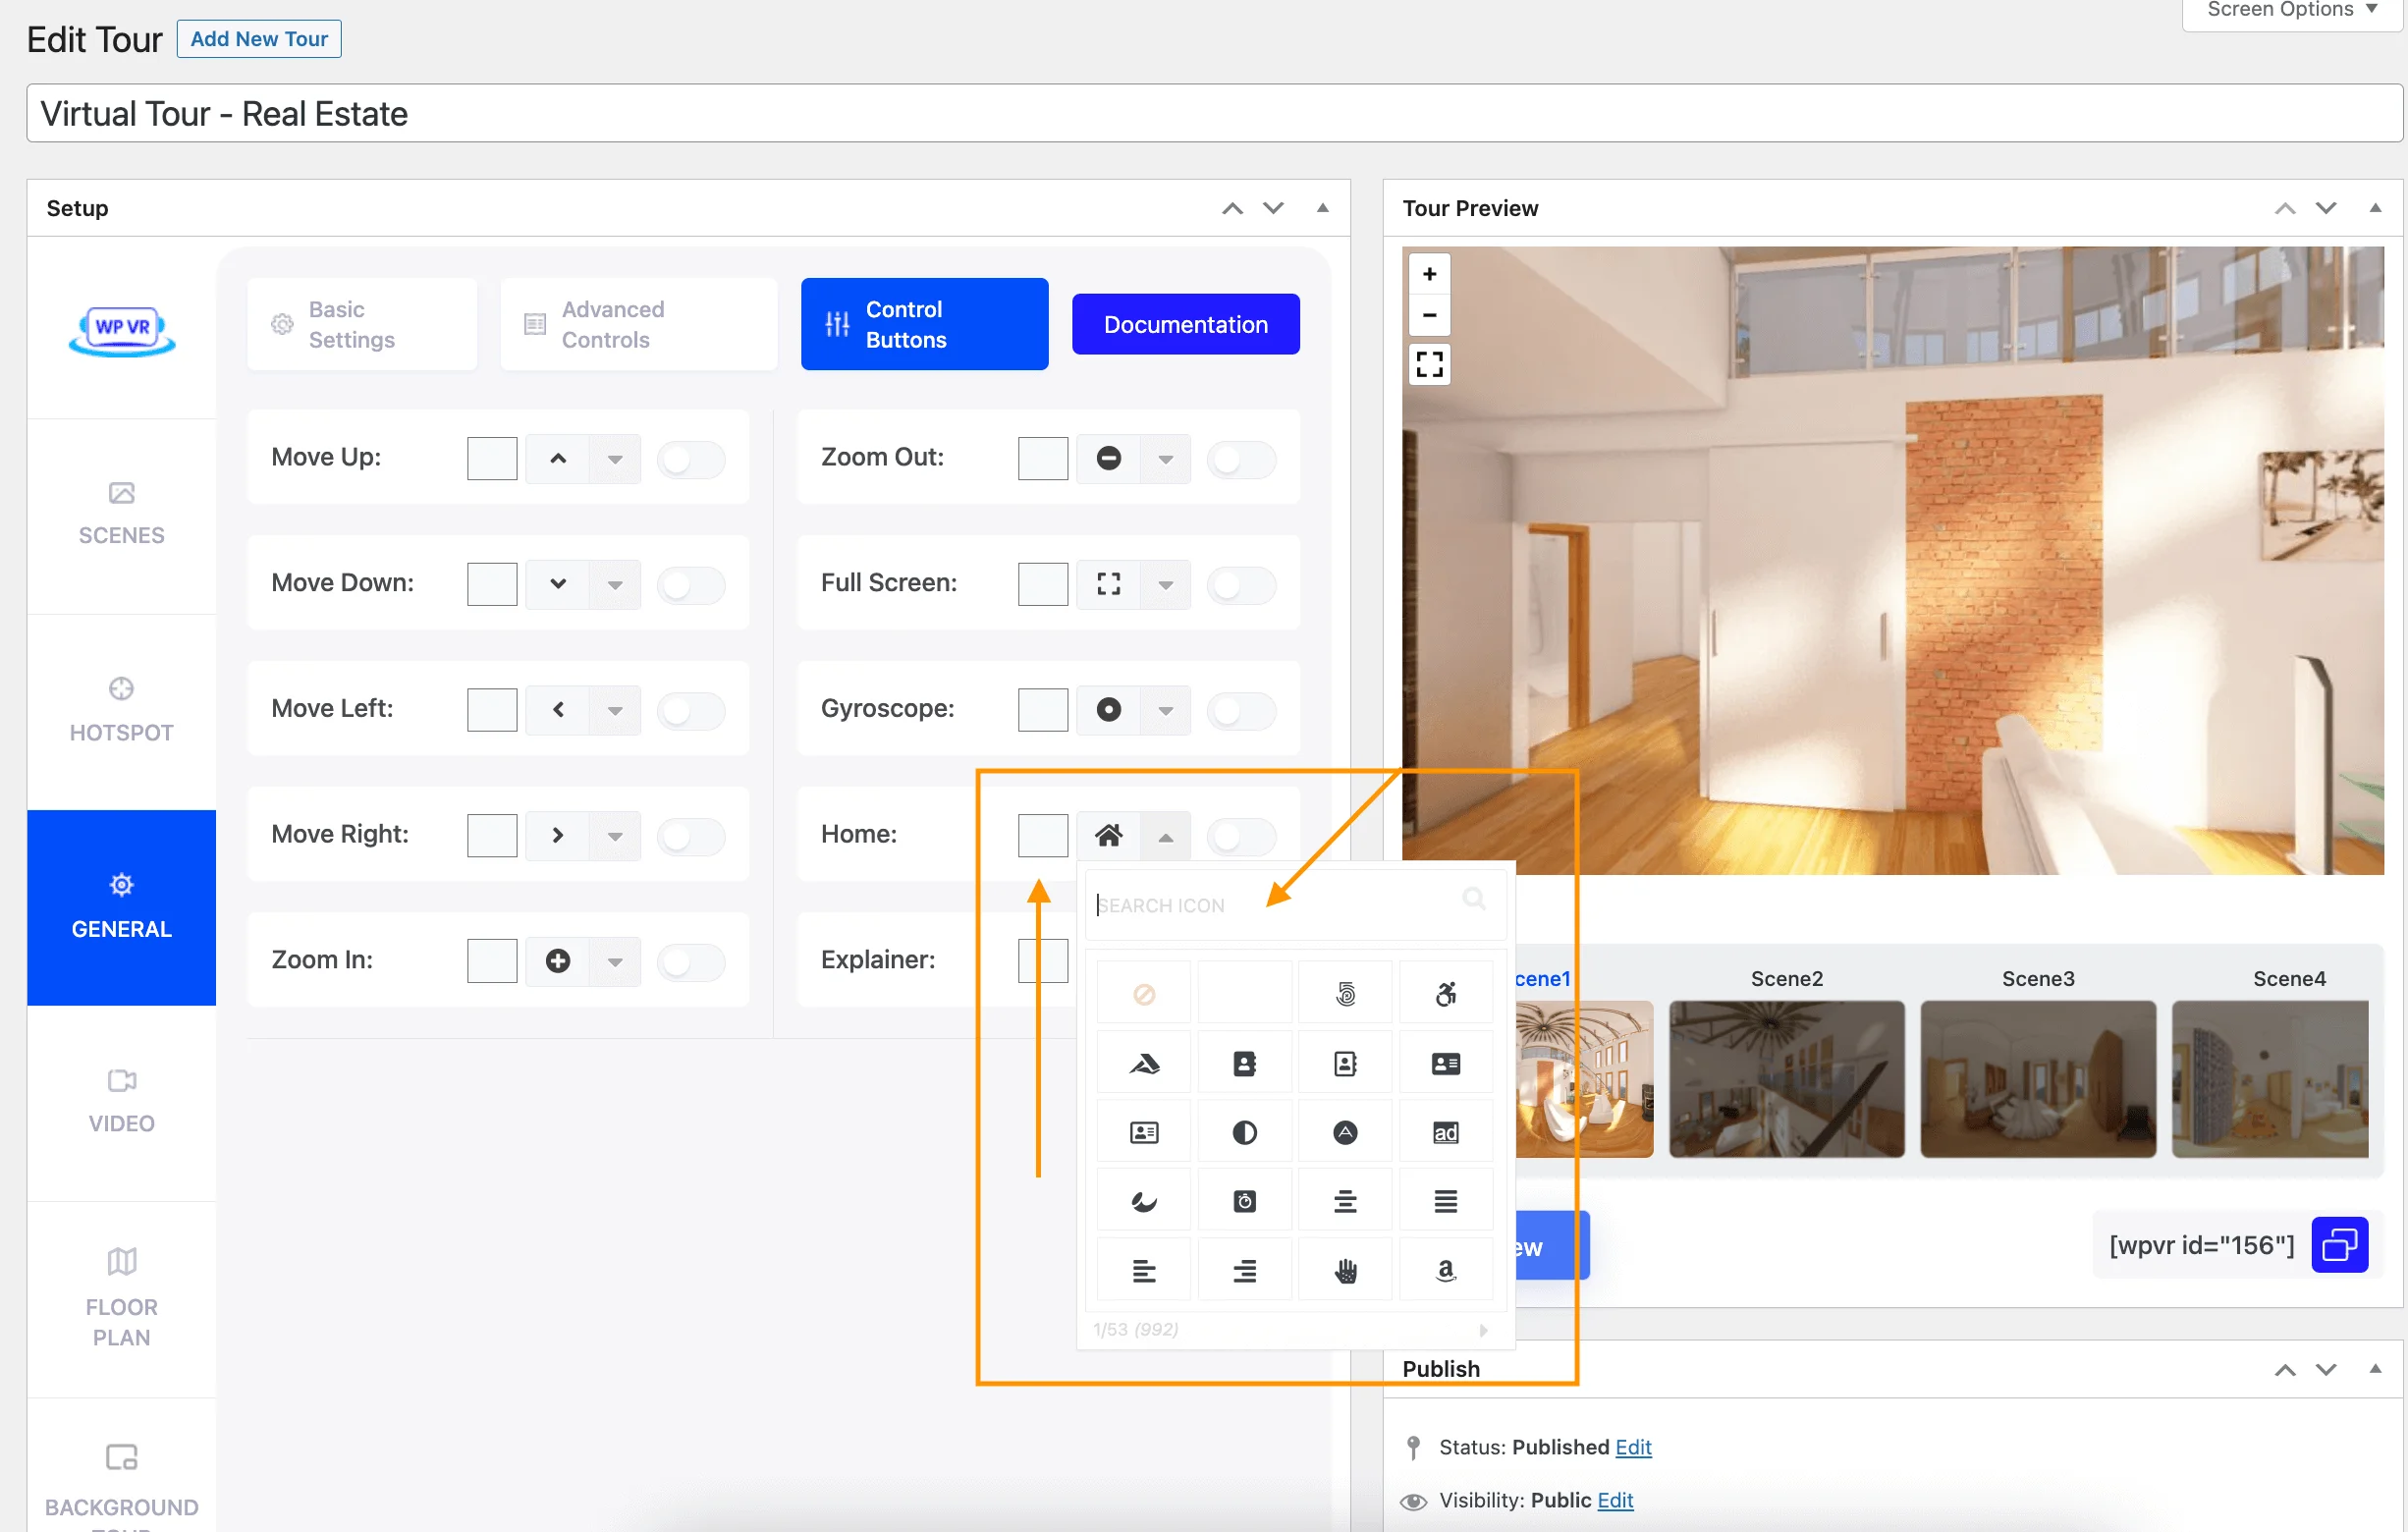
This field is there to allow you to implement customizations of the hotspot content.

Custom Hotspot Icon

Here you can apply customization to the hotspot icon. You may use any icon of your own choice. Let me give you an example.

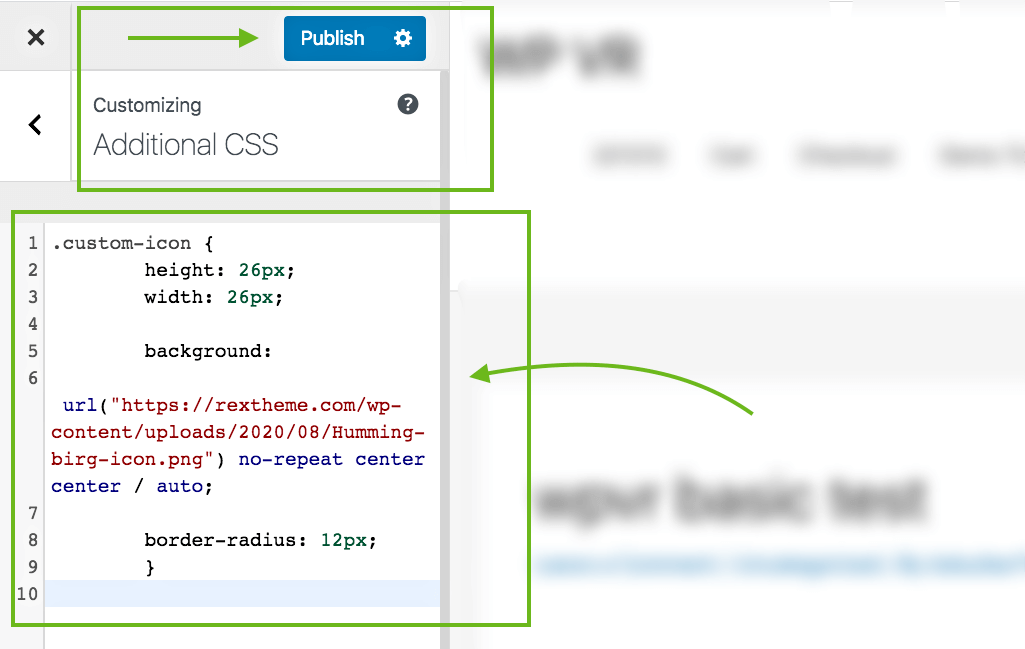
To customize your hotspot icon, go to your Appearance > Editor. Choose the style sheet of your current theme, or you may go to Appearance > Customize > Additional CSS.

Here, create a class and under the class, add your custom style CSS code for customization. Click Save. For example:

.custom-icon { 
height: 26px; 
width: 26px; 
background: url("image url") no-repeat center center/auto; 
border-radius: 12px; 
}

Here I set the class name as “custom-icon” but you can give any name you want. Then set the height and width of the image (ideally 26px by 26px for icons). Then provide the image URL. You can add a border radius if you want the icon to be circular.

Here’s how my one looks:
Paste code in Additional CSS

Then Publish.

Hotspot Custom Icon Class:

Now go to your tour and input the class name “custom-icon” on the “Hotspot custom icon class” field for the hotspot you wish this icon to apply on.

Icon class used

Then update the tour. This icon won’t show at the back end, but it will appear on the front-end.

Hence, embed the tour on a page and preview it to see the result.

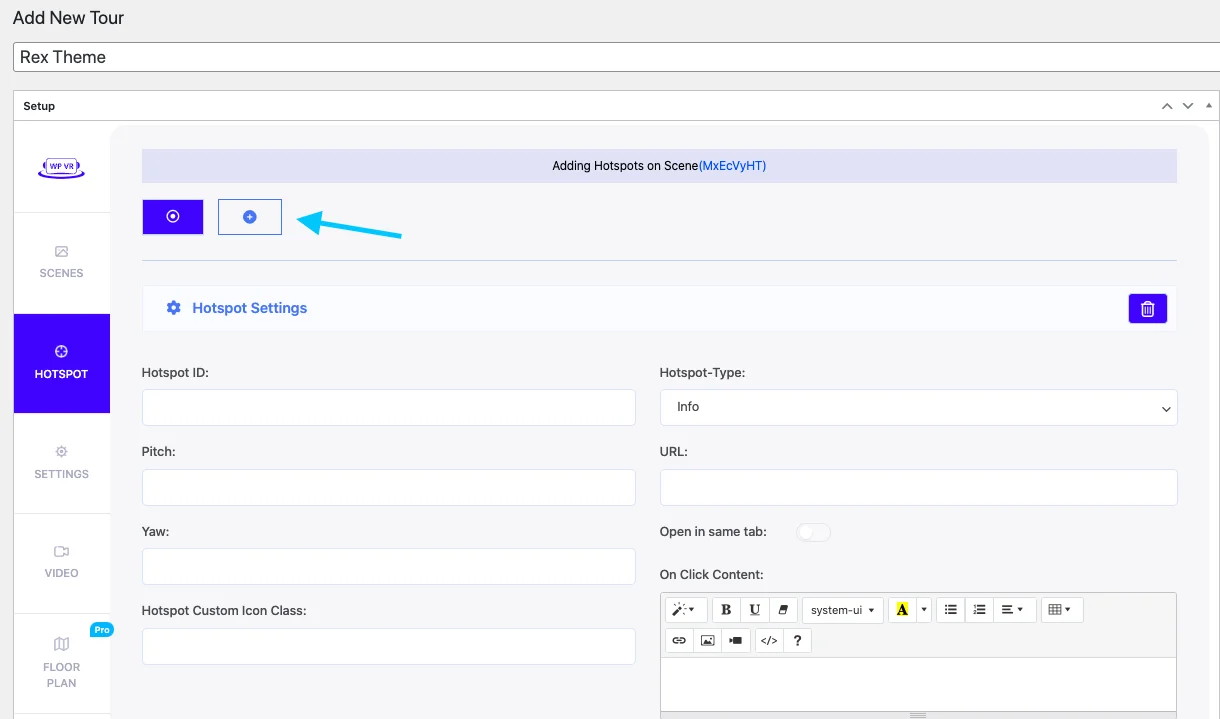
Add More Hotspot As You Move On:

To add a second hotspot, click on the “+” button above and a new blank hotspot will be added.

add hostpot option

To remove a hotspot, simply click on the trash icon and the hotspot will be deleted.

hotspot delete option

That’s it, that’s all you need to know about setting up a hotspot for now.

Hotspot Special Features In WPVR PRO

Now utilize Steps 3, 4, and 5 to add more scenes and set up a virtual tour.

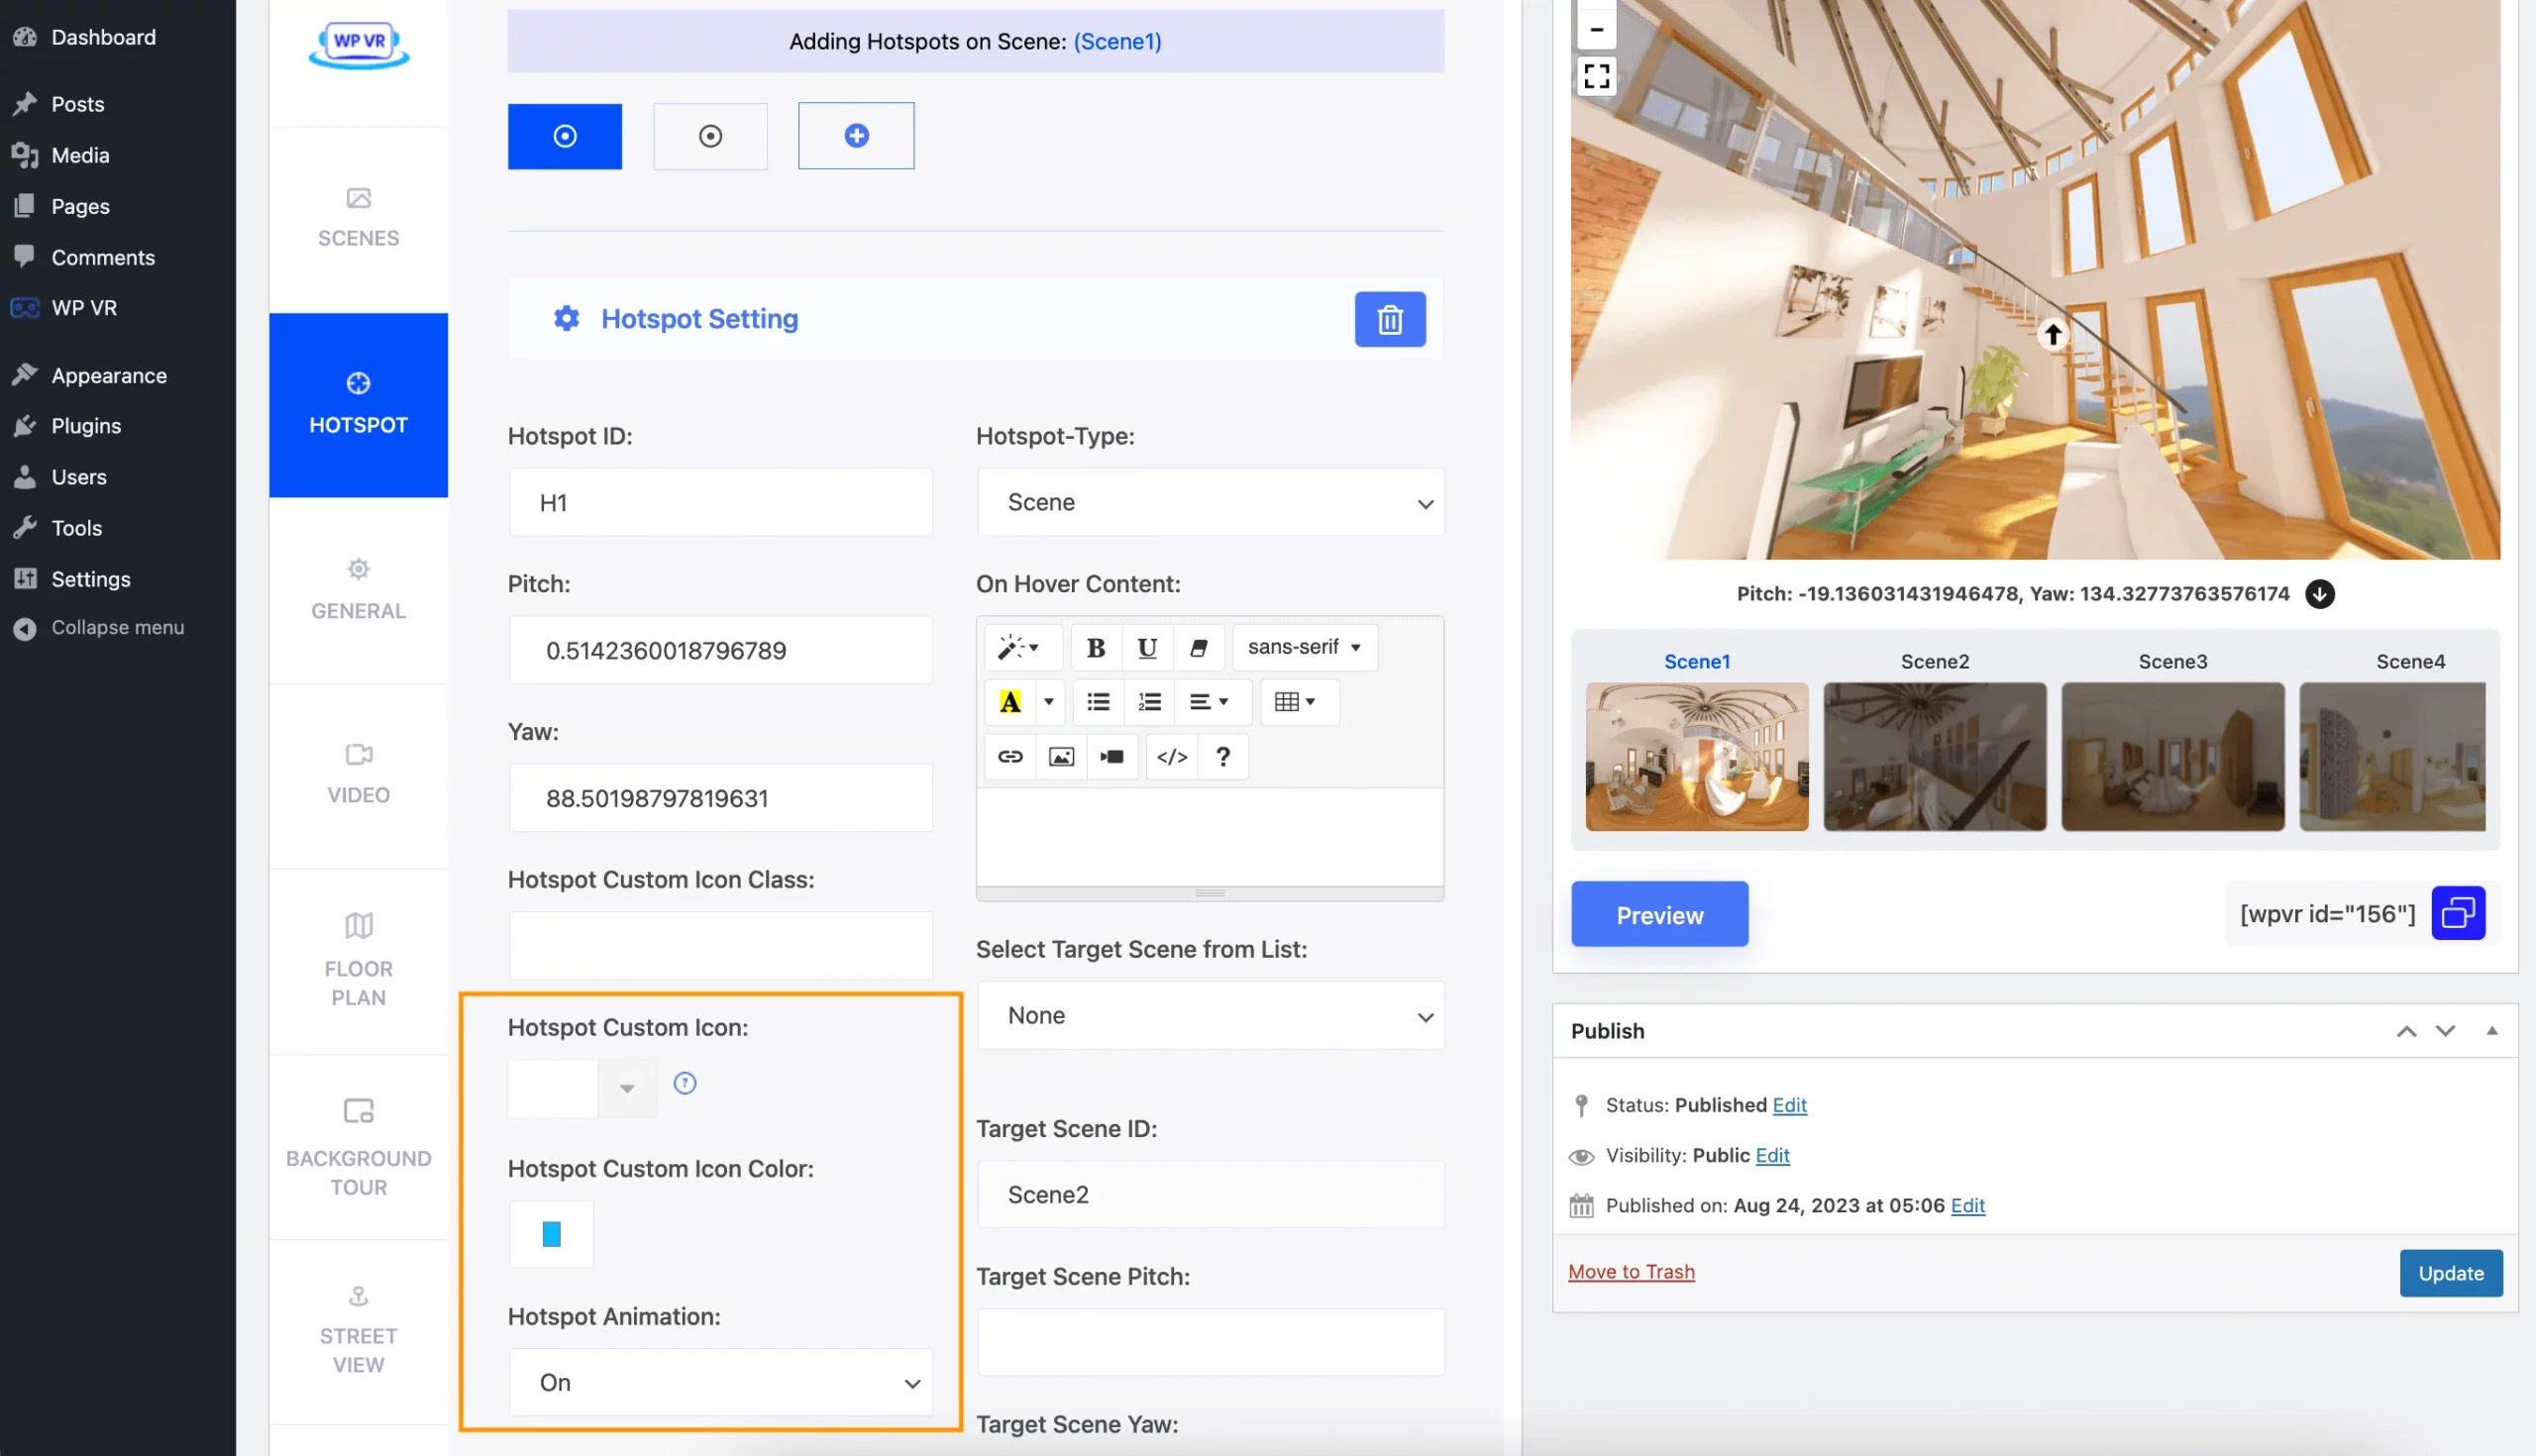
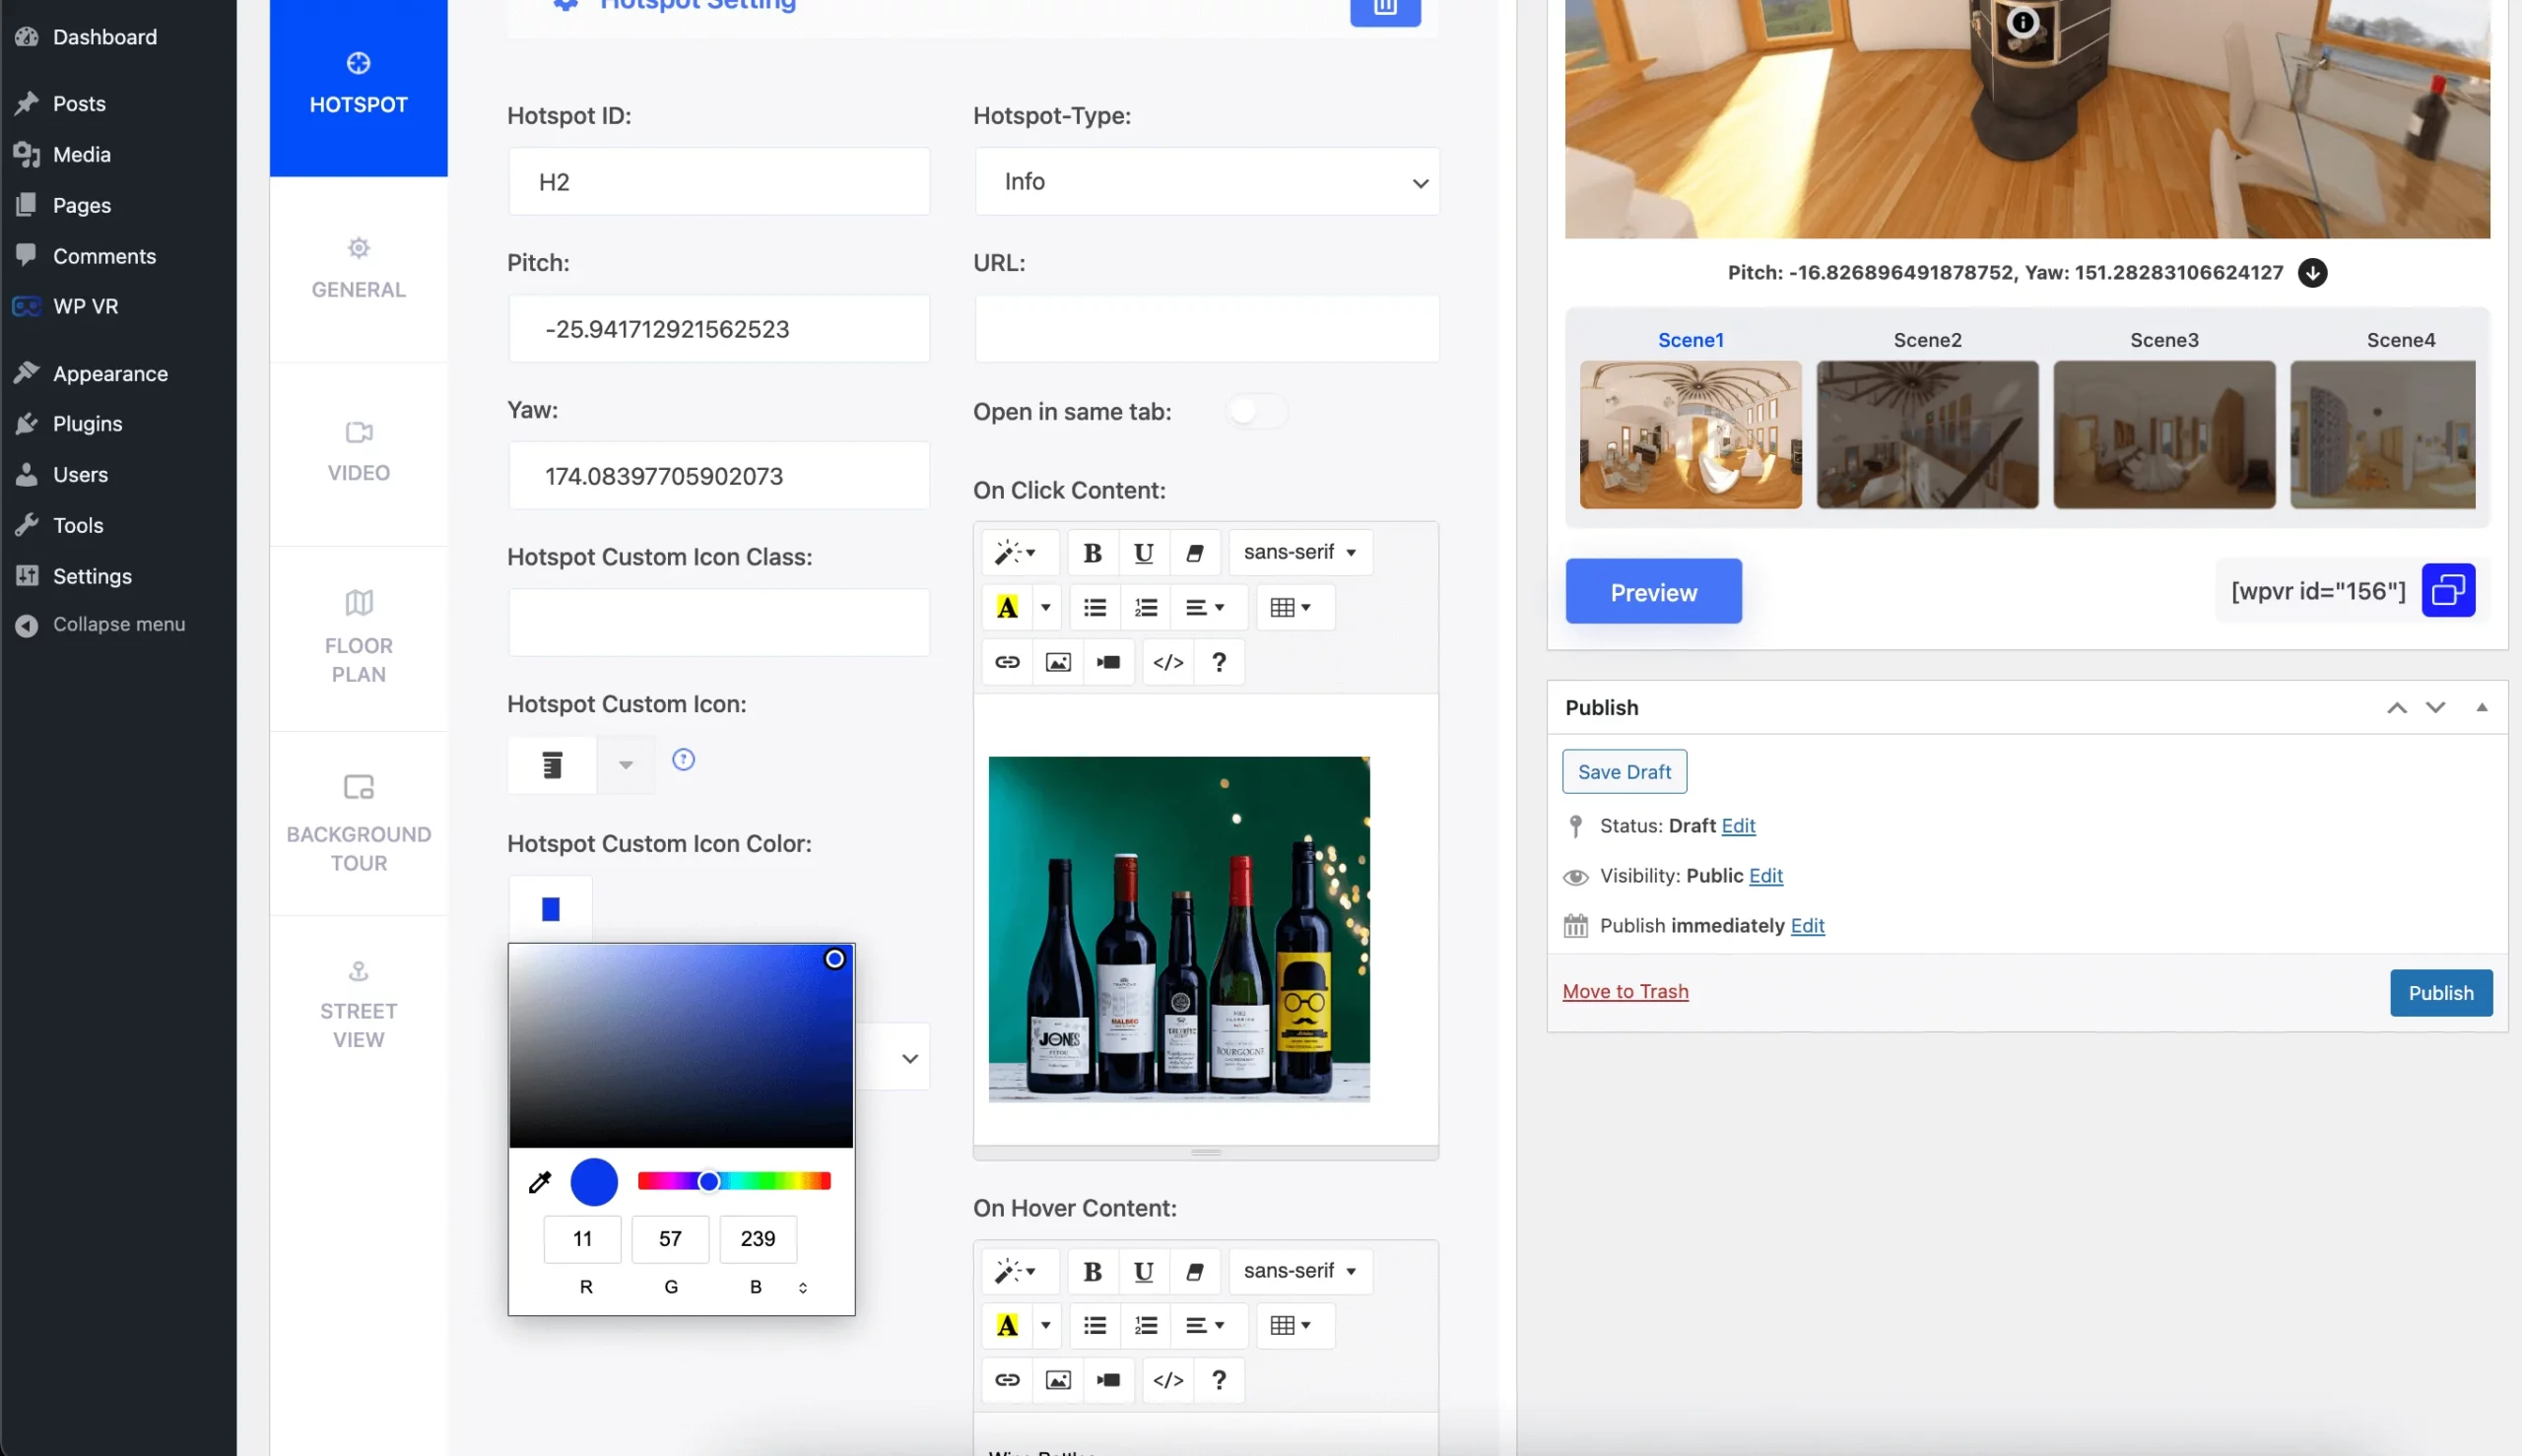
You can also customize your icon with these options :

  • Hotspot Custom Background Color: This allows you to set a specific background color for hotspots in the panoramic scene.
  • Hotspot Custom Background Shape: This allows you to set specific background shapes for hotspot icons like circles, rectangles or hexagon.
  • Hotspot Custom Icon Color: Enables customization of the color of the icon used for hotspots in the panoramic view.
  • Hotspot Animation: Provides options to add visual effects or movements to hotspots, making them more noticeable or interactive. This icon won’t show at the back end, but it will appear on the front end.
Hotspot Customization

Step 6 – Publish The Tour and Collect Tour ID

Once done, move to the next step.

Publish The Tour:
Once you have successfully set the settings for General settings, Scene settings, and Hotspots settings, click on the Publish button on the top right side of the page.

publish option

Once you publish, that button will change to Update.

update option

Collect Tour ID:
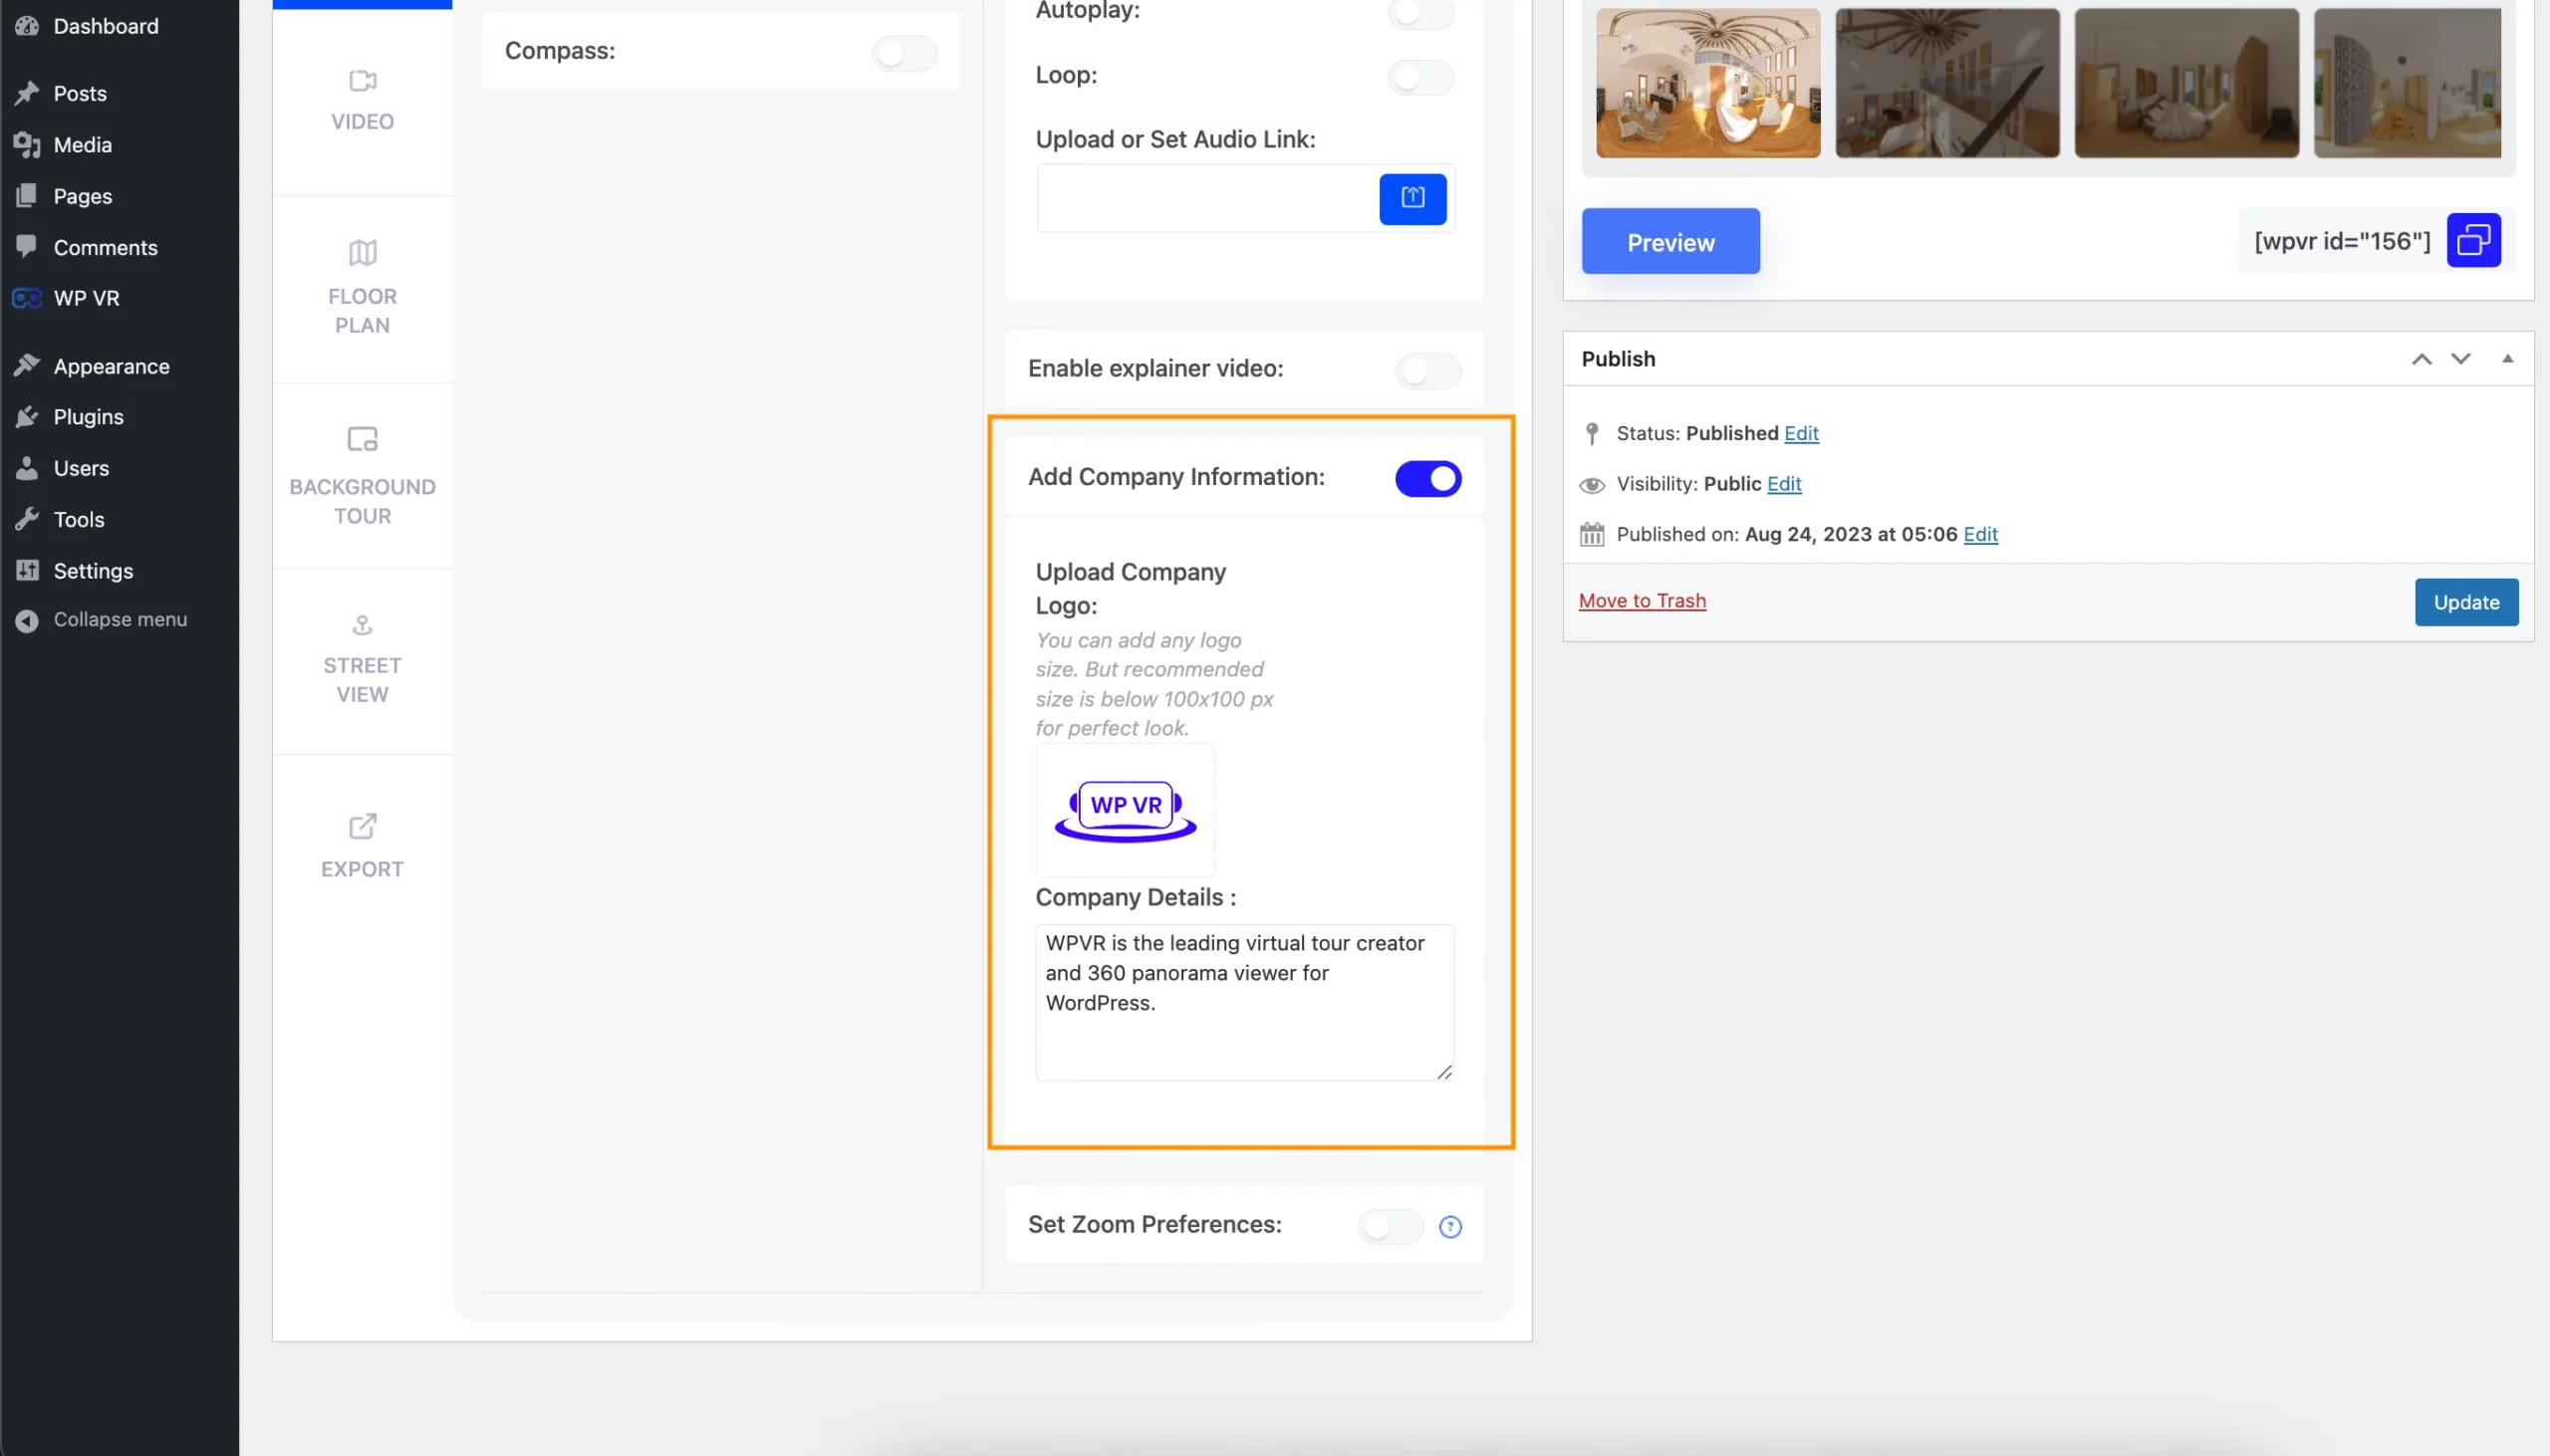
On the tour setting pages, you will see a box named Using This Tour where the shortcode and the Tour ID is provided. You will need the Tour ID to embed your virtual tour on the website.

Tour ID

You can also get the Tour ID from the tours section.

All the tours you have created will be stored under Dashboard > WPVR > Tours.

You will see the list of the tours you have created. You can collect the Shortcode or tour ID.

Step 7 – Place The Virtual Tour On Your Website

Placing the virtual tour on your website depends on the page editor you use.

  • Classic editor: For Classic Editor, copy and paste the shortcode of your virtual tour. You can add height, width, radius, or any designs you want within the shortcode.
[wpvr id = "Example ID" width = "600px" height = "400px"]

Preview or Publish the page to find the virtual tour added.

  • Other page editors (such as Visual Composer):

For page builders such as Beaver Builder, Visual Composer, etc, you need to use an “HTML” block (such as Raw HTML block) and input the shortcode there.

Step 8 – Enjoy The Benefits Of Using A Virtual Tour

Now that you know how to create, set up, and present the virtual tour on your website. The next thing to do is to sit and see your audience getting excited, visitors becoming dedicated prospects, and prospects turning into customers.

As you can see, it is super easy to create a virtual tour for your WordPress site. Go ahead and start using virtual tours ASAP.

In a later section, I will discuss how many business niches can use and benefit from using virtual tours. You will definitely be able to relate.

Anyways, now most of us are not familiar with panoramic images since they cannot be taken without a few equipment and methods. And as you saw in the last section, in order to create a virtual tour, you will need to use a Seamless 360 Panoramic Image.

Now, let us look at how you can capture 360 panoramic images on your own.

Capturing A Perfect 360 Panoramic Image

Capturing A Seamless 360 Panoramic Image 

You can capture and create 360 panoramic images in 3 ways:

  1. Using Digital 360 Degree Camera (Recommended)
  2. Using Standard DSLR
  3. Using A Smart Phone

Digital 360 Degree Cameras are the best for this case. They are easy to use, less hassle, and cost-effective.

However, I will give you a proper guide to follow all the 3 methods with suggestions on the equipment required, and tips and directions to successfully create 360 Panoramic Images.

1. Using Digital 360 Degree Cameras

There are certain cameras available just for 360-degree photography. These are digital cameras that usually have multiple built-in Fisheye lenses that cover a complete 360 degrees in one go.

Here is a list of some of the best 360 Degree Digital Cameras.

Here, we will give a brief guide on using the Ricoh Theta V to take seamless 360 panoramic images.

Let us look at the tools required.

Equipment Required:

1. Ricoh Theta V

Ricoh Theta V is a slim camera with two Fisheye lenses in opposite directions. Each lens captures a complete 180 degrees both horizontally and vertically.

The main advantage of this camera is that it has an auto-stitching function, i.e., once you take a photo, the output will automatically be a 360 panoramic image. You do not need to do any manual stitching or take multiple images.

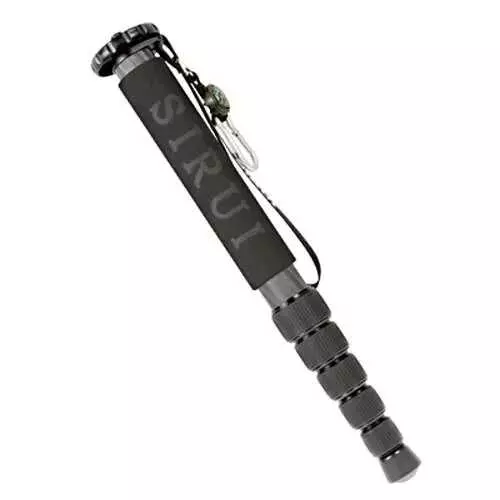
2. Monopod

A Monopod is a camera that has 1 extendable leg, fixable at specific heights. Since the Ricoh Theta covers a complete 360 degrees, a tripod would be obstructive with its 3 legs. A Monopod will not appear in the image at all.

Here’s a list of monopods you can check out.

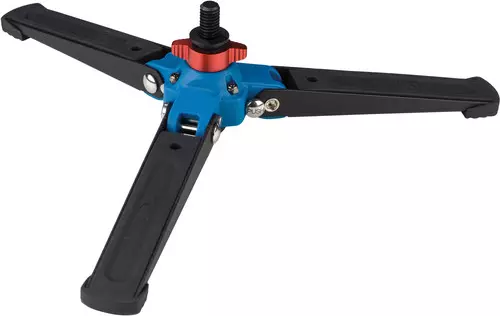
However, you will need a 3-leg locking base to be attached at the bottom for it to stand tall.

It is a small 3-legged stand that lays flat, while the Monopod is connected on top. Its 3 legs give the support required for the Monopod to stand.

3. Ricoh Theta V App

Whether you call it an advantage or not, you can control the Ricoh Theta capture using your smartphone through the Ricoh Theta V App.
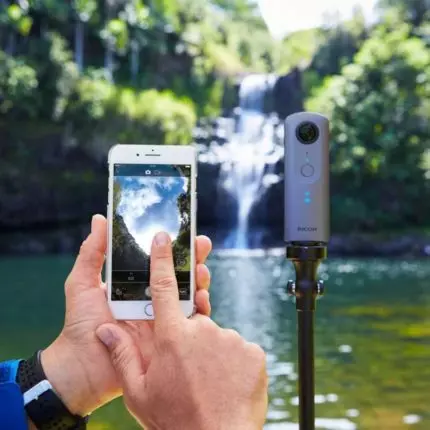
Ricoh Theta V App

Simply connect the camera to your phone through Bluetooth and then you can get the image preview on your phone through the Ricoh Theta V app. Hence, you can carefully analyze if you have placed the camera in the right spot for the best light and location exposure.

The app gives you features to control white balance, ISO, bracketing, and shutter timer.

The main reason to use the app is to be able to take photos remotely. Since the 360 camera covers all directions in one go, you clicking manually would mean that you would be on the image.

With the help of the app, you can set the devices up, go to the next room and use the app to capture the image.

Tips And Directions To Use

  1. Place the Monopod on the stand and attach the camera to it. Place the devices at a point near the center of the room.
  2. Toggle the Monopod to place the camera at a height similar to the height of an average person’s eyes or shoulder. This will create a more realistic effect when creating a virtual tour.
  3. Connect the phone app to the camera, and go on live view mode. Here, it will show the image in a 360 Equirectangular format, to see if you have adjusted all the settings correctly and if the image looks good.
  4. During the day, it is advised to keep the ISO between 200-400 based on the surrounding light. At night you should lower the ISO to 100 or below to get less noise in the image.
  5. Enable the “noise reduction” option from the app to improve image quality.
  6. Go outside the room and prepare to shoot the image.
  7. Turn the live view mode “off” since it can causes a shutter lag if turned “on”.
  8. Capture the photo which will be saved either on your phone’s photo gallery or in the memory card of the camera.

The device automatically does the stitching and processing so you do not have to do any extra hard work.

That’s it! You now have a seamless 360 panoramic image. You can upload this image to WPVR and create a stunning virtual tour.

2. Using DSLR To Capture 360 Panoramic Images

DSLRs are usually used for professional photography and can capture high-quality images. However, it is quite difficult to capture 360 panoramic images using a DSLR.

You will need to capture several images to cover complete 360 degrees in all directions, and then do some editing to achieve a proper 360 panoramic image.

Here’s a brief guide to help you out.

Equipment Required:

1. A Quality DSLR Body

Use a DSLR body with high dpi that has a bracketing feature.

**Bracketing refers to taking a certain photo multiple times at different exposures and then merging them together to form a photo with a balanced exposure.

You can take a look at Nikon D810Canon EOS 5d Mark IVSony Alpha A7R2, or Panasonic Lumix G6 when considering buying a DSLR body.

2. A Fisheye Lens

You will need a Fisheye lens to capture wider images, in order to complete the process with fewer photographs taken.

Here’s a list of Canon Fisheye lens you can take a look at.

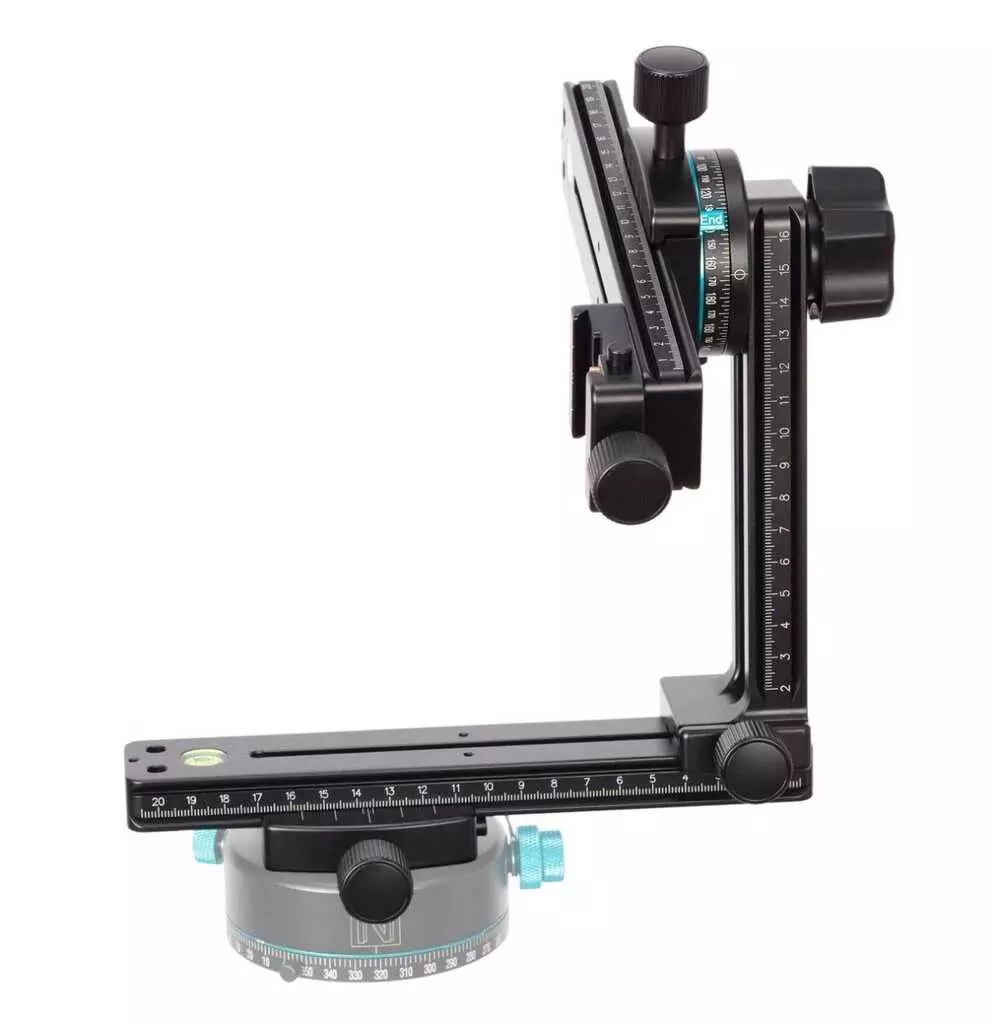
3. A Panohead

A Panohead/Nodalhead is a piece of equipment to that you attach your camera to. You can then can set the camera to rotate at fixed horizontal angles using the Panohead rings. This will ensure you cover a complete 360 degrees horizontally, without overlapping.

You can learn more about Panoheads here.

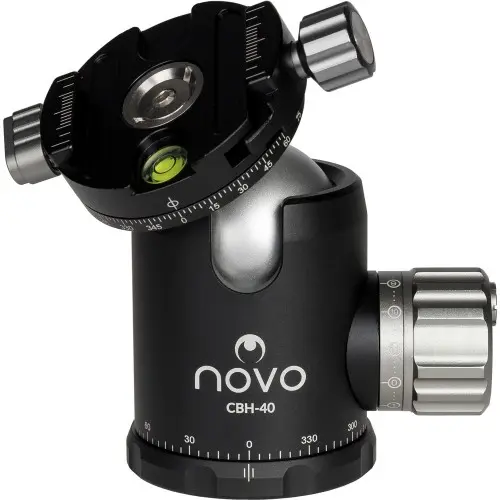
4. A Ball head (optional)

If you are willing to capture images on an uneven or unbalanced ground location, then you may use a Ball head to balance your camera on a proper horizontal axis.

Here’s a list of good ball heads you can look at.

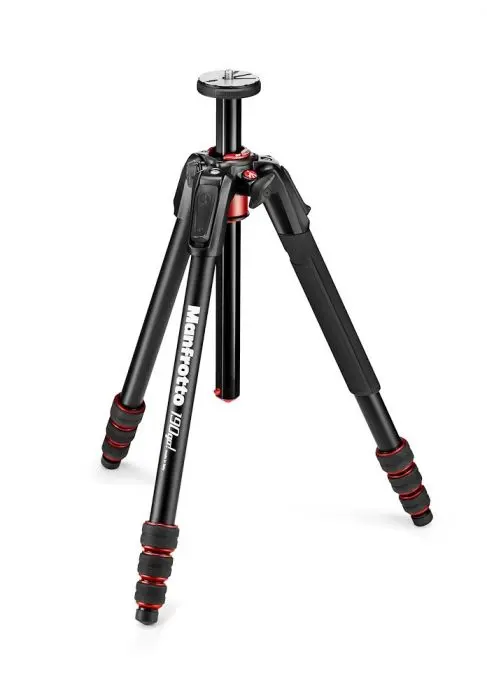
5. A Tripod

A tripod is a camera stand with 3 legs that are extendable and fixable to specific heights. It has a horizontal 360 spinnable top section, with a handle, on which the ball head or the Panohead (in case you don’t use a ball head) is attached.

The Panohead ring will help to control the angles you can spin the camera.

Here are some of the best tripods out there.

Tips And Directions To Use

  1. Chose a time of the day when there is suitable light from all directions to take photographs. If you’re shooting at night, make sure you have proper lighting all around.
  2. Set up the equipment and place it in the center of the room.
  3. Make sure to create a no Parallex point. Here’s a video to help you understand.
  4. Toggle the tripod to place the camera at a height similar to the height of an average person’s eyes or shoulder.
  5. Toggle camera for best settings. Here are my suggestions in case there is sufficient daylight:
    • Put the camera in full manual mode
    • Keep a decent shutter speed; 1/10th or 1/20th is ideal at daytime
    • Set apparture to about F11, and ISO to around 640 or more
    • Set manual white balance to 4000Kelvin
  6. Set bracketing to 3 exposure levels at a difference of 2 levels between them.
  7. Apply auto timer to capture these bracketing images, maybe within 3-5seconds.

FYI: Photography completely depends on the light, and these settings might not give the best output at different light exposures. Hence, you need to toggle settings based on the amount of light available.

Now to take pictures.

Capturing Necessary Images Using DSLR

Capturing Necessary Images Using DSLR

Now, you need to take a number of photographs depending on the width your Fisheye lens can cover.

Let’s take an example:

If you are using a Fisheye lens that cover 90 degrees vertically and 60 degrees horizontally, then here’s what you need to do:

  1. Set your Panohead to rotate 60 degrees.
  2. Take 6 bracketed photographs by rotating the camera to 60 degrees after each capture.
  3. Set the camera upwards and take 2 photographs by rotating the camera 180 degrees after the 1st shot.
  4. Set the camera downwards and take 2 photographs by rotating the camera 180 degrees after the 1st shot.
  5. Separate the DSLR body from rest of the equipment and take a handheld photo of the center of the room where the tripod was placed earlier.

So as per this example, you will now have 6 horizontal photos, two ceiling photos, and 3 ground photos.

Stitching The Photos

Stitching The Photos

Now that you have the required images, you have to stitch them into a seamless 360 panoramic image.

You can manually do it using Photoshop. Here’s a beginner’s tutorial.

Once you do it, you need to make sure you inject metadata to make it into a complete 360 degree panorama. You can use the tool Xifer to do it.

However, this is not necessary to have metadata when you use WPVR since the plugin does not need metadata to work.

You may also use tools such as PhotoMerge, PhotoStitcher, Stitcher V4, etc.

Once stitched, a seamless 360 panoramic image is created. You can then upload it to WPVR to convert it into a Virtual Tour.

3. 360-Degree Photos With Your Smartphone

360 Photo With Smartphone

Even if you don’t have any DSLR, Lenses, or specialized 360 cameras, you can take a 360 seamless panorama picture with your smartphone.

Here’s a step-by-step guide to using a smartphone to take 360 panoramic images.

Four Steps Guide To Capture 360 Panoramas With Smartphone

Whether you use an Android device or an IOS device, the process is the same.

Step 1 – Download The App

The Google Street View app lets you easily take 360 photos with your Android smartphone. It is the most stable 360-degree photography app for smartphones to date.

Download the Google Street View For Android or Google Street View For IOS and the Google Camera app from the Playstore/Appstore.

Step 2 – Set Up The App

The app will give you some welcome tips and then take you to the homepage. In the bottom-right corner, there is a camera option. 

Choose the camera option, and a menu will appear. You have to choose the third option to take 360 photos.

Step 3 – Take The Pictures

You will be taken to the camera screen and the app will give you guidance for the capture process. Hold the phone close to you, choose a suitable position, and stand up still.

Once you click on the start button, you will have a hollow circle in the center of your screen. And some orange circles will start appearing in different directions.

Move the phone, match the center circle with an orange circle, and click the snap button. That orange circle will turn blue/green and will disappear, while a photo is captured.

Another orange circle will appear in a different direction. Move the phone to the next orange circle to do the same. Keep doing it until all the orange spots are captured.

The app is designed so that once you have snapped all the orange circles, a full 360 view was captured.

Once done, the app will take you to the homepage again.

Step 4 – Image Output

At this point, the app is already stitching the photos together to make a 360 image. You will be able to see the progress of stitching on a loading bar.

After stitching is complete, you will find the 360-degree image saved in your photo gallery. You can then use this photo to upload it on WPVR and create a virtual tour.

**Please note that the latest update of the Google Camera App has some major back-end changes, due to which it might not be compatible with many Android devices.

There you go, now you know what is virtual reality, what is a virtual tour, how to create a virtual tour, what a seamless 360 panoramic image is, and how to capture 360 panoramic images on your own.

Now, you can simply choose a method to take a 360 panoramic image, upload it on the virtual tour creator (WPVR) and present it on your website to engage with your audience with more authority and opportunity for conversion.

How Your Business Can Benefit From Virtual Tours

Previously, I have listed a number of businesses that can benefit from using virtual tours on their websites.

If your business was part of that list, then you already know that virtual tours are ideal for your business.

Around 67% of the people online want virtual tours to be implemented on more businesses.

Every business can have a virtual tour on its website. However, some businesses can dramatically increase revenue by implementing a virtual tour on their site.

Now let us look at the major benefits of using a virtual tour on your site, focusing on the major niches.

Find out how a virtual tour can positively impact your business.

1. Real Estate

VR for Real Estate

People visiting real estate sites are mostly looking to buy properties or houses within the next 2-3 months. However, the main issue is indecisiveness.

Though prospects mostly look for houses in specific locations and within a suitable price range, they find it difficult to choose among multiple properties that match their requirements.

One of the reasons for this is that they are visualizing how the house looks based on flat images. They are not able to understand if the structure of the house is suitable for them since they are visualizing in their imagination.

End result? They tend to physically visit several properties before choosing one that resembles their imagination and requirements.

Here, you are losing a lot of time while giving them the live tour, and effort by pitching to prospects who might end up buying from other realtors (yes, people will talk with several realtors when searching for a house).

A real estate virtual tour can ensure that the prospects you are dealing with are already interested to buy.

The visit is just for credibility. People will be able to remotely visit the place and explore.

They will be able to view the place from every angle and eventually develop a genuine interest in a property that suits their requirements.

Hence, they will call you for a visit, with the intent to buy.

Rather than taking several live tours of many properties, they will only wish to visit a few which they might end up purchasing, thanks to the remote virtual tour.

2. Hotel & Resorts

VR for Hotel & Resorts

Tourists, travelers, or international businessmen tend to look for suitable hotels to lodge at when going to distant locations. So, it is natural for them to browse through the websites of hotels available at the location they are visiting.

You can take steps to attract as many prospects as possible through your website. A simple hotel or resort virtual tour can take you a long way.

Here’s the idea. People always look for hotels that are both affordable and comfortable to stay at. Most people tend to browse through photos of rooms when choosing. Why not give them a better visual with a virtual tour?

Create virtual tours for each room available for lodging and place them on your website. Try to add a virtual tour of your reception, hall room, bar, and dining area on your home page.

These will act as big attractions, especially for foreigners. A quality virtual tour will mean that people will be able to understand the quality and beauty of your hotel, and will probably consider calling in for reservations immediately, rather than looking into more hotels.

For Resorts, you should create a broad virtual tour, highlighting all of your special facilities such as swimming pools, beach areas, parks, ballrooms, spas, and other specialties besides the lodging and basic entertainment.

Virtual tours will definitely get prospects excited and influence more site visitors to convert into interested prospects.

3. Restaurants

VR for Restaurants

Having a restaurant means a lot of competition since currently, it is among to top business niches. 

People love to try out restaurants with good food, as well as well interior design.

Whether it’s a fancy restaurant or a classic restaurant, they have their own set of admirers.

Now, food quality is the most important thing. If you get good ratings about your food from customers, more people will probably take a visit soon. 

However, the second most important aspect is the interior.

Nowadays, prospects tend to visit the websites of several restaurants before choosing to visit one.

There, they not only look at the menus but also look at the gallery of your restaurant photos to understand if it is a suitable place to visit.

A better way to catch their attention is by allowing them to take a virtual tour of your restaurant from home.

They will be able to see the seating arrangement, spaciousness, decoration, quality, and overall interior arrangement. This will inspire them to choose your restaurant over others.

Here’s an example:

Let’s say you are a burger joint. A group of teenagers is willing to eat burgers in your area. So they will visit the websites of several burger joints in your area before choosing one.

You can stand out by displaying your amazing interior decorations besides your delicious food, through a virtual tour.

Through this remote tour, they might realize that the seating arrangements are comfortable and the decorations are great for taking selfies with friends.

Thus, they will end up visiting your place. Your next task is to impress them with the food.

For a fancy or theme-based restaurant, a virtual tour is more lucrative since you will be able to highlight your specialty to remote prospects on your website.

This will raise more awareness and influence more people to visit your restaurant.

4. Wedding Venues

VR for Wedding Venues

A wedding is among the most important milestones that a person achieves in life. And it is natural for anyone to wish to have a wedding ceremony like no other. The wedding venue plays an important role in making the wedding a memorable one.

Usually, fiances choose the wedding venue together. They tend to browse through the websites of several wedding venues and shortlist a few that they feel are perfect for their wedding.

A virtual tour can make your wedding venue the ideal one. Let the couple take a remote visit and experience how grand the venue is.

The venue entrance, the stage, the dining halls, the chandeliers, the photo session room, and all the specialties of your venue can be highlighted easily through a virtual tour.

Send the couple into a world of imagination so that they can feel their walk in the venue, and the bride walking down the carpet towards the priest and her fiance, ready to get married; the tossing of the bouquet and toasts from friends and family.

This little journey within the venue will help them set their future and choose your venue to be the ideal venue that will mark their togetherness in days to come.

Hence, a virtual tour on your website is only the right thing to do.

5. Universities, Schools & Colleges

VR for Universities, Schools & Colleges

Though newly implemented in many, a lot of universities, schools, and colleges achieved greater student reach by creating virtual tours of their institutions.

Whether you run a large institution or a small one, students and their parents are more concerned about quality dorms and attractive campuses, after quality education.

While they visit your website to find out about the courses you offer, you can also present a virtual tour of your campus to give them a remote experience of being part of the institution.

Let them take a stroll around your faculty buildings, sports facilities, dorms, research labs, fitness centers, etc, and understand the quality you offer besides education.

This is very important for international students. They will be moving to a new location, therefore, the quality environment and surroundings are among their main concerns and priorities.

Plus, the virtual tour will act as a symbol of credibility, highlighting your ability to accommodate students with high quality, while within your premises.

6. Travel/Tourism Industry

VR in Travel and Tourism Industry

If you are promoting holiday or travel packages, then getting more prospects depends a lot on the locations you are taking them to, besides the price.

People are often reluctant to purchase travel packages since they have doubts about the quality of their journey. You may easily gain their trust by using a virtual tour.

You can include virtual tours for several iconic locations that your travel package will cover. You may also highlight great tourist resorts or historic places that your travel package will take travelers to.

The idea is to give viewers a glimpse of the attractive zones that the tour will include remotely through a virtual tour. Let them inspect, in full control, the amazing locations they will be able to visit.

This will not only create more excitement but also influence onlookers into interested prospects.

7. Gym / Fitness Centers

VR for Gym and Fitness Centers

People tend to choose a gym or fitness center based on the various types of equipment and fitness machines available there. Plus, it also depends on the quality of the Equipment.

You can use virtual tours to attract people online and gain credibility for your fitness center. Create a quality virtual tour, covering every section of your center. And on each section, leave click bubbles beside the machines which will give information about the machine model and quality.

At the same time, create short videos of the fitness trainer of the center, training and demonstrating the use of every piece of fitness equipment.

Leave a hotspot on each piece of fitness equipment available within the virtual tour, to be clicked to watch the relevant video.

This will not only highlight the equipment but also demonstrate the expertise of the fitness trainer, thus inspiring more people to join your fitness center.

8. Shopping Mall

VR for Shopping Mall

Shopping is among the favorite activities of most women and some men. However, it often gets difficult to find the right shops in an ideal shopping mall.

There are tons of shops selling various products and services. Although every shopping mall provides a directions map on every floor, it often gets difficult to look for any desired shop only by interpreting the map.

For a large mall, people often run around in circles while messing up the directions. This is frustrating to customers and often limits them to purchase items.

Whether you are part of the ownership of a shopping mall or a shop owner at a mall, you could guide more prospects in the right direction through a virtual tour on your site.

On the virtual tour, a person will be able to follow directions as if in person and eventually reach their desired shops.

Since it’s a realistic visualization, the directions will be much easier to remember. Then when the prospect visits the mall, it will not take long to find his/her desired shop.

As a shop owner, this could help you drive more customers and not lose potential ones to competitors.

People with the internet on their phones can access your website while in the mall, hence they won’t need to use the flat map, rather they can get a realistic guide on their mobile.

As you can see, it is beneficial to add a showroom virtual tour on the website of either the shopping mall or any particular shop, to provide better navigation for prospects.

9. Museums

VR for Museums

People often love to visit museums due to the incredible historical display of various tools, items and reminisces of the past.

But the problem is, due to visual entertainment available on mobile phones or computers, most people do not try to seek out how great a visit to a museum might be.

Most museums are facing a decline in visitors over time. However, this can be changed by using virtual tours.

Create a virtual tour for a certain section of your museum. Let’s assume this section contains items from World War II. Within the virtual tour, you can place clickable information bubbles for people to get historical information about any particular item.

This will create a good amount of interest among site visitors. The key is to create curiosity among viewers so that they feel like they need to visit other sections of your museum to learn more.  

You can also offer a paid virtual tour for the rest of the sections. This will allow people overseas to take a tour of your museum remotely.

You will see a rise in visitors and also let people from overseas appreciate your museum.

10. Art Gallery

VR for Art Gallery

Do you draw and contribute to exhibit art galleries? Or do you have an art gallery of your own?

Then you probably know how excited people are about art when they visit an art gallery. Not only that, several collectors tend to visit and often purchase works of art with great value. 

However, when it comes to online business, art galleries are often underrated. Why not? Most art galleries do not make much out of their website.

Let me tell you why. It’s because owners tend to flood their websites with individual pictures of their art. With so much art to look at, how long will a person browse through the collection?

Eventually, people only check the first few and then leave if nothing amazes them among the early collection.

But this means that they are avoiding pictures that are in a later queue. It is possible that one of those photos could have been the one to connect with them.

This can be drastically changed with an art gallery virtual tour. Create a virtual tour of your gallery and let art enthusiasts take a remote tour. This will be similar to a live visit and viewers will be able to walk around the gallery while observing your artwork.

You can leave little click bubbles beside every piece of art so that viewers can click to view the piece of art as a pop-up image, or on a new tab.

Provide a unique ID for every piece of art so that prospects can order online or request a visit to view the piece of art.

That’s how effective a virtual tour can be. Go ahead and attract more prospects to buy your art online.

So far, I’ve explained the benefits of using virtual tours in 10 different business niches. If your business niche was not among these 10 businesses, then don’t get disappointed.

Read the following article to learn about the benefits of virtual tours for all 32 niches mentioned in this article.

Conclusion

So, after reading this article, you should have a good knowledge of virtual reality, virtual tours and their benefits, and what you need to create virtual tours.

You have also learned how you can create a virtual tour and include it on your WordPress site using WPVR.

And you got a detailed guide on how to take 360 panoramic images on your own and use them to create virtual tours.

Finally, we discussed how different businesses can benefit from virtual tours.

Now, you should be able to create your own virtual tours without any expert assistance. Hence, why waste any more time?

Go ahead and start using virtual tours to take your business to the next level. Engage and connect with your prospects from your website, and see them turn into valuable customers.

FAQs

Can I create a virtual tour without expensive equipment?

Yes! You can use a smartphone with a 360° camera app or an affordable 360° camera to capture images.

How long does it take to set up a virtual tour?

It depends on complexity, but a basic tour can be created in a few hours using the right tools.

Do I need coding skills to build a virtual tour?

No, many platforms offer easy drag-and-drop options to set up and publish your virtual tour.

What types of businesses can benefit from virtual tours?

Real estate, hotels, museums, retail stores, and educational institutions all gain from immersive tours.

Can I embed a virtual tour on my website?

Yes! Most virtual tour platforms provide embed codes, making it easy to add them to any site.

Categories
Deals Plugins WooCommerce

Huge WooCommerce Black Friday Discount Deals [2024]

It’s time to have a blast at shopping!! Black Friday week is here, and we, the WordPress enthusiasts, are ready for it.

Every WooCommerce store is at a buzz offering huge Black Friday discount offers on products; the sales just keep on coming.

Are you ready for Black Friday with your WooCommerce store?

Here’s a little helping hand. In this list, you will find some awesome WooCommerce Black Friday discount deals!!

Make the most of these deals and make your WooCommerce store better than ever this Black Friday!!

WooCommerce Black Friday Discount Offers – 2024

Product Feed Manager For WooCommerce - BFCM Offer

With Product Feed Manager, you can get full control over product feed creation and share your products across multichannel platforms.

You can promote your products in Google Shopping, Facebook Marketplace, TikTok, and 180+ marketplaces, all from your WordPress dashboard.

It’s a flexible solution to generate flawless feeds for your target marketplace.

Moreover, with advanced customization options and automatic feed updates, Product Feed Manager ensures your products are always accurately represented across all channels!

Get 40% Off On Product Feed Manager For WooCommerce Now!

Cart Lift - BFCM Offer

Cart Lift helps you win back over 20% of abandoned customers by automatically sending personalized follow-up emails to customers.

Track your abandoned carts, create targeted recovery campaigns, offer targeted coupons, and offer an exit popup modal with automated features to see instant growth in your sales.

Moreover, Cart Lift offers advanced analytics that give you the insights to optimize your recovery strategies and maximize your revenue!

Get 40% Off On Cart Lift Now!

Checkoutify - BFCM Offer

Checkoutify offers a powerful one-page checkout solution that simplifies the WooCommerce default checkout process with a well-organized and clutter-free experience.

Customize your checkout page with a drag-and-drop editor, add multi-step checkout, and reduce cart abandonment with ease.

Moreover, Checkoutify integrates with popular payment gateways like (credit cards, digital wallets, or alternative payment methods) giving you everything you need to optimize your online store’s checkout process!

Cart Lift - BFCM Offer

Advanced Shipping for WooCommerce lets you create dynamic shipping rules based on user role, weight, dimensions, cart items, price, and more!

Offer your customers accurate shipping rates and flexible delivery options with hassle-free tax management to enhance their shopping experience.

Moreover, this plugin supports real-time rate calculations and offers ready-made scenarios to get your shipping work done on the go.

So, grab this plugin with a  Black Friday and Cyber Monday discount and satisfy customer expectations with powerful shipping options.

Product Feed Manager For WooCommerce - BFCM Offer

Dynamic Discounts allow you to set up advanced discount rules like product-based discounts, bulk discounts, BOGO offers, and more.

Boost sales with personalized offers and loyalty rewards that keep your customers returning.

Moreover, Dynamic Discounts offers real-time discount calculations and integration with your existing WooCommerce setup, giving you the power to implement versatile pricing strategies that drive growth!

WPFunnels - BFCM Offer

Want to experience a solution that meets your funnel-building needs within WordPress?

With WPFunnels, you can create high-converting sales funnels directly on your WordPress site.

Collect, engage & convert by creating a personalized funnel journey with the easiest visual funnel builder.

Moreover, WPFunnels integrates 15+ popular CRMs and automation tools (such as FluentCRM, Pabbly Connect, WPFusion, ActiveCampaign, etc.) giving you everything you need for your sales process!
Grab WPFunnels with this amazing money-saving offer this  Black Friday and Cyber Monday, and convert your leads automatically!

Take advantage of our third-anniversary sale on WPFunnels and convert your leads with ease.

Take advantage of 40% Off On WPFunnels!

Mail Mint - BFCM Offer

Mail Mint helps you manage your leads and run targeted email campaigns with this less cluttered and easy-to-use tool.

With Mail Mint, you can now plan lead generation campaigns using forms, crafting email marketing automation, and single email campaigns without going back and forth between multiple tools.

Moreover, Mail Mint offers integrations WordPress, Easy Digital Downloads (Pro), WooCommerce (Pro), ChatGPT,  and more, giving you everything you need to make email marketing effortless!

Get 40% Off On Mail Mint Now!

Dokan - BFCM Offer

Experience unlimited possibilities with Dokan, the most popular WooCommerce multi-vendor marketplace solution for WordPress—trusted by over 50,000 entrepreneurs worldwide!

Unlock incredible savings this Black Friday and Cyber Monday with discounts of up to 55% on Dokan Multivendor. Packed with a dazzling array of 40+ premium modules and game-changing features, Dokan empowers you to create a fully functional multi-vendor online marketplace in just minutes. Don’t miss out!

yaymailpro - BFCM Offer

Customize WooCommerce email templates with extra custom blocks. It allows you to add multiple languages, premade patterns, hooks, and custom fields to your outgoing transactional emails.

yaycurrency-BFCM Offer

YayCurrency is a powerful multi-currency switcher for WooCommerce, enabling your customers to browse and check out in their preferred currency.

With features like automatic exchange rates, customizable currency displays, and seamless integration, it’s perfect for global stores looking to boost sales and improve customer experience.

yayswatches-BFCM Offer

Customize YaySwatches is a WooCommerce plugin that transforms standard variation dropdowns into engaging swatches, like color, image, button, and radio swatches. It offers easy customization, responsive design, and advanced styling, providing a better user experience for selecting product variations. Perfect for store owners looking to boost engagement and conversions this Black Friday & Cyber Monday!

catfolders-BFCM Offer

Transform the way you organize your WordPress media library with CatFolders! This powerful plugin offers a streamlined folder-based structure, enabling you to efficiently manage and categorize all your media files.

Say goodbye to endless scrolling and hello to easy drag-and-drop folder creation, advanced sorting options, and improved workflow for content creators and site managers. Perfect for websites with extensive media libraries, CatFolders helps you save time and stay organized—just in time for Black Friday and Cyber Monday!

moreconvert-plugin-BFCM Offer

MoreConvert is a powerful WooCommerce marketing tool that truly helps increase customer engagement and sales. With features like wishlists, multi-lists, save-for-later options, and waitlists, along with email marketing tools and advanced analytics, it enhances the shopping experience and encourages customers to return.

It has received over 80 five-star reviews, reflecting a perfect satisfaction rate. Designed for speed, MoreConvert easily integrates with more than 100 WordPress plugins and themes, providing a lightweight solution that boosts revenue and builds customer loyalty.

themehunk-bfcm Offer

ThemeHunk is your source for premium WordPress themes and plugins. Elevate your website with visually stunning designs, user-friendly customization, and performance optimization. Affordable pricing, regular updates, and dedicated support ensure your online success.

Join thousands of satisfied users and transform your WordPress site into a digital masterpiece with ThemeHunk.

SureCart- BFCM Offer

SureCart is a powerful eCommerce platform that can be set up in a matter of minutes. It does everything WooCommerce does, only better. Build checkout forms visually using an easy-to-use drag and drop form builder and do more using highly customizable tools and features. 

Incorporate one-time payments, recurring subscriptions, and other payment types too!

SureTriggers-BFCM Offer

SureTriggers is a cutting-edge automation platform that connects over 1000+ apps and WordPress plugins to streamline manual tasks, boost productivity, and enhance ROI. With an easy-to-use visual canvas, you can build seamless workflows that power your business operations effortlessly. Join over 70,000 users who are already automating WordPress and beyond.

SureTriggers is 90% more affordable than Zapier, making it the best value for your automation needs!

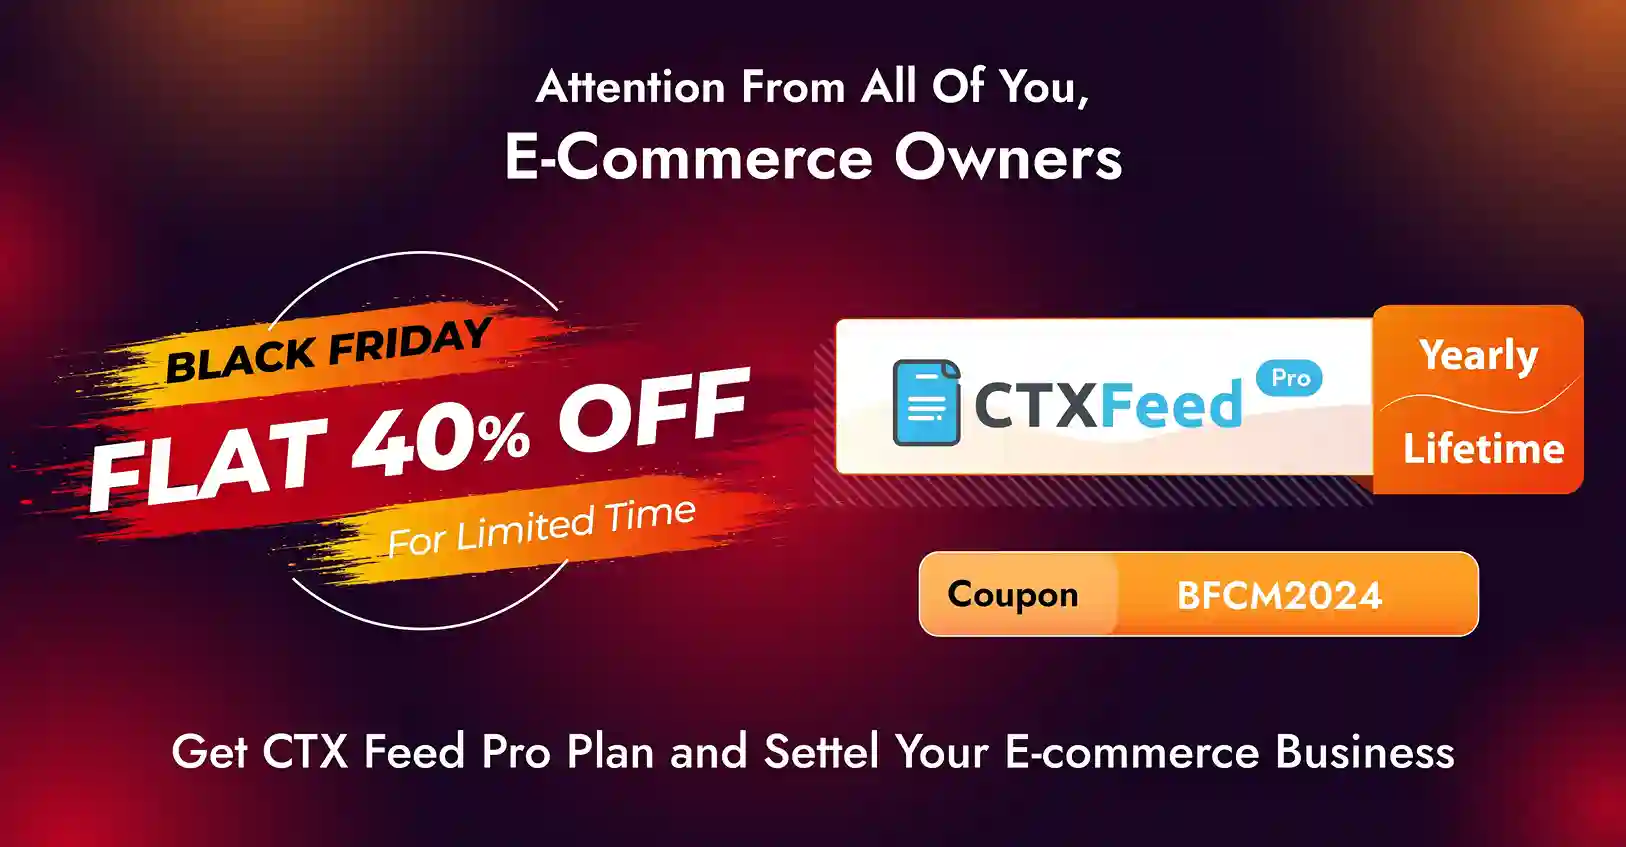
CTX Feed pro - BFCM Offer

CTX Feed Product Feed Manager helps you generate unlimited product feed for any marketing and affiliate channels you can think of!

So, if you run a WooCommerce store and want to promote your products on Facebook, Google Shopping, TikTok, Rakuten, and 130+ other marketing channels, CTX Feed Pro can help.

No matter whether you want to make a product feed for 10 products or 100000, CTX Feed Pro has got you covered.

PluginHive - BFCM Offer

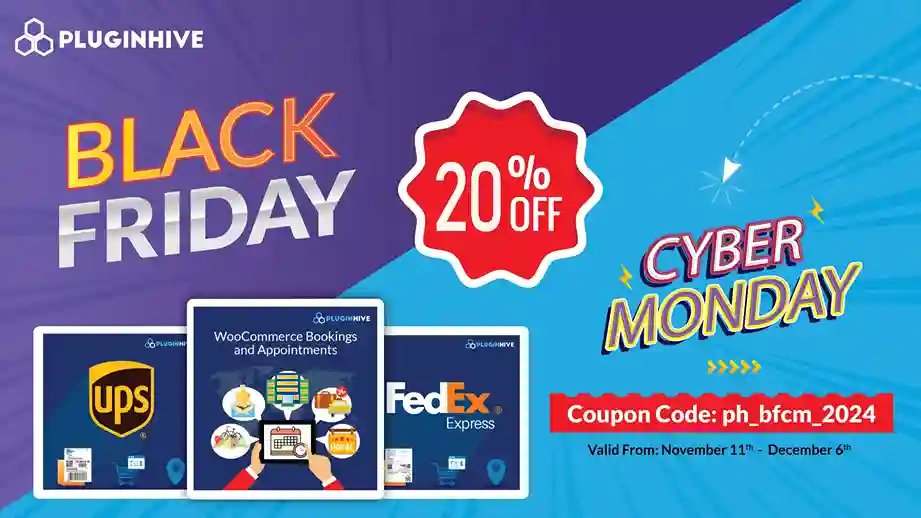
Gear up for the biggest shopping weekend of the year! PluginHive is thrilled to offer a 20% discount on our entire WooCommerce plugin catalog for Black Friday and Cyber Monday. Now’s the time to take your store to the next level!

Woo-FreeGift - BFCM Offer

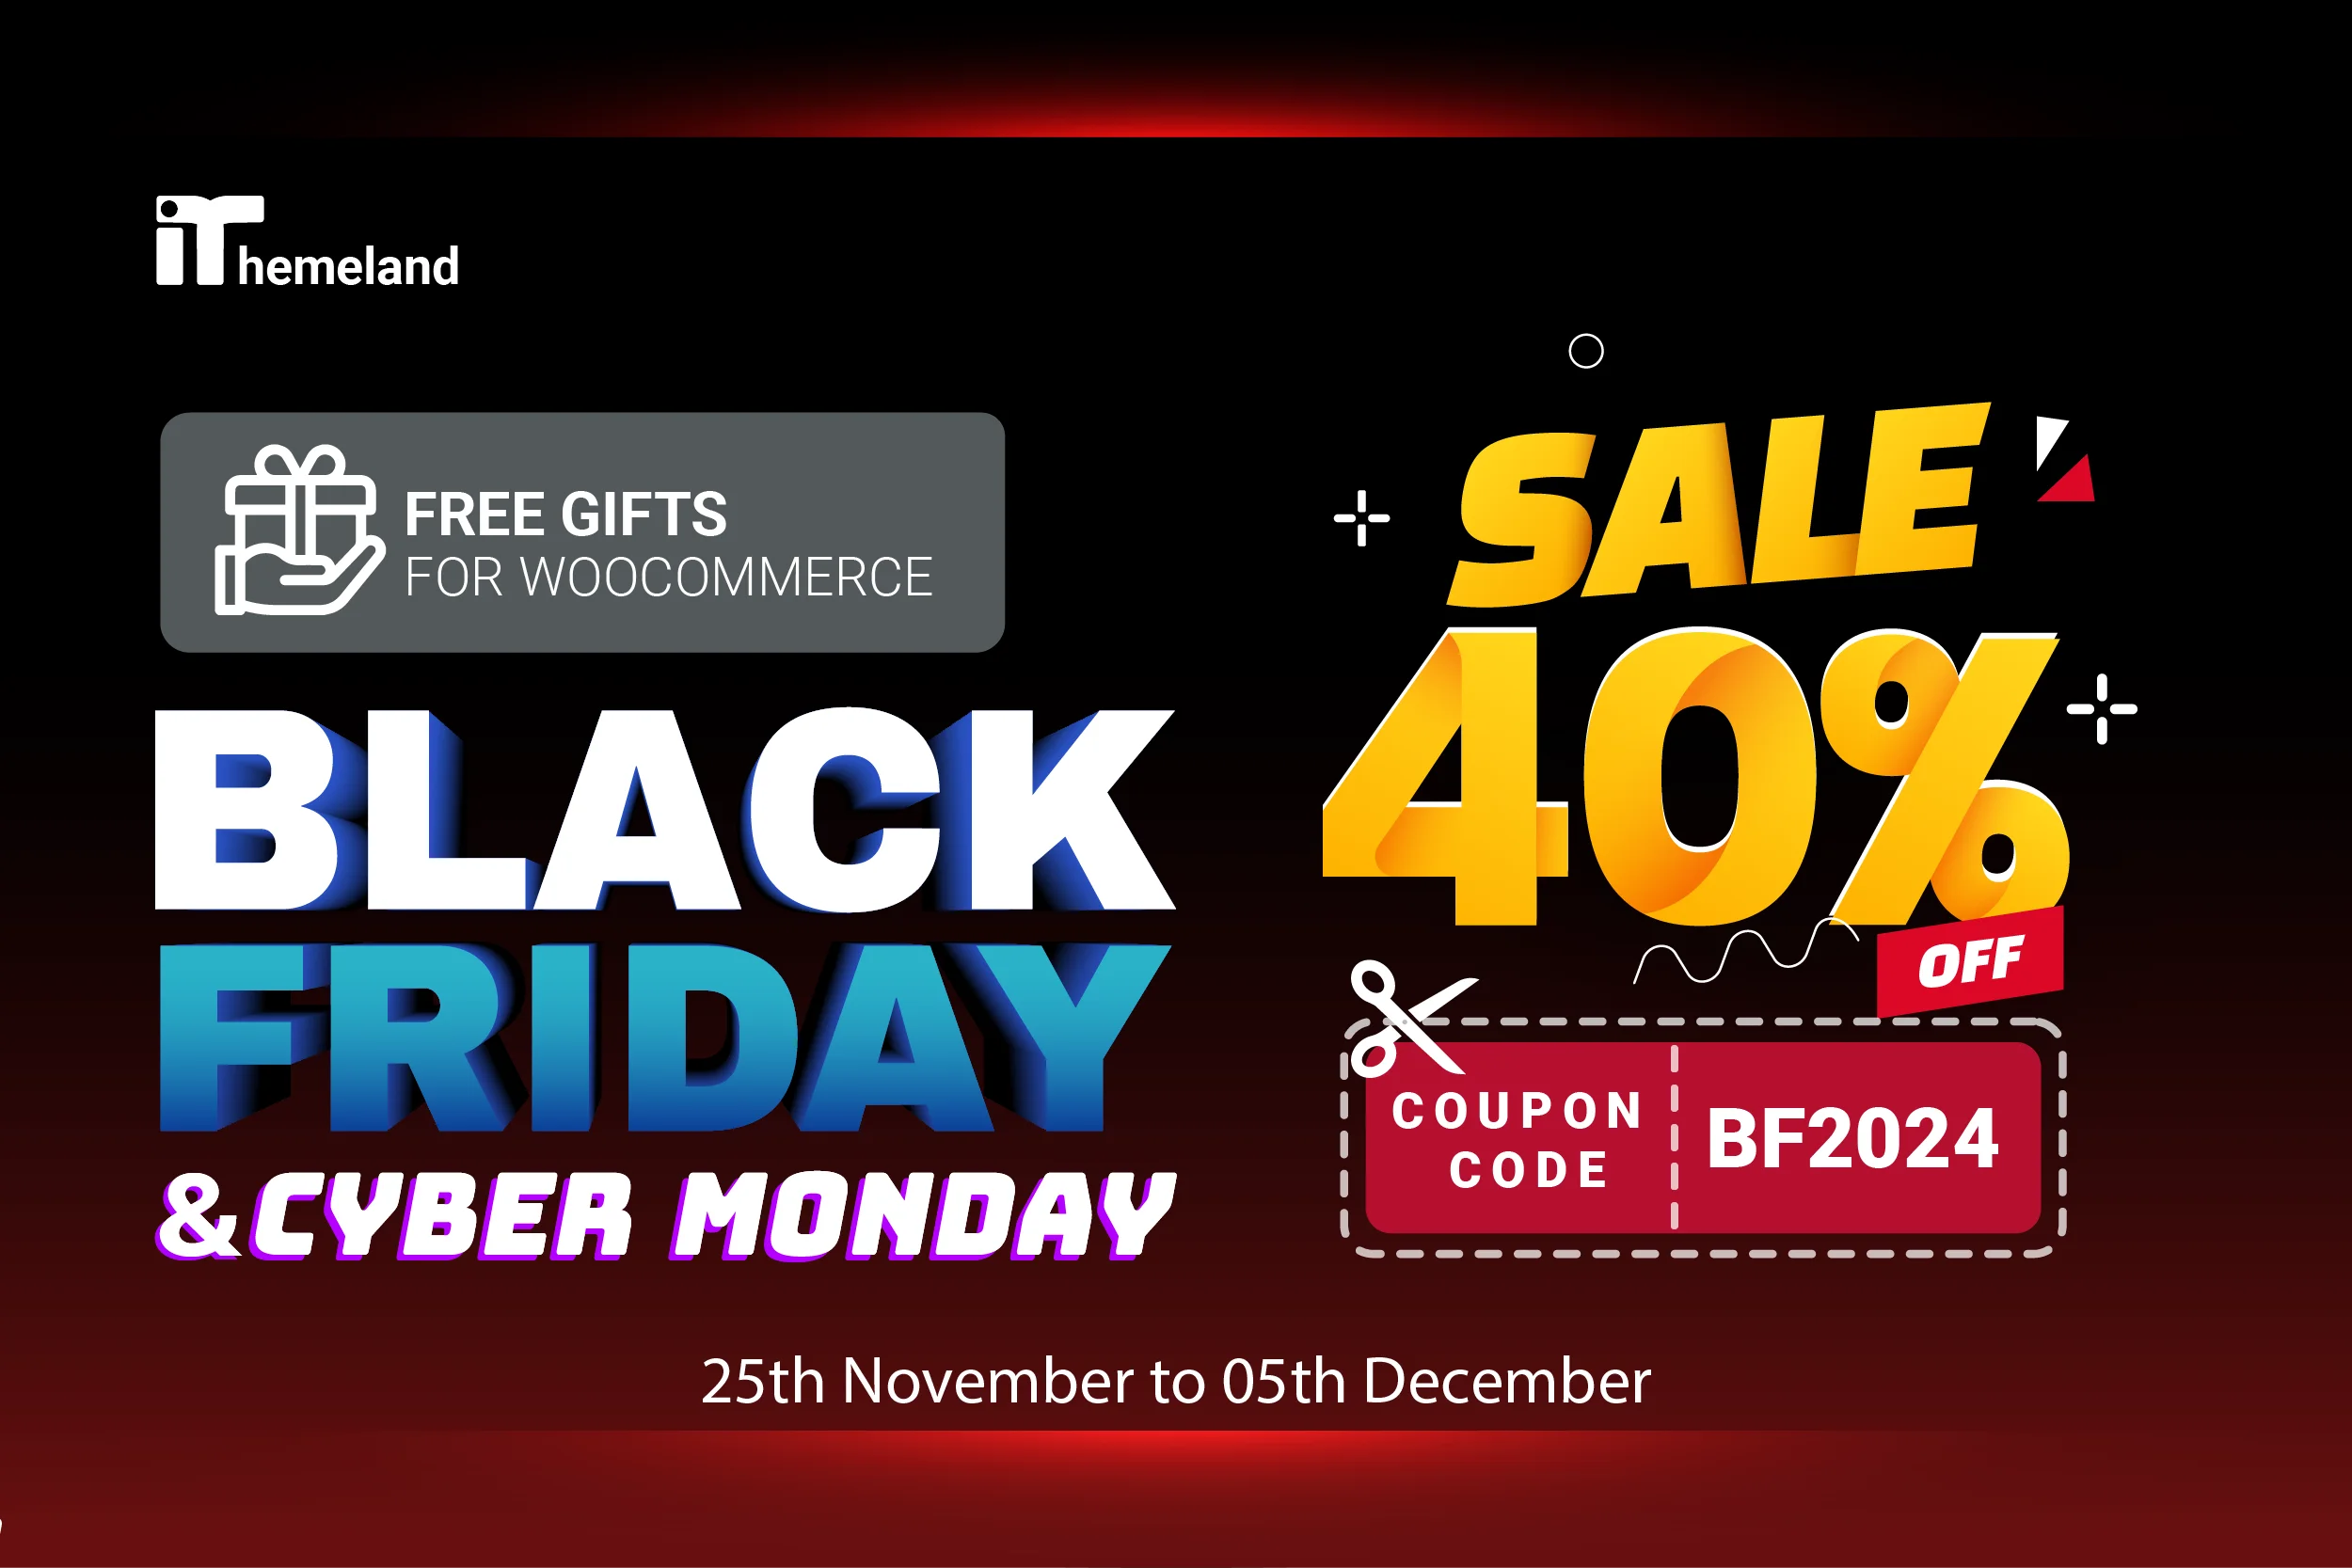
Unlock the power of giving with the Free Gifts for WooCommerce plugin! Delight customers by offering free products during their shopping experience. Set up deals like “Buy One, Get One” or “Buy X, Get Y” and customize offers with flexible rules based on product choices, cart value, or sales periods to boost loyalty!

pixelavo - BFCM Offer

Pixelavo is a Facebook pixel WordPress plugin for WooCommerce that connects your store seamlessly with Facebook Pixel. It unlocks essential visitor data, powering more personalized and targeted Facebook ad campaigns. Going beyond basics, Pixelavo tracks advanced events and conversions based on behavior. Gain enhanced insights to improve your website’s performance and increase ad success.

swatchly - BFCM Offer

Swatchly, the WooCommerce variation swatches plugin, enhances the shopping experience by enabling seamless image, color, label, and size selection for product options. With its user-friendly interface, Swatchly improves customer satisfaction and boosts conversion rates, making it essential for any WooCommerce store.

justtable - BFCM Offer

JustTables is a powerful WordPress plugin for WooCommerce that simplifies product management with sortable and filterable tables. It offers 27 customizable prebuilt columns, allowing for personalized product displays. This user-friendly tool enhances the online shopping experience for both sellers and customers. It streamlines product presentation, making it easier for customers to compare options.

moreconvert-plugin-BFCM Offer

MoreConvert is a powerful WooCommerce marketing tool that truly helps increase customer engagement and sales. With features like wishlists, multi-lists, save-for-later options, and waitlists, along with email marketing tools and advanced analytics, it enhances the shopping experience and encourages customers to return.

It has received over 80 five-star reviews, reflecting a perfect satisfaction rate. Designed for speed, MoreConvert easily integrates with more than 100 WordPress plugins and themes, providing a lightweight solution that boosts revenue and builds customer loyalty.

themehunk-bfcm Offer

ThemeHunk is your source for premium WordPress themes and plugins. Elevate your website with visually stunning designs, user-friendly customization, and performance optimization. Affordable pricing, regular updates, and dedicated support ensure your online success.

Join thousands of satisfied users and transform your WordPress site into a digital masterpiece with ThemeHunk.

Woo-RoleBased - BFCM Offer

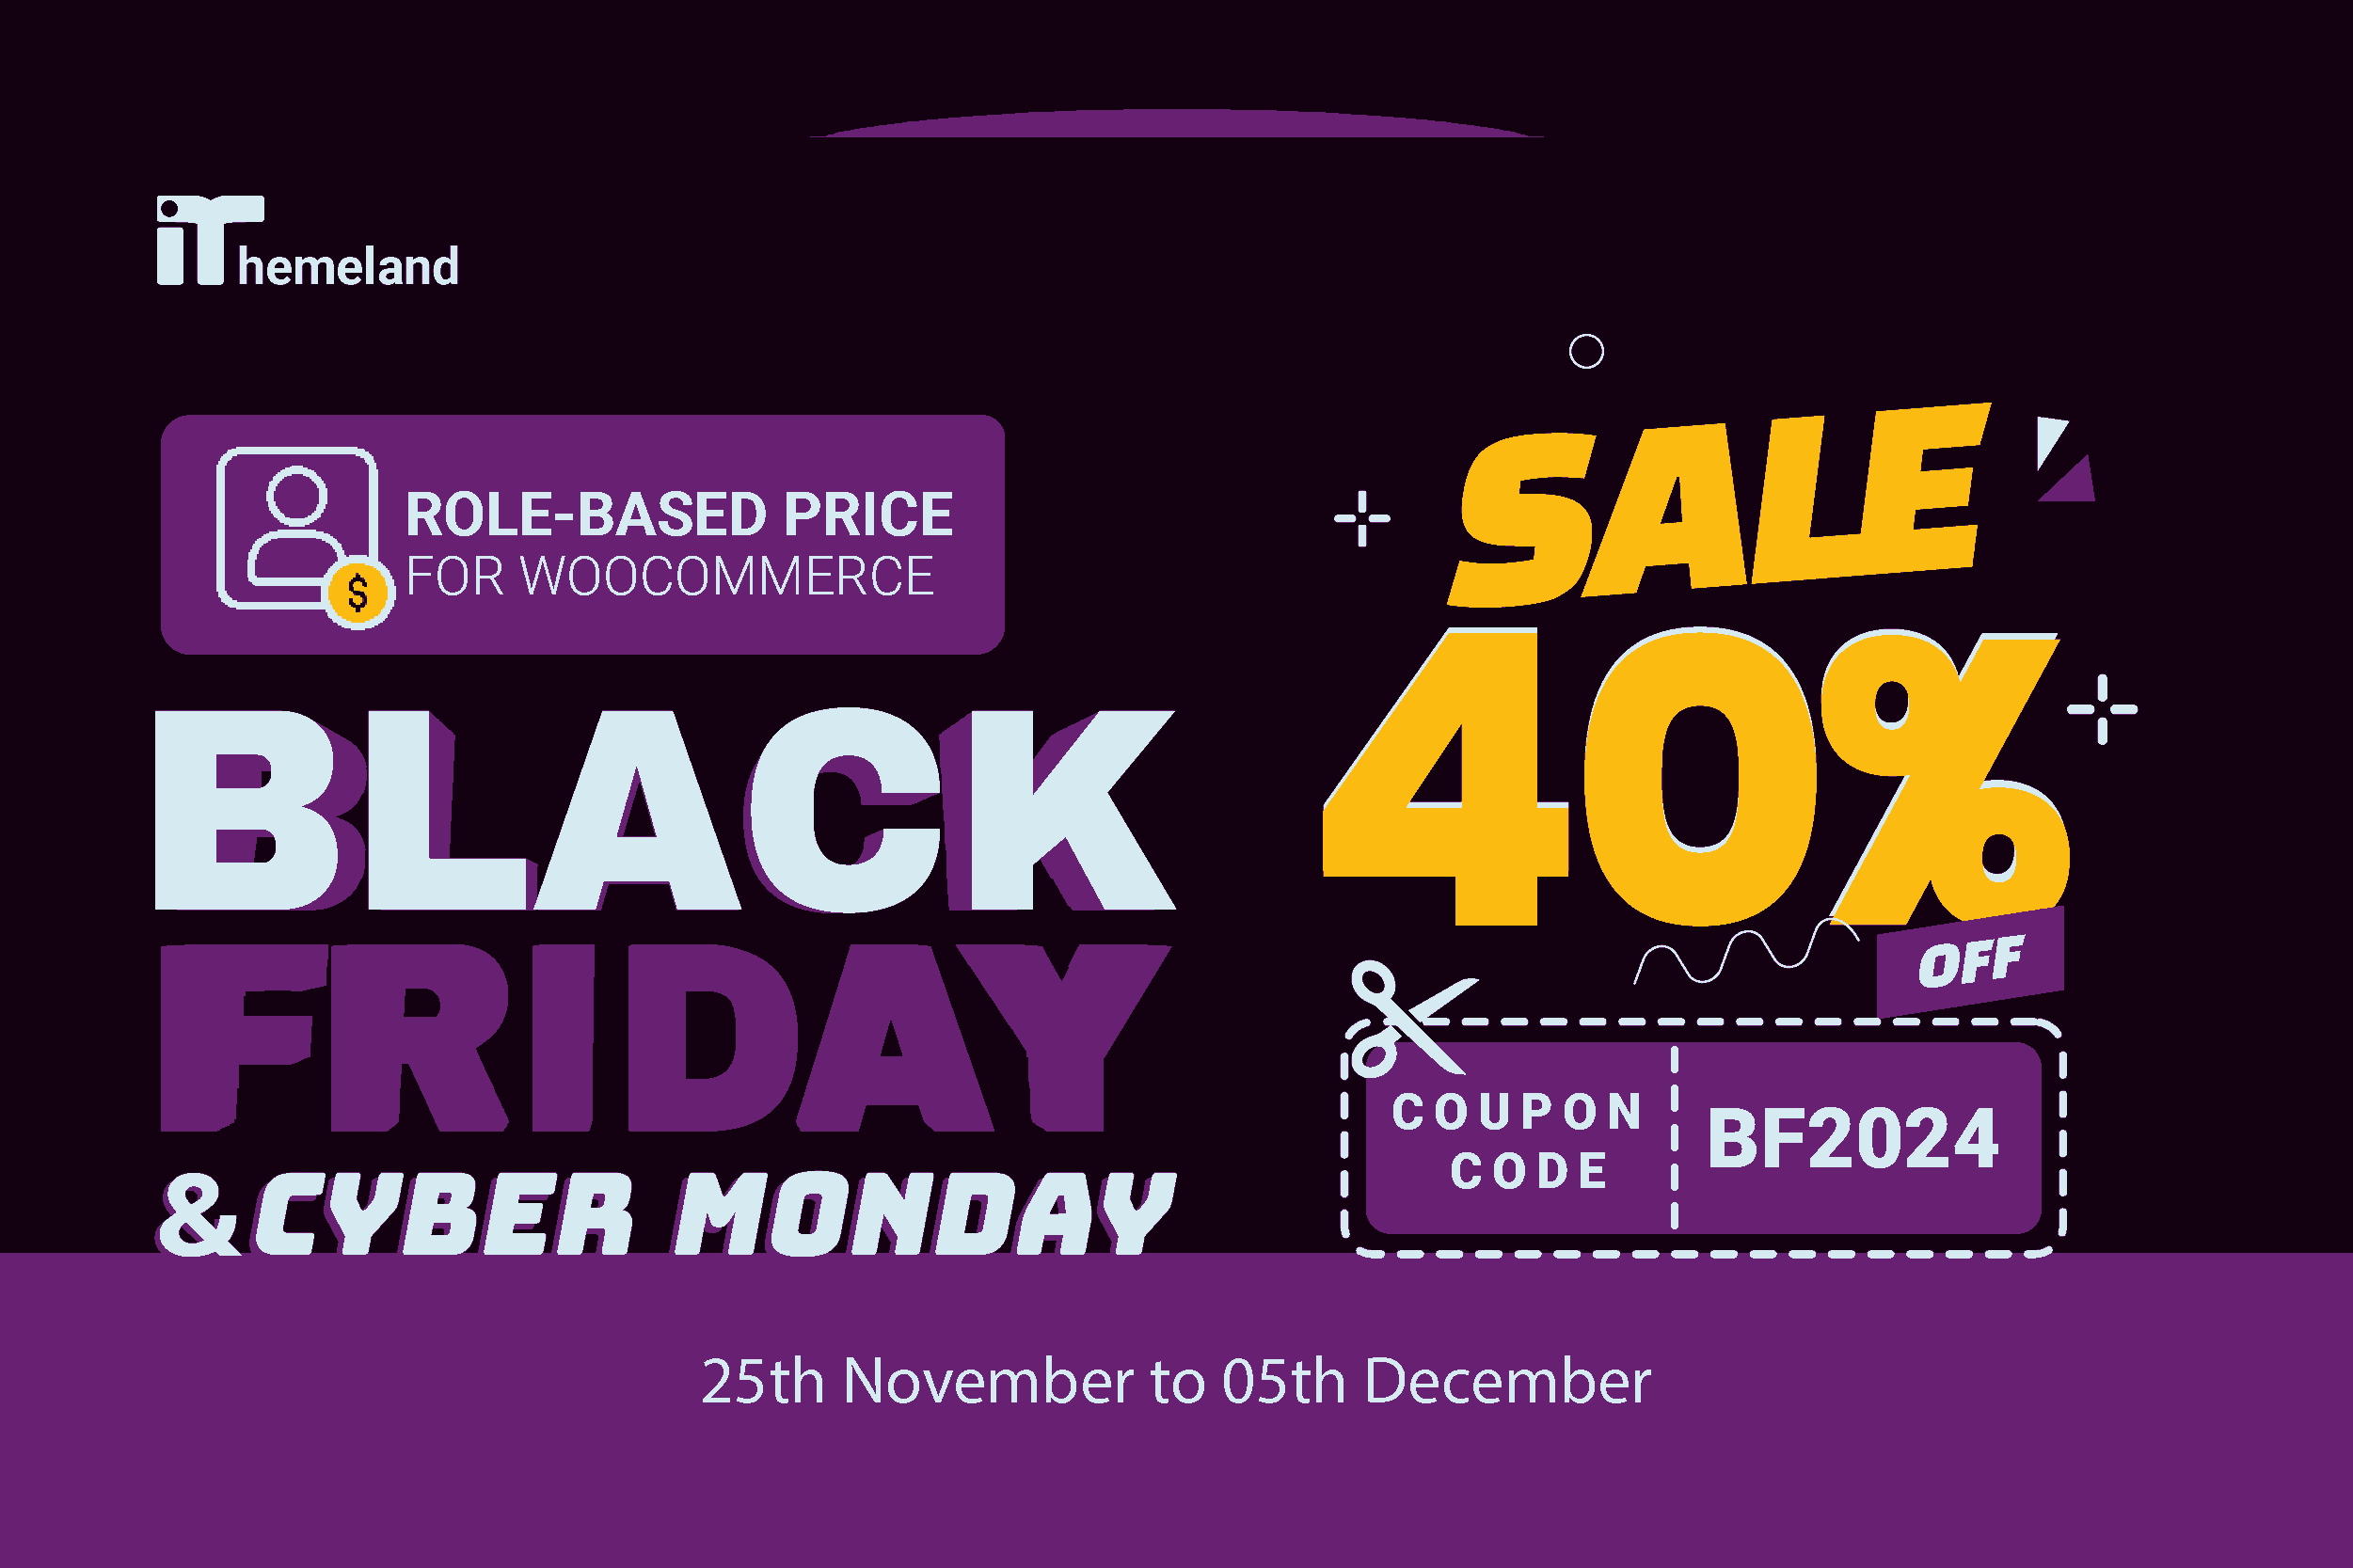
The WooCommerce Role-Based Pricing Plugin is designed to empower online stores by enabling custom pricing and discounts based on user roles, like wholesale clients, VIP members, or standard customers. This plugin helps merchants create tailored pricing strategies that enhance customer satisfaction, drive loyalty, and support diverse customer segments. We’d love to explore a partnership to expand the reach and impact of this powerful tool in your WooCommerce store.

Woo-RoleBased-BFCM Offer

The WooCommerce Min/Max Quantity and Spend Plugin provides essential tools for store owners to set minimum and maximum order quantities, enforce spending thresholds, and apply purchase limits on products. This plugin enhances control over inventory and order values, ensuring customers meet specific requirements for quantity or spending before checkout.

Woo-PTPRO-BFCM Offer

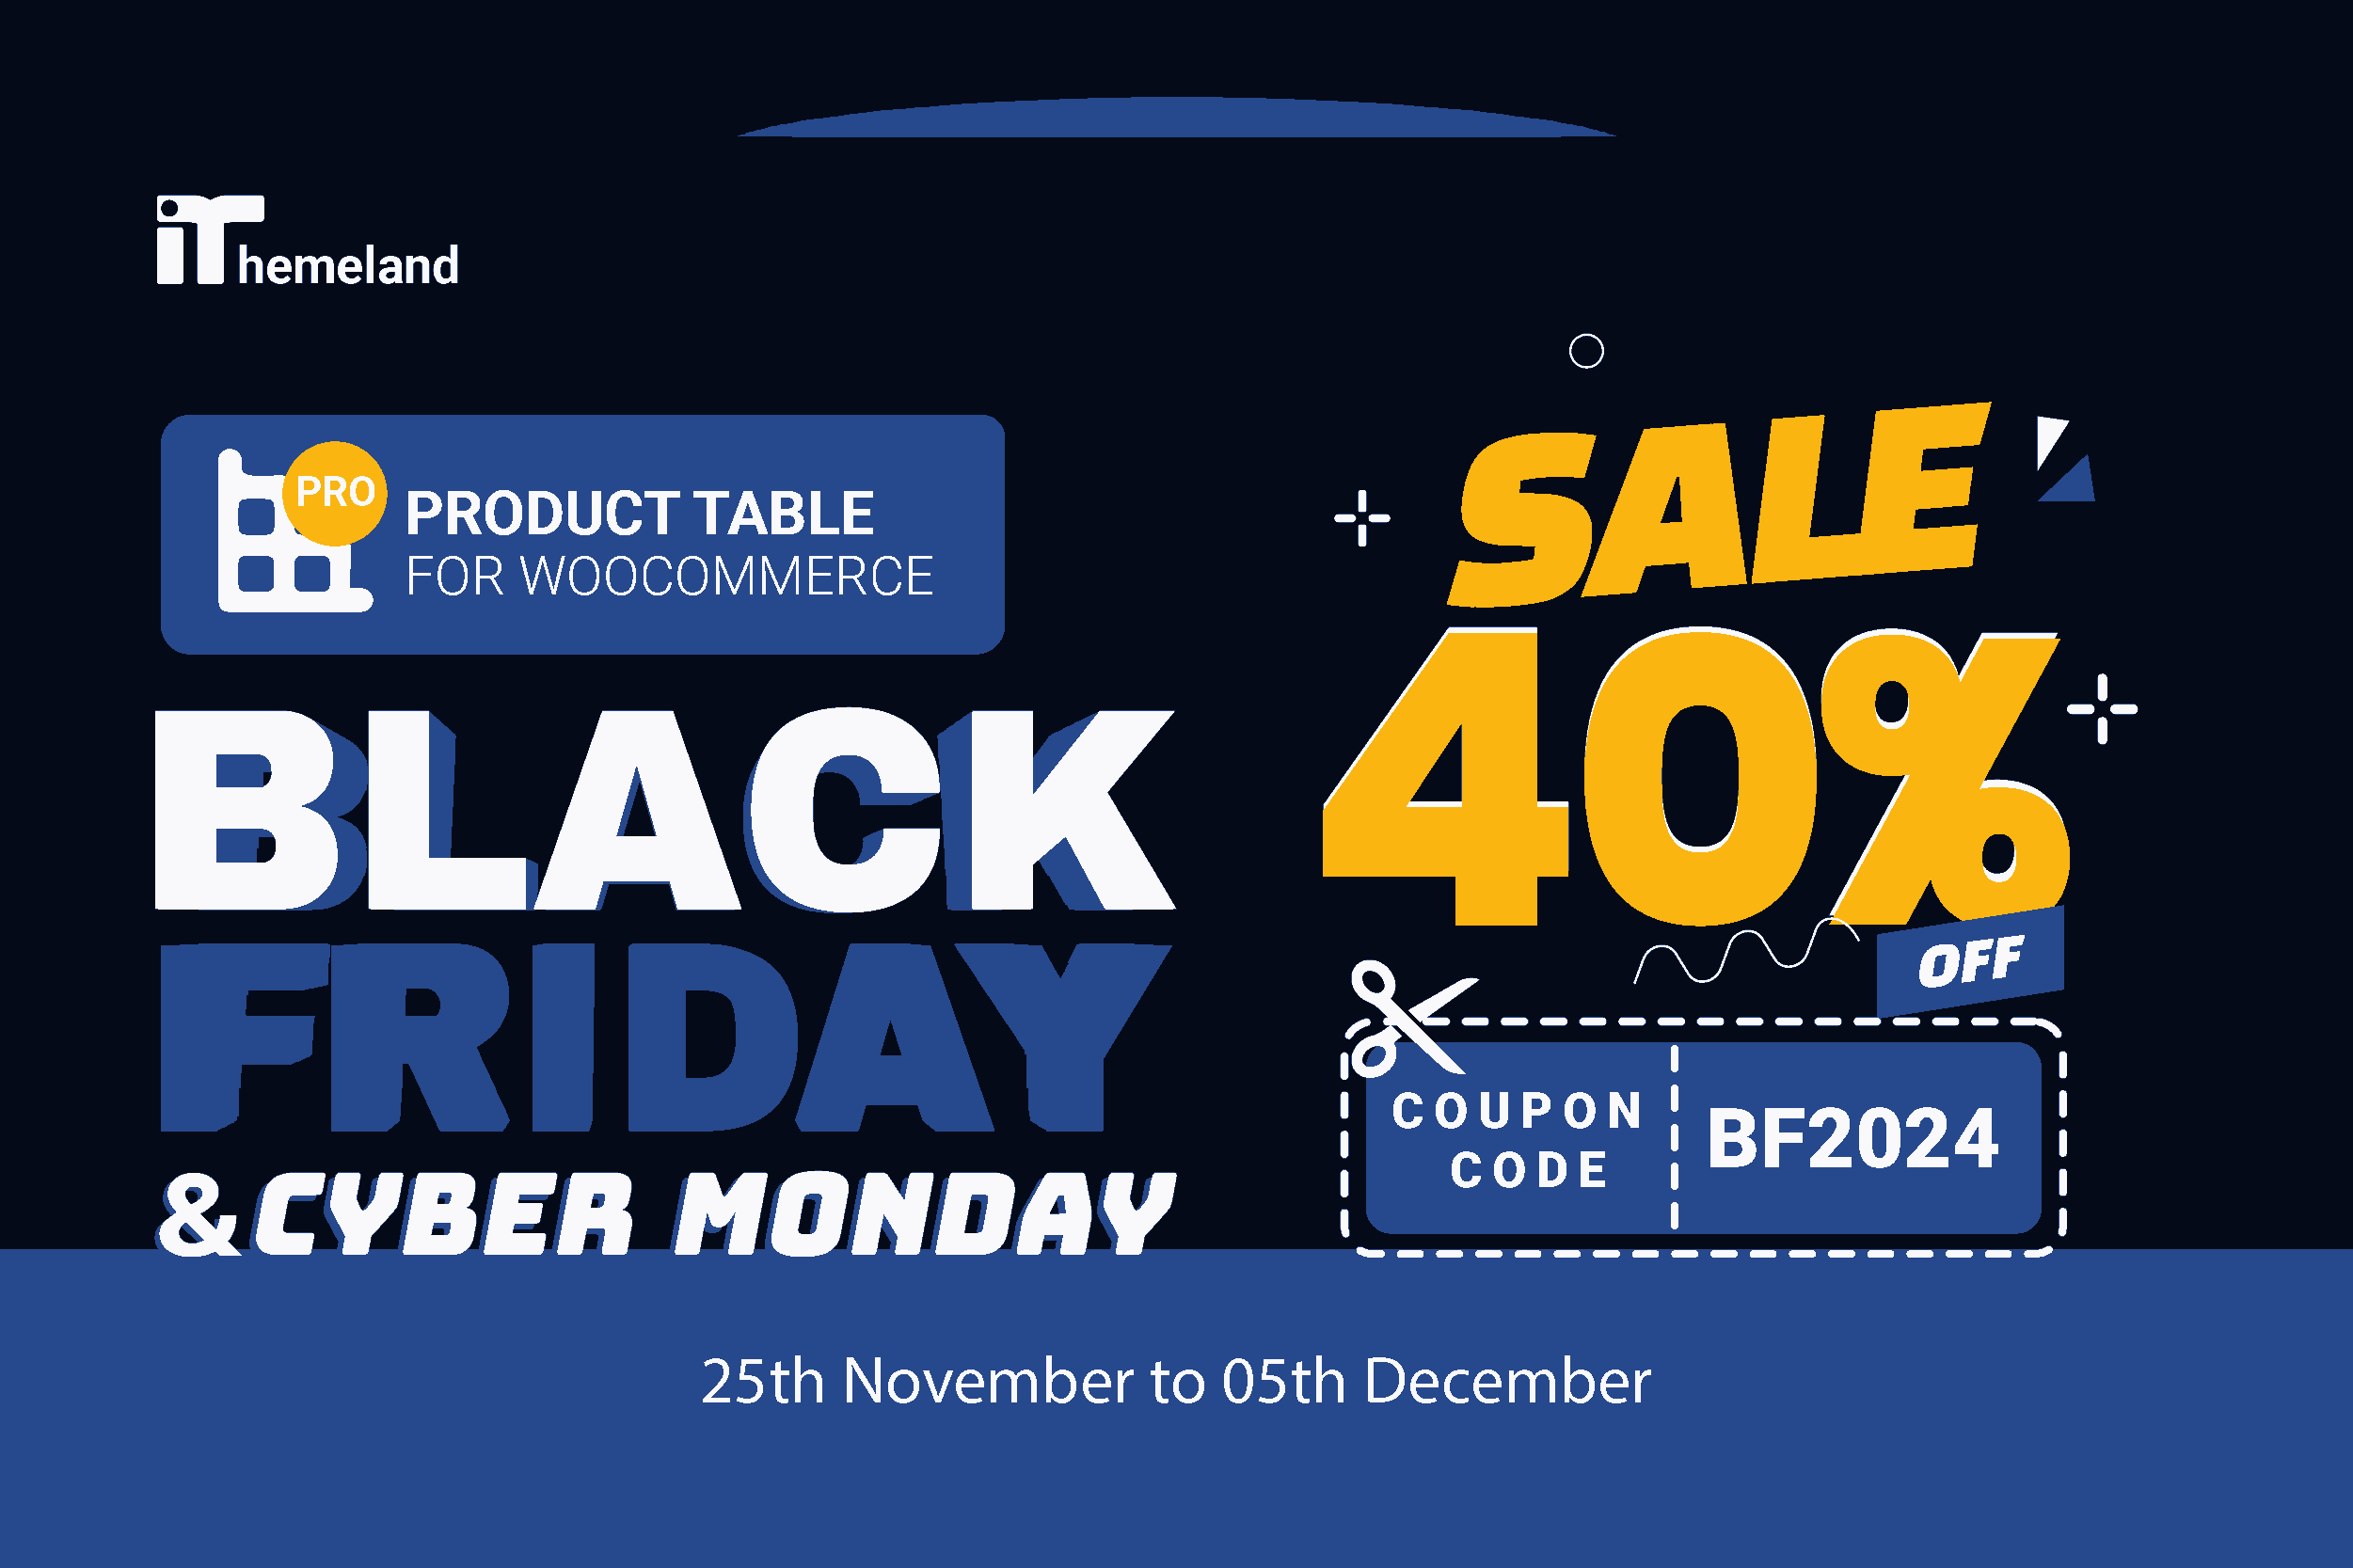
Simplify the ordering process with the WooCommerce Product Table Plugin! Display products in a clean, searchable, and responsive table for quick ordering and easy navigation. Ideal for restaurants, music shops, wholesale stores, or catalogs. Create multiple tables, customize them, and offer a streamlined shopping experience.

Trafft - Logo

One thing many of the top tools have in common is they have much to offer for a relatively small investment. That is certainly the case with Trafft with which you can automate your bookings, maintain your calendar, manage your services, employees, and customers in one location and within one powerful tool.
Traff is also perfect for agencies and web designers looking to offer their clients a white-labeled booking solution customized to match their agency’s branding.
Trafft’s features and integrations are designed to keep your business running smoothly 24/7. The features include:
Custom domains, fields, and the ability to manage bookings, etc., at multiple locations.
Managing recurring appointments, group bookings, and sending appointment reminders.
Tracking and managing taxes, invoices, and deposit payments.

acowebs - BFCM Offer

During this black Friday season, Acowebs provides up to 30% discounts on their WooCommerce plugins. Acowebs offers a wide range of plugins, including WooCommerce Wishlist, WooCommerce Custom Product Addons, WooCommerce Dynamic Pricing With Discount Rates, WooCommerce Checkout Field Editor and Manager, WooCommerce PDF Invoices and Packing Slips, WooCommerce Product Labels, WooCommerce Product Table, WooCommerce Quick View, WooCommerce Table Rate Shipping, Variation swatches for Woocommerce, Woocommerce deposits & partial payments, Woocommerce currency switches,
Product options & addons, and Labeler- product labels

Customers get a 10% discount on every plugin purchase they make. The discount increases to 20% when two items are purchased and increases to 30% for three or more items.

wholesalex - BFCM Offer

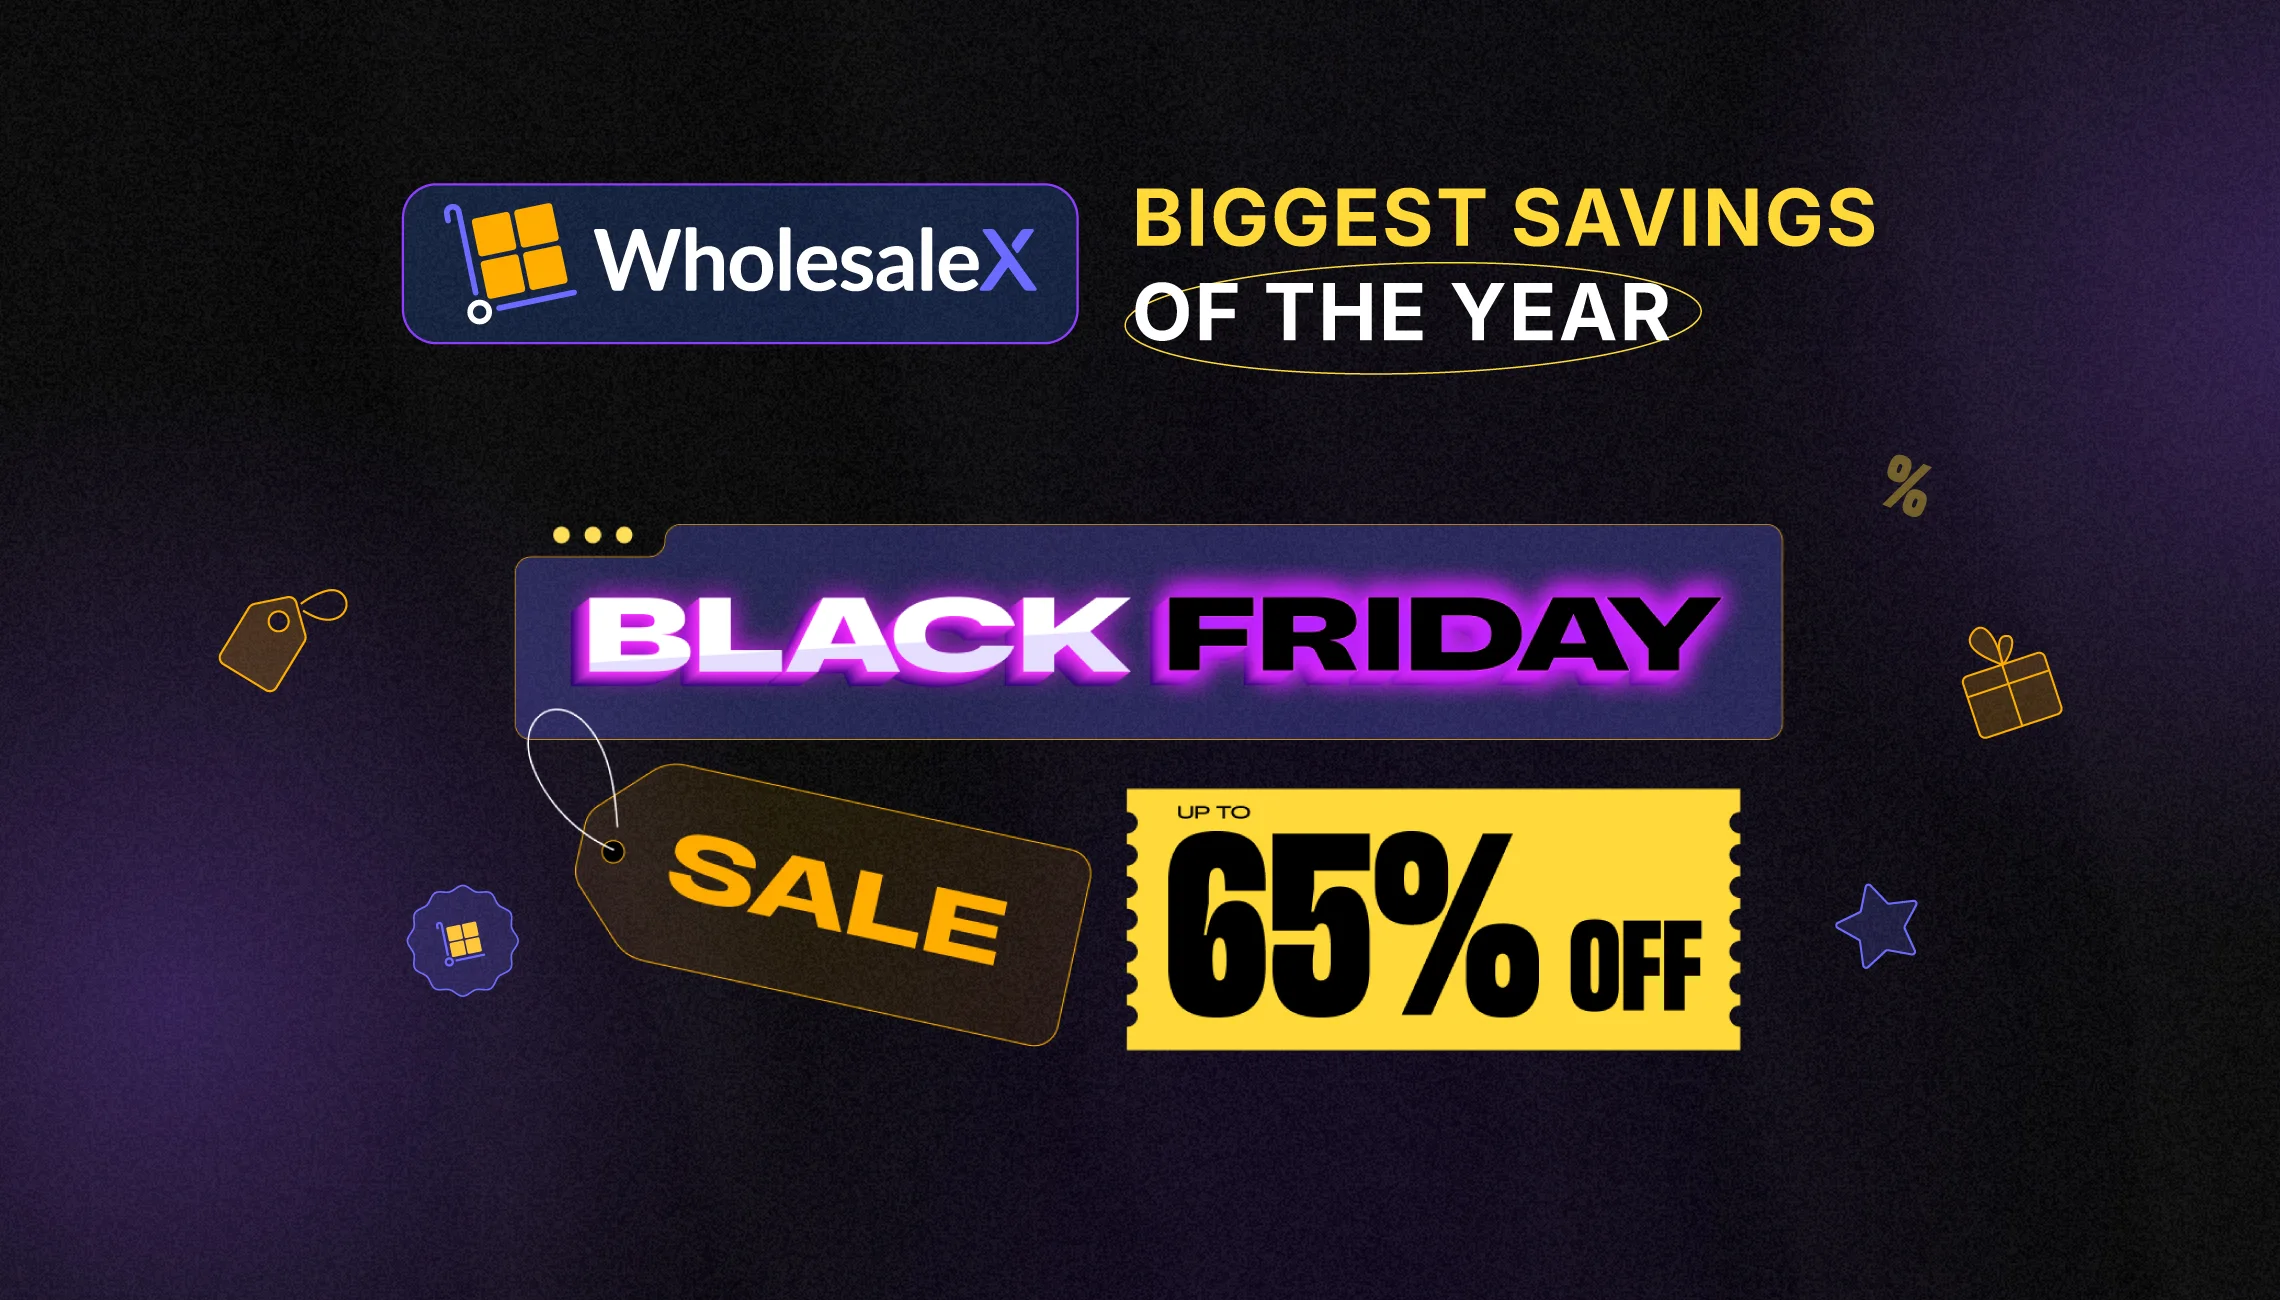
WholesaleX is here to make your regular WooCommerce store into a B2B (or B2B+B2C hybrid) powerhouse. It has features like user role creation, registration form builder, dynamic rules for pricing and discount management, private store, request a quote, subaccounts management, and more.

The feature that sets WholesaleX apart is the dynamic rules system. You can create a total of 13 different discount rules globally or for specific users/ user roles.

WholesaleX is offering an incredible 65% discount this Black Friday. Don’t miss the opportunity. Transform your WooCommerce store into a massive B2B WooCommerce success.

Themehigh WooCommerce Plugins - BFCM Offer

Themehigh delivers powerful WooCommerce plugins designed to enhance your store’s functionality and drive conversions. With a global user base of over 400,000 active users, our plugins are trusted for their reliability and ease of use. From customizable checkout pages to advanced product options, our tools are built to optimize your online store effortlessly.

This Black Friday, we’re adding an exclusive twist: 1 Lucky Winner from all Black Friday purchases will get an additional year free for any plugin or bundle purchased during the sale!

ACFW_UPDATED HEADER - BFCM Offer

Advanced Coupons is the ultimate tool for extending coupons in WooCommerce. Run Buy One, Get One deals, store credits, gift cards, loyalty programs, + more to grow your store.

Wholesale Suite - BFCM Offer

Wholesale Suite is the #1 rated wholesale plugin in WooCommerce. It helps reduce admin work, ditch the spreadsheets, and seamlessly bring your wholesale operation online.

WC Vendors - BFCM Offer

WCVendors is the best WooCommerce multi-vendor plugin for swift, hassle-free multi-vendor marketplace setups like Amazon and Etsy.

Visser Labs - BFCM Offer

VisserLabs is the ultimate WooCommerce export and import solution. It offers advanced export scheduling, smart filtering, robust attribute controls, & can handle the transfer of 10,000+ products!

Huge WooCommerce Black Friday Discount Deals [2024] 2

AdTribes makes managing WooCommerce product feeds a breeze! It helps you easily create and optimize feeds for Google Shopping, Facebook, and other platforms. With advanced filtering and customization, your products will reach the right audience in no time.

Aovup - BFCM Offer

Create a robust wholesale system on your WooCommerce store to sell to B2B or B2C and B2B. Stand-out features include wholesale registration, tax exemptions, tiered pricing, wholesale order form, sales agent management, and more.

Conclusion

I hope you’ve found the desired deal you were looking for and have a better experience on WooCommerce with great plugins, themes, and tools.

There are more Black Friday Discounts out there. Check out the following:

Categories
Guide WooCommerce

6 Halloween Store Tips & Trends: Promote Halloween Merches & Increase Online Sales

The spooky October has arrived already – it’s time to prepare your online store for Halloween! But it won’t be just a treat for the buyers; retail sales for any Halloween store are also going to shoot for the sky.

It is the third most celebrated holiday in the United States. And the best part is, customers then go crazy looking for exciting deals. Last year, average consumers spent $108.24 on Halloween festivities.

So you must start working on getting your Halloween store ready and boost your sales significantly!

Now, let us look at how you can prepare your online shop for Halloween and maximize your revenue.

So let’s begin.

Here are the best marketing ideas for Halloween

6 Treats To Boost Your Halloween Sales

You can’t just apply any strategy in your store for Halloween and expect sales. You need to pick a strategy that is the right fit for you.

Here, in these 6 strategies, you will find applicable ideas to get your Halloween products stocked out fast!

1. Offer The Right Halloween Merch

If you are a retailer, then you should know that the most popular products sold during Halloween are Costumes, Candies, Decorations, and Greeting Cards.

Halloween

Customer’s approaches and buying mindsets during any seasonal events are different than usual buying intent.

For example, a vampire costume seems very unnecessary to shopping at the usual time but not in the Halloween season.

Before stocking your store with Halloween merchandise, you should have a solid knowledge of the buying factors that trigger buyers on Halloween.

Here’s a detailed statistics on Products sold and the nature of buyer habits during Halloween: Halloween Spending Statistics   – MuchNeeded

As per eBay and Etsy, one of the latest trends is Halloween costumes for pets. So this is something you can improvise on.

You may learn how to choose Halloween products from other websites specializing in Halloween, i.e., they only sell Halloween products.

Here’s a list of five popular e-commerce websites for buying costumes and other Halloween accessories: Halloween Ecommerce Sites That Are Scary Good – ZMags.

Follow The Latest Halloween Trends

To get customers limelight on you in the crowd, you need to know the latest Halloween trends.

According to Pinterest, the number of searches below has increased compared to last year during this Halloween season.

Most searches increased on makeup looks :

  • spooky makeup – 60% increase
  • Gentle vampire makeup ideas -475% increase
  • Gothic romance cosmetics- 710% increase
  • Makeup for goth boys- 290% increase
  • Ideas for zombie makeup -230% increase
  • The Crow composition (plus 275%) increase
  • Makeup on clowns appears – 1870% increase
  • Sakuna cosmetics – 1655% increase

People are searching for these ideas on Pinterest, which means they are going to search for the same type of products to get the latest Halloween vibe.

Mix & Match Halloween Products To Increase Revenue

You can also offer a Halloween-themed bundle and increase your AOV.

You can use a plugin like product recommendation for WooCommerce to help your customer find better pairing deals and also increase your sales.

So, you need to stock up on the products that will help them to create a look and vibe that align with this year’s Halloween trend to get an insane sale.

2. Marketing As An Online Halloween Store

Even if you have amazing products, you must understand global Halloween trends and create a great Halloween theme on your website to give your buyers a spooky feel.

Make sure to use proper Halloween design trends when redesigning your site for the occasion.

halloween ready online store

Besides web design, you should also focus on creating exciting marketing campaigns to get more traction and boost sales.

For example, you can start a Facebook giveaway contest that will take prospects to your site. They might end up purchasing more products. You may also run bulk discount campaigns on small decors.

Here are more marketing ideas for WooCommerce Halloween stores:

3. Build Dynamic Sales Funnels To Streamline Halloween Sales

As Halloween is near already, you should make every effort to boost your sales. And it’s high time you built your sales funnel to track your buyer’s journey & make them spend more than they intended.

Now, every online store comes up with offers and deals. This is your chance to set yourself apart from your competitors.

For that, you can use different tactics to surprise your customers with dynamic offers.

For example, you can run funnels for special product categories within a specific time limit for Halloween.

Here are some more ideas you might consider –

  • Set dynamic offers on their purchase total or product quantity.
  • Offer special discounts based on user role.
  • Sell other relevant items with the Highest-sold products or Most popular products.

Or just run a storewide funnel to offer Halloween special items with any product they purchase.

These offers will engage your potential buyers and drive sales instantly.

You can implement all these strategies with WPFunnels which has the most unique Dynamic WooCommerce Funnel feature for your store with tons of conditions.

So get your dynamic funnels in place before Halloween hits.

4. Customize Your Discounts For Halloween Season

Your potential customers are hunting for the best Halloween deals and discounts.

You can use a variety of inventive marketing strategies to increase sales and generate buzz around Halloween.

You can give your customers the option to receive a “Treat” discount on larger purchases or a “Trick” discount on selected items when they make a purchase.

To attract greater orders, you can create unique bundles such as “Halloween Party Packs” or “Buy One, Get One 50% Off” offers.

You can create a separate category of Halloween products and offer category-based discounts.

You can also offer BOGO deals like this brand named Trusted Health Products:

bogo offers

You can use time-limited flash offers on a few products that are advertised on social media and by email to incite customers to act right away.

To offer more various types of discounts like :

  • Bulk Discounts
  • Conditional Offers
  • Stock-based Discounts
  • Customer-based Discounts
  • Time-specific Discounts

You can use a plugin that gives you features to generate these types of discounts. One such plugin is Dynamic Discounts for WooCommerce.

Watch this video to learn how you can set various discounts using this tool:

5. Make The Most Of Social Media During Halloween

Unbelievably, nearly 30% of celebrants last year made purchases just for social media posts, particularly in the Gen Z and millennial demographics.

Also, Gen Z and millennial groups are hunting the social media platform in search of costume inspiration.

One-third of TikTok users reported that the website influenced their Halloween purchases the previous year. TikTok even released a tutorial on how to publicize the holiday on their platform.

This is the perfect moment to plan your TikTok or Instagram Halloween strategy if you have not already.

Influencer partnerships can help you promote products more widely but do not undervalue the importance of social media-worthy events, promotions, and shop displays.

6. Halloween Is For You Aswell

Now, amidst all of these, do not forget that Halloween is also for you. And you deserve a great treat.

halloween sale

Guess what, there are tons of treats you can enjoy. Several themes and plugins are offering exclusive Halloween discounts. You may find yourself the best premium themes and plugins at the lowest price.

Here’s where you can avail of amazing Halloween discounts on WordPress themes and plugins.

Best WordPress Halloween Deals And Discounts For You

Here you can find a complete list of the best Halloween deals and discounts for WordPress this year.

So go ahead and make this Halloween a thrilling one for yourself.

Leverage The Best Marketplaces For A Greater Reach

Online marketplaces will grow faster than overall eCommerce sales this Halloween shopping season.

The reason is millions of buyers prefer these platforms for online shopping.

If you wish to boost your sales for your WooCommerce Halloween store, it’s best to check out what’s popular on these marketplaces and include similar products to your store.

Let’s have a look at the top 3 marketplaces where you can promote your products this Halloween.

i. Google Shopping

Google Shopping is currently the best platform for promoting products online.

Google is the number one search engine, its campaigns during the holiday season always bring out the best results.

This Halloween, you can run a sales campaign here and expect to generate greater revenue for your WooCommerce store.

Google Shopping Halloween

Here is how you can promote products through Google Shopping in an optimized way.

ii. Walmart

Walmart is one of the most trusted online marketplaces because of its dedicated customer support and exclusive shipping opportunities.

On top of that, it offers you some special listing tools to automate your pricing and product promotion.

So, Walmart will be a really great option to promote your WooCommerce products this Halloween.

Walmart Halloween Merch

Here’s a short guide that can help you to create product feeds for Walmart.

iii. Facebook & Instagram Marketplace

6 Halloween Store Tips & Trends: Promote Halloween Merches & Increase Online Sales 3

Promoting on Facebook & Instagram is a great way to engage your potential buyers easily.

You can promote your products on Facebook and inform your customers through engaging Facebook posts and videos.

The super-friendly business features of Facebook & Instagram can highlight your brand efficiently on Halloween.

instagram promotion

Instagram’s target audience is GenZ and millennials, and entertaining events like Halloween are highly trends on Instagram.

Instagram is not only for enjoyment but it also encourages people to follow and interact with your business.

By applying easy tactics like interactive Halloween vibe product videos, hashtags, and spooky product images you can attract a lot of targeted buyers and create instant hype for your online Halloween store.

Here’s an example from a popular Halloween merch store Spirit Halloween:

Spirit Halloween - Halloween costumes

These two marketplaces make millions of sales every week.

And you can take advantage of it by promoting products from your online store through these marketplaces during Halloween.

For that, you can use Product Feed Manager for WooCommerce to generate an accurate product feed in minutes. Eventually, you can easily promote it on your desired platforms.

iv. TikTok Ads

In the Halloween season, TikTok often triggers visitors for more unplanned and impulse purchases.

You can simply choose your creator and visit the creator marketplace of TikTok, collaborate, and get a huge increase in your sales.

But before that, you need to lay out your Halloween products on your TikTok business page properly.

For that, you can choose a product feed manager for WooCommerce to promote your WooCommerce products with TikTok ads.

Watch how easily with simple steps you can create the most accurate feed for Tiktok ads :

Author’s Note

Halloween is among the best occasions to increase sales for your online store. Make use of all the tips and articles referring to this article, and you will no doubt, haunt your way towards a high number of sales.

Get ready to call yourself the spookiest online Halloween store out there.

Categories
WooCommerce Guide

WooCommerce Shipping Setup – Guide To Follow [2024]

As a Woocommerce owner, you might often be scared that your potential customer will abandon their almost-buying cart.

One of the reasons for abandoning your cart may be unclear shipping methods and payment sections.

WooCommerce Shipping settings are often confusing because there are plenty of options in the WooCommerce Dashboard.

So, in this article, I focused on making things as simple as possible for you when setting up the WooCommerce Shipping.

I gave proper directions for every step and used several pictures to let you follow the steps with your dashboard [EASILY].

Follow all the steps properly and your WooCommerce shipping settings will be ready.

So let’s begin.

WooCommerce Shipping Setup (Basic Steps)

WooCommerce Shipping is a feature that allows you to control shipping options.

WooCommerce Shipping consists of basic three options. You can say these are the foundation-setting options that you must set.

Here are these 3 options :

  • Shipping Class
  • Shipping Zone
  • Shipping Method

I’ll go over them one by one :

Create WooCommerce Shipping Classes

In this section, you will learn how to create shipping classes :

Step 1

First, Go to WooCommerce > Settings > Shipping

Woocommerce Shipping

You’ll see four options: Shipping Zones, Shipping Settings, Classes, and Local Pickup.

Notice the blue line under the panel, you will find the option “Classes

Shipping Class

Step 2

After clicking on Add Shipping Classes, you will see a page as follows :

add shipping class

You will need to enter the following details:

  • Shipping Class: what kind of shipping approach do you want? For example: if you want free shipping, you must write free shipping. (This is mandatory).
  • Slug: A slug is created based on your shipping classes in your database. In most cases, you won’t need them unless you are working with several shipping classes. If you don’t provide a slug name, it will be created automatically.
  • Description: It is a good practice to provide a brief description of your shipping classes; the specific nature of products that put them under the same class, etc. This is completely optional.

Step 3

Once you provide the information, click on Save.

In my case, the shipping class looks like this:

Shipping class

You can create as many shipping classes as you want.

Then assign products to your shipping classes. The next step is to create your desired shipping zone.

Create WooCommerce Shipping Zones

Your shipping zone specifies the set of regions you are willing to ship your products to.

You can set multiple shipping regions based on the name, country/province, postal codes, etc.

You can also set different shipping rates for different regions based on the shipping methods available within this option.

P.S: When you set regions, users only from those regions will see your shipping options.

Now let’s learn how to create a new shipping zone :

Step 1

On your dashboard go to WooCommerce > Settings and on the page, click on Shipping

Shipping option

Step 2

Under Shipping, you will get 3 options. Click on the Shipping Zones option.

Shipping zone option

Step 3

As you can see, To create one, click on Add zone.

add shipping zone

Step 4

In the first option, you will see the zone name. Fill the box accordingly.

Zone name

When you select a zone region on the box, all the regions under that zone will be previewed in the list. You will be able to select multiple regions among them.

Add shipping region

In my case, the box looks like this.

shipping region set up

Click on Save Changes to save your newly created shipping zone.

shipping region set up

You are done with creating a Shipping Zone.

Then you need to select “Add Shipping Method” to Free Shipping or Flat Rate.

Which I am now going to discuss elaborately on how you can set up shipping methods :

Set Up A WooCommerce Shipping Method [Manual]

So, There are 3 types of shipping methods you can go for :

  • i. Free Shipping
  • ii. Flat Shipping
  • iii. Local shipping

First I will guide you with free shipping.

Then I will give you an overview of the other two WooCommerce shipping methods.

So let’s go ahead :

i. Free Shipping Method

If you want to give your customers shipping free of charge then you need to set up a free shipping method.

So, now go to the WooCommerce settings option. Then select the button Shipping< Add Zone

As you scroll down you will see the option shipping methods on the left side :

add shipping method

On the right panel, you will see a blue button labeled “Add shipping Method

Add shipping method

As you click on the button this list will come up :

shipping method option

Here, you will see a 2 option. select Free Shipping and click on the Continue button.

This is what the Free shipping Settings look like:

Set up free shipping

As you can see, first you have to put a name on it and then fill out the requirements.

You have to enter the following information:

1. Title:

This is the name of your shipping method. The name you set here is what users will see while checking out.

You can set the title from Free shipping to anything you want (for example, ‘No shipping fee’) but the method of shipment will remain the same.

2. Free shipping requirements :

You can either choose to give free shipping without any condition, or you can choose from 4 conditions to make free shipping applicable:

  • A valid free shipping coupon: The customer has to have a coupon to get free shipping
  • A minimum order amount: The customer has to order that’s worth a certain amount or more to get free shipping
  • A minimum order amount or a coupon: Customer can have either a free shipping coupon or a certain target amount worth of the order; any one of them will avail of free shipping
  • A minimum order amount AND a coupon: The customer needs to have a free shipping coupon and order a certain amount worth of order; both have to be achieved to avail of the free shipping option
  • Minimum order amount: In case you set the condition above to have a minimum order amount (i.e. you chose one of the last three options for “Free shipping requires“.

I will select the “No requirement” option.

Now, in the shipping method box, free shipping has been added. Now, look at the right side of the dashboard, you will find the option to edit.

edit free shipping option

Click on Edit and it will take you to the free shipping settings. Update any changes you want.

Your Free shipping method is set up.

The next shipping method is flat rate shipping :

ii. Flat Rate Shipping Method

Flat-rate shipping charges a fixed rate for shipping.

To set this method up, follow the steps below :

To access Flat Rate Settings, Go to WooCommerce > Settings > Shipping > Shipping Zones > Shipping method.

flat rate

Then choose the option flat rate and click on the button Continue.

It will take you to the flat rate settings.

flat rate set up

In the Flat Rate Settings, you have to enter your estimated cost, shipping class cost, and some other relevant information accordingly.

Terms you need to know :

  • Method Title: This is the name of your shipping method. The name you set here is what users will see while checking out. You can set the title from Flat Rate to anything you want (for example, ‘Flat shipping fee’) but the method of shipment will remain the same.
  • Tax status: Choose whether shipping products are taxable or not.
  • Cost: It is the base cost you set, that adds up as the initial flat rate cost. It is charged for all the products even if they don’t fall in any specific class.
  • Shipping Class Cost: Set an additional cost you want to imply on your products that fall under certain shipping classes. For example, I have set my shipping class cost to 5 for the class ‘Heavy’. Anyone who is buying an item that falls under the class ‘Heavy’, will be charged an additional $5, along with the flat rate cost.
  • No Shipping Class Cost: Set up your shipping rates for the products that fall under no specific classes. I set it up as 2. Anyone who is buying an item that falls into no shipping classes will get an extra charge of $2 along with the flat rate cost.
  • Calculation Type: When you have multiple shipping classes, you can choose the types of calculation you want to imply with your shipping classes cost. In the Flat rate method, you will have two ways to do that: Per Class & Per Order

After you fill up all box, click on the button “Create & Save

Now let’s look at the Local pickup shipping method.

iii. Local Pickup Shipping Method

Go to Shipping zone> shipping method> add shipping method> local shipping

Local shipping set up

This is what the Local pickup Settings look like :

add local shipping

Now click on the option “Enable local pickup”.

Scroll down and tick on the label line “Add a price for customers who choose local pickup”.

local shipping set up

By default, the local pickup shipping method is free. but if you can charge an extra fee for local pickup you can assign it here. Usually, store owners do not charge anything extra, but it is an option you can use.

Tax status: Here, you have the option to choose between Taxable or None.

local shipping set up

It is by default assigned as Taxable, which means when using a local pickup, store base taxes will apply regardless of customer address.

This is the ideal choice for most store owners, however, you can choose not to charge for taxes and select Non-Taxable instead.

Now, scroll down and you will see the option to pick locations. On the left side, you will see the button “Add pickup location

add local shipping

As you click, you see this page with these options :

add pick up location

Once these are inputted, click on the Save Changes button, and your Local pickup shipping method is set up.

How to Calculate Shipping Rates & fees

There are two calculation types available :

  • Per Class

For any order that will include products in multiple classes, the shipping class cost for each of those classes will be added on top of the flat rates.

Also if the order includes products with no particular class, then the cost for no shipping class will be present as well.

For instance, let’s assume that I have another shipping class named ‘Light’ and I assigned a shipping class cost of $3 to it.

Now, let’s say a buyer ordered 4 products, out of which two products fall under the class ‘Heavy’, one product falls under the class ‘Light’ and another falls under the no shipping class.

Then the total shipping cost will include a $2 charge for no shipping class cost, a $5 charge for the shipping class cost of ‘Heavy’, and a $3 charge for the shipping class cost of ‘Light’, on top of the flat rate cost of $5. So the total shipping cost will add up to $15.

  • Per Order

In this case, for any orders that will include products from multiple classes, the shipping class cost that is the highest among these classes will be added on top of the flat rate cost. Suppose, I have another shipping class named ‘Light’ and I assigned a shipping class cost of $3 to it.

Now, let’s say a buyer ordered 4 products, out of which two products fall under the class ‘Heavy’, one product falls under the class ‘Light’ and another falls under the no shipping class.

Here, among the three, the highest shipping class cost is $5. Hence, only $5 will be added on top of the flat rate cost, the other two shipping class costs will be ignored. Therefore, the total shipping cost will add up to $10.

Once these are inputted, click on the Save changes button, and your Flat rate shipping method is set up.

Set Up Payment Methods

In the WordPress dashboard, navigate to and click on the Payments tab within the WooCommerce > Settings menu.

setting payment

You can choose from these options :

Direct bank transfer: Take payments in person via BACS. More commonly known as direct bank/wire transfer.

Check payments: Take payments in person via checks. This offline gateway can also be useful to test purchases.

Cash on delivery: Have your customers pay with cash (or by other means) upon delivery.

Click on the button manage, you will get the settings page of any option :

setting of payments

As you can see here the setting page of cash on delivery. Fill up accordingly with your credentials. Clock on save changes. Your payment setup is done.

Set Up Weight-based Shipping [Additional]

Some might think configuring WooCommerce shipping based on weight would be a hard task.

When you know the RIGHT process, it’s very simple.

Let us walk you through all the steps.

How to Turn On WooCommerce weight-based shipping class

Jump to WooCommerce >> Settings >> Shipping and add a shipping class.

I will name this WooCommerce weight-based shipping class:

Now, in the same way, create other classes for other weight ranges.

Next, you have to assign the classes to the products according to their weight categories.

For example, I have a product that is under kg, so I would send it to under the Up to kg class.

Looks like a time-consuming task, right? You can also bulk assign WooCommerce weight-based shipping classes.

Go to All Products and filter your products according to your requirements. Select all of them and click the Quick Edit button.

On the Quick Edit window, assign the appropriate class and update.

Finally, you need to create or edit a flat shipping method. Go to your designated shipping zone and add/edit the flat rate method.

Scroll down the flat rate window, and you will find all the classes you created.

Finally, set your rates for every class.

Integrate shipping with An Advanced Shipping Plugin

As you see in WooCommerce, you might not get every option you need.

You can integrate a shipping plugin into your WooCommerce. I am showing you a plugin named “Advanced Shipping

First, install and activate the plugin.

Now go to the Shipping zone > Shipping method>Advanced shipping.

Advanced shipping plugin

And now see how easy it is now to set up your shipping process. You will get all the options under one panel.

Advanced shipping plugin

You don’t have to go back and forth to different pages to set up separately.

Final Thoughts

A well-defined shipping strategy can make your shipping process smooth.

In this guide, I provided a step-by-step guide for setting up shipping in WooCommerce.

I added how you can make the process easy with the Advanced shipping plugin.

By following the steps outlined and carefully considering your customer’s need, you can establish both a user-friendly and sale-focused shipping system.

Comment below any question you have on your mind! I’d love to answer and solve your queries.

Frequently Asked Questions (FAQs)

FAQ 1: Which of the following shipping methods is commonly available in WordPress?

-Common shipping methods available in WooCommerce include:

  1. Flat Rate shipping
  2. Free shipping
  3. Local Pickup
  4. Table Rate Shipping (with plugin)
  5. Live rates from carriers (with extensions)

FAQ 2: What are the shipping variations in WooCommerce?

– Configuring shipping in WooCommerce is a straightforward process that begins in the WooCommerce Settings under the Shipping tab.

Here, you’ll set up shipping zones, which are geographical areas you ship to, and add appropriate shipping methods for each zone.

These methods can include options like flat rate, free shipping, or local pickup. For each method, you’ll need to configure specific settings such as costs and conditions.

FAQ 3: How to offer multiple shipping options in WooCommerce?

– WooCommerce offers several shipping variations to help tailor the shipping process to your business model. Shipping zones allow you to define different rates for different geographical areas. Shipping classes help you group products with similar shipping requirements.

Various shipping methods provide different ways to calculate shipping costs. You can base shipping calculations on factors like weight, dimensions, or cart total.

Categories
Product Feed Manager For WooCommerce WooCommerce

Best Online Marketplaces to Promote WooCommerce Products [2024]

Running a WooCommerce store can be difficult at times and you have to put in a lot of effort to increase your sales.

However, you can leverage the benefits of best online marketplaces and speed up the process. It also helps to expand your reach without the constant struggle.

According to digital commerce 360, the online marketplace is projected to reach $3.832 trillion in 2024, highlighting its immense growth and potential.

Popular online marketplaces are a goldmine for traffic and customer engagement. By leveraging these platforms, you can tap into a vast audience ready to discover and purchase your products.

Upload your WooCommerce products on any popular online marketplace and see the results in less time. So let’s get started with why promoting products online on the popular marketplaces.

Why Promote Products On the Best Online Marketplaces?

If you look at statistics, popular marketplaces such as Google Shopping, Facebook Dynamics, eBay, Amazon, Connexity, Vergelijk, and other large online marketplaces get thousands of traffic regularly.

A large marketplace has mutual trust from thousands of customers who frequently purchase products from the same website.

When you list your WooCommerce products on these sites you are sure to get more sales without much hassle.

With time, you will be able to expand the number of products you sell and make a substantial amount of profit. By uploading your products to online marketplaces, you can utilize their immense traffic to generate more sales

All 4 of these online merchants operate in almost every country all over the world. Plus, they all have easy interfaces that let you easily upload WooCommerce products, and promote in targetted countries.

It is highly recommended that you promote your WooCommerce products to at least one of the marketplaces among Google Shopping, Facebook Dynamics, Amazon, and eBay.

Let’s explore one by one.

1. Google Shopping:

Google Shopping - Best Online Marketplaces

Google Shopping is the largest online marketplace, making it an essential platform for promoting products online.

To maximize your sales, start by optimizing your product data. Include core keywords in your titles, such as brand names, models, and common product terms, to enhance online marketplace promotion.

Use high-quality, eye-catching images with unique colors and appropriate alt text. Categorize your products accurately using Google Product Categories to improve visibility.

Ensure all necessary attributes are included in your product feed, such as price, availability, and detailed descriptions. Optimize for local visibility if applicable by including local terms and offering local pickup options.

2. Facebook Dynamic Ads:

Facebook Dynamic Ads - Best Online Marketplaces

Facebook Dynamic Ads is the largest online marketplace, perfect for promoting products online. To boost your sales, I recommend focusing on effective online marketplace promotion.

Use Facebook’s targeting to reach your ideal audience by demographics and interests. Create ads with high-quality images and engaging descriptions that highlight your product’s best features.

Dynamic product ads can show the most relevant items to potential buyers based on their browsing history. Keep an eye on your campaigns and adjust them to improve results.

By using Facebook Dynamic Ads, you can reach more people and increase your sales effectively.

3. Amazon Seller Central:

Amazon Seller Center - Best Online Marketplaces

Amazon Seller Central is the largest online marketplace, perfect for promoting products online. If you’re looking to boost your sales, I highly recommend using this platform for online marketplace promotion. Amazon’s vast customer base and trusted reputation can help you reach millions of potential buyers.

First, set up your account and list your products with detailed descriptions and high-quality images. Optimize your product titles, bullet points, and descriptions to highlight key features and benefits.

Next, take advantage of Amazon’s advertising tools like Sponsored Products and Sponsored Brands to increase visibility. Monitor your campaigns regularly and adjust your bids and keywords to improve performance.

With Amazon Seller Central, you can reach a massive audience and boost your sales significantly. By promoting products online through Amazon, you leverage their platform’s credibility and extensive reach to grow your business.

4. eBay MIP Global:

eBay MIP Global

eBay MIP Global is a fantastic platform for promoting products online, tapping into one of the largest online marketplaces. If you’re looking to boost your sales, I highly recommend leveraging eBay for effective online marketplace promotion.

Start by creating an account and listing your products with clear descriptions and high-quality images. Use relevant keywords to ensure your items show up in searches. Utilize eBay’s promotional tools, like Promoted Listings, to increase your product’s exposure.

Regularly monitor and adjust your listings to improve performance. By promoting products online through eBay MIP Global, you can reach more customers and grow your business effortlessly.

However, there are so many more online marketplaces you can promote your products on. Below is a list of over 70+ online marketplaces where you can upload your WooCommerce products and boost sales.

Look for the ones that operate in your required countries and start planning on getting more sales through them.

List Of Trusty Online Marketplaces To Boost Sales On WooComerce Stores

Every merchant shop has its own set of dedicated customers who regularly purchase from them. As long as the product is posted there, most customers will not care who the manufacturer is. They will expect to get good quality.

Here are some of the best marketplaces including (Google Shopping, Facebook Dynamics, Amazon, and eBay) where you can promote your products.

Now I am going to explain some special features of these particular marketplaces so that you can choose which one is more beneficial for you.

Comparison Shopping Engines:

  • Google Shopping: Showcase your WooCommerce products to a vast audience with targeted ads.
  • Kelkoo.co.uk: List your products on Kelkoo to reach UK shoppers looking for deals.
  • Vergelijk.nl: Promote your WooCommerce products on this Dutch comparison site to attract local customers.
  • PriceSpy (UK): Compare prices and promote your products to UK shoppers on PriceSpy.
  • Heureka: Reach Central European customers by listing on Heureka, a popular price comparison site.
  • Prisjakt (Sweden): Promote your products to Swedish customers on Prisjakt’s comparison site.
  • Idealo: Compare and promote your products to price-conscious customers on Idealo.
  • Twenga: Increase product visibility in Europe by listing on Twenga.
  • Guenstiger: Reach German customers by promoting on Guenstiger’s comparison site.
  • Ceneo.pl: Promote your products to Polish customers on Ceneo.pl.
  • PriceRunner: Compare and promote your products on PriceRunner’s comparison site.
  • PriceMasher: Increase your product visibility with PriceMasher’s comparison service.
  • PriceSearcher: Increase visibility by listing on PriceSearcher’s comprehensive comparison site.
  • Koopkeus: Promote your products to Dutch and Belgian consumers on Koopkeus.
  • Preis.de: Reach German customers by listing on Preis.de’s comparison platform.

Affiliate Networks:

  • CJ Affiliate: Increase sales through affiliate marketing by listing your products on CJ Affiliate.
  • PassiveWP: Supercharge your affiliate marketing strategy and optimize your time and productivity with PassiveWP.
  • Pepperjam: Boost sales with affiliate marketing by using Pepperjam.
  • Daisycon: Use affiliate marketing through Daisycon to boost your product sales.

Marketplaces and Retailers:

  • Marktplaats: Sell directly to Dutch customers by uploading your products to this leading marketplace.
  • Target: Increase visibility by selling your products on Target’s online marketplace.
  • Rakuten: List your WooCommerce products on Rakuten to reach a global audience.
  • eBay Seller Center: Manage and promote your products efficiently through eBay’s Seller Center.
  • Amazon Seller Central: Reach millions of customers worldwide by selling on Amazon.
  • Walmart: List your products on Walmart to reach a vast customer base in the US.
  • Sears: Reach American customers by listing on Sears’ online marketplace.
  • Bol.com: Access the Belgian and Dutch markets by listing on Bol.com.
  • Otto: List your products on Otto to reach a wide German audience.
  • Fnac: Access French-speaking customers by listing on Fnac’s marketplace.
  • CDiscount: Sell to French customers by promoting your products on CDiscount.
  • Fruugo: Expand your global reach by selling on Fruugo’s marketplace.

Social Media and Advertising Marketplaces:

  • Google AdWords: Drive traffic to your WooCommerce store with targeted Google AdWords campaigns.
  • Facebook Dynamic Ads: Retarget and attract customers with personalized ads on Facebook.
  • Instagram: Attract customers with visually appealing ads and posts on Instagram.
  • Pinterest: Showcase your products with visually appealing pins to attract Pinterest users.
  • Snapchat: Use Snapchat ads to target younger demographics with your products.
  • Bing Ads: Drive traffic to your store with targeted ads on Bing.

Other Marketplaces:

  • Connexity: Use Connexity to reach a broad audience through comparison shopping and advertising.
  • Yandex: Access Russian customers by promoting your products on Yandex.
  • ShopMania: Increase your product reach by listing on ShopMania’s comparison platform.
  • Zalando: List your fashion products on Zalando to reach fashion-forward shoppers.
  • CoolBlue: Attract tech-savvy Dutch and Belgian customers by selling on CoolBlue.
  • Sears: Reach American customers by listing on Sears’ online marketplace.

How To Upload Products On A Large Online Marketplace? 

Of course, it makes no sense to manually upload your products to several online marketplaces one by one.

Rather, generate a product feed of your WooCommerce products using a WordPress plugin and upload it to the best online marketplaces you wish to promote.

You can easily generate product feeds in the correct formats of any popular online marketplace using Product Feed Manager For WooCommerce.

Why Use Product Feed Manager For WooCommerce?

Generate product feed for online marketplaces with WPFM

Product Feed Manager For WooCommerce is currently the most stable plugin to generate accurate product feeds.

You will be able to use features such as category mapping, category filter, add advanced custom fields, custom and category filters, scheduled updates, and many more.

You will be able to auto-sync your WooCommerce store with Google Shopping Center.

The main reason to use Product Feed Manager For WooCommerce is that it already has pre-built templates of product feed for over 70+ major online marketplaces where you can promote your products.

This means that you do not need to go through hours of tutorials to set up a product feed for each merchant shop.

You can simply select the merchant shop and assign the data correctly. That’s it. The feed will be generated in an acceptable format for the merchant you selected.

It will only take you a few clicks to generate a product feed for each online merchant shop.

Conclusion

If you are running a WooCommerce store, I advise that you promote your products to at least 3 of these marketplaces. Trying to grow with your site alone won’t work.

Plus, I already referred to a great tool to make things easier for you. Go ahead and use Product Feed Manager For WooCommerce to generate accurate product feed easily and start promoting on a large marketplace ASAP.

The more prospects you reach, the more products you can sell. So it’s only wise to increase your market presence.

If you ask me, I suggest promoting on Google Shopping is a must for any WooCommerce store. Also if you have a good social presence, then definitely promote on Facebook Dynamic Ads.

Hence, take advantage of these online marketplaces and boost your store performance.

** FAQs **

How do I choose the right online marketplace for my WooCommerce products?

Start by looking at where your competitors sell and where your customers shop most. Google Shopping and Amazon are great for general items, while niche products might do better on platforms like Etsy.

Can I manage multiple marketplace listings from one place?

Yes, use tools like Product Feed Manager For WooCommerce to create and sync feeds for various marketplaces. It saves you time and ensures consistency.

What are the costs associated with listing products on these marketplaces?

It depends on different factors: some platforms like Google Shopping charge per click, while others like Amazon and eBay have listing fees and sales commissions. Check each platform’s fee structure first.

How often should I update my product feeds?

Regular updates are important. With Product Feed Manager For WooCommerce, you can schedule automatic updates to keep your listings current and avoid selling out-of-stock items.

What if I encounter issues with my product feeds?

If you run into problems, first check that your feed meets the marketplace’s requirements. Product Feed offers support to help troubleshoot, and you can also reach out to the marketplace’s support team for assistance.

Categories
Guide Product Feed Manager For WooCommerce WooCommerce

Generate Heureka XML Feed (Easiest way): Increase Sales of Your Woocommerce Products

If you are from the Czech Republic and Slovakia, then Heureka. cz and Heureka. sk is the perfect marketplace to market your Woocommerce products.

Because Heureka regularly showcases deals, discounts, and promotional offers, serving a dual purpose to the targeted customer using separate websites for each country.

It helps consumers find the best value while providing retailers like you with an effective marketing tool to attract potential buyers.

Heureka incorporates customer reviews and ratings. With positive reviews and ratings, you can attract more potential clients.

So, if you are a WooCommerce store owner willing to sell on Heureka’s websites, in this article,

Here, I’ll talk about:

1. Why it’s good to sell your products on Heureka

2. Mandatory and other optional Product Attributes To Include In The XML Feed

3. How easily you can create an XML feed for Heureka using the right plugin (ONLY 7 STEPS)

I’ll explain everything in a simple way, whether you’re new to Heureka or already using it.

By reading this, you’ll learn how to show your products to more people and thus sell more.

But first, let’s know the reasons for choosing the Heureka marketplace to sell your products

Reasons To Sell on Heureka

Heureka provides a platform to showcase your products to a wide audience from the start.

Not many marketplaces provide these benefits. You have to wait longer to get wide audiences in other marketplaces.

This platform is user-friendly and allows sellers like you to manage their stores with ease.

It supports multiple payment options, so you can offer diversified payment options to your customers.

Heureka’s partnerships with major companies like Google help drive traffic to your store. The platform prioritizes security, using encryption to protect customer data.

So, Heureka can be a great way to expand your online business and increase your sales.

Mandatory Product Attributes To Include In The XML Feed

Following are the required product attributes that you must submit for every product you want to promote on the Heureka marketplaces.

ITEM_ID

Example Format:
<ITEM_ID>3252</ITEM_ID>

This is the unique product id.

PRODUCTNAME

Example Format:
<PRODUCTNAME>Adidas Superstar 2 W EUR 36</PRODUCTNAME</PRODUCTNAME>

Use a product title that defines exactly what the product is, along with its most notable features such as color, size, etc.

For different types of products, you are recommended to include different types of information in the product title.

Product name structures guide per category:
– Web View
– PDF View

DESCRIPTION

Example Format:
<DESCRIPTION>V rámci kolekce Originals uvádí adidas sportovní obuv The Superstar, která je již od svého vzniku jedničkou mezi obuví. Jejím poznávacím znamením je mimo jiné detaily designové zakončení špičky. Díky kvalitnímu materiálu a trendy vzhledu, podtrženého logy Adidas uvnitř boty i na ní, bude hvězdou vašeho botníku.</DESCRIPTION>

Provide a description of the product with real data.

Do not include any HTML tags or shortcodes in the description.

URL

Example Format:
<URL>https://www.yourdomain.cz/adidas-superstar-2-w7ref?eur-36</URL>

Submit a valid URL of the product on your WooCommerce store.

For variable products, each variant should have its unique URL.

Make sure the link has no spaces or diacritics.

IMGURL

Example Format:
<IMGURL>https://www.yourdomain.cz/adidas-superstar-2-36-img-1.jpg</IMGURL>

Use the link to the main product image for this attribute.

For product variants, you may use the featured image for each variant respectively.

Make sure the link has no spaces or diacritics.

PRICE_VAT

Example Format:
<PRICE_VAT>36</PRICE_VAT>

Submit the price that is a total of all the fees, except shipping, such as the base price + tax + extra packing charges, etc.

No need to include the currency.

MANUFACTURER

Example Format:
<MANUFACTURER>Adidas</MANUFACTURER>

If the product is manufactured by a renounced Brand, then you have to include the brand name in the product name as well as under this attribute.

CATEGORYTEXT

Example Format:
<CATEGORYTEXT>Oblečení a móda | Obuv | Dámská obuv</CATEGORYTEXT>

Heureka has its own category list, and you need to submit which category each of your products may fall under.

You may view all categories here:
– XML view
– PDF View

**You will find category lists in your required language on the knowledge page for your respective country.

P.S. You may use category mapping in our suggested plugin to submit the right category as per Heureka’s requirements without changing the actual categories in your WooCommerce store.
**I’ll explain how later in this guide.

DELIVERY_DATE

Example Format:
<DELIVERY_DATE>0</DELIVERY_DATE>

Use this attribute to indicate how soon the product is available for shipping, i.e., if it is in stock.

If you have the product in stock, then use the value as 0.
Else, mention the number of days after which the product will be in stock.

*Do not submit any product that is only available on request.

ITEMGROUP_ID

Example Format:
<ITEMGROUP_ID>3251</ITEMGROUP_ID>

For the variants of a variable product, submit a common item group ID to indicate that they are variants of the same product.

These are the necessary attributes. If you include these data in your product feed, you can then submit it to your merchant account.

Other Optional Product Attributes You May Submit

You may include a few more additional attributes to the product data to increase product presence and conversion.

PRODUCT

Example Format:
<PRODUCT>didas Superstar 2 W EUR 36 – novinka</PRODUCT>

You may submit this attribute to indicate some extra product benefits.

Following accepted information you may include:

  • Extended warranty
  • x year warranty on engine, parts..
  • “to your door” delivery surcharge/ convenience fee
  • Extension of warranty/post-warranty service
  • Free maintenance
  • Extended return policy
  • Only in-person pick up
  • Gift-wrapping and other services regarding the product
PARAM (For Variations)

Example Format:
<PARAM>
<PARAM_NAME>size</PARAM_NAME>
<VAL>41</VAL>
</PARAM>

For variable products, you may submit extra parameters by which the product varies under the attribute group, PARAM. For example, if a product varies by size, then you have to submit the size values as a separate attribute.

For multiple variation terms, you may submit this attribute multiple times.

You may also use it to submit additional product attributes such as material, pattern, etc. (For material, you may submit a percentage as well – PARAM_PERCENTAGE).

IMGURL_ALTERNATIVE

Example Format:
<IMGURL_ALTERNATIVE>https://www.yourdomain.cz/adidas-superstar-2-36-img-1.jpg</IMGURL_ALTERNATIVE>

You may submit additional product images by submitting this attribute multiple times.

DELIVERY

Example Format:
<DELIVERY>
<DELIVERY_ID>CESKA_POSTA</DELIVERY_ID>
<DELIVERY_PRICE>120</DELIVERY_PRICE>
<DELIVERY_PRICE_COD>120</DELIVERY_PRICE_COD>
</DELIVERY>

If you use multiple delivery services, then submit this attribute group multiple times to Indicate the delivery price and the service that will be used for the products

Use the Delivery Price COD only when you also accept cash on delivery. Else, just the Delivery Id and Delivery Price is enough.

– Support delivery carriers by Heureka

EAN

Example Format:
<EAN>5051571703857</EAN>

If you have the EAN of the product available, it’s recommended to submit it as well.

ISBN

Example Format:
<ISBN>9978-0-123456-47-2</ISBN>

For books, you may submit the ISBN number.

VIDEO_URL

Example Format:
<VIDEO_URL>https://youtu.be/gG4gtcTHb_Y</VIDEO_URL>

If you have a product review video on Youtube, you may submit the link to the video using this attribute.

HEUREKA_CPC

Example Format:
<HEUREKA_CPC>50</HEUREKA_CPC>

If you want to get a special feature on Heureka, then you may bid for a higher position by submitting the highest you are willing to spend as CPC (i.e., cost per click). The higher the bid, the higher are your chances to be featured in more popular sections.

The highest you can bid is 100 CZK.

If you want to use this, make sure to use it only on your most popular products. Otherwise, it’s not worthed.

ACCESSORY

Example Format:
<ACCESSORY>show laces</ACCESSORY>

If the product comes with some additional accessories, then you may mention them under this attribute, separating each item with a comma.

GIFT

Example Format:
<GIFT>Adidas Badge</GIFT>

You may also mention a gift that you may provide along with the product.

If you give away multiple gifts for a product, then submit this attribute multiple times to mention each gift separately.

Example XML Feed In The Right Format

Now that you know about the required and optional attributes you can include in the XML feed, take a look at the format in which products are added to the XML feed.

The following is an example of two variants of a variable product.

<?xml version="1.0" encoding="utf-8"?>
<SHOP>
     <SHOPITEM>
         <ITEM_ID>3252</ITEM_ID>
         <PRODUCTNAME>Adidas Superstar 2 W EUR 36</PRODUCTNAME>
         <DESCRIPTION>V rámci kolekce Originals uvádí adidas sportovní obuv The Superstar,
            která je již od svého vzniku jedničkou mezi obuví. Jejím poznávacím znamením je
            mimo jiné detaily designové zakončení špičky. Díky kvalitnímu materiálu a trendy
            vzhledu, podtrženého logy Adidas uvnitř boty i na ní, bude hvězdou vašeho botníku
         </DESCRIPTION>
         <URL>https://www.yourdomain.cz/adidas-superstar-2-w7ref?eur-36</URL>
         <IMGURL>https://www.yourdomain.cz/adidas-superstar-2-36-img-1.jpg</IMGURL>
         <PRICE_VAT>36</PRICE_VAT>
         <MANUFACTURER>Adidas</MANUFACTURER>
         <CATEGORYTEXT>Oblečení a móda | Obuv | Dámská obuv</CATEGORYTEXT>
         <DELIVERY_DATE>0</DELIVERY_DATE>
         <DELIVERY>
            <DELIVERY_ID>CESKA_POSTA</DELIVERY_ID>
            <DELIVERY_PRICE>120</DELIVERY_PRICE>
         </DELIVERY>
         <ITEMGROUP_ID>3251</ITEMGROUP_ID>
         </SHOPITEM>
         <SHOPITEM>
         <ITEM_ID>3253</ITEM_ID>
         <PRODUCTNAME>Adidas Superstar 2 W EUR 37</PRODUCTNAME>
         <DESCRIPTION>V rámci kolekce Originals uvádí adidas sportovní obuv The Superstar,
            která je již od svého vzniku jedničkou mezi obuví. Jejím poznávacím znamením je
            mimo jiné detaily designové zakončení špičky. Díky kvalitnímu materiálu a trendy
            vzhledu, podtrženého logy Adidas uvnitř boty i na ní, bude hvězdou vašeho botníku
         </DESCRIPTION>
         <URL>https://www.yourdomain.cz/adidas-superstar-2-w7ref?eur-37</URL>
         <IMGURL>https://www.yourdomain.cz/adidas-superstar-2-37-img-1.jpg</IMGURL>
         <PRICE_VAT>36</PRICE_VAT>
         <MANUFACTURER>Adidas</MANUFACTURER>
         <CATEGORYTEXT>Oblečení a móda | Obuv | Dámská obuv</CATEGORYTEXT>
         <DELIVERY_DATE>0</DELIVERY_DATE>
         <DELIVERY>
            <DELIVERY_ID>CESKA_POSTA</DELIVERY_ID>
            <DELIVERY_PRICE>120</DELIVERY_PRICE>
         </DELIVERY>
         <ITEMGROUP_ID>3251</ITEMGROUP_ID>
     </SHOPITEM>
     <SHOPITEM>
     ...
     </SHOPITEM>
</SHOP>

7 Steps To Generate Heuraka XML Feed With Your WooCommerce Products

In WooCommerce, you will find an easy-to-use plugin, Product Feed Manager for WooCommerce, with which you can generate an XML feed in just a few clicks.

PFM Marketplace feature page (heureka)

This is because the plugin has a pre-built template for Heureka with the right XML format and product attributes.

Follow this step-by-step guide and use the plugin to generate the required product feed.

Step 1 – Install And Activate Product Feed Manager For WooCommerce

  1. Go to your Dashboard. Then hover on Plugins and click on the Add New button.
WordPress Dashboard - Add New Plugin
  1. Type “Product Feed Manager” in the search box, and you will find the plugin. Click on Install.
  2. Once installed, Activate the plugin.
PFM Install

You will find a new menu called ‘Product Feeds’ among your dashboard menus.

Step 2 – Import Heureka Template For Feed Generation

1. On your dashboard, click on Product Feed and then click on Add New Feed option.

Add New Feed

It will take you to the feed creation page

PFM adde new feed

Here, on the top you will get an option to give a name to your feed, you can skip it too.

2. Click on the Feed Merchant Dropdown and you will get the list of all the supported merchants.

You can scroll down this merchant dropdown list or you can type Heureka in the search box, and you will get both Heureka and Heureka (availability).

Generate Heureka XML Feed (Easiest way): Increase Sales of Your Woocommerce Products 4

If you select Heureka (availability), in this way all the required attributes of Heureka will be loaded below.

Generate Heureka XML Feed (Easiest way): Increase Sales of Your Woocommerce Products 5

If you select Heureka, in this way all the required attributes of Heureka will be loaded below.

Step 3 – Create A New Product Feed

Now, you can see three buttons under the Feed Title text box, Troubleshoot, Product Filter, and Settings.

feed setting

1. If you are having any issues generating feed, click on this Troubleshoot button, it will take you to the Troubleshoot page, which could be helpful for you.

2. If you want to use any filter or condition, you can click on the Product Filter option, and a drawer will slide in from the right side of the window, and there you will get the following filters:

Product filter option in PFM

You can select any filter option and use them as per your need and click on the Close button when done.

3. Now, to schedule your feed or to choose which type of products will be included in your feed, click on the Settings button, and you will get a list of options to exclude or include products.

setting of pfm

Change the options as per your need and click on the Close button when done.

Step 4 – Use The Heureka XML Feed Template

1. If you look at the Feed Merchant dropdown button, there you will get another dropdown “Feed Type”, you can click here to set the type of this feed.

heureka feed- PFM

You can set different types of feeds depending on what types of feeds this merchant supports or what types of feeds this Product Feed Manager has the support for.

For Fruugo, CSV will be selected by default.

2. Now, in the attributes section, you will see that all the attributes are under the Required Attributes column, and their values are set according to the attributes under the Assigned Values column.

You can change any values to any attributes, simply click on the value dropdown, and select your preferred value.

All the required attributes will appear below. Now, most of the attributes will already be configured but notice that some of these attributes are unassigned.

Step 5 – Assign The Right Values To Unassigned Attributes

Most of the attributes are already configured. You need to assign values for the unassigned attributes.

  1. You will need to assign values for the following:
  • Manufacturer
    If you are the sole manufacturer of all of your products, you can set the type as Static and input your company name as the value.
    If you have different brand names for different products, you will have to save the value in a custom field or product attribute and then use that value here.
    **You may try using Perfect Brands for WooCommerce to assign the brand names more easily.
Manufacture Static
  • Category Text
    To assign the category text, you will need to use category mapping, which will be done in the next step. For now, leave it as it is.
  • Delivery date-
    If all of your products are in stock, then mark this attribute to static and assign the value as 0.

    If some products are subject to be in stock in a few days, then the value has to be saved in a field within the product and use that field value here.
Delivery Static
  1. Next, scroll up and Publish the feed.

Once the feed is published, it’s time to use Category Mapping.

Step 6 – Use Category Mapping Using The Accepted Heureka Category List

To use category mapping, first, you will need the category list supported by Heureka.

Then follow the instructions below.

  1. On your Dashboard menus, under Product Feed, click on Category Mapping. You will be taken to the category mapping page.
category mapping

Here, all the categories in your store will be listed.

  1. Give a name on the Mapper Name field.
  1. Next, for every category listed here, find a relevant/appropriate category from Heureka’s category list. Then copy the category’s full name and paste it in the field beside the respective category.
  1. Scroll down and click on the Save button, and your mapper will be saved.

Step 7 – Update & Generate Your Accurate XML Feed

  1. Go to Dashboard > Product Feed > All Product Feeds, and edit the feed you were creating.
Update heureka feed in PFM
  1. Once it loads, on the right side, click on the Purge Cache button.
  1. Next, scroll down to the Feed Configuration section and click on the value field for the Category Text attribute.
  1. At the very bottom of the value list, you will find the category map you created. Select it.
  1. Now, scroll up and click on Update.

That’s it. You have created your required product feed. The next thing to do is upload your products to Heureka.

Conclusion

If you are a local online shop owner in the Czech Republic or Slovakia, then it’s high time you start promoting your WooCommerce products on Heureka and take advantage of its huge audience.


You can go for Product Feed Manager for WooCommerce to generate the XML feed in minutes and start boosting your sales.
Go ahead and start selling on Heureka.

Categories
Guide Product Feed Manager For WooCommerce WooCommerce

Complete Guide to Increase eCommerce Sales with Pricespy [2024]

Running an eCommerce business may seem hectic, but today, eCommerce is the most booming industry out there.

According to a global report, the e-commerce industry has seen over $5.8 trillion worth of sales in 2023 globally and is expected to grow to over $8 trillion by the end of 2027.

Now, despite generating so much revenue and sales, most consumers go online to compare the prices of products. And 87% of these consumers end up making online purchases sooner or later.

Thousands of people still go to compare prices through several price comparison sites such as Pricespy, Pricerunner, Pricechecker, etc.

Thus it is ideal for any online store to list its products on popular price comparison sites. Pricespy is currently the most popular price comparison site in Europe.

This means, that if you run an online store and deliver products in major countries in Europe, then you must list your products on Pricespy to increase sales.

What is Pricespy?

Pricespy product feed

Pricespy is a popular price comparison website that helps you find the best deals on a wide range of products. It allows you to compare prices from various retailers across different categories such as electronics, appliances, and more.

As a shopper, Pricespy enables you to make informed purchasing decisions by presenting comprehensive price information and product reviews in one place.

For sellers, listing products on Pricespy increases visibility and attracts price-sensitive customers looking for competitive deals.

It is a valuable tool for both consumers seeking the best prices and businesses aiming to reach a broader audience, especially in the competitive UK online marketplaces.

How does Pricespy work?

Pricespy works by aggregating product information and prices from various online retailers into a centralized platform. Here’s how it operates:

  1. Data Collection: Pricespy gathers product details, prices, and availability from participating retailers like you.
  2. Comparison: It compiles this information into a searchable database. It allows you to compare prices and features across different products and brands.
  3. User Interface: Customers can easily navigate through categories, view product reviews, and filter results based on their preferences.
  4. Seller Participation: You can list its products on Pricespy to increase visibility and attract customers looking for competitive deals.
  5. Decision-Making: Customers benefit from comprehensive price transparency and unbiased product reviews. It enables them to make informed purchasing decisions.

Pricespy’s platform facilitates a convenient and efficient way for consumers to find the best deals online while providing you with a valuable tool to enhance your market reach and sales potential.

Why You Should List Your Products on Pricespy?

Pricespy is currently the most trusted price comparison site around Europe with over 14 million regular users.

Let’s look at the reasons why Pricespy is ideal for you to list your products.

1. Genuine Intent to Increase Sales

If you are an online store owner, Pricespy helps you to increase your eCommerce sales.

  • When you list your products, they will be sorted into various categories.
  • When a consumer will search for a product, they will get a list of the best deals for that particular product.
  • If you are offering a good price and an overall good deal compared to others, your product will appear among the suggestions that the visitors will see.
  • Let’s say the consumer chooses your product. Click on it will redirect the consumer to the product page on your site, where he/she can complete the purchase.

Now, this sounds similar to most other such sites, however, Pricespy has a few perks that outweigh others.

i. Displays Honest Deals

Display Deals - Pricespy product feed

Other listing sites such as Google Shopping or Facebook Ads have packages where paying higher can increase views. Pricespy has no such policy.

When a consumer searches for a product, he/she will get a genuine list of the best deals for that product from the lowest price to the highest.

So if you are offering a good deal, you will surely make money.

ii. Offers Price Prediction Graphs

Pricespy offers a unique service to consumers with a Price Prediction Graph. They have an artificial intelligence tool of their own called USP, which compares price changes in the past and the current market, and predicts what a product price might change into.

This can be used by consumers to decide when to purchase a product, and at the same time, it can be used by sellers to decide when to release good discount deals.

For example, if you see that the price of a product will fall next month, you can decide to give a discount offer beforehand to increase your sales as much as possible, before the fall in the market price.

In this way, even if a consumer sees that the price will fall later, your discount might tempt them to make an immediate purchase.

If the market price falls later, your current production cost will make it difficult to get a good profit at that time. So selling more of your products earlier will be more beneficial for your shop.

iii. Affordable Collaboration

Along with the above advantages you get, the cost of posting in Pricespy is absolutely nothing. They have a fair Cost Per Click (CPC) payment policy depending on the click volume. So if you are not getting results here, you will not have to pay.

They do have a paid feature, ‘Featured Shop’, however, it’s not what it sounds like. You might think a featured shop will probably be highlighted uniquely or will be displayed at the top of the list. But that’s not the case here.

In Pricespy, it will allow you to display your logo in the listing results rather than the name only, it will allow you to add a biography, and it will also add a ‘Cheapest on PriceSpy’ tag if your deal is cheapest for a certain product.

Apart from that, it gives you an analytics board to keep track of your product performance and changes the fees into a fixed Cost Per Click amount regardless of the click volume. These are the two features why most people sign up for the featured shop.

Your advantage here is that others cannot get too many special preferences just by paying extra. If you are offering good deals, you will get the value you deserve on the listing.

2. Huge Reach

Pricespy currently operates in 7 different European regions with their respective local domains (in local languages).

CountryWebsite
UK & Irelandhttps://pricespy.co.uk/
New Zealandhttps://pricespy.co.nz/
Swedenhttps://www.prisjakt.nu/
Norwayhttps://www.prisjakt.no/
Finlandhttps://hintaopas.fi/
Denmarkhttps://prisjagt.dk/
Francehttps://ledenicheur.fr/

It originated in Sweden as Prisjakt and has expanded to the above regions, while already gaining people’s favor locally and globally.

Most English-speaking people in any of these regions prefer using Pricespy UK rather than using the local sites. However, that’s not where it ends. Pricespy UK is also used by people overseas who wish to order products from the UK.

The site has regular users from the USA, Australia, India, Canada, Germany, Italy, Netherlands, and many other countries. So, if you sell products globally, this site is a sure way to reach ideal prospects.

3. High Regular Traffic

High Regular Traffic - Pricespy product feed

There is a reason why Pricespy decided to have local sites for the above-mentioned regions. It’s due to the huge traffic the site gets regularly.

Being the #1 price comparison site, Pricespy gets tons of regular visitors every day and results in tons of sales.

Here’s a chart (compiled using Ahref and Alexa) that will give you an idea of the number of visitors Pricespy gets in each of their regions:

CountryAhref Traffic AnalysisAlexa Rank & Stats
UK & IrelandGlobal: 131,914 /month
Local: 839982 /month
Rank: #54,920
1:22 Daily Time on Site
New ZealandGlobal: 251,216 /month
Local: 251,216 /month
Rank: #82,216
2:04 Daily Time on Site
SwedenGlobal: 2,807,643 /month
Local: 2,807,643 /month
Rank: #14,723
1:48 Daily Time on Site
NorwayGlobal: 835,560 /month
Local: 830,664 /month
Rank: #31,802
1:25 Daily Time on Site
FinlandGlobal: 80,406 /month
Local: 279,935 /month
Rank: #243,912
0:51 Daily Time on Site
DenmarkGlobal: 14,191 /month
Local: 14,069 /month
Rank: #601,266
1:42 Daily Time on Site
FranceGlobal: 636,256 /month
Local: 627,249 /month
Rank: #98,963
2:04 Daily Time on Site

**Daily time on site means the average time spent by every visitor per day.

As you can see, each of these sites has a high number of monthly visitors. This is a plus sign for you if you list your products on these sites.

Also, notice that visitors to all of these sites spend more than 1 minute (on average) daily. This is considered highly engaging. Any site with a daily time above 45 seconds is considered a quality and well-preferred site.

All these are proof that people regularly buy products through the help of this website which is earning revenue for many online stores.

4. Trusted Overseas

Here’s another great advantage of listing your products on Pricespy. Other than huge local visitors, Pricespy is also used by people overseas, who wish to order products from the UK.

Here are stats of the number of visitors Pricespy gets from a few overseas countries.

CountryTraffic Volume
USA63,828 /month
Australia2,019 /month
India1,036 /month
Canada886 /month
Germany854 /month
Italy588 /month
Netherlands502 /month

This is promising for any online store that delivers globally. Hence you have an opportunity to expand.

5. Engaging Mobile App

Pricespy Mobile App

Pricespy launched its mobile app which helped increase its usage even further.

The app comes in 7 different languages:

  • English
  • Danish
  • Finnish
  • French
  • Norwegian
  • Bokmål
  • Swedish

This is a great advantage because more than half the online consumers prefer using mobile apps to make purchases. Hence, this will increase the possibility of you getting more sales.

Currently, the app is regularly used by over 5 million Android users and tons of Apple users as well.

Now that you know all the advantages you can get just by listing your products in Pricespy, let us look at how you can start listing your products here.

How to List Your Products on Pricespy Accurately

First of all, keep in mind, that Pricespy will not list any non-branded products. So, for any products you submit here, you must submit a brand name.

For in-house products, they too need to have a brand name, possibly under your company name. Now, in order to list your products on Pricespy, you will need the following.

Signing Up As A Retailer On Pricespy

Signing up is completely free. The idea is to make sure that even very small shops can benefit from the site along with large stores.

However, there is a certain set of requirements that needs to be met. In this guide, I will elaborate on how you can get registered on Pricespy UK.

It’s a simple process. To get registered on their UK platform you will need to meet the following requirements:

  • You must sell at least one product within the categories of PriceSpy.
  • The website must be in English (language).
  • Products prices on your site must be in GBP (currency).
  • You must be able to take online orders via your website (or email).
  • The company policy should comply with all laws and regulations; nothing illegal is allowed.
  • You must submit your Company number or VAT number to Pricespy
  • You need to comply with UK Government policy on online selling and state the VAT number on your site.

After you register, if your shop is a British legal entity, then it will be listed with a UK flag next to its name.

And, if you own a non-EU company, then you must either be VAT registered in the EU countries where you wish to sell your products or be registered via the EU-service “VAT Mini One Stop Shop” (VAT MOSS). See details on Non-Union VAT MOSS here.

Here’s a copy of the Registration form:

Pricespy registration form

Simply fill out the form with all the required details.

The field ‘URL to product feed is where you can put the link to the price list you create for your products. If you don’t have that ready yet, you can leave it blank for now.

The shop category is important. Pricespy lets you choose from the following shop categories:

  • Various
  • Audio & Video
  • Beauty & Health
  • Camera & Photo
  • Computers & Accessories
  • Fashion & Accessories
  • Gamer Zone
  • Games & Consoles
  • Home & Garden
  • Phones & GPS
  • Sports & Outdoors
  • White Goods & Household Appliances

If you sell products from different niches in one shop, then you can choose ‘Various’. However, if you sell products within a single niche, then it’s best to choose one of the other categories.

This is because consumers have the option to get notifications and updates on Shopping categories. Choosing ‘Various’ reduces your shop’s visibility in any individual category.

Once you register, your application will be reviewed and you will get a confirmation e-mail with instructions for using Pricespy.

After that, the next step is to submit the Price List of your products.

How to Generate And Upload an Accurate Product Price List on Pricespy?

Accurate Price List - Pricespy product feed

When you create your product price list, you will need to include a few specific data.

Let us look into what data you must include on your price list and I will give you examples for each data so that you know the most optimized way to generate it.

Pricespy accepts either a Text format with tab delimiters or an XML format, although they prefer you to submit the Text format.

*I will provide you with a sample feed template to understand how the data should be submitted for your products

Now, Pricespy requires the following attribute values for each of your products to be included in the price list:

Mandatory Attributes

  • Product ID / Article Number
  • Product Name
  • Product Category
  • Product URL
  • Product Price
  • Condition / Product Format
  • Availability
  • Brand / Manufacturer

Recommended (but optional) Attributes

  • Product Image links
  • MPN / Manufacturer SKU
  • EAN-13 / GTIN-13
  • Shipping Fees
  • Total Price
  • Product Description
  • Stock Status
  • Colour or pattern
  • Gender and audience
  • Product Size
  • Multi-pack or bundle

Now, you must include all the data listed under the Mandatory Attributes. The recommended attributes are strongly advised to be used for better results in the listings.

Below is a more detailed explanation with examples of how each of these attributes should be assigned on your Pricespy price list for the maximum output.

After learning about the attributes in detail, you will get a sample of a Pricespy price list to get a clear idea. Now, let’s get into the details to understand what values you should assign to each attribute.

Product Attributes Explained

For each of the attributes, Pricespy has its own set of instructions that you need to follow.

Here I will give you examples and tips on how to make sure the data is not rejected and are optimized for better results.

Product ID

AttributeProduct ID or Article Number
**Here you can either submit Product ID or Article Number
Example241

This is a unique value for each product, to identify it in your store. It is limited to 36 characters.

For this, you can either use the value of the Product ID or the SKU of the product in your store.

**SKU is also unique for each product and can be used for the same purpose.

Product Name

AttributeProduct name
ExampleRFL White Electronic Blender

It is the name of the product to be displayed. When you set the product title, make sure it includes the product title, along with the model name/number.

Also, specify any special feature such as its color, material, model year, etc on the title if possible, especially for variations of the certain product.

If there is a separate brand name that people may recognize your product by, that is different from the manufacturer name you submitted, then you must include the brand name in the Product name.

For example, if you submit the Manufacturer as Today Electronics, but the brand name of the product is RFL, then include RFL in the product name (as shown in the example in the table).

Certain products may have different pack sizes (such as perfume, shampoo, and food). In this case, you need to specify the volume or weight in the product name.

If it is bundled or multiple packs of products, this should also be stated in the product name.

These tips are important to follow to get better chances of being relevant to a user’s search term, thus more chance of being listed when searched for.

Product Category

AttributeCategory
ExampleKitchen Appliances > Electronics For Kitchen

This is the category of the product. You must include the full category including sub-categories, in a tree structure.

The categories you submit should be based on the product type and not brand or any other aspects such as sales category, color, trademark, etc.

Pricespy will only accept the submission of one category, so you cannot submit multiple categories for the same product.

In this case, I suggest you use certain category mapping tools to ensure the right category tree is assigned.

If you own a WooCommerce store, you can use the plugin Product Feed Manager For WooCommerce which has a great category mapping feature to help you set the categories accurately.

**Browse through Pricespy and find out how other products, similar to yours, are categorized, and try to assign similar categories to your products when mapping.

Product URL

AttributeURL
Examplehttps://www.yourwebsite.com/rlf-white-electronic-blender/

This is the link to your product page. If the product page doesn’t have a URL of its own, you can use the URL for the category page.

If there are parameters in the product URL to differentiate between variants of a product such as color or size, the parameter must be included in the link; do not just give the URL of the basic product page.

**Do not include any UTM tracking code in the URL. For UTM tracking, submit a separate attribute called UTM, with the value of the UTM code.

Product Price

AttributePrice or Price (without VAT)
**Here you can either submit Price or Price (without VAT)
ExampleExample: 85.09 GBP

This is the price of the product to be displayed when listed, excluding shipping fees. I suggest you submit the price with VAT.

If you submit the price without VAT included, then rather use the attribute name Price (without VAT) to specify this to Pricespy.

The price you submit should match the price shown on your product page, and the currency should be GBP for the UK market.

Condition / Product Format

AttributeCondition or Product Format
**Here you can either submit Condition or Product Format
ExampleDemo

Use this attribute to indicate the current condition of the product or the format of the product.

These are the accepted values for the condition:

  • New – to indicate that is a brand new product and intact
  • Demo – to indicate that this is a preview of the product.
  • Used – to indicate that the product was refurbished or unpacked
  • Download – to indicate that this is a digital product to be downloaded

If all the products in your price list it in new condition and are physical products, then you can avoid submitting this attribute at all.

Availability

AttributeAvailability
ExampleCan not be ordered

Use this attribute to indicate if a product is currently available for shipping, if a certain product in the price list cannot be ordered immediately, or if it doesn’t accept home delivery.

These are the accepted conditional values for availability:

  • Available – to indicate that the product is in stock and can be ordered
  • Can not be ordered – to indicate that it is not available for ordering at the time being
  • Pickup – to indicate that this product has to be physically collected; no home delivery

Brand / Manufacturer

AttributeManufacturer
ExampleRexSupplies

It is mandatory to provide the brand/manufacturer to add products on Pricespy. Ideally, you should also mention the brand name on the product title.

In case you are a renounced manufacturer but are selling products with another brand, then you probably want to represent your company name as the Manufacturer’s name.

In that case, you must include the product brand name in the Product name. Certain products may be accepted without submitting this attribute.

These include

  • Movies
  • Books
  • Music Records

Other than these 3 types of products, any other products with missing brands or incorrectly defined brands will not be indexed or listed.

Product Image links

AttributeImage links
Examplehttps://www.yourwebsite.com/productimage.png

You may submit 1 or more image links for the product. The first link will be considered the primary image in case you submit multiple links.

Make sure the image has no watermarks brand seals, or any such marks on it. It’s advised to use high-resolution images of the product with a white background.

Also, the image should match various details that you include on the Product Name such as the color or the size.

For example, if the name of a product is White Blender, then the image should also include a Blender that is White color.

Pricespy will list your products even if you do not submit image links, however, we strongly advise you to provide at least 1 image link for better results in the listing.

MPN / Manufacturer SKU

AttributeMPN or manufacturer SKU
**Here you can either submit MPND or manufacturer SKU
ExamplePH0011

Here you need to provide the product MPN code of your products.

In case you do not have an MPN, you may use the SKU as the value (provided that you did not use the SKU as the Product ID.

It is not mandatory to include this attribute, but it is highly recommended to help with faster, more accurate indexing.

**MPN for each product is unique.

EAN-13 / GTIN-13

AttributeEAN-13 or GTIN-13
**Here you can either submit EAN-13 or GTIN-13
Example4129179234125

A product that is manufactured in Europe usually has an EAN. Similarly, a product manufactured in the US or Canada comes with a GTIN.

If you have the EAN-13 or GTIN-13 barcodes for your products, then you may submit them through this attribute.

This is optional data to provide, but submitting it helps with an accurate listing.

Shipping Fees

AttributeShipping
Example5 GBP

You can submit the shipping fees for your products.

The shipping fee may vary depending on the product, so it is not necessary that you have to assign a fixed shipping fee.

Total Price

AttributeTotal Price (with VAT) or Total Price (without VAT)
**Here you can either submit the Total Price (with VAT) or the Total Price (without VAT)
ExampleExample: 90.09 GBP

Rather than submitting a separate shipping fee, you can choose to submit a total price which is basically, the shipping fees added to the product price.

If you wish to submit the Total Price including VAT then use the attribute Total Price (with VAT).

If you wish to submit the Total Price excluding the VAT, then use the attribute Total Price (without VAT).

**You can either submit a shipping fee or the total price. If you submit both, Pricespy will keep the Shipping and exclude the Total Price attribute.

Product Description

AttributeProduct description
ExampleThis blender is super efficient and takes up less electricity than others.

You can add a short description of the product you are selling. Try to highlight all the major features it may have included in any features that you did not include in the Product Name.

This is optional data you may submit; we advise you to submit it to attract more prospects.

Stock Status

AttributeStock status
ExampleIn stock

This attribute indicates the stock status of the products in the shop. It is not mandatory to submit this attribute, but it helps to enhance the search results on the listing.

The stock status value you submit is conditional. It must be relative to the value you submitted under Availability. The following are the accepted values for the stock status:

  • In stock: To indicate that the product is available and can be delivered to the customer within six business days.
  • Out of stock: To indicate that the product is out of stock in the shop.
  • Incoming [date]: To indicate that the product is not in stock at the moment, but is expected to be available on the given date
  • Pre-order [date]: To indicate that the product is not released yet, but it will be released on the given date and can be pre-ordered from your website

You can use ‘In stock’ only when you submit Availability as ‘Available’.

Use ‘Out of stock’, ‘Incoming [date]’ or Pre-order [date] when you submit Availability as ‘Can not be ordered’

Do not submit a Stock Status if you submit Availability as ‘Pickup’.

**If you do choose to submit the stock status, then make sure it matches the instructions above. Incorrect submission of the Stock Status for any product will result in Pricespy hiding that product from the listing.

Color or Pattern

AttributeColor or pattern
ExampleStripped Marble Green/White

For certain types of products such as Apparel & Accessories, it is more logical to specify the color or pattern since buyers look into these aspects when buying such products.

Submit the actual color or pattern assigned by the manufacturer if possible.

As you can see, the example in the table, Stripped Marble Green/White is not a generic color or pattern; it was assigned by the manufacturer.

Gender and Audience

AttributeGender and audience
ExampleUnisex

Certain products are made for people of a specific gender or age group. For example, a skirt for women or a toy for children.

In such cases, you may submit the target gender or audience for the product. You may use the following values:

  • Women – if the product is for an adult lady
  • Men – if the product is for an adult man
  • Unisex – to indicate the product is usable by any gender
  • Girl – if it is for a teenage girl
  • Boy – if it is for a teenage boy
  • Child – to indicate that the product is for children

This attribute is optional. You only need to submit it if you did not include the value of the Product name.

Product Size

AttributeSize
ExampleUK12

For certain products such as shoes or T-shirts, a buyer will always look into the size. So you can submit the size of the product using this attribute.

Make sure to indicate the size type such as EU45 or US11 or UK12, to understand which size type the buyers are dealing with.

For example, you can submit the size as UK12, and if the buyer is from the US, then he/she can convert it from the UK to the US size and decide if this is the right size to buy.

If you have a product with multiple sizes available, you may submit all of them with a ‘/’ in between for example EU45 /E42 / EU40.

Multi-pack or bundle

AttributeMulti-pack or bundle
ExampleBundle

If you wish to submit a bundle or multi-pack offer from within your shop, and not the actual product manufacturer, you can use this attribute.

For example, let’s say you have the products Shampoo, Hair Conditioner, and Hair Serum. In your shop, you created a bundle with these items. You can submit that bundle as a product in Pricespy. In that case, you need to include this attribute and set the value as ‘Bundle’.

You can use the following values:

  • No: Indicate that the product is not a multi-pack or bundle created by your shop (or you may keep it blank).
  • Multi-pack: If you submit a multi-pack offer created by your shop.
  • Bundle: If you submit a bundle offer created within your shop.

Although this seems beneficial, I advise you not to submit your own created bundles or multi-packs to Pricespy as it may confuse buyers. You can avoid using this attribute by adding “bundle by (your shop name)” to the product names of the bundles you submit. For example, “Shampoo Combo bundle by RexSupplies”.

That’s it. By following the instructions above when including data in the price list, you can expect successful approval by Pricespy and optimization for better results in the listing.

Sample Price List of A Product for Pricespy

Here’s a sample of a price list for a single product in text format (with the mandatory attributes included),

One advantage you have with Pricespy is that, unlike most other listing sites, if you submit extra attributes, that are not among the ones mentioned above, they are not entirely ignored.

After pre-scanning, if any such values are traced that are not part of the expected attributes, Pricespy initiates review by a live agent, i.e., manual review.

How to Generate The Price List for Pricespy Easily?

Now comes the question, how will you generate the price list?

Manually creating it will take hours of your time, in case you have over 50 products. In that case, you can look for product feed generation tools to help you out.

If you are using WooCommerce, then it’s even easier for you. Simply use the plugin Product Feed Manager For WooCommerce.

Pricespy product feed

The plugin has the template of Pricespy already created. All you need to do is assign the target values and the plugin will generate the price list in minutes.

I mentioned earlier that to create categories, you will need category mapping. This plugin already has this feature.

Before generating the price list, simply set the category mapping. Then when you generate the price list, assign the category mapper you created as the value for the Category.

You can first test out the free version of the plugin. Once you generate the price list, log in to your Pricespy account.

On the Merchant Dashboard, you will find the Products tab. Here, choose Add Products and then click on the option called Feed file. There you will be able to upload the price list.

Conclusion

Using more options to promote your online products is wise if you want maximum sales. Pricespy is one of the few price comparison sites that consistently brings good results for online shops.

To excel in sales, it’s high time you start listing your products on Pricespy, provided you offer competitive deals and don’t overcharge.

It’s essential to create accurate and optimized product feeds to upload your products without any hassle. And for listing your eCommerce products on Pricespy, you need a plugin to simplify the process.

A product feed manager for WooCommerce can help you upload and optimize all your products effortlessly. So go ahead with it to save your valuable time on listing

** FAQs **

How do I start selling on Pricespy?

  • To start selling on Pricespy, create a seller account on their platform. Then, use a product feed manager plugin to upload your WooCommerce product feed. Make sure your products are competitively priced for better visibility.

What are the benefits of using Pricespy?

  • Pricespy helps you attract more customers by allowing them to compare prices across different retailers. This increased visibility can lead to higher sales, especially if you offer competitive pricing.

How can I optimize my product listings on Pricespy?

  • Use a product feed manager to ensure your product data is accurate and up-to-date. Regularly update your prices and product information to stay competitive and improve your chances of appearing in search results.

Is it necessary to use a product feed manager?

  • Yes, using a product feed manager simplifies the process of uploading and managing your products on Pricespy. It ensures your listings are optimized and helps maintain accurate, current product data.

Can I list bundle offers on Pricespy?

  • Yes, you can list bundle offers on Pricespy. Label them clearly by adding “bundle by (your shop name)” to the product names. This helps avoid confusion and ensures buyers know they are purchasing a bundle created by your shop.
Categories
Guide Product Feed Manager For WooCommerce WooCommerce

How to Generate Trovaprezzi Product Feed for WooCommerce [2024]

Trovaprezzi is one of the largest marketplaces in Italy to sell electronics online.

To promote your products on this marketplace, you simply need to submit your product feed in the right format, along with the necessary attributes for listing.

Currently, this marketplace gets an average of over 15.4 million visits per month, and it’s high time you too start selling on Trovaprezzi to boost your revenue.

In this guide, you will learn about the mandatory attributes, i.e., the product data you need to submit to list your products on Trovaprezzi

Plus, you will get a step-by-step guide to generate a Trovaprezzi product feed from your WooCommerce store in just a few clicks, using a simple and easy-to-use plugin.

So let’s get started.

What is The Trovaprezzi Marketplace?

How to Generate Trovaprezzi Product Feed for WooCommerce [2024] 6

Trovaprezzi is a top Italian price comparison marketplace that can help you find the best deals on products ranging from electronics to fashion and home goods.

If you’re a retailer, listing your products on Trovaprezzi can boost your visibility and sales by reaching a broader, price-conscious audience.

This platform enables a competitive shopping environment, benefiting you as a consumer looking for great prices or as a seller aiming to expand your market presence.

Therefore, Utilizing Trovaprezzi can be a strategic move to enhance your shopping or selling experience in the Italian market.

Benefits of Selling on Trovaprezzi Marketplace

Now let me explain the effective benefits of selling on Trovaprezzi Marketplace:

  • Increased Visibility: Listing on the Trovaprezzi marketplace boosts your product’s visibility among price-conscious Italian shoppers.
  • WooCommerce Integration: By integrating your WooCommerce product feed with Trovaprezzi using product feed management software, you can simplify the process.
  • Optimized Listings: Product feed optimization ensures your listings are accurate, appealing, and competitive.
  • Higher Conversion Rates: Effective product data feed management can lead to higher conversion rates and increased sales.
  • Market Expansion: Selling on Trovaprezzi helps you reach a broader audience and expand your presence in the Italian market.

Mandatory Product Data for Feed Prodotto Trovaprezzi

Trovaprezzi.it

Following are the mandatory attributes you need to submit for each of your products to list them on the Trovaprezzi marketplace.

  • Name: It is the name of the product, along with the model name. Do not include any promotional tag lines or phrases.

  • Code: You need to submit a unique product ID as the code. You can use the product IDs or the product SKU in your WooCommerce store for this attribute.

  • Description: In the description, you have to discuss the use and features of the product. You can also mention the compatibility, specifications, and variation details along with the product description.
    • You can use HTML tags to structure the description properly.
    • I advise you not to be too promotional as they tend to bring fewer results in this marketplace.

  • Categories: Include the entire category tree, from the parent category to the last child category, that a product can fall under.
    • You can use a comma (“,”) or semicolon (“;”) as the separator between the categories.

  • Image: Include a link to the main image of the product.
    • Make sure the image over-edited.
    • Avoid including watermarks, slogans, or promotional phrases in the image.
    • You must submit at least one image for each of your products to be listed on Trovaprezzi.

  • Link: This is the link to the product on your site.

  • Original Price: This is the base price of the product.
    • Do not include the currency along with the price. Normally people run discount campaigns when promoting Trovarprezzi. The original price still needs to be submitted so that Trovaprezzi can show the users the original price on which they are getting the discount.

  • Price: If you are running discounts on your products, then submit the discounted price using this attribute. However, if you are not running a discount, then submit this attribute with the same value as the Original Price.
    • Do not include the currency along with the price.

  • Shipping Cost: Trovaprezzi is very strict about accuracy and needs you to submit an accurate shipping cost for the products that you are availing on your site. For example, let’s say you have an Air Cooler, that you are selling at a free shipping cost. So the Shipping Cost for this will be 0. Now, let’s say you are delivering an Air Conditioner at a shipping cost of 10 GBP, then you need to submit this attribute for the Air Conditioner with the value of 10.
    • Do not include the currency along with the cost.

  • Brand: If you are the main manufacturer, then use your company name as the brand name. However, if you sell various products from different providers, then include the actual brand name using this attribute.

  • EAN Code: EAN is a unique identifier that exists for all original manufactured products. You have to submit an accurate EAN code for all products you include in the product feed.

  • Part Number: The Part Number also referred to as MPN, is provided by the manufacturer of most electronic goods. If you have the original MPN of your products, then include them here, or you can use your product SKU instead.

  • Weight: You have to submit the weight of the products you are listing on Trovaprezzi. The weight is measured in kg. So do not submit any unit; just input the numerical value in terms of kg.

  • Stock: This is the number of a certain product you have available in stock.

Example Feed Prodotto Trovaprezzi

Here is an example of how a general product feed for Trovaprezzi looks like with two product offers:

<Products>
	<Offer>
		<Name>DataTraveler G3 16 GB</Name>
 		<Brand>Kingstone</Brand>
 		<Description>Pen Drive Professional 16GB USB 2.0</Description>
 		<OriginalPrice>10.60</OriginalPrice>
 		<Price>8.60</Price>
 		<Code>219</Code>
 		<Link>http://www.NOMESITO.it/product.asp?Id=219</Link>
 		<Stock>35</Stock>
 		<Categories>informatica, chiavette usb/pen drives</Categories>
 		<Image>http://www.NOMESITO.it/images/219.jpg</Image>
 		<ShippingCost>0</ShippingCost>
 		<PartNumber>TS2GJFV20</PartNumber>
 		<EanCode>0075678164125</EanCode>
		<Weight>0.100</Weight>
 		<Image2>http://www.NOMESITO.it/images/219bis.jpg</Image2>
 		<Image3>http://www.NOMESITO.it/images/219tris.jpg</Image3>
	</Offer>
	<Offer>
 		<Name>Pendrive 4GB Verbatim Store'n'go</Name>
 		<Brand>Verbatim</Brand>
 		<Description>Pen Drive Professional 4GB USB 2.0</Description>
		<OriginalPrice>6.50</OriginalPrice>
 		<Price>3.50</Price>
 		<Code>220</Code>
 		<Link>http://www.NOMESITO.it/product.asp?Id=220</Link>
 		<Stock>5</Stock>
 		<Categories>informatica, chiavette usb/pen drives</Categories>
 		<Image>http://www.NOMESITO.it/images/220.jpg</Image>
 		<ShippingCost>0</ShippingCost>
 		<PartNumber>49061</PartNumber>
 		<EanCode>0075678164134</EanCode>
		<Weight>0.100</Weight>
 		<Image2>http://www.NOMESITO.it/images/220bis.jpg</Image2>
 		<Image3>http://www.NOMESITO.it/images/220tris.jpg</Image3>
	</Offer>
</Products>

So far, you have learned about all the product attributes that you need to submit on Trovaprezzi. Now, let us learn how you can generate a WooCommerce product feed for Trovaprezzi.

7 Steps to Generate Feed Prodotto Trovaprezzi Using PFM

The best way to create a feed on Trovaprezzi is to use a reliable plugin called Product Feed Manager for WooCommerce (PFM).

PFM is right now the most stable and easy-to-use plugin that you can use to generate a product feed for Trovaprezzi real quickly.

Additionally, the plugin comes with a pre-build template which you can use to generate an optimized product feed in just a few clicks.

You can also add UTM parameters to track your feed’s performance effectively. Now, let me show you how easily you can generate a Trovaprezzi product feed in minutes by following these 7 simple steps.

Step 1 – Install And Activate Product Feed Manager for WooCommerce

1. Go to Dashboard > Plugins > Add New

Add New Feed

2. Then search for Product Feed Manager for WooCommerce on the search bar and you will see the plugin logo.

Install Product Feed Manager for WooCommerce

3. Install and Activate it. Once activated, you will find the menu Product feed on your dashboard.

Product feed manager installed

Step 2 – Enable Trovaprezzi As A Merchant Type For Feed Generation

1. Go to Dashboard > Product Feed> Settings and go to the Merchants tab.

Product feed - Settings - Merchants

2. Here, look for Trovaprezzi and enable it.

Enable Trovaprezzi

3. Then go to the Controls tab and click on Purge cache.

Purge Cache

Now Trovaprezzi is enabled. It’s time to generate feed prodotto Trovaprezzi.

Step 3 – Create A New Feed

1. Hover on Dashboard > Product Feed and click on Add New Feed.

Add new feed

It will take you to a feed creation page.

2. Give a Title to the feed.

Step 4 – Configure Basic Settings For The Feed

1. First, decide if you want to include all the products in your store or use a filter to exclude certain products.

All published products or product filter

2. Use a refresh interval if you frequently make changes to your product data in your store.

3. The rest of the basic configurations are already configured.

Basic Settings Configured

You may scroll down to the Feed Configurations Section.

4. If you need to use UTM parameters for product links, you can enable the option and input the UTM values.

UTM Parameter

Step 5 – Use The Trovaprezzi Feed Template

1. Choose the Merchant Type as Trovaprezzi and keep the format as XML.

Merchant Type Trovaprezzi in XML Format

You will see, that all required attributes will appear below.

Trovaprezzi All Required Attributes

2. Configure the missing attribute values

As you see, most of these attributes are already configured. You simply need to configure the values for the following attributes:

  • Shipping Cost
  • Brand
  • EAN Code
  • Part Number
  • Weight
  • Stock

3. Assign A Shipping Cost

If you offer free shipping, then use a Static value of 0.

Free Shipping in Trovaprezzi

Or, if you have a fixed shipping cost, you may use a Static value here.

Fixed Shipping

However, if you have dynamic shipping, you need to store this value in a field within each product and then use that field value as shipping cost.

Dynamic Shipping Cost

4. Include the product brand name

If you are the sole manufacturer, then you may use a Static value with your company’s name for the Brand attribute.

Manufacturer as Brand Name

But, if you have products with many different brands, then you can either save them as attributes or save them in a custom field for each product.

Or you may consider using the plugin, Perfect Brands for WooCommerce to assign the brands to your products.

Whichever way you save it, you can use that value for the Brand attribute.

Use Product Brand Name

5. Submit the Product Ean Code and Part Number

For the EAN Code, since it has to be unique for each product, you must save it in a custom field within your product. You can use the custom fields provided by our plugin (which is a Pro feature), or you can add a custom field of your own to store the value.

Product Ean Code And Product SKU for MPN

For the Part Number, you can use the SKU, or if you have actual MPNs stored for your products, you can use them through custom fields.

6. Assign A Product Weight

Product Weight

In WooCommerce, you will be able to assign a weight to every product. Then use it in the feed by choosing Weight as the value for the attribute.

7. Decide on available stock

Product Quantity in Stock

Since you need to submit the available product quantity in stock for each product, you have to manage stock in your WooCommerce store, which will be included in the feed.

Step 6 – Publish & View Your XML Feed

1. Scroll up and click on Update.

Publish and Generate feed prodotto Trovaprezzi

A progress bar will appear to show that the feed is being generated.

Generating Feed

2. Once updated, you will get a notification “Product Feed Updated” and also you will get the option to view or download the feed.

View or Download Trovaprezzi product feed

Step 7 – Submit Your Feed on Trovaprezzi And Start Getting More Sales

Now that you have the feed ready, you can log in to your Trovaprezzi merchant account and submit your product feed. Once listed, you will start getting more traction soon.

Conclusion 

In conclusion, utilizing a product feed manager simplifies the process of generating and optimizing your Trovaprezzi product feed.

These tools automate feed creation, update product information dynamically, and simplify the synchronization of inventory.

By using a product feed manager, you can ensure that your listings on Trovaprezzi are accurate, up-to-date, and attractive to potential buyers, thereby enhancing your visibility and sales opportunities on this popular Italian price comparison platform.

If you are looking to maximize your presence on Trovaprezzi, utilizing a product feed manager is a highly recommended solution.

** FAQs **

How do I start selling on Trovaprezzi?

  • To start selling on Trovaprezzi, you need to create a seller account on their platform. Once registered, you can integrate your products from WooCommerce using tools. Ensure your product feed meets Trovaprezzi’s requirements for easy integration.

What are the benefits of using a product feed manager?

  • Using a product feed manager simplifies the process of managing your Trovaprezzi listings. It automates feed generation, updates product information in real time, and helps optimize your listings for better visibility and sales.

Can I customize my product listings on Trovaprezzi?

  • Yes, you can customize your product listings on Trovaprezzi through your WooCommerce store. Use features to adjust product details, pricing, and availability directly from your WooCommerce dashboard.

How often should I update my Trovaprezzi product feed?

  • It’s recommended to update your Trovaprezzi product feed regularly, especially when there are changes in product information or inventory. Use PFM to automate these updates to ensure your listings are always accurate and up-to-date.

Is selling on Trovaprezzi safe and reliable?

  • Yes, Trovaprezzi is a reputable platform known for its secure transactions and reliable service. They provide a trusted marketplace environment for both sellers and buyers, ensuring a safe experience for all parties involved.
Categories
Product Feed Manager For WooCommerce Update

Generate WooCommerce Product Feed Optimized For Effective Promotion [2024]

Your WooCommerce store conversion can significantly increase by promoting on renounced 180+ merchant platforms such as Google Shopping, Facebook Dynamics, eBay, Amazon, etc with our product feed manager for the Woocommerce plugin.

Product Feed Manager (PFM) for WooCommerce is here to help you generate a product feed for all the products on your WooCommerce store with just a few clicks and without any hassle.

WPFM allows you to generate flawless WooCommerce product data feed in the correct format for your desired merchant shop. All you need to do is select the merchant type, assign the correct attribute values, and generate the product feed.

Then simply download the feed file and upload it on your desired merchant platform.

New And Improved Product Feed Manager For WooCommerce 

Product Feed Manager For WooCommerce already has set templates for major merchant shops for free.

PFM Repo

It also has many useful features including Auto-sync with google shopping center, Extensive Filter options (category, tag, custom), and more, in the free version. Have a look below :

PFM free features

Upgrading to pro allows you to generate unlimited product feeds and many more. Have a look below :

PFM premium features

So as you can see, we have introduced a few more impressive features that will help you generate product feeds more efficiently and without any hassle.

Let us look at the new features of Product Feed Manager For WooCommerce.

1. Generate Large Volume of Product Feed Without Issues

It is always a great concern about efficiency when you are generating product feed for a large number of products.

There are many tools that often get overloaded and fail to generate feed properly. They either stop after generating a few thousand product feeds or simply crash. Also, some tools will claim that the product feed is generated in full, but if you check the feed, you will find that several data are missing. 

Unlike most other such plugins, Product Feed Manager For WooCommerce generates feed using batch processing.

Which means, there is no chance of getting overloaded. Whether you have 50 products or 50,000 products or more, it does not matter; the plugin will successfully generate a product feed without any flaws.

2. Custom Fields for identifiers (Pro) 

Some products have assigned GTIN, MPN, UPC, or other forms of such product identifiers.

In order to promote products on Google Shopping, you need to provide at least one of these identifiers, if you wish to disclose the brand name of your product.

As you know, WooCommerce doesn’t provide such fields by default. So your options would be to use custom fields, add attributes manually to the feed, or use some other plugin to add these fields.

But now, you will not need to do any extra work. Product Feed Manager For WooCommerce now helps you to get these fields.

Add custom fields

You simply need to input the correct data and generate the product feed. 

For a single product, these fields could be added manually using WooCommerce custom fields, but what about variable products?

Just to let you know, identifiers are unique for every variation of a product under the same brand. WooCommerce only allows custom fields to be added for the parent product, not the variations.

Product Feed Manager For WooCommerce gives you the solution to this. The custom fields you get with our plugin will add the identifier fields within each variation for variable products.

Custom fields for variable products

This saves you from any complications.

You don’t need to use any extra plugins or get expert assistance to add the custom fields. Product Feed Manager For WooCommerce will help you add these fields without any extra effort.

Enabling custom identifier fields:
If you have activated the license for Product Feed Manager For WooCommerce Pro, then you should be able to enable or disable custom identifier fields from the dashboard.

Go to Dashboard > Product Feed> Settings. On the top, go to the tab called Controls.

Controls

Once you go there, you will get the option to enable or disable custom identifier fields.

Enable identifiers

It’s as simple as that.

3. Custom Fields for extra attributes (Pro)

Some attributes are very important for prospects to make decisions but WooCommerce doesn’t have fields for that. For example, age group, size, material, etc.

Also, if you have apparel products, to promote them on Google Shopping, it is mandatory to provide extra data which includes size, pattern, material, age group, and gender, for which each product is suitable.

You can add the custom fields for these attributes through Product Feed Manager For WooCommerce.

For Single Product:

Single product Custom Attribute added

For Variable Products:

Variable product Custom Attribute added

Due to this, you can easily assign these attributes and use them for generating product feeds.

Enabling custom attribute fields:
If you have activated the license for Product Feed Manager For WooCommerce Pro, then you should be able to enable or disable custom attribute fields from the dashboard.

Go to Dashboard > product feed > Settings. On the top, go to the tab called Controls.

Controls

Once you go there, you will get the option to enable or disable custom attribute fields.

Enable custom attribute fields

So, once you have these fields, there will be no more chance of missing information when uploading products to other merchant shops.

4. eBay MIP Feed Generation 

Feed formats are crucial when uploading on other platforms. However, some platforms have different feed formats. eBay MIP is one of them.

You can generate a product feed for eBay MIP in the correct format using Product Feed Manager For WooCommerce.

Most merchant shops accept a feed format similar to what Google accepts. But eBay MIP requires a completely unique feed format.

Here’s a glance at the differences:

Compare Google and eBay feed format

Well, using WooCommerce Product Feed Manager, you will get the feed format required by eBay MIP without any errors.

So maybe it’s time you promote on eBay MIP as well.

5. More amazing merchant shop feed templates 

The improved WooCommerce Product Feed Manager also supports major merchant shops.

As you know, different merchant shops have different feed formats, it is difficult to read and apply their instructions and create product feed manually.

You don’t need to. We have done that for you. Now, you will be able to generate product feeds for over 20 merchant shops.

Apart from these merchant shops in the free plugin,

Once you upgrade to Pro, you will also be able to generate a product feed for the following:

All these merchant platforms are very popular and if you operate internationally, you can benefit from promoting on whichever ones you want.

Additionally, there are tons of new merchants added in the free version. You can check them out here: All supported marketplaces.

Enabling more merchant feed formats:
To activate extra merchant product feed formats, go to
Dashboard > product feed > Settings. On the top, go to the tab called Merchants.

Merchants Tab

Once you go there, you will get the option to enable or disable feed generation for any supported merchant shop.

All Supported Merchants

Here, enable the ones you wish to promote, and then go ahead and generate a product feed to upload on those platforms.

Upcoming features 

We are working on adding more and more features so that you can generate feed more easily and have a tool that is value for the money.

>>Amazon Auto-Sync – Amazon is a large platform. We are trying to connect with Amazon and set up an auto-sync feature for Amazon. This will surely save a lot of time and effort.

>>E-mail product feed – You will be able to send the generated feed via e-mail to anyone you want. If you have someone else handling a certain merchant account for you, you can simply generate a product feed, and e-mail it to him. This feature is in the process of creation.

There are so many more upcoming features waiting down the line to be developed.

Product Feed Manager For WooCommerce is a stable and powerful tool that you can benefit from.

WPFM click

Save your time and effort and promote your products globally without hassle.

Take advantage of the Product Feed Manager For Woocommerce plugin and generate product feeds with ease.


Categories
Real Estate Virtual Reality WP VR

How to Create A Virtual Tour For Real Estate to Increase Property Sales [2025]

The number of realtors is now rapidly increasing.

According to Statista, number of home sales have been fallen from 5.03M to 4.09M in 2023 compared to previous year.

However, the number of licensed realtors in the USA increased to over 2 million in 2023 compared to 1.6 million in 2022.

As a realtor, you must find new ways to stay ahead of the high competition and attract more potential buyers.

One of the best ways to connect with clients in 2024 is to use real estate virtual tours.

The fact is, people no longer want to watch polished images and optimized videos to choose properties.

Your only options would be to make them visit your properties or get a virtual walkthrough of the homes for sale.

Today, you will learn how you can create a virtual tour for real estate easily.

Eventually, you will be able to create stunning virtual tours of homes for sale to attract the right buyers.

So let’s begin.

Benefits Of Virtual Tour For Real Estate To Sell Properties

It’s 2024. Even Zillow started using virtual tours a long time ago. As a realtor, you must accept that virtual tours for the real estate sector are now an essential element in your sales strategy.

Your Buyers Expect A Virtual Tour

As more and more realtors are using commercial real estate virtual tours to sell and rent their properties, your clients are now getting used to experiencing VR property tours.

According to the annual report by the National Association of Realtors:

  • 54% of the buyers will not look up to a property if it doesn’t have 360-degree images.
  • 50% of the buyers found virtual tours really useful.

This indicates that if you do not use visual tours, there is a possibility that you may end up losing up to half of your potential buyers to your competitors.

Having said that, there are more reasons why a commercial virtual tour for real estate can help you to sell more properties effectively.

i. Keep Visitors Engaged & Connected

A virtual tour will create more engagement than regular flat images as the viewers feel like they are taking an actual live tour.

Integrating virtual tours into listings for shared apartments can significantly enhance the appeal to potential renters by providing a comprehensive view of the communal living spaces and amenities.

Since the view seems realistic, they will know exactly how the property is built and if it’s something they would like in real life.

Images make it difficult to imagine the house in reality – after a visit, you may notice some areas are smaller than expected or less coordinated than in the images.

A virtual tour will help avoid this sort of situation to a great extent.

ii. Trigger Buyers To Make A Decision

Usually, a buyer tends to look into several listings based on his budget and location preference before inquiring about the ones he finds suitable as per the images. If you create a virtual tour, you can have a chance to land a deal more easily.

Basically, people already know that images can be altered and misleading at times. Plus, useful information on the home listing page can not be easy to relate to while looking at the images.

Hence buyers tend to call several agents to find out more about the houses and often visit multiple properties before making a decision. (Your time invested can not always be fruitful.)

With a virtual tour, you have the option to add relevant information at the right spots via tooltips or click-to-view content within the tour.

This will help to eliminate all unnecessary questions and convince a few to make a temporary decision. When they call you, it will be much easier for you to invite them for a live visitation.

These people are already interested, and you will have a greater chance of closing the deal during the live tours of houses.

According to Property Week, using virtual tours will reduce the number of your wasted viewings by 40%.

iii. No More Wasted House Visits

As a real estate agent, one of the most irritating issues you have to face is wasted viewings of your properties.

Many people visit the properties, and you take time and effort to give them a good tour, but most of them end up declining your offers.

If someone requests a live visit after taking a virtual tour, then he/she is probably serious about the deal, thus increasing the possibility of closing deals for your property with less effort. If you’re dealing with niche properties like tiny homes, virtual tours can help attract only genuinely interested buyers.

Steps to Create A Real Estate Virtual Tour

Now that you know the benefits of using a virtual tour for real estate to sell more properties, let us look at how to make a virtual tour for real estate.

1. How To Take 360 Photos Of Your Properties

The first step of this process is to take 360 panoramic images of your houses or properties, which you can then convert into a 360 virtual tour.

In this case, you have 5 possible options:

  • Use a professional assistant to capture & edit 360 images. The best option is always to get professional help. But sometimes, the expenses can not result in a good ROI. So you have to be calculative in terms of expenses before seeking professional virtual tour creators.
  • Get a tripod & DSLR to capture images in all directions and stitch them into a panoramic image. In this case, you have to capture images at fixed angles in all directions manually, after that use a stitching app to turn them into a 360 panoramic image.
  • Use 360 panorama apps on your iPhone. If you don’t have an iPhone, don’t worry you can also use an Android app to take 360 panoramas. You can also use You will find amazing apps to help you capture great panoramic images via a guided photo session.
  • Capture 360 images using a drone. Aerial photography using drones can be an amazing experience while delivering high-quality output.
  • Use a QR code for photo sharing. QR codes are a convenient way to share your 360 images. It allows prospects to access them with just a simple scan. Placing them on any marketing collateral will help you promote your property.

Your panoramic images together will become a 360 virtual tour using the right VR software.

2. Choosing The Right Virtual Tour Software

You want to make sure you can create a property virtual tour that not only gives a realistic tour but also keeps the visitors engaged with the right details.

Now I am going to help you choose the right tool to make a virtual tour of real estate.

Crucial Features To Look For In An Ideal Real Estate Virtual Tour Software

Essential Elements For Virtual Tour - Real Estate Virtual Tour

i. Ability To Display Information Inside The Virtual Tour

You can make the tour more meaningful for your buyers while property searches by providing additional information on the property before visiting.

So, you will need a virtual tour creator that will allow you to place relevant information at suitable spots in the tour.

Information Inside Virtual Tour - Real Estate Virtual Tour
GIF In Virtual Tour - Real Estate Virtual Tour

For example, let’s say the fireplace is an exotic one. You may include a tooltip on top of the fireplace where people can hover to learn what type of fireplace it is, along with a preview of how it looks when lit.

Or, let’s say there is a swimming pool on the property. Then you can let people click on an icon to learn about its dimensions.

You may even consider providing information such as the floor type, ceiling material, etc. All of these will make it easier for the buyer to realize if this is what he/she is looking for. So find a tool that lets you add such engaging materials.

ii. Make It Easy To Contact You

After taking the tour, you would want the visitor to contact you ASAP. Hence, you have to make it easy for the buyer to reach out to you if they like what they see.

The best option here would be to include a contact form within the tour.

Contact form on a virtual tour - Real Estate Virtual Tour

Since the buyer is interested, why make him look for your contact details elsewhere? Simply get him to book a call with you during the tour.

This means the contact form is an important feature you want to have in your virtual tour creator. You might also consider using a software localization platform to translate your website and contact form into multiple languages, making it accessible to a wider global audience.

iii. Use Company Branding

While contacting you is great, many may still want to decide on this later. Hence, you need to find a way to create a place in the prospect’s mind so that he trusts you in dealing with the house.

In that case, you can include your Company logo on a corner of the virtual tour for real estate so that clicking on it will give people further details about your business location, the service you offer, and additional contact information.

Company information - Real Estate Virtual Tour

This is partially a brand promotion. People will remember you more easily if they see your logo. Plus, it will help to gain trust now that they know you have a physical location.

It will also help your re-targeting Ads to get noticed more effectively. So, branding opportunity is a good feature to have in your VR software.

iv. Option To Include A Gallery To View All Available Scenes

The easier your buyers can navigate the tour, the more time they’ll spend on it.

If the property has a lot of rooms or scenes, then the virtual tour for real estate can be confusing when navigating back and forth between different scenes in the tour.

A logical thing to do here is to include a gallery that will show all the available rooms/scenes on the property, which people can click to view right away.

v. Cover Every Inch Of The Property For An Interactive Tour

Keep in mind that the virtual tour for real estate should be a replication of a real-life tour. So make sure you manage to highlight all the rooms or views of the property.

For example, if a house has 5 rooms, then you should include at least 5 scenes in the virtual tour (1 for each from the middle of the room).

Plus, it’s an added benefit if you include scenes for the restrooms, kitchen, front yard, and backyard. For a duplex, a view from the stairs will be great.

Now, your tool should be able to connect these scenes to make them into a tour. Basically, you need to be able to include hotspots that people can click and go to the other room.

For example, let’s say you are in the yard just outside the main entrance. Then you can place an icon on the entrance section that people can click to enter the house.

Recommended Real Estate Virtual Tour Creator For You ⚙️

All the features listed above are just the core features you would look for in your virtual tour software. Based on these requirements, we recommend you use a WordPress website and go for the WPVR tool.

WPVR is right now the no.1 virtual tour creator in WordPress and has all the features from above, plus more to create a perfect virtual tour for real estate sector. All you have to do is upload your 360 panoramic images, and this plugin will turn it into a 360 virtual tour.

Besides the core features, you will get additional features to make the tour even more engaging such as an interactive house floor map, a short introductory video, background music, mobile responsiveness, custom hotspot icons & navigation control, and many more.

3. How To Create A Real Estate Virtual Tour Easily

So far, you have learned how to capture 360 panoramas and know what to look for when choosing the right virtual tour plugin. Now, it’s time to create your property virtual tour.

I’ll be using WPVR to show you how it’s done.

First, I will create a basic virtual tour. And then, I will use additional features to make your tour engaging.

Create A Basic Real Estate Virtual Tour (For Beginners)

You can start by using the free version of WPVR to create a basic real estate virtual tour. At first, you need to install and activate it to make it functional.

Now, follow the steps below to craft your 3d real estate walkthrough.

1. Add Scenes to Your Virtual Tour

Upload your 360 images to WPVR by following the steps below:

i. Go to WordPress Dashboard > WP VR > Add New Tour.

You’ll be taken to the General Settings page of WPVR.

ii. Set a title for your virtual tour.

Set the virtual real estate tour title

iii. Click on the Scenes tab.

Upload a Scene - Real Estate Virtual Tour

Here, you can upload your 360 panoramas one by one, and each one will be considered one scene. But before you upload the images, follow the next two steps first.

iv. Set the first scene as default.

Click the Set as Default option and choose Yes. It means that this scene will be the 1st scene of the tour. (You can choose another scene as default when you upload more images)

v. Assign a Scene ID to your scene.

Each scene should contain a unique Scene ID.

vi. Click on the Upload button to upload a 360-degree image. You can manually upload an image or choose from your media folder.

Similarly, you can add more scenes by clicking on the “+” icon on top and then uploading images for them.

Here, I’ve added 4 scenes with different panoramic images.

Upload Multiple 360 Image for real Estate Virtual Tour

After uploading, each scene will have a thumbnail of it under the Scene Upload section.

vii. Click on the Preview button.

Live Preview of Your Real Estate Virtual Tour

You’ll see a live preview of your virtual tour in the Tour Preview section on the right side.

You can add up to 5 scenes on each virtual tour on the free plugin. (With WPVR Pro, you can add Unlimited Scenes on a virtual tour.)

Your scenes are uploaded, but now, you can only view the 1st scene. To be able to view the others, you need to add hotspots that people can click to go to other scenes.

2. Connect Your Scenes Into A Virtual Walkthrough Using Hotspots

Suppose you uploaded 4 scenes. Now, we will see how you can add the option for visitors to move between multiple scenes of your real estate virtual tour.

i. While on Scene 1, Click on the hotspots tab

Add Hotspot on 360 Degree Image - Real Estate Virtual Tour

ii. Here, set a unique hotspot ID.

iii. Change the hotspot type to Scene

iv. On the preview on the right, click on the spot you want to place the hotspot.

Assign the Position for Hotspot - Real Estate Virtual Tour

When you click, some coordinates will appear called ‘Pitch’ and ‘Yaw.’

Click on the “arrow-down” button to its right. It will add the coordinate values in the respective fields on the left.

Set Target Scene for Hotspot - Real Estate Virtual Tour

v. Add a short tooltip as on-hover content for this hotspot.

For example, if that hotspot leads to “Master Bedroom,” add it as on-hover text so that people know where they are going next.

vi. Under Select Target Scene from List, choose the Scene ID where you want your viewers to go by clicking on this hotspot.

Repeat the same for the rest of the scenes and you will have a complete real estate virtual tour ready. Now, people will be able to move from one scene to another.

**To add hotspots to other scenes, go to the scenes Tab and click on the scene window from the top to view its settings. Set this scene as default and click on preview. Then go to the Hotspots tab and add hotspots to that scene. After you have added hotspots to all the scenes, return to the 1st scene and set it as default.

3. Add Information to Your Tour

Now, your tour is set. Next, you can make this tour more interesting and engaging by adding more information.

i. Again, go to the scene in question, then go to the Hotspots tab.

ii. Here, choose the Scene type as “Info.”

iii. Then collect the Pitch and Yaw from the Preview to place the hotspot.

iv. Under the Scene Type, add content.

The On-Hover Content will be displayed when someone hovers over the hotspot icon.

The On-click Content will be displayed on a pop-up within the virtual tour when someone clicks on the hotspot icon.

Set Images On Hotspots - Real Estate Virtual Tour

In the On-Click Content, you will be able to add content using a WYSIWYG editor to show text, image, video, GIF, or audio.

You may even add shortcodes of booking forms or lead forms.

Set Image On Real Estate Virtual Tour

You can set images, videos, and GIF files here.

And on the URL field, you can add a URL of any website so that clicking on the hotspot will rather take them to that website. So, you could take them to more listings of the same category of houses in the desired location.

You can add up to 5 hotspots on each scene. With WPVR Pro, you can add Unlimited Hotspots to each scene.

4. Set Up The Basic Settings and Control Buttons

Go to the General tab.

Here you’ll find two options are enabled by default:

  • Tour Autoload
  • Basic Control Buttons
Real Estate Virtual Tour Autoload and Basic Controls

Keep the Tour Autoload option enabled to automatically load the virtual tour once you land on the web page that contains the virtual tour.

Enabling the Basic Controls will display a few basic navigation control buttons, ‘fullscreen,’ ‘zoom-in,’ and ‘zoom-out’ on the virtual tour.

Once this is done, Publish the tour, and it will be ready. You can then embed it on any web page or post it on your website.

Here’s what this tour looks like.

But this is just a basic tour. Time to make it even better by using WPVR Pro.

Customize Your Tour into An Engaging Virtual Walkthrough

To carry out the next few customizations, you will need WPVR Pro. Here is how you can upgrade to WPVR Pro. Activate WPVR Pro and then follow the steps below.

1. Add Scene Title and Author Information on Each Scene

Go to the Scenes tab. Now, you’ll find these options:

  • Title: You can give the name of the scene.
  • Author: State who created it. You may use the company name here if you want
  • Author URL: You can add a link to your website or social profile which people can visit by clicking on the Author URL.
Title, Author Name and URL for 360 Degree Images - Real Estate Virtual Tour

2. Customize The Hotspot Icons of Your Real Estate Virtual Tour

Go to a Hotspot tab under a scene.

Here you’ll find these options:

  • Hotspot Custom Icon
  • Hotspot Custom Icon Color
  • Hotspot Animation
hotspot icon customization - Real Estate Virtual Tour

> Hotspot Custom Icon:

Using this option, you can set custom icons for your hotspots.

Just click on the dropdown option, and you’ll find 900+ custom icons you can choose from.

Custom Hotspot Icon - Real Estate Virtual Tour

> Hotspot Custom Icon Color

This option allows you to set a custom color for your hotspot icons.

Custom Hotspot Color - Real Estate Virtual Tour

You can add custom colors from RGB, HSL, and Hex mode.

Hotspot Animation:

By turning this option On, there will be smooth and slow flickering animation on your hotspots.

3. Display A Scene Gallery on Your Virtual Tour

Since you have created this virtual tour with multiple scenes, you can enable the scene gallery option where all the scenes will be shown as a thumbnail.

Go to the General section then click on the Advanced Controls tab. You’ll find an option here named Scene Gallery.

Enable Scene Gallery - Real Estate Virtual Tour

Turn it on, and a new option named ‘Scene Titles on Gallery‘ will appear. This option will show your scene titles at the top of each scene thumbnail in the scene gallery. You’ll be turning all the options On as well.

4. Add Background Music on Your Property Virtual Tour

You can also add soothing background music to your entire virtual tour to make it enjoyable. While on the Advanced Controls tab, enable the Tour Background Music option.

Set Background Music on Real Estate Virtual Tour

These new options will appear:

  • Autoplay: Turning on the Autoplay option will automatically start playing the background music.
  • Loop: Turning on the Loop option will play the background music on a loop.
  • Upload or Set Audio Link: With the Upload or Set Audio Link field, you can either set an audio link here or upload the audio file manually or from your media server.

5. Add your Real Estate Company Logo and Description

Adding your company logo on this virtual tour will show authority and let your clients learn a little more about your company and service.

Add company information - Real Estate Virtual Tour

Here, you’ll find these two options:

  • Upload Company Logo: This will allow you to upload a company logo to be shown on the top right corner of your virtual tour.
  • Company Details: You can add a small but informative description of your company here. Once your viewers click on your logo, this description will appear.

6. Add A Home Button To The Virtual Tour

WPVR allows you to add a home button on your real estate virtual tour that will take your viewers to the default scene by clicking on it.

To add this button, go to General > Control Buttons.

Home Button on Real Estate Virtual Tour

Find the Home option and turn it On. You can also customize its icon and icon color.

7. Add Contact Forms On Your Tour

One of the most important elements you can add to your real estate virtual tour is a contact form.

Suppose a potential buyer just had a look around your tour and is now interested in the property. Now, he’ll try to contact you to learn more about this property and arrange a visitation.

You can allow him to contact you instantly by keeping a contact form on this virtual tour. For this, you will need to install the WPVR Fluent Forms Add-on and the FluentForms plugin on your site.

You will get the Add-on for free when you get WPVR Pro.

Once you’ve created a suitable form for this purpose, you can easily integrate this form into your real estate virtual tour by following the steps below:

i. Create a form in Fluent Forms.

ii. Go to the Scenes section and add a new hotspot.

Add Contact Form Hotspot - Real Estate Virtual Tour

iii. Select the Hotspot-Type as Fluent Forms.

iv. From the Select Your Form section, choose your desired form.

Set Contact Form - Real Estate Virtual Tour

v. Publish or Update the virtual tour.

vi. Now, the form hotspot will appear on the tour preview.

Set Interactive Contact Form - Real Estate Virtual Tour

Click on the hotspot, and the form will pop up on the tour.

Contact Form On Real Estate Virtual Tour

So now, your potential clients can contact you immediately when they’re experiencing the tour.

8. Add a house floor plan to your virtual tour

Having floor maps of virtual tours of houses will make the experience more meaningful and interactive. Once you are satisfied with your tour, view it on your website.

This is how your commercial real estate virtual tour looks like after you’ve applied all the customizations.

You can realize it’s way more engaging than the basic real estate virtual tour.

Pricing Of WPVR to Create A Real Estate Virtual Tour

WPVR pricing

When you calculate real estate virtual tour pricing, you will be surprised that it’s not as high as you would expect.

If you use WPVR, the software will cost you as low as $79.99.

Initially, the equipment may seem expensive if you go for the DSLR or the drone approach. But using your phone would mean it would cost less than $200.

But think of the long-term benefit. Your equipment cost will be one-time, and the software cost will be a yearly cost. But your tours will be created on a monthly basis, and you will be able to earn back thousands of dollars through successful home sales.

So, if you think about it, you won’t be spending too much, but the earning potential is huge.

Conclusion

Today, you’ve learned the importance of creating real estate virtual tours to stay ahead of the competition and attract more buyers. Using tools ensures your virtual tours include all crucial elements to make them memorable and effective.

Your main goal is to create tours that captivate visitors and drive sales. Start building your next virtual tour today and gain a competitive edge in the market.

Additionally, consider investing in VR stocks and exploring free real estate WordPress plugins to enhance your business further.

WPVR stands out as one of the best virtual tour software options available. By following this guide and leveraging WPVR, you’ll elevate your real estate business and close more deals.

Now, go ahead and transform your property listings with stunning virtual tours

FAQs

How do you make a virtual tour for real estate?

Creating a virtual tour for real estate involves capturing 360-degree images of your property, and using virtual tour software to stitch these images together. It also adds interactive elements like hotspots and descriptions.

Which 3D real estate camera should you use?

For high-quality virtual tours, invest in a good 3D real estate camera. Popular choices include the Ricoh Theta Z1, Insta360 ONE X, and Matterport Pro2. These cameras offer excellent image quality and ease of use, making your virtual tour creation process smoother.

How can you create an engaging 3D real estate walkthrough?

To create an engaging 3D real estate walkthrough, focus on capturing detailed and high-quality 360-degree images. Use virtual tour software to add interactive elements like hotspots, floor plans, and descriptions.

How do real estate video tours differ from virtual tours?

Real estate video tours are pre-recorded videos showcasing a property, often with a guided narration. In contrast, virtual tours are interactive and allow you to navigate through the property at your own pace. It also provides a more immersive experience

Why should you use virtual tours of homes for sale?

Using virtual tours for homes for sale helps you reach a broader audience, including remote buyers. They provide a comprehensive view of the property. It allows potential buyers to explore every detail. Virtual tours also help you stand out from competitors and can lead to faster sales by offering an innovative and convenient way to view properties.

Categories
Guide Product Feed Manager For WooCommerce

How to Create eBay Seller Center Product Feed – Actionable Guide [2024]

eBay is currently one of the largest online marketplaces in the world with 1.7 billion live listings, being the third most popular in the USA.

Right now there are over 182 million active eBay users worldwide. Among all the people in the USA who make purchases online through mobile apps, over 33% of them made at least one purchase through the eBay app last year. That’s huge!!

However, uploading products to the eBay Seller Center manually can be very complicated. They have a fixed template which is difficult to fill out on your own, especially if you have a lot of products.

To solve this problem today, you will get a complete step-by-step guide on how to generate eBay product feed in the most optimized way and skyrocket your conversion rate.

So let’s get started

What is eBay Seller Center Product Feed?

eBay Seller Center Product Feed is a tool that allows you to upload and manage large quantities of product listings on eBay efficiently. Using this feed, you can provide detailed information about your products, including descriptions, prices, images, and inventory levels, in a structured format.

This system is especially useful for sellers with extensive catalogs, as it simplifies the process of keeping your listings up-to-date and consistent in the USA marketplaces.

The product feed helps streamline inventory management by allowing bulk updates and automating many aspects of listing products, such as categorization and compliance with eBay’s listing standards.

By utilizing eBay Seller Center Product Feed, you can enhance your productivity. It also ensures your listings are accurate and ultimately improves your sales performance on eBay.

Guide to Generate eBay Seller Center Product Feed

eBay Seller Center app

Once you upload your products on eBay, they will be available on the main eBay site depending on the location it is viewed from, and on its mobile app.

The best part of eBay is that you can put your products up on auction. This means you will name a minimum price, and others will bid on the product.

Whoever will bid the highest within the auction period, will be the buyer. So, there is a possibility that you will be able to get more than what you expected.

Make sure you have an eBay account. Once you create an account, you will have access to upload products on eBay.

The next thing to do is to prepare a product feed file using the right format.

How To Set Up eBay Seller Center Product Feed In The Most Optimized Way

In order to submit your products on eBay feed, you need to use one of their templates.

Ideally, if all of your products fall under a single category, then it’s best to use an item-specific template. However, for an online store with products in multiple categories, you should use the basic template.

**You can use the plugin Product Feed Manager For WooCommerce to generate the feed in the correct format. I will show you how later in this guide.

Now let us look at the mandatory attributes that you must submit for your products, and how you can optimize eBay data feed for each attribute you submit.

You will get examples and tips on using valid values in an optimized way for all the required attributes.

Necessary Product Attributes

The following are the mandatory and recommended product attributes that you need to submit when generating a feed using the basic template.

● Action
● Category
● Title
● Description
● ConditionID
● Picture URL

● Quantity
● Format
● StartPrice
● BuyItNowPrice
● Duration
● Location

● Shipping Attributes
● DispatchTimeMax
● CustomLabel
● Returns & Refund Attributes
● Payment Option Attributes
● Variation Details

For certain categories, you may need to submit a few item specifics such as Brand, Identifiers (UPC, MPN, or equivalent), Color, Style, etc. For such cases, you will need the

● Item Specific Attributes

To improve packaging and handling data, you may also need to submit certain weight or package dimension attributes which include

● WeightMajor
● WeightMinor
● WeightUnit

● PackageDepth
● PackageLength
● PackageWidth
● PackageType

Initially, when you decide to sell on eBay Seller Center, you need to look into a lot of details to understand how it works for your business. Each attribute will have different requirements based on the product you are selling.

But before going there, you should know that you don’t have to do it all manually. Since you own a WooCommerce store, you can easily generate an eBay Seller Center product feed for your products in minutes. Simply use the plugin Product Feed Manager For WooCommerce.

The plugin has a built-in eBay Seller Center Basic Template. All you need to do is assign them the correct values and fields. Here’s a video to show you how quickly you can generate an eBay feed without any hassle.

Generate Accurate eBay Seller Center Product Feed Using Product Feed Manager For WooCommerce

Now that you know how easy it is to generate the product feed, let’s learn about the accepted values for eBay when creating the feed.

The good news is, through this guide, you will learn about the acceptable values for each attribute and you will get tips to understand how to use them for your business.

So let’s get into details.

**Do note that eBay requires you to submit a lot of extra product data, some of which you have no way to input through default WooCommerce.

This is why it is more important for you to read the details for every attribute and understand which data you need to add to your store products via custom fields.

Any feed generation tool you use will only be able to pull data from your WooCommerce database, and if the data is not there, then your feed will not be accurate.

So go through the details and if you are serious about selling on eBay Seller Center, then you will find a way to add custom fields and include the extra required data to your products.

Details & Tips on Using Accepted Values for Mandatory eBay Attributes

Action

Attribute NameAction(SiteID=US| Country=US| Currency=USD| Version=941)
Example ValueAdd
Valid values● Add
● VerifyAdd
● Revise
● Relist
● AddToItemDescription
● End
● Status

The action attribute will signify your purpose for generating this feed.

Naturally, you will see that the Action field name will include some extra data to indicate the Country, Currency, and template version you are using.

For example:
Action(SiteID=US| Country=US| Currency=USD| Version=941)

  • The SiteID tells eBay, which eBay platform you are willing to list the products on.
  • The Country defines the location of your business.
  • The Currency states what currency will be an acceptable payment mode.
  • The Version signifies the template format.

The Version for the Basic template is 941.

The Version for an item specific template is 945

For the Action attribute, the following are the accepted values:

  • Add
    • The Add action is used to upload new products to eBay listings and eBay will generate an ItemID for each product listed.
  • VerifyAdd
    • If you want to check if your submitted feeds file is in the right format and contains the correct data before they are added to eBay listings, then you can use the VerifyAdd action.
    • Using this value will mean that eBay will generate a result file to state if there are any issues with the feed, or if it is acceptable. But the products will not be listed and no ItemID will be generated.
    • This is a convenient way to make sure you are uploading products with the correct data.
    • I advise you to use this and create a feed with a couple of products, let’s say a simple product and a variable product with two variants. Then upload on eBay to see if you have the right format or if any data is missing. Based on that, you can alter your feed and later submit it with the Add action value.
  • Revise
    • The Revise action means you want to modify the value of specific attributes for certain products.
    • When using this value, you need to submit the ItemIDs of the products for which you want to make changes in the data and the fields in which you want changes along with their dependent fields.
  • Relist
    • If an item was not sold when you initially listed it for auction, you can relist it using the Relist action.
    • All you need to submit are the ItemIDs of the products you want to relist.
  • AddToItemDescription
    • The AddToItemDescription field is used to make changes to only the description of the listed products
    • You are required to submit the ItemID and the description of any product for which you want to update the description.
  • End
    • Use the End action if you want to remove a product from the listing.
    • In this case, you need to submit the ItemID and the EndCode.
    • For EndCode, you can assign one of the values
      – LostOrBroken,
      – NotAvailable,
      – Incorrect, or
      – OtherListingError.
  • Status
    • The Status action is used to update the status of certain attributes for sold products such as Payment status and Shipping status or to leave feedback.
    • This attribute is rarely used. It’s best to handle these with your eBay Seller Center account. However, you can choose to use it if you need to update the status for too many products at once.

To upload new products, first, upload a feed with ‘VerifyAdd’ as the action. If everything goes well, then generate and upload the feed with the Action ‘Add‘.

◈ Category

Attribute NameCategory
Example Value1245
Valid valuesYou need to collect the appropriate category ID from the eBay category list.

Here are the category IDs based on the eBay category tree:
eBay Category ID List 1
eBay Category ID List 2

If you need the Category IDs of parent categories, you can collect them here.

eBay has its own set of category lists. So you need to submit a category ID for each product to signify which eBay category it will be listed under.

The best way to handle this is to map your store’s categories with eBay’s category IDs using a tool.

For WordPress, you can use the plugin Product Feed Manager for WooCommerce which includes the category mapping feature and the eBay template to generate product feed.

You can download the category lists given in the table above and configure category mapping with their help when generating product feeds.

◈ Title

Attribute NameTitle
Example ValueDenim Jacket With Zip Closure
Valid valuesUse a title with a maximum length of 80 characters.

This is the name of the product.

You can use a product title that includes a special feature that defines the product, for example, its model number.

**Avoid using special characters in the title.

◈ Description

Attribute NameDescription
Example ValueThis jacket is perfect for attending parties.
Valid values– Use texts with a maximum length of 32,765 characters.
– You can use the HTML tags, <br> to break lines, and <p> tags to separate lines into paragraphs.

Here provide a full description of the product to highlight all the features and attract buyers.

You can use HTML tags to present the data in an organized manner.

**But do not include any information about its condition here. If it’s not a brand-new product and you want to specify a description regarding its condition, you can use the ConditionDescription field.

◈ Condition ID

Attribute NameConditionID
Example Value2750
Valid valuesUse Condition IDs based on the category of the product. You can collect it from the list below:
Condition IDs based on Category

The condition ID is used to specify if the condition of the product is New or not.

Basically, there are set IDs for different conditions of a product. However, these IDs vary depending on the product category.

You can collect the condition IDs for your required products from the table above.

You will notice that some categories do not have Condition IDs assigned to them. This is because if your products fall under those categories, you are not allowed to sell them unless they are brand new.

**The Condition ID attribute is optional unless you have products that are not brand new. So, if you are uploading products that are brand new, you can skip using this attribute.

◈ Condition Description

Attribute NameConditionDescription
Example ValueThe jacket has a slight defect on the zip on the left pocket as it was used for a month. Other than that, it is in great condition.
Valid valuesYou can use text to describe the condition of the product if it’s not brand new.

The Condition Description field is used to give a further description of the product’s condition if it is not brand new.

Basically, if you submit a Condition ID, then you can wish to include a Condition Description as well, though this is optional.

**You can only submit a Condition Description if you include a Condition ID.

◈ Picture URL

Attribute NamePicURL
Example Valuehttps://www.example-image1.jpg| https://www.example-image2.jpg
Valid values– Submit the full image link along with “http / https”.
– You can submit multiple image links with a “|” separator between each link (with no spaces).

You can submit images of the product using this attribute.

Try to use images that highlight the main features of the product. Avoid using fake product images, or images that are edited into something not identical to the product. You can also try out AI for editing images in a manner that ensures they remain true to the product’s actual appearance.

Quantity

Attribute NameQuantity
Example Value25
Valid values– Use numerical values with a maximum length of 45 characters

The quantity refers to the number of available products in stock.

**If you sell in ‘Lots’ then you have to use the ‘LotSize’ attribute to indicate the number of products in a lot, and the quantity will signify the number of lots.

Format

Attribute NameFormat
Example ValueAuction
Valid valuesValid eBay formats include
– Auction
– FixedPrice
– ClassifiedAd

Here you need to specify the format in which you want to list your products on eBay.

Ideally, there are 3 types of listing formats.

Auction, FixedPrice and ClassifiedAd

  • Auction
    • When you list an item for sale in an eBay auction, you need to choose a starting price, and interested buyers will place bids. When the auction ends, the product will be sold to the highest bidder. In this case, you need to submit a ‘Starting Price’.

      You can also set a ‘Buy it Now price’ which is seemingly a high price that any buyer will be able to pay and purchase the product immediately, ignoring the auction.
  • FixedPrice
    • When you list your products under FixedPrice, it means that there will be no bidding; the price you submit will be the only cost to pay to buy a product. In this case, the StartPrice you submit will be considered the default price of the product.

      **To list products as FixedPrice, the product must be worth more than $0.99.
  • ClassifiedAd
    • When you list an item through an eBay Classified Ad, you will set a price for a product, and an interested buyer will contact you. Then you both will come into private contact and complete the transaction in person, outside the eBay platform.

      **The Classified Ad format is only available in a handful of selected categories.

◈ Start Price

Attribute NameStartPrice
Example Value5.99
Valid values– Use a numeric value with a maximum length of 16 characters including the decimal.

This is the price at which bidding will start when you list your products on Auction.

If you list your product in a fixed price format, this will be the default price of the product.

**If you remember, the currency is specified in the field name of the Action field. So you do not need to provide a currency here.

◈ Buy It Now Price

Attribute NameBuyItNowPrice
Example Value400
Valid values– Use a numeric value with a maximum length of 16 characters including the decimal.

When you list a product under auction, you can assign a Buy It Now Price so that a person can directly pay this amount and purchase the product, without waiting for the bidding.

Naturally, this price should be quite higher than the Start Price.

◈ Duration

Attribute NameDuration
Example Value5
Valid valuesThe following are the accepted values for Duration:
-1
-3
-5
-7
-10
-14
-30
-60
-120
-GTC

When you list products on the eBay seller center, you are required to specify a time limit until when the products will be available for purchase on eBay.

Here’s how you can decide what value to use for your products:

  • 1
    – To List products for a single day only.
    *This is only available to sellers with a feedback score above 10.
  • 3
    – To List products for three days since uploading.
  • 5
    – To List products for five days since uploading.
  • 7
    – To List products for seven days since uploading.
  • 10
    – To List products for ten days since uploading.
  • 14
    – To List products for fourteen days since uploading.
  • 30
    – To List products for thirty days since uploading.
    *Normally, this option is available for Motor Local listings only. But if you get high feedback scores on a regular basis, then you might be able to use it for other listings as well.
  • 60
    – To List products for sixty days since uploading.
    *This option is only applicable for Classified Ads in a few specific categories.
  • 120
    – To List products for around four months since uploading.
    *This option is only applicable for Classified Ads in a few specific categories.
  • GTC
    – GTC stands for Good ‘Til Cancelled. It means, every 30 days, if a product is not sold out, it will be relisted automatically.
    *If you submit a product in the FixedPrice format, then you have to submit the duration as GTC.

So use the duration value that applies to your products.

◈ Location

Attribute NameLocation
Example ValueLos Angeles, CA
Valid values– You can use alphanumeric text with a maximum length of 45 characters
– Do not include the zip code / postal code.

The location field specifies the location where the product is stored currently.

Here, simply provide the country name where you will be shipping out the products from.

**Do not include a zip code / postal code here. You can rather submit the ‘PostalCode’ and not submit the Location attribute. In that case, eBay will determine your location from the postal code.

◈ Shipping Attributes

There are several attributes which you need to use to indicate the available shipping options and shipping costs to the buyers.

You can use the following

  • Shipping Type
  • Shipping Service Option
  • Shipping Service Cost
  • Shipping Service Priority

Or, rather than submitting these 4 options, if you have opted in the eBay business policies, you can then just submit the attribute

  • ShippingPolicyName

In this case, eBay will collect the data related to shipping from your business policies created in your eBay account.

So you can choose to use either of the ways mentioned above to submit shipping information. So let us look at how you can use each of them properly.

Shipping Type
Attribute NameShippingType
Example ValueCalculated
Valid valuesAccepted Values are:
• Flat
• FreightFlat
• Calculated
• FlatDomesticCalculatedInternational
• CalculatedDomesticFlatInternational

The shipping type attributes decide how the shipping charges will be handled.

There are five shipping types you can use:

  • Flat
    • If you use a Flat shipping type, then it means that you will charge a flat rate for domestic shipping. (This may also be applied to international shipping if international shipping services are specified.)

      When using the Flat shipping type, you must also submit values for ShippingService Option and ShippingService Cost.
  • FreightFlat
    • You can offer a freight service for shipping heavy and bulky items. Here, you will negotiate the actual shipping cost with your preferred local freight carrier. separately from the checkout process, so that the sale can be completed quickly. Hence, the cost may vary depending on the negotiation.

      In this case, you must also submit the ‘ShippingService Option’ attribute, and assign the value ‘Freight.
      You do not need to submit any shipping service costs.

      **The FreightFlat option can only be offered by eBay US sellers.
  • Calculated
    • For domestic orders, if you wish to implement a calculated shipping cost based on the distance, weight, or dimension of the package, then you can use the Calculated shipping type.

      In this case, you need to submit the ‘ShippingService Option’ attribute, and one of the following attribute(s):
      • OriginatingPostalCode
        – if the cost is measured based on the distance.
      • Weight Major and WeightMinor
        – if the cost is calculated based on the weight of the product.
      • PackageDepth, PackageLength, and PackageWidth
        – if the calculation is based on the package dimensions.
  • FlatDomesticCalculated International
    • Use this option to apply a combination of Flat and Calculated shipping options among domestic and internal shipping.

      In this case, you need to submit data for ShippingService Option, ShippingService Cost, IntlShippingService Option, and IntlShippingService Locations.

      Plus you need to submit the ‘PackageType’ attribute, and one of the following attributes:
      • Weight Major and WeightMinor
        – if the cost is calculated based on the weight of the product.
      • PackageDepth, PackageLength, and PackageWidth
        -if the calculation is based on the package dimensions.
  • CalculatedDomesticFlat International
    • Use this option to use Flat shipping for domestic shipping and Calculated shipping for international shipping only.

      In this case, you need to submit data for ShippingService Option, IntlShippingService Option, and IntlShippingService Locations.

      Plus you need to submit the ‘PackageType’ attribute, and one of the following attributes:
      • Weight Major and WeightMinor
        – if the cost is calculated based on the weight of the product.
      • PackageDepth, PackageLength, and PackageWidth
        -if the calculation is based on the package dimensions.
Shipping Service Option
Attribute NameShippingService-1:Option
Example ValueFedEx2Day
Valid valuesYou can submit up to 4 shipping service options attributes –
– ShippingService-1:Option
– ShippingService-2:Option
– ShippingService-3:Option
– ShippingService-4:Option

You can collect a valid shipping service option here:
USA Valid Shipping Services

Here, you need to specify the shipping service that you will be used to deliver the product to the buyer.

Make sure you use a valid shipping service and input the name without spaces. You will find the list in the table above.

**You can submit up to 4 shipping options along with their dependent fields, Shipping Cost, Priority, and Shipping Surcharge.

Shipping Service Cost
Attribute NameShippingService-1:Cost
Example Value2.99
Valid valuesYou can submit up to 4 shipping service options attributes –
– ShippingService-1:Cost
– ShippingService-2:Cost
– ShippingService-3:Cost
– ShippingService-4:Cost

You need to use this when you have submitted a Shipping Service Option and selected the Shipping Type as Flat.

It’s basically the cost of shipping through the shipping service.

**You need to submit a shipping service cost for every shipping service option you include.

Shipping Service Priority
Attribute NameShippingService-1:Priority
Example Value1
Valid valuesIts valid values are 1, 2, 3, and 4.

You need to assign a Shipping service priority, if you include more than one Shipping Service Option, to indicate the priority of shipping service.

**Do not use the same value for multiple shipping options or the feed will not be accepted.

Shipping Profile Name
Attribute NameShippingProfileName
Example ValueShippingPolicy1
Valid values– Must be the same as one of the policies created on your eBay account.

If you opt-in to Business Policies for your eBay account, then you can set up Policies to specify your preferred shipping options.

You can use it instead of using the Shipping options. Simply submit the policy name using the ShippingProfileName.

**Business policy names are case-sensitive. So make sure to use the correct policy name.

If you submit both the shipping options and a shipping profile name, then eBay will by default give priority to the Shipping Profile Name.

◈ Dispatch Time Max

Attribute NameDispatchTimeMax
Example Value10
Valid valuesThe valid values are:
• -1
• 0
• 1
• 2
• 3
• 4
• 5
• 10
• 15
• 20
• 30

When you assign the Shipping type as Flat or Calculated, you have to submit a value on the DispatchTimeMax field to indicate the maximum number of business days you will need to prepare an item for shipment after the payment has been made.

  • The positive number in the valid values mentioned in the table refers to the number of days for dispatch time.
  • 0 indicates same-day handling
  • -1 indicates that the item has to be picked up locally, and will not be shipped.

◈ Custom Label

Attribute NameCustomLabel
Example Value256-HK122
Valid values– Use an alphanumeric value with a maximum length of 50 characters.

You can use CustomLabel to submit a unique identifier for your product. Ideally, I advise you to use the Product SKU as the CustomLabel.

However, this is an optional attribute.

◈ Returns & Refund Attributes

For your products, you also need to submit your return and refund policies that apply to the buyers.

You can submit the following attributes

  • Returns Accepted Option
  • Refund Option
  • Returns Within Option
  • Return Shipping Cost Paid By Option
  • Additional Details For Returns/Refunds

Or, rather than submitting these 3 options, if you have opted in the eBay business policies, you can then just submit the attribute

  • ReturnProfileName

In this case, eBay will collect the data related to returns and refunds from your business policies created in your eBay account.

So you can choose to use either of the ways mentioned above to submit your return and refund policies. Let us look at how you can use each of them properly.

Returns Accepted Option
Attribute NameReturnsAcceptedOption
Example ValueReturnsAccepted
Valid valuesThe following are the accepted values for this attribute:
– ReturnsAccepted
– ReturnsNotAccepted

Use this to indicate if you accept returns in case the buyer is not satisfied.

You can use the following values as per your requirements:

  • ReturnsAccepted
    – Means you accept returns.
  • ReturnsNotAccepted
    – Means you do not accept returns
Refund Option
Attribute NameRefundOption
Example ValueMoneyBackOrExchange
Valid valuesThe following are the accepted values for this attribute:
– MoneyBackOrExchange
– MoneyBack
– MoneyBackOrReplacement

If you have marked the ReturnsAcceptedOption as ‘ReturnsAccepted’, then you must submit a value for RefundOption.

This field indicates how a refund/return claim from a buyer will be compensated.

There are three refund options you can offer:

  • MoneyBackOrExchange
    – This means that you can return the money or offer to exchange for another product when someone returns a product.
  • MoneyBack
    – This means, if someone returns a product, you will return the money. You can use this option when you do not have more products in stock.
  • MoneyBackOrReplacement
    – This means that you will be able to offer a replacement or return the money when someone returns a product.
Returns Within Option
Attribute NameReturnsWithinOption
Example ValueDays_14
Valid valuesThe following are the accepted values for this attribute:
– Days_14
– Days_30
– Days_60

This will indicate the number of days within which a buyer will be able to return a product.

You can use one of the three accepted values given in the table above.

If you have marked the ReturnsAcceptedOption as ReturnsAccepted, then you must submit a value for this attribute.

Return Shipping Cost Paid By Option
Attribute NameShippingCostPaidByOption
Example ValueSeller
Valid valuesAccepted values are:
– Seller
– Buyer

For returns, you have to submit this attribute to indicate who will bear the shipping cost of returning a product.

If you are to bear the shipping cost of returns, use the value Seller.

If the buyer has to bear the returns shipping cost, then submit the value Buyer.

Additional Details for Returns/Refunds
Attribute NameAdditionalDetails
Example ValueReturns will not be valid if the warranty seal is broken.
Valid valuesUse text to explain your return policy with a maximum length of 5000 characters.

If you accept returns, then you can provide additional information about your return policy using this attribute.

However, this is an optional attribute.

Return Profile Name
Attribute NameReturnProfileName
Example ValueExchange101.
Valid values– Must be the same as one of the policies created on your eBay account.

If you opt into Business Policies for your eBay account, then you can set up Policies to specify your preferred return and refund options.

You can use it instead of using the other return and refund attributes. Simply submit the policy name using the ReturnProfileName.

**Business policy names are case-sensitive. So make sure to use the correct policy name.

If you submit both the return and refund options and a return profile name, then eBay will by default give priority to the Return Profile Name.

◈ Payment Option Attributes

Though optional, it is highly recommended that you indicate how you accept the payments from buyers.

To do so, you can either opt into the eBay Business Policies and set up a profile for payment options or use the attributes for payment options to indicate the payment modes you accept.

To use the payment policy from your eBay business policies, you have to submit the attribute

  • PaymentProfileName

But if you rather want to use the payment option attributes, then you can choose to use one or more of the 12 payment option attributes.

You can also add instructions regarding your accepted payments using the attribute ‘PaymentInstructions.’

Here’s how you use them.

Payment Profile Name
Attribute NamePaymentProfileName
Example ValueCashOnly1
Valid values– Must be the same as one of the policies created on your eBay account.

If you opt-in to Business Policies for your eBay account, then you can set up Policies to specify your preferred payment options.

You can use it instead of using the other payment option attributes. Simply submit the policy name using the PaymentProfileName.

**Business policy names are case-sensitive. So make sure to use the correct policy name.

If you submit both the payment options and a return profile name, then eBay will by default give priority to the Payment Profile Name.

Payment Option Attributes

In case you did not create a business policy for payment options, I recommend you submit at least one payment method.

The following are the payment method attributes you can choose to submit, in case you accept them.

  • AmEx
    – Submit this if you accept payments through American Express cards
  • Discover
    – Submit this if you accept payments through Discover Cards
  • VisaMastercard
    – You can submit this attribute if you accept payments through Visa or Master Cards.
  • Paypal accepted
    – To indicate that you accept payments through PayPal. In this case, you must also submit the PayPalEmailAddress attribute.
  • PayPalEmailAddress
    – This will be your email address where you accept payments through PayPal.
  • ImmediatePayRequired
    – This indicates that a person has to pay immediately via PayPal and later receive the product. In this case, you must also submit the PayPalAccepted attribute.
  • PaymentSeeDescription
    – You can rather explain your payment policies in the product description. Then you can use this attribute to insist the buyer read the product description to find out about the payment options.
  • Payment Status
    – Once a buyer processes a payment, you can give a status of the purchase to indicate if the payment was received or not using this attribute.
  • IntegratedMerchantCreditCard
    – If you issue credit cards for purchases in your online store, then you can use this attribute to indicate that the buyers will be able to pay using that card.
  • MOCashiers
    – For certain products, accepting money orders or cashiers’ checks seems more convenient. If this applies to your business, then you can submit this attribute.
  • PayUponPickup
    – You can allow a buyer to pay, and then pick up the product from your location. In that case, you can use this attribute.
  • PersonalCheck
    – If you accept a personal check, you can use this attribute.

The following table applies to AmEx.

Attribute NameAmEx
Example Value1
Valid valuesAccepted values are 0 or 1.

All the payment option attributes work in the same way. The field names are as-is on the list above. And the accepted values are 0 or 1.

  • 0 indicates false, i.e., you do not accept that payment option
  • 1 indicates true, i.e., you accept that payment option

So for some products, you might accept MOCashiers, but for others, you can not. In that case, you can use the MOCashiers attribute and assign the values accordingly.

◈ Variation Details

So far you learned about the attributes that either provide product data or business policies.

If you have product variations, then you need to submit the parent product with common details, and variation products with only the dynamic data.

For example, you can submit the Title for the parent product and leave it blank for the variants as the title will be the same no matter the variance.

Again, you need to submit separate image links for each variant as they tend to have unique images in your store.

For variable products, i.e. products with multiple variants, you have to submit 2 extra attributes to handle their relationships.

Relationship
Attribute NameRelationship
Example ValueVariation
Valid values– Use the value ‘Variation’ for variants
– Leave it blank for parent products
Relationship Details
Attribute NameRelationshipDetails
Example ValueSize=S;M;L;XL|Color=Black;Pink;Red;Blue
Valid values– For the Parent product, indicate the variation factor and its variant terms in the format:
VariationFactor1=VariantTerm1;VariantTerm2
– Use a “|” separator in between multiple variation factors
– For product variant, indicate which variant term it represents in the format:
VariationFactor1=VariantTerm2

Use the Relationship Details attribute to indicate what factors a product varies with, and its variant terms.

For example, let’s say you have a t-shirt with the variation factor Color and its variant terms are Red and Blue. And it also has a variation factor Size with variant terms S, M, and L.

In this case, the RelationshipDetails value will be as follows:

For Parent Product:

Color=Red;Blue|Size=S;M;L

**You can see, each variant term is separated by a semi-colon. And each variation factor is separated by a “|”.

For Product Variant:

Color=Red|Size=S
Color=Red|Size=M
Color=Red|Size=L
Color=Blue|Size=S
Color=Blue|Size=M
Color=Blue|Size=L

**You can see only one variation term is selected for Color and Size. And each variation factor is separated by a “|”.

◈ Item-Specific Attributes

Now, products in certain categories require you to submit certain item specifics to optimize the data. For example, you might have to submit a Brand name.

In this case, you need to follow the format C:ItemSpecificName for the attribute name.

For example, when submitting a brand, you use the attribute C:Brand with the value of a brand name such as Sony.

Attribute NameC:Brand
Example ValueSony
Valid values– Any valid value for the item specific

For any other item specific, you need to submit the attribute names in the same way. So, for MPN, the attribute name will be C:MPN, and for Size Type, the item specific will be C:Size Type.

To know if you need to submit any of these specifics, you can collect your desired category IDs and generate an item specifics template to learn if you need to submit these attributes.

Or, you can simply upload the products using the Basic Template and later input item specifies within eBay, where required.

◈ Weight Attributes

For certain shipping options you have to submit the weight attributes to determine the shipping cost. As a result, you need to submit the following attributes

  • WeightMajor
  • WeightMinor
  • WeightUnit
Weight Major
Attribute NameWeightMajor
Example Value2
Valid values– The whole number part of the actual weight.

This attribute represents the whole number part of the actual weight of the product.

For example,
– if the product is 2.5 kg, then the WeightMajor will be 2.
– if the product is 3 lbs and 8 oz, then the WeightMajor will be 2.

Weight Minor
Attribute NameWeightMinor
Example Value5
Valid values– The decimal/fraction/sub-unit part of the actual weight.

This represents the remaining decimal/fraction/sub-unit part of the actual weight of the product.

For example,
– if the product is 2.5 kg, then the WeightMinor will be 5.
– if the product is 3 lbs and 8 oz, then the WeightMinor will be 8.

Weight Unit
Attribute NameWeightUnit
Example Valuekg
Valid values– kg or lb

The weight unit is used to decide on the unit of measurement for the weight.

  • For imperial measurement, use the value lb
  • For metric measurement, use the value kg

Package Dimension Attributes

The packaging and handling time of products can be justified by submitting Package dimension attributes. This includes

  • PackageDepth
  • PackageLength
  • PackageWidth
  • PackageType

Package Depth

Attribute NamePackageDepth
Example Value10
Valid values– Only whole numbers allowed

This indicates the height of the package (top to bottom). Submit the nearest whole number of the package height. For example, if the height of the package is 10.4 cm, submit the value 10.

Package Length

Attribute NamePackageLength
Example Value15
Valid values– Only whole numbers allowed

This indicates the length of the package (from side to side). Submit the nearest whole number of the package length. For example, if the length of the package is 15.3 cm, submit the value 15.

Package Width

Attribute NamePackageWidth
Example Value12
Valid values– Only whole numbers allowed

This indicates the width of the package (from front to back). Submit the nearest whole number of the package width. For example, if the width of the package is 12.1 cm, submit the value 12.

Package Type

Attribute NamePackageType
Example ValueLargeEnvelope
Valid valuesFollowing are the valid values you can use to indicate the product type:
– Letter
– LargeEnvelope
– PackageThickEnvelope
– USPSLargePack
– VeryLargePack
– ExtraLargePack
– None

The package type will help eBay understand what sort of package will be shipped.

As you can see in the valid values, if it falls under any of them, then you can submit this attribute with those values, else, you can use the value none.

However, this is an optional attribute. You may or may not use this attribute.

There are many more attributes within eBay, but the ones explained here are the most important ones.

Conclusion

Since eBay is a renowned marketplace, getting on board to sell your products can be challenging. However, the detailed explanation here should help you understand how to prepare your store to generate an accurate product feed.

For WooCommerce stores, generating an eBay Seller Center product feed is much easier with the Product Feed Manager For WooCommerce plugin, rather than manually preparing a feed file.

So, go ahead and start using the plugin to get your products on the eBay feed. Reach millions of eBay buyers and boost your sales effortlessly.

** FAQs **

How do I create a product feed for the eBay Seller Center?

  • To create a product feed for eBay Seller Center, you need to prepare a CSV or XML file with all your product details. This file should include attributes like title, description, price, and stock levels. Using a plugin like Product Feed Manager for WooCommerce simplifies this process.

Can I automate the product feed updates?

  • Yes, you can automate product data feed updates. By using a plugin, you can schedule regular updates to ensure your product listings on eBay are always current. This saves you time and keeps your inventory accurate.

What should I include in my product feed?

  • Make sure your product feed includes key details such as product titles, descriptions, prices, images, stock levels, and unique identifiers like SKUs. Including comprehensive and accurate information helps attract buyers and prevents listing errors.

How often should I update my product feed?

  • It’s best to update your product feed regularly, ideally daily, to reflect any changes in your inventory or pricing. Automating this process with a plugin ensures your eBay listings are always accurate and up-to-date.

How can I troubleshoot feed errors?

  • If you encounter feed errors, start by checking the error messages provided by the eBay Seller Center. These messages will guide you on what needs fixing. Common issues include missing required fields or incorrect formatting. Double-check your feed file and make the necessary corrections.
Categories
Guide Real Estate Virtual Reality WP VR

Do Virtual Tours Help Sell Houses in 2025? Let’s See How!

Do virtual tours help sell houses?

Spoiler alert: They absolutely do.

Imagine you’re trying to sell a house with just photos—like convincing someone to buy a car by only showing the tires.

But it’s 2025 and the buyers want more. They want to step inside, walk through the rooms, and picture where their favorite chair will go.

And there’s no alternative to virtual tours in this case. You can think of them as your 24/7 open house—accessible anytime, anywhere.

In this guide, I’ll cover:

✅ How virtual tours build buyer confidence

✅ Why they can lead to quicker offers

✅ What makes them a must-have for today’s home sales

By the end, you’ll see how virtual tours aren’t just a convenience—they’re a powerful sales tool.

Let’s get started.

How Do Virtual Tours Help Sell Houses?

As I’ve mentioned earlier, virtual home tours are the latest and the most credible way to promote your homes for sale.

They offer an interactive, immersive experience that static photos just can’t match.

Let’s break down exactly how virtual tours help you sell houses more effectively:

 1. Attract More Potential Buyers

Potential Buyers Will Prefer Using Virtual Home Tours

The only visual your customers before visiting are the photos you put up on your site.

Once they visit, if it doesn’t meet their expectations, they reject the offer in most cases.

This is a clear indication that people’s interest mostly depends on what expectations you can create in their minds about the property before they choose to visit.

Sell more properties with WPVR

If you include a virtual home tour, the person viewing will be able to experience a realistic tour of the house while sitting at home.

They’ll be able to get a complete visual of how the house will look when they actually visit in person.

Now this will give you 3 major advantages:

  • The person will stay longer on your site when exploring the virtual tour. Hence he/she will get more time to choose on your site and probably, eventually, get interested. The fact is the more you spend time, the more attractive it gets.
  • People calling with any inquiry will have a good tour around the house. Hence, they calling means they are probably highly interested, and the house satisfies their requirements. Now, giving them further details will be worthwhile.
  • Since you have a virtual tour, anyone asking to take a visit is probably interested in buying the house and you will have a higher chance of closing the deal. This is because the viewer will be able to get a good visual of the house and his/her expectations will match when he/she actually visits. Thus increasing the chance of buying.

And this is how virtual home tours can make a big difference and will certainly increase potential buyers.

If you include a virtual home tour, the person viewing will be able to experience a realistic tour of the house while sitting at home.

They’ll be able to get a complete visual of how the house will look when they actually visit in person.

2. Showcase Spatial Flow and Layout

If you put only photographs, You must need to know that comes up with some limitations such as:

  • Inability to fully demonstrate the transition and flow from one room to another.
  • Incapability to present every angle and perspective of a room.
  • Difficulty in assessing whether furniture will fit a space based solely on photos.
  • Lack of detailed information about the home’s amenities.

And with virtual home tours, buyers to feel as if they are physically present in the property. They can control the tour and explore the flow, spatial context, and size.

3. Empower Buyers to Explore What They Want

With photos and videos, Your site represents what you want to portray. Not what your customer wants to see.

But on a virtual tour, Your customers can control what they want to see. Buying a new home is as much an emotional decision as it is a financial one. Your customers what to take time while inspecting your house.

This freedom of choosing and exploring at their own desire will definitely get you more buyers.

4. Focus More on Closing Deals

Home Sells Itself
A virtual home tour will increase your closing rate.

Virtual Tours of Homes for sale can save you a lot of time and effort and will let you focus more on increasing your business revenue.

Now that you know that the person you will be dealing with already got a virtual tour, you can focus on closing deals, go for negotiations, and give extra details about the house, such as its history or neighborhood. 

You do not need to spend hours over the phone trying to convince people with details about the house itself.

The virtual home selling goes through virtual tours. People calling has developed a genuine interest.

All you need to do now is set up a visit and work on closing the deal.

The moment a customer steps foot in the house, he/she will know that this is exactly what they experienced in the virtual tour and exactly what he/she visualized about the home that got them interested in the first place.

Hence, you will have a better chance of closing deals.

5. Boost Follow-up Response Rates

Increased Followup Response

As a realtor, you are always busy speaking with clients who are interested to buy homes.

You probably get people leaving messages on your site about inquiries or through e-mails.

And sometimes you get calls, while you are trying to close a deal, which you can’t answer and they leave voicemails.

All of these are hard to follow up on.

You need to list them and then get back to them, hoping that they are still interested.

And more often, people don’t respond to your attempt to follow up with them unless they are really interested. 

This means that you have no way of knowing the level of interest a person has when they made the inquiry, although it’s obvious that they are willing to buy a house sooner or later.

Having virtual home tours can make a big difference when you sell property virtually.

You can be sure that the people inquiring, after taking a virtual tour, are probably interested to a great extent since they saw exactly what they will get, and probably that’s what they were looking for.

Hence, you will get a better response when you reach back.

6. Help Buyers Make Faster, Informed Decisions

Take Informed Decision

Even though you put well-crafted details on your sites, your potential customers will not be sure what they want and will probably visit several homes before making a decision.

But if you use virtual tours, your buyers will be able to get a detailed view of the house; a realistic visual which he/she will not get from other property listing sites.

So, that prospect might develop an instant interest and probably stop looking elsewhere.

7. Make It Easier to Promote Your Business

Promote Business Easily

Since virtual tours are still pretty new, a lot of realtors are yet to make proper use of them.

If you choose to use virtual tours on your site, you will be taking one step ahead of the lot.

You will have a strong marketing value point, that you offer virtual home tours to visitors.

People will be able to make an informed decision when using your site.

You will be able to stand out in the industry since people will find you more reliable.

Creating Virtual Home Tours – More Affordable And Easier Than You Think

Well, You must be thinking creating virtual video tours will require you to hire an expensive video crew or production house.

Creating a 3D model dollhouse requires you to hire experts in that field.

No, You don’t need to.

Virtual tours have a new meaning now.

Now there are several real estate virtual tour creator tools out there that will allow you to create virtual tours on your own, without the need of hiring an expert, and at a reasonably low cost.

You can give “WPVR” a try. The user interface is very easy and will make it super easy for you to create virtual home tours when selling properties.

WP VR – Quality Virtual Tour Creator for WordPress 

Use WP VR to create virtual home tours and sell properties easily.

Using WPVR, all you need is to take 360 panoramic images of all the rooms in a home, and some from outside the house, and upload them to the plugin.

If you have any specific information to provide, let’s say the history of the design of the fireplace, you can set a small icon to click on, to view that information.

Not only that, you can add an explainer video on your virtual tour.

You can also add a virtual floor plan on your virtual tour using WPVR. Also, with WPVR you can publish your tour anywhere, anytime. And share with people with a QR code.

You will not need any assistance from experts, you will be able to create the tour on your own, and that too in a very short amount of time.

For your busy customers, you can add a direct CTA button link with your virtual home tour.

Conclusion

As you can see, virtual tours are very useful and innovative.

You can definitely find more interested customers than usual and will have a greater conversion than what you have without virtual tours.

Plus, they are cost-effective and easy to create If you choose the right tool like WPVR.

So, include virtual home tours on your website, you will surely get more business and go ahead of other realtors in your area.

**You can also check out this complete guide on how to create a virtual tour to get in-depth knowledge of all necessary tools and activities required for creating a virtual tour from scratch (i.e. from taking pics to using virtual tours).

Hence, embrace virtual tours as soon as possible and you will benefit from it no doubt.  

FAQs

Do virtual tours help sell houses faster?

Yes, virtual tours attract more serious buyers and help them make quicker decisions, speeding up the sales process.

How do virtual tours increase buyer interest?

They offer detailed, realistic views of properties, helping buyers feel more confident and connected to the home.

Can virtual tours replace in-person visits?

They can’t fully replace visits but help buyers shortlist homes and save time by narrowing down options.

Are virtual tours expensive to create?

It depends, but many affordable options exist with tools and services designed for realtors.

Do virtual tours make a listing stand out?

Yes, they add a unique, interactive experience that can set your listing apart from others.